Vmware Setting Up Desktop And Application Pools In View OpenTopic Horizon 6.2 62 Desktops
User Manual: vmware Horizon 6.2 - Setting Up Desktop and Application Pools in View Free User Guide for VMware Horizon Software, Manual
Open the PDF directly: View PDF ![]() .
.
Page Count: 318 [warning: Documents this large are best viewed by clicking the View PDF Link!]
- Setting Up Desktop and Application Pools in View
- Contents
- Setting Up Desktop and Application Pools in View
- Introduction to Desktop and Application Pools
- Preparing Unmanaged Machines
- Creating and Preparing Virtual Machines
- Creating Virtual Machines for Remote Desktop Deployment
- Create a Virtual Machine for Remote Desktop Deployment
- Install a Guest Operating System
- Prepare a Guest Operating System for Remote Desktop Deployment
- Prepare Windows Server Operating Systems for Desktop Use
- Install Desktop Experience on Windows Server 2008 R2
- Install Desktop Experience on Windows Server 2012 or 2012 R2
- Configure the Windows Firewall Service to Restart After Failures
- Install View Agent on a Virtual Machine
- Install View Agent Silently
- Configure a Virtual Machine with Multiple NICs for View Agent
- Optimize Guest Operating System Performance
- Disable the Windows Customer Experience Improvement Program
- Optimizing Windows for Linked-Clone Virtual Machines
- Benefits of Disabling Windows Services and Tasks
- Overview of Windows Services and Tasks That Cause Linked-Clone Growth
- Disable Scheduled Disk Defragmentation on Windows Parent Virtual Machines
- Disable the Windows Update Service on Windows Virtual Machines
- Disable the Diagnostic Policy Service on Windows Virtual Machines
- Disable the Prefetch and Superfetch Features on Windows Virtual Machines
- Disable Windows Registry Backup on Windows Virtual Machines
- Disable the System Restore on Windows Virtual Machines
- Disable Windows Defender on Windows Virtual Machines
- Disable Microsoft Feeds Synchronization on Windows Virtual Machines
- Preparing Virtual Machines for View Composer
- Prepare a Parent Virtual Machine
- Activating Windows on Linked-Clone Virtual Machines
- Disable Windows Hibernation in the Parent Virtual Machine
- Configure a Parent Virtual Machine to Use Local Storage
- Keep a Record of the Parent Virtual Machine's Paging-File Size
- Increase the Timeout Limit of QuickPrep Customization Scripts
- Creating Virtual Machine Templates
- Creating Customization Specifications
- Creating Virtual Machines for Remote Desktop Deployment
- Creating Automated Desktop Pools That Contain Full Virtual Machines
- Creating Linked-Clone Desktop Pools
- Linked-Clone Desktop Pools
- Worksheet for Creating a Linked-Clone Desktop Pool
- Create a Linked-Clone Desktop Pool
- Clone an Automated Desktop Pool
- Desktop Pool Settings for Linked-Clone Desktop Pools
- View Composer Support for Linked-Clone SIDs and Third-Party Applications
- Keeping Linked-Clone Machines Provisioned for Use in Remote Desktop Sessions During View Composer Operations
- Use Existing Active Directory Computer Accounts for Linked Clones
- Creating Manual Desktop Pools
- Setting Up Remote Desktop Services Hosts
- Remote Desktop Services Hosts
- Install Remote Desktop Services on Windows Server 2008 R2
- Install Remote Desktop Services on Windows Server 2012 or 2012 R2
- Install Desktop Experience on Windows Server 2008 R2
- Install Desktop Experience on Windows Server 2012 or 2012 R2
- Restrict Users to a Single Session
- Install View Agent on a Remote Desktop Services Host
- Enable Time Zone Redirection for RDS Desktop and Application Sessions
- Enable Windows Basic Theme for Applications
- Configure Group Policy to Start Runonce.exe
- RDS Host Performance Options
- Configuring 3D Graphics for RDS Hosts
- Creating Farms
- Creating Application Pools
- Creating RDS Desktop Pools
- Provisioning Desktop Pools
- User Assignment in Desktop Pools
- Naming Machines Manually or Providing a Naming Pattern
- Manually Customizing Machines
- Desktop Pool Settings for All Desktop Pool Types
- Adobe Flash Quality and Throttling
- Setting Power Policies for Desktop Pools
- Power Policies for Desktop Pools
- Configure Dedicated Machines To Be Suspended After Users Disconnect
- How Power Policies Affect Automated Desktop Pools
- Power Policy Examples for Automated Pools with Floating Assignments
- Power Policy Example for Automated Pools with Dedicated Assignments
- Preventing View Power Policy Conflicts
- Configuring 3D Rendering for Desktops
- Prevent Access to View Desktops Through RDP
- Deploying Large Desktop Pools
- Entitling Users and Groups
- Configuring Remote Desktop Features
- Configuring Unity Touch
- Configuring Flash URL Redirection for Multicast or Unicast Streaming
- Configuring Real-Time Audio-Video
- Configuration Choices for Real-Time Audio-Video
- System Requirements for Real-Time Audio-Video
- Ensuring That Real-Time Audio-Video Is Used Instead of USB Redirection
- Selecting Preferred Webcams and Microphones
- Select a Default Microphone on a Windows Client System
- Select a Preferred Webcam on a Windows Client System
- Select a Default Microphone on a Mac OS X Client System
- Configuring Real-Time Audio-Video on a Mac OS X Client
- Configure a Preferred Webcam or Microphone on a Mac OS X Client System
- Select a Default Microphone on a Linux Client System
- Select a Preferred Webcam or Microphone on a Linux Client System
- Configuring Real-Time Audio-Video Group Policy Settings
- Real-Time Audio-Video Bandwidth
- Configuring Scanner Redirection
- Configuring Serial Port Redirection
- Managing Access to Windows Media Multimedia Redirection (MMR)
- Managing Access to Client Drive Redirection
- Using USB Devices with Remote Desktops and Applications
- Limitations Regarding USB Device Types
- Overview of Setting Up USB Redirection
- Network Traffic and USB Redirection
- Automatic Connections to USB Devices
- Deploying USB Devices in a Secure View Environment
- Using Log Files for Troubleshooting and to Determine USB Device IDs
- Using Policies to Control USB Redirection
- Troubleshooting USB Redirection Problems
- Reducing and Managing Storage Requirements
- Managing Storage with vSphere
- Reducing Storage Requirements with View Composer
- Storage Sizing for Linked-Clone Desktop Pools
- Storage Overcommit for Linked-Clone Virtual Machines
- Linked-Clone Data Disks
- Storing Linked Clones on Local Datastores
- Storing View Composer Replicas and Linked Clones on Separate Datastores
- Configure View Storage Accelerator for Desktop Pools
- Reclaim Disk Space on Linked-Clone Virtual Machines
- Using View Composer Array Integration with Native NFS Snapshot Technology (VAAI)
- Set Blackout Times for ESXi Operations on View Virtual Machines
- Configuring Policies for Desktop and Application Pools
- Setting Policies in View Administrator
- Using Active Directory Group Policies
- Using View Group Policy Administrative Template Files
- View ADM and ADMX Template Files
- View Agent Configuration ADM Template Settings
- View PCoIP Session Variables ADM Template Settings
- Using Remote Desktop Services Group Policies
- Add the Remote Desktop Services ADMX Files to Active Directory
- RDS Application Compatibility Settings
- RDS Connections Settings
- RDS Device and Resource Redirection Settings
- RDS Licensing Settings
- RDS Profiles Settings
- RDS Remote Session Environment Settings
- RDS Security Settings
- RDS Temporary Folders Settings
- Setting Up Location-Based Printing
- Active Directory Group Policy Example
- Configuring User Profiles with View Persona Management
- Providing User Personas in View
- Using View Persona Management with Standalone Systems
- Migrating User Profiles with View Persona Management
- Persona Management and Windows Roaming Profiles
- Configuring a View Persona Management Deployment
- Overview of Setting Up a View Persona Management Deployment
- Configure a User Profile Repository
- Install View Agent with the View Persona Management Option
- Install Standalone View Persona Management
- Add the View Persona Management ADM Template File
- Configure View Persona Management Policies
- Create Desktop Pools That Use Persona Management
- Best Practices for Configuring a View Persona Management Deployment
- View Persona Management Group Policy Settings
- Troubleshooting Machines and Desktop Pools
- Display Problem Machines
- Send Messages to Desktop Users
- Troubleshooting Desktop Pool Creation Problems
- Pool Creation Fails if Customization Specifications Cannot Be Found
- Pool Creation Fails Because of a Permissions Problem
- Pool Provisioning Fails Due to a Configuration Problem
- Pool Provisioning Fails Due to a View Connection Server Instance Being Unable to Connect to vCenter
- Pool Provisioning Fails Due to Datastore Problems
- Pool Provisioning Fails Due to vCenter Server Being Overloaded
- Virtual Machines Are Stuck in the Provisioning State
- Virtual Machines Are Stuck in the Customizing State
- Removing Orphaned or Deleted Linked Clones
- Troubleshooting Machines That Are Repeatedly Deleted and Recreated
- Troubleshooting QuickPrep Customization Problems
- Finding and Unprotecting Unused View Composer Replicas
- View Composer Provisioning Errors
- Troubleshooting Network Connection Problems
- Troubleshooting USB Redirection Problems
- Manage Machines and Policies for Unentitled Users
- Resolving Database Inconsistencies with the ViewDbChk Command
- Further Troubleshooting Information
- Index

Setting Up Desktop and Application
Pools in View
VMware Horizon 6
Version 6.2
This document supports the version of each product listed and
supports all subsequent versions until the document is
replaced by a new edition. To check for more recent editions of
this document, see http://www.vmware.com/support/pubs.
EN-001907-06
Setting Up Desktop and Application Pools in View
2 VMware, Inc.
You can find the most up-to-date technical documentation on the VMware Web site at:
hp://www.vmware.com/support/
The VMware Web site also provides the latest product updates.
If you have comments about this documentation, submit your feedback to:
docfeedback@vmware.com
Copyright © 2016 VMware, Inc. All rights reserved. Copyright and trademark information.
VMware, Inc.
3401 Hillview Ave.
Palo Alto, CA 94304
www.vmware.com
Contents
Seing Up Desktop and Application Pools in View 7
1Introduction to Desktop and Application Pools 9
Farms, RDS Hosts, and Desktop and Application Pools 9
Advantages of Desktop Pools 10
Desktop Pools for Specic Types of Workers 11
Advantages of Application Pools 14
2Preparing Unmanaged Machines 15
Prepare an Unmanaged Machine for Remote Desktop Deployment 15
Install View Agent on an Unmanaged Machine 16
3Creating and Preparing Virtual Machines 19
Creating Virtual Machines for Remote Desktop Deployment 19
Install View Agent on a Virtual Machine 27
Install View Agent Silently 30
Congure a Virtual Machine with Multiple NICs for View Agent 37
Optimize Guest Operating System Performance 37
Disable the Windows Customer Experience Improvement Program 38
Optimizing Windows for Linked-Clone Virtual Machines 39
Preparing Virtual Machines for View Composer 45
Creating Virtual Machine Templates 51
Creating Customization Specications 52
4Creating Automated Desktop Pools That Contain Full Virtual Machines 53
Automated Pools That Contain Full Virtual Machines 53
Worksheet for Creating an Automated Pool That Contains Full Virtual Machines 53
Create an Automated Pool That Contains Full Virtual Machines 57
Clone an Automated Desktop Pool 58
Desktop Seings for Automated Pools That Contain Full Virtual Machines 59
5Creating Linked-Clone Desktop Pools 61
Linked-Clone Desktop Pools 61
Worksheet for Creating a Linked-Clone Desktop Pool 61
Create a Linked-Clone Desktop Pool 69
Clone an Automated Desktop Pool 71
Desktop Pool Seings for Linked-Clone Desktop Pools 72
View Composer Support for Linked-Clone SIDs and Third-Party Applications 73
Keeping Linked-Clone Machines Provisioned for Use in Remote Desktop Sessions During View
Composer Operations 77
Use Existing Active Directory Computer Accounts for Linked Clones 78
VMware, Inc. 3
6Creating Manual Desktop Pools 81
Manual Desktop Pools 81
Worksheet for Creating a Manual Desktop Pool 81
Create a Manual Desktop Pool 83
Create a Manual Pool That Contains One Machine 84
Desktop Pool Seings for Manual Pools 85
7Seing Up Remote Desktop Services Hosts 87
Remote Desktop Services Hosts 87
Install Remote Desktop Services on Windows Server 2008 R2 89
Install Remote Desktop Services on Windows Server 2012 or 2012 R2 89
Install Desktop Experience on Windows Server 2008 R2 90
Install Desktop Experience on Windows Server 2012 or 2012 R2 90
Restrict Users to a Single Session 91
Install View Agent on a Remote Desktop Services Host 91
Enable Time Zone Redirection for RDS Desktop and Application Sessions 94
Enable Windows Basic Theme for Applications 94
Congure Group Policy to Start Runonce.exe 95
RDS Host Performance Options 95
Conguring 3D Graphics for RDS Hosts 96
8Creating Farms 99
Farms 99
Preparing a Parent Virtual Machine for an Automated Farm 100
Worksheet for Creating a Manual Farm 103
Worksheet for Creating an Automated Farm 104
Create a Manual Farm 108
Create an Automated Farm 109
9Creating Application Pools 111
Application Pools 111
Worksheet for Creating an Application Pool Manually 112
Create an Application Pool 112
10 Creating RDS Desktop Pools 115
Understanding RDS Desktop Pools 115
Create an RDS Desktop Pool 116
Desktop Pool Seings for RDS Desktop Pools 116
Congure Adobe Flash Throling with Internet Explorer for RDS Desktop Pools 117
11 Provisioning Desktop Pools 119
User Assignment in Desktop Pools 119
Naming Machines Manually or Providing a Naming Paern 120
Manually Customizing Machines 125
Desktop Pool Seings for All Desktop Pool Types 127
Adobe Flash Quality and Throling 130
Seing Power Policies for Desktop Pools 131
Setting Up Desktop and Application Pools in View
4 VMware, Inc.
Conguring 3D Rendering for Desktops 136
Prevent Access to View Desktops Through RDP 143
Deploying Large Desktop Pools 144
12 Entitling Users and Groups 147
Add Entitlements to a Desktop or Application Pool 147
Remove Entitlements from a Desktop or Application Pool 148
Review Desktop or Application Pool Entitlements 148
Restricting Remote Desktop Access 148
13 Conguring Remote Desktop Features 153
Conguring Unity Touch 153
Conguring Flash URL Redirection for Multicast or Unicast Streaming 156
Conguring Real-Time Audio-Video 160
Conguring Scanner Redirection 174
Conguring Serial Port Redirection 179
Managing Access to Windows Media Multimedia Redirection (MMR) 186
Managing Access to Client Drive Redirection 188
14 Using USB Devices with Remote Desktops and Applications 189
Limitations Regarding USB Device Types 190
Overview of Seing Up USB Redirection 191
Network Trac and USB Redirection 192
Automatic Connections to USB Devices 192
Deploying USB Devices in a Secure View Environment 193
Using Log Files for Troubleshooting and to Determine USB Device IDs 195
Using Policies to Control USB Redirection 196
Troubleshooting USB Redirection Problems 205
15 Reducing and Managing Storage Requirements 207
Managing Storage with vSphere 207
Reducing Storage Requirements with View Composer 212
Storage Sizing for Linked-Clone Desktop Pools 213
Storage Overcommit for Linked-Clone Virtual Machines 217
Linked-Clone Data Disks 219
Storing Linked Clones on Local Datastores 220
Storing View Composer Replicas and Linked Clones on Separate Datastores 221
Congure View Storage Accelerator for Desktop Pools 222
Reclaim Disk Space on Linked-Clone Virtual Machines 223
Using View Composer Array Integration with Native NFS Snapshot Technology (VAAI) 225
Set Blackout Times for ESXi Operations on View Virtual Machines 226
16 Conguring Policies for Desktop and Application
Pools 227
Seing Policies in View Administrator 227
Using Active Directory Group Policies 229
Using View Group Policy Administrative Template Files 230
View ADM and ADMX Template Files 231
Contents
VMware, Inc. 5
View Agent Conguration ADM Template Seings 232
View PCoIP Session Variables ADM Template Seings 237
Using Remote Desktop Services Group Policies 248
Seing Up Location-Based Printing 256
Active Directory Group Policy Example 261
17 Conguring User Proles with View Persona Management 265
Providing User Personas in View 265
Using View Persona Management with Standalone Systems 266
Migrating User Proles with View Persona Management 267
Persona Management and Windows Roaming Proles 270
Conguring a View Persona Management Deployment 270
Best Practices for Conguring a View Persona Management Deployment 279
View Persona Management Group Policy Seings 282
18 Troubleshooting Machines and Desktop Pools 291
Display Problem Machines 291
Send Messages to Desktop Users 292
Troubleshooting Desktop Pool Creation Problems 292
Troubleshooting Network Connection Problems 302
Troubleshooting USB Redirection Problems 305
Manage Machines and Policies for Unentitled Users 307
Resolving Database Inconsistencies with the ViewDbChk Command 307
Further Troubleshooting Information 310
Index 311
Setting Up Desktop and Application Pools in View
6 VMware, Inc.

Setting Up Desktop and Application Pools in
View
Seing Up Desktop and Application Pools in View describes how to create and provision pools of machines and
create pools of remote applications that run on Microsoft Remote Desktop Services (RDS) hosts. It includes
information about preparing machines, conguring policies, entitling users and groups, conguring remote
desktop features, and conguring user proles with View Persona Management.
Intended Audience
This information is intended for anyone who wants to create and provision desktop and application pools.
The information is wrien for experienced Windows system administrators who are familiar with virtual
machine technology and datacenter operations.
VMware, Inc. 7
Setting Up Desktop and Application Pools in View
8 VMware, Inc.

Introduction to Desktop and
Application Pools 1
With VMware Horizon 6, you can create desktop pools that include one or hundreds or thousands of virtual
desktops. You can deploy desktops that run on virtual machines, physical machines, and Windows Remote
Desktop Services (RDS) hosts. Create one virtual machine as a base image, and View can generate a pool of
virtual desktops from that image. You can also create application pools that give users remote access to
applications.
This chapter includes the following topics:
n“Farms, RDS Hosts, and Desktop and Application Pools,” on page 9
n“Advantages of Desktop Pools,” on page 10
n“Desktop Pools for Specic Types of Workers,” on page 11
n“Advantages of Application Pools,” on page 14
Farms, RDS Hosts, and Desktop and Application Pools
With View, you can create desktop and application pools to give users remote access to virtual machine-
based desktops, session-based desktops, physical computers, and applications. View takes advantage of
Microsoft Remote Desktop Services (RDS) and VMware PC-over-IP (PCoIP) technologies to provide high-
quality remote access to users.
RDS Hosts
RDS hosts are server computers that have Windows Remote Desktop Services and View Agent installed.
These servers host applications and desktop sessions that users can access remotely. To use RDS desktop
pools or applications, your end users must have access to Horizon Client 3.0 or later software.
Desktop Pools
There are three types of desktop pools: automated, manual, and RDS. Automated desktop pools use a
vCenter Server virtual machine template or snapshot to create a pool of identical virtual machines. Manual
desktop pools are a collection of existing vCenter Server virtual machines, physical computers, or third-
party virtual machines. In automated or manual pools, each machine is available for one user to access
remotely at a time. RDS desktop pools are not a collection of machines, but instead, provide users with
desktop sessions on RDS hosts. Multiple users can have desktop sessions on an RDS host simultaneously.
Application Pools
Application pools let you deliver applications to many users. The applications in application pools run on a
farm of RDS hosts.
VMware, Inc. 9
Farms
Farms are collections of RDS hosts and facilitate the management of those hosts. Farms can have a variable
number of RDS hosts and provide a common set of applications or RDS desktops to users. When you create
an RDS desktop pool or an application pool, you must specify a farm. The RDS hosts in the farm provide
desktop and application sessions to users.
Advantages of Desktop Pools
View oers the ability to create and provision pools of desktops as its basis of centralized management.
You create a remote desktop pool from one of the following sources:
nA physical system such as a physical desktop PC or an RDS host
nA virtual machine that is hosted on an ESXi host and managed by vCenter Server
nA virtual machine that runs on a virtualization platform other than vCenter Server that supports View
Agent
If you use a vSphere virtual machine as a desktop source, you can automate the process of making as many
identical virtual desktops as you need. You can set a minimum and maximum number of virtual desktops to
be generated for the pool. Seing these parameters ensures that you always have enough remote desktops
available for immediate use but not so many that you overuse available resources.
Using pools to manage desktops allows you to apply seings or deploy applications to all remote desktops
in a pool. The following examples show some of the seings available:
nSpecify which remote display protocol to use as the default for the remote desktop and whether to let
end users override the default.
nIf using a virtual machine, specify whether to power o the virtual machine when it is not in use and
whether to delete it altogether.
nSpecify whether to use a Microsoft Sysprep customization specication or QuickPrep from VMware.
Sysprep generates a unique SID and GUID for each virtual machine in the pool.
In addition, using desktop pools provides many conveniences.
Dedicated-assignment
pools
Each user is assigned a particular remote desktop and returns to the same
desktop at each login. Users can personalize their desktops, install
applications, and store data.
Floating-assignment
pools
The remote desktop is optionally deleted and re-created after each use,
oering a highly controlled environment. A oating-assignment desktop is
like a computer lab or kiosk environment where each desktop is loaded with
the necessary applications and all desktops have access to necessary data.
Using oating-assignment pools also allows you to create a pool of desktops
that can be used by shifts of users. For example, a pool of 100 desktops could
be used by 300 users if they worked in shifts of 100 users at a time.
Setting Up Desktop and Application Pools in View
10 VMware, Inc.
Desktop Pools for Specific Types of Workers
View provides many features to help you conserve storage and reduce the amount of processing power
required for various use cases. Many of these features are available as pool seings.
The most fundamental question to consider is whether a certain type of user needs a stateful desktop image
or a stateless desktop image. Users who need a stateful desktop image have data in the operating system
image itself that must be preserved, maintained, and backed up. For example, these users install some of
their own applications or have data that cannot be saved outside of the virtual machine itself, such as on a
le server or in an application database.
Stateless desktop
images
Stateless architectures have many advantages, such as being easier to
support and having lower storage costs. Other benets include a limited
need to back up the linked-clone virtual machines and easier, less expensive
disaster recovery and business continuity options.
Stateful desktop images These images might require traditional image management techniques.
Stateful images can have low storage costs in conjunction with certain
storage system technologies. Backup and recovery technologies such as
VMware Consolidated Backup and VMware Site Recovery Manager are
important when considering strategies for backup, disaster recovery, and
business continuity.
You create stateless desktop images by using View Composer and creating oating-assignment pools of
linked-clone virtual machines.
You create stateful desktop images by creating dedicated-assignment pools of either linked-clone virtual
machines or full virtual machines. If you use linked-clone virtual machines, you can congure View
Composer persistent disks and folder redirection. Some storage vendors have cost-eective storage
solutions for stateful desktop images. These vendors often have their own best practices and provisioning
utilities. Using one of these vendors might require that you create a manual dedicated-assignment pool.
Pools for Task Workers
You can standardize on stateless desktop images for task workers so that the image is always in a well-
known, easily supportable conguration and so that workers can log in to any available desktop.
Because task workers perform repetitive tasks within a small set of applications, you can create stateless
desktop images, which help conserve storage space and processing requirements. Use the following pool
seings:
nCreate an automated pool so that desktops can be created when the pool is created or can be generated
on demand based on pool usage.
nUse oating assignment so that users log in to any available desktop. This seing reduces the number of
desktops required if everyone does not need to be logged in at the same time.
nCreate View Composer linked-clone desktops so that desktops share the same base image and use less
storage space in the datacenter than full virtual machines.
nDetermine what action, if any, to take when users log o. Disks grow over time. You can conserve disk
space by refreshing the desktop to its original state when users log o. You can also set a schedule for
periodically refreshing desktops. For example, you can schedule desktops to refresh daily, weekly, or
monthly.
Chapter 1 Introduction to Desktop and Application Pools
VMware, Inc. 11

nIf applicable, consider storing desktops on local ESXi datastores. This strategy can oer advantages
such as inexpensive hardware, fast virtual-machine provisioning, high-performance power operations,
and simple management. For a list of the limitations, see “Storing Linked Clones on Local Datastores,”
on page 220.
N For information about other types of storage options, see Chapter 15, “Reducing and Managing
Storage Requirements,” on page 207.
nUse the Persona Management feature so that users always have their preferred desktop appearance and
application seings, as with Windows user proles. If you do not have the desktops set to be refreshed
or deleted at logo, you can congure the persona to be removed at logo.
I View Persona Management facilitates implementing a oating-assignment pool for those users
who want to retain seings between sessions. Previously, one of the limitations of oating-assignment
desktops was that when end users logged o, they lost all their conguration seings and any data stored in
the remote desktop.
Each time end users logged on, their desktop background was set to the default wallpaper, and they would
have to congure each application's preferences again. With View Persona Management, an end user of a
oating-assignment desktop cannot tell the dierence between their session and a session on a dedicated-
assignment desktop.
Pools for Knowledge Workers and Power Users
Knowledge workers must be able to create complex documents and have them persist on the desktop.
Power users must be able to install their own applications and have them persist. Depending on the nature
and amount of personal data that must be retained, the desktop can be stateful or stateless.
Because power users and knowledge workers, such as accountants, sales managers, marketing research
analysts, must be able to create and retain documents and seings, you create dedicated-assignment
desktops for them. For knowledge workers who do not need user-installed applications except for
temporary use, you can create stateless desktop images and save all their personal data outside of the virtual
machine, on a le server or in an application database. For other knowledge workers and for power users,
you can create stateful desktop images. Use the following pool seings:
nUse dedicated assignment pools so that each knowledge worker or power user logs in to the same
desktop every time.
nUse the Persona Management feature so that users always have their preferred desktop appearance and
application seings, as with Windows user proles.
nUse vStorage thin provisioning so that at rst, each desktop uses only as much storage space as the disk
needs for its initial operation.
nFor power users and knowledge workers who must install their own applications, which adds data to
the operating system disk, create full virtual machine desktops. Use Mirage to deploy and update
applications without overwriting user-installed applications.
nIf knowledge workers do not require user-installed applications except for temporary use, you can
create View Composer linked-clone desktops. The desktop images share the same base image and use
less storage space than full virtual machines.
nIf you use View Composer with vSphere 5.1 or later virtual desktops, enable the space reclamation
feature for vCenter Server and for the desktop pool. With the space reclamation feature, stale or deleted
data within a guest operating system is automatically reclaimed with a wipe and shrink process.
Setting Up Desktop and Application Pools in View
12 VMware, Inc.

nIf you use View Composer linked-clone desktops, implement View Persona Management, roaming
proles, or another prole management solution.
Congure persistent disks so that you can refresh and recompose the linked-clone OS disks while
keeping a copy of the user prole on the persistent disks.
Pools for Kiosk Users
Kiosk users might include customers at airline check-in stations, students in classrooms or libraries, medical
personnel at medical data entry workstations, or customers at self-service points. Accounts associated with
client devices rather than users are entitled to use these desktop pools because users do not need to log in to
use the client device or the remote desktop. Users can still be required to provide authentication credentials
for some applications.
Virtual machine desktops that are set to run in kiosk mode use stateless desktop images because user data
does not need to be preserved in the operating system disk. Kiosk mode desktops are used with thin client
devices or locked-down PCs. You must ensure that the desktop application implements authentication
mechanisms for secure transactions, that the physical network is secure against tampering and snooping,
and that all devices connected to the network are trusted.
As a best practice, use dedicated View Connection Server instances to handle clients in kiosk mode, and
create dedicated organizational units and groups in Active Directory for the accounts of these clients. This
practice not only partitions these systems against unwarranted intrusion, but also makes it easier to
congure and administer the clients.
To set up kiosk mode, you must use the vdmadmin command-line interface and perform several procedures
documented in the topics about kiosk mode in the View Administration document. As part of this setup, you
can use the following pool seings.
nCreate an automated pool so that desktops can be created when the pool is created or can be generated
on demand based on pool usage.
nUse oating assignment so that users can access any available desktop in the pool.
nCreate View Composer linked-clone desktops so that desktops share the same base image and use less
storage space in the datacenter than full virtual machines.
nInstitute a refresh policy so that the desktop is refreshed frequently, such as at every user logo.
nIf applicable, consider storing desktops on local ESXi datastores. This strategy can oer advantages
such as inexpensive hardware, fast virtual-machine provisioning, high-performance power operations,
and simple management. For a list of the limitations, see “Storing Linked Clones on Local Datastores,”
on page 220.
N For information about other types of storage options, see Chapter 15, “Reducing and Managing
Storage Requirements,” on page 207.
nUse an Active Directory GPO (group policy object) to congure location-based printing, so that the
desktop uses the nearest printer. For a complete list and description of the seings available through
Group Policy administrative (ADM) templates, see Chapter 16, “Conguring Policies for Desktop and
Application Pools,” on page 227.
nUse a GPO if you want to override the default policy that enables connecting local USB devices to the
desktop when the desktop is launched or when USB devices are plugged in to the client computer.
Chapter 1 Introduction to Desktop and Application Pools
VMware, Inc. 13
Advantages of Application Pools
With application pools, you give users access to applications that run on servers in a data center instead of
on their personal computers or devices.
Application pools oer several important benets:
nAccessibility
Users can access applications from anywhere on the network. You can also congure secure network
access.
nDevice independence
With application pools, you can support a range of client devices, such as smart phones, tablets,
laptops, thin clients, and personal computers. The client devices can run various operating systems,
such as Windows, iOS, Mac OS, or Android.
nAccess control
You can easily and quickly grant or remove access to applications for one user or a group of users.
nAccelerated deployment
With application pools, deploying applications can be accelerated because you only deploy applications
on servers in a data center and each server can support multiple users.
nManageability
Managing software that is deployed on client computers and devices typically requires signicant
resources. Management tasks include deployment, conguration, maintenance, support, and upgrades.
With application pools, you can simplify software management in an enterprise because the software
runs on servers in a data center, which requires fewer installed copies.
nSecurity and regulatory compliance
With application pools, you can improve security because applications and their associated data are
centrally located in a data center. Centralized data can address security concerns and regulatory
compliance issues.
nReduced cost
Depending on software license agreements, hosting applications in a data center can be more cost-
eective. Other factors, including accelerated deployment and improved manageability, can also reduce
the cost of software in an enterprise.
Setting Up Desktop and Application Pools in View
14 VMware, Inc.

Preparing Unmanaged Machines 2
Users can access remote desktops delivered by machines that are not managed by vCenter Server. These
unmanaged machines can include physical computers and virtual machines running on virtualization
platforms other than vCenter Server. You must prepare an unmanaged machine to deliver remote desktop
access.
For information about preparing machines that are used as Remote Desktop Services (RDS) hosts, see
Chapter 7, “Seing Up Remote Desktop Services Hosts,” on page 87.
For information about preparing Linux virtual machines for remote desktop deployment, see the Seing Up
Horizon 6 for Linux Desktops guide.
This chapter includes the following topics:
n“Prepare an Unmanaged Machine for Remote Desktop Deployment,” on page 15
n“Install View Agent on an Unmanaged Machine,” on page 16
Prepare an Unmanaged Machine for Remote Desktop Deployment
You must perform certain tasks to prepare an unmanaged machine for remote desktop deployment.
Prerequisites
nVerify that you have administrative rights on the unmanaged machine.
nTo make sure that remote desktop users are added to the local Remote Desktop Users group of the
unmanaged machine, create a restricted Remote Desktop Users group in Active Directory. See the View
Installation document for more information.
Procedure
1 Power on the unmanaged machine and verify that it is accessible to the View Connection Server
instance.
2 Join the unmanaged machine to the Active Directory domain for your remote desktops.
3Congure the Windows rewall to allow Remote Desktop connections to the unmanaged machine.
What to do next
Install View Agent on the unmanaged machine. See “Install View Agent on an Unmanaged Machine,” on
page 16.
VMware, Inc. 15
Install View Agent on an Unmanaged Machine
You must install View Agent on an all unmanaged machines. View cannot manage an unmanaged machine
unless View Agent is installed.
To install View Agent on multiple Windows physical computers without having to respond to wizard
prompts, you can install View Agent silently. See “Install View Agent Silently,” on page 30.
Prerequisites
nVerify that you have administrative rights on the unmanaged machine.
nTo use an unmanaged Windows Server machine as a remote desktop rather than as an RDS host,
perform the steps described in “Prepare Windows Server Operating Systems for Desktop Use,” on
page 24.
nFamiliarize yourself with the View Agent custom setup options for unmanaged machines. See “View
Agent Custom Setup Options for Unmanaged Machines,” on page 17.
nFamiliarize yourself with the TCP ports that the View Agent installation program opens on the rewall.
See the View Architecture Planning document for more information.
nIf the machine has the Microsoft Visual C++ Redistributable package installed, verify that the version of
the package is 2005 SP1 or later. If the package version is 2005 or earlier, you can either upgrade or
uninstall the package.
nDownload the View Agent installer le from the VMware product page at
hp://www.vmware.com/go/downloadview.
Procedure
1 To start the View Agent installation program, double-click the installer le.
The installer lename is VMware-viewagent-y.y.y-xxxxxx.exe or VMware-viewagent-x86_64-y.y.y-
xxxxxx.exe, where y.y.y is the version number and xxxxxx is the build number.
2 Accept the VMware license terms.
3 Select the Internet Protocol (IP) version, IPv4 or IPv6.
You must install all View components with the same IP version.
4 Select whether to enable or disable FIPS mode.
This option is available only if FIPS mode is enabled in Windows.
5 Select your custom setup options.
6 Accept or change the destination folder.
7 In the Server text box, type the host name or IP address of a View Connection Server host.
During installation, the installer registers the unmanaged machine with this View Connection Server
instance. After registration, the specied View Connection Server instance, and any additional instances
in the same View Connection Server group, can communicate with the unmanaged machine.
Setting Up Desktop and Application Pools in View
16 VMware, Inc.

8 Select an authentication method to register the unmanaged machine with the View Connection Server
instance.
Option Action
Authenticate as the currently
logged in user
The Username and Password text boxes are disabled and you are logged
in to the View Connection Server instance with your current username and
password.
Specify administrator credentials You must provide the username and password of a View Connection
Server administrator in the Username and Password text boxes.
Provide the username in the following format: Domain\User.
The user account must be a domain user with access to View LDAP on the View Connection Server
instance. A local user does not work.
9 Follow the prompts in the View Agent installation program and nish the installation.
10 If you selected the USB redirection option, restart the unmanaged machine to enable USB support.
In addition, the Found New Hardware wizard might start. Follow the prompts in the wizard to
congure the hardware before you restart the unmanaged machine.
The VMware Horizon View Agent service is started on the unmanaged machine.
What to do next
Use the unmanaged machine to create a remote desktop. See “Manual Desktop Pools,” on page 81.
View Agent Custom Setup Options for Unmanaged Machines
When you install View Agent on an unmanaged machine, you can select or deselect certain custom setup
options. In addition, View Agent installs certain features automatically on all guest operating systems on
which they are supported. These features are not optional.
To change custom setup options after you install the latest View Agent version, you must uninstall and
reinstall View Agent. For patches and upgrades, you can run the new View Agent installer and select a new
set of options without uninstalling the previous version.
Table 2‑1. View Agent Custom Setup Options for Unmanaged Machines in an IPv4 Environment (Optional)
Option Description
USB Redirection Gives users access to locally connected USB devices on
their desktops.
USB redirection is supported on remote desktops that are
deployed on single-user machines. In addition, redirection
of USB ash drives and hard disks is supported on RDS
desktops and applications.
This setup option is not selected by default. You must select
the option to install it.
For guidance on using USB redirection securely, see the
View Security guide. For example, you can use group policy
seings to disable USB redirection for specic users.
Client Drive Redirection Allows Horizon Client users to share local drives with their
remote desktops.
After this setup option is installed, no further conguration
is required on the remote desktop.
Client Drive Redirection is also supported on VDI desktops
that run on managed, single-user virtual machines and on
RDS desktops and applications.
Chapter 2 Preparing Unmanaged Machines
VMware, Inc. 17

Table 2‑1. View Agent Custom Setup Options for Unmanaged Machines in an IPv4 Environment (Optional)
(Continued)
Option Description
View Persona Management Synchronizes the user prole on the local desktop with a
remote prole repository, so that users have access to their
proles whenever they log in to a desktop.
PCoIP Smartcard Lets users authenticate with smart cards when they use the
PCoIP display protocol.
PCoIP Smartcard is supported on remote desktops that are
deployed on single-user machines but is not supported on
RDS host-based remote desktops.
Virtual audio driver Provides a virtual audio driver on the remote desktop.
In an IPv6 environment, the only optional feature is PCoIP Smartcard.
Table 2‑2. View Agent Features That Are Installed Automatically on Unmanaged Machines in an IPv4
Environment (Not Optional)
Feature Description
PCoIP Agent Lets users connect to the remote desktop with the PCoIP
display protocol.
The PCoIP Agent feature is supported on physical
machines that are congured with a Teradici TERA host
card.
Lync Provides support for Microsoft Lync 2013 Client on remote
desktops.
Unity Touch Allows tablet and smart phone users to interact easily with
Windows applications that run on the remote desktop.
Users can browse, search, and open Windows applications
and les, choose favorite applications and les, and switch
between running applications, all without using the Start
menu or Taskbar.
In an IPv6 environment, the only automatically installed feature is PCoIP Agent.
Setting Up Desktop and Application Pools in View
18 VMware, Inc.

Creating and Preparing Virtual
Machines 3
You can use virtual machines managed by vCenter Server to provision and deploy remote desktops. You can
use a virtual machine managed by vCenter Server as a template for an automated pool, a parent for a
linked-clone pool, or a machine in a manual pool. You must prepare virtual machines to deliver remote
desktop access.
For information about preparing machines that are used as Remote Desktop Services (RDS) hosts, see
Chapter 7, “Seing Up Remote Desktop Services Hosts,” on page 87.
For information about preparing Linux virtual machines for remote desktop deployment, see the Seing Up
Horizon 6 for Linux Desktops guide.
This chapter includes the following topics:
n“Creating Virtual Machines for Remote Desktop Deployment,” on page 19
n“Install View Agent on a Virtual Machine,” on page 27
n“Install View Agent Silently,” on page 30
n“Congure a Virtual Machine with Multiple NICs for View Agent,” on page 37
n“Optimize Guest Operating System Performance,” on page 37
n“Disable the Windows Customer Experience Improvement Program,” on page 38
n“Optimizing Windows for Linked-Clone Virtual Machines,” on page 39
n“Preparing Virtual Machines for View Composer,” on page 45
n“Creating Virtual Machine Templates,” on page 51
n“Creating Customization Specications,” on page 52
Creating Virtual Machines for Remote Desktop Deployment
The initial virtual machine establishes a virtual hardware prole and operating system to be used for rapid
deployment of remote desktops.
1Create a Virtual Machine for Remote Desktop Deployment on page 20
You use vSphere Client to create virtual machines in vCenter Server for remote desktops.
2Install a Guest Operating System on page 22
After you create a virtual machine, you must install a guest operating system.
3Prepare a Guest Operating System for Remote Desktop Deployment on page 22
You must perform certain tasks to prepare a guest operating system for remote desktop deployment.
VMware, Inc. 19
4Prepare Windows Server Operating Systems for Desktop Use on page 24
To use a Windows Server 2008 R2 or Windows Server 2012 R2 virtual machine as a single-session View
desktop (rather than as an RDS host), you must perform certain steps before you install View Agent in
the virtual machine. You must also congure View Administrator to treat Windows Servers as
supported operating systems for View desktop use.
5Install Desktop Experience on Windows Server 2008 R2 on page 25
For RDS desktops and applications, and for VDI desktops that are deployed on single-user virtual
machines that run Windows Server, scanner redirection requires that you install the Desktop
Experience feature on the RDS hosts and the single-user virtual machines.
6Install Desktop Experience on Windows Server 2012 or 2012 R2 on page 26
For RDS desktops and applications, and for VDI desktops that are deployed on single-user virtual
machines that run Windows Server, scanner redirection requires that you install the Desktop
Experience feature on the RDS hosts and the single-user virtual machines.
7Congure the Windows Firewall Service to Restart After Failures on page 26
Some Windows Server 2012 R2, Windows 8.1, and Windows 10 machines that are deployed as single-
session desktops do not become available immediately after they are provisioned. This issue occurs
when the Windows Firewall service does not restart after its timeout period expires. You can congure
the Windows Firewall service on the parent or template virtual machine to ensure that all machines in
a desktop pool become available.
Create a Virtual Machine for Remote Desktop Deployment
You use vSphere Client to create virtual machines in vCenter Server for remote desktops.
Prerequisites
nUpload an ISO image le of the guest operating system to a datastore on your ESXi server.
nFamiliarize yourself with the custom conguration parameters for virtual machines. See “Virtual
Machine Custom Conguration Parameters,” on page 21.
Procedure
1 In vSphere Client, log in to the vCenter Server system.
2 Select File > New > Virtual Machine to start the New Virtual Machine wizard.
3 Select Custom and congure custom conguration parameters.
4 Select Edit the virtual machine before completion and click Continue to congure hardware
seings.
a Add a CD/DVD drive, set the media type to use an ISO image le, select the ISO image le of the
guest operating system that you uploaded to your datastore, and select Connect at power on.
b Set Power-on Boot Delay to 10,000 milliseconds.
5 Click Finish to create the virtual machine.
What to do next
Install a guest operating system on the virtual machine.
Setting Up Desktop and Application Pools in View
20 VMware, Inc.

Virtual Machine Custom Configuration Parameters
You can use virtual machine custom conguration parameters as baseline seings when you create a virtual
machine for remote desktop deployment.
You can change certain seings when you use View Administrator to deploy desktop pools from the virtual
machine.
Table 3‑1. Custom Configuration Parameters
Parameter Description and Recommendations
Name and Location The name and location of the virtual machine.
If you plan to use the virtual machine as a template, assign
a generic name. The location can be any folder within your
datacenter inventory.
Host/Cluster The ESXi server or cluster of server resources that will run
the virtual machine.
If you plan to use the virtual machine as a template, the
location of the initial virtual machine does not necessarily
specify where future virtual machines created from
template will reside.
Resource Pool If the physical ESXi server resources are divided into
resource pools, you can assign them to the virtual machine.
Datastore The location of les associated with the virtual machine.
Hardware Machine Version The hardware machine version that is available depends on
the ESXi version you are running. As a best practice, select
the latest available hardware machine version, which
provides the greatest virtual machine functionality. Certain
View features require minimum hardware machine
versions.
Guest Operating System The type of operating system that you will install in the
virtual machine.
CPUs The number of virtual processors in the virtual machine.
For most guest operating systems, a single processor is
sucient.
Memory The amount of memory to allocate to the virtual machine.
In most cases, 512MB is sucient.
Network The number of virtual network adapters (NICs) in the
virtual machine.
One NIC is usually sucient. The network name should be
consistent across virtual infrastructures. An incorrect
network name in a template can cause failures during the
instance customization phases.
When you install View Agent on a virtual machine that has
more than one NIC, you must congure the subnet that
View Agent uses. See “Congure a Virtual Machine with
Multiple NICs for View Agent,” on page 37 for more
information.
I For Windows 8, Windows 7, Windows 2012
R2, and Windows Server 2008 R2 operating systems, you
must select the VMXNET 3 network adapter. Using the
default E1000 adapter can cause customization timeout
errors on virtual machines. To use the VMXNET 3 adapter,
you must install a Microsoft hotx patch:
nFor Windows 7 SP1:
hp://support.microsoft.com/kb/2550978
Chapter 3 Creating and Preparing Virtual Machines
VMware, Inc. 21

Table 3‑1. Custom Configuration Parameters (Continued)
Parameter Description and Recommendations
SCSI Controller The type of SCSI adapter to use with the virtual machine.
For Windows 8/8.1 and Windows 7 guest operating
systems, you should specify the LSI Logic adapter. The LSI
Logic adapter has improved performance and works beer
with generic SCSI devices.
LSI Logic SAS is available only for virtual machines with
hardware version 7 and later.
Select a Disk The disk to use with the virtual machine.
Create a new virtual disk based on the amount of local
storage that you decide to allocate to each user. Allow
enough storage space for the OS installation, patches, and
locally installed applications.
To reduce the need for disk space and management of local
data, you should store the user's information, prole, and
documents on network shares rather than on a local disk.
Install a Guest Operating System
After you create a virtual machine, you must install a guest operating system.
Prerequisites
nVerify that an ISO image le of the guest operating system is on a datastore on your ESXi server.
nVerify that the CD/DVD drive in the virtual machine points to the ISO image le of the guest operating
system and that the CD/DVD drive is congured to connect at power on.
Procedure
1 In vSphere Client, log in to the vCenter Server system where the virtual machine resides.
2 Right-click the virtual machine, select Power, and select Power On to start the virtual machine.
Because you congured the CD/DVD drive to point to the ISO image of the guest operating system and
to connect at power on, the guest operating system installation process begins automatically.
3 Click the Console tab and follow the installation instructions provided by the operating system vendor.
4 Activate Windows.
What to do next
Prepare the guest operating system for View desktop deployment.
Prepare a Guest Operating System for Remote Desktop Deployment
You must perform certain tasks to prepare a guest operating system for remote desktop deployment.
Prerequisites
nCreate a virtual machine and install a guest operating system.
nCongure an Active Directory domain controller for your remote desktops. See the View Installation
document for more information.
nTo make sure that desktop users are added to the local Remote Desktop Users group of the virtual
machine, create a restricted Remote Desktop Users group in Active Directory. See the View Installation
document for more information.
Setting Up Desktop and Application Pools in View
22 VMware, Inc.

nVerify that Remote Desktop Services are started on the virtual machine. Remote Desktop Services are
required for View Agent installation, SSO, and other View operations. You can disable RDP access to
your View desktops by conguring desktop pool seings and group policy seings. See “Prevent
Access to View Desktops Through RDP,” on page 143.
nVerify that you have administrative rights on the guest operating system.
nOn Windows Server operating systems, prepare the operating system for desktop use. See “Prepare
Windows Server Operating Systems for Desktop Use,” on page 24.
nIf you intend to congure 3D graphics rendering for desktop pools, familiarize yourself with the Enable
3D Support seing for virtual machines.
This seing is active on Windows 7 and later operating systems. On ESXi 5.1 and later hosts, you can
also select options that determine how the 3D renderer is managed on the ESXi host. For details, see the
vSphere Virtual Machine Administration document.
Procedure
1 In vSphere Client, log in to the vCenter Server system where the virtual machine resides.
2 Right-click the virtual machine, select Power, and select Power On to start the virtual machine.
3 Right-click the virtual machine, select Guest, and select Install/Upgrade VMware Tools to install the
latest version of VMware Tools.
N The virtual printing feature is supported only when you install it from View Agent. Virtual
printing is not supported if you install it with VMware Tools.
4 Use the VMware Tools time synchronization function to ensure that the virtual machine is synchronized
to ESXi.
ESXi must synchronize to an external NTP source, for example, the same time source as Active
Directory.
Disable other time synchronization mechanisms such as Windows Time Service.
The VMware Tools online help provides information on conguring time synchronization between
guest and host.
5 Install service packs and updates.
6 Install antivirus software.
7 Install other applications and software, such as smart card drivers if you are using smart card
authentication.
If you plan to use Workspace Portal to oer a catalog that includes ThinApp applications, you must
install Workspace Portal for Windows.
I If you are installing Microsoft .NET Framework, you must install it after you install View
Agent.
8 If Horizon Client devices will connect to the virtual machine with the PCoIP display protocol, set the
power option Turn the display to Never.
If you do not disable this seing, the display will appear to freeze in its last state when power savings
mode starts.
Chapter 3 Creating and Preparing Virtual Machines
VMware, Inc. 23
9 If Horizon Client devices will connect to the virtual machine with the PCoIP display protocol, go to
Control Panel > System > Advanced System > Performance and change the seing
for Visual to Adjust for best performance.
If you instead use the seing called Adjust for best appearance or Let Windows choose what's best for
my computer and Windows chooses appearance instead of performance, performance is negatively
aected.
10 If a proxy server is used in your network environment, congure network proxy seings.
11 Congure network connection properties.
a Assign a static IP address or specify that an IP address is assigned by a DHCP server.
View does not support link-local (169.254.x.x) addresses for View desktops.
b Set the preferred and alternate DNS server addresses to your Active Directory server address.
12 Join the virtual machine to the Active Directory domain for your remote desktops.
A parent virtual machine that you use for View Composer must either belong to the same Active
Directory domain as the domain that the linked-clone desktops will join or be a member of the local
WORKGROUP.
13 Congure Windows Firewall to allow Remote Desktop connections to the virtual machine.
14 (Optional) Disable Hot Plug PCI devices.
This step prevents users from accidentally disconnecting the virtual network device (vNIC) from the
virtual machine.
15 (Optional) Congure user customization scripts.
What to do next
Install View Agent. See “Install View Agent on a Virtual Machine,” on page 27.
Prepare Windows Server Operating Systems for Desktop Use
To use a Windows Server 2008 R2 or Windows Server 2012 R2 virtual machine as a single-session View
desktop (rather than as an RDS host), you must perform certain steps before you install View Agent in the
virtual machine. You must also congure View Administrator to treat Windows Servers as supported
operating systems for View desktop use.
Prerequisites
nFamiliarize yourself with the steps to install the Desktop Experience feature on Windows Server 2008
R2 or Windows Server 2012 R2. See “Install Desktop Experience on Windows Server 2008 R2,” on
page 25 or “Install Desktop Experience on Windows Server 2012 or 2012 R2,” on page 26
nOn Windows Server 2012 R2 machines, familiarize yourself with the steps to congure the Windows
Firewall service to restart after failures occur. See “Congure the Windows Firewall Service to Restart
After Failures,” on page 26.
Procedure
1 Verify that the Remote Desktop Services role is not installed.
When the Remote Desktop Services role is not present, the View Agent installer prompts you to conrm
that you want to install View Agent in desktop mode. If the Remote Desktop Services role is present,
the View Agent installer does not display this prompt and it treats the Windows Server machine as an
RDS host instead of a single-session View desktop.
Setting Up Desktop and Application Pools in View
24 VMware, Inc.
2 Install Windows Server 2008 R2 Service Pack 1 (SP1) or Windows Server 2012 R2.
If you do not install SP1 with Windows Server 2008 R2, an error occurs when you install View Agent.
3 (Optional) Install the Desktop Experience feature if you plan to use the following features.
nHTML Access
nScanner redirection
nWindows Aero
4 (Optional) To use Windows Aero on a Windows Server desktop, start the Themes service.
When you create or edit a desktop pool, you can congure 3D graphics rendering for your desktops.
The 3D Renderer seing oers a Software option that enables users to run Windows Aero on the
desktops in the pool.
5 On Windows Server 2012 R2 machines, congure the Windows Firewall service to restart after failures
occur.
6Congure View Administrator to treat Windows Servers as supported desktop operating systems.
If you do not perform this step, you cannot select Windows Server machines for desktop use in View
Administrator.
a In View Administrator, select View > Global .
b In the General pane, click Edit.
c Select the Enable Windows Server desktops check box and click OK.
When you enable Windows Server desktops in View Administrator, View Administrator displays all
available Windows Server machines, including machines on which View Connection Server is installed, as
potential machines for desktop use. You cannot install View Agent on machines on which other View
software components are installed.
Install Desktop Experience on Windows Server 2008 R2
For RDS desktops and applications, and for VDI desktops that are deployed on single-user virtual machines
that run Windows Server, scanner redirection requires that you install the Desktop Experience feature on the
RDS hosts and the single-user virtual machines.
Procedure
1 Log in as an administrator.
2 Start Server Manager.
3 Click Features.
4 Click Add Features.
5 On the Select Features page, select the Desktop Experience checkbox.
6 Review the information about other features that are required by the Desktop Experience feature, and
click Add Required Features.
7 Follow the prompts and nish the installation.
Chapter 3 Creating and Preparing Virtual Machines
VMware, Inc. 25

Install Desktop Experience on Windows Server 2012 or 2012 R2
For RDS desktops and applications, and for VDI desktops that are deployed on single-user virtual machines
that run Windows Server, scanner redirection requires that you install the Desktop Experience feature on the
RDS hosts and the single-user virtual machines.
Windows Server 2012 and Windows Server 2012 R2 are supported on machines that are used as RDS hosts.
Windows Server 2012 R2 is supported on single-user virtual machines.
Procedure
1 Log in as an administrator.
2 Start Server Manager.
3 Select Add roles and features.
4 On the Select Installation Type page, select Role-based or feature-based installation.
5 On the Select Destination Server page, select a server.
6 On the Select Server Roles page, accept the default selection and click Next.
7 On the Select Features page, under User Interfaces and Infrastructure, select Desktop Experience.
8 Follow the prompts and nish the installation.
Configure the Windows Firewall Service to Restart After Failures
Some Windows Server 2012 R2, Windows 8.1, and Windows 10 machines that are deployed as single-session
desktops do not become available immediately after they are provisioned. This issue occurs when the
Windows Firewall service does not restart after its timeout period expires. You can congure the Windows
Firewall service on the parent or template virtual machine to ensure that all machines in a desktop pool
become available.
If you encounter this issue during provisioning, the Windows event logs display the following error: The
Windows Firewall service terminated with the following service-specific error: This operation
returned because the timeout period expired.
This issue occurs on Windows Server 2012 R2, Windows 8.1, and Windows 10 machines. Other guest
operating systems are not aected.
Procedure
1 On the Windows Server 2012 R2, Windows 8.1, or Windows 10 parent or template virtual machine from
which you will deploy a desktop pool, select Control Panel > Administrative Tools > Services.
2 In the Services dialog box, right-click the Windows Firewall service and select Properties.
3 In the Windows Firewall Properties dialog box, click the Recovery tab.
4 Select the recovery seings to restart the service after a failure occurs.
Setting Drop-down Menu Option
First failure: Restart the Service
Second failure: Restart the Service
Subsequent failures: Restart the Service
5 Select the Enable actions for stops with errors check box and click OK.
6 Deploy or redeploy the desktop pool from the parent or template virtual machine.
Setting Up Desktop and Application Pools in View
26 VMware, Inc.
Install View Agent on a Virtual Machine
You must install View Agent on virtual machines that are managed by vCenter Server so that View
Connection Server can communicate with them. Install View Agent on all virtual machines that you use as
templates for automated desktop pools, parents for linked-clone desktop pools, and machines in manual
desktop pools.
To install View Agent on multiple Windows virtual machines without having to respond to wizard
prompts, you can install View Agent silently. See “Install View Agent Silently,” on page 30.
The View Agent software cannot coexist on the same virtual or physical machine with any other View
software component, including a security server, View Connection Server, View Composer, or
Horizon Client.
Prerequisites
nPrepare the guest operating system for remote desktop deployment. See “Prepare a Guest Operating
System for Remote Desktop Deployment,” on page 22.
nTo use a Windows Server virtual machine as a remote desktop (rather than as an RDS host), perform the
steps described in “Prepare Windows Server Operating Systems for Desktop Use,” on page 24.
nIf the machine has the Microsoft Visual C++ Redistributable package installed, verify that the version of
the package is 2005 SP1 or later. If the package version is 2005 or earlier, you can either upgrade or
uninstall the package.
nDownload the View Agent installer le from the VMware product page at
hp://www.vmware.com/go/downloadview.
nVerify that you have administrative rights on the virtual machine.
nFamiliarize yourself with the View Agent custom setup options. See “View Agent Custom Setup
Options,” on page 28.
nFamiliarize yourself with the TCP ports that the View Agent installation program opens on the rewall.
See the View Architecture Planning document for more information.
nIf you select the View Composer Agent custom setup option, verify that you have a license to use View
Composer.
Procedure
1 To start the View Agent installation program, double-click the installer le.
The installer lename is VMware-viewagent-y.y.y-xxxxxx.exe or VMware-viewagent-x86_64-y.y.y-
xxxxxx.exe, where y.y.y is the version number and xxxxxx is the build number.
2 Accept the VMware license terms.
3 If you install View Agent on a Windows Server machine on which the Remote Desktop Services (RDS)
role is not installed, select Install VMware Horizon View Agent in 'desktop mode'.
Selecting this option congures the Windows Server machine as a single-user View desktop rather than
as an RDS host. If you intend the machine to function as an RDS host, cancel the View Agent
installation, install the RDS role on the machine, and restart the View Agent installation.
4 Select the Internet Protocol (IP) version, IPv4 or IPv6.
You must install all View components with the same IP version.
5 Select whether to enable or disable FIPS mode.
This option is available only if FIPS mode is enabled in Windows.
Chapter 3 Creating and Preparing Virtual Machines
VMware, Inc. 27

6 Select your custom setup options.
To deploy linked-clone desktops, select the View Composer Agent option.
7 Accept or change the destination folder.
8 Follow the prompts in the View Agent installation program and nish the installation.
N If you did not enable Remote Desktop support during guest operating system preparation, the
View Agent installation program prompts you to enable it. If you do not enable Remote Desktop
support during View Agent installation, you must enable it manually after the installation is nished.
9 If you selected the USB redirection option, restart the virtual machine to enable USB support.
In addition, the Found New Hardware wizard might start. Follow the prompts in the wizard to
congure the hardware before you restart the virtual machine.
The VMware Horizon View Agent service is started on the virtual machine.
If you selected the View Composer Agent option, the VMware Horizon View Composer Guest Agent Server
service is started on the virtual machine.
What to do next
If the virtual machine has multiple NICs, congure the subnet that View Agent uses. See “Congure a
Virtual Machine with Multiple NICs for View Agent,” on page 37.
View Agent Custom Setup Options
When you install View Agent on a virtual machine, you can select or deselect custom setup options. In
addition, View Agent installs certain features automatically on all guest operating systems on which they
are supported. These features are not optional.
To learn which features are supported on which guest operating systems, see "Feature Support Matrix for
View Agent" in the View Architecture Planning document.
To change custom setup options after you install the latest View Agent version, you must uninstall and
reinstall View Agent. For patches and upgrades, you can run the new View Agent installer and select a new
set of options without uninstalling the previous version.
All custom setup options are selected by default except Serial Port Redirection, Scanner Redirection, USB
Redirection, and PCoIP Smartcard.
Table 3‑2. View Agent Custom Setup Options in an IPv4 Environment
Option Description
Serial Port Redirection Redirects serial COM ports that are connected to the client
system so that they can be used on the remote desktop.
This setup option is not selected by default. You must select
the option to install it.
Serial port redirection is supported on remote desktops
that are deployed on single-user machines.
Serial port redirection is available in Horizon 6 version
6.1.1 and later releases.
Scanner Redirection Redirects scanning and imaging devices that are connected
to the client system so that they can be used on the remote
desktop or application.
This setup option is not selected by default. You must select
the option to install it.
Scanner redirection is available in Horizon 6.0.2 and later
releases.
Setting Up Desktop and Application Pools in View
28 VMware, Inc.

Table 3‑2. View Agent Custom Setup Options in an IPv4 Environment (Continued)
Option Description
USB Redirection Gives users access to locally connected USB devices on
their desktops.
USB redirection is supported on remote desktops that are
deployed on single-user machines. In addition, redirection
of USB ash drives and hard disks is supported on RDS
desktops and applications.
This setup option is not selected by default. You must select
the option to install it.
For guidance on using USB redirection securely, see the
View Security guide. For example, you can use group policy
seings to disable USB redirection for specic users.
HTML Access Allows users to connect to View desktops by using
HTML Access. The HTML Access Agent must be installed
on View desktops to allow users to make connections with
HTML Access.
View Composer Agent Lets View Agent run on the linked-clone desktops that are
deployed from this virtual machine.
Real-Time Audio-Video Redirects webcam and audio devices that are connected to
the client system so that they can be used on the remote
desktop.
Client Drive Redirection Allows Horizon Client users to share local drives with their
remote desktops.
After this setup option is installed, no further conguration
is required on the remote desktop.
Client Drive Redirection is also supported on RDS
desktops and applications and on VDI desktops that run on
unmanaged machines.
Virtual Printing Lets users print to any printer available on their client
computers. Users do not have to install additional drivers
on their desktops.
In Horizon 6.0.1 and later, virtual printing is supported on
the following remote desktops and applications:
nDesktops that are deployed on single-user machines,
including Windows Desktop and Windows Server
machines
nDesktops that are deployed on RDS hosts, where the
RDS hosts are virtual machines
nHosted Apps
nHosted Apps that are launched from Horizon Client
inside remote desktops
In Horizon 6.0 and earlier, virtual printing is supported on
desktops that are deployed on single-user, Windows
Desktop machines.
The virtual printing feature is supported only when you
install it from View Agent. It is not supported if you install
it with VMware Tools.
vRealize Operations Desktop Agent Provides information that allows vRealize Operations for
View to monitor View desktops.
View Persona Management Synchronizes the user prole on the local desktop with a
remote prole repository, so that users have access to their
proles whenever they log in to a desktop.
Chapter 3 Creating and Preparing Virtual Machines
VMware, Inc. 29

Table 3‑2. View Agent Custom Setup Options in an IPv4 Environment (Continued)
Option Description
PCoIP Smartcard Lets users authenticate with smart cards when they use the
PCoIP display protocol. This option is not selected by
default.
PCoIP Smartcard is supported on remote desktops that are
deployed on single-user machines.
VMware Audio Provides a virtual audio driver on the remote desktop.
In an IPv6 environment, the only optional features are View Composer Agent and VMware Audio.
Table 3‑3. View Agent Features That Are Installed Automatically (Not Optional)
Feature Description
PCoIP Agent Lets users connect to the View desktop using the PCoIP
display protocol.
Installing the PCoIP Agent feature disables sleep mode on
Windows desktops. When a user navigates to the Power
Options or Shut Down menu, sleep mode or standby mode
is inactive. Desktops do not go into sleep or standby mode
after a default period of inactivity. Desktops remain in
active mode.
Windows Media Multimedia Redirection (MMR) Extends multimedia redirection to Windows 7 and later
desktops and clients. This feature delivers a multimedia
stream directly to the client computer, allowing the
multimedia stream to be processed on the client hardware
instead of the remote ESXi host.
Unity Touch Allows tablet and smart phone users to interact easily with
Windows applications that run on the remote desktop.
Users can browse, search, and open Windows applications
and les, choose favorite applications and les, and switch
between running applications, all without using the Start
menu or Taskbar.
Virtual video driver Provides a virtual video driver on the remote desktop.
In an IPv6 environment, the only automatically installed feature is PCoIP Agent.
Install View Agent Silently
You can use the silent installation feature of the Microsoft Windows Installer (MSI) to install View Agent on
several Windows virtual machines or physical computers. In a silent installation, you use the command line
and do not have to respond to wizard prompts.
With silent installation, you can eciently deploy View components in a large enterprise.
If you do not want to install all features that are installed automatically or by default, you can use the
ADDLOCAL MSI property to selectively install individual setup options and features. For details about the
ADDLOCAL property, see Table 3-5.
Prerequisites
nPrepare the guest operating system for desktop deployment. See “Prepare a Guest Operating System
for Remote Desktop Deployment,” on page 22.
nTo use Windows Server as a single-session remote desktop (rather than as an RDS host), perform the
steps described in “Prepare Windows Server Operating Systems for Desktop Use,” on page 24.
Setting Up Desktop and Application Pools in View
30 VMware, Inc.
nIf the machine has the Microsoft Visual C++ Redistributable package installed, verify that the version of
the package is 2005 SP1 or later. If the package version is 2005 or earlier, you can either upgrade or
uninstall the package.
nDownload the View Agent installer le from the VMware product page at
hp://www.vmware.com/go/downloadview.
The installer lename is VMware-viewagent-y.y.y-xxxxxx.exe or VMware-viewagent-x86_64-y.y.y-
xxxxxx.exe, where y.y.y is the version number and xxxxxx is the build number.
nVerify that you have administrative rights on the virtual machine or physical PC.
nFamiliarize yourself with the View Agent custom setup options. See “View Agent Custom Setup
Options,” on page 28.
nIf you select the View Composer Agent custom setup option, verify that you have a license to use View
Composer.
nFamiliarize yourself with the MSI installer command-line options. See “Microsoft Windows Installer
Command-Line Options,” on page 32.
nFamiliarize yourself with the silent installation properties available with View Agent. See “Silent
Installation Properties for View Agent,” on page 34.
nFamiliarize yourself with the TCP ports that the View Agent installation program opens on the rewall.
See the View Architecture Planning document for more information.
nVerify that the latest Windows Update patches are installed on the guest operating systems on which
you plan to install View Agent silently. In certain cases, an interactive installation by an administrator
might be required to execute pending Windows Update patches. Verify that all OS operations and
subsequent reboots are completed.
Procedure
1 Open a Windows command prompt on the virtual machine or physical PC.
2 Type the installation command on one line.
This example installs View Agent in a virtual machine that is managed by vCenter Server. The installer
congures the View Composer Agent, Virtual Printing, USB redirection, HTML Access, and Real-Time
Audio-Video custom setup options and the non-optional features that are installed automatically.
VMware-viewagent-y.y.y-xxxxxx.exe /s /v"/qn VDM_VC_MANAGED_AGENT=1
ADDLOCAL=Core,SVIAgent,ThinPrint,USB,HtmlAccess,RTAV"
This example installs View Agent on an unmanaged computer and registers the desktop with the
specied View Connection Server, cs1.companydomain.com. The installer congures the Virtual Printing
and USB redirection custom setup options and the non-optional features that are installed
automatically.
VMware-viewagent-y.y.y-xxxxxx.exe /s /v"/qn VDM_VC_MANAGED_AGENT=0
VDM_SERVER_NAME=cs1.companydomain.com VDM_SERVER_USERNAME=admin.companydomain.com
VDM_SERVER_PASSWORD=secret ADDLOCAL=Core,ThinPrint,USB"
If you install View Agent on a Windows Server machine, and you intend to congure the machine as a
single-user View desktop rather than as an RDS host, you must include the VDM_FORCE_DESKTOP_AGENT=1
property in the installation command. This requirement applies to machines that are managed by
vCenter Server and unmanaged machines.
The VMware View Agent service is started on the virtual machine.
If you selected the View Composer Agent option, the VMware View Composer Guest Agent Server service
is started on the virtual machine.
Chapter 3 Creating and Preparing Virtual Machines
VMware, Inc. 31

What to do next
If the virtual machine has multiple NICs, congure the subnet that View Agent uses. See “Congure a
Virtual Machine with Multiple NICs for View Agent,” on page 37.
Microsoft Windows Installer Command-Line Options
To install View components silently, you must use Microsoft Windows Installer (MSI) command-line options
and properties. The View component installers are MSI programs and use standard MSI features.
For details about MSI, see the Microsoft Web site. For MSI command-line options, see the Microsoft
Developer Network (MSDN) Library Web site and search for MSI command-line options. To see MSI
command-line usage, you can open a command prompt on the View component computer and type
msiexec /?.
To run a View component installer silently, you begin by silencing the bootstrap program that extracts the
installer into a temporary directory and starts an interactive installation.
At the command line, you must enter command-line options that control the installer's bootstrap program.
Table 3‑4. Command-Line Options for a View Component's Bootstrap Program
Option Description
/s Disables the bootstrap splash screen and extraction dialog, which prevents the display of
interactive dialogs.
For example: VMware-viewconnectionserver-y.y.y-xxxxxx.exe /s
The /s option is required to run a silent installation.
/v"
MSI_command_line_options"
Instructs the installer to pass the double-quote-enclosed string that you enter at the command
line as a set of options for MSI to interpret. You must enclose your command-line entries
between double quotes. Place a double quote after the /v and at the end of the command line.
For example: VMware-viewagent-y.y.y-xxxxxx.exe /s /v"command_line_options"
To instruct the MSI installer to interpret a string that contains spaces, enclose the string in two
sets of double quotes. For example, you might want to install the View component in an
installation path name that contains spaces.
For example: VMware-viewconnectionserver-y.y.y-
xxxxxx.exe /s /v"command_line_options INSTALLDIR=""d:\abc\my folder"""
In this example, the MSI installer passes on the installation-directory path and does not
aempt to interpret the string as two command-line options. Note the nal double quote that
encloses the entire command line.
The /v"command_line_options" option is required to run a silent installation.
You control the remainder of a silent installation by passing command-line options and MSI property values
to the MSI installer, msiexec.exe. The MSI installer includes the View component's installation code. The
installer uses the values and options that you enter in the command line to interpret installation choices and
setup options that are specic to the View component.
Setting Up Desktop and Application Pools in View
32 VMware, Inc.

Table 3‑5. MSI Command-Line Options and MSI Properties
MSI Option or Property Description
/qn Instructs the MSI installer not to display the installer wizard pages.
For example, you might want to install View Agent silently and use only default setup
options and features:
VMware-viewagent-y.y.y-xxxxxx.exe /s /v"/qn"
Alternatively, you can use the /qb option to display the wizard pages in a
noninteractive, automated installation. As the installation proceeds, the wizard pages
are displayed, but you cannot respond to them.
The /qn or /qb option is required to run a silent installation.
INSTALLDIR Species an alternative installation path for the View component.
Use the format INSTALLDIR=path to specify an installation path. You can ignore this
MSI property if you want to install the View component in the default path.
This MSI property is optional.
ADDLOCAL Determines the component-specic options to install.
In an interactive installation, the View installer displays custom setup options that you
can select or deselect. In a silent installation, you can use the ADDLOCAL property to
selectively install individual setup options by specifying the options on the command
line. Options that you do not explicitly specify are not installed.
In both interactive and silent installations, the View installer automatically installs
certain features. You cannot use ADDLOCAL to control whether or not to install these non-
optional features.
Type ADDLOCAL=ALL to install all custom setup options that can be installed during an
interactive installation, including those that are installed by default and those that you
must select to install, as well as all non-optional features that are installed automatically
(on supported guest operating systems).
The following example installs Core, PCoIP, UnityTouch, VmVideo, PSG, and all
features that are supported on the guest operating system: VMware-viewagent-y.y.y-
xxxxxx.exe /s /v"/qn ADDLOCAL=ALL"
If you do not use the ADDLOCAL property, the custom setup options that are installed by
default and the automatically installed features are installed. Custom setup options that
are o (unselected) by default are not installed.
The following example installs Core, PCoIP, UnityTouch, VmVideo, PSG, and the on-by-
default custom setup options that are supported on the guest operating system:
VMware-viewagent-y.y.y-xxxxxx.exe /s /v"/qn"
To specify individual setup options, type a comma-separated list of setup option names.
Do not use spaces between names. Use the format ADDLOCAL=value,value,value....
You must include Core when you use the ADDLOCAL=value,value,value... property.
The following example installs View Agent in a guest operating system with the Core,
PCoIP, UnityTouch, VMVideo, PSG, View Composer Agent, and Virtual Printing
features (if View Composer Agent and Virtual Printing are supported on the guest
operating system):
VMware-viewagent-y.y.y-xxxxxx.exe /s /v"/qn
ADDLOCAL=Core,SVIAgent,ThinPrint"
The preceding example does not install other options, even those that are installed by
default interactively.
The ADDLOCAL MSI property is optional.
Chapter 3 Creating and Preparing Virtual Machines
VMware, Inc. 33

Table 3‑5. MSI Command-Line Options and MSI Properties (Continued)
MSI Option or Property Description
REBOOT You can use the REBOOT=ReallySuppress option to allow system conguration tasks to
complete before the system reboots.
This MSI property is optional.
/l*v log_file Writes logging information into the specied log le with verbose output.
For example: /l*v ""%TEMP%\vmmsi.log""
This example generates a detailed log le that is similar to the log generated during an
interactive installation.
You can use this option to record custom features that might apply uniquely to your
installation. You can use the recorded information to specify installation features in
future silent installations.
The /l*v option is optional.
Silent Installation Properties for View Agent
You can include specic properties when you silently install View Agent from the command line. You must
use a PROPERTY=value format so that Microsoft Windows Installer (MSI) can interpret the properties and
values.
Table 3-6 shows the View Agent silent installation properties that you can use at the command-line.
Table 3‑6. MSI Properties for Silently Installing View Agent
MSI Property Description Default Value
INSTALLDIR The path and folder in which the View Agent software is installed.
For example: INSTALLDIR=""D:\abc\my folder""
The sets of two double quotes that enclose the path permit the MSI
installer to ignore the space in the path.
This MSI property is optional.
%ProgramFiles
%\VMware\VMware
View\Agent
RDP_CHOICE Determines whether to enable Remote Desktop Protocol (RDP) on
the desktop.
A value of 1 enables RDP. A value of 0 leaves the RDP seing
disabled.
This MSI property is optional.
1
UNITY_DEFAULT_APPS Species a default list of default favorite applications that are
displayed in the Unity Touch sidebar on a mobile device. This
property was created to support the Unity Touch component. It is
not a general MSI property.
For information about conguring a default list of favorite
applications and about the syntax and format to use with this
property, see “Congure Favorite Applications Displayed by Unity
Touch,” on page 154.
This MSI property is optional.
VDM_VC_MANAGED_AGENT Determines whether vCenter Server manages the virtual machine
on which View Agent is installed.
A value of 1 congures the desktop as a vCenter Server-managed
virtual machine.
A value of 0 congures the desktop as unmanaged by vCenter
Server.
This MSI property is required.
None
Setting Up Desktop and Application Pools in View
34 VMware, Inc.

Table 3‑6. MSI Properties for Silently Installing View Agent (Continued)
MSI Property Description Default Value
VDM_SERVER_NAME The host name or IP address of the View Connection Server
computer on which the View Agent installer registers an
unmanaged desktop. This property applies to unmanaged
desktops only.
For example: VDM_SERVER_NAME=10.123.01.01
This MSI property is required for unmanaged desktops.
Do not use this MSI property for virtual-machine desktops that are
managed by vCenter Server.
None
VDM_SERVER_USERNAME The user name of the administrator on the View Connection Server
computer. This MSI property applies to unmanaged desktops only.
For example: VDM_SERVER_USERNAME=domain\username
This MSI property is required for unmanaged desktops.
Do not use this MSI property for virtual-machine desktops that are
managed by vCenter Server.
None
VDM_SERVER_PASSWORD The View Connection Server administrator user password.
For example: VDM_SERVER_PASSWORD=secret
This MSI property is required for unmanaged desktops.
Do not use this MSI property for virtual-machine desktops that are
managed by vCenter Server.
None
VDM_IP_PROTOCOL_USAGE Species the IP version that View Agent uses. The possible values
are IPv4 and IPv6.
IPv4
VDM_FIPS_ENABLED Species whether to enable or disable FIPS mode. A value of 1
enables FIPS mode. A value of 0 disables FIPS mode. If this
property is set to 1 and Windows is not in FIPS mode, the installer
will abort.
0
In a silent installation command, you can use the MSI property, ADDLOCAL=, to specify options that the View
Agent installer congures.
Table 3-7 shows the View Agent options you can type at the command line. These options have
corresponding setup options that you can deselect or select during an interactive installation. For details
about the custom setup options, see “View Agent Custom Setup Options,” on page 28.
When you do not use the ADDLOCAL property at the command line, View Agent installs all options that are
installed by default during an interactive installation, if they are supported on the guest operating system.
When you use ADDLOCAL=ALL, View Agent installs all of the following options, both on-by-default and o-
by-default, if they are supported on the guest operating system. For details, see the ADDLOCAL table entry in
“Microsoft Windows Installer Command-Line Options,” on page 32.
Table 3‑7. View Agent Silent Installation Options and Interactive Custom Setup Options (Optional)
Silent Installation
Option
Custom Setup Option in an Interactive
Installation
Installed by Default Interactively or When
ADDLOCAL Is Not Used
USB USB Redirection No
HtmlAccess HTML Access Agent Yes
SVIAgent View Composer Agent Yes
RTAV Real-Time Audio-Video Yes
ClientDriveRedirection Client Drive Redirection Yes
SerialPortRedirection Serial Port Redirection No
ScannerRedirection Scanner Redirection No
ThinPrint Virtual Printing Yes
Chapter 3 Creating and Preparing Virtual Machines
VMware, Inc. 35

Table 3‑7. View Agent Silent Installation Options and Interactive Custom Setup Options (Optional)
(Continued)
Silent Installation
Option
Custom Setup Option in an Interactive
Installation
Installed by Default Interactively or When
ADDLOCAL Is Not Used
V4V vRealize Operations Desktop Agent Yes
VPA View Persona Management Yes
SmartCard PCoIP Smartcard. This feature is not installed
by default in an interactive installation.
No
VmwVaudio VMware Audio (virtual audio driver) Yes
TSMMR Windows Media Multimedia Redirection
(MMR)
Yes
RDP This feature enables RDP in the registry if
you use the RDP_CHOICE=1 property on the
command line or select RDP as the default
display protocol when you create or edit a
desktop pool in View Administrator.
This feature is hidden during interactive
installations.
Yes
Table 3-8 shows the View Agent features that are installed automatically. The features are installed on all
guest operating systems on which they are supported. These features are not optional. You cannot control
whether or not to install them by using the ADDLOCAL= property.
Table 3‑8. View Agent Silent Installation Features That Are Installed Automatically (Not Optional)
Silent Installation Feature Description
Core The core View Agent functions.
If you specify ADDLOCAL=ALL, the Core features are installed.
PCoIP PCoIP Protocol Agent
VmVideo Virtual video driver
UnityTouch Unity Touch
PSG This features sets a registry entry that tells View Connection Server whether
View Agent is using IPv4 or IPv6.
You install the Flash URL Redirection feature by typing the command-line argument, FlashURLRedirection,
in a silent installation. This feature is not installed during an interactive installation or by using
ADDLOCAL=ALL in a silent installation.
For example: VMware-viewagent-y.y.y-xxxxxx.exe /s /v"/qn VDM_VC_MANAGED_AGENT=1
ADDLOCAL=Core,SVIAgent,ThinPrint,USB,HtmlAccess,FlashURLRedirection,RTAV"
Setting Up Desktop and Application Pools in View
36 VMware, Inc.

Configure a Virtual Machine with Multiple NICs for View Agent
When you install View Agent on a virtual machine that has more than one NIC, you must congure the
subnet that View Agent uses. The subnet determines which network address View Agent provides to the
View Connection Server instance for client protocol connections.
Procedure
uOn the virtual machine on which View Agent is installed, open a command prompt, type regedit.exe,
and create a registry entry to congure the subnet.
For example, in an IPv4 network:
HKLM\Software\VMware, Inc.\VMware VDM\IpPrefix = n.n.n.n/m (REG_SZ)
In this example, n.n.n.n is the TCP/IP subnet and m is the number of bits in the subnet mask.
N In releases earlier than Horizon 6 version 6.1, this registry path was
HKLM\Software\VMware, Inc.\VMware VDM\Node Manager\subnet = n.n.n.n/m (REG_SZ). The old
registry seing is not used with View Agent 6.1 or later. If you upgrade View Agent from an earlier
release to version 6.1 or later, make sure to use the current registry seing.
Optimize Guest Operating System Performance
You can perform certain steps to optimize guest operating system performance for remote desktop
deployment. All of the steps are optional.
These recommendations include turning o the screen saver and not specifying a sleep timer. Your
organization might require the use of screen savers. For example, you might have a GPO-managed security
policy that locks a desktop a certain time after the screen saver starts. In this case, use a blank screen saver.
Prerequisites
nPrepare a guest operating system for remote desktop deployment.
nFamiliarize yourself with the procedure for disabling the Windows Customer Experience Improvement
Program. See “Disable the Windows Customer Experience Improvement Program,” on page 38.
Procedure
nDisable any unused ports, such as COM1, COM2, and LPT.
nAdjust display properties.
a Choose a basic theme.
b Set the background to a solid color.
c Set the screen saver to None.
d Verify that hardware acceleration is enabled.
nSelect a high-performance power option and do not specify a sleep timer.
nDisable the Indexing Service component.
N Indexing improves searches by cataloging les. Do not disable this feature for users who search
often.
nRemove or minimize System Restore points.
nTurn o system protection on C:\.
nDisable any unnecessary services.
Chapter 3 Creating and Preparing Virtual Machines
VMware, Inc. 37
nSet the sound scheme to No Sounds.
nSet visual eects to Adjust for best performance.
nOpen Windows Media Player and use the default seings.
nTurn o automatic computer maintenance.
nAdjust performance seings for best performance.
nDelete any hidden uninstall folders in C:\Windows, such $NtUninstallKB893756$.
nDelete all event logs.
nRun Disk Cleanup to remove temporary les, empty the Recycle Bin, and remove system les and other
items that are no longer needed.
nRun Disk Defragmenter to rearrange fragmented data.
nUninstall Tablet PC Components, unless this feature is needed.
nDisable IPv6, unless it is needed.
nUse the File System Utility (fsutil) command to disable the seing that keeps track of the last time a
le was accessed.
For example: fsutil behavior set disablelastaccess 1
nStart the Registry Editor (regedit.exe) and change the TimeOutValue REG_DWORD in
HKEY_LOCAL_MACHINE\SYSTEM\CurrentControlSet\services\Disk to 0x000000be(190).
nTurn o the Windows Customer Experience Improvement Program and disable related tasks from the
Task Scheduler.
What to do next
Shut down the guest operating system, power o the virtual machine, and power on the virtual machine.
See “Optimizing Windows for Linked-Clone Virtual Machines,” on page 39 for information on disabling
certain Windows services and tasks to reduce the growth of View Composer linked-clone virtual machines.
Disabling certain services and tasks can also result in performance benets for full virtual machines.
Disable the Windows Customer Experience Improvement Program
Disabling the Windows Customer Experience Improvement Program and the related Task Scheduler tasks
that control this program can improve Windows 7, Windows 8/8.1, and Windows 10 system performance in
large desktop pools.
The following steps apply to Windows 7 and Windows 8. The steps might vary on dierent Windows
operating systems.
Procedure
1 In the Windows 7 or Windows 8 guest operating system, start the control panel and click Action Center
> Change Action Center .
2 Click Customer Experience Improvement Program .
3 Select No, I don't want to participate in the program and click Save changes.
4 Start the control panel and click Administrative Tools > Task Scheduler.
5 In the Task Scheduler (Local) pane of the Task Scheduler dialog box, expand the Task Scheduler
Library > Microsoft > Windows nodes and open the Application Experience folder.
6 Disable the AITAgent, ProgramDataUpdater, and if available, Microsoft Compatibility Appraiser
tasks.
Setting Up Desktop and Application Pools in View
38 VMware, Inc.
7 In the Task Scheduler Library > Microsoft > Windows node, open the Customer Experience
Improvement Program folder.
8 Disable the Consolidator, KernelCEIPTask, and UsbCEIP tasks.
9 In the Task Scheduler Library > Microsoft > Windows node, open the Autochk folder.
10 Disable the Proxy task.
What to do next
Perform other Windows optimization tasks. See “Optimize Guest Operating System Performance,” on
page 37.
Optimizing Windows for Linked-Clone Virtual Machines
By disabling certain Windows 7, Windows 8/8.1, and Windows 10 services and tasks, you can reduce the
growth of View Composer linked-clone virtual machines. Disabling certain services and tasks can also result
in performance benets for full virtual machines.
Benefits of Disabling Windows Services and Tasks
Windows 7, Windows 8/8.1, and Windows 10 schedule services and tasks that can cause View Composer
linked clones to grow, even when the linked-clone machines are idle. The incremental growth of linked-
clone OS disks can undo the storage savings that you achieve when you rst create the linked-clone
machines. You can reduce linked-clone growth by disabling these Windows services.
Windows guest operating systems schedule services such as disk defragmentation to run by default. These
services run in the background if you do not disable them.
Services that aect OS disk growth also generate input/output operations per second (IOPS) on the
Windows virtual machines. Disabling these services can reduce IOPS and improve performance on full
virtual machines and linked clones.
These best practices for optimizing Windows apply to most user environments. However, you must evaluate
the eect of disabling each service on your users, applications, and desktops. You might require certain
services to stay active.
For example, disabling Windows Update Service makes sense if you refresh and recompose the linked
clones. A refresh operation restores the OS disks to their last snapshots, deleting all automatic Windows
updates since the last snapshots were taken. A recompose operation recreates the OS disks from a new
snapshot that can contain the current Windows updates, making automatic Windows updates redundant.
If you do not use refresh and recompose regularly, you might decide to keep Windows Update Service
active.
Overview of Windows Services and Tasks That Cause Linked-Clone Growth
Certain services and tasks in Windows 7, Windows 8/8.1, and Windows 10 can cause linked-clone OS disks
to grow incrementally every few hours, even when the linked-clone machines are idle. If you disable these
services and tasks, you can control the OS disk growth.
Services that aect OS disk growth also generate IOPS on Windows virtual machines. You can evaluate the
benets of disabling these services on full virtual machines as well as linked clones.
Before you disable the Windows services that are shown in Table 3-9, verify that you took the optimization
steps in “Optimize Guest Operating System Performance,” on page 37.
Chapter 3 Creating and Preparing Virtual Machines
VMware, Inc. 39

Table 3‑9. Impact of Windows Services and Tasks on OS Disk Growth and IOPS When OS Is Left Idle
Service or Task Description
Default
Occurrence or
Startup
Impact on
Linked-Clone OS
Disks Impact on IOPS
Turn Off This
Service or Task?
Windows
Hibernation
Provides a power-
saving state by
storing open
documents and
programs in a le
before the
computer is
powered o. The
le is reloaded into
memory when the
computer is
restarted, restoring
the state when the
hibernation was
invoked.
Default power-
plan seings
disable
hibernation.
High.
By default, the size
of the hibernation
le,
hiberfil.sys, is
the same as the
installed RAM on
the virtual
machine. This
feature aects all
guest operating
systems.
High.
When hibernation
is triggered, the
system writes a
hiberfil.sys le
the size of the
installed RAM.
Yes
Hibernation
provides no benet
in a virtual
environment.
For instructions, see
“Disable Windows
Hibernation in the
Parent Virtual
Machine,” on
page 48..
Windows
Scheduled Disk
Defragmentation
Disk
defragmentation is
scheduled as a
background
process.
Once a week High.
Repeated
defragmentation
operations can
increase the size of
linked-clone OS
disks by several
GB and do lile to
make disk access
more ecient on
linked clones.
High Yes
Windows Update
Service
Detects,
downloads, and
installs updates for
Windows and
other programs.
Automatic startup Medium to high.
Causes frequent
writes to the
linked-clones' OS
disks because
update checks
occur often. The
impact depends on
the updates that
are downloaded.
Medium to high Yes, if you use View
Composer
recompose to install
Windows updates
and refresh to
return OS disks to
their original
snapshots.
Windows
Diagnostic Policy
Service
Detects,
troubleshoots, and
resolves problems
in Windows
components. If
you stop this
service,
diagnostics no
longer function.
Automatic startup Medium to high.
The service is
triggered on
demand. The write
frequency varies,
depending on
demand.
Small to medium Yes, if you do not
need the diagnostic
tools to function on
the desktops.
Prefetch/Superfetch Stores specic
information about
applications that
you run to help
them start faster.
Always on, unless
it is disabled.
Medium
Causes periodic
updates to its
layout and
database
information and
individual
prefetch les,
which are
generated on
demand.
Medium Yes, if application
startup times are
acceptable after you
disable this feature.
Setting Up Desktop and Application Pools in View
40 VMware, Inc.

Table 3‑9. Impact of Windows Services and Tasks on OS Disk Growth and IOPS When OS Is Left Idle (Continued)
Service or Task Description
Default
Occurrence or
Startup
Impact on
Linked-Clone OS
Disks Impact on IOPS
Turn Off This
Service or Task?
Windows Registry
Backup
(RegIdleBackup)
Automatically
backs up the
Windows registry
when the system is
idle.
Every 10 days at
12:00 am
Medium.
Each time this task
runs, it generates
registry backup
les.
Medium. Yes.
There is no need for
Windows Registry
Backup. To restore
registry data, you
can use the View
Composer refresh
operation.
System Restore Reverts the
Windows system
to a previous,
healthy state.
When Windows
starts up and once
a day thereafter.
Small to medium.
Captures a system
restore point
whenever the
system detects that
it is needed. When
the linked clone is
idle, this overhead
is small.
No major impact. Yes
Although its impact
is small, this task is
redundant if you
use View Composer
refresh to return OS
disks to their
original snapshots.
Windows Defender Provides anti-
spyware features.
When Windows
starts up. Performs
a quick scan once a
day. Checks for
updates before
each scan.
Medium to high.
Performs
denition updates,
scheduled scans,
and scans that are
started on
demand.
Medium to high. Yes, if other anti-
spyware software is
installed.
Microsoft Feeds
Synchronization
task
(msfeedssync.exe)
Periodically
updates RSS feeds
in Windows
Internet Explorer
Web browsers.
This task updates
RSS feeds that
have automatic
RSS feeds
synchronization
turned on. The
process appears in
Windows Task
Manager only
when Internet
Explorer is
running.
Once a day. Medium.
Aects OS-disk
growth if
persistent disks
are not congured.
If persistent disks
are congured, the
impact is diverted
to the persistent
disks.
Medium Yes, if your users do
not require
automatic RSS feed
updates on their
desktops.
Disable Scheduled Disk Defragmentation on Windows Parent Virtual Machines
Before you create linked clones, you must disable scheduled defragmentations on Windows 7, Windows
8/8.1, and Windows 10 parent virtual machines. Windows guest operating systems schedule weekly disk
defragmentations by default. Repeated defragmentation operations signicantly increase the size of linked-
clone OS disks and do not make disk access more ecient on linked clones.
When you create a linked-clone pool from the parent virtual machine, the linked clones share the replica's
disk. Subsequent defragmentation operations do not aect the replica's disk, which is read-only. Instead,
defragmentations expand each clone's OS disk.
As a best practice, defragment the parent virtual machine one time, before you take a snapshot and create
the pool. The linked clones benet from the defragmentation because they share the replica's optimized,
read-only disk.
Chapter 3 Creating and Preparing Virtual Machines
VMware, Inc. 41
The following steps apply to Windows 7 and Windows 8. The steps might vary on dierent Windows
operating systems.
Prerequisites
nVerify that the applications that you intend to deploy to the linked clones are installed on the virtual
machine.
nVerify that View Agent with View Composer Agent is installed on the virtual machine.
Procedure
1 In vSphere Client, select the parent virtual machine and select Open Console.
2 Log in to the Windows guest operating system as an administrator.
3 Click Start and type defrag in the Search programs and box.
4 In the Programs pane, click Disk Defragmenter.
5 In the Disk Defragmenter dialog box, click Defragment disk.
The Disk Defragmenter consolidates defragmented les on the virtual machine's hard disk.
6 In the Disk Defragmenter dialog box, click schedule.
7 Deselect Run on a schedule (recommended) and click OK.
Defragmentation operations will not take place on linked-clone virtual machines that are created from this
parent virtual machine.
Disable the Windows Update Service on Windows Virtual Machines
Disabling the Windows Update Service can reduce the number of les that are created and writes that occur
when updates are downloaded and installed. This action can reduce linked-clone growth and reduce IOPS
in linked clones and full virtual machines.
Disable Windows Update Service if you refresh and recompose the linked-clone desktops. A refresh
operation restores the OS disks to their original snapshots, deleting the automatic Windows updates. A
recompose operation recreates the OS disks from a new snapshot that can contain Windows updates,
making automatic Windows updates redundant.
Do not disable the Windows Update Service if you do not use recompose to install Windows updates in the
linked clones.
The following steps apply to Windows 7 and Windows 8. The steps might vary on dierent Windows
operating systems.
Prerequisites
Verify that the most recent Windows updates are downloaded and installed on the virtual machine.
Procedure
1 In vSphere Client, select the parent virtual machine and select Open Console.
2 Log in to the Windows guest operating system as an administrator.
3 Click Start > Control Panel > System and Security > Turn automatic updating on or .
4 In the Important updates menu, select Never check for updates.
5 Deselect Give me recommended updates the same way I receive important updates.
6 Deselect Allow all users to install updates on this computer and click OK.
Setting Up Desktop and Application Pools in View
42 VMware, Inc.
Disable the Diagnostic Policy Service on Windows Virtual Machines
Disabling the Windows Diagnostic Policy Service can minimize the number of system writes and reduce the
growth of linked-clone machines.
Do no disable the Windows Diagnostic Policy Service if your users require the diagnostic tools on their
desktops.
The following steps apply to Windows 7 and Windows 8. The steps might vary on dierent Windows
operating systems.
Procedure
1 In vSphere Client, select the parent virtual machine and select Open Console.
2 Log in to the Windows guest operating system as an administrator.
3 Click Start > Control Panel > System and Security > Administrative Tools.
4 Select Services and click Open.
5 Double-click Diagnostic Policy Service.
6 In the Diagnostic Policy Service Properties (Local Computer) dialog, click Stop.
7 In the Startup type menu, select Disabled.
8 Click OK.
Disable the Prefetch and Superfetch Features on Windows Virtual Machines
By disabling the Windows prefetch and superfetch features, you can avoid generating prefetch les and the
overhead associated with prefetch and superfetch operations. This action can reduce the growth of linked-
clone machines and minimize IOPS on full virtual machines and linked clones.
To disable the prefetch and superfetch features, you must edit a Windows registry key and disable the
Prefetch service on the virtual machine.
The following steps apply to Windows 7 and Windows 8. The steps might vary on dierent Windows
operating systems.
Prerequisites
See the Microsoft TechNet Web site for information on how to use the Windows Registry Editor.
Procedure
1 Start the Windows Registry Editor on the local Windows virtual machine.
2 Navigate to the registry key called PrefetchParameters.
The registry key is located in the following path:
HKEY_LOCAL_MACHINE\SYSTEM\CurrentControlSet\Control\Session Manager\Memory
Management\PrefetchParameters.
3 Set the EnablePrefetcher and EnableSuperfetch values to 0.
4 Click Start > Control Panel > System and Security > Administrative Tools.
5 Select Services and click Open.
6 Double-click the Superfetch service.
7 In the Superfetch Properties (Local Computer) dialog, click Stop.
8 In the Startup type menu, select Disabled.
Chapter 3 Creating and Preparing Virtual Machines
VMware, Inc. 43
9 Click OK.
Disable Windows Registry Backup on Windows Virtual Machines
Disabling the Windows registry backup feature, RegIdleBackup, can minimize the number of system writes
and reduce the growth of linked-clone machines.
The following steps apply to Windows 7 and Windows 8. The steps might vary on dierent Windows
operating systems.
Procedure
1 In vSphere Client, select the parent virtual machine and select Open Console.
2 Log in to the Windows guest operating system as an administrator.
3 Click Start > Control Panel > System and Security > Administrative Tools.
4 Select Task Scheduler and click Open.
5 In the left pane, expand Task Scheduler Library, Microsoft, Windows.
6 Double-click Registry and select RegIdleBackup.
7 In the Actions pane, click Disable.
Disable the System Restore on Windows Virtual Machines
You do not need to use the Windows System Restore feature if you use View Composer refresh to restore
linked-clone OS disks to their original snapshots.
When the operating system is idle, System Restore does not have a visible impact on OS-disk growth.
However, when the operating system is in use, System Restore generates restore points based on system use,
which can have a signicant impact on OS-disk growth.
The function of Windows System Restore is the same as View Composer refresh.
As a best practice, you can disable Windows System Restore and avoid unnecessary growth in your linked
clones.
If you do not use refresh, evaluate whether it is best to leave System Restore active in your View
environment.
The following steps apply to Windows 7 and Windows 8. The steps might vary on dierent Windows
operating systems.
Procedure
1 In vSphere Client, select the parent virtual machine and select Open Console.
2 Log in to the Windows guest operating system as an administrator.
3 Click Start > Control Panel > System and Security > Administrative Tools.
4 Select Task Scheduler and click Open.
5 In the left pane, expand Task Scheduler Library, Microsoft, Windows.
6 Double-click SystemRestore and select SR.
7 In the Actions pane, click Disable.
Setting Up Desktop and Application Pools in View
44 VMware, Inc.
Disable Windows Defender on Windows Virtual Machines
Microsoft Windows Defender can contribute to linked-clone OS disk growth and increase IOPS in linked
clones and full virtual machines. Disable Windows Defender if you install other anti-spyware software on
the virtual machine.
If Windows Defender is the only anti-spyware installed on the virtual machine, you might prefer to keep
Windows Defender active on the desktops in your environment.
The following steps apply to Windows 7 and Windows 8. The steps might vary on dierent Windows
operating systems.
Procedure
1 In vSphere Client, select the parent virtual machine and select Open Console.
2 Log in to the Windows guest operating system as an administrator.
3 Click Start and type Windows Defender in the Search programs and les box.
4 Click Tools > Options > Administrator.
5 Deselect Use this program and click Save.
Disable Microsoft Feeds Synchronization on Windows Virtual Machines
Windows Internet Explorer uses the Microsoft Feeds Synchronization task to update RSS feeds in users' Web
browsers. This task can contribute to linked-clone growth. Disable this task if your users do not require
automatic RSS feed updates in their browsers.
Microsoft Feeds Synchronization can cause OS-disk growth if persistent disks are not congured. If
persistent disks are congured, the impact is diverted to the persistent disks. In this situation, you should
still disable Microsoft Feeds Synchronization to control persistent-disk growth.
The following steps apply to Windows 7 and Windows 8. The steps might vary on dierent Windows
operating systems.
Procedure
1 In vSphere Client, select the parent virtual machine and select Open Console.
2 Log in to the Windows guest operating system as an administrator.
3 Click Start > Control Panel > Network and Internet > Internet Options.
4 Click the Content tab.
5 Under Feeds and Web Slices, click .
6 Deselect Automatically check feeds and Web Slices for updates and click OK.
7 In the Internet Properties dialog, click OK.
Preparing Virtual Machines for View Composer
To deploy a linked-clone desktop pool, you must prepare a parent virtual machine that meets the
requirements of the View Composer service.
nPrepare a Parent Virtual Machine on page 46
The View Composer service requires a parent virtual machine from which you generate a base image
for creating and managing a linked-clone desktop pool.
Chapter 3 Creating and Preparing Virtual Machines
VMware, Inc. 45

nActivating Windows on Linked-Clone Virtual Machines on page 48
To make sure that View Composer properly activates Windows 7, Windows 8/8.1, Windows 10, and
Windows Server operating systems on linked-clone machines, you must use Microsoft volume
activation on the parent virtual machine. The volume-activation technology requires a volume license
key.
nDisable Windows Hibernation in the Parent Virtual Machine on page 48
The Windows hibernation option creates a large system le that can increase the size of the linked-
clone OS disks that are created from the parent virtual machine. Disabling the hibernation option
reduces the size of linked-clones.
nCongure a Parent Virtual Machine to Use Local Storage on page 49
When you prepare a parent virtual machine for View Composer, you can congure the parent virtual
machine and linked clones to store virtual-machine swap les on the local datastore. This optional
strategy lets you take advantage of local storage.
nKeep a Record of the Parent Virtual Machine's Paging-File Size on page 50
When you create a linked-clone pool, you can redirect the linked clones' guest OS paging and temp
les to a separate disk. You must congure this disk to be larger than the paging le in the guest OS.
nIncrease the Timeout Limit of QuickPrep Customization Scripts on page 50
View Composer terminates a QuickPrep post-synchronization or power-o script that takes longer
than 20 seconds. You can increase the timeout limit for these scripts by changing the
ExecScriptTimeout Windows registry value on the parent virtual machine.
Prepare a Parent Virtual Machine
The View Composer service requires a parent virtual machine from which you generate a base image for
creating and managing a linked-clone desktop pool.
Prerequisites
nVerify that you prepared a virtual machine to use for deploying remote desktops. See “Creating Virtual
Machines for Remote Desktop Deployment,” on page 19.
A parent virtual machine that you use for View Composer must either belong to the same Active
Directory domain as the domain that the linked-clone machines will join or be a member of the local
WORKGROUP.
nVerify that the virtual machine was not converted from a View Composer linked clone. A virtual
machine that is converted from a linked clone has the clone's internal disk and state information. A
parent virtual machine cannot have state information.
I Linked clones and virtual machines that were converted from linked clones are not
supported as parent virtual machines.
nWhen you install View Agent on the parent virtual machine, select the View Composer Agent option.
See “Install View Agent on a Virtual Machine,” on page 27.
To update View Agent in a large environment, you can use standard Windows update mechanisms
such as Altiris, SMS, LanDesk, BMC, or other systems management software. You can also use the
recompose operation to update View Agent.
N Do not change the log on account for the VMware View Composer Guest Agent Server service in
a parent virtual machine. By default, this is the Local System account. If you change this account, the
linked clones created from the parent do not start.
Setting Up Desktop and Application Pools in View
46 VMware, Inc.

nTo deploy Windows machines, congure a volume license key and activate the parent virtual machine's
operating system with volume activation. See “Activating Windows on Linked-Clone Virtual
Machines,” on page 48.
nVerify that you followed the best practices for optimizing the operating system. See “Optimizing
Windows for Linked-Clone Virtual Machines,” on page 39.
nFamiliarize yourself with the procedure for disabling searching Windows Update for device drivers.
See the Microsoft Technet article, "Disable Searching Windows Update for Device Drivers" at
hp://technet.microsoft.com/en-us/library/cc730606(v=ws.10).aspx.
Procedure
nRemove the DHCP lease on the parent virtual machine to avoid copying a leased IP address to the
linked clones in the pool.
a On the parent virtual machine, open a command prompt.
b Type the ipconfig /release command.
nVerify that the system disk contains a single volume.
You cannot deploy linked clones from a parent virtual machine that contains more than one volume.
The View Composer service does not support multiple disk partitions. Multiple virtual disks are
supported.
N If the parent virtual machine contains multiple virtual disks, when you create a desktop pool, do
not select a drive leer for the View Composer persistent disk or disposable data disk that already exists
on the parent virtual machine or that conicts with a drive leer that is used for a network-mounted
drive.
nVerify that the virtual machine does not contain an independent disk.
An independent disk is excluded when you take a snapshot of the virtual machine. Linked clones that
are created or recomposed from the virtual machine will not contain the independent disk.
nIf you plan to congure disposable data disks when you create linked-clone machines, remove default
user TEMP and TMP variables from the parent virtual machine.
You can also remove the pagefile.sys le to avoid duplicating the le on all the linked clones. If you
leave the pagefile.sys le on the parent virtual machine, a read-only version of the le is inherited by
the linked clones, while a second version of the le is used on the disposable data disk.
nDisable the hibernation option to reduce the size of linked-clone OS disks that are created from the
parent virtual machine.
nBefore you take a snapshot of the parent virtual machine, disable searching Windows Update for device
drivers.
This Windows feature can interfere with the customization of linked-clone machines. As each linked
clone is customized, Windows might search for the best drivers on the Internet for that clone, resulting
in repeated searches and customization delays.
nIn vSphere Client, disable the vApp Options seing on the parent virtual machine.
nOn Windows 8.1, Windows Server 2008 R2, and Windows Server 2012 R2 machines, disable the
scheduled maintenance task that recovers disk space by removing unused features.
For example: Schtasks.exe /change /disable /tn "\Microsoft\Windows\AppxDeploymentClient\Pre-
staged app cleanup"
Chapter 3 Creating and Preparing Virtual Machines
VMware, Inc. 47

If left enabled, this maintenance task can remove the Sysprep customization script after the linked
clones are created, which would cause subsequent recompose operations to fail with customization
operation timeout errors. For more information, see the Microsoft KB article available at
hp://support.microsoft.com/kb/2928948.
You can deploy a linked-clone pool from the parent virtual machine.
What to do next
Use vSphere Client or vSphere Web Client to take a snapshot of the parent virtual machine in its powered-
down state. This snapshot is used as the baseline conguration for the rst set of linked-clone machines that
are anchored to the parent virtual machine.
I Before you take a snapshot, completely shut down the parent virtual machine by using the
Shut Down command in the guest operating system.
Activating Windows on Linked-Clone Virtual Machines
To make sure that View Composer properly activates Windows 7, Windows 8/8.1, Windows 10, and
Windows Server operating systems on linked-clone machines, you must use Microsoft volume activation on
the parent virtual machine. The volume-activation technology requires a volume license key.
To activate Windows with volume activation, you use Key Management Service (KMS), which requires a
KMS license key. See your Microsoft dealer to acquire a volume license key and congure volume activation.
N View Composer does not support Multiple Activation Key (MAK) licensing.
Before you create linked-clone machines with View Composer, you must use volume activation to activate
the operating system on the parent virtual machine.
When a linked-clone machine is created, and each time the linked clone is recomposed, the View Composer
agent uses the parent virtual machine's KMS server to activate the operating system on the linked clone.
The View Composer QuickPrep tool implements the activation through these steps:
1 Invokes a script to remove the existing license status on the linked-clone virtual machine
2 Restarts the guest operating system
3 Invokes a script that uses KMS licensing to activate the operating system on the clone.
Each time QuickPrep runs on a linked clone, the activation takes place.
For KMS licensing, View Composer uses the KMS server that is congured to activate the parent virtual
machine. The KMS server treats an activated linked clone as a computer with a newly issued license.
Disable Windows Hibernation in the Parent Virtual Machine
The Windows hibernation option creates a large system le that can increase the size of the linked-clone OS
disks that are created from the parent virtual machine. Disabling the hibernation option reduces the size of
linked-clones.
The Windows hibernation option creates a hidden system le, Hiberfil.sys. Windows uses this le to store
a copy of system memory on the hard disk when the hybrid sleep seing is turned on. When View
Composer creates the linked clones, the le is created on each linked clone's OS disk. This le can be 10 GB.
C When you make hibernation unavailable, the hybrid sleep seing does not work. Users can lose
data if the hybrid sleep seing is turned on and a power loss occurs.
Setting Up Desktop and Application Pools in View
48 VMware, Inc.
Prerequisites
Familiarize yourself with the Windows hibernation feature. See the Microsoft Support Web site. For
information about disabling hibernation, see the Microsoft Support Web site and search for how to disable
and re-enable hibernation on a computer that is running Windows.
Procedure
1 In vSphere Client, select the parent virtual machine and select Open Console.
2 Log in to the Windows guest operating system as an administrator.
3 Disable the hibernation option.
a Click Start and type cmd in the Start Search box.
b In the search results list, right-click Command Prompt and click Run as Administrator.
c At the User Account Control prompt, click Continue.
d At the command prompt, type powercfg.exe /hibernate off and press Enter.
e Type exit and press Enter.
4 Log out of the guest operating system.
When you a create linked-clone machines from the parent virtual machine, the Hiberfil.sys le is not
created on the linked-clone OS disks.
Configure a Parent Virtual Machine to Use Local Storage
When you prepare a parent virtual machine for View Composer, you can congure the parent virtual
machine and linked clones to store virtual-machine swap les on the local datastore. This optional strategy
lets you take advantage of local storage.
In this procedure, you congure local storage for the virtual-machine swap les, not the paging and temp
les in the guest OS. When you create a linked-clone pool, you also can redirect guest OS paging and temp
les to a separate disk. See “Worksheet for Creating a Linked-Clone Desktop Pool,” on page 61.
Prerequisites
Prepare the parent virtual machine to meet the requirements of the View Composer service. See “Prepare a
Parent Virtual Machine,” on page 46.
Procedure
1Congure a swaple datastore on the ESXi host or cluster on which you will deploy the linked-clone
pool.
2 When you create the parent virtual machine in vCenter Server, store the virtual-machine swap les on
the swaple datastore on the local ESXi host or cluster:
a In vSphere Client, select the parent virtual machine.
b Click Edit and click the Options tab.
c Click location and click Store in the host's datastore.
For detailed instructions, see the VMware vSphere documentation.
When you deploy a pool from this parent virtual machine, the linked clones use the local ESXi host's
swaple datastore.
Chapter 3 Creating and Preparing Virtual Machines
VMware, Inc. 49

Keep a Record of the Parent Virtual Machine's Paging-File Size
When you create a linked-clone pool, you can redirect the linked clones' guest OS paging and temp les to a
separate disk. You must congure this disk to be larger than the paging le in the guest OS.
When a linked clone that is congured with a separate disk for the disposable les is powered o, View
replaces the temporary disk with a copy of the original temporary disk that View Composer created with
the linked-clone pool. This feature can slow the growth of linked clones. However, this feature can work
only if you congure the disposable-le disk to be large enough to hold the guest OS's paging les.
Before you can congure the disposable-le disk, you must know the maximum paging-le size in the
parent virtual machine. The linked clones have the same paging-le size as the parent virtual machine from
which they are created.
As a best practice, you can remove the pagefile.sys le from the parent virtual machine before you take a
snapshot, to avoid duplicating the le on all the linked clones. See “Prepare a Parent Virtual Machine,” on
page 46.
N This feature is not that same as conguring local storage for the virtual-machine swap les. See
“Congure a Parent Virtual Machine to Use Local Storage,” on page 49.
Procedure
1 In vSphere Client, right-click the parent virtual machine and click Open Console.
2 Select Start > > Control Panel > System.
3 Click the Advanced tab.
4 In the Performance pane, click .
5 Click the Advanced tab.
6 In the Virtual memory pane, click Change.
The Virtual Memory page appears.
7 Set the paging le size to a larger value than the size of the memory that is assigned to the virtual
machine.
I If the Maximum size (MB) seing is smaller than the virtual-machine memory size, type a
larger value and save the new value.
8 Keep a record of the Maximum size (MB) seing that is congured in the Paging le size for selected
drive pane.
What to do next
When you congure a linked-clone pool from this parent virtual machine, congure a disposable-le disk
that is larger than the paging-le size.
Increase the Timeout Limit of QuickPrep Customization Scripts
View Composer terminates a QuickPrep post-synchronization or power-o script that takes longer than 20
seconds. You can increase the timeout limit for these scripts by changing the ExecScriptTimeout Windows
registry value on the parent virtual machine.
The increased timeout limit is propagated to linked clones that are created from the parent virtual machine.
QuickPrep customization scripts can run on the linked clones for the time that you specify.
Setting Up Desktop and Application Pools in View
50 VMware, Inc.

Alternatively, you can use your customization script to launch another script or process that performs the
long-running task.
N Most QuickPrep customization scripts can nish running within the 20-second limit. Test your
scripts before you increase the limit.
Prerequisites
nInstall View Agent with the View Composer Agent option on the parent virtual machine.
nVerify that the parent virtual machine is prepared to create a linked-clone pool. See “Prepare a Parent
Virtual Machine,” on page 46.
Procedure
1 On the parent virtual machine, start the Windows Registry Editor.
a Select Start > Command Prompt.
b At the command prompt, type regedit.
2 In the Windows registry, locate the vmware-viewcomposer-ga registry key.
HKEY_LOCAL_MACHINE\SYSTEM\CurrentControlSet\services\vmware-viewcomposer-ga
3 Click Edit and modify the registry value.
Value Name: ExecScriptTimeout
Value Type: REG_DWORD
Value unit: milliseconds
The default value is 20000 milliseconds.
The timeout value is increased. You do not have to restart Windows for this value to take eect.
What to do next
Take a snapshot of the parent virtual machine and create a linked-clone pool.
Creating Virtual Machine Templates
You must create a virtual machine template before you can create an automated pool that contains full
virtual machines.
A virtual machine template is a master copy of a virtual machine that can be used to create and provision
new virtual machines. Typically, a template includes an installed guest operating system and a set of
applications.
You create virtual machine templates in vSphere Client. You can create a virtual machine template from a
previously congured virtual machine, or you can convert a previously congured virtual machine to a
virtual machine template.
See the vSphere Basic System Administration guide for information on using vSphere Client to create virtual
machine templates. See “Automated Pools That Contain Full Virtual Machines,” on page 53 for information
on creating automated pools.
N You do not create a linked-clone pool from a virtual machine template.
Chapter 3 Creating and Preparing Virtual Machines
VMware, Inc. 51
Creating Customization Specifications
Customization specications are optional, but they can greatly expedite automated pool deployments by
providing conguration information for general properties such as licensing, domain aachment, and
DHCP seings.
With customization specications, you can customize remote desktops as they are created in View
Administrator. You create new customization specications by using the Customization Specication
wizard in vSphere Client.
See the vSphere Virtual Machine Administration document for information on using the Customization
Specication wizard.
Make sure that the customization specications are accurate before you use them in View Administrator. In
vSphere Client, deploy and customize a virtual machine from your template using the customization
specications. Fully test the virtual machine, including DHCP and authentication, before you create remote
desktops.
When you use a Sysprep customization specication to join a Windows desktop to a domain, you must use
the fully qualied domain name (FQDN) of the Active Directory domain. You cannot use the NetBIOS name
of the Active Directory domain.
Setting Up Desktop and Application Pools in View
52 VMware, Inc.

Creating Automated Desktop Pools
That Contain Full Virtual Machines 4
With an automated desktop pool that contains full virtual machines, you create a virtual machine template
and View uses that template to create virtual machines for each desktop. You can optionally create
customization specications to expedite automated pool deployments.
This chapter includes the following topics:
n“Automated Pools That Contain Full Virtual Machines,” on page 53
n“Worksheet for Creating an Automated Pool That Contains Full Virtual Machines,” on page 53
n“Create an Automated Pool That Contains Full Virtual Machines,” on page 57
n“Clone an Automated Desktop Pool,” on page 58
n“Desktop Seings for Automated Pools That Contain Full Virtual Machines,” on page 59
Automated Pools That Contain Full Virtual Machines
To create an automated desktop pool, View dynamically provisions machines based on seings that you
apply to the pool. View uses a virtual machine template as the basis of the pool. From the template, View
creates a new virtual machine in vCenter Server for each desktop.
Worksheet for Creating an Automated Pool That Contains Full Virtual
Machines
When you create an automated desktop pool, the View Administrator Add Desktop Pool wizard prompts
you to congure certain options. Use this worksheet to prepare your conguration options before you create
the pool.
You can print this worksheet and write down the values you want to specify when you run the Add Desktop
Pool wizard.
To create a linked-clone pool, see “Linked-Clone Desktop Pools,” on page 61.
VMware, Inc. 53

Table 4‑1. Worksheet: Configuration Options for Creating an Automated Pool That Contains Full Virtual
Machines
Option Description Fill In Your Value Here
User assignment Choose the type of user assignment:
nIn a dedicated-assignment pool, each user is
assigned to a machine. Users receive the
same machine each time they log in to the
pool.
nIn a oating-assignment pool, users receive
dierent machines each time they log in.
For details, see “User Assignment in Desktop
Pools,” on page 119.
Enable automatic assignment In a dedicated-assignment pool, a machine is
assigned to a user when the user rst logs in to
the pool. You can also explicitly assign machines
to users.
If you do not enable automatic assignment, you
must explicitly assign a machine to each user.
You can assign machines manually even when
automatic assignment is enabled.
vCenter Server Select the vCenter Server that manages the
virtual machines in the pool.
Desktop Pool ID The unique name that identies the pool in View
Administrator.
If multiple vCenter Servers are running in your
environment, make sure that another vCenter
Server is not using the same pool ID.
A View Connection Server conguration can be a
standalone View Connection Server instance or a
pod of replicated instances that share a common
View LDAP conguration.
Display name The pool name that users see when they log in
from a client device. If you do not specify a
display name, the pool ID is displayed to users.
Access group Select an access group in which to place the pool
or leave the pool in the default root access group.
If you use an access group, you can delegate
managing the pool to an administrator who has a
specic role. For details, see the role-based
delegated administration chapter in the View
Administration document.
N Access groups are dierent from vCenter
Server folders that store desktop virtual
machines. You select a vCenter Server folder later
in the wizard with other vCenter Server seings.
Delete machine after logo If you select oating user assignment, choose
whether to delete machines after users log o.
N You set this option on the Desktop Pool
Seings page.
Setting Up Desktop and Application Pools in View
54 VMware, Inc.

Table 4‑1. Worksheet: Configuration Options for Creating an Automated Pool That Contains Full Virtual
Machines (Continued)
Option Description Fill In Your Value Here
Desktop Pool Seings Seings that determine the desktop state, power
status when a virtual machine is not in use,
display protocol, Adobe Flash quality, and so on.
For descriptions, see “Desktop Pool Seings for
All Desktop Pool Types,” on page 127.
For a list of the seings that apply to automated
pools, see “Desktop Seings for Automated
Pools That Contain Full Virtual Machines,” on
page 59.
For more information about power policies and
automated pools, see “Seing Power Policies for
Desktop Pools,” on page 131.
Stop provisioning on error You can direct View to stop provisioning or
continue to provision virtual machines in a
desktop pool after an error occurs during the
provisioning of a virtual machine. If you leave
this seing selected, you can prevent a
provisioning error from recurring on multiple
virtual machines.
Virtual Machine Naming Choose whether to provision machines by
manually specifying a list of machine names or
by providing a naming paern and the total
number of machines.
For details, see “Naming Machines Manually or
Providing a Naming Paern,” on page 120.
Specify names manually If you specify names manually, prepare a list of
machine names and, optionally, the associated
user names.
Naming Paern If you use this naming method, provide the
paern.
The paern you specify is used as a prex in all
the machine names, followed by a unique
number to identify each machine.
For details, see “Using a Naming Paern for
Automated Desktop Pools,” on page 122.
Maximum number of machines If you use a naming paern, specify the total
number of machines in the pool.
You can also specify a minimum number of
machines to provision when you rst create the
pool.
Number of spare (powered on)
machines
If you specify names manually or use a naming
paern, specify a number of machines to keep
available and powered on for new users. For
details, see “Naming Machines Manually or
Providing a Naming Paern,” on page 120.
When you specify names manually, this option is
called # Unassigned machines kept powered on.
Chapter 4 Creating Automated Desktop Pools That Contain Full Virtual Machines
VMware, Inc. 55

Table 4‑1. Worksheet: Configuration Options for Creating an Automated Pool That Contains Full Virtual
Machines (Continued)
Option Description Fill In Your Value Here
Minimum number of machines If you use a naming paern and provision
machines on demand, specify a minimum
number of machines in the pool.
The minimum number of machines is created
when you create the pool.
If you provision machines on demand, additional
machines are created as users connect to the pool
for the rst time or as you assign machines to
users.
Use vSphere Virtual SAN Specify whether to use Virtual SAN, if available.
Virtual SAN is a software-dened storage tier
that virtualizes the local physical storage disks
available on a cluster of ESXi hosts. For more
information, see “Using Virtual SAN for High-
Performance Storage and Policy-Based
Management,” on page 209.
Template Select the virtual machine template to use for
creating the pool.
vCenter Server folder Select the folder in vCenter Server in which the
desktop pool resides.
Host or cluster Select the ESXi host or cluster on which the
virtual machines run.
In vSphere 5.1 or later, you can select a cluster
with up to 32 ESXi hosts.
Resource pool Select the vCenter Server resource pool in which
the desktop pool resides.
Datastores Select one or more datastores on which to store
the desktop pool.
For clusters, you can use shared or local
datastores.
N If you use Virtual SAN, select only one
datastore.
Use View Storage Accelerator Determine whether ESXi hosts cache common
virtual machine disk data. View Storage
Accelerator can improve performance and
reduce the need for extra storage I/O bandwidth
to manage boot storms and anti-virus scanning
I/O storms.
This feature is supported on vSphere 5.0 and
later.
This feature is enabled by default.
For details, see “Congure View Storage
Accelerator for Desktop Pools,” on page 222.
Setting Up Desktop and Application Pools in View
56 VMware, Inc.

Table 4‑1. Worksheet: Configuration Options for Creating an Automated Pool That Contains Full Virtual
Machines (Continued)
Option Description Fill In Your Value Here
Transparent Page Sharing Scope Select the level at which to allow transparent
page sharing (TPS). The choices are Virtual
Machine (the default), Pool, Pod, or Global. If
you turn on TPS for all the machines in the pool,
pod, or globally, the ESXi host eliminates
redundant copies of memory pages that result if
the machines use the same guest operating
system or applications.
Page sharing happens on the ESXi host. For
example, if you enable TPS at the pool level but
the pool is spread across multiple ESXi hosts,
only virtual machines on the same host and
within the same pool will share pages. At the
global level, all machines managed by View on
the same ESXi host can share memory pages,
regardless of which pool the machines reside in.
N The default seing is not to share
memory pages among machines because TPS can
pose a security risk. Research indicates that TPS
could possibly be abused to gain unauthorized
access to data in very limited conguration
scenarios.
Guest customization Select a customization specication (SYSPREP)
from the list to congure licensing, domain
aachment, DHCP seings, and other properties
on the machines.
Alternatively, you can customize the machines
manually after they are created.
Create an Automated Pool That Contains Full Virtual Machines
You can create an automated desktop pool based on a virtual machine template that you select. View
dynamically deploys the desktops, creating a new virtual machine in vCenter Server for each desktop.
To create a linked-clone pool, see “Linked-Clone Desktop Pools,” on page 61.
Prerequisites
nPrepare a virtual machine template that View will use to create the machines. View Agent must be
installed on the template. See Chapter 3, “Creating and Preparing Virtual Machines,” on page 19.
nIf you intend to use a customization specication, make sure that the specications are accurate. In
vSphere Client, deploy and customize a virtual machine from your template using the customization
specication. Fully test the resulting virtual machine, including DHCP and authentication.
nVerify that you have a sucient number of ports on the ESXi virtual switch that is used for the virtual
machines that are used as remote desktops. The default value might not be sucient if you create large
desktop pools. The number of virtual switch ports on the ESXI host must equal or exceed the number of
virtual machines multiplied by the number of virtual NICs per virtual machine.
nGather the conguration information you must provide to create the pool. See “Worksheet for Creating
an Automated Pool That Contains Full Virtual Machines,” on page 53.
nDecide how to congure power seings, display protocol, Adobe Flash quality, and other seings. See
“Desktop Pool Seings for All Desktop Pool Types,” on page 127.
Chapter 4 Creating Automated Desktop Pools That Contain Full Virtual Machines
VMware, Inc. 57
nIf you intend to provide access to your desktops and applications through Workspace Portal, verify that
you create the desktop and application pools as a user who has the Administrators role on the root
access group in View Administrator. If you give the user the Administrators role on an access group
other than the root access group, Workspace Portal will not recognize the SAML authenticator you
congure in View, and you cannot congure the pool in Workspace Portal.
Procedure
1 In View Administrator, select Catalog > Desktop Pools.
2 Click Add.
3 Select Automated Desktop Pool.
4 On the vCenter Server page, choose Full virtual machines.
5 Follow the prompts in the wizard to create the pool.
Use the conguration information that you gathered in the worksheet. You can go directly back to any
wizard page that you completed by clicking the page name in the navigation panel.
In View Administrator, you can view the machines as they are added to the pool by selecting Catalog >
Desktop Pools.
What to do next
Entitle users to access the pool. See “Add Entitlements to a Desktop or Application Pool,” on page 147.
Clone an Automated Desktop Pool
You can clone an automated desktop pool from an existing pool. When you clone a pool, the existing
desktop pool's seings are copied into the Add Desktop Pool wizard, allowing you to create a new pool
without having to ll in each seing manually.
With this feature, you can streamline pool creation because you do not have to type every option in the Add
Desktop Pool wizard. You can ensure that desktop pool aributes are standardized by using the pre-lled
values in the wizard.
You can clone automated desktop pools that contain full virtual machines and linked-clone desktop pools.
You cannot clone manual desktop pools or RDS desktop pools.
When you clone a desktop pool, you cannot change certain seings:
nDesktop pool type
nClone type, either linked clone or full virtual machine
nUser assignment, either dedicated or oating
nvCenter Server instance
Prerequisites
nVerify that the prerequisites for creating the original desktop pool are still valid.
For example, for a pool that contains full virtual machines, verify that a virtual machine template was
prepared.
For a linked-clone pool, verify that a parent virtual machine was prepared and a snapshot was taken
after the virtual machine was powered o.
When you clone a pool, you can use the same virtual machine template or parent virtual machine, or
you can select another one.
Setting Up Desktop and Application Pools in View
58 VMware, Inc.

nFor prerequisites for cloning an automated, full-clone pool, see “Create an Automated Pool That
Contains Full Virtual Machines,” on page 57.
nFor prerequisites for cloning a linked-cone pool, see “Create a Linked-Clone Desktop Pool,” on
page 69.
Procedure
1 In View Administrator, select Catalog > Desktop Pools.
2 Select the desktop pool that you want to clone and click Clone.
The Add Desktop Pool wizard appears.
3 On the Add Desktop Pool page, type a unique pool ID.
4 On the Provisioning Seings page, provide unique names for the virtual machines.
Option Description
Use a naming pattern Type a virtual machine naming paern.
Specify names manually Provide a list of unique names for the virtual machines.
5 Follow the other prompts in the wizard to create the pool.
Change desktop pool seings and values as needed.
In View Administrator, you can view the machines as they are added to the pool by selecting Catalog >
Desktop Pools.
What to do next
Entitle users to access the pool. See “Add Entitlements to a Desktop or Application Pool,” on page 147.
Desktop Settings for Automated Pools That Contain Full Virtual
Machines
You must specify desktop pool seings when you congure automated pools that contain full virtual
machines. Dierent seings apply to pools with dedicated user assignments and oating user assignments.
Table 4-2 lists the seings that apply to automated pools with dedicated assignments and oating
assignments.
For descriptions of each desktop pool seing, see “Desktop Pool Seings for All Desktop Pool Types,” on
page 127.
Table 4‑2. Settings for Automated Pools That Contain Full Virtual Machines
Setting
Automated Pool, Dedicated
Assignment
Automated Pool, Floating
Assignment
State Yes Yes
Connection Server restrictions Yes Yes
Remote machine power policy Yes Yes
Automatic logo after disconnect Yes Yes
Allow users to reset their machines Yes Yes
Allow user to initiate separate sessions
from dierent client devices
Yes
Delete machine after logo Yes
Default display protocol Yes Yes
Chapter 4 Creating Automated Desktop Pools That Contain Full Virtual Machines
VMware, Inc. 59

Table 4‑2. Settings for Automated Pools That Contain Full Virtual Machines (Continued)
Setting
Automated Pool, Dedicated
Assignment
Automated Pool, Floating
Assignment
Allow users to choose protocol Yes Yes
3D Renderer Yes Yes
Max number of monitors Yes Yes
Max resolution of any one monitor Yes Yes
Adobe Flash quality Yes Yes
Adobe Flash throling Yes Yes
Override global Mirage seings Yes Yes
Mirage Server conguration Yes Yes
Setting Up Desktop and Application Pools in View
60 VMware, Inc.

Creating Linked-Clone Desktop Pools 5
With a linked-clone desktop pool, View creates a desktop pool based on a parent virtual machine that you
select. The View Composer service dynamically creates a new linked-clone virtual machine in vCenter
Server for each desktop.
This chapter includes the following topics:
n“Linked-Clone Desktop Pools,” on page 61
n“Worksheet for Creating a Linked-Clone Desktop Pool,” on page 61
n“Create a Linked-Clone Desktop Pool,” on page 69
n“Clone an Automated Desktop Pool,” on page 71
n“Desktop Pool Seings for Linked-Clone Desktop Pools,” on page 72
n“View Composer Support for Linked-Clone SIDs and Third-Party Applications,” on page 73
n“Keeping Linked-Clone Machines Provisioned for Use in Remote Desktop Sessions During View
Composer Operations,” on page 77
n“Use Existing Active Directory Computer Accounts for Linked Clones,” on page 78
Linked-Clone Desktop Pools
To create a linked-clone desktop pool, View Composer generates linked-clone virtual machines from a
snapshot of a parent virtual machine. View dynamically provisions the linked-clone desktops based on
seings that you apply to the pool.
Because linked-clone desktops share a base system-disk image, they use less storage than full virtual
machines.
Worksheet for Creating a Linked-Clone Desktop Pool
When you create a linked-clone desktop pool, the View Administrator Add Desktop Pool wizard prompts
you to congure certain options. Use this worksheet to prepare your conguration options before you create
the pool.
You can print this worksheet and write down the values you want to specify when you run the Add Desktop
Pool wizard.
Before you create a linked-clone pool, you must use vCenter Server to take a snapshot of the parent virtual
machine that you prepare for the pool. You must shut down the parent virtual machine before you take the
snapshot. View Composer uses the snapshot as the base image from which the clones are created.
N You cannot create a linked-clone pool from a virtual machine template.
VMware, Inc. 61

Table 5‑1. Worksheet: Configuration Options for Creating a Linked-Clone Desktop Pool
Option Description Fill In Your Value Here
User assignment Choose the type of user assignment:
nIn a dedicated-assignment pool, each user is
assigned to a machine. Users receive the same
machine each time they log in.
nIn a oating-assignment pool, users receive
dierent machines each time they log in.
For details, see “User Assignment in Desktop Pools,”
on page 119.
Enable automatic assignment In a dedicated-assignment pool, a machine is assigned
to a user when the user rst logs in to the pool. You can
also explicitly assign machines to users.
If you do not enable automatic assignment, you must
explicitly assign a machine to each user.
vCenter Server Select the vCenter Server that manages the virtual
machines in the pool.
Desktop Pool ID The unique name that identies the pool in View
Administrator.
If multiple View Connection Server congurations are
running in your environment, make sure that another
View Connection Server conguration is not using the
same pool ID.
A View Connection Server conguration can be a
standalone View Connection Server instance or a pod
of replicated instances that share a common View
LDAP conguration.
Display name The pool name that users see when they log in from a
client device. If you do not specify a display name, the
pool ID is displayed to users.
Access group Select an access group in which to place the pool or
leave the pool in the default root access group.
If you use an access group, you can delegate managing
the pool to an administrator who has a specic role.
For details, see the role-based delegated administration
chapter in the View Administration document..
N Access groups are dierent from vCenter
Server folders that store virtual machines that are used
as desktops. You select a vCenter Server folder later in
the wizard with other vCenter Server seings.
Delete or refresh machine on
logo
If you select oating user assignment, choose whether
to refresh machines, delete machines, or do nothing
after users log o.
N You set this option on the Desktop Pool Seings
page.
Desktop Pool Seings Seings that determine the machine state, power status
when a virtual machine is not in use, display protocol,
Adobe Flash quality, and so on.
For descriptions, see “Desktop Pool Seings for All
Desktop Pool Types,” on page 127.
For a list of the seings that apply to linked-clone
pools, see “Desktop Pool Seings for Linked-Clone
Desktop Pools,” on page 72.
For more information about power policies and
automated pools, see “Seing Power Policies for
Desktop Pools,” on page 131.
Setting Up Desktop and Application Pools in View
62 VMware, Inc.

Table 5‑1. Worksheet: Configuration Options for Creating a Linked-Clone Desktop Pool (Continued)
Option Description Fill In Your Value Here
Stop provisioning on error You can direct View to stop provisioning or continue to
provision virtual machines in a desktop pool after an
error occurs during the provisioning of a virtual
machine. If you leave this seing selected, you can
prevent a provisioning error from recurring on
multiple virtual machines.
Virtual machine naming Choose whether to provision machines by manually
specifying a list of machine names or by providing a
naming paern and the total number of machines.
For details, see “Naming Machines Manually or
Providing a Naming Paern,” on page 120.
Specify names manually If you specify names manually, prepare a list of
machine names and, optionally, the associated user
names.
Naming paern If you use this naming method, provide the paern.
The paern you specify is used as a prex in all the
machine names, followed by a unique number to
identify each machine.
For details, see “Using a Naming Paern for
Automated Desktop Pools,” on page 122.
Max number of machines If you use a naming paern, specify the total number
of machines in the pool.
You can also specify a minimum number of machines
to provision when you rst create the pool.
Number of spare (powered
on) machines
If you specify names manually or use a naming
paern, specify a number of machines to keep
available and powered on for new users. For details,
see “Naming Machines Manually or Providing a
Naming Paern,” on page 120.
When you specify names manually, this option is
called # Unassigned machines kept powered on.
Minimum number of ready
(provisioned) machines
during View Composer
maintenance operations
If you specify names manually or use a naming
paern, specify a minimum number of machines that
are provisioned for use in remote desktop sessions
while View Composer maintenance operations take
place.
This seing allows users to maintain existing
connections or make new connection requests while
View Composer refreshes, recomposes, or rebalances
the machines in the pool. The seing does not
distinguish between spare machines that are ready to
accept new connections and machines that are already
connected in existing desktop sessions.
This value must be smaller than the Max number of
machines, which you specify if you provision
machines on demand.
See “Keeping Linked-Clone Machines Provisioned for
Use in Remote Desktop Sessions During View
Composer Operations,” on page 77.
Chapter 5 Creating Linked-Clone Desktop Pools
VMware, Inc. 63

Table 5‑1. Worksheet: Configuration Options for Creating a Linked-Clone Desktop Pool (Continued)
Option Description Fill In Your Value Here
Provision machines on
demand
or
Provision all machines up
front
If you use a naming paern, choose whether to
provision all machines when the pool is created or
provision machines as they are needed.
nProvision all machines up front. When the pool is
created, the system provisions the number of
machines you specify in Max number of
machines.
nProvision machines on demand. When the pool is
created, the system creates the number of
machines that you specify in Min number of
machines. Additional machines are created as
users connect to the pool for the rst time or as you
assign machines to users.
Min number of machines If you use a naming paern and provision desktops on
demand, specify a minimum number of machines in
the pool.
The system creates the minimum number of machines
when you create the pool. This number is maintained
even when other seings such as Delete or refresh
machine on cause machines to be deleted.
Redirect Windows prole to
a persistent disk
If you select dedicated user assignments, choose
whether to store Windows user-prole data on a
separate View Composer persistent disk or the same
disk as the OS data.
Separate persistent disks let you preserve user data
and seings. View Composer refresh, recompose, and
rebalance operations do not aect persistent disks. You
can detach a persistent disk from a linked clone and
recreate the linked-clone virtual machine from the
detached disk. For example, when a machine or pool is
deleted, you can detach the persistent disk and recreate
the desktop, preserving the original user data and
seings.
If you store the Windows prole in the OS disk, user
data and seings are removed during refresh,
recompose, and rebalance operations.
Disk size and drive leer for
persistent disk
If you store user prole data on a separate View
Composer persistent disk, provide the disk size in
megabytes and the drive leer.
N Do not select a drive leer that already exists on
the parent virtual machine or that conicts with a drive
leer that is used for a network-mounted drive.
Disposable File Redirection Choose whether to redirect the guest OS's paging and
temp les to a separate, nonpersistent disk. If you do,
provide the disk size in megabytes.
With this conguration, when a linked clone is
powered o, the disposable-le disk is replaced with a
copy of the original disk that was created with the
linked-clone pool. Linked clones can increase in size as
users interact with their desktops. Disposable le
redirection can save storage space by slowing the
growth of linked clones.
Setting Up Desktop and Application Pools in View
64 VMware, Inc.

Table 5‑1. Worksheet: Configuration Options for Creating a Linked-Clone Desktop Pool (Continued)
Option Description Fill In Your Value Here
Disk size and drive leer for
disposable le disk
If you redirect disposable les to a nonpersistent disk,
provide the disk size in megabytes and the drive leer.
The disk size should be larger than page-le size of the
guest OS. To determine the page-le size, see “Keep a
Record of the Parent Virtual Machine's Paging-File
Size,” on page 50.
When you congure the disposable le disk size,
consider that the actual size of a formaed disk
partition is slightly smaller than the value you provide
in View Administrator.
You can select a drive leer for the disposable le disk.
The default value, Auto, directs View to assign the
drive leer.
N Do not select a drive leer that already exists on
the parent virtual machine or that conicts with a drive
leer that is used for a network-mounted drive.
Use vSphere Virtual SAN Specify whether to use VMware Virtual SAN, if
available. Virtual SAN is a software-dened storage
tier that virtualizes the local physical storage disks
available on a cluster of ESXi hosts. For more
information, see “Using Virtual SAN for High-
Performance Storage and Policy-Based Management,”
on page 209.
Select separate datastores for
persistent and OS disks
(Available only if you do not use Virtual SAN) If you
redirect user proles to separate persistent disks, you
can store the persistent disks and OS disks on dierent
datastores.
Select separate datastores for
replica and OS disks
(Available only if you do not use Virtual SAN or
Virtual Volumes) You can store the replica (master)
virtual machine disk on a high performance datastore
and the linked clones on separate datastores.
For details, see “Storing View Composer Replicas and
Linked Clones on Separate Datastores,” on page 221.
If you store replicas and OS disks on separate
datastores, native NFS snapshots cannot be used.
Native cloning on a NAS device can only take place if
the replica and OS disks are stored on the same
datastores.
Parent VM Select the parent virtual machine for the pool.
Snapshot (default image) Select the snapshot of the parent virtual machine to use
as the base image for the pool.
Do not delete the snapshot and parent virtual machine
from vCenter Server, unless no linked clones in the
pool use the default image, and no more linked clones
will be created from this default image. The system
requires the parent virtual machine and snapshot to
provision new linked clones in the pool, according to
pool policies. The parent virtual machine and snapshot
are also required for View Composer maintenance
operations.
VM folder location Select the folder in vCenter Server in which the
desktop pool resides.
Chapter 5 Creating Linked-Clone Desktop Pools
VMware, Inc. 65

Table 5‑1. Worksheet: Configuration Options for Creating a Linked-Clone Desktop Pool (Continued)
Option Description Fill In Your Value Here
Host or cluster Select the ESXi host or cluster on which the desktop
virtual machines run.
With Virtual SAN datastores (a vSphere 5.5 Update 1
feature), you can select a cluster with up to 20 ESXi
hosts. With Virtual Volumes datastores (a vSphere 6.0
feature), you can select a cluster with up to 32 ESXi
hosts.
In vSphere 5.1 or later, you can select a cluster with up
to 32 ESXi hosts if the replicas are stored on VMFS5 or
later datastores or NFS datastores. If you store replicas
on a VMFS version earlier than VMFS5, a cluster can
have at most eight hosts.
In vSphere 5.0, you can select a cluster with more than
eight ESXi hosts if the replicas are stored on NFS
datastores. If you store replicas on VMFS datastores, a
cluster can have at most eight hosts. See “Conguring
Desktop Pools on Clusters With More Than Eight
Hosts,” on page 144.
Resource pool Select the vCenter Server resource pool in which the
desktop pool resides.
Datastores Select one or more datastores on which to store the
desktop pool.
A table on the Select Linked Clone Datastores page of
the Add Desktop Pool wizard provides high-level
guidelines for estimating the pool's storage
requirements. These guidelines can help you
determine which datastores are large enough to store
the linked-clone disks. For details, see “Storage Sizing
for Linked-Clone Desktop Pools,” on page 213.
You can use shared or local datastores for an
individual ESXi host or for ESXi clusters. If you use
local datastores in an ESXi cluster, you must consider
the vSphere infrastructure constraints that are imposed
on your desktop deployment. See “Storing Linked
Clones on Local Datastores,” on page 220.
With Virtual SAN datastores (a vSphere 5.5 Update 1
feature), you can select a cluster with up to 20 ESXi
hosts. With Virtual Volumes datastores (a vSphere 6.0
feature), you can select a cluster with up to 32 ESXi
hosts.
In vSphere 5.1 or later, a cluster can have more than
eight ESXi hosts if the replicas are stored on datastores
that are VMFS5 or later or NFS. In vSphere 5.0, a
cluster can have more than eight ESXi hosts only if the
replicas are stored on NFS datastores. See
“Conguring Desktop Pools on Clusters With More
Than Eight Hosts,” on page 144.
For more information about the disks that are created
for linked clones, see “Linked-Clone Data Disks,” on
page 219.
N If you use Virtual SAN, select only one
datastore.
Setting Up Desktop and Application Pools in View
66 VMware, Inc.

Table 5‑1. Worksheet: Configuration Options for Creating a Linked-Clone Desktop Pool (Continued)
Option Description Fill In Your Value Here
Storage Overcommit Determine the storage-overcommit level at which
linked-clones are created on each datastore.
As the level increases, more linked clones t on the
datastore and less space is reserved to let individual
clones grow. A high storage-overcommit level lets you
create linked clones that have a total logical size larger
than the physical storage limit of the datastore. For
details, see “Set the Storage Overcommit Level for
Linked-Clone Virtual Machines,” on page 218.
N This seing has no eect if you use Virtual
SAN.
Use View Storage Accelerator Determine whether to use View Storage Accelerator,
which allows ESXi hosts to cache common virtual
machine disk data. View Storage Accelerator can
improve performance and reduce the need for extra
storage I/O bandwidth to manage boot storms and
anti-virus scanning I/O storms.
This feature is supported on vSphere 5.0 and later.
This feature is enabled by default.
For details, see “Congure View Storage Accelerator
for Desktop Pools,” on page 222.
Use native NFS snapshots
(VAAI)
(Available only if you do not use Virtual SAN) If your
deployment includes NAS devices that support the
vStorage APIs for Array Integration (VAAI), you can
use native snapshot technology to clone virtual
machines.
You can use this feature only if you select datastores
that reside on NAS devices that support native cloning
operations through VAAI.
You cannot use this feature if you store replicas and OS
disks on separate datastores. You cannot use this
feature on virtual machines with space-ecient disks.
This feature is supported on vSphere 5.0 and later.
For details, see “Using View Composer Array
Integration with Native NFS Snapshot Technology
(VAAI),” on page 225.
Reclaim VM disk space (Available only if you do not use Virtual SAN or
Virtual Volumes) Determine whether to allow ESXi
hosts to reclaim unused disk space on linked clones
that are created in space-ecient disk format. The
space reclamation feature reduces the total storage
space required for linked-clone desktops.
This feature is supported on vSphere 5.1 and later. The
linked-clone virtual machines must be virtual
hardware version 9 or later.
For details, see “Reclaim Disk Space on Linked-Clone
Virtual Machines,” on page 223.
Chapter 5 Creating Linked-Clone Desktop Pools
VMware, Inc. 67

Table 5‑1. Worksheet: Configuration Options for Creating a Linked-Clone Desktop Pool (Continued)
Option Description Fill In Your Value Here
Initiate reclamation when
unused space on VM
exceeds:
(Available only if you do not use Virtual SAN or
Virtual Volumes) Type the minimum amount of
unused disk space, in gigabytes, that must accumulate
on a linked-clone OS disk to trigger space reclamation.
When the unused disk space exceeds this threshold,
View initiates the operation that directs the ESXi host
to reclaim space on the OS disk.
This value is measured per virtual machine. The
unused disk space must exceed the specied threshold
on an individual virtual machine before View starts the
space reclamation process on that machine.
For example: 2 GB.
The default value is 1 GB.
Blackout Times Congure days and times during which View Storage
Accelerator regeneration and the reclamation of virtual
machine disk space do not take place.
To ensure that ESXi resources are dedicated to
foreground tasks when necessary, you can prevent the
ESXi hosts from performing these operations during
specied periods of time on specied days.
For details, see “Set Blackout Times for ESXi
Operations on View Virtual Machines,” on page 226.
Transparent Page Sharing
Scope
Select the level at which to allow transparent page
sharing (TPS). The choices are Virtual Machine (the
default), Pool, Pod, or Global. If you turn on TPS for
all the machines in the pool, pod, or globally, the ESXi
host eliminates redundant copies of memory pages
that result if the machines use the same guest
operating system or applications.
Page sharing happens on the ESXi host. For example, if
you enable TPS at the pool level but the pool is spread
across multiple ESXi hosts, only virtual machines on
the same host and within the same pool will share
pages. At the global level, all machines managed by
View on the same ESXi host can share memory pages,
regardless of which pool the machines reside in.
N The default seing is not to share memory
pages among machines because TPS can pose a
security risk. Research indicates that TPS could
possibly be abused to gain unauthorized access to data
in very limited conguration scenarios.
Domain Select the Active Directory domain and user name.
View Composer requires certain user privileges to
create a linked-clone pool. The domain and user
account are used by QuickPrep or Sysprep to
customize the linked-clone machines.
You specify this user when you congure View
Composer seings for vCenter Server. You can specify
multiple domains and users when you congure View
Composer seings. When you use the Add Desktop
Pool wizard to create a pool, you must select one
domain and user from the list.
For information about conguring View Composer, see
the View Administration document.
Setting Up Desktop and Application Pools in View
68 VMware, Inc.

Table 5‑1. Worksheet: Configuration Options for Creating a Linked-Clone Desktop Pool (Continued)
Option Description Fill In Your Value Here
AD container Provide the Active Directory container relative
distinguished name.
For example: CN=Computers
When you run the Add Desktop Pool wizard, you can
browse your Active Directory tree for the container.
Allow reuse of pre-existing
computer accounts
Select this option to use existing computer accounts in
Active Directory for linked clones that are provisioned
by View Composer. This option lets you control the
computer accounts that are created in Active Directory.
When a linked clone is provisioned, if an existing AD
computer account name matches the linked clone
machine name, View Composer uses the existing
computer account. Otherwise, a new computer account
is created.
The existing computer accounts must be located in the
Active Directory container that you specify with the
Active Directory container seing.
When this option is disabled, a new AD computer
account is created when View Composer provisions a
linked clone. This option is disabled by default.
For details, see “Use Existing Active Directory
Computer Accounts for Linked Clones,” on page 78.
Use QuickPrep or a
customization specication
(Sysprep)
Choose whether to use QuickPrep or select a
customization specication (Sysprep) to congure
licensing, domain aachment, DHCP seings, and
other properties on the machines.
Sysprep is supported for linked clones only on vSphere
4.1 or later software.
After you use QuickPrep or Sysprep when you create a
pool, you cannot switch to the other customization
method later on, when you create or recompose
machines in the pool.
For details, see “Choosing QuickPrep or Sysprep to
Customize Linked-Clone Machines,” on page 74.
Power-o script QuickPrep can run a customization script on linked-
clone machines before they are powered o.
Provide the path to the script on the parent virtual
machine and the script parameters.
Post-synchronization script QuickPrep can run a customization script on linked-
clone machines after they are created, recomposed, and
refreshed.
Provide the path to the script on the parent virtual
machine and the script parameters.
Create a Linked-Clone Desktop Pool
You can create an automated, linked-clone desktop pool based on a parent virtual machine that you select.
The View Composer service dynamically creates a new linked-clone virtual machine in vCenter Server for
each desktop.
To create an automated pool that contains full virtual machines, see “Automated Pools That Contain Full
Virtual Machines,” on page 53.
Chapter 5 Creating Linked-Clone Desktop Pools
VMware, Inc. 69

Prerequisites
nVerify that the View Composer service is installed, either on the same host as vCenter Server or on a
separate host, and that a View Composer database is congured. See the View Installation document.
nVerify that View Composer seings for vCenter Server are congured in View Administrator. See the
View Administration document.
nVerify that you have a sucient number of ports on the ESXi virtual switch that is used for the virtual
machines that are used as remote desktops. The default value might not be sucient if you create large
desktop pools. The number of virtual switch ports on the ESXI host must equal or exceed the number of
virtual machines multiplied by the number of virtual NICs per virtual machine.
nVerify that you prepared a parent virtual machine. View Agent must be installed on the parent virtual
machine. See Chapter 3, “Creating and Preparing Virtual Machines,” on page 19.
nTake a snapshot of the parent virtual machine in vCenter Server. You must shut down the parent virtual
machine before you take the snapshot. View Composer uses the snapshot as the base image from which
the clones are created.
N You cannot create a linked-clone pool from a virtual machine template.
nGather the conguration information you must provide to create the pool. See “Worksheet for Creating
a Linked-Clone Desktop Pool,” on page 61.
nDecide how to congure power seings, display protocol, Adobe Flash quality, and other seings. See
“Desktop Pool Seings for All Desktop Pool Types,” on page 127.
nIf you intend to provide access to your desktops and applications through Workspace Portal, verify that
you create the desktop and application pools as a user who has the Administrators role on the root
access group in View Administrator. If you give the user the Administrators role on an access group
other than the root access group, Workspace Portal will not recognize the SAML authenticator you
congure in View, and you cannot congure the pool in Workspace Portal.
I While a linked-clone pool is created, do not modify the parent virtual machine in vCenter
Server. For example, do not convert the parent virtual machine to a template. The View Composer service
requires that the parent virtual machine remain in a static, unaltered state during pool creation.
Procedure
1 In View Administrator, select Catalog > Desktop Pools.
2 Click Add.
3 Select Automated Desktop Pool.
4 On the vCenter Server page, choose View Composer linked clones.
5 Follow the prompts in the wizard to create the pool.
Use the conguration information you gathered in the worksheet. You can go directly back to any
wizard page you completed by clicking the page name in the navigation panel.
On the vCenter page, you must click Browse and select the vCenter Server seings in
sequence. You cannot skip a vCenter Server seing:
a Parent VM
b Snapshot
c VM folder location
d Host or cluster
e Resource pool
Setting Up Desktop and Application Pools in View
70 VMware, Inc.
f Datastores
In View Administrator, you can view the machines as they are added to the pool by selecting Catalog >
Desktop Pools.
The linked clones might restart one or more times while they are provisioned. If a linked clone is in an error
state, the View automatic recovery mechanism aempts to power on, or shut down and restart, the linked
clone. If repeated recovery aempts fail, the linked clone is deleted.
View Composer also creates a replica virtual machine that serves as the master image for provisioning the
linked clones. To reduce space consumption, the replica is created as a thin disk. If all the virtual machines
are recomposed or deleted, and no clones are linked to the replica, the replica virtual machine is deleted
from vCenter Server.
If you do not store the replica on a separate datastore, View Composer creates a replica on each datastore on
which linked clones are created.
If you store the replica on a separate datastore, one replica is created for the entire pool, even when linked
clones are created on multiple datastores.
What to do next
Entitle users to access the pool. See “Add Entitlements to a Desktop or Application Pool,” on page 147.
Clone an Automated Desktop Pool
You can clone an automated desktop pool from an existing pool. When you clone a pool, the existing
desktop pool's seings are copied into the Add Desktop Pool wizard, allowing you to create a new pool
without having to ll in each seing manually.
With this feature, you can streamline pool creation because you do not have to type every option in the Add
Desktop Pool wizard. You can ensure that desktop pool aributes are standardized by using the pre-lled
values in the wizard.
You can clone automated desktop pools that contain full virtual machines and linked-clone desktop pools.
You cannot clone manual desktop pools or RDS desktop pools.
When you clone a desktop pool, you cannot change certain seings:
nDesktop pool type
nClone type, either linked clone or full virtual machine
nUser assignment, either dedicated or oating
nvCenter Server instance
Prerequisites
nVerify that the prerequisites for creating the original desktop pool are still valid.
For example, for a pool that contains full virtual machines, verify that a virtual machine template was
prepared.
For a linked-clone pool, verify that a parent virtual machine was prepared and a snapshot was taken
after the virtual machine was powered o.
When you clone a pool, you can use the same virtual machine template or parent virtual machine, or
you can select another one.
nFor prerequisites for cloning an automated, full-clone pool, see “Create an Automated Pool That
Contains Full Virtual Machines,” on page 57.
nFor prerequisites for cloning a linked-cone pool, see “Create a Linked-Clone Desktop Pool,” on page 69.
Chapter 5 Creating Linked-Clone Desktop Pools
VMware, Inc. 71

Procedure
1 In View Administrator, select Catalog > Desktop Pools.
2 Select the desktop pool that you want to clone and click Clone.
The Add Desktop Pool wizard appears.
3 On the Add Desktop Pool page, type a unique pool ID.
4 On the Provisioning Seings page, provide unique names for the virtual machines.
Option Description
Use a naming pattern Type a virtual machine naming paern.
Specify names manually Provide a list of unique names for the virtual machines.
5 Follow the other prompts in the wizard to create the pool.
Change desktop pool seings and values as needed.
In View Administrator, you can view the machines as they are added to the pool by selecting Catalog >
Desktop Pools.
What to do next
Entitle users to access the pool. See “Add Entitlements to a Desktop or Application Pool,” on page 147.
Desktop Pool Settings for Linked-Clone Desktop Pools
You must specify machine and desktop pool seings when you congure automated pools that contain
linked clones created by View Composer. Dierent seings apply to pools with dedicated user assignments
and oating user assignments.
Table 5-2 lists the seings that apply to linked-clone pools with dedicated assignments and oating
assignments.
For descriptions of each seing, see “Desktop Pool Seings for All Desktop Pool Types,” on page 127.
Table 5‑2. Settings for Automated, Linked-Clone Desktop Pools
Setting
Linked-Clone Pool, Dedicated
Assignment
Linked-Clone Pool, Floating
Assignment
State Yes Yes
Connection Server restrictions Yes Yes
Remote machine power policy Yes Yes
Automatically logo after disconnect Yes Yes
Allow users to reset their machines Yes Yes
Allow user to initiate separate sessions
from dierent client devices
Yes
Delete or refresh machine on logo Yes
Refresh OS disk after logo Yes
Default display protocol Yes Yes
Allow users to choose protocol Yes Yes
3D Renderer Yes Yes
Max number of monitors Yes Yes
Max resolution of any one monitor Yes Yes
Setting Up Desktop and Application Pools in View
72 VMware, Inc.

Table 5‑2. Settings for Automated, Linked-Clone Desktop Pools (Continued)
Setting
Linked-Clone Pool, Dedicated
Assignment
Linked-Clone Pool, Floating
Assignment
Adobe Flash quality Yes Yes
Adobe Flash throling Yes Yes
Override global Mirage seings Yes Yes
Mirage Server conguration Yes Yes
View Composer Support for Linked-Clone SIDs and Third-Party
Applications
View Composer can generate and preserve local computer security identiers (SIDs) for linked-clone virtual
machines in some situations. View Composer can preserve globally unique identiers (GUIDs) of third-
party applications, depending on the way that the applications generate GUIDs.
To understand how View Composer operations aect SIDs and application GUIDs, you should understand
how linked-clone machines are created and provisioned:
1 View Composer creates a linked clone by taking these actions:
a Creates the replica by cloning the parent virtual-machine snapshot.
b Creates the linked clone to refer to the replica as its parent disk.
2 View Composer and View customize the linked clone with QuickPrep or a Sysprep customization
specication, depending on which customization tool you select when you create the pool.
nIf you use Sysprep, a unique SID is generated for each clone.
nIf you use QuickPrep, no new SID is generated. The parent virtual machine's SID is replicated on
all provisioned linked-clone machines in the pool.
nSome applications generate a GUID during customization.
3 View creates a snapshot of the linked clone.
The snapshot contains the unique SID generated with Sysprep or common SID generated with
QuickPrep.
4 View powers on the machine according to the seings you select when you create the pool.
Some applications generate a GUID the rst time the machine is powered on.
For a comparison of QuickPrep and Sysprep customization, see “Choosing QuickPrep or Sysprep to
Customize Linked-Clone Machines,” on page 74.
When you refresh the linked clone, View Composer uses the snapshot to restore the clone to its initial state.
Its SID is preserved.
If you use QuickPrep, when you recompose the linked clone, the parent virtual machine's SID is preserved
on the linked clone as long as you select the same parent virtual machine for the recompose operation. If you
select a dierent parent virtual machine for the recomposition, the new parent's SID is replicated on the
clone.
If you use Sysprep, a new SID is always generated on the clone. For details, see “Recomposing Linked
Clones Customized with Sysprep,” on page 77.
Table 5-3 shows the eect of View Composer operations on linked-clone SIDs and third-party application
GUIDs.
Chapter 5 Creating Linked-Clone Desktop Pools
VMware, Inc. 73

Table 5‑3. View Composer Operations, Linked-Clone SIDs, and Application GUIDs
Support for SIDs or GUIDs Clone Creation Refresh Recompose
Sysprep: Unique SIDs for
linked clones
With Sysprep
customization, unique SIDs
are generated for linked
clones.
Unique SIDs are preserved. Unique SIDS are not
preserved.
QuickPrep: Common SIDs
for linked clones
With QuickPrep
customization, a common
SID is generated for all
clones in a pool.
Common SID is preserved. Common SID is preserved.
Third-party application
GUIDs
Each application behaves
dierently.
N Sysprep and
QuickPrep have the same
eect on GUID
preservation.
The GUID is preserved if
an application generates
the GUID before the initial
snapshot is taken.
The GUID is not preserved
if an application generates
the GUID after the initial
snapshot is taken.
Recompose operations do
not preserve an application
GUID unless the application
writes the GUID on the
drive specied as a View
Composer persistent disk.
Choosing QuickPrep or Sysprep to Customize Linked-Clone Machines
QuickPrep and Microsoft Sysprep provide dierent approaches to customizing linked-clone machines.
QuickPrep is designed to work eciently with View Composer. Microsoft Sysprep oers standard
customization tools.
When you create linked-clone machines, you must modify each virtual machine so that it can function as a
unique computer on the network. View and View Composer provide two methods for personalizing linked-
clone machines.
Table 5-4 compares QuickPrep with customization specications that are created with Microsoft Sysprep.
Table 5‑4. Comparing QuickPrep and Microsoft Sysprep
QuickPrep Customization Specification (Sysprep)
Designed to work with View Composer.
For details, see “Customizing Linked-Clone Machines with
QuickPrep,” on page 75.
Can be created with the standard Microsoft Sysprep tools.
Uses the same local computer security identier (SID) for
all linked clones in the pool.
Generates a unique local computer SID for each linked
clone in the pool.
Can run additional customization scripts before linked
clones are powered o and after linked clones are created,
refreshed, or recomposed.
Can run an additional script when the user rst logs in.
Joins the linked clone computer to the Active Directory
domain.
Joins the linked-clone computer to the Active Directory
domain.
The domain and administrator information in the Sysprep
customization specication is not used. The virtual
machine is joined to the domain using the guest
customization information that you enter in View
Administrator when you create the pool.
For each linked clone, adds a unique ID to the Active
Directory domain account.
For each linked clone, adds a unique ID to the Active
Directory domain account.
Does not generate a new SID after linked clones are
refreshed. The common SID is preserved.
Generates a new SID when each linked clone is
customized. Preserves the unique SIDs during a refresh
operation, but not during a recompose or rebalance
operation.
Setting Up Desktop and Application Pools in View
74 VMware, Inc.

Table 5‑4. Comparing QuickPrep and Microsoft Sysprep (Continued)
QuickPrep Customization Specification (Sysprep)
Does not generate a new SID after linked clones are
recomposed. The common SID is preserved.
Runs again after linked clones are recomposed, generating
new SIDs for the virtual machines.
For details, see “Recomposing Linked Clones Customized
with Sysprep,” on page 77.
Runs faster than Sysprep. Can take longer than QuickPrep.
After you customize a linked-clone pool with QuickPrep or Sysprep, you cannot switch to the other
customization method when you create or recompose machines in the pool.
Customizing Linked-Clone Machines with QuickPrep
You can personalize the linked-clone machines that are created from a parent virtual machine by using the
QuickPrep system tool. View Composer executes QuickPrep when a linked-clone machine is created or
recomposed.
QuickPrep customizes a linked-clone machine in several ways:
nGives the computer a name that you specify when you create the linked-clone pool.
nCreates a computer account in Active Directory, joining the computer to the appropriate domain.
nMounts the View Composer persistent disk. The Windows user prole is redirected to this disk.
nRedirects temp and paging les to a separate disk.
These steps might require the linked clones to restart one or more times.
QuickPrep uses KMS volume license keys to activate Windows linked-clone machines. For details, see the
View Administration document.
You can create your own scripts to further customize the linked clones. QuickPrep can run two types of
scripts at predened times:
nAfter linked clones are created or recomposed
nImmediately before linked clones are powered o
For guidelines and rules for using QuickPrep customization scripts, see “Running QuickPrep Customization
Scripts,” on page 75.
N View Composer requires domain user credentials to join linked-clone machines to an Active
Directory domain. For details, see the View Administration document.
Running QuickPrep Customization Scripts
With the QuickPrep tool, you can create scripts to customize the linked-clone machines in a pool. You can
congure QuickPrep to run customization scripts at two predened times.
When QuickPrep Scripts Run
The post-synchronization script runs after linked clones are created, recomposed, or rebalanced, and the
clones' status is Ready. The power-o script runs before linked clones are powered o. The scripts run in the
guest operating systems of the linked clones.
How QuickPrep Executes Scripts
The QuickPrep process uses the Windows CreateProcess API call to execute scripts. Your script can invoke
any process that can be created with the CreateProcess API. For example, cmd, vbscript, exe, and batch-le
processes work with the API.
Chapter 5 Creating Linked-Clone Desktop Pools
VMware, Inc. 75

In particular, QuickPrep passes the path that is specied for the script as the second parameter to the
CreateProcess API and sets the rst parameter to NULL.
For example, if the script path is c:\myscript.cmd, the path appears as the second parameter in the function
in the View Composer log le: CreateProcess(NULL,c:\myscript.cmd,...).
Providing Paths to QuickPrep Scripts
You provide paths to the QuickPrep customization scripts when you create a linked-clone machine pool or
when you edit a pool's guest customization seings. The scripts must reside on the parent virtual machine.
You cannot use a UNC path to a network share.
If you use a scripting language that needs an interpreter to execute the script, the script path must start with
the interpreter binary.
For example, if you specify the path C:\script\myvb.vbs as a QuickPrep customization script, View
Composer Agent cannot execute the script. You must specify a path that starts with the interpreter binary
path:
C:\windows\system32\cscript.exe c:\script\myvb.vbs
I Protect QuickPrep customization scripts from access by ordinary users. Place the scripts in a
secure folder.
QuickPrep Script Timeout Limit
View Composer terminates a post-synchronization or power-o script that takes longer than 20 seconds. If
your script takes longer than 20 seconds, you can increase the timeout limit. For details, see “Increase the
Timeout Limit of QuickPrep Customization Scripts,” on page 50.
Alternatively, you can use your script to launch another script or process that performs the long-running
task.
QuickPrep Script Account
QuickPrep runs the scripts under the account under which the VMware View Composer Guest Agent Server
service is congured to run. By default, this account is Local System.
Do not change this log on account. If you do, the linked clones do not start.
QuickPrep Process Privileges
For security reasons, certain Windows operating system privileges are removed from the View Composer
Guest Agent process that invokes QuickPrep customization scripts.
A QuickPrep customization script cannot perform any action that requires a privilege that is removed from
the View Composer Guest Agent process.
The following privileges are removed from the process that invokes QuickPrep scripts:
SeCreateTokenPrivilege
SeTakeOwnershipPrivilege
SeSecurityPrivilege
SeSystemEnvironmentPrivilege
SeLoadDriverPrivilege
SeSystemtimePrivilege
SeUndockPrivilege
SeManageVolumePrivilege
SeLockMemoryPrivilege
Setting Up Desktop and Application Pools in View
76 VMware, Inc.
SeIncreaseBasePriorityPrivilege
SeCreatePermanentPrivilege
SeDebugPrivilege
SeAuditPrivilege
QuickPrep Script Logs
View Composer logs contain information about QuickPrep script execution. The log records the start and
end of execution and logs output or error messages. The log is located in the Windows temp directory:
C:\Windows\Temp\vmware-viewcomposer-ga-new.log
Recomposing Linked Clones Customized with Sysprep
If you recompose a linked-clone machine that was customized with Sysprep, View runs the Sysprep
customization specication again after the OS disk is recomposed. This operation generates a new SID for
the linked-clone virtual machine.
If a new SID is generated, the recomposed linked clone functions as a new computer on the network. Some
software programs such as system-management tools depend on the SID to identify the computers under
their management. These programs might not be able to identify or locate the linked-clone virtual machine.
Also, if third-party software is installed on the system disk, the customization specication might regenerate
the GUIDs for that software after the recomposition.
A recomposition restores the linked clone to its original state, before the customization specication was run
the rst time. In this state, the linked clone does not have a local computer SID or the GUID of any third-
party software installed in the system drive. View must run the Sysprep customization specication after the
linked clone is recomposed.
Keeping Linked-Clone Machines Provisioned for Use in Remote
Desktop Sessions During View Composer Operations
If your users must be able to access remote desktops at all times, you must maintain a certain number of
machines that are provisioned for use in remote desktop sessions even when View Composer maintenance
operations take place. You can set a minimum number of machines that are not placed in maintenance mode
while View Composer refreshes, recomposes, or rebalances the linked-clone virtual machines in a pool.
When you set a Minimum number of ready (provisioned) machines during View Composer maintenance
operations, View ensures that the specied number of machines stay provisioned, and are not placed in
maintenance mode, while View Composer proceeds through the maintenance operation.
This seing lets users maintain existing connections or make new connection requests during the View
Composer maintenance operation. The seing does not distinguish between spare machines that are ready
to accept new connections and machines that are already connected in existing desktop sessions.
You can specify this seing when you create or edit a linked-clone pool.
The following guidelines apply to this seing:
nTo allow a number of users to maintain their existing desktop connections and keep a minimum
number of spare (powered on) machines that can accept new connection requests, set the Minimum
number of ready (provisioned) machines during View Composer maintenance operations to a large
enough value to include both sets of machines.
nIf you use a naming paern to provision machines and provision machines on demand, set the number
of provisioned machines during View Composer operations to a smaller value than the specied Max
number of machines. If the maximum number were smaller, your pool could end up with fewer total
machines than the minimum number you want to keep provisioned during View Composer operations.
In this case, View Composer maintenance operations could not take place.
Chapter 5 Creating Linked-Clone Desktop Pools
VMware, Inc. 77
nIf you provision machines by manually specifying a list of machine names, do not reduce the total pool
size (by removing machine names) to a lower number than the minimum number of provisioned
machines. In this case, View Composer maintenance operations could not take place.
nIf you set a large minimum number of provisioned machines in relation to the pool size, View
Composer maintenance operations might take longer to complete. While View maintains the minimum
number of provisioned machines during a maintenance operation, the operation might not reach the
concurrency limit that is specied in the Max concurrent View Composer maintenance operations
seing.
For example, if a pool contains 20 machines and the minimum number of provisioned machines is 15,
View Composer can operate on at most ve machines at a time. If the concurrency limit for View
Composer maintenance operations is 12, the concurrency limit is never reached.
nIn this seing name, the term "ready" applies to the state of the linked-clone virtual machine, not the
machine status that is displayed in View Administrator. A virtual machine is ready when it is
provisioned and ready to be powered on. The machine status reects the View-managed condition of
the machine. For example, a machine can have a status of Connected, Disconnected, Agent Unreachable,
Deleting, and so on, and still be considered "ready".
Use Existing Active Directory Computer Accounts for Linked Clones
When you create or edit a desktop pool or an automated farm, you can congure View Composer to use
existing computer accounts in Active Directory for newly provisioned linked clones.
By default, View Composer generates a new Active Directory computer account for each linked clone that it
provisions. The Allow reuse of pre-existing computer accounts option lets you control the computer
accounts that are created in Active Directory by ensuring that View Composer uses existing AD computer
accounts.
With this option enabled, when a linked clone is provisioned, View Composer checks if an existing AD
computer account name matches the linked clone machine name. If a match exists, View Composer uses the
existing AD computer account. If View Composer does not nd a matching AD computer account name,
View Composer generates a new AD computer account for the linked clone.
You can set the Allow reuse of pre-existing computer accounts option when you create or edit a desktop
pool or an automated farm. If you edit a pool or a farm and set this option, the seing aects linked-clone
machines that are provisioned in the future. Linked clones that are already provisioned are not aected.
When you set the Allow reuse of pre-existing computer accounts option, you can limit the Active Directory
permissions assigned to the View Composer user account that generates the desktop pool or farm. Only the
following Active Directory permissions are required:
nList Contents
nRead All Properties
nRead Permissions
nReset Password
You can only limit the Active Directory permissions if you are sure that all machines you intend to provision
have existing computer accounts allocated in Active Directory. View Composer generates a new AD
computer account if no matching name is found. Additional permissions such as Create Computer Objects
are required to create new computer accounts. For a complete list of permissions required for the View
Composer user account, see the View Administration document.
This option cannot be disabled if View Composer is currently using at least one existing AD computer
account.
The following procedure applies to linked-clone desktop pools. The steps are similar for automated farms.
Setting Up Desktop and Application Pools in View
78 VMware, Inc.
Prerequisites
Verify that the existing computer accounts are located in the Active Directory container that you specify
with the Active Directory container seing. If the existing accounts are located in a dierent container,
provisioning fails for linked clones with those account names, and an error message states that the existing
computer accounts already exist in Active Directory.
For example, if you select the Allow reuse of pre-existing computer accounts option and specify that the
Active Directory container is the default value, CN=Computers, and the existing computer accounts are
located in OU=mydesktops, provisioning fails for those accounts.
Procedure
1 In Active Directory, create the computer accounts to use for the linked-clone machines.
For example: machine1, machine2, machine3
The computer account names must use consecutive integers so that they match the names that are
generated during machine provisioning in View.
2 In View Administrator, create a pool by using the Add Desktop Pool wizard or edit the pool in the Edit
dialog box.
3 On the Provisioning Seings page or tab, select Use a naming .
4 In the Naming text box, type a machine name that matches the Active Directory computer
account name.
For example: machine
View appends unique numbers to the paern to provide a unique name for each machine.
For example: machine1, machine2, machine3
5 On the Guest Customization page or tab, select the Allow reuse of pre-existing computer accounts
option.
Chapter 5 Creating Linked-Clone Desktop Pools
VMware, Inc. 79
Setting Up Desktop and Application Pools in View
80 VMware, Inc.

Creating Manual Desktop Pools 6
In a manual desktop pool, each remote desktop that is accessed by an end user is a separate machine. When
you create a manual desktop pool, you select existing machines. You can create a pool that contains a single
desktop by creating a manual desktop pool and selecting a single machine.
This chapter includes the following topics:
n“Manual Desktop Pools,” on page 81
n“Worksheet for Creating a Manual Desktop Pool,” on page 81
n“Create a Manual Desktop Pool,” on page 83
n“Create a Manual Pool That Contains One Machine,” on page 84
n“Desktop Pool Seings for Manual Pools,” on page 85
Manual Desktop Pools
To create a manual desktop pool, View provisions desktops from existing machines. You select a separate
machine for each desktop in the pool.
View can use several types of machines in manual pools:
nVirtual machines that are managed by vCenter Server
nVirtual machines that run on a virtualization platform other than vCenter Server
nPhysical computers
For information about creating a manual desktop pool that uses Linux virtual machines, see the Seing Up
Horizon 6 for Linux Desktops guide.
Worksheet for Creating a Manual Desktop Pool
When you create a manual desktop pool, the View Administrator Add Desktop Pool wizard prompts you to
congure certain options. Use this worksheet to prepare your conguration options before you create the
pool.
You can print this worksheet and write down the values you want to specify when you run the Add Desktop
Pool wizard.
N In a manual pool, you must prepare each machine to deliver remote desktop access. View Agent
must be installed and running on each machine.
VMware, Inc. 81

Table 6‑1. Worksheet: Configuration Options for Creating a Manual Desktop Pool
Option Description Fill In Your Value Here
User assignment Choose the type of user assignment:
nIn a dedicated-assignment pool, each user is
assigned to a machine. Users receive the
same machine each time they log in.
nIn a oating-assignment pool, users receive
dierent machines each time they log in.
For details, see “User Assignment in Desktop
Pools,” on page 119.
vCenter Server The vCenter Server that manages the machines.
This option appears only if the machines are
virtual machines that are managed by vCenter
Server.
Machine Source The virtual machines or physical computers that
you want to include in the desktop pool.
1 Decide which type of machine you want to
use. You can use either virtual machines that
are managed by vCenter Server or
unmanaged virtual machines and physical
computers.
2 Prepare a list of the vCenter Server virtual
machines or unmanaged virtual machines
and physical computers that you want to
include in the desktop pool.
3 Install View Agent on each machine that you
want to include in the desktop pool.
To use PCoIP with machines that are unmanaged
virtual machines or physical computers, you
must use Teradici hardware.
N When you enable Windows Server
desktops in View Administrator, View
Administrator displays all available Windows
Server machines, including machines on which
View Connection Server and other View servers
are installed, as potential machine sources.
You cannot select machines for the desktop pool
if View server software is installed on the
machines. View Agent cannot coexist on the
same virtual or physical machine with any other
View software component, including View
Connection Server, security server, View
Composer, or Horizon Client.
Desktop Pool ID The pool name that users see when they log in
and that identies the pool in View
Administrator.
If multiple vCenter Servers are running in your
environment, make sure that another vCenter
Server is not using the same pool ID.
Setting Up Desktop and Application Pools in View
82 VMware, Inc.

Table 6‑1. Worksheet: Configuration Options for Creating a Manual Desktop Pool (Continued)
Option Description Fill In Your Value Here
Desktop Pool Seings Seings that determine the machine state, power
status when a virtual machine is not in use,
display protocol, Adobe Flash quality, and so on.
For details, see “Desktop Pool Seings for All
Desktop Pool Types,” on page 127.
For a list of the seings that apply to manual
pools, see “Desktop Pool Seings for Manual
Pools,” on page 85.
Transparent Page Sharing Scope Select the level at which to allow transparent
page sharing (TPS). The choices are Virtual
Machine (the default), Pool, Pod, or Global. If
you turn on TPS for all the machines in the pool,
pod, or globally, the ESXi host eliminates
redundant copies of memory pages that result if
the machines use the same guest operating
system or applications.
Page sharing happens on the ESXi host. For
example, if you enable TPS at the pool level but
the pool is spread across multiple ESXi hosts,
only virtual machines on the same host and
within the same pool will share pages. At the
global level, all machines managed by View on
the same ESXi host can share memory pages,
regardless of which pool the machines reside in.
N The default seing is not to share
memory pages among machines because TPS can
pose a security risk. Research indicates that TPS
could possibly be abused to gain unauthorized
access to data in very limited conguration
scenarios.
Create a Manual Desktop Pool
You can create a manual desktop pool that provisions desktops from existing virtual machines or physical
computers. You must select the machines that will be included in the desktop pool.
For manual pools with virtual machines that are managed by vCenter Server, View ensures that a spare
machine is powered on so that users can connect to it. The spare machine is powered on no maer which
power policy is in eect.
Prerequisites
nPrepare the machines to deliver remote desktop access. In a manual pool, you must prepare each
machine individually. View Agent must be installed and running on each machine.
To prepare virtual machines managed by vCenter Server, see Chapter 3, “Creating and Preparing
Virtual Machines,” on page 19.
To prepare unmanaged virtual machines and physical computers, see Chapter 2, “Preparing
Unmanaged Machines,” on page 15.
nGather the conguration information that you must provide to create the pool. See “Worksheet for
Creating a Manual Desktop Pool,” on page 81.
nDecide how to congure power seings, display protocol, Adobe Flash quality, and other seings. See
“Desktop Pool Seings for All Desktop Pool Types,” on page 127.
Chapter 6 Creating Manual Desktop Pools
VMware, Inc. 83
Procedure
1 In View Administrator, select Catalog > Desktop Pools.
2 Click Add.
3 Select Manual Desktop Pool.
4 Follow the prompts in the wizard to create the pool.
Use the conguration information that you gathered in the worksheet. You can go directly back to any
wizard page that you completed by clicking the page name in the navigation panel.
In View Administrator, you can view the machines as they are added to the pool by selecting Catalog >
Desktop Pools.
What to do next
Entitle users to access the pool. See “Add Entitlements to a Desktop or Application Pool,” on page 147.
Create a Manual Pool That Contains One Machine
You can create a pool that contains a single machine when a user requires a unique, dedicated desktop, or
when, at dierent times, multiple users must access a costly application with a single-host license.
You can provision an individual machine in its own pool by creating a manual desktop pool and selecting a
single machine.
To mimic a physical computer that can be shared by multiple users, specify a oating assignment for the
users entitled to access the pool.
Whether you congure the single-machine pool with dedicated or oating assignment, power operations
are initiated by session management. The virtual machine is powered on when a user requests the desktop
and powered o or suspended when the user logs o.
If you congure the Ensure machines are always powered on policy, the virtual machine remains powered
on. If the user shuts down the virtual machine, it immediately restarts.
Prerequisites
nPrepare the machine to deliver remote desktop access. View Agent must be installed and running on
the machine.
To prepare a virtual machine managed by vCenter Server, see Chapter 3, “Creating and Preparing
Virtual Machines,” on page 19.
To prepare an unmanaged virtual machine or physical computer, see Chapter 2, “Preparing
Unmanaged Machines,” on page 15.
nGather the conguration information you must provide to create the manual pool. See “Worksheet for
Creating a Manual Desktop Pool,” on page 81.
nDecide how to congure power seings, display protocol, Adobe Flash quality, and other seings. See
“Desktop Pool Seings for All Desktop Pool Types,” on page 127.
Procedure
1 In View Administrator, select Catalog > Desktop Pools.
2 Click Add.
3 Select Manual Desktop Pool.
Setting Up Desktop and Application Pools in View
84 VMware, Inc.

4 Select the type of user assignment.
Option Description
Dedicated The machine is assigned to one user. Only that user can log in to the
desktop.
Floating The machine is shared by all users who are entitled to the pool. Any
entitled user can log in to the desktop as long as another user is not logged
in.
5 On the Machine Source page, select the machine to be included in the desktop pool.
6 Follow the prompts in the wizard to create the pool.
Use the conguration information you gathered in the worksheet. You can go directly back to any
wizard page you completed by clicking the page name in the navigation panel.
In View Administrator, you can view the machine being added to the pool by selecting Catalog > Desktop
Pools.
What to do next
Entitle users to access the pool. See “Add Entitlements to a Desktop or Application Pool,” on page 147.
Desktop Pool Settings for Manual Pools
You must specify machine and pool seings when you congure manual desktop pools. Not all seings
apply to all types of manual pools.
Table 6-2 lists the seings that apply to manual desktop pools that are congured with these properties:
nDedicated user assignments
nFloating user assignments
nManaged machines (vCenter Server virtual machines)
nUnmanaged machines
These seings also apply to a manual pool that contains a single machine.
For descriptions of each desktop pool seing, see “Desktop Pool Seings for All Desktop Pool Types,” on
page 127.
Table 6‑2. Settings for Manual Desktop Pools
Setting
Manual
Managed Pool,
Dedicated
Assignment
Manual Managed Pool,
Floating Assignment
Manual Unmanaged
Pool, Dedicated
Assignment
Manual Unmanaged
Pool, Floating
Assignment
State Yes Yes Yes Yes
Connection
Server
restrictions
Yes Yes Yes Yes
Remote machine
power policy
Yes Yes
Automatically
logo after
disconnect
Yes Yes Yes Yes
Allow users to
reset their
machines
Yes Yes
Chapter 6 Creating Manual Desktop Pools
VMware, Inc. 85

Table 6‑2. Settings for Manual Desktop Pools (Continued)
Setting
Manual
Managed Pool,
Dedicated
Assignment
Manual Managed Pool,
Floating Assignment
Manual Unmanaged
Pool, Dedicated
Assignment
Manual Unmanaged
Pool, Floating
Assignment
Allow user to
initiate separate
sessions from
dierent client
devices
Yes Yes
Default display
protocol
Yes Yes Yes
To use PCoIP with a
machine that is not
managed by vCenter
Server, you must install
Teradici hardware on the
machine.
Yes
To use PCoIP with a
machine that is not
managed by vCenter
Server, you must install
Teradici hardware on the
machine.
Allow users to
choose protocol
Yes Yes Yes Yes
3D Renderer Yes Yes
Max number of
monitors
Yes Yes
Max resolution
of any one
monitor
Yes Yes
Adobe Flash
quality
Yes Yes Yes Yes
Adobe Flash
throling
Yes Yes Yes Yes
Override global
Mirage seings
Yes Yes Yes Yes
Mirage Server
conguration
Yes Yes Yes Yes
Setting Up Desktop and Application Pools in View
86 VMware, Inc.

Setting Up Remote Desktop Services
Hosts 7
Microsoft Remote Desktop Services (RDS) hosts provide desktop sessions and applications that users can
access from client devices. If you plan to create RDS desktop pools or application pools, you must rst set up
RDS hosts.
This chapter includes the following topics:
n“Remote Desktop Services Hosts,” on page 87
n“Install Remote Desktop Services on Windows Server 2008 R2,” on page 89
n“Install Remote Desktop Services on Windows Server 2012 or 2012 R2,” on page 89
n“Install Desktop Experience on Windows Server 2008 R2,” on page 90
n“Install Desktop Experience on Windows Server 2012 or 2012 R2,” on page 90
n“Restrict Users to a Single Session,” on page 91
n“Install View Agent on a Remote Desktop Services Host,” on page 91
n“Enable Time Zone Redirection for RDS Desktop and Application Sessions,” on page 94
n“Enable Windows Basic Theme for Applications,” on page 94
n“Congure Group Policy to Start Runonce.exe,” on page 95
n“RDS Host Performance Options,” on page 95
n“Conguring 3D Graphics for RDS Hosts,” on page 96
Remote Desktop Services Hosts
An RDS host is a server computer that hosts applications and desktop sessions for remote access. An RDS
host can be a virtual machine or a physical server.
In View, an RDS host is a server that has the Microsoft Remote Desktop Services role, the Microsoft Remote
Desktop Session Host service, and View Agent installed. Remote Desktop Services was previously known as
Terminal Services. The Remote Desktop Session Host service allows a server to host applications and remote
desktop sessions. With View Agent installed on an RDS host, users can connect to applications and desktop
sessions by using the display protocol PCoIP. PCoIP provides an optimized user experience for the delivery
of remote content, including images, audio and video.
The performance of an RDS host depends on many factors. For information on how to tune the performance
of dierent versions of Windows Server, see
hp://msdn.microsoft.com/library/windows/hardware/gg463392.aspx.
View supports at most one desktop session and one application session per user on an RDS host.
VMware, Inc. 87

When users submit print jobs concurrently from RDS desktops or applications that are hosted on the same
RDS host, the ThinPrint server on the RDS host processes the print requests serially rather than in parallel.
This can cause a delay for some users. Note that the print server does not wait for a print job to complete
before processing the next one. Print jobs that are sent to dierent printers will print in parallel.
If a user launches an application and also an RDS desktop, and both are hosted on the same RDS host, they
share the same user prole. If the user launches an application from the desktop, conicts may result if both
applications try to access or modify the same parts of the user prole, and one of the applications may fail to
run properly.
The process of seing up applications or RDS desktops for remote access involves the following tasks:
1 Set up RDS hosts.
2 Create a farm. See Chapter 8, “Creating Farms,” on page 99.
3 Create an application pool or an RDS desktop pool. See Chapter 9, “Creating Application Pools,” on
page 111 or Chapter 10, “Creating RDS Desktop Pools,” on page 115.
4 Entitle users and groups. See Chapter 12, “Entitling Users and Groups,” on page 147.
5 (Optional) Enable time zone redirection for RDS desktop and application sessions. See “Enable Time
Zone Redirection for RDS Desktop and Application Sessions,” on page 94.
N If smart card authentication is enabled, make sure that the Smart Card service is disabled on RDS
hosts. Otherwise, authentication might fail. By default, this service is disabled.
C When a user launches an application, for example, a Web browser, it is possible for a user to gain
access to the local drives on the RDS host that is hosting the application. This can happen if the application
provides functions that cause Windows Explorer to run. To prevent this type of access to the RDS host,
follow the procedure that is described in hp://support.microsoft.com/kb/179221 to prevent an application
from running Windows Explorer.
Because the procedure described in hp://support.microsoft.com/kb/179221 aects both desktop and
application sessions, it is recommended that you do not create RDS desktop pools and application pools on
the same farm if you plan to follow the procedure in the Microsoft KB article, so that desktop sessions are
not aected.
Installing Applications
If you plan to create application pools, you must install the applications on the RDS hosts. If you want View
to automatically display the list of installed applications, you must install the applications so that they are
available to all users from the Start menu. You can install an application at any time before you create the
application pool. If you plan to manually specify an application, you can install the application at any time,
either before or after creating an application pool.
I When you install an application, you must install it on all the RDS hosts in a farm and in the
same location on each RDS host. If you do not, a health warning will appear on the View Administrator
dashboard. In such a situation, if you create an application pool, users might encounter an error when they
try to run the application.
When you create an application pool, View automatically displays the applications that are available to all
users rather than individual users from the Start menu on all of the RDS hosts in a farm. You can choose any
applications from that list. In addition, you can manually specify an application that is not available to all
users from the Start menu. There is no limit on the number of applications that you can install on an RDS
host.
Setting Up Desktop and Application Pools in View
88 VMware, Inc.
Install Remote Desktop Services on Windows Server 2008 R2
Remote Desktop Services (RDS) is one of the roles that a Windows Server can have. You must install this
role to set up an RDS host that runs Windows Server 2008 R2.
Prerequisites
nVerify that the RDS host is running Windows Server 2008 R2 Service Pack 1 (SP1).
nVerify that the RDS host is part of the Active Directory domain for the View deployment.
nInstall the Microsoft hotx rollup that is documented in hp://support.microsoft.com/kb/2775511.
Procedure
1 Log in to the RDS host as an administrator.
2 Start Server Manager.
3 Select Roles in the navigation tree.
4 Click Add Roles to start the Add Role wizard.
5 Select the role Remote Desktop Services.
6 On the Select Role Services page, select Remote Desktop Session Host.
7 On the Specify Authentication Method page, select either Require Network Level Authentication or
Do not require Network Level Authentication, whichever is appropriate.
8 On the Congure Client Experience page, select the functionality that you want to provide to users.
9 Follow the prompts and nish the installation.
What to do next
If you plan to use HTML Access or scanner redirection, install the Desktop Experience feature. The steps for
installing Desktop Experience dier on Windows Server 2008 R2 and Windows Server 2012 or 2012 R2.
Restrict users to a single desktop session. See “Restrict Users to a Single Session,” on page 91.
Install Remote Desktop Services on Windows Server 2012 or 2012 R2
Remote Desktop Services is one of the roles that a Windows Server 2012 or 2012 R2 can have. You must
install this role to set up an RDS host.
Prerequisites
nVerify that the RDS host is running Windows Server 2012 or Windows Server 2012 R2.
nVerify that the RDS host is part of the Active Directory domain for the View deployment.
Procedure
1 Log in to the RDS host as an administrator.
2 Start Server Manager.
3 Select Add roles and features.
4 On the Select Installation Type page, select Role-based or feature-based installation.
5 On the Select Destination Server page, select a server.
6 On the Select Server Roles page, select Remote Desktop Services.
7 On the Select Features page, accept the defaults.
Chapter 7 Setting Up Remote Desktop Services Hosts
VMware, Inc. 89
8 On the Select Role Services page, select Remote Desktop Session Host.
9 Follow the prompts and nish the installation.
What to do next
If you plan to use HTML Access or scanner redirection, install the Desktop Experience feature. The steps for
installing Desktop Experience dier on Windows Server 2008 R2 and Windows Server 2012 or 2012 R2.
Restrict users to a single desktop session. See “Restrict Users to a Single Session,” on page 91.
Install Desktop Experience on Windows Server 2008 R2
For RDS desktops and applications, and for VDI desktops that are deployed on single-user virtual machines
that run Windows Server, scanner redirection requires that you install the Desktop Experience feature on the
RDS hosts and the single-user virtual machines.
Procedure
1 Log in as an administrator.
2 Start Server Manager.
3 Click Features.
4 Click Add Features.
5 On the Select Features page, select the Desktop Experience checkbox.
6 Review the information about other features that are required by the Desktop Experience feature, and
click Add Required Features.
7 Follow the prompts and nish the installation.
Install Desktop Experience on Windows Server 2012 or 2012 R2
For RDS desktops and applications, and for VDI desktops that are deployed on single-user virtual machines
that run Windows Server, scanner redirection requires that you install the Desktop Experience feature on the
RDS hosts and the single-user virtual machines.
Windows Server 2012 and Windows Server 2012 R2 are supported on machines that are used as RDS hosts.
Windows Server 2012 R2 is supported on single-user virtual machines.
Procedure
1 Log in as an administrator.
2 Start Server Manager.
3 Select Add roles and features.
4 On the Select Installation Type page, select Role-based or feature-based installation.
5 On the Select Destination Server page, select a server.
6 On the Select Server Roles page, accept the default selection and click Next.
7 On the Select Features page, under User Interfaces and Infrastructure, select Desktop Experience.
8 Follow the prompts and nish the installation.
Setting Up Desktop and Application Pools in View
90 VMware, Inc.
Restrict Users to a Single Session
View supports at most one desktop session and one application session per user on an RDS host. You must
congure the RDS host to restrict users to a single session. For Windows Server 2008 R2, Windows Server
2012, and Windows Server 2012 R2, you can can restrict users to a single session by enabling the group
policy seing
Restrict Remote Desktop Services users to a single Remote Desktop Services session. This
seing is located in the folder Computer Configuration\Administrative Templates\Windows
Components\Remote Desktop Services\Remote Desktop Session Host\Connections. For Windows Server
2008 R2, you can also use the following procedure to restrict users to a single session.
Prerequisites
nInstall the Remote Desktop Services role as described in “Install Remote Desktop Services on Windows
Server 2008 R2,” on page 89.
Procedure
1 Click Start > Administrative Tools > Remote Desktop Services > Remote Desktop Session Host
.
2 On the Edit Seings pane, under General, double-click Restrict each user to a single session.
3 In the Properties dialog box, on the General tab, select Restrict each user to a single session and click
OK.
What to do next
Install View Agent on the RDS host. See “Install View Agent on a Remote Desktop Services Host,” on
page 91.
Install View Agent on a Remote Desktop Services Host
View Agent communicates with View Connection Server and supports the display protocol PCoIP. You
must install View Agent on an RDS Host.
Prerequisites
nInstall the Remote Desktop Services role as described in “Install Remote Desktop Services on Windows
Server 2008 R2,” on page 89 or “Install Remote Desktop Services on Windows Server 2012 or 2012 R2,”
on page 89.
nRestrict users to a single desktop session. See “Restrict Users to a Single Session,” on page 91.
nFamiliarize yourself with the View Agent custom setup options. See “View Agent Custom Setup
Options for an RDS Host,” on page 92.
nIf the machine has the Microsoft Visual C++ Redistributable package installed, verify that the version of
the package is 2005 SP1 or later. If the package version is 2005 or earlier, you can either upgrade or
uninstall the package.
nDownload the View Agent installer le from the VMware product page at
hp://www.vmware.com/go/downloadview.
Procedure
1 Log in as an administrator.
2 To start the View Agent installation program, double-click the installer le.
The installer lename is VMware-viewagent-x86_64-y.y.y-xxxxxx.exe, where y.y.y is the version number
and xxxxxx is the build number.
Chapter 7 Setting Up Remote Desktop Services Hosts
VMware, Inc. 91

3 Select the Internet Protocol (IP) version, IPv4 or IPv6.
You must install all View components with the same IP version.
4 Select your custom setup options.
Do not select the View Composer Agent option if you are installing View Agent on an RDS host that
will be in a manual farm.
5 In the Server text box, type the host name or IP address of a View Connection Server host.
During installation, the installer registers the RDS host with this View Connection Server instance. After
registration, the specied View Connection Server instance, and any additional instances in the same
View Connection Server group, can communicate with the RDS host.
6 Select an authentication method to register the RDS host with the View Connection Server instance.
Option Description
Authenticate as the currently
logged in user
The Username and Password text boxes are disabled and you are logged
in to the View Connection Server instance with your current username and
password.
Specify administrator credentials You must provide the username and password of a View Connection
Server administrator in the Username and Password text boxes.
The user account must be a domain user with access to View LDAP on the View Connection Server
instance. A local user does not work.
7 Follow the prompts and nish the installation.
What to do next
Create a farm. See Chapter 8, “Creating Farms,” on page 99.
View Agent Custom Setup Options for an RDS Host
When you install View Agent on an RDS host, you can select custom setup options. In addition, View Agent
installs certain features automatically on all guest operating systems on which they are supported. These
features are not optional.
To change custom setup options after you install the latest View Agent version, you must uninstall and
reinstall View Agent. For patches and upgrades, you can run the new View Agent installer and select a new
set of options without uninstalling the previous version.
Table 7‑1. View Agent Custom Setup Options for an RDS Host in an IPv4 Environment
Option Description
USB Redirection Gives users access to locally connected USB storage devices.
Specically, redirection of USB ash drives and hard disks is supported in RDS desktops and
applications. Redirection of other types of USB devices, and other types of USB storage
devices such as security storage drives and USB CD-ROM, is not supported in RDS desktops
and applications.
This setup option is not selected by default. You must select the option to install it. This option
is available on RDS hosts that run Windows Server 2012 or 2012 R2 but not Windows Server
2008 R2.
For guidance on using USB redirection securely, see the View Security guide. For example, you
can use group policy seings to disable USB redirection for specic users.
HTML Access Allows users to connect to RDS desktops and applications by using HTML Access. The
HTML Access Agent is installed when this setup option is selected. This agent must be
installed on RDS hosts to allow users to make connections with HTML Access
3D RDSH Provides 3D graphics support to applications that run on this RDS host.
Setting Up Desktop and Application Pools in View
92 VMware, Inc.

Table 7‑1. View Agent Custom Setup Options for an RDS Host in an IPv4 Environment (Continued)
Option Description
View Composer Agent Select this option if this machine is a parent virtual machine for the creation of an automated
farm. Do not select this option if this machine is an RDS host in a manual farm.
Client Drive Redirection Allows Horizon Client users to share local drives with their RDS desktops and applications.
After this setup option is installed, no further conguration is required on the RDS host.
Client Drive Redirection is also supported on VDI desktops that run on single-user virtual
machines and unmanaged machines.
Virtual Printing Lets users print to any printer available on their client computers. Users do not have to install
additional drivers on their desktops.
In Horizon 6.0.1 and later, virtual printing is supported on the following remote desktops and
applications:
nDesktops that are deployed on single-user machines, including Windows Desktop and
Windows Server machines
nDesktops that are deployed on RDS hosts, where the RDS hosts are virtual machines
nHosted Apps
nHosted Apps that are launched from Horizon Client inside remote desktops
In Horizon 6.0 and earlier, virtual printing is supported on desktops that are deployed on
single-user, Windows Desktop machines.
The virtual printing feature is supported only when you install it from View Agent. It is not
supported if you install it with VMware Tools.
vRealize Operations
Desktop Agent
Lets vRealize Operations Manager work with vRealize Operations Manager for Horizon.
Scanner Redirection Redirects scanning devices that are connected to the client system so that they can be used on
the RDS desktop or application.
You must install the Desktop Experience feature in the Windows Server operating system on
the RDS hosts to make this option available in the View Agent installer.
This setup option is not installed by default on Windows Server guest operating systems. You
must select the option to install it.
Scanner redirection is available in Horizon 6.0.2 and later releases.
In an IPv6 environment, there are no optional features.
Table 7‑2. View Agent Features That Are Installed Automatically on an RDS Host
Option Description
PCoIP Agent Allows users to connect to applications and RDS desktops using the PCoIP display protocol.
You must install this component if you plan to create application pools because users can
only connect to applications using PCoIP.
Windows Media
Multimedia Redirection
(MMR)
Provides multimedia redirection for RDS desktops. This feature delivers a multimedia stream
directly to the client computer, allowing the multimedia stream to be processed on the client
hardware instead of the remote ESXi host.
Unity Touch Allows tablet and smart phone users to interact with Windows applications that run on the
remote desktop. Users can browse, search, and open Windows applications and les, choose
favorite applications and les, and switch between running applications without using the
Start menu or Taskbar.
PSG Agent Installs the PCoIP Secure Gateway on RDS hosts to implement the PCoIP display protocol for
desktop and application sessions that run on RDS hosts.
VMwareRDS Provides the VMware implementation of Remote Desktop Services functionality.
In an IPv6 environment, the automatically installed features are PCoIP Agent, PSG Agent, and
VMwareRDS.
For additional features that are supported on RDS hosts, see "Feature Support Matrix for View Agent" in the
View Architecture Planning document.
Chapter 7 Setting Up Remote Desktop Services Hosts
VMware, Inc. 93
Enable Time Zone Redirection for RDS Desktop and Application
Sessions
If an RDS host is in one time zone and a user is in another time zone, by default, when the user connects to
an RDS desktop, the desktop displays time that is in the time zone of the RDS host. You can enable the Time
Zone Redirection group policy seing to make the RDS desktop display time in the local time zone. This
policy seing applies to application sessions as well.
Prerequisites
nVerify that the Group Policy Management feature is available on your Active Directory server.
The steps for opening the Group Policy Management Console dier in the Windows 2012, Windows
2008, and Windows 2003 Active Directory versions. See “Create GPOs for View Group Policies,” on
page 262.
nVerify that the View RDS ADMX les are added to Active Directory. See “Add the Remote Desktop
Services ADMX Files to Active Directory,” on page 248.
nFamiliarize yourself with the group policy seings. See “RDS Device and Resource Redirection
Seings,” on page 250.
Procedure
1 On the Active Directory server, open the Group Policy Management Console.
2 Expand your domain and Group Policy Objects.
3 Right-click the GPO that you created for the group policy seings and select Edit.
4 In the Group Policy Management Editor, navigate to Computer > Policies >
Administrative Templates > Windows Components > Horizon View RDSH Services > Remote
Desktop Session Host > Device and Resource Redirection.
5 Enable the seing Allow time zone redirection.
Enable Windows Basic Theme for Applications
If a user has never connected to a desktop on an RDS host, and the user launches an application that is
hosted on the RDS host, the Windows basic theme is not applied to the application even if a GPO seing is
congured to load the Aero-styled theme. View does not support the Aero-styled theme but supports the
Windows basic theme. To make the Windows basic theme apply to the application, you must congure
another GPO seing.
Prerequisites
nVerify that the Group Policy Management feature is available on your Active Directory server.
The steps for opening the Group Policy Management Console dier in the Windows 2012, Windows
2008, and Windows 2003 Active Directory versions. See “Create GPOs for View Group Policies,” on
page 262.
Procedure
1 On the Active Directory server, open the Group Policy Management Console.
2 Expand your domain and Group Policy Objects.
3 Right-click the GPO that you created for the group policy seings and select Edit.
4 In the Group Policy Management Editor, navigate to User > Policies > Administrative
Templates > Control Panel > Personalization.
Setting Up Desktop and Application Pools in View
94 VMware, Inc.

5 Enable the seing Force a visual style or force Windows classic and set the Path to Visual
Style as %windir%\resources\Themes\Aero\aero.msstyles.
Configure Group Policy to Start Runonce.exe
By default, some applications that rely on the Explorer.exe le may not run in an application session. To
avoid this issue, you must congure a GPO seing to start runonce.exe.
Prerequisites
nVerify that the Group Policy Management feature is available on your Active Directory server.
The steps for opening the Group Policy Management Console dier in the Windows 2012, Windows
2008, and Windows 2003 Active Directory versions. See “Create GPOs for View Group Policies,” on
page 262.
Procedure
1 On the Active Directory server, open the Group Policy Management Console.
2 Expand your domain and Group Policy Objects.
3 Right-click the GPO that you created for the group policy seings and select Edit.
4 In the Group Policy Management Editor, navigate to User > Policies > Windows
> Scripts .
5 Double-click Logon and click Add.
6 In the Script Name box, type runonce.exe.
7 In the Script Parameters box, type /AlternateShellStartup.
RDS Host Performance Options
You can optimize Windows for either foreground programs or background services by seing performance
options. By default, View disables certain performance options for RDS hosts for all supported versions of
Windows Server.
The following table shows the performance options that are disabled by View.
Table 7‑3. Performance Options Disabled by View
Performance Options Disabled by View
Animate windows when minimizing and maximizing
Show shadows under mouse pointer
Show shadows under windows
Use drop shadow for icon labels on the desktop
Show windows contents while dragging
The ve performance options that are disabled by View correspond to four View seings in the registry. The
following table shows the View seings and their default registry values. The registry values are all located
in the registry subkey HKEY_LOCAL_MACHINE\Software\VMware, Inc.\VMware VDM\Agent\Configuration. You
can re-enable the performance options by seing one or more of the View registry values to false.
Table 7‑4. View Settings Related to Windows Performance Options
View Setting Registry Value
Disable cursor shadow DisableMouseShadows
Disable full window drag DisableFullWindowDrag
Chapter 7 Setting Up Remote Desktop Services Hosts
VMware, Inc. 95

Table 7‑4. View Settings Related to Windows Performance Options (Continued)
View Setting Registry Value
Disable ListView shadow DisableListViewShadow
Disable Window Animation DisableWindowAnimation
Configuring 3D Graphics for RDS Hosts
With 3D graphics congured for RDS hosts, both applications in application pools and applications running
on RDS desktops can display 3D graphics.
The following 3D graphics options are available:
NVIDIA GRID vGPU
(shared GPU hardware
acceleration)
A physical GPU on an ESXi host is shared among multiple virtual machines.
Requires ESXi 6.0 or later.
Virtual Dedicated
Graphics Acceleration
(vDGA)
A physical GPU on an ESXi host is dedicated to a single virtual machine.
Requires ESXi 5.5 or later.
With vDGA, you get beer performance, but the RDS host must be in a manual farm.
With vGPU, each graphics card can support multiple RDS hosts and the RDS hosts must be in a manual
farm. If an ESXi host has multiple physical GPUs, you can also congure the way the ESXi host assigns
virtual machines to the GPUs. By default, the ESXi host assigns virtual machines to the physical GPU with
the fewest virtual machines already assigned. This is called performance mode. You can also choose
consolidation mode, where the ESXi host assign virtual machines to the same physical GPU until the
maximum number of virtual machines is reached before placing virtual machines on the next physical GPU.
To congure consolidation mode, edit the /etc/vmware/config le on the ESXi host and add the following
entry:
vGPU.consolidation = "true"
3D graphics is only supported when you use the PCoIP protocol. Therefore, the farm must use PCoIP as the
default protocol and users must not be allowed to choose the protocol.
Overview of Steps for Configuring 3D Graphics
This overview describes tasks that you must perform in vSphere and View to congure 3D graphics. For
more information about seing up NVIDIA GRID vGPU, see the document NVIDIA GRID vGPU
Deployment Guide for VMware Horizon 6.1. For more information about seing up vDGA, see the
document Graphics Acceleration in View Virtual Desktops.
1 Set up an RDS host virtual machine. For more information, see Chapter 7, “Seing Up Remote Desktop
Services Hosts,” on page 87.
2 Add the graphics PCI device to the virtual machine. See "Other Virtual Machine Device Conguration"
in the chapter "Conguring Virtual machine Hardware" in the vSphere Virtual Machine Administration
document. Be sure to click Reserve all memory when adding the device.
3 On the virtual machine, install the device driver for the graphics card.
4 Add the RDS host to a manual farm, create an RDS desktop pool, connect to the desktop using PCoIP,
and activate the display adapter.
If the 3D option is vGPU, you can now use the RDS host as the parent virtual machine for an automated
farm. See “Create an Automated Farm,” on page 109.
Setting Up Desktop and Application Pools in View
96 VMware, Inc.
You do not need to congure 3D graphics for RDS hosts in View Administrator. Selecting the option 3D
RDSH when you install View Agent is sucient. By default, this option is not selected and 3D graphics is
disabled.
Chapter 7 Setting Up Remote Desktop Services Hosts
VMware, Inc. 97
Setting Up Desktop and Application Pools in View
98 VMware, Inc.

Creating Farms 8
A farm is a group of RDS hosts that provides a common set of applications or RDS desktops to users.
This chapter includes the following topics:
n“Farms,” on page 99
n“Preparing a Parent Virtual Machine for an Automated Farm,” on page 100
n“Worksheet for Creating a Manual Farm,” on page 103
n“Worksheet for Creating an Automated Farm,” on page 104
n“Create a Manual Farm,” on page 108
n“Create an Automated Farm,” on page 109
Farms
Farms simplify the task of managing RDS hosts, RDS desktops, and applications in an enterprise. You can
create manual or automated farms to serve groups of users that vary in size or have dierent desktop or
application requirements.
A manual farm consists of RDS hosts that already exist. The RDS hosts can be physical or virtual machines.
You manually add the RDS hosts when you create the farm.
An automated farm consists of RDS host that are linked-clone virtual machines in vCenter Server. View
Composer creates the virtual machines based on the parameters that you specify when you create the farm.
The virtual machines are cloned from a single parent virtual machine and are linked to the parent in a
mechanism that reduces the amount of storage that the virtual machines require.
When you create an application pool or an RDS desktop pool, you must specify one and only one farm. The
RDS hosts in a farm can host RDS desktops, applications, or both. A farm can support at most one RDS
desktop pool, but it can support multiple application pools. A farm can support both types of pools
simultaneously.
Farms provide the following conveniences:
nLoad balancing
By default, View balances the load of the RDS desktop sessions and the application sessions across all
the RDS hosts in the farm. You can control the placement of new application sessions by writing and
conguring load balancing scripts. For more information, see "Conguring Load Balancing for RDS
Hosts" in the View Administration document.
nRedundancy
If one RDS host in a farm is oine, the other RDS hosts in the farm continue to provide applications
and desktops to users.
VMware, Inc. 99

nScalability
A farm can have a variable number of RDS hosts. You can create farms with dierent numbers of RDS
hosts to serve user groups of dierent sizes.
Farms have the following properties:
nA View pod can have a maximum of 200 farms.
nA farm can have a maximum of 200 RDS hosts.
nThe RDS hosts in a farm can run any supported version of Windows Server. See "System Requirements
for Guest Operating Systems" in the View Installation document.
nAutomated farms support the View Composer recompose operation but do not support the refresh or
rebalance operation. You can recompose an automated farm but not a subset of the RDS hosts in the
farm.
I Microsoft recommends that you congure roaming proles for users separately for each farm.
The proles should not be shared between farms or users' physical desktops since prole corruption and
data loss may occur if a user is simultaneously logged in to two machines that load the same prole.
Preparing a Parent Virtual Machine for an Automated Farm
To create an automated farm, you must rst prepare a parent virtual machine. View Composer uses this
parent virtual machine to create linked-clone virtual machines, which are the RDS hosts in the farm.
nPrepare an RDS Host Parent Virtual Machine on page 100
The View Composer service requires a parent virtual machine from which you generate a base image
for creating linked clones.
nActivating Windows on Linked-Clone RDS Hosts on page 102
To make sure that View Composer properly activates Windows Server operating systems on linked-
clone RDS hosts, you must use Microsoft volume activation on the parent virtual machine. The
volume-activation technology requires a volume license key.
nDisable Windows Hibernation in the Parent Virtual Machine on page 102
The Windows hibernation option creates a large system le that can increase the size of the linked-
clone OS disks that are created from the parent virtual machine. Disabling the hibernation option
reduces the size of linked-clones.
Prepare an RDS Host Parent Virtual Machine
The View Composer service requires a parent virtual machine from which you generate a base image for
creating linked clones.
Prerequisites
nVerify that an RDS host virtual machine is set up. See Chapter 7, “Seing Up Remote Desktop Services
Hosts,” on page 87. To set up the RDS host, be sure not to use a virtual machine that was previously
registered to View Connection Server.
A parent virtual machine that you use for View Composer must either belong to the same Active
Directory domain as the domain that the linked-clone machines will join or be a member of the local
WORKGROUP.
Setting Up Desktop and Application Pools in View
100 VMware, Inc.

nVerify that the virtual machine was not converted from a View Composer linked clone. A virtual
machine that is converted from a linked clone has the clone's internal disk and state information. A
parent virtual machine cannot have state information.
I Linked clones and virtual machines that were converted from linked clones are not
supported as parent virtual machines.
nWhen you install View Agent on the parent virtual machine, select the View Composer Agent option.
See “Install View Agent on a Remote Desktop Services Host,” on page 91.
To update View Agent in a large environment, you can use standard Windows update mechanisms
such as Altiris, SMS, LanDesk, BMC, or other systems management software. You can also use the
recompose operation to update View Agent.
N Do not change the log on account for the VMware View Composer Guest Agent Server service in
a parent virtual machine. By default, this is the Local System account. If you change this account, the
linked clones created from the parent do not start.
nTo deploy Windows machines, congure a volume license key and activate the parent virtual machine's
operating system with volume activation. See “Activating Windows on Linked-Clone Virtual
Machines,” on page 48.
nFamiliarize yourself with the procedure for disabling searching Windows Update for device drivers.
See the Microsoft Technet article, "Disable Searching Windows Update for Device Drivers" at
hp://technet.microsoft.com/en-us/library/cc730606(v=ws.10).aspx.
nTo implement the RDS host load balancing feature, modify the RDS host parent virtual machine as
described in "Conguring Load Balancing for RDS Hosts" in the View Administration document.
Procedure
nRemove the DHCP lease on the parent virtual machine to avoid copying a leased IP address to the
linked clones in the farm.
a On the parent virtual machine, open a command prompt.
b Type the ipconfig /release command.
nVerify that the system disk contains a single volume.
You cannot deploy linked clones from a parent virtual machine that contains more than one volume.
The View Composer service does not support multiple disk partitions. Multiple virtual disks are
supported.
nVerify that the virtual machine does not contain an independent disk.
An independent disk is excluded when you take a snapshot of the virtual machine. Linked clones that
are created or recomposed from the virtual machine will not contain the independent disk.
nDisable the hibernation option to reduce the size of linked-clone OS disks that are created from the
parent virtual machine.
nBefore you take a snapshot of the parent virtual machine, disable searching Windows Update for device
drivers.
This Windows feature can interfere with the customization of linked-clone machines. As each linked
clone is customized, Windows might search for the best drivers on the Internet for that clone, resulting
in repeated searches and customization delays.
nIn vSphere Client, disable the vApp Options seing on the parent virtual machine.
Chapter 8 Creating Farms
VMware, Inc. 101

nOn Windows Server 2008 R2 and Windows Server 2012 R2 machines, disable the scheduled
maintenance task that recovers disk space by removing unused features.
For example: Schtasks.exe /change /disable /tn "\Microsoft\Windows\AppxDeploymentClient\Pre-
staged app cleanup"
If left enabled, this maintenance task can remove the Sysprep customization script after the linked
clones are created, which would cause subsequent recompose operations to fail with customization
operation timeout errors. For more information, see the Microsoft KB article available at
hp://support.microsoft.com/kb/2928948.
nOn Windows Server 2012 machines, apply the Microsoft hotx available at
hps://support.microsoft.com/en-us/kb/3020396.
This hotx allows Sysprep to customize a Windows Server 2012 virtual machine that has the RDS role
enabled. Without the hotx, Sysprep customization will fail on the Windows Server 2012 linked-clone
machines that are deployed in an automated farm.
What to do next
Use vSphere Client or vSphere Web Client to take a snapshot of the parent virtual machine in its powered-
down state. This snapshot is used as the baseline conguration for the rst set of linked-clone machines that
are anchored to the parent virtual machine.
I Before you take a snapshot, completely shut down the parent virtual machine by using the
Shut Down command in the guest operating system.
Activating Windows on Linked-Clone RDS Hosts
To make sure that View Composer properly activates Windows Server operating systems on linked-clone
RDS hosts, you must use Microsoft volume activation on the parent virtual machine. The volume-activation
technology requires a volume license key.
To activate Windows with volume activation, you use Key Management Service (KMS), which requires a
KMS license key. See your Microsoft dealer to acquire a volume license key and congure volume activation.
N View Composer does not support Multiple Activation Key (MAK) licensing.
Before you create linked-clone machines with View Composer, you must use volume activation to activate
the operating system on the parent virtual machine.
When a linked-clone machine is created, and each time the linked clone is recomposed, the View Composer
agent uses the parent virtual machine's KMS server to activate the operating system on the linked clone.
For KMS licensing, View Composer uses the KMS server that is congured to activate the parent virtual
machine. The KMS server treats an activated linked clone as a computer with a newly issued license.
Disable Windows Hibernation in the Parent Virtual Machine
The Windows hibernation option creates a large system le that can increase the size of the linked-clone OS
disks that are created from the parent virtual machine. Disabling the hibernation option reduces the size of
linked-clones.
The Windows hibernation option creates a hidden system le, Hiberfil.sys. Windows uses this le to store
a copy of system memory on the hard disk when the hybrid sleep seing is turned on. When View
Composer creates the linked clones, the le is created on each linked clone's OS disk. This le can be 10 GB.
C When you make hibernation unavailable, the hybrid sleep seing does not work. Users can lose
data if the hybrid sleep seing is turned on and a power loss occurs.
Setting Up Desktop and Application Pools in View
102 VMware, Inc.

Prerequisites
Familiarize yourself with the Windows hibernation feature. See the Microsoft Support Web site. For
information about disabling hibernation, see the Microsoft Support Web site and search for how to disable
and re-enable hibernation on a computer that is running Windows.
Procedure
1 In vSphere Client, select the parent virtual machine and select Open Console.
2 Log in to the Windows guest operating system as an administrator.
3 Disable the hibernation option.
a Click Start and type cmd in the Start Search box.
b In the search results list, right-click Command Prompt and click Run as Administrator.
c At the User Account Control prompt, click Continue.
d At the command prompt, type powercfg.exe /hibernate off and press Enter.
e Type exit and press Enter.
4 Log out of the guest operating system.
When you a create linked-clone machines from the parent virtual machine, the Hiberfil.sys le is not
created on the linked-clone OS disks.
Worksheet for Creating a Manual Farm
When you create a manual farm, the Add Farm wizard prompts you to congure certain seings.
You can print this worksheet and write down the values you want to specify when you run the Add Farm
wizard.
Table 8‑1. Worksheet: Configuration Settings for Creating a Manual Farm
Setting Description
Fill in Your Value
Here
ID Unique name that identies the farm in View Administrator.
Description Description of this farm.
Access group Access group in which to place all the pools in this farm.
For more information about access groups, see the role-based
delegated administration chapter in the View Administration
document.
Default display
protocol
Select PCoIP or RDP. This seing applies to desktop pools only. The
display protocol for application pools is always PCoIP. If you select
RDP and you plan to use this farm to host application pools, you
must set Allow users to choose protocol to Yes . The default is PCoIP.
Allow users to choose
protocol
Select Yes or No. This seing applies to RDS desktop pools only. If
you select Yes, users can choose the display protocol when they
connect to an RDS desktop from Horizon Client. The default is Yes.
Empty session timeout
(applications only)
Determines the amount of time that an empty application session is
kept open. An application session is empty when all the applications
that run in the session are closed. While the session is open, users can
open applications faster. You can save system resources if you
disconnect or log o empty application sessions. Select Never or set
the number of minutes as the timeout value. The default is After 1
minute.
Chapter 8 Creating Farms
VMware, Inc. 103

Table 8‑1. Worksheet: Configuration Settings for Creating a Manual Farm (Continued)
Setting Description
Fill in Your Value
Here
When timeout occurs Determines whether an empty application session is disconnected or
logged o after the Empty session timeout limit is reached. Select
Disconnect or Log . A session that is logged o frees up resources,
but opening an application takes longer. The default is Disconnect.
Log o disconnected
session
Determines when a disconnected session is logged o. This seing
applies to both desktop and application sessions. Select Never,
Immediate, or After ... minutes. Use caution when you select
Immediate or After ... minutes. When a disconnected session is
logged o, the session is lost. The default is Never.
Allow HTML Access to
desktops and
applications on this
farm
Determines whether HTML Access to RDS desktops and applications
is allowed. Check the Enabled box to allow HTML Access to RDS
desktops and applications. When you edit this seing after a farm is
created, the new value applies to existing desktops and applications
as well as new ones.
N Unlike an automated farm, a manual farm does not have the seing Max sessions per RDS server,
because a manual farm can have RDS hosts that are not identical. For RDS hosts in a manual farm, you can
edit individual RDS hosts and change the equivalent seing Number of connections.
Worksheet for Creating an Automated Farm
When you create an automated farm, the Add Farm wizard prompts you to congure certain seings.
You can print this worksheet and write down the values you want to specify when you run the Add Farm
wizard.
Table 8‑2. Worksheet: Configuration Settings for Creating an Automated Farm
Setting Description
Fill in Your Value
Here
ID Unique name that identies the farm in View Administrator.
Description Description of this farm.
Access group Access group in which to place all the pools in this farm.
For more information about access groups, see the role-based
delegated administration chapter in the View Administration
document.
Default display
protocol
Select PCoIP or RDP. This seing applies to desktop pools only. The
display protocol for application pools is always PCoIP. If you select
RDP and you plan to use this farm to host application pools, you
must set Allow users to choose protocol to Yes . The default is PCoIP.
Allow users to choose
protocol
Select Yes or No. This seing applies to RDS desktop pools only. If
you select Yes, users can choose the display protocol when they
connect to an RDS desktop from Horizon Client. The default is Yes.
Empty session timeout
(applications only)
Determines the amount of time that an empty application session is
kept open. An application session is empty when all the applications
that run in the session are closed. While the session is open, users can
open applications faster. You can save system resources if you
disconnect or log o empty application sessions. Select Never or set
the number of minutes as the timeout value. The default is After 1
minute.
Setting Up Desktop and Application Pools in View
104 VMware, Inc.

Table 8‑2. Worksheet: Configuration Settings for Creating an Automated Farm (Continued)
Setting Description
Fill in Your Value
Here
When timeout occurs Determines whether an empty application session is disconnected or
logged o after the Empty session timeout limit is reached. Select
Disconnect or Log . A session that is logged o frees up resources,
but opening an application takes longer. The default is Disconnect.
Log o disconnected
session
Determines when a disconnected session is logged o. This seing
applies to both desktop and application sessions. Select Never,
Immediate, or After ... minutes. Use caution when you select
Immediate or After ... minutes. When a disconnected session is
logged o, the session is lost. The default is Never.
Allow HTML Access to
desktops and
applications on this
farm
Determines whether HTML Access to RDS desktops and applications
is allowed. Check the Enabled box to allow HTML Access to RDS
desktops and applications. When you edit this seing after a farm is
created, the new value applies to existing desktops and applications
as well as new ones.
Max sessions per RDS
server
Determines the maximum number of sessions that an RDS host can
support. Select Unlimited or No More Than .... The default is
Unlimited.
Enable provisioning Select this checkbox to enable provisioning after you nish this
wizard. This box is checked by default.
Stop provisioning on
error
Select this checkbox to stop provisioning when a provisioning error
occurs. This box is checked by default.
Naming paern Specify a prex or a name format. View will append or insert an
automatically generated number starting with 1 to form the machine
name. If you want the number at the end, simply specify a prex.
Otherwise, specify {n} anywhere in a character string and {n} will be
replaced by the number. You can also specify of
digits>}, where of digits> indicates the number of
digits to be used for the number. For example, specify
and the machine names will be vm-001-sales, vm-002-sales, and
so on.
N Each machine name, including the automatically generated
number, has a 15-character limit.
Max number of
machines
The number of machines to be provisioned.
Minimum number of
ready (provisioned)
machines during View
Composer maintenance
operations
This seing lets you keep the specied number of machines available
to accept connection requests while View Composer recomposes the
machines in the farm.
Use vSphere Virtual
SAN
Specify whether to use VMware Virtual SAN, if available. Virtual
SAN is a software-dened storage tier that virtualizes the local
physical storage disks available on a cluster of ESXi hosts. For more
information, see “Using Virtual SAN for High-Performance Storage
and Policy-Based Management,” on page 209
Select separate
datastores for replica
and OS disks
(Available only if you do not use Virtual SAN) You can place replica
and OS disks on dierent datastores for performance or other reasons.
Parent VM Select a parent virtual machine from the list. Be aware that the list
includes virtual machines that do not have View Composer Agent
installed. You must not select any of those machines because View
Composer Agent is required. A good practice is to use a naming
convention that indicates whether a virtual machine has View
Composer Agent installed.
Chapter 8 Creating Farms
VMware, Inc. 105

Table 8‑2. Worksheet: Configuration Settings for Creating an Automated Farm (Continued)
Setting Description
Fill in Your Value
Here
Snapshot Select the snapshot of the parent virtual machine to use as the base
image for the farm.
Do not delete the snapshot and parent virtual machine from vCenter
Server, unless no linked clones in the farm use the default image, and
no more linked clones will be created from this default image. The
system requires the parent virtual machine and snapshot to provision
new linked clones in the farm, according to farm policies. The parent
virtual machine and snapshot are also required for View Composer
maintenance operations.
VM folder location Select the folder in vCenter Server in which the farm resides.
Host or cluster Select the ESXi host or cluster on which the desktop virtual machines
run.
With Virtual SAN datastores (a vSphere 5.5 Update 1 feature), you can
select a cluster with up to 20 ESXi hosts. With Virtual Volumes
datastores (a vSphere 6.0 feature), you can select a cluster with up to
32 ESXi hosts.
In vSphere 5.1 or later, you can select a cluster with up to 32 ESXi
hosts if the replicas are stored on VMFS5 or later datastores or NFS
datastores. If you store replicas on a VMFS version earlier than
VMFS5, a cluster can have at most eight hosts.
In vSphere 5.0, you can select a cluster with more than eight ESXi
hosts if the replicas are stored on NFS datastores. If you store replicas
on VMFS datastores, a cluster can have at most eight hosts.
Resource pool Select the vCenter Server resource pool in which the farm resides.
Datastores Select one or more datastores on which to store the farm.
A table on the Select Linked Clone Datastores page of the Add Farm
wizard provides high-level guidelines for estimating the farm's
storage requirements. These guidelines can help you determine which
datastores are large enough to store the linked-clone disks. For details,
see “Storage Sizing for Linked-Clone Desktop Pools,” on page 213.
You can use shared or local datastores for an individual ESXi host or
for ESXi clusters. If you use local datastores in an ESXi cluster, you
must consider the vSphere infrastructure constraints that are imposed
on your desktop deployment. See “Storing Linked Clones on Local
Datastores,” on page 220.
N If you use Virtual SAN, select only one datastore.
Storage Overcommit Determine the storage-overcommit level at which linked-clones are
created on each datastore.
As the level increases, more linked clones t on the datastore and less
space is reserved to let individual clones grow. A high storage-
overcommit level lets you create linked clones that have a total logical
size larger than the physical storage limit of the datastore. For details,
see “Storage Overcommit for Linked-Clone Virtual Machines,” on
page 217.
N This seing has no eect if you use Virtual SAN.
Setting Up Desktop and Application Pools in View
106 VMware, Inc.

Table 8‑2. Worksheet: Configuration Settings for Creating an Automated Farm (Continued)
Setting Description
Fill in Your Value
Here
Use native NFS
snapshots (VAAI)
(Available only if you do not use Virtual SAN) If your deployment
includes NAS devices that support the vStorage APIs for Array
Integration (VAAI), you can use native snapshot technology to clone
virtual machines.
You can use this feature only if you select datastores that reside on
NAS devices that support native cloning operations through VAAI.
You cannot use this feature if you store replicas and OS disks on
separate datastores. You cannot use this feature on virtual machines
with space-ecient disks.
This feature is supported on vSphere 5.0 and later.
For details, see “Using View Composer Array Integration with Native
NFS Snapshot Technology (VAAI),” on page 225.
Reclaim VM disk space (Available only if you do not use Virtual SAN or Virtual Volumes)
Determine whether to allow ESXi hosts to reclaim unused disk space
on linked clones that are created in space-ecient disk format. The
space reclamation feature reduces the total storage space required for
linked-clone desktops.
This feature is supported on vSphere 5.1 and later. The linked-clone
virtual machines must be virtual hardware version 9 or later.
For details, see “Reclaim Disk Space on Linked-Clone Virtual
Machines,” on page 223.
Initiate reclamation
when unused space on
VM exceeds:
(Available only if you do not use Virtual SAN or Virtual Volumes)
Type the minimum amount of unused disk space, in gigabytes, that
must accumulate on a linked-clone OS disk to trigger space
reclamation. When the unused disk space exceeds this threshold,
View initiates the operation that directs the ESXi host to reclaim space
on the OS disk.
This value is measured per virtual machine. The unused disk space
must exceed the specied threshold on an individual virtual machine
before View starts the space reclamation process on that machine.
For example: 2 GB.
The default value is 1 GB.
Blackout Times Congure days and times during which the reclamation of virtual
machine disk space do not take place.
To ensure that ESXi resources are dedicated to foreground tasks when
necessary, you can prevent the ESXi hosts from performing these
operations during specied periods of time on specied days.
For details, see “Set Blackout Times for ESXi Operations on View
Virtual Machines,” on page 226.
Transparent Page
Sharing Scope
Select the level at which to allow transparent page sharing (TPS). The
choices are Virtual Machine (the default), Farm, Pod, or Global. If
you turn on TPS for all the machines in the farm, pod, or globally, the
ESXi host eliminates redundant copies of memory pages that result if
the machines use the same guest operating system or applications.
Page sharing happens on the ESXi host. For example, if you enable
TPS at the farm level but the farm is spread across multiple ESXi
hosts, only virtual machines on the same host and within the same
farm will share pages. At the global level, all machines managed by
View on the same ESXi host can share memory pages, regardless of
which farm the machines reside in.
N The default seing is not to share memory pages among
machines because TPS can pose a security risk. Research indicates that
TPS could possibly be abused to gain unauthorized access to data in
very limited conguration scenarios.
Chapter 8 Creating Farms
VMware, Inc. 107

Table 8‑2. Worksheet: Configuration Settings for Creating an Automated Farm (Continued)
Setting Description
Fill in Your Value
Here
Domain Select the Active Directory domain and user name.
View Composer requires certain user privileges to farm. The domain
and user account are used by Sysprep to customize the linked-clone
machines.
You specify this user when you congure View Composer seings for
vCenter Server. You can specify multiple domains and users when
you congure View Composer seings. When you use the Add Farm
wizard to create a farm, you must select one domain and user from
the list.
For information about conguring View Composer, see the View
Administration document.
AD container Provide the Active Directory container relative distinguished name.
For example: CN=Computers
When you run the Add Farm wizard, you can browse your Active
Directory tree for the container.
Allow reuse of pre-
existing computer
accounts
Select this seing to use existing computer accounts in Active
Directory for linked clones that are provisioned by View Composer.
This seing lets you control the computer accounts that are created in
Active Directory.
When a linked clone is provisioned, if an existing AD computer
account name matches the linked clone machine name, View
Composer uses the existing computer account. Otherwise, a new
computer account is created.
The existing computer accounts must be located in the Active
Directory container that you specify with the Active Directory
container seing.
When this seing is disabled, a new AD computer account is created
when View Composer provisions a linked clone. This seing is
disabled by default.
For details, see “Use Existing Active Directory Computer Accounts for
Linked Clones,” on page 78.
Use a customization
specication (Sysprep)
Provide a Sysprep customization specication to customize the virtual
machines.
Create a Manual Farm
You create a manual farm as part of the process to give users access to applications or RDS desktops.
Prerequisites
nSet up the RDS hosts that belong to the farm. See Chapter 7, “Seing Up Remote Desktop Services
Hosts,” on page 87.
nVerify that all the RDS hosts have the Available status. In View Administrator, select View
> Registered Machines and check the status of each RDS host on the RDS Hosts tab.
nGather the conguration information you must provide to create the farm. See “Worksheet for Creating
a Manual Farm,” on page 103.
Procedure
1 In View Administrator, click Resources > Farms.
2 Click Add to enter the conguration information that you gathered in the worksheet.
3 Select Manual Farm.
Setting Up Desktop and Application Pools in View
108 VMware, Inc.

4 Follow the prompts in the wizard to create the farm.
Use the conguration information that you gathered in the worksheet. You can go directly back to any
wizard page that you completed by clicking the page name in the navigation panel.
5 Select the RDS hosts to add to the farm and click Next.
6 Click Finish.
In View Administrator, you can now view the farm by clicking Resources > Farms.
What to do next
Create an application pool or an RDS desktop pool. See Chapter 9, “Creating Application Pools,” on
page 111 or Chapter 10, “Creating RDS Desktop Pools,” on page 115.
Create an Automated Farm
You create an automated farm as part of the process to give users access to applications or RDS desktops.
Prerequisites
nVerify that the View Composer service is installed. See the View Installation document.
nVerify that View Composer seings for vCenter Server are congured in View Administrator. See the
View Administration document.
nVerify that you have a sucient number of ports on the ESXi virtual switch that is used for the virtual
machines that are used as remote desktops. The default value might not be sucient if you create large
desktop pools. The number of virtual switch ports on the ESXI host must equal or exceed the number of
virtual machines multiplied by the number of virtual NICs per virtual machine.
nVerify that you prepared a parent virtual machine. Both View Agent and View Composer Agent must
be installed on the parent virtual machine. See “Preparing a Parent Virtual Machine for an Automated
Farm,” on page 100.
nTake a snapshot of the parent virtual machine in vCenter Server. You must shut down the parent virtual
machine before you take the snapshot. View Composer uses the snapshot as the base image from which
the clones are created.
N You cannot create a linked-clone pool from a virtual machine template.
nGather the conguration information you must provide to create the farm. See “Worksheet for Creating
an Automated Farm,” on page 104.
Procedure
1 In View Administrator, click Resources > Farms.
2 Click Add to enter the conguration information that you gathered in the worksheet.
3 Select Automated Farm.
4 Follow the prompts in the wizard to create the farm.
Use the conguration information that you gathered in the worksheet. You can go directly back to any
wizard page that you completed by clicking the page name in the navigation panel.
In View Administrator, you can now view the farm by clicking Resources > Farms.
What to do next
Create an application pool or an RDS desktop pool. See Chapter 9, “Creating Application Pools,” on
page 111 or Chapter 10, “Creating RDS Desktop Pools,” on page 115.
Chapter 8 Creating Farms
VMware, Inc. 109
Setting Up Desktop and Application Pools in View
110 VMware, Inc.

Creating Application Pools 9
One of the tasks that you perform to give users remote access to an application is to create an application
pool. Users who are entitled to an application pool can access the application remotely from a variety of
client devices.
This chapter includes the following topics:
n“Application Pools,” on page 111
n“Worksheet for Creating an Application Pool Manually,” on page 112
n“Create an Application Pool,” on page 112
Application Pools
With application pools, you can deliver a single application to many users. The application runs on a farm of
RDS hosts.
When you create an application pool, you deploy an application in the data center that users can access from
anywhere on the network. For an introduction to application pools, see “Farms, RDS Hosts, and Desktop
and Application Pools,” on page 9.
An application pool has a single application and is associated with a single farm. To avoid errors, you must
install the application on all of the RDS hosts in the farm.
When you create an application pool, View automatically displays the applications that are available to all
users rather than individual users from the Start menu on all the RDS hosts in the farm. You can select one
or more applications from the list. If you select multiple applications from the list, a separate application
pool is created for each application. You can also manually specify an application that is not on the list. If an
application that you want to manually specify is not already installed, View displays a warning message.
When you create an application pool, you cannot specify the access group in which to place the pool. For
application pools and RDS desktop pools, you specify the access group when you create a farm.
An application supports the PCoIP and Blast (for HTML Access) display protocols. To enable HTML Access,
see "Prepare Desktops, Pools, and Farms for HTML Access," in the "Setup and Installation" chapter in the
Using HTML Access document, available from
hps://www.vmware.com/support/viewclients/doc/viewclients_pubs.html.
VMware, Inc. 111

Worksheet for Creating an Application Pool Manually
When you create an application pool and manually specify an application, the Add Application Pools
wizard prompts you for information about the application. It is not a requirement that the application is
already installed on any RDS host.
You can print this worksheet and write down the properties of an application when you specify the
application manually.
Table 9‑1. Worksheet: Application Properties for Creating an Application Pool Manually
Property Description Fill in Your Value Here
ID Unique name that identies the pool in View
Administrator. This eld is required.
Display Name Pool name that users see when they log in to
Horizon Client. If you do not specify a display
name, it will be the same as ID.
Version Version of the application.
Publisher Publisher of the application.
Path Full pathname of the application. For example,
C:\Program Files\app1.exe. This eld is
required.
Start Folder Full pathname of the starting directory for the
application.
Parameters Parameters to pass to the application when it
starts. For example, you can specify -
username user1 -loglevel 3.
Description Description of this application pool.
Create an Application Pool
You create an application pool as part of the process to give users access to an application that runs on RDS
hosts.
Prerequisites
nSet up RDS hosts. See Chapter 7, “Seing Up Remote Desktop Services Hosts,” on page 87.
nCreate a farm that contains the RDS hosts. See Chapter 8, “Creating Farms,” on page 99.
nIf you plan to add the application pool manually, gather information about the application. See
“Worksheet for Creating an Application Pool Manually,” on page 112.
Procedure
1 In View Administrator, click Catalog > Application Pools.
2 Click Add.
3 Follow the prompts in the wizard to create the pool.
If you choose to add an application pool manually, use the conguration information you gathered in
the worksheet. If you select applications from the list that View Administrator displays, you can select
multiple applications. A separate pool is created for each application.
In View Administrator, you can now view the application pool by clicking Catalog > Application Pools.
Setting Up Desktop and Application Pools in View
112 VMware, Inc.
What to do next
Entitle users to access the pool. See Chapter 12, “Entitling Users and Groups,” on page 147.
Make sure that your end users have access to Horizon Client 3.0 or later software, which is required to
support RDS applications.
If you need to ensure that View Connection Server launches the application only on RDS hosts that have
sucient resources to run the application, congure an anti-anity rule for the application pool. For more
information, see "Congure an Anti-Anity Rule for an Application Pool" in the View Administration
document.
Chapter 9 Creating Application Pools
VMware, Inc. 113
Setting Up Desktop and Application Pools in View
114 VMware, Inc.

Creating RDS Desktop Pools 10
One of the tasks that you perform to give users remote access to session-based desktops is to create a
Remote Desktop Services (RDS) desktop pool. An RDS desktop pool has properties that can satisfy some
specic needs of a remote desktop deployment.
This chapter includes the following topics:
n“Understanding RDS Desktop Pools,” on page 115
n“Create an RDS Desktop Pool,” on page 116
n“Desktop Pool Seings for RDS Desktop Pools,” on page 116
n“Congure Adobe Flash Throling with Internet Explorer for RDS Desktop Pools,” on page 117
Understanding RDS Desktop Pools
An RDS desktop pool is one of three types of desktop pools that you can create. This type of pool was
known as a Microsoft Terminal Services pool in previous View releases.
An RDS desktop pool and an RDS desktop have the following characteristics:
nAn RDS desktop pool is associated with a farm, which is a group of RDS hosts. Each RDS host is a
Windows server that can host multiple RDS desktops.
nAn RDS desktop is based on a session to an RDS host. In contrast, a desktop in an automated desktop
pool is based on a virtual machine, and a desktop in a manual desktop pool is based on a virtual or
physical machine.
nAn RDS desktop supports the RDP, PCoIP, and Blast (for HTML Access) display protocols. To enable
HTML Access, see "Prepare Desktops, Pools, and Farms for HTML Access," in the "Setup and
Installation" chapter in the Using HTML Access document, available from
hps://www.vmware.com/support/viewclients/doc/viewclients_pubs.html.
nAn RDS desktop pool is only supported on Windows Server operating systems that support the RDS
role and are supported by View. See "System Requirements for Guest Operating Systems" in the View
Installation document.
nView provides load balancing of the RDS hosts in a farm by directing connection requests to the RDS
host that has the least number of active sessions.
nBecause an RDS desktop pool provides session-based desktops, it does not support operations that are
specic to a linked-clone desktop pool, such as refresh, recompose, and rebalance.
nIf an RDS host is a virtual machine that is managed by vCenter Server, you can use snapshots as base
images. You can use vCenter Server to manage the snapshots. The use of snapshots on RDS host virtual
machines is transparent to View.
VMware, Inc. 115

nRDS desktops do not support View Persona Management.
nThe copy and paste feature is disabled by default for HTML Access. To enable the feature, see "HTML
Access Group Policy Seings" in the chapter "Conguring HTML Access for End Users" in the Using
HTML Access document, available from
hps://www.vmware.com/support/viewclients/doc/viewclients_pubs.html.
Create an RDS Desktop Pool
You create an RDS desktop pool as part of the process to give users access to RDS desktops.
Prerequisites
nSet up RDS hosts. See Chapter 7, “Seing Up Remote Desktop Services Hosts,” on page 87.
nCreate a farm that contains the RDS hosts. See Chapter 8, “Creating Farms,” on page 99.
nDecide how to congure the pool seings. See “Desktop Pool Seings for RDS Desktop Pools,” on
page 116.
Procedure
1 In View Administrator, select Catalog > Desktop Pools.
2 Click Add.
3 Select RDS Desktop Pool.
4 Provide a pool ID, display name, and description.
The pool ID is the unique name that identies the pool in View Administrator. The display name is the
name of the RDS desktop pool that users see when they log in to Horizon Client. If you do not specify a
display name, it will be the same as the pool ID.
5 Select pool seings.
6 Select or create a farm for this pool.
In View Administrator, you can now view the RDS desktop pool by selecting Catalog > Desktop Pools.
What to do next
Entitle users to access the pool. See “Add Entitlements to a Desktop or Application Pool,” on page 147.
Make sure that your end users have access to Horizon Client 3.0 or later software, which is required to
support RDS desktop pools.
Desktop Pool Settings for RDS Desktop Pools
You can specify certain pool seings when you create an RDS desktop pool. Not all pool seings apply to all
types of desktop pools.
For descriptions of all pool seings, see “Desktop Pool Seings for All Desktop Pool Types,” on page 127.
The following pool seings apply to an RDS desktop pool.
Table 10‑1. Settings for an RDS Desktop Pool
Setting Default Value
State Enabled
Connection Server restrictions None
Adobe Flash quality Do not control
Adobe Flash throling Disabled
Setting Up Desktop and Application Pools in View
116 VMware, Inc.
Configure Adobe Flash Throttling with Internet Explorer for RDS
Desktop Pools
To ensure that Adobe Flash throling works with Internet Explorer in RDS desktops, users must enable
third-party browser extensions.
Procedure
1 Start Horizon Client and log in to a user's desktop.
2 In Internet Explorer, click Tools > Internet Options.
3 Click the Advanced tab, select Enable third-party browser extensions, and click OK.
4 Restart Internet Explorer.
Chapter 10 Creating RDS Desktop Pools
VMware, Inc. 117
Setting Up Desktop and Application Pools in View
118 VMware, Inc.

Provisioning Desktop Pools 11
When you create a desktop pool, you select conguration options that determine how the pool is managed
and how users interact with the desktops.
These provisioning tasks apply to desktop pools that are deployed on single-user machines. They do not
apply to RDS desktop pools. However, the Adobe Flash quality and throling seings apply to all types of
desktop pools, including RDS.
This chapter includes the following topics:
n“User Assignment in Desktop Pools,” on page 119
n“Naming Machines Manually or Providing a Naming Paern,” on page 120
n“Manually Customizing Machines,” on page 125
n“Desktop Pool Seings for All Desktop Pool Types,” on page 127
n“Adobe Flash Quality and Throling,” on page 130
n“Seing Power Policies for Desktop Pools,” on page 131
n“Conguring 3D Rendering for Desktops,” on page 136
n“Prevent Access to View Desktops Through RDP,” on page 143
n“Deploying Large Desktop Pools,” on page 144
User Assignment in Desktop Pools
You can congure a desktop pool so that users have dedicated assignments or oating assignments to the
machines in the pool. You must choose a user assignment for automated pools that contain full virtual
machines, automated linked-clone pools, and manual pools.
With a dedicated assignment, View assigns each entitled user to one machine in the pool. When a user
connects to the pool, the user always logs in to the same machine. The user's seings and data are saved
between sessions. No other user in the pool can access the machine.
With a oating assignment, View dynamically assigns machines in the pool to entitled users. Users connect
to a dierent machine each time they log in. When a user logs o, the machine is returned to the pool.
You can congure oating-assignment machines to be deleted when users log o. Automatic deletion lets
you keep only as many virtual machines as you need at one time. You can use automatic deletion only in
automated pools that you provision with a machine-naming paern and a total number of machines.
Floating-assignment machines let you reduce software licensing costs.
VMware, Inc. 119

Naming Machines Manually or Providing a Naming Pattern
You can provision the machines in an automated pool by manually specifying a list of machine names or by
providing a naming paern and the number of machines you want in the pool. These two approaches oer
dierent advantages.
If you name machines by specifying a list, you can use your company's naming scheme, and you can
associate each machine name with a user.
If you provide a naming paern, View can dynamically create and assign machines as users need them.
You must use one of these naming methods to provision automated pools that contain full virtual machines
or linked clones.
Table 11-1 compares the two naming methods, showing how each method aects the way you create and
administer a desktop pool.
Table 11‑1. Naming machines Manually or Providing a machine-Naming Pattern
Feature Providing a Machine-Naming Pattern Naming Machines Manually
Machine names View generates machine names.
You provide a naming paern. View adds
a unique number to identify each
machine.
For details, see “Using a Naming Paern
for Automated Desktop Pools,” on
page 122.
You specify a list of machine names.
In a dedicated-assignment pool, you
can pair users with machines by listing
user names with the machine names.
For details, see “Specify a List of
Machine Names,” on page 121.
Pool size You specify a maximum number of
machines.
Your list of machine names determines
the number of machines.
To add machines to the pool You can increase the maximum pool size. You can add machine names to the list.
For details, see “Add Machines to an
Automated Pool Provisioned by a List
of Names,” on page 124.
On-demand provisioning Available.
View dynamically creates and provisions
the specied minimum and spare number
of machines as users rst log in or as you
assign machines to users.
View can also create and provision all the
machines when you create the pool.
Not available.
View creates and provisions all the
machines that you specify in your list
when the pool is created.
Initial customization Available.
When a machine is provisioned, View can
run a customization specication that you
select.
Available.
When a machine is provisioned, View
can run a customization specication
that you select.
Manual customization of
dedicated machines
To customize machines and return
desktop access to your users, you must
remove and reassign the ownership of
each machine. Depending on whether
you assign machines on rst log in, you
might have to perform these steps twice.
You cannot start machines in
maintenance mode. After the pool is
created, you can manually put the
machines into maintenance mode.
You can customize and test machines
without having to reassign ownership.
When you create the pool, you can
start all machines in maintenance
mode to prevent users from accessing
them. You can customize the machines
and exit maintenance mode to return
access to your users.
For details, see “Manually
Customizing Machines,” on page 125.
Setting Up Desktop and Application Pools in View
120 VMware, Inc.

Table 11‑1. Naming machines Manually or Providing a machine-Naming Pattern (Continued)
Feature Providing a Machine-Naming Pattern Naming Machines Manually
Dynamic or xed pool size Dynamic.
If you remove a user assignment from a
machine in a dedicated-assignment pool,
the machine is returned to the pool of
available machines.
If you choose to delete machines on logo
in a oating-assignment pool, the pool
size can grow or shrink depending on the
number of active user sessions.
Fixed.
The pool contains the number of
machines you provide in the list of
machine names.
You cannot select the Delete machine
on seing if you name machines
manually.
Spare machines You can specify a number of spare
machines that View keeps powered on for
new users.
View creates new machines to maintain
the specied number. View stops creating
spare machines when it reaches the
maximum pool size.
View keeps the spare machines powered
on even when the pool power policy is
Power or Suspend, or when you do
not set a power policy.
You can specify a number of spare
machines that View keeps powered on
for new users.
View does not create new spare
machines to maintain the specied
number.
View keeps the spare machines
powered on even when the pool
power policy is Power or Suspend,
or when you do not set a power policy.
User assignment You can use a naming paern for
dedicated-assignment and oating-
assignment pools.
You can specify machine names for
dedicated-assignment and oating-
assignment pools.
N In a oating-assignment pool,
you cannot associate user names with
machine names. The machines are not
dedicated to the associated users. In a
oating-assignment pool, all machines
that are not currently in use remain
accessible to any user who logs in.
Specify a List of Machine Names
You can provision an automated desktop pool by manually specifying a list of machine names. This naming
method lets you use your company's naming conventions to identify the machines in a pool.
When you explicitly specify machine names, users can see familiar names based on their company's
organization when they log in to their remote desktops.
Follow these guidelines for manually specifying machine names:
nType each machine name on a separate line.
nA machine name can have up to 15 alphanumeric characters.
nYou can add a user name to each machine entry. Use a comma to separate the user name from the
machine name.
In this example, two machines are specied. The second machine is associated with a user:
Desktop-001
Desktop-002,abccorp.com\jdoe
N In a oating-assignment pool, you cannot associate user names with machine names. The machines
are not dedicated to the associated users. In a oating-assignment pool, all machines that are not currently
in use remain accessible to any user who logs in.
Chapter 11 Provisioning Desktop Pools
VMware, Inc. 121
Prerequisites
Make sure that each machine name is unique. You cannot use the names of existing virtual machines in
vCenter Server.
Procedure
1 Create a text le that contains the list of machine names.
If you intend to create a desktop pool with only a few machines, you can type the machine names
directly in the Add Desktop Pool wizard. You do not have to create a separate text le.
2 In View Administrator start the Add Desktop Pool wizard to begin creating an automated desktop
pool.
3 On the Provisioning Seings page, select Specify names manually and click Enter names.
4 Copy your list of machine names in the Enter Machine Names page and click Next.
The Enter Machine Names wizard displays the desktop list and indicates validation errors with a red !.
5 Correct invalid machine names.
a Place your cursor over an invalid name to display the related error message at the boom of the
page.
b Click Back.
c Edit the incorrect names and click Next.
6 Click Finish.
7 (Optional) Select Start machines in maintenance mode.
This option lets you customize the machines before users can log in and use them.
8 Follow the prompts in the wizard to nish creating the desktop pool.
View creates a machine for each name in the list. When an entry includes a machine and user name, View
assigns the machine to that user.
After the desktop pool is created, you can add machines by importing another list le that contains
additional machine names and users. See "Add Machines to an Automated Pool Provisioned by a List of
Names" in the View Administration document.
Using a Naming Pattern for Automated Desktop Pools
You can provision the machines in a pool by providing a naming paern and the total number of machines
you want in the pool. By default, View uses your paern as a prex in all the machine names and appends a
unique number to identify each machine.
Length of the Naming Pattern in a Machine Name
Machine names have a 15-character limit, including your naming paern and the automatically generated
number.
Setting Up Desktop and Application Pools in View
122 VMware, Inc.

Table 11‑2. Maximum Length of the Naming Pattern in a Machine Name
If You Set This Number of Machines in the Pool This Is the Maximum Prefix Length
1-99 13 characters
100-999 12 characters
1,000 or more 11 characters
Names that contain xed-length tokens have dierent length limits. See “Length of the Naming Paern
When You Use a Fixed-Length Token,” on page 123.
Using a Token in a Machine Name
You can place the automatically generated number anywhere else in the name by using a token. When you
type the pool name, type n surrounded by curly brackets to designate the token.
For example: amber-{n}-desktop
When View creates a machine, View replaces {n} with a unique number.
You can generate a xed-length token by typing {n:fixed=number of digits}.
View replaces the token with numbers containing the specied number of digits.
For example, if you type amber-{n:fixed=3}, View replaces {n:fixed=3} with a three-digit number and
creates these machine names: amber-001, amber-002, amber-003, and so on.
Length of the Naming Pattern When You Use a Fixed-Length Token
Names that contain xed-length tokens have a 15-character limit, including your naming paern and the
number of digits in the token.
Table 11‑3. Maximum Length of the Naming Pattern When You Use a Fixed-Length Token
Fixed-Length Token Maximum Length of the Naming Pattern
{n:fixed=1} 14 characters
{n:fixed=2} 13 characters
{n:fixed=3} 12 characters
Machine-Naming Example
This example shows how to create two automated desktop pools that use the same machine names, but
dierent sets of numbers. The strategies that are used in this example achieve a specic user objective and
show the exibility of the machine-naming methods.
The objective is to create two pools with the same naming convention such as VDIABC-XX, where XX
represents a number. Each pool has a dierent set of sequential numbers. For example, the rst pool might
contain machines VDIABC-01 through VDIABC-10. The second pool contains machines VDIABC-11
through VDIABC-20.
You can use either machine-naming method to satisfy this objective.
nTo create xed sets of machines at one time, specify machine names manually.
nTo create machines dynamically when users log in for the rst time, provide a naming paern and use a
token to designate the sequential numbers.
Specifying the Names Manually
1 Prepare a text le for the rst pool that contains a list of machine names from VDIABC-01 through
VDIABC-10.
Chapter 11 Provisioning Desktop Pools
VMware, Inc. 123
2 In View Administrator, create the pool and specify machine names manually.
3 Click Enter Names and copy your list into the Enter Machine Names list box.
4 Repeat these steps for the second pool, using the names VDIABC-11 through VDIABC-20.
For detailed instructions, see “Specify a List of Machine Names,” on page 121.
You can add machines to each pool after it is created. For example, you can add machines VDIABC-21
through VDIABC-30 to the rst pool, and VDIABC-31 through VDIABC-40 to the second pool. See “Add
Machines to an Automated Pool Provisioned by a List of Names,” on page 124.
Providing a Naming Pattern With a Token
1 In View Administrator, create the rst pool and use a naming paern to provision the machine names.
2 In the naming-paern text box, type VDIABC-0{n}.
3 Limit the pool's maximum size to 9.
4 Repeat these steps for the second pool, but in the naming-paern text box, type VDIABC-1{n}.
The rst pool contains machines VDIABC-01 through VDIABC-09. The second pool contains machines
VDIABC-11 through VDIABC-19.
Alternatively, you can congure the pools to contain up to 99 machines each by using a xed-length token of
2 digits:
nFor the rst pool, type VDIABC-0{n:fixed=2}.
nFor the second pool, type VDIABC-1{n:fixed=2}.
Limit each pool's maximum size to 99. This conguration produces machines that contain a 3-digit
sequential naming paern.
First pool:
VDIABC-001
VDIABC-002
VDIABC-003
Second pool:
VDIABC-101
VDIABC-102
VDIABC-103
For details about naming paerns and tokens, see “Using a Naming Paern for Automated Desktop Pools,”
on page 122.
Add Machines to an Automated Pool Provisioned by a List of Names
To add machines to an automated desktop pool provisioned by manually specifying machine names, you
provide another list of new machine names. This feature lets you expand a desktop pool and continue to use
your company's naming conventions.
Follow these guidelines for manually adding machine names:
nType each machine name on a separate line.
nA machine name can have up to 15 alphanumeric characters.
nYou can add a user name to each machine entry. Use a comma to separate the user name from the
machine name.
Setting Up Desktop and Application Pools in View
124 VMware, Inc.

In this example, two machines are added. The second machine is associated with a user:
Desktop-001
Desktop-002,abccorp.com/jdoe
N In a oating-assignment pool, you cannot associate user names with machine names. The machines
are not dedicated to the associated users. In a oating-assignment pool, all machines that are not currently
in use remain accessible to any user who logs in.
Prerequisites
Verify that you created the desktop pool by manually specifying machine names. You cannot add machines
by providing new machine names if you created the pool by providing a naming paern.
Procedure
1 Create a text le that contains the list of additional machine names.
If you intend to add only a few machines, you can type the machine names directly in the Add Desktop
Pool wizard. You do not have to create a separate text le.
2 In View Administrator, select Catalog > Desktop Pools.
3 Select the desktop pool to be expanded.
4 Click Edit.
5 Click the Provisioning tab.
6 Click Add Machines.
7 Copy your list of machine names in the Enter Machine Names page and click Next.
The Enter Machine Names wizard displays the machine list and indicates validation errors with a red
X.
8 Correct invalid machine names.
a Place your cursor over an invalid name to display the related error message at the boom of the
page.
b Click Back.
c Edit the incorrect names and click Next.
9 Click Finish.
10 Click OK.
View adds the new machines to the pool.
In vCenter Server, you can monitor the creation of the new virtual machines.
In View Administrator, you can view the machines as they are added to the desktop pool by selecting
Catalog > Desktop Pools.
Manually Customizing Machines
After you create an automated pool, you can customize particular machines without reassigning ownership.
By starting the machines in maintenance mode, you can modify and test the machines before you release
them to their assigned users or make them available to all entitled users in the pool.
Chapter 11 Provisioning Desktop Pools
VMware, Inc. 125

Customizing Machines in Maintenance Mode
Maintenance mode prevents users from accessing their desktops. If you start machines in maintenance
mode, View places each machine in maintenance mode when the machine is created.
In a dedicated-assignment pool, you can use maintenance mode to log in to a machine without having to
reassign ownership to your own administrator account. When you nish the customization, you do not have
to return ownership to the user assigned to the machine.
In a oating-assignment pool, you can test machines in maintenance mode before you let users log in.
To perform the same customization on all machines in an automated pool, customize the virtual machine
you prepare as a template or parent. View deploys your customization to all the machines. When you create
the pool, you can also use a Sysprep customization specication to congure all the machines with licensing,
domain aachment, DHCP seings, and other computer properties.
N You can start machines in maintenance mode if you manually specify machine names for the pool,
not if you name machines by providing a naming paern.
Customize Individual Machines
You can customize individual machines after a pool is created by starting the machines in maintenance
mode.
Procedure
1 In View Administrator, begin creating an automated desktop pool by starting the Add Desktop Pool
wizard.
2 On the Provisioning Seings page, select Specify names manually.
3 Select Start machines in maintenance mode.
4 Complete the Add Desktop Pool wizard to nish creating the desktop pool.
5 In vCenter Server, log in, customize, and test the individual virtual machines.
You can customize the machines manually or by using standard Windows systems-management
software such as Altiris, SMS, LanDesk, or BMC.
6 In View Administrator, select the desktop pool.
7 Use the lter tool to select specic machines to release to your users.
8 Click More Commands > Exit Maintenance Mode.
What to do next
Notify your users that they can log in to their desktops.
Setting Up Desktop and Application Pools in View
126 VMware, Inc.

Desktop Pool Settings for All Desktop Pool Types
You must specify machine and desktop pool seings when you congure automated pools that contain full
virtual machines, linked-clone desktop pools, manual desktop pools, and RDS desktop pools. Not all
seings apply to all types of desktop pools.
Table 11‑4. Desktop Pool Setting Descriptions
Setting Options
State nEnabled. After being created, the desktop pool is enabled and ready for immediate use.
nDisabled. After being created, the desktop pool is disabled and unavailable for use, and
provisioning is stopped for the pool. This is an appropriate seing if you want to conduct post
deployment activities such as testing or other forms of baseline maintenance.
When this state is in eect, remote desktops are unavailable for use.
Connection Server
restrictions
nNone. The desktop pool can be accessed by any View Connection Server instance.
nWith tags. Select one or more View Connection Server tags to make the desktop pool
accessible only to View Connection Server instances that have those tags. You can use the
check boxes to select multiple tags.
If you intend to provide access to your desktops through Workspace Portal, and you congure
View Connection Server restrictions, the Workspace App Portal might display desktops to users
when those desktops are actually restricted. Workspace Portal users will be unable to launch these
desktops.
Remote machine
power policy
Determines how a virtual machine behaves when the user logs o of the associated desktop.
For descriptions of the power-policy options, see “Power Policies for Desktop Pools,” on page 131.
For more information about how power policies aect automated pools, see “Seing Power
Policies for Desktop Pools,” on page 131.
Automatically logo
after disconnect
nImmediately. Users are logged o as soon as they disconnect.
nNever. Users are never logged o.
nAfter. The time after which users are logged o when they disconnect. Type the duration in
minutes.
The log o time applies to future disconnections. If a desktop session was already
disconnected when you set a log o time, the log o duration for that user starts when you set
the log o time, not when the session was originally disconnected. For example, if you set this
value to ve minutes, and a session was disconnected 10 minutes earlier, View will log o that
session ve minutes after you set the value.
Allow users to reset
their machines
Allow users to reset their own desktops without administrative assistance.
Allow user to
initiate separate
sessions from
dierent client
devices
When this seing is selected, a user connecting to the same desktop pool from dierent client
devices will get dierent desktop sessions. The user can only reconnect to an existing session from
the client device where that session was initiated. When this seing is not selected, the user will be
reconnected to his or her existing session no maer which client device is used.
Delete machine after
logo
Select whether to delete oating-assignment, full virtual machines.
nNo. Virtual machines remain in the desktop pool after users log o.
nYes. Virtual machines are powered o and deleted as soon as users log o.
Delete or refresh
machine on logo
Select whether to delete, refresh, or leave alone oating-assignment, linked-clone virtual
machines.
nNever. Virtual machines remain in the pool and are not refreshed after users log o.
nDelete immediately. Virtual machines are powered o and deleted as soon as users log o.
When users log o, virtual machines immediately go into a Deleting state.
nRefresh immediately. Virtual machines are refreshed as soon as users log o. When users log
o, virtual machines immediately go into maintenance mode to prevent other users from
logging in as the refresh operation begins.
Chapter 11 Provisioning Desktop Pools
VMware, Inc. 127

Table 11‑4. Desktop Pool Setting Descriptions (Continued)
Setting Options
Refresh OS disk
after logo
Select whether and when to refresh the OS disks for dedicated-assignment, linked-clone virtual
machines.
nNever. The OS disk is never refreshed.
nAlways. The OS disk is refreshed every time the user logs o.
nEvery. The OS disk is refreshed at regular intervals of a specied number of days. Type the
number of days.
The number of days is counted from the last refresh, or from the initial provisioning if no
refresh has occurred yet. For example, if the specied value is 3 days, and three days have
passed since the last refresh, the machine is refreshed after the user logs o.
nAt. The OS disk is refreshed when its current size reaches a specied percentage of its
maximum allowable size. The maximum size of a linked clone's OS disk is the size of the
replica's OS disk. Type the percentage at which refresh operations occur.
With the At option, the size of the linked clone's OS disk in the datastore is compared to its
maximum allowable size. This disk-utilization percentage does not reect disk usage that you
might see inside the machine's guest operating system.
When you refresh the OS disks in a linked-clone pool with dedicated assignment, the View
Composer persistent disks are not aected.
Default display
protocol
Select the display protocol that you want View Connection Server to use to communicate with
clients.
PCoIP The default option wherever it is supported. PCoIP is supported as
the display protocol for virtual and physical machines that have
Teradici hardware. PCoIP provides an optimized PC experience for
the delivery of images, audio, and video content for a wide range of
users on the LAN or across the WAN.
Microsoft RDP Microsoft Remote Desktop Connection (RDC) uses RDP to transmit
data. RDP is a multichannel protocol that allows a user to connect to
a computer remotely.
Allow users to
choose protocol
Allow users to override the default display protocol for their desktops by using Horizon Client.
3D Renderer You can select whether to enable 3D graphics rendering if your pool comprises Windows 7 or later
desktops. You can congure the 3D Renderer to use software rendering or hardware rendering
based on physical GPU graphics cards installed on ESXi 5.1 or later hosts.
To enable this feature, you must select PCoIP as the protocol and disable the Allow users to
choose protocol seing (select No).
With the hardware-based 3D Renderer options, users can take advantage of graphics applications
for design, modeling, and multimedia. With the software 3D Renderer option, users can take
advantage of graphics enhancements in less demanding applications such as AERO, Microsoft
Oce, and Google Earth. For system requirements, see “Conguring 3D Rendering for
Desktops,” on page 136.
If your View deployment does not run on vSphere 5.0 or later, this seing is not available and is
inactive in View Administrator.
When you select this feature, if you select the Automatic, Software, or Hardware option, you can
congure the amount of VRAM that is assigned to machines in the pool. The maximum number of
monitors is 2 and the maximum resolution is 1920 x 1200.
If you select Manage using vSphere Client, or NVIDIA GRID vGPU, you must congure the
amount of 3D memory and the number of monitors in vCenter Server. You can select at most four
monitors for your machines that are used as remote desktops, depending on the monitor
resolution.
N When you congure or edit this seing, you must power o existing virtual machines,
verify that the machines are recongured in vCenter Server, and power on the machines to cause
the new seing to take eect. Restarting a virtual machine does not cause the new seing to take
eect.
For more information, see “Conguring 3D Rendering for Desktops,” on page 136, “3D Renderer
Options,” on page 138. and “Best Practices for Conguring 3D Rendering,” on page 140.
Setting Up Desktop and Application Pools in View
128 VMware, Inc.

Table 11‑4. Desktop Pool Setting Descriptions (Continued)
Setting Options
Max number of
monitors
If you use PCoIP as the display protocol, you can select the Maximum number of monitors on
which users can display the desktop.
You can select up to four monitors.
When the 3D Renderer seing is not selected, the Max number of monitors seing aects the
amount of VRAM that is assigned to machines in the pool. When you increase the number of
monitors, more memory is consumed on the associated ESXi hosts.
When the 3D Renderer seing is not selected, up to three monitors are supported at 3840 x 2160
resolution on a Windows 7 guest operating system with Aero disabled. For other operating
systems, or for Windows 7 with Aero enabled, one monitor is supported at 3840 x 2160 resolution.
When the 3D Renderer seing is selected, one monitor is supported at 3840 x 2160 resolution.
Multiple monitors are best supported at a lower resolution. Select fewer monitors if you select a
higher resolution.
N You must power o and on existing virtual machines for this seing to take eect.
Restarting a virtual machine does not cause the seing to take eect.
Max resolution of
any one monitor
If you use PCoIP as the display protocol, you should specify the Maximum resolution of any one
monitor.
The Maximum resolution of any one monitor is set to 1920 x 1200 pixels by default, but you can
congure this value.
When the 3D Renderer seing is not selected, the Max resolution of any one monitor seing
aects the amount of VRAM that is assigned to machines in the pool. When you increase the
resolution, more memory is consumed on the associated ESXi hosts.
When the 3D Renderer seing is not selected, up to three monitors are supported at 3840 x 2160
resolution on a Windows 7 guest operating system with Aero disabled. For other operating
systems, or for Windows 7 with Aero enabled, one monitor is supported at 3840 x 2160 resolution.
When the 3D Renderer seing is selected, one monitor is supported at 3840 x 2160 resolution.
Multiple monitors are best supported at a lower resolution. Select fewer monitors if you select a
higher resolution.
N You must power o and on existing virtual machines for this seing to take eect.
Restarting a virtual machine does not cause the seing to take eect.
HTML Access Select Enabled to allow users to connect to remote desktops from within their Web browsers.
When a user logs in through the VMware Horizon Web portal page or the Workspace App Portal
and selects a remote desktop, the HTML Access agent enables the user to connect to the desktop
over HTTPS. The desktop is displayed in the user's browser. Other display protocols, such as
PCoIP or RDP, are not used. Horizon Client software does not have to be installed on the client
devices.
To use HTML Access, you must install HTML Access in your View deployment. For more
information, see Using HTML Access, available from
hps://www.vmware.com/support/viewclients/doc/viewclients_pubs.html.
To use HTML Access with Workspace Portal, you must pair View Connection Server with a SAML
Authentication server, as described in the View Administration document. Workspace Portal must
be installed and congured for use with View Connection Server.
Adobe Flash quality Determines the quality of Adobe Flash content that is displayed on Web pages.
nDo not control. Quality is determined by Web page seings.
nLow. This seing results in the most bandwidth savings. If no quality level is specied, the
system defaults to Low.
nMedium. This seing results in moderate bandwidth savings.
nHigh. This seing results in the least bandwidth savings.
For more information, see “Adobe Flash Quality and Throling,” on page 130.
Chapter 11 Provisioning Desktop Pools
VMware, Inc. 129

Table 11‑4. Desktop Pool Setting Descriptions (Continued)
Setting Options
Adobe Flash
throling
Determines the frame rate of Adobe Flash movies. If you enable this seing, you can reduce or
increase the number of frames displayed per second by selecting an aggressiveness level.
nDisabled. No throling is performed. The timer interval is not modied.
nConservative. Timer interval is 100 milliseconds. This seing results in the lowest number of
dropped frames.
nModerate. Timer interval is 500 milliseconds.
nAggressive. Timer interval is 2500 milliseconds. This seing results in the highest number of
dropped frames.
For more information, see “Adobe Flash Quality and Throling,” on page 130.
Override global
Mirage seings
To specify the same Mirage server for all desktop pools, use the global View conguration seing
rather than this pool-specic seing.
Mirage Server
conguration
Allows you to specify the URL of a Mirage server, using the format
mirage://server-name:port or mirages://server-name:port. Here server-name is the fully
qualied domain name. If you do not specify the port number, the default port number 8000 is
used.
Specifying the Mirage server in View Administrator is an alternative to specifying the Mirage
server when installing the Mirage client. To nd out which versions of Mirage support having the
server specied in View Administrator, see the Mirage documentation, at
hps://www.vmware.com/support/pubs/mirage_pubs.html.
Adobe Flash Quality and Throttling
You can specify a maximum allowable level of quality for Adobe Flash content that overrides Web page
seings. If Adobe Flash quality for a Web page is higher than the maximum level allowed, quality is reduced
to the specied maximum. Lower quality results in more bandwidth savings.
To make use of Adobe Flash bandwidth-reduction seings, Adobe Flash must not be running in full screen
mode.
Table 11-5 shows the available Adobe Flash render-quality seings.
Table 11‑5. Adobe Flash Quality Settings
Quality Setting Description
Do not control Quality is determined by Web page seings.
Low This seing results in the most bandwidth savings.
Medium This seing results in moderate bandwidth savings.
High This seing results in the least bandwidth savings.
If no maximum level of quality is specied, the system defaults to a value of Low.
Adobe Flash uses timer services to update what is shown on the screen at a given time. A typical Adobe
Flash timer interval value is between 4 and 50 milliseconds. By throling, or prolonging, the interval, you
can reduce the frame rate and thereby reduce bandwidth.
Table 11-6 shows the available Adobe Flash throling seings.
Table 11‑6. Adobe Flash Throttling Settings
Throttling Setting Description
Disabled No throling is performed. The timer interval is not modied.
Conservative Timer interval is 100 milliseconds. This seing results in the lowest number of
dropped frames.
Setting Up Desktop and Application Pools in View
130 VMware, Inc.

Table 11‑6. Adobe Flash Throttling Settings (Continued)
Throttling Setting Description
Moderate Timer interval is 500 milliseconds.
Aggressive Timer interval is 2500 milliseconds. This seing results in the highest number of
dropped frames.
Audio speed remains constant regardless of which throling seing you select.
Setting Power Policies for Desktop Pools
You can congure a power policy for the virtual machines in a desktop pool if the virtual machines are
managed by vCenter Server.
Power policies control how a virtual machine behaves when its associated desktop is not in use. A desktop
is considered not in use before a user logs in and after a user disconnects or logs o. Power policies also
control how a virtual machine behaves after administrative tasks such as refresh, recompose, and rebalance
are completed.
You congure power policies when you create or edit desktop pools in View Administrator.
N You cannot congure power policies for desktop pools that have unmanaged machines.
Power Policies for Desktop Pools
Power policies control how a virtual machine behaves when the associated remote desktop is not in use.
You set power policies when you create or edit a desktop pool. Table 11-7 describes the available power
policies.
Table 11‑7. Power Policies
Power Policy Description
Take no power action View does not enforce any power policy after a user logs
o. This seing has two consequences.
nView does not change the power state of the virtual
machine after a user logs o.
For example, if a user shuts down the virtual machine,
the virtual machine remains powered o. If a user logs
o without shuing down, the virtual machine
remains powered on. When a user reconnects to the
desktop, the virtual machine restarts if it was powered
o.
nView does not enforce any power state after an
administrative task is completed.
For example, a user might log o without shuing
down. The virtual machine remains powered on. When
a scheduled recomposition takes place, the virtual
machine is powered o. After the recomposition is
completed, View does nothing to change the power
state of the virtual machine. It remains powered o.
Ensure machines are always powered on The virtual machine remains powered on, even when it is
not in use. If a user shuts down the virtual machine, it
immediately restarts. The virtual machine also restarts after
an administrative task such as refresh, recompose, or
rebalance is completed.
Select Ensure machines are always powered on if you run
batch processes or system management tools that must
contact the virtual machines at scheduled times.
Chapter 11 Provisioning Desktop Pools
VMware, Inc. 131

Table 11‑7. Power Policies (Continued)
Power Policy Description
Suspend The virtual machine enters a suspended state when a user
logs o, but not when a user disconnects.
You can also congure machines in a dedicated pool to be
suspended when a user disconnects without logging o. To
congure this policy, you must set an aribute in View
LDAP. See “Congure Dedicated Machines To Be
Suspended After Users Disconnect,” on page 133.
When multiple virtual machines are resumed from a
suspended state, some virtual machines might have delays
in powering on. Whether any delays occur depends on the
ESXi host hardware and the number of virtual machines
that are congured on an ESXi host. Users connecting to
their desktops from Horizon Client might temporarily see a
desktop-not-available message. To access their desktops,
users can connect again.
Power The virtual machine shuts down when a user logs o, but
not when a user disconnects.
N When you add a machine to a manual pool, View powers on the machine to ensure that it is fully
congured, even when you select the Power or Take no power action power policy. After View Agent is
congured, it is marked as Ready, and the normal power-management seings for the pool apply.
For manual pools with machines that are managed by vCenter Server, View ensures that a spare machine is
powered on so that users can connect to it. The spare machine is powered on no maer which power policy
is in eect.
Table 11-8 describes when View applies the congured power policy.
Table 11‑8. When View Applies the Power Policy
Desktop Pool Type The power policy is applied ...
Manual pool that contains one machine (vCenter Server-
managed virtual machine)
Power operations are initiated by session management. The
virtual machine is powered on when a user requests the
desktop and powered o or suspended when the user logs
o.
N The Ensure machines are always powered on
policy always applies, whether the single-machine pool
uses oating or dedicated assignment, and whether the
machine is assigned or unassigned.
Automated pool with dedicated assignment To unassigned machines only.
On assigned machines, power operations are initiated by
session management. Virtual machines are powered on
when a user requests an assigned machine and are
powered o or suspended when the user logs o.
N The Ensure machines are always powered on
policy applies to assigned and unassigned machines.
Automated pool with oating assignment When a machine is not in use and after a user logs o.
When you congure the Power or Suspend power
policy for a oating-assignment desktop pool, set
Automatically after disconnect to Immediately to
prevent discarded or orphaned sessions.
Setting Up Desktop and Application Pools in View
132 VMware, Inc.

Table 11‑8. When View Applies the Power Policy (Continued)
Desktop Pool Type The power policy is applied ...
Manual pool with dedicated assignment To unassigned machines only.
On assigned machines, power operations are initiated by
session management. Virtual machines are powered on
when a user requests an assigned machine and are
powered o or suspended when the user logs o.
N The Ensure machines are always powered on
policy applies to assigned and unassigned machines.
Manual pool with oating assignment When a machine is not in use and after a user logs o.
When you congure the Power or Suspend power
policy for a oating-assignment desktop pool, set
Automatically after disconnect to Immediately to
prevent discarded or orphaned sessions.
How View applies the congured power policy to automated pools depends on whether a machine is
available. See “How Power Policies Aect Automated Desktop Pools,” on page 133 for more information.
Configure Dedicated Machines To Be Suspended After Users Disconnect
The Suspend power policy causes virtual machines to be suspended when a user logs o, but not when a
user disconnects. You can also congure machines in a dedicated pool to be suspended when a user
disconnects from a desktop without logging o. Using suspend when users disconnect helps to conserve
resources.
To enable suspend on disconnect for dedicated machines, you must set an aribute in View LDAP.
Procedure
1 Start the ADSI Edit utility on your View Connection Server host.
2 In the console tree, select Connect to.
3 In the Select or type a domain or server eld, type the server name as localhost:389
4 Under Connection point, click Select or type a distinguished name or naming context, type the
distinguished name as DC=vdi,DC=vmware,DC=int, and click OK.
The ADAM ADSI Edit main window appears.
5 Expand the ADAM ADSI tree and expand OU=Properties.
6 Select OU=Global and select CN=Common in the right pane
7 Select Action > Properties, and under the pae-NameValuePair aribute, add the new entry
suspendOnDisconnect=1.
8 Restart the VMware Horizon View Connection Server service or View Connection Server.
How Power Policies Affect Automated Desktop Pools
How View applies the congured power policy to automated pools depends on whether a machine is
available.
A machine in an automated pool is considered available when it meets the following criteria:
nIs active
nDoes not contain a user session
nIs not assigned to a user
Chapter 11 Provisioning Desktop Pools
VMware, Inc. 133

The View Agent service running on the machine conrms the availability of the machine to View
Connection Server.
When you congure an automated pool, you can specify the minimum and maximum number of virtual
machines that must be provisioned and the number of spare machines that must be kept powered on and
available at any given time.
Power Policy Examples for Automated Pools with Floating Assignments
When you congure an automated pool with oating assignments, you can specify that a particular number
of machines must be available at a given time. The spare, available machines are always powered on, no
maer how the pool policy is set.
Power Policy Example 1
Table 11-9 describes the oating-assignment, automated pool in this example. The pool uses a machine-
naming paern to provision and name the machines.
Table 11‑9. Desktop Pool Settings for Automated Pool with Floating Assignment Example 1
Desktop Pool Setting Value
Number of machines (minimum) 10
Number of machines (maximum) 20
Number of spare, powered-on machines 2
Remote machine power policy Power o
When this desktop pool is provisioned, 10 machines are created, two machines are powered on and
immediately available, and eight machines are powered o.
For each new user that connects to the pool, a machine is powered on to maintain the number of spare,
available machines. When the number of connected users exceeds eight, additional machines, up to the
maximum of 20, are created to maintain the number of spare machines. After the maximum number is
reached, the machines of the rst two users who disconnect remain powered on to maintain the number of
spare machines. The machine of each subsequent user is powered o according to the power policy.
Power Policy Example 2
Table 11-10 describes the oating-assignment, automated pool in this example. The pool uses a machine-
naming paern to provision and name the machines.
Table 11‑10. Desktop Pool Settings for Automated Pool with Floating Assignments Example 2
Desktop Pool Setting Value
Number of machines (minimum) 5
Number of machines (maximum) 5
Number of spare, powered-on machines 2
Remote machine power policy Power o
When this desktop pool is provisioned, ve machines are created, two machines are powered on and
immediately available, and three machines are powered o.
If a fourth machine in this pool is powered o, one of the existing machines is powered on. An additional
machine is not powered on because the maximum of number of machines has already been reached.
Setting Up Desktop and Application Pools in View
134 VMware, Inc.

Power Policy Example for Automated Pools with Dedicated Assignments
Unlike a powered-on machine in an automated pool with oating assignments, a powered-on machine in an
automated pool with dedicated assignments is not necessarily available. It is available only if the machine is
not assigned to a user.
Table 11-11 describes the dedicated-assignment, automated pool in this example.
Table 11‑11. Desktop Pool Settings for Automated Pool with Dedicated Assignments Example
Desktop Pool Setting Value
Number of machines (minimum) 3
Number of machines (maximum) 5
Number of spare, powered-on machines 2
Remote machine power policy Ensure machines are always powered on
When this desktop pool is provisioned, three machines are created and powered on. If the machines are
powered o in vCenter Server, they are immediately powered on again, according to the power policy.
After a user connects to a machine in the pool, the machine becomes permanently assigned to that user.
After the user disconnects from the machine, the machine is no longer available to any other user. However,
the Ensure machines are always powered on policy still applies. If the assigned machine is powered o in
vCenter Server, it is immediately powered on again.
When another user connects, a second machine is assigned. Because the number of spare machines falls
below the limit when the second user connects, another machine is created and powered on. An additional
machine is created and powered on each time a new user is assigned until the maximum machine limit is
reached.
Preventing View Power Policy Conflicts
When you use View Administrator to congure a power policy, you must compare the power policy to the
seings in the guest operating system's Power Options control panel to prevent power policy conicts.
A virtual machine can become temporarily inaccessible if the power policy congured for the machine is not
compatible with a power option congured for the guest operating system. If there are other machines in the
same pool, they can also be aected.
The following conguration is an example of a power policy conict:
nIn View Administrator, the power policy Suspend is congured for the virtual machine. This policy
causes the virtual machine to enter a suspended state when it is not in use.
nIn the Power Options control panel in the guest operating system, the option Put the Computer to sleep
is set to three minutes.
In this conguration, both View Connection Server and the guest operating system can suspend the virtual
machine. The guest operating system power option might cause the virtual machine to be unavailable when
View Connection Server expects it to be powered on.
Chapter 11 Provisioning Desktop Pools
VMware, Inc. 135

Configuring 3D Rendering for Desktops
When you create or edit a desktop pool of virtual machines, you can congure 3D graphics rendering for
your desktops. Desktops can take advantage of Virtual Shared Graphics Acceleration (vSGA), Virtual
Dedicated Graphics Acceleration (vDGA), or shared GPU hardware acceleration (NVIDIA GRID vGPU).
vDGA and NVIDIA GRID vGPU are vSphere features that use physical graphics cards installed on the ESXi
hosts and manage the graphics processing unit (GPU) resources among the virtual machines.
End users can take advantage of 3D applications for design, modeling, and multimedia, which typically
require GPU hardware to perform well. For users that do not require physical GPU, a software option
provides graphics enhancements that can support less demanding applications such as Windows AERO,
Microsoft Oce, and Google Earth. Following are brief descriptions of the 3D graphics options:
NVIDIA GRID vGPU
(shared GPU hardware
acceleration)
Available with vSphere 6.0 and later, this feature allows a physical GPU on
an ESXi host to be shared among virtual machines. This feature oers exible
hardware-accelerated 3D proles ranging from lightweight 3D task workers
to high-end workstation graphics power users.
Virtual Dedicated
Graphics Acceleration
(vDGA)
Available with vSphere 5.5 and later, this feature dedicates a single physical
GPU on an ESXi host to a single virtual machine. Use this feature if you
require high-end, hardware-accelerated workstation graphics.
Virtual Shared Graphics
Acceleration (vSGA)
Available with vSphere 5.1 and later, this feature allows multiple virtual
machines to share the physical GPUs on ESXi hosts. This feature is suitable
for mid-range 3D design, modeling, and multimedia applications.
Soft 3D Software-accelerated graphics, available with vSphere 5.0 and later, allows
you to run DirectX 9 and OpenGL 2.1 applications without requiring a
physical GPU. Use this feature for less demanding 3D applications such as
Windows Aero themes, Microsoft Oce 2010, and Google Earth.
Because NVIDIA GRID vGPU and vDGA use PCI pass-through on the ESXi host, live VMotion is not
supported. vSGA and Soft 3D support live VMotion.
In some cases, if an application such as a video game or 3D benchmark forces the desktop to display in full
screen resolution, the desktop session can be disconnected. Possible workarounds include seing the
application to run in Windowed mode or matching the View session desktop resolution to the default
resolution expected by the application.
Requirements for All Types of 3D Rendering
To enable 3D graphics rendering, your pool deployment must meet the following requirements:
nThe virtual machines must be Windows 7 or later (Horizon 6 version 6.1 does not support Windows XP
or Vista guest operating systems).
nThe pool must use PCoIP as the default display protocol.
nUsers must not be allowed to choose their own protocol.
I When you congure or edit the 3D Renderer seing, you must power o existing virtual
machines, verify that the machines are recongured in vCenter Server, and power on the machines to cause
the new seing to take eect. Restarting a virtual machine does not cause the new seing to take eect.
Setting Up Desktop and Application Pools in View
136 VMware, Inc.

Additional Requirements for Using NVIDIA GRID vGPU
With NVIDIA GRID vGPU, a single physical GPU on an ESXi host can be shared among virtual machines.
To support this type of shared GPU hardware acceleration, a pool must meet these additional requirements:
nThe virtual machines must run on ESXi 6.0 or later hosts, be virtual hardware version 11 or later, and be
managed by vCenter Server 6.0 or later software.
You must congure the parent virtual machine or the virtual machine template to use a shared PCI
device before you create the desktop pool in View. For detailed instructions, see the NVIDIA GRID
vGPU Deployment Guide for VMware Horizon 6.1.
nYou must install graphics drivers from the GPU vendor in the guest operating system of the virtual
machine.
N For a list of supported GPU hardware, see the VMware Hardware Compatibility List at
hp://www.vmware.com/resources/compatibility/search.php.
nYou must set the 3D Renderer option to NVIDIA GRID vGPU.
Additional Requirements for Using vDGA
vDGA dedicates a single physical GPU on an ESXi host to a single virtual machine. To support vDGA, a
pool must meet these additional requirements:
nThe virtual machines must run on ESXi 5.5 or later hosts, be virtual hardware version 9 or later, and be
managed by vCenter Server 5.5 or later software.
You must enable GPU pass-through on the ESXi hosts and congure the individual virtual machines to
use dedicated PCI devices after the desktop pool is created in View. You cannot congure the parent
virtual machine or template for vDGA and then create a desktop pool, because the same physical GPU
would be dedicated to every virtual machine in the pool. See "vDGA Installation" in the VMware white
paper about graphics acceleration.
For linked-clone virtual machines, vDGA seings are preserved after refresh, recompose, and rebalance
operations.
nYou must install graphics drivers from the GPU vendor in the guest operating system of the virtual
machine.
N For a list of supported GPU hardware, see the VMware Hardware Compatibility List at
hp://www.vmware.com/resources/compatibility/search.php.
nYou must set the 3D Renderer option to Manage using vSphere Client.
Additional Requirements for Using vSGA
vSGA allows multiple virtual machines to share the physical GPUs on ESXi hosts. To support vSGA, a pool
must meet these additional requirements:
nThe virtual machines must run on ESXi 5.1 or later hosts and be managed by vCenter Server 5.1 or later
software.
nGPU graphics cards and the associated vSphere Installation Bundles (VIBs) must be installed on the
ESXi hosts. For a list of supported GPU hardware, see the VMware Hardware Compatibility List at
hp://www.vmware.com/resources/compatibility/search.php.
nWindows 7 machines must be virtual hardware version 8 or later. Windows 8 machines must be virtual
hardware version 9 or later. Windows 10 machines must be virtual hardware version 10 or later.
Chapter 11 Provisioning Desktop Pools
VMware, Inc. 137
nYou can set the 3D Renderer option to any of the following seings: Manage using vSphere Client,
Automatic, or Hardware. See also “Video RAM Conguration Options for the 3D Renderer,” on
page 138.
Automatic uses hardware acceleration if there is a capable and available hardware GPU in the ESXi
host. If a hardware GPU is not available, the virtual machine uses software 3D rendering for any 3D
tasks.
Additional Requirements for Using Soft 3D
To support software 3D rendering, a pool must meet these additional requirements:
nThe virtual machines must run on ESXi 5.0 or later hosts and be managed by vCenter Server 5.0 or later
software.
nThe machines must be virtual hardware version 8 or later.
nYou must set the 3D Renderer option to Software. See also “Video RAM Conguration Options for the
3D Renderer,” on page 138.
Video RAM Configuration Options for the 3D Renderer
When you enable the 3D Renderer seing, if you select the Automatic, Software, or Hardware option, you
can congure the amount of VRAM that is assigned to the virtual machines in the pool by moving the slider
in the Congure VRAM for 3D guests dialog box. The minimum VRAM size is 64MB. The default VRAM
amount depends on the virtual hardware version:
nFor virtual hardware version 8 (vSphere 5.0) virtual machines, the default VRAM size is 64MB, and you
can congure a maximum size of 128MB.
nFor virtual hardware version 9 (vSphere 5.1) and 10 (vSphere 5.5 Update 1) virtual machines, the
default VRAM size is 96MB, and you can congure a maximum size of 512MB.
nFor virtual hardware version 11 (vSphere 6.0) virtual machines, the default VRAM size is 96MB, and
you can congure a maximum size of 128MB. In vSphere 6.0 and later virtual machines, this seing
refers only to the amount of display memory in the graphics card and therefore has a lower maximum
seing than earlier virtual hardware versions, which included both display memory and guest memory
for storing 3D objects.
The VRAM seings that you congure in View Administrator take precedence over the VRAM seings that
can be congured for the virtual machines in vSphere Client or vSphere Web Client, unless you select the
Manage using vSphere Client option.
For more information about the Automatic, Software, or Hardware 3D rendering options, see “3D Renderer
Options,” on page 138.
3D Renderer Options
The 3D Renderer seing for desktop pools provides options that let you congure graphics rendering in
dierent ways.
The following table describes the dierences between the various types of 3D rendering options available in
View Administrator but does not provide complete information for conguring virtual machines and ESXi
hosts for Virtual Shared Graphics Acceleration (vSGA), Virtual Dedicated Graphics Acceleration (vDGA), or
NVIDIA GRID vGPU (shared GPU hardware acceleration). These tasks must be done with vSphere Web
Client before you aempt to create desktop pools in View Administrator. vDGA and NVIDIA GRID vGPU
require a similar setup in vSphere. For instructions about these tasks for vSGA and vDGA, see the VMware
white paper about graphics acceleration. For instructions about NVIDIA GRID vGPU, see the NVIDIA
GRID vGPU Deployment Guide for VMware Horizon 6.1.
Setting Up Desktop and Application Pools in View
138 VMware, Inc.

Table 11‑12. 3D Renderer Options for Pools Running on vSphere 5.1 or Later
Option Description
Manage using
vSphere Client
The 3D Renderer option that is set in vSphere Web Client (or vSphere Client in vSphere 5.1 or
later) for a virtual machine determines the type of 3D graphics rendering that takes place. View
does not control 3D rendering.
In the vSphere Web Client, you can congure the Automatic, Software, or Hardware options.
These options have the same eect as they do when you set them in View Administrator.
Use this seing when conguring vDGA. This seing is also an option for vSGA.
When you select the Manage using vSphere Client option, the VRAM for 3D Guests,
Max number of monitors, and Max resolution of any one monitor seings are inactive in View
Administrator. You can congure the amount of memory in vSphere Web Client.
Automatic 3D rendering is enabled. The ESXi host controls the type of 3D rendering that takes place.
For example, the ESXi host reserves GPU hardware resources on a rst-come, rst-served basis as
virtual machines are powered on. If all GPU hardware resources are already reserved when a
virtual machine is powered on, ESXi uses the software renderer for that machine.
This seing is an option when conguring vSGA.
The ESXi host allocates VRAM to a virtual machine based on the value that is set in the Congure
VRAM for 3D Guests dialog box.
Software 3D rendering is enabled. The ESXi host uses software 3D graphics rendering. If a GPU graphics
card is installed on the ESXi host, this pool will not use it.
Use this seing to congure Soft 3D.
The ESXi host allocates VRAM to a virtual machine based on the value that is set in the Congure
VRAM for 3D Guests dialog box.
Hardware 3D rendering is enabled. The ESXi host reserves GPU hardware resources on a rst-come, rst-
served basis as virtual machines are powered on.
This seing is an option when conguring vSGA.
The ESXi host allocates VRAM to a virtual machine based on the value that is set in the Congure
VRAM for 3D Guests dialog box.
I If you congure the Hardware option, consider these potential constraints:
nIf a user tries to connect to a machine when all GPU hardware resources are reserved, the
virtual machine will not power on, and the user will receive an error message.
nIf you use vMotion to move the machine to an ESXi host that does not have GPU hardware
congured, the virtual machine will not power on.
When you congure hardware-based 3D rendering, you can examine the GPU resources that are
allocated to each virtual machine on an ESXi host. For details, see “Examining GPU Resources on
an ESXi Host,” on page 143.
Chapter 11 Provisioning Desktop Pools
VMware, Inc. 139

Table 11‑12. 3D Renderer Options for Pools Running on vSphere 5.1 or Later (Continued)
Option Description
NVIDIA GRID
vGPU
3D rendering is enabled. The ESXi host reserves GPU hardware resources on a rst-come, rst-
served basis as virtual machines are powered on. If a user tries to connect to a machine when all
GPU hardware resources are being used by other virtual machines on the host, View Connection
Server will aempt to move the virtual machine to another ESXi host in the cluster before
powering on.
Use this seing when conguring NVIDIA GRID vGPU.
When you select the NVIDIA GRID vGPU option, the VRAM for 3D Guests, Max
number of monitors, and Max resolution of any one monitor seings are inactive in View
Administrator. When you congure the parent virtual machine or virtual machine template with
vSphere Web Client, you are prompted to reserve all memory.
I If you congure the NVIDIA GRID vGPU option, consider these potential
constraints:
nThe virtual machine cannot be suspended or resumed. Therefore the Remote Machine Power
Policy option for suspending the virtual machine is not available.
nIf you use vMotion to move the machine to an ESXi host that does not have GPU hardware
congured, the virtual machine will not power on. Live vMotion is not available.
nAll ESXi hosts in the cluster must be version 6.0 or later, and the virtual machines must be
hardware version 11 or later.
nIf an ESXi cluster contains a host that is NVIDIA GRID vGPU enabled and a host that is not
NVIDIA GRID vGPU enabled, the hosts display a yellow (warning) status in the View
Administrator Dashboard. If a user tries to connect to a machine when all GPU hardware
resources are being used by other virtual machines on the host, View Connection Server will
aempt to move the virtual machine to another ESXi host in the cluster before powering on. In
this case, hosts that are not NVIDIA GRID vGPU enabled cannot be used for this type of
dynamic migration.
Disabled 3D rendering is inactive.
Table 11‑13. 3D Renderer Options for Pools Running on vSphere 5.0
Option Description
Enabled The 3D Renderer option is enabled. The ESXi host uses software 3D graphics rendering.
When software rendering is congured, the default VRAM size is 64MB, the minimum size. In the
Congure VRAM for 3D Guests dialog box, you can use the slider to increase the amount of
VRAM that is reserved. With software rendering, the ESXi host allocates up to a maximum of
128MB per virtual machine. If you set a higher VRAM size, it is ignored.
Disabled 3D rendering is inactive.
If a desktop pool is running on earlier vSphere version than 5.0, the 3D Renderer seing is inactive and is
not available in View Administrator.
Best Practices for Configuring 3D Rendering
The 3D rendering options and other pool seings oer various advantages and drawbacks. Select the option
that best supports your vSphere hardware infrastructure and your users' requirements for graphics
rendering.
N This topic provides an overview of the controls you nd in View Administrator. For detailed
information about all the various choices and requirements for 3D rendering, see the VMware white paper
about graphics acceleration.
Setting Up Desktop and Application Pools in View
140 VMware, Inc.

When to Choose the Automatic Option
The Automatic option is the best choice for many View deployments that require 3D rendering. vSGA
(Virtual Shared Graphics Acceleration)-enabled virtual machines can dynamically switch between software
and hardware 3D rendering, without your having to recongure. This option ensures that some type of 3D
rendering takes place even when GPU resources are completely reserved. In a mixed cluster of ESXi 5.1 and
ESXi 5.0 hosts, this option ensures that a virtual machine is powered on successfully and uses 3D rendering
even if, for example, vMotion moved the virtual machine to an ESXi 5.0 host.
The only drawback with the Automatic option is that you cannot easily tell whether a virtual machine is
using hardware or software 3D rendering.
When to Choose the Hardware Option
The Hardware option guarantees that every virtual machine in the pool uses hardware 3D rendering,
provided that GPU resources are available on the ESXi hosts. This option might be the best choice when all
your users run graphically intensive applications. You can use this option when conguring vSGA (Virtual
Shared Graphics Acceleration).
With the Hardware option, you must strictly control your vSphere environment. All ESXi hosts must be
version 5.1 or later and must have GPU graphics cards installed.
When all GPU resources on an ESXi host are reserved, View cannot power on a virtual machine for the next
user who tries to log in to a desktop. You must manage the allocation of GPU resources and the use of
vMotion to ensure that resources are available for your desktops.
When to Choose the Option to Manage Using vSphere Client
When you select the Manage using vSphere Client option, you can use vSphere Web Client to congure
individual virtual machines with dierent options and VRAM values.
nFor vSGA (Virtual Shared Graphics Acceleration), you can support a mixed conguration of 3D
rendering and VRAM sizes for virtual machines in a pool.
nFor vDGA (Virtual Dedicated Graphics Acceleration), each virtual machine must be individually
congured to share a specic PCI device with the ESXi host and all memory must be reserved.
All ESXi hosts must be version 5.5 or later and must have GPU graphics cards installed.
You might also choose this option if you want to explicitly manage graphics seings of clones and linked
clones by having the clones inherit seings from the parent virtual machine.
When to Choose the NVIDIA GRID vGPU Option
With the NVIDIA GRID vGPU option, you can achieve a higher consolidation ratio of virtual machines on
an NVIDIA GRID vGPU-enabled ESXi host than is possible by using vDGA, while maintaining the same
performance level. As with vDGA (Dedicated Virtual Graphics), the ESXi and virtual machine also use GPU
pass-through for NVIDIA GRID vGPU.
N To improve virtual machine consolidation ratios, you can set the ESXi host to use consolidation
mode. Edit the /etc/vmware/config le on the ESXi host and add the following entry:
vGPU.consolidation = "true"
By default, the ESXi host assigns virtual machines to the physical GPU with the fewest virtual machines
already assigned. This is called performance mode. If you would rather have the ESXi host assign virtual
machines to the same physical GPU until the maximum number of virtual machines is reached before
placing virtual machines on the next physical GPU, you can use consolidation mode.
Chapter 11 Provisioning Desktop Pools
VMware, Inc. 141
Because a GPU does not need to be dedicated to one specic virtual machine, with the NVIDIA GRID
vGPU option, you can create and congure a parent virtual machine or virtual machine template to be
NVIDIA GRID vGPU-enabled and then create a desktop pool of virtual machines that can share the same
physical GPU.
If all GPU resources on an ESXi host are being used by other virtual machines, when the next user tries to
log in to a desktop, View can move the virtual machine to another NVIDIA GRID vGPU-enabled ESXi
server in the cluster and then power on the virtual machine. All ESXi hosts must be version 6.0 or later and
must have GPU graphics cards installed.
When to Choose the Software Option
Select the Software option if you have ESXi 5.0 hosts only, or if ESXi 5.1 or later hosts do not have GPU
graphics cards, or if your users only run applications such as AERO and Microsoft Oce, which do not
require hardware graphics acceleration.
Configuring Desktop Settings to Manage GPU Resources
You can congure other desktop seings to ensure that GPU resources are not wasted when users are not
actively using them.
For oating pools, set a session timeout so that GPU resources are freed up for other users when a user is
not using the desktop.
For dedicated pools, you can congure the Automatically after disconnect seing to Immediately
and a Suspend power policy if these seings are appropriate for your users. For example, do not use these
seings for a pool of researchers who execute long-running simulations. Note that the Suspend power
policy is not available if you use the NVIDIA GRID vGPU option.
Overview of Steps for Preparing for NVIDIA GRID vGPU Capabilities
This overview is an outline of tasks you must perform in vSphere before you can create or congure desktop
pools in View Administrator. For complete information and detailed procedures, see the NVIDIA GRID
vGPU Deployment Guide for VMware Horizon 6.1.
1 Verify that VT-d or AMD IOMMU is enabled on the ESXi host.
2 Add a shared PCI device to the virtual machine and select the appropriate PCI device to enable GPU
pass-through on the virtual machine.
After you add a shared PCI device, you see a list of all supported graphics prole types that are
available from the GPU card on the ESXi host.
3 Reserve all memory when creating the virtual machine.
4 Obtain the GPU drivers from the GPU vendor and install the GPU device drivers in the guest operating
system of the virtual machine.
5 Install VMware Tools and View Agent in the guest operating system and reboot.
After you perform these tasks, you must add the virtual machine to a manual pool View desktop pool so
that you can access the guest operating system using PCoIP. In a PCoIP session, you can then activate the
NVIDIA display adapter in the guest operating system.
At this point, you can congure the virtual machine to be a template or take a snapshot of the virtual
machine for use as a base image in a View Composer linked-clone pool. (You must power o the virtual
machine before taking the snapshot.) When you use the Add Desktop Pool wizard, after you select the
NVIDIA GRID vGPU option for 3D Renderer, only NVIDIA GRID vGPU-enabled ESXi hosts and NVIDIA
GRID vGPU-enabled virtual machine templates and snapshots appear for selection in the wizard.
Setting Up Desktop and Application Pools in View
142 VMware, Inc.

Overview of Steps for Preparing for vDGA Capabilities
This overview is an outline of tasks you must perform in vSphere before you can create or congure desktop
pools in View Administrator. For complete information and detailed procedures, see the VMware white
paper about graphics acceleration.
1 Verify that VT-d or AMD IOMMU is enabled on the ESXi host.
2 Enable GPU device pass-through on the ESXi host.
3 Add a PCI device to the virtual machine and select the appropriate PCI device to enable GPU pass-
through on the virtual machine.
4 Reserve all memory when creating the virtual machine.
5 Obtain the GPU drivers from the GPU vendor and install the GPU device drivers in the guest operating
system of the virtual machine.
6 Install VMware Tools and View Agent in the guest operating system and reboot.
After you perform these tasks, you must add the virtual machine to a manual desktop pool so that you can
access the guest operating system using PCoIP. In a PCoIP session, you can then activate the NVIDIA or
AMD display adapter in the guest operating system.
Examining GPU Resources on an ESXi Host
To beer manage the GPU resources that are available on an ESXi host, you can examine the current GPU
resource reservation. The ESXi command-line query utility, gpuvm, lists the GPUs that are installed on an
ESXi host and displays the amount of GPU memory that is reserved for each virtual machine on the host.
Note that this GPU memory reservation is not the same as virtual machine VRAM size.
To run the utility, type gpuvm from a shell prompt on the ESXi host. You can use a console on the host or an
SSH connection.
For example, the utility might display the following output:
~ # gpuvm
Xserver unix:0, GPU maximum memory 2076672KB
pid 118561, VM "JB-w7-64-FC3", reserved 131072KB of GPU memory.
pid 64408, VM "JB-w7-64-FC5", reserved 261120KB of GPU memory.
GPU memory left 1684480KB.
Similarly, you can use the nvidia-smi command on the ESXi host to see a list of NVIDIA GRID vGPU-
enabled virtual machines, the amount of frame buer memory consumed, and the slot ID of the physical
GPU that the virtual machine is using.
Prevent Access to View Desktops Through RDP
In certain View environments, it is a priority to prohibit access to View desktops through the RDP display
protocol. You can prevent users and administrators from using RDP to access View desktops by conguring
pool seings and a group policy seing.
By default, while a user is logged in to a View desktop session, you can use RDP to connect to the virtual
machine from outside of View. The RDP connection terminates the View desktop session, and the View
user's unsaved data and seings might be lost. The View user cannot log in to the desktop until the external
RDP connection is closed. To avoid this situation, disable the AllowDirectRDP seing.
N Remote Desktop Services must be started on the virtual machine that you use to create pools and on
the virtual machines that are deployed in the pools. Remote Desktop Services are required for View Agent
installation, SSO, and other View session-management operations.
Chapter 11 Provisioning Desktop Pools
VMware, Inc. 143

Prerequisites
Verify that the View Agent Conguration Administrative Template (ADM) le is installed in Active
Directory. See “Using View Group Policy Administrative Template Files,” on page 230.
Procedure
1 Select PCoIP as the display protocol that you want View Connection Server to use to communicate with
Horizon Client devices.
Option Description
Create a desktop pool a In View Administrator, start the Add Desktop Pool wizard.
b On the Desktop Pool Seings page, select PCoIP as the default display
protocol.
Edit an existing desktop pool a In View Administrator, select the desktop pool and click Edit.
b On the Desktop Pool tab, select PCoIP as the default display
protocol.
2 For the Allow users to choose protocol seing, select No.
3 Prevent devices that are not running Horizon Client from connecting directly to View desktops through
RDP by disabling the AllowDirectRDP group policy seing.
a On your Active Directory server, open the Group Policy Management Console and select
Computer > Policies > Administrative Templates > Classic Administrative
Templates (ADM) > VMware View Agent .
b Disable the AllowDirectRDP seing.
Deploying Large Desktop Pools
When many users require the same desktop image, you can create one large automated pool from a single
template or parent virtual machine. By using a single base image and pool name, you can avoid dividing the
machines arbitrarily into smaller groups that must be managed separately. This strategy simplies your
View deployment and administration tasks.
To support large pools, you can create pools on ESXi clusters that contain up to 32 ESXi hosts. You can also
congure a pool to use multiple network labels, making the IP addresses of multiple port groups available
for the virtual machines in the pool.
Configuring Desktop Pools on Clusters With More Than Eight Hosts
In vSphere 5.1 and later, you can deploy a linked clone desktop pool on a cluster that contains up to 32 ESXi
hosts. All ESXi hosts in the cluster must be version 5.1 or later. The hosts can use VMFS or NFS datastores.
VMFS datastores must be VMFS5 or later.
In vSphere 5.0, you can deploy linked clones on a cluster that contains more than eight ESXi hosts, but you
must store the replica disks on NFS datastores. You can store replica disks on VMFS datastores only with
clusters that contain eight or fewer hosts.
In vSphere 5.0, the following rules apply when you congure a linked clone pool on a cluster that contains
more than eight hosts:
nIf you store replica disks on the same datastores as OS disks, you must store the replica and OS disks on
NFS datastores.
nIf you store replica disks on separate datastores than OS disks, the replica disks must be stored on NFS
datastores. The OS disks can be stored on NFS or VMFS datastores.
Setting Up Desktop and Application Pools in View
144 VMware, Inc.
nIf you store View Composer persistent disks on separate datastores, the persistent disks can be
congured on NFS or VMFS datastores.
In vSphere 4.1 and earlier releases, you can deploy desktop pools only with clusters that contain eight or
fewer hosts.
Assigning Multiple Network Labels to a Desktop Pool
In View 5.2 and later releases, you can congure an automated desktop pool to use multiple network labels.
You can assign multiple network labels to a linked-clone pool or an automated pool that contains full virtual
machines.
In past releases, virtual machines in the pool inherited the network labels that were used by the NICs on the
parent virtual machine or template. A typical parent virtual machine or template contains one NIC and one
network label. A network label denes a port group and VLAN. The netmask of one VLAN typically
provides a limited range of available IP addresses.
In View 5.2 and later releases, you can assign network labels that are available in vCenter Server for all the
ESXi hosts in the cluster where the desktop pool is deployed. By conguring multiple network labels for the
pool, you greatly expand the number of IP addresses that can be assigned to the virtual machines in the
pool.
You must use View PowerCLI cmdlets to assign multiple network labels to a pool. You cannot perform this
task in View Administrator.
For details about using View PowerCLI to perform this task, see "Assign Multiple Network Labels to a
Desktop Pool" in the chapter "Using View PowerCLI" in the View Integration document.
Chapter 11 Provisioning Desktop Pools
VMware, Inc. 145
Setting Up Desktop and Application Pools in View
146 VMware, Inc.

Entitling Users and Groups 12
You congure entitlements to control which remote desktops and applications your users can access. You
can also congure the restricted entitlements feature to control desktop access based on the View
Connection Server instance that users connect to when they select remote desktops.
In a Cloud Pod Architecture environment, you create global entitlements to entitle users or groups to
multiple desktops across multiple pods in a pod federation. When you use global entitlements, you do not
need to congure and manage local entitlements for remote desktops. For information about global
entitlements and seing up a Cloud Pod Architecture environment, see the Administering View Cloud Pod
Architecture document.
This chapter includes the following topics:
n“Add Entitlements to a Desktop or Application Pool,” on page 147
n“Remove Entitlements from a Desktop or Application Pool,” on page 148
n“Review Desktop or Application Pool Entitlements,” on page 148
n“Restricting Remote Desktop Access,” on page 148
Add Entitlements to a Desktop or Application Pool
Before users can access remote desktops or applications, they must be entitled to use a desktop or
application pool.
Prerequisites
Create a desktop or application pool.
Procedure
1 Select the desktop or application pool.
Option Action
Add an entitlement for a desktop
pool
In View Administrator, select Catalog > Desktop Pools and click the name
of the desktop pool.
Add an entitlement for an
application pool
In View Administrator, select Catalog > Application Pools and click the
name of the application pool.
2 Select Add entitlement from the Entitlements drop-down menu.
VMware, Inc. 147

3 Click Add, select one or more search criteria, and click Find to nd users or groups based on your
search criteria.
N Domain local groups are ltered out of search results for mixed-mode domains. You cannot
entitle users in domain local groups if your domain is congured in mixed mode.
4 Select the users or groups you want to entitle to the desktops or applications in the pool and click OK.
5 Click OK to save your changes.
Remove Entitlements from a Desktop or Application Pool
You can remove entitlements from a desktop or application pool to prevent specic users or groups from
accessing a desktop or application.
Procedure
1 Select the desktop or application pool.
Option Description
Remove an entitlement for a
desktop pool
In View Administrator, select Catalog > Desktop Pools and click the name
of the desktop pool.
Remove an entitlement for an
application pool
In View Administrator, select Catalog > Application Pools and click the
name of the application pool.
2 Select Remove entitlement from the Entitlements drop-down menu.
3 Select the user or group whose entitlement you want to remove and click Remove.
4 Click OK to save your changes.
Review Desktop or Application Pool Entitlements
You can review the desktop or application pools to which a user or group is entitled.
Procedure
1 In View Administrator, select Users and Groups and click the name of the user or group.
2 Click the Entitlements tab and review the desktop or application pools to which the user or group is
entitled.
Option Action
List the desktop pools to which the
user or group is entitled
Click Desktop Pools.
List the application pools to which
the user or group is entitled
Click Application Pools.
Restricting Remote Desktop Access
You can congure the restricted entitlements feature to restrict remote desktop access based on the View
Connection Server instance that users connect to when they select desktops.
With restricted entitlements, you assign one or more tags to a View Connection Server instance. Then, when
conguring a desktop pool, you select the tags of the View Connection Server instances that you want to be
able to access the desktop pool.
Setting Up Desktop and Application Pools in View
148 VMware, Inc.

When users log in through a tagged View Connection Server instance, they can access only those desktop
pools that have at least one matching tag or no tags.
N You cannot congure the restricted entitlements feature to restrict access to remote applications.
nRestricted Entitlement Example on page 149
This example shows a View deployment that includes two View Connection Server instances. The rst
instance supports internal users. The second instance is paired with a security server and supports
external users.
nTag Matching on page 150
The restricted entitlements feature uses tag matching to determine whether a View Connection Server
instance can access a particular desktop pool.
nConsiderations and Limitations for Restricted Entitlements on page 151
Before implementing restricted entitlements, you must be aware of certain considerations and
limitations.
nAssign a Tag to a View Connection Server Instance on page 151
When you assign a tag to a View Connection Server instance, users who connect to that View
Connection Server can access only those desktop pools that have a matching tag or no tags.
nAssign a Tag to a Desktop Pool on page 151
When you assign a tag to a desktop pool, only users who connect to a View Connection Server
instance that has a matching tag can access the desktops in that pool.
Restricted Entitlement Example
This example shows a View deployment that includes two View Connection Server instances. The rst
instance supports internal users. The second instance is paired with a security server and supports external
users.
To prevent external users from accessing certain desktops, you could set up restricted entitlements as
follows:
nAssign the tag "Internal" to the View Connection Server instance that supports your internal users.
nAssign the tag "External" to the View Connection Server instance that is paired with the security server
and supports your external users.
nAssign the "Internal" tag to the desktop pools that should be accessible only to internal users.
nAssign the "External" tag to the desktop pools that should be accessible only to external users.
External users cannot see the desktop pools tagged as Internal because they log in through the View
Connection Server tagged as External, and internal users cannot see the desktop pools tagged as External
because they log in through the View Connection Server tagged as Internal. Figure 12-1 illustrates this
conguration.
Chapter 12 Entitling Users and Groups
VMware, Inc. 149
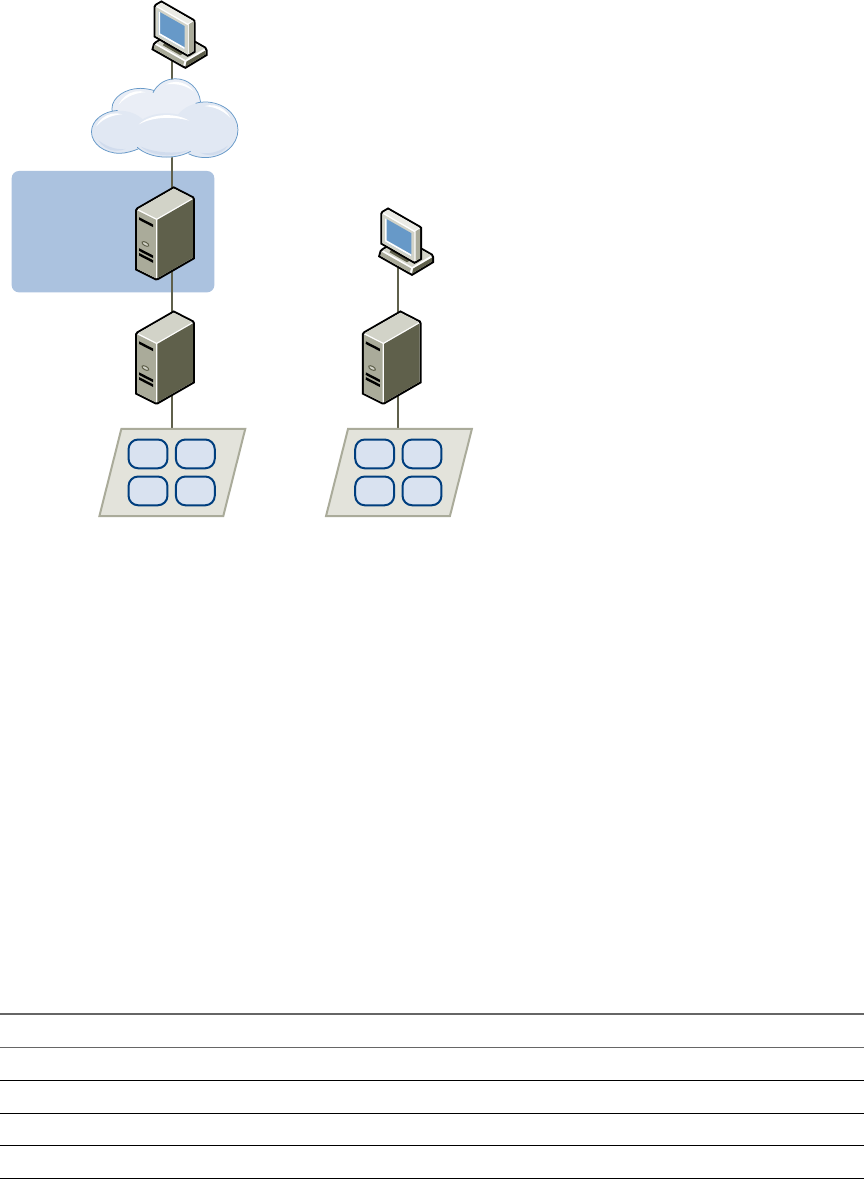
Figure 12‑1. Restricted Entitlement Configuration
DMZ
client device
View
Connection
Server
Tag: “External”
desktop pool A
Tag: “External”
View
Security
Server
VM VM
VM VM
client device
View
Connection
Server
Tag: “Internal”
desktop pool B
Tag: “Internal”
VM VM
VM VM
external
network
You can also use restricted entitlements to control desktop access based on the user-authentication method
that you congure for a particular View Connection Server instance. For example, you can make certain
desktop pools available only to users who have authenticated with a smart card.
Tag Matching
The restricted entitlements feature uses tag matching to determine whether a View Connection Server
instance can access a particular desktop pool.
At the most basic level, tag matching determines that a View Connection Server instance with a specic tag
can access a desktop pool that has the same tag.
The absence of tag assignments can also aect whether a View Connection Server instance can access a
desktop pool. For example, View Connection Server instances that do not have any tags can only access
desktop pools that also do not have any tags.
Table 12-1 shows how the restricted entitlement feature determines when a View Connection Server can
access a desktop pool.
Table 12‑1. Tag Matching Rules
View Connection Server Desktop Pool Access Permitted?
No tags No tags Yes
No tags One or more tags No
One or more tags No tags Yes
One or more tags One or more tags Only when tags match
The restricted entitlements feature only enforces tag matching. You must design your network topology to
force certain clients to connect through a particular View Connection Server instance.
Setting Up Desktop and Application Pools in View
150 VMware, Inc.
Considerations and Limitations for Restricted Entitlements
Before implementing restricted entitlements, you must be aware of certain considerations and limitations.
nA single View Connection Server instance or desktop pool can have multiple tags.
nMultiple View Connection Server instances and desktop pools can have the same tag.
nDesktop pools that do not have any tags can be accessed by any View Connection Server instance.
nView Connection Server instances that do not have any tags can only access desktop pools that also do
not have any tags.
nIf you use a security server, you must congure restricted entitlements on the View Connection Server
instance the security server is paired with. You cannot congure restricted entitlements on a security
server.
nYou cannot modify or remove a tag from a View Connection Server instance if that tag is still assigned
to a desktop pool and no other View Connection Server instances have a matching tag.
nRestricted entitlements take precedence over other desktop entitlements or assignments. For example,
even if a user is assigned to a particular machine, the user will not be able to access that machine if the
desktop pool's tag does not match the tag assigned to the View Connection Server instance that the user
connected to.
nIf you intend to provide access to your desktops through Workspace Portal, and you congure View
Connection Server restrictions, the Workspace App Portal might display desktops to users when those
desktops are actually restricted. When a Workspace Portal user aempts to log in to a desktop, it will
not launch if the desktop pool's tag does not match the tag assigned to the View Connection Server
instance that the user is connected to.
Assign a Tag to a View Connection Server Instance
When you assign a tag to a View Connection Server instance, users who connect to that View Connection
Server can access only those desktop pools that have a matching tag or no tags.
Procedure
1 In View Administrator, select View > Servers.
2 Click the Connection Servers tab, select the View Connection Server instance, and click Edit.
3 Type one or more tags in the Tags text box.
Separate multiple tags with a comma or semicolon.
4 Click OK to save your changes.
What to do next
Assign the tag to desktop pools.
Assign a Tag to a Desktop Pool
When you assign a tag to a desktop pool, only users who connect to a View Connection Server instance that
has a matching tag can access the desktops in that pool.
You can assign a tag when you add or edit a desktop pool.
Prerequisites
Assign tags to one or more View Connection Server instances.
Chapter 12 Entitling Users and Groups
VMware, Inc. 151

Procedure
1 In View Administrator, select Catalog > Desktop Pools.
2 Select the pool that you want to assign a tag to.
Option Action
Assign a tag to a new pool Click Add to start the Add Desktop Pool wizard and dene and identify
the pool.
Assign a tag to an existing pool Select the pool and click Edit.
3 Go to the Desktop Pool Seings page.
Option Action
Pool settings for a new pool Click Desktop Pool in the Add Desktop Pool wizard.
Pool settings for an existing pool Click the Desktop Pool tab.
4 Click Browse next to Connection Server restrictions and congure the View Connection Server
instances that can access the desktop pool.
Option Action
Make the pool accessible to any
View Connection Server instance
Select No Restrictions.
Make the pool accessible only to
View Connection Server instances
that have those tags
Select Restricted to these tags and select one or more tags. You can use the
check boxes to select multiple tags.
5 Click OK to save your changes.
Setting Up Desktop and Application Pools in View
152 VMware, Inc.

Configuring Remote Desktop
Features 13
Certain remote desktop features that are installed with View Agent can be updated in Feature Pack Update
releases as well as in core View releases. You can congure these features to enhance the remote desktop
experience of your end users.
These features include HTML Access, Unity Touch, Flash URL Redirection, Real-Time Audio-Video,
Windows Media Multimedia Redirection (MMR), USB Redirection, Scanner Redirection, and Serial Port
Redirection.
For information about HTML Access, see the Using HTML Access document, located on
theVMware Horizon Client Documentation Web page.
For information about USB Redirection, see Chapter 14, “Using USB Devices with Remote Desktops and
Applications,” on page 189.
This chapter includes the following topics:
n“Conguring Unity Touch,” on page 153
n“Conguring Flash URL Redirection for Multicast or Unicast Streaming,” on page 156
n“Conguring Real-Time Audio-Video,” on page 160
n“Conguring Scanner Redirection,” on page 174
n“Conguring Serial Port Redirection,” on page 179
n“Managing Access to Windows Media Multimedia Redirection (MMR),” on page 186
n“Managing Access to Client Drive Redirection,” on page 188
Configuring Unity Touch
With Unity Touch, tablet and smart phone users can easily browse, search, and open Windows applications
and les, choose favorite applications and les, and switch between running applications, all without using
the Start menu or Taskbar. You can congure a default list of favorite applications that appear in the Unity
Touch sidebar.
You can disable or enable the Unity Touch feature after it is installed by conguring the Enable Unity Touch
group policy seing. See “View Agent Conguration ADM Template Seings,” on page 232.
The VMware Horizon Client documents for iOS and Android devices provide more information about end
user features provided by Unity Touch.
VMware, Inc. 153
System Requirements for Unity Touch
Horizon Client software and the mobile devices on which you install Horizon Client must meet certain
version requirements to support Unity Touch.
View desktop To support Unity Touch, the following software must be installed in the
virtual machine that the end user will access:
nYou install the Unity Touch feature by installing View Agent 6.0 or later.
See “Install View Agent on a Virtual Machine,” on page 27.
nOperating systems: Windows 7 (32-bit or 64-bit), Windows 8 (32-bit or
64-bit), Windows 8.1 (32-bit or 64-bit), Windows Server 2008 R2, or
Windows Server 2012 R2, Windows 10 (32-bit or 64-bit)
Horizon Client software Unity Touch is supported on the following Horizon Client versions:
nHorizon Client 2.0 for iOS or later
nHorizon Client 2.0 for Android or later
Mobile device operating
systems
Unity Touch is supported on the following mobile device operating systems:
niOS 5.0 and later
nAndroid 3 (Honeycomb), Android 4 (Ice Cream Sandwich), and
Android 4.1 and 4.2 (Jelly Bean)
Configure Favorite Applications Displayed by Unity Touch
With the Unity Touch feature, tablet and smart phone users can quickly navigate to a View desktop
application or le from a Unity Touch sidebar. Although end users can specify which favorite applications
appear in the sidebar, for added convenience, administrators can congure a default list of favorite
applications.
If you use oating-assigment desktop pools, the favorite applications and favorite les that end users specify
will be lost when they disconnect from a desktop unless you enable roaming user proles in Active
Directory.
The default list of favorite applications list remains in eect when an end user rst connects to a desktop
that is enabled with Unity Touch. However, if the user congures his or her own favorite application list, the
default list is ignored. The user's favorite application list stays in the user's roaming prole and is available
when the user connects to dierent machines in a oating or dedicated pool.
If you create a default list of favorite applications and one or more of the applications are not installed in the
View desktop operating system, or the paths to these applications are not found in the Start menu, the
applications do not appear in the list of favorites. You can use this behavior to set up one master default list
of favorite applications that can be applied to multiple virtual machine images with dierent sets of
installed applications.
For example, if Microsoft Oce and Microsoft Visio are installed on one virtual machine, and Windows
Powershell and VMware vSphere Client are installed on a second virtual machine, you can create one list
that includes all four applications. Only the installed applications appear as default favorite applications on
each respective desktop.
You can use dierent methods to specify a default list of favorite applications:
nAdd a value to the Windows registry on the virtual machines in the desktop pool
nCreate an administrative installation package from the View Agent installer and distribute the package
to the virtual machines
Setting Up Desktop and Application Pools in View
154 VMware, Inc.

nRun the View Agent installer from the command line on the virtual machines
N Unity Touch assumes that shortcuts to applications are located in the Programs folder in the Start
menu. If any shortcut is located outside of the Programs folder, aach the prex Programs to the shortcut
path. For example, Windows Update.lnk is located in the ProgramData\Microsoft\Windows\Start Menu folder.
To publish this shortcut as a default favorite application, add the prex Programs to the shortcut path. For
example: "Programs/Windows Update.lnk".
Prerequisites
nVerify that View Agent is installed on the virtual machine.
nVerify that you have administrative rights on the virtual machine. For this procedure, you might need
to edit a registry seing.
nIf you have oating-assignment desktop pools, use Active Directory to set up roaming user proles.
Follow the instructions provided by Microsoft.
Users of oating-assignment desktop pools will be able to see their list of favorite applications and
favorite les every time they log in.
Procedure
n(Optional) Create a default list of favorite applications by adding a value to the Windows registry.
a Open regedit and navigate to the HKLM\Software\VMware, Inc.\VMware Unity registry seing.
On a 64-bit virtual machine, navigate to the HKLM\Software\Wow6432Node\VMware, Inc.\VMware
Unity directory.
b Create a string value called FavAppList.
c Specify the default favorite applications.
Use the following format to specify the shortcut paths to the applications that are used in the Start
menu.
path-to-app-1|path-to-app-2|path-to-app-3|…
For example:
Programs/Accessories/Accessibility/Speech Recognition.lnk|Programs/VMware/VMware vSphere
Client.lnk|Programs/Microsoft Office/Microsoft Office 2010 Tools/Microsoft Office 2010
Language Preferences.lnk
Chapter 13 Configuring Remote Desktop Features
VMware, Inc. 155

n(Optional) Create a default list of favorite applications by creating an administrative installation
package from the View Agent installer.
a From the command line, use the following format to create the administrative installation package.
VMware-viewagent-x86_64-y.y.y-xxxxxx.exe /s /a /v"/qn TARGETDIR=""a network share to
store the admin install package"" UNITY_DEFAULT_APPS=""the list of default favorite apps
that should be set in the registry"""
For example:
VMware-viewagent-x86_x64-y.y.y-xxxxxx.exe /s /a /v"/qn TARGETDIR=""\\foo-installer-
share\ViewFeaturePack\"" UNITY_DEFAULT_APPS=""Programs/Accessories/Accessibility/Ease of
Access.lnk|Programs/Accessories/System Tools/Character Map.lnk|
Programs/Accessories/Windows PowerShell/Windows PowerShell.lnk|Programs/Internet
Explorer (64-bit).lnk|Programs/Google Chrome/Google Chrome.lnk|
Programs/iTunes/iTunes.lnk|Programs/Microsoft Office/Microsoft SharePoint Workspace
2010.lnk|Programs/PuTTY/PuTTY.lnk|Programs/Skype/Skype.lnk|Programs/WebEx/Productivity
Tools/WebEx Settings.lnk|"""
b Distribute the administrative installation package from the network share to the desktop virtual
machines by using a standard Microsoft Windows Installer (MSI) deployment method that is
employed in your organization.
n(Optional) Create a default list of favorite applications by running the View Agent installer on a
command line directly on a virtual machine.
Use the following format.
VMware-viewagent-x86_x64-y.y.y-xxxxxx.exe /s /v"/qn UNITY_DEFAULT_APPS=""the list of default
favorite apps that should be set in the registry"""
N The preceding command combines installing View Agent with specifying the default list of
favorite applications. You do not have to install View Agent before you run this command.
What to do next
If you performed this task directly on a virtual machine (by editing the Windows registry or installing View
Agent from the command line), you must deploy the newly congured virtual machine. You can create a
snapshot or make a template and create a desktop pool, or recompose an existing pool. Or you can create an
Active Directory group policy to deploy the new conguration.
Configuring Flash URL Redirection for Multicast or Unicast Streaming
Customers can now use Adobe Media Server and multicast or unicast to deliver live video events in a
virtual desktop infrastructure (VDI) environment. To deliver multicast or unicast live video streams within a
VDI environment, the media stream should be sent directly from the media source to the endpoints,
bypassing the remote desktops. The Flash URL Redirection feature supports this capability by intercepting
and redirecting the ShockWave Flash (SWF) le from the remote desktop to the client endpoint.
The Flash content is then displayed using the clients' local Flash media players.
Streaming Flash content directly from the Adobe Media Server to the client endpoints lowers the load on the
datacenter ESXi host, removes the extra routing through the datacenter, and reduces the bandwidth
required to simultaneously stream Flash content to multiple client endpoints.
Setting Up Desktop and Application Pools in View
156 VMware, Inc.
The Flash URL redirection feature uses a JavaScript that is embedded inside an HTML Web page by the Web
page administrator. Whenever a remote desktop user clicks on the designated URL link from within a Web
page, the JavaScript intercepts and redirects the SWF le from the remote desktop session to the client
endpoint. The endpoint then opens a local Flash Projector outside of the remote desktop session and plays
the media stream locally.
To congure Flash URL Redirection, you must set up your HTML Web page and your client devices.
Procedure
1System Requirements for Flash URL Redirection on page 157
To support Flash URL Redirection, your View deployment must meet certain software and hardware
requirements.
2Verify that the Flash URL Redirection Feature Is Installed on page 158
Before you use this feature, verify that the Flash URL Redirection feature is installed and running on
your virtual desktops.
3Set Up the Web Pages That Provide Multicast or Unicast Streams on page 159
To allow Flash URL redirection to take place, you must embed a JavaScript command in the MIME
HTML (MHTML) Web pages that provide links to the multicast or unicast streams. Users display
these Web pages in the browsers on their remote desktops to access the video streams.
4Set Up Client Devices for Flash URL Redirection on page 159
The Flash URL Redirection feature redirects the SWF le from remote desktops to client devices. To
allow these client devices to play Flash videos from a multicast or unicast stream, you must verify that
the appropriate Adobe Flash Player is installed on the client devices. The clients also must have IP
connectivity to the media source.
5Disable or Enable Flash URL Redirection on page 160
Flash URL Redirection is enabled when you perform a silent installation of View Agent with the
command-line argument, FlashURLRedirection. You can disable or reenable the Flash URL Redirection
feature on selected remote desktops by seing a value on a Windows registry key on those virtual
machines.
System Requirements for Flash URL Redirection
To support Flash URL Redirection, your View deployment must meet certain software and hardware
requirements.
View desktop nYou install Flash URL Redirection by typing the command-line
argument, FlashURLRedirection, in a silent installation of View Agent
6.0 or later. See “Silent Installation Properties for View Agent,” on
page 34.
nThe desktops must run Windows 7 64-bit or 32-bit operating systems.
nSupported desktop browsers include Internet Explorer 8, 9, and 10,
Chrome 29.x, and Firefox 20.x.
Flash media player and
ShockWave Flash (SWF)
You must integrate an appropriate Flash media player such as Strobe Media
Playback into your Web site. To stream multicast content, you can use
multicastplayer.swf or StrobeMediaPlayback.swf in your Web pages. To
stream live unicast content, you must use StrobeMediaPlayback.swf. You can
also use StrobeMediaPlayback.swf for other supported features such as
RTMP streaming and HTTP dynamic streaming.
Chapter 13 Configuring Remote Desktop Features
VMware, Inc. 157

Horizon Client software The following Horizon Client releases support multicast and unicast:
nHorizon Client 2.2 for Linux or a later release
nHorizon Client 2.2 for Windows or a later release
The following Horizon Client releases support multicast only (they do not
support unicast):
nHorizon Client 2.0 or 2.1 for Linux
nHorizon Client 5.4 for Windows
Horizon Client computer
or client access device
nFlash URL Redirection is supported on all operating systems that run
Horizon Client for Linux on x86 Thin client devices. This feature is not
supported on ARM processors.
nFlash URL Redirection is supported on all operating systems that run
Horizon Client for Windows. For details, see the Using
VMware Horizon Client for Windows document.
nOn Windows client devices, you must install Adobe Flash Player 10.1 or
later for Internet Explorer.
nOn Linux Thin client devices, you must install the libexpat.so.0 and
libflashplayer.so les. See “Set Up Client Devices for Flash URL
Redirection,” on page 159.
N With Flash URL Redirection, the multicast or unicast stream is
redirected to client devices that might be outside your organization's rewall.
Your clients must have access to the Adobe Web server that hosts the
ShockWave Flash (SWF) le that initiates the multicast or unicast streaming.
If needed, congure your rewall to open the appropriate ports to allow
client devices to access this server.
Verify that the Flash URL Redirection Feature Is Installed
Before you use this feature, verify that the Flash URL Redirection feature is installed and running on your
virtual desktops.
The Flash URL Redirection feature must be present on every desktop where you intend to support multicast
or unicast redirection. For View Agent installation instructions, see “Silent Installation Properties for View
Agent,” on page 34.
Procedure
1 Start a remote desktop session that uses PCoIP.
2 Open the Task Manager.
3 Verify that the ViewMPServer.exe process is running on the desktop.
Setting Up Desktop and Application Pools in View
158 VMware, Inc.

Set Up the Web Pages That Provide Multicast or Unicast Streams
To allow Flash URL redirection to take place, you must embed a JavaScript command in the MIME HTML
(MHTML) Web pages that provide links to the multicast or unicast streams. Users display these Web pages
in the browsers on their remote desktops to access the video streams.
In addition, you can customize the English error message that is displayed to end users when a problem
occurs with Flash URL redirection. Take this optional step if you want to display a localized error message
to your end users. You must embed the var vmwareScriptErroMessage conguration, together with your
localized text string, in the MHTML Web page.
Prerequisites
Verify that the swfobject.js library is imported in the MHTML Web page.
Procedure
1 Embed the viewmp.js JavaScript command in the MHTML Web page.
For example: <script type="text/javascript" src="http://localhost:33333/viewmp.js"></script>
2 (Optional) Customize the Flash URL redirection error message that is sent to end users.
For example: "var vmwareScriptErroMessage=localized error message"
3 Make sure to embed the viewmp.js JavaScript command, and optionally customize the Flash URL
redirection error message, before the ShockWave Flash (SWF) le is imported into the MHTML Web
page.
When a user displays the Web page in a remote desktop, the viewmp.js JavaScript command invokes the
Flash URL Redirection mechanism on the remote desktop, which redirects the SWF le from the desktop to
the hosting client device.
Set Up Client Devices for Flash URL Redirection
The Flash URL Redirection feature redirects the SWF le from remote desktops to client devices. To allow
these client devices to play Flash videos from a multicast or unicast stream, you must verify that the
appropriate Adobe Flash Player is installed on the client devices. The clients also must have IP connectivity
to the media source.
N With Flash URL Redirection, the multicast or unicast stream is redirected to client devices that might
be outside your organization's rewall. Your clients must have access to the Adobe Web server that hosts the
SWF le that initiates the multicast or unicast streaming. If needed, congure your rewall to open the
appropriate ports to allow client devices to access this server.
Chapter 13 Configuring Remote Desktop Features
VMware, Inc. 159

Procedure
uInstall Adobe Flash Player on your client devices.
Operating System Action
Windows Install Adobe Flash Player 10.1 or later for Internet Explorer.
Linux aInstall the libexpat.so.0 le, or verify that this le is already
installed.
Ensure that the le is installed in the /usr/lib or /usr/local/lib
directory.
bInstall the libflashplayer.so le, or verify that this le is already
installed.
Ensure that the le is installed in the appropriate Flash plug-in
directory for your Linux operating system.
cInstall the wget program, or verify that the program le is already
installed.
Disable or Enable Flash URL Redirection
Flash URL Redirection is enabled when you perform a silent installation of View Agent with the command-
line argument, FlashURLRedirection. You can disable or reenable the Flash URL Redirection feature on
selected remote desktops by seing a value on a Windows registry key on those virtual machines.
Procedure
1 Start the Windows Registry Editor on the virtual machine.
2 Navigate to the Windows registry key that controls Flash URL Redirection.
Option Description
Windows 7 64-bit HKEY_LOCAL_MACHINE\Software\Wow6432Node\VMware,Inc.\VMware
ViewMP\enabled = value
Windows 7 32-bit HKEY_LOCAL_MACHINE\Software\VMware,Inc.\VMware
ViewMP\enabled = value
3 Set the value to disable or enable Flash URL Redirection.
Option Value
Disabled 0
Enabled 1
By default, the value is set to 1.
Configuring Real-Time Audio-Video
Real-Time Audio-Video allows View users to run Skype, Webex, Google Hangouts, and other online
conferencing applications on their remote desktops. With Real-Time Audio-Video, webcam and audio
devices that are connected locally to the client system are redirected to the remote desktop. This feature
redirects video and audio data to the desktop with a signicantly lower bandwidth than can be achieved by
using USB redirection.
Real-Time Audio-Video is compatible with standard conferencing applications and browser-based video
applications, and supports standard webcams, audio USB devices, and analog audio input.
This feature installs the VMware Virtual Webcam and VMware Virtual Microphone on the desktop
operating system. The VMware Virtual Webcam uses a kernel-mode webcam driver that provides enhanced
compatibility with browser-based video applications and other 3rd-party conferencing software.
Setting Up Desktop and Application Pools in View
160 VMware, Inc.

When a conferencing or video application is launched, it displays and uses these VMware virtual devices,
which handle the audio-video redirection from the locally-connected devices on the client. The VMware
Virtual Webcam and Microphone appear in the Device Manager on the desktop operating system.
The drivers for the audio and webcam devices must be installed on your Horizon Client systems to enable
the redirection.
Configuration Choices for Real-Time Audio-Video
After you install View Agent with Real-Time Audio-Video, the feature works on your View desktops
without any further conguration. The default values for the webcam frame rate and image resolution are
recommended for most standard devices and applications.
You can congure group policy seings to change these default values to adapt to particular applications,
webcams, or environments. You can also set a policy to disable or enable the feature altogether. An ADM
Template le lets you install Real-Time Audio-Video group policy seings on Active Directory or on
individual desktops. See “Conguring Real-Time Audio-Video Group Policy Seings,” on page 171.
If users have multiple webcams and audio input devices built in or connected to their client computers, you
can congure preferred webcams and audio input devices that will be redirected to their desktops. See
“Selecting Preferred Webcams and Microphones,” on page 162.
N You can select a preferred audio device, but no other audio conguration options are available.
When webcam images and audio input are redirected to a remote desktop, you cannot access the webcam
and audio devices on the local computer. Conversely, when these devices are in use on the local computer,
you cannot access them on the remote desktop.
For information about supported applications, see the VMware knowledge base article, Guidelines for Using
Real-Time Audio-Video with 3rd-Party Applications on Horizon View Desktops, at
hp://kb.vmware.com/kb/2053754.
System Requirements for Real-Time Audio-Video
Real-Time Audio-Video works with standard webcam, USB audio, and analog audio devices, and with
standard conferencing applications like Skype, WebEx, and Google Hangouts. To support Real-Time Audio-
Video, your View deployment must meet certain software and hardware requirements.
View remote desktop You install the Real-Time Audio-Video feature by installing View Agent 6.0
or later. This feature is supported in desktop pools that are deployed on
single-user virtual machines but not in RDS desktop pools. See “Install View
Agent on a Virtual Machine,” on page 27.
Horizon Client software Horizon Client 2.2 for Windows or a later release
Horizon Client 2.2 for Linux or a later release. For Horizon Client for Linux
3.1 or earlier, this feature is available only with the version of Horizon Client
for Linux provided by third-party vendors. For Horizon Client for Linux 3.2
and later, this feature is also available with the version of the client available
from VMware.
Horizon Client 2.3 for Mac OS X or a later release
Horizon Client computer
or client access device
nAll operating systems that run Horizon Client for Windows.
nAll operating systems that run Horizon Client for Linux on x86 devices.
This feature is not supported on ARM processors.
nMac OS X Mountain Lion (10.8) and later. It is disabled on all earlier Mac
OS X operating systems.
Chapter 13 Configuring Remote Desktop Features
VMware, Inc. 161

nFor details about supported client operating systems, see the Using
VMware Horizon Client document for the appropriate system or device.
nThe webcam and audio device drivers must be installed, and the
webcam and audio device must be operable, on the client computer. To
support Real-Time Audio-Video, you do not have to install the device
drivers on the desktop operating system where View Agent is installed.
Display protocol for
View
PCoIP
Real-Time Audio-Video is not supported in RDP desktop sessions.
Ensuring That Real-Time Audio-Video Is Used Instead of USB Redirection
Real-Time Audio-Video supports webcam and audio input redirection for use in conferencing applications.
The USB redirection feature that can be installed with View Agent does not support webcam redirection. If
you redirect audio input devices through USB redirection, the audio stream does not synchronize properly
with video during Real-Time Audio-Video sessions, and you lose the benet of reducing the demand on
network bandwidth. You can take steps to ensure that webcams and audio input devices are redirected to
your desktops through Real-Time Audio-Video, not USB redirection.
If your desktops are congured with USB redirection, end users can connect and display their locally
connected USB devices by selecting the Connect USB Device option in the Windows client menu bar or the
Desktop > USB menu in the Mac OS X client. Linux clients block USB redirection of audio and video
devices by default and do not provide the USB device options to end users.
If an end user selects a USB device from the Connect USB Device or Desktop > USB list, that device
becomes unusable for video or audio conferencing. For example, if a user makes a Skype call, the video
image might not appear or the audio stream might be degraded. If an end user selects a device during a
conferencing session, the webcam or audio redirection is disrupted.
To hide these devices from end users and prevent potential disruptions, you can congure USB redirection
group policy seings to disable the display of webcams and audio input devices in VMware Horizon Client.
In particular, you can create USB redirection ltering rules for View Agent and specify the audio-in and
video Device Family Names to be disabled. For information about seing group policies and specifying
ltering rules for USB redirection, see “Using Policies to Control USB Redirection,” on page 196.
C If you do not set up USB redirection ltering rules to disable the USB device families, inform your
end users that they cannot select webcam or audio devices from the Connect USB Device or Desktop > USB
list in the VMware Horizon Client menu bar.
Selecting Preferred Webcams and Microphones
If a client computer has more than one webcam and microphone, you can congure a preferred webcam and
default microphone that Real-Time Audio-Video will redirect to the desktop. These devices can be built in
or connected to the local client computer.
On a Windows client computer, you select a preferred webcam by seing a registry key value. On a Mac OS
X client computer, you can specify a preferred webcam or microphone by using the Mac OS X defaults
system. On a Linux client computer, you can specify a preferred webcam or microphone by editing a
conguration le. Real-Time Audio-Video redirects the preferred webcam if it is available. If not, Real-Time
Audio-Video uses the rst webcam that is provided by system enumeration.
To select a default microphone, you can congure the Sound control in the Windows, Mac OS X, or Linux
operating system on the client computer.
Setting Up Desktop and Application Pools in View
162 VMware, Inc.

Select a Default Microphone on a Windows Client System
If you have multiple microphones on your client system, only one of them is used on your View desktop. To
specify which microphone is the default, you can use the Sound control on your client system.
With the Real-Time Audio-Video feature, audio input devices and audio output devices work without
requiring the use of USB redirection, and the amount of network bandwidth required is greatly reduced.
Analog audio input devices are also supported.
I If you are using a USB microphone, do not connect it from the Connect USB Device menu in
Horizon Client. To do so routes the device through USB redirection so that the device cannot use the Real-
Time Audio-Video feature.
Prerequisites
nVerify that you have a USB microphone or another type of microphone installed and operational on
your client system.
nVerify that you are using the PCoIP display protocol for your remote desktop.
Procedure
1 If you are currently on a call, stop the call.
2 Right-click the speaker icon in your system tray and select Recording devices.
You can alternatively open the Sound control from the Control Panel and click the Recording tab.
3 In the Recording tab of the Sound dialog box, right-click the microphone you prefer to use.
4 Select Set as Default Device and click OK.
5 Start a new call from your View desktop.
Select a Preferred Webcam on a Windows Client System
With the Real-Time Audio-Video feature, if you have multiple webcams on your client system, only one of
them is used on your View desktop. To specify which webcam is preferred, you can set a registry key value.
The preferred webcam is used on the remote desktop if it is available, and if not, another webcam is used.
Prerequisites
nVerify that you have a USB webcam installed and operational on your client system.
nVerify that you are using the PCoIP display protocol for your remote desktop.
Procedure
1Aach the webcam you want to use.
2 Start a call and then stop a call.
This process creates a log le.
Chapter 13 Configuring Remote Desktop Features
VMware, Inc. 163

3 Open the debug log le with a text editor.
Operating System Log File Location
Windows XP C:\Documents and Settings\username\Local
Settings\Application Data\VMware\VDM\Logs\debug-20YY-MM-DD-
XXXXXX.txt
Windows 7 or Windows 8 C:\Users\%username
%\AppData\Local\VMware\VDM\Logs\debug-20YY-MM-DD-XXXXXX.txt
The format of the log le is debug-20YY-MM-DD-XXXXXX.txt , where 20YY is the year, MM is the month,
DD is the day, and XXXXXX is a number.
4 Search the log le for [ViewMMDevRedir] VideoInputBase::LogDevEnum to nd the log le entries that
reference the aached webcams.
Here is an excerpt from the log le identifying the Microsoft Lifecam HD-5000 webcam:
[ViewMMDevRedir] VideoInputBase::LogDevEnum - 2 Device(s) found
[ViewMMDevRedir] VideoInputBase::LogDevEnum - Index=0 Name=Integrated Webcam
UserId=vid_1bcf&pid_2b83&mi_00#7&1b2e878b&0&0000 SystemId=\\?\usb#vid_1bcf&pid_2b83&mi_00#
[ViewMMDevRedir] VideoInputBase::LogDevEnum - Index=1 Name=Microsoft LifeCam HD-5000
UserId=vid_045e&pid_076d&mi_00#8&11811f49&0&0000 SystemId=\\?\usb#vid_045e&pid_076d&mi_00#
5 Copy the user ID of the preferred webcam.
For example, copy vid_045e&pid_076d&mi_00#8&11811f49&0&0000 to set the Microsoft LifeCam HD-5000
as the default webcam.
6 Start the Registry Editor (regedit.exe) and navigate to HKEY_LOCAL_MACHINE\SOFTWARE\VMware,
Inc.\VMware VDM\RTAV.
7 Paste the ID portion of the string into the REG_SZ value, srcWCamId.
For example, paste vid_045e&pid_076d&mi_00#8&11811f49&0&0000 into srcWCamId.
8 Save your changes and exit the registry.
9 Start a new call.
Select a Default Microphone on a Mac OS X Client System
If you have multiple microphones on your client system, only one microphone is used on your remote
desktop. You can use System Preferences on your client system to specify which microphone is the default
microphone on the remote desktop.
With the Real-Time Audio-Video feature, audio input devices and audio output devices work without
requiring the use of USB redirection, and the amount of network bandwidth required is greatly reduced.
Analog audio input devices are also supported.
This procedure describes how to choose a microphone from the user interface of the client system.
Administrators can also congure a preferred microphone by using the Mac OS X defaults system. See
“Congure a Preferred Webcam or Microphone on a Mac OS X Client System,” on page 166.
I If you are using a USB microphone, do not connect it from the Connection > USB menu in
Horizon Client. To do so routes the device through USB redirection and the device cannot use the Real-Time
Audio-Video feature.
Setting Up Desktop and Application Pools in View
164 VMware, Inc.

Prerequisites
nVerify that you have a USB microphone or another type of microphone installed and operational on
your client system.
nVerify that you are using the PCoIP display protocol for your remote desktop.
Procedure
1 On your client system, select Apple menu > System Preferences and click Sound.
2 Open the Input pane of Sound preferences.
3 Select the microphone that you prefer to use.
The next time that you connect to a remote desktop and start a call, the desktop uses the default microphone
that you selected on the client system.
Configuring Real-Time Audio-Video on a Mac OS X Client
You can congure Real-Time Audio-Video seings at the command line by using the Mac OS X defaults
system. With the defaults system, you can read, write, and delete Mac OS X user defaults by using Terminal
(/Applications/Utilities/Terminal.app).
Mac OS X defaults belong to domains. Domains typically correspond to individual applications. The
domain for the Real-Time Audio-Video feature is com.vmware.rtav.
Syntax for Configuring Real-Time Audio-Video
You can use the following commands to congure the Real-Time Audio-Video feature.
Table 13‑1. Command Syntax for Real-Time Audio-Video Configuration
Command Description
defaults write com.vmware.rtav scrWCamId "webcam-
userid"
Sets the preferred webcam to use on remote desktops. When this
value is not set, the webcam is selected automatically by system
enumeration. You can specify any webcam connected to (or built
into) the client system.
defaults write com.vmware.rtav srcAudioInId "audio-
device-userid"
Sets the preferred microphone (audio-in device) to use on remote
desktops. When this value is not set, remote desktops use the
default recording device set on the client system. You can specify
any microphone connected to (or built into) the client system.
defaults write com.vmware.rtav srcWCamFrameWidth
pixels
Sets the image width. The value defaults to a hardcoded value of
320 pixels. You can change the image width to any pixel value.
defaults write com.vmware.rtav srcWCamFrameHeight
pixels
Sets the image height. The value defaults to a hardcoded value of
240 pixels. You can change the image height to any pixel value.
defaults write com.vmware.rtav srcWCamFrameRate fps Sets the frame rate. The value defaults to 15 fps. You can change
the frame rate to any value.
defaults write com.vmware.rtav LogLevel "level"Sets the logging level for the Real-Time Audio-Video log le
(~/Library/Logs/VMware/vmware-RTAV-pid.log). You can set
the logging level to trace or debug.
defaults write com.vmware.rtav IsDisabled value Determines whether Real-Time Audio-Video is enabled or
disabled. Real-Time Audio-Video is enabled by default. (This
value is not in eect.) To disable Real-Time Audio-Video on the
client, set the value to true.
Chapter 13 Configuring Remote Desktop Features
VMware, Inc. 165
Table 13‑1. Command Syntax for Real-Time Audio-Video Configuration (Continued)
Command Description
defaults read com.vmware.rtav Displays Real-Time Audio-Video conguration seings.
defaults delete com.vmware.rtav seing Deletes a Real-Time Audio-Video conguration seing, for
example: defaults delete com.vmware.rtav
srcWCamFrameWidth
N You can adjust frame rates from 1 fps up to a maximum of 25 fps and resolution up to a maximum of
1920x1080. A high resolution at a fast frame rate might not be supported on all devices or in all
environments.
Configure a Preferred Webcam or Microphone on a Mac OS X Client System
With the Real-Time Audio-Video feature, if you have multiple webcams or microphones on your client
system, only one webcam and one microphone can be used on your remote desktop. You specify which
webcam and microphone are preferred at the command line by using the Mac OS X defaults system.
With the Real-Time Audio-Video feature, webcams, audio input devices, and audio output devices work
without requiring USB redirection, and the amount of network bandwidth required is greatly reduced.
Analog audio input devices are also supported.
In most environments, there is no need to congure a preferred microphone or webcam. If you do not set a
preferred microphone, remote desktops use the default audio device set in the client system's System
Preferences. See “Select a Default Microphone on a Mac OS X Client System,” on page 164. If you do not
congure a preferred webcam, the remote desktop selects the webcam by enumeration.
Prerequisites
nIf you are conguring a preferred USB webcam, verify that the webcam is installed and operational on
your client system.
nIf you are conguring a preferred USB microphone or other type of microphone, verify that the
microphone is installed and operational on your client system.
nVerify that you are using the PCoIP display protocol for your remote desktop.
Procedure
1 On your Mac OS X client system, start a webcam or microphone application to trigger an enumeration
of camera devices or audio devices to the Real-Time Audio-Video log le.
aAach the webcam or audio device.
b In the Applications folder, double-click VMware Horizon View Client (Horizon Client 3.0) or
VMware Horizon Client (Horizon Client 3.1 and later) to start Horizon Client.
c Start a call and then stop the call.
Setting Up Desktop and Application Pools in View
166 VMware, Inc.

2 Find log entries for the webcam or microphone in the Real-Time Audio-Video log le.
a In a text editor, open the Real-Time Audio-Video log le.
The Real-Time Audio-Video log le is named ~/Library/Logs/VMware/vmware-RTAV-pid.log, where
pid is the process ID of the current session.
b Search the Real-Time Audio-Video log le for entries that identify the aached webcams or
microphones.
The following example shows how webcam entries might appear in the Real-Time Audio-Video log le:
2013-12-16T12:18:17.404Z| vthread-3| I120: RTAV: static void VideoInputBase::LogDevEnum() -
1 Device(s) found
2013-12-16T12:18:17.404Z| vthread-3| I120: RTAV: static void VideoInputBase::LogDevEnum() -
Name=FaceTime HD Camera (Built-in) UserId=FaceTime HD Camera (Built-
in)#0xfa20000005ac8509 SystemId=0xfa20000005ac8509
The following example shows how microphone entries might appear in the Real-Time Audio-Video log
le:
2013-12-16T12:18:17.404Z| vthread-3| I120: RTAV: int
AVCaptureEnumerateAudioDevices(MMDev::DeviceList&) -
2013-12-16T12:18:17.404Z| vthread-3| I120: RTAV: static void AudioCaptureBase::LogDevEnum()
- 2 Device(s) found
2013-12-16T12:18:17.404Z| vthread-3| I120: RTAV: static void AudioCaptureBase::LogDevEnum()
- Index=255 Name=Built-in Microphone UserId=Built-in Microphone#AppleHDAEngineInput:1B,
0,1,0:1 SystemId=AppleHDAEngineInput:1B,0,1,0:1
2013-12-16T12:18:17.404Z| vthread-3| I120: RTAV: static void AudioCaptureBase::LogDevEnum()
- Index=255 Name=Built-in Input UserId=Built-in Input#AppleHDAEngineInput:1B,0,1,1:2
SystemId=AppleHDAEngineInput:1B,0,1,1:2
3 Find the webcam or microphone that you prefer in the Real-Time Audio-Video log le and make a note
of its user ID.
The user ID appears after the string UserId= in the log le. For example, the user ID of the internal face
time camera is FaceTime HD Camera (Built-in) and the user ID of the internal microphone is Built-in
Microphone.
4 In Terminal (/Applications/Utilities/Terminal.app), use the defaults write command to set the
preferred webcam or microphone.
Option Action
Set the preferred webcam Type
defaults write com.vmware.rtav srcWCamId "webcam-userid",
where webcam-userid is the user ID of the preferred webcam, which you
obtained from the Real-Time Audio-Video log le. For example:
defaults write com.vmware.rtav srcWCamId "HD Webcam C525”
Set the preferred microphone Type
defaults write com.vmware.rtav srcAudioInId "audio-device-
userid", where audio-device-userid is the user ID of the preferred
microphone, which you obtained from the Real-Time Audio-Video log le.
For example:
defaults write com.vmware.rtav srcAudioInId "Built-in
Microphone"
5 (Optional) Use the defaults read command to verify your changes to the Real-Time Audio-Video
feature.
For example: defaults read com.vmware.rtav
The command lists all of the Real-Time Audio-Video seings.
Chapter 13 Configuring Remote Desktop Features
VMware, Inc. 167
The next time you connect to a remote desktop and start a new call, the desktop uses the preferred webcam
or microphone that you congured, if it is available. If the preferred webcam or microphone is not available,
the remote desktop can use another available webcam or microphone.
Select a Default Microphone on a Linux Client System
If you have multiple microphones on your client system, only one of them is used on your View desktop. To
specify which microphone is the default, you can use the Sound control on your client system.
With the Real-Time Audio-Video feature, audio input devices and audio output devices work without
requiring the use of USB redirection, and the amount of network bandwidth required is greatly reduced.
Analog audio input devices are also supported.
This procedure describes choosing a default microphone from the user interface of the client system.
Administrators can also congure a preferred microphone by editing a conguration le. See “Select a
Preferred Webcam or Microphone on a Linux Client System,” on page 168.
Prerequisites
nVerify that you have a USB microphone or another type of microphone installed and operational on
your client system.
nVerify that you are using the PCoIP display protocol for your remote desktop.
Procedure
1 In the Ubuntu graphical user interface, select System > Preferences > Sound.
You can alternatively click the Sound icon on the right side of the toolbar at the top of the screen.
2 Click the Input tab in the Sound Preferences dialog box.
3 Select the preferred device and click Close.
Select a Preferred Webcam or Microphone on a Linux Client System
With the Real-Time Audio-Video feature, if you have multiple webcams and microphones on your client
system, only one webcam and one microphone can be used on your View desktop. To specify which
webcam and microphone are preferred, you can edit a conguration le.
The preferred webcam or microphone is used on the View desktop if it is available, and if not, another
webcam or microphone is used.
With the Real-Time Audio-Video feature, webcams, audio input devices, and audio output devices work
without requiring the use of USB redirection, and the amount network bandwidth required is greatly
reduced. Analog audio input devices are also supported.
To set the properties in the /etc/vmware/config le and specify a preferred device, you must determine the
device ID.
nFor webcams, you set the rtav.srcWCamId property to the value of the webcam description found in the
log le, as described in the procedure that follows.
nFor audio devices, you set the rtav.srcAudioInId property to the value of the Pulse Audio
device.description eld.
To nd the value of this eld you can search the log le, as described in the procedure that follows.
Prerequisites
Depending on whether you are conguring a preferred webcam, preferred microphone, or both, perform
the appropriate prerequisite tasks:
nVerify that you have a USB webcam installed and operational on your client system.
Setting Up Desktop and Application Pools in View
168 VMware, Inc.
nVerify that you have a USB microphone or another type of microphone installed and operational on
your client system.
nVerify that you are using the PCoIP display protocol for your remote desktop.
Procedure
1 Launch the client, and start a webcam or microphone application to trigger an enumeration of camera
devices or audio devices to the client log.
aAach the webcam or audio device you want to use.
b Use the command vmware-view to start Horizon Client.
c Start a call and then stop the call.
This process creates a log le.
Chapter 13 Configuring Remote Desktop Features
VMware, Inc. 169
2 Find log entries for the webcam or microphone.
a Open the debug log le with a text editor.
The log le with real-time audio-video log messages is located at /tmp/vmware-<username>/vmware-
RTAV-<pid>.log. The client log is located at /tmp/vmware-<username>/vmware-view-<pid>.log.
b Search the log le to nd the log le entries that reference the aached webcams and microphones.
The following example shows an extract of the webcam selection:
main| I120: RTAV: static void VideoInputBase::LogDevEnum() - 3 Device(s) found
main| I120: RTAV: static void VideoInputBase::LogDevEnum() - Name=UVC Camera (046d:
0819) UserId=UVC Camera (046d:0819)#/sys/devices/pci0000:00/0000:00:1a.
7/usb1/1-3/1-3.4/1-3.4.5 SystemId=/dev/video1
main| I120: RTAV: static void VideoInputBase::LogDevEnum() - Name=gspca main driver
UserId=gspca main driver#/sys/devices/pci0000:00/0000:00:1a.7/usb1/1-3/1-3.4/1-3.4.7
SystemId=/dev/video2
main| I120: RTAV: static void VideoInputBase::LogDevEnum() -
Name=Microsoft® LifeCam HD-6000 for Notebooks UserId=Microsoft® LifeCam HD-6000 for
Notebooks#/sys/devices/pci0000:00/0000:00:1a.7/usb1/1-3/1-3.6 SystemId=/dev/video0
main| W110: RTAV: static bool AudioCaptureLin::EnumCaptureDevices(MMDev::DeviceList&) -
enumeration data unavailable
The following example shows an extract of the audio device selection, and the current audio level
for each:
vthread-18| I120: RTAV: bool AudioCaptureLin::TriggerEnumDevices() - Triggering
enumeration
vthread-18| I120: RTAV: static void AudioCaptureLin::PulseAudioGetSourceCB(pa_context*,
const pa_source_info*, int, void*) - PulseAudio Get Source (idx=1 'alsa_output.usb-
Logitech_Logitech_USB_Headset-00-Headset.analog-stereo.monitor' 'Monitor of Logitech USB
Headset Analog Stereo')
vthread-18| I120: RTAV: static void AudioCaptureLin::PulseAudioGetSourceCB(pa_context*,
const pa_source_info*, int, void*) - channel:0 vol:65536
vthread-18| I120: RTAV: static void AudioCaptureLin::PulseAudioGetSourceCB(pa_context*,
const pa_source_info*, int, void*) - channel:1 vol:65536
vthread-18| I120: RTAV: static void AudioCaptureLin::PulseAudioGetSourceCB(pa_context*,
const pa_source_info*, int, void*) - PulseAudio Get Source (idx=2 'alsa_input.usb-
Logitech_Logitech_USB_Headset-00-Headset.analog-mono' 'Logitech USB Headset Analog Mono')
vthread-18| I120: RTAV: static void AudioCaptureLin::PulseAudioGetSourceCB(pa_context*,
const pa_source_info*, int, void*) - channel:0 vol:98304
vthread-18| I120: RTAV: static void AudioCaptureLin::PulseAudioGetSourceCB(pa_context*,
const pa_source_info*, int, void*) - PulseAudio Get Source (idx=3 'alsa_output.usb-
Microsoft_Microsoft_LifeChat_LX-6000-00-LX6000.analog-stereo.monitor' 'Monitor of
Microsoft LifeChat LX-6000 Analog Stereo')
vthread-18| I120: RTAV: static void AudioCaptureLin::PulseAudioGetSourceCB(pa_context*,
const pa_source_info*, int, void*) - channel:0 vol:65536
Warnings are shown if any of the source audio levels for the selected device do not meet the
PulseAudio criteria if the source is not set to 100% (0dB), or if the selected source device is muted,
as follows:
vthread-18| I120: RTAV: static void AudioCaptureLin::PulseAudioSourceInfoCB(pa_context*,
const pa_source_info*, int, void*) - Note, selected device channel volume: 0: 67%
vthread-18| I120: RTAV: static void AudioCaptureLin::PulseAudioSourceInfoCB(pa_context*,
const pa_source_info*, int, void*) - Note, selected device channel is muted
Setting Up Desktop and Application Pools in View
170 VMware, Inc.
3 Copy the description of the device and use it to set the appropriate property in the /etc/vmware/config
le.
For a webcam example, copy Microsoft® LifeCam HD-6000 for Notebooks to specify the Microsoft
webcam as the preferred webcam and set the property as follows:
rtav.srcWCamId="Microsoft® LifeCam HD-6000 for Notebooks"
For this example you could also set the property to rtav.srcWCamId="Microsoft".
For an audio device example, copy Logitech USB Headset Analog Mono to specify the Logitech headset
as the preferred audio device and set the property as follows:
rtav.srcAudioInId="Logitech USB Headset Analog Mono"
4 Save your changes and close the /etc/vmware/config conguration le.
5 Log o of the desktop session and start a new session.
Configuring Real-Time Audio-Video Group Policy Settings
You can congure group policy seings that control the behavior of Real-Time Audio-Video (RTAV) on your
View desktops. These seings determine a virtual webcam's maximum frame rate and image resolution. The
seings allow you to manage the maximum bandwidth that any one user can consume. An additional
seing disables or enables the RTAV feature.
You do not have to congure these policy seings. Real-Time Audio-Video works with the frame rate and
image resolution that are set for the webcam on client systems. The default seings are recommended for
most webcam and audio applications.
For examples of bandwidth use during Real-Time Audio-Video, see “Real-Time Audio-Video Bandwidth,”
on page 173.
These policy seings aect your View desktops, not the client systems to which the physical devices are
connected. To congure these seings on your desktops, add the RTAV Group Policy Administrative
Template (ADM) le in Active Directory.
For information about conguring seings on client systems, see the VMware knowledge base article,
Seing Frame Rates and Resolution for Real-Time Audio-Video on Horizon View Clients, at
hp://kb.vmware.com/kb/2053644.
Add the RTAV ADM Template in Active Directory and Configure the Settings
You can add the policy seings in the RTAV ADM le, vdm_agent_rtav.adm, to group policy objects (GPOs)
in Active Directory and congure the seings in the Group Policy Object Editor.
Prerequisites
nVerify that the RTAV setup option is installed on your desktops. This setup option is installed by default
but can be deselected during installation. The seings have no eect if RTAV is not installed. See
“Install View Agent on a Virtual Machine,” on page 27.
nVerify that Active Directory GPOs are created for the RTAV group policy seings. The GPOs must be
linked to the OU that contains your desktops. See “Active Directory Group Policy Example,” on
page 261.
nVerify that the Microsoft MMC and the Group Policy Object Editor snap-in are available on your Active
Directory server.
nFamiliarize yourself with RTAV group policy seings. See “Real-Time Audio-Video Group Policy
Seings,” on page 172.
Chapter 13 Configuring Remote Desktop Features
VMware, Inc. 171
Procedure
1 Download the View GPO Bundle .zip le from the VMware download site at
hps://my.vmware.com/web/vmware/downloads.
Under Desktop & End-User Computing, select the VMware Horizon 6 download, which includes the
GPO Bundle.
The le is named VMware-Horizon-View-Extras-Bundle-x.x.x-yyyyyyy.zip, where x.x.x is the version
and yyyyyyy is the build number. All ADM and ADMX les that provide group policy seings for View
are available in this le.
2 Unzip the VMware-Horizon-View-Extras-Bundle-x.x.x-yyyyyyy.zip le and copy the RTAV ADM le,
vdm_agent_rtav.adm, to your Active Directory server.
3 On the Active Directory server, edit the GPO by selecting Start > Administrative Tools > Group Policy
Management, right-clicking the GPO, and selecting Edit.
4 In the Group Policy Object Editor, right-click the Computer > Administrative Templates
folder and select Add/Remove Templates.
5 Click Add, browse to the vdm_agent_rtav.adm le, and click Open.
6 Click Close to apply the policy seings in the ADM le to the GPO.
The seings are located in the Computer > Policies > Administrative Templates >
Classic Administrative Templates > VMware View Agent > View RTAV
folder.
7Congure the RTAV group policy seings.
Real-Time Audio-Video Group Policy Settings
The Real-Time Audio-Video (RTAV) group policy seings control the virtual webcam's maximum frame rate
and maximum image resolution. An additional seing lets you disable or enable the RTAV feature. These
policy seings aect View desktops, not the client systems where the physical devices are connected.
If you do not congure the RTAV group policy seings, RTAV uses the values that are set on the client
systems. On client systems, the default webcam frame rate is 15 frames per second. The default webcam
image resolution is 320x240 pixels.
The Resolution - Max image... group policy seings determine the maximum values that can be used. The
frame rate and resolution that are set on client systems are absolute values. For example, if you congure the
RTAV seings for maximum image resolution to 640x480 pixels, the webcam displays any resolution that is
set on the client up to 640x480 pixels. If you set the image resolution on the client to a value higher than
640x480 pixels, the client resolution is capped at 640x480 pixels.
Not all congurations can achieve the maximum group policy seings of 1920x1080 resolution at 25 frames
per second. The maximum frame rate that your conguration can achieve for a given resolution depends
upon the webcam being used, the client system hardware, the View Agent virtual hardware, and the
available bandwidth.
The Resolution - Default image... group policy seings determine the default values that are used when
resolution values are not set by the user.
Setting Up Desktop and Application Pools in View
172 VMware, Inc.

Group Policy
Setting Description
Disable RTAV When you enable this seing, the Real-Time Audio-Video feature is disabled.
When this seing is not congured or disabled, Real-Time Audio-Video is enabled.
This seing is located in the View RTAV folder.
Max frames per
second
Determines the maximum rate per second at which the webcam can capture frames. You can use this
seing to limit the webcam frame rate in low-bandwidth network environments.
The minimum value is one frame per second. The maximum value is 25 frames per second.
When this seing is not congured or disabled, no maximum frame rate is set. Real-Time Audio-Video
uses the frame rate that is selected for the webcam on the client system.
By default, client webcams have a frame rate of 15 frames per second. If no seing is congured on the
client system and the Max frames per second seing is not congured or disabled, the webcam
captures 15 frames per second.
This seing is located in the View RTAV > View RTAV Webcam folder.
Resolution -
Max image
width in pixels
Determines the maximum width, in pixels, of image frames that are captured by the webcam. By
seing a low maximum image width, you can lower the resolution of captured frames, which can
improve the imaging experience in low-bandwidth network environments.
When this seing is not congured or disabled, a maximum image width is not set. RTAV uses the
image width that is set on the client system. The default width of a webcam image on a client system is
320 pixels.
The maximum limit for any webcam image is 1920x1080 pixels. If you congure this seing with a
value that is higher than 1920 pixels, the eective maximum image width is 1920 pixels.
This seing is located in the View RTAV > View RTAV Webcam folder.
Resolution -
Max image
height in pixels
Determines the maximum height, in pixels, of image frames that are captured by the webcam. By
seing a low maximum image height, you can lower the resolution of captured frames, which can
improve the imaging experience in low-bandwidth network environments.
When this seing is not congured or disabled, a maximum image height is not set. RTAV uses the
image height that is set on the client system. The default height of a webcam image on a client system
is 240 pixels.
The maximum limit for any webcam image is 1920x1080 pixels. If you congure this seing with a
value that is higher than 1080 pixels, the eective maximum image height is 1080 pixels.
This seing is located in the View RTAV > View RTAV Webcam folder.
Resolution -
Default image
resolution
width in pixels
Determines the default resolution width, in pixels, of image frames that are captured by the webcam.
This seing is used when no resolution value is dened by the user.
When this seing is not congured or disabled, the default image width is 320 pixels.
The value that is congured by this policy seing takes eect only if both View Agent 6.0 or later and
Horizon Client 3.0 or later are used. For older versions of View Agent and Horizon Client, this policy
seing has no eect, and the default image width is 320 pixels.
This seing is located in the View RTAV > View RTAV Webcam folder.
Resolution -
Default image
resolution
height in pixels
Determines the default resolution height, in pixels, of image frames that are captured by the webcam.
This seing is used when no resolution value is dened by the user.
When this seing is not congured or disabled, the default image height is 240 pixels.
The value that is congured by this policy seing takes eect only if both View Agent 6.0 or later and
Horizon Client 3.0 or later are used. For older versions of View Agent and Horizon Client, this policy
seing has no eect, and the default image height is 240 pixels.
This seing is located in the View RTAV > View RTAV Webcam folder.
Real-Time Audio-Video Bandwidth
Real-Time Audio-Video bandwidth varies according to the webcam's image resolution and frame rate, and
the image and audio data being captured.
The sample tests shown in Table 13-2 measure the bandwidth that Real-Time Audio-Video uses in a View
environment with standard webcam and audio input devices. The tests measure the bandwidth to send both
video and audio data from Horizon Client to View Agent. The total bandwidth that is required to run a
desktop session from Horizon Client might be higher than these numbers. In these tests, the webcam
captures images at 15 frames per second for each image resolution.
Chapter 13 Configuring Remote Desktop Features
VMware, Inc. 173

Table 13‑2. Sample Bandwidth Results for Sending Real-Time Audio-Video Data from Horizon Client to
View Agent
Image Resolution (Width x Height) Bandwidth Used (Kbps)
160 x 120 225
320 x 240 320
640 x 480 600
Configuring Scanner Redirection
By using scanner redirection, View users can scan information in their remote desktops and applications
with scanning and imaging devices that are connected locally to their client computers. Scanner redirection
is available in Horizon 6.0.2 and later releases.
Scanner redirection supports standard scanning and imaging devices that are compatible with the TWAIN
and WIA formats.
After you install View Agent with the Scanner Redirection setup option, the feature works on your remote
desktops and applications without further conguration. You do not have to congure scanner-specic
drivers on remote desktops or applications.
You can congure group policy seings to change default values to adapt to particular scanning and
imaging applications or environments. You can also set a policy to disable or enable the feature altogether.
With an ADM template le, you can install scanner redirection group policy seings in Active Directory or
on individual desktops. See “Conguring Scanner Redirection Group Policy Seings,” on page 176.
When scanning data is redirected to a remote desktop or application, you cannot access the scanning or
imaging device on the local computer. Conversely, when a device is in use on the local computer, you cannot
access it on the remote desktop or application.
System Requirements for Scanner Redirection
To support scanner redirection, your View deployment must meet certain software and hardware
requirements.
View remote desktop or
application
This feature is supported on RDS desktops, RDS applications, and VDI
desktops that are deployed on single-user virtual machines.
You must install View Agent 6.0.2 or later, and select the Scanner Redirection
setup option, on the parent or template virtual machines or RDS hosts.
On Windows Desktop and Windows Server guest operating systems, the
View Agent Scanner Redirection setup option is deselected by default.
The following guest operating systems are supported on single-user virtual
machines and, where noted, on RDS hosts:
n32-bit or 64-bit Windows 7
n32-bit or 64-bit Windows 8.x
n32-bit or 64-bit Windows 10
nWindows Server 2008 R2 congured as a desktop or RDS host
Setting Up Desktop and Application Pools in View
174 VMware, Inc.

nWindows Server 2012 R2 congured as a desktop or RDS host
I The Desktop Experience feature must be installed on
Windows Server guest operating systems, whether they are congured
as desktops or as RDS hosts.
The scanner device drivers do not have to be installed on the desktop
operating system where View Agent is installed.
Horizon Client software Horizon Client 3.2 for Windows or a later release
Horizon Client computer
or client access device
Supported operating systems:
n32-bit or 64-bit Windows 7
n32-bit or 64-bit Windows 8.x
n32-bit or 64-bit Windows 10
The scanner device drivers must be installed, and the scanner must be
operable, on the client computer.
Scanning device
standard
TWAIN or WIA
Display protocol for
View
PCoIP
Scanner redirection is not supported in RDP desktop sessions.
User Operation of Scanner Redirection
With scanner redirection, users can operate physical scanners and imaging devices that are connected to
their client computers as virtual devices that perform scanning operations in their remote desktops and
applications.
Users can operate their virtual scanners in a way that closely parallels the way that they use the scanners on
their locally connected client computers.
nAfter the Scanner Redirection option is installed with View Agent, a scanner tool tray icon icon ( ) is
added to the desktop. On RDS applications, the tool tray icon is redirected to the local client computer.
You do not have to use the scanner tool tray icon. Scanning redirection works without any further
conguration. You can use the icon to congure options such as changing which device to use if more
than one device is connected to the client computer.
nWhen you click the scanner icon, the Scanner Redirection for VMware Horizon menu is displayed. No
scanners appear in the menu list if incompatible scanners are connected to the client computer.
nBy default, scanning devices are autoselected. TWAIN and WIA scanners are selected separately. You
can have one TWAIN scanner and one WIA scanner selected at the same time.
nIf more than one locally connected scanner is congured, you can select a dierent scanner than the one
that is selected by default.
nWIA scanners are displayed in the remote desktop's Device Manager menu, under Imaging devices.
The WIA scanner is named VMware Virtual WIA Scanner.
nIn the Scanner Redirection for VMware Horizon menu, you can click the Preferences option and select
options such as hiding webcams from the scanner redirection menu and determining how to select the
default scanner.
You can also control these features by conguring scanner redirection group policy seings in Active
Directory. See “Scanner Redirection Group Policy Seings,” on page 177.
Chapter 13 Configuring Remote Desktop Features
VMware, Inc. 175

nWhen you operate a TWAIN scanner, the TWAIN Scanner Redirection for VMware Horizon menu
provides additional options for selecting regions of an image, scanning in color, black and white, or
grayscale, and choosing other common functions.
nTo display the TWAIN user interface window for TWAIN scanning software that does not display the
window by default, you can select an Always show Scanner dialog option in the VMware
Horizon Scanner Redirection Preferences dialog box.
Note that most TWAIN scanning software displays the TWAIN user interface window by default. For
this software, the window is always displayed, whether you select or deselect the Always show
Scanner dialog option.
N If you run two RDS applications that are hosted on dierent farms, two scanner redirection tool tray
icons appear on the client computer. Typically, only one scanner is connected to a client computer. In this
case, both icons operate the same device, and it does not maer which icon you select. In some situations,
you might have two locally connected scanners and run two RDS applications that run on dierent farms. In
that case, you must open each icon to see which scanner redirection menu controls which RDS application.
For end-user instructions for operating redirected scanners, see the Using VMware Horizon Client for Windows
document.
Configuring Scanner Redirection Group Policy Settings
You can congure group policy seings that control the behavior of scanner redirection on your View
desktops and applications. With these policy seings, you can control centrally, from Active Directory, the
options that are available in the VMware Horizon Scanner Redirection Preferences dialog box on users'
desktops and applications.
You do not have to congure these policy seings. Scanner redirection works with the default seings that
are congured for scanning devices on remote desktops and client systems.
These policy seings aect your remote desktops and applications, not the client systems where the physical
scanners are connected. To congure these seings on your desktops and applications, add the Scanner
Redirection Group Policy Administrative Template (ADM) le in Active Directory.
Add the Scanner Redirection ADM Template in Active Directory
You can add the policy seings in the scanner redirection ADM le, vdm_agent_scanner.adm, to group policy
objects (GPOs) in Active Directory and congure the seings in the Group Policy Object Editor.
Prerequisites
nVerify that the Scanner Redirection setup option is installed on your desktops and RDS hosts. The
group policy seings have no eect if scanner redirection is not installed. See “Install View Agent on a
Virtual Machine,” on page 27.
nVerify that Active Directory GPOs are created for the scanner redirection group policy seings. The
GPOs must be linked to the OU that contains your desktops and RDS hosts. See “Active Directory
Group Policy Example,” on page 261.
nVerify that the MMC and the Group Policy Object Editor snap-in are available on your Active Directory
server.
nFamiliarize yourself with scanner redirection group policy seings. See “Scanner Redirection Group
Policy Seings,” on page 177.
Setting Up Desktop and Application Pools in View
176 VMware, Inc.

Procedure
1 Download the View GPO Bundle .zip le from the VMware download site at
hps://my.vmware.com/web/vmware/downloads.
Under Desktop & End-User Computing, select the VMware Horizon 6 download, which includes the
GPO Bundle.
The le is named VMware-Horizon-View-Extras-Bundle-x.x.x-yyyyyyy.zip, where x.x.x is the version
and yyyyyyy is the build number. All ADM and ADMX les that provide group policy seings for View
are available in this le.
2 Unzip the VMware-Horizon-View-Extras-Bundle-x.x.x-yyyyyyy.zip le and copy the scanner
redirection ADM le, vdm_agent_scanner.adm, to your Active Directory server.
3 On the Active Directory server, edit the GPO by selecting Start > Administrative Tools > Group Policy
Management, right-clicking the GPO, and selecting Edit.
4 In the Group Policy Object Editor, right-click the Computer > Administrative Templates
folder and select Add/Remove Templates.
5 Click Add, browse to the vdm_agent_scanner.adm le, and click Open.
6 Click Close to apply the policy seings in the ADM le to the GPO.
The seings are located in the Computer > Policies > Administrative Templates >
Classic Administrative Templates > VMware View Agent > Scanner Redirection
folder.
Most seings are also added to the User folder, located in User > Policies
> Administrative Templates > Classic Administrative Templates > VMware View Agent
> Scanner Redirection.
7Congure the scanner redirection group policy seings.
Scanner Redirection Group Policy Settings
The scanner redirection group policy seings control the options that are available in the VMware Horizon
Scanner Redirection Preferences dialog box on users' desktops and applications.
The scanner redirection ADM le contains both Computer Conguration and User Conguration policies.
The User Conguration policies allow you to set dierent congurations for users of VDI desktops, RDS
desktops, and RDS applications. Dierent User Conguration policies can take eect even when users'
desktop sessions and applications are running on the same RDS hosts.
Group Policy
Setting Description
Disable
functionality
Disables the scanner redirection feature.
This seing is available as a Computer Conguration policy only.
When you enable this seing, scanners cannot be redirected and do not appear in the scanner menu on
users' desktops and applications.
When you disable this seing or do not congure it, scanner redirection works and scanners appear in
the scanner menu.
Lock cong Locks the scanner redirection user interface and prevents users from changing conguration options on
their desktops and applications.
This seing is available as a Computer Conguration policy only.
When you enable this seing, users cannot congure the options that are available from the tray menu
on their desktops and applications. Users can display the VMware Horizon Scanner Redirection
Preferences dialog box, but the options are inactive and cannot be changed.
When you disable this seing or do not congure it, users can congure the options in the VMware
Horizon Scanner Redirection Preferences dialog box.
Chapter 13 Configuring Remote Desktop Features
VMware, Inc. 177

Group Policy
Setting Description
Compression Sets the image compression rate during the image transfer to the remote desktop or application.
You can choose from the following compression modes:
nDisable. Image compression is disabled.
nLossless. Lossless (zlib) compression is used without loss of image quality.
nJPEG. JPEG compression is used with loss of quality. You specify the level of image quality in the
JPEG compression quality eld. JPEG compression quality must be a value between 0 and 100.
When you enable this seing, the selected compression mode is set for all users aected by this policy.
However, users can change the Compression option in the VMware Horizon Scanner Redirection
Preferences dialog box, overriding the policy seing.
When you disable this policy seing or do not congure it, JPEG compression mode is used.
Hide Webcam Prevents webcams from appearing in the scanner selection menu in the VMware Horizon Scanner
Redirection Preferences dialog box.
This seing is available as a Computer Conguration and User Conguration policy.
By default, webcams can be redirected to desktops and applications. Users can select webcams and use
them as virtual scanners to capture images.
When you enable this seing as a Computer Conguration policy, webcams are hidden from all users
of the aected computers. Users cannot change the Hide Webcam option in the VMware Horizon
Scanner Redirection Preferences dialog box.
When you enable this seing as a User Conguration policy, webcams are hidden from all aected
users. However, users can change the Hide Webcam option in the VMware Horizon Scanner
Redirection Preferences dialog box.
When you enable this seing in both Computer Conguration and User Conguration, the Hide
Webcam seing in Computer Conguration overrides the corresponding policy seing in User
Conguration for all users of the aected computers.
When you disable this seing or do not congure it in either policy conguration, the Hide Webcam
seing is determined by the corresponding policy seing (either User Conguration or Computer
Conguration) or by user selection in the VMware Horizon Scanner Redirection Preferences dialog box.
Default
Scanner
Provides centralized management of scanner autoselection.
This seing is available as a Computer Conguration and User Conguration policy.
You select scanner autoselection options separately for TWAIN and WIA scanners. You can choose
from the following autoselection options:
nNone. Do not select scanners automatically.
nAutoselect Automatically select the locally connected scanner.
nLast used Automatically select the last-used scanner.
n Select the scanner name that you type in the scanner text box.
When you enable this seing as a Computer Conguration policy, the seing determines the scanner
autoselection mode for all users of the aected computers. Users cannot change the Default Scanner
option in the VMware Horizon Scanner Redirection Preferences dialog box.
When you enable this seing as a User Conguration policy, the seing determines the scanner
autoselection mode for all aected users. However, users can change the Default Scanner option in the
VMware Horizon Scanner Redirection Preferences dialog box.
When you enable this seing in both Computer Conguration and User Conguration, the scanner
autoselection mode in Computer Conguration overrides the corresponding policy seing in User
Conguration for all users of the aected computers.
When you disable this seing or do not congure it in either policy conguration, the scanner
autoselection mode is determined by the corresponding policy seing (either User Conguration or
Computer Conguration) or by user selection in the VMware Horizon Scanner Redirection Preferences
dialog box.
Setting Up Desktop and Application Pools in View
178 VMware, Inc.
Configuring Serial Port Redirection
With serial port redirection, users can redirect locally connected, serial (COM) ports such as built-in RS232
ports or USB to Serial adapters. Devices such as printers, bar code readers, and other serial devices can be
connected to these ports and used in the remote desktops.
Serial port redirection is available in Horizon 6 version 6.1.1 and later releases with Horizon Client for
Windows 3.4 and later releases.
After you install View Agent and set up the serial port redirection feature, the feature can work on your
remote desktops without further conguration. For example, COM1 on the local client system is redirected
as COM1 on the remote desktop, and COM2 is redirected as COM2, unless a COM port already exists on the
remote desktop. If so, the COM port is mapped to avoid conicts. For example, if COM1 and COM2 already
exist on the remote desktop, COM1 on the client is mapped to COM3 by default. You do not have to
congure the COM ports or install device drivers on the remote desktops.
To make a redirected COM port active, a user selects the Connect option from the menu on the serial port
tool tray icon during a desktop session. A user can also set a COM port device to connect automatically
whenever the user logs in to the remote desktop. See “User Operation of Serial Port Redirection,” on
page 180.
You can congure group policy seings to change the default conguration. For example, you can lock the
seings so that users cannot change the COM port mappings or properties. You can also set a policy to
disable or enable the feature altogether. With an ADM template le, you can install serial port redirection
group policy seings in Active Directory or on individual desktops. See “Conguring Serial Port
Redirection Group Policy Seings,” on page 181.
When a redirected COM port is opened and in use on a remote desktop, you cannot access the port on the
local computer. Conversely, when a COM port is in use on the local computer, you cannot access the port on
the remote desktop.
Requirements for Serial Port Redirection
With this feature, users can redirect locally connected, serial (COM) ports, such as built-in RS232 ports or
USB to Serial adapters, to their remote desktops. To support serial port redirection, your View deployment
must meet certain software and hardware requirements.
View remote desktop The remote desktops must have View Agent 6.1.1 or later installed with the
Serial Port Redirection setup option, on the parent or template virtual
machines. This setup option is deselected by default.
The following guest operating systems are supported on single-user virtual
machines:
n32-bit or 64-bit Windows 7
n32-bit or 64-bit Windows 8.x
n32-bit or 64-bit Windows 10
nWindows Server 2008 R2 congured as a desktop
nWindows Server 2012 R2 congured as a desktop
This feature is not currently supported for Windows Server RDS hosts.
Serial port device drivers do not have to be installed on the desktop
operating system where View Agent is installed.
Horizon Client computer
or client access device
nThe client system must have Horizon Client for Windows 3.4 or later
installed.
Chapter 13 Configuring Remote Desktop Features
VMware, Inc. 179

nSerial port redirection is supported on 32-bit or 64-bit Windows 7 client
systems, 32-bit or 64-bit Windows 8.x client systems, and 32-bit or 64-bit
Windows 10 client systems.
nAny required serial port device drivers must be installed, and the serial
port must be operable, on the client computer. You do not need to install
the device drivers on the remote desktop operating system where View
Agent is installed.
Display protocol for
View
PCoIP
VMware Horizon serial port redirection is not supported in RDP desktop
sessions.
User Operation of Serial Port Redirection
Users can operate physical COM port devices that are connected to their client computers and use serial port
virtualization to connect the devices to their remote desktops, where the devices are accessible to 3rd party
applications.
nAfter the Serial Port Redirection option is installed with View Agent, a serial port tool tray icon ( ) is
added to the remote desktop.
The icon appears only if you use the required versions of View Agent and Horizon Client for Windows,
and you connect over PCoIP. The icon does not appear if you connect to a remote desktop from a Mac,
Linux, or mobile client.
You can use the icon to congure options to connect, disconnect, and customize the mapped COM
ports.
nWhen you click the serial port icon, the Serial COM Redirection for VMware Horizon menu appears.
nBy default, the locally connected COM ports are mapped to corresponding COM ports on the remote
desktop. For example: COM1 mapped to COM3. The mapped ports are not connected by default.
nTo use a mapped COM port, you must manually select the Connect option in the Serial COM
Redirection for VMware Horizon menu, or the Autoconnect option must be set during a previous
desktop session or by conguring a group policy seing. Autoconnect congures a mapped port to
connect automatically when a remote desktop session is started.
nWhen you select the Connect option, the redirected port is active. In the Device Manager in the guest
operating system on the remote desktop, the redirected port is shown as Serial Port Redirector for
VMware Horizon (COMn).
When the COM port is connected, you can open the port in a 3rd-party application, which can exchange
data with the COM port device that is connected to the client machine. While a port is open in an
application, you cannot disconnect the port in the Serial COM Redirection for VMware Horizon
menu.
Before you can disconnect the COM port, you must close the port in the application or close the
application. You can then select the Disconnect option to disconnect the port and make the physical
COM port available for use on the client machine.
nIn the Serial COM Redirection for VMware Horizon menu, you can right-click a redirected port to
select the Port Properties command.
In the COM Properties dialog box, you can congure a port to connect automatically when a remote
desktop session is started, ignore the Data Set Ready (DSR) signal, and map the local port on the client
to a dierent COM port on the remote desktop by selecting a port in the Custom port name drop-down
list.
Setting Up Desktop and Application Pools in View
180 VMware, Inc.
A remote desktop port might be shown as overlapped. For example, you might see COM1
(Overlapped). In this case, the virtual machine is congured with a COM port in the virtual hardware
on the ESXi host. You can use a redirected port even when it is mapped to an overlapped port on the
virtual machine. The virtual machine receives serial data through the port from the ESXi host or from
the client system.
nIn the Device Manager in the guest operating system, you can use the Properties > Port tab to
congure seings for a redirected COM port. For example, you can set the default baud rate and data
bits. However, the seings you congure in Device Manager are ignored if the application species the
port seings.
For end-user instructions for operating redirected serial COM ports, see the Using VMware Horizon Client for
Windows document.
Guidelines for Configuring Serial Port Redirection
Through the group policy seings, you can congure serial port redirection and control the extent to which
users can customize redirected COM ports. Your choices depend on the user roles and 3rd-party
applications in your organization.
For details about the group policy seings, see “Serial Port Redirection Group Policy Seings,” on page 183.
nIf your users run the same 3rd-party applications and COM port devices, make sure that the redirected
ports are congured in the same way. For example, in a bank or retail store that uses point-of-sale
devices, make sure that all COM port devices are connected to the same ports on the client endpoints,
and all ports are mapped to the same redirected COM ports on the remote desktops.
Set the policy seing to map client ports to redirected ports. Select the Autoconnect item
in to ensure that the redirected ports are connected at the start of each desktop session.
Enable the Lock policy seing to prevent users from changing the port mappings or
customizing the port congurations. In this scenario, users never have to connect or disconnect
manually and cannot accidentally make a redirected COM port inaccessible to a 3rd-party application.
nIf your users are knowledge workers who use a variety of 3rd-party applications and might also use
their COM ports locally on their client machines, make sure that users can connect and disconnect from
the redirected COM ports.
You might set the policy seing if the default port mappings are incorrect. You might or
might not set the Autoconnect item, depending on your users' requirements. Do not enable the Lock
policy seing.
nMake sure that your 3rd-party applications open the COM port that is mapped to the remote desktop.
nMake sure that the baud rate that is in use for a device matches the baud rate that the 3rd-party
application is aempting to use.
nYou can redirect up to ve COM ports from a client system to a remote desktop.
Configuring Serial Port Redirection Group Policy Settings
You can congure group policy seings that control the behavior of serial port redirection on your remote
desktops. With these policy seings, you can control centrally, from Active Directory, the options that are
available in the Serial COM Redirection for VMware Horizon menu on users' desktops.
You do not have to congure these policy seings. Serial port redirection works with the default seings
that are congured for redirected COM ports on remote desktops and client systems.
These policy seings aect your remote desktops, not the client systems where the physical COM port
devices are connected. To congure these seings on your desktops, add the Serial Port Redirection Group
Policy Administrative Template (ADM) le in Active Directory.
Chapter 13 Configuring Remote Desktop Features
VMware, Inc. 181
Add the Serial Port Redirection ADM Template in Active Directory
You can add the policy seings in the serial port redirection ADM le, vdm_agent_serialport.adm, to group
policy objects (GPOs) in Active Directory and congure the seings in the Group Policy Object Editor.
Prerequisites
nVerify that the Serial Port Redirection setup option is installed on your desktops. The group policy
seings have no eect if serial port redirection is not installed. See “Install View Agent on a Virtual
Machine,” on page 27.
nVerify that Active Directory GPOs are created for the serial port redirection group policy seings. The
GPOs must be linked to the OU that contains your desktops. See “Active Directory Group Policy
Example,” on page 261.
nVerify that the MMC and the Group Policy Object Editor snap-in are available on your Active Directory
server.
nFamiliarize yourself with serial port redirection group policy seings. See “Serial Port Redirection
Group Policy Seings,” on page 183.
Procedure
1 Download the View GPO Bundle .zip le from the VMware download site at
hps://my.vmware.com/web/vmware/downloads.
Under Desktop & End-User Computing, select the VMware Horizon 6 download, which includes the
GPO Bundle.
The le is named VMware-Horizon-View-Extras-Bundle-x.x.x-yyyyyyy.zip, where x.x.x is the version
and yyyyyyy is the build number. All ADM and ADMX les that provide group policy seings for View
are available in this le.
2 Unzip the VMware-Horizon-View-Extras-Bundle-x.x.x-yyyyyyy.zip le and copy the serial port
redirection ADM le, vdm_agent_serialport.adm, to your Active Directory server.
3 On the Active Directory server, edit the GPO by selecting Start > Administrative Tools > Group Policy
Management, right-clicking the GPO, and selecting Edit.
4 In the Group Policy Object Editor, right-click the Computer > Administrative Templates
folder and select Add/Remove Templates.
5 Click Add, browse to the vdm_agent_serialport.adm le, and click Open.
6 Click Close to apply the policy seings in the ADM le to the GPO.
The seings are located in the Computer > Policies > Administrative Templates >
Classic Administrative Templates > VMware View Agent > Serial COM folder.
Most seings are also added to the User folder, located in User > Policies
> Administrative Templates > Classic Administrative Templates > VMware View Agent
> Serial COM.
7Congure the serial port redirection group policy seings.
Setting Up Desktop and Application Pools in View
182 VMware, Inc.
Serial Port Redirection Group Policy Settings
The serial port redirection group policy seings control the redirected COM port conguration, including
the options that are available in the Serial COM Redirection for VMware Horizon menu on remote
desktops.
The serial port redirection ADM le contains both Computer Conguration and User Conguration policies.
The User Conguration policies allow you to set dierent congurations for specied users of VDI
desktops. Policy seings that are congured in Computer Conguration take precedence over the
corresponding seings that are congured in User Conguration.
Chapter 13 Configuring Remote Desktop Features
VMware, Inc. 183

Group Policy
Setting Description
PortSeings Determines the mapping between the COM port on the client system and the redirected COM port on
the remote desktop and determines other seings that aect the redirected COM port.
You congure each redirected COM port individually. Five policy seings are available,
through , allowing up to ve COM ports to be mapped from the client to
the remote desktop. Select one policy seing for each COM port that you intend to
congure.
When you enable the policy seing, you can congure the following items that aect the
redirected COM port:
nThe Source port number seing species the number of the physical COM port that is connected
to the client system.
nThe Destination virtual port number seing species the number of the redirected virtual COM
port on the remote desktop.
nThe Autoconnect seing automatically connects the COM port to the redirected COM port at the
start of each desktop session.
nWith the IgnoreDSR seing, the redirected COM port device ignores the Data Set Ready (DSR)
signal.
nThe Pause before close port (in milliseconds) seing species the time to wait (in milliseconds)
after a user closes the redirected port and before the port is actually closed. Certain USB to Serial
adapters require this delay to ensure that transmied data is preserved. This seing is intended for
troubleshooting purposes.
nThe Serial2USBModeChangeEnabled seing resolves issues that apply to USB to Serial adapters
that use the Prolic chipset, including the GlobalSat BU353 GPS adapter. If you do not enable this
seing for Prolic chipset adapters, connected devices can transmit data but not receive data.
nThe Disable errors in wait mask seing disables the error value in the COM port mask. This
troubleshooting seing is required for certain applications. For details, see the Microsoft
documentation of the WaitCommEvent function at
hp://msdn.microsoft.com/en-us/library/windows/desktop/aa363479(v=vs.85).aspx.
nThe HandleBtDisappear seing supports BlueTooth COM port behavior. This seing is intended
for troubleshooting purposes.
nThe UsbToComTroubleShooting seing resolves some issues that apply to USB to Serial port
adapters. This seing is intended for troubleshooting purposes.
When you enable the seing for a particular COM port, users can connect and disconnect
the redirected port, but users cannot congure properties of the port on the remote desktop. For
example, users cannot set the port to be redirected automatically when they log in to the desktop, and
they cannot ignore the DSR signal. These properties are controlled by the group policy seing.
N A redirected COM port is connected and active only if the physical COM port is connected
locally to the client system. If you map a COM port that does not exist on the client, the redirected port
appears as inactive and not available in the tool tray menu on the remote desktop.
When the seing is disabled or not congured, the redirected COM port uses the seings
that users congure on the remote desktop. The Serial COM Redirection for VMware Horizon menu
options are active and available to users.
This seing is available as a Computer Conguration and User Conguration policy.
Local seings
priority
Gives priority to the seings that are congured on the remote desktop.
When you enable this policy, the serial port redirection seings that a user congures on the remote
desktop take precedence over the group policy seings. A group policy seing takes eect only if a
seing is not congured on the remote desktop.
When this seing is disabled or not congured, group policy seings take precedence over the seings
that are congured on the remote desktop.
This seing is available as a Computer Conguration and User Conguration policy.
Disable
functionality
Disables the serial port redirection feature.
When you enable this seing, COM ports are not redirected to the remote desktop. The serial port tool
tray icon on the remote desktop is not displayed.
When this seing is disabled, serial port redirection works, the serial port tool tray icon is displayed,
and COM ports appear in the Serial COM Redirection for VMware Horizon menu.
When this seing is not congured, seings that are local to the remote desktop determine whether
serial port redirection is disabled or enabled.
This seing is available as a Computer Conguration policy only.
Setting Up Desktop and Application Pools in View
184 VMware, Inc.
Group Policy
Setting Description
Lock
conguration
Locks the serial port redirection user interface and prevents users from changing conguration options
on the remote desktop.
When you enable this seing, users cannot congure the options that are available from the tool tray
menu on their desktops. Users can display the Serial COM Redirection for VMware Horizon menu,
but the options are inactive and cannot be changed.
When this seing is disabled, users can congure the options in the Serial COM Redirection for
VMware Horizon menu.
When this seing is not congured, local program seings on the remote desktop determine whether
users can congure the COM port redirection seings.
Bandwidth
limit
Sets a limit on the data transfer speed, in kilobytes per second, between the redirected serial port and
client systems.
When you enable this seing, you can set a value in the Bandwidth limit (in kilobytes per second)
box that determines the maximum data transfer speed between the redirected serial port and the client.
A value of 0 disables the bandwidth limit.
When this seing is disabled, no bandwidth limit is set.
When this seing is not congured, local program seings on the remote desktop determine whether a
bandwidth limit is set.
This seing is available as a Computer Conguration policy only.
Configure USB to Serial Adapters
You can congure USB to Serial adapters that use a Prolic chipset to be redirected to remote desktops by
the serial port redirection feature.
To ensure that data is transmied properly on Prolic chipset adapters, you can enable a serial port
redirection group policy seing in Active Directory or on an individual desktop virtual machine.
If you do not congure the group policy seing to resolve issues for Prolic chipset adapters, connected
devices can transmit data but not receive data.
You do not have to congure a policy seing or registry key on client systems.
Prerequisites
nVerify that the Serial Port Redirection setup option is installed on your desktops. The group policy
seings have no eect if serial port redirection is not installed. See “Install View Agent on a Virtual
Machine,” on page 27.
nVerify that the Serial Port Redirection ADM le is added in Active Directory or on the desktop virtual
machine. See “Add the Serial Port Redirection ADM Template in Active Directory,” on page 182.
nFamiliarize yourself with the Serial2USBModeChangeEnabled item in the group policy
seing. See “Serial Port Redirection Group Policy Seings,” on page 183.
Procedure
1 In Active Directory or on the virtual machine, open the Group Policy Object Editor.
2 Navigate to the Computer > Policies > Administrative Templates > Classic
Administrative Templates > VMware View Agent > Serial COM folder.
3 Select the folder.
4 Select and enable a group policy seing.
5 Specify the source and destination COM port numbers to map the COM port.
6 Select the Serial2USBModeChangeEnabled check box.
7Congure other items in the policy seing as needed.
Chapter 13 Configuring Remote Desktop Features
VMware, Inc. 185
8 Click OK and close the Group Policy Object Editor.
USB to Serial adapters can be redirected to remote desktops, and can receive data successfully, when users
start their next desktop sessions.
Managing Access to Windows Media Multimedia Redirection (MMR)
View provides the Windows Media MMR feature for VDI desktops that run on single-user machines and for
RDS desktops.
MMR delivers the multimedia stream directly to client computers. With MMR, the multimedia stream is
processed, that is, decoded, on the client system. The client system plays the media content, thereby
ooading the demand on the ESXi host.
MMR data is sent across the network without application-based encryption and might contain sensitive
data, depending on the content being redirected. To ensure that this data cannot be monitored on the
network, use MMR only on a secure network.
If the secure tunnel is enabled, MMR connections between Horizon Clients and the View Secure Gateway
are secure, but connections from the View Secure Gateway to desktop machines are not encrypted. If the
secure tunnel is disabled, MMR connections from Horizon Clients to the desktop machines are not
encrypted.
Enabling Multimedia Redirection in View
You can take steps to ensure that MMR is accessible only to Horizon Client systems that have sucient
resources to handle local multimedia decoding and that are connected to View on a secure network.
By default, the global policy in View Administrator, Multimedia redirection (MMR) is set to Deny.
To use MMR, you must explicitly set this value to Allow.
To control access to MMR, you can enable or disable the Multimedia redirection (MMR) policy globally, for
individual desktop pools, or for specic users.
For instructions for seing global policies in View Administrator, see “View Policies,” on page 229.
System Requirements for Windows Media MMR
To support Windows Media Multimedia Redirection (MMR), your View deployment must meet certain
software and hardware requirements. Windows Media MMR is provided in Horizon 6.0.2 and later releases.
View remote desktop nThis feature is supported on VDI desktops that are deployed on single-
user virtual machines and on RDS desktops.
View Agent 6.1.1 or later is required to support this feature on RDS
desktops.
View Agent 6.0.2 or later is required to support this feature on single-
user machines.
nThe following guest operating systems are supported:
n64-bit or 32-bit Windows 7 SP1 Enterprise or Ultimate (single-user
machine). Windows 7 Professional is not supported.
n64-bit or 32-bit Windows 8/8.1 Professional or Enterprise (single-
user machine)
nWindows Server 2008 R2 congured as an RDS host
nWindows Server 2012 and 2012 R2 congured as an RDS host
Setting Up Desktop and Application Pools in View
186 VMware, Inc.

n3D Rendering can be enabled or disabled on the desktop pool.
nUsers must play videos on Windows Media Player 12 or later or in
Internet Explorer 8 or later.
To use Internet Explorer, you must disable Protected Mode. In the
Internet Options dialog box, click the Security tab and deselect Enable
Protected Mode.
Horizon Client software Horizon Client 3.2 for Windows or a later release is required to support
Windows Media MMR on single-user machines.
Horizon Client computer
or client access device
nThe clients must run 64-bit or 32-bit Windows 7 or Windows 8/8.1
operating systems.
Supported media
formats
Media formats that are supported on Windows Media Player are supported.
For example: M4V; MOV; MP4; WMP; MPEG-4 Part 2; WMV 7, 8, and 9;
WMA; AVI; ACE; MP3; WAV.
N DRM-protected content is not redirected through Windows Media
MMR.
View policies In View Administrator, set the Multimedia redirection (MMR) policy to
Allow. The default value is Deny.
Back-end firewall If your View deployment includes a back-end rewall between your DMZ-
based security servers and your internal network, verify that the back-end
rewall allows trac to port 9427 on your desktops.
Determine Whether to Use Windows Media MMR Based on Network Latency
By default, Windows Media MMR adapts to network conditions on single-user desktops that run on
Windows 8 or later and RDS desktops that run on Windows Server 2012 or 2012 R2 or later. If the network
latency between Horizon Client and the remote desktop is 29 milliseconds or lower, the video is redirected
with Windows Media MMR. If the network latency is 30 milliseconds or higher, the video is not redirected.
Instead, it is rendered on the ESXi host and sent to the client over PCoIP.
This feature applies to Windows 8 or later single-user desktops and Windows Server 2012 or 2012 R2 or later
RDS desktops. Users can run any supported client system, Windows 7 or Windows 8/8.1.
This feature does not apply to Windows 7 single-user desktops or Windows Server 2008 R2 RDS desktops.
On these guest operating systems, Windows Media MMR always performs multimedia redirection,
regardless of network latency.
You can override this feature, forcing Windows Media MMR to perform multimedia redirection regardless
of the network latency, by conguring the RedirectionPolicy registry seing on the desktop.
Procedure
1 Start the Windows Registry Editor on the remote desktop.
2 Navigate to the Windows registry key that controls the redirection policy.
Option Description
64-bit desktop HKEY_LOCAL_MACHINE\Software\Wow6432Node\VMware,Inc.\VMware
tsmmr
32-bit desktop HKEY_LOCAL_MACHINE\Software\VMware,Inc.\VMware tsmmr
Chapter 13 Configuring Remote Desktop Features
VMware, Inc. 187

3 Set the RedirectionPolicy value to always.
Value name = RedirectionPolicy
Value Type = REG_SZ
Value data = always
4 Restart Windows Media Player on the desktop to allow the updated value to take eect.
Managing Access to Client Drive Redirection
When you deploy Horizon Client 3.5 or later and View Agent 6.2 or later with client drive redirection
(CDR), folders and les are sent across the network with encryption. CDR connections between clients and
the View Secure Gateway and connections from the View Secure Gateway to desktop machines are secure.
With earlier client or View Agent releases, CDR folders and les are sent across the network without
encryption and might contain sensitive data, depending on the content being redirected. If the secure tunnel
is enabled, CDR connections between Horizon Clients and the View Secure Gateway are secure, but
connections from the View Secure Gateway to desktop machines are not encrypted. If the secure tunnel is
disabled, CDR connections from Horizon Clients to the desktop machines are not encrypted. To ensure that
this data cannot be monitored on the network, use CDR only on a secure network if Horizon Client is earlier
than version 3.5 or View Agent is earlier than version 6.2.
The Client Drive Redirection setup option in the View Agent installer is selected by default. As a best
practice, install the Client Drive Redirection setup option only in desktop pools where users require this
feature.
You can disable CDR by conguring a Microsoft Remote Desktop Services group policy seing for remote
desktops and RDS hosts in Active Directory.
1 In the Group Policy Editor, go to Computer
Templates\Windows Components\Remote Desktop Services\Remote Desktop Session Host\Device
and Resource Redirection.
This navigation path is for Active Directory on Windows Server 2012. The navigation path diers on
other Windows operating systems.
2 Enable the Do not allow drive redirection group policy seing.
N If your View deployment includes a back-end rewall between your DMZ-based security servers and
your internal network, verify that the back-end rewall allows trac to port 9427 on your single-user and
RDS desktops. TCP connections on port 9427 are required to support CDR.
Currently, this feature is supported on Horizon Client for Mac OS X, Horizon Client for Windows, and
Horizon Client for Linux. For more information, see the Using VMware Horizon Client document for the
specic type of desktop client device. Go to
hps://www.vmware.com/support/viewclients/doc/viewclients_pubs.html.
Setting Up Desktop and Application Pools in View
188 VMware, Inc.

Using USB Devices with Remote
Desktops and Applications 14
Administrators can congure the ability to use USB devices, such as thumb ash drives, cameras, VoIP
(voice-over-IP) devices, and printers, from a remote desktop. This feature is called USB redirection, and it
supports using either the RDP or the PCoIP display protocol. A remote desktop can accommodate up to 128
USB devices.
You can also redirect locally connected USB thumb ash drives and hard disks for use in RDS desktops and
applications. Other types of USB devices, including other types of storage devices, are not supported in RDS
desktops and applications.
When you use this feature in desktop pools that are deployed on single-user machines, most USB devices
that are aached to the local client system become available in the remote desktop. You can even connect to
and manage an iPad from a remote desktop. For example, you can sync your iPad with iTunes installed in
your remote desktop. On some client devices, such as Windows and Mac OS X computers, the USB devices
are listed in a menu in Horizon Client. You use the menu to connect and disconnect the devices.
In most cases, you cannot use a USB device in your client system and in your remote desktop or application
at the same time. Only a few types of USB devices can be shared between a remote desktop and the local
computer. These devices include smart card readers and human interface devices such as keyboards and
pointing devices.
Administrators can specify which types of USB devices end users are allowed to connect to. For composite
devices that contain multiple types of devices, such as a video input device and a storage device, on some
client systems, administrators can split the device so that one device (for example, the video input device) is
allowed but the other device (for example, the storage device) is not.
The USB redirection feature is available only on some types of clients. To nd out whether this feature is
supported on a particular type of client, see the feature support matrix included in the "Using
VMware Horizon Client" document for the specic type of desktop or mobile client device. Go to
hps://www.vmware.com/support/viewclients/doc/viewclients_pubs.html.
I When you deploy the USB redirection feature, you can take steps to protect your organization
from the security vulnerabilities that can aect USB devices. See “Deploying USB Devices in a Secure View
Environment,” on page 193.
This chapter includes the following topics:
n“Limitations Regarding USB Device Types,” on page 190
n“Overview of Seing Up USB Redirection,” on page 191
n“Network Trac and USB Redirection,” on page 192
n“Automatic Connections to USB Devices,” on page 192
n“Deploying USB Devices in a Secure View Environment,” on page 193
VMware, Inc. 189
n“Using Log Files for Troubleshooting and to Determine USB Device IDs,” on page 195
n“Using Policies to Control USB Redirection,” on page 196
n“Troubleshooting USB Redirection Problems,” on page 205
Limitations Regarding USB Device Types
Although View does not explicitly prevent any devices from working in a remote desktop, due to factors
such as network latency and bandwidth, some devices work beer than others. By default, some devices are
automatically ltered, or blocked, from being used.
In Horizon 6.0.1, together with Horizon Client 3.1 or later, you can plug USB 3.0 devices into USB 3.0 ports
on the client machine, on Windows, Linux, and Mac OS X clients. USB 3.0 devices are supported only with a
single stream. Because multiple stream support is not implemented in this release, USB device performance
is not enhanced. Some USB 3.0 devices that require a constant high throughput to function correctly might
not work in a VDI session, due to network latency.
In earlier View releases, although super-speed USB 3.0 devices are not supported, USB 3.0 devices do often
work when plugged into a USB 2.0 port on the client machine. However, there might be exceptions,
depending on the type of USB chipset on the motherboard of the client system.
The following types of devices might not be suitable for USB redirection to a remote desktop that is
deployed on a single-user machine:
nDue to the bandwidth requirements of webcams, which typically consume more than 60 Mbps of
bandwidth, webcams are not supported through USB redirection. For webcams, you can use the Real-
Time Audio-Video feature.
nThe redirection of USB audio devices depends on the state of the network and is not reliable. Some
devices require a high data throughput even when they are idle. If you have the Real-Time Audio-
Video feature, audio input and output devices will work well using that feature, and you do not need to
use USB redirection for those devices.
nUSB CD/DVD burning is not supported.
nPerformance of some USB devices varies greatly, depending on the network latency and reliability,
especially over a WAN. For example, a single USB storage device read-request requires three round-
trips between the client and the remote desktop. A read of a complete le might require multiple USB
read operations, and the larger the latency, the longer the round-trip will take.
The le structure can be very large, depending on the format. Large USB disk drives can take several
minutes to appear in the desktop. Formaing a USB device as NTFS rather than FAT helps to decrease
the initial connection time. An unreliable network link causes retries, and performance is further
reduced.
Similarly, USB CD/DVD readers, as well as scanners and touch devices such as signature tablets, do not
work well over a latent network such as a WAN.
nThe redirection of USB scanners depends on the state of the network, and scans might take longer than
normal to complete.
You can redirect the following types of devices to an RDS desktop or application:
nUSB thumb ash drives
nUSB hard disks
You cannot redirect other types of USB devices, and other types of USB storage devices such as security
storage drives and USB CD-ROM, to an RDS desktop or application.
Setting Up Desktop and Application Pools in View
190 VMware, Inc.

Overview of Setting Up USB Redirection
To set up your deployment so that end users can connect removable devices, such as USB ash drives,
cameras, and headsets, you must install certain components on both the remote desktop or RDS host and the
client device, and you must verify that the global seing for USB devices is enabled in View Administrator.
This checklist includes both required and optional tasks for seing up USB redirection in your enterprise.
The USB redirection feature is available only on some types of clients, such as Windows, Mac OS X, and
partner-supplied Linux clients. To nd out whether this feature is supported on a particular type of client,
see the feature support matrix included in the "Using VMware Horizon Client" document for the specic
type of client device. Go to hps://www.vmware.com/support/viewclients/doc/viewclients_pubs.html.
I When you deploy the USB redirection feature, you can take steps to protect your organization
from the security vulnerabilities that can aect USB devices. For example, you can use group policy seings
to disable USB redirection for some remote desktops and users, or to restrict which types of USB devices can
be redirected. See “Deploying USB Devices in a Secure View Environment,” on page 193.
1 When you run the View Agent installation wizard on the remote desktop source or RDS host, be sure to
include the USB Redirection component.
This component is deselected by default. You must select the component to install it.
2 When you run the VMware Horizon Client installation wizard on the client system, be sure to include
the USB Redirection component.
This component is included by default.
3 Verify that access to USB devices from a remote desktop or application is enabled in View
Administrator.
In View Administrator, go to Policies > Global Policies and verify that USB access is set to Allow.
4 (Optional) Congure View Agent group policies to specify which types of devices are allowed to be
redirected.
See “Using Policies to Control USB Redirection,” on page 196.
5 (Optional) Congure similar seings on the client device.
You can also congure whether devices are automatically connected when Horizon Client connects to
the remote desktop or application, or when the end user plugs in a USB device. The method of
conguring USB seings on the client device depends on the type of device. For example, for Windows
client endpoints, you can congure group policies, whereas for Mac OS X endpoints, you use a
command-line command. For instructions, see the "Using VMware Horizon Client" document for the
specic type of client device.
6 Have end users connect to a remote desktop or application and plug their USB devices into the local
client system.
If the driver for the USB device is not already installed in the remote desktop or RDS host, the guest
operating system detects the USB device and searches for a suitable driver, just as it would on a
physical Windows computer.
Chapter 14 Using USB Devices with Remote Desktops and Applications
VMware, Inc. 191

Network Traffic and USB Redirection
USB redirection works independently of the display protocol (RDP or PCoIP) and USB trac usually uses
TCP port 32111.
Network trac between a client system and a remote desktop or application can travel various routes,
depending on whether the client system is inside the corporate network and how the administrator has
chosen to set up security.
1 If the client system is inside the corporate network, so that a direct connection can be made between the
client and desktop or application, USB trac uses TCP port 32111.
2 If the client system is outside the corporate network, the client can connect through a View security
server.
A security server resides within a DMZ and acts as a proxy host for connections inside your trusted
network. This design provides an additional layer of security by shielding the View Connection Server
instance from the public-facing Internet and by forcing all unprotected session requests through the
security server.
A DMZ-based security server deployment requires a few ports to be opened on the rewall to allow
clients to connect with security servers inside the DMZ. You must also congure ports for
communication between security servers and the View Connection Server instances in the internal
network.
For information on specic ports, see "Firewall Rules for DMZ-Based Security Servers" in the View
Architecture Planning Guide.
3 If the client system is outside the corporate network, you can use View Administrator to enable the
HTTPS Secure Tunnel. The client then makes a further HTTPS connection to the View Connection
Server or security server host when users connect to a remote desktop or application. The connection is
tunneled using HTTPS port 443 to the security server, and then the onward connection for USB trac
from the server to the remote desktop or application uses TCP port 32111. USB device performance is
slightly degraded when using this tunnel.
N If you are using a zero client, USB trac is redirected using a PCoIP virtual channel, rather than
through TCP 32111. Data is encapsulated and encrypted by the PCoIP Secure Gateway using TCP/UDP
port 4172. If you are using only zero clients, it is not necessary to open TCP port 32111.
Automatic Connections to USB Devices
On some client systems, administrators, end users, or both can congure automatic connections of USB
devices to a remote desktop. Automatic connections can be made either when the user plugs a USB device in
to the client system or when the client connects to the remote desktop.
Some devices, such as smart phones and tablets, require automatic connections because these devices are
restarted, and therefore disconnected, during an upgrade. If these devices are not set to automatically
reconnect to the remote desktop, during an upgrade, after the devices restart, they connect to the local client
system instead.
Conguration properties for automatic USB connections that administrators set on the client, or that end
users set by using a Horizon Client menu item, apply to all USB devices unless the devices are congured to
be excluded from USB redirection. For example, in some client versions, webcams and microphones are
excluded from USB redirection by default because these devices work beer through the Real-Time Audio-
Setting Up Desktop and Application Pools in View
192 VMware, Inc.
Video feature. In some cases, a USB device might not be excluded from redirection by default but might
require administrators to explicitly exclude the device from redirection. For example, the following types of
USB devices are not good candidates for USB redirection and must not be automatically connected to a
remote desktop:
nUSB Ethernet devices. If you redirect a USB Ethernet device, your client system might lose network
connectivity if that device is the only Ethernet device.
nTouch screen devices. If you redirect a touch screen device, the remote desktop will receive touch input
but not keyboard input.
If you have set the remote desktop to autoconnect USB devices, you can congure a policy to exclude
specic devices such as touch screens and network devices. For more information, see “Conguring Filter
Policy Seings for USB Devices,” on page 199.
On Windows clients, as an alternative to using seings that automatically connect all but excluded devices,
you can edit a conguration le on the client that sets Horizon Client to reconnect only a specic device or
devices, such as smart phones and tablets, to the remote desktop. For instructions, see Using
VMware Horizon Client for Windows.
Deploying USB Devices in a Secure View Environment
USB devices can be vulnerable to a security threat called BadUSB, in which the rmware on some USB
devices can be hijacked and replaced with malware. For example, a device can be made to redirect network
trac or to emulate a keyboard and capture keystrokes. You can congure the USB redirection feature to
protect your View deployment against this security vulnerability.
By disabling USB redirection, you can prevent any USB devices from being redirected to your users' View
desktops and applications. Alternatively, you can disable redirection of specic USB devices, allowing users
to have access only to specic devices on their desktops and applications.
The decision whether to take these steps depends on the security requirements in your organization. These
steps are not mandatory. You can install USB redirection and leave the feature enabled for all USB devices in
your View deployment. At a minimum, consider seriously the extent to which your organization should try
to limit its exposure to this security vulnerability.
Disabling USB Redirection for All Types of Devices
Some highly secure environments require you to prevent all USB devices that users might have connected to
their client devices from being redirected to their remote desktops and applications. You can disable USB
redirection for all desktop pools, for specic desktop pools, or for specic users in a desktop pool.
Use any of the following strategies, as appropriate for your situation:
nWhen you install View Agent on a desktop image or RDS host, deselect the USB redirection setup
option. (The option is deselected by default.) This approach prevents access to USB devices on all
remote desktops and applications that are deployed from the desktop image or RDS host.
nIn View Administrator, edit the USB access policy for a specic pool to either deny or allow access.
With this approach, you do not have to change the desktop image and can control access to USB devices
in specic desktop and application pools.
Only the global USB access policy is available for RDS desktop and application pools. You cannot set
this policy for individual RDS desktop or application pools.
nIn View Administrator, after you set the policy at the desktop or application pool level, you can
override the policy for a specic user in the pool by selecting the User Overrides seing and selecting a
user.
nSet the Exclude All Devices policy to true, on the View Agent side or on the client side, as appropriate.
Chapter 14 Using USB Devices with Remote Desktops and Applications
VMware, Inc. 193

If you set the Exclude All Devices policy to true, Horizon Client prevents all USB devices from being
redirected. You can use other policy seings to allow specic devices or families of devices to be redirected.
If you set the policy to false, Horizon Client allows all USB devices to be redirected except those that are
blocked by other policy seings. You can set the policy on both View Agent and Horizon Client. The
following table shows how the Exclude All Devices policy that you can set for View Agent and
Horizon Client combine to produce an eective policy for the client computer. By default, all USB devices
are allowed to be redirected unless otherwise blocked.
Table 14‑1. Effect of Combining Exclude All Devices Policies
Exclude All Devices Policy on View
Agent
Exclude All Devices Policy on
Horizon Client
Combined Effective Exclude All
Devices Policy
false or not dened (include all USB
devices)
false or not dened (include all USB
devices)
Include all USB devices
false (include all USB devices) true (exclude all USB devices) Exclude all USB devices
true (exclude all USB devices) Any or not dened Exclude all USB devices
If you have set Disable Remote Configuration Download policy to true, the value of Exclude All Devices on
View Agent is not passed to Horizon Client, but View Agent and Horizon Client enforce the local value of
Exclude All Devices.
These policies are included in the View Agent Conguration ADM template le (vdm_agent.adm). For more
information, see “USB Seings in the View Agent Conguration ADM Template,” on page 203.
Disabling USB Redirection for Specific Devices
Some users might have to redirect specic locally-connected USB devices so that they can perform tasks on
their remote desktops or applications. For example, a doctor might have to use a Dictaphone USB device to
record patients' medical information. In these cases, you cannot disable access to all USB devices. You can
use group policy seings to enable or disable USB redirection for specic devices.
Before you enable USB redirection for specic devices, make sure that you trust the physical devices that are
connected to client machines in your enterprise. Be sure that you can trust your supply chain. If possible,
keep track of a chain of custody for the USB devices.
In addition, educate your employees to ensure that they do not connect devices from unknown sources. If
possible, restrict the devices in your environment to those that accept only signed rmware updates, are
FIPS 140-2 Level 3-certied, and do not support any kind of eld-updatable rmware. These types of USB
devices are hard to source and, depending on your device requirements, might be impossible to nd. These
choices might not be practical, but they are worth considering.
Each USB device has its own vendor and product ID that identies it to the computer. By conguring View
Agent Conguration group policy seings, you can set an include policy for known device types. With this
approach, you remove the risk of allowing unknown devices to be inserted into your environment.
For example, you can prevent all devices except a known device vendor and product ID,
vid/pid=0123/abcd, from being redirected to the remote desktop or application:
ExcludeAllDevices Enabled
IncludeVidPid o:vid-0123_pid-abcd
N This example conguration provides protection, but a compromised device can report any vid/pid,
so a possible aack could still occur.
By default, View blocks certain device families from being redirected to the remote desktop or application.
For example, HID (human interface devices) and keyboards are blocked from appearing in the guest. Some
released BadUSB code targets USB keyboard devices.
Setting Up Desktop and Application Pools in View
194 VMware, Inc.

You can prevent specic device families from being redirected to the remote desktop or application. For
example, you can block all video, audio, and mass storage devices:
ExcludeDeviceFamily o:video;audio;storage
Conversely, you can create a whitelist by preventing all devices from being redirected but allowing a specic
device family to be used. For example, you can block all devices except storage devices:
ExcludeAllDevices Enabled
IncludeDeviceFamily o:storage
Another risk can arise when a remote user logs into a desktop or application and infects it. You can prevent
USB access to any View connections that originate from outside the company rewall. The USB device can
be used internally but not externally.
To disable external access to USB devices, you can block TCP port 32111 from the security server to the
remote desktops and applications. For zero clients, the USB trac is embedded inside a virtual channel on
UDP port 4172. Because port 4172 is used for the display protocol as well as for USB redirection, you cannot
block port 4172. If required, you can disable USB redirection on zero clients. For details, see the zero client
product literature or contact the zero client vendor.
Seing policies to block certain device families or specic devices can help to mitigate the risk of being
infected with BadUSB malware. These policies do not mitigate all risk, but they can be an eective part of an
overall security strategy.
Using Log Files for Troubleshooting and to Determine USB Device IDs
Useful log les for USB are located on both the client system and the remote desktop operating system or
RDS host. Use the log les in both locations for troubleshooting. To nd product IDs for specic devices, use
the client-side logs.
If you are trying to congure USB device spliing or ltering, or if you are trying to determine why a
particular device does not appear in a Horizon Client menu, look in the client-side logs. Client logs are
produced for the USB arbitrator and the Horizon View USB Service. Logging on Windows and Linux clients
is enabled by default. On Mac OS X clients, logging is disabled by default. To enable logging on Mac OS X
clients, see Using VMware Horizon Client for Mac OS X.
When you congure policies for spliing and ltering out USB devices, some values you set require the VID
(vendor ID) and PID (product ID) for the USB device. To nd the VID and PID, you can search on the
Internet for the product name combined with vid and pid. Alternatively, you can look in the client-side log
le after you plug in the USB device to the local system when Horizon Client is running. The following table
shows the default location of the log les.
Table 14‑2. Log File Locations
Client or Agent Path to Log Files
Windows client %PROGRAMDATA%\VMware\VDM\logs\debug-*.txt
C:\Windows\Temp\vmware-SYSTEM\vmware-usbarb-*.log
View Agent %PROGRAMDATA%\VMware\VDM\logs\debug-*.txt
Mac OS X client /var/root/Library/Logs/VMware/vmware-view-usbd-xxxx.log
/Library/Logs/VMware/vmware-usbarbitrator-xxxx.log
Linux client (Default location) /tmp/vmware-root/vmware-view-usbd-*.log
If a problem with the device occurs after the device is redirected to the remote desktop or application,
examine both the client- and agent-side logs.
Chapter 14 Using USB Devices with Remote Desktops and Applications
VMware, Inc. 195

Using Policies to Control USB Redirection
You can congure USB policies for both the remote desktop or application (View Agent) and Horizon Client.
These policies specify whether the client device should split composite USB devices into separate
components for redirection. You can split devices to restrict the types of USB devices that the client makes
available for redirection, and to make View Agent prevent certain USB devices from being forwarded from a
client computer.
If you have older versions of View Agent or Horizon Client installed, not all the features of the USB
redirection policies are available. Table 14-3 shows how View applies the policies for dierent combinations
of View Agent and Horizon Client.
Table 14‑3. Compatibility of USB Policy Settings
View Agent
Version
Horizon
Client
Version Effect of USB Policy Settings on USB Redirection
5.1 or later 5.1 or later USB policy seings are applicable to both View Agent and Horizon Client. You can
use View Agent USB policy seings to block USB devices from being forwarded to a
desktop. View Agent can send device spliing and ltering policy seings to
Horizon Client. You can use Horizon Client USB policy seings to prevent USB
devices from being redirected from a client computer to a desktop.
N In View Agent 6.1 or later and Horizon Client 3.3 or later, these USB
redirection policy seings apply to RDS desktops and applications as well as to
remote desktops that run on single-user machines.
5.1 or later 5.0.x or earlier USB policy seings apply only to View Agent. You can use View Agent USB policy
seings to block USB devices from being forwarded to a desktop. You cannot use
Horizon Client USB policy seings to control which devices can be redirected from a
client computer to a desktop. Horizon Client cannot receive device spliing and
ltering policy seings from View Agent. Existing registry seings for USB
redirection by Horizon Client remain valid.
5.0.x or earlier 5.1 or later USB policy seings apply only to Horizon Client. You can use Horizon Client USB
policy seings to prevent USB devices from being redirected from a client computer
to a desktop. You cannot use View Agent USB policy seings to block USB devices
from being forwarded to a desktop. View Agent cannot send device spliing and
ltering policy seings to Horizon Client.
5.0.x or earlier 5.0.x or earlier USB policy seings do not apply. Existing registry seings for USB redirection by
Horizon Client remain valid.
If you upgrade Horizon Client, any existing registry seings for USB redirection, such as
HardwareIdFilters, remain valid until you dene USB policies for Horizon Client.
On client devices that do not support client-side USB policies, you can use the USB policies for View Agent
to control which USB devices are allowed to be forwarded from the client to a desktop or application.
Configuring Device Splitting Policy Settings for Composite USB Devices
Composite USB devices consist of a combination of two or more dierent devices, such as a video input
device and a storage device or a microphone and a mouse device. If you want to allow one or more of the
components to be available for redirection, you can split the composite device into its component interfaces,
exclude certain interfaces from redirection and include others.
You can set a policy that automatically splits composite devices. If automatic device spliing does not work
for a specic device, or if automatic spliing does not produce the results your application requires, you can
split composite devices manually.
Setting Up Desktop and Application Pools in View
196 VMware, Inc.
Automatic Device Splitting
If you enable automatic device spliing View aempts to split the functions, or devices, in a composite
device according to the lter rules that are in eect. For example, a dictation microphone might be split
automatically so that the mouse device remains local to the client, but the rest of the devices are forwarded
to the remote desktop.
The following table shows how the value of the Allow Auto Device Splitting seing determines whether
Horizon Client aempts to split composite USB devices automatically. By default, automatic spliing is
disabled.
Table 14‑4. Effect of Combining Disable Automatic Splitting Policies
Allow Auto Device Splitting Policy
on View Agent
Allow Auto Device Splitting Policy
on Horizon Client
Combined Effective Allow Auto
Device Splitting Policy
Allow - Default Client Setting false (automatic spliing disabled) Automatic spliing disabled
Allow - Default Client Setting true (automatic spliing enabled) Automatic spliing enabled
Allow - Default Client Setting Not dened Automatic spliing enabled
Allow - Override Client Setting Any or not dened Automatic spliing enabled
Not dened Not dened Automatic spliing disabled
N These policies are included in the View Agent Conguration ADM template le (vdm_agent.adm). For
more information, see “USB Seings in the View Agent Conguration ADM Template,” on page 203.
By default, View disables automatic spliing, and excludes any audio-output, keyboard, mouse, or smart-
card components of a composite USB device from redirection.
View applies the device spliing policy seings before it applies any lter policy seings. If you have
enabled automatic spliing and do not explicitly exclude a composite USB device from being split by
specifying its vendor and product IDs, View examines each interface of the composite USB device to decide
which interfaces should be excluded or included according to the lter policy seings. If you have disabled
automatic device spliing and do not explicitly specify the vendor and product IDs of a composite USB
device that you want to split, View applies the lter policy seings to the entire device.
If you enable automatic spliing, you can use the Exclude Vid/Pid Device From Split policy to specify the
composite USB devices that you want to exclude from spliing.
Manual Device Splitting
You can use the Split Vid/Pid Device policy to specify the vendor and product IDs of a composite USB
device that you want to split. You can also specify the interfaces of the components of a composite USB
device that you want to exclude from redirection. View does not apply any lter policy seings to
components that you exclude in this way.
I If you use the Split Vid/Pid Device policy, View does not automatically include the
components that you have not explicitly excluded. You must specify a lter policy such as Include Vid/Pid
Device to include those components.
Table 14-5 shows the modiers that specify how Horizon Client handles a View Agent device spliing
policy seing if there is an equivalent device spliing policy seing for Horizon Client. These modiers
apply to all device-spliing policy seings.
Chapter 14 Using USB Devices with Remote Desktops and Applications
VMware, Inc. 197

Table 14‑5. Splitting Modifiers for Device-Splitting Policy Settings on View Agent
Modifier Description
m (merge) Horizon Client applies the View Agent device spliing policy seing in addition to the
Horizon Client device spliing policy seing.
o (override) Horizon Client uses the View Agent device spliing policy seing instead of the
Horizon Client device spliing policy seing.
Table 14-6 shows examples of how Horizon Client processes the seings for Exclude Device From Split by
Vendor/Product ID when you specify dierent spliing modiers.
Table 14‑6. Examples of Applying Splitting Modifiers to Device-Splitting Policy Settings
Exclude Device From Split by
Vendor/Product ID on View Agent
Exclude Device From Split by
Vendor/Product ID on
Horizon Client
Effective Exclude Device From Split
by Vendor/Product ID Policy Setting
Used by Horizon Client
m:vid-XXXX_pid-XXXX vid-YYYY_pid-YYYY vid-XXXX_pid-XXXX;vid-YYYY_pid-
YYYY
o:vid-XXXX_pid-XXXX vid-YYYY_pid-YYYY vid-XXXX_pid-XXXX
m:vid-XXXX_pid-XXXX;vid-
YYYY_pid-YYYY
vid-YYYY_pid-YYYY vid-XXXX_pid-XXXX;vid-YYYY_pid-
YYYY
o:vid-XXXX_pid-XXXX;vid-
YYYY_pid-YYYY
vid-YYYY_pid-YYYY vid-XXXX_pid-XXXX;vid-YYYY_pid-
YYYY
View Agent does not apply the device spliing policy seings on its side of the connection.
Horizon Client evaluates the device spliing policy seings in the following order of precedence.
nExclude Vid/Pid Device From Split
nSplit Vid/Pid Device
A device spliing policy seing that excludes a device from being split takes precedence over any policy
seing to split the device. If you dene any interfaces or devices to be excluded from spliing,
Horizon Client excludes the matching component devices from being available for redirection.
Examples of Setting Policies to Split Composite USB Devices
Set spliing policies for desktops to exclude devices with specic vendor and product IDs from redirection
after automatic spliing and pass these policies to client computers:
nFor View Agent, set the Allow Auto Device Splitting policy to Allow - Override Client Setting.
nFor View Agent, se the Exclude VidPid From Split policy to o:vid-xxx_pid-yyyy, where xxx and yyyy
are the appropriate IDs.
Allow automatic device spliing for desktops and specify policies for spliing specic devices on client
computers:
nFor View Agent, set the Allow Auto Device Splitting policy to Allow - Override Client Setting.
nFor the client device, set the Include Vid/Pid Device lter policy to include the specic device that you
want to split; for example, vid-0781_pid-554c.
nFor the client device, set the Split Vid/Pid Device policy to vid-0781_pid-554c(exintf:00;exintf:01)
for example, to split a specied composite USB device so that interface 00 and interface 01 are excluded
from redirection.
Setting Up Desktop and Application Pools in View
198 VMware, Inc.

Configuring Filter Policy Settings for USB Devices
Filter policy seings that you congure for View Agent and Horizon Client establish which USB devices can
be redirected from a client computer to a remote desktop or application. USB device ltering is often used
by companies to disable the use of mass storage devices on remote desktops, or to block a specic type of
device from being forwarded, such as a USB-to-Ethernet adapter that connects the client device to the
remote desktop.
When you connect to a desktop or application, Horizon Client downloads the View Agent USB policy
seings and uses them in conjunction with the Horizon Client USB policy seings to decide which USB
devices it will allow you to redirect from the client computer.
View applies any device spliing policy seings before it applies the lter policy seings. If you have split a
composite USB device, View examines each of the device's interfaces to decide which should be excluded or
included according to the lter policy seings. If you have not split a composite USB device, View applies
the lter policy seings to the entire device.
The device spliing policies are included in the View Agent Conguration ADM template le
(vdm_agent.adm). For more information, see “USB Seings in the View Agent Conguration ADM
Template,” on page 203.
Interaction of Agent-Enforced USB Settings
The following table shows the modiers that specify how Horizon Client handles a View Agent lter policy
seing for an agent-enforceable seing if an equivalent lter policy seing exists for Horizon Client.
Table 14‑7. Filter Modifiers for Agent-Enforceable Settings
Modifier Description
m (merge) Horizon Client applies the View Agent lter policy seing in addition to the Horizon Client
lter policy seing. In the case of Boolean, or true/false, seings, if the client policy is not
set, the agent seings are used. If the client policy is set, the agent seings are ignored,
except for the Exclude All Devices seing. If the Exclude All Devices policy is set on
the agent side, the policy overrides the client seing.
o (override) Horizon Client uses the View Agent lter policy seing instead of the Horizon Client lter
policy seing.
For example, the following policy on the agent side overrides any include rules on the client side, and only
device VID-0911_PID-149a will have an include rule applied:
IncludeVidPid: o:VID-0911_PID-149a
You can also use asterisks as wildcard characters; for example: o:vid-0911_pid-****
I If you congure the agent side without the o or m modier, the conguration rule is considered
invalid and will be ignored.
Interaction of Client-Interpreted USB Settings
The following table shows the modiers that specify how Horizon Client handles a View Agent lter policy
seing for a client-interpreted seing.
Chapter 14 Using USB Devices with Remote Desktops and Applications
VMware, Inc. 199

Table 14‑8. Filter Modifiers for Client-Interpreted Settings
Modifier Description
Default (d in the registry
seing)
If a Horizon Client lter policy seing does not exist, Horizon Client uses the View Agent
lter policy seing.
If a Horizon Client lter policy seing exists, Horizon Client applies that policy seing and
ignores the View Agent lter policy seing.
Override (o in the
registry seing)
Horizon Client uses the View Agent lter policy seing instead of any equivalent
Horizon Client lter policy seing.
View Agent does not apply the lter policy seings for client-interpreted seings on its side of the
connection.
The following table shows examples of how Horizon Client processes the seings for Allow Smart Cards
when you specify dierent lter modiers.
Table 14‑9. Examples of Applying Filter Modifiers to Client-Interpreted Settings
Allow Smart Cards Setting on View
Agent
Allow Smart Cards Setting on
Horizon Client
Effective Allow Smart Cards Policy
Setting Used by Horizon Client
Disable - Default Client
Setting (d:false in the registry
seing)
true (Allow) true (Allow)
Disable - Override Client
Setting (o:false in the registry
seing)
true (Allow) false (Disable)
If you set the Disable Remote Configuration Download policy to true, Horizon Client ignores any lter
policy seings that it receives from View Agent.
View Agent always applies the lter policy seings in agent-enforceable seings on its side of the
connection even if you congure Horizon Client to use a dierent lter policy seing or disable
Horizon Client from downloading lter policy seings from View Agent. Horizon Client does not report
that View Agent is blocking a device from being forwarded.
Precedence of Settings
Horizon Client evaluates the lter policy seings according to an order of precedence. A lter policy seing
that excludes a matching device from being redirected takes precedence over the equivalent lter policy
seing that includes the device. If Horizon Client does not encounter a lter policy seing to exclude a
device, Horizon Client allows the device to be redirected unless you have set the Exclude All Devices
policy to true. However, if you have congured a lter policy seing on View Agent to exclude the device,
the desktop or application blocks any aempt to redirect the device to it.
Horizon Client evaluates the lter policy seings in order of precedence, taking into account the
Horizon Client seings and the View Agent seings together with the modier values that you apply to the
View Agent seings. The following list shows the order of precedence, with item 1 having the highest
precedence.
1Exclude Path
2Include Path
3Exclude Vid/Pid Device
4Include Vid/Pid Device
5Exclude Device Family
6Include Device Family
Setting Up Desktop and Application Pools in View
200 VMware, Inc.
7Allow Audio Input Devices, Allow Audio Output Devices, Allow HIDBootable, Allow HID (Non
Bootable and Not Mouse Keyboard), Allow Keyboard and Mouse Devices, Allow Smart Cards, and Allow
Video Devices
8 Combined eective Exclude All Devices policy evaluated to exclude or include all USB devices
You can set Exclude Path and Include Path lter policy seings only for Horizon Client. The Allow lter
policy seings that refer to separate device families have equal precedence.
If you congure a policy seing to exclude devices based on vendor and product ID values, Horizon Client
excludes a device whose vendor and product ID values match this policy seing even though you might
have congured an Allow policy seing for the family to which the device belongs.
The order of precedence for policy seings resolves conicts between policy seings. If you congure Allow
Smart Cards to allow the redirection of smart cards, any higher precedence exclusion policy seing
overrides this policy. For example, you might have congured an Exclude Vid/Pid Device policy seing to
exclude smart-card devices with matching path or vendor and product ID values, or you might have
congured an Exclude Device Family policy seing that also excludes the smart-card device family entirely.
If you have congured any View Agent lter policy seings, View Agent evaluates and enforces the lter
policy seings in the following order of precedence on the remote desktop or application, with item 1
having the highest precedence.
1Exclude Vid/Pid Device
2Include Vid/Pid Device
3Exclude Device Family
4Include Device Family
5 Agent-enforced Exclude All Devices policy set to exclude or include all USB devices
View Agent enforces this limited set of lter policy seings on its side of the connection.
By dening lter policy seings for View Agent, you can create a ltering policy for non-managed client
computers. The feature also allows you to block devices from being forwarded from client computers, even
if the lter policy seings for Horizon Client permit the redirection.
For example, if you congure a policy that permits Horizon Client to allow a device to be redirected, View
Agent blocks the device if you congure a policy for View Agent to exclude the device.
Examples of Setting Policies to Filter USB Devices
The vendor IDs and product IDs used in these examples are examples only. For information about
determining the vendor ID and product ID for a specify device, see “Using Log Files for Troubleshooting
and to Determine USB Device IDs,” on page 195.
nOn the client, exclude a particular device from being redirected:
Exclude Vid/Pid Device: Vid-0341_Pid-1a11
nBlock all storage devices from being redirected to this desktop or application pool. Use an agent-side
seing:
Exclude Device Family: o:storage
nFor all users in a desktop pool, block audio and video devices to ensure that these devices will always
be available for the Real-Time Audio-Video feature. Use an agent-side seing::
Exclude Device Family: o:video;audio
Note that another strategy would be to exclude specic devices by vendor and product ID.
Chapter 14 Using USB Devices with Remote Desktops and Applications
VMware, Inc. 201

nOn the client, block all devices from being redirected except one particular device:
Exclude All Devices: true
Include Vid/Pid Device: Vid-0123_Pid-abcd
nExclude all devices made by a particular company because these devices cause problems for your end
users. Use an agent-side seing:
Exclude Vid/Pid Device: o:Vid-0341_Pid-*
nOn the client, include two specic devices but exclude all others:
Exclude All Devices: true
Include Vid/Pid Device: Vid-0123_Pid-abcd;Vid-1abc_Pid-0001
USB Device Families
You can specify a family when you are creating USB ltering rules for Horizon Client or View Agent.
N Some devices do not report a device family.
Table 14‑10. USB Device Families
Device Family
Name Description
audio Any audio-input or audio-output device.
audio-in Audio-input devices such as microphones.
audio-out Audio-output devices such as loudspeakers and headphones.
bluetooth Bluetooth-connected devices.
comm Communications devices such as modems and wired networking adapters.
hid Human interface devices excluding keyboards and pointing devices.
hid-bootable Human interface devices that are available at boot time excluding keyboards and pointing devices.
imaging Imaging devices such as scanners.
keyboard Keyboard device.
mouse Pointing device such as a mouse.
other Family not specied.
pda Personal digital assistants.
physical Force feedback devices such as force feedback joysticks.
printer Printing devices.
security Security devices such as ngerprint readers.
smart-card Smart-card devices.
storage Mass storage devices such as ash drives and external hard disk drives.
unknown Family not known.
vendor Devices with vendor-specic functions.
video Video-input devices.
wireless Wireless networking adapters.
wusb Wireless USB devices.
Setting Up Desktop and Application Pools in View
202 VMware, Inc.

USB Settings in the View Agent Configuration ADM Template
You can dene USB policy seings for both View Agent and Horizon Client. On connection, Horizon Client
downloads the USB policy seings from View Agent and uses them in conjunction with the Horizon Client
USB policy seings to decide which devices it will allow to be available for redirection from the client
computer.
The View Agent Conguration ADM template le (vdm_agent.adm) contains policy seings related to the
authentication and environmental components of View Agent, including USB redirection. The seings apply
at the computer level. View Agent preferentially reads the seings from the GPO at the computer level, and
otherwise from the registry at HKLM\Software\Policies\VMware, Inc.\VMware VDM\Agent\USB
Settings for Configuring USB Device Splitting
The following table describes each policy seing for spliing composite USB devices in the View Agent
Conguration ADM template le. View Agent does not enforce these seings. View Agent passes the
seings to Horizon Client for interpretation and enforcement according to whether you specify the merge
(m) or override (o) modier. Horizon Client uses the seings to decide whether to split composite USB
devices into their component devices, and whether to exclude the component devices from being available
for redirection. For a description of how View applies the policies for spliing composite USB devices, see
“Conguring Device Spliing Policy Seings for Composite USB Devices,” on page 196.
Table 14‑11. View Agent Configuration Template: Device-Splitting Settings
Setting Properties
Allow Auto Device
Splitting
Property:
AllowAutoDeviceSplitting
Allows the automatic spliing of composite USB devices.
The default value is undened, which equates to false.
Exclude Vid/Pid Device
From Split
Property: SplitExcludeVidPid
Excludes a composite USB device specied by vendor and product IDs from
spliing. The format of the seing is {m|o}:vid-xxx1_pid-yyy2[;vid-xxx2_pid-
yyy2]...
You must specify ID numbers in hexadecimal. You can use the wildcard character (*)
in place of individual digits in an ID.
For example: o:vid-0781_pid-55**
The default value is undened.
Split Vid/Pid Device
Property: SplitVidPid
Treats the components of a composite USB device specied by vendor and product
IDs as separate devices. The format of the seing is
{m|o}:vid-xxxx_pid-yyyy(exintf:zz[;exintf:ww])
or
{m|o}:vid-xxxx_pid-yyyy(exintf:zz[;exintf:ww])
You can use the exintf keyword to exclude components from redirection by
specifying their interface number. You must specify ID numbers in hexadecimal, and
interface numbers in decimal including any leading zero. You can use the wildcard
character (*) in place of individual digits in an ID.
For example: o:vid-0781_pid-554c(exintf:01;exintf:02)
N View does not automatically include the components that you have not
explicitly excluded. You must specify a lter policy such as Include Vid/Pid
Device to include those components.
The default value is undened.
Chapter 14 Using USB Devices with Remote Desktops and Applications
VMware, Inc. 203

View Agent-Enforced USB Settings
The following table describes each agent-enforced policy seing for USB in the View Agent Conguration
ADM template le. View Agent uses the seings to decide if a USB device can be forwarded to the host
machine. View Agent also passes the seings to Horizon Client for interpretation and enforcement
according to whether you specify the merge (m) or override (o) modier. Horizon Client uses the seings to
decide if a USB device is available for redirection. As View Agent always enforces an agent-enforced policy
seing that you specify, the eect might be to counteract the policy that you have set for Horizon Client. For
a description of how View applies the policies for ltering USB devices, see “Conguring Filter Policy
Seings for USB Devices,” on page 199.
Table 14‑12. View Agent Configuration Template: Agent-Enforced Settings
Setting Properties
Exclude All Devices
Property: ExcludeAllDevices
Excludes all USB devices from being forwarded. If set to true, you can use other
policy seings to allow specic devices or families of devices to be forwarded. If set to
false, you can use other policy seings to prevent specic devices or families of
devices from being forwarded.
If set to true and passed to Horizon Client, this seing always overrides the seing
on Horizon Client. You cannot use the merge (m) or override (o) modier with this
seing.
The default value is undened, which equates to false.
Exclude Device Family
Property: ExcludeFamily
Excludes families of devices from being forwarded. The format of the seing is {m|
o}:family_name_1[;family_name_2]...
For example: o:bluetooth;smart-card
If you have enabled automatic device spliing, View examines the device family of
each interface of a composite USB device to decide which interfaces should be
excluded. If you have disabled automatic device spliing, View examines the device
family of the whole composite USB device.
The default value is undened.
Exclude Vid/Pid Device
Property: ExcludeVidPid
Excludes devices with specied vendor and product IDs from being forwarded. The
format of the seing is {m|o}:vid-xxx1_pid-yyy2[;vid-xxx2_pid-yyy2]...
You must specify ID numbers in hexadecimal. You can use the wildcard character (*)
in place of individual digits in an ID.
For example: m:vid-0781_pid-****;vid-0561_pid-554c
The default value is undened.
Include Device Family
Property: IncludeFamily
Includes families of devices that can be forwarded. The format of the seing is {m|
o}:family_name_1[;family_name_2]...
For example: m:storage
The default value is undened.
Include Vid/Pid Device
Property: IncludeVidPid
Includes devices with specied vendor and product IDs that can be forwarded. The
format of the seing is {m|o}:vid-xxx1_pid-yyy2[;vid-xxx2_pid-yyy2]...
You must specify ID numbers in hexadecimal. You can use the wildcard character (*)
in place of individual digits in an ID.
For example: o:vid-0561_pid-554c
The default value is undened.
Client-Interpreted USB Settings
The following table describes each client-interpreted policy seing in the View Agent Conguration ADM
template le. View Agent does not enforce these seings. View Agent passes the seings to Horizon Client
for interpretation and enforcement. Horizon Client uses the seings to decide if a USB device is available for
redirection.
Setting Up Desktop and Application Pools in View
204 VMware, Inc.

Table 14‑13. View Agent Configuration Template: Client-Interpreted Settings
Setting Properties
Allow Audio Input Devices
Property: AllowAudioIn
Allows audio input devices to be forwarded.
The default value is undened, which equates to true.
Allow Audio Output Devices
Property: AllowAudioOut
Allows audio output devices to be forwarded.
The default value is undened, which equates to false.
Allow HIDBootable
Property: AllowHIDBootable
Allows input devices other than keyboards or mice that are available at boot time
(also known as hid-bootable devices) to be forwarded.
The default value is undened, which equates to true.
Allow Other Input Devices Allows input devices other than hid-bootable devices or keyboards with integrated
pointing devices to be forwarded.
The default value is undened.
Allow Keyboard and Mouse
Devices
Property: AllowKeyboardMouse
Allows keyboards with integrated pointing devices (such as a mouse, trackball, or
touch pad) to be forwarded.
The default value is undened, which equates to false.
Allow Smart Cards
Property: AllowSmartcard
Allows smart-card devices to be forwarded.
The default value is undened, which equates to false.
Allow Video Devices
Property: AllowVideo
Allows video devices to be forwarded.
The default value is undened, which equates to true.
Troubleshooting USB Redirection Problems
Various problems can arise with USB redirection in Horizon Client.
Problem
USB redirection in Horizon Client fails to make local devices available on the remote desktop, or some
devices do not appear to be available for redirection in Horizon Client.
Cause
The following are possible causes for USB redirection failing to function correctly or as expected.
nThe device is a composite USB device and one of the devices it includes is blocked by default. For
example, a dictation device that includes a mouse is blocked by default because mouse devices are
blocked by default. To work around this problem, see “Conguring Device Spliing Policy Seings for
Composite USB Devices,” on page 196.
nUSB redirection is not supported on Windows Server 2008 RDS hosts that deploy remote desktops and
applications. USB redirection is supported on Windows Server 2008 R2 systems that are used as single-
user desktops.
nOnly USB ash drives and hard disks are supported on RDS desktops and applications. You cannot
redirect other types of USB devices, and other types of USB storage devices such as security storage
drives and USB CD-ROM, to an RDS desktop or application.
nWebcams are not supported for redirection.
nThe redirection of USB audio devices depends on the state of the network and is not reliable. Some
devices require a high data throughput even when they are idle.
nUSB redirection is not supported for boot devices. If you run Horizon Client on a Windows system that
boots from a USB device, and you redirect this device to the remote desktop, the local operating system
might become unresponsive or unusable. See hp://kb.vmware.com/kb/1021409.
nBy default, Horizon Client for Windows does not allow you to select keyboard, mouse, smart card and
audio-out devices for redirection. See hp://kb.vmware.com/kb/1011600.
Chapter 14 Using USB Devices with Remote Desktops and Applications
VMware, Inc. 205
nRDP does not support the redirection of USB HIDs for the console session, or of smart card readers. See
hp://kb.vmware.com/kb/1011600.
nWindows Mobile Device Center can prevent the redirection of USB devices for RDP sessions. See
hp://kb.vmware.com/kb/1019205.
nFor some USB HIDs, you must congure the virtual machine to update the position of the mouse
pointer. See hp://kb.vmware.com/kb/1022076.
nSome audio devices might require changes to policy seings or to registry seings. See
hp://kb.vmware.com/kb/1023868.
nNetwork latency can cause slow device interaction or cause applications to appear frozen because they
are designed to interact with local devices. Very large USB disk drives might take several minutes to
appear in Windows Explorer.
nUSB ash cards formaed with the FAT32 le system are slow to load. See
hp://kb.vmware.com/kb/1022836.
nA process or service on the local system opened the device before you connected to the remote desktop
or application.
nA redirected USB device stops working if you reconnect a desktop or application session even if the
desktop or application shows that the device is available.
nUSB redirection is disabled in View Administrator.
nMissing or disabled USB redirection drivers on the guest.
Solution
nIf available, use PCoIP instead of RDP as the protocol.
nIf a redirected device remains unavailable or stops working after a temporary disconnection, remove
the device, plug it in again, and retry the redirection.
nIn View Administrator, go to Policies > Global Policies, and verify that USB access is set to Allow
under View Policies.
nExamine the log on the guest for entries of class ws_vhub, and the log on the client for entries of class
vmware-view-usbd.
Entries with these classes are wrien to the logs if a user is not an administrator, or if the USB
redirection drivers are not installed or are not working. For the location of these log les, see “Using
Log Files for Troubleshooting and to Determine USB Device IDs,” on page 195.
nOpen the Device Manager on the guest, expand Universal Serial Bus controllers, and reinstall the
VMware View Virtual USB Host Controller and VMware View Virtual USB Hub drivers if these drivers
are missing or re-enable them if they are disabled.
Setting Up Desktop and Application Pools in View
206 VMware, Inc.

Reducing and Managing Storage
Requirements 15
Deploying desktops on virtual machines that are managed by vCenter Server provides all the storage
eciencies that were previously available only for virtualized servers. Using View Composer increases the
storage savings because all virtual machines in a pool share a virtual disk with a base image.
This chapter includes the following topics:
n“Managing Storage with vSphere,” on page 207
n“Reducing Storage Requirements with View Composer,” on page 212
n“Storage Sizing for Linked-Clone Desktop Pools,” on page 213
n“Storage Overcommit for Linked-Clone Virtual Machines,” on page 217
n“Linked-Clone Data Disks,” on page 219
n“Storing Linked Clones on Local Datastores,” on page 220
n“Storing View Composer Replicas and Linked Clones on Separate Datastores,” on page 221
n“Congure View Storage Accelerator for Desktop Pools,” on page 222
n“Reclaim Disk Space on Linked-Clone Virtual Machines,” on page 223
n“Using View Composer Array Integration with Native NFS Snapshot Technology (VAAI),” on
page 225
n“Set Blackout Times for ESXi Operations on View Virtual Machines,” on page 226
Managing Storage with vSphere
vSphere lets you virtualize disk volumes and le systems so that you can manage and congure storage
without having to consider where the data is physically stored.
Fibre Channel SAN arrays, iSCSI SAN arrays, and NAS arrays are widely used storage technologies
supported by vSphere to meet dierent datacenter storage needs. The storage arrays are connected to and
shared between groups of servers through storage area networks. This arrangement allows aggregation of
the storage resources and provides more exibility in provisioning them to virtual machines.
Compatible vSphere 5.0 and 5.1 or Later Features
With vSphere 5.0 or a later release, you can use the following features:
nWith the View storage accelerator feature, you can congure ESXi hosts to cache virtual machine disk
data.
VMware, Inc. 207

Using this content-based read cache (CBRC) can reduce IOPS and improve performance during boot
storms, when many machines start up and run anti-virus scans at the same time. Instead of reading the
entire OS from the storage system over and over, a host can read common data blocks from cache.
nIf remote desktops use the space-ecient disk format available with vSphere 5.1 and later, stale or
deleted data within a guest operating system is automatically reclaimed with a wipe and shrink
process.
nYou can deploy a desktop pool on a cluster that contains up to 32 ESXi hosts, with certain restrictions.
Replica disks must be stored on VMFS5 or later datastores or NFS datastores. If you store replicas on a
VMFS version earlier than VMFS5, a cluster can have at most eight hosts. OS disks and persistent disks
can be stored on NFS or VMFS datastores.
Compatible vSphere 5.5 Update 1 or Later Features
With vSphere 5.5 Update 1 or a later release, you can use Virtual SAN, which virtualizes the local physical
solid-state disks and hard disk drives available on ESXi hosts into a single datastore shared by all hosts in a
cluster. Virtual SAN provides high-performance storage with policy-based management, so that you specify
only one datastore when creating a desktop pool, and the various components, such as virtual machine les,
replicas, user data, and operating system les, are placed on the appropriate solid-state drive (SSD) disks or
direct-aached hard disks (HDDs).
Virtual SAN also lets you manage virtual machine storage and performance by using storage policy proles.
If the policy becomes noncompliant because of a host, disk, or network failure, or workload changes, Virtual
SAN recongures the data of the aected virtual machines and optimizes the use of resources across the
cluster. You can deploy a desktop pool on a cluster that contains up to 20 ESXi hosts.
I The Virtual SAN feature available with vSphere 6.0 and later releases contains many
performance improvements over the feature that was available with vSphere 5.5 Update 1. With vSphere 6.0
this feature also has broader HCL (hardware compatibility) support. For more information about Virtual
SAN in vSphere 6 or later, see the Administering VMware Virtual SAN document.
N Virtual SAN is compatible with the View storage accelerator feature but not with the space-ecient
disk format feature, which reclaims disk space by wiping and shrinking disks.
Compatible vSphere 6.0 or Later Features
With vSphere 6.0 or a later release, you can use Virtual Volumes (VVols). This feature maps virtual disks and
their derivatives, clones, snapshots, and replicas, directly to objects, called virtual volumes, on a storage
system. This mapping allows vSphere to ooad intensive storage operations such as snapshoting, cloning,
and replication to the storage system.
Virtual Volumes also lets you manage virtual machine storage and performance by using storage policy
proles in vSphere. These storage policy proles dictate storage services on a per-virtual-machine basis.
This type of granular provisioning increases capacity utilization. You can deploy a desktop pool on a cluster
that contains up to 32 ESXi hosts.
N Virtual Volumes is compatible with the View storage accelerator feature but not with the space-
ecient disk format feature, which reclaims disk space by wiping and shrinking disks.
Setting Up Desktop and Application Pools in View
208 VMware, Inc.

Using Virtual SAN for High-Performance Storage and Policy-Based
Management
VMware Virtual SAN is a software-dened storage tier, available with vSphere 5.5 Update 1 or a later
release, that virtualizes the local physical storage disks available on a cluster of vSphere hosts. You specify
only one datastore when creating an automated desktop pool or an automated farm, and the various
components, such as virtual machine les, replicas, user data, and operating system les, are placed on the
appropriate solid-state drive (SSD) disks or direct-aached hard disks (HDDs).
Virtual SAN implements a policy-based approach to storage management. When you use Virtual SAN,
View denes virtual machine storage requirements, such as capacity, performance, and availability, in the
form of default storage policy proles, which you can modify. Storage is provisioned and automatically
congured according to the assigned policies. You can use Virtual SAN for linked-clone desktop pools, full-
clone desktop pools, or an automated farm.
Each virtual machine maintains its policy regardless of its physical location in the cluster. If the policy
becomes noncompliant because of a host, disk, or network failure, or workload changes, Virtual SAN
recongures the data of the aected virtual machines and load-balances to meet the policies of each virtual
machine.
While supporting VMware features that require shared storage, such as HA, vMotion, and DRS, Virtual
SAN eliminates the need for an external shared storage infrastructure and simplies storage conguration
and virtual machine provisioning activities.
I The Virtual SAN feature available with vSphere 6.0 and later releases contains many
performance improvements over the feature that was available with vSphere 5.5 Update 1. With vSphere 6.0
this feature also has broader HCL (hardware compatibility) support. Also, VMware Virtual SAN 6.0
supports an all-ash architecture that uses ash-based devices for both caching and persistent storage.
Virtual SAN Workflow in View
1 Use vCenter Server 5.5 Update 1 or a later release to enable Virtual SAN. For more information about
Virtual SAN in vSphere 5.5 Update 1, see the vSphere Storage document. For more information about
Virtual SAN in vSphere 6 or later, see the Administering VMware Virtual SAN document.
2 When creating an automated desktop pool or an automated farm in View Administrator, under Storage
Policy Management, select Use VMware Virtual SAN, and select the Virtual SAN datastore to use.
After you select Use VMware Virtual SAN, only Virtual SAN datastores are displayed.
Default storage policy proles are created according to the options you choose. For example, if you
create a linked-clone, oating desktop pool, a replica disk prole and an operating system disk prole
are automatically created. If you create a linked-clone, persistent desktop pool, a replica disk prole and
a persistent disk prole are created. For an automated farm, a replica disk prole is created. For both
types of desktop pools and automated farms, a prole is created for virtual machine les.
3 To move existing View Composer desktop pools from another type of datastore to a Virtual SAN
datastore, in View Administrator, edit the pool to deselect the old datastore and select the Virtual SAN
datastore instead, and use the Rebalance command. This operation is not possible for automated farms
because you cannot rebalance an automated farm .
4 (Optional) Use vCenter Server to modify the parameters of the storage policy proles, which include
things like the number of failures to tolerate and the amount of SSD read cache to reserve.
The names of the policies are OS_DISK (for operating system les), PERSISTENT_DISK (for user data
les), REPLICA_DISK (for replicas), and VM_HOME (for virtual machine les such as .vmx and .vmsn
les). Changes to the policy are propagated to newly created virtual machines and to all existing virtual
machines in the desktop pool or the automated farm.
Chapter 15 Reducing and Managing Storage Requirements
VMware, Inc. 209

5 Use vCenter Server to monitor the Virtual SAN cluster and the disks that participate in the datastore.
For more information, see the vSphere Storage document and the vSphere Monitoring and Performance
documentation. For vSphere 6 or later, see the Administering VMware Virtual SAN document.
6 (Optional) For View Composer linked-clone desktop pools, use the Refresh and Recompose commands
as you normally would. For automated farms, only the Recompose command is supported, regardless
of the type of datastore.
Requirements and Limitations
The Virtual SAN feature has the following limitations when used in a View deployment:
nThis release does not support using the View space-ecient disk format feature, which reclaims disk
space by wiping and shrinking disks.
nVirtual SAN does not support the View Composer Array Integration (VAAI) feature because Virtual
SAN does not use NAS devices.
nVirtual SAN datastores are not compatible with Virtual Volumes datastores for this release.
N Virtual SAN is compatible with the View Storage Accelerator feature. Virtual SAN provides a
caching layer on SSD disks, and the View Storage Accelerator feature provides a content-based cache that
reduces IOPS and improves performance during boot storms.
The Virtual SAN feature has the following requirements:
nvSphere 5.5 Update 1 or a later release.
nAppropriate hardware. For example, VMware recommends a 10GB NIC and at least one SSD and one
HDD for each capacity-contributing node. For specics, see the VMware Compatibility Guide.
nA cluster of at least three ESXi hosts. You need enough ESXi hosts to accommodate your setup. For
more information, see the vSphere Conguration Maximums document, available from
hps://www.vmware.com/support/pubs/vsphere-esxi-vcenter-server-pubs.html.
nSSD capacity that is at least 10 percent of HDD capacity.
nEnough HDDs to accommodate your setup. Do not exceed more than 75% utilization on a magnetic
disk.
For more information about Virtual SAN requirements, see "Working with Virtual SAN" in the vSphere 5.5
Update 1 Storage document. For vSphere 6 or later, see the Administering VMware Virtual SAN document. For
guidance on sizing and designing the key components of View virtual desktop infrastructures for VMware
Virtual SAN, see the white paper at
hp://www.vmware.com/les/pdf/products/vsan/VMW-TMD-Virt-SAN-Dsn-Szing-Guid-Horizon-View.pdf.
Default Storage Policy Profiles for Virtual SAN Datastores
When you use Virtual SAN, View denes virtual machine storage requirements, such as capacity,
performance, and availability, in the form of default storage policy proles, which you can modify. Storage is
provisioned and automatically congured according to the assigned policies.
The default policies that are created during desktop pool creation depend on the type of pool you create.
The names of the policies are OS_DISK (for operating system les), PERSISTENT_DISK (for user data les),
REPLICA_DISK (for replicas), and VM_HOME (for virtual machine les such as .vmx and .vmsn les). For
example, a REPLICA_DISK policy is created only for linked-clone pools. Changes to the policy are
propagated to newly created virtual machines and to all existing virtual machines in the desktop pool.
Setting Up Desktop and Application Pools in View
210 VMware, Inc.

Virtual SAN oers a storage policy framework so that you can control the behavior of various virtual
machine objects that reside on the Virtual SAN datastore. An example of an object in Virtual SAN is a virtual
disk (VMDK) le, and there are four characteristics of each object that are controlled through policy:
nStripes: Number of stripes of data. The number of disk stripes aects how many magnetic disks you
have (HDDs).
nResiliency: Number of failures to tolerate. The number of host failures to tolerate depends, of course,
on the number of hosts you have.
nStorage Provisioning: Thick or Thin.
nCache Reservation: Read-cache reservation.
The stripes and cache reservation seings are used to control performance. The resiliency seing controls
availability. The storage provisioning seing control capacity. These seings, taken together, aect how
many vSphere hosts and magnetic disks are required.
For example, if you set the number of disk stripes per object to 2, Virtual SAN will stripe the object across at
least 2 HDDs. In conjunction with this seing, if you set the number of host failures to tolerate to 1, Virtual
SAN will create an additional copy for resiliency and therefore require 4 HDDs. Additionally, seing the
number of host failures to tolerate to 1 requires a minimum of 3 ESXi hosts, 2 for resiliency and the third to
break the tie in case of partitioning.
N If you inadvertently aempt to use seings that contradict each other, when you aempt to apply the
seings, the operation will fail, and an error message will tell you, for example, that you do not have enough
hosts.
There is no requirement for any user action associated with these default policies. Policies are created for
linked-clone desktop pools, full-clone desktop pools, and automated farms.
You can use either the vSphere Command-Line Interface (esxcli) or the vSphere Web Client to change the
default storage policy proles. Each virtual machine maintains its policy regardless of its physical location
in the cluster. If the policy becomes noncompliant because of a host, disk, or network failure, or workload
changes, Virtual SAN recongures the data of the aected virtual machines and load-balances to meet the
policies of each virtual machine.
Using Virtual Volumes for Virtual-Machine-Centric Storage and Policy-Based
Management
With Virtual Volumes (VVols), available with vSphere 6.0 or a later release, an individual virtual machine,
not the datastore, becomes a unit of storage management. The storage hardware gains control over virtual
disk content, layout, and management.
With Virtual Volumes, abstract storage containers replace traditional storage volumes based on LUNs or
NFS shares. Virtual Volumes maps virtual disks and their derivatives, clones, snapshots, and replicas,
directly to objects, called virtual volumes, on a storage system. This mapping allows vSphere to ooad
intensive storage operations such as snapshoting, cloning, and replication to the storage system. The result,
for example, is that a cloning operation that previously took an hour might now take just a few minutes
using Virtual Volumes.
I Although one of the key benets of Virtual Volumes is the ability to use Software Policy-Based
Management (SPBM), for this release of View, no default granular storage policies are created by View, as
they are when you use the Virtual SAN feature. Instead, you can set a global default storage policy in
vCenter Server that will apply to all Virtual Volume datastores.
Virtual Volumes has the following benets:
nVirtual Volumes supports ooading a number of operations to storage hardware. These operations
include snapshoing, cloning, and Storage DRS.
Chapter 15 Reducing and Managing Storage Requirements
VMware, Inc. 211

nWith Virtual Volumes, you can use advanced storage services that include replication, encryption,
deduplication, and compression on individual virtual disks.
nVirtual Volumes supports such vSphere features as vMotion, Storage vMotion, snapshots, linked clones,
Flash Read Cache, and DRS.
nYou can use Virtual Volumes with storage arrays that support vSphere APIs for Array Integration
(VAAI).
Requirements and Limitations
The Virtual Volumes feature has the following limitations when used in a View deployment:
nThis release does not support using the View space-ecient disk format feature, which reclaims disk
space by wiping and shrinking disks.
nVirtual Volumes does not support using View Composer Array Integration (VAAI).
nVirtual Volumes datastores are not compatible with Virtual SAN datastores for this release.
N Virtual Volumes is compatible with the View Storage Accelerator feature. Virtual SAN provides a
caching layer on SSD disks, and the View Storage Accelerator feature provides a content-based cache that
reduces IOPS and improves performance during boot storms.
The Virtual Volumes feature has the following requirements:
nvSphere 6.0 or a later release.
nAppropriate hardware. Certain storage vendors are responsible for supplying storage providers that
can integrate with vSphere and provide support for Virtual Volumes. Every storage provider must be
certied by VMware and properly deployed.
nAll virtual disks that you provision on a virtual datastore must be an even multiple of 1 MB.
Virtual Volumes is a vSphere 6.0 feature. For more information about the requirements, functionality,
background, and setup requirements, see the topics about Virtual Volumes in the vSphere Storage document.
Reducing Storage Requirements with View Composer
Because View Composer creates desktop images that share virtual disks with a base image, you can reduce
the required storage capacity by 50 to 90 percent.
View Composer uses a base image, or parent virtual machine, and creates a pool of up to 2,000 linked-clone
virtual machines. Each linked clone acts like an independent desktop, with a unique host name and IP
address, yet the linked clone requires signicantly less storage.
Replica and Linked Clones on the Same Datastore
When you create a linked-clone desktop pool or farm of Microsoft RDS hosts, a full clone is rst made from
the parent virtual machine. The full clone, or replica, and the clones linked to it can be placed on the same
data store, or LUN (logical unit number). If necessary, you can use the rebalance feature to move the replica
and linked-clone desktop pools from one LUN to another or to move linked-clone desktop pools to a Virtual
SAN datastore or from a Virtual SAN datastore to a LUN.
Replica and Linked Clones on Different Datastores
Alternatively, you can place View Composer replicas and linked clones on separate datastores with dierent
performance characteristics. For example, you can store the replica virtual machines on a solid-state drive
(SSD). Solid-state drives have low storage capacity and high read performance, typically supporting tens of
thousands of I/Os per second (IOPS). You can store linked clones on traditional, spinning media-backed
Setting Up Desktop and Application Pools in View
212 VMware, Inc.

datastores. These disks provide lower performance, but are less expensive and provide higher storage
capacity, which makes them suited for storing the many linked clones in a large pool. Tiered storage
congurations can be used to cost-eectively handle intensive I/O scenarios such as simultaneous rebooting
of many virtual machines or running scheduled antivirus scans.
For more information, see the best-practices guide called Storage Considerations for VMware View.
If you use Virtual SAN datastores or Virtual Volumes datastores, you cannot manually select dierent
datastores for replicas and linked clones. Because the Virtual SAN and Virtual Volumes features
automatically place objects on the appropriate type of disk and cache of all I/O operations, there is no need
to use replica tiering for Virtual SAN and Virtual Volumes datastores.
Disposable Disks for Paging and Temp Files
When you create a linked-clone pool or farm, you can also optionally congure a separate, disposable
virtual disk to store the guest operating system's paging and temp les that are generated during user
sessions. When the virtual machine is powered o, the disposable disk is deleted. Using disposable disks
can save storage space by slowing the growth of linked clones and reducing the space used by powered o
virtual machines.
Persistent Disks for Dedicated Desktops
When you create dedicated-assignment desktop pools, View Composer can also optionally create a separate
persistent virtual disk for each virtual desktop. The end user's Windows prole and application data are
saved on the persistent disk. When a linked clone is refreshed, recomposed, or rebalanced, the contents of
the persistent virtual disk are preserved. VMware recommends that you keep View Composer persistent
disks on a separate datastore. You can then back up the whole LUN that holds persistent disks.
Storage Sizing for Linked-Clone Desktop Pools
View provides high-level guidelines that can help you determine how much storage a linked-clone desktop
pool requires. A table in the Add Desktop Pool wizard shows a general estimate of the linked-clone disks'
storage requirements when the pool is created and as the linked clones grow over time.
The storage-sizing table also displays the free space on the datastores that you select for storing OS disks,
View Composer persistent disks, and replicas. You can decide which datastores to use by comparing the
actual free space with the estimated requirements for the linked-clone disks.
The formulas that View uses can only provide a general estimate of storage use. Your linked clones' actual
storage growth depends on many factors:
nAmount of memory assigned to the parent virtual machine
nFrequency of refresh operations
nSize of the guest operating system's paging le
nWhether you redirect paging and temp les to a separate disk
nWhether you congure separate View Composer persistent disks
nWorkload on the linked-clone machines, determined primarily by the types of applications that users
run in the guest operating system
N In a deployment that includes hundreds or thousands of linked clones, congure your linked-clone
pools so that particular sets of datastores are dedicated to particular ESXi clusters. Do not congure pools
randomly across all the datastores so that most or all ESXi hosts must access most or all LUNs.
When too many ESXi hosts aempt to write to linked-clone OS disks on a particular LUN, contention
problems can occur, degrading performance and interfering with scalability. For more information about
datastore planning in large deployments, see the View Architecture Planning document.
Chapter 15 Reducing and Managing Storage Requirements
VMware, Inc. 213

Sizing Guidelines for Linked-Clone Pools
When you create or edit a linked-clone desktop pool, the Select Linked Clone Datastores page displays a
table that provides storage-sizing guidelines. The table can help you to decide which datastores to select for
the linked-clone disks. The guidelines calculate space needed for new linked clones.
Sizing Table for Linked-Clone Disks
Table 15-1 shows an example of storage-sizing recommendations that might be displayed for a pool of 10
virtual machines if the parent virtual machine has 1GB of memory and a 10GB replica. In this example,
dierent datastores are selected for OS disks and View Composer persistent disks.
Table 15‑1. Example Sizing Table for Linked-Clone Disks
Data Type
Selected Free
Space (GB)
Min Recommended
(GB) 50% Utilization (GB)
Max Recommended
(GB)
OS disks 184.23 40.00 80.00 130.00
Persistent disks 28.56 4.00 10.00 20.00
The Selected Free Space column shows the total available space on all of the datastores that you selected for
a disk type such as OS disks.
The Min Recommended column shows the minimum amount of recommended storage for a pool.
The 50% Utilization column shows the recommended storage when the linked-clone disks grow to 50% of
the parent virtual machine.
The Max Recommended column shows the recommended storage when the linked-clone disks approach
the full size of the parent virtual machine.
If you store OS disks and persistent disks on the same datastore, View calculates the storage requirements of
both disk types. The Data Type is shown as Linked clones instead of a particular disk type.
If you store View Composer replicas on a separate datastore, the table also shows storage recommendations
for the replicas and adjusts the recommendations for OS disks.
Sizing Guidelines
The table provides general guidelines. Your storage calculations must account for additional factors that can
aect actual storage growth in the linked-clone pool.
For OS disks, your sizing estimates depend on how frequently you refresh and recompose the pool.
If you refresh your linked-clone pool between once a day and once a week, make sure that the Selected Free
Space can accommodate storage use between the Min Recommended and 50% Utilization estimates.
If you rarely refresh or recompose the pool, the linked-clone disks continue to grow. Make sure that the
Selected Free Space can accommodate storage use between the 50 % Utilization and Max Recommended
estimates.
For persistent disks, your sizing estimates depend on the amount of Windows prole data that users
generate on their desktops. Refresh and recompose operations do not aect persistent disks.
Sizing Guidelines When You Edit an Existing Desktop Pool
View estimates the storage space that is needed for new linked clones. When you create a desktop pool, the
sizing guidelines encompass the entire pool. When you edit an existing desktop pool, the guidelines
encompass only the new linked clones that you add to the pool.
For example, if you add 100 linked clones to a desktop pool and select a new datastore, View estimates
space requirements for the 100 new clones.
Setting Up Desktop and Application Pools in View
214 VMware, Inc.

If you select a new datastore but keep the desktop pool the same size, or reduce the number of linked clones,
the sizing guidelines show as 0. The values of 0 reect that no new clones must be created on the selected
datastore. Space requirements for the existing clones are already accounted for.
How View Calculates the Minimum Sizing Recommendations
To arrive at a minimum recommendation for OS disks, View estimates that each clone consumes twice its
memory size when it is rst created and started up. If no memory is reserved for a clone, an ESXi swap le is
created for a clone as soon as it is powered on. The size of the guest operating system's paging le also
aects the growth of a clone's OS disk.
In the minimum recommendation for OS disks, View also includes space for two replicas on each datastore.
View Composer creates one replica when a pool is created. When the pool is recomposed for the rst time,
View Composer creates a second replica on the datastore, anchors the linked clones to the new replica, and
deletes the rst replica if no other clones are using original snapshot. The datastore must have the capacity
to store two replicas during the recompose operation.
By default, replicas use vSphere thin provisioning, but to keep the guidelines simple, View accounts for two
replicas that use the same space as the parent virtual machine.
To arrive at a minimum recommendation for persistent disks, View calculates 20% of the disk size that you
specify on the View Composer Disks page of the Add Desktop Pool wizard.
N The calculations for persistent disks are based on static threshold values, in gigabytes. For example, if
you specify a persistent disk size of any value between 1024MB and 2047MB, View calculates the persistent
disk size as 1GB. If you specify a disk size of 2048MB, View calculates the disk size as 2GB.
To arrive at a recommendation for storing replicas on a separate datastore, View allows space for two
replicas on the datastore. The same value is calculated for minimum and maximum usage.
For details, see “Sizing Formulas for Linked-Clone Pools,” on page 215.
Sizing Guidelines and Storage Overcommit
After you estimate storage requirements, select datastores, and deploy the pool, View provisions linked-
clone virtual machines on dierent datastores based on the free space and the existing clones on each
datastore.
Based on the storage-overcommit option that you select on the Select Linked Clone Datastores page in the
Add Desktop Pool wizard, View stops provisioning new clones and reserves free space for the existing
clones. This behavior ensures that a growth buer exists for each machine in the datastore.
If you select an aggressive storage-overcommit level, the estimated storage requirements might exceed the
capacity shown in the Selected Free Space column. The storage-overcommit level aects how many virtual
machines that View actually creates on a datastore.
For details, see “Set the Storage Overcommit Level for Linked-Clone Virtual Machines,” on page 218.
Sizing Formulas for Linked-Clone Pools
Storage-sizing formulas can help you estimate the size of linked-clone disks relative to the free space on the
datastores that you select for OS disks, View Composer persistent disks, and replicas.
Storage Sizing Formulas
Table 15-2 shows the formulas that calculate the estimated sizes of linked-clone disks when you create a pool
and as the linked-clone machines grow over time. These formulas include the space for replica disks that are
stored with the clones on the datastore.
Chapter 15 Reducing and Managing Storage Requirements
VMware, Inc. 215

If you edit an existing pool or store replicas on a separate datastore, View uses a dierent sizing formula.
See “Sizing Formulas for Creating Linked Clones When You Edit a Pool or Store Replicas on a Separate
Datastore,” on page 216.
Table 15‑2. Storage Sizing Formulas for Linked-Clone Disks on Selected Datastores
Data Type
Selected Free
Space (GB)
Min Recommended
(GB) 50% Utilization (GB)
Max Recommended
(GB)
OS disks Free space on the
selected datastores
Number of VMs * (2
* memory of VM)
+ (2 * replica disk)
Number of VMs *
(50% of replica disk +
memory of VM) + (2
* replica disk)
Number of VMs *
(100% of replica disk +
memory of VM) + (2 *
replica disk)
Persistent disks Free space on the
selected datastores
Number of VMs *
20% of persistent
disk
Number of VMs *
50% of persistent
disk
Number of VMs *
100% of persistent
disk
Example of a Storage Sizing Estimate
In this example, the parent virtual machine is congured with 1GB of memory. The parent virtual machine's
disk size is 10GB. A linked-clone pool is created with 10 machines. Persistent disks are congured as
2048MB in size.
The OS disks are congured on a datastore that currently has 184.23GB of available space. The persistent
disks are congured on a dierent datastore with 28.56GB of available space.
Table 15-3 shows how the sizing formulas calculate estimated storage requirements for the sample linked-
clone desktop pool.
Table 15‑3. Example of a Sizing Estimate for Linked-Clone Disks Deployed on Selected Datastores
Data Type
Selected Free
Space (GB)
Min Recommended
(GB) 50% Utilization (GB)
Max Recommended
(GB)
OS disks 184.23 10 * (2*1GB)
+ (2*10GB) =
40.00
10 * (50% of 10GB
+ 1GB) + (2*10GB) =
80.00
10 * (100% of 10GB
+ 1GB) + (2*10GB) =
130.00
Persistent disks 28.56 10 * (20% of 2GB) =
4.00
10 * (50% of 2GB) =
10.00
10 * (100% of 2GB) =
20.00
Sizing Formulas for Creating Linked Clones When You Edit a Pool or Store
Replicas on a Separate Datastore
View calculates dierent sizing formulas when you edit an existing linked-clone desktop pool, or store
replicas on a separate datastore, than when you rst create a pool.
If you edit an existing pool and select datastores for the pool, View Composer creates new clones on the
selected datastores. The new clones are anchored to the existing snapshot and use the existing replica disk.
No new replicas are created.
View estimates the sizing requirements of new clones that are added to the desktop pool. View does not
include the existing clones in the calculation.
If you store replicas on a separate datastore, the other selected datastores are dedicated to linked-clone
disks.
In these cases, View does not include space for replicas when it calculates storage recommendations for
linked-clone disks.
Table 15-4 shows the formulas that calculate the estimated sizes of linked-clone disks when you edit a pool
or store replicas on a separate datastore.
Setting Up Desktop and Application Pools in View
216 VMware, Inc.

Table 15‑4. Storage Sizing Formulas for Linked-Clone Disks When You Edit a Pool or Store Replicas on a
Separate Datastore
Data Type
Selected Free
Space (GB)
Min Recommended
(GB) 50% Utilization (GB)
Max Recommended
(GB)
OS disks Free space on the
selected datastores
Number of new VMs
* (2 * memory of VM)
Number of new VMs
* (50% of replica disk
+ memory of VM)
Number of new VMs *
(100% of replica disk +
memory of VM)
Persistent disks Free space on the
selected datastores
Number of new VMs
* 20% of persistent
disk
Number of new VMs
* 50% of persistent
disk
Number of new VMs *
100% of persistent
disk
Example of a Storage Sizing Estimate When You Edit a Pool or Store Replicas on a
Separate Datastore
In this example, the parent virtual machine is congured with 1GB of memory. The parent virtual machine's
disk size is 10GB. A linked-clone pool is created with 10 machines. Persistent disks are congured as
2048MB in size.
The OS disks are congured on a datastore that currently has 184.23GB of available space. The persistent
disks are congured on a dierent datastore with 28.56GB of available space.
Table 15-5 shows how the sizing formulas calculate estimated storage requirements for the sample linked-
clone pool.
Table 15‑5. Example of a Sizing Estimate for Linked-Clone Disks When You Edit a Pool or Store Replicas
on a Separate Datastore
Data Type
Selected Free
Space (GB)
Min Recommended
(GB) 50% Utilization (GB)
Max Recommended
(GB)
OS disks 184.23 10 * (2*1GB) =
20.00
10 * (50% of 10GB
+ 1GB) =
60.00
10 * (100% of 10GB
+ 1GB) =
110.00
Persistent disks 28.56 10 * (20% of 2GB) =
4.00
10 * (50% of 2GB) =
10.00
10 * (100% of 2GB) =
20.00
Storage Overcommit for Linked-Clone Virtual Machines
With the storage overcommit feature, you can reduce storage costs by placing more linked-clone virtual
machines on a datastore than is possible with full virtual machines. The linked clones can use a logical
storage space several times greater than the physical capacity of the datastore.
This feature helps you choose a storage level that lets you overcommit the datastore's capacity and sets a
limit on the number of linked clones that View creates. You can avoid either wasting storage by provisioning
too conservatively or risking that the linked clones will run out of disk space and cause the operating system
or applications to fail.
For example, you can create at most ten full virtual machines on a 100GB datastore, if each virtual machine
is 10GB. When you create linked clones from a 10GB parent virtual machine, each clone is a fraction of that
size.
If you set a conservative overcommit level, View allows the clones to use four times the physical size of the
datastore, measuring each clone as if it were the size of the parent virtual machine. On a 100GB datastore,
with a 10GB parent, View provisions approximately 40 linked clones. View does not provision more clones,
even if the datastore has free space. This limit keeps a growth buer for the existing clones.
Table 15-6 shows the storage overcommit levels you can set.
Chapter 15 Reducing and Managing Storage Requirements
VMware, Inc. 217

Table 15‑6. Storage Overcommit Levels
Option Storage Overcommit Level
None Storage is not overcommied.
Conservative 4 times the size of the datastore. This is the default level.
Moderate 7 times the size of the datastore.
Aggressive 15 times the size of the datastore.
Storage overcommit levels provide a high-level guide for determining storage capacity. To determine the
best level, monitor the growth of linked clones in your environment.
Set an aggressive level if your OS disks will never grow to their maximum possible size. An aggressive
overcommit level demands aention. To make sure that the linked clones do not run out of disk space, you
can periodically refresh or rebalance the desktop pool and reduce the linked clones' OS data to its original
size. Automated farms do not support refresh or rebalance. If the linked clones in an automated farm are in
danger of running out of disk space, change the overcommit level.
For example, it would make sense to set an aggressive overcommit level for a oating-assignment desktop
pool in which the virtual machines are set to delete or refresh after logo.
You can vary storage overcommit levels among dierent types of datastores to address the dierent levels of
throughput in each datastore. For example, a NAS datastore can have a dierent seing than a SAN
datastore.
Set the Storage Overcommit Level for Linked-Clone Virtual Machines
You can control how aggressively View creates linked-clone virtual machines on a datastore by using the
storage overcommit feature. This feature lets you create linked clones that have a total logical size larger
than the physical storage limit of the datastore.
This feature works only with linked-clone pools and automated farms.
The storage overcommit level calculates the amount of storage greater than the physical size of the datastore
that the clones would use if each clone were a full virtual machine. For details, see “Storage Overcommit for
Linked-Clone Virtual Machines,” on page 217. The following procedure applies to linked-clone desktop
pools. The steps are similar for automated farms.
Procedure
1 In View Administrator, select Catalog > Desktop Pools.
2 When you create a new desktop pool or edit an existing pool, navigate to the vCenter Seings page.
Option Action
New desktop pool a Click Add.
b Proceed through the Add Desktop Pool wizard until the vCenter
Seings page appears.
Existing desktop pool a Select the linked-clone pool and click Edit.
b Click the vCenter tab.
3 On the vCenter Seings page, click Browse next to Datastores.
4 Select the datastore on the Select Linked Clone Datastores page.
A drop-down menu appears in the Storage Overcommit column for the selected datastore.
Setting Up Desktop and Application Pools in View
218 VMware, Inc.

5 Select the storage overcommit level from the drop-down menu.
Option Description
None Storage is not overcommied.
Conservative 4 times the size of the datastore. This is the default level.
Moderate 7 times the size of the datastore.
Aggressive 15 times the size of the datastore.
Unbounded View does not limit the number of linked-clone machines that it creates
based on the physical capacity of the datastore. Select this level only if you
are certain that the datastore has enough storage capacity to accommodate
all of the machines and their future growth.
6 Click OK.
Linked-Clone Data Disks
View Composer creates more than one data disk to store the components of a linked-clone virtual machine.
OS Disk
View Composer creates an OS disk for each linked clone. This disk stores the system data that the clone
needs to remain linked to the base image and to function as a unique virtual machine.
QuickPrep Configuration-Data Disk
View Composer creates a second disk with the OS disk. The second disk stores QuickPrep conguration
data and other OS-related data that must be preserved during refresh and recompose operations. This disk
is small, typically about 20MB. This disk is created whether you use QuickPrep or Sysprep to customize the
virtual machine.
If you congure separate View Composer persistent disks to store user proles, three disks are associated
with each linked clone: the OS disk, the second virtual machine disk, and the View Composer persistent
disk.
The second virtual machine disk is stored on the same datastore as the OS disk. You cannot congure this
disk.
View Composer Persistent Disk
In a dedicated-assignment pool, you can congure separate View Composer persistent disks to store
Windows user-prole data. This disk is optional.
Separate persistent disks let you preserve user data and seings. View Composer refresh, recompose, and
rebalance operations do not aect persistent disks. You can detach a persistent disk from a linked clone and
aach it to another linked clone.
If you do not congure separate persistent disks, the Windows prole is stored in the OS disk. User data and
seings are removed during refresh, recompose, and rebalance operations.
You can store persistent disks on the same datastore as the OS disk or on a dierent datastore.
Disposable-Data Disk
When you create a linked-clone pool, you can congure a separate, nonpersistent disk to store the guest OS's
paging and temp les that are generated during user sessions. You must specify the disk size in megabytes.
This disk is optional.
Chapter 15 Reducing and Managing Storage Requirements
VMware, Inc. 219

When the linked clone is powered o, View replaces the disposable-data disk with a copy of the original
disk that View Composer created with the linked-clone pool. Linked clones can increase in size as users
interact with their desktops. Using disposable-data disks can save storage space by slowing the growth of
linked clones.
The disposable-data disk is stored on the same datastore as the OS disk.
Storing Linked Clones on Local Datastores
Linked-clone virtual machines can be stored on local datastores, which are internal spare disks on ESXi
hosts. Local storage oers advantages such as inexpensive hardware, fast virtual-machine provisioning,
high performance power operations, and simple management. However, using local storage limits the
vSphere infrastructure conguration options that are available to you. Using local storage is benecial in
certain View environments but not appropriate in others.
N The limitations described in this topic do not apply to Virtual SAN datastores, which also use local
storage disks but require specic hardware.
Using local datastores is most likely to work well if the View desktops in your environment are stateless. For
example, you might use local datastores if you deploy stateless kiosks or classroom and training stations.
Consider using local datastores if your virtual machines have oating assignments, are not dedicated to
individual end users, do not require persistent disks for user data, and can be deleted or refreshed at regular
intervals such as on user logo. This approach lets you control the disk usage on each local datastore
without having to move or load-balance the virtual machines across datastores.
However, you must consider the restrictions that using local datastores imposes on your View desktop or
farm deployment:
nYou cannot use VMotion to manage volumes.
nYou cannot load-balance virtual machines across a resource pool. For example, you cannot use the View
Composer rebalance operation with linked-clones that are stored on local datastores.
nYou cannot use VMware High Availability.
nYou cannot use the vSphere Distributed Resource Scheduler (DRS).
nYou cannot store a View Composer replica and linked clones on separate datastores if the replica is on a
local datastore.
When you store linked clones on local datastores, VMware strongly recommends that you store the
replica on the same volume as the linked clones. Although it is possible to store linked clones on local
datastores and the replica on a shared datastore if all ESXi hosts in the cluster can access the replica,
VMware does not recommend this conguration.
nIf you select local spinning-disk drives, performance might not match that of a commercially available
storage array. Local spinning-disk drives and a storage array might have similar capacity, but local
spinning-disk drives do not have the same throughput as a storage array. Throughput increases as the
number of spindles grows.
If you select direct aached solid-state disks (SSDs), performance is likely to exceed that of many storage
arrays.
You can store linked clones on a local datastore without constraints if you congure the desktop pool or
farm on a single ESXi host or a cluster that contains a single ESXi host. However, using a single ESXi host
limits the size of the desktop pool or farm that you can congure.
To congure a large desktop pool or farm, you must select a cluster that contains multiple ESXi hosts with
the collective capacity to support a large number of virtual machines.
Setting Up Desktop and Application Pools in View
220 VMware, Inc.

If you intend to take advantage of the benets of local storage, you must carefully consider the consequences
of not having VMotion, HA, DRS, and other features available. If you manage local disk usage by
controlling the number and disk growth of the virtual machines, if you use oating assignments and
perform regular refresh and delete operations, you can successfully deploy linked clones to local datastores.
Storing View Composer Replicas and Linked Clones on Separate
Datastores
You can place View Composer replicas and linked clones on separate datastores with dierent performance
characteristics. This exible conguration can speed up intensive operations such as provisioning many
linked clones at once or running antivirus scans.
For example, you can store the replica virtual machines on a solid-state disk-backed datastore. Solid-state
disks have low storage capacity and high read performance, typically supporting 20,000 I/Os per second
(IOPS). View Composer creates only one replica for each View Composer base-image snapshot on each ESXi
cluster, so replicas do not require much storage space. A solid-state disk can improve the speed at which
ESXi reads a replica's OS disk when a task is performed concurrently on many linked clones.
You can store linked clones on traditional, spinning media-backed datastores. These disks provide lower
performance, typically supporting 200 IOPS. They are cheap and provide high storage capacity, which
makes them suited for storing the many linked clones in a large pool. ESXi does not need to perform
intensive, simultaneous read operations on a linked clone.
Conguring replicas and linked clones in this way can reduce the impact of I/O storms that occur when
many linked clones are created at once. For example, if you deploy a oating-assignment pool with a delete-
machine-on-logo policy, and your users start work at the same time, View must concurrently provision
new machines for them.
I This feature is designed for specic storage congurations provided by vendors who oer
high-performance disk solutions. Do not store replicas on a separate datastore if your storage hardware does
not support high-read performance.
You must follow certain requirements when you store the replica and linked clones in a pool on separate
datastores:
nYou can specify only one separate replica datastore for a pool.
nIf a replica datastore is shared, it must be accessible from all ESXi hosts in the cluster.
nIf the linked-clone datastores are shared, the replica datastore must be shared. The replica cannot reside
on a local datastore.
If the linked-clone datastores are local, VMware strongly recommends that you store the replica on the
same volume as the linked clones. Although it is possible to store linked clones on local datastores and
the replica on a shared datastore if all ESXi hosts in the cluster can access the replica, VMware does not
recommend this conguration.
nThis feature is not available you use Virtual SAN datastores or Virtual Volumes datastores. These types
of datastores use Software Policy-Based Management, so that storage proles dene which components
go on which types of disks.
Chapter 15 Reducing and Managing Storage Requirements
VMware, Inc. 221

Availability Considerations for Storing Replicas on a Separate Datastore or
Shared Datastores
You can store View Composer replicas on a separate datastore or on the same datastores as linked-clone
virtual machines. These congurations aect the availability of the pool in dierent ways.
When you store replicas on the same datastores as linked clones, to enhance availability, View Composer
creates a separate replica on each datastore. If a datastore becomes unavailable, only the linked clones on
that datastore are aected. Linked clones on other datastores continue to run.
When you store replicas on a separate datastore, all linked clones in the pool are anchored to the replicas on
that datastore. If the datastore becomes unavailable, the entire pool is unavailable.
To enhance the availability of the linked-clone virtual machines, you can congure a high-availability
solution for the datastore on which you store the replicas.
Configure View Storage Accelerator for Desktop Pools
You can congure desktop pools to enable ESXi hosts to cache virtual machine disk data. This feature, called
View Storage Accelerator, uses the Content Based Read Cache (CBRC) feature in ESXi hosts. View Storage
Accelerator can reduce IOPS and improve performance during boot storms, when many machines start up
or run anti-virus scans at once. The feature is also benecial when administrators or users load applications
or data frequently. To use this feature, you must make sure that View Storage Accelerator is enabled for
individual desktop pools.
When a virtual machine is created, View indexes the contents of each virtual disk le. The indexes are stored
in a virtual machine digest le. At runtime, the ESXi host reads the digest les and caches common blocks of
data in memory. To keep the ESXi host cache up to date, View regenerates the digest les at specied
intervals and when the virtual machine is recomposed. You can modify the regeneration interval.
View Storage Accelerator is enabled for a pool by default. The feature can be disabled or enabled when you
create or edit a pool. The best approach is to enable this feature when you rst create a desktop pool. If you
enable the feature by editing an existing pool, you must ensure that a new replica and its digest disks are
created before linked clones are provisioned. You can create a new replica by recomposing the pool to a new
snapshot or rebalancing the pool to a new datastore. Digest les can only be congured for the virtual
machines in a desktop pool when they are powered o.
You can enable View Storage Accelerator on pools that contain linked clones and pools that contain full
virtual machines.
View Storage Accelerator is now qualied to work in congurations that use View replica tiering, in which
replicas are stored on a separate datastore than linked clones. Although the performance benets of using
View Storage Accelerator with View replica tiering are not materially signicant, certain capacity-related
benets might be realized by storing the replicas on a separate datastore. Hence, this combination is tested
and supported.
I If you plan to use this feature and you are using multiple View pods that share some ESXi
hosts, you must enable the View Storage Accelerator feature for all pools that are on the shared ESXi hosts.
Having inconsistent seings in multiple pods can cause instability of the virtual machines on the shared
ESXi hosts.
Prerequisites
nVerify that your vCenter Server and ESXi hosts are version 5.0 or later.
In an ESXi cluster, verify that all the hosts are version 5.0 or later.
Setting Up Desktop and Application Pools in View
222 VMware, Inc.

nVerify that the vCenter Server user was assigned the Host > > Advanced
privilege in vCenter Server. See the topics in the View Installation documentation that describe View and
View Composer privileges required for the vCenter Server user.
nVerify that View Storage Accelerator is enabled in vCenter Server. See the View Administration
document.
Procedure
1 In View Administrator, display the Advanced Storage Options page.
Option Description
New desktop pool (recommended) Start the Add Desktop Pool wizard to begin creating an automated
desktop pool. Follow the wizard conguration prompts until you reach the
Advanced Storage page.
Existing desktop pool Select the existing pool, click Edit, and click the Advanced Storage tab.
In an existing pool, View Storage Accelerator digest les are not
congured for virtual machines until they are powered o.
2 To enable View Storage Accelerator for the pool, make sure that the Use View Storage Accelerator
check box is selected.
This seing is selected by default. To disable the seing, uncheck the Use View Storage Accelerator
box.
3 (Optional) Specify which disk types to cache by selecting OS disks only or OS and persistent disks
from the Disk Types menu.
OS disks is selected by default.
If you congure View Storage Accelerator for full virtual machines, you cannot select a disk type. View
Storage Accelerator is performed on the whole virtual machine.
4 (Optional) In the Regenerate storage accelerator after text box, specify the interval, in days, after which
the regeneration for View Storage Accelerator digest les take place.
The default regeneration interval is seven days.
What to do next
You can congure blackout days and times during which disk space reclamation and View Storage
Accelerator regeneration do not take place. See “Set Blackout Times for ESXi Operations on View Virtual
Machines,” on page 226.
If you enable View Storage Accelerator by editing an existing pool, recompose the desktop pool to a new
snapshot or rebalance the pool to a new datastore before linked clones are provisioned.
Reclaim Disk Space on Linked-Clone Virtual Machines
In vSphere 5.1 and later, you can congure the disk space reclamation feature for linked-clone desktop pools
and automated farms. Starting in vSphere 5.1, View creates linked-clone virtual machines in an ecient disk
format that allows ESXi hosts to reclaim unused disk space on the linked clones, reducing the total storage
space required for linked clones.
As users interact with the virtual machines, the linked clones' OS disks grow and can eventually use almost
as much disk space as full-clone virtual machines. Disk space reclamation reduces the size of the OS disks
without requiring you to refresh or recompose the linked clones. Space can be reclaimed while the virtual
machines are powered on and users are interacting with the machines.
Chapter 15 Reducing and Managing Storage Requirements
VMware, Inc. 223

In View Administrator, you cannot directly initiate disk space reclamation for a pool. You determine when
View initiates disk space reclamation by specifying the minimum amount of unused disk space that must
accumulate on a linked-clone OS disk to trigger the operation. When the unused disk space exceeds the
specied threshold, View directs the ESXi host to reclaim space on that OS disk. View applies the threshold
to each virtual machine in the pool.
You can use the vdmadmin -M option to initiate disk space reclamation on a particular virtual machine for
demonstration or troubleshooting purposes. See the View Administration document.
You can congure disk space reclamation on linked clones when you create a new pool or edit an existing
pool. For an existing pool, see "Tasks for Upgrading Pools to Use Space Reclamation" in the View Upgrades
document.
N This feature is not available for virtual machines stored on a Virtual SAN datastore or a Virtual
Volumes datastore.
If a View Composer is refreshing, recomposing, or rebalancing linked clones, disk space reclamation does
not take place on those linked clones.
Disk space reclamation operates only on OS disks in linked clones. The feature does not aect View
Composer persistent disks and does not operate on full-clone virtual machines.
Native NFS snapshot technology (VAAI) is not supported in pools that contain virtual machines with space-
ecient disks.
The following procedure applies to linked-clone desktop pools. The steps are similar for automated farms.
Prerequisites
nVerify that your vCenter Server and ESXi hosts, including all ESXi hosts in a cluster, are version 5.1 with
ESXi 5.1 download patch ESXi510-201212001 or later.
nVerify that VMware Tools that are provided with vSphere version 5.1 or later are installed on all the
linked-clone virtual machines in the pool.
nVerify that all the linked-clone virtual machines in the pool are virtual hardware version 9 or later.
nVerify that the virtual machines use SCSI controllers. Disk space reclamation is not supported on virtual
machines with IDE controllers.
nFor Windows 10 virtual machines, verify that the machines are running in vSphere 5.5 U3 or later.
nFor Windows 8 or 8.1 virtual machines, verify that the machines are running in vSphere 5.5 or later.
Disk space reclamation is supported on Windows 8 or 8.1 virtual machines in vSphere 5.5 or later.
nFor Windows 7 virtual machines, verify that the machines are running in vSphere 5.1 or later.
nVerify that disk space reclamation is enabled in vCenter Server. This option ensures that the virtual
machines in the pool are created in the ecient disk format that is required to reclaim disk space. See
the View Administration document.
Procedure
1 In View Administrator, display the Advanced Storage page.
Option Description
New desktop pool Start the Add Desktop Pool wizard to begin creating an automated
desktop pool. Follow the wizard conguration prompts until you reach the
Advanced Storage page.
Existing desktop pool Select the existing pool, click Edit, and click the Advanced Storage tab. To
upgrade a pool to support space reclamation, see "Upgrade Desktop Pools
for Space Reclamation" in the View Upgrades document.
Setting Up Desktop and Application Pools in View
224 VMware, Inc.
2 Select the Reclaim VM disk space check box.
3 In the Initiate reclamation when unused space on VM exceeds text box, type the minimum amount of
unused disk space, in gigabytes, that must accumulate on a linked-clone OS disk before ESXi starts
reclaiming space on that disk.
For example: 2 GB.
The default value is 1 GB.
What to do next
You can congure blackout days and times during which disk space reclamation and regeneration for View
Storage Accelerator do not take place. See “Set Blackout Times for ESXi Operations on View Virtual
Machines,” on page 226.
In View Administrator, you can select Catalog > Desktop Pools and select a machine to display the last time
space reclamation occurred and the last amount of space reclaimed on the machine.
Using View Composer Array Integration with Native NFS Snapshot
Technology (VAAI)
If your deployment includes NAS devices that support the vStorage APIs for Array Integration (VAAI), you
can enable the View Composer Array Integration (VCAI) feature on linked-clone pools. This feature uses
native NFS snapshot technology to clone virtual machines.
With this technology, the NFS disk array clones the virtual machine les without having the ESXi host read
and write the data. This operation might reduce the time and network load when virtual machines are
cloned.
Apply these guidelines for using native NFS snapshot technology:
nYou can use this feature only if you congure desktop pools or automated farms on datastores that
reside on NAS devices that support native cloning operations through VAAI.
nYou can use View Composer features to manage linked clones that are created by native NFS snapshot
technology. For example, you can refresh, recompose, rebalance, create persistent disks, and run
QuickPrep customization scripts on these clones.
nYou cannot use this feature if you store replicas and OS disks on separate datastores.
nThis feature is supported on vSphere 5.0 and later.
nIf you edit a pool and select or deselect the native NFS cloning feature, existing virtual machines are not
aected.
To change existing virtual machines from native NFS clones to traditional redo log clones, you must
deselect the native NFS cloning feature and recompose the pool to a new base image. To change the
cloning method for all virtual machines in a pool and use a dierent datastore, you must select the new
datastore, deselect the native NFS cloning feature, rebalance the pool to the new datastore, and
recompose the pool to a new base image.
Similarly, to change virtual machines from traditional redo log clones to native NFS clones, you must
select a NAS datastore that supports VAAI, select the native NFS cloning feature, rebalance the pool to
the NAS datastore, and recompose the pool. For more information, see
hp://kb.vmware.com/kb/2088995.
nOn an ESXi cluster, to congure native cloning on a selected NFS datastore in View Administrator, you
might have to install vendor-specic NAS plug-ins that support native cloning operations on VAAI on
all ESXi hosts in the cluster. See your storage vendor documentation for guidance on conguration
requirements.
Chapter 15 Reducing and Managing Storage Requirements
VMware, Inc. 225

nNative NFS snapshot technology (VAAI) is not supported on virtual machines with space-ecient
disks.
nThis feature is not available if you use a Virtual SAN datastore or a Virtual Volumes datastore.
nSee VMware Knowledge Base (KB) article 2061611 for answers to frequently asked questions about
VCAI support in View.
I NAS storage vendors might provide additional seings that can aect the performance and
operation of VAAI. You should follow the vendor's recommendations and congure the appropriate seings
on both the NAS storage array and ESXi. See your storage vendor documentation for guidance on
conguring vendor-recommended seings.
Set Blackout Times for ESXi Operations on View Virtual Machines
Regenerating digest les for View Storage Accelerator and reclaiming virtual machine disk space can use
ESXi resources. To ensure that ESXi resources are dedicated to foreground tasks when necessary, you can
prevent the ESXi hosts from performing these operations during specied periods of time on specied days.
For example, you can specify a blackout period during weekday morning hours when users start work, and
boot storms and anti-virus scanning I/O storms take place. You can specify dierent blackout times on
dierent days.
Disk space reclamation and View Storage Accelerator digest le regeneration do not occur during blackout
times that you set. You cannot set separate blackout times for each operation.
View allows View Storage Accelerator digest les to be created for new machines during the provisioning
stage, even when a blackout time is in eect.
The following procedure applies to linked-clone desktop pools. The steps are similar for automated farms.
Prerequisites
nVerify that Enable View Storage Accelerator, Enable space reclamation, or both features are selected
for vCenter Server.
nVerify that Use View Storage Accelerator, Reclaim VM disk space, or both features are selected for the
desktop pool.
Procedure
1 On the Advanced Storage page in the Add Desktop Pool wizard, go to Blackout Times and click Add.
If you are editing an existing pool, click the Advanced Storage tab.
2 Check the blackout days and specify the starting and ending times.
The time selector uses a 24-hour clock. For example, 10:00 is 10:00 a.m., and 22:00 is 10:00 p.m.
3 Click OK.
4 To add another blackout period, click Add and specify another period.
5 To modify or remove a blackout period, select the period from the Blackout times list and click Edit or
Remove.
Setting Up Desktop and Application Pools in View
226 VMware, Inc.

Configuring Policies for Desktop and
Application Pools 16
You can congure policies to control the behavior of desktop and application pools, machines, and users.
You use View Administrator to set policies for client sessions. You can use Active Directory group policy
seings to control the behavior of View Agent, Horizon Client for Windows, and features that aect single-
user machines, RDS hosts, or the PCoIP display protocol.
This chapter includes the following topics:
n“Seing Policies in View Administrator,” on page 227
n“Using Active Directory Group Policies,” on page 229
n“Using View Group Policy Administrative Template Files,” on page 230
n“View ADM and ADMX Template Files,” on page 231
n“View Agent Conguration ADM Template Seings,” on page 232
n“View PCoIP Session Variables ADM Template Seings,” on page 237
n“Using Remote Desktop Services Group Policies,” on page 248
n“Seing Up Location-Based Printing,” on page 256
n“Active Directory Group Policy Example,” on page 261
Setting Policies in View Administrator
You use View Administrator to congure policies for client sessions.
You can set these policies to aect specic users, specic desktop pools, or all client sessions users. Policies
that aect specic users and desktop pools are called user-level policies and desktop pool-level policies.
Policies that aect all sessions and users are called global policies.
User-level policies inherit seings from the equivalent desktop pool-level policy seings. Similarly, desktop
pool-level policies inherit seings from the equivalent global policy seings. A desktop pool-level policy
seing takes precedence over the equivalent global policy seing. A user-level policy seing takes
precedence over the equivalent global and desktop pool-level policy seings.
Lower-level policy seings can be more or less restrictive than the equivalent higher-level seings. For
example, you can set a global policy to Deny and the equivalent desktop pool-level policy to Allow, or vice
versa.
N Only global policies are available for RDS desktop and application pools. You cannot set user-level
policies or pool-level policies for RDS desktop and application pools.
VMware, Inc. 227
Configure Global Policy Settings
You can congure global policies to control the behavior of all client sessions users.
Prerequisites
Familiarize yourself with the policy descriptions. See “View Policies,” on page 229.
Procedure
1 In View Administrator, select Policies > Global Policies.
2 Click Edit policies in the View Policies pane.
3 Click OK to save your changes.
Configure Policies for Desktop Pools
You can congure desktop-level policies to aect specic desktop pools. Desktop-level policy seings take
precedence over their equivalent global policy seings.
Prerequisites
Familiarize yourself with the policy descriptions. See “View Policies,” on page 229.
Procedure
1 In View Administrator, select Catalog > Desktop Pools.
2 Double-click the ID of the desktop pool and click the Policies tab.
The Policies tab shows the current policy seings. When a seing is inherited from the equivalent
global policy, Inherit appears in the Desktop Pool Policy column.
3 Click Edit Policies in the View Policies pane.
4 Click OK to save your changes.
Configure Policies for Users
You can congure user-level policies to aect specic users. User-level policy seings always take
precedence over their equivalent global and desktop pool-level policy seings.
Prerequisites
Familiarize yourself with the policy descriptions. See “View Policies,” on page 229.
Procedure
1 In View Administrator, select Catalog > Desktop Pools.
2 Double-click the ID of the desktop pool and click the Policies tab.
The Policies tab shows the current policy seings. When a seing is inherited from the equivalent
global policy, Inherit appears in the Desktop Pool Policy column.
3 Click User Overrides and then click Add User.
4 To nd a user, click Add, type the name or description of the user, and then click Find.
5 Select one or more users from the list, click OK, and then click Next.
The Add Individual Policy dialog box appears.
6Congure the View policies and click Finish to save your changes.
Setting Up Desktop and Application Pools in View
228 VMware, Inc.

View Policies
You can congure View policies to aect all client sessions, or you can apply them to aect specic desktop
pools or users.
Table 16-1 describes each View policy seing.
Table 16‑1. View Policies
Policy Description
Multimedia redirection (MMR) Determines whether MMR is enabled for client systems.
MMR is a Windows Media Foundation lter that forwards multimedia data
from specic codecs on remote desktops directly through a TCP socket to the
client system. The data is then decoded directly on the client system, where it is
played.
The default value is Deny.
If client systems have insucient resources to handle local multimedia
decoding, leave the seing as Deny.
Multimedia Redirection (MMR) data is sent across the network without
application-based encryption and might contain sensitive data, depending on
the content being redirected. To ensure that this data cannot be monitored on
the network, use MMR only on a secure network.
USB Access Determines whether remote desktops can use USB devices connected to the
client system.
The default value is Allow. To prevent the use of external devices for security
reasons, change the seing to Deny.
PCoIP hardware acceleration Determines whether to enable hardware acceleration of the PCoIP display
protocol and species the acceleration priority that is assigned to the PCoIP
user session.
This seing has an eect only if a PCoIP hardware acceleration device is
present on the physical computer that hosts the remote desktop.
The default value is Allow at Medium priority.
Using Active Directory Group Policies
You can use Microsoft Windows Group Policy to optimize and secure remote desktops, control the behavior
of View components, and to congure location-based printing.
Group Policy is a feature of Microsoft Windows operating systems that provides centralized management
and conguration of computers and remote users in an Active Directory environment.
Group policy seings are contained in entities called group policy objects (GPOs). GPOs are associated with
Active Directory objects. You can apply GPOs to View components at a domain-wide level to control various
areas of the View environment. After they are applied, GPO seings are stored in the local Windows
Registry of the specied component.
You use the Microsoft Windows Group Policy Object Editor to manage group policy seings. The Group
Policy Object Editor is a Microsoft Management Console (MMC) snap-in. The MMC is part of the Microsoft
Group Policy Management Console (GPMC). See the Microsoft TechNet Web site for information on
installing and using the GPMC.
Chapter 16 Configuring Policies for Desktop and Application Pools
VMware, Inc. 229

Creating an OU for Remote Desktops
You should create an organizational unit (OU) in Active Directory specically for your remote desktops.
To prevent group policy seings from being applied to other Windows servers or workstations in the same
domain as your remote desktops, create a GPO for your View group policies and link it to the OU that
contains your remote desktops.
See the Microsoft Active Directory documentation on the Microsoft TechNet Web site for information on
creating OUs and GPOs.
Enabling Loopback Processing for Remote Desktops
By default, a user's policy seings come from the set of GPOs that are applied to the user object in Active
Directory. However, in the View environment, GPOs should apply to users based on the computer they log
in to.
When you enable loopback processing, a consistent set of policies applies to all users that log in to a
particular computer, regardless of their location in Active Directory.
See the Microsoft Active Directory documentation for information on enabling loopback processing.
N Loopback processing is only one approach to handling GPOs in View. You might need to implement
a dierent approach.
Using View Group Policy Administrative Template Files
View provides several component-specic Group Policy Administrative (ADM and ADMX) template les.
You can optimize and secure remote desktops and applications by adding the policy seings in these ADM
and ADMX template les to a new or existing GPO in Active Directory.
All ADM and ADMX les that provide group policy seings for View are available in a bundled .zip le
named VMware-Horizon-View-Extras-Bundle-x.x.x-yyyyyyy.zip, where x.x.x is the version and yyyyyyy is
the build number. You can download the le from the VMware download site at
hps://my.vmware.com/web/vmware/downloads. Under Desktop & End-User Computing, select the
VMware Horizon 6 download, which includes the bundled .zip le.
The View ADM and ADMX template les contain both Computer Conguration and User Conguration
group policies.
nThe Computer Conguration policies set policies that apply to all remote desktops, regardless of who
connects to the desktop.
nThe User Conguration policies set policies that apply to all users, regardless of the remote desktop or
application they connect to. User Conguration policies override equivalent Computer Conguration
policies.
Microsoft Windows applies policies at desktop startup and when users log in.
Setting Up Desktop and Application Pools in View
230 VMware, Inc.

View ADM and ADMX Template Files
The View ADM and ADMX template les provide group policy seings that let you control and optimize
View components.
Table 16‑2. View ADM and ADMX Template Files
Template Name Template File Description
View Agent Conguration vdm_agent.adm Contains policy seings related to the
authentication and environmental components
of View Agent.
See “View Agent Conguration ADM Template
Seings,” on page 232.
Horizon Client Conguration vdm_client.adm Contains policy seings related to
Horizon Client for Windows.
Clients that connect from outside the View
Connection Server host domain are not aected
by policies applied to Horizon Client.
See the Using VMware Horizon Client for Windows
document.
View Server Conguration vdm_server.adm Contains policy seings related to View
Connection Server.
See the View Administration document.
View Common Conguration vdm_common.adm Contains policy seings that are common to all
View components.
See the View Administration document.
View PCoIP Session Variables pcoip.adm Contains policy seings related to the PCoIP
display protocol.
See “View PCoIP Session Variables ADM
Template Seings,” on page 237.
View PCoIP Client Session
Variables
pcoip.client.adm Contains policy seings related to the PCoIP
display protocol that aect Horizon Client for
Windows.
See the Using VMware Horizon Client for Windows
document.
View Persona Management
Conguration
ViewPM.adm Contains policy seings related to View Persona
Management.
See “View Persona Management Group Policy
Seings,” on page 282.
View Remote Desktop Services vmware_rdsh.admx
vmware_rdsh_server.admx
Contains policy seings related to Remote
Desktop Services.
See “Using Remote Desktop Services Group
Policies,” on page 248.
Real-Time Audio-Video
Conguration
vdm_agent_rtav.adm Contains policy seings related to webcams that
are used with the Real-Time Audio-Video
feature.
See “Real-Time Audio-Video Group Policy
Seings,” on page 172.
Chapter 16 Configuring Policies for Desktop and Application Pools
VMware, Inc. 231

Table 16‑2. View ADM and ADMX Template Files (Continued)
Template Name Template File Description
Scanner Redirection vdm_agent_scanner.adm Contains policy seings related to scanning
devices that are redirected for use in remote
desktops and applications.
See “Scanner Redirection Group Policy Seings,”
on page 177.
Serial Port Redirection vdm_agent_serialport.adm Contains policy seings related to serial (COM)
ports that are redirected for use in remote VDI
desktops.
See “Serial Port Redirection Group Policy
Seings,” on page 183.
View Agent Configuration ADM Template Settings
The View Agent Conguration ADM template le (vdm_agent.adm) contains policy seings related to the
authentication and environmental components of View Agent.
This ADM le is available in a bundled .zip le named VMware-Horizon-View-Extras-Bundle-x.x.x-
yyyyyyy.zip, which you can download from the VMware download site at
hps://my.vmware.com/web/vmware/downloads. Under Desktop & End-User Computing, select the
VMware Horizon 6 download, which includes the bundled .zip le.
The following table describes policy seings in the View Agent Conguration ADM template le other than
those seings that are used with USB devices. The template contains both Computer Conguration and
User Conguration seings. The User Conguration seing overrides the equivalent Computer
Conguration seing.
Table 16‑3. View Agent Configuration Template Settings
Setting Computer User Properties
AllowDirectRDP X Determines whether clients other than Horizon Client
devices can connect directly to View desktops with RDP.
When this seing is disabled, View Agent permits only
View-managed connections through Horizon Client.
When connecting to a remote desktop from
Horizon Client for Mac OS X, do not disable the
AllowDirectRDP seing. If this seing is disabled, the
connection fails with an Access is denied error.
By default, while a user is logged in to a View desktop
session, you can use RDP to connect to the virtual
machine from outside of View. The RDP connection
terminates the View desktop session, and the View user's
unsaved data and seings might be lost. The View user
cannot log in to the desktop until the external RDP
connection is closed. To avoid this situation, disable the
AllowDirectRDP seing.
This seing is enabled by default.
AllowSingleSignon X Determines whether single sign-on (SSO) is used to
connect users to View desktops. When this seing is
enabled, users are required to enter only their credentials
when connecting with Horizon Client. When it is
disabled, users must reauthenticate when the remote
connection is made.
This seing is enabled by default.
Setting Up Desktop and Application Pools in View
232 VMware, Inc.

Table 16‑3. View Agent Configuration Template Settings (Continued)
Setting Computer User Properties
CommandsToRunOnConnect XSpecies a list of commands or command scripts to be
run when a session is connected for the rst time.
See “Running Commands on View Desktops,” on
page 237 for more information.
CommandsToRunOnDisconnect XSpecies a list of commands or command scripts to be
run when a session is disconnected.
See “Running Commands on View Desktops,” on
page 237 for more information.
CommandsToRunOnReconnect XSpecies a list of commands or command scripts to be
run when a session is reconnected after a disconnect.
See “Running Commands on View Desktops,” on
page 237 for more information.
ConnectionTicketTimeout XSpecies the amount of time in seconds that the View
connection ticket is valid.
Horizon Client devices use a connection ticket for
verication and single sign-on when connecting to View
Agent. For security reasons, a connection ticket is valid
for a limited amount of time. When a user connects to a
View desktop, authentication must take place within the
connection ticket timeout period or the session times out.
If this seing is not congured, the default timeout period
is 900 seconds.
CredentialFilterExceptions XSpecies the executable les that are not allowed to load
the agent CredentialFilter. Filenames must not include a
path or sux. Use a semicolon to separate multiple
lenames.
Disable Time Zone
Synchronization
X X Determines whether the time zone of the View desktop is
synchronized with the time zone of the connected client.
An enabled seing applies only if the Disable time
zone forwarding seing of the Horizon Client
Conguration policy is not set to disabled.
This seing is disabled by default.
Enable multi-media
acceleration
X Determines whether multimedia redirection (MMR) is
enabled on the View desktop.
MMR is a Windows Media Foundation lter that
forwards multimedia data from specic codecs on the
remote system directly through a TCP socket to the client.
The data is then decoded directly on the client, where it is
played. You can disable MMR if the client has insucient
resources to handle local multimedia decoding.
This seing is enabled by default.
Enable system tray
redirection for Hosted Apps
X Determines whether system tray redirection is enabled
while a user is running remote applications.
This seing is located in the VMware View Agent
> Unity Touch and Hosted Apps folder in
the Group Policy Management Editor.
This seing is enabled by default.
Chapter 16 Configuring Policies for Desktop and Application Pools
VMware, Inc. 233

Table 16‑3. View Agent Configuration Template Settings (Continued)
Setting Computer User Properties
Enable Unity Touch X Determines whether the Unity Touch functionality is
enabled on the View desktop. Unity Touch supports the
delivery of remote applications in View and allows
mobile device users to access applications in the Unity
Touch sidebar.
This seing is located in the VMware View Agent
> Unity Touch and Hosted Apps folder in
the Group Policy Management Editor.
This seing is enabled by default.
ShowDiskActivityIcon X This seing is not supported in this release.
Toggle Display Settings
Control
X Determines whether to disable the tab in the
Display control panel when a client session uses the
PCoIP display protocol.
This seing is enabled by default.
N The Connect using DNS Name seing was removed in the Horizon 6 version 6.1 release. You can set
the View LDAP aribute, pae-PreferDNS, to tell View Connection Server to give preference to DNS names
when sending the addresses of desktop machines and RDS hosts to clients and gateways. See "Give
Preference to DNS Names When View Connection Server Returns Address Information" in the View
Installation document.
USB Settings for the View Agent
See “USB Seings in the View Agent Conguration ADM Template,” on page 203.
Client System Information Sent to View Desktops
When a user connects or reconnects to a View desktop, Horizon Client gathers information about the client
system and View Connection Server sends that information to the remote desktop.
View Agent writes the client computer information to the system registry path HKCU\Volatile Environment
on remote desktops that are deployed on single-user machines.
For remote desktops that are deployed in RDS sessions, View Agent writes the client computer information
to the system registry path HKCU\Volatile Environment\x, where x is the session ID, on the RDS host.
You can add commands to the View Agent CommandsToRunOnConnect, CommandsToRunOnReconnect, and
CommandsToRunOnDisconnect group policy seings to run commands or command scripts that read this
information from the system registry when users connect and reconnect to desktops. See “Running
Commands on View Desktops,” on page 237 for more information.
Table 16-4 describes the registry keys that contain client system information and lists the types of client
systems that support them.
Table 16‑4. Client System Information
Registry Key Description Supported Desktops
Supported Client
Systems
ViewClient_IP_Address The IP address of the client system. VDI (single-user
machine)
RDS
Windows, Linux, Mac,
Android, iOS, Metro
ViewClient_MAC_Address The MAC address of the client system. VDI (single-user
machine)
RDS
Windows, Linux, Mac,
Android
Setting Up Desktop and Application Pools in View
234 VMware, Inc.

Table 16‑4. Client System Information (Continued)
Registry Key Description Supported Desktops
Supported Client
Systems
ViewClient_Machine_Nam
e
The machine name of the client system. VDI (single-user
machine)
RDS
Windows, Linux, Mac,
Android, iOS, Metro
ViewClient_Machine_Dom
ain
The domain of the client system. VDI (single-user
machine)
RDS
Windows, Metro
ViewClient_LoggedOn_Us
ername
The user name that was used to log in to the
client system.
VDI (single-user
machine)
RDS
Windows, Linux, Mac
ViewClient_LoggedOn_Do
mainname
The domain name that was used to log in to
the client system.
VDI (single-user
machine)
RDS
Windows, Metro
For Linux and Mac
clients, see
ViewClient_Machine_Do
main.ViewClient_Logge
dOn_Domainname is not
given by the Linux or Mac
client because Linux and
Mac accounts are not
bound to Windows
domains.
ViewClient_Type The thin client name or operating system
type of the client system.
VDI (single-user
machine)
RDS
Windows, Linux, Mac,
Android, iOS, Metro
ViewClient_Broker_DNS_
Name
The DNS name of the View Connection
Server instance.
VDI (single-user
machine)
RDS
Value is sent directly from
View Connection Server,
not gathered by
Horizon Client.
ViewClient_Broker_URL The URL of the View Connection Server
instance.
VDI (single-user
machine)
RDS
Value is sent directly from
View Connection Server,
not gathered by
Horizon Client.
ViewClient_Broker_Tunn
eled
The status of the tunnel connection for the
View Connection Server, which can be either
true (enabled) or false (disabled).
VDI (single-user
machine)
RDS
Value is sent directly from
View Connection Server,
not gathered by
Horizon Client.
ViewClient_Broker_Tunn
el_URL
The URL of the View Connection Server
tunnel connection, if the tunnel connection is
enabled.
VDI (single-user
machine)
RDS
Value is sent directly from
View Connection Server,
not gathered by
Horizon Client.
ViewClient_Broker_Remo
te_IP_Address
The IP address of the client system that is
seen by the View Connection Server
instance.
VDI (single-user
machine)
RDS
Value is sent directly from
View Connection Server,
not gathered by
Horizon Client.
ViewClient_TZID The Olson time zone ID.
To disable time zone synchronization, enable
the View Agent Disable Time Zone
Synchronization group policy seing.
VDI (single-user
machine)
RDS
Windows, Linux, Mac,
Android, iOS
ViewClient_Windows_Tim
ezone
The GMT standard time.
To disable time zone synchronization, enable
the View Agent Disable Time Zone
Synchronization group policy seing.
VDI (single-user
machine)
RDS
Windows, Metro
Chapter 16 Configuring Policies for Desktop and Application Pools
VMware, Inc. 235

Table 16‑4. Client System Information (Continued)
Registry Key Description Supported Desktops
Supported Client
Systems
ViewClient_Broker_Doma
inName
Domain name used to authenticate to View
Connection Server.
VDI (single-user
machine)
RDS
Value is sent directly from
View Connection Server,
not gathered by
Horizon Client.
ViewClient_Broker_User
Name
Username used to authenticate to View
Connection Server.
VDI (single-user
machine)
RDS
Value is sent directly from
View Connection Server,
not gathered by
Horizon Client.
ViewClient_Client_ID Species the Unique Client HardwareId
used as a link to the license key.
VDI (single-user
machine)
RDS
Windows, Linux, Mac,
Android, iOS, Metro
ViewClient_Displays.Nu
mber
Species the number of monitors being used
on the client.
VDI (single-user
machine)
RDS
Windows, Linux, Mac,
Android, iOS, Metro
ViewClient_Displays.To
pology
Species the arrangement, resolution, and
dimensions of displays on the client.
VDI (single-user
machine)
RDS
Windows, Linux, Mac,
Android, iOS, Metro
ViewClient_Keyboard.Ty
pe
Species the type of keyboard being used on
the client. For example: Japanese, Korean.
VDI (single-user
machine)
RDS
Windows
ViewClient_Launch_Sess
ionType
Species the session type. The type can be
desktop or application.
VDI (single-user
machine)
RDS
Value is sent directly from
View Connection Server,
not gathered by
Horizon Client.
ViewClient_Mouse.Ident
ifier
Species the type of mouse. VDI (single-user
machine)
RDS
Windows
ViewClient_Mouse.NumBu
ttons
Species the number of buons supported
by the mouse.
VDI (single-user
machine)
RDS
Windows
ViewClient_Mouse.Sampl
eRate
Species the rate, in reports per second, at
which input from a PS/2 mouse is sampled.
VDI (single-user
machine)
RDS
Windows
ViewClient_Protocol Species the protocol being used. VDI (single-user
machine)
RDS
Windows, Linux, Mac,
Android, iOS, Metro
ViewClient_Language Species the operating system language. VDI (single-user
machine)
RDS
Windows, Linux, Mac,
Android, iOS, Metro
ViewClient_Launch_ID Species the desktop pool Unique ID. VDI (single-user
machine)
Windows, Linux, Mac,
Android, iOS, Metro
Setting Up Desktop and Application Pools in View
236 VMware, Inc.

N The denitions of ViewClient_LoggedOn_Username and ViewClient_LoggedOn_Domainname in Table 16-4
apply to Horizon Client 2.2 for Windows or later releases.
For Horizon Client 5.4 for Windows or earlier releases, ViewClient_LoggedOn_Username sends the user name
that was entered in Horizon Client, and ViewClient_LoggedOn_Domainname sends the domain name that was
entered in Horizon Client.
Horizon Client 2.2 for Windows is a later release than Horizon Client 5.4 for Windows. Starting with
Horizon Client 2.2, the release numbers for Windows are consistent with the Horizon Client releases on
other operating systems and devices.
Running Commands on View Desktops
You can use the View Agent CommandsToRunOnConnect, CommandsToRunOnReconnect, and
CommandsToRunOnDisconnect group policy seings to run commands and command scripts on View
desktops when users connect, reconnect, and disconnect.
To run a command or a command script, add the command name or the le path of the script to the group
policy seing's list of commands. For example:
date
C:\Scripts\myscript.cmd
To run scripts that require console access, prepend the -C or -c option followed by a space. For example:
-c C:\Scripts\Cli_clip.cmd
-C e:\procexp.exe
Supported le types include .CMD, .BAT, and .EXE. .VBS les will not run unless they are parsed with
cscript.exe or wscript.exe. For example:
-C C:\WINDOWS\system32\wscript.exe C:\Scripts\checking.vbs
The total length of the string, including the -C or -c option, should not exceed 260 characters.
View PCoIP Session Variables ADM Template Settings
The View PCoIP Session Variables ADM template le (pcoip.adm) contains policy seings related to the
PCoIP display protocol. You can congure seings to default values that can be overridden by an
administrator, or you can congure seings to non-overridable values.
This ADM le is available in a bundled .zip le named VMware-Horizon-View-Extras-Bundle-x.x.x-
yyyyyyy.zip, which you can download from the VMware download site at
hps://my.vmware.com/web/vmware/downloads. Under Desktop & End-User Computing, select the
VMware Horizon 6 download, which includes the bundled .zip le.
The View PCoIP Session Variables ADM template le contains two subcategories:
Overridable
Administrator Defaults
Species PCoIP session variable default values. These seings can be
overridden by an administrator. These seings write registry keys values to
HKLM\Software\Policies\Teradici\PCoIP\pcoip_admin_defaults.
Not Overridable
Administrator Settings
Contains the same seings as Overridable Administrator Defaults, but these
seings cannot be overridden by an administrator. These seings write
registry key values to HKLM\Software\Policies\Teradici\PCoIP\pcoip_admin.
The template contains Computer Conguration seings only.
Chapter 16 Configuring Policies for Desktop and Application Pools
VMware, Inc. 237

Non-Policy Registry Keys
If a local machine seing needs to be applied and cannot be placed under
HKLM\Software\Policies\Teradici, local machine seings can be placed in registry keys in
HKLM\Software\Teradici. The same registry keys can be placed in HKLM\Software\Teradici as in
HKLM\Software\Policies\Teradici. If the same registry key is present in both locations, the seing in
HKLM\Software\Policies\Teradici overrides the local machine value.
View PCoIP General Session Variables
The View PCoIP Session Variables ADM template le contains group policy seings that congure general
session characteristics such as PCoIP image quality, USB devices, and network ports.
Table 16‑5. View PCoIP General Session Variables
Setting Description
Configure clipboard redirection Determines the direction in which clipboard redirection is allowed. You
can select one of these values:
nEnabled client to agent only (That is, allow copy and paste only
from the client system to the remote desktop.)
nDisabled in both directions
nEnabled in both directions
nEnabled agent to client only (That is, allow copy and paste only
from the remote desktop to the client system.)
Clipboard redirection is implemented as a virtual channel. If virtual
channels are disabled, clipboard redirection does not function.
This seing applies to View Agent only.
When this seing is disabled or not congured, the default value is
Enabled client to agent only.
Configure PCoIP client image cache
size policy
Controls the size of the PCoIP client image cache. The client uses image
caching to store portions of the display that were previously
transmied. Image caching reduces the amount of data that is
retransmied.
This seing applies only to Windows, Linux, and Mac clients when
Horizon Client, View Agent, and View Connection Server are a View 5.0
or later release.
When this seing is not congured or disabled, PCoIP uses a default
client image cache size of 250 MB.
In Horizon Client 3.1 or later releases, if you specify a number that is
smaller than the amount of available memory divided by 2, the cache
size is set using the following formula:
user-setting - 10 MB
In Horizon Client 3.1 or later releases, if you specify a number that is
larger than the available memory divided by 2, the cache size is set
using the following formula:
available-memory / 2 - 10 MB
For example, if you specify a maximum cache size of 1024 MB, and the
available memory is 1600 MB, the maximum cache size is set to 790 MB.
For all Horizon Client versions, the default size is 250 MB and the
minimum size is 50 MB.
In Horizon Client 1.6 or later releases, the maximum size is 1024 MB. In
Horizon Client 1.5 or earlier releases, the maximum size is 300 MB.
Setting Up Desktop and Application Pools in View
238 VMware, Inc.

Table 16‑5. View PCoIP General Session Variables (Continued)
Setting Description
Configure PCoIP event log cleanup by
size in MB
Enables the conguration of the PCoIP event log cleanup by size in MB.
When this policy is congured, the seing controls how large a log le
can grow before it is cleaned up. For a non-zero seing of m, log les
larger than m MB are automatically and silently deleted. A seing of 0
indicates that no le cleanup by size takes place.
When this policy is disabled or not congured, the default event log
cleanup by size is 100 MB.
The log le cleanup is performed once at session startup. A change to
the seing is not applied until the next session.
Configure PCoIP event log cleanup by
time in days
Enables the conguration of the PCoIP event log cleanup by time in
days.
When this policy is congured, the seing controls how many days can
pass before the log le is cleaned up. For a non-zero seing of n, log les
older than n days are automatically and silently deleted. A seing of 0
indicates that no le cleanup by time takes place.
When this policy is disabled or not congured, the default event log
cleanup is 7 days.
The log le cleanup is performed once at session startup. A change to
the seing is not applied until the next session.
Configure PCoIP event log verbosity Sets the PCoIP event log verbosity. The values range from 0 (least
verbose) to 3 (most verbose).
When this seing is enabled, you can set the verbosity level from 0 to 3.
When the seing is not congured or disabled, the default event log
verbosity level is 2.
When this seing is modied during an active PCoIP session, the new
seing takes eect immediately.
Chapter 16 Configuring Policies for Desktop and Application Pools
VMware, Inc. 239

Table 16‑5. View PCoIP General Session Variables (Continued)
Setting Description
Configure PCoIP image quality levels Controls how PCoIP renders images during periods of network
congestion. The Minimum Image Quality, Maximum Initial Image
Quality, and Maximum Frame Rate values interoperate to provide ne
control in network-bandwidth constrained environments.
Use the Minimum Image Quality value to balance image quality and
frame rate for limited-bandwidth scenarios. You can specify a value
between 30 and 100. The default value is 40. A lower value allows higher
frame-rates, but with a potentially lower quality display. A higher value
provides higher image quality, but with potentially lower frame rates
when network bandwidth is constrained. When network bandwidth is
not constrained, PCoIP maintains maximum quality regardless of this
value.
Use the Maximum Initial Image Quality value to reduce the network
bandwidth peaks required by PCoIP by limiting the initial quality of the
changed regions of the display image. You can specify a value between
30 and 100. The default value is 80. A lower value reduces the image
quality of content changes and decreases peak bandwidth requirements.
A higher value increases the image quality of content changes and
increases peak bandwidth requirements. Unchanged regions of the
image progressively build to a lossless (perfect) quality regardless of this
value. A value of 80 or lower best utilizes the available bandwidth.
The Minimum Image Quality value cannot exceed the Maximum
Initial Image Quality value.
Use the Maximum Frame Rate value to manage the average bandwidth
consumed per user by limiting the number of screen updates per
second. You can specify a value between 1 and 120 frames per second.
The default value is 30. A higher value can use more bandwidth but
provides less jier, which allows smoother transitions in changing
images such as video. A lower value uses less bandwidth but results in
more jier.
These image quality values apply to the soft host only and have no eect
on a soft client.
When this seing is disabled or not congured, the default values are
used.
When this seing is modied during an active PCoIP session, the new
seing takes eect immediately.
Configure PCoIP session encryption
algorithms
Controls the encryption algorithms advertised by the PCoIP endpoint
during session negotiation.
Checking one of the check boxes disables the associated encryption
algorithm. You must enable at least one algorithm.
This seing applies to both agent and client. The endpoints negotiate the
actual session encryption algorithm that is used. If FIPS140-2 approved
mode is enabled, the Disable AES-128-GCM encryption value is always
overridden so that AES-128-GCM encryption is enabled.
Supported encryption algorithms, in order of preference, are
SALSA20/12-256, AES-GCM-128, and AES-GCM-256. By default, all
supported encryption algorithms are available for negotiation by this
endpoint.
If both endpoints are congured to support all three algorithms and the
connection does not use a Security Gateway (SG), the SALSA20
algorithm will be negotiated and used. However, if the connection uses
an SG, SALSA20 is automatically disabled and AES128 will be
negotiated and used. If either endpoint or the SG disables SALSA20 and
either endpoint disables AES128, then AES256 will be negotiated and
used.
Setting Up Desktop and Application Pools in View
240 VMware, Inc.

Table 16‑5. View PCoIP General Session Variables (Continued)
Setting Description
Configure PCoIP USB allowed and
unallowed device rules
Species the USB devices that are authorized and not authorized for
PCoIP sessions that use a zero client that runs Teradici rmware. USB
devices that are used in PCoIP sessions must appear in the USB
authorization table. USB devices that appear in the USB unauthorization
table cannot be used in PCoIP sessions.
You can dene a maximum of 10 USB authorization rules and a
maximum of 10 USB unauthorization rules. Separate multiple rules with
the vertical bar (|) character.
Each rule can be a combination of a Vendor ID (VID) and a Product ID
(PID), or a rule can describe a class of USB devices. A class rule can
allow or disallow an entire device class, a single subclass, or a protocol
within a subclass.
The format of a combination VID/PID rule is 1xxxxyyyy, where xxxx is
the VID in hexadecimal format and yyyy is the PID in hexadecimal
format. For example, the rule to authorize or block a device with VID
0x1a2b and PID 0x3c4d is 11a2b3c4d.
For class rules, use one of the following formats:
Allow all USB
devices
Format: 23XXXXXX
Example: 23XXXXXX
Allow USB
devices with a
specific class
ID
Format: 22classXXXX
Example: 22aaXXXX
Allow a specific
subclass
Format: 21class-subclassXX
Example: 21aabbXX
Allow a specific
protocol
Format: 20class-subclass-protocol
Example: 20aabbcc
For example, the USB authorization string to allow USB HID (mouse
and keyboard) devices (class ID 0x03) and webcams (class ID 0x0e) is
2203XXXX|220eXXXX. The USB unauthorization string to disallow USB
Mass Storage devices (class ID 0x08) is 2208XXXX.
An empty USB authorization string means that no USB devices are
authorized. An empty USB unauthorization string means that no USB
devices are banned.
This seing applies to View Agent only and only when the remote
desktop is in a session with a zero client that runs Teradici rmware.
Device use is negotiated between the endpoints.
By default, all devices are allowed and none are disallowed.
Chapter 16 Configuring Policies for Desktop and Application Pools
VMware, Inc. 241

Table 16‑5. View PCoIP General Session Variables (Continued)
Setting Description
Configure PCoIP virtual channels Species the virtual channels that can and cannot operate over PCoIP
sessions. This seing also determines whether to disable clipboard
processing on the PCoIP host.
Virtual channels that are used in PCoIP sessions must appear on the
virtual channel authorization list. Virtual channels that appear in the
unauthorized virtual channel list cannot be used in PCoIP sessions.
You can specify a maximum of 15 virtual channels for use in PCoIP
sessions.
Separate multiple channel names with the vertical bar (|) character. For
example, the virtual channel authorization string to allow the mksvchan
and vdp_rdpvcbridge virtual channels is mksvchan|vdp_vdpvcbridge.
If a channel name contains the vertical bar or backslash (\) character,
insert a backslash character before it. For example, type the channel
name awk|ward\channel as awk\|ward\\channel.
When the authorized virtual channel list is empty, all virtual channels
are disallowed. When the unauthorized virtual channel list is empty, all
virtual channels are allowed.
The virtual channels seing applies to both agent and client. Virtual
channels must be enabled on both agent and client for virtual channels
to be used.
The virtual channels seing provides a separate check box that allows
you to disable remote clipboard processing on the PCoIP host. This
value applies to the agent only.
By default, all virtual channels are enabled, including clipboard
processing.
Configure the PCoIP transport header Congures the PCoIP transport header and sets the transport session
priority.
The PCoIP transport header is a 32-bit header that is added to all PCoIP
UDP packets (only if the transport header is enabled and supported by
both sides). The PCoIP transport header allows network devices to make
beer prioritization/QoS decisions when dealing with network
congestion. The transport header is enabled by default.
The transport session priority determines the PCoIP session priority
reported in the PCoIP transport header. Network devices make beer
prioritization/QoS decisions based on the specied transport session
priority.
When the Configure the PCoIP transport header seing is
enabled, the following transport session priorities are available:
nHigh
nMedium (default value)
nLow
n
The transport session priority value is negotiated by the PCoIP agent
and client. If the PCoIP agent species a transport session priority value,
the session uses the agent-specied session priority. If only the client has
specied a transport session priority, the session uses the client-specied
session priority. If neither agent nor client has specied a transport
session priority, or Priority is specied, the session uses the
default value, Medium priority.
Setting Up Desktop and Application Pools in View
242 VMware, Inc.

Table 16‑5. View PCoIP General Session Variables (Continued)
Setting Description
Configure the TCP port to which the
PCoIP host binds and listens
Species the TCP agent port bound to by software PCoIP hosts.
The TCP port value species the base TCP port that the agent aempts
to bind to. The TCP port range value determines how many additional
ports to try if the base port is not available. The port range must be
between 1 and 10.
The range spans from the base port to the sum of the base port and port
range. For example, if the base port is 4172 and the port range is 10, the
range spans from 4172 to 4182.
Do not set the size of the retry port range to 0. Seing this value to 0
causes a connection failure when users log in to the desktop with the
PCoIP display protocol. Horizon Client returns the error message, The
Display protocol for this desktop is currently not
available. Please contact your system administrator.
This seing applies to View Agent only.
On single-user machines, the default base TCP port is 4172 in View 4.5
and later. The default base port is 50002 in View 4.0.x and earlier. By
default, the port range is 1.
On RDS hosts, the default base TCP port is 4173. When PCoIP is used
with RDS hosts, a separate PCoIP port is used for each user connection.
The default port range that is set by the Remote Desktop Service is large
enough to accommodate the expected maximum of concurrent user
connections.
I As a best practice, do not use this policy seing to change
the default port range on RDS hosts, or change the TCP port value from
the default of 4173. Most important, do not set the TCP port value to
4172. Reseing this value to 4172 will adversely aect PCoIP
performance in RDS sessions.
Configure the UDP port to which the
PCoIP host binds and listens
Species the UDP agent port bound to by software PCoIP hosts.
The UDP port value species the base UDP port that the agent aempts
to bind to. The UDP port range value determines how many additional
ports to try if the base port is not available. The port range must be
between 1 and 10.
Do not set the size of the retry port range to 0. Seing this value to 0
causes a connection failure when users log in to the desktop with the
PCoIP display protocol. Horizon Client returns the error message, The
Display protocol for this desktop is currently not
available. Please contact your system administrator.
The range spans from the base port to the sum of the base port and port
range. For example, if the base port is 4172 and the port range is 10, the
range spans from 4172 to 4182.
This seing applies to View Agent only.
On single-user machines, the default base UDP port is 4172 for View 4.5
and later and 50002 for View 4.0.x and earlier. By default, the port range
is 10.
On RDS hosts, the default base UDP port is 4173. When PCoIP is used
with RDS hosts, a separate PCoIP port is used for each user connection.
The default port range that is set by the Remote Desktop Service is large
enough to accommodate the expected maximum of concurrent user
connections.
I As a best practice, do not use this policy seing to change
the default port range on RDS hosts, or change the UDP port value from
the default of 4173. Most important, do not set the UDP port value to
4172. Reseing this value to 4172 will adversely aect PCoIP
performance in RDS sessions.
Chapter 16 Configuring Policies for Desktop and Application Pools
VMware, Inc. 243

Table 16‑5. View PCoIP General Session Variables (Continued)
Setting Description
Enable access to a PCoIP session from
a vSphere console
Determines whether to allow a vSphere Client console to display an
active PCoIP session and send input to the desktop.
By default, when a client is aached through PCoIP, the vSphere Client
console screen is blank and the console cannot send input. The default
seing ensures that a malicious user cannot view the user's desktop or
provide input to the host locally when a PCoIP remote session is active.
This seing applies to View Agent only.
When this seing is disabled or not congured, console access is not
allowed. When this seing is enabled, the console displays the PCoIP
session and console input is allowed.
When this seing is enabled, the console can display a PCoIP session
that is running on a Windows 7 system only when the Windows 7
virtual machine is hardware v8. Hardware v8 is available only on ESXi
5.0 and later. By contrast, console input to a Windows 7 system is
allowed when the virtual machine is any hardware version.
Enable the FIPS 140-2 approved mode
of operation
Determines whether to use only FIPS 140-2 approved cryptographic
algorithms and protocols to establish a remote PCoIP connection.
Enabling this seing overrides the disabling of AES128-GCM
encryption.
This seing applies to both agent and client. You can congure either
endpoint or both endpoints to operate in FIPS mode. Conguring a
single endpoint to operate in FIPS mode limits the encryption
algorithms that are available for session negotiation.
FIPS mode is available for View 4.5 and later. For View 4.0.x and earlier,
FIPS mode is not available, and conguring this seing has no eect.
When this seing is disabled or not congured, FIPS mode is not used.
Enable/disable audio in the PCoIP
session
Determines whether audio is enabled in PCoIP sessions. Both endpoints
must have audio enabled. When this seing is enabled, PCoIP audio is
allowed. When it is disabled, PCoIP audio is disabled. When this seing
is not congured, audio is enabled by default.
Enable/disable microphone noise and
DC offset filter in PCoIP session
Determines whether to enable the microphone noise and DC oset lter
for microphone input during PCoIP sessions.
This seing applies to View Agent and Teradici audio driver only.
When this seing is not congured, the Teradici audio driver uses the
microphone noise and DC oset lter by default.
Turn on PCoIP user default input
language synchronization
Determines whether the default input language for the user in the
PCoIP session is synchronized with the default input language of the
PCoIP client endpoint. When this seing is enabled, synchronization is
allowed. When this seing is disabled or not congured,
synchronization is disallowed.
This seing applies to View Agent only.
Setting Up Desktop and Application Pools in View
244 VMware, Inc.

View PCoIP Session Bandwidth Variables
The View PCoIP Session Variables ADM template le contains group policy seings that congure PCoIP
session bandwidth characteristics.
Table 16‑6. View PCoIP Session Bandwidth Variables
Setting Description
Configure the maximum PCoIP session
bandwidth
Species the maximum bandwidth, in kilobits per second, in a PCoIP
session. The bandwidth includes all imaging, audio, virtual channel,
USB, and control PCoIP trac.
Set this value to the overall capacity of the link to which your endpoint
is connected, taking into consideration the number of expected
concurrent PCoIP sessions. For example, with a single-user VDI
conguration (a single PCoIP session) that connects through a 4Mbit/s
Internet connection, set this value to 4Mbit, or 10% less than this value to
leave some allowance for other network trac. When you expect
multiple concurrent PCoIP sessions to share a link, comprising either
multiple VDI users or an RDS conguration, you might want to adjust
the seing accordingly. However, lowering this value will restrict the
maximum bandwidth for each active session.
Seing this value prevents the agent from aempting to transmit at a
higher rate than the link capacity, which would cause excessive packet
loss and a poorer user experience. This value is symmetric. It forces the
client and agent to use the lower of the two values that are set on the
client and agent side. For example, seing a 4Mbit/s maximum
bandwidth forces the agent to transmit at a lower rate, even though the
seing is congured on the client.
When this seing is disabled or not congured on an endpoint, the
endpoint imposes no bandwidth constraints. When this seing is
congured, the seing is used as the endpoint's maximum bandwidth
constraint in kilobits per second.
The default value when this seing is not congured is 900000 kilobits
per second.
This seing applies to View Agent and the client. If the two endpoints
have dierent seings, the lower value is used.
Configure the PCoIP session bandwidth
floor
Species a lower limit, in kilobits per second, for the bandwidth that is
reserved by the PCoIP session.
This seing congures the minimum expected bandwidth transmission
rate for the endpoint. When you use this seing to reserve bandwidth
for an endpoint, the user does not have to wait for bandwidth to become
available, which improves session responsiveness.
Make sure that you do not over-subscribe the total reserved bandwidth
for all endpoints. Make sure that the sum of bandwidth oors for all
connections in your conguration does not exceed the network
capability.
The default value is 0, which means that no minimum bandwidth is
reserved. When this seing is disabled or not congured, no minimum
bandwidth is reserved.
This seing applies to View Agent and the client, but the seing only
aects the endpoint on which it is congured.
When this seing is modied during an active PCoIP session, the
change takes eect immediately.
Chapter 16 Configuring Policies for Desktop and Application Pools
VMware, Inc. 245

Table 16‑6. View PCoIP Session Bandwidth Variables (Continued)
Setting Description
Configure the PCoIP session MTU Species the Maximum Transmission Unit (MTU) size for UDP packets
for a PCoIP session.
The MTU size includes IP and UDP packet headers. TCP uses the
standard MTU discovery mechanism to set MTU and is not aected by
this seing.
The maximum MTU size is 1500 bytes. The minimum MTU size is 500
bytes. The default value is 1300 bytes.
Typically, you do not have to change the MTU size. Change this value if
you have an unusual network setup that causes PCoIP packet
fragmentation.
This seing applies to View Agent and the client. If the two endpoints
have dierent MTU size seings, the lowest size is used.
If this seing is disabled or not congured, the client uses the default
value in the negotiation with View Agent.
Configure the PCoIP session audio
bandwidth limit
Species the maximum bandwidth that can be used for audio (sound
playback) in a PCoIP session.
The audio processing monitors the bandwidth used for audio. The
processing selects the audio compression algorithm that provides the
best audio possible, given the current bandwidth utilization. If a
bandwidth limit is set, the processing reduces quality by changing the
compression algorithm selection until the bandwidth limit is reached. If
minimum quality audio cannot be provided within the bandwidth limit
specied, audio is disabled.
To allow for uncompressed high quality stereo audio, set this value to
higher than 1600 kbit/s. A value of 450 kbit/s and higher allows for
stereo, high-quality, compressed audio. A value between 50 kbit/s and
450 kbit/s results in audio that ranges between FM radio and phone call
quality. A value below 50 kbit/s might result in no audio playback.
This seing applies to View Agent only. You must enable audio on both
endpoints before this seing has any eect.
In addition, this seing has no eect on USB audio.
If this seing is disabled or not congured, a default audio bandwidth
limit of 500 kilobits per second is congured to constrain the audio
compression algorithm selected. If the seing is congured, the value is
measured in kilobits per second, with a default audio bandwidth limit
of 500 kilobits per second.
This seing applies to View 4.6 and later. It has no eect on earlier
versions of View.
When this seing is modied during an active PCoIP session, the
change takes eect immediately.
Turn off Build-to-Lossless feature Species whether to turn the build-to-lossless feature of the PCoIP
protocol o or on. This feature is turned o by default.
If this seing is enabled or not congured, the build-to-lossless feature is
turned o, and images and other desktop and application content are
never built to a lossless state. In network environments with constrained
bandwidth, turning o the build-to-lossless feature can provide
bandwidth savings.
If this seing is disabled, the build-to-lossless feature is turned on.
Turning on the build-to-lossless feature is recommended in
environments that require images and other desktop and application
content to be built to a lossless state.
When this seing is modied during an active PCoIP session, the
change takes eect immediately.
For more information about the PCoIP build-to-lossless feature, see
“View PCoIP Build-to-Lossless Feature,” on page 247.
Setting Up Desktop and Application Pools in View
246 VMware, Inc.

View PCoIP Session Variables for the Keyboard
The View PCoIP Session Variables ADM template le contains group policy seings that congure PCoIP
session characteristics that aect the use of the keyboard.
Table 16‑7. View PCoIP Session Variables for the Keyboard
Setting Description
Disable sending CAD when users press
Ctrl+Alt+Del
When this policy is enabled, users must press Ctrl+Alt+Insert instead of
Ctrl+Alt+Del to send a Secure Aention Sequence (SAS) to the remote
desktop during a PCoIP session.
You might want to enable this seing if users become confused when
they press Ctrl+Alt+Del to lock the client endpoint and an SAS is sent to
both the host and the guest.
This seing applies to View Agent only and has no eect on a client.
When this policy is not congured or is disabled, users can press Ctrl
+Alt+Del or Ctrl+Alt+Insert to send an SAS to the remote desktop.
Use alternate key for sending Secure
Attention Sequence
Species an alternate key, instead of the Insert key, for sending a Secure
Aention Sequence (SAS).
You can use this seing to preserve the Ctrl+Alt+Ins key sequence in
virtual machines that are launched from inside a remote desktop during
a PCoIP session.
For example, a user can launch a vSphere Client from inside a PCoIP
desktop and open a console on a virtual machine in vCenter Server. If
the Ctrl+Alt+Ins sequence is used inside the guest operating system on
the vCenter Server virtual machine, a Ctrl+Alt+Del SAS is sent to the
virtual machine. This seing allows the Ctrl+Alt+Alternate Key sequence
to send a Ctrl+Alt+Del SAS to the PCoIP desktop.
When this seing is enabled, you must select an alternate key from a
drop-down menu. You cannot enable the seing and leave the value
unspecied.
When this seing is disabled or not congured, the Ctrl+Alt+Ins key
sequence is used as the SAS.
This seing applies to View Agent only and has no eect on a client.
View PCoIP Build-to-Lossless Feature
You can congure the PCoIP display protocol to use an encoding approach called progressive build, or
build-to-lossless, which works to provide the optimal overall user experience even under constrained
network conditions. This feature is turned o by default.
The build-to-lossless feature provides a highly compressed initial image, called a lossy image, that is then
progressively built to a full lossless state. A lossless state means that the image appears with the full delity
intended.
On a LAN, PCoIP always displays text using lossless compression. If the build-to-lossless feature is turned
on, and if available bandwidth per session drops below 1Mbs, PCoIP initially displays a lossy text image
and rapidly builds the image to a lossless state. This approach allows the desktop to remain responsive and
display the best possible image during varying network conditions, providing an optimal experience for
users.
The build-to-lossless feature provides the following characteristics:
nDynamically adjusts image quality
nReduces image quality on congested networks
nMaintains responsiveness by reducing screen update latency
nResumes maximum image quality when the network is no longer congested
Chapter 16 Configuring Policies for Desktop and Application Pools
VMware, Inc. 247
You can turn on the build-to-lossless feature by disabling the Turn off Build-to-Lossless feature group
policy seing. See “View PCoIP Session Bandwidth Variables,” on page 245.
Using Remote Desktop Services Group Policies
You can use Remote Desktop Services (RDS) group policies to control the conguration and performance of
RDS hosts and RDS desktop and application sessions. View provides ADMX les that contain the Microsoft
RDS group policies that are supported in View.
As a best practice, congure the group policies that are provided in the View ADMX les rather than the
corresponding Microsoft group policies. The View group policies are certied to support your View
deployment.
Add the Remote Desktop Services ADMX Files to Active Directory
You can add the policy seings in the View RDS ADMX les to group policy objects (GPOs) in Active
Directory. You can also install the RDS ADMX les on individual RDS hosts.
Prerequisites
nCreate GPOs for the RDS group policy seings and link them to the OU that contains your RDS hosts.
nVerify that the Group Policy Management feature is available on your Active Directory server.
The steps for opening the Group Policy Management Console dier in the Windows 2012, Windows
2008, and Windows 2003 Active Directory versions. See “Create GPOs for View Group Policies,” on
page 262.
Procedure
1 Download the View GPO Bundle .zip le from the VMware download site at
hps://my.vmware.com/web/vmware/downloads.
Under Desktop & End-User Computing, select the VMware Horizon 6 download, which includes the
GPO Bundle.
The le is named VMware-Horizon-View-Extras-Bundle-x.x.x-yyyyyyy.zip, where x.x.x is the version
and yyyyyyy is the build number. All ADM and ADMX les that provide group policy seings for View
are available in this le.
2 Unzip the VMware-Horizon-View-Extras-Bundle-x.x.x-yyyyyyy.zip le and copy the RDS ADMX les
to your Active Directory or RDS host.
a Copy the vmware_rdsh.admx and vmware_rdsh_server.admx les and the en-US folder to the
C:\Windows\PolicyDefinitions folder on your Active Directory or RDS host.
b (Optional) Copy the language resource les vmware_rdsh.adml and vmware_rdsh_server.adml to the
appropriate subfolder in C:\Windows\PolicyDefinitions\ on your Active Directory or RDS host.
3 On the Active Directory host, open the Group Policy Management Editor.
On an individual RDS host, you can open the Local Group Policy Editor with the gpedit.msc utility.
The View RDS group policy seings are installed in the Computer > Policies >
Administrative Templates > Windows Components > Horizon View RDSH Services > Remote
Desktop Session Host folder.
4 (Optional) Congure the group policy seings in the Horizon View RDSH Services > Remote Desktop
Session Host folder.
Setting Up Desktop and Application Pools in View
248 VMware, Inc.

RDS Application Compatibility Settings
The RDS Application Compatibility group policy seings control Windows installer compatibility, remote
desktop IP virtualization, network adapter selection, and the use of the RDS host IP address.
Table 16‑8. RDS Application Compatibility Group Policy Settings
Setting Description
Turn off Windows Installer RDS Compatibility This policy seing species whether Windows Installer RDS
Compatibility runs on a per user basis for fully installed
applications. Windows Installer allows one instance of the
msiexec process to run at a time. By default, Windows
Installer RDS Compatibility is turned on.
If you enable this policy seing, Windows Installer RDS
Compatibility is turned o, and only one instance of the
msiexec process can run at a time.
If you disable or do not congure this policy seing, Windows
Installer RDS Compatibility is turned on, and multiple per
user application installation requests are queued and handled
by the msiexec process in the order in which they are
received.
Turn on Remote Desktop IP Virtualization This policy seing species whether Remote Desktop IP
Virtualization is turned on.
By default, Remote Desktop IP Virtualization is turned o.
If you enable this policy seing, Remote Desktop IP
Virtualization is turned on. You can select the mode in which
this seing is applied. If you are using Per Program mode, you
must enter a list of programs to use virtual IP addresses. List
each program on a separate line (do not enter any blank lines
between programs). For example:
explorer.exe
mstsc.exe
If you disable or do not congure this policy seing, Remote
Desktop IP Virtualization is turned o.
Select the network adapter to be used for
Remote Desktop IP Virtualization
This policy seing species the IP address and network mask
that corresponds to the network adapter used for virtual IP
addresses. The IP address and network mask should be
entered in Classless Inter-Domain Routing notation. For
example: 192.0.2.96/24.
If you enable this policy seing, the specied IP address and
network mask are used to select the network adapter used for
the virtual IP addresses.
If you disable or do not congure this policy seing, Remote
Desktop IP Virtualization is turned o. A network adapter
must be congured for Remote Desktop IP Virtualization to
work.
Do not use Remote Desktop Session Host server
IP address when virtual IP address is not
available
This policy seing species whether a session uses the IP
address of the Remote Desktop Session Host server if a virtual
IP address is not available.
If you enable this policy seing, the IP address of the RD
Session Host server is not used if a virtual IP is not available.
The session will not have network connectivity.
If you disable or do not congure this policy seing, the IP
address of the RD Session Host server is used if a virtual IP is
not available.
Chapter 16 Configuring Policies for Desktop and Application Pools
VMware, Inc. 249

RDS Connections Settings
The RDS Connections group policy seing lets you disable Fair Share CPU Scheduling.
Table 16‑9. RDS Connections Group Policy Settings
Setting Description
Turn off Fair Share CPU Scheduling Fair Share CPU Scheduling dynamically distributes processor
time across all Remote Desktop Services sessions on the same
RD Session Host server, based on the number of sessions and
the demand for processor time within each session.
If you enable this policy seing, Fair Share CPU Scheduling is
turned o.
If you disable or do not congure this policy seing, Fair
Share CPU Scheduling is turned on.
RDS Device and Resource Redirection Settings
The RDS device and resource redirection group policy seings control access to devices and resources on a
client computer in Remote Desktop Services sessions.
Table 16‑10. RDS Device and Resource Redirection Group Policy Settings
Setting Description
Allow time zone redirection This policy seing determines whether the client computer
redirects its time zone seings to the Remote Desktop Services
session.
If you enable this policy seing, clients that are capable of
time zone redirection send their time zone information to the
server. The server base time is then used to calculate the
current session time (current session time = server base time +
client time zone).
If you disable or do not congure this policy seing, the client
computer does not redirect its time zone information and the
session time zone is the same as the server time zone.
Setting Up Desktop and Application Pools in View
250 VMware, Inc.

RDS Licensing Settings
The RDS Licensing group policy seings control the order in which RDS license servers are located, whether
problem notications are displayed, and whether Per User or Per Device licensing is used for RDS Client
Access Licenses (CALs).
Table 16‑11. RDS Licensing Group Policy Settings
Setting Description
Use the specified Remote Desktop license
servers
This policy seing allows you to specify the order in which an
RD Session Host server aempts to locate Remote Desktop
license severs.
If you enable this policy seing, an RD Session Host server
rst aempts to locate the license servers that you specify. If
the specied license servers cannot be located, the RD Session
Host server will aempt automatic license server discovery.
In the automatic license server discovery process, an RD
Session Host server in a Windows Server-based domain
aempts to contact a license server in the following order:
1 License servers that are specied in the Remote Desktop
Session Host Conguration tool
2 License servers that are published in Active Directory
Domain Services
3 License servers that are installed on domain controllers in
the same domain as the RD Session Host server
If you disable or do not congure this policy seing, the RD
Session Host server uses the license server discovery mode
specied in the Remote Desktop Session Host Conguration
tool.
Hide notifications about RD Licensing
problems that affect the RD Session Host
server
This policy seing determines whether notications are
displayed on an RD Session Host server when there are
problems with RD Licensing that aect the RD Session Host
server.
By default, notications are displayed on an RD Session Host
server after you log on as a local administrator, if there are
problems with RD Licensing that aect the RD Session Host
server. If applicable, a notication will also be displayed that
notes the number of days until the licensing grace period for
the RD Session Host server will expire.
If you enable this policy seing, these notications will not be
displayed on the RD Session Host server.
If you disable or do not congure this policy seing, these
notications will be displayed on the RD Session Host server
after you log on as a local administrator.
Set the Remote Desktop licensing mode This policy seing allows you to specify the type of Remote
Desktop Services client access license (RDS CAL) that is
required to connect to this RD Session Host server.
You can use this policy seing to select one of two licensing
modes: Per User or Per Device.
Per User licensing mode requires that each user account
connecting to this RD Session Host server have an RDS Per
User CAL.
Per Device licensing mode requires that each device
connecting to this RD Session Host server have an RDS Per
Device CAL.
If you enable this policy seing, the licensing mode that you
specify takes precedence over the licensing mode that is
specied during the installation of Remote Desktop Session
Host or specied in the Remote Desktop Session Host
Conguration tool.
Chapter 16 Configuring Policies for Desktop and Application Pools
VMware, Inc. 251

Table 16‑11. RDS Licensing Group Policy Settings (Continued)
Setting Description
If you disable or do not congure this policy seing, the
licensing mode that is specied during the installation of
Remote Desktop Session Host role service or specied in the
Remote Desktop Session Host Conguration tool is used.
Setting Up Desktop and Application Pools in View
252 VMware, Inc.

RDS Profiles Settings
The RDS Proles group policy seings control roaming prole and home directory seings for Remote
Desktop Services sessions.
Table 16‑12. RDS Profiles Group Policy Settings
Setting Description
Limit the size of the entire roaming user
profile cache
This policy seing allows you to limit the size of the entire
roaming user prole cache on the local drive. This policy
seing only applies to a computer on which the Remote
Desktop Session Host role service is installed.
N If you want to limit the size of an individual user
prole, use the Limit profile size policy seing located in
User
.
If you enable this policy seing, you must specify a
monitoring interval (in minutes) and a maximum size (in
gigabytes) for the entire roaming user prole cache. The
monitoring interval determines how often the size of the
entire roaming user prole cache is checked. When the size of
the entire roaming user prole cache exceeds the maximum
size that you have specied, the oldest (least recently used)
roaming user proles will be deleted until the size of the
entire roaming user prole cache is less than the maximum
size specied.
If you disable or do not congure this policy seing, no
restriction is placed on the size of the entire roaming user
prole cache on the local drive.
Note: This policy seing is ignored if the Prevent Roaming
Profile changes from propagating to the server
policy seing located in Computer
is enabled.
Set Remote Desktop Services User Home
Directory
Species whether Remote Desktop Services uses the specied
network share or local directory path as the root of the user's
home directory for a Remote Desktop Services session.
To use this seing, select the location for the home directory
(network or local) from the Location drop-down list. If you
choose to place the directory on a network share, type the
Home Dir Root Path in the
form \\Computername\Sharename, and then select the drive
leer to which you want the network share to be mapped.
If you choose to keep the home directory on the local
computer, type the Home Dir Root Path in the form
Drive:\Path, without environment variables or ellipses. Do
not specify a placeholder for user alias, because Remote
Desktop Services automatically appends this at logon.
N The Drive Leer eld is ignored if you choose to
specify a local path. If you choose to specify a local path but
then type the name of a network share in Home Dir Root Path,
Remote Desktop Services places user home directories in the
network location.
If the status is set to Enabled, Remote Desktop Services creates
the user's home directory in the specied location on the local
computer or the network. The home directory path for each
user is the specied Home Dir Root Path and the user's alias.
If the status is set to Disabled or Not Congured, the user's
home directory is as specied at the server.
Chapter 16 Configuring Policies for Desktop and Application Pools
VMware, Inc. 253

Table 16‑12. RDS Profiles Group Policy Settings (Continued)
Setting Description
Use mandatory profiles on the RD Session Host
server
This policy seing allows you to specify whether Remote
Desktop Services uses a mandatory prole for all users
connecting remotely to the RD Session Host server.
If you enable this policy seing, Remote Desktop Services uses
the path specied in the Set path for Remote Desktop
Services Roaming User Profile policy seing as the root
folder for the mandatory user prole. All users connecting
remotely to the RD Session Host server use the same user
prole.
If you disable or do not congure this policy seing,
mandatory user proles are not used by users connecting
remotely to the RD Session Host server.
N For this policy seing to take eect, you must also
enable and congure the Set path for Remote Desktop
Services Roaming User Profile policy seing.
Set path for Remote Desktop Services Roaming
User Profile
This policy seing allows you to specify the network path that
Remote Desktop Services uses for roaming user proles.
By default, Remote Desktop Services stores all user proles
locally on the RD Session Host server. You can use this policy
seing to specify a network share where user proles can be
centrally stored, allowing a user to access the same prole for
sessions on all RD Session Host servers that are congured to
use the network share for user proles.
If you enable this policy seing, Remote Desktop Services uses
the specied path as the root directory for all user proles.
The proles are contained in subfolders named for the account
name of each user.
To congure this policy seing, type the path to the network
share in the form of \\Computername\Sharename. Do not
specify a placeholder for the user account name, because
Remote Desktop Services automatically adds this when the
user logs on and the prole is created. If the specied network
share does not exist, Remote Desktop Services displays an
error message on the RD Session Host server and will store
the user proles locally on the RD Session Host server.
If you disable or do not congure this policy seing, user
proles are stored locally on the RD Session Host server. You
can congure a user's prole path on the Remote Desktop
Services Prole tab on the user's account Properties dialog
box.
Notes:
1 The roaming user proles enabled by the policy seing
apply only to Remote Desktop Services connections. A
user might also have a Windows roaming user prole
congured. The Remote Desktop Services roaming user
prole always takes precedence in a Remote Desktop
Services session.
2 To congure a mandatory Remote Desktop Services
roaming user prole for all users connecting remotely to
the RD Session Host server, use this policy seing
together with the Use mandatory profiles on the RD
Session Host server policy seing located in
Computer
Templates\Windows Components\Remote Desktop
Services\RD Session . The path set in the
Set path for Remote Desktop Services Roaming
User Profile policy seing should contain the
mandatory prole.
Setting Up Desktop and Application Pools in View
254 VMware, Inc.

RDS Remote Session Environment Settings
he RDS Remote Session Environment group policy seings control conguration of the user interface in
Remote Desktop Services sessions.
Table 16‑13. RDS Remote Session Environment Group Policy Settings
Setting Description
Remove Windows Security item from Start menu Species whether to remove the Windows Security item from
the Seings menu on Remote Desktop clients. You can use this
seing to prevent inexperienced users from logging o from
Remote Desktop Services inadvertently.
If the status is set to Enabled, Windows Security does not
appear in Seings on the Start menu. As a result, users must
type a security aention sequence, such as CTRL+ALT+END,
to open the Windows Security dialog box on the client
computer.
If the status is set to Disabled or Not Congured, Windows
Security remains in the Seings menu.
RDS Security Settings
The RDS Security group policy seing controls whether to let local administrators customize permissions.
Table 16‑14. RDS Security Group Policy Settings
Setting Description
Do not allow local administrators to
customize permissions
Species whether to disable the administrator rights to
customize security permissions in the Remote Desktop
Session Host Conguration tool.
You can use this seing to prevent administrators from
making changes to the user groups on the Permissions tab in
the Remote Desktop Session Host Conguration tool. By
default, administrators are able to make such changes.
If the status is set to Enabled, the Permissions tab in the
Remote Desktop Session Host Conguration tool cannot be
used to customize per-connection security descriptors or to
change the default security descriptors for an existing group.
All of the security descriptors are Read Only.
If the status is set to Disabled or Not Congured, server
administrators have full Read/Write privileges to the user
security descriptors on the Permissions tab in the Remote
Desktop Session Host Conguration tool.
N The preferred method of managing user access is by
adding a user to the Remote Desktop Users group.
Chapter 16 Configuring Policies for Desktop and Application Pools
VMware, Inc. 255

RDS Temporary Folders Settings
The RDS Connections group policy seings control the creation and deletion of temporary folders for
Remote Desktop Services sessions.
Table 16‑15. RDS Temporary Folders Group Policy Settings
Setting Description
Do not delete temp folder upon exit Species whether Remote Desktop Services retains a user's
per-session temporary folders at logo.
You can use this seing to maintain a user's session-specic
temporary folders on a remote computer, even if the user logs
o from a session. By default, Remote Desktop Services
deletes a user's temporary folders when the user logs o.
If the status is set to Enabled, users' per-session temporary
folders are retained when the user logs o from a session.
If the status is set to Disabled, temporary folders are deleted
when a user logs o, even if the administrator species
otherwise in the Remote Desktop Session Host Conguration
tool.
If the status is set to Not Congured, Remote Desktop
Services deletes the temporary folders from the remote
computer at logo, unless specied otherwise by the server
administrator.
N This seing only takes eect if per-session temporary
folders are in use on the server. That is, if you enable the "Do
not use temporary folders per session" seing, this seing has
no eect.
Do not use temporary folders per session This policy seing allows you to prevent Remote Desktop
Services from creating session-specic temporary folders.
You can use this policy seing to disable the creation of
separate temporary folders on a remote computer for each
session. By default, Remote Desktop Services creates a
separate temporary folder for each active session that a user
maintains on a remote computer. These temporary folders are
created on the remote computer in a Temp folder under the
user's prole folder and are named with the sessionid.
If you enable this policy seing, per-session temporary folders
are not created. Instead, a user's temporary les for all
sessions on the remote computer are stored in a common
Temp folder under the user's prole folder on the remote
computer.
If you disable this policy seing, per-session temporary
folders are always created, even if you specify otherwise in the
Remote Desktop Session Host Conguration tool.
If you do not congure this policy seing, per-session
temporary folders are created unless you specify otherwise in
the Remote Desktop Session Host Conguration tool.
Setting Up Location-Based Printing
The location-based printing feature maps printers that are physically near client systems to View desktops,
enabling users to print to their local and network printers from their View desktops.
Location-based printing allows IT organizations to map View desktops to the printer that is closest to the
endpoint client device. For example, as a doctor moves from room to room in a hospital, each time the
doctor prints a document, the print job is sent to the nearest printer.
The location-based printing feature is available for Windows, Mac OS X, Linux, and mobile client devices.
Setting Up Desktop and Application Pools in View
256 VMware, Inc.

In Horizon 6.0.1 and later, location-based printing is supported on the following remote desktops and
applications:
nDesktops that are deployed on single-user machines, including Windows Desktop and Windows Server
machines
nDesktops that are deployed on RDS hosts, where the RDS hosts are virtual machines
nHosted Apps
nHosted Apps that are launched from Horizon Client inside remote desktops
In Horizon 6.0 and earlier, location-based printing is supported on desktops that are deployed on single-
user, Windows Desktop machines.
To use the location-based printing feature, you must install the Virtual Printing setup option with View
Agent and install the correct printer drivers on the desktop.
You set up location-based printing by conguring the Active Directory group policy seing AutoConnect Map
Additional Printers for VMware View, which is located in the Microsoft Group Policy Object Editor in the
Software folder under Computer .
N AutoConnect Map Additional Printers for VMware View is a computer-specic policy. Computer-
specic policies apply to all View desktops, regardless of who connects to the desktop.
AutoConnect Map Additional Printers for VMware View is implemented as a name translation table. You
use each row in the table to identify a specic printer and dene a set of translation rules for that printer.
The translation rules determine whether the printer is mapped to the View desktop for a particular client
system.
When a user connects to a View desktop, View compares the client system to the translation rules associated
with each printer in the table. If the client system meets all of the translation rules set for a printer, or if a
printer has no associated translation rules, View maps the printer to the View desktop during the user's
session.
You can dene translation rules based on the client system's IP address, name, and MAC address, and on
the user's name and group. You can specify one translation rule, or a combination of several translation
rules, for a specic printer.
The information used to map the printer to the View desktop is stored in a registry entry on the View
desktop in HKEY_LOCAL_MACHINE\SOFTWARE\Policies\thinprint\tpautoconnect.
Printer Settings for Location-Based Printing
In Horizon 6.0.2 and later, printer seings for location-based printers are retained after a user logs out or
disconnects from the desktop. For example, a user might set a location-based printer to use black and white
mode. After the user logs out and logs in to the desktop again, the location-based printer continues to use
black and white mode.
To save printer seings across sessions in a Hosted App, the user must select a location-based printer from
the application's print dialog box, right-click the selected printer, and select Printing Preferences. Printer
seings are not saved if the user selects a printer and clicks the Preferences buon in the application's print
dialog box.
Persistent seings for location-based printers are not supported if the seings are saved in the printer
driver's private space and not in the DEVMODE extended part of the printer driver, as recommended by
Microsoft. To support persistent seings, deploy printers that have the seings saved in the DEVMODE part
of the printer driver.
Chapter 16 Configuring Policies for Desktop and Application Pools
VMware, Inc. 257
Register the Location-Based Printing Group Policy DLL File
Before you can congure the group policy seing for location-based printing, you must register the DLL le
TPVMGPoACmap.dll.
In Horizon 6.0.1 or later, 32-bit and 64-bit versions of TPVMGPoACmap.dll are available in a bundled .zip le
named VMware-Horizon-View-Extras-Bundle-x.x.x-yyyyyyy.zip, where x.x.x is the version and yyyyyyy is
the build number. You can download the le from the VMware Horizon 6 download site at
hp://www.vmware.com/go/downloadview.
Earlier View releases provide 32-bit and 64-bit versions of TPVMGPoACmap.dll in the directory
install_directory\VMware\VMware View\Server\extras\GroupPolicyFiles\ThinPrint on your View
Connection Server host.
Procedure
1 Copy the appropriate version of TPVMGPoACmap.dll to your Active Directory server or to the domain
computer that you use to congure group policies.
2 Use the regsvr32 utility to register the TPVMGPoACmap.dll le.
For example: regsvr32 "C:\TPVMGPoACmap.dll"
What to do next
Congure the group policy seing for location-based printing.
Configure the Location-Based Printing Group Policy
To set up location-based printing, you congure the AutoConnect Map Additional Printers for VMware
View group policy seing. The group policy seing is a name translation table that maps printers to View
desktops.
Prerequisites
nVerify that the Microsoft MMC and the Group Policy Object Editor snap-in are available on your Active
Directory server or on the domain computer that you use to congure group policies.
nRegister the DLL le TPVMGPoACmap.dll on your Active Directory server or on the domain computer that
you use to congure group policies. See “Register the Location-Based Printing Group Policy DLL File,”
on page 258.
nFamiliarize yourself with syntax of the AutoConnect Map Additional Printers for VMware View group
policy seing. See “Location-Based Printing Group Policy Seing Syntax,” on page 259.
nCreate a GPO for the location-based group policy seing and link it to the OU that contains your View
desktops. See “Create GPOs for View Group Policies,” on page 262 for an example of how to create
GPOs for View group policies.
nVerify that the Virtual Printing setup option was installed with View Agent on your desktops. To verify,
check if the TP AutoConnect Service and TP VC Gateway Service are installed in the desktop operating
system.
nBecause print jobs are sent directly from the View desktop to the printer, verify that the required printer
drivers are installed on your desktops.
Setting Up Desktop and Application Pools in View
258 VMware, Inc.

Procedure
1 On the Active Directory server, edit the GPO.
AD Version Navigation Path
Windows 2003 a Select Start > All Programs > Administrative Tools > Active Directory
Users and Computers.
b Right-click the OU that contains your View desktops and select
Properties.
c On the Group Policy tab, click Open to open the Group Policy
Management plug-in.
d In the right pane, right-click the GPO that you created for the location-
based printing group policy seing and select Edit.
Windows 2008 a Select Start > Administrative Tools > Group Policy Management.
b Expand your domain, right-click the GPO that you created for the
location-based printing group policy seing and select Edit.
The Group Policy Object Editor window appears.
2 Expand Computer , open the Software folder, and select AutoConnect Map
Additional Printers for VMware View.
3 In the Policy pane, double-click AutoConnect Map Additional Printers.
The AutoConnect Map Additional Printers for VMware View window appears.
4 Select Enabled to enable the group policy seing.
The translation table headings and buons appear in the group policy window.
I Clicking Disabled deletes all table entries. As a precaution, save your conguration so that
you can import it later.
5 Add the printers that you want to map to View desktops and dene their associated translation rules.
6 Click OK to save your changes.
Location-Based Printing Group Policy Setting Syntax
You use the AutoConnect Map Additional Printers for VMware View group policy seing to map printers to
remote desktops.
AutoConnect Map Additional Printers for VMware View is a name translation table that identies printers
and denes associated translation rules. Table 16-16 describes the syntax of the translation table.
Location-based printing maps local printers to remote desktops but does not support mapping network
printers that are congured by using UNC paths.
Chapter 16 Configuring Policies for Desktop and Application Pools
VMware, Inc. 259

Table 16‑16. Translation Table Columns and Values
Column Description
IP Range A translation rule that species a range of IP addresses for client
systems.
To specify IP addresses in a specic range, use the following notation:
ip_address-ip_address
For example: 10.112.116.0-10.112.119.255
To specify all of the IP addresses in a specic subnet, use the following
notation:
ip_address/subnet_mask_bits
For example: 10.112.4.0/22
This notation species the usable IPv4 addresses from 10.112.4.1 to
10.112.7.254.
Type an asterisk to match any IP address.
Client Name A translation rule that species a computer name.
For example: Mary's Computer
Type an asterisk to match any computer name.
Mac Address A translation rule that species a MAC address. In the GPO editor, you
must use the same format that the client system uses. For example:
nWindows clients use hyphens: 01-23-45-67-89-ab
nLinux clients use colons: 01:23:45:67:89:ab
Type an asterisk to match any MAC address.
User/Group A translation rule that species a user or group name.
To specify a particular user or group, use the following notation:
\\domain\user_or_group
For example: \\mydomain\Mary
The Fully Qualied Domain Name (FQDN) is not supported notation
for the domain name. Type an asterisk to match any user or group
name.
Printer Name The name of the printer when it is mapped to the remote desktop.
For example: PRINTER-2-CLR
The mapped name does not have to match the printer name on the
client system.
The printer must be local to the client device. Mapping a network
printer in a UNC path is not supported.
Printer Driver The name of the driver that the printer uses.
For example: HP Color LaserJet 4700 PS
I Because print jobs are sent directly from the desktop to
the printer, the printer driver must be installed on the desktop.
IP Port/ThinPrint Port For network printers, the IP address of the printer prepended with
IP_.
For example: IP_10.114.24.1
The default port is 9100. You can specify a non-default port by
appending the port number to the IP address.
For example: IP_10.114.24.1:9104
Default Indicates whether the printer is the default printer.
You use the buons that appear above the column headings to add, delete, and move rows and save and
import table entries. Each buon has an equivalent keyboard shortcut. Mouse over each buon to see a
description of the buon and its equivalent keyboard shortcut. For example, to insert a row at the end of the
table, click the rst table buon or press Alt+A. Click the last two buons to import and save table entries.
Table 16-17 shows an example of two translation table rows.
Setting Up Desktop and Application Pools in View
260 VMware, Inc.

Table 16‑17. Location-Based Printing Group Policy Setting Example
IP Range
Client
Name
Mac
Address
User/
Group Printer Name Printer Driver
IP Port/ThinPrint
Port Default
* * * * PRINTER-1-CLR HP Color
LaserJet 4700 PS
IP_10.114.24.1
10.112.116.140-10.1
12.116.145
* * * PRINTER-2-CLR HP Color
LaserJet 4700 PS
IP_10.114.24.2 X
The network printer specied in the rst row will be mapped to a remote desktop for any client system
because asterisks appear in all of the translation rule columns. The network printer specied in the second
row will be mapped to a remote desktop only if the client system has an IP address in the range
10.112.116.140 through 10.112.116.145.
Active Directory Group Policy Example
One way to implement Active Directory group policies in View is to create an OU for the View machines
that deliver remote desktop sessions and link one or more GPOs to that OU. You can use these GPOs to
apply group policy seings to your View machines.
You can link GPOs directly to a domain if the policy seings apply to all computers in the domain. As a best
practice, however, most deployments should link GPOs to individual OUs to avoid policy processing on all
computers in the domain.
You can congure policies on your Active Directory Server or on any computer in your domain. This
example shows how to congure policies directly on your Active Directory server.
N Because every View environment is dierent, you might need to perform dierent steps to meet your
organization's specic needs.
Create an OU for View Machines
To apply group policies to the View machines that deliver remote desktop sessions without aecting other
Windows computers in the same Active Directory domain, create an OU specically for your View
machines. You might create one OU for your entire View deployment or separate OUs for single-user
machines and RDS hosts.
Procedure
1 On your Active Directory server, select Start > All Programs > Administrative Tools > Active Directory
Users and Computers.
2 Right-click the domain that contains your View machines and select New > Organizational Unit.
3 Type a name for the OU and click OK.
The new OU appears in the left pane.
4 To add View machines to the new OU:
a Click Computers in the left pane.
All the computer objects in the domain appear in the right pane.
b Right-click the name of the computer object that represents the View machine in the right panel
and select Move.
c Select the OU and click OK.
The View machine appears in the right pane when you select the OU.
Chapter 16 Configuring Policies for Desktop and Application Pools
VMware, Inc. 261

What to do next
Create GPOs for View group policies.
Create GPOs for View Group Policies
Create GPOs to contain group policies for View components and location-based printing and link them to
the OU for your View machines.
Prerequisites
nCreate an OU for your View machines.
nVerify that the Group Policy Management feature is available on your Active Directory server.
Procedure
1 On the Active Directory server, open the Group Policy Management Console.
AD Version Navigation Path
Windows 2012 Select Server Manager > Tools > Group Policy Management.
Windows 2008 Select Start > Administrative Tools > Group Policy Management.
Windows 2003 a Select Start > All Programs > Administrative Tools > Active Directory
Users and Computers.
b Right-click the OU that contains your View machines and select
Properties.
c On the Group Policy tab, click Open to open the Group Policy
Management plug-in.
2 Expand your domain, right-click the OU that contains your View machines, and select Create a GPO in
this domain, and Link it here.
On Windows 2003 Active Directory, this option is named Create and Link a GPO Here.
3 Type a name for the GPO and click OK.
The new GPO appears under the OU in the left pane.
4 (Optional) To apply the GPO only to specic View machines in the OU:
a Select the GPO in the left pane.
b Select Security Filtering > Add.
c Type the computer names of the View machines and click OK.
The View machines appear in the Security Filtering pane. The seings in the GPO apply only to
these machines.
What to do next
Add the View ADM templates to the GPO for group policies.
Add View ADM Templates to a GPO
To apply View component group policy seings to your remote desktops and applications, add their ADM
template les to GPOs.
Prerequisites
nCreate GPOs for the View component group policy seings and link them to the OU that contains your
View machines.
nVerify that the Group Policy Management feature is available on your Active Directory server.
Setting Up Desktop and Application Pools in View
262 VMware, Inc.
The steps for opening the Group Policy Management Console dier in the Windows 2012, Windows
2008, and Windows 2003 Active Directory versions. See “Create GPOs for View Group Policies,” on
page 262.
Procedure
1 Download the View GPO Bundle .zip le from the VMware download site at
hps://my.vmware.com/web/vmware/downloads.
Under Desktop & End-User Computing, select the VMware Horizon 6 download, which includes the
GPO Bundle.
The le is named VMware-Horizon-View-Extras-Bundle-x.x.x-yyyyyyy.zip, where x.x.x is the version
and yyyyyyy is the build number. All ADM and ADMX les that provide group policy seings for View
are available in this le.
2 Copy the le to your Active Directory server and unzip the le.
3 On the Active Directory server, open the Group Policy Management Console.
4 Expand your domain, right-click the GPO that you created for the group policy seings, and select Edit.
5 In the Group Policy Management Editor, right-click the Computer > Policies >
Administrative Templates: Policy folder and select Add/Remove Templates.
6 Click Add, browse to the ADM Template le, and click Open.
7 Click Close to apply the policy seings in the ADM Template le to the GPO.
In Windows Server 2012 or 2008 Active Directory, the template name appears in the left pane under
Administrative Templates > Classic Administrative Templates (ADM). In Windows Server 2003
Active Directory, the template appears under Administrative Templates.
8Congure the group policy seings.
What to do next
Enable loopback processing for your View machines.
Enable Loopback Processing for Remote Desktops
To make User Conguration seings that usually apply to a computer apply to all of the users that log in to
that computer, enable loopback processing.
Prerequisites
nCreate GPOs for the View component group policy seings and link them to the OU that contains your
View machines.
nVerify that the Group Policy Management feature is available on your Active Directory server.
The steps for opening the Group Policy Management Console dier in the Windows 2012, Windows
2008, and Windows 2003 Active Directory versions. See “Create GPOs for View Group Policies,” on
page 262.
Procedure
1 On the Active Directory server, open the Group Policy Management Console.
2 Expand your domain, right-click the GPO that you created for the group policy seings, and select Edit.
3 In the Group Policy Management Editor, navigate to Computer > Policies >
Administrative Templates: Policy > System > Group Policy.
4 In the right pane, double-click User Group Policy loopback processing mode.
Chapter 16 Configuring Policies for Desktop and Application Pools
VMware, Inc. 263

5 Select Enabled and then select a loopback processing mode from the Mode drop-down menu.
Option Action
Merge The user policy seings applied are the combination of those included in
both the computer and user GPOs. Where conicts exist, the computer
GPOs take precedence.
Replace The user policy is dened entirely from the GPOs associated with the
computer. Any GPOs associated with the user are ignored.
6 Click OK to save your changes.
Setting Up Desktop and Application Pools in View
264 VMware, Inc.

Configuring User Profiles with View
Persona Management 17
With View Persona Management, you can congure user proles that are dynamically synchronized with a
remote prole repository. This feature gives users access to a personalized desktop experience whenever
they log in to a desktop. View Persona Management expands the functionality and improves the
performance of Windows roaming proles, but does not require Windows roaming proles to operate.
You congure group policy seings to enable View Persona Management and control various aspects of
your View Persona Management deployment.
To enable and use View Persona Management, you must have the appropriate VMware Horizon license. See
the VMware End User Licensing Agreement (EULA) at hp://www.vmware.com/download/eula .
This chapter includes the following topics:
n“Providing User Personas in View,” on page 265
n“Using View Persona Management with Standalone Systems,” on page 266
n“Migrating User Proles with View Persona Management,” on page 267
n“Persona Management and Windows Roaming Proles,” on page 270
n“Conguring a View Persona Management Deployment,” on page 270
n“Best Practices for Conguring a View Persona Management Deployment,” on page 279
n“View Persona Management Group Policy Seings,” on page 282
Providing User Personas in View
With the View Persona Management feature, a user's remote prole is dynamically downloaded when the
user logs in to a View desktop. You can congure View to store user proles in a secure, centralized
repository. View downloads persona information as the user needs it.
View Persona Management is an alternative to Windows roaming proles. View Persona Management
expands functionality and improves performance compared to Windows roaming proles.
You can congure and manage personas entirely within View. You do not have to congure Windows
roaming proles. If you have a Windows roaming proles conguration, you can use your existing
repository conguration with View.
A user prole is independent of the View desktop. When a user logs in to any desktop, the same prole
appears.
For example, a user might log in to a oating-assignment, linked-clone desktop pool and change the desktop
background and Microsoft Word seings. When the user starts the next session, the virtual machine is
dierent, but the user sees the same seings.
VMware, Inc. 265

A user prole comprises a variety of user-generated information:
nUser-specic data and desktop seings
nApplication data and seings
nWindows registry entries congured by user applications
Also, if you provision desktops with ThinApp applications, the ThinApp sandbox data can be stored in the
user prole and roamed with the user.
View Persona Management minimizes the time it takes to log in to and log o of desktops. Login and logo
time can be a problem with Windows roaming proles.
nDuring login, View downloads only the les that Windows requires, such as user registry les. Other
les are copied to the local desktop when the user or an application opens them from the local prole
folder.
nView copies recent changes in the local prole to the remote repository, typically once every few
minutes. The default is every 10 minutes. You can specify how often to upload the local prole.
nDuring logo, only les that were updated since the last replication are copied to the remote repository.
Using View Persona Management with Standalone Systems
You can install a standalone version of View Persona Management on physical computers and virtual
machines that are not managed by View. With this software, you can manage user proles across View
desktops and standalone systems.
The standalone View Persona Management software operates on Windows 7, Windows 8, Windows 10,
Windows Server 2008 R2, and Windows Server 2012 R2 operating systems.
You can use the standalone View Persona Management software to accomplish these goals:
nShare user proles across standalone systems and View desktops.
Your users can continue to use standalone systems as well as View desktops with View Persona
Management. If you use the same View Persona Management group policy seings to control View
desktops and physical systems, users can receive their up-to-date proles each time they log in,
whether they use their legacy computers or View desktops.
N View Persona Management does not support concurrent active sessions. A user must log out of
one session before logging in to another.
nMigrate user proles from physical systems to View desktops
If you intend to re-purpose legacy physical computers for use in a View deployment, you can install
standalone View Persona Management on the legacy systems before you roll out View desktops to your
users. When users log in to their legacy systems, their proles are stored on the View remote prole
repository. When users log in to their View desktops for the rst time, their existing proles are
downloaded to their View desktops.
nPerform a staged migration from physical systems to View desktops
If you migrate your deployment in stages, users who do not yet have access to View desktops can use
standalone View Persona Management. As each set of View desktops is deployed, users can access their
proles on their View desktops, and the legacy systems can be phased out. This scenario is a hybrid of
the previous scenarios.
nSupport up-to-date proles when users go oine.
Setting Up Desktop and Application Pools in View
266 VMware, Inc.

Users of standalone laptops can disconnect from the network. When a user reconnects, View Persona
Management uploads the latest changes in the user's local prole to the remote prole repository.
N Before a user can go oine, the user prole must be completely downloaded to the local system.
Migrating User Profiles with View Persona Management
With View Persona Management, you can migrate existing user proles in a variety of seings to View
desktops. When users log in to their View desktops after a prole migration is complete, they are presented
with the personal seings and data that they used on their legacy systems.
By migrating user proles, you can accomplish the following desktop migration goals:
nYou can upgrade Windows 7, Windows 8, Windows Server 2008 R2, or Windows Server 2012 R2 View
desktops to Windows 10 View desktops.
nYou can upgrade your users' systems from legacy Windows XP to Windows 7, Windows 8, Windows
Server 2008 R2, or Windows Server 2012 R2 and migrate your users from physical computers to View
for the rst time.
nYou can upgrade legacy Windows XP View desktops to Windows 7, Windows 8, Windows Server 2008
R2, or Windows Server 2012 R2 View desktops.
nYou can migrate from physical computers to View desktops without upgrading the operating systems.
To support these scenarios, View Persona Management provides a prole migration utility and a standalone
View Persona Management installer for physical or virtual machines that do not have View Agent 5.x
installed.
I View Agent 6.1 and later releases do not support Windows XP and Windows Vista desktops.
View Agent 6.0.2 is the last View release that supports these guest operating systems. Customers who have
an extended support agreement with Microsoft for Windows XP and Vista, and an extended support
agreement with VMware for these guest operating systems, can deploy the View Agent 6.0.2 version of their
Windows XP and Vista desktops with View Connection Server 6.1.
With the View user prole migration utility, you can perform an important task in a migration from a legacy
Windows XP desktop deployment to a desktop deployment that will continue to be supported in future
View releases.
Table 17-1 shows various migration scenarios and outlines the tasks you should perform in each scenario.
Chapter 17 Configuring User Profiles with View Persona Management
VMware, Inc. 267

Table 17‑1. User Profile Migration Scenarios
If This Is Your Original
Deployment...
And This Is Your Destination
Deployment... Perform These Tasks:
Windows 7, Windows 8,
Windows Server 2008 R2, or
Windows Server 2012 R2 View
desktops
Windows 10 View desktops 1 Congure the Windows 10 View desktops
with View Persona Management for your
users. See “Conguring a View Persona
Management Deployment,” on page 270.
N Do not roll out the Windows 10 View
desktops to your users until you complete
step 2.
2 Run the View V2 to V5 prole migration
utility.
nFor the source proles, specify the
remote prole repository for existing
Windows 7, Windows 8, Windows
Server 2008 R2, or Windows Server 2012
R2 View desktops.
nFor the destination proles, specify the
remote prole repository that you
congured for the Windows 10 View
desktops.
For details, see the View User Prole Migration
document.
3 Allow your users to log in to their Windows
10 View desktops.
Windows XP physical computers Windows 7, Windows 8,
Windows Server 2008 R2, or
Windows Server 2012 R2 View
desktops
1Congure Windows 7, Windows 8, Windows
Server 2008 R2, or Windows Server 2012 R2
View desktops with View Persona
Management for your users. See
“Conguring a View Persona Management
Deployment,” on page 270.
N Do not roll out the Windows 7,
Windows 8, Windows Server 2008 R2, or
Windows Server 2012 R2 View desktops to
your users until you complete step 2.
2 Run the View V1 to V2 prole migration
utility.
nFor the source proles, specify the local
proles on the Windows XP physical
computers.
nFor the destination proles, specify the
remote prole repository that you
congured for the View deployment.
For details, see the View User Prole Migration
document.
3 Allow your users to log in to their Windows
7, Windows 8, Windows Server 2008 R2, or
Windows Server 2012 R2 View desktops.
Setting Up Desktop and Application Pools in View
268 VMware, Inc.

Table 17‑1. User Profile Migration Scenarios (Continued)
If This Is Your Original
Deployment...
And This Is Your Destination
Deployment... Perform These Tasks:
Windows XP physical computers
or virtual machines that use a
roaming user prole solution.
For example, your deployment
might use one of these solutions:
nView Persona Management
nRTO Virtual Proles
nWindows roaming proles
In this scenario, the original user
proles must be maintained in a
remote prole repository.
Windows 7, Windows 8,
Windows Server 2008 R2, or
Windows Server 2012 R2 View
desktops
1Congure Windows 7, Windows 8, Windows
Server 2008 R2, or Windows Server 2012 R2
View desktops with View Persona
Management for your users. See
“Conguring a View Persona Management
Deployment,” on page 270.
N Do not roll out the Windows 7,
Windows 8, Windows Server 2008 R2, or
Windows Server 2012 R2 View desktops to
your users until you complete step 2.
2 Run the View V1 to V2 prole migration
utility.
nFor the source proles, specify the
remote prole repository for the
Windows XP systems.
nFor the destination proles, specify the
remote prole repository that you
congured for the View deployment.
For details, see the View User Prole Migration
document.
3 Allow your users to log in to their Windows
7, Windows 8, Windows Server 2008 R2, or
Windows Server 2012 R2 View desktops.
Windows 7, Windows 8,
Windows Server 2008 R2, or
Windows Server 2012 R2
physical computers or virtual
machines.
The legacy systems cannot have
View Agent 5.x installed.
Windows 7, Windows 8,
Windows Server 2008 R2, or
Windows Server 2012 R2 View
desktops
1Congure Windows 7, Windows 8, Windows
Server 2008 R2, or Windows Server 2012 R2
View desktops with View Persona
Management for your users. See
“Conguring a View Persona Management
Deployment,” on page 270.
2 Install the standalone View Persona
Management software on the Windows 7,
Windows 8, Windows Server 2008 R2, or
Windows Server 2012 R2 systems. See
“Install Standalone View Persona
Management,” on page 273.
3Congure the legacy Windows 7, Windows
8, Windows Server 2008 R2, or Windows
Server 2012 R2 systems to use the same
remote prole repository as the View
desktops. See “Congure a User Prole
Repository,” on page 271.
The easiest approach is to use the same View
Persona Management group policy seings
in Active Directory to control both the legacy
systems and the View desktops. See “Add
the View Persona Management ADM
Template File,” on page 274.
4 Roll out your Windows 7, Windows 8,
Windows Server 2008 R2, or Windows Server
2012 R2 View desktops to your users.
Chapter 17 Configuring User Profiles with View Persona Management
VMware, Inc. 269
Persona Management and Windows Roaming Profiles
When Persona Management is enabled, you cannot manage View users' personas by using the Windows
roaming proles functions.
For example, if you log in to a desktop's guest operating system, navigate to the Advanced tab in the System
Properties dialog box, and change the User Proles seings from Roaming to Local , View
Persona Management continues to synchronize the user's persona between the local desktop and the remote
persona repository.
However, you can specify les and folders within users' personas that are managed by Windows roaming
proles functionality instead of View Persona Management. You use the Windows Roaming
Synchronization policy to specify these les and folders.
Configuring a View Persona Management Deployment
To congure View Persona Management, you set up a remote repository that stores user proles, install
View Agent with the View Persona Management setup option on virtual machines that deliver remote
desktop sessions, add and congure View Persona Management group policy seings, and deploy desktop
pools.
You can also congure View Persona Management for a non-View deployment. You install the standalone
version of View Persona Management on your users' non-View laptops, desktops, or virtual machines. You
must also set up a remote repository and congure View Persona Management group policy seings.
Overview of Setting Up a View Persona Management Deployment
To set up a View desktop deployment or standalone computers with View Persona Management, you must
perform several high-level tasks.
This sequence is recommended, although you can perform these tasks in a dierent sequence. For example,
you can congure or recongure group policy seings in Active Directory after you deploy desktop pools.
1Congure a remote repository to store user proles.
You can congure a network share or use an existing Active Directory user prole path that you
congured for Windows roaming proles.
2 Install View Agent with the View Persona Management setup option on the virtual machines that you
use to create desktop pools.
To congure View Persona Management for non-View laptops, desktops, or virtual machines, install the
standalone View Persona Management software on each computer in your targeted deployment.
3 Add the View Persona Management Administrative (ADM) Template le to your Active Directory
server or the Local Computer Policy conguration on the parent virtual machine.
To congure View Persona Management for your whole View or non-View deployment, add the ADM
Template le to Active Directory.
To congure View Persona Management for one desktop pool, you can take these approaches:
nAdd the ADM Template le to the virtual machine that you use to create the pool.
nAdd the ADM Template le to Active Directory and apply the group policy seings to the OU that
contains the machines in the pool.
4 Enable View Persona Management by enabling the Manage user persona group policy seing.
5 If you congured a network share for the remote prole repository, enable the Persona repository
location group policy seing and specify the network share path.
Setting Up Desktop and Application Pools in View
270 VMware, Inc.

6 (Optional) Congure other group policy seings in Active Directory or the Local Computer Policy
conguration.
7 Create desktop pools from the virtual machines on which you installed View Agent with the View
Persona Management setup option.
Configure a User Profile Repository
You can congure a remote repository to store the user data and seings, application-specic data, and
other user-generated information in user proles. If Windows roaming proles are congured in your
deployment, you can use an existing Active Directory user prole path instead.
N You can congure View Persona Management without having to congure Windows roaming
proles.
Prerequisites
nFamiliarize yourself with the minimum access permissions that are required to congure a shared
folder. See “Seing Access Permissions on Shared Folders for View Persona Management,” on page 271.
nFamiliarize yourself with the guidelines for creating a user prole repository. See “Creating a Network
Share for View Persona Management,” on page 272
Procedure
1 Determine whether to use an existing Active Directory user prole path or congure a user prole
repository on a network share.
Option Action
Use an existing Active Directory
user profile path
If you have an existing Windows roaming proles conguration, you can
use the user prole path in Active Directory that supports roaming
proles. You can skip the remaining steps in this procedure.
Configure a network share to store
the user profile repository
If you do not have an existing Windows roaming proles conguration,
you must congure a network share for the user prole repository. Follow
the remaining steps in this procedure.
2 Create a shared folder on a computer that your users can access from the guest operating systems on
their desktops.
If %username% is not part of the folder path that you congure, View Persona Management appends
%username%.%userdomain% to the path.
For example: \\server.domain.com\VPRepository\%username%.%userdomain%
3 Set access permissions for the shared folders that contain user proles.
C Make sure that access permissions are congured correctly. The incorrect conguration of
access permissions on the shared folder is the most common cause of problems with View Persona
Management.
Setting Access Permissions on Shared Folders for View Persona Management
View Persona Management and Windows roaming proles require a specic minimum level of permissions
on the user prole repository. View Persona Management also requires that the security group of the users
who put data on the shared folder must have read aributes on the share.
Set the required access permissions on your user prole repository and redirected folder share.
Chapter 17 Configuring User Profiles with View Persona Management
VMware, Inc. 271

Table 17‑2. Minimum NTFS Permissions Required for the User Profile Repository and Redirected Folder
Share
User Account Minimum Permissions Required
Creator Owner Full Control, Subfolders and Files Only
Administrator None. Instead, enable the Windows group policy seing, Add the Administrators
security group to the roaming user . In the Group Policy Object Editor, this
policy seing is located in Computer
.
Security group of users
needing to put data on share
List Folder/Read Data, Create Folders/Append Data, Read Aributes - This Folder
Only
Everyone No permissions
Local System Full Control, This Folder, Subfolders and Files
Table 17‑3. Share Level (SMB) Permissions Required for User Profile Repository and Redirected Folder
Share
User Account Default Permissions Minimum Permissions Required
Everyone Read only No permissions
Security group of users needing to put data
on share
N/A Full Control
For information about roaming user proles security, see the Microsoft TechNet topic, Security
Recommendations for Roaming User Proles Shared Folders.
hp://technet.microsoft.com/en-us/library/cc757013(WS.10).aspx
Creating a Network Share for View Persona Management
You must follow certain guidelines when you create a shared folder to use as a prole repository.
nIf you use Windows 8 desktops and your network share uses a OneFS le system on an EMC Isilon
NAS device, the OneFS le system must be version 6.5.5.11 or later.
nYou can create the shared folder on a server, a network-aached storage (NAS) device, or a network
server.
nThe shared folder does not have to be in the same domain as View Connection Server.
nThe shared folder must be in the same Active Directory forest as the users who store proles in the
shared folder.
nYou must use a shared drive that is large enough to store the user prole information for your users. To
support a large View deployment, you can congure separate repositories for dierent desktop pools.
If users are entitled to more than one pool, the pools that share users must be congured with the same
prole repository. If you entitle a user to two pools with two dierent prole repositories, the user
cannot access the same version of the prole from desktops in each pool.
nYou must create the full prole path under which the user prole folders will be created. If part of the
path does not exist, Windows creates the missing folders when the rst user logs in and assigns the
user's security restrictions to those folders. Windows assigns the same security restrictions to every
folder it creates under that path.
For example, for user1 you might congure the View Persona Management
path \\server\VPRepository\profiles\user1. If you create the network share \\server\VPRepository,
and the profiles folder does not exist, Windows creates the path \profiles\user1 when user1 logs in.
Windows restricts access to the \profiles\user1 folders to the user1 account. If another user logs in
with a prole path in \\server\VPRepository\profiles, the second user cannot access the repository
and the user's prole fails to be replicated.
Setting Up Desktop and Application Pools in View
272 VMware, Inc.
Install View Agent with the View Persona Management Option
To use View Persona Management with View desktops, you must install View Agent with the View Persona
Management setup option on the virtual machines that you use to create desktop pools.
For an automated pool, you install View Agent with the View Persona Management setup option on the
virtual machine that you use as a parent or template. When you create a desktop pool from the virtual
machine, the View Persona Management software is deployed on your View desktops.
For a manual pool, you must install View Agent with the View Persona Management setup option on each
virtual machine that is used as a desktop in the pool. Use Active Directory to congure View Persona
Management group policies for a manual pool. The alternative is to add the ADM Template le and
congure group policies on each individual machine.
Prerequisites
nVerify that you are performing the installation on a Windows 7, Windows 8, Windows 10, Windows
Server 2008 R2, or Windows Server 2012 R2 virtual machine. View Persona Management does not
operate on Microsoft RDS hosts.
Installing View Agent with the View Persona Management setup option does not work on physical
computers. You can install the standalone View Persona Management software on physical computers.
See “Install Standalone View Persona Management,” on page 273.
nVerify that you can log in as an administrator on the virtual machine.
nVerify that a native RTO Virtual Proles 2.0 is not installed on the virtual machine. If a native RTO
Virtual Prole 2.0 is present, uninstall it before you install View Agent with the View Persona
Management setup option.
nFamiliarize yourself with installing View Agent. See “Install View Agent on a Virtual Machine,” on
page 27 or “Install View Agent on an Unmanaged Machine,” on page 16.
Procedure
uWhen you install View Agent on a virtual machine, select the View Persona Management setup option.
What to do next
Add the View Persona Management ADM Template le to your Active Directory server or the Local
Computer Policy conguration on the virtual machine itself. See “Add the View Persona Management ADM
Template File,” on page 274.
Install Standalone View Persona Management
To use View Persona Management with non-View physical computers or virtual machines, install the
standalone version of View Persona Management. You can run an interactive installation or a silent
installation at the command line.
Install the standalone View Persona Management software on each individual computer or virtual machine
in your targeted deployment.
Prerequisites
nVerify that you are performing the installation on a Windows 7, Windows 8, Windows 10, Windows
Server 2008 R2, or Windows Server 2012 R2 physical computer or virtual machine. View Persona
Management does not operate on Windows Servers or Microsoft RDS hosts. Verify that the system
satises the requirements described in "Supported Operating Systems for Standalone View Persona
Management" in the View Installation document.
nVerify that you can log in as an administrator on the system.
Chapter 17 Configuring User Profiles with View Persona Management
VMware, Inc. 273

nVerify that View Agent 5.x or later is not installed on the computer.
nVerify that a native RTO Virtual Proles 2.0 is not installed on the virtual machine.
nIf you intend to perform a silent installation, familiarize yourself with the MSI installer command-line
options. See “Microsoft Windows Installer Command-Line Options,” on page 32.
Procedure
1 Download the standalone View Persona Management installer le from the VMware product page at
hp://www.vmware.com/products/.
The installer lename is VMware-personamanagement-y.y.y-xxxxxx.exe or VMware-personamanagement-
x86_64-y.y.y-xxxxxx.exe, where y.y.y is the version number and xxxxxx is the build number.
2 Run the installation program interactively or perform a silent installation.
Option Description
Interactive installation a To start the installation program, double-click the installer le.
b Accept the VMware license terms.
c Click Install.
By default, View Persona Management is installed in the C:\Program
Files\VMware\VMware View Persona Management directory.
d Click Finish.
Silent installation Open a Windows command prompt on the machine and type the
installation command on one line.
For example: VMware-personamanagement-y.y.y-
xxxxxx.exe /s /v"/qn /l*v ""c:\persona.log"" ALLUSERS=1"
I You must include the ALLUSERS=1 property in the command
line.
3 Restart your system to allow the installation changes to take eect.
What to do next
Add the View Persona Management ADM Template le to your Active Directory or local group policy
conguration.
Add the View Persona Management ADM Template File
The View Persona Management Administrative (ADM) Template le contains group policy seings that
allow you to congure View Persona Management. Before you can congure the policies, you must add the
ADM Template le to the local systems or Active Directory server.
To congure View Persona Management on a single system, you can add the group policy seings to the
Local Computer Policy conguration on that local system.
To congure View Persona Management for a desktop pool, you can add the group policy seings to the
Local Computer Policy conguration on the virtual machine that you use as a parent or template for
deploying the desktop pool.
To congure View Persona Management at the domain-wide level and apply the conguration to many
View machines or your whole deployment, you can add the group policy seings to Group Policy Objects
(GPOs) on your Active Directory server. In Active Directory, you can create an OU for the View machines
that use View Persona Management, create one or more GPOs, and link the GPOs to the OU. To congure
separate View Persona Management policies for dierent types of users, you can create OUs for particular
sets of View machines and apply dierent GPOs to the OUs.
For example, you might create one OU for View machines with View Persona Management and another OU
for physical computers on which the standalone View Persona Management software is installed.
Setting Up Desktop and Application Pools in View
274 VMware, Inc.

For an example of implementing Active Directory group policies in View, see “Active Directory Group
Policy Example,” on page 261.
Add the Persona Management ADM Template to a Single System
To congure View Persona Management for a single desktop pool, you must add the Persona Management
ADM Template le to the Local Computer Policy on the virtual machine that you use to create the pool. To
congure View Persona Management on a single system, you must add the Persona Management ADM
Template le to that system.
Prerequisites
nVerify that View Agent is installed with the View Persona Management setup option on the system. See
“Install View Agent with the View Persona Management Option,” on page 273.
nVerify that you can log in as an administrator on the system.
Procedure
1 Download the View GPO Bundle .zip le from the VMware download site at
hps://my.vmware.com/web/vmware/downloads.
Under Desktop & End-User Computing, select the VMware Horizon 6 download, which includes the
GPO Bundle.
The le is named VMware-Horizon-View-Extras-Bundle-x.x.x-yyyyyyy.zip, where x.x.x is the version
and yyyyyyy is the build number. All ADM and ADMX les that provide group policy seings for View
are available in this le.
2 Unzip the le and copy the the ADM le, ViewPM.adm, to the local system.
3 On the local system, click Start > Run.
4 Type gpedit.msc and click OK.
5 In the Local Computer Policy window, navigate to Computer and right-click
Administrative Templates.
N Do not select Administrative Templates under User .
6 Click Add/Remove Templates and click Add.
7 Browse to the directory that contains the ViewPM.adm le.
8 Select the ViewPM.adm le and click Add.
9 Close the Add/Remove Templates window.
The View Persona Management group policy seings are added to the Local Computer Policy conguration
on the local system. You must use gpedit.msc to display this conguration.
What to do next
Congure the View Persona Management group policy seings on the local system. See “Congure View
Persona Management Policies,” on page 276.
Chapter 17 Configuring User Profiles with View Persona Management
VMware, Inc. 275
Add the Persona Management ADM Template to Active Directory
To congure View Persona Management for your deployment, you can add the Persona Management ADM
Template le to a Group Policy Object (GPO) in your Active Directory server.
Prerequisites
nCreate GPOs for your View Persona Management deployment and link them to the OU that contains
the View machines that use View Persona Management. See “Active Directory Group Policy Example,”
on page 261.
nVerify that the Microsoft MMC and the Group Policy Object Editor snap-in are available on your Active
Directory server.
nVerify that View Agent is installed with the View Persona Management setup option on a system that is
accessible to your Active Directory server. See “Install View Agent with the View Persona Management
Option,” on page 273.
Procedure
1 Download the View GPO Bundle .zip le from the VMware download site at
hps://my.vmware.com/web/vmware/downloads.
Under Desktop & End-User Computing, select the VMware Horizon 6 download, which includes the
GPO Bundle.
The le is named VMware-Horizon-View-Extras-Bundle-x.x.x-yyyyyyy.zip, where x.x.x is the version
and yyyyyyy is the build number. All ADM and ADMX les that provide group policy seings for View
are available in this le.
2 Unzip the le and copy the View Persona Management ADM Template le, ViewPM.adm, to your Active
Directory server.
3 On your Active Directory server, open the Group Policy Management Console.
For example, start the Run dialog box, type gpmc.msc, and click OK.
4 In the left pane, select the domain or OU that contains your View machines.
5 In the right pane, right-click the GPO that you created for the group policy seings and select Edit.
The Group Policy Object Editor window appears.
6 In the Group Policy Object Editor, right-click Administrative Templates under Computer
and select Add/Remove Templates.
7 Click Add, browse to the ViewPM.adm le, and click Open.
8 Click Close to apply the policy seings in the ADM Template le to the GPO.
The name of the template appears in the left pane under Administrative Templates.
What to do next
Congure the View Persona Management group policy seings on your Active Directory server.
Configure View Persona Management Policies
To use View Persona Management, you must enable the Manage user persona group policy seing, which
activates the View Persona Management software. To set up a user prole repository without using an
Active Directory user prole path, you must congure the Persona repository location group policy seing.
You can congure the optional group policy seings to congure other aspects of your View Persona
Management deployment.
Setting Up Desktop and Application Pools in View
276 VMware, Inc.

If Windows roaming proles are already congured in your deployment, you can use an existing Active
Directory user prole path. You can leave the Persona repository location seing disabled or not
congured.
Prerequisites
nFamiliarize yourself with the Manage user persona and Persona repository location group policy
seings. See “Roaming and Synchronization Group Policy Seings,” on page 283.
nIf you are seing group policies on a local system, familiarize yourself with opening the Group Policy
window. See steps Step 3 and Step 4 in “Add the Persona Management ADM Template to a Single
System,” on page 275.
nIf you are seing group policies on your Active Directory server, familiarize yourself with starting the
Group Policy Object Editor. See steps Step 3 through Step 5 in “Add the Persona Management ADM
Template to Active Directory,” on page 276.
Procedure
1 Open the Group Policy window.
Option Description
Local system Open the Local Computer Policy window.
Active Directory server Open the Group Policy Object Editor window.
2 Expand the Computer folder and navigate to the Persona Management folder.
Option Description
Windows 7 and later or Windows
Server 2008 and later
Expand the following folders: Administrative Templates, Classic
Administrative Templates (ADM), VMware View Agent ,
Persona Management
Windows Server 2003 Expand the following folders: Administrative Templates, VMware View
Agent , Persona Management
3 Open the Roaming & Synchronization folder.
4 Double-click Manage user persona and click Enabled.
This seing activates View Persona Management. When this seing is disabled or not congured, View
Persona Management does not function.
5 Type the prole upload interval, in minutes, and click OK.
The prole upload interval determines how often View Persona Management copies user prole
changes to the remote repository. The default upload interval is 10 minutes.
6 Double-click Persona repository location and click Enabled.
If you have an existing Windows roaming proles deployment, you can use an Active Directory user
prole path for the remote prole repository. You do not have to congure a Persona repository
location.
7 Type the UNC path to a network le server share that stores the user proles.
For example: \\server.domain.com\UserProfilesRepository\%username%
The network share must be accessible to the virtual machines in your deployment.
If you intend to use an Active Directory user prole path, you do not have to specify a UNC path.
Chapter 17 Configuring User Profiles with View Persona Management
VMware, Inc. 277

8 If an Active Directory user prole path is congured in your deployment, determine whether to use or
override this path.
Option Action
Use the network share. Check the Override Active Directory user path if it is
check box.
Use an Active Directory user profile
path, if one exists.
Do not check the Override Active Directory user path if it is
check box.
9 Click OK.
10 (Optional) Congure other View Persona Management group policy seings.
Create Desktop Pools That Use Persona Management
To use View Persona Management with View desktops, you must create desktop pools with a View Persona
Management agent installed on each machine.
You cannot use View Persona Management on RDS desktop pools, which run on Remote Desktop Services
(RDS) hosts.
Prerequisites
nVerify that View Agent with the View Persona Management setup option is installed on the virtual
machine that you use to create the desktop pool. See “Install View Agent with the View Persona
Management Option,” on page 273.
nIf you intend to congure View Persona Management policies for this desktop pool only, verify that you
added the View Persona Management ADM Template le to the virtual machine and congured group
policy seings in the Local Computer Policy conguration. See “Add the Persona Management ADM
Template to a Single System,” on page 275 and “Congure View Persona Management Policies,” on
page 276.
Procedure
nGenerate a snapshot or template from the virtual machine and create an automated desktop pool.
You can congure View Persona Management with pools that contain full virtual machines or linked
clones. The pools can use dedicated or oating assignments.
n(Optional) To use View Persona Management with manual desktop pools, select machines on which
View Agent with the View Persona Management option is installed.
N After you deploy View Persona Management on your View desktop pools, if you remove the View
Persona Management setup option on the View machines, or uninstall View Agent altogether, the local user
proles are removed from the machines of users who are not currently logged in. For users who are
currently logged in, the user proles are downloaded from the remote prole repository during the
uninstall process.
Setting Up Desktop and Application Pools in View
278 VMware, Inc.
Best Practices for Configuring a View Persona Management
Deployment
You should follow best practices for conguring View Persona Management to enhance your users' desktop
experience, improve desktop performance, and ensure that View Persona Management operates eciently
with other View features.
Determining Whether to Remove Local User Profiles at Logoff
By default, View Persona Management does not delete user proles from the local machines when users log
o. The Remove local persona at log policy is disabled. In many cases, the default seing is a best
practice because it reduces I/O operations and avoids redundant behavior.
For example, keep this policy disabled if you deploy oating-assignment pools and either refresh or delete
the machines on logo. The local prole is deleted when the virtual machine is refreshed or deleted. In a
oating-assignment, automated pool, full virtual machines can be deleted after logo. In a oating-
assignment, linked-clone pool, the clones can be refreshed or deleted on logo.
If you deploy dedicated-assignment pools, you can keep the policy disabled because users return to the
same machines at each session. With the policy disabled, when a user logs in, View Persona Management
does not have to download les that are present in the local prole. If you congure dedicated-assignment,
linked-clone pools with persistent disks, keep the policy disabled to avoid deleting user data from the
persistent disks.
In some cases, you might want to enable the Remove local persona at log policy.
Handling Deployments That Include View Persona Management and Windows
Roaming Profiles
In deployments in which Windows roaming proles are congured, and users access View desktops with
View Persona Management and standard desktops with Windows roaming proles, the best practice is to
use dierent proles for the two desktop environments. If a View desktop and the client computer from
which the desktop is launched are in the same domain, and you use an Active Directory GPO to congure
both Windows roaming proles and View Persona Management, enable the Persona repository location
policy and select Override Active Directory user path if it is .
This approach prevents Windows roaming proles from overwriting a View Persona Management prole
when the user logs o from the client computer.
If users intend to share data between existing Windows roaming proles and View Persona Management
proles, you can congure Windows folder redirection.
Configuring Paths for Redirected Folders
When you use the Folder Redirection group policy seing, congure the folder path to include %username%,
but make sure that the last subfolder in the path uses the name of the redirected folder, such as My Videos.
The last folder in the path is displayed as the folder name on the user's desktop.
For example, if you congure a path such as \\myserver\videos\%username%\My Videos, the folder name that
appears on the user's desktop is My Videos.
If %username% is the last subfolder in the path, the user's name appears as the folder name. For example,
instead of seeing a My Videos folder on the desktop, the user JDoe sees a folder named JDoe and cannot
easily identify the folder.
Chapter 17 Configuring User Profiles with View Persona Management
VMware, Inc. 279

Using the Windows Event Log to Monitor the View Persona Management
Deployment
To help you manage your deployment, View Persona Management provides improved log messages and
prole size and le and folder count tracking. View Persona Management uses the le and folder counts to
suggest folders for redirection in the Windows event log and provides statistics for these folders. For
example, when a user logs in, the Windows event log might display the following suggestions to redirect
folders:
Profile path: \\server.domain.com\persona\user1V2
...
Folders to redirect:
\\server.domain.com\persona\user1V2 Reason: Folder size larger than 1GB
\\server.domain.com\persona\user1V2\Documents Reason: More than 10000 files and folders
Additional Best Practices
You can also follow these recommendations:
nBy default, many antivirus products do not scan oine les. For example, when a user logs in to a
desktop, these anti-virus products do not scan user prole les that are not specied in the Files and
folders to preload or Windows roaming synchronization group policy seing. For many
deployments, the default behavior is the best practice because it reduces the I/O required to download
les during on-demand scans.
If you do want to retrieve les from the remote repository and enable scanning of oine les, see the
documentation for your antivirus product.
nIt is highly recommended that you use standard practices to back up network shares on which View
Persona Management stores the prole repository.
N Do not use backup software such as MozyPro or Windows Volume backup services with View
Persona Management to back up user proles on View desktops.
View Persona Management ensures that user proles are backed up to the remote prole repository,
eliminating the need for additional tools to back up user data on the desktops. In certain cases, tools
such as MozyPro or Windows Volume backup services can interfere with View Persona Management
and cause data loss or corruption.
nYou can set View Persona Management policies to enhance performance when users start ThinApp
applications. See “Conguring User Proles to Include ThinApp Sandbox Folders,” on page 281.
nIf your users generate substantial persona data, and you plan to use refresh and recompose to manage
dedicated-assignment, linked-clone desktops, congure your desktop pool to use separate View
Composer persistent disks. Persistent disks can enhance the performance of View Persona
Management. See “Conguring View Composer Persistent Disks with View Persona Management,” on
page 281.
nIf you congure View Persona Management for standalone laptops, make sure that the proles are kept
synchronized when users go oine. See “Manage User Proles on Standalone Laptops,” on page 281.
nDo not use Windows Client-Side Caching with View Persona Management. The Windows Client-Side
Caching system is a mechanism that supports the Windows Oine Files feature. If this system is in
eect on the local system, View Persona Management features such as folder redirection, oine le
population during logon, background download, and replication of local prole les to the remote
prole repository do not work properly.
Setting Up Desktop and Application Pools in View
280 VMware, Inc.
As a best practice, disable the Windows Oine Files feature before you begin using View Persona
Management. If you encounter issues with View Persona Management because Windows Client-Side
Caching is in eect on your desktops, you can resolve these issues by synchronizing the prole data
that currently resides in the local Client-Side Caching database and disabling the Windows Oine Files
feature. For instructions, see KB 2016416: View Persona Management features do not function when
Windows Client-Side Caching is in eect.
Configuring User Profiles to Include ThinApp Sandbox Folders
View Persona Management maintains user seings that are associated with ThinApp applications by
including ThinApp sandbox folders in user proles. You can set View Persona Management policies to
enhance performance when users start ThinApp applications.
View Persona Management preloads ThinApp sandbox folders and les in the local user prole when a user
logs in. The ThinApp sandbox folders are created before a user can complete the log on. To enhance
performance, View Persona Management does not download the ThinApp sandbox data during the login,
although les are created on the local desktop with the same basic aributes and sizes as the ThinApp
sandbox les in the user's remote prole.
As a best practice, download the actual ThinApp sandbox data in the background. Enable the Folders to
background download group policy seing and add the ThinApp sandbox folders. See “Roaming and
Synchronization Group Policy Seings,” on page 283.
The actual ThinApp sandbox les can be large. With the Folders to background download seing, users do
not have to wait for large les to download when they start an application. Also, users do not have to wait
for the les to preload when they log in, as they might if you use the Files and folders to preload seing
with large les.
Configuring View Composer Persistent Disks with View Persona Management
With View Composer persistent disks, you can preserve user data and seings while you manage linked-
clone OS disks with refresh, recompose, and rebalance operations. Conguring persistent disks can enhance
the performance of View Persona Management when users generate a large amount of persona information.
You can congure persistent disks only with dedicated-assignment, linked-clone desktops.
View Persona Management maintains each user prole on a remote repository that is congured on a
network share. After a user logs into a desktop, the persona les are dynamically downloaded as the user
needs them.
If you congure persistent disks with View Persona Management, you can refresh and recompose the
linked-clone OS disks and keep a local copy of the each user prole on the persistent disks.
The persistent disks can act as a cache for the user proles. When a user requires persona les, View Persona
Management does not need to download data that is the same on the local persistent disk and the remote
repository. Only unsynchronized persona data needs to be downloaded.
If you congure persistent disks, do not enable the Remove local persona at log policy. Enabling this
policy deletes the user data from the persistent disks when users log o.
Manage User Profiles on Standalone Laptops
If you install View Persona Management on standalone (non-View) laptops, make sure that the user proles
are kept synchronized when users take their standalone laptops oine.
To ensure that a standalone laptop user has an up-to-date local prole, you can congure the View Persona
Management group policy seing, Enable background download for laptops. This seing downloads the
entire user prole to the standalone laptop in the background.
Chapter 17 Configuring User Profiles with View Persona Management
VMware, Inc. 281

As a best practice, notify your users to make sure that their user proles are completely downloaded before
they disconnect from the network. Tell users to wait for the Background download complete notice to appear
on their laptop screens before they disconnect.
To allow the Background download complete notice to be displayed on user laptops, congure the View
Persona Management group policy seing, Show critical errors to users via tray icon alerts.
If a user disconnects from the network before the prole download is complete, the local prole and remote
prole might become unsynchronized. While the user is oine, the user might update a local le that was
not fully downloaded. When the user reconnects to the network, the local prole is uploaded, overwriting
the remote prole. Data that was in the original remote prole might be lost.
The following steps provide an example you might follow.
Prerequisites
Verify that View Persona Management is congured for your users' standalone laptops. See “Conguring a
View Persona Management Deployment,” on page 270.
Procedure
1 In the Active Directory OU that controls your standalone laptops, enable the Enable background
download for laptops seing.
In the Group Policy Object Editor, expand the following folders: Computer ,
Administrative Templates, Classic Administrative Templates (ADM), VMware View Agent
, Persona Management, Roaming & Synchronization.
The Classic Administrative Templates (ADM) folder appears only in Windows 7 or later and Windows
Server 2008 or later releases.
2 For standalone laptops, you must use a non-View method to notify users when they log in.
For example, you might distribute this message:
Your personal data is dynamically downloaded to your laptop after you log in. Make sure your
personal data has finished downloading before you disconnect your laptop from the network. A
"Background download complete" notice pops up when your personal data finishes downloading.
View Persona Management Group Policy Settings
The View Persona Management ADM Template le contains group policy seings that you add to the
Group Policy conguration on individual systems or on an Active Directory server. You must congure the
group policy seings to set up and control various aspects of View Persona Management.
The ADM Template le is named ViewPM.adm.
This ADM le is available in a bundled .zip le named VMware-Horizon-View-Extras-Bundle-x.x.x-
yyyyyyy.zip, which you can download from the VMware download site at
hps://my.vmware.com/web/vmware/downloads. Under Desktop & End-User Computing, select the
VMware Horizon 6 download, which includes the bundled .zip le.
After you add the ViewPM.adm le to your Group Policy conguration, the policy seings are located in the
Persona Management folder in the Group Policy window.
Table 17‑4. Location of View Persona Management Settings in the Group Policy Window
Operating System Location
Windows 7 and later or Windows Server
2008 and later
Computer > Administrative Templates > Classic
Administrative Templates (ADM) > VMware View Agent
> Persona Management
Windows Server 2003 Computer > Administrative Templates > VMware View
Agent > Persona Management
Setting Up Desktop and Application Pools in View
282 VMware, Inc.

The group policy seings are contained in these folders:
nRoaming & Synchronization
nFolder Redirection
nDesktop UI
nLogging
Roaming and Synchronization Group Policy Settings
The roaming and synchronization group policy seings turn View Persona Management on and o, set the
location of the remote prole repository, determine which folders and les belong to the user prole, and
control how to synchronize folders and les.
Group Policy
Setting Description
Manage user
persona
Determines whether to manage user proles dynamically with View Persona Management or with
Windows roaming proles. This seing turns View Persona Management on and o.
When this seing is enabled, View Persona Management manages user proles.
When the seing is enabled, you can specify a prole upload interval in minutes. This value
determines how often changes in the user prole are copied to the remote repository. The default
value is 10 minutes.
When this seing is disabled or not congured, user proles are managed by Windows.
Persona
repository
location
Species the location of the user prole repository. This seing also determines whether to use a
network share that is specied in View Persona Management or a path that is congured in Active
Directory to support Windows roaming proles.
When this seing is enabled, you can use the Share path to determine the location of the user prole
repository.
In the Share path text box, you specify a UNC path to a network share that is accessible to View
Persona Management desktops. This seing lets View Persona Management control the location of
the user prole repository.
For example: \\server.domain.com\VPRepository
If %username% is not part of the folder path that you congure, View Persona Management appends
%username%.%userdomain% to the path.
For example: \\server.domain.com\VPRepository\%username%.%userdomain%
If you specify a location in the Share path, you do not have to set up roaming proles in Windows or
congure a user prole path in Active Directory to support Windows roaming proles.
For details about conguring a UNC network share for View Persona Management, see “Congure a
User Prole Repository,” on page 271.
By default, the Active Directory user prole path is used.
Specically, when the Share path is left blank, the Active Directory user prole path is used. The
Share path is blank and inactive when this seing is disabled or not congured. You can also leave
the path blank when this seing is enabled.
When this seing is enabled, you can select the Override Active Directory user path if it is
check box to make sure that View Persona Management uses the path specied in the
Share path. By default, this check box is unchecked, and View Persona Management uses the Active
Directory user prole path when both locations are congured.
Remove local
persona at log o
Deletes each user's locally stored prole from the View machine when the user logs o.
You can also check a box to delete each user's local seings folders when the user prole is removed.
Checking this box removes the AppData\Local folder.
For guidelines for using this seing, see “Best Practices for Conguring a View Persona
Management Deployment,” on page 279.
When this seing is disabled or not congured, the locally stored user proles, including local
seings folders, are not deleted when users log o.
Roam local
seings folders
Roams the local seings folders with the rest of each user prole.
This policy aects the AppData\Local folder.
By default, local seings are not roamed.
Chapter 17 Configuring User Profiles with View Persona Management
VMware, Inc. 283

Group Policy
Setting Description
Files and folders
to preload
Species a list of les and folders that are downloaded to the local user prole when the user logs in.
Changes in the les are copied to the remote repository as they occur.
In some situations, you might want to preload specic les and folders into the locally stored user
prole. Use this seing to specify these les and folders.
Specify paths that are relative to the root of the local prole. Do not specify a drive in a pathname.
For example: Application Data\Microsoft\Certificates
After the specied les and folders are preloaded, View Persona Management manages the les and
folders in the same way that it manages other prole data. When a user updates preloaded les or
folders, View Persona Management copies the updated data to the remote prole repository during
the session, at the next prole upload interval.
Files and folders
to preload
(exceptions)
Prevents the specied les and folders from being preloaded.
The selected folder paths must reside within the folders that you specify in the Files and folders to
preload seing.
Specify paths that are relative to the root of the local prole. Do not specify a drive in a pathname.
Windows
roaming proles
synchronization
Species a list of les and folders that are managed by standard Windows roaming proles. The les
and folders are retrieved from the remote repository when the user logs in. The les are not copied
to the remote repository until the user logs o.
For the specied les and folders, View Persona Management ignores the prole replication interval
that is congured by the upload interval in the Manage user persona seing.
Specify paths that are relative to the root of the local prole. Do not specify a drive in a pathname.
Windows
roaming proles
synchronization
(exceptions)
The selected les and folders are exceptions to the paths that are specied in the Windows roaming
synchronization seing.
The selected folder paths must reside within the folders that you specify in the Windows roaming
synchronization seing.
Specify paths that are relative to the root of the local prole. Do not specify a drive in a pathname.
Files and folders
excluded from
roaming
Species a list of les and folders that are not roamed with the rest of the user prole. The specied
les and folders exist only on the local system.
Some situations require specic les and folders to reside only in the locally stored user prole. For
example, you can exclude temporary and cached les from roaming. These les do not need to be
replicated to the remote repository.
Specify paths that are relative to the root of the local prole. Do not specify a drive in a pathname.
By default, the user prole's temp folder, ThinApp cache folder, and cache folders for Internet
Explorer, Firefox, Chrome, and Opera are excluded from roaming.
Files and folders
excluded from
roaming
(exceptions)
The selected les and folders are exceptions to the paths that are specied in the Files and folders
excluded from roaming seing.
The selected folder paths must reside within the folders that you specify in the Files and folders
excluded from roaming seing.
Specify paths that are relative to the root of the local prole. Do not specify a drive in a pathname.
Enable
background
download for
laptops
Downloads all les in the user prole when a user logs in to a laptop on which the View Persona
Management software is installed. Files are downloaded in the background.
When the operation is complete, a pop-up notication appears on the user's screen: Background
download complete. To allow this notication to appear on the user's laptop, you must enable the
Show critical errors to users via tray icon alerts seing.
N If you enable this seing, as a best practice, notify your users to make sure that the prole is
completely downloaded before the users disconnect from the network.
If a user takes a standalone laptop oine before the prole download is complete, the user might
not have access to local prole les. While the user is oine, the user will be unable to open a local
le that was not fully downloaded.
See “Manage User Proles on Standalone Laptops,” on page 281.
Setting Up Desktop and Application Pools in View
284 VMware, Inc.

Group Policy
Setting Description
Folders to
background
download
The selected folders are downloaded in the background after a user logs in to the desktop.
In certain cases, you can optimize View Persona Management by downloading the contents of
specic folders in the background. With this seing, users do not have to wait for large les to
download when they start an application. Also, users do not have to wait for the les to preload
when they log in, as they might if you use the Files and folders to preload seing with very large
les.
For example, you can include VMware ThinApp sandbox folders in the Folders to background
download seing. The background download does not aect performance when a user logs in or
uses other applications on the desktop. When the user starts the ThinApp application, the required
ThinApp sandbox les are likely to be downloaded from the remote repository, improving the
application startup time.
Specify paths that are relative to the root of the local prole. Do not specify a drive in a pathname.
Folders to
background
download
(exceptions)
The selected folders are exceptions to the paths that are specied in the Folders to background
download seing.
The selected folder paths must reside within the folders that you specify in the Folders to
background download seing.
Specify paths that are relative to the root of the local prole. Do not specify a drive in a pathname.
Excluded
processes
The I/O of the specied processes are ignored by View Persona Management.
You might have to add certain anti-virus applications to the Excluded processes list to prevent
performance problems. If an anti-virus application does not have a feature to disable oine le
retrieval during its on-demand scans, the Excluded processes seing prevents the application from
retrieving les unnecessarily. However, View Persona Management does replicate changes to les
and seings in the users' proles that are made by excluded processes.
To add processes to the Excluded processes list, enable this seing, click Show, type the process
name, and click OK. For example: process.exe.
Cleanup CLFS
les
Deletes the les that are generated by Common Log File System (CLFS) for ntuser.dat and
usrclass.dat from the roaming prole on logon.
Enable this seing only if you have to repair user proles that are experiencing a problem with these
les. Otherwise, leave the seing disabled or not congured.
Folder Redirection Group Policy Settings
With folder redirection group policy seings, you can redirect user prole folders to a network share. When
a folder is redirected, all data is stored directly on the network share during the user session.
You can use these seings to redirect folders that must be highly available. View Persona Management
copies updates from the local user prole to the remote prole as often as once a minute, depending on the
value you set for the prole upload interval. However, if a network outage or failure on the local system
occurs, a user's updates since the last replication might not be saved in the remote prole. In situations
where users cannot aord a temporary loss of a few minutes of recent work, you can redirect those folders
that store this critical data.
The following rules and guidelines apply to folder redirection:
nWhen you enable this seing for a folder, you must type the UNC path of the network share to which
the folder is redirected.
nIf %username% is not part of the folder path that you congure, View Persona Management appends
%username% to the UNC path.
nAs a best practice, congure the folder path to include %username%, but make sure that the last subfolder
in the path uses the name of the redirected folder, such as My Videos. The last folder in the path is
displayed as the folder name on the user's desktop. For details, see “Conguring Paths for Redirected
Folders,” on page 279.
nYou congure a separate seing for each folder. You can select particular folders for redirection and
leave others on the local View desktop. You can also redirect dierent folders to dierent UNC paths.
Chapter 17 Configuring User Profiles with View Persona Management
VMware, Inc. 285

nIf a folder redirection seing is disabled or not congured, the folder is stored on the local View
desktop and managed according to the View Persona Management group policy seings.
nIf View Persona Management and Windows roaming proles are congured to redirect the same folder,
View Persona Management's folder redirection takes precedence over Windows roaming proles.
nFolder redirection applies only to applications that use the Windows shell APIs to redirect common
folder paths. For example, if an application writes a le to %USERPROFILE%\AppData\Roaming, the le is
wrien to the local prole and not redirected to the network location.
nBy default, Windows folder redirection gives users exclusive rights to redirected folders. To grant
domain administrators access to newly redirected folders, you can use a View Persona Management
group policy seing.
Windows folder redirection has a check box called Grant user exclusive rights to folder-name, which
gives the specied user exclusive rights to the redirected folder. As a security measure, this check box is
selected by default. When this check box is selected, administrators do not have access to the redirected
folder. If an administrator aempts to force change the access rights for a user's redirected folder, View
Persona Management no longer works for that user.
You can make newly redirected folders accessible to domain administrators by using the Add the
administrators group to redirected folders group policy seing. This seing lets you grant the domain
administrators group full control over each redirected folder. See Table 17-5.
For existing redirected folders, see “Granting Domain Administrators Access to Existing Redirected
Folders,” on page 287.
You can specify folder paths that are excluded from folder redirection. See Table 17-5.
C View does not support enabling folder redirection to a folder that is already in a prole managed
by View Persona Management. This conguration can cause failures in View Persona Management and loss
of user data.
For example, if the root folder in the remote prole repository is \\Server\%username%\, and you redirect
folders to \\Server\%username%\Desktop, these seings would cause a failure of folder redirection in View
Persona Management and the loss of any contents that were previously in the \\Server\%username%\Desktop
folder.
You can redirect the following folders to a network share:
nApplication Data (roaming)
nContacts
nCookies
nDesktop
nDownloads
nFavorites
nHistory
nLinks
nMy Documents
nMy Music
nMy Pictures
nMy Videos
nNetwork Neighborhood
Setting Up Desktop and Application Pools in View
286 VMware, Inc.

nPrinter Neighborhood
nRecent Items
nSave Games
nSearches
nStart Menu
nStartup Items
nTemplates
nTemporary Internet Files
Table 17‑5. Group Policy Settings That Control Folder Redirection
Group Policy Setting Description
Add the administrators
group to redirected
folders
Determines whether to add the administrators group to each redirected folder. Users have
exclusive rights to redirected folders by default. When you enable this seing, administrators
can also access redirected folders.
By default, this seing is not congured.
Files and Folders
excluded from Folder
Redirection
The selected le and folder paths are not redirected to a network share.
In some scenarios, specic les and folders must remain in the local user prole.
To add a folder path to the Files and Folders excluded from Folder Redirection list, enable
this seing, click Show, type the path name, and click OK.
Specify folder paths that are relative to the root of the user's local prole. For example:
Desktop\New Folder.
Files and folders
excluded from Folder
Redirection (exceptions)
The selected le and folder paths are exceptions to the paths that are specied in the Files and
Folders excluded from Folder Redirection seing.
To add a folder path to the Files and folders excluded from Folder Redirection (exceptions)
list, enable this seing, click Show, type the path name, and click OK.
Specify folder paths that reside within a folder that is specied in the Folders excluded from
Folder Redirection seing and are relative to the root of the user's local prole. For example:
Desktop\New Folder\Unique Folder.
Granting Domain Administrators Access to Existing Redirected Folders
By default, Windows folder redirection gives users exclusive rights to redirected folders. To grant domain
administrators access to existing redirected folders, you must use the icacls utility.
If you are seing up new redirected folders for use with View Persona Management, you can make the
newly redirected folders accessible to domain administrators by using the Add the administrators group to
redirected folders group policy seing. See Table 17-5.
Procedure
1 Set ownership for the administrator on the les and folders.
icacls "\\file-server\persona-share\*" /setowner "domain\admin" /T /C /L /Q
For example: icacls "\\myserver-123abc\folders\*" /setowner
"mycompanydomain\vcadmin" /T /C /L /Q
2 Modify the ACLs for the les and folders.
icacls "\\file-server\persona-share\*" /grant "admin-group":F /T /C /L /Q
For example: icacls "\\myserver-123abc\folders\*" /grant "Domain-Admins":F /T /C /L /Q
Chapter 17 Configuring User Profiles with View Persona Management
VMware, Inc. 287

3 For each user folder, revert ownership from the administrator to the corresponding user.
icacls "\\file-server\persona-share\*" /setowner "domain\folder-owner" /T /C /L /Q
For example: icacls "\\myserver-123abc\folders\*" /setowner
"mycompanydomain\user1" /T /C /L /Q
Desktop UI Group Policy Settings
The desktop UI group policy seings control View Persona Management seings that users see on their
desktops.
Group Policy Setting Description
Hide local oine le
icon
Determines whether to hide the oine icon when a user views locally stored les that belong to
the user prole. Enabling this seing hides the oine icon in Windows Explorer and most
Windows dialog boxes.
By default, the oine icon is hidden.
Show progress when
downloading large
les
Determines whether to display a progress window on a user's desktop when the client retrieves
large les from the remote repository.
When this seing is enabled, you can specify the minimum le size, in megabytes, to begin
displaying the progress window. The window is displayed when View Persona Management
determines that the specied amount of data will be retrieved from the remote repository. This
value is an aggregate of all les that are retrieved at one time.
For example, if the seing value is 50MB and a 40MB le is retrieved, the window is not
displayed. If a 30MB le is retrieved while the rst le is still being downloaded, the aggregate
download exceeds the value and the progress window is displayed. The window appears when
a le starts downloading.
By default, this value is 50MB.
By default, this progress window is not displayed.
Show critical errors to
users via tray icon
alerts
Displays critical error icon alerts in the desktop tray when replication or network connectivity
failures occur.
By default, these icon alerts are hidden.
Logging Group Policy Settings
The logging group policy seings determine the name, location, and behavior of the View Persona
Management log les.
View Persona Management logging conguration is simplied in Horizon 6 version 6.1 and later releases. To
use the updated logging seings, you must upgrade the View Persona Management ADM le, ViewPM.adm,
to the version that is provided with Horizon 6 version 6.1 with View or later.
Group Policy
Setting Description
Logging
lename
Species the full pathname of the local View Persona Management log le.
The default path is ProgramData\VMware\VDM\logs\filename.
The default logging lename is VMWVvp.txt.
Logging
destination
Determines whether to write all log messages to the log le, the debug port, or both destinations.
By default, logging messages are sent to the log le.
Logging ags Species the type of log messages that are generated.
nLog information messages.
nLog debug messages.
When this seing is disabled or not congured, and by default when the seing is congured, log
messages are set to information level.
Setting Up Desktop and Application Pools in View
288 VMware, Inc.

Group Policy
Setting Description
Log history
depth
Determines the number of historical log les that View Persona Management maintains.
You can set a minimum of one and a maximum of 10 historical log les to be maintained.
By default, one historical log le is maintained.
Upload log to
network
Uploads the View Persona Management log le to the specied network share when the user logs o.
When this seing is enabled, specify the network share path. The network share path must be a UNC
path. View Persona Management does not create the network share.
By default, the log le is not uploaded to the network share.
Chapter 17 Configuring User Profiles with View Persona Management
VMware, Inc. 289
Setting Up Desktop and Application Pools in View
290 VMware, Inc.

Troubleshooting Machines and
Desktop Pools 18
You can use a variety of procedures to diagnose and x problems that you encounter when you create and
use machines and desktop pools.
Users might experience diculty when they use Horizon Client to access desktops and applications. You
can use troubleshooting procedures to investigate the causes of such problems and aempt to correct them
yourself, or you can obtain assistance from VMware Technical Support.
This chapter includes the following topics:
n“Display Problem Machines,” on page 291
n“Send Messages to Desktop Users,” on page 292
n“Troubleshooting Desktop Pool Creation Problems,” on page 292
n“Troubleshooting Network Connection Problems,” on page 302
n“Troubleshooting USB Redirection Problems,” on page 305
n“Manage Machines and Policies for Unentitled Users,” on page 307
n“Resolving Database Inconsistencies with the ViewDbChk Command,” on page 307
n“Further Troubleshooting Information,” on page 310
Display Problem Machines
You can display a list of the machines whose operation View has detected as being suspect.
View Administrator displays machines that exhibit the following problems:
nAre powered on, but which are not responding.
nRemain in the provisioning state for a long time.
nAre ready, but which report that they are not accepting connections.
nAppear to be missing from a vCenter Server.
nHave active logins on the console, logins by users who are not entitled, or logins not made via a View
Connection Server instance.
Procedure
1 In View Administrator, select Resources > Machines.
2 On the vCenter VMs tab, click Problem Machines.
VMware, Inc. 291
What to do next
The action that you should take depends on the problem that View Administrator reports for a machine.
nIf a linked-clone machine is in an error state, the View automatic recovery mechanism aempts to
power on, or shut down and restart, the linked clone. If repeated recovery aempts fail, the linked clone
is deleted. In certain situations, a linked clone might be repeatedly deleted and recreated. See
“Troubleshooting Machines That Are Repeatedly Deleted and Recreated,” on page 297.
nIf a machine is powered on, but does not respond, restart its virtual machine. If the machine still does
not respond, verify that the version of the View Agent is supported for the machine operating system.
You can use the vdmadmin command with the -A option to display the View Agent version. For more
information, see the View Administration document.
nIf a machine remains in the provisioning state for a long time, delete its virtual machine, and clone it
again. Verify that there is sucient disk space to provision the machine. See “Virtual Machines Are
Stuck in the Provisioning State,” on page 295.
nIf a machine reports that it is ready, but does not accept connections, check the rewall conguration to
make sure that the display protocol (RDP or PCoIP) is not blocked. See “Connection Problems Between
Machines and View Connection Server Instances,” on page 302.
nIf a machine appears to be missing from a vCenter Server, verify whether its virtual machine is
congured on the expected vCenter Server, or if it has been moved to another vCenter Server.
nIf a machine has an active login, but this is not on the console, the session must be remote. If you cannot
contact the logged-in users, you might need to restart the virtual machine to forcibly log out the users.
Send Messages to Desktop Users
You might sometimes need to send messages to users who are currently logged into desktops. For example,
if you need to perform maintenance on machine, you can ask the users to log out temporarily, or warn them
of a future interruption of service. You can send a message to multiple users.
Procedure
1 In View Administrator, click Catalog > Desktop Pools.
2 Double-click a pool and click the Sessions tab.
3 Select one or more machines and click Send Message.
4 Type the message, select the message type, and click OK.
A message type can be Info, Warning, or Error.
The message is sent to all selected machines in active sessions.
Troubleshooting Desktop Pool Creation Problems
You can use several procedures for diagnosing and xing problems with the creation of desktop pools.
Pool Creation Fails if Customization Specifications Cannot Be Found
If you try to create a desktop pool, the operation fails if the customization specications cannot be found.
Problem
You cannot create a desktop pool, and you see the following message in the event database.
Provisioning error occurred for Machine Machine_Name: Customization failed for Machine
Setting Up Desktop and Application Pools in View
292 VMware, Inc.
Cause
The most likely cause of this problem is that you have insucient permissions to access the customization
specications, or to create a pool. Another possible cause is that the customization specication has been
renamed or deleted.
Solution
nVerify that you have sucient permissions to access the customization specications, and to create a
pool.
nIf the customization specication no longer exists because it has been renamed or deleted, choose a
dierent specication.
Pool Creation Fails Because of a Permissions Problem
You cannot create a desktop pool if there is a permissions problem with an ESX/ESXi host, ESX/ESXi cluster,
or datacenter.
Problem
You cannot create a desktop pool in View Administrator because the templates, ESX/ESXi host, ESX/ESXi
cluster, or datacenter are not accessible.
Cause
This problem has a number of possible causes.
nYou do not have the correct permissions to create a pool.
nYou do not have the correct permissions to access the templates.
nYou do not have the correct permissions to access the ESX/ESXi host, ESX/ESXi cluster, or datacenter.
Solution
nIf the Template Selection screen does not show any available templates, verify that you have sucient
permissions to access the templates.
nVerify that you have sucient permissions to access the ESX/ESXi host, ESX/ESXi cluster, or datacenter.
nVerify that you have sucient permissions to create a pool.
Pool Provisioning Fails Due to a Configuration Problem
If a template is not available or a virtual machine image has been moved or deleted, provisioning of a
desktop pool can fail.
Problem
A desktop pool is not provisioned, and you see the following message in the event database.
Provisioning error occurred on Pool Desktop_ID because of a configuration problem
Cause
This problem has a number of possible causes.
nA template is not accessible.
nThe name of a template has been changed in vCenter.
nA template has been moved to a dierent folder in vCenter.
nA virtual machine image has been moved between ESX/ESXi hosts, or it has been deleted.
Chapter 18 Troubleshooting Machines and Desktop Pools
VMware, Inc. 293
Solution
nVerify that the template is accessible.
nVerify that the correct name and folder are specied for the template.
nIf a virtual machine image has been moved between ESX/ESXi hosts, move the virtual machine to the
correct vCenter folder.
nIf a virtual machine image has been deleted, delete the entry for the virtual machine in View
Administrator and recreate or restore the image.
Pool Provisioning Fails Due to a View Connection Server Instance Being Unable
to Connect to vCenter
If a Connection Server is not able to connect to vCenter, provisioning of a desktop pool can fail.
Problem
Provisioning of a desktop pool fails, and you see one of the following error messages in the event database.
nCannot log in to vCenter at address VC_Address
nThe status of vCenter at address VC_Address is unknown
Cause
The View Connection Server instance cannot connect to vCenter for one of the following reasons.
nThe Web service on the vCenter Server has stopped.
nThere are networking problems between the View Connection Server host and the vCenter Server.
nThe port numbers and login details for vCenter or View Composer have changed.
Solution
nVerify that the Web service is running on the vCenter.
nVerify that there are no network problems between the View Connection Server host and the vCenter.
nIn View Administrator, verify the port numbers and login details that are congured for vCenter and
View Composer.
Pool Provisioning Fails Due to Datastore Problems
If a datastore is out of disk space, or you do not have permission to access the datastore, provisioning of a
desktop pool can fail.
Problem
Provisioning of a desktop pool fails, and you see one of the following error messages in the event database.
nProvisioning error occurred for Machine Machine_Name: Cloning failed for Machine
nProvisioning error occurred on Pool Desktop_ID because available free disk space is reserved
for linked clones
nProvisioning error occurred on Pool Desktop_ID because of a resource problem
Cause
You do not have permission to access the selected datastore, or the datastore being used for the pool is out of
disk space.
Setting Up Desktop and Application Pools in View
294 VMware, Inc.
Solution
nVerify that you have sucient permissions to access the selected datastore.
nVerify whether the disk on which the datastore is congured is full.
nIf the disk is full or the space is reserved, free up space on the disk, rebalance the available datastores, or
migrate the datastore to a larger disk.
Pool Provisioning Fails Due to vCenter Server Being Overloaded
If vCenter Server is overloaded with requests, provisioning of a desktop pool can fail.
Problem
Provisioning of a desktop pool fails, and you see the following error message in the event database.
Provisioning error occurred on Pool Desktop_ID because of a timeout while customizing
Cause
vCenter is overloaded with requests.
Solution
nIn View Administrator, reduce the maximum number of concurrent provisioning and power operations
for vCenter Server.
nCongure additional vCenter Server instances.
For more information about conguring vCenter Server, see the View Installation document.
Virtual Machines Are Stuck in the Provisioning State
After being cloned, virtual machines are stuck in the Provisioning state.
Problem
Virtual machines are stuck in the Provisioning state.
Cause
The most likely cause of this problem is that you restarted the View Connection Server instance during a
cloning operation.
Solution
uDelete the virtual machines and clone them again.
Virtual Machines Are Stuck in the Customizing State
After being cloned, virtual machines are stuck in the Customizing state.
Problem
Virtual machines are stuck in the Customizing state.
Cause
The most likely cause of this problem is that there is not enough disk space to start the virtual machine. A
virtual machine must start before customization can take place.
Solution
nDelete the virtual machine to recover from a stuck customization.
nIf the disk is full, free up space on the disk or migrate the datastore to a larger disk.
Chapter 18 Troubleshooting Machines and Desktop Pools
VMware, Inc. 295

Removing Orphaned or Deleted Linked Clones
Under certain conditions, linked-clone data in View, View Composer, and vCenter Server might get out of
synchronization, and you might be unable to provision or delete linked-clone machines.
Problem
nYou cannot provision a linked-clone desktop pool.
nProvisioning linked-clone machines fails, and the following error occurs: Virtual machine with Input
Specification already exists
nIn View Administrator, linked-clone machines are stuck in a Deleting state. You cannot restart the
Delete command in View Administrator because the machines are already in the Deleting state.
Cause
This issue occurs if the View Composer database contains information about linked clones that is
inconsistent with the information in View LDAP, Active Directory, or vCenter Server. Several situations can
cause this inconsistency:
nThe linked-clone virtual machine name is changed manually in vCenter Server after the pool was
created, causing View Composer and vCenter Server refer to the same virtual machine with dierent
names.
nA storage failure or manual operation causes the virtual machine to be deleted from vCenter Server.
The linked-clone virtual machine data still exists in the View Composer database, View LDAP, and
Active Directory.
nWhile a pool is being deleted from View Administrator, a networking or other failure leaves the virtual
machine in vCenter Server.
Solution
If the virtual machine name was renamed in vSphere Client after the desktop pool was provisioned, try
renaming the virtual machine to the name that was used when it was deployed in View.
If other database information is inconsistent, use the SviConfig RemoveSviClone command to remove these
items:
nThe linked clone database entries from the View Composer database
nThe linked clone machine account from Active Directory
nThe linked clone virtual machine from vCenter Server
The SviConfig utility is located with the View Composer application. The default path is C:\Program Files
(x86)\VMware\VMware View Composer\sviconfig.exe.
I Only experienced View Composer administrators should use the SviConfig utility. This utility
is intended to resolve issues relating to the View Composer service.
Take these steps:
1 Verify that the View Composer service is running.
Setting Up Desktop and Application Pools in View
296 VMware, Inc.
2 From a Windows command prompt on the View Composer computer, run the SviConfig
RemoveSviClone command in the following form:
sviconfig -operation=removesviclone
-VmName=virtual machine name
[-AdminUser=local administrator username]
-AdminPassword=local administrator password
[-ServerUrl=View Composer server URL]
For example:
sviconfig -operation=removesviclone -vmname=MyLinkedClone
-adminuser=Admin -adminpassword=Pass -serverurl=ViewComposerURL
The VmName and AdminPassword parameters are required. The default value of the AdminUser parameter is
Administrator. The default value of the ServerURL parameter is https://localhost:
18443/SviService/v2_0
For more information about removing virtual machine information from View LDAP, see VMware
Knowledge Base article 2015112: Manually deleting linked clones or stale virtual desktop entries from VMware
View Manager 4.5 and later.
Troubleshooting Machines That Are Repeatedly Deleted and Recreated
View can repeatedly delete and recreate linked-clone and full-clone machines that are in an Error state.
Problem
A linked-clone or full-clone machine is created in an Error state, deleted, and recreated in an Error state.
This cycle keeps repeating.
Cause
When a large desktop pool is provisioned, one or more virtual machines might end up in an Error state. The
View automatic recovery mechanism aempts to power on the failed virtual machine. If the virtual machine
does not power on after a certain number of aempts, View deletes the virtual machine.
Following the pool size requirements, View creates a new virtual machine, often with the same machine
name as the original machine. If the new virtual machine is provisioned with the same error, that virtual
machine is deleted, and the cycle repeats.
Automatic recovery is performed on linked-clone and full-clone machines.
If automatic recovery aempts fail for a virtual machine, View deletes the virtual machine only if it is a
oating machine or a dedicated machine that is not assigned to a user. Also, View does not delete virtual
machines when pool provisioning is disabled.
Solution
Examine the parent virtual machine or template that was used to create the desktop pool. Check for errors in
the virtual machine or guest operating system that might cause the error in the virtual machine.
For linked clones, resolve errors in the parent virtual machine and take a new snapshot.
nIf many machines are in an Error state, use the new snapshot or template to recreate the pool.
nIf most machines are healthy, select the desktop pool in View Administrator, click Edit, select the
vCenter Seings tab, select the new snapshot as a default base image, and save your edits.
New linked-clone machines are created using the new snapshot.
For full clones, resolve errors in the virtual machine, generate a new template, and recreate the pool.
Chapter 18 Troubleshooting Machines and Desktop Pools
VMware, Inc. 297
Troubleshooting QuickPrep Customization Problems
A View Composer QuickPrep customization script can fail for a variety of reasons.
Problem
A QuickPrep post-synchronization or power-o script does not execute. In some cases, a script might
complete successfully on some linked clones, but fail on others.
Cause
A few common causes exist for QuickPrep script failures:
nThe script times out
nThe script path refers to a script that requires an interpreter
nThe account under which the script runs does not have sucient permission to execute a script task
Solution
nExamine the customization script log.
QuickPrep customization information is wrien to a log le in Windows temp directory:
C:\Windows\Temp\vmware-viewcomposer-ga-new.log
nDetermine if the script timed out.
View Composer terminates a customization script that takes longer than 20 seconds. The log le
displays a message showing that the script has started and a later message indicating the timeout:
2010-02-21 21:05:47,687 [1500] INFO Ready -
[Ready.cpp, 102] Running the PostSync script: cmd /c
C:\temp\build\composer.bat
2010-02-21 21:06:07,348 [1500] FATAL Guest -
[Guest.cpp, 428] script cmd /c
C:\temp\build\composer.bat timed out
To solve a timeout problem, increase the timeout limit for the script and run it again.
nDetermine if the script path is valid.
If you use a scripting language that needs an interpreter to execute the script, the script path must start
with the interpreter binary.
For example, if you specify the path C:\script\myvb.vbs as a QuickPrep customization script, View
Composer Agent cannot execute the script. You must specify a path that starts with the interpreter
binary path:
C:\windows\system32\cscript.exe c:\script\myvb.vbs
nDetermine if the account under which the script runs has appropriate permissions to perform script
tasks.
QuickPrep runs the scripts under the account under which the VMware View Composer Guest Agent
Server service is congured to run. By default, this account is Local System.
Do not change this log on account. If you do, the linked clones do not start.
Setting Up Desktop and Application Pools in View
298 VMware, Inc.

Finding and Unprotecting Unused View Composer Replicas
Under certain conditions, View Composer replicas might remain in vCenter Server when they no longer
have any linked clones associated with them.
Problem
An unused replica remains in a vCenter Server folder. You are unable to remove the replica by using
vSphere Client.
Cause
Network outages during View Composer operations, or removing the associated linked clones directly from
vSphere without using the proper View commands, might leave an unused replica in vCenter Server.
Replicas are protected entities in vCenter Server. They cannot be removed by ordinary vCenter Server or
vSphere Client management commands.
Solution
Use the SviConfig FindUnusedReplica command to nd the replica in a specied folder. You can use the -
Move parameter to move the replica to another folder. The -Move parameter unprotects an unused replica
before moving it.
I Only experienced View Composer administrators should use the SviConfig utility. This utility
is intended to resolve issues relating to the View Composer service.
The SviConfig utility is located with the View Composer application. The default path is C:\Program Files
(x86)\VMware\VMware View Composer\sviconfig.exe.
Before you begin, verify that no linked clones are associated with the replica.
Familiarize yourself with the SviConfig FindUnusedReplica parameters:
nDsnName. The DSN that must be used to connect to the database.
nUserName. The user name used to connect to the database. If this parameter is not specied, Windows
authentication is used.
nPassword. The password for the user that connects to the database. If this parameter is not specied and
Windows authentication is not used, you are prompted to enter the password later.
nReplicaFolder. The name of the replica folder. Use an empty string for the root folder. The default value
is VMwareViewComposerReplicaFolder.
nUnusedReplicaFolder. The name of the folder to contain all unused replicas. The default value is
UnusedViewComposerReplicaFolder. Use this parameter to specify the destination folder when you use
the Move parameter.
nOutputDir. The name of the output directory in which the list of unused replicas, stored in the unused-
replica-*.txt le, is generated. The default value is the current working directory.
nMove. Determines whether to unprotect unused replica virtual machines and move them to a specied
folder. The UnusedReplicaFolder parameter species the destination folder. The default value of the
Move parameter is false.
The DsnName, Username, and Password parameters are required. The DsnName cannot be an empty string.
Take these steps:
1 Stop the View Composer service.
Chapter 18 Troubleshooting Machines and Desktop Pools
VMware, Inc. 299

2 From a Windows command prompt on the View Composer computer, run the SviConfig
FindUnusedReplica command in the following form:
sviconfig -operation=findunusedreplica
-DsnName=name of the DSN
-Username=Database administrator username
-Password=Database administrator password
[-ReplicaFolder=Replica folder name]
[-UnusedReplicaFolder=Unused replica folder name.]
[-OutputDir=Output file directory]
[-Move=true or false]
For example:
sviconfig -operation=FindUnusedReplica -DsnName=SVI
-Username=SVIUser -Password=1234 -Move=True
3 Restart the View Composer service.
4 (Optional) After the replica is moved to the new folder, remove the replica virtual machine from
vCenter Server.
View Composer Provisioning Errors
If an error occurs when View Composer provisions or recomposes linked-clone machines, an error code
indicates the cause of the failure. The error code appears in the machine-status column in View
Administrator.
Table 18-1 describes the View Composer provisioning error codes.
This table lists errors that are associated with View Composer and QuickPrep customization. Additional
errors can occur in View Connection Server and other View components that can interfere with machine
provisioning.
Table 18‑1. View Composer Provisioning Errors
Error Description
0 The policy was applied successfully.
N Result code 0 does not appear in View Administrator. The linked-clone machine proceeds to a
Ready state, unless a View error outside the domain of View Composer occurs. This result code is
included for completeness.
1 Failed to set the computer name.
2 Failed to redirect the user proles to the View Composer persistent disk.
3 Failed to set the computer's domain account password.
4 Failed to back up a user's prole keys. The next time the user logs in to this linked-clone machine after the
recompose operation, the OS creates a new prole directory for the user. As a new prole is created, the
user cannot not see the old prole data.
5 Failed to restore a user's prole. The user should not log in to the machine in this state because the prole
state is undened.
Setting Up Desktop and Application Pools in View
300 VMware, Inc.

Table 18‑1. View Composer Provisioning Errors (Continued)
Error Description
6 Errors not covered by other error codes. The View Composer agent log les in the guest OS can provide
more information about the causes of these errors.
For example, a Windows Plug and Play (PnP) timeout can generate this error code. In this situation, View
Composer times out after waiting for the PnP service to install new volumes for the linked-clone virtual
machine.
PnP mounts up to three disks, depending on how the pool was congured:
nView Composer persistent disk
nNonpersistent disk for redirecting guest OS temp and paging les
nInternal disk that stores QuickPrep conguration and other OS-related data. This disk is always
congured with a linked clone.
The timeout length is 10 minutes. If PnP does not nish mounting the disks within 10 minutes, View
Composer fails with error code 6.
7 Too many View Composer persistent disks are aached to the linked clone. A clone can have at most
three View Composer persistent disks.
8 A persistent disk could not be mounted on the datastore that was selected when the pool was created.
9 View Composer could not redirect disposable-data les to the nonpersistent disk. Either the paging le or
the temp-les folders were not redirected.
10 View Composer cannot nd the QuickPrep conguration policy le on the specied internal disk.
12 View Composer cannot nd the internal disk that contains the QuickPrep conguration policy le and
other OS-related data.
13 More than one persistent disk is congured to redirect the Windows user prole.
14 View Composer failed to unmount the internal disk.
15 The computer name that View Composer read from conguration-policy le does not match the current
system name after the linked clone is initially powered on.
16 The View Composer agent did not start because the volume license for the guest OS was not activated.
17 The View Composer agent did not start. The agent timed out while waiting for Sysprep to start.
18 The View Composer agent failed to join the linked-clone virtual machine to a domain during
customization.
19 The View Composer agent failed to execute a post-synchronization script.
20 The View Composer agent failed to handle a machine password synchronization event.
This error might be transient. If the linked clone joins the domain, the password is ne.
If the clone fails to join the domain, restart the operation you performed before the error occurred. If you
restarted the clone, restart it again. If you refreshed the clone, refresh it again. If the clone still fails to join
the domain, recompose the clone.
21 The View Composer agent failed to mount the system disposable disk.
22 The View Composer agent failed to mount the View Composer persistent disk.
Chapter 18 Troubleshooting Machines and Desktop Pools
VMware, Inc. 301
Troubleshooting Network Connection Problems
You can use a variety of procedures for diagnosing and xing problems with network connections with
machines, Horizon Client devices, and View Connection Server instances.
Connection Problems Between Machines and View Connection Server
Instances
You might experience connection problems between machines and View Connection Server instances.
Problem
If connectivity between a machine and a View Connection Server instance fails, you see one of the following
messages in the event database.
nProvisioning error occurred for Machine Machine_Name: Customization error due to no network
communication between the View agent and Connection Server
nProvisioning error occurred on Pool Desktop_ID because of a networking problem with a View
Agent
nUnable to launch from Pool Desktop_ID for user User_Display_Name: Failed to connect to
Machine MachineName using Protocol
Cause
The connectivity problems between a machine and a View Connection Server instance can occur for
dierent reasons.
nLookup failure on the machine for the DNS name of the View Connection Server host.
nThe ports for JMS, RDP, or AJP13 communication being blocked by rewall rules.
nThe failure of the JMS router on the View Connection Server host.
Solution
nAt a command prompt on the machine, type the nslookup command.
nslookup CS_FQDN
CS_FQDN is the fully qualied domain name (FQDN) of the View Connection Server host. If the
command fails to return the IP address of the View Connection Server host, apply general network
troubleshooting techniques to correct the DNS conguration.
nAt a command prompt on the machine, verify that TCP port 4001, which View Agent uses to establish
JMS communication with the View Connection Server host, is working by typing the telnet command.
telnet CS_FQDN 4001
If the telnet connection is established, network connectivity for JMS is working.
nIf a security server is deployed in the DMZ, verify that exception rules are congured in the inner
rewall to allow RDP connectivity between the security server and virtual machines on TCP port 3389.
nIf secure connections are bypassed, verify that the rewall rules allow a client to establish either a direct
RDP connection to the virtual machine on TCP port 3389, or a direct PCoIP connection to the virtual
machine on TCP port 4172 and UDP port 4172.
nVerify that exception rules are congured in the inner rewall to allow connections between each
Security Server and its associated View Connection Server host on TCP port 4001 (JMS) and TCP port
8009 (AJP13).
Setting Up Desktop and Application Pools in View
302 VMware, Inc.

Connection Problems Between Horizon Client and the PCoIP Secure Gateway
You might experience connection problems between Horizon Client and a security server or View
Connection Server host when the PCoIP Secure Gateway is congured to authenticate external users that
communicate over PCoIP.
Problem
Clients that use PCoIP cannot connect to or display View desktops. The initial login to a security server or
View Connection Server instance succeeds, but the connection fails when the user selects a View desktop.
This issue occurs when the PCoIP Secure Gateway is congured on a security server or View Connection
Server host.
N Typically, the PCoIP Secure Gateway is leveraged on a security server. In a network conguration in
which external clients connect directly to a View Connection Server host, the PCoIP Secure Gateway can also
be congured on View Connection Server.
Cause
Problems connecting to the PCoIP Secure Gateway can occur for dierent reasons.
nWindows Firewall has closed a port that is required for the PCoIP Secure Gateway.
nThe PCoIP Secure Gateway is not enabled on the security server or View Connection Server instance.
nThe PCoIP External URL seing is congured incorrectly. You must specify this seing as the external
IP address that clients can access over the Internet.
nThe PCoIP External URL, secure tunnel External URL, Blast External URL, or another address is
congured to point to a dierent security server or View Connection Server host. When you congure
these addresses on a security server or View Connection Server host, all addresses must allow client
systems to reach the current host.
nThe client is connecting through an external web proxy that has closed a port required for the PCoIP
Secure Gateway. For example, a web proxy in a hotel network or public wireless connection might block
the required ports.
nThe View Connection Server instance that is paired with the security server on which the PCoIP Secure
Gateway is congured is version View 4.5 or earlier. The security server and paired View Connection
Server instance must be View 4.6 or later.
Solution
nCheck that the following network ports are opened on the rewall for the security server or View
Connection Server host.
Port Description
TCP 4172 From Horizon Client to the security server or View Connection Server host.
UDP 4172 Between Horizon Client and the security server or View Connection Server host, in both directions.
TCP 4172 From the security server or View Connection Server host to the View desktop.
UDP 4172 Between the security server or View Connection Server host and the View desktop, in both directions.
nIn View Administrator, make sure that the PCoIP Secure Gateway is enabled.
a Click View > Servers.
b Select the View Connection Server instance on the Connection Servers tab and click Edit.
Chapter 18 Troubleshooting Machines and Desktop Pools
VMware, Inc. 303
c Select Use PCoIP Secure Gateway for PCoIP connections to machine.
The PCoIP Secure Gateway is disabled by default.
d Click OK.
nIn View Administrator, make sure that the PCoIP External URL is congured correctly.
a Click View > Servers.
b Select the host to congure.
nIf your users connect to the PCoIP Secure Gateway on a security server, select the security
server on the Security Servers tab.
nIf your users connect to the PCoIP Secure Gateway on a View Connection Server instance,
select that instance on the Connection Servers tab.
c Click Edit.
d In the PCoIP External URL text box, make sure that the URL contains the external IP address for
the security server or View Connection Server host that clients can access over the Internet.
Specify port 4172. Do not include a protocol name.
For example: 10.20.30.40:4172
e Make sure that all addresses in this dialog allow client systems to reach this host.
All addresses in the Edit Security Server Seings dialog must allow client systems to reach this
security server host. All addresses in the Edit View Connection Server Seings dialog must allow
client systems to reach this View Connection Server instance.
f Click OK.
Repeat these steps for each security server and View Connection Server instance on which users connect
to the PCoIP Secure Gateway.
nIf the user is connecting through a web proxy that is outside of your network, and the proxy is blocking
a required port, direct the user to connect from a dierent network location.
Connection Problems Between Machines and View Connection Server
Instances
You might experience connection problems between machines and View Connection Server instances.
Problem
If connectivity between a machine and a View Connection Server instance fails, you see one of the following
messages in the event database.
nProvisioning error occurred for Machine Machine_Name: Customization error due to no network
communication between the View agent and Connection Server
nProvisioning error occurred on Pool Desktop_ID because of a networking problem with a View
Agent
nUnable to launch from Pool Desktop_ID for user User_Display_Name: Failed to connect to
Machine MachineName using Protocol
Cause
The connectivity problems between a machine and a View Connection Server instance can occur for
dierent reasons.
nLookup failure on the machine for the DNS name of the View Connection Server host.
Setting Up Desktop and Application Pools in View
304 VMware, Inc.
nThe ports for JMS, RDP, or AJP13 communication being blocked by rewall rules.
nThe failure of the JMS router on the View Connection Server host.
Solution
nAt a command prompt on the machine, type the nslookup command.
nslookup CS_FQDN
CS_FQDN is the fully qualied domain name (FQDN) of the View Connection Server host. If the
command fails to return the IP address of the View Connection Server host, apply general network
troubleshooting techniques to correct the DNS conguration.
nAt a command prompt on the machine, verify that TCP port 4001, which View Agent uses to establish
JMS communication with the View Connection Server host, is working by typing the telnet command.
telnet CS_FQDN 4001
If the telnet connection is established, network connectivity for JMS is working.
nIf a security server is deployed in the DMZ, verify that exception rules are congured in the inner
rewall to allow RDP connectivity between the security server and virtual machines on TCP port 3389.
nIf secure connections are bypassed, verify that the rewall rules allow a client to establish either a direct
RDP connection to the virtual machine on TCP port 3389, or a direct PCoIP connection to the virtual
machine on TCP port 4172 and UDP port 4172.
nVerify that exception rules are congured in the inner rewall to allow connections between each
Security Server and its associated View Connection Server host on TCP port 4001 (JMS) and TCP port
8009 (AJP13).
Connection Problems Due to Incorrect Assignment of IP Addresses to Cloned
Machines
You might not be able to connect to cloned machines if they have static IP addresses.
Problem
You cannot use Horizon Client to connect to cloned machines.
Cause
Cloned machines are incorrectly congured to use a static IP address instead of using DHCP to obtain their
IP addresses.
Solution
1 Verify that the template for a desktop pool on vCenter Server is congured to use DHCP to assign IP
addresses to machines.
2 In the vSphere Web Client, clone one virtual machine manually from the desktop pool and verify that it
obtains its IP address from DHCP correctly.
Troubleshooting USB Redirection Problems
Various problems can arise with USB redirection in Horizon Client.
Problem
USB redirection in Horizon Client fails to make local devices available on the remote desktop, or some
devices do not appear to be available for redirection in Horizon Client.
Chapter 18 Troubleshooting Machines and Desktop Pools
VMware, Inc. 305
Cause
The following are possible causes for USB redirection failing to function correctly or as expected.
nThe device is a composite USB device and one of the devices it includes is blocked by default. For
example, a dictation device that includes a mouse is blocked by default because mouse devices are
blocked by default. To work around this problem, see “Conguring Device Spliing Policy Seings for
Composite USB Devices,” on page 196.
nUSB redirection is not supported on Windows Server 2008 RDS hosts that deploy remote desktops and
applications. USB redirection is supported on Windows Server 2008 R2 systems that are used as single-
user desktops.
nOnly USB ash drives and hard disks are supported on RDS desktops and applications. You cannot
redirect other types of USB devices, and other types of USB storage devices such as security storage
drives and USB CD-ROM, to an RDS desktop or application.
nWebcams are not supported for redirection.
nThe redirection of USB audio devices depends on the state of the network and is not reliable. Some
devices require a high data throughput even when they are idle.
nUSB redirection is not supported for boot devices. If you run Horizon Client on a Windows system that
boots from a USB device, and you redirect this device to the remote desktop, the local operating system
might become unresponsive or unusable. See hp://kb.vmware.com/kb/1021409.
nBy default, Horizon Client for Windows does not allow you to select keyboard, mouse, smart card and
audio-out devices for redirection. See hp://kb.vmware.com/kb/1011600.
nRDP does not support the redirection of USB HIDs for the console session, or of smart card readers. See
hp://kb.vmware.com/kb/1011600.
nWindows Mobile Device Center can prevent the redirection of USB devices for RDP sessions. See
hp://kb.vmware.com/kb/1019205.
nFor some USB HIDs, you must congure the virtual machine to update the position of the mouse
pointer. See hp://kb.vmware.com/kb/1022076.
nSome audio devices might require changes to policy seings or to registry seings. See
hp://kb.vmware.com/kb/1023868.
nNetwork latency can cause slow device interaction or cause applications to appear frozen because they
are designed to interact with local devices. Very large USB disk drives might take several minutes to
appear in Windows Explorer.
nUSB ash cards formaed with the FAT32 le system are slow to load. See
hp://kb.vmware.com/kb/1022836.
nA process or service on the local system opened the device before you connected to the remote desktop
or application.
nA redirected USB device stops working if you reconnect a desktop or application session even if the
desktop or application shows that the device is available.
nUSB redirection is disabled in View Administrator.
nMissing or disabled USB redirection drivers on the guest.
Solution
nIf available, use PCoIP instead of RDP as the protocol.
nIf a redirected device remains unavailable or stops working after a temporary disconnection, remove
the device, plug it in again, and retry the redirection.
Setting Up Desktop and Application Pools in View
306 VMware, Inc.
nIn View Administrator, go to Policies > Global Policies, and verify that USB access is set to Allow
under View Policies.
nExamine the log on the guest for entries of class ws_vhub, and the log on the client for entries of class
vmware-view-usbd.
Entries with these classes are wrien to the logs if a user is not an administrator, or if the USB
redirection drivers are not installed or are not working. For the location of these log les, see “Using
Log Files for Troubleshooting and to Determine USB Device IDs,” on page 195.
nOpen the Device Manager on the guest, expand Universal Serial Bus controllers, and reinstall the
VMware View Virtual USB Host Controller and VMware View Virtual USB Hub drivers if these drivers
are missing or re-enable them if they are disabled.
Manage Machines and Policies for Unentitled Users
You can display the machines that are allocated to users whose entitlement has been removed, and you can
also display the policies that have been applied to unentitled users.
A user who is unentitled might have left the organization permanently, or you might have suspended their
account for an extended period of time. These users are assigned a machine but they are no longer entitled
to use the machine pool.
You can also use the vdmadmin command with the -O or -P option to display unentitled machines and
policies. For more information, see the View Administration document.
Procedure
1 In View Administrator, select Resources > Machines.
2 Select More Commands > View Unentitled Machines.
3 Remove the machine assignments for unentitled users.
4 Select More Commands > View Unentitled Machines or More Commands > View Unentitled Policies
as appropriate.
5 Change or remove the policies that are applied to unentitled users.
Resolving Database Inconsistencies with the ViewDbChk Command
With the ViewDbChk command, you can resolve inconsistencies in the databases that store information about
desktop virtual machines in an automated desktop pool and RDS hosts in an automated farm.
In a View environment, information about desktop virtual machines and RDS hosts in an automated farm is
stored in three places:
nThe LDAP database
nThe View Composer database
nThe vCenter Server database
Normally, you can recover from an error that occurs during provisioning or other operations by removing or
reseing a desktop virtual machine or an RDS host using View Administrator. On rare occasions, the
information in the dierent databases about a machine that is in an error state might become inconsistent
and it is not possible to recover from the error using View Administrator. You might see one of the following
symptoms:
nProvisioning fails with the error message Virtual machine with Input Specification already exists.
nRecomposing a desktop pool fails with the error message Desktop Composer Fault: Virtual Machine
with Input Specification already exists.
Chapter 18 Troubleshooting Machines and Desktop Pools
VMware, Inc. 307

nView Administrator shows that a desktop machine or an RDS host is stuck in a deleting state.
nYou cannot delete a desktop pool or an automated farm.
nYou cannot delete a desktop machine or an RDS host.
nIn View Administrator's Inventory tab, the status of a desktop machine or an RDS host is missing.
In situations where database inconsistencies cause a desktop machine or an RDS host to be in an
unrecoverable error state or prevent a View Administrator task from completing successfully, you can use
the ViewDbChk command to resolve the inconsistencies. The ViewDbChk command has the following
characteristics:
nViewDbChk is automatically installed when you install View Standard Server or View Replica Server. The
utility is not installed when you install View Security Server.
nViewDbChk is a command that you can run from the Windows Command Prompt or from a script.
nViewDbChk supports automated farms and automated desktop pools of full virtual machines as well as
View Composer linked clones.
nWhen you want to remove a machine, ViewDbChk performs a health check on the machine and prompts
you for additional conrmation if the machine looks healthy.
nViewDbChk can delete erroneous or incomplete LDAP entries.
nViewDbChk supports input and output using I18N character sets.
nViewDbChk does not remove user data. For a full desktop virtual machine, ViewDbChk removes the virtual
machine from inventory but does not delete it from disk. For a linked-clone desktop virtual machine,
ViewDbChk deletes the virtual machine and archives the user disks to the root folder in the case of VMFS
datastores or to a sub-folder named archiveUDD in the case of Virtual SAN and Virtual Volumes
datastores.
nViewDbChk does not support unmanaged desktop machines or RDS hosts in a manual farm.
ViewDbChk Syntax
ViewDbChk --findDesktop --desktopName <desktop pool or farm name> [--verbose]
ViewDbChk --enableDesktop --desktopName <desktop pool or farm name> [--verbose]
ViewDbChk --disableDesktop --desktopName <desktop pool or farm name> [--verbose]
ViewDbChk --findMachine --desktopName <desktop pool or farm name> --machineName <machine name>
[--verbose]
ViewDbChk --removeMachine --machineName <machine name> [--desktopName <desktop pool or farm
name>] [--force] [--noErrorCheck] [--verbose]
ViewDbChk --scanMachines [--desktopName <desktop pool or farm name>] [--limit <maximum deletes>]
[--force] [--verbose]
ViewDbChk --help [--commandName] [--verbose]
ViewDbChk Parameters
Parameter Description
--ndDesktop Finds a desktop pool or farm.
--enableDesktop Enables a desktop pool or farm.
Setting Up Desktop and Application Pools in View
308 VMware, Inc.

Parameter Description
--disableDesktop Disables a desktop pool or farm.
--ndMachine Finds a machine.
--removeMachine Removes a machine from a desktop pool or farm. Before removing a machine,
ViewDbChk prompts the user to disable the desktop pool or farm. After removing the
machine, ViewDbChk prompts the user to re-enable the desktop pool or farm.
--scanMachines Searches for machines that are in an error or cloneerror state or have missing virtual
machines, lists the problem machines grouped by desktop pool or farm, and gives the
option to remove the machines. Before removing a machine, ViewDbChk prompts the
user to disable the desktop pool or farm. After removing all erroneous machines in a
desktop pool or farm, ViewDbChk prompts the user to re-enable the desktop pool or
farm.
--help Displays the syntax of ViewDbChk.
--desktopName <desktop
name>
Species the desktop pool or farm name.
--machineName <machine
name>
Species the machine name.
--limit <maximum deletes> Limits the number of machines that ViewDbChk can remove. The default is 1.
--force Forces machine removal without user conrmation.
--noErrorCheck Forces the removal of machines that have no errors.
--verbose Enables verbose logging.
N All the parameter names are case-sensitive.
ViewDbChk Usage Example
A desktop machine named lc-pool2-2 is in an error state and we cannot remove it using View Administrator.
We use ViewDbChk to remove it from the View environment.
C:\>viewdbchk --removeMachine --machineName lc-pool2-2
Looking for desktop pool "lc-pool2" in LDAP...
Desktop Pool Name: lc-pool2
Desktop Pool Type: AUTO_LC_TYPE
VM Folder: /vdi/vm/lc-pool2/
Desktop Pool Disabled: false
Desktop Pool Provisioning Enabled: true
Looking for machine "/vdi/vm/lc-pool2/lc-pool2-2" in vCenter...
Connecting to vCenter "https://10.133.17.3:443/sdk". This may take some time...
Checking connectivity...
Connecting to View Composer "https://10.133.17.3:18443". This may take some time...
The desktop pool "lc-pool2" must be disabled before proceeding. Do you want to disable the
desktop pool? (yes/no):yes
Found machine "lc-pool2-2"
VM Name: lc-pool2-2
Creation Date: 1/25/15 1:20:26 PM PST
MOID: vm-236
Clone Id: b12a9ed2-8535-44ee-a9d6-6c9b5cf6f878
VM Folder: /vdi/vm/lc-pool2/lc-pool2-2
VM State: ERROR
Do you want to remove the desktop machine "lc-pool2-2"? (yes/no):yes
Shutting down VM "/vdi/vm/lc-pool2/lc-pool2-2"...
Archiving persistent disks...
Destroying View Composer clone "b12a9ed2-8535-44ee-a9d6-6c9b5cf6f878"...
Chapter 18 Troubleshooting Machines and Desktop Pools
VMware, Inc. 309
Removing ThinApp entitlements for machine "/vdi/vm/lc-pool2/lc-pool2-2"...
Removing machine "/vdi/vm/lc-pool2/lc-pool2-2" from LDAP...
Running delete VM scripts for machine "/vdi/vm/lc-pool2/lc-pool2-2"...
Do you want to enable the desktop pool "lc-pool2"? (yes/no):yes
Further Troubleshooting Information
You can nd further troubleshooting information in VMware Knowledge Base articles.
The VMware Knowledge Base (KB) is continually updated with new troubleshooting information for
VMware products.
For more information about troubleshooting View, see the KB articles that are available on the VMware KB
Web site:
hp://kb.vmware.com/selfservice/microsites/microsite.do
Setting Up Desktop and Application Pools in View
310 VMware, Inc.
Index
Numerics
3D renderer, configuring 136, 138, 140
A
access permissions, shared folders for Persona
Management 271
Active Directory, using existing computer
accounts for linked clones 78
ADM Template file
adding to a local system 275
adding to Active Directory 276
installing 274
ADM template file
Real-Time Audio-Video 171
scanner redirection 176
serial port redirection 182
ADM template files
PCoIP Session Variables 237
PCoIP session bandwidth settings 245
View components 230
View Agent Configuration 232
where to find 231
ADMX files, adding to Active Directory 248
Adobe Flash
quality modes 130
throttling modes 130
Adobe Flash Throttling Throttling, RDS desktop
pools 117
Adobe Flash URL redirection, system
requirements 157
Always on policy 131
application compatibility, RDS group policy
settings 249
application pools
advantages 14
creating 111, 112
introduction 9
worksheet for creating 112
application sessions, time zone redirection 94
applications, enable Windows basic theme 94
automated desktop pools
adding machines manually 124
assigning multiple network labels 145
cloning 58, 71
creating 53, 57
customizing machines in maintenance
mode 126
deploying large pools 144
desktop settings 59, 127
machine-naming example 123
maintenance mode 125, 126
naming machines manually 120, 121
power policies 133–135
using a machine-naming pattern 120
worksheet for creating 53
automated farm creation, storing swap files 100
automated farms, preparing a parent virtual
machine 100
automatic Windows updates, disabling 42
B
bandwidth, Real-Time Audio-Video 173
base image for virtual desktops 207, 212
best practices, View Persona Management 279
blackout times
for disk space reclamation 226
for View Storage Accelerator 226
C
CBRC, configuring for desktop pools 222
client devices, setting up for Flash URL
Redirection 159
client drive redirection, managing access 188
client session policies
configuring global 228
configuring pool-level 228
configuring user-level 228
defined 227
general 229
inheritance 227
client systems, passing information to
desktops 234
cluster, more than eight hosts 144
COM ports, redirecting serial 179
command scripts, running on desktops 237
CommandsToRunOnConnect group policy
setting 237
composite USB devices 196
connection issues
between Horizon Client and the PCoIP Secure
Gateway 303
between machines and View Connection
Server 302, 304
linked-clone machines with static IP
addresses 305
VMware, Inc. 311
connection ticket timeout 232
connections, troubleshooting 302
custom setup options
installing View Agent on an RDS host 92
View Agent 17, 28
customization specifications
creating 52
recomposing linked-clone machines 77
customization scripts
increasing QuickPrep timeout limits 50
using QuickPrep for linked-clone machines 75
customizing machines, maintenance mode 125
D
datastores
local storage 220
sizing linked-clone pools 213
storage sizing table 214
storing linked clones and replicas 221, 222
dedicated-assignment desktop pools 10, 212
dedicated-assignment pools
choosing a user assignment type 119
maintenance mode 126
defragmentation, disabling on linked clones 41
delta disks, storage overcommit 217
Desktop Experience feature
install on Windows Server 2008 R2 25, 90
install on Windows Server 2012 or 2012
R2 26, 90
desktop pool managementdesktop pool
management, reclaiming disk
space 223
desktop pool creation
choosing a user assignment type 119
customizing in maintenance mode 126
deploying large pools 144
machine-naming example 123
on more than 8 hosts 144
provisioning options 119
with Persona Management 278
desktop pool troubleshooting
cloning failure 294
creation problems 292
customization failure 295
failure due to configuration problems 293
failure due to missing customization
specifications 292
failure due to permissions problems 293
failure due to vCenter being overloaded 295
free disk space problems 294
inability to connect to vCenter 294
inability to log in to vCenter 294
resource problems 294
timeout while customizing 295
vCenter status unknown 294
virtual machines stuck in Provisioning
state 295
desktop pools, introduction 9
desktop settings
automated desktop pools 59, 127
linked-clone desktops 72
manual desktop pools 127
RDS desktop pools 116, 127
desktop sources, preparing for desktop
deployment 19
desktop UI, group policy settings 288
device families 202
Diagnostic Policy Service, disabling 43
disposable file redirection, paging-file size 50
disposable-data disks, linked-clone virtual
machines 219
Do nothing policy 131
E
entitlements
adding to desktop pools 147
adding to desktop or application pools 147
removing from desktop or application
pools 148
restricting 148
reviewing 148
ESXi hosts, using more than eight in a
cluster 144
F
farms
creating 99
creating a manual farm 108
creating an automated farm 109
introduction 9
worksheet for creating a manual farm 103
worksheet for creating an automated farm 104
Favorite Applications, configuring 154
Fibre Channel SAN arrays 207
Flash URL Redirection
configuring 156
disabling 160
enabling 160
setting up clients 159
system requirements 157
verifying installation 158
floating-assignment desktop pools 10
floating-assignment pools
choosing a user assignment type 119
maintenance mode 126
folder redirection
granting domain administrator rights 287
group policy settings 285
Setting Up Desktop and Application Pools in View
312 VMware, Inc.
G
global policies, configuring 228
GPOs
creating for desktops 262
creating for View component policies 229
gpuvm utility, examining GPU resources 143
graphics, 3D renderer 136, 138, 140
GRID vGPU 138
GRID vGPU, NVIDIA 136, 140
group policies
ADM template files 231
applying to GPOs 262
examples 261
Remote Desktop Services 248
View Agent configuration 232
View components 230
group policies for desktop pools 227
group policy settings
adding RDS ADMX files 248
adding to a local system 275
adding to Active Directory 276
desktop UI settings 288
folder redirection 285
logging 288
manage user persona 283
persona repository location 283
Real-Time Audio-Video 172
roaming and synchronization 283
runonce.exe 95
scanner redirection 177
View Persona Management 282
guest operating systems
installing 22
optimizing performance 37
paging-file size 50
preparing for desktop deployment 22
GUIDs, support in View Composer 73
H
Horizon Client, connection problems to the
PCoIP Secure Gateway 303
host caching, for desktop pools 222
I
individual desktops, creating 84
installation
guest operating system 22
silent 30
silent installation options 32
standalone View Persona Management 273
View Agent 16, 27, 30
IOPS
benefits of disabling Windows 7 services 39
benefits of disabling Windows 8 services 39
IP addresses, troubleshooting for linked-cloned
machine connections 305
iSCSI SAN arrays 207
K
keyboard settings, PCoIP session variables 247
kiosk mode 13
KMS license keys, volume action on linked
clones 48, 102
Knowledge Base articles, where to find 310
knowledge workers 12
L
laptops
installing View Persona Management 266
Persona Management configuration 281
licensing, RDS group policy settings 251
linked clones 212
linked-clone desktop creation
cloning a pool 58, 71
desktop settings 72
storage sizing 213
understanding 61
using View Composer 69
worksheet for creating 61
linked-clone desktop pools 61
linked-clone desktop pool creation, storing swap
files 46
linked-clone machine creation
choosing a naming pattern 122
choosing QuickPrep or Sysprep 74
customizing 74
data disk creation 219
setting minimum ready machines 77
setting the storage overcommit level 218
storage overcommit feature 217
storage sizing table 214, 215
storing replicas and linked clones on separate
datastores 221, 222
storing swap files 49
support for unique SIDs 73
using existing AD computer accounts 78
using local datastores 220
Windows 7 volume activation 48
Windows 7volume activation 48
linked-clone machine troubleshooting
connection problems 305
deleting orphaned clones 296
provisioning error codes 300
repeated deletions 297
linked-clone RDS hosts creation, Windows
Server volume activation 102
Linux Thin clients, setting up for Flash URL
Redirection 159
Index
VMware, Inc. 313
local datastore, linked-clone swap files 46, 49,
100
location-based printing
configuring 256
group policy 256, 258, 259
registry key 256
TPVMGPoACmap.dll file 258
logging, group policy settings 288
loopback processing
benefits 230
enabling 263
LSI20320-R controllers, installing driver 22
LUNs 212
M
machine recomposition, Sysprep 77
machine settings, manual desktop pools 85
machine troubleshooting
connection issues 302, 304
displaying orphaned machines 307
displaying problem machines 291
repeated deletions 297
maintenance mode
customizing machines 126
starting machines 125, 126
manage user persona
configuring 276
group policy settings 283
manual desktop pools
configuring a single machine 84
creating 81, 83
desktop settings 127
machine settings 85
worksheet for creating 81
messages, sending to desktop users 292
MHTML Web pages, setting up for multicast 159
microphone 163, 164, 168
microphones, selecting default 162
Microsoft Feeds Synchronization
disabling on Windows 7 45
disabling on Windows 8 45
Microsoft Windows Defender
disabling in Windows 8 45
disabling in Windows 7 45
Microsoft Windows Installer, properties for View
Agent 34
migrating, user profiles 267
MMR, system requirements 186
multicast redirection
configuring 156
system requirements 157
multimedia redirection
enabling 186
managing across a network 186
network latency 187
override network latency trigger 187
system requirements 186
multiple NICs, configuring for View Agent 37
N
naming desktop pools
example 123
manually specifying names 121
naming machines
manually specifying names 120
providing a naming pattern 120
naming patterns, linked-clone machines 122
NAS arrays 207
NAS devices, native NFS snapshots 225
network connections, troubleshooting 302
network labels, configuring for a pool 145
network share
access permissions for Persona
Management 271
guidelines for creating 272
NFS datastores, clusters with more than eight
hosts 144
NVIDIA GRID vGPU 136, 138, 140
O
orphaned machines, displaying 307
OS disks
disabling Windows 7 services 39
disabling Windows 8 services 39
growth caused by Windows 7 services 39
growth caused by Windows 8 services 39
linked-clone virtual machines 219
storage overcommit 218
storage sizing formulas for editing pools 215,
216
OS_DISKpolicy profile 210
OUs, creating for remote desktops 230, 261
P
paging-file size, parent virtual machine 50
parent virtual machines
disabling hibernation 48, 102
disabling defragmentation on Windows 7 41
disabling defragmentation on Windows 8 41
disabling Windows 7 services 39
preparing for View Composer 46
parent virtual machine 212
PCoIP Agent, View Agent feature 92
PCoIP Secure Gateway, connection
problems 303
PCoIP Server, View Agent custom option 28
PCoIP session variables
build-to-lossless feature 247
general session variables 238
group policy settings 237
Setting Up Desktop and Application Pools in View
314 VMware, Inc.
keyboard settings 247
session bandwidth settings 245
PCoIP Smartcard, View Agent custom
option 17, 28
pcoip.adm, ADM template files 231
performance optimization, guest operating
system 37
persistent disks
creating 61
linked-clone desktops 219
Persona Management 281
storage sizing formulas for editing pools 215,
216
PERSISTENT_DISK policy profile 210
Persona Management
best practices 279
configuration overview 270
configuring a deployment 270
configuring and managing 265
creating desktop pools 278
enabling 276
migrating user profiles 267
setting the repository location 276
standalone installation 273
standalone laptops 281
standalone systems 266
View Agent installation option 273
View Composer persistent disks 281
Windows roaming profiles 270
with View 265
persona repository location, group policy
settings 283
physical computers
installing View Agent 16
preparing for desktop delivery 15
policies
Active Directory 229
automated pools 133
client session 227
client session inheritance 227
configuring persona management 265
displaying unentitled 307
general client session 229
global 228
pool-level 228
power 131, 133
user-level 228
pools
desktop 11, 212
kiosk users 13
knowledge workers 12
task workers 11
pools, desktop 10
post-synchronization script, customizing linked-
clone machines 75
Power Off VM policy 131
power policies
automated desktop pools 134, 135
avoiding conflicts 135
machines and pools 131
power-off script, customizing linked-clone
machines 75
prefetch and superfetch, disabling 43
printing, location-based 256
problem machines, displaying 291
product ID 195
Q
QuickPrep
customization errors 300
customization scripts 75
increasing timeout limit for customization
scripts 50
troubleshooting customization failure 298
View Composer 74, 75
R
RDP, disabling access to desktops 143
RDS hosts
configuring 3D graphics 96
installing applications 87
installing Remote Desktop Services on
Windows Server 2008 R2 89
installing Remote Desktop Services on
Windows Server 2012 or 2012 R2 89
installing View Agent 91
introduction 9
performance options 95
Restrict Users to a Single Desktop Session 91
setting up 87
RDS desktop pools
Adobe Flash Throttling 117
creating 115, 116
desktop settings 116, 127
RDS desktop sessions, time zone redirection 94
RDS host parent virtual machines, preparing for
View Composer 100
RDS hosts, add ADMX files 248
Real-Time Audio-Video
bandwidth 173
configuring 160
configuring group policy settings 171
group policy settings 172
preventing conflicts with USB redirection 162
system requirements 161
Real-Time Audio-Video, adding the ADM
template 171
Index
VMware, Inc. 315
Real-Time Audio-Video, configuration
choices 161
rebalance feature 212
rebalancing linked-clone machines, setting
minimum ready machines 77
recomposing machines, setting minimum ready
machines 77
recomposing linked-clone machines,
Sysprep 77
refresh, setting minimum ready machines 77
registry backup (RegIdleBackup), disabling 44
regulatory compliance 14
remote repository, configuring 271
Remote Desktop connections
disabling RDP 143
enabling 22
Remote Desktop Services
adding ADMX files to Active Directory 248
application compatibility group policies 249
connections group policies 250
device and resource redirection group
policies 250
licensing group policies 251
profiles group policies 253
remote session environment group
policies 255
security group policies 255
temporary folders group policies 256
Remote Desktop Services (RDS) hosts
setting up 87
See also RDS hosts
Remote Desktop Services group policies 248
Remote Desktop Users group 22
remote desktops, USB redirection
problems 205, 305
remote desktops, configuring features 153
REPLICA_DISK policy profile 210
replicas 212
restricted entitlements
assigning tags to desktop pools 151
configuring 151
examples 149
limitations 151
tag matching 150
understanding 148
roaming and synchronization, group policy
settings 283
roaming profiles, See persona management
S
SBPM (storage-based policy management) 209,
211
scanner redirection
ADM template file 176
configuring 174
group policy settings 176, 177
system requirements 174
user features 175
security 14
security server, connection problems to the
PCoIP Secure Gateway 303
security servers, restricted entitlements
limitations 151
sending messages to desktop users 292
serial port redirection
ADM template file 182
configuring 179
configuring group policies 181
group policy settings 183
guidelines 181
user operation 180
shared folders, access permissions for Persona
Management 271
shared storage 207
SIDs, support in View Composer 73
silent installation, View Agent 30
silent installation options 32
single sign-on, group policy settings 232
solid-state disks, storing View Composer
replicas 221
sparse disks, configuring for desktop pools 223
splitting composite USB devices 196
SSO, group policy settings 232
storage
reclaiming disk space 223
reducing, with View Composer 207, 212
storage overcommit, linked clones 217, 218
storage-based policy management 209, 211
Suspend VM policy, on disconnect 133
swap files, linked-clone machines 46, 49, 100
Sysprep
linked-clone machines 74
recomposing linked-clone machines 77
System Restore, disabling 44
system requirements, Unity Touch 154
T
task workers 11
terminal servers, preparing for desktop
delivery 15
ThinApp applications, configuring user
profiles 281
third-party applications, support in View
Composer 73
time synchronization, guest OS and ESXi
host 22
time zone redirection 94
timeout limit, QuickPrep customization
scripts 50
Setting Up Desktop and Application Pools in View
316 VMware, Inc.
TPVMGPoACmap.dll file 258
troubleshooting machines and desktop
pools 291
U
unentitled users, displaying 307
unicast redirection
configuring 156
system requirements 157
Unity Touch
configuring 153
system requirements 154
Unity Touch feature 154
unmanaged machines
defined 15
installing View Agent 16
preparing for desktop delivery 15
Update Service, disabling 42
USB device families 202
USB device filtersUSB device filters 199
USB devices
support for 190
using with View desktops 189, 191
USB redirection
automatic connections 192
configuring in View Agent 17, 28
controlling using policies 196, 203
deploying devices securely 193
disabling all devices 193
disabling specific devices 194
ports for 192
preventing conflicts with Real-Time Audio-
Video 162
troubleshooting failure 205, 305
USB to Serial adapters, configuring for
redirection 185
user persona, configuring policies 265
user profile path, configuring 271
user profile repository, guidelines for
creating 272
user profiles
ThinApp sandbox folders 281
See also persona management
users
displaying unentitled 307
sending messages 292
V
VAAI, creating linked clones 225
vCenter Server 10
vDGA (Virtual Dedicated Graphics
Acceleration) 136, 138, 140
vdm_agent.adm 231, 232
vdm_client.adm 231
vdm_common.adm 231
vdm_server.adm 231
vendor ID 195
vid/pid 195
View Storage Accelerator, configuring for
desktop pools 222
View Agent
configuring multiple NICs 37
custom setup options 17, 28
custom setup options on an RDS host 92
installing silently 30
installing on a virtual machine 27
installing on unmanaged machines 16
silent installation properties 34
with View Persona Management 273
View Composer 212
View Composer Agent
View Agent custom option 28
View Agent custom setup option 28
View Composer Array Integration, enabling for
desktop pools 225
View Composer configuration
support for unique SIDs 73
volume activation 48, 102
View Composer persistent disks
storage sizing formulas 215
storage sizing formulas for editing pools 216
View Composer troubleshooting
finding unused replicas 299
provisioning error codes 300
QuickPrep script failure 298
View Composer use
choosing QuickPrep or Sysprep 74
considerations for storing replicas on separate
datastores 222
creating data disks 219
creating linked-clone pools 61, 69
local datastores 220
preparing a parent virtual machine 45, 46
preparing an RDS host parent virtual
machine 100
QuickPrep 75
storing replicas and linked clones on separate
datastores 221
worksheet for creating linked-clone pools 61
View Connection Server
assigning tags for restricted entitlement 151
troubleshooting connection issues 302, 304
ViewDbChk 307
ViewPM.adm, ADM template files 231
ViewPM.adm file
adding to Active Directory 276
adding to a local system 275
virtual machines
creating templates 51
Index
VMware, Inc. 317
custom configuration parameters 21
customization failures 295
disabling Windows 7 services 39
disabling Windows 8 services 39
installing guest operating system 22
preparing for desktop deployment 19, 20
stuck in Provisioning state 295
Virtual Printing, View Agent custom option 28
virtual profiles, See persona management
Virtual SAN 207, 209, 212
Virtual Volumes (VVols) 211, 212
VM_HOMEpolicy profile 210
VMFS datastores, clusters with more than eight
hosts 144
VMware Tools, installing 22
volume activation
linked-clone machines 48
linked-clone RDS hosts 102
vSAN 207, 209, 212
vSGA (Virtual Shared Graphics
Acceleration) 136, 138, 140
vSphere 207
W
Web pages, providing multicast streams 159
webcam 163, 166, 168
webcams, selecting preferred 162
Windows 8.1, restarting Windows Firewall 26
Windows 10
disabling services 39
restarting Windows Firewall 26
services that cause OS disk growth 39
Windows 7
3D rendering 136, 138, 140
benefits of disabling services 39
customization specifications 52
disabling hibernation 48, 102
disabling customer experience improvement
program 38
disabling defragmentation for linked clones 41
disabling Microsoft Feeds Synchronization 45
disabling prefetch and superfetch 43
disabling registry backup 44
disabling System Restore 44
disabling Windows Defender 45
disabling Windows Diagnostic Policy
Service 43
disabling Windows Update Service 42
services that cause OS disk growth 39
volume activation with linked clones 48
Windows 8
benefits of disabling services 39
customization specifications 52
disabling hibernation 48, 102
disabling services 39
disabling customer experience improvement
program 38
disabling defragmentation for linked clones 41
disabling Microsoft Feeds Synchronization 45
disabling prefetch and superfetch 43
disabling registry backup 44
disabling System Restore 44
disabling Windows Defender 45
disabling Windows Diagnostic Policy
Service 43
disabling Windows Update Service 42
services that cause OS disk growth 39
volume activation with linked clones 48
Windows registry, disabling or enabling Flash
URL Redirection 160
Windows roaming profiles, Persona
Management 270
Windows Server 2008 R2 desktops 24
Windows Server 2012 R2 desktops, restarting
Windows Firewall 26
worker types 11
Setting Up Desktop and Application Pools in View
318 VMware, Inc.
