Vmware VCenter Server And Host Management ESXi 6.0 V Center 6.0.1 Vsphere 602 En
User Manual: vmware vCenter Server - 6.0.1 - vCenter Server and Host Management Free User Guide for VMware vCenter Software, Manual
Open the PDF directly: View PDF ![]() .
.
Page Count: 184 [warning: Documents this large are best viewed by clicking the View PDF Link!]
- vCenter Server and Host Management
- Contents
- About VMware vCenter Server and Host Management
- Updated Information
- vSphere Concepts and Features
- Using the vSphere Web Client
- Log in to vCenter Server by Using the vSphere Web Client
- Log Out of vCenter Server Using the vSphere Web Client
- Use the vSphere Web Client Navigator
- Customize the User Interface
- Install the Client Integration Plug-In
- Pause and Resume a Task in Progress
- Refresh Data
- Searching the Inventory
- Use Quick Filters
- View Recent Objects
- Configure the vSphere Web Client Timeout Value
- Remove Stored User Data
- Drag and Drop Objects
- Export Lists
- Keyboard Shortcuts
- Configuring Hosts and vCenter Server
- Host Configuration
- Synchronizing Clocks on the vSphere Network
- Configuring vCenter Server
- Configure License Settings for vCenter Server
- Configuring Statistics Settings
- Configure Runtime Settings for vCenter Server
- Configure User Directory Settings
- Configure Mail Sender Settings
- Configure SNMP Settings
- View Port Settings
- Configure Timeout Settings
- Configure Logging Options
- Configure Database Settings
- Verifying SSL Certificates for Legacy Hosts
- Configure Advanced Settings
- Send a Message to Other Logged In Users
- Edit the Settings of Services
- Start, Stop, and Restart Services
- Configuring Services in the vSphere Web Client
- Using Enhanced Linked Mode
- Configuring Communication Among ESXi , vCenter Server, and the vSphere Web Client
- Configuring Customer Experience Improvement Program
- Providing vCenter Server Availability
- Managing Third-Party Hypervisors by Using vCenter Host Gateway
- vCenter Host Gateway System Requirements
- Supported Third-Party Hypervisors
- Deploy the vCenter Host Gateway Appliance
- vCenter Host Gateway User Permissions
- Configure the vCenter Host Gateway Appliance
- Restart the vCenter Host Gateway Service
- Synchronize the Time Settings of the vCenter Host Gateway Appliance
- Change Network Settings of the vCenter Host Gateway Appliance
- Configure Proxy Settings
- Manage the Registration of the vCenter Host Gateway Service
- Change the Administrator Password of the vCenter Host Gateway Appliance
- Restart or Shut Down the vCenter Host Gateway Appliance
- Download a Support Bundle
- Add Third-Party Hosts to the vCenter Server Inventory
- Supported Actions for Managing Third-Party Hosts in the vSphere Web Client
- Supported Actions for Managing Third-Party Virtual Machines in the vSphere Web Client
- Organizing Your Inventory
- Tagging Objects
- License Management and Reporting
- Working with Tasks
- Reboot or Shut Down an ESXi Host
- Managing Hosts with vCenter Server in the vSphere Client
- Migrating Virtual Machines
- Cold Migration
- Migration with vMotion
- Migration with Storage vMotion
- CPU Compatibility and EVC
- CPU Compatibility Scenarios
- CPU Families and Feature Sets
- About Enhanced vMotion Compatibility
- EVC Requirements for Hosts
- Create an EVC Cluster
- Enable EVC on an Existing Cluster
- Change the EVC Mode for a Cluster
- Determine EVC Modes for Virtual Machines
- Determine the EVC Mode that a Host Supports
- Prepare Clusters for AMD Processors Without 3DNow!
- CPU Compatibility Masks
- View CPUID Details for an EVC Cluster
- Migrate a Powered-Off or Suspended Virtual Machine
- Migrate a Virtual Machine to a New Compute Resource
- Migrate a Virtual Machine to a New Compute Resource and Storage
- Migrate a Virtual Machine to New Storage
- Place vMotion Traffic on the vMotion TCP/IP Stack of an ESXi Host
- Place Traffic for Cold Migration on the Provisioning TCP/IP Stack
- Limits on Simultaneous Migrations
- About Migration Compatibility Checks
- Automating Management Tasks by Using vRealize Orchestrator
- Concepts of Workflows
- Performing Administration Tasks on the vSphere Objects
- Configure the Default vRealize Orchestrator
- Managing Associations of Workflows with vSphere Inventory Objects
- Managing Workflows
- Workflows for Managing Inventory Objects
- Cluster and Compute Resource Workflows
- Guest Operation Files Workflows
- Guest Operation Processes Workflows
- Custom Attributes Workflows
- Data Center Workflows
- Datastore and Files Workflows
- Data Center Folder Management Workflows
- Host Folder Management Workflows
- Virtual Machine Folder Management Workflows
- Basic Host Management Workflows
- Host Power Management Workflows
- Host Registration Management Workflows
- Networking Workflows
- Distributed Virtual Port Group Workflows
- Distributed Virtual Switch Workflows
- Standard Virtual Switch Workflows
- Resource Pool Workflows
- Storage Workflows
- Storage DRS Workflows
- Basic Virtual Machine Management Workflows
- Clone Workflows
- Linked Clone Workflows
- Linux Customization Clone Workflows
- Tools Clone Workflows
- Windows Customization Clone Workflows
- Device Management Workflows
- Move and Migrate Workflows
- Other Workflows
- Power Management Workflows
- Snapshot Workflows
- VMware Tools Workflows
- About Headless Systems
- Index

vCenter Server and Host Management
Update 2
ESXi 6.0
vCenter Server 6.0
This document supports the version of each product listed and
supports all subsequent versions until the document is
replaced by a new edition. To check for more recent editions of
this document, see http://www.vmware.com/support/pubs.
EN-002008-02
vCenter Server and Host Management
2 VMware, Inc.
You can find the most up-to-date technical documentation on the VMware Web site at:
hp://www.vmware.com/support/
The VMware Web site also provides the latest product updates.
If you have comments about this documentation, submit your feedback to:
docfeedback@vmware.com
Copyright © 2009–2016 VMware, Inc. All rights reserved. Copyright and trademark information.
VMware, Inc.
3401 Hillview Ave.
Palo Alto, CA 94304
www.vmware.com
Contents
About VMware vCenter Server™ and Host Management 9
Updated Information 11
1vSphere Concepts and Features 13
Virtualization Basics 13
Physical Topology of vSphere Data Center 14
vSphere Software Components 15
Client Interfaces for vSphere 17
vSphere Managed Inventory Objects 18
Optional vCenter Server Components 20
vCenter Server Plug-Ins 21
2Using the vSphere Web Client 23
Log in to vCenter Server by Using the vSphere Web Client 24
Log Out of vCenter Server Using the vSphere Web Client 24
Use the vSphere Web Client Navigator 25
Customize the User Interface 25
Rearrange the Components of the User Interface 26
Customize the User Interface by Using the Layout Seings Menu 26
Disable the Customizable User Interface Feature 26
Install the Client Integration Plug-In 26
Pause and Resume a Task in Progress 27
Refresh Data 28
Searching the Inventory 28
Perform a Quick Search 28
Perform a Simple Search 29
Perform an Advanced Search 29
Save a Search 30
Load a Saved Search 30
Use Quick Filters 30
Quick Filters Available for vSphere Objects 31
View Recent Objects 32
Congure the vSphere Web Client Timeout Value 33
Remove Stored User Data 33
Drag and Drop Objects 34
Export Lists 34
Keyboard Shortcuts 35
Inventory Keyboard Shortcuts 35
Create a Scheduled Task with a Keyboard Shortcut 35
VMware, Inc. 3
3Conguring Hosts and vCenter Server 37
Host Conguration 37
Congure the Boot Device on an ESXi Host 37
Congure Agent VM Seings 38
Set Advanced Host Aributes 38
Synchronizing Clocks on the vSphere Network 39
Edit Time Conguration for a Host 39
Conguring vCenter Server 40
Congure License Seings for vCenter Server 40
Conguring Statistics Seings 40
Congure Runtime Seings for vCenter Server 43
Congure User Directory Seings 43
Congure Mail Sender Seings 44
Congure SNMP Seings 44
View Port Seings 45
Congure Timeout Seings 45
Congure Logging Options 46
Congure Database Seings 46
Verifying SSL Certicates for Legacy Hosts 47
Congure Advanced Seings 48
Send a Message to Other Logged In Users 48
Edit the Seings of Services 49
Start, Stop, and Restart Services 49
Conguring Services in the vSphere Web Client 50
Using Enhanced Linked Mode 58
Conguring Communication Among ESXi , vCenter Server, and the vSphere Web Client 58
4Conguring Customer Experience Improvement Program 59
Categories of Information That VMware Receives 59
Join the Customer Experience Improvement Program in the vSphere Web Client 59
5Providing vCenter Server Availability 61
Using a vSphere High Availability Cluster 61
Establishing Watchdog Support 62
Using MSCS for vCenter Server Availability 62
Set Up MSCS for vCenter Server Availability 63
6Managing Third-Party Hypervisors by Using vCenter Host Gateway 65
vCenter Host Gateway System Requirements 66
Supported Third-Party Hypervisors 66
Deploy the vCenter Host Gateway Appliance 67
Start the OVF Deployment Wizard 68
Select the OVF Source Location 68
Review the OVF Details 68
Accept the OVF License Agreements 69
Select OVF Name and Location 69
Select Storage for the vCenter Host Gateway OVF Template 69
Setup OVF Network 70
vCenter Server and Host Management
4 VMware, Inc.
Customize the OVF Template 70
Review the Conguration and Complete the Deployment 71
vCenter Host Gateway User Permissions 71
Congure the vCenter Host Gateway Appliance 72
Restart the vCenter Host Gateway Service 72
Synchronize the Time Seings of the vCenter Host Gateway Appliance 72
Change Network Seings of the vCenter Host Gateway Appliance 73
Congure Proxy Seings 73
Manage the Registration of the vCenter Host Gateway Service 74
Change the Administrator Password of the vCenter Host Gateway Appliance 74
Restart or Shut Down the vCenter Host Gateway Appliance 75
Download a Support Bundle 75
Add Third-Party Hosts to the vCenter Server Inventory 75
Supported Actions for Managing Third-Party Hosts in the vSphere Web Client 76
Supported Actions for Managing Third-Party Virtual Machines in the vSphere Web Client 76
7Organizing Your Inventory 77
Create Data Centers 78
Add a Host 78
Create Clusters 79
Create a Folder 80
8Tagging Objects 83
Migrate Custom Aributes to Tags 83
Create a Tag Category 85
Delete a Tag Category 85
Edit a Tag Category 86
Create a Tag 87
Apply a Tag to an Object 87
Remove a Tag from an Object 87
Delete a Tag 88
Edit a Tag 88
Tagging Best Practices 89
9License Management and Reporting 91
Licensing Terminology and Denitions 92
The License Service in vSphere 6.0 93
Licensing for Environments with vCenter Server Systems 6.0 and 5.5 93
Licensing for Products in vSphere 94
Licensing for ESXi Hosts 94
Licensing for vCenter Server 95
Licensing for Clusters with Enabled Virtual SAN 96
Suite Licensing 96
Licensing for VMware vCloud® Suite 96
Licensing for vSphere® with Operations Management 97
Managing Licenses 97
Create New Licenses 97
Assign a License to Multiple Assets 98
Contents
VMware, Inc. 5
Congure License Seings for an ESXi Host 99
Congure License Seings for vCenter Server 99
Assign a License to a Virtual SAN Cluster 100
Set Assets to Evaluation Mode 101
Rename a License 101
Remove Licenses 101
Viewing Licensing Information 102
View Licensing Information About the vSphere Environment 102
View Available Licenses and Features About a Product 103
View the Features that an Asset Uses 103
View the License Key of the License 103
View the Licensed Features for an Asset 104
Generating Reports for License Usage in the vSphere Web Client 104
View the License Usage for Multiple Products 104
View License Usage Details for a Single Product 105
Export a License Usage Report 105
10 Working with Tasks 107
Managing Tasks 107
View Tasks 107
Schedule Tasks 107
Create a Scheduled Task 108
Change or Reschedule a Task 110
Remove a Scheduled Task 110
11 Reboot or Shut Down an ESXi Host 111
12 Managing Hosts in vCenter Server 113
Disconnecting and Reconnecting a Host 113
Disconnect a Managed Host 113
Reconnect a Managed Host 114
Reconnecting Hosts After Changes to the vCenter Server SSL Certicate 114
Remove a Host from a Cluster 114
Remove a Managed Host from vCenter Server 115
13 Migrating Virtual Machines 117
Cold Migration 119
Migration with vMotion 120
Host Conguration for vMotion 121
Virtual Machine Conditions and Limitations for vMotion 123
Migration with vMotion in Environments Without Shared Storage 124
Migration Between vCenter Server Systems 125
Migration with Storage vMotion 127
Storage vMotion Requirements and Limitations 127
CPU Compatibility and EVC 128
CPU Compatibility Scenarios 128
CPU Families and Feature Sets 129
About Enhanced vMotion Compatibility 129
vCenter Server and Host Management
6 VMware, Inc.
EVC Requirements for Hosts 130
Create an EVC Cluster 130
Enable EVC on an Existing Cluster 131
Change the EVC Mode for a Cluster 131
Determine EVC Modes for Virtual Machines 132
Determine the EVC Mode that a Host Supports 133
Prepare Clusters for AMD Processors Without 3DNow! 133
CPU Compatibility Masks 134
View CPUID Details for an EVC Cluster 135
Migrate a Powered-O or Suspended Virtual Machine 135
Migrate a Virtual Machine to a New Compute Resource 137
Migrate a Virtual Machine to a New Compute Resource and Storage 138
Migrate a Virtual Machine to New Storage 140
Place vMotion Trac on the vMotion TCP/IP Stack of an ESXi Host 141
Place Trac for Cold Migration, Cloning, and Snapshots on the Provisioning TCP/IP Stack 143
Limits on Simultaneous Migrations 144
About Migration Compatibility Checks 145
14 Automating Management Tasks by Using vRealize Orchestrator 147
Concepts of Workows 147
Performing Administration Tasks on the vSphere Objects 148
Congure the Default vRealize Orchestrator 149
Managing Associations of Workows with vSphere Inventory Objects 149
Associate Workows with vSphere Inventory Object Types 149
Edit the Associations of Workows with vSphere Objects 150
Export the Associations of Workows with vSphere Objects 151
Import the Association of Workows with vSphere Objects 151
Managing Workows 152
Run Workows on vSphere Inventory Objects 152
View Information About Workow Runs 153
View Information About the Runs of a Specic Workow 153
View Workows that Are Waiting for User Interaction 154
Searching for Workows 154
Scheduling Workows 155
Workows for Managing Inventory Objects 158
Cluster and Compute Resource Workows 158
Guest Operation Files Workows 159
Guest Operation Processes Workows 159
Custom Aributes Workows 160
Data Center Workows 160
Datastore and Files Workows 160
Data Center Folder Management Workows 161
Host Folder Management Workows 161
Virtual Machine Folder Management Workows 161
Basic Host Management Workows 161
Host Power Management Workows 162
Host Registration Management Workows 162
Networking Workows 162
Distributed Virtual Port Group Workows 163
Contents
VMware, Inc. 7
Distributed Virtual Switch Workows 163
Standard Virtual Switch Workows 163
Resource Pool Workows 164
Storage Workows 164
Storage DRS Workows 165
Basic Virtual Machine Management Workows 166
Clone Workows 167
Linked Clone Workows 167
Linux Customization Clone Workows 168
Tools Clone Workows 168
Windows Customization Clone Workows 168
Device Management Workows 169
Move and Migrate Workows 169
Other Workows 170
Power Management Workows 171
Snapshot Workows 172
VMware Tools Workows 172
15 About Headless Systems 173
Detecting a Headless System 173
About Serial Mode Dynamic Switching 173
ESXi Serial Port Modes 174
Dynamic Switching Keystrokes 174
Serial Port Dynamic Switching using the CLI 174
Controlling the Serial DCUI 175
Index 177
vCenter Server and Host Management
8 VMware, Inc.

About VMware vCenter Server™ and Host
Management
vCenter Server and Host Management describes how to start and stop the VMware® vSphere Web Client
components, build your vSphere environment, monitor and manage the information generated about the
components, and set up roles and permissions for users and groups using the vSphere environment.
In addition, vCenter Server and Host Management provides brief introductions to the various tasks you can
perform within the system as well as cross-references to the documentation that describes all the tasks in
detail.
vCenter Server and Host Management covers ESXi and vCenter Server.
Intended Audience
vCenter Server and Host Management is intended for system administrators who are experienced Windows or
Linux system administrators and who are familiar with virtual machine technology and data center
operations.
VMware, Inc. 9
vCenter Server and Host Management
10 VMware, Inc.

Updated Information
This vCenter Server and Host Management is updated with each release of the product or when necessary.
This table provides the update history of the vCenter Server and Host Management.
Revision Description
EN-002008-02 Updated Chapter 2, “Using the vSphere Web Client,” on page 23 to correct supported browser
requirements.
EN-002008-01 nUpdated “Log in to vCenter Server by Using the vSphere Web Client,” on page 24 to clarify the URL
for the vSphere Web Client.
nUpdated description and link to information in “Categories of Information That VMware Receives,”
on page 59.
EN-002008-00 Initial release.
VMware, Inc. 11
vCenter Server and Host Management
12 VMware, Inc.

vSphere Concepts and Features 1
VMware vSphere™ leverages the power of virtualization to transform data centers into simplied cloud
computing infrastructures and enables IT organizations to deliver exible and reliable IT services.
The two core components of vSphere are VMware ESXi™ and VMware vCenter Server™. ESXi is the
virtualization platform on which you create and run virtual machines. vCenter Server is a service that acts as
a central administrator for ESXi hosts that are connected on a network. vCenter Server allows you to pool
and manage the resources of multiple hosts. vCenter Server provides many features that allow you to
monitor and manage your physical and virtual infrastructure.
Additional vSphere components are available as plugins that extend the functionality of the vSphere
product.
This chapter includes the following topics:
n“Virtualization Basics,” on page 13
n“Physical Topology of vSphere Data Center,” on page 14
n“vSphere Software Components,” on page 15
n“Client Interfaces for vSphere,” on page 17
n“vSphere Managed Inventory Objects,” on page 18
n“Optional vCenter Server Components,” on page 20
n“vCenter Server Plug-Ins,” on page 21
Virtualization Basics
A virtual machine is a software computer that, like a physical computer, runs an operating system and
applications. The hypervisor serves as a platform for running virtual machines and allows for the
consolidation of computing resources.
Each virtual machine contains its own virtual, or software-based, hardware, including a virtual CPU,
memory, hard disk, and network interface card.
Software called the hypervisor is installed on the physical hardware in a virtualized data center, and acts as
a platform for virtual machines. ESXi is the hypervisor in a vSphere environment. The hypervisor provides
physical hardware resources dynamically to virtual machines as needed to support the operation of the
virtual machines. The hypervisor allows virtual machines to operate with a degree of independence from
the underlying physical hardware. For example, a virtual machine can be moved from one physical host to
another, or its virtual disks can be moved from one type of storage to another, without aecting the
functioning of the virtual machine.
VMware, Inc. 13
Because virtual machines are decoupled from specic underlying physical hardware, virtualization allows
you to consolidate physical computing resources such as CPUs, memory, storage, and networking into pools
of resources that can be dynamically and exibly made available to virtual machines. With appropriate
management software, such as vCenter Server, you can also use a number of features that increase the
availability and security of your virtual infrastructure.
Physical Topology of vSphere Data Center
A typical VMware vSphere data center consists of basic physical building blocks such as x86 virtualization
servers, storage networks and arrays, IP networks, a management server, and desktop clients.
The vSphere data center topology includes the following components.
Compute servers Industry standard x86 servers that run ESXi on the bare metal. ESXi software
provides resources for and runs the virtual machines. Each computing server
is referred to as a standalone host in the virtual environment. You can group
a number of similarly congured x86 servers with connections to the same
network and storage subsystems to provide an aggregate set of resources in
the virtual environment, called a cluster.
Storage networks and
arrays
Fibre Channel SAN arrays, iSCSI SAN arrays, and NAS arrays are widely
used storage technologies supported by VMware vSphere to meet dierent
data center storage needs. The storage arrays are connected to and shared
between groups of servers through storage area networks. This arrangement
allows aggregation of the storage resources and provides more exibility in
provisioning them to virtual machines.
IP networks Each compute server can have multiple physical network adapters to
provide high bandwidth and reliable networking to the entire VMware
vSphere data center.
vCenter Server vCenter Server provides a single point of control to the data center. It
provides essential data center services such as access control, performance
monitoring, and conguration. It unies the resources from the individual
computing servers to be shared among virtual machines in the entire data
center. It does this by managing the assignment of virtual machines to the
computing servers and the assignment of resources to the virtual machines
within a given computing server based on the policies that the system
administrator sets.
Computing servers continue to function even in the unlikely event that
vCenter Server becomes unreachable (for example, if the network is severed).
Servers can be managed separately and continue to run the virtual machines
assigned to them based on the resource assignment that was last set. After
connection to vCenter Server is restored, it can manage the data center as a
whole again.
Management clients VMware vSphere provides several interfaces for data center management
and virtual machine access. These interfaces include vSphere Web Client for
access through a web browser or vSphere Command-Line Interface (vSphere
CLI).
vCenter Server and Host Management
14 VMware, Inc.
vSphere Software Components
VMware vSphere is a suite of software components for virtualization. These include ESXi, vCenter Server,
and other software components that fulll a number of dierent functions in the vSphere environment.
vSphere includes the following software components:
ESXi A virtualization platform that you use to create the virtual machines as a set
of conguration and disk les that together perform all the functions of a
physical machine.
Through ESXi, you run the virtual machines, install operating systems, run
applications, and congure the virtual machines. Conguration includes
identifying the virtual machine’s resources, such as storage devices.
The server provides bootstrapping, management, and other services that
manage your virtual machines.
vCenter Server A service that acts as a central administrator for VMware ESXi hosts that are
connected on a network. vCenter Server directs actions on the virtual
machines and the virtual machine hosts (the ESXi hosts).
vCenter Server is a single Windows or Linux Service and is installed to run
automatically. vCenter Server runs continuously in the background. It
performs its monitoring and managing activities even when no
vSphere Web Clients are connected and when no one is logged on to the
computer where it resides. It must have network access to all the hosts it
manages and be available for network access from any machine where the
vSphere Web Client is run.
You can install vCenter Server in a Windows virtual machine on an ESXi
host, allowing it to take advantage of the high-availability that is provided by
VMware HA. See the vSphere Installation and Setup documentation for details
about seing up this conguration.
vCenter Single Sign-On A service that is part of the vCenter Server management infrastructure. The
vCenter Single Sign-On authentication service makes the VMware cloud
infrastructure platform more secure by allowing the various vSphere
software components to communicate with each other through a secure
token exchange mechanism, instead of requiring each component to
authenticate a user separately with a directory service like Active Directory.
When you install vCenter Single Sign-On, the following components are
deployed.
STS (Security
Token Service)
STS certicates enable a user who has logged on
through vCenter Single Sign-On to use any vCenter
service that vCenter Single Sign-On supports
without authenticating to each one. The STS service
Chapter 1 vSphere Concepts and Features
VMware, Inc. 15
issues Security Assertion Markup Language (SAML)
tokens. These security tokens represent the identity
of a user in one of the identity source types
supported by vCenter Single Sign-On.
Administration
server
The administration server allows users with
administrator privileges to vCenter Single Sign-On
to congure the vCenter Single Sign-On server and
manage users and groups from the
vSphere Web Client. Initially, only the user
administrator@vsphere.local has these privileges.
vCenter Lookup
Service
vCenter Lookup Service contains topology
information about the vSphere infrastructure,
enabling vSphere components to connect to each
other securely. Unless you are using Simple Install,
you are prompted for the Lookup Service URL when
you install other vSphere components. For example,
the Inventory Service and the vCenter Server
installers ask for the Lookup Service URL and then
contact the Lookup Service to nd vCenter Single
Sign-On. After installation, the Inventory Service and
vCenter Server system are registered in vCenter
Lookup Service so other vSphere components, like
the vSphere Web Client, can nd them.
VMware
Directory
Service
Directory service associated with the vsphere.local
domain. This service is a multi-tenanted, multi-
mastered directory service that makes an LDAP
directory available on port 11711. In multisite mode,
an update of VMware Directory Service content in
one VMware Directory Service instance results in the
automatic update of the VMware Directory Service
instances associated with all other vCenter Single
Sign-On nodes.
vCenter Server plug-ins Applications that provide additional features and functionality to
vCenter Server. Typically, plug-ins consist of a server component and a client
component. After the plug-in server is installed, it is registered with
vCenter Server and the plug-in client is available to the vSphere Web Client
for download. After a plug-in is installed on the vSphere Web Client, it might
alter the interface by adding views, tabs, toolbar buons, or menu options
related to the added functionality.
Plug-ins leverage core vCenter Server capabilities, such as authentication and
permission management, but can have their own types of events, tasks,
metadata, and privileges.
Some vCenter Server features are implemented as plug-ins, and can be
managed using the vSphere Web Client Plug-in Manager. These features
include vCenter Storage Monitoring, vCenter Hardware Status, and vCenter
Service Status.
vCenter Server
database
A persistent storage area for maintaining the status of each virtual machine,
host, and user managed in the vCenter Server environment. The
vCenter Server database can be remote or local to the vCenter Server system.
vCenter Server and Host Management
16 VMware, Inc.
The database is installed and congured during vCenter Server installation.
If you are accessing your ESXi host directly through the vSphere Web Client,
and not through a vCenter Server system and associated vSphere Web Client,
you do not use a vCenter Server database.
tcServer Many vCenter Server functions are implemented as Web services that require
the tcServer. The tcServer is installed on the vCenter Server machine as part
of the vCenter Server installation.
Features that require the tcServer to be running include: lCIM/Hardware
Status tab, Performance charts, WebAccess, Storage Policy-Based services,
and vCenter Service status.
vCenter Server agent On each managed host, the software that collects, communicates, and
executes the actions received from vCenter Server. The vCenter Server agent
is installed the rst time any host is added to the vCenter Server inventory.
Host agent On each managed host, the software that collects, communicates, and
executes the actions received through the vSphere Web Client. It is installed
as part of the ESXi installation.
Client Interfaces for vSphere
You have several ways to access vSphere components through vSphere interface options.
vSphere interface options include:
vSphere Web Client The vSphere Web Client is a Web application installed on a machine with
network access to your vCenter Server installation. The vSphere Web Client
is the primary interface for connecting to and managing vCenter Server
instances.
vSphere Client The vSphere Client is installed on a Windows machine with network access
to your ESXi or vCenter Server system installation. The interface displays
slightly dierent options depending on which type of server you are
connected to. A single vCenter Server system or ESXi host can support
multiple, simultaneously connected vSphere Clients.
For more information about the the vSphere Client, see vSphere
Administration with the vSphere Client.
vSphere Command-Line
Interface
A command-line interface for conguring an ESXi host.
See Chapter 11, “Reboot or Shut Down an ESXi Host,” on page 111 for information and instructions about
starting and stopping ESXi hosts and vCenter Server.
Chapter 1 vSphere Concepts and Features
VMware, Inc. 17
vSphere Managed Inventory Objects
In vSphere, the inventory is a collection of virtual and physical objects on which you can place permissions,
monitor tasks and events, and set alarms. You can group most inventory objects by using folders to more
easily manage them.
All inventory objects, with the exception of hosts, can be renamed to represent their purposes. For example,
they can be named after company departments or locations or functions. vCenter Server monitors and
manages the following components of your virtual and physical infrastructure:
Data Centers Unlike a folder, which is used to organize a specic object type, a data center
is an aggregation of all the dierent types of objects needed to do work in
virtual infrastructure: hosts, virtual machines, networks, and datastores.
Within a data center there are four separate hierarchies.
nVirtual machines (and templates)
nHosts (and clusters)
nNetworks
nDatastores
The data center denes the namespace for networks and datastores. The
names for these objects must be unique within a data center. For example,
you cannot have two datastores with the same name within a single data
center, but you can have two datastores with the same name in two dierent
data centers. Virtual machines, templates, and clusters need not be unique
within the data center, but must be unique within their folder.
Objects with the same name in two dierent data centers are not necessarily
the same object. Because of this, moving objects between data centers can
create unpredictable results. For example, a network named networkA in
data_centerA might not be the same network as a network named networkA
in data_centerB. Moving a virtual machine connected to networkA from
data_centerA to data_centerB results in the virtual machine changing the
network it is connected to.
Managed objects also cannot exceed 214 bytes (UTF-8 encoded).
Clusters A collection of ESXi hosts and associated virtual machines intended to work
together as a unit. When you add a host to a cluster, the host’s resources
become part of the cluster’s resources. The cluster manages the resources of
all hosts.
If you enable VMware EVC on a cluster, you can ensure that migrations with
vMotion do not fail because of CPU compatibility errors. If you enable
vSphere DRS on a cluster, the resources of the hosts in the cluster are merged
to allow resource balancing for the hosts in the cluster. If you enable vSphere
HA on a cluster, the resources of the cluster are managed as a pool of
capacity to allow rapid recovery from host hardware failures.
Datastores A virtual representation of underlying physical storage resources in the data
center. A datastore is the storage location for virtual machine les. These
physical storage resources can come from the local SCSI disk of the ESXi
host, the Fibre Channel SAN disk arrays, the iSCSI SAN disk arrays, or
Network Aached Storage (NAS) arrays. Datastores hide the idiosyncrasies
of the underlying physical storage and present a uniform model for the
storage resources required by virtual machines.
vCenter Server and Host Management
18 VMware, Inc.
Folders Folders allow you to group objects of the same type so you can easily
manage them. For example, you can use folders to set permissions across
objects, to set alarms across objects, and to organize objects in a meaningful
way.
A folder can contain other folders, or a group of objects of the same type:
data centers, clusters, datastores, networks, virtual machines, templates, or
hosts. For example, one folder can contain hosts and a folder containing
hosts, but it cannot contain hosts and a folder containing virtual machines.
data center folders form a hierarchy directly under the root vCenter Server
and allow users to group their data centers in any convenient way. Within
each data center is one hierarchy of folders with virtual machines and
templates, one with hosts and clusters, one with datastores, and one with
networks.
Hosts The physical computer on which ESXi is installed. All virtual machines run
on hosts.
Networks A set of virtual network interface cards (virtual NICs), distributed switches
or vSphere Distributed Switches, and port groups or distributed port groups
that connect virtual machines to each other or to the physical network
outside of the virtual data center. All virtual machines that connect to the
same port group belong to the same network in the virtual environment,
even if they are on dierent physical servers. You can monitor networks and
set permissions and alarms on port groups and distributed port groups.
Resource pools Resource pools are used to compartmentalize the CPU and memory
resources of a host or cluster. Virtual machines execute in, and draw their
resources from, resource pools. You can create multiple resource pools as
direct children of a standalone host or cluster and then delegate control over
them to other individuals or organizations.
vCenter Server provides, through the DRS components, various options in
monitoring the status of the resources and adjusting or suggesting
adjustments to the virtual machines using the resources. You can monitor
resources and set alarms on them.
Templates A master copy of a virtual machine that can be used to create and provision
new virtual machines. Templates can have a guest operating system and
application software installed, and can be customized during deployment to
ensure that the new virtual machine has a unique name and network
seings.
Virtual machines A virtualized computer environment in which a guest operating system and
associated application software can run. Multiple virtual machines can
operate on the same managed host machine concurrently.
vApps vSphere vApp is a format for packaging and managing applications. A vApp
can contain multiple virtual machines.
Chapter 1 vSphere Concepts and Features
VMware, Inc. 19
Optional vCenter Server Components
Optional vCenter Server components are packaged and installed with the base product, but might require a
separate license.
Optional vCenter Server features include:
vMotion A feature that enables you to move running virtual machines from one ESXi
host to another ESXi host without service interruption. It requires licensing
on both the source and target host. vCenter Server centrally coordinates all
vMotion activities.
Storage vMotion A feature that allows you to move the disks and conguration le of a
running virtual machine from one datastore to another without service
interruption. It requires licensing on the virtual machine's host.
vSphere HA A feature that enables a cluster with High Availability. If a host goes down,
all virtual machines that were running on the host are promptly restarted on
dierent hosts in the same cluster.
When you enable the cluster for vSphere HA, you specify the number of
hosts you want to be able to recover. If you specify the number of host
failures allowed as 1, vSphere HA maintains enough capacity across the
cluster to tolerate the failure of one host. All running virtual machines on
that host can be restarted on remaining hosts. By default, you cannot turn on
a virtual machine if doing so violates required failover capacity. See the
vSphere Availability documentation for more information.
vSphere DRS A feature that helps improve resource allocation and power consumption
across all hosts and resource pools. vSphere DRS collects resource usage
information for all hosts and virtual machines in the cluster and gives
recommendations (or migrates virtual machines) in one of two situations:
nInitial placement – When you rst power on a virtual machine in the
cluster, DRS either places the virtual machine or makes a
recommendation.
nLoad balancing – DRS aempts to improve resource utilization across
the cluster by performing automatic migrations of virtual machines
(vMotion) or by providing a recommendation for virtual machine
migrations.
vSphere DRS includes distributed power management (DPM) capabilities.
When DPM is enabled, the system compares cluster-level and host-level
capacity to the demands of virtual machines running in the cluster. Based on
the results of the comparison, DPM recommends (or implements) actions
that can reduce the power consumption of the cluster.
Storage DRS A feature that enables you to manage multiple datastores as a single compute
resource, called a datastore cluster. A datastore cluster is an aggregation of
multiple datastores into a single logical, load-balanced pool. You can treat
the datastore cluster as a single exible storage resource for resource
management purposes. You can assign a virtual disk to a datastore cluster,
and Storage DRS nds an appropriate datastore for it. The load balancer
vCenter Server and Host Management
20 VMware, Inc.
takes care of initial placement and future migrations based on workload
measurements. Storage space balancing and I/O balancing minimize the risk
of running out of space and the risk of I/O bolenecks slowing the
performance of virtual machines.
vSphere Fault Tolerance vSphere Fault Tolerance provides continuous availability for virtual
machines by creating and maintaining a Secondary VM that is identical to,
and continuously available to replace, the Primary VM in the event of a
failover situation.
vCenter Server Plug-Ins
vCenter Server plug-ins extend the capabilities of vCenter Server by providing more features and functions.
Some plug-ins are installed as part of the base vCenter Server product.
vCenter Storage
Monitoring
Allows you to review information on storage usage and to visually map
relationships between all storage entities available in vCenter Server.
vCenter Hardware
Status
Uses CIM monitoring to display the hardware status of hosts that
vCenter Server manages.
vCenter Service Status Displays the status of vCenter services.
Some plug-ins are packaged separately from the base product and require separate installation. You can
update plug-ins and the base product independently of each other. VMware modules include:
vSphere Update
Manager (VUM)
Enables administrators to apply updates and patches across ESXi hosts and
all managed virtual machines. Administrators can create user-dened
security baselines that represent a set of security standards. Security
administrators can compare hosts and virtual machines against these
baselines to identify and remediate systems that are not in compliance.
vShield Zones An application-aware rewall built for vCenter Server integration. vShield
Zones inspects client-server communications and communications between
virtual machines to provide detailed trac analytics and application-aware
rewall partitioning. vShield Zones is a critical security component for
protecting virtualized data centers from network-based aacks and misuse.
vRealize Orchestrator A workow engine that enables you to create and run automated workows
in your vSphere environment. vRealize Orchestrator coordinates workow
tasks across multiple VMware products and third-party management and
administration solutions through its open plug-in architecture.
vRealize Orchestrator provides a library of workows that are extensible.
You can use any operation available in the vCenter Server API to customize
vRealize Orchestrator workows.
Chapter 1 vSphere Concepts and Features
VMware, Inc. 21
vCenter Server and Host Management
22 VMware, Inc.

Using the vSphere Web Client 2
Use the vSphere Web Client to connect to vCenter Server systems and manage vSphere inventory objects.
Use of the vSphere Web Client requires a supported Web browser.
VMware has tested and supports the following guest operating systems and browser versions for the
vSphere Web Client.
Table 2‑1. Supported guest operating systems and browser versions for the vSphere Web Client .
Operating system Browser
Windows 32-bit and 64-bit Microsoft Internet Explorer 10.0.19 and later.
Mozilla Firefox 34 and later.
Google Chrome 39 and later.
Mac OS Mozilla Firefox 34 and later.
Google Chrome 39 and later.
Later versions of these browsers are likely to work, but have not been tested.
The vSphere Web Client 6.0 requires the Adobe Flash Player version 16 or later. The latest Adobe Flash
Player version for Linux systems is 11.2. Therefore, the vSphere Web Client cannot run on Linux platforms.
This chapter includes the following topics:
n“Log in to vCenter Server by Using the vSphere Web Client,” on page 24
n“Log Out of vCenter Server Using the vSphere Web Client,” on page 24
n“Use the vSphere Web Client Navigator,” on page 25
n“Customize the User Interface,” on page 25
n“Install the Client Integration Plug-In,” on page 26
n“Pause and Resume a Task in Progress,” on page 27
n“Refresh Data,” on page 28
n“Searching the Inventory,” on page 28
n“Use Quick Filters,” on page 30
n“View Recent Objects,” on page 32
n“Congure the vSphere Web Client Timeout Value,” on page 33
n“Remove Stored User Data,” on page 33
n“Drag and Drop Objects,” on page 34
VMware, Inc. 23

n“Export Lists,” on page 34
n“Keyboard Shortcuts,” on page 35
Log in to vCenter Server by Using the vSphere Web Client
Log in to vCenter Server by using the vSphere Web Client to manage your vSphere inventory.
Prerequisites
If you want to use vCenter Server 5.0 with vSphere Web Client, verify that the vCenter Server 5.0 system is
registered with vSphere Web Client.
If you want to use vCenter Server 5.1 or vCenter Server 5.5 with vSphere Web Client, verify that
vCenter Server is installed and that both vCenter Server and vSphere Web Client point to the same vCenter
Single Sign-On instance.
In vSphere 6.0, the vSphere Web Client is installed as part of the vCenter Server on Windows or the
vCenter Server Appliance deployment. This way, the vSphere Web Client always points to the same vCenter
Single Sign-On instance.
Procedure
1 Open a Web browser and enter the URL for the vSphere Web Client:
https://vceneter_server_ip_address_or_fqdn/vsphere-client.
2 Enter the credentials of a user who has permissions on vCenter Server, and click Login.
3 If a warning message about an untrusted SSL certicate appears, select the appropriate action based on
your security policy.
Option Action
Ignore the security warning for this
login session only.
Click Ignore.
Ignore the security warning for this
login session, and install the default
certificate so that the warning does
not appear again.
Select Install this and do not display any security warnings for
this server and click Ignore.
Select this option only if using the default certicate does not present a
security problem in your environment.
Cancel and install a signed
certificate before proceeding.
Click Cancel and ensure that a signed certicate is installed on the vCenter
Server system before you aempt to connect again.
The vSphere Web Client connects to all the vCenter Server systems on which the specied user has
permissions, allowing you to view and manage your inventory.
Log Out of vCenter Server Using the vSphere Web Client
Log out of your vSphere Web Client to disconnect from the vCenter Server system.
Procedure
uClick the username at the top of the vSphere Web Client window and select Logout.
vCenter Server and Host Management
24 VMware, Inc.

Use the vSphere Web Client Navigator
You can use the navigator to browse and select objects in the vSphere Web Client inventory as an alternative
to the hierarchical inventory tree.
Unlike the inventory tree, which presents hierarchical arrangements of parent and child objects arranged in
the Hosts and Clusters, VMs and Templates, Storage, and Networking views, the navigator presents a
graph-based view of the inventory, which allows you to navigate from an object to its related objects,
regardless of type.
Procedure
1 From the vSphere Web Client Home, click vCenter Inventory Lists.
2 Under vCenter Inventory Lists, click one of the object categories to view objects of that type.
For example, click Hosts to view hosts in the vSphere Web Client inventory.
3 Click an object in the list once to display information about the object in the center pane of the
vSphere Web Client.
4 (Optional) Click the object again to open it.
Opening an object brings it to the top of the navigator and displays related object categories beneath it.
For example, opening a host allows you to see the child resource pools, virtual machines, vApps,
datastores, standard networks, distributed switches, and distributed port groups associated with this
host.
5 Click one of the tabs in the center pane to access additional information and actions.
Option Description
Getting Started View introductory information and access basic actions.
Summary View basic status and conguration for an object.
Monitor View alarms, performance data, resource allocation, events, and other
status information for an object.
Manage Congure seings, alarm denitions, tags, and permissions.
Related Objects View related objects.
Customize the User Interface
You can customize the look and feel of vSphere Web Client to improve your experience while you perform
your tasks.
After you customize the user interface, vSphere Web Client saves the individual user interface
customization.
nRearrange the Components of the User Interface on page 26
You can rearrange the sidebars in the vSphere Web Client user interface. You can move the sidebars
and Navigator pane around the content area to enhance your personal experience by customizing the
vSphere Web Client user interface . You change the interface at any time.
nCustomize the User Interface by Using the Layout Seings Menu on page 26
You can customize the user interface of vSphere Web Client by choosing to hide or display dierent
sidebars.
nDisable the Customizable User Interface Feature on page 26
You can disable the customizable user interface feature by changing the webclient.properties le of
vCenter Server or vCenter Server Appliance.
Chapter 2 Using the vSphere Web Client
VMware, Inc. 25

Rearrange the Components of the User Interface
You can rearrange the sidebars in the vSphere Web Client user interface. You can move the sidebars and
Navigator pane around the content area to enhance your personal experience by customizing the
vSphere Web Client user interface . You change the interface at any time.
Procedure
1 In a Web browser, log in to vSphere Web Client.
2 Drag and drop the sidebar you want to move to an appropriate place.
While you hover the sidebar you see two types of arrows. Single arrows move as you hover from one
part of the UI to another. Both single and double arrows indicate the target position of the sidebar you
want to move.
Customize the User Interface by Using the Layout Settings Menu
You can customize the user interface of vSphere Web Client by choosing to hide or display dierent
sidebars.
Procedure
1 In a Web browser, log in to vSphere Web Client.
2 Click the user name at the top of the vSphere Web Client window and select Layout .
3 In the Layout Seings window, select the sidebars that you want the UI to display.
4 Click OK to save the changes.
Disable the Customizable User Interface Feature
You can disable the customizable user interface feature by changing the webclient.properties le of
vCenter Server or vCenter Server Appliance.
Procedure
1 Connect to the vCenter Server or vCenter Server Appliance by using any remote console, and optionally
use SSH.
2 Navigate to the webclient.properties le and open it in a text editor.
Option Description
vCenter Server installation_directory\VMware\CIS\cfg\vsphere-
client\webclient.properties
vCenter Server Appliance /etc/vmware/vsphere-client/webclient.properties
3 On a new line, enter docking.disabled=true and save the le.
Install the Client Integration Plug-In
The Client Integration Plug-in provides access to a virtual machine's console in the vSphere Web Client, and
provides access to other vSphere infrastructure features. The Client Integration Plug-in also lets you log in to
the vSphere Web Client by using Windows session credentials.
You use the Client Integration Plug-in to deploy OVF or OVA templates and transfer les with the datastore
browser. You can also use the Client Integration Plug-in to connect virtual devices that reside on a client
computer to a virtual machine.
vCenter Server and Host Management
26 VMware, Inc.

Install the Client Integration Plug-in only once to enable all the functionality the plug-in delivers. You must
close the Web browser before installing the plug-in.
If you install the Client Integration Plug-in from an Internet Explorer browser, you must rst disable
Protected Mode and enable pop-up windows on your Web browser. Internet Explorer identies the Client
Integration Plug-in as being on the Internet instead of on the local intranet. In such cases, the plug-in is not
installed correctly because Protected Mode is enabled for the Internet.
For information about supported browsers and operating systems, see the vSphere Installation and Setup
documentation.
Watch the video "Installing the Client Integration Plug-In" for information about the Client Integration Plug-
In:
Installing the Client Integration Plug-In
(hp://link.brightcove.com/services/player/bcpid2296383276001?bctid=ref:video_client_plug_in)
Prerequisites
If you use Microsoft Internet Explorer, disable Protected Mode.
Procedure
1 In the vSphere Web Client, navigate to a link to download the Client Integration Plug-in.
Option Description
vSphere Web Client login page a Open a Web browser and type the URL for the vSphere Web Client.
b At the boom of the vSphere Web Client login page, click Download
Client Integration Plug-in.
N If the Client Integration Plug-In is already installed on your
system, you will not see the link to download the plug-in. If you
uninstall the Client Integration Plug-In, the link to download it will
display on the vSphere Web Client login page.
OVF deployment wizard a Select a host in the inventory and select Actions > Deploy OVF
Template.
b Click Download Client Integration Plug-in.
2 If the browser blocks the installation either by issuing certicate errors or by running a pop-up blocker,
follow the Help instructions for your browser to resolve the problem.
Pause and Resume a Task in Progress
You can pause many tasks in the vSphere Web Client and later resume them from the Work in Progress
pane.
Procedure
1 In a dialog box or wizard, click the minimize buon.
The task is paused and minimized to the Work in Progress pane. Any changes that you have made in
the dialog box or wizard are saved, but not yet applied to the object you are working with.
2 When you are ready to resume the task, click it in the Work in Progress pane.
The dialog box or wizard opens and you can resume the task from where you left o.
Chapter 2 Using the vSphere Web Client
VMware, Inc. 27

Refresh Data
You must manually refresh the data in the vSphere Web Client to see changes made to objects by other users
during your session.
For performance reasons, the vSphere Web Client does not continuously refresh data on all objects in the
inventory. All changes that you make during your current session are immediately reected in the client
user interface. Change made by other users or in other sessions are not reected until you manually refresh
the data.
Procedure
uTo update all data in the current vSphere Web Client view, click the refresh icon ( ).
The client view is updated. The date and time of the last refresh are displayed next to the refresh icon.
Searching the Inventory
With vSphere Web Client, you can search the inventory for objects that match specied criteria. You can
search the inventories of all vCenter Server systems connected to the same Platform Services Controller or to
Platform Services Controllers.
You can only view and search for inventory objects that you have permission to view.
N If your permissions change while you are logged in, the search service might not immediately
recognize these changes. To ensure that your search is performed with up-to-date permissions, log out of all
your open sessions and log in again before you perform the search.
nPerform a Quick Search on page 28
A quick search searches all types of objects for the specied search term in the name or other
properties of the object.
nPerform a Simple Search on page 29
A simple search searches all types of objects for the specied search term in the name of the object.
nPerform an Advanced Search on page 29
With Advanced search, you can search for managed objects that meet multiple criteria.
nSave a Search on page 30
You can save search queries so that you can retrieve them to rerun later.
nLoad a Saved Search on page 30
You can load a saved search query to rerun the search.
Perform a Quick Search
A quick search searches all types of objects for the specied search term in the name or other properties of
the object.
Procedure
1 Type the search term in the search box at the top right of the client window.
Multiple search terms in a quick or simple search are treated as if they are connected by ORs. For
example, searching for example machine nds all objects with names containing either "example" or
"machine".
The search results appear below the search box as you type. The number of items displayed is limited to
10.
vCenter Server and Host Management
28 VMware, Inc.

2 (Optional) Click any item in the search results to display that item in the inventory.
3 (Optional) To see more search results or more details about the search results, click Show All Results.
a (Optional) Select an object in the results table to see additional information about the object.
b (Optional) Double-click any item in the search results to display that item in the inventory.
The search results are listed in a table. If diering types of objects are found, the table contains tabs for
each type of object. For example, if a search nds hosts and datastores, the following tabs appear:
Datastore, showing only datastore results and Host, showing only host results.
Perform a Simple Search
A simple search searches all types of objects for the specied search term in the name of the object.
Procedure
1 From the vSphere Web Client Home screen, click New Search
2 Type the search term in the search box and press Enter.
Multiple search terms in a quick or simple search are treated as if they are connected by ORs. For
example, searching for example machine nds all objects with names containing either "example" or
"machine".
The search results are listed in a table. If diering types of objects are found, the table contains tabs for
each type of object. For example, if a search nds hosts and datastores, the following tabs appear:
Datastore, showing only datastore results and Host, showing only host results.
3 (Optional) Select an object in the results table to see additional information about the object.
4 (Optional) Double-click any item in the search results to display that item in the inventory.
Perform an Advanced Search
With Advanced search, you can search for managed objects that meet multiple criteria.
For example, you can search for virtual machines whose name contains a particular string that reside on a
particular host.
Procedure
1 From the vSphere Web Client Home, click New Search and then click Advanced Search.
2 Select the type of object to search for from the Search for drop-down menu.
3 Select how to combine the search criteria.
Option Description
any The search returns results that match any of the specied criteria.
all The search returns only results that match all of the specied criteria.
4 Select a property to search for from the drop-down menu.
The properties available depend on the type of object you are searching for.
5 Select the relationship between the search term and the property from the drop-down menu.
The options available in this step depend on the property selected in the previous step. For example, if
you select a Name property, the options available are contains, is, and is not.
6 Type or select the search term.
7 (Optional) To add additional search criteria, click Add new criteria and repeat Step 4 to Step 6.
Chapter 2 Using the vSphere Web Client
VMware, Inc. 29

8 (Optional) To add an additional search, click Add another object type and repeat Step 2 to Step 7.
9 Click Search.
Search results are displayed in the details pane and in the navigator.
10 (Optional) Click any item in the navigator to see its details without leaving the context of the search.
11 (Optional) Double-click any item in the details pane to display that item in the inventory.
Save a Search
You can save search queries so that you can retrieve them to rerun later.
Procedure
1 Enter a query for either a simple or advanced search.
2 Click Save.
3 Type a name for the search and click OK.
The search query you entered is saved. You can reload that query later and repeat the search.
Load a Saved Search
You can load a saved search query to rerun the search.
The vSphere Web Client saves search queries, not search results. When you load a saved search, the search
query is run again and new results are displayed.
Procedure
1 From the vSphere Web Client Home, click Saved Searches.
2 Click the saved search.
The search runs and the results are displayed.
Use Quick Filters
You can use quick lters to nd an object or a set of objects in your vSphere Web Client inventory that t
certain criteria.
Quick lters are available in the list views, which appear in the Objects tab of an inventory list, on the
Related Objects tab, and in search results.
For example, you can use the quick lter options for virtual machines to nd all virtual machines in your
vSphere inventory that are powered on but do not have VMware Tools running.
Procedure
1 From the vSphere Web Client, open a list view.
You can access list views of objects from the Inventory Lists, the Related Objects tab, and the search
results.
2Click Show and hide quick ( ) next to the lter box, and select from the available options.
A list of inventory objects that meet your selection criteria is displayed.
What to do next
To clear the ltered list of vSphere inventory objects, deselect the lter criteria or click Clear next to the lter
group name.
vCenter Server and Host Management
30 VMware, Inc.
Quick Filters Available for vSphere Objects
Various types of quick lters are available for the vSphere objects in your inventory. No quick lters are
available for linked vCenter Server systems, host proles, and extensions.
Tags are a quick lter option available for all types of vSphere objects, except for linked vCenter Server
systems, host proles, and extensions. You can lter data centers, vApps, and resource pools only by using
the tags that are assigned to them. For datastores, clusters, hosts, virtual machines, and VM templates, you
can use a number of dierent quick lters.
Quick Filters for Datastores
You can lter datastores by the following criteria:
nTags
nType
nBelongs to Datastore Cluster
nAccessibility
nMaintenance Mode
nDrive Type
n% Free Space
nStorage I/O Control
Quick Filters for Clusters
You can lter clusters by the following criteria:
nTags
nvSphere DRS
nvSphere HA
Quick Filters for Hosts
You can lter hosts by the following criteria:
nTags
nConnection State
nMaintenance Mode
nStandalone or Clustered
nPower State
nCPU Count
nNIC Count
nESX/ESXi Version
nvMotion
nHA State
nFT Support
nEVC Mode
Chapter 2 Using the vSphere Web Client
VMware, Inc. 31

Quick Filters for Virtual Machines
You can lter virtual machines by the following criteria:
nTags
nState
nNeeds Consolidation
nBlocked by Question
nFT Role
nVMware Tools Version Status
nVMware Tools Running Status
nEVC Mode
nGuest OS
nCompatibility
nCPU Count
nNIC Count
Quick Filters for VM Templates
You can lter virtual machine templates by the following criteria:
nTags
nVMware Tools Version Status
nGuest OS
nCompatibility
nCPU Count
nNIC Count
View Recent Objects
You can quickly navigate to the objects that you visited during your vSphere Web Client session. You can go
back and forth between objects you last visited without having to search for the objects in the object
navigator or in the inventory tree.
In the Recent Objects drop-down menu, you can see a history of the most recent objects that you visited in
your environment. Recent objects display two types of objects, the most recent objects that you visited, and
the latest objects that you created. The recent objects list is persistent between vSphere Web Client sessions,
but the new objects list is not persistent between vSphere Web Client sessions.
Procedure
1In the vSphere Web Client object navigator, click Recent Objects ( ).
vCenter Server and Host Management
32 VMware, Inc.

2 From the Recent Objects drop-down menu, select the object that you want to view.
Objects are listed in two types depending on whether you visited or created the object.
Option Description
Recent Objects The last objects that you visited in the vSphere Web Client inventory.
New Objects The latest objects that you created in the vSphere Web Client inventory.
You have navigated to the object that you selected in the Recent Objects menu.
Configure the vSphere Web Client Timeout Value
By default, vSphere Web Client sessions terminate after 120 minutes of idle time, requiring the user to log in
again to resume using the client. You can change the timeout value by editing the webclient.properties le.
Procedure
1 On the computer where the vSphere Web Client is installed, locate the webclient.properties le.
The location of this le depends on the operating system on which the vSphere Web Client is installed.
Operating System File path
Windows 2008 C:\ProgramData\VMware\vCenterServer\cfg\vsphere-client
vCenter Server Appliance /etc/vmware/vsphere-client/
2 Edit the le to include the line session.timeout = value where value is the timeout value in minutes.
Uncomment the line, if necessary.
To set the client to never time out, specify a negative or 0 value for the timeout.
For example, to set the timeout value to 60 minutes, include the line session.timeout = 60.
3 Restart the vSphere Web Client service.
nOn Windows operating systems, restart the VMware vSphere Web Client service.
nOn the vCenter Server Appliance, restart the vSphere-client service.
Remove Stored User Data
The vSphere Web Client stores user data including saved searches, Work In Progress items, and Geing
Started Pages preferences. You can remove this stored data to reset these items to the initial defaults and
remove stored data that you no longer need.
You can remove data only for the currently logged-in user. Data stored by other users is not aected.
Procedure
1 In the vSphere Web Client, click the name of the currently logged-in user and select Remove Stored
Data.
2 Select the data to remove.
Option Description
"Work in progress" items All current Work In Progress items for this user are removed.
Getting Started Pages preferences All Geing Started pages preferences for this user are removed. All Geing
Started pages will be displayed in the vSphere Web Client.
Saved Searches All Saved Searches for this user are removed.
Chapter 2 Using the vSphere Web Client
VMware, Inc. 33
3 Click OK.
Drag and Drop Objects
You can select an inventory object, and while holding the left mouse buon you can drag and drop it to
another object. Drag and drop is an alternative way to quickly initiate operations that are available in the
context menu, such as Move To and Migrate.
For completing some drag-and-drop operations, you do not need to perform any additional actions. For
completing others, you might have to go through a wizard.
Procedure
1 In the vSphere Web Client inventory tree or in a list view, select an inventory object group.
You can drag-and-drop objects within the vSphere Web Client inventory tree, or from a list view to the
inventory tree.
You can access list views from the Inventory Lists, the Related Objects tab, and search results.
2 Drag an object to a destination object.
The mouse cursor changes depending on whether you can drop the object to the object you currently
point to.
Table 2‑2. Mouse icons indicating possible drag and drop operations
Icon Description
You can drop the object that you are dragging into this object.
You cannot drop the object that you are dragging into this object.
3 Drop the object on the destination object.
A task starts in the Recent Tasks panel.
4 (Optional) If a wizard opens, follow the prompts to complete the drag-and-drop operation.
The object is moved to the destination object you selected.
Export Lists
You can export the contents of an inventory list view to a CSV le.
Procedure
1 From the vSphere Web Client, open a list view.
You can access list views of objects from the Inventory Lists, the Related Objects tab, and the search
results.
2Click Export List ( ) at the boom right corner of a list view.
The Export List Contents dialog box opens and lists the available options for inclusion in the CSV le.
3 Select whether you want all rows or your current selection of rows to be listed in the CSV le.
4 From the available options, select the columns you want listed in the CSV le.
5 Click Generate CSV Report.
6 Click Save and provide location on your local machine to save the report.
vCenter Server and Host Management
34 VMware, Inc.
Keyboard Shortcuts
Keyboard shortcuts allow you to quickly navigate or perform a task in the vSphere Web Client.
Inventory Keyboard Shortcuts
With inventory keyboard shortcuts you can quickly navigate to dierent inventories in the
vSphere Web Client.
Table 2‑3. Inventory Keyboard Shortcuts
Keyboard Combination Action
Ctrl+Alt+s Quick search
Ctrl+Alt+Home or Ctrl+Alt+1 Home
Ctrl+Alt+2 vCenter Server inventory
Ctrl+Alt+3 Hosts and Clusters inventory
Ctrl+Alt+4 Virtual Machines and Templates inventory
Ctrl+Alt+5 Datastores and Datastores Clusters inventory
Ctrl+Alt+6 Networking inventory
Create a Scheduled Task with a Keyboard Shortcut
You can use a keyboard shortcut to create a scheduled task.
For more information about how to schedule tasks, see “Schedule Tasks,” on page 107.
Procedure
1 Select the Actions menu and press Ctrl.
The clock icon ( ) appears next to the action that you can schedule.
2 Select the action and congure the scheduling options.
3 Navigate to the object in the inventory.
Chapter 2 Using the vSphere Web Client
VMware, Inc. 35
vCenter Server and Host Management
36 VMware, Inc.

Configuring Hosts and vCenter
Server 3
Conguring ESXi hosts, vCenter Server systems, and the vSphere Web Client involves several tasks.
This chapter includes the following topics:
n“Host Conguration,” on page 37
n“Synchronizing Clocks on the vSphere Network,” on page 39
n“Conguring vCenter Server,” on page 40
n“Using Enhanced Linked Mode,” on page 58
n“Conguring Communication Among ESXi, vCenter Server, and the vSphere Web Client,” on
page 58
Host Configuration
Before you create virtual machines on your hosts, you must congure the hosts to ensure that they have
correct licensing, network and storage access, and security seings. Each type of host has a manual that
provides information on the conguration for that host.
For information on conguring a host, see the conguration information for the specic vSphere component
in the vSphere Security documentation, the vSphere Storage documentation, or the vSphere Networking
documentation.
Configure the Boot Device on an ESXi Host
On servers running ESXi, you can select the device that the server boots from.
Procedure
1 Select a host in the inventory.
2 Click the Manage tab.
3 Click .
4 Select Processors and click Boot Options.
5 Select a boot device from the drop-down menu.
6 (Optional) To reboot immediately from the device you have selected, select Apply and Reboot on OK.
If you do not select Apply and Reboot on OK, the new seing takes eect when the host is next
rebooted.
7 Click OK.
VMware, Inc. 37

Configure Agent VM Settings
You can congure the datastore and network seings for the ESX agent virtual machines that you deploy on
a host.
An ESX agent is a virtual machine, or a virtual machine and a vSphere Installation Bundle (VIB), that extend
the functions of an ESXi host to provide additional services that a vSphere solution requires.
For example, a solution might require a particular network lter or rewall conguration to function. A
solution can use an ESX agent to connect to the vSphere Hypervisor and extend the host with functions
specic to that solution. For example, the ESX agent can lter network trac, act as a rewall, or gather
other information about the virtual machines on the host.
When you congure the datastore and network seings for ESX agents on a host, all of the ESX agents that
you deploy on the host use that datastore and network conguration.
I ESX agents are not deployed if you do not congure the network and datastore seings.
Procedure
1 Select a host in the vSphere Web Client inventory.
2 Click the Manage tab to display conguration information for the host.
3 Click .
4 Select Agent VM .
The current seings for the ESX agents on the host, if any, appear.
5 Click Edit.
6 From the Datastore drop-down menu, select a datastore in which to deploy the ESX agent virtual
machines.
7 From the Network drop-down menu, select a network to connect the ESX agents.
8 Click OK.
What to do next
For information about ESX agents and ESX Agent Manager, see Developing and Deploying vSphere Solutions,
vServices, and ESX Agents.
Set Advanced Host Attributes
You can set advanced aributes for a host.
C Changing advanced options is considered unsupported unless VMware technical support or a KB
article instruct you to do so. In all other cases, changing these options is considered unsupported. In most
cases, the default seings produce the optimum result.
Procedure
1 Browse to the host in the vSphere Web Client navigator.
2 Click the Manage tab and click .
3 Under System, click Advanced System .
4 In Advanced Seings, select the appropriate item.
5 Click the Edit buon to edit the value.
vCenter Server and Host Management
38 VMware, Inc.

6 Click OK.
Synchronizing Clocks on the vSphere Network
Make sure that all components on the vSphere network have their clocks synchronized. If the clocks on the
machines in your vSphere network are not synchronized, SSL certicates, which are time-sensitive, might
not be recognized as valid in communications between network machines.
Unsynchronized clocks can result in authentication problems, which can cause the installation to fail or
prevent the vCenter Server Appliance vpxd service from starting.
Make sure any Windows host machine on which a vCenter component runs is synchronized with the NTP
server. See the Knowledge Base article hp://kb.vmware.com/kb/1318.
Edit Time Configuration for a Host
You can congure the time seings on a host manually, or you can synchronize the time and date of the host
by using an NTP server.
Procedure
1 In the vSphere Web Client, navigate to the host in the vSphere inventory.
2 Select Manage, and select .
3 Under System, select Time and click Edit.
4 Select an option for seing the time and date of the host.
Option Description
Manually configure the date and
time on this host
Set the time and date for the host manually.
Use Network Time Protocol (Enable
NTP client)
Synchronize the time and date of the host with an NTP server. The NTP
service on the host periodically takes the time and date from the NTP
server.
a In the NTP Servers text box, type the IP addresses or host names of the
NTP servers that you want to use.
b From the NTP Service Startup Policy drop-down list, select an option
for starting and stopping the NTP service on the host.
nStart and stop with port usage - Starts or stops the NTP service
when the NTP client port is enabled or disabled for access in the
security prole of the host.
nStart and stop with host - Starts and stops the NTP service when
the host powers on or shuts down.
nStart and stop manually - Enables manual starting and stopping
of the NTP service.
You can use the Start, Stop, or Restart buons to control the status of the
NTP service on the host manually at any time no maer of the selected
startup policy for the NTP service. For the Start and stop manually policy,
you always use the buons to control the status of the NTP service.
5 Click OK.
Chapter 3 Configuring Hosts and vCenter Server
VMware, Inc. 39

Configuring vCenter Server
You can congure vCenter Server from the vSphere Web Client, including seings such as licensing,
statistics collection, logging, and other seings.
Configure License Settings for vCenter Server
You must assign a license to a vCenter Server system before its evaluation period expires or its currently
assigned license expires. If you upgrade, combine, or divide vCenter Server licenses in My VMware, you
must assign the new licenses to vCenter Server systems.
Prerequisites
nTo view and manage licenses in the vSphere 6.0 environment, you must have the Global.Licenses
privilege on the vCenter Server system, where the vSphere Web Client runs.
Procedure
1 In the vSphere Web Client, navigate to the vCenter Server system.
2 Select the Manage tab.
3 Under System, select Licensing.
4 Click Assign License.
5 Select a licensing method.
nSelect an existing license and click OK.
nCreate a new license.
aClick the Create New License ( ) icon.
b In the New Licenses dialog, type or copy and paste a license key and click Next.
c On the Edit license names page, rename the new license as appropriate and click Next.
d Click Finish.
e In the Assign License dialog, select the newly-created license and click OK.
The license is assigned to the vCenter Server system, and one instance from the license capacity is allocated
for thevCenter Server system.
Configuring Statistics Settings
To set up how statistical data is recorded, you congure collection intervals for statistics. You can access the
stored statistical information through command-line monitoring utilities or by viewing performance charts
in the vSphere Web Client.
Configure Statistics Collection Intervals in the vSphere Web Client
Statistic collection intervals determine the frequency at which statistic queries occur, the length of time
statistical data is stored in the database, and the type of statistical data that is collected. You can view the
collected statistics through the performance charts in the vSphere Web Client or through command-line
monitoring utilities.
N Not all interval aributes are congurable.
Prerequisites
Required privilege: Performance.ModifyIntervals
vCenter Server and Host Management
40 VMware, Inc.
Procedure
1 In the vSphere Web Client, navigate to the vCenter Server instance.
2 Select the Manage tab.
3 Under , select General.
4 Click Edit.
5 From Statistics intervals, click a statistics interval aribute to edit its value.
a In Interval duration, select the time interval in which statistics data is collected.
b In Save for, select for how long the archived statistics are kept in the database.
c In Statistics level, select a new level for collecting statistics.
The lower the level is, the fewer number of statistic counters are used. Level 4 uses all statistics
counters. Use it only for debugging purposes.
The statistics level must be less than or equal to the statistics level that is set for the preceding
statistics interval. This is a vCenter Server dependency.
6 (Optional) In Database Size, estimate the eect of the statistics seings on the database.
a Enter the number of Physical Hosts.
b Enter the number of Virtual Machines.
The estimated space required and number of database rows required are calculated and displayed.
c If necessary, make changes to your statistics collection seings.
7 Click OK.
Example: Relationships Between the Default Settings for Statistics Intervals
nSamples that are collected every 5 minutes are stored for 1 day.
nSamples that are collected every 30 minutes are stored for 1 week.
nSamples that are collected every 2 hours are stored for 1 month.
nSamples that are collected on 1 day are stored for 1 year.
For all statistics intervals, the default level is 1. It uses the Cluster Services, CPU, Disk, Memory, Network,
System, and Virtual Machine Operations counters.
Estimate the Effect of Statistics Collection on the Database in the
vSphere Web Client
The impact of the statistics collection on your vCenter Server database depends on the current inventory size
of vCenter Server.
Prerequisites
Required privilege: Global.
Procedure
1 (Optional) If necessary, congure the statistics intervals.
Chapter 3 Configuring Hosts and vCenter Server
VMware, Inc. 41

2 In Database Size, estimate the eect of the statistics seings on the database.
a Enter the number of Physical Hosts.
b Enter the number of Virtual Machines.
The estimated space required and number of database rows required are calculated and displayed.
c If necessary, make changes to your statistics collection seings.
3 Click OK.
Data Collection Levels
Each collection interval has a default collection level that determines the amount of data gathered and which
counters are available for display in charts. Collection levels are also referred to as statistics levels.
Table 3‑1. Statistics Levels
Level Metrics Best Practice
Level 1 nCluster Services (VMware Distributed Resource Scheduler) –
all metrics
nCPU – cpuentitlement, totalmhz, usage (average), usagemhz
nDisk – capacity, maxTotalLatency, provisioned, unshared,
usage (average), used
nMemory – consumed, mementitlement, overhead,
swapinRate, swapoutRate, swapused, totalmb, usage
(average), vmmemctl (balloon)
nNetwork – usage (average), IPv6
nSystem – heartbeat, uptime
nVirtual Machine Operations – numChangeDS,
numChangeHost, numChangeHostDS
Use for long-term performance
monitoring when device statistics are
not required.
Level 1 is the default Collection Level
for all Collection Intervals.
Level 2 nLevel 1 metrics
nCPU – idle, reservedCapacity
nDisk – All metrics, excluding numberRead and numberWrite.
nMemory – All metrics, excluding memUsed and maximum
and minimum rollup values.
nVirtual Machine Operations – All metrics
Use for long-term performance
monitoring when device statistics are
not required but you want to monitor
more than the basic statistics.
Level 3 nLevel 1 and Level 2 metrics
nMetrics for all counters, excluding minimum and maximum
rollup values.
nDevice metrics
Use for short-term performance
monitoring after encountering
problems or when device statistics are
required.
Because of the large quantity of
troubleshooting data retrieved and
recorded, use level 3 for the shortest
time period (Day or Week collection
interval).
Level 4 All metrics supported by the vCenter Server, including minimum
and maximum rollup values.
Use for short-term performance
monitoring after encountering
problems or when device statistics are
required.
Because of the large quantity of
troubleshooting data retrieved and
recorded, use level 4 for the shortest
amount of time.
N When you increase the collection level the storage and system requirements might change. You
might need to allocate more system resources to avoid decrease in the performance.
vCenter Server and Host Management
42 VMware, Inc.
Configure Runtime Settings for vCenter Server
You can change the vCenter Server ID, managed address, and name. Usually, you do not need to change
these seings, but you might need to make changes if you run multiple vCenter Server systems in the same
environment.
Prerequisites
Required privilege: Global.
Procedure
1 In the vSphere Web Client, navigate to the vCenter Server instance.
2 Select the Manage tab.
3 Under , select General.
4 In the Edit vCenter Server Seings dialog box, select Runtime .
5 In vCenter Server unique ID, type a unique ID.
You can change this value to a number from 0 through 63 to uniquely identify each vCenter Server
system running in a common environment. By default, an ID value is generated randomly.
6 In vCenter Server managed address, type the vCenter Server system address.
The address can be IPv4, IPv6, a fully qualied domain name, an IP address, or another address format.
7 In vCenter Server name, type the name of the vCenter Server system.
If you change the DNS name of the vCenter Server, use this option to modify the vCenter Server name
to match.
8 Click OK to save your changes and close the dialog box.
What to do next
If you made changes to the vCenter Server system unique ID, you must restart the vCenter Server system for
these changes to take eect.
Configure User Directory Settings
You can congure some of the ways vCenter Server interacts with the user directory server that is
congured as an identity source.
For vCenter Server versions before vCenter Server 5.0, these seings apply to an Active Directory associated
with vCenter Server. For vCenter Server 5.0 and later, these seings apply to vCenter Single Sign-On
identity sources.
Prerequisites
Required privilege: Global.
Procedure
1 In the vSphere Web Client, navigate to the vCenter Server instance.
2 Select the Manage tab.
3 Under , select General.
4 Click Edit.
5 Select User directory.
Chapter 3 Configuring Hosts and vCenter Server
VMware, Inc. 43

6 In User directory timeout, type the timeout interval in seconds for connecting to the directory server.
7 In Query Limit, type the number of users and groups for which you can associate permissions on the
child inventory objects of the vCenter Server system.
You can associate permissions with users and groups from the Add Permissions dialog box that
displays when you click Add permissions in Manage > Permissions for a vSphere inventory object.
8 Select the Enabled check box next to Validation to have vCenter Server periodically check its known
users and groups against the user directory server.
9 In Validation Period, enter the number of minutes between instances of synchronization.
10 Click OK.
Configure Mail Sender Settings
You must congure the email address of the sender account if you want to enable vCenter Server operations,
such as sending email notications as alarm actions.
Prerequisites
Required privilege: Global.
Procedure
1 In the vSphere Web Client, navigate to the vCenter Server instance.
2 Select the Manage tab.
3 Under , select General.
4 Click Edit.
5 Select Mail.
6 In Mail server, type the SMTP server information.
The SMTP server is the DNS name or IP address of the SMTP gateway to use for sending email
messages.
7 In Mail sender, type the sender account information.
The sender account is the email address of the sender.
N You must type the full email address, including the domain name.
For example, mail_server@example.com.
8 Click OK.
What to do next
To test the mail seings, create an alarm that can be triggered by a user action, such as by powering o a
virtual machine, and verify that you receive an email when the alarm is triggered.
Configure SNMP Settings
You can congure up to four receivers to receive SNMP traps from vCenter Server. For each receiver, specify
a host name, port, and community.
Prerequisites
Required privilege: Global.
vCenter Server and Host Management
44 VMware, Inc.
Procedure
1 In the vSphere Web Client, navigate to the vCenter Server instance.
2 Select the Manage tab.
3 Under , select General.
4 Click Edit.
5 Select SNMP receivers.
6 In Receiver URL, type the host name or IP address of the SNMP receiver.
7 Select the Enabled check box next to Enable receiver.
8 In Receiver port, type the port number of the receiver.
The port number must be a value between 1 and 65535.
9 In Community string, type the community identier.
10 Click OK.
View Port Settings
You can view the ports used by the Web service to communicate with other applications. You cannot
congure these port seings.
The Web service is installed as part of the VMware vCenter Server installation. The Web service is a required
component for third-party applications that use the VMware SDK application programming interface (API).
For information about installing the Web service, see the vSphere Installation and Setup documentation.
Procedure
1 In the vSphere Web Client, navigate to the vCenter Server instance.
2 Select the Manage tab.
3 Under , select General.
4 Click Edit.
5 Select Ports.
The ports used by the Web service are displayed.
6 Click OK.
Configure Timeout Settings
You can congure the timeout intervals for vCenter Server operations. These intervals specify the amount of
time after which the vSphere Web Client times out.
Prerequisites
Required privilege: Global.
Procedure
1 In the vSphere Web Client, navigate to the vCenter Server instance.
2 Select the Manage tab.
3 Under , select General.
4 Click Edit.
5 Select Timeout .
Chapter 3 Configuring Hosts and vCenter Server
VMware, Inc. 45

6 In Normal operations, type the timeout interval in seconds for normal operations.
Do not set the value to zero (0).
7 In Long operations, enter the timeout interval in minutes for long operations.
Do not set the value to zero (0).
8 Click OK.
9 Restart the vCenter Server system for the changes to take eect.
Configure Logging Options
You can congure the amount of detail that vCenter Server collects in log les.
Prerequisites
Required privilege: Global.
Procedure
1 In the vSphere Web Client, navigate to the vCenter Server instance.
2 Select the Manage tab.
3 Under , select General.
4 Click Edit.
5 Select Logging .
6 Select the logging options.
Option Description
None (Disable logging) Turns o logging
Error (Errors only) Displays only error log entries
Warning (Errors and warnings) Displays warning and error log entries
Info (Normal logging) Displays information, error, and warning log entries
Verbose (Verbose) Displays information, error, warning, and verbose log entries
Trivia (Extended verbose) Displays information, error, warning, verbose, and trivia log entries
7 Click OK.
Changes to the logging seings take eect immediately. You do not need to restart vCenter Server system.
Configure Database Settings
You can congure the maximum number of database connections that can occur simultaneously. To limit the
growth of the vCenter Server database and save storage space, you can congure the database to discard
information about tasks or events periodically.
N Do not use the database retention options if you want to keep a complete history of tasks and events
for your vCenter Server.
Procedure
1 In the vSphere Web Client, navigate to the vCenter Server instance.
2 Select the Manage tab.
3 Under , select General.
vCenter Server and Host Management
46 VMware, Inc.
4 Click Edit.
5 Select Database.
6 In Maximum connections, type a number.
Increase this number if your vCenter Server system performs many operations frequently and
performance is critical. Decrease this number if the database is shared and connections to the database
are costly. Do not change this value unless one of these issues pertains to your system.
7 Select the Enabled check box next to Task cleanup to have vCenter Server periodically delete the
retained tasks.
8 (Optional) In Tasks retained for, type a value in days.
Information about tasks that are performed on this vCenter Server system is discarded after the
specied number of days.
9 Select the Enabled check box next to Event cleanup to have vCenter Server periodically clean up the
retained events.
10 (Optional) In Events retention, type a value in days.
Information about events for this vCenter Server system are discarded after the specied number of
days.
11 Click OK.
Verifying SSL Certificates for Legacy Hosts
You can congure vCenter Server to check the SSL certicates of hosts to which it connects. If you congure
this seing, vCenter Server and the vSphere Web Client check for valid SSL certicates before connecting to
a host for operations such as adding a host or making a remote console connection to a virtual machine.
vCenter Server 5.1 and vCenter Server 5.5 always connect to ESXi hosts using SSL thumbprint certicates.
Starting with vCenter Server 6.0, the SSL certicates are signed by VMware Certicate Authority by default.
You can instead use certicates from a third-party CA. Thumbprint mode is supported only for legacy hosts.
Procedure
1 In the vSphere Web Client, navigate to the vCenter Server instance.
2 Select the Manage tab.
3 Under , select General.
4 Click Edit.
5 Select SSL .
6 Determine the host thumbprint for each legacy host that requires validation.
a Log in to the direct console.
b Select View Support Information on the System Customization menu.
The thumbprint is displayed in the column on the right.
7 Compare the thumbprint you obtained from the host with the thumbprint listed in the vCenter Server
Seings dialog box.
8 If the thumbprints match, select the check box for the host.
Hosts that are not selected will be disconnected after you click OK.
9 Click OK.
Chapter 3 Configuring Hosts and vCenter Server
VMware, Inc. 47
Configure Advanced Settings
In Advanced , you can modify the vCenter Server conguration le, vpxd.cfg.
You can use Advanced to add entries to the vpxd.cfg le, but not to edit or delete them. VMware
recommends that you change these seings only when instructed to do so by VMware technical support or
when you are following specic instructions in VMware documentation.
Prerequisites
Required privilege: Global.
Procedure
1 In the vSphere Web Client, navigate to the vCenter Server instance.
2 Select the Manage tab.
3 Select Advanced .
4 Click Edit.
5 In the Key, type a key.
6 In the Value eld, type the value for the specied key.
7 Click Add.
8 Click OK.
Newly added advanced seings have config. appended to the seing keys in the vpxd.cfg le. For
example:
config.example.setting = exampleValue
What to do next
Many advanced seings changes require that the vCenter Server system be restarted before they take eect.
Consult VMware technical support to determine if your changes require a restart.
Send a Message to Other Logged In Users
You might sometimes need to send messages to users who are currently logged in to a vCenter Server
system. For example, if you need to perform maintenance on a desktop, you can ask the user to log out
temporarily, or warn them of a future interruption of service.
Procedure
1 In the vSphere Web Client, navigate to the vCenter Server instance.
2 Select the Manage tab.
3 Under , select Message of the Day, and click Edit.
4 Type the Message of the Day, and click OK.
A warning appears at the top of the vSphere Web Client in every active user session advising users to read
the Message of the Day that is set in the relevant vCenter Server system.
vCenter Server and Host Management
48 VMware, Inc.
Edit the Settings of Services
The vSphere Web Client lists all manageable services running on vCenter Server. You can edit the seings
for some of the services.
The vSphere Web Client displays information about all manageable services running in vCenter Server and
the vCenter Server Appliance. A list of the default services is available for each vCenter Server instance.
Prerequisites
Verify that the user you use to log in to the vCenter Server instance is a member of the
SystemConguration.Administrators group in the vCenter Single Sign-On domain.
Procedure
1 Log in as administrator@your_domain_name to the vCenter Server instance by using the
vSphere Web Client.
2 On the vSphere Web Client Home page, under Administration, click System .
3 Under System Conguration click Nodes and select a node from the list.
4 Click the Related Objects tab.
You see the list of services running in the node you selected. Editable seings are not available for all
manageable services.
5 Right-click a service from the list and click .
Editable seings are not available for all manageable services.
6 On the Manage tab click the Edit buon.
7 Edit the service conguration properties.
8 Click OK to save the seings.
9 (Optional) From the Actions menu, select Restart.
You should restart the service only if a restart of the service is required so that the conguration
changes are applied.
Start, Stop, and Restart Services
In the vSphere Web Client, you can start, stop, and restart services that are running on vCenter Server. You
can restart services upon a conguration change or in case of suspected functional or performance issues.
Prerequisites
Verify that the user you use to log in to the vCenter Server instance is a member of the
SystemConguration.Administrators group in the vCenter Single Sign-On domain.
Procedure
1 Log in to the vCenter Server by using the vSphere Web Client.
2 On the vSphere Web Client Home page, click System .
3 Under System Conguration click Services.
4 From the Services list select a manageable service.
Chapter 3 Configuring Hosts and vCenter Server
VMware, Inc. 49

5 From the Actions menu select an operation name.
nRestart
nStart
nStop
N Restarting the Content Library Service also restarts the Transfer Service and the OVF Service.
The Content Library Service, the Transfer Service, and the OVF Service run on the same Tomcat server.
Configuring Services in the vSphere Web Client
You can monitor and manage services by using the vSphere Web Client. You can change the seings of only
a few services.
There are slight dierences between the services available for a vCenter Server instance that runs on a
Windows system and those available for vCenter Server Appliance on Linux.
N Only the default values of the service properties have undergone all product testing cycles. Avoid the
usage of nondefault values without guidance from VMware.
Services that You Can Configure in vCenter Server Appliance
You can use vSphere Web Client to congure the following services in vCenter Server Appliance:
Service Description
Auto Deploy Lets you perform stateless ESXi caching. See “Auto Deploy Service,” on page 51.
Content Library Service Manages OVF templates, ISO images, and scripts for vSphere administrators. See “Content
Library Service,” on page 51.
Hardware Health Service Collects and analyzes IPMI sensor metrics for hardware that runs ESXi. See “Hardware
Health Service,” on page 53.
Transfer Service Provides support for moving content, such as VM templates, scripts, and ISO images across
sites and vCenter Server instances. See “Transfer Service Properties,” on page 53.
VMware Open
Virtualization Format
Service
Supports the provisioning of OVF based virtual machines. For a list of seings you can
congure for this service, see “VMware Open Virtualization Format Service,” on page 56.
VMware Syslog Service Provides support for system logging, network logging, and collecting logs from hosts. You
can use the Syslog service to redirect and store ESXi messages to a server on the network.
See “VMware Syslog Service,” on page 57.
VMware vSphere ESXi
Dump Collector Service
Collects core dumps from remote hosts. See “VMware vSphere ESXi Dump Collector,” on
page 57.
vAPI Endpoint Provides a single point of access to vAPI services. For a list of general seings that you can
congure for this service, see “vAPI Endpoint,” on page 54.
Services that you can configure in vCenter Server
You can congure the following services on a vCenter Server instance that runs on a Windows machine:
Service Name Description
Auto Deploy Lets you perform stateless ESXi caching. See “Auto Deploy Service,” on page 51.
Content Library Service Manages OVF templates, ISO images, and scripts for vSphere administrators. See
“Content Library Service,” on page 51.
Hardware Health Service Collects and analyzes IPMI sensor metrics for hardware that runs ESXi. See “Hardware
Health Service,” on page 53.
vCenter Server and Host Management
50 VMware, Inc.

Service Name Description
Transfer Service Provides support for moving content, such as VM templates, scripts, and ISO images
across sites and vCenter Server instances. See “Transfer Service Properties,” on page 53.
VMware Open
Virtualization Format
Service
Supports the provisioning of OVF based virtual machines. For a list of seings you can
congure for this service, see “VMware Open Virtualization Format Service,” on page 56.
VMware vSphere ESXi
Dump Collector Service
Collects core dumps from remote hosts. See “VMware vSphere ESXi Dump Collector,” on
page 57.
vAPI Endpoint Provides a single point of access to vAPI services. For a list of general seings that you can
congure for this service, see “vAPI Endpoint,” on page 54.
Auto Deploy Service
vSphere Auto Deploy uses the Auto Deploy Service for stateless ESXi caching. You can change the default
conguration properties of the Auto Deploy service.
Auto Deploy and the Auto Deploy Service are installed as part of the vCenter Server installation.
Property Default Value Description
cachesize_GB 2 Auto Deploy cache size in gigabytes.
The maximum size of an ESXi image
or host prole uploads.
loglevel INFO The default Auto Deploy log level.
Includes information, warnings, errors,
and fatal errors.
managementport 6502 Auto Deploy management port. The
port on which interfaces that create
rules for Auto Deploy, such as vSphere
PowerCLI, communicate.
serviceport 6501 Auto Deploy service port. Auto
Deploy uses this port to power on ESXi
hosts.
Content Library Service
The Content Library service provides simple and eective management of OVF templates, ISO images, and
scripts for vSphere administrators. The Content Library service lets you synchronize content across
vCenter Server instances.
Property Default Value Description
Download Session Expiration Timeout
(milliseconds)
300000 Download session expiry timeout in
milliseconds. The download session
indicates the time for downloading
content from a content library item.
Force HTTP for Library Sync false Forces data transfers to go through
HTTP instead of HTTPS, regardless of
the subscription URL protocol. The
usage of HTTP improves the speed of
le transfer but might cause problems
if content libraries contain sensitive
information.
Garbage Collect Interval (minutes) 60 Interval in minutes for Content library
garbage collection. Garbage collection
cleans content library data and les
that are no longer used.
Chapter 3 Configuring Hosts and vCenter Server
VMware, Inc. 51

Property Default Value Description
Garbage Collect Max Retries 5 Number of aemts to clean the content
library after the deletion of les fails.
Garbage collection cleans content
library data and les that are no longer
used.
Garbage Collection Start Hour 22 The time of the day when the content
library garbage collection starts.
Garbage Collection Stop Hour 8 The time of the day when the content
library garbage collection stops.
Library Auto Sync Enabled true Enables automatic synchronization of
subscribed content libraries.
Library Auto Sync Refresh Interval
(minutes)
240 Interval between two consequent
automatic synchronizations of the
subscribed content library. Measured
in minutes.
Library Auto Sync Seing Refresh
Interval (seconds)
600 Refresh interval for the automatic
synchronization seings of the
subscribed library. Measured in
seconds. If you change the refresh
interval, you must restart
vCenter Server
Library Auto Sync Start Hour 20 The time of the day when the
automatic synchronization of a
subscribed content library starts.
Library Auto Sync Stop Hour 7 The time of the day when the
automatic synchronization of a
subscribed content library stops.
Automatic synchronization stops until
the start hour.
Library File Preparation No-Progress
Timeout (minutes)
30 Timeout for le preparation of the
subscribed content library, measured
in minutes.
Library HTTP Connection Timeout
(milliseconds)
500000 The HTTP connection timeout for
subscribed library, measured in
milliseconds.
Library HTTP Socket Connection
Timeout (milliseconds)
300000 Subscribed library HTTP connection
socket timeout, measured in
milliseconds.
Library Maximum Concurrent Sync
Items
5 Maximum number of concurrently
synchronizing library items for each
subscribed library.
Update Session Expiration Timeout
(milliseconds)
300000 Update session expiration timeout,
measured in milliseconds. Update
session is for uploading content to
library item.
N You must log in as a user with an Administrator or a Content library administrator role to change the
seings of the Content Library service.
vCenter Server and Host Management
52 VMware, Inc.

Hardware Health Service
The Hardware Health Service collects and analyses Intelligent Platform Management Interface (IPMI) sensor
metrics from hardware that runs ESXi.
Property Default Value Description
vws.loglevel Warning Level of details of the information
included in the logs.
Transfer Service Properties
The Transfer Service lets you move content, such as VM templates, scripts, and ISO images across sites and
vCenter Server instances. The Transfer Service has a set of congurable properties that you can change to
meet the needs of your virtual environment.
Property Default Value Description
Forced Flush to Output Interval 45 Interval between forced ushes to
output stream, measured in seconds.
Hp Client Buer Size 262144 Buer size of the HTTP client input
stream during transfers, measured in
bytes.
Hp Client Socket Timeout 180 Socket timeout of the HTTP client,
measured in seconds.
Hp Request-handling Timeout 120 Request handling timeout for HTTP
transfers, after which service
unavailable status is returned to client,
measured in seconds.
Hp Socket Buer Size 2048 Buer size of the HTTP client socket,
measured in bytes.
Intermediary I/O Stream Buer Size 131072 Maximum size of buer siing
between input and output streams
during a transfer, measured in bytes.
Maximum Bandwidth Consumption 0 Bandwidth usage threshold across all
transfers, measured in megabits per
second Mbps. 0 means unlimited
bandwidth.
Maximum Number of Concurrent
Priority Transfers
5 Concurrent transfer limit for priority
les. If exceeded, transfers are queued.
This threadpool is used only to
transfer priority objects.
Maximum Number of Concurrent
Transfers
20 Concurrent transfer limit. If exceeded,
transfers are queued.
NFC Connection Socket Timeout 120 Socket timeout for an NFC connection,
measured in seconds. An NFC
connection is opened only when
interacting with a datastore.
NFC Eager-zeroed Thick Disk Write
Timeout
5400 Eager-zeroed thick disk write timeout
for an NFC connection, measured in
seconds. This timeout must be larger
than the socket timeout of NFC
connection. An NFC connection is
opened only when interacting with
datastore.
Chapter 3 Configuring Hosts and vCenter Server
VMware, Inc. 53

vAPI Endpoint
The vAPI endpoint provides a single point of access to vAPI services. You can change the properties of the
vAPI Endpoint service.
Property Default Value Description
[default] endpoint maximum number
of execution threads
300 The maximum number of execution
threads for the vAPI endpoint.
[default] endpoint minimum number
of spare threads
10 The minimum number of threads that
are always kept alive for the vAPI
endpoint.
[default] endpoint queue size 50 The maximum number of tasks that
can queue up for the vAPI endpoint.
[router] Broadcast execution timeout 30 The duration after which vAPI
broadcast routing queries time out,
measured in seconds.
[router] Federated IS queries timeout 30 Timeout of federated inventory service
queries, measured in seconds.
[router] Maximum size of the in-
memory cache
10 The maximum size of the identier
cache that is used for routing vAPI
calls between management nodes.
Measured in megabytes.
[router] Number of broadcast timeout
threads
3 The number of threads that handle
vAPI broadcast timeouts.
[router] Number of control threads for
federated IS queries
10 The number of threads that control the
federated Inventory Service queries for
vAPI routing.
[router] Number of execution threads
for federated IS queries
20 The number of threads that perform
the federated Inventory Service queries
for vAPI routing.
Bearer token usage allowance Enabled Lets you use Bearer SAML tokens in
addition to Holder of Key (HoK)
tokens.
Bearer tokens do not have
cryptographic verication of the client
identity. Their security is sucient
only when used over a secure
encrypted connection.
CloudVM Components authz,com.vmware.cis,com.vmware.c
ontent,
com.vmware.transfer,com.vmware.va
pi,com.vmware.vapi.rest.navigation,
com.vmware.vapi.vcenter,com.vmwa
re.vcenter.inventory,
com.vmware.vcenter.pbm.provisioni
ng,
com.vmware.vcenter.pbm.provisioni
ng.anity,
com.vmware.vcenter.pbm.provisioni
ng.tagpolicies,
com.vmware.vcenter.vdcs,
data_service,tagging,vpx_workow
A comma-separated list of VMware
components that require the usage of
identiers. Identiers must be
qualied with a management node ID.
The list must not contain spaces.
C Editing the list might result
in system failures. Edit this seing
only as part of VMware maintenance
procedure.
vCenter Server and Host Management
54 VMware, Inc.

Property Default Value Description
Cookie authentication Enabled Enables or disables cookie
authentication. If you enable the cookie
authentication, the session ID is
returned in cookie. If you disable it the
cookie is returned in the header
Credentials login allowance Enabled Lets vAPI users authenticate with a
user name and password in addition to
using a SAML token.
Enables REST basic authentication Enabled Enables login service for simple
authentication with username and
password.
Global request rate 180 Global request rate. Set to 0 to disable.
Global request rate interval 1 Global request rate interval, measured
in seconds. This is the time frame in
which only hp.request.rate.count
requests are allowed. Set to 0 to
disable.
If you enable this option, the default
value is 1.
Maximum allowed request size 204800 The maximum allowed request size,
measured in bytes. Set to 0 to disable.
Maximum number of in-ight
requests.
2000 The maximum allowed number of in-
ight requests. Set to 0 to disable.
N In-ight requests take up
memory. If you increase this seing,
you must increase the memory of the
endpoint component.
Maximum number of simultaneous
connections to the VIM service
10 The max number of simultaneous
connections allowed to the VIM
service.
Maximum request age 14400 The maximum request age in seconds.
Maximum session count 1000 The maximum number of allowed
sessions. If you leave the value empty,
the maximum number of sessions
allowed is 10,000.
Maximum session idle time 3600000 The maximum time between requests
that a session may remain idle,
measured in milliseconds.
Maximum session lifespan 172800000 The maximum session lifespan,
measured in milliseconds. Used to
capture long sessions.
Minimum session lifespan 86400000 Minimum session lifespan in
milliseconds, used for renewable
tokens.
Reconguration interval 240 Interval between reconguration
aempts, measured in seconds.
Request rate for anonymous calls 3000 Maximum request rate for anonymous
calls. Set to 0 to disable.
Request rate for authorized requests 3800 Maximum request rate for authorized
calls. Set to 0 to disable.
Chapter 3 Configuring Hosts and vCenter Server
VMware, Inc. 55

Property Default Value Description
Request rate interval for anonymous
calls
60 Request rate interval for anonymous
calls, measured in seconds. This is the
time frame in which only request rates
for anonymous calls are allowed.
Set to 0 to disable.
N The vAPI endpoint limits the
number of incoming requests to
Request rate for anonymous calls per
Request rate interval for anonymous
calls. For example if the rate is set to 50
seconds and interval is set to 60
seconds, the system allows up to 50
calls per minute.
Any calls exceeding the limit return a
server busy error.
Request rate interval for authorized
calls
60 The request rate interval for
authorized calls, measured in seconds.
This is the time frame in which only
hp.authorized.request.rate.count
authorized requests are allowed. Set to
0 to disable.
The socket timeout 0 The socket timeout (SO_TIMEOUT),
measured in milliseconds that is used
when executing a method. A timeout
value of 0 is interpreted as an innite
timeout.
Timeout for the HTTP connections to
vAPI providers
300000 Timeout for the HTTP connections to
vAPI providers, measured in
milliseconds.
Token clock tolerance 1000 Clock tolerance for authentication
tokens, measured in seconds.
URL Deseriliazation (POST-as-GET) Enabled Enables or disables URL
deserialization (POST-as-GET).
vAPI Endpoint solution user Generated at the time of installation vAPI Endpoint solution user.
C Do not modify this value.
Changing only this seing without
updating the related seings, might
lead to a failure of the component.
VMware Open Virtualization Format Service
The Open Virtualization Format Service enables OVF based provisioning of virtual machines. You can
change the conguration properties of this service.
Property Default Value Description
OVF Export Session Timeout 5 The amount of time after which the
OVF export session times out.
Measured in minutes.
OVF Import Session Timeout 10 Waiting time before the OVF import
session times out. Measured in
minutes.
vCenter Server and Host Management
56 VMware, Inc.

VMware Syslog Service
The Syslog Service provides support for system logging, network logging, and collecting logs from hosts.
You can use the Syslog Service to redirect and store ESXi messages to a server on the network.
Property Default Value Description
Common Log Level N/A Set the level of information you want
to include in the logs.
n* - include all log les.
ninfo - Only informational log les
are redirected to the remote
machine.
nnotice - Only notices are redirected
to the remote machine. A notice
message indicates a normal but
signicant condition.
nwarn - Only warnings are
redirected to the remote machine.
nerror - Only error messages are
redirected to the remote machine.
ncrit - Only critical log les are
redirected to the remote machine.
nalert - Only critical log les are
redirected to the remote machine.
nemerg - Only emergency log les
are redirected to the remote
machine. An emergency message
indicates that the system has
stopped responding and cannot be
used.
Remote Syslog Host N/A The IP address of the host you want to
use for storing ESXi messages and
logs. This is also the IP address of the
remote syslog server on the network
you use to redirect logs and ESXi
messages.
Remote Syslog Port N/A The port number to use for
communication with the machine to
which you want to export log les.
Remote Syslog Protocol N/A The communication protocol that
Syslog uses. Available protocols are
TCP, UDP, and TLS.
VMware vSphere ESXi Dump Collector
The vSphere ESXi Dump Collector service collects core dumps from remote hosts.
Property Default Value Description
Coredump Server UDP Port
(1025-9999)
6500 The default port on which the core
dump server communicates.
Repository max size (1-10 GB) 2 The maximum size of the core dump
repository in gigabytes.
Chapter 3 Configuring Hosts and vCenter Server
VMware, Inc. 57
Using Enhanced Linked Mode
Enhanced Linked Mode links multiple vCenter Server systems by using one or more
Platform Services Controllers. With Enhanced Linked Mode, you can view and search across all linked
vCenter Server systems. This mode replicates roles, permissions, licenses, and other key data across systems.
Enhanced Linked Mode provides the following features for both vCenter Server on Windows and
vCenter Server Appliance systems:
nYou can log in to all linked vCenter Server systems simultaneously with a single user name and
password.
nYou can view and search the inventories of all linked vCenter Server systems within the
vSphere Web Client. The vSphere Client does not support Enhanced Linked Mode.
nRoles, permission, licenses, tags, and policies are replicated across linked vCenter Server systems.
To join vCenter Server systems in Enhanced Linked Mode, connect them to the same
Platform Services Controller, or to Platform Services Controllers that share the same vCenter Single Sign-On
domain.
Enhanced Linked Mode requires the vCenter Server Standard licensing level, and is not supported with
vCenter Server Foundation or vCenter Server Essentials.
In vSphere 5.5 and earlier, Linked Mode relied on Microsoft ADAM to provide replication functionality.
Starting in vSphere 6.0, the Platform Services Controller provides replication and ADAM is no longer
required. Because of the change in architecture, you must isolate vCenter Server 5.5 systems from any
Linked Mode groups before upgrading these systems to vCenter Server 6.0. For more information, see the
vSphere Upgrade documentation.
Configuring Communication Among ESXi , vCenter Server, and the
vSphere Web Client
By default, the vSphere Web Client uses ports 80 and 443 to communicate with vCenter Server and ESXi
hosts.
Congure your rewall to allow communication between the vSphere Web Client and vCenter Server by
opening ports 80 and 443.
vCenter Server acts as a web service. If your environment requires the use of a web proxy, vCenter Server
can be proxied like any other web service.
vCenter Server and Host Management
58 VMware, Inc.

Configuring Customer Experience
Improvement Program 4
When you choose to participate in the Customer Experience Improvement Program (CEIP), VMware
receives anonymous information to improve the quality, reliability, and functionality of VMware products
and services.
This chapter includes the following topics:
n“Categories of Information That VMware Receives,” on page 59
n“Join the Customer Experience Improvement Program in the vSphere Web Client,” on page 59
Categories of Information That VMware Receives
This product participates in VMware's Customer Experience Improvement Program ("CEIP").
Details regarding the data collected through CEIP and the purposes for which it is used by VMware are set
forth at the Trust & Assurance Center at hp://www.vmware.com/trustvmware/ceip.html. To join or leave
the CEIP for this product, see “Join the Customer Experience Improvement Program in the vSphere Web
Client,” on page 59.
Join the Customer Experience Improvement Program in the
vSphere Web Client
You can choose to join the Customer Experience Improvement Program (CEIP), or leave the CEIP at any
time.
Prerequisites
Verify that you are a member of the Administrators@vsphere.local group.
Procedure
1 Log into the vCenter Server instance as a member of Administrators@vsphere.local group by using the
vSphere Web Client.
2 On the vSphere Web Client Home page, under Administration, click Customer Experience
Improvement Program.
3 Click Join to enable the CEIP or Leave to disable the Program.
VMware, Inc. 59
vCenter Server and Host Management
60 VMware, Inc.

Providing vCenter Server Availability 5
When you deploy vCenter Server, you must build a highly available architecture that can handle workloads
of all sizes.
Availability is critical for solutions requiring continuous connectivity to vCenter Server. To avoid extended
periods of downtime, users should run vCenter Server in highly available congurations.
Two options can help you achieve continuous connectivity:
nOption 1: Using a vSphere High Availability cluster and Watchdog
nOption 2: Using a Microsoft Cluster Service (MSCS) cluster
Use option 1 when your vCenter Server environment is virtualized. Use option 2 when vCenter Server is
installed on Windows.
N In this document, references to MSCS also apply to WSFC on corresponding Windows Server
versions.
This chapter includes the following topics:
n“Using a vSphere High Availability Cluster,” on page 61
n“Establishing Watchdog Support,” on page 62
n“Using MSCS for vCenter Server Availability,” on page 62
n“Set Up MSCS for vCenter Server Availability,” on page 63
Using a vSphere High Availability Cluster
One method of providing vCenter Server availability is to use the Watchdog feature in a vSphere HA cluster.
vSphere HA is congured by using vCenter Server at the cluster level. After it has been enabled, vSphere
HA monitors hosts and virtual machines (VMs) and takes the user-congured action with or without
vCenter Server availability. For more information on vSphere HA and the requirements to set up a cluster,
see the vSphere Availability documentation.
N Starting with vSphere 6.x, vCenter Server Heartbeat is discontinued. The Watchdog and vSphere HA
option replaces this technology and provides vCenter Server availability.
If you are using vCenter Server Appliance, you must use this option instead of an MSCS cluster.
VMware, Inc. 61

Cluster Recommendations for Protecting vCenter Server
When conguring the vSphere HA and vSphere DRS cluster that you use to provide vCenter Server
availability by protecting the vCenter Server database server, observe these recommendations.
nPlace all database servers in a dedicated management cluster.
nFor vSphere DRS, create VM and host anti-anity rules to prevent the database servers from running
on the same host.
nSet the ForceAffinePoweron vSphere DRS advanced option to a value of 1 to enable strict enforcement
of vSphere DRS rules when servers are powered on.
nEnable vSphere HA with both host and VM monitoring.
nEnable and properly congure vSphere HA admission control for the cluster.
nSet the VM restart priority for the VM or VMs that are hosting the vCenter Server database to High.
Establishing Watchdog Support
Watchdog monitors and protects vCenter Server services. If any services fail, Watchdog aempts to restart
them. If it cannot restart the service because of a host failure, vSphere HA restarts the virtual machine (VM)
running the service on a new host.
Watchdog can provide beer availability by using vCenter Server processes (PID Watchdog) or the
vCenter Server API (API Watchdog).
You can use the service start command to start PID Watchdog and the service stop command to stop it. PID
Watchdog monitors only services that are running. After the service is stopped, PID Watchdog does not
monitor it. PID Watchdog detects only that a process with the correct executable is in the process table. It
does not determine if the process is ready to service requests.
Starting with vSphere 6.x, a Python daemon called API Watchdog checks the status of APIs for the VPXD
service. If the APIs are not running, API Watchdog aempts to restart the service two times. If that still does
not solve the issue, API Watchdog then reboots the VM.
API Watchdog starts running immediately after deployment of the vCenter Server Appliance. On
vCenter Server for Windows, however, you must reboot vCenter Server once before API Watchdog starts
working.
API Watchdog generates support bundles before a service restart and also before a VM reboot and these
support bundles are stored in C:\ProgramData\VMware\vCenterServer\data\core\*.tgz on vCenter Server
for Windows and in /storage/core/*.tgz for vCenter Server Appliance.
N To reset the Watchdog capability, delete the data les. On vCenter Server for Windows, the default
location is C:\ProgramData\VMware\vCenterServer\data\iiad\iiad.dat. On vCenter Server Appliance, it
is /storage /iiad/iiad.dat.
Using MSCS for vCenter Server Availability
With vCenter Server 5.5 Update 3 and later, Microsoft Cluster Service (MSCS) is supported as an option for
providing vCenter Server availability.
Multiple instances of vCenter Server are in a MSCS cluster, but only one instance is active at a time. Use this
solution to perform maintenance, such as patching or upgrades, on one node in the cluster without taking
down the vCenter Server database.
vCenter Server and Host Management
62 VMware, Inc.
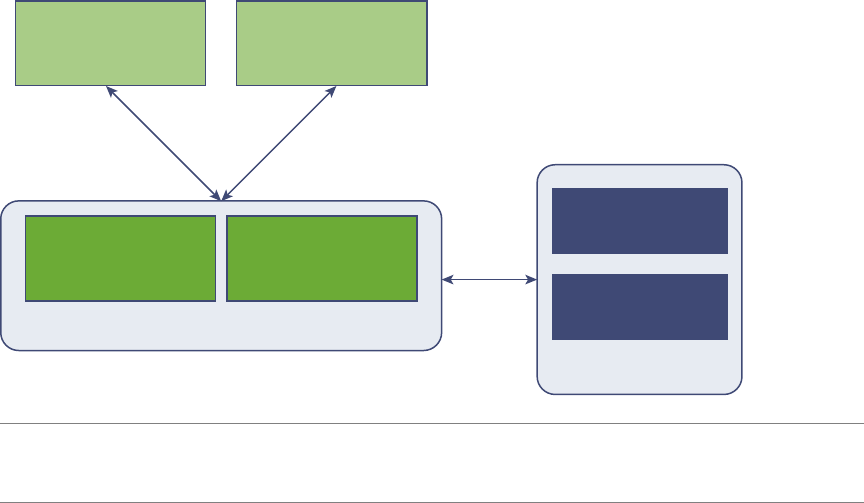
Another potential benet of this approach is that MSCS uses a type of "shared-nothing" cluster architecture.
The cluster does not involve concurrent disk accesses from multiple nodes. In other words, the cluster does
not require a distributed lock manager. MSCS clusters typically include only two nodes and they use a
shared SCSI connection between the nodes. Only one server needs the disks at any given time, so no
concurrent data access occurs. This sharing minimizes the impact if a node fails.
Unlike the vSphere HA cluster option, the MSCS option works only for Windows virtual machines and does
not support thevCenter Server Appliance.
Set Up MSCS for vCenter Server Availability
Use the following steps to set up Microsoft Cluster Service (MSCS) as an availability solution for
vCenter Server.
Prerequisites
Before you can set up MSCS for vCenter Server availability, you must create a virtual machine (VM) with
one of the following guest operating systems:
nWindows 2008 SP2
nWindows 2012 R2 Datacenter
Also, you must add two raw device mapping (RDM) disks to this VM. These disks must be mounted and
when they are added, you must create a separate SCSI controller with the bus sharing option set to physical.
The RDM disks must also be independent and persistent.
Figure 5‑1. MSCS Cluster for vCenter Server Availability
vCenter Server
Infrastructure Node
(VM1)
N1
vCenter Server
Infrastructure Node
(VM 2)
N2
vCenter Server
Management Node
(VM1)
M1
vCenter Server
Management Node
(VM2)
M1
MSCS Cluster
SQL Server DB
(VM2)
Node2
SQL Server DB
(VM1)
Node1
MSCS Cluster
N MSCS as an availability solution for vCenter Server is provided only for management nodes of
vCenter Server (M node). For infrastructure nodes, customers must deploy multiple N nodes for high
availability. You cannot have both M and N nodes on the same VM for MSCS protection.
Procedure
1 Power on the VM.
2 Format the two RDM disks, assign them drive leers, and convert them to MBR.
3 Using Windows > Server Manager > Features, Install .net.
4 Install vCenter Server on one of the RDM disks.
5 Set the vCenter Server start option to manual.
Chapter 5 Providing vCenter Server Availability
VMware, Inc. 63
6 Power o the VM.
7 Detach the RDM disks.
Detaching the RDM disks is not a permanent deletion. Do not select Delete from disk and do not delete
the vmdk les.
8 Clone the VM and select the Customize the operating system option, so that the clone has a unique
identity.
Create a unique identity through either the default sysrep le or the custom sysrep le.
9Aach the shared RDMs to both VMs.
10 Power on both VMs.
11 Change the host name and IP address on the rst VM (VM1).
Note the original IP address and host name that were used at the time of the installation of
vCenter Server on VM1. This information is used to assign a cluster role IP.
12 Install failover clustering on both nodes.
13 Create an MSCS cluster on VM1 by including both nodes in the cluster. Also select the validation option
for the new cluster.
14 Create a cluster role or service and add all of the vCenter Server services to it, one by one. Use the IP
address and host name from step 11 for the role or service.
You have created an MSCS cluster that can support vCenter Server availability.
What to do next
After you have created the MSCS cluster, verify that failover is occurring by powering o the VM hosting
vCenter Server (VM1). Within a few minutes, the services should be running on the other VM (VM2).
vCenter Server and Host Management
64 VMware, Inc.

Managing Third-Party Hypervisors by
Using vCenter Host Gateway 6
vCenter Host Gateway is a vCenter Server feature that lets you manage virtual environments that consist of
various types of hypervisors.
vCenter Host Gateway is distributed as a virtual appliance. After you deploy and congure the
vCenter Host Gateway appliance, you can use the vSphere Web Client to manage both VMware and third-
party hypervisors, such as Microsoft Hyper-V.
N You can also use the public API to manage third-party hypervisors. For more information, see
vSphere Management SDK Documentation.
nvCenter Host Gateway System Requirements on page 66
To install vCenter Host Gateway, ensure your system meets the hardware and software requirements.
nSupported Third-Party Hypervisors on page 66
vCenter Host Gateway supports several third-party hypervisors. This enables you to manage more
virtual machines and hosts through the vSphere Web Client.
nDeploy the vCenter Host Gateway Appliance on page 67
vCenter Host Gateway is distributed as a virtual appliance in OVF format that you can deploy by
using the vSphere Web Client.
nvCenter Host Gateway User Permissions on page 71
While deploying the vCenter Host Gateway appliance, you must provide Single Sign-On
administrator credentials. vCenter Host Gateway requires those credentials to create a solution user.
nCongure the vCenter Host Gateway Appliance on page 72
After you deploy the vCenter Host Gateway appliance, you can change the conguration seings by
using the Web conguration UI of the appliance.
nAdd Third-Party Hosts to the vCenter Server Inventory on page 75
You can add third-party hosts to the vCenter Server inventory by using the vSphere Web Client.
nSupported Actions for Managing Third-Party Hosts in the vSphere Web Client on page 76
vCenter Host Gateway lets you perform various operations with third-party hosts and virtual
machines.
nSupported Actions for Managing Third-Party Virtual Machines in the vSphere Web Client on page 76
vCenter Host Gateway lets you perform various operations with third-party hosts and virtual
machines.
VMware, Inc. 65

vCenter Host Gateway System Requirements
To install vCenter Host Gateway, ensure your system meets the hardware and software requirements.
Software Requirements
nvCenter Server 6.0
nVersion 7. ESXi 4x or higher
Hardware Requirements
You can run vCenter Host Gateway on any system that meets the minimum hardware requirements.
Table 6‑1. Minimum Hardware Requirements
Hardware Requirements
Number of CPUs 2
vRAM 3 GB
Disk Space 6 GB.
If you store logs on the vCenter Host Gateway appliance machine, increase the storage to 10 GB.
Network A 1 Gbps connection between the vCenter Host Gateway appliance and vCenter Server instance.
Networking Requirements
vCenter Host Gateway requires access to various ports to function properly. You can change the default
connectivity if you need to adjust the conguration to suit your own environment.
Table 6‑2. Default Connectivity Requirements
Machine Connection To Connection Scope Protocol Port
Local machine,
running the
vSphere Web Client
vCenter Host
Gateway appliance
Internal Network HTTPS 5480
vCenter Server vCenter Host
Gateway appliance
Internal Network HTTPS 8443
NFC 8902
vCenter Host Gateway
appliance
Platform Services
Controller
Internal Network HTTPS 443
vCenter Host Gateway
appliance
Hyper-V host that
you want to manage
Internal Network HTTP 80 or 5985
vCenter Host Gateway
appliance
Hyper-V host that
you want to manage
Internal Network HTTPS 443 or 5986
Supported Third-Party Hypervisors
vCenter Host Gateway supports several third-party hypervisors. This enables you to manage more virtual
machines and hosts through the vSphere Web Client.
Supported Microsoft Hypervisors
vCenter Host Gateway supports the following releases of Microsoft Hyper-V:
nMicrosoft Hyper-V Server 2012 R2
vCenter Server and Host Management
66 VMware, Inc.

nMicrosoft Hyper-V Server 2012
nMicrosoft Hyper-V Server 2008 R2
nMicrosoft Hyper-V Server 2008
N vCenter Host Gateway relies on Windows Remote Management (WinRM) to manage Microsoft
Hyper-V Server. To manage Microsoft hypervisors by using vCenter Server, you must verify that you have
congured WinRM on the host running Microsoft Hyper-V Server and that WinRM is accessible over the
network.
Deploy the vCenter Host Gateway Appliance
vCenter Host Gateway is distributed as a virtual appliance in OVF format that you can deploy by using the
vSphere Web Client.
Procedure
1Start the OVF Deployment Wizard on page 68
To deploy the vCenter Host Gateway appliance you must start the deployment wizard from the
vSphere Web Client.
2Select the OVF Source Location on page 68
Specify the location where the source of OVF template resides.
3Review the OVF Details on page 68
The OVF template details page of the Deploy OFV Template wizard display available information
about the .ovf le.
4Accept the OVF License Agreements on page 69
The Accept License Agreements page of the Deploy OFV Template wizard appears only if license
agreements are packaged with the OVF template.
5Select OVF Name and Location on page 69
When you deploy an OVF template, you provide a unique name for the virtual machine or vApp. The
name can contain up to 80 characters. You can select a data center or folder location for the virtual
machine.
6Select Storage for the vCenter Host Gateway OVF Template on page 69
Select the location to store the les for the deployed vCenter Host Gateway template.
7Setup OVF Network on page 70
Set up and congure the networks the deployed OVF templates use. The Setup networks page page of
the Deploy OVF Template wizard allows you to map source networks to target networks and to
specify seings for those networks.
8Customize the OVF Template on page 70
Customize the deployment properties of the template. vCenter Host Gateway appliance has specic
options that you must set during the deployment.
9Review the Conguration and Complete the Deployment on page 71
Review the details of the vCenter Host Gateway appliance conguration and complete the
deployment process.
Chapter 6 Managing Third-Party Hypervisors by Using vCenter Host Gateway
VMware, Inc. 67

Start the OVF Deployment Wizard
To deploy the vCenter Host Gateway appliance you must start the deployment wizard from the
vSphere Web Client.
Prerequisites
Verify that the Client Integration plug-in is installed.
Procedure
1 In a Web browser, log in to vSphere Web Client as an administrator.
2 Select an inventory object that is a valid parent object of a virtual machine, such as data center, folder,
cluster, resource pool, or host.
3 From the Actions menu, select Deploy OVF Template.
The Deploy OVF Template wizard appears.
Select the OVF Source Location
Specify the location where the source of OVF template resides.
Procedure
1 Specify the source location.
Option Action
URL Type a URL to an OVF template located on the Internet. Supported URL
sources are HTTP and FTP.
Local file Click Browse and select an OVF or OVA template from the local le
system.
2 Click Next.
Review the OVF Details
The OVF template details page of the Deploy OFV Template wizard display available information about
the .ovf le.
Procedure
1 Review the OVF template details.
Option Description
Product Product name, as specied in the OVF template le.
Version Version, if the version is specied in the OVF template le.
Vendor Vendor, if the vendor is specied in the OVF template le.
Publisher Publisher of the OVF template, if a certicate included in the OVF template
le species a publisher.
Download size Size of the OVF le.
Size on disk Size on disk after you deploy the OVF template.
Description Description, as provided by the distributor of the OVF template.
2 Click Next.
vCenter Server and Host Management
68 VMware, Inc.

Accept the OVF License Agreements
The Accept License Agreements page of the Deploy OFV Template wizard appears only if license
agreements are packaged with the OVF template.
Procedure
1 On the Accept License Agreements page of the wizard, read the End User License Agreements and click
Accept.
2 Click Next.
Select OVF Name and Location
When you deploy an OVF template, you provide a unique name for the virtual machine or vApp. The name
can contain up to 80 characters. You can select a data center or folder location for the virtual machine.
Procedure
1 On the Select name and folder page of the Deploy OVF Template wizard, specify a name for the virtual
machine.
The name must be unique within each vCenter Server virtual machine folder.
2 Select or search for a datacenter or folder for the virtual machine.
3 Click Next.
Select Storage for the vCenter Host Gateway OVF Template
Select the location to store the les for the deployed vCenter Host Gateway template.
Prerequisites
Select the disk format to store the virtual machine virtual disks.
Procedure
1 On the Select storage page of the Deploy OVF Template wizard, select the virtual disk format to store
the virtual machine virtual disks.
Option Description
Thick Provisioned Lazy Zeroed Creates a virtual disk in a default thick format. Space required for the
virtual disk is allocated when the virtual disk is created. Data remaining
on the physical device is not erased during creation, but is zeroed out on
demand at a later time on rst write from the virtual machine.
Thick Provision Eager Zeroed Creates a thick virtual disk that supports clustering features such as Fault
Tolerance. Space required for the virtual disk is allocated at creation time.
In contrast to the at format, the data remaining on the physical device is
zeroed out when the virtual disk is created. Creating disks in this format
might take much longer than creating other types of disks.
Thin Provision Creates a thin disk, which starts small, at rst using only as much
datastore space as the disk needs for its initial operations. The disk space
grows when the virtual machine needs more storage. Use this format to
save storage space. For the thin disk, you provision as much datastore
space as the disk requires based on the value that you enter for the disk
size.
Chapter 6 Managing Third-Party Hypervisors by Using vCenter Host Gateway
VMware, Inc. 69

2 Select a datastore to store the deployed OVF template.
The conguration le and virtual disk les are stored on the datastore. Select a datastore large enough
to accommodate the virtual machine and all associated virtual disk les.
3 Click Next.
Setup OVF Network
Set up and congure the networks the deployed OVF templates use. The Setup networks page page of the
Deploy OVF Template wizard allows you to map source networks to target networks and to specify seings
for those networks.
Procedure
1 On the Setup networks page of the Deploy OVF Template wizard, select a source network in the table
and map it to a destination network.
The Source column lists all networks that are dened in the OVF template. The Destination column
contains a list of target networks.
2 From the IP protocol list, select the IP type.
3 Select the IP allocation and click Next.
Customize the OVF Template
Customize the deployment properties of the template. vCenter Host Gateway appliance has specic options
that you must set during the deployment.
Procedure
1 Enter the administrator user name and password for the vCenter Host Gateway appliance.
2 (Optional) If you want to enable SSH-based remote login, select the SSH Enabled check box.
3 To synchronize the time of the vCenter Host Gateway with the time of VMware Tools, select the Tools-
based Time Synchronization Enabled check box.
4 To synchronize the time of the vCenter Host Gateway with one or more NTP servers, enter the host
names or IP addresses in the NTP Server text box, separated by a comma.
N If you chose to synchronize the time of the appliance with both VMware Tools and an NTP
server, and there is a dierence between those times, the appliance synchronizes according to the NTP
server time.
5 (Optional) Enter the host name or IP address of the Platform Services Controller.
N You can use vCenter Host Gateway only after you register it as a service in the
Platform Services Controller. If you leave the text box empty, you must use the vCenter Host Gateway
appliance to register vCenter Host Gateway later.
6 Provide a Single Sign-On user name and password.
The user name you enter must have Single Sign-On administrator privileges.
7 Enter the Host Network IP Address Family.
vCenter Server and Host Management
70 VMware, Inc.

8 Select the Host Network Mode.
Option Description
static Manual conguration. If you are using static host network mode, enter the
Host Network IP Adddress and the length of the Host Network .
dhcp Automatic conguration.
autoconf Automatic conguration. Available only if you have selected IPv6 address.
9 Enter the Host Network Default Gateway.
10 Enter the Host Network DNS Servers.
If you need to provide more than one value, separate them by a comma.
11 Enter the Host Network Identity name or the fully qualied domain name of the appliance.
12 Click Next.
Review the Configuration and Complete the Deployment
Review the details of the vCenter Host Gateway appliance conguration and complete the deployment
process.
Procedure
1 On the Ready to complete page of the Deploy OVF Template wizard, review the seings you
congured during the deployment .
2 (Optional) Select Power on after deployment.
3 Click Finish to complete the deployment process.
vCenter Host Gateway User Permissions
While deploying the vCenter Host Gateway appliance, you must provide Single Sign-On administrator
credentials. vCenter Host Gateway requires those credentials to create a solution user.
Solution User
vCenter Host Gateway creates a solution user when vCenter Host Gateway is registered as a service in the
Platform Services Controller. vCenter Host Gateway requires the solution user to register, unregister, and
modify the service.
The name of the solution user is in the format vchgUserNamenumeric_value.
N Each time you register the vCenter Host Gateway service in the Platform Services Controller, a new
solution user is created.
vCenter Host Gateway Privileges
vCenter Host Gateway allows you to manage third-party hosts and virtual machines. vCenter Host Gateway
does not require other privileges.
Chapter 6 Managing Third-Party Hypervisors by Using vCenter Host Gateway
VMware, Inc. 71
Configure the vCenter Host Gateway Appliance
After you deploy the vCenter Host Gateway appliance, you can change the conguration seings by using
the Web conguration UI of the appliance.
nRestart the vCenter Host Gateway Service on page 72
You can restart the vCenter Host Gateway service by using the vCenter Host Gateway appliance. If the
host name or the certicate of vCenter Host Gateway changes, you must restart the service.
nSynchronize the Time Seings of the vCenter Host Gateway Appliance on page 72
You can change the time synchronization of the vCenter Host Gateway appliance after the
deployment. Synchronization is required when the NTP servers change to ensure the successful
registration with the Platform Services Controller.
nChange Network Seings of the vCenter Host Gateway Appliance on page 73
You can change the network conguration of the vCenter Host Gateway appliance when, for example,
your network connection changes.
nCongure Proxy Seings on page 73
If you connect through a corporate rewall, you can congure the vCenter Host Gateway proxy
seings.
nManage the Registration of the vCenter Host Gateway Service on page 74
You can unregister the vCenter Host Gateway service from the Platform Services Controller, and
change the registration seings.
nChange the Administrator Password of the vCenter Host Gateway Appliance on page 74
You can change the password of the vCenter Host Gateway after you deploy the appliance.
nRestart or Shut Down the vCenter Host Gateway Appliance on page 75
You must reboot the vCenter Host Gateway appliance when the network or hardware conguration
changes, or after you update the software updates.
nDownload a Support Bundle on page 75
You can download a support bundle for the vCenter Host Gateway appliance. The support bundle
contains the log les of the appliance.
Restart the vCenter Host Gateway Service
You can restart the vCenter Host Gateway service by using the vCenter Host Gateway appliance. If the host
name or the certicate of vCenter Host Gateway changes, you must restart the service.
Procedure
1 In a Web browser, log in to the Web interface of the vCenter Host Gateway appliance.
2 On the VMware vCenter Host Gateway tab, click Summary.
3 Click Restart.
Synchronize the Time Settings of the vCenter Host Gateway Appliance
You can change the time synchronization of the vCenter Host Gateway appliance after the deployment.
Synchronization is required when the NTP servers change to ensure the successful registration with the
Platform Services Controller.
Procedure
1 In a Web browser, log in to the Web interface of the vCenter Host Gateway appliance.
vCenter Server and Host Management
72 VMware, Inc.

2 On the VMware vCenter Host Gateway tab, click Time.
3 Select a synchronization method and click Submit.
Option Description
No Synchronization Select this option if you do not use any synchronization.
NTP Synchronization Enter one or more NTP server names, separated by a comma. In addition
to the names, enter NTPD options for each server, if applicable.
VMware Tools Synchronization Synchronize the vCenter Host Gateway appliance with VMware Tools
Change Network Settings of the vCenter Host Gateway Appliance
You can change the network conguration of the vCenter Host Gateway appliance when, for example, your
network connection changes.
Procedure
1 In a Web browser, log in to the Web interface of the vCenter Host Gateway appliance.
2 On the Network tab, click Address.
3 From the IP Version drop-down menu, select the IP version that corresponds to your network.
You can select IPv4 or IPv6 version.
4 Select the Network Mode.
Option Description
DHCP Select this option if a DHCP server is used to allocate the IP address in
your environment.
Static Manually set the networking seings.
Auto Select this option if the IP address allocation is done by a stateless method.
The option is available for IPv6.
5 (Optional) If required, enter values for the following seings:
Option Description
Host Address The host address of the appliance in IPv4 or IPv6 format.
Prefix The valid network prex. Only for IPv6.
Mask The valid network mask. Only for IPv4.
Gateway The default gateway.
DNS servers The IP addresses of the DNS servers.
Hostname The FQDN of the host.
6 Click Save .
Configure Proxy Settings
If you connect through a corporate rewall, you can congure the vCenter Host Gateway proxy seings.
Procedure
1 In a Web browser, log in to the Web interface of the vCenter Host Gateway appliance.
2 On the Network tab, click Proxy.
3 Select the Use HTTP Proxy Server check box.
Chapter 6 Managing Third-Party Hypervisors by Using vCenter Host Gateway
VMware, Inc. 73
4 Enter the IP address of the proxy server.
5 Enter the port on which the proxy server listens.
6 (Optional) Provide a proxy user name and password.
7 Click Save to apply your changes.
Manage the Registration of the vCenter Host Gateway Service
You can unregister the vCenter Host Gateway service from the Platform Services Controller, and change the
registration seings.
You must change the vCenter Host Gateway service registration when you perform one of the following
tasks:
nPlatform Services Controller host name
nvCenter Host Gateway host name
nvCenter Host Gateway certicate
Before you change the vCenter Host Gateway service registration, you must unregister the service.
Procedure
1 In a Web browser, log in to the Web interface of the vCenter Host Gateway appliance.
2 Click the Registration tab.
3 Click Unregister.
This operation unregisters vCenter Host Gateway from thePlatform Services Controller and deletes the
solution user.
4 In the IP or host name text box, enter the IP address of the Platform Services Controller.
5 Enter a Single Sign-On administrator user name and password.
6 Click Register.
Change the Administrator Password of the vCenter Host Gateway Appliance
You can change the password of the vCenter Host Gateway after you deploy the appliance.
Procedure
1 In a Web browser, log in to the Web interface of the vCenter Host Gateway appliance.
2 Click the Admin tab.
3 Enter the current administrator password.
4 Enter and conrm the new administrator password.
5 Click Change Password.
6 Select whether you want to use SSH login for the administrator user.
7 Click Submit.
vCenter Server and Host Management
74 VMware, Inc.

Restart or Shut Down the vCenter Host Gateway Appliance
You must reboot the vCenter Host Gateway appliance when the network or hardware conguration
changes, or after you update the software updates.
Procedure
1 In a Web browser, log in to the Web interface of the vCenter Host Gateway appliance.
2 Click the System tab.
3 Select a power management option.
Option Description
Reboot Restart the vCenter Host Gateway appliance.
Shutdown Power o the vCenter Host Gateway appliance. To power on the appliance
again, you must use the vSphere Web Client.
4 Log out of the vSphere Web Client and log in again to see the changes in the power state of the
vCenter Host Gateway appliance.
Download a Support Bundle
You can download a support bundle for the vCenter Host Gateway appliance. The support bundle contains
the log les of the appliance.
Procedure
1 In a Web browser, log in to the Web interface of the vCenter Host Gateway appliance.
2 On the VMware vCenter Host Gateway tab, click Download Support Bundle.
3 Select the location where you want to save the le in .tar.gz format and click Save.
Add Third-Party Hosts to the vCenter Server Inventory
You can add third-party hosts to the vCenter Server inventory by using the vSphere Web Client.
Prerequisites
Verify that you have a valid ESXi 6.0 license for each third-party host that you add.
Procedure
1 In the vSphere Web Client, navigate to a data center or host folder.
2 Click Actions > Add Host.
3 Enter the name or IP address of the host, followed by the port.
hostname:port
4 From the Type drop-down menu, select a third-party host type.
5 Click Next.
6 If prompted, conrm that the connection is as secure as required.
7 If prompted, check and verify the host certicate.
8 In the Username and Password text boxes, enter administrator credentials and click Next.
9 Review the host summary information and click Next.
Chapter 6 Managing Third-Party Hypervisors by Using vCenter Host Gateway
VMware, Inc. 75

10 Assign a licence key to the host and click Next.
11 On the page that displays lockdown options, leave the default options selected, and click Next.
12 Select a location for the virtual machines that already exist on the host and click Next.
13 Review the summary information and click Finish.
Supported Actions for Managing Third-Party Hosts in the
vSphere Web Client
vCenter Host Gateway lets you perform various operations with third-party hosts and virtual machines.
Table 6‑3. Supported Operations with Hosts
Operation Options and Limitations
Add Host See “Add Third-Party Hosts to the vCenter Server
Inventory,” on page 75.
Remove Host See vCenter Server and Host Management.
Reconnect Host If aempts to reconnect the host fail, add the host again.
Disconnect Host See vCenter Server and Host Management.
Shut down Host See vCenter Server and Host Management.
Reboot Host See vCenter Server and Host Management.
Supported Actions for Managing Third-Party Virtual Machines in the
vSphere Web Client
vCenter Host Gateway lets you perform various operations with third-party hosts and virtual machines.
Table 6‑4. Supported Operations for Virtual Machines on Third-Party Hosts
Operation Options and Limitations
Create a virtual machine You can customize the name, CPU and RAM. For more
information, see vSphere Virtual Machine Administration.
Change the name of the virtual machine You can only change the name of the virtual machine. For
more information, see vSphere Virtual Machine
Administration.
Delete a virtual machine No specic options and limitations. For more information,
see vSphere Virtual Machine Administration.
Congure the virtual machine power states You can change the basic power conguration:
nPower On
nPower O
nSuspend
nReset
For more information, see vSphere Virtual Machine
Administration.
vCenter Server and Host Management
76 VMware, Inc.

Organizing Your Inventory 7
Plan how you will set up your virtual environment. A large vSphere implementation might contain several
virtual data centers with a complex arrangement of hosts, clusters, resource pools, and networks. It might
involve multiple vCenter Server systems connected using Enhanced Linked Mode. Smaller implementations
might require a single virtual data center with a much less complex topology. Regardless of the scale of your
virtual environment, consider how the virtual machines it will support are going to be used and
administered.
Here are questions you should answer as you create and organize an inventory of virtual objects:
nWill some virtual machines require dedicated resources?
nWill some virtual machines experience periodic spikes in workload?
nWill some virtual machines need to be administered as a group?
nDo you want to use multiple vSphere Standard Switches, or you want to have a single vSphere
Distributed Switch per data center?
nDo you want to use vMotion and Distributed Resource Management with certain virtual machines but
not others?
nWill some virtual objects require one set of system permissions, while other objects will require a
dierent set of permissions?
The left pane of the vSphere Web Client displays your vSphere inventory. You can add and arrange objects
in any way with the following restrictions:
nThe name of an inventory object must be unique with its parent.
nvApp names must be unique within the Virtual Machines and Templates view.
nSystem permissions are inherited and cascade.
Tasks for Organizing Your Inventory
Populating and organizing your inventory involves the following activities:
nCreate data centers.
nAdd hosts to the data centers.
nOrganize inventory objects in folders.
nSetup networking by using vSphere Standard Switches or vSphere Distributed Switches. To use services
such as vMotion, TCP/IP storage, Virtual SAN, and Fault Tolerance, setup VMkernel networking for
these services. For more information, see vSphere Networking.
VMware, Inc. 77
nCongure storage systems and create datastore inventory objects to provide logical containers for
storage devices in your inventory. See vSphere Storage.
nCreate clusters to consolidate the resources of multiple hosts and virtual machines. You can enable
vSphere HA and vSphere DRS for increased availability and more exible resource management. See
vSphere Availability for information about conguring vSphere HA and vSphere Resource Management for
information about conguring vSphere DRS.
nCreate resource pools to provide logical abstraction and exible management of the resources in
vSphere. Resource pools can be grouped into hierarchies and used to hierarchically partition available
CPU and memory resources. See vSphere Resource Management for details.
This chapter includes the following topics:
n“Create Data Centers,” on page 78
n“Add a Host,” on page 78
n“Create Clusters,” on page 79
n“Create a Folder,” on page 80
Create Data Centers
A virtual data center is a container for all the inventory objects required to complete a fully functional
environment for operating virtual machines. You can create multiple data centers to organize sets of
environments. For example, you might create a data center for each organizational unit in your enterprise or
create some data centers for high performance environments and others for less demanding virtual
machines.
Prerequisites
In the vSphere Web Client verify that you have sucient permissions to create a data center object.
Procedure
1 In the vSphere Web Client, navigate to the vCenter Server object.
2 Select Actions > New Datacenter.
3 Rename the data center and click OK.
What to do next
Add hosts, clusters, resource pools, vApps, networking, datastores, and virtual machines to the data center.
Add a Host
You can add hosts under a data center object, folder object, or cluster object. If a host contains virtual
machines, those virtual machines are added to the inventory together with the host.
You can also add hosts to a DRS cluster, for details see vSphere Resource Management.
Prerequisites
nVerify that a data center, folder, or cluster exists in the inventory.
nObtain the user name and password of the root user account for the host.
nVerify that hosts behind a rewall are able to communicate with the vCenter Server system and all other
hosts through port 902 or other custom-congured port.
nVerify that all NFS mounts on the host are active.
vCenter Server and Host Management
78 VMware, Inc.
Required privileges:
nHost.Inventory.Add host to cluster
nResource.Assign virtual machine to resource pool
nSystem.View on the virtual machines folder where you want to place the virtual machines of the host.
Procedure
1 In the vSphere Web Client, navigate to a data center, cluster, or folder within a data center.
2 Right-click the data center, cluster, or folder and select Add Host.
3 Type the IP address or the name of the host and click Next.
4 Type administrator credentials and click Next.
5 Review the host summary and click Next.
6 License the host through one of the following methods.
nAssign an already existing license.
nAssign a new license.
a Click Create New Licenses. The Add Host wizard minimizes in Work in Progress and the
New Licenses wizard appears.
b Type of copy and paste the new license key from My VMware and click Next.
c Enter a new name for the license and click Next.
d Review the new license and click Finish.
7 In the Add Host wizard click Next.
8 (Optional) Select a lookdown mode option to disable the remote access for the administrator account
after vCenter Server takes control of this host.
9 (Optional) If you add the host to a data center or a folder, select a location for the virtual machines that
reside on the host and click Next.
10 Review the summary and click Finish.
A new task for adding the host appears in the Recent Tasks pane. It might take a few minutes for the task to
complete.
Create Clusters
A cluster is a group of hosts. When a host is added to a cluster, the resources of the host become part of the
resources of the cluster. The cluster manages the resources of all hosts within it. Clusters enable, vSphere
High Availability (HA), vSphere Distributed Resource Scheduler (DRS), and the VMware Virtual SAN
features.
Prerequisites
nVerify that you have sucient permissions to create a cluster object.
nVerify that a data center, or folder within a data center, exists in the inventory.
Procedure
1 Browse to a data center in the vSphere Web Client navigator.
2 Right-click the data center and select New Cluster.
3 Enter a name for the cluster.
Chapter 7 Organizing Your Inventory
VMware, Inc. 79

4 Select DRS and vSphere HA cluster features.
Option Description
To use DRS with this cluster a Select the DRS Turn ON check box.
b Select an automation level and a migration threshold.
To use HA with this cluster a Select the vSphere HA Turn ON check box.
b Select whether to enable host monitoring and admission control.
c If admission control is enabled, specify a policy.
d Select a VM Monitoring option.
e Specify the virtual machine monitoring sensitivity.
5 Select an Enhanced vMotion Compatibility (EVC) seing.
EVC ensures that all hosts in a cluster present the same CPU feature set to virtual machines, even if the
actual CPUs on the hosts dier. This prevents migrations with vMotion from failing due to
incompatible CPUs.
6 Select the Virtual SAN cluster feature.
a Select the Virtual SAN Turn ON check box.
b Specify whether to add disks automatically or manually to the Virtual SAN cluster.
7 Click OK.
The cluster is added to the inventory
What to do next
Add hosts to the cluster.
For information about conguring vSphere HA, see vSphere Availability, and for information about
conguring vSphere DRS see vSphere Resource Management. For information about Virtual SAN, see
Administering VMware Virtual SAN .
Create a Folder
You can use folders to group objects of the same type for easier management. For example, permissions can
be applied to folders, allowing you to use folders to group objects that should have a common set of
permissions.
A folder can contain other folders, or a group of objects of the same type. For example, a single folder can
contain virtual machines and another folder containing virtual machines, but it cannot contain hosts and a
folder containing virtual machines.
You can create these types of folders: Host and Cluster folders, Network folders, Storage folders, and VM
and Template folders.
Procedure
1 In the navigator, select either a data center or another folder as a parent object for the folder.
vCenter Server and Host Management
80 VMware, Inc.

2 Right-click the parent object and select the menu option to create the folder.
Option Description
The parent object is a data center. If the parent object is a data center, you can select the type of folder to
create:
nSelect All vCenter Actions > New Host and Cluster Folder.
nSelect All vCenter Actions > New Network Folder.
nSelect All vCenter Actions > New Storage Folder.
nSelect All vCenter Actions > New VM and Template Folder.
The parent object is a folder. If the parent object is a folder, the new folder is of the same type as the
parent folder.
Select All vCenter Actions > New Folder.
3 Type the name for the folder and click OK.
What to do next
Move objects into the folder by right-clicking the object and selecting Move To. Select the folder as the
destination.
Chapter 7 Organizing Your Inventory
VMware, Inc. 81
vCenter Server and Host Management
82 VMware, Inc.

Tagging Objects 8
Tags allow you to aach metadata to objects in the vSphere inventory to make these objects more sortable
and searchable.
A tag is a label that you can apply to objects in the vSphere inventory. When you create a tag, you assign that
tag to a category. Categories allow you to group related tags together. When you dene a category, you can
also specify which object types its tags can be applied to and whether more than one tag in the category can
be applied to an object. For example, if you wanted to tag your virtual machines by guest operating system
type, you could create a category called 'operating system', and specify that it applies to virtual machines
only and that only a single tag can be applied to a virtual machine at any time. The tags in this category
could be "Windows", "Linux", and "Mac OS".
If multiple vCenter Server instances are congured to use Enhanced Linked Mode, tags and tag categories
are replicated across all these vCenter Server instances.
Tagging replaces the custom aributes functionality found in previous versions of vCenter Server. If you
have existing custom aributes, you can convert them into tags.
This chapter includes the following topics:
n“Migrate Custom Aributes to Tags,” on page 83
n“Create a Tag Category,” on page 85
n“Delete a Tag Category,” on page 85
n“Edit a Tag Category,” on page 86
n“Create a Tag,” on page 87
n“Apply a Tag to an Object,” on page 87
n“Remove a Tag from an Object,” on page 87
n“Delete a Tag,” on page 88
n“Edit a Tag,” on page 88
n“Tagging Best Practices,” on page 89
Migrate Custom Attributes to Tags
Tags replace the custom aributes functionality found in previous versions of vSphere. If you have existing
custom aributes, you can migrate them to tags.
During the migration, the custom aribute names are converted to categories. Custom aribute values are
converted to tag names.
VMware, Inc. 83

Procedure
1 In the vSphere Web Client object navigator, browse to any object that has custom aributes.
2 Click the object's Summary tab.
3 Select Actions > Tags & Custom > Edit Custom
4 In the Migrate Custom Aribues dialog box, click Migrate.
The Migrate Custom Aributes to Tags wizard appears.
5 Read the instructions and click Next.
6 Select the custom aributes to migrate and click Next.
The Create Tag Categories page displays the name of each custom aribute as a new tag category.
7 (Optional) Select a category to edit its options.
Option Description
Category Name The category name must be unique to the currently-selected vCenter
Server system.
Description You can provide text in the description to describe the purpose or usage of
the category.
Cardinality nSelect 1 tag per object to allow only one tag from this category to be
applied to an object at any one time.
Use this option for categories whose tags are mutually exclusive. For
example, a category called Priority with tags High, Medium, and Low
should allow one tag per object, because an object should have only
one priority.
nSelect Many tags per object to allow multiple tags from the category to
be applied to an object at any one time.
Use this option for categories whose tags are not mutually exclusive.
After you have set the cardinality of a category, you can change the
cardinality from 1 tag per object to Many tags per object, but not from
Many tags per object to 1 tag per object.
Associable Object Types Select whether tags in this category can be assigned to all objects or only to
a specic type of managed object, such as virtual machines or datastores.
After you have set the associable object types for a category, you can
change a category that is associable with a single object type to be
associable with all object types, but you cannot restrict a category that is
associable to all object types to being associable to a single object type.
8 (Optional) Select a tag to edit its aributes.
Option Description
Name The tag name must be unique across all linked vCenter Server systems.
Description You can provide text in the description to describe the purpose or usage of
the tag.
9 Click Finish.
The selected custom aributes are converted to categories and tags.
vCenter Server and Host Management
84 VMware, Inc.

Create a Tag Category
You use categories to group tags together and dene how tags can be applied to objects.
Every tag must belong to one and only one category. You must create at least one category before creating
any tags.
Prerequisites
Required privilege: Inventory Service.vSphere Tagging.Create vSphere Tag Category on the root vCenter
Server.
Procedure
1 From the vSphere Web Client Home, click Tags.
2 Click the Items tab and click Categories.
3 Click the New Category icon.
4 Edit the category options.
Option Description
Category Name The category name must be unique to the currently-selected vCenter
Server system.
Description You can provide text in the description to describe the purpose or usage of
the category.
Cardinality nSelect 1 tag per object to allow only one tag from this category to be
applied to an object at any one time.
Use this option for categories whose tags are mutually exclusive. For
example, a category called Priority with tags High, Medium, and Low
should allow one tag per object, because an object should have only
one priority.
nSelect Many tags per object to allow multiple tags from the category to
be applied to an object at any one time.
Use this option for categories whose tags are not mutually exclusive.
After you have set the cardinality of a category, you can change the
cardinality from 1 tag per object to Many tags per object, but not from
Many tags per object to 1 tag per object.
Associable Object Types Select whether tags in this category can be assigned to all objects or only to
a specic type of managed object, such as virtual machines or datastores.
After you have set the associable object types for a category, you can
change a category that is associable with a single object type to be
associable with all object types, but you cannot restrict a category that is
associable to all object types to being associable to a single object type.
5 Click OK.
Delete a Tag Category
You delete a category to remove it from your vSphere environment.
Deleting a category also deletes all tags associated with that category.
Prerequisites
Required privilege: Inventory Service.vSphere Tagging.Delete vSphere Tag Category on the root vCenter
Server.
Chapter 8 Tagging Objects
VMware, Inc. 85

Procedure
1 From the vSphere Web Client Home, click Tags.
2 Click the Items tab and click Categories.
3Select a category from the list and click the Delete Category icon ( ).
4 Click Yes to conrm deletion of the category.
The category and all its associated tags are deleted.
Edit a Tag Category
You can edit a category to change its name, cardinality, or associable objects.
Prerequisites
Required privilege: Inventory Service.vSphere Tagging.Edit vSphere Tag Category on the root vCenter
Server.
Procedure
1 From the vSphere Web Client Home, click Tags.
2 Click the Items tab and click Categories.
3Select a category and click the Edit Category icon ( ).
4 Edit the category parameters.
Option Description
Category Name The category name must be unique to the currently-selected vCenter
Server system.
Description You can provide text in the description to describe the purpose or usage of
the category.
Cardinality nSelect 1 tag per object to allow only one tag from this category to be
applied to an object at any one time.
Use this option for categories whose tags are mutually exclusive. For
example, a category called Priority with tags High, Medium, and Low
should allow one tag per object, because an object should have only
one priority.
nSelect Many tags per object to allow multiple tags from the category to
be applied to an object at any one time.
Use this option for categories whose tags are not mutually exclusive.
After you have set the cardinality of a category, you can change the
cardinality from 1 tag per object to Many tags per object, but not from
Many tags per object to 1 tag per object.
Associable Object Types Select whether tags in this category can be assigned to all objects or only to
a specic type of managed object, such as virtual machines or datastores.
After you have set the associable object types for a category, you can
change a category that is associable with a single object type to be
associable with all object types, but you cannot restrict a category that is
associable to all object types to being associable to a single object type.
5 Click OK
vCenter Server and Host Management
86 VMware, Inc.

Create a Tag
You use tags to add metadata to inventory objects. You can record information about your inventory objects
in tags and use the tags in searches.
Prerequisites
Required privilege: Inventory Service.vSphere Tagging.Create vSphere Tag on root vCenter Server.
Procedure
1 From the vSphere Web Client Home, click Tags.
2 Click the Items tab and click Tags.
3 Click the New Tag icon.
4 In the vCenter Server drop-down menu, select the vCenter Server instance on which to create this tag.
5 In the Name text box, enter a name for the tag.
Tag names must be unique within the category in which they are created.
6 (Optional) In the Description text box, enter a description for the tag.
7 In the Category drop-down menu, select an existing category or create a new category.
If you select [New Category], the dialogue box expands to show the options for creating a category. See
“Create a Tag Category,” on page 85.
8 Click OK.
Apply a Tag to an Object
After you have created tags, you can apply them as metadata to objects in the vSphere Web Client inventory.
Prerequisites
Required privilege: Inventory Service.vSphere Tagging.Assign or Unassign vSphere Tag on the root
vCenter Server instance.
Procedure
1 Browse to the object in the vSphere Web Client inventory.
2 Click the Manage tab and click Tags.
3Click the Assign Tag icon ( ).
4 (Optional) From the Categories drop-down menu, select a category to limit the tags displayed to ones
from that category.
5 Select a tag from the list and click OK.
That tag is assigned to the object. The assigned tags for each object appear in the list on the Tags tab.
Remove a Tag from an Object
You can remove a tag that has been applied to an object.
Prerequisites
Required privilege: Inventory Service.vSphere Tagging.Assign or Unassign vSphere Tag on the root
vCenter Server instance.
Chapter 8 Tagging Objects
VMware, Inc. 87

Procedure
1 Browse to the object in the vSphere Web Client inventory.
2 Click the Manage tab and click Tags.
3Select a tag to remove and click the Detach Tag icon ( ).
4 Click Yes to conrm the removal of the tag.
Delete a Tag
You can delete a tag when it is no longer needed. Deleting a tag removes it from all the objects to which it is
applied.
Prerequisites
Required privilege: Inventory Service.vSphere Tagging.Delete vSphere Tag on the root vCenter Server
instance.
Procedure
1 From the vSphere Web Client Home, click Tags.
2 Click the Items tab and click Tags.
3 Select the tag to delete.
4Click the Delete Tag icon ( ).
5 Click OK to conrm tag deletion.
Edit a Tag
You can edit a tag to change its name or description.
After a tag has been created, you cannot change the tag's category.
Prerequisites
Required privilege: Inventory Service.vSphere Tagging.Edit vSphere Tag on the root vCenter Server
instance.
Procedure
1 From the vSphere Web Client Home, click Tags.
2 Click the Items tab and click Tags.
3 Select the tag to edit.
4Click the Edit Tag icon ( ).
5 (Optional) In the Name text box, enter a new name for the tag.
Tag names must be unique within their category.
6 (Optional) In the Description text box, edit the description for the tag.
7 Click OK.
vCenter Server and Host Management
88 VMware, Inc.
Tagging Best Practices
Incorrect tagging can lead to replication errors. To avoid these errors, diligently follow best practices when
tagging objects.
When working with tags in multiple node situations, expect replication delays between the nodes (generally
30 seconds to 2 minutes depending on your setup). Follow these best practices to avoid replication errors:
nAfter creating a tag, if you immediately assign that tag to a local object, assign it from the management
node where you created the tag.
nAfter creating a tag, if you immediately assign that tag to a remote object, assign it from the
management node to which the object is local. Depending on your environment setup, allow for
replication time to propagate the new tag before you use the tag.
nAvoid simultaneously creating categories and tags from dierent management nodes before categories
and tags across nodes can nish the replication process. If duplicate categories or tags are created from
dierent nodes at the same time, the duplicates might not be detected and will appear. If you see these
results, manually delete duplicates from one management node.
Chapter 8 Tagging Objects
VMware, Inc. 89
vCenter Server and Host Management
90 VMware, Inc.

License Management and Reporting 9
vSphere provides centralized a license management and reporting system that you can use to manage
licenses for ESXi hosts, vCenter Server systems, Virtual SAN clusters, and solutions. Solutions are products
that integrate with vSphere such as VMware Site Recovery Manager, vCloud Networking and Security,
vRealize Operations Manager, and others.
nLicensing Terminology and Denitions on page 92
The licensing system in vSphere uses specic terminology and denitions to refer to dierent
licensing-related objects.
nThe License Service in vSphere 6.0 on page 93
In vSphere 6.0, the License Service is part of the Platform Services Controller and delivers centralized
license management and reporting functionality to vSphere and to products that integrate with
vSphere.
nLicensing for Environments with vCenter Server Systems 6.0 and 5.5 on page 93
If your vSphere 6.0 environment consists of vCenter Server 6.0 and 5.5 systems, you should consider
the dierences in the license management and reporting between vSphere 6.0 and vSphere 5.5.
nLicensing for Products in vSphere on page 94
ESXi hosts, vCenter Server, and Virtual SAN clusters are licensed dierently. To apply their licensing
models correctly, you must understand how the associated assets consume license capacity, the way
the evaluation period for each product functions, what happens if a product license expires, and so on.
nSuite Licensing on page 96
Suite products combine multiple components to provide a certain set of capabilities. Suite products
have a single license that you can assign to all suite components. When participating in a suite, suite
components have dierent licensing models than their standalone versions. Examples of suite
products are vCloud Suite and vSphere with Operations Management.
nManaging Licenses on page 97
To license an asset in vSphere, you must assign it a license that holds an appropriate product license
key. You can use the license management functionality in the vSphere Web Client to license multiple
assets at a time from a central place. Assets are vCenter Server systems, hosts, Virtual SAN clusters,
and solutions.
nViewing Licensing Information on page 102
You can view the licensing state of the vSphere environment from a central place by using the license
management functionality in the vSphere Web Client. You can view the licenses that are available in
vSphere, current license assignments and usage, available license capacity, licensed features in use,
and so on.
VMware, Inc. 91
nGenerating Reports for License Usage in the vSphere Web Client on page 104
You can track the license usage of your vSphere environment by generating reports for the license
usage of assets for a certain time period. Assets are hosts, vCenter Server systems, Virtual SAN
clusters, and solutions.
Licensing Terminology and Definitions
The licensing system in vSphere uses specic terminology and denitions to refer to dierent licensing-
related objects.
License Key A license key encodes details about the product it is associated with, the
license expiration date, the license capacity, and other information. The
license key is assigned to an object to activate the functionality of its
associated product.
License A container for a license key of a VMware product. To use a license key, you
create a license object in the vSphere Web Client, and insert the license key
into the license. Once the license is created, you can assign it to assets .
Product Edition A set of specic features that are associated with a unique license key. When
assigned, the license key unlocks the features in the product edition.
Examples of product editions are vSphere Enterprise, vSphere Standard,
vCenter Server Essentials, and so on.
Feature Functionality that is enabled or disabled by a license that is associated with a
specic product edition. Examples of features are vSphere DRS, vSphere
vMotion, and vSphere High Availability.
Solution A product that is packed and distributed independently from vSphere. You
install a solution in vSphere to take advantage of certain functionality. Every
solution has a licensing model specic for the solution, but uses the License
Service for license management and reporting. Examples of solutions are
VMware Site Recovery Manager, vRealize Operations Manager, vCloud
Network and Security, and so on.
Asset Any object in vSphere that requires licensing. The license administrator in
vSphere can assign one license to one or multiple assets of the same type if
the license has sucient capacity. Suite licenses can be assigned to all assets
that are part of the suite. Assets are vCenter Server systems, ESXi hosts, and
products that integrate with vSphere such as VMware Site Recovery
Manager, vRealize Operations Manager, and others.
License Capacity The number of units that you can assign to assets. The units of a license
capacity can be of dierent types depending on the product that the license is
associated with. For example, a license for vCenter Server determines the
number of vCenter Server systems that you can license.
License Usage The number of units that an asset uses from the capacity of a license. For
example, if you assign a per-virtual-machine license to VMware Site
Recovery Manager, the license usage for VMware Site Recovery Manager is
the number of protected virtual machines.
vCenter Server and Host Management
92 VMware, Inc.

The License Service in vSphere 6.0
In vSphere 6.0, the License Service is part of the Platform Services Controller and delivers centralized license
management and reporting functionality to vSphere and to products that integrate with vSphere.
You can use the License Service with newly installed vSphere 6.0 environments, or environments that are
upgraded from vSphere 5.x to vSphere 6.0 . For details about upgrading the license management in
vCenter Server 5.x to the License Service in vSphere 6.0, see the vSphere Upgrade guide.
The License Service provides an inventory of licenses in the vSphere environment, and manages the license
assignments for ESXi hosts, vCenter Server systems, and clusters with enabled Virtual SAN. The License
Service also manages the license assignments for products that integrate with vSphere, such as vRealize
Operations Manager, VMware Site Recovery Manager, and so on.
If your vSphere environment has several Platform Services Controllers that are joined through one vCenter
Single Sign-on domain, the licensing inventory is replicated across all Platform Services Controllers . This
way, the licensing data for each asset and all available licenses are replicated across all of the
Platform Services Controllers, and each individual Platform Services Controller contains a copy of that data
and licenses for all of the Platform Services Controllers.
N Licensing data is replicated across multiple Platform Services Controllers on a 10 minute interval.
For example, suppose that your environment consists of two Platform Services Controllers that are
connected to four vCenter Server systems each, and every vCenter Server system has 10 hosts connected to
it. The License Service stores information about the license assignments and usage for all eight
vCenter Server systems, and the 80 hosts that are connected to those systems. The License Service also lets
you manage the licensing for all eight vCenter Server systems and the 80 hosts that are connected to them
through the vSphere Web Client.
Licensing for Environments with vCenter Server Systems 6.0 and 5.5
If your vSphere 6.0 environment consists of vCenter Server 6.0 and 5.5 systems, you should consider the
dierences in the license management and reporting between vSphere 6.0 and vSphere 5.5.
The License Service in vSphere 6.0 manages the licensing data for all ESXi hosts, Virtual SAN clusters, and
solutions that are associated with the vCenter Server 6.0 systems in the vSphere environment. However,
every standalone vCenter Server 5.5 system manages the licensing data only for the hosts, solutions, and
Virtual SAN clusters that are associated with that system . Licensing data for linked vCenter Server 5.5
systems is replicated only for the vCenter Server 5.5 systems in the group.
Due to the architectural changes in vSphere 6.0, you can either manage the licensing data for all assets that
are associated with all vCenter Server 6.0 systems in vSphere, or manage the licensing data for individual
vCenter Server 5.5 systems or a group of linked vCenter Server 5.5 systems. The licensing interface in the
vSphere Web Client 6.0 lets you select between all vCenter Server 6.0 systems and vCenter Server 5.5
systems.
Chapter 9 License Management and Reporting
VMware, Inc. 93
Licensing for Products in vSphere
ESXi hosts, vCenter Server, and Virtual SAN clusters are licensed dierently. To apply their licensing models
correctly, you must understand how the associated assets consume license capacity, the way the evaluation
period for each product functions, what happens if a product license expires, and so on.
Licensing for ESXi Hosts
ESXi hosts are licensed with vSphere licenses. Each vSphere license has a certain CPU capacity that you can
use to license multiple physical CPUs on ESXi hosts. When you assign a vSphere license to a host, the
amount of CPU capacity that is consumed is equal to the number of physical CPUs in the host. vSphere
Desktop that is intended for VDI environments is licensed on per virtual machine basis.
To license an ESXi host, you must assign it a vSphere license that meets the following prerequisites:
nThe license must have sucient CPU capacity to license all physical CPUs on the host. For example, to
license two ESXi hosts that have four CPUs each, you need to assign a vSphere license with a minimum
capacity of 8 CPUs to the hosts.
nThe license must support all the features that the host uses. For example, if the host is associated with a
vSphere Distributed Switch, the license that you assign must support the vSphere Distributed Switch
feature.
If you aempt to assign a license that has insucient capacity or does not support the features that the host
uses, the license assignment fails.
You can assign and reassign the CPU capacity of a vSphere license to any combination of ESXi hosts. . You
can assign a vSphere license for 10 CPUs to any of the following combinations of hosts:
nFive 2-CPU hosts
nThree 2-CPU hosts and one 4-CPU host
nTwo 4-CPU hosts and one 2-CPU host
nOne 8-CPU host and one 2-CPU host
Dual-core and quad-core CPUs, such as Intel CPUs that combine two or four independent CPUs on a single
chip, count as one CPU.
Evaluation Mode
When you install ESXi, its default license is evaluation mode. Evaluation mode licenses expire after 60 days.
An evaluation mode license provides the set of features that equals the highest vSphere product edition.
If you assign a license to an ESXi host before its evaluation period expires, the time available in the
evaluation period is decreased by the time already used. To explore the entire set of features that are
available for the host, you can set it back to evaluation mode, and use it for the remaining evaluation period.
For example, if you use an ESXi host in evaluation mode for 20 days and then assign a vSphere Standard
license to the host and then set the host back to evaluation mode, you can explore the entire set of features
that are available for the host for the remaining evaluation period of 40 days.
License and Evaluation Period Expiry
For ESXi hosts, license or evaluation period expiry leads to disconnection from vCenter Server. All powered
on virtual machines continue to work, but you cannot power on virtual machines after they are powered o.
You cannot change the current conguration of the features that are in use. You cannot use the features that
remained unused while the host was in evaluation mode.
vCenter Server and Host Management
94 VMware, Inc.
Licensing ESXi Hosts After Upgrade
If you upgrade an ESXi host to a version that starts with the same number, you do not need to replace the
existing license with a new one. For example, if you upgrade a host from ESXi 5.1 to 5.5, you can use the
same license for the host.
If you upgrade an ESXi host to a version that starts with a dierent number, you must apply a new license.
For example, if you upgrade an ESXi host from 5.x to 6.x, you need to license the host with a vSphere 6
license.
vSphere Desktop
vSphere Desktop is intended for VDI environments such as Horizon View. The license usage for vSphere
Desktop equals the total number of powered on desktop virtual machines running on the hosts that are
assigned a vSphere Desktop license.
Licensing for vCenter Server
vCenter Server systems are licensed with vCenter Server licenses that have per-instance capacity.
To license a vCenter Server system, you need a vCenter Server license that has the capacity for at least one
instance.
Evaluation Mode
When you install a vCenter Server system, it is in evaluation mode. An evaluation mode license of a
vCenter Server system expires 60 days after the product is installed no maer whether you assign a license
to vCenter Server or not . You can set vCenter Server back to evaluation mode only within 60 days after its
installation.
For example, suppose that you install a vCenter Server system and use it in evaluation mode for 20 days and
assign the system an appropriate license. The evaluation mode license of vCenter Server will expire after the
remaining 40 days of the evaluation period.
License and Evaluation Period Expiry
When the license or evaluation period of a vCenter Server system expires, all hosts disconnect from that
vCenter Server system.
Licensing vCenter Server after Upgrade
If you upgradevCenter Server to a version that starts with the same number, you can keep the same license.
For example, if you upgrade a vCenter Server system from vCenter Server 5.1 to 5.5., you can keep the same
license on the system.
If you upgrade vCenter Server to a version that starts with a dierent number, you must apply a new
license. For example, if you upgrade a vCenter Server system from 5.x to 6.x, you must license the system
with a vCenter Server 6 license.
If you upgrade the edition of the license, for example, from vCenter Server Foundation to vCenter Server
Standard, you must replace the existing license on the system with the upgraded license.
Chapter 9 License Management and Reporting
VMware, Inc. 95
Licensing for Clusters with Enabled Virtual SAN
After you enable Virtual SAN on a cluster, you must assign the cluster an appropriate Virtual SAN license.
Just like vSphere licenses, Virtual SAN licenses have per CPU capacity. When you assign a Virtual SAN
license to a cluster, the amount of license capacity that is used equals the total number of CPUs in the hosts
that participate in the cluster. For example, if you have a Virtual SAN cluster that contains 4 hosts with 8
CPUs each, you need to assign the cluster a Virtual SAN license with a minimum capacity of 32 CPUs.
The license usage of the Virtual SAN cluster is recalculated and updated in one of the following cases:
nIf you assign a new license to the Virtual SAN cluster.
nIf you add a new host to the Virtual SAN cluster.
nIf a host is removed from the cluster.
nIf the total number of CPUs in a cluster changes.
You must maintain the Virtual SAN clusters in compliance with the Virtual SAN licensing model. The total
number of CPUs of all hosts in the cluster must not exceed the capacity of the Virtual SAN license that is
assigned to the cluster.
License and Evaluation Period Expiry
When the license or the evaluation period of a Virtual SAN expires, you can continue to use the currently
congured Virtual SAN resources and features. However, you cannot add SSD or HDD capacity to an
existing disk group or create new disk groups.
Virtual SAN for Desktop
Virtual SAN for Desktop is intended for use in VDI environments, such as vSphere for Desktop or
Horizon™ View™. The license usage for Virtual SAN for Desktop equals the total number of powered on
VMs in a cluster with enabled Virtual SAN.
To remain EULA compliant, the license usage for Virtual SAN for Desktop must not exceed the license
capacity. The number of powered on desktop VMs in a Virtual SAN cluster must be less than or equal to the
license capacity of Virtual SAN for Desktop.
Suite Licensing
Suite products combine multiple components to provide a certain set of capabilities. Suite products have a
single license that you can assign to all suite components. When participating in a suite, suite components
have dierent licensing models than their standalone versions. Examples of suite products are vCloud Suite
and vSphere with Operations Management.
Licensing for VMware vCloud® Suite
VMware vCloud® Suite combines multiple components into a single product to cover the complete set of
cloud infrastructure capabilities. When used together, the vCloud Suite components provide virtualization,
software-dened data center services, policy-based provisioning, disaster recovery, application
management, and operations management.
A vCloud Suite edition combines components such as vSphere, vCloud Director, vCloud Networking and
Security, and others, under a single license. vCloud Suite editions are licensed on per-CPU basis. Many of
the vCloud Suite components are also available as standalone products licensed on per-virtual machine
basis. However, when these components are obtained through vCloud Suite, they are licensed on per-CPU
basis.
vCenter Server and Host Management
96 VMware, Inc.

The components from a vCloud Suite edition are activated with a single license key. For example, if you
have a license key for vCloud Suite Standard, you assign the same key to all assets that will run vCloud
Suite, for example, ESXi hosts, vCloud Automation Center, vCloud Director, and others.
All virtual machines running on a CPU licensed with a vCloud Suite edition can use all components
included in that vCloud Suite edition. You can run unlimited number of virtual machines on the CPUs that
are licensed with a vCloud Suite edition. To run virtual machines on CPUs that are not licensed for vCloud
Suite, you need individual licenses for the products that you want to use.
For more information about the licensing model of vCloud Suite, see the vCloud Suite documentation.
Licensing for vSphere® with Operations Management
VMware vSphere® with Operations Management™ combines vSphere and vCenter™ Operations
ManagementSuite™ Standard under a single suite with a single license. vSphere with Operations
Management lets you gain operational insight in vSphere and optimize resource allocation by providing
monitoring, performance, and capacity information about the vSphere environment.
vSphere with Operations Management is licensed on a per-processor basis. To run vSphere with Operations
Management, you must assign ESXi hosts a vSphere with Operations Management license. You can run
unlimited number of virtual machines on the hosts that are licensed for vSphere with Operations
Management.
Managing Licenses
To license an asset in vSphere, you must assign it a license that holds an appropriate product license key.
You can use the license management functionality in the vSphere Web Client to license multiple assets at a
time from a central place. Assets are vCenter Server systems, hosts, Virtual SAN clusters, and solutions.
In vSphere, you can assign one license to multiple assets of the same type if the license has enough capacity.
You can assign a suite license to all components that belong to the suite product edition. For example, you
can assign one vSphere license to multiple ESXi hosts, but you cannot assign two licenses to one host. If you
have a vCloud Suite license, you can assign the license to ESXi hosts, vCloud Networking and Security,
vCenter Site Recovery Manager, and so on.
Managing Licenses in vSphere (hp://link.brightcove.com/services/player/bcpid2296383276001?
bctid=video_manage_vsphere_license)
Create New Licenses
When you purchase, divide, or combine license keys in My VMware, you must use the new keys to license
assets in your vSphere environment. You must go to the vSphere Web Client and create a new license object
for every license key. In the vSphere Web Client, a license is a container for a license key of a VMware
product. After you create the new licenses, you can assign them to assets.
Prerequisites
nTo view and manage licenses in the vSphere 6.0 environment, you must have the Global.Licenses
privilege on the vCenter Server system, where the vSphere Web Client runs.
Procedure
1 In the vSphere Web Client, select Administration, and under Licensing, select Licenses.
2 Select the Licenses tab.
3Click the Create New Licenses ( ) icon.
Chapter 9 License Management and Reporting
VMware, Inc. 97

4 In the text area of the Enter licenses keys page, enter one license key per line, and click Next.
You can enter a list of keys in one operation. A new license will be created for every license key that you
enter.
5 On the Edit license names page, rename the new licenses as appropriate and click Next .
6 On the Ready to complete page, review the new licenses and click Finish.
A new license is created for every license key that you entered.
What to do next
Assign the new licenses to hosts, vCenter Server systems, or other products that you use with vSphere. You
must not keep unassigned licenses in the inventory.
Assign a License to Multiple Assets
To continue using product functionality, you must assign appropriate licenses to assets in evaluation mode,
or assets with expiring licenses. When you upgrade a license edition, combine, or split licenses in My
VMware, you must assign the new licenses to assets. You can assign licenses that are already available, or
create new licenses and assign them to the assets in a single workow. Assets are vCenter Server systems,
ESXi hosts, Virtual SAN clusters, and other products that integrate with vSphere .
Prerequisites
nTo view and manage licenses in the vSphere 6.0 environment, you must have the Global.Licenses
privilege on the vCenter Server system, where the vSphere Web Client runs.
Procedure
1 In the vSphere Web Client, select Administration, and under Licensing, select Licenses.
2 Select the Assets tab.
3 Select the vCenter Server systems, Hosts, Clusters, or Solutions tab.
4 Use Shift+click to select the assets to license.
5 Click Assign License.
6 Select a licensing method.
nSelect an existing license and click OK.
nCreate a new license.
aClick the Create New License ( ) icon.
b In the New Licenses dialog, type or copy and paste a license key and click Next.
c On the Edit license names page, rename the new license as appropriate and click Next.
d Click Finish.
e In the Assign License dialog, select the newly-created license and click OK.
The license is assigned to the assets. Capacity from the license is allocated according to the license usage of
the assets. For example, if you assign the license to 3 hosts with 4 CPUs each, the consumed license capacity
is 12 CPUs.
vCenter Server and Host Management
98 VMware, Inc.

Configure License Settings for an ESXi Host
You must assign a license to an ESXi host before its evaluation period expires or its currently assigned
license expires. If you upgrade, combine, or divide vSphere licenses in My VMware, you must assign the
new licenses to ESXi hosts.
Prerequisites
nTo view and manage licenses in the vSphere 6.0 environment, you must have the Global.Licenses
privilege on the vCenter Server system, where the vSphere Web Client runs.
Procedure
1 In the vSphere Web Client, navigate to the host in the inventory.
2 Select the Manage tab.
3 Under System, select Licensing.
4 Click Assign License.
5 Select a licensing method.
nSelect an existing license and click OK.
nCreate a new license.
aClick the Create New License ( ) icon.
b In the New Licenses dialog, type or copy and paste a license key and click Next.
c On the Edit license names page, rename the new license as appropriate and click Next.
d Click Finish.
e In the Assign License dialog, select the newly-created license and click OK.
The license is assigned to the host. Capacity from the license is allocated according to the license usage of the
host.
Configure License Settings for vCenter Server
You must assign a license to a vCenter Server system before its evaluation period expires or its currently
assigned license expires. If you upgrade, combine, or divide vCenter Server licenses in My VMware, you
must assign the new licenses to vCenter Server systems.
Prerequisites
nTo view and manage licenses in the vSphere 6.0 environment, you must have the Global.Licenses
privilege on the vCenter Server system, where the vSphere Web Client runs.
Procedure
1 In the vSphere Web Client, navigate to the vCenter Server system.
2 Select the Manage tab.
3 Under System, select Licensing.
4 Click Assign License.
Chapter 9 License Management and Reporting
VMware, Inc. 99

5 Select a licensing method.
nSelect an existing license and click OK.
nCreate a new license.
aClick the Create New License ( ) icon.
b In the New Licenses dialog, type or copy and paste a license key and click Next.
c On the Edit license names page, rename the new license as appropriate and click Next.
d Click Finish.
e In the Assign License dialog, select the newly-created license and click OK.
The license is assigned to the vCenter Server system, and one instance from the license capacity is allocated
for thevCenter Server system.
Assign a License to a Virtual SAN Cluster
You must assign a license to a Virtual SAN cluster before its evaluation period expires or its currently
assigned license expires.
If you upgrade, combine, or divide Virtual SAN licenses, you must assign the new licenses to Virtual SAN
clusters. When you assign a Virtual SAN license to a cluster, the amount of license capacity that is used
equals the total number of CPUs in the hosts participating in the cluster. The license usage of the Virtual
SAN cluster is recalculated and updated every time you add or remove a host from the cluster. For
information about managing licenses and licensing terminology and denitions, see the vCenter Server and
Host Management documentation.
When you enable Virtual SAN on a cluster, you can use Virtual SAN in evaluation mode to explore its
features. The evaluation period starts when Virtual SAN is enabled, and expires after 60 days. To use Virtual
SAN, you must license the cluster before the evaluation period expires. Just like vSphere licenses, Virtual
SAN licenses have per CPU capacity. Some features, such as all-ash conguration and stretched clusters,
require a license that supports the feature.
Prerequisites
nTo view and manage Virtual SAN licenses, you must have the Global.Licenses privilege on the
vCenter Server systems, where the vSphere Web Client runs.
Procedure
1 In the vSphere Web Client, navigate to a cluster where you have enabled Virtual SAN.
2 On the Manage tab, click .
3 Under , select Licensing, and click Assign License.
4 Select a licensing option.
nSelect an existing license and click OK.
nCreate a new Virtual SAN license.
aClick the Create New License ( ) icon.
b In the New Licenses dialog box, type or copy and paste a Virtual SAN license key and click
Next.
c On the Edit license names page, rename the new license as appropriate and click Next.
d Click Finish.
e In the Assign License dialog, select the newly created license and click OK.
vCenter Server and Host Management
100 VMware, Inc.

Set Assets to Evaluation Mode
To explore the complete set of features available for an asset, you can set it to evaluation mode.
Dierent products have dierent terms for using their evaluation mode. Before you set an asset to
evaluation mode, you should consider the specics for using the evaluation mode of its associated product.
For details, see the licensing model documentation for the relevant product at “Licensing for Products in
vSphere,” on page 94
Prerequisites
nTo view and manage licenses in the vSphere 6.0 environment, you must have the Global.Licenses
privilege on the vCenter Server system, where the vSphere Web Client runs.
Procedure
1 In the vSphere Web Client, select Administration, and under Licensing, select Licenses.
2 Select the Assets tab.
3 Select the vCenter Server systems, Hosts, Clusters, or Solutions tab.
4 Select the asset that you want to set to evaluation mode.
5 Click Assign License.
6 Select Evaluation License.
7 Click OK to save your changes.
The asset is in evaluation mode. You can explore the entire set of features that are available for the asset.
N You must assign an appropriate license to the asset before its evaluation period expires. Otherwise
the asset will get into unlicensed state and certain functionality will be blocked.
Rename a License
After you create a license, you can change its name.
Prerequisites
nTo view and manage licenses in the vSphere 6.0 environment, you must have the Global.Licenses
privilege on the vCenter Server system, where the vSphere Web Client runs.
Procedure
1 In the vSphere Web Client, select Administration, and under Licensing, select Licenses.
2 Select the Licenses tab.
3 Select the license to rename, and click Rename License.
4 Type the new license name and click OK.
Remove Licenses
To remain in compliance with the licensing models of products that you use with vSphere, you must remove
all unassigned licenses from the inventory. If you have divided, combined, or upgraded licenses in My
VMware, you must remove the old licenses.
For example, suppose that you have upgraded a vSphere license from 5.5 to 6.0 in My VMware. You assign
the license to ESXi 6.0 hosts. After assigning the new vSphere 6.0 licenses, you must remove the old vSphere
5.5 license from the inventory.
Chapter 9 License Management and Reporting
VMware, Inc. 101

Prerequisites
nTo view and manage licenses in the vSphere 6.0 environment, you must have the Global.Licenses
privilege on the vCenter Server system, where the vSphere Web Client runs.
Procedure
1 In the vSphere Web Client, select Administration, and under Licensing, select Licenses.
2 Select the Licenses tab.
3 From the Show drop-down menu, select Unassigned to display only the unassigned licenses.
4 By pressing Ctrl+A select all licenses to remove.
5Click Remove Licenses ( ) .
6 Review the conrmation message and click Yes.
Viewing Licensing Information
You can view the licensing state of the vSphere environment from a central place by using the license
management functionality in the vSphere Web Client. You can view the licenses that are available in
vSphere, current license assignments and usage, available license capacity, licensed features in use, and so
on.
View Licensing Information About the vSphere Environment
You can view the available licenses in vSphere along with their expiration dates, available capacity, and
usage. You can also view the available products and assets.
Prerequisites
nTo view and manage licenses in the vSphere 6.0 environment, you must have the Global.Licenses
privilege on the vCenter Server system, where the vSphere Web Client runs.
Procedure
1 In the vSphere Web Client, select Administration, and under Licensing, select Licenses.
2 Select a tab for the licensing information that you want to view.
Tab Description
Licenses Lists all licenses that are available in the vSphere environment. For every
license, you can view the associated license key, license usage, license
capacity, and expiration date.
Products Lists the products that have licenses available in the vSphere environment.
You can view the licenses that are available for every product, licensed
features, license usage, and license capacity.
Assets Displays licensing information about the assets that are available in the
vSphere environment. Assets are vCenter Server systems, hosts, Virtual
SAN clusters, and other products that you use with vSphere that are listed
under Solutions.
What to do next
To comply with the EULA of vSphere and the products that you use with vSphere, you should not keep
unassigned licenses in the inventory.
nIf any unassigned licenses exist, assign these licenses to assets.
vCenter Server and Host Management
102 VMware, Inc.
nRemove all expired licenses or licenses that you do not intend to assign. For example, if you have
upgraded, divided, or combined any licenses in My VMware, you must remove the old licenses from
the inventory.
View Available Licenses and Features About a Product
You can view information about a product, such as the available licenses, features, and license capacity in
the vSphere Web Client.
Prerequisites
nTo view and manage licenses in the vSphere 6.0 environment, you must have the Global.Licenses
privilege on the vCenter Server system, where the vSphere Web Client runs.
Procedure
1 In the vSphere Web Client, select Administration, and under Licensing, select Licenses.
2 Select Products.
3 In the table, select the product for which you want to view information.
4 To view the licenses that are available for the product, click the arrow next to the product name to
expand the row.
5 To view the licensed features for the product, click the View Features toolbar icon.
View the Features that an Asset Uses
You can view the features that an asset uses before you assign it a license. For example, if an ESXi host is in
evaluation mode, you can view which features the hosts uses and then assign an appropriate license to it.
Prerequisites
nTo view and manage licenses in the vSphere 6.0 environment, you must have the Global.Licenses
privilege on the vCenter Server system, where the vSphere Web Client runs.
Procedure
1 In the vSphere Web Client, select Administration, and under Licensing, select Licenses.
2 Select the Assets tab.
3 Select the vCenter Server systems, Hosts, Clusters or the Solutions option.
4 Select an asset and click the View Features in Use toolbar icon.
View the License Key of the License
In vSphere, a license holds a license key for a product. You can view the associated license key for every
license.
Prerequisites
nTo view and manage licenses in the vSphere 6.0 environment, you must have the Global.Licenses
privilege on the vCenter Server system, where the vSphere Web Client runs.
Procedure
1 In the vSphere Web Client, select Administration, and under Licensing, select Licenses.
2 Select the Licenses tab.
3 In the table, select a license.
Chapter 9 License Management and Reporting
VMware, Inc. 103
4 Click View License Key.
View the Licensed Features for an Asset
Before you start to use a feature on an asset, you can check whether the asset is licensed to use this feature.
For example, to use vSphere HA, you should check whether all hosts in a vSphere HA cluster are licensed
for this feature.
Prerequisites
nTo view and manage licenses in the vSphere 6.0 environment, you must have the Global.Licenses
privilege on the vCenter Server system, where the vSphere Web Client runs.
Procedure
1 In the vSphere Web Client, navigate to the asset whose licensed features you want to view.
2 Click the Manage tab.
3 Select the option.
4 Under System, select Licensing.
The list of features that you can congure on the asset appears on the right.
Generating Reports for License Usage in the vSphere Web Client
You can track the license usage of your vSphere environment by generating reports for the license usage of
assets for a certain time period. Assets are hosts, vCenter Server systems, Virtual SAN clusters, and
solutions.
You can use the license reporting in vSphere for the following tasks:
nView statistics about the license usage and capacity for all products that have been assigned licenses in
vSphere for a certain time period.
nExport license usage reports in CSV format for further analysis and processing.
The License Service takes snapshots of the license usage in the vSphere environment every day. A license
usage snapshot contains data about the current license assignment and usage. The license usage information
that you can view in the license reporting interface contains aggregated statistics from the snapshots that are
collected in the period that you select.
The license usage reports that you can export in CSV format contain the raw data from the license usage
snapshots that are collected during the selected period. You can analyze the data from CSV reports by
aggregating it with third-party tools or scripts.
View the License Usage for Multiple Products
Tracking the license usage for products helps you to estimate the overall license requirements for your
environment and to keep it correctly licensed. You can lter the license usage data by time period.
Prerequisites
nTo view and generate license usage reports for the products in vSphere 6.0, you must have the
Global.Licenses privilege on the vCenter Server system, where the vSphere Web Client runs.
Procedure
1 In the vSphere Web Client, select Administration, and under Licensing select Reports.
2 From the Time period drop-down menu, select a precongured or a custom time period for which you
want to generate license use data.
vCenter Server and Host Management
104 VMware, Inc.

3 If you select a custom time period, select the start and end dates, and click Recalculate.
The Report Summary shows the license usage for each product as a percentage of the license capacity for the
product over the selected period.
View License Usage Details for a Single Product
You can view details about the license usage and capacity of a certain product. You can lter the license
usage data by time period.
Prerequisites
nTo view and generate license usage reports for the products in vSphere 6.0, you must have the
Global.Licenses privilege on the vCenter Server system, where the vSphere Web Client runs.
Procedure
1 In the vSphere Web Client, select Administration, and under Licensing select Reports.
2 From the Time period drop-down menu, select a precongured or a custom time period for which you
want to generate license usage data.
3 If you select a custom time period, specify the start and end dates, and click Recalculate.
4 Select a product from the Report Summary pane.
Details about the license usage for the selected product appear. The Usage Breakdown table lists all the
licenses for the product that are assigned to assets in the selected period. The table can list licenses that are
not used currently but were assigned to assets in the selected period.
The License Service collects license usage snapshots every day. The license usage on the Usage Breakdown
table is an aggregated value from the raw data in the license usage snapshots that are collected within the
selected time period.
Export a License Usage Report
You can export a report for the license usage of products for a certain time period. The report is exported in
a CSV le that you can later open with third-party applications.
I A tamper-detection feature in the License Service protects the license usage information. If the
licensing data in the License Service database has been edited, you cannot export a license usage report.
Prerequisites
nTo export license usage reports, you must have the Global.Licenses privilege on the vCenter Server
system, where the vSphere Web Client runs.
Procedure
1 In the vSphere Web Client, select Administration, and under Licensing select Reports.
2 Click Export Licensing Usage Report.
The Export Licensing Usage Report window appears.
3 Select a precongured or a custom time period for the license usage report from the Time period drop-
down menu.
4 Click Generate CSV report.
The operation takes a few seconds.
5 Click Save.
Chapter 9 License Management and Reporting
VMware, Inc. 105
6 Browse to the location where you want to save the le and click Save.
The license usage for products over the selected time period is exported in a CSV le. The CSV le is
contained in a .zip le that is saved to the location that you specied.
The exported report contains raw data about the license usage of products over the selected period. The
rows of the exported CSV le list the license usage snapshots that the License Service has collected daily
over the selected period. You can use third-party tools to open the CSV report and analyse its data.
A license usage snapshot contains data about the assigned licenses, associated products, license expiration
date, license units (cost units), capacity, usage, asset ID, and so on. Permanent licenses do not have an
expiration date listed. vCloud Suite is licensed on per CPU basis, and so, the license usage for vCloud Suite
products is reected only for ESXi hosts that are assigned licenses from the corresponding vCloud Suite
editions.
vCenter Server and Host Management
106 VMware, Inc.

Working with Tasks 10
vSphere tasks are activities and actions that occur on an object within the vSphere inventory.
This chapter includes the following topics:
n“Managing Tasks,” on page 107
n“Schedule Tasks,” on page 107
Managing Tasks
Tasks represent system activities that do not complete immediately, such as migrating a virtual machine.
They are initiated by high-level activities that you perform with the vSphere Web Client in real time and
activities that you schedule to occur at a later time or on a recurring basis.
For example, powering o a virtual machine is a task. You can perform this task manually every evening, or
you can set up a scheduled task to power o the virtual machine every evening for you.
View Tasks
You can view tasks that are associated with a single object or all objects in the vSphere Web Client.
By default, the tasks list for an object also includes tasks performed on its child objects. You can lter the list
by removing tasks performed on child objects and by using keywords to search for tasks.
If you are logged in to a vCenter Server system that is part of a Connected Group, a column in the task list
displays the name of the vCenter Server system on which the task was performed.
Procedure
1 Navigate to an object in the inventory.
2 Click the Monitor tab, then click Tasks.
The task list contains tasks performed on the object and detailed information, such as target, task status,
initiator, and start/completion time of the task.
3 (Optional) To view related events for a task, select the task in the list.
Schedule Tasks
You can schedule tasks to run once in the future or multiple times, at a recurring interval.
The tasks you can schedule are listed in the following table.
VMware, Inc. 107

Table 10‑1. Scheduled Tasks
Scheduled Task Description
Add a host Adds the host to the specied data center or cluster.
Change the power state of a virtual
machine
Powers on, powers o, suspends, or resets the state of the virtual machine.
Change cluster power seings Enable or disable DPM for hosts in a cluster.
Change resource seings of a resource pool
or virtual machine
Changes the following resource seings:
nCPU – Shares, Reservation, Limit.
nMemory – Shares, Reservation, Limit.
Check compliance of a prole Checks that a host's conguration matches the conguration specied in a
host prole.
Clone a virtual machine Makes a clone of the virtual machine and places it on the specied host or
cluster.
Create a virtual machine Creates a new virtual machine on the specied host.
Deploy a virtual machine Creates a new virtual machine from a template on the specied host or
cluster.
Migrate a virtual machine Migrate a virtual machine to the specied host or datastore by using
migration or migration with vMotion.
Make a snapshot of a virtual machine Captures the entire state of the virtual machine at the time the snapshot is
taken.
Scan for Updates Scans templates, virtual machines, and hosts for available updates.
This task is available only when vSphere Update Manager is installed.
Remediate Installs missing patches from the baselines selected for remediation on the
hosts discovered during the scan operation and applies the newly
congured seings.
This task is available only when vSphere Update Manager is installed.
You create scheduled tasks by using the Scheduled Task wizard. For some scheduled tasks, this wizard
opens the wizard used specically for that task. For example, if you create a scheduled task that migrates a
virtual machine, the Scheduled Task wizard opens the Migrate Virtual Machine wizard, which you use to set
up the migration details.
Scheduling one task to run on multiple objects is not possible. For example, you cannot create one scheduled
task on a host that powers on all virtual machines on that host. You must create a separate scheduled task
for each virtual machine.
After a scheduled task runs, you can reschedule it to run again at another time.
Create a Scheduled Task
You can create scheduled tasks for operations that you want to automatically run once or at a recurring
interval.
If the task to schedule is not available in the vSphere Web Client, use the vSphere API. See the vSphere SDK
Programming Guide.
C Do not schedule multiple tasks simultaneously on the same object. The results are unpredictable.
Prerequisites
Required privilege: Schedule Task.Create tasks
vCenter Server and Host Management
108 VMware, Inc.

Procedure
1 In the vSphere Web Client, navigate to the object for which you want to schedule a task.
2 Select Manage, and select Scheduled Tasks.
3 From the Schedule New Task drop-down list, select the task to schedule.
A wizard opens for the task with (scheduled) appended next to its name. The wizard contains a
Scheduling options page, where you congure the scheduling options for the task. For example, to
schedule taking a virtual machine snapshot, the Take a VM Snapshot wizard (scheduled) opens. In Edit
, you enter the properties for the snapshot, and in Scheduling options,you congure the
scheduling options for the task.
4 In the Scheduling options page, congure the required seings for the task.
a Type a name and a description for the task.
b To congure the scheduling seings for the task, click Change next to Congured Scheduler.
Table 10‑2. Scheduler options
Option Description
Run this action now Runs the scheduled task immediately.
Run this action after startup Runs the task after a certain number of minutes.
Schedule this action to run later Runs the scheduled task at a date and time that you specify.
Setup a recurring schedule for this
action
Runs the scheduled task on a recurring paern.
Hourly 1 Type the number of hours after which to run the task.
2 Type the number of minutes after the hour to run the task.
For example, to start a task at the half-hour mark of every fth
hour, type 5 hours and 30 minutes.
Daily 1 Type the number of days on which to run the task.
2 Type the start time for the task.
For example, to run the task at 2:30 pm every four days, type 4 and
2:30.
Weekly 1 Type the number of weeks on which the task must run.
2 Select the day of the week you want the task to run.
3 Type the start time for the task.
For example, to run the task at 6 am every Tuesday and Thursday,
type 1 week, 6 am, and select Tuesday and Thursday.
Monthly 1 Type the start time for the task.
2 Select the days by using one of the following methods.
nType a specic day of the month and the number of
months to run the task on. For example, the tenth day
every ve months.
nSelect , second, third, fourth, or last, and select the
day of the week and the number of months to run the task
on.
last runs the task on the last week in the month that the
day occurs. For example, if you select the last Monday of
the month and the month ends on a Sunday, the task runs
six days before the end of the month.
c Set up email notications and click OK.
Chapter 10 Working with Tasks
VMware, Inc. 109
Change or Reschedule a Task
After a scheduled task is created, you can change the schedule, frequency, and other aributes of the task.
You can edit and reschedule tasks before or after they run.
Prerequisites
Required privilege:Schedule Task.Modify
Procedure
1 In the vSphere Web Client, navigate to the object for which you want to edit a scheduled task.
To view all scheduled tasks for a vCenter Server instance, navigate to that vCenter Server instance.
2 Select Manage > Scheduled Tasks.
3 Right-click the task and select Edit.
4 Change the task aributes as necessary.
5 Click OK.
Remove a Scheduled Task
Removing a scheduled task removes all future occurrences of the task. The history associated with all
completed occurrences of the task remains in the vCenter Server database.
Prerequisites
Required privilege:Scheduled task.Remove
Procedure
1 In the vSphere Web Client, navigate to the object for which you want to remove a scheduled task.
To view all scheduled tasks for a vCenter Server instance, navigate to that vCenter Server instance.
2 Select Manage > Scheduled Tasks.
3 Right-click the task to remove and select Remove.
vCenter Server and Host Management
110 VMware, Inc.

Reboot or Shut Down an ESXi Host 11
You can power o or restart (reboot) any ESXi host using the vSphere Client. Powering o a managed host
disconnects it from vCenter Server, but does not remove it from the inventory.
Procedure
1 Shut down all virtual machines running on the ESXi host.
2 Select the ESXi host you want to shut down.
3 From the main or right-click menu, select Reboot or Shut Down.
nIf you select Reboot, the ESXi host shuts down and reboots.
nIf you select Shut Down, the ESXi host shuts down. You must manually power the system back on.
4 Provide a reason for the shut down.
This information is added to the log.
VMware, Inc. 111
vCenter Server and Host Management
112 VMware, Inc.

Managing Hosts in vCenter Server 12
To access the full capabilities of the host that you are managing, connect the host to a vCenter Server system.
For information about conguration management of ESXi hosts, see the vSphere Networking documentation,
the vSphere Storage documentation, and the vSphere Security documentation.
This chapter includes the following topics:
n“Disconnecting and Reconnecting a Host,” on page 113
n“Remove a Host from a Cluster,” on page 114
n“Remove a Managed Host from vCenter Server,” on page 115
Disconnecting and Reconnecting a Host
You can disconnect and reconnect a host that a vCenter Server system manages. Disconnecting a managed
host does not remove it from vCenter Server; it temporarily suspends all monitoring activities that
vCenter Server performs.
The managed host and its associated virtual machines remain in the vCenter Server inventory. By contrast,
removing a managed host from vCenter Server removes the managed host and all its associated virtual
machines from the vCenter Server inventory.
Disconnect a Managed Host
Use the vSphere Client to disconnect a managed host from vCenter Server.
Procedure
1 From the vSphere Client connected to a vCenter Server system, display the inventory and click the
managed host to disconnect.
2 Right-click the host and select Disconnect from the pop-up menu.
3 In the conrmation dialog box that appears, click Yes.
If the managed host is disconnected, the word “disconnected” is appended to the object name in
parentheses, and the object is dimmed. All associated virtual machines are similarly dimmed and
labeled.
VMware, Inc. 113
Reconnect a Managed Host
Use the vSphere Client to reconnect a managed host to a vCenter Server system.
Procedure
1 From the vSphere Client connected to a vCenter Server system, display the inventory and click the
managed host to reconnect.
2 Right-click the host and select Connect from the pop-up menu.
When the managed host’s connection status to vCenter Server is changed, the statuses of the virtual
machines on that managed host are updated to reect the change.
Reconnecting Hosts After Changes to the vCenter Server SSL Certificate
vCenter Server uses an SSL certicate to encrypt and decrypt host passwords stored in the vCenter Server
database. If the certicate is replaced or changed, vCenter Server cannot decrypt host passwords, and
therefore cannot connect to managed hosts.
If vCenter Server fails to decrypt a host password, the host is disconnected from vCenter Server. You must
reconnect the host and supply the login credentials, which will be encrypted and stored in the database
using the new certicate.
Remove a Host from a Cluster
When a host is removed from a cluster, the resources it provides are deducted from the total cluster
resources. The virtual machines deployed on the host are either migrated to other hosts within the cluster, or
remain with the host and are removed from the cluster, depending on the state of the virtual machines when
the host is removed from the cluster.
You can remove hosts from a cluster by selecting them in the inventory and dragging them to a new location
within the inventory. The new location can be a folder as a standalone host or another cluster.
Prerequisites
Before you can remove a host from a cluster, you must power o all virtual machines that are running on
the host, or migrate the virtual machines to a new host using vMotion.
Procedure
1 From the vSphere Client connected to a vCenter Server system, display the inventory.
2 Right-click the appropriate managed host icon in the inventory panel, and select Enter Maintenance
Mode from the pop-up menu.
If all virtual machines on the host are not powered o, the host will not enter maintenance mode.
If the host is inside a DRS-enabled cluster, entering maintenance mode causes DRS to aempt to
automatically evacuate powered-on virtual machines from the host using vMotion.
3 In the conrmation dialog that appears, click Yes.
The conrmation dialog also asks if you want to automatically evacuate virtual machines that are not
powered on from the host. This is useful if you want those virtual machines to remain registered to a
host within the cluster.
The host icon changes and the term “maintenance mode” is added to the name in parentheses.
vCenter Server and Host Management
114 VMware, Inc.
4 Select the host icon in the inventory panel, and drag it to the new location.
The host can be moved to another cluster or another datacenter. When the new location is selected, a
blue box surrounds the cluster or datacenter name.
vCenter Server moves the host to the new location.
5 Right-click the host, and select Exit Maintenance Mode from the pop-up menu.
6 (Optional) Restart any virtual machines, as needed.
Remove a Managed Host from vCenter Server
Remove a managed host from vCenter Server to stop all vCenter Server monitoring and management of that
host.
If possible, remove managed hosts while they are connected. Removing a disconnected managed host does
not remove the vCenter Server agent from the managed host.
Prerequisites
Make sure NFS mounts are active. If NFS mounts are unresponsive, the operation fails.
Procedure
1 From the vSphere Client connected to a vCenter Server system, display the inventory.
2 (Optional) If the host is part of a cluster, you must put it in maintenance mode.
a Right-click the managed host in the inventory and select Enter Maintenance Mode from the pop-
up menu.
b On the conrmation dialog, click Yes.
The host icon changes and the term “maintenance mode” is added to the name in parentheses.
3 Right-click the appropriate host in the inventory panel, and select Remove from the pop-up menu.
4 In the conrmation dialog that appears, click Yes to remove the managed host.
vCenter Server removes the managed host and associated virtual machines from the vCenter Server
environment. vCenter Server then returns the status of all associated processor and migration licenses
to available.
Chapter 12 Managing Hosts in vCenter Server
VMware, Inc. 115
vCenter Server and Host Management
116 VMware, Inc.

Migrating Virtual Machines 13
You can move virtual machines from one host or storage location to another location using hot or cold
migration. For example, with vSphere vMotion you can move powered on virtual machines away from a
host to perform maintenance, to balance loads, to collocate virtual machines that communicate with each
other, to move virtual machines apart to minimize fault domain, to migrate to new server hardware, and so
on.
You can use cold or hot migration to move virtual machines to dierent hosts or datastores.
Cold Migration You can move a powered o or suspended virtual machine to a new host.
Optionally, you can relocate conguration and disk les for powered o or
suspended virtual machines to new storage locations. You can also use cold
migration to move virtual machines from one data center to another. To
perform a cold migration, you can move virtual machines manually or set up
a scheduled task.
Hot Migration Depending on the type of migration you are using, vMotion or Storage
vMotion, you can move a powered on virtual machine to a dierent host,
and move its disks or folder to a dierent datastore without any interruption
in the availability of the virtual machine. You can also move a virtual
machine to a dierent host and to a dierent storage location at the same
time. vMotion is also referred to as live migration or hot migration.
N Copying a virtual machine creates a new virtual machine. It is not a form of migration. Cloning a
virtual machine or copying its disks and conguration le creates a new virtual machine. Cloning is not a
form of migration.
VMware, Inc. 117
You can perform several types of migration according to the virtual machine resource type.
Change compute
resource only
Moving a virtual machine but not its storage to another compute resource,
such as a host, cluster, resource pool, or vApp. You use vMotion to move a
powered on virtual machine to another compute resource. You can move the
virtual machine to another host by using cold migration or hot migration.
Change storage only Moving a virtual machine and its storage, including virtual disks,
conguration les, or a combination of these, to a new datastore on the same
host. You can change the datastore using cold or hot migration. You use
Storage vMotion to move a powered on virtual machine and its storage to a
new datastore .
Change both compute
resource and storage
Moving a virtual machine to another host and moving its disk or virtual
machine folder to another datastore. You can change the host and datastore
using cold or hot migration. When you move a virtual machine network
between distributed switches, the network conguration and policies that are
associated with the network adapters of the virtual machine are transferred
to the target switch.
In vSphere 6.0 and later, you can move virtual machines between vSphere sites by using migration between
these types of objects.
Migrate to another
virtual switch
Moving the network of a virtual machine to a virtual switch of a dierent
type. You can migrate virtual machines without reconguring the physical
and virtual network. While performing cold or hot migration, you can move
the virtual machine from a standard to a standard or distributed switch and
from a distributed switch to another distributed switch.
Migrate to another data
center
Moving virtual machines between data centers. While performing cold or hot
migration, you can change the data center of a virtual machine. For
networking in the target data center, you can select a dedicated port group
on a distributed switch.
Migrate to another
vCenter Server system
Moving virtual machines between two vCenter Server instances that are
connected in Enhanced Linked Mode.
You can also move virtual machines between vCenter Server instances that
are located across a long distance from each other.
For information about the requirements about vMotion across
vCenter Server instances, see “Requirements for Migration Between vCenter
Server Instances,” on page 126.
To migrate virtual machines with disks larger than 2 TB, the source and destination ESXi hosts must be
version 5.5 and later.
This chapter includes the following topics:
n“Cold Migration,” on page 119
n“Migration with vMotion,” on page 120
n“Migration with Storage vMotion,” on page 127
n“CPU Compatibility and EVC,” on page 128
n“Migrate a Powered-O or Suspended Virtual Machine,” on page 135
n“Migrate a Virtual Machine to a New Compute Resource,” on page 137
n“Migrate a Virtual Machine to a New Compute Resource and Storage,” on page 138
vCenter Server and Host Management
118 VMware, Inc.
n“Migrate a Virtual Machine to New Storage,” on page 140
n“Place vMotion Trac on the vMotion TCP/IP Stack of an ESXi Host,” on page 141
n“Place Trac for Cold Migration, Cloning, and Snapshots on the Provisioning TCP/IP Stack,” on
page 143
n“Limits on Simultaneous Migrations,” on page 144
n“About Migration Compatibility Checks,” on page 145
Cold Migration
Cold migration is the migration of powered o or suspended virtual machines between hosts across
clusters, data centers, and vCenter Server instances. By using cold migration you can also move associated
disks from one datastore to another.
You can use cold migration to have the target host checked against less requirements than when you use
vMotion. For example, use cold migration when a virtual machine contains a complex application setup, the
compatibility checks during vMotion might prevent the virtual machine from moving to another host.
You must power o or suspend the virtual machines before you begin the cold migration process. Migrating
a suspended virtual machine is considered a cold migration because although the virtual machine is
powered on, it is not running.
CPU Compatibility Check During Cold Migration
If you aempt to migrate a powered o virtual machine that is congured with a 64-bit operating system,
vCenter Server generates a warning if you migrate the virtual machine to a host that does not support 64-bit
operating system. Otherwise, CPU compatibility checks do not apply when you migrate powered o virtual
machines with cold migration.
When you migrate a suspended virtual machine, the new host for the virtual machine must meet CPU
compatibility requirements, because the virtual machine must be able to resume execution on the new host.
Operations During Cold Migration
A cold migration consists of the following operations:
1 If you select the option to move to a dierent datastore, the conguration les, including the NVRAM
le (BIOS seings), log les, and the suspend le, are moved from the source host to the destination
host’s associated storage area. You can choose to move the virtual machine's disks as well.
2 The virtual machine is registered with the new host.
3 After the migration is completed, the old version of the virtual machine is deleted from the source host
and datastore if you selected the option to move to a dierent datastore.
Network Traffic for Cold Migration
By default, data for VM cold migration, cloning, and snapshots is transferred through the management
network. This trac is called provisioning trac. It is not encrypted but uses run-length encoding of data.
On a host, you can dedicate a separate VMkernel network adapter to the provisioning trac, for example, to
isolate this trac on another VLAN. On a host, you can assign no more than one VMkernel adapter for
provisioning trac. For information about enabling provisioning trac on a separate VMkernel adapter, see
the vSphere Networking documentation.
Chapter 13 Migrating Virtual Machines
VMware, Inc. 119
If you plan to transfer high volumes of virtual machine data that the management network cannot
accommodate or if you want to isolate cold migration trac in a subnet dierent from the management
network, for example, for migration over a long distance, redirect the cold migration trac on a host to the
TCP/IP stack that is dedicated to cold migration and cloning of powered o virtual machines. See “Place
Trac for Cold Migration, Cloning, and Snapshots on the Provisioning TCP/IP Stack,” on page 143.
Migration with vMotion
If you need to take a host oine for maintenance, you can move the virtual machine to another host.
Migration with vMotion™ allows virtual machine processes to continue working throughout a migration.
When you migrate a virtual machine with vMotion, the new host for the virtual machine must meet
compatibility requirements so that the migration can proceed.
vMotion Migration Types
With vMotion, you can change the compute resource on which a virtual machine is running, or you can
change both the compute resource and the storage of the virtual machine.
When you migrate virtual machines with vMotion and choose to change only the host, the entire state of the
virtual machine is moved to the new host. The associated virtual disk remains in the same location on
storage that must be shared between the two hosts.
When you choose to change both the host and the datastore, the virtual machine state is moved to a new
host and the virtual disk is moved to another datastore. vMotion migration to another host and datastore is
possible in vSphere environments without shared storage.
After the virtual machine state is migrated to the alternate host, the virtual machine runs on the new host.
Migrations with vMotion are completely transparent to the running virtual machine.
When you choose to change both the compute resource and the storage, you can use vMotion to migrate
virtual machines across vCenter Server instances, data centers, and subnets.
Transferred State Information
The state information includes the current memory content and all the information that denes and
identies the virtual machine. The memory content includes transaction data and the bits of the operating
system and applications that are in the memory. The dening and identication information stored in the
state includes all the data that maps to the virtual machine hardware elements, such as BIOS, devices, CPU,
MAC addresses for the Ethernet cards, chip set states, registers, and so forth.
Stages in vMotion
Migration with vMotion occurs in three stages:
1 When the migration with vMotion is requested, vCenter Server veries that the existing virtual machine
is in a stable state with its current host.
2 The virtual machine state information (memory, registers, and network connections) is copied to the
target host.
3 The virtual machine resumes its activities on the new host.
If errors occur during migration, the virtual machine reverts to its original state and location.
vCenter Server and Host Management
120 VMware, Inc.

Host Configuration for vMotion
Before using vMotion, you must congure your hosts correctly.
Ensure that you have correctly congured your hosts.
nEach host must be correctly licensed for vMotion.
nEach host must meet shared storage requirements for vMotion.
nEach host must meet the networking requirements for vMotion.
I The ESXi rewall in ESXi 5.0 and later does not allow per-network ltering of vMotion
trac. Therefore, you must apply rules on your external rewall to ensure that no incoming
connections can be made to the vMotion socket on TCP port 8000.
vMotion Across Long Distances
You can perform reliable migrations between hosts and sites that are separated by high network round-trip
latency times. vMotion across long distances is enabled when the appropriate license is installed. No user
conguration is necessary.
For long-distance migration, verify the network latency between the hosts and your license.
nThe round-trip time between the hosts must be up to 150 milliseconds.
nYour license must cover vMotion across long distances.
nYou must place the trac related to virtual machine les transfer to the destination host on the
provisioning TCP/IP stack. See “Place Trac for Cold Migration, Cloning, and Snapshots on the
Provisioning TCP/IP Stack,” on page 143.
vMotion Shared Storage Requirements
Congure hosts for vMotion with shared storage to ensure that virtual machines are accessible to both
source and target hosts.
During a migration with vMotion, the migrating virtual machine must be on storage accessible to both the
source and target hosts. Ensure that the hosts congured for vMotion use shared storage. Shared storage can
be on a Fibre Channel storage area network (SAN), or can be implemented using iSCSI and NAS.
If you use vMotion to migrate virtual machines with raw device mapping (RDM) les, make sure to
maintain consistent LUN IDs for RDMs across all participating hosts.
See the vSphere Storage documentation for information on SANs and RDMs.
vSphere vMotion Networking Requirements
Migration with vMotion requires correctly congured network interfaces on source and target hosts.
Congure each host with at least one network interface for vMotion trac. To ensure secure data transfer,
the vMotion network must be a secure network, accessible only to trusted parties. Additional bandwidth
signicantly improves vMotion performance. When you migrate a virtual machine with vMotion without
using shared storage, the contents of the virtual disk is transferred over the network as well.
N vMotion network trac is not encrypted. You should provision secure private networks for use by
vMotion only.
Chapter 13 Migrating Virtual Machines
VMware, Inc. 121

Requirements for Concurrent vMotion Migrations
You must ensure that the vMotion network has at least 250 Mbps of dedicated bandwidth per concurrent
vMotion session. Greater bandwidth lets migrations complete more quickly. Gains in throughput resulting
from WAN optimization techniques do not count towards the 250 Mbps limit.
To determine the maximum number of concurrent vMotion operations possible, see “Limits on
Simultaneous Migrations,” on page 144. These limits vary with a host's link speed to the vMotion network.
Round-Trip Time for Long-Distance vMotion Migration
If you have the proper license applied to your environment, you can perform reliable migrations between
hosts that are separated by high network round-trip latency times. The maximum supported network
round-trip time for vMotion migrations is 150 milliseconds. This round-trip time lets you migrate virtual
machines to another geographical location at a longer distance.
Multiple-NIC vMotion
You can congure multiple NICs for vMotion by adding two or more NICs to the required standard or
distributed switch. For details, see the VMware knowledge base article at hp://kb.vmware.com/kb/2007467.
Network Configuration
Congure the virtual networks on vMotion enabled hosts as follows:
nOn each host, congure a VMkernel port group for vMotion.
To have the vMotion trac routed across IP subnets, enable the vMotion TCP/IP stack on the host. See
“Place vMotion Trac on the vMotion TCP/IP Stack of an ESXi Host,” on page 141.
nIf you are using standard switches for networking, ensure that the network labels used for virtual
machine port groups are consistent across hosts. During a migration with vMotion, vCenter Server
assigns virtual machines to port groups based on matching network labels.
N By default, you cannot use vMotion to migrate a virtual machine that is aached to a standard
switch with no physical uplinks congured, even if the destination host also has a no-uplink standard
switch with the same label.
To override the default behavior, set the
config.migrate.test.CompatibleNetworks.VMOnVirtualIntranet advanced seings of vCenter Server to
false. The change takes eect immediately. For details about the seing, see VMware knowledge base
article at hp://kb.vmware.com/kb/1003832. For information about conguring advanced seings of
vCenter Server, see “Congure Advanced Seings,” on page 48.
For information about conguring vMotion network resources, see “Networking Best Practices for vSphere
vMotion,” on page 123.
vCenter Server and Host Management
122 VMware, Inc.

Networking Best Practices for vSphere vMotion
Consider certain best practices for conguring the network resources for vMotion on an ESXi host.
nProvide the required bandwidth in one of the following ways:
Physical Adapter
Configuration Best Practices
Dedicate at least one
adapter for vMotion.
Use at least one 1 GbE adapter for workloads that have a small number of memory
operations. Use at least one 10 GbE adapter if you migrate workloads that have many
memory operations.
If only two Ethernet adapters are available, congure them for security and availability.
nFor best security, dedicate one adapter to vMotion, and use VLANs to divide the
virtual machine and management trac on the other adapter.
nFor best availability, combine both adapters into a team, and use VLANs to divide
trac into networks: one or more for virtual machine trac and one for vMotion
Direct vMotion trac to
one or more physical NICs
that have high bandwidth
capacity and are shared
between other types of
trac as well
nTo distribute and allocate more bandwidth to vMotion trac across several
physical NICs, use multiple-NIC vMotion.
nOn a vSphere Distributed Switch 5.1 and later, use vSphere Network I/O Control
shares to guarantee bandwidth to outgoing vMotion trac. Dening shares also
prevents from contention as a result from excessive vMotion or other trac.
nUse trac shaping in egress direction on the vMotion port group on the
destination host to avoid saturation of the physical NIC link as a result of intense
incoming vMotion trac. By using trac shaping you can limit the average and
peak bandwidth available to vMotion trac, and reserve resources for other trac
types.
nProvision at least one additional physical NIC as a failover NIC.
nUse jumbo frames for best vMotion performance.
Ensure that jumbo frames are enabled on all network devices that are on the vMotion path including
physical NICs, physical switches and virtual switches.
nPlace vMotion trac on the vMotion TCP/IP stack for migration across IP subnets that have a dedicated
default gateway that is dierent from the gateway on the management network. See “Place vMotion
Trac on the vMotion TCP/IP Stack of an ESXi Host,” on page 141.
For information about the conguring networking on an ESXi host, see the vSphere Networking
documentation.
Virtual Machine Conditions and Limitations for vMotion
To migrate virtual machines with vMotion, the virtual machine must meet certain network, disk, CPU, USB,
and other device requirements.
The following virtual machine conditions and limitations apply when you use vMotion:
nThe source and destination management network IP address families must match. You cannot migrate a
virtual machine from a host that is registered to vCenter Server with an IPv4 address to a host that is
registered with an IPv6 address.
nYou cannot use migration with vMotion to migrate virtual machines that use raw disks for clustering.
nIf virtual CPU performance counters are enabled, you can migrate virtual machines only to hosts that
have compatible CPU performance counters.
nYou can migrate virtual machines that have 3D graphics enabled. If the 3D Renderer is set to Automatic,
virtual machines use the graphics renderer that is present on the destination host. The renderer can be
the host CPU or a GPU graphics card. To migrate virtual machines with the 3D Renderer set to
Hardware, the destination host must have a GPU graphics card.
Chapter 13 Migrating Virtual Machines
VMware, Inc. 123
nYou can migrate virtual machines with USB devices that are connected to a physical USB device on the
host. You must enable the devices for vMotion.
nYou cannot use migration with vMotion to migrate a virtual machine that uses a virtual device backed
by a device that is not accessible on the destination host. For example, you cannot migrate a virtual
machine with a CD drive backed by the physical CD drive on the source host. Disconnect these devices
before you migrate the virtual machine.
nYou cannot use migration with vMotion to migrate a virtual machine that uses a virtual device backed
by a device on the client computer. Disconnect these devices before you migrate the virtual machine.
nYou can migrate virtual machines that uses Flash Read Cache if the destination host also provides Flash
Read Cache. During the migration, you can select whether to migrate the virtual machine cache or drop
it, for example, when the cache size is large.
Swap File Location Compatibility
Virtual machine swap le location aects vMotion compatibility in dierent ways depending on the version
of ESXi running on the virtual machine's host.
You can congure ESX 3.5 or ESXi 3.5 or later hosts to store virtual machine swap les with the virtual
machine conguration le, or on a local swap le datastore specied for that host.
The location of the virtual machine swap le aects vMotion compatibility as follows:
nFor migrations between hosts running ESX/ESXi version 3.5 and later, vMotion and migrations of
suspended and powered-o virtual machines are allowed.
nDuring a migration with vMotion, if the swaple location specied on the destination host diers from
the swaple location specied on the source host, the swap le is copied to the new location. This
activity can result in slower migrations with vMotion. If the destination host cannot access the specied
swap le location, it stores the swap le with the virtual machine conguration le.
See the vSphere Resource Management documentation for information about conguring swap le policies.
Migration with vMotion in Environments Without Shared Storage
You can use vMotion to migrate virtual machines to a dierent compute resource and storage
simultaneously. In addition, unlike Storage vMotion, which requires a single host to have access to both the
source and destination datastore, you can migrate virtual machines across storage accessibility boundaries.
vMotion does not require environments with shared storage. This is useful for performing cross-cluster
migrations, when the target cluster machines might not have access to the source cluster's storage. Processes
that are working on the virtual machine continue to run during the migration with vMotion.
You can use vMotion to migrate virtual machines across vCenter Server intances.
You can place the virtual machine and all of its disks in a single location or select separate locations for the
virtual machine conguration le and each virtual disk. In addition, you can change virtual disks from
thick-provisioned to thin-provisioned or from thin-provisioned to thick-provisioned. For virtual
compatibility mode RDMs, you can migrate the mapping le or convert from RDM to VMDK.
vMotion without shared storage is useful for virtual infrastructure administration tasks similar to vMotion
with shared storage or Storage vMotion tasks.
nHost maintenance. You can move virtual machines o of a host to allow maintenance of the host.
nStorage maintenance and reconguration. You can move virtual machines o of a storage device to
allow maintenance or reconguration of the storage device without virtual machine downtime.
nStorage load redistribution. You can manually redistribute virtual machines or virtual disks to dierent
storage volumes to balance capacity or improve performance.
vCenter Server and Host Management
124 VMware, Inc.

Requirements and Limitations for vMotion Without Shared Storage
A virtual machine and its host must meet resource and conguration requirements for the virtual machine
les and disks to be migrated with vMotion in the absence of shared storage.
vMotion in an environment without shared storage is subject to the following requirements and limitations:
nThe hosts must be licensed for vMotion.
nThe hosts must be running ESXi 5.1 or later.
nThe hosts must meet the networking requirement for vMotion. See “vSphere vMotion Networking
Requirements,” on page 121.
nThe virtual machines must be properly congured for vMotion. See “Virtual Machine Conditions and
Limitations for vMotion,” on page 123
nVirtual machine disks must be in persistent mode or be raw device mappings (RDMs). See “Storage
vMotion Requirements and Limitations,” on page 127.
nThe destination host must have access to the destination storage.
nWhen you move a virtual machine with RDMs and do not convert those RDMs to VMDKs, the
destination host must have access to the RDM LUNs.
nConsider the limits for simultaneous migrations when you perform a vMotion migration without
shared storage. This type of vMotion counts against the limits for both vMotion and Storage vMotion,
so it consumes both a network resource and 16 datastore resources. See “Limits on Simultaneous
Migrations,” on page 144.
Migration Between vCenter Server Systems
vSphere 6.0 or later lets you migrate virtual machines between vCenter Server instances.
Migration of virtual machines across vCenter Server systems is helpful in certain VM provisioning cases.
nBalance workloads across clusters and vCenter Server instances.
nElastically grow or shrink capacity across resources in dierent vCenter Server instances in the same
site or in another geographical area .
nMove virtual machines between environments that have dierent purposes, for example, from a
development to production.
nMove virtual machines to meet dierent Service Level Agreements (SLAs) regarding storage space,
performance, and so on.
N During the migration of a virtual machine to another vCenter Server system, the performance data
that has been collected about the virtual machine is lost.
nRequirements for Migration Between vCenter Server Instances on page 126
To enable migration across vCenter Server instances, your system must meet certain requirements.
nNetwork Compatibility Checks During vMotion Between vCenter Server Instances on page 126
Migration of VMs between vCenter Server instances moves VMs to new networks. The migration
process performs checks to verify that the source and destination networks are similar.
nMAC Address Management During Migration Between vCenter Server Systems on page 126
When you move a virtual machine between vCenter Server instances, the environment specically
handles MAC address migration to avoid address duplication and loss of data in the network.
Chapter 13 Migrating Virtual Machines
VMware, Inc. 125
Requirements for Migration Between vCenter Server Instances
To enable migration across vCenter Server instances, your system must meet certain requirements.
nThe source and destination vCenter Server instances and ESXi hosts must be 6.0 or later.
nThe cross vCenter Server and long distance vMotion features require an Enterprise Plus license. For
more information, see hp://www.vmware.com/uk/products/vsphere/compare.html.
nBoth vCenter Server instances must be time-synchronized with each other for correct vCenter Single
Sign-On token verication.
nFor migration of compute resources only, both vCenter Server instances must be connected to the
shared virtual machine storage.
nWhen using the vSphere Web Client, both vCenter Server instances must be in Enhanced Linked Mode
and must be in the same vCenter Single Sign-On domain so that the source vCenter Server can
authenticate to the destination vCenter Server.
For information about installing vCenter Server in Enhanced Linked Mode, see the vSphere Installation
and Setup documentation.
If the vCenter Server instances exist in separate vSphere Single Sign-On domains, you can use vSphere
APIs/SDK to migrate virtual machines. For more information, see the VirtualMachineRelocateSpec data
object in the vSphere Management SDK Guide.
Network Compatibility Checks During vMotion Between vCenter Server Instances
Migration of VMs between vCenter Server instances moves VMs to new networks. The migration process
performs checks to verify that the source and destination networks are similar.
vCenter Server performs a number of network compatibility checks to prevent the following conguration
problems:
nMAC address compatibility on the destination host
nvMotion from a distributed switch to a standard switch
nvMotion between distributed switches of dierent versions
nvMotion to an internal network, for example, a network without a physical NIC
nvMotion to a distributed switch that is not working properly
vCenter Server does not perform checks for and notify you about the following problems:
nIf the source and destination distributed switches are not in the same broadcast domain, virtual
machines lose network connectivity after migration.
nIf the source and destination distributed switches do not have the same services congured, virtual
machines might lose network connectivity after migration.
MAC Address Management During Migration Between vCenter Server Systems
When you move a virtual machine between vCenter Server instances, the environment specically handles
MAC address migration to avoid address duplication and loss of data in the network.
In an environment with multiple vCenter Server instances, when a virtual machine is migrated, its MAC
addresses are transferred to the target vCenter Server. The source vCenter Server adds the MAC addresses
to a black list so that it does not assign them to newly created virtual machines.
To reclaim unused MAC addresses from the black list, contact VMware Technical Support for assistance.
vCenter Server and Host Management
126 VMware, Inc.
Migration with Storage vMotion
With Storage vMotion, you can migrate a virtual machine and its disk les from one datastore to another
while the virtual machine is running. With Storage vMotion, you can move virtual machines o of arrays for
maintenance or to upgrade. You also have the exibility to optimize disks for performance, or to transform
disk types, which you can use to reclaim space.
You can choose to place the virtual machine and all its disks in a single location, or select separate locations
for the virtual machine conguration le and each virtual disk. The virtual machine does not change
execution host during a migration with Storage vMotion.
During a migration with Storage vMotion, you can change the disk provisioning type.
Migration with Storage vMotion changes virtual machine les on the destination datastore to match the
inventory name of the virtual machine. The migration renames all virtual disk, conguration, snapshot,
and .nvram les. If the new names exceed the maximum lename length, the migration does not succeed.
Storage vMotion has several uses in administering virtual infrastructure, including the following examples
of use.
nStorage maintenance and reconguration. You can use Storage vMotion to move virtual machines o of
a storage device to allow maintenance or reconguration of the storage device without virtual machine
downtime.
nRedistributing storage load. You can use Storage vMotion to manually redistribute virtual machines or
virtual disks to dierent storage volumes to balance capacity or improve performance.
Storage vMotion Requirements and Limitations
A virtual machine and its host must meet resource and conguration requirements for the virtual machine
disks to be migrated with Storage vMotion.
Storage vMotion is subject to the following requirements and limitations:
nVirtual machine disks must be in persistent mode or be raw device mappings (RDMs). For virtual
compatibility mode RDMs, you can migrate the mapping le or convert to thick-provisioned or thin-
provisioned disks during migration if the destination is not an NFS datastore. If you convert the
mapping le, a new virtual disk is created and the contents of the mapped LUN are copied to this disk.
For physical compatibility mode RDMs, you can migrate the mapping le only.
nMigration of virtual machines during VMware Tools installation is not supported.
nBecause VMFS3 datastores do not support large capacity virtual disks, you cannot move virtual disks
greater than 2 TB from a VMFS5 datastore to a VMFS3 datastore.
nThe host on which the virtual machine is running must have a license that includes Storage vMotion.
nESXi 5.0 and later hosts do not require vMotion conguration in order to perform migration with
Storage vMotion.
nThe host on which the virtual machine is running must have access to both the source and target
datastores.
nFor limits on the number of simultaneous migrations with vMotion and Storage vMotion, see “Limits
on Simultaneous Migrations,” on page 144.
Chapter 13 Migrating Virtual Machines
VMware, Inc. 127

CPU Compatibility and EVC
vCenter Server performs compatibility checks before it allows migration of running or suspended virtual
machines to ensure that the virtual machine is compatible with the target host.
vMotion transfers the running state of a virtual machine between underlying ESXi systems. Live migration
requires that the processors of the target host provide the same instructions to the virtual machine after
migration that the processors of the source host provided before migration. Clock speed, cache size, and
number of cores can dier between source and target processors. However, the processors must come from
the same vendor class (AMD or Intel) to be vMotion compatible.
N Do not add virtual ESXi hosts to an EVC cluster. ESXi virtual machines are not supported in EVC
clusters.
Migrations of suspended virtual machines also require that the virtual machine be able to resume execution
on the target host using equivalent instructions.
When you initiate a migration with vMotion or a migration of a suspended virtual machine, the Migrate
Virtual Machine wizard checks the destination host for compatibility and produces an error message if
compatibility problems will prevent migration.
The CPU instruction set available to the operating system and to applications running in a virtual machine is
determined at the time that a virtual machine is powered on. This CPU feature set is based on the following
items:
nHost CPU family and model
nSeings in the BIOS that might disable CPU features
nESX/ESXi version running on the host
nThe virtual machine's compatibility seing
nThe virtual machine's guest operating system
To improve CPU compatibility between hosts of varying CPU feature sets, some host CPU features can be
hidden from the virtual machine by placing the host in an Enhanced vMotion Compatibility (EVC) cluster.
N You can hide Host CPU features from a virtual machine by applying a custom CPU compatibility
mask to the virtual machine, but this is not recommended. VMware, in partnership with CPU and hardware
vendors, is working to maintain vMotion compatibility across the widest range of processors. For additional
information, search the VMware Knowledge Base for the vMotion and CPU Compatibility FAQ.
CPU Compatibility Scenarios
vCenter Server's CPU compatibility checks compare the CPU features available on the source host, the
subset of features that the virtual machine can access, and the features available on the target host. Without
the use of EVC, any mismatch between two hosts' user-level features will block migration, whether or not
the virtual machine itself has access to those features. A mismatch between two hosts' kernel-level features,
however, blocks migration only when the virtual machine has access to a feature that the target host does
not provide.
User-level features are non-privileged instructions that might be used by virtual machine applications.
These include SSE3, SSSE3, SSE4.1, SSE4.2, and AES. Because they are user-level instructions that bypass the
virtualization layer, these instructions could cause application instability if mismatched after a migration
with vMotion.
Kernel-level features are privileged instructions that might be used by the virtual machine operating system.
These include the AMD No eXecute (NX) and the Intel eXecute Disable (XD) security features.
vCenter Server and Host Management
128 VMware, Inc.

When you aempt to migrate a virtual machine with vMotion, one of the following scenarios applies:
nThe destination host feature set matches the virtual machine’s CPU feature set. CPU compatibility
requirements are met, and migration with vMotion proceeds.
nThe virtual machine’s CPU feature set contains features not supported by the destination host. CPU
compatibility requirements are not met, and migration with vMotion cannot proceed.
N EVC overcomes such incompatibility by providing a "baseline" feature set for all virtual
machines running in a cluster and that hides the dierences among the clustered hosts' CPUs from the
virtual machines.
nThe destination host supports the virtual machine’s feature set, plus additional user-level features (such
as SSE4.1) not found in the virtual machine’s feature set. CPU compatibility requirements are not met,
and migration with vMotion cannot proceed.
N This type of incompatibility is ignored for migrations among hosts in EVC clusters.
nThe destination host supports the virtual machine’s feature set, plus additional kernel-level features
(such as NX or XD) not found in the virtual machine’s feature set. CPU compatibility requirements are
met, and migration with vMotion proceeds. The virtual machine retains its CPU feature set as long as it
remains powered on, allowing it to migrate freely back to the original host. However, if the virtual
machine is rebooted, it acquires a new feature set from the new host, which might cause vMotion
incompatibility if you aempt to migrate the virtual machine back to the original host.
CPU Families and Feature Sets
Processors are grouped into families. Processors within a given family generally have similar feature sets.
Processor families are dened by the processor vendors. You can distinguish dierent processor versions
within the same family by comparing the processors’ model, stepping level, and extended features. In some
cases, processor vendors have introduced signicant architectural changes within the same processor family,
such as the SSSE3 and SSE4.1 instructions, and NX/XD CPU security features.
By default, vCenter Server identies mismatches on features accessible to applications as incompatible to
guarantee the stability of virtual machines after migrations with vMotion.
Server hardware’s CPU specications will usually indicate whether or not the CPUs contain the features that
aect vMotion compatibility.
For more information on identifying Intel processors and their features, see Application Note 485: Intel®
Processor Identication and the CPUID Instruction, available from Intel. For more information on identifying
AMD processors and their features, see CPUID Specication, available from AMD.
About Enhanced vMotion Compatibility
You can use the Enhanced vMotion Compatibility (EVC) feature to help ensure vMotion compatibility for
the hosts in a cluster. EVC ensures that all hosts in a cluster present the same CPU feature set to virtual
machines, even if the actual CPUs on the hosts dier. Using EVC prevents migrations with vMotion from
failing because of incompatible CPUs.
Congure EVC from the cluster seings dialog box. When you congure EVC, you congure all host
processors in the cluster to present the feature set of a baseline processor. This baseline feature set is called
the EVC mode. EVC leverages AMD-V Extended Migration technology (for AMD hosts) and Intel
FlexMigration technology (for Intel hosts) to mask processor features so that hosts can present the feature
set of an earlier generation of processors. The EVC mode must be equivalent to, or a subset of, the feature set
of the host with the smallest feature set in the cluster.
Chapter 13 Migrating Virtual Machines
VMware, Inc. 129

EVC masks only those processor features that aect vMotion compatibility. Enabling EVC does not prevent
a virtual machine from taking advantage of faster processor speeds, increased numbers of CPU cores, or
hardware virtualization support that might be available on newer hosts.
EVC cannot prevent virtual machines from accessing hidden CPU features in all circumstances.
Applications that do not follow CPU vendor recommended methods of feature detection might behave
unexpectedly in an EVC environment. VMware EVC cannot be supported with ill-behaved applications that
do not follow the CPU vendor recommendations. For more information about creating well-behaved
applications, search the VMware Knowledge Base for the article Detecting and Using New Features in CPUs.
EVC Requirements for Hosts
To improve CPU compatibility between hosts that have varying CPU feature sets, you can hide some host
CPU features from the virtual machines by placing the host in an Enhanced vMotion Compatibility (EVC)
cluster. Hosts in an EVC cluster and hosts that you add to an existing EVC cluster must meet EVC
requirements.
nPower o all virtual machines in the cluster that are running on hosts with a feature set greater than the
EVC mode that you intend to enable. You can also migrate these virtual machines out of the cluster.
nAll hosts in the cluster must meet the following requirements:
Requirements Description
Supported ESXi
version
ESXi 5.0 or later.
vCenter Server The host must be connected to a vCenter Server system.
CPUs A single vendor, either AMD or Intel.
Advanced CPU
features enabled
Enable these CPU features in the BIOS if they are available:
nHardware virtualization support (AMD-V or Intel VT)
nAMD No eXecute(NX)
nIntel eXecute Disable (XD)
N Hardware vendors sometimes disable particular CPU features in the BIOS by default. In
this case, you might have problems in enabling EVC, because the EVC compatibility checks
detect the absence of features that are expected to be present for a particular CPU. If you cannot
enable EVC on a system with a compatible processor, ensure that all features are enabled in the
BIOS.
Supported CPUs for
the EVC mode that
you want to enable
To check EVC support for a specic processor or server model, see the VMware Compatibility
Guide at hp://www.vmware.com/resources/compatibility/search.php.
Congured for
vMotion
See “Host Conguration for vMotion,” on page 121.
Create an EVC Cluster
Create an EVC cluster to ensure vMotion CPU compatibility between the hosts in the cluster.
To create an EVC cluster with minimal disruption to your existing infrastructure, create an empty EVC
cluster and move hosts into the cluster. To enable EVC on an existing cluster, see “Enable EVC on an
Existing Cluster,” on page 131.
Other cluster features such as vSphere DRS and vSphere HA are fully compatible with EVC. You can enable
these features when you create the cluster.
Prerequisites
Verify that the hosts you intend to add to the cluster meet the requirements listed in “EVC Requirements for
Hosts,” on page 130.
vCenter Server and Host Management
130 VMware, Inc.
Procedure
1 Right-click a data center in the inventory and select New Cluster.
2 Type a name for the cluster.
3 Expand EVC and select a baseline CPU feature set from the EVC mode drop-down menu.
Select a CPU vendor and EVC mode appropriate for the hosts that you intend to add to the cluster.
4 (Optional) Enable DRS.
5 (Optional) Enable vSphere HA.
6 Click OK.
7 Select a host to move into the cluster.
If the host feature set is greater than the EVC mode that you enabled for the EVC cluster, power o all
the virtual machines on the host, or use vMotion to migrate them to another host.
8 Move the host into the cluster.
You can power on the virtual machines that are on the host, or migrate virtual machines into the cluster
with vMotion. The virtual machines must meet CPU compatibility requirements for the EVC mode of
the cluster.
You can now use vMotion to migrate virtual machines between dierent hosts in the cluster without
encountering CPU incompatibility issues.
Enable EVC on an Existing Cluster
Enable EVC on an existing cluster to ensure vMotion CPU compatibility between the hosts in the cluster.
Prerequisites
Verify that the hosts in the cluster meet the requirements listed in “EVC Requirements for Hosts,” on
page 130.
Procedure
1 Select the cluster in the inventory.
2 Power o all the virtual machines on the hosts with feature sets greater than the EVC mode.
3 Ensure that the cluster contains hosts with CPUs from only one vendor, either Intel or AMD.
4 Click the Manage tab, select VMware EVC and click Edit.
5 Enable EVC for the CPU vendor and feature set appropriate for the hosts in the cluster, and click OK.
6 Power on the virtual machines in the cluster to apply the EVC.
Change the EVC Mode for a Cluster
Congure EVC to ensure that virtual machine migrations between hosts in the cluster do not fail because of
CPU feature incompatibilities.
Several EVC approaches are available to ensure CPU compatibility:
nIf all the hosts in a cluster are compatible with a newer EVC mode, you can change the EVC mode of an
existing EVC cluster.
nYou can enable EVC for a cluster that does not have EVC enabled.
nYou can raise the EVC mode to expose more CPU features.
nYou can lower the EVC mode to hide CPU features and increase compatibility.
Chapter 13 Migrating Virtual Machines
VMware, Inc. 131

Prerequisites
nVerify that all hosts in the cluster have supported CPUs for the EVC mode you want to enable. See
hp://kb.vmware.com/kb/1003212 for a list of supported CPUs.
nVerify that all hosts in the cluster are connected and registered on vCenter Server. The cluster cannot
contain a disconnected host.
nVirtual machines must be in the following power states, depending on whether you raise or lower the
EVC mode.
EVC Mode Virtual Machine Power Action
Raise the EVC mode to a CPU
baseline with more features.
Running virtual machines can remain powered on. New EVC mode features are
not available to the virtual machines until they are powered o and powered back
on again. A full power cycling is required. Rebooting the guest operating system
or suspending and resuming the virtual machine is not sucient.
Lower the EVC mode to a CPU
baseline with fewer features.
Power o virtual machines if they are powered on and running at a higher EVC
Mode than the one you intend to enable.
To verify the EVC mode for virtual machines, see “Determine EVC Modes for Virtual Machines,” on
page 132.
Procedure
1 Select a cluster in the inventory.
2 Click the Manage tab and click .
3 Select VMware EVC and click Edit.
4 Select whether to enable or disable EVC.
Option Description
Disable EVC The EVC feature is disabled. CPU compatibility is not enforced for the
hosts in this cluster.
Enable EVC for AMD Hosts The EVC feature is enabled for AMD hosts.
Enable EVC for Intel Hosts The EVC feature is enabled for Intel hosts.
5 From the VMware EVC Mode drop-down menu, select the baseline CPU feature set that you want to
enable for the cluster.
If you cannot select the EVC Mode, the Compatibility pane displays the reason, and the relevant hosts
for each reason.
6 Click OK.
Determine EVC Modes for Virtual Machines
The EVC mode of a virtual machine denes the CPU features that the virtual machine can access. The
virtual machine's EVC mode is determined when it is powered on in an EVC-enabled cluster.
When a virtual machine is powered on, it determines the EVC mode of the cluster in which it is running. If
the EVC mode of the cluster is subsequently raised, the virtual machine does not change its EVC mode until
it is powered o and powered on again. This means that the virtual machine does not use of any CPU
features exposed by the cluster's new EVC mode until the virtual machine has been powered o and
powered on again.
vCenter Server and Host Management
132 VMware, Inc.
For example, consider a cluster containing hosts with Intel Xeon 45nm Core 2 processors that have been set
to the Intel Merom Generation (Xeon Core 2) EVC mode. A virtual machine powered on in this cluster runs
in the Intel Merom Generation (Xeon Core 2) EVC mode. If the cluster's EVC mode is raised to Intel Penryn
Generation (Xeon 45nm Core 2), the virtual machine remains at the lower Intel Merom Generation (Xeon
Core 2) EVC mode. To use any of the features exposed by the higher cluster EVC mode, such as SSE4.1, you
must power o the virtual machine and power it on again.
Procedure
1 Select the cluster or host in the inventory.
2 Click the Related Objects tab and click Virtual Machines.
3 If the EVC Mode column does not appear, right-click any column title, select Show/Hide Columns and
select EVC Mode.
The EVC modes of all running or suspended virtual machines appear in the EVC Mode column.
Powered o virtual machines and virtual machines that are not in EVC clusters show N/A as the EVC
mode.
Determine the EVC Mode that a Host Supports
By determining the EVC modes that the host can support, you can determine whether the host is compatible
with other hosts in an EVC cluster. For hosts to be included in the same EVC cluster, all the hosts must
support at least one common mode.
Procedure
1 Select a host in the inventory.
2 Click the Summary tab.
3 In the Conguration panel, expand EVC Mode.
The supported EVC modes are listed in order from the fewest to the greatest number of supported
features.
Prepare Clusters for AMD Processors Without 3DNow!
Newer generations of AMD processors do not include 3DNow! processor instructions. If hosts in a cluster
have dierent generations of AMD processors, some with 3DNow! instruction sets and some without, you
cannot successfully migrate virtual machines between the hosts. You must use an EVC mode or CPU
compatibility mask to hide the instructions.
The vCenter Server AMD Opteron Gen. 3 (no 3DNow!) EVC mode masks the 3DNow! instructions from
virtual machines. You can apply this EVC mode to EVC clusters containing only AMD Opteron Generation
3 hosts to allow the clusters to maintain vMotion compatibility with AMD Opteron hosts that do not have
3DNow! instructions. Clusters containing AMD Opteron Generation 1 or AMD Opteron Generation 2 hosts
cannot be made vMotion-compatible with hosts that do not have 3DNow! instructions.
Prerequisites
Ensure that the cluster contains only hosts with AMD Opteron Generation 3 or newer processors.
Chapter 13 Migrating Virtual Machines
VMware, Inc. 133

Procedure
uEnable the AMD Opteron Gen. 3 (no 3DNow!) EVC mode for your EVC cluster.
The steps to enable the EVC mode dier depending on whether you are creating a cluster or enabling
the mode on an existing cluster, and on whether the existing cluster contains powered-on virtual
machines.
Option Description
Creating a new cluster In the New Cluster wizard, enable EVC for AMD hosts and select the
AMD Opteron Gen. 3 (no 3DNow!) EVC mode.
Editing a cluster without powered-
on virtual machines
In the Cluster Seings dialog box, edit the VMware EVC seings and
select the AMD Opteron Gen. 3 (no 3DNow!) EVC mode.
Editing a cluster with powered-on
virtual machines
The AMD Opteron Gen. 3 (no 3DNow!) EVC mode cannot be enabled
while there are powered-on virtual machines in the cluster.
aPower-o any running virtual machines in the cluster, or migrate them
out of the cluster using vMotion.
Migrating the virtual machines out of the cluster with vMotion allows
you to delay powering o the virtual machines until a more
convenient time.
b In the Cluster Seings dialog box, edit the VMware EVC seings and
select the AMD Opteron Gen. 3 (no 3DNow!) EVC mode.
c If you migrated virtual machines out of the cluster, power them o
and cold migrate them back into the cluster.
d Power on the virtual machines.
You can now add hosts with AMD processors without 3DNow! instructions to the cluster and preserve
vMotion compatibility between the new hosts and the existing hosts in the cluster.
CPU Compatibility Masks
CPU compatibility masks allow per-virtual machine customization of the CPU features visible to a virtual
machine.
vCenter Server compares the CPU features available to a virtual machine with the CPU features of the
destination host to determine whether to allow or not migrations with vMotion.
Default values for the CPU compatibility masks are set by VMware to guarantee the stability of virtual
machines after a migration with vMotion.
In some cases, where a choice between CPU compatibility or guest operating system features (such as
NX/XD) exists, VMware provides check-box options to congure individual virtual machines through the
Advanced Seings option for the CPU of the virtual machine. For more control over the visibility of CPU
features, you can edit CPU compatibility mask of the virtual machine at the bit level.
C Changing the CPU compatibility masks can result in an unsupported conguration. Do not
manually change the CPU compatibility masks unless instructed to do so by VMware Support or a VMware
Knowledge base article.
CPU compatibility masks cannot prevent virtual machines from accessing masked CPU features in all
circumstances. In some circumstances, applications can detect and use masked features even though they
are hidden from the guest operating system. In addition, on any host, applications that use unsupported
methods of detecting CPU features rather than using the CPUID instruction can access masked features.
Virtual machines running applications that use unsupported CPU detection methods might experience
stability problems after migration.
vCenter Server and Host Management
134 VMware, Inc.

View CPUID Details for an EVC Cluster
The feature set that is exposed by an EVC cluster corresponds to the feature set of a particular type of
processor. Processor feature sets are described by a set of feature ags that you examine using the CPUID
instruction.
You can view the CPUID feature ags currently exposed by the hosts in an EVC cluster.
Procedure
1 Select a cluster in the inventory.
2 Click the Manage tab and click .
3 Under , click VMware EVC and expand Current CPUID Details.
This VMware EVC panel displays the CPUID feature ags that EVC enforces for the hosts in this cluster. For
information about CPUID feature ags, see the Intel and AMD Web sites.
Migrate a Powered-Off or Suspended Virtual Machine
You can use cold migration to move a virtual machine and its associated disks from one datastore to
another. The virtual machines are not required to be on shared storage.
Prerequisites
nMake sure that you are familiar with the requirements for cold migration. See “Cold Migration,” on
page 119.
nRequired privilege: Resource.Migrate powered virtual machine
Procedure
1 Power o or suspend the virtual machine.
2 Right-click the virtual machine and select Migrate.
a To locate a virtual machine, select a data center, folder, cluster, resource pool, host, or vApp.
b Click the Related Objects tab and click Virtual Machines.
3 Select the migration type and click Next.
Option Description
Change compute resource only Move the virtual machine to another host.
Change storage only Move the virtual machine’s conguration le and virtual disks.
Change both compute resource and
storage
Move the virtual machine to another host and move its conguration le
and virtual disks.
Migrate virtual machine(s) to a
specific datacenter
Move the virtual machine to a virtual data center, where you can assign
policies to VMs.
4 If you change the compute resource of the virtual machine, select the destination compute resource for
this virtual machine migration and click Next.
Any compatibility problem appears in the Compatibility panel. Fix the problem, or select another host
or cluster.
Possible targets include hosts and DRS clusters with any level of automation. If a cluster has no DRS
enabled, select a specic host in the cluster rather than selecting the cluster.
Chapter 13 Migrating Virtual Machines
VMware, Inc. 135

5 Select the format for the virtual machine's disks.
Option Action
Same format as source Use the same format as the source virtual machine.
Thick Provision Lazy Zeroed Create a virtual disk in a default thick format. Space required for the
virtual disk is allocated during creation. Any data remaining on the
physical device is not erased during creation, but is zeroed out on demand
at a later time on rst write from the virtual machine.
Thick Provision Eager Zeroed Create a thick disk that supports clustering features such as Fault
Tolerance. Space required for the virtual disk is allocated at creation time.
In contrast to the thick provision lazy zeroed format, the data remaining
on the physical device is zeroed out during creation. It might take longer
to create disks in this format than to create other types of disks.
Thin Provision Use the thin provisioned format. At rst, a thin provisioned disk uses only
as much datastore space as the disk initially needs. If the thin disk needs
more space later, it can grow to the maximum capacity allocated to it.
6 Select a virtual machine storage policy from the VM Storage Policy drop-down menu.
Storage policies specify storage requirements for applications that run on the virtual machine. You can
also select the default policy for Virtual SAN or Virtual Volumes datastores.
7 Select the datastore location where you want to store the virtual machine les.
Option Action
Store all virtual machine files in the
same location on a datastore.
Select a datastore and click Next.
Store all virtual machine files in the
same Storage DRS cluster.
a Select a Storage DRS cluster.
b (Optional) To not use Storage DRS with this virtual machine, select
Disable Storage DRS for this virtual machine and select a datastore
within the Storage DRS cluster.
c Click Next.
Store virtual machine configuration
files and disks in separate
locations.
a Click Advanced.
b For the virtual machine conguration le and for each virtual disk,
select Browse, and select a datastore or Storage DRS cluster.
c (Optional) If you selected a Storage DRS cluster and do not want to use
Storage DRS with this virtual machine, select Disable Storage DRS for
this virtual machine and select a datastore within the Storage DRS
cluster.
d Click Next.
8 Select a destination network for all VM network adapters and click Next.
You can click Advanced to select a new destination network for each VM network adapter.
You can migrate a virtual machine networks to another distributed switch in the same or to another
data center or vCenter Server.
9 Review the information on the Review Selections page and click Finish.
vCenter Server moves the virtual machine to the new host or storage location.
Event messages appear in the Events tab. The data displayed on the Summary tab shows the status and
state throughout the migration. If errors occur during migration, the virtual machines revert to their original
states and locations.
vCenter Server and Host Management
136 VMware, Inc.

Migrate a Virtual Machine to a New Compute Resource
You can use the Migration wizard to migrate a powered-on virtual machine from one compute resource to
another by using vMotion. To relocate only the disks of a powered-on virtual machine, migrate the virtual
machine to a new datastore by using Storage vMotion.
Prerequisites
Verify that your hosts and virtual machines meet the requirements for migration with vMotion with shared
storage.
nVerify that your hosts and virtual machines meet the requirements for migration with vMotion. See
“Host Conguration for vMotion,” on page 121 and “Virtual Machine Conditions and Limitations for
vMotion,” on page 123.
nVerify that the storage that contains the virtual machine disks is shared between the source and target
hosts. See “vMotion Shared Storage Requirements,” on page 121.
nFor migration across vCenter Server instances verify whether your system meets additional
requirements. See “Requirements for Migration Between vCenter Server Instances,” on page 126.
nRequired privilege: Resource.Migrate powered on virtual machine
Procedure
1 Right-click the virtual machine and select Migrate.
a To locate a virtual machine, select a data center, folder, cluster, resource pool, host, or vApp.
b Click the Related Objects tab and click Virtual Machines.
2 Click Change compute resource only and click Next.
3 Select a host, cluster, resource pool, or vApp ro run the virtual machine, and click Next.
Any compatibility problem appears in the Compatibility panel. Fix the problem, or select another host
or cluster.
Possible targets include hosts and fully automated DRS clusters in the same or another vCenter Server
system. If your target is a non-automated cluster, select a host within the non-automated cluster.
4 Select a destination network for all VM network adapters and click Next.
You can click Advanced to select a new destination network for each VM network adapter.
You can migrate a virtual machine networks to another distributed switch in the same or to another
data center or vCenter Server.
5 Select the migration priority level and click Next.
Option Description
Schedule vMotion with high priority vCenter Server aempts to reserve resources on both the source and
destination hosts to be shared among all concurrent migrations with
vMotion. vCenter Server grants a larger share of host CPU resources. if
sucient CPU resources are not immediately available, vMotion is not
initiated.
Schedule regular vMotion vCenter Server reserves resources on both the source and destination hosts
to be shared among all concurrent migration with vMotion. vCenter Server
grants a smaller share of host CPU resources. If there is a lack of CPU
resources, the duration of vMotion can be extended.
6 Review the page and click Finish.
Chapter 13 Migrating Virtual Machines
VMware, Inc. 137

vCenter Server moves the virtual machine to the new host or storage location.
Event messages appear in the Events tab. The data displayed on the Summary tab shows the status and
state throughout the migration. If errors occur during migration, the virtual machines revert to their original
states and locations.
Migrate a Virtual Machine to a New Compute Resource and Storage
You can move a virtual machine to another compute resource and move its disks or virtual machine folder
to another datastore. With vMotion, you can migrate a virtual machine and its disks and les while the
virtual machine is powered on.
Simultaneous migration to a new compute resource and datastore provides greater mobility for virtual
machines by eliminating the vCenter Server boundary. Virtual machine disks or content of the virtual
machine folder are transferred over the vMotion network to reach the destination host and datastores.
To make disk format changes and preserve them, you must select a dierent datastore for the virtual
machine les and disks. You cannot preserve disk format changes if you select the same datastore on which
the virtual machine currently resides.
Prerequisites
nVerify that your hosts and virtual machines meet the requirements for live migration. See
“Requirements and Limitations for vMotion Without Shared Storage,” on page 125.
nFor migration across vCenter Server instances verify whether your system meets additional
requirements. See “Requirements for Migration Between vCenter Server Instances,” on page 126.
nRequired privilege: Resource.Migrate powered on virtual machine
Procedure
1 Right-click the virtual machine and select Migrate.
a To locate a virtual machine, select a data center, folder, cluster, resource pool, host, or vApp.
b Click the Related Objects tab and click Virtual Machines.
2 Select Change both compute resource and storage and click Next.
3 Select a destination resource for the virtual machine, and click Next.
Any compatibility problems appear in the Compatibility panel. Fix the problem, or select another host
or cluster.
Possible targets include hosts and fully automated DRS clusters. If your target is a non-automated
cluster, select a host within the non-automated cluster.
If you environment has more than one vCenter Server instances, you can move virtual machines from
one vCenter Server inventory to another.
4 Select the format for the virtual machine's disks.
Option Action
Same format as source Use the same format as the source virtual machine.
Thick Provision Lazy Zeroed Create a virtual disk in a default thick format. Space required for the
virtual disk is allocated during creation. Any data remaining on the
physical device is not erased during creation, but is zeroed out on demand
at a later time on rst write from the virtual machine.
vCenter Server and Host Management
138 VMware, Inc.

Option Action
Thick Provision Eager Zeroed Create a thick disk that supports clustering features such as Fault
Tolerance. Space required for the virtual disk is allocated at creation time.
In contrast to the thick provision lazy zeroed format, the data remaining
on the physical device is zeroed out during creation. It might take longer
to create disks in this format than to create other types of disks.
Thin Provision Use the thin provisioned format. At rst, a thin provisioned disk uses only
as much datastore space as the disk initially needs. If the thin disk needs
more space later, it can grow to the maximum capacity allocated to it.
5 Assign a storage policy from the VM Storage Policy drop-down menu.
Storage policies dene the storage capabilities that are required by the applications running on the
virtual machine.
6 Select the datastore location where you want to store the virtual machine les.
Option Action
Store all virtual machine files in the
same location on a datastore.
Select a datastore and click Next.
Store all virtual machine files in the
same Storage DRS cluster.
a Select a Storage DRS cluster.
b (Optional) To not use Storage DRS with this virtual machine, select
Disable Storage DRS for this virtual machine and select a datastore
within the Storage DRS cluster.
c Click Next.
Store virtual machine configuration
files and disks in separate
locations.
a Click Advanced.
b For the virtual machine conguration le and for each virtual disk,
select Browse, and select a datastore or Storage DRS cluster.
c (Optional) If you selected a Storage DRS cluster and do not want to use
Storage DRS with this virtual machine, select Disable Storage DRS for
this virtual machine and select a datastore within the Storage DRS
cluster.
d Click Next.
7 Select a destination network for all VM network adapters and click Next.
You can click Advanced to select a new destination network for each VM network adapter.
You can migrate a virtual machine networks to another distributed switch in the same or to another
data center or vCenter Server.
8 Select the migration priority level and click Next.
Option Description
Schedule vMotion with high priority vCenter Server aempts to reserve resources on both the source and
destination hosts to be shared among all concurrent migrations with
vMotion. vCenter Server grants a larger share of host CPU resources. if
sucient CPU resources are not immediately available, vMotion is not
initiated.
Schedule regular vMotion vCenter Server reserves resources on both the source and destination hosts
to be shared among all concurrent migration with vMotion. vCenter Server
grants a smaller share of host CPU resources. If there is a lack of CPU
resources, the duration of vMotion can be extended.
9 Review the information on the Review Selections page and click Finish.
vCenter Server moves the virtual machine to the new host or storage location.
Chapter 13 Migrating Virtual Machines
VMware, Inc. 139

Event messages appear in the Events tab. The data displayed on the Summary tab shows the status and
state throughout the migration. If errors occur during migration, the virtual machines revert to their original
states and locations.
Migrate a Virtual Machine to New Storage
Use migration with Storage vMotion to relocate the conguration le of a virtual machine and virtual disks
while the virtual machine is powered on.
You can change the virtual machine host during a migration with Storage vMotion.
Prerequisites
nVerify that your system satises the requirements for Storage vMotion. See “Storage vMotion
Requirements and Limitations,” on page 127.
nRequired privilege: Resource.Migrate powered on virtual machine
Procedure
1 Right-click the virtual machine and select Migrate.
a To locate a virtual machine, select a data center, folder, cluster, resource pool, host, or vApp.
b Click the Related Objects tab and click Virtual Machines.
2 Click Change storage only and click Next.
3 Select the format for the virtual machine's disks.
Option Action
Same format as source Use the same format as the source virtual machine.
Thick Provision Lazy Zeroed Create a virtual disk in a default thick format. Space required for the
virtual disk is allocated during creation. Any data remaining on the
physical device is not erased during creation, but is zeroed out on demand
at a later time on rst write from the virtual machine.
Thick Provision Eager Zeroed Create a thick disk that supports clustering features such as Fault
Tolerance. Space required for the virtual disk is allocated at creation time.
In contrast to the thick provision lazy zeroed format, the data remaining
on the physical device is zeroed out during creation. It might take longer
to create disks in this format than to create other types of disks.
Thin Provision Use the thin provisioned format. At rst, a thin provisioned disk uses only
as much datastore space as the disk initially needs. If the thin disk needs
more space later, it can grow to the maximum capacity allocated to it.
4 Select a virtual machine storage policy from the VM Storage Policy drop-down menu.
Storage policies specify storage requirements for applications that run on the virtual machine. You can
also select the default policy for Virtual SAN or Virtual Volumes datastores.
vCenter Server and Host Management
140 VMware, Inc.

5 Select the datastore location where you want to store the virtual machine les.
Option Action
Store all virtual machine files in the
same location on a datastore.
Select a datastore and click Next.
Store all virtual machine files in the
same Storage DRS cluster.
a Select a Storage DRS cluster.
b (Optional) To not use Storage DRS with this virtual machine, select
Disable Storage DRS for this virtual machine and select a datastore
within the Storage DRS cluster.
c Click Next.
Store virtual machine configuration
files and disks in separate
locations.
a Click Advanced.
b For the virtual machine conguration le and for each virtual disk,
select Browse, and select a datastore or Storage DRS cluster.
c (Optional) If you selected a Storage DRS cluster and do not want to use
Storage DRS with this virtual machine, select Disable Storage DRS for
this virtual machine and select a datastore within the Storage DRS
cluster.
d Click Next.
6 Review the information on the Review Selections page and click Finish.
vCenter Server moves the virtual machine to the new storage location. Names of migrated virtual machine
les on the destination datastore match the inventory name of the virtual machine.
Event messages appear in the Events tab. The data displayed on the Summary tab shows the status and
state throughout the migration. If errors occur during migration, the virtual machines revert to their original
states and locations.
Place vMotion Traffic on the vMotion TCP/IP Stack of an ESXi Host
Use the vMotion TCP/IP stack to isolate trac for vMotion and to assign a dedicated default gateway,
routing table, and DNS conguration for this trac. To enable the vMotion TCP/IP stack, assign a new
VMkernel adapter to it.
By using a separate TCP/IP stack, you can handle vMotion and cold migration trac according to the
topology of the network and as required for your organization:
nRoute the trac for migration of powered on or powered o virtual machines by using a default
gateway that is dierent from the gateway assigned to the default stack on the host.
By using a separate default gateway, you can use DHCP for IP address assignment to the VMkernel
adapters for migration in a exible way.
nAssign a separate set of buers and sockets.
nAvoid routing table conicts that might otherwise appear when many features are using a common
TCP/IP stack.
nIsolate trac to improve security.
Prerequisites
Verify that the host is running ESXi 6.0 or later
Procedure
1 In the vSphere Web Client, navigate to the host.
2 Under Manage, select Networking and then select VMkernel adapters.
3 Click Add host networking.
Chapter 13 Migrating Virtual Machines
VMware, Inc. 141

4 On the Select connection type page, select VMkernel Network Adapter and click Next.
5 On the Select target device page, select the switch for the VMkernel adapter, and click Next.
Option Description
Select an existing network Use the physical adapter conguration of an existing distributed port
group to send data from the VMkernel adapter to the external network.
Select an existing standard switch Use the physical adapter conguration for the VMkernel adapter of an
existing standard switch.
New vSphere standard switch Assign a new physical adapter conguration for the VMkernel adapter on
a new standard switch.
6 On the Port properties page, select vMotion from the TCP/IP stack drop-down menu.
The vMotion trac becomes the only enabled service. You cannot use this VMkernel adapter for trac
types other than vMotion.
7 Set the label, VLAN ID, and IP mode of the VMkernel adapter, and click Next.
8 (Optional) On the IPv4 seings page, select an option for obtaining IP addresses.
Option Description
Obtain IP settings automatically Use DHCP to obtain IP seings. A DHCP server must be present on the
network.
Use static IP settings Enter the IPv4 IP address and subnet mask for the VMkernel adapter.
The VMkernel Default Gateway and DNS server addresses for IPv4 are
obtained from the selected TCP/IP stack.
9 (Optional) On the IPv6 seings page, select an option for obtaining IPv6 addresses.
Option Description
Obtain IPv6 addresses
automatically through DHCP
Use DHCP to obtain IPv6 addresses. A DHCPv6 server must be present on
the network.
Obtain IPv6 addresses
automatically through Router
Advertisement
Use router advertisement to obtain IPv6 addresses.
Static IPv6 addresses a Click Add to add a new IPv6 address.
b Enter the IPv6 address and subnet prex length, and click OK.
c To change the VMkernel default gateway, click Edit.
The VMkernel Default Gateway address for IPv6 is obtained from the
selected TCP/IP stack.
10 Review your seing selections in the Ready to complete page and click Finish.
After you create a VMkernel adapter on the vMotion TCP/IP stack, you can use only this stack for vMotion
on this host. The VMkernel adapters on the default TCP/IP stack are disabled for the vMotion service. If a
live migration uses the default TCP/IP stack while you are conguring VMkernel adapters with the vMotion
TCP/IP stack, the migration completes successfully. However, the involved VMkernel adapters on the
default TCP/IP stack are disabled for future vMotion sessions.
What to do next
Assign a default gateway, and congure the DNS seings, congestion control, and maximum number of
connections for the vMotion TCP/IP stack.
vCenter Server and Host Management
142 VMware, Inc.

Place Traffic for Cold Migration, Cloning, and Snapshots on the
Provisioning TCP/IP Stack
Use the provisioning TCP/IP stack to isolate trac for cold migration, VM clones, and snapshots, and to
assign a dedicated default gateway, routing table, and DNS conguration for this trac. To enable the
Provisioning TCP/IP stack, assign it a new VMkernel adapter.
By using a separate TCP/IP stack, you can handle vMotion and cold migration trac according to the
topology of the network and as required for your organization:
nRoute the trac for migration of powered on or powered o virtual machines by using a default
gateway that is dierent from the gateway assigned to the default stack on the host.
By using a separate default gateway, you can use DHCP for IP address assignment to the VMkernel
adapters for migration in a exible way.
nAssign a separate set of buers and sockets.
nAvoid routing table conicts that might otherwise appear when many features are using a common
TCP/IP stack.
nIsolate trac to improve security.
Prerequisites
Verify that the host is running ESXi 6.0 or later
Procedure
1 In the vSphere Web Client, navigate to the host.
2 Under Manage, select Networking and then select VMkernel adapters.
3 Click Add host networking.
4 On the Select connection type page, select VMkernel Network Adapter and click Next.
5 On the Select target device page, select the switch for the VMkernel adapter, and click Next.
Option Description
Select an existing network Use the physical adapter conguration of an existing distributed port
group to send data from the VMkernel adapter to the external network.
Select an existing standard switch Use the physical adapter conguration for the VMkernel adapter of an
existing standard switch.
New vSphere standard switch Assign a new physical adapter conguration for the VMkernel adapter on
a new standard switch.
6 On the Port properties page, select Provisioning from the TCP/IP stack drop-down menu.
The provisioning trac becomes the only enabled service. You cannot use this VMkernel adapter for
trac types other than provisioning.
7 Set the label, VLAN ID, and IP mode of the VMkernel adapter, and click Next.
Chapter 13 Migrating Virtual Machines
VMware, Inc. 143

8 (Optional) On the IPv4 seings page, select an option for obtaining IP addresses.
Option Description
Obtain IP settings automatically Use DHCP to obtain IP seings. A DHCP server must be present on the
network.
Use static IP settings Enter the IPv4 IP address and subnet mask for the VMkernel adapter.
The VMkernel Default Gateway and DNS server addresses for IPv4 are
obtained from the selected TCP/IP stack.
9 (Optional) On the IPv6 seings page, select an option for obtaining IPv6 addresses.
Option Description
Obtain IPv6 addresses
automatically through DHCP
Use DHCP to obtain IPv6 addresses. A DHCPv6 server must be present on
the network.
Obtain IPv6 addresses
automatically through Router
Advertisement
Use router advertisement to obtain IPv6 addresses.
Static IPv6 addresses a Click Add to add a new IPv6 address.
b Enter the IPv6 address and subnet prex length, and click OK.
c To change the VMkernel default gateway, click Edit.
The VMkernel Default Gateway address for IPv6 is obtained from the
selected TCP/IP stack.
10 Review your seing selections in the Ready to complete page and click Finish.
After you create a VMkernel adapter on the provisioning TCP/IP stack, you can use only this stack for cold
migration, cloning, and snapshots on this host. The VMkernel adapters on the default TCP/IP stack are
disabled for the provisioning service. If a live migration uses the default TCP/IP stack while you congure
VMkernel adapters with the provisioning TCP/IP stack, the data transfer completes successfully. However,
the involved VMkernel adapters on the default TCP/IP stack are disabled for future cold migration, cross-
host cloning, and snapshot sessions.
Limits on Simultaneous Migrations
vCenter Server places limits on the number of simultaneous virtual machine migration and provisioning
operations that can occur on each host, network, and datastore.
Each operation, such as a migration with vMotion or cloning a virtual machine, is assigned a resource cost.
Each host, datastore, or network resource, has a maximum cost that it can support at any one time. Any new
migration or provisioning operation that causes a resource to exceed its maximum cost does not proceed
immediately, but is queued until other operations complete and release resources. Each of the network,
datastore, and host limits must be satised for the operation to proceed.
vMotion without shared storage, migrating virtual machines to a dierent host and datastore
simultaneously, is a combination of vMotion and Storage vMotion. This migration inherits the network,
host, and datastore costs associated with those operations. vMotion without shared storage is equivalent to a
Storage vMotion with a network cost of 1.
Network Limits
Network limits apply only to migrations with vMotion. Network limits depend on the version of ESXi and
the network type. All migrations with vMotion have a network resource cost of 1.
vCenter Server and Host Management
144 VMware, Inc.

Table 13‑1. Network Limits for Migration with vMotion
Operation ESXi Version Network Type Maximum Cost
vMotion 5.0, 5.1, 5.5, 6.0 1GigE 4
vMotion 5.0, 5.1, 5.5, 6.0 10GigE 8
Datastore Limits
Datastore limits apply to migrations with vMotion and with Storage vMotion. A migration with vMotion
has a resource cost of 1 against the shared virtual machine's datastore. A migration with Storage vMotion
has a resource cost of 1 against the source datastore and 1 against the destination datastore.
Table 13‑2. Datastore Limits and Resource Costs for vMotion and Storage vMotion
Operation ESXi Version Maximum Cost Per Datastore
Datastore Resource
Cost
vMotion 5.0, 5.1, 5.5, 6.0 128 1
Storage vMotion 5.0, 5.1, 5.5, 6.0 128 16
Host Limits
Host limits apply to migrations with vMotion, Storage vMotion, and other provisioning operations such as
cloning, deployment, and cold migration. All hosts have a maximum cost per host of 8. For example, on an
ESXi 5.0 host, you can perform 2 Storage vMotion operations, or 1 Storage vMotion and 4 vMotion
operations.
Table 13‑3. Host Migration Limits and Resource Costs for vMotion, Storage vMotion, and Provisioning
Operations
Operation ESXi Version
Derived Limit Per
Host Host Resource Cost
vMotion 5.0, 5.1, 5.5, 6.0 8 1
Storage vMotion 5.0, 5.1, 5.5, 6.0 2 4
vMotion Without Shared
Storage
5.1, 5.5, 6.0 2 4
Other provisioning
operations
5.0, 5.1, 5.5, 6.0 8 1
About Migration Compatibility Checks
During migration, the Migrate Virtual Machine wizard checks the destination host for compatibility with
the migrating virtual machine using a number of criteria.
When you select a host or a cluster, the Compatibility panel at the boom of the Migrate Virtual Machine
wizard displays information about the compatibility of the selected host or cluster with the virtual machine’s
conguration.
Compatibility Check Results
If the virtual machine is compatible, the panel displays the message Compatibility checks succeeded. If the
virtual machine is not compatible with either the host’s or cluster’s congured networks or datastores, the
compatibility window might display both warnings and errors:
nWarning messages do not disable migration. Often the migration is justied and you can continue with
the migration despite the warnings.
Chapter 13 Migrating Virtual Machines
VMware, Inc. 145
nErrors might disable migration if no error-free destination hosts are available among the selected
destination hosts. In this case, if you click Next, the wizard displays the compatibility errors again, and
you cannot proceed to the next step.
Compatibility Checks During Migration Setup
When you aempt to move only the compute resource, the Migrate Virtual Machine wizard examines the
source and destination hosts, the target resource pool, the datastore, and the network. When you aempt to
move only the storage, the wizard checks the compatibility of the same objects except for the network.
When you move compute resources and storage together, the Migrate Virtual Machine wizard runs fewer
compatibility checks. For example, if you move the compute resource, you select the target host or cluster
under a vCenter Server instance. The wizard performs all necessary validation only against the selected
host, and does not check the datastores available on the destination host. When you aempt to move the
virtual machine to a cluster, the Migrate Virtual Machine wizard examines the compatibility against the host
recommendation from vSphere DRS. The wizard directly validates the compatibility of the target datastore
when you select it later.
Another compatibility check is whether vMotion is enabled on the source and target hosts.
Compatibility Checks for Virtual Hardware
Eects of a specic host CPU feature on compatibility are dependent on whether ESXi exposes or hides
them from virtual machines.
nFeatures that are exposed to virtual machines are not compatible when they are do not match on the
source and target hosts.
nFeatures that are not exposed to virtual machines are considered as compatible regardless of whether
they match on the hosts.
Specic items of virtual machine hardware can also cause compatibility problems. For example, a virtual
machine using an Enhanced VMXNET virtual NIC cannot be migrated to a host running a version of ESXi
that does not support Enhanced VMXNET.
vCenter Server and Host Management
146 VMware, Inc.

Automating Management Tasks by
Using vRealize Orchestrator 14
VMware™ vRealize Orchestrator is a development- and process-automation platform that provides a
library of extensible workows. By using the workow library you can create and run automated,
congurable processes to manage the vSphere infrastructure as well as other VMware and third-party
technologies.
Orchestrator exposes every operation in the vCenter Server API and so that you can integrate all of these
operations into your own automated processes.
To run and schedule workows on the objects in your vSphere infrastructure by using the
vSphere Web Client, make sure that you congure the Orchestrator server to work with the same Single
Sign-On instance to which both the vCenter Server and vSphere Web Client point. You must also ensure that
Orchestrator is registered as a vCenter Server extension. You register Orchestrator as a vCenter Server
extension when you specify a user (by providing the user name and password), who has the privileges to
manage vCenter Server extensions. For more information, see Installing and Conguring vRealize Orchestrator.
This chapter includes the following topics:
n“Concepts of Workows,” on page 147
n“Performing Administration Tasks on the vSphere Objects,” on page 148
n“Congure the Default vRealize Orchestrator,” on page 149
n“Managing Associations of Workows with vSphere Inventory Objects,” on page 149
n“Managing Workows,” on page 152
n“Workows for Managing Inventory Objects,” on page 158
Concepts of Workflows
A workow is a series of actions and decisions that you run sequentially. Orchestrator provides a library of
workows that perform common management tasks according to best practices.
Basics of Workflows
Workows consist of a schema, aributes, and parameters. The workow schema is the main component of
a workow as it denes all the workow elements and the logical connections between them. The workow
aributes and parameters are the variables that workows use to transfer data. Orchestrator saves a
workow token every time a workow runs, recording the details of that specic run of the workow. This
token contains all parameters related to the running of the workow. For example, if you run a workow
three times, three workow tokens are created.
VMware, Inc. 147
The vSphere Web Client allows you run and schedule workows on selected objects from your vSphere
inventory. You cannot create, delete, edit and manage workows in the vSphere Web Client. You develop
and manage workows in the Orchestrator client. For more information about the Orchestrator client, see
Using the VMware vRealize Orchestrator Client. For information about developing workows, see Developing
with VMware vRealize Orchestrator.
Input Workflow Parameters
Most workows require a certain set of input parameters to run. An input parameter is an argument that the
workow processes when it starts. The user, an application, or another workow or an action passes input
parameters to a workow, for the workow to process when it starts.
For example, if a workow resets a virtual machine, the workow requires as an input parameter the name
of the virtual machine to reset.
Output Workflow Parameters
Workow's output parameters represent the result from the workow run. Output parameters can change
when a workow or a workow element runs. While they run, workows can receive the output parameters
of other workows as input parameters.
For example, if a workow creates a snapshot of a virtual machine, the output parameter for the workow is
the resulting snapshot.
Workflow Presentation
When you start a workow in the vSphere Web Client, the client loads the workow presentation. You
provide the input parameters of the workow in the workow presentation.
User Interaction
Some workows require interactions from users during their run and suspend either until the user provides
the required information or until the workow times out.
Performing Administration Tasks on the vSphere Objects
By using the Orchestrator view in the vSphere Web Client you can perform your administration tasks such
as running and scheduling workows, and viewing the list of available workows.
From the Orchestrator view in the vSphere Web Client, you can perform the following tasks:
nSelect a default Orchestrator server.
nManage workows. Managing workows includes the following tasks:
nAssociating workows with selected vSphere inventory objects such as virtual machines, ESXi
hosts, clusters, resource pools, and folders.
nExporting and importing current associations of workows with vSphere inventory objects for
backup purposes or to import them in another vSphere Web Client instance.
nEditing associations of workows with vSphere inventory objects such as virtual machines, ESXi
hosts, clusters, resource pools, folders, and so on.
nViewing information about workow runs, as well as about workows waiting for user interaction.
nRunning and scheduling workows on vSphere objects.
To run workows on selected vSphere inventory objects, you must select a default Orchestrator server. You
should also associate the workows of the default Orchestrator server with vSphere inventory objects that
you want to manage.
vCenter Server and Host Management
148 VMware, Inc.
Configure the Default vRealize Orchestrator
If you have congured more than one Orchestrator server to work with a vCenter Server instance that is
connected with your vSphere Web Client, you must congure the default Orchestrator server to use with the
vCenter Server instance.
You cannot run workows on the objects in a vCenter Server instance if it is not added as a vCenter Server
host to the Orchestrator server.
Prerequisites
Log in as a member of the Administrators group to be able to congure the default Orchestrator server.
Procedure
1 Log in to the vSphere Web Client.
2 In the object navigator, click vRealize Orchestrator.
3 In the Manage tab, click the Servers subtab.
A table appears that lists the available vCenter Server instances. Each row of the table contains a
vCenter Server and the Orchestrator server that manages it.
4 Right-click a row of the table with the available vCenter Server instances and select Edit .
5 In the Edit vRealize Orchestrator connections dialog box, select the default Orchestrator server to
manage your vCenter Server instance.
nSelect the Fixed IP/host name check box and type the IP address of the Orchestrator server.
nSelect the Registered as VC extension check box and from the drop-down menu, select the URL
address of the Orchestrator server.
6 Click OK.
You successfully congured a default vRealize Orchestrator server in the vSphere Web Client.
Managing Associations of Workflows with vSphere Inventory Objects
If you want to see more workows displayed in the pop-up menu when you right-click a vSphere inventory
object, and run these workows on more object types, you can associate workows with the dierent
vSphere object types.
You can add and edit associations, as well as export and import XML les containing the associations of
workows with vSphere objects.
Workows associated with inventory object types are listed in the pop-up menu that appears when you
right-click the inventory objects and in the Actions menu.
Only users from the Orchestrator Administrator group have the rights to manage the associations of
workows with vSphere inventory objects.
Associate Workflows with vSphere Inventory Object Types
You can associate workows with a vSphere object type to run the workows directly on the inventory
objects of that type.
Workows associated with inventory object types are listed in the pop-up menu that appears when you
right-click an inventory object, and in the Actions menu.
Chapter 14 Automating Management Tasks by Using vRealize Orchestrator
VMware, Inc. 149

Prerequisites
nVerify that you have congured at least one Orchestrator server to work with the same Single Sign-On
instance to which both the vCenter Server and vSphere Web Client are pointing. You must also ensure
that Orchestrator is registered as a vCenter Server extension. You register Orchestrator as a vCenter
Server extension when you specify a user (by providing the user name and password), who has the
privileges to manage vCenter Server extensions. For more information, see Installing and Conguring
VMware vRealize Orchestrator.
nLog in as a member of the Administrators group to be able to congure the default Orchestrator server.
Procedure
1 In the object navigator, click vRealize Orchestrator.
2 Click the Manage tab.
3 Click the Context Actions subtab.
4
Click the Add icon to add a new workow.
5 Select the Orchestrator server from the vRO Servers tree, and navigate through the workow library to
nd the workow to add.
6 Click Add.
The workow appears in the list of selected workows on the right.
7 (Optional) Enable multi-selection.
Multi-selection allows you to select multiple vSphere objects of the same type when you run the
workow.
8 Under Available types, select the vSphere object types with which you want to associate the workow.
9 Click OK.
Edit the Associations of Workflows with vSphere Objects
You can associate a workow with dierent objects from the vSphere inventory and also edit the
associations of workows with the objects from the vSphere inventory.
Prerequisites
nVerify that you have congured at least one Orchestrator server to work with the same Single Sign-On
instance to which both the vCenter Server and vSphere Web Client are pointing. You must also ensure
that Orchestrator is registered as a vCenter Server extension. You register Orchestrator as a vCenter
Server extension when you specify a user (by providing the user name and password), who has the
privileges to manage vCenter Server extensions. For more information, see Installing and Conguring
VMware vRealize Orchestrator.
nLog in as a member of the Administrators group to be able to congure the default Orchestrator server.
Procedure
1 In the object navigator, click vRealize Orchestrator.
2 Click the Manage tab.
3 Click the Context Actions subtab.
4 Right-click the workow to edit and select Edit.
5 Change the association properties.
6 Click OK.
vCenter Server and Host Management
150 VMware, Inc.

Export the Associations of Workflows with vSphere Objects
You can transfer the associations of workows with objects in the vSphere inventory from one
vSphere Web Client to another by using an XML le.
Prerequisites
nVerify that you have congured at least one Orchestrator server to work with the same Single Sign-On
instance to which both the vCenter Server and vSphere Web Client are pointing. You must also ensure
that Orchestrator is registered as a vCenter Server extension. You register Orchestrator as a vCenter
Server extension when you specify a user (by providing the user name and password), who has the
privileges to manage vCenter Server extensions. For more information, see Installing and Conguring
VMware vRealize Orchestrator.
nLog in as a member of the Administrators group to be able to congure the default Orchestrator server.
Procedure
1 In the object navigator, click vRealize Orchestrator.
2 Click the Manage tab.
3 Click the Context Actions subtab.
4
Click the Export icon .
5 Select a location where you want to save the XML le, and click Save.
Import the Association of Workflows with vSphere Objects
You can import an XML le that contains the association of workows with objects in the vSphere inventory.
Prerequisites
nVerify that you have congured at least one Orchestrator server to work with the same Single Sign-On
instance to which both the vCenter Server and vSphere Web Client are pointing. You must also ensure
that Orchestrator is registered as a vCenter Server extension. You register Orchestrator as a vCenter
Server extension when you specify a user (by providing the user name and password), who has the
privileges to manage vCenter Server extensions. For more information, see Installing and Conguring
VMware vRealize Orchestrator.
nLog in as a member of the Administrators group to be able to congure the default Orchestrator server.
Procedure
1 In the object navigator, click vRealize Orchestrator.
2 Click the Manage tab.
3 Click the Context Actions subtab.
4
Click the Import icon .
5 Browse to select the XML le to import and click Open.
Orchestrator compares the two associated workow sets and imports the missing workow associations.
Chapter 14 Automating Management Tasks by Using vRealize Orchestrator
VMware, Inc. 151
Managing Workflows
You can view dierent information about Orchestrator workows, run and schedule workows and manage
them by using the vSphere Web Client.
You can perform some management tasks on the Orchestrator workows from the vRealize Orchestrator
view in the vSphere Web Client. You can also perform some of the tasks by right-clicking a vSphere
inventory object and selecting All vRealize Orchestrator plugin Actions.
Workow management tasks include:
nRunning workows on vSphere inventory objects, such as virtual machines, ESXi hosts, clusters,
resource pools, and folders.
nViewing information about workow runs.
nViewing information about workows waiting for user interaction.
nSearching for a specic workow from the list of available workows.
nScheduling workows.
Run Workflows on vSphere Inventory Objects
You can automate management tasks in vSphere by running Orchestrator workows directly on objects
from the vSphere inventory.
Prerequisites
nVerify that you have congured at least one Orchestrator server to work with the same Single Sign-On
instance to which both the vCenter Server and vSphere Web Client are pointing. You must also ensure
that Orchestrator is registered as a vCenter Server extension. You register Orchestrator as a vCenter
Server extension when you specify a user (by providing the user name and password), who has the
privileges to manage vCenter Server extensions. For more information, see Installing and Conguring
VMware vRealize Orchestrator.
nVerify that you have workows associated with the vSphere inventory objects. See “Associate
Workows with vSphere Inventory Object Types,” on page 149.
Procedure
1 Click vCenter.
2 Under Inventory Lists, click an inventory category.
3 Right-click the object that you want to run the workow on, and navigate to All vRealize Orchestrator
plugin Actions.
All available workows that you can run on the selected inventory object are listed.
4 Click the workow that you want to run.
5 Provide the required workow parameters.
6 (Optional) Schedule the workow to run at a specied time.
a In the Task name text box, type the name of the scheduled task.
b (Optional) In the Description text box, type a description of the scheduled task.
c Schedule the date and time of the workow run.
d Specify the recurrence options.
7 Click Finish.
vCenter Server and Host Management
152 VMware, Inc.
View Information About Workflow Runs
You can view information about the workow runs for each connected Orchestrator server. The available
information includes the workow name, start and end date, state of the workow, and user who started the
workow.
Prerequisites
Verify that you have congured at least one Orchestrator server to work with the same Single Sign-On
instance to which both the vCenter Server and vSphere Web Client are pointing. You must also ensure that
Orchestrator is registered as a vCenter Server extension. You register Orchestrator as a vCenter Server
extension when you specify a user (by providing the user name and password), who has the privileges to
manage vCenter Server extensions. For more information, see Installing and Conguring
VMware vRealize Orchestrator.
Procedure
1 In the object navigator, click vRealize Orchestrator.
2 Click vRO Servers.
A list of the available vRealize Orchestrator servers appears.
3 Click a vRealize Orchestrator server, and click the Monitor tab.
The list of workow runs appears.
What to do next
You can review the list of workow runs, cancel a running workow, or respond to a workow that requires
interaction.
View Information About the Runs of a Specific Workflow
You can view information about the runs of a single workow such as start and end date, state of the
workow, and user who has started the workow.
Prerequisites
Verify that you have congured at least one Orchestrator server to work with the same Single Sign-On
instance to which both the vCenter Server and vSphere Web Client are pointing. You must also ensure that
Orchestrator is registered as a vCenter Server extension. You register Orchestrator as a vCenter Server
extension when you specify a user (by providing the user name and password), who has the privileges to
manage vCenter Server extensions. For more information, see Installing and Conguring
VMware vRealize Orchestrator.
Procedure
1 In the object navigator, click vRealize Orchestrator.
2 Under Inventory Lists, click .
A list of the available workows appears.
3 Click the name of a workow, and click the Monitor tab.
A list of workow runs appears.
What to do next
You can review the list of workow runs, cancel a running workow, or respond to a workow that requires
interaction.
Chapter 14 Automating Management Tasks by Using vRealize Orchestrator
VMware, Inc. 153

View Workflows that Are Waiting for User Interaction
You can view the workows that are waiting for a user interaction.
Prerequisites
Verify that you have congured at least one Orchestrator server to work with the same Single Sign-On
instance to which both the vCenter Server and vSphere Web Client are pointing. You must also ensure that
Orchestrator is registered as a vCenter Server extension. You register Orchestrator as a vCenter Server
extension when you specify a user (by providing the user name and password), who has the privileges to
manage vCenter Server extensions. For more information, see Installing and Conguring
VMware vRealize Orchestrator.
Procedure
1 In the object navigator, click vRealize Orchestrator.
2 Under Inventory lists, click Waiting for interaction.
A list of workows that are waiting for a user interaction appears.
What to do next
You can provide values for the required parameters of workows that are waiting for a user interaction.
Searching for Workflows
You can browse for workows in the inventory of the Orchestrator server or lter the available workows
by a search keyword to nd a particular workow.
Browse the Inventory of the Orchestrator Server
You can view the available workows in the inventory of each connected Orchestrator server. You can
search for a particular type of workow by browsing the workow categories.
Prerequisites
Verify that you have congured at least one Orchestrator server to work with the same Single Sign-On
instance to which both the vCenter Server and vSphere Web Client are pointing. You must also ensure that
Orchestrator is registered as a vCenter Server extension. You register Orchestrator as a vCenter Server
extension when you specify a user (by providing the user name and password), who has the privileges to
manage vCenter Server extensions. For more information, see Installing and Conguring
VMware vRealize Orchestrator.
Procedure
1 In the object navigator, click vRealize Orchestrator.
2 Click vRO Servers.
A list of the available vRealize Orchestrator servers appears.
3 Double-click a vRealize Orchestrator server.
4 Click Categories.
5 Double-click Library.
N Library is the default main workow category. An Orchestrator server can have additional
custom workow categories.
vCenter Server and Host Management
154 VMware, Inc.
6 Click Categories.
A list of available workow categories appears.
7 Double-click a workow category to browse the available workows and its subcategories.
Find a Workflow
If you have a large number of workows, you can lter them by a search keyword to nd a specic
workow.
Prerequisites
Verify that you have congured at least one Orchestrator server to work with the same Single Sign-On
instance to which both the vCenter Server and vSphere Web Client are pointing. You must also ensure that
Orchestrator is registered as a vCenter Server extension. You register Orchestrator as a vCenter Server
extension when you specify a user (by providing the user name and password), who has the privileges to
manage vCenter Server extensions. For more information, see Installing and Conguring
VMware vRealize Orchestrator.
Procedure
1 In the object navigator, click vRealize Orchestrator.
2 Click .
3 In the Filter text box, type a search term or the name of the workow that you are searching for.
A list displays the workows that contain the search term in the workow name or description.
Scheduling Workflows
You can create tasks to schedule workows, edit scheduled tasks, suspend scheduled tasks, and resume
suspended scheduled tasks.
Schedule a Workflow
You can schedule a workow to run at a specied time. You can also set the recurrence for a scheduled
workow.
Prerequisites
Verify that you have congured at least one Orchestrator server to work with the same Single Sign-On
instance to which both the vCenter Server and vSphere Web Client are pointing. You must also ensure that
Orchestrator is registered as a vCenter Server extension. You register Orchestrator as a vCenter Server
extension when you specify a user (by providing the user name and password), who has the privileges to
manage vCenter Server extensions. For more information, see Installing and Conguring
VMware vRealize Orchestrator.
Procedure
1 In the object navigator, click vRealize Orchestrator.
2 Under Inventory Lists click .
3 Right-click the workow that you want to schedule and select Schedule a .
4 Provide the required workow parameters.
5 Click Start/Schedule.
6 In the Task name text box, type the name of the scheduled task.
7 (Optional) In the Description text box, type a description of the scheduled task.
Chapter 14 Automating Management Tasks by Using vRealize Orchestrator
VMware, Inc. 155
8 Schedule the date and time of the workow run.
9 Specify the recurrence options.
10 Click Finish.
Edit the Schedule of a Workflow
You can modify the schedule of a workow and set it to run at an earlier or later time.
Prerequisites
Verify that you have congured at least one Orchestrator server to work with the same Single Sign-On
instance to which both the vCenter Server and vSphere Web Client are pointing. You must also ensure that
Orchestrator is registered as a vCenter Server extension. You register Orchestrator as a vCenter Server
extension when you specify a user (by providing the user name and password), who has the privileges to
manage vCenter Server extensions. For more information, see Installing and Conguring
VMware vRealize Orchestrator.
Procedure
1 In the object navigator, click vRealize Orchestrator.
2 Click Scheduled .
A list of the scheduled workows appears.
3 Right-click the workow whose schedule you want to edit and select Edit.
4 In the Task name text box, type the new name of the scheduled task.
5 (Optional) In the Description text box, type a description of the scheduled task.
6 Edit the scheduled date and time of the workow run.
7 Specify the recurrence options.
8 Click Finish.
Run a Scheduled Workflow
You can manually run a scheduled workow before it runs automatically.
When you run a workow manually, the schedule is not aected. After the manual run, the workow runs
again at the scheduled time.
Prerequisites
Verify that you have congured at least one Orchestrator server to work with the same Single Sign-On
instance to which both the vCenter Server and vSphere Web Client are pointing. You must also ensure that
Orchestrator is registered as a vCenter Server extension. You register Orchestrator as a vCenter Server
extension when you specify a user (by providing the user name and password), who has the privileges to
manage vCenter Server extensions. For more information, see Installing and Conguring
VMware vRealize Orchestrator.
Procedure
1 In the object navigator, click vRealize Orchestrator.
2 Click Scheduled .
A list of the scheduled workows appears.
3 Click Scheduled .
4 Right-click the workow that you want to run and select Run now.
vCenter Server and Host Management
156 VMware, Inc.
What to do next
You can view information about the workow run in the Recent Tasks pane or in the Orchestrator server
menu. See “View Information About Workow Runs,” on page 153.
Suspend a Scheduled Task
You can suspend a scheduled workow run. You can also resume suspended scheduled tasks.
Prerequisites
Verify that you have congured at least one Orchestrator server to work with the same Single Sign-On
instance to which both the vCenter Server and vSphere Web Client are pointing. You must also ensure that
Orchestrator is registered as a vCenter Server extension. You register Orchestrator as a vCenter Server
extension when you specify a user (by providing the user name and password), who has the privileges to
manage vCenter Server extensions. For more information, see Installing and Conguring
VMware vRealize Orchestrator.
Procedure
1 In the object navigator, click vRealize Orchestrator.
2 Click Scheduled .
A list of the scheduled workows appears.
3 Right-click a workow and select Suspend.
The workow schedule is suspended.
The state of the scheduled task changes to Suspended.
Resume a Suspended Scheduled Task
You can resume a scheduled task that has been suspended.
Prerequisites
Verify that you have congured at least one Orchestrator server to work with the same Single Sign-On
instance to which both the vCenter Server and vSphere Web Client are pointing. You must also ensure that
Orchestrator is registered as a vCenter Server extension. You register Orchestrator as a vCenter Server
extension when you specify a user (by providing the user name and password), who has the privileges to
manage vCenter Server extensions. For more information, see Installing and Conguring
VMware vRealize Orchestrator.
Procedure
1 In the object navigator, click vRealize Orchestrator.
2 Click Scheduled .
A list of the scheduled workows appears.
3 Right-click a workow and select Resume.
The workow schedule is resumed from suspension.
The state of the scheduled task changes to Pending.
Chapter 14 Automating Management Tasks by Using vRealize Orchestrator
VMware, Inc. 157

Workflows for Managing Inventory Objects
The default workows for managing vSphere inventory objects are the workows included in the vCenter
Server 5.5 plug-in workow library. The vCenter Server 5.5 plug-in workow library contains workows
that you can use to run automated processes related to the vCenter Server and host management.
To access workows in the vSphere Web Client, make sure that you congure at least one running
Orchestrator server to work with the same Single Sign-On instance to which both vCenter Server and
vSphere Web Client are pointing. You must also ensure that Orchestrator is registered as a vCenter Server
extension. You register Orchestrator as a vCenter Server extension when you specify a user (by providing
the user name and password), who has the privileges to manage vCenter Server extensions. For more
information, see Installing and Conguring VMware vRealize Orchestrator.
The common workow to access the available workows is the following:
1Congure the Orchestrator server with the same Single Sign-On insance to which both vCenter Server
and vSphere Web Client point.
2 Ensure that Orchestrator is registered as a vCenter Server extension.
3 In the vSphere Web Client, congure the default Orchestrator server to use.
For instructions about conguring the default Orchestrator server, see “Congure the Default vRealize
Orchestrator,” on page 149.
4 (Optional) To see more workows when you right-click an object from your vSphere inventory, you can
associate workows with dierent object types.
For instructions, see “Associate Workows with vSphere Inventory Object Types,” on page 149.
5 Right-click a vSphere inventory object, such as a virtual machine, host, cluster, folder, datastore,
resource pool, and so on, and select All vRealize Orchestrator plugin Actions.
N Only a predened set of vCenter Server workows are available by default in the pop-up menu. You
can associate additional workows with each vSphere object. See “Associate Workows with vSphere
Inventory Object Types,” on page 149.
Cluster and Compute Resource Workflows
With cluster and compute resource workows, you can create, rename or delete a cluster, and enable or
disable high availability on a cluster.
Add DRS virtual
machine group to
cluster
Adds a DRS virtual machine group to a cluster.
Add virtual machines to
DRS group
Adds a virtual machine list to an existing DRS virtual machine group.
Create cluster Creates a new cluster in a host folder.
Delete cluster Deletes a cluster.
Disable DRS on cluster Disables DRS on a cluster.
Disable HA on cluster Disables high availability on a cluster.
Disable vCloud
Distributed Storage on
cluster
Disables vCloud Distributed Storage on a cluster.
vCenter Server and Host Management
158 VMware, Inc.
Enable DRS on cluster Enables DRS on a cluster.
Enable HA on cluster Enables high availability on a cluster.
Enable vCloud
Distributed Storage on
cluster
Enables vCloud Distributed Storage on a cluster.
Remove virtual machine
DRS group from cluster
Removes a DRS virtual machine group from a cluster.
Remove virtual
machines from DRS
group
Removes virtual machines from a cluster DRS group.
Rename cluster Renames a cluster.
Guest Operation Files Workflows
With guest operation les workows, you can manage les in a guest operating system.
Check for directory in
guest
Veries that a directory exists in a guest virtual machine.
Check for file in guest Veries that a le exists in a guest virtual machine.
Copy file from guest to
Orchestrator
Copies a specied le from a guest le system to an Orchestrator server.
Copy file from
Orchestrator to guest
Copies a specied le from an Orchestrator server to a guest le system.
Create directory in
guest
Creates a directory in a guest virtual machine.
Create temporary
directory in guest
Creates a temporary directory in a guest virtual machine.
Create temporary file in
guest
Creates a temporary le in a guest virtual machine.
Delete directory in
guest
Deletes a directory from a guest virtual machine.
Delete file in guest Deletes a le from a guest virtual machine.
List path in guest Shows a path in a guest virtual machine.
Move directory in guest Moves a directory in a guest virtual machine.
Move file in guest Moves a le in a guest virtual machine.
Guest Operation Processes Workflows
With guest operation processes workows, you can get information and control the running processes in a
guest operating system.
Get environment
variables from guest
Returns a list with environmental variables from a guest. An interactive
session returns the variables of the user who is currently logged in.
Get processes from
guest
Returns a list with the processes running in the guest operating system and
the recently completed processes started by the API.
Chapter 14 Automating Management Tasks by Using vRealize Orchestrator
VMware, Inc. 159
Run program in guest Starts a program in a guest operating system.
Kill process in guest Treminates a process in a guest operating system.
Custom Attributes Workflows
With custom aributes workows, you can add custom aributes to virtual machines or get a custom
aribute for a virtual machine.
Add custom attribute to
a virtual machine
Adds a custom aribute to a virtual machine.
Add custom attribute to
multiple virtual
machines
Adds a custom aribute to a selection of virtual machines.
Get custom attribute Gets a custom aribute for a virtual machine in vCenter Server.
Data Center Workflows
With data center workows, you can create, delete, reload, rename, or rescan a data center.
Create datacenter Creates a new data center in a data center folder.
Delete datacenter Deletes a data center.
Reload datacenter Forces vCenter Server to reload data from a data center.
Rename datacenter Renames a data center and waits for the task to complete.
Rescan datacenter
HBAs
Scans the hosts in a data center and initiates a rescan on the host bus
adapters to discover new storage.
Datastore and Files Workflows
With datastore and les workows, you can delete a list of les, nd unused les in a datastore, and so on.
Delete all files Deletes a list of les.
Delete all unused
datastore files
Searches all datastores in the vCenter Server environment and deletes all
unused les.
Export unused
datastore files
Searches all datastores and creates an XML descriptor le that lists all
unused les.
Find unused files in
datastores
Searches the vCenter Server environment for all unused disks (*.vmdk),
virtual machines (*.vmx), and template (*.vmtx) les that are not associated
with any vCenter Server instances registered with Orchestrator.
Get all configuration,
template, and disk files
from virtual machines
Creates a list of all virtual machine descriptor les and a list of all virtual
machine disk les, for all datastores.
Log all datastore files Creates a log for every virtual machine conguration le and every virtual
machine le found in all datastores.
vCenter Server and Host Management
160 VMware, Inc.
Log unused datastore
files
Searches the vCenter Server environment for unused les that are registered
on virtual machines and exports a log of the les in a text le.
Upload file to datastore Uploads a le to an existing folder on a specic datastore. The uploaded le
will overwrite any existing le with the same name in the same destination
folder.
Data Center Folder Management Workflows
With data center folder management workows, you can create, delete, or rename a data center folder.
Create datacenter folder Creates a data center folder.
Delete datacenter folder Deletes a data center folder and waits for the task to complete.
Rename datacenter
folder
Renames a data center folder and waits for the task to complete.
Host Folder Management Workflows
With host folder management workows, you can create, delete, or rename a host folder.
Create host folder Creates a host folder.
Delete host folder Deletes a host folder and waits for the task to complete.
Rename host folder Renames a host folder and waits for the task to complete.
Virtual Machine Folder Management Workflows
With virtual machine folder management workows, you can create, delete, or rename a virtual machine
folder.
Create virtual machine
folder
Creates a virtual machine folder.
Delete virtual machine
folder
Deletes a virtual machine folder and waits for the task to complete.
Rename virtual machine
folder
Renames a virtual machine folder and waits for the task to complete.
Basic Host Management Workflows
With basic host management workows, you can put a host into maintenance mode, make a host exit
maintenance mode, move a host to a folder or a cluster, and reload data from a host.
Enter maintenance
mode
Puts the host into maintenance mode. You can cancel the task.
Exit maintenance mode Exits maintenance mode. You can cancel the task.
Move host to cluster Moves an existing host into a cluster. The host must be part of the same data
center, and if the host is part of a cluster, the host must be in maintenance
mode.
Chapter 14 Automating Management Tasks by Using vRealize Orchestrator
VMware, Inc. 161
Move host to folder Moves a host into a folder as a standalone host. The host must be part of a
ClusterComputeResource in the same data center and the host must be in
maintenance mode.
Reload host Forces vCenter Server to reload data from a host.
Host Power Management Workflows
With host power management workows you can reboot or shut down a host.
Reboot host Reboots a host. If the Orchestrator client is connected directly to the host, it
does not receive an indication of success in the returned task, but rather loses
the connection to the host if the operation succeeds.
Shut down host Shuts down a host. If the Orchestrator client is connected directly to the host,
it does not receive an indication of success in the returned task, but rather
loses the connection to the host if the operation succeeds.
Host Registration Management Workflows
With host registration management workows, you can add a host to a cluster, disconnect or reconnect a
host from a cluster, and so on.
Add host to cluster Adds a host to the cluster. This workow fails if it cannot authenticate the
SSL certicate of the host.
Add standalone host Registers a host as a standalone host.
Disconnect host Disconnects a host from vCenter Server.
Reconnect host Reconnects a disconnected host by providing only the host information.
Reconnect host with all
information
Reconnects a disconnected host by providing all information about the host.
Remove host Removes a host and unregisters it from vCenter Server. If the host is part of a
cluster, you must put it in maintenance mode before aempting to remove it.
Networking Workflows
With networking workows you can add a port group to distributed virtual switch, create a distributed
virtual switch with a port group, and so on.
Add port group to
distributed virtual
switch
Adds a new distributed virtual port group to a specied distributed virtual
switch.
Attach host system to
distributed virtual
switch
Adds a host to a distributed virtual switch.
Create distributed
virtual switch with port
group
Creates a new distributed virtual switch with a distributed virtual port
group.
vCenter Server and Host Management
162 VMware, Inc.
Distributed Virtual Port Group Workflows
With distributed virtual port group workows you can update or delete a port group, and recongure the
port group.
Connect virtual machine
NIC number to
distributed virtual port
group
Recongures the network connection of the specied virtual machine NIC
number to connect to the specied distributed virtual port group. If no NIC
number is specied, the number zero is used.
Delete distributed
virtual port group
Deletes a specied distributed virtual port group.
Set teaming options Provides an interface to manage the teaming options for a distributed virtual
port group.
Update distributed
virtual port group
Updates the conguration of a specied distributed virtual port group.
Distributed Virtual Switch Workflows
With distributed virtual switch workows, you can create, update or delete a distributed virtual switch, and
create, delete, or update a private VLAN.
Create distributed
virtual switch
Creates a distributed virtual switch in the specied network folder with a
name and uplink port names that you specify. You must specify at least one
uplink port name.
Create private VLAN Creates a VLAN on the specied distributed virtual switch.
Delete distributed
virtual switch
Deletes a distributed virtual switch and all associated elements.
Delete private VLAN Deletes a VLAN from a specied distributed virtual switch. If a secondary
VLAN exists, you should rst delete the secondary VLAN.
Update distributed
virtual switch
Updates the properties of a distributed virtual switch.
Update private VLAN Updates a VLAN on the specied distributed virtual switch.
Standard Virtual Switch Workflows
With standard virtual switch workows you can create, update, or delete a standard virtual switch, and
create, delete, or update port groups in standard virtual switches.
Add port group in
standard virtual switch
Adds a port group in a standard virtual switch.
Create standard virtual
switch
Creates a standard virtual switch.
Delete port group from
standard virtual switch
Deletes a port group from a standard virtual switch.
Delete standard virtual
switch
Deletes a standard virtual switch from a host's network conguration.
Chapter 14 Automating Management Tasks by Using vRealize Orchestrator
VMware, Inc. 163
Retrieve all standard
virtual switches
Retrieves all standard virtual switches from a host.
Update port group in
standard virtual switch
Updates the properties of a port group in a standard virtual switch.
Update standard virtual
switch
Updates the properties of a standard virtual switch.
Update VNIC for port
group in standard
virtual switch
Updates a VNIC associated with a port group in a standard virtual switch.
Resource Pool Workflows
With resource pool workows you can create, rename, recongure or delete a resource pool, and get
resource pool information.
Create resource pool Creates a resource pool with the default CPU and memory allocation values.
To create a resource pool in a cluster, the cluster must have VMware DRS
enabled.
Create resource pool
with specified values
Creates a resource pool with CPU and memory allocation values that you
specify. To create a resource pool in a cluster, the cluster must have VMware
DRS enabled.
Delete resource pool Deletes a resource pool and waits for the task to complete.
Get resource pool
information
Returns CPU and memory information about a given resource pool.
Reconfigure resource
pool
Recongures CPU and memory allocation conguration for a given resource
pool.
Rename resource pool Renames a resource pool and waits for the task to complete.
Storage Workflows
With storage workows you can perform storage-related operations.
Add datastore on
iSCSI/FC/local SCSI
Creates a datastore on a Fibre Channel, iSCSI or local SCSI disk. Only disks
that are not currently in use by an existing VMFS are applicable to new
datastore creation. The new datastore allocates the maximum available space
of the specied disk.
Add datastore on NFS Adds a datastore on an NFS server.
Add iSCSI target Adds iSCSI targets to a vCenter Server host. The targets can be of the type
Send or Static.
Create VMFS for all
available disks
Creates a VMFS volume for all available disks of a specied host.
Delete datastore Deletes datastores from a vCenter Server host.
Delete iSCSI target Deletes already congured iSCSI targets. The targets can be of type Send or
Static.
Disable iSCSI adapter Disables the software iSCSI adapter of a specied host.
vCenter Server and Host Management
164 VMware, Inc.
Display all datastores
and disks
Displays the existing datastores and available disks on a specied host.
Enable iSCSI adapter Enables an iSCSI adapter.
List all storage adapters Lists all storage adapters of a specied host.
Storage DRS Workflows
With storage DRS workows you perform storage-related operations, such as creating and conguring a
datastore cluster, removing a datastore from cluster, adding storage to a cluster, and so on.
Add datastore to cluster Adds datastores to a datastore cluster. Datastores must be able to connect to
all hosts to be included in the datastore cluster. Datastores must have the
same connection type to reside within a datastore cluster.
Change Storage DRS
per virtual machine
configuration
Sets Storage DRS seings for each virtual machine.
Configure datastore
cluster
Congures datastore cluster seing values for automation and runtime rules.
Create simple datastore
cluster
Creates a simple datastore cluster with default conguration. The new
datastore cluster contains no datastores.
Create Storage DRS
scheduled task
Creates a scheduled task for reconguring a datastore cluster. Only
automation and runtime rules can be set.
Create virtual machine
anti-affinity rule
Creates an anti-anity rule to indicate that all virtual disks of certain virtual
machines must be kept on dierent datastores.
Create VMDK anti-
affinity rule
Creates a VMDK anti-anity rule for a virtual machine that indicates which
of its virtual disks must be kept on dierent datastores. The rule applies to
the virtual disks of the selected virtual machine.
Remove datastore
cluster
Removes a datastore cluster. Removing a datastore cluster also removes all of
the seings and the alarms for the cluster from the vCenter Server system.
Remove datastore from
cluster
Removes a datastore from a datastore cluster and puts the datastore in a
datastore folder.
Remove Storage DRS
scheduled task
Removes a scheduled Storage DRS task.
Remove virtual machine
anti-affinity rule
Removes a virtual machine anti-anity rule for a given datastore cluster.
Remove VMDK anti-
affinity rule
Removes a VMDK anti-anity rule for a given datastore cluster.
Chapter 14 Automating Management Tasks by Using vRealize Orchestrator
VMware, Inc. 165
Basic Virtual Machine Management Workflows
With basic virtual machine management workows you can perform basic operations on virtual machines,
for example, create, rename or delete a virtual machine, upgrade virtual hardware, and so on.
Create custom virtual
machine
Creates a virtual machine with the specied conguration options and
additional devices.
Create simple
dvPortGroup virtual
machine
Creates a simple virtual machine. The network used is a Distributed Virtual
Port Group.
Create simple virtual
machine
Creates a virtual machine with the most common devices and conguration
options.
Delete virtual machine Removes a virtual machine from the inventory and datastore.
Get virtual machines by
name
Returns a list of virtual machines from all registered vCenter Server instances
that match the provided expression.
Mark as template Converts an existing virtual machine to a template, not allowing it to start.
You can use templates to create virtual machines.
Mark as virtual machine Converts an existing template to a virtual machine, allowing it to start.
Move virtual machine to
folder
Moves a virtual machine to a specied virtual machine folder.
Move virtual machine to
resource pool
Moves a virtual machine to a resource pool. If the target resource pool is not
in the same cluster, you must use the migrate or relocate workows.
Move virtual machines
to folder
Moves several virtual machines to a specied virtual machine folder.
Move virtual machines
to resource pool
Moves several virtual machines to a resource pool.
Register virtual machine Registers a virtual machine. The virtual machine les must be placed in an
existing datastore and must not be already registered.
Reload virtual machine Forces vCenter Server to reload a virtual machine.
Rename virtual machine Renames an existing virtual machine on the vCenter Server system or host
and not on the datastore.
Set virtual machine
performance
Changes performance seings such as shares, minimum and maximum
values, shaping for network, and disk access of a virtual machine.
Unregister virtual
machine
Removes an existing virtual machine from the inventory.
Upgrade virtual
machine hardware
(force if required)
Upgrades the virtual machine hardware to the latest revision that the host
supports. This workow forces the upgrade to continue, even if VMware
Tools is out of date. If the VMware Tools is out of date, forcing the upgrade
to continue reverts the guest network seings to the default seings. To
avoid this situation, upgrade VMware Tools before running the workow.
vCenter Server and Host Management
166 VMware, Inc.
Upgrade virtual
machine
Upgrades the virtual hardware to the latest revision that the host supports.
An input parameter allows a forced upgrade even if VMware Tools is out of
date.
Wait for task and
answer virtual machine
question
Waits for a vCenter Server task to complete or for the virtual machine to ask
a question. If the virtual machine requires an answer, accepts user input and
answers the question.
Clone Workflows
With clone workows you can clone virtual machines with or without customizing the virtual machine
properties.
Clone virtual machine
from properties
Clones virtual machines by using properties as input parameters.
Clone virtual machine,
no customization
Clones a virtual machine without changing anything except the virtual
machine UUID.
Customize virtual
machine from
properties
Customizes a virtual machine by using properties as input parameters.
Linked Clone Workflows
With linked clone workows, you can perform linked clone operations such as restoring a virtual machine
from a linked clone, creating a linked clone, and so on.
Restore virtual machine
from linked clone
Removes a virtual machine from a linked clone setup.
Set up virtual machine
for linked clone
Prepares a virtual machine to be link cloned.
Create a linked clone of
a Linux machine with
multiple NICs
Creates a linked clone of a Linux virtual machine, performs the guest
operating system customization, and congures up to four virtual network
cards.
Create a linked clone of
a Linux machine with a
single NIC
Creates a linked clone of a Linux virtual machine, performs the guest
operating system customization, and congures one virtual network card.
Create a linked clone of
a Windows machine
with multiple NICs and
credential
Creates a linked clone of a Windows virtual machine and performs the guest
operating system customization. Congures up to four virtual network cards
and a local administrator user account.
Create a linked clone of
a Windows machine
with a single NIC and
credential
Creates a linked clone of a Windows virtual machine and performs the guest
operating system customization. Congures one virtual network card and a
local administrator user account.
Create a linked clone
with no customization
Creates the specied number of linked clones of a virtual machine.
Chapter 14 Automating Management Tasks by Using vRealize Orchestrator
VMware, Inc. 167
Linux Customization Clone Workflows
With Linux customization workows you can clone a Linux virtual machine and customize the guest
operating system.
Clone a Linux machine
with multiple NICs
Clones a Linux virtual machine, performs the guest operating system
customization, and congures up to four virtual network cards.
Clone a Linux machine
with a single NIC
Clones a Linux virtual machine, performs the guest operating system
customization, and congures one virtual network card.
Tools Clone Workflows
With tools clone workows you can obtain customization information about the operating system of the
virtual machine, information needed to update a virtual device, and so on.
Get a virtual Ethernet
card to change the
network
Returns a new ethernet card to update a virtual device. Contains only the
device key of the given virtual device and the new network.
Get Linux customization Returns the Linux customization preparation.
Get multiple virtual
Ethernet card device
changes
Returns an array of VirtualDeviceCongSpec objects for add and remove
operations on VirtualEthernetCard objects.
Get NIC setting map Returns the seing map for a virtual network card by using
VimAdapterMapping.
Get Windows
customization for
Sysprep with
credentials
Returns customization information about the Microsoft Sysprep process,
with credentials. Workows for cloning Windows virtual machines use this
workow.
Get Windows
customization for
Sysprep with
Unattended.txt
Returns customization information about the Microsoft Sysprep process by
using an Unaended.txt le. Workows for cloning Windows virtual
machines use this workow.
Get Windows
customization for
Sysprep
Returns customization information about the Microsoft Sysprep process.
Workows for cloning Windows virtual machines use this workow.
Windows Customization Clone Workflows
With Windows customization clone workows you can clone Windows virtual machines and customize the
guest operating system.
Customize a Windows
machine with single NIC
and credential
Performs guest operating system customization, congures one virtual
network card and a local administrator user account on a Windows virtual
machine.
Clone a thin
provisioned Windows
machine with single NIC
and credential
Clones a Windows virtual machine performing the guest operating system
customization. Species virtual disk thin provisioning policy and congures
one virtual network card and a local administrator user account. Sysprep
tools must be available on the vCenter Server system.
vCenter Server and Host Management
168 VMware, Inc.
Clone a Windows
machine Sysprep with
single NIC and
credential
Clones a Windows virtual machine performing the guest operating system
customization. Congures one virtual network card and a local
administrator user account. Sysprep tools must be available on vCenter
Server.
Clone a Windows
machine with multiple
NICs and credential
Clones a Windows virtual machine performing the guest operating system
customization. Congures the local administrator user account and up to
four virtual network cards. Sysprep tools must be available on the vCenter
Server system.
Clone a Windows
machine with single NIC
Clones a Windows virtual machine performing the guest operating system
customization and congures one virtual network card. Sysprep tools must
be available on the vCenter Server system.
Clone a Windows
machine with single NIC
and credential
Clones a Windows virtual machine performing the guest operating system
customization. Congures one virtual network card and a local
administrator user account. Sysprep tools must be available on the vCenter
Server system.
Device Management Workflows
With device management workows you can manage the devices that are connected to a virtual machine or
to a host datastore.
Add CD-ROM Adds a virtual CD-ROM to a virtual machine. If the virtual machine has no
IDE controller, the workow creates one.
Add disk Adds a virtual disk to a virtual machine.
Change RAM Changes the amount of RAM of a virtual machine.
Convert disks to thin
provisioning
Converts thick-provisioned disks of virtual machines to thin-provisioned
disks.
Convert independent
disks
Converts all independent virtual machine disks to normal disks by removing
the independent ag from the disks.
Disconnect all
detachable devices
from a running virtual
machine
Disconnects oppy disks, CD-ROM drives, parallel ports, and serial ports
from a running virtual machine.
Mount CD-ROM Mounts the CD-ROM of a virtual machine. If the virtual machine has no IDE
controller and/or CD-ROM drive, the workow creates them.
Mount floppy disk drive Mounts a oppy disk drive FLP le from the ESX datastore.
Move and Migrate Workflows
With move and migrate workows, you can migrate virtual machines.
Mass migrate virtual
machines with storage
vMotion
Uses Storage vMotion to migrate a single virtual machine, a selection of
virtual machines, or all available virtual machines.
Mass migrate virtual
machines with vMotion
Uses vMotion, Storage vMotion, or both vMotion and Storage vMotion to
migrate a single virtual machine, a selection of virtual machines, or all
available virtual machines.
Chapter 14 Automating Management Tasks by Using vRealize Orchestrator
VMware, Inc. 169

Migrate virtual machine
with vMotion
Migrates a virtual machine from one host to another by using the
MigrateVM_Task operation from the vSphere API.
Move virtual machine to
another vCenter Server
system
Moves a list of virtual machines to another vCenter Server system.
Quick migrate multiple
virtual machines
Suspends the virtual machines if they are powered on and migrates them to
another host using the same storage.
Quick migrate virtual
machine
Suspends the virtual machine if it is powered on and migrates it to another
host using the same storage.
Relocate virtual
machine disks
Relocates virtual machine disks to another host or datastore while the virtual
machine is powered o by using the RelocateVM_Task operation from the
vSphere API.
Other Workflows
With other workows, you can enable and disable Fault Tolerance (FT), extract virtual machine information,
and nd orphaned virtual machines.
Disable FT Disables Fault Tolerance for a specied virtual machine.
Enable FT Enables Fault Tolerance for a specied virtual machine.
Extract virtual machine
information
Returns the virtual machine folder, host system, resource pool, compute
resource, datastore, hard drive sizes, CPU and memory, network, and IP
address for a given virtual machine. Might require VMware Tools.
Find orphaned virtual
machines
Lists all virtual machines in an orphaned state in the Orchestrator inventory.
Lists the VMDK and VMTX les for all datastores in the Orchestrator
inventory that have no association with any virtual machines in the
Orchestrator inventory. Sends the lists by email (optional).
Get Virtual Machine by
Name and BIOS UUID
Searches virtual machines by name and then lters the result with particular
universally unique identier (UUID) in order to identify a unique virtual
machine.
N This workow is needed when DynamicOps calls
vRealize Orchestrator workows having input parameters of
VC:VirtualMachine type in order to make the correspondence between a
particular DynamicOps and vRealize Orchestrator virtual machine.
vCenter Server and Host Management
170 VMware, Inc.

Get Virtual Machine by
Name and UUID
Searches virtual machines by name and then lters the result with particular
universally unique identier (UUID) in order to identify a unique virtual
machine.
N This workow is needed when DynamicOps calls
vRealize Orchestrator workows having input parameters of
VC:VirtualMachine type in order to make the correspondence between a
particular DynamicOps and vRealize Orchestrator virtual machine.
Get Virtual Machine
UUID
Searches virtual machines by name and then lters the result with particular
universally unique identier (UUID) in order to identify a unique virtual
machine.
N This workow is needed when DynamicOps calls
vRealize Orchestrator workows having input parameters of
VC:VirtualMachine type in order to make the correspondence between a
particular DynamicOps and vRealize Orchestrator virtual machine.
Power Management Workflows
With power management workows, you can power on and o virtual machines, reboot the guest operating
system of a virtual machine, suspend a virtual machine, and so on.
Power off virtual
machine and wait
Powers o a virtual machine and waits for the process to complete.
Reboot guest OS Reboots the virtual machine's guest operating system. Does not reset
nonpersistent virtual machines. VMware Tools must be running.
Reset virtual machine
and wait
Resets a virtual machine and waits for the process to complete.
Resume virtual machine
and wait
Resumes a suspended virtual machine and waits for the process to complete.
Set guest OS to standby
mode
Sets the guest operating system to standby mode. VMware Tools must be
running.
Shut down and delete
virtual machine
Shuts down a virtual machine and deletes it from the inventory and disk.
Shut down guest OS
and wait
Shuts down a guest operating system and waits for the process to complete.
Start virtual machine
and wait
Starts a virtual machine and waits for VMware Tools to start.
Suspend virtual
machine and wait
Suspends a virtual machine and waits for the process to complete.
Chapter 14 Automating Management Tasks by Using vRealize Orchestrator
VMware, Inc. 171
Snapshot Workflows
With snapshot workows, you can perform snapshot-related operations.
Create a snapshot Creates a snapshot.
Create snapshots of all
virtual machines in a
resource pool
Creates a snapshot of each virtual machine in a resource pool.
Remove all snapshots Removes all existing snapshots without reverting to a previous snapshot.
Remove excess
snapshots
Finds virtual machines with more than a given number of snapshots and
optionally deletes the oldest snapshots. Sends the results by email.
Remove old snapshots Gets all snapshots that are older than a given number of days and prompts
the user to select which ones to delete.
Remove snapshots of a
given size
Gets all snapshots that are larger than a given size and prompts the user to
conrm deletion.
Revert to current
snapshot
Reverts to the current snapshot.
Revert to snapshot and
wait
Reverts to a specic snapshot. Does not delete the snapshot.
VMware Tools Workflows
With VMware Tools workows, you can perform VMware Tools-related tasks on virtual machines.
Mount VMware tools
installer
Mounts the VMware Tools installer on the virtual CD-ROM.
Set console screen
resolution
Sets the console window's resolution. The virtual machine must be powered
on.
Turn on time
synchronization
Turns on time synchronization between the virtual machine and the ESX
server in VMware Tools.
Unmount VMware tools
installer
Unmounts the VMware Tools CD-ROM.
Upgrade VMware tools Upgrades VMware Tools on a virtual machine.
Upgrade VMware tools
at next reboot
Upgrades VMware Tools on a virtual machine without performing an
automatic reboot.
vCenter Server and Host Management
172 VMware, Inc.

About Headless Systems 15
ESXi supports the detection and conguration of headless systems.
A headless system is a system that can be operated without a monitor, keyboard or mouse. Network
Appliance boxes do not have VGA, the primary interface is a single serial port. You can leverage your
existing headless systems to use ESXi. You can add ESXi appliances to a datacenter where virtual machines
are managed with vSphere Virtual Center. All existing ESXi features can be used with a headless system that
is congured with either embedded ash or minimal local storage. ESXi allows for dynamic switching
between dierent serial modes, which is useful for diagnosing and debugging problems. You can switch
between modes to view or modify system parameters.
This chapter includes the following topics:
n“Detecting a Headless System,” on page 173
n“About Serial Mode Dynamic Switching,” on page 173
Detecting a Headless System
ESXi automatically detects headless systems.
ESXi automatically redirects the DCUI over a serial port connection to improve headless detection. When
ESXi automatically detects a headless system, ESXi will setup the serial port as COM1, 115200 baud, and
redirects the DCUI over this serial port. The specic seings of com port and baud rate are read from the
SPCR (Serial Port Console Redirection) table, if it exists. This behavior can be disabled using new boot
parameters if the default seings are not acceptable. You can set the headless ag in the ACPI FADT table to
mark a system as headless.
About Serial Mode Dynamic Switching
ESXi supports dynamically switching between four dierent serial port modes.
ESXi supports serial mode dynamic switching in order to provide maximum platform exibility, and to
allow debugging and supportability in the eld. ESXi examines the input characters for any serial port mode
and switches the modes based on the input key sequence. DCUI, Shell, GDB and Logging modes are
supported. If you have two serial ports, only one of the 4 modes is allowed on each port. This means both
serial ports cannot be in the same mode. If you aempt to dynamically switch to a mode in use by the other
serial port, the request is ignored. Dynamic switching eliminates the need to interrupt the boot process
manually or to create a custom image in order to redirect to a serial port. It also addresses supportability
issues regarding headless systems that only have one serial port, by making it possible to switch the serial
port between dierent modes of operation.
VMware, Inc. 173

ESXi Serial Port Modes
ESXi supports four serial port modes.
There are four serial port modes in ESXi:
Logging mode – Logging mode is the default mode in a debug build. Logging mode sends the vmkernel.log
over the serial port.
GDB mode – Use GDB mode for dedicated debugging.
Shell mode – Shell mode is the shell port access, which is similar to SSH.
DCUI mode – DCUI mode is a Direct Console User Interface. This is the user interface that is displayed
when you boot ESXi using a monitor.
N Only COM1 and COM2 ports are supported. USB serial or PCI serial cards are not supported.
Dynamic Switching Keystrokes
ESXi includes a unique keystroke sequence that allows dynamic serial mode switching.
Dynamic Switching Keytrokes
Once the correct keystroke sequence is entered, the system switches the serial port to the desired mode.
Logging mode: Ctrl+G, Ctrl+B, 1
Shell mode: Ctrl+G, Ctrl+B, 2
DCUI mode: Ctrl+G, Ctrl+B, 3
GDB mode: Ctrl+G, Ctrl+B, ?
N Once in GDB mode, you cannot switch modes again using a key sequence. You must use the CLI to
switch modes.
Serial Port Dynamic Switching using the CLI
You can switch serial modes using the CLI.
Dynamic Switching using the CLI
Use esxcfg-advcfg to set the current mode to none. Then set the new desired mode using the CLI.
Logging mode: esxcfg-advcfg -s com1 /Misc/LogPort
Shell mode: esxcfg-advcfg -s com1 /Misc/ShellPort
DCUI mode: esxcfg-advcfg -s com1 /Misc/ConsolePort
GDB mode: esxcfg-advcfg -s com1 /Misc/GDBPort
Example: Example
If the serial mode is set to logging mode, it would require 2 commands to switch it to DCUI mode.
§. > esxcfg-advcfg –s none /Misc/LogPort
§. > esxcfg-advcfg –s com1 /Misc/ConsolePort
vCenter Server and Host Management
174 VMware, Inc.
Controlling the Serial DCUI
You can use alternate keystrokes to control the DCUI over a serial port. This is useful when F2 or other
function keys cannot be used.
Controlling the Serial DCUI
Alternate keystroke mappings for DCUI mode:
nEsc + 1 -> F1
nEsc + 2 -> F2
nEsc + 3 -> F3
nEsc + 4 -> F4
nEsc + 5 -> F5
nEsc + 6 -> F6
nEsc + 7 -> F7
nEsc + 8 -> F8
nEsc + 9 -> F9
nEsc + 0 -> F10
nEsc + ! -> F11
nEsc + @ -> F12
Chapter 15 About Headless Systems
VMware, Inc. 175
vCenter Server and Host Management
176 VMware, Inc.
Index
Numerics
3DNow!, EVC modes 133
A
abbreviations 9
adding hosts 78
advanced attributes, hosts 38
advanced settings, vCenter Server 48
API Watchdog 62
Asset 92
assets
features in use 103
used features 103
assign licenses 97
assigning license keys 99
associate workflows 148, 149
Auto Deploy Service, configuring 51
B
baselines, security 21
basic host management workflows 161
basic virtual machine workflows 166
boot devices, configuring for an ESXi host 37
C
categories
creating 85
deleting 85
editing 86
Client Integration Plug-in, installing 26
clone workflows 167
cluster settings
CPUID details 135
EVC 131
cluster and compute resource workflows 158
clusters
creating 79
EVC 130, 131
removing hosts 114
requirements for enabling EVC 130
shared storage 121
cold migration, suspended virtual machines 119
Cold migration
routable network 143
TCP/IP Stack 143
collection intervals 40
community string 44
component manager
component manager
restart services 49
stop services 49
start services 49
components
ESXi 15
host agent 15
managed 18
vCenter Server 15
vCenter Server agent 15
vCenter Server database 15
vSphere 15
configuring, default vRealize Orchestrator 149
configuring services 50
content library service, settings 51
CPU compatibility
EVC 129
for vMotion 128
masks 134
CPU families 129
CPU features
kernel level 128
user-level 128
virtual machines 132
CPUID, viewing details 135
create a scheduled task using keyboard
shortcuts 35
create license 97
creating
clusters 79
folders 80
creating data centers 78
custom attributes, converting to tags 83
custom attributes workflows 160
customer experience improvement program
collected information 59
disabling 59
enabling 59
customizable UI, disabling 26
D
data, refreshing 28
data center folder management folder 161
data center workflows 160
VMware, Inc. 177
data centers, creating 78
data collection levels 42
data collector, enabling 59
database
impact of statistics on 41
limiting size 46
retention policy 46
vCenter Server 15
datastore and files workflows 160
datastores
about 18
relocate virtual machine files 127
default vRealize Orchestrator 149
deploy OFV template 71
deploy OVF template
network setup 70
select OVF name 69
deploy the vCenter Host Gateway appliance
accepting EULA 69
customize the OVF template 70
selecting storage 69
deploy vCenter Host Gateway Appliance 71
device management workflows 169
different licensing interface 93
disconnecting from vCenter Server 24
distributed virtual port group workflows 163
distributed virtual switch workflows 163
dockable UI 26
drag and drop objects 34
E
edit the association of workflows 150
edit associations of workflows 148
Email messages 44
Enhanced Linked Mode 58
Enhanced vMotion Compatibility, See EVC
ESX agent VMs, settings 38
ESXi
about 15
rebooting 111
shutdown 111
ESXi dump collector service, configuring 57
ESXi hosts, configuring the boot device 37
evaluation mode 101
EVC
configuring 131
CPUID details 135
creating a cluster 130
enabling on a cluster 131
requirements 130
supported processors 130
virtual ESXi host support 128
EVC modes
virtual machines 132
without 3DNow! 133
events, configuring retention policy 46
export an association of workflows 151
export associations of workflows 148
export license report 105
F
Feature 92
feedback 9
filter, inventory objects 30
firewall, configure communication 58
folders, creating 80
G
Getting Started pages, preferences 33
guest operation files workflows 159
guest operation processes workflows 159
H
hardware health service 53
headless 173–175
hiding sidebars 26
host
evaluation mode 101
managing 113
verify certificates 47
host folder management workflows 161
host management 113
host management registration workflows 162
host Summary tab, EVC modes 133
hosts
about 18
adding 78
advanced attributes 38
configuring 37
configuring boot device 37
connecting to vCenter Server 113
definition 18
disconnecting 113
disconnecting from vCenter Server 113
ESXi 111
reconnecting 114
removing from cluster 114
removing from vCenter Server 115
time configuration 39
hypervisor 13
I
import an association of workflows 151
import associations of workflows 148
input parameters 147
vCenter Server and Host Management
178 VMware, Inc.
installing, Client Integration Plug-in 26
interfaces 17
inventory
organize 77
searching 28, 29
inventory object
filter 30
quick filter 30
inventory keyboard shortcuts 35
inventory objects
migrate 34
view recent 32
view last visited 32
K
kernel-level CPU features 128
keyboard shortcuts 35
L
layout settings, customizing 26
license
add license keys 97
create 97
rename 101
license assets 97
license hosts 97
license information 102
license report 105
License usage 92
license capacity 104
License capacity 92
license inventory 93
License key 92
license reporting 104
license usage 104, 105
license usage for a product 105
license use 104
license vCenter Server 97
licenses
assigning 99
delete 101
remove 101
viewing 102
licensing
assign license key 98
license management 98
license asset 98
licensed features 104
Licensing ESXi 94
licensing changes in vSphere 6.0 93
licensing details 105
licensing for ESXi hosts 94
licensing for vCenter Server 94
licensing for vCenter Server 5.5 93
licensing for vCenter with Operations
Management 97
licensing for Virtual SAN 94
licensing reporting 104
licensing Virtual SAN 96
limiting users or groups 43
limits
migration operations 144
provisioning operations 144
Storage vMotion 144
vMotion 144
linked clone workflows 167
Linked Mode, affect on license inventory 93
Linux customization clone workflows 168
list, export 34
list contents, exporting 34
load balancing 20
loading, searches 30
log detail, setting the log level 46
logging options, configuring 46
logging in to vCenter Server 24
long operations 45
Long-Distance vMotion 121
M
Mail Sender settings, configuring 44
managed components 18
managing associations of workflows 149
metadata 83
Microsoft Cluster Service (MSCS) 61, 62
migrating
MAC addresses management 126
network compatibility checks 126
powered-off virtual machines 135
powered-on virtual machines 137
suspended virtual machines 119, 135
turned off virtual machines 119
virtual machine disks 140
virtual machines 117
virtual machines and storage
simultaneously 138
virtual machines with Storage vMotion 140
virtual machines without shared storage 138
with drag and drop in vSphere Web
Client, migrate 34
with vMotion 137
migration
about 117
compatibility checks 145
limits 144
relocate virtual machine files 127
Index
VMware, Inc. 179
Storage vMotion 127
with vMotion 120
migration across vCenter Server systems 126
modules, See plug-ins
move and migrate workflows 169
MSCS 63
N
navigating, vSphere Web Client 25
networking workflows 162
networks
best practices for vMotion 123
requirements for vMotion 121
normal operations 45
O
object navigator 25
objects, migrate 34
Open Virtualization Format service, settings 56
Orchestrator
associate workflows 149
browsing the inventory 154
edit the association of workflows 150
export an association of workflows 151
finding a workflow 155
import an association of workflows 151
managing associations of workflows 149
running workflows 152
scheduling workflows 155
searching for workflows 154
workflow management 152
workflow schedule editing 156
workflow runs information 153
workflow scheduling 155–157
workflow search 154
workflows waiting for user interaction 154
Orchestrator Web Client, default workflows 158
output parameters 147
overview of
Orchestrator 147
Orchestrator view 148
workflows 147
OVF service 56
OVF Details, deploying OVF template 68
P
pausing, tasks 27
performance charts, data collection levels 42
physical topology
computing servers 14
desktop clients 14
IP networks 14
storage networks and arrays 14
vCenter Server 14
PID Watchdog 62
plug-ins 15
power host management workflows 162
power management 20
power management workflows 171
presentation 147
Product 92
Product edition 92
proxy settings 73
Q
query limit 43
quick filters 30, 31
quick filter types 31
quick filters reference 31
quick search 28
R
raw device mappings, migrating 127
RDMs, See raw device mappings
receiver URL 44
recent objects 32
reconnecting hosts 114
refreshing, data 28
resource pool workflows 164
resources
definition 18
management 20
resuming, tasks 27
S
saved searches, removing 33
saving, searches 30
scheduled tasks
about 107
creating 108
removing 110
scheduling workflows 155
searches
loading 30
saving 30
searching
advanced 29
inventory 28, 29
load a search 30
save search 30
searching for workflows 154
security, baselines 21
serial modes 174
set up MSCS for vCenter Server availability 63
vCenter Server and Host Management
180 VMware, Inc.
settings
ESX agent VMs 38
vCenter Server 40
showing sidebars 26
simple search 29
SMTP
notification 44
server 44
snapshot workflows 172
SNMP
community string 44
receiver URL 44
settings 44
traps 44
Solution 92
solutions, licensing 91
specify OVF location 68
SSL certificate 114
standard virtual switch workflows 163
statistics
collection intervals 40
impact on the database 41
statistics settings, configuring 40
storage DRS workflows 165
Storage vMotion
limitations 127
limits 144
requirements 127
storage workflows 164
stored data, vSphere Web Client 33
suite licensing 96
support 9
synchronizing clocks on the vSphere network 39
syslog service, configuring 57
system configuration, editing service settings 49
T
tagging 83
tags
applying 87
best practices 89
categories 85
creating 87
deleting 88
editing 88
migrating custom attributes to 83
removing 87
tasks
about 107
configuring retention policy 46
pausing 27
removing scheduled tasks 110
rescheduling 110
resuming 27
scheduled, about 107
scheduling 108
viewing 107
tcServer 15
third-party hypervisor 65
time zones 110
timeout
interval 45
vSphere Web Client 33
timeout interval, setting 43
timeout settings, configuring 45
tools clone workflows 168
Transfer Properties 53
U
updated information 11
User directory 43
user interaction 147
user preferences, vSphere Web Client 33
user-level CPU features 128
V
validation
enabling 43
of users or groups 43
period 43
vAPI Endpoint Service, general properties 54
vCenter Server
about 15
address 43
advanced settings 48
agent 15
assign license 40, 99
communication through firewall 58
configuring 37, 40
database 15
disconnecting from 24
license key 40, 99
licensing 40, 91, 99
logging in to 24
managed address 43
plug-ins 15, 21
runtime settings 43
set license 40, 99
settings 43
SSL settings 47
vCenter Host Gateway
adding a host 75
adding third-party host 75
changing password 74
connectivity requirements 66
deploying appliance 67
Index
VMware, Inc. 181
hardware requirements 66
network settings, changing 73
networking requirements 66
overview 65
proxy settings 73
rebooting 75
registering services 71
registering a service 74
restarting the service 72
shut down 75
shutdown 75
shutting down 75
solution user 71
supported host operations 76
supported third-party hosts 66
supported virtual machine operations 76
synchronizing the time 72
system requirements 66
vCenter Host Gateway appliance
configuring 72
support bundles downloading 75
troubleshooting 75
vCenter Server license 95
vCenter Server services, configuring 50
vCenter Server settings, message of the day 48
vCenter Server 5.1 plug-in, default
workflows 158
vCenter Server Appliance services,
configuring 50
vCenter with Operations Managemen
licensing 97
vCloud
licensing 96
solutions 96
suite 96
VCSA services, configuring 50
view license information 102
view license key 103
view product 103
Virtual SAN, licensing 100
virtual machine console, installing 26
virtual machine folder management
workflows 161
virtual machines
best practices for vMotion networking 123
convert 21
CPU compatibility masks 134
definition 18
EVC modes 132
migrating 117, 119, 135, 138, 140
migrating with vMotion 120
migration 117
migration between vCenter Server
systems 125
requirements for vMotion 123
security compliance 21
virtualization 13
vMotion
3DNow! 133
compatibility checks 128, 145
limits 144
MAC addresses management 126
migrating virtual machines with 137
migration between vCenter Server
systems 125
migration of VMs between vCenter Server
systems 125
network compatibility checks 126
networking 123
networking requirements 121
requirements 121
routable network 141
storage requirements 121
swapfile considerations 124
TCP/IP Stack 141
virtual machine requirements 123
without shared storage 124, 125
VMware Tools workflows 172
vSphere
components of 15
introduction 13
vSphere HA cluster 61
vSphere inventory objects 152
vSphere licensing 94
vSphere DRS 20
vSphere HA 61
vSphere High Availability (HA) 20
vSphere license 94
vSphere Update Manager 21
vSphere Web Client
communication through firewall 58
customizing interface 25, 26
navigating 25
rearranging interface 26
stored user data 33
timeout 33
user preferences 33
W
Watchdog 61, 62
Web service settings 45
windows customization clone workflows 168
Work in Progress 27
Work In Progress, removing items 33
vCenter Server and Host Management
182 VMware, Inc.
workflow management 152
workflow runs information, single workflow 153
workflow schedule editing 156
workflow scheduling
resuming from suspension 157
running a scheduled workflow 156
suspending 157
workflow search 154
workflows
basic host management 161
basic virtual machine 166
clone 167
cluster and compute resource 158
components 147
custom attributes 160
data center folder management 161
datancenter 160
datastore and files 160
device management 169
distributed virtual port group 163
distributed virtual switch 163
guest operation files 159
guest operation processes 159
host folder management 161
host management registration 162
linked clone 167
Linux customization clone 168
move and migrate 169
networking 162
Orchestrator Web Client 158
other 170
power host management 162
power management 171
resource pool 164
snapshot 172
standard virtual switch 163
storage 164
Storage DRS 165
tools clone 168
virtual machine folder management 161
VMware Tools 172
windows customization clone 168
workflows waiting for user interaction 154
Index
VMware, Inc. 183
vCenter Server and Host Management
184 VMware, Inc.
