Vmware VSphere Command Line Interface Concepts And Examples ESXi 6.5 V Center Server Sphere Vcenter 65 En
User Manual: vmware vCenter Server - 6.5 - vSphere Command-Line Interface Concepts and Examples Free User Guide for VMware vCenter Software, Manual
Open the PDF directly: View PDF ![]() .
.
Page Count: 174 [warning: Documents this large are best viewed by clicking the View PDF Link!]
- vSphere Command-Line Interface Concepts and Examples
- Contents
- About This Book
- vSphere CLI Command Overviews
- Introduction
- List of Available Host Management Commands
- Targets and Protocols for vCLI Host Management Commands
- Supported Platforms for vCLI Commands
- Commands with an esxcfg Prefix
- ESXCLI Commands Available on Different ESXi Hosts
- Trust Relationship Requirement for ESXCLI Commands
- Using ESXCLI Output
- Connection Options for vCLI Host Management Commands
- Connection Options for DCLI Commands
- vCLI Host Management Commands and Lockdown Mode
- Managing Hosts
- Managing Files
- Managing Storage
- Introduction to Storage
- Examining LUNs
- Detach a Device and Remove a LUN
- Reattach a Device
- Working with Permanent Device Loss
- Managing Paths
- Managing Path Policies
- Scheduling Queues for Virtual Machine I/O
- Managing NFS/NAS Datastores
- Monitor and Manage FibreChannel SAN Storage
- Monitoring and Managing Virtual SAN Storage
- Monitoring vSphere Flash Read Cache
- Monitoring and Managing Virtual Volumes
- Migrating Virtual Machines with svmotion
- Configuring FCoE Adapters
- Scanning Storage Adapters
- Retrieving SMART Information
- Managing iSCSI Storage
- iSCSI Storage Overview
- Protecting an iSCSI SAN
- Command Syntax for esxcli iscsi and vicfg-iscsi
- iSCSI Storage Setup with ESXCLI
- iSCSI Storage Setup with vicfg-iscsi
- Listing and Setting iSCSI Options
- Listing and Setting iSCSI Parameters
- Enabling iSCSI Authentication
- Set Up Ports for iSCSI Multipathing
- Managing iSCSI Sessions
- Managing Third-Party Storage Arrays
- Managing Users
- Managing Virtual Machines
- Managing vSphere Networking
- Introduction to vSphere Networking
- Retrieving Basic Networking Information
- Troubleshoot a Networking Setup
- Setting Up vSphere Networking with vSphere Standard Switches
- Setting Up Virtual Switches and Associating a Switch with a Network Interface
- Retrieving Information About Virtual Switches
- Adding and Deleting Virtual Switches
- Checking, Adding, and Removing Port Groups
- Managing Uplinks and Port Groups
- Setting the Port Group VLAN ID
- Managing Uplink Adapters
- Adding and Modifying VMkernel Network Interfaces
- Managing VMkernel Network Interfaces with ESXCLI
- Add and Configure an IPv4 VMkernel Network Interface with ESXCLI
- Add and Configure an IPv6 VMkernel Network Interface with ESXCLI
- Managing VMkernel Network Interfaces with vicfg-vmknic
- Add and Configure an IPv4 VMkernel Network Interface with vicfg-vmknic
- Add and Configure an IPv6 VMkernel Network Interface with vicfg-vmknic
- Setting Up vSphere Networking with vSphere Distributed Switch
- Managing Standard Networking Services in the vSphere Environment
- Setting the DNS Configuration
- Manage an NTP Server
- Manage the IP Gateway
- Setting Up IPsec
- Manage the ESXi Firewall
- Monitor VXLAN
- Monitoring ESXi Hosts
- Index

vSphere Command-Line Interface
Concepts and Examples
ESXi 6.5
vCenter Server 6.5
This document supports the version of each product listed and
supports all subsequent versions until the document is
replaced by a new edition. To check for more recent editions of
this document, see http://www.vmware.com/support/pubs.
EN-002352-00
vSphere Command-Line Interface Concepts and Examples
2 VMware, Inc.
You can find the most up-to-date technical documentation on the VMware Web site at:
hp://www.vmware.com/support/
The VMware Web site also provides the latest product updates.
If you have comments about this documentation, submit your feedback to:
docfeedback@vmware.com
Copyright © 2007–2017 VMware, Inc. All rights reserved. Copyright and trademark information.
VMware, Inc.
3401 Hillview Ave.
Palo Alto, CA 94304
www.vmware.com
Contents
About This Book 9
1vSphere CLI Command Overviews 11
Introduction 11
Documentation 12
Command-Line Help 12
List of Available Host Management Commands 13
Targets and Protocols for vCLI Host Management Commands 15
Supported Platforms for vCLI Commands 15
Commands with an esxcfg Prex 16
ESXCLI Commands Available on Dierent ESXi Hosts 17
Trust Relationship Requirement for ESXCLI Commands 17
Download and Install the vCenter Server Certicate 17
Using the --cacertsle Option 18
Using the --thumbprint Option 18
Use the Credential Store 18
Using ESXCLI Output 19
Connection Options for vCLI Host Management Commands 19
Connection Options for DCLI Commands 19
vCLI Host Management Commands and Lockdown Mode 19
2Managing Hosts 21
Stopping, Rebooting, and Examining Hosts 21
Stopping and Rebooting Hosts with ESXCLI 21
Stopping, Rebooting, and Examining Hosts with vicfg-hostops 22
Entering and Exiting Maintenance Mode 22
Enter and Exit Maintenance Mode with ESXCLI 22
Enter and Exit Maintenance Mode with vicfg-hostops 23
Backing Up Conguration Information with vicfg-cfgbackup 24
Backup Tasks 24
Backing Up Conguration Data 24
Restore Conguration Data 24
Using vicfg-cfgbackup from vMA 25
Managing VMkernel Modules 25
Manage Modules with esxcli system module 25
Manage Modules with vicfg-module 26
Using vicfg-authcong for Active Directory Conguration 26
Prepare ESXi Hosts for Active Directory Integration 26
Set Up Active Directory to Work with ESXi 27
Updating Hosts 27
VMware, Inc. 3
3Managing Files 29
Introduction to Virtual Machine File Management 29
Managing the Virtual Machine File System with vmkfstools 30
Upgrading VMFS3 Volumes to VMFS5 31
Managing VMFS Volumes 31
Managing Duplicate VMFS Datastores 32
Mounting Datastores with Existing Signatures 32
Resignaturing VMFS Copies 33
Reclaiming Unused Storage Space 34
Using vifs to View and Manipulate Files on Remote ESXi Hosts 35
vifs Options 36
vifs Examples 37
4Managing Storage 41
Introduction to Storage 42
How Virtual Machines Access Storage 42
Datastores 44
Storage Device Naming 44
Examining LUNs 45
Target and Device Representation 45
Examining LUNs with esxcli storage core 46
Examining LUNs with vicfg-scsidevs 47
Detach a Device and Remove a LUN 48
Reaach a Device 49
Working with Permanent Device Loss 49
Removing a PDL LUN 49
Reaach a PDL LUN 49
Managing Paths 50
Multipathing with Local Storage and FC SANs 50
Listing Path Information 51
Changing the State of a Path 53
Managing Path Policies 54
Multipathing Considerations 54
Changing Path Policies 55
Set Policy Details for Devices that Use Round Robin 56
Scheduling Queues for Virtual Machine I/O 57
Managing NFS/NAS Datastores 57
Capabilities Supported by NFS/NAS 57
Adding and Deleting NAS File Systems 58
Monitor and Manage FibreChannel SAN Storage 59
Monitoring and Managing Virtual SAN Storage 60
Retrieve Virtual SAN Information 60
Manage a Virtual SAN Cluster 60
Add and Remove Virtual SAN Storage 61
Monitoring vSphere Flash Read Cache 62
Monitoring and Managing Virtual Volumes 62
Migrating Virtual Machines with svmotion 63
Storage vMotion Uses 63
Storage vMotion Requirements and Limitations 63
vSphere Command-Line Interface Concepts and Examples
4 VMware, Inc.
Running svmotion in Interactive Mode 64
Running svmotion in Noninteractive Mode 64
Conguring FCoE Adapters 65
Scanning Storage Adapters 66
Retrieving SMART Information 66
5Managing iSCSI Storage 69
iSCSI Storage Overview 69
Discovery Sessions 70
Discovery Target Names 71
Protecting an iSCSI SAN 71
Protecting Transmied Data 71
Securing iSCSI Ports 72
Seing iSCSI CHAP 72
Command Syntax for esxcli iscsi and vicfg-iscsi 73
esxcli iscsi Command Syntax 74
Key to esxcli iscsi Short Options 74
vicfg-iscsi Command Syntax 75
iSCSI Storage Setup with ESXCLI 78
Set Up Software iSCSI with ESXCLI 78
Set Up Dependent Hardware iSCSI with ESXCLI 80
Set Up Independent Hardware iSCSI with ESXCLI 82
iSCSI Storage Setup with vicfg-iscsi 84
Set Up Software iSCSI with vicfg-iscsi 85
Set Up Dependent Hardware iSCSI with vicfg-iscsi 86
Set Up Independent Hardware iSCSI with vicfg-iscsi 87
Listing and Seing iSCSI Options 89
Listing iSCSI Options with ESXCLI 89
Seing MTU with ESXCLI 89
Listing and Seing iSCSI Options with vicfg-iscsi 89
Listing and Seing iSCSI Parameters 90
Listing and Seing iSCSI Parameters with ESXCLI 90
Returning Parameters to Default Inheritance with ESXCLI 92
Listing and Seing iSCSI Parameters with vicfg-iscsi 92
Returning Parameters to Default Inheritance with vicfg-iscsi 94
Enabling iSCSI Authentication 94
Enable iSCSI Authentication with ESXCLI 94
Enable Mutual iSCSI Authentication with ESXCLI 95
Enable iSCSI Authentication with vicfg-iscsi 96
Set Up Ports for iSCSI Multipathing 97
Managing iSCSI Sessions 98
Introduction to iSCSI Session Management 98
Listing iSCSI Sessions 98
Logging in to iSCSI Sessions 99
Removing iSCSI Sessions 99
Contents
VMware, Inc. 5
6Managing Third-Party Storage Arrays 101
Managing NMP with esxcli storage nmp 101
Device Management with esxcli storage nmp device 102
Listing Paths with esxcli storage nmp path 102
Managing Path Selection Policy Plug-Ins with esxcli storage nmp psp 103
Fixed Path Selection Policy Operations 104
Customizing Round Robin Setup 105
Managing SATPs 106
Path Claiming with esxcli storage core claiming 108
Using the Reclaim Troubleshooting Command 109
Unclaiming Paths or Sets of Paths 109
Managing Claim Rules 110
Change the Current Claim Rules in the VMkernel 110
Adding Claim Rules 111
Removing Claim Rules 112
Listing Claim Rules 113
Loading Claim Rules 113
Moving Claim Rules 113
Load and Apply Path Claim Rules 114
Running Path Claim Rules 114
7Managing Users 117
Users in the vSphere Environment 117
vicfg-user Command Syntax 118
Managing Users with vicfg-user 118
Assigning Permissions with ESXCLI 120
8Managing Virtual Machines 123
vmware-cmd Overview 123
Connection Options for vmware-cmd 124
General Options for vmware-cmd 124
Format for Specifying Virtual Machines 124
List and Register Virtual Machines 125
Retrieving Virtual Machine Aributes 125
Managing Virtual Machine Snapshots with vmware-cmd 127
Take a Virtual Machine Snapshot 127
Reverting and Removing Snapshots 128
Powering Virtual Machines On and O 128
Connecting and Disconnecting Virtual Devices 129
Working with the AnswerVM API 130
Forcibly Stop a Virtual Machine with ESXCLI 130
9Managing vSphere Networking 131
Introduction to vSphere Networking 131
Networking Using vSphere Standard Switches 132
Networking Using vSphere Distributed Switches 133
Retrieving Basic Networking Information 134
Troubleshoot a Networking Setup 134
vSphere Command-Line Interface Concepts and Examples
6 VMware, Inc.
Seing Up vSphere Networking with vSphere Standard Switches 136
Seing Up Virtual Switches and Associating a Switch with a Network Interface 136
Retrieving Information About Virtual Switches 137
Adding and Deleting Virtual Switches 138
Checking, Adding, and Removing Port Groups 139
Managing Uplinks and Port Groups 140
Seing the Port Group VLAN ID 141
Managing Uplink Adapters 142
Adding and Modifying VMkernel Network Interfaces 145
Seing Up vSphere Networking with vSphere Distributed Switch 148
Managing Standard Networking Services in the vSphere Environment 149
Seing the DNS Conguration 149
Seing the DNS Conguration with ESXCLI 149
Seing the DNS Conguration with vicfg-dns 151
Manage an NTP Server 152
Manage the IP Gateway 152
Seing Up IPsec 153
Using IPsec with ESXi 154
Managing Security Associations 155
Managing Security Policies 156
Manage the ESXi Firewall 157
Monitor VXLAN 158
10 Monitoring ESXi Hosts 161
Using resxtop for Performance Monitoring 161
Managing Diagnostic Partitions 161
Managing Core Dumps 162
Manage Local Core Dumps with ESXCLI 162
Manage Core Dumps with ESXi Dump Collector 163
Manage Core Dumps with vicfg-dumppart 164
Conguring ESXi Syslog Services 164
Managing ESXi SNMP Agents 166
Conguring SNMP Communities 166
Conguring the SNMP Agent to Send Traps 166
Conguring the SNMP Agent for Polling 168
Retrieving Hardware Information 169
Index 171
Contents
VMware, Inc. 7
vSphere Command-Line Interface Concepts and Examples
8 VMware, Inc.

About This Book
vSphere Command-Line Interface Concepts and Examples explains how to use the commands in the VMware
vSphere® Command-Line Interface (vCLI) and includes command overviews and examples.
Intended Audience
This book is for experienced Windows or Linux system administrators who are familiar with vSphere
administration tasks and data center operations and know how to use commands in scripts.
VMware Technical Publications Glossary
VMware Technical Publications provides a glossary of terms that might be unfamiliar to you. For denitions
of terms as they are used in VMware technical documentation, go to
hp://www.vmware.com/support/pubs.
Related Documentation
The documentation for vCLI is available in the vSphere Documentation Center and on the vCLI
documentation page. Go to hp://www.vmware.com/support/developer/vcli.
nGeing Started with vSphere Command-Line Interfaces includes information about available CLIs, enabling
the ESXi Shell, as well as installing and running vCLI and DCLI commands.
nvSphere Command-Line Interface Reference is a reference to both ESXCLI commands and vicfg-
commands. The vicfg- command help is generated from the POD available for each command, run
pod2html for any vicfg- command to generate individual HTML les interactively. The ESXCLI
reference information is generated from the ESXCLI help.
nDCLI Reference is a reference to DCLI commands for managing vCenter services.
The documentation for PowerCLI is available in the vSphere Documentation Center and on the PowerCLI
documentation page.
The vSphere SDK for Perl documentation explains how you can use the vSphere SDK for Perl and related
utility applications to manage your vSphere environment.
The vSphere Management Assistant Guide explains how to install and use the vSphere Management Assistant
(vMA). vMA is a virtual machine that includes vCLI and other prepackaged software.
Background information for the tasks discussed in this book is available in the vSphere documentation set.
The vSphere documentation consists of the combined VMware vCenter Server and ESXi documentation.
VMware, Inc. 9
vSphere Command-Line Interface Concepts and Examples
10 VMware, Inc.

vSphere CLI Command Overviews 1
This chapter introduces the command set, presents supported commands for dierent versions of vSphere,
lists connection options, and discusses vCLI and lockdown mode.
This chapter includes the following topics:
n“Introduction,” on page 11
n“List of Available Host Management Commands,” on page 13
n“Targets and Protocols for vCLI Host Management Commands,” on page 15
n“Supported Platforms for vCLI Commands,” on page 15
n“Commands with an esxcfg Prex,” on page 16
n“ESXCLI Commands Available on Dierent ESXi Hosts,” on page 17
n“Trust Relationship Requirement for ESXCLI Commands,” on page 17
n“Using ESXCLI Output,” on page 19
n“Connection Options for vCLI Host Management Commands,” on page 19
n“Connection Options for DCLI Commands,” on page 19
n“vCLI Host Management Commands and Lockdown Mode,” on page 19
Introduction
The commands in the vSphere CLI package allow you to perform vSphere conguration tasks using
commands from vCLI package installed on supported platforms, or using commands from vMA. The
package consists of several command sets.
The following table lists the components of the vSphere CLI command set.
vCLI Commands Description
ESXCLI commands Manage many aspects of an ESXi host. You can run ESXCLI commands remotely or in the
ESXi Shell.
You can also run ESXCLI commands from the PowerCLI prompt by using the Get-EsxCli
cmdlet.
vicfg- commands Set of commands for many aspects of host management Eventually, these commands will be
replaced by ESXCLI commands.
A set of esxcfg- commands that precisely mirrors the vicfg- commands is also included in
the vCLI package.
VMware, Inc. 11

vCLI Commands Description
Other commands
(vmware-cmd, vifs,
vmkfstools)
Commands implemented in Perl that do not have a vicfg- prex. These commands are
scheduled to be deprecated or replaced by ESXCLI commands.
DCLI commands Manage VMware SDDC services.
DCLI is a CLI client to the vSphere Automation SDK interface for managing VMware SDDC
services. A DCLI command talks to a vSphere Automation API endpoint to locate relevant
information, and then executes the command and displays result to the user.
You can install the vSphere CLI command set on a supported Linux or Windows system. See Geing Started
with vSphere Command-Line Interfaces. You can also deploy the vSphere Management Assistant (vMA) to an
ESXi system of your choice.
After installation, run vCLI commands from the Linux or Windows system or from vMA.
nManage ESXi hosts with other vCLI commands by specifying connection options such as the target
host, user, and password or a conguration le. See “Connection Options for vCLI Host Management
Commands,” on page 19.
nManage vCenter services with DCLI commands by specifying a target vCenter Server system and
authentication options. See Geing Started with vSphere Command-Line Interfaces for a list of connection
options.
Documentation
You can nd information about dierent aspects of vCLI in separate publications.
Geing Started with vSphere Command-Line Interfaces includes information about available CLIs, enabling the
ESXi Shell, and installing and running vCLI commands.
Reference information for vCLI and DCLI commands is available on the vCLI documentation page
hp://www.vmware.com/support/developer/vcli/ and in the vSphere Documentation Center for the product
version that you are using.
nvSphere Command-Line Interface Reference is a reference to vicfg- and related vCLI commands and
includes reference information for ESXCLI commands. All reference information is generated from the
help.
nA reference to esxtop and resxtop is included in the Resource Management documentation.
nThe DCLI Reference is included separately from the vSphere Command-Line Interface Reference. All
reference information is generated from the help.
Command-Line Help
Available command-line help diers for the dierent command sets.
Command Set Available Command-Line Help
vicfg-
commands
Run <vicfg-cmd> --help for an overview of each options.
Run Pod2Html with a vicfg- command as input and pipe the output to a le for more detailed help
information.
pod2html vicfg-authconfig.pl > vicfg-authconfig.html
This output corresponds to the information available in the vSphere Command-Line Interface Reference.
ESXCLI
commands
Run --help at any level of the hierarchy for information about both commands and namespaces
available from that level.
DCLI commands Run --help for any command or namespace to display the input options, whether the option is
required, and the input option type. For namespaces, --help displays all available child namespaces
and commands.
Run dcli --help to display usage information for DCLI.
vSphere Command-Line Interface Concepts and Examples
12 VMware, Inc.

List of Available Host Management Commands
vCLI host management commands from earlier versions have been replaced with commands that have
equivalent functionality.
The following table lists vCLI host management commands in alphabetical order and the corresponding
ESXCLI command if available. For ESXCLI, new commands and namespaces are added with each release.
See the Release Notes for the corresponding release for information.
Functionality of the DCLI command set that is being added in vSphere 6.0 and later is dierent from these
commands. They are not included in the table.
vCLI 4.1
Command
vCLI 5.1 and later
Command Comment
esxcli esxcli (new syntax) All vCLI 4.1 commands have been renamed. Signicant additions
have been made to ESXCLI. Many tasks previously performed
with a vicfg- command is now performed with ESXCLI.
resxtop resxtop (No ESXCLI
equivalent)
Supported only on Linux.
Monitors in real time how ESXi hosts use resources. Runs in
interactive or batch mode.
See “Using resxtop for Performance Monitoring,” on page 161.
See the vSphere Resource Management documentation for a detailed
reference.
svmotion svmotion (No ESXCLI
equivalent)
Must run against a
vCenter Server system.
Moves a virtual machine’s conguration le, and, optionally, its
disks, while the virtual machine is running.
See “Migrating Virtual Machines with svmotion,” on page 63.
vicfg-advcfg esxcli system settings
advanced
Performs advanced conguration.
The advanced seings are a set of VMkernel options. These
options are typically in place for specic workarounds or
debugging.
Use this command as instructed by VMware.
vicfg-authconfig vicfg-authconfig (No
ESXCLI equivalent)
Remotely congures Active Directory seings for an ESXi host.
See “Using vicfg-authcong for Active Directory Conguration,”
on page 26.
vicfg-cfgbackup vicfg-cfgbackup (No
ESXCLI equivalent)
Cannot run against a
vCenter Server system.
Backs up the conguration data of an ESXi system and restores
previously saved conguration data.
See “Backing Up Conguration Information with vicfg-
cfgbackup,” on page 24.
vicfg-dns esxcli network ip dns Species an ESXi host’s DNS (Domain Name Server)
conguration.
See “Seing the DNS Conguration,” on page 149.
vicfg-dumppart esxcli system coredump Sets both the partition (esxcli system coredump partition)
and the network (esxcli system coredump network) to use for
core dumps. Use this command to set up ESXi Dump Collector.
See “Managing Diagnostic Partitions,” on page 161.
vicfg-hostops esxcli system
maintenancemode
esxcli system shutdown
Manages hosts.
“Stopping, Rebooting, and Examining Hosts,” on page 21.
“Entering and Exiting Maintenance Mode,” on page 22.
vicfg-ipsec esxcli network ip ipsec Sets up IPsec (Internet Protocol Security), which secures IP
communications coming from and arriving at ESXi hosts. ESXi
hosts support IPsec using IPv6.
See “Seing Up IPsec,” on page 153.
vicfg-iscsi esxcli iscsi Manages hardware and software iSCSI storage.
See Chapter 5, “Managing iSCSI Storage,” on page 69.
Chapter 1 vSphere CLI Command Overviews
VMware, Inc. 13

vCLI 4.1
Command
vCLI 5.1 and later
Command Comment
vicfg-module esxcli system module Enables VMkernel options. Use this command with the options
listed in this document, or as instructed by VMware.
See “Managing VMkernel Modules,” on page 25.
vicfg-mpath
vicfg-mpath35
esxcli storage core
path
Congures storage arrays.
See “Managing Paths,” on page 50.
vicfg-nas esxcli storage nfs Manages NAS/NFS lesystems.
See “Managing NFS/NAS Datastores,” on page 57.
vicfg-nics esxcli network nic Manages the ESXi host's uplink adapters.
See “Managing Uplink Adapters,” on page 142.
vicfg-ntp vicfg-ntp (No ESXCLI
equivalent)
Denes the NTP (Network Time Protocol) server.
See “Manage an NTP Server,” on page 152.
vicfg-rescan esxcli storage core
adapter rescan
Rescans the storage conguration.
See “Scanning Storage Adapters,” on page 66.
vicfg-route esxcli network ip route Manages the ESXi host's route entry.
See “Manage the IP Gateway,” on page 152.
vicfg-scsidevs esxcli storage core
device
Finds and examines available LUNs.
See “Examining LUNs,” on page 45.
vicfg-snmp esxcli system snmp Manages the SNMP agent. See “Managing ESXi SNMP Agents,”
on page 166. Using SNMP in a vSphere environment is discussed
in detail in the vSphere Monitoring and Performance documentation.
New options added in vCLI 5.0.
Expanded SNMP support added in vCLI 5.1.
vicfg-syslog esxcli system syslog Species log seings for ESXi hosts including local storage
policies and server and port information for network logging. See
“Conguring ESXi Syslog Services,” on page 164.
The vCenter Server and Host Management documentation explains
how to set up system logs using the vSphere Web Client.
vicfg-user vicfg-user (No ESXCLI
equivalent)
Creates, modies, deletes, and lists local direct access users and
groups of users. See Chapter 7, “Managing Users,” on page 117.
The vSphere Security documentation discusses security
implications of user management and custom roles.
vicfg-vmknic esxcli network ip
interface
Adds, deletes, and modies VMkernel network interfaces.
See “Adding and Modifying VMkernel Network Interfaces,” on
page 145.
vicfg-volume esxcli storage
filesystem
Supports resignaturing the copy of a VMFS volume, and
mounting and unmounting the copy.
See “Managing Duplicate VMFS Datastores,” on page 32.
vicfg-vswitch esxcli network vswitch Adds or removes virtual switches or modies virtual switch
seings.
See “Seing Up Virtual Switches and Associating a Switch with a
Network Interface,” on page 136.
vifs vifs (No ESXCLI equivalent) Performs le system operations such as retrieving and uploading
les on the ESXi system.
See “Managing the Virtual Machine File System with vmkfstools,”
on page 30.
vihostupdate esxcli software vib Updates legacy ESXi hosts to a dierent version of the same major
release.
You cannot run vihostupdate against ESXi 5.0 and later hosts.
See “Managing VMkernel Modules,” on page 25.
vSphere Command-Line Interface Concepts and Examples
14 VMware, Inc.

vCLI 4.1
Command
vCLI 5.1 and later
Command Comment
vmkfstools vmkfstools (No ESXCLI
equivalent)
Creates and manipulates virtual disks, le systems, logical
volumes, and physical storage devices on an ESXi host.
See “Managing the Virtual Machine File System with vmkfstools,”
on page 30.
vmware-cmd vmware-cmd (No ESXCLI
equivalent)
Performs virtual machine operations remotely. This includes, for
example, creating a snapshot, powering the virtual machine on or
o, and geing information about the virtual machine.
See Chapter 8, “Managing Virtual Machines,” on page 123.
Targets and Protocols for vCLI Host Management Commands
Most vCLI commands are used to manage or retrieve information about one or more ESXi hosts. They can
target an ESXi host or a vCenter Server system.
When you target a vCenter Server system, you can use --vihost to specify the ESXi host to run the
command against. The only exception is svmotion, which you can run against vCenter Server systems, but
not against ESXi systems.
The following commands must have an ESXi system, not a vCenter Server system as a target.
nvifs
nvicfg-user
nvicfg-cfgbackup
nvihostupdate
nvmkfstools
The resxtop command requires an HTTPS connection. All other commands support HTTP and HTTPS.
Supported Platforms for vCLI Commands
Platform support for vCLI commands diers depending on the vCenter Server and ESXi version.
You cannot run the vihostupdate command against an ESXi 5.0 or later system.
You cannot run vicfg-syslog --setserver or vicfg-syslog --setport with an ESXi 5.0 or later target.
The following table lists platform support for the dierent vCLI commands.
Command ESXi 5.x and 6.x
vCenter Server 5.x
and 6.x ESXi 4.x ESX 4.x
vCenter Server
4.x
DCLI No No No No No
esxcli Yes Yes Yes Yes No
resxtop Yes (from Linux) Yes (from Linux) Yes (from
Linux)
Yes (from
Linux)
Yes (from Linux)
svmotion No Yes No No Yes
vicfg-advcfg Yes Yes Yes Yes Yes
vicfg-authconfig Yes Yes Yes Yes Yes
vicfg-cfgbackup Yes No Yes No No
vicfg-dns Yes Yes Yes Yes Yes
vicfg-dumppart Yes Yes Yes Yes Yes
vicfg-hostops Yes Yes Yes Yes Yes
Chapter 1 vSphere CLI Command Overviews
VMware, Inc. 15

Command ESXi 5.x and 6.x
vCenter Server 5.x
and 6.x ESXi 4.x ESX 4.x
vCenter Server
4.x
vicfg-ipsec Yes No Yes Yes No
vicfg-iscsi Yes Yes Yes Yes Yes
vicfg-module Yes Yes Yes Yes Yes
vicfg-mpath Yes Yes Yes Yes Yes
vicfg-nas Yes Yes Yes Yes Yes
vicfg-nics Yes Yes Yes Yes Yes
vicfg-ntp Yes Yes Yes Yes Yes
vicfg-rescan Yes Yes Yes Yes Yes
vicfg-route Yes Yes Yes Yes Yes
vicfg-scsidevs Yes Yes Yes Yes Yes
vicfg-snmp Yes No Yes Yes No
vicfg-syslog No No for 5.0 target Yes No Yes
vicfg-user Yes No Yes Yes No
vicfg-vmknic Yes Yes Yes Yes Yes
vicfg-volume Yes Yes Yes Yes Yes
vicfg-vswitch Yes Yes Yes Yes Yes
vifs Yes No Yes Yes No
vihostupdate Use esxcli
software vib
instead.
Use esxcli
software vib
instead.
Yes Yes No
vmkfstools Yes No Yes Yes No
vmware-cmd Yes Yes Yes Yes Yes
vicfg-mpath35 No No No No No
vihostupdate35 No No No No No
Commands with an esxcfg Prefix
To facilitate easy migration if shell scripts that use esxcfg- commands, the vCLI package includes a copy of
each vicfg- command that uses an esxcfg prex.
I You should use ESXCLI or the vCLI commands with the vicfg prex. Commands with the
esxcfg prex are available mainly for compatibility reasons and are now obsolete. vCLI esxcfg- commands
are equivalent to vicfg- commands, but not completely equivalent to the deprecated esxcfg- service console
commands.
The Following table lists all vCLI vicfg- commands for which a vCLI command with an esxcfg prex is
available.
Command with vicfg Prefix Command with esxcfg Prefix
vicfg-advcfg esxcfg-advcfg
vicfg-cfgbackup esxcfg-cfgbackup
vicfg-dns esxcfg-dns
vicfg-dumppart esxcfg-dumppart
vicfg-module esxcfg-module
vSphere Command-Line Interface Concepts and Examples
16 VMware, Inc.

Command with vicfg Prefix Command with esxcfg Prefix
vicfg-mpath esxcfg-mpath
vicfg-nas esxcfg-nas
vicfg-nics esxcfg-nics
vicfg-ntp esxcfg-ntp
vicfg-rescan esxcfg-rescan
vicfg-route esxcfg-route
vicfg-scsidevs esxcfg-scsidevs
vicfg-snmp esxcfg-snmp
vicfg-syslog esxcfg-syslog
vicfg-vmknic esxcfg-vmknic
vicfg-volume esxcfg-volume
vicfg-vswitch esxcfg-vswitch
ESXCLI Commands Available on Different ESXi Hosts
The available ESXCLI commands depend on the ESXi host version.
When you run an ESXCLI vCLI command, you must know the commands supported on the target host. For
example, if you run commands against ESXi 5.x hosts, ESXCLI 5.x commands are supported. If you run
commands against ESXi 6.x hosts, ESXCLI 6.x commands are supported.
Some commands or command outputs are determined by the host type. In addition, VMware partners
might develop custom ESXCLI commands that you can run on hosts where the partner VIB has been
installed.
Run esxcli --server <target> --help for a list of namespaces supported on the target. You can drill down
into the namespaces for additional help.
Trust Relationship Requirement for ESXCLI Commands
Starting with vSphere 6.0, ESXCLI checks whether a trust relationship exists between the machine where
you run the ESXCLI command and the ESXi host. An error results if the trust relationship does not exist.
Download and Install the vCenter Server Certificate
You can download the vCenter Server root certicate by using a Web browser and add it to the trusted
certicates on the machine where you plan to run ESXCLI commands.
Procedure
1 Enter the URL of the vCenter Server system or vCenter Server Appliance into a Web browser.
2 Click the Download trusted root link.
3 Change the extension of the downloaded le to .zip. (The le is a ZIP le of all certicates in the
TRUSTED_ROOTS store).
4 Extract the ZIP le.
A certicates folder is extracted. The folder includes les with the extension .0. .1, and so on, which are
certicates, and les with the extension .r0, r1, and so on which are CRL les associated with the
certicates.
Chapter 1 vSphere CLI Command Overviews
VMware, Inc. 17

5 Add the trusted root certicates to the list of trusted roots.
The process diers depending on the platform that you are on.
What to do next
You can now run ESXCLI commands against any host that is managed by the trusted vCenter Server system
without supplying additional information if you specify the vCenter Server system in the --server option
and the ESXi host in the --vihost option.
Using the --cacertsfile Option
Using a certicate to establish the trust relationship is the most secure option.
You can specify the certicate with the --cacertsfile parameter or the VI_CACERTFILE variable.
Using the --thumbprint Option
You can supply the thumbprint for the target ESXi host or vCenter Server system in the --thumbprint
parameter or the VI_THUMBPRINT variable.
When you run a command, ESXCLI rst checks whether a certicate le is available. If not, ESXCLI checks
whether a thumbprint of the target server is available. If not, you receive an error of the following type.
Connect to sof-40583-srv failed. Server SHA-1 thumbprint: 5D:01:06:63:55:9D:DF:FE:38:81:6E:2C:FA:
71:BC:Usin63:82:C5:16:51 (not trusted).
You can run the command with the thumbprint to establish the trust relationship, or add the thumbprint to
the VI_THUMBPRINT variable. For example, using the thumbprint of the ESXi host above, you can run the
following command.
esxcli --server myESXi --username user1 --password 'my_password' --thumbprint 5D:
01:06:63:55:9D:DF:FE:38:81:6E:2C:FA:71:BC:63:82:C5:16:51 storage nfs list
Use the Credential Store
Your vCLI installation includes a credential store. You can establish trust for a user with the credential store.
You can manage the credential store with the credstore-admin utility application, which is located in
the /Perl/apps/general directory inside the VMware vSphere CLI directory.
I Updating the credential store is a two-step process. First you add the user and password for
the server, and then you add the thumbprint for the server.
Procedure
1 Add the user and password for the target ESXi host to the local credential store.
credstore_admin.pl add --server <esxi_HOSTNAME_OR_IP> --username <user> --password <pwd>
2 Add the thumbprint for the target ESXi host. This thumbprint was returned in the error when you
aempted to connect to the host.
credstore_admin.pl add --server <esxi_HOSTNAME_OR_IP> --thumbprint <thumbprint>
3If you are using a non-default credential store le, you must pass it in with the --credstore option.
If you do not use the --credstore option, the host becomes accessible without authentication.
vSphere Command-Line Interface Concepts and Examples
18 VMware, Inc.

Using ESXCLI Output
Many ESXCLI commands generate output you might want to use in your application. You can run esxcli
with the --formatter dispatcher option and send the resulting output as input to a parser.
The --formatter options supports three values - csv, xml, and keyvalue and is used before any namespace.
The following example lists all le system information in CSV format.
esxcli --formatter=csv storage filesystem list
You can pipe the output to a le.
esxcli --formatter=keyvalue storage filesystem list > myfilesystemlist.txt
I You should always use a formaer for consistent output.
Connection Options for vCLI Host Management Commands
You can run host management commands such as ESXCLI commands, vicfg- commands, and other
commands with several dierent connection options.
You can target hosts directly or target a vCenter Server system and specify the host you want to manage. If
you are targeting a vCenter Server system, specify the Platform Services Controller, which includes the
vCenter Single Sign-On service, for best security.
I For connections to ESXi hosts version 6.0 or later, vCLI supports both the IPv4 protocol and the
IPv6 protocol. For earlier versions, vCLI supports only IPv4. In all cases, you can congure IPv6 on the
target host with several of the networking commands.
See the Geing Started with vSphere Command-Line Interfaces documentation for a complete list and examples.
Connection Options for DCLI Commands
DCLI is a CLI client to the vSphere Automation SDK interface for managing VMware SDDC services. A
DCLI command talks to a vSphere Automation SDK endpoint to get the vSphere Automation SDK
command information, executes the command, and displays result to the user.
You can run DCLI commands locally or from an administration server.
nRun DCLI on the Linux shell of a vCenter Server Appliance.
nInstall vCLI on a supported Windows or Linux system and target a vCenter Server Windows
installation or a vCenter Server Appliance. You have to provide endpoint information to successfully
run commands.
DCLI commands support other connection options than other commands in the command set.
See the Geing Started with vSphere Command-Line Interfaces documentation for a complete list and examples.
vCLI Host Management Commands and Lockdown Mode
For additional security, an administrator can place one or more hosts managed by a vCenter Server system
in lockdown mode. Lockdown mode aects login privileges for the ESXi host.
See the vSphere Security document in the vSphere Documentation Center for a detailed discussion of normal
lockdown mode and strict lockdown mode, and of how to enable and disable them.
Chapter 1 vSphere CLI Command Overviews
VMware, Inc. 19
To make changes to ESXi systems in lockdown mode, you must go through a vCenter Server system that
manages the ESXi system as the user vpxuser and include both the --server and --vihost parameters.
esxcli --server MyVC --vihost MyESXi storage filesystem list
The command prompts for the vCenter Server system user name and password.
The following commands cannot run against vCenter Server systems and are therefore not available in
lockdown mode.
nvifs
nvicfg-user
nvicfg-cfgbackup
nvihostupdate
nvmkfstools
If you have problems running a command on an ESXi host directly, without specifying a vCenter Server
target, check whether lockdown mode is enabled on that host.
vSphere Command-Line Interface Concepts and Examples
20 VMware, Inc.

Managing Hosts 2
Host management commands can stop and reboot ESXi hosts, back up conguration information, and
manage host updates. You can also use a host management command to make your host join an Active
Directory domain or exit from a domain.
For information on updating ESXi 5.0 hosts with the esxcli software command and on changing the host
acceptance level to match the level of a VIB that you might want to use for an update, see the vSphere
Upgrade documentation in the vSphere 5.0 Documentation Center.
This chapter includes the following topics:
n“Stopping, Rebooting, and Examining Hosts,” on page 21
n“Entering and Exiting Maintenance Mode,” on page 22
n“Backing Up Conguration Information with vicfg-cfgbackup,” on page 24
n“Managing VMkernel Modules,” on page 25
n“Using vicfg-authcong for Active Directory Conguration,” on page 26
n“Updating Hosts,” on page 27
Stopping, Rebooting, and Examining Hosts
You can stop, reboot, and examine hosts with ESXCLI or with vicfg-hostops.
Stopping and Rebooting Hosts with ESXCLI
You can shut down or reboot an ESXi host by using the vSphere Web Client or vCLI commands, such as
ESXCLI or vicfg-hostops.
Shuing down a managed host disconnects it from the vCenter Server system, but does not remove the host
from the inventory. You can shut down a single host or all hosts in a data center or cluster. Specify one of the
options listed in “Connection Options for vCLI Host Management Commands,” on page 19 in place of
<conn_options>.
To shut down a host, run esxcli system shutdown poweroff. You must specify the --reason option and
supply a reason for the shutdown. A --delay option allows you to specify a delay interval, in seconds.
To reboot a host, run system shutdown reboot. You must specify the --reason option and supply a reason
for the reboot. A --delay option allows you to specify a delay interval, in seconds.
VMware, Inc. 21
Stopping, Rebooting, and Examining Hosts with vicfg-hostops
You can shut down or reboot an ESXi host by using the vSphere Web Client, or ESXCLI or the vicfg-hostops
vCLI command.
Shuing down a managed host disconnects it from the vCenter Server system, but does not remove the host
from the inventory. You can shut down a single host or all hosts in a data center or cluster. Specify one of the
options listed in “Connection Options for vCLI Host Management Commands,” on page 19 in place of
<conn_options>.
nSingle host - Run vicfg-hostops with --operation shutdown.
nIf the host is in maintenance mode, run the command without the --force option.
vicfg-hostops <conn_options> --operation shutdown
nIf the host is not in maintenance mode, use --force to shut down the host and all running virtual
machines.
vicfg-hostops <conn_options> --operation shutdown --force
nAll hosts in data center or cluster - To shut down all hosts in a cluster or data center, specify --cluster
or --datacenter.
vicfg-hostops <conn_options> --operation shutdown --cluster <my_cluster>
vicfg-hostops <conn_options> --operation shutdown --datacenter <my_datacenter>
You can reboot a single host or all hosts in a data center or cluster.
nSingle host - Run vicfg-hostops with --operation reboot.
nIf the host is in maintenance mode, run the command without the --force option.
vicfg-hostops <conn_options> --operation reboot
nIf the host is not in maintenance mode, use --force to shut down the host and all running virtual
machines.
vicfg-hostops <conn_options> --operation reboot --force
nAll hosts in data center or cluster - You can specify --cluster or --datacenter to reboot all hosts in a
cluster or data center.
vicfg-hostops <conn_options> --operation reboot --cluster <my_cluster>
vicfg-hostops <conn_options> --operation reboot --datacenter <my_datacenter>
You can display information about a host by running vicfg-hostops with --operation info.
vicfg-hostops <conn_options> --operation info
The command returns the host name, manufacturer, model, processor type, CPU cores, memory capacity,
and boot time. The command also returns whether vMotion is enabled and whether the host is in
maintenance mode.
Entering and Exiting Maintenance Mode
You can instruct your host to enter or exit maintenance mode with ESXCLI or with vicfg-hostops.
Enter and Exit Maintenance Mode with ESXCLI
You place a host in maintenance mode to service it, for example, to install more memory. A host enters or
leaves maintenance mode only as the result of a user request.
esxcli system maintenanceMode set allows you to enable or disable maintenance mode.
vSphere Command-Line Interface Concepts and Examples
22 VMware, Inc.

When you run the vicfg-hostops vCLI command, you can specify one of the options listed in “Connection
Options for vCLI Host Management Commands,” on page 19 in place of <conn_options>.
Procedure
1 To enter maintenance mode, run the following command.
esxcli <conn_options> system maintenanceMode set --enable true
After all virtual machines on the host have been suspended or migrated, the host enters maintenance
mode.
N You cannot deploy or power on a virtual machine on hosts in maintenance mode.
2 To exit maintenance mode, run the following command.
esxcli <conn_options> system maintenanceMode set --enable false
N If you aempt to exit maintenance mode when the host is no longer in maintenance mode, an
error informs you that maintenance mode is already disabled.
Enter and Exit Maintenance Mode with vicfg-hostops
You place a host in maintenance mode to service it, for example, to install more memory. A host enters or
leaves maintenance mode only as the result of a user request.
vicfg-hostops suspends virtual machines by default, or powers o the virtual machine if you run vicfg-
hostops --action poweroff.
N vicfg-hostops does not work with VMware DRS. Virtual machines are always suspended.
The host is in a state of Entering Maintenance Mode until all running virtual machines are suspended or
migrated. When a host is entering maintenance mode, you cannot power on virtual machines on it or
migrate virtual machines to it.
When you run the vicfg-hostops vCLI command, you can specify one of the options listed in “Connection
Options for vCLI Host Management Commands,” on page 19 in place of <conn_options>.
Procedure
1 To enter maintenance mode, run the following command.
vicfg-hostops <conn_options> --operation enter
2 To check whether the host is in maintenance mode or in the Entering Maintenance Mode state, run the
following command.
vicfg-hostops <conn_options> --operation info
After all virtual machines on the host have been suspended or migrated, the host enters maintenance mode.
You cannot deploy or power on a virtual machine on hosts in maintenance mode.
What to do next
You can put all hosts in a cluster or data center in maintenance mode by using the --cluster or --
datacenter option. You must not use those options unless suspending all virtual machines in that cluster or
data center is no problem.
You can later run vicfg-hostops <conn_options> --operation exit to exit maintenance mode.
Chapter 2 Managing Hosts
VMware, Inc. 23

Backing Up Configuration Information with vicfg-cfgbackup
After you congure an ESXi host, you can back up the host conguration data. You should always back up
your host conguration after you change the conguration or upgrade the ESXi image.
I The vicfg-cfgbackup command is available only for ESXi hosts. The command is not available
through a vCenter Server system connection. No equivalent ESXCLI command is supported.
Backup Tasks
During a conguration backup, the serial number is backed up with the conguration.
The number is restored when you restore the conguration. The number is not preserved when you run the
Recovery CD (ESXi Embedded) or perform a repair operation (ESXi Installable).
You can back up and restore conguration information as follows.
1 Back up the conguration by using the vicfg-cfgbackup command.
2 Run the Recovery CD or repair operation.
3 Restore the conguration by using the vicfg-cfgbackup command.
When you restore a conguration, you must make sure that all virtual machines on the host are stopped.
Backing Up Configuration Data
You can back up conguration data by running vicfg-cfgbackup with the -s option.
The following example backs up conguration data in a temporary location.
vicfg-cfgbackup <conn_options> -s /tmp/ESXi_181842_backup.txt
For the backup lename, include the number of the build that is running on the host that you are backing
up. If you are running vCLI on vMA, the backup le is saved locally on vMA. Backup les can safely be
stored locally because virtual appliances are stored in the /vmfs/volumes/<datastore> directory on the host,
which is separate from the ESXi image and conguration les.
Restore Configuration Data
If you have created a backup, you can later restore ESXi conguration data.
When you restore conguration data, the number of the build running on the host must be the same as the
number of the build that was running when you created the backup le. To override this requirement,
include the -f (force) option.
When you run the vicfg-cfgbackup vCLI command, you can specify one of the options listed in
“Connection Options for vCLI Host Management Commands,” on page 19 in place of <conn_options>.
Procedure
1 Power o all virtual machines that are running on the host that you want to restore.
2 Log in to a host on which vCLI is installed, or log in to vMA.
3 Run vicfg-cfgbackup with the -l ag to load the host conguration from the specied backup le.
nIf you run the following command, you are prompted for conrmation.
vicfg-cfgbackup <conn_options> -l /tmp/ESXi_181842_backup.tgz
nIf you run the following command, you are not prompted for conrmation.
vicfg-cfgbackup <conn_options> -l /tmp/ESXi_181842_backup.tgz -q
vSphere Command-Line Interface Concepts and Examples
24 VMware, Inc.
4 (Optional) To restore the host to factory seings, run vicfg-cfgbackup with the -r option.
vicfg-cfgbackup <conn_options> -r
Using vicfg-cfgbackup from vMA
To back up a host conguration, you can run vicfg-cfgbackup from a vMA instance. The vMA instance can
run on the host that you are backing up or restoring, also referred to as the target host, or on a remote host.
To restore a host conguration, you must run vicfg-cfgbackup from a vMA instance running on a remote
host. The host must be in maintenance mode, which means all virtual machines, including vMA, must be
suspended on the target host.
For example, a backup operation for two ESXi hosts, host1 and host2, with vMA deployed on both hosts
works as follows.
nTo back up one of the host’s conguration, run vicfg-cfgbackup from the vMA appliance running on
either host1 or host2. Use the --server option to specify the host for which you want backup
information. The information is stored on vMA.
nTo restore the host1 conguration, run vicfg-cfgbackup from the vMA appliance running on host2. Use
the --server option to point to host1 to restore the conguration to that host.
nTo restore the host2 conguration, run vicfg-cfgbackup from the vMA appliance running on host1. Use
the --server option to point to host2 to restore the conguration to that host.
Managing VMkernel Modules
The esxcli system module and vicfg-module commands support seing and retrieving VMkernel module
options.
The vicfg-module and esxcli system module commands are implementations of the deprecated esxcfg-
module service console command. The two commands support most of the options esxcfg-module supports.
vicfg-module and esxcli system module are commonly used when VMware Technical Support, a
Knowledge Base article, or VMware documentation instruct you to do so.
Manage Modules with esxcli system module
Not all VMkernel modules have seable module options.
The following example illustrates how to examine and enable a VMkernel module. Specify one of the
connection options listed in “Connection Options for vCLI Host Management Commands,” on page 19 in
place of <conn_options>.
Procedure
1 List information about the module.
esxcli <conn_options> system module list --module=module_name
The system returns the name, type, value, and description of the module.
2 (Optional) List all enabled or loaded modules.
esxcli <conn_options> system module list --enabled=true
esxcli <conn_options> system module list --loaded=true
3 Enable the model.
esxcli <conn_options> system module set --module=module_name --enabled=true
Chapter 2 Managing Hosts
VMware, Inc. 25

4 Set the parameter.
esxcli system module parameters set --module=module_name --parameter-
string="parameter_string"
5 Verify that the module is congured.
esxcli <conn_options> system module parameters list --module=module_name
Manage Modules with vicfg-module
Not all VMkernel modules have seable module options.
The following example illustrates how the examine and enable a VMkernel modules. Specify one of the
connection options listed in “Connection Options for vCLI Host Management Commands,” on page 19 in
place of <conn_options>.
Procedure
1 Run vicfg-module --list to list the modules on the host.
vicfg-module <conn_options> --list
2 Run vicfg-module --set-options with connection options, the option string to be passed to a module,
and the module name.
vicfg-module <conn_options> --set-options '<parameter_name>=<value>' <module_name>
3 (Optional) To retrieve the option string that is congured to be passed to a module when the module is
loaded, run vicfg-module --get-options.
N This string is not necessarily the option string currently in use by the module.
vicfg-module <conn_options> --get-options module_name
Veries that a module is congured.
Using vicfg-authconfig for Active Directory Configuration
ESXi can be integrated with Active Directory. Active Directory provides authentication for all local services
and for remote access through the vSphere Web Services SDK, vSphere Web Client, PowerCLI, and vSphere
CLI.
You can congure Active Directory seings with the vSphere Web Client, as discussed in the vCenter Server
and Host Management documentation, or use vicfg-autconfig.
vicfg-authconfig allows you to remotely congure Active Directory seings on ESXi hosts. You can list
supported and active authentication mechanisms, list the current domain, and join or part from an Active
Directory domain.
Prepare ESXi Hosts for Active Directory Integration
Before you run the vicfg-authconfig command on an ESXi host, you must prepare the host.
Procedure
1Congure ESXi and Active Directory to use same NTP server.
I All hosts that join Active Directory must also be managed by an NTP server to avoid
issues with clock skews and Kerberos tickets. You must make sure the ESXi system and the Active
Directory server are using the same time zone.
The ESXi system’s time zone is always set to UTC.
vSphere Command-Line Interface Concepts and Examples
26 VMware, Inc.
2Congure the ESXi system’s DNS to be in the Active Directory domain.
Set Up Active Directory to Work with ESXi
You can run vicfg-authconfig to add the ESXi host to the Active Directory domain. You can run the
command directly against the host or against a vCenter Server system, specifying the host with --vihost.
Prerequisites
nVerify that you have installed the ESXi host, as explained in the vSphere Installation and Setup
documentation.
nVerify that you have installed Windows Active Directory on a Windows Server that runs Windows 2000
Server, Windows Server 2003, or Windows Server 2008. See the Microsoft Web site for instructions and
best practices.
nVerify that you have the appropriate Active Directory permissions and administrative privileges on the
ESXi host.
nVerify that time between the ESXi system and Windows Active Directory is synchronized.
Procedure
1 Test that the Windows Active Directory Server can ping the ESXi host by using the host name.
ping <ESX_hostname>
2 Run vicfg-authconfig to add the host to the Active Directory domain.
vicfg-authconfig --server=<ESXi Server IP Address>
--username=<ESXi Server Admin Username>
--password=<ESXi Server Admin User's Password>
--authscheme AD --joindomain <AD Domain Name>
--adusername=<Active Directory Administrator User Name>
--adpassword=<Active Directory Administrator User's Password>
The system prompts for user names and passwords if you do not specify them on the command line.
Passwords are not echoed to the screen.
3 Check that a Successfully Joined <Domain Name> message appears.
4 Verify the ESXi host is in the intended Windows Active Directory domain.
vicfg-authconfig --server XXX.XXX.XXX.XXX --authscheme AD -c
You are prompted for a user name and password for the ESXi system.
Updating Hosts
When you add custom drivers or patches to a host, the process is called an update.
nUpdate ESXi 4.0 and ESXi 4.1 hosts with the vihostupdate command, as discussed in the vSphere
Command-Line Interface Installation and Reference Guide included in the vSphere 4.1 documentation set.
nUpdate ESXi 5.0 hosts with esxcli software vib commands discussed in the vSphere Upgrade
documentation included in the vSphere 5.0 documentation set. You cannot run the vihostupdate
command against ESXi 5.0 or later.
nUpdate ESXi 5.0 hosts with esxcli software vib commands discussed in the vSphere Upgrade
documentation included in the vSphere 5.0 documentation set. You cannot run the vihostupdate
command against ESXi 5.0 or later.
nUpdate ESXi 5.1 hosts with esxcli software vib commands discussed in the vSphere Upgrade
documentation included in the vSphere 5.1 documentation set.
Chapter 2 Managing Hosts
VMware, Inc. 27
nUpdate ESXi 5.5 hosts with esxcli software vib commands discussed in the vSphere Upgrade
documentation included in the vSphere 5.5 documentation set.
nUpdate ESXi 6.0 hosts with esxcli software vib commands discussed in the vSphere Upgrade
documentation included in the vSphere 6.0 documentation set.
nUpdate ESXi 6.5 hosts with esxcli software vib commands discussed in the vSphere Upgrade
documentation included in the vSphere 6.5 documentation set.
vSphere Command-Line Interface Concepts and Examples
28 VMware, Inc.

Managing Files 3
The vSphere CLI includes two commands for le manipulation. vmkfstools allows you to manipulate VMFS
(Virtual Machine File System) and virtual disks. vifs supports remote interaction with les on your ESXi
host.
N See Chapter 4, “Managing Storage,” on page 41 for information about storage manipulation
commands.
This chapter includes the following topics:
n“Introduction to Virtual Machine File Management,” on page 29
n“Managing the Virtual Machine File System with vmkfstools,” on page 30
n“Upgrading VMFS3 Volumes to VMFS5,” on page 31
n“Managing VMFS Volumes,” on page 31
n“Reclaiming Unused Storage Space,” on page 34
n“Using vifs to View and Manipulate Files on Remote ESXi Hosts,” on page 35
Introduction to Virtual Machine File Management
You can use the vSphere Web Client or vCLI commands to access dierent types of storage devices that your
ESXi host discovers and to deploy datastores on those devices.
N Datastores are logical containers, analogous to le systems, that hide specics of each storage device
and provide a uniform model for storing virtual machine les. Datastores can be used for storing ISO
images, virtual machine templates, and oppy images. The vSphere Web Client uses the term datastore
exclusively. In vCLI, the term datastore, as well as VMFS or NFS volume, refer to the same logical container
on the physical device.
Depending on the type of storage you use, datastores can be backed by the VMFS and NFS le system
formats.
nVirtual Machine File System (VMFS) - High-performance le system that is optimized for storing
virtual machines. Your host can deploy a VMFS datastore on any SCSI-based local or networked storage
device, including Fibre Channel and iSCSI SAN equipment. As an alternative to using the VMFS
datastore, your virtual machine can have direct access to raw devices and use a mapping le (RDM) as
a proxy.
You manage VMFS and RDMs with the vSphere Web Client, or the vmkfstools command.
VMware, Inc. 29

nNetwork File System (NFS) - The NFS client built into ESXi uses the NFS protocol over TCP/IP to access
a designated NFS volume that is located on a NAS server. The ESXi host can mount the volume and use
it for its storage needs. vSphere supports versions 3 and 4.1 of the NFS protocol. Typically, the NFS
volume or directory is created by a storage administrator and is exported form the NFS server. The NFS
volumes do not need to be formaed with a local le system, such as VMFS. You can mount the
volumes directly and use them to store and boot virtual machines in the same way that you use VMFS
datastores. The host can access a designated NFS volume located on an NFS server, mount the volume,
and use it for any storage needs.
You manage NAS storage devices from the vSphere Web Client or with the esxcli storage nfs
command. The diagram below illustrates dierent types of storage, but it is for conceptual purposes
only. It is not a recommended conguration.
Figure 3‑1. Virtual Machines Accessing Different Types of Storage
iSCSI array
VMFS VMFS
LAN LAN
iSCSI
hardware
initiator ethernet
NIC
Host
requires TCP/IP connectivity
software
initiator
NAS
appliance
NFS
LAN
ethernet
NIC
fibre
array
VMFS
VMFS
LAN
fibre
channel
HBA
local
ethernet
SCSI
Managing the Virtual Machine File System with vmkfstools
VMFS datastores primarily serve as repositories for virtual machines.
You can store multiple virtual machines on the same VMFS volume. Each virtual machine, encapsulated in a
set of les, occupies a separate single directory. For the operating system inside the virtual machine, VMFS
preserves the internal le system semantics.
In addition, you can use the VMFS datastores to store other les, such as virtual machine templates and ISO
images. VMFS supports le and block sizes that enable virtual machines to run data-intensive applications,
including databases, ERP, and CRM, in virtual machines. See the vSphere Storage documentation.
vSphere Command-Line Interface Concepts and Examples
30 VMware, Inc.

You use the vmkfstools vCLI to create and manipulate virtual disks, le systems, logical volumes, and
physical storage devices on an ESXi host. You can use vmkfstools to create and manage a virtual machine
le system on a physical partition of a disk and to manipulate les, such as virtual disks, stored on VMFS-3
and NFS. You can also use vmkfstools to set up and manage raw device mappings (RDMs).
I The vmkfstools vCLI supports most but not all of the options that the vmkfstools ESXi Shell
command supports. See VMware Knowledge Base article 1008194.
You cannot run vmkfstools with --server pointing to a vCenter Server system.
The vSphere Storage documentation includes a complete reference to the vmkfstools command that you can
use in the ESXi Shell. You can use most of the same options with the vmkfstools vCLI command. Specify one
of the connection options listed in “Connection Options for vCLI Host Management Commands,” on
page 19 in place of <conn_options>.
The following options supported by the vmkfstools ESXi Shell command are not supported by the
vmkfstools vCLI command.
n--breaklock -B
n--chainConsistent -e
n--eagerzero -k
n--fix -x
n--lock -L
n--migratevirtualdisk -M
n--parseimage -Y
n--punchzero -K
n--snapshotdisk -I
n--verbose -v
Upgrading VMFS3 Volumes to VMFS5
vSphere 5.0 supports VMFS5 volumes, which have improved scalability and performance.
You can upgrade from VMFS3 to VMFS5 by using the vSphere Web Client, the vmkfstools ESXi Shell
command, or the esxcli storage vmfs upgrade command. You can pass the volume label or the volume
UUID to the ESXCLI command.
I You cannot upgrade VMFS3 volumes to VMFS5 with the vmkfstools command included in
vSphere CLI.
Managing VMFS Volumes
Dierent commands are available for listing, mounting, and unmounting VMFS volumes and for listing,
mounting, and unmounting VMFS snapshot volumes.
nManaging VMFS volumes
esxcli storage filesystem list shows all volumes, mounted and unmounted, that are resolved, that
is, that are not snapshot volumes.
esxcli storage filesystem unmount unmounts a currently mounted lesystem. Use this command for
snapshot volumes or resolved volumes.
nManaging snapshot volumes
Chapter 3 Managing Files
VMware, Inc. 31

esxcli storage vmfs snapshot commands can be used for listing, mounting, and resignaturing
snapshot volumes. See “Mounting Datastores with Existing Signatures,” on page 32 and
“Resignaturing VMFS Copies,” on page 33.
Managing Duplicate VMFS Datastores
In some cases VMFS datastores can have duplicate UUIDs.
Each VMFS datastore created in a LUN has a unique UUID that is stored in the le system superblock.
When the LUN is replicated or when a snapshot is made, the resulting LUN copy is identical, byte-for-byte,
to the original LUN. As a result, if the original LUN contains a VMFS datastore with UUID X, the LUN copy
appears to contain an identical VMFS datastore, or a VMFS datastore copy, with the same UUID X.
ESXi hosts can determine whether a LUN contains the VMFS datastore copy, and either mount the datastore
copy with its original UUID or change the UUID to resignature the datastore.
When a LUN contains a VMFS datastore copy, you can mount the datastore with the existing signature or
assign a new signature. The vSphere Storage documentation discusses volume resignaturing in detail.
Mounting Datastores with Existing Signatures
You can mount a VMFS datastore copy without changing its signature if the original is not mounted.
For example, you can maintain synchronized copies of virtual machines at a secondary site as part of a
disaster recovery plan. In the event of a disaster at the primary site, you can mount the datastore copy and
power on the virtual machines at the secondary site.
I You can mount a VMFS datastore only if it does not conict with an already mounted VMFS
datastore that has the same UUID.
When you mount the VMFS datastore, ESXi allows both read and write operations to the datastore that
resides on the LUN copy. The LUN copy must be writable. The datastore mounts are persistent and valid
across system reboots.
You can mount a datastore with ESXCLI or with vicfg-volume. See “Mount a Datastore with ESXCLI,” on
page 32 or “Mount a Datastore with vicfg-volume,” on page 33.
Mount a Datastore with ESXCLI
The esxcli storage filesystem commands support mounting and unmounting volumes. You can also
specify whether to persist the mounted volumes across reboots by using the --no-persist option.
Use the esxcli storage filesystem command to list mounted volumes, mount new volumes, and unmount
a volume. Specify one of the connection options listed in “Connection Options for vCLI Host Management
Commands,” on page 19 in place of <conn_options>.
Procedure
1 List all volumes that have been detected as snapshots.
esxcli <conn_options> storage filesystem list
2 Run esxcli storage filesystem mount with the volume label or volume UUID.
esxcli <conn_options> storage filesystem volume mount --volume-label=<label>|--volume-
uuid=<VMFS-UUID>
N This command fails if the original copy is online.
vSphere Command-Line Interface Concepts and Examples
32 VMware, Inc.

What to do next
You can later run esxcli storage filesystem volume unmount to unmount the snapshot volume.
esxcli <conn_options> storage filesystem volume unmount --volume-label=<label>|--volume-
uuid=<VMFS-UUID>
Mount a Datastore with vicfg-volume
The vicfg-volume command supports mounting and unmounting volumes.
Use the vicfg-volume command to list mounted volumes, mount new volumes, and unmount a volume.
Specify one of the connection options listed in “Connection Options for vCLI Host Management
Commands,” on page 19 in place of <conn_options>.
Procedure
1 List all volumes that have been detected as snapshots or replicas.
vicfg-volume <conn_options> --list
2 Run vicfg-volume --persistent-mount with the VMFS-UUID or label as an argument to mount a
volume.
vicfg-volume <conn_options> --persistent-mount <VMFS-UUID|label>
N This command fails if the original copy is online.
What to do next
You can later run vicfg-volume --unmount to unmount the snapshot or replica volume.
vicfg-volume <conn_options> --unmount <VMFS-UUID|label>
The vicfg-volume command supports resignaturing a snapshot volume and mounting and unmounting the
volume. You can also make the mounted volume persistent across reboots and query a list of snapshot
volumes and original volumes.
Resignaturing VMFS Copies
You can use datastore resignaturing to retain the data stored on the VMFS datastore copy.
When resignaturing a VMFS copy, the ESXi host assigns a new UUID and a new label to the copy, and
mounts the copy as a datastore distinct from the original. Because ESXi prevents you from resignaturing the
mounted datastore, unmount the datastore before resignaturing.
The default format of the new label assigned to the datastore is snap-<snapID>-<oldLabel>, where <snapID>
is an integer and <oldLabel> is the label of the original datastore.
When you perform datastore resignaturing, consider the following points.
nDatastore resignaturing is irreversible.
nThe LUN copy that contains the VMFS datastore that you resignature is no longer treated as a LUN
copy.
nA spanned datastore can be resignatured only if all its extents are online.
nThe resignaturing process is crash and fault tolerant. If the process is interrupted, you can resume it
later.
nYou can mount the new VMFS datastore without a risk of its UUID conicting with UUIDs of any other
datastore, such as an ancestor or child in a hierarchy of LUN snapshots.
Chapter 3 Managing Files
VMware, Inc. 33
You can resignature a VMFS copy with ESXCLI or with vicfg-volume. See “Resignature a VMFS Copy with
ESXCLI,” on page 34 or “Resignature a VMFS Copy with vicfg-volume,” on page 34.
Resignature a VMFS Copy with ESXCLI
The esxcli storage vmfs snapshot commands support resignaturing a snapshot volume.
Specify one of the connection options listed in “Connection Options for vCLI Host Management
Commands,” on page 19 in place of <conn_options>.
Procedure
1 List unresolved snapshots or replica volumes.
esxcli <conn_options> storage vmfs snapshot list
2 (Optional) Unmount the copy.
esxcli <conn_options> storage filesystem unmount
3 Run the resignature command.
esxcli <conn_options> storage vmfs snapshot resignature --volume-label=<label>|--volume-
uuid=<id>
The command returns to the prompt or signals an error.
What to do next
After resignaturing, you might have to perform the following operations.
nIf the resignatured datastore contains virtual machines, update references to the original VMFS
datastore in the virtual machine les, including .vmx, .vmdk, .vmsd, and .vmsn.
nTo power on virtual machines, register them with the vCenter Server system.
Resignature a VMFS Copy with vicfg-volume
You can use vicfg-volume to mount, unmount, and resignature VMFS volumes.
Prerequisites
Verify that the VMFS copy you want to resignature is not mounted.
Procedure
uRun vicfg-volume with the resignature option.
vicfg-volume <conn_options> --resignature <VMFS-UUID|label>
The command returns to the prompt or signals an error.
Reclaiming Unused Storage Space
When VMFS datastores reside on thin-provisioned LUNs, you can use ESXCLI commands to reclaim the
unused logical blocks of a thin-provisioned LUN formaed with VMFS.
When you run the commands, you must specify the volume label --volume-label or the volume ID --
volume-uuid but you cannot specify both.
In each iteration, the command issues unmap commands to the number of le system blocks that are
specied by the optional reclaim-unit argument, which defaults to 200. For newly created VMFS-5 le
systems, the lesystem block size is always 1 MB. For VMFS-3 le systems or VMFS-5 le systems that were
upgraded from VMFS-3, the lesystem block size could be one of 1, 2, 4, 8 MB.
vSphere Command-Line Interface Concepts and Examples
34 VMware, Inc.

The following examples illustrate how to use the command.
# esxcli storage vmfs unmap --volume-label datastore1 --reclaim-unit 100
# esxcli storage vmfs unmap -l datastore1 -n 100
# esxcli storage vmfs unmap --volume-uuid 515615fb-1e65c01d-b40f-001d096dbf97 --reclaim-unit 500
# esxcli storage vmfs unmap -u 515615fb-1e65c01d-b40f-001d096dbf97 -n 500
# esxcli storage vmfs unmap -l datastore1
# esxcli storage vmfs unmap -u 515615fb-1e65c01d-b40f-001d096dbf97
Using vifs to View and Manipulate Files on Remote ESXi Hosts
You can use the vifs utility for datastore le management.
C If you manipulate les directly, your vSphere setup might end up in an inconsistent state. Use the
vSphere Web Client or one of the other vCLI commands to manipulate virtual machine conguration les
and virtual disks.
The vifs command performs common operations such as copy, remove, get, and put on ESXi les and
directories. The command is supported against ESXi hosts but not against vCenter Server systems.
Some similarities between vifs and DOS or UNIX/Linux le system management utilities exist, but there are
many dierences. For example, vifs does not support wildcard characters or current directories and, as a
result, relative pathnames. You should use vifs only as documented.
Instead of using the vifs command, you can browse datastore contents and host les by using a Web
browser. Connect to the following location.
http://ESX_host_IP_Address/host
http://ESX_host_IP_Address/folder
You can view data center and datastore directories from this root URL. The following examples demonstrate
the syntax that you can use.
http://<ESXi_addr>/folder?dcPath=ha-datacenter
http://<ESXi_host_name>/folder?dcPath=ha-datacenter
The ESXi host prompts for a user name and password.
The vifs command supports dierent operations for the following groups of les and directories. Dierent
operations are available for each group, and you specify locations with a dierent syntax. The behavior
diers for vSphere 4.x and vSphere 5.0.
Chapter 3 Managing Files
VMware, Inc. 35

vSphere 4.x vSphere 5.0
Host Host conguration les. You must
specify the le’s unique name
identier.
Specify host locations by using
the /host/<path> syntax.
Host conguration les. You must
specify the le’s unique name
identier.
Specify host locations by using
the /host/<path> syntax.
You cannot list subdirectories
of /host.
Temp The /tmp directory and les in that
directory.
Specify temp locations by using
the /tmp/dir/subdir syntax.
Not supported.
Datastores Datastore les and directories. You have two choices for specifying a
datastore.
nUse datastore prex style '[ds_name] relative_path' as demonstrated
in the following example.
'[myStorage1] testvms/VM1/VM1.vmx'(Linux) or "[myStorage1]
testvms/VM1/VM1.vmx" (Windows)
nUse URL style /folder/dir/subdir/file?dsName=<name> as
demonstrated in the following example.
'/folder/testvms/VM1/VM1.vmx?dsName=myStorage1' (Linux)
"/folder/testvms/VM1/VM1.vmx?dsName=myStorage1" (Windows)
The two example paths refer to a virtual machine conguration le for the
VM1 virtual machine in the testvms/VM1 directory of the myStorage1
datastore.
To avoid problems with directory names that use special characters or spaces, enclose the path in quotes for
both operating systems.
When you run vifs, you can specify the operation name and argument and one of the standard connection
options. Use aliases, symbolic links, or wrapper scripts to simplify the invocation syntax.
I The concepts of working directory and last directory or le operated on are not supported with
vifs.
vifs Options
vifs command-specic options allow you to retrieve and upload les from the remote host and perform a
number of other operations.
All vifs options work on datastore les or directories. Some options also work on host les and les in the
temp directory. You must also specify connection options.
Command Description Target Syntax
--copy
-c <source>
<target>
Copies a le in a datastore to another location
in a datastore. The <source> must be a
remote source path, the <target> a remote
target path or directory.
The --force option replaces existing
destination les.
Datastore
Temp
copy src_file_path
dst_directory_path [--
force]
copy src_file_path
dst_file_path [--force]
--dir
-D <remote_dir>
Lists the contents of a datastore directory. Datastore
Temp
dir
datastore_directory_path
--force
-F
Overwrites the destination le. Used with --
move and --copy.
Datastore
Temp
copy src_file_path
dst_file_path [--force]
vSphere Command-Line Interface Concepts and Examples
36 VMware, Inc.

Command Description Target Syntax
--get
-g <remote_path>
<local_path>
Downloads a le from the ESXi host to the
machine on which you run vCLI. This
operation uses HTTP GET.
Datastore
Host
get src_dstore_file_path
dst_local_file_path
get src_d store_dir_path
dst_local_file_path
--listdc
-C
Lists the data center paths available on an
ESXi system.
Datastore
Host
--listds
-S
Lists the datastore names on the ESXi system.
When multiple data centers are available, use
the --dc (-Z) argument to specify the name of
the data center from which you want to list
the datastore.
Datastore
Host
vifs --listds
--mkdir
-M <remote_dir>
Creates a directory in a datastore. This
operation fails if the parent directory of
dst_datastore_file_path does not exist.
Datastore
Temp
mkdir dst_directory_path
--move
-m <source>
<target>
Moves a le in a datastore to another location
in a datastore. The <source> must be a
remote source path, the <target> a remote
target path or directory.
The --force option replaces existing
destination les.
Datastore
Temp
move src_file_path
dst_directory_path [--
force]
move src_file_path
dst_file_path [--force]
--put
-p <local_path>
<remote_path>
Uploads a le from the machine on which you
run vCLI to the ESXi host. This operation uses
HTTP PUT.
This command can replace existing host les
but cannot create new les.
Datastore
Host Temp
put src_local_file_path
dst_file_path
put src_local_file_path
dst_directory_path
--rm
-r <remote_path>
Deletes a datastore le. Datastore
Temp
rm dst_file_path
--rmdir
-R <remote_dir>
Deletes a datastore directory. This operation
fails if the directory is not empty.
Datastore
Temp
rmdir dst_directory_path
vifs Examples
You can use vifs to interact with the remote ESXi or vCenter Server system in a variety of ways.
Specify one of the connection options listed in “Connection Options for vCLI Host Management
Commands,” on page 19 in place of <conn_options>.
N The examples illustrate use on a Linux system. You must use double quotes instead of single quotes
when on a Windows system.
Listing Remote Information
nList all data centers on a vCenter Server system with --listdc, using --server to point to the
vCenter Server system.
vifs --server <my_vc>--username administrator --password <pswd> --listdc
nList all datastores on a vCenter Server system with --listds.
vifs --server <my_vc> --username administrator --password <pswd> --dc kw-dev --listds
nList all datastores on an ESXi host with --listds.
vifs --server <my_ESXi> --username root --password <pswd> --listds
The command lists the names of all datastores on the specied server.
Chapter 3 Managing Files
VMware, Inc. 37
You can use each name that has been returned to refer to datastore paths by using square bracket
notation.
'[my_datastore] dir/subdir/file'
nList the content of a directory in a datastore.
vifs --server <my_ESXi> --username root --password <pswd>--dir '[Storage1]'
vifs --server <my_ESXi> --username root --password <pswd> --dir '[Storage1] WindowsXP'
The command lists the directory content. In this example, the command lists the contents of a virtual
machine directory.
Content Listing
_________________
vmware-37.log
vmware-38.log
...
vmware.log
...
winxpPro-sp2.vmdk
winxpPro-sp2.vmx
winxpPro-sp2.vmxf
...
nList the contents of one of the datastores.
vifs <conn_options> --dir '[osdc-cx700-02]'
The command lists the complete contents of the datastore.
Working with Directories and Files on the Remote Server
nCreate a new directory in a datastore with --mkdir <remote_dir>.
vifs --server <my_ESXi> --username root --password <pswd> --mkdir '[Storage1] test'
nRemove a directory with --rmdir <remote_dir>.
vifs --server <my_ESXi> --username root --password <pswd> --rmdir '[Storage1] test'
nForcibly remove a directory with --rmdir --force <remote_dir>.
vifs --server <my_ESXi> --username root --password <pswd> --rmdir '[Storage1] test2' --force
nUpdate a le on the remote server with --put <local_path> <remote_path>.
vifs --server <my_ESXi> --username root --password <pswd>
--put /tmp/testfile '[Storage1] test/testfile'
nRetrieve a le from the remote server with --get <remote_path> <local_path>|<local_dir>. The
command overwrites the local le if it exists. If you do not specify a le name, the le name of the
remote le is used.
vifs --server <my_ESXi> --username root --password <pswd> --get '[Storage1]
test/testfile' /tmp/tfile
vifs --server <my_ESXi> --username root --password <pswd> --get '[Storage1]
test/testfile' /tmp
nDelete a le on the remote server with -rm <remote_path>.
vifs --server <my_ESXi> --username root --password <pswd> --rm '[Storage1] test2/testfile'
vSphere Command-Line Interface Concepts and Examples
38 VMware, Inc.

nForcibly remove a le on the remote server with --rm <remote_path> --force.
vifs --server <my_ESXi> --username root --password <pswd> --rm '[Storage1] test2/testfile2'
--force
nMove a le from one location on the remote server to another location with --move
<remote_source_path> <remote_target_path>. If you specify a le name, the le is moved and renamed
at the same time.
vifs --server <my_ESXi> --username root --password <pswd> --move '[Storage1] test/tfile'
'[Storage1] newfile'
If the target le already exists on the remote server, the command fails unless you use --force.
vifs --server <my_ESXi> --username root --password <pswd> --move '[Storage1] test/tfile2'
'[Storage1] test2/tfile' --force
nCreate a copy of a le on the remote server at a dierent location on the remote server.
vifs --server <my_ESXi> --username root --password <pswd> --copy '[Storage1] test/tfile'
'[Storage1] test/tfile2'
If the target le already exists on the remote server, the command fails unless you use --force.
vifs --server <my_ESXi> --username root --password <pswd> --copy '[Storage1] test/tfile'
'[Storage1] test/tfile2' --force
Manage Files and Directories on the Remote ESXi System
The following example scenario illustrates other uses of vifs.
1 Create a directory in the datastore.
vifs <conn_options> --mkdir '[osdc-cx700-03] vcli_test'
N You must specify the precise path. There is no concept of a relative path.
2 Place a le that is on the system from which you are running the commands into the newly created
directory.
vifs <conn_options> --put /tmp/test_doc '[osdc-cx700-03] vcli_test/test_doc'
3 Move a le into a virtual machine directory.
vifs <conn_options> - -move '[osdc-cx700-03] vcli_test/test_doc'
'[osdc-cx700-03] winxpPro-sp2/test_doc
A message indicates success or failure.
4 Retrieve one of the les from the remote ESXi system.
vifs <conn_options> --get '[osdc-cx700-03] winxpPro-sp2/vmware.log' ~user1/vmware.log
Retrieves a log le for analysis.
5 Clean up by removing the le and directory you created earlier.
vifs <conn_options> --rm '[osdc-cx700-03] vcli_test/test_doc'
vifs <conn_options> --rmdir '[osdc-cx700-03] vcli_test'
Chapter 3 Managing Files
VMware, Inc. 39
vSphere Command-Line Interface Concepts and Examples
40 VMware, Inc.

Managing Storage 4
A virtual machine uses a virtual disk to store its operating system, program les, and other data associated
with its activities. A virtual disk is a large physical le, or a set of les, that can be copied, moved, archived,
and backed up.
To store virtual disk les and manipulate the les, a host requires dedicated storage space. ESXi storage is
storage space on a variety of physical storage systems, local or networked, that a host uses to store virtual
machine disks.
Chapter 5, “Managing iSCSI Storage,” on page 69 discusses iSCSI storage management. Chapter 6,
“Managing Third-Party Storage Arrays,” on page 101 explains how to manage the Pluggable Storage
Architecture, including Path Selection Plugin (PSP) and Storage Array Type Plug-in (SATP) conguration.
For information on masking and unmasking paths with ESXCLI, see the vSphere Storage documentation.
This chapter includes the following topics:
n“Introduction to Storage,” on page 42
n“Examining LUNs,” on page 45
n“Detach a Device and Remove a LUN,” on page 48
n“Reaach a Device,” on page 49
n“Working with Permanent Device Loss,” on page 49
n“Managing Paths,” on page 50
n“Managing Path Policies,” on page 54
n“Scheduling Queues for Virtual Machine I/O,” on page 57
n“Managing NFS/NAS Datastores,” on page 57
n“Monitor and Manage FibreChannel SAN Storage,” on page 59
n“Monitoring and Managing Virtual SAN Storage,” on page 60
n“Monitoring vSphere Flash Read Cache,” on page 62
n“Monitoring and Managing Virtual Volumes,” on page 62
n“Migrating Virtual Machines with svmotion,” on page 63
n“Conguring FCoE Adapters,” on page 65
n“Scanning Storage Adapters,” on page 66
n“Retrieving SMART Information,” on page 66
VMware, Inc. 41
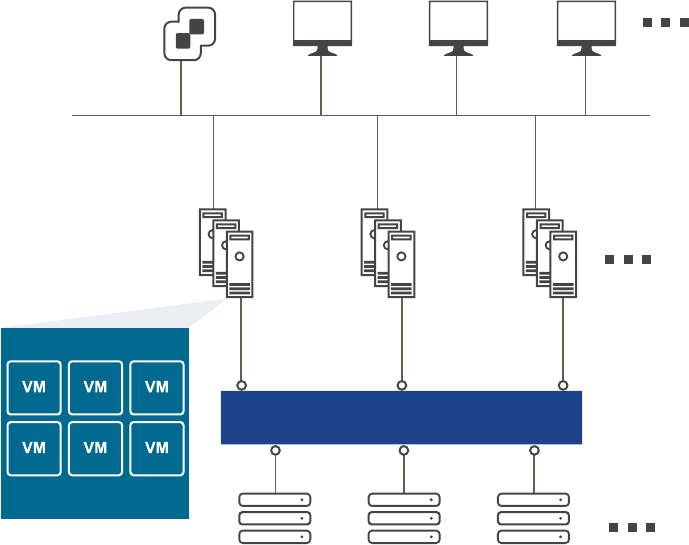
Introduction to Storage
Fibre Channel SAN arrays, iSCSI SAN arrays, and NAS arrays are widely used storage technologies
supported by VMware vSphere to meet dierent data center storage needs.
The storage arrays are connected to and shared between groups of servers through storage area networks.
This arrangement allows aggregation of the storage resources and provides more exibility in provisioning
them to virtual machines.
Figure 4‑1. vSphere Data Center Physical Topology
fibre channel switch fabric / IP network
server
group 1
virtual machines
server
group 2
server
group 3
iSCSI
storage array
NAS
storage array
vCenter Server terminal
Web access
vSphere Client
ESX/ESXi
fibre channel
storage array
How Virtual Machines Access Storage
A virtual disk hides the physical storage layer from the virtual machine's operating system.
Regardless of the type of storage device that your host uses, the virtual disk always appears to the virtual
machine as a mounted SCSI device. As a result, you can run operating systems that are not certied for
specic storage equipment, such as SAN, in the virtual machine.
When a virtual machine communicates with its virtual disk stored on a datastore, it issues SCSI commands.
Because datastores can exist on various types of physical storage, these commands are encapsulated into
other forms, depending on the protocol that the ESXi host uses to connect to a storage device.
Figure 4-2 depicts ve virtual machines that use dierent types of storage to illustrate the dierences
between each type.
vSphere Command-Line Interface Concepts and Examples
42 VMware, Inc.
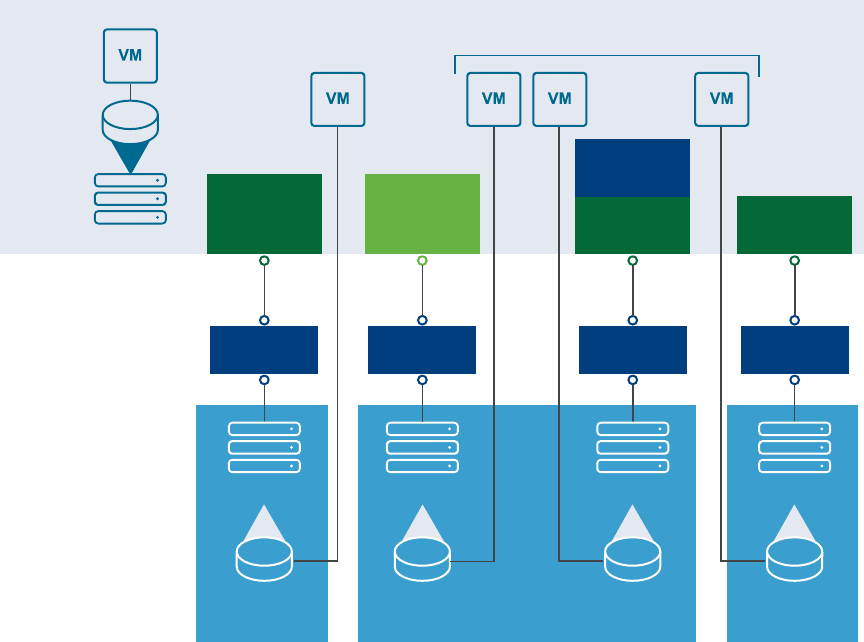
Figure 4‑2. Virtual Machines Accessing Different Types of Storage
iSCSI array
VMFS VMFS
LAN LAN
iSCSI
hardware
initiator ethernet
NIC
Host
requires TCP/IP connectivity
software
initiator
NAS
appliance
NFS
LAN
ethernet
NIC
fibre
array
VMFS
VMFS
LAN
fibre
channel
HBA
local
ethernet
SCSI
You can use vCLI commands to manage the virtual machine le system and storage devices.
nVMFS - Use vmkfstools to create, modify, and manage VMFS virtual disks and raw device mappings.
See “Managing the Virtual Machine File System with vmkfstools,” on page 30 for an introduction and
the vSphere Storage documentation for a detailed reference.
nDatastores - Several commands allow you to manage datastores and are useful for multiple protocols.
nLUNs - Use esxcli storage core or vicfg-scsidevs commands to display available LUNs and
mappings for each VMFS volume to its corresponding partition. See “Examining LUNs,” on
page 45.
nPath management - Use esxcli storage core or vicfg-mpath commands to list information about
Fibre Channel or iSCSI LUNs and to change a path’s state. See “Managing Paths,” on page 50. Use
the ESXCLI command to view and modify path policies. See “Managing Path Policies,” on
page 54.
nRescan - Use esxcli storage core or vicfg-rescan adapter rescan to perform a rescan operation
each time you recongure your storage setup. See “Scanning Storage Adapters,” on page 66.
nStorage devices - Several commands manage only specic storage devices.
nNFS storage - Use esxcli storage nfs or vicfg-nas to manage NAS storage devices. See
“Managing NFS/NAS Datastores,” on page 57.
niSCSI storage - Use esxcli iscsi or vicfg-iscsi to manage both hardware and software iSCSI. See
Chapter 5, “Managing iSCSI Storage,” on page 69.
nSoftware-dened storage - vSphere supports several types of software-dened storage.
nVirtual SAN storage - Use commands in the esxcli vsan namespace to manage Virtual SAN. See
“Monitoring and Managing Virtual SAN Storage,” on page 60.
Chapter 4 Managing Storage
VMware, Inc. 43
nVirtual Flash storage - Use commands in the esxcli storage vflash namespace to manage
VMware vSphere Flash Read Cache.
nVirtual volumes - Virtual volumes oer a dierent layer of abstraction than datastores. As a result,
ner-grained management is possible. Use commands in the esxcli storage vvol namespace.
Datastores
ESXi hosts use storage space on a variety of physical storage systems, including internal and external
devices and networked storage.
A host can discover storage devices to which it has access and format them as datastores. Each datastore is a
special logical container, analogous to a le system on a logical volume, where the host places virtual disk
les and other virtual machine les. Datastores hide specics of each storage product and provide a uniform
model for storing virtual machine les.
Depending on the type of storage you use, datastores can be backed by the following le system formats.
nVirtual Machine File System (VMFS) - High-performance le system optimized for storing virtual
machines. Your host can deploy a VMFS datastore on any SCSI-based local or networked storage
device, including Fibre Channel and iSCSI SAN equipment.
As an alternative to using the VMFS datastore, your virtual machine can have direct access to raw
devices and use a mapping le (RDM) as a proxy. See “Managing the Virtual Machine File System with
vmkfstools,” on page 30.
nNetwork File System (NFS) - File system on a NAS storage device. ESXi supports NFS version 3 over
TCP/IP. The host can access a designated NFS volume located on an NFS server, mount the volume, and
use it for any storage needs.
Storage Device Naming
Each storage device, or LUN, is identied by several device identier names.
Device Identifiers
Depending on the type of storage, the ESXi host uses dierent algorithms and conventions to generate an
identier for each storage device.
nSCSI INQUIRY identiers - The host uses the SCSI INQUIRY command to query a storage device and
uses the resulting data, in particular the Page 83 information, to generate a unique identier. SCSI
INQUIRY device identiers are unique across all hosts, persistent, and have one of the following
formats.
nnaa.<number>
nt10.<number>
neui.<number>
These formats follow the T10 commiee standards. See the SCSI-3 documentation on the T10 commie
Web site for information on Page 83.
nPath-based identier. If the device does not provide the information on Page 83 of the T10 commiee
SCSI-3 documentation, the host generates an mpx.<path> name, where <path> represents the rst path to
the device, for example, mpx.vmhba1:C0:T1:L3. This identier can be used in the same way as the SCSI
inquiry identiers.
The mpx. identier is created for local devices on the assumption that their path names are unique.
However, this identier is neither unique nor persistent and could change after every boot.
vSphere Command-Line Interface Concepts and Examples
44 VMware, Inc.
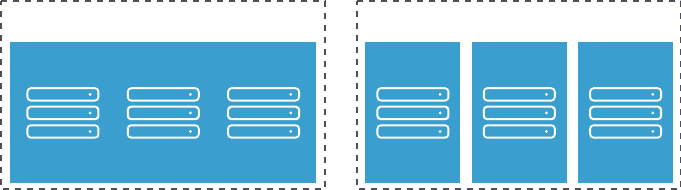
Typically, the path to the device has the following format.
vmhba<adapter>:C<channel>:T<target>:L<LUN>
nvmbh<adapter> is the name of the storage adapter. The name refers to the physical adapter on the
host, not the SCSI controller used by the virtual machines.
nC<channel> is the storage channel number. Software iSCSI adapters and dependent hardware
adapters use the channel number to show multiple paths to the same target.
nT<target> is the target number. Target numbering is determined by the host and might change if
the mappings of targets that are visible to the host change. Targets that are shared by dierent
hosts might not have the same target number.
nL<LUN> is the LUN number that shows the position of the LUN within the target. The number is
provided by the storage system. If a target has only one LUN, the LUN number is always zero (0).
Legacy Identifiers
In addition to the SCSI INQUIRY or mpx identiers, ESXi generates an alternative legacy name, called VML
name, for each device. Use the device UID instead.
Examining LUNs
A LUN (Logical Unit Number) is an identier for a disk volume in a storage array target.
Target and Device Representation
In the ESXi context, the term target identies a single storage unit that a host can access. The terms device
and LUN describe a logical volume that represents storage space on a target.
The terms device and LUN mean a SCSI volume presented to the host from a storage target.
Dierent storage vendors present their storage systems to ESXi hosts in dierent ways. Some vendors
present a single target with multiple LUNs on it. Other vendors, especially iSCSI vendors, present multiple
targets with one LUN each.
Figure 4‑3. Target and LUN Representations
storage array
target
LUN LUN LUN
storage array
target targettarget
LUN LUN LUN
In Figure 4-3, three LUNs are available in each conguration. On the left, the host sees one target, but that
target has three LUNs that can be used. Each LUN represents an individual storage volume. On the right,
the host sees three dierent targets, each having one LUN.
Chapter 4 Managing Storage
VMware, Inc. 45
Examining LUNs with esxcli storage core
You can use esxcli storage core to display information about available LUNs on ESXi 5.0.
You can run one of the following commands to examine LUNs. Specify one of the connection options listed
in “Connection Options for vCLI Host Management Commands,” on page 19 in place of <conn_options>.
nList all logical devices known on this system with detailed information.
esxcli <conn_options> storage core device list
The command lists device information for all logical devices on this system. The information includes
the name (UUID), device type, display name, and multipathing plugin. Specify the --device option to
only list information about a specic device. See “Storage Device Naming,” on page 44 for background
information.
naa.5000c50037b3967e
Display Name: <name> (naa.5000c50037b3967e)
Has Settable Display Name: true
Size: 953869
Device Type: Direct-Access
...
naa.500000e014e7a4e0
Display Name: <name> (naa.500000e014e7a4e0)
Has Settable Display Name: true
Size: 70007
Device Type: Direct-Access
...
mpx.vmhba0:C0:T0:L0
Display Name: Local <name> CD-ROM (mpx.vmhba0:C0:T0:L0)
Has Settable Display Name: false
Size: 0
Device Type: CD-ROM
nList a specic logical device with its detailed information.
esxcli <conn_options> storage core device list -d mpx.vmhba32:C0:T1:L0
nList all device unique identiers.
esxcli <conn_options> storage core device list
The command lists the primary UID for each device, such as naa.xxx or other primary name, and any
other UIDs for each UID (VML name). You can specify --device to only list information for a specic
device.
nPrint mappings for VMFS volumes to the corresponding partition, path to that partition, VMFS UUID,
extent number, and volume names.
esxcli <conn_option> storage filesystem list
nPrint HBA devices with identifying information.
esxcli <conn_options> storage core adapter list
The return value includes adapter and UID information.
nPrint a mapping between HBAs and the devices it provides paths to.
esxcli <conn_options> storage core path list
vSphere Command-Line Interface Concepts and Examples
46 VMware, Inc.

Examining LUNs with vicfg-scsidevs
You can use vicfg-scsidevs to display information about available LUNs on ESXi 4.x hosts.
I You can run vicfg-scsidevs --query and vicfg-scsidevs --vmfs against ESXi version 3.5. The
other options are supported only against ESXi version 4.0 and later.
You can run one of the following commands to examine LUNs. Specify one of the connection options listed
in “Connection Options for vCLI Host Management Commands,” on page 19 in place of <conn_options>.
nList all logical devices known on this system with detailed information.
vicfg-scsidevs <conn_options> --list
The command lists device information for all logical devices on this system. The information includes
the name (UUID), device type, display name, and multipathing plugin. Specify the --device option to
only list information about a specic device. The following example shows output for two devices. The
actual listing might include multiple devices and the precise format diers between releases.
mpx.vmhba2:C0:T1:L0
Device Type: cdrom
Size: 0 MB
Display Name: Local HL-DT-ST (mpx.vmhba2:C0:T1:L0)
Plugin: NMP
Console Device: /vmfs/devices/cdrom/mpx.vmhba2:C0:T1:L0
Devfs Path: /vmfs/devices/cdrom/mpx.vmhba2:C0:T1:L0
Vendor: SONY Model: DVD-ROM GDRXX8XX Revis: 3.00
SCSI Level: 5 Is Pseudo: Status:
Is RDM Capable: Is Removable:
Other Names:
vml.000N000000XXXdXXXXXXXXaXXXaXX
VAAI Status: nnnn
naa.60060...
Device Type: disk
Size: 614400 MB
Display Name: DGC Fibre Channel Disk (naa.60060...)
...
nList all logical devices with abbreviated information.
vicfg-scsidevs <conn_options> --compact-list
The information includes the device ID, device type, size, plugin, and device display name.
nList all device unique identiers.
vicfg-scsidevs <conn_options> --uids
The command lists the primary UID for each device, such as naa.xxx or other primary name, and any
other UIDs for each UID (VML name). You can specify --device to only list information for a specic
device.
nList a specic logical device with its detailed information.
vicfg-scsidevs <conn_options> -l -d mpx.vmhba32:C0:T1:L0
nPrint mappings for VMFS volumes to the corresponding partition, path to that partition, VMFS uuid,
extent number, and volume names.
vicfg-scsidevs <conn_options> --vmfs
Chapter 4 Managing Storage
VMware, Inc. 47
nPrint HBA devices with identifying information.
vicfg-scsidevs <conn_options> --hbas
The return value includes the adapter ID, driver ID, adapter UID, PCI, vendor, and model.
nPrint a mapping between HBAs and the devices it provides paths to.
vicfg-scsidevs <conn_options> --hba-device-list
Detach a Device and Remove a LUN
Before you can remove a LUN, you must detach the corresponding device by using the vSphere Web Client,
or the esxcli storage core device set command.
Detaching a device brings a device oine. Detaching a device does not impact path states. If the LUN is still
visible, the path state is not set to dead.
Prerequisites
nMake sure you are familiar with virtual machine migration. See the vCenter Server and Host Management
documentation.
nMake sure you are familiar with datastore mounting and unmounting. See “Mount a Datastore with
ESXCLI,” on page 32.
Procedure
1 Migrate virtual machines from the device you plan to detach.
2 Unmount the datastore deployed on the device.
If the unmount fails, ESXCLI returns an error. If you ignore that error, you will get an error when you
aempt to detach a device with a VMFS partition still in use.
3 If the unmount failed, check whether the device is in use.
esxcli storage core device world list -d <device>
If a VMFS volume is using the device indirectly, the world name includes the string idle0. If a virtual
machine uses the device as an RDM, the virtual machine process name is displayed. If any other process
is using the raw device, the information is displayed.
4 Detach the storage device.
esxcli storage core device set -d naa.xxx... --state=off
Detach is persistent across reboots and device unregistration. Any device that is detached remains
detached until a manual aach operation. Rescan does not bring persistently detached devices back
online. A persistently detached device comes back in the o state.
ESXi maintains the persistent information about the device’s oine state even if the device is
unregistered. You can remove the device information by running esxcli storage core device
detached remove -d naa.12.
5 (Optional) To troubleshoot the detach operation, list all devices that were detached manually.
esxcli storage core device detached list
6 Perform a rescan.
esxcli <conn_options> storage core adapter rescan
vSphere Command-Line Interface Concepts and Examples
48 VMware, Inc.

Reattach a Device
When you have completed storage reconguration, you can reaach the storage device, mount the
datastore, and restart the virtual machines.
Prerequisites
Make sure you are familiar with datastore mounting. See“Mounting Datastores with Existing Signatures,”
on page 32.
Procedure
1 (Optional) Check whether the device is detached.
esxcli storage core device detached list
2Aach the device.
esxcli storage core device set -d naa.XXX --state=on
3 Mount the datastore and restart virtual machines.
Working with Permanent Device Loss
In some cases a permanent device loss (PDL) might occur.
With earlier ESXi releases, an APD (All Paths Down) event results when the LUN becomes unavailable. The
event is dicult for administrators because they do not have enough information about the state of the LUN
to know which corrective action is appropriate.
In ESXi 5.0, the ESXi host can determine whether the cause of an APD event is temporary, or whether the
cause is PDL. A PDL status occurs when the storage array returns SCSI sense codes indicating that the LUN
is no longer available or that a severe, unrecoverable hardware problem exist with it. ESXi has an improved
infrastructure that can speed up operations of upper-layer applications in a device loss scenario.
I Do not plan for APD or PDL events, for example, when you want to upgrade your hardware.
Instead, perform an orderly removal of LUNs from your ESXi server, which is described in “Detach a Device
and Remove a LUN,” on page 48, perform the operation, and add the LUN back.
Removing a PDL LUN
How you remove a PDL LUN depends on whether it was in use.
nIf the LUN that goes into PDL is not in use by any user process or by the VMkernel, the LUN
disappears by itself after a PDL.
nIf the LUN was in use when it entered PLD, delete the LUN manually by following the process
described in “Detach a Device and Remove a LUN,” on page 48.
Reattach a PDL LUN
You can reaach a PDL LUN after it has been removed.
Procedure
1 Return the LUN to working order.
Chapter 4 Managing Storage
VMware, Inc. 49
2 Remove any users of the device.
You cannot bring a device back without removing active users. The ESXi host cannot know whether the
device that was added back has changed. ESXi must be able to treat the device similarly to a new device
being discovered.
3 Perform a rescan to get the device back in working order.
Managing Paths
To maintain a constant connection between an ESXi host and its storage, ESXi supports multipathing. With
multipathing you can use more than one physical path for transferring data between the ESXi host and the
external storage device.
In case of failure of an element in the SAN network, such as an HBA, switch, or cable, the ESXi host can fail
over to another physical path. On some devices, multipathing also oers load balancing, which redistributes
I/O loads between multiple paths to reduce or eliminate potential bolenecks.
The storage architecture in vSphere 4.0 and later supports a special VMkernel layer, Pluggable Storage
Architecture (PSA). The PSA is an open modular framework that coordinates the simultaneous operation of
multiple multipathing plug-ins (MPPs). You can manage PSA using ESXCLI commands. See Chapter 6,
“Managing Third-Party Storage Arrays,” on page 101. This section assumes you are using only PSA plug-ins
included in vSphere by default.
Multipathing with Local Storage and FC SANs
Multipathing is a technique that lets you use more than one physical path that transfers data between the
host and an external storage device.
In a simple multipathing local storage topology, you can use one ESXi host with two HBAs. The ESXi host
connects to a dual-port local storage system through two cables. This conguration ensures fault tolerance if
one of the connection elements between the ESXi host and the local storage system fails.
To support path switching with FC SAN, the ESXi host typically has two HBAs available from which the
storage array can be reached through one or more switches. Alternatively, the setup can include one HBA
and two storage processors so that the HBA can use a dierent path to reach the disk array.
In FC Multipathing, multiple paths connect each host with the storage device. For example, if HBA1 or the
link between HBA1 and the switch fails, HBA2 takes over and provides the connection between the server
and the switch. The process of one HBA taking over for another is called HBA failover.
vSphere Command-Line Interface Concepts and Examples
50 VMware, Inc.
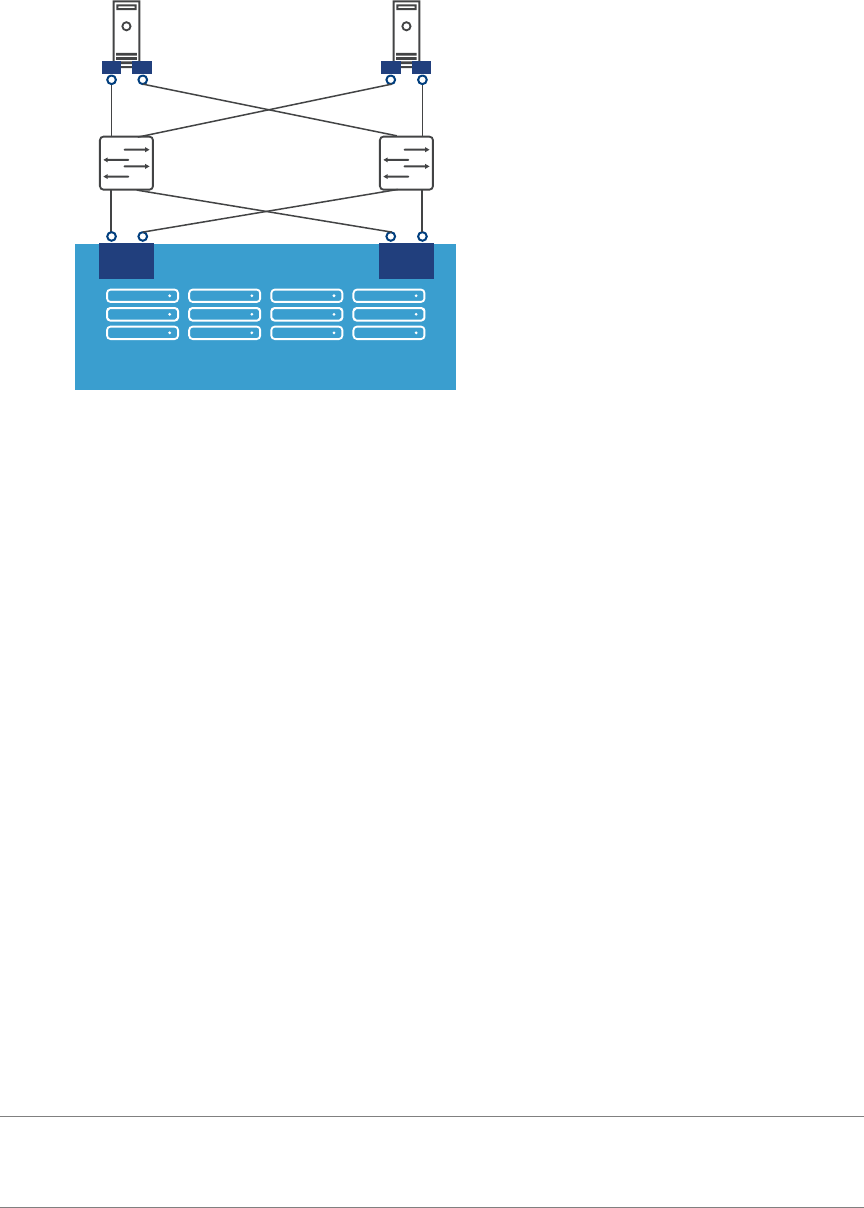
Figure 4‑4. FC Multipathing
storage array
SP1 SP2
switch switch
HBA2 HBA1 HBA3 HBA4
Host 1 Host 2
If SP1 or the link between SP1 and the switch breaks, SP2 takes over and provides the connection between
the switch and the storage device. This process is called SP failover. ESXi multipathing supports HBA and
SP failover.
After you have set up your hardware to support multipathing, you can use the vSphere Web Client or vCLI
commands to list and manage paths. You can perform the following tasks.
nList path information with vicfg-mpath or esxcli storage core path. See “Listing Path Information,”
on page 51.
nChange path state with vicfg-mpath or esxcli storage core path. See “Changing the State of a Path,”
on page 53.
nChange path policies with ESXCLI. See “Set Policy Details for Devices that Use Round Robin,” on
page 56.
nMask paths with ESXCLI. See the vSphere Storage documentation.
nManipulate the rules that match paths to multipathing plugins to newly discovered devices with esxcli
claimrule. See “Managing Claim Rules,” on page 110.
nRun or rerun claim rules or unclaim paths. See “Managing Claim Rules,” on page 110.
nRescan with vicfg-rescan. See “Scanning Storage Adapters,” on page 66.
Listing Path Information
You can list path information with ESXCLI or with vicfg-mpath.
Listing Path Information with ESXCLI
You can run esxcli storage core path to display information about Fibre Channel or iSCSI LUNs.
I Use industry-standard device names, with format eui.xxx or naa.xxx to ensure consistency. Do
not use VML LUN names unless device names are not available.
Names of virtual machine HBAs are not guaranteed to be valid across reboots.
Chapter 4 Managing Storage
VMware, Inc. 51

You can display information about paths by running esxcli storage core path. Specify one of the options
listed in “Connection Options for vCLI Host Management Commands,” on page 19 in place of
<conn_options>.
nList all devices with their corresponding paths, state of the path, adapter type, and other information.
esxcli <conn_options> storage core path list
nLimit the display to only a specied path or device.
esxcli <conn_options> storage core path list --path <path>
esxcli <conn_options> storage core path list --device <device>
nList the statistics for the SCSI paths in the system. You can list all paths or limit the display to a specic
path.
esxcli <conn_options> storage core path stats get
esxcli <conn_options> storage core path stats get --path <path>
nList detailed information for the paths for the device specied with --device.
esxcli <conn_options> storage core path list -d <naa.xxxxxx>
nList all adapters.
esxcli <conn_options> storage core adapter list
nRescan all adapters.
esxcli <conn_options> storage core adapter rescan
Listing Path Information with vicfg-mpath
You can run vicfg-mpath to list information about Fibre Channel or iSCSI LUNs.
I Use industry-standard device names, with format eui.xxx or naa.xxx to ensure consistency. Do
not use VML LUN names unless device names are not available.
Names of virtual machine HBAs are not guaranteed to be valid across reboots.
You can display information about paths by running vicfg-mpath with one of the following options. Specify
one of the options listed in “Connection Options for vCLI Host Management Commands,” on page 19 in
place of <conn_options>.
nList all devices with their corresponding paths, state of the path, adapter type, and other information.
vicfg-mpath <conn_options> --list-paths
nDisplay a short listing of all paths.
vicfg-mpath <conn_options> --list-compact
nList all paths with adapter and device mappings.
vicfg-mpath <conn_options> --list-map
nList paths and detailed information by specifying the path UID (long path). The path UID is the rst
item in the vicfg-mpath --list display.
vicfg-mpath <conn_options> --list
-P sas.5001c231c79c4a00-sas.1221000001000000-naa.5000c5000289c61b
nList paths and detailed information by specifying the path runtime name.
vicfg-mpath <conn_options> -l -P vmhba32:C0:T0:L0
The return information includes the runtime name, device, device display name, adapter, adapter
identier, target identier, plugin, state, transport, and adapter and target transport details.
vSphere Command-Line Interface Concepts and Examples
52 VMware, Inc.
nList detailed information for the paths for the device specied with --device.
vicfg-mpath <conn_options> -l -d mpx.vmhba32:C0:T1:L0
vicfg-mpath <conn_options> --list --device naa.60060...
Changing the State of a Path
You can change the state of a path with ESXCLI or with vicfg-mpath.
Disable a Path with ESXCLI
You can temporarily disable a path with ESXCLI for maintenance or other reasons, and enable the path
when you need it again.
If you are changing a path's state, the change operation fails if I/O is active when the path seing is changed.
Reissue the command. You must issue at least one I/O operation before the change takes eect.
Specify one of the options listed in “Connection Options for vCLI Host Management Commands,” on
page 19 in place of <conn_options>.
Procedure
1 (Optional) List all devices and corresponding paths.
esxcli <conn_options> storage core path list
The display includes information about each path's state.
2 Set the state of a LUN path to o.
esxcli <conn_options> storage core path set --state off --path vmhba32:C0:T1:L0
What to do next
When you are ready, set the path state to active again.
esxcli <conn_options> storage core path set --state active --path vmhba32:C0:T1:L0
Disable a Path with vicfg-mpath
You can temporarily disable a path with vicfg-mpath for maintenance or other reasons, and enable the path
when you need it again.
If you are changing a path's state, the change operation fails if I/O is active when the path seing is changed.
Reissue the command. You must issue at least one I/O operation before the change takes eect.
Specify one of the options listed in “Connection Options for vCLI Host Management Commands,” on
page 19 in place of <conn_options>.
Procedure
1 (Optional) List all devices and corresponding paths.
vicfg-mpath <conn_options> --list-paths
The display includes information about each path's state.
2 Set the state of a LUN path to o.
vicfg-mpath <conn_options> --state off --path vmhba32:C0:T1:L0
What to do next
When you are ready, set the path state to active again.
vicfg-mpath <conn_options> --state active --path vmhba32:C0:T1:L0
Chapter 4 Managing Storage
VMware, Inc. 53

Managing Path Policies
For each storage device managed by NMP, and not PowerPath, an ESXi host uses a path selection policy. If
you have a third-party PSP installed on your host, its policy also appears on the list.
Supported Path Policies
The following path policies are supported by default.
Policy Description
VMW_PSP_FIXED The host uses the designated preferred path, if it has been congured. Otherwise, the host selects the
rst working path discovered at system boot time. If you want the host to use a particular preferred
path, specify it through the vSphere Web Client, or by using esxcli storage nmp psp fixed
deviceconfig set. See “Changing Path Policies,” on page 55.
The default policy for active-active storage devices is VMW_PSP_FIXED.
N If the host uses a default preferred path and the path's status turns to Dead, a new path is
selected as preferred. However, if you explicitly designate the preferred path, it will remain preferred
even when it becomes inaccessible.
VMW_PSP_MRU The host selects the path that it used most recently. When the path becomes unavailable, the host
selects an alternative path. The host does not revert back to the original path when that path becomes
available again. There is no preferred path seing with the MRU policy. MRU is the default policy for
active-passive storage devices.
The VMW_PSP_MRU ranking capability allows you to assign ranks to individual paths. To set ranks to
individual paths, use the esxcli storage nmp psp generic pathconfig set command. For
details, see the VMware knowledge base article 2003468.
VMW_PSP_RR The host uses an automatic path selection algorithm that rotates through all active paths when
connecting to active-passive arrays, or through all available paths when connecting to active-active
arrays. Automatic path selection implements load balancing across the physical paths available to your
host. Load balancing is the process of spreading I/O requests across the paths. The goal is to optimize
throughput performance such as I/O per second, megabytes per second, or response times.
VMW_PSP_RR is the default for a number of arrays and can be used with both active-active and active-
passive arrays to implement load balancing across paths for dierent LUNs.
Path Policy Effects
The type of array and the path policy determine the behavior of the host.
Policy Active/Active Array Active/Passive Array
Most Recently
Used
Administrator action is required to fail
back after path failure.
Administrator action is required to fail back after path
failure.
Fixed VMkernel resumes using the preferred
path when connectivity is restored.
VMkernel aempts to resume by using the preferred path.
This action can cause path thrashing or failure when
another SP now owns the LUN.
Round Robin No fail back. Next path in round robin scheduling is selected.
Multipathing Considerations
You should consider a number of key points when working with multipathing.
The following considerations help you with multipathing.
nIf no SATP is assigned to the device by the claim rules, the default SATP for iSCSI or FC devices is
VMW_SATP_DEFAULT_AA. The default PSP is VMW_PSP_FIXED.
nWhen the system searches the SATP rules to locate a SATP for a given device, it searches the driver
rules rst. If there is no match, the vendor/model rules are searched, and nally the transport rules are
searched. If no match occurs, NMP selects a default SATP for the device.
vSphere Command-Line Interface Concepts and Examples
54 VMware, Inc.
nIf VMW_SATP_ALUA is assigned to a specic storage device, but the device is not ALUA-aware, no claim
rule match occurs for this device. The device is claimed by the default SATP based on the device's
transport type.
nThe default PSP for all devices claimed by VMW_SATP_ALUA is VMW_PSP_MRU. The VMW_PSP_MRU selects an
active/optimized path as reported by the VMW_SATP_ALUA, or an active/unoptimized path if there is no
active/optimized path. This path is used until a beer path is available (MRU). For example, if the
VMW_PSP_MRU is currently using an active/unoptimized path and an active/optimized path becomes
available, the VMW_PSP_MRU will switch the current path to the active/optimized one.
nWhile VMW_PSP_MRU is typically selected for ALUA arrays by default, certain ALUA storage arrays need
to use VMW_PSP_FIXED. To check whether your storage array requires VMW_PSP_FIXED, see the VMware
Compatibility Guide or contact your storage vendor. When using VMW_PSP_FIXED with ALUA arrays,
unless you explicitly specify a preferred path, the ESXi host selects the most optimal working path and
designates it as the default preferred path. If the host selected path becomes unavailable, the host selects
an alternative available path. However, if you explicitly designate the preferred path, it remains
preferred no maer what its status is.
nBy default, the PSA claim rule 101 masks Dell array pseudo devices. Do not delete this rule, unless you
want to unmask these devices.
Changing Path Policies
You can change path policies with ESXCLI or with vicfg-mpath.
Change the Path Policy with ESXCLI
You can change the path policy with ESXCLI.
Specify one of the options listed in “Connection Options for vCLI Host Management Commands,” on
page 19 in place of <conn_options>.
Prerequisites
Verify that you are familiar with the supported path policies. See “Managing Path Policies,” on page 54.
Procedure
1 Ensure your device is claimed by the NMP plug-in.
Only NMP devices allow you to change the path policy.
esxcli <conn_options> storage nmp device list
2 Retrieve the list of path selection policies on the system to see which values are valid for the --psp
option when you set the path policy.
esxcli storage core plugin registration list --plugin-class="PSP"
3 Set the path policy by using ESXCLI.
esxcli <conn_options> storage nmp device set --device naa.xxx --psp VMW_PSP_RR
Chapter 4 Managing Storage
VMware, Inc. 55
4 (Optional) If you specied the VMW_PSP_FIXED policy, you must make sure the preferred path is set
correctly.
a Check which path is the preferred path for a device.
esxcli <conn_options> storage nmp psp fixed deviceconfig get --device naa.xxx
b If necessary, change the preferred path.
esxcli <conn_options> storage nmp psp fixed deviceconfig set --device naa.xxx --path
vmhba3:C0:T5:L3
The command sets the preferred path to vmhba3:C0:T5:L3. Run the command with --default to
clear the preferred path selection.
Change the Path Policy with vicfg-mpath
You can change the path policy with vicfg-mpath.
Specify one of the options listed in “Connection Options for vCLI Host Management Commands,” on
page 19 in place of <conn_options>.
Prerequisites
Verify that you are familiar with the supported path policies. See “Managing Path Policies,” on page 54.
Procedure
1 List all multipathing plugins loaded into the system.
vicfg-mpath <conn_options> --list-plugins
At a minimum, this command returns NMP (Native Multipathing Plug-in) and MASK_PATH. If other MPP
plug-ins have been loaded, they are listed as well.
2 Set the path policy by using ESXCLI.
esxcli <conn_options> nmp device set --device naa.xxx --psp VMW_PSP_RR
3 (Optional) If you specied the VMW_PSP_FIXED policy, you must make sure the preferred path is set
correctly.
a Check which path is the preferred path for a device.
esxcli <conn_options> storage nmp psp fixed deviceconfig get -d naa.xxxx
b If necessary, change the preferred path.
esxcli <conn_options> storage nmp psp fixed deviceconfig set --device naa.xxx --path
vmhba3:C0:T5:L3
The command sets the preferred path to vmhba3:C0:T5:L3.
Set Policy Details for Devices that Use Round Robin
ESXi hosts can use multipathing for failover. With some storage devices, ESXi hosts can also use
multipathing for load balancing.
To achieve beer load balancing across paths, administrators can specify that the ESXi host should switch
paths under specic circumstances. Dierent options determine when the ESXi host switches paths and
what paths are chosen. Only a limited number of storage arrays support round robin.
You can use esxcli storage nmp psp roundrobin to retrieve and set round robin path options on a device
controlled by the roundrobin PSP. Specify one of the options listed in “Connection Options for vCLI Host
Management Commands,” on page 19 in place of <conn_options>.
vSphere Command-Line Interface Concepts and Examples
56 VMware, Inc.
No vicfg- command exists for performing the operations. The ESXCLI commands for seing round robin
path options have changed. The commands supported in ESXi 4.x are no longer supported.
Procedure
1 Retrieve path selection seings for a device that is using the roundrobin PSP.
esxcli <conn_options> storage nmp psp roundrobin deviceconfig get --device na.xxx
2 Set the path selection. You can specify when the path should change, and whether unoptimized paths
should be included.
uUse --bytes or --iops to specify when the path should change, as in the following examples.
esxcli <conn_options> storage nmp psp roundrobin deviceconfig set --type "bytes" -B
12345 --device naa.xxx
Sets the device specied by --device to switch to the next path each time 12345 bytes have been
sent along the current path.
esxcli <conn_options> storage nmp psp roundrobin deviceconfig set --type=iops --iops
4200 --device naa.xxx
Sets the device specied by --device to switch after 4200 I/O operations have been performed on a
path.
uUse useano to specify that the round robin PSP should include paths in the active, unoptimized
state in the round robin set (1) or that the PSP should use active, unoptimized paths only if no
active optimized paths are available (0). If you do not include this option, the PSP includes only
active optimized paths in the round robin path set.
Scheduling Queues for Virtual Machine I/O
You can use ESXCLI to enable or disable per le I/O scheduling.
By default, vSphere provides a mechanism that creates scheduling queues for each virtual machine le. Each
le has individual bandwidth controls. This mechanism ensures that the I/O for a particular virtual machine
goes into its own separate queue and does not interfere with the I/O of other virtual machines.
This capability is enabled by default. You can turn it o by using the esxcli system settings kernel set -
s isPerFileSchedModelActive option.
nRun esxcli system settings kernel set -s isPerFileSchedModelActive -v FALSE to disable per le
scheduling.
nRun esxcli system settings kernel set -s isPerFileSchedModelActive -v TRUE to enable per le
scheduling.
Managing NFS/NAS Datastores
ESXi hosts can access a designated NFS volume located on a NAS (Network Aached Storage) server, can
mount the volume, and can use it for its storage needs. You can use NFS volumes to store and boot virtual
machines in the same way that you use VMFS datastores.
Capabilities Supported by NFS/NAS
An NFS client built into the ESXi hypervisor uses the Network File System (NFS) protocol over TCP/IP to
access a designated NFS volume that is located on a NAS server. The ESXi host can mount the volume and
use it for its storage needs.
vSphere supports versions 3 and 4.1 of the NFS protocol.
Chapter 4 Managing Storage
VMware, Inc. 57
Typically, the NFS volume or directory is created by a storage administrator and is exported from the NFS
server. The NFS volume does not need to be formaed with a local le system, such as VMFS. You can
mount the volume directly on ESXi hosts, and use it to store and boot virtual machines in the same way that
you use VMFS datastores.
In addition to storing virtual disks on NFS datastores, you can also use NFS as a central repository for ISO
images, virtual machine templates, and so on. If you use the datastore for ISO images, you can connect the
virtual machine's CD-ROM device to an ISO le on the datastore and install a guest operating system from
the ISO le.
ESXi hosts support the following shared storage capabilities on NFS volumes.
nVMware vMotion and Storage vMotion
nHigh Availability (HA), Fault Tolerance, and Distributed Resource Scheduler (DRS)
nISO images, which are presented as CD-ROMs to virtual machines
nVirtual machine snapshots
nHost proles
nVirtual machines with large capacity virtual disks, or disks greater than 2 TB. Virtual disks created on
NFS datastores are thin-provisioned by default, unless you use hardware acceleration that supports the
Reserve Space operation. See Hardware Acceleration on NAS Devices in the vSphere Storage
documentation.
In addition to storing virtual disks on NFS datastores, you can also use NFS as a central repository for ISO
images, virtual machine templates, and so on.
To use NFS as a shared repository, you create a directory on the NFS server and then mount the directory as
a datastore on all hosts. If you use the datastore for ISO images, you can connect the virtual machine's CD-
ROM device to an ISO le on the datastore and install a guest operating system from the ISO le.
Adding and Deleting NAS File Systems
You can list, add, and delete a NAS le system with ESXCLI or with vicfg-nas.
Manage a NAS File System with ESXCLI
You can use ESXCLI as a vCLI command with connection options or in the ESXi Shell.
For more information on connection options, see “Connection Options for vCLI Host Management
Commands,” on page 19.
Procedure
1 List all known NAS le systems.
esxcli <conn_options> storage nfs list
For each NAS le system, the command lists the mount name, share name, and host name and whether
the le system is mounted. If no NAS le systems are available, the system does not return a NAS
lesystem and returns to the command prompt.
vSphere Command-Line Interface Concepts and Examples
58 VMware, Inc.
2 Add a new NAS le system to the ESXi host.
Specify the NAS server with --host, the volume to use for the mount with --volume-name, and the share
name on the remote system to use for this NAS mount point with --share.
esxcli <conn_options> storage nfs add --host=dir42.eng.vmware.com --share=/<mount_dir> --
volume-name=nfsstore-dir42
This command adds an entry to the known NAS le system list and supplies the share name of the new
NAS le system. You must supply the host name, share name, and volume name for the new NAS le
system.
3 Add a second NAS le system with read-only access.
esxcli <conn_options> storage nfs add --host=dir42.eng.vmware.com --share=/home --volume-
name=FileServerHome2 --readonly
4 Delete one of the NAS le systems.
esxcli <conn_options> storage nfs remove --volume-name=FileServerHome2
This command unmounts the NAS le system and removes it from the list of known le systems.
Managie a NAS File System with vicfg-nas
You can use vicfg-nas as a vCLI command with connection options.
For more information on connection options, see “Connection Options for vCLI Host Management
Commands,” on page 19.
Procedure
1 List all known NAS le systems.
vicfg-nas <conn_options> -l
For each NAS le system, the command lists the mount name, share name, and host name and whether
the le system is mounted. If no NAS le systems are available, the system returns a No NAS datastore
found message.
2 Add a new NAS le system to the ESXi host.
vicfg-nas <conn_options --add --nasserver dir42.eng.vmware.com -s /<mount_dir> nfsstore-dir42
This command adds an entry to the known NAS le system list and supplies the share name of the new
NAS le system. You must supply the host name and the share name for the new NAS le system.
3 Add a second NAS le system with read-only access.
vicfg-nas <conn_options> -a -y --n esx42nas2 -s /home FileServerHome2
4 Delete one of the NAS le systems.
vicfg-nas <conn_options> -d FileServerHome1
This command unmounts the NAS le system and removes it from the list of known le systems.
Monitor and Manage FibreChannel SAN Storage
The esxcli storage san commands help administrators troubleshoot issues with I/O devices and fabric, and
include Fibre Channel, FCoE, iSCSI, SAS protocol statistics.
The commands allow you to retrieve device information and I/O statistics from those device. You can also
issue Loop Initialization Primitives (LIP) to FC/FCoE devices and you can reset SAS devices.
Chapter 4 Managing Storage
VMware, Inc. 59
For FC and FCoE devices, you can retrieve FC events such as RSCN, LINKUP, LINKDOWN, Frame Drop and FCoE
CVL. The commands log a warning in the VMkernel log if it encounters too many Link Toggling or frame
drops.
The following example examines and resets SAN storage through a FibreChannel adapter. Instead of fc, the
information retrieval commands can also use iscsi, fcoe, and sas.
Procedure
1 List adapter aributes.
esxcli storage san fc list
2 Retrieve all events for a Fibre Channel I/O device.
esxcli storage san fc events get
3 Clear all I/O Device Management events for the specied adapter.
esxcli storage san fc events clear --adapter adapter
4 Reset the adapter.
esxcli storage san fc reset
Monitoring and Managing Virtual SAN Storage
Virtual SAN is a distributed layer of software that runs natively as a part of the ESXi hypervisor. Virtual
SAN aggregates local or direct-aached storage disks of a host cluster and creates a single storage pool
shared across all hosts of the cluster.
While supporting VMware features that require shared storage, such as HA, vMotion, and DRS, Virtual
SAN eliminates the need for an external shared storage and simplies storage conguration and virtual
machine provisioning activities.
You can use ESXCLI commands to retrieve Virtual SAN information, manage Virtual SAN clusters, perform
network management, add storage, set the policy, and perform other monitoring and management tasks.
Type esxcli vsan --help for a complete list of commands.
Retrieve Virtual SAN Information
You can use ESXCLI commands to retrieve Virtual SAN information.
Procedure
1 Verify which VMkernel adapters are used for Virtual SAN communication.
esxcli vsan network list
2 List storage disks that were claimed by Virtual SAN.
esxcli vsan storage list
3 Get Virtual SAN cluster information.
esxcli vsan cluster get
Manage a Virtual SAN Cluster
You can activate Virtual SAN when you create host clusters or enable Virtual SAN on existing clusters.
When enabled, Virtual SAN aggregates all local storage disks available on the hosts into a single datastore
shared by all hosts.
You can run these commands in the ESXi Shell for a host, or the command aects the target host that you
specify as part of the vCLI connection options.
vSphere Command-Line Interface Concepts and Examples
60 VMware, Inc.

Procedure
1 Join the target host to a given Virtual SAN cluster.
esxcli vsan cluster join --cluster-uuid <uuid>
N The UUID of the cluster is required.
2 Verify that the target host is joined to a Virtual SAN cluster.
esxcli vsan cluster get
3 Remove the target host from the Virtual SAN cluster.
esxcli vsan cluster leave
Add and Remove Virtual SAN Storage
You can use ESXCLI commands to add and remove Virtual SAN storage.
Procedure
1 Add an HDD or data disk for use by Virtual SAN.
esxcli vsan storage add --disks <device_name>
N The command expects an empty disk, which will be partitioned or formaed. Specify a device
name, for example, mpx.vmhba2:C0:T1:L0.
2 Add an SSD disk for use by Virtual SAN.
esxcli vsan storage add --ssd <device_name>
N The command expects an empty disk, which will be partitioned or formaed. Specify a device
name, for example, mpx.vmhba2:C0:T1:L0.
3 List the Virtual SAN storage conguration. You can display the complete list, or lter to show only a
single device.
esxcli vsan storage list --device <device>
4 Remove disks or disk groups.
N You can remove disks or disk groups only when Virtual SAN is in manual mode. For the
automatic disk claim mode, the remove action is not supported.
nRemove an individual Virtual SAN disk.
esxcli vsan storage remove --disk <device_name>
Instead of specifying the device name, you can specify the UUID if you include the --uuid option.
nRemove a disk group's SSD and each of its backing HDD drives from Virtual SAN usage.
esxcli vsan storage remove --ssd <device_name>
Instead of specifying the device name, you can specify the UUID if you include the --uuid option.
Any SSD that you remove from Virtual SAN becomes available for such features as Flash Read
Cache.
Chapter 4 Managing Storage
VMware, Inc. 61

Monitoring vSphere Flash Read Cache
Flash Read Cache™ lets you accelerate virtual machine performance through the use of host resident ash
devices as a cache.
The vSphere Storage documentation discusses vSphere Flash Read Cache in some detail.
You can reserve a Flash Read Cache for any individual virtual disk. The Flash Read Cache is created only
when a virtual machine is powered on, and it is discarded when a virtual machine is suspended or powered
o. When you migrate a virtual machine you have the option to migrate the cache. By default the cache is
migrated if the virtual ash module on the source and destination hosts are compatible. If you do not
migrate the cache, the cache is rewarmed on the destination host. You can change the size of the cache while
a virtual machine is powered on. In this instance, the existing cache is discarded and a new write-through
cache is created, which results in a cache warm up period. The advantage of creating a new cache is that the
cache size can beer match the application's active data.
Flash Read Cache supports write-through or read caching. Write-back or write caching are not supported.
Data reads are satised from the cache, if present. Data writes are dispatched to the backing storage, such as
a SAN or NAS. All data that is read from or wrien to the backing storage is unconditionally stored in the
cache.
N Not all workloads benet with a Flash Read Cache. The performance boost depends on your
workload paern and working set size. Read-intensive workloads with working sets that t into the cache
can benet from a Flash Read Cache conguration. By conguring Flash Read Cache for your read-intensive
workloads additional I/O resources become available on your shared storage, which can result in a
performance increase for other workloads even though they are not congured to use Flash Read Cache.
You can manage vSphere Flash Read Cache from the vSphere Web Client. You can monitor Flash Read
Cache by using commands in the esxcli storage vflash namespace. The following table lists available
commands. See the vSphere Command-Line Interface Reference or the online help for a list of options to each
command.
Table 4‑1. Commands for Monitoring vSphere Flash Read Cache
Command Description
storage vflash cache get Gets individual vflash cache info.
storage vflash cache list Lists individual vflash caches.
storage vflash cache stats get Gets vflash cache statistics.
storage vflash cache stats reset Resets vflash cache statistics.
storage vflash device list Lists vflash SSD devices.
storage vflash module get Gets vflash module info.
storage vflash module list Lists vflash modules.
storage vflash module stats get Gets vflash module statistics.
Monitoring and Managing Virtual Volumes
The Virtual Volumes functionality changes the storage management paradigm from managing space inside
datastores to managing abstract storage objects handled by storage arrays.
With Virtual Volumes, an individual virtual machine, not the datastore, becomes a unit of storage
management, while storage hardware gains complete control over virtual disk content, layout, and
management. The vSphere Storage documentation discusses Virtual Volumes in some detail and explains
how to manage them by using the vSphere Web Client.
vSphere Command-Line Interface Concepts and Examples
62 VMware, Inc.

The following ESXCLI commands are available for managing display information about virtual volumes
and for unbinding all Virtual Volumes from all vendor providers. See the vSphere Storage documentation for
information on creating Virtual Volumes and conguring multipathing and SCSI-based endpoints.
Table 4‑2. VVol Commands
Command Description
storage vvol daemon unbindall Unbinds all Virtual Volume instances from all storage
providers that are known to the ESXi host.
storage vvol protocolendpoint list Lists the VVol protocol endpoints currently known to the
ESXi host.
storage vvol storagecontainer list Lists the VVol storage containers currently known to the
ESXi host.
storage vvol storagecontainer restore Restores storage containers of vendor providers that are
registered on the host.
storage vvol vasacontext get Gets the VASA context (VC UUID).
storage vvol vendorprovider list Lists the vendor providers registered on the host.
storage vvol vendorprovider restore Restores the vendor providers that are registered on the
host.
Migrating Virtual Machines with svmotion
Storage vMotion moves a virtual machine's conguration le, and, optionally, its disks, while the virtual
machine is running. You can perform Storage vMotion tasks from the vSphere Web Client or with the
svmotion command.
I No ESXCLI command for Storage vMotion is available.
You can place the virtual machine and all of its disks in a single location, or choose separate locations for the
virtual machine conguration le and each virtual disk. You cannot change the virtual machine's execution
host during a migration with svmotion.
Storage vMotion Uses
Storage vMotion has several uses in administering your vSphere environment.
nUpgrade ESXi without virtual machine downtime in situations where virtual machine disks must be
moved to shared storage to allow migration with vMotion.
nPerform storage maintenance and reconguration. You can use Storage vMotion to move virtual
machines o a storage device to allow maintenance or reconguration of the storage device without
virtual machine downtime.
nRedistribute storage load. You can use Storage vMotion to manually redistribute virtual machines or
virtual disks to dierent storage volumes to balance capacity or improve performance.
Storage vMotion Requirements and Limitations
You can migrate virtual machine disks with Storage vMotion if the virtual machine and its host meet specic
resource and conguration requirements.
To migrate virtual machine disks with Storage vMotion, the virtual machine and its host must meet the
following requirements.
nFor ESXi 5.0 and later hosts, you can migrate virtual machines that have snapshots. For earlier versions
of ESXi, you cannot migrate virtual machines that have snapshots.
Chapter 4 Managing Storage
VMware, Inc. 63

nVirtual machine disks must be in persistent mode or be raw device mappings (RDMs). For physical and
virtual compatibility mode RDMs, you can migrate the mapping le only. For virtual compatibility
mode RDMs, you can use the vSphere Web Client to convert to thick-provisioned or thin-provisioned
disks during migration as long as the destination is not an NFS datastore. You cannot use the svmotion
command to perform this conversion.
nThe host on which the virtual machine is running must have a license that includes Storage vMotion.
nThe host on which the virtual machine is running must have access to both the source and target
datastores.
nA particular host can be involved in up to four migrations with vMotion or Storage vMotion at one
time. See Limits on Simultaneous Migrations in the vCenter Server and Host Management documentation for
details.
If you use the vSphere Web Client for migration with svmotion, the system performs several compatibility
checks. These checks are not supported by the svmotion vCLI command.
Running svmotion in Interactive Mode
You can run svmotion in interactive mode by using the --interactive option. The command prompts you
for the information it needs to complete the storage migration.
In interactive mode, the svmotion command uses the following syntax.
svmotion <conn_options> --interactive
When you use --interactive, all other options are ignored.
I When responding to the prompts, use quotes around input strings with special characters.
Running svmotion in Noninteractive Mode
You can run svmotion in noninteractive mode if you do not use the --interactive option.
I When you run svmotion, --server must point to a vCenter Server system.
In noninteractive mode, the svmotion command uses the following syntax.
svmotion [standard vCLI options] --datacenter=<datacenter_name>
--vm <VM config datastore path>:<new datastore>
[--disks <virtual disk datastore path>:<new datastore>,
<virtual disk datastore path>:<new datastore>]
Square brackets indicate optional elements, not datastores.
The --vm option species the virtual machine and its destination. By default, all virtual disks are relocated to
the same datastore as the virtual machine. This option requires the current virtual machine conguration le
location. See “Determine the Path to the Virtual Machine Conguration File and Disk File,” on page 64.
The --disks option relocates individual virtual disks to dierent datastores. The --disks option requires the
current virtual disk datastore path as an option. See “Determine the Path to the Virtual Machine
Conguration File and Disk File,” on page 64.
Determine the Path to the Virtual Machine Configuration File and Disk File
To use the --vm option, you need the current virtual machine conguration le location.
Procedure
1 Run vmware-cmd -l to list all virtual machine conguration les (VMX les).
vmware-cmd -H <vc_server> -U <login_user> -P <login_password> -h <esx_host> -l
vSphere Command-Line Interface Concepts and Examples
64 VMware, Inc.

2 Choose the VMX le for the virtual machine of interest.
By default, the virtual disk le has the same name as the VMX le but has a .vmdk extension.
3 (Optional) Use vifs to verify that you are using the correct VMDK le.
Relocate a Virtual Machine's Storage
You can relocate a virtual machine's storage including the disks.
Procedure
1 Determine the path to the virtual machine conguration le.
2 Run svmotion by using the following syntax.
svmotion
--url=https://myvc.mycorp.com/sdk --datacenter=DC1
--vm="[storage1] myvm/myvm.vmx:new_datastore"
N The example is for Windows. Use single quotes on Linux.
Relocate a Virtual Machine's Configuration File
You can relocate a virtual machine's conguration le, but leave the virtual disks.
Procedure
1 Determine the path to the virtual disk les and the virtual machine conguration le.
2 Run svmotion by using the following syntax.
svmotion
<conn_options>
--datacenter='My DC'
--vm='[old_datastore] myvm/myvm.vmx:new_datastore'
--disks='[old_datastore] myvm/myvm_1.vmdk:old_datastore, [old_datastore] myvm/myvm_2.vmdk:
old_datastore'
N The example is for Linux. Use double quotes on Windows. The square brackets surround the
datastore name and do not indicate an optional element.
This command relocates the virtual machine's conguration le to new_datastore, but leaves the two
disks, myvm_1.vmdk and myvm_2.vmdk, in old_datastore.
Configuring FCoE Adapters
ESXi can use Fibre Channel over Ethernet (FCoE) adapters to access Fibre Channel storage.
The FCoE protocol encapsulates Fibre Channel frames into Ethernet frames. As a result, your host does not
need special Fibre Channel links to connect to Fibre Channel storage, but can use 10 Gbit lossless Ethernet to
deliver Fibre Channel trac.
To use FCoE, you need to install FCoE adapters. The adapters that VMware supports generally fall into two
categories, hardware FCoE adapters and software FCoE adapters.
nHardware FCoE adapters include completely ooaded specialized Converged Network Adapters
(CNAs) that contain network and Fibre Channel functionalities on the same card. When such an
adapter is installed, your host detects and can use both CNA components. In the vSphere Web Client,
the networking component appears as a standard network adapter (vmnic) and the Fibre Channel
component as a FCoE adapter (vmhba). You do not have to congure a hardware FCoE adapter to be
able to use it.
Chapter 4 Managing Storage
VMware, Inc. 65
nA software FCoE adapter is a software code that performs some of the FCoE processing. The adapter
can be used with a number of NICs that support partial FCoE ooad. Unlike the hardware FCoE
adapter, the software adapter must be activated.
Scanning Storage Adapters
You must perform a rescan operation each time you recongure your storage setup.
You can scan by using the vSphere Web Client, the vicfg-rescan vCLI command, or the esxcli storage
core adapter rescan command.
nesxcli storage core adapter rescan supports the following additional options.
n-a|--all or -A|--adapter=<string> – Scan all adapters or a specied adapter.
n-S|--skip-claim – Skip claiming of new devices by the appropriate multipath plug-in.
n-F|--skip-fs-scan – Skip lesystem scan.
n-t|--type – Specify the type of scan to perform. The command either scans for all changes (all) or
for added, deleted, or updated adapters (add, delete, update).
nvicfg-rescan supports only a simple rescan operation on a specied adapter.
Rescanning a storage adapter with ESXCLI
The following command scans a specic adapter and skips the lesystem scan that is performed by default.
esxcli <conn_options> storage core adapter rescan --adapter=vmhba33 --skip-claim
The command returns an indication of success or failure, but no detailed information.
Rescanning a storage adapter with vicfg-rescan
Run vicfg-rescan, specifying the adapter name.
vicfg-rescan <conn_options> vmhba1
The command returns an indication of success or failure, but no detailed information.
Retrieving SMART Information
You can use ESXCLI to retrieve information related to SMART. SMART is a monitoring system for computer
hard disks that reports information about the disks.
You can use the following example syntax to retrieve SMART information.
esxcli storage core device smart get -d device
What the command returns depends on the level of SMART information that the device supports. If no
information is available for a parameter, the output displays N/A, as in the following sample output.
Parameter Value Threshold Worst
-----------------------------------------------------
Health Status OK N/A N/A
Media Wearout Indicator N/A N/A N/A
Write Error Count N/A N/A N/A
Read Error Count 119 6 74
Power-on Hours 57 0 57
Power Cycle Count 100 20 100
Reallocated Sector Count 100 36 100
Raw Read Error Rate 119 6 74
Drive Temperature 38 0 49
vSphere Command-Line Interface Concepts and Examples
66 VMware, Inc.
Driver Rated Max Temperature 62 45 51
Write Sectors TOT Count 200 0 200
Read Sectors TOT Count 100 0 253
Initial Bad Block Count N/A N/A N/A
Chapter 4 Managing Storage
VMware, Inc. 67
vSphere Command-Line Interface Concepts and Examples
68 VMware, Inc.

Managing iSCSI Storage 5
ESXi systems include iSCSI technology to access remote storage using an IP network. You can use the
vSphere Web Client, commands in the esxcli iscsi namespace, or the vicfg-iscsi command to congure
both hardware and software iSCSI storage for your ESXi system.
See the vSphere Storage documentation for additional information.
This chapter includes the following topics:
n“iSCSI Storage Overview,” on page 69
n“Protecting an iSCSI SAN,” on page 71
n“Command Syntax for esxcli iscsi and vicfg-iscsi,” on page 73
n“iSCSI Storage Setup with ESXCLI,” on page 78
n“iSCSI Storage Setup with vicfg-iscsi,” on page 84
n“Listing and Seing iSCSI Options,” on page 89
n“Listing and Seing iSCSI Parameters,” on page 90
n“Enabling iSCSI Authentication,” on page 94
n“Set Up Ports for iSCSI Multipathing,” on page 97
n“Managing iSCSI Sessions,” on page 98
iSCSI Storage Overview
With iSCSI, SCSI storage commands that your virtual machine issues to its virtual disk are converted into
TCP/IP protocol packets and transmied to a remote device, or target, on which the virtual disk is located.
To the virtual machine, the device appears as a locally aached SCSI drive.
To access remote targets, the ESXi host uses iSCSI initiators. Initiators transport SCSI requests and responses
between ESXi and the target storage device on the IP network. ESXi supports the following types of
initiators.
nSoftware iSCSI adapter - VMware code built into the VMkernel. Allows an ESXi host to connect to the
iSCSI storage device through standard network adapters. The software initiator handles iSCSI
processing while communicating with the network adapter.
nHardware iSCSI adapter - Ooads all iSCSI and network processing from your host. Hardware iSCSI
adapters are broken into two types.
nDependent hardware iSCSI adapter - Leverages the VMware iSCSI management and conguration
interfaces.
VMware, Inc. 69
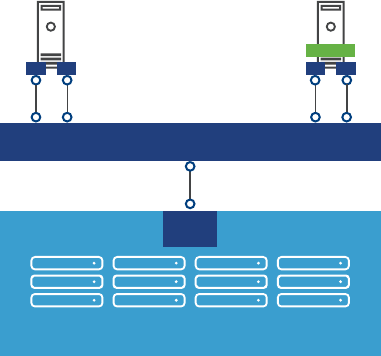
nIndependent hardware iSCSI adapter - Leverages its own iSCSI management and conguration
interfaces.
See the vSphere Storage documentation for details on setup and failover scenarios.
You must congure iSCSI initiators for the host to access and display iSCSI storage devices.
Figure 5-1 depicts hosts that use dierent types of iSCSI initiators.
nThe host on the left uses an independent hardware iSCSI adapter to connect to the iSCSI storage system.
nThe host on the right uses software iSCSI.
Dependent hardware iSCSI can be implemented in dierent ways and is not shown. iSCSI storage devices
from the storage system become available to the host. You can access the storage devices and create VMFS
datastores for your storage needs.
Figure 5‑1. iSCSI Storage
iSCSI storage
SP
IP network
HBA2 HBA1 NIC2
software
adapter
NIC1
Host 1 Host 2
hardware
iSCSI
software
iSCSI
Discovery Sessions
A discovery session is part of the iSCSI protocol. The discovery session returns the set of targets that you can
access on an iSCSI storage system.
ESXi systems support dynamic and static discovery.
nDynamic discovery - Also known as Send Targets discovery. Each time the ESXi host contacts a
specied iSCSI storage server, it sends a Send Targets request to the server. In response, the iSCSI
storage server supplies a list of available targets to the ESXi host. Monitor and manage with esxcli
iscsi adapter discovery sendtarget or vicfg-iscsi commands.
nStatic discovery - The ESXi host does not have to perform discovery. Instead, the ESXi host uses the IP
addresses or domain names and iSCSI target names, IQN or EUI format names, to communicate with
the iSCSI target. Monitor and manage with esxcli iscsi adapter discovery statictarget or vicfg-
iscsi commands.
For either case, you set up target discovery addresses so that the initiator can determine which storage
resource on the network is available for access. You can do this setup with dynamic discovery or static
discovery. With dynamic discovery, all targets associated with an IP address or host name and the iSCSI
name are discovered. With static discovery, you must specify the IP address or host name and the iSCSI
name of the target you want to access. The iSCSI HBA must be in the same VLAN as both ports of the iSCSI
array.
vSphere Command-Line Interface Concepts and Examples
70 VMware, Inc.
Discovery Target Names
The target name is either an IQN name or an EUI name.
The IQN and EUI names use specic formats.
nThe IQN name uses the following format.
iqn.yyyy-mm.{reversed domain name}:id_string
The following IQN name contains example values.
iqn.2007-05.com.mydomain:storage.tape.sys3.abc
The ESXi host generates an IQN name for software iSCSI and dependent hardware iSCSI adapters. You
can change that default IQN name.
nThe EUI name is described in IETF rfc3720 as follows.
The IEEE Registration Authority provides a service for assigning globally unique identiers [EUI]. The
EUI-64 format is used to build a global identier in other network protocols. For example, Fibre
Channel denes a method of encoding it into a WorldWideName.
The format is eui. followed by an EUI-64 identier (16 ASCII-encoded hexadecimal digits).
The following EUI name contains example values.
Type EUI-64 identifier (ASCII-encoded hexadecimal)
+- -++--------------+
| || |
eui.02004567A425678D
The IEEE EUI-64 iSCSI name format can be used when a manufacturer is registered with the IEEE
Registration Authority and uses EUI-64 formaed worldwide unique names for its products.
You can check in the UI of the storage array whether an array uses an IQN name or an EUI name.
Protecting an iSCSI SAN
Your iSCSI conguration is only as secure as your IP network. By enforcing good security standards when
you set up your network, you help safeguard your iSCSI storage.
Protecting Transmitted Data
A primary security risk in iSCSI SANs is that an aacker might sni transmied storage data.
Neither the iSCSI adapter nor the ESXi host iSCSI initiator encrypts the data that it transmits to and from the
targets, making the data vulnerable to sning aacks. You must therefore take additional measures to
prevent aackers from easily seeing iSCSI data.
Allowing your virtual machines to share virtual switches and VLANs with your iSCSI conguration
potentially exposes iSCSI trac to misuse by a virtual machine aacker. To help ensure that intruders
cannot listen to iSCSI transmissions, make sure that none of your virtual machines can see the iSCSI storage
network.
Protect your system by giving the iSCSI SAN a dedicated virtual switch.
nIf you use an independent hardware iSCSI adapter, make sure that the iSCSI adapter and ESXi physical
network adapter are not inadvertently connected outside the host. Such a connection might result from
sharing a switch.
nIf you use dependent hardware or software iscsi adapter, which uses ESXi networking, congure iSCSI
storage through a dierent virtual switch than the one used by your virtual machines.
Chapter 5 Managing iSCSI Storage
VMware, Inc. 71

You can also congure your iSCSI SAN on its own VLAN to improve performance and security. Placing
your iSCSI conguration on a separate VLAN ensures that no devices other than the iSCSI adapter can see
transmissions within the iSCSI SAN. With a dedicated VLAN, network congestion from other sources
cannot interfere with iSCSI trac.
Securing iSCSI Ports
You can improve the security of iSCSI ports by installing security patches and limiting the devices connected
to the iSCSI network.
When you run iSCSI devices, the ESXi host does not open ports that listen for network connections. This
measure reduces the chances that an intruder can break into the ESXi host through spare ports and gain
control over the host. Therefore, running iSCSI does not present an additional security risks at the ESXi host
end of the connection.
An iSCSI target device must have one or more open TCP ports to listen for iSCSI connections. If security
vulnerabilities exist in the iSCSI device software, your data can be at risk through no fault of the ESXi
system. To lower this risk, install all security patches that your storage equipment manufacturer provides
and limit the devices connected to the iSCSI network.
Setting iSCSI CHAP
iSCSI storage systems authenticate an initiator using a name and key pair. ESXi systems support Challenge
Handshake Authentication Protocol (CHAP).
Using CHAP for your SAN implementation is a best practice. The ESXi host and the iSCSI storage system
must have CHAP enabled and must have common credentials. During iSCSI login, the iSCSI storage system
exchanges its credentials with the ESXi system and checks them.
You can set up iSCSI authentication by using the vSphere Web Client, as discussed in the vSphere Storage
documentation or by using the esxcli command, discussed in “Enabling iSCSI Authentication,” on
page 94. To use CHAP authentication, you must enable CHAP on both the initiator side and the storage
system side. After authentication is enabled, it applies for targets to which no connection has been
established, but does not apply to targets to which a connection is established. After the discovery address is
set, the new volumes to which you add a connection are exposed and can be used.
For software iSCSI and dependent hardware iSCSI, ESXi hosts support per-discovery and per-target CHAP
credentials. For independent hardware iSCSI, ESXi hosts support only one set of CHAP credentials per
initiator. You cannot assign dierent CHAP credentials for dierent targets.
When you congure independent hardware iSCSI initiators, ensure that the CHAP conguration matches
your iSCSI storage. If CHAP is enabled on the storage array, it must be enabled on the initiator. If CHAP is
enabled, you must set up the CHAP authentication credentials on the ESXi host to match the credentials on
the iSCSI storage.
Supported CHAP Levels
To set CHAP levels with esxcli iscsi adapter setauth or vicfg-iscsi, specify one of the values in
Table 5-1 for <level>. Only two levels are supported for independent hardware iSCSI.
Mutual CHAP is supported for software iSCSI and for dependent hardware iSCSI, but not for independent
hardware iSCSI.
I Ensure that CHAP is set to chapRequired before you set mutual CHAP, and use compatible
levels for CHAP and mutual CHAP. Use dierent passwords for CHAP and mutual CHAP to avoid security
risks.
vSphere Command-Line Interface Concepts and Examples
72 VMware, Inc.

Table 5‑1. Supported Levels for CHAP
Level Description Supported
chapProhibited Host does not use CHAP
authentication. If authentication is
enabled, specify chapProhibited to
disable it.
Software iSCSI
Dependent hardware iSCSI
Independent hardware iSCSI
chapDiscouraged Host uses a non-CHAP connection,
but allows a CHAP connection as
fallback.
Software iSCSI
Dependent hardware iSCSI
chapPreferred Host uses CHAP if the CHAP
connection succeeds, but uses non-
CHAP connections as fallback.
Software iSCSI
Dependent hardware iSCSI
Independent hardware iSCSI
chapRequired Host requires successful CHAP
authentication. The connection fails if
CHAP negotiation fails.
Software iSCSI
Dependent hardware iSCSI
Returning Authentication to Default Inheritance
The values of iSCSI authentication seings associated with a dynamic discovery address or a static
discovery target are inherited from the corresponding seings of the parent. For the dynamic discovery
address, the parent is the adapter. For the static target, the parent is the adapter or discovery address.
nIf you use the vSphere Web Client to modify authentication seings, you must deselect the Inherit from
Parent check box before you can make a change to the discovery address or discovery target.
nIf you use vicfg-iscsi, the value you set overrides the inherited value.
nIf you use esxcli iscsi commands, the value you set overrides the inherited value. You can set CHAP
at the following levels.
nesxcli iscsi adapter auth chap [get|set]
nesxcli iscsi adapter discovery sendtarget auth chap [get|set]
nesxcli iscsi adapter target portal auth chap [get|set]
Inheritance is relevant only if you want to return a dynamic discovery address or a static discovery target to
its inherited value. In that case, use one of the following commands.
nDynamic discovery
esxcli iscsi adapter discovery sendtarget auth chap set --inherit
nStatic discovery
esxcli iscsi adapter target portal auth chap set --inherit
N You can set target-level CHAP authentication properties to be inherited from the send target level
and set send target level CHAP authentication properties to be inherited from the adapter level. Reseing
adapter-level properties is not supported.
Command Syntax for esxcli iscsi and vicfg-iscsi
In vSphere 5.0 and later, you can manage iSCSI storage by using either esxcli iscsi commands or vicfg-
iscsi options.
For details, see the vSphere Command-Line Interface Reference. “esxcli iscsi Command Syntax,” on page 74
and “vicfg-iscsi Command Syntax,” on page 75.
Chapter 5 Managing iSCSI Storage
VMware, Inc. 73

esxcli iscsi Command Syntax
The esxcli iscsi command includes a number of nested namespaces.
The following table illustrates the namespace hierarchy. Commands at each level are included in bold. Many
namespaces include both commands and namespaces.
adapter [get|list|
set]
auth chap [set|get]
discovery
[rediscover]
sendtarget [add|
list|remove]
auth chap [get|set]
param [get|set]
statictarget
[add|list|remove]
status get
target [list] portal [list] auth chap [get|set]
param [get|set]
capabilities get
firmware [get|
set]
param [get|set]
networkportal
[add|list|remove]
ipconfig [get|
set]
physicalnetworkpor
tal [list]
param [get|set]
session [add|list|
remove]
connection list
ibftboot [get|
import]
logicalnetworkport
al list
plugin list
software [get|set]
Key to esxcli iscsi Short Options
ESXCLI commands for iSCSI management consistently use the same short options. For several options, the
associated full option depends on the command.
Table 5‑3. Short Options for iSCSI ESXCLI Command Options
Lower-case
Option Option
Upper-case
Option Option Number Option
a --address,
alias
A --adapter 1 --dns1
c --cid 2 --dns2
d --direction D --default
f --file, force
vSphere Command-Line Interface Concepts and Examples
74 VMware, Inc.

Table 5‑3. Short Options for iSCSI ESXCLI Command Options (Continued)
Lower-case
Option Option
Upper-case
Option Option Number Option
g --gateway
i --ip I --inherit
k --key
l --level
m --method M --module
n --nic N --authname,
--name
o --option
p --plugin
s --isid,
subnet,
switch
S --state,
secret
v --value
vicfg-iscsi Command Syntax
vicfg-iscsi supports a comprehensive set of options.
Table 5‑4. Options for vicfg-iscsi
Option Suboptions Description
-A --
authentication
-c <level>
-m <auth_method> -b
-v <ma_username>
-x <ma_password>
[-i <stor_ip_addr|stor_hostname> [:<portnum>] [-n
<iscsi_name>]]
<adapter_name>
--level <level>
--method <auth_method> --mutual
--mchap_username <ma_username>
--mchap_password <ma_password>
[--ip <stor_ip_addr|stor_hostname> [:<portnum>]
[--name <iscsi_name>]] <adapter_name>
Enables mutual
authentication. You must
enable authentication before
you can enable mutual
authentication.
-A --
authentication
-c <level>
-m <auth_method>
-u <auth_u_name>
-w <a_password>
[-i <stor_ip_addr|stor_hostname> [:<portnum>] [-n
<iscsi_name>]] <adapter_name>
--level <level>
--method <auth_method>
--chap_password <auth_u_name>
--chap_username <chap_password>
[--ip <stor_ip_addr|stor_hostname> [:<portnum>]
[--name <iscsi_name>]] <adapter_name>
Enables authentication using
the specied options.
-A --
authentication
-l <adapter_name>
--list <adapter_name>
Lists supported authentication
methods.
Chapter 5 Managing iSCSI Storage
VMware, Inc. 75

Table 5‑4. Options for vicfg-iscsi (Continued)
Option Suboptions Description
-D --discovery -a -i <stor_ip_addr|stor_hostname[:<portnum>]
<adapter_name>
--add --ip <stor_ip_addr|stor_hostname>
[:<portnum>] <adapter_name>
Adds a dynamic discovery
address.
-D --discovery -l <adapter_name>
--list <adapter_name>
Lists dynamic discovery
addresses.
-D --discovery -r -i <stor_ip_addr|stor_hostname>[:<portnum>]
<adapter_name>
--remove --ip <stor_ip_addr|stor_hostname>
[:<portnum>] <adapter_name>
Removes a dynamic discovery
address.
-H -l [<adapter_name>]
--list [<adapter_name>]
Lists all iSCSI adapters or a
specied adapter.
-L --lun -l <adapter_name>
--list <adapter_name>
Lists LUN information.
-L --lun -l -t <target_ID> <adapter_name>
--list --target_id <target_id> <adapter_name>
Lists LUN information for a
specic target.
-N --network
(Independent
hardware iSCSI
only)
-l <adapter_name>
--list <adapter_name>
Lists network properties.
-N --network
(Independent
hardware iSCSI
only)
-i <ip_addr> <adapter_name>
--ip <ip_addr> <vmhba>
Sets the HBA IPv4 address to
ip_addr.
-N --network
(Independent
hardware iSCSI
only)
-s <subnet_mask> <adapter_name>
--subnetmask <subnet_mask> <adapter_name>
Sets the HBA network mask to
subnet_mask.
-N --network
(Independent
hardware iSCSI
only)
-g <default_gateway> <adapter_name>
--gateway <default_gateway> <adapter_name>
Sets the HBA gateway to
default_gateway.
-N --network
(Independent
hardware iSCSI
only)
-i <ip_addr> -s <subnet mask>
-g <default_gateway> <adapter_name>
--ip <ip_addr> --subnetmask <subnet_mask>
--gateway <default_gateway> <adapter_name>
Sets the IP address, subnet
mask, and default gateway in
one command.
-p --pnp
(Independent
hardware iSCSI
only)
-l <adapter_name>
--list <adapter_name>
Lists physical network portal
options.
-p --pnp
(Independent
hardware iSCSI
only)
-M <mtu_size> <adapter_name>
--mtu <mtu-size> <adapter_name>
Sets physical network portal
options.
-I --iscsiname -a <alias_name> <adapter_name>
--alias <alias_name> <adapter_name>
Sets the iSCSI initiator alias.
-I --iscsiname -n <iscsi_name> <adapter_name>
--name <iscsi_name> <adapter_name>
Sets the iSCSI initiator name.
-I --iscsiname -l <adapter_name>
--list <adapter_name>
Lists iSCSI initiator options.
vSphere Command-Line Interface Concepts and Examples
76 VMware, Inc.

Table 5‑4. Options for vicfg-iscsi (Continued)
Option Suboptions Description
-M --mtu -p -M <mtu_size> <adapter_name>
--pnp - -mtu <mtu-size> <adapter_name>
Sets MTU size. Used with the
--pnp option.
-S --static -l <adapter_name>
--list <adapter_name>
Lists static discovery
addresses.
-S --static -r -i <stor_ip_addr|stor_hostname> [:<portnum>] -n
<target_name> <adapter_name>
--remove - -ip <stor_ip_addr|stor_hostname>
[:<portnum>] -name <target_name> <adapter_name>
Removes a static discovery
address.
-S --static -a -i <stor_ip_addr|stor_hostname> [:<portnum>]
-n <target_name> <adapter_name>
--add --ip <stor_ip_addr|stor_hostname> [:<portnum>]
-name <target_name> <adapter_name>
Adds a static discovery
address.
-P --phba -l <adapter_name>
--list <adapter_name>
Lists external, vendor-specic
properties of an iSCSI adapter.
-T --target -l <adapter_name>
--list <adapter_name>
Lists target information.
-W --parameter -l [-i <stor_ip_addr|stor_hostname> [:<portnum>]
[-n <iscsi_name]] <adapter_name>
--list [--ip <stor_ip_addr|stor_hostname>
[:<portnum>]
[--name <iscsi_name]] <adapter_name>
Lists iSCSI parameter
information.
-W --parameter -l -k [-i <stor_ip_addr|stor_hostname> [:<portnum>]
[-n <iscsi_name]] <adapter_name>
--list --detail
[--ip <stor_ip_addr|stor_hostname> [:<portnum>] [--
name <iscsi_name]] <adapter_name>
Lists iSCSI parameter details.
-W --parameter -W -j <name>=<value>
-i <stor_ip_addr|stor_hostname> [:port_num>] [-n
<iscsi_name>]] <adapter_name>
--parameter - -set <name>=<value>
--ip <stor_ip_addr|stor_hostname> [:port_num>]
[--name <iscsi_name>]] <adapter_name>
Sets iSCSI parameters.
-W --parameter -W - o <param_name>
-i <stor_ip_addr|stor_hostname> [:port_num>] [-n
<iscsi_name>]] <adapter_name>
-parameter --reset <param_name>
-ip <stor_ip_addr|stor_hostname> [:port_num>] [-
name <iscsi_name>]] <adapter_name>
Returns parameters in
discovery target or send target
to default inheritance
behavior.
-z --reset_auth -a -z
-m <auth_method> -b
[-i <stor_ip_addr|stor_hostname> [:<portnum>] [-n
<iscsi_name>]]
<adapter_name>
--authentication --reset_auth
--method <auth_method>
[--ip <stor_ip_addr|stor_hostname> [:<portnum>]
[--name <iscsi_name>]] <adapter_name>
Resets target level
authentication properties to be
inherited from adapter level.
Used with the --
authentication option.
Chapter 5 Managing iSCSI Storage
VMware, Inc. 77
iSCSI Storage Setup with ESXCLI
You can set up iSCSI storage by using commands in the esxcli iscsi namespace.
You can also set up iSCSI storage by using the vSphere Web Client or vicfg-iscsi commands. See “iSCSI
Storage Setup with vicfg-iscsi,” on page 84.
Set Up Software iSCSI with ESXCLI
Software iSCSI setup requires a number of high-level tasks.
You should be familiar with the corresponding command for each task. You can refer to the relevant
documentation for each command or run esxcli iscsi --help in the console. Specify one of the options
listed in “Connection Options for vCLI Host Management Commands,” on page 19 in place of
<conn_options>.
Prerequisites
nVerify that you are familiar with iSCSI authentication. See “Enabling iSCSI Authentication,” on
page 94.
nVerify that you are familiar with CHAP. See “Seing iSCSI CHAP,” on page 72.
nVerify that you are familiar with iSCSI parameters. See “Listing and Seing iSCSI Parameters,” on
page 90.
Procedure
1 Enable software iSCSI.
esxcli <conn_options> iscsi software set --enabled=true
2 Check whether a network portal, that is, a bound port, exists for iSCSI trac.
esxcli <conn_options> iscsi adapter list
3 If no adapter exists, add one.
Software iSCSI does not require port binding, but requires that at least one VMkernel NIC is available
and can be used as an iSCSI NIC. You can name the adapter as you add it.
esxcli <conn_options> iscsi networkportal add -n <portal_name> -A <vmhba>
4 (Optional) Check the status.
esxcli <conn_options> iscsi software get
The system prints true if software iSCSI is enabled, or false if it is not enabled.
5 (Optional) Set the iSCSI name and alias.
esxcli <conn_options> iscsi adapter set --adapter=<iscsi adapter> --name=<name>
esxcli <conn_options> iscsi adapter set --adapter=<iscsi adapter> --alias=<alias>
vSphere Command-Line Interface Concepts and Examples
78 VMware, Inc.

6 Add a dynamic discovery address or a static discovery address.
nWith dynamic discovery, all storage targets associated with a host name or IP address are
discovered. You can run the following command.
esxcli <conn_options> iscsi adapter discovery sendtarget add --address=<ip/dns[:port]> --
adapter=<adapter_name>
nWith static discovery, you must specify the host name or IP address and the iSCSI name of the
storage target. You can run the following command.
esxcli <conn_options> iscsi adapter discovery statictarget add --address=<ip/dns[:port]>
--adapter=<adapter_name> --name=<target_name>
When you later remove a discovery address, it might still be displayed as the parent of a static target.
You can add the discovery address and rescan to display the correct parent for the static targets.
7 (Optional) Set the authentication information for CHAP.
You can set per-target CHAP for static targets, per-adapter CHAP, or apply the command to the
discovery address.
Option Command
Adapter-level CHAP esxcli iscsi adapter auth chap set --direction=uni --
chap_username=<name> --chap_password=<pwd> --
level=[prohibited, discouraged, preferred, required] --
secret=<string> --adapter=<vmhba>
Discovery-level CHAP esxcli iscsi adapter discovery sendtarget auth chap set --
direction=uni --chap_username=<name> --chap_password=<pwd>
--level=[prohibited, discouraged, preferred, required] --
secret=<string> --adapter=<vmhba> --
address<sendtarget_address>
Target-level CHAP esxcli iscsi adapter target portal auth chap set --
direction=uni --chap_username=<name> --chap_password=<pwd>
--level=[prohibited, discouraged, preferred, required] --
secret=<string> --adapter=<vmhba> --name<iscsi_iqn_name>
The following example sets adapter-level CHAP.
esxcli <conn_options> iscsi adapter auth chap set --direction=uni --chap_username=<name> --
chap_password=<pwd> --level=preferred --secret=uni_secret --adapter=vmhba33
8 (Optional) Set the authentication information for mutual CHAP by running esxcli iscsi adapter auth
chap set again with --direction set to mutual and a dierent authentication user name and secret.
Option Command
Adapter-level CHAP esxcli iscsi adapter auth chap set --direction=mutual --
mchap_username=<name2> --mchap_password=<pwd2> --
level=[prohibited required] --secret=<string2> --
adapter=<vmhba>
Discovery-level CHAP esxcli iscsi adapter discovery sendtarget auth chap set --
direction=mutual --mchap_username=<name2> --
mchap_password=<pwd2> --level=[prohibited, required] --
secret=<string2> --adapter=<vmhba> --
address=<sendtarget_address>
Target-level CHAP esxcli iscsi adapter target portal auth chap set --
direction=mutual --mchap_username=<nam2e> --
mchap_password=<pwd2> --level=[prohibited required] --
secret=<string2> --adapter=<vmhba> --name=<iscsi_iqn_name>
I You are responsible for making sure that CHAP is set before you set mutual CHAP, and
for using compatible levels for CHAP and mutual CHAP.
Chapter 5 Managing iSCSI Storage
VMware, Inc. 79

9 (Optional) Set iSCSI parameters.
Option Command
Adapter-level CHAP esxcli iscsi adapter param set --adapter=<vmhba> --
key=<key> --value=<value>
Discovery-level CHAP esxcli iscsi adapter discovery sendtarget param set --
adapter=<vmhba> --key=<key> --value=<value> --
address=<sendtarget_address>
Target-level CHAP esxcli iscsi adapter target portal param set --
adapter=<vmhba> --key=<key> --value=<value> --
address=<address> --name=<iqn.name>
10 After setup is complete, perform rediscovery and rescan all storage devices.
The following example performs the rediscovery and rescan operations.
esxcli <conn_options> iscsi adapter discovery rediscover
esxcli <conn_options> storage core adapter rescan --adapter=vmhba36
11 (Optional) If you want to make additional iSCSI login parameter changes, you must log out of the
corresponding iSCSI session and log back in.
a Run esxcli iscsi session remove to log out.
b Run esxcli iscsi session add or rescan the adapter to add the session back.
Set Up Dependent Hardware iSCSI with ESXCLI
Dependent hardware iSCSI setup requires several high-level tasks.
You should be familiar with the corresponding command for each task. You can refer to the relevant
documentation for each command or run esxcli iscsi --help in the console. Specify one of the options
listed in “Connection Options for vCLI Host Management Commands,” on page 19 in place of
<conn_options>.
Prerequisites
nVerify that you are familiar with iSCSI authentication. See “Enabling iSCSI Authentication,” on
page 94.
nVerify that you are familiar with CHAP. See “Seing iSCSI CHAP,” on page 72.
nVerify that you are familiar with iSCSI parameters. See “Listing and Seing iSCSI Parameters,” on
page 90.
Procedure
1 Determine the iSCSI adapter type and retrieve the iSCSI adapter ID.
esxcli <conn_options> iscsi adapter list
2 (Optional) Set the iSCSI name and alias.
esxcli <conn_options> iscsi adapter set --adapter <adapter_name> --name=<name>
esxcli <conn_options> iscsi adapter set --adapter <adapter_name> --alias=<alias>
vSphere Command-Line Interface Concepts and Examples
80 VMware, Inc.

3 Set up port binding.
a Identify the VMkernel port of the dependent hardware iSCSI adapter.
esxcli <conn_options> iscsi logicalnetworkportal list --adapter=<adapter_name>
b Connect the dependent hardware iSCSI initiator to the iSCSI VMkernel ports by running the
following command for each port.
esxcli <conn_options> iscsi networkportal add --nic=<bound_vmknic> --
adapter=<iscsi_adapter>
c Verify that the ports were added to the dependent hardware iSCSI initiator.
esxcli <conn_options> iscsi physicalnetworkportal list --adapter=<adapter_name>
4 Add a dynamic discovery address or a static discovery address.
nWith dynamic discovery, all storage targets associated with a host name or IP address are
discovered. You can run the following command.
esxcli <conn_options> iscsi adapter discovery sendtarget add --address=<ip/dns[:port]> --
adapter=<adapter_name>
nWith static discovery, you must specify the host name or IP address and the iSCSI name of the
storage target. You can run the following command.
esxcli <conn_options> iscsi adapter discovery statictarget add --address=<ip/dns[:port]>
--adapter=<adapter_name> --name=<target_name>
When you later remove a discovery address, it might still be displayed as the parent of a static target.
You can add the discovery address and rescan to display the correct parent for the static targets.
5 (Optional) Set the authentication information for CHAP.
You can set per-target CHAP for static targets, per-adapter CHAP, or apply the command to the
discovery address.
Option Command
Adapter-level CHAP esxcli iscsi adapter auth chap set --direction=uni --
chap_username=<name> --chap_password=<pwd> --
level=[prohibited, discouraged, preferred, required] --
secret=<string> --adapter=<vmhba>
Discovery-level CHAP esxcli iscsi adapter discovery sendtarget auth chap set --
direction=uni --chap_username=<name> --chap_password=<pwd>
--level=[prohibited, discouraged, preferred, required] --
secret=<string> --adapter=<vmhba> --
address<sendtarget_address>
Target-level CHAP esxcli iscsi adapter target portal auth chap set --
direction=uni --chap_username=<name> --chap_password=<pwd>
--level=[prohibited, discouraged, preferred, required] --
secret=<string> --adapter=<vmhba> --name<iscsi_iqn_name>
The following example sets adapter-level CHAP.
esxcli <conn_options> iscsi adapter auth chap set --direction=uni --chap_username=<name> --
chap_password=<pwd> --level=preferred --secret=uni_secret --adapter=vmhba33
Chapter 5 Managing iSCSI Storage
VMware, Inc. 81

6 (Optional) Set the authentication information for mutual CHAP by running esxcli iscsi adapter auth
chap set again with --direction set to mutual and a dierent authentication user name and secret.
Option Command
Adapter-level CHAP esxcli iscsi adapter auth chap set --direction=mutual --
mchap_username=<name2> --mchap_password=<pwd2> --
level=[prohibited required] --secret=<string2> --
adapter=<vmhba>
Discovery-level CHAP esxcli iscsi adapter discovery sendtarget auth chap set --
direction=mutual --mchap_username=<name2> --
mchap_password=<pwd2> --level=[prohibited, required] --
secret=<string2> --adapter=<vmhba> --
address=<sendtarget_address>
Target-level CHAP esxcli iscsi adapter target portal auth chap set --
direction=mutual --mchap_username=<nam2e> --
mchap_password=<pwd2> --level=[prohibited required] --
secret=<string2> --adapter=<vmhba> --name=<iscsi_iqn_name>
I You are responsible for making sure that CHAP is set before you set mutual CHAP, and
for using compatible levels for CHAP and mutual CHAP.
7 (Optional) Set iSCSI parameters.
Option Command
Adapter-level CHAP esxcli iscsi adapter param set --adapter=<vmhba> --
key=<key> --value=<value>
Discovery-level CHAP esxcli iscsi adapter discovery sendtarget param set --
adapter=<vmhba> --key=<key> --value=<value> --
address=<sendtarget_address>
Target-level CHAP esxcli iscsi adapter target portal param set --
adapter=<vmhba> --key=<key> --value=<value> --
address=<address> --name=<iqn.name>
8 After setup is complete, perform rediscovery and rescan all storage devices.
The following example performs the rediscovery and rescan operations.
esxcli <conn_options> iscsi adapter discovery rediscover
esxcli <conn_options> storage core adapter rescan --adapter=vmhba36
9 (Optional) If you want to make additional iSCSI login parameter changes, you must log out of the
corresponding iSCSI session and log back in.
a Run esxcli iscsi session remove to log out.
b Run esxcli iscsi session add or rescan the adapter to add the session back.
Set Up Independent Hardware iSCSI with ESXCLI
With independent hardware-based iSCSI storage, you use a specialized third-party adapter capable of
accessing iSCSI storage over TCP/IP. This iSCSI initiator handles all iSCSI and network processing and
management for your ESXi system.
You must install and congure the independent hardware iSCSI adapter for your host before you can access
the iSCSI storage device. For installation information, see vendor documentation.
Hardware iSCSI setup requires a number of high-level tasks. You should be familiar with the corresponding
command for each task. You can refer to the relevant documentation for each command or run esxcli iscsi
--help in the console. Specify one of the options listed in “Connection Options for vCLI Host Management
Commands,” on page 19 in place of <conn_options>.
vSphere Command-Line Interface Concepts and Examples
82 VMware, Inc.

Prerequisites
nVerify that you are familiar with iSCSI authentication. See “Enabling iSCSI Authentication,” on
page 94.
nVerify that you are familiar with CHAP. See “Seing iSCSI CHAP,” on page 72.
nVerify that you are familiar with iSCSI parameters. See “Listing and Seing iSCSI Parameters,” on
page 90.
Procedure
1 Determine the iSCSI adapter type and retrieve the iSCSI adapter ID.
esxcli <conn_options> iscsi adapter list
2Congure the hardware initiator (HBA) by running esxcli iscsi networkportal ipconfig with one or
more of the following options.
Option Description
-A|--adapter=<str> iSCSI adapter name (required)
-1|--dns1=<str> iSCSI network portal primary DNS address
-2|--dns2=<str> iSCSI network portal secondary DNS address
-g|--gateway=<str> iSCSI network portal gateway address
-i|--ip=<str> iSCSI network portal IP address (required)
-n|--nic=<str> iSCSI network portal (vmknic)
-s|--subnet=<str> iSCSI network portal subnet mask (required)
3 (Optional) Set the iSCSI name and alias.
esxcli <conn_options> iscsi adapter set --adapter <adapter_name> --name=<name>
esxcli <conn_options> iscsi adapter set --adapter <adapter_name> --alias=<alias>
4 Add a dynamic discovery address or a static discovery address.
nWith dynamic discovery, all storage targets associated with a host name or IP address are
discovered. You can run the following command.
esxcli <conn_options> iscsi adapter discovery sendtarget add --address=<ip/dns[:port]> --
adapter=<adapter_name>
nWith static discovery, you must specify the host name or IP address and the iSCSI name of the
storage target. You can run the following command.
esxcli <conn_options> iscsi adapter discovery statictarget add --address=<ip/dns[:port]>
--adapter=<adapter_name> --name=<target_name>
Chapter 5 Managing iSCSI Storage
VMware, Inc. 83

5 (Optional) Set the authentication information for CHAP.
You can set per-target CHAP for static targets, per-adapter CHAP, or apply the command to the
discovery address.
Option Command
Adapter-level CHAP esxcli iscsi adapter auth chap set --direction=uni --
chap_username=<name> --chap_password=<pwd> --
level=[prohibited, discouraged, preferred, required] --
secret=<string> --adapter=<vmhba>
Discovery-level CHAP esxcli iscsi adapter discovery sendtarget auth chap set --
direction=uni --chap_username=<name> --chap_password=<pwd>
--level=[prohibited, discouraged, preferred, required] --
secret=<string> --adapter=<vmhba> --
address<sendtarget_address>
Target-level CHAP esxcli iscsi adapter target portal auth chap set --
direction=uni --chap_username=<name> --chap_password=<pwd>
--level=[prohibited, discouraged, preferred, required] --
secret=<string> --adapter=<vmhba> --name<iscsi_iqn_name>
The following example sets adapter-level CHAP.
esxcli <conn_options> iscsi adapter auth chap set --direction=uni --chap_username=<name> --
chap_password=<pwd> --level=preferred --secret=uni_secret --adapter=vmhba33
N Mutual CHAP is not supported for independent hardware iSCSI storage.
6 (Optional) Set iSCSI parameters.
Option Command
Adapter-level CHAP esxcli iscsi adapter param set --adapter=<vmhba> --
key=<key> --value=<value>
Discovery-level CHAP esxcli iscsi adapter discovery sendtarget param set --
adapter=<vmhba> --key=<key> --value=<value> --
address=<sendtarget_address>
Target-level CHAP esxcli iscsi adapter target portal param set --
adapter=<vmhba> --key=<key> --value=<value> --
address=<address> --name=<iqn.name>
7 After setup is complete, run esxcli storage core adapter rescan --adapter=<iscsi_adapter> to
rescan all storage devices.
8 After setup is complete, perform rediscovery and rescan all storage devices.
The following example performs the rediscovery and rescan operations.
esxcli <conn_options> iscsi adapter discovery rediscover
esxcli <conn_options> storage core adapter rescan --adapter=vmhba36
iSCSI Storage Setup with vicfg-iscsi
You can set up iSCSI storage by using the vicfg-iscsi command.
You can also set up iSCSI storage by using the vSphere Web Client or commands in the esxcli iscsi
namespace. See “iSCSI Storage Setup with ESXCLI,” on page 78.
vSphere Command-Line Interface Concepts and Examples
84 VMware, Inc.
Set Up Software iSCSI with vicfg-iscsi
Software iSCSI setup requires a number of high-level tasks.
You should be familiar with the corresponding command for each task. You can refer to the relevant
documentation for each command. Specify one of the options listed in “Connection Options for vCLI Host
Management Commands,” on page 19 in place of <conn_options>.
Prerequisites
nVerify that you are familiar with iSCSI authentication. See “Enabling iSCSI Authentication,” on
page 94.
nVerify that you are familiar with CHAP. See “Seing iSCSI CHAP,” on page 72.
Procedure
1 Determine the HBA type and retrieve the HBA ID.
vicfg-iscsi <conn_options> --adapter --list
2 Enable software iSCSI for the HBA.
vicfg-iscsi <conn_options> --swiscsi --enable
3 (Optional) Check the status.
vicfg-iscsi <conn_options> --swiscsi --list
The system prints Software iSCSI is enabled or Software iSCSI is not enabled.
4 (Optional) Set the iSCSI name and alias.
vicfg-iscsi <conn_options> -I -n <iscsi_name> <adapter_name>
vicfg-iscsi <conn_options> --iscsiname - -name <iscsi_name> <adapter_name>
vicfg-iscsi <conn_options> -I -a <alias_name> <adapter_name>
vicfg-iscsi <conn_options> --iscsiname --alias <alias_name> <adapter_name>
5 Add a dynamic discovery address or a static discovery address.
nWith dynamic discovery, all storage targets associated with a host name or IP address are
discovered. You can run the following command.
vicfg-iscsi <conn_options> --discovery --add --ip <ip_addr | domain_name> <adapter_name>
nWith static discovery, you must specify the host name or IP address and the iSCSI name of the
storage target. You can run the following command.
vicfg-iscsi <conn_options> --static --add --ip <ip_addr | domain_name> --name
<iscsi_name> <adapter_name>
When you later remove a discovery address, it might still be displayed as the parent of a static target.
You can add the discovery address and rescan to display the correct parent for the static targets.
6 Set the authentication information for CHAP.
vicfg-iscsi <conn_options> -A -c <level> -m <auth_method> -u <auth_u_name> -w <chap_password>
[-i <stor_ip_addr|stor_hostname> [:<portnum>] [-n <iscsi_name]] <adapter_name>
vicfg-iscsi <conn_options> - -authentication - -level <level> - -method <auth_method>
--chap_username <auth_u_name> --chap_password <chap_password>
[--ip <stor_ip_addr|stor_hostname> [:<portnum>] [-name <iscsi_name]]
<adapter_name>
Chapter 5 Managing iSCSI Storage
VMware, Inc. 85
The target (-i) and name (-n) option determine what the command applies to.
Option Result
-i and -n Command applies to per-target CHAP for static targets.
Only -i Command applies to the discovery address.
Neither -i nor -n Command applies to per-adapter CHAP.
7 (Optional) Set the authentication information for mutual CHAP by running vicfg-iscsi -A again with
the -b option and a dierent authentication user name and password.
For <level>, specify chapProhibited or chapRequired.
nchapProhibited – The host does not use CHAP authentication. If authentication is enabled, specify
chapProhibited to disable it.
nchapRequired – The host requires successful CHAP authentication. The connection fails if CHAP
negotiation fails. You can set this value for mutual CHAP only if CHAP is set to chapRequired.
For <auth_method>, CHAP is the only valid value.
I You are responsible for making sure that CHAP is set before you set mutual CHAP, and
for using compatible levels for CHAP and mutual CHAP.
8 (Optional) Set iSCSI parameters by running vicfg-iscsi -W.
9 After setup is complete, run vicfg-rescan to rescan all storage devices.
Set Up Dependent Hardware iSCSI with vicfg-iscsi
Dependent hardware iSCSI setup requires a number of high-level tasks.
You should be familiar with the corresponding command for each task. You can refer to the relevant
documentation for each command. Specify one of the options listed in “Connection Options for vCLI Host
Management Commands,” on page 19 in place of <conn_options>.
Prerequisites
nVerify that you are familiar with iSCSI authentication. See “Enabling iSCSI Authentication,” on
page 94.
nVerify that you are familiar with CHAP. See “Seing iSCSI CHAP,” on page 72.
Procedure
1 Determine the HBA type and retrieve the HBA ID.
vicfg-iscsi <conn_options> --adapter --list
2 (Optional) Set the iSCSI name and alias.
vicfg-iscsi <conn_options> -I -n <iscsi_name> <adapter_name>
vicfg-iscsi <conn_options> --iscsiname - -name <iscsi_name> <adapter_name>
vicfg-iscsi <conn_options> -I -a <alias_name> <adapter_name>
vicfg-iscsi <conn_options> --iscsiname --alias <alias_name> <adapter_name>
vSphere Command-Line Interface Concepts and Examples
86 VMware, Inc.

3 Set up port binding.
a Identify the VMkernel port of the dependent hardware iSCSI adapter.
esxcli <conn_options> swiscsi vmknic list -d <vmhba>
b Connect the dependent hardware iSCSI initiator to the iSCSI VMkernel ports by running the
following command for each port.
esxcli <conn_options> swiscsi nic add -n <port_name> -d <vmhba>
c Verify that the ports were added to the dependent hardware iSCSI initiator.
esxcli <conn_options> swiscsi nic list -d <vmhba>
d Rescan the dependent hardware SCSI initiator.
vicfg-rescan <conn_options> <vmhba>
4 Add a dynamic discovery address or a static discovery address.
nWith dynamic discovery, all storage targets associated with a host name or IP address are
discovered. You can run the following command.
vicfg-iscsi <conn_options> --discovery --add --ip <ip_addr | domain_name> <adapter_name>
nWith static discovery, you must specify the host name or IP address and the iSCSI name of the
storage target. You can run the following command.
vicfg-iscsi <conn_options> --static --add --ip <ip_addr | domain_name> --name
<iscsi_name> <adapter_name>
When you later remove a discovery address, it might still be displayed as the parent of a static target.
You can add the discovery address and rescan to display the correct parent for the static targets.
5 Set the authentication information for CHAP.
vicfg-iscsi <conn_options> -A -c <level> -m <auth_method> -u <auth_u_name> -w <chap_password>
[-i <stor_ip_addr|stor_hostname> [:<portnum>] [-n <iscsi_name]] <adapter_name>
vicfg-iscsi <conn_options> - -authentication - -level <level> - -method <auth_method>
--chap_username <auth_u_name> --chap_password <chap_password>
[--ip <stor_ip_addr|stor_hostname> [:<portnum>] [-name <iscsi_name]]
<adapter_name>
The target (-i) and name (-n) option determine what the command applies to.
Option Result
-i and -n Command applies to per-target CHAP for static targets.
Only -i Command applies to the discovery address.
Neither -i nor -n Command applies to per-adapter CHAP.
6 (Optional) Set iSCSI parameters by running vicfg-iscsi -W.
7 After setup is complete, run vicfg-rescan to rescan all storage devices.
Set Up Independent Hardware iSCSI with vicfg-iscsi
With independent hardware-based iSCSI storage, you use a specialized third-party adapter capable of
accessing iSCSI storage over TCP/IP. This iSCSI initiator handles all iSCSI and network processing and
management for your ESXi system.
You must install and congure the independent hardware iSCSI adapter for your host before you can access
the iSCSI storage device. For installation information, see vendor documentation.
Chapter 5 Managing iSCSI Storage
VMware, Inc. 87
Hardware iSCSI setup requires a number of high-level tasks. You should be familiar with the corresponding
command for each task. You can refer to the relevant documentation for each command or the manpage
(Linux). Specify one of the options listed in “Connection Options for vCLI Host Management Commands,”
on page 19 in place of <conn_options>.
Prerequisites
nVerify that you are familiar with iSCSI authentication. See “Enabling iSCSI Authentication,” on
page 94.
nVerify that you are familiar with CHAP. See “Seing iSCSI CHAP,” on page 72.
Procedure
1 Determine the HBA type and retrieve the HBA ID.
vicfg-iscsi <conn_options> --adapter --list
2Congure the hardware initiator (HBA) by running vicfg-iscsi -N with one or more of the following
options.
n--list – List network properties.
n--ip <ip_addr> – Set HBA IPv4 address.
n--subnetmask <subnet_mask> – Set HBA network mask.
n--gateway <default_gateway> – Set HBA gateway.
n--set ARP=true|false – Enable or disable ARP redirect.
You can also set the HBA IPv4 address and network mask and gateway in one command.
vicfg-iscsi <conn_options> --ip <ip_addr> --subnetmask <subnet_mask> --gateway
<default_gateway>
3 (Optional) Set the iSCSI name and alias.
vicfg-iscsi <conn_options> -I -n <iscsi_name> <adapter_name>
vicfg-iscsi <conn_options> --iscsiname - -name <iscsi_name> <adapter_name>
vicfg-iscsi <conn_options> -I -a <alias_name> <adapter_name>
vicfg-iscsi <conn_options> --iscsiname --alias <alias_name> <adapter_name>
4 Add a dynamic discovery address or a static discovery address.
nWith dynamic discovery, all storage targets associated with a host name or IP address are
discovered. You can run the following command.
vicfg-iscsi <conn_options> --discovery --add --ip <ip_addr | domain_name> <adapter_name>
nWith static discovery, you must specify the host name or IP address and the iSCSI name of the
storage target. You can run the following command.
vicfg-iscsi <conn_options> --static --add --ip <ip_addr | domain_name> --name
<iscsi_name> <adapter_name>
When you later remove a discovery address, it might still be displayed as the parent of a static target.
You can add the discovery address and rescan to display the correct parent for the static targets.
5 Set the authentication information for CHAP.
vicfg-iscsi <conn_options> -A -c <level> -m <auth_method> -u <auth_u_name> -w <chap_password>
[-i <stor_ip_addr|stor_hostname> [:<portnum>] [-n <iscsi_name]] <adapter_name>
vicfg-iscsi <conn_options> - -authentication - -level <level> - -method <auth_method>
--chap_username <auth_u_name> --chap_password <chap_password>
[--ip <stor_ip_addr|stor_hostname> [:<portnum>] [-name <iscsi_name]]
<adapter_name>
vSphere Command-Line Interface Concepts and Examples
88 VMware, Inc.

The target (-i) and name (-n) option determine what the command applies to.
Option Result
-i and -n Command applies to per-target CHAP for static targets.
Only -i Command applies to the discovery address.
Neither -i nor -n Command applies to per-adapter CHAP.
N Mutual CHAP is not supported for independent hardware iSCSI storage.
6 (Optional) Set iSCSI parameters by running vicfg-iscsi -W.
7 After setup is complete, run vicfg-rescan to rescan all storage devices.
Listing and Setting iSCSI Options
You can list and set iSCSI options with ESXCLI or with vicfg-iscsi.
You can also manage parameters. See “Listing and Seing iSCSI Parameters,” on page 90.
Listing iSCSI Options with ESXCLI
You can use esxcli iscsi information retrieval commands to list external HBA properties, information
about targets, and LUNs.
You can use the following esxcli iscsi options to list iSCSI parameters. Specify one of the options listed in
“Connection Options for vCLI Host Management Commands,” on page 19 in place of <conn_options>.
nRun esxcli iscsi adapter firmware to list or upload the rmware for the iSCSI adapter.
esxcli <conn_options> iscsi adapter firmware get --adapter=<adapter_name>
esxcli <conn_options> iscsi adapter firmware set --file=<firmware_file_path>
The system returns information about the vendor, model, description, and serial number of the HBA.
nRun commands in the esxcli iscsi adapter target name space.
nesxcli iscsi adapter target portal lists and sets authentication and portal parameters.
nesxcli iscsi adapter target list lists LUN information.
Setting MTU with ESXCLI
You can change MTU seings by using ESXCLI.
If you want to change the MTU used for your iSCSI storage, you must make the change in two places.
nRun esxcli network vswitch standard set to change the MTU of the virtual switch.
nRun esxcli network ip interface set to change the MTU of the network interface.
Listing and Setting iSCSI Options with vicfg-iscsi
You can use vicfg-iscsi information retrieval options to list external HBA properties, information about
targets, and LUNs.
You can use the following vicfg-iscsi options to list iSCSI parameters. Specify one of the options listed in
“Connection Options for vCLI Host Management Commands,” on page 19 in place of <conn_options>.
nRun vicfg-iscsi -P|--phba to list external (vendor-specic) properties of an iSCSI adapter.
vicfg-iscsi <conn_options> -P -l <adapter_name>
vicfg-iscsi <conn_options> --phba --list <adapter_name>
Chapter 5 Managing iSCSI Storage
VMware, Inc. 89
The system returns information about the vendor, model, description, and serial number of the HBA.
nRun vicfg-iscsi -T | --target to list target information.
vicfg-iscsi <conn_options> -T -l <adapter_name>
vicfg-iscsi <conn_options> --target --list <adapter_name>
The system returns information about targets for the specied adapter, including the iSCSI name, in
IQN or EUI format, and alias. See “Discovery Target Names,” on page 71.
nRun vicfg-iscsi -L|--lun to list LUN information.
vicfg-iscsi <conn_options> -L -l <adapter_name>
vicfg-iscsi <conn_options> --lun --list <adapter_name>
The command returns the operating system device name, bus number, target ID, LUN ID, and LUN
size for the LUN.
nRun vicfg-iscsi -L with -t to list only LUNs on a specied target.
vicfg-iscsi <conn_options> -L -l -t <target_ID> <adapter_name>
vicfg-iscsi <conn_options> --lun --list --target_id <target_id> <adapter_name>
The system returns the LUNs on the specied target and the corresponding device name, device
number, LUN ID, and LUN size.
nRun vicfg-iscsi -p|--pnp to list physical network portal information for independent hardware iSCSI
devices. You can also use this option with --mtu.
vicfg-iscsi <conn_options> -p -l <adapter_name>
vicfg-iscsi <conn_options> --pnp --list <adapter_name>
The system returns information about the MAC address, MTU, and current transfer rate.
nRun vicfg-iscsi -I -l to list information about the iSCSI initiator. ESXi systems use a software-based
iSCSI initiator in the VMkernel to connect to storage. The command returns the iSCSI name, alias name,
and alias seable bit for the initiator.
vicfg-iscsi <conn_options> -I -l vmhba42
nRun vicfg-iscsi -p -M to set the MTU for the adapter. You must specify the size and adapter name.
vicfg-iscsi <conn_options> -p -M <mtu_size> <adapter_name>
vicfg-iscsi <conn_options> --pnp --mtu <mtu-size> <adapter_name>
Listing and Setting iSCSI Parameters
You can list and set iSCSI parameters for software iSCSI and for dependent hardware iSCSI by using
ESXCLI or vicfg-iscsi.
Listing and Setting iSCSI Parameters with ESXCLI
You can list and set iSCSI parameters for software iSCSI and for dependent hardware iSCSI by using
ESXCLI.
You can retrieve and set iSCSI parameters by running one of the following commands.
vSphere Command-Line Interface Concepts and Examples
90 VMware, Inc.

Parameter Type Command
Adapter-level parameters esxcli iscsi adapter param set --adapter=<vmhba> --key=<key> --
value=<value>
Target-level parameters esxcli iscsi adapter target portal param set --adapter=<vmhba> --
key=<key> --value=<value> --address=<address> --name=<iqn.name>
Discovery-level parameters esxcli iscsi adapter discovery sendtarget param set --adapter=<vmhba> --
key=<key> --value=<value> --address=<address>
The following table lists all seable parameters. These parameters are also described in the IETF rfc 3720.
You can run esxcli iscsi adapter param get to determine whether a parameter is seable or not.
The parameters in the table apply to software iSCSI and dependent hardware iSCSI.
Table 5‑5. Settable iSCSI Parameters
Parameter Description
DataDigestType Increases data integrity. When data digest is enabled, the system performs a
checksum over each PDUs data part and veries using the CRC32C algorithm.
N Systems that use Intel Nehalem processors ooad the iSCSI digest
calculations for software iSCSI, thus reducing the impact on performance.
Valid values are digestProhibited, digestDiscouraged,
digestPreferred, or digestRequired.
HeaderDigest Increases data integrity. When header digest is enabled, the system performs a
checksum over the header part of each iSCSI Protocol Data Unit (PDU) and
veries using the CRC32C algorithm.
MaxOutstandingR2T Max Outstanding R2T denes the Ready to Transfer (R2T) PDUs that can be in
transition before an acknowledgement PDU is received.
FirstBurstLength Maximum amount of unsolicited data an iSCSI initiator can send to the target
during the execution of a single SCSI command, in bytes.
MaxBurstLength Maximum SCSI data payload in a Data-In or a solicited Data-Out iSCSI
sequence, in bytes.
MaxRecvDataSegLen Maximum data segment length, in bytes, that can be received in an iSCSI
PDU.
NoopOutInterval Time interval, in seconds, between NOP-Out requests sent from your iSCSI
initiator to an iSCSI target. The NOP-Out requests serve as the ping
mechanism to verify that a connection between the iSCSI initiator and the
iSCSI target is active.
Supported only at the initiator level.
NoopOutTimeout Amount of time, in seconds, that can lapse before your host receives a NOP-In
message. The message is sent by the iSCSI target in response to the NOP-Out
request. When the NoopTimeout limit is exceeded, the initiator terminates the
current session and starts a new one.
Supported only at the initiator level.
RecoveryTimeout Amount of time, in seconds, that can lapse while a session recovery is
performed. If the timeout exceeds its limit, the iSCSI initiator terminates the
session.
DelayedAck Allows systems to delay acknowledgment of received data packets.
You can use the following ESXCLI commands to list parameter options.
nRun esxcli iscsi adapter param get to list parameter options for the iSCSI adapter.
nRun esxcli iscsi adapter discovery sendtarget param get or esxcli iscsi adapter target portal
param set to retrieve information about iSCSI parameters and whether they are seable.
Chapter 5 Managing iSCSI Storage
VMware, Inc. 91

nRun esxcli iscsi adapter discovery sendtarget param get or esxcli iscsi adapter target portal
param set to set iSCSI parameter options.
If special characters are in the <name>=<value> sequence, for example, if you add a space, you must surround
the sequence with double quotes ("<name> = <value>").
Returning Parameters to Default Inheritance with ESXCLI
The values of iSCSI parameters associated with a dynamic discovery address or a static discovery target are
inherited from the corresponding seings of the parent.
For the dynamic discovery address, the parent is the adapter. For the static target, the parent is the adapter
or discovery address.
nIf you use the vSphere Web Client to modify authentication seings, you must deselect the Inherit from
Parent check box before you can make a change to the discovery address or discovery target.
nIf you use esxcli iscsi, the value you set overrides the inherited value.
Inheritance is relevant only if you want to return a dynamic discovery address or a static discovery target to
its inherited value. In that case, use the following command, which requires the --name option for static
discovery addresses, but not for dynamic discovery targets.
Target Type Command
Dynamic target esxcli iscsi adapter discovery sendtarget param set
Static target esxcli iscsi adapter target portal param set
Listing and Setting iSCSI Parameters with vicfg-iscsi
You can list and set iSCSI parameters by running vicfg-iscsi -W.
The following table lists all seable parameters. These parameters are also described in the IETF rfc 3720.
You can also run vicfg-iscsi --parameter --list --details to determine whether a parameter is seable
or not.
The parameters in the table apply to software iSCSI and dependent hardware iSCSI.
Table 5‑6. Settable iSCSI Parameters
Parameter Description
DataDigestType Increases data integrity. When data digest is enabled, the system performs a
checksum over each PDUs data part and veries using the CRC32C algorithm.
N Systems that use Intel Nehalem processors ooad the iSCSI digest
calculations for software iSCSI, thus reducing the impact on performance.
Valid values are digestProhibited, digestDiscouraged,
digestPreferred, or digestRequired.
HeaderDigest Increases data integrity. When header digest is enabled, the system performs a
checksum over the header part of each iSCSI Protocol Data Unit (PDU) and
veries using the CRC32C algorithm.
MaxOutstandingR2T Max Outstanding R2T denes the Ready to Transfer (R2T) PDUs that can be in
transition before an acknowledgement PDU is received.
FirstBurstLength Maximum amount of unsolicited data an iSCSI initiator can send to the target
during the execution of a single SCSI command, in bytes.
MaxBurstLength Maximum SCSI data payload in a Data-In or a solicited Data-Out iSCSI
sequence, in bytes.
MaxRecvDataSegLen Maximum data segment length, in bytes, that can be received in an iSCSI
PDU.
vSphere Command-Line Interface Concepts and Examples
92 VMware, Inc.

Table 5‑6. Settable iSCSI Parameters (Continued)
Parameter Description
NoopOutInterval Time interval, in seconds, between NOP-Out requests sent from your iSCSI
initiator to an iSCSI target. The NOP-Out requests serve as the ping
mechanism to verify that a connection between the iSCSI initiator and the
iSCSI target is active.
Supported only at the initiator level.
NoopOutTimeout Amount of time, in seconds, that can lapse before your host receives a NOP-In
message. The message is sent by the iSCSI target in response to the NOP-Out
request. When the NoopTimeout limit is exceeded, the initiator terminates the
current session and starts a new one.
Supported only at the initiator level.
RecoveryTimeout Amount of time, in seconds, that can lapse while a session recovery is
performed. If the timeout exceeds its limit, the iSCSI initiator terminates the
session.
DelayedAck Allows systems to delay acknowledgment of received data packets.
You can use the following vicfg-iscsi options to list parameter options. Specify one of the options listed in
“Connection Options for vCLI Host Management Commands,” on page 19 in place of <conn_options>.
nRun vicfg-iscsi -W -l to list parameter options for the HBA.
vicfg-iscsi <conn_options> -W -l
[-i <stor_ip_addr|stor_hostname> [:<portnum>] [-n <iscsi_name>]] <adapter_name>
vicfg-iscsi <conn_options> --parameter --list
[--ip <stor_ip_addr|stor_hostname> [:<portnum>] [--name <iscsi_name>]] <adapter_name>
The target (-i) and name (-n) option determine what the command applies to.
Option Result
-i and -n Command applies to static targets.
Only -i Command applies to the discovery address.
Neither -i nor -n Command applies to per-adapter parameters.
nRun vicfg-iscsi -W -l -k to list iSCSI parameters and whether they are seable.
vicfg-iscsi <conn_options> -W -l -k
[-i <stor_ip_addr|stor_hostname>[:<port_num>] [-n <iscsi_name>]] <adapter_name>
vicfg-iscsi <conn_options> --parameter --list --detail
[--ip <stor_ip_addr|stor_hostname>[:<port_num>][--name <iscsi_name>]] <adapter_name>
nRun vicfg-iscsi -W -j to set iSCSI parameter options.
vicfg-iscsi <conn_options> -W -j <name>=<value>
[-i <stor_ip_addr|stor_hostname>[:port_num>][-n <iscsi_name>]] <adapter_name>
vicfg-iscsi <conn_options> --parameter --set <name>=<value>
[--ip <stor_ip_addr|stor_hostname>[:port_num>][--name <iscsi_name>]] <adapter_name>
Chapter 5 Managing iSCSI Storage
VMware, Inc. 93

The target (-i) and name (-n) option determine what the command applies to.
Option Result
-i and -n Command applies to per-target CHAP for static targets.
Only -i Command applies to the discovery address.
Neither -i nor -n Command applies to per-adapter CHAP.
If special characters are in the <name>=<value> sequence, for example, if you add a space, you must surround
the sequence with double quotes ("<name> = <value>").
Returning Parameters to Default Inheritance with vicfg-iscsi
The values of iSCSI parameters associated with a dynamic discovery address or a static discovery target are
inherited from the corresponding seings of the parent.
For the dynamic discovery address, the parent is the adapter. For the static target, the parent is the adapter
or discovery address.
nIf you use the vSphere Web Client to modify authentication seings, you must deselect the Inherit from
Parent check box before you can make a change to the discovery address or discovery target.
nIf you use vicfg-iscsi, the value you set overrides the inherited value.
Inheritance is relevant only if you want to return a dynamic discovery address or a static discovery target to
its inherited value. In that case, use the --reset <param_name> option, which requires the --name option for
static discovery addresses, but not for dynamic discovery targets.
vicfg-iscsi <conn_options> --parameter --reset <param_name>
--ip <stor_ip_addr | stor_hostname>[:port_num>] <adapter_name>
vicfg-iscsi <conn_options> -W - o <param_name>
-i <stor_ip_addr|stor_hostname>[:port_num>] <adapter_name>
Enabling iSCSI Authentication
You can enable iSCSI authentication by using ESXCLI or vicfg-iscsi.
Enable iSCSI Authentication with ESXCLI
You can use the esxcli iscsi adapter auth commands to enable iSCSI authentication.
For information on iSCSI CHAP, see “Seing iSCSI CHAP,” on page 72.
vSphere Command-Line Interface Concepts and Examples
94 VMware, Inc.

Procedure
1 (Optional) Set the authentication information for CHAP.
esxcli <conn_options> iscsi adapter auth chap set --direction=uni --chap_username=<name> --
chap_password=<pwd> --level=[prohibited, discouraged, preferred, required] --secret=<string>
--adapter=<adapter_name>
You can set per-target CHAP for static targets, per-adapter CHAP, or apply the command to the
discovery address.
Option Command
Per-adapter CHAP esxcli iscsi adapter auth chap set
Per-discovery CHAP esxcli iscsi adapter discovery sendtarget auth chap set
Per-target CHAP esxcli iscsi adapter target portal auth chap set
The following example sets adapter-level CHAP.
esxcli <conn_options> iscsi adapter auth chap set --direction=uni --chap_username=User1 --
chap_password=MySpecialPwd --level=preferred --secret=uni_secret --adapter=vmhba33
2 (Optional) Set the authentication information for mutual CHAP by running esxcli iscsi adapter auth
chap set again with the -d option set to mutual option and a dierent authentication user name and
secret.
esxcli <conn_options> iscsi adapter auth chap set --direction=mutual --
mchap_username=<m_name> --mchap_password=<m_pwd> --level=[prohibited, required] --
secret=<string> --adapter=<adapter_name>
For <level>, specify prohibited or required.
Option Description
prohibited The host does not use CHAP authentication. If authentication is enabled,
specify chapProhibited to disable it.
required The host requires successful CHAP authentication. The connection fails if
CHAP negotiation fails. You can set this value for mutual CHAP only if
CHAP is set to chapRequired.
For direction, specify mutual.
I You are responsible for making sure that CHAP is set before you set mutual CHAP, and
for using compatible levels for CHAP and mutual CHAP. Use a dierent secret in CHAP and mutual
CHAP.
Enable Mutual iSCSI Authentication with ESXCLI
Mutual authentication is supported for software iSCSI and dependent hardware iSCSI, but not for
independent hardware iSCSI.
For information on iSCSI CHAP, see “Seing iSCSI CHAP,” on page 72.
Prerequisites
nVerify that CHAP authentication is already set up when you start seing up mutual CHAP.
nVerify that CHAP and mutual CHAP use dierent user names and passwords. The second user name
and password are supported for mutual authentication on the storage side.
nVerify that CHAP and mutual CHAP use compatible CHAP levels.
Chapter 5 Managing iSCSI Storage
VMware, Inc. 95
Procedure
1 Enable authentication.
esxcli <conn_options> iscsi adapter auth chap set --direction=uni --chap_username=<name> --
chap_password=<pw> --level=[prohibited, discouraged, preferred, required] --secret=<string>
--adapter=<adapter_name>
The specied chap_username and secret must be supported on the storage side.
2 List possible VMkernel NICs to bind.
esxcli <conn_options> iscsi logicalnetworkportal list
3 Enable mutual authentication.
esxcli <conn_options> iscsi adapter auth chap set --direction=mutual --
mchap_username=<m_name> --mchap_password=<m_pwd> --level=[prohibited, required] --
secret=<string> --adapter=<adapter_name>
The specied mchap_username and secret must be supported on the storage side.
4 After setup is complete, perform rediscovery and rescan all storage devices.
The following example performs the rediscovery and rescan operations.
esxcli <conn_options> iscsi adapter discovery rediscover
esxcli <conn_options> storage core adapter rescan --adapter=vmhba36
Enable iSCSI Authentication with vicfg-iscsi
You can use the vicfg-iscsi -A -c options to enable iSCSI authentication. Mutual authentication is
supported for software iSCSI and dependent hardware iSCSI, but not for independent hardware iSCSI.
For information on iSCSI CHAP, see “Seing iSCSI CHAP,” on page 72.
Prerequisites
nVerify that CHAP authentication is already set up when you start seing up mutual CHAP.
nVerify that CHAP and mutual CHAP use dierent user names and passwords. The second user name
and password are supported for mutual authentication on the storage side.
nVerify that CHAP and mutual CHAP use compatible CHAP levels.
Procedure
1 Enable authentication on the ESXi host.
vicfg-iscsi <conn_options> -A -c <level> -m <auth_method> -u <auth_u_name> -w <chap_password>
[-i <stor_ip_addr|stor_hostname> [:<portnum>] [-n <iscsi_name]] <adapter_name>
The specied user name and password must be supported on the storage side.
2 Enable mutual authentication on the ESXi host.
vicfg-iscsi <conn_options> -A -c <level> -m <auth_method> -b -u <ma_username>
-w <ma_password> [-i <stor_ip_addr|stor_hostname> [:<portnum>]
[-n <iscsi_name]] <adapter_name>
3 After setup is complete, perform rediscovery and rescan all storage devices.
vSphere Command-Line Interface Concepts and Examples
96 VMware, Inc.

Set Up Ports for iSCSI Multipathing
With port binding, you create a separate VMkernel port for each physical NIC using 1:1 mapping.
You can add all network adapter and VMkernel port pairs to a single vSwitch. The vSphere Storage
documentation explains in detail how to specify port binding.
You cannot set up ports for multipathing by using vicfg-iscsi.
In the examples below, specify one of the options listed in “Connection Options for vCLI Host Management
Commands,” on page 19 in place of <conn_options>.
I The ESXi 4.x ESXCLI commands for seing up iSCSI are no longer supported.
Prerequisites
Verify that you are familiar with iSCSI session removal. See “Removing iSCSI Sessions,” on page 99.
Procedure
1 Find out which uplinks are available for use with iSCSI adapters.
esxcli <conn_options> iscsi physicalnetworkportal list --adapter=<adapter_name>
2 Connect the software iSCSI or dependent hardware iSCSI initiator to the iSCSI VMkernel ports by
running the following command for each port.
esxcli <conn_options> iscsi networkportal nic add --adapter=<adapter_name> --nic=<bound_nic>
3 Verify that the ports were added to the iSCSI initiator by running the following command.
esxcli <conn_options> iscsi networkportal list --adapter=<adapter_name>
4 (Optional) If there are active iSCSI sessions between your host and targets, discontinue them. See
Removing iSCSI Sessions.
5 Rescan the iSCSI initiator.
esxcli <conn_options> storage core adapter rescan --adapter <iscsi adapter>
6 To disconnect the iSCSI initiator from the ports, run the following command.
esxcli <conn_options> iscsi networkportal remove --adapter=<adapter_name> --nic=<bound_nic>
Chapter 5 Managing iSCSI Storage
VMware, Inc. 97

Managing iSCSI Sessions
To communicate with each other, iSCSI initiators and targets establish iSCSI sessions. You can use esxcli
iscsi session to list and manage iSCSI sessions for software iSCSI and dependent hardware iSCSI.
Introduction to iSCSI Session Management
By default, software iSCSI and dependent hardware iSCSI initiators start one iSCSI session between each
initiator port and each target port.
If your iSCSI initiator or target has more than one port, your host can establish multiple sessions. The
default number of sessions for each target equals the number of ports on the iSCSI adapter times the number
of target ports. You can display all current sessions to analyze and debug them. You might add sessions to
the default for several reasons.
nCloning sessions - Some iSCSI arrays support multiple sessions between the iSCSI adapter and target
ports. If you clone an existing session on one of these arrays, the array presents more data paths for
your adapter. Duplicate sessions do not persist across reboot. Additional sessions to the target might
have performance benets, but the result of cloning depends entirely on the array. You must log out
from an iSCSI session if you want to clone a session. You can use the esxcli iscsi session add
command to clone a session.
nEnabling Header and Data Digest - If you are logged in to a session and want to enable the Header and
Data Digest parameters, you must set the parameter, remove the session, and add the session back for
the parameter change to take eect. You must log out from an iSCSI session if you want to clone a
session.
nEstablishing target-specic sessions - You can establish a session to a specic target port. This can be
useful if your host connects to a single-port storage system that, by default, presents only one target
port to your initiator, but can redirect additional sessions to a dierent target port. Establishing a new
session between your iSCSI initiator and another target port creates an additional path to the storage
system.
C Some storage systems do not support multiple sessions from the same initiator name or endpoint.
Aempts to create multiple sessions to such targets can result in unpredictable behavior of your iSCSI
environment.
Listing iSCSI Sessions
You can use esxcli iscsi session to list sessions.
The following example scenario uses the available commands. Run esxcli iscsi session --help and each
command with --help for reference information. The example uses a conguration le to log in to the host.
Specify one of the options listed in “Connection Options for vCLI Host Management Commands,” on
page 19 in place of <conn_options>.
I The ESXi 4.x ESXCLI commands for managing iSCSI sessions are not supported against ESXi
5.0 hosts.
nList a software iSCSI session at the adapter level.
esxcli <conn_options> iscsi session list --adapter=<iscsi_adapter>
nList a software iSCSI session at the target level.
esxcli <conn_options> iscsi session list --name=<target> --adapter=<iscsi_adapter>
vSphere Command-Line Interface Concepts and Examples
98 VMware, Inc.
Logging in to iSCSI Sessions
You can use esxcli iscsi session to log in to a session.
Specify one of the options listed in “Connection Options for vCLI Host Management Commands,” on
page 19 in place of <conn_options>.
nLog in to a session on the current software iSCSI or dependent hardware iSCSI conguration at the
adapter level.
esxcli <conn_options> iscsi session add --adapter=<adapter_name>
The following example applies custom values.
esxcli --config /host-config-file iscsi session add --adapter=vmhba36
nLog in to a session on the current software iSCSI or dependent hardware iSCSI conguration at the
target level.
esxcli <conn_options> iscsi session add --name=<target> --adapter=<adapter_name>
The following example applies custom values.
esxcli --config /host-config-file iscsi session add -name=iqn.xxx --adapter=vmhba36
nAdd duplicate sessions with target and session IDs in current software iSCSI or dependent hardware
iSCSI conguration.
esxcli <conn_options> iscsi session add --name=<iqn.xxxx> --isid=<session_id> --
adapter=<iscsi_adapter>
iqn.xxxx is the target IQN, which you can determine by listing all sessions. session_id is the session's
iSCSI ID. The following example applies custom values.
esxcli --config /host-config-file iscsi session add -name=iqn.xxx --isid='00:02:3d:00:00:01'
--adapter=vmhba36
Removing iSCSI Sessions
You can use esxcli iscsi session to remove iSCSI sessions.
Specify one of the options listed in “Connection Options for vCLI Host Management Commands,” on
page 19 in place of <conn_options>.
nRemove sessions from the current software iSCSI or dependent hardware iSCSI conguration at the
adapter level.
esxcli <conn_options> iscsi session remove --adapter=<iscsi_adapter>
The following example applies custom values.
esxcli iscsi session remove --adapter=vmhba36
nRemove sessions from the current software iSCSI or dependent hardware iSCSI conguration at the
target level.
esxcli <conn_options> iscsi session remove --name=<iqn> --adapter=<iscsi_adapter>
The following example applies custom values.
esxcli <conn_options> iscsi session remove --name=iqn.xxx --adapter=vmhba38
Chapter 5 Managing iSCSI Storage
VMware, Inc. 99
nRemove sessions from the current software iSCSI or dependent hardware iSCSI conguration with
target and session ID.
esxcli <conn_options> iscsi session remove --name=<iqn.xxxx> --isid=<session id> --
adapter=<iscsi_adapter>
iqn.xxxx is the target IQN, which you can determine by listing all sessions. session_id is the session's
iSCSI ID. The following example applies custom values.
esxcli --config /host-config-file iscsi session remove --name=iqn.xxx --session='00:02:3d:
01:00:01' --adapter=vmhba36
vSphere Command-Line Interface Concepts and Examples
100 VMware, Inc.

Managing Third-Party Storage Arrays 6
VMware partners and customers can optimize performance of their storage arrays in conjunction with
VMware vSphere by using VMware PSA (pluggable storage architecture). The esxcli storage core
namespace manages VMware PSA and the esxcli storage nmp namespace manages the VMware NMP
plug-in.
The vSphere Storage documentation discusses PSA functionality in detail and explains how to use the
vSphere Web Client to manage the PSA, the associated native multipathing plug-in (NMP), and third-party
plug-ins.
This chapter uses the following acronyms.
Acronym Meaning
PSA Pluggable Storage Architecture
NMP Native Multipathing Plug-in. Generic VMware multipathing module.
PSP Path Selection Plug-in. Handles path selection for a given device.
SATP Storage Array Type Plug-in. Handles path failover for a given storage array.
This chapter includes the following topics:
n“Managing NMP with esxcli storage nmp,” on page 101
n“Path Claiming with esxcli storage core claiming,” on page 108
n“Managing Claim Rules,” on page 110
Managing NMP with esxcli storage nmp
The NMP is an extensible multipathing module that ESXi supports by default. You can use esxcli storage
nmp to manage devices associated with NMP and to set path policies.
The NMP supports all storage arrays listed on the VMware storage Hardware Compatibility List (HCL) and
provides a path selection algorithm based on the array type. The NMP associates a set of physical paths with
a storage device (LUN). An SATP determines how path failover is handled for a specic storage array. A PSP
determines which physical path is used to issue an I/O request to a storage device. SATPs and PSPs are
plug-ins within the NMP.
VMware, Inc. 101

Device Management with esxcli storage nmp device
The device option performs operations on devices currently claimed by the VMware NMP.
esxcli storage nmp device list
The list command lists the devices controlled by VMware NMP and shows the SATP and PSP information
associated with each device. To show the paths claimed by NMP, run esxcli storage nmp path list to list
information for all devices, or for just one device with the --device option.
Options Description
--device <device>
-d <device>
Filters the output of the command to show information about a single device. Default is all
devices.
esxcli storage nmp device set
The set command sets the PSP for a device to one of the policies loaded on the system.
Any device can use the PSP assigned to the SATP handling that device, or you can run esxcli storage nmp
device set --device naa.xxx --psp <psp> to specically override the PSP assigned to the device.
nIf a device does not have a specic PSP set, it always uses the PSP assigned to the SATP. If the default
PSP for the SATP changes, the PSP assigned to the device changes only after reboot or after a device is
reclaimed. A device is reclaimed when you unclaim all paths for the device and reclaim the paths.
nIf you use esxcli storage nmp device set to override the SATPs default PSP with a specic PSP, the
PSP changes immediately and remains the user-dened PSP across reboots. A change in the SATP's PSP
has no eect.
Use the --default option to return the device to using the SATP's PSP.
Options Description
--default
-E
Sets the PSP back to the default for the SATP assigned to this device.
--device <device>
-d <device>
Device to set the PSP for.
--psp <PSP>
-P <PSP>
PSP to assign to the specied device. Call esxcli storage nmp psp list to display all
currently available PSPs. See “Managing Path Policies,” on page 54.
See vSphere Storage for a discussion of path policies.
To set the path policy for the specied device to VMW_PSP_FIXED, run the following command.
esxcli <conn_options> storage nmp device set --device naa.xxx --psp VMW_PSP_FIXED
Listing Paths with esxcli storage nmp path
You can use the path option to list paths claimed by NMP.
By default, the command displays information about all paths on all devices. You can lter in the following
ways.
nOnly show paths to a singe device.
esxcli storage nmp path list --device <device>
nOnly show information for a single path.
esxcli storage nmp path list --path=<path>
To list devices, call esxcli storage nmp device list.
vSphere Command-Line Interface Concepts and Examples
102 VMware, Inc.

Managing Path Selection Policy Plug-Ins with esxcli storage nmp psp
You can use esxcli storage nmp psp to manage VMware path selection policy plug-ins included with the
VMware NMP and to manage third-party PSPs.
I When used with third-party PSPs, the syntax depends on the third-party PSP implementation.
Retrieving PSP Information
The esxcli storage nmp psp generic deviceconfig get and esxcli storage nmp psp generic pathconfig
get commands retrieve PSP conguration parameters. The type of PSP determines which command to use.
nUse nmp psp generic deviceconfig get for PSPs that are set to VMW_PSP_RR, VMW_PSP_FIXED or
VMW_PSP_MRU.
nUse nmp psp generic pathconfig get for PSPs that are set to VMW_PSP_FIXED or VMW_PSP_MRU. No path
conguration information is available for VMW_PSP_RR.
To retrieve PSP conguration parameters, use the appropriate command for the PSP.
nDevice conguration information.
esxcli <conn_options> storage nmp psp generic deviceconfig get --device=<device>
esxcli <conn_options> storage nmp psp fixed deviceconfig get --device=<device>
esxcli <conn_options> storage nmp psp roundrobin deviceconfig get --device=<device>
nPath conguration information.
esxcli <conn_options> storage nmp psp generic pathconfig get --path=<path>
nRetrieve the PSP conguration for the specied path.
esxcli <conn_options> nmp psp pathconfig generic get --path vmhba4:C1:T2:L23
The esxcli storage nmp psp list command shows the list of PSPs on the system and a brief description of
each plug-in.
Setting Configuration Parameters for Third-Party Extensions
The esxcli storage nmp psp generic deviceconfig set and esxcli storage nmp psp generic pathconfig
set commands support future third-party PSA expansion. The setconfig command sets PSP conguration
parameters for those third-party extensions.
N The precise results of these commands depend on the third-party extension. See the extension
documentation for information.
Use esxcli storage nmp roundrobin setconfig for other path policy conguration. See “Customizing
Round Robin Setup,” on page 105.
You can run esxcli storage nmp psp generic deviceconfig set --device=<device> to specify PSP
information for a device, and esxcli storage nmp psp generic pathconfig set --path=<path> to specify
PSP information for a path. For each command, use --config to set the specied conguration string.
Chapter 6 Managing Third-Party Storage Arrays
VMware, Inc. 103

Options Description
--config <config_string>
-c <config_string>
Conguration string to set for the device or path specied by --device or --path. See
“Managing Path Policies,” on page 54.
--device <device>
-d <device>
Device for which you want to customize the path policy.
--path <path>
-p <path>
Path for which you want to customize the path policy.
Fixed Path Selection Policy Operations
The fixed option gets and sets the preferred path policy for NMP devices congured to use VMW_PSP_FIXED.
Retrieving the Preferred Path
The esxcli storage nmp fixed deviceconfig get command retrieves the preferred path on a specied
device that is using NMP and the VMW_PSP_FIXED path policy.
Options Description
- -device <device>
-d <device>
Device for which you want to get the preferred path. This device must be controlled by the
VMW_PSP_FIXED PSP.
To return the path congured as the preferred path for the specied device, run the following command.
Specify one of the options listed in “Connection Options for vCLI Host Management Commands,” on
page 19 in place of <conn_options>.
esxcli <conn_options> storage nmp fixed deviceconfig get --device naa.xxx
Setting the Preferred Path
The esxcli storage nmp fixed deviceconfig set command sets the preferred path on a specied device that
is using NMP and the VMW_PSP_FIXED path policy.
Options Description
--device <device>
-d <device>
Device for which you want to set the preferred path. This device must be controlled by the
VMW_PSP_FIXED PSP.
Use esxcli storage nmp device --list to list the policies for all devices.
--path <path>
-p <path>
Path to set as the preferred path for the specied device.
To set the preferred path for the specied device to vmhba3:C0:T5:L3, run the following command. Specify
one of the options listed in “Connection Options for vCLI Host Management Commands,” on page 19 in
place of <conn_options>.
esxcli <conn_options> storage nmp fixed deviceconfig set --device naa.xxx --path vmhba3:C0:T5:L3
vSphere Command-Line Interface Concepts and Examples
104 VMware, Inc.

Customizing Round Robin Setup
You can use the esxcli storage nmp psp roundrobin commands to set round robin path options on a device
controlled by the VMW_PSP_RR PSP.
Specifying and Customizing Round Robin Path Policies
You can use esxcli storage nmp commands to set path policies. Specify one of the options listed in
“Connection Options for vCLI Host Management Commands,” on page 19 in place of <conn_options>.
1 Set the path policy to round robin.
esxcli <conn_options> storage nmp device set --device naa.xxx --psp VMW_PSP_RR
2 Specify when to switch paths.
You can choose the number of I/O operations, number of bytes, and so on. The following example sets
the device specied by --device to switch to the next path each time 12345 bytes have been sent along
the current path.
esxcli <conn_options> storage nmp psp roundrobin deviceconfig set --type "bytes" -B 12345 --
device naa.xxx
The following example sets the device specied by --device to switch after 4200 I/O operations have
been performed on a path.
esxcli <conn_options> storage nmp psp roundrobin deviceconfig set --type=iops --iops 4200 --
device naa.xxx
Retrieving Path Selection Settings
The esxcli storage nmp psp roundrobin deviceconfig get command retrieves path selection seings for a
device that is using the roundrobin PSP. You can specify the device to retrieve the information for.
Options Description
-d <device>
--device <device>
Device to get round robin properties for.
Specifying Conditions for Path Changes
The esxcli storage nmp psp roundrobin deviceconfig set command species under which conditions a
device that is using the VMW_PSP_RR PSP changes to a dierent path. You can use --bytes or --iops to specify
when the path should change.
Options Description
--bytes
-B
Number of bytes to send along one path for this device before the PSP switches to the next path. You can use
this option only when --type is set to bytes.
--device
-d
Device to set round robin properties for. This device must be controlled by the round robin (VMW_PSP_RR)
PSP.
--iops
-I
Number of I/O operations to send along one path for this device before the PSP switches to the next path.
You can use this option only when --type is set to iops.
Chapter 6 Managing Third-Party Storage Arrays
VMware, Inc. 105

Options Description
--type
-t
Type of round robin path switching to enable for this device. The following values for type are supported.
nbytes: Sets the trigger for path switching based on the number of bytes sent down a path.
ndefault: Sets the trigger for path switching back to default values.
niops: Sets the trigger for path switching based on the number of I/O operations on a path.
An equal sign (=) before the type or double quotes around the type are optional.
--useANO
-U
If set to 1, the round robin PSP includes paths in the active, unoptimized state in the round robin set. If set to
0, the PSP uses active, unoptimized paths only if no active optimized paths are available. Otherwise, the PSP
includes only active optimized paths in the round robin path set.
Managing SATPs
The esxcli storage nmp satp commands manage SATPs.
You can use these commands to perform the following tasks.
nRetrieve and set conguration parameters.
nAdd and remove rules from the list of claim rules for a specied SATP.
nSet the default PSP for a specied SATP.
nList SATPs that are currently loaded into NMP and the associated claim rules.
The default SATP for an active-active FC array with a vendor and model not listed in the SATP rules is
VMW_SATP_DEFAULT_AA.
Retrieving Information About SATPs
The esxcli storage nmp satp list command lists the SATPs that are currently available to the NMP
system and displays information about those SATPs. This command supports no options and displays
information about these SATPs.
esxcli <conn_options> storage nmp satp list
The rule list command lists the claim rules for SATPs.
esxcli <conn_options> storage nmp satp rule list
Adding SATP Rules
Claim rules specify that a storage device that uses a certain driver or transport or has a certain vendor or
model should use a certain SATP. The esxcli storage nmp satp rule add command adds a rule that
performs such a mapping to the list of claim rules. The options you specify dene the rule. For example, the
following command species that if a path has vendor VMWARE and model Virtual, the PSA assigns it to the
VMW_SATP_LOCAL SATP.
esxcli <conn_options> storage nmp satp rule add --satp="VMW_SATP_LOCAL" --vendor="VMWARE" --
model="Virtual" --description="VMware virtual disk"
Option Description
--driver
-D
Driver string to set when adding the SATP claim rule.
--device
-d
Device to set when adding SATP claim rules. Device rules are mutually exclusive with vendor/model
and driver rules.
--force
-f
Force claim rules to ignore validity checks and install the rule even if checks fail.
vSphere Command-Line Interface Concepts and Examples
106 VMware, Inc.

Option Description
--model
-M
Model string to set when adding the SATP claim rule. Can be the model name or a paern ^mod*,
which matches all devices that start with mod. That is, the paern successfully matches mod1 and
modz, but not mymod1.
The command supports the start/end (^) and wildcard (*) functionality but no other regular
expressions.
--transport
-R
Transport string to set when adding the SATP claim rule. Describes the type of storage HBA, for
example, iscsi or fc.
--vendor
-V
Vendor string to set when adding the SATP claim rule.
--satp
-s
SATP for which the rule is added.
--claim-option
-c
Claim option string to set when adding the SATP claim rule.
--description
-e
Description string to set when adding the SATP claim rule.
--option
-o
Option string to set when adding the SATP claim rule. Surround the option string in double quotes,
and use a space, not a comma, when specifying more than one option.
"enable_local enable_ssd"
--psp
-P
Default PSP for the SATP claim rule.
--psp-option
-O
PSP options for the SATP claim rule.
--type
-t
Set the claim type when adding a SATP claim rule.
The following examples illustrate adding SATP rules. Specify one of the options listed in “Connection
Options for vCLI Host Management Commands,” on page 19 in place of <conn_options>.
nAdd an SATP rule that species that disks with vendor string VMWARE and model string Virtual should
be added to VMW_SATP_LOCAL.
esxcli <conn_options> storage nmp satp rule add --satp="VMW_SATP_LOCAL" --vendor="VMWARE" --
model="Virtual" --description="VMware virtual disk"
nAdd an SATP rule that species that disks with the driver string somedriver should be added to
VMW_SATP_LOCAL.
esxcli <conn_options> storage nmp satp rule add --satp="VMW_SATP_LOCAL" --driver="somedriver"
nAdd a rule that species that all storage devices with vendor string ABC and a model name that starts
with 120 should use VMW_SATP_DEFAULT_AA.
esxcli <conn_options> storage nmp satp rule add --satp VMW_SATP_DEFAULT_AA --vendor="ABC" --
model="^120*
Removing SATP Rules
The esxcli storage nmp satp rule remove command removes an existing SATP rule. The options you
specify dene the rule to remove. The options listed for “Adding SATP Rules,” on page 106 are supported.
The following example removes the rule that assigns devices with vendor string VMWARE and model string
Virtual to VMW_SATP_LOCAL.
esxcli <conn_options> storage nmp satp rule remove --satp="VMW_SATP_LOCAL" --vendor="VMWARE" --
model="Virtual"
Chapter 6 Managing Third-Party Storage Arrays
VMware, Inc. 107

Retrieving and Setting SATP Configuration Parameters
The esxcli storage nmp satp generic deviceconfig get and esxcli storage nmp satp generic
pathconfig get commands retrieve per-device or per-path SATP conguration parameters. You cannot
retrieve paths or devices for all SATPs, you must retrieve the information one path or one device at a time.
Use the following command to retrieve per device or per path SATP conguration parameters, and to see
whether you can set specic conguration parameters for a device or path.
For example, esxcli storage nmp satp generic deviceconfig get --device naa.xxx might return SATP
VMW_SATP_LSI does not support device configuration.
esxcli storage nmp satp generic pathconfig get -path vmhba1:C0:T0:L8 might return INIT,AVT
OFF,v5.4,DUAL ACTIVE,ESX FAILOVER
The esxcli storage nmp satp generic deviceconfig set and esxcli storage nmp satp generic
pathconfig set commands set conguration parameters for SATPs that are loaded into the system, if they
support device conguration. You can set per-path or per-device SATP conguration parameters.
I The command passes the conguration string to the SATP associated with that device or path.
The conguration strings might vary by SATP. VMware supports a xed set of conguration strings for a
subset of its SATPs. The strings might change in future releases.
Options Description
--config
-c
Conguration string to set for the path specied by --path or the device specied by --device.
You can set the conguration for the following SATPs.
nVMW_SATP_ALUA_CX
nVMW_SATP_ALUA
nVMW_SATP_CX
nVMW_SATP_INV
You can specify one of the following device conguration strings.
nnavireg_on – starts automatic registration of the device with Navisphere.
nnavireg_off – stops the automatic registration of the device.
nipfilter_on – stops the sending of the host name for Navisphere registration. Used if host is known as
localhost.
nipfilter_off – enables the sending of the host name during Navisphere registration.
--device
-d
Device to set SATP conguration for. Not all SATPs support the setcong option on devices.
--path
-p
Path to set SATP conguration for. Not all SATPs support the setcong option on paths.
Run esxcli storage nmp device set --default --device=<device> to set the PSP for the specied device
back to the default for the assigned SATP for this device.
Path Claiming with esxcli storage core claiming
The esxcli storage core claiming namespace includes a number of troubleshooting commands.
These commands are not persistent and are useful only to developers who are writing PSA plug-ins or
troubleshooting a system. If I/O is active on the path, unclaim and reclaim actions fail.
I The help for esxcli storage core claiming includes the autoclaim command. Do not use this
command unless instructed to do so by VMware support sta.
vSphere Command-Line Interface Concepts and Examples
108 VMware, Inc.
Using the Reclaim Troubleshooting Command
The esxcli storage core claiming reclaim troubleshooting command is intended for PSA plug-in
developers or administrators who troubleshoot PSA plug-ins.
The command performs the following tasks.
nAempts to unclaim all paths to a device.
nRuns the loaded claim rules on each of the unclaimed paths to reclaim those paths.
It is normal for this command to fail if a device is in use.
I The reclaim command unclaims paths associated with a device.
You cannot use the command to reclaim paths currently associated with the MASK_PATH plug-in because --
device is the only option for reclaim and MASK_PATH paths are not associated with a device.
You can use the command to unclaim paths for a device and have those paths reclaimed by the MASK_PATH
plug-in.
Options Description
--device <device>
-d <device>
Name of the device on which all paths are reclaimed.
--help Displays the help message.
Unclaiming Paths or Sets of Paths
The esxcli storage core claiming unclaim command unclaims a path or set of paths, disassociating those
paths from a PSA plug-in. The command fails if the device is in use.
You can unclaim only active paths with no outstanding requests. You cannot unclaim the ESXi USB partition
or devices with VMFS volumes on them. It is therefore normal for this command to fail, especially when you
specify a plug-in or adapter to unclaim.
Unclaiming does not persist. Periodic path claiming reclaims unclaimed paths unless claim rules are
congured to mask a path. See the vSphere Storage documentation for details.
I The unclaim command unclaims paths associated with a device. You can use this command to
unclaim paths associated with the MASK_PATH plugin but cannot use the --device option to unclaim those
paths.
Options Description
--adapter <adapter>
-A <adapter>
If --type is set to location, species the name of the HBA for the paths that you want to
unclaim. If you do not specify this option, unclaiming runs on paths from all adapters.
--channel <channel>
-C <channel>
If --type is set to location, species the SCSI channel number for the paths that you want
to unclaim. If you do not specify this option, unclaiming runs on paths from all channels.
--claimrule-class <cl>
-c <cl>
Claim rule class to use in this operation. You can specify MP (Multipathing), Filter, or
VAAI. Multipathing is the default. Filter is used only for VAAI. Specify claim rules for
both VAAI_FILTER and VAAI plug-in to use it.
--device <device>
-d <device>
If --type is set to device, aempts to unclaim all paths to the specied device. If there are
active I/O operations on the specied device, at least one path cannot be unclaimed.
--driver <driver>
-D <driver>
If --type is driver, unclaims all paths specied by this HBA driver.
Chapter 6 Managing Third-Party Storage Arrays
VMware, Inc. 109

Options Description
--lun <lun_number>
-L <lun_number>
If --type is location, species the SCSI LUN for the paths to unclaim. If you do not
specify --lun, unclaiming runs on paths with any LUN number.
--model <model>
-m <model>
If --type is vendor, aempts to unclaim all paths to devices with specic model
information (for multipathing plug-ins) or unclaim the device itself (for lter plug-ins). If
there are active I/O operations on this device, at least one path fails to unclaim.
--path <path>
-p <path>
If --type is path, unclaims a path specied by its path UID or runtime name.
--plugin <plugin>
-P
If --type is plugin, unclaims all paths for a specied multipath plug-in.
<plugin> can be any valid PSA plug-in on the system. By default, only NMP and MASK_PATH
are available, but additional plugi-ns might be installed.
--target <target>
-T <target>
If --type is location, unclaims the paths with the SCSI target number specied by target.
If you do not specify --target, unclaiming runs on paths from all targets.
--type <type>
-t <type>
Type of unclaim operation to perform. Valid values are location, path, driver, device,
plugin, and vendor.
--vendor <vendor>
-v <vendor>
If --type is vendor, aempts to unclaim all paths to devices with specic vendor info for
multipathing plug-ins or unclaim the device itself for lter plug-ins. If there are any active
I/O operations on this device, at least one path fails to unclaim
The following troubleshooting command tries to unclaim all paths on vmhba1.
esxcli <conn_options> storage core claiming unclaim --type location -A vmhba1
Run vicfg-mpath <conn_options> -l to verify that the command succeeded.
If a path is the last path to a device that was in use, or a if a path was very recently in use, the unclaim
operation might fail. An error is logged that not all paths could be unclaimed. You can stop processes that
might use the device and wait 15 seconds to let the device be quiesced, then retry the command.
Managing Claim Rules
The PSA uses claim rules to determine which multipathing module should claim the paths to a particular
device and to manage the device. esxcli storage core claimrule manages claim rules.
Change the Current Claim Rules in the VMkernel
Claim rule modication commands do not operate on the VMkernel directly. Instead, they operate on the
conguration le by adding and removing rules.
Specify one of the options listed in “Connection Options for vCLI Host Management Commands,” on
page 19 in place of <conn_options>.
Procedure
1 Run one or more of the esxcli storage core claimrule modication commands.
For example, add, remove, or move.
2 Run esxcli storage core claimrule load to replace the current rules in the VMkernel with the
modied rules from the conguration le.
What to do next
You can also run esxcli storage core plugin list to list all loaded plug-ins.
vSphere Command-Line Interface Concepts and Examples
110 VMware, Inc.

Adding Claim Rules
The esxcli storage core claimrule add command adds a claim rule to the set of claim rules on the system.
You can use this command to add new claim rules or to mask a path using the MASK_PATH claim rule. You
must load the rules after you add them.
Options Description
--adapter <adapter>
-A <adapter>
Adapter of the paths to use. Valid only if --type is location.
--autoassign
-u
Adds a claim rule based on its characteristics. The rule number is not required.
--channel <channel>
-C <channel>
Channel of the paths to use. Valid only if --type is location.
--claimrule-class <cl>
-c <cl>
Claim rule class to use in this operation. You can specify MP (default), Filter, or VAAI.
To congure hardware acceleration for a new array, add two claim rules, one for the
VAAI lter and another for the VAAI plug-in. See vSphere Storage for detailed
instructions.
--driver <driver>
-D <driver>
Driver for the HBA of the paths to use. Valid only if --type is driver.
--force
-f
Force claim rules to ignore validity checks and install the rule.
--lun <lun_number>
-L <lun_number>
LUN of the paths to use. Valid only if --type is location.
--model <model>
-M <model>
Model of the paths to use. Valid only if --type is vendor.
Valid values are values of the Model string from the SCSI inquiry string. Run vicfg-
scsidevs <conn_options> -l on each device to see model string values.
--plugin
-P
PSA plug-in to use. Currently, the values are NMP or MASK_PATH, but third parties can
ship their own PSA plug-ins in the future.
MASK_PATH refers to the plug-in MASK_PATH_PLUGIN. The command adds claim rules for
this plug-in if the user wants to mask the path.
You can add a claim rule that causes the MASK_PATH_PLUGIN to claim the path to mask a
path or LUN from the host. See the vSphere Storage documentation for details.
--rule <rule_ID>
-r <rule_ID>
Rule ID to use. Run esxcli storage core claimrule list to see the rule ID. The
rule ID indicates the order in which the claim rule is to be evaluated. User-dened claim
rules are evaluated in numeric order starting with 101.
--target <target>
-T <target>
Target of the paths to use. Valid only if --type is location.
--transport <transport>
-R <transport>
Transport of the paths to use. Valid only if --type is transport. The following values
are supported.
nblock – block storage
nfc – FibreChannel
niscsivendor — iSCSI
niscsi – not currently used
nide — IDE storage
nsas — SAS storage
nsata — SATA storage
nusb – USB storage
nparallel – parallel
nunknown
Chapter 6 Managing Third-Party Storage Arrays
VMware, Inc. 111

Options Description
--type <type>
-t <type>
Type of matching to use for the operation. Valid values are vendor, location, driver,
and transport.
--vendor
-V
Vendor of the paths to use. Valid only if --type is vendor.
Valid values are values of the vendor string from the SCSI inquiry string. Run vicfg-
scsidevs <conn_options> -l on each device to see vendor string values.
--wwnn World-Wide Node Number for the target to use in this operation.
--wwpn World-Wide Port Number for the target to use in this operation.
--xcopy-max-transfer-
size
-m
Maximum data transfer size when using XCOPY. Valid only if --xcopy-use-array-
values is specied.
--xcopy-use-array-values
-a
Use the array reported values to construct the XCOPY command to be sent to the storage
array. This applies to VAAI claim rules only.
--xcopy-use-multi-segs
-s
Use multiple segments when issuing an XCOPY request. Valid only if --xcopy-use-
array-values is specied.
Claim rules are numbered as follows.
nRules 0–100 are reserved for internal use by VMware.
nRules 101–65435 are available for general use. Any third-party multipathing plug-ins installed on your
system use claim rules in this range. By default, the PSA claim rule 101 masks Dell array pseudo
devices. Do not remove this rule, unless you want to unmask these devices.
nRules 65436–65535 are reserved for internal use by VMware.
When claiming a path, the PSA runs through the rules starting from the lowest number and determines is a
path matches the claim rule specication. If the PSA nds a match, it gives the path to the corresponding
plug-in. This is worth noticing because a given path might match several claim rules.
The following examples illustrate adding claim rules. Specify one of the options listed in “Connection
Options for vCLI Host Management Commands,” on page 19 in place of <conn_options>.
nAdd rule 321, which claims the path on adapter vmhba0, channel 0, target 0, LUN 0 for the NMP.
esxcli <conn_options> storage core claimrule add -r 321 -t location -A vmhba0 -C 0 -T 0 -L 0
-P NMP
nAdd rule 429, which claims all paths provided by an adapter with the mptscsi driver for the MASK_PATH
plug-in.
esxcli <conn_options> storage core claimrule add -r 429 -t driver -D mptscsi -P MASK_PATH
nAdd rule 914, which claims all paths with vendor string VMWARE and model string Virtual for the NMP.
esxcli <conn_options> storage core claimrule add -r 914 -t vendor -V VMWARE -M Virtual -P NMP
nAdd rule 1015, which claims all paths provided by FC adapters for the NMP.
esxcli <conn_options> storage core claimrule add -r 1015 -t transport -R fc -P NMP
Removing Claim Rules
The esxcli storage core claimrule remove command removes a claim rule from the set of claim rules on
the system.
I By default, the PSA claim rule 101 masks Dell array pseudo devices. Do not remove this rule,
unless you want to unmask these devices.
vSphere Command-Line Interface Concepts and Examples
112 VMware, Inc.

Option Description
--rule <rule_ID>
-r <rule_ID>
ID of the rule to be removed. Run esxcli storage core claimrule list to see the rule ID.
The following example removes rule 1015. Specify one of the options listed in “Connection Options for vCLI
Host Management Commands,” on page 19 in place of <conn_options>.
esxcli <conn_options> storage core claimrule remove -r 1015
Listing Claim Rules
The list command lists all claim rules on the system.
You can specify the claim rule class as an argument.
Option Description
--claimrule-class
<cl>
-c <cl>
Claim rule class to use in this operation. You can specify MP (Multipathing), Filter, or VAAI.
Multipathing is the default. Filter is used only for VAAI. Specify claim rules for both
VAAI_FILTER and VAAI plug-in to use it. See vSphere Storage for information about VAAI.
You can run the command as follows. The equal sign is optional, so both forms of the command have the
same result. Specify one of the options listed in “Connection Options for vCLI Host Management
Commands,” on page 19 in place of <conn_options>.
esxcli <conn_options> storage core claimrule list -c Filter
esxcli <conn_options> storage core claimrule list --claimrule-class=Filter
Loading Claim Rules
The esxcli storage core claimrule load command loads claim rules from the esx.conf conguration le
into the VMkernel. Developers and experienced storage administrators might use this command for boot
time conguration.
esxcli storage core claimrule load has no options. The command always loads all claim rules from
esx.conf.
Moving Claim Rules
The esxcli storage core claimrule move command moves a claim rule from one rule ID to another.
Options Description
--claimrule-class <cl>
-c <cl>
Claim rule class to use in this operation.
--new-rule <rule_ID>
-n <rule_ID>
New rule ID you want to give to the rule specied by the --rule option.
--rule <rule_ID>
-r <rule_ID>
ID of the rule to be removed. Run esxcli storage core claimrule list to display the
rule ID.
The following example renames rule 1016 to rule 1015 and removes rule 1016. Specify one of the options
listed in “Connection Options for vCLI Host Management Commands,” on page 19 in place of
<conn_options>.
esxcli <conn_options> storage core claimrule move -r 1015 -n 1016
Chapter 6 Managing Third-Party Storage Arrays
VMware, Inc. 113

Load and Apply Path Claim Rules
You can run the esxcli storage core claimrule run command to apply claim rules that are loaded.
If you do not call run, the system checks for claim rule updates every ve minutes and applies them. Specify
one of the options listed in “Connection Options for vCLI Host Management Commands,” on page 19 in
place of <conn_options>.
Procedure
1 Modify rules and load them.
esxcli <conn_options> storage core claimrule load
2 Quiesce the devices that use paths for which you want to change the rule and unclaim those paths.
esxcli <conn_options> storage core claiming unclaim --device=<device>
3 Run path claiming rules.
esxcli <conn_options> storage core claimrule run
Running Path Claim Rules
The esxcli storage core claimrule run command runs path claiming rules.
You can run this command to apply claim rules that are loaded. See “Load and Apply Path Claim Rules,” on
page 114.
You can also use the esxcli storage core claimrule run command for troubleshooting and boot time
conguration.
Options Description
--adapter <adapter>
-A <adapter>
If --type is location, name of the HBA for the paths to run the claim rules on. To run
claim rules on paths from all adapters, omit this option.
--channel <channel>
-C <channel>
If --type is location, value of the SCSI channel number for the paths to run the claim
rules on. To run claim rules on paths with any channel number, omit this option.
--claimrule-class
-c
Claim rule class to use in this operation.
--device
-d
Device UID to use for this operation.
--lun <lun>
-L <lun>
If --type is location, value of the SCSI LUN for the paths to run claim rules on. To run
claim rules on paths with any LUN, omit this option.
--path <path_UID>
-p <path_UID>
If --type is path, this option indicates the unique path identier (UID) or the runtime
name of a path to run claim rules on.
--target <target>
-T <target>
If --type is location, value of the SCSI target number for the paths to run claim rules on.
To run claim rules on paths with any target number, omit this option.
vSphere Command-Line Interface Concepts and Examples
114 VMware, Inc.

Options Description
--type <location|path|
all>
-t <location|path|all>
Type of claim to perform. By default, uses all, which means claim rules run without
restriction to specic paths or SCSI addresses. Valid values are location, path, and all.
--wait
-w
You can use this option only if you also use --type all.
If the option is included, the claim waits for paths to sele before running the claim
operation. In that case, the system does not start the claiming process until it is likely that
all paths on the system have appeared before starting the claim process.
After the claiming process has started, the command does not return until device
registration has completed.
If you add or remove paths during the claiming or the discovery process, this option
might not work correctly.
Chapter 6 Managing Third-Party Storage Arrays
VMware, Inc. 115
vSphere Command-Line Interface Concepts and Examples
116 VMware, Inc.

Managing Users 7
An ESXi system grants access to its resources when a known user with appropriate permissions logs on to
the system with a password that matches the one stored for that user.
You can use the vSphere SDK for all user management tasks. You cannot create ESXi users by using the
vSphere Web Client.
You can use the vicfg-user command to create, modify, delete, and list local direct access users on an ESXi
host. You cannot run this command against a vCenter Server system.
I Starting with vSphere 5.1, you can no longer manage groups with vicfg-user.
This chapter includes the following topics:
n“Users in the vSphere Environment,” on page 117
n“vicfg-user Command Syntax,” on page 118
n“Managing Users with vicfg-user,” on page 118
n“Assigning Permissions with ESXCLI,” on page 120
Users in the vSphere Environment
Users and roles control who has access to vSphere components and what actions each user can perform.
User management is discussed in detail in the vSphere Security documentation.
I You cannot use vicfg-user to create roles. You can manage system-dened roles.
vCenter Server and ESXi systems authenticate a user with a combination of user name, password, and
permissions. Servers and hosts maintain lists of authorized users and the permissions assigned to each user.
Privileges dene basic individual rights that are required to perform actions and retrieve information. ESXi
and vCenter Server use sets of privileges, or roles, to control which users can access particular vSphere
objects. ESXi and vCenter Server provide a set of pre-established roles.
The privileges and roles assigned on an ESXi host are separate from the privileges and roles assigned on a
vCenter Server system. When you manage a host by using a vCenter Server system, only the privileges and
roles assigned through the vCenter Server system are available. You cannot create ESXi users by using the
vSphere Web Client.
VMware, Inc. 117

vicfg-user Command Syntax
The vicfg-user syntax diers from other vCLI commands.
You specify operations by using the following syntax.
vicfg-user <conn_options> -e <user> -o <add|modify|delete|list>
If you create a user without specifying the role (--role), the user has no permissions. You cannot change the
user's role, you can only change the user's permission.
I You cannot use the vicfg-user command to modify users created with the vSphere Client in
vSphere 6.0 or earlier.
Options
The vicfg-user command-specic options manipulate users. You must also specify connection options. See
“Connection Options for vCLI Host Management Commands,” on page 19.
Option Description
--adduser <user_list>
-u <user_list>
Adds the specied users. Takes a comma-separated list of users.
--entity <user>
-e <user>
Entity to perform the operation on. Starting with vSphere 5.1, entity is
always user.
--login <login_id>
-l <login_id>
Login ID of the user.
--newpassword <p_wd>
-p <p_wd>
Password for the target user.
--newuserid <UUID>
-i <UUID>
New UUID for the target user.
--newusername <name>
-n <name>
New user name for the target user.
--operation
-o
Operation to perform. Specify add, modify, delete, or list.
--role <admin|read-only|no-
access>
-r <admin|read-only|no-access>
Role for the target user. Specify one of admin, read-only, or no-access.
Users that you create without assigning permissions have no permissions.
--shell
-s
Grant shell access to the target user. Default is no shell access. Use this
command to change the default or to revoke shell access rights after they
have been granted.
Valid values are yes and no.
This option is not supported against vSphere 5.0 systems. The option is
supported only against ESX. The option is not supported against ESXi.
Managing Users with vicfg-user
A user is an individual authorized to log in to an ESXi or vCenter Server system.
vSphere does not explicitly restrict users with the same authentication credentials from accessing and taking
action within the vSphere environment simultaneously.
vSphere Command-Line Interface Concepts and Examples
118 VMware, Inc.
You can manage users dened on the vCenter Server system and users dened on individual hosts
separately.
nManage users dened on ESXi with the vSphere Web Services SDK or vicfg-user.
nManage vCenter Server users with the vSphere Web Client or the vSphere Web Services SDK.
I You cannot use the vicfg-user command to modify users created with the vSphere Client in
vSphere 6.0 or earlier.
Even if the user lists of a host and a vCenter Server system appear to have common users, for example, a
user called devuser, these users are separate users with the same name. The aributes of devuser in
vCenter Server, including permissions, passwords, and so forth, are separate from the aributes of devuser
on the ESXi host. If you log in to vCenter Server as devuser, you might have permission to view and delete
les from a datastore. If you log in to an ESXi host as devuser, you might not have these permissions.
Users authorized to work directly on an ESXi host are added to the internal user list when ESXi is installed
or can be added by a system administrator after installation. You can use vicfg-user to add users, remove
users, change passwords, and congure permissions.
C See the Authentication and User Management chapter of vSphere Security for information about
root users before you make any changes to the default users. Mistakes regarding root users can have serious
access consequences.
Each ESXi host has several default users.
nThe root user has full administrative privileges. Root users can control all aspects of the host that they
are logged on to. Root users can manipulate permissions, create users on ESXi hosts, work with events,
and so on.
nThe vpxuser user is a vCenter Server entity with root rights on the ESXi host, allowing it to manage
activities for that host. The system creates vpxuser when an ESXi host is aached to vCenter Server.
vpxuser is not present on the ESXi host unless the host is being managed through vCenter Server.
nOther users might be dened by the system, depending on the networking setup and other factors.
Example: Create, Modify, and Delete Users
The following example scenario illustrates some of the tasks that you can perform. Specify one of the
options listed in “Connection Options for vCLI Host Management Commands,” on page 19 in place of
<conn_options>.
1 List the existing users.
vicfg-user <conn_options> -e user -o list
The list displays all users that are predened by the system and all users that were added later.
I The command lists a maximum of 100 users.
2 Add a new user, specifying a login ID and password.
vicfg-user <conn_options> -e user -o add -l user27 -p 27_password
The command creates the user. By default, the command autogenerates a UID for the user.
3 List the users again to verify that the new user was added and a UID was generated.
vicfg-user <conn_options> -e user -o list
USERS
-------------------
Principal -: root
Chapter 7 Managing Users
VMware, Inc. 119

Full Name -: root
UID -: 0
Shell Access -> 1
-------------------
...
--------------------
Principal -: user27
Full Name -:
UID -: 501
Shell Access -> 0
4 Modify the password for user user27.
vicfg-user <conn_options> -e user -o modify -l user27 -p 27_password2
The system might return Updated user user27 successfully.
5 Assign read-only privileges to the user, who currently has no access.
vicfg-user <conn_options> -e user -o modify -l user27 --role read-only
The system prompts whether you want to change the password, which might be advisable if the user
does not currently have a password. Answer y or n. The system then updates the user.
Updated user user27 successfully.
Assigned the role read-only
6 Remove the user with login ID user27.
vicfg-user <conn_options> -e user -o delete -l user27
The system removes the user and prints a message.
Removed the user user27 successfully.
Assigning Permissions with ESXCLI
You can use ESXCLI commands to manage permissions.
Starting with vSphere 6.0, a set of ESXCLI commands allows you to perform the following operations.
nGive permissions to local users and groups by assigning them one of the predened roles.
nGive permissions to Active Directory users and groups if your ESXi host has been joined to an Active
Directory domain by assigning them one of the predened roles.
I When you manage local users on your ESXi host, you are not aecting the vCenter Server
users.
Example: Manage Permissions
You can list, remove, and set permissions for a user or group, as shown in the following example.
1 List permissions.
esxcli system permission list
vSphere Command-Line Interface Concepts and Examples
120 VMware, Inc.
The system displays permission information. The second column indicates whether the information is
for a user or group.
Principal Is Group Role
-----------------------------------
ABCDEFGH\esx^admins true Admin
dcui false Admin
root false Admin
vpxuser false Admin
test1 false ReadOnly
2 Set permissions for a user or group. Specify the ID of the user or group, and set the --group option to
true to indicate a group. Specify one of three roles, Admin, ReadOnly or NoAccess.
esxcli system permission set --id test1 -r ReadOnly
3 Remove permissions for a user or group.
esxcli system permission unset --id test1
Account Management
You can manage accounts by using the following commands.
esxcli system account add
esxcli system account set
esxcli system account list
esxcli system account remove
Chapter 7 Managing Users
VMware, Inc. 121
vSphere Command-Line Interface Concepts and Examples
122 VMware, Inc.

Managing Virtual Machines 8
You can manage virtual machines with the vSphere Web Client or the vmware-cmd vCLI command. By using
vmware-cmd you can register and unregister virtual machines, retrieve virtual machine information, manage
snapshots, turn the virtual machine on and o, add and remove virtual devices, and prompt for user input.
Some virtual machine management utility applications are included in the vSphere SDK for Perl.
The VMware PowerCLI cmdlets, which you can install for use with Microsoft PowerShell, manage many
aspects of virtual machines.
This chapter includes the following topics:
n“vmware-cmd Overview,” on page 123
n“List and Register Virtual Machines,” on page 125
n“Retrieving Virtual Machine Aributes,” on page 125
n“Managing Virtual Machine Snapshots with vmware-cmd,” on page 127
n“Powering Virtual Machines On and O,” on page 128
n“Connecting and Disconnecting Virtual Devices,” on page 129
n“Working with the AnswerVM API,” on page 130
n“Forcibly Stop a Virtual Machine with ESXCLI,” on page 130
vmware-cmd Overview
vmware-cmd was included in earlier version of the ESX Service Console. A vmware-cmd command has been
available in the vCLI package since ESXi version 3.0.
I vmware-cmd is not available in the ESXi Shell. Run the vmware-cmd vCLI command instead.
Older versions of vmware-cmd support a set of connection options and general options that dier from the
options in other vCLI commands. The vmware-cmd vCLI command supports these options. The vCLI
command also supports the standard vCLI --server, --username, --password, and --vihost options. vmware-
cmd does not support other connection options.
I vmware-cmd is a legacy tool and supports the usage of VMFS paths for virtual machine
conguration les. As a rule, use datastore paths to access virtual machine conguration les.
VMware, Inc. 123

Connection Options for vmware-cmd
The vmware-cmd vCLI command supports only a specic set of connection options. Other vCLI connection
options are not supported, for example, you cannot use variables because the corresponding option is not
supported.
The following connection options are supported.
Option Description
--server <host>
-H <host>
Target ESXi or vCenter Server system.
--vihost <target>
-h <target>
When you run vmware-cmd with the -H option pointing to a vCenter Server system, use --
vihost to specify the ESXi host to run the command against.
-O <port> Alternative connection port. The default port number is 902.
--username <username>
-U <username>
User who is authorized to log in to the host specied by --server or --vihost.
--password <password>
-P <password>
Password for the user specied by -U.
-Q <protocol> Protocol to use, either http or https. Default is https.
General Options for vmware-cmd
The vmware-cmd vCLI command supports a set of general options.
The following general options are supported.
Option Description
--help Prints a help message that lists the options for this command.
-q Runs in quiet mode with minimal output. The output does not display the specied operation and arguments.
-v Runs in verbose mode.
Format for Specifying Virtual Machines
When you run vmware-cmd, the virtual machine path is usually required.
You can specify the virtual machine by using one of the following formats.
Type Syntax Examples
Datastore
prex style
'[ds_name]
relative_path'
n'[myStorage1] testvms/VM1/VM1.vmx' (Linux)
n"[myStorage1] testvms/VM1/VM1.vmx" (Windows)
UUID-based
path
folder/subfolder/file n'/vmfs/volumes/mystorage/testvms/VM1/VM1.vmx' (Linux)
n"/vmfs/volumes/mystorage/testvms/VM1/VM1.vmx"
(Windows)
vSphere Command-Line Interface Concepts and Examples
124 VMware, Inc.

List and Register Virtual Machines
You can list, unregister, and register virtual machines by using vmware-cmd.
Registering or unregistering a virtual machine means adding the virtual machine to the vCenter Server or
ESXi inventory or removing the virtual machine.
I If you register a virtual machine with a vCenter Server system, and then remove it from the
ESXi host, an orphaned virtual machine results. Call vmware-cmd -s unregister with the vCenter Server
system as the target to resolve the issue.
The following example scenario lists all registered virtual machines on a vCenter Server, unregisters a
virtual machine, and reregisters the virtual machine.
Procedure
1 Run vmware-cmd -l to list all registered virtual machines on a server.
vmware-cmd -H <vc_server> -U <login_user> -P <login_password> --vihost <esx_host> -l
The command lists the VMX le for each virtual machine.
/vmfs/volumes/<storage>/winxpPro-sp2/winxpPro-sp2.vmx
/vmfs/volumes/<storage>/RHEL-lsi/RHEL-lsi.vmx
/vmfs/volumes/<storage>/VIMA0809/VIMA0809.vmx
.....
2 Run vmware-cmd -s unregister to remove a virtual machine from the inventory.
vmware-cmd -H <vc_server> -U <login_user> -P <login_password> --vihost <esx_host> -s
unregister /vmfs/volumes/Storage2/testvm/testvm.vmx
The system returns 0 to indicate success, 1 to indicate failure.
N When you run against a vCenter Server system, you must specify the data center and the
resource pool to register the virtual machine in. The default data center is ha-datacenter and the
default resource pool is Resources.
When you run against an ESXi host, you usually do not specify the resource pool and data center.
However, if two virtual machines with the same name exist in two resource pools, you must specify the
resource pool.
3 Run vmware-cmd -l again to verify that the virtual machine was removed from the inventory.
4 Run vmware-cmd -s register to add the virtual machine back to the inventory.
vmware-cmd -H <vc_server> -U <login_user -P <login_password --vihost <esx_host> -s
register /vmfs/volumes/Storage2/testvm/testvm.vmx
The system returns 0 to indicate success, 1 to indicate failure.
Retrieving Virtual Machine Attributes
vmware-cmd includes options for retrieving information about a virtual machine.
Each option requires that you specify the virtual machine path. See “Format for Specifying Virtual
Machines,” on page 124. You must also specify connection options, which dier from other vCLI commands.
See “Connection Options for vmware-cmd,” on page 124.
Chapter 8 Managing Virtual Machines
VMware, Inc. 125
You can use vmware-cmd options to retrieve a number of dierent virtual machine aributes. For a complete
list of options, see the vSphere CLI Reference.
nThe guestinfo option allows you to retrieve information about the guest operating system. For
example, you can retrieve the number of remote consoles allowed by a virtual machine by using
guestinfo with the RemoteDisplay.maxConnections variable.
vmware-cmd -H <vc_system> -U <user> -P <password> --vihost
<esx_host> /vmfs/volumes/Storage2/testvm/testvm.vmx getguestinfo RemoteDisplay.maxConnections
The Hardening Guide includes additional information about variables you can use in conjunction with
guestinfo. A complete list is not available.
nThe getuptime option retrieves the uptime of the guest operating system on the virtual machine, in
seconds.
vmware-cmd -H <vc_system> -U <user> -P <password> --vihost
<esx_host> /vmfs/volumes/Storage2/testvm/testvm.vmx getuptime
getuptime() = 17921
nThe getproductinfo product option lists the VMware product that the virtual machine runs on.
vmware-cmd -H <vc_system> -U <user> -P <password> --vihost
<esx_host> /vmfs/volumes/Storage2/testvm/testvm.vmx getproductinfo product
The return value can be esx for VMware ESX, embeddedESX for VMware ESXi, or unknown.
nThe getproductinfo platform option lists the platform that the virtual machine runs on.
vmware-cmd -H <vc_system> -U <user> -P <password> --vihost
<esx_host> /vmfs/volumes/Storage2/testvm/testvm.vmx getproductinfo platform
The return value can be win32-x86 for an x86-based Windows system, linux-x86 for an x86-based Linux
system, or vmnix-x86 for an x86-based ESXi microkernel.
nThe getproductinfo build, getproductinfo majorversion, or getproductinfo minorversion options
retrieve version information.
nThe getstate option retrieves the execution state of the virtual machine, which can be on, off,
suspended, or unknown.
vmware-cmd -H <vc_system> -U <user> -P <password> --vihost
<esx_host> /vmfs/volumes/Storage2/testvm/testvm.vmx getstate
getstate() = on
nThe gettoolslastactive option indicates whether VMware Tools is installed and whether the guest
operating system is responding normally.
vmware-cmd -H <vc_system> -U <user> -P <password> --vihost
<esx_host> /vmfs/volumes/Storage2/testvm/testvm.vmx gettoolslastactive
The command returns an integer indicating how much time has passed, in seconds, since the last
heartbeat was detected from the VMware Tools service. This value is initialized to zero when a virtual
machine powers on. The value stays at zero until the rst heartbeat is detected. After the rst heartbeat,
the value is always greater than zero until the virtual machine is power cycled again. The command
returns one of the following values.
n0 – VMware Tools is not installed or not running.
n1 – Guest operating system is responding normally.
n5 – Intermient heartbeat. There might be a problem with the guest operating system.
vSphere Command-Line Interface Concepts and Examples
126 VMware, Inc.

n100 – No heartbeat. Guest operating system might have stopped responding.
N You usually use the vmware-cmd guestinfo option only when VMware Support instructs you to do
so. The command is therefore not discussed in this document.
Managing Virtual Machine Snapshots with vmware-cmd
You can manage virtual machine snapshots by using vmware-cmd. A snapshot captures the entire state of the
virtual machine at the time you take the snapshot.
Virtual machine state includes the following aspects of the virtual machine.
nMemory state - Contents of the virtual machine's memory.
nSeings state - Virtual machine seings.
nDisk state - State of all the virtual machine's virtual disks.
When you revert to a snapshot, you return these items to the state they were in at the time that you took the
snapshot. If you want the virtual machine to be running or to be shut down when you start it, make sure
that it is in that state when you take the snapshot.
You can use snapshots as restoration points when you install update packages, or during a branching
process, such as installing dierent versions of a program. Taking snapshots ensures that each installation
begins from an identical baseline. The vSphere Virtual Machine Administration documentation discusses
snapshots in detail.
I Use the vSphere Web Client to revert to a named snapshot. vmware-cmd only supports reverting
to the current snapshot.
Take a Virtual Machine Snapshot
You can take virtual machine snapshots by using vmware-cmd.
You can take a snapshot while a virtual machine is running, shut down, or suspended. If you are in the
process of suspending a virtual machine, wait until the suspend operation has nished before taking a
snapshot.
If a virtual machine has multiple disks in dierent disk modes, you must shut down the virtual machine
before taking a snapshot. For example, if you have a special-purpose conguration that requires you to use
an independent disk, you must shut down the virtual machine before taking a snapshot.
Procedure
1 (Optional) If the virtual machine has multiple disks in dierent disk modes, shut down the virtual
machine.
vmware-cmd -H <vc_system> -U <user> -P <password> --vihost
<esx_host> /vmfs/volumes/Storage2/testvm/testvm.vmx stop soft
2 (Optional) Check that the shut down operation has been completed.
vmware-cmd -H <vc_system> -U <user> -P <password> --vihost
<esx_host> /vmfs/volumes/Storage2/testvm/testvm.vmx getstate
3Run vmware-cmd with the createsnapshot option.
You must specify the description, quiesce ag (0 or 1) and memory ag (0 or 1).
vmware-cmd -H <vc_system> -U <user> -P <password> --vihost
<esx_host> /vmfs/volumes/Storage2/testvm/testvm.vmx createsnapshot VM1Aug09 'test snapshot
August 09' 0 0
Chapter 8 Managing Virtual Machines
VMware, Inc. 127

4Check that the virtual machine has a snapshot by using the hassnapshot option.
The call returns 1 if the virtual machine has a snapshot and returns 0 otherwise.
vmware-cmd -H <vc_system> -U <user> -P <password> --vihost
<esx_host> /vmfs/volumes/Storage2/testvm/testvm.vmx hassnapshot
hassnapshot () = 1
Reverting and Removing Snapshots
You can use vmware-cmd to revert to the current snapshot or to remove a snapshot.
I You cannot use vmware-cmd to revert to a named snapshot. Use the vSphere Web Client to revert
to a named snapshot.
Run vmware-cmd with the revertsnapshot option to revert to the current snapshot. If no snapshot exists, the
command does nothing and leaves the virtual machine state unchanged.
vmware-cmd -H <vc_system> -U <user> -P <password> --vihost
<esx_host> /vmfs/volumes/Storage2/testvm/testvm.vmx revertsnapshot
Run vmware-cmd with the removesnapshots option to remove all snapshots associated with a virtual
machine. If no snapshot exists, the command does nothing.
vmware-cmd -H <vc_system> -U <user> -P <password> --vihost
<esx_host> /vmfs/volumes/Storage2/testvm/testvm.vmx removesnapshots
Powering Virtual Machines On and Off
You can start, reboot, stop, and suspend virtual machines by using vmware-cmd.
You must supply a value for the powerop_mode ag, which can be soft or hard.
I You must have the current version of VMware Tools installed and running in the guest
operating system to use a soft power operation.
nSoft power operations - When you specify soft as the powerop_mode value, the result of the call depends
on the operation.
Operation Result
Stop vmware-cmd aempts to shut down the guest operating system and powers o the virtual machine.
Reset vmware-cmd aempts to shut down the guest operating system and reboots the virtual machine.
Suspend vmware-cmd aempts to run a script in the guest operating system before suspending the virtual
machine.
nHard power operations - vmware-cmd immediately and unconditionally shuts down, resets, or suspends
the virtual machine.
The following examples illustrate how to use vmware-cmd.
nStart - Use the start option to power on a virtual machine or to resume a suspended virtual machine.
The powerop_mode, either hard or soft, is required.
vmware-cmd -H <vc_system> -U <user> -P <password> --vihost
<esx_host> /vmfs/volumes/Storage2/testvm/testvm.vmx start soft
nReset - When you reset the virtual machine with the soft powerop_mode, which is the default mode, the
guest operating system is shut down before the reset.
vSphere Command-Line Interface Concepts and Examples
128 VMware, Inc.

If VMware Tools is not currently installed on the virtual machine, you can perform only a hard reset
operation.
a Check that VMware tools is installed so that you can reset the virtual machine with the default
powerop_mode, which is soft.
vmware-cmd -H <vc_system> -U <user> -P <password> --vihost
<esx_host> /vmfs/volumes/Storage2/testvm/testvm.vmx gettoolslastactive
See “Retrieving Virtual Machine Aributes,” on page 125.
b Use the reset option to shut down and restart the virtual machine.
vmware-cmd -H <vc_system> -U <user> -P <password> --vihost
<esx_host> /vmfs/volumes/Storage2/testvm/testvm.vmx reset soft
nSuspend - You have two options for suspending a virtual machine.
nThe suspend option with the hard powerop_mode unconditionally shuts down a virtual machine.
vmware-cmd -H <vc_system> -U <user> -P <password> --vihost
<esx_host> /vmfs/volumes/Storage2/testvm/testvm.vmx suspend hard
nThe suspend option with the soft powerop_mode runs scripts that result in a graceful shut-down of
the guest operating system and shuts down the virtual machine. VMware Tools must be installed
for soft powerop_mode.
vmware-cmd -H <vc_system> -U <user> -P <password> --vihost
<esx_host> /vmfs/volumes/Storage2/testvm/testvm.vmx suspend soft
Connecting and Disconnecting Virtual Devices
You can connect and disconnect virtual devices by using the connectdevice and disconnectdevice
options of vmware-cmd.
The following types of devices are supported.
nNetwork adapters
nCD/DVD drives
nFloppy drives
These devices must already be dened in the virtual machine virtual hardware list.
The command options connect and disconnect a dened ISO or FLP le or a physical device on the host.
After you connect a device, its content can be accessed from the guest OS. For network adapters, the options
connect the virtual NIC to its dened port group or disconnect the NIC. This is equivalent to selecting or
deselecting the Connected check box in the vSphere Web Client.
N The terms CD/DVD drive, Floppy drive. and Network adapter are case-sensitive.
You can connect or disconnect devices if the following conditions are met.
nThe virtual machine has a guest operating system that supports hot-plug functionality. See the
Operating System Installation documentation.
nThe virtual machine is using hardware version 7 or later.
nThe virtual machine is powered on.
Chapter 8 Managing Virtual Machines
VMware, Inc. 129

The following examples illustrate connecting and disconnecting a virtual device. Device names are case
sensitive.
nThe connectdevice option connects the virtual IDE device CD/DVD Drive 2 to the specied virtual
machine.
vmware-cmd -H <vc_system> -U <user> -P <password> --vihost
<esx_host> /vmfs/volumes/Storage2/testvm/testvm.vmx connectdevice "CD/DVD drive 2"
nThe disconnectdevice option disconnects the virtual device.
vmware-cmd -H <vc_system> -U <user> -P <password> --vihost
<esx_host> /vmfs/volumes/Storage2/testvm/testvm.vmx disconnectdevice "CD/DVD drive 2"
Working with the AnswerVM API
The AnswerVM API allows users to provide input to questions, thereby allowing blocked virtual machine
operations to complete.
The vmware-cmd --answer option allows you to access the input. You can use this option when you want to
congure a virtual machine based on a user's input, such as in the following example situations.
1 The user clones a virtual machine and provides the default virtual disk type.
2 When the user powers on the virtual machine, it prompts for the desired virtual disk type.
Forcibly Stop a Virtual Machine with ESXCLI
You can use ESXCLI to stop a virtual machine forcibly.
In some cases, virtual machines do not respond to the normal shutdown or stop commands. In these cases, it
might be necessary to forcibly shut down the virtual machines. Forcibly shuing down a virtual machine
might result in guest operating system data loss and is similar to pulling the power cable on a physical
machine.
You can forcibly stop virtual machines that are not responding to normal stop operation with the esxcli vm
process kill command. Specify one of the options listed in “Connection Options for vCLI Host
Management Commands,” on page 19 in place of <conn_options>.
Procedure
1 List all running virtual machines on the system to see the World ID of the virtual machine that you
want to stop.
esxcli <conn_options> vm process list
2 Stop the virtual machine by running the following command.
esxcli <conn_options> vm process kill --type <kill_type> --world-id <ID>
The command supports three --type options. Try the types sequentially - soft before hard, hard before
force. The following types are supported through the --type option.
Type Description
soft Gives the VMX process a chance to shut down cleanly, like kill or kill -
SIGTERM.
hard Stops the VMX process immediately, like kill -9 or kill -SIGKILL.
force Stops the VMX process when other options do not work.
What to do next
If all three options do not work, reboot your ESXi host to resolve the issue.
vSphere Command-Line Interface Concepts and Examples
130 VMware, Inc.

Managing vSphere Networking 9
The vSphere CLI networking commands allow you to manage the vSphere network services.
You can connect virtual machines to the physical network and to each other and congure vSphere standard
switches. Limited conguration of vSphere distributed switches is also supported. You can also set up your
vSphere environment to work with external networks such as SNMP or NTP.
This chapter includes the following topics:
n“Introduction to vSphere Networking,” on page 131
n“Retrieving Basic Networking Information,” on page 134
n“Troubleshoot a Networking Setup,” on page 134
n“Seing Up vSphere Networking with vSphere Standard Switches,” on page 136
n“Seing Up vSphere Networking with vSphere Distributed Switch,” on page 148
n“Managing Standard Networking Services in the vSphere Environment,” on page 149
n“Seing the DNS Conguration,” on page 149
n“Manage an NTP Server,” on page 152
n“Manage the IP Gateway,” on page 152
n“Seing Up IPsec,” on page 153
n“Manage the ESXi Firewall,” on page 157
n“Monitor VXLAN,” on page 158
Introduction to vSphere Networking
At the core of vSphere Networking are virtual switches.
vSphere supports standard switches (VSS) and distributed switches (VDS). Each virtual switch has a preset
number of ports and one or more port groups.
Virtual switches allow your virtual machines to connect to each other and to connect to the outside world.
nWhen two or more virtual machines are connected to the same virtual switch, and those virtual
machines are also on the same port group or VLAN, network trac between them is routed locally.
nWhen virtual machines are connected to a virtual switch that is connected to an uplink adapter, each
virtual machine can access the external network through that uplink. The adapter can be an uplink
connected to a standard switch or a distributed uplink port connected to a distributed switch.
VMware, Inc. 131
Virtual switches allow your ESXi host to migrate virtual machines with VMware vMotion and to use IP
storage through VMkernel network interfaces.
nUsing vMotion, you can migrate running virtual machines with no downtime. You can enable vMotion
with vicfg-vmknic --enable-vmotion. You cannot enable vMotion with ESXCLI.
nIP storage refers to any form of storage that uses TCP/IP network communication as its foundation and
includes iSCSI and NFS for ESXi. Because these storage types are network based, they can use the same
VMkernel interface and port group.
The network services that the VMkernel provides (iSCSI, NFS, and vMotion) use a TCP/IP stack in the
VMkernel. The VMkernel TCP/IP stack is also separate from the guest operating system's network stack.
Each of these stacks accesses various networks by aaching to one or more port groups on one or more
virtual switches.
Networking Using vSphere Standard Switches
vSphere standard switches allow you to connect virtual machines to the outside world.
Figure 9‑1. Networking with vSphere Standard Switches
Physical Network
vSphere
Standart Switch
B C D E
virtual
physical
physical network adapters
port
groups
Network
C
Host1
Host1
Host2
Host2
A
1
3
2
vSphere
Standart Switch
B C D EA
Figure 9-1 shows the relationship between the physical and virtual network elements. The numbers match
those in the gure.
nAssociated with each ESXi host are one or more uplink adapters (1). Uplink adapters represent the
physical switches the ESXi host uses to connect to the network. You can manage uplink adapters by
using the esxcli network nic or vicfg-nics vCLI command. See “Managing Uplink Adapters,” on
page 142.
nEach uplink adapter is connected to a standard switch (2). You can manage a standard switch and
associate it with uplink adapters by using the esxcli network vswitch or vicfg-vswitch vCLI
command. See “Seing Up Virtual Switches and Associating a Switch with a Network Interface,” on
page 136.
vSphere Command-Line Interface Concepts and Examples
132 VMware, Inc.
nAssociated with the standard switch are port groups (3). Port group is a unique concept in the virtual
environment. You can congure port groups to enforce policies that provide enhanced networking
security, network segmentation, beer performance, high availability, and trac management. You can
use the esxcli network vswitch standard portgroup or vicfg-vswitch command to associate a
standard switch with a port group, and the esxcli network ip interface or vicfg-vmknic command to
associate a port group with a VMkernel network interface.
nThe VMkernel TCP/IP networking stack supports iSCSI, NFS, and vMotion and has an associated
VMkernel network interface. You congure VMkernel network interfaces by using esxcli network ip
interface or vicfg-vmknic. See “Adding and Modifying VMkernel Network Interfaces,” on page 145.
Separate VMkernel network interfaces are often used for separate tasks, for example, you might devote
one VMkernel network interface card to vMotion only. Virtual machines run their own systems' TCP/IP
stacks and connect to the VMkernel at the Ethernet level through virtual switches.
Networking Using vSphere Distributed Switches
When you want to connect a virtual machine to the outside world, you can use a standard switch or a
distributed switch. With a distributed switch, the virtual machine can maintain its network seings even if
the virtual machine is migrated to a dierent host.
Figure 9‑2. Networking with vSphere Distributed Switches
uplink uplink
Physical Network
vSphere Distributed Switch
B C D E F G H I J
virtual
physical
physical network adapters
distributed port
group
Network
C
Host1
Host1
Host2
Host2
A
1
2
4
3
nEach physical network adapter (1) on the host is paired with a distributed uplink port (2), which
represents the uplink to the virtual machine. With distributed switches, the virtual machine no longer
depends on the host’s physical uplink but on the (virtual) uplink port. You manage a uplink ports
primarily using the vSphere Web Client, or vSphere APIs.
Chapter 9 Managing vSphere Networking
VMware, Inc. 133
nThe distributed switch itself (3) functions as a single virtual switch across all associated hosts. Because
the switch is not associated with a single host, virtual machines can maintain consistent network
conguration as they migrate from one host to another.
Like a standard switch, each distributed switch is a network hub that virtual machines can use. A
distributed switch can route trac internally between virtual machines or link to an external network
by connecting to physical network adapters. You create a distributed switch by using the
vSphere Web Client UI, but can manage some aspects of a distributed switch by using vicfg-vswitch.
You can list distributed virtual switches by using the esxcli network vswitch command. See “Seing
Up Virtual Switches and Associating a Switch with a Network Interface,” on page 136.
Retrieving Basic Networking Information
Service console commands for retrieving networking information are not included in the ESXi Shell. You can
instead use ESXCLI commands directly in the shell or use vCLI commands.
On ESXi 5.0, ifconfig information should be the information of the VMkernel NIC that aaches to the
Management Network port group. You can retrieve information by using ESXCLI commands.
esxcli <conn_options> network ip interface list
esxcli <conn_options> network ip interface ipv4 get -n vmk<X>
esxcli <conn_options> network ip interface ipv6 get -n vmk<X>
esxcli <conn_options> network ip interface ipv6 address list
For information corresponding to the Linux netstat command, use the following ESXCLI command.
esxcli <conn_options> network ip connection list
You can also ping individual hosts with the esxcli network diag ping command. The command includes
options for using ICMPv4 or ICMPv6 packet requests, specifying an interface to use, specifying the interval,
and so on.
Troubleshoot a Networking Setup
You can use vCLI network commands to view network statistics and troubleshoot your networking setup.
The nested hierarchy of commands allows you to drill down to potential trouble spots.
Procedure
1 List all virtual machine networks on a host.
esxcli network vm list
The command returns for each virtual machine the World ID, name, number of ports, and networks, as
in the following example.
World ID Name Num Ports Networks
----------------------------------------------------
10374 ubuntu-server-11.04-1 2 VM Network, dvportgroup-19
10375 ubuntu-server-11.04-2 2 VM Network, dvportgroup-19
10376 ubuntu-server-11.04-3 2 VM Network, dvportgroup-19
10408 ubuntu-server-11.04-4 3 VM Network, VM Network 10Gbps, dvportgroup-19
vSphere Command-Line Interface Concepts and Examples
134 VMware, Inc.
2 List the ports for one of the virtual machines by specifying its World ID.
esxcli network vm port list -w 10408
The command returns port information, as in the following example.
Port:
Port ID: XXXXXXXX
vSwitch: vSwitch0
Portgroup: VM Network
DVPort ID:
MAC Address: 00:XX:XX:aa:XX:XX
IP Address: 10.XXX.XXX.XXX
Team Uplink: vmnic0
Uplink Port ID: 12345678
Active Filters:
3 Retrieve the switch statistics for a port.
esxcli network port stats get -p 12345678
The command returns detailed statistics, as in the following example.
Packet statistics for port 12345678:
Packets received: 517631
Packets sent: 18937
Bytes received: 100471874
Bytes sent: 1527233
Broadcast packets received: 474160
Broadcast packets sent: 107
Multicast packets received: 8020
Multicast packets sent: 8
Unicast packets received: 35451
Unicast packets sent: 18822
Receive packets dropped: 45
Transmit packets dropped: 0
4 Retrieve the lter information for the port.
esxcli network port filter stats get -p 12345678
The command returns detailed statistics, as in the following example.
Filter statistics for dvfilter-test:
Filter direction: Receive
Packets in: 202080
Packets out: 202080
Packets dropped: 0
Packets filtered: 0
Packets faulted: 0
Packets queued: 0
Packets injected: 0
Packet errors: 0
5 Retrieve complete statistics for a NIC.
esxcli network nic stats get -n vmnic0
6 Get a per-VLAN packed breakdown on a NIC.
esxcli network nic vlan stats get -n vmnic0
The command returns the number of packets sent and received for the VLAN you specied.
Chapter 9 Managing vSphere Networking
VMware, Inc. 135
Setting Up vSphere Networking with vSphere Standard Switches
You can use ESXCLI and vicfg-vswitch to set up the vSphere networking.
You can set up your virtual network by performing a set of tasks.
1 Create or manipulate virtual switches by using esxcli network vswitch or vicfg-vswitch. By default,
each ESXi host has one virtual switch, vSwitch0. You can create additional virtual switches or manage
existing switches. See “Seing Up Virtual Switches and Associating a Switch with a Network Interface,”
on page 136.
2 (Optional) Make changes to the uplink adapter by using esxcli network vswitch standard uplink or
vicfg-nics. See “Managing Uplink Adapters,” on page 142.
3 (Optional) Use esxcli network vswitch standard portgroup or vicfg-vswitch to add port groups to
the virtual switch. See “Managing Port Groups with vicfg-vswitch,” on page 140.
4 (Optional) Use esxcli network vswitch standard portgroup set or vicfg-vswitch to establish VLANs
by associating port groups with VLAN IDs. See “Seing the Port Group VLAN ID with vicfg-vswitch,”
on page 141.
5 Use esxcli network ip interface or vicfg-vmknic to congure the VMkernel network interfaces. See
“Adding and Modifying VMkernel Network Interfaces,” on page 145.
Setting Up Virtual Switches and Associating a Switch with a Network Interface
A virtual switch models a physical Ethernet switch. You can manage virtual switches and port groups by
using the vSphere Web Client or by using vSphere CLI commands.
You can create a maximum of 127 virtual switches on a single ESXi host. By default, each ESXi host has a
single virtual switch called vSwitch0. By default, a virtual switch has 56 logical ports. See the Conguration
Maximums document on the vSphere documentation main page for details. Ports connect to the virtual
machines and the ESXi physical network adapters.
nYou can connect one virtual machine network adapter to each port by using the vSphere Web Client UI.
nYou can connect the uplink adapter to the virtual switches by using vicfg-vswitch or esxcli network
vswitch standard uplink. See “Linking and Unlinking Uplink Adapters with vicfg-vswitch,” on
page 144.
When two or more virtual machines are connected to the same virtual switch, network trac between them
is routed locally. If an uplink adapter is aached to the virtual switch, each virtual machine can access the
external network that the adapter is connected to.
This section discusses working in a standard switch environment. See “Networking Using vSphere
Distributed Switches,” on page 133 for information about distributed switch environments.
When working with virtual switches and port groups, perform the following tasks.
1 Find out which virtual switches are available and, optionally, what the associated MTU and CDP (Cisco
Discovery Protocol) seings are. See “Retrieving Information About Virtual Switches with ESXCLI,” on
page 137 and “Retrieving Information About Virtual Switches with vicfg-vswitch,” on page 137.
2 Add a virtual switch. See “Adding and Deleting Virtual Switches with ESXCLI,” on page 138 and
“Adding and Deleting Virtual Switches with vicfg-vswitch,” on page 138.
3 For a newly added switch, perform these tasks.
a Add a port group. See “Managing Port Groups with ESXCLI,” on page 139 and “Managing Port
Groups with vicfg-vswitch,” on page 140.
b (Optional) Set the port group VLAN ID. See “Seing the Port Group VLAN ID with ESXCLI,” on
page 141 and “Seing the Port Group VLAN ID with vicfg-vswitch,” on page 141.
vSphere Command-Line Interface Concepts and Examples
136 VMware, Inc.
c Add an uplink adapter. See “Linking and Unlinking Uplink Adapters with ESXCLI,” on page 144
and “Linking and Unlinking Uplink Adapters with vicfg-vswitch,” on page 144.
d (Optional) Change the MTU or CDP seings. See “Seing Switch Aributes with ESXCLI,” on
page 138 and “Seing Switch Aributes with vicfg-vswitch,” on page 139.
Retrieving Information About Virtual Switches
You can retrieve information about virtual switches by using ESXCLI or vicfg-vswitch.
Retrieving Information About Virtual Switches with ESXCLI
You can retrieve information about virtual switches by using esxcli network vswitch commands.
Specify one of the options listed in “Connection Options for vCLI Host Management Commands,” on
page 19 in place of <conn_options>.
nList all virtual switches and associated port groups.
esxcli <conn_options> network vswitch standard list
The command prints information about the virtual switch, which might include its name, number of
ports, MTU, port groups, and other information. The output includes information about CDP seings
for the virtual switch. The precise information depends on the target system. The default port groups
are Management Network and VM Network.
nList the network policy seings, such as security policy, trac shaping policy, and failover policy, for
the virtual switch. The following commands are supported.
esxcli <conn_options> network vswitch standard policy failover get
esxcli <conn_options> network vswitch standard policy security get
esxcli <conn_options> network vswitch standard policy shaping get
Retrieving Information About Virtual Switches with vicfg-vswitch
You can retrieve information about virtual switches by using the vicfg-vswitch command.
Specify one of the options listed in “Connection Options for vCLI Host Management Commands,” on
page 19 in place of <conn_options>.
nCheck whether vSwitch1 exists.
vicfg-vswitch <conn_options> -c vSwitch1
nList all virtual switches and associated port groups.
vicfg-vswitch <conn_options> -l
The command prints information about the virtual switch, which might include its name, number of
ports, MTU, port groups, and other information. The default port groups are Management Network and
VM Network.
nRetrieve the current CDP (Cisco Discovery Protocol) seing for this virtual switch.
If CDP is enabled on a virtual switch, ESXi administrators can nd out which Cisco switch port is
connected to which virtual switch uplink. CDP is a link-level protocol that supports discovery of CDP-
aware network hardware at either end of a direct connection. CDP is bit forwarded through switches.
CDP is a simple advertisement protocol which beacons information about the switch or host and some
port information.
vicfg-vswitch <conn_options> --get-cdp vSwitch1
Chapter 9 Managing vSphere Networking
VMware, Inc. 137
Adding and Deleting Virtual Switches
You can add and delete virtual switches with ESXCLI and with vicfg-vswitch.
Adding and Deleting Virtual Switches with ESXCLI
You can add and delete virtual switches by using the esxcli network vswitch standard namespace.
Specify one of the options listed in “Connection Options for vCLI Host Management Commands,” on
page 19 in place of <conn_options>.
nAdd a virtual switch.
esxcli <conn_options> network vswitch standard add --vswitch-name=vSwitch42
You can specify the number of port groups while adding the virtual switch. If you do not specify a
value, the default value is used. The system-wide port count cannot be greater than 4096.
esxcli <conn_options> network vswitch standard add --vswitch-name=vSwitch42 --ports=8
After you have added a virtual switch, you can set switch aributes. See “Seing Switch Aributes with
ESXCLI,” on page 138. You can also add one or more uplink adapters. See “Linking and Unlinking
Uplink Adapters with ESXCLI,” on page 144.
nDelete a virtual switch.
esxcli <conn_options> network vswitch standard remove --vswitch-name=vSwitch42
You cannot delete a virtual switch if any ports on the switch are still in use by VMkernel networks or
virtual machines. Run esxcli network vswitch standard list to determine whether a virtual switch is
in use.
Adding and Deleting Virtual Switches with vicfg-vswitch
You can add and delete virtual switches by using the --add|-a and --delete|-d options.
Specify one of the options listed in “Connection Options for vCLI Host Management Commands,” on
page 19 in place of <conn_options>.
nAdd a virtual switch.
vicfg-vswitch <conn_options> --add vSwitch2
After you have added a virtual switch, you can set switch aributes. See “Seing Switch Aributes with
vicfg-vswitch,” on page 139. You can also add one or more uplink adapters. See “Linking and
Unlinking Uplink Adapters with vicfg-vswitch,” on page 144.
nDelete a virtual switch.
vicfg-vswitch <conn_options> --delete vSwitch1
You cannot delete a virtual switch if any ports on the switch are still in use by VMkernel networks,
virtual machines, or vswifs. Run vicfg-vswitch --list to determine whether a virtual switch is in use.
Setting Switch Attributes with ESXCLI
You can set the maximum transmission unit (MTU) and CDP status for a virtual switch. The CDP status
shows which Cisco switch port is connected to which uplink.
Specify one of the options listed in “Connection Options for vCLI Host Management Commands,” on
page 19 in place of <conn_options>.
nSet the MTU for a vSwitch.
esxcli <conn_options> network vswitch standard set --mtu=9000 --vswitch-name=vSwitch1
vSphere Command-Line Interface Concepts and Examples
138 VMware, Inc.
The MTU is the size, in bytes, of the largest protocol data unit the switch can process. When you set this
option, it aects all uplinks assigned to the virtual switch.
nSet the CDP value for a vSwitch. You can set status to down, listen, advertise, or both.
esxcli <conn_options> network vswitch standard set --cdp-status=listen --vswitch-
name=vSwitch1
Setting Switch Attributes with vicfg-vswitch
You can set the maximum transmission unit (MTU) and CDP status for a virtual switch. The CDP status
shows which Cisco switch port is connected to which uplink.
Specify one of the options listed in “Connection Options for vCLI Host Management Commands,” on
page 19 in place of <conn_options>.
nSet the MTU for a vSwitch.
vicfg-vswitch <conn_options> -m 9000 vSwitch1
The MTU is the size, in bytes, of the largest protocol data unit the switch can process. When you set this
option, it aects all uplinks assigned to the virtual switch.
nSet the CDP value for a vSwitch. You can set status to down, listen, advertise, or both.
vicfg-vswitch <conn_options> --set-cdp 'listen'
Checking, Adding, and Removing Port Groups
You can check, add, and remove port groups with ESXCLI and with vicfg-vswitch
Managing Port Groups with ESXCLI
You can use esxcli network vswitch standard portgroup to check, add, and remove port groups.
Network services connect to vSwitches through port groups. A port group allows you to group trac and
specify conguration options such as bandwidth limitations and VLAN tagging policies for each port in the
port group. A virtual switch must have one port group assigned to it. You can assign additional port groups.
Specify one of the options listed in “Connection Options for vCLI Host Management Commands,” on
page 19 in place of <conn_options>.
nList port groups currently associated with a virtual switch.
esxcli <conn_options> network vswitch standard portgroup list
The command lists the port group name, associated virtual switch, active clients, and VLAN ID.
nAdd a port group.
esxcli <conn_options> network vswitch standard portgroup add --portgroup-name=<name> --
vswitch-name=vSwitch1
nDelete one of the existing port groups.
esxcli <conn_options> network vswitch standard portgroup remove --portgroup-name=<name> --
vswitch-name=vSwitch1
Chapter 9 Managing vSphere Networking
VMware, Inc. 139
Managing Port Groups with vicfg-vswitch
You can use vicfg-vswitch to check, add, and remove port groups.
Network services connect to virtual switches through port groups. A port group allows you to group trac
and specify conguration options such as bandwidth limitations and VLAN tagging policies for each port in
the port group. A virtual switch must have one port group assigned to it. You can assign additional port
groups.
Specify one of the options listed in “Connection Options for vCLI Host Management Commands,” on
page 19 in place of <conn_options>.
nCheck whether port groups are currently associated with a virtual switch.
vicfg-vswitch <conn_options> --check-pg <port_group> vSwitch1
The command returns 0 if the specied port group is associated with the virtual switch, and returns 1
otherwise. Use vicfg-vswitch --list to list all port groups.
nAdd a port group.
vicfg-vswitch <conn_options> --add-pg <port_group_name> vSwitch1
nDelete one of the existing port groups.
vicfg-vswitch <conn_options> --del-pg <port_group_name> vSwitch1
Managing Uplinks and Port Groups
You can manage uplinks and port groups with ESXCLI and with vicfg-vswitch.
Connecting and Disconnecting Uplink Adapters and Port Groups with ESXCLI
You can use esxcli network vswitch standard portgroup policy failover set to connect and disconnect
uplink adapters and port groups.
If your setup includes one or more port groups, you can associate each port group with one or more uplink
adapters and remove the association. This functionality allows you to lter trac from a port group to a
specic uplink, even if the virtual switch is connected with multiple uplinks.
Specify one of the options listed in “Connection Options for vCLI Host Management Commands,” on
page 19 in place of <conn_options>.
nConnect a port group with an uplink adapter.
esxcli <conn_options> network vswitch standard portgroup policy failover set --active-
uplinks=vmnic1,vmnic6,vmnic7
This command fails silently if the uplink adapter does not exist.
nMake some of the adapters standby instead of active.
esxcli <conn_options> network vswitch standard portgroup policy failover set --standby-
uplinks=vmnic1,vmnic6,vmnic7
Connecting and Disconnecting Uplinks and Port Groups with vicfg-vswitch
You can use vicfg-vswitch to connect and disconnect uplink adapters and port groups.
If your setup includes one or more port groups, you can associate each port group with one or more uplink
adapters and remove the association. This functionality allows you to lter trac from a port group to a
specic uplink, even if the virtual switch is connected with multiple uplinks.
vSphere Command-Line Interface Concepts and Examples
140 VMware, Inc.
Specify one of the options listed in “Connection Options for vCLI Host Management Commands,” on
page 19 in place of <conn_options>.
nConnect a port group with an uplink adapter.
vicfg-vswitch <conn_options> --add-pg-uplink <adapter_name> --pg <port_group> <vswitch_name>
This command fails silently if the uplink adapter does not exist.
nRemove a port group from an uplink adapter.
vicfg-vswitch <conn_options> --del-pg-uplink <adapter_name> --pg <port_group> <vswitch_name>
Setting the Port Group VLAN ID
You can set the port group VLAN ID with ESXCLI and with vicfg-vswitch.
Setting the Port Group VLAN ID with ESXCLI
You can use esxcli network vswitch standard portgroup set to manage VLANs.
VLANs allow you to further segment a single physical LAN segment so that groups of ports are isolated as
if they were on physically dierent segments. The standard is IEEE 802.1Q.
A VLAN ID restricts port group trac to a logical Ethernet segment within the physical network.
nSet the VLAN ID to 4095 to allow a port group to reach port groups located on other VLAN.
nSet the VLAN ID to 0 to disable the VLAN for this port group.
If you use VLAN IDs, you must change the port group labels and VLAN IDs together so that the labels
properly represent connectivity. VLAN IDs are optional.
You can use the following commands for VLAN management.
nAllow port groups to reach port groups located on other VLANs.
esxcli <conn_options> network vswitch standard portgroup set -p <pg_name> --vlan-id 4095
Run the command multiple times to allow all ports to reach port groups located on other VLANs.
nDisable VLAN for port group g42.
esxcli <conn_options> network vswitch standard portgroup set --vlan-id 0 -p g42
Run esxcli network vswitch standard portgroup list to list all port groups and associated VLAN IDs.
Setting the Port Group VLAN ID with vicfg-vswitch
You can use vicfg-vswitch to manage VLANs.
VLANs allow you to further segment a single physical LAN segment so that groups of ports are isolated as
if they were on physically dierent segments. The standard is IEEE 802.1Q.
A VLAN ID restricts port group trac to a logical Ethernet segment within the physical network.
nSet the VLAN ID to 4095 to allow a port group to reach port groups located on other VLAN.
nSet the VLAN ID to 0 to disable the VLAN for this port group.
If you use VLAN IDs, you must change the port group labels and VLAN IDs together so that the labels
properly represent connectivity. VLAN IDs are optional.
You can use the following commands for VLAN management.
nAllow all port groups to reach port groups located on other VLANs.
vicfg-vswitch <conn_options> --vlan 4095 --pg "ALL" vSwitch2
Chapter 9 Managing vSphere Networking
VMware, Inc. 141

nDisable VLAN for port group g42.
vicfg-vswitch <conn_options> --vlan 0 --pg g42 vSwitch2
Run vicfg-vswitch -l to retrieve information about VLAN IDs currently associated with the virtual
switches in the network.
Managing Uplink Adapters
You can manage uplink adapters, which represent the physical NICs that connect the ESXi host to the
network by using the esxcli network nic or the vicfg-nics command. You can also use esxcli network
vswitch and esxcfg-vswitch to link and unlink the uplink.
You can use vicfg-nics to list information and to specify speed and duplex seing for the uplink.
You can use esxcli network nic to list all uplinks, to list information, to set aributes, and to bring a
specied uplink down or up.
Manage Uplink Adapters with ESXCLI
you can use to manage uplink adapters.
The following example workow lists all uplink adapters, lists properties for one uplink adapter, changes
the uplink's speed and duplex seings, and brings the uplink down and back up. Specify one of the options
listed in “Connection Options for vCLI Host Management Commands,” on page 19 in place of
<conn_options>.
Procedure
1 List all uplinks and information about each device.
esxcli <conn_options> network nic list
You can narrow down the information displayed by using esxcli network nic get --nic-name=<nic>.
2 (Optional) Bring down one of the uplink adapters.
esxcli <conn_options> network nic down --nic-name=vmnic0
3 Change uplink adapter seings.
esxcli <conn_options> network nic set <option>
You must specify one of the following options.
Option Description
-a|--auto Sets the speed and duplex seings to autonegotiate.
-D|--duplex=<str> Duplex to set this NIC to. Acceptable values are full and half.
-P | --phy-address Sets the MAC address of the device
-l|--message-level=<long> Sets the driver message level. Message levels and what they imply dier
per driver.
-n|--nic-name=<str> Name of the NIC to congured. Must be one of the cards listed in the nic
list command (required).
-p|--port=<str> Selects the device port. The following device ports are available.
naui
nbnc
nfibre
nmii
ntp
-S|--speed=<long> Speed to set this NIC to. Acceptable values are 10, 100, 1000, and 10000.
vSphere Command-Line Interface Concepts and Examples
142 VMware, Inc.

Option Description
-t|--transceiver-type=<str> Selects transceiver type. The following transceiver types are available.
nexternal
ninternal
-w|--wake-on-lan=<str> Sets Wake-on-LAN options. Not all devices support this option. The option
value is a string of characters specifying which options to enable.
np – Wake on phy activity
nu – Wake on unicast messages
nm – Wake on multicast messages
nb – Wake on broadcast messages
na – Wake on ARP
ng – Wake on MagicPacket
ns – Enable SecureOn password for MagicPacket
4 (Optional) Bring the uplink adapter back up.
esxcli <conn_options> network nic up --nic-name=vmnic0
Specifying Multiple Uplinks with ESXCLI
At any time, one port group NIC array and a corresponding set of active uplinks exist. When you change the
active uplinks, you also change the standby uplinks and the number of active uplinks.
The following example illustrates how active and standby uplinks are set.
1 The port group NIC array is [vmnic1, vmnic0, vmnic3, vmnic5, vmnic6, vmnic7] and active-uplinks
is set to three uplinks - vmnic1, vmnic0, vmnic3. The other uplinks are standby uplinks.
2 You set the active uplinks to a new set [vmnic3, vmnic5].
3 The new uplinks override the old set. The NIC array changes to [vmnic3, vmnic5, vmnic6, vmnic7].
vmnic0 and vmnic1 are removed from the NIC array and max-active becomes 2.
If you want to keep vmnic0 and vmnic1 in the array, you can make those NICs standby uplinks in the
command that changes the active uplinks.
esxcli network vswitch standard portgroup policy failover set -p testPortgroup --active-uplinks
vmnic3,vmnic5 --standby-uplinks vmnic1,vmnic0,vmnic6,vmnic7
Manage Uplink Adapters with vicfg-nics
You can use vicfg-nics to manage uplink adapters.
The following example workow lists an uplink adapter's properties, changes the duplex and speed, and
sets the uplink to autonegotiate its speed and duplex seings. Specify one of the options listed in
“Connection Options for vCLI Host Management Commands,” on page 19 in place of <conn_options>.
Procedure
1 List seings.
vicfg-nics <conn_options> -l
This command lists the uplinks in the system, their current and congured speed, and their duplex
seing.
2 Set the seings for vmnic0 to full and the speed to 100.
vicfg-nics <conn_options> -d full -s 100 vmnic0
3 Set vmnic2 to autonegotiate its speed and duplex seings.
vicfg-nics <conn_options> -a vmnic2
Chapter 9 Managing vSphere Networking
VMware, Inc. 143
Linking and Unlinking Uplink Adapters with ESXCLI
You can use ESXCLI to link and unlink uplink adapters.
When you create a virtual switch by using esxcli network vswitch standard add, all trac on that virtual
switch is initially conned to that virtual switch. All virtual machines connected to the virtual switch can
talk to each other, but the virtual machines cannot connect to the network or to virtual machines on other
hosts. A virtual machine also cannot connect to virtual machines connected to a dierent virtual switch on
the same host.
Having a virtual switch that is not connected to the network might make sense if you want a group of
virtual machines to be able to communicate with each other, but not with other hosts or with virtual
machines on other hosts. In most cases, you set up the virtual switch to transfer data to external networks by
aaching one or more uplink adapters to the virtual switch.
You can use the following commands to list, add, and remove uplink adapters. When you link by using
ESXCLI, the physical NIC is added as a standby adapter by default. You can then modify the teaming policy
to make the physical NIC active by running the command esxcli network vswitch standard policy
failover set.
nList uplink adapters.
esxcli <conn_options> network vswitch standard list
The uplink adapters are returned in the Uplink item.
nAdd a new uplink adapter to a virtual switch.
esxcli <conn_options> network vswitch standard uplink add --uplink-name=vmnic15 vswitch-
name=vSwitch0
nRemove an uplink adapter from a virtual switch.
esxcli <conn_options> network vswitch standard uplink remove --uplink-name=vmnic15 vswitch-
name=vSwitch0
Linking and Unlinking Uplink Adapters with vicfg-vswitch
You can use vicfg-vswitch to link and unlink uplink adapters.
When you create a virtual switch by using vicfg-vswitch --add, all trac on that virtual switch is initially
conned to that virtual switch. All virtual machines connected to the virtual switch can talk to each other,
but the virtual machines cannot connect to the network or to virtual machines on other hosts. A virtual
machine also cannot connect to virtual machines connected to a dierent virtual switch on the same host.
Having a virtual switch that is not connected to the network might make sense if you want a group of
virtual machines to be able to communicate with each other, but not with other hosts or with virtual
machines on other hosts. In most cases, you set up the virtual switch to transfer data to external networks by
aaching one or more uplink adapters to the virtual switch.
You can use the following commands to add and remove uplink adapters.
nAdd a new uplink adapter to a virtual switch.
vicfg-vswitch <conn_options> --link vmnic15 vSwitch0
nRemove an uplink adapter from a virtual switch.
vicfg-vswitch <conn_options> --unlink vmnic15 vSwitch0
vSphere Command-Line Interface Concepts and Examples
144 VMware, Inc.
Adding and Modifying VMkernel Network Interfaces
VMkernel network interfaces are used primarily for management trac, which can include vMotion, IP
Storage, and other management trac on the ESXi system. You can also bind a newly created VMkernel
network interface for use by software and dependent hardware iSCSI by using the esxcli iscsi commands.
The VMkernel network interface is separate from the virtual machine network. The guest operating system
and application programs communicate with a VMkernel network interface through a commonly available
device driver or a VMware device driver optimized for the virtual environment. In either case,
communication in the guest operating system occurs as it would with a physical device. Virtual machines
can also communicate with a VMkernel network interface if both use the same virtual switch.
Each VMkernel network interface has its own MAC address and one or more IP addresses, and responds to
the standard Ethernet protocol as would a physical NIC. The VMkernel network interface is created with
TCP Segmentation Ooad (TSO) enabled.
You can manage VMkernel NICs with ESXCLI and with vicfg-vmknic.
Managing VMkernel Network Interfaces with ESXCLI
You can congure the VMkernel network interface for IPv4 or for IPv6 with ESXCLI. In contrast to vicfg-
vmknic, ESXCLI does not support enabling vMotion.
For IPv4, see “Add and Congure an IPv4 VMkernel Network Interface with ESXCLI,” on page 145. For
IPv6, see “Add and Congure an IPv6 VMkernel Network Interface with ESXCLI,” on page 146.
Add and Configure an IPv4 VMkernel Network Interface with ESXCLI
You can add and congure an IPv4 VMkernel NIC by using ESXCLI.
Specify one of the options listed in “Connection Options for vCLI Host Management Commands,” on
page 19 in place of <conn_options>.
Procedure
1 Add a new VMkernel network interface.
esxcli <conn_options> network ip interface add --interface-name=vmk<x> --portgroup-
name=<my_portgroup>
You can specify the MTU seing after you have added the network interface by using esxcli network
ip interface set --mtu.
2Congure the interface as an IPv4 interface.
You must specify the IP address by using --ip, the netmask, and the name. For the following examples,
assume that VMSF-VMK-363 is a port group to which you want to add a VMkernel network interface.
esxcli <conn_options> network ip interface ipv4 set --ipv4=<ip_address> --
netmask=255.255.255.0 --interface-name=vmk<X>
You can set the address as follows.
n<X.X.X.X> – Static IPv4 address.
nDHCP – Use IPv4 DHCP.
The VMkernel supports DHCP only for ESXi 4.0 and later.
When the command nishes successfully, the newly added VMkernel network interface is enabled.
Chapter 9 Managing vSphere Networking
VMware, Inc. 145
3 List information about all VMkernel network interfaces on the system.
esxcli <conn_options> network ip interface list
The command displays the network information, port group, MTU, and current state for each virtual
network adapter in the system.
Add and Configure an IPv6 VMkernel Network Interface with ESXCLI
You can add and congure an IPv6 VMkernel NIC by using ESXCLI.
Specify one of the options listed in “Connection Options for vCLI Host Management Commands,” on
page 19 in place of <conn_options>.
Procedure
1 Add a new VMkernel network interface.
esxcli <conn_options> network ip interface add --interface-name=vmk<x> --portgroup-
name=<my_portgroup>
You can specify the MTU seing after you have added the network interface by using esxcli network
ip interface set --mtu.
When the command nishes successfully, the newly added VMkernel network interface is enabled.
2 Run esxcli network ip interface ipv6 address add to congure the interface as an IPv6 interface.
You must specify the IP address using --ip and the name. For the following examples, assume that
VMSF-VMK-363 is a port group to which you want to add a VMkernel network interface.
esxcli <conn_options> network ip interface ipv6 address add --ip=<X:X:X::/X> --interface-
name=vmk<X>
You can set the address as follows.
n<X:X:X::/X> - Static IPv6 address.
n--enable-dhcpv6 - Enables DHCPv6 on this interface and aempts to acquire an IPv6 address from
the network.
n--enable-router-adv - Use the IPv6 address advertised by the router. The address is added when
the router sends the next router advert.
The VMkernel supports DHCP only for ESXi 4.0 and later.
When the command nishes successfully, the newly added VMkernel network interface is enabled.
3 List information about all VMkernel network interfaces on the system.
esxcli <conn_options> network ip interface list
The command displays the network information, port group, MTU, and current state for each virtual
network adapter in the system.
4 (Optional) Remove the IPv6 address and disable IPv6.
esxcli <conn_options> network ip interface ipv6 address remove --interface-name=<VMK_NIC> --
ipv6=<ipv6_addr>
esxcli <conn_options> network ip set --ipv6-enabled=false
Managing VMkernel Network Interfaces with vicfg-vmknic
You can congure the VMkernel network interface for IPv4 or for IPv6.
For IPv4, see “Add and Congure an IPv4 VMkernel Network Interface with vicfg-vmknic,” on page 147.
For IPv6, see “Add and Congure an IPv6 VMkernel Network Interface with vicfg-vmknic,” on page 147.
vSphere Command-Line Interface Concepts and Examples
146 VMware, Inc.
Add and Configure an IPv4 VMkernel Network Interface with vicfg-vmknic
You can add and congure an IPv4 VMkernel NIC by using vicfg-vmknic.
Specify one of the options listed in “Connection Options for vCLI Host Management Commands,” on
page 19 in place of <conn_options>.
Procedure
1 Add a new VMkernel network interface.
You must specify the IP address by using --ip, the netmask, and the name. For the following examples,
assume that VMSF-VMK-363 is a port group to which you want to add a VMkernel network interface.
vicfg-vmknic <conn_options> --add --ip <ip_address> -n 255.255.255.0 VMSF-VMK-363
You can specify the MTU seing when adding a VMkernel network interface. You cannot change that
seing at a later time.
When the command nishes successfully, the newly added VMkernel network interface is enabled.
2 Change the IP address as needed.
vicfg-vmknic <conn_options> --ip <address> VMSF-VMK-363
For IPv4, the IP address can have one of the following formats.
n<X.X.X.X> – Static IPv4 address.
nDHCP – Use IPv4 DHCP.
The VMkernel supports DHCP only for ESXi 4.0 and later.
3 (Optional) Enable vMotion.
By default, vMotion is disabled.
vicfg-vmknic <conn_options> --enable-vmotion VMSF-VMK-363
You can later use --disable-vmotion to disable vMotion for this VMkernel network interface.
4 List information about all VMkernel network interfaces on the system.
vicfg-vmknic <conn_options> --list
The command displays the network information, port group, MTU, and current state for each virtual
network adapter in the system.
Add and Configure an IPv6 VMkernel Network Interface with vicfg-vmknic
You can add and congure an IPv6 VMkernel NIC by using vicfg-vmknic.
Specify one of the options listed in “Connection Options for vCLI Host Management Commands,” on
page 19 in place of <conn_options>.
Procedure
1 Add a new VMkernel network interface.
You must specify the IP address by using --ip, the netmask, and the name. For the following examples,
assume that VMSF-VMK-363 is a port group to which you want to add a VMkernel network interface.
vicfg-vmknic <conn_options> --add --ip <ip_address> -n 255.255.255.0 VMSF-VMK-363
You can specify the MTU seing when adding a VMkernel network interface. You cannot change that
seing at a later time.
When the command nishes successfully, the newly added VMkernel network interface is enabled.
Chapter 9 Managing vSphere Networking
VMware, Inc. 147

2 Enable IPv6.
vicfg-vmknic <conn_options> --enable-ipv6 true VMSF-VMK-363
3 Supply an IPv6 address.
vicfg-vmknic <conn_options> --ip <ip_address> VMSF-VMK-363
For IPv6, the IP address can have one of the following formats.
n<X:X:X::/X> - Static IPv6 address.
nDHCPV6 – Use DHCP IPv6 address. The VMkernel supports DHCP only for ESXi 4.0 and later.
nAUTOCONF – Use the IPv6 address advertised by the router. If you create a VMkernel network
interface with AUTOCONF, an address is assigned immediately. If you add AUTOCONF to an
existing vmknic, the address is added when the router sends the next router advert.
4 (Optional) Enable vMotion.
By default, vMotion is disabled.
vicfg-vmknic <conn_options> --enable-vmotion VMSF-VMK-363
You can later use --disable-vmotion to disable vMotion for this VMkernel network interface.
5 List information about all VMkernel network interfaces on the system.
vicfg-vmknic <conn_options> --list
The command displays the network information, port group, MTU, and current state for each virtual
network adapter in the system.
6 (Optional) Remove the IPv6 address and disable IPv6.
vicfg-vmknic <conn_options> --unset-ip <X:X:X::/X> VMSF-VMK-363
vicfg-vmknic <conn_options> --enable-ipv6 false VMSF-VMK-363
Setting Up vSphere Networking with vSphere Distributed Switch
You can use vicfg-vswitch to set up vSphere distributed switches.
A distributed switch functions as a single virtual switch across all associated hosts. A distributed switch
allows virtual machines to maintain a consistent network conguration as they migrate across multiple
hosts. See “Networking Using vSphere Distributed Switches,” on page 133.
Like a vSphere standard switch, each distributed switch is a network hub that virtual machines can use. A
distributed switch can forward trac internally between virtual machines or link to an external network by
connecting to uplink adapters.
Each distributed switch can have one or more distributed port groups assigned to it. Distributed port
groups group multiple ports under a common conguration and provide a stable anchor point for virtual
machines that are connecting to labeled networks. Each distributed port group is identied by a network
label, which is unique to the current data center. A VLAN ID, which restricts port group trac to a logical
Ethernet segment within the physical network, is optional.
You can create distributed switches by using the vSphere Web Client. After you have created a distributed
switch, you can add hosts by using the vSphere Web Client, create distributed port groups, and edit
distributed switch properties and policies with the vSphere Web Client. You can add and remove uplink
ports by using vicfg-vswitch.
I In vSphere 5.0, you cannot create distributed virtual switches by using ESXCLI.
vSphere Command-Line Interface Concepts and Examples
148 VMware, Inc.

See the vSphere Networking documentation and the white paper available through the Resources link at
hp://www.vmware.com/go/networking for information about distributed switches and how to congure
them using the vSphere Web Client.
You can add and remove distributed switch uplink ports by using vicfg-vswitch.
I You cannot add and remove uplink ports with ESXCLI.
After the distributed switch has been set up, you can use vicfg-vswitch to add or remove uplink ports.
Specify one of the options listed in “Connection Options for vCLI Host Management Commands,” on
page 19 in place of <conn_options>.
nAdd an uplink port.
vicfg-vswitch <conn_options> --add-dvp-uplink <adapter_name> --dvp <DVPort_id>
<dvswitch_name>
nRemove an uplink port.
vicfg-vswitch <conn_options> --del-dvp-uplink <adapter_name> --dvp <DVPort_id>
<dvswitch_name>
Managing Standard Networking Services in the vSphere Environment
You can use vCLI commands to set up DNS, NTP, SNMP, and the default gateway for your vSphere
environment.
Setting the DNS Configuration
You can set the DNS conguration with ESXCLI or with vicfg-dns.
Setting the DNS Configuration with ESXCLI
The esxcli network ip dns command lists and species the DNS conguration of your ESXi host.
I If you try to change the host or domain name or the DNS server on hosts that use DHCP, an
error results.
In network environments where a DHCP server and a DNS server are available, ESXi hosts are
automatically assigned DNS names.
In network environments where automatic DNS is not available or you do not want to use automatic DNS,
you can congure static DNS information, including a host name, primary name server, secondary name
server, and DNS suxes.
The esxcli network ip dns namespace includes two namespaces.
nesxcli network ip dns search includes commands for DNS search domain conguration.
nesxcli network ip dns server includes commands for DNS server conguration.
Set Up a DNS Server with ESXCLI
You can use ESXCLI to set up a DNS server.
The following example illustrates seing up a DNS server. Specify one of the options listed in “Connection
Options for vCLI Host Management Commands,” on page 19 in place of <conn_options>.
Chapter 9 Managing vSphere Networking
VMware, Inc. 149
Procedure
1 Print a list of DNS servers congured on the system in the order in which they will be used.
esxcli <conn_options> network ip dns server list
If DNS is not set up for the target server, the command returns an empty string.
2 Add a server by running esxcli network ip dns server add and specifying the server IPv4 or IPv6
address.
esxcli <conn_options> network ip dns server add --server=<str>
3 Change the DNS seings.
nSpecify the DNS server by using the --dns option and the DNS host.
esxcli <conn_options> network ip dns server add --server=<server>
Run the command multiple times to specify multiple DNS hosts.
nCongure the DNS host name for the server specied by --server or --vihost.
esxcli <conn_options> system hostname set --host=<new_host_name>
nCongure the DNS domain name for the server specied by --server or --vihost.
esxcli <conn_options> system hostname --domain=mydomain.biz
4 To turn on DHCP, enable DHCP and set the VMkernel NIC.
nTurn on DHCP for IPv4.
esxcli <conn_options> network ip interface ipv4 set --type dhcp/none/static
esxcli <conn_options> network ip interface ipv4 set --peer-dns=<str>
nTurn on DHCP for IPv6.
esxcli <conn_options> network ip interface ipv6 set --enable-dhcpv6=true/false
esxcli <conn_options> network ip interface ipv6 set --peer-dns=<str>
Modify DNS Setup for a Preconfigured Server with ESXCLI
You can use ESXCLI to modify the setup of a precongured DNS server.
Specify one of the options listed in “Connection Options for vCLI Host Management Commands,” on
page 19 in place of <conn_options>.
Procedure
1 Display DNS properties for the specied server.
a List the host and domain name.
esxcli <conn_options> system hostname get
b List available DNS servers.
esxcli <conn_options> network ip dns server list
c List the DHCP seings for individual VMkernel NICs.
esxcli <conn_options> network ip interface ipv4 get
esxcli <conn_options> network ip interface ipv6 get
vSphere Command-Line Interface Concepts and Examples
150 VMware, Inc.

2 If the DNS properties are set, and you want to change the DHCP seings, you must specify the virtual
network adapter to use when overriding the system DNS.
You can override the existing DHCP seing by using the following commands.
esxcli <conn_options> network ip interface ipv4 set --type dhcp/none/static
esxcli <conn_options> network ip interface ipv6 set --enable-dhcpv6=true/false
Setting the DNS Configuration with vicfg-dns
The vicfg-dns command lists and species the DNS conguration of your ESXi host. You can call the
command without command-specic options to list the existing DNS conguration.
You can also use esxcli network ip dns for DNS management.
I If you try to change the host or domain name or the DNS server on hosts that use DHCP, an
error results.
In network environments where a DHCP server and a DNS server are available, ESXi hosts are
automatically assigned DNS names.
In network environments where automatic DNS is not available or not desirable, you can congure static
DNS information, including a host name, primary name server, secondary name server, and DNS suxes.
Set Up a DNS Server with vicfg-dns
You can use vicfg-dns to set up a DNS server.
The following example illustrates seing up a DNS server. Specify one of the options listed in “Connection
Options for vCLI Host Management Commands,” on page 19 in place of <conn_options>.
Procedure
1 Run vicfg-dns without command-specic options to display DNS properties for the specied server.
vicfg-dns <conn_options>
If DNS is not set up for the target server, the command returns an error.
2To change the seings, use vicfg-dns with --dns, --domain, or --hostname.
nSpecify the DNS server by using the --dns option and a comma-separated list of hosts, in order of
preference.
vicfg-dns <conn_options --dns <dns1,dns2>
nCongure the DNS host name for the server specied by --server or --vihost.
vicfg-dns <conn_options> -n dns_host_name
nCongure the DNS domain name for the server specied by --server or --vihost.
vicfg-dns <conn_options> -d mydomain.biz
3To turn on DHCP, use the --dhcp option.
vicfg-dns <conn_options> --dhcp yes
Modify DNS Setup for a Preconfigured Server with vicfg-dns
You can use vicfg-dns to modify the setup of a precongured DNS server.
Specify one of the options listed in “Connection Options for vCLI Host Management Commands,” on
page 19 in place of <conn_options>.
Chapter 9 Managing vSphere Networking
VMware, Inc. 151

Procedure
1 Run vicfg-dns without command-specic options to display DNS properties for the specied server.
vicfg-dns <conn_options>
The information includes the host name, domain name, DHCP seing (true or false), and DNS servers
on the ESXi host.
2 If the DNS properties are set, and you want to change the DHCP seings, you must specify the virtual
network adapter to use when overriding the system DNS.
v_nic must be one of the VMkernel network adapters.
You can override the existing DHCP seing by using the following command.
vicfg-dns <conn_options> --dhcp yes --v_nic <vnic>
Manage an NTP Server
Some protocols, such as Kerberos, must have accurate information about the current time. In those cases,
you can add an NTP (Network Time Protocol) server to your ESXi host.
I No ESXCLI command exists for adding and starting an NTP server.
The following example illustrates seing up an NTP server. Specify one of the options listed in “Connection
Options for vCLI Host Management Commands,” on page 19 in place of <conn_options>.
Procedure
1 Run vicfg-ntp --add to add an NTP server to the host specied in <conn_options> and use a host name
or IP address to specify an already running NTP server.
vicfg-ntp <conn_options> -a 192.XXX.XXX.XX
2 Run vicfg-ntp --start to start the service.
vicfg-ntp <conn_options> --start
3 Run vicfg-ntp --list to list the service.
vicfg-ntp <conn_options> --list
4 Run vicfg-ntp --stop to stop the service.
vicfg-ntp <conn_options> --stop
5 Run vicfg-ntp --delete to remove the specied NTP server from the host specied in <conn_options>.
vicfg-ntp <conn_options> --delete 192.XXX.XXX.XX
Manage the IP Gateway
If you move your ESXi host to a new physical location, you might have to change the default IP gateway.
You can use the vicfg-route command to manage the default gateway for the VMkernel IP stack. vicfg-
route supports a subset of the Linux route command’s options.
I No ESXCLI command exists to manage the default gateway.
If you run vicfg-route with no options, the command displays the default gateway. Use --family to print
the default IPv4 or the default IPv6 gateway. By default, the command displays the default IPv4 gateway.
Specify one of the options listed in “Connection Options for vCLI Host Management Commands,” on
page 19 in place of <conn_options>.
vSphere Command-Line Interface Concepts and Examples
152 VMware, Inc.

Procedure
1 Add a route entry to the VMkernel and make it the default.
nFor IPv4 networks, no additional options are required.
vicfg-route <conn_options> --add <network_ip> <netmask_IP> <gateway_ip>
For example, to add a route to 192.XXX.100.0 through 192.XXX.0.1 by using the following syntax.
vicfg-route <conn_options> -a 192.XXX.100.0/24 192.XXX.0.1
You can also use the following syntax.
vicfg-route <conn_options> -a 192.XXX.100.0 255.255.255.0 192.XXX.0.1
nFor IPv6 networks, use --family v6.
vicfg-route <conn_options> -f V6 --add <network_ip_and_mask> <gateway_ip>
The following command uses example values.
vicfg-route <conn_options> -f V6 --add 2001:10:20:253::/64 2001:10:20:253::1
2 List route entries to check that your route was added by running the command without options.
vicfg-route <conn_options>
The output lists all networks and corresponding netmasks and gateways.
3 Set the default gateway.
nFor IPv4, use the following syntax.
vicfg-route <conn_options> 192.XXX.0.1
You can also use the following syntax.
vicfg-route <conn_options> -a default 192.XXX.0.1
nFor IPv6, use the following syntax.
vicfg-route <conn_options> -f V6 -a default 2001:10:20:253::1
4 Run vicfg-route --delete to delete the route. Specify rst the gateway, and then the network.
vicfg-route <conn_options> -d 192.XXX.100.0/24 192.XXX.0.1
Setting Up IPsec
You can set Internet Protocol Security with esxcli network ip ipsec commands or with the vicfg-ipsec
command, which secures IP communications coming from and arriving at ESXi hosts. Administrators who
perform IPsec setup must have a solid understanding of both IPv6 and IPsec.
ESXi hosts support IPsec only for IPv6 trac, but not for IPv4 trac.
I In ESXi 4.1, ESXi 5.0, and ESXi 5.1, IPv6 is by default disabled. You can turn on IPv6 by running
one of the following vCLI commands.
esxcli <conn_options> network ip interface ipv6 set --enable-dhcpv6
esxcli <conn_options> network ip interface ipv6 address add
vicfg-vmknic <conn_options> --enable-ipv6
You cannot run vicfg-ipsec with a vCenter Server system as the target, by using the --vihost option.
You can run esxcli network ip ipsec commands with a vCenter Server system as a target, by using the
--vihost option.
Chapter 9 Managing vSphere Networking
VMware, Inc. 153

The VMware implementation of IPsec adheres to the following IPv6 RFCs.
n4301 Security Architecture for the Internet Protocol
n4303 IP Encapsulating Security Payload (ESP)
n4835 Cryptographic Algorithm Implementation Requirements for ESP
n2410 The NULL Encryption Algorithm and Its Use With IPsec
n2451 The ESP CBC-Mode Cipher Algorithms
n3602 The AES-CBC Cipher Algorithm and Its Use with IPsec
n2404 The Use of HMAC-SHA-1-96 within ESP and AH
n4868 Using HMAC-SHA-256, HMAC-SHA-384, and HMAC-SHA-512
Using IPsec with ESXi
When you set up IPsec on an ESXi host, you enable protection of incoming or outgoing data. What happens
precisely depends on how you set up the system’s Security Associations (SAs) and Security Policies (SPs).
nAn SA determines how the system protects trac. When you create an SA, you specify the source and
destination, authentication, and encryption parameters, and an identier for the SA with the following
options.
vicfg-ipsec esxcli network ip ipsec
sa-src and sa-dst --sa-source and --sa-destination
spi (security parameter index) --sa-spi
sa-mode (tunnel or transport) --sa-mode
ealgo and ekey --encryption-algorithm and --encryption-key
ialgo and ikey --integrity-algorithm and --integrity-key
nAn SP identies and selects trac that must be protected. An SP consists of two logical sections, a
selector, and an action.
The selector is specied by the following options.
vicfg-ipsec esxcli network ip ipsec
src-addr and src-port --sa-source and --source-port
dst-addr and dst-port --destination-port
ulproto --upper-layer-protocol
direction (in or out)--flow-direction
The action is specied by the following options.
vicfg-ipsec esxcli network ip ipsec
sa-name --sa-name
sp-name --sp-name
action (none, discard, ipsec)--action
Because IPsec allows you to target precisely which trac should be encrypted, it is well suited for securing
your vSphere environment. For example, you can set up the environment so all vMotion trac is encrypted.
vSphere Command-Line Interface Concepts and Examples
154 VMware, Inc.

Managing Security Associations
You can specify an SA and request that the VMkernel use that SA.
The following options for SA setup are supported.
vicfg-ipsec Option esxcli Option Description
sa-src <source_IP> sa-source <source_IP> Source IP for the SA.
sa-dst <destination_IP> sa-destination
<destination_IP>
Destination IP for the SA.
spi sa-spi Security Parameter Index (SPI) for the
SA. Must be a hexadecimal number
with a 0x prex.
When IPsec is in use, ESXi uses the
ESP protocol (RFC 43030), which
includes authentication and encryption
information and the SPI. The SPI
identies the SA to use at the receiving
host. Each SA you create must have a
unique combination of source,
destination, protocol, and SPI.
sa-mode [tunnel | transport] sa-mode [tunnel | transport] Either tunnel or transport.
In tunnel mode, the original packet is
encapsulated in another IPv6 packet,
where source and destination
addresses are the SA endpoint
addresses.
ealgo [null | 3des-cbc |
aes128-cbc]
encryption-algorithm [null |
3des-cbc | aes128-cbc]
Encryption algorithm to be used.
Choose 3des-cbc or aes128-cbc, or
null for no encryption.
ekey <key> encryption-key <key> Encryption key to be used by the
encryption algorithm. A series of
hexadecimal digits with a 0x prex or
an ASCII string.
ialgo [hmac-sha1 | hmac-
sha2-256 ]
integrity-algorithm [hmac-sha1
| hmac-sha2-256 ]
Authentication algorithm to be used.
Choose hmac-sha1 or hmac-
sha2-256.
ikey integrity-key Authentication key to be used. A series
of hexadecimal digits or an ASCII
string.
You can perform these main tasks with SAs.
nCreate an SA. You specify the source, the destination, and the authentication mode. You also specify the
authentication algorithm and authentication key to use. You must specify an encryption algorithm and
key, but you can specify null if you want no encryption. Authentication is required and cannot be null.
The following example includes extra line breaks for readability. The last option, sa_2 in the example, is
the name of the SA.
esxcli network ip ipsec sa add
--sa-source 2001:DB8:1::121
--sa-destination 2001:DB8:1::122
--sa-mode transport
--sa-spi 0x1000
--encryption-algorithm 3des-cbc
Chapter 9 Managing vSphere Networking
VMware, Inc. 155

--encryption-key 0x6970763672656164796c6f676f336465736362636f757432
--integrity-algorithm hmac-sha1
--integrity-key 0x6970763672656164796c6f67736861316f757432
--sa-name sa_2
nList an SA by using esxcli network ip ipsec sa list. This command returns SAs currently available
for use by an SP. The list includes SAs you created.
nRemove a single SA by using esxcli network ip ipsec sa remove. If the SA is in use when you run this
command, the command cannot perform the removal.
nRemove all SAs by using esxcli network ip ipsec sa remove --removeall. This option removes all
SAs even when they are in use.
C Running esxcli network ip ipsec sa remove --removeall removes all SAs on your system
and might leave your system in an inconsistent state.
Managing Security Policies
After you have created one or more SAs, you can add security policies (SPs) to your ESXi hosts. While the
SA species the authentication and encryption parameters to use, the SP identies and selects trac.
The following options for SP management are supported.
vicfg-ipsec Option esxcli Option Description
sp-src <ip>/<p_len> sp-source <ip>/<p_len> Source IP address and prex length.
sp-dst <ip>/<p_len> sp-destination <ip>/<p_len> Destination IP address and prex
length.
src-port <port> source-port <port> Source port (0-65535). Specify any for
any ports.
dst-port <port> destination-port <port> Destination port (0-65535). Specify any
for any ports. If ulproto is icmp6, this
number refers to the icmp6 type.
Otherwise, this number refers to the
port.
ulproto [any | tcp | udp |
icmp6]
upper-layer-protocol [any |
tcp | udp | icmp6]
Upper layer protocol. Use this option
to restrict the SP to only certain
protocols, or use any to apply the SP to
all protocols.
dir [in | out] flow-direction [in | out] Direction in which you want to
monitor the trac. To monitor trac
in both directions, create two policies.
action [none | discard | ipsec] action [none | discard |
ipsec]
Action to take when trac with the
specied parameters is encountered.
nnone - Take no action, that is,
allow trac unmodied.
ndiscard - Do not allow data in or
out.
nipsec - Use the authentication and
encryption information specied
in the SA to determine whether the
data come from a trusted source.
sp-mode [tunnel | transport] sp-mode [tunnel | transport] Mode, either tunnel or transport.
sa-name sa-name Name of the SA to use by this SP.
vSphere Command-Line Interface Concepts and Examples
156 VMware, Inc.

You can perform the following main tasks with SPs.
nCreate an SP by using esxcli network ip ipsec add. You identify the data to monitor by specifying the
selector’s source and destination IP address and prex, source port and destination port, upper layer
protocol, direction of trac, action to take, and SP mode. The last two option are the name of the SA to
use and the name of the SP that is being created. The following example includes extra line breaks for
readability.
esxcli network ip ipsec add
--sp-source=2001:0DB8:0001:/48
--sp-destination=2001:0DB8:0002:/48
--source-port=23
--destination-port=25
--upper-layer-protocol=tcp
--flow-direction=out
--action=ipsec
--sp-mode=transport
--sp-name sp_2
nList an SP by using esxcli network ip ipsec list. This command returns SPs currently available. All
SPs are created by the administrator.
nRemove an SP by using esxcli network ip ipsec remove. If the SP is in use when you run this
command, the command cannot perform the removal. You can run esxcli network ip ipsec remove
--removeall instead to remove the SP even when it is in use.
C Running esxcli network ip ipsec remove --removeall removes all SPs on your system and
might leave your system in an inconsistent state.
Manage the ESXi Firewall
To minimize the risk of an aack through the management interface, ESXi includes a rewall between the
management interface and the network.
To ensure the integrity of the host, only a small number of rewall ports are open by default. The vSphere
Security documentation explains how to set up rewalls for your environment and which ports you might
have to temporarily enable for certain trac.
You manage rewalls by seing up rewall rulesets. vSphere Security documentation explains how to
perform these tasks with the vSphere Web Client. You can also use esxcli network firewall to manage
rewall rulesets and to retrieve information about them. Specify one of the options listed in “Connection
Options for vCLI Host Management Commands,” on page 19 in place of <conn_options>.
Procedure
1 Check rewall status and sshServer ruleset status.
esxcli <conn_options> network firewall get
Default Action: DROP
Enabled: true
Loaded: true
esxcli <conn_options> network firewall ruleset list --ruleset-id sshServer
Name Enabled
--------- -------
sshServer true
Chapter 9 Managing vSphere Networking
VMware, Inc. 157
2 Enable the sshServer ruleset if it is disabled.
esxcli <conn_options> network firewall ruleset set --ruleset-id sshServer --enabled true
3 Obtain access to the ESXi Shell and check the status of the allowedAll ag.
esxcli <conn_options> network firewall ruleset allowedip list --ruleset-id sshServer
Ruleset Allowed IP Addresses
--------- --------------------
sshServer All
See Geing Started with vSphere Command-Line Interfaces for information on accessing the ESXi Shell.
4 Set the status of the allowedAll ag to false.
esxcli <conn_options> network firewall ruleset set --ruleset-id sshServer --allowed-all false
5 Add the list of allowed IP addresses.
esxcli <conn_options> network firewall ruleset allowedip add --ruleset-id sshServer --ip-
address 192.XXX.1.0/24
esxcli <conn_options> network firewall ruleset allowedip add --ruleset-id sshServer --ip-
address 192.XXX.10.10
6 Check the allowed IP address list.
esxcli <conn_options> network firewall ruleset allowedip list --ruleset-id sshServer
Ruleset Allowed IP Addresses
--------- -----------------------------
sshServer 192.XXX.10.10, 192.XXX.1.0/24
Monitor VXLAN
The esxcli network vswithch dvs vmware vxlan namespace supports commands for exploring VXLAN
conguration details.
For a more detailed example of this functionality, see the VMware vSphere blog post about the topic.
Procedure
1 List all available VXLAN vNetwork Distributed Switches.
esxcli network vswitch dvs vmware vxlan list
2 View the VXLAN statistics level.
esxcli network vswitch dvs vmware vxlan config stats get
3 Change the statistics level, for example, from 0 to 1.
esxcli network vswitch dvs vmware vxlan config stats set --level 1
You can decide to lter statistics as follows.
nFor a vNetwork Distributed Switch, localized to an ESXi host
nFor a VTEP VMkernel interface
nFor a VXLAN segment ID
nFor a vNetwork Distributed Switch port ID
4 View statistics for a specic vNetwork Distributed Switch.
esxcli network vswitch dvs vmware vxlan config stats list --vds-name Cluster01-VXLAN-VDS
vSphere Command-Line Interface Concepts and Examples
158 VMware, Inc.
5 View statistics for a VXLAN segment ID.
nList the available segment IDs.
esxcli network vswitch dvs vmware vxlan network list -vds-name Cluster01-VXLAN-VDS
nView the network statistics for a particular segment ID.
esxcli network vswitch dvs vmware vxlan network stats list --vds-name Cluster01-VXLAN-
VDS --vxlan-id 5000
nRetrieve network mapping if some virtual machine communication is occurring.
esxcli network vswitch dvs vmware vxlan network mapping list --vds-name Cluster01-VXLAN-
VDS --vxlan-id 5000
6 View VXLAN statistics for a VDS Port ID.
esxcli network vswitch dvs vmware vxlan network port list --vds-name Cluster01-VXLAN-VDS --
vxlan-id 5000
7 View the network statistics for a specic VDS Port ID.
esxcli network vswitch dvs vmware vxlan network port list --vds-name Cluster01-VXLAN-VDS --
vxlan-id 5000 vdsport-is 968
Chapter 9 Managing vSphere Networking
VMware, Inc. 159
vSphere Command-Line Interface Concepts and Examples
160 VMware, Inc.

Monitoring ESXi Hosts 10
Starting with the vSphere 4.0 release, vCenter Server makes performance charts for CPU, memory, disk I/O,
networking, and storage available.
You can view performance charts by using the vSphere Web Client and read about them in the vSphere
Monitoring documentation. You can also perform some monitoring of your ESXi system by using vCLI
commands.
This chapter includes the following topics:
n“Using resxtop for Performance Monitoring,” on page 161
n“Managing Diagnostic Partitions,” on page 161
n“Managing Core Dumps,” on page 162
n“Conguring ESXi Syslog Services,” on page 164
n“Managing ESXi SNMP Agents,” on page 166
n“Retrieving Hardware Information,” on page 169
Using resxtop for Performance Monitoring
You can use the resxtop vCLI command to examine how ESXi systems use resources.
You can use the command in the default interactive mode or in batch mode. The Resource Management
documentation explains how to use resxtop and provides information about available commands and
display statistics.
If you cannot reach the host with the resxtop vCLI command, you might be able to use the esxtop command
in the ESXi Shell instead. See Geing Started with vSphere Command-Line Interfaces for information on
accessing the shell.
I resxtop and esxtop are supported only on Linux.
Managing Diagnostic Partitions
Your host must have a diagnostic partition, also referred to as dump partition, to store core dumps for
debugging and for use by VMware technical support.
A diagnostic partition is on the local disk where the ESXi software is installed by default. You can also use a
diagnostic partition on a remote disk shared between multiple hosts. If you want to use a network
diagnostic partition, you can install ESXi Dump Collector and congure the networked partition. See
“Manage Core Dumps with ESXi Dump Collector,” on page 163.
VMware, Inc. 161

The following considerations apply.
nA diagnostic partition cannot be located on an iSCSI LUN accessed through the software iSCSI or
dependent hardware iSCSI adapter. For more information about diagnostic partitions with iSCSI, see
General Boot from iSCSI SAN Recommendations in the vSphere Storage documentation.
nA standalone host must have a diagnostic partition of 110 MB.
nIf multiple hosts share a diagnostic partition on a SAN LUN, congure a large diagnostic partition that
the hosts share.
nIf a host that uses a shared diagnostic partition fails, reboot the host and extract log les immediately
after the failure. Otherwise, the second host that fails before you collect the diagnostic data of the rst
host might not be able to save the core dump.
Diagnostic Partition Creation
You can use the vSphere Web Client to create the diagnostic partition on a local disk or on a private or
shared SAN LUN. You cannot use vicfg-dumppart to create the diagnostic partition. The SAN LUN can be
set up with FibreChannel or hardware iSCSI. SAN LUNs accessed through a software iSCSI initiator are not
supported.
C If two hosts that share a diagnostic partition fail and save core dumps to the same slot, the core
dumps might be lost.
If a host that uses a shared diagnostic partition fails, reboot the host and extract log les immediately after
the failure.
Diagnostic Partition Management
You can use the vicfg-dumppart or the esxcli system coredump command to query, set, and scan an ESXi
system's diagnostic partitions. The vSphere Storage documentation explains how to set up diagnostic
partitions with the vSphere Web Client and how to manage diagnostic partitions on a Fibre Channel or
hardware iSCSI SAN.
Diagnostic partitions can include, in order of suitability, parallel adapter, block adapter, FC, or hardware
iSCSI partitions. Parallel adapter partitions are most suitable and hardware iSCSI partitions the least
suitable.
I When you list diagnostic partitions, software iSCSI partitions are included. However, SAN
LUNs accessed through a software iSCSI initiator are not supported as diagnostic partitions.
Managing Core Dumps
With esxcli system coredump, you can manage local diagnostic partitions or set up core dump on a remote
server in conjunction with the ESXi Dump Collector.
For information about the ESXi Dump Collector, see the vSphere Networking documentation.
Manage Local Core Dumps with ESXCLI
You can use ESXCLI to manage local core dumps.
The following example scenario changes the local diagnostic partition by using ESXCLI. Specify one of the
options listed in “Connection Options for vCLI Host Management Commands,” on page 19 in place of
<conn_options>.
vSphere Command-Line Interface Concepts and Examples
162 VMware, Inc.
Procedure
1 Show the diagnostic partition the VMkernel uses and display information about all partitions that can
be used as diagnostic partitions.
esxcli <conn_options> system coredump partition list
2 Deactivate the current diagnostic partition.
esxcli <conn_options> system coredump partition set --unconfigure
The ESXi system is now without a diagnostic partition, and you must immediately set a new one.
3 Set the active partition to naa.<naa_ID>.
esxcli <conn_options> system coredump partition set --partition=naa.<naa_ID>
4 List partitions again to verify that a diagnostic partition is set.
esxcli <conn_options> system coredump partition list
If a diagnostic partition is set, the command displays information about it. Otherwise, the command
shows that no partition is activated and congured.
Manage Core Dumps with ESXi Dump Collector
By default, a core dump is saved to the local disk. You can use the ESXi Dump Collector to keep core dumps
on a network server for use during debugging.
The ESXi Dump Collector is especially useful for Auto Deploy, but supported for any ESXi 5.0 and later
host. The ESXi Dump Collector supports other customization, including sending core dumps to the local
disk.
The ESXi Dump Collector is included with the vCenter Server autorun.exe application. You can install the
ESXi Dump Collector on the same system as the vCenter Server service or on a dierent Windows or Linux
machine. See vSphere Networking.
You can congure ESXi hosts to use the ESXi Dump Collector by using the Host Proles interface of the
vSphere Web Client, or by using ESXCLI. Specify one of the options listed in “Connection Options for vCLI
Host Management Commands,” on page 19 in place of <conn_options>.
Procedure
1 Set up an ESXi system to use the ESXi Dump Collector by running esxcli system coredump.
esxcli <conn_options> system coredump network set --interface-name vmk0 --server-ipv4=1-
XX.XXX --port=6500
You must specify a VMkernel port with --interface-name, and the IP address and port of the server to
send the core dumps to. If you congure an ESXi system that is running inside a virtual machine, you
must choose a VMkernel port that is in promiscuous mode.
2 Enable the ESXi Dump Collector.
esxcli <conn_options> system coredump network set --enable=true
3 (Optional) Check that the ESXi Dump Collector is congured correctly.
esxcli <conn_options> system coredump network get
The host on which you have set up the ESXi Dump Collector sends core dumps to the specied server by
using the specied VMkernel NIC and optional port.
Chapter 10 Monitoring ESXi Hosts
VMware, Inc. 163
Manage Core Dumps with vicfg-dumppart
You can use vicfg-dumppart to manage core dumps.
The following example scenario changes the diagnostic partition. Specify one of the options listed in
“Connection Options for vCLI Host Management Commands,” on page 19 in place of <conn_options>.
Procedure
1 Show the diagnostic partition the VMkernel uses.
vicfg-dumppart <conn_options> -t
2 Display information about all partitions that can be used as diagnostic partitions. Use -l to list all
diagnostic partitions, -f to list all diagnostic partitions in order of priority.
vicfg-dumppart <conn_options> -f
The output might appear in the following format.
Partition name on vml.mpx.vmhba36:C0:T0:L0:7 -> mpx.vmhba36:C0:T0:L0:7
3 Deactivate the diagnostic partition.
vicfg-dumppart <conn_options> -d
The ESXi system is now without a diagnostic partition, and you must immediately set a new one.
4 Set the active partition to naa.<naa_ID>.
vicfg-dumppart <conn_options> -s naa.<naa_ID>
5 Run vicfg-dumppart -t again to verify that a diagnostic partition is set.
vicfg-dumppart <conn_options> -t
If a diagnostic partition is set, the command displays information about it. Otherwise, the command
informs you that no partition is set.
Configuring ESXi Syslog Services
All ESXi hosts run a syslog service, which logs messages from the VMkernel and other system components
to local les or to a remote host.
You can use the vSphere Web Client, or use the esxcli system syslog command to congure the following
parameters of the syslog service.
nRemote host and port - Remote host to which syslog messages are forwarded and port on which the
remote host receives syslog messages. The remote host must have a log listener service installed and
correctly congured to receive the forwarded syslog messages. See the documentation for the syslog
service installed on the remote host for information on conguration.
nTransport protocol - Logs can be sent by using UDP, which is the default, TCP, or SSL transports.
nLocal logging directory - Directory where local copies of the logs are stored. The directory can be
located on mounted NFS or VMFS volumes. Only the /scratch directory on the local le system is
persistent across reboots.
nUnique directory name prex - Seing this option to true creates a subdirectory with the name of the
ESXi host under the specied logging directory. This method is especially useful if the same NFS
directory is used by multiple ESXi hosts.
vSphere Command-Line Interface Concepts and Examples
164 VMware, Inc.

nLog rotation policies - Sets maximum log size and the number of archives to keep. You can specify
policies both globally, and for individual subloggers. For example, you can set a larger size limit for the
vmkernel log.
I The esxcli system syslog command is the only supported command for changing ESXi 5.0
and later logging conguration. The vicfg-syslog command and editing conguration les is not supported
for ESXi 5.0 and can result in errors.
After making conguration changes, restart the vmsyslogd syslog service by running esxcli system syslog
reload.
The esxcli system syslog command allows you to congure the logging behavior of your ESXi system.
With vSphere 5.0, you can manage the top-level logger and subloggers. The command has the following
options.
Option Description
mark Marks all logs with the specied string.
reload Reloads the conguration, and updates any changed conguration values.
config get Retrieves the current conguration.
config set Sets the conguration. Use one of the following options.
n--logdir=<path> – Saves logs to a given path.
n--loghost=<host> – Sends logs to a given host.
n--logdir-unique=<true|false> – Species whether the log should go to a unique
subdirectory of the directory specied in logdir.
n--default-rotate=<int> – Default number of log rotations to keep.
n--default-size=<int> – Size before rotating logs, in KB.
config logger list Shows currently congured subloggers.
config logger set Sets conguration options for a specic sublogger. Use one of the following options.
n--id=<str> – ID of the logger to congure. Required.
n--reset=<str> – Resets values to default.
n--rotate=<long> – Number of rotated logs to keep for a specic logger. Requires --id.
n--size=<long> – Size of logs before rotation for a specic logger, in KB. Requires --id.
Example: esxcli system syslog Usage
The following workow illustrates how you might use esxcli system syslog for log conguration. Specify
one of the options listed in “Connection Options for vCLI Host Management Commands,” on page 19 in
place of <conn_options>.
1 Show conguration options.
esxcli <conn_options> system syslog config get
Default Rotation Size: 1024
Default Rotations: 8
Log Output: /scratch/log
Logto Unique Subdirectory: false
Remote Host: <none>
2 Set all logs to keep twenty rotations before overwriting the oldest log.
esxcli <conn_options> system syslog config set --default-rotate=20
3 Set the rotation policy for VMkernel logs to 10 rotations, rotating at 2 MB.
esxcli <conn_options> system syslog config logger --id=vmkernel --size=2048 --rotate=10
Chapter 10 Monitoring ESXi Hosts
VMware, Inc. 165
4 Send logs to remote host myhost.mycompany.com. The logs will use the default transport (UDP) and port
(514).
esxcli system syslog config set --loghost='myhost.mycompany.com'
5 Save the local copy of logs to /scratch/mylogs and send another copy to the remote host.
esxcli <conn_options> system syslog config set --loghost='tcp://myhost.mycompany.com:1514' --
logdir='/scratch/mylogs'
You can set the directory on the remote host by conguring the client running on that host. You can use
the vSphere Web Client to redirect system logs to a remote host by changing the System.global.logHost
advanced seing.
6 Send a log message to all logs simultaneously.
esxcli <conn_options> system syslog mark --message="this is a message!"
7 Reload the syslog daemon and apply conguration changes.
esxcli <conn_options> system syslog reload
Managing ESXi SNMP Agents
Simple Network Management Protocol (SNMP) allows management programs to monitor and control
networked devices. You can manage vSphere 5.0 SNMP agents by using vicfg-snmp commands.
The host-based embedded SNMP agent is disabled by default. Conguring and enabling the agent requires
that you perform the following tasks.
1Congure SNMP communities. See “Conguring SNMP Communities,” on page 166.
2Congure the SNMP agent. You have the following choices.
n“Conguring the SNMP Agent to Send Traps,” on page 166
n“Conguring the SNMP Agent for Polling,” on page 168
Configuring SNMP Communities
Before you enable the ESXi embedded SNMP agent, you must congure at least one community for the
agent.
An SNMP community denes a group of devices and management systems. Only devices and management
systems that are members of the same community can exchange SNMP messages. A device or management
system can be a member of multiple communities.
To congure SNMP communities, run esxcli system snmp set or vicfg-snmp -c, specifying a comma-
separated list of communities as shown in the following examples.
esxcli system snmp set -c public, internal
vicfg-snmp <conn_options> -c public, internal
Each time you specify a community with this command, the seings that you specify overwrite the previous
conguration.
Configuring the SNMP Agent to Send Traps
You can use the SNMP agent embedded in ESXi to send virtual machine and environmental traps to
management systems.
To congure the agent to send traps, you must specify a target address, also referred to as receiver address,
the community, and an optional port. If you do not specify a port, the SNMP agent sends traps to UDP port
162 on the target management system by default.
vSphere Command-Line Interface Concepts and Examples
166 VMware, Inc.
Configure a Trap Destination with ESXCLI
You can use ESXCLI to congure a trap destination and send traps.
Specify one of the options listed in “Connection Options for vCLI Host Management Commands,” on
page 19 in place of <conn_options>.
Procedure
1 Make sure a community is set up.
esxcli system snmp get <conn_options>
Current SNMP agent settings:
Enabled: 1
UDP port: 161
Communities: public
Notification targets:
2 Set the target address, port number, and community.
esxcli <conn_options> system snmp set -t target.example.com@163/public
Each time you specify a target with this command, the seings you specify overwrite all previously
specied seings. To specify multiple targets, separate them with a comma.
You can change the port that the SNMP agent sends data to on the target using the --targets option.
That port is UDP 162 by default.
3 (Optional) Enable the SNMP agent if it is not yet running.
esxcli <conn_options> system snmp set --enable=yes
4 (Optional) Send a test trap to verify that the agent is congured correctly.
esxcli <conn_options> system snmp test
The agent sends a warmStart trap to the congured target.
Configure a Trap Destination with vicfg-snmp
You can use vicfg-snmp to congure a trap destination and send traps.
Specify one of the options listed in “Connection Options for vCLI Host Management Commands,” on
page 19 in place of <conn_options>.
Procedure
1 Make sure a community is set up.
vicfg-snmp <conn_options> --show
Current SNMP agent settings:
Enabled: 1
UDP port: 161
Communities: public
Notification targets:
2 Run vicfg-snmp --target with the target address, port number, and community.
vicfg-snmp <conn_options> -t target.example.com@163/public
Chapter 10 Monitoring ESXi Hosts
VMware, Inc. 167

Each time you specify a target with this command, the seings you specify overwrite all previously
specied seings. To specify multiple targets, separate them with a comma.
You can change the port that the SNMP agent sends data to on the target using the --targets option.
That port is UDP 162 by default.
3 (Optional) Enable the SNMP agent if it is not yet running.
vicfg-snmp <conn_options> --enable
4 (Optional) Send a test trap to verify that the agent is congured correctly.
vicfg-snmp <conn_options> --test
The agent sends a warmStart trap to the congured target.
Configuring the SNMP Agent for Polling
If you congure the ESXi embedded SNMP agent for polling, it can listen for and respond to requests such
as GET requests from SNMP management client systems.
By default, the embedded SNMP agent listens on UDP port 161 for polling requests from management
systems. You can use the vicfg-snmp command to congure an alternative port. To avoid conicts with other
services, use a UDP port that is not dened in /etc/services.
I Both the embedded SNMP agent and the Net-SNMP-based agent available in the ESX 4.x
service console listen on UDP port 161 by default. If you are using an ESX 4.x system, change the port for
one agent to enable both agents for polling.
Configure the SNMP Agent for Polling with ESXCLI
You can use ESXCLI to congure the SNMP agent for polling.
Specify one of the options listed in “Connection Options for vCLI Host Management Commands,” on
page 19 in place of <conn_options>.
Procedure
1 Run vicfg-snmp --target with the target address, port number, and community.
vicfg-snmp <conn_options> -c public -t target.example.com@163/public
Each time you specify a target with this command, the seings you specify overwrite all previously
specied seings. To specify multiple targets, separate them with a comma.
You can change the port that the SNMP agent sends data to on the target by using the --targets
option. That port is UDP 162 by default.
2 (Optional) Specify a port for listening for polling requests.
vicfg-snmp <conn_options> -p <port>
3 (Optional) If the SNMP agent is not enabled, enable it.
vicfg-snmp <conn_options> --enable
4 Run vicfg-snmp --test to validate the conguration.
vicfg-snmp <conn_options> --test
vSphere Command-Line Interface Concepts and Examples
168 VMware, Inc.
Example: Running Commands in Sequence
The following example shows how the commands are run in sequence.
vicfg-snmp <conn_options> –c public –t example.com@162/private --enable
# next validate your config by doing these things:
vicfg-snmp <conn_options> -–test
walk –v1 –c public esx-host
Configure the SNMP Agent for Polling with vicfg-snmp
You can use vicfg-snmp to congure the SNMP agent for polling.
Specify one of the options listed in “Connection Options for vCLI Host Management Commands,” on
page 19 in place of <conn_options>.
Procedure
1 Run vicfg-snmp --target with the target address, port number, and community.
vicfg-snmp <conn_options> -c public -t target.example.com@163/public
Each time you specify a target with this command, the seings you specify overwrite all previously
specied seings. To specify multiple targets, separate them with a comma.
You can change the port that the SNMP agent sends data to on the target by using the --targets
option. That port is UDP 162 by default.
2 (Optional) Specify a port for listening for polling requests.
vicfg-snmp <conn_options> -p <port>
3 (Optional) If the SNMP agent is not enabled, enable it.
vicfg-snmp <conn_options> --enable
4 Run vicfg-snmp --test to validate the conguration.
vicfg-snmp <conn_options> --test
Example: Running Commands in Sequence
The following example shows how the commands are run in sequence.
vicfg-snmp <conn_options> –c public –t example.com@162/private - -enable
# next validate your config by doing these things:
vicfg-snmp <conn_options> -–test
walk –v1 –c public esx-host
Retrieving Hardware Information
Commands in dierent ESXCLI namespaces might display some hardware information, but the esxcli
hardware namespace is specically intended to give you that information. The namespace includes
commands for geing and seing CPU properties, for listing boot devices, and for geing and seing the
hardware clock time.
You can also use the ipmi namespace to retrieve IPMI system event logs (SEL) and sensor data records
(SDR). The command supports both get (single return value) and list (multiple return values) commands
and returns raw sensor information.
See the vCLI Reference or the ESXCLI online help for details.
Chapter 10 Monitoring ESXi Hosts
VMware, Inc. 169
vSphere Command-Line Interface Concepts and Examples
170 VMware, Inc.
Index
C
commands, overview 11
connection options
DCLI commands 19
vCLI host management commands 19
D
datastore management
capabilities 57
NAS 57–59
NFS 57
DCLI commands, connection options 19
E
esxcfg commands 16
ESXCLI
available commands 17
output usage 19
ESXCLI trust relationship requirement 17
ESXi host monitoring
core dump management 162
core dump management with vicfg-
dumppart 164
core dump management with ESXi Dump
Collector 163
diagnostic partition management 161
ESXi SNMP agent management 166
ESXi syslog services configuration 164
hardware information retrieval 169
local core dump management with
ESXCLI 162
monitor performance with resxtop 161
sending traps with the SNMP agent 166
SNMP agent polling configuration 168
SNMP communities configuration 166
F
FibreChannel SAN
managing 59
monitoring 59
file management
duplicate VMFS datastores 32
introduction 29
mount datastores with existing signatures 32
mounting a datastore with ESXCLI 32
mounting a datastore with vicfg-volume 33
resignature VMFS copies 33
resignaturing VMFS copies with ESXCLI 34
resignaturing VMFS copies with vicfg-
volume 34
unmounting a datastore with ESXCLI 32
unmounting a datastore with vicfg-volume 33
unused storage space reclamation 34
vifs examples 37
vifs options 36
vifs usage 35
VMFS volumes 31
VMFS3 to VMFS5 upgrade 31
vmkfstools 30
G
glossary 9
H
host management
Active Directory configuration 26
Active Directory integration with ESXi 26
Active Directory setup 27
backup tasks 24
configuration backup 24
configuration backup from vMA 25
configuration data backup 24
enter maintenance mode 22
entering maintenance mode with ESXCLI 22
entering maintenance mode with vicfg-
hostops 23
examine 21, 22
exit maintenance mode 22
exiting maintenance mode with ESXCLI 22
exiting maintenance mode with vicfg-
hostops 23
reboot 21, 22
restoring configuration data 24
stop 21, 22
updating 27
vicfg-authconfig usage 26
vicfg-hostops 22
VMkernel module management 25
VMware, Inc. 171
VMkernel module management with vicfg-
module 26
VMkernel module management with esxcli 25
host management commands, targets and
protocols 15
I
intended audience 9
iSCSI SAN protection
iSCSI CHAP 72
iSCSI port security 72
transmitted data 71
iSCSI session management
introduction 98
listing 98
login 99
removal 99
iSCSI storage management
command syntax 73
dependent hardware iSCSI setup with
ESXCLI 80
dependent hardware iSCSI setup with vicfg-
iscsi 86
discovery sessions 70
discovery target names 71
enable iSCSI authentication 94
enabling iSCSI authentication 94
enabling mutual iSCSI authentication 95, 96
esxcli iscsi syntax 73, 74
esxcli iscsi short options 74
ESXCLI setup 78
independent hardware iSCSI setup with
ESXCLI 82
independent hardware iSCSI setup with vicfg-
iscsi 87
iSCSI SAN protection 71
iSCSI session management 98
list iSCSI parameters 90
list iSCSI options 89
list iSCSI options with ESXCLI 89
list iSCSI options with vicfg-iscsi 89
list iSCSI parameters with ESXCLI 90
list iSCSI parameters with vicfg-iscsi 92
multipathing port setup 97
overview 69
return parameters to default inheritance with
ESXCLI 92
return parameters to default inheritance with
vicfg-iscsi 94
set iSCSI parameters with ESXCLI 90
set MTU with ESXCLI 89
set iSCSI options 89
set iSCSI parameters 90
set iSCSI options with vicfg-iscsi 89
set iSCSI parameters with vicfg-iscsi 92
software iSCSI setup with ESXCLI 78
software iSCSI setup with vicfg-iscsi 85
vicfg-iscsi setup 84
vicfg-iscsi syntax 73, 75
L
LUN examination
device representation 45
esxcli storage core 46
target representation 45
vicfg-scsidevs 47
M
manage port groups
ESXCLI 139
vicfg-vswitch 140
manage VMkernel network interfaces with
ESXCLI
IPv4 145
IPv6 146
manage VMkernel network interfaces with vicfg-
vmknic
IPv4 147
IPv6 147
multipathing
path management 50
setting round robin policy details 56
N
NAS
add 58
NAS
delete 58
managing with ESXCLI 58
managing with vicfg-nas 59
O
overview
command-line help 12
documentation 12
introduction 11
P
path information, listing 51
path management
multipathing 54
policies 54
path claiming rules
applying 114
loading 114
port group VLAN ID setup
ESXCLI 141
vicfg-vswitch 141
vSphere Command-Line Interface Concepts and Examples
172 VMware, Inc.
S
sending traps with the SNMP agent
ESXCLI 167
vicfg-snmp 167
set switch attributes
ESXCLI 138
vicfg-vswitch 139
SNMP agent polling configuration
ESXCLI 168
vicfg-snmp 169
storage management
APD 49
datastore management 57
datastores 44
device detaching 48
device naming 44
device reattaching 49
FCoE adapter configuration 65
FibreChannel SAN 59
I/O scheduling 57
introduction 42
LUN examination 45–47
LUN removal 48
monitor vSphere Flash Read Cache 62
multipathing 56
path disabling with ESXCLI 53
path disabling with vicfg-mpath 53
path information 51
path management 50, 54
path policy modification 55
path policy modification with vicfg-mpath 56
path policy modification with ESXCLI 55
path state modification 53
PDL 49
PDL reattaching 49
PDL removal 49
permanent device loss 49
SMART information retrieval 66
storage access by virtual machines 42
storage adapter scanning 66
svmotion migration 63
Virtual SAN 60
Virtual Volumes 62
Storage vMotion
limitations 63
requirements 63
uses 63
svmotion
interactive mode 64
noninteractive mode 64
virtual machine configuration file relocation 65
virtual machine storage relocation 65
VMX file path 64
T
third-party storage array management
changing claim rules 110
claim rule listing 113
claim rule loading 113
claim rule management 110
claim rule moving 113
claim rule addition 111
claim rule removal 112
device management 102
fixed PSP 104
NMP management 101
path claiming 108
path unclaiming 109
path claiming rules 114
path listing 102
PSP management 103
reclaim troubleshooting command usage 109
round robin setup customization 105
SATP management 106
U
uplink adapter management
ESXCLI 142
linking with ESXCLI 144
linking with vicfg-vswitch 144
specify multiple uplinks with ESXCLI 143
unlinking with ESXCLI 144
unlinking with vicfg-vswitch 144
vicfg-nics 143
uplinks and port groups
connect with vicfg-vswitch 140
connect with ESXCLI 140
disconnect with ESXCLI 140
disconnect with vicfg-vswitch 140
user management
permissions 120
vicfg-user syntax 118
vicfg-user usage 118
vSphere environment 117
V
vCLI commands, platform support 15
vCLI host management commands
cacertsfile usage 18
connection options 19
credential store usage 18
lockdown mode 19
thumbprint usage 18
vCenter Server certificate installation 17
virtual machine management
AnswerVM API 130
attribute retrieval 125
Index
VMware, Inc. 173
connect virtual devices 129
disconnect virtual devices 129
list virtual machines 125
power off 128
power on 128
register virtual machines 125
remove snapshots 128
revert snapshots 128
stop a virtual machine forcibly 130
taking a snapshot 127
vmware-cmd 123
Virtual SAN
adding storage 61
cluster management 60
removing storage 61
retrieving information 60
virtual switch addition
ESXCLI 138
vicfg-vswitch 138
virtual switch deletion
ESXCLI 138
vicfg-vswitch 138
virtual switch information retrieval
ESXCLI 137
vicfg-vswitch 137
vmware-cmd
connection options 124
general options 124
overview 123
remove snapshots 128
revert snapshots 128
taking a virtual machine snapshot 127
virtual machine path format 124
virtual machine snapshot management 127
vSphere networking
distributed switches usage 133
introduction 131
standard switches usage 132
vSphere network management
add port groups 139
add VMkernel network interfaces 145
adding an NTP server 152
basic network information retrieval 134
check port groups 139
distributed switch setup 148
DNS configuration setup 149
DNS configuration setup with ESXCLI 149
DNS configuration setup with vicfg-dns 151
DNS server setup with ESXCLI 149
DNS server setup with vicfg-dns 151
ESXI firewall 157
IP gateway management 152
IPsec setup 153
manage VMkernel network interfaces with
ESXCLI 145
manage VMkernel network interfaces with
vicfg-vmknic 146
modify VMkernel network interfaces 145
port group VLAN ID setup 141
preconfigured DNS server setup modification
with ESXCLI 150
preconfigured DNS server setup modification
with vicfg-dns 151
remove port groups 139
security associations 155
security policies 156
starting an NTP server 152
switch association 136
troubleshooting 134
uplink adapter management 142
uplinks and port groups 140
use IPsec with ESXi 154
virtual switch addition 138
virtual switch deletion 138
virtual switch information retrieval 137
virtual switches setup 136
vSphere standard switches setup 136
VXLAN monitoring 158
vSphere Networking management, standard
networking services in the vSphere
environment 149
vSphere Command-Line Interface Concepts and Examples
174 VMware, Inc.
