Vmware VSphere Migration VCenter Server 6.0 V Center 6.0.2 Sphere 602 En
User Manual: vmware vCenter Server - 6.0.2 - vSphere Migration Free User Guide for VMware vCenter Software, Manual
Open the PDF directly: View PDF ![]() .
.
Page Count: 56
- vSphere Migration
- Contents
- About vSphere Migration
- System Requirements for Migrating vCenter Server Deployments to vCenter Server Appliance Deployments
- vCenter Server Appliance Requirements
- vCenter Server Appliance Hardware Requirements
- vCenter Server Appliance Storage Requirements
- Software Included in the vCenter Server Appliance
- vCenter Server Appliance Software Requirements
- vCenter Server Appliance Database Requirements
- vSphere Web Client Software Requirements
- Required Ports for vCenter Server and Platform Services Controller
- Pre-migration Checks
- Known Limitations
- Preparing for Migration
- Moving Update Manager to a New Host Machine When Migrating vCenter Server to vCenter Server Appliance
- Synchronizing Clocks on the vSphere Network
- Preparing vCenter Server Certificates for Migration
- Preparing vCenter Server Databases for Migration
- Prepare Managed ESXi Hosts for Migration
- Install the Client Integration Plug-In
- Required Information for Migrating vCenter Server and vCenter Single Sign-On from Windows to an Appliance
- Migration of vCenter Server with an Embedded vCenter Single Sign-On to an Appliance
- Migration of vCenter Server with an External vCenter Single Sign-On to an Appliance
- After Migrating vCenter Server
- Troubleshooting
- Index

vSphere Migration
2 VMware, Inc.
You can find the most up-to-date technical documentation on the VMware Web site at:
hp://www.vmware.com/support/
The VMware Web site also provides the latest product updates.
If you have comments about this documentation, submit your feedback to:
docfeedback@vmware.com
Copyright © 2016 VMware, Inc. All rights reserved. Copyright and trademark information.
VMware, Inc.
3401 Hillview Ave.
Palo Alto, CA 94304
www.vmware.com
Contents
About vSphere Migration 5
1System Requirements for Migrating vCenter Server Deployments to
vCenter Server Appliance Deployments 7
2vCenter Server Appliance Requirements 9
vCenter Server Appliance Hardware Requirements 9
vCenter Server Appliance Storage Requirements 10
Software Included in the vCenter Server Appliance 11
vCenter Server Appliance Software Requirements 11
vCenter Server Appliance Database Requirements 11
vSphere Web Client Software Requirements 11
Required Ports for vCenter Server and Platform Services Controller 12
3Pre-migration Checks 17
4Known Limitations 19
5Preparing for Migration 21
Moving Update Manager to a New Host Machine When Migrating vCenter Server to
vCenter Server Appliance 21
Synchronizing Clocks on the vSphere Network 24
Preparing vCenter Server Certicates for Migration 25
Preparing vCenter Server Databases for Migration 25
Prepare Managed ESXi Hosts for Migration 28
Install the Client Integration Plug-In 30
Required Information for Migrating vCenter Server and vCenter Single Sign-On from Windows to
an Appliance 30
6Migration of vCenter Server with an Embedded vCenter Single Sign-On to an
Appliance 35
Download the vCenter Server Appliance Installer 36
Copy and Run VMware Migration Assistant on the Source vCenter Server Instance 36
Migrate vCenter Server with an Embedded vCenter Single Sign-On to an Appliance 37
7Migration of vCenter Server with an External vCenter Single Sign-On to an
Appliance 41
Download the vCenter Server Appliance Installer 43
Copy and Run VMware Migration Assistant on the Source vCenter Server Instance 43
Migrate an External vCenter Single Sign-On instance to a Platform Services Controller appliance 44
Migrate vCenter Server to an Appliance 47
VMware, Inc. 3
8After Migrating vCenter Server 51
Check vCenter Server Instance Upgrade or Migration 51
Verify Your vCenter Server Appliance Migration Is Successful 51
Log in to vCenter Server Appliance by Using the vSphere Web Client 52
9Troubleshooting 53
View Migration Assistant Logs and Status Files 53
Index 55
vSphere Migration
4 VMware, Inc.

About vSphere Migration
The vSphere Migration guide provides information about migrating VMware® vCenter Server to
vCenter Server Appliance.
To move to the current version of vSphere by performing a fresh installation that does not preserve existing
congurations, see the vSphere Installation and Setup documentation. To upgrade your vSphere environment,
see vSphere Upgrade. For information about Migration Assistant and answers to frequently asked questions,
see hp://kb.vmware.com/kb/2146439.
Intended Audience
This information is intended for anyone who plans to migrate from earlier versions of vSphere. The
information is wrien for experienced Windows or Linux system administrators who are familiar with
virtual machine technology and data center operations.
VMware Technical Publications Glossary
VMware Technical Publications provides a glossary of terms that might be unfamiliar to you. For denitions
of terms as they are used in VMware technical documentation, go to
hp://www.vmware.com/support/pubs.
VMware, Inc. 5
vSphere Migration
6 VMware, Inc.

System Requirements for Migrating
vCenter Server Deployments to
vCenter Server Appliance
Deployments 1
Your source and target systems must meet specic software and hardware requirements before you can
migrate a vCenter Server or a vCenter Single Sign-On deployment to a vCenter Server Appliance or
Platform Services Controller appliance.
Source System
nSynchronize the clocks on all machines running the source vCenter Server services. See “Synchronizing
Clocks on the vSphere Network,” on page 24.
nVerify that the system network name of the machines running the target vCenter Server services are
valid, and are reachable from other machines in the network.
nVerify that the host name of the virtual machine or physical server from which you are migrating
vCenter Server complies with RFC 1123 guidelines.
nIf your vCenter Server service is running using a user account other than the Local System account,
verify that the user account in which the vCenter Server service is running has the following
permissions:
nMember of the Administrators group
nLog on as a service
nAct as part of the operating system (if the user is a domain user)
nIf your vCenter Server service is running using a service user account for access to the vCenter Server
database and you run Migration Assistant under a dierent account, the Migration Assistant account
must have the Replace a process level token permission.
nVerify that the LOCAL SERVICE account has read permission on the folder in which vCenter Server is
installed and on the HKLM registry.
nVerify that the connection between the virtual machine or physical server and the domain controller is
working.
nVerify that the source vCenter Server instance or vCenter Single Sign-On instance on Windows have a
default gateway. If there is no default gateway, the migration will fail.
nVerify that the source vCenter Server instance or vCenter Single Sign-On instance on Windows does not
use a DHCP IP address as its system network name.
I Migration from a source Windows machine using a DHCP IP Address as its system
network name to an appliance is not supported.
VMware, Inc. 7
Target System
nYour target system must meet specic software and hardware requirements for
vCenter Server Appliance. See Chapter 2, “vCenter Server Appliance Requirements,” on page 9.
nWhen you use Fully Qualied Domain Names, make sure that the machine you use for deploying the
vCenter Server Appliance and the target ESXi host or vCenter Server instance are on the same DNS
server.
nSynchronize the clocks of all target virtual machines on the vSphere network before beginning
migration. Unsynchronized clocks might result in authentication problems and can cause the migration
to fail or prevent the vCenter Server services from starting. See “Synchronizing Clocks on the vSphere
Network,” on page 24.
vSphere Migration
8 VMware, Inc.

vCenter Server Appliance
Requirements 2
You can migrate the vCenter Server Appliance on an ESXi host 5.0 or later. Your system must also meet
specic software and hardware requirements.
When you use Fully Qualied Domain Names, make sure that the machine you use for deploying the
vCenter Server Appliance and the ESXi host are on the same DNS server.
Before you migrate the vCenter Server to vCenter Server Appliance, synchronize the clocks of all virtual
machines on the vSphere network. Unsynchronized clocks might result in authentication problems and can
cause the installation to fail or prevent the vCenter Server Appliance services from starting. See
“Synchronizing Clocks on the vSphere Network,” on page 24.
This chapter includes the following topics:
n“vCenter Server Appliance Hardware Requirements,” on page 9
n“vCenter Server Appliance Storage Requirements,” on page 10
n“Software Included in the vCenter Server Appliance,” on page 11
n“vCenter Server Appliance Software Requirements,” on page 11
n“vCenter Server Appliance Database Requirements,” on page 11
n“vSphere Web Client Software Requirements,” on page 11
n“Required Ports for vCenter Server and Platform Services Controller,” on page 12
vCenter Server Appliance Hardware Requirements
When you deploy the vCenter Server Appliance, you can select to deploy an appliance that is suitable for
the size of your vSphere environment. The option that you select determine the number of CPUs and the
amount of memory that the appliance will have.
The hardware requirements such as number of CPUs and memory depend on the size of your vSphere
inventory.
VMware, Inc. 9

Table 2‑1. Hardware Requirements for VMware vCenter Server Appliance
Resources
Platform Services
Controller
Tiny
Environment
(up to 10
Hosts, 100
Virtual
Machines)
Small
Environment
(up to 100
Hosts, 1,000
Virtual
Machines)
Medium
Environment
(up to 400
Hosts, 4,000
Virtual
Machines)
Large
Environment
(up to 1,000
Hosts, 10,000
Virtual
Machines)
Number of CPUs 2 2 4 8 16
Memory 2 GB RAM 8 GB RAM 16 GB RAM 24 GB RAM 32 GB RAM
I For vCenter Server Appliance with an embedded Platform Services Controller, you must add
the hardware requirements for Platform Services Controller to the hardware requirements for
vCenter Server Appliance depending on the size of your environment.
vCenter Server Appliance Storage Requirements
When you deploy the vCenter Server Appliance, the host on which you deploy the appliance must meet
minimum storage requirements. The required storage depends not only on the size of the vSphere
environment, but also on the disk provisioning mode.
The storage requirements depend on the deployment model that you select to deploy.
Table 2‑2. vCenter Server Minimum Storage Requirements Depending On the Deployment Model
vCenter Server Appliance with an
Embedded
Platform Services Controller
vCenter Server Appliance with an
External
Platform Services Controller
External
Platform
Services
Controller
Appliance
Default
Storage Size Large Storage Size
Default
Storage Size Large Storage Size
Default Storage
Size
Tiny
environment (up
to 10 hosts, 100
virtual
machines)
120 GB 700 GB 120 GB 700 GB 30 GB
Small
environment (up
to 100 hosts,
1,000 virtual
machines)
150 GB 700 GB 150 GB 700 GB 30 GB
Medium
environment (up
to 400 hosts,
4,000 virtual
machines)
300 GB 800 GB 300 GB 800 GB 30 GB
Large
environment (up
to 1,000 hosts,
10,000 virtual
machines)
450 GB 900 GB 450 GB 900 GB 30 GB
vSphere Migration
10 VMware, Inc.

Software Included in the vCenter Server Appliance
The vCenter Server Appliance is a precongured Linux-based virtual machine optimized for running
vCenter Server and associated services.
The vCenter Server Appliance package contains the following software:
nSUSE Linux Enterprise Server 11 Update 3 for VMware, 64-bit edition
nPostgreSQL
nvCenter Server 6.0 and vCenter Server 6.0 components.
vCenter Server Appliance Software Requirements
The VMware vCenter Server Appliance can be migrated only on hosts that are running ESXi version 5.0 or
later.
You can migrate the vCenter Server Appliance only by using the Client Integration Plug-In, which is an
HTML installer for Windows that you can use to connect directly to an ESXi 5.0.x, ESXi 5.1.x, ESXi 5.5.x, or
ESXi 6.0 host and migrate the vCenter Server Appliance on the host.
I You cannot migrate the vCenter Server Appliance by using the vSphere Client or the
vSphere Web Client. During the migration of the vCenter Server Appliance you must provide various
inputs, such as operating system and vCenter Single Sign-On passwords.
vCenter Server Appliance Database Requirements
The vCenter Server Appliance requires a database to store and organize server data.
Each vCenter Server Appliance instance must have its own database. When you migrate vCenter Server to
vCenter Server Appliance the database is migrated to an internal PostgreSQL database, which supports up
to 1,000 hosts and 10,000 virtual machines.
vSphere Web Client Software Requirements
Make sure that your browser supports the vSphere Web Client.
The vSphere Web Client 6.0 requires Adobe Flash Player 16 or later. The latest Adobe Flash Player version
for Linux systems is 11.2. Therefore, the vSphere Web Client cannot run on Linux platforms.
VMware has tested and supports the following guest operating systems and browser versions for the
vSphere Web Client. For best performance, use Google Chrome.
Table 2‑3. Supported Guest Operating Systems and Minimum Browser Versions for the
vSphere Web Client
Operating system Browser
Windows Microsoft Internet Explorer 10.0.19 and later.
Mozilla Firefox 34 and later.
Google Chrome 39 and later.
Mac OS Mozilla Firefox 34 and later.
Google Chrome 39 and later.
Chapter 2 vCenter Server Appliance Requirements
VMware, Inc. 11

Required Ports for vCenter Server and Platform Services Controller
The vCenter Server system both on Windows and in the appliance, must be able to send data to every
managed host and receive data from the vSphere Web Client and the Platform Services Controller services.
To enable migration and provisioning activities between managed hosts, the source and destination hosts
must be able to receive data from each other.
Ports Required for Communication Between Components
If a port is in use or is blacklisted, the vCenter Server installer displays an error message. You must use
another port number to proceed with the installation. There are internal ports that are used only for inter-
process communication.
VMware uses designated ports for communication. Additionally, the managed hosts monitor designated
ports for data from vCenter Server. If a rewall exists between any of these elements, the installer opens the
ports during the installation or upgrade process. For custom rewalls, you must manually open the required
ports. If you have a rewall between two managed hosts and you want to perform source or target activities,
such as migration or cloning, you must congure a means for the managed hosts to receive data.
N In Microsoft Windows Server 2008 and later, rewall is enabled by default.
If you congured a custom port when you installed the source vCenter Server instance, revert to default port
values before you proceed with the migration.
Table 2‑4. Ports Required for Communication Between Components
Port Protocol Description Required for
Used for Node-to-
Node
Communication
22 TCP/UDP System port for SSHD.
I This port must be open
during the migration to an appliance.
The migration process establishes an
SSH connection to transfer the data
from the existing to the new
appliance.
Appliance
deployments of
nvCenter Server
nPlatform Services
Controller
No
80 TCP vCenter Server requires port 80 for
direct HTTP connections. Port 80
redirects requests to HTTPS port 443.
This redirection is useful if you
accidentally use hp://server instead
of hps://server.
WS-Management (also requires port
443 to be open).
If you use a Microsoft SQL database
that is stored on the same virtual
machine or physical server as the
vCenter Server, port 80 is used by the
SQL Reporting Service. When you
install or upgrade vCenter Server, the
installer prompts you to change the
HTTP port for vCenter Server.
Change the vCenter Server HTTP
port to a custom value to ensure a
successful installation or upgrade.
I You can change this port
number during the vCenter Server
and Platform Services Controller
installations on Windows.
Windows
installations and
appliance
deployments of
nvCenter Server
nPlatform Services
Controller
No
vSphere Migration
12 VMware, Inc.

Table 2‑4. Ports Required for Communication Between Components (Continued)
Port Protocol Description Required for
Used for Node-to-
Node
Communication
88 TCP Active Directory server. Windows
installations and
appliance
deployments of
Platform Services
Controller
No
389 TCP/UDP This port must be open on the local
and all remote instances of
vCenter Server. This is the LDAP port
number for the Directory Services for
the vCenter Server group. If another
service is running on this port, it
might be preferable to remove it or
change its port to a dierent port. You
can run the LDAP service on any port
from 1025 through 65535.
If this instance is serving as the
Microsoft Windows Active Directory,
change the port number from 389 to
an available port from 1025 through
65535.
Windows
installations and
appliance
deployments of
Platform Services
Controller
nvCenter Server to
Platform Services
Controller
nPlatform Services
Controller to
Platform Services
Controller
443 TCP The default port that the
vCenter Server system uses to listen
for connections from the
vSphere Web Client. To enable the
vCenter Server system to receive data
from the vSphere Web Client, open
port 443 in the rewall.
The vCenter Server system also uses
port 443 to monitor data transfer from
SDK clients.
This port is also used for the
following services:
nWS-Management (also requires
port 80 to be open)
nThird-party network
management client connections to
vCenter Server
nThird-party network
management clients access to
hosts
I You can change this port
number during the vCenter Server
and Platform Services Controller
installations on Windows.
Windows
installations and
appliance
deployments of
nvCenter Server
nPlatform Services
Controller
nvCenter Server to
vCenter Server
nvCenter Server to
Platform Services
Controller
nPlatform Services
Controller to
vCenter Server
514 UDP vSphere Syslog Collector port for
vCenter Server on Windows and
vSphere Syslog Service port for
vCenter Server Appliance
I You can change this port
number during the vCenter Server
and Platform Services Controller
installations on Windows.
Windows
installations and
appliance
deployments of
nvCenter Server
nPlatform Services
Controller
No
Chapter 2 vCenter Server Appliance Requirements
VMware, Inc. 13

Table 2‑4. Ports Required for Communication Between Components (Continued)
Port Protocol Description Required for
Used for Node-to-
Node
Communication
636 TCP vCenter Single Sign-On LDAPS Windows
installations and
appliance
deployments of
Platform Services
Controller
vCenter Server to
Platform Services
Controller
902 TCP/UDP The default port that the
vCenter Server system uses to send
data to managed hosts. Managed
hosts also send a regular heartbeat
over UDP port 902 to the
vCenter Server system. This port
must not be blocked by rewalls
between the server and the hosts or
between hosts.
Port 902 must not be blocked between
the vSphere Client and the hosts. The
vSphere Client uses this port to
display virtual machine consoles
I You can change this port
number during the vCenter Server
installations on Windows.
Windows
installations and
appliance
deployments of
vCenter Server
No
1514 TCP/UDP vSphere Syslog Collector TLS port for
vCenter Server on Windows and
vSphere Syslog Service TLS port for
vCenter Server Appliance
I You can change this port
number during the vCenter Server
and Platform Services Controller
installations on Windows.
Windows
installations and
appliance
deployments of
nvCenter Server
nPlatform Services
Controller
No
2012 TCP Control interface RPC for vCenter
Single Sign-On
Windows
installations and
appliance
deployments of
Platform Services
Controller
nvCenter Server to
Platform Services
Controller
nPlatform Services
Controller to
vCenter Server
nPlatform Services
Controller to
Platform Services
Controller
2014 TCP RPC port for all VMCA (VMware
Certicate Authority) APIs
I You can change this port
number during the
Platform Services Controller
installations on Windows.
Windows
installations and
appliance
deployments of
Platform Services
Controller
nvCenter Server to
Platform Services
Controller
nPlatform Services
Controller to
vCenter Server
2020 TCP/UDP Authentication framework
management
I You can change this port
number during the vCenter Server
and Platform Services Controller
installations on Windows.
Windows
installations and
appliance
deployments of
nvCenter Server
nPlatform Services
Controller
nvCenter Server to
Platform Services
Controller
nPlatform Services
Controller to
vCenter Server
vSphere Migration
14 VMware, Inc.

Table 2‑4. Ports Required for Communication Between Components (Continued)
Port Protocol Description Required for
Used for Node-to-
Node
Communication
5480 TCP vCenter Server Appliance Web user
interface (HTTPS)
Appliance
deployments of
nvCenter Server
nPlatform Services
Controller
No
6500 TCP/UDP ESXi Dump Collector port
I You can change this port
number during the vCenter Server
installations on Windows.
Windows
installations and
appliance
deployments of
vCenter Server
No
6501 TCP Auto Deploy service
I You can change this port
number during the vCenter Server
installations on Windows.
Windows
installations and
appliance
deployments of
vCenter Server
No
6502 TCP Auto Deploy management
I You can change this port
number during the vCenter Server
installations on Windows.
Windows
installations and
appliance
deployments of
vCenter Server
No
7444 TCP Secure Token Service Windows
installations and
appliance
deployments of
Platform Services
Controller
nvCenter Server to
Platform Services
Controller
nPlatform Services
Controller to
vCenter Server
9443 TCP vSphere Web Client HTTPS Windows
installations and
appliance
deployments of
vCenter Server
No
11711 TCP vCenter Single Sign-On LDAP - For backward
compatibility with
vSphere 5.5 only.
vCenter Single Sign-
On 5.5 to
Platform Services
Controller 6.0
11712 TCP vCenter Single Sign-On LDAPS - For backward
compatibility with
vSphere 5.5 only.
vCenter Single Sign-
On 5.5 to
Platform Services
Controller 6.0
Custom Ports
If you congured custom ports for Auto Deploy or vSphere ESXi Dump Collector, these custom ports are
migrated to the conguration of the target vCenter Server Appliance. For example, if you congured Auto
Deploy to use port 6545, the conguration is migrated to the target vCenter Server Appliance. Other custom
ports are not supported in the vCenter Server Appliance.
Chapter 2 vCenter Server Appliance Requirements
VMware, Inc. 15
To congure the vCenter Server system to use a dierent port to receive vSphere Web Client data, see the
vCenter Server and Host Management documentation.
For more information about rewall conguration, see the vSphere Security documentation.
vSphere Migration
16 VMware, Inc.

Pre-migration Checks 3
When you migrate vCenter Server or vCenter Single Sign-On on Windows to an appliance, the installer does
a pre-check, for example, to verify that enough space is available on the source machine, and veries that the
external database, if any, can be successfully accessed.
Source Environment Checks
When you migrate vCenter Single Sign-On (version 5.5), the vCenter Single Sign-On is included as part of
the Platform Services Controller.
If your vCenter Server service is running in a service user account for access to the vCenter Server database
and you run Migration Assistant under a dierent account, the Migration Assistant account must have the
Replace a process level token permission.
The pre-migration checker performs checks for the following aspects of the source environment:
nNetwork connections
nInternal and external port availability
nAdministrator privileges on the Windows machine
nAny credentials that you enter
nSupported product and version
nAdministrator privilege for launching Migration Assistant
nMigration Assistant port availability
nExport directory space and permission requirements
nSystem name validity
nInventory size compatibility
nExternal vCenter Single Sign-On version
nvCenter Single Sign-On and vCenter Server certicate compatibility
nNTP server validity
Target Environment Checks
The pre-migration checker performs checks for the following aspects of the target environment:
nNetwork connections
nTarget vCenter Server IP address
VMware, Inc. 17
nMinimum processor requirements
nMinimum memory requirements
nMinimum disk space requirements
nPermissions on the selected install and data directory
nInternal and external port availability
nAdministrator privileges on the target host
nAny credentials that you enter
vSphere Migration
18 VMware, Inc.

Known Limitations 4
The current release of Migration Assistant has several known limitations.
The following list contains features or actions that are currently not supported:
nvSphere Update Manager is not migrated. If you use Update Manager in your environment, there are
more steps you must perform to manually move Update Manager to a new destination machine. See
“Moving Update Manager to a New Host Machine When Migrating vCenter Server to vCenter Server
Appliance,” on page 21.
nLocal Windows OS users and groups are not migrated to the SLES OS of the vCenter Server Appliance
6.0. If you assigned vCenter Server permissions to any Local Windows OS users and groups, remove
the permissions assignments before the migration. You can re-create Local OS users and groups on the
SLES OS of the vCenter Server Appliance 6.0 after the migration.
nThe migration process migrates only one network adapter seings to the target
vCenter Server Appliance. If the hostname of the source vCenter Server resolves to multiple IP
addresses across multiple network adapters, you have the option to select which IP address and
network adapter seings to migrate. After the migration, you can add the rest of the network adapters
and seings to the target vCenter Server Appliance.
nAfter the migration, the source vCenter Server is turned o and cannot be turned on to avoid network
ID conicts with the target vCenter Server Appliance. After the source vCenter Server is turned o, all
solutions that are not migrated become unavailable.
VMware, Inc. 19
vSphere Migration
20 VMware, Inc.

Preparing for Migration 5
Before beginning to migrate any type of vCenter Server deployment to an appliance, you must complete the
preparation tasks.
Preparation tasks:.
n“Synchronizing Clocks on the vSphere Network,” on page 24
n“Preparing vCenter Server Databases for Migration,” on page 25
n“Prepare Managed ESXi Hosts for Migration,” on page 28
n“Download the vCenter Server Appliance Installer,” on page 36
n“Copy and Run VMware Migration Assistant on the Source vCenter Server Instance,” on page 36
This chapter includes the following topics:
n“Moving Update Manager to a New Host Machine When Migrating vCenter Server to vCenter Server
Appliance,” on page 21
n“Synchronizing Clocks on the vSphere Network,” on page 24
n“Preparing vCenter Server Certicates for Migration,” on page 25
n“Preparing vCenter Server Databases for Migration,” on page 25
n“Prepare Managed ESXi Hosts for Migration,” on page 28
n“Install the Client Integration Plug-In,” on page 30
n“Required Information for Migrating vCenter Server and vCenter Single Sign-On from Windows to an
Appliance,” on page 30
Moving Update Manager to a New Host Machine When Migrating
vCenter Server to vCenter Server Appliance
When you intend to migrate your vCenter Server that runs on Windows to a vCenter Server Appliance, if
your vCenter Server deployment uses Update Manager, additional steps might be required to move
Update Manager to a new host machine manually.
You must move the Update Manager server and database in the following cases:
nUpdate Manager 5.5, vCenter Server and vCenter Single Sign-On 5.5 run on the same machine.
nUpdate Manager 5.5, and vCenter Single Sign-On 5.5 run on the same machine.
If Update Manager 5.5 runs on a dierent machine than vCenter Server 5.5 and vCenter Single Sign-On 5.5,
after vCenter Server successfully migrates to vCenter Server Appliance, upgrade Update Manager.
VMware, Inc. 21
vCenter Server Deployment Uses Embedded Update Manager
If Update Manager, vCenter Server, and vCenter Single Sign-On 5.5 run on the same machine, or if
Update Manager 5.5 and vCenter Single Sign-On 5.5 run on the same machine, perform the following steps:
1“Move the Update Manager Server and Database to a New Host Machine,” on page 22.
2 Migrate vCenter Server 5.5 or vCenter Single Sign-On to an appliance. See Chapter 6, “Migration of
vCenter Server with an Embedded vCenter Single Sign-On to an Appliance,” on page 35 and
Chapter 7, “Migration of vCenter Server with an External vCenter Single Sign-On to an Appliance,” on
page 41
3 Upgrade Update Manager to the same version as the target vCenter Server Appliance, and connect
Update Manager to the target vCenter Server Appliance. For more information on how to upgrade
Update Manager, see the vSphere Update Manager documentation.
vCenter Server Deployment Uses External Update Manager
If Update Manager runs on a dierent machine than vCenter Server 5.5 and vCenter Single Sign-On 5.5,
perform the following steps:
1 Migrate vCenter Server 5.5 or vCenter Single Sign-On 5.5 to an appliance. See Chapter 6, “Migration of
vCenter Server with an Embedded vCenter Single Sign-On to an Appliance,” on page 35 and
Chapter 7, “Migration of vCenter Server with an External vCenter Single Sign-On to an Appliance,” on
page 41
2 Upgrade Update Manager to the same version as the target vCenter Server Appliance, and connect
Update Manager to the target vCenter Server Appliance. For more information on how to upgrade
Update Manager, see the vSphere Update Manager documentation.
Move the Update Manager Server and Database to a New Host Machine
Before migrating a vCenter Server instance that runs on Windows to vCenter Server Appliance, if your
vCenter Server deployment uses embedded Update Manager, you must rst move Update Manager to a
new host machine.
Prerequisites
Create a virtual machine of have a physical server with a compatible version of Windows for installing
Update Manager. For more information, see Supported host operating systems for VMware vCenter Server
installation (including vCenter Update Manager and vRealize Orchestrator) (2091273).
Procedure
1 On the source machine, stop the VMware vSphere Update Manager Service.
2 On the source machine, stop the VMware vSphere Update Manager UFA Service.
3 Depending on whether the Update Manager database is on the same machine as the Update Manager
server, or on a dierent machine, perform the following steps:
uIf the Update Manager database and the Update Manager server run on the same source machine:
a On the source machine, back up the Update Manager database.
b On the destination machine, copy the Update Manager database backup, and restore the
database.
uIf the Update Manager database and the Update Manager server run on dierent machines, move
to the next step.
vSphere Migration
22 VMware, Inc.

4 On the destination machine, create DSN to point to the Update Manager database.
For more information about how to create DSN, see Installing and Administering VMware vSphere Update
Manager.
5 On the source machine, in the Start Menu, either in the Run Box or the Search box, type regedit and
press Enter.
The Microsoft Registry Editor opens.
6 In the Microsoft Registry Editor and navigate to HKEY_LOCAL_MACHINE\SOFTWARE\Wow6432Node\VMware,
Inc.\VMware Update Manager.
The Microsoft Registry Editor contains the conguration values for Update Manager that you need for
the move of the Update Manager server and database to a new host machine.
7 On the destination machine, start the installing of the Update Manager server of the same version as the
Update Manager server instance on the source machine.
a On the vCenter Server Information page, perform the following:
nIn the vCenter IP Address/Name text box, enter the VCServer registry value from the source
machine.
nIn the HTTP Port text box, enter the VCServerPort registry value from the source machine.
nIn the user name text box, enter the VCUserName registry value from the source machine.
nEnter the vCenter Server password that you use as an administrator.
b On the Database Options page, from the Data Source Name drop-down menu, select the DSN you
created in step 4.
c (Optional) On the Database Information page, enter user name and password for the database.
N The database password is required only if the DSN does not use Windows authentication.
A Database re-initialization warning dialog box opens.
d On the Database re-initialization warning dialog box, select the option Do not overwrite, leave my
existing database in place.
e On the VMware vSphere Update Manager Port Seings page, perform the following:
nFrom the drop-down menu, select the IP address or host name of your Update Manager
instance.
nIn the SOAP Port text box, enter the SoapPort registry value from the source machine.
nIn the Web Port text box, enter the WebPort registry value from the source machine.
nIn the SSL Port text box, enter the WebSSLPort registry value from the source machine.
nDepending on your source proxy seings, you have one of the following options:
nIf the source machine registry value UseProxy is 1, select the check box Yes, I have
Internet connection and I want to proxy now, and enter the
ProxyPassword, ProxyPort, ProxyServer, ProxyUserName registry values from the source
machine.
nIf the source machine registry value UseProxy is 0, proceed to the next step.
f On the Destination Folder page, enter the InstallPath and PatchStore registry values from the
source machine if you want to use the same paths as on the source machine, or set dierent paths
for the destination machine.
Chapter 5 Preparing for Migration
VMware, Inc. 23
8 On the source machine, copy the data folder of Update Manager.
The default directory where Update Manager data is stored is C:\ProgramData\VMware\VMware Update
Manager\Data. For a custom location of the Update Manager data folder, see the PatchStore registry
value.
9 If you used a custom SslVerifyDownloadCerticate registry value on your Update Manager source
machine, make the same customization on the destination machine.
10 If you modied the jetty-vum-ssl.xml or vci-integrity.xml les on the source machine, make the
same modication on these les on the destination machine.
The default location of the jetty-vum-ssl.xml and vci-integrity.xml les is C:\Program Files
(x86)\VMware\Infrastructure\Update Manager\.
11 If you used custom certicates on the source machine, move them to the destination machine.
You can use VMware vSphere Update Manager Utility to set your new certicates. For more
information about how to use VMware vSphere Update Manager Utility, see Reconguring VMware
vSphere Update Manager documentation.
12 Uninstall Update Manager from the source machine.
For more information about uninstalling the Update Manager server, see Installing and Administering
VMware vSphere Update Manager documentation.
You have installed an exact replica of your Update Manager environment on the new destination machine.
What to do next
Start the migration process for vCenter Server to vCenter Server Appliance.
Synchronizing Clocks on the vSphere Network
Verify that all components on the vSphere network have their clocks synchronized. If the clocks on the
machines in your vSphere network are not synchronized, SSL certicates, which are time-sensitive, might
not be recognized as valid in communications between network machines.
Unsynchronized clocks can result in authentication problems, which can cause the installation to fail or
prevent the vCenter Server Appliance vpxd service from starting.
Verify that any Windows host machine on which vCenter Server runs is synchronized with the Network
Time Server (NTP) server. See the Knowledge Base article hp://kb.vmware.com/kb/1318.
To synchronize ESXi clocks with an NTP server, you can use the Host Client. For information about editing
the time conguration of an ESXi host, see vSphere Single Host Management.
Synchronize ESXi Clocks with a Network Time Server
Before you install vCenter Server or deploy the vCenter Server Appliance, make sure all machines on your
vSphere network have their clocks synchronized.
This task explains how to set up NTP from the vSphere Client. You can instead use the vicfg-ntp vCLI
command. See the vSphere Command-Line Interface Reference.
Procedure
1 Start the vSphere Client, and connect to the ESXi host.
2 On the tab, click Time .
3 Click Properties, and click Options.
4 Select NTP .
vSphere Migration
24 VMware, Inc.

5 Click Add.
6 In the Add NTP Server dialog box, enter the IP address or fully qualied domain name of the NTP
server to synchronize with.
7 Click OK.
The host time synchronizes with the NTP server.
Preparing vCenter Server Certificates for Migration
You must verify that your vCenter Server certicates are prepared before you start the migration process.
Certificate Files Location
The vCenter Server certicate les are located at %ProgramData%\VMware\VMware VirtualCenter\SSL
Supported Certificate Types
If your environment uses any of the supported certicate types, you can continue with the migration. The
migration process proceeds normally and preserves your certicates.
nYour rui.crt le contains the entire chain including the leaf certicate. You can create this type of
certicate by deploying and using the VMware SSL Certicate Automation Tool,
seehp://kb.vmware.com/kb/2057340.
nYour rui.crt le contains the leaf certicate and the corresponding cacert.pem is available to validate
the rui.crt.
Unsupported Certificate Types
If your environment uses any of the unsupported certicate types, you must prepare your certicates before
you can proceed with the migration process proceeds.
nYour rui.crt contains only the leaf certicate, the cacert.pem is missing or invalid, and cacert.pem is
not added to the Windows trust store.
Get the Certicate Authority certicate, including all intermediate certicates, and create a cacert.pem
le, or replace the vCenter Server certicates with any of the supported formats.
nYour rui.crt contains only the leaf certicate and the cacert.pem is missing or invalid, but the
cacert.pem is added to the Windows trust store.
Get the Certicate Authority certicate, including all intermediate certicates from the Windows trust
store and create cacert.pem. Use OpenSSL to verify the certicate by running verify -CAfile
cacert.pem ru.crt command
For more information about vSphere security certicates, see the vSphere Security documentation.
Preparing vCenter Server Databases for Migration
The vCenter Server Appliance instance requires a database to store and organize server data. Ensure your
source vCenter Server database is prepared for migration to the target vCenter Server Appliance.
Each vCenter Server Appliance instance must have its own database. The bundled PostgreSQL database that
is included in the vCenter Server Appliance supports up to 1,000 hosts and 10,000 virtual machines.
I If you are using an external database for vCenter Server Appliance, it is converted to an
embedded PostgreSQL database during the migration.
Chapter 5 Preparing for Migration
VMware, Inc. 25
To ensure your database is prepared for migration:
nVerify that passwords are current and not set to expire soon.
nFor vCenter Server 5.5, run the cleanup scripts to remove any unnecessary data in the vCenter Server
database using the steps for your database. For details see:
n“Prepare an Oracle Database for Migration,” on page 26,
n“Prepare a Microsoft SQL Server Database for Migration,” on page 27
nVerify that you have backed up your database. See your database documentation.
nVerify that vCenter Server can communicate with the local database.
During the migration of vCenter Server to vCenter Server Appliance, the installer:
1 Exports the vCenter Server database.
2 Copies exported data to the target vCenter Server Appliance.
3 Starts the PostgreSQL service to import the source database data.
4 Upgrades the database schema to be compatible with the target vCenter Server Appliance.
5 Starts the target vCenter Server Appliance services.
When you congure the target vCenter Server Appliance, you initialize and congure using the imported
database with the old schema. You have a choice of migration options:
1 Core data
2 Performance and other historical data
Prepare an Oracle Database for Migration
Ensure that you have the necessary credentials, and that you complete any necessary cleanup or other
preparation before migrating your Oracle database from Windows to an embedded PostgreSQL database in
the appliance.
Prerequisites
Verify that you have conrmed basic interoperability before preparing your Oracle database for migration.
Verify that you have backed up your database. For information about backing up the vCenter Server
database, see the Oracle documentation.
Procedure
1 Verify that passwords are current and not set to expire soon.
2 Ensure that you have login credentials, the database name, and the database server name that the
vCenter Server database is to use.
Look in the ODBC system for the connection name of the database source name for the vCenter Server
database.
3 Use the Oracle SERVICE_NAME instead of SID to verify that your Oracle database instance is available.
nLog in to the database server to read from the alert log:
$ORACLE_BASE/diag/rdbms/$instance_name/$INSTANCE_NAME/trace/alert_$ INSTANCE_NAME.log.
nLog in to the database server to read from the Oracle Listener status output.
nIf you have the SQL*Plus client installed, you can use tnsping for the vCenter Database instance. If
the tnsping command does not work the rst time, retry it after waiting a few minutes. If retrying
does not work, restart the vCenter Database instance on the Oracle server and then retry tnsping to
ensure it is available.
vSphere Migration
26 VMware, Inc.

4 Verify that the JDBC driver le is included in the CLASSPATH variable.
5 Verify that permissions are set correctly.
6 Either assign the DBA role or grant the required permissions to the user.
7 For vCenter Server 5.5, run the cleanup script.
a Locate the cleanup_orphaned_data_Oracle.sql script in the ISO image and copy it to the Oracle
server.
b Log in to a SQL*Plus session with the vCenter Server database account.
c Run the cleanup script.
@pathcleanup_orphaned_data_Oracle.sql
The cleanup process purges unnecessary and orphaned data that is not used by any vCenter Server
component.
8 Make a full backup of the vCenter Server database.
Your database is prepared for the vCenter Server migration to vCenter Server Appliance.
Prepare a Microsoft SQL Server Database for Migration
Ensure that you have the necessary credentials, and that you complete any necessary cleanup or other
preparation before migrating your Microsoft SQL Server database on Windows to an embedded PostgreSQL
database appliance.
I You cannot use Integrate Windows for your authentication method if the vCenter Server
service is running under the Microsoft Windows built-in system account.
Prerequisites
Verify that you have backed up your database. For information about backing up the vCenter Server
database, see the Microsoft SQL Server documentation.
Procedure
1 Verify that passwords are current and not set to expire soon.
2 Verify that JDK 1.6 or later is installed on the vCenter Server machine.
3 Verify that the sqljdbc4.jar le is added to the CLASSPATH variable on the machine where
vCenter Server Appliance is to be migrated.
If the sqljdbc4.jar le is not installed on your system, the vCenter Server Appliance installer installs it.
4 Verify that your system database source name is using the Microsoft SQL Server Native Client 10 or 11
driver.
5 For vCenter Server 5.5, run the cleanup script.
a Locate the cleanup_orphaned_data_Oracle.sql script in the ISO image and copy it to the Oracle
server.
b Log in to a SQL*Plus session with the vCenter Server database account.
c Run the cleanup script.
@pathcleanup_orphaned_data_Oracle.sql
The cleanup process purges unnecessary and orphaned data that is not used by any vCenter Server
component.
Chapter 5 Preparing for Migration
VMware, Inc. 27
6 For vCenter Server 5.5, run the cleanup script.
a Locate the cleanup_orphaned_data_MSSQL.sql script in the ISO image and copy it to the Microsoft
SQL server.
b Log in to your database.
nFor Microsoft SQL Server Express, open a command prompt.
nFor Microsoft SQL Server, log in to a Microsoft SQL Server Management Studio session as the
vCenter Server database user.
c Run the cleanup script.
For Microsoft SQL Server Express, run:
sqlcmd -E -S localhost\VIM_SQLEXP -d VIM_VCDB -i pathcleanup_orphaned_data_MSSQL.sql
For Microsoft SQL Server: run the cleanup_orphaned_data_MSSQL.sql contents.
Make sure that you are connected to the database used by vCenter Server.
The cleanup script cleans any unnecessary data in your vCenter Server database.
7 Make a full backup of the vCenter Server database.
Your database is prepared for the vCenter Server migration to vCenter Server Appliance.
Prepare Managed ESXi Hosts for Migration
You must prepare the ESXi hosts that are managed by your vCenter Server installation before migrating it
from Windows to an appliance.
Prerequisites
To migrate vCenter Server or vCenter Single Sign-On from Windows to an appliance, your source and target
ESXi hosts must meet the migration requirements.
nESXi hosts must be at version 5.5 or greater. If your ESXi hosts are at an earlier version than 5.5,
upgrade them to 5.5. Read and follow all best practices when upgrading your hosts to ESXi 5.5.
nThe target ESXi host must not be in lockdown or maintenance mode.
Procedure
1 If you have Custom or Thumbprint certicates, see “Host Upgrades and Certicates,” on page 29 to
determine your preparatory steps.
2 Run vCenter Host Agent Pre-Upgrade Checker.
3 If you have vSphere HA clusters, SSL certicate checking must be enabled.
If certicate checking is not enabled when you upgrade, vSphere HA fails to congure on the hosts.
a Select the vCenter Server instance in the inventory panel.
b Select the Manage tab and the General subtab.
c Verify that the SSL eld is set to vCenter Server requires host SSL .
Your ESXi hosts are ready for vCenter Server upgrade.
vSphere Migration
28 VMware, Inc.

Host Upgrades and Certificates
If you upgrade an ESXi host to ESXi 6.0 or later, the upgrade process replaces the self-signed (thumbprint)
certicates with VMCA-signed certicates. If the ESXi host uses custom certicates, the upgrade process
retains those certicates even if those certicates are expired or invalid.
If you decide not to upgrade your hosts to ESXi 6.0 or later, the hosts retain the certicates that they are
currently using even if the host is managed by a vCenter Server system that uses VMCA certicates.
The recommended upgrade workow depends on the current certicates.
Host Provisioned with
Thumbprint Certificates
If your host is currently using thumbprint certicates, it is automatically
assigned VMCA certicates as part of the upgrade process.
N You cannot provision legacy hosts with VMCA certicates. You must
upgrade those hosts to ESXi 6.0 later.
Host Provisioned with
Custom Certificates
If your host is provisioned with custom certicates, usually third-party CA-
signed certicates, those certicates remain in place during upgrade. Change
the certicate mode to Custom to ensure that the certicates are not replaced
accidentally during a certicate refresh later.
N If your environment is in VMCA mode, and you refresh the
certicates from the vSphere Web Client, any existing certicates are
replaced with certicates that are signed by VMCA.
Going forward, vCenter Server monitors the certicates and displays
information, for example, about certicate expiration, in the
vSphere Web Client.
Hosts Provisioned with
Auto Deploy
Hosts that are being provisioned by Auto Deploy are always assigned new
certicates when they are rst booted with ESXi 6.0 or later software. When
you upgrade a host that is provisioned by Auto Deploy, the Auto Deploy
server generates a certicate signing request (CSR) for the host and submits it
to VMCA. VMCA stores the signed certicate for the host. When the Auto
Deploy server provisions the host, it retrieves the certicate from VMCA and
includes it as part of the provisioning process.
You can use Auto Deploy with custom certicates.
Change the Certificate Mode
In most cases, using VMCA to provision the ESXi hosts in your environment is the best solution. If corporate
policy requires that you use custom certicates with a dierent root CA, you can edit the vCenter Server
advanced options so that the hosts are not automatically provisioned with VMCA certicates when you
refresh certicates. You are then responsible for the certicate management in your environment.
You can use the vCenter Server advanced seings to change to thumbprint mode or to custom CA mode.
Use thumbprint mode only as a fallback option.
Procedure
1 Select the vCenter Server that manages the hosts and click .
2 Click Advanced , and click Edit.
3 In the Filter box, enter certmgmt to display only certicate management keys.
Chapter 5 Preparing for Migration
VMware, Inc. 29

4 Change the value of vpxd.certmgmt.mode to custom if you intend to manage your own certicates, and
to thumbprint if you temporarily want to use thumbprint mode, and click OK.
5 Restart the vCenter Server service.
Install the Client Integration Plug-In
You must install the Client Integration Plug-in before you migrate to the vCenter Server Appliance.
Prerequisites
“Download the vCenter Server Appliance Installer,” on page 36.
Procedure
1 In the vCenter Server Appliance installer, navigate to the vcsa directory and double-click VMware-
ClientIntegrationPlugin-6.0.0.exe.
The Client Integration Plug-in installation wizard appears.
2 On the Welcome page, click Next.
3 Read and accept the terms in the End-User License Agreement and click Next.
4 (Optional) Change the default path to the Client Integration Plug-in installation folder, and click Next.
5 On the Ready to Install the Plug-in page of the wizard, review the information and click Install.
6 After the installation completes, click Finish.
Required Information for Migrating vCenter Server and vCenter Single
Sign-On from Windows to an Appliance
The vCenter Server migration wizard prompts you for the deployment and migration information when
migrating a vCenter Server instance or a vCenter Single Sign-On instance from Windows to an appliance. It
is a best practice to keep a record of the values that you entered in case you must power o the appliance
and restore the source installation.
You can use this worksheet to record the information that you need for migrating a vCenter Server instance
with an embedded vCenter Single Sign-On, vCenter Server instance with an external
vCenter Single Sign-On, or an external vCenter Single Sign-On from Windows to an appliance.
I The user name that you use to log in to the machine from which you want run the GUI
installer, the path to the vCenter Server Appliance installer, and your values including the passwords, must
contain only ASCII characters. Extended ASCII and non-ASCII characters are unsupported.
Local OS users existing on source Windows machine are not migrated to the target
vCenter Server Appliance and must be recreated after migration is complete. If any local OS user names are
used to log in to the vCenter Single Sign-On, you must recreate them and reassign permissions in the
Platform Services Controller appliance.
If the source vCenter Server machine is joined to an Active Directory domain, the account you use must
have permissions to rejoin the machine to the domain. For more information, see
hp://kb.vmware.com/kb/2146454
vSphere Migration
30 VMware, Inc.

Table 5‑1. Information Required for Migrating vCenter Server from Windows to vCenter Server Appliance
Required Information Default Value Your Entry
Required source
vCenter Server or
vCenter Single Sign-
On migration data
vCenter Server or vCenter Single
Sign-On IP address or FQDN
vCenter Single Sign-On administrator
user name
administrator@vsphere.lo
cal
Password of the vCenter Single Sign-
On administrator
Migration Assistant port number
vCenter Server or vCenter Single
Sign-On version
IP address or FQDN of the source
ESXi host on which the source
vCenter Server or vCenter Single
Sign-On resides
Source ESXi host user name with
administrative rights on the source
ESXi host
Source ESXi host password
Migrate performance & other
historical data
Disabled by default
Required target
vCenter Server
Appliance data
IP address or FQDN of the target
ESXi host or vCenter Server instance
to which you deploy the
vCenter Server Appliance to migrate
the source vCenter Server
User name with administrative
privileges for the target ESXi host. or
vCenter Server instance, data center
or data center folder, and resource
pool of an ESXi host or DRS cluster to
which to migrate the source
installation
Password for the target ESXi host. or
vCenter Server instance, data center
or data center folder, and resource
pool of an ESXi host or DRS cluster
vCenter Single Sign-On password
vCenter Single Sign-On domain name
vCenter Single Sign-On site name
Target vCenter Server Appliance
name
Password of the root user
Chapter 5 Preparing for Migration
VMware, Inc. 31

Table 5‑1. Information Required for Migrating vCenter Server from Windows to vCenter Server Appliance
(Continued)
Required Information Default Value Your Entry
vCenter Server Appliance size.
The options vary depending on the
size of your vSphere environment.
nTiny (up to 20 hosts, 400 virtual
machines)
nSmall (up to 150 hosts, 3,000
virtual machines)
nMedium (up to 300 hosts, 6,000
virtual machines)
nLarge (up to 1,000 hosts, 10,000
virtual machines)
Tiny (up to 20 hosts, 400
virtual machines)
Name of the datastore on which the
new version of the
vCenter Server Appliance is deployed
Enable or disable thin disk mode. Disabled by default
Join or do not participate in the
VMware Customer Experience
Improvement Program (CEIP).
For information about the CEIP, see
the Conguring Customer Experience
Improvement Program section in
vCenter Server and Host Management.
Join the CEIP
Temporary network
for communication
between the source
vCenter Server or
vCenter Single Sign-
on and the target
vCenter Server
Appliance
I The
IP address or port
group of the
temporary network
must be on the same
subnet as the source
vCenter Server or
vCenter Single Sign-
on. Verify that the
default gateway, IP
address, and subnet
mask match with the
port group that you
select. The port group
that you select should
be able to acquire the
source vCenter Server
or vCenter Single
Sign-on IP address.
IP address version IPv4
IP address allocation method Static
Static assignment
seings
Network address
Subnet mask
Network gateway
Network DNS servers, separated with
commas
vSphere Migration
32 VMware, Inc.

Table 5‑1. Information Required for Migrating vCenter Server from Windows to vCenter Server Appliance
(Continued)
Required Information Default Value Your Entry
Enable or disable SSH Disabled by default
Migration Assistant port number 9123 or the port number
that is shown in the
Migration Assistant
console
Chapter 5 Preparing for Migration
VMware, Inc. 33
vSphere Migration
34 VMware, Inc.
Migration of vCenter Server with an
Embedded vCenter Single Sign-On to
an Appliance 6
You can migrate a vCenter Server instance with an embedded vCenter Single Sign-On to a
vCenter Server Appliance with an embedded Platform Services Controller appliance.
When you migrate from vCenter Server with an embedded vCenter Single Sign-On (version 5.5) on
Windows to vCenter Server Appliance with an embedded Platform Services Controller appliance, the entire
installation is migrated at the same time.
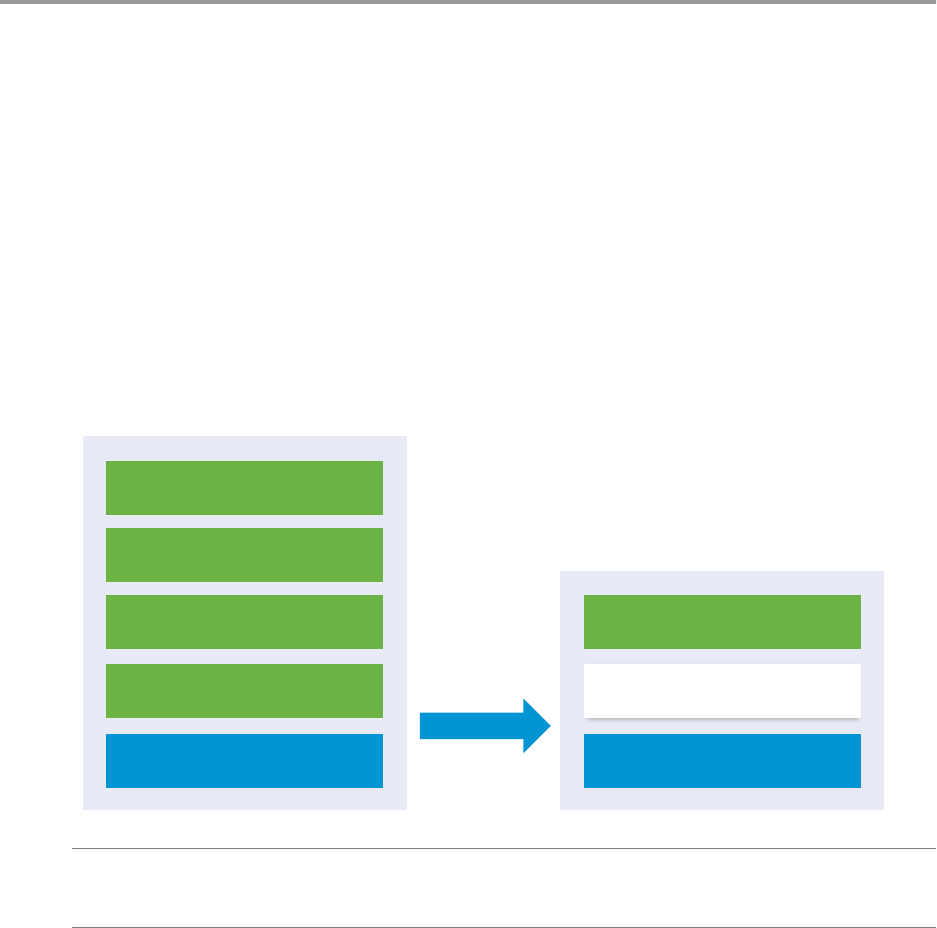
If vCenter Inventory Service, vSphere Web Client, vSphere Auto Deploy, or vSphere ESXi Dump Collector
are installed on a dierent machine than the source vCenter Server with an embedded
vCenter Single Sign-On, these components are migrated to the target vCenter Server Appliance.
Figure 6‑1. vCenter Server 5.5 with Embedded vCenter Single Sign-On Before and After Migration
Windows OS
vCenter Inventory Service
vSphere Web Client
vCenter Server
vCenter Single Sign-On
vCenter Server 5.5
with Embedded
vCenter Single Sign-On 5.5
vCenter Server Appliance 6.0
with Embedded Platform
Services Controller 6.0
Platform Services Controller
Appliance
vCenter Server
I The user name that you use to log in to the machine from which you want run the GUI
installer, the path to the vCenter Server Appliance installer, and your values including the passwords, must
contain only ASCII characters. Extended ASCII and non-ASCII characters are unsupported.
The installer:
nDeploys a new target appliance.
nExports the required les from the source vCenter Server.
VMware, Inc. 35
nCopies the required les to the new vCenter Server Appliance.
nRuns the migration process on the new vCenter Server Appliance as specied in the Summary.
nImports and updates the les and seings of the source vCenter Server installation to the new
vCenter Server Appliance.
Prerequisites
Assemble the “Required Information for Migrating vCenter Server and vCenter Single Sign-On from
Windows to an Appliance,” on page 30.
Procedure
1Download the vCenter Server Appliance Installer on page 36
Download the .iso installer for the vCenter Server Appliance and Client Integration Plug-in.
2Copy and Run VMware Migration Assistant on the Source vCenter Server Instance on page 36
You must Copy and run the VMware Migration Assistant on your source vCenter Server or
vCenter Single Sign-On to prepare it for migration from Windows to an appliance.
3Migrate vCenter Server with an Embedded vCenter Single Sign-On to an Appliance on page 37
You can use the Client Integration Plug-In to migrate a vCenter Server 5.5.x that uses the embedded
vCenter Single Sign-On instance to a vCenter Server Appliance 6.0 with an embedded
Platform Services Controller.
Download the vCenter Server Appliance Installer
Download the .iso installer for the vCenter Server Appliance and Client Integration Plug-in.
Prerequisites
Create a My VMware account at hps://my.vmware.com/web/vmware/.
Procedure
1 Download the vCenter Server Appliance installer from the VMware Web site at
hps://my.vmware.com/web/vmware/downloads.
2Conrm that the md5sum is correct.
See the VMware Web site topic Using MD5 Checksums at
hp://www.vmware.com/download/md5.html.
3 Mount the ISO image to a Windows virtual machine or physical server dierent from the source
vCenter Server or vCenter Single Sign-On. Mount the ISO image to the Windows virtual machine or
physical server on which you want to install the Client Integration Plug-In to migrate to the
vCenter Server Appliance.
If you are using a Windows virtual machine, you can congure the ISO image as a datastore ISO le for
the CD/DVD drive of the virtual machine by using the vSphere Web Client. See vSphere Virtual Machine
Administration.
Copy and Run VMware Migration Assistant on the Source
vCenter Server Instance
You must Copy and run the VMware Migration Assistant on your source vCenter Server or
vCenter Single Sign-On to prepare it for migration from Windows to an appliance.
You run the VMware Migration Assistant on your source vCenter Server or vCenter Single Sign-On to:
1 Discover the source deployment type.
vSphere Migration
36 VMware, Inc.

2 Run pre-checks on the source.
3 Report errors that must be addressed before starting the migration.
4 Provide information for the next steps in the migration process.
I Ensure that the Migration Assistant window remains open during the migration process.
Closing the Migration Assistant causes the migration process to stop.
Prerequisites
n“Download the vCenter Server Appliance Installer,” on page 36
nIf your vCenter Server service is running in a service user account for access to the vCenter Server
database and you run Migration Assistant under a dierent account, the Migration Assistant account
must have the Replace a process level token permission.
Procedure
1 Navigate to the migration-assistant directory of the vCenter Server Appliance installer package and
copy the migration-assistant folder to the source vCenter Server or vCenter Single Sign-On instance.
2 Start Migration Assistant
nDouble-click VMware-Migration-Assistant.exe
nFrom the command line run VMware-Migration-Assistant.exe --help to launch Migration
Assistant and display the help options.
The VMware Migration Assistant runs pre-migration checks and prompts you to resolve any errors it
nds before proceeding with the migration.
3 Enter the user name and password of a user who has administrative privileges on the vCenter Server
instance, for example, the administrator@vsphere.local user
When the pre-checks are nished and any errors are addressed, your source system is ready for migration.
What to do next
Follow the VMware Migration Assistant instructions to start migration.
R Leave the Migration Assistant window open until you complete the migration.
Migrate vCenter Server with an Embedded vCenter Single Sign-On to
an Appliance
You can use the Client Integration Plug-In to migrate a vCenter Server 5.5.x that uses the embedded vCenter
Single Sign-On instance to a vCenter Server Appliance 6.0 with an embedded Platform Services Controller.
Prerequisites
nIf you plan to deploy the target vCenter Server Appliance on an ESXi host, verify that the ESXi host is
not in lockdown or maintenance mode
nIf you plan to deploy the target vCenter Server Appliance on a DRS cluster of a vCenter Server
inventory, verify that the cluster contains at least one ESXi host that is not in lockdown or maintenance
mode.
nIf you plan to assign a static IP address in the temporary network seings of the appliance, verify that
you have congured the forward and reverse DNS records for the IP address.
Chapter 6 Migration of vCenter Server with an Embedded vCenter Single Sign-On to an Appliance
VMware, Inc. 37

nIf you plan to assign a DHCP IP address in the temporary network seings of the new appliance, verify
that the ESXi host on which you want to deploy the new appliance is in the same network as the ESXi
host on which the existing vCenter Server runs.
nIf you plan to assign a DHCP IPv4 address in the temporary network seings of the new appliance,
verify that the ESXi host on which you want to deploy the new appliance is connected to at least one
network that is associated with a port group which accepts MAC address changes. Consider the default
security policy of a distributed virtual switch, which is to reject MAC address changes. For information
about how to congure the security policy for a switch or port group, see vSphere Networking.
Procedure
1 In the software installer directory, double-click vcsa-setup.html.
2 Wait up to three seconds for the browser to detect the Client Integration Plug-in and allow the plug-in
to run on the browser when prompted.
3 On the Home page, click Migrate.
4 Review the Introduction page to understand the migration process and click Next.
5 Read and accept the license agreement, and click Next.
6 Connect to the target server on which you want to deploy the vCenter Server Appliance.
Option Steps
You can connect to an ESXi
host on which to deploy the
appliance.
1 Enter the FQDN or IP address of the ESXi host.
2 Enter the HTTPS port of the ESXi host.
3 Enter the user name and password of a user with administrative privileges on
the ESXi host, for example, the root user.
4 Click Next.
5 Verify that the certicate warning displays the SHA1 thumbprint of the SSL
certicate that is installed on the target ESXi host, and click Yes to accept the
certicate thumbprint.
You can connect to a
vCenter Server instance and
browse the inventory to
select an ESXi host or DRS
cluster on which to deploy
the appliance. If you select a
DRS cluster, verify that the
cluster is not set to Fully
Automated DRS for the
duration of the deployment.
1 Enter the FQDN or IP address of the vCenter Server instance.
2 Enter the HTTPS port of the vCenter Server instance.
3 Enter the user name and password of user with vCenter Single Sign-On
administrative privileges on the vCenter Server instance, for example, the
administrator@vsphere.local user.
4 Click Next.
5 Verify that the certicate warning displays the SHA1 thumbprint of the SSL
certicate that is installed on the target vCenter Server instance, and click Yes to
accept the certicate thumbprint.
6 Select the data center or data center folder that contains the ESXi host or DRS
cluster on which you want to deploy the appliance, and click Next
N You must select a data center or data center folder that contains at least
one ESXi host that is not in lockdown or maintenance mode.
7 Select the ESXi host or DRS cluster on which you want to deploy the appliance,
and click Next
7 (Optional) Acknowledge the warning message, if any, by clicking Yes.
8 On the Set up virtual machine page, enter a name for the new vCenter Server Appliance, set the
password for the root user, and click Next.
The password must contain at least eight characters, a number, uppercase and lowercase leers, and a
special character, for example, an exclamation mark (!), hash key (#), at sign (@), or brackets (()).
N The root password of the old appliance is not transferred to the new upgraded appliance.
9 (Optional) Select the Enable SSH check box to enable SSH connection to the vCenter Server Appliance.
vSphere Migration
38 VMware, Inc.

10 On the Connect to source page, enter the details for the source vCenter Server instance, and click Next.
a Enter the IP address or FQDN.
b Enter the user name and password of a user who has administrative privileges on the
vCenter Server instance, for example, the administrator@vsphere.local user.
c Enter the Migration Assistant Port you received in the Migration Assistant instructions.
d (Optional) Select Performance and other historical data if you want to migrate this data.
By default only the core inventory and conguration data is migrated. Select the check box to
migrate all vCenter Server performance and historical data such as stats, events, alarms, and tasks.
Not migrating this data reduces the amount of overall downtime.
11 (Optional) Acknowledge the warning message, if any, by clicking Yes.
12 If the source vCenter Server is a member of an Active Directory domain, provide the credentials to join
the target vCenter Server Appliance to the domain.
13 On the Select appliance size page of the wizard, select the vCenter Server Appliance size for the
vSphere inventory size and click Next.
Option Description
Tiny (up to 10 hosts, 100 VMs) Deploys an appliance with 2 CPUs, 8 GB of memory, and 120 GB of disk
space.
Small (up to 100 hosts, 1,000 VMs) Deploys an appliance with 4 CPUs, 16 GB of memory, and 150 GB of disk
space.
Medium (up to 400 hosts, 4,000
VMs)
Deploys an appliance with 8 CPUs, 24 GB of memory, and 300 GB of disk
space.
Large (up to 1,000 hosts, 10,000
VMs)
Deploys an appliance with 16 CPUs, 32 GB of memory, and 450 GB of disk
space.
Tiny (up to 10 hosts, 100 VMs, large
storage)
Deploys an appliance with 2 CPUs, 8 GB of memory, and 700 GB of disk
space.
Small (up to 100 hosts, 1,000 VMs,
large storage)
Deploys an appliance with 4 CPUs, 16 GB of memory, and 700 GB of disk
space.
Medium (up to 400 hosts, 4,000
VMs, large storage)
Deploys an appliance with 8 CPUs, 24 GB of memory, and 800 GB of disk
space.
Large (up to 1,000 hosts, 10,000
VMs)
Deploys an appliance with 16 CPUs, 32 GB of memory, and 900 GB of disk
space.
14 From the list of available datastores, select the location where all the virtual machine conguration les
and virtual disks will be stored and, optionally, enable thin provisioning by selecting Enable Thin Disk
Mode.
15 On the Set up temporary network page, set up the network seings.
The IP address or the FQDN of the appliance is used as a system name. It is recommended to use an
FQDN. However, if you want to use an IP address, use static IP address allocation for the appliance,
because IP addresses allocated by DHCP might change.
Chapter 6 Migration of vCenter Server with an Embedded vCenter Single Sign-On to an Appliance
VMware, Inc. 39

Option Action
Choose a
network
Select the network to which to connect the new appliance temporarily.
Verify that the temporary network provides connectivity between the source vCenter Server and the
target vCenter Server Appliance.
The networks displayed in the drop-down menu depend on the network seings of the target server.
If you are deploying the appliance directly on an ESXi host, non-ephemeral distributed virtual port
groups are not supported and are not displayed in the drop-down menu.
I If you want to assign a temporary IPv4 address with DHCP allocation, you must select
a network that is associated with a port group which accepts MAC address changes.
Network
type
Select how to allocate the IP address of the appliance.
nStatic
You are prompted to enter the IP address and network seings.
nDHCP
A DHCP server is used to allocate the IP address. Select this option only if a DHCP server is
available in your environment.
If you use an IP address as a system name, you cannot change the IP address and update the DNS
seings after deployment.
16 Review the VMware Customer Experience Improvement Program (CEIP) page and choose if you want
to join the program.
For information about the CEIP, see the Conguring Customer Experience Improvement Program
section in vCenter Server and Host Management.
17 On the Ready to complete page, review the seings for the vCenter Server Appliance migration and
click Finish to complete the process.
The source vCenter Server is migrated from Windows to an appliance. The source vCenter Server is
powered o and the new appliance starts.
The source vCenter Single Sign-On is migrated from Windows to an appliance. The old vCenter Single Sign-
On on Windows is powered o and the new appliance starts.
What to do next
Verify that your migration to an appliance was successful. For verication steps, see “Verify Your vCenter
Server Appliance Migration Is Successful,” on page 51.
vSphere Migration
40 VMware, Inc.

Migration of vCenter Server with an
External vCenter Single Sign-On to
an Appliance 7
You can migrate a vCenter Server with an external vCenter Single Sign-On to an appliance.
When you migrate from vCenter Server with an external vCenter Single Sign-On (version 5.5) on Windows
to vCenter Server Appliance with an external Platform Services Controller appliance, you migrate in two
steps.
1 First you migrate the vCenter Single Sign-On instance from Windows to an appliance.
2 Next you migrate the vCenter Server instance from Windows to an appliance.
I Concurrent migrations of vCenter Single Sign-On instances are not supported. You must
migrate the instances in a sequence. If you have multiple vCenter Single Sign-On nodes, rst you must
migrate all vCenter Single Sign-On nodes to Platform Services Controller appliances before you start the
migration of vCenter Server to vCenter Server Appliance.
If vCenter Inventory Service, vSphere Web Client, vSphere Auto Deploy, or vSphere ESXi Dump Collector
are installed on a dierent machine than the source vCenter Server with an embedded
vCenter Single Sign-On, these components are migrated to the target vCenter Server Appliance.
VMware, Inc. 41
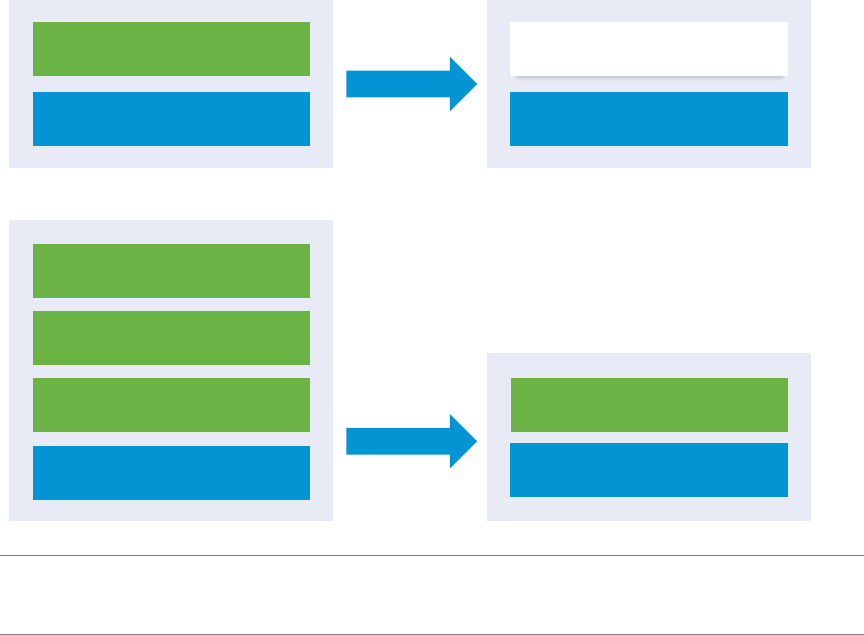
Figure 7‑1. vCenter Server 5.5 with External vCenter Single Sign-On Before and After Migration
Windows OS
vCenter Inventory Service
vSphere Web Client
vCenter Server
Windows OS
vCenter Single Sign-On
Appliance
External vCenter
Single Sign-On 5.5
vCenter Server 5.5
External Platform
Services Controller 6.0
vCenter Server Appliance 6.0
Platform Services Controller
Appliance
vCenter Server
I The user name that you use to log in to the machine from which you want run the GUI
installer, the path to the vCenter Server Appliance installer, and your values including the passwords, must
contain only ASCII characters. Extended ASCII and non-ASCII characters are unsupported.
For each node to be migrated, the installer:
nDeploys a new target appliance.
nExports the required les from the source vCenter Single Sign-On instance.
nCopies the required les to the target appliance for migration.
nRuns the migration process on the target appliance as specied in the Summary.
nImports and updates the les and seings of the source vCenter Single Sign-On instance to the new
appliance.
Prerequisites
Assemble the “Required Information for Migrating vCenter Server and vCenter Single Sign-On from
Windows to an Appliance,” on page 30.
Procedure
1Download the vCenter Server Appliance Installer on page 43
Download the .iso installer for the vCenter Server Appliance and Client Integration Plug-in.
2Copy and Run VMware Migration Assistant on the Source vCenter Server Instance on page 43
You must Copy and run the VMware Migration Assistant on your source vCenter Server or
vCenter Single Sign-On to prepare it for migration from Windows to an appliance.
vSphere Migration
42 VMware, Inc.

3Migrate an External vCenter Single Sign-On instance to a Platform Services Controller appliance on
page 44
You can use the Client Integration Plug-In to migrate an external vCenter Single Sign-On instance to a
Platform Services Controller appliance.
4Migrate vCenter Server to an Appliance on page 47
You can use the Client Integration Plug-In to migrate a vCenter Server 5.5.x to a
vCenter Server Appliance 6.0 with an embedded Platform Services Controller
Download the vCenter Server Appliance Installer
Download the .iso installer for the vCenter Server Appliance and Client Integration Plug-in.
Prerequisites
Create a My VMware account at hps://my.vmware.com/web/vmware/.
Procedure
1 Download the vCenter Server Appliance installer from the VMware Web site at
hps://my.vmware.com/web/vmware/downloads.
2Conrm that the md5sum is correct.
See the VMware Web site topic Using MD5 Checksums at
hp://www.vmware.com/download/md5.html.
3 Mount the ISO image to a Windows virtual machine or physical server dierent from the source
vCenter Server or vCenter Single Sign-On. Mount the ISO image to the Windows virtual machine or
physical server on which you want to install the Client Integration Plug-In to migrate to the
vCenter Server Appliance.
If you are using a Windows virtual machine, you can congure the ISO image as a datastore ISO le for
the CD/DVD drive of the virtual machine by using the vSphere Web Client. See vSphere Virtual Machine
Administration.
Copy and Run VMware Migration Assistant on the Source
vCenter Server Instance
You must Copy and run the VMware Migration Assistant on your source vCenter Server or
vCenter Single Sign-On to prepare it for migration from Windows to an appliance.
You run the VMware Migration Assistant on your source vCenter Server or vCenter Single Sign-On to:
1 Discover the source deployment type.
2 Run pre-checks on the source.
3 Report errors that must be addressed before starting the migration.
4 Provide information for the next steps in the migration process.
I Ensure that the Migration Assistant window remains open during the migration process.
Closing the Migration Assistant causes the migration process to stop.
Prerequisites
n“Download the vCenter Server Appliance Installer,” on page 36
nIf your vCenter Server service is running in a service user account for access to the vCenter Server
database and you run Migration Assistant under a dierent account, the Migration Assistant account
must have the Replace a process level token permission.
Chapter 7 Migration of vCenter Server with an External vCenter Single Sign-On to an Appliance
VMware, Inc. 43

Procedure
1 Navigate to the migration-assistant directory of the vCenter Server Appliance installer package and
copy the migration-assistant folder to the source vCenter Server or vCenter Single Sign-On instance.
2 Start Migration Assistant
nDouble-click VMware-Migration-Assistant.exe
nFrom the command line run VMware-Migration-Assistant.exe --help to launch Migration
Assistant and display the help options.
The VMware Migration Assistant runs pre-migration checks and prompts you to resolve any errors it
nds before proceeding with the migration.
3 Enter the user name and password of a user who has administrative privileges on the vCenter Server
instance, for example, the administrator@vsphere.local user
When the pre-checks are nished and any errors are addressed, your source system is ready for migration.
What to do next
Follow the VMware Migration Assistant instructions to start migration.
R Leave the Migration Assistant window open until you complete the migration.
Migrate an External vCenter Single Sign-On instance to a
Platform Services Controller appliance
You can use the Client Integration Plug-In to migrate an external vCenter Single Sign-On instance to a
Platform Services Controller appliance.
Prerequisites
nIf you plan to deploy the new Platform Services Controller on an ESXi host, verify that the ESXi host is
not in lockdown or maintenance mode
nIf you plan to deploy the Platform Services Controller on a DRS cluster of a vCenter Server inventory,
verify that the cluster contains at least one ESXi host that is not in lockdown or maintenance mode.
nIf you plan to assign a static IP address in the temporary network seings of the appliance, verify that
you have congured the forward and reverse DNS records for the IP address.
nIf you plan to assign a DHCP IP address in the temporary network seings of the new appliance, verify
that the ESXi host on which you want to deploy the new appliance is in the same network as the ESXi
host on which the existing vCenter Server runs.
nIf you plan to assign a DHCP IPv4 address in the temporary network seings of the new appliance,
verify that the ESXi host on which you want to deploy the new appliance is connected to at least one
network that is associated with a port group which accepts MAC address changes. Consider the default
security policy of a distributed virtual switch, which is to reject MAC address changes. For information
about how to congure the security policy for a switch or port group, see vSphere Networking.
Procedure
1 In the software installer directory, double-click vcsa-setup.html.
2 Wait up to three seconds for the browser to detect the Client Integration Plug-in and allow the plug-in
to run on the browser when prompted.
3 On the Home page, click Migrate.
vSphere Migration
44 VMware, Inc.

4 Review the Introduction page to understand the migration process and click Next.
5 Read and accept the license agreement, and click Next.
6 Connect to the target server on which you want to deploy the Platform Services Controller.
Option Steps
You can connect to an
ESXi host on which to
deploy the appliance.
1 Enter the FQDN or IP address of the ESXi host.
2 Enter the HTTPS port of the ESXi host.
3 Enter the user name and password of a user with administrative privileges on the ESXi
host, for example, the root user.
4 Click Next.
5 Verify that the certicate warning displays the SHA1 thumbprint of the SSL certicate
that is installed on the target ESXi host, and click Yes to accept the certicate
thumbprint.
You can connect to a
vCenter Server
instance and browse
the inventory to select
an ESXi host or DRS
cluster on which to
deploy the appliance.
1 Enter the FQDN or IP address of the vCenter Server instance.
2 Enter the HTTPS port of the vCenter Server instance.
3 Enter the user name and password of user with vCenter Single Sign-On administrative
privileges on the vCenter Server instance, for example, the administrator@vsphere.local
user.
4 Click Next.
5 Verify that the certicate warning displays the SHA1 thumbprint of the SSL certicate
that is installed on the target vCenter Server instance, and click Yes to accept the
certicate thumbprint.
6 Select the data center or data center folder that contains the ESXi host or DRS cluster on
which you want to deploy the appliance, and click Next
N You must select a data center or data center folder that contains at least one ESXi
host that is not in lockdown or maintenance mode.
7 Select the ESXi host or DRS cluster on which you want to deploy the appliance, and
click Next
7 (Optional) Acknowledge the warning message, if any, by clicking Yes.
8 On the Set up virtual machine page, enter the Platform Services Controller name, set the password for
the root user, and click Next.
The password must contain at least eight characters, a number, uppercase and lowercase leers, and a
special character, for example, an exclamation mark (!), hash key (#), at sign (@), or brackets (()).
9 (Optional) Select the Enable SSH check box to enable SSH connection to the vCenter Server Appliance.
10 On the Connect to source page, enter the details for the source vCenter Single Sign-On instance, and
click Next.
a Enter the IP address or FQDN.
b Enter the user name and password of a user who has administrative privileges on the vCenter
Single Sign-On instance, for example, the administrator@vsphere.local user.
c Enter the Migration Assistant Port you received in the Migration Assistant instructions.
11 (Optional) Acknowledge the warning message, if any, by clicking Yes.
12 If the source vCenter Single Sign-On is a member of an Active Directory domain, provide the
credentials to join the target Platform Services Controller to the domain.
13 On the Select appliance size page of the wizard, click Next.
The target Platform Services Controller appliance is deployed with 2 CPUs, 2 GB of memory and 30 GB
of disk space.
Chapter 7 Migration of vCenter Server with an External vCenter Single Sign-On to an Appliance
VMware, Inc. 45

14 From the list of available datastores, select the location where all the virtual machine conguration les
and virtual disks will be stored and, optionally, enable thin provisioning by selecting Enable Thin Disk
Mode.
15 On the Set up temporary network page, set up the network seings.
The IP address or the FQDN of the appliance is used as a system name. It is recommended to use an
FQDN. However, if you want to use an IP address, use static IP address allocation for the appliance,
because IP addresses allocated by DHCP might change.
Option Action
Choose a
network
Select the network to which to connect the new appliance temporarily.
Verify that the temporary network provides connectivity between the source vCenter Server and the
target vCenter Server Appliance.
The networks displayed in the drop-down menu depend on the network seings of the target server.
If you are deploying the appliance directly on an ESXi host, non-ephemeral distributed virtual port
groups are not supported and are not displayed in the drop-down menu.
I If you want to assign a temporary IPv4 address with DHCP allocation, you must select
a network that is associated with a port group which accepts MAC address changes.
Network
type
Select how to allocate the IP address of the appliance.
nStatic
You are prompted to enter the IP address and network seings.
nDHCP
A DHCP server is used to allocate the IP address. Select this option only if a DHCP server is
available in your environment.
If you use an IP address as a system name, you cannot change the IP address and update the DNS
seings after deployment.
16 Review the VMware Customer Experience Improvement Program (CEIP) page and choose if you want
to join the program.
For information about the CEIP, see the Conguring Customer Experience Improvement Program
section in vCenter Server and Host Management.
17 On the Ready to complete page, review the seings for the vCenter Single Sign-On migration and click
Finish to complete the process.
The source vCenter Single Sign-On is migrated from Windows to an appliance. The old vCenter Single Sign-
On on Windows is powered o and the new appliance starts.
What to do next
Verify that your migration to an appliance was successful. For verication steps, see “Verify Your vCenter
Server Appliance Migration Is Successful,” on page 51.
For the new Platform Services Controller appliance to replicate infrastructure data with other
Platform Services Controller instances, you must migrate or upgrade all joined vCenter Single Sign-On
instances within the vCenter Single Sign-On domain to the same version.
After you migrate all joined vCenter Single Sign-On instances, you can migrate the vCenter Server instances
within the vCenter Single Sign-On domain. For information on migrating vCenter Server instances to
appliances, see
vSphere Migration
46 VMware, Inc.
Migrate vCenter Server to an Appliance
You can use the Client Integration Plug-In to migrate a vCenter Server 5.5.x to a vCenter Server Appliance
6.0 with an embedded Platform Services Controller
Prerequisites
nIf you plan to deploy the target vCenter Server Appliance on an ESXi host, verify that the ESXi host is
not in lockdown or maintenance mode
nIf you plan to deploy the target vCenter Server Appliance on a DRS cluster of a vCenter Server
inventory, verify that the cluster contains at least one ESXi host that is not in lockdown or maintenance
mode.
nIf you plan to assign a static IP address in the temporary network seings of the appliance, verify that
you have congured the forward and reverse DNS records for the IP address.
nIf you plan to assign a DHCP IP address in the temporary network seings of the new appliance, verify
that the ESXi host on which you want to deploy the new appliance is in the same network as the ESXi
host on which the existing vCenter Server runs.
nIf you plan to assign a DHCP IPv4 address in the temporary network seings of the new appliance,
verify that the ESXi host on which you want to deploy the new appliance is connected to at least one
network that is associated with a port group which accepts MAC address changes. Consider the default
security policy of a distributed virtual switch, which is to reject MAC address changes. For information
about how to congure the security policy for a switch or port group, see vSphere Networking.
Procedure
1 In the software installer directory, double-click vcsa-setup.html.
2 Wait up to three seconds for the browser to detect the Client Integration Plug-in and allow the plug-in
to run on the browser when prompted.
3 On the Home page, click Migrate.
4 Review the Introduction page to understand the migration process and click Next.
5 Read and accept the license agreement, and click Next.
Chapter 7 Migration of vCenter Server with an External vCenter Single Sign-On to an Appliance
VMware, Inc. 47

6 Connect to the target server on which you want to deploy the vCenter Server Appliance.
Option Steps
You can connect to an ESXi
host on which to deploy the
appliance.
1 Enter the FQDN or IP address of the ESXi host.
2 Enter the HTTPS port of the ESXi host.
3 Enter the user name and password of a user with administrative privileges on
the ESXi host, for example, the root user.
4 Click Next.
5 Verify that the certicate warning displays the SHA1 thumbprint of the SSL
certicate that is installed on the target ESXi host, and click Yes to accept the
certicate thumbprint.
You can connect to a
vCenter Server instance and
browse the inventory to
select an ESXi host or DRS
cluster on which to deploy
the appliance. If you select a
DRS cluster, verify that the
cluster is not set to Fully
Automated DRS for the
duration of the deployment.
1 Enter the FQDN or IP address of the vCenter Server instance.
2 Enter the HTTPS port of the vCenter Server instance.
3 Enter the user name and password of user with vCenter Single Sign-On
administrative privileges on the vCenter Server instance, for example, the
administrator@vsphere.local user.
4 Click Next.
5 Verify that the certicate warning displays the SHA1 thumbprint of the SSL
certicate that is installed on the target vCenter Server instance, and click Yes to
accept the certicate thumbprint.
6 Select the data center or data center folder that contains the ESXi host or DRS
cluster on which you want to deploy the appliance, and click Next
N You must select a data center or data center folder that contains at least
one ESXi host that is not in lockdown or maintenance mode.
7 Select the ESXi host or DRS cluster on which you want to deploy the appliance,
and click Next
7 (Optional) Acknowledge the warning message, if any, by clicking Yes.
8 On the Set up virtual machine page, enter a name for the new vCenter Server Appliance, set the
password for the root user, and click Next.
The password must contain at least eight characters, a number, uppercase and lowercase leers, and a
special character, for example, an exclamation mark (!), hash key (#), at sign (@), or brackets (()).
N The root password of the old appliance is not transferred to the new upgraded appliance.
9 (Optional) Select the Enable SSH check box to enable SSH connection to the vCenter Server Appliance.
10 On the Connect to source page, enter the details for the source vCenter Server instance, and click Next.
a Enter the IP address or FQDN.
b Enter the user name and password of a user who has administrative privileges on the
vCenter Server instance, for example, the administrator@vsphere.local user.
c Enter the Migration Assistant Port you received in the Migration Assistant instructions.
d (Optional) Select Performance and other historical data if you want to migrate this data.
By default only the core inventory and conguration data is migrated. Select the check box to
migrate all vCenter Server performance and historical data such as stats, events, alarms, and tasks.
Not migrating this data reduces the amount of overall downtime.
11 (Optional) Acknowledge the warning message, if any, by clicking Yes.
12 If the source vCenter Server is a member of an Active Directory domain, provide the credentials to join
the target vCenter Server Appliance to the domain.
vSphere Migration
48 VMware, Inc.

13 On the Select appliance size page of the wizard, select the vCenter Server Appliance size for the
vSphere inventory size and click Next.
Option Description
Tiny (up to 10 hosts, 100 VMs) Deploys an appliance with 2 CPUs, 8 GB of memory, and 120 GB of disk
space.
Small (up to 100 hosts, 1,000 VMs) Deploys an appliance with 4 CPUs, 16 GB of memory, and 150 GB of disk
space.
Medium (up to 400 hosts, 4,000
VMs)
Deploys an appliance with 8 CPUs, 24 GB of memory, and 300 GB of disk
space.
Large (up to 1,000 hosts, 10,000
VMs)
Deploys an appliance with 16 CPUs, 32 GB of memory, and 450 GB of disk
space.
Tiny (up to 10 hosts, 100 VMs, large
storage)
Deploys an appliance with 2 CPUs, 8 GB of memory, and 700 GB of disk
space.
Small (up to 100 hosts, 1,000 VMs,
large storage)
Deploys an appliance with 4 CPUs, 16 GB of memory, and 700 GB of disk
space.
Medium (up to 400 hosts, 4,000
VMs, large storage)
Deploys an appliance with 8 CPUs, 24 GB of memory, and 800 GB of disk
space.
Large (up to 1,000 hosts, 10,000
VMs)
Deploys an appliance with 16 CPUs, 32 GB of memory, and 900 GB of disk
space.
14 From the list of available datastores, select the location where all the virtual machine conguration les
and virtual disks will be stored and, optionally, enable thin provisioning by selecting Enable Thin Disk
Mode.
15 On the Set up temporary network page, set up the network seings.
The IP address or the FQDN of the appliance is used as a system name. It is recommended to use an
FQDN. However, if you want to use an IP address, use static IP address allocation for the appliance,
because IP addresses allocated by DHCP might change.
Option Action
Choose a
network
Select the network to which to connect the new appliance temporarily.
Verify that the temporary network provides connectivity between the source vCenter Server and the
target vCenter Server Appliance.
The networks displayed in the drop-down menu depend on the network seings of the target server.
If you are deploying the appliance directly on an ESXi host, non-ephemeral distributed virtual port
groups are not supported and are not displayed in the drop-down menu.
I If you want to assign a temporary IPv4 address with DHCP allocation, you must select
a network that is associated with a port group which accepts MAC address changes.
Network
type
Select how to allocate the IP address of the appliance.
nStatic
You are prompted to enter the IP address and network seings.
nDHCP
A DHCP server is used to allocate the IP address. Select this option only if a DHCP server is
available in your environment.
If you use an IP address as a system name, you cannot change the IP address and update the DNS
seings after deployment.
16 Review the VMware Customer Experience Improvement Program (CEIP) page and choose if you want
to join the program.
For information about the CEIP, see the Conguring Customer Experience Improvement Program
section in vCenter Server and Host Management.
Chapter 7 Migration of vCenter Server with an External vCenter Single Sign-On to an Appliance
VMware, Inc. 49
17 On the Ready to complete page, review the seings for the vCenter Server Appliance migration and
click Finish to complete the process.
The source vCenter Server is migrated from Windows to an appliance. The source vCenter Server is
powered o and the new appliance starts.
What to do next
Verify that your migration to an appliance was successful. For verication steps, see “Verify Your vCenter
Server Appliance Migration Is Successful,” on page 51.
vSphere Migration
50 VMware, Inc.

After Migrating vCenter Server 8
After you migrate to vCenter Server Appliance, consider the post-migration options and requirements.
nYou can review the migration logs. See “View Migration Assistant Logs and Status Files,” on page 53.
nComplete any component recongurations that might be required for changes during upgrade.
nVerify that you understand the authentication process and identify your identity sources.
nUpgrade any additional modules that are linked to this instance of vCenter Server Appliance, such as
vSphere Update Manager.
nOptionally, upgrade or migrate the ESXi hosts in the vCenter Server Appliance inventory to the same
version as the vCenter Server Appliance instance.
For more information about conguring the vCenter Server Appliance, see vSphere Installation and Setup,
vSphere Upgrade, and vCenter Server Appliance Conguration guides.
This chapter includes the following topics:
n“Check vCenter Server Instance Upgrade or Migration,” on page 51
n“Verify Your vCenter Server Appliance Migration Is Successful,” on page 51
n“Log in to vCenter Server Appliance by Using the vSphere Web Client,” on page 52
Check vCenter Server Instance Upgrade or Migration
You can check the target vCenter Server Appliance to determine if it is migrated from a vCenter Server on
Windows or from vCenter Server Appliance.
Procedure
uLog in to the vCenter Server Appliance shell and run the following command:
install-parameter upgrade.source.platform
The command returns the platform of the source vCenter Server instance, for example windows.
What to do next
“Verify Your vCenter Server Appliance Migration Is Successful,” on page 51
Verify Your vCenter Server Appliance Migration Is Successful
You can verify the success of your vCenter Server Appliance migration.
You must be logged into migrated vCenter Server instance. If you created a reference of required
information, you can use it to validate the migration success.
VMware, Inc. 51

Procedure
1 Verify that the IP address is correct.
2 Verify that the Active Directory registration has not changed.
3 Verify the Network registration is correct.
4 Verify the Domain is correct.
5 Verify the certicates are valid.
6 Verify the inventory data is correctly migrated.
a Review the events history.
b Review the performance charts.
c Review the users, permissions, and roles.
If the post-upgrade or post-migration conguration conforms to your required information or CLI template
reference and expectations, the vCenter Server upgrade or migration is complete.
What to do next
You can troubleshoot unexpected behavior by reviewing logs.
Log in to vCenter Server Appliance by Using the vSphere Web Client
Log in to vCenter Server Appliance by using the vSphere Web Client to manage your vSphere inventory.
Prerequisites
In vSphere 6.0, the vSphere Web Client is installed as part of the vCenter Server Appliance deployment. This
way, the vSphere Web Client always points to the same vCenter Single Sign-On instance.
Procedure
1 Open a Web browser and enter the URL for the vSphere Web Client:
https://vceneter_server_ip_address_or_fqdn/vsphere-client.
2 Enter the credentials of a user who has permissions on vCenter Server, and click Login.
3 If a warning message about an untrusted SSL certicate appears, select the appropriate action based on
your security policy.
Option Action
Ignore the security warning for this
login session only.
Click Ignore.
Ignore the security warning for this
login session, and install the default
certificate so that the warning does
not appear again.
Select Install this and do not display any security warnings for
this server and click Ignore.
Select this option only if using the default certicate does not present a
security problem in your environment.
Cancel and install a signed
certificate before proceeding.
Click Cancel and ensure that a signed certicate is installed on the vCenter
Server system before you aempt to connect again.
The vSphere Web Client connects to all the vCenter Server Appliance systems on which the specied user
has permissions, allowing you to view and manage your inventory.
vSphere Migration
52 VMware, Inc.

Troubleshooting 9
The vSphere Migration troubleshooting topics provide solutions to problems that you might encounter
during the vCenter Server migration process.
For information about rolling back a migration, see hp://kb.vmware.com/kb/2146453
View Migration Assistant Logs and Status Files
You can use Migration Assistant log les and status les to troubleshoot migration failures.
If the migration fails, Migration Assistant generates a log le bundle on your desktop.
Procedure
1 Navigate to your desktop folder and open the VMware-MA-logs-time-of-migration-attempt.zip le,
where time-of-migration-aempt displays the year, month, date, hour, minutes, and seconds of the
migration aempt.
2 Retrieve the log les from the .zip le on your desktop.
3 Retrieve other log les and status les.
Table 9‑1. Log and status files locations on the source vCenter Server or vCenter Server Single Sign-
On
File Location
Migration Assistant log le %temp%\migration-assistant.log
Pre-check log le %temp%\vcsMigration\UpgradeRunner.log
Pre-check component log les %temp
%\vcsMigration\CollectRequirements_ComponentN
ame.log
Export log le %temp%\vcsMigration\UpgradeRunner.log
Export component log les %temp%\vcsMigration\Export_ComponentName.log
Status le %temp%\UpgradeRunnerExportOutput.json
Table 9‑2. Log and status files locations on the target vCenter Server Appliance or
Platform Services Controller
File Location
Log les /var/log/vmware/upgrade/UpgradeRunner.log
/var/log/vmware/upgrade/upgrade-
requirements.log
Domain join log le /tmp/lwidentity.join.log
VMware, Inc. 53

Table 9‑2. Log and status files locations on the target vCenter Server Appliance or
Platform Services Controller (Continued)
File Location
Export log les /var/log/vmware/upgrade/UpgradeRunner.log
/var/log/vmware/upgrade/upgrade-export.log
First boot component log les /var/log/firstboot/ComponentName-
firstboot.py_##_stdout.log
/var/log/firstboot/ComponentName-
firstboot.py_##_stderr.log
Import log les /var/log/vmware/upgrade/UpgradeRunner.log
/var/log/vmware/upgrade/upgrade-import.log
Precheck status le /var/log/vmware/upgrade/prechecks.json
Export status le /var/log/vmware/upgrade/export.json
First boot status le /var/log/vmware/firstbootStatus.json
Import status le /var/log/vmware/upgrade/import.json
What to do next
Examine the log les to determine the cause of failure.
vSphere Migration
54 VMware, Inc.
Index
C
certificates, host upgrades 29
check source platform 51
Client Integration plug-in, installing 30
clients, firewall 12
configuring ports 12
custom certificates 29
D
database requirements, vCenter Server
Appliance 11
database,prepare for migration 25
E
esxi custom certificate mode 29
esxi thumbprint certificate mode 29
F
firewall 12
G
glossary 5
GUI migration
embedded use case 41
overview 35
H
hardware requirements, vCenter Server
Appliance 9
host upgrades and certificates 29
hosts firewall 12
I
intended audience 5
L
large environment, required storage space 10
logging in to vCenter Server 52
M
medium environment, required storage
space 10
migrate, Update Manager 22
migrating, Update Manager 21
migrating vCenter Server, using the GUI 35
migration, known limitations 19
Migration Assistant, limitations 19
migration limitations 19
migration log files, vCenter Server wizard
page 53
migration success, verify 51
move, Update Manager 22
moving, Update Manager 21
MSSQL Server database, preparing for
migration 27
O
Oracle database, preparing for migration 26
P
ports
configuring 12
firewall 12
ports used by vCenter Server 12
post-migration considerations for vCenter
Appliance Server 51
pre-migration checks 17
pre-migration database preparations
MSSQL Server 27
Oracle 26
predefined software, vCenter Server
Appliance 11
prepare certificates 25
prepare ESXi hosts for vCenter Server
migration 28
R
required storage space 10
requirements for vSphere Web Client 11
roll back, migration 53
S
small environment, required storage space 10
software requirements, vCenter Server
Appliance 11
source system requirements for migration 7
storage requirements, vCenter Server
Appliance 10
synchronize ESXi clocks on vSphere network 24
synchronizing clocks on the vSphere network 24
T
target system requirements for migration 7
thumbprint certificates 29
VMware, Inc. 55
tiny environment, required storage space 10
troubleshooting
vCenter Server migration 53
vCenter Server Appliance migration 53
V
vCenter Server
logging in to 52
migration 53
ports 12
post-migration considerations 51
vCenter Server Appliance
.iso downloading 36, 43
GUI migration overview 35
hardware requirements 9
installer downloading 36, 43
migrate prerequisites 37, 44, 47
migrating 37, 44, 47
migrating from Windows 41
Migration Assistant 36, 43
predefined software 11
software requirements 9, 11
vCenter Server Appliance databases,
requirements 11
vCenter Server Appliance installer 36, 43
vCenter Server Appliance migrating 37, 44, 47
vCenter Server for Windows
migration worksheet 30
root password 30
vCenter Server migration with Oracle
database 26
vCenter Server migration with MSSQL
database 27
vCenter Server on Windows, migrating to
vCenter Server Appliance 41
vpxd.certmgmt.mode 29
vSphere Web Client, requirements 11
W
worksheet 30
vSphere Migration
56 VMware, Inc.
