Xiaomi Mi Pad 2 MIUI V5 Install Guide On En
User Manual: xiaomi Mi Pad 2 - MIUI v5 Install Guide Free User Guide for Xiaomi MI PAD Series Tablet and eReader, Manual
Open the PDF directly: View PDF ![]() .
.
Page Count: 16

The Official MIUI V5
User Guide
A note about flashing MIUI on to your device
The process for flashing MIUI varies a bit depending on what device you're using. If you
have a Xiaomi device, the guys over at Xiaomi.eu (aka MIUI Android) have written a
great series of guides about flashing ROMs on to Xiaomi devices.
If you have another Android device, don't worry, the process is pretty straight forward.
XDA has a wiki guide on how to flash ROMs on to Android devices.
You can always find the latest official build on the English MIUI home page.
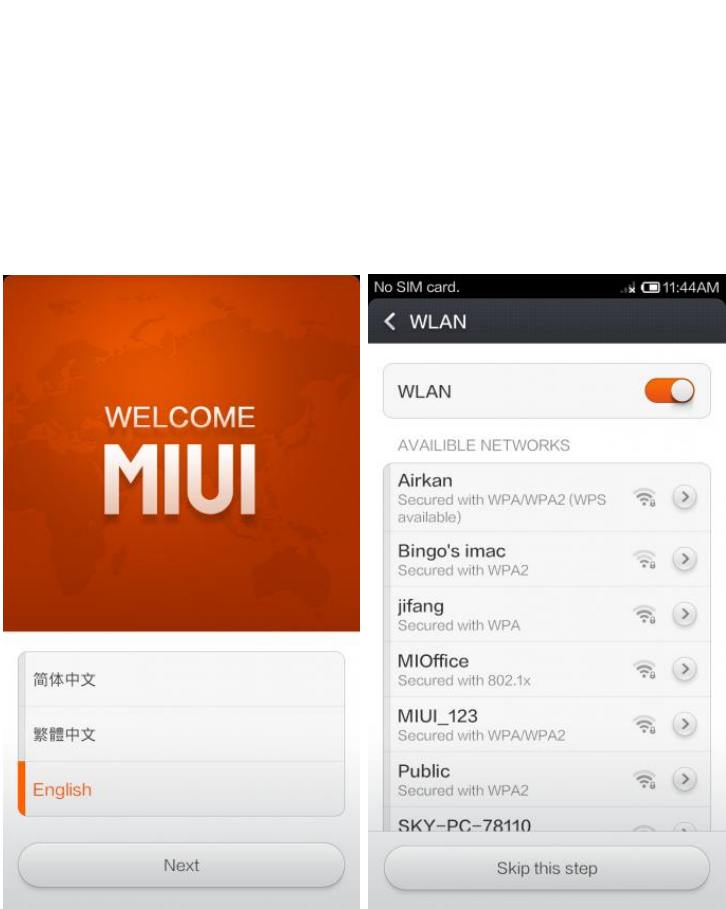
Getting started
Ok, just so we're all on the same page: At this point the hard part is over, you'veinstalled
MIUI and you've powered on your device. Select your preferred language at the welcome
screen (i.e. the first screen yousee after turning on your device) (left). On the following
screen (right), you can select a wireless network to connect to (Tip: using Wi-fi networks
when everpossible will reduce your mobile data usage).
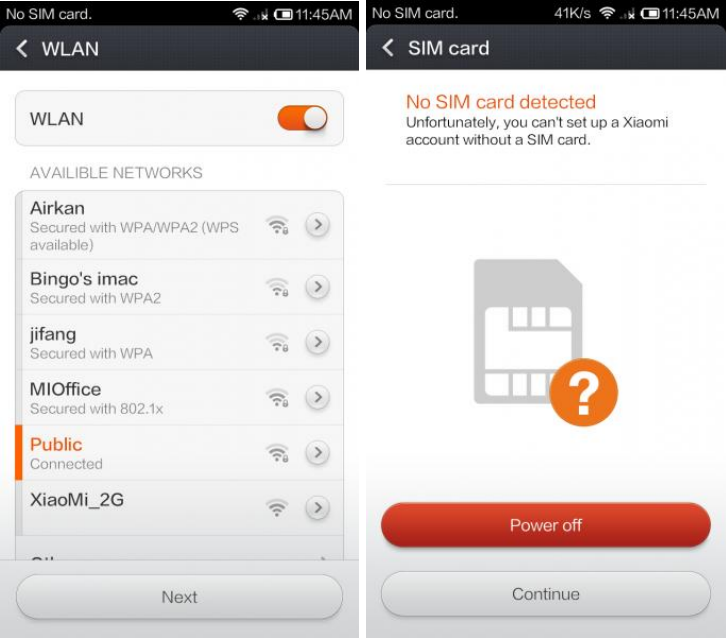
After you've successfully connected to a wireless network, touch Next to go to the SIM
card configuration screen. If you haven't inserted a SIM card (or have inserted the SIM
card incorrectly) you can either Power off your phone if you want to insert one or
Continue if you want to skip this step.
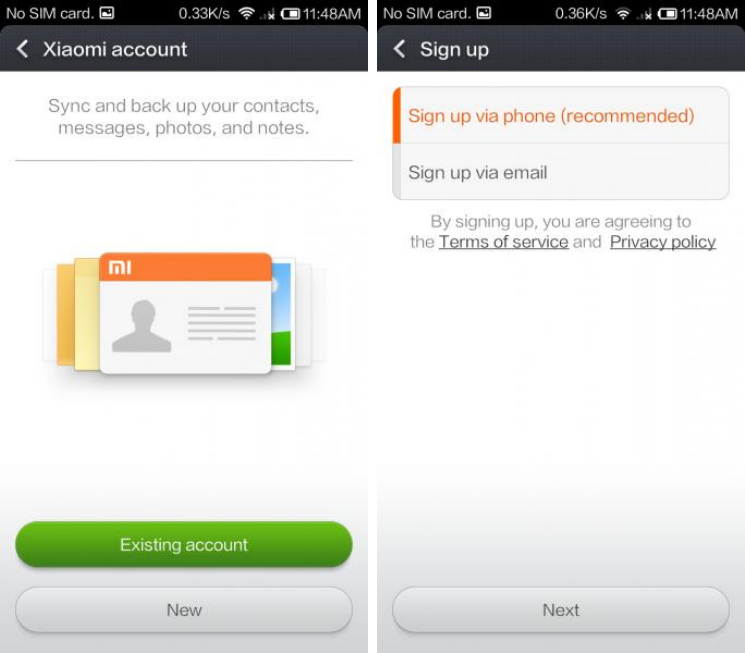
Next (if a SIM card is detected) you'll come to the Xiaomi account set up page (ifyou
haven't inserted your SIM card, don't worry, you can set up an account later in Settings).
Using a Xiaomi account enables you to enjoy the best of MIUI: Get up to 10GB of free
storage on MiCloud, sync messages and contacts across devices, share photos, and back
up your phone's user data. Xiaomi accounts are completely free (your service provider's
regular mobile data charges may apply). You can register using your phone number or
your email address.
On the next screen you'll find MIUI's data usage monitor. This tool helps you to track
your mobile data usage, provides alerts when you're in danger of exceeding your monthly
limit, and can even automatically stop your phone from connecting Internet via SIM to
prevent additional penalty charges. After you've configured the data monitor, you can
choose whether or not you want to allow Xiaomi's built-in apps access your phone's
location data (for maps, weather, etc.) and if you want to participate in Xiaomi's User
experience program (send Xiaomi anonymous diagnostic and usage data).
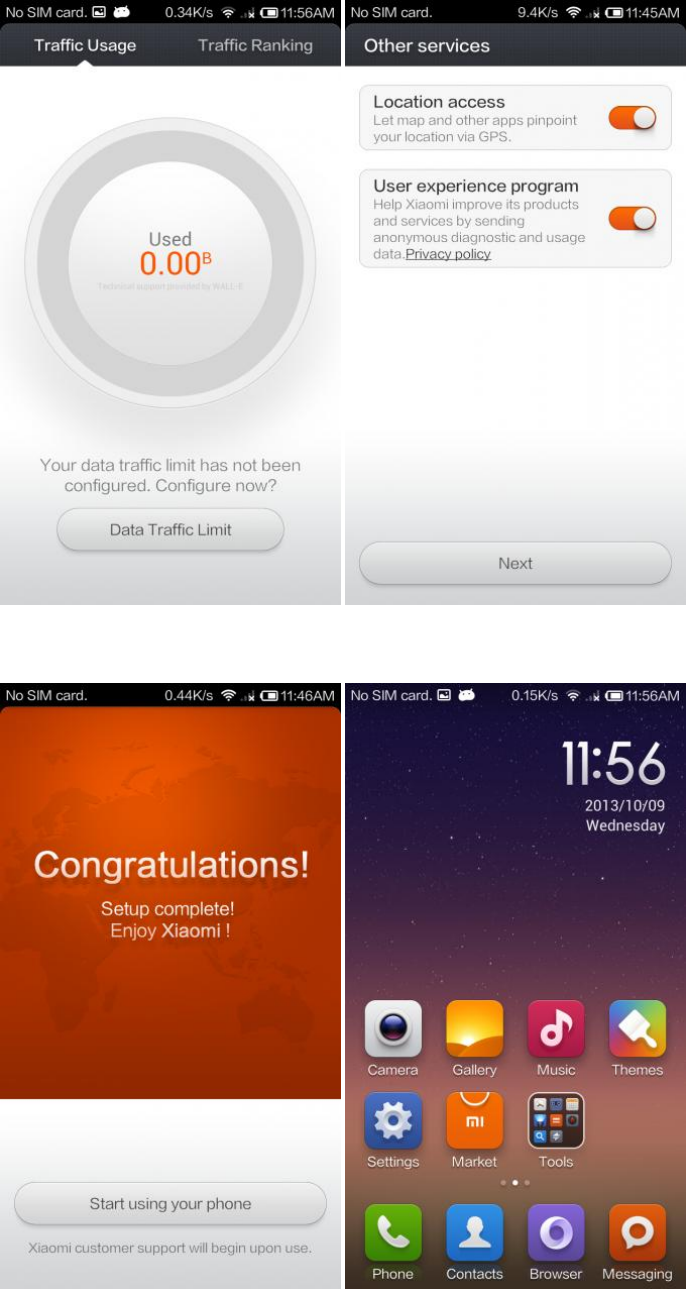
You're ready to start using MIUI!
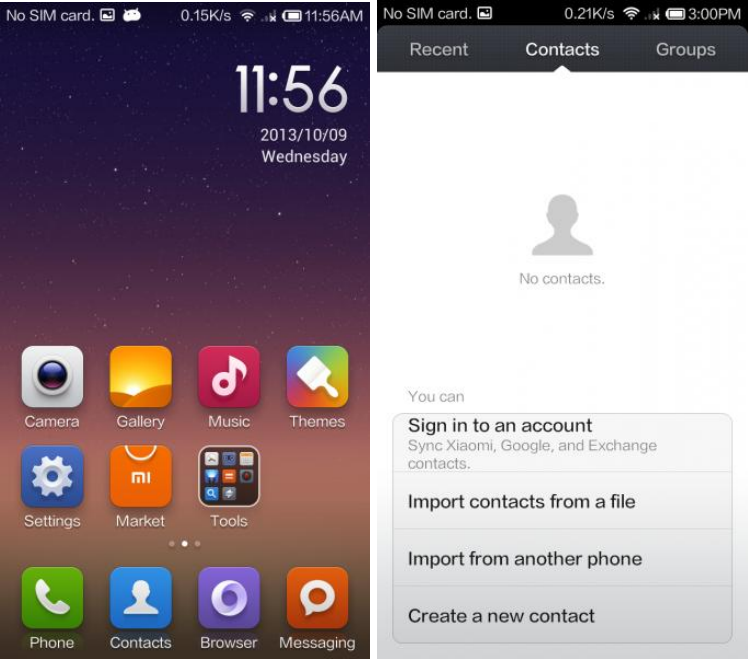
Importing contacts
First open Contacts. If you don’t have any contacts, you will be presented the follow set
of choices under the contacts tab: Sign in to an account, Import contacts from a file,
Import from another phone, and Create a new contact.
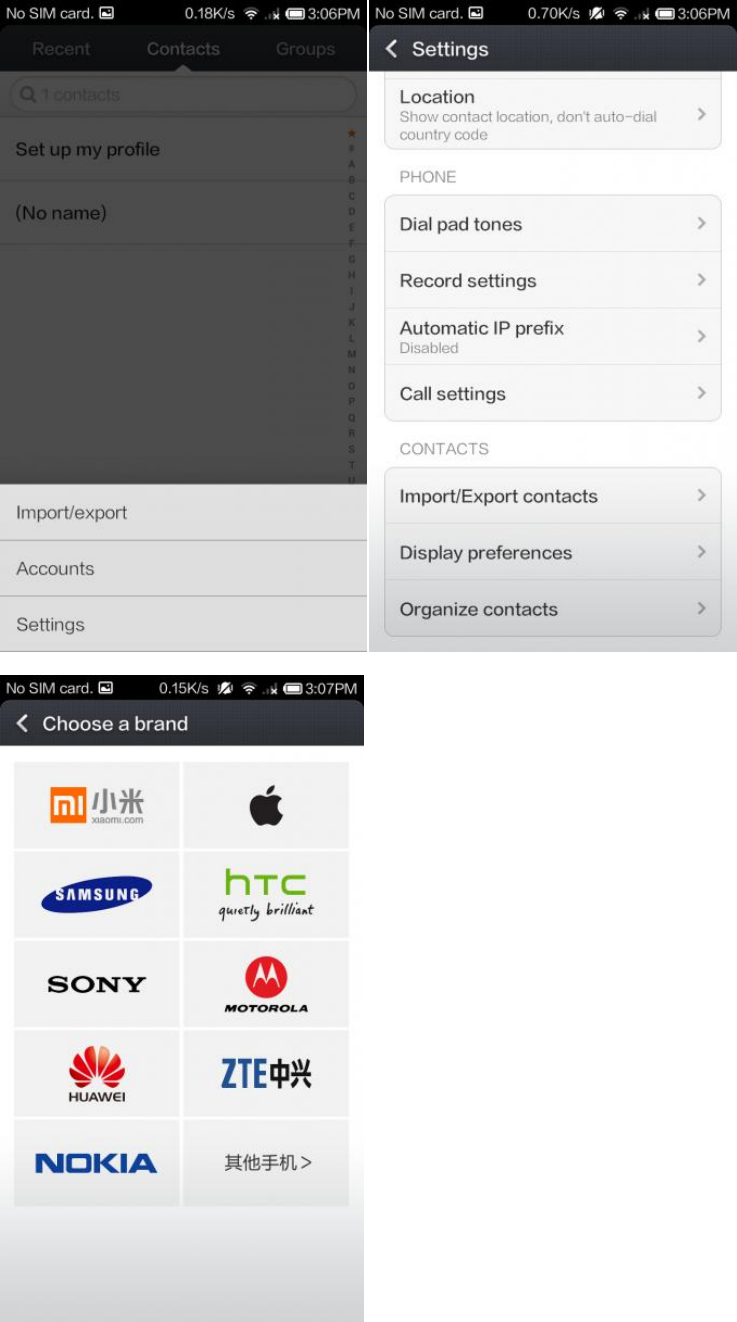
If you want to import contacts after you’ve already added a few, touch the Menu button
and select Import/Export. From here, you can find detailed directions on how to import
contacts from hundreds of different phones. Touch “Import from another phone” to get
started.
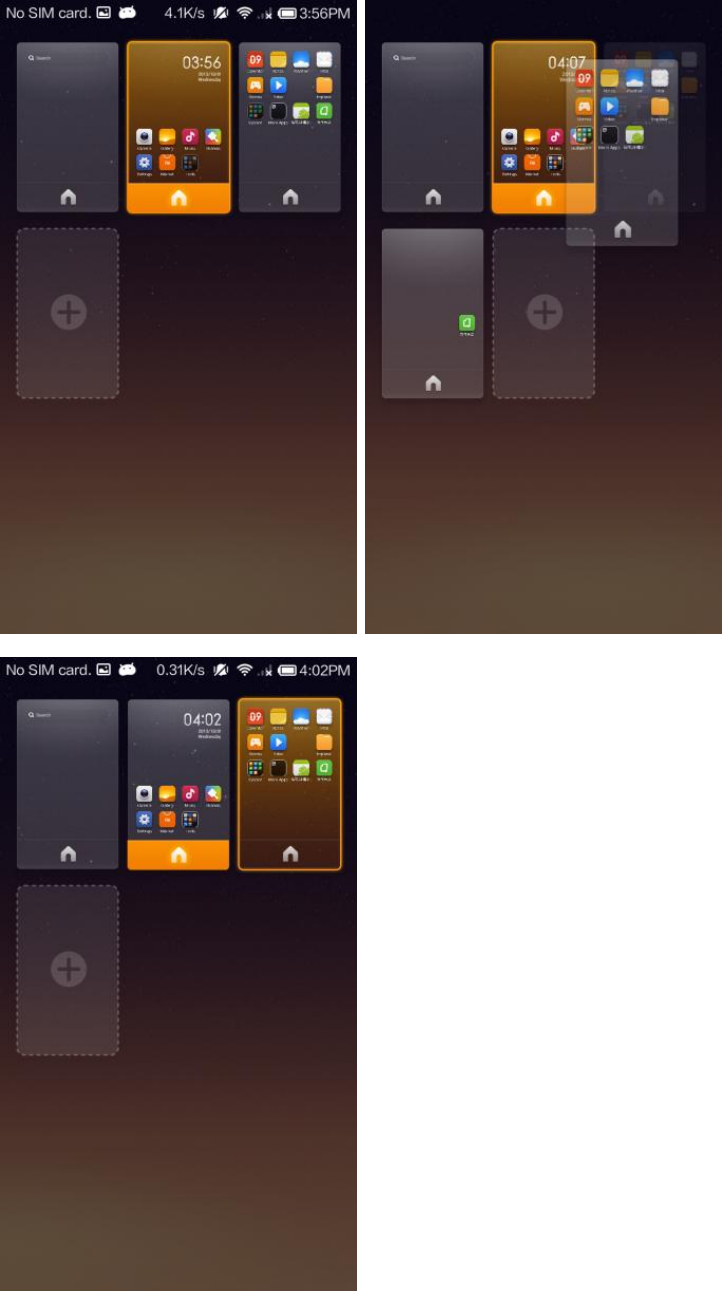
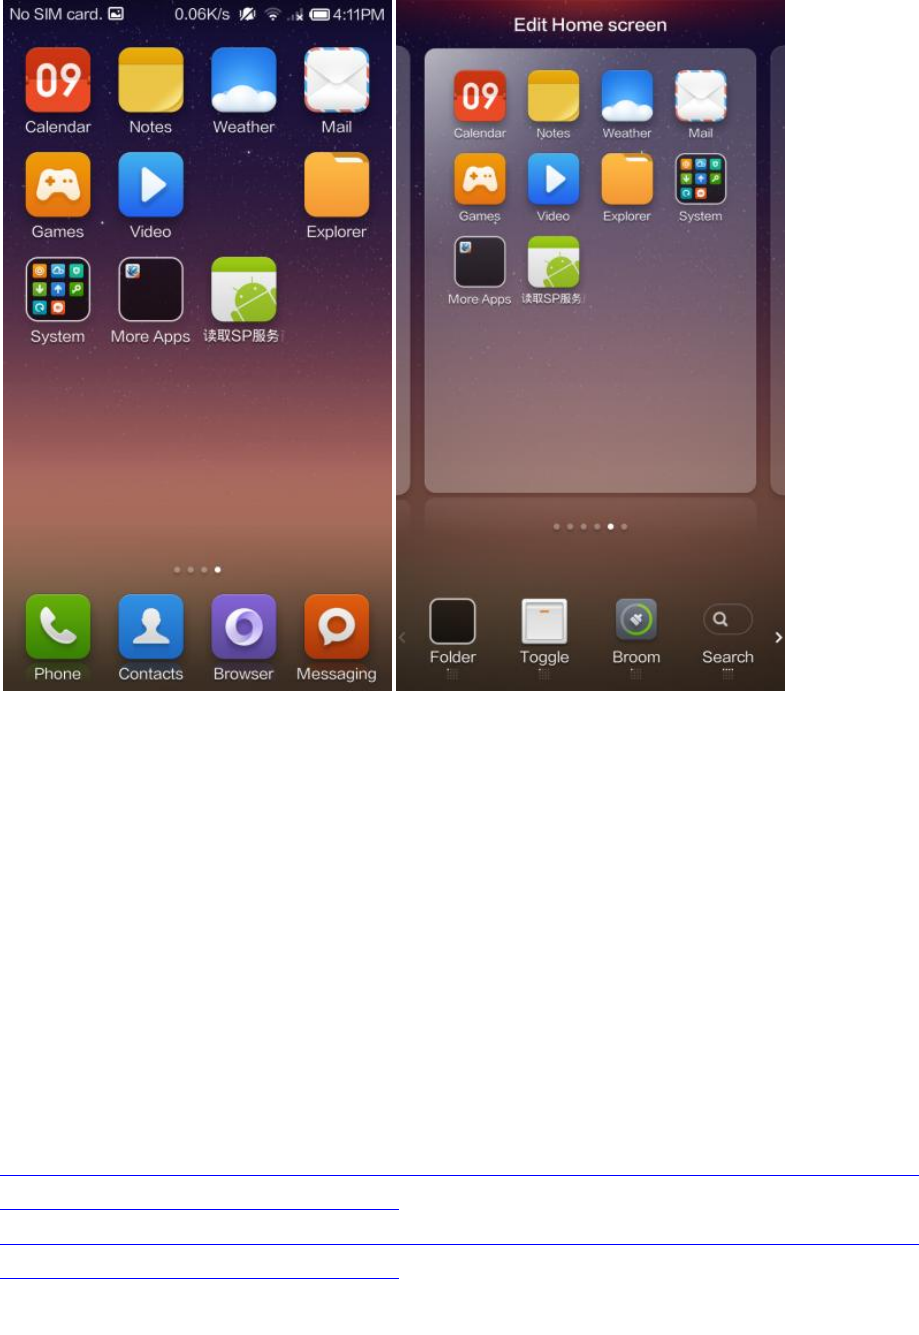
Browse & organize your Home screens
To move an app or widget, touch & hold it until the trash bin appears at the top of the
screen, slide it into place, and lift your finger.
To edit an individual Home screen, pinch using two fingers (expand with two fingers to
exit). You can also access this screen from the Settings menu (lower right screen shot).
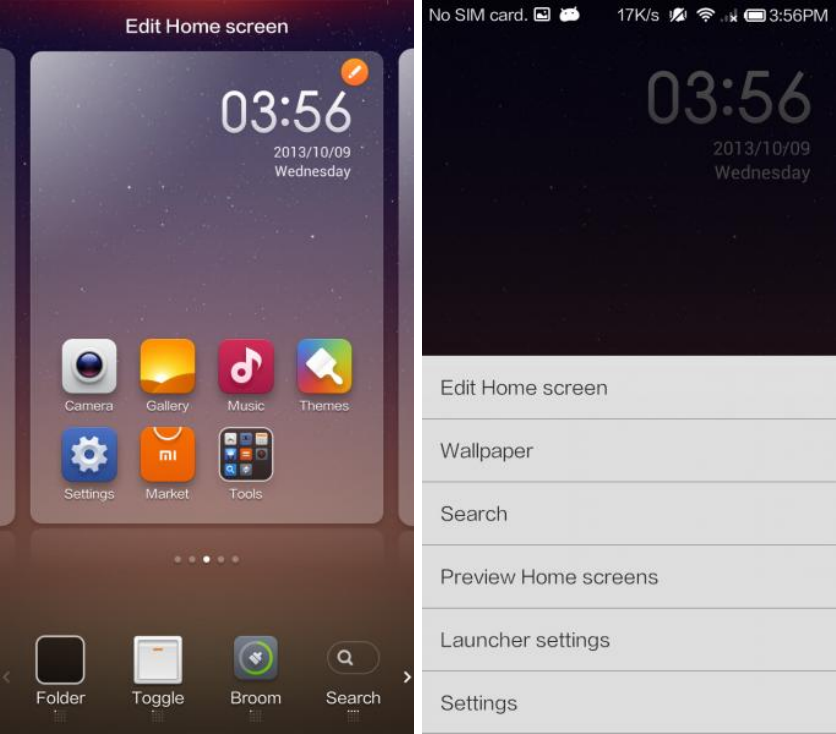
To preview all your Home screens, pinch using three fingers (touch any of the Home
screens to exit). You can also access this screen from the Settings menu (see above right
screen shot).To quickly change the order of your Home screens, touch & hold a Home
screen to pick it up, lift your finger to drop it into place. Touch the Home icon to
designate which screen you want to set as your default Home screen (i.e. Touch the
Home button will bring you to this screen).
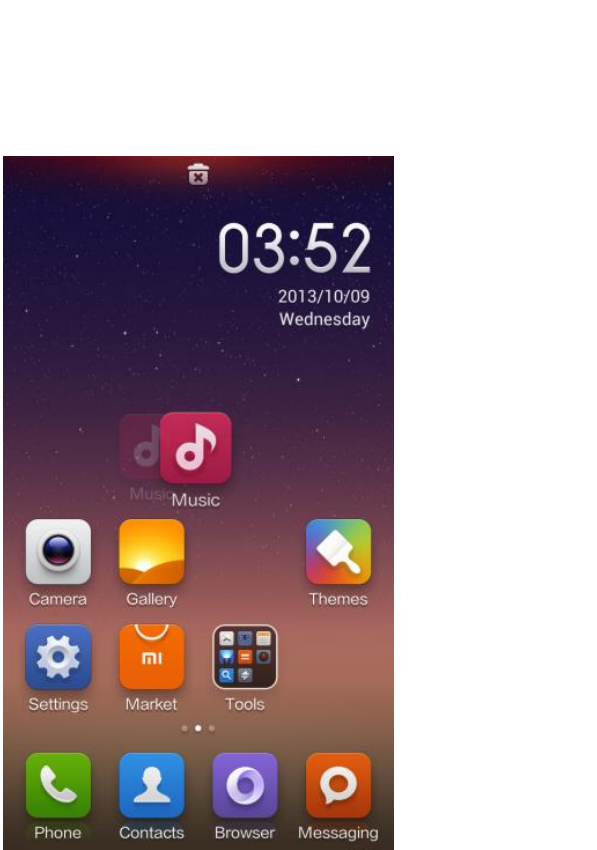
One final tip: To quickly tidy up the icons on a given Home screen, enter the edit Home
screen mode (pinch using two fingers) and shake your phone three times. See the before
(right) and after (left) below!
Getting Google apps and services
Unfortunately, a lot of Kingsoft’s (a partner co. of Xiaomi) products and services are not
available outside of mainland China and some of Xiaomi’s services are a bit slow. Not to
worry though, you can get all of your favorite Google products working on MIUI in no
time!
Make sure you are running the latest Official Developer Build of MIUI (which you can
find here http://en.miui.com/download.html ). Then download the Google Installer (sets
up the Google service framework, Play Store, and account manager) and the Google App
Installer (both attached here >>).
http://en.miui.com/forum.php?mod=attachment&aid=MzQzOTV8N2U1ZDg5N2R8MT
QwOTgxOTU3MnwwfDg5OTA%3D
http://en.miui.com/forum.php?mod=attachment&aid=MzQzOTd8ZDg2ODQ3ZTB8MT
QwOTgxOTU3MnwwfDg5OTA%3D
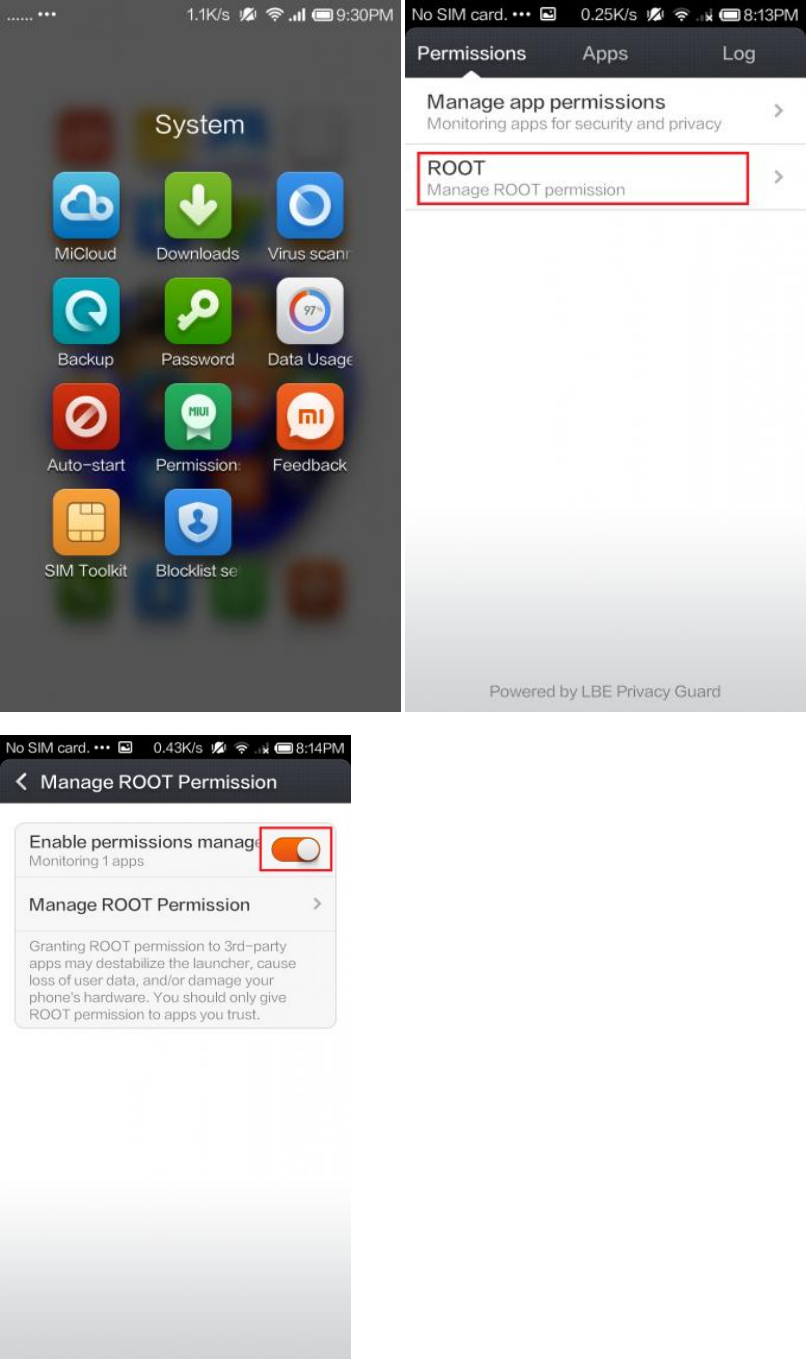
Ok now open MIUI’s built-in Permissions app > ROOT > Enable permissions manager
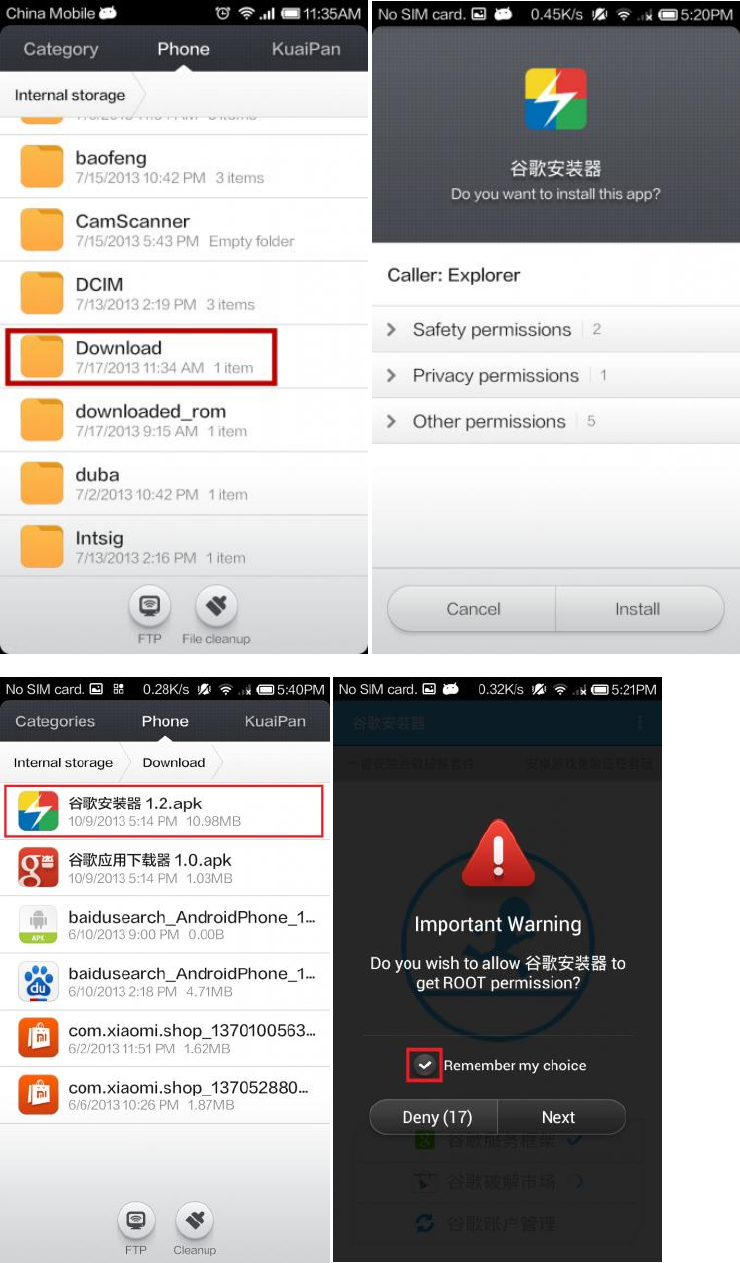
Next install the Google Installer (the lightning bolt logo with the 1.2 next to it). Touch
the big blue button in the middle to start. Then, when MIUI warns you about granting
Google app ROOT permissions check remember my decision and touch Next.
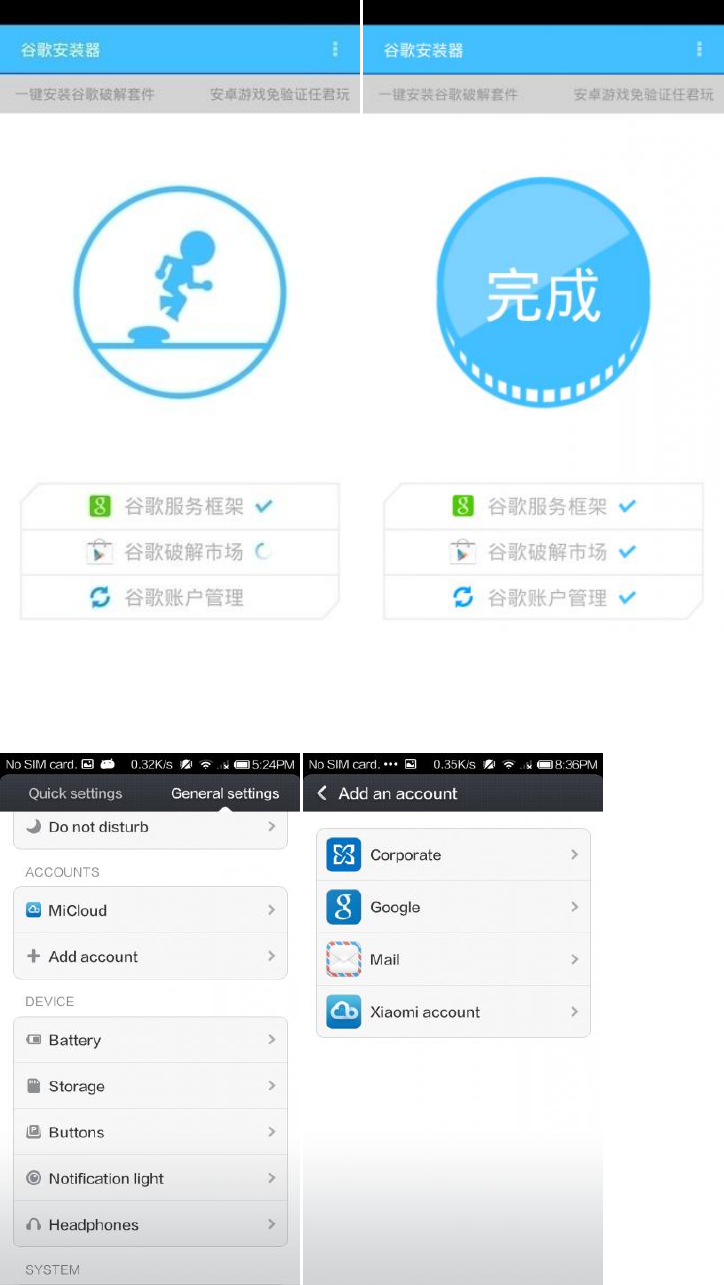
After installation process completes (the little running guy in the circle indicates the app
is still installing), touch the big blue button in the middle to restart your phone (hint the
characters 完成 are in the middle of the button!).
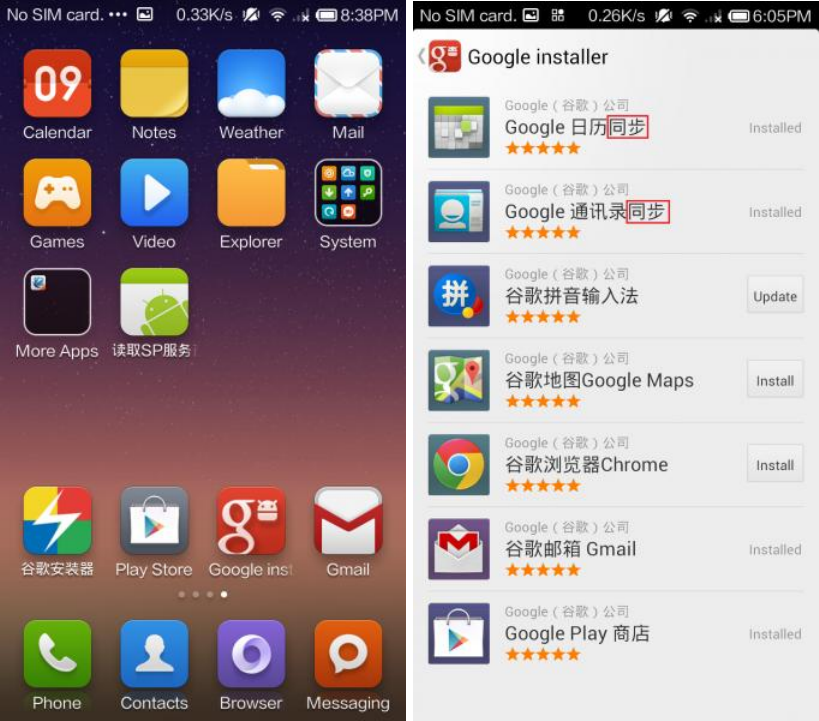
Ok moving on, set up your Google account in Settings > Accounts > Add Account >
Google. (duh).
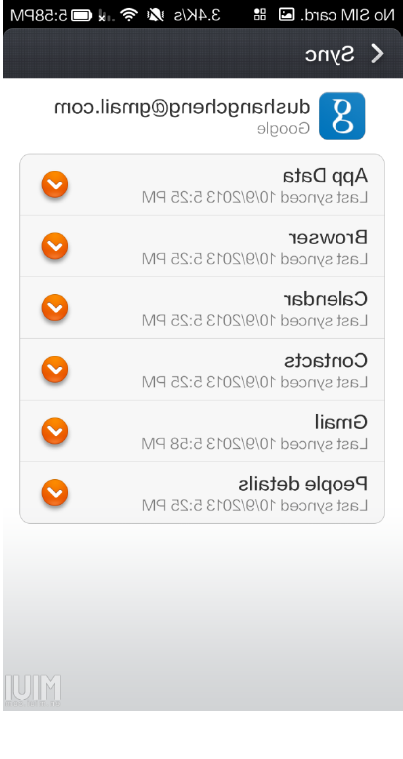
As you can see the Play Store is has appeared on the Home screen, but some of the sync
features for Google products (like Calendar sync, Contacts sync) may still be
unavailable. Don’t panic. You can download them with the Google app installer
(remember that second apk with the 1.0 next to it? go install it!). Open the Google
installer (the red square with the white g), any app on the list with the characters “同步”
indicates that is associated with syncing. Related sync functions for the Calendar and the
Contacts app are in pictured in the red box below.
You can configure sync options in Settings > Accounts.
ENJOY!
