Continental Automotive Systems 3290X Vehicle Data Recorder User Manual
Continental Automotive Systems, Inc Vehicle Data Recorder
User Manual
RoadLog™ Owner’s Manual
Version 1.3
Includes Instructions on:
• Fleet Management Software
• RoadLog Installation
• RoadLog Operation
www.vdoroadlog.com

32
Table of Contents Table of Contents
Table of Contents
Chapter 3: VDO RoadLog™ Operation ..............57
1. VDO RoadLog Fundamentals .............................................. 57
Operating RoadLog: ............................................................... 58
On/Off Button and Operation Modes ....................................... 60
USB Connector....................................................................... 60
Printer .................................................................................... 61
GPS Antenna / Connector ..................................................... 61
Connector Cables ................................................................... 61
Battery .................................................................................... 62
Touch Screen Display ............................................................. 62
System Icons .......................................................................... 62
2. First Device Start Up After Installation Into Vehicle .......... 63
3. Company Log In ................................................................... 64
4. Configuration Parameters ................................................... 65
Setting Configuration Parameters ............................................ 65
Setting the Vehicle Synchronization Parameter ........................ 66
Setting the Vehicle Synchronization Parameter Automatically ... 67
Setting the Vehicle Synchronization Parameter Manually .......... 67
Setting the Vehicle Odometer Parameter ................................. 68
Setting the Vehicle Identification Number (VIN)......................... 69
Setting the Wake up condition ................................................ 69
Setting the Vehicle Type .......................................................... 70
Setting the Printing Speed....................................................... 71
Setting the W Factor ............................................................... 72
Saving new Configuration Parameters to the Fleet Key ............ 74
5. The User Settings Menu ...................................................... 75
Adjusting Illumination .............................................................. 75
Change Language .................................................................. 75
Diagnostic Functions ............................................................... 76
About – RoadLog Device Information ...................................... 76
6. Daily Operations ................................................................... 77
Driver Log In ........................................................................... 77
Enter your Status .................................................................... 78
If you are not the first Driver to Log In: ..................................... 79
Manual Log In ......................................................................... 80
Manual Location Entry ............................................................ 81
Performing DVIRs at Log In and Log Out ................................. 81
The Driver Overview Options Screen: ..................................... 82
Company Data Transfer .......................................................... 83
Update the Company Assets File ........................................... 84
Upload the Company Support Data Lists ................................ 84
Data Download to a normal USB Flash Drive ......................... 84
Change Status ........................................................................ 85
Status Lock ............................................................................ 85
View Logs (Grid) ...................................................................... 86
View Logs (Details) .................................................................. 86
Event Details ........................................................................... 87
Driver Log Out ........................................................................ 88
Data Download at Driver Log Out ............................................ 89
7. Trailer management ............................................................. 90
Adding a Trailer ....................................................................... 90
Removing a Trailer ................................................................... 91
8. Shipment Documents management ................................... 92
9. Supporting Documents ....................................................... 93
Generating a Supporting Document Automatically ................... 93
Generating a Supporting Document Manually.......................... 94
10. Vehicle Inspection Reports: Creating DVIRs ..................... 96
Performing DVIRs.................................................................... 96
Pre-trip Inspection ................................................................... 96
Creating a Pre-trip DVIR .......................................................... 96
Creating a Post-trip DVIR ........................................................ 97
Assigning Defects to a Part in the DVIR ................................... 98
DVIR Summary ..................................................................... 100
Printing a DVIR ..................................................................... 100
Viewing Driver Vehicle Inspection Reports (DVIR) ................... 101
11. Enabling/Disabling Exemptions ....................................... 102
Automatic deactivation of Exemptions ................................... 102
Disabling the 100 or 150 Air-miles Radius Exemptions .......... 103
12. Adding a Pre-Trip or Post-Trip Activity ............................ 104
13. Performing a Roadside Inspection .................................. 105
Retrieving and Printing DVIR Reports .................................... 105
Retrieving, Printing and Transferring HOS logs....................... 106
14. Company Log Out from RoadLog ................................... 107
15. Software Updates .............................................................. 108
16. Diagnostic Warning Screens ............................................ 109
17. RoadLog Files .................................................................... 129
Company-Related Files (Fleet Management Software Files) ... 129
Company Identification File ................................................... 129
Company Tractor List File ...................................................... 130
Company Support Data File .................................................. 130
Company Vehicle Activities Data File ..................................... 130
Company Vehicle DVIR Data File ........................................... 130
Company Configuration Session File ..................................... 131
Company Assets Parts List File ............................................. 131
Device Related Files .............................................................. 131
Device Configuration Parameters Data .................................. 131
Device Diagnostic Events Data .............................................. 132
Vehicle Data .......................................................................... 132
Device Software Update History File ...................................... 133
Driver Related Files ............................................................... 133
Driver Identification Data File ................................................. 133
Driver Support Data File ........................................................ 133
Driver RODS Binary Data File ................................................ 134
Driver RODS Text Data File .................................................... 134
Printouts ............................................................................... 135
Daily Log ............................................................................... 136
DVIR Report .......................................................................... 137
Supporting Document ........................................................... 138
18. Support / Warranty ............................................................ 142
19. Glossary ............................................................................. 143
20. Legal Notices ..................................................................... 145
Introduction ................................................................................. 5
The RoadLog device is used in conjunction with: ...................... 5
Getting Started ......................................................................... 5
Chapter 1: VDO RoadLog™ Fleet Management
Software ..........................................................6
1. Managing your Fleet with the VDO RoadLog™ System....... 7
2. Getting Started ...................................................................... 8
System Requirements ............................................................... 8
Activating the RoadLog Fleet Management Software ................. 9
Software Installation .................................................................. 9
3. Navigating RoadLog Fleet Management Software:
First Look .............................................................................. 13
The Quick Start Screen: ......................................................... 13
The Navigation Buttons: ......................................................... 13
The Action Palettes: ................................................................ 14
4. Navigating work area Screens and Tabs............................ 15
Viewer Screen ......................................................................... 15
HOS Tab: ............................................................................... 15
IFTA/IRP Tab: .......................................................................... 15
DVIR Tab: ................................................................................ 15
Supporting Documents Tab: .................................................... 15
Speed Graph Tab: ................................................................... 16
Events Tab: ............................................................................. 16
Report Screen ......................................................................... 16
Supporting Documents Screen ............................................... 16
Drivers / Vehicles ..................................................................... 17
Driver Profile Tab: .................................................................... 17
Trailer Assignments Tab: .......................................................... 17
Shipping Assignments Tab: ..................................................... 17
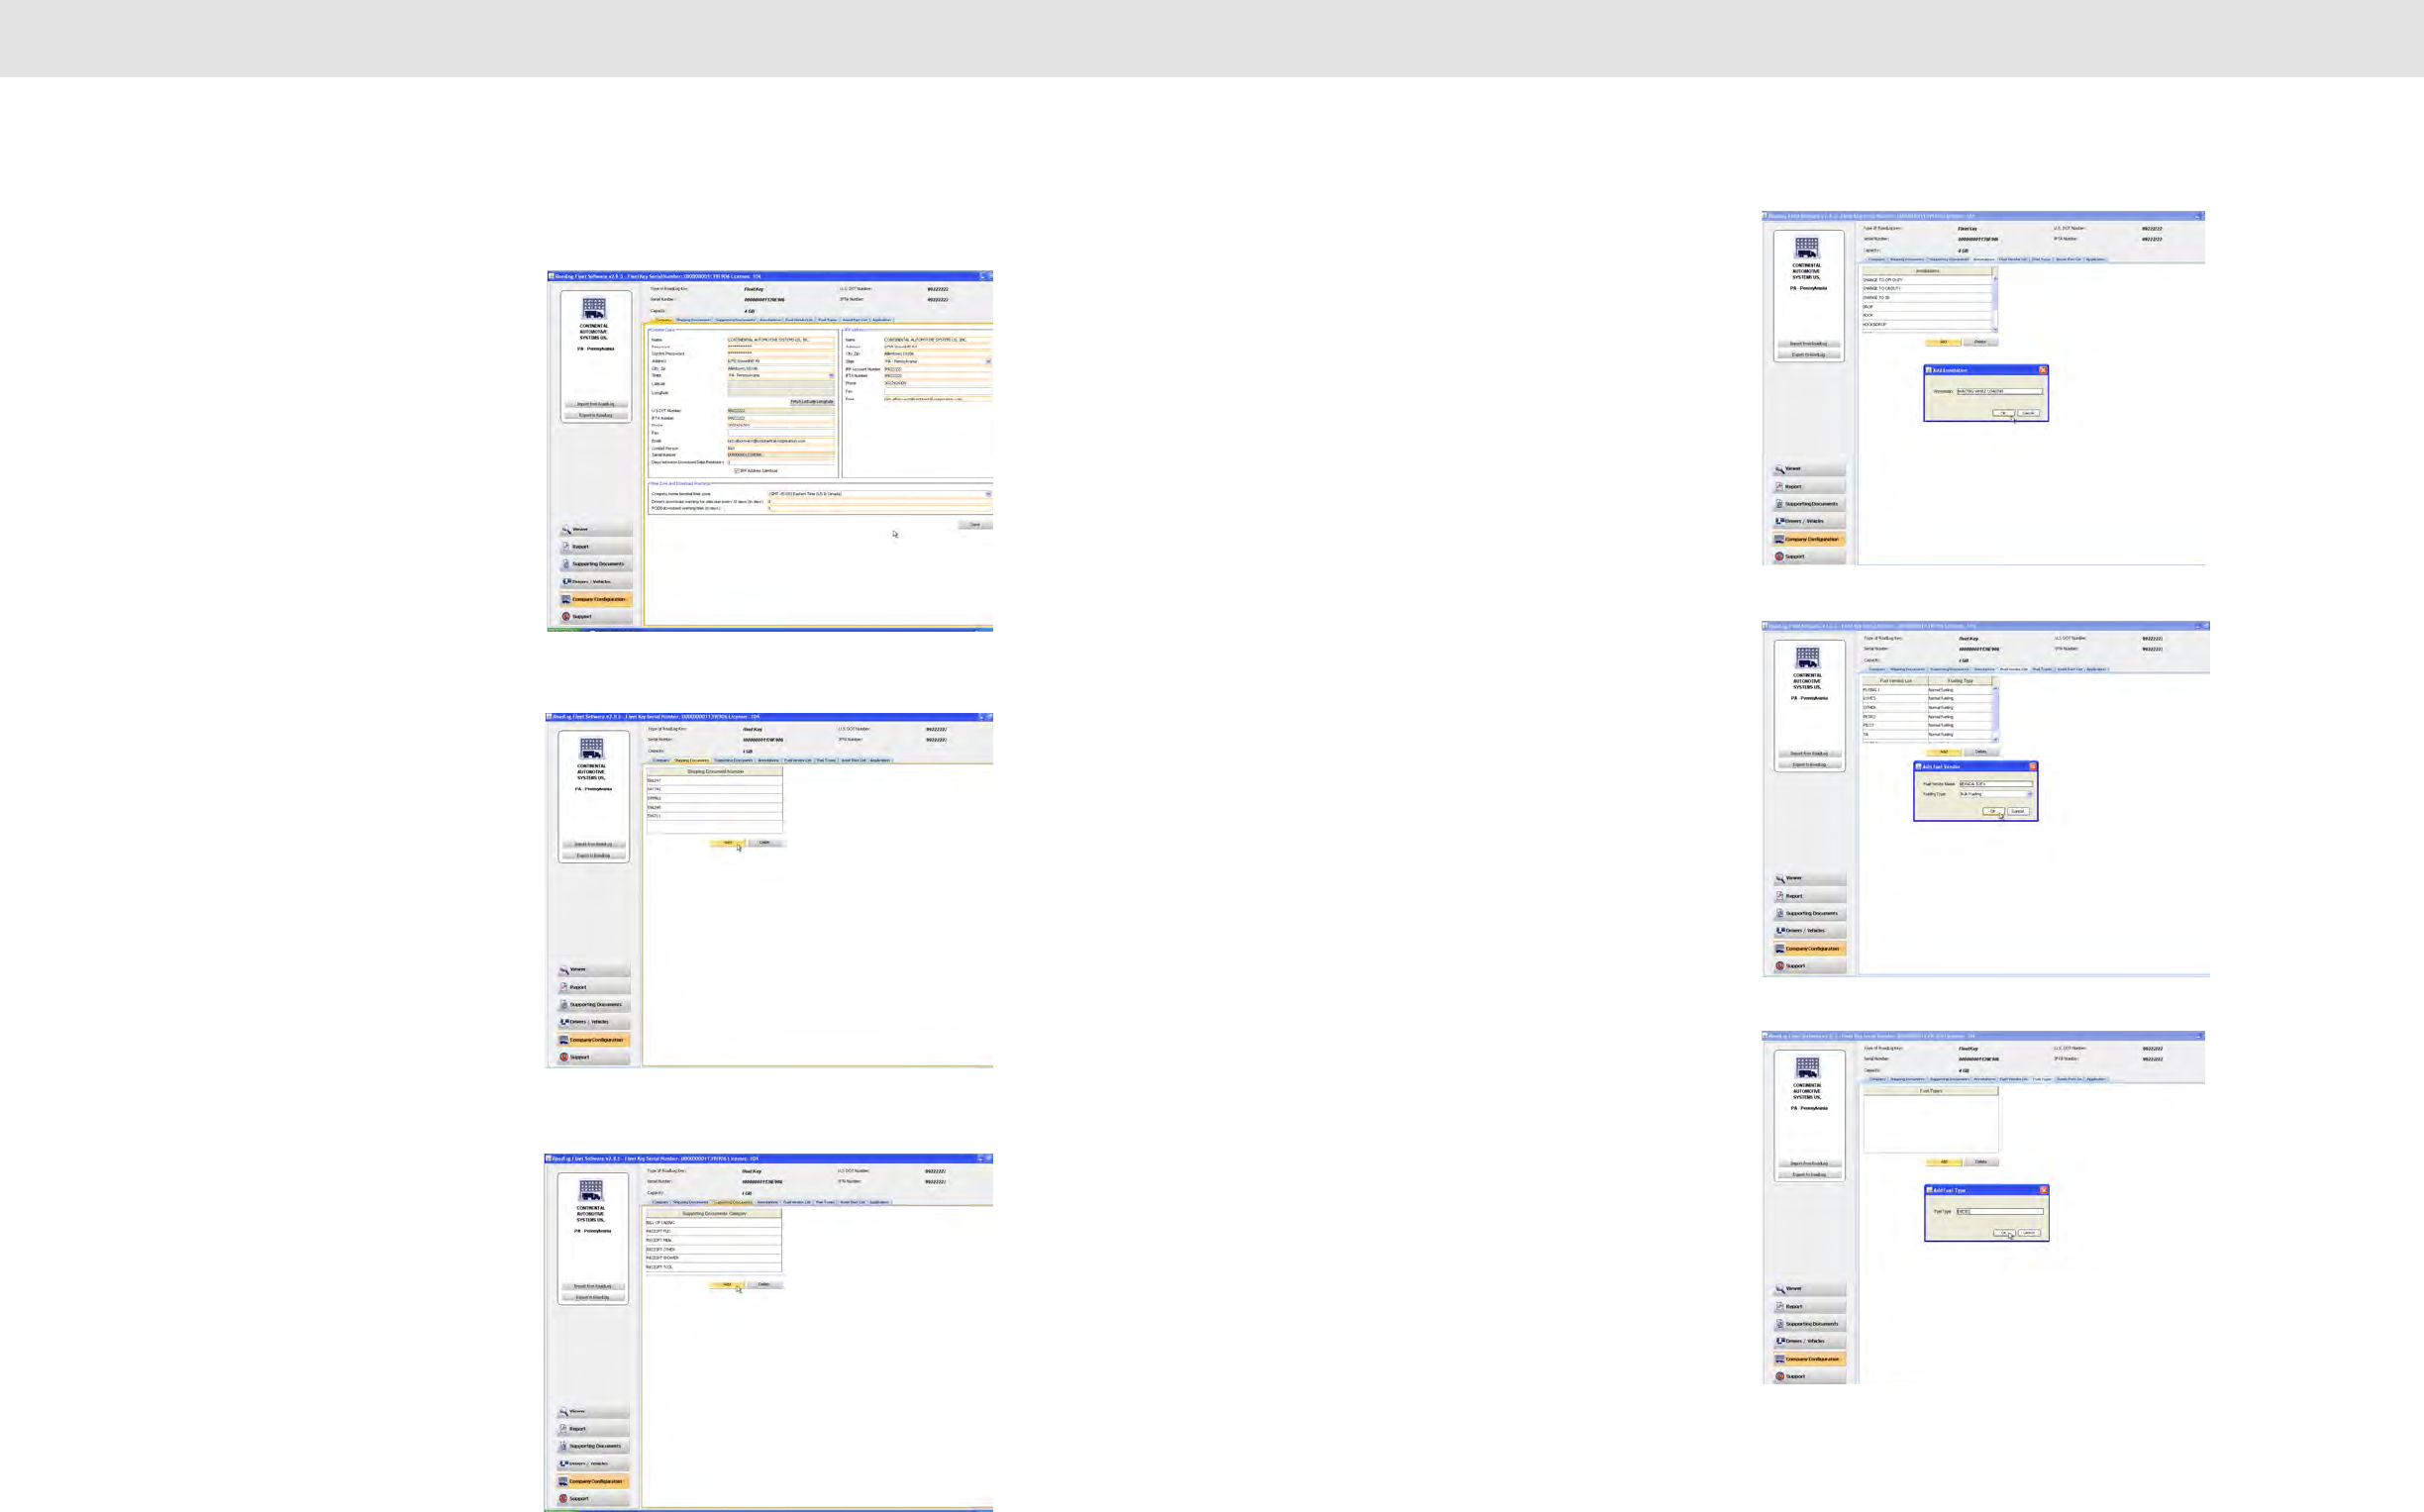
Company Configuration Screen............................................... 18
Company Tab: ........................................................................ 18
Shipping Documents Tab: ....................................................... 18
Supporting Documents Tab: .................................................... 18
Annotations Tab: ..................................................................... 19
Fuel Vendor List Tab: ............................................................... 19
Fuel Types Tab: ....................................................................... 19
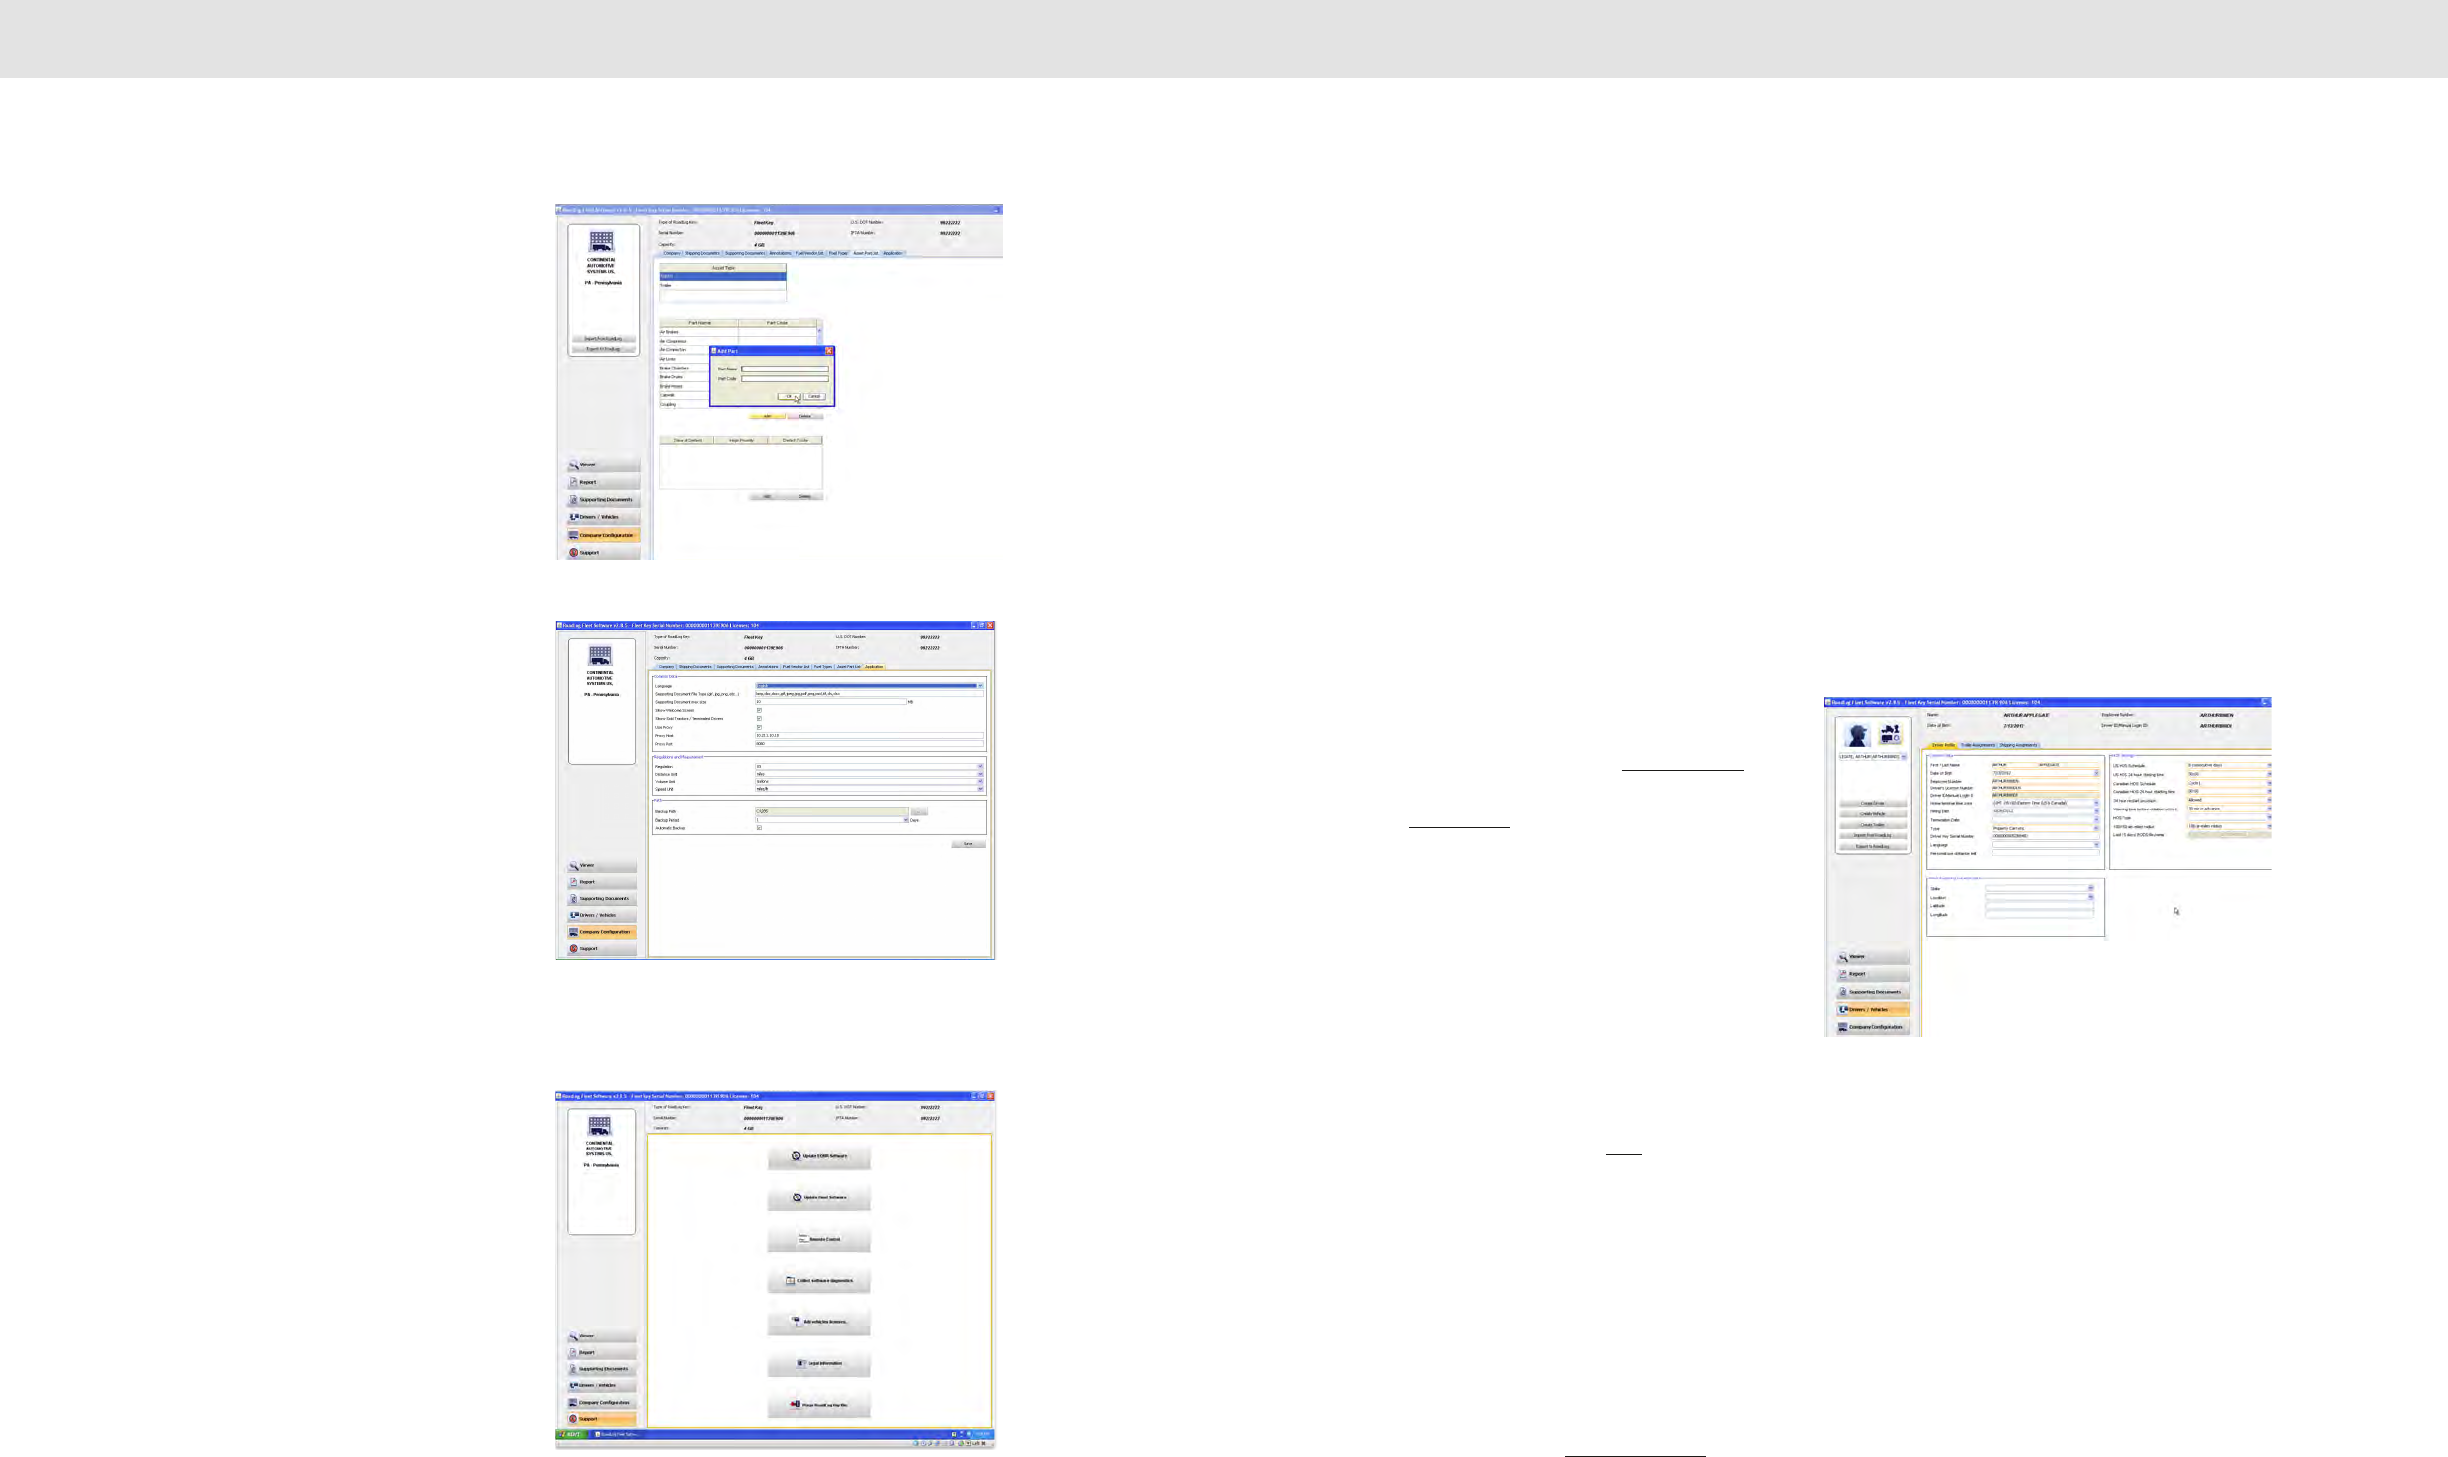
Asset Part List Tab: ................................................................. 20
Application Tab: ...................................................................... 20
Support .................................................................................. 20
5. Creating and working
with Driver Keys ................................................................... 21
Creating Drivers ...................................................................... 21
Creating a Driver Profile ........................................................... 21
6. Transferring data .................................................................. 23
Uploading Driver data to the Fleet Management Software ....... 23
Exporting to RoadLog ............................................................. 23
7. Screens & Tabs: Features & Functions .............................. 24
Viewer Screen – HOS Tab ....................................................... 24
Events Grid ............................................................................ 25
Map View and IFTA / IRP Tabs ................................................. 27
DVIR Tab ................................................................................. 27
Exporting DVIRs to RoadLog................................................... 29
Importing DVIRs from RoadLog ............................................... 29
Supporting Documents Tab ..................................................... 29
Speed Graph Tab ................................................................... 30
This functionality will be introduced in 2013. ............................ 30
Events Tab .............................................................................. 30
Report Screen ......................................................................... 31
DVIR Status Report ................................................................. 31
HOS Download Reminder Report ............................................ 32
IRP Driven Miles and IRP Vehicle List Reports ......................... 32
Vehicle Trip Report .................................................................. 32
Supporting Documents Screen ............................................... 33
Drivers / Vehicles Screen ......................................................... 33
Driver Tab ............................................................................... 34
Vehicle Screen ........................................................................ 35
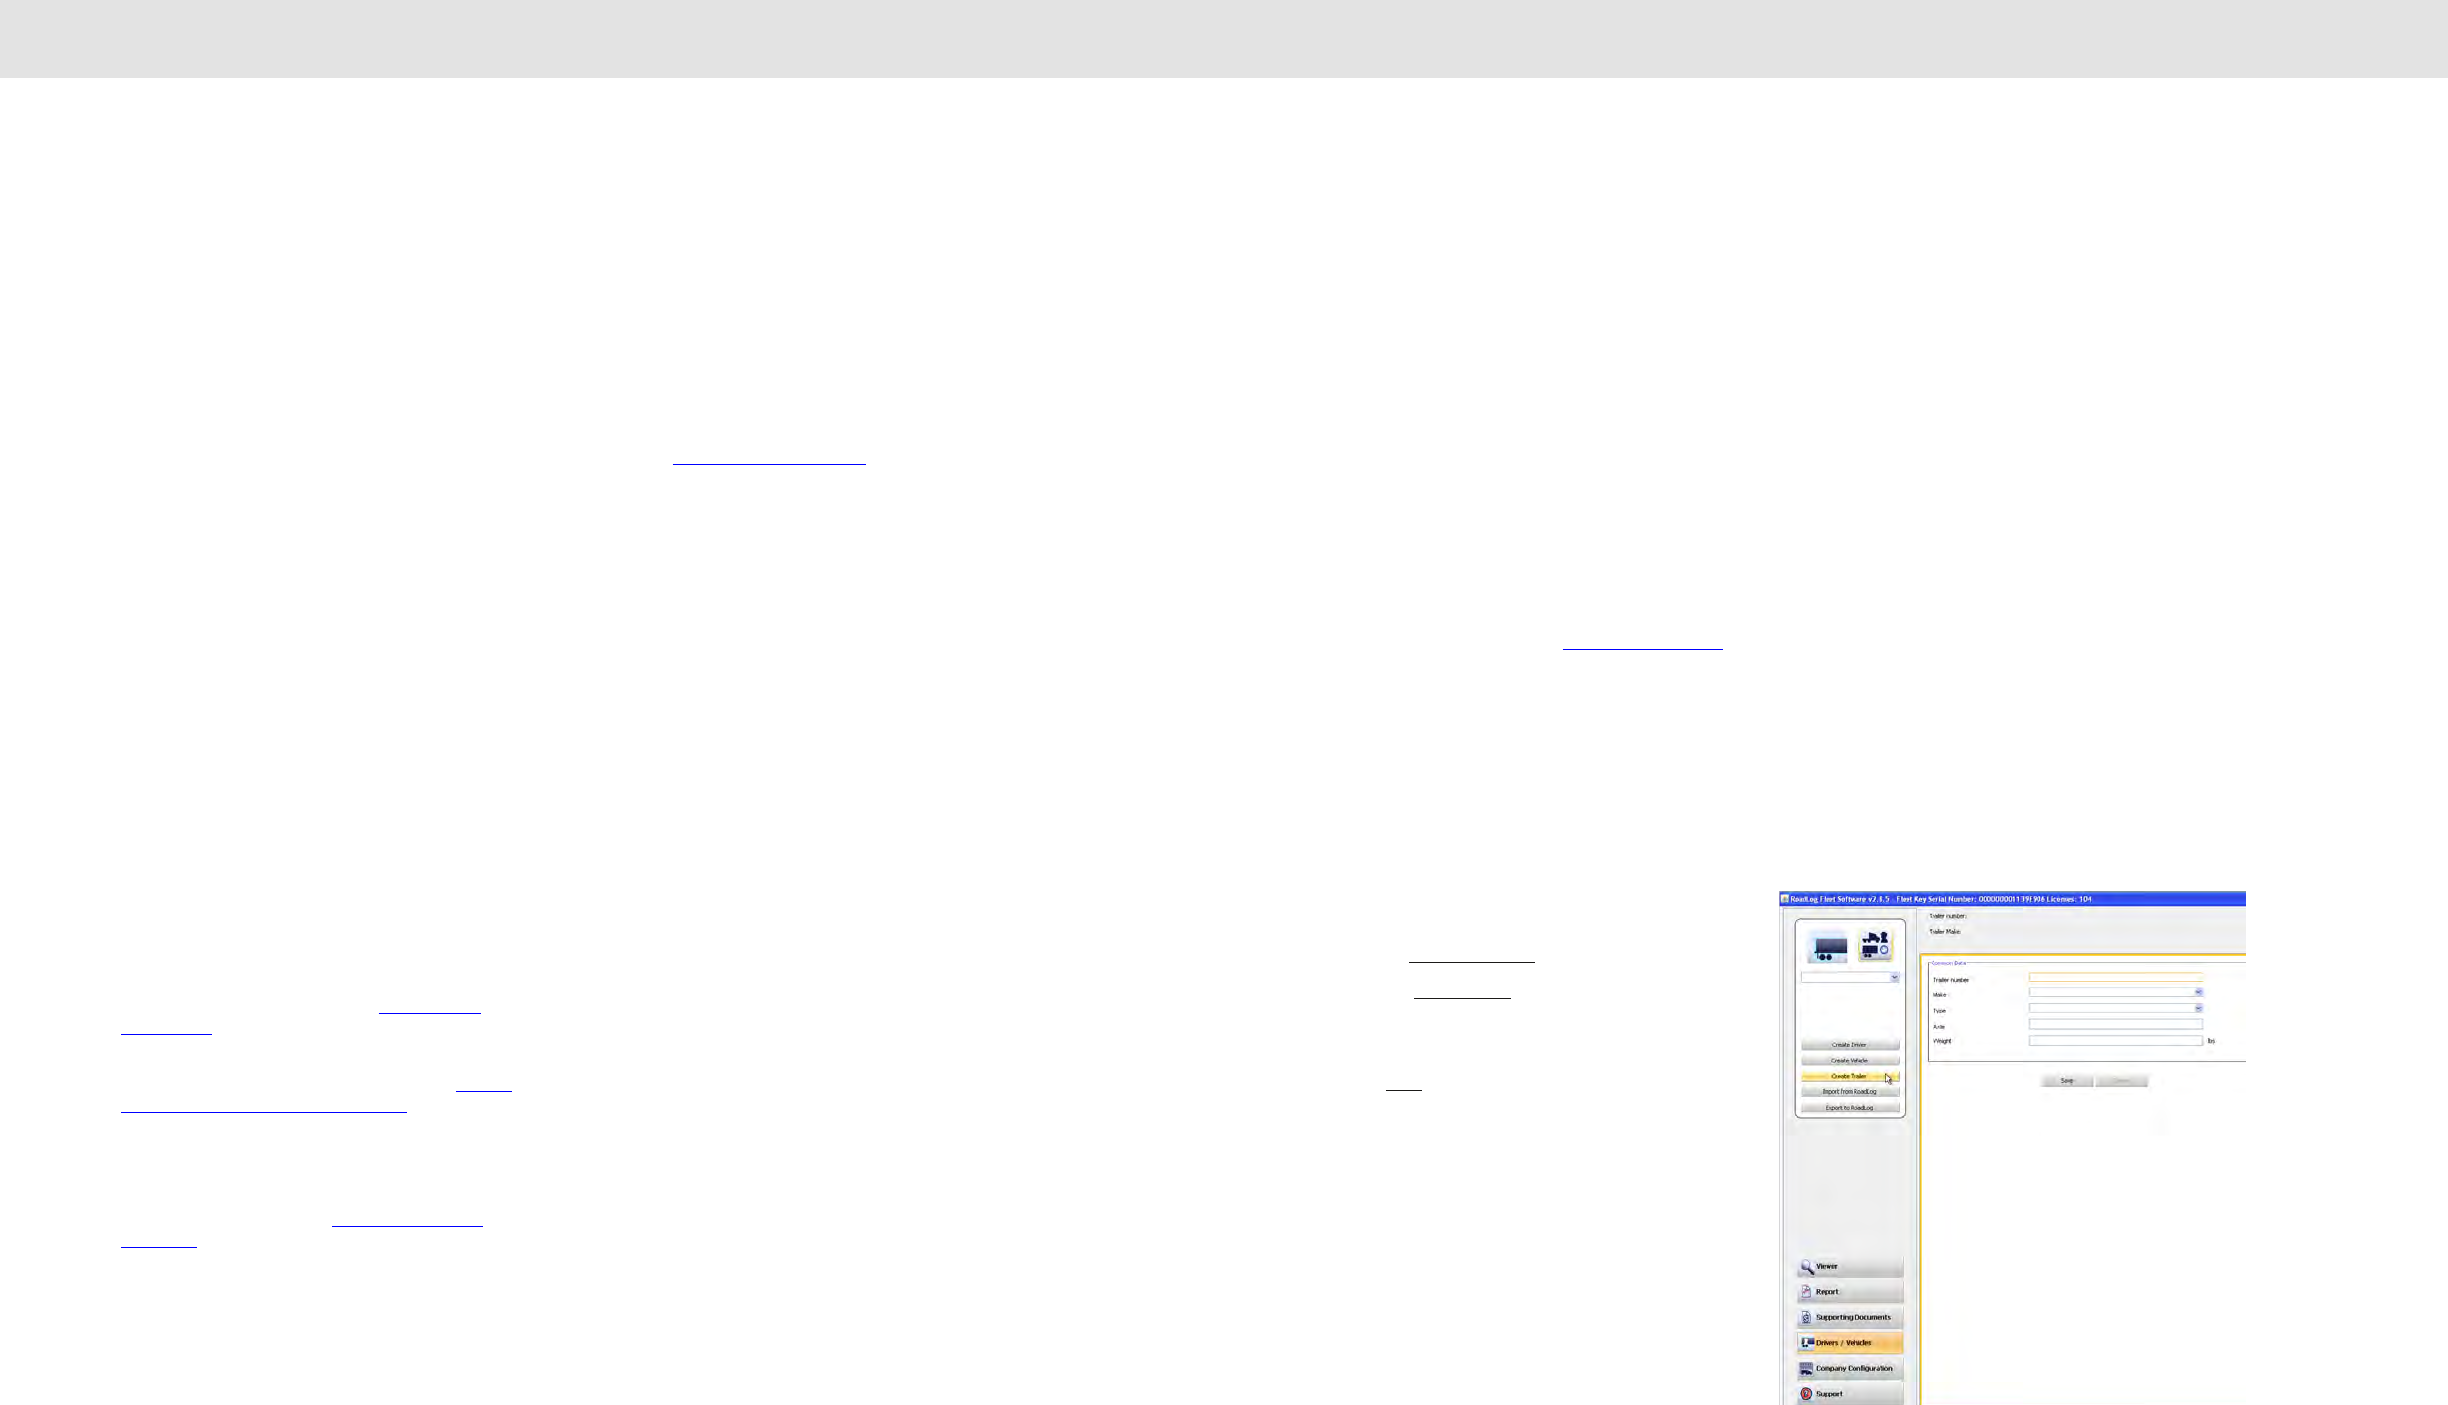
Creating Trailers ...................................................................... 37
Trailer Screen .......................................................................... 38
Trailer Assignments Tab ........................................................... 38
Shipping Assignments Tab ...................................................... 39
Company Configuration Screen............................................... 40
Company Tab ......................................................................... 40
Creating Shipping Documents ................................................. 42
Supporting Documents Tab .................................................... 42
Annotations Tab ...................................................................... 43
Fuel Vendor List Tab ................................................................ 43
Fuel Types Tab ........................................................................ 43
Asset Part List Tab .................................................................. 44
Application Tab ....................................................................... 45
Support Screen ....................................................................... 46
Update RoadLog Software ...................................................... 46
Update RoadLog Fleet Management Software ........................ 46
Start Remote Control (FastViewer) ........................................... 46
Technical Support ................................................................... 46
Collect Software Diagnostics ................................................... 47
Adding Vehicle Licenses .......................................................... 47
Purging old data ..................................................................... 48
Replacing Lost or Damaged RoadLog Keys ............................ 48
8. Resolving Conflict Files ....................................................... 49
9. Backing up your RoadLog Data .......................................... 50
Chapter 2: VDO RoadLog™
Installation .....................................................51
1. VDO RoadLog™ Installation ............................................... 51
1. Make sure you have the correct Installation Kit! ................... 52
2. Choose your Mounting Option. ........................................... 52
3. Choose your Mounting Location. ........................................ 53
4. Attach your Bracket or Mount. ............................................ 53
5. Prepare the RoadLog. ......................................................... 53
6. Connect Cable. ................................................................... 54
7. Install RoadLog into Mount. ................................................ 54
8. Load Paper Roll. ................................................................. 54
9. Compliance Sticker. ............................................................ 54
Instructions for Open End “Basic” Cable ................................. 55
6-pin and 9-pin Wiring Configurations ..................................... 56
OBDII Vehicle Connector ......................................................... 56
5
Introduction
Fleet Key
Driver Key
4
DOT Certificate of Compliance Introduction
Introduction
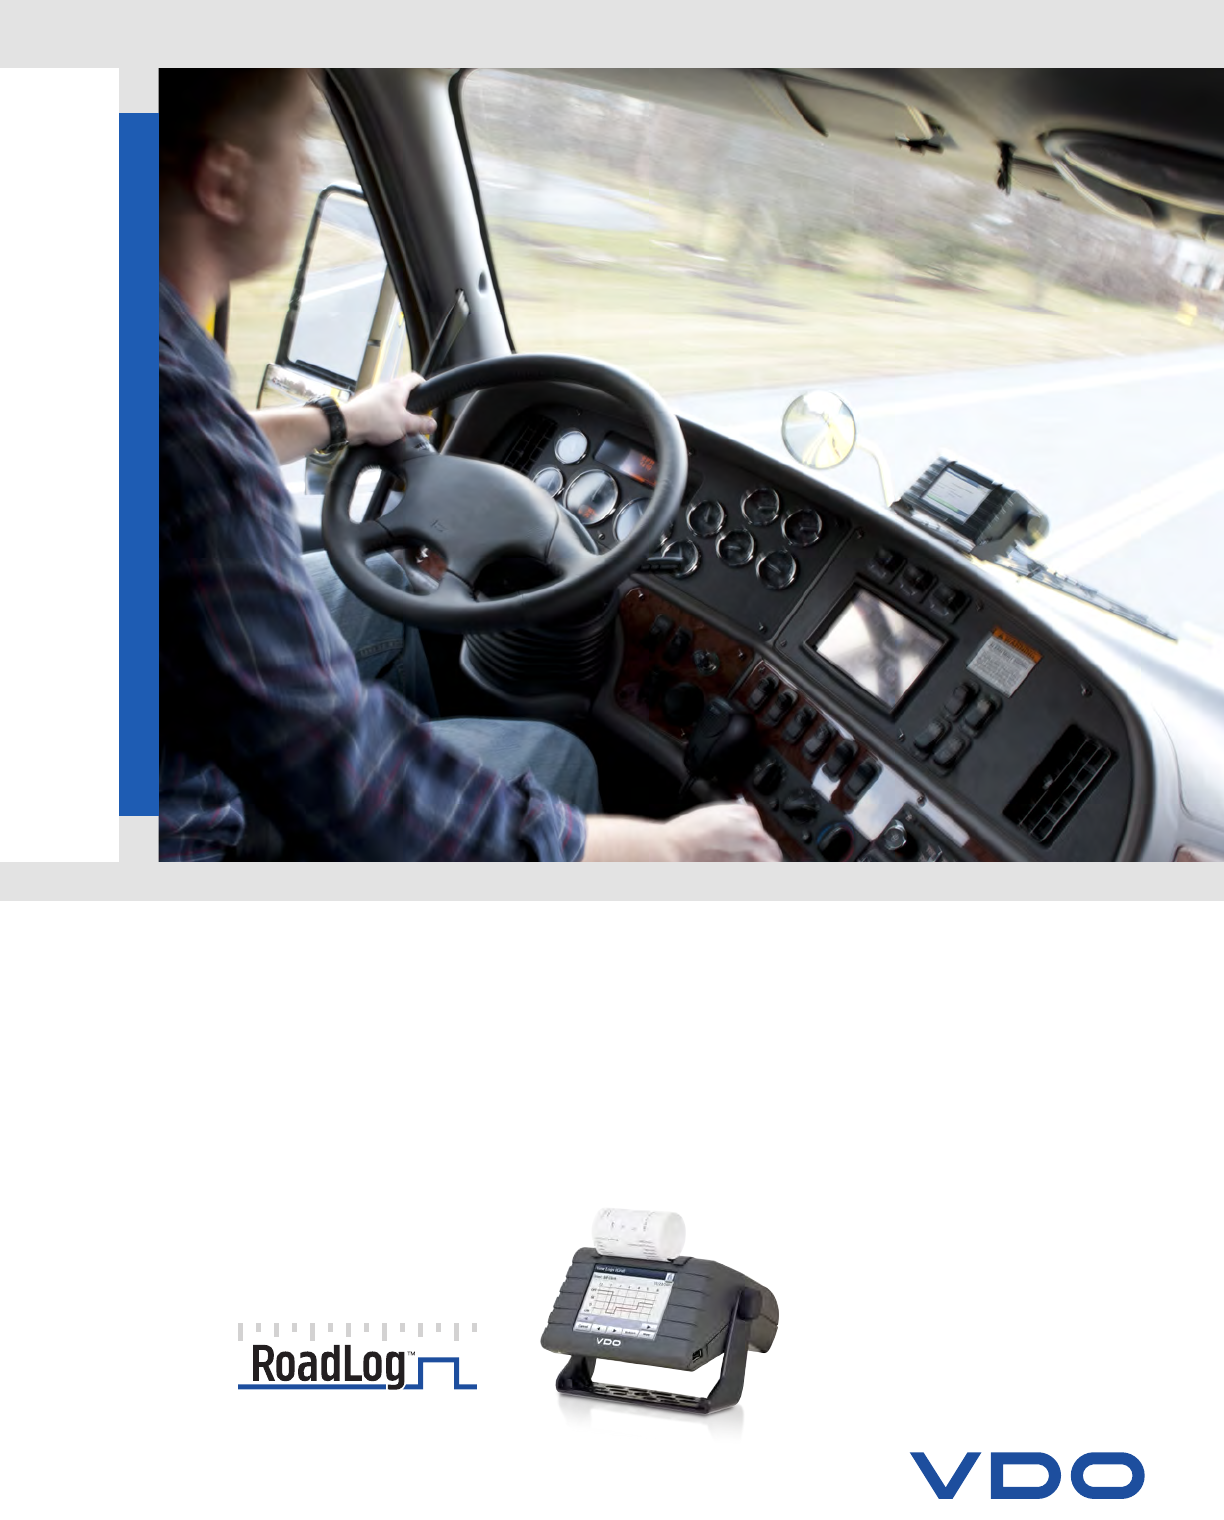
VDO RoadLog is the simple, affordable, all-in-one solution for automated daily log
book and compliance reporting. It provides cost-effective HOS monitoring that
you can have up and running in minutes.
RoadLog was designed to keep Drivers in compliance with all FMSCA regulations
by recording data for:
• Hours-of-Service (HOS)
• Driver Vehicle Inspection Reports (DVIR)
• International Fuel Tax Agreement (IFTA)
(This feature will be implemented in an upcoming release)
• International Registration Plan (IRP)
(This feature will be implemented in an upcoming release)
RoadLog Fleet Software is designed to enable Fleet Managers and Owner /
Operators to collect and archive driver data to maintain compliance with FMSCA
regulations and to help manage trucking operations more efficiently.
RoadLog is used in conjunction with:
RoadLog Fleet Management Software
The Fleet Management Software allows the Fleet Manager or Owner / Operator to
collect and archive Driver data, make notes in the Driver data and prepare reports
on Driver history.
RoadLog Fleet Key
The RoadLog Fleet Key USB flash drive is used to log in to the RoadLog Fleet
Software. The Fleet Key can also be used to download and upload data to and
from RoadLog. Each company must have at least one Fleet Key and the RoadLog
Fleet Management Software.
RoadLog Driver Key
The RoadLog Driver Key USB flash drive is used by the Driver to log in and out of
RoadLog and to transfer data.
Getting Started
To set up your VDO RoadLog, you’ll follow these steps:
1. Install the RoadLog Fleet Software.
2. Activate the RoadLog Fleet Key.
3. Set up your Company and Drivers in the RoadLog Fleet Software.
4. Install RoadLog in your Vehicle.
5. Download and upload Driver data.
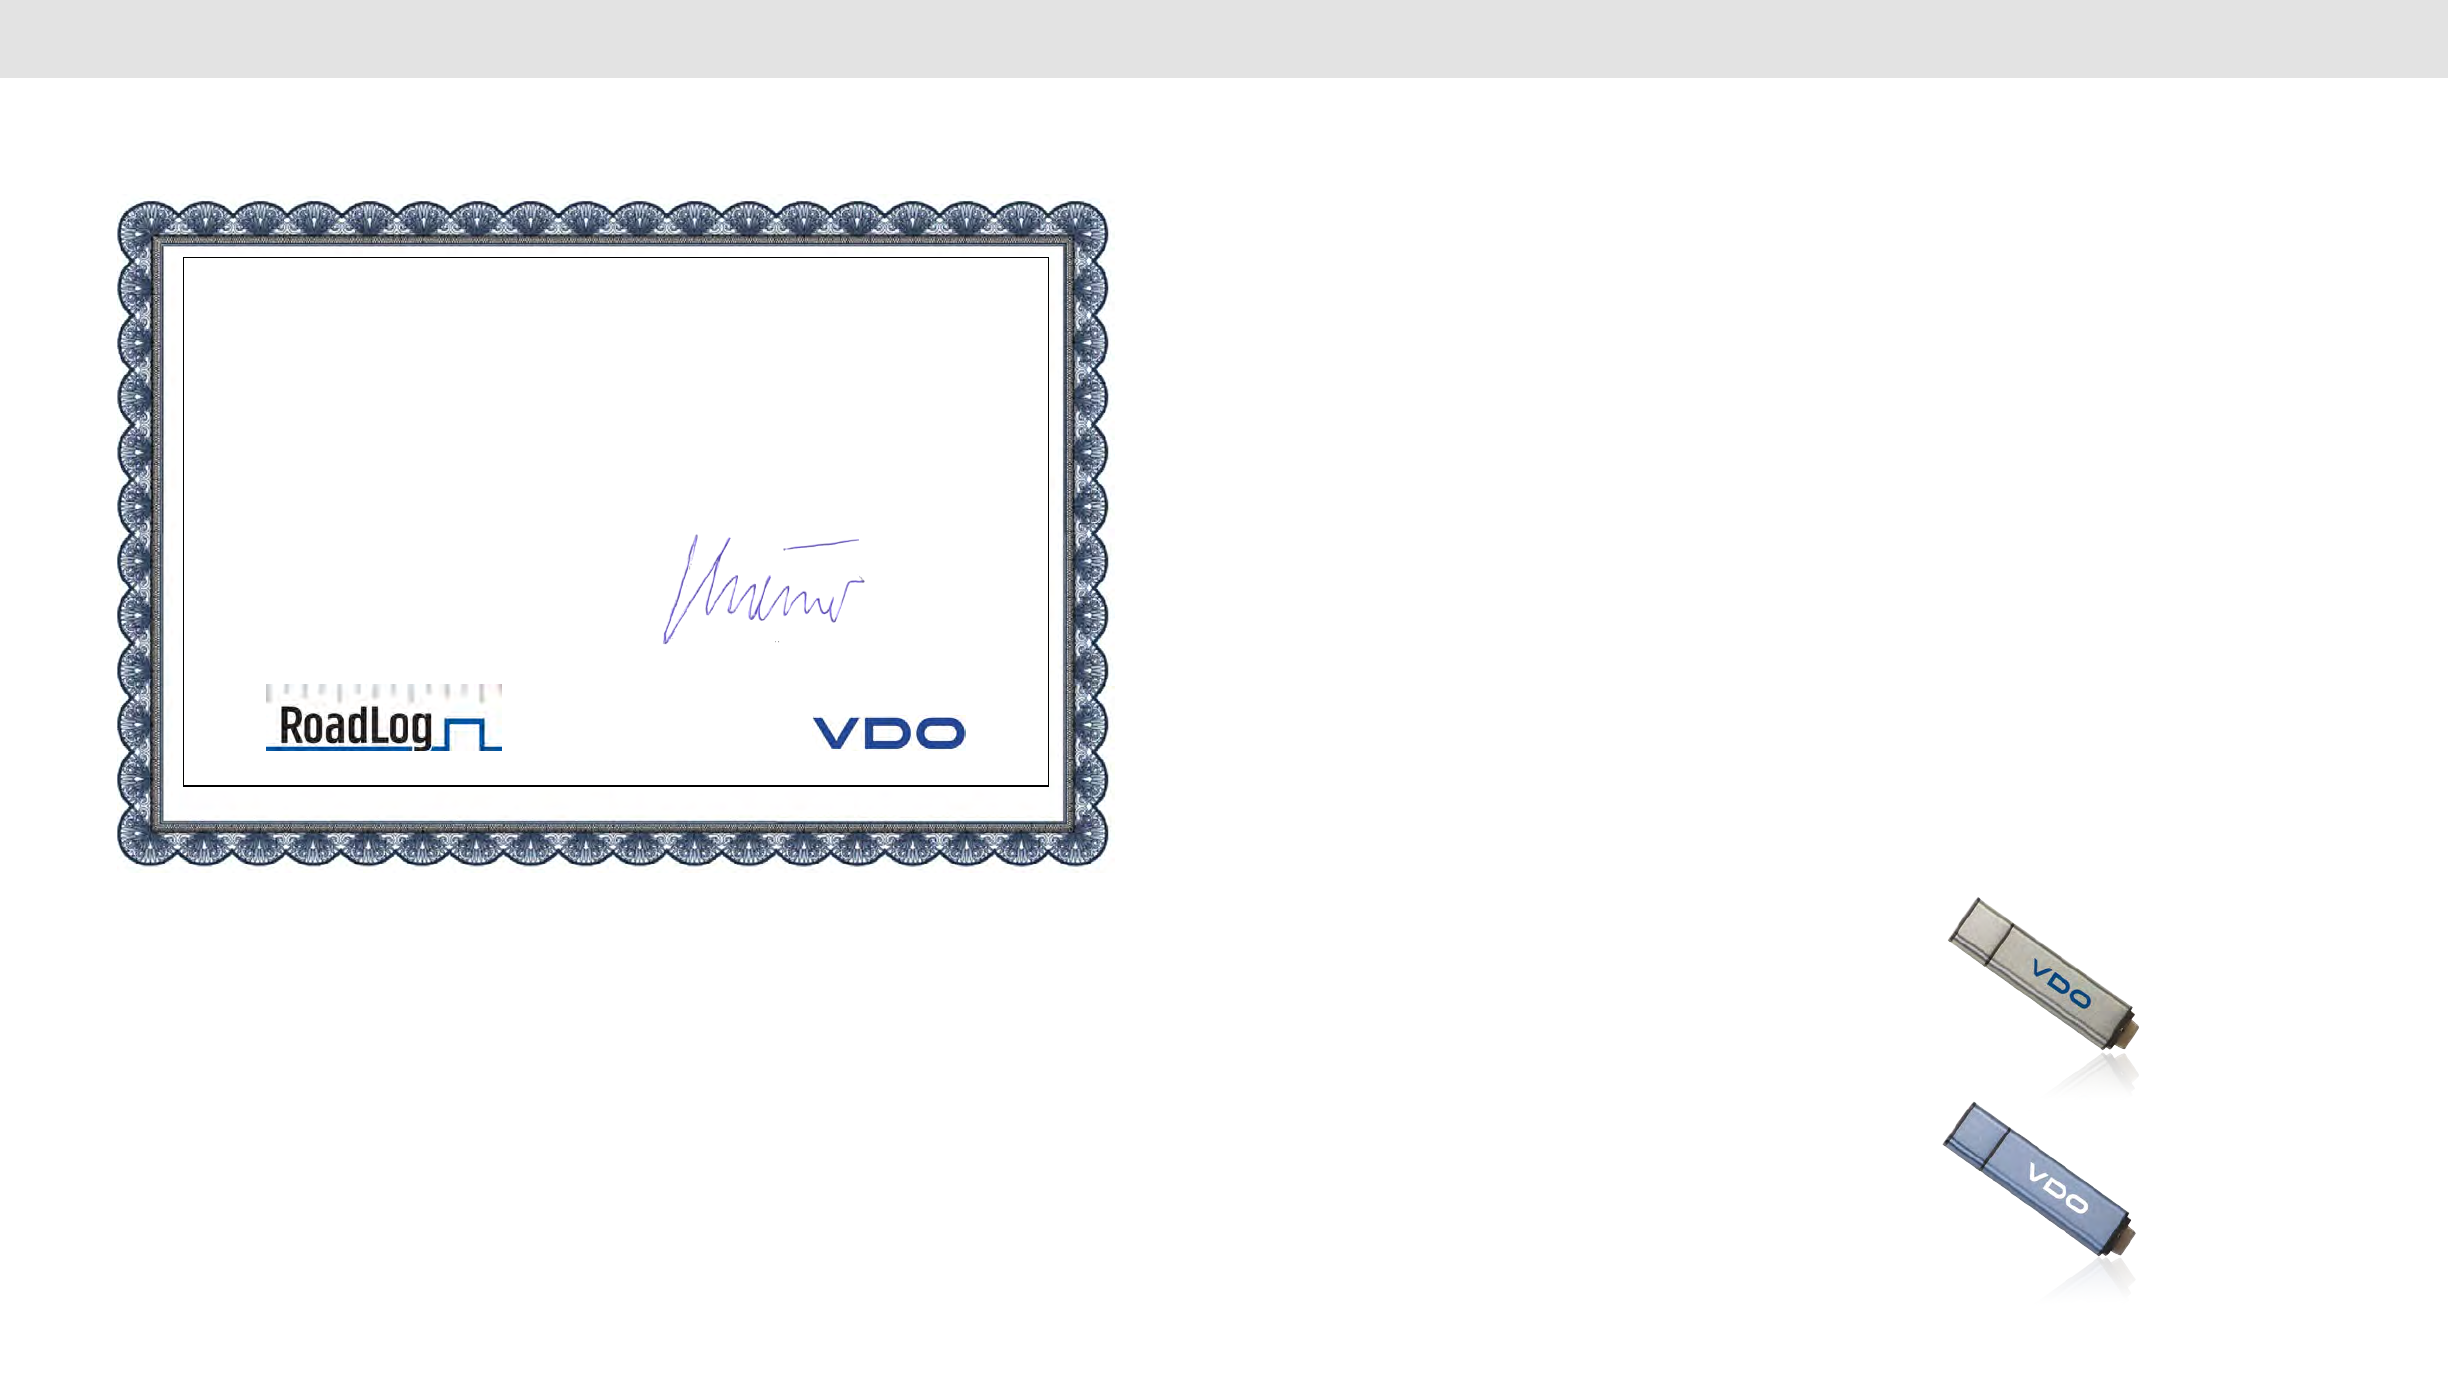
ContinentalAutomotiveSystemsUS,Inc.
CERTIFICATEOFCOMPLIANCE
DEPARTMENTOFTRANSPORTATIONREGULATIONS
The VDO RoadLog electronic logging system has been sufficiently tested, under the conditions in which it will be used, to meet
or exceed the requirements of section 49 CFR 395.15 of the United States Federal Motor Carrier Safety Regulations in effect at
the time of its manufacture. This VDO RoadLog electronic logging system can be used to record, transfer and archive all hours
of service data as required by the United States Department of Transportation Federal Motor Carrier Safety Administration as of
the date of its manufacture.
Authorized by
Ekkehard Kraemer
Head of Finance and Quality
Tachographs, Telematics and Services
Commercial Vehicles & Aftermarket
76
Managing your Fleet with the VDO RoadLog™ System
Chapter 1:
VDO RoadLog™ Fleet Management Software
1. Managing your Fleet with the
VDO RoadLog™ System
VDO RoadLog was designed to allow Drivers, Fleets and
Owner Operators to record and report Hours of Service
(HOS), Driver Vehicle Inspection Reports (DVIR), Fuel Tax
Reporting and other data quickly and easily, and without
monthly fees.
VDO RoadLog Fleet Management Software lets you collect
and manage that data to ensure that your fleet complies
with regulations. By having accurate data on hand, Fleet
Managers and Owner Operators can see if they are
operating within regulations, and where changes need to be
made to improve efficiency and increase profits.
RoadLog eliminates the chance of manual logbook entry
errors that can result in big fines. RoadLog printouts provide
all the information that a manual log provides and more, but
RoadLog is faster, easier and more accurate, for both the
Driver and the Compliance Officer.
The VDO RoadLog Fleet Management Software generates
accurate, up-to-date reports far quicker than paper-based
methods, saving time and money. RoadLog Fleet
Management Software can manage an unlimited number
of Drivers and trucks. And, since the RoadLog Fleet
Management Software is a one-time purchase, it
represents an excellent value compared to subscription-
based solutions.
RoadLog records a range of data that helps make trucking
operations safer and more efficient:
• Hours-of-Service (HOS) according to US rules
• Driver Vehicle Inspection Reports (DVIR) according to
US rules
• International Fuel Tax Agreement (IFTA)
• International Registration Plan (IRP)
RoadLog’s software is flexible and up-dateable to meet
anticipated DOT compliance requirements. Free upcoming
software updates will include:
• Hours-of-Service (HOS) according to Canadian rules
• Vehicle Inspection and Repair Maintenance (DVIR)
according to Canadian rules
• Compliance with Alaska and oilfield rules
Entry errors in traditional paper logbooks interfere with your
asset tracking and operations planning. They can also lead
to big fines! The RoadLog system is faster, easier and more
accurate, for both the Driver and the fleet manager or
compliance officer.
Permission to access data from RoadLog and the Fleet
Management Software is possible only with the Driver Key or
Fleet Key USBs, so that data is fully protected and tamper
resistant, to ensure data integrity and data privacy.
VDO RoadLog Fleet Management Software is used in
conjunction with:
• VDO RoadLog – the in-vehicle device that records
vehicle and Driver activities.
• VDO RoadLog Driver Key – a proprietary USB drive that
allows Drivers to log in to RoadLog and that is used to
transfer data between RoadLog and the PC that is
running the Fleet Management Software. The Driver
Key can also transfer Driver data between vehicles, if
the Driver uses different vehicles through out the
workday/workweek. The Driver Key can also enable
use of a limited feature set of the Fleet Management
Software.
• VDO RoadLog Fleet Key – a proprietary USB drive that
is required to log in to the Fleet Management Software,
assuring the integrity and authenticity of your RoadLog
data files.
• The Fleet Key and Driver Keys are also used to transfer
data between the PC that is running the Fleet
Management Software and the RoadLog device.
Driver Key
Fleet Key
98
Getting Started Getting Started
2. Getting Started
System Requirements
VDO RoadLog Fleet Management Software requires:
• A PC with Windows® 8, Windows® 7, Windows Vista with Service Pack 2,
or Windows XP with Service Pack 3.
• Adobe® PDF Reader (or any software that allows reading of PDFs).
• An Internet connection.
• Two open USB ports.
• A CD drive.
• 400 MB of free hard drive space.
Activating the RoadLog Fleet
Management Software
In order to use the RoadLog Fleet Management
Software, you will need to install the Software and
activate the VDO RoadLog Fleet Key. Whenever you use
the Fleet Management Software, an activated VDO Fleet
Key or VDO Driver Key must be inserted in the PC.
If the Fleet Key is not already activated, it can be
activated by filling the data in the Company window that
appears after installation of the RoadLog Fleet Software
application.
The application connects to the VDO Internet portal. The
company will be registered, and the PC will receive a
download of the CID file for the activation of the Fleet key.
Note: The activation described here requires an Internet
connection. If you do not have an Internet connection, see
Activating Your Fleet Key through the RoadLog Portal for how to
activate the Fleet Key using Internet access from another PC.
Software Installation
1. Insert the Fleet Key into a USB port on your PC.
2. Insert the Fleet Management Software CD into the PC. When the
CD appears, double click the setup.exe file. The Fleet Management
Software installation will start.
3. Follow the InstallShield Wizard prompts, and make all the required
user choices.
While running the InstallShield Wizard, there is an option to choose
a Client/Server installation.
> If you select “Complete installation,” all parts of the application
(database, client application, etc.) will be installed on one
computer. This option is selected by default.
> If you select “Client installation,” only the client portions
(application, JRE, etc.) will be installed.
> If the user selects “Server installation,” only the server parts will
be installed.
> If “Client installation” is selected, you will be prompted for a
database server name / address. You will also have to enter the
US DOT Number for the company.
> If there is a PostgreSQL database already installed, you will have
to enter the admin password.
PC OPERATING SYSTEM REQUIREMENTS -
32 BIT Versions
Windows XP (SP3)
Windows VistaSP2 Enterprise
Windows VistaSP2 Ultimate
Windows VistaSP2 Home Basic
Windows VistaSP2 Home Premium
Windows VistaSP2 Business
Windows 7 Ultimate
Windows 7 Home Premium
Windows 7 Home Basic
Windows 7 Enterprise
Windows 7 Professional
Windows 8 Consumer
Windows 8 Professional
Windows 8 Enterprise
PC OPERATING SYSTEM REQUIREMENTS -
64 BIT Versions
Windows XP (SP3)
Windows 7 Ultimate
Windows 7 x64 Home Premium
Windows 7 x64 Home Basic
Windows 7 x64 Enterprise
Windows 7 x64 Professional
Windows 8 Consumer
Windows 8 Professional
Windows 8 Enterprise
NOTE: PostgreSQL 9.0 Database supported for all Operating Systems.
The installer will check to see if the PostgreSQL database is installed on the
machine. If it is not installed, setup will automatically install it.
1110
Getting Started Getting Started
Note: The installer will check to see if PostgreSQL database is
installed on the machine. If it is not installed, the setup will
automatically install it. You may see a message(s) indicating that
there are software updates available. Click Yes to allow installation
of the updates.
When you see the Fleet Key Activation screen, enter your company
information in the fields shown. Be careful to enter the information
accurately – once saved, the US DOT number cannot be changed.
We recommend using an email address that all users will have
access to, for example: manager@your_company.com.
You’ll need to know your company data, including your US DOT
Number. The serial number of the Fleet Key will be read from the
Key and entered into the field automatically.
When the information entry is completed, click Save. The software
will automatically activate your Fleet Key (this may take several
minutes - again, Internet access is required). When the activation is
complete, your Fleet Key will be activated. The Fleet Manager
Software will start up automatically, and a “RoadLog Fleet
Management Software” shortcut icon will appear on your desktop.
To start the RoadLog Fleet Management Software, double click on
this shortcut icon.
Activating your Key will create a Company account for you on the
RoadLog User Portal (www.vdoroadlog.com/user). You will be able
to use this account to purchase additional RoadLog Fleet Keys and
Vehicle licenses when you need them.
4. At first start up, no Driver data will be present. You’ll
need to complete your Company and Driver profiles,
create Trailers and Tractors and export the data to
the Fleet Key and Driver Key(s). Then, you’ll be ready
to log your Company in on your RoadLog(s) with the
Fleet Key and then have your Driver(s) begin using
the system. When the Driver(s) return from driving
with data from RoadLog, you will be able to
download the data from the Driver Key(s), view
Driver activities and manage Driver records.
Note: You will be notified by e-mail when software
updates are available. If you do not have Internet
access from the PC where you’ll use the Fleet
Management Software, you must make
arrangements to get the software updates. Software
updates may be necessary to maintain compliance
with changes to the FMCSA regulations. Updates
will be available on the VDO RoadLog web portal:
www.vdoroadlog.com/user
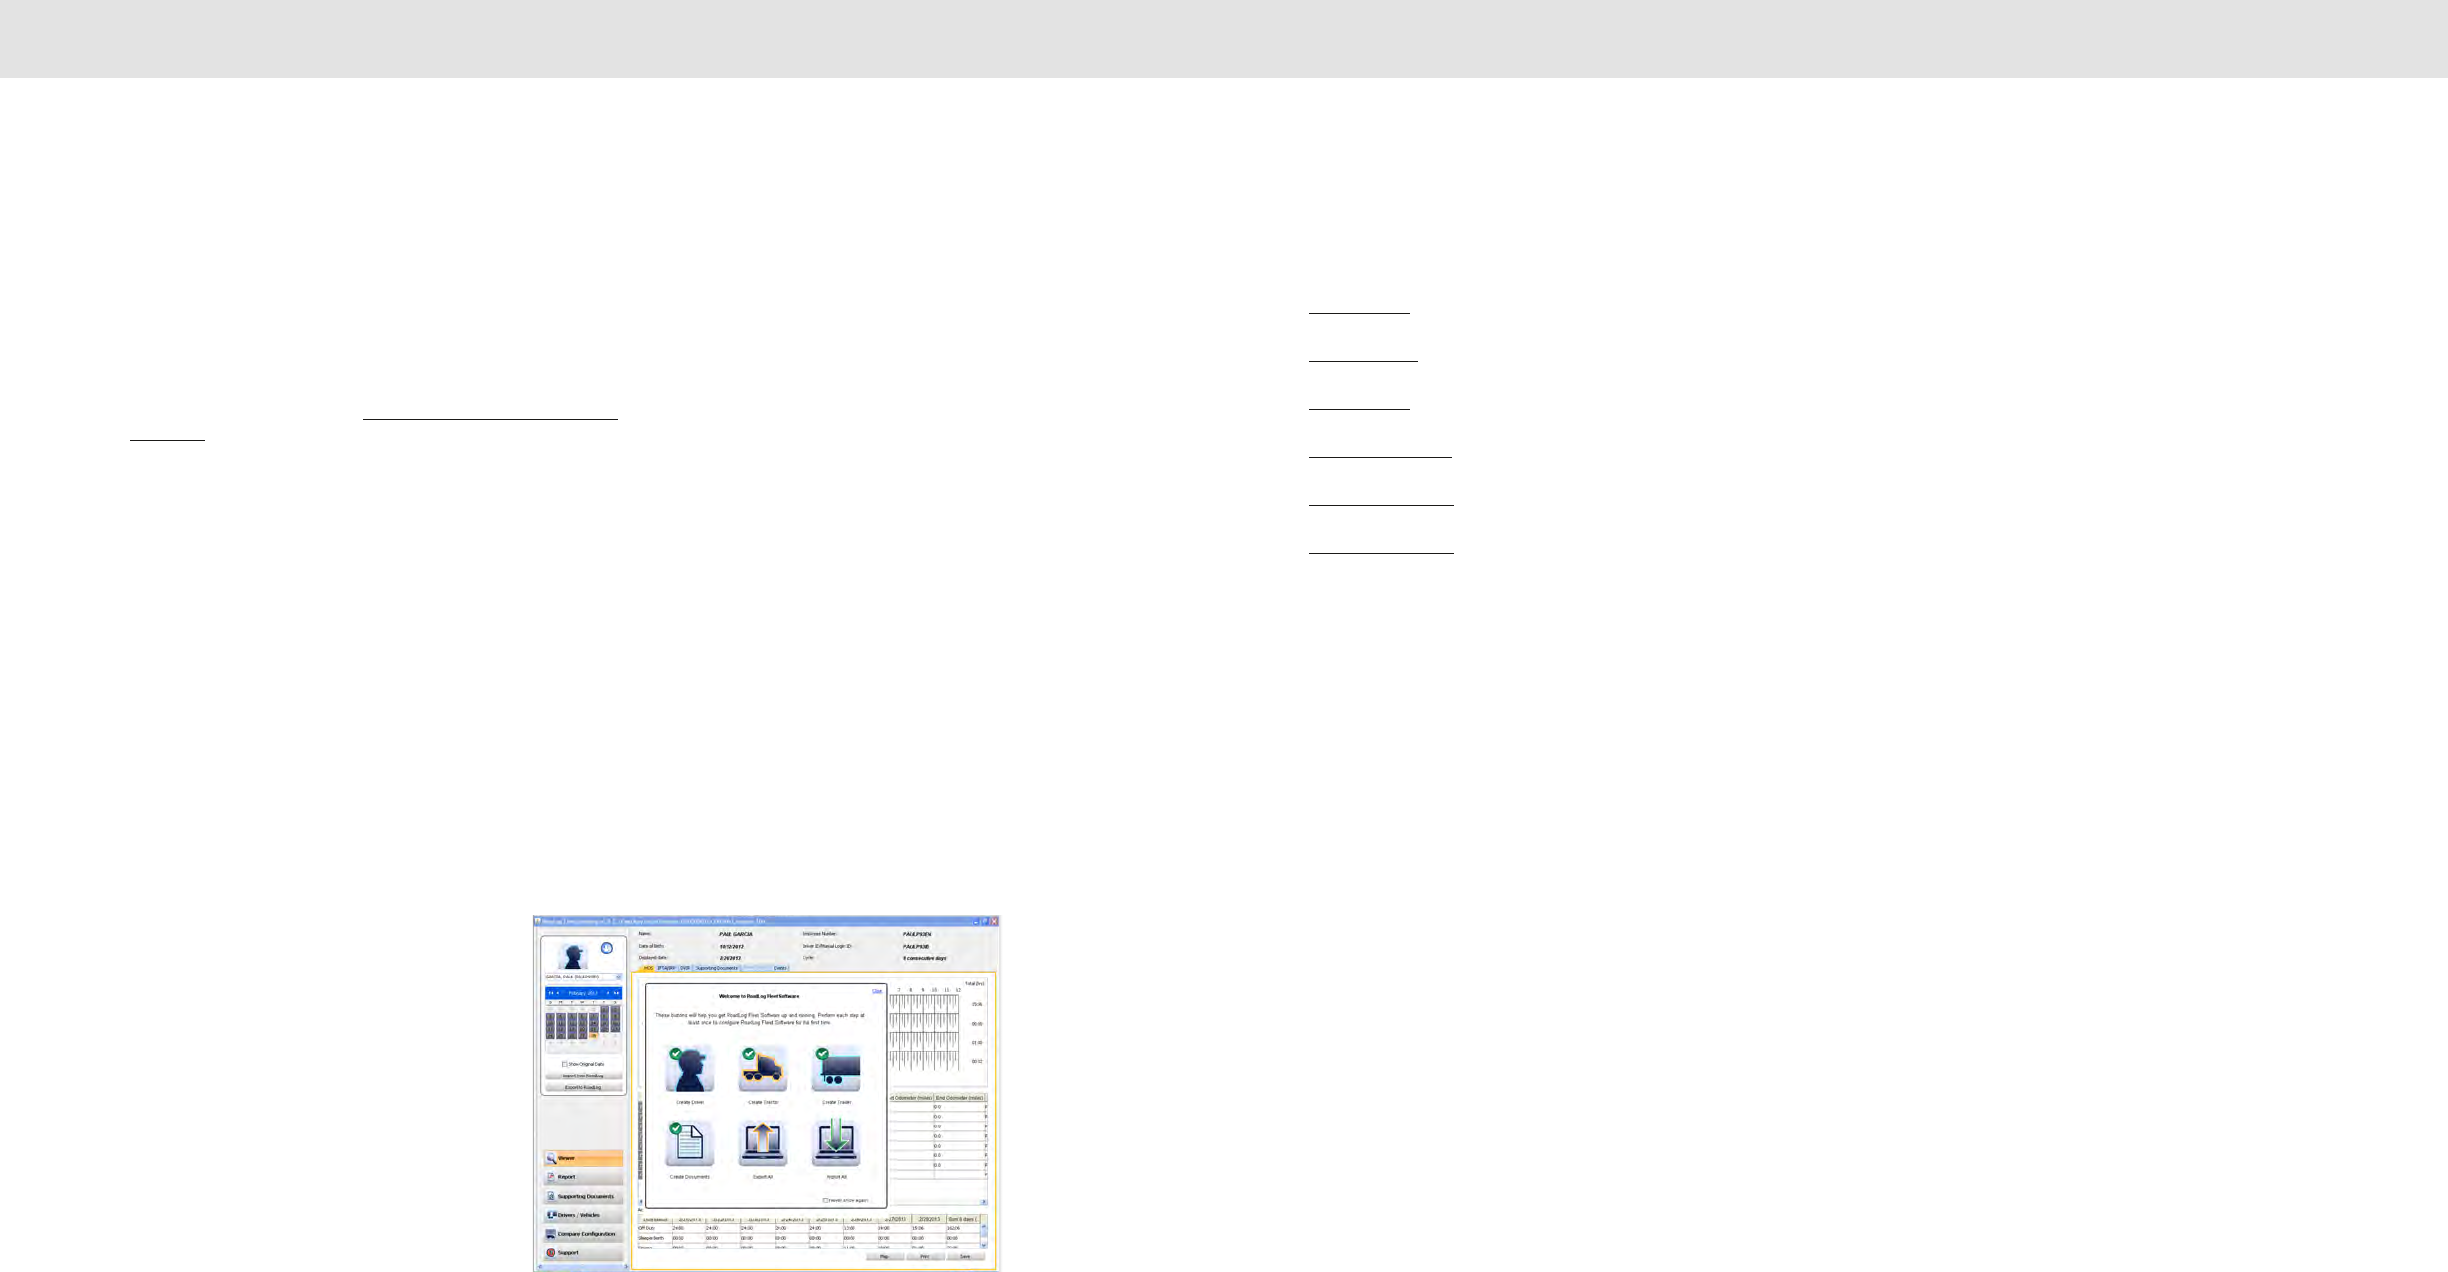
When the Fleet Management Software starts up and the Fleet Key is
authenticated, you’ll see the Quick Start Screen. The Quick Start Screen
provides shortcuts to create Drivers, Tractors, Trailers and Supporting
Documents, as well as import and export data.
Instructions on how to perform each of these steps are
featured below.
Create Driver
Create Tractor
Create Trailer
Create Documents
Import to RoadLog
Export to RoadLog
Important note: It is recommended to read the instructions prior
to using this software. However, some users may choose to create
these entries before reading this manual completely. If you are
going to immediately create entries, please read “Backing Up Your
RoadLog Data” and follow the guidance there to ensure that the
results of your work are secure.
Activating your Fleet Key
through the RoadLog Portal
If your computer is not able to connect to the Internet and the RoadLog
Portal, the Fleet Management Software will not be able to download the
.CID file needed to activate your Fleet Key.
If this is the case, you must use a computer that can connect to the
RoadLog Portal and use the Portal to manually register your company
and activate your Fleet Key. You will also need an email account that you
can access from the Internet-connected computer.
To perform a manual registration and .CID file download:
• Insert the Fleet Key into a USB port on the Internet-connected PC.
• Using the PC’s Internet browser, go to the RoadLog User Portal at
www.vdoroadlog.com/user and click on “Register.”
• Enter your company information in the fields shown. You’ll need to
know your company data, including your US Department of
Transportation (DOT) number and the serial number of the Fleet Key.
This serial number is available on the package of the Fleet Key and
in the file KEY_DATA.txt on the root directory of the Fleet Key.
Once you enter your registration information, an email with a
download link will be sent to the email address that you registered
with. Click on the link to begin the download. Save the download
as a file in your Documents folder. The downloaded file, with the
extension .CID, is your Company ID registration file.
• Copy this file to your Fleet Key’s “Company” folder. You can now
use your Fleet Key to launch the Fleet Management Software as
described above in Software Installation.
1312
Getting Started Navigating RoadLog Fleet Management Software: First Look
Note: The .CID file is unique to your Fleet Key. It will not work with other Fleet
Keys or with generic USB flash drives. The activated Fleet Key must be
plugged into a USB port on the computer for the Fleet Management Software
to run.
Adding additional Fleet Keys
You may wish to have more than one Fleet Key for your company. Additional Fleet
Keys can be purchased from VDO RoadLog retailers or by contacting RoadLog
Customer Support:
Customer Support
Email: roadlog-support@vdo.com
Tel.: (855) ROADLOG, or (855) 762-3564
Fax: (800) 752-7224 or (610) 366-9837
Customer service is available 8:00 am – 5:00 pm EST
IMPORTANT: All additional Fleet Keys purchased for your company must be
activated using the same US DOT number and company address as the
original Fleet Key, or the new Fleet Key cannot be used with your original
company file.
3. Navigating RoadLog Fleet
Management Software:
First Look
The RoadLog Fleet Management Software four main elements:
The Quick Start Screen:
This floating layer is seen at the first start up and it is designed to help
you through your initial software configuration and to enable easy access
to common tasks at start up. The Quick Start Screen includes buttons
that allow you to quickly create Drivers, Tractors, Trailers, and Supporting
Documents, as well as to import data from your RoadLog device and
export data to RoadLog.
Note: If you don’t want the Quick Start Screen to appear at start
up, check the box “Don’t show again” in the Screen.
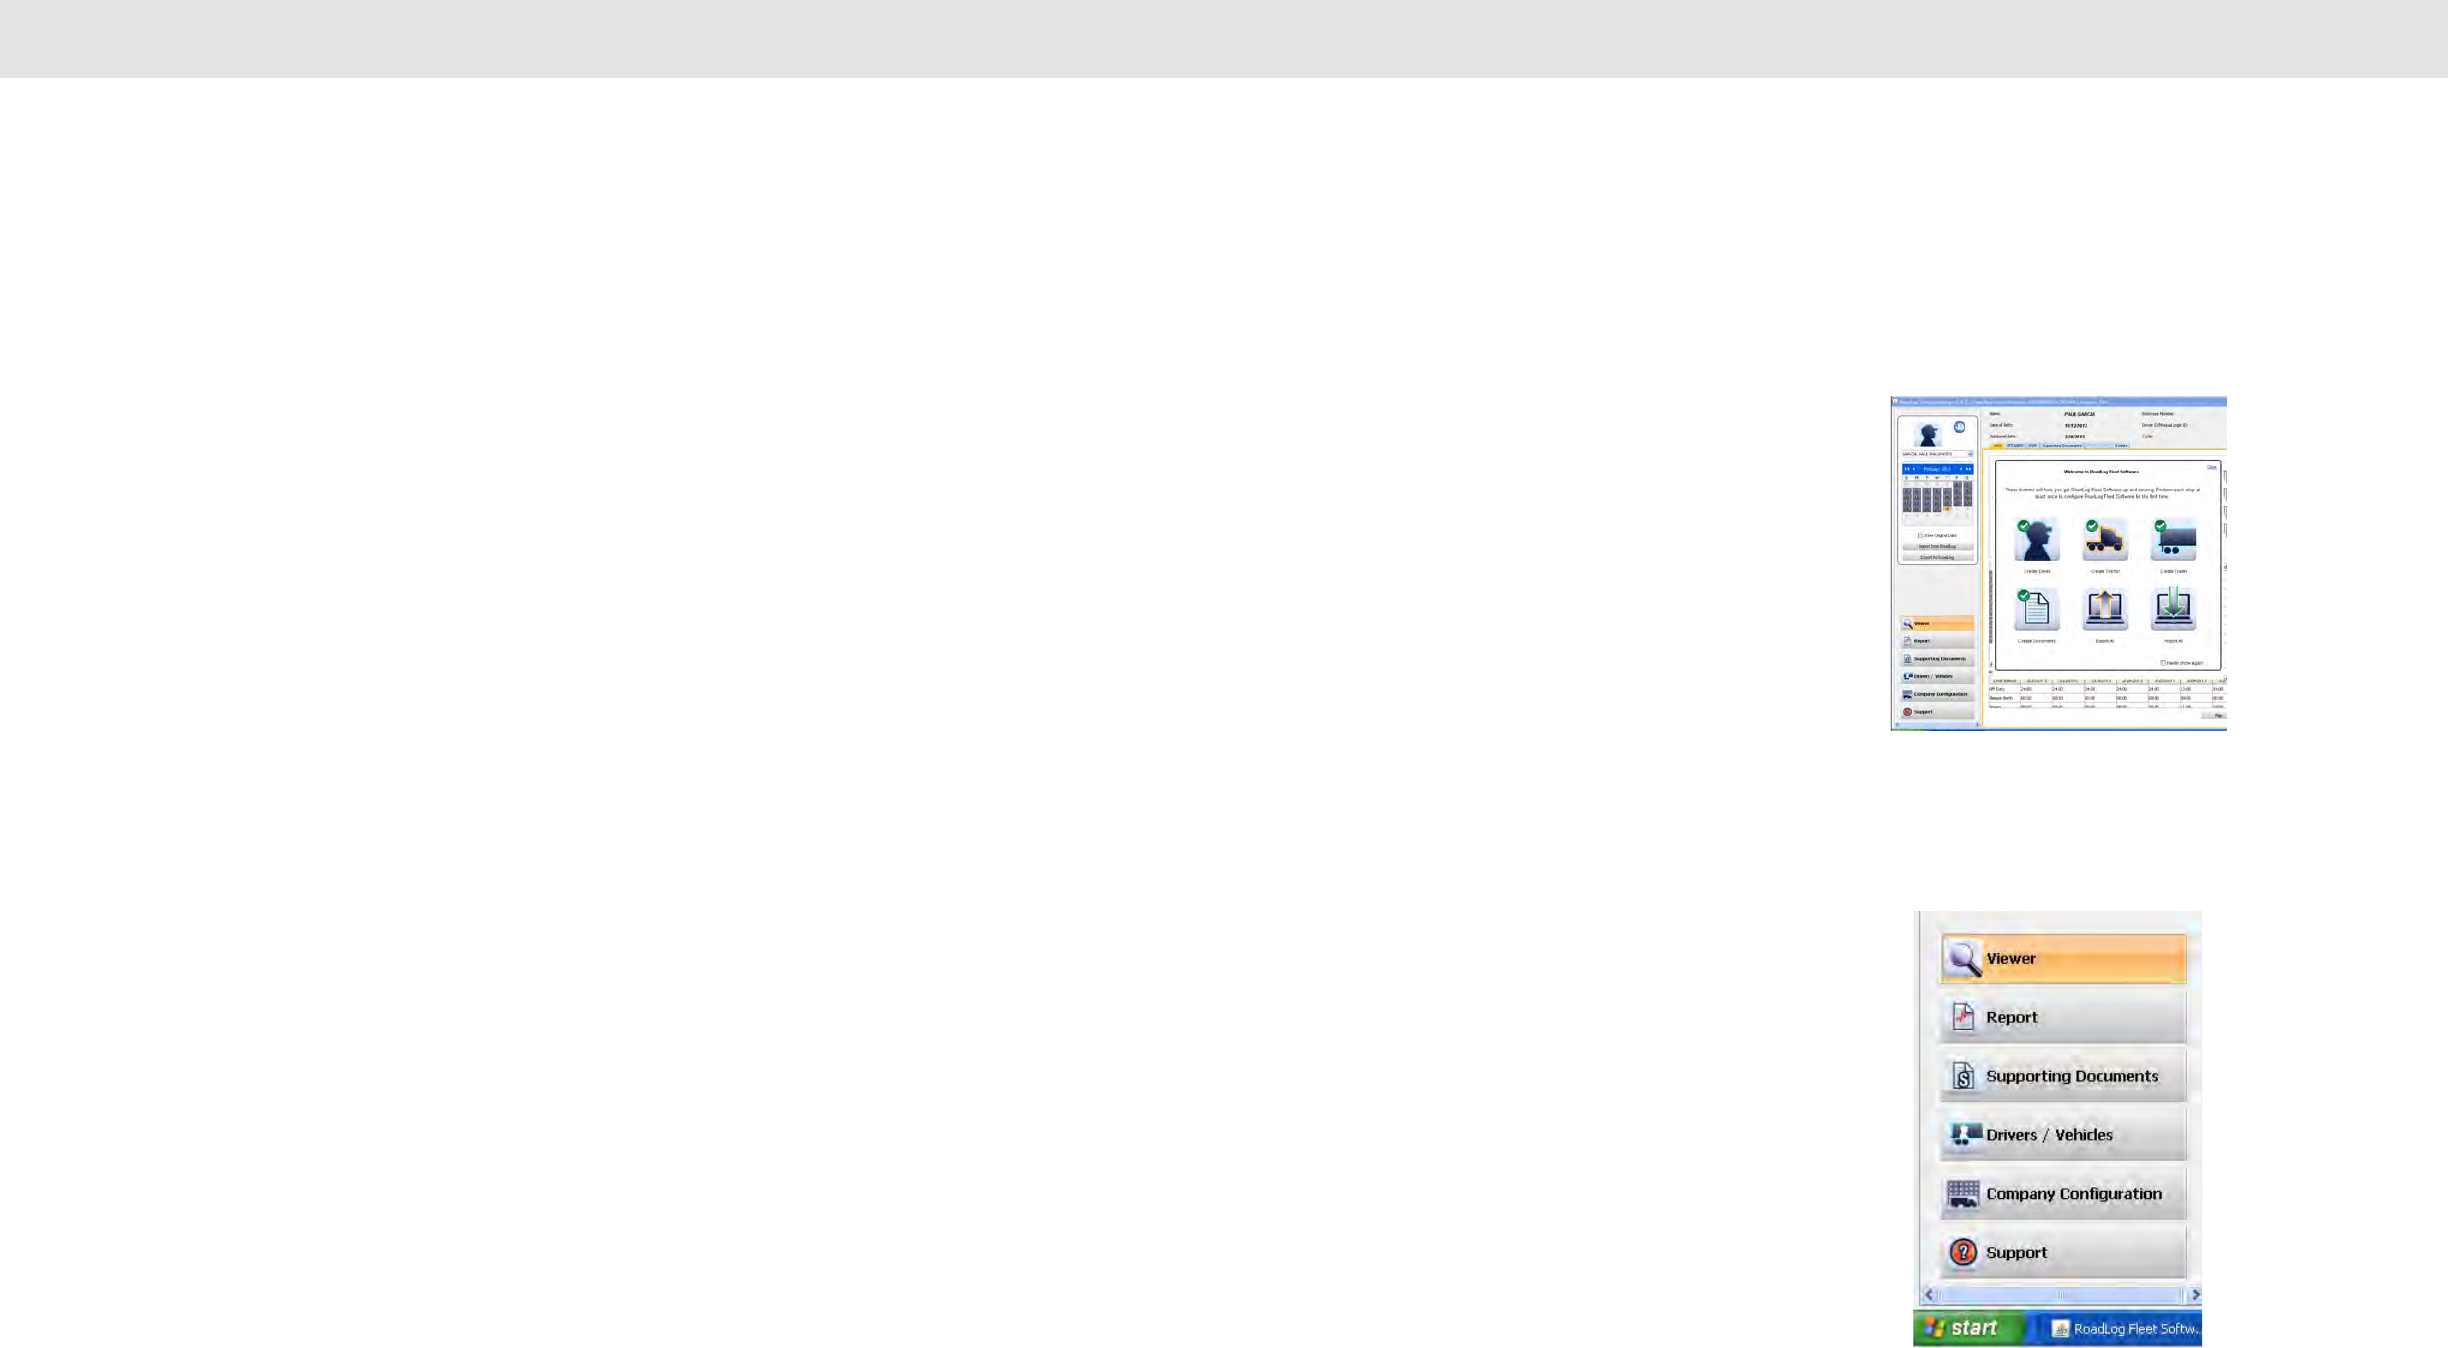
The Navigation Buttons:
Seen at the lower left, the Navigation Buttons select among the various
screens designed for different activities. The Navigation Buttons include:
Viewer: For viewing tabs that show Driver logs and records
associated with their activities.
Report: For viewing various reports reflecting the status of Drivers,
Vehicles and IRP information.
Supporting Documents: For viewing Supporting Documents,
which are records created by the Driver to document activities
during trips such as meals, fueling and vehicle maintenance.
Drivers / Vehicles: For creating and viewing Driver profiles and
assignments of tractors and shipments made to each Driver.
Company Configuration: For creating and viewing the company
profile as well as creating Shipping Documents, Supporting
Document Categories, frequently used Annotations, pre-
established Fuel Vendors and Fuel Types, and Asset Part Names.
In addition, the Company Configuration screen includes the
Application tab for configuring the VDO Fleet Management
Software user preferences.
1514
Navigating RoadLog Fleet Management Software: First Look Navigating work area Screens and Tabs
The Action Palettes:
Seen at the upper left, the Action Palette provides access to
the frequently used actions. The options shown in the Action
Palette change, depending on which Navigation button is
active.
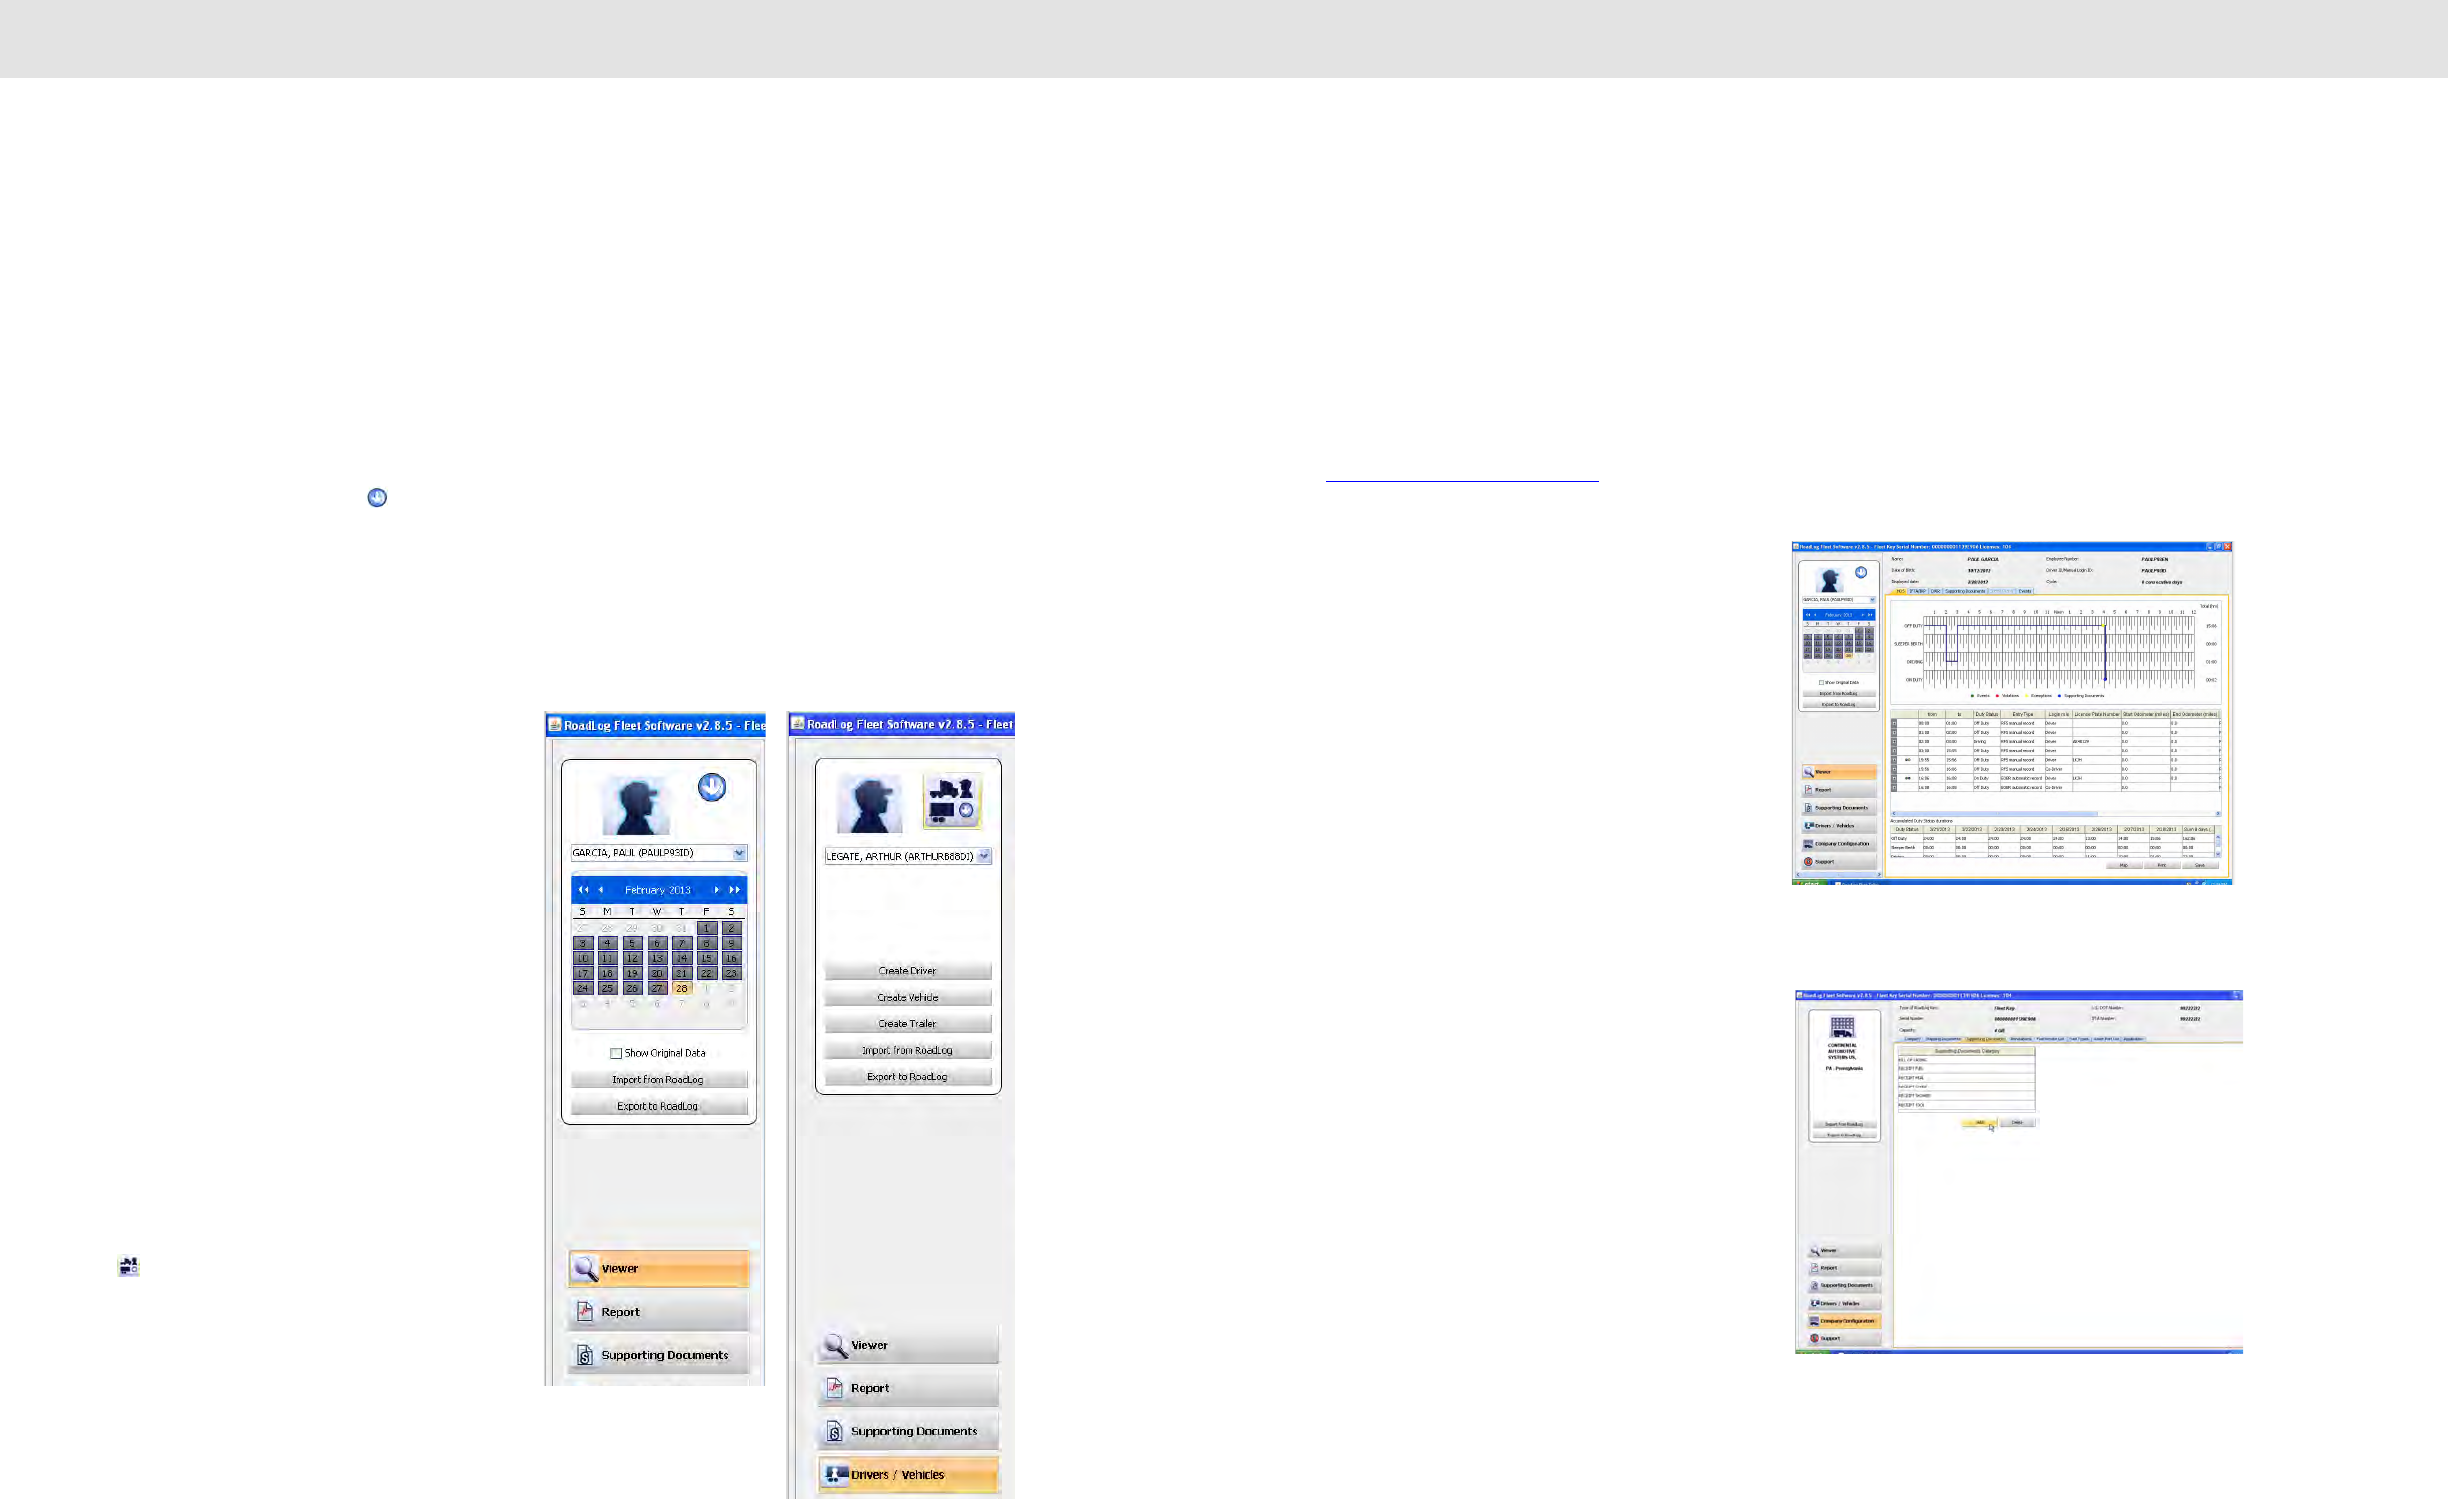
Viewer Action Palette:
When the Viewer Navigation Button is active, the Action
Palette shows the interactive calendar used to select dates
you’ll view and buttons to import or export data from or to a
RoadLog Fleet Key or Driver Key. The icon at the top of
the Action Palette toggles to reveal the list of all Drivers that
have been created for the company. You may also select the
Driver or vehicle from the drop-down menu. The “Show
Original Data” check box will cause the HOS tab screen to
show original data automatically recorded by the RoadLog
device rather than data that was manually edited by a
RoadLog Fleet Management Software user.
Report Action Palette:
When the Report Navigation Button is active, the Action
Palette is inactive and shows only the Company icon. You
may use the default Company Icon, or if you wish, you can
change the Company icon to an image of your choosing,
such as your logo, by clicking on it.
Supporting Documents Action Palette:
When the Supporting Documents Navigation Button is
active, the Action Palette shows timeline selectors that
define the time period from which you will see recorded
Supporting Documents. The “Display only new entries”
checkbox will cause the software to display only newly
recorded entries.
Drivers / Vehicles Action Palette:
When the Drivers / Vehicles Navigation Button is active, the
Action Palette shows buttons to create Drivers, vehicles
and trailers as well as buttons to import or export data from
or to a RoadLog Fleet Key or Driver Key.
The icon at the top of the Action Palette toggles to
reveal the list of all Drivers that have been created for the
company.
Company Configuration Action Palette:
When the Company Configuration Navigation Button is
active, the Action palette shows buttons to import or export
data from or to a RoadLog Fleet Key or Driver Key.
Support Action Palette:
When the Support Navigation Button is active, the Action
Palette is inactive, and shows only the Company icon.
The Work Area:
The Work Area displays the tabbed screens and fields you’ll
work in. The screens seen here change according to which
of the Navigation Buttons is active and which tab you’ve
clicked on.
Note: As with the Company icon mentioned above,
you can change the icons for Driver, Trailer or Vehicle,
to images of your choosing. Create your icon at 75 x
75 pixels. Click on the icon you wish to replace and
choose your icon from the dialog box that appears.
4. Navigating work area
Screens and Tabs
The easiest way to understand the Fleet Software’s capabilities
is to review the screens and their tabs’ functions. An overview
of the functions of each section is described below; a detailed
explanation of how to work in the screen and tabs is provided
in Screens & Tabs: Features & Functions.
Viewer Screen
HOS Tab:
• View, edit and print Driver HOS data in logbook, tabular
and map form.
• View start/end times for Events, Violations, Exemptions
and Supporting Documents.
• View and edit accumulated times for each Duty Status
recorded; Off Duty, Sleeper Berth, Driving and On Duty
IFTA/IRP Tab:
• [This feature will be implemented in a free
upcoming release]
DVIR Tab:
• View and annotate DVIR records created by the Driver.
Supporting Documents Tab:
• View Supporting Documents records such as fuel and
meal receipts.
• Manually create new Supporting Documents.
• Add scanned documents to the Supporting Documents
records.
1716
Navigating work area Screens and Tabs Navigating work area Screens and Tabs
Speed Graph Tab:
• [This feature will be implemented in a free
upcoming release]
Events Tab:
• View a complete list of all events recorded
automatically by RoadLog, including vehicle status
changes and Driver actions.
Report Screen
Create, view, save and print reports for:
• DVIR status.
• HOS download reminders.
• IRP driven miles [This feature will be implemented in
a free upcoming release].
• IRP vehicles list. [This feature will be implemented in
a free upcoming release].
• Vehicle trips.
Supporting Documents Screen
• View Supporting Documents records such as fuel
and meal receipts.
• Add scanned documents to the Supporting
Documents records.
Drivers / Vehicles
Driver Profile Tab:
• Create RoadLog identities for Drivers.
• Choose from existing profiles for Drivers and vehicles
(using the icon in the actions palette).
Trailer Assignments Tab:
• Assign trailers to the currently selected Driver.
• Un-assign trailers from the currently selected Driver.
Shipping Assignments Tab:
• Assign Shipping Documents to the currently selected
Driver.
• Un-assign Shipping Documents from the currently
selected Driver.
1918
Navigating work area Screens and Tabs Navigating work area Screens and Tabs
Company Configuration Screen
Company Tab:
• Enter and maintain Company and IRP data as well as
time zone settings and download warnings.
Shipping Documents Tab:
• Create new Shipping Document numbers for use in
making Shipping Assignments to Drivers.
Supporting Documents Tab:
• Create a list of predefined Supporting Document types,
such as “Receipt Fuel” and “Receipt Meal,” to allow
Drivers easy and consistent creation of Supporting
Documents.
Annotations Tab:
• Create a list of predefined annotations such as
“Waiting while loading.”
Fuel Vendor List Tab:
• Create a predefined list of fuel vendors and fueling
types such as “Normal refueling” or “Bulk refueling.”
Fuel Types Tab:
• Create a predefined list of fuel types such as “Gasoline”
or “Diesel” for use in creating reports on fueling events.
2120
Navigating work area Screens and Tabs Creating and working with Driver Keys
Asset Part List Tab:
• Create a predefined list of Part Names and associated
Part Codes to be used in creating DVIRs for tractors and
trailers.
• Create a predefined list of Types of Defects associated
with each Part Name and assign each Type of Defect
with a priority level and Defect Code, both for use in
creating DVIRs.
Application Tab:
• Set the language to be used.
• Set the file types that can be used for Supporting
Document scans.
• Set the maximum file size for Supporting Document
scans.
• Set whether or not the Quick Start Screen will appear at
start up.
• Set the region whose regulations will be used to
calculate HOS compliance.
• Check box to show Sold Tractors / Terminated Drivers.
• Set the distance, volume and speed units that will be
used.
• Set the location where backup files will be stored and
the number of days before a backup warning is given to
the user.
• Check box to select whether Automatic Backup will be
performed or not.
Support
• Check for updates to the RoadLog software.
• Check for updates to the RoadLog Fleet Management
Software.
• Start Remote Control (FastViewer), allowing RoadLog
support personnel to diagnose problems and answer
questions.
• Collect and open software diagnostic data for evaluation
by RoadLog support personnel.
• Enter license extension activations to enable
management of additional vehicles.
• View RoadLog legal notices.
• Purge operational data that is older than the required
time period.
5. Creating and working
with Driver Keys
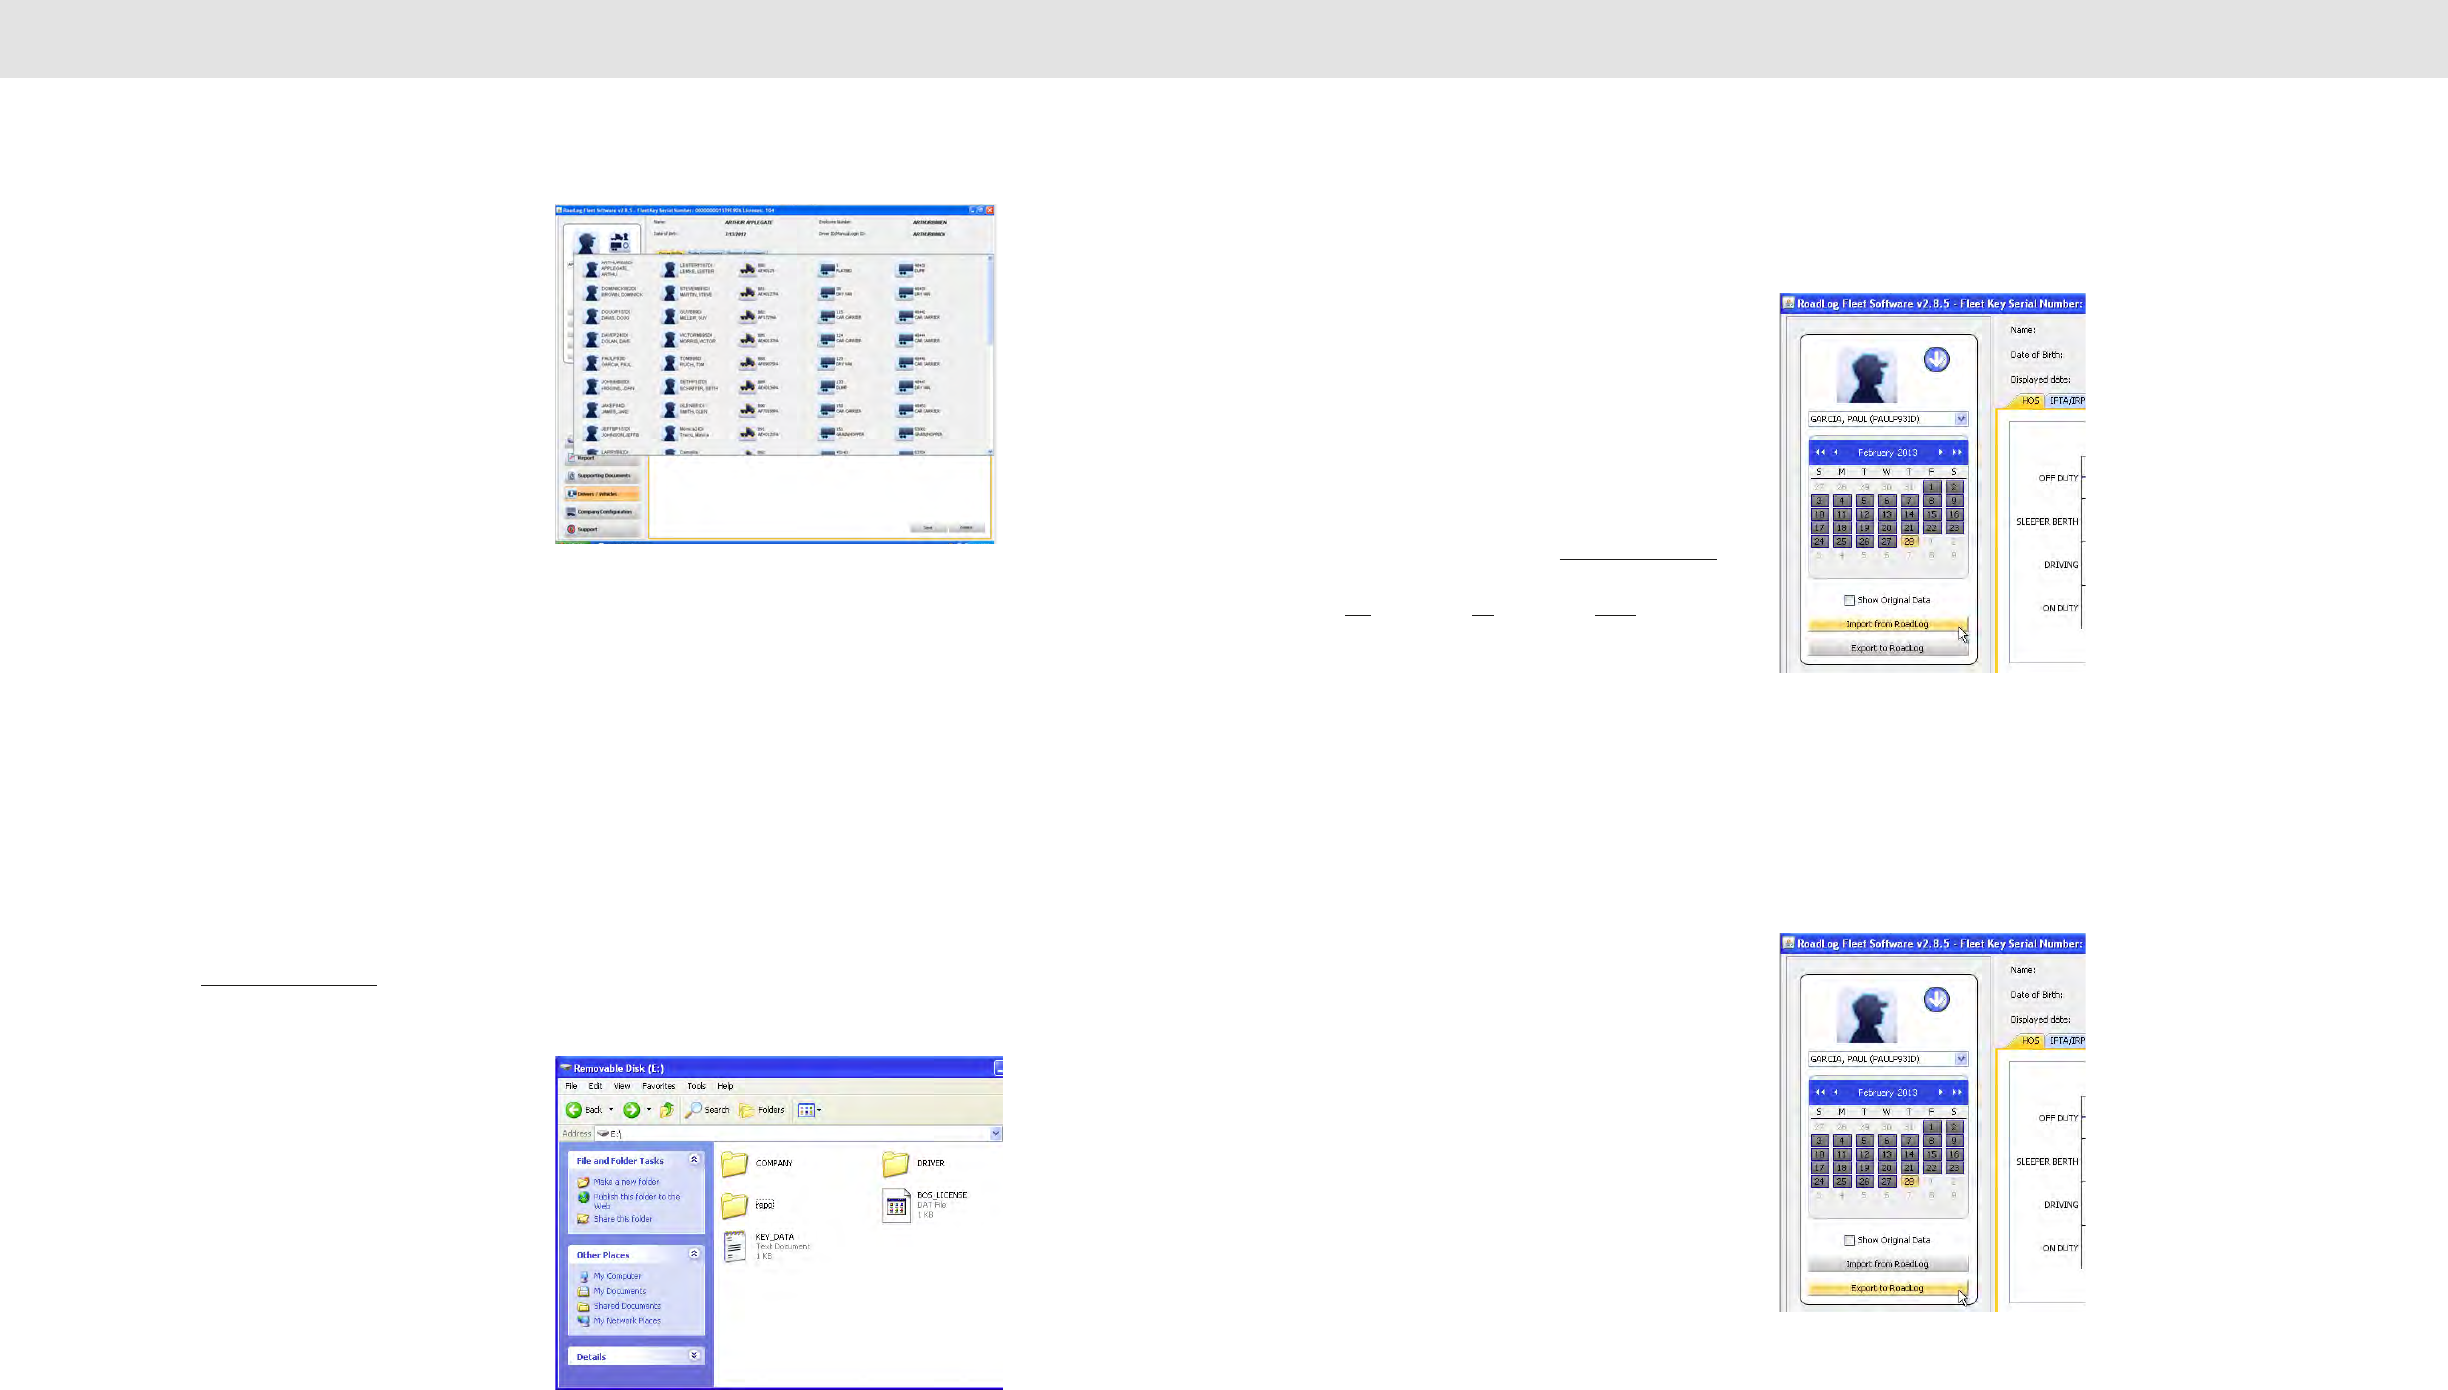
Creating Drivers
To use RoadLog, each Driver must have a profile in the Fleet
Management Software and must have a personal Driver Key activated
with that profile.
The RoadLog Driver Key is a proprietary USB drive that allows Drivers to
log in to RoadLog and download and transfer their records to the Fleet
Management Software or transfer their data between multiple vehicles
equipped with RoadLog devices.
The Driver Key can also be used to transfer software updates to the
RoadLog device.
Creating a Driver Profile
• To create a Driver profile, click on the Drivers/Vehicles
button in the main navigation.
• Click on Create Driver from the Action Palette.
• Enter the data for the Driver – fields outlined in orange are
mandatory and must be completed.
• The Driver Key serial number (S/N) can be found on the
Driver Key package, or it can be read from the key_data.txt
file on the Driver Key. Enter the serial number exactly as it
appears, including all zeros.
• If you wish to enter the optional Latitude and Longitude
information for the “Work Reporting Location” can be found
using free websites such as http://itouchmap.com
• The Last 15 days RODS file name is set automatically for the file that
contains the most recent RODS data for the selected Driver.
• When data has been entered, click Save. The Driver’s profile is now
part of the Fleet Management Software data.
After the Driver’s profile has been created in the Fleet Management
Software, the profile must be transferred to a Driver Key to activate the
Key.
Activating a Driver Key
• Insert the Driver Key you want to activate into an open USB port.
• Click the Drivers/Vehicles button in the main naviagtion.
• From the Action Palette click Export to RoadLog.
• A popup for selecting the Key appears. Select the drive icon for the
Driver Key you wish to activate.
2322
Creating and working with Driver Keys Transferring data
• Click the Driver icon in the Action palette, and select
the Driver you wish to assign to the Key from the drop
down box that appears.
Note: Only Drivers for whom a serial number is not
already assigned will appear on the drop-down list of
Drivers.
Once the Driver’s profile data and relevant company
information has been downloaded to the Driver Key, that
Driver can now automatically log in to the RoadLog device
by inserting the Key. When the Driver changes vehicles
within a working day or within a working week, the data is
transferred from one vehicle to another and it is recognized
by each RoadLog device installed in those vehicles at log in
and log out. When the Driver’s workday is complete,
updated records can be downloaded to the Driver Key for
transfer to the Fleet Management Software.
Note: The Fleet Key can also double as a Driver Key
for one Driver. To use the Fleet Key as a Driver Key,
insert the Fleet Key and follow the steps listed above
for activating a Driver Key.
Note: If there are two usable Keys available to the
computer when you chose Export to RoadLog, you
will be asked to choose which Key is the one you
wish to activate.
For complete instructions on downloading data from the
device, see the RoadLog User Manual.
Reassigning a Driver Key
A Driver Key can be reassigned to a new Driver by deleting
the Driver’s data from they key, deleting the Key’s Serial
Number from the profile of the old Driver and assigning the
Key’s Serial Number to the new Driver.
WARNING!!! DO NOT DELETE the BOS_
LICENSE.dat file or the driver folder as this will
turn RoadLog Driver Key into a plain USB flash
drive, and you will not be able to use it as a
RoadLog Driver Key.
6. Transferring data
Uploading Driver data to the
Fleet Management Software
At the end of the workday, Drivers will download their data
from RoadLog to their Driver Key. Once Drivers download
their data from RoadLog to the Driver Key, the data can be
entered into the Fleet Management Software:
• Insert the Driver Key into the PC’s USB port.
• Select Drivers / Vehicles from the main navigation.
• From the Action palette click Import From Roadlog.
• Select the key from which you wish to import. Click
Yes to import all, No to cancel, or Details to choose
specific files to import.
The RoadLog Fleet Software will detect when a new trailer,
not currently in the company data, is included in the data
being imported from the Driver Key. If a new trailer is
detected, a “Create Trailer” pop-up window will appear. Data
for the trailer must be entered and it will be saved along with
the data imported from the Driver Key.
When importing the files from the Fleet Key or
Driver Key the data are archived in the installation folder
(e.g. C:\Program Files\VDO\BOS\dist\Archive).
Exporting to RoadLog
In addition to downloading data from RoadLog to the Fleet
Management Software, there will also be data that must be
uploaded from the Fleet Management Software to RoadLog.
Examples include:
• When a Driver has been assigned a new trailer or
shipping document.
• When company configuration data has been updated.
• When a Driver’s records have been annotated in the
Fleet Manager Software.
To export data from the RoadLog
Fleet Management Software to RoadLog:
• Insert the Driver Key into the PC’s USB port.
• Select Drivers / Vehicles from the main navigation.
• From the Action Palette click on Export to RoadLog.
Company and Driver files are automatically downloaded
to the Driver Key.
Note: If there is more than one Key inserted, you will
be asked to choose the one you want to download to.
2524
Screens & Tabs: Features & Functions Screens & Tabs: Features & Functions
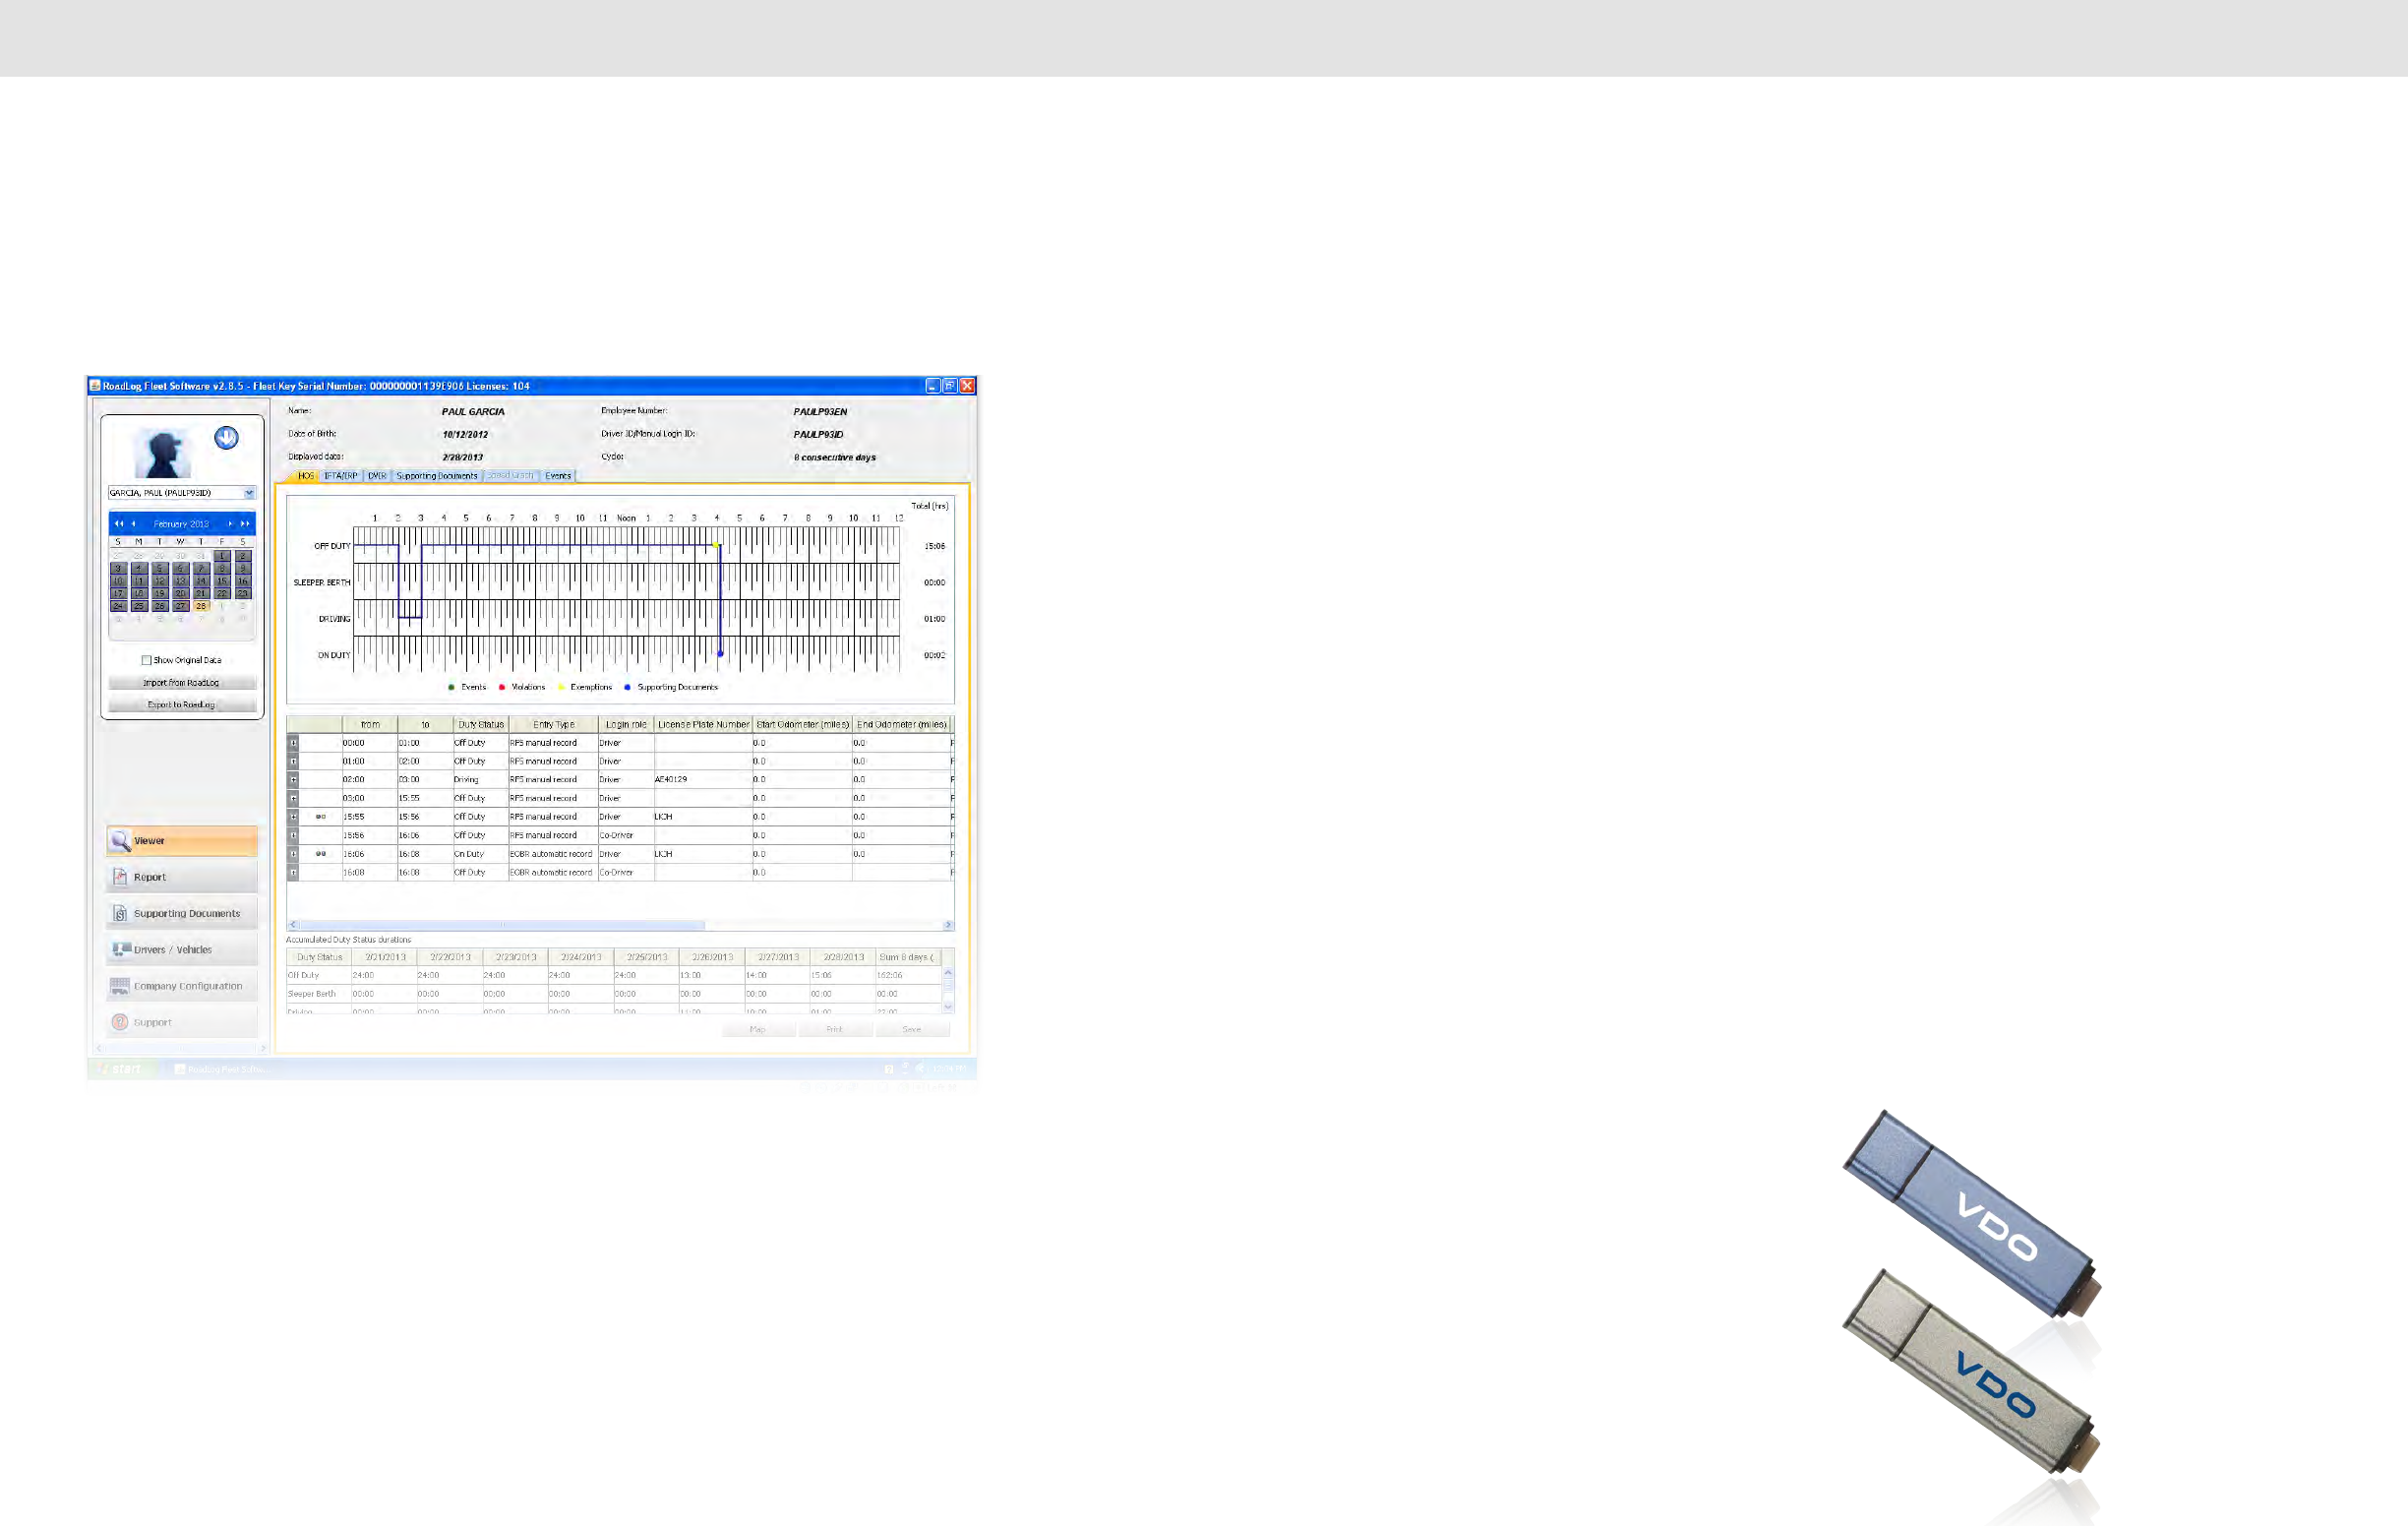
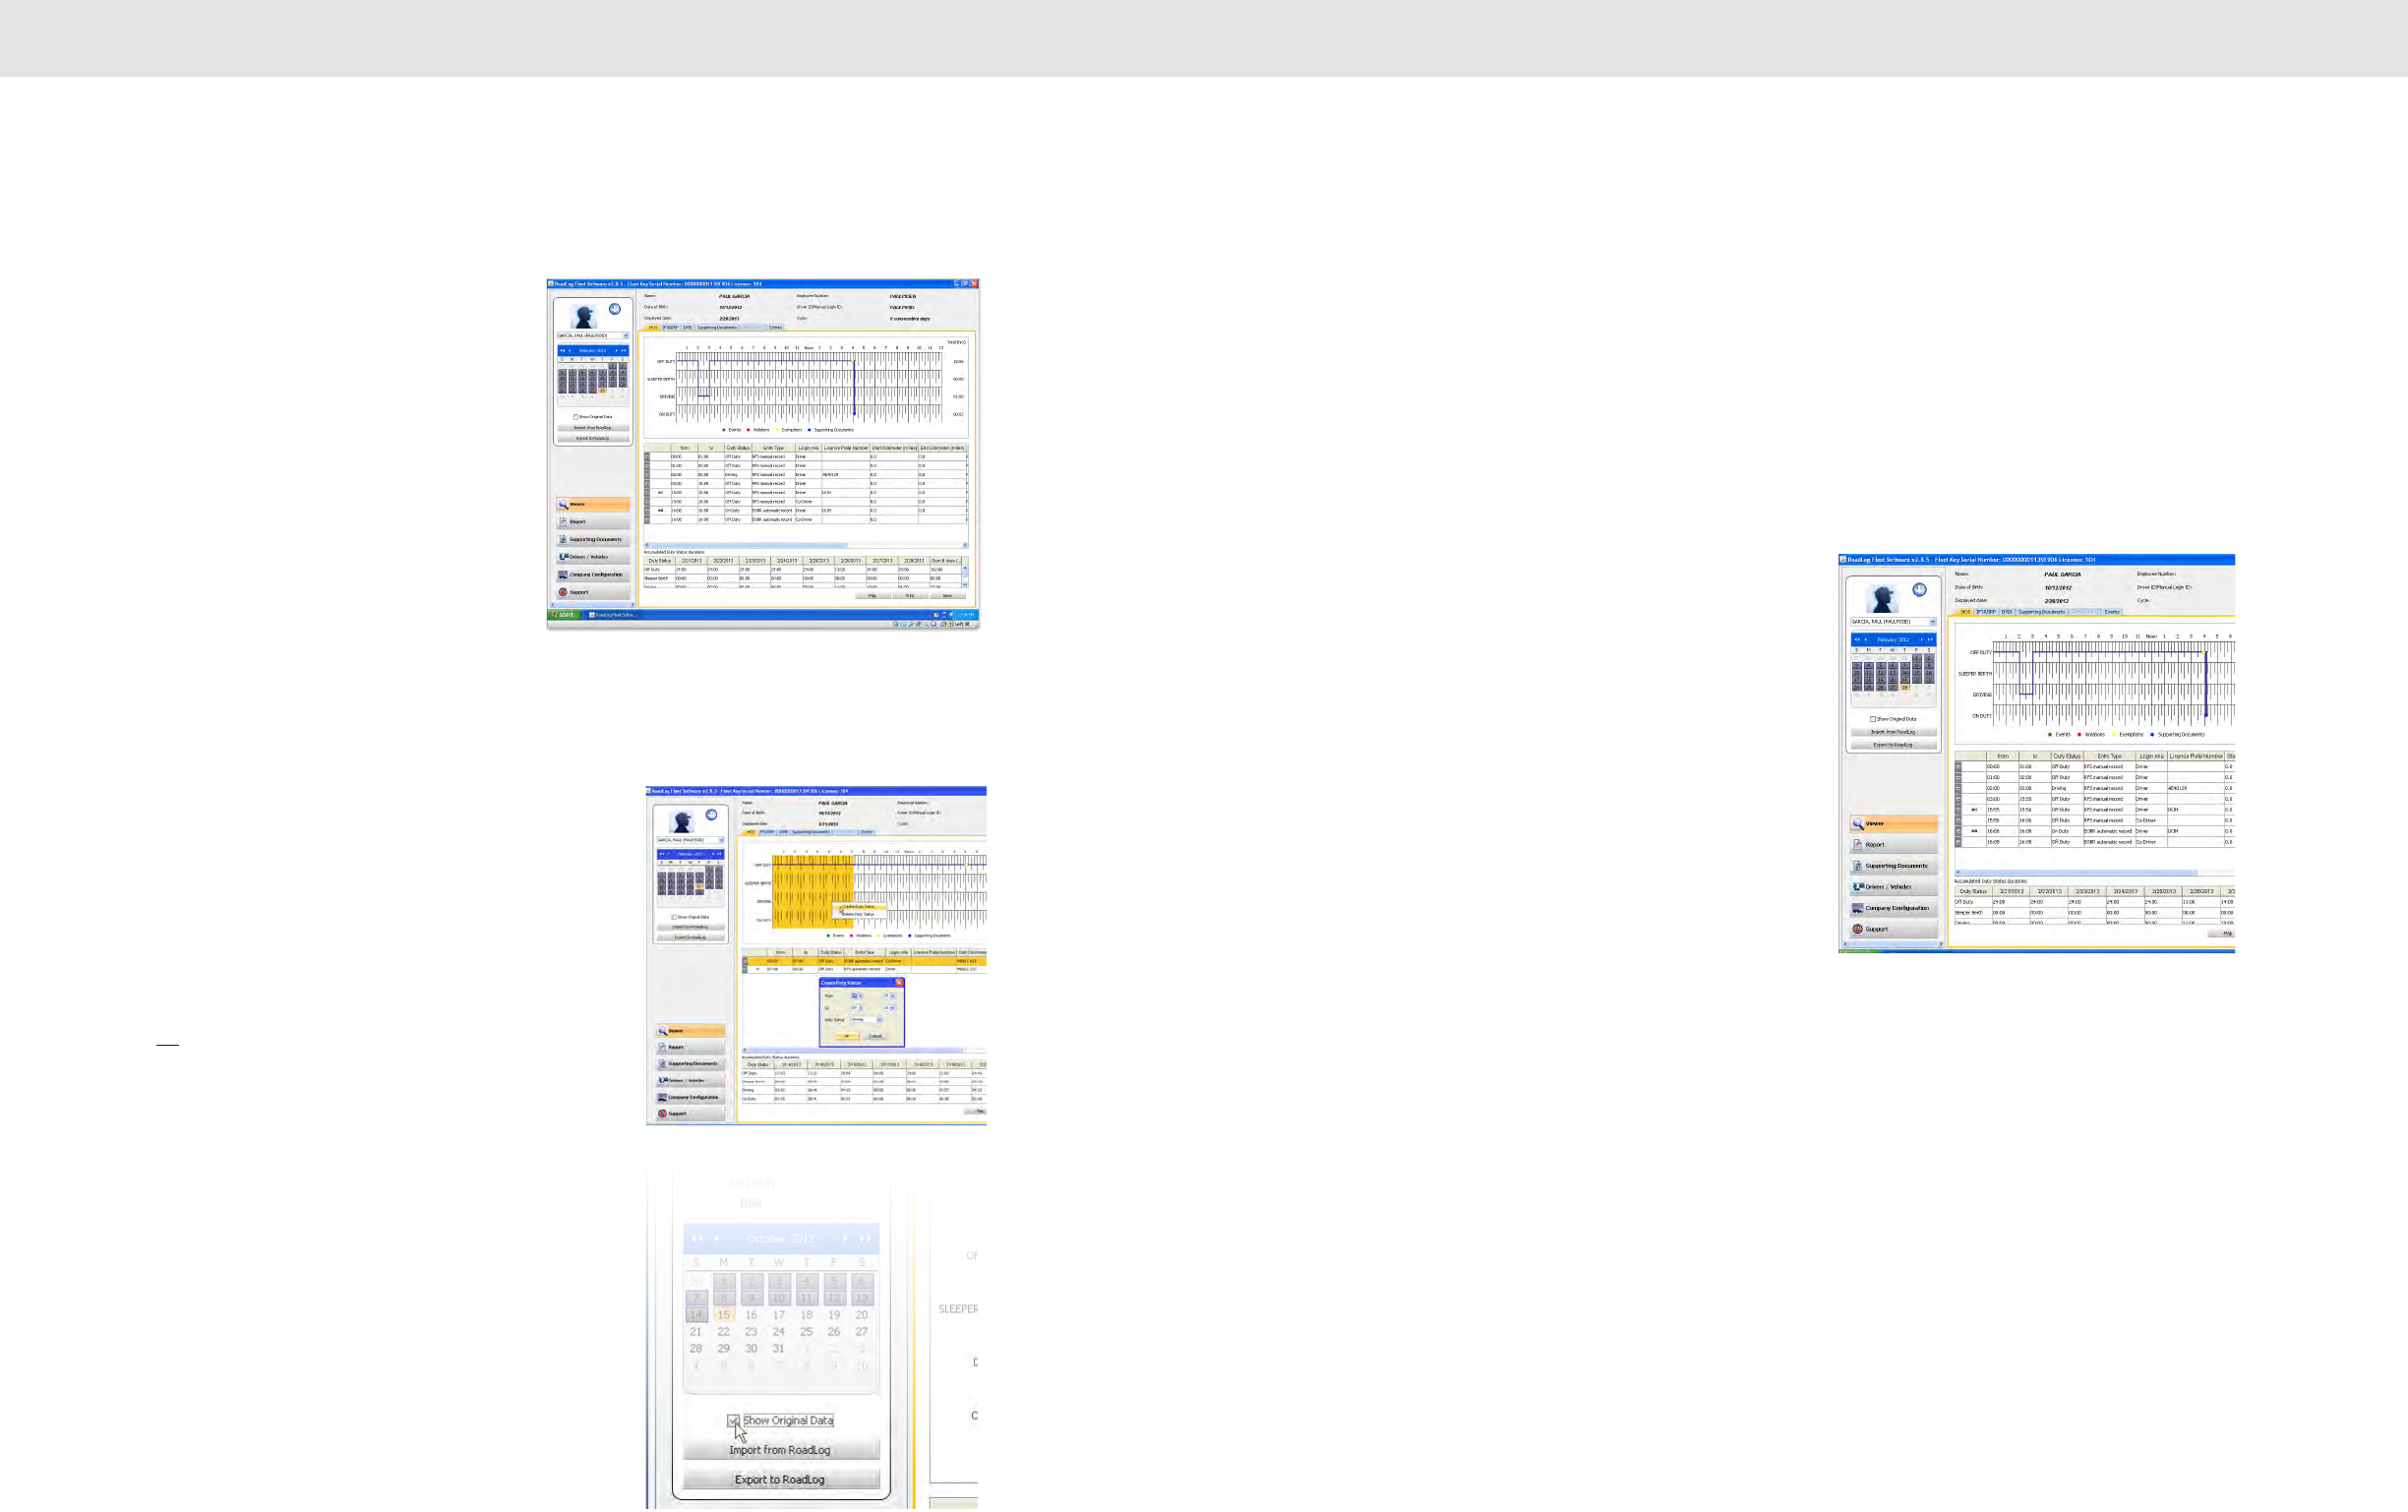
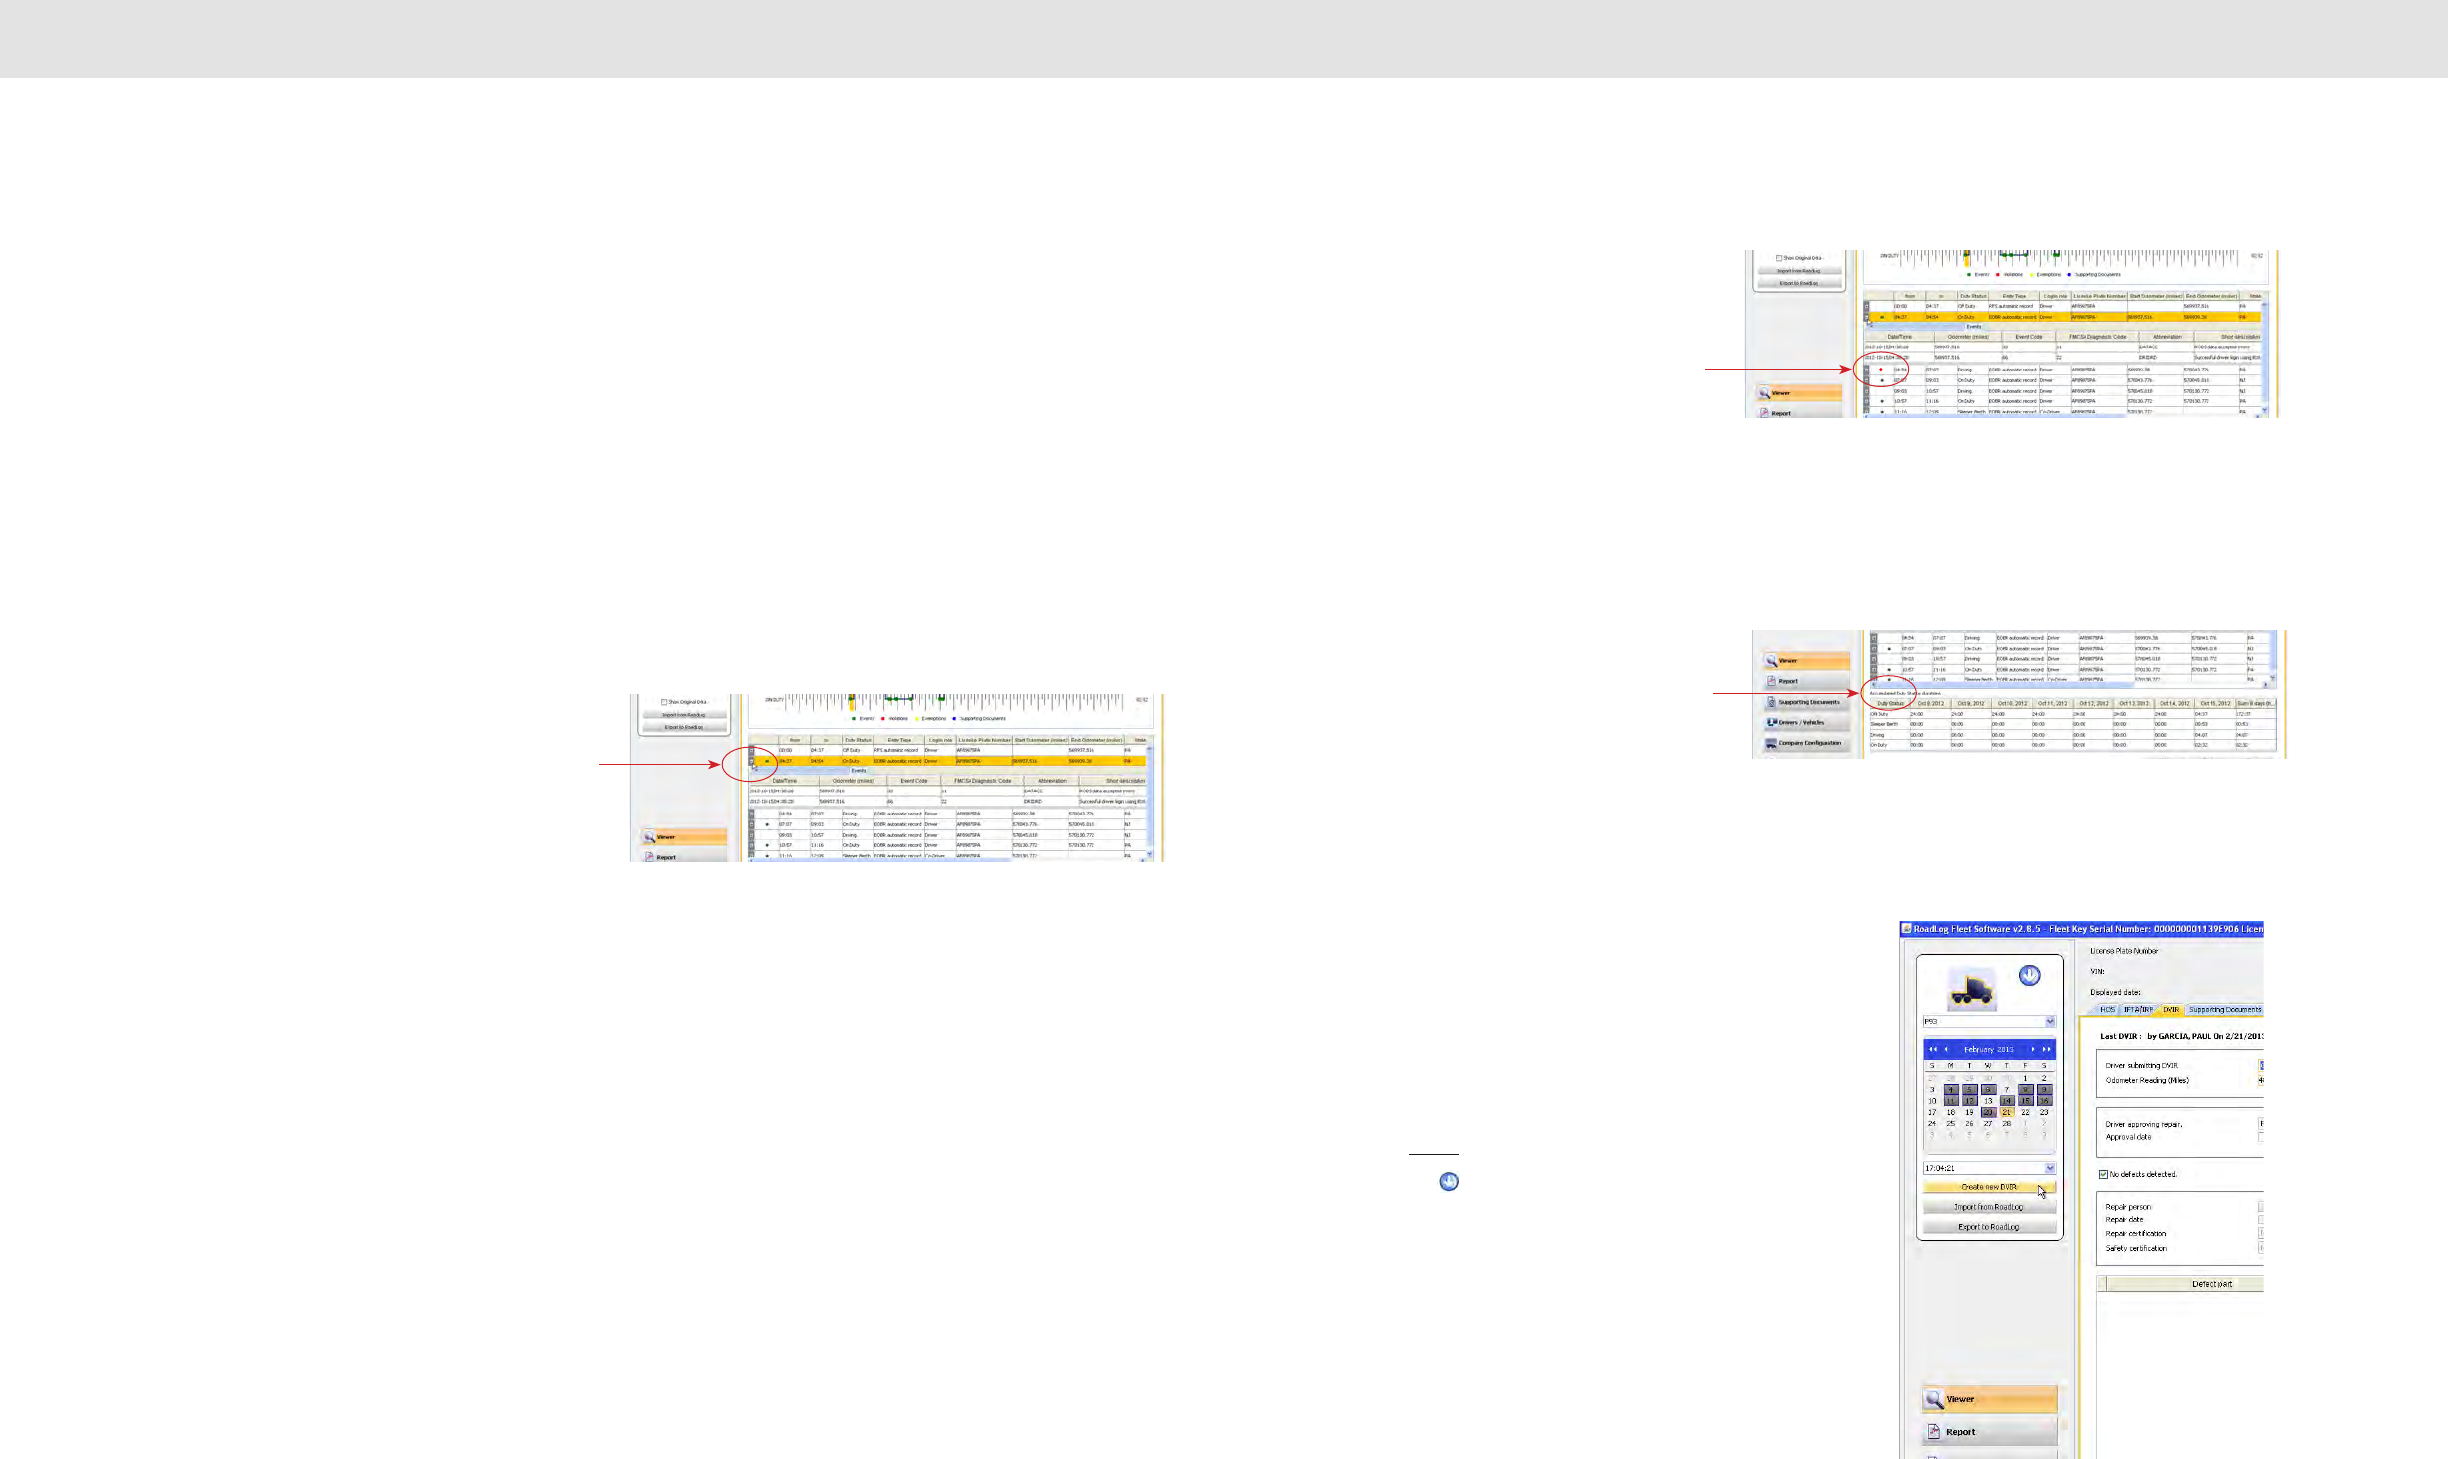
Events Grid
Below the logbook view, the events grid shows a record of the same
data seen in the logbook.
Annotating the Events Grid
Clicking on some cells in a segment row allow you to edit the value in the
cell, either by directly typing in a new value or by selecting a new value
from a drop-down menu. While the grid and logbook record displayed
will reflect the changes made, the Fleet Management Software will
annotate the data as having been changed and will retain the original
data as well as the revised data. To view the original, unchanged data,
click the “Show Original Data” checkbox in the Action Palette.
The data points in the Events Grid include (from left to right):
• Events: Colored dots that coincide with the dots seen on the
events timeline indicating Events (Green), Violations (Red),
Exemptions (Yellow), and Supporting Documents (Blue).
• From: Start time for the trip segment.
• To: End time for the trip segment.
• Duty Status: Duty Status indicated by the Driver during the
segment (Duty Status can be edited by clicking on the cell and
selecting another status from the pull-down menu).
• Entry Type: Indication of whether the recorded segment was
entered manually in the Fleet Management Software (RFS manual
record) or recorded automatically by RoadLog (RoadLog automatic
record).
• Login Role: Indication of whether the record was made under a
Driver or Co-Driver log in (Login Role can be edited by clicking on
the cell and selecting another status from the pull-down menu).
• VLPN: The Vehicle License Plate Number of the vehicle recorded for
the segment (the VLPN can be edited by clicking in the cell
choosing another VLPN from the pull-down menu).
• Start Odometer: The odometer reading at the beginning of the
segment.
• End Odometer: The odometer reading at the end of the segment.
Note: The odometer reading can be edited by clicking in the cell
and entering another value. However, the End Odometer reading
entered cannot be lower than the Start Odometer reading from the
previous cell.
7. Screens & Tabs: Features & Functions
Viewer Screen – HOS Tab
The HOS tab displays Driver information across the top of
the work area: name, employee number, date of birth,
Driver ID, the currently displayed date as selected in the
action palette calendar and the cycle chosen for the HOS
schedule.
Note: The Driver information seen here is entered and
maintained on the Driver Data Tab of the Master Data
screens.
In the work area, the Driver’s hours of service are shown in
several formats:
Logbook Timeline
The logbook timeline displays a running line of a Driver’s
Duty Status (On Duty, Driving, Sleeper Berth, Off Duty) and also shows
color-coded indicators for Events, Violations, Exemptions and Supporting
Documents associated with times recorded in the Driver’s log.
Annotating the logbook
The recorded record shown in the logbook timeline can be changed if
necessary. An example would be a period of time when the Driver
neglected to switch from On Duty to Off Duty.
• Click and drag on a segment of the timeline, to select it.
• Right-click on the selection to change (annotate) the status
recorded. A “Create Duty Status” pop-up appears.
• Enter the revised time span and status you wish to record and
click OK.
Note: Segments can only be selected for editing as they were
recorded. Therefore some edits will require you to individually
select and edit multiple adjacent segments to create one
continuous new segment. Segments can also be edited in the
events grid below the logbook view.
While the logbook record displayed will reflect the changes made, the
Fleet Management Software will annotate the data as having been
changed and will retain the original data as well as the revised data. To
view the original, unchanged data, click the “Show Original Data”
checkbox in the Action Palette.
Data can also been added manually when clicking on a calendar day. If
no data is available this message appears: “No HOS data for the Driver
available. To create HOS data please click here.” Clicking brings up a
pop-up where data can be entered. This can also be used to enter
activities recorded for the previous 15 days for a new Driver or when
starting up a new company record.
2726
Screens & Tabs: Features & Functions Screens & Tabs: Features & Functions
Note about Odometer readings: The RoadLog device is typically calibrated
to observe the odometer reading from the engine’s computer. The engine
computer’s odometer reading can vary significantly from the odometer reading
displayed on the dashboard. These conflicting odometer readings both come
from different message sources within the vehicle. Therefore, odometer
readings from this device may not match the odometer reading displayed on
the dashboard.
• State: The state traveled during the segment (the State can be edited by
clicking in the cell and choosing another state from the drop-down menu).
• Location: The nearest populated area to the area traveled during the segment.
• Distance to nearest populated location: Distance to the nearest populated
area as recorded by the US census.
• Bearing Data: Your current location relative to the closest most populated
place – for example, “7 miles West of Allentown, PA.”
• Description: Remarks recorded by the Driver regarding changes of duty status.
Additional Events Grid data
Clicking on some of the other cells in a segment row in the events
grid opens an additional grid view showing additional details for the
segment including:
Events
• Date/Time: Exact recording time for an Event.
• Odometer: ECM Odometer reading at the time of the event (may not match the
instrument cluster odometer).
• Event Code: Predefined codes for diagnostic events recorded by the RoadLog
device, including FMCSA type events and events related specifically to the
RoadLog device.
• FMSCA Diagnostic Code: FMCSA codes for events that are detected and
recorded in order to maintain compliance with US HOS regulation.
• Abbreviation: FMCSA abbreviations for events that are detected and recorded
in order to maintain compliance with US HOS regulation. Examples include
“ENG_ON” (Engine On) and “BATLOW” (Battery Low).
• Short Description: Predefined descriptions for predefined events. An example
would be “Successful Driver log in using Driver Key.”
• Description: A longer text version of the activity described in the “Short
Description.”
Violations / Exemptions
Violations are instances where the Driver’s record of
duty status has violated FMCSA regulations.
Violations are highlighted by red dots on the Logbook
Timeline and by red dots in the Events Grid.
Clicking on the red dot in the Events Grid reveals a
second grid showing details of the Violation including
Date / Time, Odometer, Event Code, Type, Short
Description and Description.
Exemptions are instances where the Driver has encountered
circumstances that affected HOS compliance. Exemptions are predefined
in the RoadLog device and include Emergency Conditions, Adverse
driving conditions, 16 hours extension, 100- or 150-mile radius Driver,
and Personal Use.
Accumulated Duty Status Durations Grid
Below the events grid view, the accumulated Duty
Status view shows daily and weekly cumulative totals
of each Duty Status, based on the values seen in the
logbook and events grid displays.
Map View and IFTA / IRP Tabs
[These features will be implemented in a free upcoming release]
DVIR Tab
The DVIR Tab displays Driver Vehicle Inspection Reports recorded by the
Driver in the RoadLog device and imported into the Fleet Management
Software as well as DVIRs created in the Fleet Management Software.
To select the vehicle that you wish to view o r create a DVIR for:
• Click on Viewer form the main navigation.
• Click on the icon at the top of the Action Palette. Select the
vehicle from those shown.
• Select the date that you wish to view or create a DVIR for from the
interactive calendar in the Action Palette.
The drop down menu field below the calendar is self-populated with the
times for all the DVIRs created on the selected date. If there is more than
one DVIR for a selected date, choose the time from the drop down menu
for the DVIR you want to view.
At the top of the screen, the work area data displayed reflects the vehicle
and the date selected including License Plate Number, VIN, Displayed
date, and Make and Model of the vehicle.
2928
Screens & Tabs: Features & Functions Screens & Tabs: Features & Functions
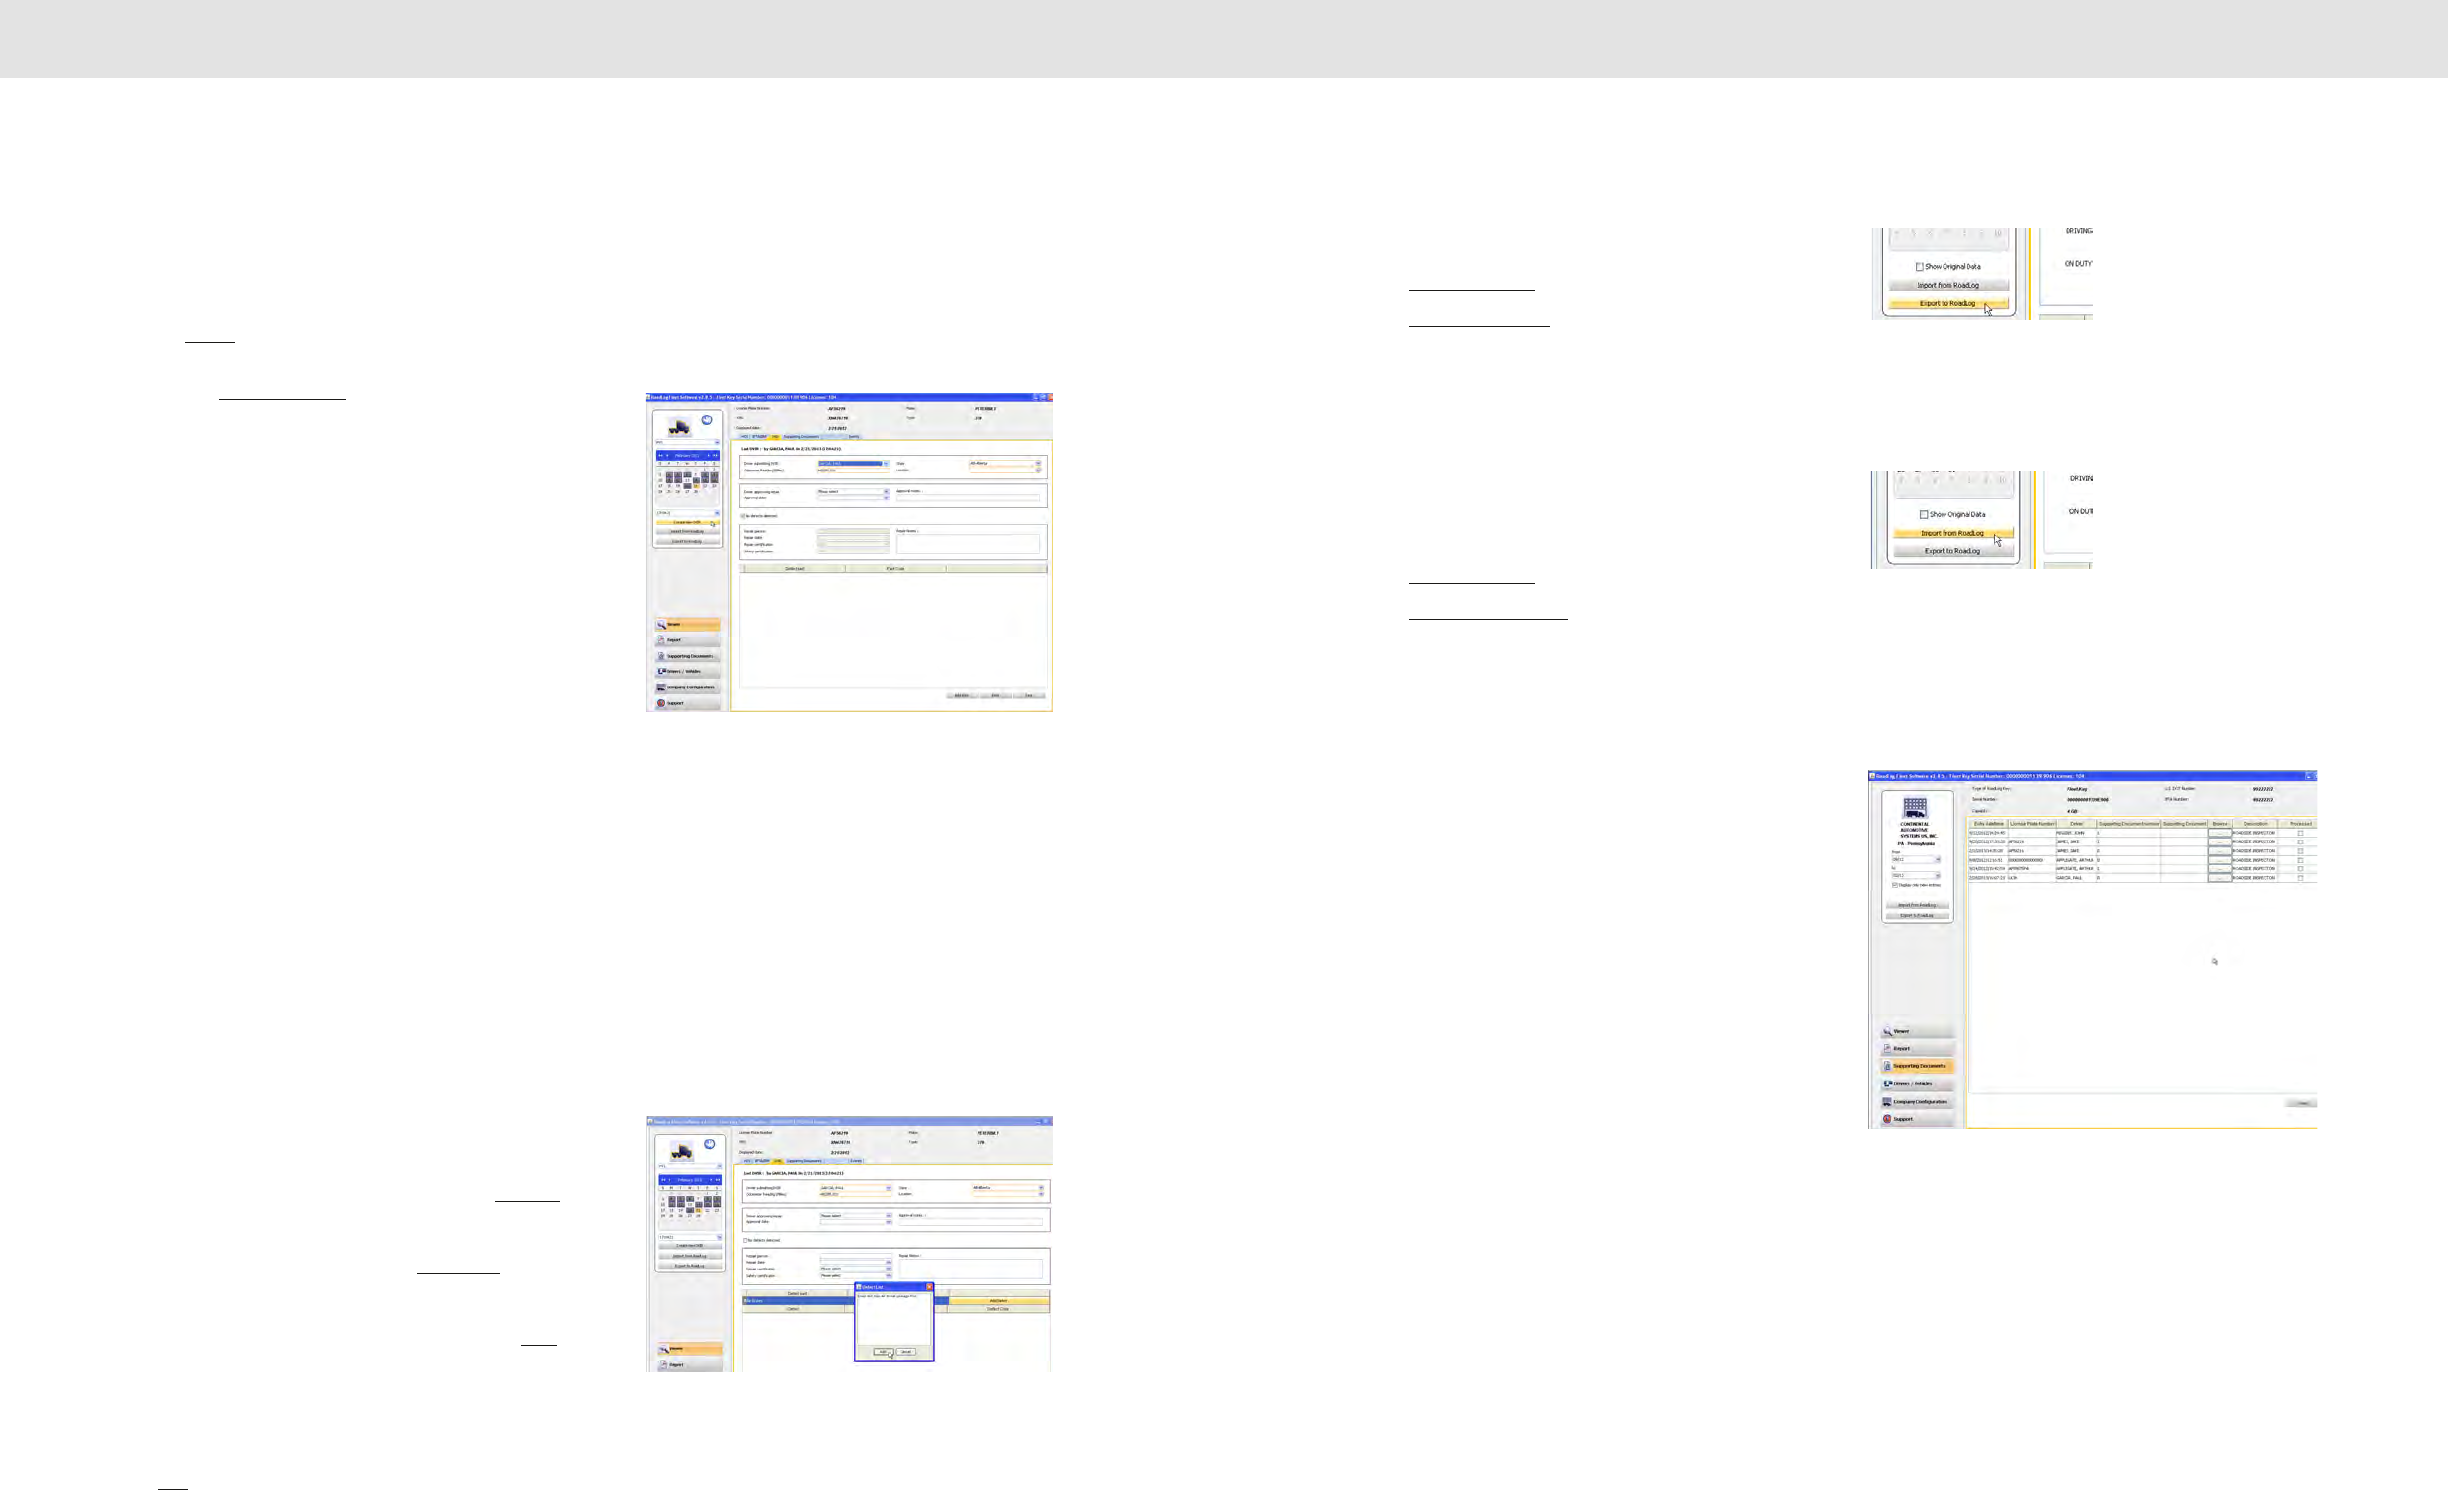
Creating a DVIR in the Fleet Management Software
The Driver in the RoadLog can create DVIRs, or they can be created in the Fleet
Management Software. To create a DVIR in the Fleet Management Software:
• Click on Viewer in tha main navigation.
• Select the date you want to record the DVIR for in the calendar, and
then click on Create new DVIR in the Action Palette.
• Complete the fields in the tab. Fields outlined in orange are
mandatory.
The DVIR fields include:
• Driver submitting DVIR: The Driver who has reported the vehicle
inspection details.
• Odometer Reading (miles): Odometer at the time the report is
made.
• State: The state from which the DVIR was filed.
• Location: The location from which the DVIR was filed.
• Driver approving repair: Driver who has viewed the repairs made
to defects reported in the DVIR and has judged them to be
complete.
• Approval Date: Date that the Driver approving the repair reported that the
repairs had been made satisfactorily.
• Approval notes: Comments made by the Driver or user on the repairs and
approval.
• No defects detected: A check box to indicate that the Driver detected no
defects.
• Repair person: The person making repairs to the reported defects.
• Repair date: The date the defects were repaired.
• Repair certification: Predefined list of repairs for annotations to the repair
person’s report; None, Repairs made, Repairs not necessary.
• Safety certification: Predefined list of safety conditions for annotations to the
repair person’s report; None, Safe to operate, Unsafe to operate.
• Repair notes: Comments made by the repair person or user on the
repairs and approval.
You can add defective parts to the DVIR by clicking the Add Part button at
the lower right of the screen and selecting from the list of predefined parts.
Once you have entered the defective part, you may add the defect(s) you
want to record for the part by clicking on the Add Defect bar, and selecting
the defect(s) from the list of predefined defects.
When all fields and defect part listings are completed, click Save to record
the DVIR. To print the DVIR, click on the Print button at the lower right of
the screen.
Note: There is a list of predefined defective parts that comes with the Fleet
Management Software. You can add additional parts to the list by clicking on
the Add button below the Part Name / Part code grid on the Asset Part List tab.
Once uploaded to RoadLog, these parts and defects will appear in the
RoadLog menus for easy creation of DVIRs.
Exporting DVIRs to RoadLog
To export DVIRs to RoadLog, insert a Driver Key in the USB port.
• Click on Drivers / Vehicles in the main navigation.
• Click on Export to RoadLog in the Action Palette.
• Click on the Key you wish to export to. If more than one Key is
inserted, select the correct drive. All Driver files are automatically
transferred to the Driver Key.
Importing DVIRs from RoadLog
To import DVIRs from RoadLog, insert a Driver Key in the USB port.
• Click on Drivers / Vehicles in the main navigation.
• Click on Import from RoadLog in the Action Palette.
• Click on the Key you wish to export to. If more than one Key is
inserted, select the correct drive. All Driver files are automatically
transferred from the Driver Key to the Fleet Management Software.
Supporting Documents Tab
Supporting Documents are electronic records of costs incurred by the
Driver during the trip. Examples include “Fuel Receipt” and “Meal
Receipt.” The Supporting Document records are created by the Driver on
the RoadLog device and transferred to the Fleet Management Software
when data is exported from RoadLog and imported into the RoadLog
Fleet Management Software.
To allow Drivers easy and consistent creation of Supporting Documents,
predefined Supporting Document Categories can be created in the Fleet
Management Software, in the Company Configuration screen’s
Supporting Documents tab (not to be confused with the Supporting
Documents tab in the Viewer screen). Supporting Document Categories
that are created here will appear as choices for the Driver in the RoadLog
device, once data has been exported from the Fleet Management
Software to the RoadLog device.
A paper receipt for each Supporting Document can be printed from the
RoadLog device, using the RoadLog’s built-in thermal printer. In addition,
physical documents such as paper receipts can be scanned, and the
scanned file can be “attached” to the Supporting Document’s electronic
record.
The Supporting Documents tab displays vehicle information across the
top of screen in the work area: Vehicle License Plate Number, VIN, Make
and Model, and the currently displayed date period as selected in the
action palette.
The work area shows a table of Supporting Documents associated with
the currently selected vehicle, listed in order by entry date and time.
3130
Screens & Tabs: Features & Functions Screens & Tabs: Features & Functions
Each Supporting Document record shows:
• Entry date/time: Entered automatically when the record is created.
• Supporting Document Number: The number assigned automatically by
the software when the supporting Document is created.
• Description: The description is selected from the list of predefined
Supporting Document types established in the Company Configuration /
Supporting Documents tab.
• Link: A scan of a physical document that is added to the Supporting Document
record.
• Browse: Click the Browse button to navigate to and select the scan file
you wish to make a Link.
Note: File types accepted and the maximum file size that can be used as
a link is set in the Company Configuration / Application tab.
• Driver: The Driver who created or is associated with the Supporting
Document.
• Processed: A check box that indicates that the user has finished working
with this record. Once clicked, the record is processed and the Supporting
Document will no longer be displayed in the list.
To create a new Supporting Document in the Viewer / Supporting
Documents tab:
• Click on the Viewer in the main navigation.
• Click on the Supporting Documents tab.
• Click the Add Entry button. The Add Supporting Document Number dialog is
displayed.
• Select a description from the drop-down menu.
• Select a Driver from the drop-down menu.
• If appropriate, select a scanned document to add to the record by clicking the
••• button. Navigate to the file and click on Open to select the file and add
it to the record.
Speed Graph Tab
This functionality will be introduced in 2013.
Events Tab
The events tab displays vehicle information across the top of the work area and
a table of events automatically logged by the RoadLog device, listed in order by
date and time.
Select the date to be displayed from the interactive calendar in the Action
Palette.
For each event, the table shows the odometer reading, the event code, Federal
Motor Carrier Safety Administration (FMCSA) diagnostic code (if applicable), a short
description and a longer description.
• Clicking and dragging on the column divider allows you to view the full contents
of any cell.
Report Screen
The report screen displays information about the Fleet Key
currently in use across the top of the work area, including its
DOT number, serial number, IFTA number and memory
capacity.
In the work area, a drop-down menu allows you to select the
type of report you wish to view:
• DVIR Status.
• HOS Download Reminder.
• IRP Miles Driven. (Future feature.)
• IRP Vehicle List. (Future feature.)
• Vehicle Trip. (Future feature.)
Reports can be printed directly from the Fleet Management
Software or saved in a variety of formats, including PDF, RTF,
ODT, DOCX, HTML, XLS and CSV.
DVIR Status Report
The DVIR Status Report data includes:
• Vehicle number
• Most Recent Pre-Trip Date
• Most Recent Post-Trip Date
• Most Recent Pre-Trip Driver
• Most Recent Post-Trip Driver
• Repair Certification
• Safety Certification
To view the DVIR Status Report click on the Report button.
• Select DVIR Status Report from the drop-down menu.
• Click on the Create Report button. The Fleet Management
Software generates the report and shows an on-screen
view. From the on-screen view you can print or save the
report.
3332
Screens & Tabs: Features & Functions Screens & Tabs: Features & Functions
HOS Download Reminder Report
The HOS Download Reminder Report shows a list of Drivers and their IDs
along with:
• Last Downloaded Date
• Next Download Due Date
• Days until Next Download
To view the HOS Download Reminder Report, click on the Report button.
• Select HOS Download Reminder Report from the drop-down menu.
• Click on the Create Report button. The Fleet Management Software
generates the report and shows an on-screen view. From the on-screen
view you can print or save the report.
IRP Driven Miles and IRP Vehicle List Reports
[These features will be implemented in a free upcoming release]
Vehicle Trip Report
The Vehicle Trip Report shows the selected vehicle’s trip data, including state
traveled, route used, odometer reading at border crossing(s), distance driven in each
state, date of the trip/segment, fuel type used, gallons refueled and fuel price per
gallon.
• To view the Vehicle Trip Report, click on the Report button.
• Select Vehicle Trip Report from the drop-down menu.
• Select the vehicle you wish to view from the drop-down menu.
• Select a start date and end date from the interactive calendar.
• Click in the date field to display the interactive calendar.
• Use the double arrows to select the year.
• Use the single arrows to select the month.
• On the interactive calendar, select your desired date.
Note: The Today button provides a shortcut to enter today’s date.
• Click on the Create Report button. The Fleet Management Software generates
the report and shows an on-screen view. From the on-screen view you can print
or save the report.
Supporting Documents Screen
The work area shows a table of Supporting
Documents by entry date and time. The range of
entry dates shown is selected with the interactive
calendar in the action palette.
This Supporting Document Screen also displays
the company’s Fleet Key information across the top
of the work area.
The table shows the Entry date / time, Vehicle
License Plate Number, Driver, Supporting
Document number, Supporting Document (linked
scan file), a Browse button to locate and open
scanned document files, a document Description
and a checkbox indicating whether the document
has been processed.
• To add a scanned file to a Supporting
Document record, click the Browse button to find and select the file.
Note: File types accepted and the maximum file size that can be
used as a link is set in the Company Configuration / Application
tab.
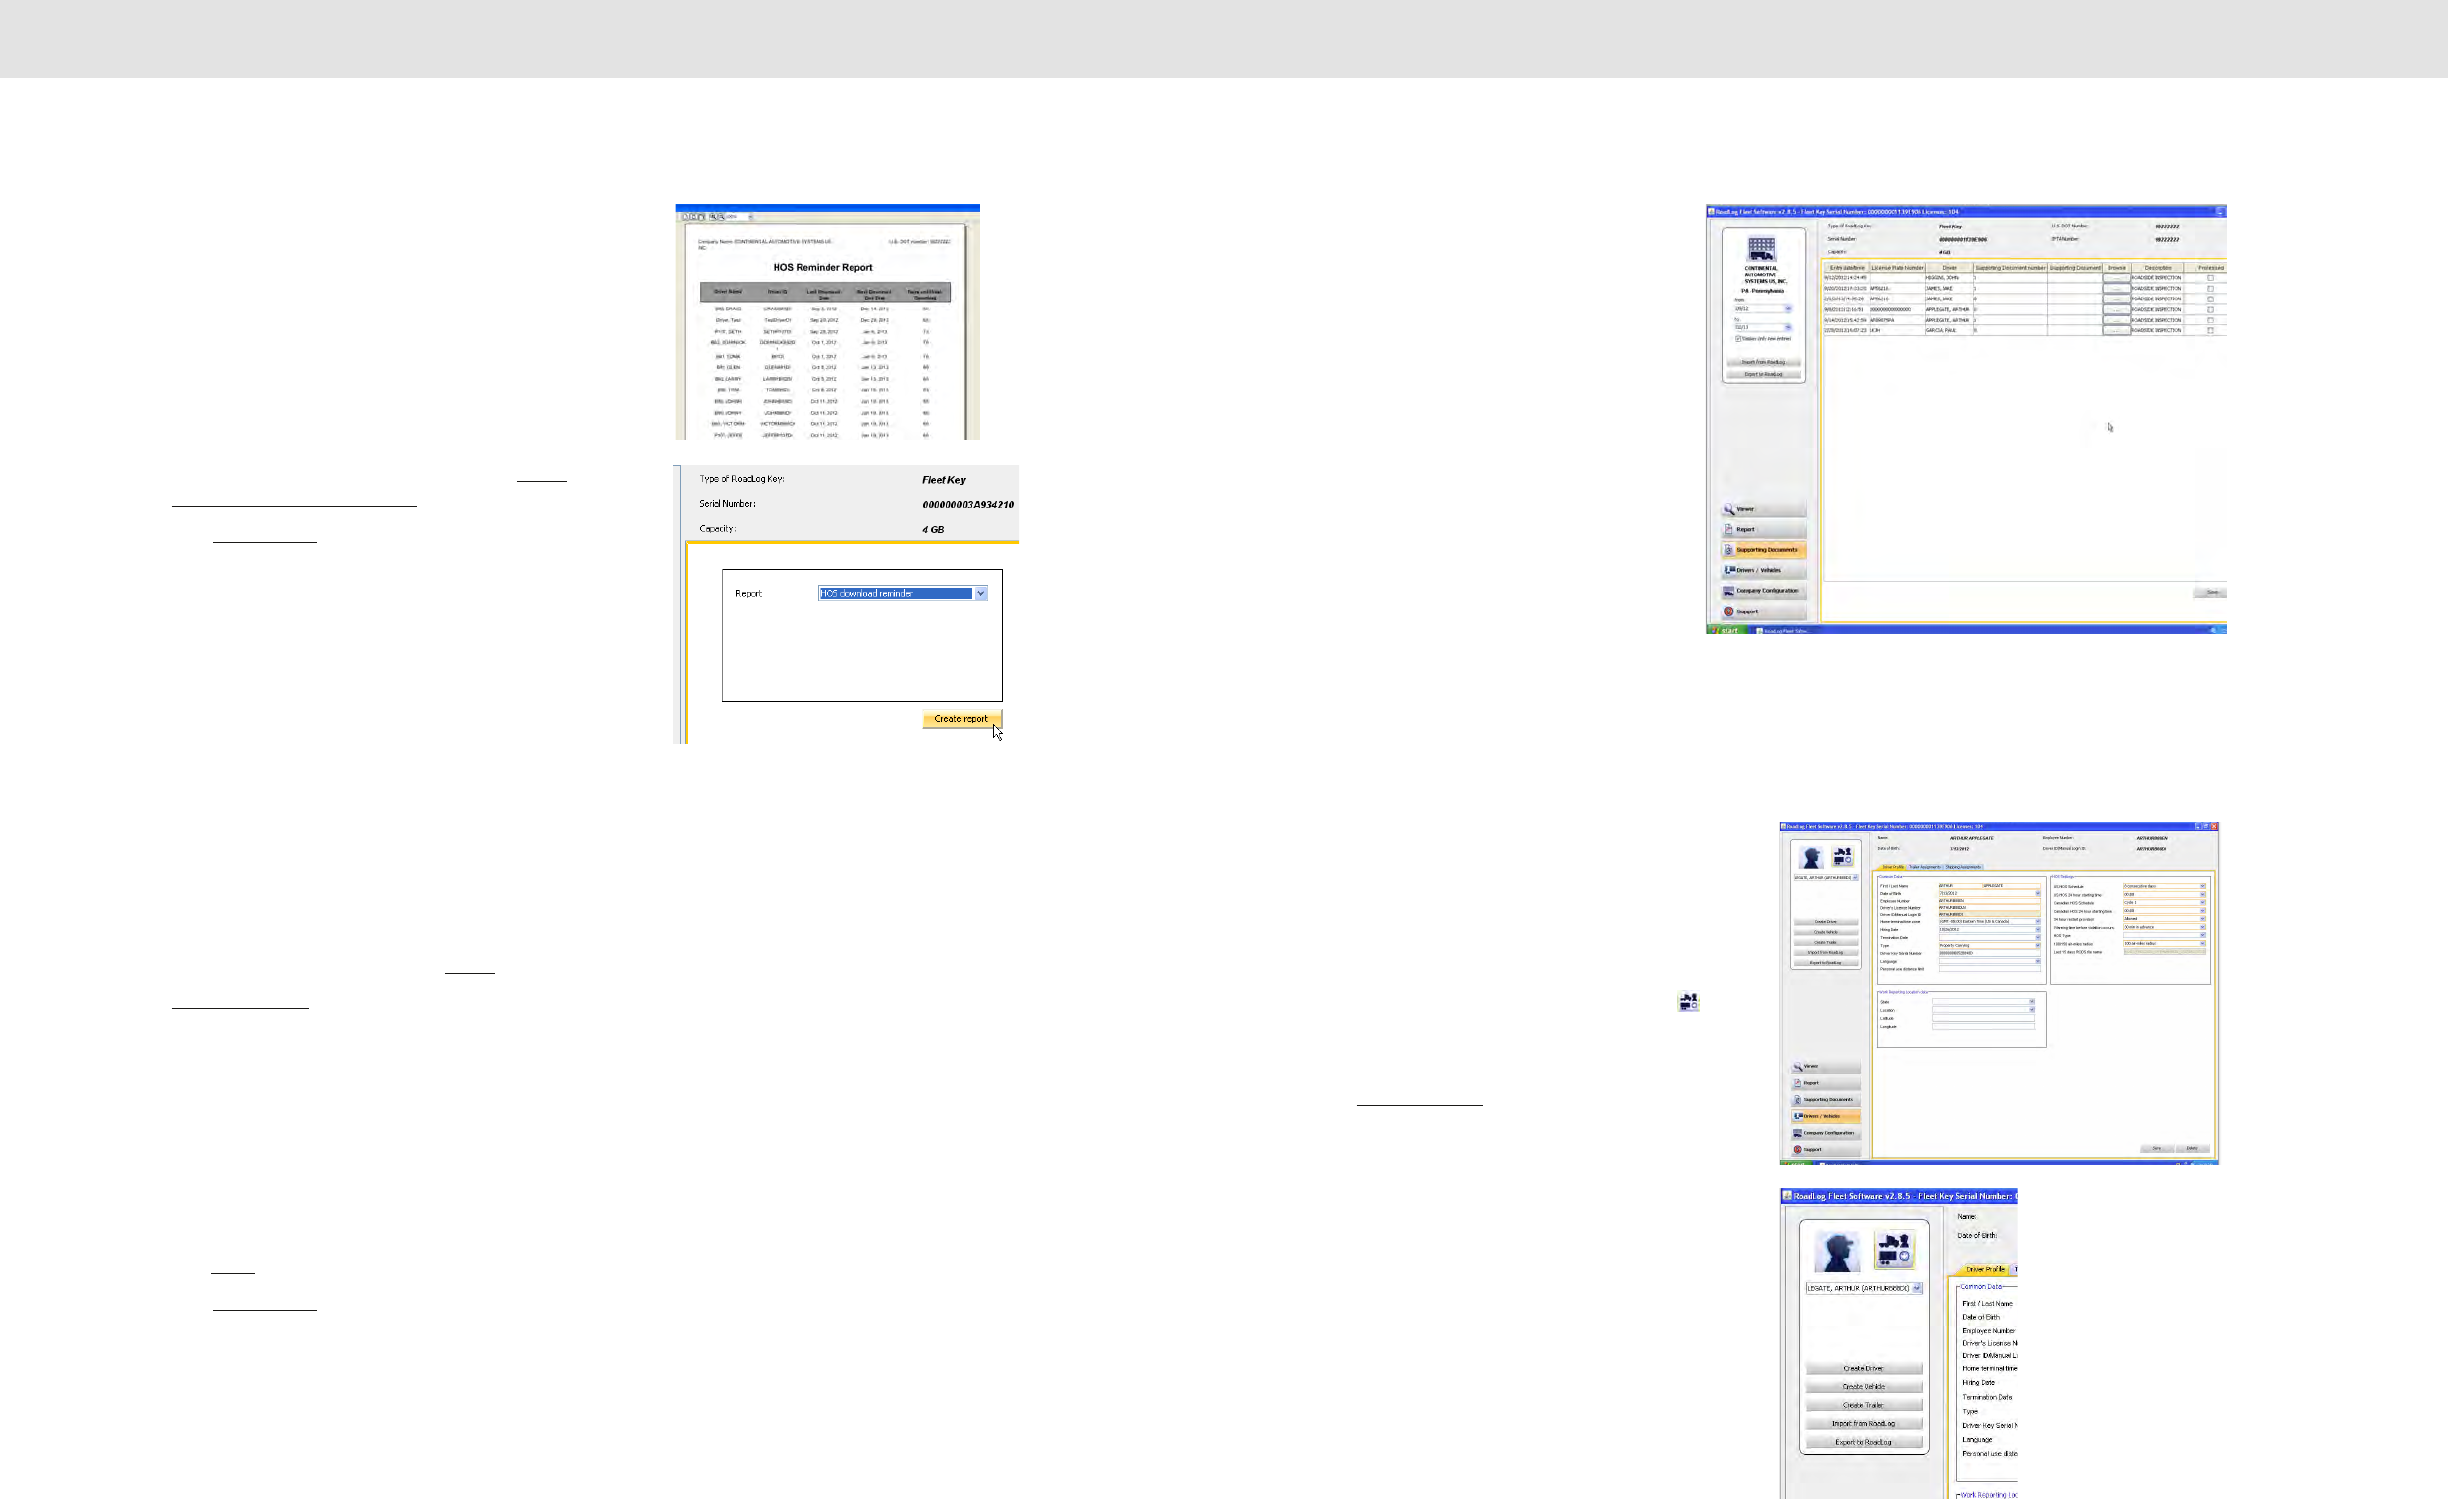
Drivers / Vehicles Screen
The Drivers / Vehicles screen shows the Driver Profile tab as
well as tabs for Trailer Assignments and Shipping Document
Assignments.
When the Drivers / Vehicles screen is chosen, the icon in
the Action Palette allows you to view and make selections
from the lists of existing Drivers, vehicles and trailers.
When Drivers / Vehicles is seleted from the main naviagtion,
the Action Palette will also allow you to:
• Create new Driver.
• Create new vehicle.
• Create new trailer.
• Import data from a RoadLog device via a Fleet or
Driver Key.
• Export data to a RoadLog device via a Fleet or
Driver Key.
3534
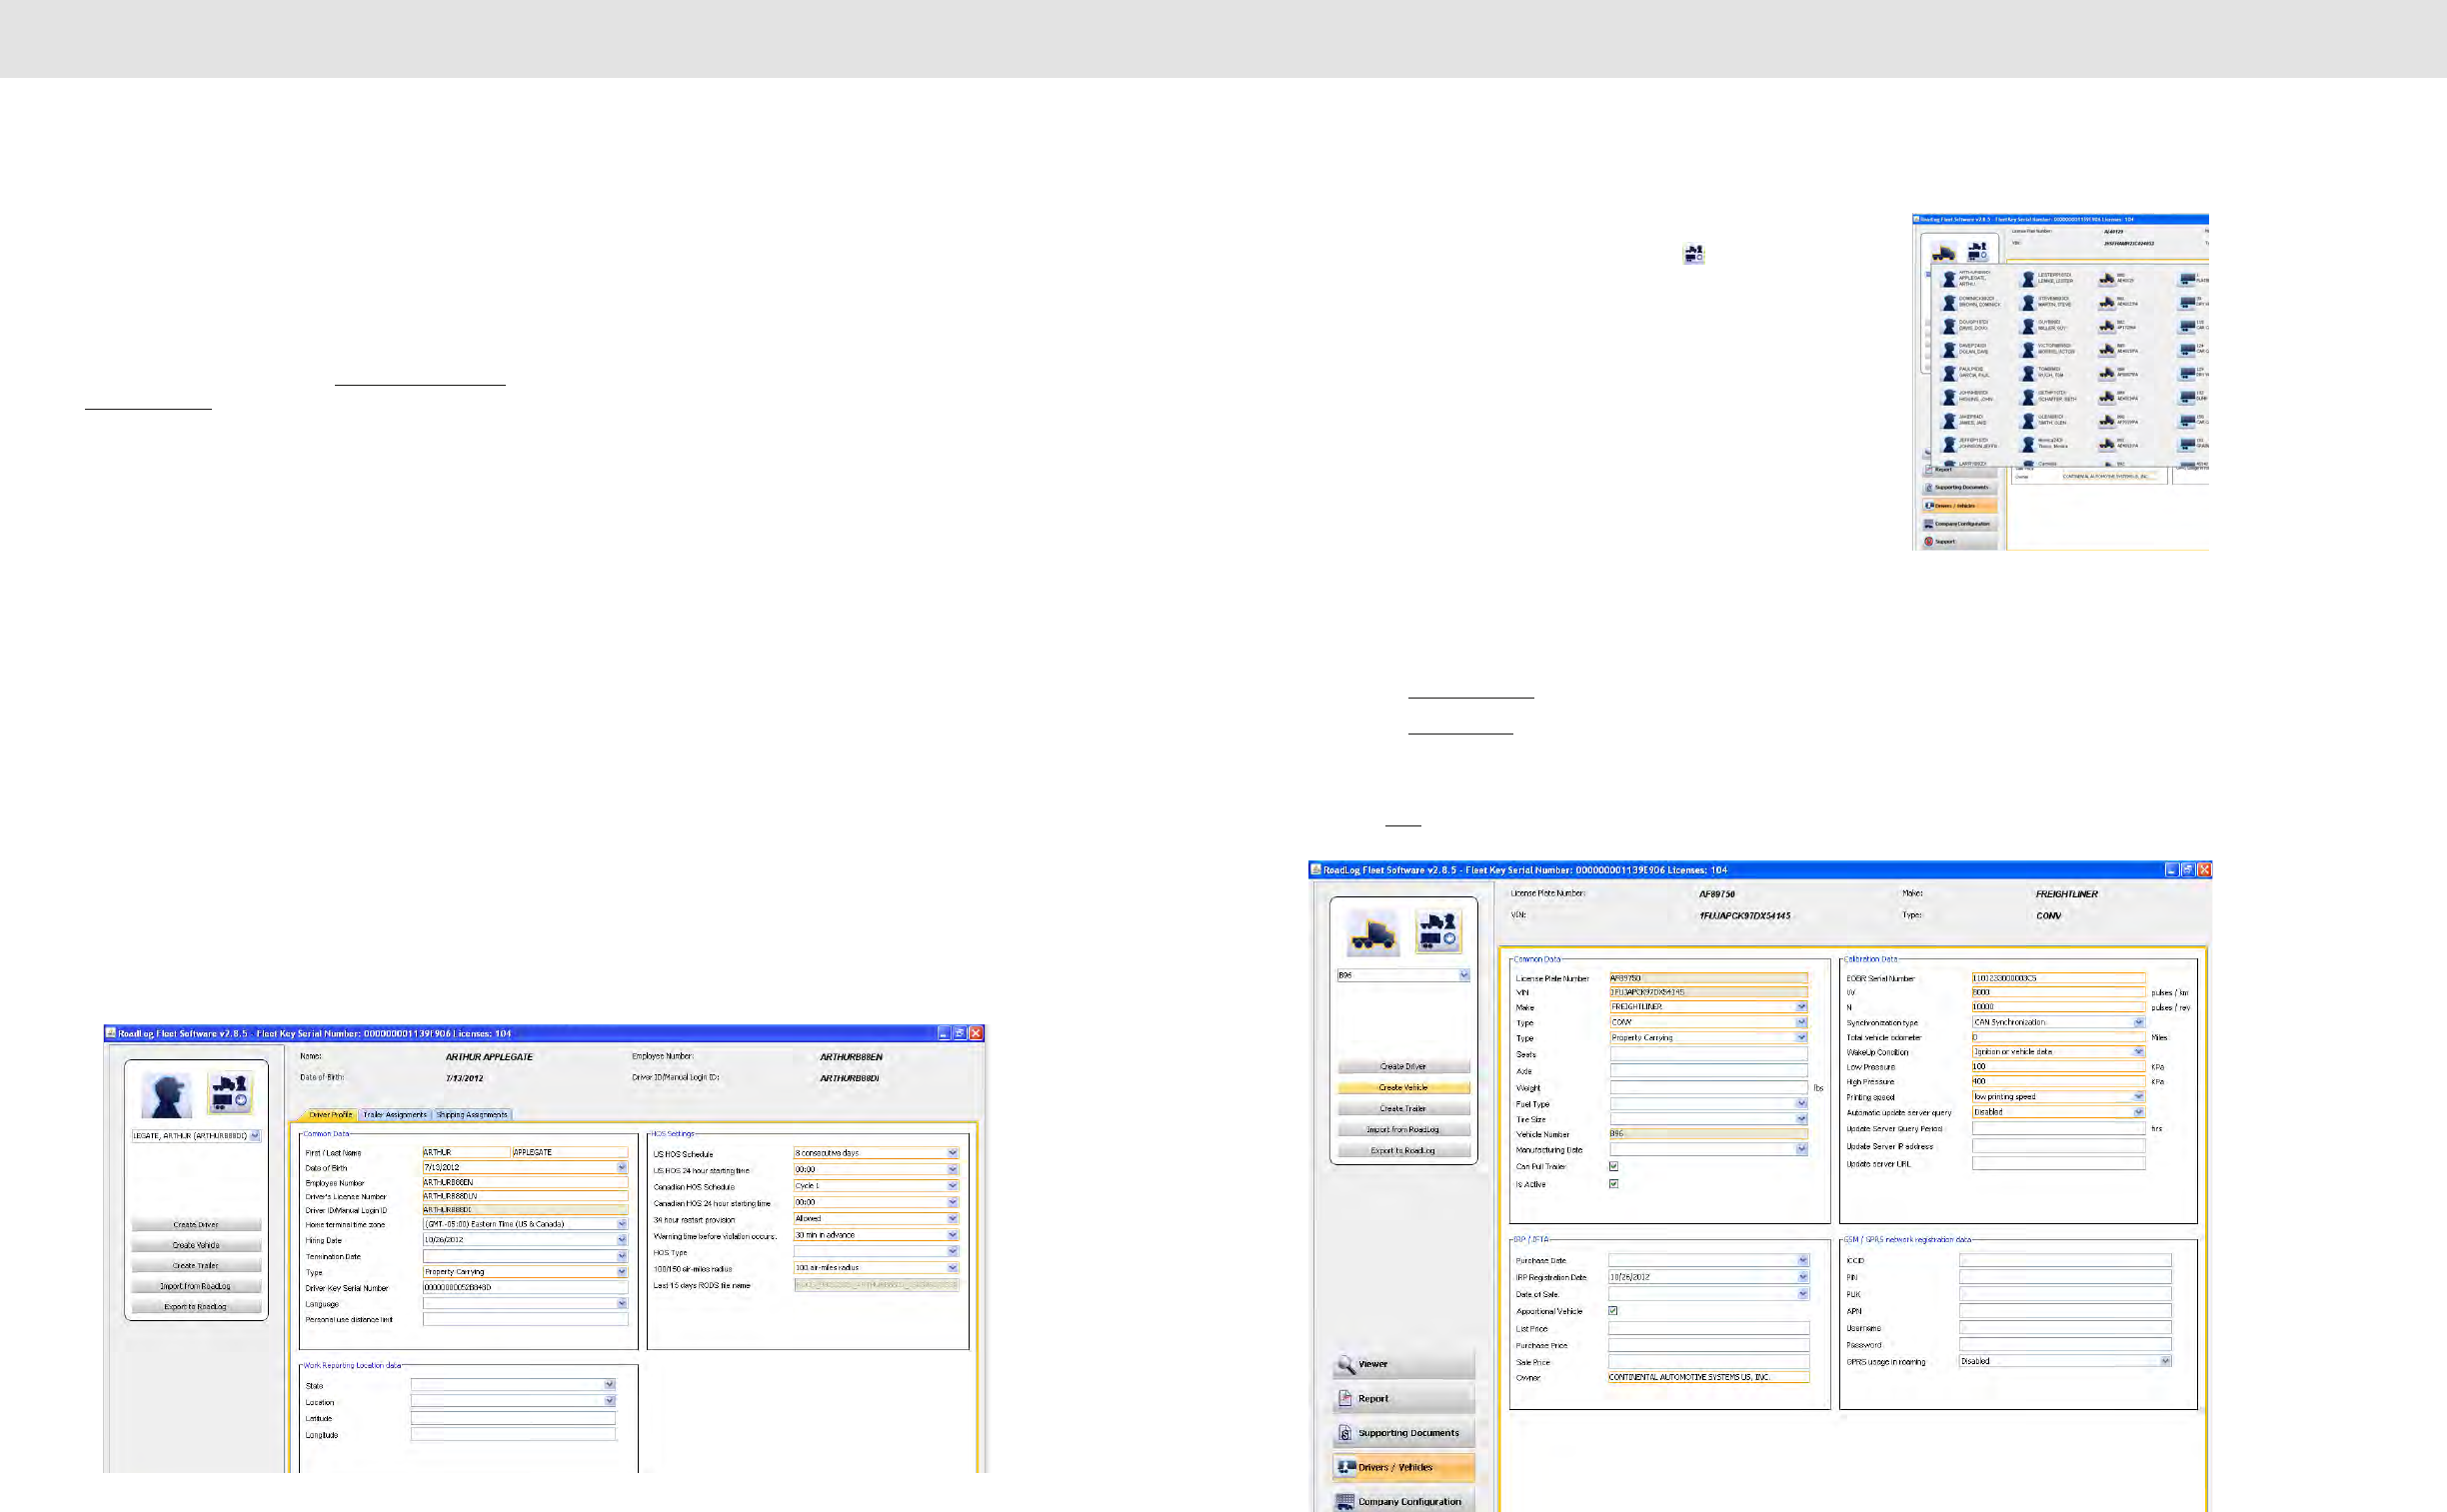
Screens & Tabs: Features & Functions Screens & Tabs: Features & Functions
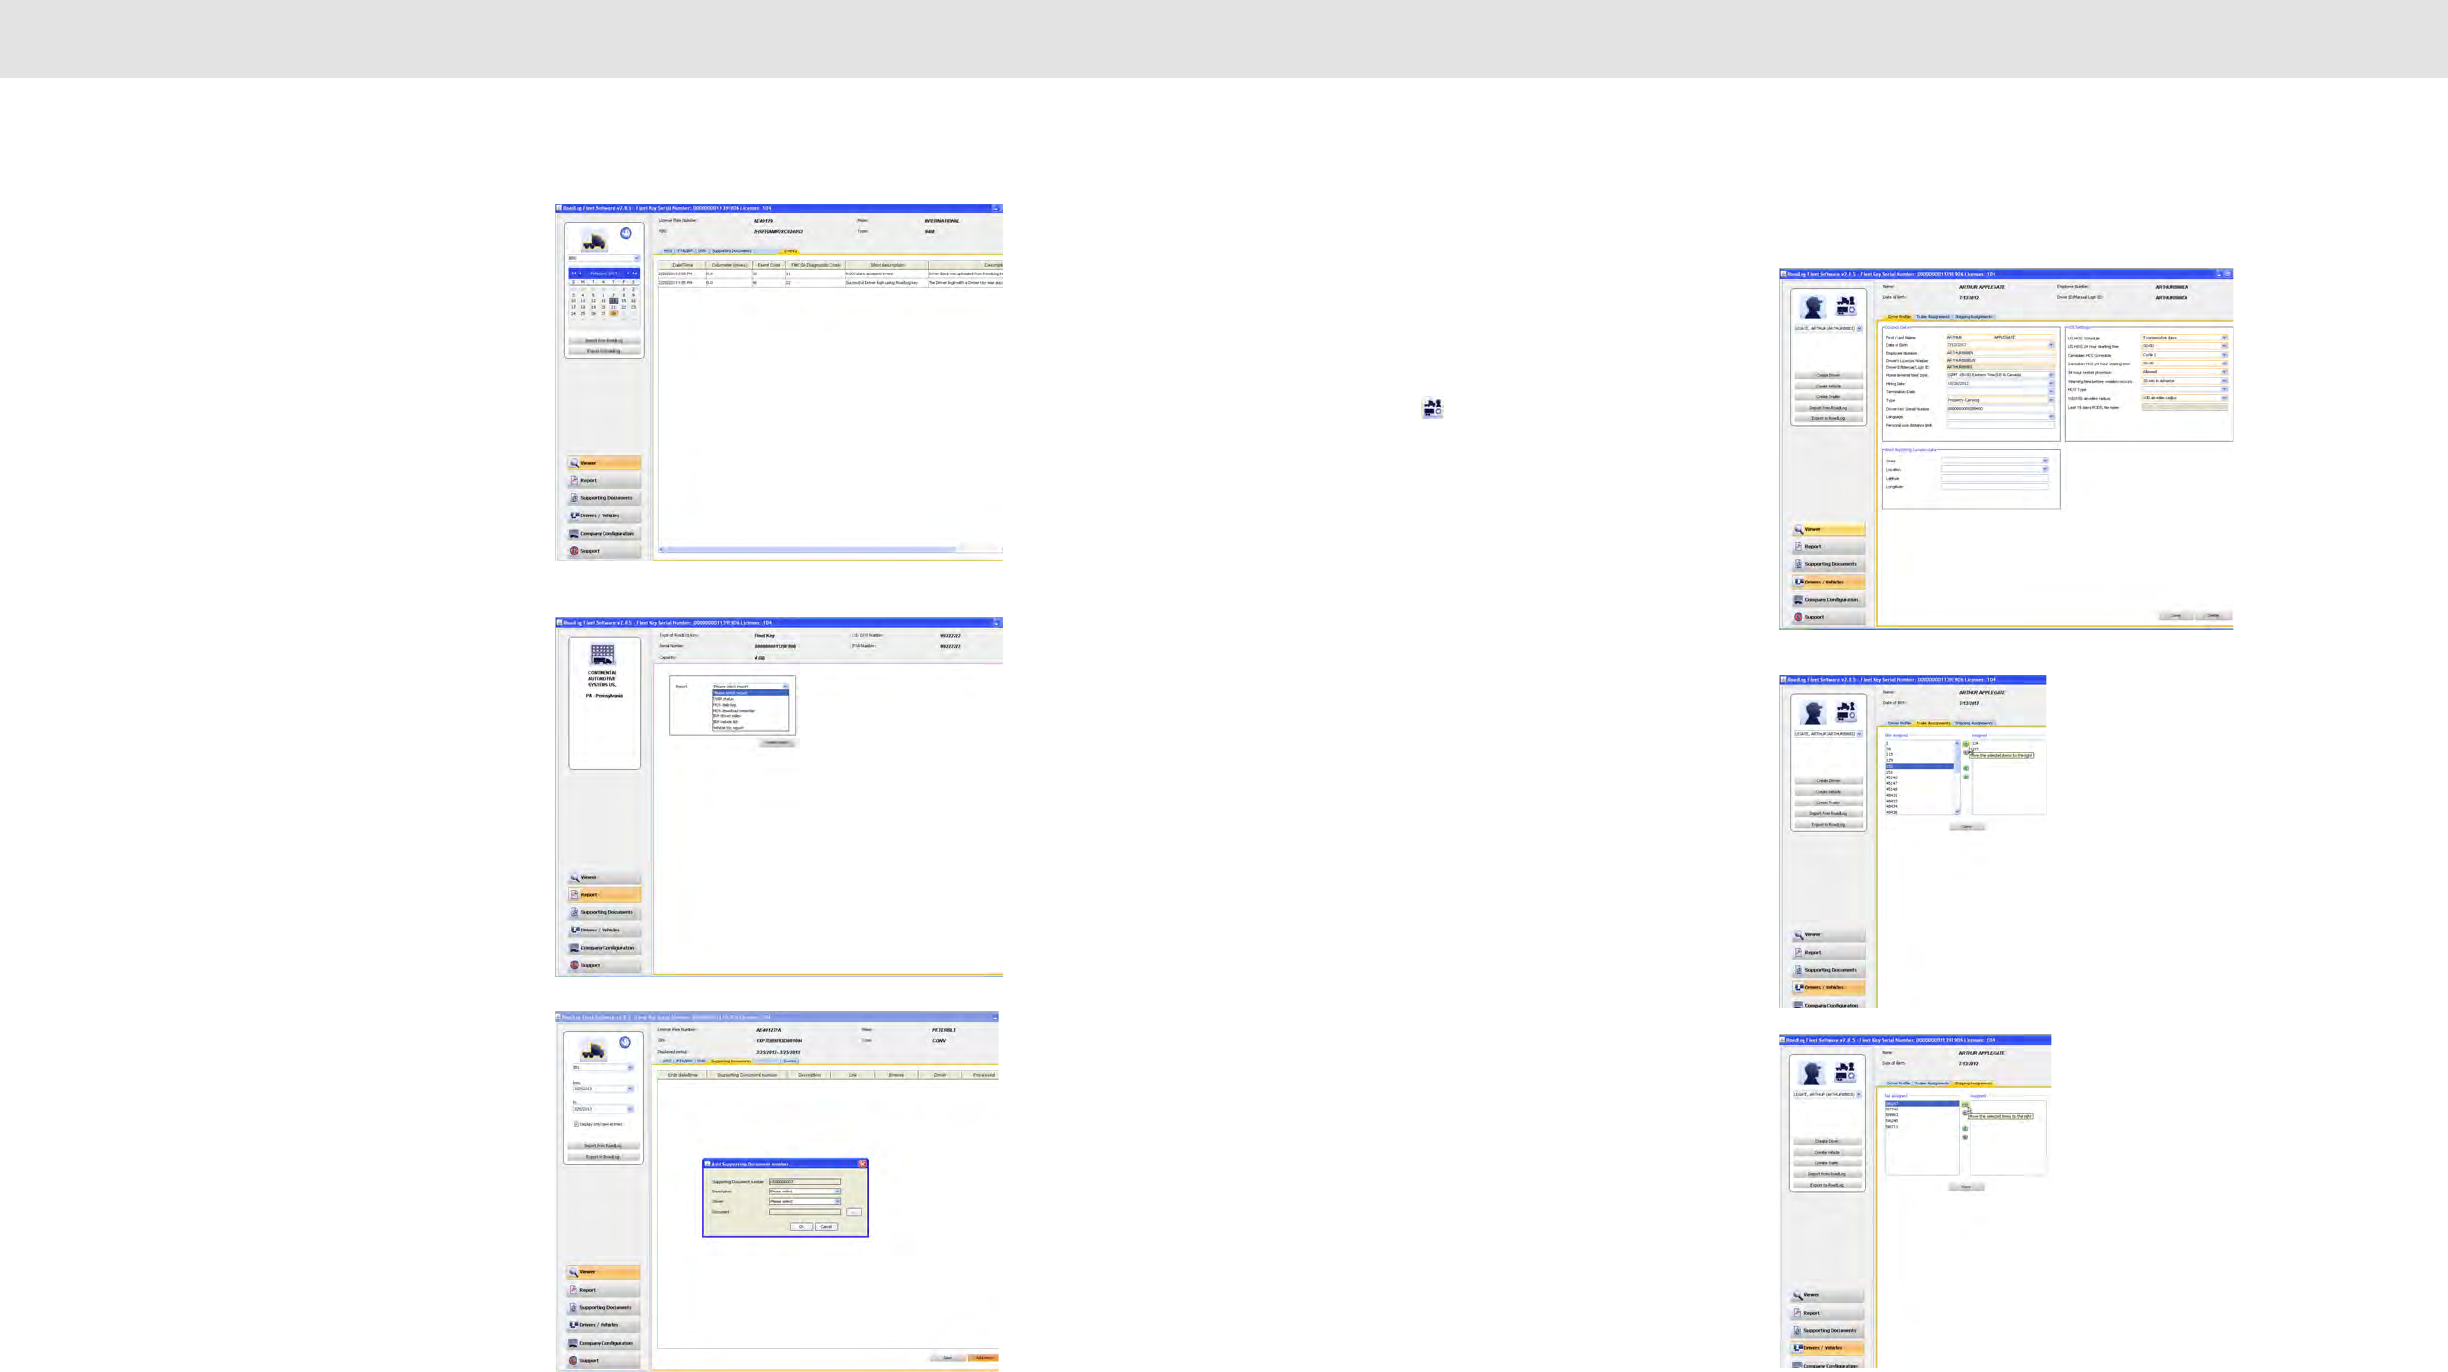
Driver Tab
The Driver tab shows three types of data: Common Data
about the Driver, Hours of Service (HOS) settings and data
on the Driver’s work reporting location. Many of the fields
provide drop-down menus for quick selections from a list.
To create a new Driver Profile see Creating and Working
With Driver Keys.
Driver data includes:
Common Data:
• First / Last name.
• Date of birth.
• Employee Number (assigned by the Fleet Manager).
• Driver’s License Number.
• Driver ID (this is a unique identifier assigned when the
Driver entry is created and cannot be edited once set).
• Home terminal time zone.
• Date hired.
• Termination date.
• Type (type of vehicle driven by this Driver, Property
Carrying (Truck) or Passenger Carrying (Bus)).
• Driver Key Serial Number.
• Language.
• Personal use distance limit.
HOS Settings:
• US HOS schedule (7 days or 8 days).
• US HOS starting time (in 24-hour format).
• Canadian HOS schedule (Cycle 1 or Cycle 2).
• Canadian HOS starting time (in 24-hour format).
• 34 hours restart function (Allowed or Not Allowed).
• Warning time before violation occurs (No warning or 30,
60 or 90 minutes in advance).
• HOS type.
• 100/150 air-miles radius (Not assigned, 100 miles or
150 miles).
• Last 15 days RODS file name. File name for RODS
(Record of Duty Status) file covering the last 15 days (file
and file name is created automatically by the Fleet
Management Software).
Work Reporting Location:
• State (or Canadian province).
• Location.
• Latitude.
• Longitude.
Note: If you wish to enter the optional Latitude and
Longitude information for the “Work Reporting
Location” it can be found using free websites such as
http://itouchmap.com
Vehicle Screen
The Vehicle Screen can be seen by clicking on the icon in the Action
Palette and selecting the Vehicle that you want to view. If no vehicles
exist, you must first create one to see the Vehicle screen.
The vehicle screen shows the Vehicle Profile including: Common Data
about the vehicle, Calibration Data to ensure accurate speed and mileage
records, IRP/IFTA data and GSM/GPRS network registration data. Many
of the fields provide drop-down menus for quick selection from a list.
Note: IRP/IFTA and GSM/GPRS functionality will be implemented
in an upcoming release.
Creating a Vehicle
Vehicles must have a profile created before they can be assigned to a
Driver.
To create a new Vehicle profile from the Drivers / Vehicles screen:
• Click on Drivers / Vehicles in the main navigation.
• Click on Create Vehicle in the Action Palette.
• Enter the Vehicle’s data. Fields with orange borders are mandatory
and must be completed.
• Click Save. The Vehicle record is created.
3736
Screens & Tabs: Features & Functions Screens & Tabs: Features & Functions
Vehicle data includes:
Common Data
• License Plate Number.
• VIN.
• Make.
• Model.
• Type.
• Seats.
• Axle.
• Weight.
• Fuel Type.
• Tire Size.
• Vehicle Number (this is a unique identifier assigned
when the vehicle entry is created, and cannot be
edited).
• Manufacturing Date.
• Can Pull Trailer (checkbox to indicate whether or not
the vehicle can pull a trailer).
• Is Active (checkbox to indicate whether or not the
vehicle is active in the fleet).
Configuration and Calibration Data
• RoadLog serial number (The RoadLog device serial
number can be found on the sticker on the RoadLog’s
underside. It is the number on the right side of the
sticker).
• W (a calibration factor). See Setting Configuration
Parameters).
• Synchronization type: The type of cable connection
used to connect RoadLog to the vehicle (see Setting
the Vehicle Synchronization Parameter).
• Total vehicle odometer: The odometer reading at the
time you create the vehicle profile.
• Wake up condition: The event that triggers the device
to begin recording data (see Setting the Wake up
condition).
Important note: Improper calibration of the WakeUp
Condition may result in the RoadLog device screen
failing to turn off after the engine has been shut off.
This can lead to failure of the vehicle’s battery.
• Low pressure: The lower tire-pressure threshold that
generates a warning to the Driver and records a
RoadLog device event in vehicles with a Tire Pressure
Management System (TPMS).
• High pressure: The upper tire-pressure threshold that
generates a warning to the Driver. (This feature is not
yet implemented)
• Printing speed (for instructions on selecting the printing
speed see Setting the Printing Speed).
Additional fields are included that will not be used until
GSM/GPRS functionality is made available in a future
release:
• Automatic update server query.
• Update server query period.
• Update server IP address.
• Update server URL.
IRP/IFTA data
IRP/IFTA data fields are included but will not be used until
IRP/IFTA functionality is made available in a future release:
• Purchase date.
• IRP Registration Date.
• Date of Sale.
• Apportional Vehicle (checkbox).
• List Price.
• Purchase price.
• Sale price
• Owner.
GSM/GPRS network registration data
GSM/GPRS data fields are included but will be optional in
future GSM RoadLog enabled devices:
• ICCID (Integrated Circuit Card ID).
• PIN (Personal Identification Number).
• PUK (Pin Unlocked Key).
• APN (Access Point Name).
• Username.
• Password.
• GPRS (General Packet Radio Service) usage in roaming.
Calibration Data
“W” and “N” factors are utilized in RoadLog calibration on
trucks that feature a non-computerized interface with
RoadLog. These trucks are uncommon, and are usually older
models. Installation on these trucks is done with the RoadLog
Open-end cable.
The vehicle’s W factor is the number of pulses that are
generated by the vehicle speed sensor when the vehicle
travels a distance of 1 kilometer. By default, the W factor
parameter is set to 8,000 pulses / km. If the vehicle’s W factor
is not known, it can be set by direct measurement through the
RoadLog device while driving. See Setting the W Factor.
If the W factor setting is changed in the vehicle, the value in
the Fleet Management Software will be overwritten. This will
happen when the data from the vehicle is downloaded to the
Fleet Management Software from the Driver Key.
Creating Trailers
To create a new Trailer profile from the Drivers / Vehicles
screen:
• Click on Drivers / Vehicles in the main navigation.
• Click on Create Trailer in the Action Palette.
• Enter the Trailer’s data. Fields with orange borders are
mandatory and must be completed.
• Click Save. The Trailer record is created.
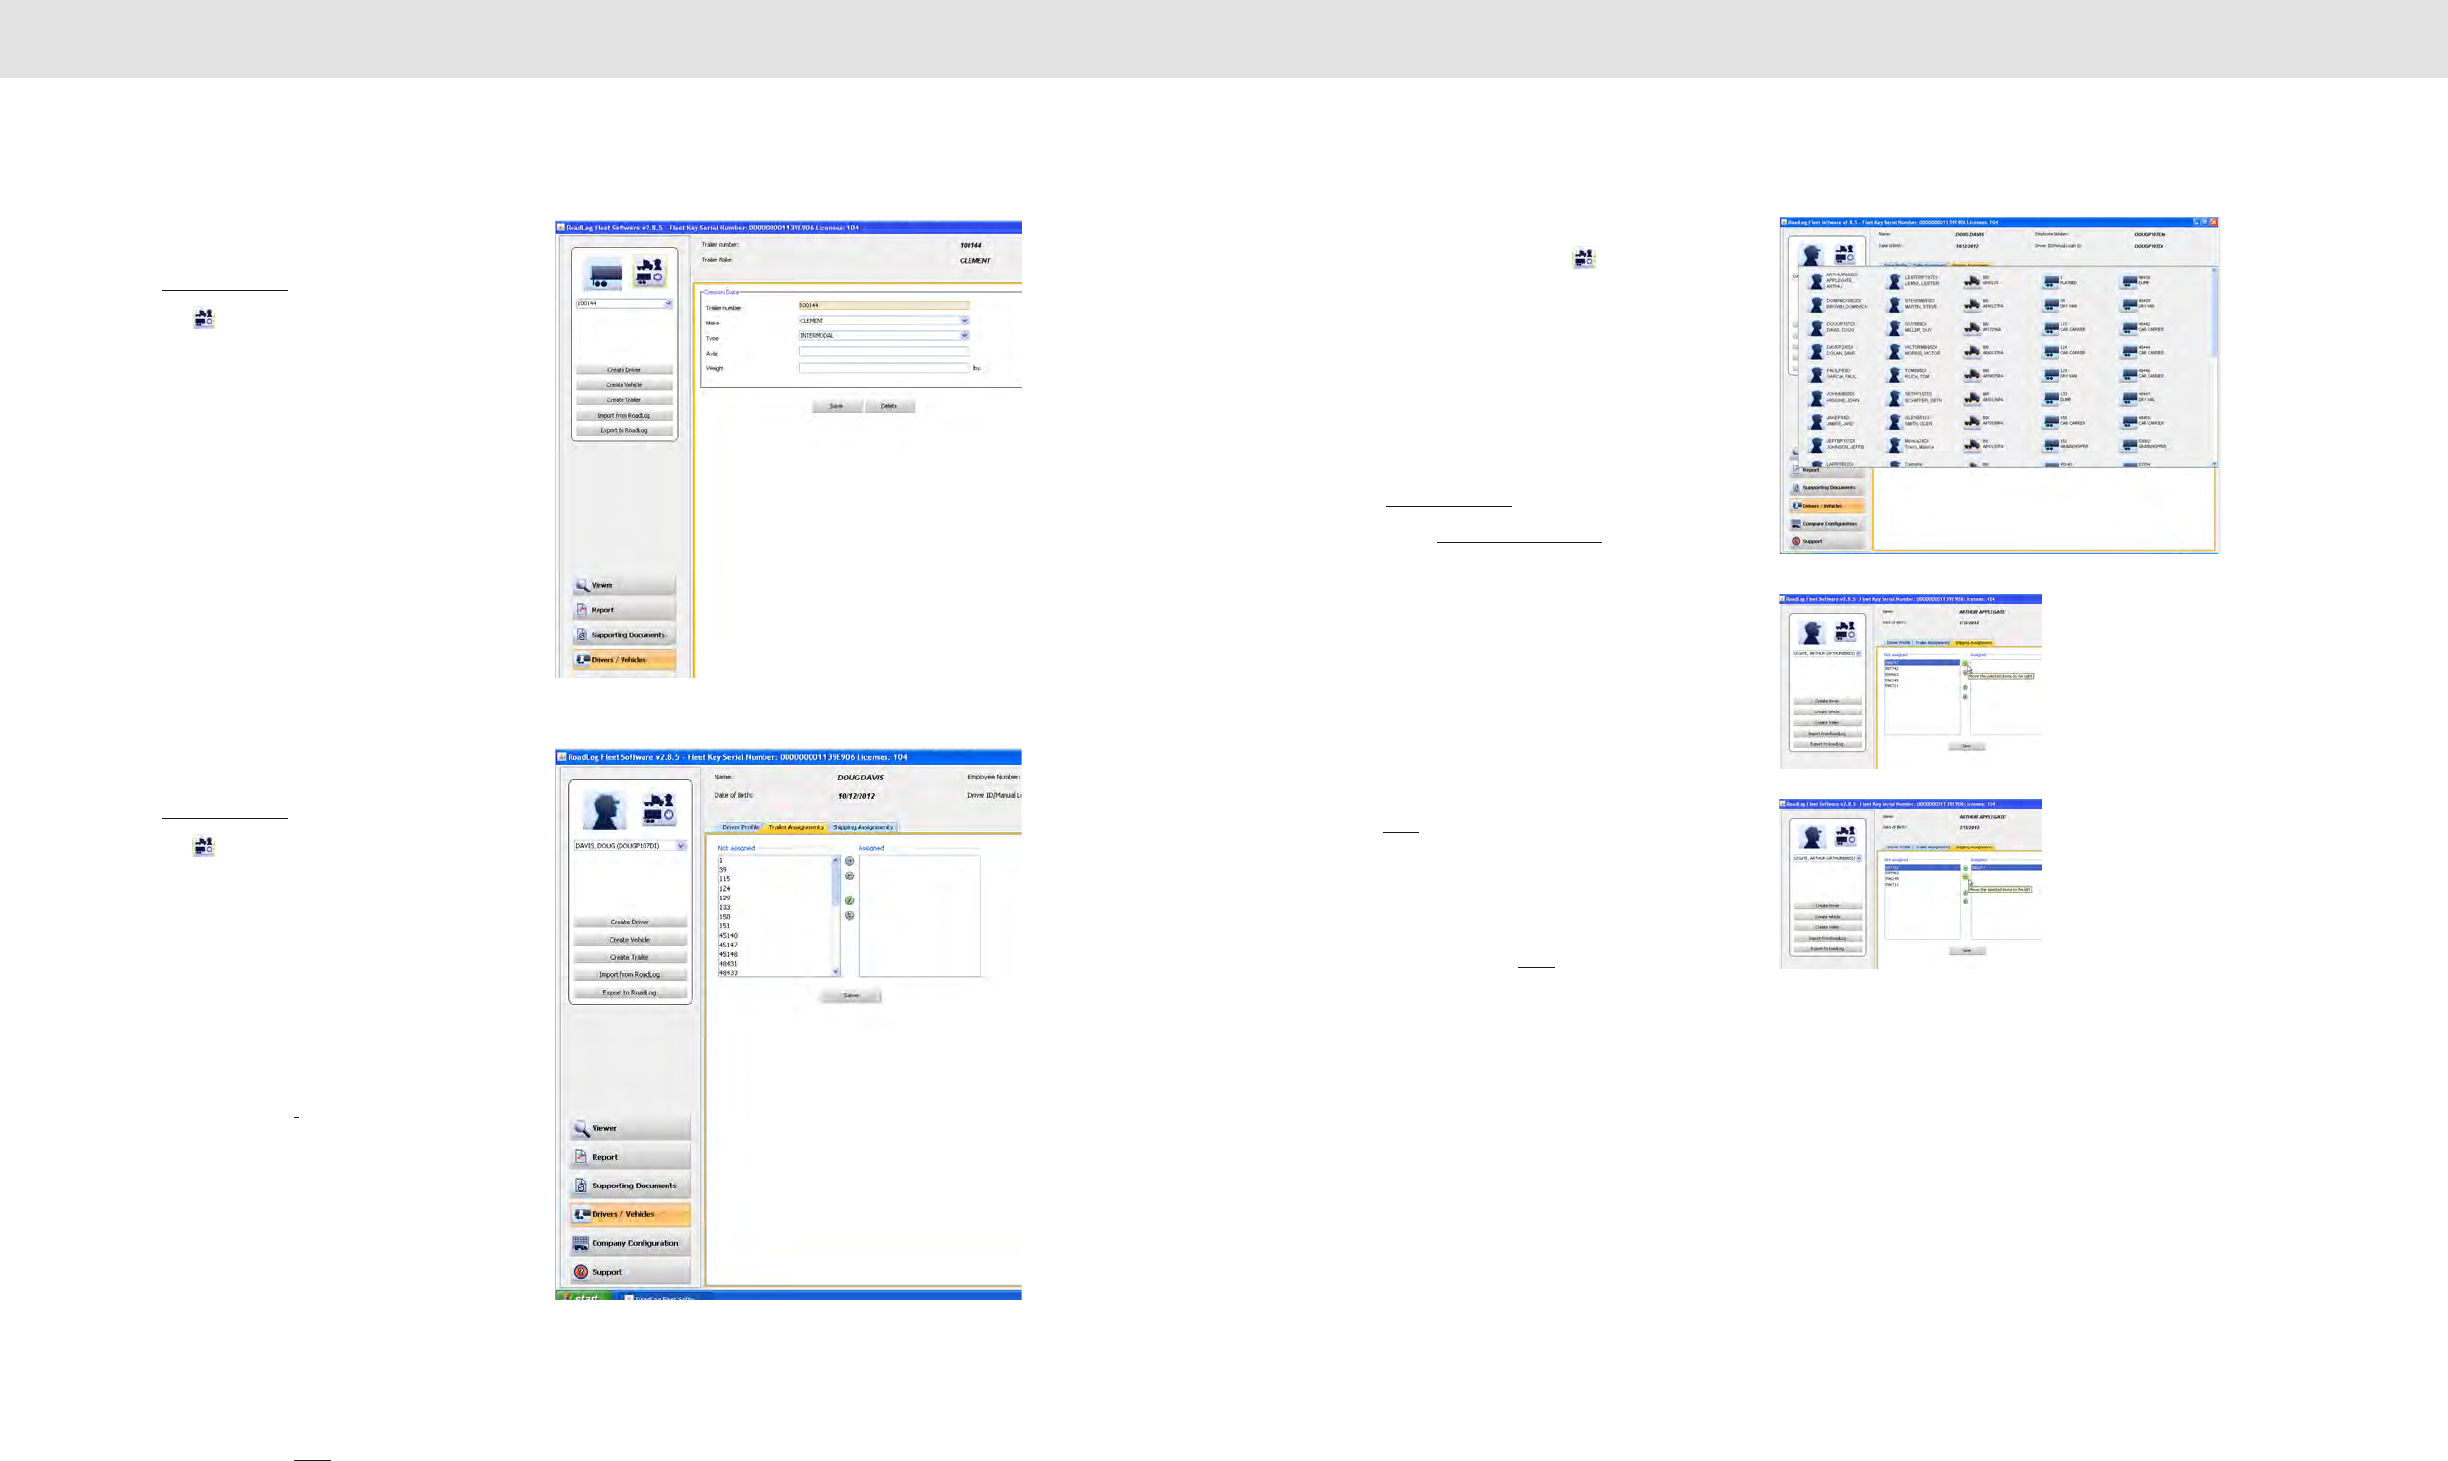
3938
Screens & Tabs: Features & Functions Screens & Tabs: Features & Functions
Trailer Screen
To view the Trailer screen:
• Click Drivers / Vehicles in the main navigation.
• Click the Icon in the Action Palette and select the
trailer that you want to view. If no trailers exist, you
must first create one to see the Trailer screen.
When a Trailer is selected in the Action Palette, the Trailer
Profile screen in shown. Data includes:
• Trailer number (this is a unique identifier assigned
when the trailer entry is first created and cannot be
edited).
• Make.
• Type.
• Axle.
• Weight.
Trailer Assignments Tab
To view the Trailer Assignments tab:
• Click Drivers / Vehicles in the main navigation.
• Click the Icon in the Action Palette and select the
Driver that you want to assign trailers to or from. The
Trailer tab shows two columns used to assign trailers
to a Driver and to remove trailer assignments from a
Driver.
Note: Trailer numbers shown in the columns are
assigned in the Create Trailer tab.
To assign a trailer to a Driver from the Trailer Assignments
tab:
• From the Action Palette, click on the Driver icon and
select the Driver that you want to assign the trailer to.
• Click on a trailer number in the left column to highlight
it.
• Clicking on the right-pointing and left-pointing arrow
buttons will move Trailer numbers from the “Not
assigned” column to the “Assigned” column for the
selected Driver.
Note: The double arrow buttons will move all entries
in the column.
• To remove a trailer assignment from a Driver, use the
left-facing arrows to move trailer assignments from
the “Assigned” column to the “Not assigned” column.
• When completed, click Save.
Shipping Assignments Tab
When a Driver is selected using the icon in the Action
Palette, the Shipping Assignments tab shows two columns
used to assign Shipping Documents to a Driver and to
remove Shipping Documents assignments from a Driver. The
Shipping Documents shown in the columns are created in
the Shipping Documents tab in the Company Configuration
screen.
To assign a Shipping Document to a Driver from the
Shipping Assignments tab:
• Click Drivers / Vehicles in the main navigation.
• Click on the Shipping Assignments tab.
• From the Action Palette, click on the Driver icon and
select the Driver that you want to assign Shipping
Documents to.
• Click on a Shipment number in the left column to
highlight it.
• Click on the right-facing arrow buttons to move a
Shipment number from the “Not assigned” column to
the “Assigned” column. You can move all Shipments at
once by clicking on the double arrow buttons.
• When you have completed your Shipment assignments,
click Save.
• To remove a Shipping Document assignment from a
Driver, use the left-facing arrows to move document
numbers from the “Assigned” column to the “Not
assigned” column.
• When completed, click Save.
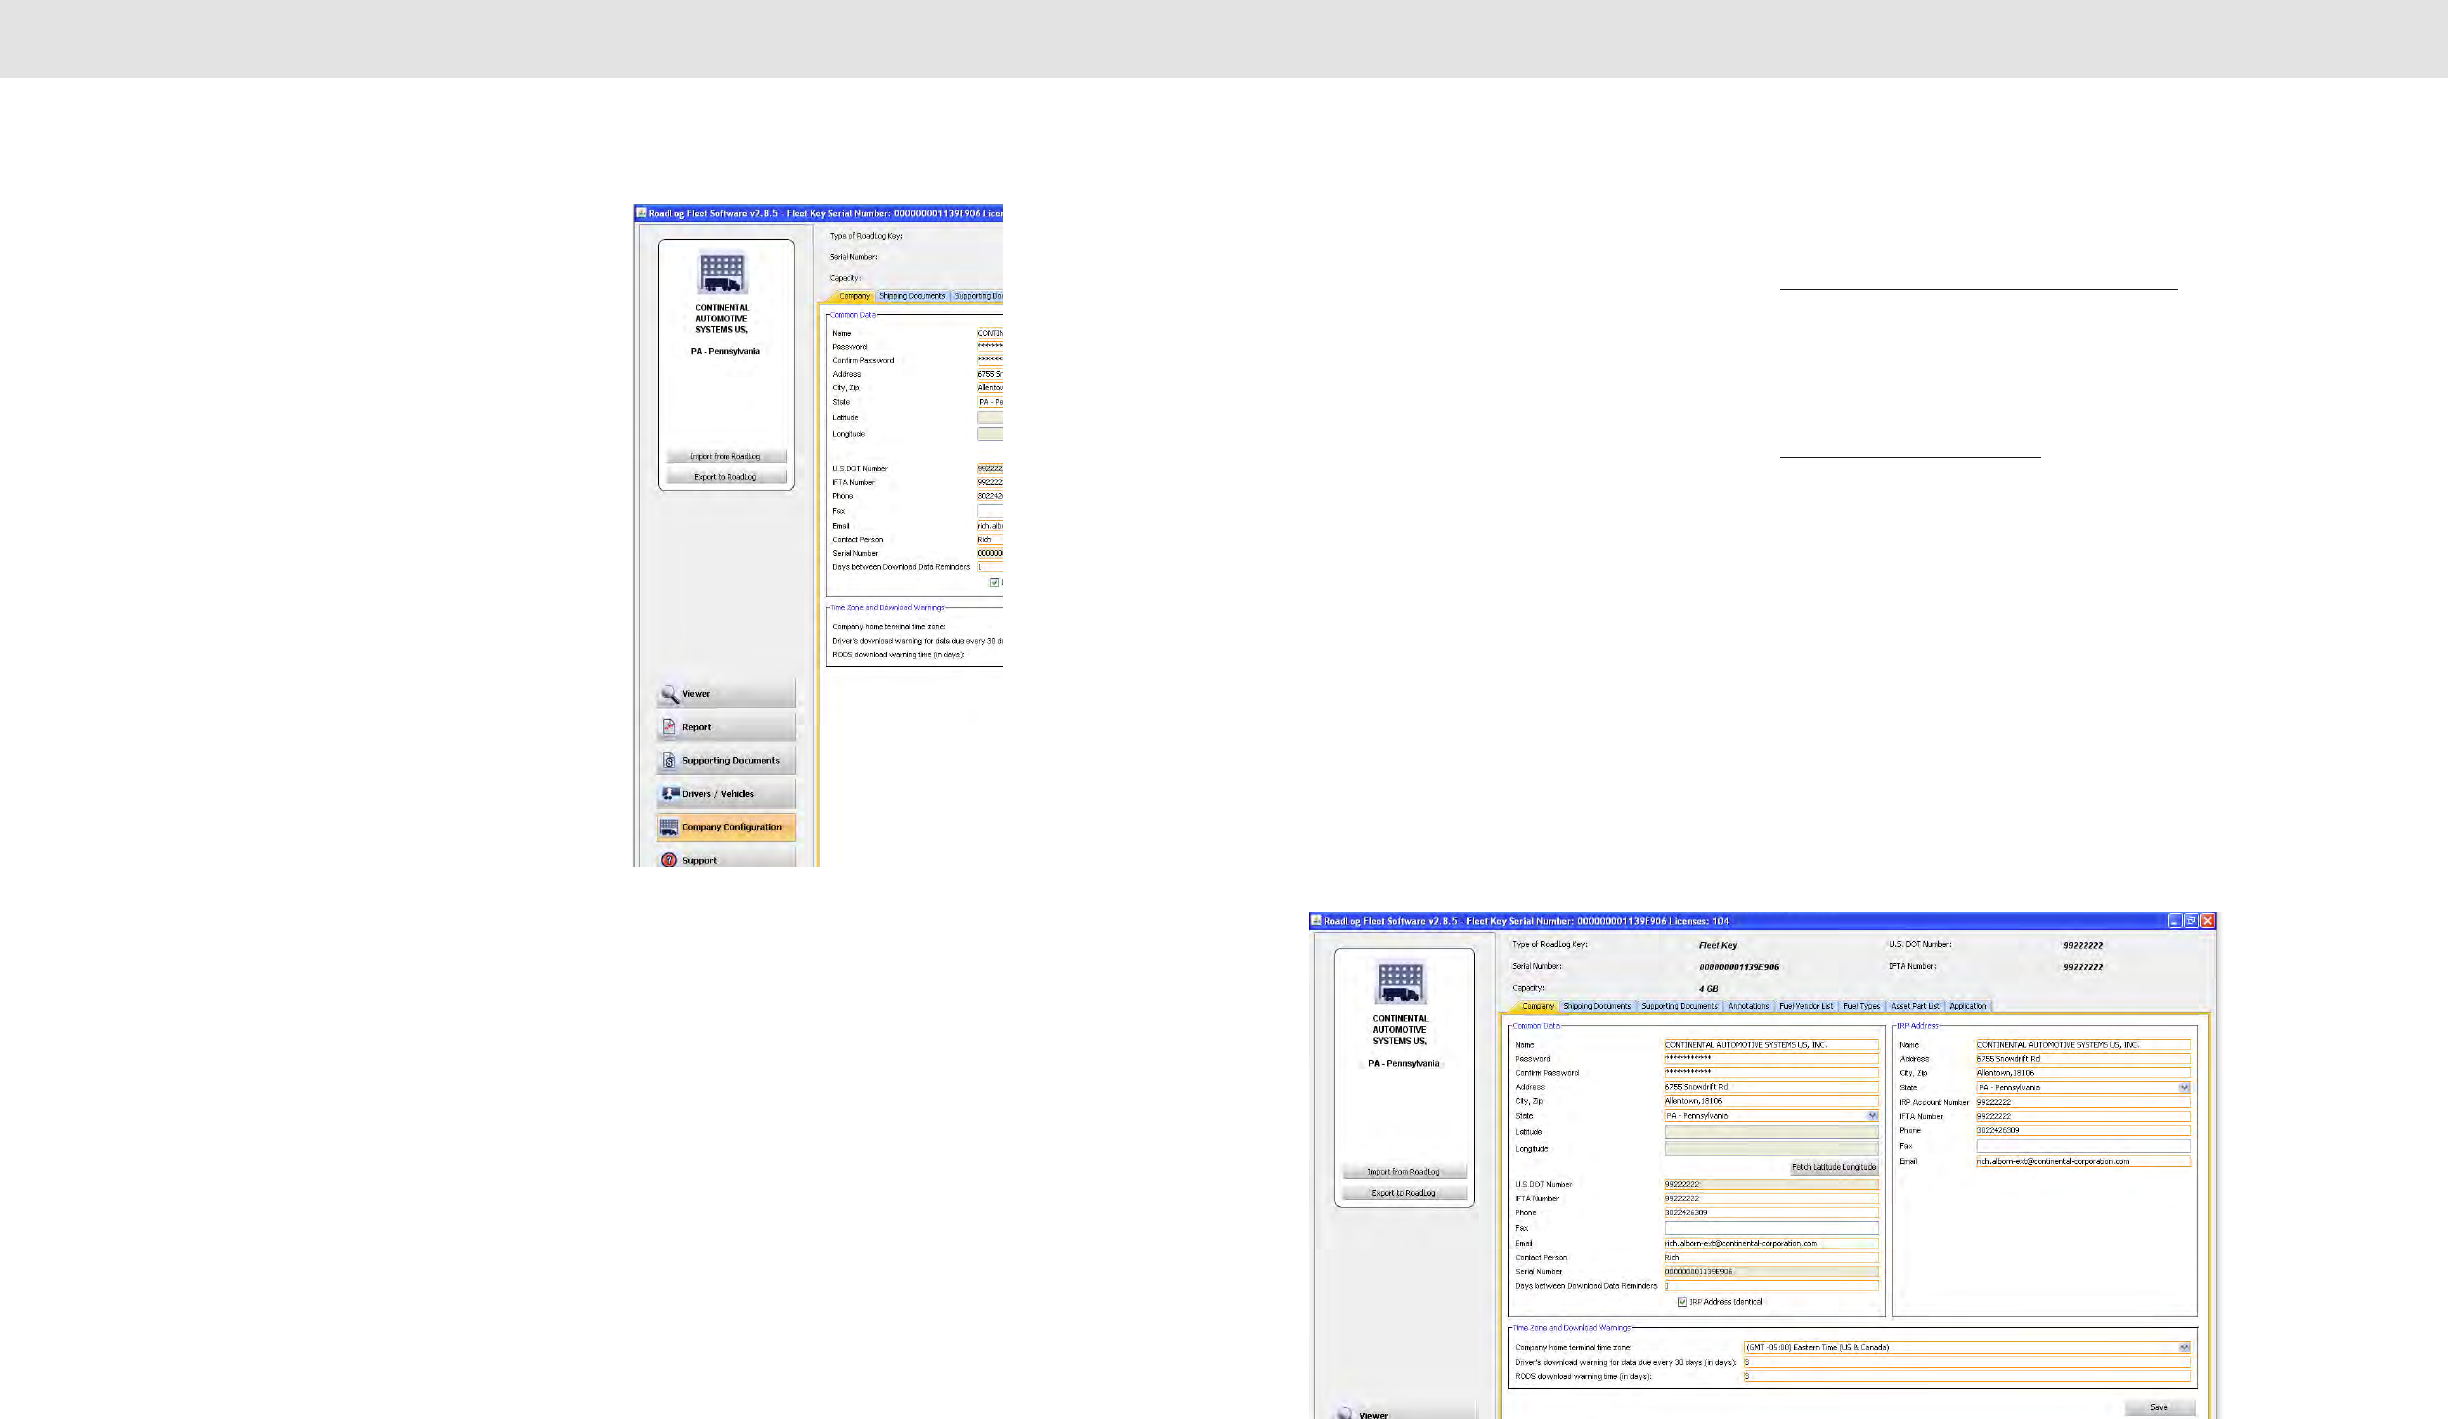
4140
Screens & Tabs: Features & Functions Screens & Tabs: Features & Functions
Company Configuration Screen
The Company Configuration screen contains tabs for the company’s
profile as well as information that supports other aspects of the
RoadLog Fleet Management Software. Some of this information is
used to automatically complete on-screen fields and reports. It also
provides the settings that control how the software operates.
Company Tab
When you used the Fleet Management Software for the first time,
you entered your company information to activate the software.
Some of the information seen in the Company tab will have been
entered automatically during your activation. Complete any empty
fields, and correct any fields with incorrect or incomplete information.
Note: The fields with orange borders are mandatory
and must be completed.
Company data fields include:
Common Data
• Name (company name).
• Password.
• Confirm Password (must match Password).
• Address (address of the company’s headquarters or the field
office that the fleet is deployed from).
• City, ZIP.
• State.
• US DOT Number.
• Latitude.
• Longitude. (The button for “Fetch Latitude Longitude” provides
the entry for the coordinates automatically. An Internet
connection is required.)
• IFTA Number (International Fuel Tax Agreement).
• Phone.
• Fax.
• Email.
• Contact Person.
• Serial Number (for the Fleet Key).
• Days between Download Data Reminders (lets you select the
number of days that will pass before you receive a reminder to
back up your data).
• IRP Address Identical (If checked, the software automatically fills
out the appropriate IRP data fields with entries identical to those
in the Common Data).
IRP Address
• Name (company name).
• Address (address used for IRP reporting for the fleet).
• City, ZIP.
• State.
• IRP Account Number.
• IFTA Number.
• Phone.
• Fax.
• Email.
Time Zone and Download Warnings
The Company’s home terminal time zone is the time zone
from which the Fleet being managed is deployed.
Some types of data must be downloaded from RoadLog
more frequently than other types. The Fleet Management
Software provides warnings to remind you to perform
downloads regularly. Download Warnings are displayed to
the Driver three days before the oldest data is overwritten by
default. The default download warnings can be modified to
your preference.
The download warnings are as follows:
Drivers download warning for data due every 30 days:
30-day data must be downloaded before the end of the
30th day, or the oldest data will be lost. The “Drivers
download warning for data due every 30 days” sets the
number of days before the end of the 30th day that the
Driver receives a reminder to download data before it is lost.
The RODS download warning time:
RODS data must be periodically downloaded or the oldest
data will be lost. The “RODS download warning time” sets
how far in advance the Driver receives a warning before it is
lost.

4342
Screens & Tabs: Features & Functions Screens & Tabs: Features & Functions
Shipping Documents Tab
Shipping Documents are records relating to Bills of Lading or
Pro Numbers.
Note: Shipping Documents are assigned to Drivers in
the Shipping Documents tab in the Drivers / Vehicles
screen.
Creating Shipping Documents
To create a new Shipping Document:
• Click on Company Configuration in the main navigation.
• Click on the Shipping Documents tab. An Add Shipping
Document pop-up window appears.
• Add the Shipping Document number and click OK. The
number is added to the list.
Supporting Documents Tab
Supporting Documents are records of transactions that
Drivers collect on a trip such as fuel bills, food bills, Bills of
Lading, or, and Shipping Documents. Supporting
Documents can be created by the Driver in the RoadLog
device or in the Fleet Management Software. In addition,
physical documents can be scanned and added to a
Supporting Document record in the Fleet Management
Software.
Having predefined Document types makes creating
Supporting Documents in the RoadLog device faster and
more consistent. The Supporting Documents tab in the
Company Configuration screen is where you can add to the
list of predefined Supporting Document types.
To add a Supporting Document Category:
• Click on Supporting Documents in the main navigation.
• Click on the Supporting Documents tab.
• Add Supporting Documents categories you wish to
track. After each entry, click OK.
To learn how to create a Supporting Document in the
RoadLog device, see RoadLog Supporting Documents.
To learn how to create a Supporting Document in the
RoadLog Fleet Management Software, see the Supporting
Documents Tab.
Annotations Tab
Annotations are comments or corrections made to Duty
Status records submitted by Drivers on their Driver Keys.
In the Annotations tab, you can create predefined
Annotations to explain changes made in Duty Status
records, such as “waiting while loading” or “traffic stopped.”
Having predefined Annotations makes creating reports from
the RoadLog device faster and more consistent.
To create a predefined Annotation from the Annotations tab:
• Click on Company Configuration in the main navigation.
• Click the Annotations tab. An Add Annotation pop-up
appears.
• Add text explaining each Annotation you’ll want to use.
After each entry, click OK.
Note: Annotations are shown on the daily logs as
required by FMCSA regulations.
Fuel Vendor List Tab
The Fuel Vendor List tab allows you to create a predefined
list of fuel suppliers and the Fuel Types purchased from
them. The Fuel Vendor names are recalled when creating
Supporting Documents.
To add a Fuel Vendor from the Fuel Vendor List tab:
• Click on Company Configuration in the main navigation.
• Click the Fuel Vendor List tab.
• Click Add. An Add Fuel Vendor pop-up is displayed.
• Enter the Fuel Vendor Name and select the Fueling
Type from the pull-down menu.
• Click OK. The vendor and type are added to the list.
Fuel Types Tab
The Fuel Types tab allows you to create predefined Fuel
Types. The Fuel Types are used in your Fuel Vendor list
records.
To add a Fuel Type from the Fuel Types tab:
• Click on Company Configuration in the main navigation.
• Click the Fuel Type tab.
• Click Add. An Add Fuel Type pop-up is displayed.
• Enter the Fuel Type.
• Click OK. The Fuel Type is added to the list.
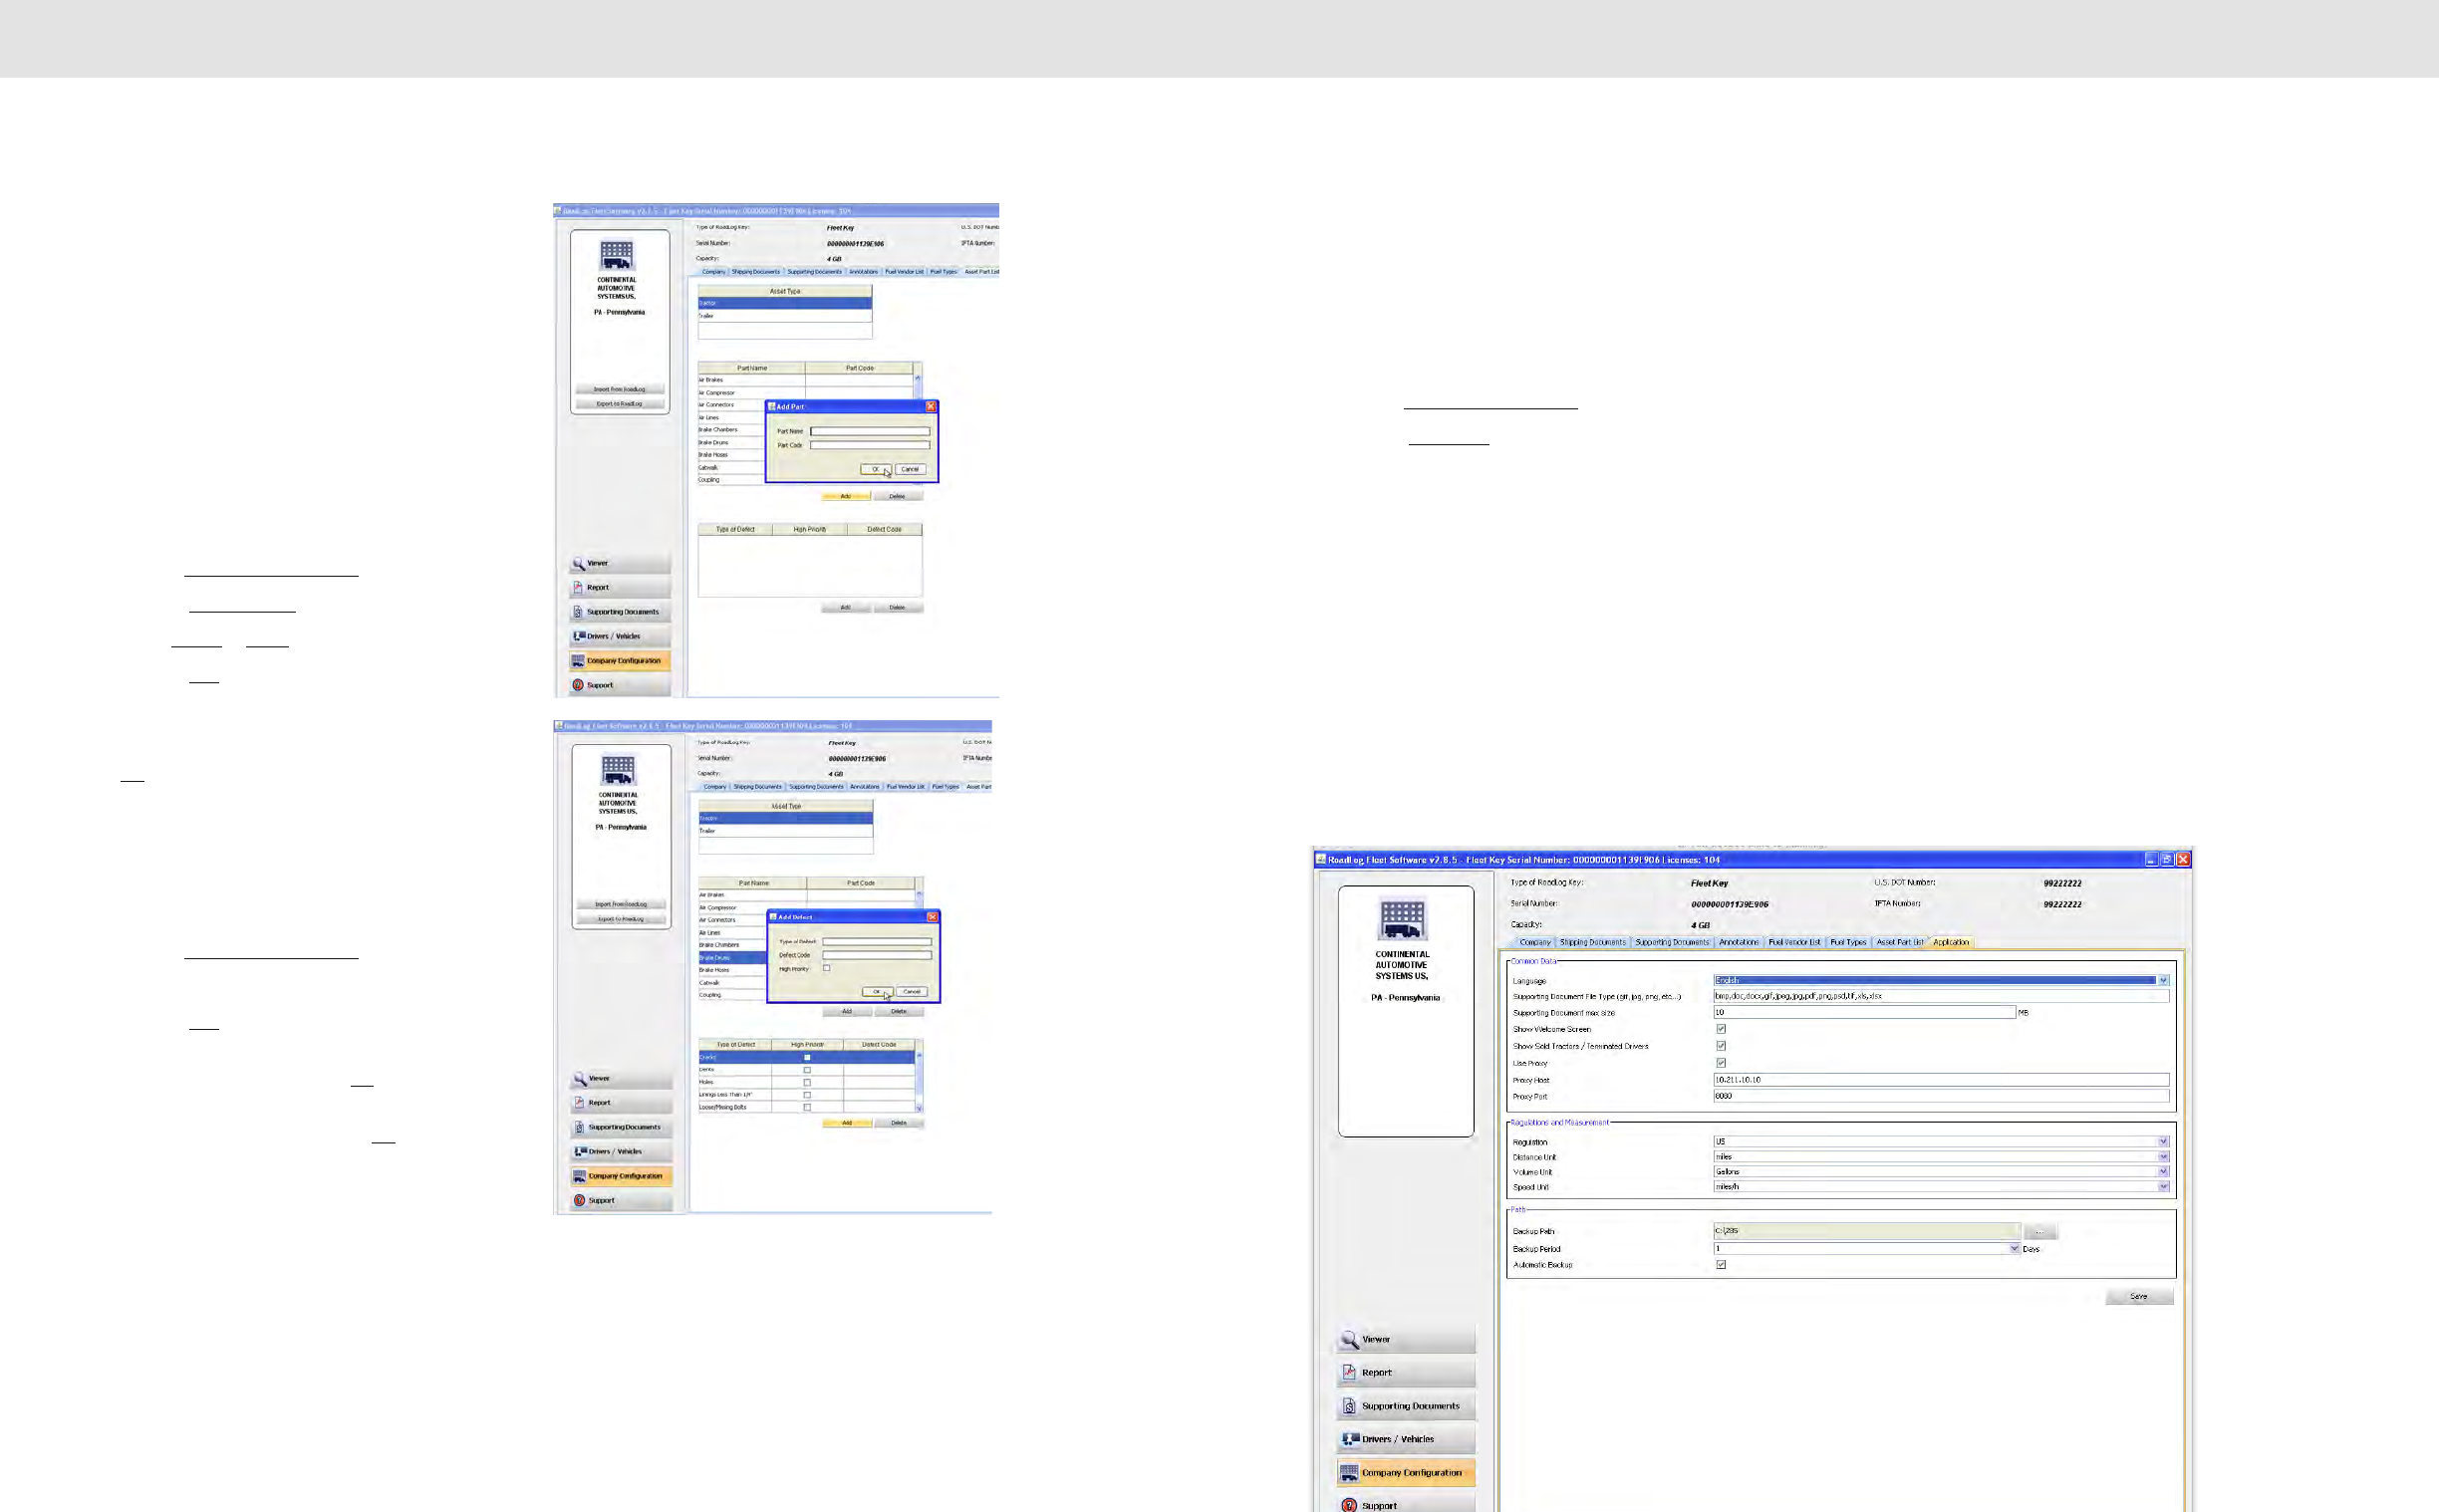
4544
Screens & Tabs: Features & Functions Screens & Tabs: Features & Functions
Asset Part List Tab
The Asset Part List allows you to create predefined lists of
Part Names and Part Codes for the Part Names. It also
allows you to create predefined lists of Defects for each of
the Part Names. Each Defect Name is assigned to a specific
Part Name. Defect Codes are assigned to each Defect name
and Defects can be flagged as being “High Priority.”
The Part Names and Codes and Defect Names and Codes
are used by the Driver when creating DVIRs in the RoadLog
device. All Part Names are established as either a Trailer part
or a Tractor part.
To add Part Name and Part Code to the Asset Part List:
• Click on Company Configuration in the main navigation.
• Click the Asset Part List tab.
• Select Tractor or Trailer from the Asset Type list.
• Click the Add button below the Part Name / Part Code
grid to add a Part Name for the vehicle type selected.
An Add Part pop-up appears.
• Enter the Asset Part Name and Part Code and click
OK. The Asset Part Name and Code are entered.
For each Asset Part, you can establish a list of predefined
Defects and Defect Codes associated with that part.
To create a Defect Name and Defect Code for a specific
asset:
• Click on Company Configuration in the main navigation.
• Click on the asset in the Part Name list.
• Click the Add button below the Defective Name grid.
• Enter the Defect Name and a Defect Code. Check High
Priority, if appropriate and click OK. The Defect Name
and Code are entered.
• After each Defect is entered, click OK.
Application Tab
The Application Tab allows you to set the parameters for the
Fleet Management Software itself. The application settings
are established during first start up, but they can be edited
at any time.
To edit the application parameters:
• Click on Company Configuration in the main navigation.
• Click the Application tab.
• Click in the appropriate field to edit settings for
Common Data, Regulations and Measurement and
Path.
Application Tab fields include:
Common Data
• Language: Choose the language to be used from the
pull-down menu.
• SD Type: A list of the file types that can be used for
Supporting Document scanned file links. Only image
files (jpeg, png, gif), .pdf and .txt files can be linked as
Supporting Documents. The .doc, .exe and .cmd files
cannot be used.
• SD Max Size: Set the maximum file size for scans
associated with Supporting Documents.
Note: Limiting the scan file size will help maintain
lower times required for transfers and back ups.
Regulations and Measurements
• Regulation: Select the region whose regulations will be
used to calculate HOS compliance.
• Distance: Choose miles or kilometers as unit for
distance.
• Volume Unit: Choose gallons or liters as the unit for
volume.
• Speed Unit: Choose either miles/hr or km/hr as the
unit for speed.
Path
• Database Backup Path: Sets the location where
backup files will be stored.
• Database Backup Period: The number of days before
a backup reminder is given to the user.
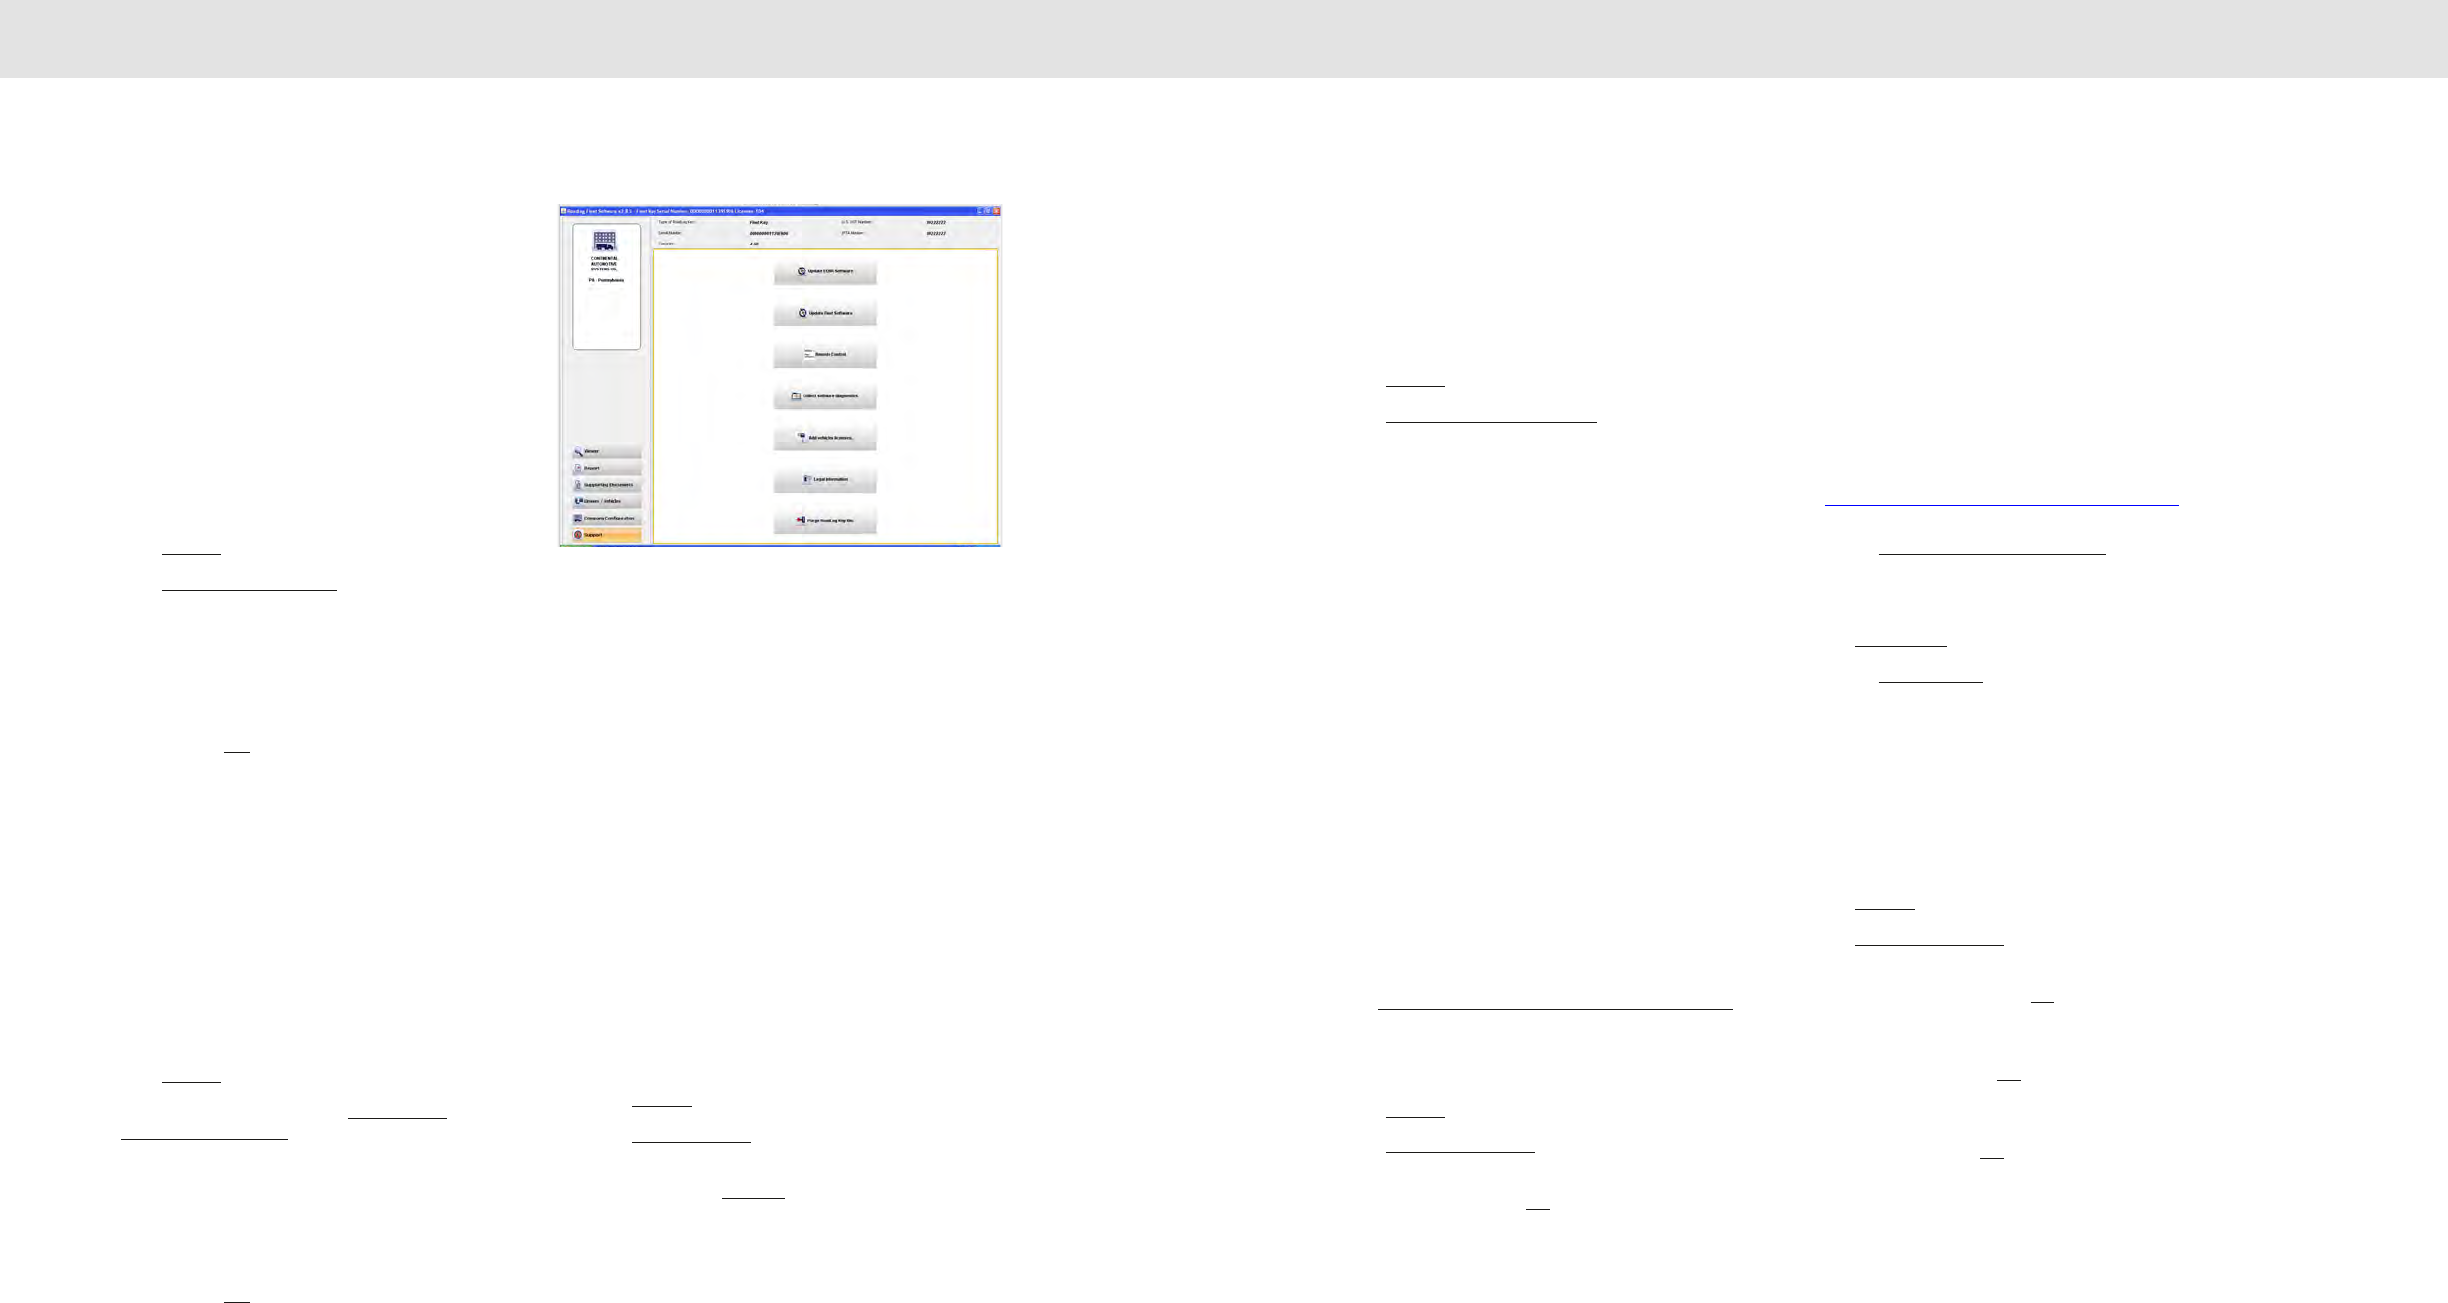
4746
Screens & Tabs: Features & Functions Screens & Tabs: Features & Functions
Support Screen
The Support page allows you to download updates for the
Fleet Management Software and the RoadLog device and to
work with VDO RoadLog technical and customer support.
Your PC must be connected to the Internet to use most of
these functions.
Update RoadLog Device Software
To check for updates available for the RoadLog device from
the Support screen:
• Click Support in the main navigation.
• Click Update EOBR Software. The RoadLog Fleet
Management Software will automatically check the
RoadLog User Portal for software updates. Note, the
check may take a few minutes, and you will not see a
new window or progress bar as the check is made.
• If a newer version of RoadLog software is available, you
will be asked whether you wish to download the new
version. Click Yes to begin the download.
• The file will automatically be downloaded to your
computer and onto the Fleet Key or Driver Key
connected to the PC. The next time that Key is inserted
into the RoaLog, you will be able to upload the newer
software.
Update RoadLog Fleet Management
Software
To check for updates available for the RoadLog Fleet
Management Software from the Support screen:
• Click Support in the main navigation.
• From the Support screen click Update Fleet
Management Software. The software will automatically
check the RoadLog User Portal for software updates.
The check may take a few minutes, and you will not see
a new window or progress bar as the check is made.
• If there is a Fleet Management Software version
available that is newer than what you are using, you will
be asked whether you wish to download the new
version. Click Yes to begin the download.
• When the download is complete, the update will load
automatically and restart the Fleet Management
Software automatically. No action is required.
Start Remote Control (FastViewer)
FastViewer is an internet-enabled program that allows
RoadLog technical support personnel to share your screen
and controls in order to diagnose problems and answer
questions.
To use this feature, contact RoadLog Technical Support to
schedule a FastViewer Session. Technical Support is
available from 8:00 am to 5:00 pm EST.
Technical Support
Email: roadlog-support@vdo.com
Tel.: (855) ROADLOG, or (855) 762-3564
Fax: (800) 752-7224 or (610) 366-9837
To start a FastViewer session:
• Click Support in the main navigation.
• Click Start FastViewer. A Connection pop-up appears.
• Choose the method you’ll use to connect to the
Internet and click Connect.
• Enter the session number received from Technical
Support and confirm the transfer of screen control by
clicking “On” on the remote control.
Note: By participating in a FastViewer session, you
are agreeing to let VDO Technical Support personnel
take temporary control of your PC.
Technical support personnel will assist you in the FastViewer
procedure. They may ask you to use the Collect Software
Diagnostics function to collect diagnostic files for the Net
Viewer Session.
Collect Software Diagnostics
The Collect Software Diagnostics function creates an archive
of data and diagnostic files that will help technical support
personnel deal with your issues.
To perform a Collect Software Diagnostics:
• Click Support in the main navigation.
• Click Collect Software Diagnostics.
Adding Vehicle Licenses
The RoadLog Fleet Management Software includes built-in
licenses to track two RoadLog devicess. In order to track
additional vehicles, you must purchase additional licenses.
VDO RoadLog™ Fleet Management Software License
Extension Cards will enable you to add additional Vehicles to
your list of tracked Vehicles. License cards can be
purchased from RoadLog retailers. If a RoadLog retailer is
not available in your area, licenses can be ordered by phone
through VDO RoadLog Customer Support by calling (855)
ROADLOG, or (855) 762-3564.
Adding Vehicle Licenses through the
RoadLog Fleet Management Software
Note: The procedure described here requires Internet
access to complete the license addition process. If
you do not have Internet access, see the instructions
for Adding Vehicle Licenses through the VDO Portal.
To add Vehicle licenses from the VDO RoadLog™ Fleet
Management Software License Extension you’ve purchased:
• Click Support in the main navigation.
• Click Add vehicle licenses.
• Enter the License Key number from the License card
you’ve purchased. Click OK. The Fleet Management
Software communicates with the RoadLog portal to
activate the licenses.
Note: This communication may take several minutes.
• When communication is completed, the Fleet
Management Software will display a confirmation
message confirming the number of licenses that have
been added. The number of licenses is shown in the
Windows bar on the RoadLog Fleet Software
application.
Adding Vehicle Licenses through the VDO Portal
If you do not have Internet access on the PC that you use to
run the Fleet Management Software, you will have to use a
different PC that has Internet access to add licenses.
Purchase the RoadLog Fleet Management Software License
Extension card(s) you need. Take the extension card(s) and
your RoadLog Fleet Portal User Name and Password to the
Internet-connected PC (your User Name is the email
address that you entered when you created your RoadLog
Fleet Management Software account).
Go to http://www.vdoroadlog.com/software-downloads. Log
in with your User Name (email) and Password.
• Click on Update Fleet Manager licenses.
• Enter the license code from one License card into the
field Add Device Licenses.
• Click Add License.
• Click on View Licenses. The portal will display your
License Card Number(s) and Activation Code(s).
• Write down the Activation Code for each newly entered
License Card number(s).
• Note: Copy carefully! All numbers must be exactly
correct for the Activation Code to work.
• Take your Activation Code(s) back to your PC and
launch the Fleet Management Software.
• Click Support in the main navigtion.
• Click Add vehicle licenses.
• In the field seen on the Add vehicle licenses screen,
enter NOT AVAILABLE. Click OK.
• You’ll see the Extend License Error screen with the
message “Error occurred while getting Activation key
from web service.” Click OK. You’ll see the Activation
Key screen.
• Enter the Activation Code you copied from the
RoadLog Portal. Click OK.
• The RoadLog Fleet Management Software will update
your license record to reflect the additional licenses you
purchased. The number of licenses is shown in the
Windows bar on the RoadLog Fleet Software
application.
If you need assistance, call VDO RoadLog support
personnel are available at:
Technical Support & Customer Service
Email: RoadLog-support@vdo.com
Tel.: (855)-ROADLOG, or (855) 762-3564
Fax: (800) 752-7224 or (610) 366-9837
Customer service is available 8:00 am – 5:00 pm EST
Email: RoadLog-sales@vdo.com
www.vdoRoadLog.com

4948
Screens & Tabs: Features & Functions Resolving Conflict Files
Purging old data
Whenever you import files, the Fleet Management Software
will automatically purge data from the Driver Key and Fleet
Key that is older than you are legally required to keep.
Backup files are not affected; the Fleet Management
Software keeps a copy of those files in the backup folder.
Note: The backup folder location is defined in the
Company Configuration / Application tab in the
Backup Path field.
To choose the backup location:
• Click Company Configuraton in the main navigation.
• Click the Application tab.
• Click on the ••• button and navigate to the directory/
folder you want to use.
• When you’ve selected the directory/folder, click Open.
You may want to periodically purge old data from the
Driver or Fleet Key, manually.
As it is used, the Driver Key will continue to accumulate
data. The Key will eventually fill up and need to be purged of
old data.
To manually purge older data from the the Driver or Fleet
Key:
• Click Support in the main navigation.
• Click Purge RoadLog Key file. The default choice is to
purge all records shown with a checkmark.
• If you want to purge only selected files, unclick the
Purge All checkbox and select those you want to purge
in the check box column. If you want to purge all, leave
the box checked.
• Click OK. The selected records are purged from the
RoadLog Key.
Replacing Lost or
Damaged RoadLog Keys
If your Fleet Key or Driver Keys are ever lost or damaged,
VDO Technical Support can replace them. They will assist
you in restoring the data on the keys and enabling the new
keys to work with your existing Fleet Management Software.
Note: Buying a new key to replace a lost or damaged
one is only one part of what you’ll need to do to
restore your operations. Your Fleet Management
Software records are tied to the specific serial
numbers of your Fleet Key and Driver Keys. To enable
your Fleet Management Software to work with new
serial numbers, you’ll need assistance from VDO
Technical Support.
If you need to replace lost or damaged keys, contact VDO
Technical Support:
VDO RoadLog support personnel are available at:
Technical Support & Customer Service
Email: RoadLog-support@vdo.com
Tel.: (855)-ROADLOG, or (855) 762-3564
Fax: (800) 752-7224 or (610) 366-9837
Customer service is available 8:00 am – 5:00 pm EST
Email: RoadLog-sales@vdo.com
www.vdoRoadLog.com
8. Resolving Conflict Files
Using the Fleet Key and Driver Keys, data can be imported
from the RoadLog Fleet Management Software to the
RoadLog device, and from the RoadLog device to the Fleet
Management Software.
As a result of such data transfers, there may be instances of
conflicting files, where data from the Fleet Management
Software does not match the data from the RoadLog device.
When the Fleet Management Software detects conflicting
data, it will prompt you to resolve “Conflict Files.” You will
need to choose which file to retain – the file generated at the
RoadLog device or the File generated in the Fleet
Management Software.
Often, the newer file will be the correct one to retain, but
there may be instances where the opposite is true. Check
with the Driver who created the records in the RoadLog
device to help determine where the conflict occurred and
which record is the correct record to retain.
IMPORTANT: When you choose the conflicting file to retain,
it will overwrite the other record! Be sure to choose carefully
before proceeding.
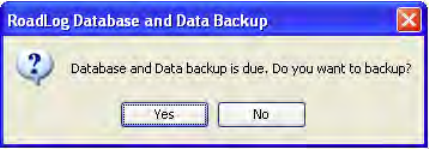
50
9. Backing up your RoadLog Data
Moving from paper logbooks to electronic fleet data does
not change the regulatory requirements for maintaining
compliance records. The US and Canada require that
operators maintain HOS and other records for specific
periods of time – in the US, for six months.
You are legally responsible for maintaining that data. That
means establishing a data backup routine and following it
without exception. A daily backup is the best way to avoid
falling out of legal compliance. Do not back up data to the
same computer that holds your active Fleet Management
Software. If it fails, you’ll lose your data and your backup.
RoadLog Fleet Management Software supports easy
backup with automatic reminders at intervals you select. You
can backup RoadLog data to any storage location your PC
can access – a USB memory stick, a CD or DVD, an
external hard drive, a networked server or online “cloud”
storage.
In the Application settings tab, you can set in the back-up
location, whether you want the back-up to take place
automatically and how frequently.
Any one Key, hard drive, or computer can fail, or be lost or
stolen. So always back up to multiple storage devices.
To guard against fire or other natural disasters, never keep
all your backups in one location. We strongly recommend
daily transport or copying of backups to an off-site location.
Driver back up reminders at startup
When you’ve used the Fleet Management Software for a
period of time, you’ll see Driver backup reminders at startup.
You’ll see a grid that lists Drivers along with the date of their
last download, the date their next download is scheduled for
and the number of days until the next download will be
overdue.
Backing up your RoadLog Data
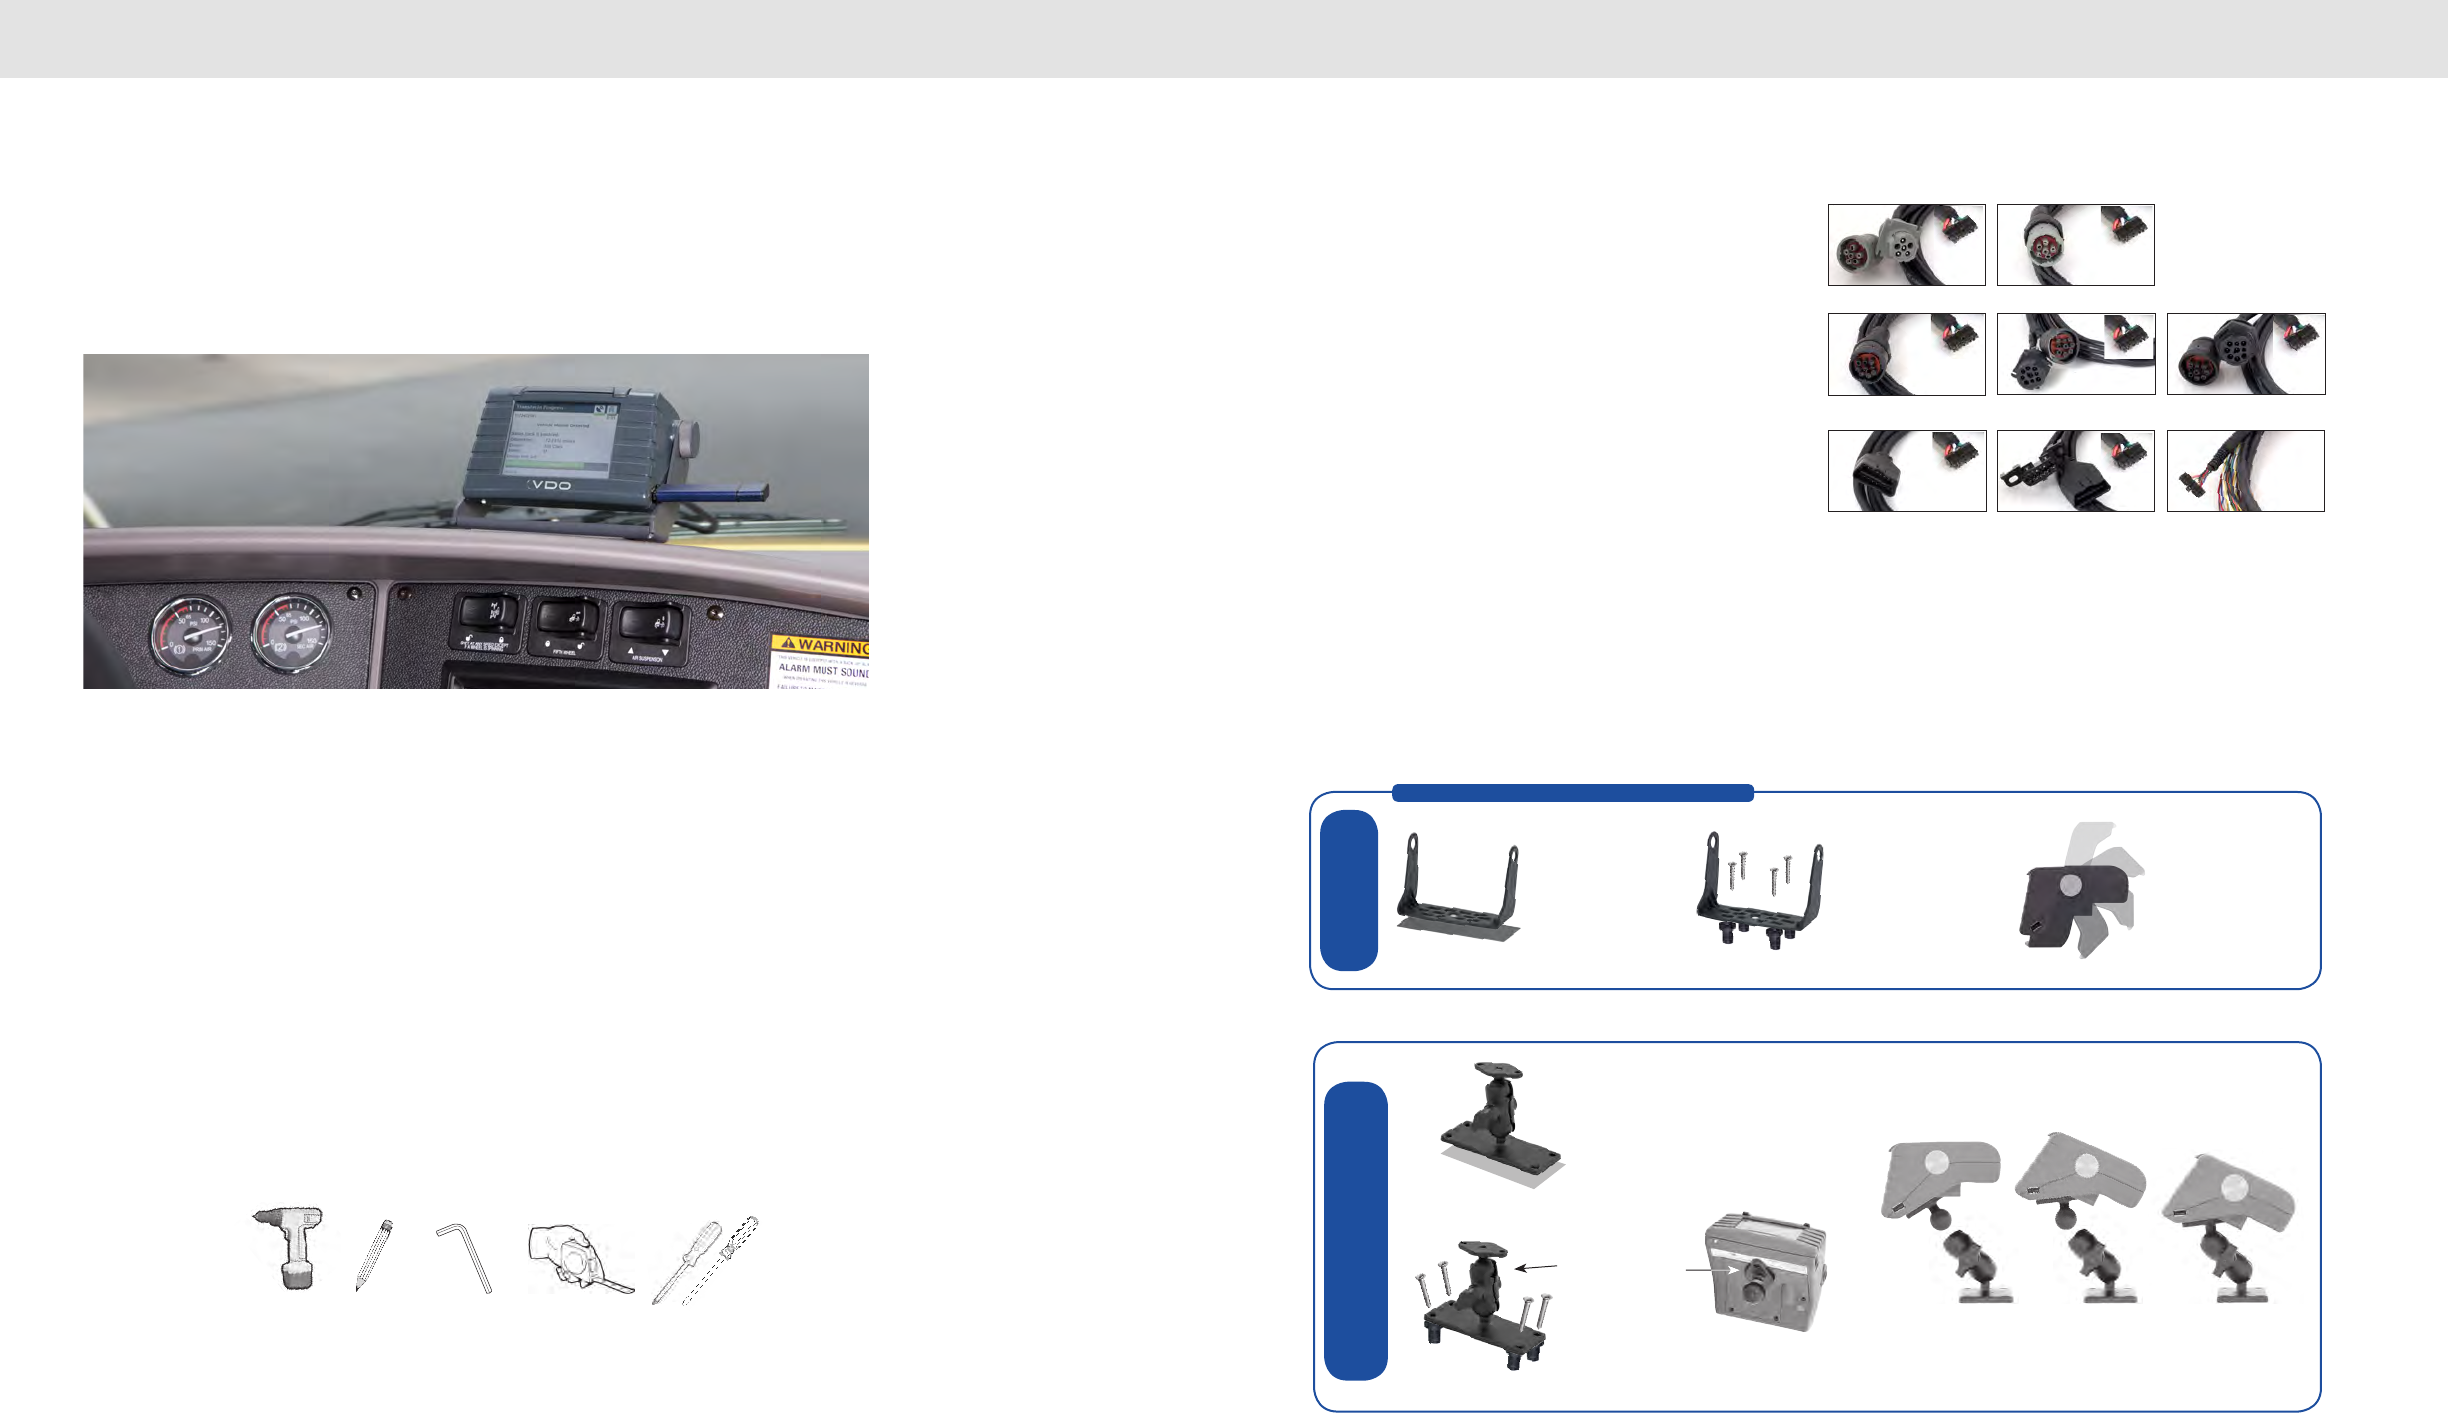
5251
This chapter of the Owner’s Manual is intended to help
you get your RoadLog device installed, up and running
quickly and easily.
BEFORE STARTING:
• To avoid damage to the vehicle or risk of electric shock,
always confirm the location of electric wires and air lines
by consulting the vehicle’s owner’s manual or your local
vehicle repair facility. If there is any uncertainty about
the location of electric wires, disconnect the vehicle
battery before drilling.
• Be careful when installing cable or wires to avoid kinks,
knots or twisting in the line.
• Be certain cable/wires are not rubbing on sharp edges.
RECOMMENDED TOOLS:
1. Make sure you have the correct
Installation Kit!
• RoadLog can be connected with 6-pin, 9-pin, 16-pin
OBDII or open-end “basic” cable. Only one cable is
required. Choose the one that fits your connector or
choose the open-end if you have no connector and will
connect individual wires to the vehicle. (For basic cable,
installation by a professional shop is recommended.
When using the basic cable the ignition line should be
connected.)
• Each cable is supplied with the basic installation bracket.
Y-Cables are an optional upgrade that retain an open
cable connector in the cab.
2. Choose your Mounting Option.
• The “basic” bracket is included with each
installation kit. The optional omni-directional mount
(Part #3290-90110100) allows for more mounting
location options and greater control of the viewing angle.
• Drill • Pen or
pencil
• 5mm
Hex Key
• Tape
measure
• Phillips & Flathead
Screwdrivers
16 pin direct OBDII Open end
9 pin Y with ange9 pin direct
6 pin direct
16 pin Y OBDII
9 pin Y with ange w/plastic nut
6 pin Y
OMNI-DIRECTIONAL MOUNT
(optional)
INSTALL OMNI-DIRECTIONAL MOUNT WITH
DOUBLE-SIDED ADHESIVE OR WITH SCREWS
AND WELL-NUTS.
LOOSEN HANDLE ON
MOUNT TO REMOVE
UPPER PORTION.
ATTACH UPPER MOUNT
TO UNDERSIDE OF
ROADLOG USING
SCREWS PROVIDED.
PLACE THE ROADLOG AND UPPER MOUNT BACK INTO THE CLAMP AND
RETIGHTEN WHILE ADJUSTING THE SCREEN VIEW ANGLE AS REQUIRED.
BASIC BRACKET
(included)
INSTALL BRACKET
WITH DOUBLE-SIDED
ADHESIVE...
...OR INSTALL BRACKET
WITH SCREWS AND
WELL-NUTS.
SCREEN VIEW ANGLE
IS ADJUSTABLE USING
BRACKET KNOBS.
SUGGESTIONS FOR BRACKET MOUNTING
Chapter 2: VDO RoadLog™ Installation
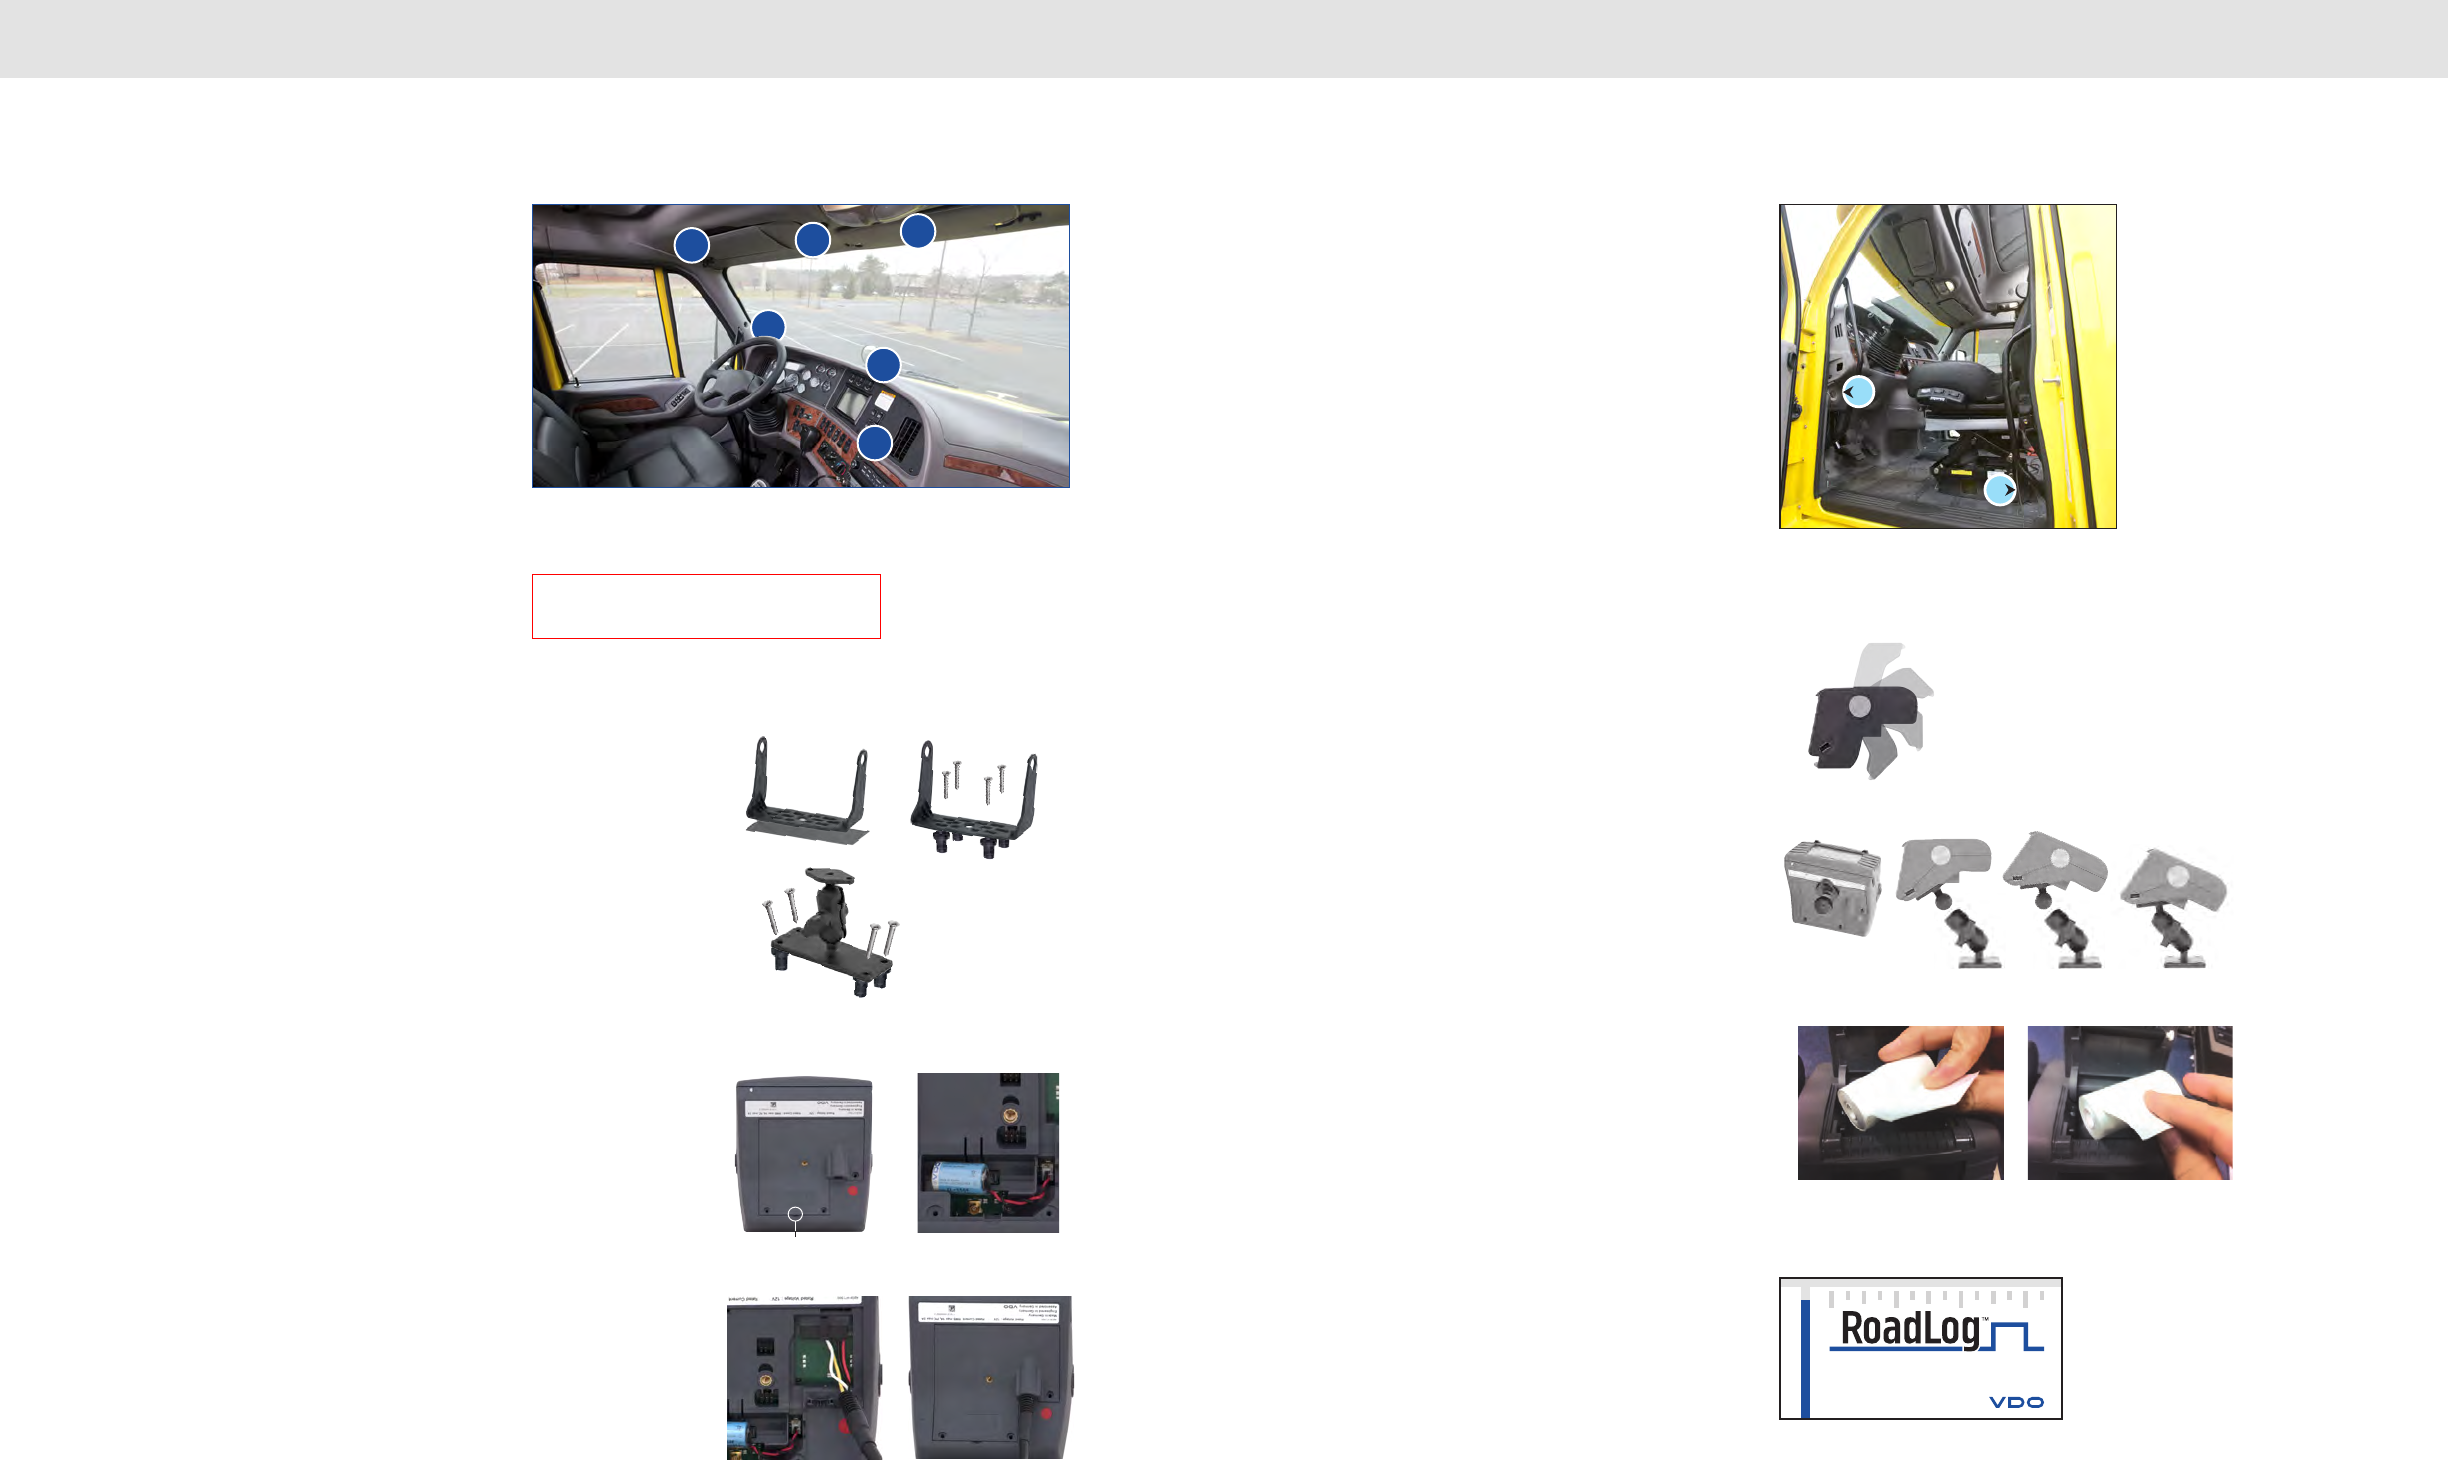
5453
3. Choose your Mounting Location.
*Recommended locations
A. Top of the dash driver’s left side*
B. Top of the dash driver’s center*
C. Instrument panel driver’s right side
D. Overhead console driver’s left side
E. Overhead console driver’s center side
F. Overhead console driver‘s right side
4. Attach your Bracket or Mount.
• The bracket or omni-directional mount can be attached
with the adhesive foam pads or with screws and well-
nut inserts supplied. When using the adhesive foam
pads be sure to clean the surface with a single direction
swipes by using an alcohol prep pad supplied in the
installation kit. Let it dry and apply the tape. The tape
will cure in 24-48 hours. The best results are achieved
when the surface is warm, so you may want to warm up
the cab if the ambient temperature is low.
• Screws and well-nut inserts will require drilling into the
cab’s interior. If using screws, first mark the mounting
holes using the bracket or omni-mount base plate as a
guide. Make sure to avoid drilling into any electrical
cables and air supply lines underneath the surface.
• If using well-nuts, use a 3/8” drill bit to create a hole in
which to insert the well-nut shaft. Again, make sure to
avoid drilling into the electrical cables and air supply
lines underneath the surface.
5. Prepare the RoadLog.
• Unpack the device.
• Remove the service panel on the underside.
• Insert the Battery.
• Connect the cable.
• Close the service panel.
6. Connect Cable.
• Run the cable from the RoadLog to the vehicle data
port. The cable can be run behind the interior dash
panels via gaps between them or by their removal
where necessary.
• Secure the cable out of the driver’s range of motion and
moving parts – coil up and secure the excess cable by
using zip ties provided.
• Connect the cable to the vehicle data port. The device
will power up and be ready for the initial on screen
setup.
• NOTE: If using the Open End Cable, follow the wiring
indications shown on Page 6.
7. Install RoadLog into Mount.
Basic bracket:
Place the RoadLog device into the basic bracket and install
the knobs. Adjust the screen view angle and then tighten the
knobs.
Omni-directional mount (optional):
Loosen the handle until the upper portion of the mount can
be removed. Attach the upper mount to the underside of the
RoadLog device using screws provided. Place the RoadLog
device and upper mount back into the clamp and retighten
while adjusting the screen view angle as required.
8. Load Paper Roll.
To load the paper roll (Part # 3290-90010100), lift the access
panel at the top of the RoadLog, lay the paper roll into
the cavity and pull the leading edge of the paper forward,
towards the screen. The roll should be inserted so that when
the paper comes out, it curls towards the back of the unit.
9. Compliance Sticker.
Applying the included sticker to the window of your cab is
optional, but doing so will ensure that anyone who sees it
knows your vehicle is complying with FMCSA regulations.
(Clean surface before applying.)
Pry open the service panel
with a small, athead
screwdriver.
Plug the battery connector into
the jack and place the battery
into the holder.
Check marking and plug the data
cable. Attach the corrugated pipe.
Close the service panel again and
insert the three screws included
in the box.
1
Cable ports are usually located in the dash (1)
or on the oor to the left of the driver’s seat (2).
IMPORTANT: Choose a location that will allow easy operation, but
will not block your view of the road.
NOTE: The unit must be placed a minimum
of 10 inches (20cm) away from the driver.
DEF
A
B
C
Correct roll orientation Incorrect roll orientation
Electronic
Driver Lo gs
2
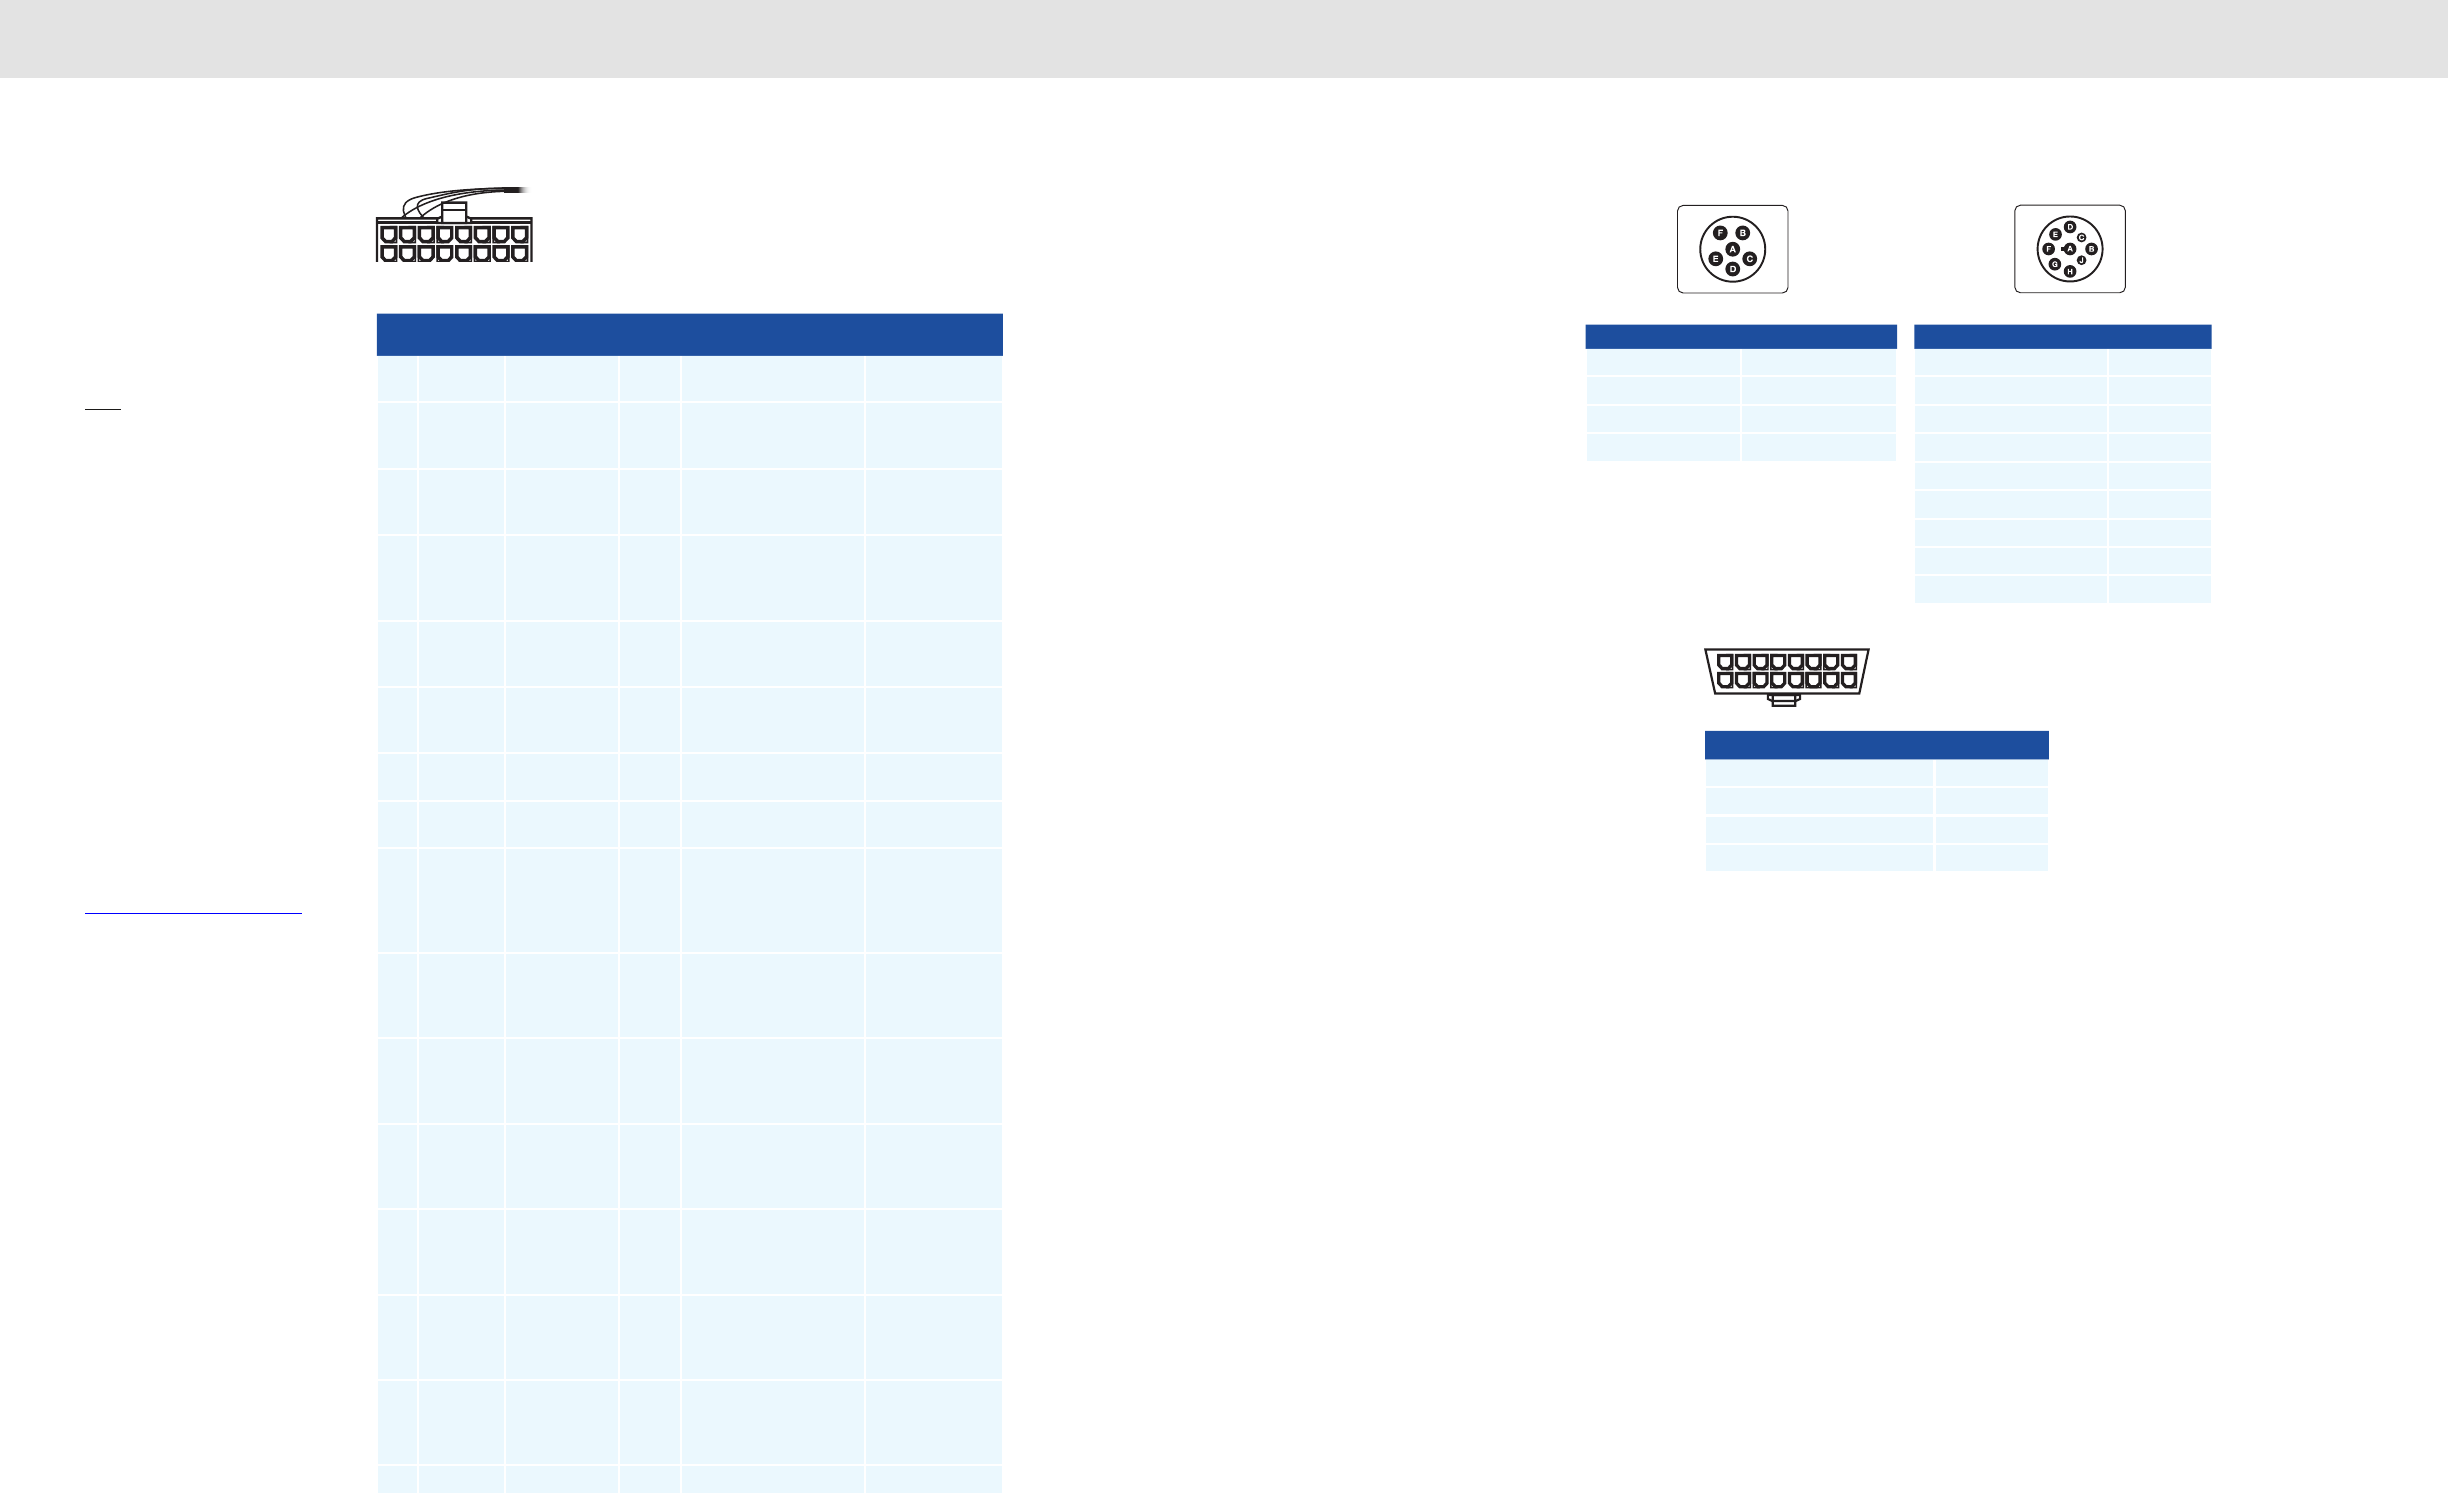
5655
Instructions for Open
End “Basic” Cable
If using the Open End “Basic”
Cable, follow the pin / wire color
assignments from the table:
Note: If the vehicle ignition line is
accessible during RoadLog
installation, it’s recommended that
the ignition line be connected with
the device (see vehicle connector).
If the ignition line is connected, it’s
recommended that the
Wake up condition configuration
parameter be set to the ignition
only setting.
For the vehicles in which the
ignition line is not accessible,
RoadLog can detect the vehicle
ignition on / off status based on
the vehicle synchronization data
received. Therefore, if the ignition
line is not connected, the Wake
up condition configuration
parameter should be set to the
ignition or vehicle data setting. See
Setting the Wake up condition
If the ignition or vehicle
configuration setting is chosen, the
installer must verify that RoadLog
is in fact receiving
the ignition on / off status
based on the received vehicle
synchronization data. If the status
is not being received, RoadLog
cannot function properly.
Pin
No
Signal
Name Description
Wire
Color Purpose
Notes /
Connection
1TERM15 Terminal 15
ignition signal
Brown Input of vehicle ignition
line
2TERM30 Terminal 30
power supply
voltage
Red Supply line from vehicle
battery (+)
3CAN1_H CAN1 High
Line
CAN_H connection
to vehicle CAN bus
(J1939-11/15)
Must be twisted
together with
CAN1-L wire
4TERM31 Terminal
31power
supply
ground
Black Ground line, GND
5CAN1_L CAN1 Low
Line
CAN_L connection
to vehicle CAN bus
(J1939-11/15)
Must be twisted
together with
CAN1-H wire
6CAN1_
GND
CAN 1
ground
CAN_GND connection
to vehicle CAN bus
(J1939-11/15)
7J1708 (+) RS484 line A J1708 (+) connection to
vehicle SAE J1708 bus
8J1708 (-) RS484 line B J1708 (-) connection to
vehicle SAE J1708 bus
9SPEED_
IN
Speed pulse signal
input Vehicle speed
pulse input from
vehicle speed sensor
(ISO16844)
10 RPM_IN Revolution pulse signal
input RPM pulse input
from vehicle engine
controller ECU
11 CAN2_H CAN2
HighLine
CAN_H connection
to proprietary CAN
bus (third party device
connection)
Must be twisted
together with
CAN2-L wire
12 CAN2_L CAN2 Low
Line
CAN_L connection to
proprietary CAN bus
(third party device
connection)
Must be twisted
together with
CAN2-H wire
13 CAN2_
GND
CAN2 ground CAN_GND connection
to proprietary CAN
bus (third party device
connection)
14 DIGITAL_
IN1
Digital input 1 Digital input (tri-state:
not used (high-Z)/
high-level active input/
low-level active input)
15 DIGITAL_
IN2
Digital input 2 Digital input (tri-state:
not used (high-Z)/
high-level active input/
low-level active input)
16 RFU Not used Reserved for future use
OBDII connector pin assignments
(front view)
OBDII-Pin Description Pin Location
Chassis ground 4
CAN_H line of ISO 15765-4 6
CAN_L line of ISO 15765-4 14
Permanent positive voltage 16
6
14
5
13
4
129
1
10
2
11
3
15
7
16
8
12
11
10
9
8
71
2
3
4
5
6
13
14
15
16
The basic cable has a total of 8 wires and only Pins 1, 2 and 4
are connected: ignition, battery ( + ) and ground ( – ), respectively.
The rest of the wires have to be connected according to the table
below depending on the type of the vehicle.
6-pin and 9-pin Wiring
Configurations
The 6-pin and 9-pin cables
are configured as shown:
OBDII Vehicle Connector
If using the OBDII Vehicle Connector, follow the
pin assignments from the OBDII connector pin
assignments table:
9-Pin Connector (front view)
6-Pin Connector (front view)
6-Pin Description Pin Location
J1708 ( + ) Data A
J1708 ( – ) Data B
Battery ( + ) C
Battery ( – ) E
9-Pin Description Pin Location
Battery ( + ) A
Battery ( – ) B
J1939/CAN Data HIGH C
J1939/CAN Data LOW D
CAN Shield E
J1708 ( + ) Data F
J1708 ( – ) Data G
OEM H
OEM J
(front view)
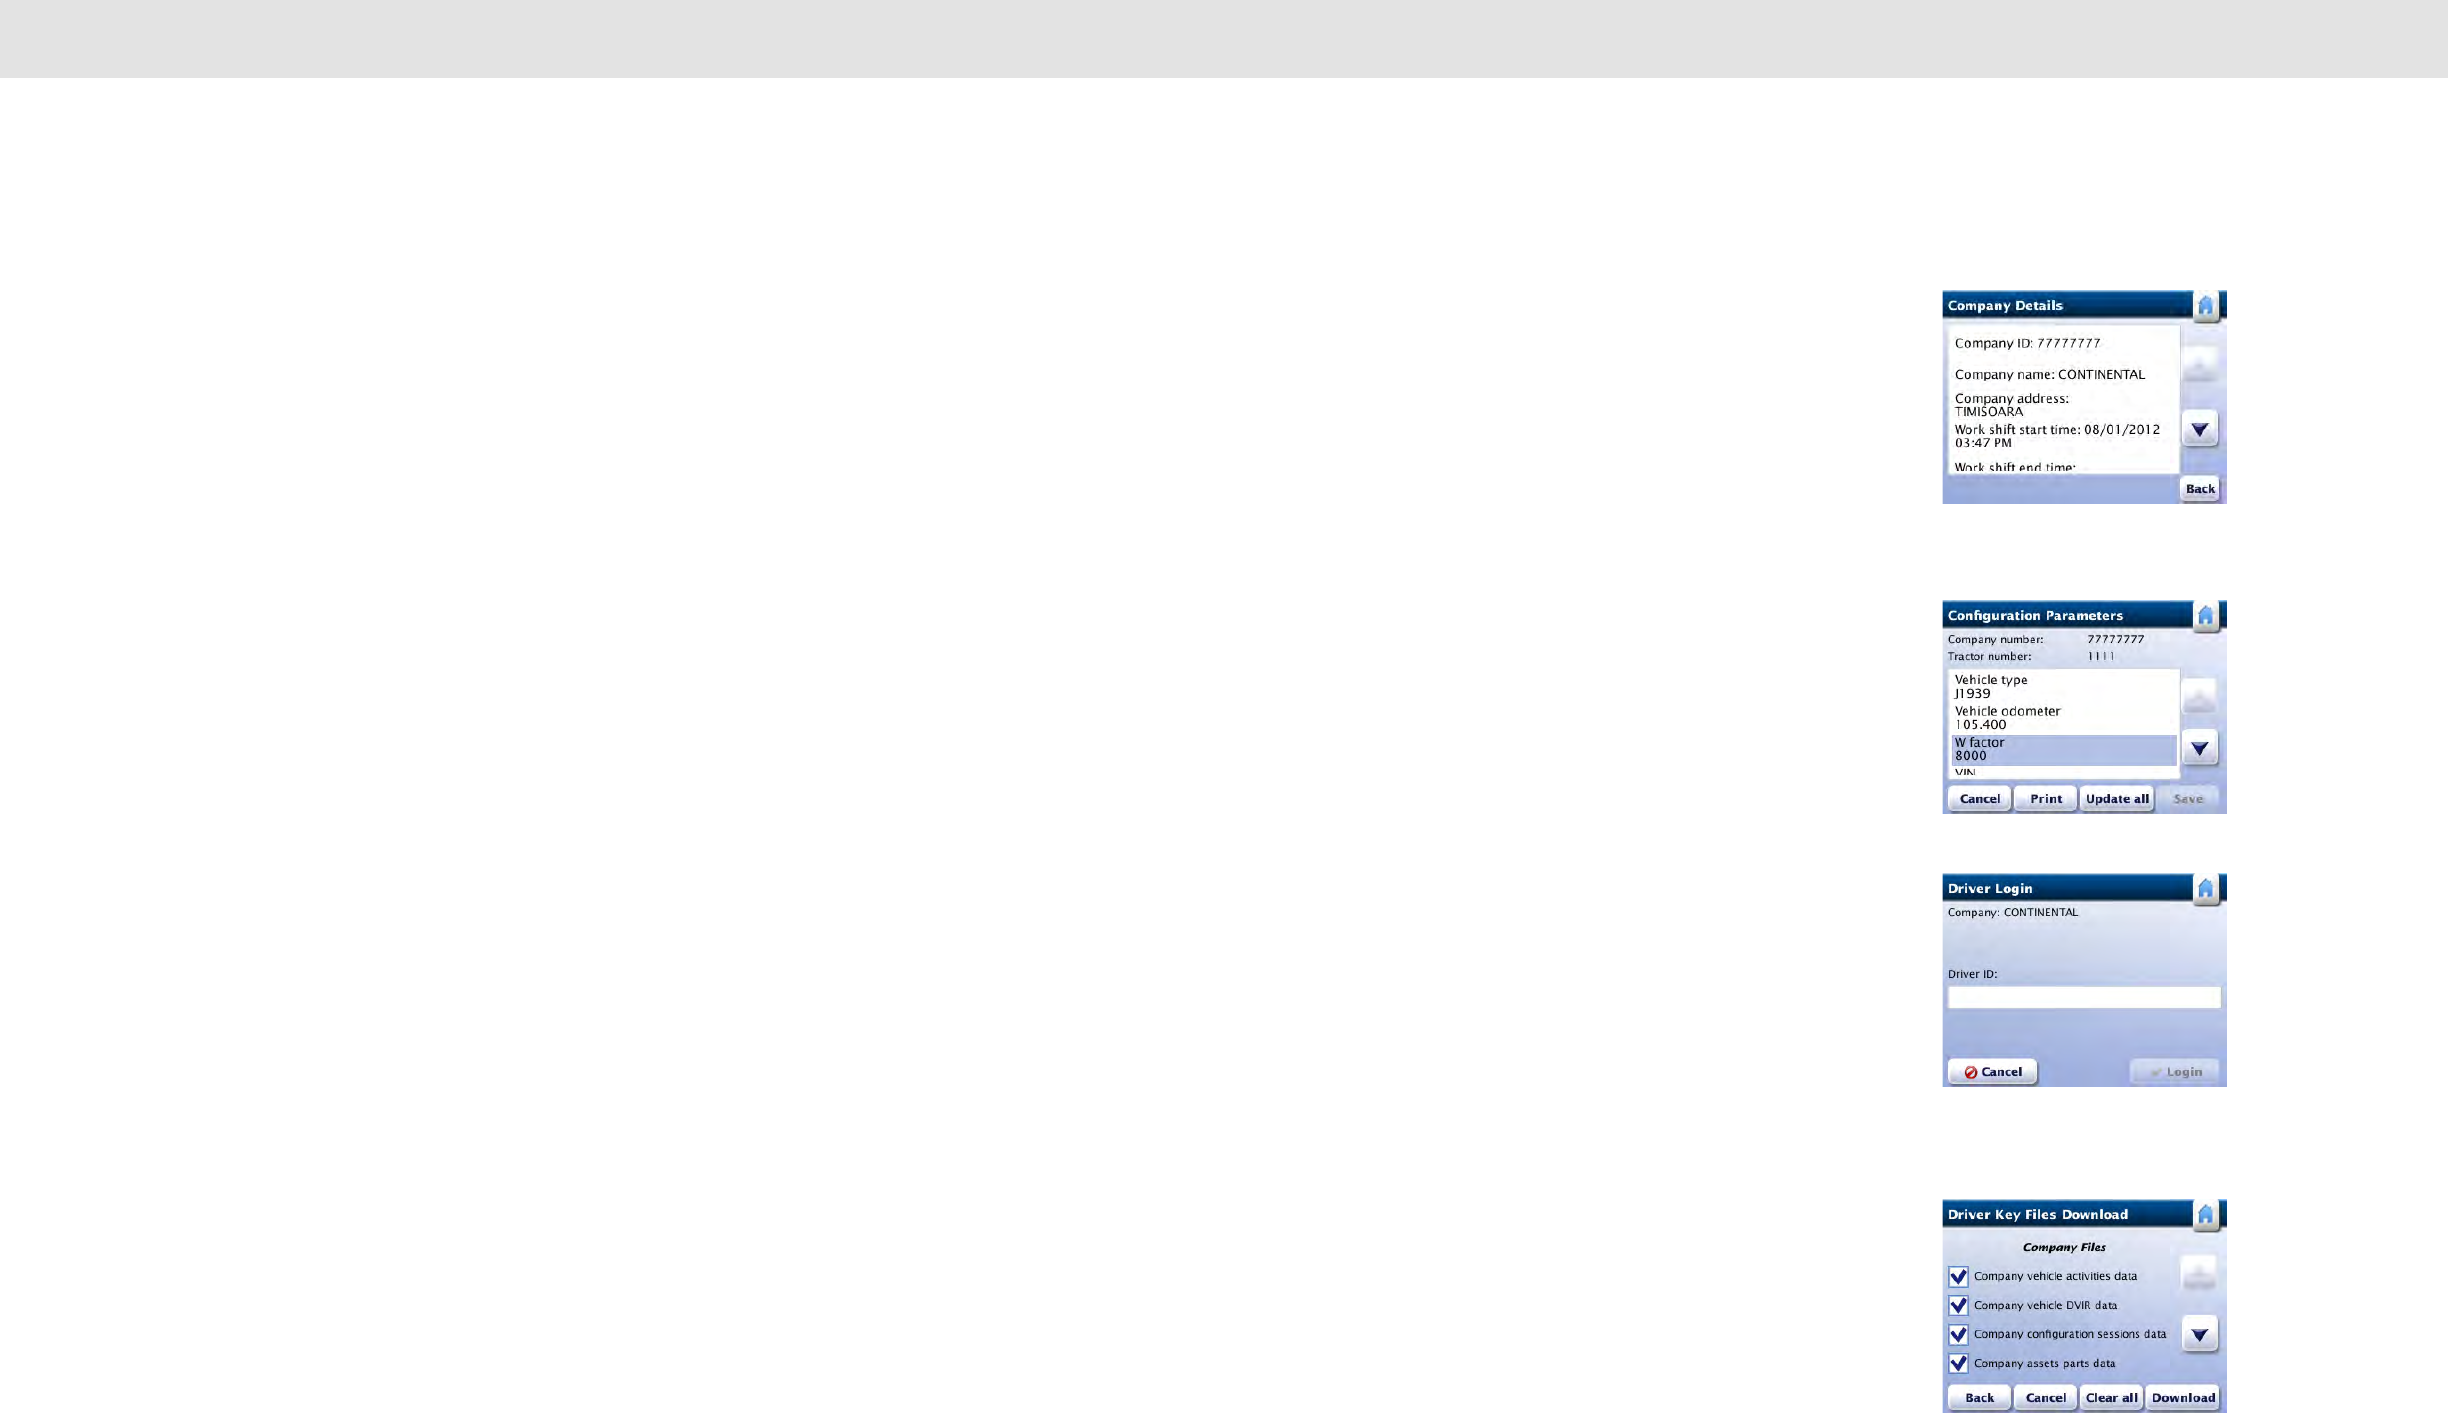
5857
VDO RoadLog Fundamentals VDO RoadLog Fundamentals
1. VDO RoadLog Fundamentals
RoadLog is designed to eliminate the need for paper logs,
while keeping Drivers in compliance with all FMCSA Hours
of Service (HOS) and Driver Vehicle Inspection Report (DVIR)
regulations.
Free upcoming software updates will include reporting on
IFTA mileage and IRP miles and compliance with rules for
Canada, Alaska and oil field.
With RoadLog, a Driver can:
• Automatically calculate and display HOS daily driving
availability, HOS daily duty availability and HOS weekly
duty availability based on the limits imposed by FMCSA
regulations.
• Record Off Duty Status activities (RODS data).
RoadLog will store the RODS data for the current day
and the previous 14 calendar days.
• Receive audio and visual warnings before exceeding
the driving and HOS duty limits and receive warnings
again after exceeding the driving and HOS duty limits.
• Take exemptions from HOS rules when required
(personal use, emergency conditions, adverse driving
conditions, 16-hour extension and 100 and 150 air-
miles radius Driver).
• View and print the HOS daily log for the current day as
well as each of the past 14 days.
• Assign up to three trailers to the trip.
• Assign up to five shipping documents to the trip.
• Create, view and print pre-trip and post-trip DVIRs by
entering data for the vehicle and the current trailers.
• Comply with roadside inspections by proving HOS logs
and DVIRs via data transfer on USB or by printing them
directly from RoadLog’s built-in thermal printer.
• Record various trip activities such as meals, fueling and
vehicle wash and print out Supporting Documents for
these activities directly from the RoadLog’s built-in
thermal printer.
• Download vehicle data and DVIR data recorded by
RoadLog over the course of the past 30 calendar days
to any Fleet Key or Driver Key belonging to the logged-
in company.
• Carry data from one vehicle to another if he/she
changes vehicles in a fleet.
• At the end of each day’s work, log out and download
RODS data to the Driver Key and submit that data to
the company.
Operating RoadLog:
The key functions required to operate RoadLog include:
Company Log In:
Before any Driver can log in to RoadLog, the company must be
logged in so that all the data can be recorded under a company
account. Company log in can be done automatically with an
activated Fleet Key.
Note: More than one company can share a single RoadLog,
but only one company can be logged in at a time.
RoadLog Configuration:
RoadLog configuration requires setting vehicle and company
parameters such as VIN, language preference and vehicle license
plate number. Configuration data can be entered directly through
the RoadLog touch screen, or data can be entered into the Fleet
Software and transferred to the RoadLog via the Fleet Key.
Note: Company data cannot be transferred to RoadLog via
the Driver Key.
Important: Serial number of the RoadLog vehicle unit needs
to match the serial number provided during the tractor
creation process in the Fleet Software.
Driver Log In / Log Out:
Drivers must log in on their RoadLog at the beginning of the work
period, whether they’re about to begin Driving or going On Duty.
Drivers can log in and log out automatically, with their personalized
Driver Key, or manually through the RoadLog Touch Screen,
provided they were logged in with their Driver Key at an earlier time,
or their Driver Profile has been uploaded to RoadLog via the Fleet
Key.
Data Download / Upload:
Data recorded by RoadLog is downloaded to the Driver Key for
transfer to the Fleet Software. Once entered in the Fleet Software,
the data can be analyzed and archived to maintain compliance with
FMSCA regulations.
Data can be transferred using a personalized Driver Key or the
Fleet Key.
When a Driver logs in with a Driver Key, RoadLog automatically
uploads status data (RODS data) recorded during past work
sessions. When a driver downloads or uploads data, both Driver
and company-related data is transferred.
Chapter 3: VDO RoadLog™ Operation
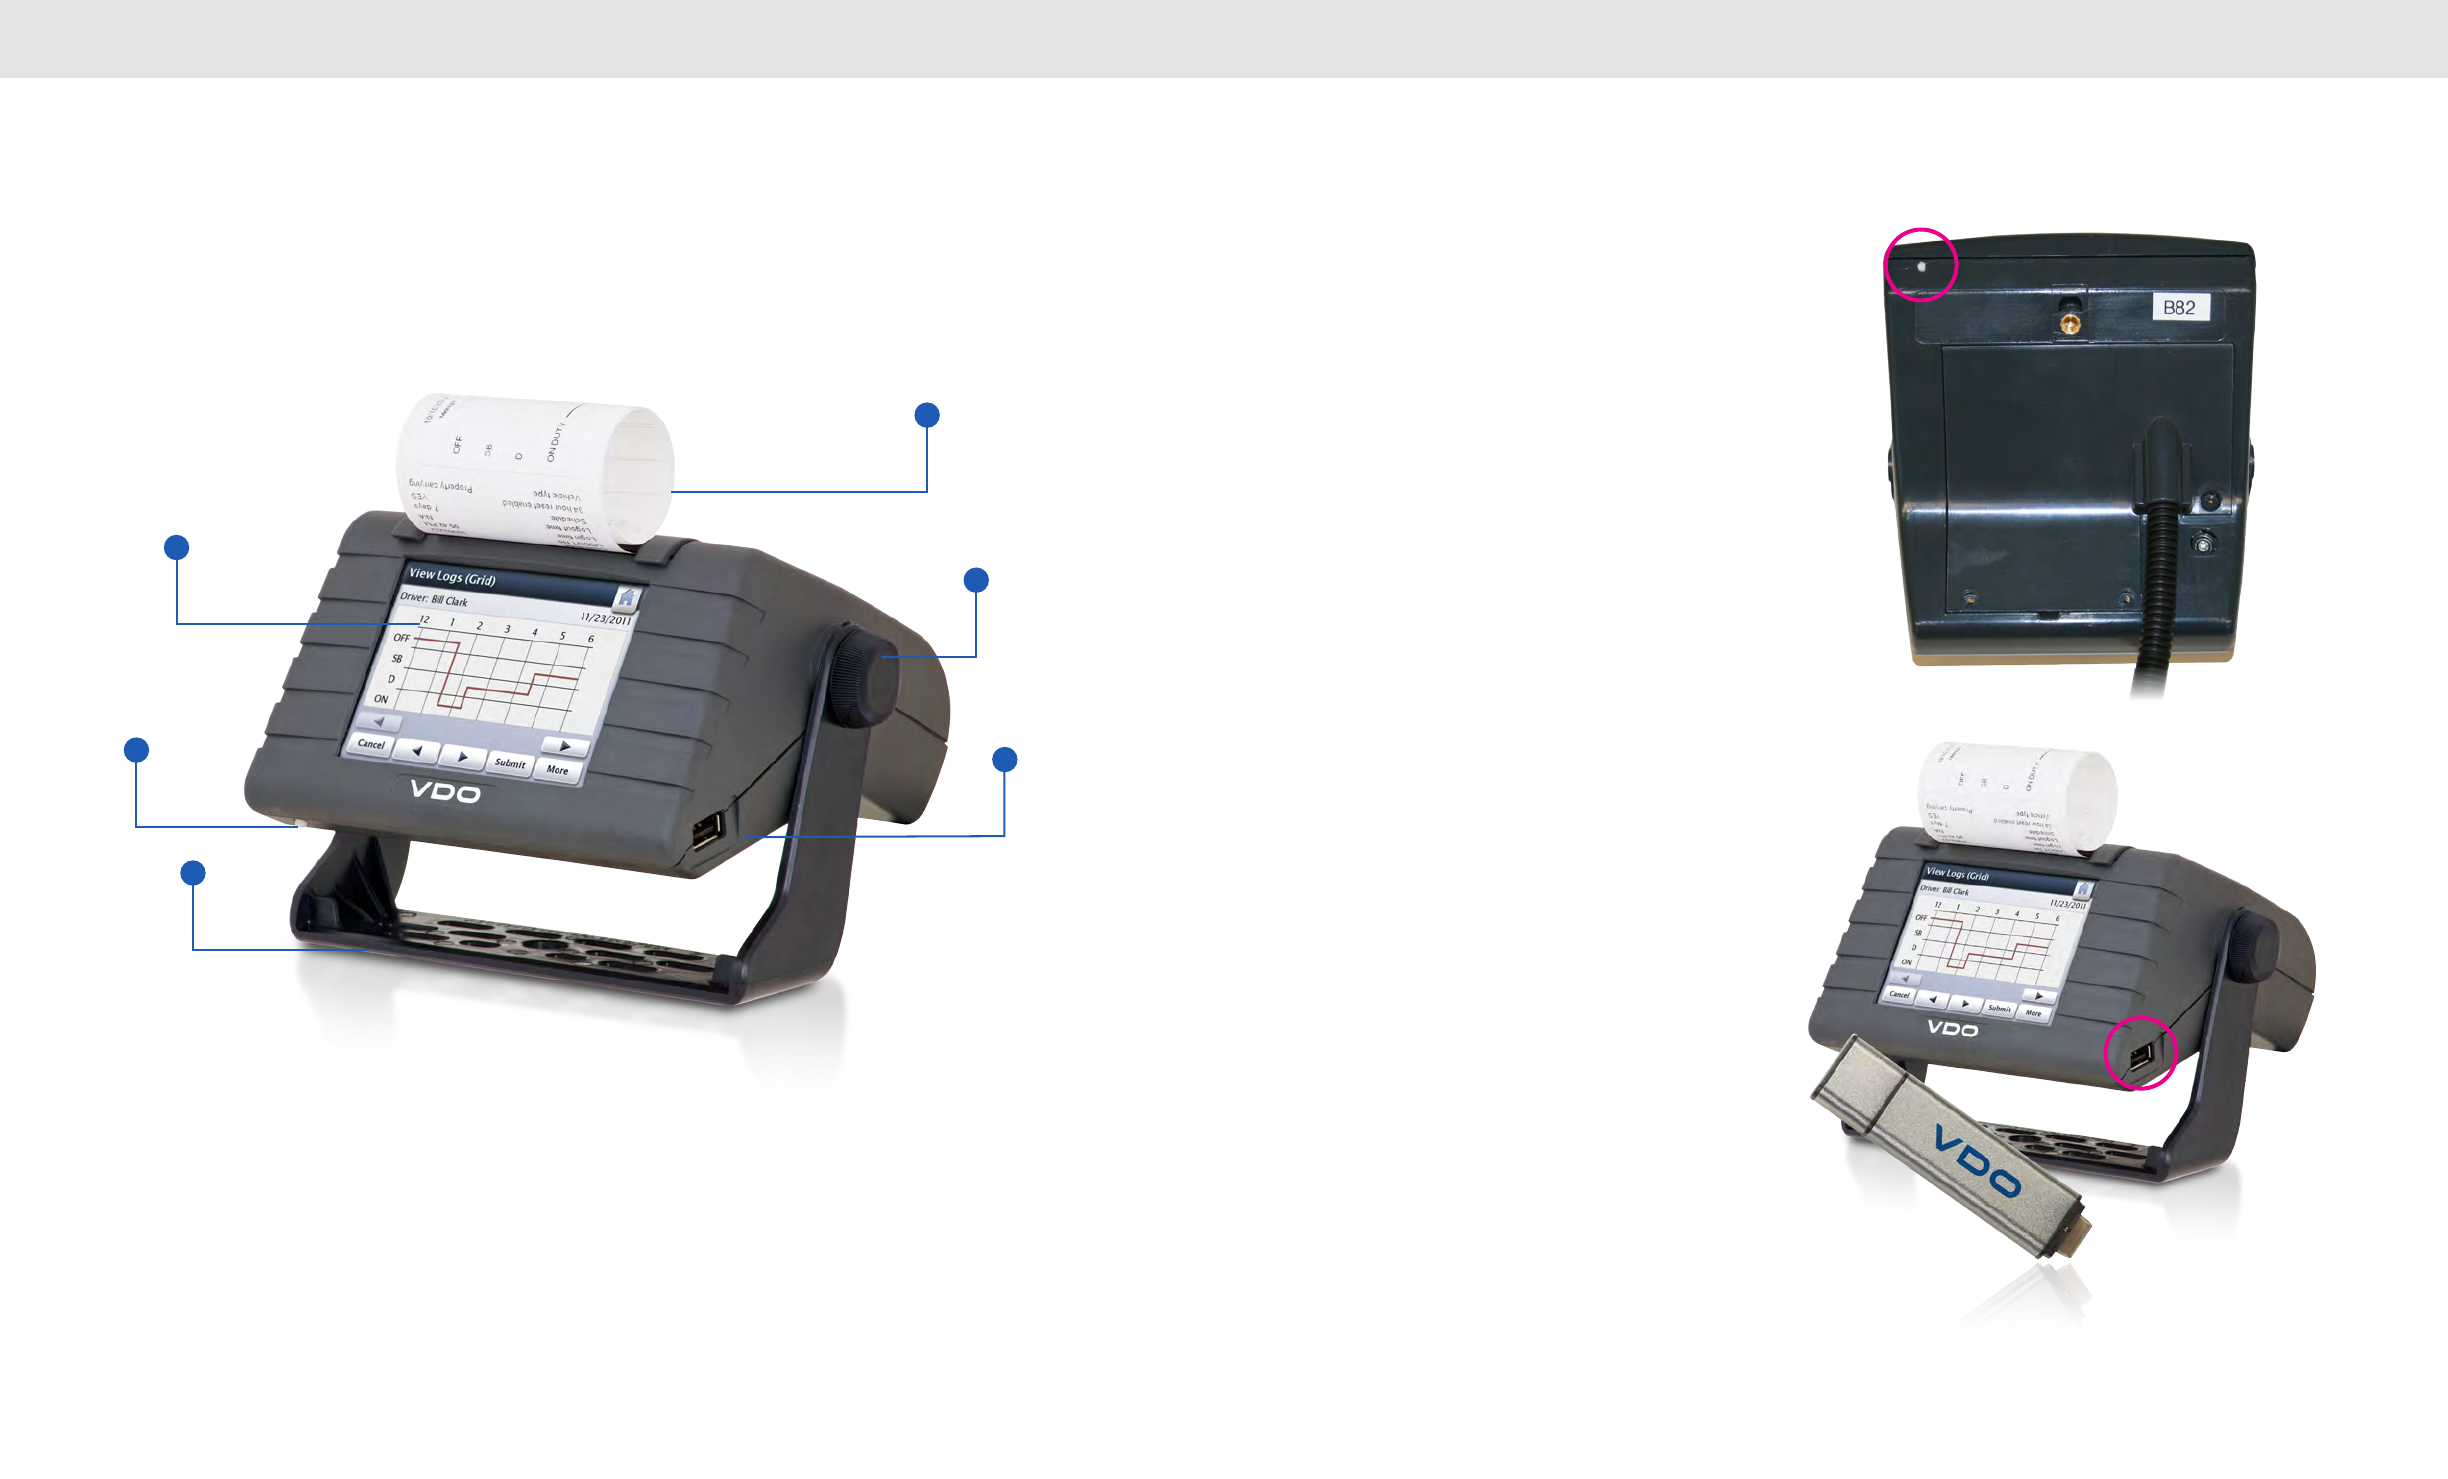
6059
VDO RoadLog Fundamentals VDO RoadLog Fundamentals
The RoadLog Hardware On/Off Button and Operation Modes
When power is applied to RoadLog, it starts automatically.
The splash screen is displayed during device initialization.
After initialization, RoadLog enters the active mode and is
fully operational.
As long as RoadLog is connected to the vehicle and has
power, it monitors the vehicle’s engine status. When the
vehicle engine is on, RoadLog stays in active mode. It is not
possible to turn off the device, except by disconnecting the
power supply.
When RoadLog is in active mode and the vehicle engine is
off, pressing the On/Off button switches RoadLog to sleep
mode.
When RoadLog is in sleep mode, pressing the On/Off button
switches RoadLog to active mode.
When RoadLog is in active mode, holding the On/Off button
continuously for 10 seconds causes RoadLog to reboot. The
device will restart with a software startup sequence.
When the engine is turned off and no USB data transfer,
printing or touch screen activity occurs for five minutes,
RoadLog enters sleep mode and the display automatically
darkens. During sleep mode, RoadLog consumes minimal
current from the vehicle battery.
USB Connector
A “type A” USB port is used to connect the RoadLog with
Driver Keys, the Fleet Key or any USB flash drive formatted
in FAT32 file system.
CAUTION! USB devices can only be plugged into
RoadLog when the vehicle is stopped!
Driving while a USB device is plugged into RoadLog
may cause permanent damage to both RoadLog and
the USB device.
1. Touch Screen Display
2. On/Off Button and Operation Mode
3. Standard Mount
4. Printer paper output
5. Positionable Dial
6. USB Connector
4
1
2
3
5
6
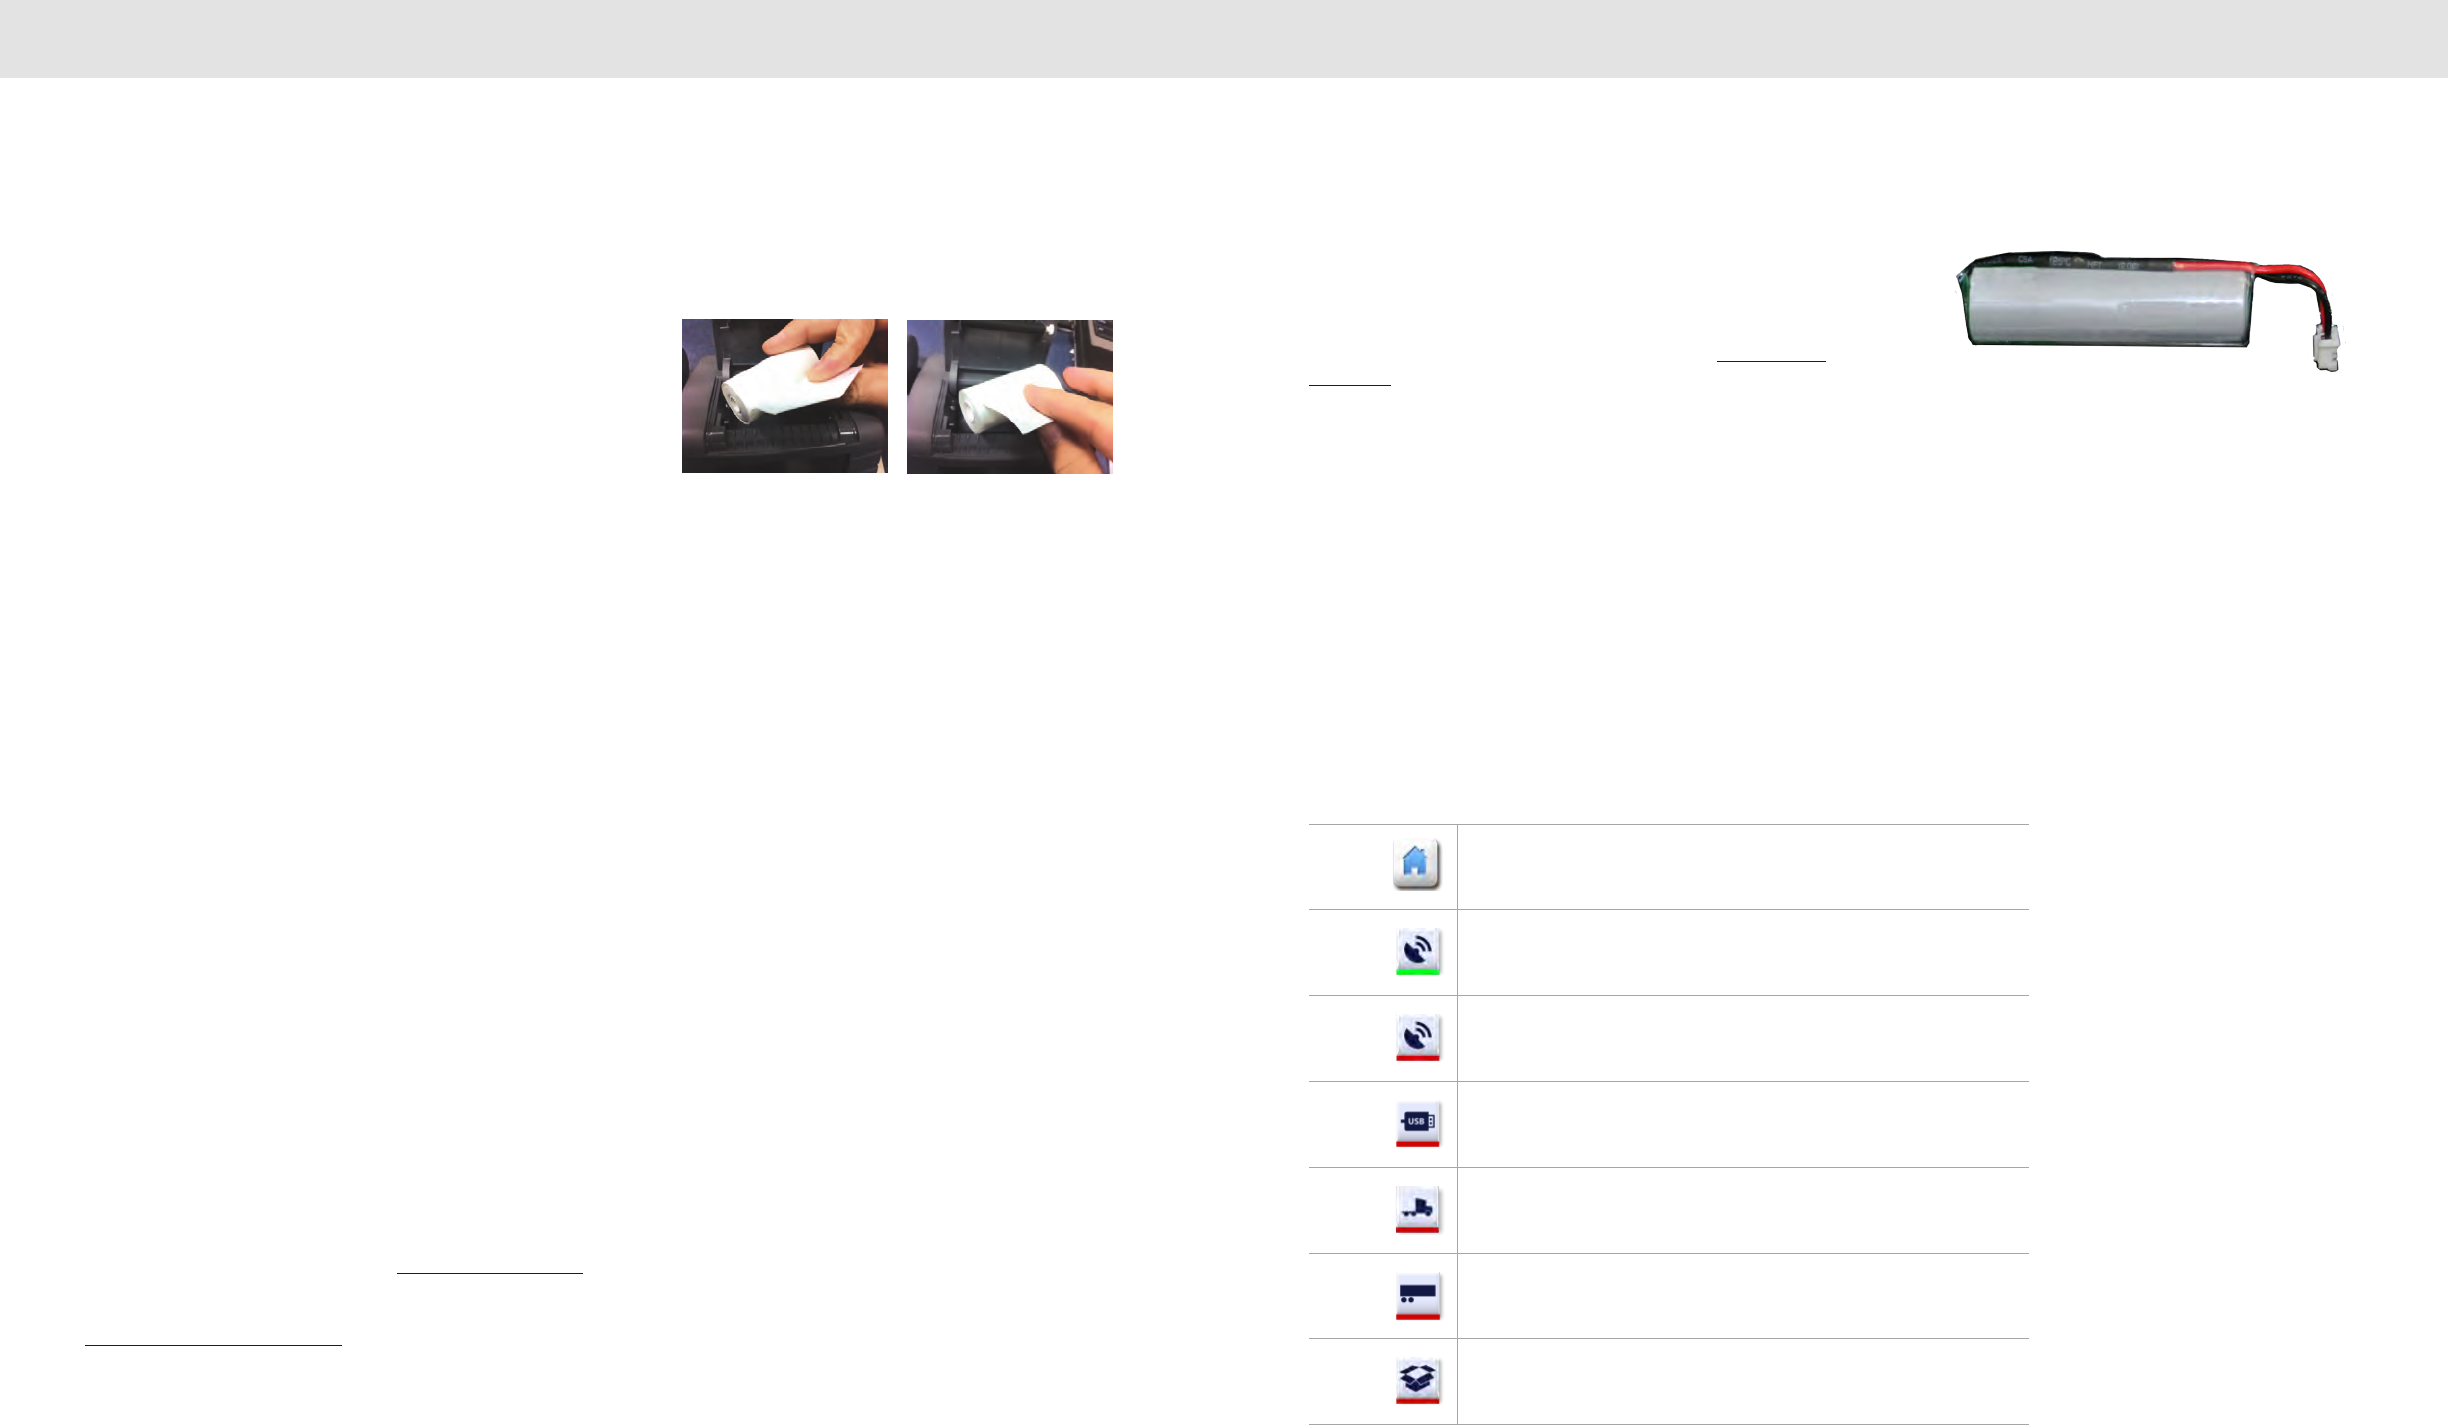
6261
VDO RoadLog Fundamentals VDO RoadLog Fundamentals
Printer
RoadLog has a built-in thermal printer to print roadside reports. Since it’s
a thermal printer, no ink is ever required. VDO RoadLog brand paper is
fade-resistant.
To load the paper roll, lift the access panel at the top of the RoadLog, lay
the paper roll into the cavity and pull the leading edge of the paper
forward, towards the screen. The roll should be inserted so that when the
paper comes out, it curls towards the back of the unit, not forward
towards the screen. If the paper curls forward, take the roll out and
reverse the orientation. Close the lid and tear the leading edge flush with
a downward motion.
Note: when a red line appears on the printout, it indicates the end
of the paper roll. The roll needs to be replaced.
Note: The head of the printer may get hot! Do not touch the printer
head as this may cause burns!
Note: Use only VDO RoadLog brand paper rolls! Using non-
approved paper can damage the unit and void the warranty.
GPS Antenna / Connector
RoadLog has a built-in GPS receiver and antenna, allowing it to acquire
and record position data along with RODS data. When a strong GPS
signal is received, the bar below the on-screen GPS icon turns green. If
the signal is not strong enough to compute location, a red bar is
displayed below the on-screen GPS icon.
To improve the signal reception, an external GPS antenna is available as
an optional accessory.
Note: Use only the VDO RoadLog external GPS antenna.
Non-approved antenna may not provide correct
performance.
Connector Cables
A variety of cable options are offered. See VDO RoadLog Installation for
details.
Learn more about connector cables
Battery
RoadLog has a built-in battery that’s used to maintain the date and time
if power becomes unavailable. The battery is capable of maintaining the
device date and time continuously for at least 2 years. When the battery
level becomes critically low, a warning screen with a low-battery icon is
displayed. For information on replacing the battery, see VDO RoadLog
Installation.
Touch Screen Display
RoadLog is operated by tapping the touch screen with your fingers. The
touch screen allows you to choose actions and type into the on-screen
keyboard. When RoadLog is in the active mode the display is on. When
RoadLog is in sleep mode the display is off.
System Icons
Depending on the screen selected, one or more of the following RoadLog
icons will appear:
Home
GPS signal:
Green = Good signal
GPS signal:
Red = Low/no signal
USB device:
Red = Remove Driver/Fleet Key
When no USB device is plugged in, no icon is shown.
Vehicle data:
Red = No ECM. No communication with the vehicle engine module.
When vehicle data is available, no icon is shown.
Trailer:
Red = No trailer(s) assigned for the trip
When trailer(s) are assigned for the trip, no icon is shown.
Shipment documents:
Red = No document(s) assigned for the trip
When document(s) are assigned for the trip, no icon is shown.
CORRECT Roll Orientation INCORRECT Roll Orientation
6463
First Device Start Up After Installation Into Vehicle Company Log In
2. First Device Start Up
After Installation Into
Vehicle
After all of the installation steps as described in VDO
RoadLog Device Installation are completed, RoadLog starts
automatically. The splash screen is displayed during device
initialization.
RoadLog searches for a GPS signal while displaying the
GPS Synchronization screen.
Once RoadLog acquires a GPS signal, it synchronizes its
system time with GPS time and displays the GPS
Synchronization Successful screen.
RoadLog then restarts while displaying the Logo screen.
Notes: If RoadLog cannot receive a valid GPS signal, it
remains in the GPS Synchronization screen. When a signal
is acquired, RoadLog is able to synchronize the system only
with the time, not with the vehicle location.
Note: At first start-up RoadLog needs to acquire a
valid GPS signal in order to initialize and set the
internal clock of the system. RoadLog will remain in
the GPS Synchronization screen until a valid signal is
acquired and the clock has been set to the current
time.
During the initialization process, RoadLog performs a self-
test. If the self-test fails, it displays the Self-Test Failed
screen. In this case, the device is not operational and will
need to be serviced by a factory certified service provider.
During the initialization process, RoadLog verifies the internal
battery energy level. If RoadLog detects a low battery, it
displays the Battery Replacement screen. You can tap the
OK button to continue normal operation, but the battery
must be replaced soon. For instructions on battery
replacement, see “VDO RoadLog Installation.”
If RoadLog is disconnected from the power supply, it will go
through the same initial sequence seen at first device start
up, including displaying the Settings screen for no company
log in.
3. Company Log In
To enable all RoadLog functions, a company must be logged
into the device. To log in your company:
Insert your activated RoadLog Fleet Key into the RoadLog
USB port.
RoadLog performs the company log in and, when complete,
displays the Login Completion screen.
Remove the Fleet Key from the connector. RoadLog displays
the View Configuration Parameters screen.
Tap Yes to view the Configuration Parameters screen.
IMPORTANT: If the RoadLog says 'This fleet key cannot be
used to login the company” it means that the serial number
of the device is not entered in the Fleet Software under the
vehicle for which that unit is intended.
GPS Synchronization
Synchronization Successful
Self-Test Self-Test Failed
Battery Replacement
Login Completion
Configuration Parameters
6665
Configuration Parameters Configuration Parameters
4. Configuration
Parameters
In order for RoadLog to perform its functions, the
Configuration Parameters must be set to the correct values
for your vehicle.
Go to the Configuration Parameters screen from the View
Configuration Parameters screen during first start up, or
by going to the Menu screen and tapping Settings.
From the Settings screen, tap Configuration.
Note: In order to be able to edit the configuration
parameters, the Fleet Key must be inserted and a
company must be logged in.
Note: If you go to the Configuration Parameters
screen from the Settings screen, RoadLog displays
the Insert the Fleet Key screen to indicate that a
Fleet Key is required to configure the device. If the
Fleet Key is not available, tap Continue to view the
current parameters. RoadLog displays the
Configuration Parameters screen with the editing
controls disabled.
Setting Configuration Parameters
At first device start up, RoadLog has default values for the
configuration parameters.
To change the default values, insert the Fleet Key. RoadLog
displays the Fleet Key Options screen.
Tap Configuration. RoadLog displays the Configuration
Parameters screen.
Use the up and down arrows to scroll through the
parameters list. Tap Print to print the configuration
parameters.
Setting the Vehicle Synchronization
Parameter
The vehicle synchronization parameter defines which
interface will be used to transfer the synchronization data
from the vehicle to RoadLog. The following values can be
chosen:
J1939: RoadLog device obtains vehicle data from vehicle
J1939 data bus (the RoadLog cable connects to lines 3, 5
and 6 for communication).
J1708: RoadLog obtains vehicle data from vehicle J1708
data bus (the RoadLog cable connects to lines 7 and 8 for
communication).
Pulse inputs: RoadLog device obtains speed pulses from
the vehicle speed sensor (the RoadLog cable connects to
line 9 for communication).
By default, the vehicle synchronization parameter is set to
J1939.
To change the parameter from the Configuration
Parameters screen tap Vehicle Type. RoadLog displays the
Configuration Type screen.
Tap Vehicle Synchronization. RoadLog displays the
Configuration Type screen.
Notes: If your Vehicle uses a 6-pin connector,
RoadLog will synchronize with J1708.
If your Vehicle uses a 9-pin connector, RoadLog will
synchronize with either J1708 or J1939 connection.
Generally, for Vehicles built before 2007, the 9-pin
connector uses J1708. For the 2007 and newer
vehicles, the 9-pin connector uses J1939.
Different manufacturers transitioned between J1708
and J1939 at different times, so it is important to carry
out the synchronization procedure and wait for the
“Communication established successfully” screen
to appear.
Configuration Parameters
Settings
Fleet Key Options Configuration Parameters
Menu
Vehicle Syncronization
No Communication Established Communication established
successfully
6867
Configuration Parameters Configuration Parameters
Setting the Vehicle Synchronization
Parameter Automatically
From the Configuration Type screen tap Automatic.
RoadLog uploads the parameter setting from the Fleet Key
and displays the Fleet Key Configuration Value screen
containing the uploaded value.
Tap Accept. RoadLog displays the Configuration Type
screen showing the new setting for the vehicle
synchronization parameter.
Setting the Vehicle Synchronization
Parameter Manually
To set the configuration type manually, tap Manual from the
Configuration Type screen. RoadLog displays the Vehicle
Synchronization screen. Select the interface to be set.
Bus Synchronization Method
If you select J1939 or J1708, RoadLog displays the
Checking Messages Presence screen while checking that
it’s receiving the correct data from the vehicle.
RoadLog detects the relevant messages along with their
source and displays the Source Selection Method screen.
Automatic Message Source Method
From the Source Selection Method screen, tap Automatic.
RoadLog will detect and choose the preferred sources for
the relevant messages and then display the Vehicle
Synchronization screen.
Setting the Automatic Message Source
To select the sources for the relevant messages manually
from the Source Selection Method screen, tap Manual and
then tap Next. RoadLog displays the J1939 Messages
Manual Selection or J1708 Messages Manual Selection
screen, according to your selection.
Vehicle odometer and vehicle speed data can come in from
multiple sources.
Tap the preferred source for each and tap Next when you’ve
made the selection. RoadLog returns to the Vehicle
Synchronization screen.
Tap Done. RoadLog displays the Configuration Type
screen showing the new setting for the vehicle
synchronization parameter.
Pulse Inputs Synchronization Method
If you select Pulse Inputs from the Vehicle Synchronization
screen, RoadLog displays the Configuration Parameters
screen showing the new setting for the vehicle
synchronization parameter.
Setting the Vehicle Odometer Parameter
The vehicle odometer parameter is used only when
RoadLog is synchronized using the pulse inputs interface.
When using pulse inputs, the odometer reading is based on
the mileage entered into the Fleet Software when the vehicle
record was created. Starting from this value, RoadLog
automatically adds mileage based on the pulse inputs from
vehicle.
To set the odometer reading from the Configuration
Parameters screen, tap Vehicle odometer. RoadLog
displays the Configuration Type screen.
Setting the Odometer Parameter Automatically
From the Configuration Type screen tap Automatically.
RoadLog uploads the parameter setting from the Fleet Key
and displays the Fleet Key Configuration Value screen
containing the uploaded value.
Tap Accept. RoadLog displays the Configuration
Parameters screen showing the new setting for the vehicle
odometer parameter.
Setting the Odometer Reading Manually
From the Fleet Key Configuration Value screen Tap
Manual. RoadLog displays the Edit Parameter Value
screen.
Select Miles or Kilometers and tap the editable field to enter
the odometer value. RoadLog displays the popup keyboard.
Type in the vehicle odometer reading and tap Go. RoadLog
displays the Edit Parameter Value screen with the user-
defined value.
Tap Done to confirm the newly added value. RoadLog
displays the Configuration Type screen showing the new
setting for the vehicle odometer parameter.
Configuration Type
Checking Messages PresenceVehicle Synchronization
Source Selection
Vehicle Synchronization
Setting the Odometer Reading
Manually
Configuration TypeConfiguration Parameters
Setting the Odometer Parameter
Automatically
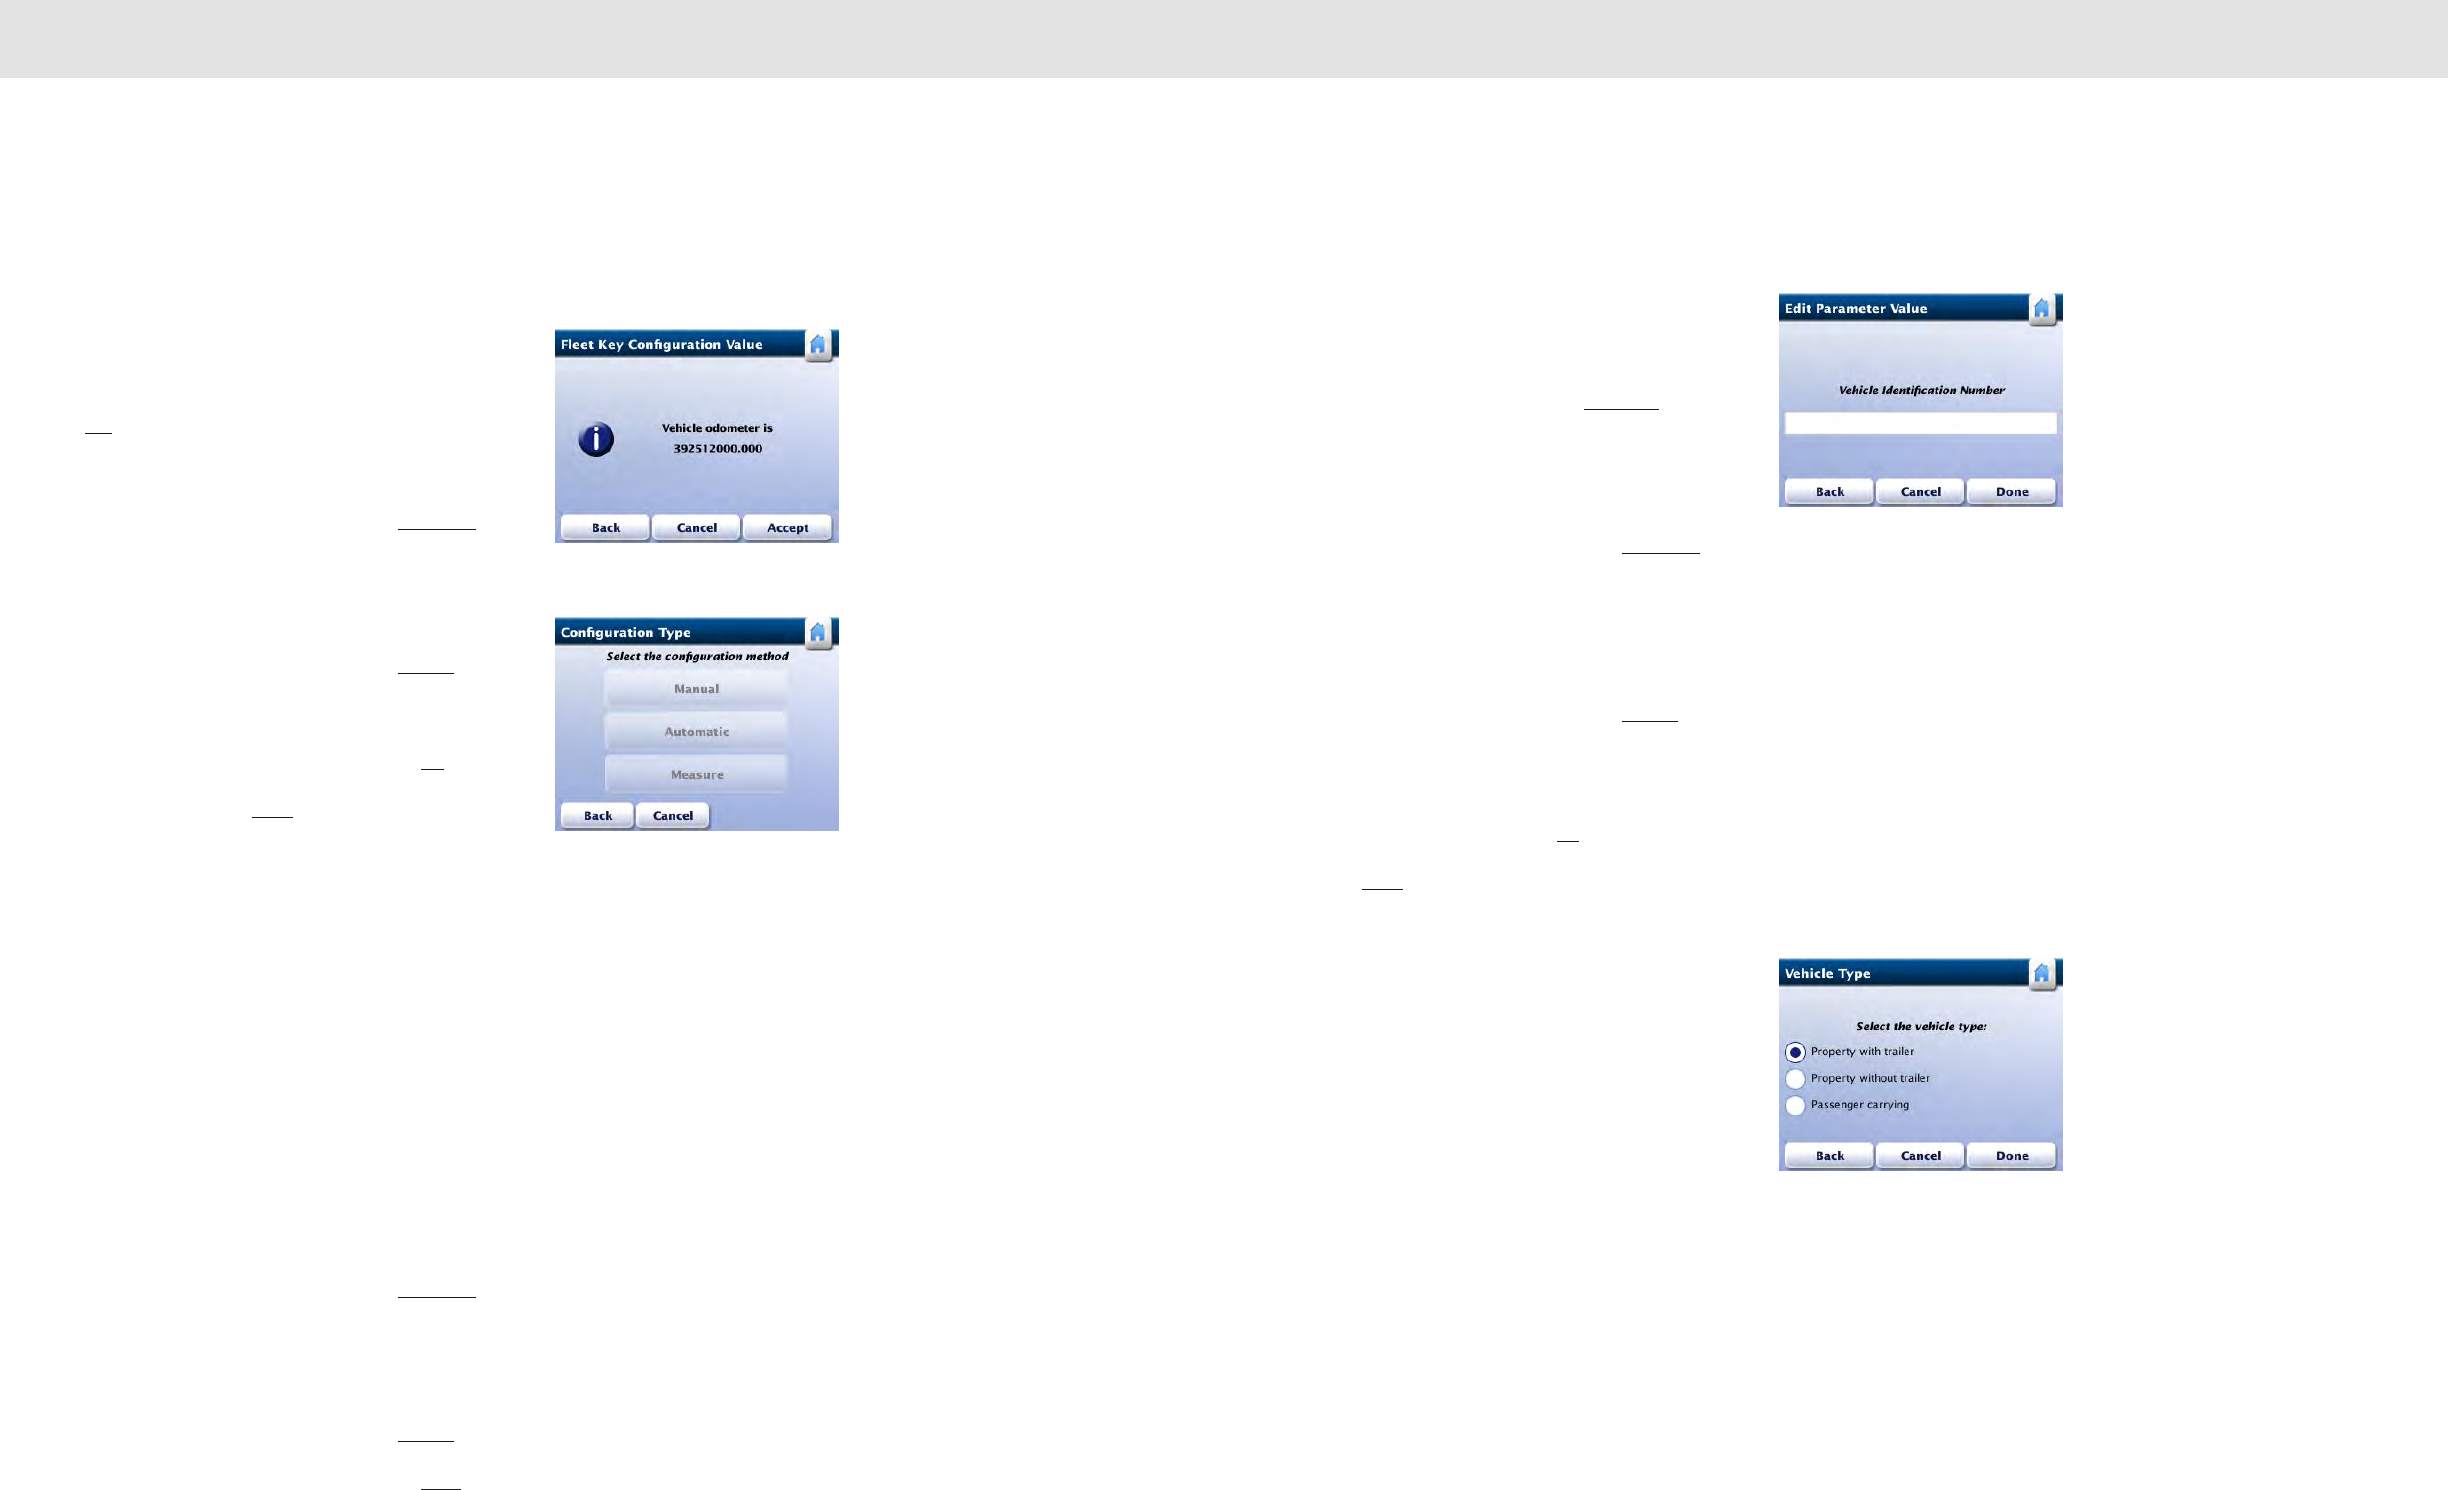
7069
Configuration Parameters Configuration Parameters
Setting the Vehicle Identification Number
(VIN)
By default, the VIN parameter is set to
00000000000000000.
To enter the actual VIN from the Configuration Parameters
screen, use the arrows to scroll to the VIN line and tap the
VIN. RoadLog displays the Configuration Type screen.
Setting the VIN Automatically
From the Configuration Type screen, tap Automatic.
RoadLog displays the Fleet Key Configuration Value
screen showing the uploaded value.
Setting the VIN Manually
From the Configuration Type screen, tap Manual. RoadLog
displays the Edit Parameter Value screen. Tap the editable
field to enter VIN. RoadLog displays the popup keyboard.
Type in the vehicle odometer reading and tap Go. RoadLog
displays the Edit Parameter Value screen with the value
that was typed in. Tap Done. RoadLog displays the
Configuration Parameters screen showing the new setting
for the VIN.
Setting the Wake up condition
The Wake up condition is the event that triggers the device
to begin recording data. If the ignition line is connected
during installation, it’s recommended that the Wake up
condition configuration parameter be set to the ignition only
setting.
If the ignition line was notconnected during installation, the
Wake up condition configuration parameter should be set to
the ignition or vehicle data setting.
Setting the Wake up condition Automatically
From the Configuration Type screen, tap Automatic.
RoadLog displays the Fleet Key Configuration Value
screen showing the uploaded value.
Setting the Wake up condition Manually
From the Configuration Type screen, tap Manual. RoadLog
displays the Wake up condition screen. Chose the desired
wake up source using the radio buttions. Tap Done.
Setting the Vehicle License Plate Number
(VLPN)
From the Configuration Parameters screen, use the arrows
to scroll to the VLPN line and tap the VLPN line. RoadLog
displays the Configuration Type screen.
Setting the Vehicle License Plate Number (VLPN)
Automatically
From the Configuration Type screen, tap Automatic.
RoadLog displays the Fleet Key Configuration Value
screen showing the uploaded value.
Setting the Vehicle License Plate Number (VLPN)
Manually
From the Configuration Type screen, tap Manual. RoadLog
displays the Edit Parameter Value screen. Tap the editable
field to enter the VLPN. RoadLog displays the popup
keyboard.
Type in the vehicle VLPN and tap Go. RoadLog displays the
Edit Parameter Value screen with the value that was typed
in. Tap Done. RoadLog displays the Configuration
Parameters screen showing the new setting for the VLPN.
Setting the Vehicle Type
The Vehicle Type parameter must be set based on the
vehicle type in which RoadLog is installed. There are three
Vehicle Types:
1. Property-carrying Vehicle with Trailer – If this is the
selection made, RoadLog performs the HOS availability
calculation for any logged in Driver according to the
HOS rules for property-carrying vehicles. The Driver is
required to inspect the trailer if equipped and enter a
record for trailers attached to the vehicle. The vehicle
type selection must be property-carrying vehicle with
trailer.
2. Property-carrying vehicle without trailer – If this is
the selection made, RoadLog performs the HOS
availability calculation for any logged in Driver
according to the HOS rules for property-carrying
vehicles.
3. Passenger-carrying vehicle – If this is the selection
made, RoadLog performs the HOS availability
calculation for any logged in Driver according to the
HOS rules for passenger-carrying vehicles.
Setting the VIN Automatically
Configuration Type
Vehicle Type
Setting the VLPN Manually
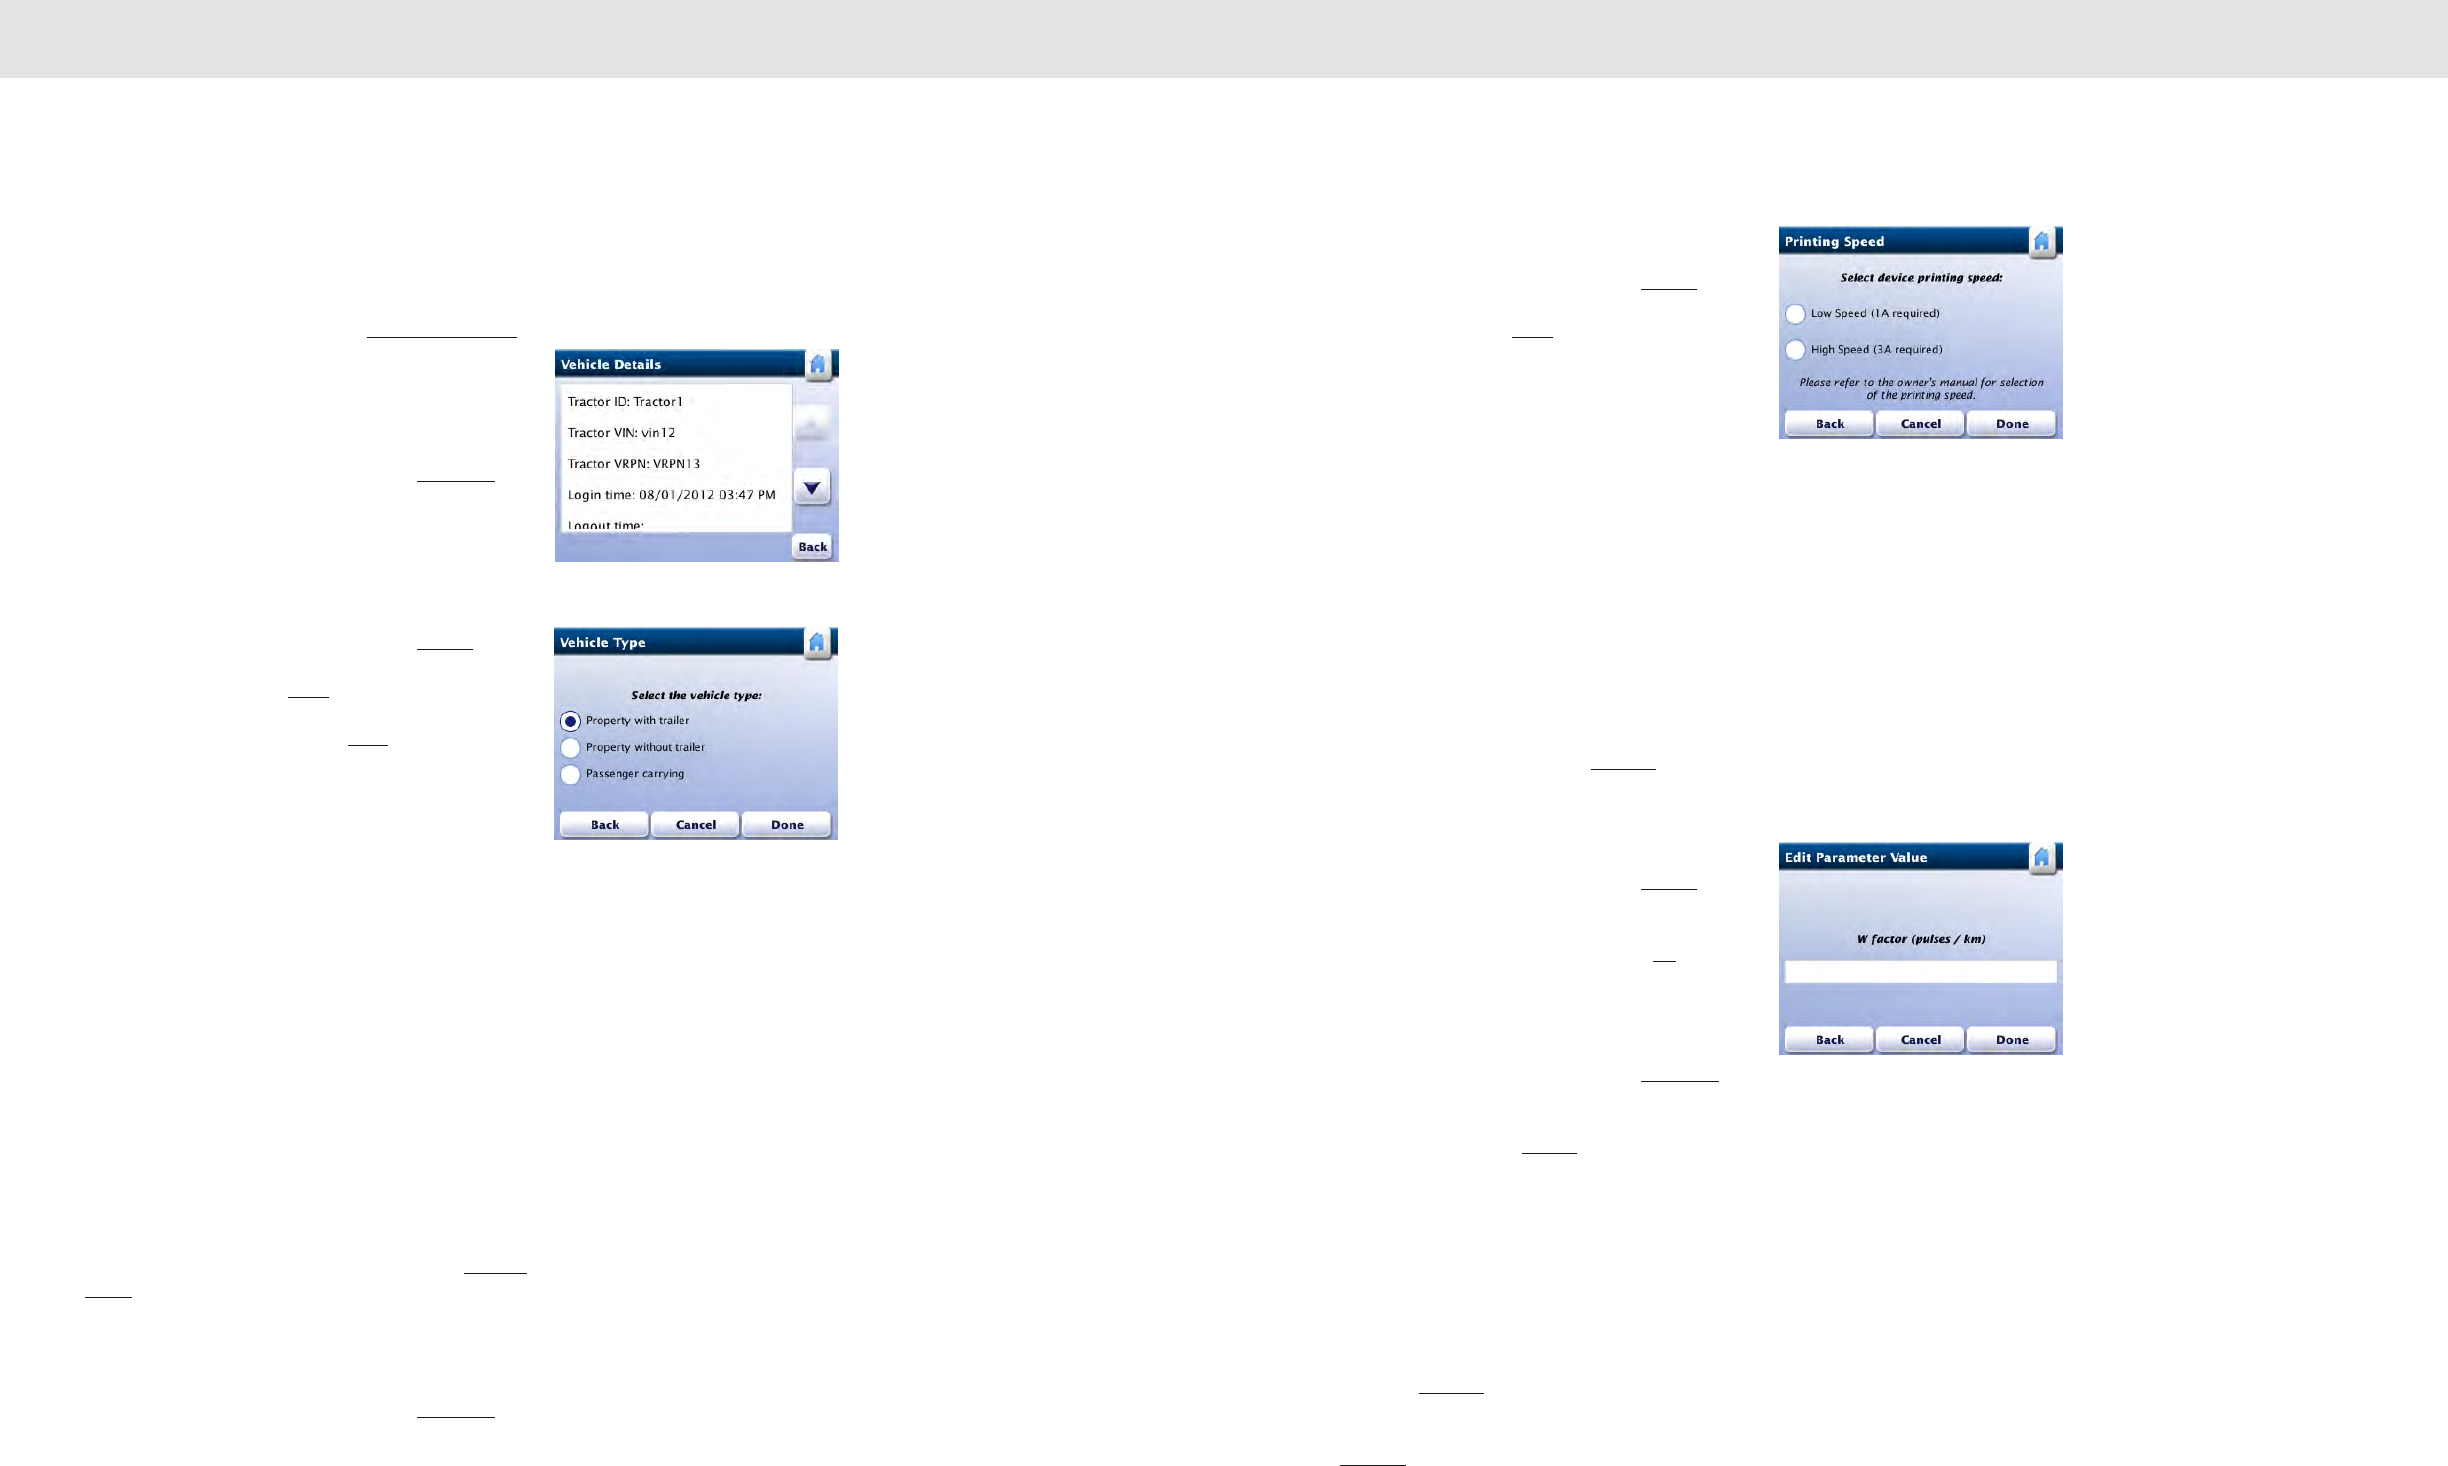
7271
Configuration Parameters Configuration Parameters
By default, the vehicle type is set to property-carrying vehicle
with trailer.
To change the setting from the Configuration Parameters
screen, use the arrows to scroll to the Property with trailer
line. Tap the line. RoadLog displays the Configuration Type
screen.
Setting the Vehicle Type Automatically
From the Configuration Type screen, select Automatic.
RoadLog displays the Fleet Key Configuration Value
screen showing the Vehicle Type that was entered in the
Fleet Software for the vehicle.
Setting the Vehicle Type Manually
From the Configuration Type screen, select Manual.
RoadLog displays the Vehicle Type screen. Tap the
selection you want and tap Done to confirm the selection.
Tap the selection you want and tap Done to confirm the
selection. RoadLog returns to the Configuration
Parameters screen.
Setting the Printing Speed
RoadLog’s built-in printer can be set to print at low speed or
high speed. At low speed, the RMS current consumption is
approximately 1A. At high speed the RMS current
consumption is approximately 3A.
CAUTION: Before choosing high printing speed, be certain
your line can supply the 3A necessary. Insufficient power can
cause the unit to shut down, data loss and other
unpredictable behavior. If uncertain of your power supply,
consult the vehicle manufacturer.
By default, the printing speed is set to low speed.
To change the printing speed from the Configuration
Parameters screen, use the arrows to scroll to the Printing
speed line. Tap the line. RoadLog displays the
Configuration Type screen.
Setting the Printing Speed Automatically
From the Configuration Type screen, select Automatic.
RoadLog displays the Fleet Key Configuration Value
screen showing the printing speed for the vehicle that was
entered in the Fleet Software.
Setting the Printing Speed Manually
From the Configuration Type screen, select Manual.
RoadLog displays the Printing Speed screen. Tap the
selection you want and tap Done to confirm the selection.
RoadLog returns to the Configuration Parameters screen.
Setting the W Factor
The vehicle’s W factor is the number of pulses that are
generated by the vehicle speed sensor when the vehicle
travels a distance of 1 kilometer. The vehicle W factor is
used only when RoadLog is synchronized with the vehicle
using the pulse inputs interface, which is uncommon. In this
case, the W factor is used by RoadLog to calculate the
vehicle distance travelled.
By default, the W factor parameter is set to 8,000 pulses/
km. There are three ways to change the W factor value. To
change the W factor from the Configuration Parameters
screen, use the arrows to scroll to the W factor line. Tap the
line. RoadLog displays the Configuration Type screen.
Setting the W Factor Manually
From the Configuration Type screen, select Manual.
RoadLog display the Edit Parameters Value screen. Tap
the editable field to enter the W factor. RoadLog displays the
popup keyboard. Type in the W factor and tap Go. RoadLog
returns to the Configuration Parameters screen.
Setting the W Factor Automatically
From the Configuration Type screen, select Automatic.
RoadLog displays the Fleet Key Configuration Value
screen showing the W factor that was entered in the Fleet
Software for the vehicle. Tap Accept. RoadLog returns to
the Configuration Parameters screen.
Setting the W Factor by Measurement
If you are not certain of the vehicle’s W factor, you can
determine it by driving and entering the initial and final
odometer values.
From the Configuration Parameters screen, use the arrows
to scroll to the W factor line. Tap the line. RoadLog displays
the Configuration Type screen.
Tap Measure. RoadLog displays the Odometer Initial Value
screen. Select miles or kilometers and tap the editable field
Vehicle Type
Set Printing Speed Manually
Enter W Factor Manually
Vehicle Details
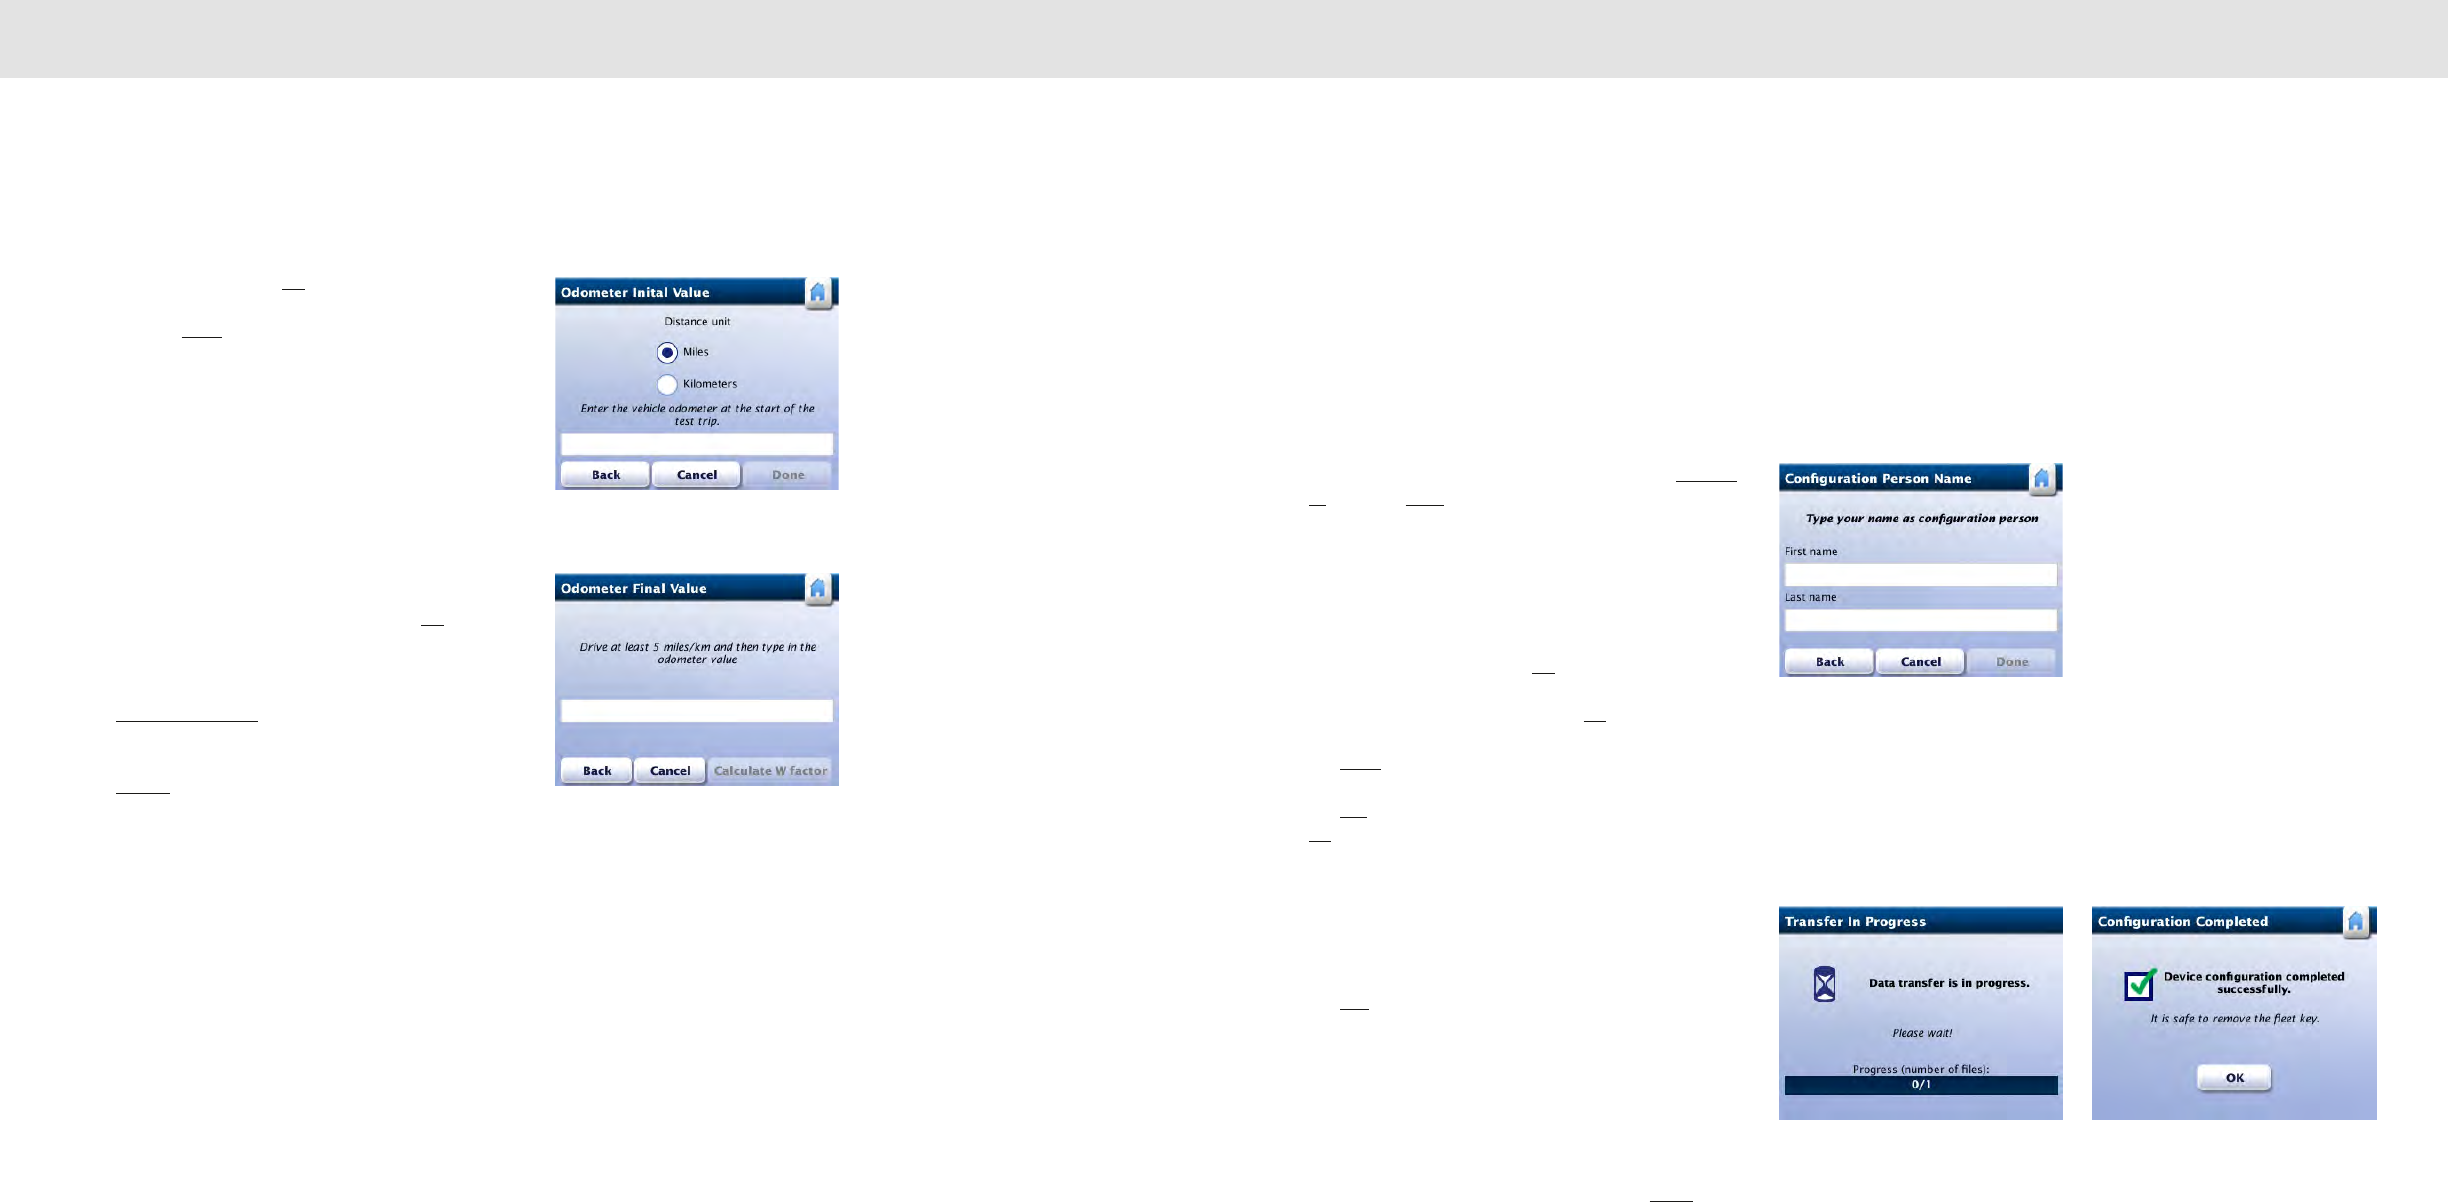
7473
Configuration Parameters Configuration Parameters
to enter the odometer value at the start of the test trip.
RoadLog displays the Keyboard screen.Type in the vehicle
odometer reading and tap Go. RoadLog displays the
Odometer Initial Value screen with the value for odometer
entered. Tap Done. RoadLog displays the Odometer Final
Value screen.
Drive the vehicle at least 5 miles.
Note: The longer the trip distance, the more accurate
the W factor measurement is.
At the end of the test trip, when the vehicle is stopped, tap
the editable field in the Odometer Final Value screen.
RoadLog displays the Keyboard screen.
Type in the vehicle odometer reading and tap Go. RoadLog
displays the Odometer Final Value screen with the value for
odometer entered.
Tap Calculate W factor. RoadLog calculates the W factor
and displays the W Factor Value screen.
Tap Accept. RoadLog displays the W Factor Value screen
showing the new setting for the W factor parameter.
Note: As the Vehicle is driven, RoadLog will compare
distance measured by GPS against distance
calculated using the W factor. If there is a significant
discrepancy between the distance calculated by the
use of W factor and the GPS coordinates, the system
will go into the “no ECM” mode, and calibration will
need to be repeated.
Saving new Configuration Parameters to
the Fleet Key
Whenever vehicle parameters are entered into RoadLog in
the vehicle, you’ll want to transfer those parameters to the
RoadLog Fleet Software.
To save new configuration parameters to the Fleet Key,
insert the Fleet Key into RoadLog.
From the Configuration Parameters screen, tap Update
all. Then tap Save. RoadLog displays the Configuration
Person Name screen.
Tap the first name field to enter the first name of the person
updating the Configuration Parameters. RoadLog displays
the Keyboard screen.
Type in the first name and tap Go. RoadLog displays the
Configuration Person Name screen with the first name
entered. Enter the last name and tap Go.
Tap Done. RoadLog displays the Fleet Key Update screen.
Tap Yes to update the values saved on the Fleet Key, or tap
No to save the changes to RoadLog, but leave the values
unchanged on the Fleet Key.
RoadLog displays the Transfer in Progress screen during
data transfer and the Configuration Update Completed
screen when data transfer is completed.
Tap OK. RoadLog displays the Configuration Completed
screen to indicate that the Configuration process has been
completed successfully.
Unplug the Fleet Key. RoadLog displays the Menu screen.
Note: The Menu screen serves as the home screen when a
company is logged in but no Drivers are logged in. The
Menu screen can also be reached by tapping Menu on the
Driver Overview screen.
Odometer Final Value
Configuration Person Name
Transfer in progress Configuration Completed
Odometer Initial Value
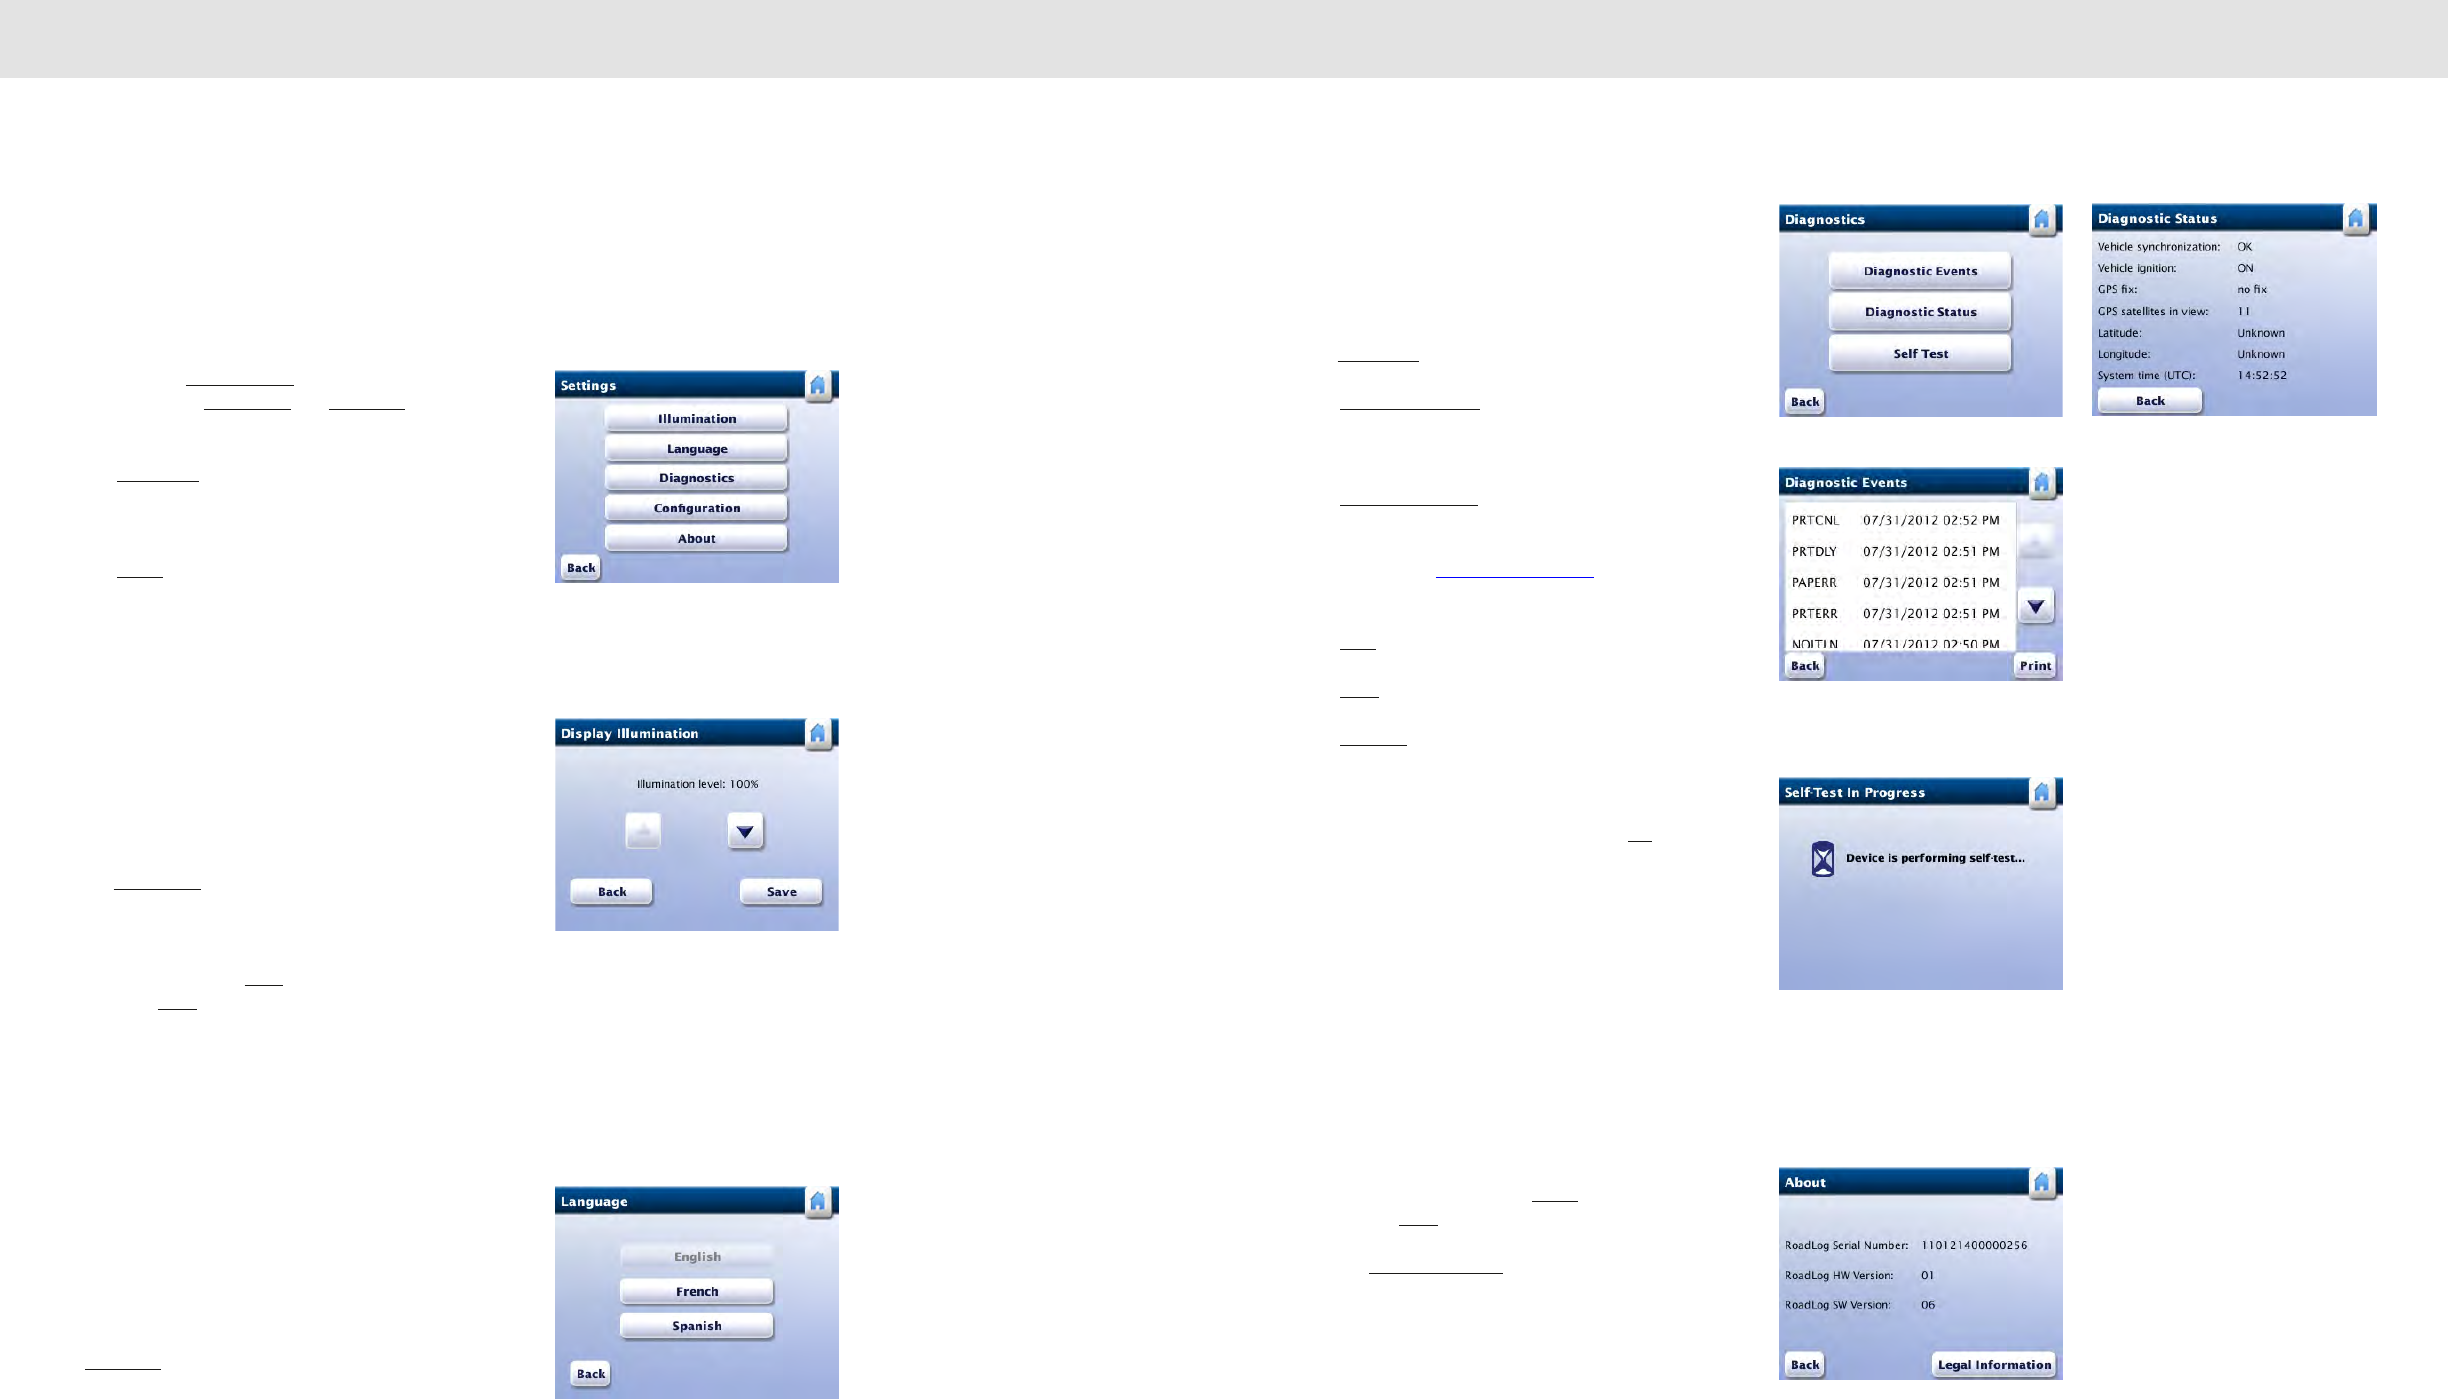
7675
The User Settings Menu The User Settings Menu
5. The User Settings
Menu
In addition to Configuration, the Settings menu screen
choices include Illumination and Language buttons that
allow the user to customize the display settings.
The Diagnostic button allows users to see the diagnostic
events, check on the diagnostic status and run the memory
self test.
The About button takes you to a display of the Serial
Number, Hardware Version (HW) and Software Version (SW)
number of your RoadLog. The About screen also provides a
link to legal information about the RoadLog system.
Adjusting Illumination
At first power up, the screen illumination is set to maximum
brightness.
To adjust the screen brightness from the Settings screen
tap Illumination. RoadLog displays the Display Illumination
screen.
Use the up and down arrows to adjust screen illumination to
the desired level. Tap Save to save the current illumination
level. Tap Back to go to the Settings screen.
Note: If the RoadLog vehicle synchronization calibration
parameter is configured to J1939, and it receives illumination
level data from the vehicle, RoadLog will use the vehicle
illumination setting instead of the RoadLog user setting.
Change Language
RoadLog uses English as the default language at first start
up.
To change the language from the Settings screen, tap
Language. RoadLog displays the Language screen.
Select the new language by tapping the corresponding
button. RoadLog sets the selected language and returns to
the Settings screen.
Diagnostic Functions
You can view RoadLog’s diagnostic status, view historical
diagnostic events or perform a device self-test.
To perform a diagnostic function from the Settings screen
tap Diagnostic. RoadLog displays the Diagnostics screen.
Tap Diagnostic Status to display the Diagnostic Status
screen showing the status of Vehicle synchronization,
ignition, GPS, position and time.
Tap Diagnostic Events to display the Diagnostic Events
screen showing the history of diagnostic events.
Note: See Diagnostic events list for explanation of the
diagnostic codes.
Tap Print to print the diagnostic events list.
Tap Back to return to the Diagnostics screen.
Tap Self-Test to start a self-test. RoadLog displays the Self-
Test in Progress screen.
When the self-test is successfully completed, RoadLog
displays the Self-Test Passed screen. Tap OK to return to
the Diagnostics screen.
Note: If the self-test fails, RoadLog displays the
Self-Test Failed screen. In this case, the device is not
operational and will need to be serviced by a factory
certified service provider.
About – RoadLog Device Information
You can view the Serial Number, Hardware Version (HW) and
Software Version (SW) number of your RoadLog.
From the Settings screen tap About to display the About
screen. Tap Back to return to the Settings screen. You can
also view legal information from the About screen by
tapping Legal Information.
Settings
Display Illumination
Language
Diagnostics
Diagnostic Events
Self-Test in Progress
About
Diagnostic Status
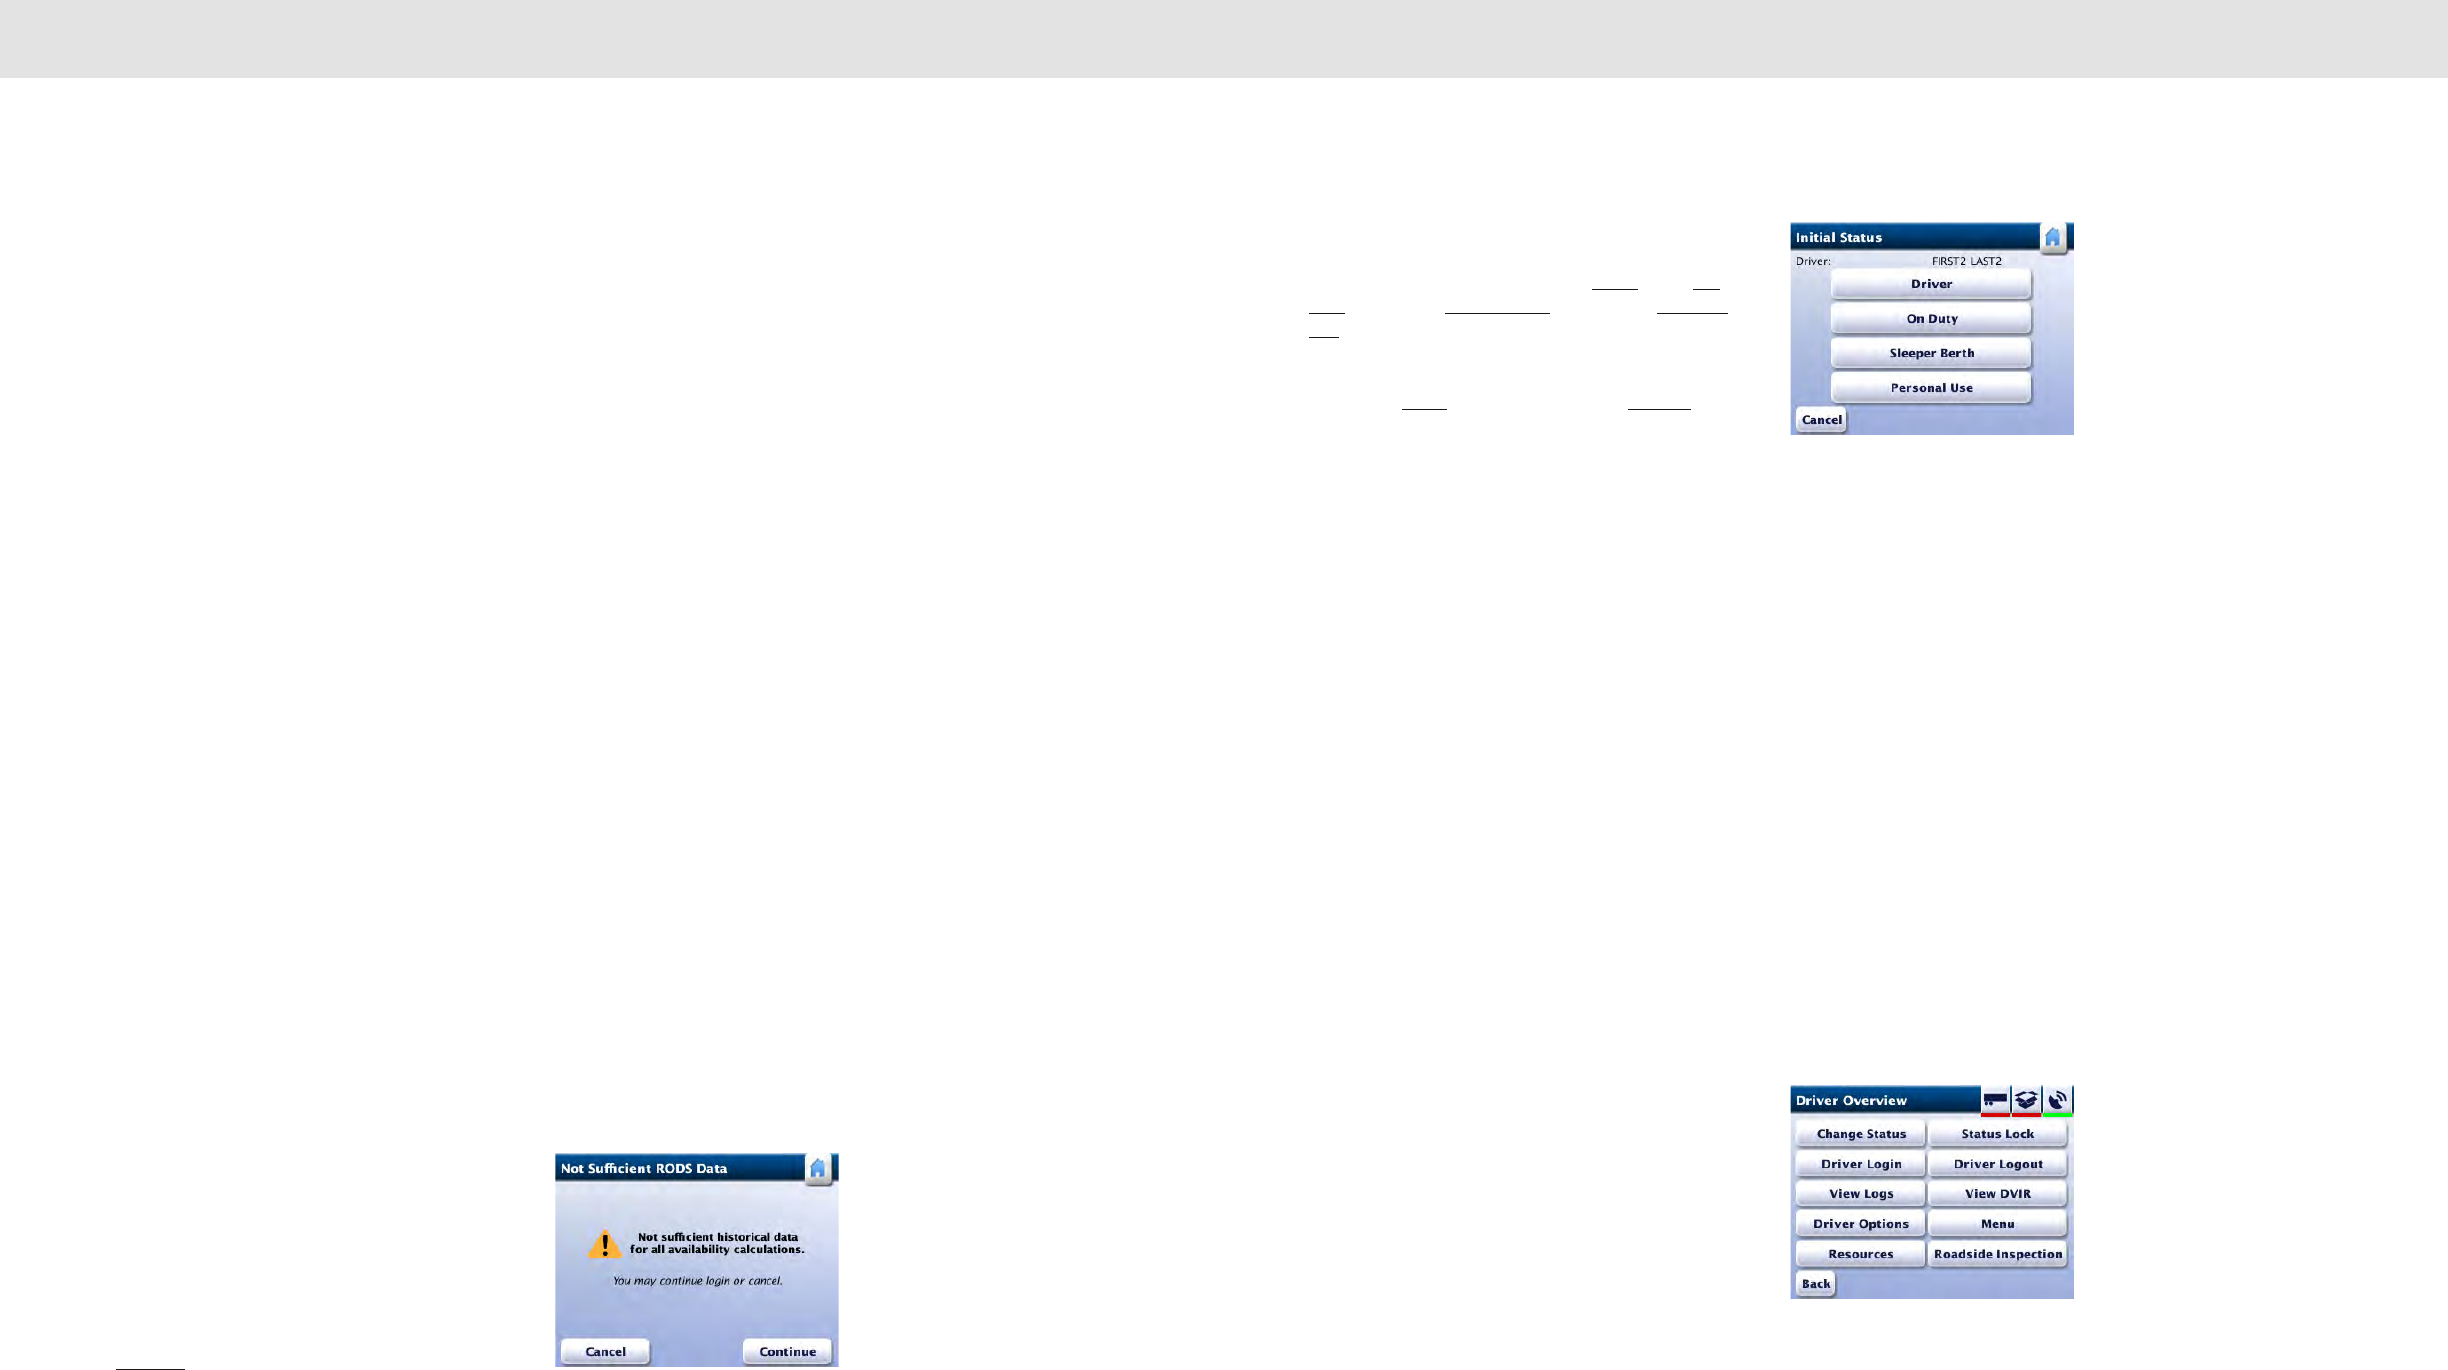
7877
Daily Operations Daily Operations
6. Daily Operations
Once RoadLog has been installed, the Company has been
logged in and first start up procedures have been
completed, RoadLog is ready for daily operational use.
When you start the engine, RoadLog will automatically go
from sleep mode to active mode.
Note: If no Driver is logged in at start up, you’ll see
the Menu screen. From here you can log in, review the
DVIR or view the RoadLog settings.
Driver Log In
At the start of each workday, Drivers must log in to RoadLog
in order to record their duty status and activities for that day.
Drivers can log in automatically with their Driver Key or
manually.
Automatic Log In with the Driver Key
To log in to RoadLog automatically, insert your Driver Key
into the USB port. RoadLog displays the Preview
Availability screen. Data displayed includes:
• Driver: Name of the Driver logging in.
• Last status: Last duty status recorded for the Driver
and the date and time when the duty status was set.
• Driving time left: Remaining driving time allowed for
the Driver.
• Availability reset: Time of the day when the HOS
calculations will be reset.
Note: If it’s your first log in, or RoadLog detects there
is not sufficient historical data for HOS availability
calculation, RoadLog will not be able to calculate
“Driving time left,” and it displays the Not Sufficient
RODS Data screen. It will take a 24 hour period from
the first Driver log in for the system to be able to
calculate “Driving time left” and “Daily Duty Availability.”
It will take 34 consecutive hours of “off duty” time to
show “Weekly duty availability.”
Tap Continue to continue. RoadLog displays the Initial
Status screen.
Enter your Status
Tap the appropriate button for your current status to let the
system know if you’re coming on as a Driver, going On
Duty, going in the Sleeper Berth, or driving for Personal
Use.
Note: If you’re logging in as a team, one person must
select Driver and the other person(s) On Duty.
RoadLog will record HOS data for each person based
on your duty status selections.
Your next step will depend on whether you are the first Driver
to log in and whether there are Trailers and/or Shipping
Documents assigned to the vehicle. In either case, you’ll
need to perform all necessary DVIR procedures when
starting your trip.
If you are the first driver to log in as “Driving,” and current
resources are assigned in RoadLog, you must choose
whether to keep or discard the Trailers and/or Shipping
Documents that have been assigned as current resources.
After making your choices, you’ll perform a DVIR.
If Trailers and/or Shipping Documents are already confirmed
by a previous Driver, you’ll be asked to “Keep the current
resources,” to confirm that resources have not changed.
After confirming the resources, you’ll perform a DVIR.
Automatic status updates
Once you’ve logged in, RoadLog will update your status
automatically – there’s no need to select a status change
from the Driver Overview options menu.
When you travel over 2 miles, RoadLog will automatically put
you in “Driving” (D) status.
When the vehicle is stationary for five minutes, RoadLog will
automatically put you in “On Duty” status (ON).
Note: You can manually select “Sleeper Berth” (SB) or
“Personal Use” (PS) from the Driver Overview options
menu, whenever the vehicle is not traveling.
Not Sufficient RODS Data
Initial Status
Driver Overview Options
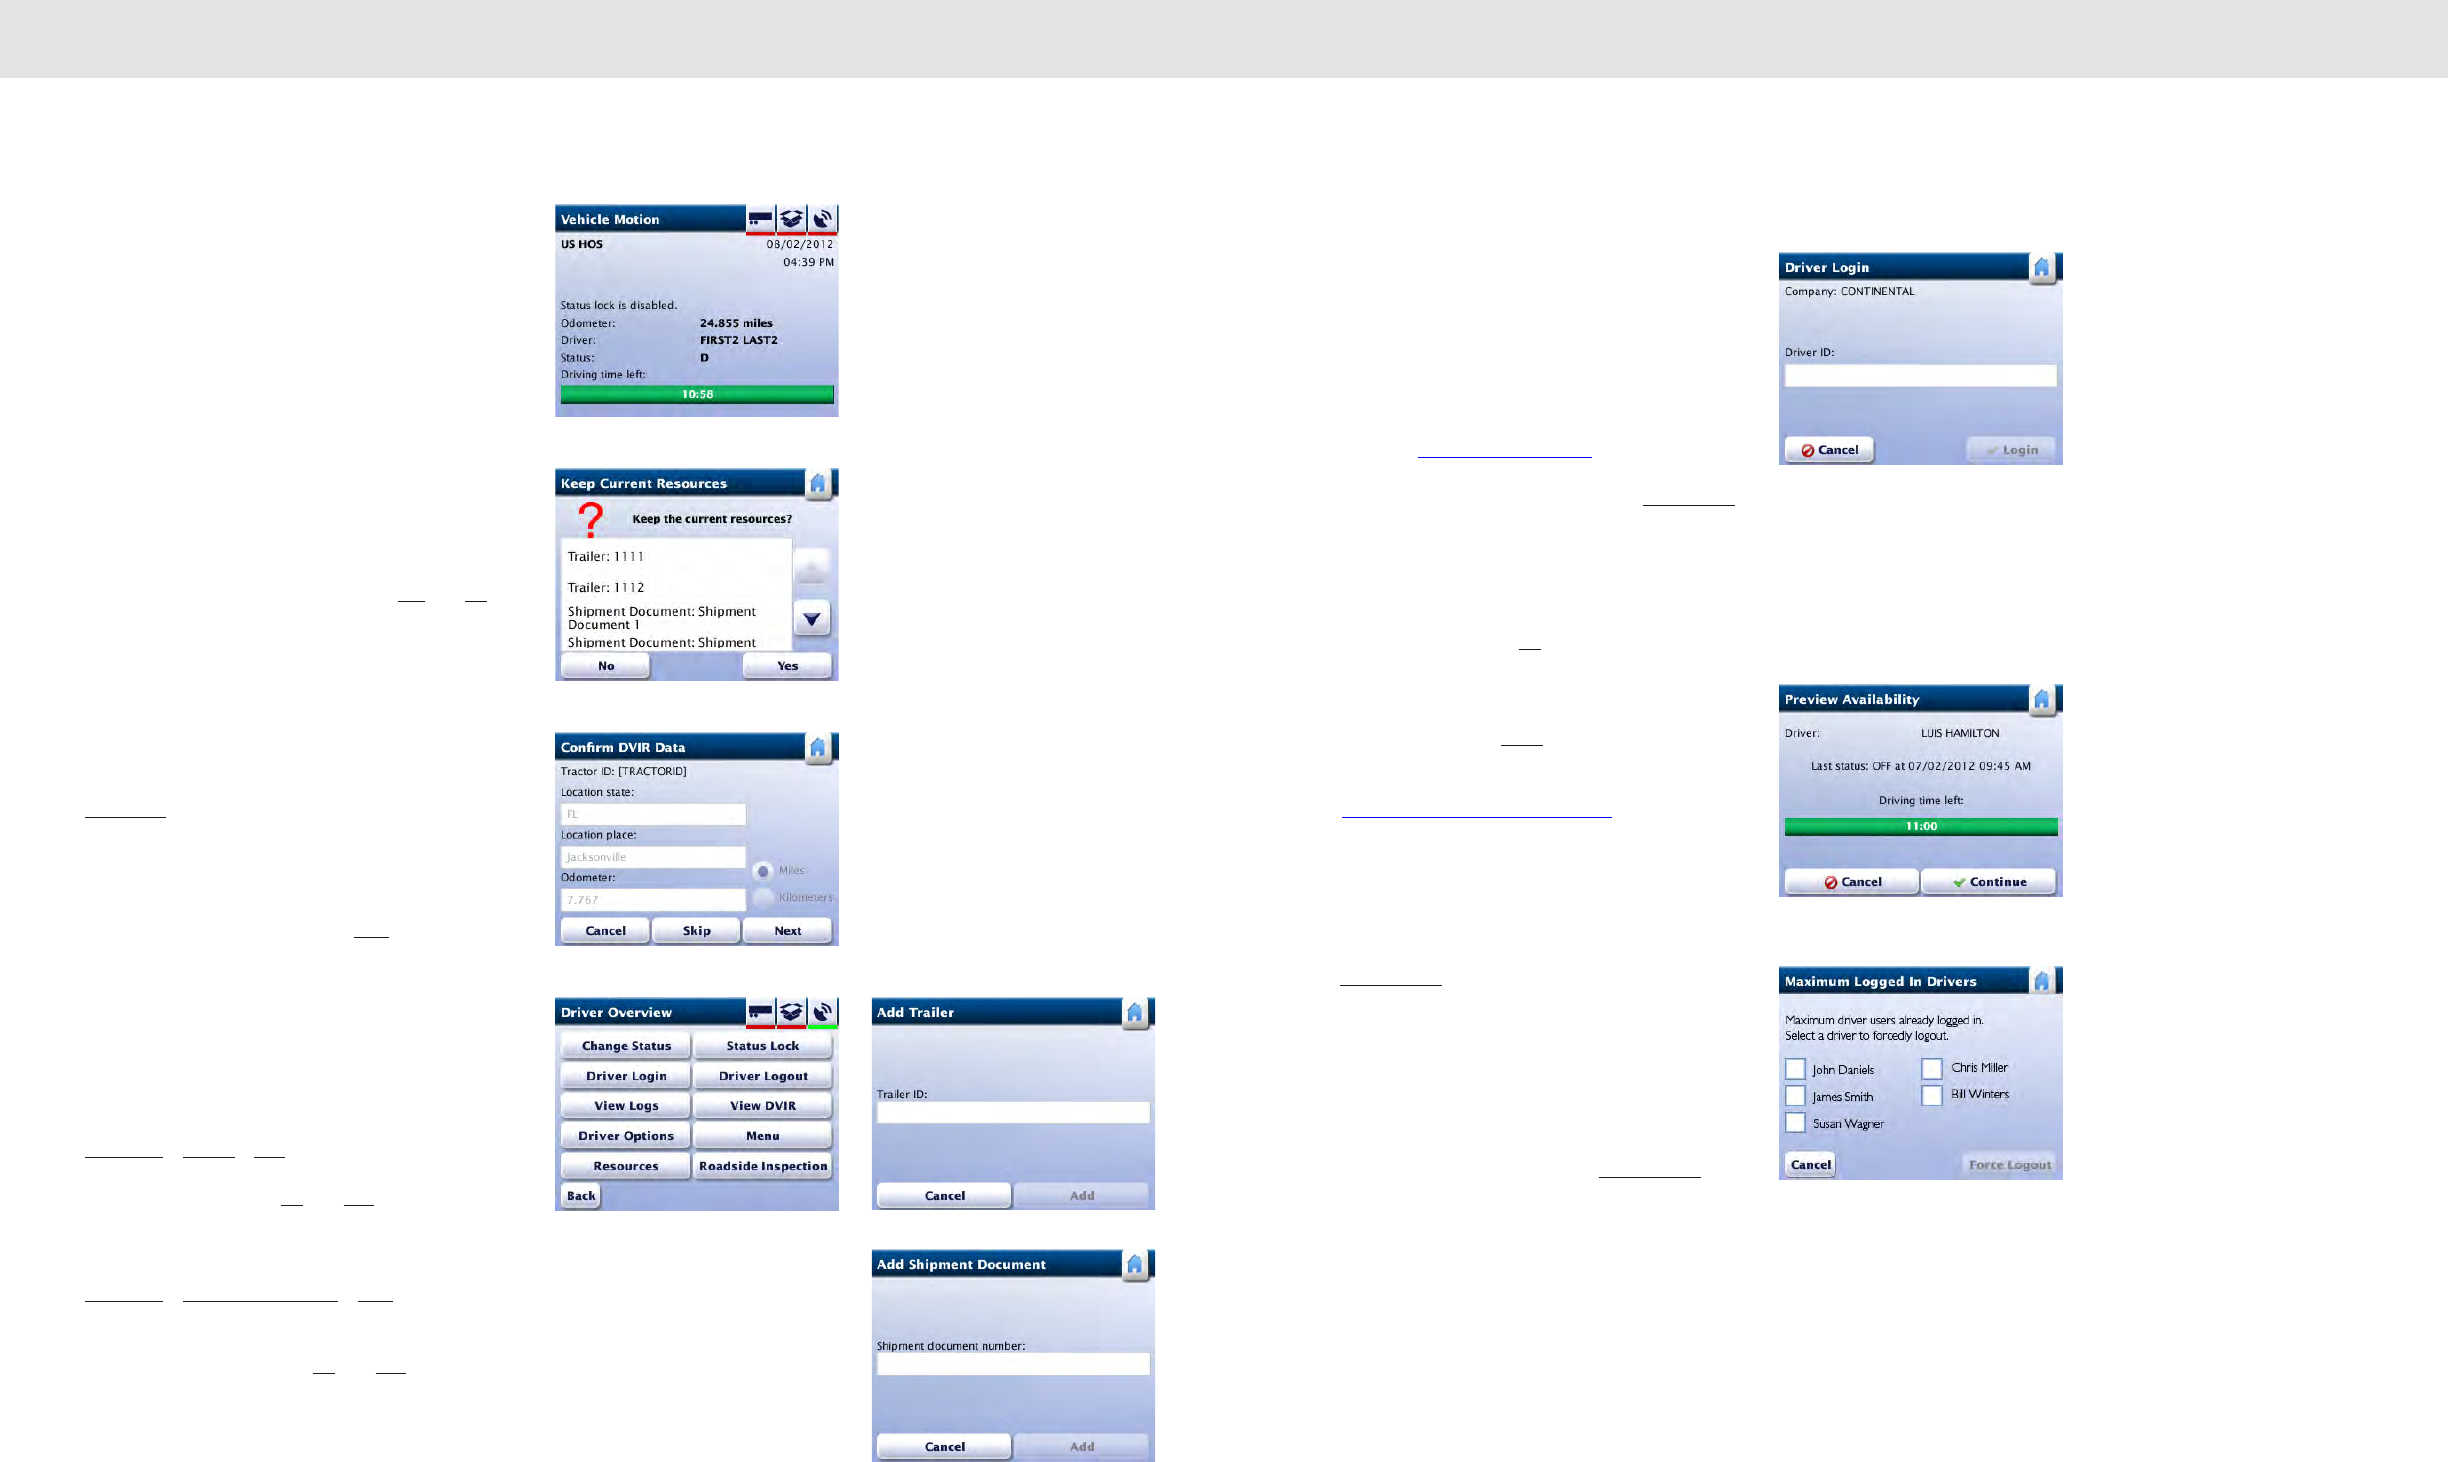
8079
Daily Operations Daily Operations
Vehicle motion screen
When vehicle motion is detected, the Vehicle Motion screen
is displayed regardless of whether or not a Driver is logged
in.
Managing Resources
If current resources are assigned in RoadLog, and you are
the first Driver to log in, RoadLog displays Keep Current
Resources screen that lists the trailers or Shipping
Documents as current resources.
If you want to keep current resources, tap Yes. Tap No if you
want to discard them.
If you are not the first Driver to Log In:
From the Driver Overview Options menu screen, tap
Resources. Confirm your Resources, including Assets
(tractor and trailers), Shipping Documents (Bills of Lading
or Manifest Numbers, Pro, etc. ) and Supporting
Documents (fuel receipts, meal receipts and vehicle wash
receipts, etc.), RoadLog displays Confirm DVIR Data
screen. Confirm your Data, then tap Next.
RoadLog will ask you to perform a DVIR inspection and
enter your findings.
If resources such as trailers or Shipping Documents do not
exist, you first need to add them.
From the Driver Overview options menu screen, choose
Resources > Trailers > Add. In the Add Trailer screen, tap
the Trailer ID field to bring up the Keyboard. Type in your
Trailer information and tap Go. Tap Add to save Trailer info.
Follow the same procedure if no Shipment Documents exist.
From the Driver Overview options menu screen, choose
Resources > Shipping Documents > Add. In the Add
Shipping Document screen, tap the Shipping Document
Number field to bring up the Keyboard. Type in your
document information and tap Go. Tap Add to save
Shipping Document info.
Manual Log In
If the Driver Key is not available, Drivers can log in manually.
Note: This is the EMERGENCY procedure in case the
Driver Key is lost or damaged.
To log in manually, Drivers must have already been entered
into the Fleet Software, and their identity must have already
been transferred from the Fleet Software to RoadLog via the
Fleet Key. See Company Data Transfer.
To log in manually from the Menu screen tap Driver Login.
RoadLog displays the Driver Login screen.
Tap the Driver ID field. RoadLog displays the Keyboard
screen.
Enter your Driver ID and tap Go (note Driver ID is CAP/
lowercase sensitive). RoadLog displays the Driver Login
screen.
Check your entry and tap Login. RoadLog displays the
Preview Availability screen. You can now follow the same
log in steps you would had you logged in with a Driver Key.
See: Automatic log in with the Driver Key.
Note: If you select Personal Use from the Initial
Status screen, and another Driver is already logged
under Personal Use, RoadLog displays the Force
Personal Use Driver Logout screen.
Tap Force Logout to continue log in under Personal Use.
The current Personal Use Driver will be logged out from
RoadLog.
Note: If five Drivers are currently logged in, and a new
Driver attempts to log in, RoadLog displays the
Maximum Logged In Drivers screen.
Select a Driver to force log out and tap Force Logout to
continue log in process. The selected Driver is now logged
out.
Vehicle Motion
Preview Availability
Maximum Logged In Drivers
Keep Current Resources
Confirm DVIR Data
Driver Login
Add Shipment Document
Add Trailer
Driver Overview options
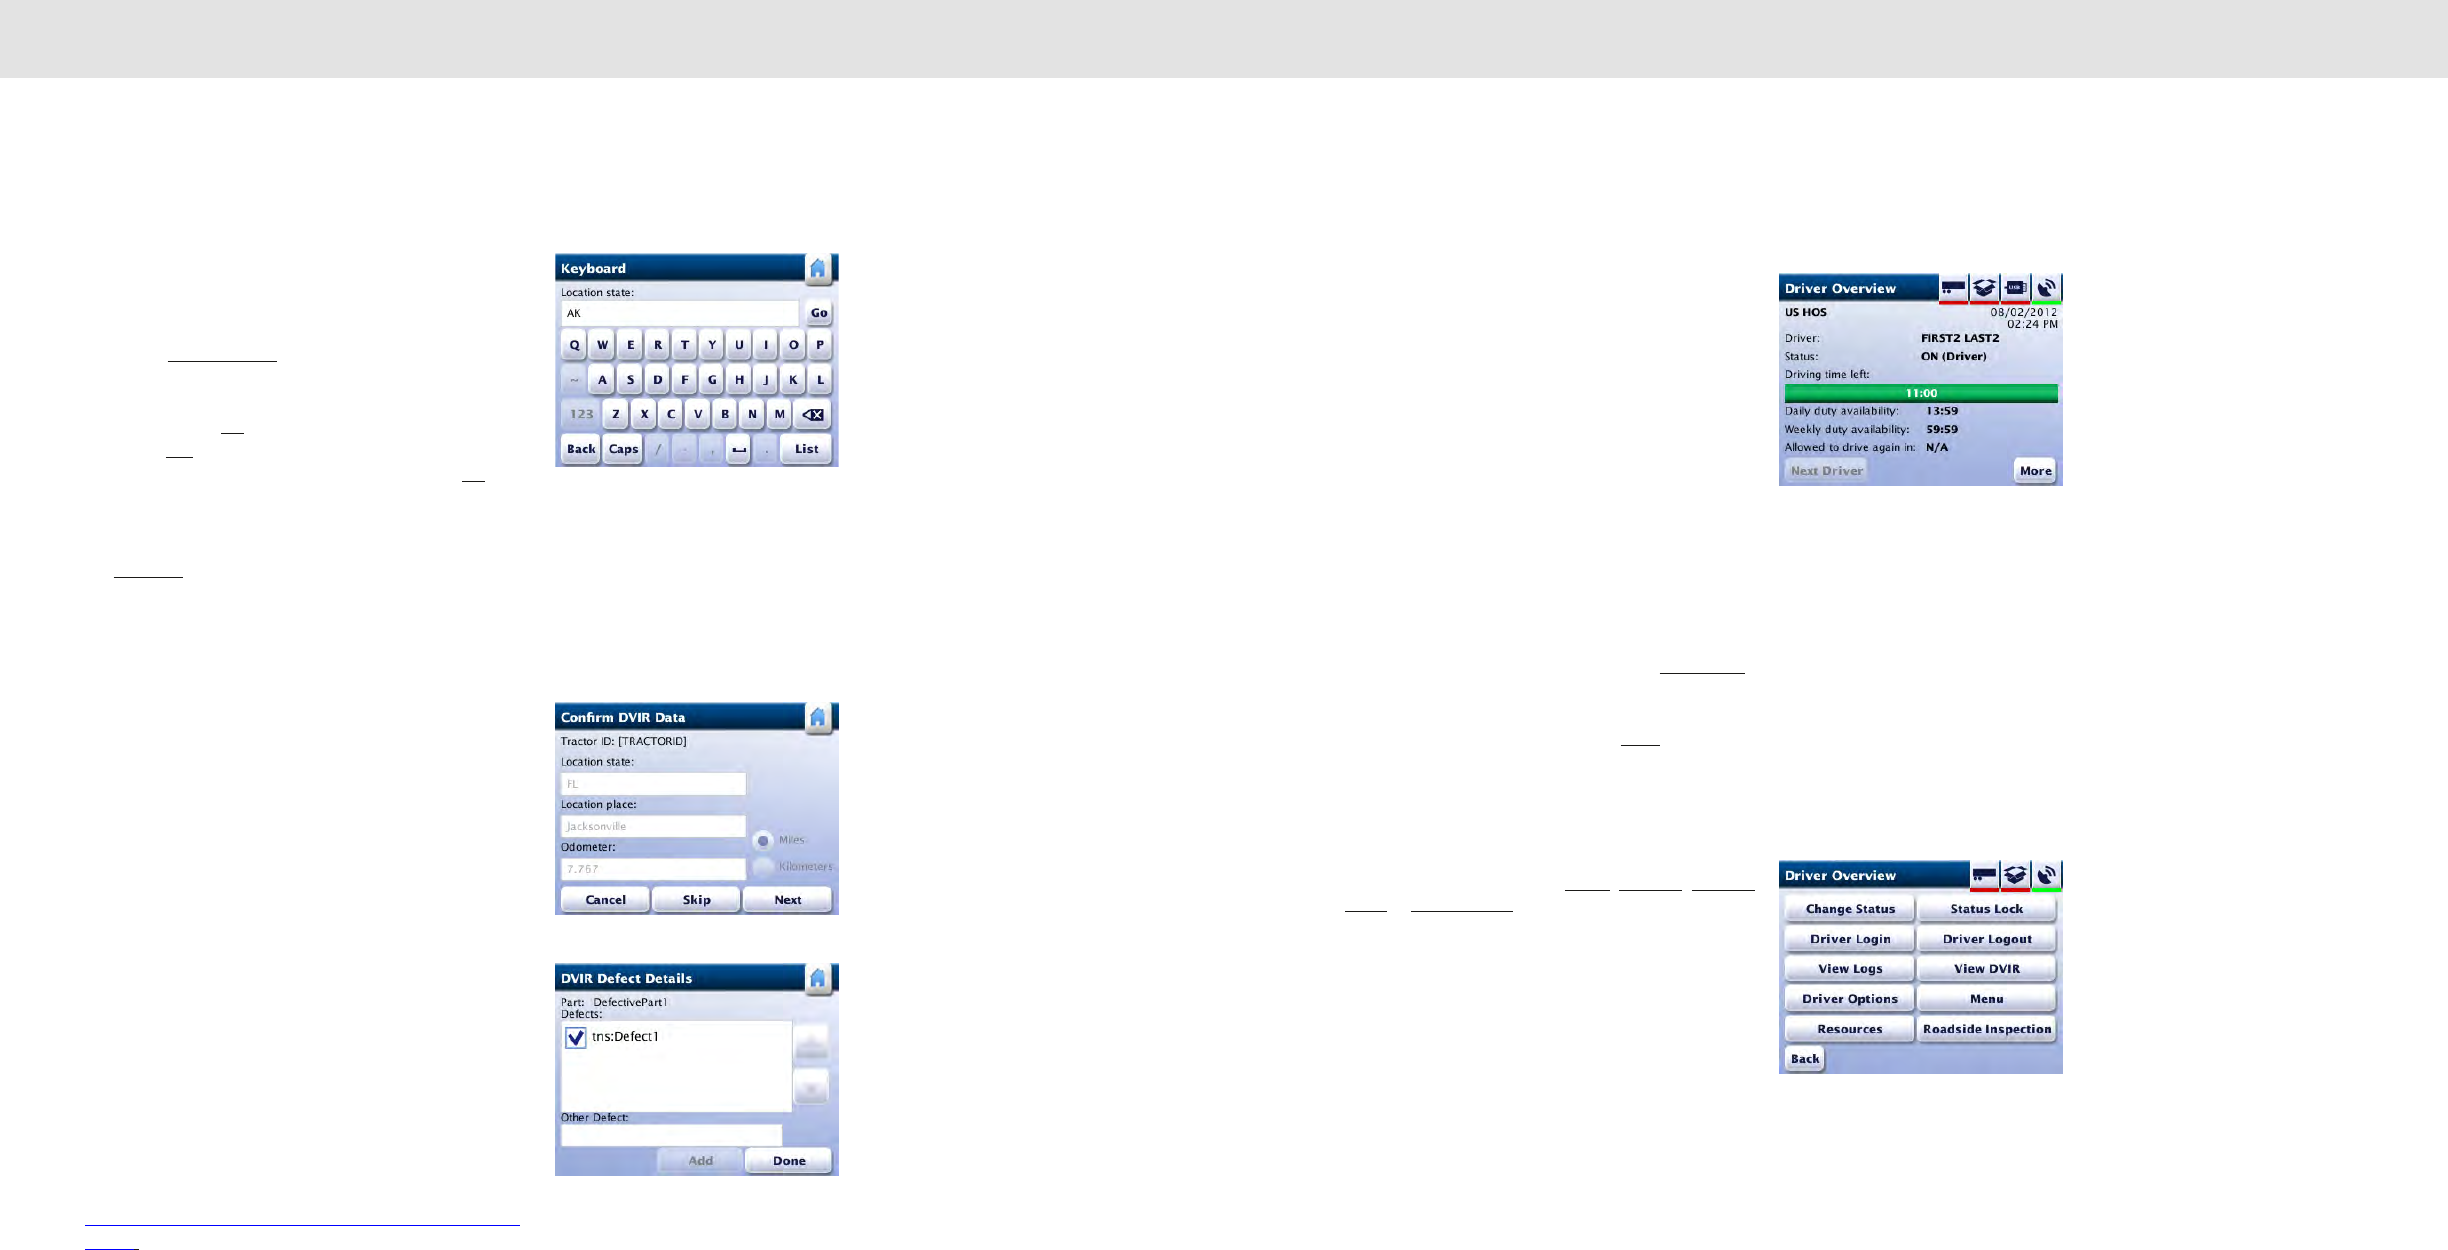
8281
Daily Operations Daily Operations
Manual Location Entry
During log in, if RoadLog does not receive a sufficiently
strong GPS signal, it displays the Manual Location Entry
screen.
Tap on the Location state field to bring up the pop-up
keyboard. Tap the first letter(s) of your current state (the auto
complete feature suggests the first state that begins with the
typed letters). Tap Go if the suggested state is where you
are,or tap List to see other states matching the typed
letters. Pick your current state from the list and tap Go.
In Location place, enter the city or town closest to your
location, as you did your Location state. When complete,
tap Continue to continue the log in process.
Performing DVIRs at Log In and Log Out
At each log in or log out, RoadLog will prompt the Driver to
perform a DVIR. In the DVIR process, you will:
Confirm location and odometer reading.
Confirm defects and/or repairs to defects on the vehicle and
trailer(s).
Add any defects found during your inspection.
Confirm that there are no defects or need for repairs and
that the vehicle and trailer(s) are in good working order.
When logging in, you will be prompted to begin a DVIR after
confirming resources. When logging out, you will be
prompted to begin a DVIR after viewing your logs.
During roadside inspections, you will be able to print DVIR
reports directly from RoadLog’s built-in thermal printer, or
download and transfer DVIR records via USB.
For procedures on creating and printing DVIRs see Creating
DVIRs.
Driver Overview
The Driver Overview screen lets Drivers check the
remaining time they’re allowed to spend in On Duty or Driver
status. Data displayed includes:
• Country used for HOS regulations.
• Driver: Name of the Driver.
• Status: Driver’s current duty status.
• Driving time left: Progress bar indicating the remaining
driving time allowed for this Driver. When the remaining
allowed driving time is less than 30 minutes, the
progress bar color will change to red.
• Daily duty availability: Available On Duty time remaining
for the current day.
• Weekly duty availability: Available On Duty time
remaining for the current week.
• Gain time in: Time the Driver must wait before driving
the vehicle.
If there are other Drivers logged in, you can tap Next Driver
to display the Driver Overview screen for other logged in
Drivers.
To view more Driver overview options, tap More. RoadLog
displays the Driver Overview Options screen.
The Driver Overview Options Screen:
Menu choices from this screen include:
• Change Status: Choose from Driver, On Duty, Sleeper
Berth or Personal Use.
• Driver Login: Allows additional Drivers to log in
manually. If the fleet manager has entered Drivers in the
RoadLog Fleet software and transferred the list into the
RoadLog, each Driver entered can log in without their
Driver Key by tapping the Driver Login button.
• View Logs: View, edit and print your log.
• Driver Options: Enter Exemptions and Pre-Trip and
Post-trip activities.
• Resources: View and edit records for documents,
trailers and assets.
• Status Lock: Allows you to disable the automatic switch
from “Driving” to “On Duty” whenever t he vehicle stops
(see details below).
• Driver Logout: Starts the log out process at the end of
the trip.
• View DVIR: View and edit DVIRs.
• Menu: Shows the top-level navigation choices seen
after company log in, including Driver Login, Driver
Overview and Settings.
• Roadside Inspection: Allows Driver to provide
authorized inspection personnel with HOS data, either
as a print out or as a download to USB drive.
Confirm DVIR Data
DVIR Defect Details
Driver Overview
Driver Overview options
Location entry
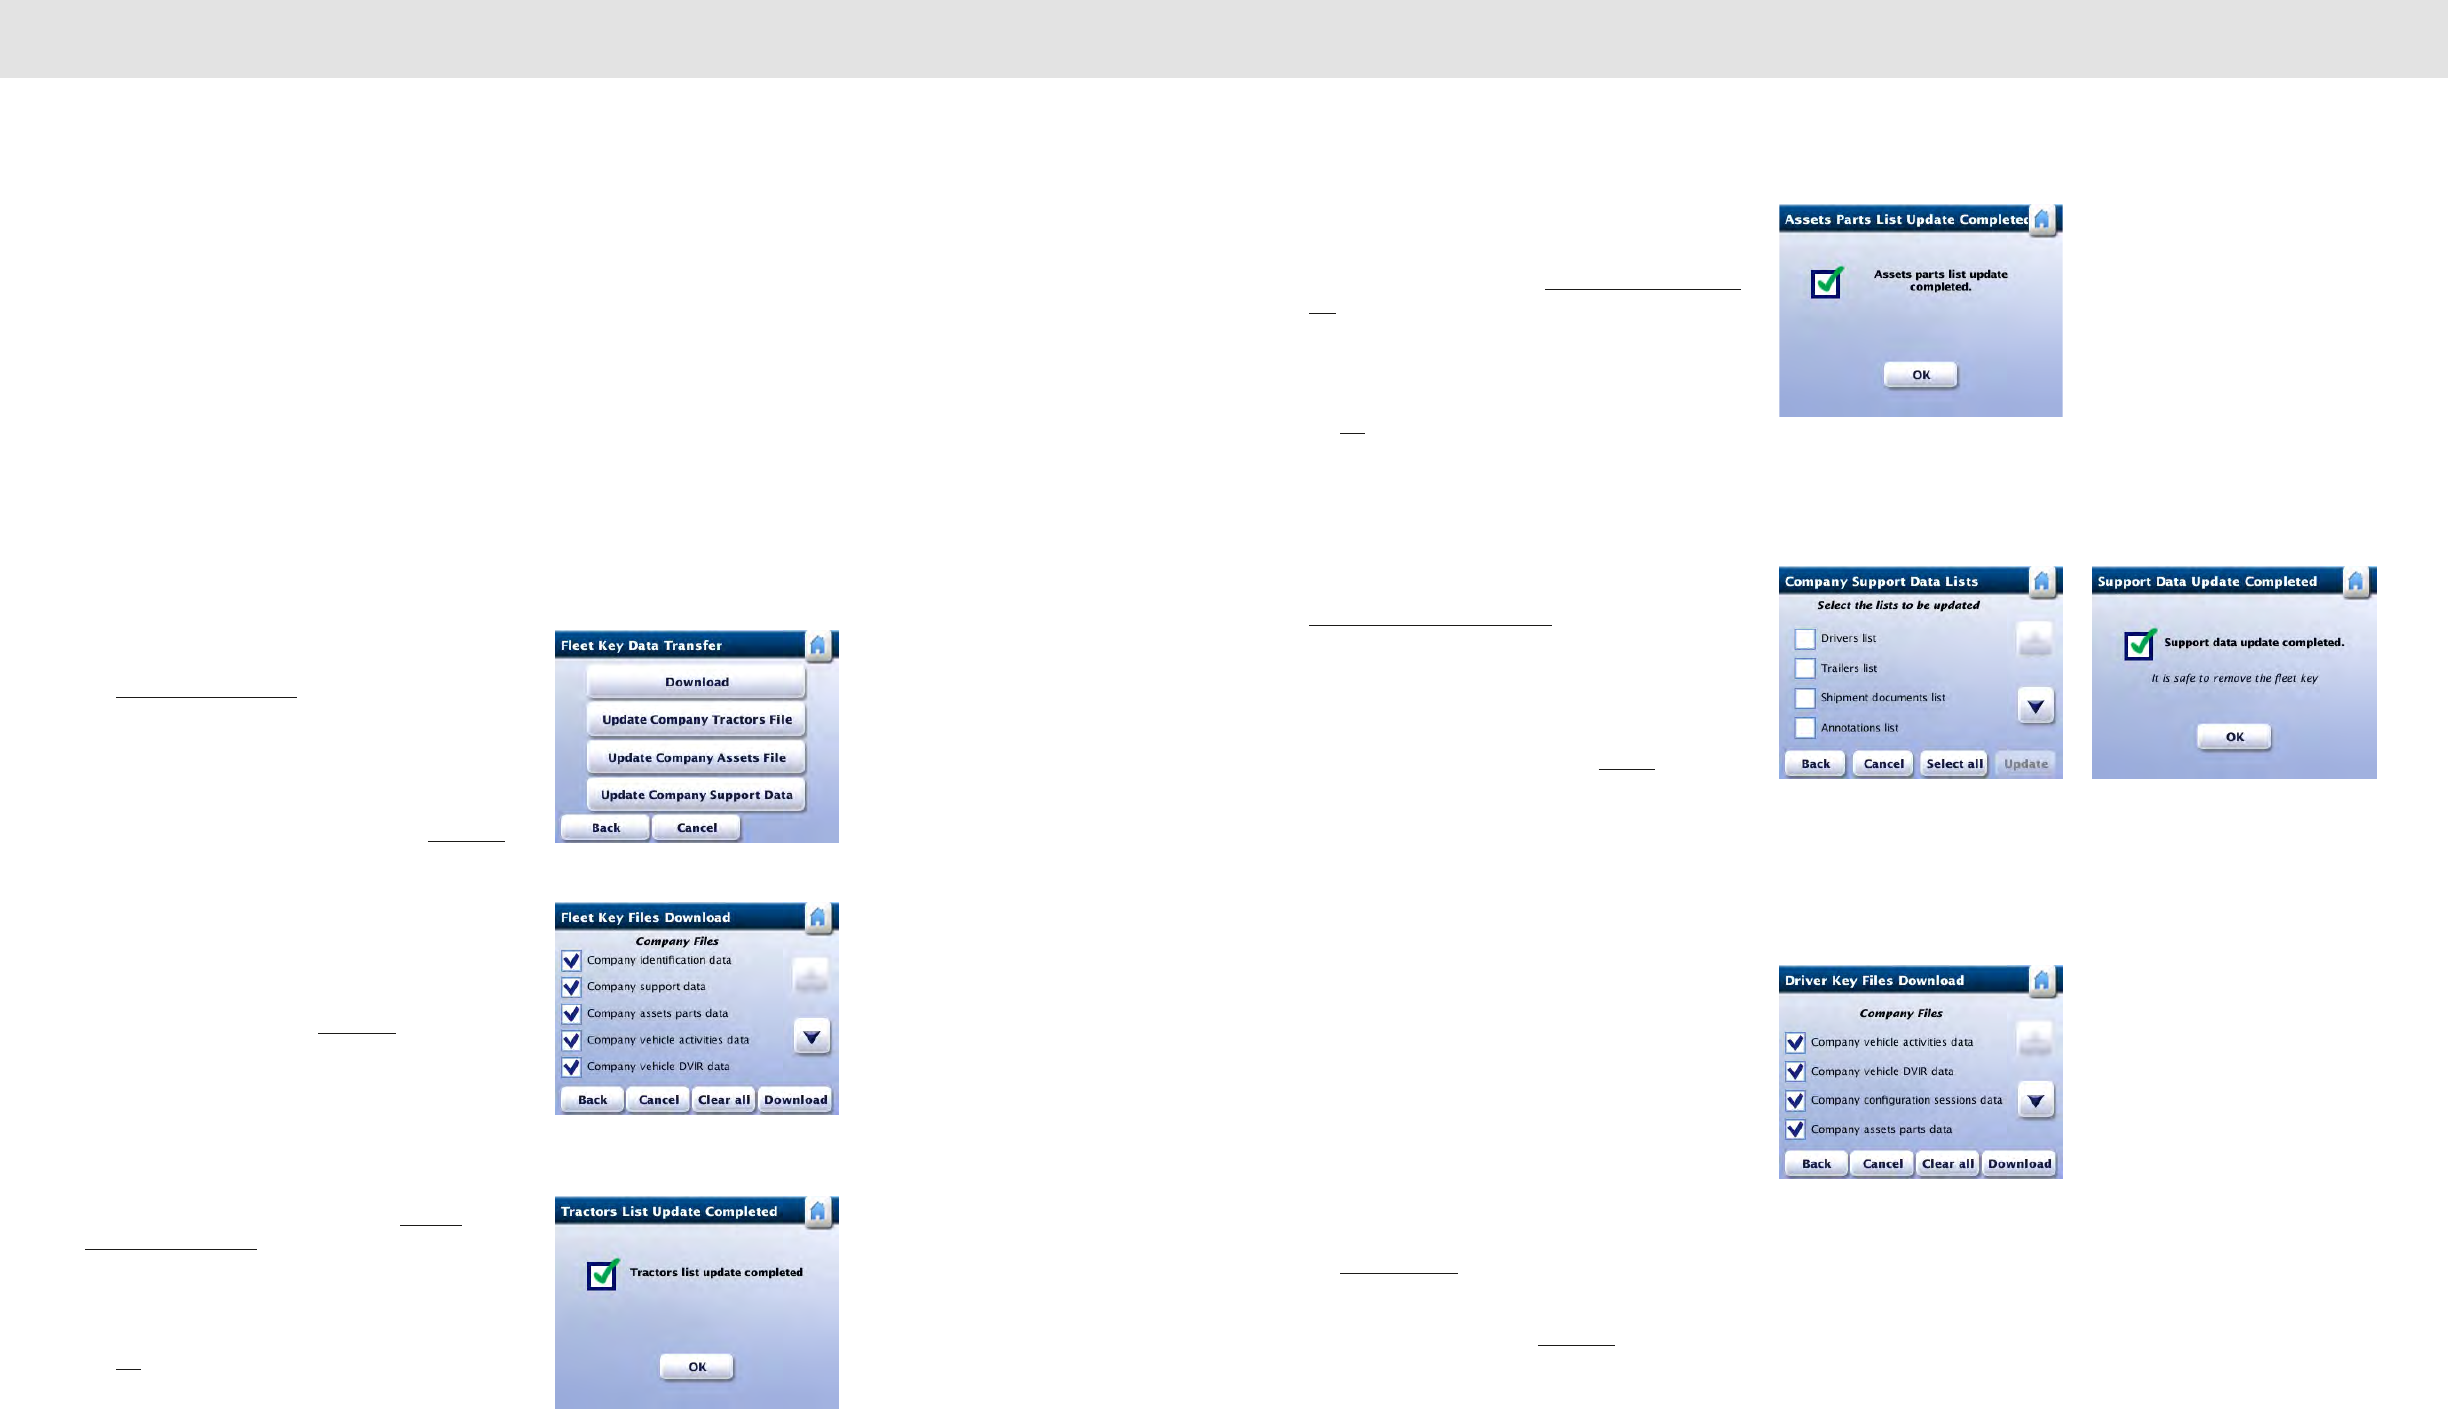
8483
Daily Operations Daily Operations
Company Data Transfer
The Fleet Key is used not only to run the Fleet Software but
also to transfer company data to and from the RoadLog(s)
installed in your vehicle(s). With your Fleet Key you can:
• Download company data from RoadLog to the Fleet
Key.
• Update the company tractors and trailers files on the
Fleet Key with the tractors and trailers data from
RoadLog.
• Update the company assets file on the Fleet Key with
assets parts list data from RoadLog.
• Upload the company support data from the Fleet Key
to RoadLog.
To perform these transfer functions, insert your Fleet Key
into RoadLog. The Fleet Key Options screen will be
displayed.
Tap Company Data Transfer. RoadLog displays the Fleet
Key Data Transfer screen.
Download Company Data
To download company data from RoadLog to the Fleet Key
from the Fleet Key Data Transfer screen, tap Download.
RoadLog displays the Fleet Key Files Download screen.
Use the up and down arrows to scroll through Fleet Key
Files Download screens.
From the Fleet Keys Files Download Company Files and
Fleet Keys Files Download Driver Files screens, select the
files to be downloaded and tap Download. RoadLog
displays the Transfer in Progress screen during data
transfer and the Data Download Completed screen when
data transfer is completed.
Update the Company Tractors File
To update the company tractors file on the Fleet Key with
the tractor data from RoadLog device, tap Update
Company Tractors File from the Fleet Key Data Transfer
screen. RoadLog displays the Transfer in Progress screen
during data transfer and the Tractors List Update
Completed screen when the update is completed.
Tap OK. RoadLog displays the Fleet Key Options screen.
Update the Company Assets File
To update the company Assets file on the Fleet Key with the
Assets data from RoadLog, tap Update Company Assets
File from the Fleet Key Data Transfer screen. RoadLog
displays the Transfer in Progress screen during data
transfer and the Assets Parts List Update Completed
screen when the update is complete.
Tap OK. RoadLog displays the Fleet Key Options screen.
Upload the Company Support Data Lists
To upload the company support data lists from the Fleet Key
to RoadLog from the Fleet Key Data Transfer screen, tap
Update Company Support Data. RoadLog displays the
Company Support Data Lists screen.
Use the up and down arrows to scroll through the Company
Support Data Lists screens.
Select the lists to be uploaded and tap Update. When the
upload is completed, RoadLog displays the Support Data
Update Completed screen.
When all data transfers are complete, remove the Fleet Key
from USB port. RoadLog displays the Menu screen or
Driver Overview screen, depending on the log in status.
Data Download to a normal USB
Flash Drive
You can download data from RoadLog to a Driver Key, Fleet
Key or any regular USB flash drive that has been formatted
in the FAT32 file system.
To download data to a normal USB flash drive, insert it into
the USB port. RoadLog displays the USB Flash Drive
Options screen.
Tap Data Download to display the Download Files screen.
Select the files to be downloaded by tapping on the
corresponding check box. Tap Download to start the data
transfer. RoadLog displays Transfer in Progress screen
during data transfer and Data Download Completed
screen when the data transfer is complete.
Fleet Key Data Transfer
Fleet Key Files Download
Tractors List Update Completed
Company Support Data Lists
Download FIles
Support Data Update Completed
Assests Parts List Update Completed
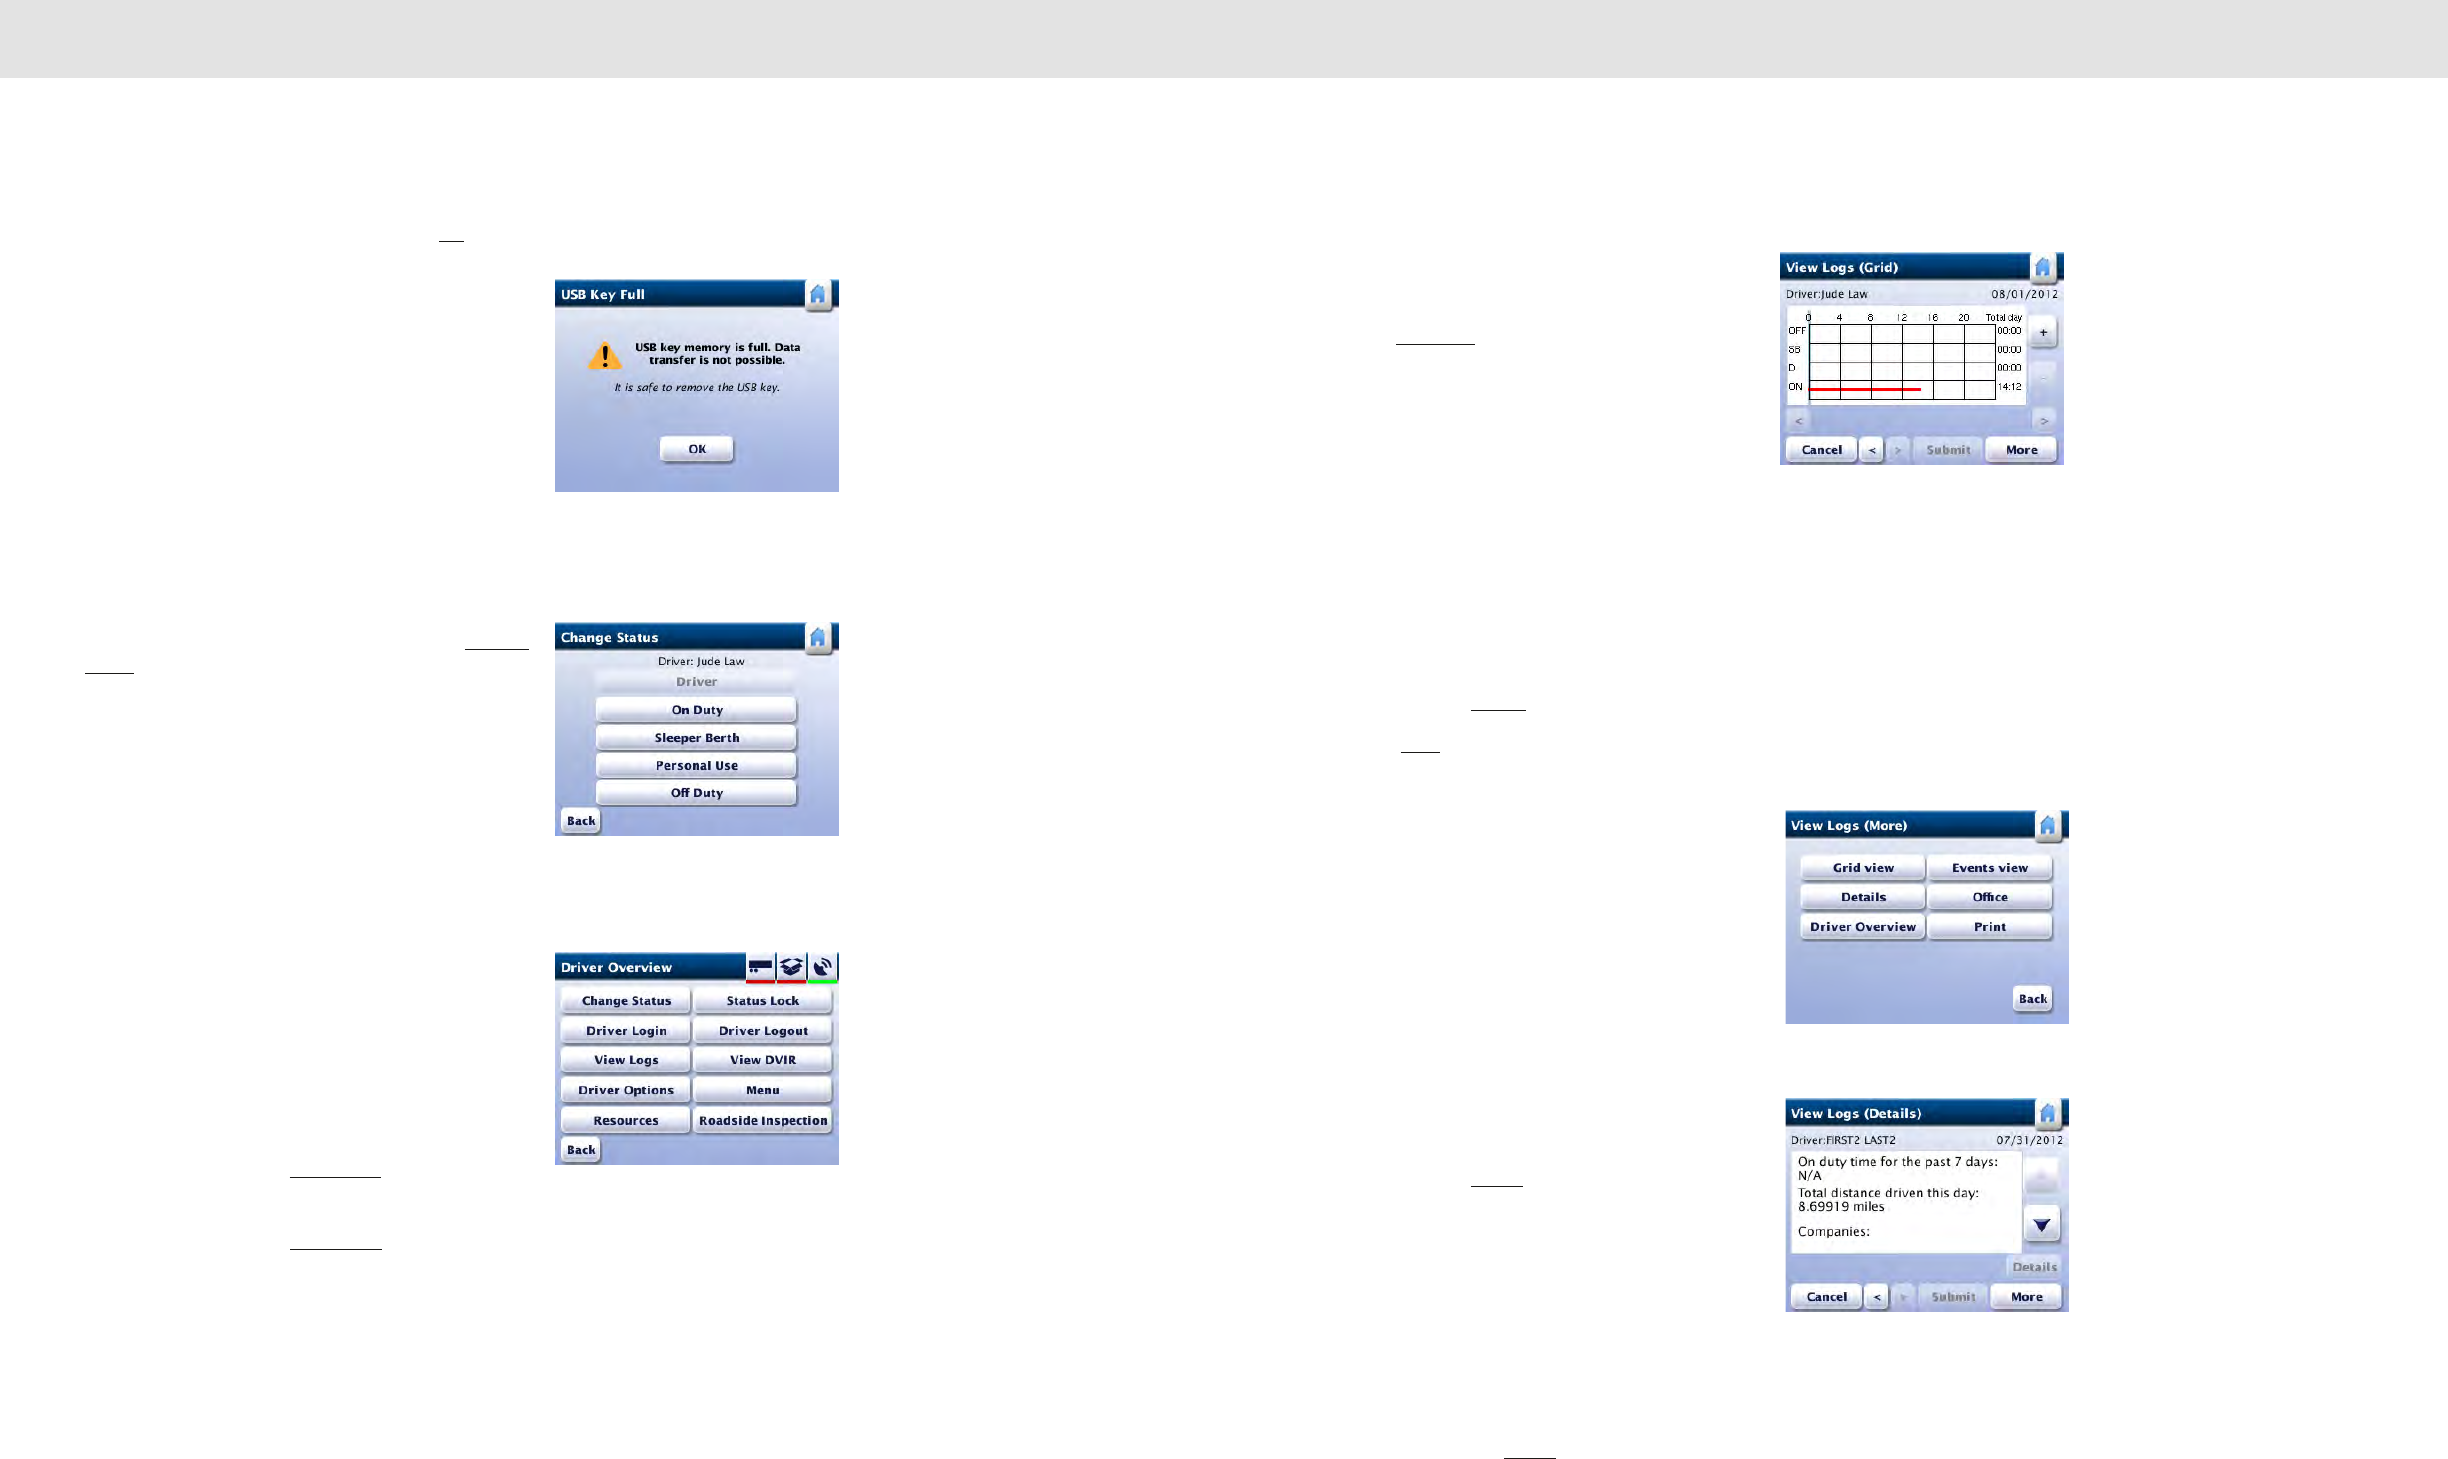
8685
Daily Operations Daily Operations
Unplug the USB key from the RoadLog and tap OK.
RoadLog returns to the Settings screen.
Notes: If the inserted USB flash drive is not formatted
in FAT32, RoadLog will display the Unknown USB
Device screen.
If the inserted USB flash drive contains too much data,
RoadLog will display the USB Flash Drive Full screen.
If an error is detected during data transfer, RoadLog will
display the Data Transfer Failure screen.
Change Status
To change the duty status of a logged in Driver, tap Change
Status from the Driver Overview options screen.
RoadLog displays the Change Status screen.
Tap on the button for the duty status selection. RoadLog
assigns the new HOS duty status and goes to the Driver
Overview screen.
Status Lock
RoadLog detects when the vehicle stops and automatically
changes the status of the logged in driver to “On Duty.”
However, in some situations, such as severe traffic jams, the
Driver may want to disable this feature by using the “Status
Lock” function. When Status Lock is on, RoadLog will keep
the current Driver status as “Driving,” even when the vehicle
has stopped and the ignition is off.
To enable Status Lock, Tap Status Lock from the Driver
Overview Options screen.
To disable Status Lock, tap Status Lock again.
Status Lock is automatically disabled when the Driver logs
out or RoadLog enters sleep mode.
View Logs (Grid)
RoadLog allows the Driver to view recorded logs for the
current as well as each of the past 14 days.
To review your logs from the Driver Overview Options
screen, tap View Logs. RoadLog displays the View Logs
(Grid) screen.
Note: The View Logs (Grid) screen is displayed
automatically when the Driver Key is inserted at log
out.
Use the upper horizontal arrows to scroll through the
selected day. Use the lower horizontal arrows to scroll
through logs recorded for the current and past 14 days.
Use the + and - buttons to zoom in and out on the grid.
Check your logs: Use the arrow buttons at the bottom of the
screen to change the selected date (the current and
previous 14 days can be selected).
Check recorded logs. If they are correct and you want to
complete log out, tap Submit to finish the viewing session.
However, you can view additional log information before you
log out. Tap More for further viewing options. RoadLog
displays View Logs (More) screen.
View Logs (More)
The View Logs (More) screen provides access to other
screens where you can view Log Details, Log Events and
Details on the Company logged in. It also provides links to
the Driver Overview screen and the View Logs (Grid)
screen. You can also print Logs from the View Logs (More)
screen.
View Logs (Details)
RoadLog records and displays details for the Driver’s
workday.
To view the details from the View Logs (Details) screen,
highlight any item tap Details. RoadLog displays the View
Logs (Details) screen.
To review log details, use the up and down arrows to scroll
through the list of details. Use the left and right arrows to
scroll through recorded logs from the last seven days.
Details displayed include:
• Amount of On Duty time for the past 7 days.
• Total distance driven for the current day.
• Companies for which the Driver worked.
Note: to view Company details, select any one of the
Companies and tap Details. RoadLog displays the
Company Details screen.
Change Status
Driver Overview Options
USB Flash Drive Full
View Logs (Grid)
View Logs (More)
View Logs (Details)
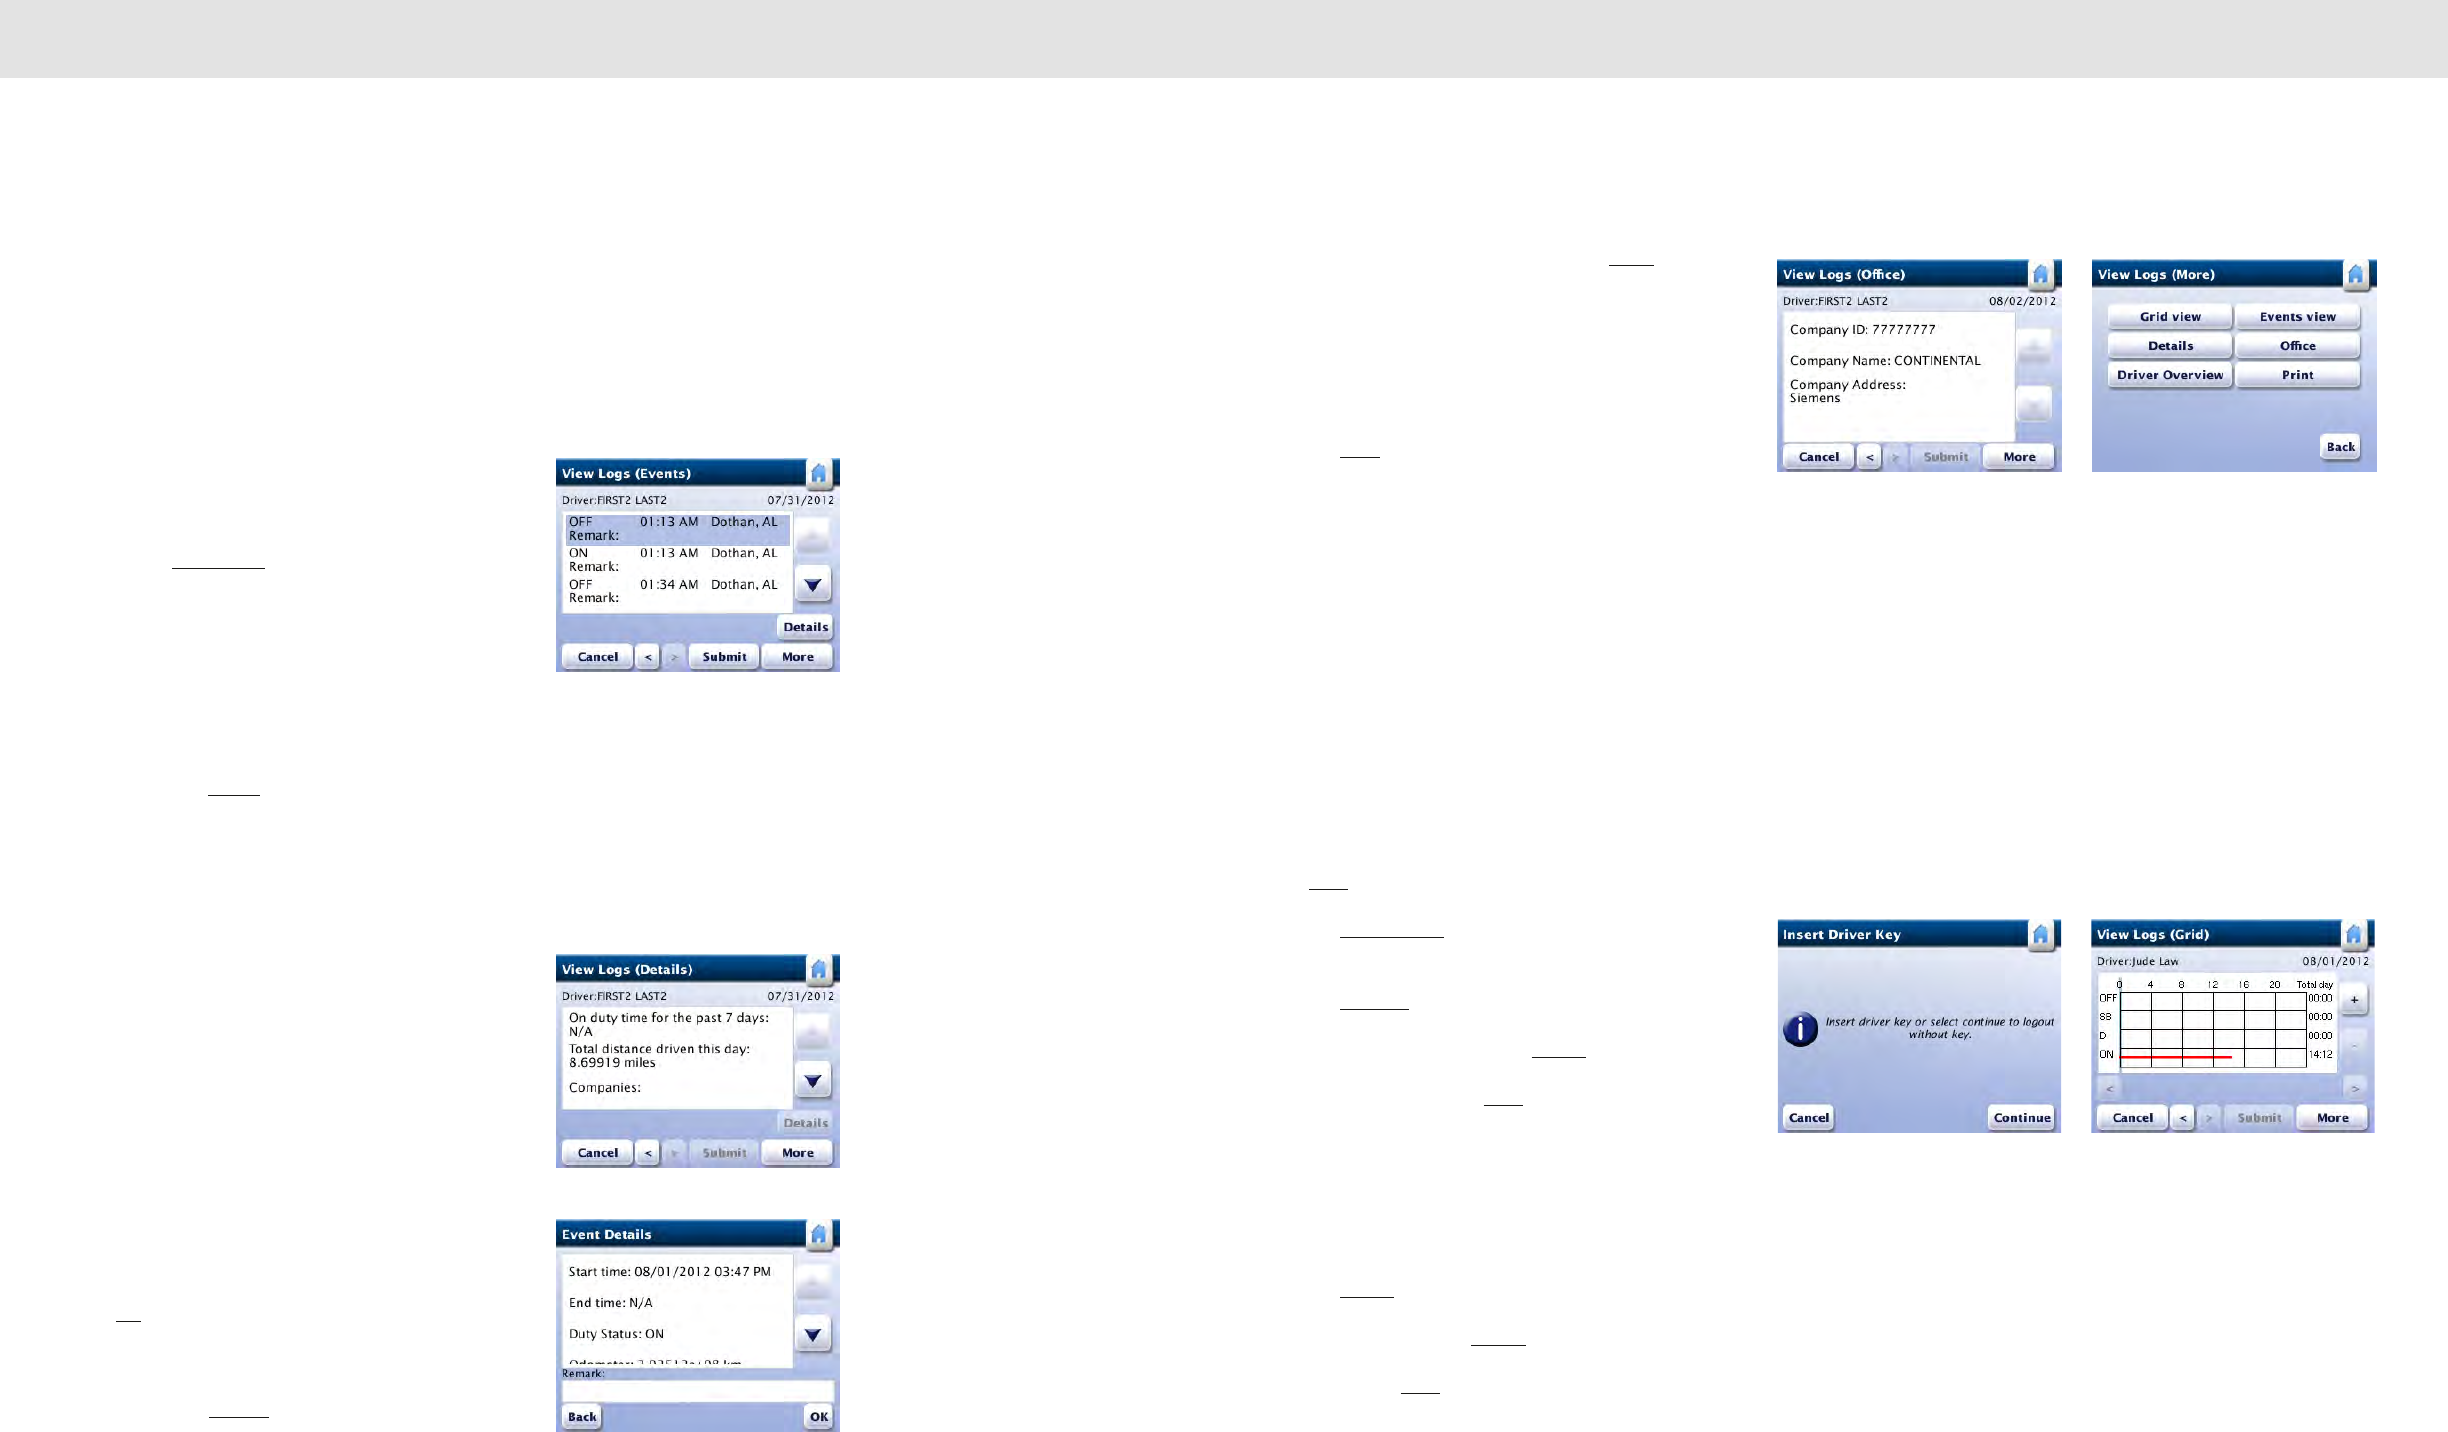
8887
Daily Operations Daily Operations
• Names of Co-Drivers.
• Vehicles used by the Driver.
Note: to view vehicle details, select any one of the
vehicle identification numbers and tap Details.
RoadLog displays Vehicle Details screen.
• Trailers used by the Driver.
• Shipment Documents used by the Driver.
View Logs (Events)
RoadLog records a list of events, such as lunch, rest and
fueling for the logged in Driver. You can view events and add
annotations from the View Logs (Events) screen.
To see a list of recorded events from the View Logs (More)
screen, tap Events View. RoadLog displays the View Logs
(Events) screen.
From the View Logs (Events) screen check the duty status
records and events recorded during your log in session.
Use the up and down arrows to view the list of recorded
events for the selected day. Use the left and right arrows to
scroll through the current and past 14 days’ recorded
events.
Note: If you want to see details for a highlighted
event, tap Details to view the selected record’s details.
RoadLog displays the Event Details screen.
Event Details
To add a remark to a recorded event shown in the View
Logs (Events) screen, highlight the event. Then tap Details.
RoadLog displays the View Logs (Details) screen.
Tap on any detail to add a remark. Then tap Details.
RoadLog displays the Event Details screen. Use the up and
down arrows to scroll through the list of details for each
event. Select the detail you want to annotate by highlighting
and tapping it.
Then, tap in the remark field. RoadLog displays the popup
keyboard.
Type in the remark, or annotation, you want to add.
Tap OK on the Event Details screen to save your remark.
RoadLog returns to the View Logs (Events) screen.
When you have reviewed all events and completed all
annotations, tap Submit to return to the Driver Overview
screen.
View Logs (Office)
From the View Logs (More) screen, tap Office. RoadLog
displays the View Logs (Office) screen showing details for
the currently logged in company:
• Company ID number
• Company Name
• Company Address
Tap More to return to the View Logs (More) screen, or tap
Submit to return to the Driver Overview screen.
Driver Log Out
At the end of the working day, Drivers must log out from
RoadLog. Drivers can log out automatically with their Driver
Keys, or they can log out manually on screen.
When logging out automatically, recorded data will be
automatically downloaded to the Driver Key. When logging
out manually, recorded data is stored in the RoadLog.
Manual Log Out:
To log out manually from the Driver Overview screen, tap
More.
Tap Driver Logout. RoadLog displays the Insert Driver Key
screen.
Tap Continue. RoadLog displays the View Logs (Grid)
screen. Check recorded logs. If they are correct and you
want to complete log out, tap Submit to finish the viewing
session. However, you can view additional log information
before you log out. Tap More for further viewing options.
Automatic Log Out with the Driver Key:
To log out automatically with the Driver Key, insert the Driver
Key into the USB port. RoadLog displays the Driver Key
Options screen.
Tap Logout. RoadLog displays the View Logs (Grid) screen.
Check recorded logs. If they are correct and you want to
complete log out, tap Submit to finish the viewing session.
However, you can view additional log information before you
log out. Tap More for further viewing options.
View Logs (Grid)Insert Driver Key
View Logs (Events)
View Logs (Details)
View Logs (Office) View Logs (More)
Event Details
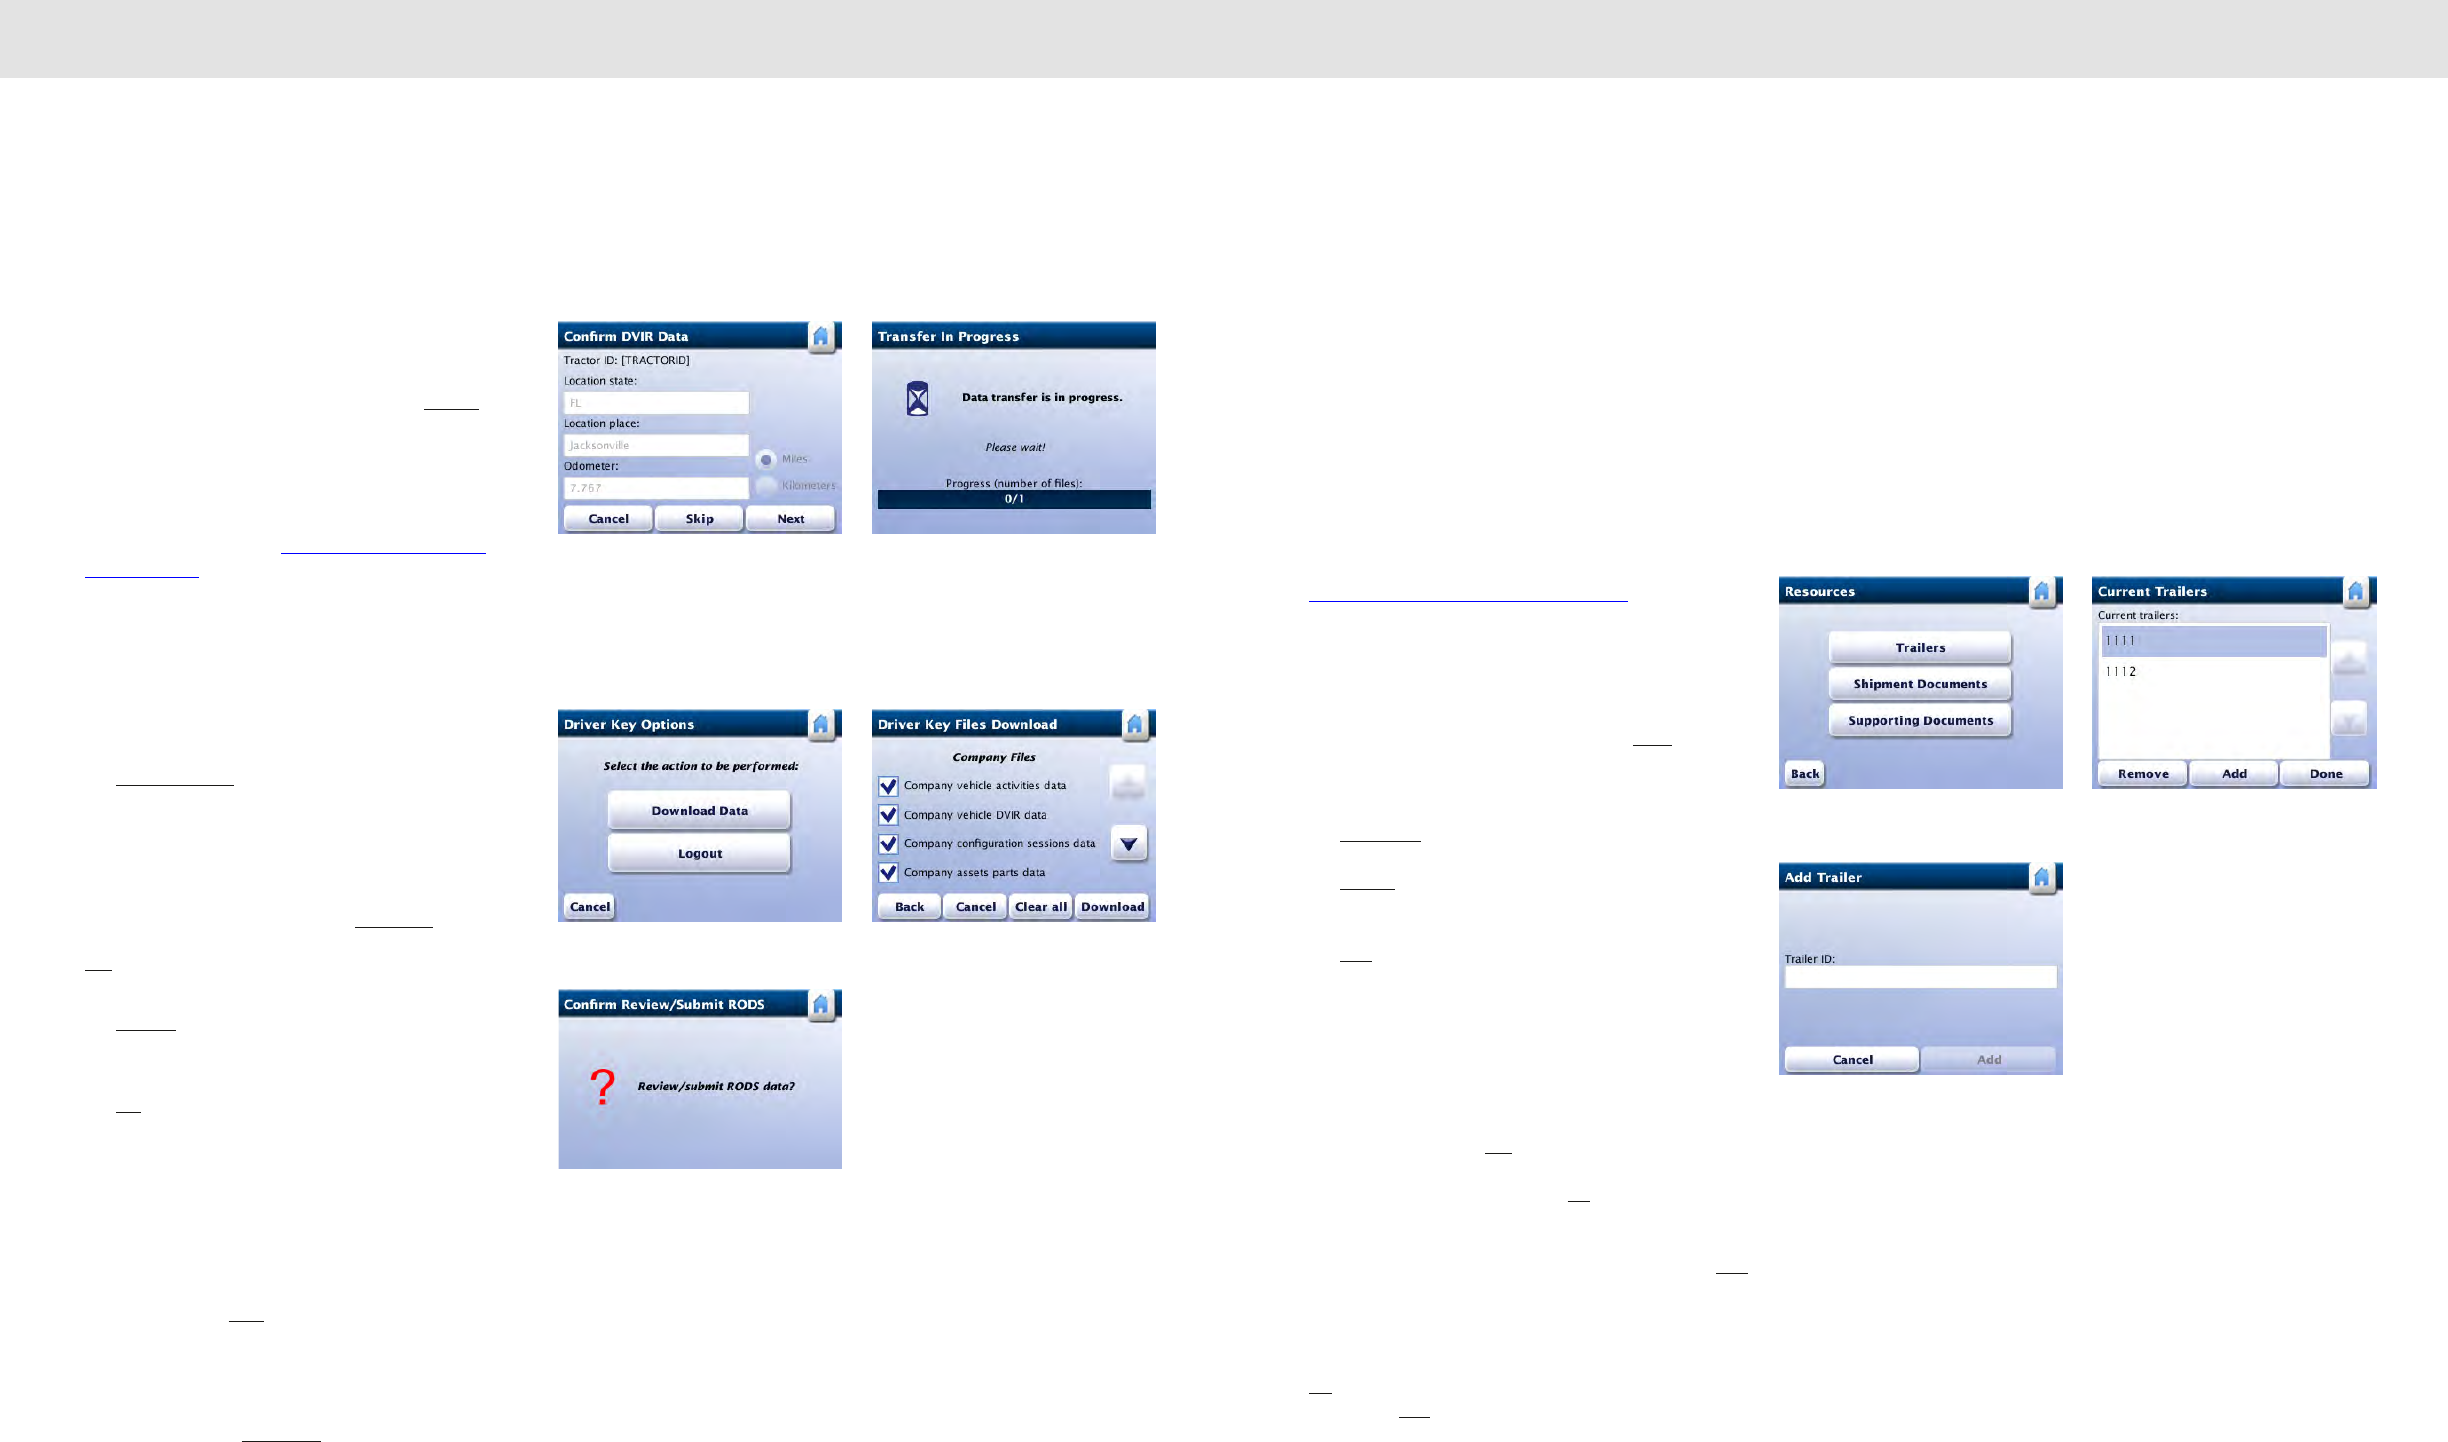
9089
Daily Operations Trailer management
Data Download at Driver Log Out
At Driver Log Out, RoadLog files are transferred
automatically to the Driver Key.
If you are the last logged in Driver, when you log out,
RoadLog displays the Confirm DVIR Data screen. If you are
not the last logged in Driver, RoadLog displays the Transfer
In Progress screen immediately after you tap Submit.
If you are the last logged in Driver, when you log out, you
must perform the DVIR post-trip inspection for current
assets assigned to the vehicle, confirming or editing defects.
You can print a DVIR report at this time and / or download
the data to the Driver Key. For the DVIR procedure see
Creating DVIRs.
Data Download without Log Out
Driver data can also be downloaded to the Driver Key
without logging out.
Insert the Driver Key. RoadLog displays the Driver Key
Options screen.
Tap Download Data. RoadLog displays the Driver Key Files
screen.
Use the Up ad Down arrows to scroll through the list of
available files. Tap the check boxes to select the files you
want to download.
When your selections are made, tap Download. Roadlog
displays the Confirm Review/Submit RODS screen. Tap
Yes to confirm your choices. RoadLog displays the View
Logs (Grid) screen.
Tap Submit to initiate file download. RoadLog displays the
Transfer in Progress screen while transferring the data and
the Data Download Completed screen when it is finished.
Tap OK. RoadLog returns to the Driver Overview screen.
After the download the Driver will remain logged in to
RoadLog.
Printing Logs
To print the current HOS Daily Log from the View Logs
(More) screen, tap Print. When completed, RoadLog
returns to the View Logs (Grid) screen.
Note: In addition to viewing logs as part of the log out, you
can also view logs anytime from the Driver Overview
Options screen. Tap View Logs. RoadLog displays View
Logs (Grid) screen.
7. Trailer management
Whenever a trailer is attached or detached from a vehicle,
the Driver must add or remove it from RoadLog’s database.
RoadLog allows you to assign up to three trailers per
vehicle.
When attaching a trailer, the Driver must perform a pre-trip
inspection and DVIR.
When removing a trailer, the Driver must perform a post-trip
inspection and create a DVIR.
For the DVIR procedure see Creating DVIRs.
Adding a Trailer
To add a trailer to RoadLog’s database, tap More from the
Driver Overview screen. RoadLog displays the Driver
Overview Options screen.
Tap Resources. RoadLog displays the Resources screen.
Tap Trailers. RoadLog displays the Current Trailers List
screen showing any previously attached trailers.
Tap Add button to add a new trailer. RoadLog displays the
Add Trailer screen. From the Add Trailer screen, tap the
Trailer ID field to bring up the Keyboard. Type the first
digit(s) of the trailer number you want to add.
If a list of trailers has been entered from the Fleet Software,
RoadLog suggests a trailer number matching the digits
typed. If the trailer number you want to add is different than
the suggested one, tap List to view other pre-stored trailer
numbers matching the typed characters. Pick the correct
trailer number from the list and tap Go.
If no list of trailers has been entered from Fleet /Software, or
if the trailer you wish to add is not in the stored list, tap Add
from the Current Trailers screen. RoadLog displays the
Keyboard screen.
Type in the Trailer ID for the trailer you want to add, then tap
Go. RoadLog displays the Add Trailer screen. If the ID is
correct, tap Add. RoadLog displays the Confirm DVIR
screen - each time you add a trailer, you must perform a
DVIR.
Resources Current Trailers
Add Trailer
Confirm Review/Submit RODS
Driver Key Options Driver Key Files
Confirm DVIR Data Transfer in Progress
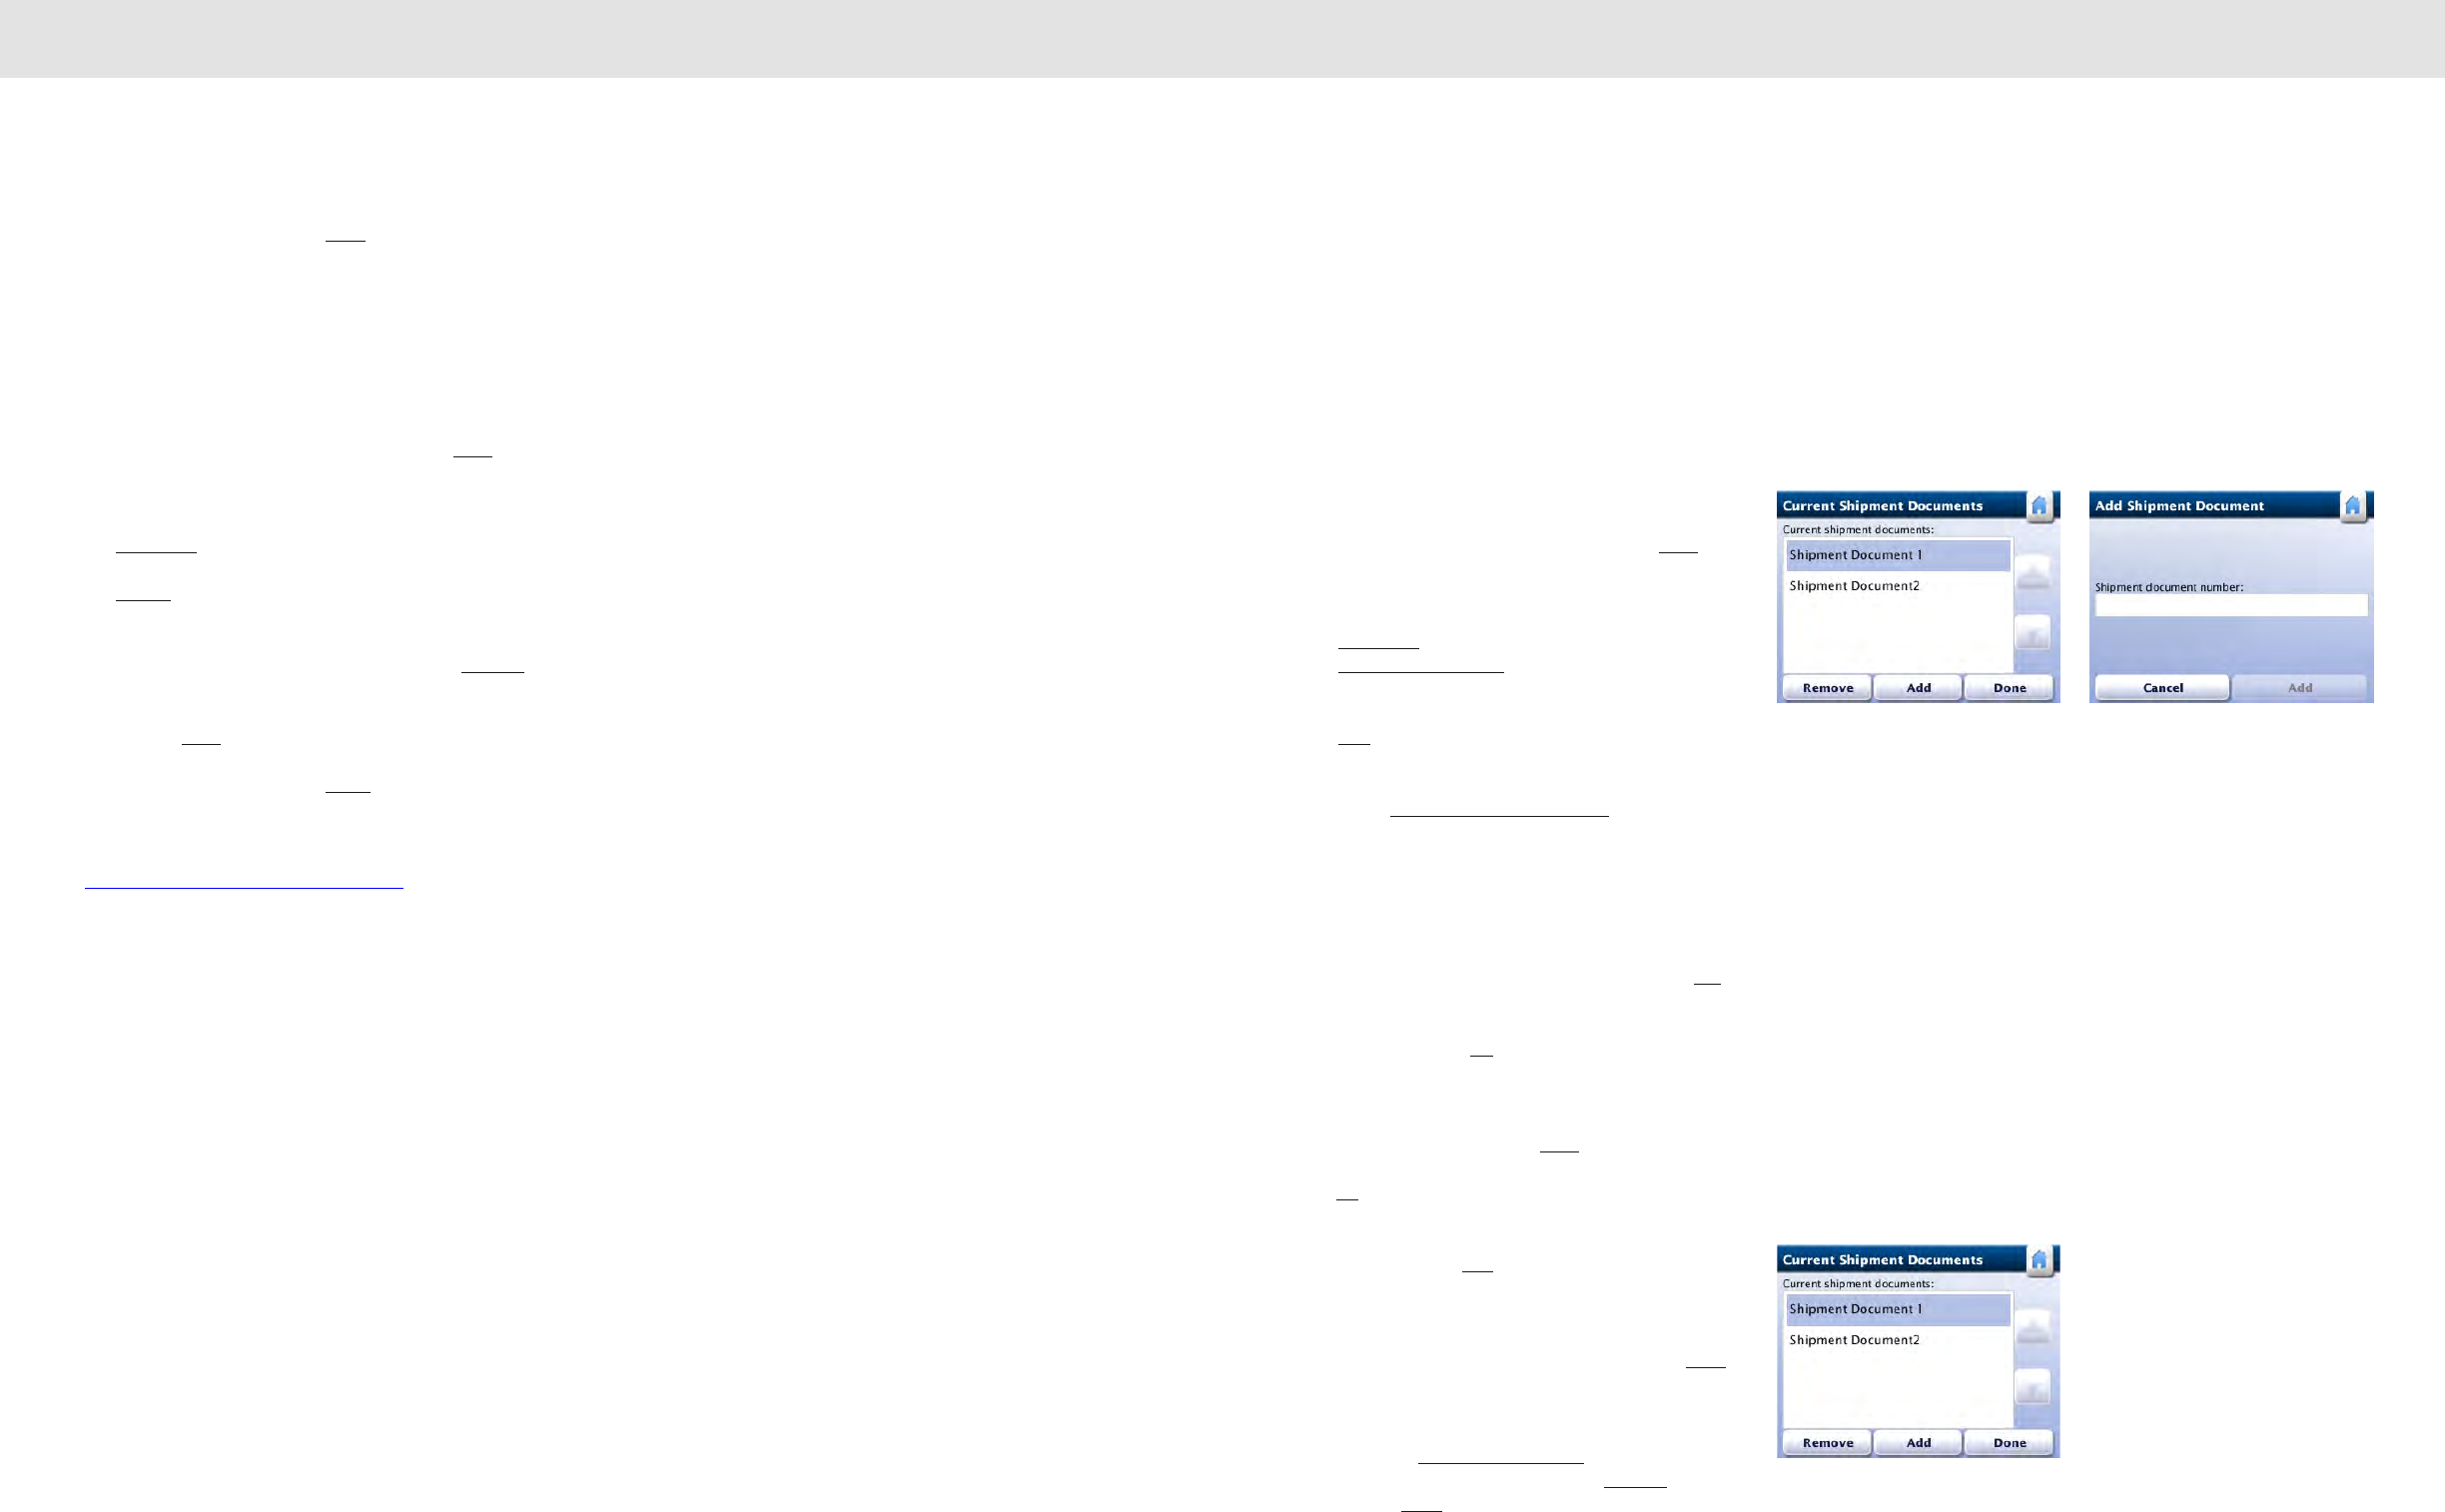
9291
Trailer management Shipment Documents management
When the DVIR is complete, tap Done. RoadLog displays
the Resources screen.
Removing a Trailer
To remove a trailer from RoadLog’s database, tap More from
the Driver Overview screen. RoadLog displays the Driver
Overview Options screen.
Tap Resources. RoadLog displays the Resources screen.
Tap Trailers. RoadLog displays the Current Trailers List
screen showing the attached trailers.
Tap on the trailer you want to remove and then tap Remove.
RoadLog displays the Confirm DVIR Data screen – before
removing a trailer, you must perform a post-trip inspection
and create a DVIR for it.
When the DVIR is complete, tap Finish. RoadLog displays
the Current Trailer List screen, showing the newly added
trailer in the Current trailers list.
For the DVIR procedure see Creating DVIRs.
8. Shipment Documents
management
RoadLog allows Drivers to include Shipping Documents
such as Bills of Lading, Manifest Numbers, or Pro
documents, as part of your data record. Whenever a
Shipment Document is added or removed, the Driver must
add or remove it from RoadLog’s database. RoadLog allows
you to assign up to five Shipment Documents per trip.
To add a shipment to RoadLog’s database, tap More from
the Driver Overview screen. RoadLog displays the Driver
Overview Options screen.
Tap Resources. RoadLog displays the Resources screen.
Tap Shipment Documents. RoadLog displays the Current
Documents List screen.
Tap Add to add a new Shipment Document for the trip.
RoadLog displays the Add Shipment Document screen.
Tap on the Shipment document number field. RoadLog
displays the Keyboard screen. Type the first character(s) of
the shipment document ID you want to add.
RoadLog uses its auto-complete feature to suggest a
Shipment Document number from the available shipment
documents in its memory. If the Shipment Document you
want to add is different than the suggested one, tap List to
view other pre-stored Shipment Document numbers
matching the typed characters. Pick the correct Shipment
Document ID and tap Go.
If no list of Shipment Documents has been entered from
Fleet Software, or if the Shipment Document you wish to
add is not in the stored list, tap Back to go to the Keyboard
screen. Type in the complete document number and then
tap Go to continue.
RoadLog displays the Add Shipment Document screen. If
the ID is correct, tap Add. RoadLog displays the Current
Documents List screen, showing the newly added shipment
document.
When the Current Documents List is complete, tap Done.
RoadLog returns to the Resources screen.
To remove a Shipment Document from the Resources
screen, tap on Shipment Documents. Highlight the
document you want to remove, and tap Remove. When
finished, tap Done to return to the Resources screen.
Current Shipment Documents Add Shipment Documents
Current Shipment Documents
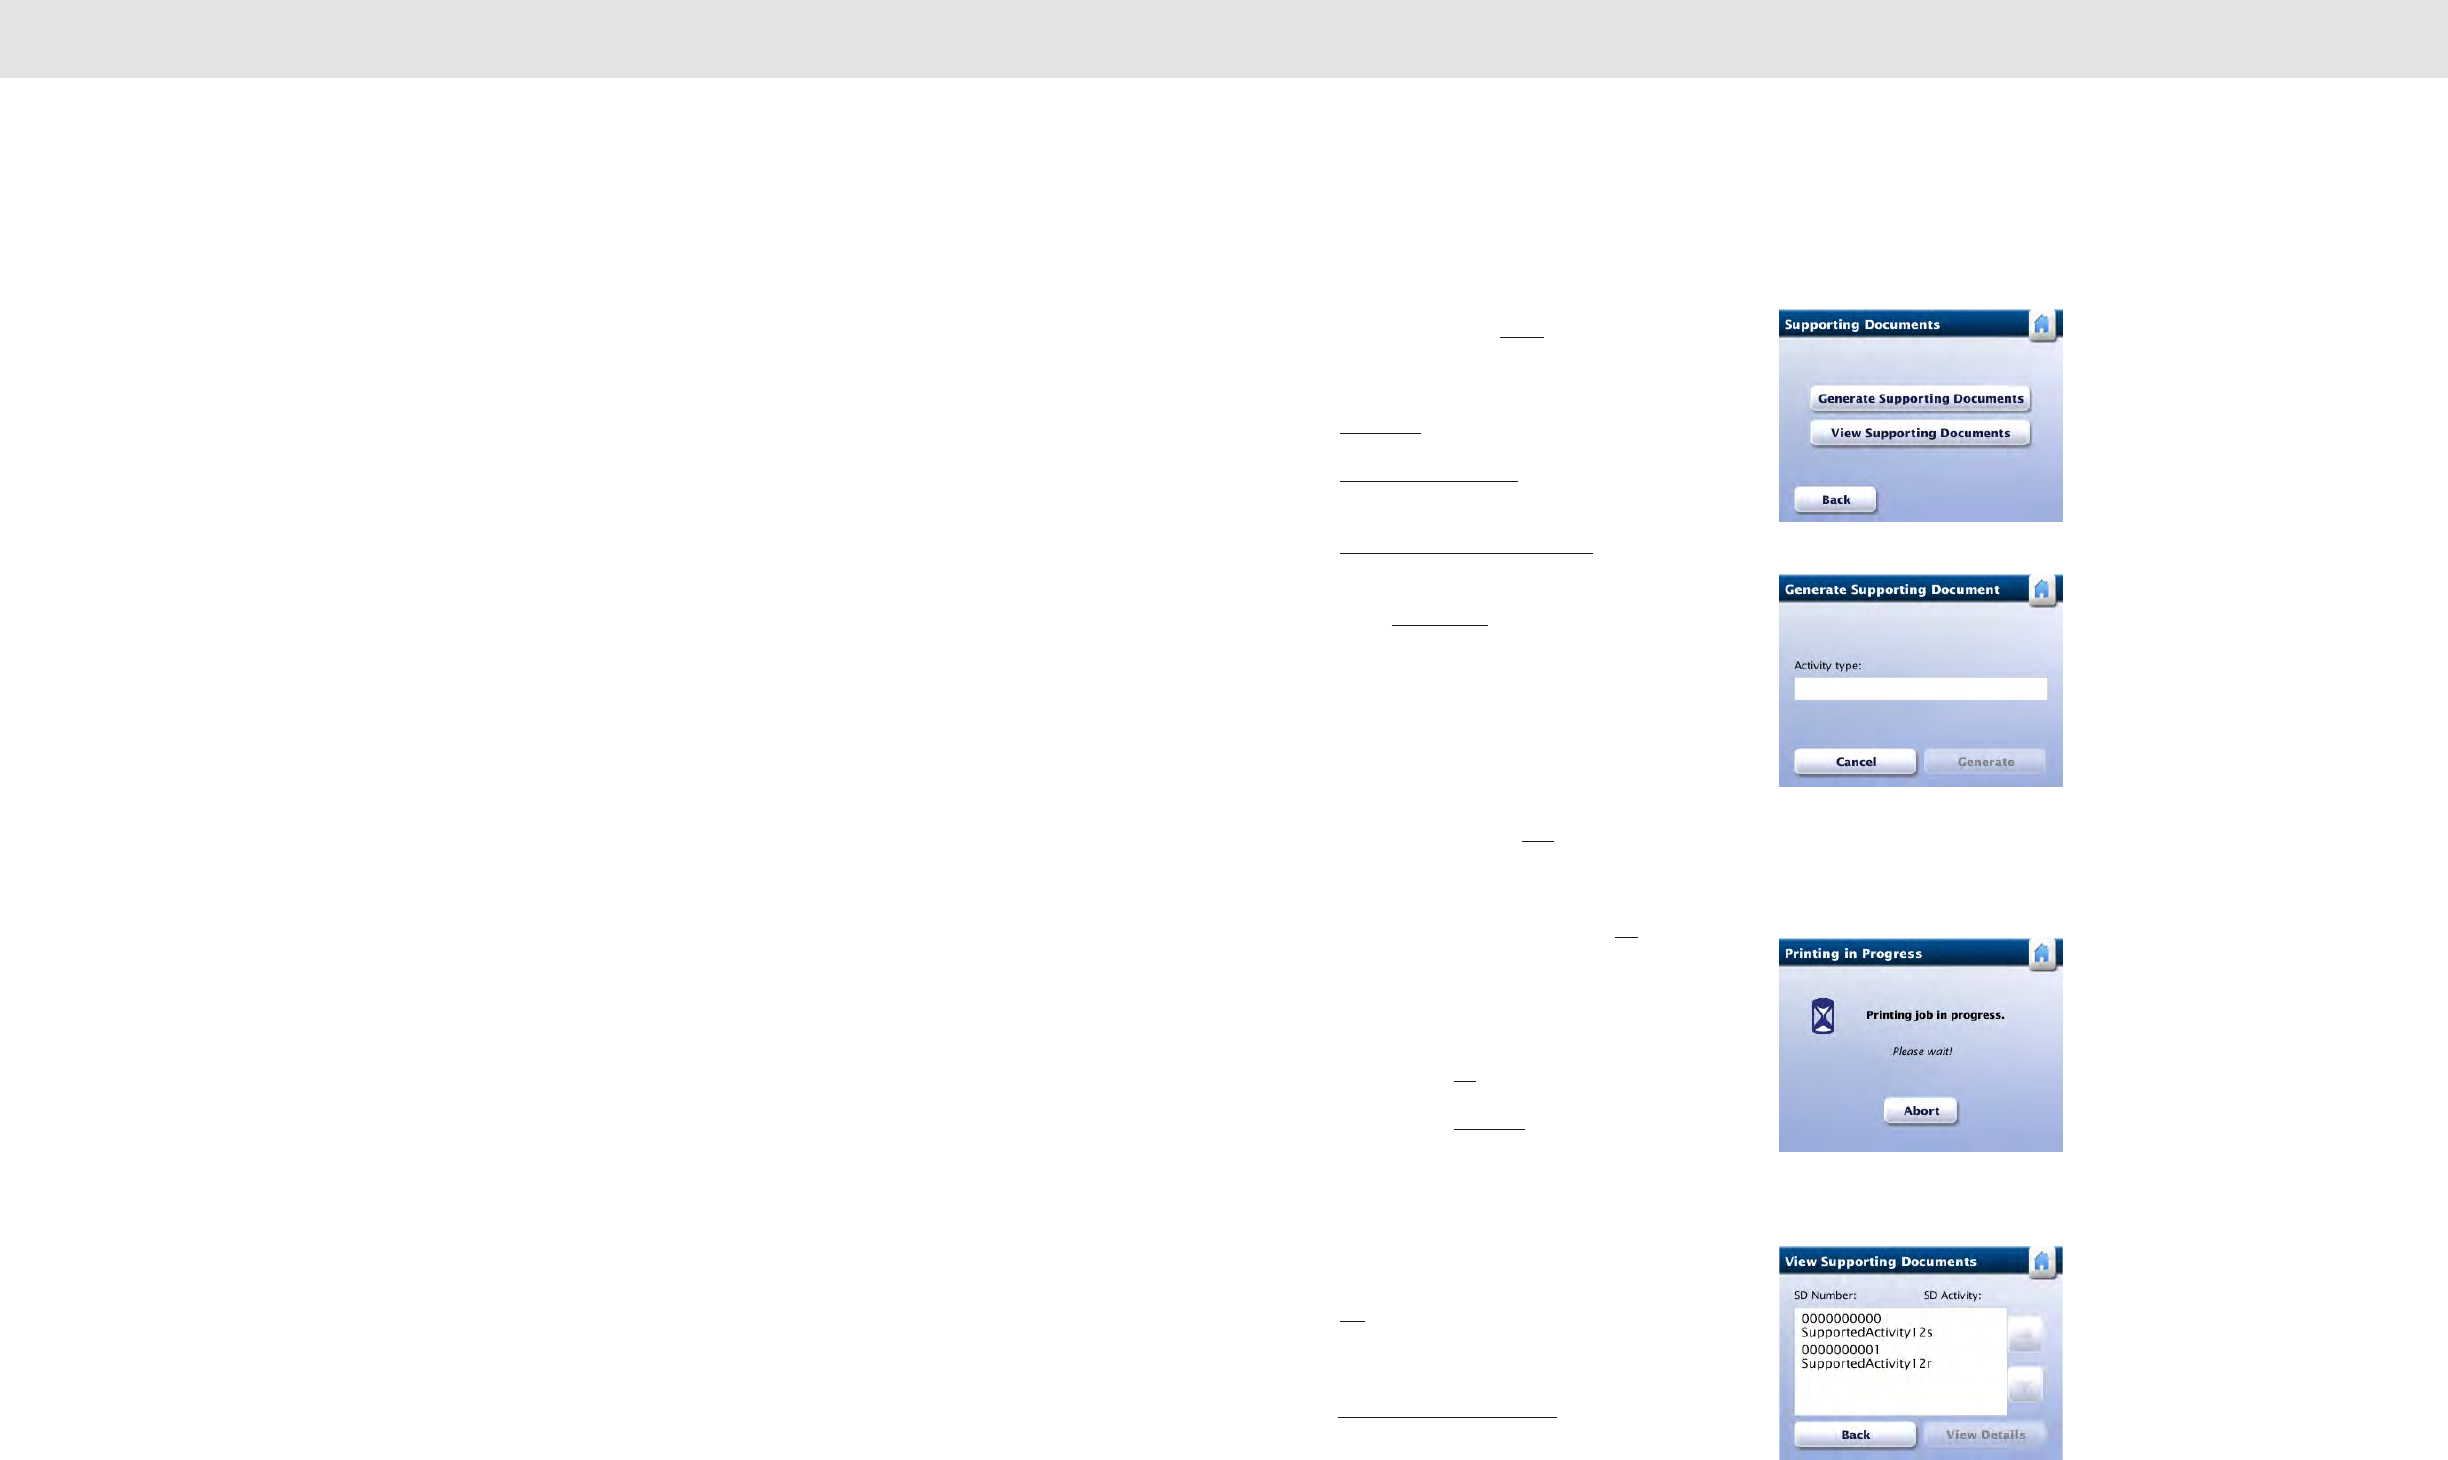
9493
Supporting Documents Supporting Documents
9. Supporting
Documents
RoadLog allows you to create different types of Supporting
Documents such as fuel receipts, meal receipts and vehicle
wash receipts. Predefined types of Supporting Documents
can be created in the Fleet Software and transferred to
RoadLog via data upload from the Fleet Key, other
Supporting Document types can be created, as needed, in
RoadLog.
Supporting Documents are created both automatically by
RoadLog as well as manually by the Driver.
Supporting Documents are stored as data records in
RoadLog and are also printed out from RoadLog’s built-in
thermal printer.
Whenever the Driver creates a Supporting Document for the
trip, it must be added to RoadLog’s database.
Generating a Supporting Document
Automatically
RoadLog automatically generates Supporting Documents in
the following circumstances:
The Driver performs a roadside inspection.
OR
The Driver performs a post-trip inspection DVIR and reports
the defects found.
Generating a Supporting Document
Manually
To manually generate a Supporting Document and add it to
RoadLog’s database, tap More from the Driver Overview
screen. RoadLog displays the Driver Overview Options
screen.
Tap Resources. RoadLog displays the Resources screen.
Tap Supporting Documents. RoadLog displays the
Supporting Documents screen.
Tap Generate Supporting Documents. RoadLog displays
the Generate Supporting Document screen.
Tap on the Activity Type field. RoadLog displays the
Keyboard screen.
Type in the first character(s) of the Activity Type you wish to
link to the supported document.
RoadLog uses its auto-complete feature to suggest an
activity from the available Supporting Documents Activities
List in its memory. If the activity you want to add is different
than the suggested one, tap List to view other pre-stored
Supporting Documents activities matching the typed
characters.
Tap on the selected activity, and then tap Go.
If no list of Supporting Document activities has been entered
from Fleet Software, or if the Supporting Document activity
you wish to add is not in the stored list, tap Back to go to
the Keyboard screen. Type in the complete Activity Type
name and then tap Go to continue. RoadLog displays the
Generate Supporting Document screen. If the Activity
Type is correct, tap Generate.
The Supporting Document for the selected Activity Type is
added to the RoadLog’s database. RoadLog prints the
Supporting Document while displaying the Printing in
Progress screen. Once the printing is complete, the SD
Generation Completed screen is displayed.
Tap OK. RoadLog displays the Supporting Documents
screen.
If you want to view the Supporting Documents generated,
tap View Supporting Documents from the Supporting
Documents screen. RoadLog displays View Supporting
Documents screen.
Generate Supporting Documents
Supporting Documents
Printing in progress
View Supporting Documents
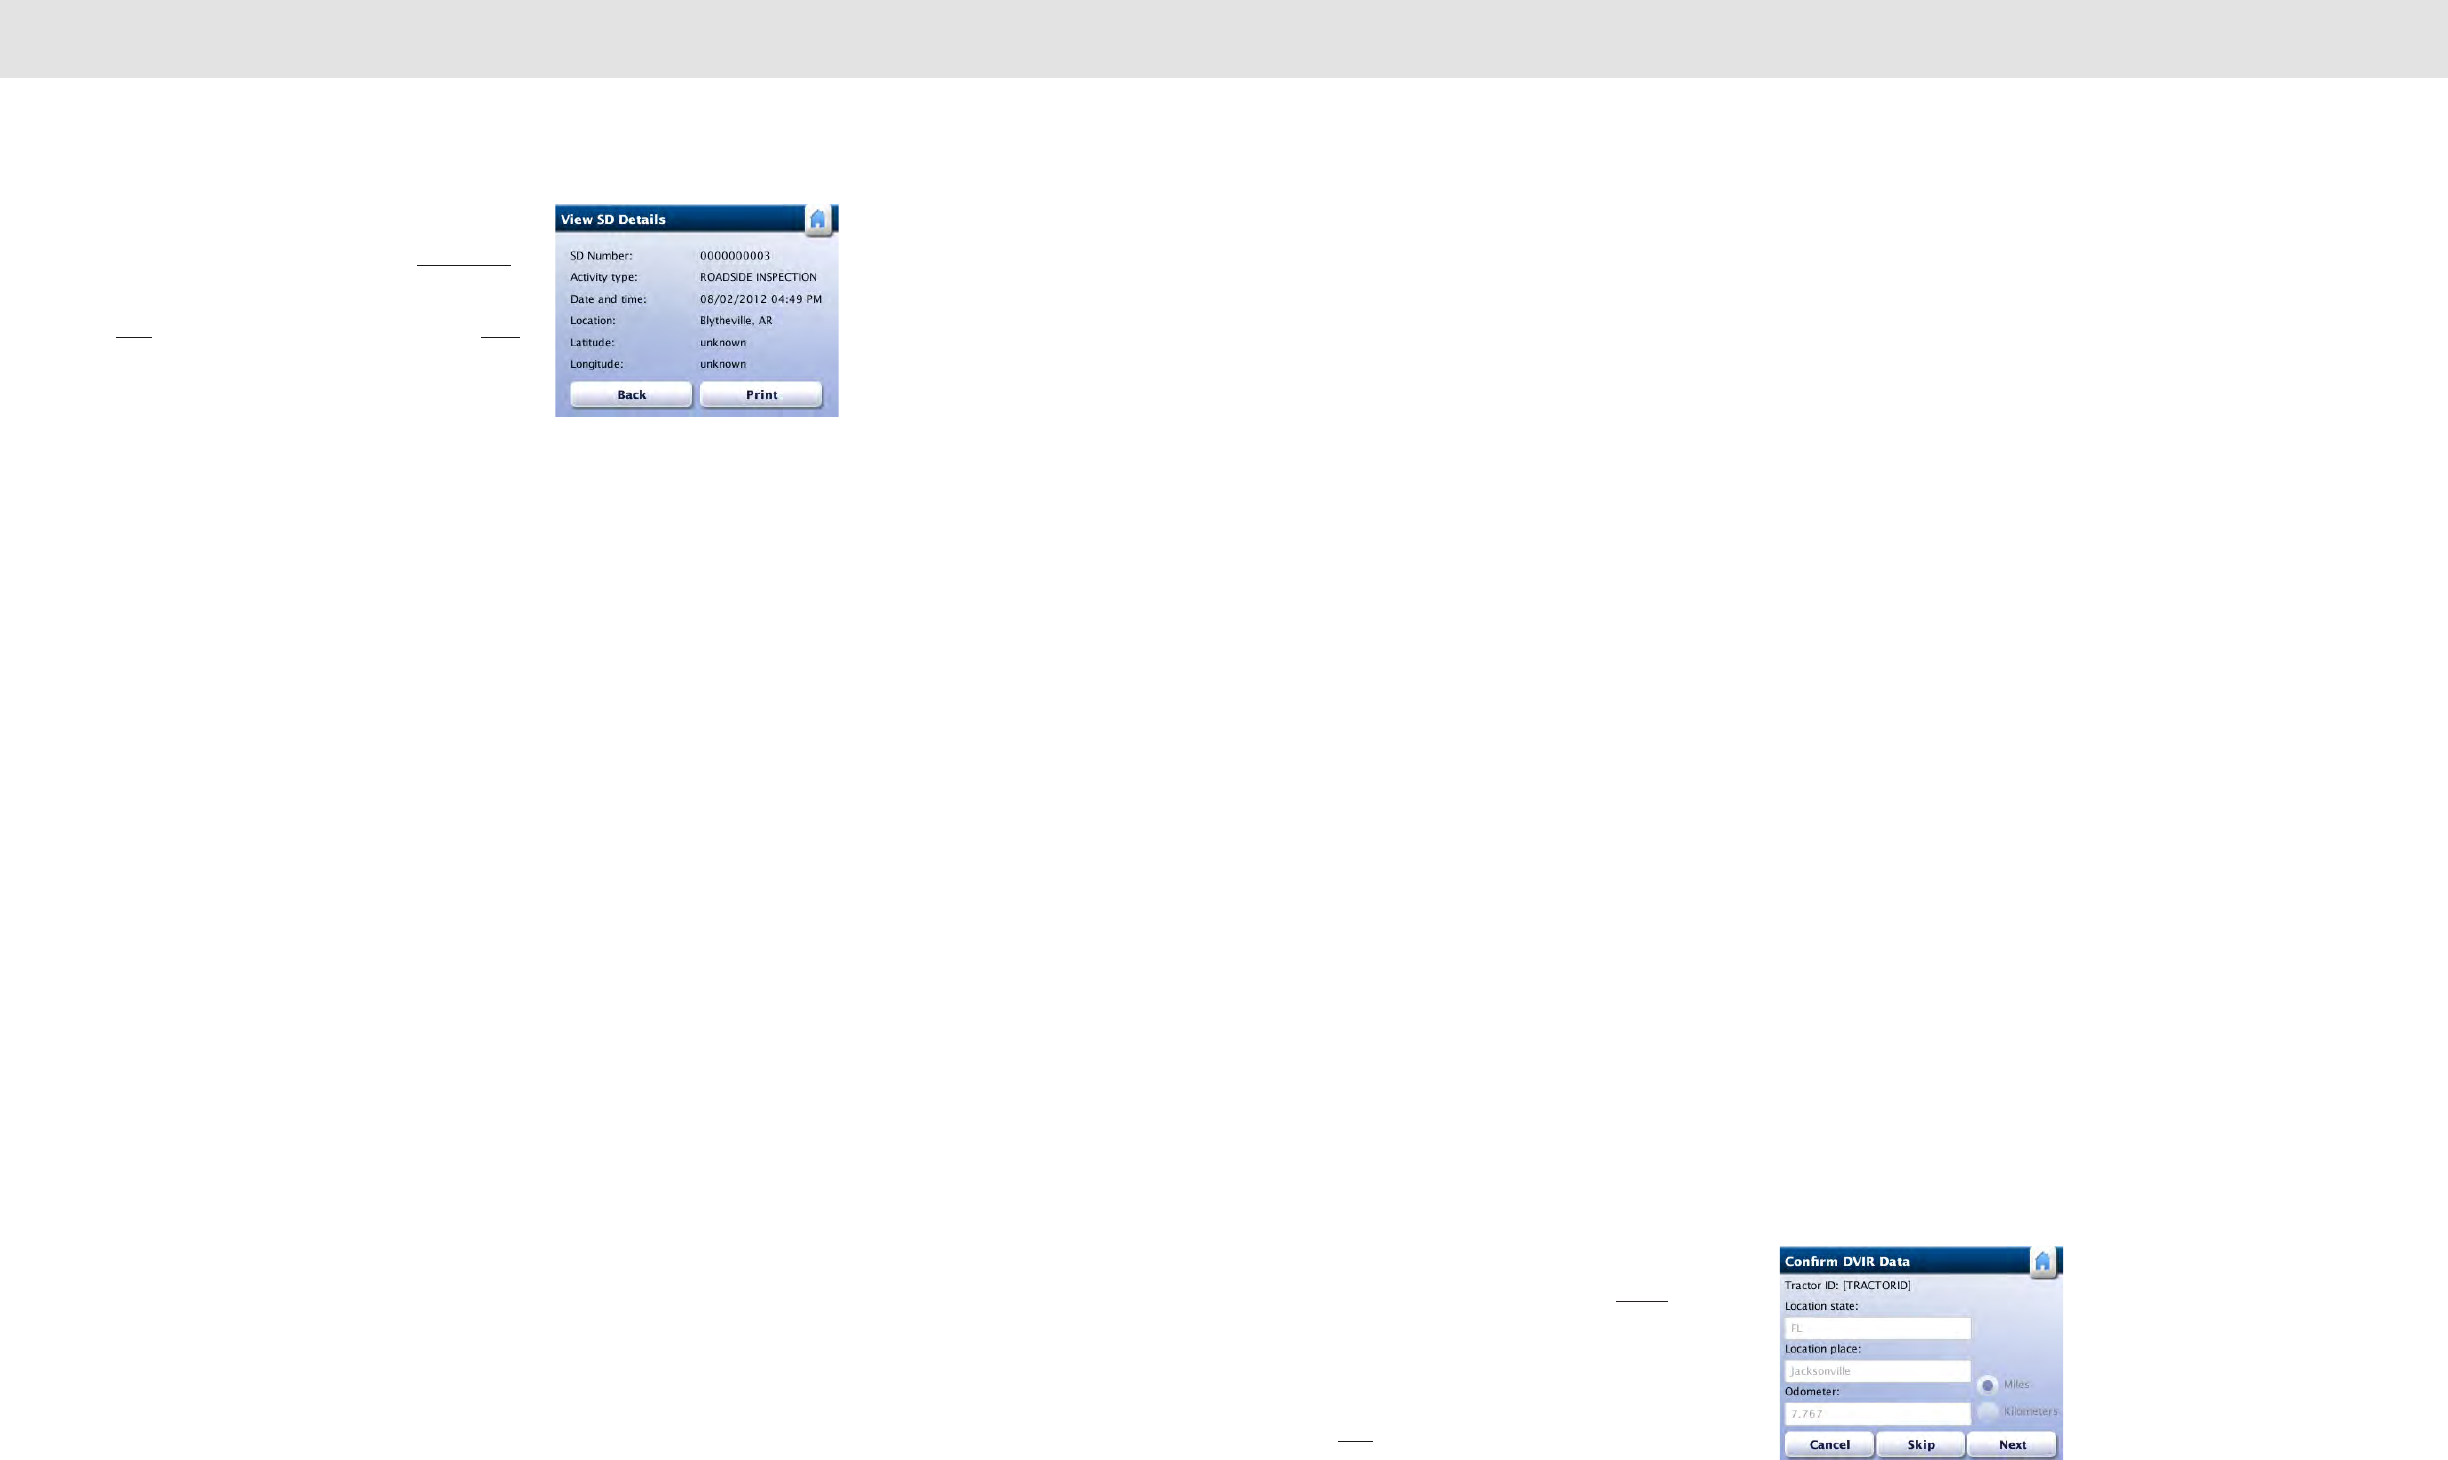
9695
Supporting Documents Vehicle Inspection Reports: Creating DVIRs
Select the Supporting Document you want to view by
tapping it. Once a document is selected, tap View Details.
RoadLog displays the View SD Details screen.
Tap Print to print the Supporting Document details or Back
to return to the Supporting Documents screen.
10. Vehicle Inspection
Reports: Creating
DVIRs
Performing DVIRs
RoadLog allows you to create the legally required Driver
Vehicle Inspection Reports (DVIR) for the following vehicle
assets:
• Tractor inspection
• Trailer inspection
Pre-trip and post-trip inspections can be performed. You
can also view the recorded inspection reports.
RoadLog automatically prompts the Driver to perform a pre-
trip inspection in the following circumstances:
• A Driver logs in
• A logged-in user changes duty status to Driver
• A trailer is attached to the vehicle
The Confirm DVIR Data screen will appear
automatically whenever any of the three actions above
occurs.
Pre-trip Inspection
You are required to check the safety of the vehicle before
driving and to check whether any defects recorded during
the previous post-trip inspection have been fixed. You must
then record the results of your inspction in a Pre-trip DVIR.
Creating a Pre-trip DVIR
When the Driver logs in and selects the Driving status,
RoadLog prompts the user to perform a pre-trip DVIR for
the vehicle and current trailer(s). At the start of the pre-trip
DVIR, RoadLog displays the Confirm DVIR Data screen.
After checking the vehicle location and odometer reading,
tap Next to continue with the DVIR pre-trip inspection.
RoadLog displays the DVIR Menu screen.
Veiw SD Details
Confrim DVIR Data
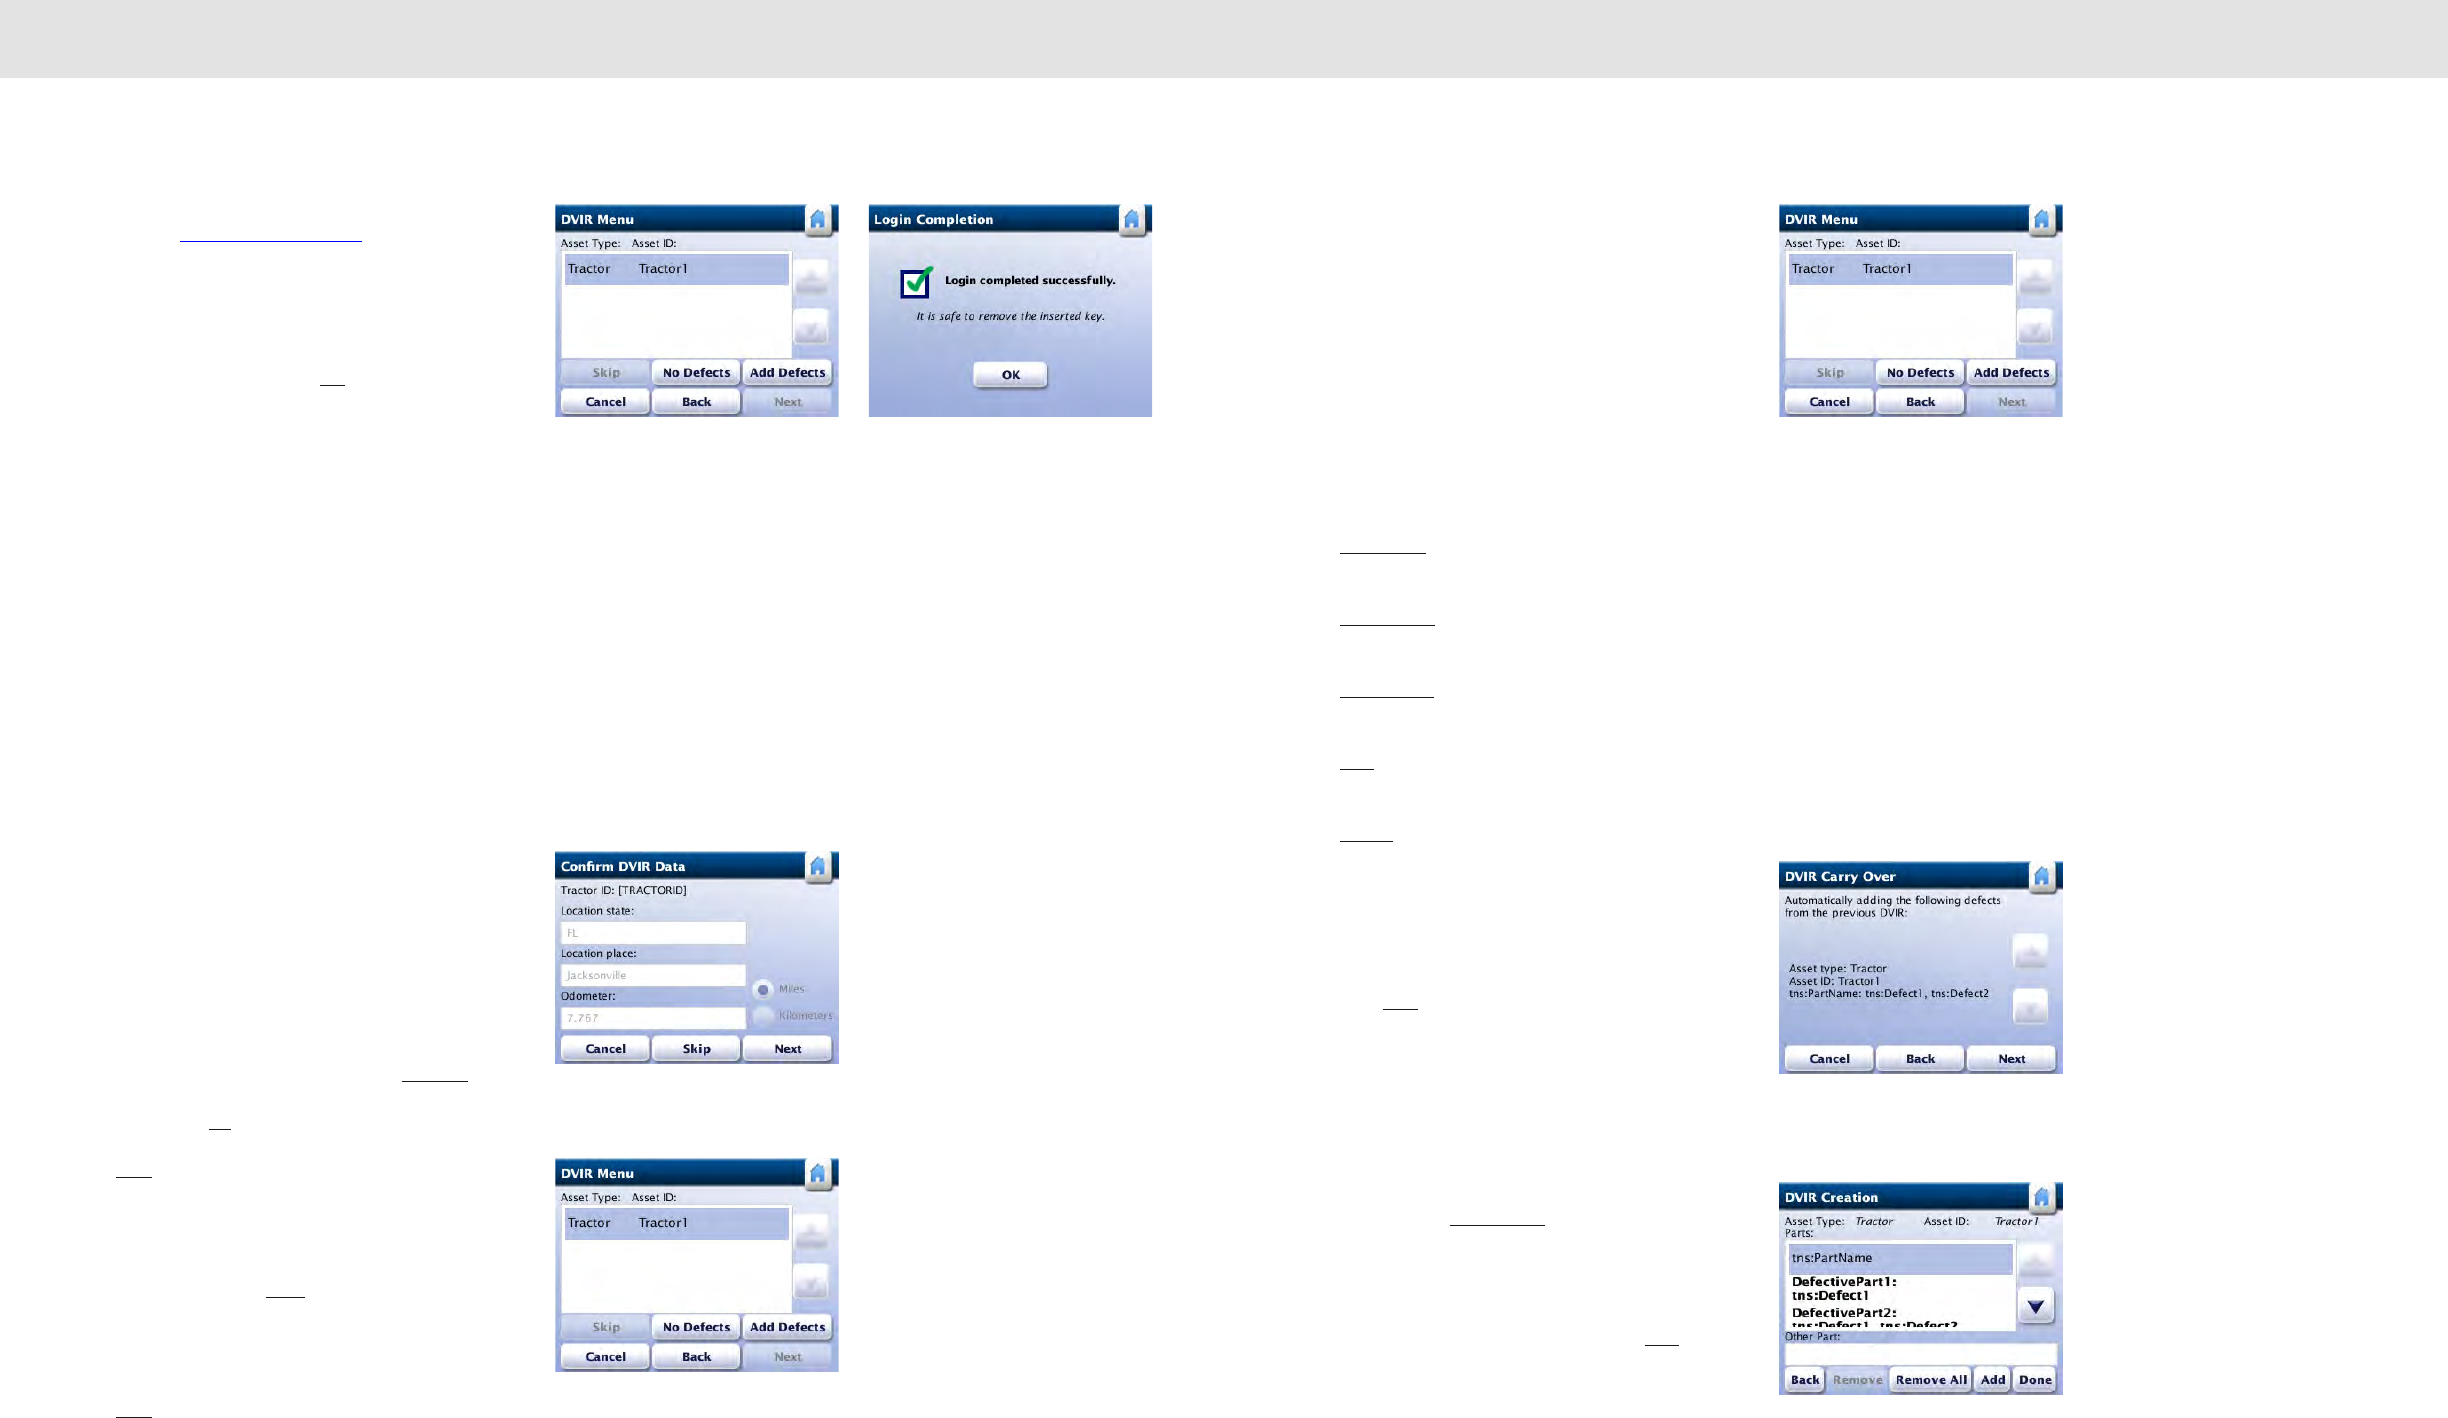
9897
Vehicle Inspection Reports: Creating DVIRs Vehicle Inspection Reports: Creating DVIRs
From the DVIR Menu screen, follow the DVIR procedure as
described in Creating a Post-trip DVIR, below.
Once all pre-trip DVIRs are submitted, the log in process is
completed. RoadLog displays the Login Completion
screen.
Remove the Driver Key and tap OK. RoadLog displays the
Driver Overview screen.
Creating a Post-trip DVIR
A post-trip inspection requires that you check Assets
(vehicle and current trailer(s)) and sub-assemblies at the end
of a trip. If defects are noticed, they must be recorded
manually in RoadLog.
RoadLog automatically prompts the Driver to perform a
post-trip inspection when:
• A Driver logs out of the system
• Drivers change their status to either Personal Use or
Sleeper Berth
• A Trailer is detached from the Vehicle
The post-trip DVIR inspection begins at the Confirm DVIR
Data screen:
Check the Vehicle location and odometer. Edit the location if
required.
Note: If the system is not receiving a clear GPS signal,
you may have to enter your location manually.
You can enter your location by tapping the Location field.
When you tap the field, the Keyboard comes up. Type in the
location and tap Go.
Tap Next to continue. RoadLog displays the DVIR Menu
screen that shows the assigned assets list (vehicle and
current trailer(s)).
If you are not detaching any trailers and want to skip the
post-trip inspection, tap Skip.
Note: If you are detaching any trailer(s), you must
perform a DVIR.
Tap Next to perform DVIR post-trip inspection. RoadLog
displays the DVIR Menu screen.
The DVIR Menu screen provides a list of the assigned
assets (tractor and current trailer(s)). The Assets in bold text
have a viewable DVIR, indicating that a post-trip inspection
was already performed.
Assets that are not in bold text do not have reviewable
DVIRs. The Driver must select them and create a DVIR:
Use the up and down arrows to scroll through the Asset list.
Tap each unchecked Asset, one at a time, to confirm its
status or create a DVIR.
Tap No Defects to create a DVIR with no defects for the
selected Asset.
Tap Add Defects to create a DVIR with defects for the
selected Asset.
Tap Edit Defects to edit existing DVIR defects previously
recorded.
Tap Skip to skip the post-trip inspection of the selected
Asset.
Tap Cancel to end the DVIR.
Note: The DVIR Carry Over screen will appear if an
Asset defect recorded in the previous post-trip
inspection was not corrected during the most recent
pre-trip inspection. Use the up and down arrows to
scroll through the existing post-trip inspection reports,
tap Next, and RoadLog will automatically add the
previously recorded defects to the current report.
RoadLog will then return to the DVIR Menu screen.
Assigning Defects to a Part in the DVIR
To create a new DVIR for the selected Asset from the DVIR
Menu screen, tap Add Defects. RoadLog displays the
DVIR Creation screen listing the predefined parts for this
Asset.
Use the up and down arrows to scroll through the parts list.
Select the defective part from the list and tap Edit to assign
defects to it.
Note: Part lists are created in the RoadLog Fleet
Software, but you may add another part if it does not
appear on your list.
Login Completion
Confrim DVIR Data DVIR Carry Over
DVIR Creation
DVIR Assets
DVIR AssetsDVIR Menu
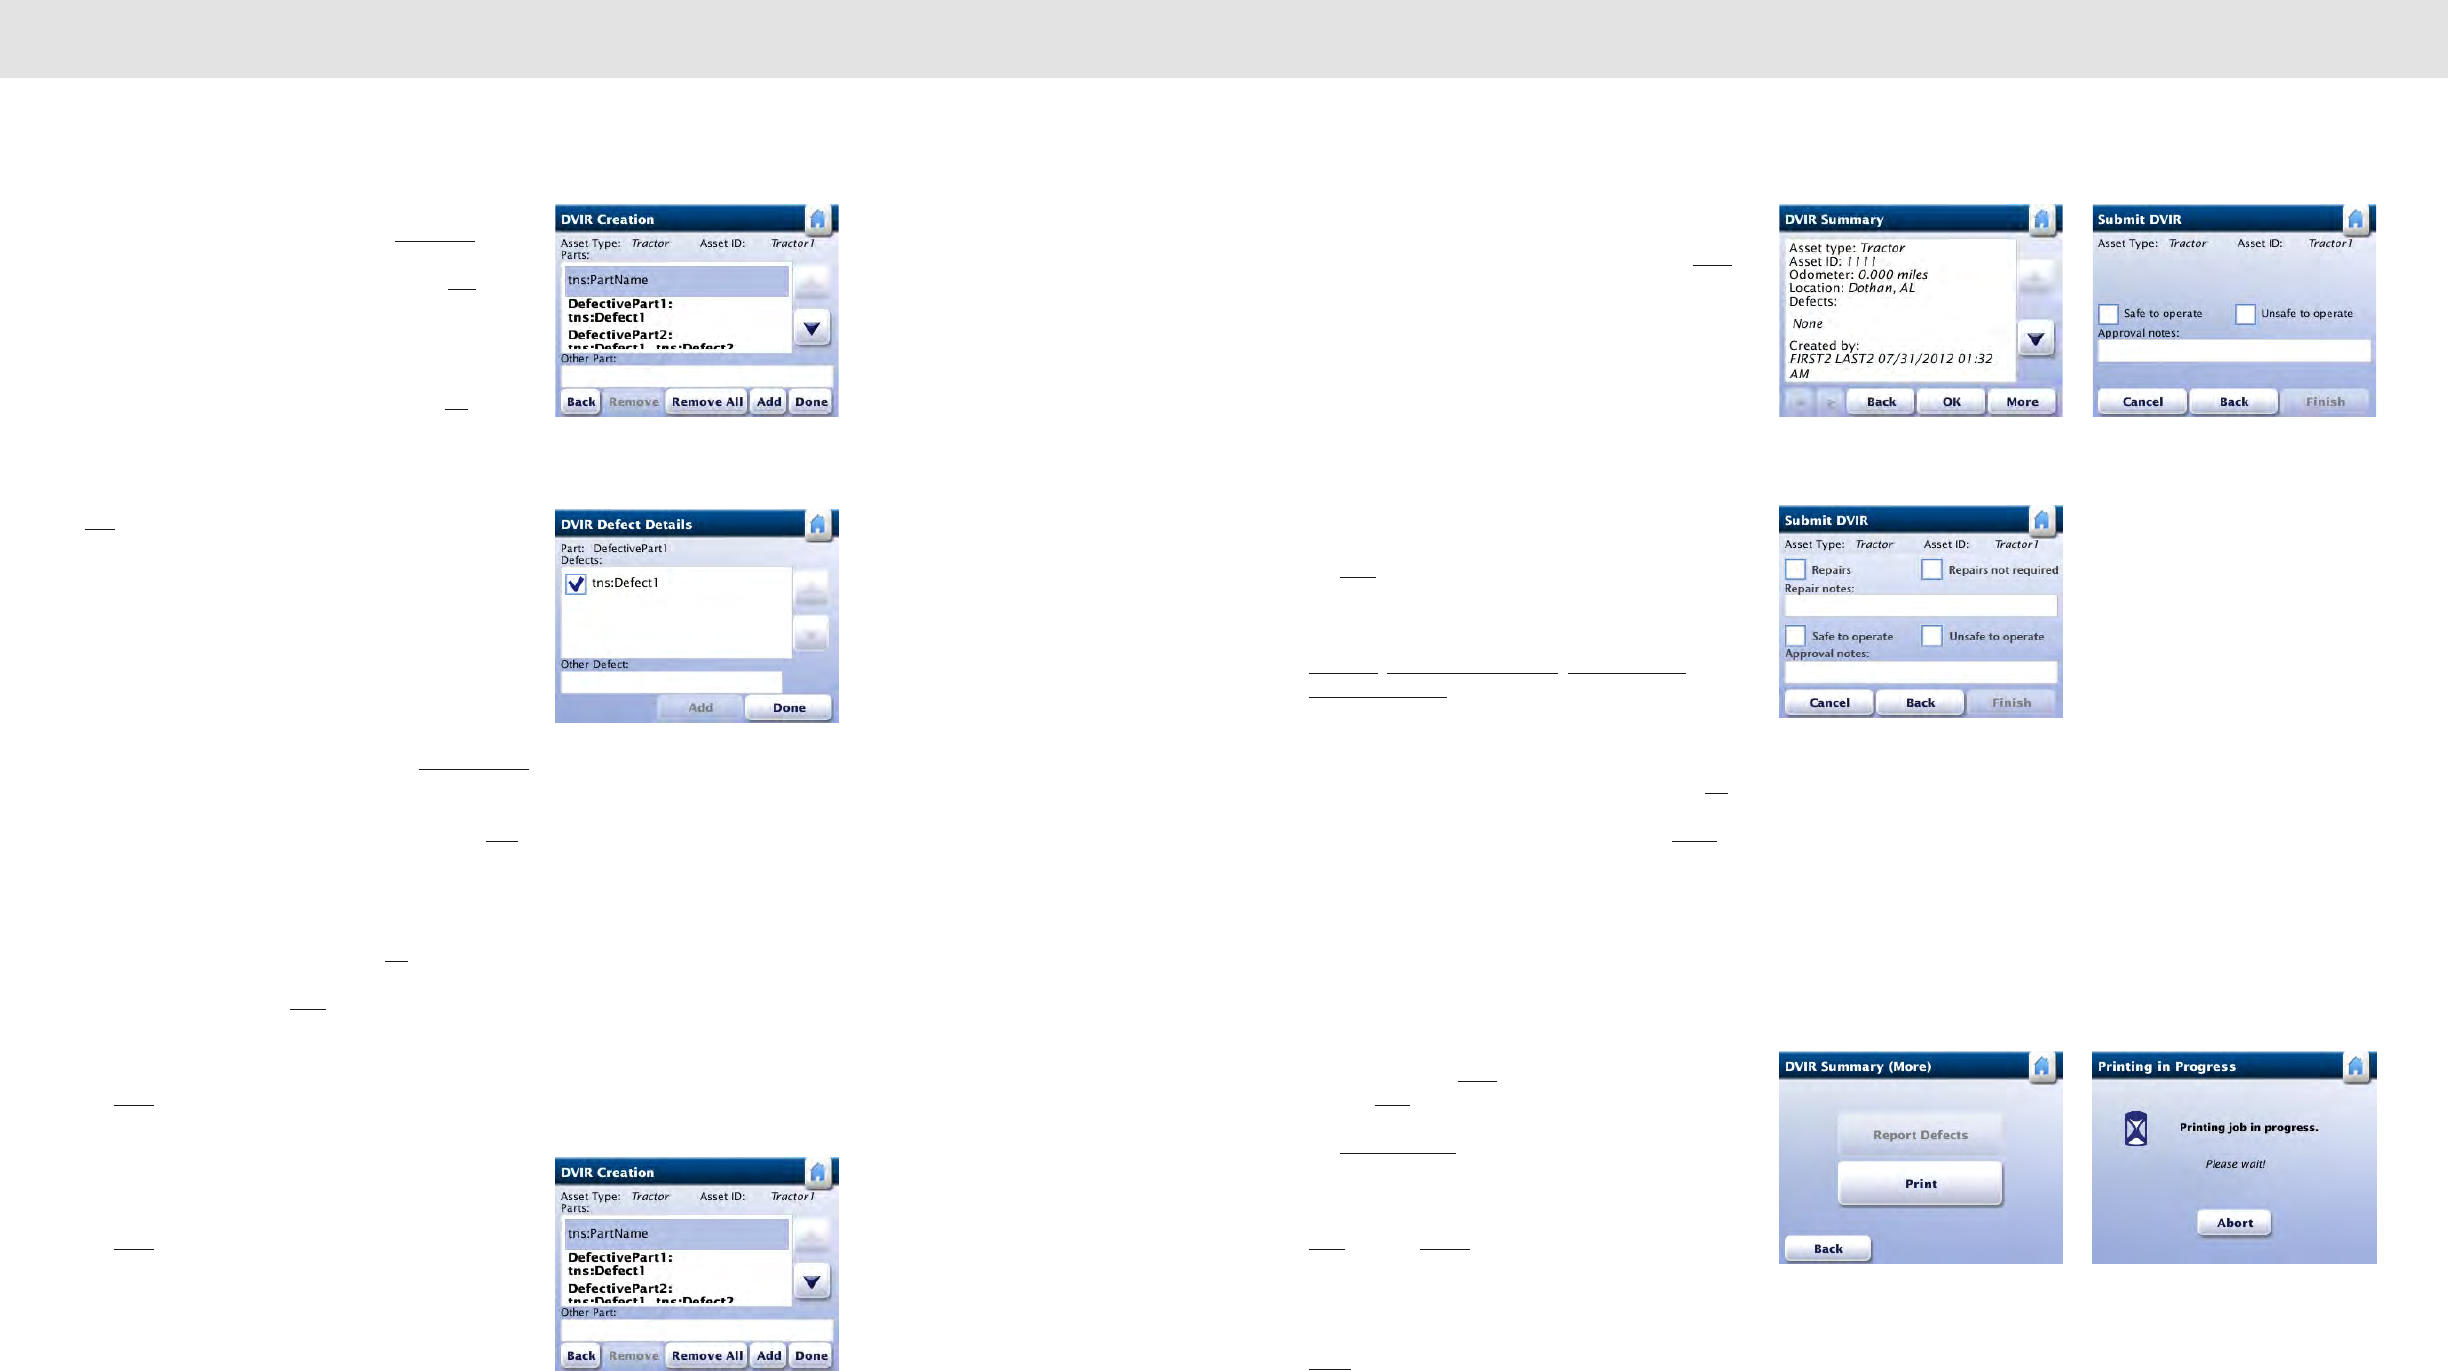
10099
Vehicle Inspection Reports: Creating DVIRs Vehicle Inspection Reports: Creating DVIRs
To create a new part in the list, tap on the Other Part field.
RoadLog displays the Keyboard screen. Enter the first
letter(s) of the defective component and then tap List. A
Parts List screen containing the predefined parts that match
the typed characters will appear.
If the part you wish to add does not appear in the stored list,
enter the part’s name in its entirety, and then tap Go. The
DVIR Creation screen is displayed, highlighting the newly
added part.
Once you have selected or added the defective part, tap
Edit. RoadLog displays the DVIR Defect Details screen.
Use the up and down arrows to scroll through the DVIR
Defects Details list. Tap on and highlight the defect you
want to assign to the selected part.
Note: Defect lists are created in the RoadLog Fleet
Software. You may select a defect from the list or add
another defect if it does not appear on your list.
To create a new defect in the list, tap on the “Other Defect”
field. RoadLog displays the Keyboard screen.
Enter the first letter(s) of the defect detail and then tap List.
A Defects List screen containing the predefined defects for
the part matching the typed characters will appear.
If the defect you wish to add is not in the stored list, enter
the full name of the defect, and then tap Go. The DVIR
Defect Details screen, with the “Other Defect” field
complete, is displayed. Tap Add to add the new defect to
the list.
Once you finish adding new defective part types to the list,
tap Done.
RoadLog displays the DVIR Menu screen. Complete your
DVIR using the new defect listing(s) you’ve created.
When all applicable defects for the part have been entered,
tap Done. RoadLog displays the DVIR Creation screen.
Defective parts are now in bold. Repeat these steps for any
remaining defective parts.
Perform post-trip inspections for the remaining assets. Once
all assets are checked and entries completed, tap Next.
RoadLog displays the DVIR Summary screen where you
can review each DVIR item. If editing is needed, tap Back to
return to the DVIR Menu screen.
DVIR Summary
To view items listed in the DVIR Summary screen, use the
up and down arrows to scroll through the assets.
Use the left and right arrows to scroll through the individual
DVIR Summary for each asset.
Tap Next to continue. RoadLog displays Submit DVIR
screen.
For each Asset, select the appropriate checkbox for
Repaired, Repairs not necessary, Safe to operate, or
Unsafe to operate.
You can add notes by tapping in the Repair notes and
Approval notes fields. When you tap the field, RoadLog
displays the Keyboard screen. Type in notes and tap Go.
Each time you complete a DVIR for an asset, tap Finish:
Note: If there are more assets to be reviewed,
RoadLog automatically displays the DVIR Summary
screen for the next asset.
Printing a DVIR
To print a DVIR, tap More from the DVIR Summary screen,
then tap Print from the DVIR Summary (more) screen.
Tap Report Defects from the DVIR Summary (More)
screen to associate a Supporting Document with this DVIR.
To submit each DVIR from the DVIR Summary screen, tap
Next, then tap Finish from the Submit DVIR screen.
RoadLog prints the DVIR, along with the Supporting
Document for this activity. During printing, RoadLog displays
the Printing in Progress screen. To cancel printing, tap
Abort.
New Part Added
DVIR Defect Details
DVIR Summary
Repair Notes/Approval Notes
DVIR Summary (More) Printing in Progress
Submit DVIR
DVIR Creation
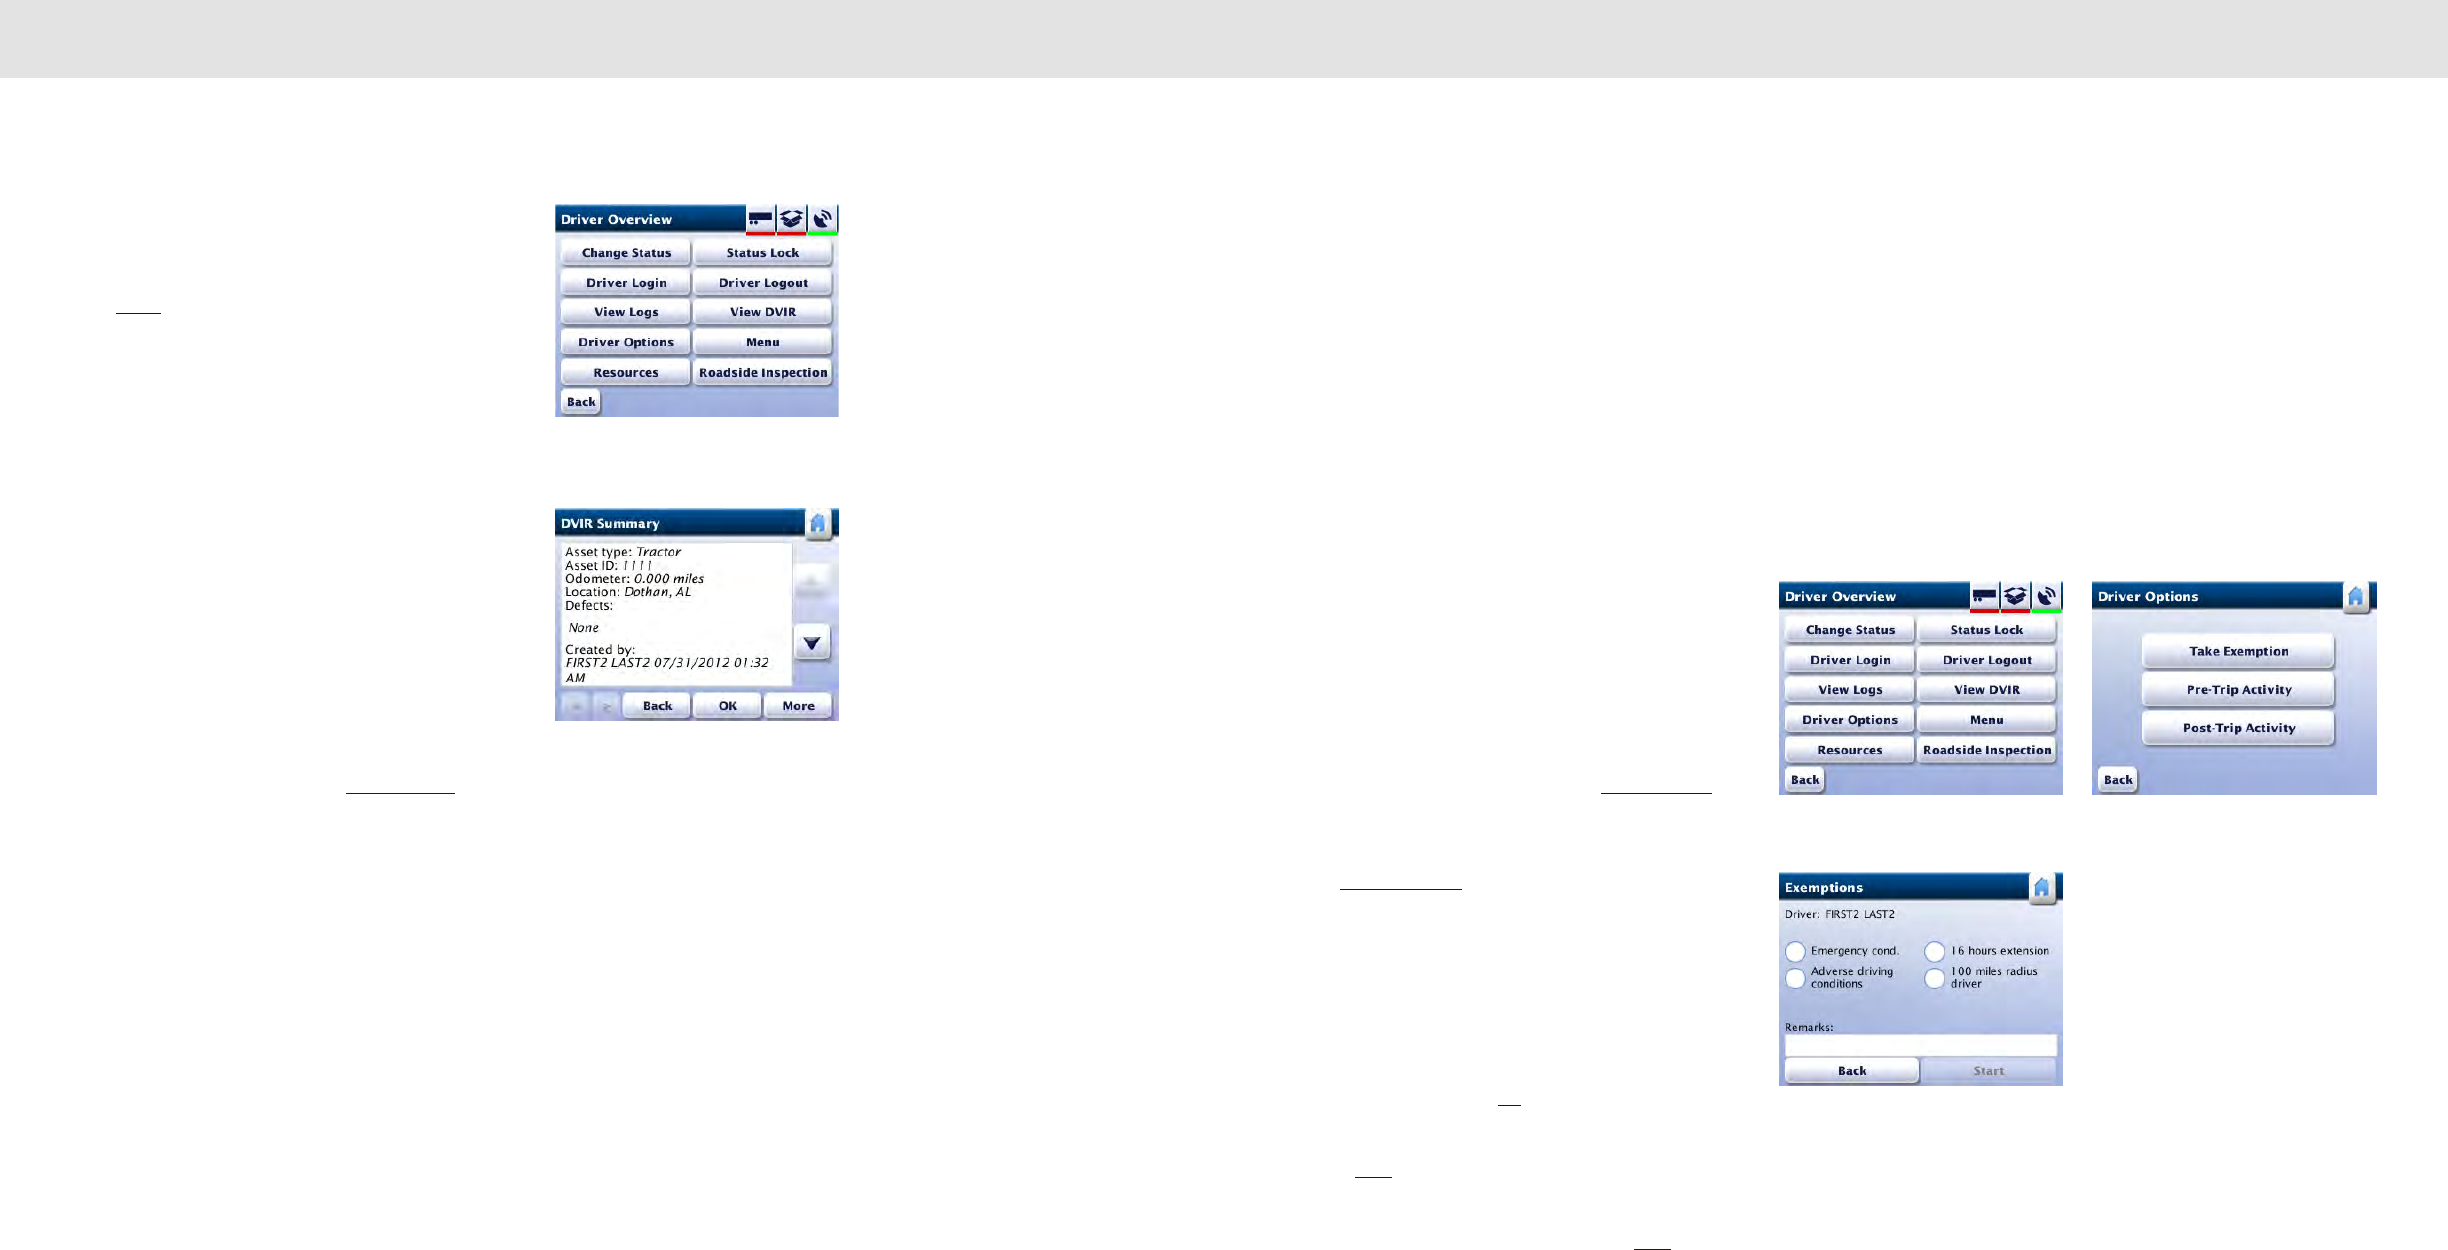
102101
Vehicle Inspection Reports: Creating DVIRs Enabling/Disabling Exemptions
Once the printing finishes, the DVIR Summary screen will
appear.
Tap Finish to complete the DVIR.
Viewing Driver Vehicle Inspection Reports
(DVIR)
RoadLog allows you to view the most recent Driver Vehicle
Inspection Report for each of the assigned assets.
From the Menu screen, tap DVIR overview.
Or
From the or Driver Overview screen tap View DVIR.
RoadLog displays the DVIR Summary screen. To view, Print
and Report Defects from the DVIR reports, follow the
procedures from DVIR Summary and Printing a DVIR.
For the procedure on printing see Printing a DVIR.
11. Enabling/Disabling
Exemptions
According to the US HOS regulations, a Driver is permitted
to take exemptions from HOS rules in the following
circumstances:
• Emergency conditions
• Adverse driving conditions
• 16-hour extension (This exception is applicable only for
property-carrying vehicles)
• 100 mile radius for CDL drivers
• 150 mile radius for non-CDL drivers
• Personal Use
Exemptions are stopped and started by the Driver and may
also be automatically deactivated by RoadLog under specific
conditions.
To enter an exemption in RoadLog, tap Driver Options from
the Driver Overview Options screen. RoadLog displays the
Driver Options screen.
Tap Take Exemption. RoadLog displays the Exemptions
screen.
Select the exemption you wish to take from the radio button
list.
To add a remark related to the selected exemption, tap on
the remarks field. RoadLog displays the Keyboard screen.
Enter the remark and tap Go. RoadLog displays the
Exemption screen with the typed remark.
Press Start to activate the exemption. RoadLog returns to
the Driver Options screen.
If you wish to stop a current exemption, tap Stop.
Automatic deactivation of Exemptions
RoadLog will automatically deactivate the exemptions in the
following instances:
The Emergency exemption will end when the Driver changes
duty status to Off Duty or Sleeper Berth.
Driver Overview
Driver Overview Driver Options
Exemptions
DVIR Summary
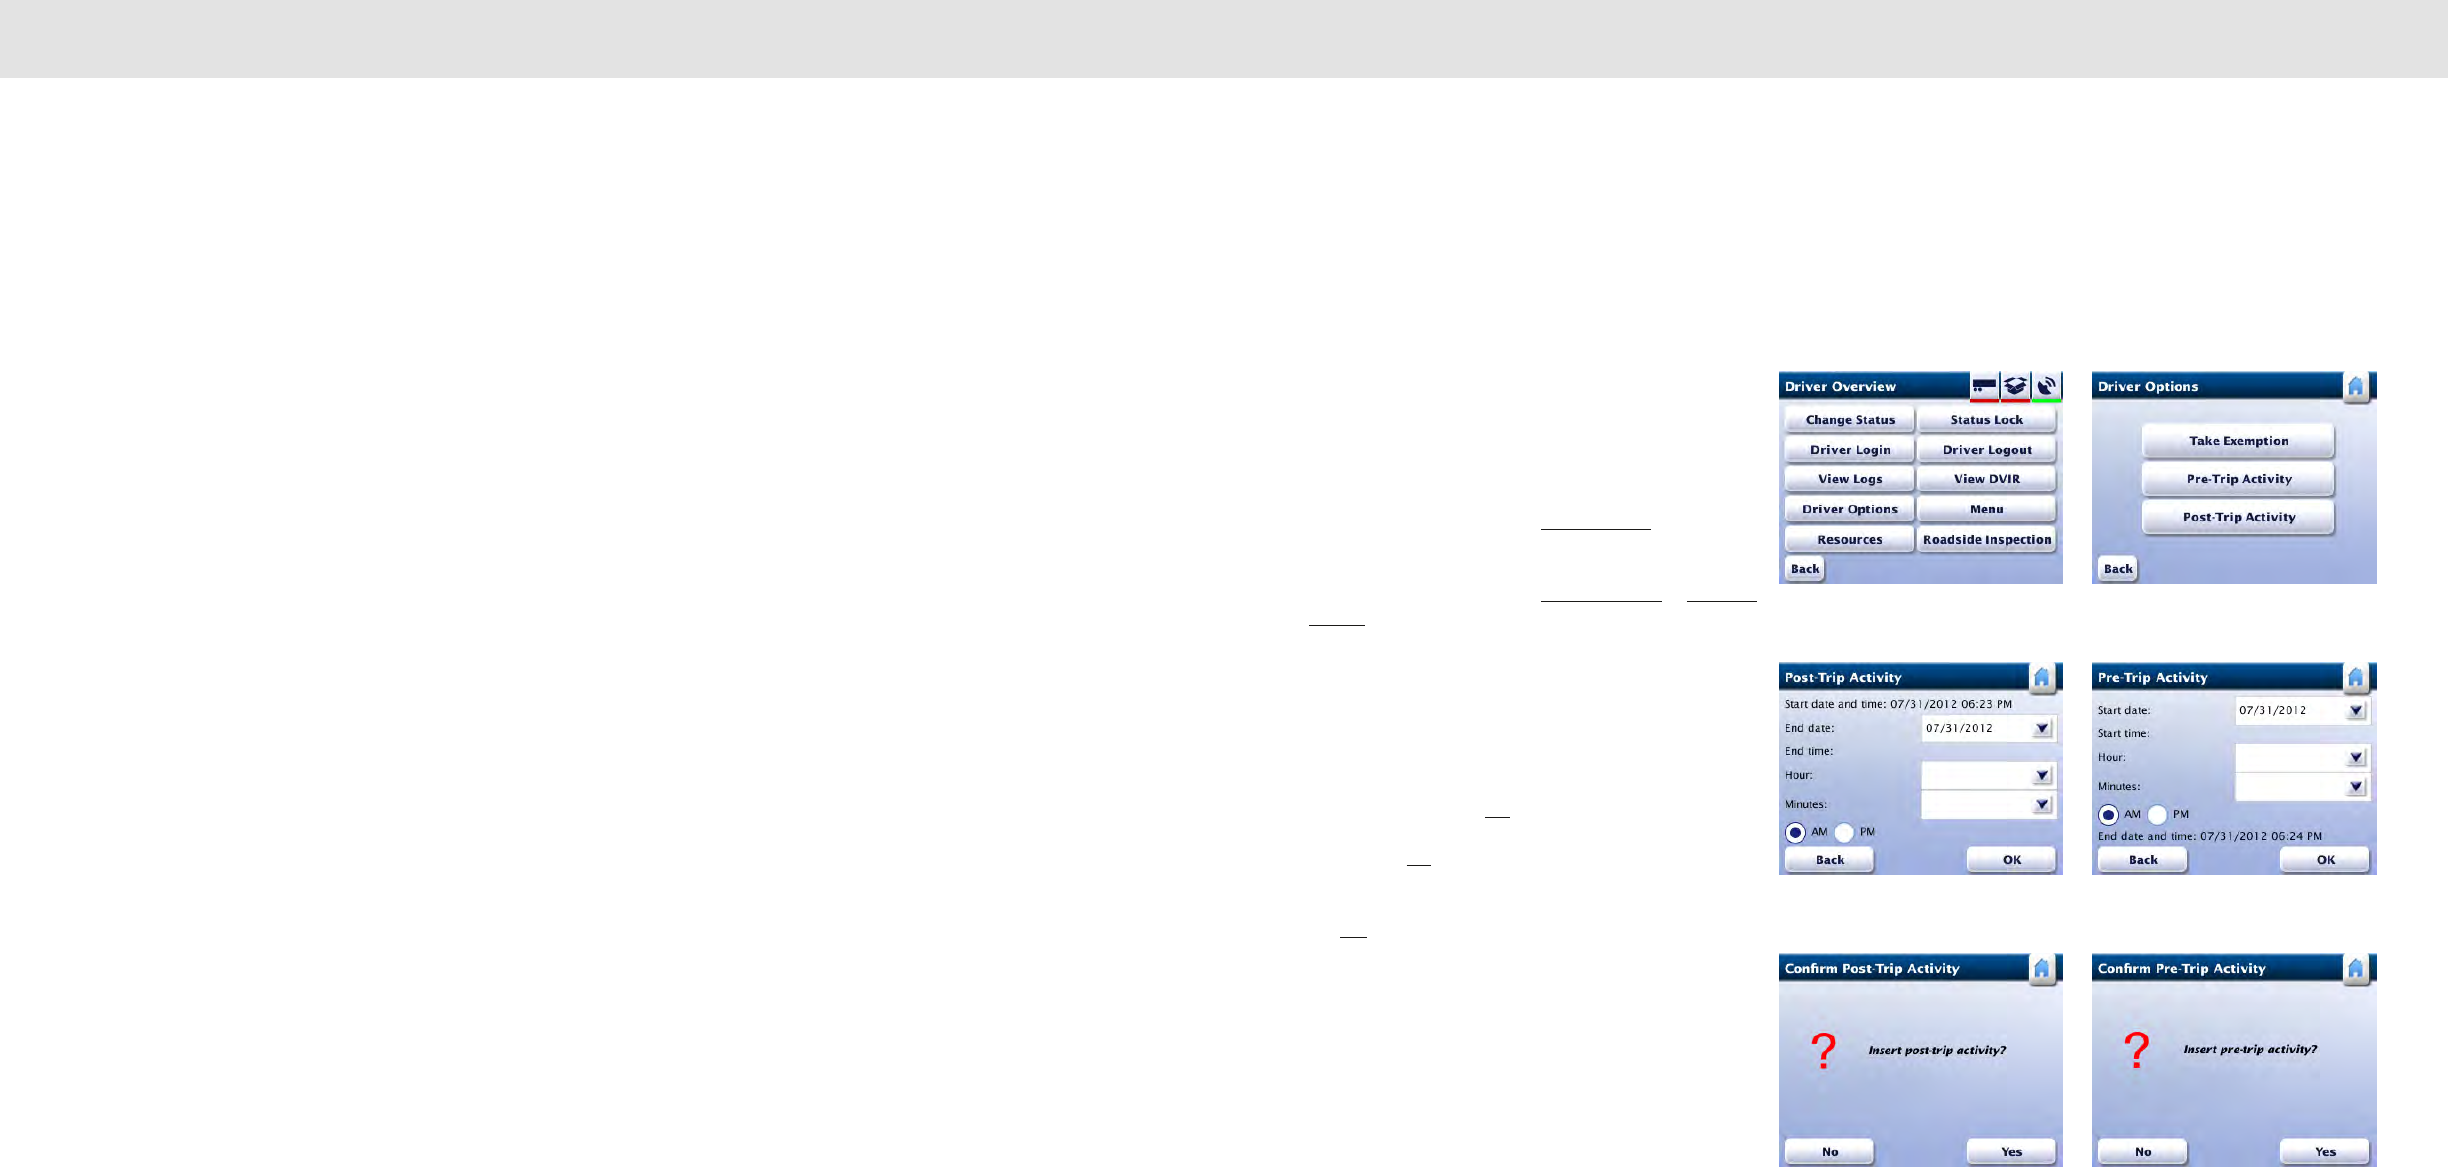
104103
Enabling/Disabling Exemptions Adding a Pre-Trip or Post-Trip Activity
The Adverse driving condition exemption will end when the
Driver fulfills the HOS daily reset condition.
The 100 and 150 air-miles radius exemptions will end when
the vehicle exceeds the prescribed radius, when the Driver
logs out, or when the Driver changes duty status to Personal
Use.
The 16-hour extension exemption will end when the Driver
fulfills the HOS daily reset condition.
Note: The 16-hour exemption is designed for one-day
“duty tours.” The duty tour is the interval between the
time a Driver comes On Duty and is released from
duty on a daily basis. This period begins and ends at
the Driver’s normal work reporting location and may
only be used following 10 or more consecutive hours
off-duty, 10 or more consecutive hours in the sleeper
berth, or a combination of 10 or more consecutive
hours Off Duty and Sleeper Berth time.
Disabling the 100 or 150 Air-miles
Radius Exemptions
The 100 or 150 air-miles radius exemptions can only be
disabled automatically by RoadLog in the following
circumstances:
• The 100 or 150 air-miles radius is exceeded by the
vehicle’s distance traveled.
• The Driver logs out.
• The Driver changes status to Personal Use.
12. Adding a Pre-Trip or
Post-Trip Activity
The Driver has the option of extending the On Duty time
frame at the beginning of the current log in session by
adding a pre-trip activity or at the end of the trip by adding a
post-trip activity function.
To add a pre-trip or post-trip activity from the Driver
Overview Options screen, tap Driver Options. RoadLog
displays the Driver Options screen.
Depending on your choice, tap Pre-Trip Activity or Post-Trip
Activity. RoadLog displays the appropriate screen.
Tap on the arrows for each field to select the Start Date and
Start time Hour and Minutes for the Activity using the drop-
down menus. Select AM or PM using the radio buttons.
Note: If the entered start time or end time overlaps with a
preceding log in session, RoadLog displays the Invalid
Date/Time screen. Tap OK. The Pre-Trip or Post-Trip
Activity screen will be displayed again. Enter a valid start
time and tap OK. RoadLog displays the Confirm Pre-Trip
or Confirm Post-Trip Activity screen.
Tap Yes to confirm the pre-trip or post-trip activity. RoadLog
displays the Driver Options screen.
Driver Overview Driver Options
Post-Trip Activity
Confirm Post-Trip Activity
Pre-Trip Activity
Confirm Pre-Trip Activity
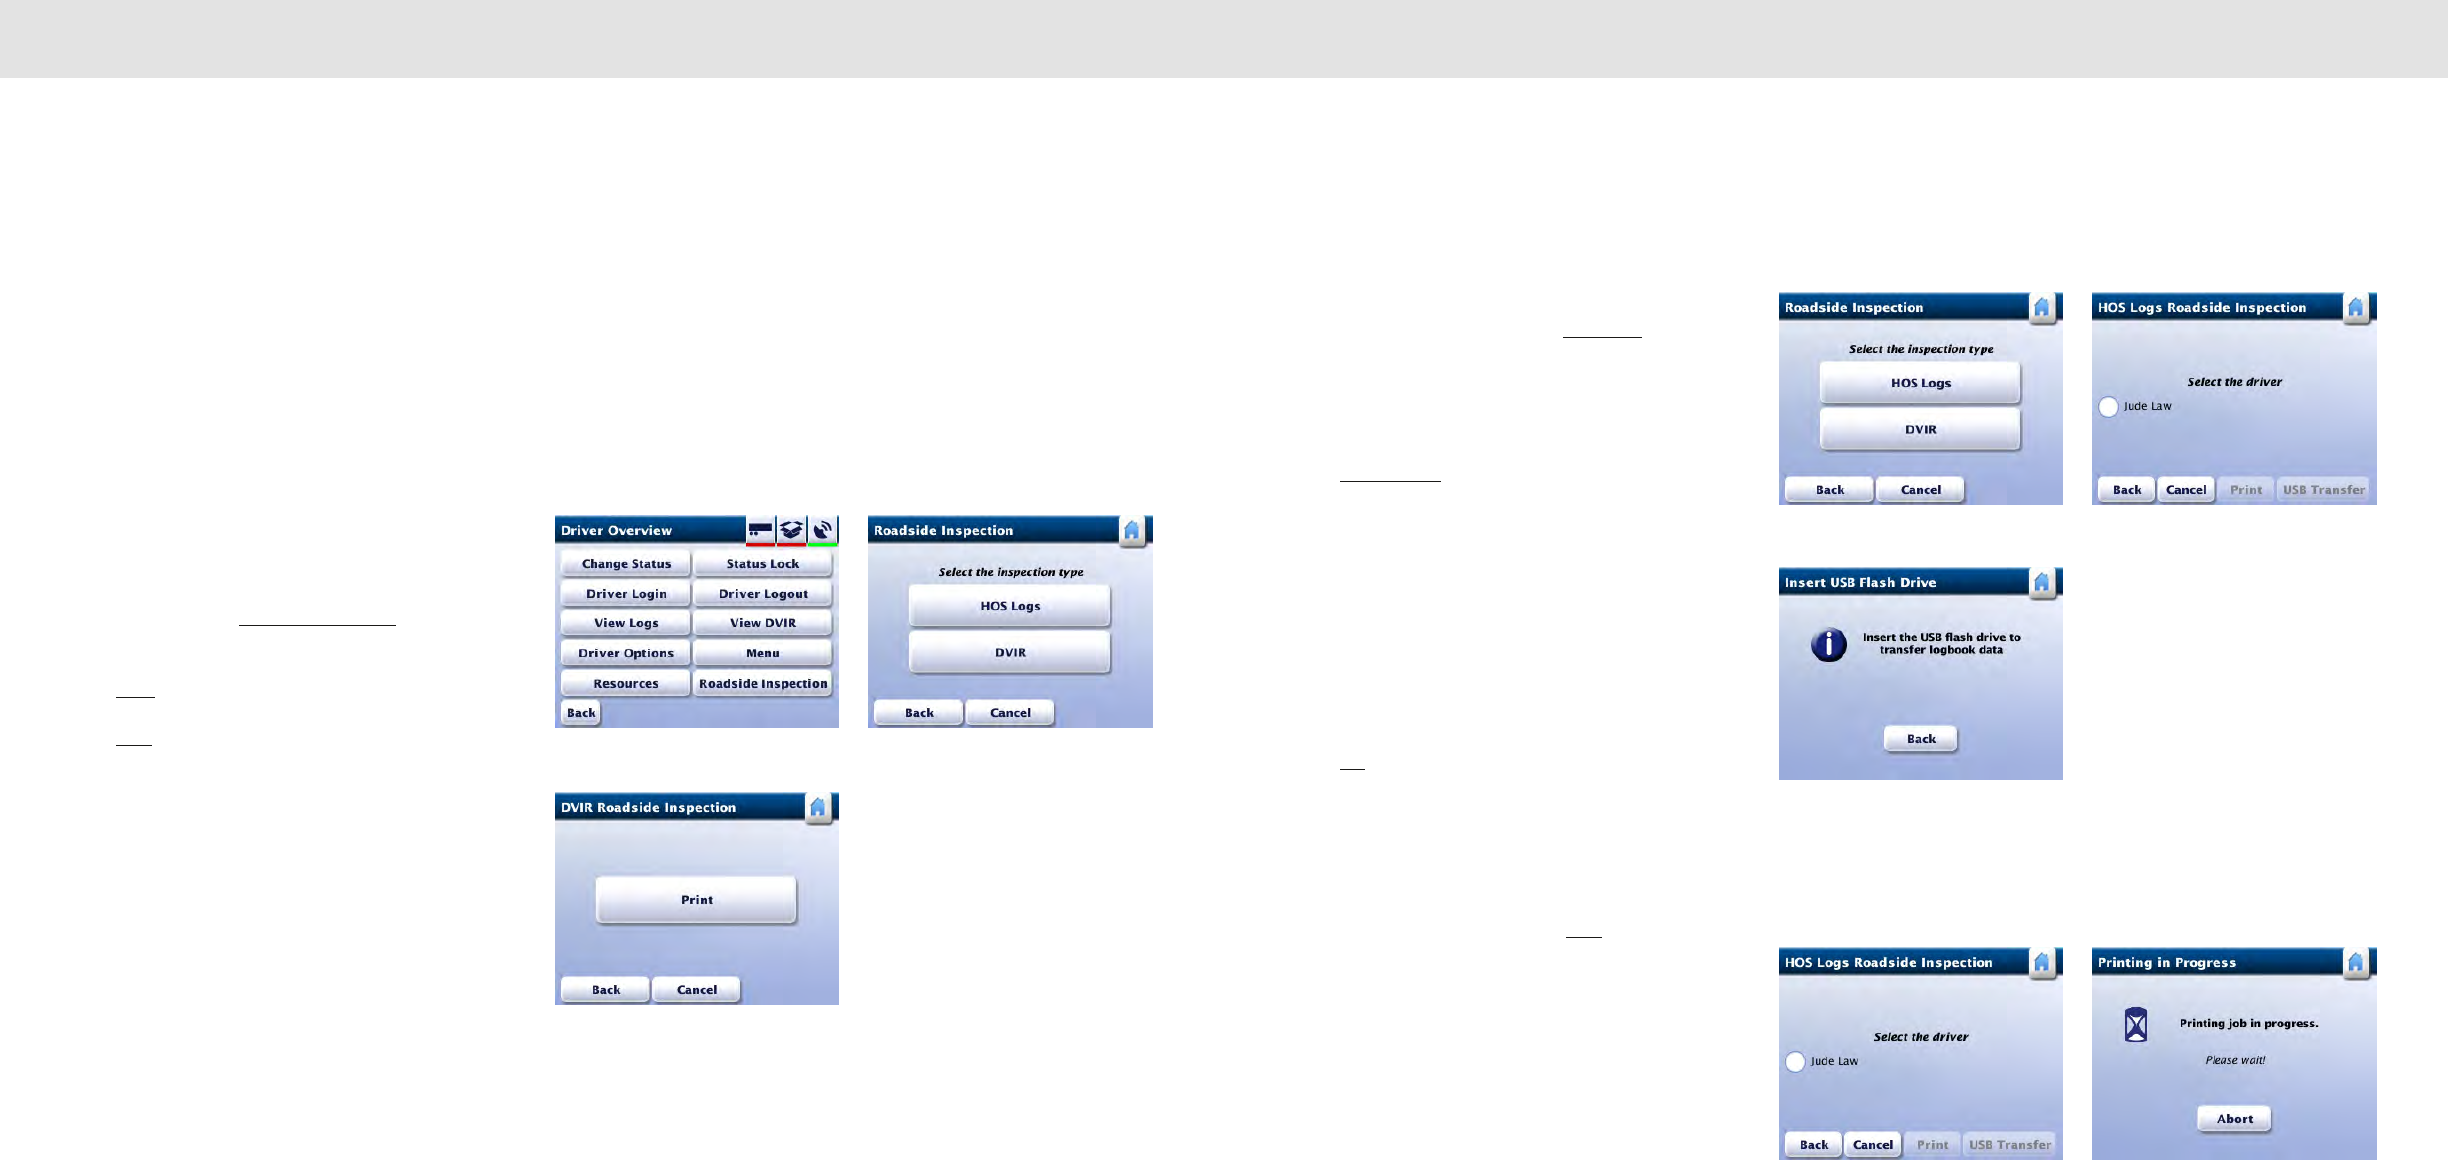
106105
Performing a Roadside Inspection Performing a Roadside Inspection
13. Performing a Roadside
Inspection
RoadLog features a roadside inspection function that allows
authorized inspection personnel to retrieve the recorded
logbooks of the logged in Drivers’ last 7 or 8 days schedule
in print or electronic format.
Retrieving and Printing DVIR Reports
To retrieve logbook records from the Driver Overview
Options screen, tap Roadside Inspection. RoadLog
displays the Roadside Inspection screen.
Tap DVIR to display the DVIR Roadside Inspection screen.
Tap Print. RoadLog prints the last recorded DVIR report for
each of the current assets while displaying the Printing in
Progress screen.
Note: For an explanation of the print out, see DVIR
Report printout.
Retrieving, Printing and Transferring
HOS logs
To perform an inspection of the HOS Logs from the
Roadside Inspection screen, tap HOS Logs. RoadLog
displays the HOS Logs Roadside Inspection screen.
Using the radio buttons, select the name of the Driver that
you’ll perform a roadside inspection for.
Tap USB Transfer to transfer the HOS Log file to a USB
flash drive.
RoadLog displays the Insert USB Flash Drive screen.
Insert a USB flash drive into the USB port to perform the
RODS data transfer. After the transfer is complete, RoadLog
displays the Data Download Completed screen.
Note: To enable data transfer, the USB must be
formatted in the FAT32 file system.
Tap OK, and remove the USB key from the slot.
Note: The file that is transferred in the Roadside
Inspection is the RODS data (Record Of Duty Status)
text data file. No other data is transferred.
To print the chosen Driver’s daily Log from the HOS Logs
Roadside Inspection screen, Tap Print. RoadLog prints the
logs for the last 7 or 8 days (based on the Driver’s schedule),
while displaying the Printing in Progress screen.
Driver Overview Roadside Inspection
Roadside Inspection
Insert USB Flash Drive
DVIR Roadside Inspection
HOS Logs Roadside Inspection
HOS Logs Roadside Inspection Printing in progress
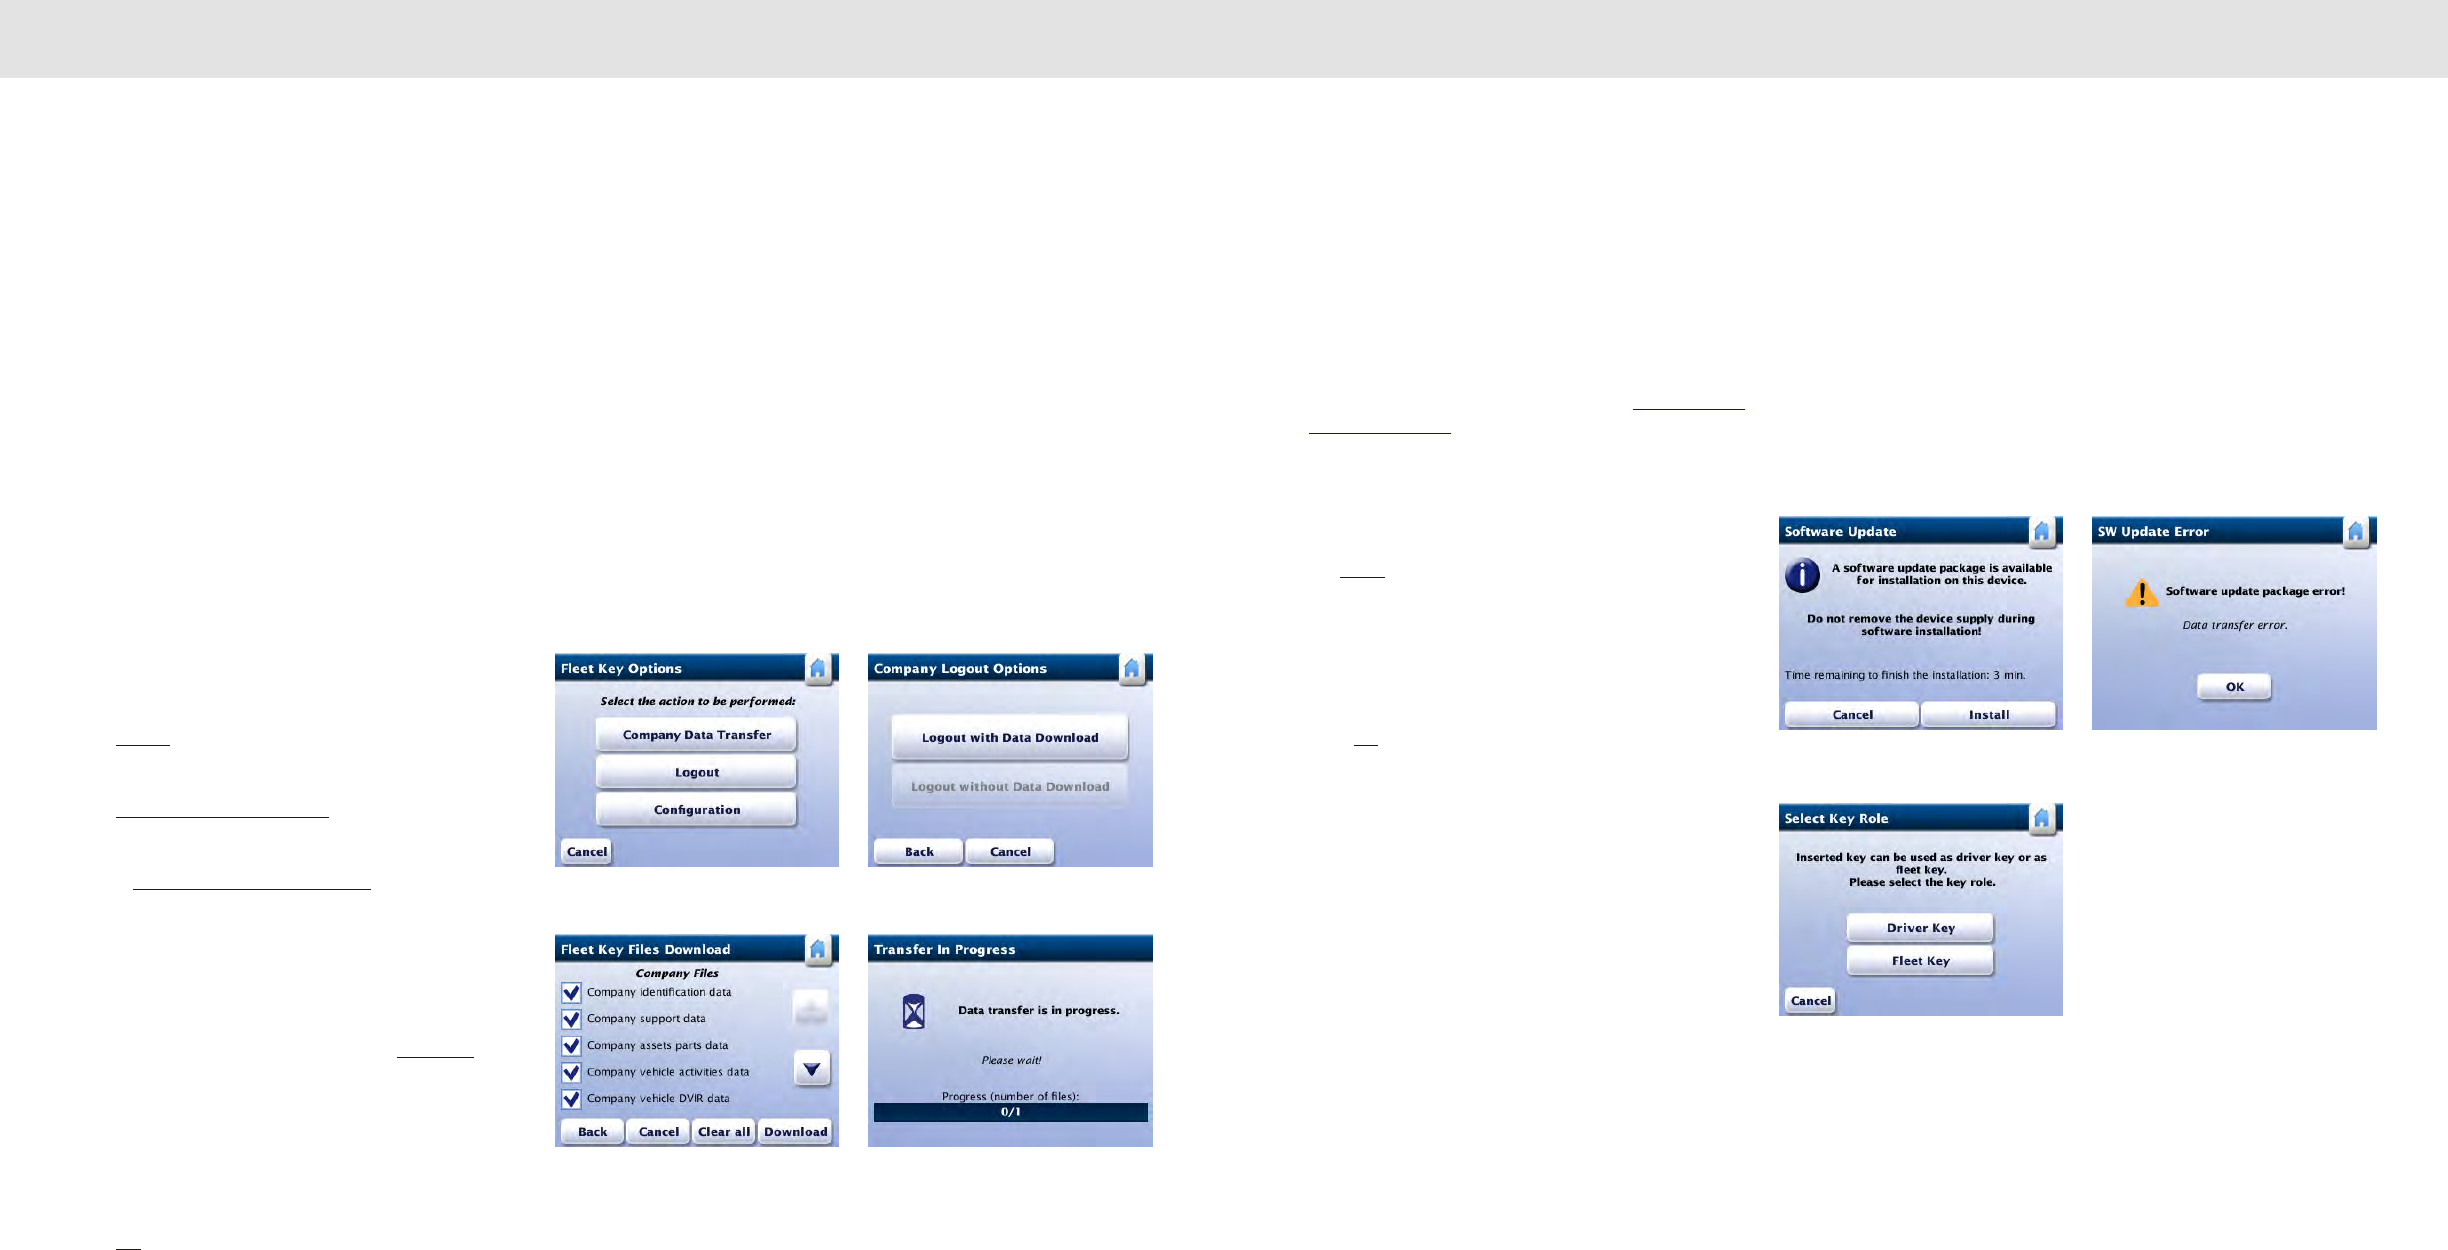
108107
Company Log Out from RoadLog Software Updates
14. Company Log Out
from RoadLog
When a company isn’t using a RoadLog, the company
should log out. RoadLog data recorded while the company
was logged in is not available to other companies that log in
afterwards.
Note: Before going on to company log out, all logged-
in Drivers must log out from RoadLog, in order to save
their RODS data to their Driver Keys. After a company
logs out from a RoadLog device, its Drivers can no
longer save their RODS data from RoadLog to their
Driver Keys.
To log out the company, insert the company’s Fleet Key.
RoadLog displays the Fleet Key Options screen.
Tap Logout. RoadLog displays the Company Logout
Options screen.
Tap Logout with Data Download to save company data
from RoadLog to the Fleet Key (If RoadLog detects the Fleet
Key is full and unable to store additional data, you may only
select Logout without Data Download). RoadLog displays
the Fleet Key Files Download screen.
Use the up and down arrows to view the Fleet Key Files
Download file choices. It is recommended that you
download all files.
Select the files to be downloaded and tap Download.
RoadLog displays the Transfer in Progress screen during
data transfer and the Data Download Completed screen
when data transfer is complete.
Remove the Fleet Key. RoadLog displays the Successful
Logout screen.
Tap OK. RoadLog displays the Settings screen.
Notes: If you try to log out the company while a Driver
is still logged in, RoadLog displays the Driver Logged
In screen.
15. Software Updates
You can update RoadLog’s software by transferring an
update package from a Driver or Fleet key. See details on
how to transfer the update package onto a Driver or Fleet
Key in the RoadLog Fleet Software manual: Transferring an
Update to RoadLog.
To perform a RoadLog software update, insert a Driver Key
or Fleet Key that contains the software update package into
the USB port. RoadLog displays the SW Update screen.
Tap Install to start the updating process. Once the
installation is complete, RoadLog will automatically reboot
and display the start up screen. After RoadLog completes
the reboot, the software update becomes effective.
Note: If a data transfer error is detected, RoadLog will
display the SW Update Error screen. In this case, tap
OK. If the inserted flash drive is the Driver Key,
RoadLog will display the Driver Key Options screen.
If the inserted flash drive is the Fleet Key, RoadLog will
display the Select Key Role screen.
Tap the Home icon or remove the inserted Key to go to the
Driver Overview screen.
Fleet Key Options
Software Update
Select Key Role
Software Update Error
Fleet Key Files Download Transfer in Progress
Company Logout Options
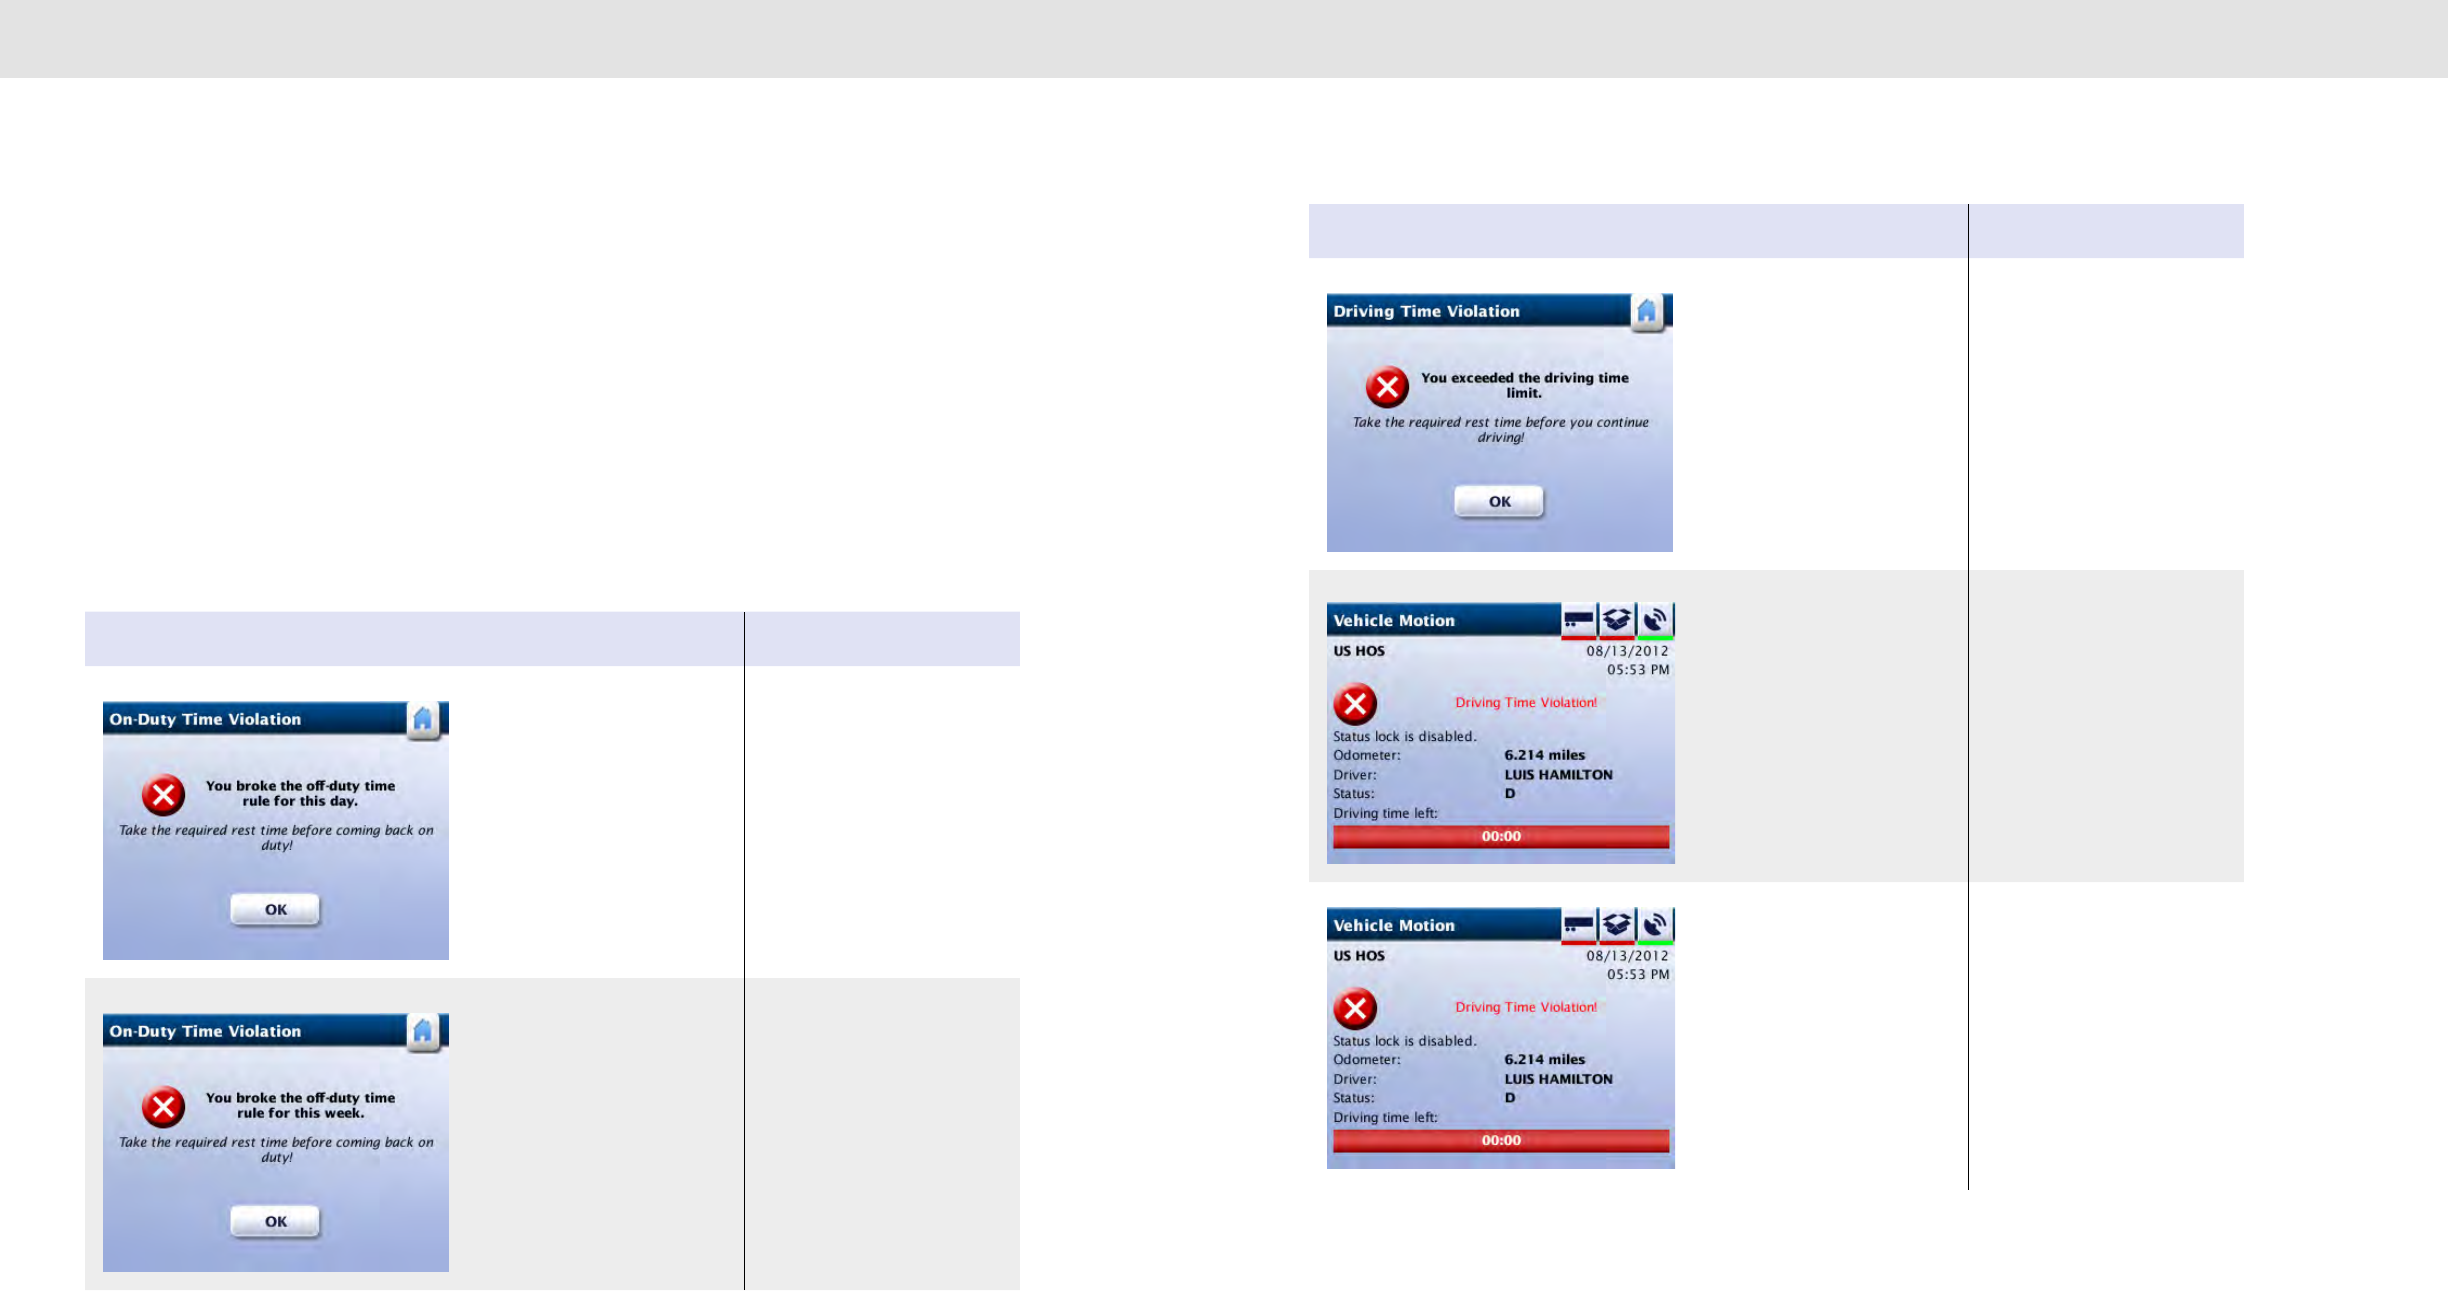
110109
Diagnostic Warning Screens Diagnostic Warning Screens
16. Diagnostic Warning
Screens
RoadLog runs automatic diagnostic checks to detect and
report failures that affect its performance. When failures are
detected, RoadLog displays relevant warning screens.
The warnings RoadLog may issue regarding Driver
compliance and device operations are described in the chart
below.
Steps you can take to resolve the problems detected are
also provided.
Screen Meaning Action required
The daily On Duty time rule has
been broken.
Take the required rest time
before coming back on duty.
Check the Driver Overview
screen for the remaining rest
time available to you.
The weekly On Duty time rule
has been broken.
The week refers to the
preceding seven or eight days,
depending on the schedule
assigned for the Driver.
Take the required rest time
before coming back on duty.
Check the Driver Overview
screen for the remaining rest
time available to you.
Screen Meaning Action required
The Driving Time limit has been
exceeded.
Take the required rest time.
Check the Driver Overview
screen for the rest time available
to you before Driving again.
Although the Driver has
exceeded the Driving Time limit,
the vehicle is still in motion.
Stop the vehicle as soon as
possible and take the required
rest time.
RoadLog detects a daily On
Duty time violation for this Driver
while the vehicle is in motion, or
RoadLog detects a weekly On
Duty time violation for this Driver
while the vehicle is in motion.
Stop the vehicle as soon as
possible and take the required
rest time.
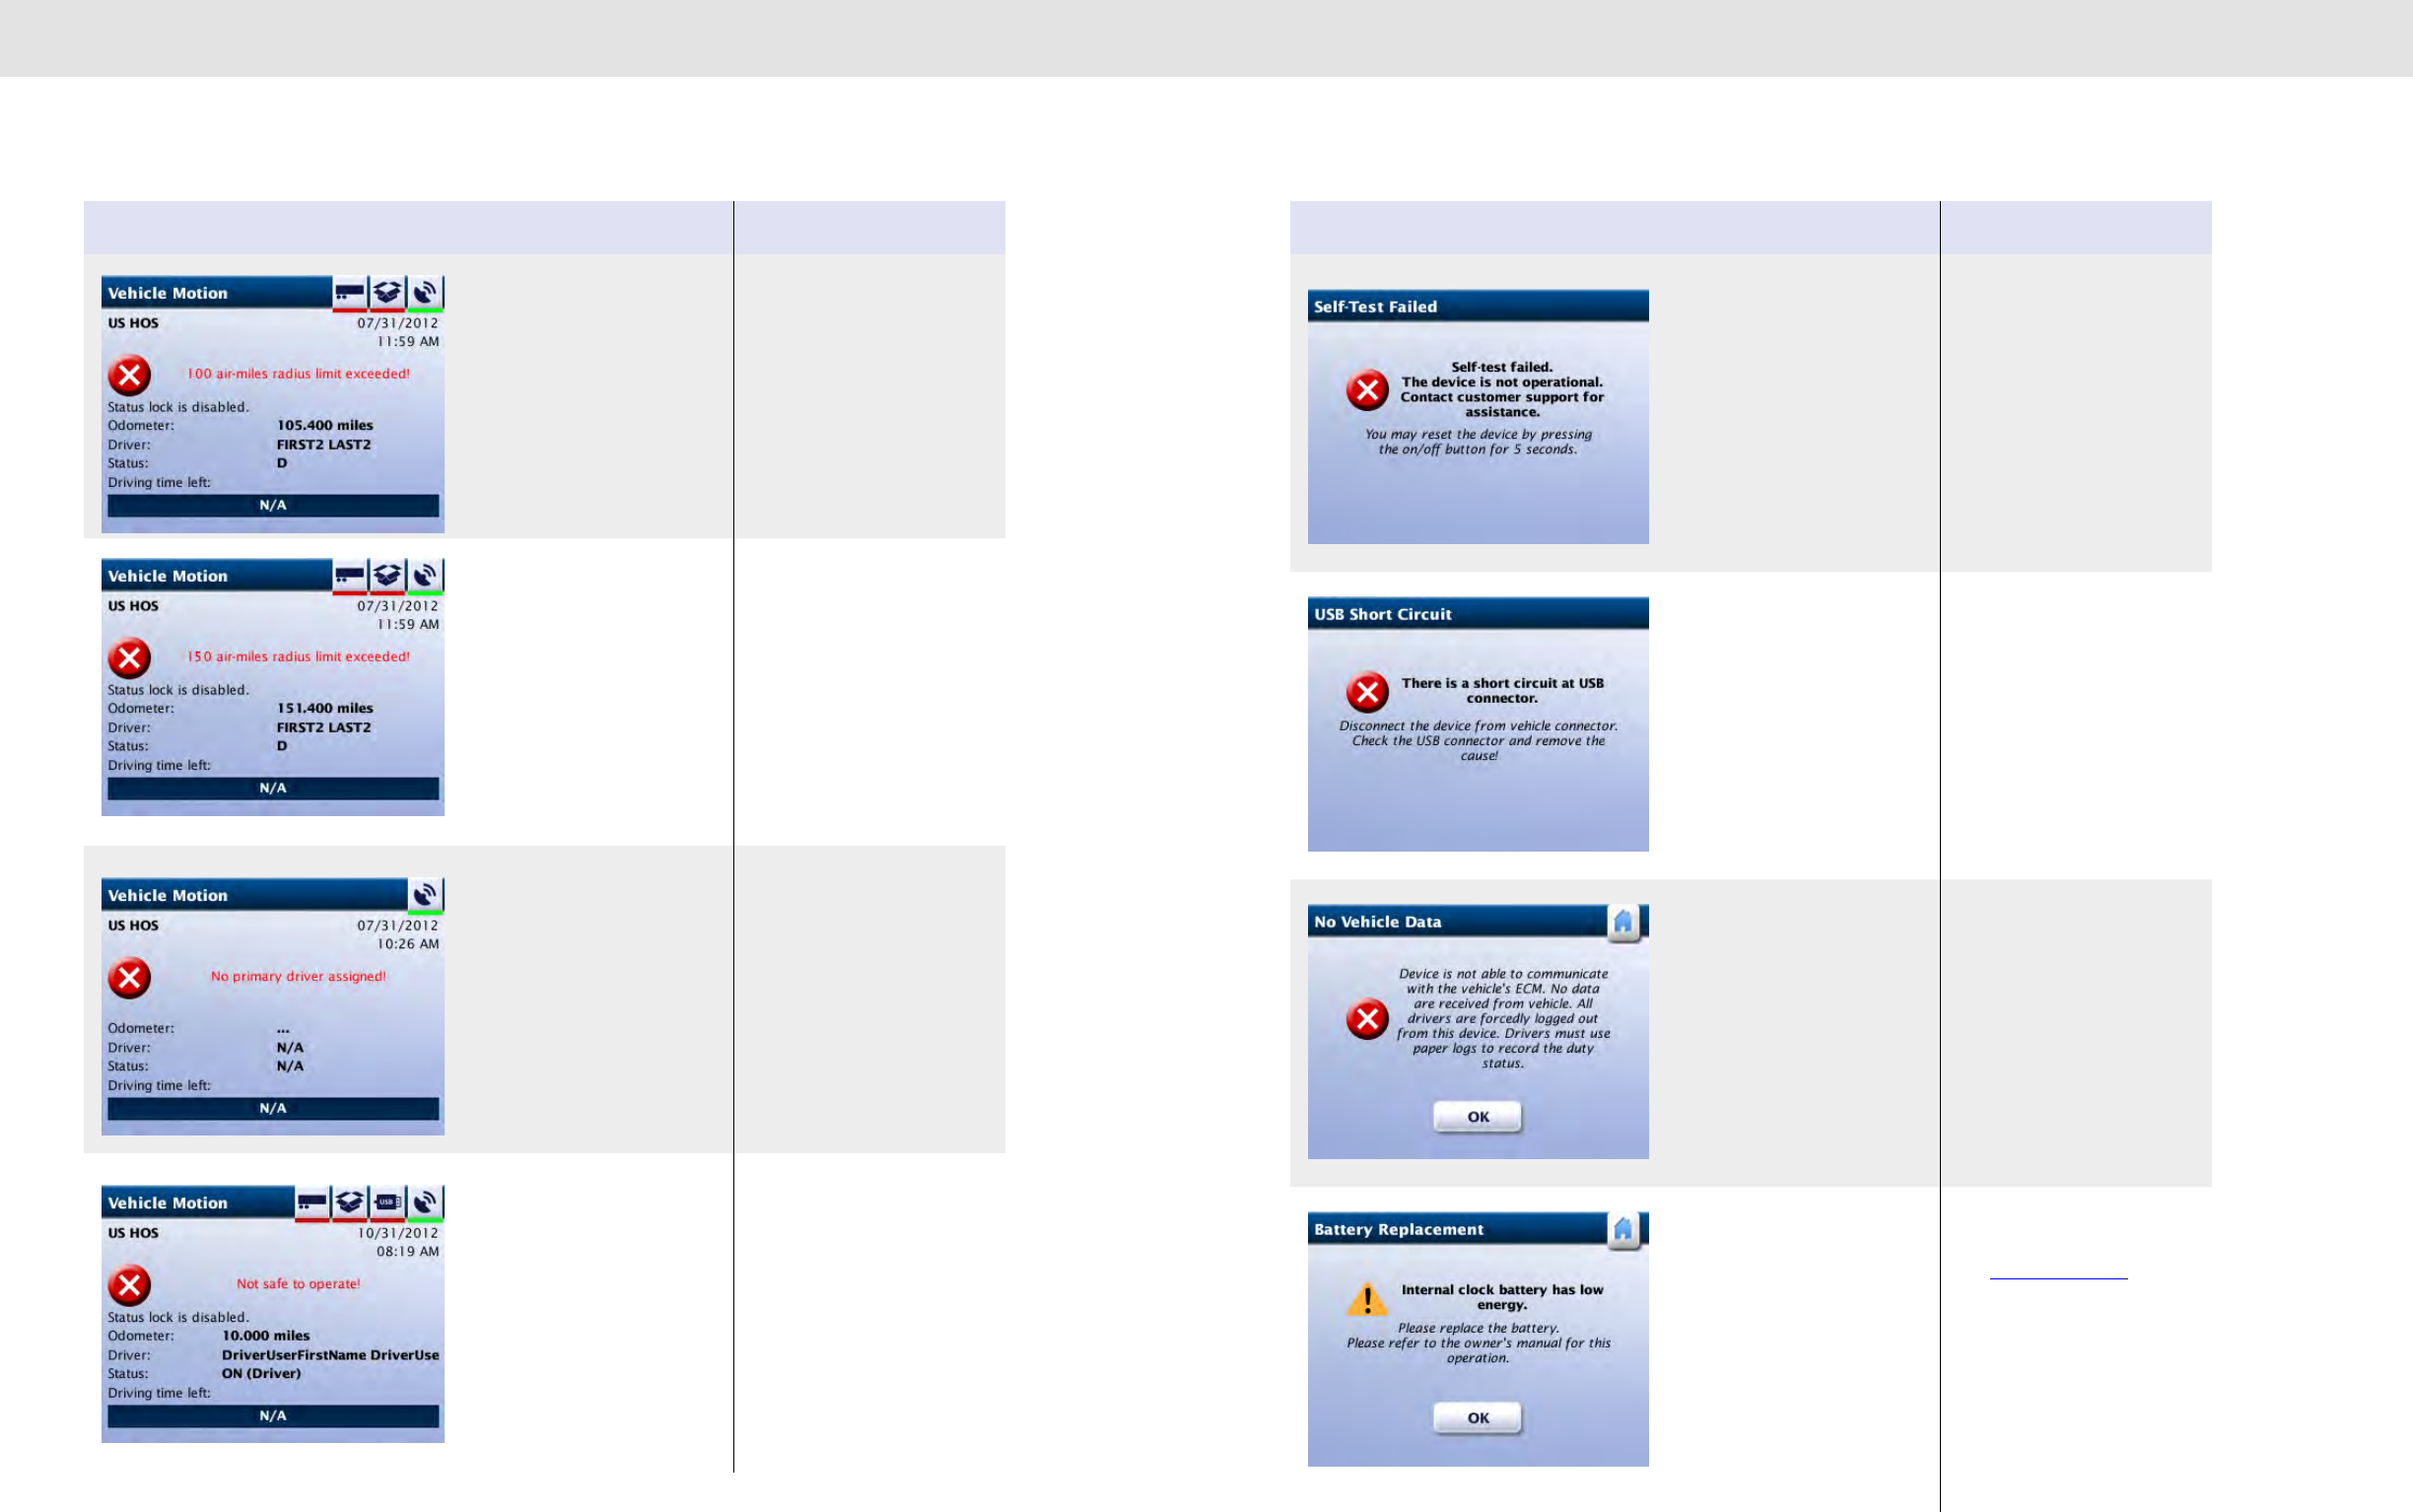
112111
Diagnostic Warning Screens Diagnostic Warning Screens
Screen Meaning Action required
The Driver has crossed the
border of the 100 air-miles
radius zone.
The 100 air-miles exemption is
no longer active
Stop the vehicle as soon as
possible and take the required
rest time.
The Driver has crossed the
border of the 150 air-miles
radius zone.
The 150 air-miles exemption is
no longer active
Stop the vehicle as soon as
possible and take the required
rest time.
The vehicle is in motion although
none of the logged in the Drivers
has changed their status to
Driver, or the vehicle is in motion
and no Drivers are logged into
the system.
Stop the vehicle and log in to
RoadLog, or stop the vehicle
and switch status to Driver.
RoadLog detects that a pre-trip
inspection was not performed
on one or more current
resources, but the vehicle is in
motion, or a pre-trip inspection
was performed for all resources,
but at least one of those
resources indicates that vehicle
operation is not safe.
Stop the vehicle and perform
the pre-trip inspection on the
resource(s) in question.
Screen Meaning Action required
The Self-Test Failed screen is
displayed.
Press the on/off button to restart
the device.
If the problem persists, contact
Customer Assistance for
support.
VDO Technical Support:
Tel: 855-ROADLOG or 855-762-3564
E-mail: roadlog-support@vdo.com
The inserted USB device is
defective and has caused the
RoadLog USB port to short
circuit.
Remove the USB device. Press
the on/off button to restart the
device.
If the problem persists, contact
Technical Support for
assistance.
VDO Technical Support:
Tel: 855-ROADLOG or 855-762-3564
E-mail: roadlog-support@vdo.com
RoadLog cannot communicate
with the vehicle, and therefore
HOS calculations cannot be
performed.
Until the problem can be
resolved, use paper logs to
track Duty Status changes and
activities.
The internal battery has a low
energy level.
Replace the battery.
See Battery Installation.
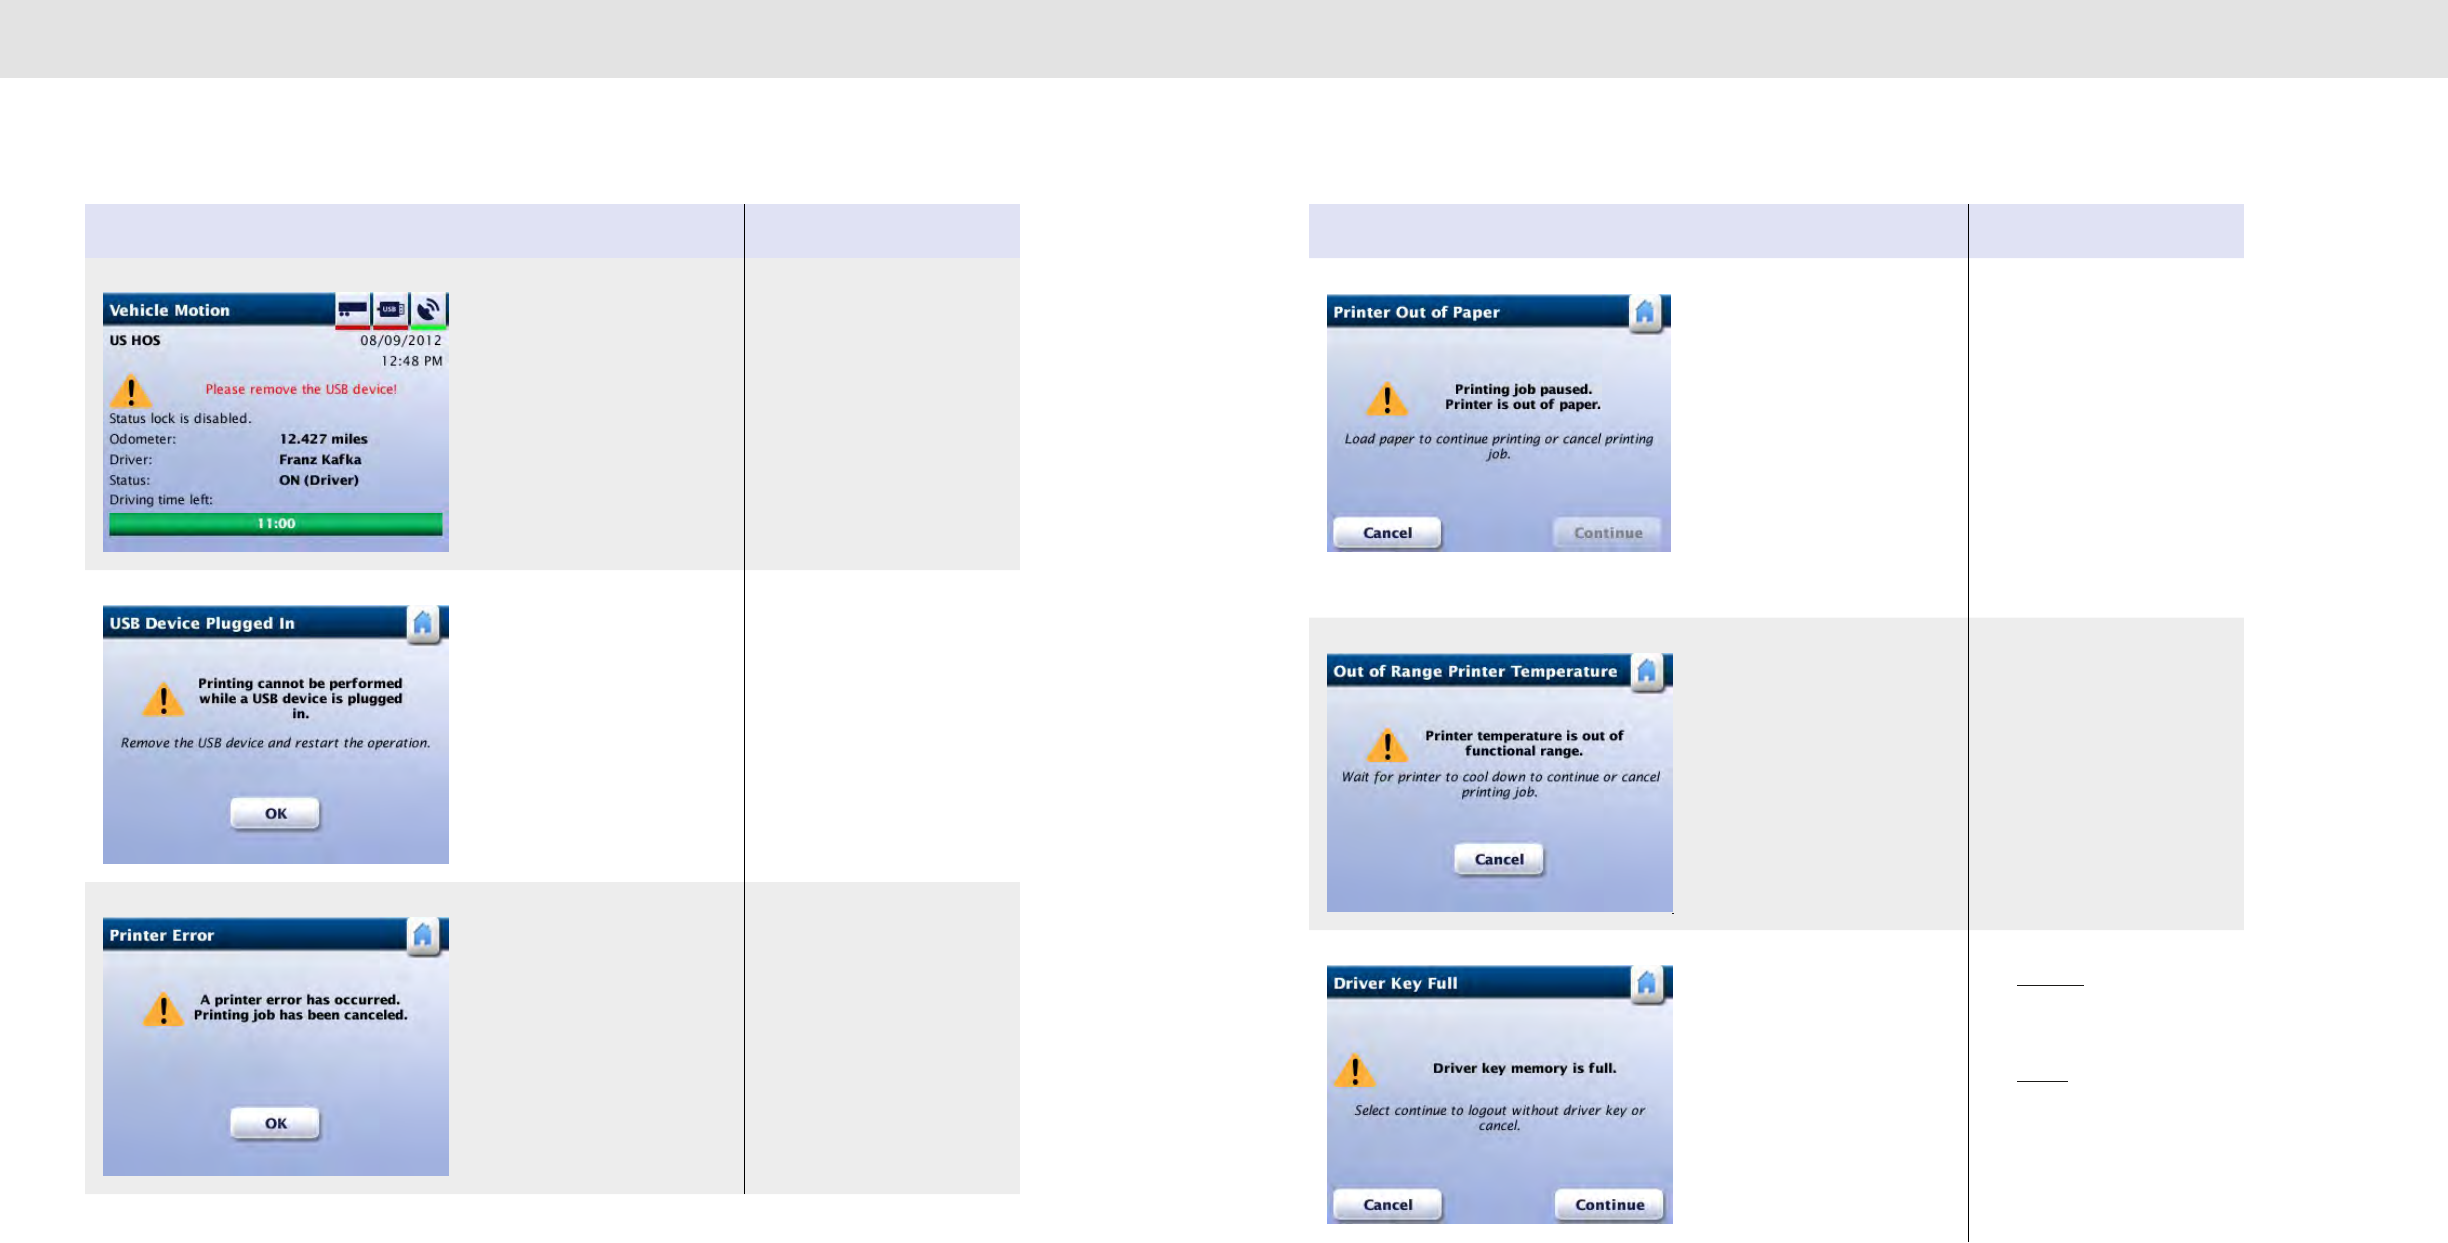
114113
Diagnostic Warning Screens Diagnostic Warning Screens
Screen Meaning Action required
The vehicle started to move and
RoadLog detects a USB device
connected.
Remove the USB device.
CAUTION! Driving with a USB
device in the USB port can
cause damage to RoadLog and
/ or the USB device.
RoadLog has detected a USB
device connected while a
printing request was performed.
Remove the USB device and try
printing again.
During the printing process, a
printer error was detected.
Try to print again.
If the problem persists, contact
Customer Support for
assistance.
VDO Technical Support:
Tel: 855-ROADLOG or 855-762-3564
E-mail: roadlog-support@vdo.com
Screen Meaning Action required
Printer paper has run out. Insert a new paper roll and then
tap Continue to resume printing.
Tap Cancel to abort printing
CAUTION! Do not touch printer
head while replacing paper. It
may be very hot!
The printer overheated. Wait for printer to cool down.
The printing resumes
automatically once the
temperature is in the normal
range.
Tap Cancel if you want to abort
the current printing.
During Driver log out, RoadLog
detects that there is not enough
available memory on the Driver
Key to download data.
Tap Continue to log out
manually. The Driver RODS data
will be stored on RoadLog.
Tap Cancel to abort the log out.
Download data to the Fleet
Software as soon as possible to
create more available memory
on the Driver Key.
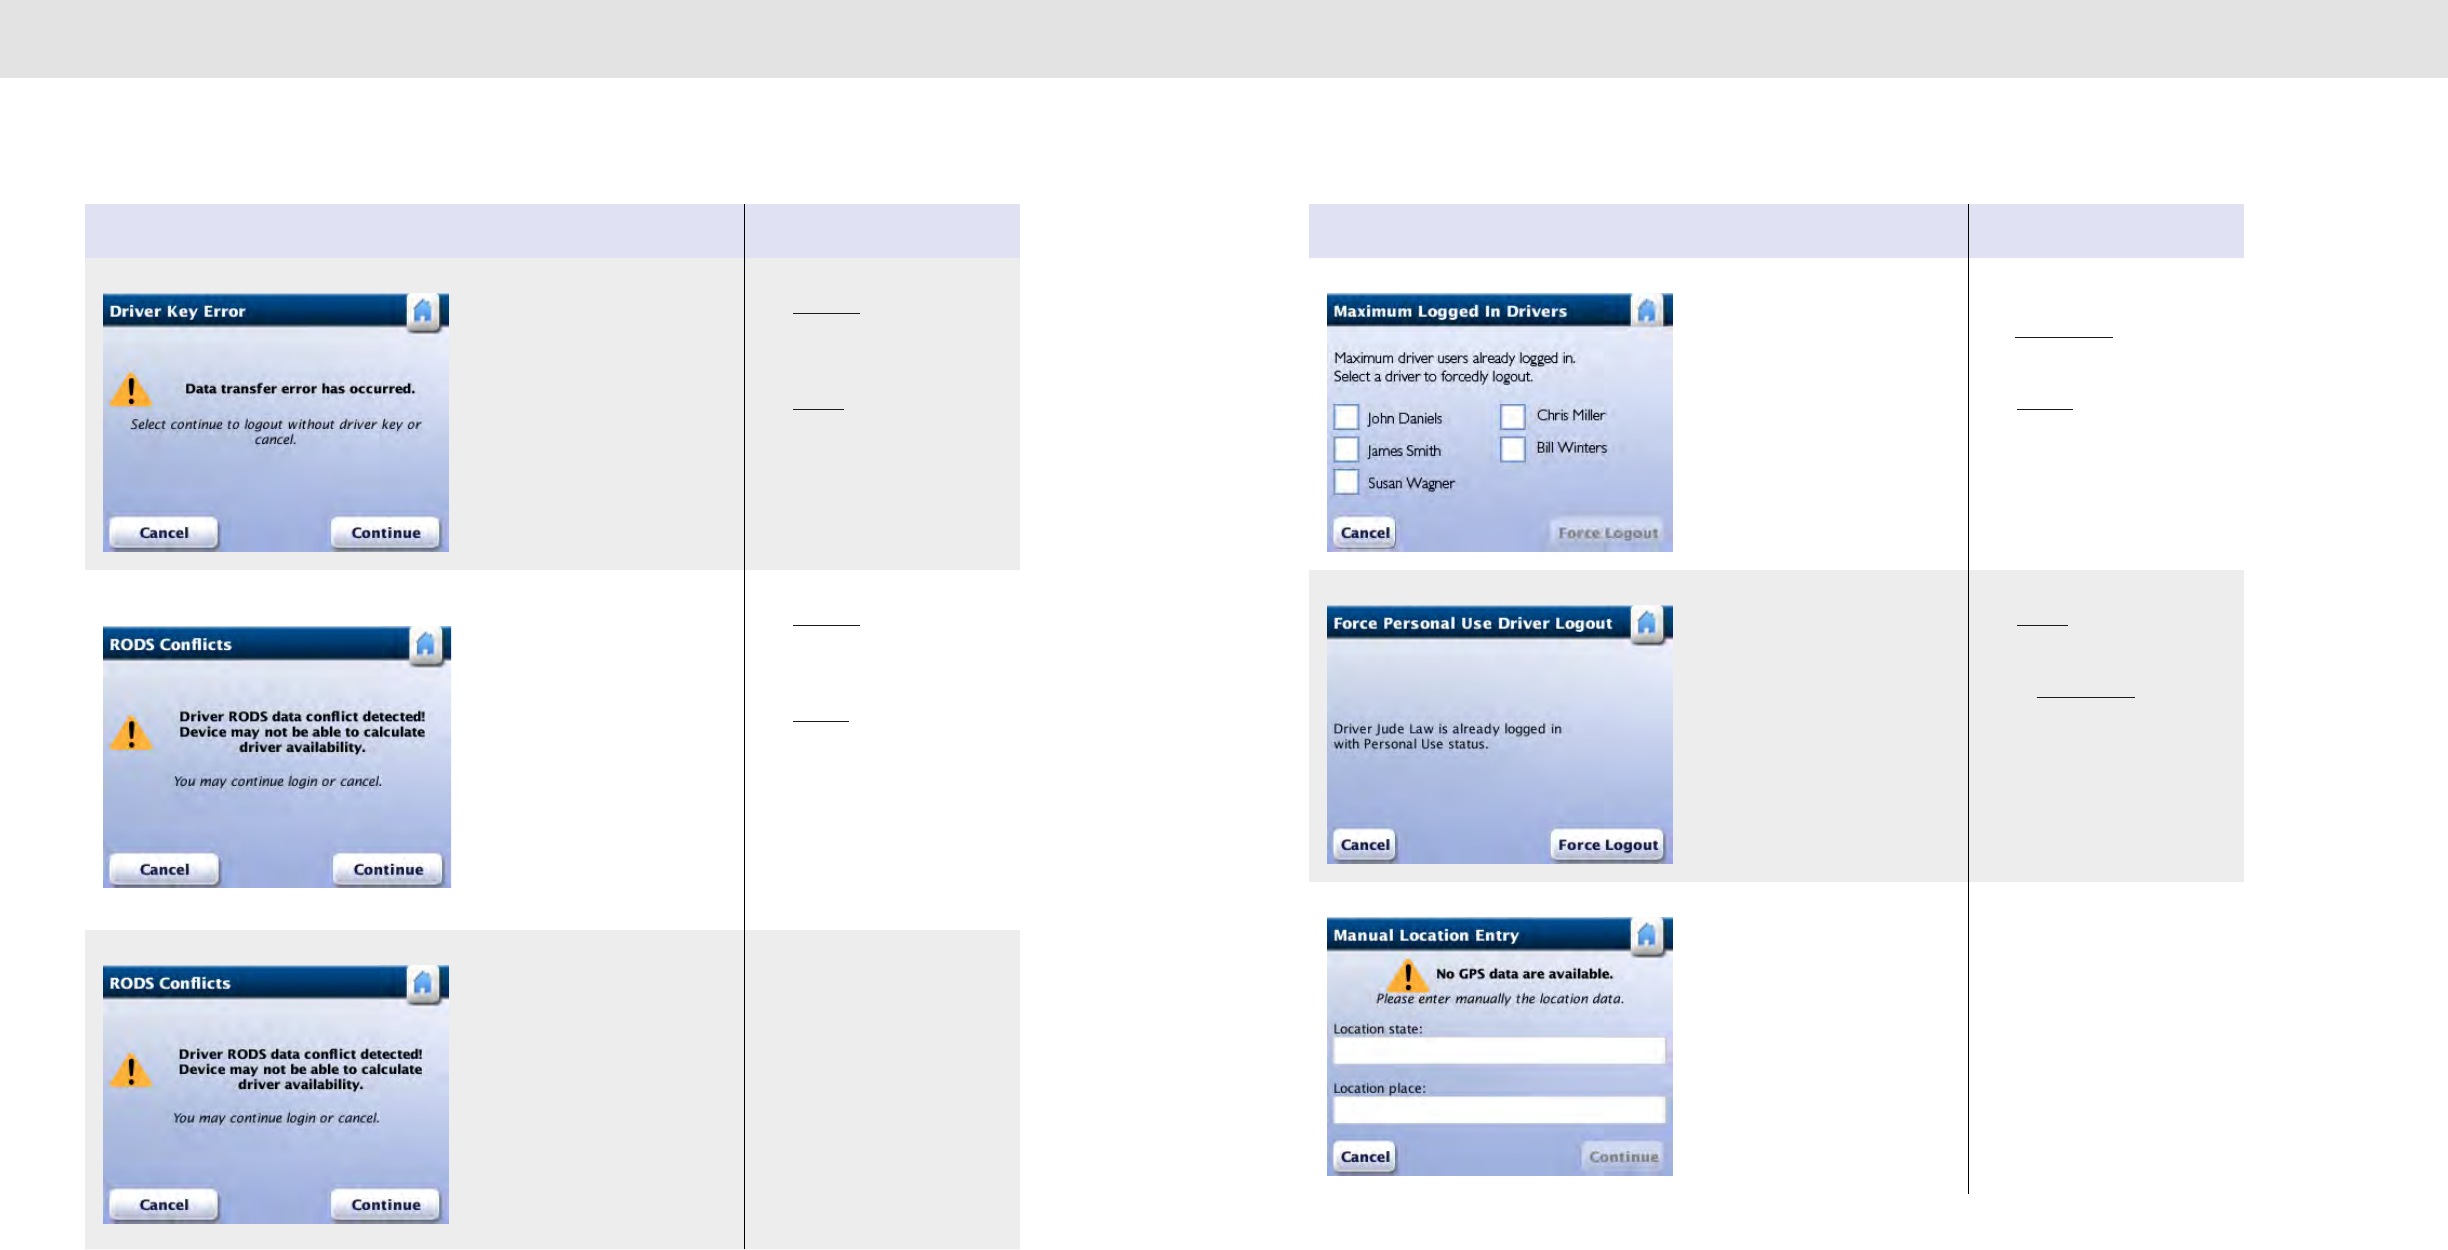
116115
Diagnostic Warning Screens Diagnostic Warning Screens
Screen Meaning Action required
A transfer error has been
detected during data download
to the Driver Key.
Tap Continue to log out
manually. The Driver RODS data
will be stored in RoadLog.
Tap Cancel to abort the log out.
RoadLog detected data
conflicts between RODS data
on Driver Key and the RODS
data in RoadLog device.
Due to this conflict, merging the
two sets of RODS data is not
possible.
As a result, RoadLog may not
have enough data to calculate
your HOS availability.
Tap Continue to continue log in.
OR
Tap Cancel to abort log in.
OR
Fix the conflicting RODS data
using the RoadLog Fleet
Software.
Conflicting RODS data has been
downloaded to the Driver Key.
Fix the conflicting RODS data
using the RoadLog Fleet
Software.
Screen Meaning Action required
The maximum number of
Drivers (five) are already logged
into this RoadLog device.
Select a Driver from the list and
tap Force Logout to log that
Driver out.
Tap Cancel if you don’t want to
continue logging in.
There is another Driver logged
into RoadLog under Personal
Use status.
Tap Cancel if you want to cancel
your log in.
Select Force Logout to log out
the Driver logged in under
Personal Use status and
continue your log in.
GPS signal is unavailable. The
automatic localization feature
does not work.
Enter your location state and
place manually.
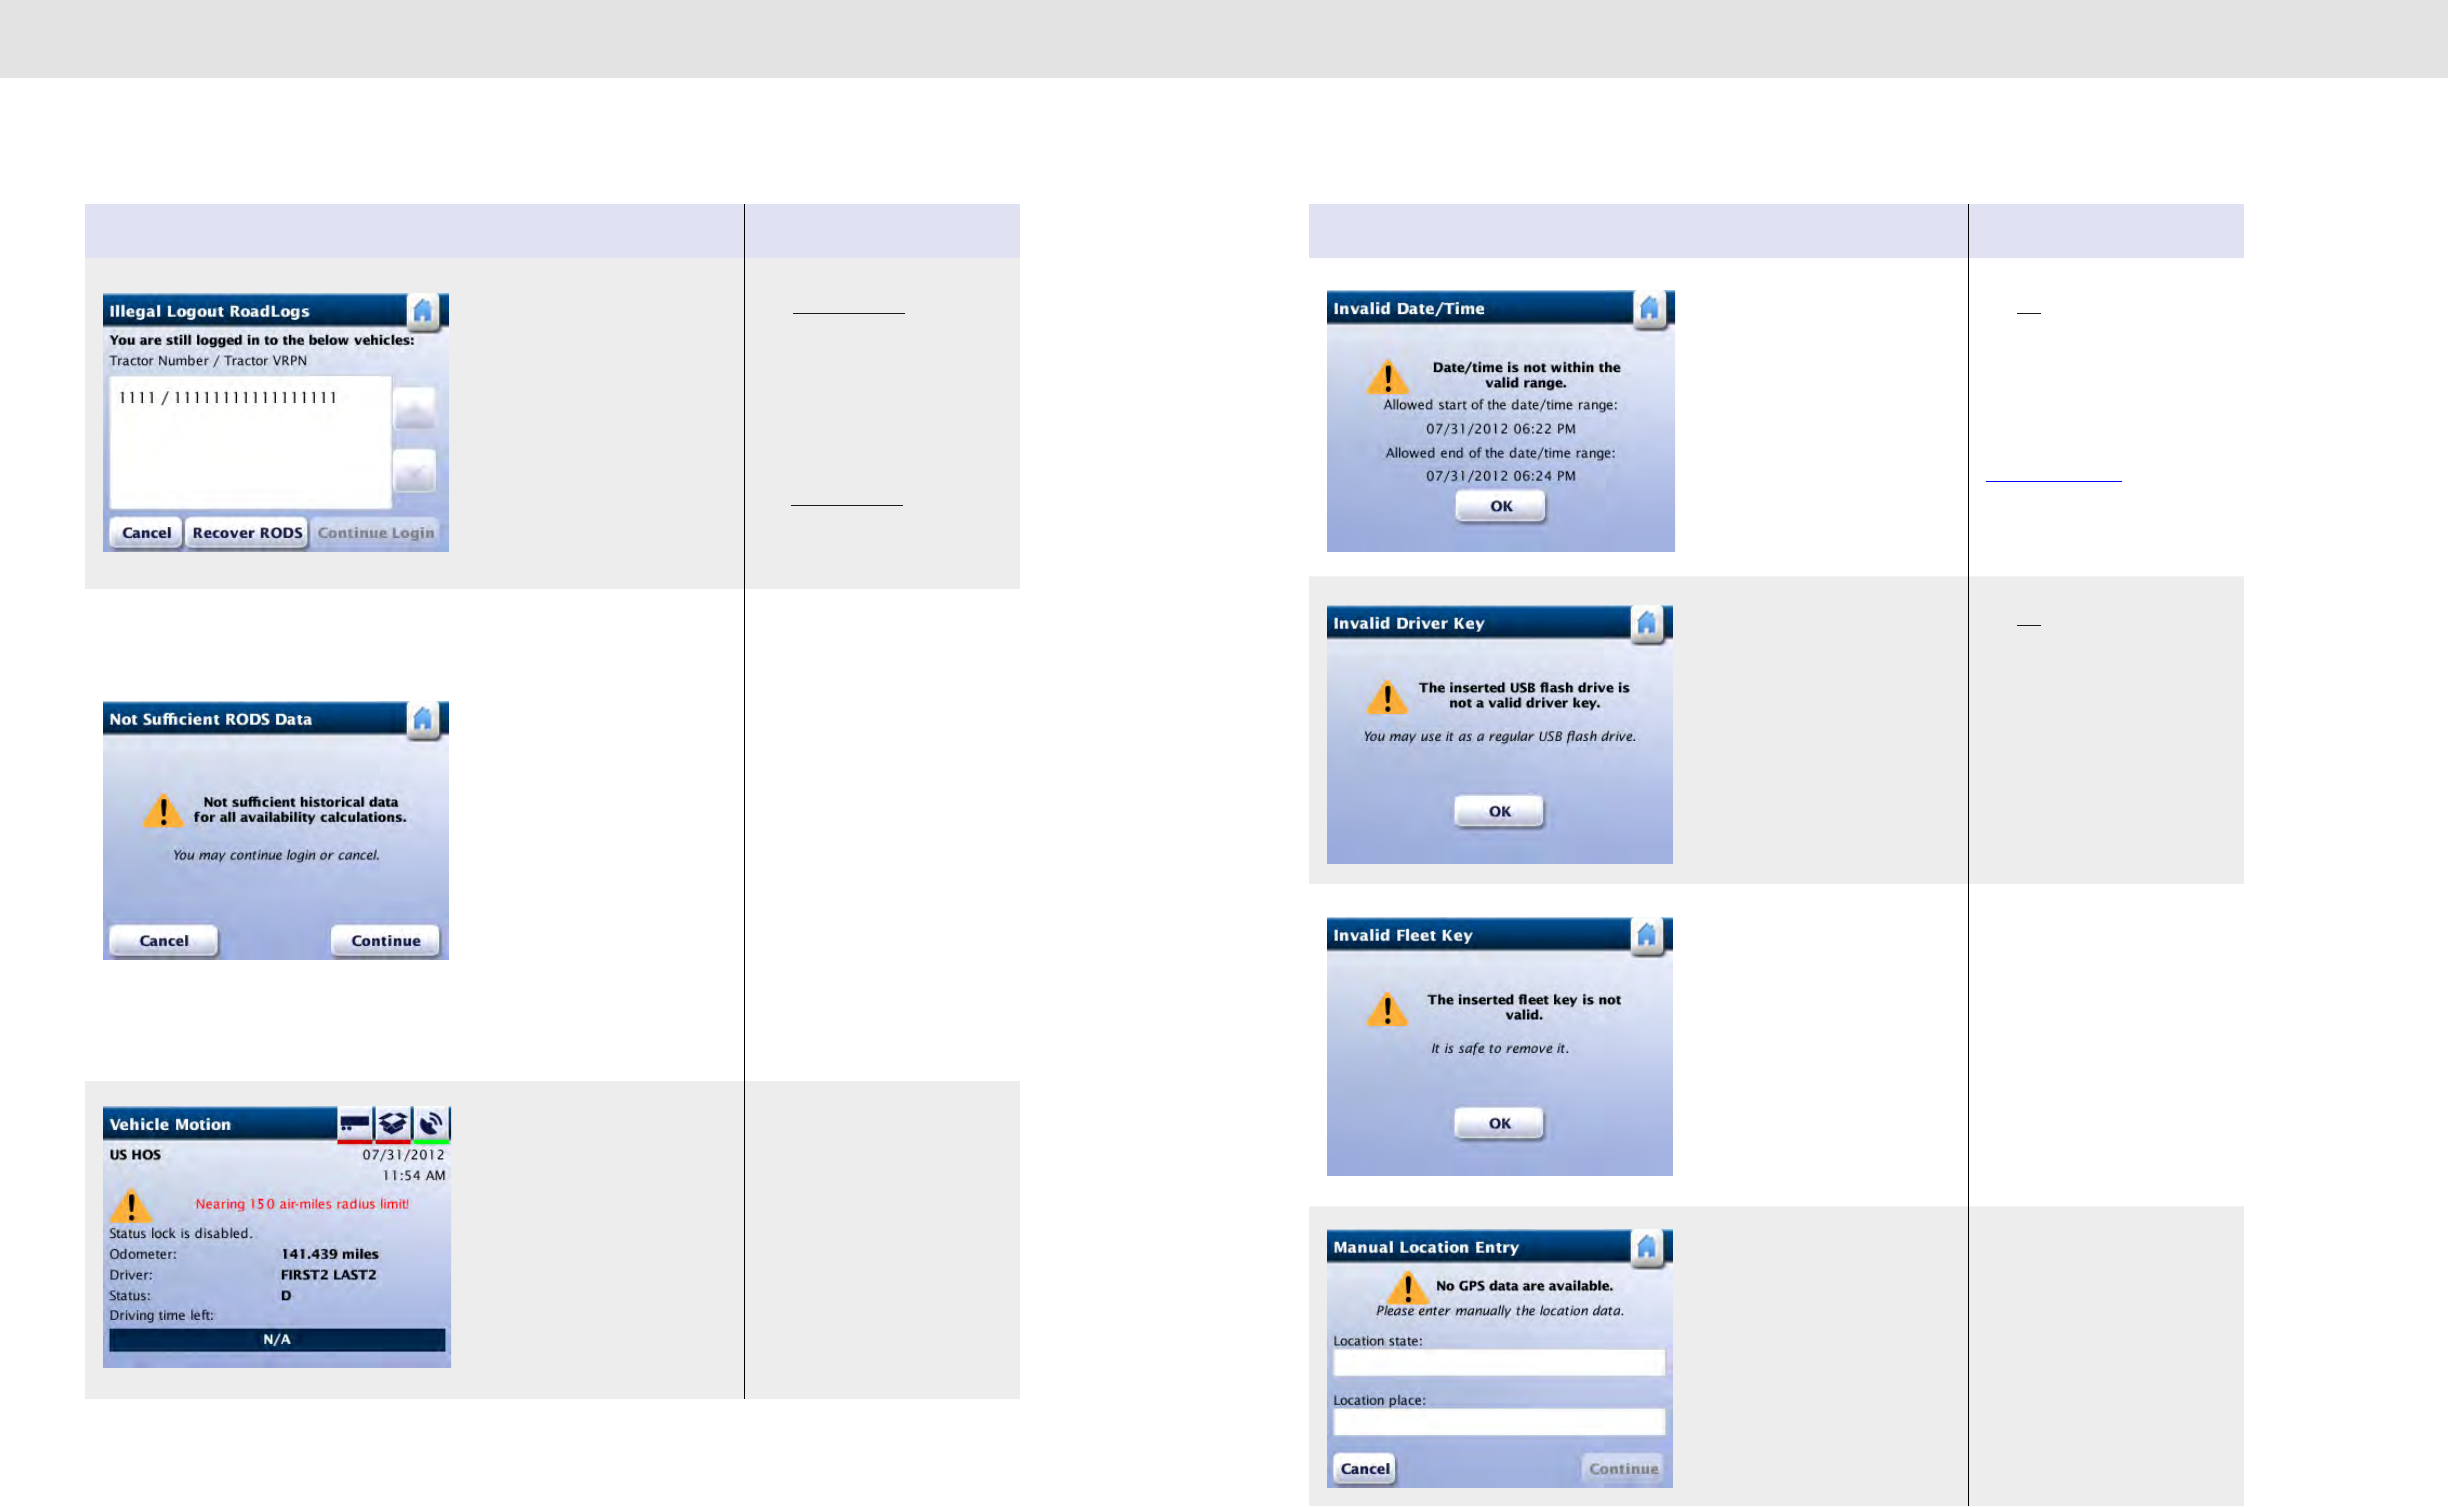
118117
Diagnostic Warning Screens Diagnostic Warning Screens
Screen Meaning Action required
You performed an improper log
out from the listed Vehicles.
The RODS data found on Driver
Key might be incomplete due to
the improper log out.
Tap Continue Login to continue
logging in. The RoadLog
calculations may be incorrect
due to the missing RODS data.
Go to the listed vehicles and
recover your RODS data by
inserting your Driver Key and
tap Recover RODS.
Tap Cancel to abort the log in.
There is insufficient historical
data for RODS availability
calculation.
If you get this message while
logging in with a Driver Key, it
means the RODS data found on
your Key merged with the
RODS data found in RoadLog,
and RoadLog does not have the
complete duty status history for
the last 15 days.
If you get this message while
logging in manually, it means
that your RODS data found on
this RoadLog does not have the
complete duty status history for
the last 15 days.
You may cancel log in and then
use the RoadLog Fleet Software
to reconstruct the missing parts
of your RODS history on the
Driver Key.
You may continue the log in but
RoadLog will not be able to
accurately warn you when you
are about to break HOS
regulations.
Vehicle is in motion and you are
approaching the limit of the 150
air-miles radius zone.
If you go beyond this limit, the
150 air-miles exemption will
automatically be disabled
Screen Meaning Action required
The entered date and time for a
pre-trip or post-trip activity is
invalid, meaning it overlaps with
an already recorded log session.
Tap OK and then type in a valid
date for the activity you want to
add.
To view the available time
frames for extending your on
duty time, check your logs. See
View Logs (Details).
The inserted USB device is not
a valid Driver Key.
Even thought the USB is not a
valid Driver Key it can still be
used for performing roadside
inspections or for downloading
the device related files.
Tap OK to continue.
The inserted USB device is not
a valid Fleet Key.
Configuration cannot continue
without having a valid Fleet key
inserted in RoadLog.
The tractor list may not contain
the tractor created with the
serial number of the RoadLog
unit in this vehicle
Remove the USB device and
insert a valid Fleet Key.
None of the downloadable files
were selected and the
Download button was tapped.
Select at least one file from the
list before continuing to
download.

120119
Diagnostic Warning Screens Diagnostic Warning Screens
Screen Meaning Action required
Data download onto the USB
key failed.
Retry data download.
The USB key memory is full. Free up some memory from the
USB key by downloading to the
Fleet Software, and then retry
the current function.
An invalid Fleet Key was
inserted into the RoadLog
connector.
Remove the USB key and insert
a valid Fleet Key to continue.
Screen Meaning Action required
The inserted USB device is not
recognized by RoadLog.
Remove the USB device and
insert a valid RoadLog USB
Driver or Fleet Key.
The entered Driver Identification
is not found in RoadLog
memory.
You are not able to log in to this
RoadLog.
Acknowledge the message and
log in with valid Driver ID.
Driver IDs are established in the
Fleet Software.
During system startup, RoadLog
detects that the current vehicle
position is not the same position
recorded when the device was
switched off.
Acknowledge the message. A
record of the location conflict is
stored in the RoadLog data.
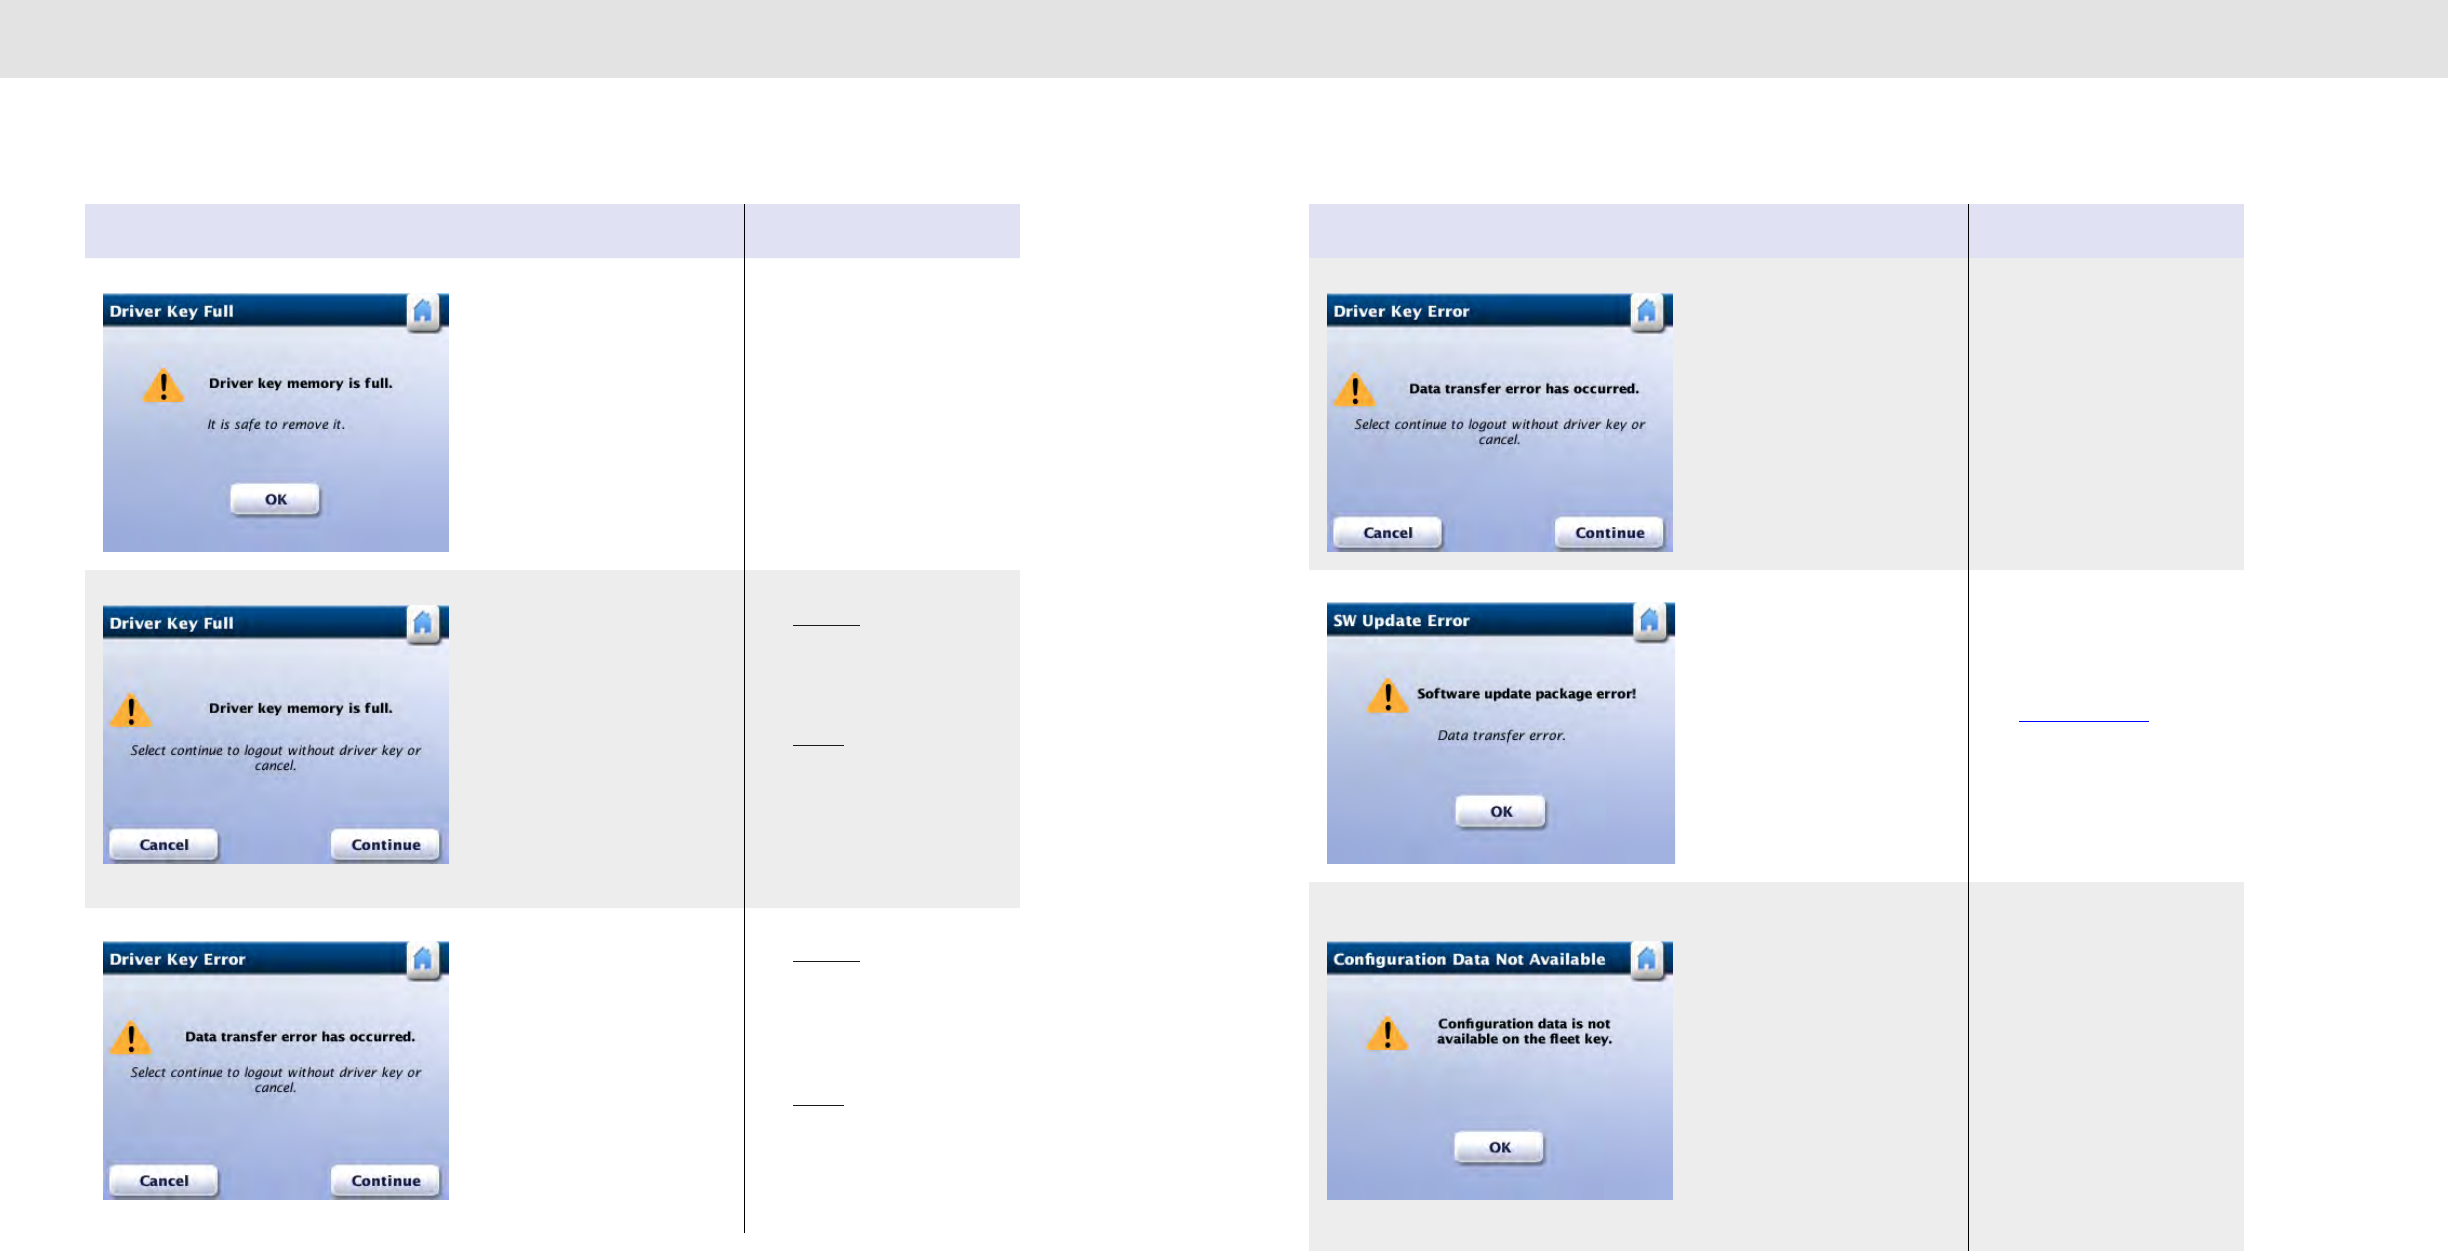
122121
Diagnostic Warning Screens Diagnostic Warning Screens
Screen Meaning Action required
Driver Key memory is full. No
data download can be
performed on this Key.
Free up some memory from the
USB key by downloading to the
Fleet Software, and retry
download.
Driver Key memory is full.
The available recorded RODS
cannot be downloaded on the
Driver Key.
Tap Continue to continue to
perform a manual log out. Your
RODS history will be stored in
RoadLog.
Tap Cancel to abort the log out.
Free up some memory from the
USB key by downloading to the
Fleet Software, and then try to
log out again.
Data transfer error occurred
while transferring the Driver
RODS file on the Driver Key.
Tap Continue to log out
manually. Your RODS history will
be stored in RoadLog (if there is
sufficient internal memory
available).
Tap Cancel to abort the log out.
Try to log out again.
Screen Meaning Action required
A data transfer error occurred
while performing the download
to Driver Key.
Remove the Driver Key, and
then reinsert Driver Key and
retry download.
During a software update, an
error was detected.
Acknowledge the message.
Try to install again.
See Software Updates.
The user attempts to perform an
automatic configuration, but the
Company Trailer List file is either
damaged or cannot be found on
the Fleet Key.
Automatic configuration cannot
be performed.
Acknowledge the message.
Then, use the RoadLog Fleet
Software to create or fix the
Company Tractor List File on the
Fleet Key. When complete, re-
attempt automatic configuration.
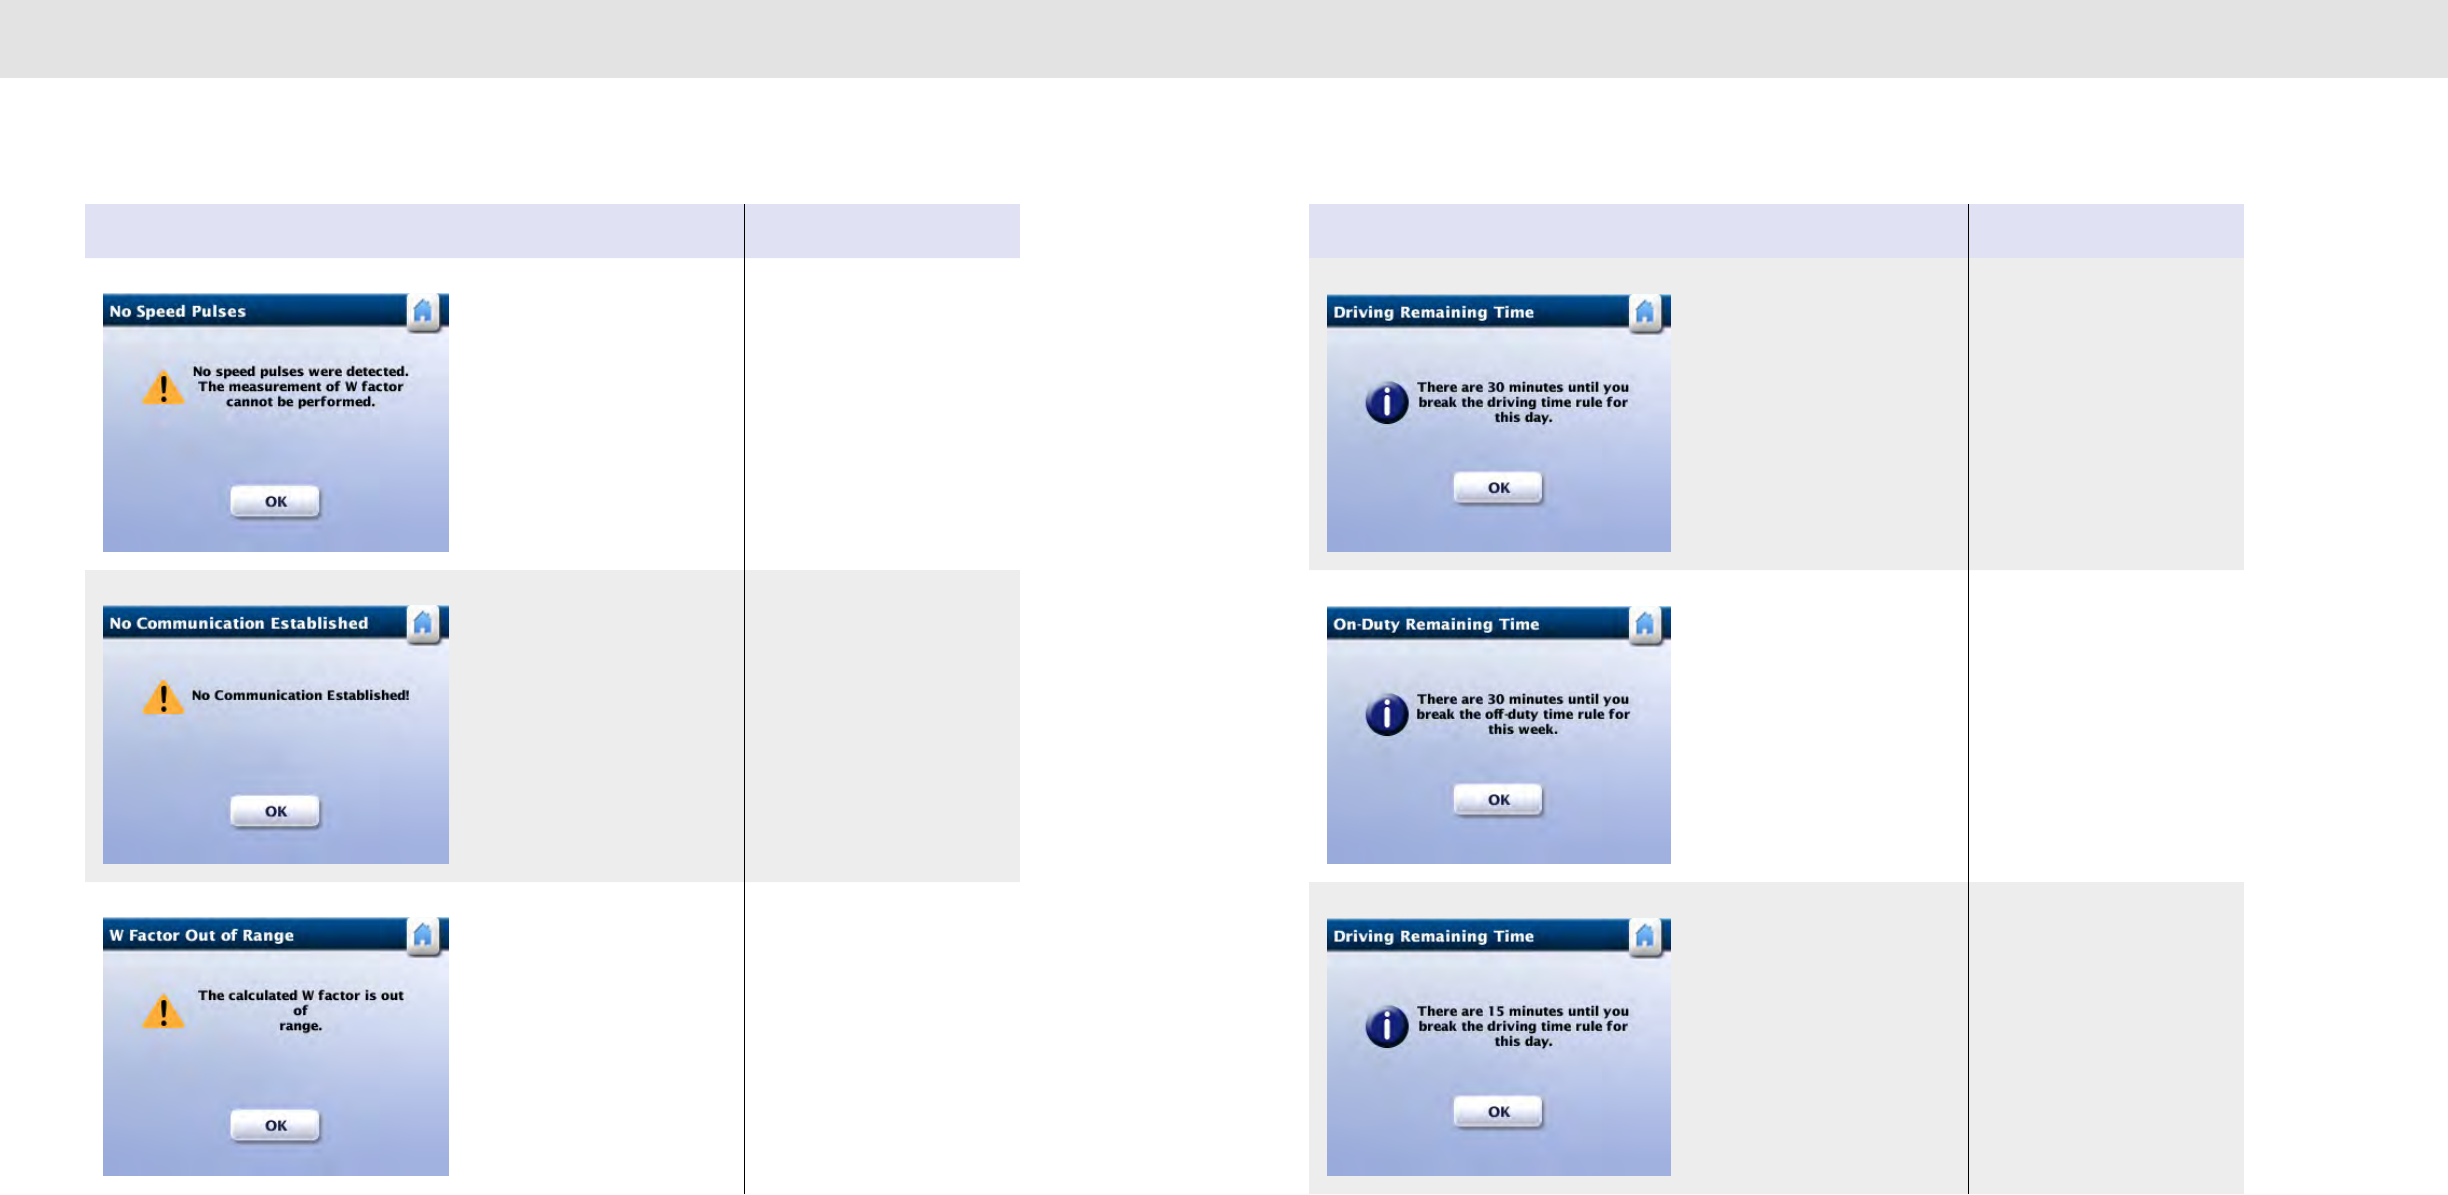
124123
Diagnostic Warning Screens Diagnostic Warning Screens
Screen Meaning Action required
RoadLog detects no speed
pulses; therefore it cannot
calculate the W factor.
Acknowledge the message.
The connection between
RoadLog and the Vehicle will
need to be checked.
RoadLog does not detect the
relevant messages for the
chosen synchronization
interface.
The wrong interface may have
been selected.
Check which synchronization
interface RoadLog is physically
connected to in the Vehicle and
then try to re-synchronize.
Try changing the synchronization
type between J1708 and J1939
or vice versa
The calculated value of the W
factor is beyond the valid range.
W Factor value must have a
value of between 2,400 and
25,000 pulses per kilometer.
Re-enter the measurement with
a valid value.
Screen Meaning Action required
In 30 minutes, the On Duty time
rule will be broken.
Stop the vehicle in 30 minutes
or less and take the required
rest time.
In 30 minutes, the On Duty time
rule for this week will be broken.
Stop the vehicle in 30 minutes
or less and take the required
rest time.
In 15 minutes the On Duty time
rule for this day will be broken.
Stop the vehicle in 15 minutes
or less and take the required
rest time.
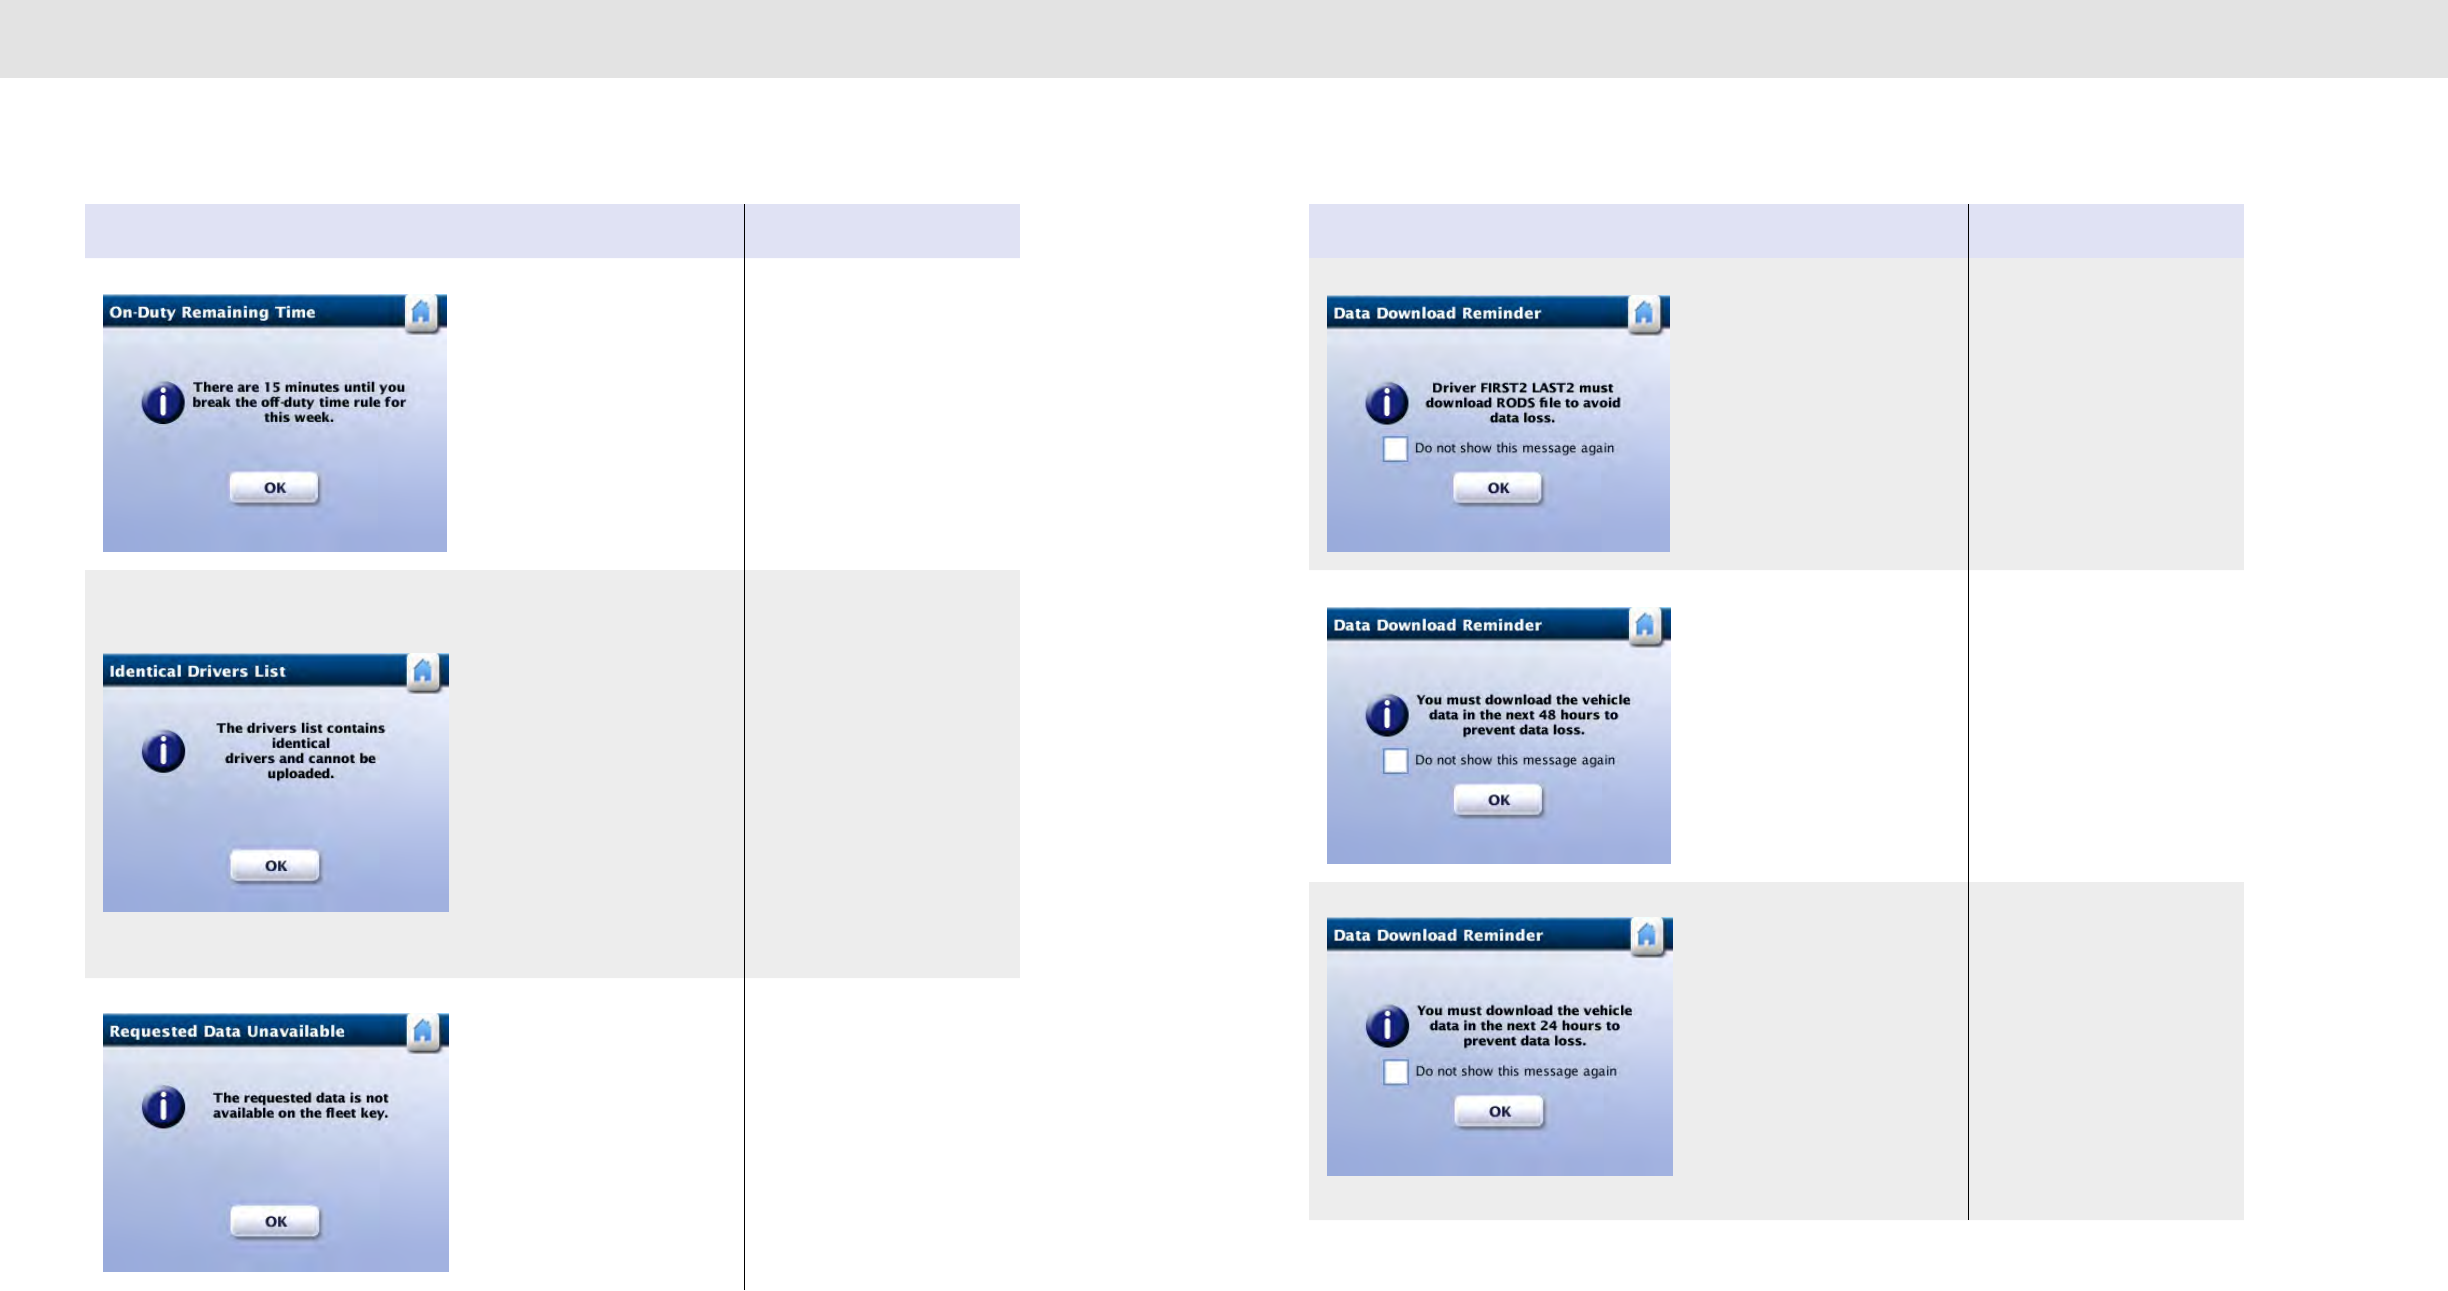
126125
Diagnostic Warning Screens Diagnostic Warning Screens
Screen Meaning Action required
In 15 minutes the On Duty time
rule for this week will be broken.
Stop the vehicle in 15 minutes
or less and take the required
rest time.
The Driver list from Company
Support Data File contained on
the Fleet Key has two or more
identical sets of Driver data.
In this case, the Driver list
cannot be uploaded into
RoadLog.
Manual Driver log in for this
RoadLog is not possible unless
the Driver who wants to log in
manually was previously logged
in to this RoadLog unit using his
or her Driver Key.
Use the RoadLog Fleet Software
to remove the duplicate Driver
from Company Support Data
File.
Company Support Data File is
not found on the Fleet Key.
Use the RoadLog Fleet software
to create the missing file on the
Fleet Key.
Screen Meaning Action required
RoadLog has no more memory
available to record the vehicle
activities, data and DVIR data.
Download Company Vehicle
Activities Data File and
Company Vehicle DVIR Data File
as soon as possible to avoid
overwriting recorded activities.
Company Vehicle Activities Data
File or Company Vehicle DVIR
Data File was not downloaded
for more than 28 days.
Download Company Vehicle
Activities Data File and
Company Vehicle DVIR Data File
in the next 48 hours to avoid
overwriting recorded activities.
Company Vehicle Activities Data
File or Vehicle DVIR Data File
has not been downloaded in 29
days
In 24 hours, existing vehicle
activities data will be overwritten
if no download is performed.
Download Company Vehicle
Activities Data File and
Company Vehicle DVIR Data File
in the next 24 hours to avoid
overwriting recorded activities.
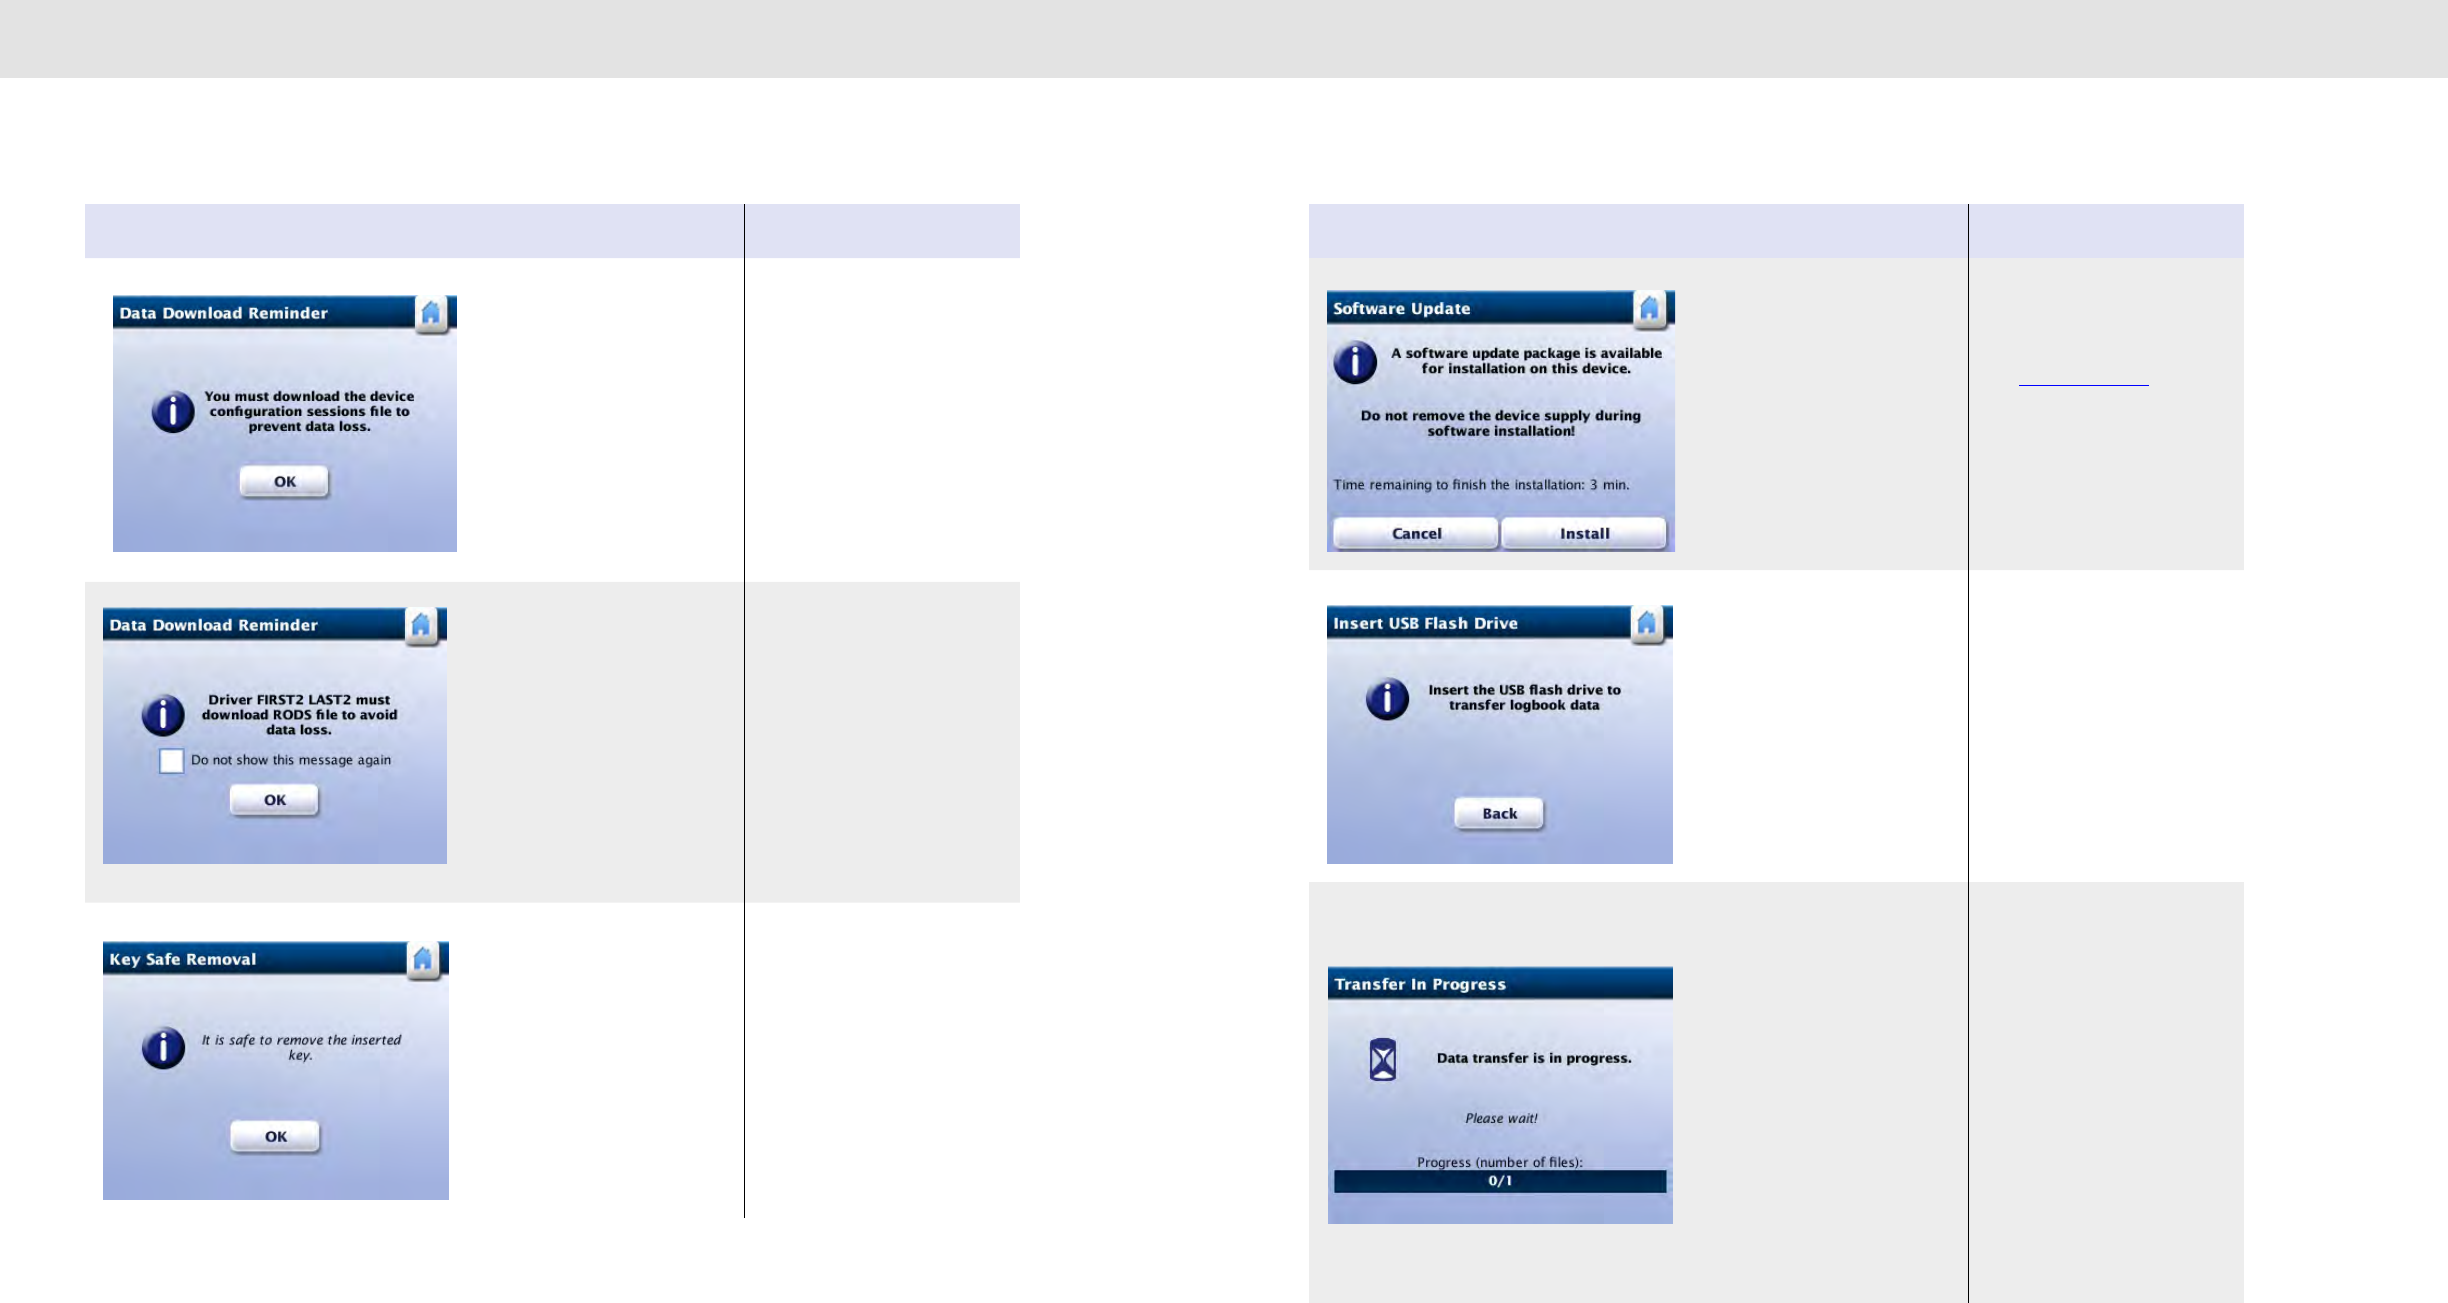
128127
Diagnostic Warning Screens Diagnostic Warning Screens
Screen Meaning Action required
The maximum number of
configuration sessions (100)
were recorded in RoadLog
memory.
Download Company
Configuration Session File in
order to perform the next
configuration.
There is no more memory
available in RoadLog’s internal
memory to record this Driver’s
activities.
Download Driver RODS binary
data file as soon as possible.
It is safe to remove the inserted
USB device.
Acknowledge the message.
Remove the USB drive from the
USB port.
Screen Meaning Action required
The inserted Key contains a
Software update package.
Tap Install to update RoadLog
Software.
See Software Updates.
Tap Cancel if you don’t want to
perform the software update.
RoadLog detects there is no
USB flash drive inserted in the
USB connector.
Insert a USB flash drive into the
connector.
Data transfer is in progress. CAUTION! Do not remove the
inserted USB flash drive until
you are prompted to do so.
Removal of the USB flash drive
during data transfer might result
in data loss.

130129
RoadLog Files RoadLog Files
17. RoadLog Files
Data exchange between RoadLog and the Fleet Software is
achieved through transfers using the Fleet Key, Driver Key or
USB flash drive. Data exchanges involve uploading and
downloading several different types of files, each type of file
having its own purpose.
There are three types of files:
• Files related to the Company
• Files related to Driver use
• Files related to the RoadLog device
Company-Related Files (Fleet
Management Software Files)
Company Files are files that are either used by RoadLog
during company log in sessions or that contain data
recorded by RoadLog during company log in.
COMPANY IDENTIFICATION FILE
The Company Identification File contains the company
configuration data.
• The file is created during company registration and first
set up.
• The file is uploaded in RoadLog memory during
company log in.
• The file can be downloaded only on Fleet Keys
belonging to the logged in company
The Company Identification File contains:
• Company identification.
• Company address.
• Time zone of the company’s home terminal.
The Company Identification File name structure is:
• When created by the RoadLog: Carrier_ CompanyID.
CID
• When created by RoadLogFleet: Carrier_CompanyID_
yymmddhhmmss.CID
• CompanyID: the USDOT number.
• yymmddhhmmss: the time the file is created.
COMPANY TRACTOR LIST FILE
The Company Tractor List File contains the list of RoadLog
devices (up to 100) installed on the fleet’s vehicles. The file is
created by the RoadLog Fleet Software during company
registration and first set up. The file can be updated by the
RoadLog with the latest configuration upon the user’s
request.
The Company Tractor List File includes:
• Company identification.
• A list of the company’s tractors.
• Configuration parameters for each of the tractors.
• The last DVIR record for each of the tractors.
The Company Tractor List File name structure is:
• When created by RoadLog: Carrier_ CompanyID_
TractorList.CTL
• When created by the RoadLog Fleet Software: Carrier_
CompanyID_TractorList_ yymmddhhmmss.CTL
• CompanyID: the USDOT number.
• yymmddhhmmss is the time when the file is created.
COMPANY SUPPORT DATA FILE
The Company Support Data File contains data used by
RoadLog during company log in. The file is created by the
RoadLog Fleet Software during company registration and
first set up. The file is uploaded in RoadLog memory during
company log in. The file is updated by RoadLog whenever a
user requests its download.
The file can be downloaded only on the Fleet Key belonging
to the logged in company. The Company Support Data
File includes:
• List of the Driver/Users permitted to log in manually.
• List of predefined company trailers along with their
latest DVIR report.
• List of predefined company annotations.
• List of predefined Supporting Documents activities.
• List of company Shipment Documents.
The Company Support Data File name structure is:
• When created by the RoadLog: Carrier_CompanyID_
SupportData.CSD
• When created by RoadLogFleet: Carrier_CompanyID_
SupportData _ yymmddhhmmss.CSD
• CompanyID: the USDOT number.
• yymmddhhmmss : time the file is created.
COMPANY VEHICLE ACTIVITIES DATA FILE
The Company Vehicle Activities Data File contains data
recorded by RoadLog during company log sessions. The file
is downloaded automatically onto the Driver Key upon Driver
log out. The file is created by RoadLog whenever a user
requests its download onto a Driver Key or Fleet Key
Company Vehicle Activities Data File includes:
• Vehicle reports recorded over the previous 30 days.
The Company Vehicle Activities Data File name
structure is:
• Only created by the RoadLog: Carrier_CompanyID_
TractorNumber_yymmddhhmmss.CVD
• CompanyID: the USDOT number.
• Yymmddhhmmss: time the file is created.
COMPANY VEHICLE DVIR DATA FILE
The Company Vehicle DVIR Data file contains DVIR data
reports recorded by RoadLog during company log sessions
for the last 30 days. The file is created by RoadLog
whenever a user requests its download on a Driver Key or
Fleet Key belonging to the logged in company.

132131
RoadLog Files RoadLog Files
The Company Vehicle DVIR Data file includes:
• DVIR reports recorded no more than 30 days from the
last download.
The Company Vehicle DVIR Data file name structure is:
• Only created by the RoadLog: Carrier_CompanyID_
TractorNumber_yymmddhhmmss.CVD
• CompanyID: the USDOT number.
• yymmddhhmmss: time the file is created.
COMPANY CONFIGURATION SESSION FILE
The Company Configuration Session file contains
configuration session data recorded by RoadLog during
company log sessions. The file is created by RoadLog
whenever a user requests its download on a Driver Key or
Fleet Key belonging to the logged in company.
The Company Configuration Session File includes:
• The last 100 calibration sessions records.
The Company Configuration Session File name
structure is:
• Only created by RoadLog: Carrier_CompanyID_
TractorNumber_CalibrationData_yymmddhhmmss.CVD
• CompanyID: the USDOT number.
• TractorNumber is the number on which the RoadLog
device is installed.
• yymmddhhmmss is the time when the file is created.
COMPANY ASSETS PARTS LIST FILE
The Company Assets Parts List file contains the list of
predefined asset types used during RoadLog DVIR
inspection. It is uploaded to RoadLog memory during
company log in. The file is created by RoadLogFleet during
activation of the Fleet Key. The file is downloaded, when
requested by the user, only onto Fleet Keys belonging to the
logged in company.
The Company Assets Parts List file includes:
• A predefined list of vehicle parts, along with the related
possible defects for each part.
• A predefined list of trailer parts, along with the related
possible defects for each part.
• Optional: The predefined list of other asset types, along
with related defects. “Other assets” refers to any other
asset (except trailers) that might be attached to the
vehicle.
The Company Assets Parts List file name structure is:
• When created by RoadLog: Carrier_ CompanyID_
DVIRPartsList.DPL
• When created by RoadLogFleet: Carrier_CompanyID_
DVIRPartsList_yymmddhhmmss.DPL
• CompanyID: the USDOT number.
• yymmddhhmmss: time the file is created.
Device Related Files
Device-related files contain data recorded by RoadLog, or
data related to the vehicle. These files are not recorded
during company log in sessions. At the user’s request, the
files can be downloaded onto a Fleet Key, Driver Key or any
USB flash drive formatted in FAT32, irrespective of a
company’s log in status.
DEVICE CONFIGURATION PARAMETERS DATA
The Device Configuration Parameters Data file contains
RoadLog’s original set up configuration.
The Device Configuration Parameters Data file
includes:
• Configuration Parameters based on default values.
The Device Configuration Parameters Data file name
structure is:
• Only created by RoadLog.
• EOBR_SerialNumber_Configuration Parameters_
yymmddhhmmss.CLB
• Serial Number is the device serial number.
• yymmddhhmmss is the time when the file is created.
DEVICE DIAGNOSTIC EVENTS DATA
The Device Diagnostic Events Data file contains the
RoadLog diagnostic events that were recorded in the last 30
days, irrespective of whether the events occurred during a
company log session or not.
The Device Diagnostic Events Data file includes:
• Diagnostic events recorded by RoadLog in the last 30
days.
The Device Diagnostic Events Data file name structure
is:
• Only created by RoadLog: EOBR_SerialNumber_
DiagnosticData_yymmddhhmmss.EDD
• Serial Number is the device serial number.
• yymmddhhmmss is the time when the file is created.
VEHICLE DATA
The Vehicle Data file contains data recorded by RoadLog
over the previous 30 days, during periods of time that
companies were not logged into the system.
The Vehicle Data file includes:
• Vehicle travelling periods.
• Records of system time synchronization with GPS time.
The Device Diagnostic Events Data file name structure
is:
• Only created by RoadLog: EOBR_SerialNumber_
VehicleData_yymmddhhmmss.EVD
• Serial Number is the device serial number.
• yymmddhhmmss is the time when the file is created.

134133
RoadLog Files RoadLog Files
DEVICE SOFTWARE UPDATE HISTORY FILE
The Device Software Update History file contains the list of
software packages installed on a specific RoadLog.
The Device Software Update History file contains:
• Installed software packages in this RoadLog.
Device Software Update History file name structure
is:
• Only created by RoadLog: EOBR_SerialNumber_
SWUpdates_yymmddhhmmss.EVD
• Serial Number is the RoadLog serial number.
• yymmddhhmmss is the time when the file is created.
Driver Related Files
Driver-related files contain the following:
• Data recorded by RoadLog during Driver log in
sessions.
• Driver identification data.
• Driver support data .
DRIVER IDENTIFICATION DATA FILE
The Driver Identification Data file includes the Driver’s
identification data as supplied by the Driver’s employer. The
file is created by the RoadLog Fleet Software and
downloaded to the Driver Key. At the user’s request,
RoadLog downloads this data to the Driver Key or Fleet Key.
The Driver Identification Data file contains:
• Driver’s first and last name.
• Driver’s schedule (7 days or 8 days).
• Driver’s starting time.
• Time zone at the driver’s home terminal.
• Coordinates (latitude and longitude) of the vehicle
location at the work-reporting location.
• Indication of whether or not the driver has been
assigned a 100 or 150 air-miles radius exemption
according to FMCSA regulations.
• Indication of whether or not the Driver is allowed to use
the 34-hour restart provision as defined by FMCSA.
The Driver Identification Data file name structure is:
• When created by RoadLog: Driver_DriverID_
yymmddhhmmss.DID
• When created by RoadLogFleet: Driver_DriverID.DID
• DriverID is the Driver identification number as it was
assigned by the company.
• yymmddhhmmss is the time when the file is created.
DRIVER SUPPORT DATA FILE
The Driver Support Data file contains predefined data for use
by the Driver user during log in sessions. The file is uploaded
to RoadLog memory during Driver log in. The file is created
by the RoadLog Fleet Software and downloaded to the
Driver Key.
The Driver Support Data File contains:
• Predefined list of trailers assigned to the Driver by the
RoadLog Fleet Software, along with each trailer’s
related DVIR record. Up to 20 DVIR records can be
stored in the file. This data is available to the Driver
during pre-trip or post-trip trailer inspection.
• List of Shipment Documents assigned to the Driver. Up
to 20 Shipment Documents can be stored in the file.
This data is available to the Driver during Shipment
Documents management (whenever a Shipment
Document is added or removed).
The Driver Support Data File name structure is:
• When created by RoadLog: Driver_DriverID_
SupportData_yymmddhhmmss.DSD
• When created by RoadLogFleet: Driver_DriverID_
SupportData.DSD
• DriverID is the Driver identification number as it was
assigned by the company.
• yymmddhhmmss is the time when the file is created.
DRIVER RODS BINARY DATA FILE
The Driver RODS Binary Data file includes Driver duty status
records for the current and the previous 15 calendar days.
The file is uploaded to RoadLog memory during the Driver’s
log in session.
The file is created by RoadLog at the user’s request, and
downloaded automatically onto the Driver Key during Driver
log out.
The file can be downloaded only onto a Driver Key or Fleet
Key belonging to the logged-in company.
The Driver RODS Binary Data file contains:
• Driver log in sessions.
• Change of duty status records.
• Positioning data(GPS) recorded during Driver log in
session.
• Diagnostic events recorded by RoadLog during Driver
log in session.
• Logged in co-drivers during Driver log in session.
• Assigned trailers during Driver log in session.
• Assigned shipment documents during Driver log in
session.
• Supporting documents events generated during Driver
log in session.
• Exemptions taken by the Driver.
• Adjustments of system time with the GPS time records.
• Time frame for the reviewed RODS.
The Driver RODS Binary Data file name structure is:
• Created only by RoadLog: RODS_CompanyID_
DriverID_yymmddhhmmss.RDS
• CompanyID is the company identification as assigned
by FMCSA (USDOT number).
• DriverID is the driver identification number as it was
assigned by the company
• yymmddhhmmss is the time when the file is created.
DRIVER RODS TEXT DATA FILE
The Driver RODS Text Data file includes Driver duty status
records for the current and the previous 7 or 8 calendar
days in FMCSA required format.
The file is created by RoadLog at the user’s request, and
downloaded automatically onto the inserted flash drive
during roadside inspection.
The file can be downloaded onto a Driver Key, Fleet Key or
any USB flash drive in the FAT32 format.
The Driver RODS Text Data file contains:
• Change of duty status events.
• Diagnostic events.
• Positioning data (GPS) recorded during Driver log in
sessions.
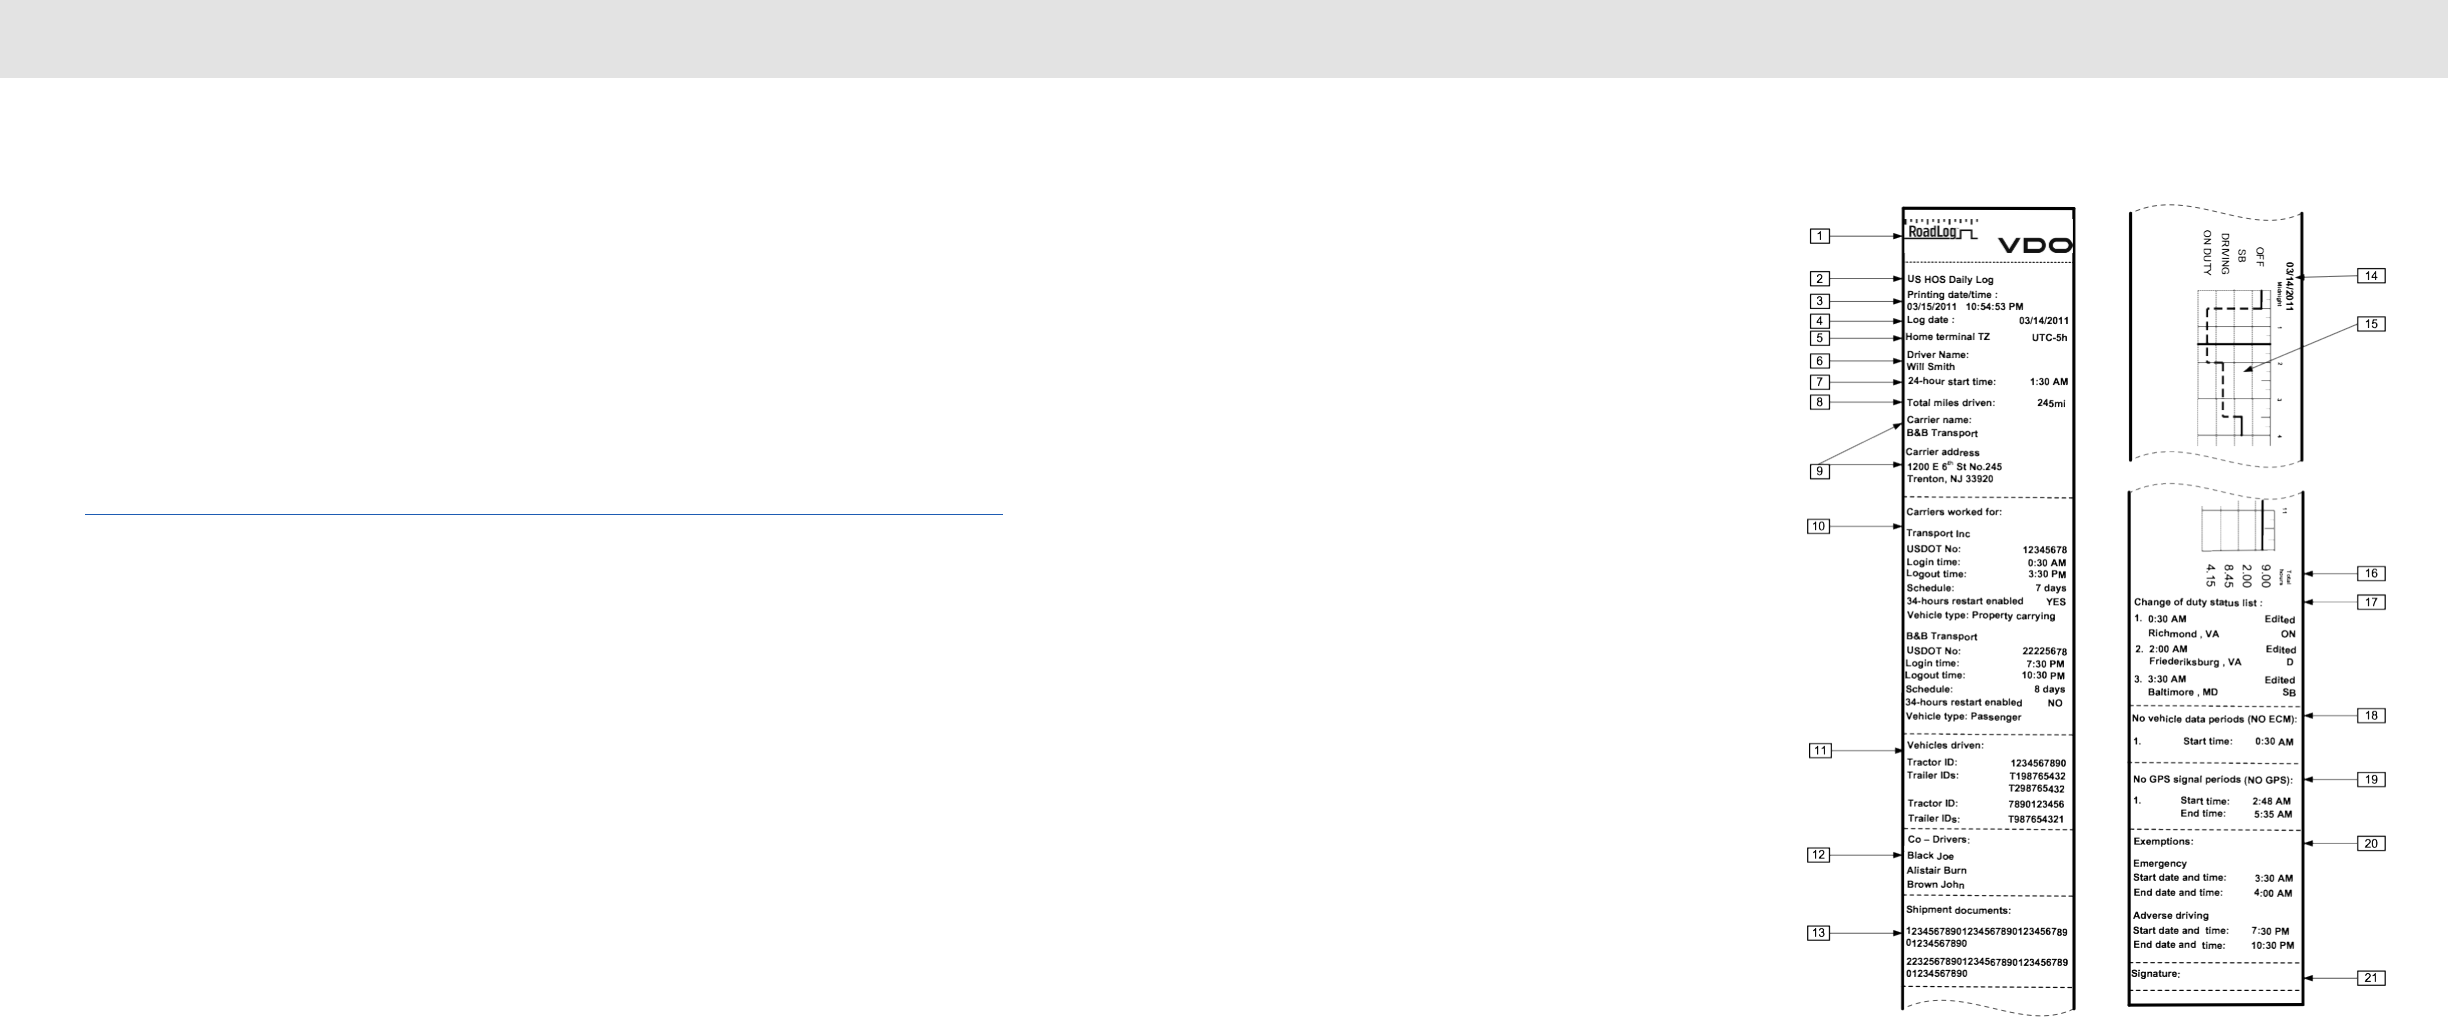
136135
RoadLog Files RoadLog Files
The Driver RODS Text Data file name structure is:
• Created only by RoadLog: RODS_CompanyID_
DriverID_yymmddhhmmss.TXT
• CompanyID is the company identification as assigned
by FMCSA (USDOT number).
• DriverID is the Driver identification number as it was
assigned by the company
• yymmddhhmmss is the time when the file is created.
Note: This file is a text file in the CSV (Comma
Separated Values) format. Therefore, it can be viewed
with any text file editors.
Printouts
RoadLog provides the following types of printouts:
• Daily Log
• DVIR Report
• Supporting Document
• Diagnostic Events
• Configuration Parameters
Daily Log
1. VDO Logo
2. Title of the printout
3. Time and date of printing
4. Date log was recorded
5. Driver’s home terminal time offset.
6. The name of the Driver whose log is printed.
7. Start time of the 24-hour period.
8. Total miles Driver travelled on the date the log was recorded
per day.
9. Name and address of the primary company.
10. Carriers worked for: Companies for which the Driver worked on
the day the log is or was printed, as well as:
• USDOT number
• Login time: Time the Driver started working for this
company.
• Logout time: Time the Driver finished working for this
company.
• Schedule: Type of schedule assigned to the Driver by the
company (7 or 8 days).
• 34-hours restart function: Indication of whether the 34-
hour restart function is enabled or disabled.
• Vehicle type: Type of vehicle assigned to the Driver
(Passenger or Property-carrying).
11. Vehicles driven:
• List of vehicles driven, along with ID numbers for attached
trailers during the period covered by the printed log.
12. Co-Drivers: First and last names of Co-Drivers.
13. Shipment documents: List of shipment documents assigned to
the vehicle during the period covered by the printed log.
14. Date of the printed log
15. Graphical representation of duty status changes
• Format graph of the time spent by the driver in each duty
status:
• OFF (off duty status).
• SB (time spent in sleeper berth).
• ON DUTY (on duty time).
• DRIVING (driving time).
16. Total hours: Total hours the Driver has spent in each duty
status.
17. Change of duty status list: List all the duty status change
events, along with the location of the duty status change.
Note: If the change of duty status was not recorded by the RoadLog
device, but created/edited with the RoadLog Fleet Software, it will
be marked as Edited.
18. No vehicle data periods (NO_ECM): Periods of time that
vehicle data was not received by RoadLog. The start time for
each of these periods is also listed.
19. No GPS signal periods: Periods of time during which RoadLog
did not detect a GPS signal. The start and end times for each
of these periods are also listed.
20. Exemptions: All the exemptions taken by
the Driver on the day the log was completed. Possible
exemptions are:
• Emergency.
• Adverse driving.
• 16-hour extension.
• 100 mile radius driver.
• 150 mile radius driver.
• Personal Use
• The start and end times for each exemption taken are also
printed.
21. Signature: Field for Driver’s signature.
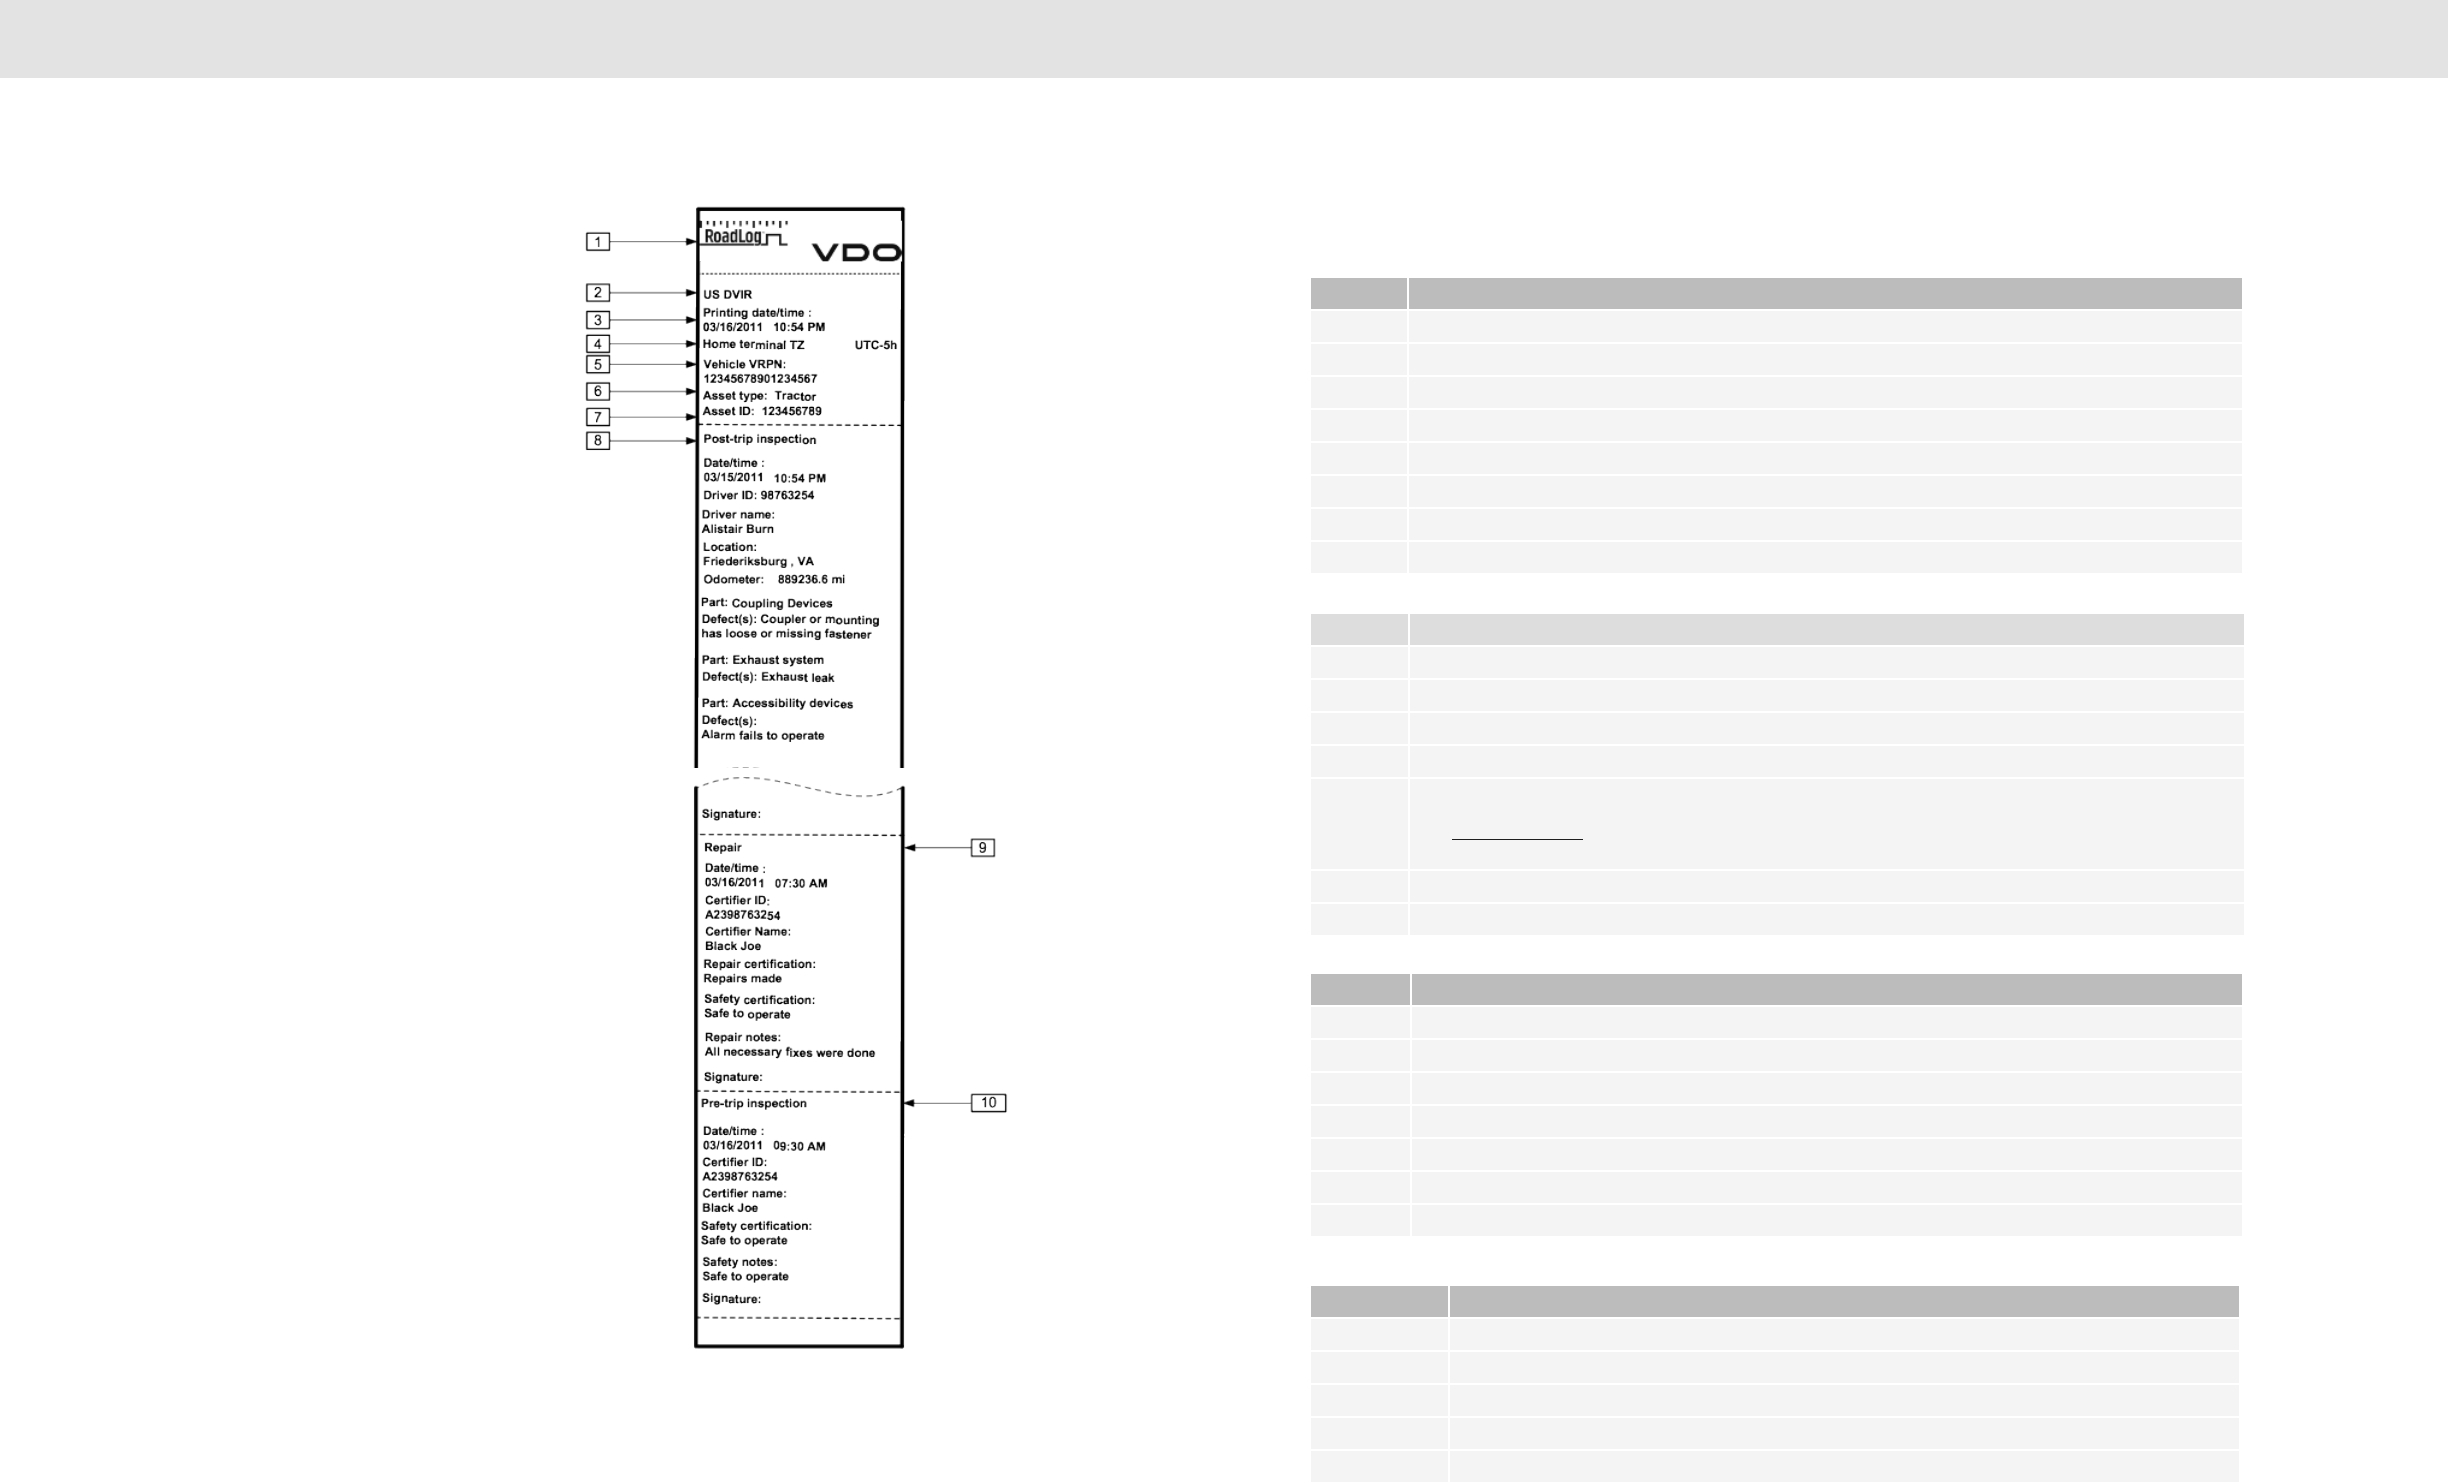
138137
RoadLog Files RoadLog Files
DVIR Report
1. VDO Logo.
2. Title of printout.
3. Date and time of printing.
4. Driver’s home terminal time zone.
5. Vehicle registration plate number.
6. Type of asset for which DVIR inspection has been performed.
7. Asset identification number.
8. Post-trip inspection
• Date/Time Date and time the post-trip
inspection was performed.
• Driver ID Identification of the Driver who
performed the post-trip inspection.
• Driver name Name of the Driver who performed
the post-trip inspection.
• Location Name of the location the post-trip
inspection was performed.
• Odometer Vehicle odometer reading at the time
of post-trip inspection.
• Part: List of defective part(s) and defect
details recorded during the post-trip
inspection. Safety-critical details are
made explicit.
• Signature The signature field for the Driver who
performed the inspection.
9. Repair
• Date/Time Date and time the repair certification
is recorded in RoadLog.
• Certifier ID Identification of the Driver who
certified the repairs.
• Certifier Name Name of the person who certified the
repair.
• Repair certification Indication of whether or not the
defects recorded during the post-trip
inspection were repaired.
• Safety certification Indication of whether or not the
vehicle is safe to operate.
• Repair notes List of repair notes, if any.
• Signature Signature field for the person who
certified the repairs.
10. Pre-trip inspection
• Date/Time Date and time the pre-trip inspection
is registered in RoadLog.
• Certifier ID Identification of the Driver who
performed the pre-trip inspection.
• Certifier name Name of the Driver who performed
the pre-trip inspection.
• Safety certification Indication of whether or not the
defects recorded during post-trip
inspection were repaired.
• Safety notes Indication of whether or not the
vehicle is safe to operate
• Signature Signature field for the Driver who
performed the pre-trip inspection.
Supporting Document
Company Log Out from RoadLog
No. Explanation
1VDO Logo.
2 Time of printing.
3Vehicle’s license plate registration number.
4Number of the supporting document generated for the given activity.
5Activity for which the supporting document was generated.
6Time the supporting document was generated.
7 Nearest populated area at the time the supporting document was added.
8 Coordinates of the location at which the supporting document was generated.
Diagnostic Events
No. Explanation
1VDO Logo.
2 Title of printout.
3 Time and date of printing.
4Vehicle’s license plate registration number.
5The most recent 100 diagnostic events recorded by RoadLog during the previous 30 days, along with the time of
each occurrence and its event code.
See Diagnostic Events list for a complete list of diagnostic events and their respective causes.
6Signature eld for the user who prints the Diagnostic Events.
Configuration Parameters
No. Explanation
1VDO Logo.
2 Title of printout.
3 Printing date and time.
4 Date and time the most recent conguration was performed.
5 Name of the person who performed the conguration.
6 List of calibration parameters and their value.
7Signature eld for the Driver who performed the conguration.
Diagnostic events list
Event Code Occurrence / Condition
PWR_ON RoadLog is powered up and the booting sequence is completed.
PWROFF RoadLog is powered off.
TESTOK Self-test result is OK.
SERVIC Self-test failed.
MEMERR Self-test failed.

140139
RoadLog Files RoadLog Files
Event Code Occurrence / Condition
LOW VLT Low voltage detected.
BATLOW Battery energy level is low.
CLKERR A deviation of greater than 60 seconds between RoadLog time and the time received from the GPS has been
detected.
CLKADJ RoadLog has adjusted its system time to GPS time.
HIGHVT High voltage detected.
IGN_ON Ignition signal is ON.
IGNOFF Ignition is OFF.
SWC_ON RoadLog has woken up from sleep mode.
SWCOFF RoadLog has entered sleep mode.
RESTRT RoadLog is reset (the ON/OFF button has been pressed for 5 or more consecutive seconds).
BAT_OK Battery condition OK.
ENG_ON Vehicle engine is ON.
ENG_OFF Vehicle engine is OFF.
FCT_ON RoadLog is fully functional.
FCTOFF RoadLog is not fully functional.
UPD_OK RoadLog software update completed successfully.
UPDNOK RoadLog software update failed.
INTFUL RoadLog has recorded company Vehicle data and DVIR data for the past 29 days, but no data downloads
have been performed.
OR
RoadLog has data for the previous 99 conguration sessions, but no data downloads have been performed.
OR
RoadLog has recorded RODS data for at least one logged in Driver for the past 14 days, but no data
downloads have been performed.
DATACC At Driver log in, RoadLog has used RODS data from the Driver Key to create the current Driver’s RODS in its
memory.
EXTFUL The USB key memory is full. Data download cannot occur.
EXTERR Communication error with the USB device.
Event Code Occurrence / Condition
DLOADY RoadLog has successfully downloaded data onto the USB key.
DLOADN The inserted USB key is not authenticated as a valid Fleet Key or Driver Key.
FATERR The inserted USB key is not formatted according FAT32 le system.
CLSERR The inserted USB device is not recognized by RoadLog.
USPERR USB power supply error.
USP_OK USB power supply is OK.
NODRID No Drivers have logged into RoadLog, but the vehicle is in motion.
PINERR During manual log in, the Driver identication entered is not recognized by RoadLog.
DRIDRD Driver log in with Driver Key successful.
DRIDNO Driver log in with Driver Key failed.
DPYERR Display error.
KEYERR Touch panel error.
DPY_OK The existing display error has been corrected.
KEY_OK The existing key error has been corrected.
DPYTMP The display temperature is out of working range.
PRTERR Printer error.
PRT_OK Existing printer error corrected.
PRTTMP The printer temperature is out of working range.
PAPERR Printer has run out of paper.
PRTDLY Print job has been stopped by RoadLog.
PRTCNL Print job has been canceled by RoadLog.
NOLTLN RoadLog cannot obtain valid positioning data.
NOTSYC RoadLog cannot synchronize its time with GPS time due to a poor or absent GPS signal.
NO_ECM One of the diagnostic events listed below has been detected, indicating that the distance travelled according
to GPS data conicts with the distance travelled according to vehicle data.
CDSTER
CSPDER
JDSTER
JSPDER
ECM_ID An ECU serial number mismatch has been detected during RoadLog’s synchronization with vehicle data
received from CAN interface.
OR
A MID mismatch has been detected during RoadLog’s synchronization with vehicle data received from J1708
interface.
ECM_OK The NO_ECM condition has been corrected.
FCTERR RoadLog is congured to synchronize with the vehicle via speed pulses…
AND
During the timeframe of the GPS plausibility check, vehicle motion is detected...
AND
Distance travelled according to GPS data conicts with distance travelled as measured by vehicle speed
pulses.

142141
RoadLog Files Support / Warranty
Event Code Occurrence / Condition
PLSERR RoadLog is congured to synchronize with the vehicle via speed pulses…
AND
During the timeframe of the GPS plausibility check, no vehicle motion is detected.
CDSTER RoadLog is calibrated to be synchronized with vehicle via CAN interface…
AND
Vehicle total distance data has not been received from CAN bus.
CSPERR RoadLog is calibrated to be synchronized with vehicle via CAN interface…
AND
Vehicle speed data has not been received from CAN bus.
CRPMER RoadLog is calibrated to be synchronized with vehicle via CAN interface...
AND
Engine speed data has not been received from CAN bus.
CRPMOK RoadLog is calibrated to be synchronized with vehicle via CAN interface...
AND
CRPMER event is active...
AND
RoadLog has successfully received engine speed data from CAN bus.
JDSTER RoadLog is calibrated to be synchronized with vehicle via J1708 interface...
AND
RoadLog has not received vehicle total distance data from J1708 interface.
JSPDER RoadLog is calibrated to be synchronized with vehicle via J1708 interface...
AND
Vehicle speed data has not been received from J1708 interface.
JRPMER RoadLog is calibrated to be synchronized with vehicle via J1708 interface...
AND
Engine speed data has not been received from J1708 interface.
JRPMOK RoadLog is calibrated to be synchronized with vehicle via J1708 interface...
AND
JRPMER event is active...
AND
RoadLog has successfully received engine speed data from JRPMOK interface.
LTLNOK Valid positioning data (GPS) obtained.
TSYCOK GPS signal quality has improved and system time synchronization can occur.
GPSERR GPS receiver error.
GPS_OK The GPSERR condition has been corrected.
GPS_FF RoadLog performs the rst GPS position after entering Full Function State.
MOVOFF The vehicle has changed positions since the last power OFF.
OVERLP Driver RODS data found in RoadLog’s memory REPAIR APPROVALs with driver RODS data found on the
Driver Key. Data cannot be merged.
18. Support / Warranty
Access to support for VDO RoadLog and VDO RoadLog
Fleet Management Software is available directly through the
Fleet Software. Click the Support button for links to software
updates, data backups, and “NetViewer” software that will
allow RoadLog Technical Support personnel to share your
computer screen online, to help diagnose problems and
answer questions.
VDO RoadLog support is available at:
Technical Support
Email: RoadLog-support@vdo.com
Tel.: (855)-RoadLog, or (855) 762-3564
Customer Service
Fax: (800) 752-7224 or (610) 366-9837
Email: RoadLog-sales@vdo.com
www.vdoRoadLog.com
Warranty
Registered RoadLog users can find the complete VDO
RoadLog Warranty at:
www.vdoroadlog.com/users

144143
Glossary Glossary
19. Glossary
Adverse driving conditions
Conditions that interfere with normal safe driving that were not known to the person
dispatching the run at the time it began. Includes snow, sleet, fog, ice or unusual road or
traffic conditions.
DVIR
Driver Vehicle Inspection Report. The report on vehicle functions, parts and accessories
that must be completed by Drivers at the completion of each day and the beginning of the
next day.
HOS
Hours of Service. The set of regulations issued by Federal Motor Carrier Safety
Administration setting the maximum allowed working hours for Drivers operating a
commercial motor vehicle in US.
RODS Records of Duty Status. Records of a Driver’s work activities for a day.
On Duty time (ON)
The time from when a Driver begins to work or is required to be in readiness to work until
the time the Driver is relieved from work and all responsibility for performing work. On duty
time includes:
All time at a plant, terminal, facility or other property of a motor carrier or shipper, or on any
public property, waiting to be dispatched, unless the Driver has been relieved from duty by
the motor carrier.
All time inspecting, servicing, or conditioning any commercial motor vehicle at any time.
All driving time as defined in the term driving time.
All time, other than driving time, in or upon any commercial motor vehicle except time spent
resting in a sleeper berth.
All time loading or unloading a commercial motor vehicle, supervising, or assisting in the
loading or unloading, attending a commercial motor vehicle being loaded or unloaded,
remaining in readiness to operate the commercial motor vehicle, or in giving or receiving
receipts for shipments loaded or unloaded.
All time repairing, obtaining assistance, or remaining in attendance upon a disabled
commercial motor vehicle.
All time spent providing a breath sample or urine specimen, including travel time to and
from the collection site, in order to comply with the random, reasonable suspicion, post-
accident or follow-up testing when directed by a motor carrier.
Performing any other work in the capacity, employ or service of a motor carrier.
Performing any compensated work for a person who is not a motor carrier.
Sleeper Berth time (SB) All time spent by the Driver in the sleeper berth.
Driving time (D) All time spent at the driving controls of a commercial motor vehicle in operation.
Off Duty time All the remaining time for which the Driver is not in ON or SB.
Twenty-four hour period
Any 24 consecutive hour period beginning at the time designated by the motor carrier for
the terminal from which the Driver is normally dispatched.
Seven consecutive days (7
days)
The period of 7 consecutive days beginning on any day at the time designated by the
motor carrier for a 24-hour period.
Eight consecutive days (8
days)
The period of 8 consecutive days beginning on any day at the time designated by the
motor carrier for a 24-hour period.
SD Supporting Documents.
FMCSA Federal Motor Carrier Safety Administration.
Sleep mode
RoadLog’s low power consumption mode. RoadLog functionalities are not available in this
mode and the display is turned off.
Active mode Operation mode in which RoadLog has all functionalities available.
Deactivated mode RoadLog is not connected to power supply.
Download Data transfer from RoadLog to a flash drive, usually a RoadLog Driver Key or Fleet Key.
Upload Data transfer from a USB flash driver to RoadLog.
GPS Global Positioning System.
GPRS
GSM
General Packet Radio Service.
Global System for Mobile Communications
USB Universal Serial Bus – serial bus interface standard for connecting electronic devices.
Driver Key Special USB flash drive used by the Driver to transfer logbook data.
Fleet Key
Special USB flash drive used by the Company to configure the RoadLog device and
download/upload data to/from RoadLog and the Fleet Management Software. Also used to
authenticate software licensing when starting the RoadLog Fleet Software.
Daily reset condition
The time of the day when the Driver accumulates the required off duty time for that day,
according to FMCSA HOS rules. Once the daily reset condition is reached, the duty
calculations are reset.

146145
Legal Notices Legal Notices
20. Legal Notices
This product may contain software available under open
source licenses.
Some of this software in source code, object code or other
forms may be available at www.vdoroadlog.com/oss5_2012
or upon request to:
Technical Support
Continental
6755 Snowdrift Rd
Allentown PA, 18106
roadlog-support@vdo.com
To the extent permissible under the law, Continental reserves
the right to charge for the costs of research, duplication,
shipping and handling associated with such requests.
VDO RoadLog™
Copyright © 2016 Continental AG
Part of this product is free software: you can redistribute it
and/or modify it under the terms of the GNU General Public
License as published by the Free Software Foundation,
either version 3 of the License, or (at your option) any later
version.
This program is distributed in the hope that it will be useful,
but WITHOUT ANY WARRANTY; without even the implied
warranty of MERCHANTABILITY or FITNESS FOR A
PARTICULAR PURPOSE. See the GNU General Public
License for more details.
You should have received a copy of the GNU General Public
License along with this product. If not, see <http://www.
gnu.org/licenses/>.
VDO RoadLog
Copyright © 2016 Continental AG
This product contains libraries which are free software; you
can redistribute them and/or modify them under the terms of
the GNU Lesser General Public License as published by the
Free Software Foundation; either version 2.1 of the License,
or (at your option) any later version.
The libraries are distributed in the hope that they will be
useful, but WITHOUT ANY WARRANTY; without even the
implied warranty of MERCHANTABILITY or FITNESS FOR A
PARTICULAR PURPOSE. See the GNU Lesser General
Public License for more details.
You should have received a copy of the GNU Lesser General
Public License along with this library; if not, write to the Free
Software Foundation, Inc., 51 Franklin Street, Fifth Floor,
Boston, MA 02110-1301 USA
This product includes software developed by Paul
Mackerras
This product includes software developed by Computing
Services at Carnegie Mellon University (http://www.cmu.
edu/computing/).
This product includes software developed by Tommi
Komulainen
This product includes software developed by Pedro Roque
Marques
This product includes cryptographic software written by Eric
Young (eay@cryptsoft.com)
This product includes software written by Tim Hudson (tjh@
cryptsoft.com)
Acknowledgements go, in no particular order, to:
The Regents of the University of Michigan
Livingston Enterprises, Inc.
Paul Mackerras
Alan Curry
Michal Ostrowski
Mitchell Blank Jr.
Carnegie Mellon University
The Regents of the University of California
RSA Data Security, Inc.
Lars Fenneberg
WIDE Project.
Francis.Dupont@inria.fr, INRIA Rocquencourt
Jean-loup Gailly
Mark Adler
Kungliga Tekniska Hoegskolan
Eric Rosenquist
Pedro Roque Marques
Matjaz Godec
Miguel A.L. Paraz
GIE DYADE,
Tommi Komulainen
Roaring Penguin Software Inc.
Sun Microsystems, Inc.
Torsten Landschoff
Google, Inc.
Netservers
Andrew Bartlet
Sean E. Millichamp
Marco d’Itri
Katalix Systems Ltd
Diego Rivera
Andrew Tridgell
Anton Blanchard
Jeremy Allison
Martin Pool
Paul `Rusty’ Russell
Simo Sorce
Bitstream, Inc
Tavmjong Bah
Erik Andersen
Denys Vlasenko
Internet Systems Consortium, Inc. (“ISC”)
Internet Software Consortium
Digital Equipment Corporation.
Craig Metz
Tuukka Karvonen <tkarvone@iki.fi>
Purdue Research Foundation, West Lafayette, Indiana
Victor A. Abell
RSA Data Security, Inc.
Tatu Ylonen <ylo@cs.hut.fi>, Espoo, Finland
CORE SDI S.A., Buenos Aires, Argentina
David Mazieres
Vincent Rijmen
Antoon Bosselaers
Paulo Barreto
Markus Friedl
Theo de Raadt
Niels Provos
Dug Song
Aaron Campbell
Damien Miller
Kevin Steves
Daniel Kouril
Wesley Griffin
Per Allansson
Nils Nordman
Simon Wilkinson
Ben Lindstrom
Tim Rice
Andre Lucas
Chris Adams
Corinna Vinschen
Cray Inc.
Denis Parker
Gert Doering
Jakob Schlyter
Jason Downs
Juha Yrj
Michael Stone
Networks Associates Technology, Inc.
Solar Designer
Todd C. Miller
Wayne Schroeder
William Jones
Darren Tucker
Sun Microsystems
The SCO Group
Daniel Walsh
Eric Young (eay@cryptsoft.com)
Tim Hudson (tjh@cryptsoft.com)Red Hat Software
Mentor Graphics (http://www.mentor.com)
Gary Jennejohn, DENX Software Engineering, <gj@denx.de>

148147
Legal Notices Legal Notices
This device complies with Part 15 of the FCC Rules and
with Industry Canada licence-exempt RSS standard(s).
Operation is subject to the following two conditions:
(1) this device may not cause harmful interference, and
(2) this device must accept any interference received,
including interference that may cause undesired
operation.
Le présent appareil est conforme aux CNR d’Industrie
Canada applicables aux appareils radio exempts de
licence.
L’exploitation est autorisée aux deux conditions suivantes :
(1) l’appareil ne doit pas produire de brouillage, et
(2) l’appareil doit accepter tout brouillage radioélectrique
subi, même si le brouillage est susceptible d’en
compromettre le fonctionnement.
Radiofrequency radiation exposure Information:
• This equipment complies with FCC and IC radiation
exposure limits set forth for an uncontrolled environment.
• This equipment should be installed and operated with
minimum distance of 20 cm between the radiator and
your body.
• This transmitter must not be co-located or operating in
conjunction with any other antenna or transmitter.
Radiofréquence exposition aux rayonnements
Information :
• Cet équipement est conforme aux limites d’exposition aux
rayonnements IC établies pour un environnement non
contrôlé.
• Cet équipement doit être installé et utilisé avec un
minimum de 20 cm de distance entre la source de
rayonnement et votre corps.
• Ce transmetteur ne doit pas etre place au meme endroit
ou utilise simultanement avec un autre transmetteur ou
antenne.
CONTINENTAL AUTOMOTIVE SYSTEMS US, INC. , A
DELAWARE CORPORATION, CERTIFIES THAT THIS VDO
ROADLOG™ DEVICE COMPLIES WITH ALL
REQUIREMENTS OF 49 CFR 395.15 (AUTOMATIC ON-
BOARD RECORDING DEVICES) WHEN MAINTAINED IN
PROPER WORKING ORDER AND OPERATED AS
INSTRUCTED IN THIS OWNER’S MANUAL. NEITHER
CONTINENTAL AUTOMOTIVE SYSTEMS US, INC. NOR ITS
PARENT, SUBSIDIARIES OR AFFILIATES ARE
RESPONSIBLE FOR ANY DRIVER ERROR OR FOR
SYSTEMS NOT MAINTAINED IN PROPER WORKING
ORDER.
Legal Foundation
United States federal motor carrier safety regulations permit
a motor carrier to require a Driver to use an automatic on-
board recording device to record the Driver’s hours of
service. The use of automatic on-board recording devices is
regulated by 49 CFR 395.15. The regulations require the
operator of a vehicle and the company who employs the
operator to conform to a number of obligations and
responsibilities. The following list is not guaranteed to be
complete or legally valid.
Requirements of the Automatic On-Board Recording Device
• The device shall produce, upon demand, a Driver’s
hours of service chart, electronic display, or printout
showing the time and sequence of duty status
changes, including the Drivers’ starting time at the
beginning of each day.
• The device shall have a means by which authorized
federal, state, or local officials can immediately check
the status of a Driver’s hours of service.
Obligations of the Driver
• The Driver must use the automatic on-board recording
device if required to do so by his or her employer.
• The Driver shall have in his or her possession and
available for inspection while on duty records of duty
status for the previous seven (7) or eight (8) consecutive
days.
• All hard copies of the Driver’s record of duty status
must be signed by the Driver.
• Entries must be made by the Driver only.
• Drivers must note any failure of automatic on-board
recording devices and reconstruct his or her record of
duty status for the current day and the past seven days
and continue to prepare handwritten records until the
device is operational again.
• Drivers must review and verify that all entries are
accurate prior to submission to the employer motor
carrier.
Obligations of the Company
• Motor carriers must ensure that a certificate is obtained
from the manufacturer of the on-board recording device
certifying that the device has been sufficiently tested to
meet the requirements of 49 CFR 395.15.
• The motor carrier must ensure that the on-board
recording device permits duty statuses to be updated
only when the vehicle is at rest, except when registering
the time a vehicle crosses a state boundary.
• The motor carrier must ensure that the device and
associated support systems are, to the maximum
extent possible, tamperproof and do not permit
alterations of the information concerning the Driver’s
hours of service.
• The motor carrier must ensure that the device warns
the Driver visually or audibly that the device has ceased
to function.
• The motor carrier must ensure that the device is
maintained and recalibrated in accordance with the
manufacturer’s specifications.
• The motor carrier must ensure that Drivers are
adequately trained in proper operation of the device.
• The motor carrier must maintain a second, back-up
copy of the electronic hours-of-service files in a different
physical location than where the original data is stored.
FCC part 15.105
• Note: This equipment has been tested and found to
comply with the limits for a Class A digital device,
pursuant to part 15 of the FCC Rules. These limits are
designed to provide reasonable protection against
harmful interference when the equipment is operated in
a commercial environment. This equipment generates,
uses, and can radiate radio frequency energy and, if not
installed and used in accordance with the instruction
manual, may cause harmful interference to radio
communications. Operation of this equipment in a
residential area is likely to cause harmful interference in
which case the user will be required to correct the
interference at his own expense.
FCC part 15.21
• Warning: Changes or modications to this unit not
expressly approved by the party responsible for
compliance could void the user’s authority to operate
the equipment.

Continental
Commercial Vehicles & Aftermarket
6755 Snowdrift Road, Allentown, PA 18106 USA
www.vdoroadlog.com
For more information and to become a VDO RoadLog distributor or retailer call:
1-800-564-5066 or 610-366-8489
E-mail: roadlog-sales@vdo.com
For installation and service questions contact:
VDO Technical Support:
Tel: (855)-ROADLOG, or (855) 762-3564
E-mail: roadlog-support@vdo.com
VDO and RoadLog – Trademarks of the Continental Corporation
©2016 Continental Corporation
Printed in the USA TD00.3290.00100102