Satellite Tracking of People BH0107A BluHome® User Manual BlutagUserGuide9 1
Satellite Tracking of People LLC BluHome® BlutagUserGuide9 1
Contents
- 1. User Manual Part 1
- 2. User Manual Part 2
User Manual Part 1

BluTag
User’s Guide
Version 9.1
Blutag:
FCC ID S5EAA700008
For body worn operation this tracking device has been tested and meets the FCC RF exposure guidelines The
highest reported SAR value is: 0.709 W/kg GSM850 and 0.967 W/Kg GSM1900.
BluHome:
FCC ID S5EBH0107A
FCC regulatory statement for Part 15 devices -
This device complies with Part 15 of the FCC Rules. Operation is subject to the following two
conditions:
(1) This device may not cause harmful interference, and
(2) This device must accept any interference received, including interference that may cause
undesired operation.
RF exposure for mobile equipment -
“This equipment complies with FCC RF radiation exposure limits set forth for an uncontrolled
environment. The antenna(s) used for this transmitter must be installed to provide a separation distance of
at least 20 cm from all persons and must not be co-located or operating in conjunction with any other
antenna or transmitter.”
Ninth Edition, Amendment 0 (Dec 2006)
VeriTracks™, BluTag®, BluHome™ and various software icons are worldwide registered trademarks of Satellite
Tracking of People LLC (STOP).
The software described herein has U.S. and Foreign Patents Pending.
STOP provides this publication as is without warranty of any kind, expressed or implied, including, but not limited
to, the implied warranties of merchantability or fitness for a particular purpose.
This publication could include technical inaccuracies or typographical errors. Changes are periodically made to the
information contained herein; these changes will be incorporated in new editions of the publication. STOP may
make improvements and/or changes to the products described in this publication at any time.
Reproduction of this document is expressly forbidden.
© 2005 Satellite Tracking of People LLC. All rights reserved.

VeriTracks™ User’s Manual
Satellite Tracking Of People i
Table of Contents
Chapter 1: About VeriTracks™ BluTag® and BluHome.....................................................1
BluTag®........................................................................................................................................................................... 2
Summary of BluTag® Specifications:..............................................................................................................2
BluHome® ....................................................................................................................................................................... 2
About this document ........................................................................................................................................................ 2
Chapter 2: Getting Started ...............................................................................................4
System Requirements...................................................................................................................................................... 4
Getting Help..................................................................................................................................................................... 4
Logging In........................................................................................................................................................................ 4
Understanding Main Menu Options .................................................................................................................................. 5
Chapter 3: Registering an Offender..................................................................................8
Registering an Offender........................................................................................................................................................ 8
Preparing the BluTag® for Use ........................................................................................................................................ 8
Preparation for Adding the BluHome.............................................................................................................11
Installing BluTag®.......................................................................................................................................................... 12
Installing the BluHome................................................................................................................................13
Enrolling a New Tracked Offender in VeriTracks™......................................................................................................... 13
Enrolling an offender with the BluHome ........................................................................................................15
Complete Enrollment Paperwork.................................................................................................................................... 17
Un-Enrolling a Tracked Offender in VeriTracks™................................................................................................................ 18
Removing the Strap ....................................................................................................................................................... 18
Changing a Tag on an Offender.......................................................................................................................................... 19
Storing and Maintaining BluTag® and BluHome ................................................................................................................. 20
Review................................................................................................................................................................................ 21
Chapter 4: Zones 22
Create a zone and assign it to an offender. .................................................................................................................... 22
Creating Zones..........................................................................................................................................22
Create a zone based on an address ........................................................................................................22
Create a Zone from the map...................................................................................................................23
Assigning Zones ........................................................................................................................................24
Verifying a zone assignment .......................................................................................................................................... 25
Verify the zone is assigned to the offender ....................................................................................................25
Verify the zone is in the proper place ............................................................................................................26
Edit a zone..................................................................................................................................................................... 26
Un-assign a zone ........................................................................................................................................................... 26
Expire a zone................................................................................................................................................................. 27
Review................................................................................................................................................................................ 27
Chapter 5: Curfews, Ranges, and Event Control .............................................................28
Curfews.......................................................................................................................................................................... 28

VeriTracks™ User’s Manual
Satellite Tracking Of People ii
Setting up a schedule .................................................................................................................................28
Deleting a schedule....................................................................................................................................29
Ranges .......................................................................................................................................................................... 29
Event control.................................................................................................................................................................. 30
Setting up a schedule .................................................................................................................................30
Deleting a schedule....................................................................................................................................31
Chapter 6: Events and Notifications ...............................................................................32
Understanding Events and Notifications.............................................................................................................................. 32
BluTag® Events............................................................................................................................................................. 32
BluTag® and BluHome® Events.................................................................................................................................... 33
Notifications ................................................................................................................................................................... 34
Event Driven Notifications ...........................................................................................................................35
The Corrections Officer Summary Report......................................................................................................36
Display the results in text reports..................................................................................................................37
Drill down to see OFFENDER DETAILS........................................................................................................38
Map one or more offender tracks..................................................................................................................39
Chapter 7: Supervising an Offender ...............................................................................40
Determining Offender Location and Status.......................................................................................................................... 40
About the Offender Status Tabs..................................................................................................................................... 40
The Event Tab...........................................................................................................................................41
The Device Assignment Tab........................................................................................................................41
Understanding Offender Status when using BluHome.................................................................................................... 42
About the Search Pages ................................................................................................................................................ 42
Use the Offender Search.............................................................................................................................43
Display the results in text reports..................................................................................................................43
Using Mapping tools and procedures ............................................................................................................................. 43
Play back tracks.........................................................................................................................................43
Review a track...........................................................................................................................................44
Identify Features ........................................................................................................................................44
See the places an offender frequents............................................................................................................44
Find offenders at a location at a time. ...........................................................................................................44
Review................................................................................................................................................................................ 45
Chapter 8: User Administration ......................................................................................46
Menu Options ..................................................................................................................................................................... 46
Incident.......................................................................................................................................................................... 46
User Accounts ............................................................................................................................................................... 46
Zone .............................................................................................................................................................................. 46
Preferences ................................................................................................................................................................... 46
Profile Tab ................................................................................................................................................46
Notifications Tab ........................................................................................................................................47
Map Preferences Tab ............................................................................................................................49
Chapter 9: Inventory Management..................................................................................50
Chapter 10: Using VeriTracks™ to Solve Crimes ..............................................................52
The Crime Hit Report .......................................................................................................................................................... 52
How to use the hit report ................................................................................................................................................ 52

VeriTracks™ User’s Manual
Satellite Tracking Of People iii
Other methods and tools for crime solving .......................................................................................................................... 53
Finding offenders at the scene of a crime....................................................................................................................... 53
If the crime has been added to VeriTracks™ .................................................................................................54
Search Based on crime hits identified by the system..................................................................................54
Or Search Based on the crime incident ....................................................................................................55
If the crime is not in VeriTracks™.................................................................................................................55
Find offenders in a violation status when a crime occurred using the Third List .............................................................. 55
Using Aerial Photography............................................................................................................................................... 56
Using zones for Law Enforcement....................................................................................................................................... 57
Creating Zones .............................................................................................................................................................. 58
Create a zone based on an address .............................................................................................................58
Create a Zone from the map........................................................................................................................58
Review................................................................................................................................................................................ 59
Appendix 1: Enrollment Tabs ....................................................................................................60
Offender Profile Tab...................................................................................................................................60
Offender Addresses Tab.............................................................................................................................60
Appendix 2: Conducting Searches .............................................................................................62
Incident Hit Search......................................................................................................................................................... 62
Incident Search.............................................................................................................................................................. 62
Tracked Offender Search............................................................................................................................................... 63
Zone Search .................................................................................................................................................................. 63
Zone Hit Search............................................................................................................................................................. 64
Appendix 3: Understanding Text Reports ...................................................................................65
The Report Frame.......................................................................................................................................................... 65
Incident Hit Search Results ............................................................................................................................................ 66
Incident Search Results ................................................................................................................................................. 66
Tracked Offender Search Results .................................................................................................................................. 67
Zone Search Results...................................................................................................................................................... 68
Zone Hit Search Results ................................................................................................................................................ 69
Appendix 4: Maps 70
Map Components........................................................................................................................................................... 70
Map Features................................................................................................................................................................. 70
Map Toolbar................................................................................................................................................................... 71
Best Practices When Working With Maps ...................................................................................................................... 74
Appendix 5: Agency Administration ..........................................................................................75
User Accounts................................................................................................................................................................ 75
VeriTracks™ User’s Manual
Satellite Tracking Of People 1
Chapter 1: ABOUT VERITRACKS™
BLUTAG® AND BLUHOME
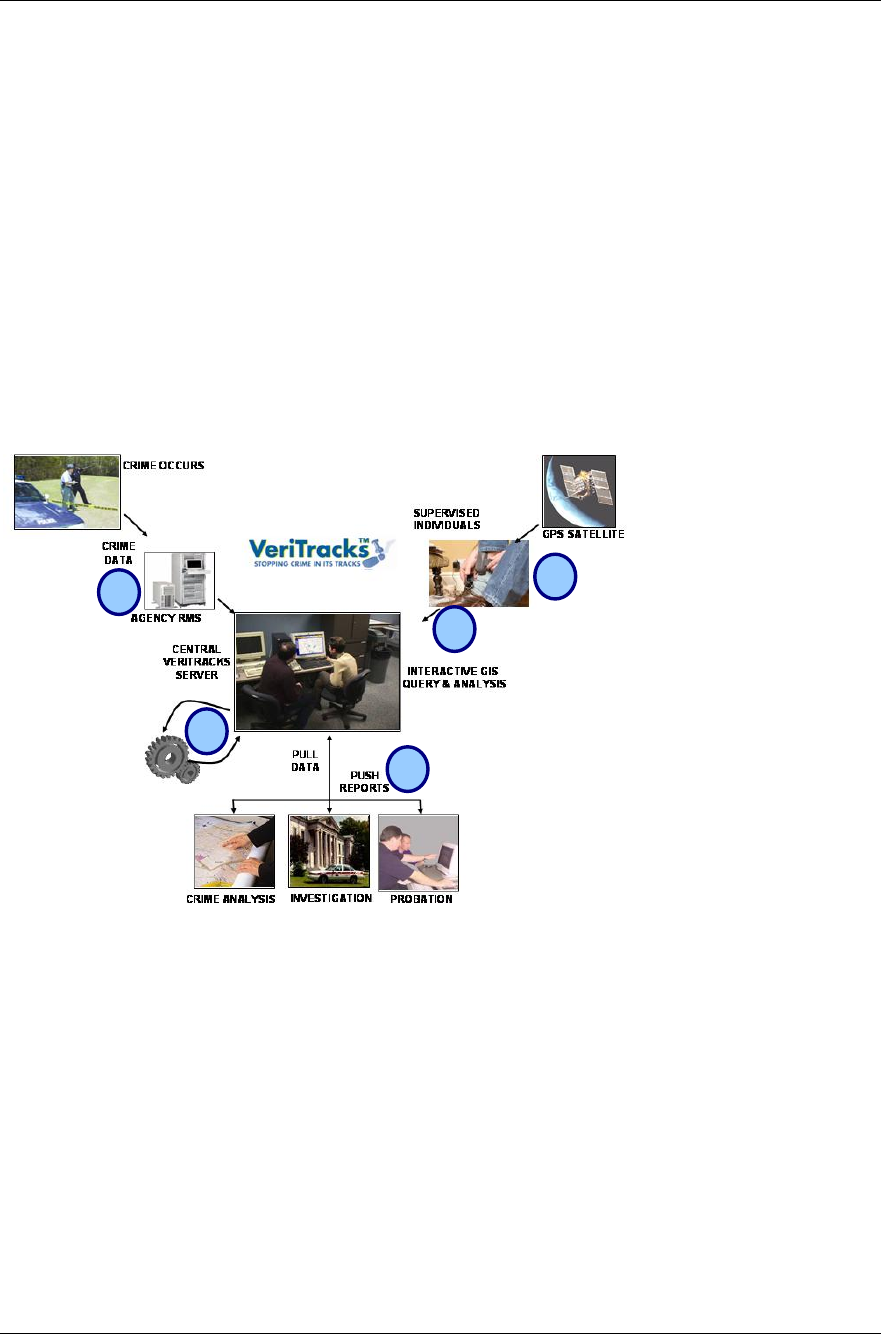
VeriTracks™ is an innovative public safety tool developed by General Dynamics Advanced
Information Systems and offered exclusively by Satellite Tracking of People (STOP) LLC.
VeriTracks™ employs a combination of data integration, geo-mapping, and Global Positioning
Satellite (GPS) technology to effectively remove the “anonymity” of non-incarcerated offenders
under the supervision of local, state or federal criminal justice agencies. VeriTracks™ is applicable
for arrestees on pre-trial release; convicted offenders on probation and other forms of community
control; and parolees. The system uses GPS technology to constantly track the precise location of
offenders and link that data to the location and time of reported crime incidents. The system also
electronically monitors certain “exclusion” and “inclusion” zones for violations. Any intersection of
a tracked offender with a crime incident or zone violation is known as a “hit” and is electronically
sent to the appropriate police and corrections agencies for action.
1. The supervised offender wears a BluTag® on his/her leg. The “tag” determines and records
the offender location.
2. The tag data is collected and stored on the VeriTracks™ central server.
3. Crime incident data from local law enforcement agencies is collected and integrated with
offender location data.
4. The “hit” engine determines correlation between offender location and the location of crime
incidents to determine if the offender was in the vicinity of the crime when it occurred.
5. Criminal Justice users access the central server through a user-friendly web interface to
analyze and investigate offender movement, crime patterns and the correlation of offender
location with crime incidents, investigative zones and probationary zones.
1
2
3
4
5
VeriTracks™ User’s Manual
Satellite Tracking Of People 2
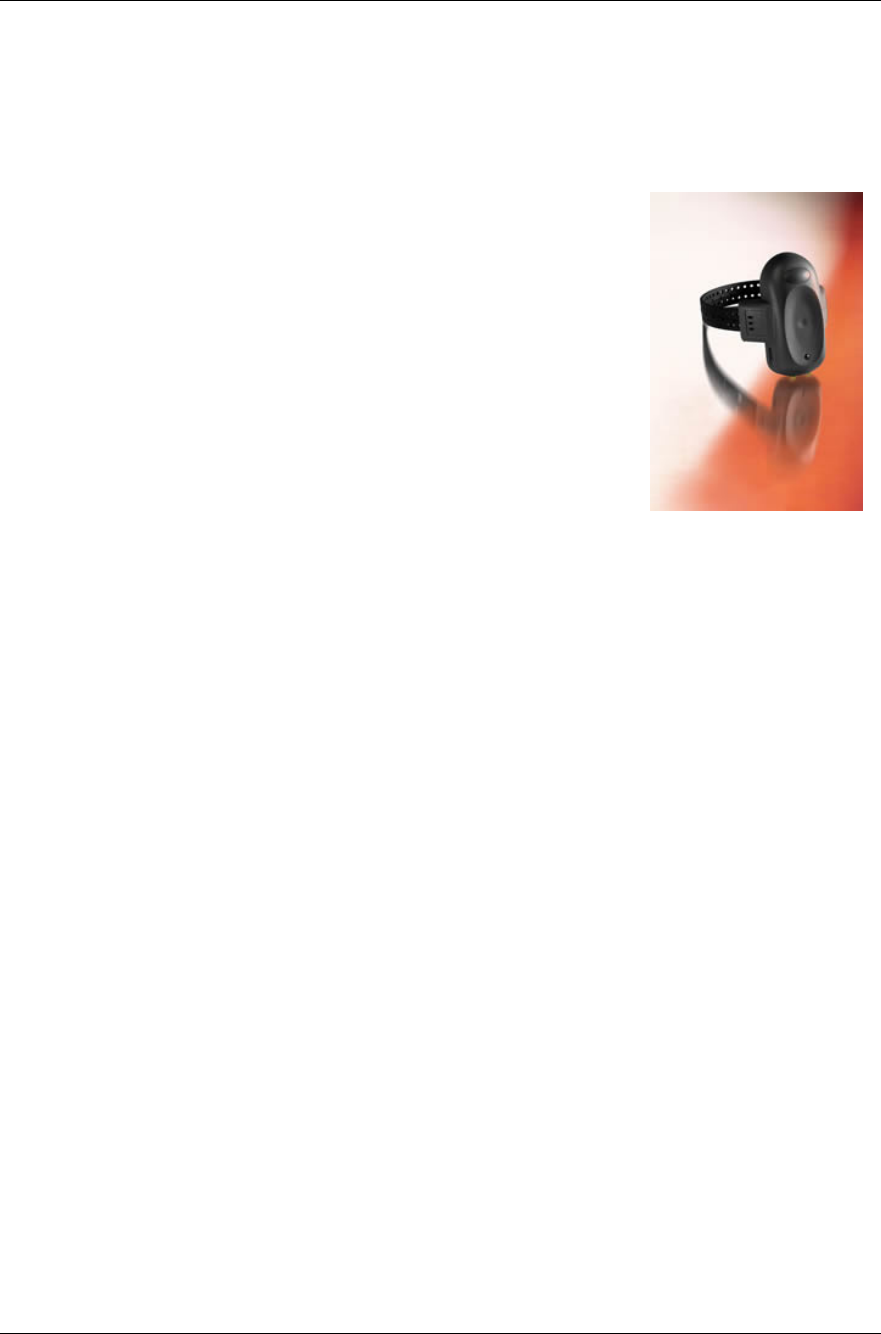
BluTag®
BluTag® is a one-piece device, about the same size as a small PC mouse. It is comfortable to wear
and weighs just six ounces. It has a fully rechargeable battery, tamper resistant strap, status call
button, audible tone notification, vibration alarm notification, on-board management controls, and is
completely waterproof to a depth of 50 feet.
Summary of BluTag® Specifications:
• Single one-piece device, including GPS and GSM/GPRS
• On board logic controller is programmable over the air
• Remote programming of multiple “inclusion” and “exclusion”
zones
• Battery re-charge period: about 30 minutes
• Low-Battery notification by a vibration alarm
• Weighs only six ounces
• High temperature stability
• Audible Tone or Vibration alarm can be programmed and sent immediately
• Soft push status call button
• Waterproof
• Tamper resistant fiber optic strap
BluHome®
Is an accessory to the BluTag that allows positive confirmation of an offenders location. BluHome is
also the primary means of communication for Passive BluTag and backup communications for the
Active BluTag.
As a monitoring accessory, BluTag® enters BluHome’s® radio frequency monitoring range, it will
electronically tether itself to the accessory and transmit data. BluHome’s® radio frequency monitoring
range is highly flexible. The range can be configured in increments of approximately 1 foot from 5
feet to 300 feet.
As a communications accessory BluTag® transmits data to BluHome®, which uses standard AC
electricity for power and a landline phone connection for data transmission. BluHome® transmits
monitoring data to VeriTracks®
About this document
This User’s Manual describes the use of the VeriTracks™ software and the BluTag® equipment. It
will enable you to maximize the value of the program's special features by showing tips and
techniques where appropriate.
For easier reading, look for the following conventions in this document:
"Select" refers to selecting an option from the screen with your mouse.
"Enter" refers to entering text or data into a field using the keyboard.

VeriTracks™ User’s Manual
Satellite Tracking Of People 3
"=>" indicates a series of selections to be made.
Key + Key indicates that two keys on the keyboard should be pressed at the same time.
Filenames, on-screen options, and field names are shown in bold Arial font.
Information to be entered using the keyboard is shown in Courier New font.
Information describing the use of the BluHome menu will be shown as Aerial Shaded font
VeriTracks™ User’s Manual
Satellite Tracking Of People 4
Chapter 2: GETTING STARTED
Because VeriTracks™ is Internet-based, you need a 128-bit encrypted browser, such as MS Internet
Explorer® 5.5 or higher. If your browser does not have sufficient encryption capability, a message
will appear and you will be directed to a site where an upgraded browser can be downloaded. For
further assistance, contact our technical support personnel 866-999-6427 toll free.
System Requirements
To maximize use of your connection to the VeriTracks™ server, here are some requirements you
should be aware of:
o Cookies must be enabled on your web browser, for login identification purposes only.
o JavaScript must be enabled on your web browser. (Note: for both #1 and #2, these should be
enabled by default when using MS Internet Explorer® 5.5 or higher).
o The best screen resolution setting is at a minimum, 600X800, and optimal, 1280 x 1024. You
can verify this setting by Right Clicking on your desktop anywhere => select Properties =>
select Settings tab => verify Screen Resolution from there.
TIP - Using web applications has advantages: such as availability of both left and right mouse clicks,
not requiring double clicking, and a status window notifies when multiple windows are open.
Note: The Back button will not work with VeriTracks™ on the web for security reasons.
Please use the Last Result or Back options shown on the interface.
Getting Help
The technical support staff at VeriTracks™ is pleased to assist you with any questions you may have
regarding the operation of VeriTracks™ and BluTag®.
Our Technical Support Center: 1-866-703-STOP (7867)
Our Mailing/Shipping Address is: 1800 Alexander Bell Drive, Suite 130
Reston, VA 20191
Or send e-mail to: TechSupport@stopllc.com
Logging In
1. To get started, open up your MS Internet Explorer® browser.
2. In the address line on the Home Page, enter the following address using your state name in
the space before .veritracks:
https:// .veritracks.com
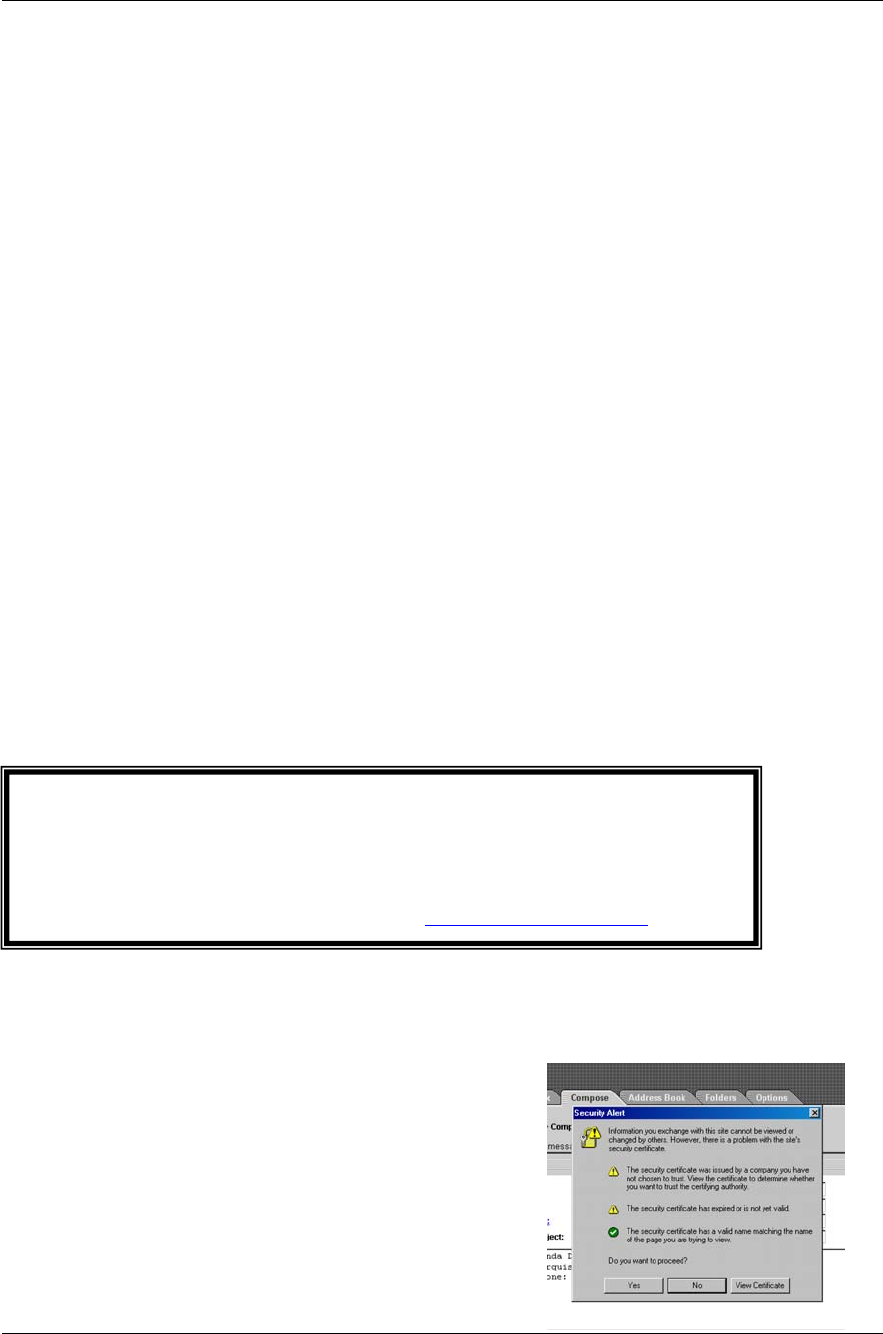
3. You will be asked to accept the Security Certificate
pictured to the right. After you accept, you will be
brought to the login screen for VeriTracks.
VeriTracks™ User’s Manual
Satellite Tracking Of People 5
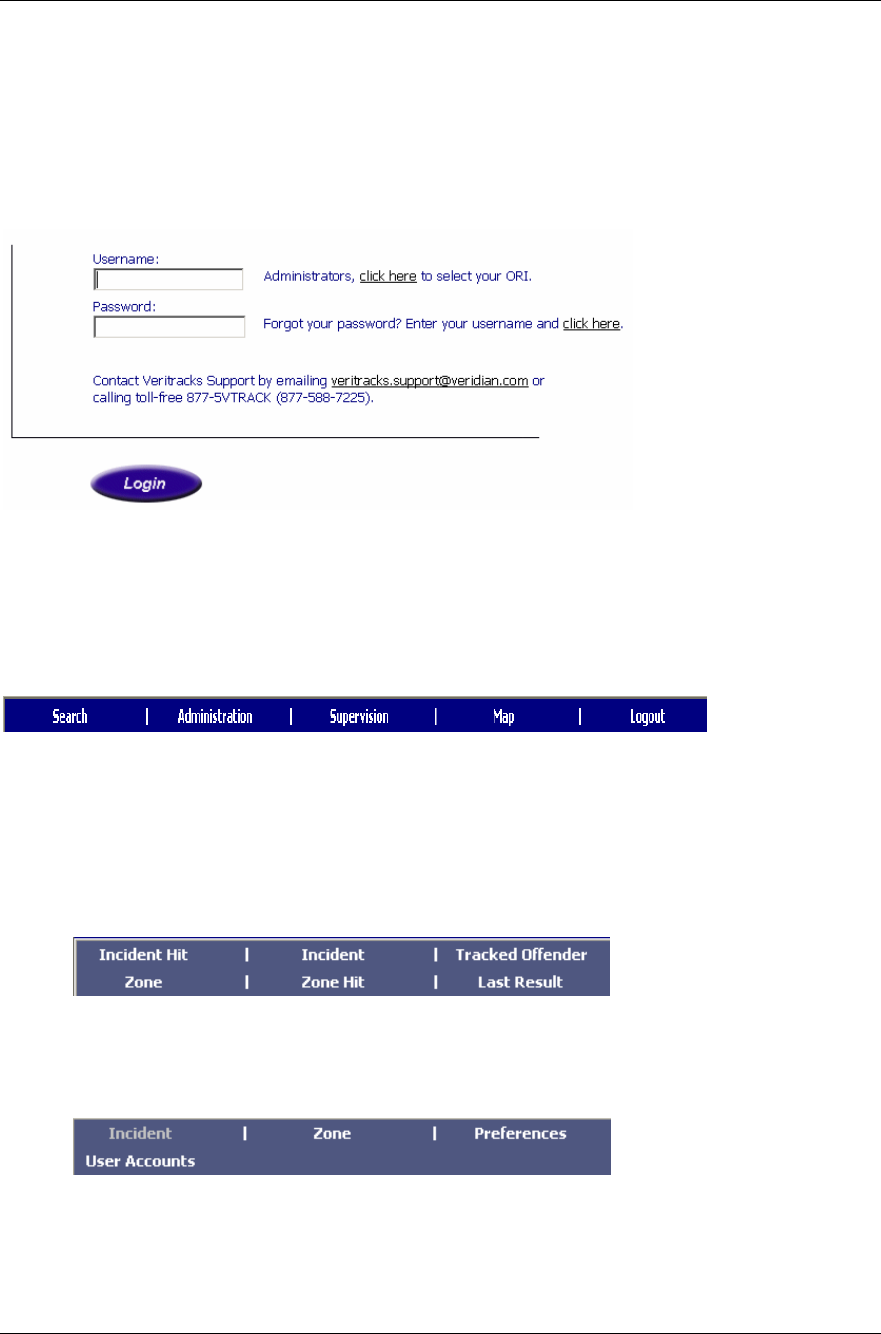
4. To login, you will need to enter the User Name and Password assigned to you.
5. If you forget your password, we can email it to you. To receive your password via email,
enter your Username in the space provided and then click on the link ‘Click Here’ in the
instructions next to the Password entry box.
6. Click on the Login button when you have finished entering in your account information.
Understanding Main Menu Options
The VeriTracks™ home page consists of a Menu Bar and the Display Area in the center of the page. The
Menu Bar is accessible from every VeriTracks™ web page, while the Display Area changes to reflect the
selected VeriTracks™ function.
This is the VeriTracks™ Main Menu, accessible from all pages.
The VeriTracks™ Menu Bar is divided into five sections:
1. The Search link takes you to search pages where you can define specific parameters for your
search. Law Enforcement agencies will usually use this menu bar to access read only
information. The menu below drops down when you move your mouse over the Search link.
2. The Administration link allows you to add or modify crime incident and zone data, or
administer your user name, password, and preferences. On this menu access is restricted to
data owned by you or your agency or office. The menu below drops down when you move
your mouse over the Administration link.
3. The Supervision link allows you to conduct offender searches, enroll a new offender,
administer and schedule tag commands, manage inventory, and create zones. Agencies with
specific caseloads to supervise will usually use this menu bar to access and update their
information. Access to records through this menu is restricted to only that data owned by the
VeriTracks™ User’s Manual
Satellite Tracking Of People 6
agency or office. The menu below drops down when you move your mouse over the
Supervision link.
4. The Map link allows you to map an address or to retrieve previously mapped addresses. The
map data entry box drops down when you move your mouse over the Map link.
5. The Logout link logs you out of VeriTracks™. If you close your browser you will
automatically time out your session.
On some of drop down menu items you will see small lock symbols next to the item name. The
lock means you do not have access to this menu item.
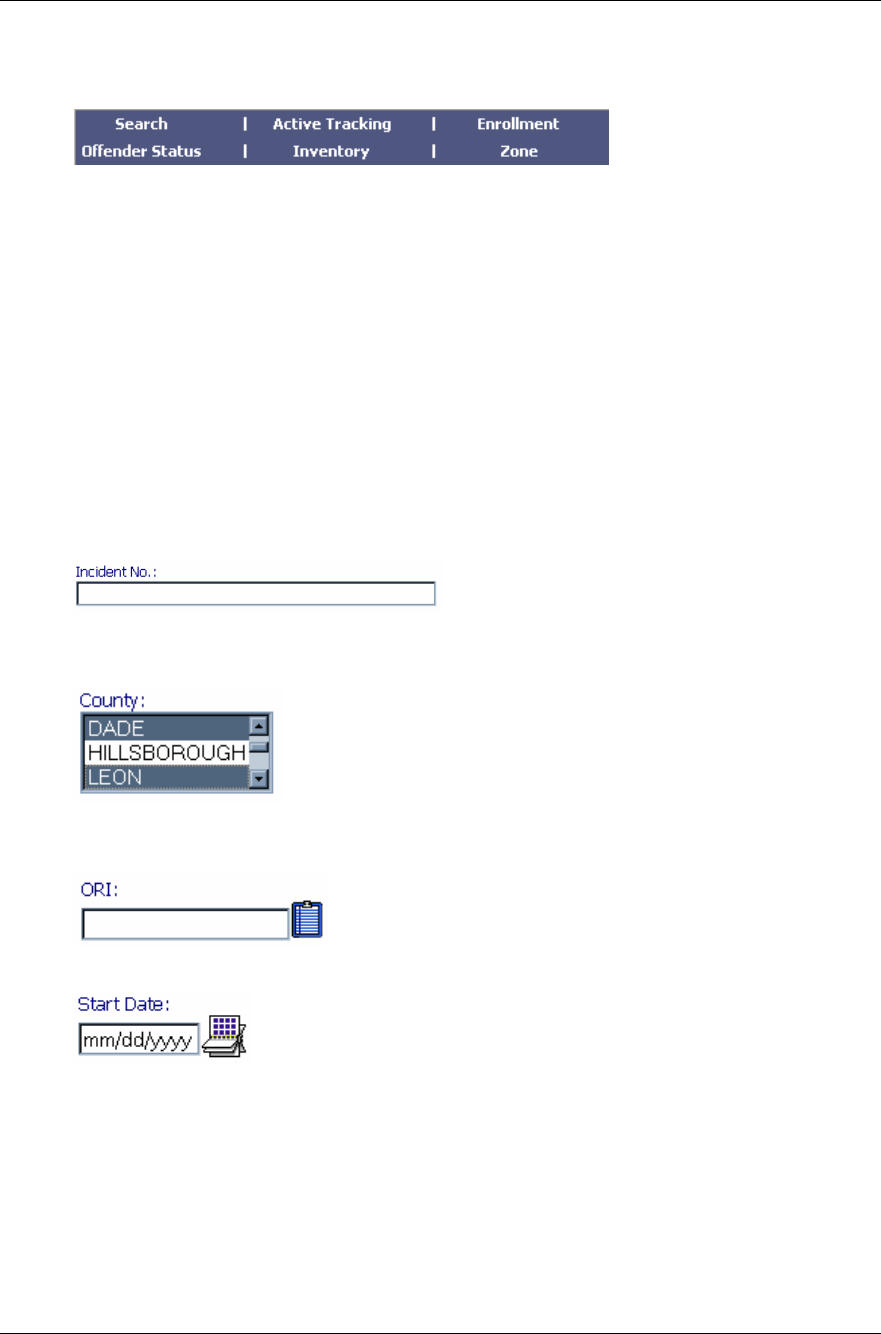
Understanding Search and Data Entry Page Features
All Data Entry and Search pages within VeriTracks™ have a number of common features and
functions.
1. Text Boxes – Text boxes allow direct data entry using the keyboard, where multiple values
can be entered separated by commas.
2. Scrolling List Boxes – List boxes allow you to pick items from a list. Multiple items can be
selected by holding down the control <CTRL> key and selecting the item with the mouse.
3. Text Box/Clipboard Pop-up Combination – These boxes can be used like a text box or you
may use the clipboard to pop-up a pick list of valid values.
4. Date Fields – All dates can be input directly or picked off a calendar pop-up list.
5. Drop Down List Boxes – The drop down list boxes allow you to type information directly
into the box, search the list or pick one item off a list that drops down. In these fields, you
cannot select multiple values.
VeriTracks™ User’s Manual
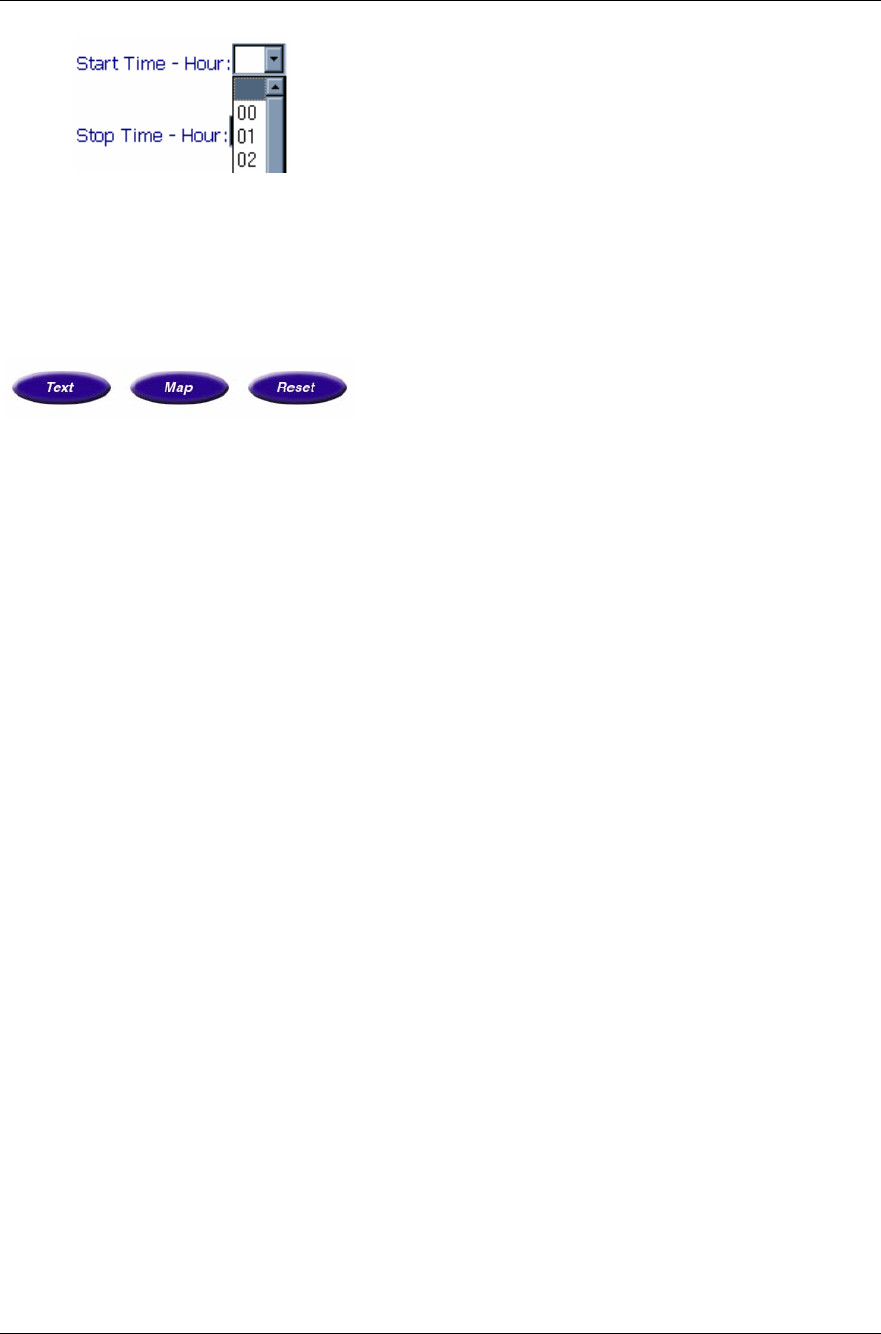
Satellite Tracking Of People 7
6. Buttons – All Search Pages have TEXT, MAP, and RESET buttons. TEXT will produce a
text report of the data you queried. MAP will produce a map of the Incident or Tracks you
queried. RESET will clear your query and let you start over.
Data Entry pages will include the ADD button. When you have entered all the data to
register a new offender or to create a new zone, you will need to click on the ADD button to
add the information to the database.

VeriTracks™ User’s Manual
Satellite Tracking Of People 8
Chapter 3: REGISTERING AN OFFENDER
In this Chapter you will learn how to:
- Register an offender and install the tag
o Register and install Blutag
o Register and install BluTag and BluHome
- Un-enroll an offender and remove the tag and/or BluHome
- Store and care for tags and/or BluHome
- Swap out equipment if it is damaged or needs maintenance
Registering an Offender
To start using the VeriTracks™ system, you need to register your agency’s offenders in the system
and activate the BluTag® assigned to a specific offender. The recommended registration process is
as follows:
1. Prepare the BluTag® for use
2. Install the BluTag® on the offender
3. Enroll the new offender in VeriTracks™ and assign zones
4. Check the enrollment
5. Complete the appropriate enrollment paperwork
Adding the BluHome unit, required for the Passive BluTag requires the following added steps:
1. Prepare the BluTag® for use
a. Prepare the BluHome For use
2. Install the BluTag® on the offender
a. Set up the BluHome at the offenders home
3. Enroll the new offender in VeriTracks™ and assign zones and Curfews
4. Check the enrollment
5. Complete the appropriate enrollment paperwork
Preparing the BluTag® for Use
The BluTags® are shipped in a “deep sleep” mode. When you un-enroll an offender the tag
automatically places itself in a deep sleep mode. Before using the BluTag® you must:
1. Remove the tag from inventory
2. Wake it up – Plug the tag in to wake it up.

VeriTracks™ User’s Manual
Satellite Tracking Of People 9
3. Charge it up – Charge the tag for at least 4 hours.
4. Update it - If the tag has traveled any distance or is new, the tag will have to be placed in a
location where it can acquire GPS almanac and empheris data. This can take up to 30 minutes
with a clear view of the sky. If the BluTag® has spent significant time indoors with no GPS
whatsoever it may need to do this as well.
5. Verify Tag Operations - After at least 2 hours of charging, verify the BluTag® is
communicating and has GPS. We recommend verifying that the tag received a GPS fix
within the last 30 minutes and called during the previous hour prior to installing it on an
offender. The tag still needs a full four-hour charge. Follow the instructions below to verify
the tags readiness.
a. Select Supervision => Inventory Menu Item.
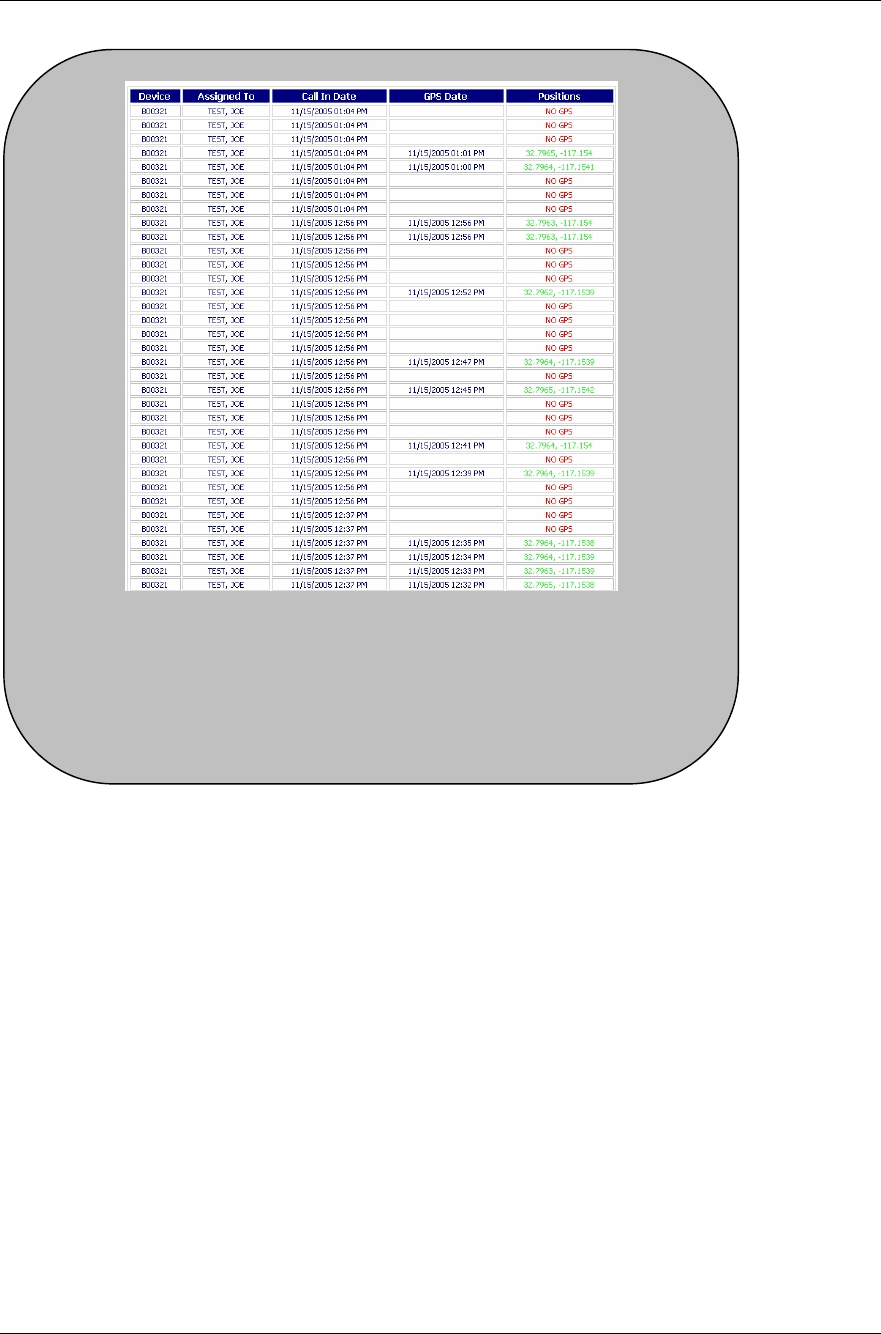
b. Click Device Data Load Report on left-pane menu list. (It's the second to last
report.)
c. Select your tag number from the table. (Click the arrow images at the top of the
screen to scroll list.) You can click any part of a row in the table, it will then turn
red, and your results will be displayed
If there are no records with “Call in Date” of today, the tag has not awoken and it has not
connected to the network. If the GPS Date or Positions column are blank or have “NO
GPS”, the tag has not acquired GPS. At a minimum, you should see at least one call to
VeriTracks™ in the last hour and five GPS positions in last hour before installing
the tag.
In this example the tag has been communicating (calls at 1:04, 12:56, and 12:37, and had
acquired GPS during each call.
VeriTracks™ User’s Manual
Satellite Tracking Of People 10
If the tag is not calling, indicated by no calls from the tag in the past hour, use these techniques to
activate the tag’s calling into VeriTracks™.
– Plug the unit in and unplug it – repeat, you do not need to keep the tag plugged in for
more than a few seconds
– Press the Status Call Button until it buzzes
– Take the tag to a different location – “take it for a drive”
If the tag does not have a current GPS fix (five points in the last hour), use the following
techniques.
– Place the tag in the open with a full view of the sky - A car window is a good option
– Take the tag for a walk or drive
Remember it may take a tag 20 to 60 minutes to acquire a GPS fix if the tag has been in
storage or shipped a long distance. Tags ship from our Reston, Virginia office in the
Washington, DC metro area.
If you cannot rectify either condition, use a different tag and return the tag to STOP LLC.
If you need assistance, call our Monitoring Center for assistance
Table Columns:
Call in Date: The date/time the unit last called into the server
GPS Date: The date/time of a successful GPS fix.
Positions: The latitude and longitude of a successful GPS fix.
VeriTracks™ User’s Manual
Satellite Tracking Of People 11
6. Prepare - Locate clips, strap, and installation tools.
Preparation for Adding the BluHome
Adding the BluHome requires the following added preparation:
1. Remove the BluHome from inventory
2. Wake it up – Plug the BluHome in to wake it up and connect the unit to an analog phone line
(in most offices this is your fax line).
3. Charge it up – Charge the BluHome for at least 4 hours.
4. Update it - No action required
5. Verify BluHome and BluTag Operations – At the same time that you verify the operation
of the tag, verify the BluHome: a) is calling b) can hear the BluTag.
a. To verify the BluHome is calling, Check Inventory > BluHome List. The list should
show recent records and look something like the table below. The Event column lists
the raw events reported by the BluHome. This will include BluTag events reported
through the BluHome. The Alarm Info column lists the BluTag for events reported by
a BluTag.
BluHome Assigned
Offender Event Date Event Alarm
Info
03-000020 UNASSIGNED 11/9/2006 6:49 BLUHOME SANITY CALL TIMER EXPIRED
03-000020 UNASSIGNED 11/9/2006 6:39 BLUHOME CALL SUCCESSFUL
03-000020 UNASSIGNED 11/9/2006 6:38 BLUHOME GUEST PRESS BUTTON 02004030
03-000020 UNASSIGNED 11/9/2006 6:36 BLUHOME GUEST DEVICE IN RANGE
b. To verify the BluHome can communicate with the BluTag, use the front panel of the
BluHome unit. Complete instructions for using the Menu are provided separately.
The instructions below are limited to use of the menu to verify communications
between BluTag and BluHome
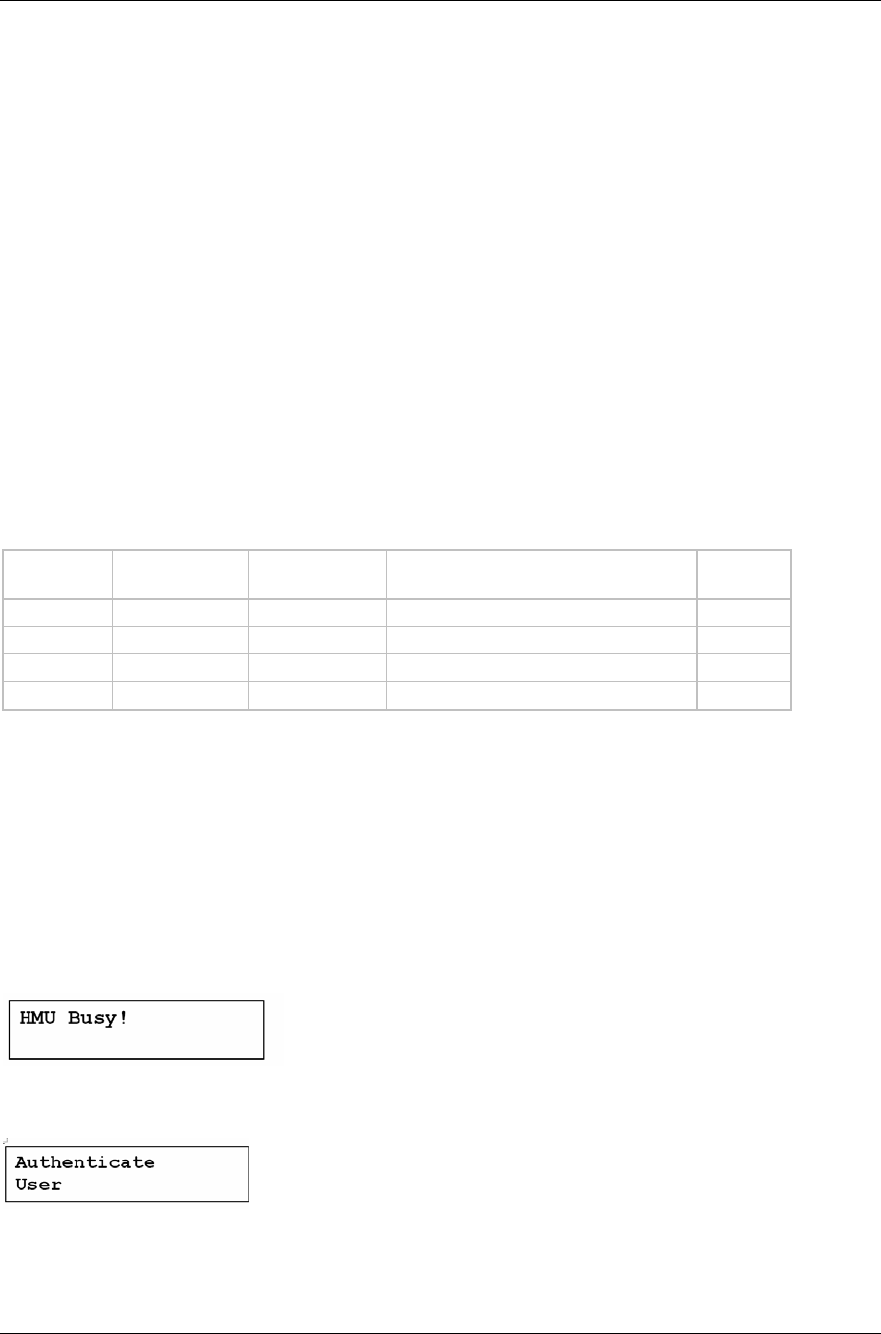
The Menu or Setup Mode can only be entered from normal mode by holding down the up
arrow key on the key pad for 3 to 5 seconds. You cannot move the box during this process
or the HMU will enter report mode and call in blocking access to the menus. If the HMU is in
Report mode the user will not be able to enter setup and the following will be displayed
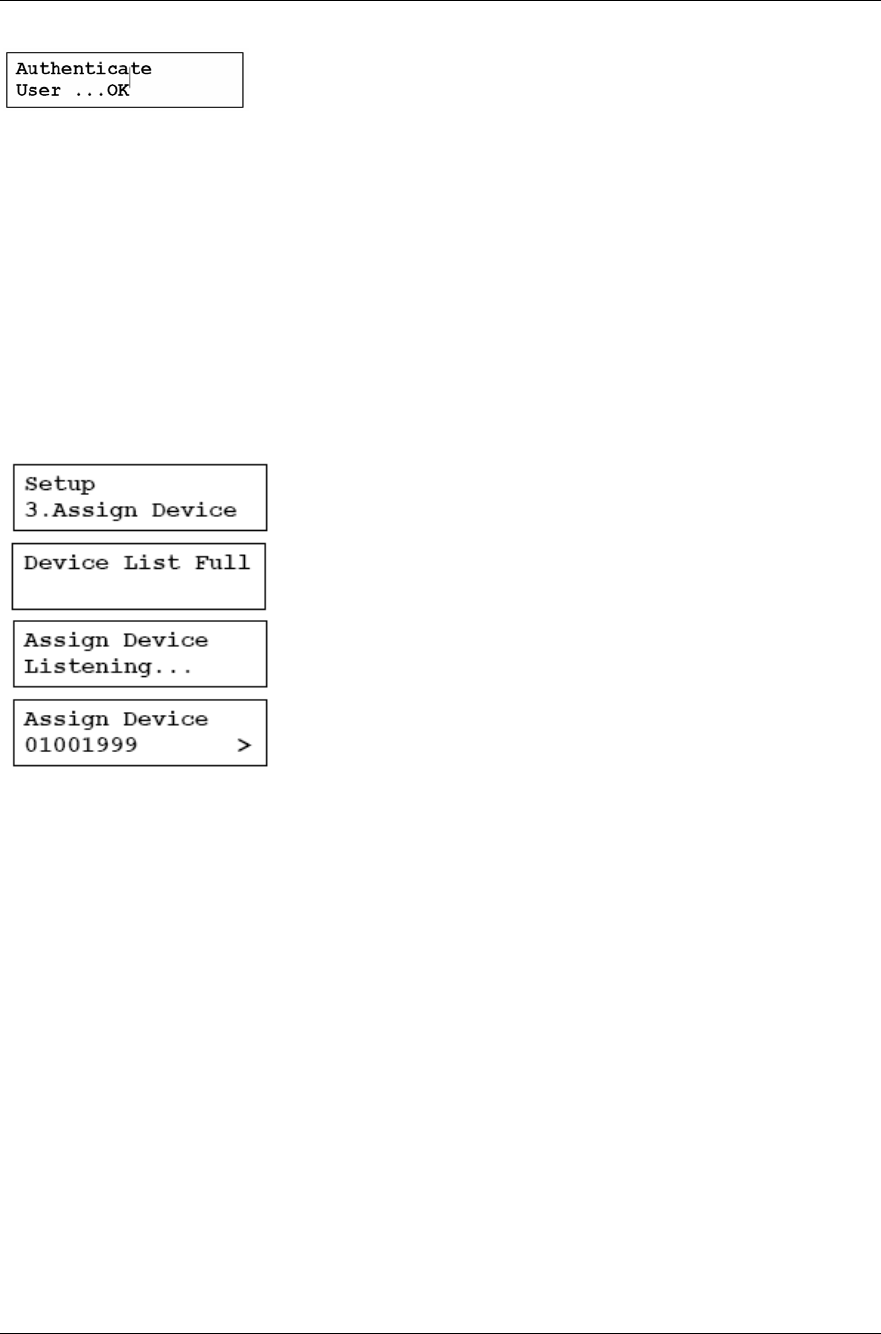
After holding down the up arrow key on the key pad for 3 to 5 seconds the following will be
displayed if the HMU is in Normal mode.
The user will be authenticated by a further series of button presses provided separately.
If the authentication is successful you will see
VeriTracks™ User’s Manual
Satellite Tracking Of People 12
In three seconds you will get the menus.
Pressing the down key will progress the display to the next menu item.
The up key will return to the previous menu item. Each of the menu items can be accessed
in this way. Pressing the down key on the last menu item will display the first item. Pressing
the up key on the first item will display the last item.
Pressing the enter key will select the displayed item.
Use the arrow key to scroll to the second menu item, set up ccs number – this is the call in
number.
The 3rd menu item is Assign Device. Once this menu option is selected the HMU will
display a list of device IDs that it receives a Ping from. The
device can then be added to the assigned device list.
If the assigned device table is full this will be indicated on the
display.
‘Listening..’ will be displayed until a Ping is received from any
device.
The presence of more than 1 device in the list will be
indicated by an arrow on the right of the display. The list of
devices can be scrolled using the up /down keys. Pressing
the left key will return the display back to the menu option.
Scroll through the list to veriy that the BluHome can communicate with the selected Blutag.
Once the BluTag islocated, Exit the menu by pressing the left arrow key. Press the left arrow
key a second time to return the BluHome to normal operations. .
Pressing enter will bring up the confirmation screen. The left key will accept the device into
the list. Either left or right key will return the display to the device list screen.
Note that devices should not be manually assigned using this procedure.
6. Prepare – Locate phone line splitter (if required)
Installing BluTag®
Once you have prepared the tag for use, you will physically attach the device to the offender.
Installation on the left leg is recommended to improve tracking in automobiles. Follow these easy
steps to install BluTag® on an offender.
1. Measure the offender’s ankle: A the measuring strip is provided in the installation kit.
2. Cut the strap to size. Carefully cut the strap to size using the cutters provided. A straight
cut right at the sizing line is required to avoid false bracelet tamper events from occurring.
VeriTracks™ User’s Manual
Satellite Tracking Of People 13
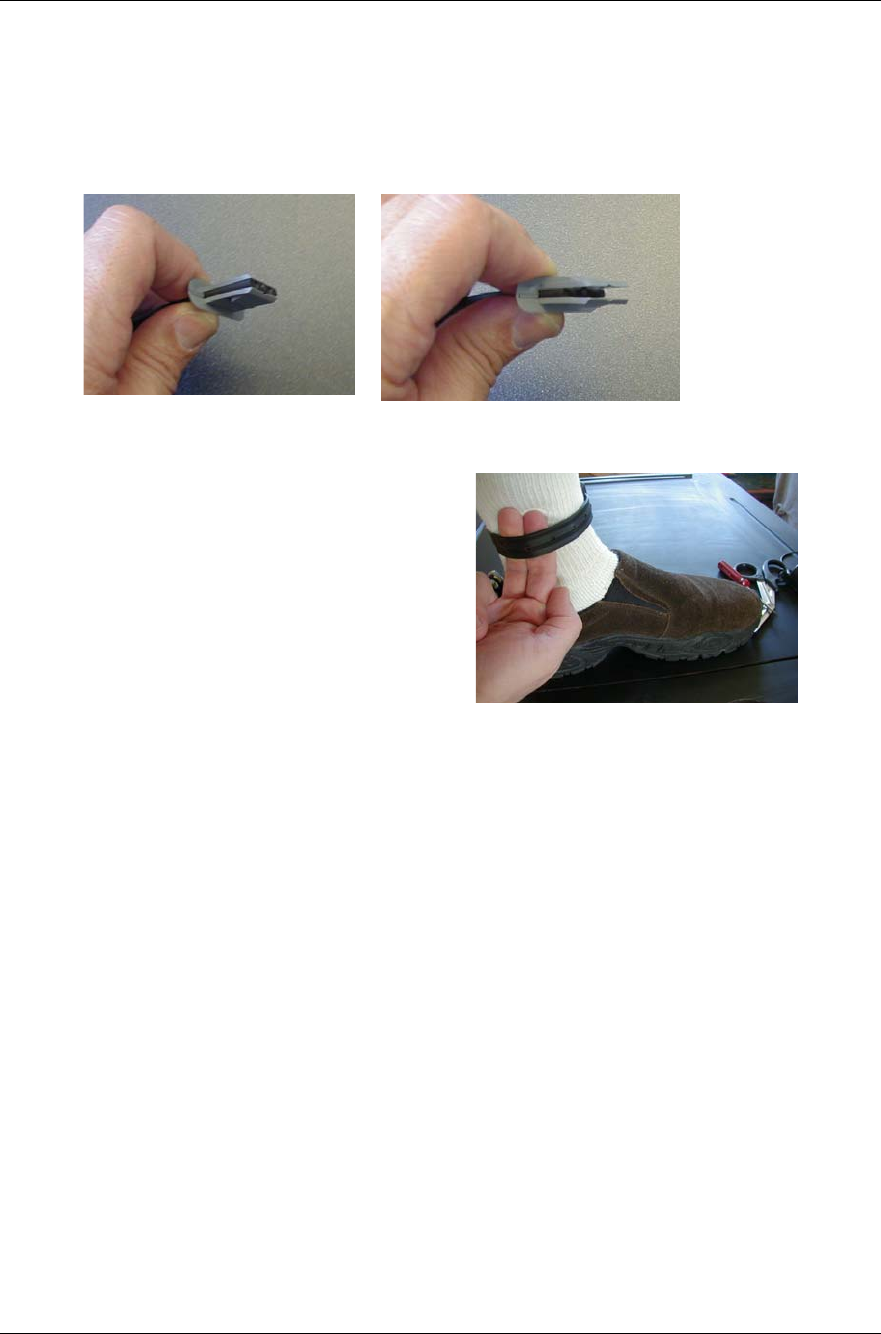
3. Attach the device: Each tag is a one-piece self contained unit. Clips are included in the
installation kit. Two clips must be placed on each end of the strap. The clips fit into holes on
the strap. Insert one end of the strap (with the two clips) into one side of the tag. Wrap
everything around the offender’s ankle and place the other end of the strap (with the two
clips) into the opposite side of the tag. Note: The ends of the clips must align with the ends
of the strap – as shown in photo below.
Correct alignment – end of
strap and clips are flush. Incorrect alignment – end of strap and
clips are not flush.
4. Check the fit. Once you have the strap
attached, check the fit of the tag. The tag
should be tight to prevent it from banging
against the ankle. No more than two fingers
should fit between the strap and the ankle.
5. Press the Status Call Button. This ensures
that the tag is operational and clears any
tamper alarms. When pressed, the button
makes an audible tone.
Installing the BluHome
Adding the BluHome requires the following added installation actions:
7. Plug in the BluHome to AC power and the phone line.
Enrolling a New Tracked Offender in VeriTracks™
Do not assign the BluTag® (using the Assign Tab) to the offender in VeriTracks™ until the tag
is attached to the Offender’s leg.
To enroll a new offender in VeriTracks™:
1. Mouse over the Supervision menu option
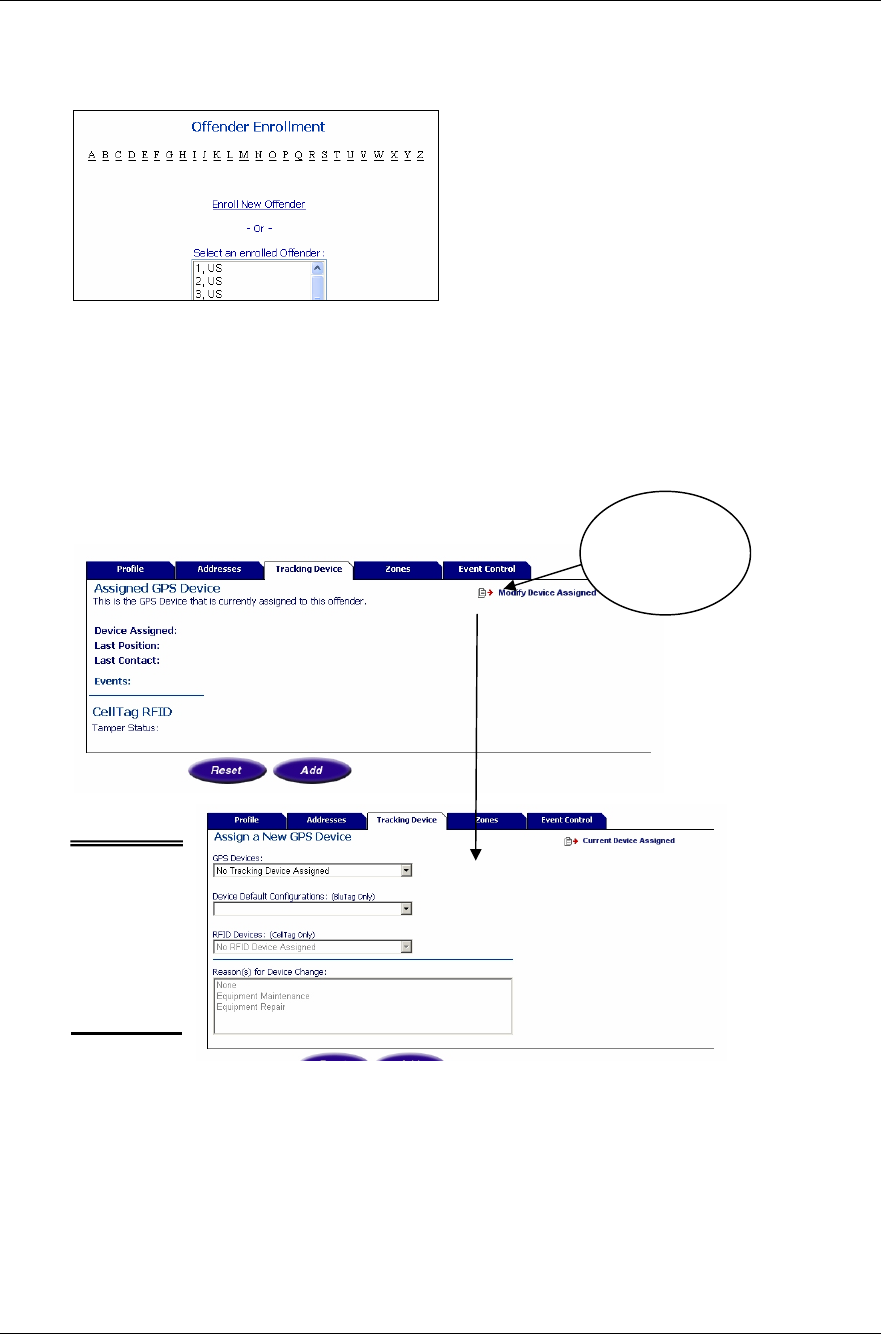
2. Select Enrollment, then click the Enroll New Offender link to add a new offender to the
system. There are five tabs/areas for enrollment: Profile, Address, Tracking Device, Zones,
and Event Control.
VeriTracks™ User’s Manual
Satellite Tracking Of People 14
Note: only people in your office can access the enrollment screens for your offenders.
VeriTracks™ restricts access to the enrollment data to prevent accidental changes.
3. Fill in Profile and Address tabs. These tabs capture data about the offender. Complete the
information on these tabs as described in Appendix 1.
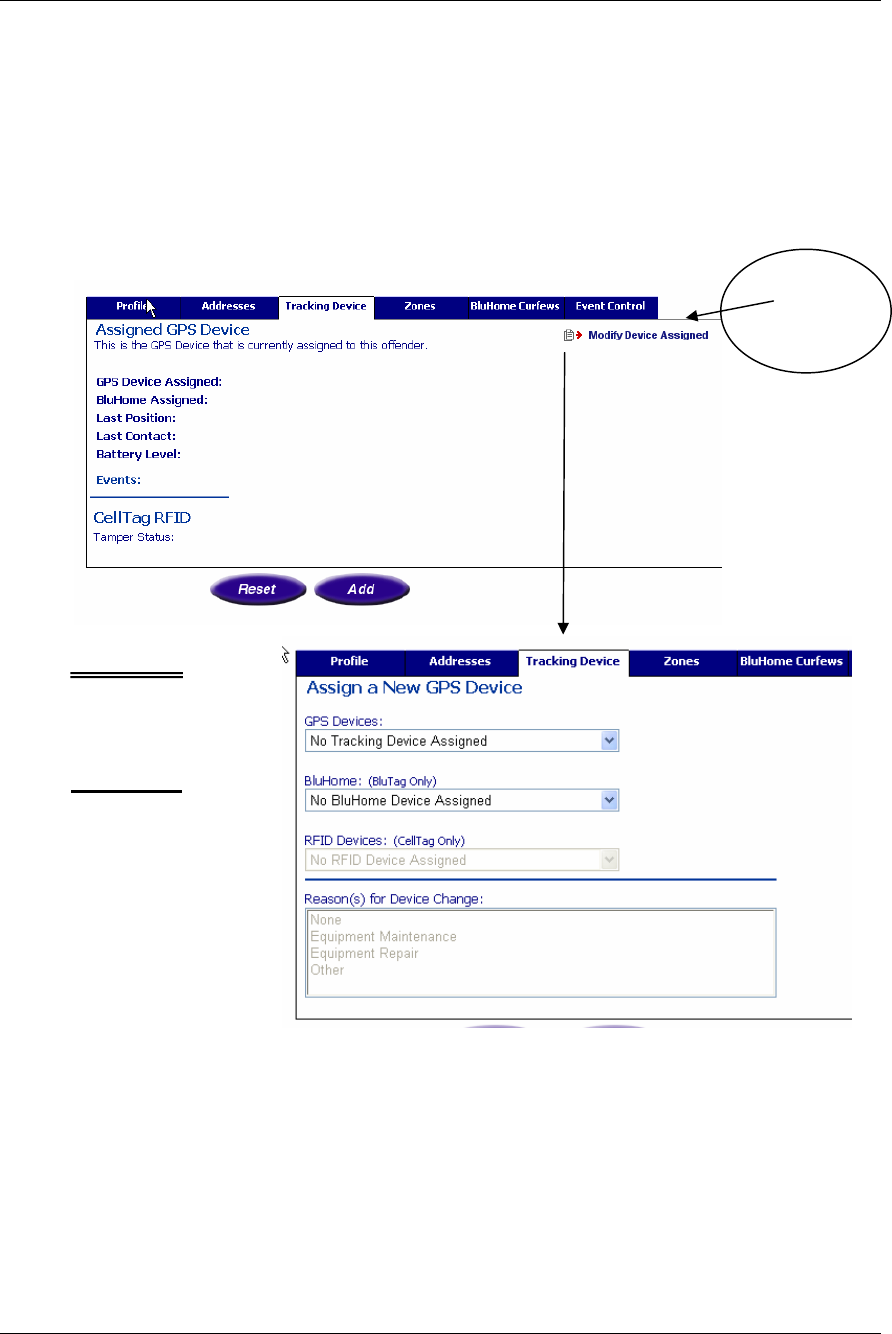
4. Assign the tag to the offender. When you first access this tab you will see the status of the
tag. For a new enrollment the status fields will be blank. Click on the Modify Device
Assigned link to assign a device to a new offender or to modify a currently assigned device
(see instructions for swapping a tag later in this chapter. Select the device you wish to assign
to the offender from the GPS Devices drop-down listing,
Assign a
device by
picking the
device off
the list of
available
devices.
5. Press the Status Call Button. This ensures that the tag is operational and clears any tamper
alarms. When pressed, the button makes an audible tone.
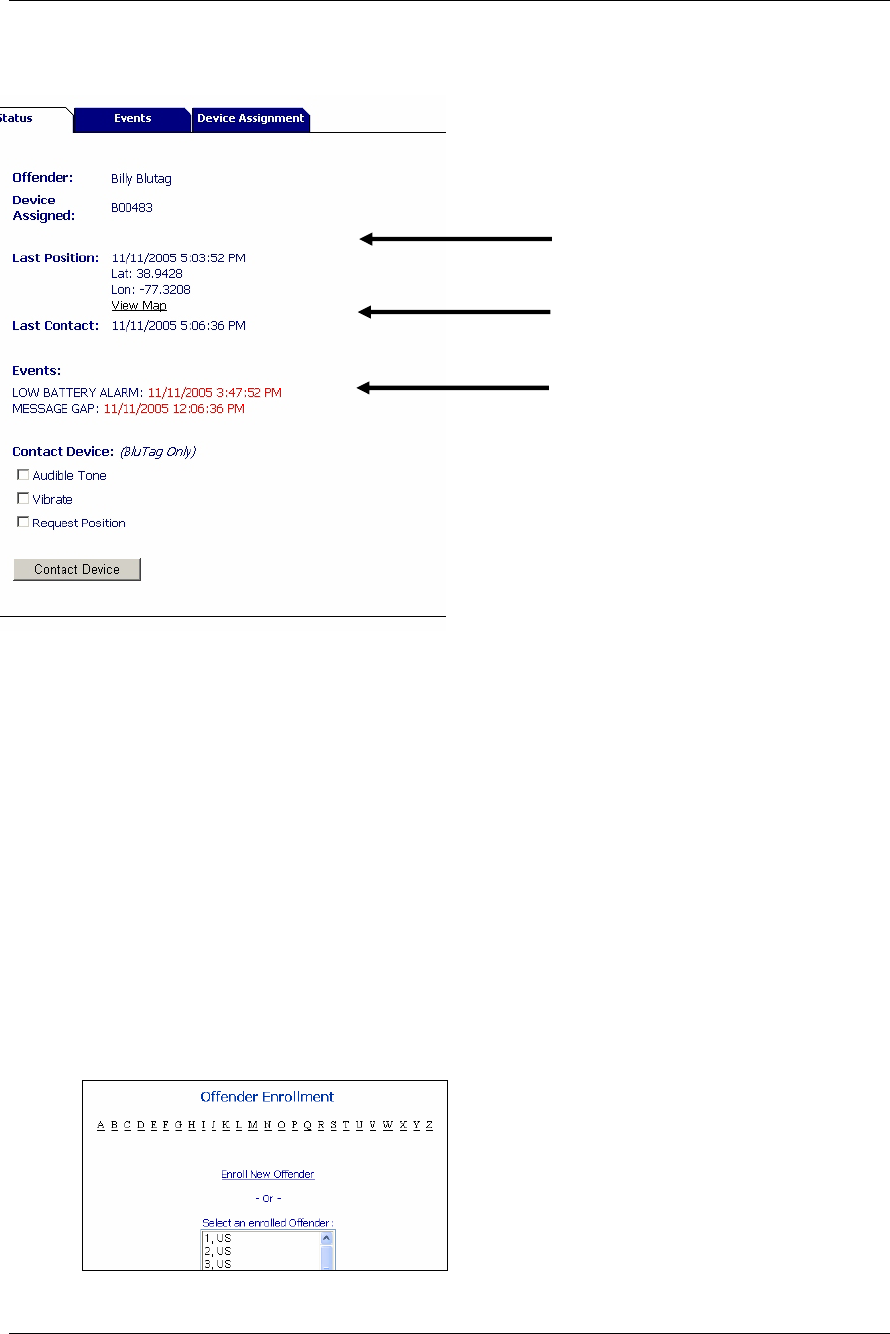
6. Complete the final verification of the install.
To verify that the tag is properly installed. Go to the Supervision => Offender Status
screen. Verify that the tag has called in (Last Contact) since it has been installed and no
open events are listed.
Click here to
make the Tag
Assignment
VeriTracks™ User’s Manual
Satellite Tracking Of People 15
8. Add zones (Chapter 4) , curfews (Chapter 5), and event controls(Chapter 5)
GPS Position
Call
n
Events
Enrolling an offender with the BluHome
Adding the BluHome is slightly different so the entire enrollment process is repeated here rather than
just the added actions.
Do not assign the BluTag® (using the Assign Tab) to the offender in VeriTracks™ until the tag
is attached to the Offender’s leg.
To enroll a new offender in VeriTracks™:
1. Mouse over the Supervision menu option
2. Select Enrollment, then click the Enroll New Offender link to add a new offender to the
system. There are five tabs/areas for enrollment: Profile, Address, Tracking Device, Zones,
and Event Control.
Note: only people in your office can access the enrollment screens for your offenders.
VeriTracks™ restricts access to the enrollment data to prevent accidental changes.
VeriTracks™ User’s Manual
Satellite Tracking Of People 16
3. Fill in Profile and Address tabs. These tabs capture data about the offender. Complete the
information on these tabs as described in Appendix 1.
4. Assign the tag and BluHome to the offender. When you first access this tab you will see the
status of the tag. For a new enrollment the status fields will be blank. Click on the Modify
Device Assigned link to assign a device to a new offender or to modify a currently assigned
device (see instructions for swapping a tag later in this chapter. Select the device you wish
to assign to the offender from the GPS Devices drop-down listing,
Assign a device by
picking the device
off the list of
available devices.
5. Press the Status Call Button. This ensures that the tag is operational and clears any tamper
alarms. When pressed, the button makes an audible tone.
6. Complete the final verification of the install.
To verify that the tag and BluHome are properly installed. Go to the Supervision =>
Offender Status screen. Verify:
a. The BluHome has called in (Last Contact) since it has been installed and no open
events are listed.
Click here to
make the Tag
Assignment

VeriTracks™ User’s Manual
Satellite Tracking Of People 17
a. The Tag has either called in and Has GPS and/or registered an ENTER event.
b. All other events should be cleared including the “AWAITING ENTER at Time” event.
7. Add zones (Chapter 4) , curfews (Chapter 5), and event controls(Chapter 5)
Complete Enrollment Paperwork
Each agency will have its own policies and procedures; The Administrators Guide contains sample
enrollment forms that can be adopted by your agency. These forms are used to gather information
needed for enrollment and administration as well as to educate and advise the offender of their
responsibilities related to the tracking equipment and your program.
Below are some basic instructions that should be provided to the offender.
Instructions to offenders:
These procedures are the minimum instructions that should be given to all
offenders.
Don’t strike or try to open the tag.
Avoid prolonged exposure to extreme temperatures.
Do not force a boot over the tag.
Charge the tag twice a day, once every 12 hours until the light turns green.
Charging should take less than 30 minutes.
When charging the tag, the lights should be orange and green.
If the Red light comes on and stays on call your supervising officer.
Do not:
• Tamper with the tag, or pull on the strap. The strap is sensitive and
will alert the supervising officer if it is tampered with.
• Press the button - this will send an alert to the supervising officer.
• Take the tag into a pool or hot tub
• Take a bath, only showers
<BluHome Only>
• Do not move the unit
• Do not unplug the unit
• Do not unplug the phone line
In general we recommend telling the offender to:
• Call the supervising officer if it buzzes.
• Charge the tag if it vibrates. Since a vibration indicates a low battery,
you may want the offender call if the tag vibrates as well.
VeriTracks™ User’s Manual
Satellite Tracking Of People 18
Un-Enrolling a Tracked Offender in VeriTracks™
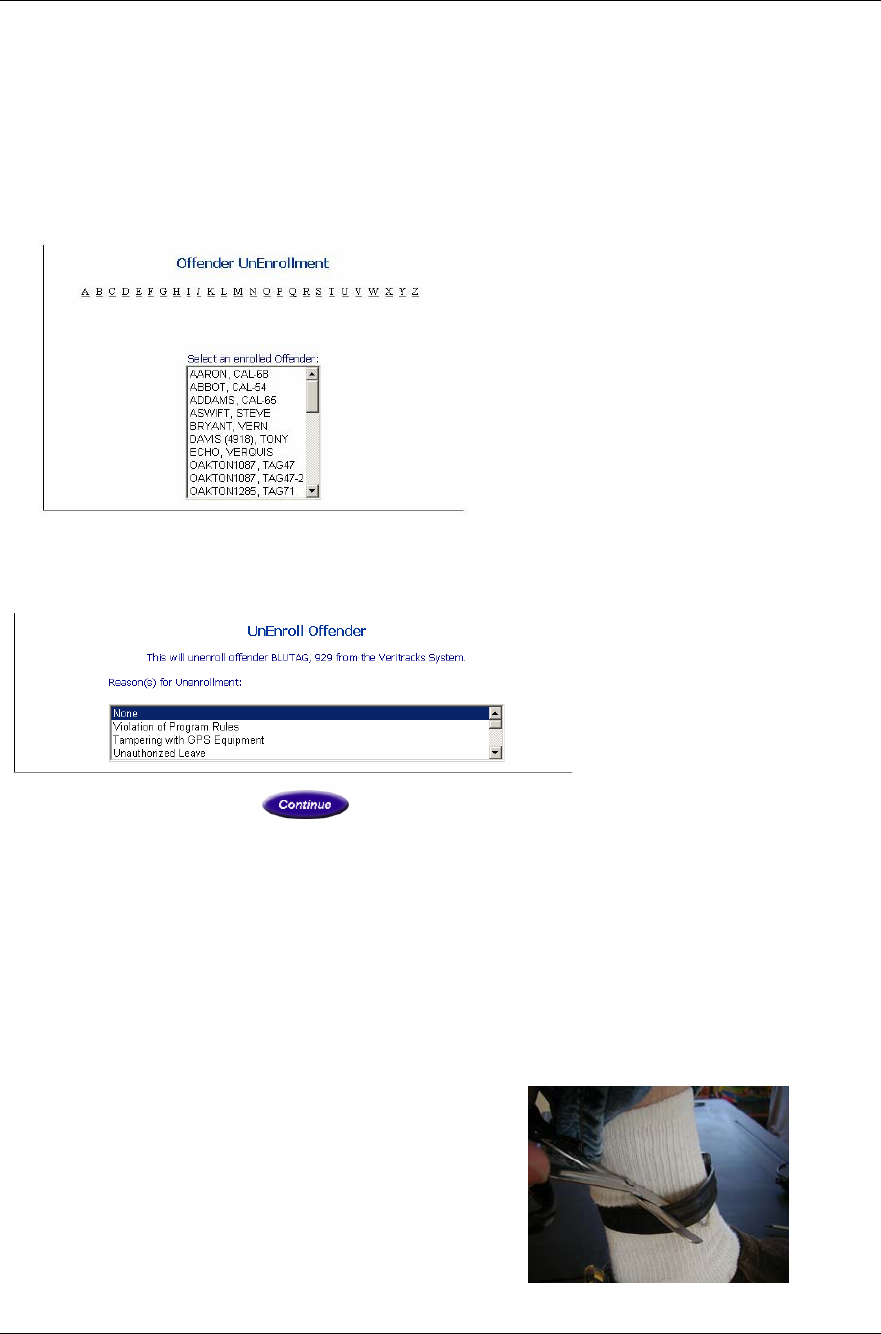
To un-enroll the offender in VeriTracks™:
1. Mouse over the Supervision menu option, select Enrollment from the list.
2. Under the Enrollment option, select the Un-Enroll link on the left hand side of the screen.
3. Select the offender you wise to un-enroll from the scrolling list.
4. In addition to confirming that you want to un-enroll an offender, you can select a reason for
the un-enrollment. For agencies that do not want to use this functionality, the “None” option
is automatically selected.
Notes on un-enrollment:
A. When you un-enroll the offender, VeriTracks™ orders the tag into a deep sleep. The deep
sleep command will turn the tag off indefinitely.
B. Attaching the charging coupler is the only way to activate the BluTag®. The BluTag® will
wake up and enter its normal Wake / Sleep cycle currently defaulted to 60 minutes on and 1
minute off
C. If a tag will be reinstalled on an offender in the next 24 hours, we recommend immediately
placing the tag on a charger and keeping it there until it is reinstalled.
Removing the Strap
1. After un-enrolling an offender, cut the strap to
remove the tag from his or her ankle.
ONCE THE OFFENDER HAS LEFT
2. Using the supplied screwdriver, remove the four
tamper-proof screws
VeriTracks™ User’s Manual
Satellite Tracking Of People 19
3. Pry the bridge off the tag
4. Remove and discard the old straps and clips.
5. Replace the bridge using the four tamper proof screws
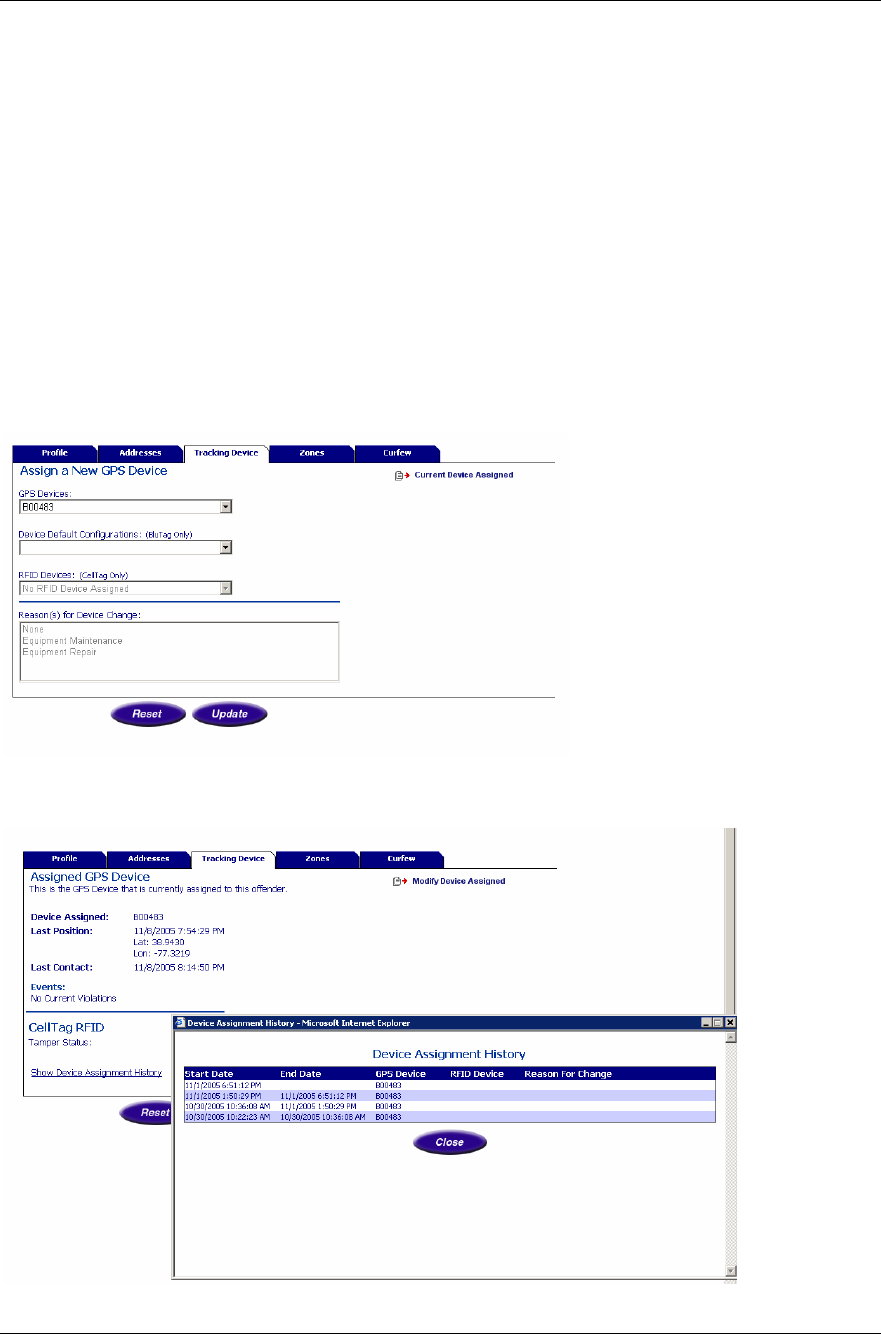
Changing a Tag on an Offender
Occasionally you may need to remove a device from an offender’s ankle due to service issues or
damage and replace it with a new one. You can either un-enroll and re-enroll the offender or go
directly to the Tracking Device tag of Offender Enrollment.
Following the same procedures as described for assigning a tag, you can select the new one from the
drop down list. When selecting a new tag, a second drop down list is activated to capture the reason
the original tag is being changed. Again, for agencies that do not want to use this functionality, the
“None” option is automatically selected.
Note: Under Enrollment, on the Tracking Device tab, the labeled ‘Device Assignment History’
displays a list of the devices assigned to an offender.

VeriTracks™ User’s Manual
Satellite Tracking Of People 20
The Device Assignment History Report lists the period of time a device was assigned to an offender,
as well as the reason it was removed from the offender.
Storing and Maintaining BluTag® and BluHome
1. Unused tags should be stored in a secure, dry space.
2. Tags do not require charging while in storage.
3. Prior to re-enrolling a tag, follow the instructions for preparing a tag for use, registering an
offender, and enrolling an offender.
4. For BluHome, inspect the unit for damage. Clean it with a damp cloth or serial wipe. Store it
in a temperature controlled, dry place.

VeriTracks™ User’s Manual
Satellite Tracking Of People 21
Review
How To…
Register an offender:
Prepare the BluTag® for use
Install the BluTag® on the offender
Enroll the new offender in VeriTracks™
Complete the appropriate paperwork for the enrollment
How To…
Un-Enroll an offender in VeriTracks™
Un-enroll the offender in VeriTracks™ and remove the tag by cutting the
strap.
Complete any paperwork with the offender.
After the offender has departed:
Remove the strap ends from the tag by removing the safety screws and
pulling off the bridge.
Throw away the strap . Clips are re-usable if not worn, cracked or damaged.
Wipe down the unit down with a damp cloth (dampened with warm water or
alcohol).
Place the unit in storage. It is ready for use again.

VeriTracks™ User’s Manual
Satellite Tracking Of People 22
Chapter 4: ZONES
In this Chapter you will learn how to:
- Create a zone and assign it to an offender.
- Verifying a zone assignment.
- Edit a zone.
- Un-assign a zone.
- Expire a zone
Zones are a useful way to better track offender movements. A Zone defines a geographic location
that an offender must be in (Inclusion Zone) or prohibited from (Exclusion Zone) entering at
prescheduled times. You receive notification when an offender violates an assigned zone.
Create a zone and assign it to an offender.
Creating zones is a two-step process. First the zone is created, then it is assigned to an offender. You
can create Inclusion or Exclusion zones and have four ways to assign the zone(s) to the offender.
Zone assignment defines the way you are notified about violation events.
Creating Zones
Zones are created to better track offender movements.
Inclusion zones define an area in which an offender must stay. For example, if an offended is
confined to only his or her home and work during specific periods of time, zones can be created
around each location with time sensitivity. You can then monitor when an offender leaves their
assigned zones.
Exclusion zones define an area(s) where an offender is not allowed to enter. For example, if an
offender has been ordered to keep a distance of at least 500 feet from his or her former spouse’s
home, a zone can be set up around that location with time sensitivity and remain active 24/7. When
the offender enters into this zone, this will produce a violation.
There are two ways to create a zone:
1) Based on an address.
2) Directly on the map.
Create a zone based on an address
The following are the steps necessary to create a zone based on an address:
1. Mouse over either the Supervision or the Administration menu options and select Zone.
You can create a new zone or select one that you have previously created.
2. Click on Add New Zone.
3. Complete the Zone Entry fields as follows:

VeriTracks™ User’s Manual
Satellite Tracking Of People 23
Zone Name Name your zone. Be sure to use a specific name that is
meaningful to you. Each organization may want to come
up with a naming schema. The name must be unique.
If the name is not unique you will receive a message
that the zone cannot be created.
Street No The Zone Address Street Number.
Street Name The Zone Address Street Name.
Cross Street Name The Zone Address Cross Street Name, if not using the
street number.
City The Zone Address City Name.
Zip Code The Zone Address Zip Code.
Geocode Click on this button to produce the Latitude and
Longitude coordinates from the address entered. The
address MUST be able to produce Latitude and
Longitude in order for you to be able to map the address.
HINT: if the Geocode does not work: check spelling and
street type (Ave, Blvd, Rd), check for alternative street
names (RT 50 vs. Arlington Blvd), or try using an
address of a neighboring building and adjust your zone
size.
Buffer Distance Enter the zone’s buffer distance in Feet, Yards, or Miles.
Exclusion/Inclusion Select if this is an Exclusion or Inclusion Zone.
Start/Stop Dates Enter or select the Start and Stop Dates from the
calendar pop-up for the zone.
Schedule The zone will be effective during specific times. Set-up
the zone schedule from here by selecting times for each
day. Select everything when the zone applies all the
time, or use the smart select to specify periods of time
across each day.
Reset/Add Select the Reset button to start your zone entry again.
Select the Add button to add the new zone.
Create a Zone from the map
The following are the steps necessary to create a zone based on an address:
1. Locate the zone area on the map. You may want to go to a specific address using the Map
link on the main menu.
2. Click on the Create/Edit Zone icon. This will place a small blue ball onto the middle
of your map. Drag the blue ball to create the circumference of the zone you wish to create.
Then move the center green ball to the location of the zone (it does not have to be exactly in
the center of the map).
3. Click on the Create/Edit Zone icon again. This will take you to the Zone Entry form.

VeriTracks™ User’s Manual
Satellite Tracking Of People 24
4. Complete the Zone Entry fields as described above beginning with the Zone Name. Because
the zone location and size are already defined you do not need to add the zone address,
Geocode, or enter the buffer distance.
Assigning Zones
On the Enrollment screens, (Supervision – Enrollment – Zone Tab) the Zones tab allows you to
view zones that are currently assigned to an offender and assign existing zones to an offender. A
zone can be assigned as one of three types of zones: 911, Active, and Silent.
o 911 zones are assigned to and monitored on a 24 hour/7 day-a-week, active basis
within the device itself. Notifications for 911 Zone violations can be set up to your
preferences and sent out for immediate response. 911 zone notifications are also sent
to the monitoring center for human intervention and follow up. 911 zones are not
available to all agencies or may incur an additional, per-event charge.
o Active zones are assigned to and monitored on a 24 hour/7 day-a-week, active basis
within the device itself. Unlike 911 zones, the notification is sent to the probation
officer but the monitoring center does not automatically follow up. Notifications for
Active Zone violations can be set up to your preferences and sent out for immediate
response.
o Silent zones are like active zone except the tag will not notify the offender but the
notification is still sent to the supervising officer if they subscribe to it. Silent zones
can be used like a passive zone. If the officer does not subscribe to the immediate
notifications the event will only appear on the daily summary report.
o Global zones are applied to all offenders being monitored within the VeriTracks™
program only by law enforcement agencies. A supervising officer cannot assign a
global zone.
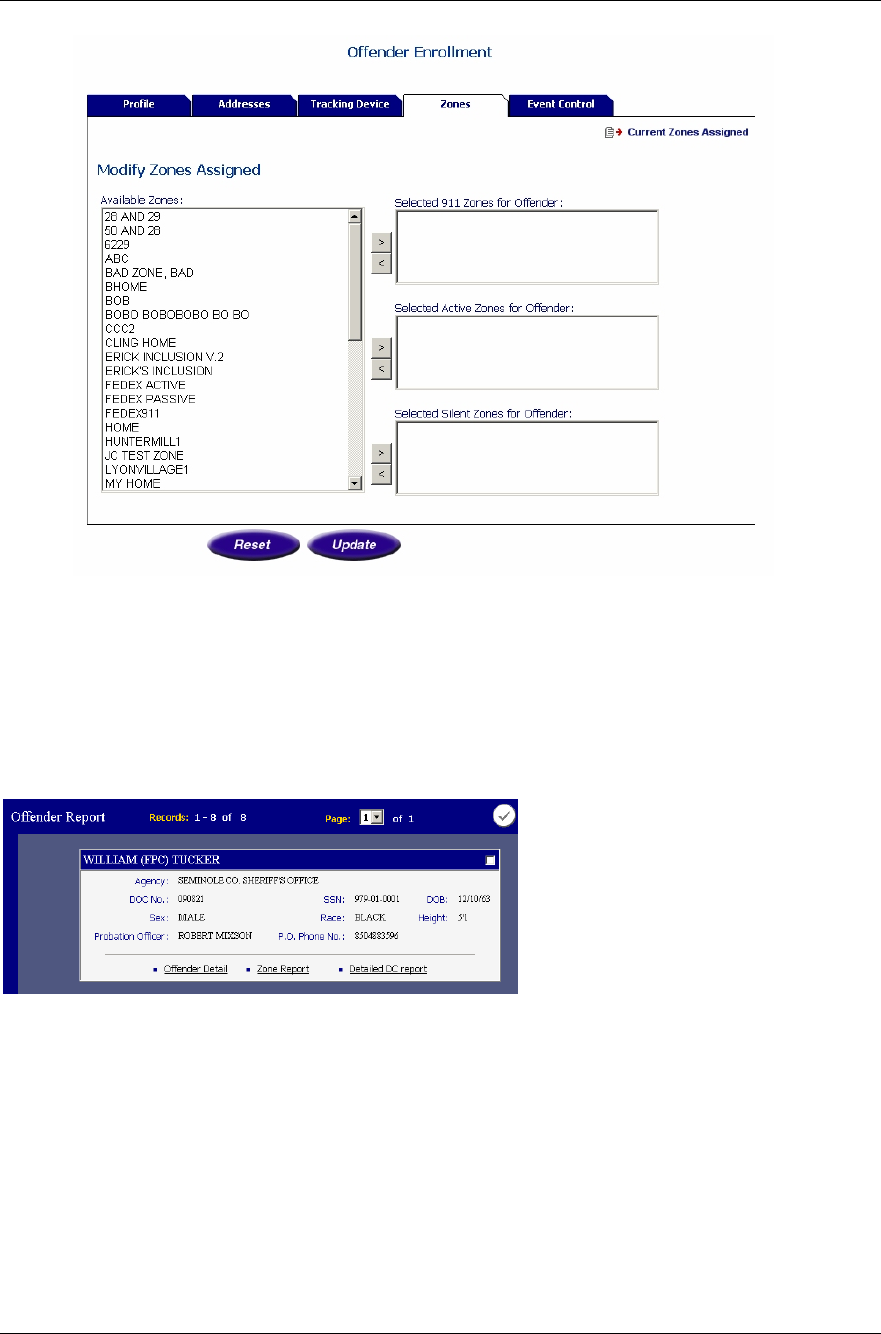
To assign a zone select Modify Zones Assigned. This brings up a screen like the one shown
below. To add a zone to an offender’s monitoring schedule, simply click on the zone name in
the listing on the left side of the page and move it into either the Active or Passive zone list
on the right by pressing the arrow button next to the type of zone.
VeriTracks™ User’s Manual
Satellite Tracking Of People 25
Verifying a zone assignment
After a zone is set up you should verify that the zone is assigned to the correct offender and in the
correct location.
Verify the zone is assigned to the offender
To verify the zone is assigned to the correct offender search for the offender, Supervision =>
Search. On the Offender Report, select Zone

VeriTracks™ User’s Manual
Satellite Tracking Of People 26
Verify the zone is in the proper place
The most effective way to verify the location of a zone is to view it by mapping it in the from the
Zone report. Select the (1) check box on the Zone report and (2) hit the globe.
For inclusion zones you may also want to map the zone after the first night the offender has gone
home to verify the offenders points are in the correct place. If the zone is incorrectly mapped you can
edit the location of the zone.
Edit a zone
Any time a zone is edited, it must be reassigned to all offenders that it was assigned to before
the edit.
To edit any of the text fields on the zone creation page, select the zone off the main zone page. Edit
the fields and update the changes. If you need to change the address on a zone, make sure to
manually clear the latitude and longitude filed and use the Geo-Code button to recalculate the zones
new latitude and longitude.
You can also edit the location of the zone right on a map. Select Supervision => Zone then select
the zone off the drop down menu. You can only edit zones you created. Select the map button to
map the zone location. Once the zone has been mapped, you can move it by clicking and dragging.
You can also resize the zone. Once you moved the zone, click on the Create/Edit Zone icon.
This will take you back to the Zone Entry form.
Edit the Zone Entry fields as desired. Because the zone location and size were already redefined they
do not need editing.
Make sure you update the zone to save your changes. Then reassign the zone to all offenders who
were assigned to it before the edit.
Un-assign a zone
To un-assign a zone, select Modify Zones Assigned. This brings up a screen like the one below.
Click on the zone name you want to remove by pressing the out arrow button next to the type of zone.

VeriTracks™ User’s Manual
Satellite Tracking Of People 27
Expire a zone
Zones cannot be deleted. To expire a zone once you are done with it, un-assign it from all offenders
first.
To expire a zone, mouse over either the Supervision or the Administration menu options and select
the zone you wish to expire. Change the Stop Date to today’s date and the zone will expire.
Review
How To…
Create a Zone
1. Locate the zone area on the map. You may want to go to a specific address
using the Map link on the main menu.
2. Click on the Create/Edit Zone icon to place a small blue ball on the middle
of your map. Drag the blue ball to create the circumference of the desired
zone. Move the center green ball to the location of the zone
3. Click on the Create/Edit Zone icon again. This will take you to the Zone
Entry form.
4. Complete the Zone Entry fields.

VeriTracks™ User’s Manual
Satellite Tracking Of People 28
Chapter 5: CURFEWS, RANGES, AND EVENT
CONTROL
In this Chapter you will learn how to:
- Set up curfew schedule
o Edit a schedule.
o Delete a schedule.
- Set up a range for a BluHome – BluTag pair
- Set up a schedule for controlling events.
o Edit a schedule.
o Delete a schedule.
While the purpose of each of these functions is different the application of each is similar so we
placed both the curfew and event control guidance in this chapter.
Curfews
Curfews define the time period that an offender must be in range of the BluHome. Placing the
BluHome at a specific location, like the home, is a stronger method of verifying offender location
than through the use of inclusion Zones alone. The curfew works much like the inclusion zone in that
when an offender is late arriving in range of the BluHome or leaves the area of the BluHome during
the curfew period an alarm is raised.
Setting up a schedule
The Curfew tab on the enrollment screens allows you to set the times that the curfew is enforced and
curfew violations are reported. The areas shown in Blue are the times for when curfew events are
recorded and notifications sent.
Select the start and end time for the curfew schedule. You can pick end times that are in the next day,
VeriTracks™ will wrap the times around past midnight into the next day.
If you want to exclude certain days from having a curfew simply make sure the box next tot eh day is
unchecked.
VeriTracks™ User’s Manual
Satellite Tracking Of People 29
Deleting a schedule
To drop a curfew for an offender simply uncheck the everyday or selected days and the curfew will
be removed.
Ranges
The variable range setting for the BluHome – Blutag pair is set through he menu on BluHome.
The instructions are as follows.
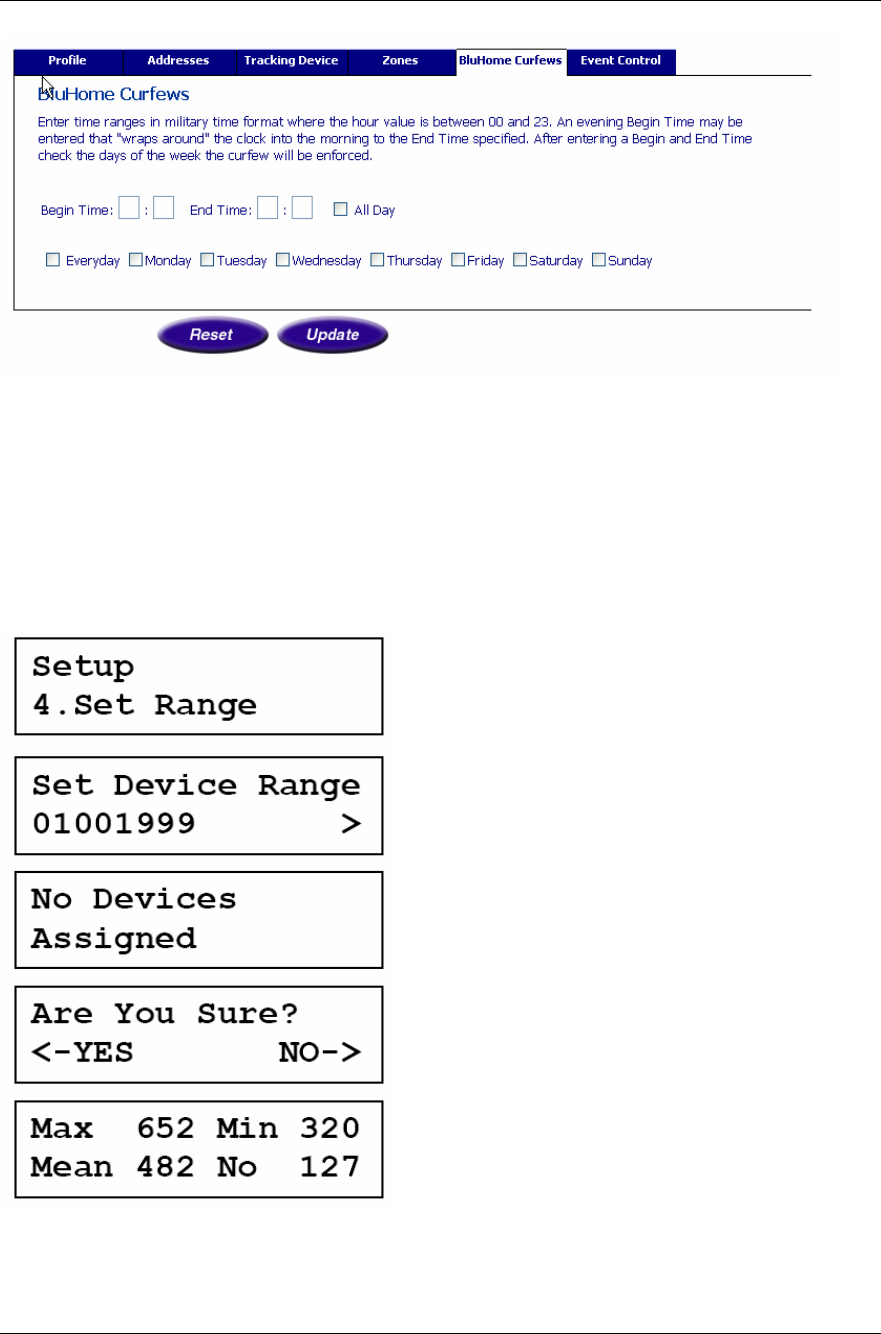
The set range menu item allows the RSSI
validation limit to be set for any device assigned
to the BLUHOME.
On selecting the option a list of assigned
devices will be displayed. The up / down keys
will scroll through the list.
Pressing enter will select the displayed device
If no devices are assigned to the BLUHOME this
will be indicated on the display. The display will
return to the menu option after 3 seconds.
A confirmation screen is provided to avoid
accidental use. The right key will cancel the
operation and the left will start the set range
process.
Once started, the BluHome will wait for a
message from the device. The BluHome will
send a test request reply to the tag which will put
it into setup mode. This causes the tag to
transmit every 10 seconds.

VeriTracks™ User’s Manual
Satellite Tracking Of People 30
The BluHome measures the RSSI of each received message and displays the maximum,
minimum and mean value received as well as the number of messages received. The higher
the given RSSI value the stronger the received signal.
Pressing the enter key will end the setup range process. The BluHome will send an exit
setup reply to the next message from the tag.
The new RSSI limit will be calculated (exact calculation to be determined after testing) and
displayed. The user can then accept the limit using the left key.
The right key will cause the RSSI limit to be disabled for that device
Event control
Event control allows you to select time periods where events and the associated notifications are
reported. While this functionality works for the BluTag, it is designed primarily for the CellTag.
During the selected time periods any event (Bracelet gone, etc) will be reported by the system.
During all other times, events will be ignored by the system and no notification of a violation will
occur. This functionality is used to suppress events and notifications in cases where an offender is in
a custody or controlled situation and you do not want the events recorded. For instance, for an
offender in a shelter or work release program, event control could be used to suppress events like a
bracelet gone when the CellTag is taken from the individual for the evening.
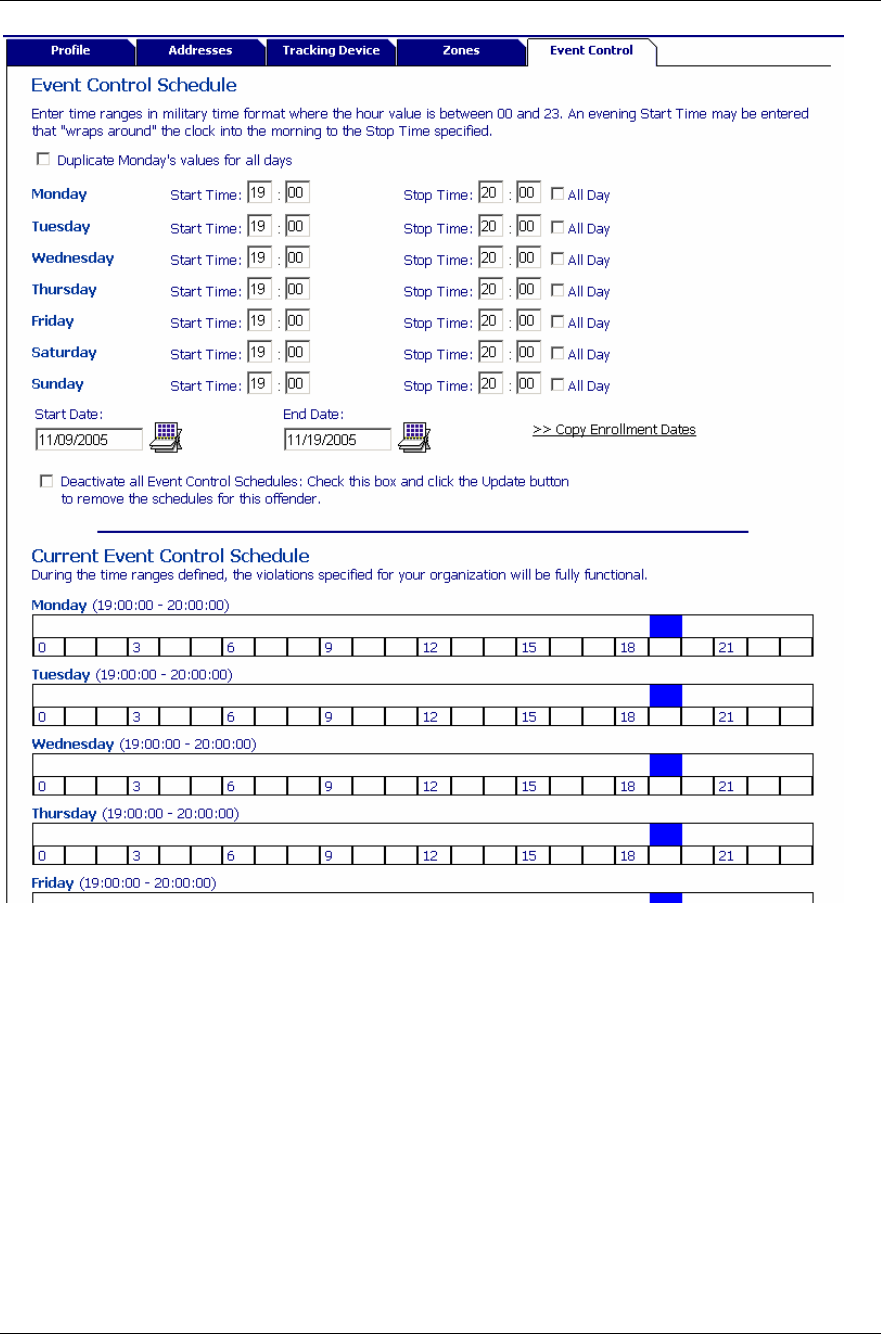
Setting up a schedule
The Event Control tab on the enrollment screens allows you to set the times that events are reported.
The areas shown in Blue are the times for when events are recorded and notifications sent.
For each day, select the start and end time for the schedule. You can pick end times that are in the
next day, VeriTracks™ will wrap the times around past midnight into the next day.
Once you have saved the schedule THE TIMES THE SYSTEM WILL RECORD AND REPORT
VIOLATIONS WILL BE IN BLUE.
VeriTracks™ User’s Manual
Satellite Tracking Of People 31
Deleting a schedule
Select “Deactivate all Event Control Schedules” to clear the schedule.

VeriTracks™ User’s Manual
Satellite Tracking Of People 32
Chapter 6: EVENTS AND NOTIFICATIONS
This chapter covers:
• BluTag® Events.
• BluTag and BluHome Events
• Immediate Notifications.
• The Daily Summary Report Notification.
To supervise an offender you need to have the important and time-critical information delivered to
you (any where).
The most frequently used tools for monitoring offenders are events and notifications. BluTag® and
VeriTracks™ can be used to detect violations of program rules and release conditions. When time
critical events occur, VeriTracks™ can immediately notify you. For less time critical events,
VeriTracks™ provides summary notification reports on a daily basis.
Understanding Events and Notifications
Events are generated by either the tag or by a rule violation in the VeriTracks™ software. For
instance, if the tag detects that the strap has been tampered with or that it is in an exclusion zone, the
tag will generate an event. Events are also generated by the server if, for instance, the tag fails to call
on schedule, or the offender violates a silent zone. The events you receive and the method of
notification vary with the type of tracking device and your preferences. For instance, with a one-
piece device there are no “Bracelet Gone” events since the entire unit is self-contained.
A notification is the way in which the event information is delivered to the supervising officer or
other users. The VeriTracks™ system has two types of notifications: Event driven and Periodic. To
receive a notification, a user simply subscribes to the given notification and provides an e-mail
address that will receive notifications. The e-mail address can be for an account on the users desktop,
mobile phone, pager, PDA, or Blackberry device.
BluTag® Events
The BluTag® and VeriTracks™ generate the following events:
BRACELET STRAP
BRACELET STRAP CLEAR
Bracelet strap on the tracking device may
have been tampered with.
ON CHARGER
OFF CHARGER Tag is placed on the charger
LOW BATTERY ALARM
LOW BATTERY ALARM CLEAR
Warning that the battery needs recharging.
Clears when placed on charger.
MESSAGE GAP
MESSAGE GAP CLEAR
The unit has failed to call in a specified
time period. Default is six hours.
CELL ID CHANGE
CELL ID CLEAR
The unit has communicated with a different
cell tower during each scheduled call-in
over a specified number of call-ins.

VeriTracks™ User’s Manual
Satellite Tracking Of People 33
EXCLUSION ALARM
EXCLUSION CLEAR
When an offender enters an area in which
he/she is not allowed.
INCLUSION ALARM
INCLUSION CLEAR
When an offender exits an area in which
he/she is required to stay.
SILENT EXCLUSION ALARM
SILENT EXCLUSION ALARM CLEAR See above
SILENT INCLUSION ALARM
SILENT INCLUSION ALARM CLEAR See above
911 EXCLUSION ALARM
911 EXCLUSION ALARM CLEAR See above
911 INCLUSION ALARM
911 INCLUSION ALARM CLEAR See above
PRESS BUTTON The Status call button has been pressed
BluTag® and BluHome® Events
Using BluTag® with BluHome and VeriTracks™ generate some additional events. BluHome only
events are in Bold below:
BRACELET STRAP
BRACELET STRAP CLEAR
Bracelet strap on the tracking device may
have been tampered with.
ON CHARGER
OFF CHARGER Tag is placed on the charger
LOW BATTERY ALARM
LOW BATTERY ALARM CLEAR
Warning that the battery needs recharging.
Clears when placed on charger.
MESSAGE GAP
MESSAGE GAP CLEAR
The unit has failed to call in a specified
time period. Default is six hours.
CELL ID CHANGE
CELL ID CLEAR
The unit has communicated with a different
cell tower during each scheduled call-in
over a specified number of call-ins.
EXCLUSION ALARM
EXCLUSION CLEAR
When an offender enters an area in which
he/she is not allowed.
INCLUSION ALARM
INCLUSION CLEAR
When an offender exits an area in which
he/she is required to stay.
SILENT EXCLUSION ALARM
SILENT EXCLUSION ALARM CLEAR See above
SILENT INCLUSION ALARM
SILENT INCLUSION ALARM CLEAR See above
911 EXCLUSION ALARM
911 EXCLUSION ALARM CLEAR See above
911 INCLUSION ALARM
911 INCLUSION ALARM CLEAR See above
PRESS BUTTON The Status call button has been pressed
BLUHOME LOW BATTERY CLEAR The low battery on BluHome has clear,
the unit has had power restored
BLUHOME POWER LOSS CLEAR The BluHome unit has regained AC
power, it is no longer running on battery

VeriTracks™ User’s Manual
Satellite Tracking Of People 34
BLUHOME POWER ON / RESET
The BluHome unit had lost power,
Battery and AC. As a result it had shut
down and has been restarted.
BLUHOME POWER LOSS The BluHome unit no longer has AC
power, it is now running on battery
BLUHOME MOVEMENT The BluHome unit has been moved
BLUHOME MOVEMENT CLEAR The BluHome unit stopped moving
BLUHOME LID TAMPER CLEAR The BluHome unit has been closed
BLUHOME LID TAMPER The BluHome unit has been opened
BLUHOME SANITY CALL TIMER
EXPIRED The BluHome unit made a sanity call
BLUHOME CALL SUCCESSFUL
The BluHome has completed a call, note
this event is not transmitted until the
next call
BLUHOME LOW BATTERY
The BluHome battery is low, the
BluHome needs to be plugged in to a
working AC power outlet
AWAITING ENTER
The tag has been assigned to the
BluHome but the tag has not registered
it first arrival event
ENTER The tag has entered the BluHome area
LEAVE The tag has left the BluHome area
BLUHOME CURFEW ALARM The offender failed to arrive or left
during curfew
BLUHOME CURFEW CLEAR The offedner arrived or returned into the
BluHome area
BLUHOME SETUP RSSI CHANGED The range on the tag has been changed
BLUHOME: BLUTAG BRACELET
STRAP Bracelet strap on the tracking device
may have been tampered with.
BLUHOME: BLUTAG LOW
BATTERY ALARM
Warning that the battery needs
recharging. Clears when placed on
charger.
BLUHOME: BLUTAG PRESS
BUTTON The Status call button has been pressed
BLUHOME SETUP DEVICE
ASSIGNED A devcie has been manually assigend to
the BluHome. This is not recommended
BLUHOME: BLUTAG ON CHARGER Tag is placed on the charger
BLUHOME: BLUTAG OFF
CHARGER Tag is off the charger
BLUHOME: BLUTAG BRACELET
STRAP CLEAR The BluTag Strap violation has cleared
BLUHOME: BLUTAG LOW
BATTERY ALARM CLEAR The tag has been placed onteh charger
Notifications
Event driven reports are delivered when zones are violated or technical violations occur (e.g. when
the tracking device is tampered with). Each event report is related to a specific event. Event reports
are generated as they occur and delivered to the supervising officer based on his/her preferences.
Periodic notifications include the daily summary report, monthly activity reports, and any custom
report you may require. The most common of these are the daily summary reports. They are
delivered each morning and summarize events from the previous day. There are three daily summary