Satellite Tracking of People BH0107A BluHome® User Manual BlutagUserGuide9 1
Satellite Tracking of People LLC BluHome® BlutagUserGuide9 1
Contents
- 1. User Manual Part 1
- 2. User Manual Part 2
User Manual Part 2

VeriTracks™ User’s Manual
Satellite Tracking Of People 35
reports available--one for corrections officers, one for law enforcement officers, and one for
administrators. The purpose of the daily summary report is to summarize the previous day’s
important events and focus the attention of officers on current and emerging offender problems.
To set up your notification preferences see Chapter 7 under Preferences.
Event Driven Notifications
The events you can receive notifications on are listed below. Codes for each event type are used to
shorten the message length to the phones making the message easier to readable, less scrolling is
required.
On the event driven (immediate) notifications you get both open and close event notifications. Open
events start with a ‘+’ (plus sign). Close event notifications start with a ‘-’ (minus sign).
The notification contains the following information:
Event Type Office <zone name> Offender name Time and date
+IZ CA11116 BAKER VICTIM EXCLUSION ZONE THOMAS BAKER 04:49 11/10/05
- IZ CA11116 BAKER VICTIM EXCLUSION ZONE THOMAS BAKER 05:17 11/10/05
The underlines added for clarity only and are not on the actual notifications.
Codes are (BluHome Codes in Bold and Italics):
BRACELET STRAP +BSTP
BRACELET STRAP CLEAR -BSTP
ON CHARGER +CHG
OFF CHARGER -CHG
LOW BATTERY ALARM +BATT
LOW BATTERY ALARM CLEAR -BATT
MESSAGE GAP +MGAP
MESSAGE GAP CLEAR -MGAP
CELL ID CHANGE +CELL
CELL ID CLEAR -CELL
EXCLUSION ALARM +EZ
EXCLUSION CLEAR -EZ
INCLUSION ALARM +IZ
INCLUSION CLEAR -IZ
SILENT EXCLUSION ALARM +EZS
SILENT EXCLUSION ALARM CLEAR -EZS
SILENT INCLUSION ALARM +IZS
SILENT INCLUSION ALARM CLEAR -IZS
911 EXCLUSION ALARM +E911
911 EXCLUSION ALARM CLEAR -E911
911 INCLUSION ALARM +I911
911 INCLUSION ALARM CLEAR -I911
BLUHOME POWER LOSS CLEAR -HPOW
BLUHOME POWER LOSS +HPOW
BLUHOME LID TAMPER CLEAR -HLID
BLUHOME LID TAMPER +HLID
BLUHOME CURFEW ALARM +CUR
BLUHOME CURFEW CLEAR -CUR
BLUHOME: BLUTAG BRACELET +HBSTP

VeriTracks™ User’s Manual
Satellite Tracking Of People 36
STRAP
BLUHOME: BLUTAG BRACELET
STRAP CLEAR -HBSTP
BLUHOME: BLUTAG LOW
BATTERY ALARM +HBATT
BLUHOME: BLUTAG LOW
BATTERY ALARM CLEAR -HCHG
The Corrections Officer Summary Report
The Corrections Officer Summary Report outlines the activities of each supervised offender. It lists
any events (technical violations, equipment status changes), Zone Violations and crime incident hits
that have occurred in the last 24 hours or that are still open.
This report is e-mailed each morning to the supervising officer and provides summary information for
each supervised offender. The e-mail report contains hyperlinks that direct the supervising officer
into VeriTracks™ for further analysis of the events or hits. An officer can view maps of multiple
offenders or map a specific zone violation or crime hit.
The purpose of this report is to provide the supervising officer with a quick view of issues or
problems that have occurred in the past 24 hours without logging into the system. From this single
report, the supervising officer can see which offenders had problems the previous day and which ones
were compliant. The goal is to allow the officer to focus on those offenders that are non-compliant or
otherwise a problem as a priority and to remind the officer of events that may still be open.
VeriTracks™ User’s Manual
Satellite Tracking Of People 37
Hyper link to map of
offenders tracks for the
day
Technical Violations
related to equipment
Leaves/enters
Tampers
Zone Violations
Correlation with crimes
reports
Display the results in text reports
The link in the Offender Summary report links to the offender report, shown below and described in
Appendix 3, Reports.
From the basic report you can:
VeriTracks™ User’s Manual
Satellite Tracking Of People 38
• Show the records in a table, the results can be sorted by the columns displayed.
• See the zones assigned to this offender. Click on the Offender Detail Link
• In certain jurisdictions, you can link to detailed demographic or criminal history date on the
offender using the Detailed DC Report link.
• Drill down to see Offender Details like violations, hits, and status changes for the offender
during the selected time period. Click on the Offender Detail Link
Drill down to see OFFENDER DETAILS
From the text report, click on the Offender Detail Link, which shows events and status changes for
the selected time period.
Select one of the different options to change the data displayed: Violations, Device Summary,
Incident hits, or Zone Hits.
a. Violation: The Violation Event Summary details if the offender had any device
violations during the specified period of time. It lists the Violation Date/Time,
Violation Cleared, the Violation code, and the Duration that the violation occurred.
These violations include, but are not limited to, “Bracelet Gone,” “Bracelet Strap,”
and “Motion No GPS.”
b. Status: This link provides details about the device. Not only does it list the
Violations of the device, but it also lists “Device at Rest” and “Device in Charger.”
c. Incident Hits: This link will take you to a table listing of all Incident Hits that the
offender had for a specified time period. This report lists the Primary Offense, with
links to the Incident reports, the reporting agency, the Points and Distance from the
Incident, and the Start/Stop Date and Time.
d. Zone Hits: This link provides a table of any Zone Violations for this offender for a
specified period of time. This report lists the Zone Name, the Violation Date, the
VeriTracks™ User’s Manual
Satellite Tracking Of People 39
ORI, and POC (point of contact), the number of Points in the violation, and the Zone
Type.
Map one or more offender tracks
• Check the box in the upper right corner to select records.
• Click on the globe icon to map the records.
• TIP - See Maps in Chapter 4 for more details on Maps
VeriTracks™ User’s Manual
Satellite Tracking Of People 40
Chapter 7: SUPERVISING AN OFFENDER
This chapter covers the tools you will use to supervise an offender.
• The offender status tool provides a quick snap shot of the offender’s current location and
status.
• The Search Screen locates an offender’s history, including reports and maps that show where
he/she has been.
• Mapping tools analyze where an offender has been and what he/she has been doing.
Determining Offender Location and Status
There are two ways to view offender location and status information. View the most current
information with the Offender Status submenu. View historic information, with the Search
submenu option that is designed to manage and display a complete historic view of the offender’s
actions.
The Offender Status button, like the inventory, enrollment and zone submenus, is designed
specifically for the supervising officer. It allows you to contact the offender and capture notes on
his/her activities. Access to the offender status is limited to the offenders in your office, and parent
offices if you are part of an organizational hierarchy. Users outside your organization (law
enforcement agencies for instance) cannot access offender status.
To promote data sharing, all users can access some offender information through the search
submenu. This is the only shared submenu under the supervision menu. The pages under the search
submenu are read only. This prevents users from outside your organization from changing any
offender data.
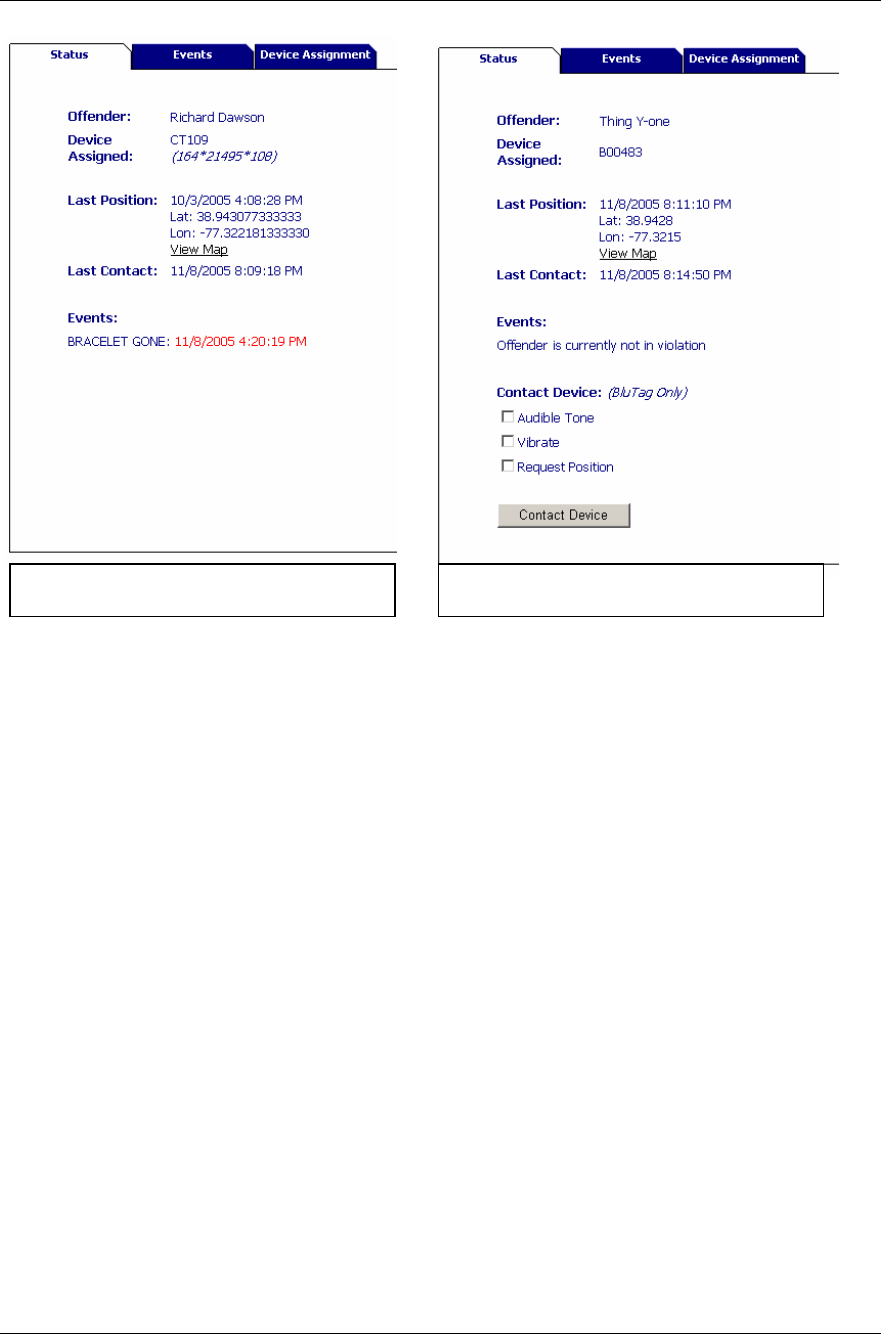
About the Offender Status Tabs
The Offender Status option provides you with a set of tabs that give an immediate status of the
selected offender. The three tabbed screens highlight location, events, and offender device history for
the selected offender.
As shown below the main tab is Status – the information block shows the offender’s name and the
device number. It also shows the last reported location of the offender, the time of the last position,
the last time the device reported in, and any events that are still open. This tab also provides a link to
a map of the offender’s activities for the day. If the offender has not had any location data today it
will show the data for the last day a position was obtained. This map has all the tools and
capabilities described later in this chapter.
When using a passive tag, a label will appear next to the Device Assigned: Device number.
Clicking on the contact button on the information block allows you to initiate an audible tone and/or
vibrate action or requests the current location from the device.
VeriTracks™ User’s Manual
Satellite Tracking Of People 41
NOTE: The information provided in the Offender Status report is current as of the last call by the
tag. (When events occur, officers are notified by email. It is possible that between the time a
notification is received and the time an officer checks in with VeriTracks™, the event may have
cleared.) To refresh the data on the offender status pages, select the offender from the drop down list
again.
The other tabs are the violation tab and the Device Assignment tab.
The Event Tab
The Event Tab lists all the violations for the offender within the last 24 hours. The officer can change
the time range on the screen to show longer or shorter periods of time.
You can also manage events on the Event Tab. The officer can use the check box and confirm button
to record the fact that the event was reviewed. The notepad can be used to capture notes on the event.
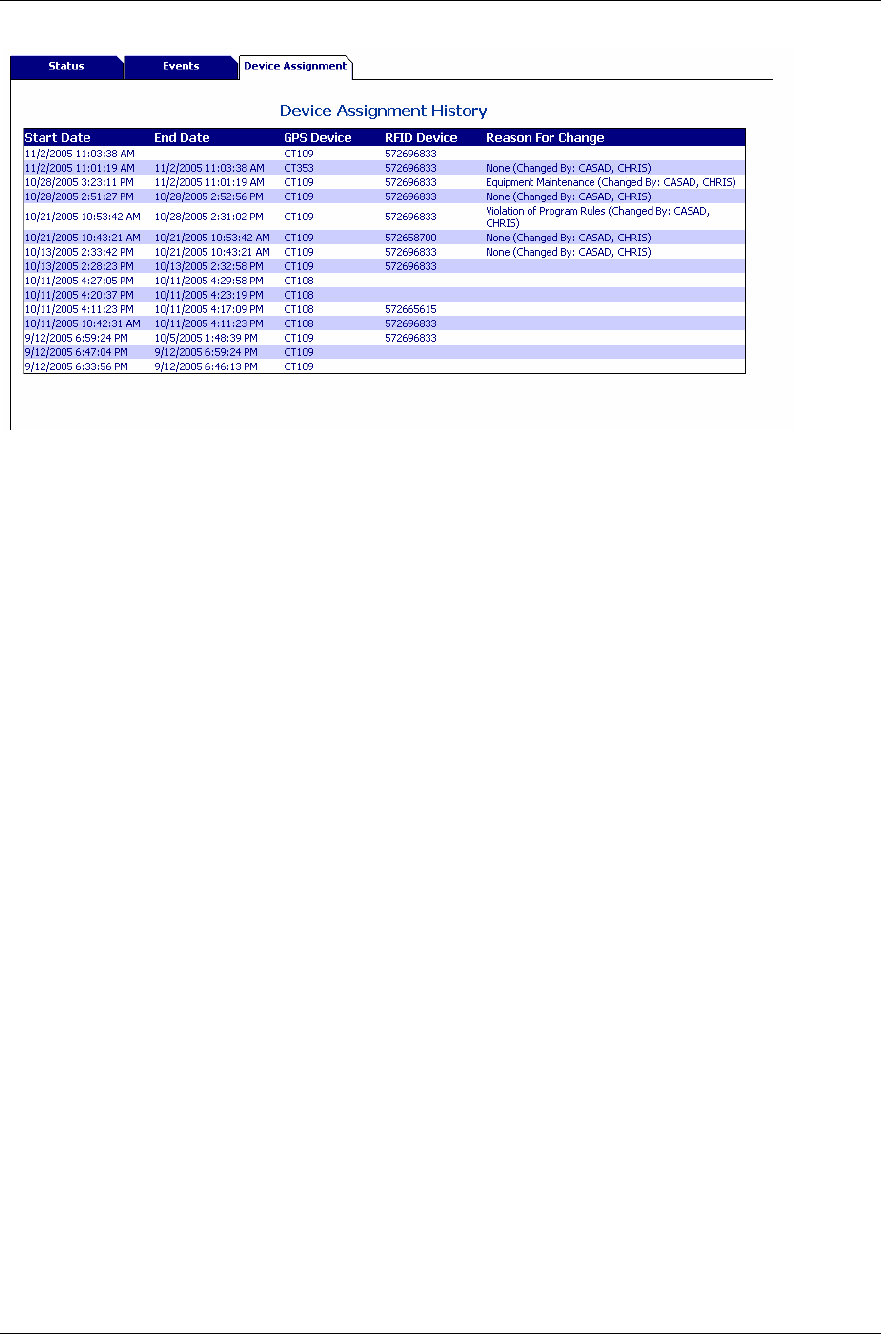
The Device Assignment Tab
The Device Assignment Tab shows the assignment history for the offender including a reason for any
change in the assigned tag. This report lists the period of time a tag was assigned to an offender, as
well as the reason the device was removed from him/her. It is available from the enrollment pages as
well.
CellTag Offender Status BluTag Offender Status
VeriTracks™ User’s Manual
Satellite Tracking Of People 42
Understanding Offender Status when using BluHome
When using the BluHome accessory, the last contact for the BluTag will be shown below ... When
the BluTag is in range (ENTER Event) of the BluHome, Active BluTags stop collecting GPS data and
stops calling directly over the wireless network. Instead the BluTag calls any GPS data it may still be
storing through the BluHome. When the Blutag passes GPS data through a BluHome the BluTag last
contact will update as will the last position.
When a tag arrives at the Home unit, it will likely pass GPS data on the tag through the BluHome.
An active tag will generally pass its last call data through the BluHome. A passive tag will of course
pass all its data through the BluHome on arrival. The passive data may take up to 30 minutes to
download on arrival depending on how long it has been since the offender has downloaded data.
Any events that occur while in an enter status will be passed through the BluHome. These events will
be listed as BluHome:BluTag EVENT, for instance a Bracelet Strap will be reported as
BluHome:BluTag Bracelet Strap. When BluTag passes event data through the BluHome, The last
contact (and last position) will not update. Instead this contact will be represented by the update to
the BluHome last contact.
When using the BluHome the status page will always show either an Enter or Leave under the events
label so a supervising agent or officer can quickly tell the Enter/Leave status at a glance.
About the Search Pages
To review an offender’s data on the shared pages (pages accessed by other agencies) or to quickly
review your entire case load use the Search submenu and pages. You may also use the search screen
to view historic data that is older than 24 hours. The search screen is designed around text-based
query screens that allow the user to create a custom query and generate the needed report. Appendix
X and Y described the offender search (also called Tracked Offender Search) and the four other query
screens and associated reports. The Search capability lets you display in read only format text
reports and map historic location information.

VeriTracks™ User’s Manual
Satellite Tracking Of People 43
Use the Offender Search
To use the offender search you can enter any or all of the fields shown to limit the data result set
returned. These fields are defined in Appendix 2, under Tracked Offender Search.
To review your case load, select your name in the supervising officer field and set the date range to
the one of interest.
Display the results in text reports
This is the same report that is linked to the Offender Summary report described in chapter 6.
From the basic report you can:
• Show the records in a table, the results can be sorted by the columns displayed.
• See the zones assigned to this offender. Click on the Offender Detail Link.
• In certain jurisdictions, you can link to detailed demographic or criminal history date on the
offender using the Detailed DC Report link.
• Drill down to see OFFENDER DETAILS like violations, hits, and status changes for the
offender during the selected time period. Click on the Offender Detail Link.
• Map the offender’s movements.
Using Mapping tools and procedures
There are a number of tools and procedures for analyzing an offender’s tracks on a map. The
following four procedures describe different ways to understand and interpret the mapped location
data.
Play back tracks
• Map one or more offender tracks (a collection of points during a specified time period)
• Click on the Playback Tracks icon The playback tracks icon allows the user to
view the movement from one tracking point to the next from the earliest point on map. This
will regenerate the map and add a new tool bar at the top of the map.
• Move through the offender tracks by using the VCR-like buttons for playing, stepping
through, stepping back and pausing. In addition,
dragging the bar allows you to control the movement of the tracks.
• When tracking a single offender, the playback symbol is a green dot with a blue trail
depicting the previous five track points.
VeriTracks™ User’s Manual
Satellite Tracking Of People 44
• If the offender’s tracks move off of the current map, click on the auto pan check box so the
map automatically pans and refreshes ..
Review a track
• The connect track points from start date/time icon allows you to connect track points
for a selected offender, beginning with the earliest point to fall within the date range of the
map.
• Map one or more offender tracks (a collection of points during a specified time period)
• Select one or more points for the offender of interest. You can only link points for a single
offender at a time.
• Select the connect track point button.
• The track points will be connected by colored lines. A green line indicates less than two
minutes between points, a yellow line indicates less than 10 minutes between points and a red
line indicates more than 10 minutes between points.
Identify Features
• Hold down your left mouse button and draw a box around one or many map features.
• Click the Identify Features icon on toolbar.
• This produces a detailed report on each feature (offender track point, zone, home/work
address) in the box drawn.
NOTE: These first three capabilities when used together can quickly focus the supervising officer on
location anomalies, such as on offender going to an unusual place and allows him/her to drill down
into the details of the offender’s behavior..
See the places an offender frequents
• Map a track for the offender of interest for any time period.
• Select an offender’s track on the map by drawing a box around one track point to identify the
offender.
• Select the Show Offender Range icon to overlay a density layer that depicts hot spots
where the offender frequented or the offender’s “home range.”
• Zoom out to see the entire home range
• This feature visualizes an offender’s “home range,” which covers all of the places an offender
has visited and where he/she spends most of his/her time.
Find offenders at a location at a time.
• Go to the Map link on the main menu bar. This provides a drop-down box in which you can
enter the address information to be mapped.
VeriTracks™ User’s Manual
Satellite Tracking Of People 45
• Alternatively, click on the Map link on the main menu bar and you will be redirected to the
Map Data Entry screen. Here you can enter the address information or select from a drop-
down listing of previously mapped addresses.
• When you have entered the address information in either location, you will need to click on
the Map button to create the map.
• On the map, draw a box around the area of interest
• Click on the Select Tracks icon. This icon displays an offender’s tracks that occurred
in a selected area of the map during the specified time range.
Note – You can also Select Crime Incidents and Select Zones to display crimes and
zones in an area on the map following a procedure similar to the one described above.
Review
How To…
Determine Current Offender Status
Select Offender Status from the Supervision drop down menu.
Select the offender of interest from the scrolling list.
Review the information on the offender status tabs.
How To…
Review Tracked Offender History
To review an offender’s historic data that is older than 24 hours, use these screens to
generate reports and maps of historic information:
Open the Offender Search Screen (Supervision , Search ) and enter search criteria.
Display the results in text reports, or
Map one or more offender tracks.

VeriTracks™ User’s Manual
Satellite Tracking Of People 46
Chapter 8: USER ADMINISTRATION
VeriTracks™ allows users to administer their own account information, select the types of
notifications they need to receive, and create zones. A section under Administration was also
included for agency administrators to manage users and for smaller law enforcement agencies to input
its own crime incident data when it does not have its own system for this function.
Menu Options
Incident
The Incident Data Entry option is available for smaller law enforcement agencies that do not have an
automated Crime Incident entry system already in place, like a CAD system or RMS. Electronic
formatting of data is required in order to feed it into VeriTracks™. This function will not be used by
most agencies
User Accounts
Each agency will have an administrator account assigned to manage user accounts. This menu option
is accessible only by your agency administrator. Administrators can create users as needed and
modify user information. Procedures for the Agency Administrator are covered Appendix 4.
Zone
This menu option is another way of accessing the Zone creation screen described in Chapter 4.
Preferences
There are two types of users defined within VeriTracks™: Law Enforcement Officers/Crime
Analysts and Supervising Officers/Probation Officers. The Preferences menu allows the user to
modify his/her own account and select the types of notifications he/she needs to receive from
VeriTracks™. In addition, the user can set up how he/she wants his/her default map layers displayed.
Each of these options are accessed by clicking on the appropriate folder tab.
For BOTH Law Enforcement and Probation Officers, some user account information is modifiable.
You DO NOT have privileges to modify your Username, First Name, Last Name or Contact Type.
The following are the fields can be modified.
Profile Tab
First Name Your first name entered by your agency VeriTracks™
administrator.
Last Name Your last name entered by your agency VeriTracks™
administrator.
Password Your password will originally be assigned by your agency
VeriTracks™ administrator, but you will be able to modify
VeriTracks™ User’s Manual
Satellite Tracking Of People 47
this as you see fit.
Confirm Password Type your password in two times for verification.
User Time Zone This allows the user to set the Time Zone in which
VeriTracks™ should display data.
E-mail Each user must enter his/her e-mail address and keep it
updated in order to receive the VeriTracks™ notifications.
Active E-mail This e-mail address is used for the officer to receive
immediate notifications on his/her offender’s movements.
This can be the same e-mail address listed above or another
one, such as a cell phone or Blackberry.
Phone Your phone number where you can be reached.
The above fields are common for both types of users. Once your user account information is updated,
click on the Update button.
Notifications Tab
Supervising Officers/Probation Officers
Probation offices can be notified about Zone Hits, Incident Hits and equipment related violations. For
Zone Hit notifications, choose the notifications based on who set up the Zone. The following
information pertains to Supervising Officers/Probation Officers users:
VeriTracks™ User’s Manual
Satellite Tracking Of People 48
Daily notifications
Immediate or Event Driven Notifications
Law Enforcement/Crime Analysts
Law enforcement offices have fewer choices for notifications. They can only be notified about Zone
Hits and Crime Incident Hits. For Zone Hit notifications, choose the notifications based on who set
up the Zone. The following information pertains to Law Enforcement/Crime Analyst users:
Zones I set up Select this check box to ensure notification of any Zone
Hits on Zones you created.
Zones my ORI or
Agency set up Select this check box to ensure notification of any Zone
Hits on Zones anyone in your agency created.
Incidents reported by
ORI or Agency Select this check box to ensure notification of any Crimes
reported by your agency.
VeriTracks™ User’s Manual
Satellite Tracking Of People 49
Map Preferences Tab
The Map Preferences tab displays the entire listing of map layer options. From here select and
deselect the layers you wish to see by default on your maps. You can also change your defaults from
the map toolbar. A best practice is to change your map preferences prior to creating a map. That way
the changes are saved and take effect when you do go to create a map.
Each map layer list can be either visible and/or labeled. To remove the layer completely, you need
only deselect the item in the visible check box. You can modify this list as often as you like until you
have the map layers as you need.
NOTE: The offender address layer provides a single map layer that is customizable to show offender
addresses by Status with "Current, Off Monitoring, or All" options, and by Agency, with "My ORI,
My Individuals, or All" options. This enhancement removes the clutter on maps in areas dense with
extraneous addresses.
When you have finished selecting your preferences, click on the “Update” button. Click on “Reset”
to nullify your changes.

VeriTracks™ User’s Manual
Satellite Tracking Of People 50
Chapter 9: INVENTORY MANAGEMENT
The Inventory menu allows your agency to monitor your device inventory. There are several sub-
menu options available to assist you in monitoring your device inventory: Inventory List, Change
Device(s) Status, Change Device(s) Owner, Device Assignment Report, Device History Report,
Device Data Load Report, and the Case Load Report. Of these reports, new and intermediate users
generally only need to use and understand the inventory list and the device data load report.
1. Inventory List: Displays all devices within your agency’s inventory, including each
device’s serial number, the offender that it is assigned to (if any), and the status of
each device (NEEDS REPAIR, PRE-SHIPPING, RECEIVED, SHIPPED,
ASSIGNED, UNASSIGNED). Devices can also be placed in a RETURNED status.
Returned devices are shown only on the device history report.
2. Change Device(s) Status: Select the device on which you wish to change the status
by clicking in that device’s row of information. To select more than one device in
the list, hold down the control key on the keyboard while selecting each device you
wish to change. Below the list of devices is a drop-down listing of status options to
choose from. Select the new status for that device. Click on the “Submit” button to
save the changes.
3. Change Device(s) Owner: Certain agencies will be set-up as a “parent” company
with possibly multiple agencies within its hierarchy. Devices can be moved around
within these hierarchies. In order to reassign a device within your agency’s structure,
the device must be unassigned. Select the device you wish to change ownership by
clicking in that device’s row of information. To select more than one device in the
list, hold down the control key on the keyboard while selecting each device you wish
to change. Below the list of devices is a drop-down listing of all agencies within
your company’s hierarchy that have privileges to reassign devices. Select the agency
from the list to change the owner.
4. Device Assignment Report: Displays a listing of all devices within your agency
assigned to offenders. Create this report by selecting the date from you wish to view.
The report provides the serial number of the devices, the device’s ORI, the offender
assigned to the device, the start dand end date (if the device has been unassigned on
the date you selected) and the status of the device (ASSIGNED or UNASSIGNED).
5. Device History Report: Displays a report of all devices assigned to your agency.
This report is dependent on the hierarchy of your agency. If it is at the highest level
of the hierarchy, you will see all of the agencies within your structure. This is an
information-only report.
6. Device Data Load Report: Displays all the devices on the inventory list and drills
down to a detailed report in the enrollment process. It lists the last 50 records called
in from a selected device. Chapter 3 has a description on how to use this report.
7. The Case Load Report: Displays the number of devices in use for each supervising
officer per organization.

VeriTracks™ User’s Manual
Satellite Tracking Of People 51
If viewed from a parent organization, the Case Load Report shows all the offices and agents in the
subordinate organizations.

VeriTracks™ User’s Manual
Satellite Tracking Of People 52
Chapter 10: USING VERITRACKS™ TO SOLVE
CRIMES
In this chapter you will learn how to:
• Use VeriTracks™ to assist in crime analysis.
• Understand and interpret crime hits and the hit report.
• Locate criminals at the scene of a crime manually.
• Use Zones for monitoring areas with high levels of criminal activity.
This chapter describes various procedures for performing crime analysis. Central to crime solving
procedures are the “Crime Hit” and the Crime Hit Report.
A crime hit is the correlation of an offender’s location with the time and location of a crime.
VeriTracks™ offers many features to solve crimes, which includes the Crime Hit report and tools on
the map screen.
The Crime Hit Report
The Crime Hit Report lists any crime hits that have been reported in the last 24 hours. Because not all
crimes are reported when they occur or occur over several days, the Crime Hit Report may contain
hits that are days or weeks old.
How to use the hit report
This report provides the crime analyst a summary of the hits and list of offenders at crimes without
logging into the system.
VeriTracks™ User’s Manual
Satellite Tracking Of People 53
This report is e-mailed every morning to each law enforcement agency that reports crimes. It
provides summary information for each crime hit and is sorted by the reported crimes. The e-mail
report contains hyperlinks that direct the crime analyst into VeriTracks™ for further analysis of the
hits and to view the crime hit.
Other methods and tools for crime solving
Finding offenders at the scene of a crime
When crimes are reported into VeriTracks™, the system determines which, if any, offenders were in
the vicinity of the crimes at the time they occurred and automatically generates a Crime Hit Report.
For this case, the officer can review the Crime Hit Reports and develop a viable suspect list. If the
Crime Description
including: Type,
time, and place of
crime
Individual at the
scene of the crime
Link to VeriTracks
Crime Description
including: Type,
time, and place of
crime
Individual at the
scene of the crime
Link to VeriTracks
VeriTracks™ User’s Manual
Satellite Tracking Of People 54
the crime has not been reported into VeriTracks™, the user can still create a suspect/witness list
manually.
1. Determine if the crime incident has been reported in VeriTracks™ ,
2. Search based on the incident or incident hits if the crime has been reported, or
3. Locate the scene of the crime and search for offenders in the vicinity of the crime.
If the crime has been added to VeriTracks™
If the crime has been reported to VeriTracks™, of the system has already correlated the location of
crimes to that of offenders’ movements. To find these matches you can:
Search Based on crime hits identified by the system
1. Perform an Incident Hit search for the crime.
2. Screen the hits to determine if they are a good match (may require mapping the hits). See
Scoring the hits.
3. Map the hits by selecting those that are of interest.
4. If no good matches are found, use the last report function and review the “Third List.”
Commentary: While searching for incident hits is the most expedient means of finding the
offenders at the scene of the crime, it does require additional work to drill down to the “Third
List,” if it is needed.
Scoring Hits
VeriTracks™ has a scoring system for hits. Those with a single star are the “best
hits” meaning that the offender was close to the reported crime scene and at that
location for a large percentage of the time the crime occurred.
VeriTracks™ User’s Manual
Satellite Tracking Of People 55
Or Search Based on the crime incident
1. Perform an Incident search for the crime.
2. Follow the Hits hyperlink to see all the hit for the incident of interest.
3. Screen the hits to determine if they are a good match (may require mapping the hits. See
Scoring the hits.
4. Map the hits by selecting those that are of interest.
5. If no good matches are found, use the last report function and review the “Third List.”
If the crime is not in VeriTracks™
• Go to the Map link on the main menu bar. This provides a drop-down box in which you can
enter the address information to be mapped.
• Alternatively, if you click on the Map link on the main menu bar, you will be redirected to
the Map Data Entry screen. Enter the address information or select from a drop-down listing
of previous mapped addresses.
• When you have entered the address information in either location, click on the Map button to
create the map.
• On the map, draw a box around the area of interest
• Click on the Select Tracks icon, which displays an offender’s tracks that occurred in
the selected area and time range of the map.
Find offenders in a violation status when a crime occurred
using the Third List
Tracked offenders can be in one of two statuses at any time: location known or location unknown
(violation status). For a crime event, this concept of statuses is extended to three. location known at
the crime (Hit), location known (No Hit), and location unknown. To account for the third status,
VeriTracks™ has a “hit violation report,” which lists all offenders in a violation status during the time
of the crime.
VeriTracks™ User’s Manual
Satellite Tracking Of People 56
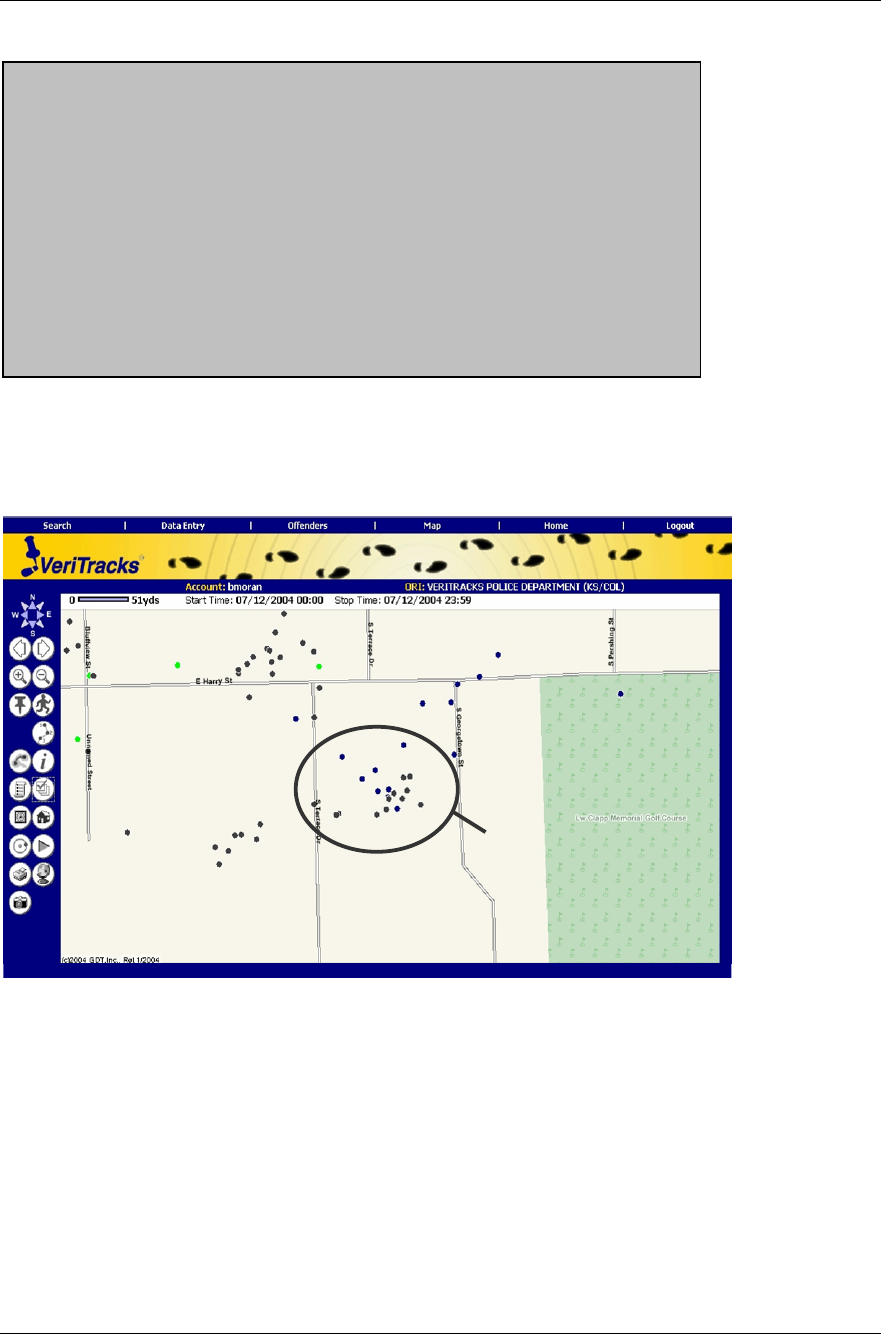
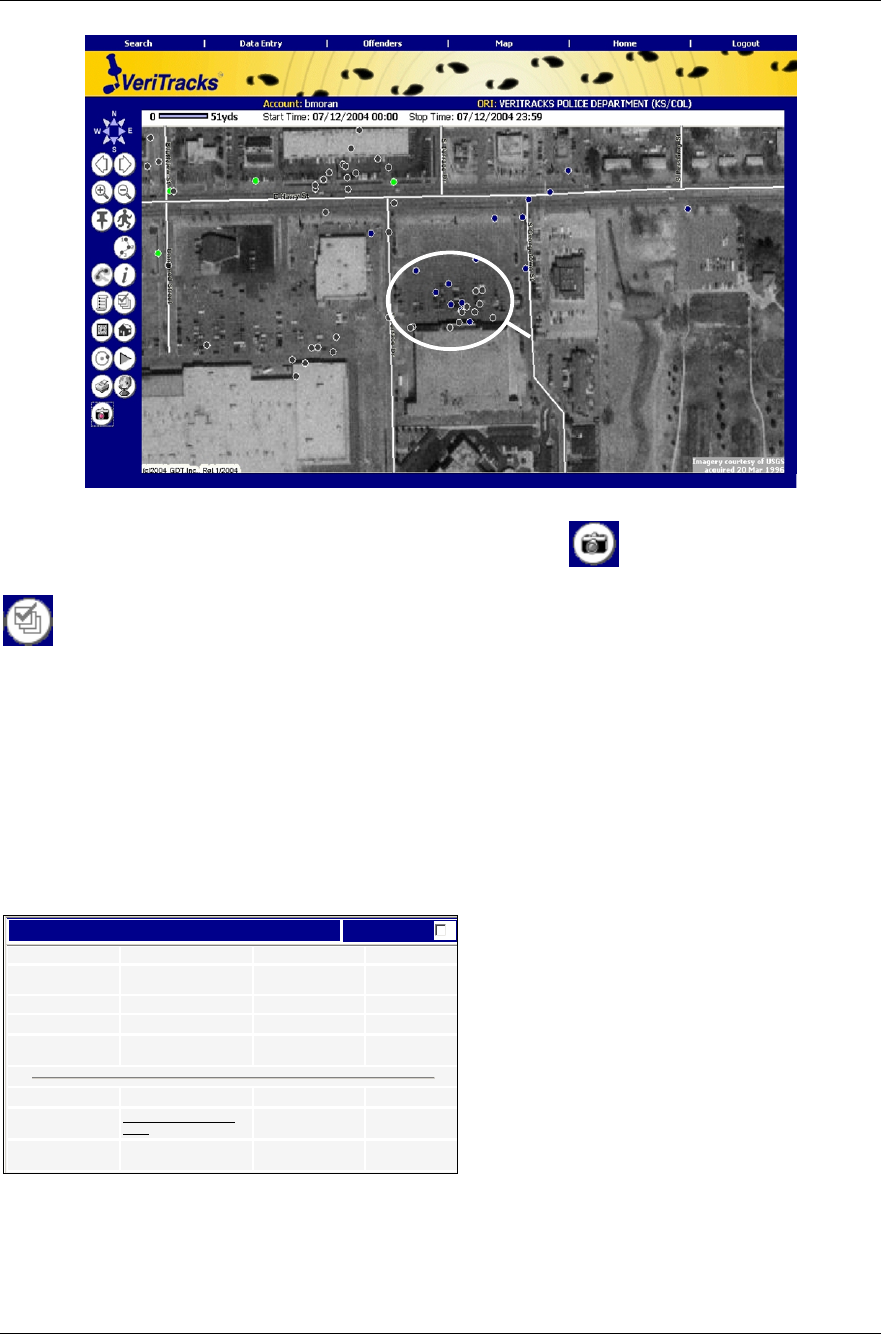
Using Aerial Photography
The aerial photography features of VeriTracks™ can help an officer better understand an offender’s
movements. For example overlaying the data on an aerial photo can provide additional context to the
story of an offender’s movement.
Offenders in
a field?
Typical Map – Does not give a complete picture of where the offenders are.
The Third List
Tracked offenders can be in one of two statuses at any time: location known
or location unknown (violation status). For a crime event, this concept of
location status is extended to three different statuses.
1) location known; at the crime (Hit),
2) location known (No Hit), and
3) location unknown, can’t determine if a valid hit has occurred.
To account for the third status, VeriTracks™ has a “hit violation report,”
which lists all offenders in a violation status during the time the crime
was
co
mmi
tted.
VeriTracks™ User’s Manual
Satellite Tracking Of People 57
Offender in
parking lot
of store
Aerial Photo Overlay – helps determine that the offenders are at a store not in a field.
To access aerial photos, click the button that looks alike a camera (USGS Imagery) on the map
tool bar. When viewing aerial photos, you can still add and hide other layers using the layer list tool
. In the examples above, we left the road layer on so streets are more visible and labeled.
Using zones for Law Enforcement
Zones can be effective tools that assist law enforcement agencies. For example, a local law
enforcement agency is using VeriTracks™ to supplement observation of a high crime, high drug
traffic area. The agency has set up a hot zone around this investigative area. Hit reports from the hot
zone are passed to the task force investigating the zone. Hit reports list the time an offender entered
the area, the offender’s name and profile information, as well as the supervising officer’s name and
phone number.
Zone Hit # 3
Zone Name: Alabama Street Zone ID: 2
Zone Address: 1100 ALABAMA STREET,
TALLAHASSEE Zone Type: E
Zone Distance: 2000 ft. Zone Time: 1001 points
Zone Start
Date/Time: 01-MAR-01 at 00:01 Zone Stop
Date/Time: 01-MAY-
02 at 23:59
Offender Name: ALBERT WILLIAMSON
(FPC) Zone Probation
Officer: ROBERT MIXSON
Zone Hit Start
Date/Time: 06/02/2001 at 10:36 Zone Hit Stop
Date/Time: 04/30/2001 at 21:04
.
VeriTracks™ User’s Manual
Satellite Tracking Of People 58
Creating Zones
Zones are a useful way to enhance offender movement tracking. You will be notified when an
offender violates an assigned zone. There are two types of zones: Inclusion and Exclusion.
Inclusion zones define an area in which an offender needs to remain. For example, if he/she is
confined to only their home and work, time sensitive zones can be created around each location. You
can then monitor when an offender leaves his/her assigned zones.
Exclusion zones define an area(s) where an offender is prohibited from entering. For example, an
offender may have been ordered to stay at least 500 feet from his/her former spouse’s home. A time
sensitive zone can be set up around the home and activated 24/7. When the offender enters into this
zone, a violation is produced.
Create a zone based on an address
The following steps create a zone based on an address:
1. Mouse over either the Supervision or the Administration menu options and select Zone.
Create a new zone or select one already created.
2. Click on Add New Zone to begin the process for creating a new zone.
3. Complete the Zone Entry fields
Create a Zone from the map
The following steps create a zone based on an address:
1. Locate the zone area on the map. Go to a specific address using the Map link on the main
menu.
2. Click on the Create/Edit Zone icon. This will place a small blue ball onto the middle
of the map. Drag the blue ball to create the circumference of the zone. Move the center
green ball to the location of the zone (it does not have to be exactly in the center of the map).
3. Click on the Create/Edit Zone icon again to complete the Zone Entry form.
Complete the Zone Entry fields beginning with the Zone Name. Because the zone location and size
are already defined you do not need to add the zone address, Geo-code, or enter the buffer distance.
Note: Global Zones hits do not change the offender track icon on the map.
VeriTracks™ User’s Manual
Satellite Tracking Of People 59
Review
How To…
Determine Current Offender Status
1. Select Offender Status from the Supervision drop down menu.
2. Select the offender of interest from the scrolling list.
3. Review the information on the offender status tabs.
How To…
Create a Zone
1. Locate the zone area on the map. Go to a specific address using the
Map link on the main menu.
2. Click on the Create/Edit Zone icon to place a small blue ball
onto the middle of the map. Drag the blue ball to create the
circumference of the zone. Move the center green ball to the location
of the zone
3. Click on the Create/Edit Zone icon again to complete the Zone Entry
form.
4. Fill in the Zone Entry fields.

VeriTracks™ User’s Manual
Satellite Tracking Of People 60
APPENDIX 1: ENROLLMENT TABS
Offender Profile Tab
Offender ID Number This field contains the offender identification number.
This number may vary by agency, depending on what is
used for a unique identifier.
SSN The offender’s Social Security Number.
First Name The offender’s First Name.
Last Name The offender’s Last Name.
Height The offender’s height in inches.
Weight The offender’s weight in pounds.
Hair Color Select the hair color from the drop down listing.
Eye Color Select the eye color from the drop down listing.
Gender Select the gender from the drop down listing.
Race Select the race from the drop down listing.
Birth Date This field contains the offender’s date of birth. Enter this
manually or select the date from the calendar pop-up
listing.
Probation Officer Select the Probation Officer from the drop down listing.
Supervision Type Select the Supervision Type from the drop down listing.
Supervision Office Select the Supervision Office from the drop down listing.
Supervision Begin
Date Enter the Begin Date for Supervision, or select the date
from the calendar pop-up listing.
Supervision End Date Enter the End Date for Supervision, or select the date
from the calendar pop-up listing.
Prior Offenses Select the Prior Offenses from the drop down listing.
Sex Offender Select the Sex Offender Check Box if the offender is a
convicted Sex Offender.
Offender Addresses Tab
Home Address:
Street Number The offender’s Home Street Number.
Street Name The offender’s Home Street Name.
City The offender’s Home Address City.
State The offender’s Home Address State.
Zip The offender’s Home Address Zip Code.

VeriTracks™ User’s Manual
Satellite Tracking Of People 61
Phone Number The offender’s Home Phone Number.
Work Address:
Street Number The offender’s Work Street Number.
Street Name The offender’s Work Street Name.
City The offender’s Work Address City.
State The offender’s Work Address State.
Zip The offender’s Work Address Zip Code.
Phone Number The offender’s Work Phone Number.
VeriTracks™ User’s Manual
Satellite Tracking Of People 62
APPENDIX 2: CONDUCTING SEARCHES
VeriTracks™ provides the user with the ability to conduct searches on offenders and their proximity to
various “Inclusion” and “Exclusion” Zones. When Law Enforcement provides crime incident data, the
user can also search for crime incident hits. The following describes how to use the various search
capabilities in VeriTracks™ by using the “Search” link on the main menu.
Incident Hit Search
The “Incident Hit” searches for offender tracks that come within 1,000 feet of the reported crime location
during the specified time. NOTE: This function is only enabled when crime data is provided by Law
Enforcement and collected into the VeriTracks™ central server. To conduct the “Incident Hit”
search, enter any or all of the following fields to limit the data results returned:
Incident Hit No.: The unique identifier assigned to the hit by the
VeriTracks™ system.
County: The County in which the Incident occurred.
ORI/Agency: The Originating Agency responsible for investigating the
Incident.
Agency Case No.: The Case Number assigned by the ORI, which may be
the same as the Agency Incident Number.
Primary Offense: The nature/type code assigned by the agency to describe
the Incident.
Incident No.:
Offender Name-DC
No.: The offender whose tracks crossed the Incident, causing a
hit to occur.
Maximum Distance
(ft.): The distance the offender’s tracks were from the Incident.
Minimum No. Points: The amount of time the tracked offender was near the
Incident, the higher the points the longer the time period.
Start/Stop Dates: The date(s) to include in your search.
Start/Stop Time: The time to begin/end your search.
Incident Search
The “Incident” searches for reported Crime Incidents. NOTE: This function is only enabled when
crime data is provided by Law Enforcement and collected into the VeriTracks™ central server. To
conduct the “Incident” search you can enter any or all of the following fields to limit the data result set
returned:
Incident No.: The unique identifier for the incident assigned by
VeriTracks™.

VeriTracks™ User’s Manual
Satellite Tracking Of People 63
County: The County in which the Iincident occurred.
ORI/Agency: The Originating Agency responsible for investigating the
Incident.
Agency Case No.: The Case Number assigned by the ORI, which may be
the same as the Agency Incident Number.
Primary Offense: The nature/type code assigned by the agency to describe
the Incident.
Disposition: The current disposition of the crime Incident.
Start/Stop Dates: The date(s) to include in your search.
Start/Stop Time: The time to begin/end your search.
Tracked Offender Search
“Tracked Offender” search can be accessed through “Search” on the main menu. This function is also
accessed through “Supervision” followed by selecting “Search” on the main menu.
Office: The office the offender is registered with. Select the
office from the drop-down listing.
Exclude Offenders
Off Monitoring: Select this check box to search ONLY on offenders who
are currently being monitored and excluding those who
are no longer monitored.
Offender Name-DC
No.: The offender’s name and unique identifier assigned to the
offender by the agency. Click on the clipboard pop-up
listing to select the offender you wish to see. Multiple
offenders can be selected and added to the list.
City of Residence: The city where the offender resides.
Zip Code: The zip code of the city where the offender resides.
Race: The race of the offender.
Sex: The sex of the offender.
Probation Officer: The officer responsible for the offender. Select an officer
name from the drop-down list.
Start/Stop Date: The date(s) to include in your search.
Start/Stop Times: The time to begin/end your search.
Zone Search
The “Zone” searches for Zones that have been created by your ORI. To conduct the Zone Search, enter
any or all of the following fields to limit the data results returned:
Zone POC: The individual responsible for initiating the zone.
County: The County in which the zone was defined.
ORI/Agency: The Originating Agency responsible for the zone.

VeriTracks™ User’s Manual
Satellite Tracking Of People 64
Zone No.: The unique identifier of the zone assigned by
VeriTracks™.
Street Name: The name of the street defined in the zone.
Zip Code: The zip code defined in the zone.
Offender Name-DC
No.: The offender whose tracks crossed the incident, causing a
hit to occur.
Zone Hit Search
The “Zone Hit” searches for offender tracks that have violated defined Zones created by your ORI. To
conduct a search, enter any or all of the following fields to limit the data results returned:
Zone Hit No.: The unique identifier of the offender tracks that occur
outside an inclusion zone or inside an exclusion zone
assigned by VeriTracks™.
Zone POC: The individual responsible for initiating the zone.
County: The County in which the zone was defined.
ORI/Agency: The Originating Agency responsible for the zone.
Zone No: The unique identifier of the zone assigned by
VeriTracks™.
Street Name: The name of the street defined in the zone.
Minimum No. Points: The amount of time the tracked offender was in violation
of the zone; the higher the points the longer the time
period.
Offender Name-DC
No.: The offender whose tracks crossed the incident, causing a
hit to occur.
Start/Stop Dates: The date(s) to include in your search.
Start/Stop Time: The time to begin/end your search.
VeriTracks™ User’s Manual
Satellite Tracking Of People 65
APPENDIX 3: UNDERSTANDING TEXT REPORTS
When conducting searches you can create Text Reports or Map the results. You can request a text
report and then map the results. You cannot, however, follow mapped results by a text report.
If you are scheduled to receive a daily report, that report will be sent to you as a Text Report. You
can Map the results as described in #4 below, or arrange in a Table as described in #5 below.
The Report Frame
Each report is framed by a common set of information and buttons. The report content changes based
on the type of information requested.
1. Records: This is how many records were returned based on your search. If you choose a
link from an email notification, then this number should only be one (1).
2. Page: This is how many pages of results have been returned. VeriTracks™ is set to show
only 100 records per screen. This number will indicate when there is more than one (1) page
in the result set. To access the next page, select the page number from the drop down listing.
A new button will appear at the top as well. This arrow button will also advance to the next
page.
3. Select Records/Select All Records: Each individual record is displayed on its own note
card. Select a record by placing a check in the square in the upper right corner of a note card.
To select all records, click on this button.
4. Map Selected Records: To view the results on a map, click on this icon. Be sure to
select the individual or multiple records you wish to view on the map first.
5. View as Table: To view the results in table format click on this icon. The table view
allows sorting of the data using any column. Click on the column header link and the table
will automatically reformat the information within the table. If your result set is large it also
makes browsing through the data easier.
1 2 3
4
5
VeriTracks™ User’s Manual
Satellite Tracking Of People 66
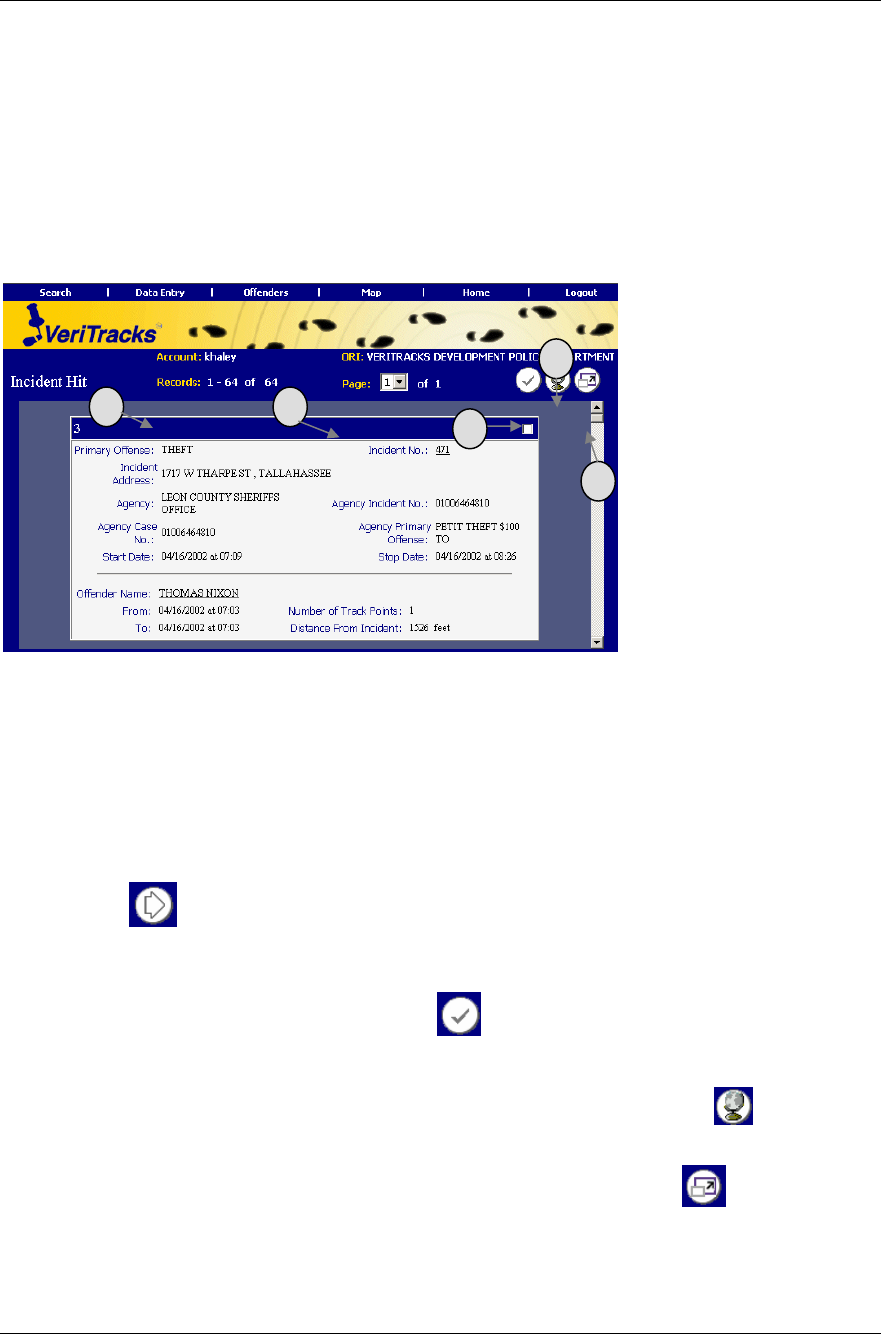
Incident Hit Search Results
Enter the appropriate information into the Search Page options to retrieve the requested Incident Hit
information. Or start this search from the daily Incident Hit Notification email link. Click on the link
of the Incident Hit that interests you, and you will be brought into VeriTracks™. Login and the
report will automatically generate.
From that report, you are provided with information about the incident and the offender who caused
the hit to be generated. You can choose to map one or more incident hits from this report by selecting
an individual incident hit note card, or select all of them, and then clicking on the “Map Selected
Records” button, (#4,above).
Below is an explanation of the important details of this report:
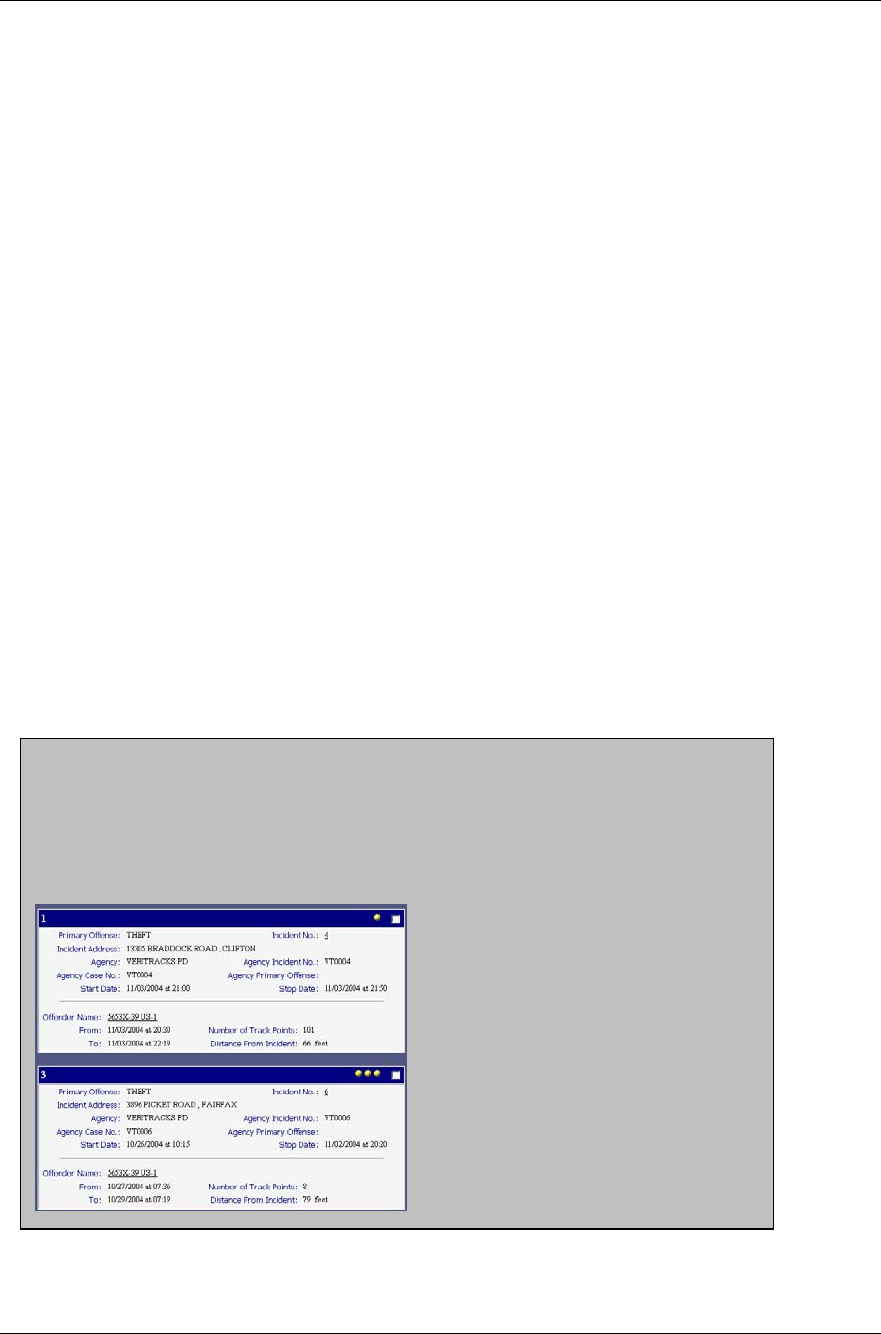
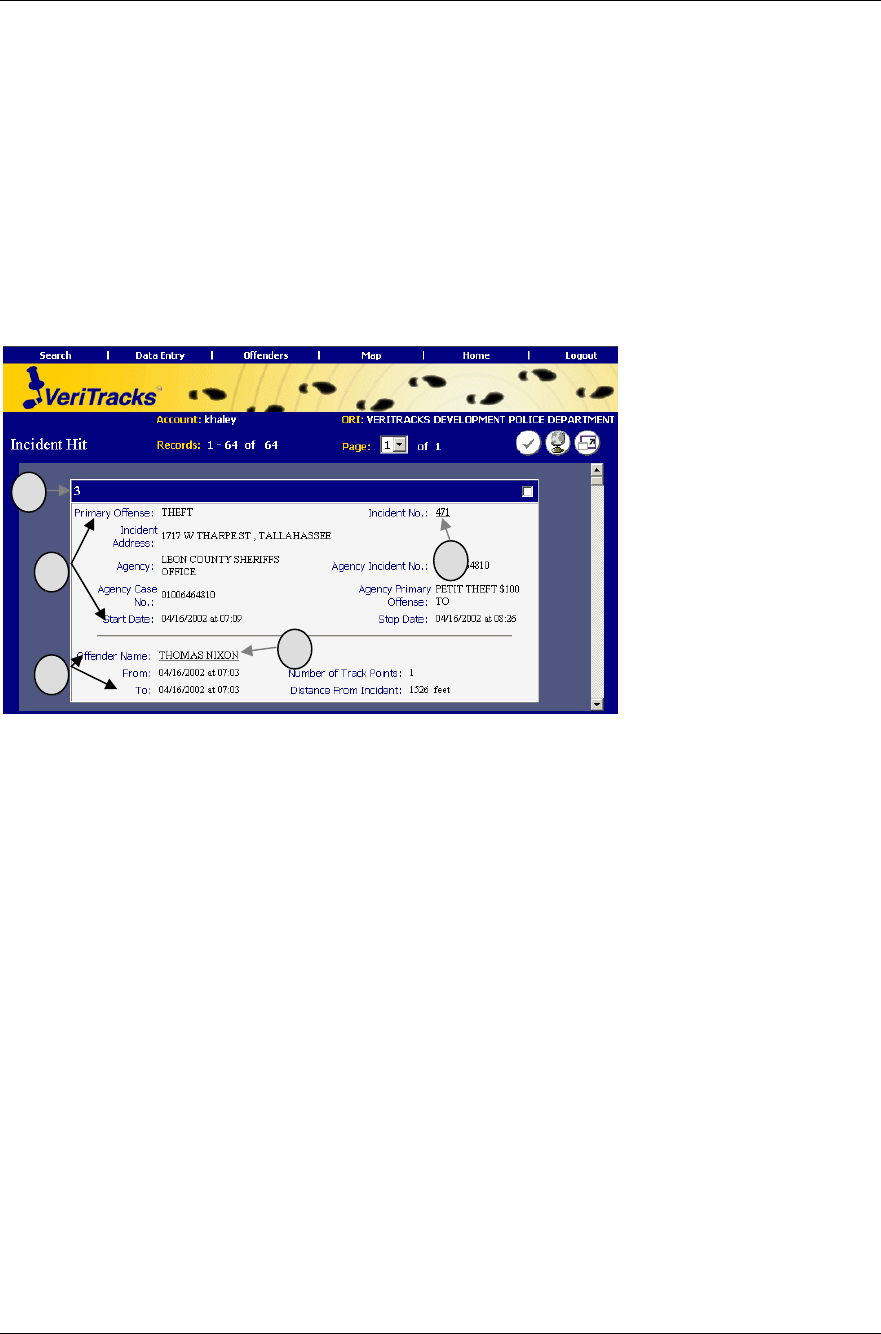
1. VeriTracks™ Incident Hit Number: The VeriTracks™ hit engine automatically assigns a
unique number to each hit returned. This number is displayed on the top left corner of each
note card and can be used in future searches for ease of re-retrieving records.
2. Incident Information: This section provides the details about the reported incident.
3. Incident No. Hyperlink: This hyperlink opens up the incident report to more detailed
information about the incident.
4. Offender Information: This section provides the details about the time/date range, number
of track points and the closest recorded distance from the incident that the offender’s track
crossed the reported incident information. This information, crossed with the incident
information, is what caused the hit to be generated.
5. Offender Name Hyperlink: This hyperlink opens the “Offender Details Report.”
Incident Search Results
Enter the appropriate information into the Search Page options to retrieve the requested Incident
information, (crime information). This search option allows you to view one or multiple Incidents in
the same report.
1
2 3
4 5
VeriTracks™ User’s Manual
Satellite Tracking Of People 67
From the above report, you are provided with information about the incident. In addition, there are
links on each Crime Incident note card that will take you to crime incident hit and violation
information. Choose to map one or more incidents from this report by selecting the individual
incident note card, or all of them, and then click on the “Map Selected Records” button, .
Below is an explanation of the important details of this report:
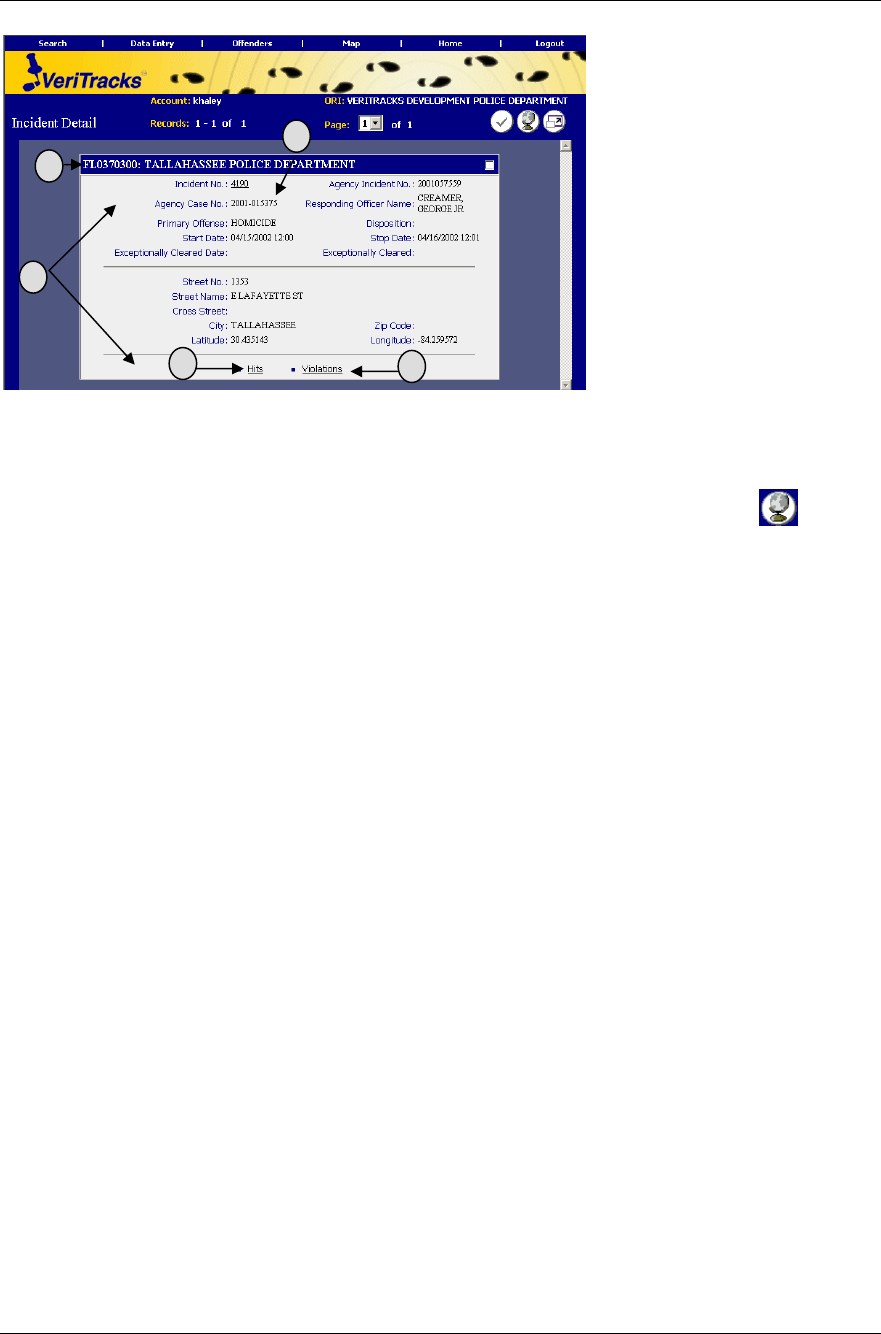
1. Reporting Agencies ORI: VeriTracks™ displays the originating agency that reported the
incident.
2. Incident Information: This provides the details about the reported incident.
3. Incident No. Hyperlink: This hyperlink opens up the incident report to more detailed
information.
4. Hits Hyperlink: This hyperlink provides a text report of any hits that occurred for that
particular incident.
5. Violations Hyperlink: This hyperlink displays a list of offenders who had device violations,
(i.e., strap tampers) during the specified time period for the crime. This includes the distance
and time from the last good point for the offender before the violation. The report shows
only the 100 closest offender violations.
Tracked Offender Search Results
Enter the appropriate information into the Search options to retrieve the requested offender
information. This search option displays a report for one or multiple offenders.
2
3
5
1
4
VeriTracks™ User’s Manual
Satellite Tracking Of People 68
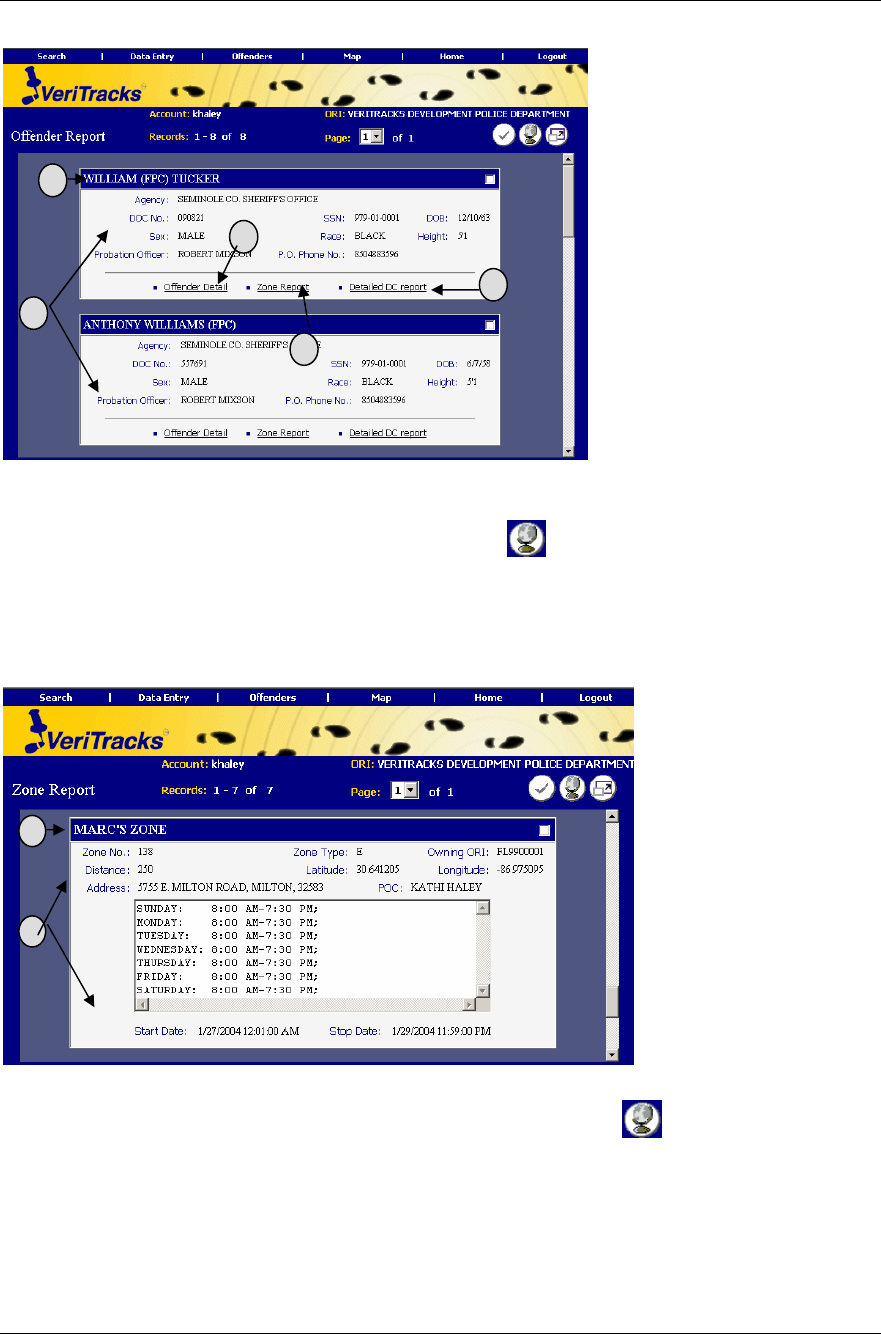
From the above report you are provided with information about the Offender(s). You can choose to
map one or more offenders from this report by selecting the individual offender note card, or all of
them, and clicking on the “Map Selected Records” button, .
Zone Search Results
Enter the appropriate information into the “Search” page. This search option allows you to view one
or multiple zones in the same report.
You can choose to map one or more zones from this report by selecting the individual zone note card,
or all of them, and then clicking on the “Map Selected Records” button, .
Below is an explanation of the important details of this report:
1. Zone Name: VeriTracks™ displays the zone name on an individual note card.
2. Zone Information: This section provides the details about the zone.
2
3
5
4
1
1
2
VeriTracks™ User’s Manual
Satellite Tracking Of People 69
Zone Hit Search Results
Enter the appropriate information into the “Search” page. This search option allows you to view one
or multiple “Zone Hits” in the same report.
From this report you are provided with information about the Zone(s) and any associated “hits” on
those zones. You can choose to map one or more “zone hits” from this report by selecting the
individual zone hit note card, or all of them, and then clicking on the “Map Selected Records” button,
.
Below is an explanation of the important details of this report:
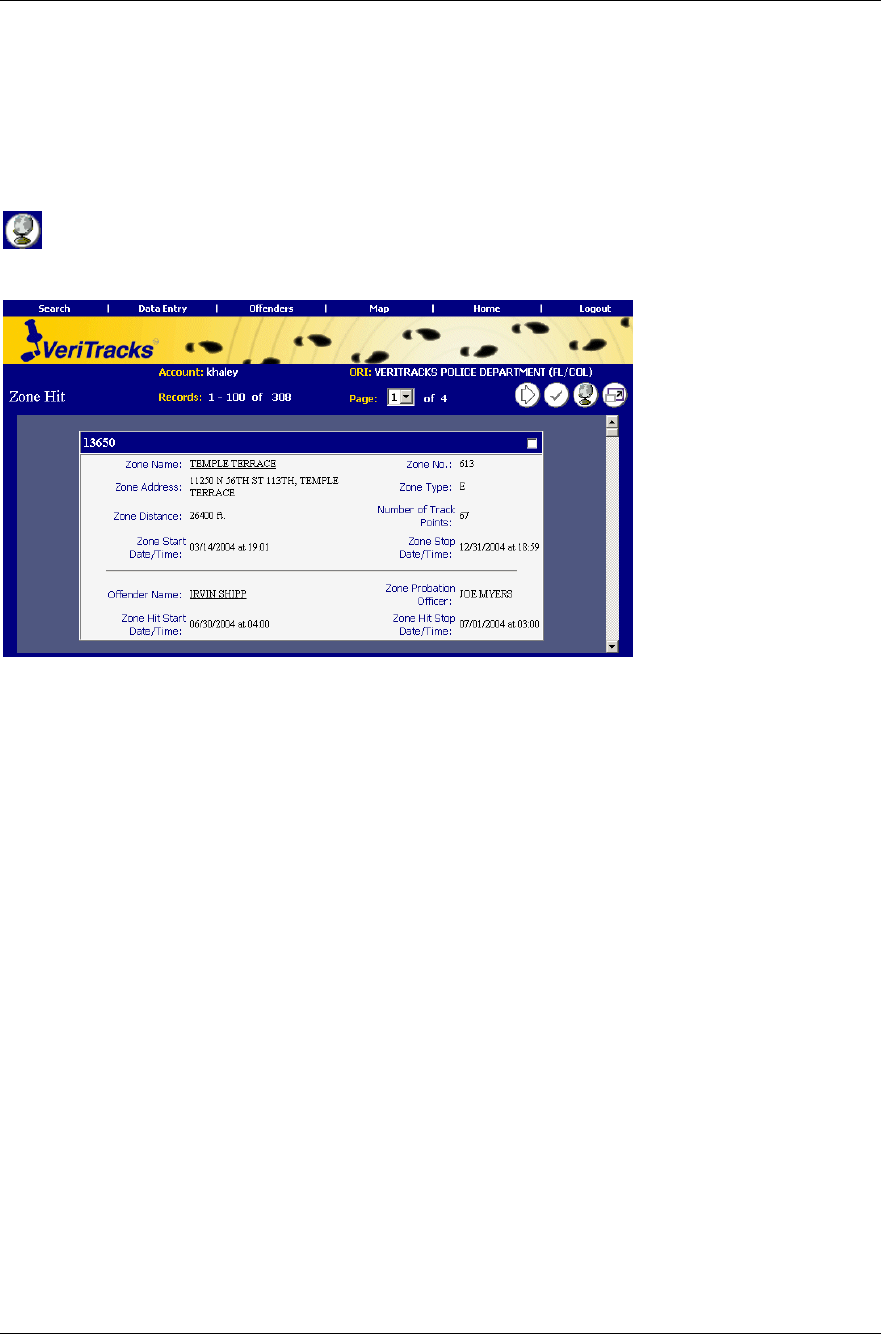
1. Zone Hit Number: The VeriTracks™ hit engine automatically assigns a unique number to
each hit returned, which is displayed on the top left corner of each note card. This number
can be used in future searches for ease of re-retrieving records.
2. Zone Information: This section provides the details about the Zone.
3. Zone Name Hyperlink: This link opens up the zone report with detailed information about
the zone.
4. Offender Information: This section provides the details about the offender whose tracks
violated the zone causing the “Hit.”
5. Offender Name Hyperlink: This link opens up the offender details report (see above).

VeriTracks™ User’s Manual
Satellite Tracking Of People 70
APPENDIX 4: MAPS
The Map function in VeriTracks™ allows you to jump directly to a location on a map. There are
many ways to access this function:
• Use the map button at the bottom of most of the search screens to access the maps directly
and skip the related test reports.
• View the text reports by clicking on the globe icon. in Map Selected Records. Select
the individual or multiple records you wish to view on the map first.
• Mouse over the Map link on the main menu bar. This provides a drop-down box to enter the
address information to be mapped.
• Click on the Map link on the main menu bar and you are redirected to the Map Data Entry
screen. Enter the address information or select from a drop-down listing of previously
mapped addresses. Click on the Map button to create the map.
Map Components
The mapping functionality in VeriTracks™ is robust and provides the user with many features. The
components of the maps are:
Map Area The map area displays any geographic elements and map
features.
Navigation Star The navigation star allows you to navigate around the
map in any direction. To pan the map, click on the
direction on the star that you wish to pan your map. The
navigation star is located to the upper left side of the map
area.
Toolbar The toolbar contains tools for manipulating data on the
map and located to the left of the map area.
Map Date/Time Range The Map Date/Time Range indicates the valid time range
for map features and located above the map area.
Map Scale The map scale shows the scale at a selected zoom level.
This information is located above the map area on the left
side.
Status Bar The status bar shows status information such as latitude
and longitude location of a point. If you click and drag a
box around some point(s) the status bar displays distance
as well. The status bar is located under the map area in
the lower portion of the browser window.
Map Features
The features of the maps are:
Crime Incidents The crime incidents are represented by different
colored thumbtacks, with each color indicating the

VeriTracks™ User’s Manual
Satellite Tracking Of People 71
crime type.
Offender Tracks The offender tracks are represented by different colored
dots, with each color indicating a specific mapped
offender.
Zones The zones are represented by a pink (Exclusion) or
green (Inclusion) circle.
Offender Home Location The offender home locations are represented by a black
house symbol. You can add the text for the name of the
offender who lives there as well (to be defined in the
Map Toolbar section).
Offender Work Location The offender work locations are represented by a black
factory symbol. You can add the text for the name of
the offender who lives there as well (to be defined in
the Map Toolbar section).
Violation Display Enable the violation display by selecting the Label
Offender Tracks option from the Show/Hide Layer List
pop-up (to be defined in the Map Toolbar section).
Red Circle denotes Bracelet Gone.
Red Square denotes Bracelet Strap.
Red Triangle denotes Motion with No GPS.
Green Triangle denotes Device at Rest.
Green Square denotes Device in Charger.
Map Toolbar
The map toolbar contains the following functionality:
Back
The back icon allows you to go to previous maps
created during your current session. You can only go
back 10 maps.
Forward
The forward icon allows you to go forward to maps
when using the back button to go between previous
maps.
Zoom In
The zoom in icon allows you to focus in on a selected
area of the map. Click on the icon to zoom an overall
10% or draw a box around the desired location on the
map and then click on this icon.
Zoom Out The zoom out icon allows you to focus in on a selected
area of the map. Click on the icon to zoom an overall
10% or draw a box around the desired location on the
map and then click on this icon.
VeriTracks™ User’s Manual
Satellite Tracking Of People 72
Select Incidents
The select incidents icon allows you to display
incidents that occurred in a selected area of the map.
Draw a box around the desired location of the map and
then click the icon. NOTE: The incidents that appear
also correspond with the defined time of the map.
Select Tracks The select tracks icon allows you to display offender
tracks that occurred in a selected area of the map.
Draw a box around the desired location of the map and
then click the icon.
Select Zones
The select zones icon allows you to display zones that
cross a selected area on the map. Draw a box around
the desired location of the map and then click the icon.
Connect Track
Points from Start
Date/Time
The connect track points from start date/time icon
allows you to connect track points for a selected
offender, beginning with the earliest point to fall within
the date range of the map. Select an offender’s track on
the map by drawing a box around one track point to
identify the offender, and then select the Connect Track
Points icon.
Show Offender
Range
This density layer depicts hot spots where most of an
offender’s track points occur. This layer is created for
each offender from their entire history of points stored
in VeriTracks™. The result can be used to visualize an
offender’s “home range”, which covers where the
offender has been and highlights areas where the
offender spends most of their time. This layer will be
recalculated once per week. Select an offender’s track
on the map by drawing a box around one track point to
identify the offender and then select the Show Offender
Range icon.
Identify Features
The identify features icon displays a text report for
selected incidents, tracks or zones. Draw a box on the
desired location of the map, to include all items (i.e.,
offender tracks, incident markers and offender
address/work locations) and then click the Identify
Features icon.
Show/Hide Legend
The show/hide legend icon displays or hides the map
legend.
Show/Hide Layer
List
The show/hide layer list icon selects different map
layers such as institutions, roads and water bodies to
display.
Change Date/Time
Parameters
The change date/time parameters icon specifies a
different date or time range for the map. This comes in
handy when looking at a map that spans multiple days
and you want to narrow the result set down to a
particular time period.
VeriTracks™ User’s Manual
Satellite Tracking Of People 73
Reverse Geocode
The reverse geocode icon selects a point on the map
and then obtain the address for that point. Click on a
location on an active map and then click on the Reverse
Geocode icon. The system will display an estimated
address for that point. If you draw a box on the active
map and click on this icon, it will provide an address
for the closest point in the upper left corner.
Create/Edit Zone
The create/edit zone icon sets the center and radius of a
zone on the map. While you are on an active map that
you wish to create a new zone, click on the Create/Edit
Zone icon. This will place a small blue ball onto the
middle of your map. Drag the blue ball to create the
circumference of the zone. Move the center green ball
to the location of the zone (it does not have to be
exactly in the center of the map).
Playback Tracks
The playback tracks icon displays the movement from
one track point to the next from the earliest point on
map. From an active map that contains offender tracks
(can include multiple offenders), click on the Playback
Tracks icon. This regenerates the map and adds a new
tool bar at the top of the map. Move through the
offender tracks by using the VCR-like buttons for
playing, stepping through, stepping back and pausing.
In addition,
the bar can be dragged to control the movement of the
tracks. When tracking a single offender, the playback
symbol is a green dot with a blue trail depicting the
previous five track points. If your offender’s tracks
move off of the current map, the map will
automatically pan and resume playback once it
refreshes.
Print Map
The print map icon opens a new window containing the
map with a legend of the Offender Tracks that can be
printed by the user.
Re-center Map
The re-center map icon selects a point or area on the
map by clicking the spot with your mouse or drawing a
box around the area and clicking on the re-center map
icon to re-center the map to that point or area.
USGS Imagery As a demonstration of the power of aerial photography
to orient the user to the relative map scale and provide a
source of ground truth, we have under-laid USGS
imagery beneath the VeriTracks™ maps. Toggle
between the map and the imager by clicking the camera
button that has been added at the bottom of the map
navigation tools.

VeriTracks™ User’s Manual
Satellite Tracking Of People 74
Best Practices When Working With Maps
1. Construct small searches to maximize performance and keep your map results legible.
2. Use the search pages to restrict your results to specific parameters such as primary offense,
UCR code or ORI or Agency.
3. Limit the date range you are using, whenever possible. Wide date ranges for tracks and
incidents may turn up “false positives” on the map.
4. Use the zoom in icon to access greater detail on a specific location of the map.
5. If you receive a warning message that your box encompasses too large an area, stop the
search and draw a smaller box.
6. If you make a mistake in sizing the map, use the back icon on the tool bar to return to your
previous map.
7. Do not use the Back button on your browser when working with the map report.
8. If you need to rebuild your map from your text report page, use the Last Results link under
Search on the main menu.
VeriTracks™ User’s Manual
Satellite Tracking Of People 75
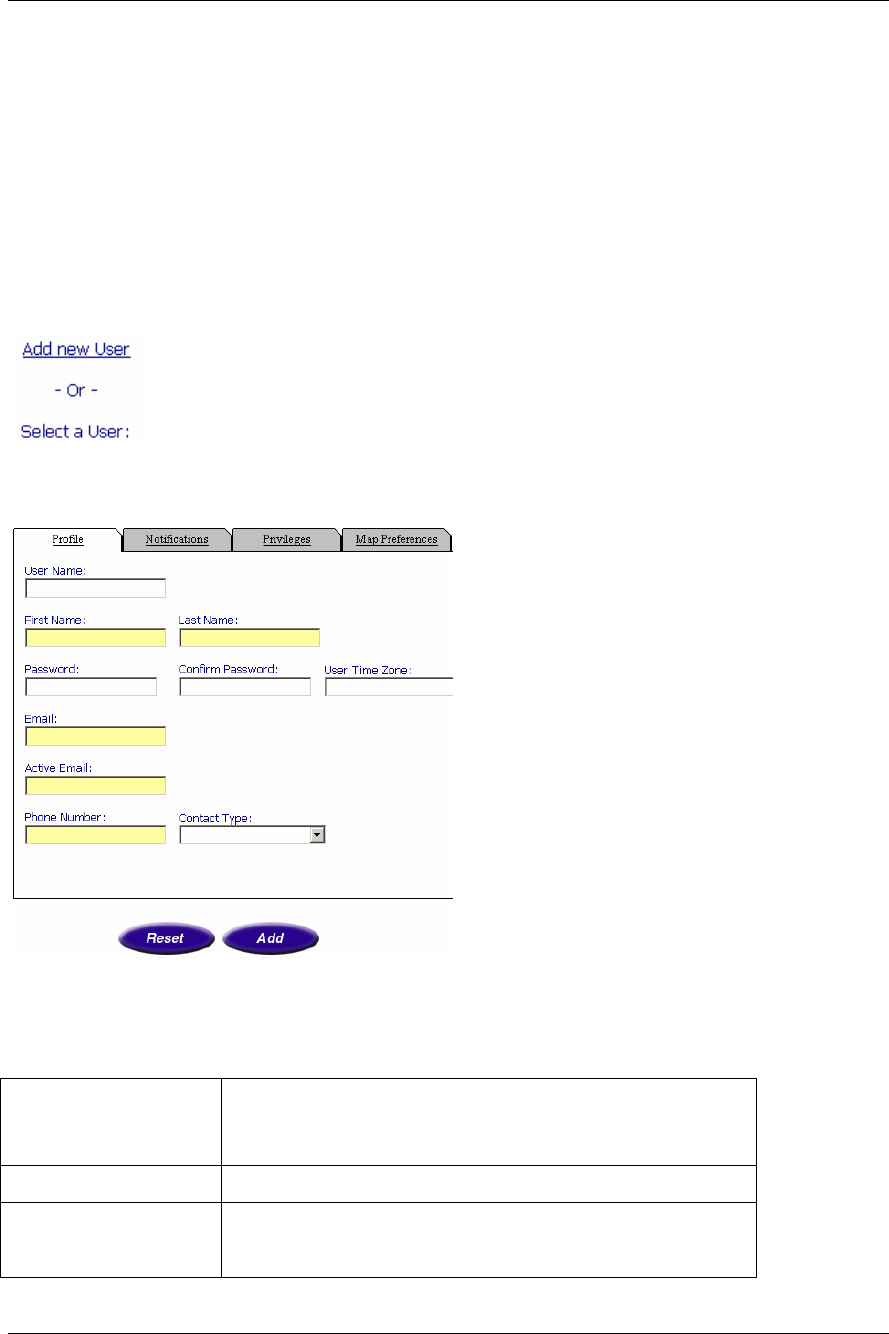
APPENDIX 5: AGENCY ADMINISTRATION
User Accounts
Each agency will have an administrator account assigned to manage user accounts. Administrators
will be able to create users as needed and to modify user information.
In the main menu bar of the VeriTracks™ Home Page, place your cursor over the Administration
menu option. The administration menu will appear below. Select the “User Accounts” option by
clicking on the link.
You will have the option here to Create New Users or to Modify Existing User Accounts.
Click on the “Add New User” option.
To create a new user, enter the following information:
User Name Assign a user name for the new account. You may want to
use your agency’s conventions for assigning user names,
for ease of use.
First and Last Name Enter the first and last name of the new user.
Password/Confirm
Password Either assign a password and confirm it for the user, or as is
recommended enter an arbitrary password (like “password”
or “changeme”) to allow the user to enter their own
VeriTracks™ User’s Manual
Satellite Tracking Of People 76
preferred password once they start using the system. Be
sure to enter the password in both places.
User Time Zone Select the time zone in which the user is located from the
drop down listing.
Email Enter the user’s email address. This also can be entered by
the user when they log in for the first time. It is not a
mandatory field for account creation.
Active Email This email address is used for immediate notification of
offender movements. Users should enter an address where
they wish to receive these types of event notifications.
Phone Number Enter the user’s phone number. This also can be entered by
the user when they log in for the first time. It is not a
mandatory field for account creation.
Contact Type Select the type of user this new account will be. There are
three types: Crime Analyst, Data Steward, and Probation
Officer. Law Enforcement users are classified as Crime
Analysts; Parole/Probation/Corrections users are classified
as Probation Officers; and Data Stewards are generally
users that will serve as data entry and enrollment officers.
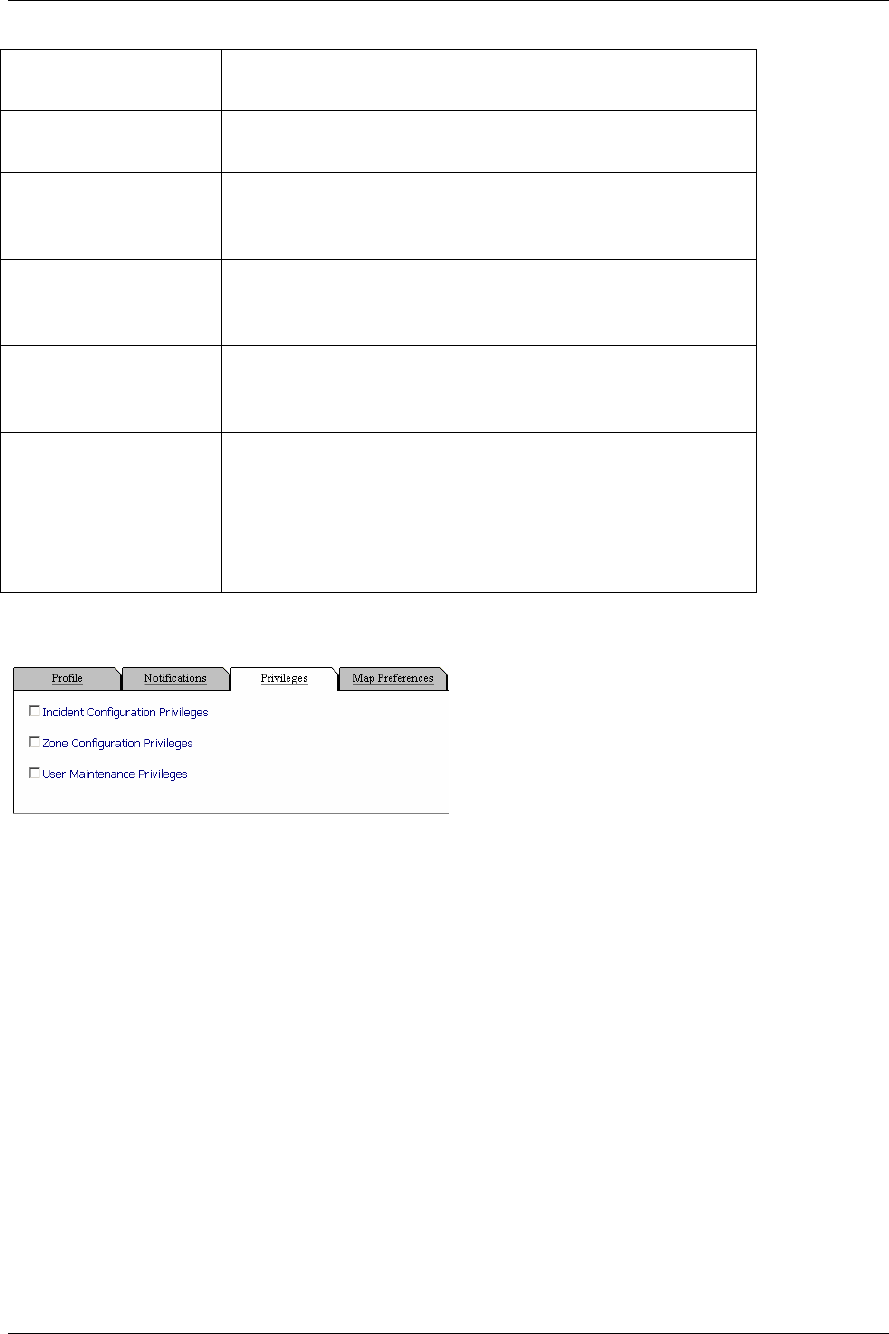
To complete the creation of a new user, navigate to the Privileges tab.
General users need to be granted “Zone Configuration Privileges” in order to create and edit new Hot
Zones in VeriTracks™.
The “Incident Configuration Privileges” rights allow users to enter Crime Incident information. This
feature is only used for smaller agencies that do not already have an RMS system for Incident
reporting. In addition to selecting this privilege, the administrator for VeriTracks™ will have to grant
access to the agency ORI.
The “User Maintenance Privileges” are reserved for users who will create and modify user accounts.
Each agency must decide who should have the rights to administer users.
The rest of the information is optional for the Administrator. It is recommended to have users log-in
to VeriTracks™ and navigate to Preferences to change their own password, input their own phone
number and email address, and to select the types of notifications they wish to receive. Users can
also access their map preferences from here to change their map layers.
Once you have entered the necessary information click on the “Add” button. Click on “Reset” if you
would like to enter the information again.