4IPNET 120001 WIRELESS DEVICE SERVER User Manual SDS200W v1 00 Guide EN 20120420
4IPNET, INC. WIRELESS DEVICE SERVER SDS200W v1 00 Guide EN 20120420
4IPNET >
Users Manual

User Guide
Wireless Network Ticket Generator
(SDS200W and POS Printer)
V1.00

User
UserUser
User Guide
Guide Guide
Guide
Wireless Network Ticket Generator (SDS200W and POS Printer) ENGLISH
Copyright © 4IPNET, INC. All rights reserved. i
Copyright Notice
This document is protected by USA copyright laws and other laws and is the property of
4IPNET, INC. You may not copy, reproduce, distribute, publish, display, perform, or
modify any part of this publication in any form or by any means without prior written
permission from 4IPNET, INC. You may not alter or remove any copyright or other notice
from copies of the content. All other brand and product names are claimed or
registered marks of their respective companies or organizations.
All rights reserved.
To download up-to-date version, please visit www.4ipnet.com.

User
UserUser
User Guide
Guide Guide
Guide
Wireless Network Ticket Generator (SDS200W and POS Printer) ENGLISH
Copyright © 4IPNET, INC. All rights reserved. ii
FCC CAUTION
This device complies with part 15 of the FCC Rules. Operation is subject to the following two
conditions: (1) This device may not cause harmful interference, and (2) this device must accept any
interference received, including interference that may cause undesired operation.
This equipment has been tested and proven to comply with the limits for a class B digital device,
pursuant to part 15 of the FCC Rules. These limits are designed to provide reasonable protection
against harmful interference in a residential installation. This equipment generates uses and can
radiate radio frequency energy and, if not installed and used in accordance with the instructions, may
cause harmful interference to radio communications. However, there is no guarantee that interference
will not occur in a particular installation. If this equipment does cause harmful interference to radio or
television reception, which can be determined by turning the equipment off and on, the user is
encouraged to try to correct the interference by one or more of the following measures:
---Reorient or relocate the receiving antenna.
---Increase the separation between the equipment and receiver.
---Connect the equipment into an outlet on a circuit different from that to which the receiver is
connected.
---Consult the dealer or an experienced radio/TV technician for help.
Changes or modifications not expressly approved by the party responsible for compliance could void the user‘s
authority to operate the equipment.
This device meets the government’s requirements for exposure to radio waves. This device is
designed and manufactured not to exceed the emission limits for exposure to radio frequency (RF)
energy set by the Federal Communications Commission of the U.S. Government.
The device contains a low power transmitter which will send out Radio Frequency (RF) signal when
transmitting. This equipment complies with FCC RF radiation exposure limits set forth for an
uncontrolled environment. This equipment should be installed and operated with a minimum distance
of 20 centimeters between the radiator and your body.

User
UserUser
User Guide
Guide Guide
Guide
Wireless Network Ticket Generator (SDS200W and POS Printer) ENGLISH
Copyright © 4IPNET, INC. All rights reserved. iii
CE CAUTION
Declaration of Conformity with Regard to the 1999/5/EC (R&TTE Directive) for
European Community, Switzerland, Norway, Iceland, and Liechtenstein
Model: SDS200W
For 2.4 GHz radios, the device has been tested and passed the requirements of the following standards,
and hence fulfills the EMC and safety requirements of R&TTE Directive within the CE marking
requirement.
• Radio: EN 300.328
:
• EMC: EN 301.489-1, EN 301.489-17,
• Safety: EN 60950-1 + A11,
Caution:
This declaration is only valid for configurations (combinations of software, firmware, and hardware)
provided and supported by 4ipnet Inc. The use of software or firmware not provided and supported
by 4ipnet Inc. may result in the equipment no longer being compliant with the regulatory
requirements.
European standards dictate maximum radiated transmit power of 100mW EIRP and frequency range
2.400-2.4835 GHz. This equipment is intended to be used in all EU and EFTA countries.
Taiwan NCC Statement
根據 NCC 低功率電波輻射性電機管理辦法 規定:
第十二條
經型式認證合格之低功率射頻電機,非經許可,公司、商號或使用者均不得擅自變更頻率、加大功率或
變更原設計之特性及功能。
第十四條
低功率射頻電機之使用不得影響飛航安全及干擾合法通信;經發現有干擾現象時應立即停用,並改善至
無干擾時方得繼續使用。
前項合法通信,指依電信法規定作業之無線電通信。
低功率射頻電機須忍受合法通信或工業、科學及醫療用電波輻射性電機設備之擾。
User
UserUser
User Guide
Guide Guide
Guide
Wireless Network Ticket Generator (SDS200W and POS Printer) ENGLISH
Copyright © 4IPNET, INC. All rights reserved. 1
1. Introduction
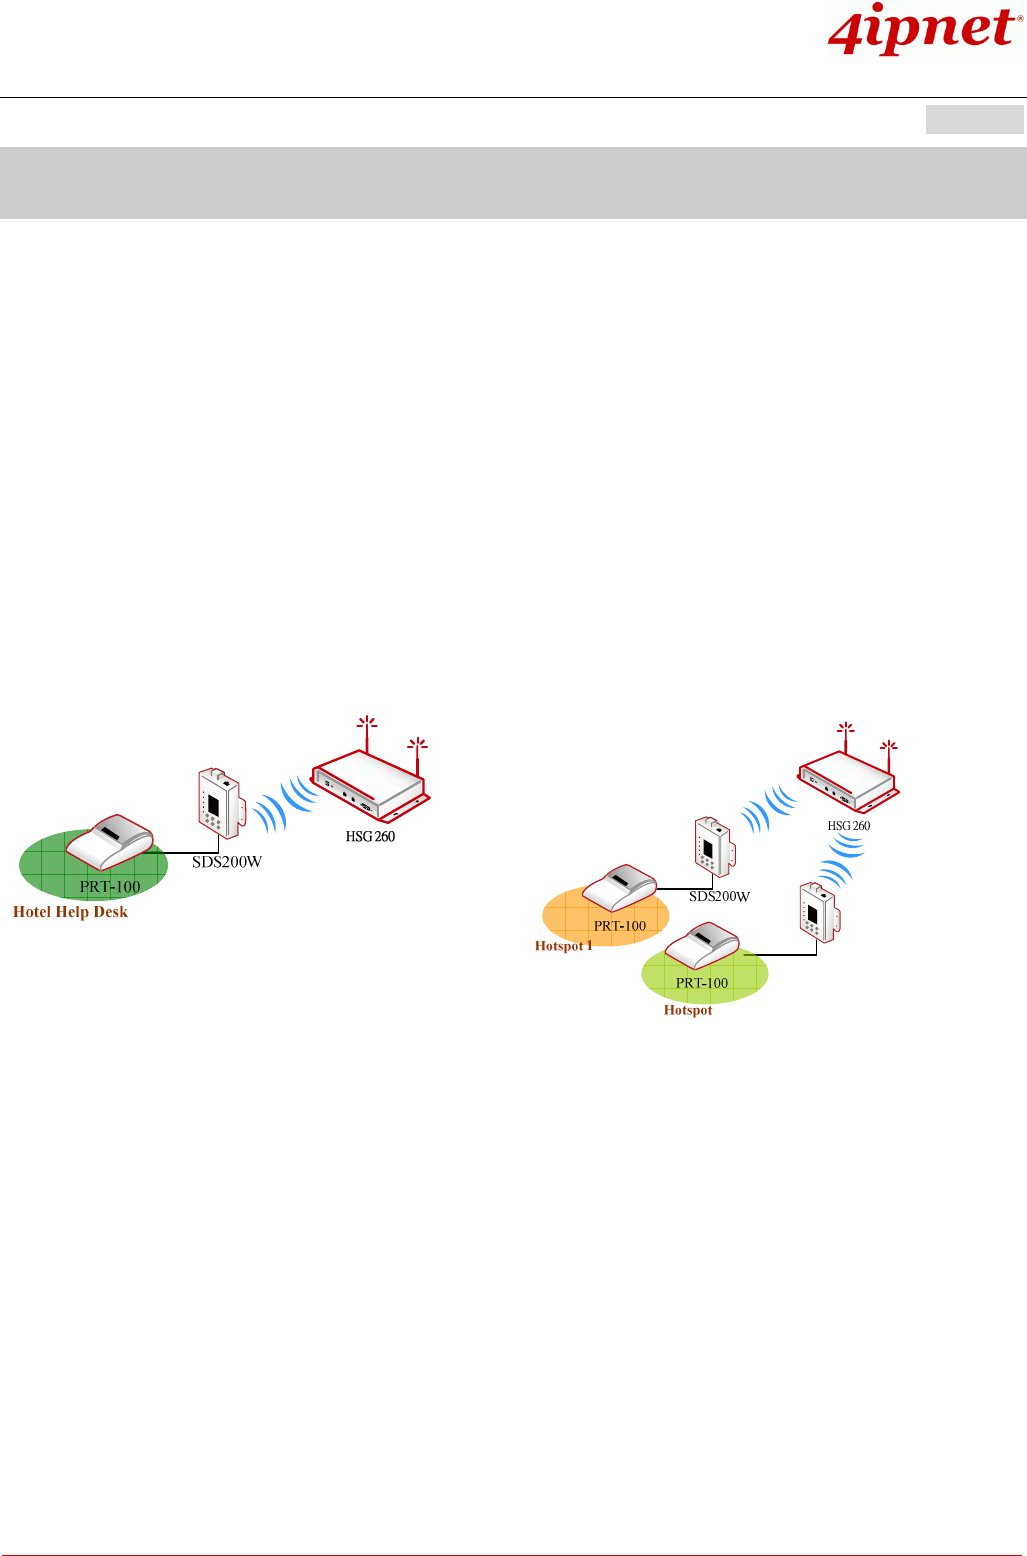
Overview of Network Ticket Generator
SDS200W is an innovative product 4ipnet offers to facilitate the communication between 4ipnet hotspot
gateway and serail POS printer. It is mainly used to have the connected printer fast-print necessary
account information extracted from a 4ipnet hotspot gateway for a user who would like to access the
Internet or managed networks, making provisioning of wired or wireless connection easier and more
user-friendly. What is noteworhty is that, SDS200W supports wireless connectibity to the uplink gateway.
That is, operators now can deploy a network with lesser physical wires.
Here lists some deployment examples:
User
UserUser
User Guide
Guide Guide
Guide
Wireless Network Ticket Generator (SDS200W and POS Printer) ENGLISH
Copyright © 4IPNET, INC. All rights reserved. - 2 -
2. Device Overview
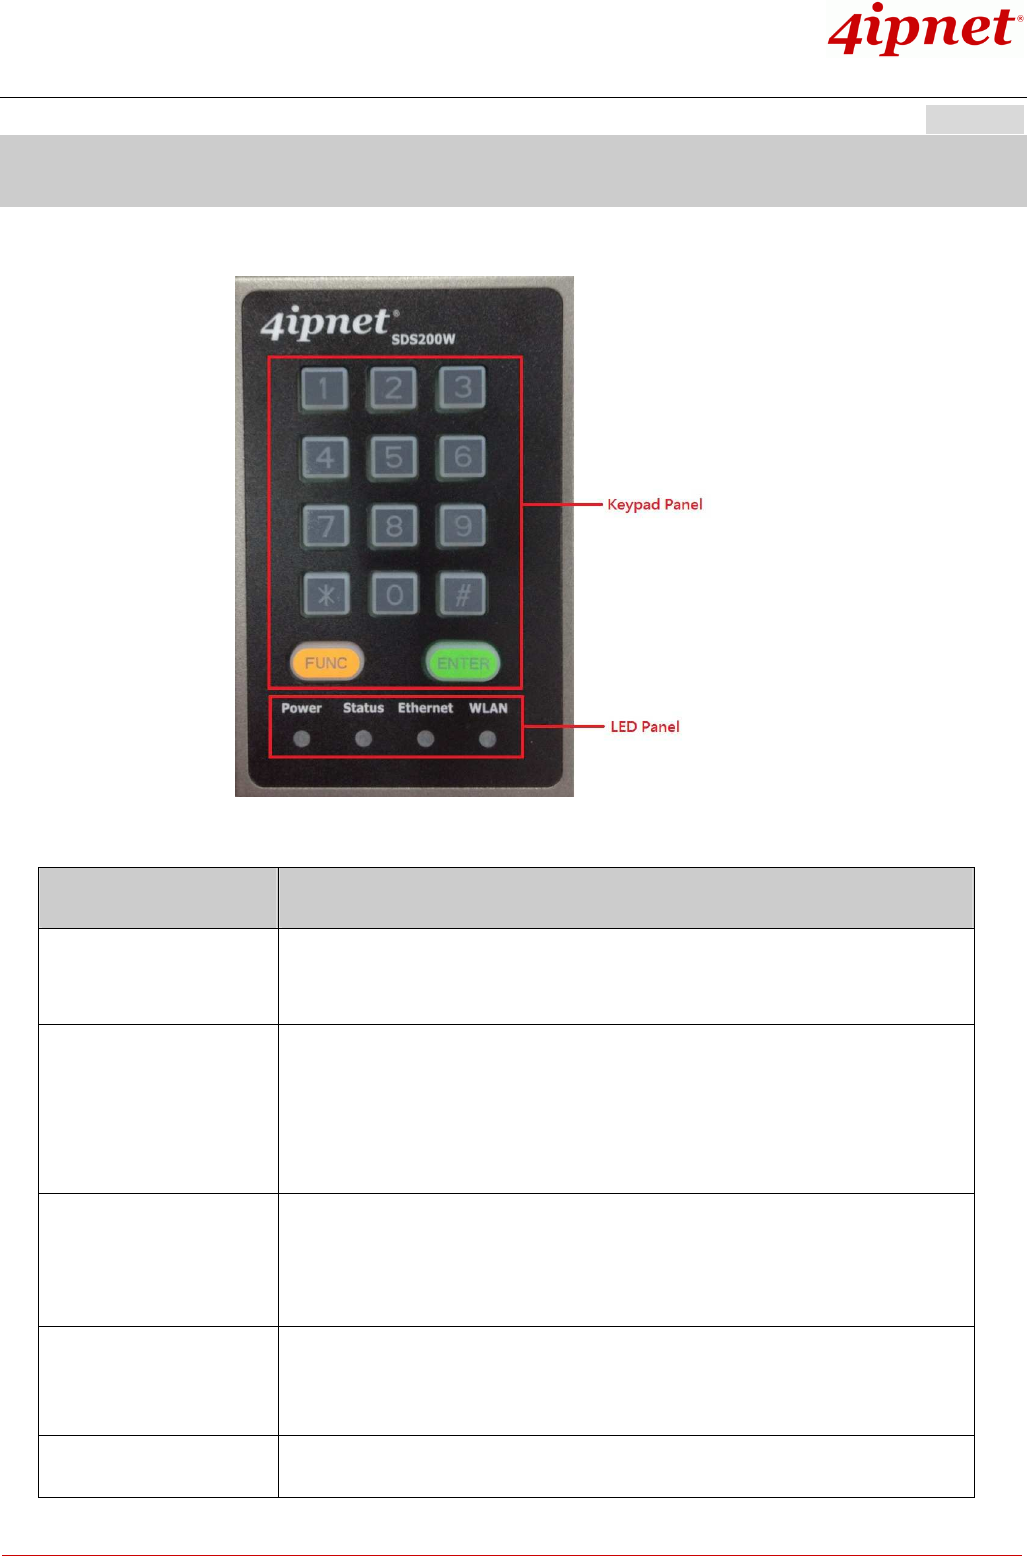
Keypad Panel Overview
Useful Shortcut Keys
Combination Function
‘Number’ + ENTER
To create and print out an on-demand account of an enabled billing plan
of the
uplink Hotspot gateway mainly for the user who purchased an account.
‘Number 1’ +
‘asterisk (*)’ +
‘Number 2’ + ENTER
Print a ticket of billing ‘Number 1’ with ‘Number 2’ units. For example, ‘8’ +
asterisk(*) + ‘3’ + ENTER is equal to create an on-demand account of billing
plan 8 with 3 units and have the POS printer print out the corresponding
ticket.
That is, the quota that billing plan 8 grants is multiplied by 3.
FUNC + ‘1’ +
ENTER
To print out the information of SDS200W, including (1) its IP address (2) the
firmware version and the build number (3) the current listening port (4) uplink
connection status (5) the IP address of the uplink 4ipnet gateway (HSG/WHG).
FUNC + ENTER
To clear what is pressed. This is used when the operator pressed a wrong
button or combination. The system will also clear it automatically after five
seconds.
FUNC + ‘0’ + ENTER
To activate Safe Mode – disabling the FUNC + ‘1’ + ENTER shortcut key in

User
UserUser
User Guide
Guide Guide
Guide
Wireless Network Ticket Generator (SDS200W and POS Printer) ENGLISH
Copyright © 4IPNET, INC. All rights reserved. - 3 -
order to protect SDS200W’s information leakage.
‘4-digit’ + ENTER
To unlock Safe Mode. This 4-digit password can be changed on the WMI at
“System >> Safe Mode (Password).” The default value is ‘0000.’
‘asterisk (*)’ +
ENTER
To lock the keypad, excluding the TAS and the Reset button. In Lock Mode,
the Status indicator will enter into special flashing. Press asterisk (*) +
ENTER
again to disable the function, and the LED indicator Status will go back to
short illuminated intervals or long illuminated intervals.
LED Panel
LED indicators
Power
When the power adapter is connected, Power will become constantly on; when
disconnected, the light turns into constantly off. Always check if Power is on
before using SDS200W.
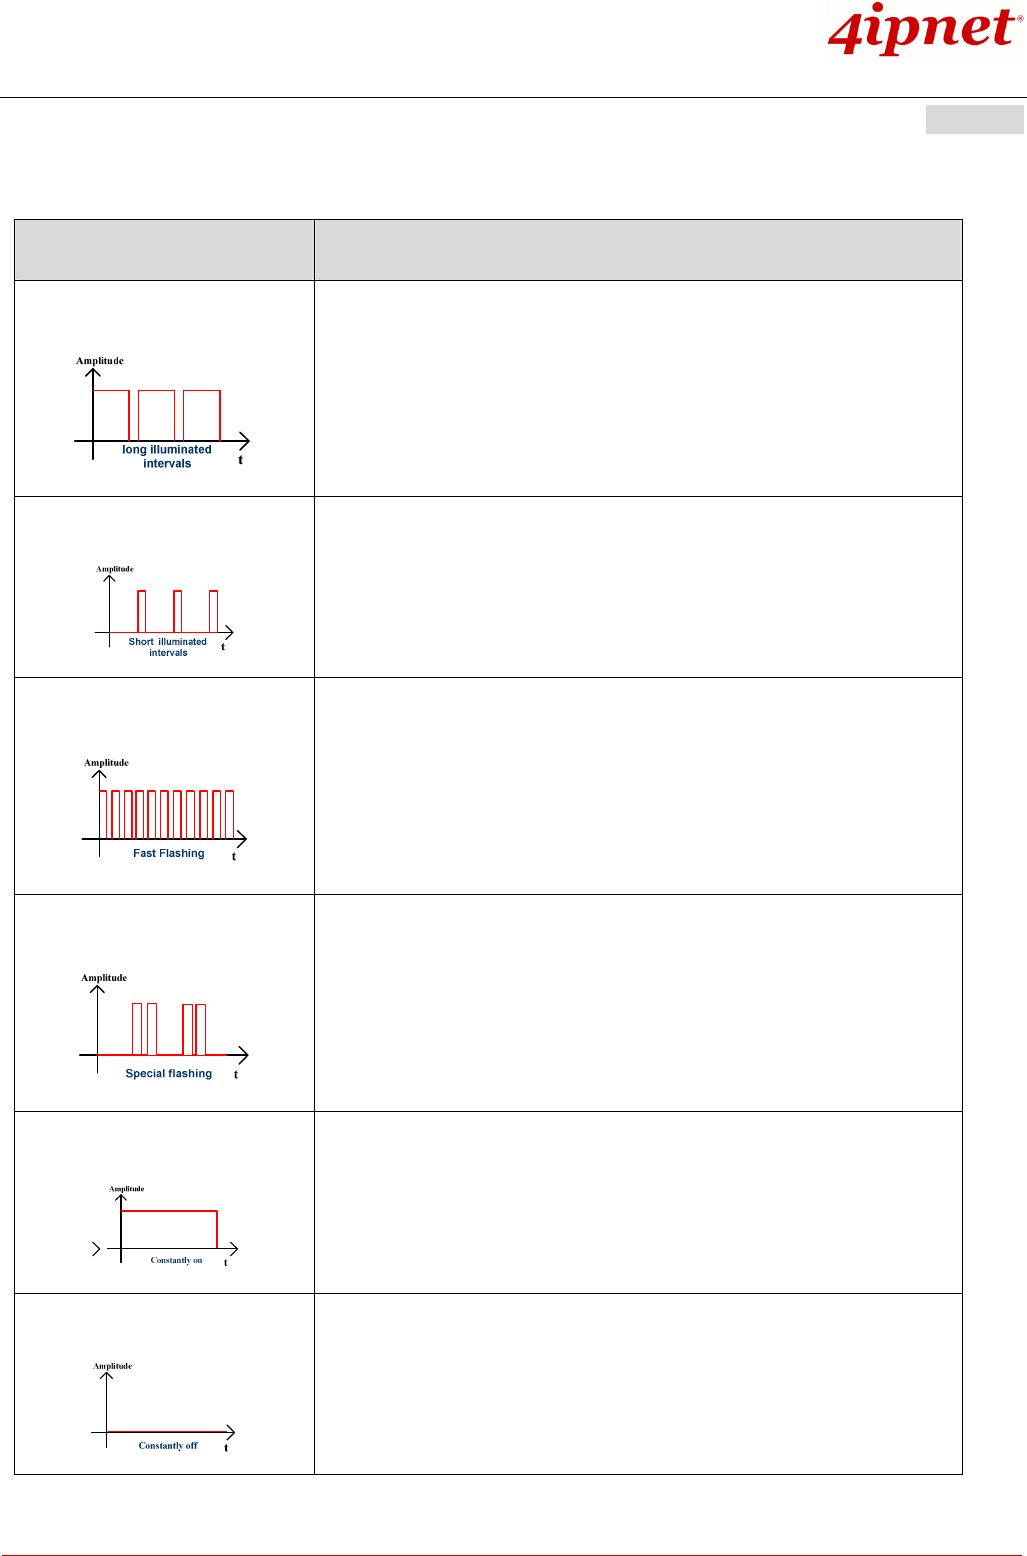
Status
1. Short illuminated intervals means SDS200W successfully booted up. It
flashes slowly.
2. Long illuminated intervals means SDS200W and uplink device connected
3. Special flashing means the keypad locked. The indicator fast-blinks twice
periodically.
Note: <TAS Mode only>
4. Fast flashing means SDS200W trying to connect to uplink device.
5. Constantly off for ten seconds means SDS200W fails to connect to uplink
device after step 4. Afterwards, Status will go back to step 1.
6. Constantly on for ten seconds means SDS200W succeeds in connecting to
uplink device after step 4. Afterwards, Status will go to step 2.
Ethernet
Ethernet turns into constantly on when an Ethernet cable is connected.
Ethernet blinks when the system detects wired traffic passing Ethernet. It is
constantly off when no cable is connected.
WLAN
WLAN behaves similarly as Ethernet - becoming constantly on when wireless
connectivity is enabled (not necessarily connected. It just means that the RF
card is ready to serve). WLAN blinks when the system detects wireless traffic. It
User
UserUser
User Guide
Guide Guide
Guide
Wireless Network Ticket Generator (SDS200W and POS Printer) ENGLISH
Copyright © 4IPNET, INC. All rights reserved. - 4 -
is constantly off if the RF card is disabled.
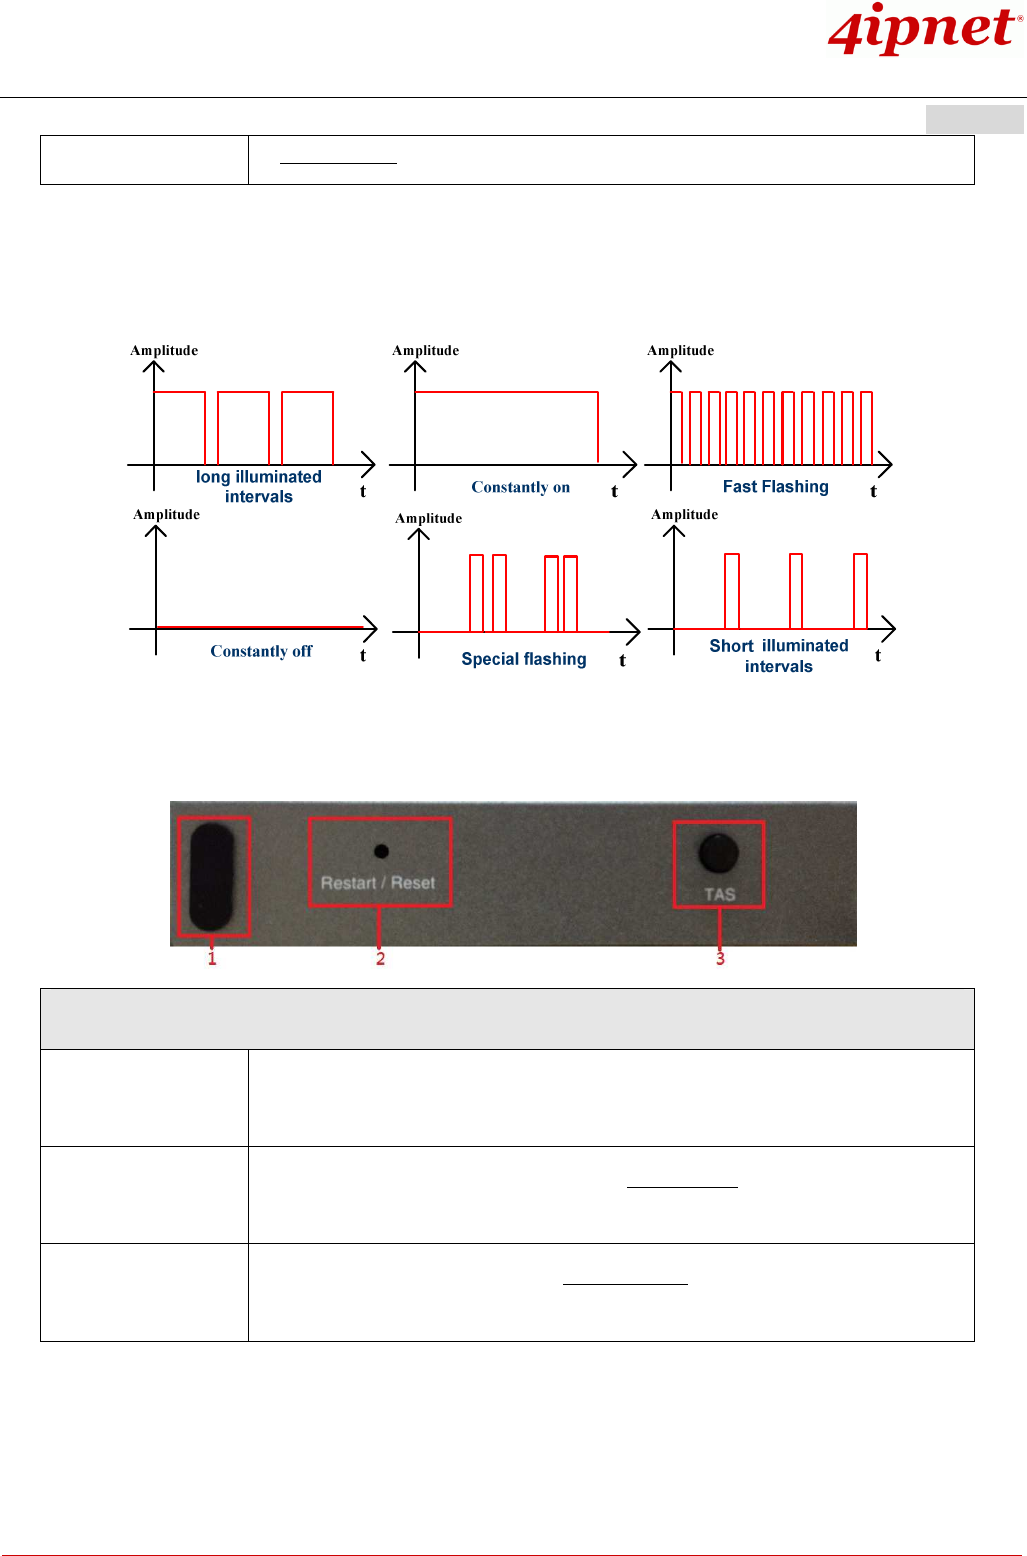
Understanding the LED indicators
There are four LED indicators on the panel : Power, Status, LAN, and WLAN from left to right. Below
summarizes all indication types in different states:
Right Side Panel Overview
Right Side Panel
1. Kensington
Lock
Be used to lock the device to a pole.
2. Restart / Reset
Pole once to reboot the system. Poke for five seconds to make SDS200W set
back to factory default settings.
3. TAS
Terminal Auto Setup (TAS). Press three seconds to initiate the auto uplink
connection process. This will be introduced later.
User
UserUser
User Guide
Guide Guide
Guide
Wireless Network Ticket Generator (SDS200W and POS Printer) ENGLISH
Copyright © 4IPNET, INC. All rights reserved. - 5 -
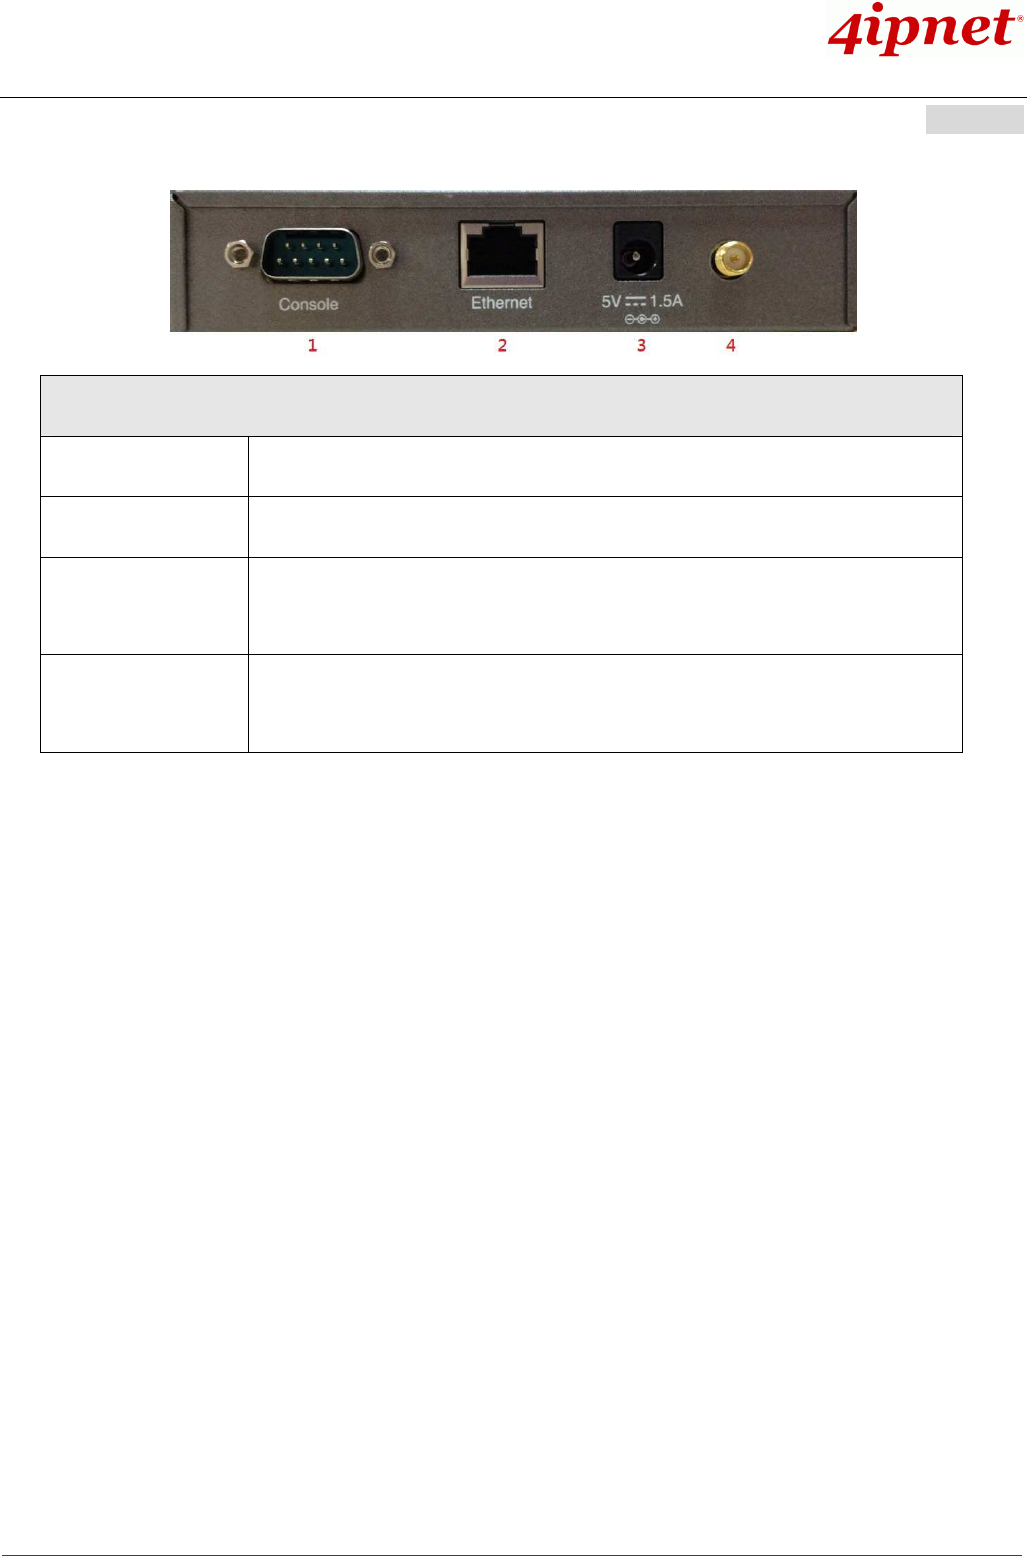
Left Side Panel Overview
Left Side Panel
1. Console
Serial port for connecting to a POS printer.
2. Ethernet
RJ-45 Ethernet port Serial port for connecting to the uplink gateway via wire.
3. 5V / 1.5A
The DC power socket for connecting to an external power source through a
DC power supply.
4. Antenna
connector
Assemble the dipole antenna within the package here.
User
UserUser
User Guide
Guide Guide
Guide
Wireless Network Ticket Generator (SDS200W and POS Printer) ENGLISH
Copyright © 4IPNET, INC. All rights reserved. - 6 -
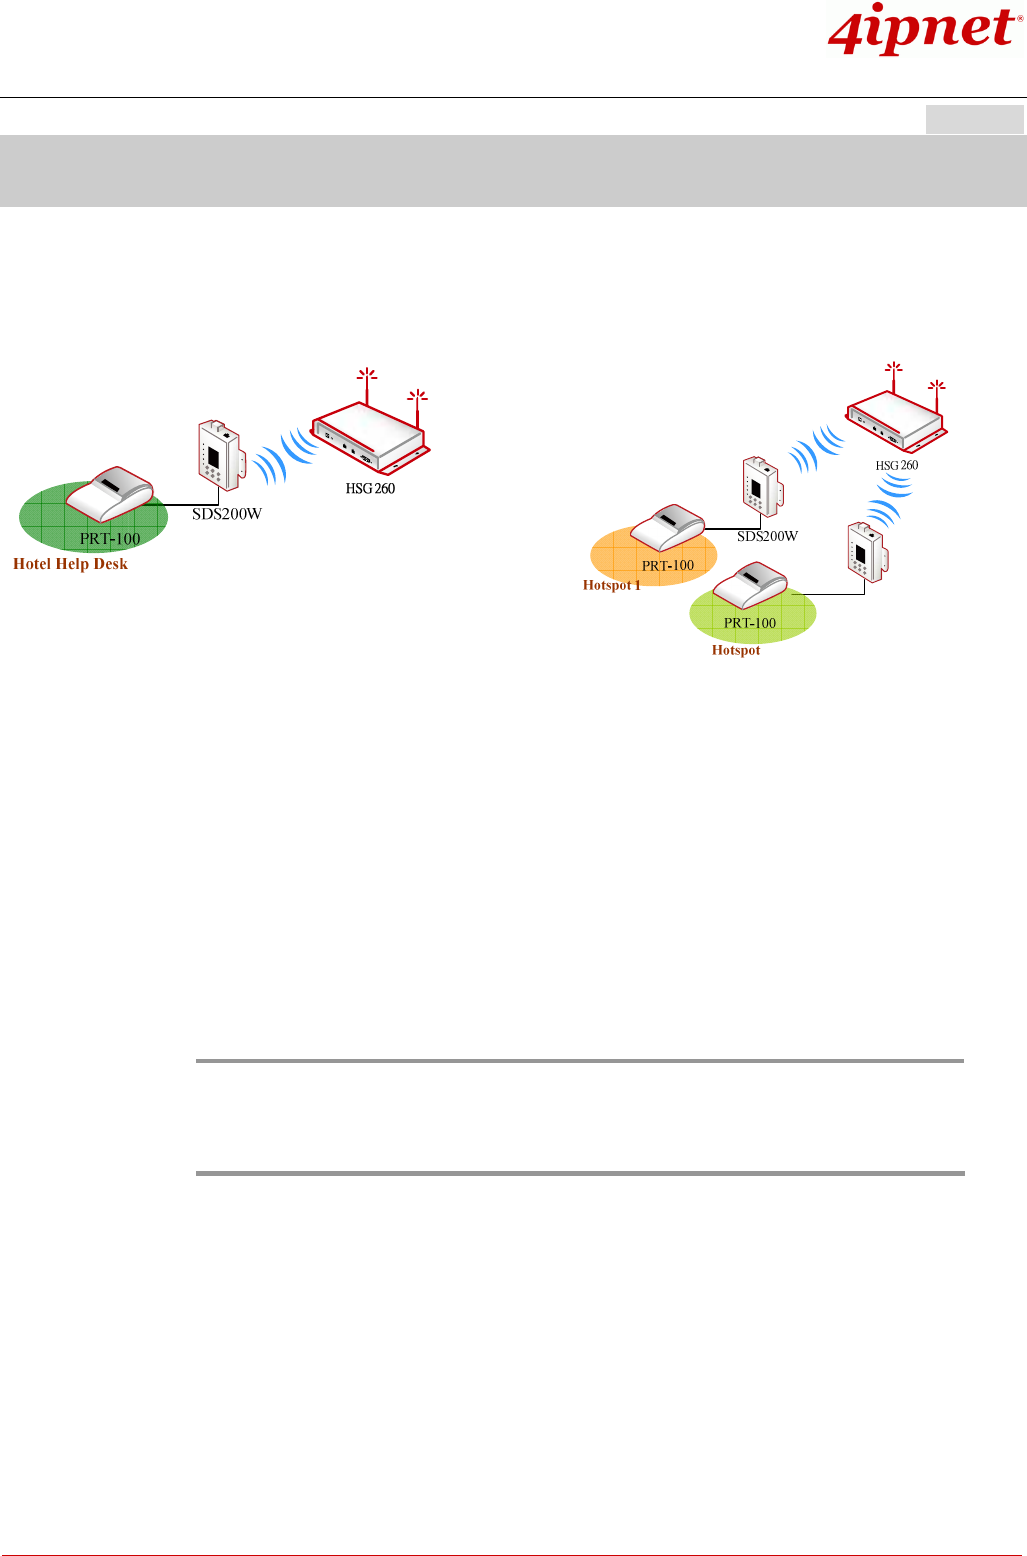
3. Including SDS200W into Your Network
The following diagram illustrates some deployment examples that show how to connect SDS200W to the
POS printer and 4ipnet Gateways/Controllers.
1. Put relevant devices in place.
2. Attach a SDS200W to a power adaptor provided in the package.
3. Attach a POS printer to a power adaptor provided in the package and turn on the power switch situated
on the left side of the device.
4. Connect a POS printer to the Console port of SDS200W by a RS-232 cable provided within the POS
printer package.
5. Connect SDS200W to your 4ipnet Gateway/Controller via Ethernet port or wirelessly. If you are to do it
wirelessly, conduct a site survey in the first place. The wireless coverage is subject to change.
Note: You need to connect to the correct LAN port if your Gateway/Controller
is operating in Port-based mode.
6. To verify if the deployment works fine. Press FUNC + ‘1’ + ENTER to see if SDS200W is attached to a
correct gateway and get an IP address from it. Additionally, press ‘Number’ + ENTER to see if an
account with a certain billing plan can be printed out. If it is not working properly, go to Appendix A for
trouble shooting.
User
UserUser
User Guide
Guide Guide
Guide
Wireless Network Ticket Generator (SDS200W and POS Printer) ENGLISH
Copyright © 4IPNET, INC. All rights reserved. - 7 -
4. Managing SDS200W on the Web Management Interface
SDS200W is designed specifically to operate in conjunction with all 4ipnet Gateways/Controllers,
including both HSG and WHG series. If you are not using default settings, before connecting SDS200W
to your 4ipnet Gateway/Controller, some configurations steps are required.
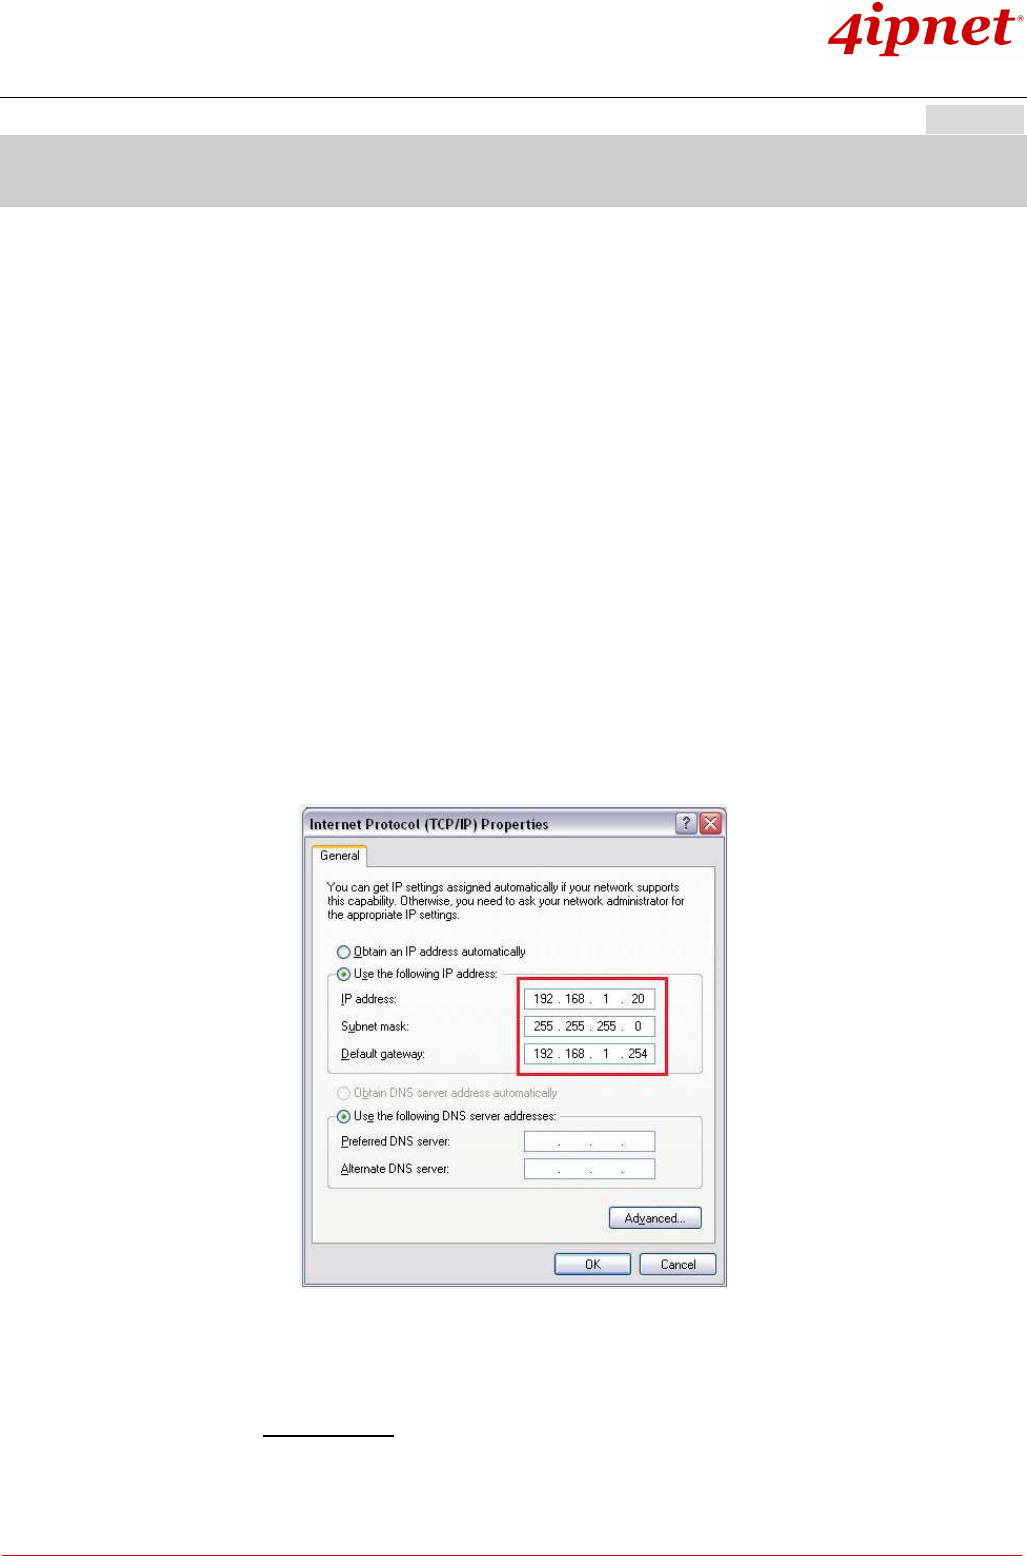
Go to the Web Management Interface (WMI) for SDS200W’s relevant configurations. The default values
are:
IP address: 192.168.1.10
Subnet Mask: 255.255.255.0
Default Gateway: 192.168.1.254
Remember to set the TCP/IP settings of the computer you use with a static IP address that is under the
same subnet as SDS200W. For example: 192.168.1.20.
The settings of SDS200W are separated into seven categories, which are
1. System – to setup the system name and device control.
2. Uplink – to determine wired / wireless relevant parameters. Any change on this page will take effect

User
UserUser
User Guide
Guide Guide
Guide
Wireless Network Ticket Generator (SDS200W and POS Printer) ENGLISH
Copyright © 4IPNET, INC. All rights reserved. - 8 -
after rebooting the system.
3. Console – to change console related settings for POS printers.
4. Utility – to upgrade the firmware version or backup/ restore SDS200W’s configuration settings.
5. Password – to change administrator’s password.
6. Reboot – to reboot (restart) the system.
7. Status – to overview device, system, uplink, and radio status if available.
User
UserUser
User Guide
Guide Guide
Guide
Wireless Network Ticket Generator (SDS200W and POS Printer) ENGLISH
Copyright © 4IPNET, INC. All rights reserved. - 9 -
5. SDS 200W with POS printer
5.1 Serial Settings
To make a POS printer properly functions with SDS200W, set up serial settings in advance in Console on
SDS200W’s WMI. The default values are for PRT-100 devices. Change the values if you use another
POS printer.
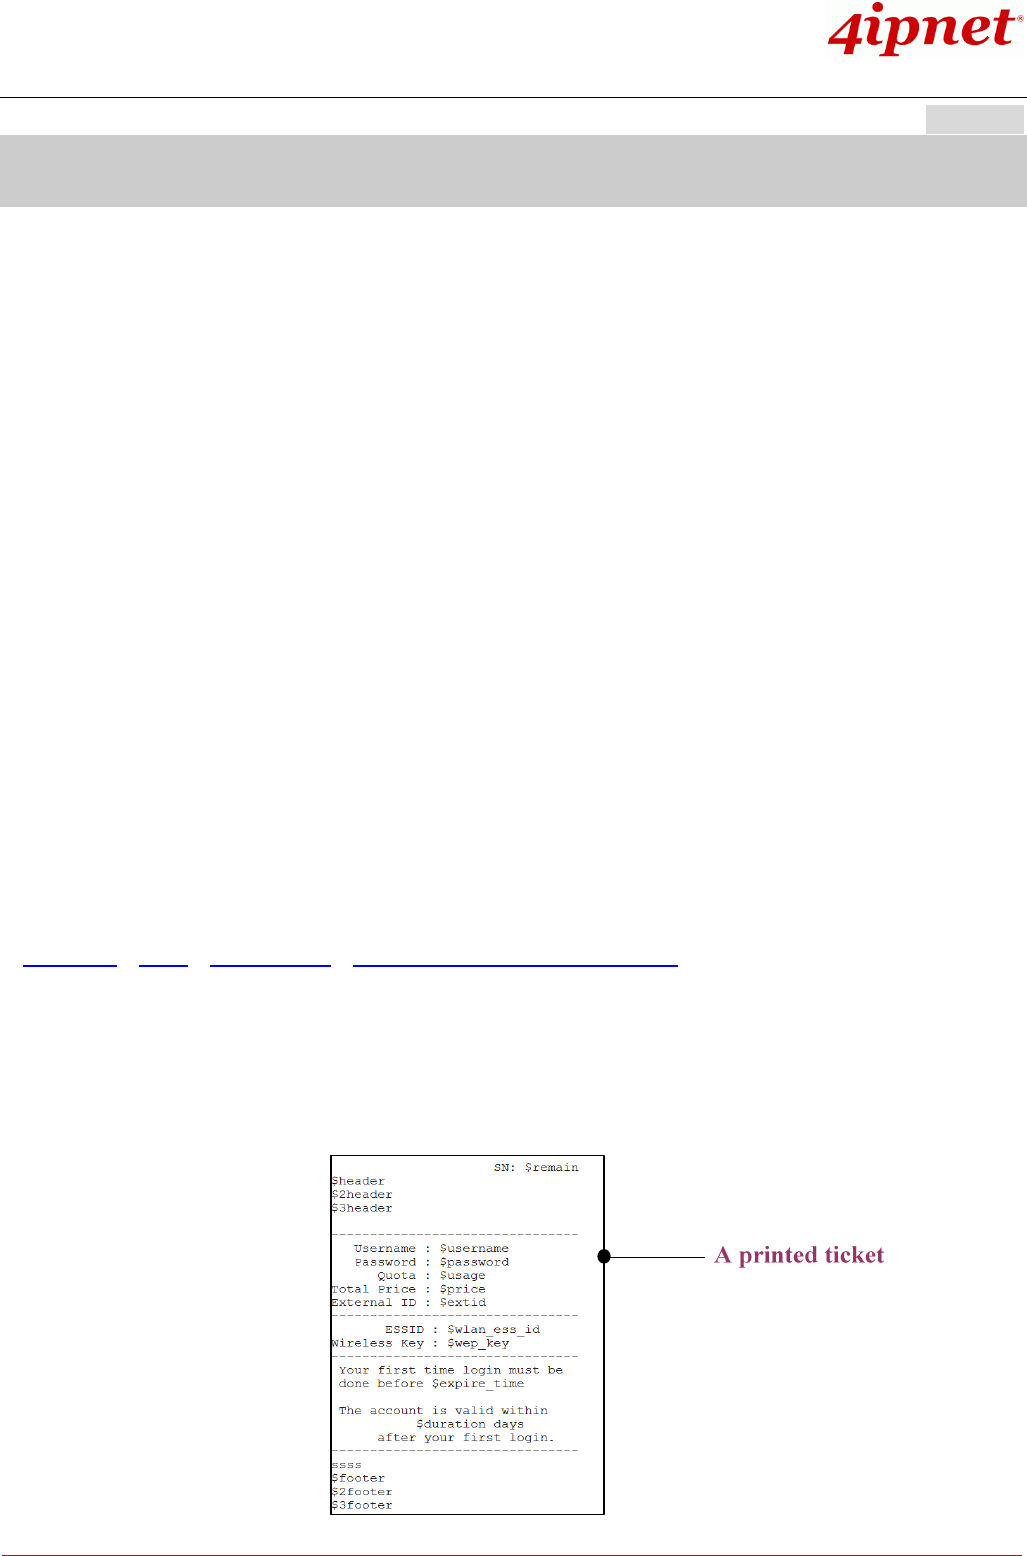
5.2 Printing On-demand Tickets for Your Customers
Operators have two ways of printing on-demand account tickets for their customers. One is to go onto the
WMI of 4ipnet Gateway/Controller and create one (or more). See the manual of the 4ipnet
Gateway/Controller you use; the other is to use SDS200W by the following two shortcut keys.
(1) ‘Number’ + ENTER or
(2) ‘Number 1’ + asterisk (*) + ‘Number 2’ + ENTER
For example,
‘3’ + ENTER is to have POS printer print out a billing 3 ticket;
‘4’ +
asterisk (*)
+ ‘2’ + ENTER allows operator to print a single ticket of billing plan 4 with two
units of the quota. That is, the given quota is multiplied by two. Note that the keys can only print
out tickets one at a time. To Batch-create tickets, turn to
Main Menu > Users > Authentication > On-demand User Server Configuration > On-demand Account Batch Creation
on 4ipnet controller’s WMI.
Use FUNC + ENTER or wait 5 seconds to clear the wrong number just pressed.

User
UserUser
User Guide
Guide Guide
Guide
Wireless Network Ticket Generator (SDS200W and POS Printer) ENGLISH
Copyright © 4IPNET, INC. All rights reserved. - 10 -
6. SDS 200W with 4ipnet Gateway/Controller
SDS200W offers ‘manual’ and ‘auto’ connection to uplink 4ipnet Gateway/Controller. The former implies
that administrator would have to go on to SDS200W’s WMI, filling in necessary columns that are
supposed to fit what is set up on the controller end. However, the auto connection – called Terminal Auto
Setup (TAS) – is particularly designed for quickly establishing connection without any previous setting.
6.1 Manual setup
Connecting SDS200W to uplink 4ipnet Gateway/Controller manually, there are still two ways to achieve.
One is through wired connection, and the other is via wireless connection.
Method 1: Wired Connection
Plug in an Ethernet cable between SDS200W and 4ipnet Gateway/Controller. Fill in Network Settings and
make sure they match what is determined on the controller. The change will take effect after (1) clicking
Save and (2) rebooting the system. After SDS200W and the uplink device has built up a successful
connection, the
Status indicator will blink
with long illuminated intervals.
Method 2: Wireless Connection
Fill in Network Settings and Wireless Settings, click Save, and reboot the system. After SDS200W and
the uplink device has successfully built up a connection, the Status indicator will blink with long
illuminated intervals.
Note:
When wired connection is established, the wireless connectivity will be turned off by
the system automatically, meaning wireless and wired connection will not co-exist at
any time. Wired connection has a higher priority.
User
UserUser
User Guide
Guide Guide
Guide
Wireless Network Ticket Generator (SDS200W and POS Printer) ENGLISH
Copyright © 4IPNET, INC. All rights reserved. - 11 -
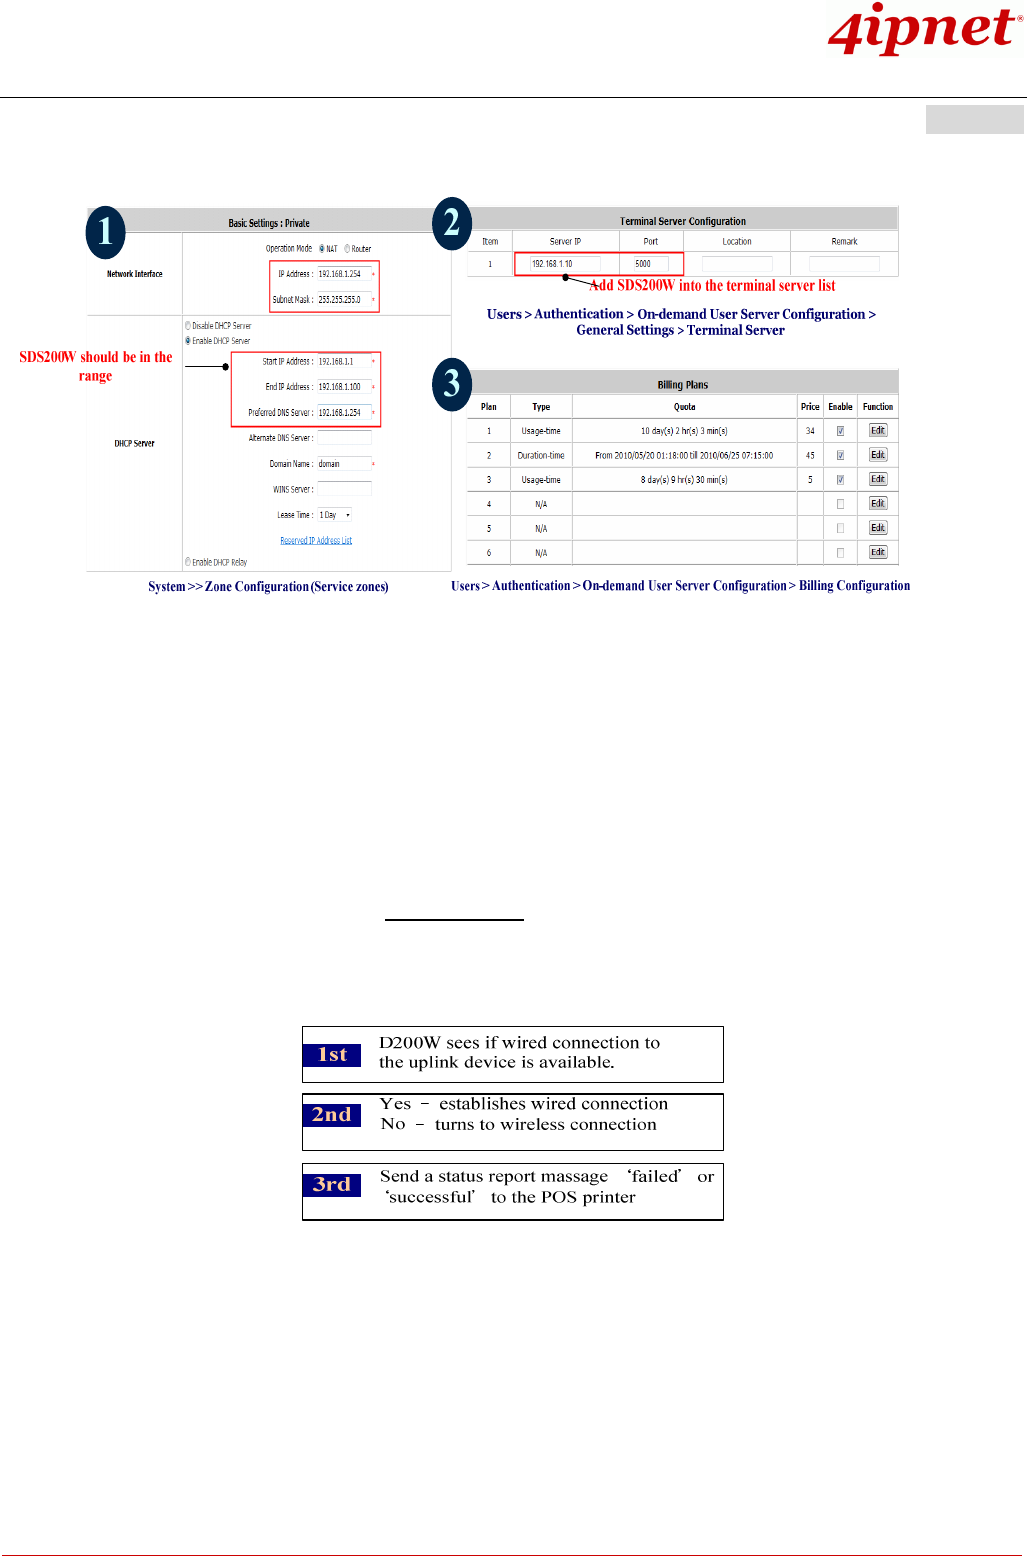
The recommended step-by-step setup process is shown as follows.
When the settings are done completely on the 4ipnet Gateway/Controller side, go to SDS200W’s WMI
and check if every uplink setting matches that on the controller.
6.2 Terminal Auto Setup (TAS)
TAS refers to an automatic connection mechanism that requires NO previous network settings. Just
press the TAS button on SDS200W for three seconds, and it will automatically look for and associate to a
suitable 4ipnet gateway that supports this function. The connection building process is as follows
The TAS connection will rewrite the previous manual settings. You will see the Uplink page of the WMI
grayed out as well as Status show that the system is in TAS mode. TAS process takes about thirty
seconds for completion. Whether the connection succeeds or fail s the attempt, SDS200W will always
have the printer print out if the connection is ‘successful’ or it ‘failed.’ Please make sure beforehand that

User
UserUser
User Guide
Guide Guide
Guide
Wireless Network Ticket Generator (SDS200W and POS Printer) ENGLISH
Copyright © 4IPNET, INC. All rights reserved. - 12 -
the Ethernet cable is plugged/ the wireless environment is ok.
Note:
Wired TAS uses port 5000 as the default value. The controller has to set the port to
the number, as well. Additionally, when trying to deploy TAS, make sure that the table
of Terminal Server Configuration on the controller side is not filled up. Otherwise, the
connection must fail.
User
UserUser
User Guide
Guide Guide
Guide
Wireless Network Ticket Generator (SDS200W and POS Printer) ENGLISH
Copyright © 4IPNET, INC. All rights reserved. - 13 -
Appendix A. Trouble Shooting
Q1. SDS200W can not have the POS printer print out accounts
1. See if the printer is still connected to SDS200W.
2. Check if the panel is locked by looking at the Status indicator. If it belongs to special flashing,
unlock the keypad by pressing asterisk (*) + ENTER.
3. Press FUNC + ‘1’ + ENTER to see SDS200W’s state. Check if every value is proper.
4. See the Status indicator on the device panel. If it is short illuminated intervals, the device is
then
not connected to the controller. Try to establish the connection again.
5. Read through the section ‘SDS200W with 4ipnet controller’ to ensure the settings.
Q2. The TAS triggered connection is not working.
1. Check if the capability is disabled by someone. Go to “System >> TAS button” on SDS200W’s
WMI to enable the function.
2. Make sure the cable is plugged and SDS200W is placed in the c
overage of the hotspot gateway
you want to associate to (wirelessly).
3.
Check if the Terminal Server Configuration table on the gateway has at least one empty field for
the controller for the system to automatically add SDS200W to the list. If not, clear one space for
TAS.
User
UserUser
User Guide
Guide Guide
Guide
Wireless Network Ticket Generator (SDS200W and POS Printer) ENGLISH
Copyright © 4IPNET, INC. All rights reserved. - 14 -
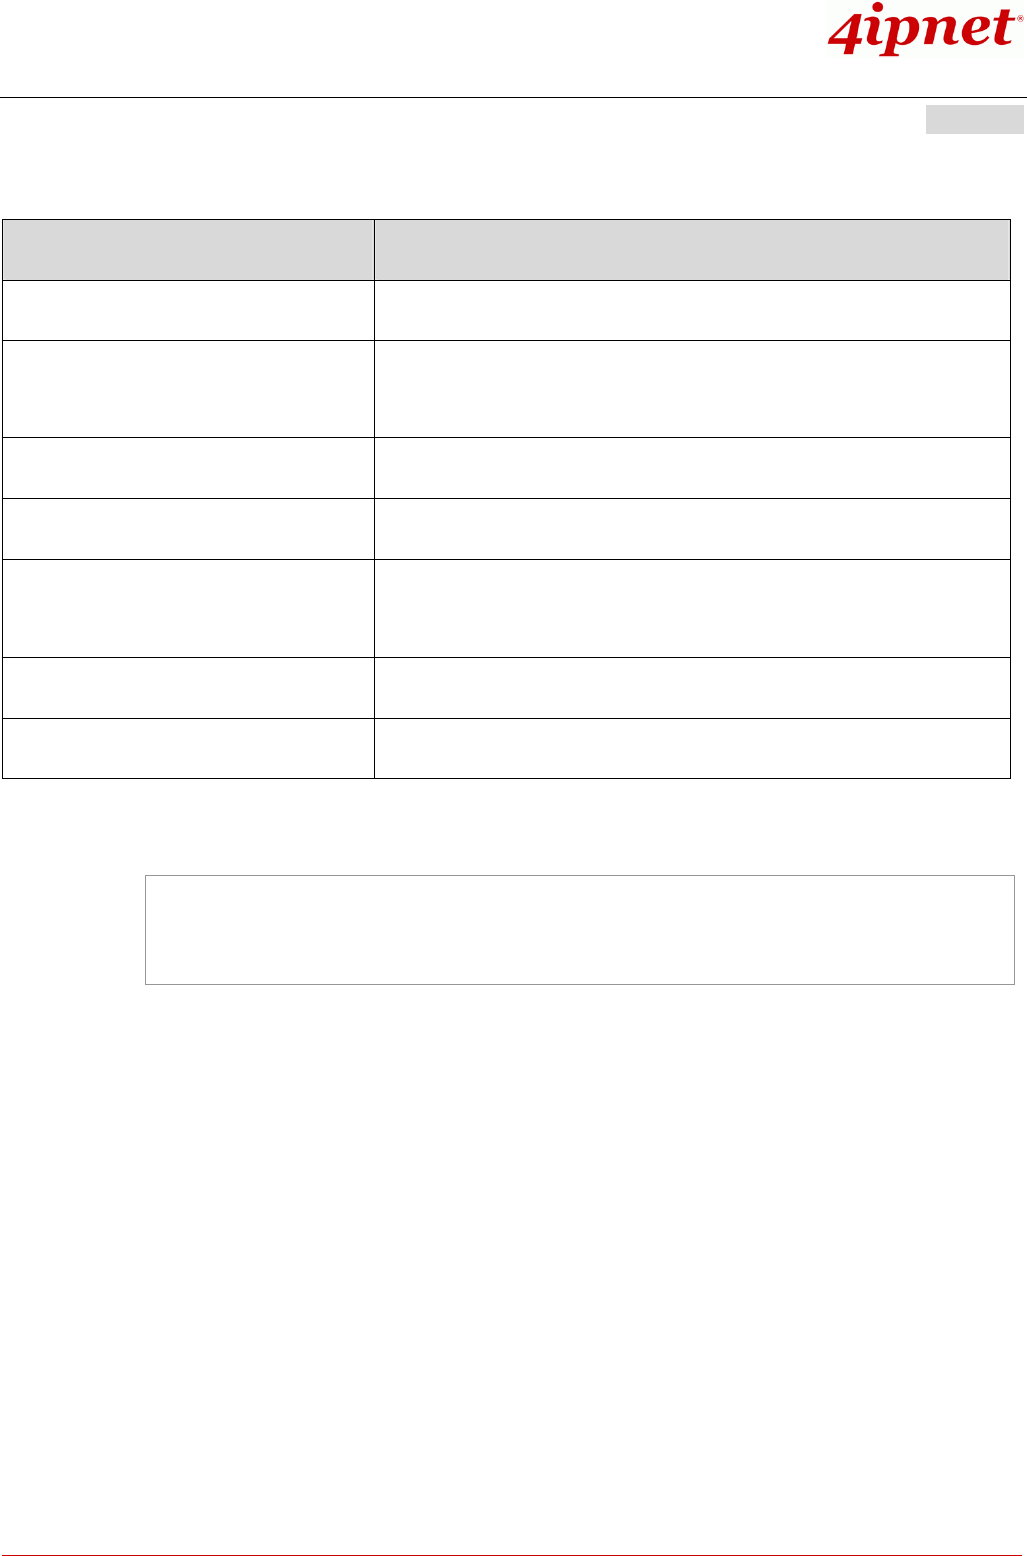
Appendix B. Connection Status with the Indicators
Display State
Long illuminated intervals
SDS200W and the uplink device are connected.
Short illuminated intervals
The system is ready, but uplink connection has not been set up yet.
Fast flashing
(TAS) SDS 200W is trying to connect to the uplink controller.
Special flashing
The keypad is locked. Unlock it by pressing
asterisk (*)
+ ENTER.
It is a 10-second state.
Constantly on
(TAS) SDS 200W succeeds in connecting to the controller.
It is a ten-second state.
Constantly off
(TAS) SDS 200W fails to connect to the controller
User
UserUser
User Guide
Guide Guide
Guide
Wireless Network Ticket Generator (SDS200W and POS Printer) ENGLISH
Copyright © 4IPNET, INC. All rights reserved. - 15 -
Appendix C. Shortcut Keys
Combination Function
‘Number’ + ENTER Print a ticket of billing plan ‘Number’
‘Number 1 ’ +
asterisk (*)
+ ‘N
umber 2’
+ENTER
Print a ticket of billing ‘Number 1’ with ‘Number 2’ units.
FUNC + ‘1’ + ENTER To print out SDS200W’s status.
FUNC + ENTER To clear what is pressed.
FUNC + ‘0’ + ENTER To activate Safe Mode – disabling the FUNC + ‘1’ + ENTER shortcut
key in order to protect SDS200W’s information leakage.
‘4-digit’ + ENTER To disable Safe Mode.
asterisk (*)
+ ENTER To lock the keypad.
Note: Detailed information about the shortcut keys are explained in section
Hardware and Appearance
P/N: 10020120420