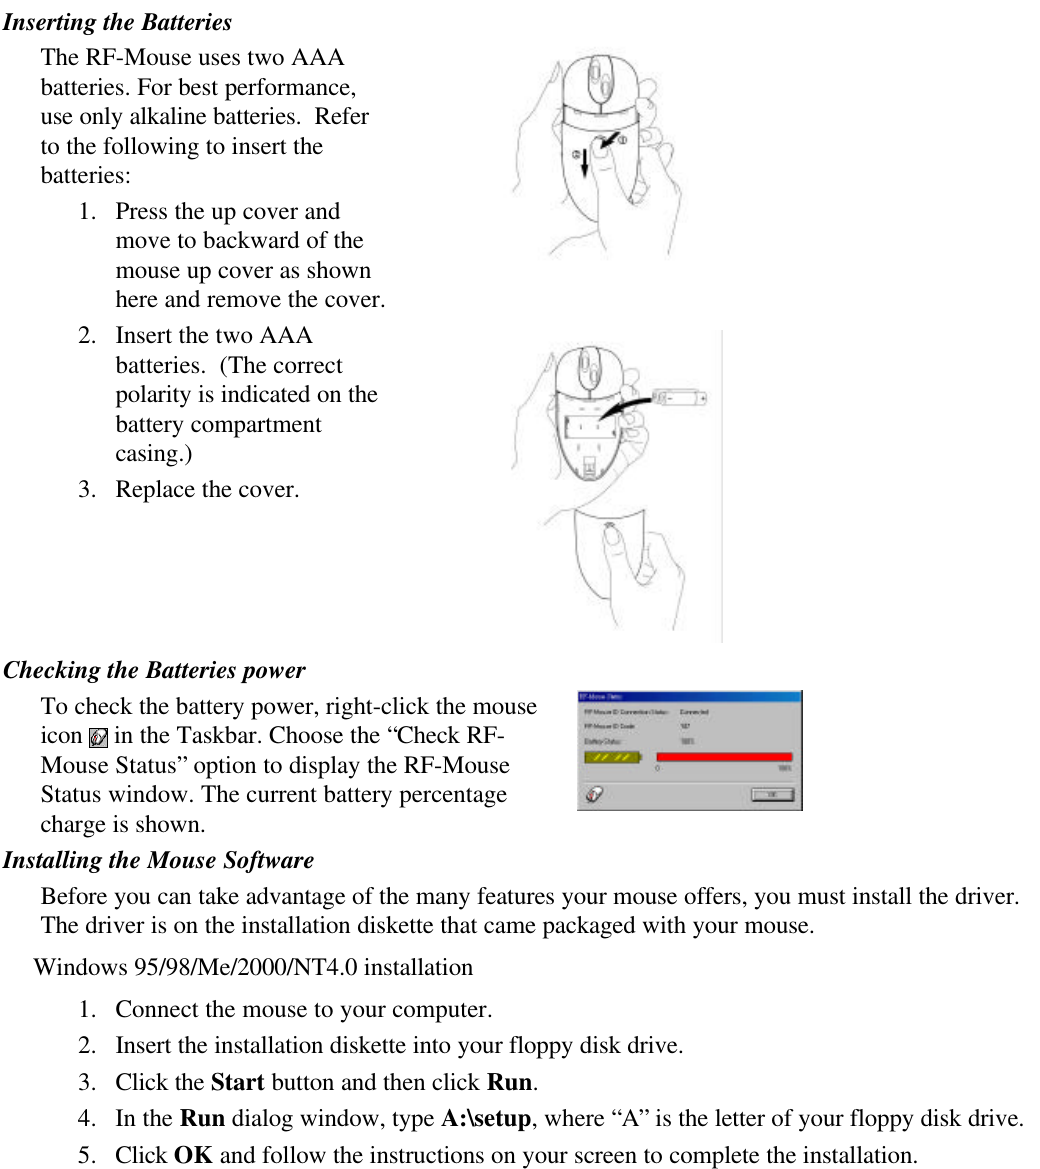
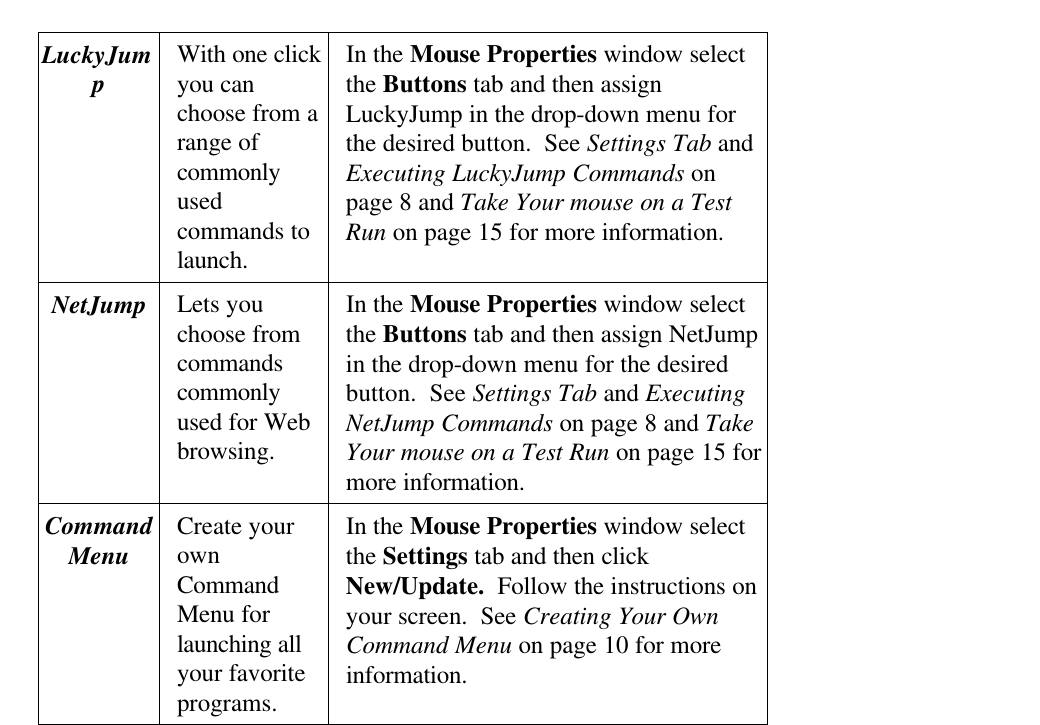
A Four Tech Co RW23 Radio Wireless Wheel Mouse User Manual RFW 23 UserMan
A Four Tech Co Ltd Radio Wireless Wheel Mouse RFW 23 UserMan
UserManual.wiki
>
A Four Tech Co
>
RW23 User Manual
users manual
Navigation menu
Upload a User Manual
Namespaces
Wiki Guide
HTML
PDF
Info
Views
User Manual
Discussion / Help
Navigation
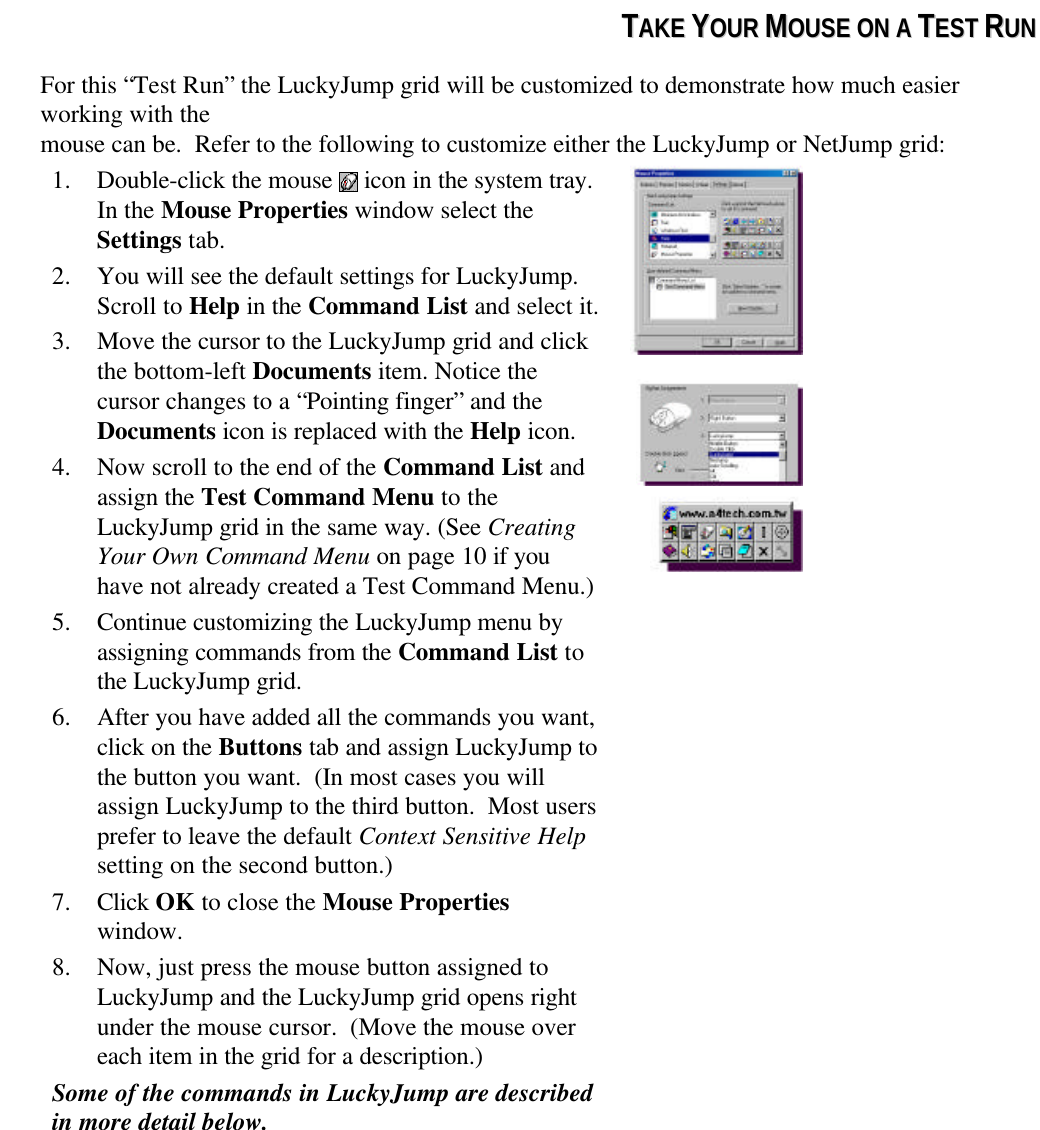
![The RF-Mouse ID codeEach RF-Mouse is assigned a unique ID code at manufacture, so the receiver only picks up the signalfrom your mouse and prevents other RF-Mouse radio signals from operating on your computer. Thisfeature can also be disabled, allowing other RF-pointing devices to operate your computer.Connecting the RF-Mouse ID CodeWhen the driver installation is finished yourcomputer reboots and the RF-Mouse window(shown on the right) appears.CONNECT ID: Move the RF-Mouse for a fewseconds to establish a connection, then clickConnect ID. The unique ID code of your mouse isrecognized and another RF pointing device will notfunction on your computer.Exit: Click Exit if no other RF pointing devicesare within 3 meters range or if you want other RFpointing devices to be able to access yourcomputer.Changing the RF-Mouse ID CodeYou can use a new RF-Mouse on your computer without changing the Radio receiver; you just need tochange the ID code. Refer to the following:1. Press [Shift + Alt + F11] or [Shift + Alt + F12] to call up the RF-Mouse ID Code window.2. Move the RF-Mouse for a few seconds to establish a connection, then click Connect ID.3. The new ID code is Connected and the RF-Mouse window closes.4. Click Exit to close the RF-Mouse ID code window.Identifying ComponentsThe mouse is designed to fit snugly into your hand. The scroll wheel ispositioned on the top allowing for easy operation with the index finger.Standard mouse buttons are positioned to either side of the scroll wheelsand can be reached comfortably with the index and ring fingers. A thirdbutton is placed under the vertical wheel and can be easily clicked bypushing down on the wheel.The following pages will tell you how to configure the scroll wheels andbuttons to suit your specific needs.Cleaning the MouseClean the mouse regularly to ensure efficient operation. Refer to the following:1. Rotate the housing cover counterclockwise until it unlocks andremove it.2. Remove the tracking ball.3. Wash the tracking ball with warm water and soap then allow it todry.4. Use a cotton swab and alcohol to clean the tracking rollers in thehousing.5. Replace the tracking ball and the housing cover.6. Rotate the housing cover clockwise until it locks in place.](https://usermanual.wiki/A-Four-Tech-Co/RW23/User-Guide-137434-Page-5.png)
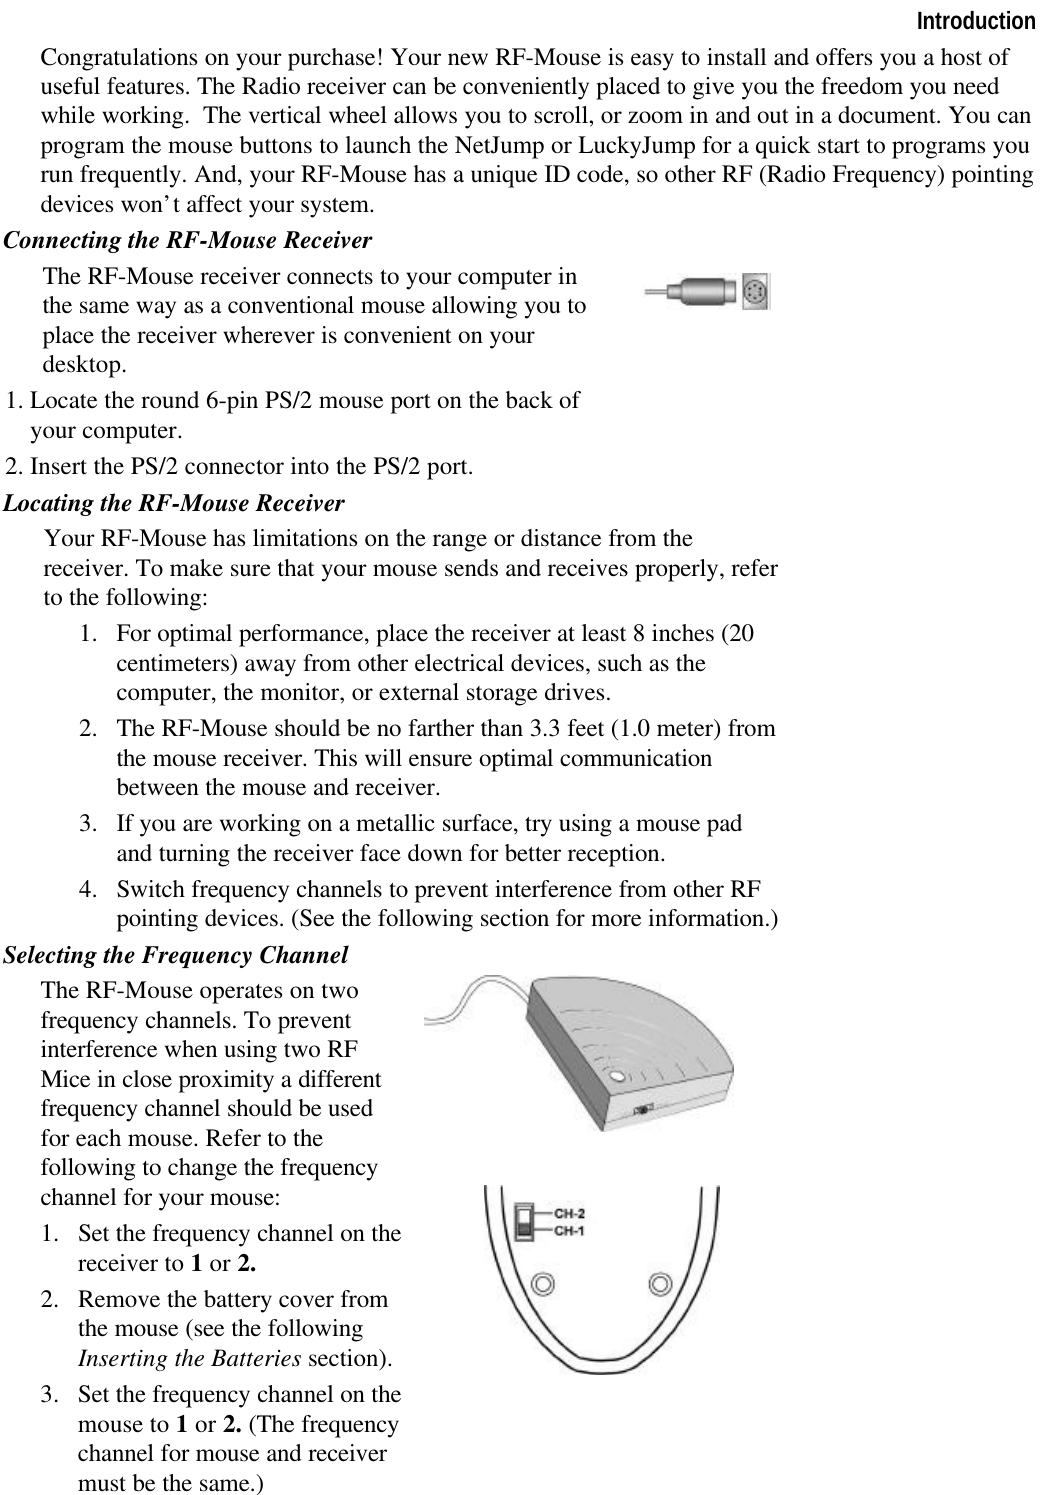
![IIWWHHEEEELLWWOORRKKSS DDOOEESS TTHHEE HHEEAAVVYY WWOORRKK!!With iWheelWorks driver/software installed, your Mouse is transformed into much more than just apointing device. See how easy scrolling through long documents or panning in drawing applicationsbecomes when using the scroll wheels. Office users should love this feature—use the vertical wheelto scroll through your document then just press the [Ctrl] key and use the same wheel to zoom infor a close look. It even works in print preview! The third button can be programmed to launchNetJump or LuckyJump—two customizable toolbars that open all those useful programs that youneed so often with just one click. And, in easy-to-follow steps, create your own Command Menuand with one click put all your favorite programs right under the cursor!The following tableprovides an overview of the mouse functions.Function Description Here’s how to do itVerticalScroll Lets you scrollup or down inthe currentapplicationwindow.To scroll up, move the vertical wheelforward; to scroll down, move the wheelback. See Wheel Tab on page 8 for moreinformation.HorizontalScroll Lets you scrollto the left orright in thecurrentapplicationwindow.To scroll left, move the horizontal wheelforward; to scroll right, move the wheelback. See Wheel Tab on page 8 for moreinformation.AutoScroll UseAutoScroll inOffice 97-compatibleapplications toscroll throughlargedocuments.Activate AutoScroll from LuckyJump orNetJump. The AutoScroll icon appearsover the vertical scrollbar. Move themouse in the direction you want to scroll.The farther you move the AutoScroll iconfrom the starting point, the faster thescrolling. To stop AutoScroll, press anymouse button.Zoom Lets youzoom in or outwhen usingapplicationsthat supportzoomfunction.In the Mouse Properties window selectthe Wheel tab and check the “WheelZoom for Office 97/2000” option (if youdon’t check this option you can hold the[Ctrl] key while zooming with eitherscroll wheel). Then use the horizontalwheel to zoom in and out. See WheelTab on page 8 for more information.](https://usermanual.wiki/A-Four-Tech-Co/RW23/User-Guide-137434-Page-6.png)
![MMOOUUSSEE PPRROOPPEERRTTIIEESS SSEETTTTIINNGGSSFrom the Mouse Properties window you can customize manysettings for your mouse including button assignments, scrollwheels and cursor movement. To open the Mouse Propertieswindow double-click on the mouse icon in the system tray.The Mouse Properties window has six tabs that are describedbelow.SystemTrayButtons TabButton Assignments: Click the down arrowto select the preferred function for each button.(See the Settings Tab for more information.)Double Click Speed: Increase the speed forexecuting a double-click.Button Configuration: Configure your mousefor left- or right-hand use. The default settingfor buttons 1 and 2 will be reversed.Ø Note!The particular mouse you purchased maydiffer somewhat from the illustrationshown in the Buttons tab. The thirdbutton on some models is positionedunder the vertical scroll wheel instead ofat the side as shown here.Pointers TabThe Pointers tab lets you change the way thecursor appears. Click the down arrow underScheme and choose the setting you want. Theavailable pointers for each scheme are shown inthe pane below. You can browse to additionalpointers, then create your own scheme usingthe Save As button.Motion TabPointer Speed: Lets you adjust how fast thecursor moves on the screen.SnapTo Button: Check this box toautomatically have the cursor move to thedefault button in each new dialog box orwindow.Sonar: When this box is checked, pressing andreleasing the [Ctrl] key will highlight thecursor.Trails: Check this box when you want yourcursor to display pointer trails. This option isuseful when using an LCD display that canmake the cursor difficult to see.](https://usermanual.wiki/A-Four-Tech-Co/RW23/User-Guide-137434-Page-8.png)
![Wheel TabWheel Mode: Select the Enhanced Dual Wheel4D Wheel function mode radio button to enableboth vertical and horizontal wheels. When theMS-IntelliMouse Compatible mode radio buttonis selected only the vertical wheel will function.Swap Vertical and Horizontal Wheel: Checkthis box to swap the functions of the Horizontaland Vertical Wheels.Vertical Wheel/Horizontal Wheel: Check theReverse scrolling direction box to change thescrolling direction when you turn the scrollwheel. Select the Scroll or Scroll one “page” perscroll unit radio button to set the scrolling speedto suit your work habits.Wheel Zoom for Office 97/2000: Check thisbox to use the horizontal wheel to zoom in andout when using applications that support thisfunction. You can still use the wheel to scrollhorizontally by positioning the cursor over thehorizontal scroll bar. When this option isunchecked, you must press the [Ctrl] key whileturning the horizontal wheel to use the zoomfunction.Settings TabCommand List: Shows all the availablecommands (including User-defined CommandMenus) that you can assign to either the NetJumpor LuckyJump grids.NetJump (top grid): The NetJump grid groupscommonly used Web-browsing commands. Tochange a command, select a new one from theCommand List and click on the icon in the gridthat you want to change.LuckyJump (bottom grid): The LuckyJumpgrid groups all-purpose commands. To change acommand, select a new one from the CommandList and click on the icon in the grid that youwant to change.User-defined Command Menu: Here you cancreate your own command menu to suit yourspecific needs. Click on New/Update… andfollow the onscreen instructions.Apply Net/LuckyJump or the User-definedCommand Menu you define here from theButtons tab.](https://usermanual.wiki/A-Four-Tech-Co/RW23/User-Guide-137434-Page-9.png)
![1. Double-click the mouse icon in thesystem tray. In the Mouse Propertieswindow select the Settings tab.2. Click New/Update… to open the User-defined Options window.3. Select Keyboard Sequence in theCommand Type pane and click <AddNew Command.4. In the Keyboard Sequence window typea name for the command. Under Mode,select the Text radio button and then typein your message.5. Click OK when you are finished.6. Repeat steps 3 to 5 to add more Textcommands to your Test Command Menu.7. When you have finished addingcommands, close the User-definedOptions window and the MouseProperties window.8. Open a text editor or e-mail messengerand place the cursor where you want themessage added. Select the KeyboardSequence Text command from your TestCommand Menu.9. Your message is added to yourdocument.Adding a Keyboard Sequence Shortcut CommandIn Office applications many users are accustomed to using keyboard commands such as the copycommand, [Ctrl] + [C] or the paste command [Ctrl] + [V] directly from the keyboard. However, tospare you from having to remember all these keyboard shortcuts you can add them to your TestCommand Menu. Refer to the following to add a Keyboard Sequence command.](https://usermanual.wiki/A-Four-Tech-Co/RW23/User-Guide-137434-Page-14.png)
![1. Double-click the mouse icon in the system tray.In the Mouse Properties window select theSettings tab.2. Click New/Update… to open the User-definedOptions window.3. Select Keyboard Sequence in the CommandType pane and click <Add New Command.4. In the Keyboard Sequence window type a namefor the command. Click Record and then type inthe keyboard sequence. To apply the “Underline”command as shown below, type: [Ctrl] + [Shift] +[W].5. Click Stop when you are finished and then clickOK.6. Repeat steps 3 to 5 to add more KeyboardSequence commands to your Test CommandMenu.7. When you have finished adding commands, closethe User-defined Options window and theMouse Properties window.8. Open your Office application and select some text.Select the Underline Keyboard Sequencecommand from your Test Command Menu.9. The text you selected is now underlined.](https://usermanual.wiki/A-Four-Tech-Co/RW23/User-Guide-137434-Page-15.png)