A and H Design Group BV-004RX Wireless remote control vibrator User Manual Novice User Guide cs5 indd
A&H; Design Group, Ltd. Wireless remote control vibrator Novice User Guide cs5 indd
User Manual

English . . . . . . . . . . . . . . . 2
Deutsch. . . . . . . . . . . . . . . 24
Español . . . . . . . . . . . . . . . 46
Français . . . . . . . . . . . . . . . 68
Nederlands . . . . . . . . . . . . .90
Italiano . . . . . . . . . . . . . . .112
!!"! !"! !"! !"! !"! !"! !"! !"! !"! !"! !"! !"! !"! 134
USER GUIDE

2
OVERVIEW
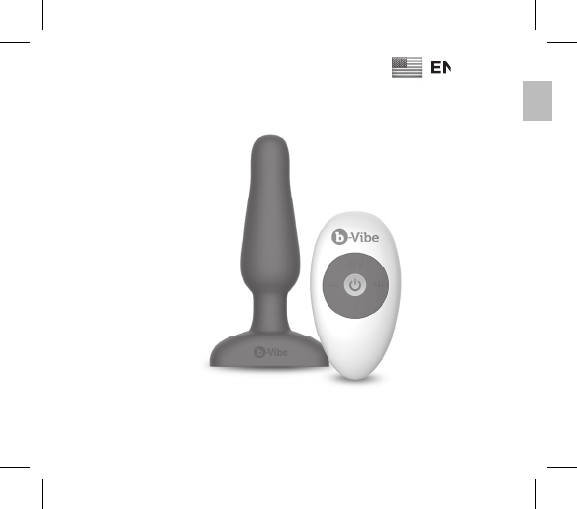
b-VibeTM products are made with silky smooth, body-
safe silicone. Our products are phthalate-free and
latex-free.
The easy to use interface allows users to easily reach
their desired stimulation and intensity level. Get ready
for sensual satisfaction and exploration that will have
you craving for more.
3
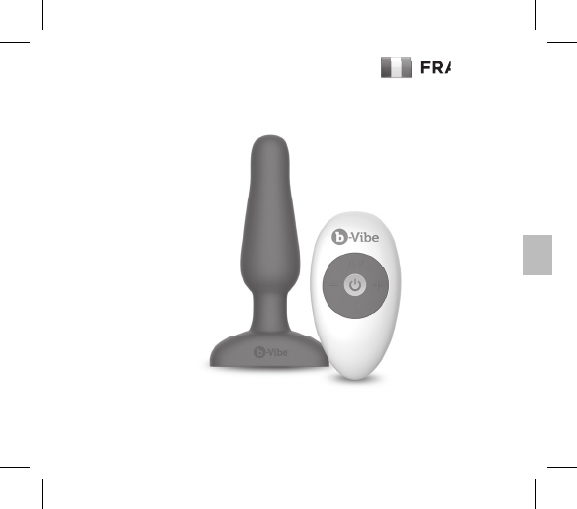
b-VibeTM Novice Plug
ENGLISH
ENGLISH
4
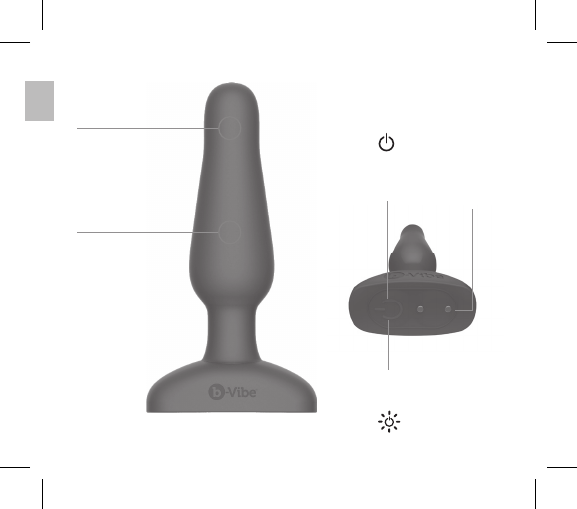
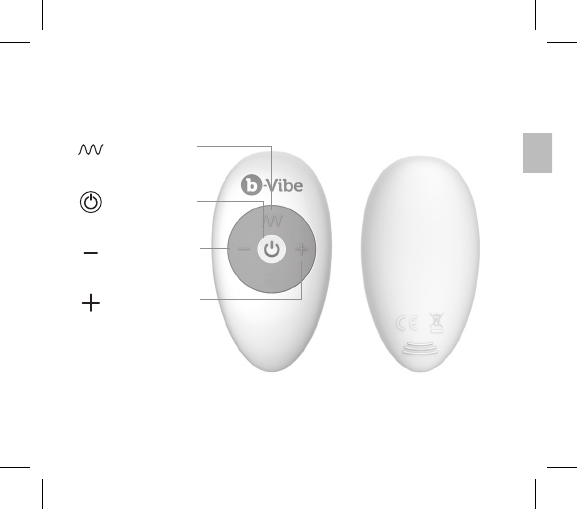
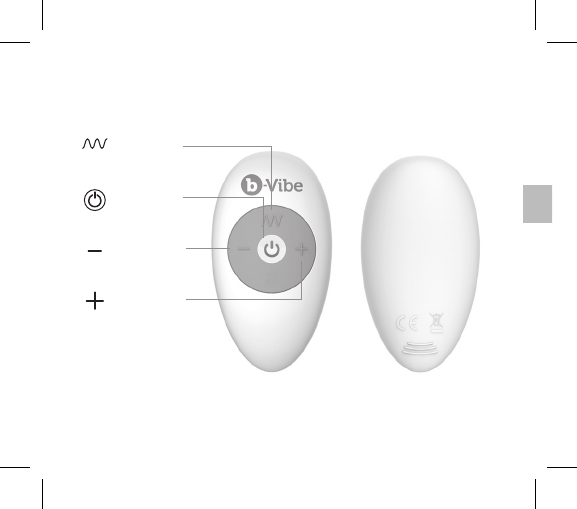
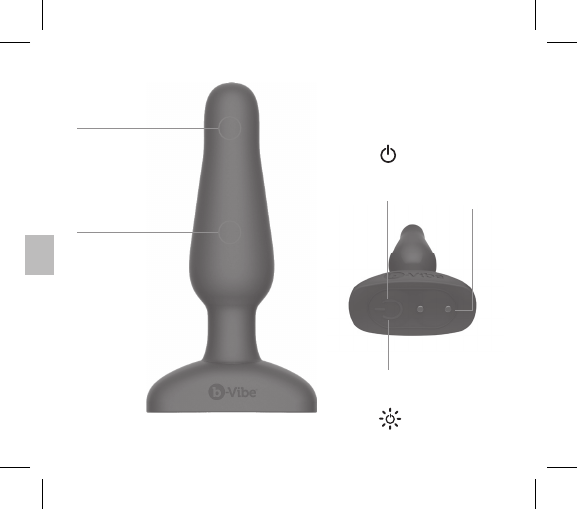
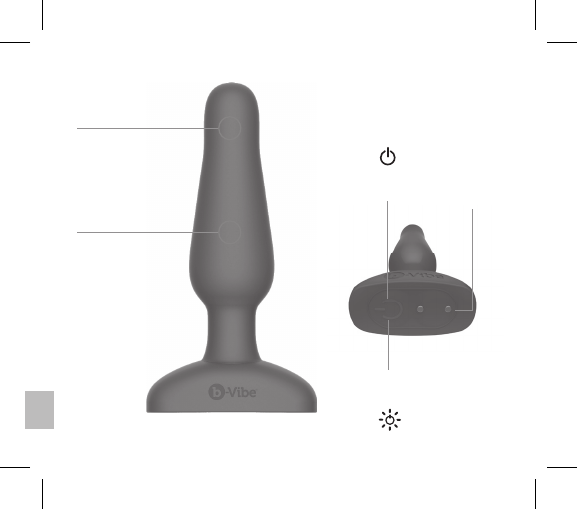
Powerful Motor
Base
Control
Button
Magnetic
Charging
Contact
LED
Indicator
NOVICE PLUG
Easily
Insertible Tip

5
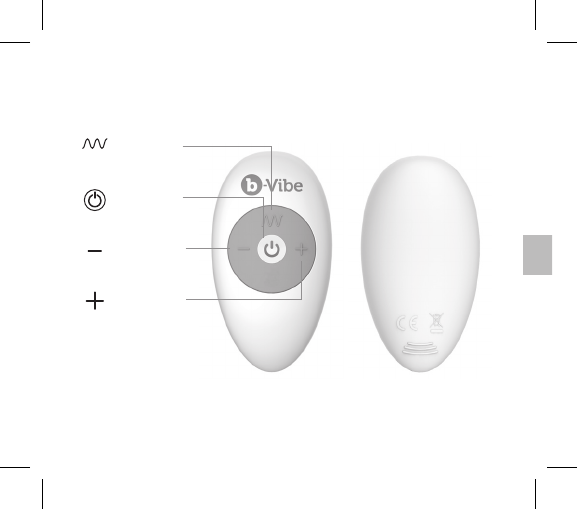
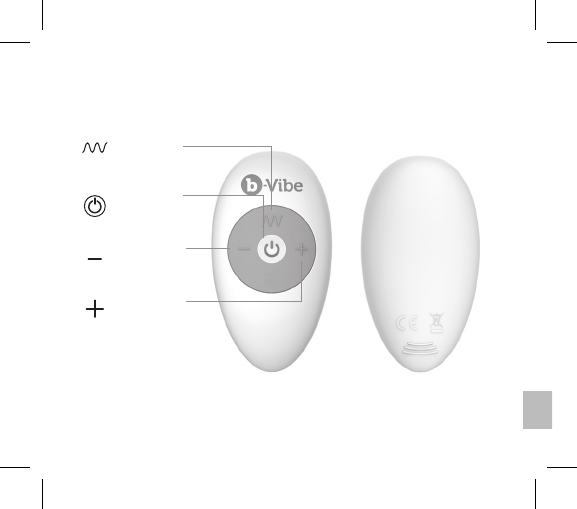
Decrease
Intensity
Power
Button
Vibration
Function
Button
Increase
Intensity
WIRELESS REMOTE CONTROL
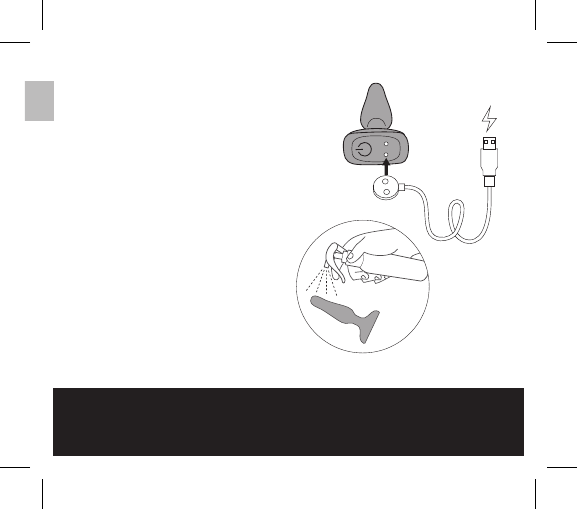
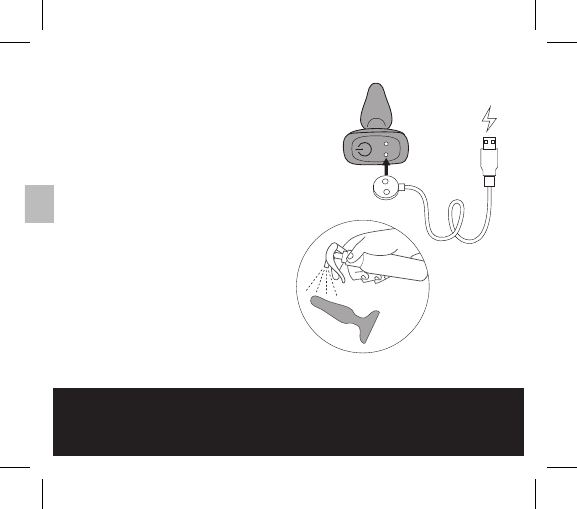
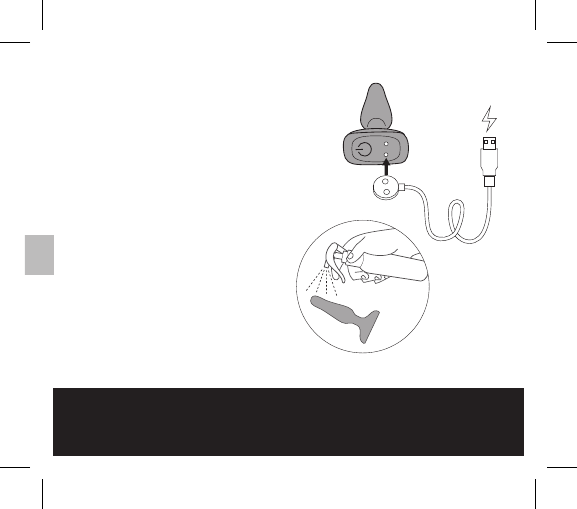
GETTING STARTED
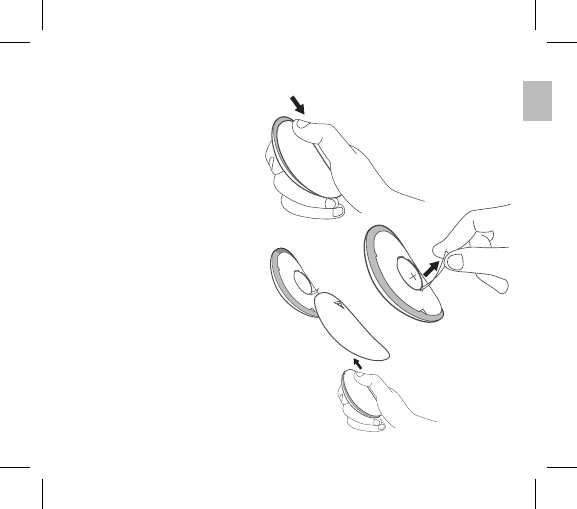
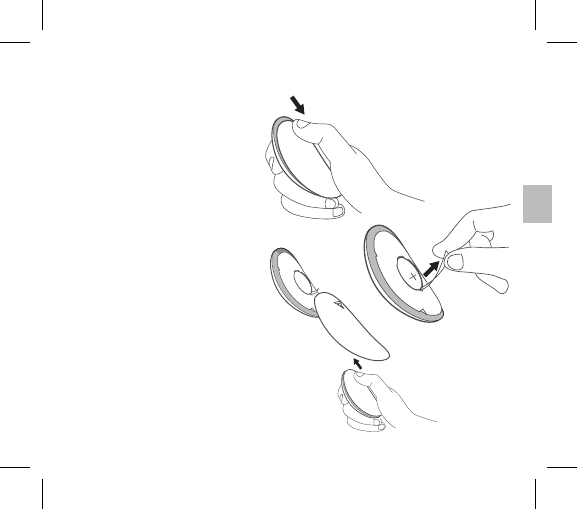
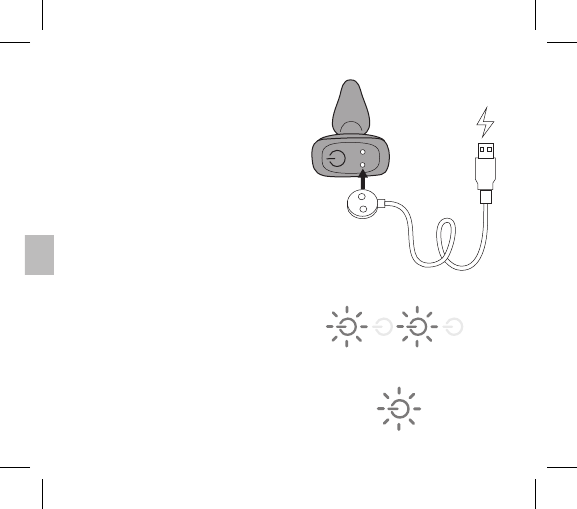
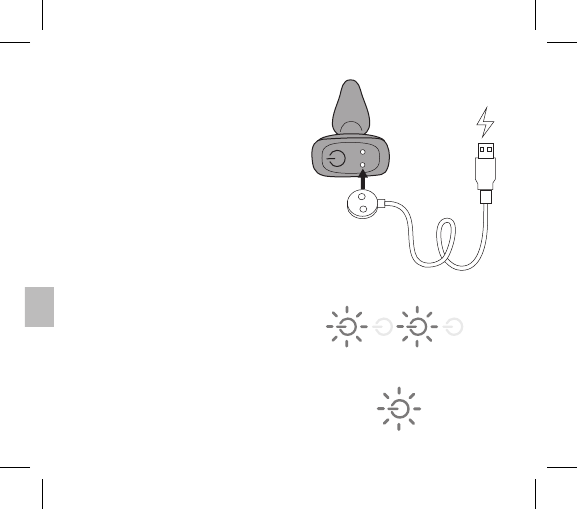
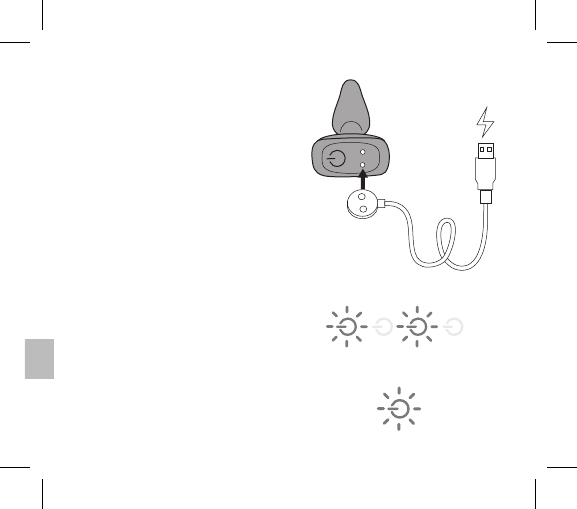
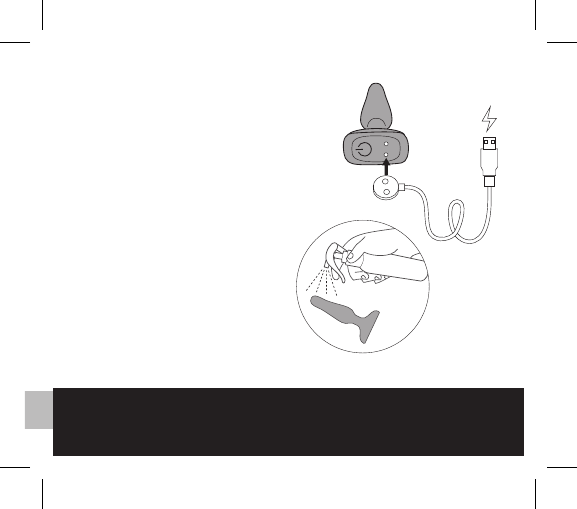
1. Before first use, charge your
plug for approximately 1 ½ hours.
The USB charging cable can
be plugged into any USB port
or USB/AC power adapter (not
included).
Ėĺ£pÀªĺ1Æĺňĺp¼ª
ĖĺN¯£ĺ1ÆĺňĺÊ££Úĺ|p¼
ĖĺJp¹ĺ£pÀªĺ1Æĺňĺ1¯Ôĺĺ
battery. Charge is needed
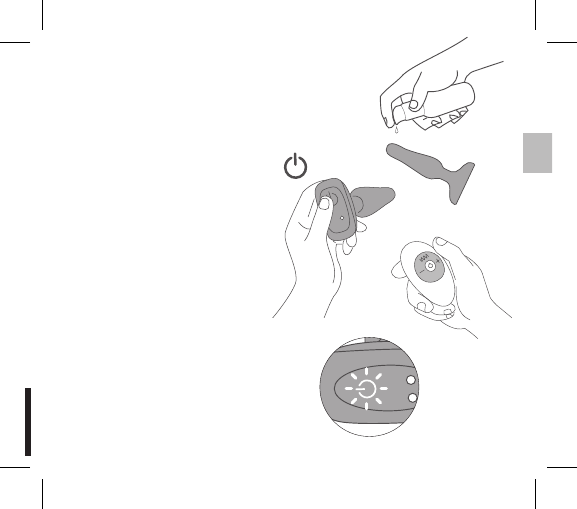
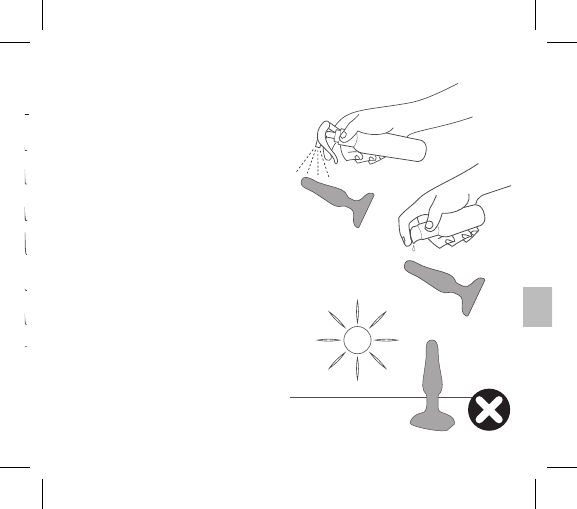
2. Wash your plug with soap and
water or toy cleaner suitable for
use with silicone items.
FAQs can be found at
www.bvibe.com
Email us at
customerservice@bvibe.com
for any unanswered questions
TOY CLEANER
7
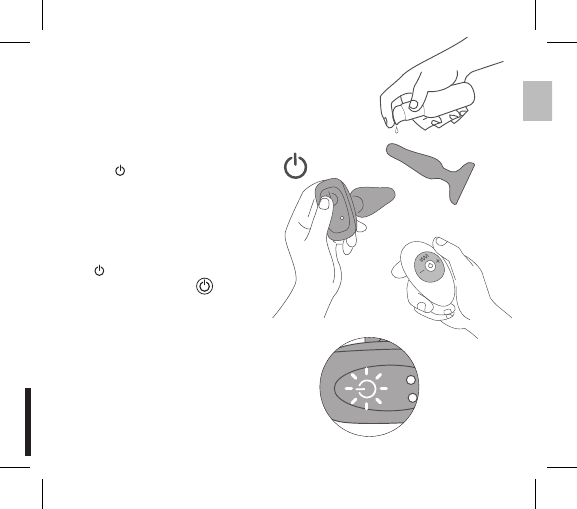
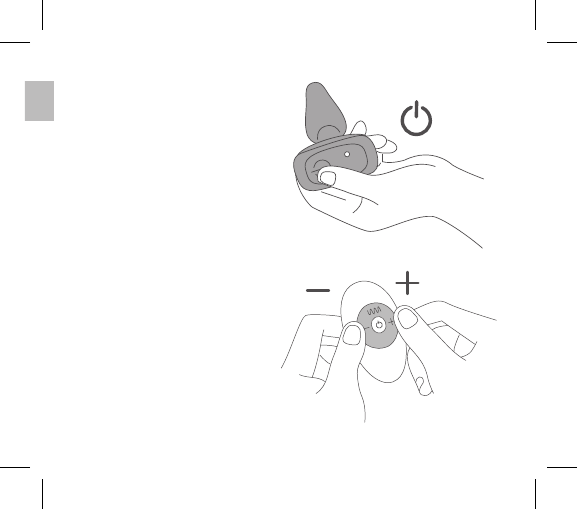
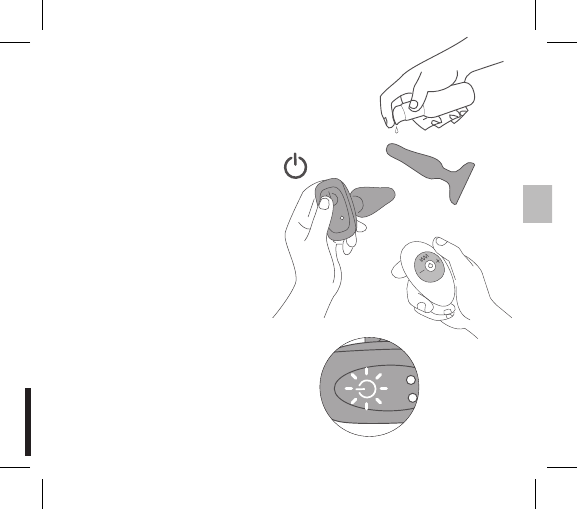
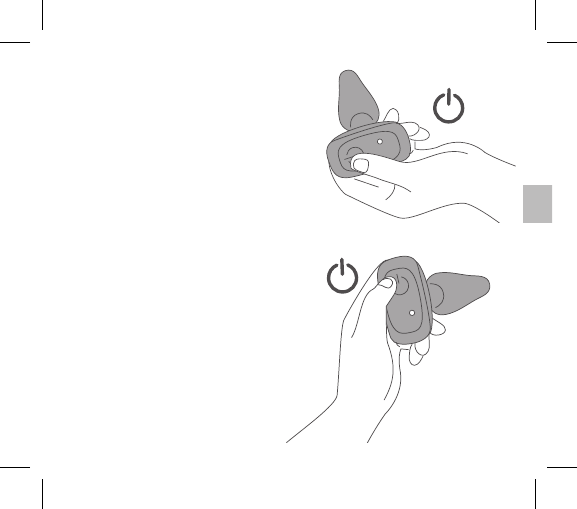
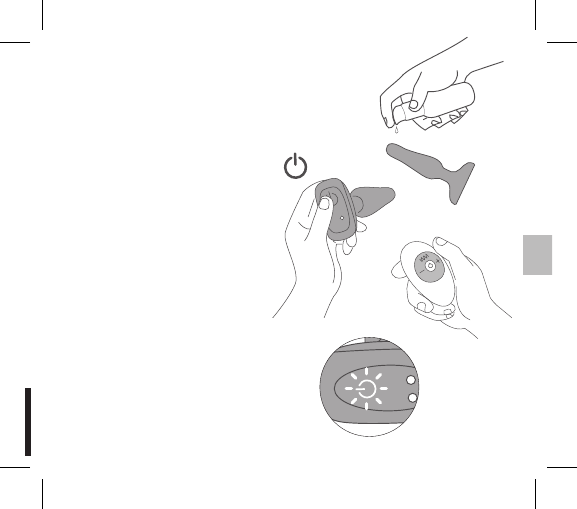
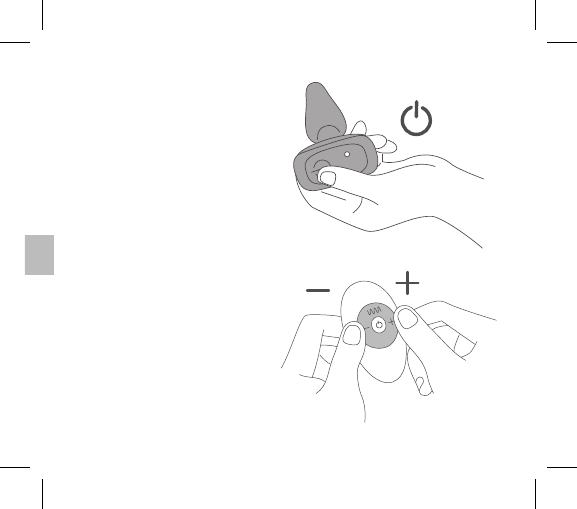
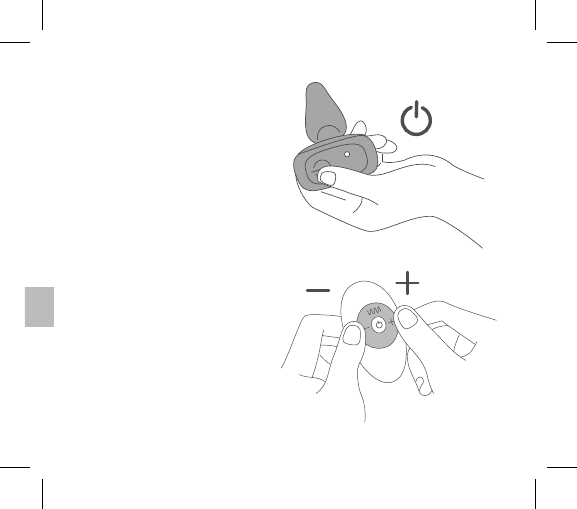
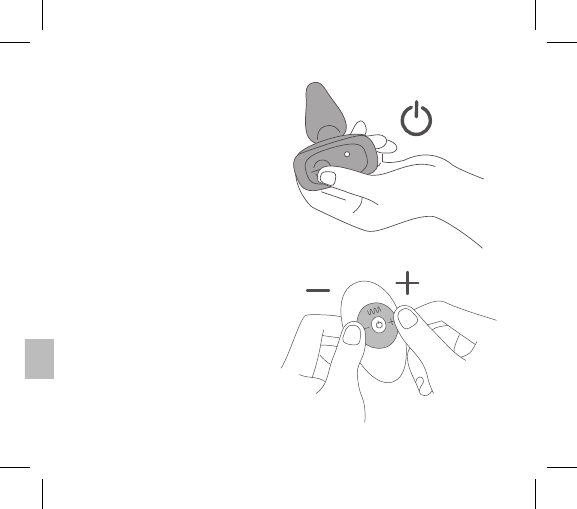
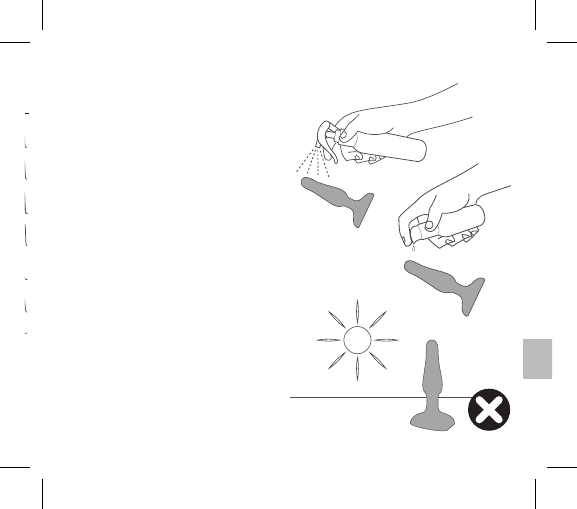
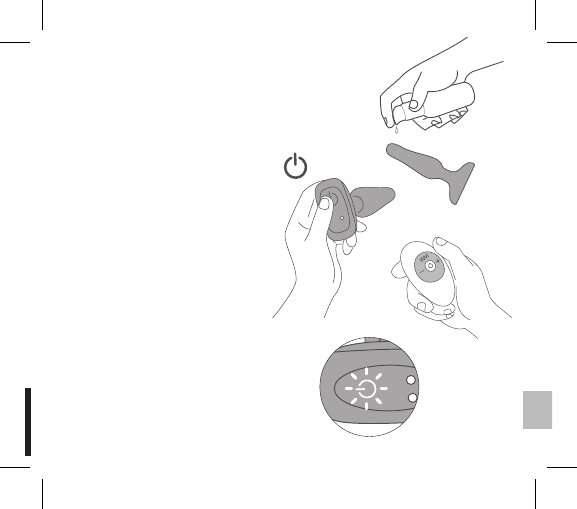
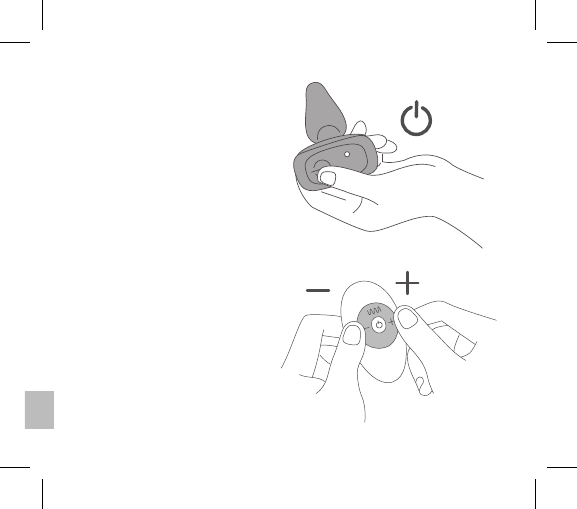
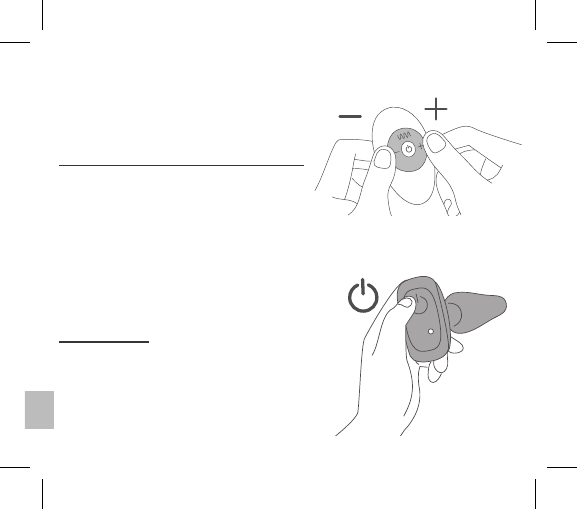
3. Lubricate your plug with
a water based, silicone
compatible lubricant.
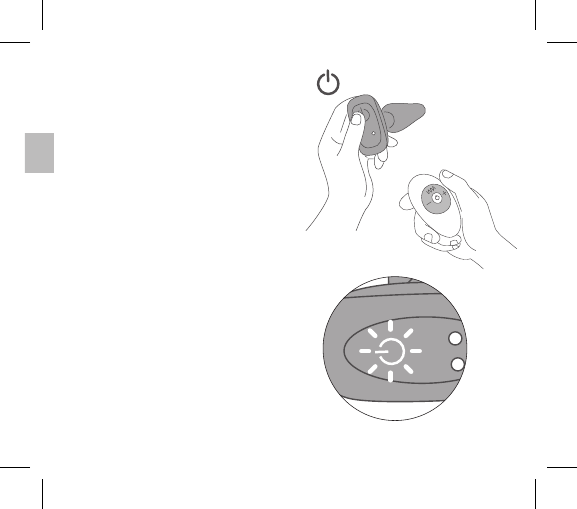
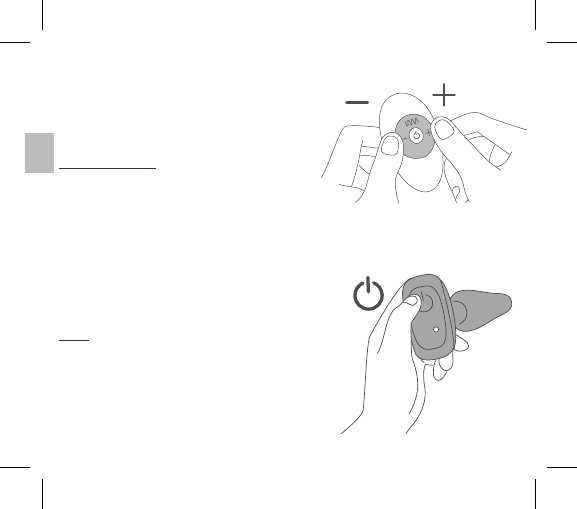
4. Turn ON your plug by
pressing quickly at the
bottom of your plug.
The light will flash, indicating
the power is on and in standby
mode.
Push again to use the
manual mode, or push
on the remote to pair
the remote & plug.
Once in use, the base light will
change from flashing to solid.
LUBE
8
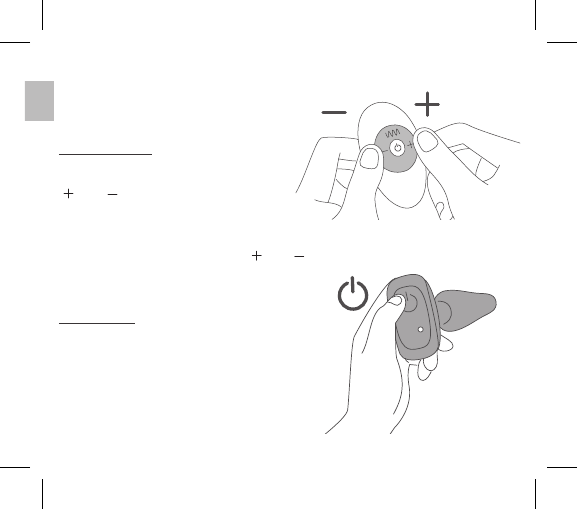
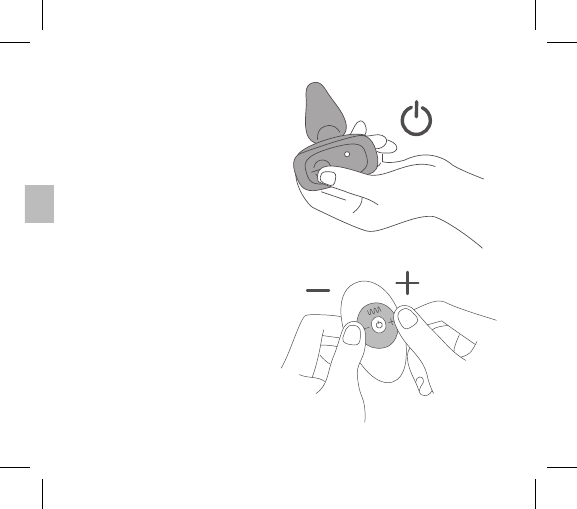
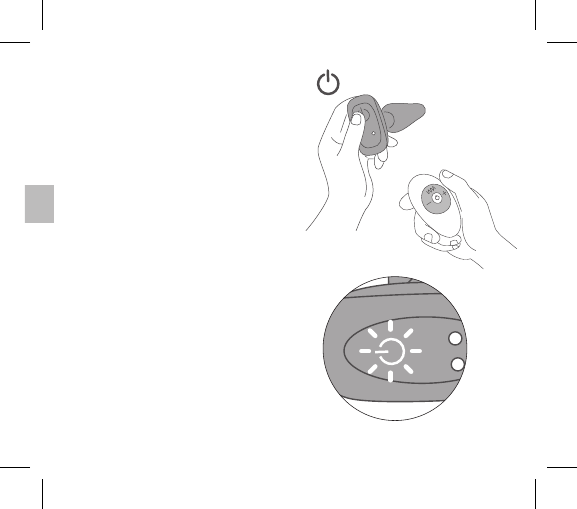
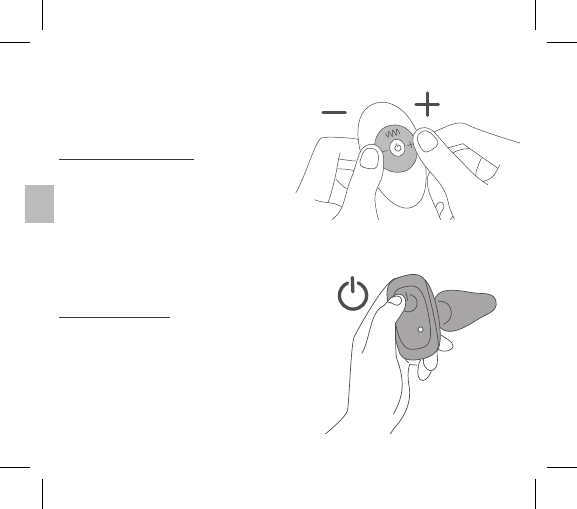
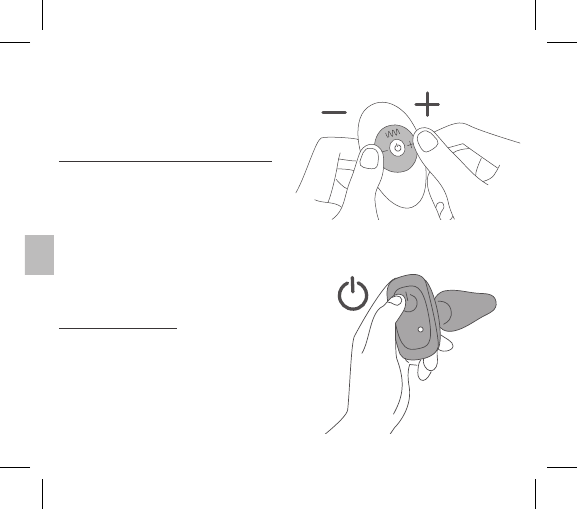
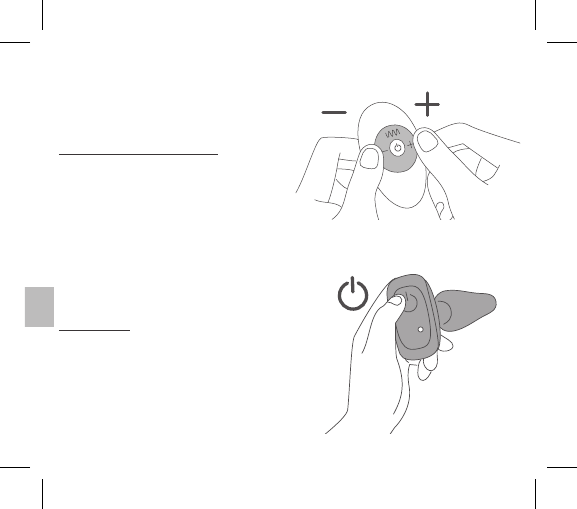
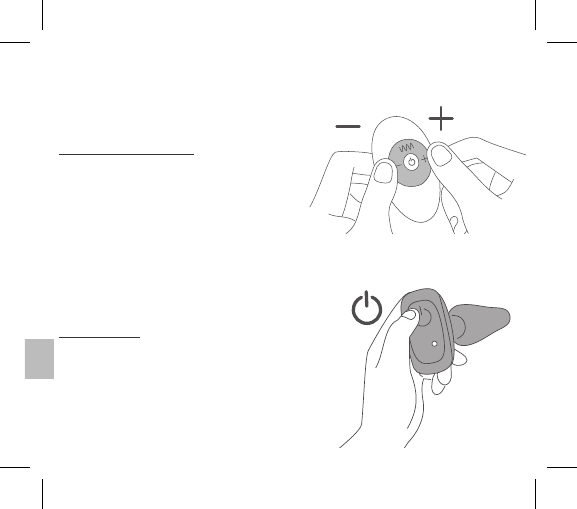
5. To change the vibration pattern via
the base control, press the A. There
are a total of 15 modes when
using manual control. Vibration
intensity can only be increased via
use of the remote control.
6. To change the vibration intensity
via the remote control, press and
release A (Increase Intensity) and
A (Decrease Intensity). Press and
release A to change the
vibration pattern.
9
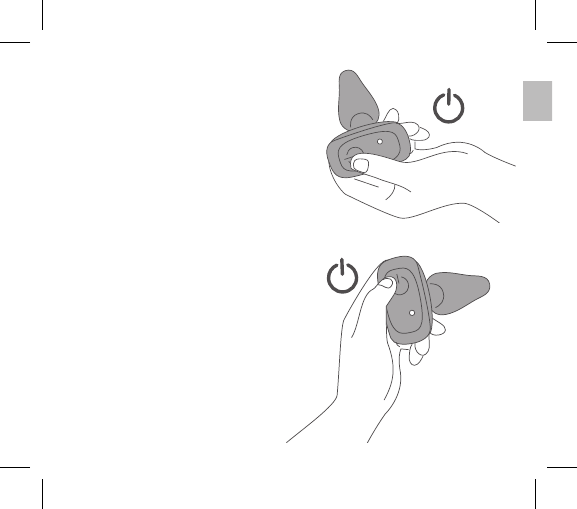
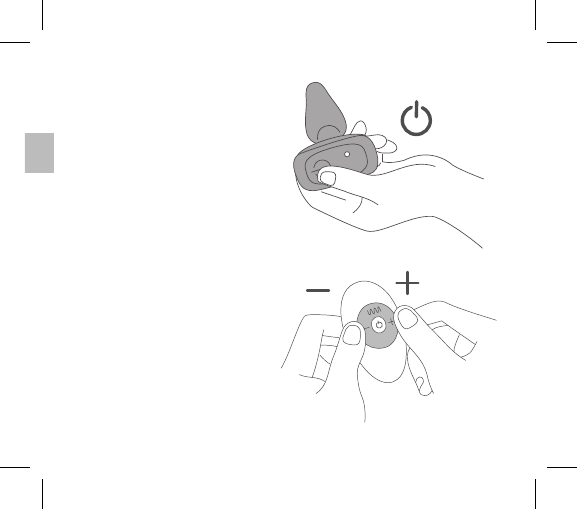
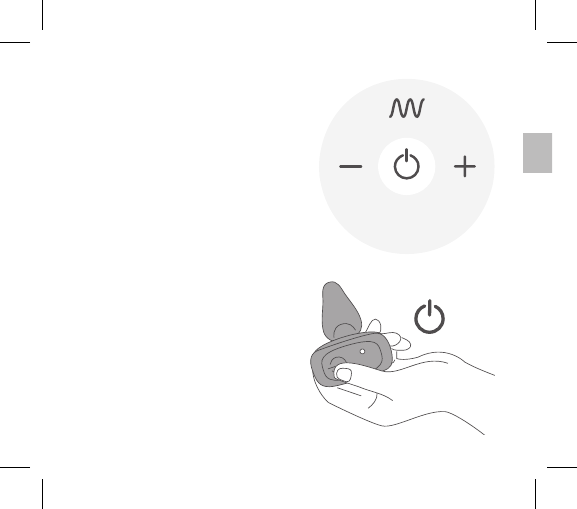
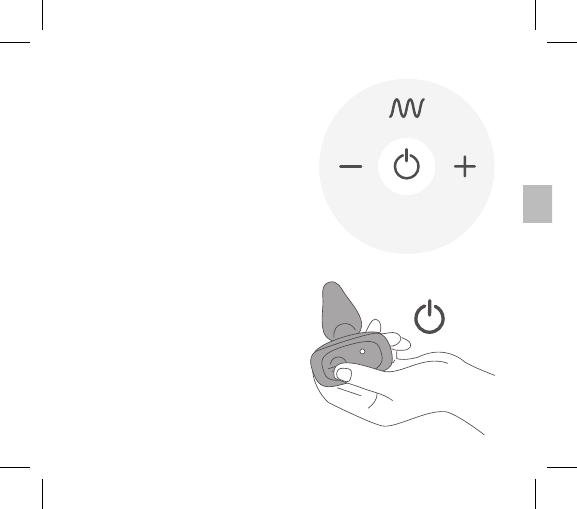
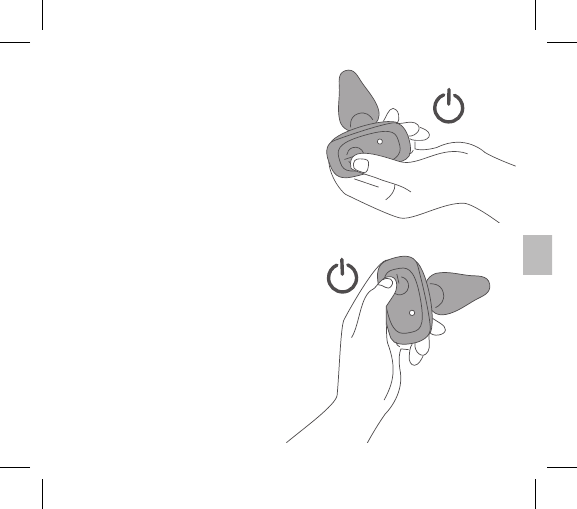
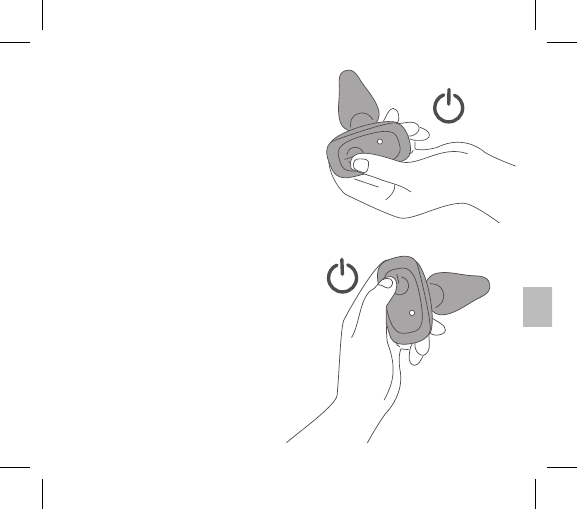
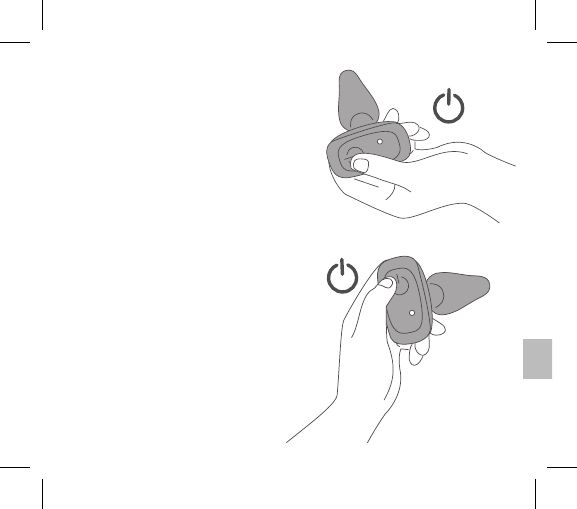
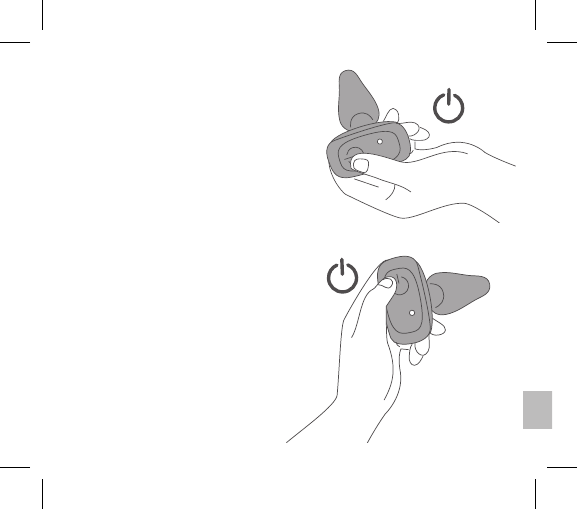
1. To turn the item ON quickly press A.
The A will flash to indicate the power is
on. Push again to change the vibration
pattern. There are a total of 15 modes
using the manual control. Vibration
intensity can only be increased via use of
the remote control.
2. To power OFF your plug press and
hold A for 2 seconds. LED will turn off
to indicate the power is OFF.
MANUAL CONTROL
1
2

10
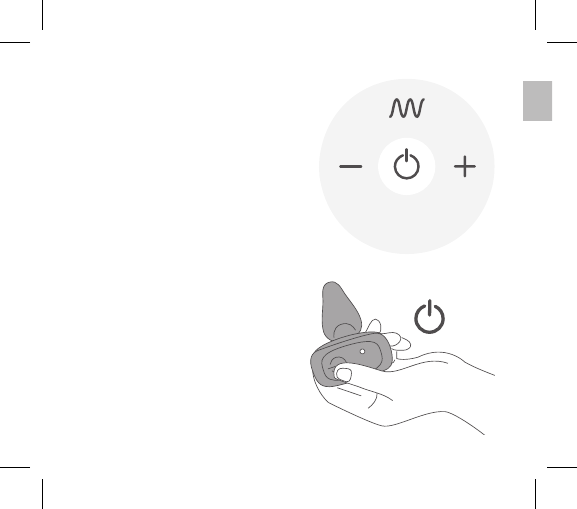
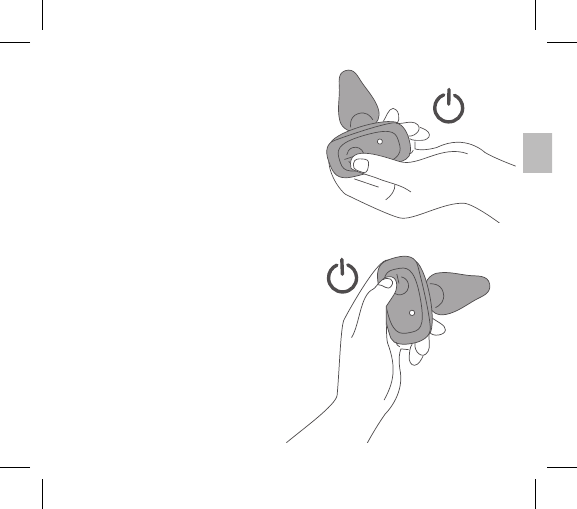
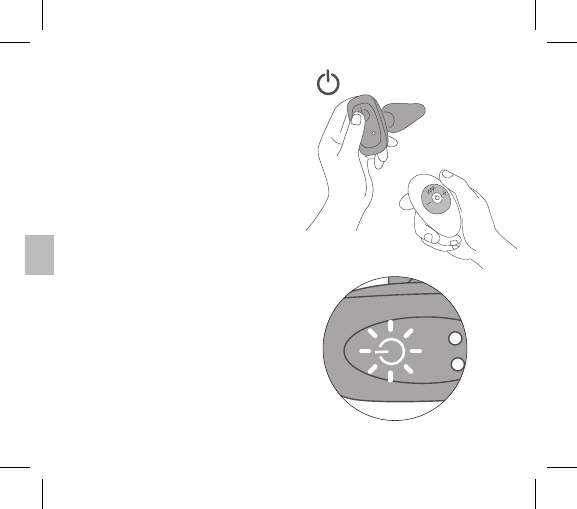
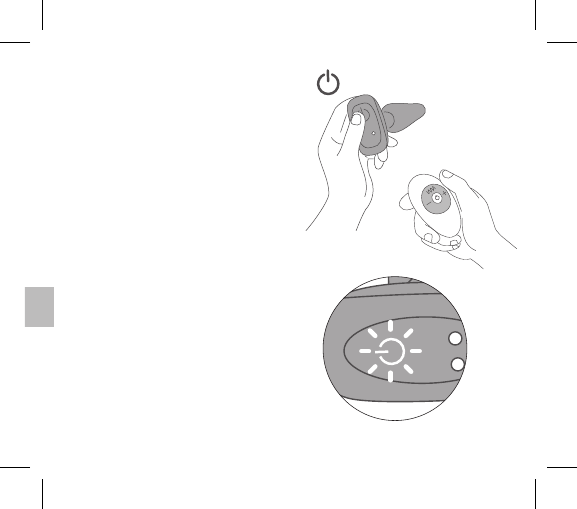
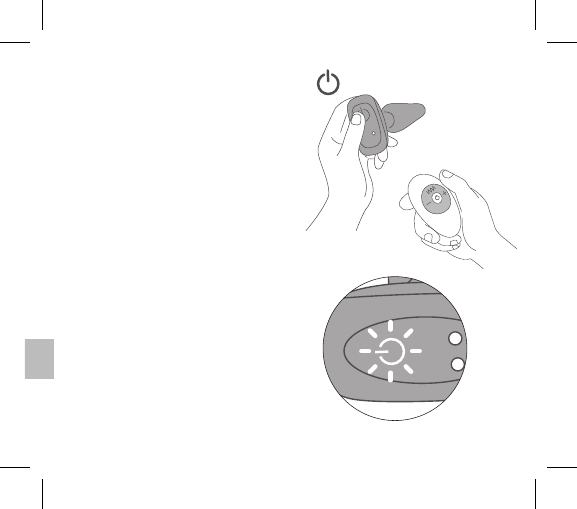
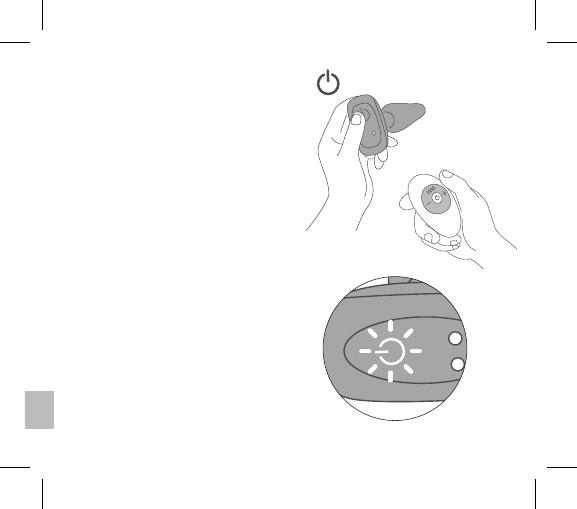
1. First turn your plug on in standby
mode by quickly pressing on your
plug.
2. While the baselight is flashing, power
on your remote to pair the remote &
plug.
3. Once the item is paired the base light
will become solid and you can control
your plug by remote.
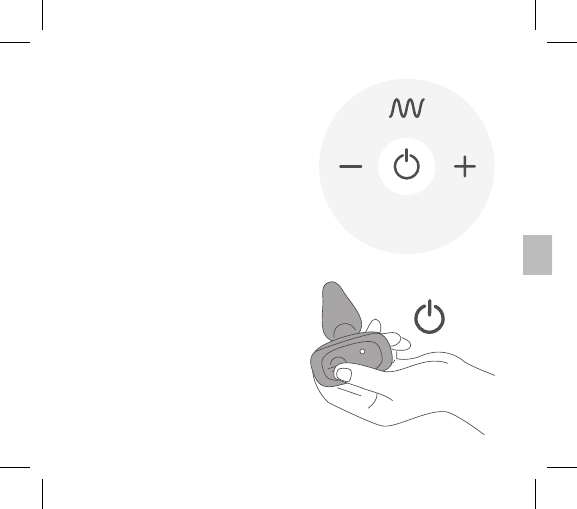
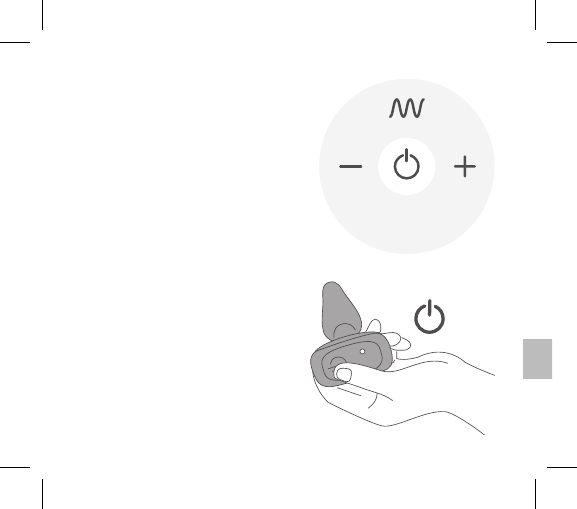
4. Press and release to increase
vibration intensity.
5. Press and release to decrease
vibration intensity. There are a total of 6
vibration intensity levels.
REMOTE CONTROL
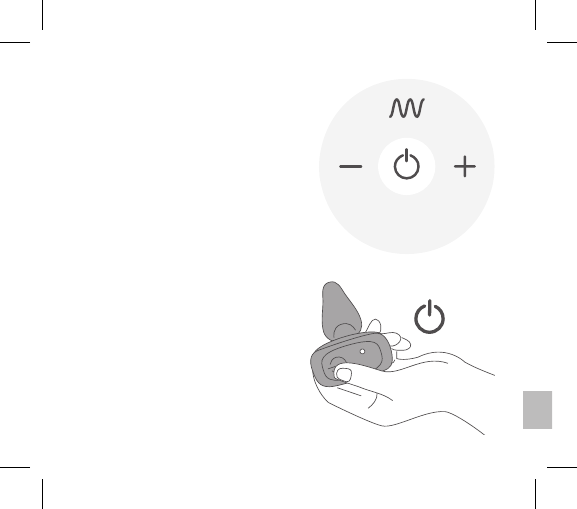
11
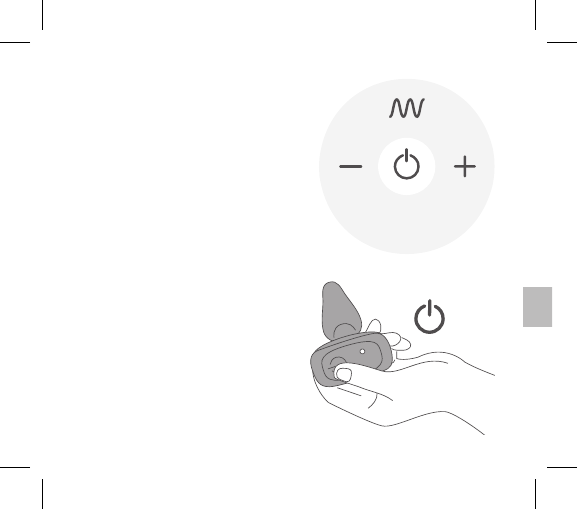
6. The vibration modes can be changed
by pressing and releasing A.
7. Holding A or for 3 seconds will
pause the motor.
8. Fast pressing A for 1 second will turn
the motor back on.
9. To turn the item ON/OFF press and
release A on the remote.
10. To completely turn off your plug,
you must press and hold A on your
plug.
REMOTE CONTROL
12
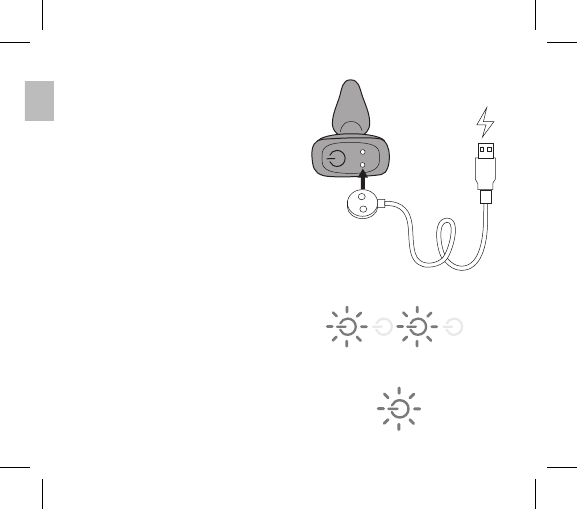
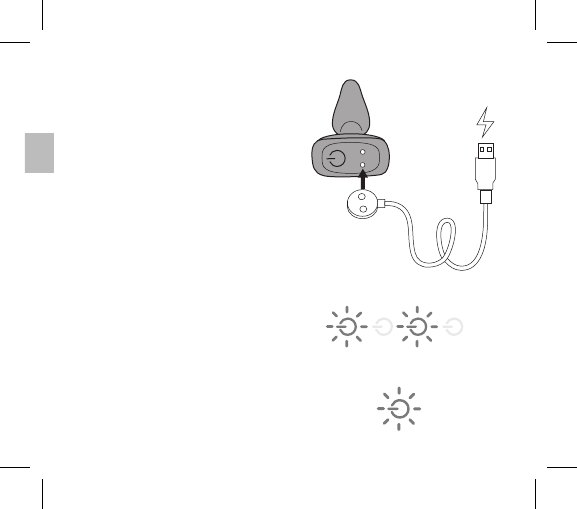
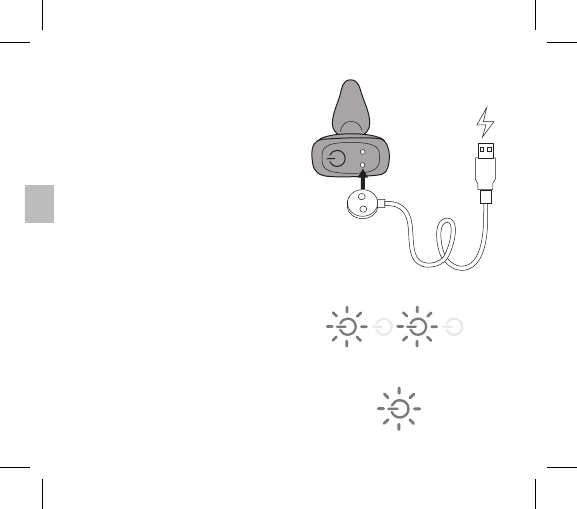
CHARGING YOUR PLUG
ĖĺÆÆp|ĺÆĺ©pªÆ|ĺ|p¼ªĺ
plug to the designated
charging area on the base of
the product
Ėĺ£pÀªĺ£Æĺª|pÆÀĺÆ©ĺ
is charging
ĖĺN¯£ĺ£Æĺª|pÆÀĺÆ©ĺÀĺ
fully charged
ĖĺJp¹ĺ£pÀªĺª|pÆÀĺ
charging is required
ĖĺG£ÊÀĺ¼»Ê¼ĺp¹¹¼¯Ù©pÆ£Úĺ
1 ½ hours for full charge
Flashing light = Charging
Solid light = Fully Charged
13
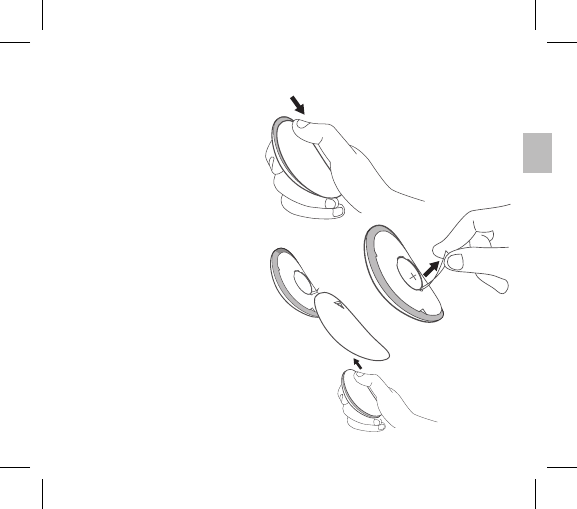
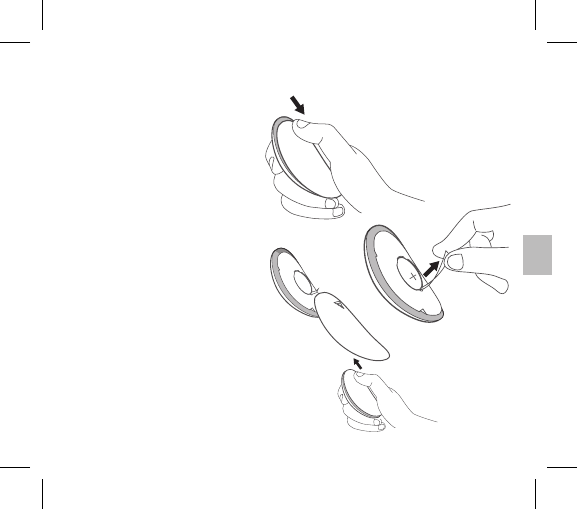
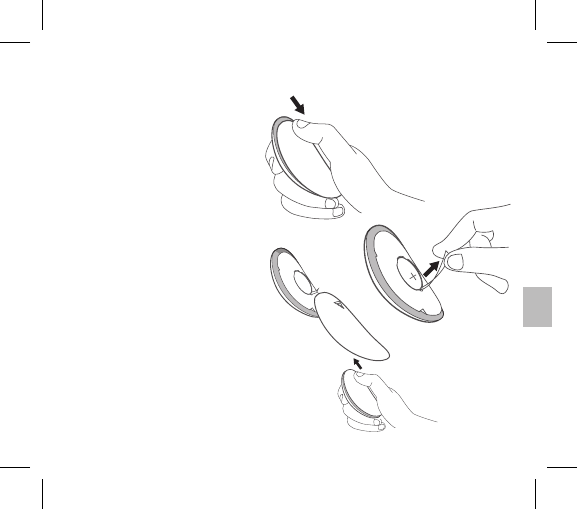
CHANGING YOUR REMOTE CONTROL BATTERY
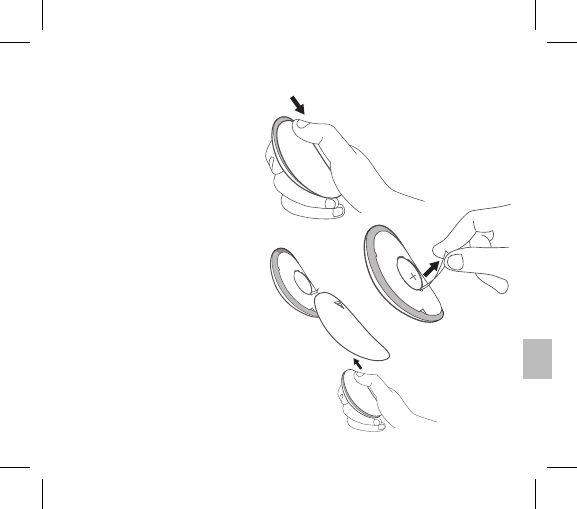
ĖĺN£ĺ¯¹ªĺÆĺ¼©¯Æĺ
control battery compartment
as shown.
ĖĺÊÆƯªĺ|££ĺJĺíëîíĺpÀĺ{ªĺ
preinstalled into the remote
control.
ĖĺJ©¯ÓĺÆĺ¹p¹¼ĺÀ£¹ĺªÀĺ
the battery compartment
to activate the power in the
remote control.
ĖĺNƯ¼ĺÆĺ¼©¯Æĺ|¯ªÆ¼¯£ĺ
and the battery separately to
prolong the battery life.
OPEN
14
TRAVEL LOCK
Ėĺ££ĺ{Į`{ĺÆ©Àĺª|£ÊĺƼpÓ£ĺ£¯|ĺ¯¼ĺ
safe and convenient travel
Via the remote:
Simultaneously press and hold the
and buttons for 3 seconds.
Flashing light on the remote will
indicate the item is locked.
To unlock simply press and hold and
again for 3 seconds. Flashing light will
indicate lock is disabled.
Via the plug:
Hold A for 5 seconds, flashing light on
the base of the plug will indicate the
item is locked. For unlocking, hold A
again for 5 seconds, flashing light will
indicate the item is unlocked.
1
23
12
3
45
15
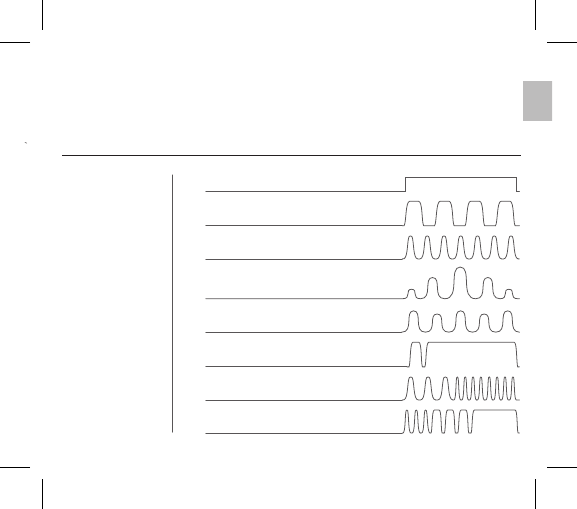
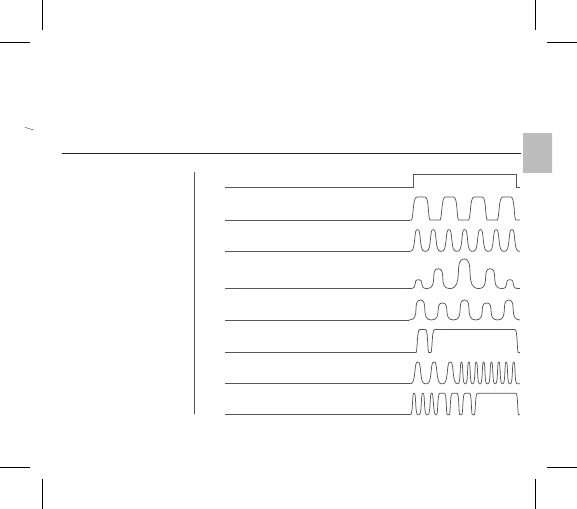
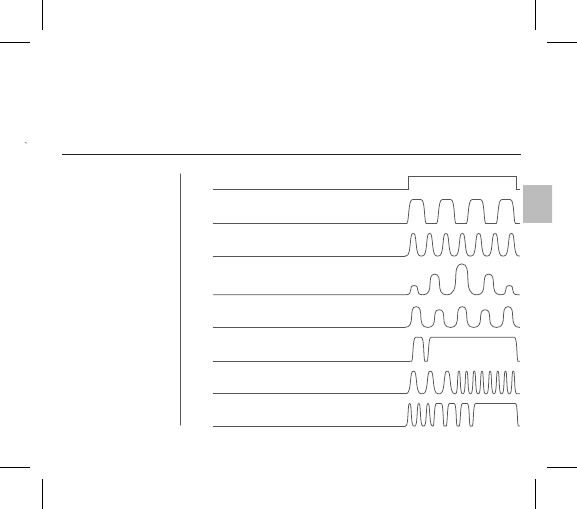
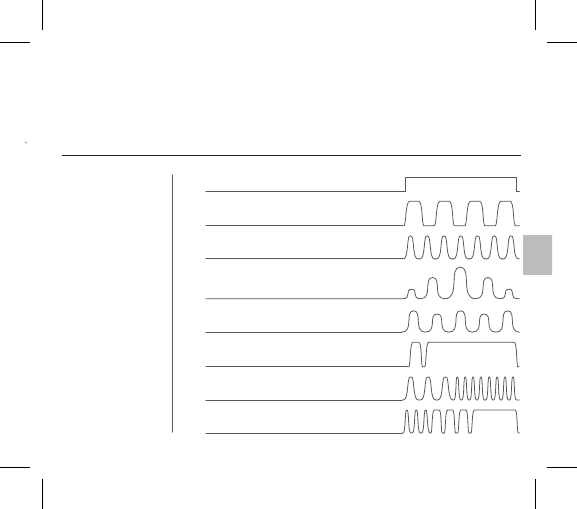
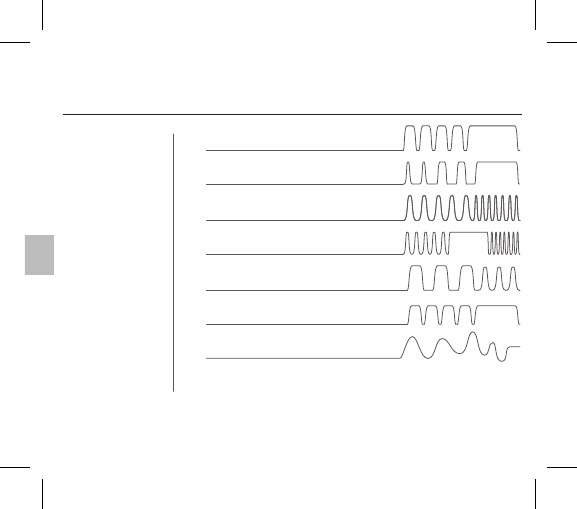
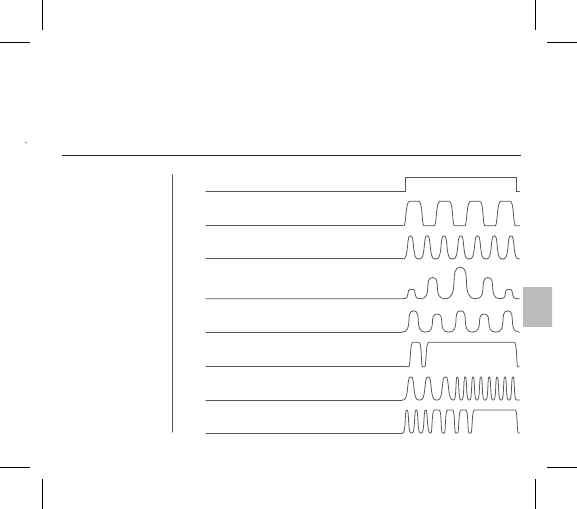
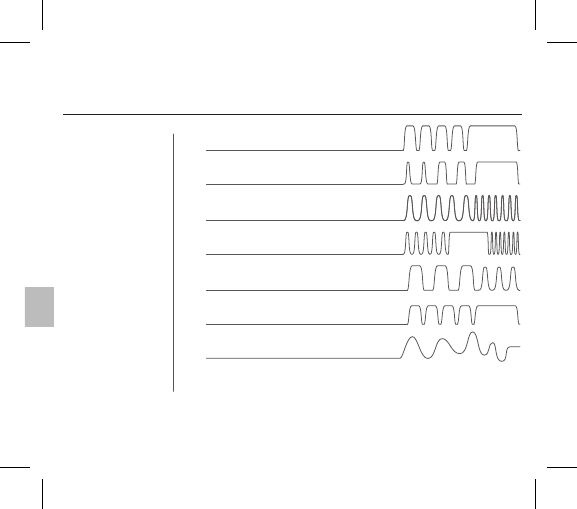
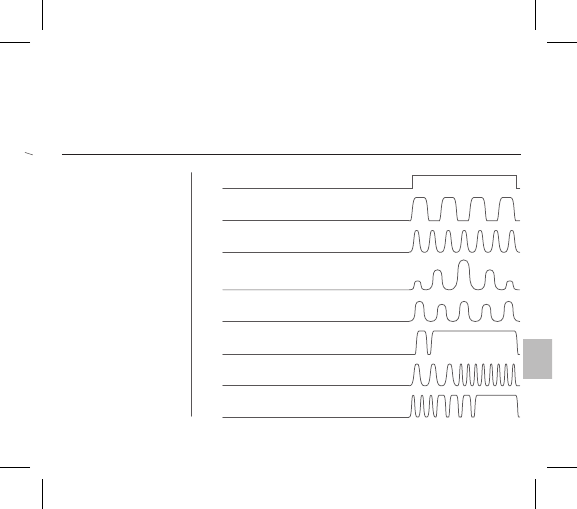
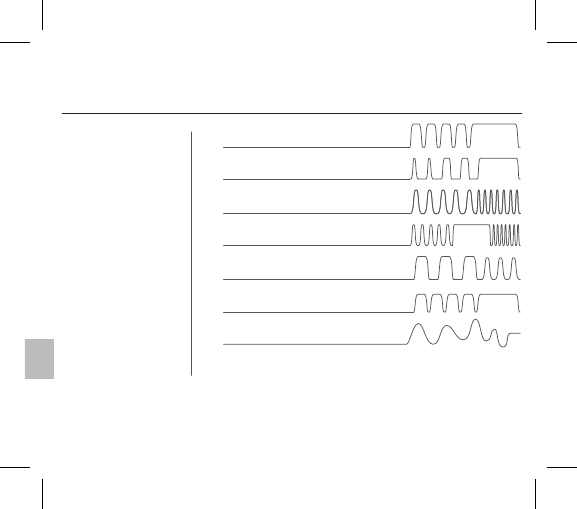
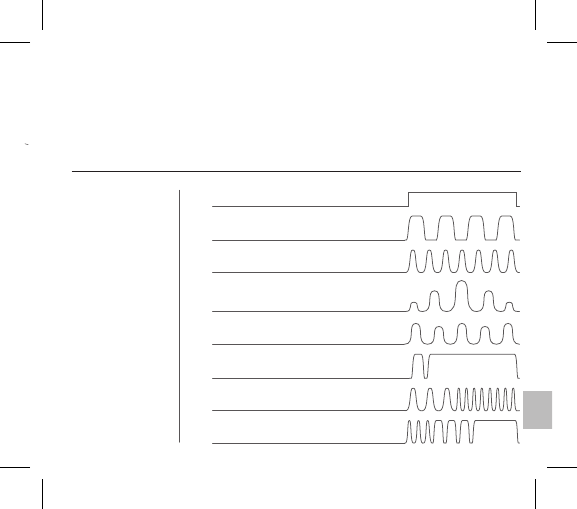
VIBRATING MODES
ĖĺS¼ĺp¼ĺñĺÓ{¼pƯªĺªÆªÀÆÀĝ
ĖĺS¼ĺp¼ĺìðĺÓ{¼pƯªĺ©¯ÀĘĺÙ¹£pªĺ{£¯Ôė
1
23
Vibration Pattern 4
Vibration Pattern 5
1. Low
2. Speed II
3. Speed III
4. Speed IV
5. Speed V
6. Maximum
Vibration Intensity Vibration Pattern
Vibration Pattern 3
Vibration Pattern 2
Vibration Pattern 8
Vibration Pattern 6
Vibration Pattern 1
Vibration Pattern 7
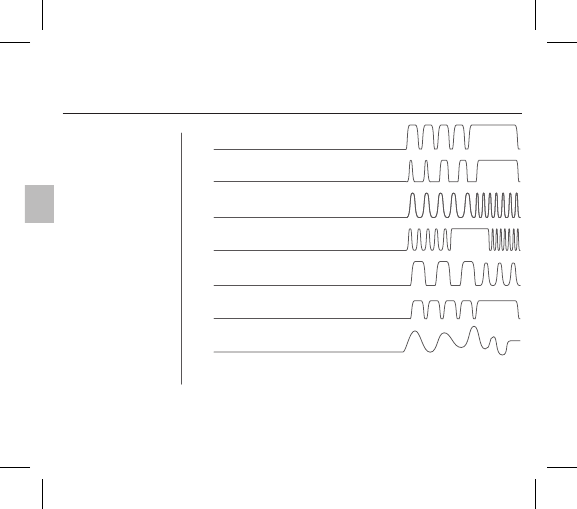
16
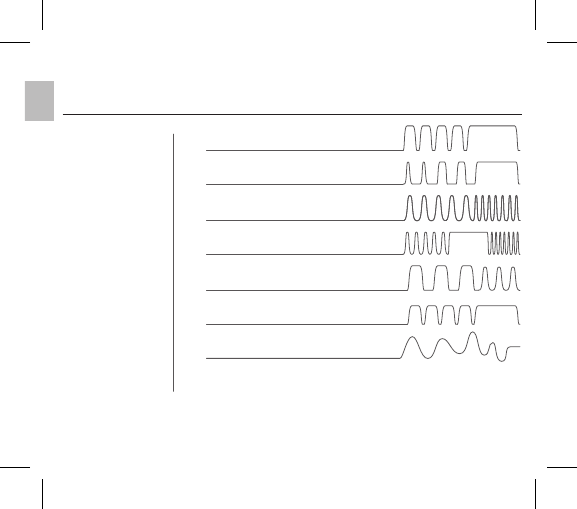
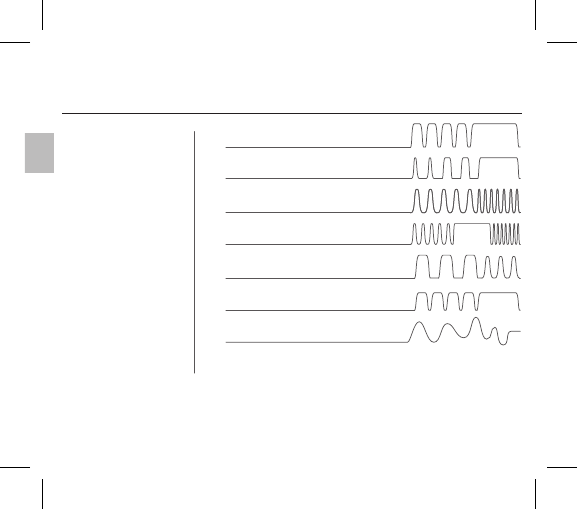
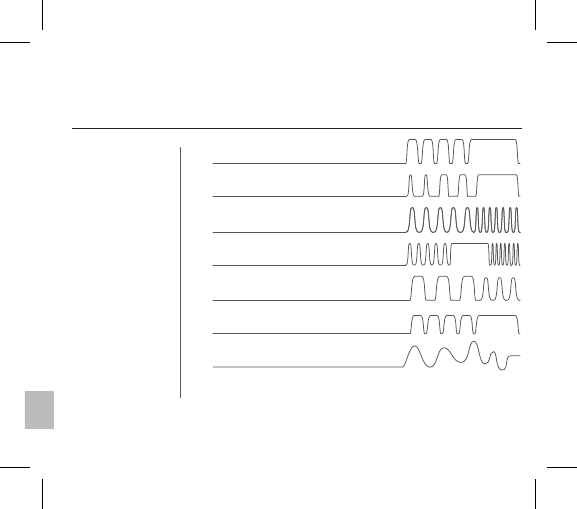
VIBRATING MODES
Vibration Pattern 15
1. Low
2. Speed II
3. Speed III
4. Speed IV
5. Speed V
6. Maximum
Vibration Intensity Vibration Pattern
Vibration Pattern 13
Vibration Pattern 14
Vibration Pattern 10
Vibration Pattern 9
Vibration Pattern 11
Vibration Pattern 12
17
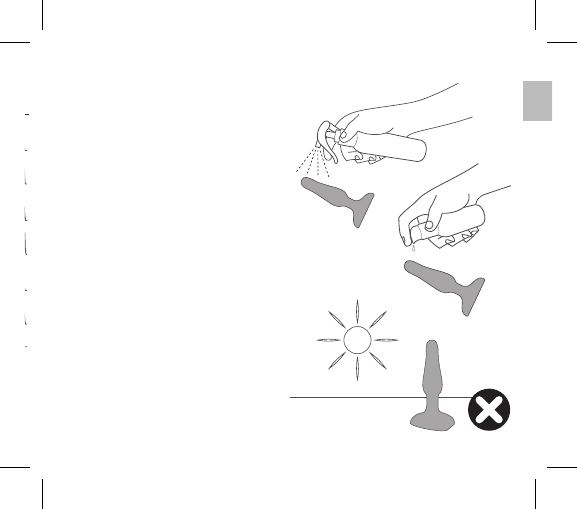
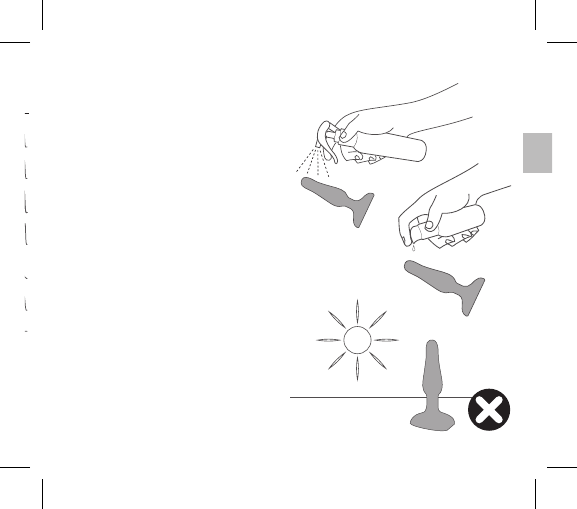
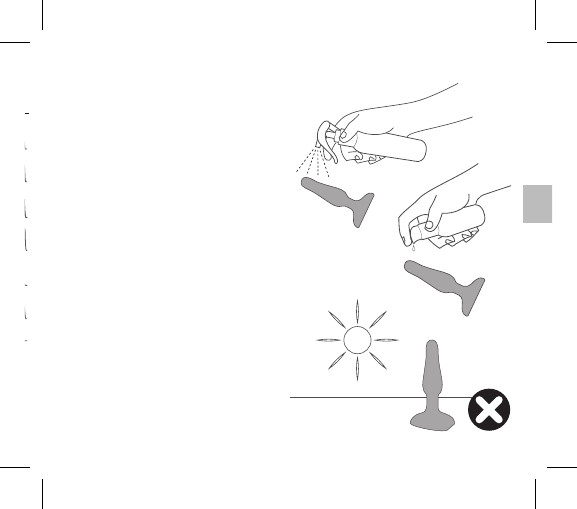
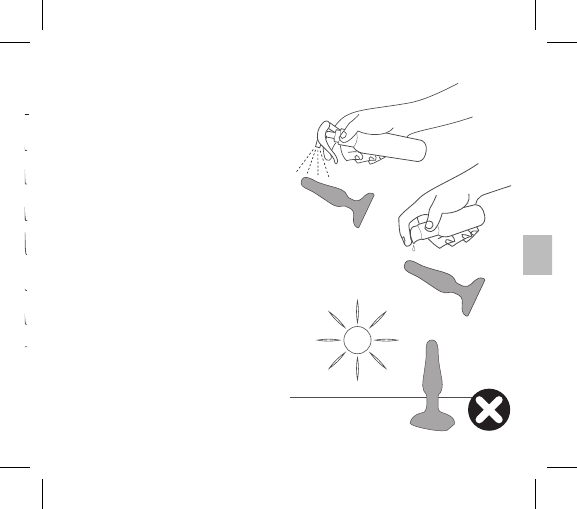
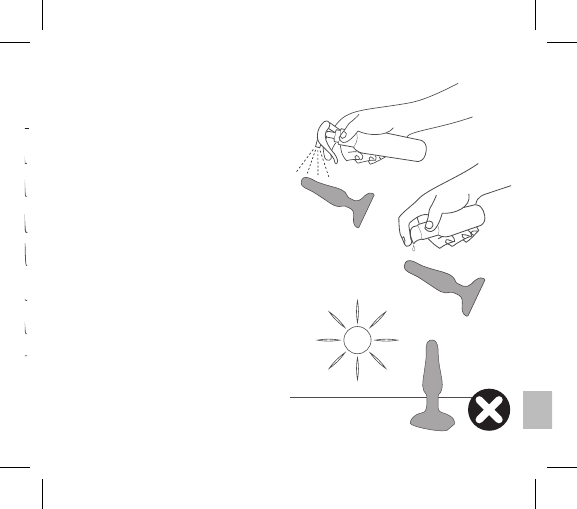
1. Always clean your plug thoroughly
before and after each use.
2. We recommend premium water-
based lubricant. Silicone-based
lubricants are not recommended and
can cause damage to the product.
3. To properly clean your plug,
wash with luke-warm water and a
¼À¹|ÆĺpªÆ{p|Ƽp£ĺÀ¯p¹ĝĺJªÀĺ
clean and pat dry using a lint-free
cloth or towel. Do not use cleaners
containing alcohol, petrol or acetone.
4. Avoid leaving your plug in direct
sunlight and never expose it to
extreme heat.
b-Vibe CARE
Cleaning, Storage & Safety
TOY CLEANER
LUBE
VIBRATING MODES
Vibration Pattern 15
1. Low
2. Speed II
3. Speed III
4. Speed IV
5. Speed V
6. Maximum
Vibration Intensity Vibration Pattern
Vibration Pattern 13
Vibration Pattern 14
Vibration Pattern 10
Vibration Pattern 9
Vibration Pattern 11
Vibration Pattern 12
18
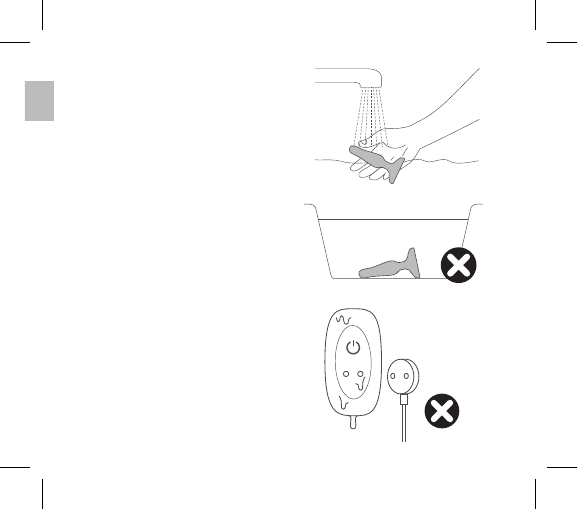
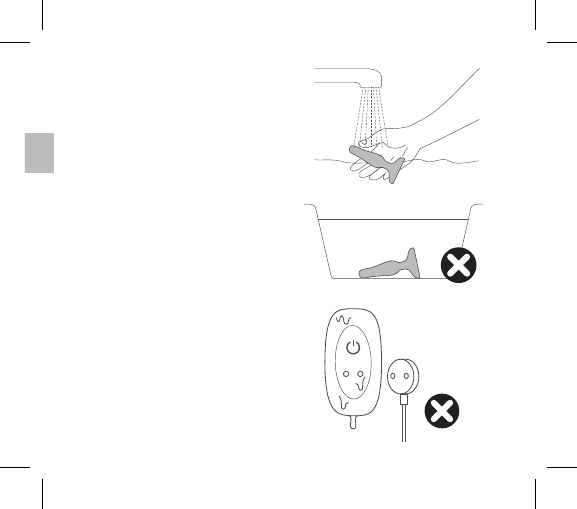
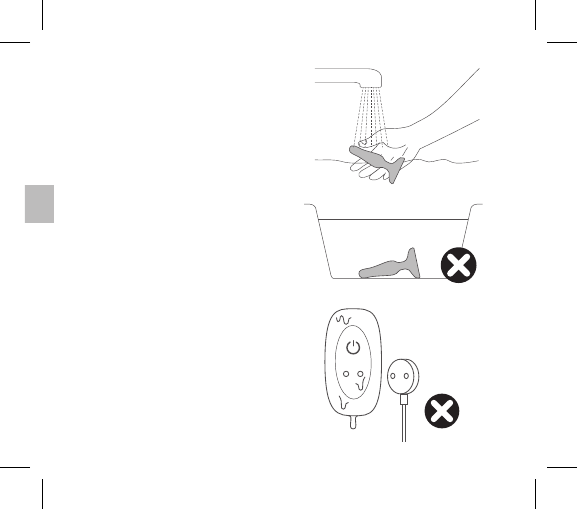
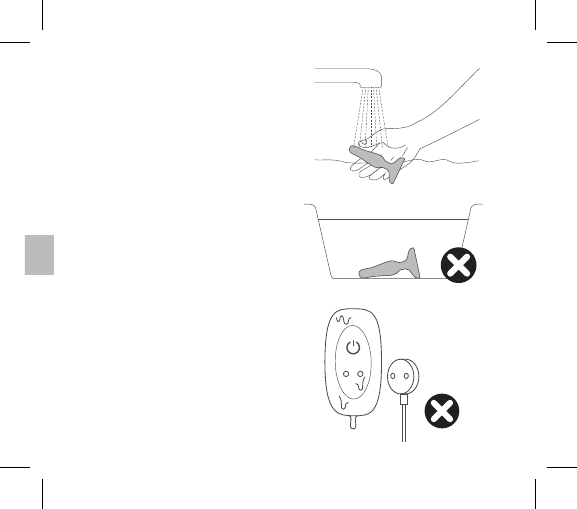
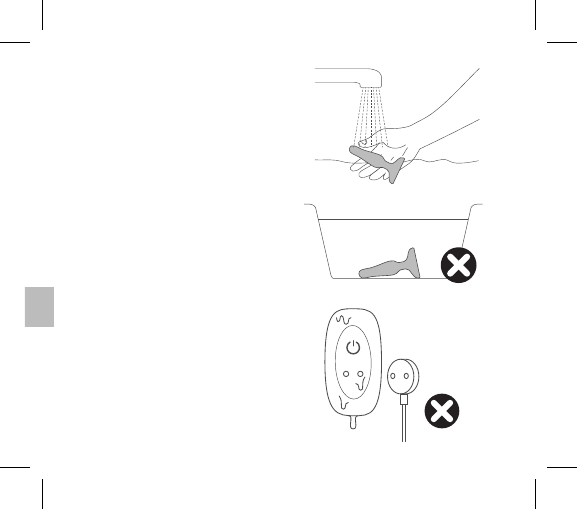
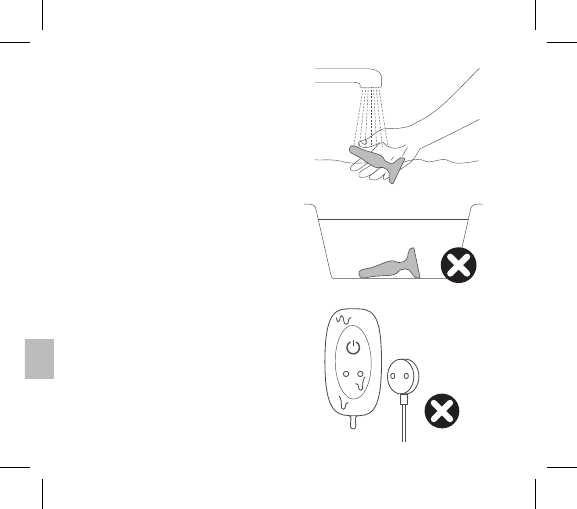
5. Our products are designed to
be splash-proof. This means that
a session in the shower or washing
in running water will not cause
damage, but prolonged exposure —
such as using in the bath — would
be harmful. Do not fully submerse
your plug in water.
6. Never charge your plug while
it is wet. Ensure that the charging
pins on the base of the plug are
completely dry before connecting to
the charging cord.
If your plug appears to function
abnormally, turn OFF and consult
our customer care section on
bvibe.com, where you will find
help tips. Should you require
ʼƼĺpÀÀÀÆpª|ĺ¹£pÀĺ|¯ªÆp|Æėĺ
customerservice@bvibe.com
Never charge
your plug while
it is wet.

19
Materials
Size
Weight
Battery
Charging
Use Time
Max Noise Level
Interface
Body Safe Silicone/
ABS
102 x 52.5 x 27.5 mm
49.3 g
Battery li-ion
150m-Ah
1 ½ hours
1 hour
< 68 dB
Single Button
Manual Control
ïĺÊÆƯªĺJ©¯Æĺ
Control
SPECIFICATIONS
20
The crossed-out dustbin symbol indicates that these items should not be
treated as household waste, but rather brought to the appropriate collection
point for recycling electrical and electronic equipment.
DISPOSAL INFORMATION
Disposal of old electronic equipment (applicable in the EU and other
European countries with separate waste collection systems):

21
The crossed-out dustbin symbol indicates that these items should not be
treated as household waste, but rather brought to the appropriate collection
point for recycling electrical and electronic equipment.
Disposal of old electronic equipment (applicable in the EU and other
European countries with separate waste collection systems):
Declaration of Conformity
Hereby, b-Vibe declares that this Novice Plug product is in compliance with
essential requirements and other relevant provisions of Directive 1999/5/EC. A
copy of the Declaration of Conformity can be found at www.bvibe.com.
RADIO AND TELECOMMUNICATION TERMINAL EQUIPMENT (R&TTE)
20 21
Declaration of Conformity
Hereby, b-Vibe declares that this Rimming Plug product is in compliance with
essential requirements and other relevant provisions of Directive 1999/5/EC. A
copy of the Declaration of conformity can be found at www.bvibe.com
R&TTE STATEMENT:
FCC STATEMENT
1. This device complies with Part 15 of the FCC Rules. Operation is subject to the following two
conditions:
(1) This device may not cause harmful interference, and
(2) This device must accept any interference received, including interference that may cause
undesired operation.
2. Changes or modifications not expressly approved by the party responsible for compliance
could void the user’s authority to operate the equipment.
This equipment has been tested and found to comply with the limits for a Class B digital device,
pursuant to part 15 of the FCC Rules. These limits are designed to provide
reasonable
protection against harmful interference in a residential installation. This equipment
generates, uses and can radiate radio frequency energy and, if not installed and used
in accordance with the instructions, may cause harmful interference to radio communications.
However, there is no guarantee that interference will not occur in a particular installation.
If this equipment does cause harmful interference to radio or television reception,
which can be determined by turning the equipment o and on, the user is encouraged
to try to correct the interference by one or more of the following measures:
—Reorient or relocate the receiving antenna.
—Increase the separation between the equipment and receiver.
—Connect the equipment into an outlet on a circuit dierent from that to which the
receiver is connected.
—Consult the dealer or an experienced radio/ TV technician for help.
Declaration of Conformity
We declare on our sole responsibility that this equipment complies with the essential
requirements of the Radio and Telecommunications Terminal Equipment Directive,
1999/5/EC, and that any applicable Essential Test Suite measurements have been
performed.
CE versions of the Wireless remote control vibrator
which display the CE symbol on the product label, comply with the essential
requirements of the European Radio and Telecommunication Terminal Directive
1999/5/CE.
(Model No: BV-004 BLK, BV-004 FUS)

23
ìĝĺSÀĺÓ|ĺ|¯©¹£ÀĺÔÆĺGp¼Æĺìðĺ¯ĺÆĺĺJÊ£Àĝ
=¹¼pƯªĺÀĺÀÊ{|ÆĺƯĺÆĺ¯££¯ÔªĺÆÔ¯ĺ|¯ªÆ¯ªÀė
(1) This device may not cause harmful interference, and
(2) This device must accept any interference received, including interference
that may cause undesired operation.
2. Changes or modifications not expressly approved by the party responsible
for compliance could void the user’s authority to operate the equipment.
FCC STATEMENT
Complete user instructions in additional
£pªÊpÀĺpªĺIĺ|pªĺ{ĺ¯ÊªĺpÆė
www.bvibe.com
Email us at
customerservice@bvibe.com
for any unanswered questions
Designed and Developed by
b-VibeTM
Made in China
© 2016 b-VibeTM

24
ÜBERBLICK
b-VibeTM Produkte werden aus seidenweichem und
körpersicherem Silikon hergestellt. Unsere Produkte
sind phtalat- und latexfrei.
Die einfach zu bedienende Benutzeroberfläche
ermöglicht den Benutzern, die gewünschte
Stimulation und Intensität zu erreichen. Machen Sie
sich bereit für eine sinnliche Befriedigung, die nicht zu
übertreffen ist und Ihnen Lust auf mehr macht.
25
DEUTSCH
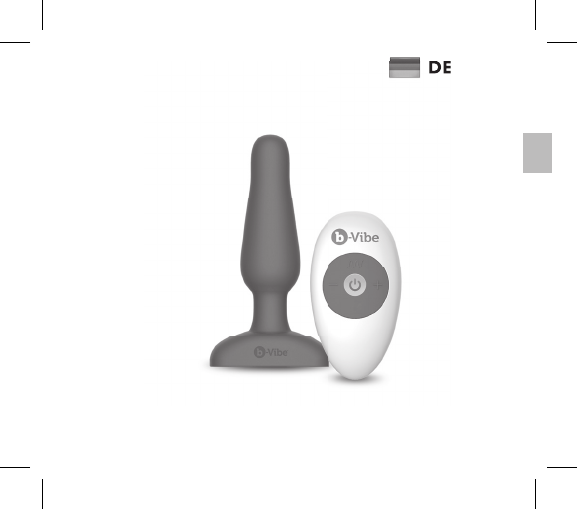
b-VibeTM Novice Plug
DEUTSCH

26
NOVICE PLUG
Magnet-
Ladeanschluss
Kraftvoller Motor
Einfach
einzuführende Spitze
Basissteuerung
LED-
Anzeige
27
Magnet-
Ladeanschluss
KABELLOSE FERNBEDIENUNG
Intensität
Verringern
Netzschalter
Vibrations-
Funktiontaste
Intensität
Erhöhen

1. Laden Sie Ihren Plug vor dem
ersten Gebrauch für ungefähr 1 ½
Stunden auf. Das USB-Ladekabel
kann mit jedem USB-Port oder USB/
Netzadapter verwendet werden (nicht
enthalten).
Ėĺ£ªªÀĺ1|Æĺňĺ¼tÆĺ£tÆĺpÊ
ĖĺpʼpÆÀĺ1|Æĺňĺ`¯££ĺpÊ£pª
ĖĺN|ª££ĺ{£ªªÀĺ1|ÆĺňĺpÆƼĺ
leer. Bitte aufladen
2. Waschen Sie den Plug mit
Seife und Wasser, oder alternativ
mit für Silikonteile geeignetem
Spielzeugreiniger.
FAQs können auf
www.bvibe.com gefunden
werden
Schreiben Sie uns eine E-Mail an
customerservice@bvibe.com für
unbeantwortete Fragen
TOY CLEANER
ERSTE SCHRITTE
29
3. Ölen Sie ihren Plug
mit wasserbasiertem,
silikonkompatiblem Gleitgel ein.
4. Drücken Sie auf A um Ihren
Plug einzuschalten.
Wenn das Licht blinkt ist das
Gerät eingeschaltet und im
Standby Modus.
Drücken Sie den A-Knopf
erneut, um den manuellen
Modus zu verwenden oder
drücken Sie den A auf der
Fernbedienung, um diese mit
dem Plug zu verbinden.
Während der Benutzung wird
das Licht dauerhaft aufleuchten,
anstatt zu blinken.
LUBE
30
5. Drücken Sie kurz A auf
der Basissteuerung, um die
Virbationsmodi/muster zu
verändern. Insgesamt gibt es 15
Vibrationsmodi bei der manuellen
Bedienung. Die Vibrationsintensität
kann nur mit der Fernbedienung
erhöht werden.
6. Drücken Sie kurz A
(Intensität Erhöhen) und A
(Intensität Verringern), um
die Vibrationsintensität und/
oder Modus/Muster mit der
Fernbedienung zu verändern.
Drücken Sie kurz A, um den
Vibrationsmodus zu wechseln.
31
1. Um das Gerät einzuschalten,
drücken Sie A. Die A-Leuchte wird
blinken sobald das Gerät eingeschaltet
ist. Drücken Sie erneut auf A, um
das Vibrationsmuster zu ändern.
Insgesamt gibt es 15 Modi bei der
manuellen Bedienung.
2. Um Ihren Plug wieder
auszuschalten, drücken und halten
Sie A für zwei Sekunden. Wenn das
Gerät ausgeschaltet ist, wird die LED-
Leuchte wieder erlischen.
MANUELLE BEDIENUNG
1
2
32
1. Um das Gerät ein- oder
auszuschalten, drücken Sie auf A
2. Wenn das Licht blinkt können
Sie die Fernbedienung mit dem
Gerät verbinden, indem Sie die
Fernbedienung einschalten.
3. Sobald die Fernbedienung
verbunden ist wird das Licht dauerhaft
aufleuchten und Sie können die
Fernbedienung jetzt verwenden.
4. Drücken Sie kurz A um die
Vibrationsintensität zu erhöhen.
5. Drücken Sie kurz A um
die Vibrationsintensität zu
verringern. Insgesamt gibt es 6
Vibrationsintensitäten.
6. Durch kurzes drücken der A-Taste
können die Vibrationsmodi gewechselt
werden.
FERNBEDIENUNG
33
FERNBEDIENUNG
7. Drücken und halten Sie die A-Taste
für 3 Sekunden, um alle 3 Motoren zu
pausieren.
8. Drücken Sie die A-Taste schnell
hintereinander, um die 3 Motoren wieder
einzuschalten.
9. Um das Gerät ein- oder auszuschalten,
drücken Sie kurz auf die A-Taste der
Fernbedienung.
10. Um Ihr Gerät vollständig
auszuschalten, drücken und halten
Sie die A-Taste auf Ihrem Gerät.
34
AUFLADEN
ĖĺÀƪĺNĺªĺ
Magnetladestecker am
angegebenen Ladebereich am
Schaft des Produkts.
ĖĺpÀĺ£ª£|ÆĺßÆĺpªĘĺÔªªĺ
das Gerät aufgeladen wird.
ĖĺpÀĺ¼tÆĺÀÆĺÓ¯££ÀÆtªĺ
aufgeladen, wenn das Licht
dauerhaft leuchtet.
ĖĺN|ª££Àĺ{£ªªĺ{ÊÆĺ
dass Ihr Gerät aufgeladen
werden muss.
Ėĺ`¯££ÀĺpÊ£pªĺ{ª²ÆÆĺ|pĝĺ
1 ½ Stunden.
Blinkicht = Aufladen
Dauerlicht = Voll aufgeladen
35
WECHSELN DER FERNBEDIENUNGSBATTERIE
ĖĺN|{ªĺNĺpÀĺpÆƼp|ĺ
wie abgebildet auf.
Ėĺªĺ1ÆÊ©{pÆƼĺÀÆĺªĺ¼ĺ
Fernbedienung enthalten.
ĖĺªÆ¼ªªĺNĺªĺ
Papierschein im Batteriefach,
um die Fernbedienung zu
benutzen.
ĖĺÔp¼ªĺNĺ¼ª{ªÊªĺ
und Batterie separat auf, um
die Batterielaufzeit zu verlängern.
OPEN
36
REISESICHERUNG
Ėĺ££ĺ{Į`{ĺ¼tÆĺªÆp£Æªĺªĺ
JÀÀ|¼ÊªĺͼĺÀ|¼Àĺʪĺ
{»Ê©ÀĺJÀªĝ
Fernbedienung:
Drücken Sie die A und A Knöpfe gleichzeitig
für 3 Sekunden. Das blinkende Licht zeigt, dass
das Gerät gesichert ist.
Um das Gerät zu entsichern, drücken Sie
die A und A Knöpfe erneut für 3 Sekunden.
Das blinkende Licht zeigt, dass das Gerät
entsichert ist.
Plug:
Drücken und halten Sie die A-Taste für 5
Sekunden. Das blinkende Licht an Ihrem
Plug bedeutet, dass das Gerät gesperrt ist.
Um das Gerät wieder zu entsperren, drücken
und halten Sie A erneut. Das blinkende Licht
bedeutet, dass das Gerät entsperrt ist.
1
2
3
12
3
45
37
VIBRATIONSMODI
Ėĺ#ªÀÀp©Æĺ{ÆĺÀĺñĺ`{¼pƯªÀªÆªÀÆtƪĝ
Ėĺ#ªÀÀp©Æĺ{ÆĺÀĺìðĺ`{¼pƯªÀ©¯ĘĺÔĺ©ĺ¯£ªªĺ¼£t¼Æė
1
2
3
Vibrationsmuster 4
Vibrationsmuster 5
Vibrationintensität Vibrationmuster
Vibrationsmuster 3
Vibrationsmuster 2
Vibrationsmuster 8
Vibrationsmuster 6
Vibrationsmuster 1
Vibrationsmuster 7
1. Langsam
2. Geschwindigkeit II
3. Geschwindigkeit III
4. Geschwindigkeit IV
5. Geschwindigkeit V
6. Maximum
1. Langsam
2. Geschwindigkeit II
3. Geschwindigkeit III
4. Geschwindigkeit IV
5. Geschwindigkeit V
6. Maximum
38
VIBRATIONSMODI
Vibrationsmuster 15
Vibrationsmuster 13
Vibrationsmuster 14
Vibrationsmuster 10
Vibrationsmuster 9
Vibrationsmuster 11
Vibrationsmuster 12
1. Langsam
2. Geschwindigkeit II
3. Geschwindigkeit III
4. Geschwindigkeit IV
5. Geschwindigkeit V
6. Maximum
Vibrationintensität Vibrationmuster
39
ìĝĺJªªĺNĺpÀĺ¼tÆĺ¼Íª£|ĺ
vor und nach jedem Gebrauch.
2. Wir empfehlen Premium-
Gleitmittel auf Wasserbasis.
Gleitmittel auf Silikonbasis sind
nicht empfehlenswert und können
Schäden am Gerät verursachen.
3. Um Ihr Gerät richtig zu reinigen,
empfehlen wir es mit lauwarmem
Wasser und antibakterieller Seife
zu waschen. Spülen Sie das Gerät
sauber und tupfen Sie es mit einem
fusselfreien Tuch trocken. Verwenden
NĺªĺJª¼ĺĺ£¯¯£Ęĺªßªĺ
oder Azeton enthalten.
4. Bewahren Sie das Gerät niemals in
direktem Sonnenlicht oder extremer
Hitze auf.
b-Vibe PFLEGE
Reinigung, Lagerung & Sicherheit
VIBRATIONSMODI
Vibrationsmuster 15
Vibrationsmuster 13
Vibrationsmuster 14
Vibrationsmuster 10
Vibrationsmuster 9
Vibrationsmuster 11
Vibrationsmuster 12
1. Langsam
2. Geschwindigkeit II
3. Geschwindigkeit III
4. Geschwindigkeit IV
5. Geschwindigkeit V
6. Maximum
Vibrationintensität Vibrationmuster
TOY CLEANER
LUBE
40
5. Unsere Produkte sind
spritzwassergeschützt. Dies bedeutet,
dass Sie Ihr Produkt in der Dusche
verwenden oder waschen können, aber
auch dass längere Belastungen durch
Wasser - wie z.B. beim Baden - Schäden
verursachen können. Tauchen Sie das
Gerät niemals in Wasser.
6. Laden Sie Ihr Gerät niemals auf
wenn es nass ist. Stellen Sie sicher dass
die Ladestifte an der Basis Ihres Plugs
vollständig trocken sind, bevor Sie das
Ladekabel anschließen.
Wenn Ihr Gerät nicht einwandfrei
funktionieren sollte, schalten Sie
es aus und wenden Sie sich an
unsere Kundenbetreuung auf
bvibe.com. Sollten Sie weitere Hilfe
{ª²ÆªĘĺÔªªĺNĺÀ|ĺ{ÆÆĺpªėĺ
customerservice@bvibe.com
Laden Sie Ihr
Gerät niemals auf
wenn es nass ist.

41
Materialien
Größe
Gewicht
Batterie
Ladezeit
Nutzungszeit
Körpersicherer
Silikon / ABS
102 x 52.5 x 27.5 mm
49.3 g
Li-Ion 150m-Ah
Batterie
1 ½ Stunden
1 Stunde
Max.
Geräuschpegel
Oberfläche
< 68 dB
Manuelle 1-Knopf
Steuerung
4-Knopf
Fernbedienung
TECHNISCHE DATEN
42
Die durchgestrichene Mülltonne bedeutet, dass diese Geräte nicht als Hausmüll
entsorgt werden dürfen, sondern an einem gesonderten Sammelpunkt
abgegeben werden müssen.
ENTSORGUNG
Entsorgung von elekronischen Geräten (anwendbar in der EU und anderen
europäischen Ländern mit einem separaten Sammelsystem):

43
Die durchgestrichene Mülltonne bedeutet, dass diese Geräte nicht als Hausmüll
entsorgt werden dürfen, sondern an einem gesonderten Sammelpunkt
abgegeben werden müssen.
Entsorgung von elekronischen Geräten (anwendbar in der EU und anderen
europäischen Ländern mit einem separaten Sammelsystem):
Declaration of Conformity
Hiermit erklärt b-Vibe, dass dieses Gerät die wesentlichen Anforderungen und
pª¼ĺ¼£ÓpªÆĺ`¯¼p{ªĺ¼ĺJ|Æ£ªĺìôôôĤðĤĺ¼Í££Æĝĺªĺ/¯¹ĺ¼ĺ
Konformitätserklärung finden Sie unter www.bvibe.com
FUNK- UND TELEKOMMUNIKATIONSENDEINRICHTUN-
GEN (R&TTE)

44
ìĝĺÀÀĺ¼tÆĺ¼Í££ÆĺS£ĺìðĺ¼ĺĺJ£ªĝ
ͼĺªĺƼ{ĺ£Æªĺ¯£ªĺªÊªªė
(1) Dieses Gerät darf keine schädlichen Interferenzen verursachen, und
(2) Dieses Gerät muss empfangene Interferenzen aufnehmen können, auch
Interferenzen, die eventuell einen unerwünschten Betrieb verursachen.
2. Änderungen und Umbauten die von den für die Konformität
verantwortlichen Parteien nicht ausdrücklich genehmigt wurden, können die
Befugnis des Benutzers, das Gerät zu betreiben, aufheben.
FCC EINHALTUNGSERKLÄRUNG

45
ìĝĺÀÀĺ¼tÆĺ¼Í££ÆĺS£ĺìðĺ¼ĺĺJ£ªĝ
ͼĺªĺƼ{ĺ£Æªĺ¯£ªĺªÊªªė
(1) Dieses Gerät darf keine schädlichen Interferenzen verursachen, und
(2) Dieses Gerät muss empfangene Interferenzen aufnehmen können, auch
Interferenzen, die eventuell einen unerwünschten Betrieb verursachen.
2. Änderungen und Umbauten die von den für die Konformität
verantwortlichen Parteien nicht ausdrücklich genehmigt wurden, können die
Befugnis des Benutzers, das Gerät zu betreiben, aufheben.
FCC EINHALTUNGSERKLÄRUNG
Eine komplette Bedienungsanleitung
finden Sie auf www.bvibe.com
Schreiben Sie uns eine E-Mail an
customerservice@bvibe.com für
unbeantwortete Fragen
Entworfen und Hergestellt von
b-VibeTM
FAQs können auf www.bvibe.com
gefunden werden
Hergestellt in China
© 2016 b-VibeTM

46
DESCRIPCIÓN
Los productos b-Vibe están hechos con silicona suave,
segura para el cuerpo. Nuestros productos son sin
phthalatos y sin látex.
La interfaz fácil de usar permite al usuario alcanzar
fácilmente el nivel de intensidad y la estimulación
deseados. Preparate para una satisfacción sensual que
no puede ser igualada que te dará una ansia irresistible
de repetir.
47
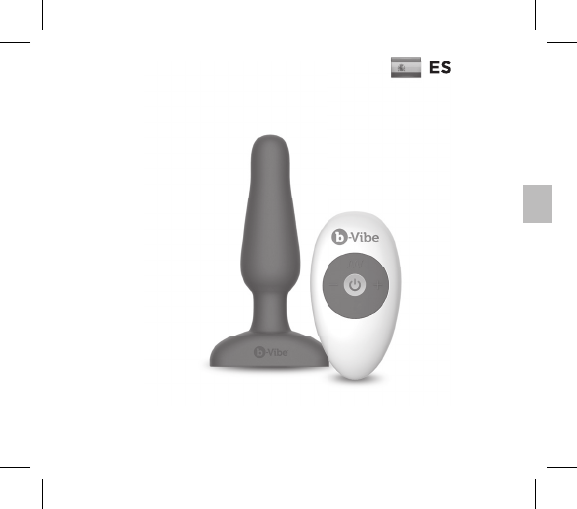
ESPAÑOL
b-VibeTM Novice Plug
ESPAÑOL
48
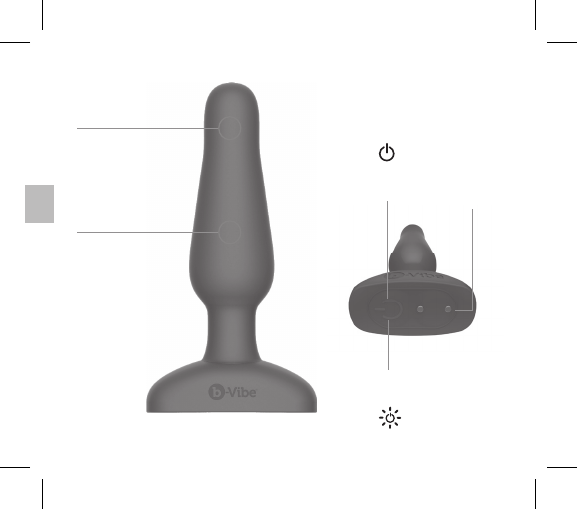
NOVICE PLUG
Contacto
a Carga
Magnética
Control
Básico
Indicador
LED
Motor Potente
Punta Fácil
de Insertar
49
CONTROL REMOTO INALÁMBRICO
Disminuir
Intensidad
Botón de
Encendido
Botón
Función
Vibración
Aumentar
Intensidad
PRIMEROS PASOST
1. Antes del primer uso, cargue
su consolador alrededor de 1
½ horas. El cable de carga USB
puede ser conectado a todo
puerto USB o adaptador de
corriente USB/AC (no incluido)
Ėĺ1ÊßĺªÆ¼©ÆªÆĺňĺp¼pª¯
Ėĺ1ÊßĺpĺňĺG£ªpĺ|p¼p
Ėĺ1ÊßĺªÆ¼©ÆªÆĺ¼q¹pĺňĺpƼpĺ
baja. Necesita ser cargada
2. Limpie su consolador con agua
y jabón, o un limpiador para
juguetes compatible con los
p¼Æ|Ê£¯ÀĺªĺÀ£|¯ªpĝ
La sección de preguntas mas
frecuentes puede consultarse
en www.bvibe.com
Escribanos a
customerservice@bvibe.com para toda
pregunta sin respuesta
TOY CLEANER
51
3. Lubrique su consolador con
un lubricante compatible con la
silicona, a base de agua.
4. Encienda su consolador
pulsando el A rápidamente en
la parte inferior del dispositivo.
La luz empezara a parpadear,
indicando que el consolador
esta encendido y en modo
standby.
Pulse de nuevo el A para usar
el modo manual, o pulse el
A del control remoto para
emparejar el control remoto y el
consolador.
Una vez en uso, la luz cambiara
de parpadeante a fija.
LUBE
52
5. Para cambiar el modo/patrón
de vibración y la intensidad con
el control del dispositivo, pulse A.
Hay un total de 15 modos cuando
se utiliza el control manual. La
intensidad vibratoria solo puede
aumentarse por medio del control
remoto
6. Para cambiar la intensidad
de vibración y/o el modo/patrón
con el control remoto, presione y
suelte A (Aumentar Intensidad) y A
(Disminuir Intensidad). Presione y
suelte A para cambiar el modo/
patrón de vibración.
53
1. Para encender el dispositivo pulse
con rapidez el A. El A parpadeara
para indicar que el dispositivo esta
encendido. Vuelva a pulsar el A para
cambiar la configuración vibratoria.
Hay un total de 15 modos utilizando el
control manual.
2. Para apagar su consolador pulse y
guarde el A durante 2 segundos. El
LED se apagara para indicar que el
dispositivo esta apagado.
CONTROL MANUAL
1
2
54
1. En primer lugar, ponga su consolador
en modo Standby pulsando con rapidez
el A de su consolador.
2. Mientras la luz del soporte parpadea,
encienda su control remoto para
conectarlo al consolador.
3. Una vez que el articulo esta
emparejado la luz del soporte pasara a
ser fija y podrá controlar su consolador
a distancia.
4. Presione y suelte A para aumentar la
intensidad de vibración.
5. Presione y suelte A para disminuir la
intensidad de vibración. Hay un total de
6 niveles de intensidad de vibración.
CONTROL REMOTO
55
CONTROL REMOTO
6. Los modos de vibración pueden
cambiarse presionando y soltando A.
7. Presionar A durante 3 segundos
pondrá en pausa los 3 botones.
8. Presionar A rápidamente durante
1 segundo volverá a encender los 3
motores, de la cabeza, cuerpo y cuello
del consolador.
9. Para poner el articulo en posicion ON/
OFF hay que presionar y soltar la tecla
A en el control remoto.
10. Para apagar completamente el
consolador, debe presionar y soltar A
en el consolador.
56
CARGAR EL CONSOLADOR
Ėĺ¯ª|Æĺ£ĺª|Êĺĺ|p¼pĺ
magnética a la área de carga
determinada en el soporte del
producto
Ėĺ1pĺ£Êßĺ¹p¼¹ppªÆĺª|pĺ»Êĺ
el articulo esta cargando.
Ėĺ1pĺ£Êßĺpĺª|pĺ»Êĺ£ĺp¼Æ|Ê£¯ĺ
esta completamente cargado.
ĖĺWªĺGp¼¹p¯ĺ¼q¹¯ĺª|pĺ
que la carga es requerida
Ėĺ£ĺ|¯ªÀ¯£p¯¼ĺ¼»Ê¼ĺ
aproximadamente 1 ½ horas
para estar totalmente cargado.
Flashing light = Charging
Solid light = Fully Charged
57
CAMBIAR LA BATERÍA DE SU CONTROL REMOTO
Ėĺ{¼pĺ£ĺ|¯©¹p¼Æ©ªÆ¯ĺĺ£pĺ
{pƼpĺĺÀÊĺ|¯ªÆ¼¯£ĺ¼©¯Æ¯ĺ
como indicado.
Ėĺ1pĺ¹£pĺĺ{¯Æ°ªĺJĺíëîíĺpĺ
sido preinstalada en el control
remoto.
ĖĺJƼĺ£pĺ¯pĺĺ¹p¹£ĺªĺ£ĺ
|¯©¹p¼Æ©ªÆ¯ĺĺ£pĺ{pƼpĺ
para activar la alimentación en
el control remoto.
ĖĺÊp¼ĺ£ĺ|¯ªÆ¼¯£ĺ¼©¯Æ¯ĺÚĺ
la bateria separados a fin de
alargar la vida de la bateria.
OPEN
58
BLOQUEO DE VIAJE
ĖĺS¯¯Àĺ£¯Àĺp¼Æ|Ê£¯Àĺ{Į`{ĺª|£ÊÚªĺʪĺ
bloqueo de viaje para un transporte
seguro y conveniente.
Con el control remoto:
Pulsar simultáneamente los botones
A y A durante 3 segundos, la luz
parpadeante indica que el articulo
esta bloqueado.
Para desbloquear pulse simplemente
los botones A y A de nuevo durante 3
segundos. La luz parpadeante indicara
que el bloqueo esta desactivado.
Con el consolador:
Presione A durante 5 segundos, la luz
parpadeante en la base del consolador
indica que el articulo esta bloqueado.
Para desbloquearlo, presione
nuevamente A durante 5 segundos,
la luz parpadeante indicara que el
articulo esta desbloqueado.
1
23
12
3
45
59
MODOS VIBRATORIOS
Ėĺ"pÚĺʪĺƯÆp£ĺĺñĺªÓ£ÀĺĺªÆªÀpĺÓ{¼pƯ¼pĝ
Ėĺ"pÚĺʪĺƯÆp£ĺĺìðĺ©¯¯ÀĺÓ{¼pƯ¼¯ÀĘĺÙ¹£|p¯Àĺpĺ|¯ªÆªÊp|°ªė
1
23
Patrón Vibratorio 4
Patrón Vibratorio 5
Intensidad Vibratoria Patrón Vibratorio
Patrón Vibratorio 3
Patrón Vibratorio 2
Patrón Vibratorio 8
Patrón Vibratorio 6
Patrón Vibratorio 1
Patrón Vibratorio 7
1. Baja
2. Velocidad II
3. Velocidad III
4. Velocidad IV
5. Velocidad V
6. Máxima
60
Patrón Vibratorio 15
Patrón Vibratorio 13
Patrón Vibratorio 14
Patrón Vibratorio 10
Patrón Vibratorio 9
Patrón Vibratorio 11
Patrón Vibratorio 12
Intensidad Vibratoria Patrón Vibratorio
1. Baja
2. Velocidad II
3. Velocidad III
4. Velocidad IV
5. Velocidad V
6. Máxima
MODOS VIBRATORIOS
61
1. Limpie siempre su consolador
cuidadosamente antes y después de
cada uso.
2. Se recomienda el uso de un
lubricante de primera calidad a base
de agua. Los lubricantes a base de
silicona no son recomendados y
pueden dañar el producto.
3. Para limpiar adecuadamente
su consolador, lave lo con agua
templada y un jabón antibacteriano.
Enjuague abundantemente y seque el
consolador con un trapo suave o una
toalla. No se pueden usar limpiadores
con alcohol, petróleo o acetona.
4. Evite dejar su consolador expuesto a
la luz solar directa y nunca lo exponga
a un calor intenso.
MANTENIMIENTO DEL b-Vibe
Limpieza, Almacenamiento y
Seguridad
Patrón Vibratorio 15
Patrón Vibratorio 13
Patrón Vibratorio 14
Patrón Vibratorio 10
Patrón Vibratorio 9
Patrón Vibratorio 11
Patrón Vibratorio 12
Intensidad Vibratoria Patrón Vibratorio
1. Baja
2. Velocidad II
3. Velocidad III
4. Velocidad IV
5. Velocidad V
6. Máxima
TOY CLEANER
LUBE
MODOS VIBRATORIOS
62
5. Nuestros productos están diseñados
para estar a prueba de las salpicaduras.
Esto significa que una sesión en la ducha
o una limpieza en agua corriente no
causaran ningún daño, pero la exposición
prolongada-,tal como una utilización en
la bañera-seria perjudicable. No sumerja
nunca totalmente su consolador anal
en el agua.
6. No ponga nunca en carga su
consolador mientras esté húmedo.
Asegurase de que los conectores
situados en la base del consolador estén
totalmente secos antes de conectar el
cordón de carga.
Si su consolador parece funcionar
anormalmente, apaga lo y consulte
nuestro servicio de atención al cliente en
bvibe.com, adonde encontrara consejos. Si
se requiere asistencia adicional por favor
|¯ªÆp|Æĺ|¯ªėĺ
customerservice@bvibe.com
No ponga nunca en
carga su consolador
mientras esté
húmedo.

63
No ponga nunca en
carga su consolador
mientras esté
húmedo.
Materiales
Talla
Peso
Batería
Silicona segura para
el cuerpo/ ABS
102 x 52.5 x 27.5 mm
49.3 g
pƼpĺ£Į¯ªĺ
150m-ah
Tiempo de carga
Tiempo de uso
Nivel de Sonido
Máxim
Interfaz
1 ½ hora
1 hora
< 68 dB
Control Manual
con un Solo Botón
¯ªÆ¼¯£ĺJ©¯Æ¯ĺ
con 4 Botones
ESPECIFICACIONES
64
£ĺ À©{¯£¯ĺ £ĺ |¯ªÆª¯¼ĺ ĺ {pÀʼpĺ Æp|p¯ĺ ª|pĺ »Êĺ ÀƯÀĺ p¼Æ|Ê£¯Àĺ ª¯ĺ
pueden ser tratados como desperdicios domésticos, y mas bien ser llevados
al punto de recogida apropiado para el reciclaje de dispositivos eléctricos y
electrónicos.
INFORMACIONES DE ELIMINACIÓN
Eliminación de antiguos dispositivos electrónicos (aplicándose en la UE y los
otros países europeos con un sistema de recogida selectiva de residuos):

65
£ĺ À©{¯£¯ĺ £ĺ |¯ªÆª¯¼ĺ ĺ {pÀʼpĺ Æp|p¯ĺ ª|pĺ »Êĺ ÀƯÀĺ p¼Æ|Ê£¯Àĺ ª¯ĺ
pueden ser tratados como desperdicios domésticos, y mas bien ser llevados
al punto de recogida apropiado para el reciclaje de dispositivos eléctricos y
electrónicos.
INFORMACIONES DE ELIMINACIÓN
Eliminación de antiguos dispositivos electrónicos (aplicándose en la UE y los
otros países europeos con un sistema de recogida selectiva de residuos):
Declaración de Conformidad
Por la presente, b-vibe declara que este Producto Consolador de Novice es
conforme con los requisitos esenciales y otras disposiciones pertinentes de la
Directiva 1999/5/EC. Una copia de la Declaración de Conformidad puede ser
consultada a www.bvibe.com
EQUIPOS TERMINALES DE TELECOMUNICACIÓN Y
RADIO (R&TTE)

66
1. Este dispositivo es conforme con la Parte 15 de las reglas FCC.
1pĺÙ¹£¯Æp|°ªĺÀÆpĺÀÊÆpĺpĺ£pÀĺ¯Àĺ|¯ª|¯ªÀĺÀʪÆÀė
ĺ ĪìīĺÀÆĺÀ¹¯ÀÆÓ¯ĺª¯ĺ{¼pĺ|pÊÀp¼ĺªÆ¼¼ª|pÀĺª¯|ÓpÀĘĺÚ
(2) Este dispositivo debe aceptar toda interferencia recibida, incluyendo
interferencias pudiendo causar un funcionamiento no deseado.
2. Cambios o modificaciones no aprobadas expresamente por la parte
responsable de la conformidad pueden invalidar el permiso del usuario para
operar este equipo.
DECLARACIÓN FCC

67
Instrucciones usuario completas en
diferentes idiomas pueden consultarse
ªėĺwww.bvibe.com
Escribanos a customerservice@bvibe.com
para toda pregunta sin respuesta
Diseñado y desarrollado por
b-VibeTM
Hecho en China
© 2016 b-VibeTM
Las preguntas mas frecuentes pueden consultarse
en www.bvibe.com

68
VUE D’ENSEMBLE
Les produits b-Vibe sont composés de silicone
soyeux et sans risques pour le corps. Nos produits ne
contiennent ni phtalate ni latex.
L’interface facile d’utilisation permet aux utilisateurs
d’atteindre aisément le niveau d’intensité et la
stimulation désirée. Soyez prets pour une satisfaction
sensuelle ne pouvant être égalée et qui vous donnera
une envie irrésistible de recommencer.
69
FRANÇAIS
b-VibeTM Novice Plug
FRANÇAIS
70
NOVICE PLUG
Moteur Puissant
Embout Facile
à Insérer
Contact à
Chargement
Magnétique
Commande
de Base
Indicateur
LED
71
CONTRÔLE À DISTANCE SANS FIL
Diminuer
Intensité
Bouton
Power
Bouton
Fonction
Vibration
Augmenter
Intensité
COMMENT DÉMARRER
1. Avant la première utilisation,
chargez le plug pendant environ 1 ½
heures. Le cable de chargement USB
peut être branché dans tout port USB
ou adaptateur de courant USB/AC
(n’est pas inclus)
Ėĺ1Ê©¼ĺ|£ª¯ÆpªÆĺňĺªĺ|p¼
Ėĺ1Ê©¼ĺG£ªĺňĺ¯©¹£Æ©ªÆĺ
Chargé
Ėĺ1Ê©¼ĺ|£ª¯ÆpªÆĺ¼p¹©ªÆĺ
ňĺpÆƼĺp{£ĝĺ`¯ÊÀĺÓßĺ£ĺ
recharger
2. Lavez le plug avec de l’eau et du
savon, ou un nettoyant pour jouets
utilisable avec les articles en silicone
Les FAQ peuvent être
consultées sur
www.bvibe.com
Envoyez-nous un message à
customerservice@bvibe.com pour toute
question supplémentaire
TOY CLEANER
73
3. Lubrifiez votre plug anal avec
un lubrifiant compatible avec le
silicone, à base d’eau.
4. Allumez votre plug en
appuyant sur le A rapidement
dans la partie inférieure de votre
appareil.
La lumière clignotera, indiquant
que le plug est sous tension, et
en mode standby.
Appuyez à nouveau sur le A
pour utiliser le mode manuel,
ou poussez le A du contrôle
à distance pour l’apparier avec
le plug.
Une fois en fonctionnement, la
lumière changera, passant de
clignotante à pleine.
LUBE
74
5. Pour modifier le mode/patron de
vibration et l’intensité par le biais du
contrôle de l’appareil, appuyez sur A.
Il y a un total de 15 modes lorsqu’on
utilise le contrôle manuel. L’intensité
vibratoire ne peut être augmentée
que par le biais du contrôle à distance.
6. Pour modifier l’intensité de
vibration et/ou le mode/patron par le
biais du contrôle à distance, pressez
et relâchez A (Augmenter Intensité)
et A (Diminuer Intensité). Pressez et
relâchez A pour changer le mode/
patron de vibration.
75
1. Pour mettre l’appareil en route
appuyez rapidement sur le A L’A
clignotera pour indiquer que l’appareil
est sous tension. Appuyez à nouveau
sur le A pour modifier la configuration
de la vibration. Il y a un total de 15
modes en utilisant le contrôle manuel.
2. Pour éteindre votre plug appuyez
sur le A et gardez-le pressé pendant
2 secondes. Le LED s’éteindra pour
indiquer que l’alimentation est
coupée.
CONTRÔLE MANUEL
1
2
76
1. Tout d’abord allumez votre plug en
mode standby en appuyant rapidement
sur le A sur votre plug.
2. Pendant que la lumière à la base
clignote, allumez votre contrôle à
distance pour le connecter au plug.
3. Une fois que l’objet est apparié la
lumière à la base cessera de clignoter
et vous pourrez alors contrôler le plug à
distance.
4. Pressez et relâchez A pour augmenter
l’intensité vibratoire.
5. Pressez et relâchez A pour diminuer
l’intensité vibratoire. Il y a un total de 6
niveaux d’intensité vibratoire.
CONTRÔLE À DISTANCE
77
CONTRÔLE À DISTANCE
6. Les modes vibratoires peuvent être
changés en pressant et relâchant A.
7. Appuyer sur A pendant 3 secondes
mettra en pause les 3 moteurs.
8. Presser rapidement A durant 1
seconde remettra en marche les 3
moteurs, de la tête, du cou et du corps
de l’appareil.
9. Pour mettre l’appareil en position
ON/OFF appuyez et relâchez A sur le
contrôle à distance.
10. Pour éteindre complèrement votre
plug, vous devez appuyer et relâcher A
sur le plug.
78
CHARGER VOTRE PLUG ANAL
Ėĺ¼pª|ßĺ£pĺ¹¼Àĺĺ
chargement magnétique à la
zone de chargement désignée
à la base du produit.
Ėĺ1pĺ£Ê©¼ĺ|£ª¯ÆpªÆĺª»Êĺ
que l’objet est en charge.
Ėĺ1pĺ£Ê©¼ĺÙĺª»Êĺ»Êĺ
l’objet est complètement
chargé.
ĖĺWªĺ£ª¯Æ©ªÆĺ¼p¹ĺ
indique qu’il faut recharger
l’appareil.
Ėĺĺ¹£ÊĺÀÆĺƯÆp£©ªÆĺ|p¼ĺ
au bout d’environ 1 ½ heures.
Flashing light = Charging
Solid light = Fully Charged
79
CHANGER LA BATTERIE DE VOTRE CONTRÔLE
À DISTANCE
ĖĺpÆÀĺ£ÀÀ¼ĺ¹¯Ê¼ĺ¯ÊÓ¼¼ĺ£ĺ
compartiment de la batterie
de votre contrôle à distance
comme indiqué.
Ėĺ1pĺ¹£Į{¯ÊƯªĺJĺíëîíĺpĺÆĺ
préinstallée dans le contrôle à
distance.
Ėĺª£Óßĺ£pĺÊ££ĺĺ¹p¹¼ĺ
dans le compartiment de
la batterie pour activer
l’alimentation du contrôle
à distance.
ĖĺJpªßĺ£ĺ|¯ªÆ¼±£ĺuĺÀÆpª|ĺ
et la batterie dans des endroits
séparés afin de prolonger la
durée de vie de la batterie.
OPEN
80
SÉCURITÉ DE TRANSPORT
ĖĺS¯ÊÀĺ£Àĺp¼Æ|£Àĺ{Į`{ĺÀ¯ªÆĺ»Ê¹Àĺ
d’une sécurité de transport pour un
transport sûr et pratique.
Par le biais du contrôle à distance:
Presser simultanément les boutons A
et A pendant 3 secondes. La lumière
clignotante indique que l’article est
verrouillé.
Pour déverouiller pressez simplement
les boutons A et A à nouveau pendant 3
secondes. La lumière clignotante indique
que le verrou est désactivé.
Par le biais du plug:
Appuyez sur A pendant 5 secondes, la
lumière clignotante à la base du plug
indique que l’objet est verrouillé. Pour
le déverrouiller, maintenez à nouveau
A pendant 5 secondes, la lumière
clignotante indique que l’objet est
déverrouillé.
1
23
12
3
45
81
1
23
MODES DE VIBRATION
Ėĺ#£ĺÚĺpĺpÊĺƯÆp£ĺñĺªÓpÊÙĺĸªÆªÀÆĺÓ{¼pƯ¼ĝ
Ėĺ#£ĺÚĺpĺpÊĺƯÆp£ĺìðĺ©¯ÀĺÓ{¼pƯ¼ÀĘĺÙ¹£»ÊÀĺ|ĮÀÀ¯ÊÀė
Schéma Vibratoire 4
Schéma Vibratoire 5
Intensité Vibratoire Schéma Vibratoire
Schéma Vibratoire 3
Schéma Vibratoire 2
Schéma Vibratoire 8
Schéma Vibratoire 6
Schéma Vibratoire 1
Schéma Vibratoire 7
1. Faible
2. Vitesse II
3. Vitesse III
4. Vitesse IV
5. Vitesse V
6. Maximum
82
Schéma Vibratoire 15
Schéma Vibratoire 13
Schéma Vibratoire 14
Schéma Vibratoire 10
Schéma Vibratoire 9
Schéma Vibratoire 11
Schéma Vibratoire 12
Intensité Vibratoire Schéma Vibratoire
1. Faible
2. Vitesse II
3. Vitesse III
4. Vitesse IV
5. Vitesse V
6. Maximum
MODES DE VIBRATION
83
1. Nettoyez toujours soigneusement
votre plug anal avant et après chaque
utilisation.
2. Nous recommandons l’utilisation
d’un lubrifiant à base d’eau de
première qualité. Les lubrifiants à base
silicone ne sont pas recommandés et
peuvent endommager le produit.
3. Pour nettoyer correctement votre
plug, lavez le à l’eau tiède et un savon
pªÆ{p|ƼªĝĺJª|ßĺp{¯ªp©©ªÆĺ
puis séchez le plug à l’aide d’un chiffon
doux ou d’une serviette. N’utilisez pas
de nettoyants contenant de l’alcool, du
pétrole ou de l’acétone.
4. Évitez de laisser votre plug exposé à
la lumière directe du soleil et ne l’exposez
jamais à des chaleurs extrêmes.
ENTRETIEN DU b-Vibe
Nettoyage, Stockage et Sécurité
Schéma Vibratoire 15
Schéma Vibratoire 13
Schéma Vibratoire 14
Schéma Vibratoire 10
Schéma Vibratoire 9
Schéma Vibratoire 11
Schéma Vibratoire 12
Intensité Vibratoire Schéma Vibratoire
1. Faible
2. Vitesse II
3. Vitesse III
4. Vitesse IV
5. Vitesse V
6. Maximum
TOY CLEANER
LUBE
MODES DE VIBRATION
84
5. Nos produits sont conçus pour être
étanches aux projections. Cela signifie
qu’une session sous la douche ou un
lavage à l’eau courante ne causeront
pas de dégâts, mais une exposition
prolongée- comme une utilisation dans
le bain- pourrait être dommageable.
Ne jamais immerger complètement
votre plug anal dans l’eau.
6. Ne rechargez jamais votre plug anal
tandis qu’il est humide. Assurez-vous
que les broches d’alimentation situées
à la base du plug sont totalement
sèches avant de connecter le cordon
d’alimentation.
Si vous constatez un fonctionnement
anormal de votre plug, éteignez-le et
consultez notre section de service client
sur bvibe.com, ou vous trouverez des
conseils utiles. Si vous avez besoin d’une
assistance supplémentaire, veuillez nous
|¯ªÆp|Ƽėĺcustomerservice@bvibe.com
Ne rechargez jamais
votre plug anal tandis
qu’il est humide.

85
Matériaux
Taille
Poids
Batterie
Silicone sans risque
pour le corps/ABS
102 x 52.5 x 27.5 mm
49.3 g
Batterie li-ion
150m-Ah
Temps de charge
Temps d’Utilisation
Niveau Sonore
Maximum
Interface
1 heure et 1/2
1 heure
< 68 dB
Contrôle Manuel
Avec Un Seul
Bouton
Contrôle à
distance 4
boutons
CARACTÉRISTIQUES
86
Le symbole de la poubelle barrée indique que cet article ne doit pas être traité
comme une ordure ménagère, mais plutôt être déposé à l’endroit approprié
pour le recyclage d’équipements électriques et électroniques.
INFORMATIONS DE MISE AU REBUT
Décharge de vieux équipements électroniques (appliquable dans l’UE et les
autres pays européens pratiquant le tri des déchets):

87
Le symbole de la poubelle barrée indique que cet article ne doit pas être traité
comme une ordure ménagère, mais plutôt être déposé à l’endroit approprié
pour le recyclage d’équipements électriques et électroniques.
Décharge de vieux équipements électroniques (appliquable dans l’UE et les
autres pays européens pratiquant le tri des déchets):
Déclaration de Conformité
Par la présente, b-Vibe déclare que ce produit Plug de Novice est en
conformité avec les conditions essentielles et autres dispositions pertinentes
de la Directive 1999/5/EC. Une copie de la Déclaration de Conformité est
disponible sur www.bvibe.com.
ÉQUIPEMENTS TERMINAUX DE RADIO &
TÉLÉCOMMUNICATIONS (R&TTE)

88
ìĝĺĺÀ¹¯ÀÆĺÀÆĺ|¯ª¯¼©ĺpÓ|ĺ£pĺGp¼ÆĺìðĺÀĺJ£Àĺĝ
N¯ªĺÙ¹£¯ÆpƯªĺÀÆĺÀ¯Ê©ÀĺpÊÙĺÊÙĺ|¯ªÆ¯ªÀĺÀÊÓpªÆÀė
(1) Ce dispositif ne peut pas causer d’interférences nocives, et
(2) Ce dispositif doit accepter toutes les interférences reçues, incluant les
interférences pouvant causer un fonctionnement non désiré.
2. Les changements ou modifications non expressément approuvés par
la partie responsable de la conformité peuvent annuler l’autorisation de
l’utilisateur de faire fonctionner le matériel.
DÉCLARATION FCC

89
DÉCLARATION FCC
Des instructions utilisateur complètes
en différentes langues peuvent être
|¯ªÀÊ£ÆÀĺÀʼėĺwww.bvibe.com
Envoyez-nous un message à
customerservice@bvibe.com pour toute
question supplémentaire
Conçu et développé par
b-VibeTM
Fabriqué en Chine
© 2016 b-VibeTM
Les FAQ peuvent être consultées sur
www.bvibe.com

90
OVERZICHT
b-VibeTM producten zijn gemaakt met zijdezachte,
lichaamsveilige siliconen. Onze producten zijn ftalaat-
vrij en latex-vrij.
De eenvoudig te gebruiken interface biedt gebruikers
de mogelijkheid om gemakkelijk de gewenste
stimulatie en intensiteit te bereiken. Maak je klaar voor
sensuele voldoening die niet kan worden geëvenaard
en die je laat verlangen naar meer.
91
NEDERLANDS
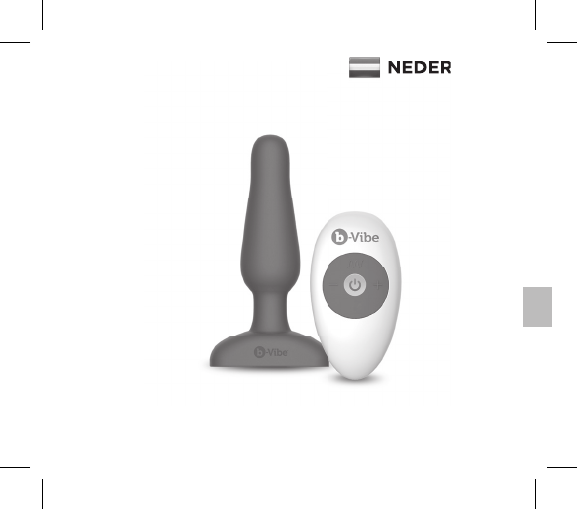
b-VibeTM Novice Plug
NEDERLANDS
92
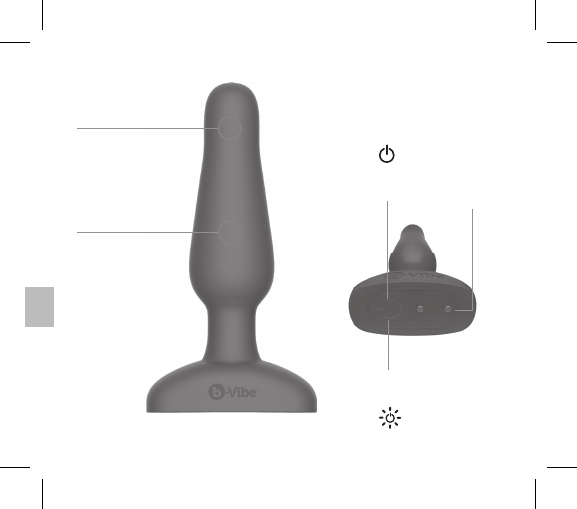
NOVICE PLUG
Krachtige Motor
Makkelijk
Inbrengbare Top
Magnetisch
Laad
Contact
Basis
Controle
LED
Indicator
93
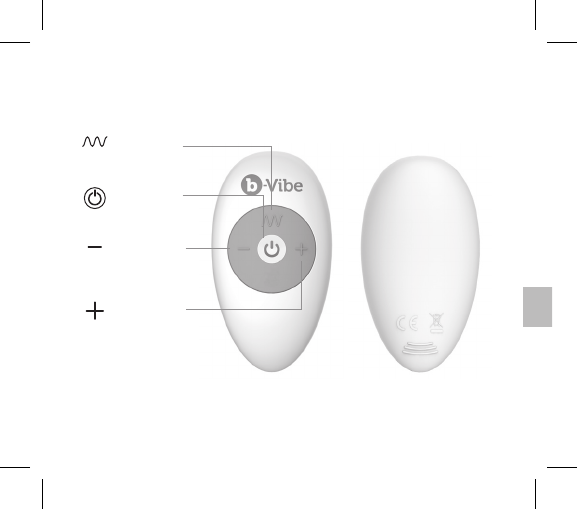
DRAADLOZE AFSTANDSBEDIENING
Verlaag
Intensiteit
Aan/Uit
Knop
Vibratie
Functie
Knop
Verhoog
Intensiteit

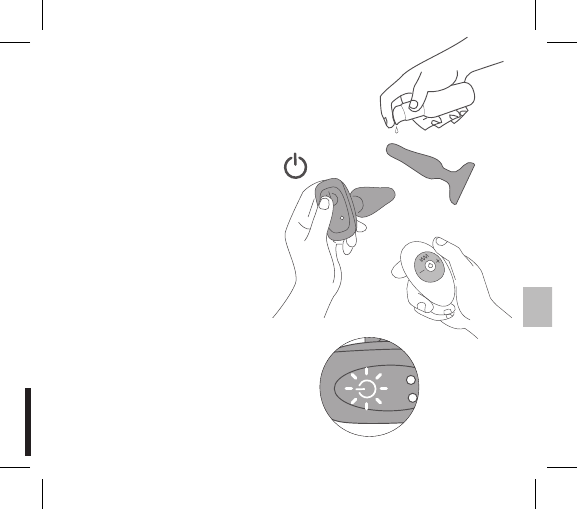
1. Laadt je plug voor het eerste
gebruik ongeveer 1 ½ uur op. De
USB-oplaadkabel kan worden
aangesloten op een USB-
poort of USB/AC-adapter (niet
meegeleverd)
Ėĺ/ª¹¹¼£|Æĺňĺ=¹£pª
ĖĺN¯£ĺ1|Æĺňĺ`¯££ĺ¯¹£pª
ĖĺNª£ĺ/ª¹¹¼ªĺ1|ÆĺňĺpÆƼĺ
bijna leeg. Opladen is nodig
2. Was de plug met water en zeep
of speelgoedreiniger geschikt voor
gebruik met siliconen artikelen.
Veelgestelde vragen kunnen
worden gevonden op
www.bvibe.com
E-mail ons op
customerservice@bvibe.com voor
eventuele onbeantwoorde vragen
TOY CLEANER
BEGINNEN
95
3. Bevochtig de plug met een op
water gebaseerd glijmiddel dat
geschikt is voor siliconen.
4. Zet je plug AAN door snel op
de A aan de onderkant van de
plug te drukken.
Het licht knippert om aan te
geven dat het apparaat aanstaat
en in de standby-modus staat.
Druk nogmaals op de A om
de handmatige modus te
gebruiken, of druk op de A op
de afstandsbediening om deze te
koppelen met de plug.
Eenmaal in gebruik is, zal het
lampje op de basis veranderen
van knipperen naar solide.
LUBE
96
5. Druk op A om de vibratie modus/
patroon en intensiteit via de knop
aan de basis aan te passen. Er
zijn 15 modi voor de handmatige
controle. De vibratie intensiteit kan
alleen verhoogd worden met de
afstandsbediening.
6. Om de vibratie intensiteit en/of
de modus/patroon aan te passen
met de afstandsbediening druk je
op A en laat weer los (Intensiteit
Verhogen) en A (Intensiteit
Verlagen). Druk op A en laat weer
los om de vibratiemodus/patroon
aan te passen.
97
1. Druk om het product AAN te zetten
snel op de A. Het A zal knipperen
om aan te geven dat het apparaat is
ingeschakeld. Druk op de A om het
vibratiepatroon te veranderen. Er zijn
15 modi als je de handmatige controle
gebruikt.
2. Druk om je plug UIT te zetten op
de A voor 2 seconden. De LED gaat
uit om aan te geven dat het apparaat
UIT staat.
HANDMATIGE BEDIENING
1
2
98
1. Zet de plug eerst aan in de
standby-modus door kort op de A van
de plug te drukken.
2. Zet als het basislampje knippert de
afstandsbediening aan om deze te
koppelen met de plug.
3. Zodra het product is gekoppeld wordt
het basislampje solide en kun je de plug
op afstand bedienen.
4. Druk op A en laat weer los om de
vibratie intensiteit te verhogen.
5. Druk op A om de vibratie intensiteit
te verlegen. Er zijn in totaal 6 vibratie
intensiteit niveaus.
AFSTANDSBEDIENING
99
AFSTANDSBEDIENING
6. De vibratie modi kunnen worden
aangepast door op A te drukken en
weer los te laten.
7. A 3 secondes inhouden pauzeert
alle 3 de motors.
8. A snel 1 seconde indrukken draait
de 3 motors in de top, het midden en de
nek van de plug terug.
9. Druk op A en laat weer los om het
apparaat AAN/UIT te zetten.
10. Druk op A en hou ingedrukt om de
plug volledig uit te zetten.
100
JE PLUG OPLADEN
Ėĺ`¼{ªÆĺĺ©pªÆÀ|ĺ
laadstekker naar de
aangewezen laadzone op de
basis van het product.
Ėĺ"Æĺª¹¹¼ªĺ£p©¹ĺÆĺ
aan dat het product oplaadt.
ĖĺN¯£ĺ£p©¹ĺÆĺppªĺ
dat het product volledig is
opgeladen.
ĖĺªĺÀª£ĺª¹¹¼ªĺ£p©¹ĺ
geeft aan dat opladen nodig is
ĖĺG£ÊĺÀĺÓ¯££ĺ¯¹£pªĺªĺ
ongeveer 1 ½ uur.
Flashing light = Charging
Solid light = Fully Charged
101
DE BATTERIJEN VAN DE AFSTANDSBEDIENING VERVANGEN
ĖĺN|ÊĺÆĺ
batterijcompartiment van de
afstandsbediening open zoals
aangegeven.
Ėĺ/ª¯¯¹|£ĺJĺíëîíĺßÆĺp£ĺªĺĺ
afstandsbediening.
Ėĺ`¼Ô¼ĺÆĺ¹p¹¼Æĺªĺ
het batterijcompartiment
om de afstandsbediening te
activeren.
ĖĺÔpp¼ĺĺpÀÆpªÀ{ªªĺ
en de batterij apart om de
batterijduur te verlengen.
OPEN
102
REISSLOT
Ėĺ££ĺ{Į`{ĺÆ©Àĺ{{ªĺªĺ¼ÀÀ£¯Æĺ
voor veilig en gemakkelijk reizen.
Via de afstandsbediening:
Druk gelijktijdig op de A en A
toetsen gedurende 3 seconden. Het
knipperlicht geeft aan dat het product
is vergrendeld.
Om te ontgrendelen hou je A en A
gewoon opnieuw 3 seconden ingedrukt.
Het knipperlicht geeft aan dat het
product ontgrendeld is.
Via de plug:
Hou A 5 seconden ingedrukt, het
knipperlampje op de basis geeft aan
dat het apparaat vergrendeld is. Hou
A opnieuw 5 seconden ingedrukt
om het apparaat te vergrendelen, het
knipperend lampje geeft aan dat het
apparaat is ontgrendeld.
1
23
12
3
45
103
1
23
VIBRATIESTANDEN
Ėĺ¼ĺߪĺªĺƯÆpp£ĺñĺÓ{¼pÆĺªÆªÀÆÆĺªÓpÊÀĝ
Ėĺ¼ĺߪĺªĺƯÆpp£ĺìðĺÓ{¼pÆĺ©¯ÊÀÀªĘĺ¼¯ª¼ĺÊÆ£ė
Vibrerend Patroon 4
Vibrerend Patroon 5
Vibratie Intensiteit Vibrerend Patroon
Vibrerend Patroon 3
Vibrerend Patroon 2
Vibrerend Patroon 8
Vibrerend Patroon 6
Vibrerend Patroon 1
Vibrerend Patroon 7
1. Laag
2. Snelheid II
3. Snelheid III
4. Snelheid IV
5. Snelheid V
6. Maximaal
104
Vibrerend Patroon 15
Vibrerend Patroon 13
Vibrerend Patroon 14
Vibrerend Patroon 10
Vibrerend Patroon 9
Vibrerend Patroon 11
Vibrerend Patroon 12
1. Laag
2. Snelheid II
3. Snelheid III
4. Snelheid IV
5. Snelheid V
6. Maximaal
Vibratie Intensiteit Vibrerend Patroon
VIBRATIESTANDEN
105
1.ĺJªĺĺ¹£Êĺ¼¯ªĺÓ¯¯¼ĺªĺªpĺ
elk gebruik.
2. Wij raden premium glijmiddel
op waterbasis aan. Glijmiddelen
op basis van siliconen worden niet
aanbevolen en kunnen schade aan
het product veroorzaken.
3. Om de plug goed te reinigen, was
hem met lauw water en een goede
antibacteriële zeep. Spoel schoon
en dep droog met een pluisvrije
doek of handdoek. Gebruik geen
schoonmaakmiddelen die alcohol,
benzine of aceton bevatten.
4. Laat de plug niet achter in direct
zonlicht en stel hem nooit bloot aan
extreme hitte.
b-Vibe VERZORGING
Reiniging, Opslag en Veiligheid
Vibrerend Patroon 15
Vibrerend Patroon 13
Vibrerend Patroon 14
Vibrerend Patroon 10
Vibrerend Patroon 9
Vibrerend Patroon 11
Vibrerend Patroon 12
1. Laag
2. Snelheid II
3. Snelheid III
4. Snelheid IV
5. Snelheid V
6. Maximaal
Vibratie Intensiteit Vibrerend Patroon
TOY CLEANER
LUBE
VIBRATIESTANDEN
106
5. Onze producten zijn
ontworpen om spatwaterdicht te
zijn. Dit betekent dat een sessie
in de douche of wassen onder
stromend water geen kwaad kan,
maar langdurige blootstelling
–zoals in bad- kan wel schadelijk
zijn. Dompel je rimming plug
nooit volledig onder in water.
6. Laadt de plug nooit op als
deze nat is. Let op dat de stekker
volledig droog is voordat deze
in aanraking komt met het
stopcontact.
Als de plug abnormaal lijkt te
functioneren, zet hem dan UIT
en neem contact op met onze
klantenservice bij bvibe.com, waar
je tips vindt. Mocht je verdere
hulp nodig hebben dan kun
ĺ|¯ªÆp|Æĺ¯¹ª©ªĺ©Æėĺ
customerservice@bvibe.com
Laadt de plug
nooit op als deze
nat is.

107
Materialen
Maat
Gewicht
Batterij
Opladen
Lichaamsveilige
Siliconen / ABS
102 x 52.5 x 27.5 mm
49.3 g
Batterij Li-ion
150m-Ah
1 ½ uur
Gebruikstijd
Max
Geluidsniveau
Interface
1 uur
< 68 dB
Handmatige
Bediening met
Een Knop
4 Knoppen
Afstandsbediening
SPECIFICATIES
108
Het doorgestreepte vuilnisbak symbool geeft aan dat deze onderdelen
niet moeten worden behandeld als huishoudelijk afval, maar naar het juiste
verzamelpunt moeten worden gebracht voor de recycling van elektrische en
elektronische apparatuur.
INFORMATIE OVER HET VERWIJDEREN
Verwijdering van oude elektronische apparatuur (in de EU en andere
Europese landen met gescheiden inzameling van afval systemen):

109
Het doorgestreepte vuilnisbak symbool geeft aan dat deze onderdelen
niet moeten worden behandeld als huishoudelijk afval, maar naar het juiste
verzamelpunt moeten worden gebracht voor de recycling van elektrische en
elektronische apparatuur.
Verwijdering van oude elektronische apparatuur (in de EU en andere
Europese landen met gescheiden inzameling van afval systemen):
Conformiteitsverklaring
Hierbij verklaart b-Vibe dat dit Novice Plug product in overeenstemming is met
ĺÀÀªÆ£ĺÀªĺªĺpª¼ĺ¼£ÓpªÆĺ{¹p£ªªĺÓpªĺJ|Æ£ªĺìôôôĤðĤĝĺ
Een kopie van de verklaring van overeenstemming is te vinden op www.bvibe.com.
RADIO EN TELECOMMUNICATIE-EINDAPPARATUUR
(R&TTE)

110
1. Dit apparaat voldoet aan Deel 15 van de FCC-regels.
ĺÔ¼ªĺÀĺ¯ª¼Ô¯¼¹ªĺppªĺĺÓ¯£ªĺÆÔĺÓ¯¯¼Ôpp¼ªė
(1) Dit apparaat mag geen schadelijke interferentie veroorzaken, en
(2) Dit apparaat moet elke ontvangen interferentie accepteren, inclusief
interferentie die ongewenste werking kan veroorzaken.
2. Wijzigingen die niet uitdrukkelijk zijn goedgekeurd door de partij die
verantwoordelijk is voor de naleving kunnen de bevoegdheid van de gebruiker
om het apparaat te gebruiken aantasten.
FCC-VERKLARING

111
1. Dit apparaat voldoet aan Deel 15 van de FCC-regels.
ĺÔ¼ªĺÀĺ¯ª¼Ô¯¼¹ªĺppªĺĺÓ¯£ªĺÆÔĺÓ¯¯¼Ôpp¼ªė
(1) Dit apparaat mag geen schadelijke interferentie veroorzaken, en
(2) Dit apparaat moet elke ontvangen interferentie accepteren, inclusief
interferentie die ongewenste werking kan veroorzaken.
2. Wijzigingen die niet uitdrukkelijk zijn goedgekeurd door de partij die
verantwoordelijk is voor de naleving kunnen de bevoegdheid van de gebruiker
om het apparaat te gebruiken aantasten.
FCC-VERKLARING
Volledige gebruiksaanwijzing in andere
Æp£ªĺÀĺÆĺÓªªĺ¯¹ė
www.bvibe.com
Envoyez-nous un message à
customerservice@bvibe.com pour toute
question supplémentaire
Ontworpen en ontwikkeld door
b-VibeTM
Gemaakt in China
© 2016 b-VibeTM
E-mail ons op
customerservice@bvibe.com
voor eventuele onbeantwoorde vragen

112
PANORAMICA
I prodotti b-VibeTM sono realizzati in silicone liscio
come seta e sicuro per il corpo. I nostri prodotti sono
privi di ftalati e di lattice.
L’interfaccia di facile utilizzo permette agli utenti di
raggiungere facilmente la stimolazione e il livello di
intensità desiderati. Preparatevi a una soddisfazione
sensuale che non ha uguali e che vi porterà a
desiderare di più.
113
ITALIANO
b-VibeTM Novice Plug
ITALIANO
114
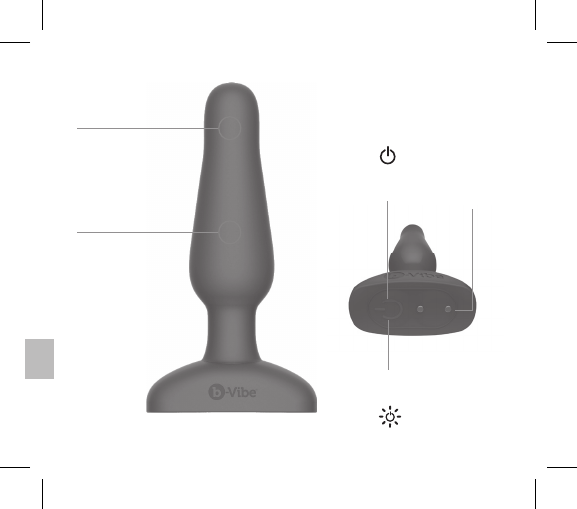
NOVICE PLUG
Motore Potente
Punta Facilmente
Inseribile
Contatto
ĺJ|p¼|p
Magnetico
Comando
sulla Base
Indicatore
LED
115
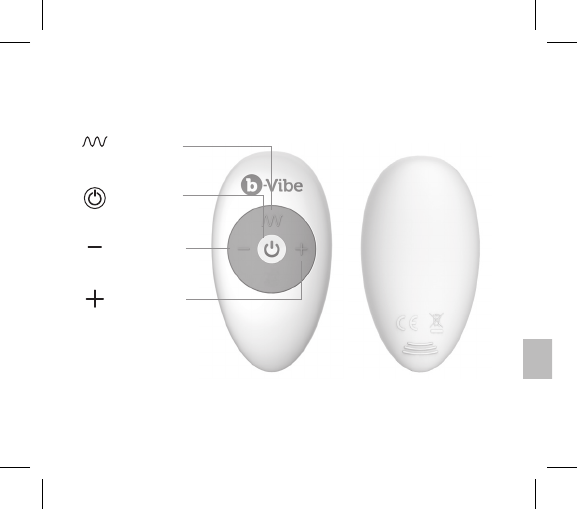
COMANDO A DISTANZA WIRELESS
Diminuisci
Intensità
Pulsante
Accensione
Pulsante
Funzione
Vibrazione
Aumenta
Intensità

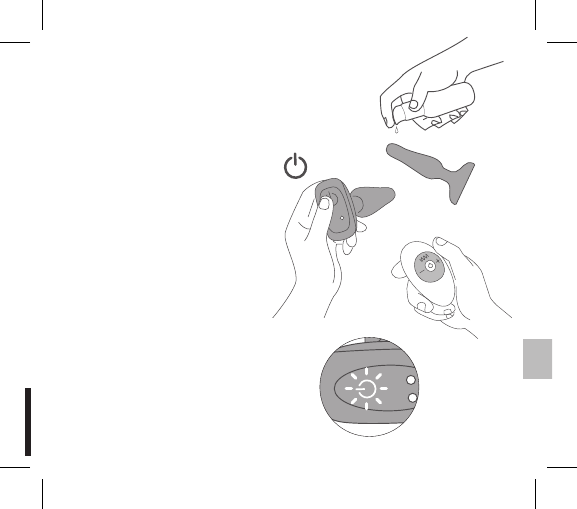
1. Prima del primo utilizzo,
lasciare in carica il plug per circa
1 ½ ore. Il cavo USB di ricarica può
essere collegato a qualsiasi porta
USB o adattatore USB/AC (non
incluso)
Ėĺ1Ê|ĺ£p©¹pªÆĺňĺ#ªĺ|p¼|p
Ėĺ1Ê|ĺãÀÀpĺňĺp¼|pĺ|¯©¹£Æp
Ėĺ1Ê|ĺ£p©¹pªÆĺ¼p¹pĺ
ňĺpÆƼpĺÀ|p¼|pĝĺ8|ÀÀp¼¯ĺ
ricaricare
2. Lavare il plug con acqua
e sapone o detergente per
giocattoli adatto a oggetti in
silicone.
È possibile consultare la
sezione Domande frequenti su
www.bvibe.com
Scrivere a
customerservice@bvibe.com
per eventuali altre domande.
TOY CLEANER
117
3. Lubrificare il plug con un
lubrificante a base acquosa
compatibile col silicone.
4. Accendere il plug premendo
rapidamente il A sulla parte
inferiore del plug. La spia
lampeggerà indicando che
il dispositivo è acceso e in
modalità standby.
Premere nuovamente il A per
utilizzare la modalità manuale o
premere il A sul telecomando
per collegare telecomando e
plug.
Una volta in uso, la luce alla
base cambierà da lampeggiante
a fissa.
LUBE
118
5. Per cambiare la modalità/tipo di
vibrazione, premere A. In totale, ci
sono 15 modalità quando si utilizza
il controllo manuale. L’intensità di
vibrazione può essere aumentata
solo tramite il telecomando.
6. Per cambiare intensità e/o
modalità/tipo di vibrazione tramite il
telecomando, premere e rilasciare A
(Aumenta intensità) e A (Diminuisci
intensità). Premere e rilasciare A
per cambiare modalità/tipo di
vibrazione.
119
1. Per accendere il dispositivo, premere
rapidamente il A. L’ A lampeggerà
per indicare che il dispositivo è acceso.
J¹¼©¼ĺ£ĺA per cambiare il tipo
di vibrazione. In totale, ci sono 15
modalità usando il controllo manuale.
2. Per spegnere il plug, premere e
tenere premuto il A per 2 secondi.
Il LED si spegnerà per indicare che
l’apparecchio è spento.
CONTROLLO MANUALE
1
2
120
1. In primo luogo, mettere il plug
in modalità standby premendo
rapidamente il A sul plug.
2. Mentre la luce alla base lampeggia,
accendere il telecomando per collegare
telecomando e plug.
3. Una volta collegato l’oggetto, la luce
alla base diventerà fissa e il plug potrà
essere controllato a distanza.
4. Premere e rilasciare A per aumentare
l’intensità.
5. Premere e rilasciare A per diminuire
l’intensità di vibrazione. In totale, ci sono
6 livelli d’intensità di vibrazione.
TELECOMANDO
121
TELECOMANDO
6. È possibile cambiare le modalità di
vibrazione premendo e rilasciando A.
7. Tenendo premuto A per 3 secondi,
si interrompe il funzionamento di tutti e
tre i motori.
8. Premendo velocemente A per 1
secondo, si riaccendono i tre motori su
punta, corpo e collo del plug.
9. Per accendere/spegnere l’apparecchio
premere e rilasciare A sul telecomando.
10. Per spegnere completamente
l’apparecchio, tenere premuto A sul plug.
122
COME RICARICARE IL PLUG
ĖĺÀÀp¼ĺ£pĺÀ¹ªpĺĺ¼|p¼|pĺ
magnetica alla zona di ricarica
preposta sulla base del
prodotto
Ėĺ1pĺ£Ê|ĺ£p©¹pªÆĺª|pĺ
che il dispositivo è in carica
Ėĺ1pĺ£Ê|ĺÀÀpĺª|pĺ|ĺ£ĺ
dispositivo è completamente
carico
ĖĺWªĺ£p©¹¯ĺ¼p¹¯ĺª|pĺ
che la batteria necessita di
ricarica.
Ėĺ#ĺ¹£Êĺ¼|¯ª¯ĺ|¼|pĺìĺöĺ¯¼ĺ
per una ricarica completa
Luce lampeggiante = in carica
Luce fissa = carica completa
123
COME CAMBIARE LA BATTERIA DEL TELECOMANDO
Ėĺp¼ĺÀ|¯¼¼¼ĺ£ĺ|¯¹¼|¯ĺ£ĺ
vano batteria per aprire il
telecomando, come illustrato.
ĖĺWªpĺ¹£pĺpĺ{¯ÆƯªĺJĺíëîíĺĺ
già inserita nel telecomando.
ĖĺJ©Ê¯Ó¼ĺ£pĺ£ªÊÆÆpĺ
di carta all’interno del
vano batterie per attivare
l’accensione del telecomando.
Ėĺ£ĺªĺĺ¹¼¯£Êªp¼ĺ£pĺ
vita della batteria, riporre il
telecomando e la batteria
separatamente.
OPEN
124
CHIUSURA DI SICUREZZA DA VIAGGIO
ĖĺSÊÆÆĺ£ĺp¼Æ|¯£ĺ{Į`{ĺª|£Ê¯ª¯ĺʪpĺ|ÊÀʼpĺ
di sicurezza, per un viaggio comodo e sicuro
Tramite telecomando:
Tenere premuti contemporaneamente
i pulsanti A e A per 3 secondi. La luce
lampeggiante indicherà che l’oggetto è
bloccato.
Per sbloccarlo, basta premere e tenere di
nuovo premuti i pulsanti A e A per 3 secondi.
La luce lampeggiante indicherà che il blocco
è disabilitato.
Tramite plug:
Mantenere premuto Aĺ¹¼ĺðĺÀ|¯ªėĺ£pĺ£Ê|ĺ
lampeggiante alla base del plug indicherà
che l’apparecchio è bloccato. Per sbloccarlo,
mantenere premuto Aĺpª|¯¼pĺ¹¼ĺðĺÀ|¯ªėĺ£pĺ
luce lampeggiante indicherà che l’apparecchio
è sbloccato.
1
23
12
3
45
125
1
23
MODALITÀ DI VIBRAZIONE
Ėĺ#ªĺƯÆp£Ęĺ|ĺÀ¯ª¯ĺñĺ£Ó££ĺĺªÆªÀÆuĺĺÓ{¼p߯ªĝ
Ėĺ#ªĺƯÆp£Ęĺ|ĺÀ¯ª¯ĺìðĺ©¯p£ÆuĺĺÓ{¼p߯ªĘĺ|¯©ĺÀ¹pƯĺĺÀÊƯė
Modalità di vibrazione 4
Modalità di vibrazione 5
Intensità di Vibrazione Modalità di Vibrazione
Modalità di vibrazione 3
Modalità di vibrazione 2
Modalità di vibrazione 8
Modalità di vibrazione 6
Modalità di vibrazione 1
Modalità di vibrazione 7
1. Bassa
2. Velocità II
3. Velocità III
4. Velocità IV
5. Velocità V
6. Maximale
126
Modalità di vibrazione 15
Modalità di vibrazione 13
Modalità di vibrazione 14
Modalità di vibrazione 10
Modalità di vibrazione 9
Modalità di vibrazione 11
Modalità di vibrazione 12
Intensità di Vibrazione Modalità di Vibrazione
1. Bassa
2. Velocità II
3. Velocità III
4. Velocità IV
5. Velocità V
6. Maximale
MODALITÀ DI VIBRAZIONE
127
1. Pulire sempre il plug a fondo prima
e dopo ogni uso.
2. Si consiglia un lubrificante di alta
qualità a base acquosa. I lubrificanti a
base siliconica non sono consigliati e
possono causare danni al prodotto.
3. Per pulire correttamente il plug,
lavarlo con acqua tiepida e un buon
Àp¹¯ªĺpªÆ{pÆƼ|¯ĝĺJÀ|p|»Êp¼ĺĺ
asciugare bene con un panno privo
di lanugine o un asciugamano. Non
utilizzare detergenti che contengano
alcool, benzina o acetone.
4. Evitare di lasciare il plug alla luce
solare diretta e non esporlo al calore
eccessivo.
Cura del b-Vibe
Pulizia, conservazione e sicurezza
Modalità di vibrazione 15
Modalità di vibrazione 13
Modalità di vibrazione 14
Modalità di vibrazione 10
Modalità di vibrazione 9
Modalità di vibrazione 11
Modalità di vibrazione 12
Intensità di Vibrazione Modalità di Vibrazione
1. Bassa
2. Velocità II
3. Velocità III
4. Velocità IV
5. Velocità V
6. Maximale
TOY CLEANER
LUBE
MODALITÀ DI VIBRAZIONE
128
5. I nostri prodotti sono progettati
per essere a prova di schizzi. Questo
significa che tenerli sotto la doccia o
l’acqua corrente non ne comprometterà
il funzionamento, ma l’esposizione
prolungata − ad esempio, nella vasca da
bagno − potrebbe danneggiarli.
Non immergere completamente in
acqua il plug.
6. Non mettere mai in carica il plug
quando è bagnato. Prima di collegare
il cavo di ricarica, assicurarsi che i pin
di ricarica alla base del plug siano
completamente asciutti.
Se il plug sembra funzionare in modo
anomalo, spegnerlo e consultare la nostra
sezione Assistenza clienti su bvibe.com,
dove sono disponibili suggerimenti. Per
ʣƼ¯¼ĺpÀÀÀƪßpĘĺÀĺ¹¼pĺĺ|¯ªÆpÆÆp¼ėĺ
customerservice@bvibe.com
Non mettere mai
in carica il plug
quando è bagnato.

129
Materiali
Dimensioni
Peso
Batteria
Ricarica
Silicone/ABS sicuri
per il corpo
102 x 52.5 x 27.5 mm
49.3 g
Batteria Li-ion
150m-Ah
1 ½ ore
Tempo di
utilizzo
Livello di
rumore
Interfaccia
1 ore
< 68 dB
Controllo manuale
a pulsante singolo
Controllo remoto a
4 pulsanti
SPECIFICATIES
130
Il simbolo del cassonetto barrato indica che questi oggetti non vanno trattati
come rifiuti domestici, ma devono invece essere portati al centro di raccolta per
il riciclaggio di apparecchiature elettriche ed elettroniche.
INFORMAZIONI SULLO SMALTIMENTO
Smaltimento delle vecchie apparecchiature elettroniche (applicabile nell’Unione
Europea e in altri paesi europei con sistemi di raccolta differenziata):

131
Il simbolo del cassonetto barrato indica che questi oggetti non vanno trattati
come rifiuti domestici, ma devono invece essere portati al centro di raccolta per
il riciclaggio di apparecchiature elettriche ed elettroniche.
Smaltimento delle vecchie apparecchiature elettroniche (applicabile nell’Unione
Europea e in altri paesi europei con sistemi di raccolta differenziata):
Dichiarazione di Conformità
Con la presente, b-Vibe dichiara che questo plug anale è conforme
ai requisiti essenziali e alle altre disposizioni pertinenti della Direttiva
1999/5/EC. È possibile consultare una copia della Dichiarazione di
¯ª¯¼©Æuĺp£ĺÀʪÆĺª¼ß߯ėĺÔÔÔĝ{Ó{ĝ|¯©ĝ
RADIO EN TELECOMMUNICATIE-EINDAPPARATUUR
(R & TTE)

132
1. Questo dispositivo è conforme alla Parte 15 delle norme FCC.
#£ĺʪ߯ªp©ªÆ¯ĺĺÀ¯ÆƯĺp££ĺÊĺÀʪÆĺ|¯ªß¯ªė
(1) Questo dispositivo può causare interferenze dannose e
(2) Questo dispositivo deve accettare qualsiasi interferenza ricevuta,
incluse le interferenze che potrebbero comprometterne il funzionamento.
2. Eventuali cambiamenti o modifiche non espressamente approvati dal
responsabile della conformità potrebbero invalidare il diritto dell’utente a
utilizzare l’apparecchiatura.
DICHIARAZIONE FCC

133
1. Questo dispositivo è conforme alla Parte 15 delle norme FCC.
#£ĺʪ߯ªp©ªÆ¯ĺĺÀ¯ÆƯĺp££ĺÊĺÀʪÆĺ|¯ªß¯ªė
(1) Questo dispositivo può causare interferenze dannose e
(2) Questo dispositivo deve accettare qualsiasi interferenza ricevuta,
incluse le interferenze che potrebbero comprometterne il funzionamento.
2. Eventuali cambiamenti o modifiche non espressamente approvati dal
responsabile della conformità potrebbero invalidare il diritto dell’utente a
utilizzare l’apparecchiatura.
DICHIARAZIONE FCC
Istruzioni complete per l’uso sono
disponibili in altre lingue all’indirizzo
www.bvibe.com
Per domande non incluse in
questa pagina, inviare una mail a
customerservice@bvibe.com
Progettato e sviluppato da
b-VibeTM
Prodotto in Cina
© 2016 b-VibeTM
È possibile consultare la sezione Domande
frequenti su www.bvibe.com

134
b-VibeTM

135
РУССКИЙ
b-VibeTM Novice Plug
РУССКИЙ
136
#$%&'(!)*+,
137
1.
!
!
2.
www.bvibe.com
customerservice@bvibe.com
TOY CLEANER
139
3.
4.
A
!
!
!
!
A
A
!
!
LUBE
140
5.
A"!
6.
A!
A!
A
141
1.
AA
A
2.
A
1
2
142
1.
A"!
!
!
2.
!
!
!
3.
!
!
!
4. A
!
!
!
5. A
143
6.
A"!
!
!
7.A
!
!
!
8.A
!
!
!
9.
A
10. Чтобы полностью выключить
устройство, нажмите и удерживайте A
на устройстве.!

144
!
!
Flashing light = Charging
Solid light = Fully Charged

145
OPEN
146
На пульте дистанцион- ного управления:
AA!
AA
!
На устройстве:
A
A
1
23
12
3
45
Характер вибраций 4
Характер вибраций 5
интенсивности
вибрации Характер вибраций
Характер вибраций 3
Характер вибраций 2
Характер вибраций 8
Характер вибраций 6
Характер вибраций 1
Характер вибраций 7
1. Низкий
2. Скорость II
3. Скорость III
4. Скорость IV
5. Скорость V
6. Максимальный
147
1
23
-!
Ėĺ
Ėĺ
Характер вибраций 4
Характер вибраций 5
интенсивности
вибрации Характер вибраций
Характер вибраций 3
Характер вибраций 2
Характер вибраций 8
Характер вибраций 6
Характер вибраций 1
Характер вибраций 7
1. Низкий
2. Скорость II
3. Скорость III
4. Скорость IV
5. Скорость V
6. Максимальный
148
Характер вибраций 15
Характер вибраций
Характер вибраций 13
Характер вибраций 14
Характер вибраций 10
Характер вибраций 9
Характер вибраций 11
Характер вибраций 12
1. Низкий
2. Скорость II
3. Скорость III
4. Скорость IV
5. Скорость V
6. Максимальный
интенсивности
вибрации
-!
149
1.
2.
3.
4.
Чистка, хранение и обеспечение
безопасности
Характер вибраций 15
Характер вибраций
Характер вибраций 13
Характер вибраций 14
Характер вибраций 10
Характер вибраций 9
Характер вибраций 11
Характер вибраций 12
1. Низкий
2. Скорость II
3. Скорость III
4. Скорость IV
5. Скорость V
6. Максимальный
интенсивности
вибрации
TOY CLEANER
LUBE
-!

150
5.
!
Никогда
полностью не погружайте свой
стимулятор в воду.
6.!Никогда не заряжайте стиму- лятор,
если он влажный.
customerservice@bvibe.com
Никогда не
заряжайте стиму-
лятор, если он
влажный.

151
Материалы
Размер
Вес
Aккумулятор
Продолжительность
зарядки
!
!
!
!
!
!
!
Продолжительность
работы при полной
зарядке
Максимальный
уровень шума
Интерфейс
!
!
!
152
Утилизация старого электронного оборудования (применимо в странах ЕС и
других странах Европы, в которых используется система раздельного сбора
отходов):

153
Утилизация старого электронного оборудования (применимо в странах ЕС и
других странах Европы, в которых используется система раздельного сбора
отходов):
Декларация о соответствии

154

155
www.bvibe.com
b-VibeTM
© 2016 b-VibeTM
customerservice@bvibe.com

156
bvibe.com