AAMP of Florida AAMP Global UN1880 NAVIGATION MULTIMEDIA RECEIVER User Manual
AAMP of Florida, Inc. dba AAMP Global NAVIGATION MULTIMEDIA RECEIVER
UserManual.wiki
>
AAMP of Florida AAMP Global
>
UN1880 User Manual
User Manual
Navigation menu
Upload a User Manual
Namespaces
Wiki Guide
HTML
PDF
Info
Views
User Manual
Discussion / Help
Navigation

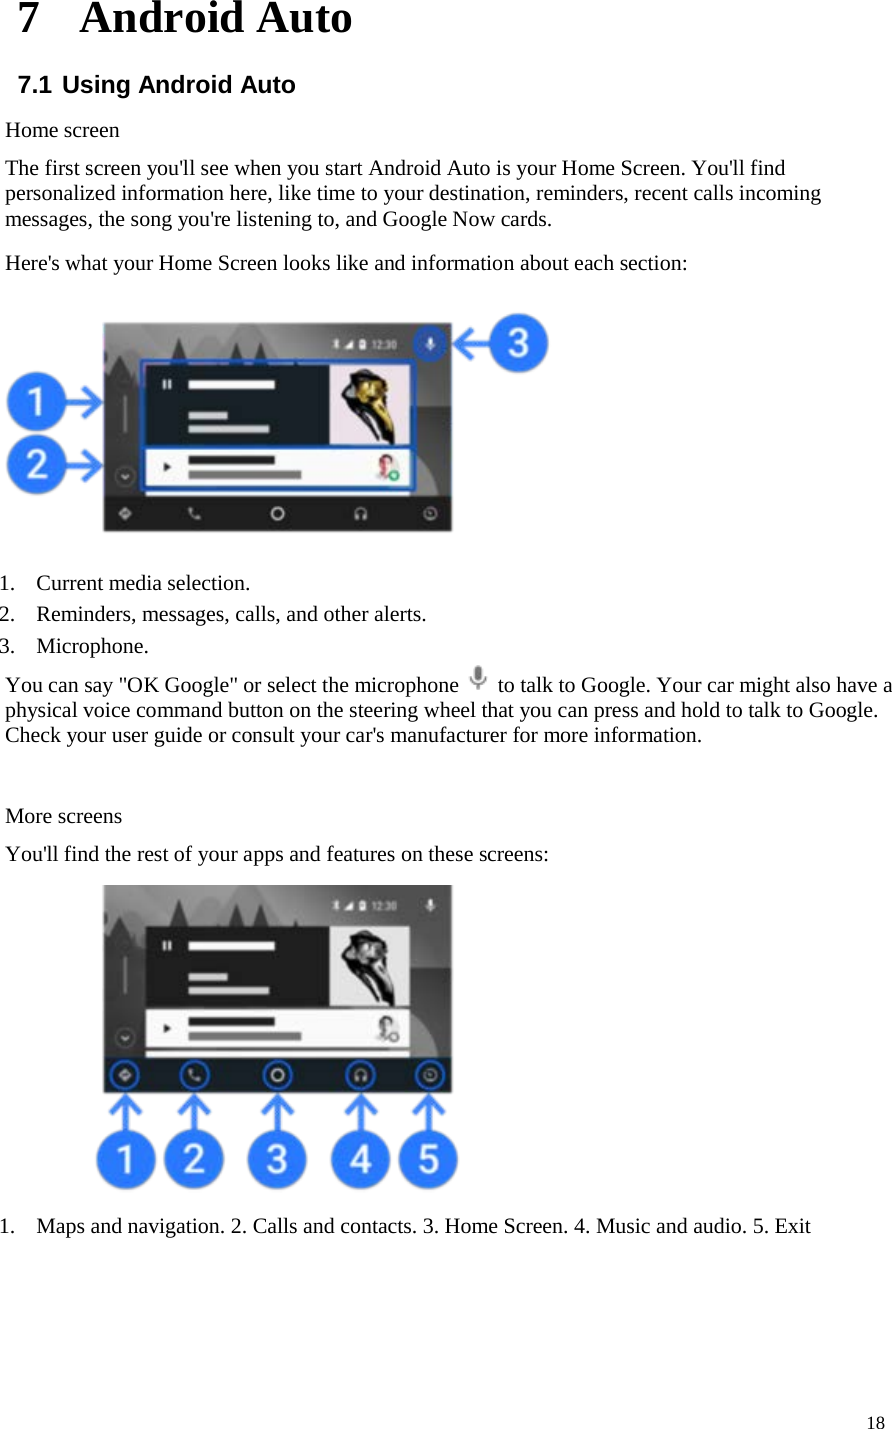
![4 1 Operations 1.1. Panel buttons Functions of Buttons 1. [PWR] [VOL] Knob • Press this knob to turn the unit on. • Long press this knob to turn the unit off. • Rotate the knob to increase or decrease the volume. • Press this knob in radio mode, Rotate the knob within 3 seconds to tune forward or tune backward. 2. [RESET] Button • Press [RESET] button to reset the unit. 3. [MUTE] Button 4. [HOME] Button • Press this button to go to the main menu. • Press this button to go back to the last source. 5. [MIC] Button • Press this button to use CarPlay Siri/Android Auto Google Assistant. 6. [Tuning Knob] Button • Turn to increment frequencies up (clockwise) or down (counter clockwise) 7. [] Tune +/ Skip Forward 8. [] Tune -/ Skip Back 9. [NAV] Button • Press this button to enter NAV. • Press this button to go back to the last page. 1 2 3 4 5 9 7 8 6](https://usermanual.wiki/AAMP-of-Florida-AAMP-Global/UN1880/User-Guide-3960002-Page-4.png)
![12 3 SXM Operations This function is available when a Satellite Radio Receiver is connected through the dedicated connection. Note: Satellite radio is a subscription service. Press the [SXM] button on Main Menu display. The SXM mode will be displayed. 1. Channel up button. 2. Play/Pause button. 3. Channel down button 4. Show the channel is live. 5. Choose channel list. 6. Keypad Button. 7. Channel category type. 8. Channel list. 9. Current Channel Number / Category Name / Preset Number,etc. 10. Channel time](https://usermanual.wiki/AAMP-of-Florida-AAMP-Global/UN1880/User-Guide-3960002-Page-7.png)
![13 4 Settings Operation 4.1 Main Settings Press [Settings] button on the Main menu screen. The Setting menu screen will be displayed. Contains Main, Camera, Style, Tabs. 4.2 Camera Settings 4.3 Style Settings](https://usermanual.wiki/AAMP-of-Florida-AAMP-Global/UN1880/User-Guide-3960002-Page-8.png)
![14 4.4 Set Bottom Tabs 1. Seven tabs on the bottom on the screens are shortcuts. Among them the third to the sixth users can customize. User can press [ ] or [ ] button to set different tabs. 2. While user sets tabs, the shortcut will be shown the same on each source. 4.5 Display Setup Menu TV Shape: Set TV Shape Normal or Cinema. Set Day: Set Day value from 0 to 20. Set Nigh: Set Nigh value from 0 to 20. Auto: Choose ON or OFF. Rear Zone: Touch the [ / ] key to select the Rear Zone source.](https://usermanual.wiki/AAMP-of-Florida-AAMP-Global/UN1880/User-Guide-3960002-Page-9.png)
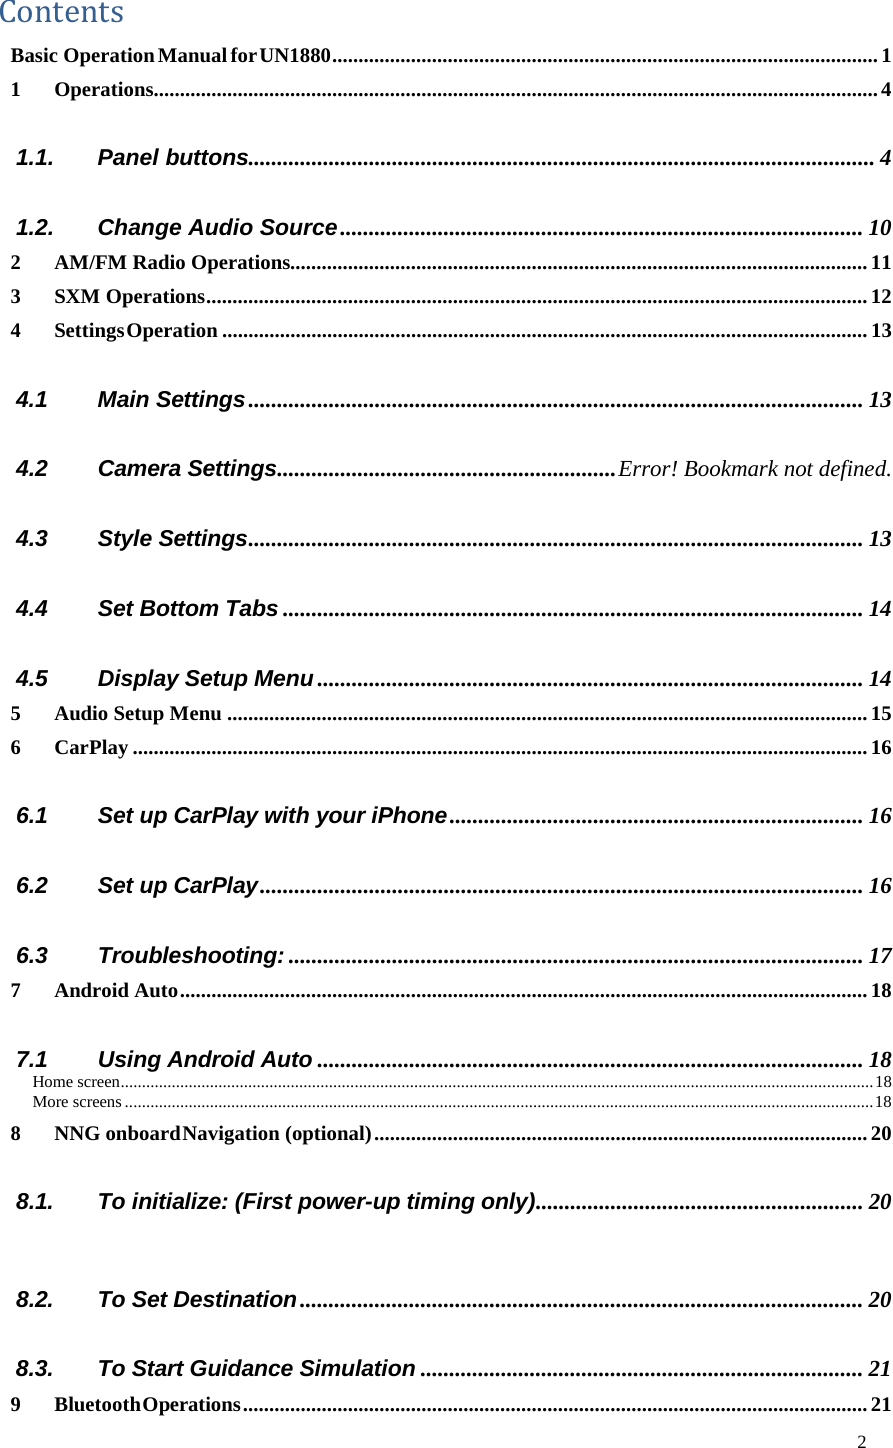
![21 8.3. To Start Guidance Simulation 1. Touch Navigation MENU “ ” icon. 2. Touch “Route Summary” button. 3. Touch “ ” icon. 4. Select “Simulation”. 9 Bluetooth Operations 9.1. Bluetooth Paring 1. Turn on the power of the cellular phone you wish to register. 2. Touch the [ ] key to display the Device Select screen. 3. Touch the [Add] key to display the Inquiring Device screen.](https://usermanual.wiki/AAMP-of-Florida-AAMP-Global/UN1880/User-Guide-3960002-Page-16.png)
![22 9.2. Bluetooth Setting 1. Touch the [ ] key to display the Devices information on the screen. 2. Touch the [Setup] key to display the Setup information on the screen. 9.3. Telephone operations 1. Touch the [ ] key to display the Ten-Key pad screen. 2. Enter the telephone number by using the Ten-Key pad displayed on the screen. 3. Touch the [ ] (Send) key to call the number. 4. When the call is finished, touch the [ ] (End) key to hang up.](https://usermanual.wiki/AAMP-of-Florida-AAMP-Global/UN1880/User-Guide-3960002-Page-17.png)
![23 9.4. Bluetooth Audio Player Operations 1. Confirm that Bluetooth device is connected. 2. Press “HOME” button and choose “BT Music” source. 3. Bluetooth Audio mode screen will be displayed. Pausing playback • Touch the [ ] key during playback. Playback pauses. • To resume playback, touch the [ ] key. Playback resumes. Skipping a track • Press the [ ] or [ ] button during playback, Tracks are skipped. 10 Camera Operations Switching to Camera mode • Touch the [Camera] key on Main Menu to select desired mode. • The LCD will display the external camera video. The screen will display "No Video Signal" menu, if a valid camera is not connect to this head unit. • Press Menu button on Operational Panel to return to the Main Menu. *Note: If the reverse cable is connected correctly to the car, the head unit will go to camera mode automatically when the car is in reverse.](https://usermanual.wiki/AAMP-of-Florida-AAMP-Global/UN1880/User-Guide-3960002-Page-18.png)
![24 11 HDMI Operations External peripheral devices, including android or iPhone etc. can be connected to the unit through HDMI Line. Then you can see the phone screen on the HDMI app, you can watch movie which in your phone on unit. 12 AV IN External peripheral devices, including a game console, camcorder, navigation unit, iPod/iPhone, etc. can be connected to the AUX 1 connector on the back of this unit using the A/V media cables. 1. Touch [ ] button on Main Menu to select desired mode (when unit is reading). 2. Touch [ ] or [] button in other source to select desired mode.](https://usermanual.wiki/AAMP-of-Florida-AAMP-Global/UN1880/User-Guide-3960002-Page-20.png)