AAMP of Florida AAMP Global UN1880 NAVIGATION MULTIMEDIA RECEIVER User Manual
AAMP of Florida, Inc. dba AAMP Global NAVIGATION MULTIMEDIA RECEIVER
User Manual
1
Basic Operation Manual for UN1880
All Rights Reserved. Copyright AAMP of America
3
9.1. Bluetooth Paring ..................................................................................................... 21
9.2. Bluetooth Setting .................................................................................................... 22
9.3. Telephone operations ............................................................................................ 22
9.4. Bluetooth Audio Player Operations ................................................................... 23
Pausing playback ...................................................................................................................... 23
Playback pauses. ....................................................................................................................... 23
Skipping a track ........................................................................................................................ 23
10
Camera Operations ......................................................................................................................... 23
Switching to Camera mode ....................................................................................................... 23
11
HDMI Operations ............................................................................................................................ 24
12
AV IN ............................................................................................................................................... 24
67891011
17
16
15
14
13
12
2
4
3
5
1
1
2
3
4
5
6
7
8
9
.
.
.
.
.
.
.
.
.
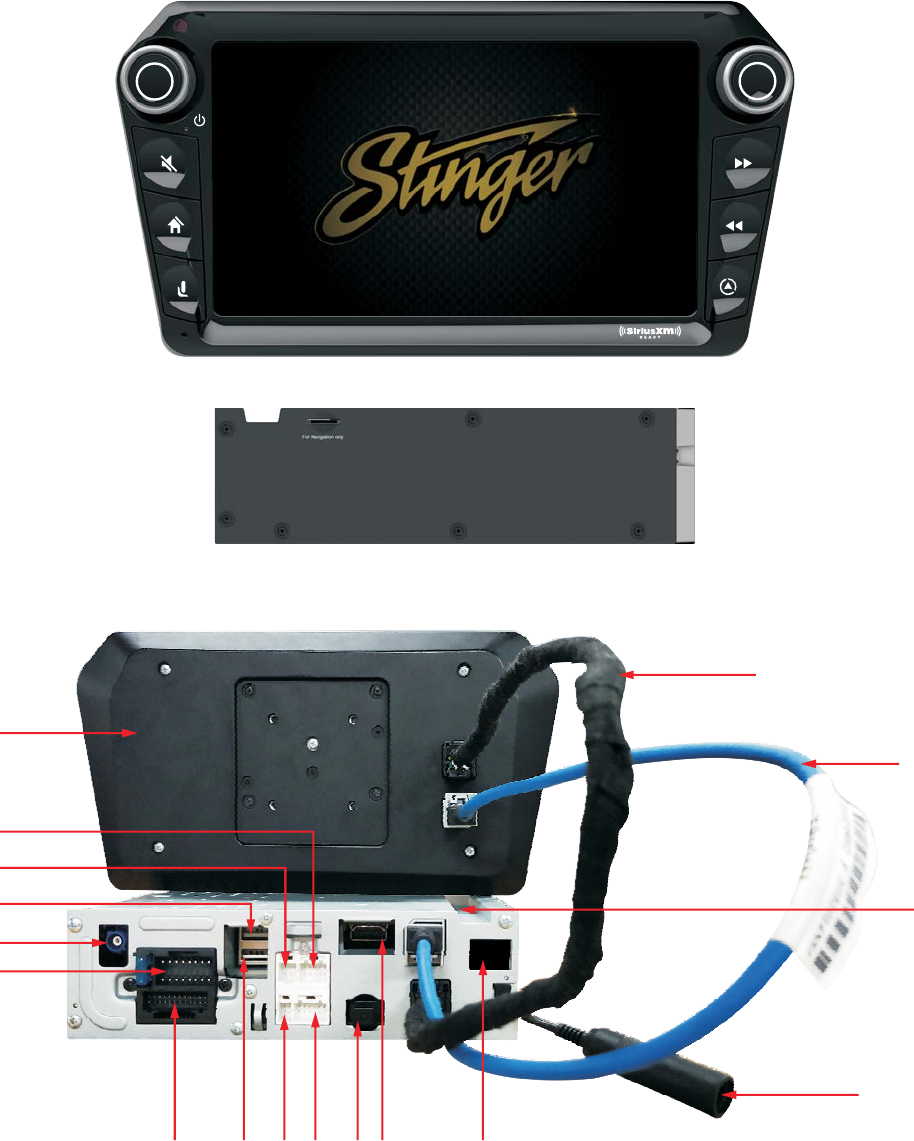
8pin cable connect to panel
LVDS cable connect to panel
Car multimedia navigation hosts
FM/AM antenna interface
No function
HDMI signal input
Toslink output
12pin cable connect to Sirius XM
4pin cable connect to microphone
10
11.
12
13
14
15
16
17
.
.
.
.
.
.
.
USB2.0_HOST (only USB host)
24pin cable for AV in and out
16pin cable for power and speaker
GPS antenna interface
USB_OTG (carplay&Android auto&iPod&iPhone)
6pin cable connect to the steering wheel control buttons
10pin cable connect to camera
Panel (LCD)
4
1
Operations
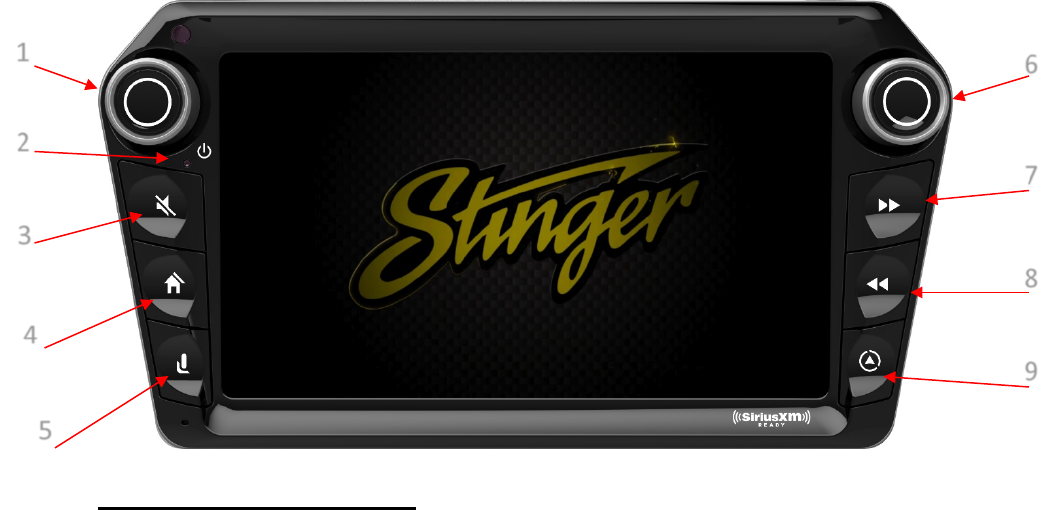
1.1. Panel buttons
Functions of Buttons
1. [PWR] [VOL] Knob
• Press this knob to turn the unit on.
• Long press this knob to turn the unit off.
• Rotate the knob to increase or decrease the volume.
• Press this knob in radio mode, Rotate the knob within 3 seconds to tune forward or tune backward.
2. [RESET] Button
• Press [RESET] button to reset the unit.
3. [MUTE] Button
4. [HOME] Button
• Press this button to go to the main menu.
• Press this button to go back to the last source.
5. [MIC] Button
• Press this button to use CarPlay Siri/Android Auto Google Assistant.
6. [Tuning Knob] Button
• Turn to increment frequencies up (clockwise) or down (counter clockwise)
7. [] Tune +/ Skip Forward
8. [] Tune -/ Skip Back
9. [NAV] Button
• Press this button to enter NAV.
• Press this button to go back to the last page.
1
2
3
4
5
9
7
8
6
10
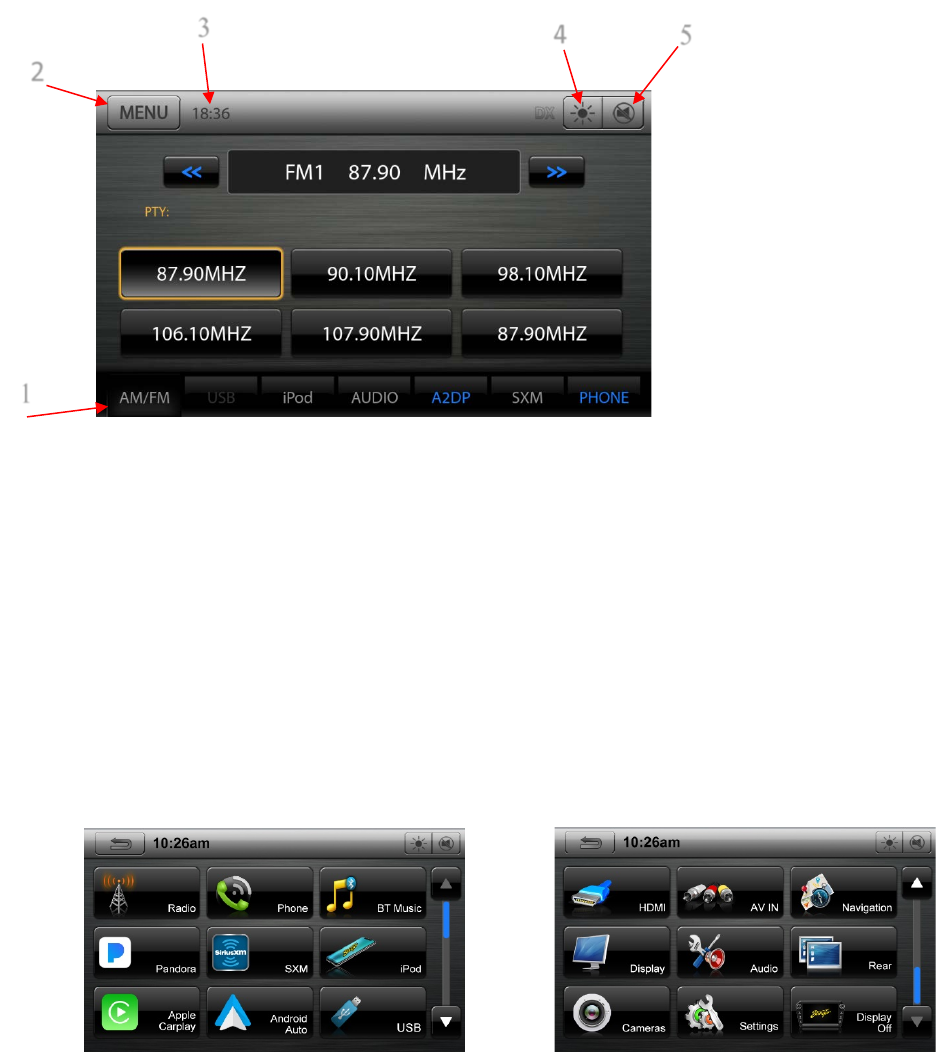
1. Select the tab and enter the available source or option
2. Press to enter Menu or back to the current source.
3. Show the current time
4. Monitor-OFF / Monitor-ON
5. Press to mute OFF/ON
1.2. Change Source and options
• Source Menu:
1. Press “Home” button. Main menu will be displayed.
Available tabs:
1. Radio – AM/FM 10. HDMI – Selects HDMI rear input
2. Phone – Enter for setup 11. AV IN – Selects AV rear input
3. BT Music – For Audio streaming (A2DP) 12. Navigation – If installed
4. Pandora – 13. Display – Enter for display setup
5. SXM – SirusXM tuner required 14. Audio – Audio adjustments
6. Ipod – Play iPod music 15. Rear – Output from AV or USB
7. Apple Carplay – 16. Cameras – Access camera inputs
8. Android Auto – 17. Settings – Access setup options
9. USB – For playing music and video 18. Display OFF – Turns off screen
2
1
3
4
5
11
2
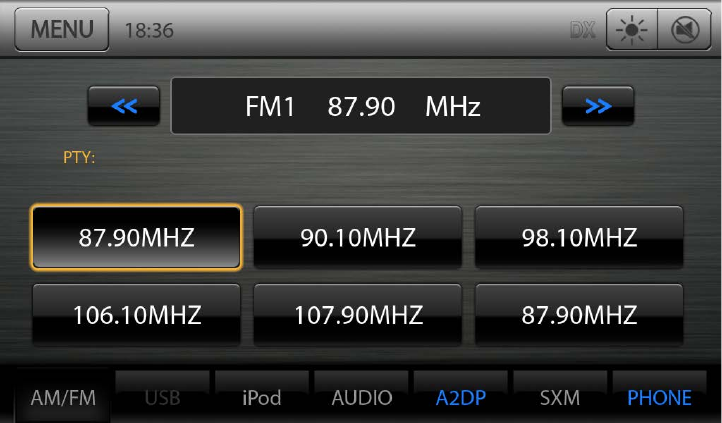
AM/FM Radio Operations
1. Frequency display, touch to automatically seek next station in the direction of higher
frequencies
2. Station name
3. Loc/DX. It is used to set the station is local or dx.
4. Mute button
5. Tune backward
6. Tune forward
7. Title, PTY, Artist, Text display area. The strings will roll from left to right to display all the
characters.
8. Preset station list
9. Mode switch buttons bar
10. AM/FM button
11. Touch this area to switch to Main page
12. Title, PTY, Artist, Text display area
Using the tuner unit:
1. Touch the AM/FM button on the mode switch buttons bar, if the unit does not work
in tuner mode. The tuner mode screen is displayed.
2. Touch the AM/FM button to select the radio band, when the unit already works in tuner
mode. Each time the button is pressed, the radio reception band changes in the following
order: FM1 FM2 FM3 AM FM1 FM2 FM3 AM…
3. Hold one preset station more than 3 seconds to save current station to the preset
station list.
12
3
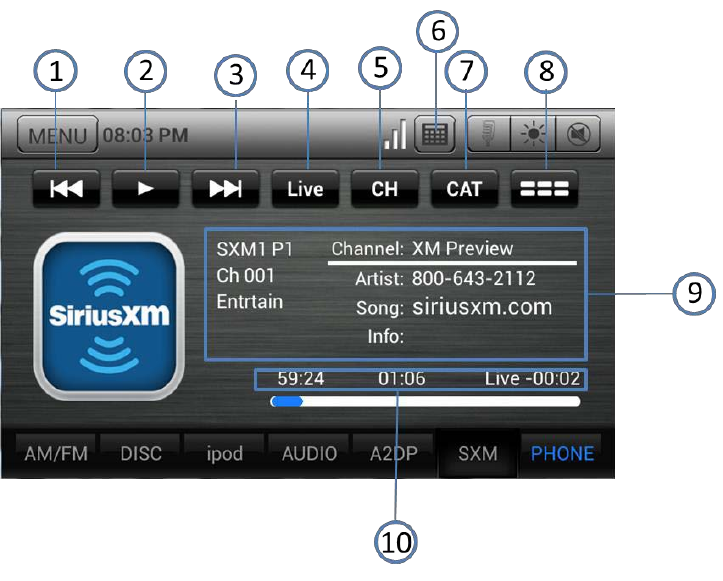
SXM Operations
This function is available when a Satellite Radio Receiver is connected through the dedicated
connection.
Note: Satellite radio is a subscription service.
Press the [SXM] button on Main Menu display. The SXM mode will be displayed.
1. Channel up button.
2. Play/Pause button.
3. Channel down button
4. Show the channel is live.
5. Choose channel list.
6. Keypad Button.
7. Channel category type.
8. Channel list.
9. Current Channel Number / Category Name / Preset Number,etc.
10. Channel time
13
4
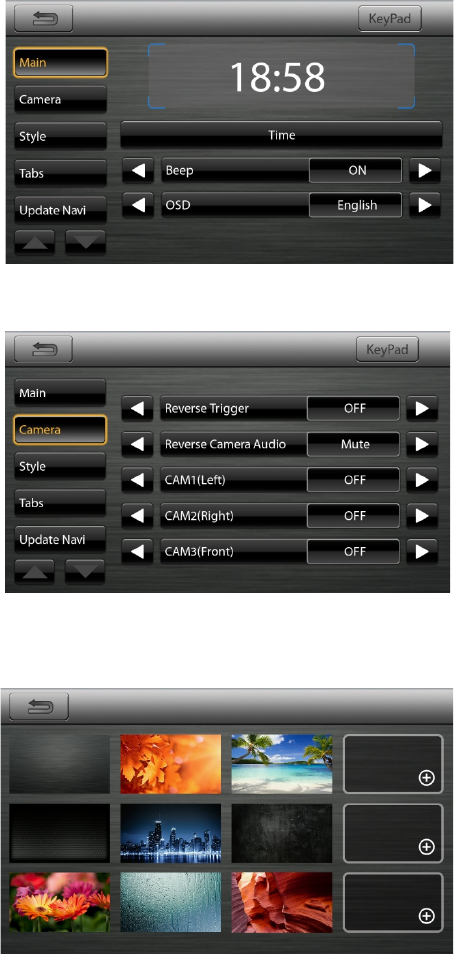
Settings Operation
4.1 Main Settings
Press [Settings] button on the Main menu screen. The Setting menu screen will be displayed.
Contains Main, Camera, Style, Tabs.
4.2 Camera Settings
4.3 Style Settings
14
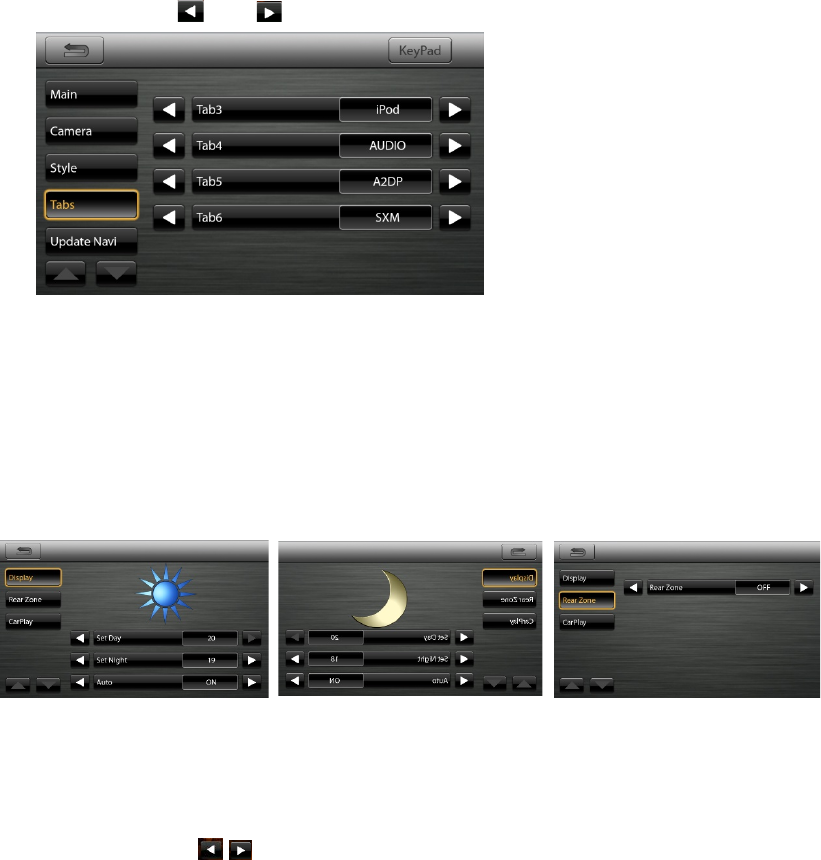
4.4 Set Bottom Tabs
1. Seven tabs on the bottom on the screens are shortcuts.
Among them the third to the sixth users can customize.
User can press [ ] or [ ] button to set different tabs.
2. While user sets tabs, the shortcut will be shown the same
on each source.
4.5 Display Setup Menu
TV Shape: Set TV Shape Normal or Cinema.
Set Day: Set Day value from 0 to 20.
Set Nigh: Set Nigh value from 0 to 20.
Auto: Choose ON or OFF.
Rear Zone: Touch the [
/
] key to select the Rear Zone source.
15
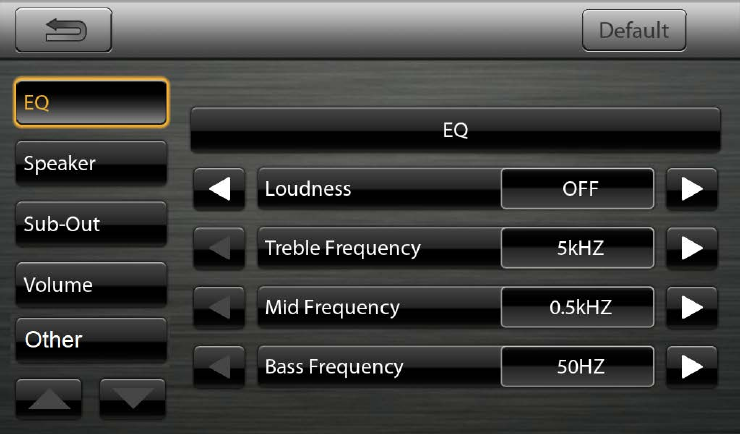
5
Audio Setup Menu
This menu contains: EQ, Speaker, Sub-Out, Volume, Other
EQ: 15 Band adjustable with 3 user presets per audio source
Speaker: Set the balance and fader
Sub-Out: Set the sound level and crossover
Volume: Set the volume start volumes
Other: Set Toslink ON or OFF, Set Mic Location, Source Gain, Gain

16
6
CarPlay
6.1 Set up CarPlay with your iPhone
You can use CarPlay to get directions, make calls, send and receive messages, and more.
You need an iPhone 5 or later to use CarPlay. Also, make sure that you're in an area that supports
CarPlay and that Siri is on. To turn on Siri, go to Settings > Siri & Search.
6.2 Set up CarPlay
1. Make sure that your car or stereo supports CarPlay.
2. Plug your iPhone into the CarPlay USB port. The USB port might be labeled with a CarPlay icon
or a smartphone icon. If the CarPlay Home screen doesn’t appear, select the CarPlay logo on your
car’s display.
• If your car supports CarPlay over a wired solution, plug your iPhone into the USB port of
your car. The USB port might be labeled with a CarPlay icon or a smartphone icon.
• If your car supports wireless CarPlay, press and hold the Voice Control button on your
steering wheel to set up CarPlay. Or make sure that your car is in wireless or Bluetooth
pairing mode. Then on your iPhone, go to Settings > General > CarPlay > Available Cars and
select your car. See your car's manual for more information.
3. Make sure that your car is running.
4. Ask Siri for what you need. You can do this in a few ways:
• If your car has one, press and hold the Voice Control button on your steering wheel. Then ask
what you need.
• If you have a touch screen, touch and hold the Home button in CarPlay until Siri appears on
your stereo display. Then ask what you need.
17
6.3 Troubleshooting:
If CarPlay doesn't work like you expect, here’s what you can check. After each step, try using
CarPlay again.
1. Make sure that Siri is turned on.
2. Restart your iPhone and your car. Depending on your car, you might see the CarPlay Home
screen when you turn it on. If you don't, look for the CarPlay logo on your car’s display.
3. If possible, connect your iPhone to a different USB port in your car.
4. Try a different Lightning to USB cable. Make sure that the cable is certified.
5. Update to the latest version of iOS.
6. You might need to install firmware updates for your stereo.
18
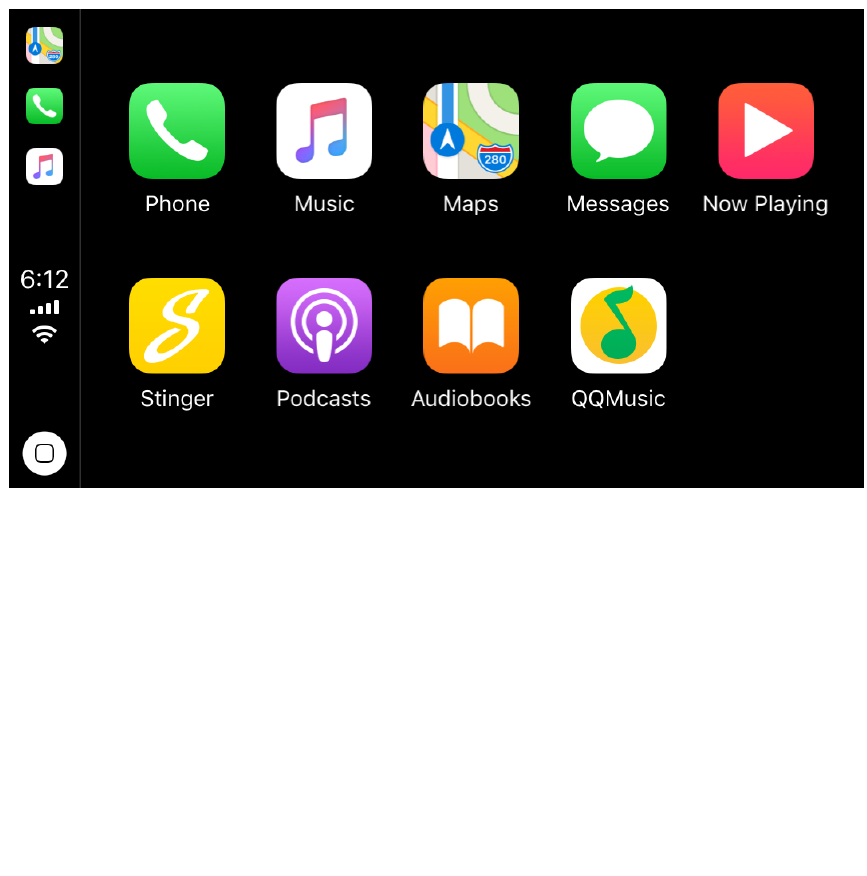
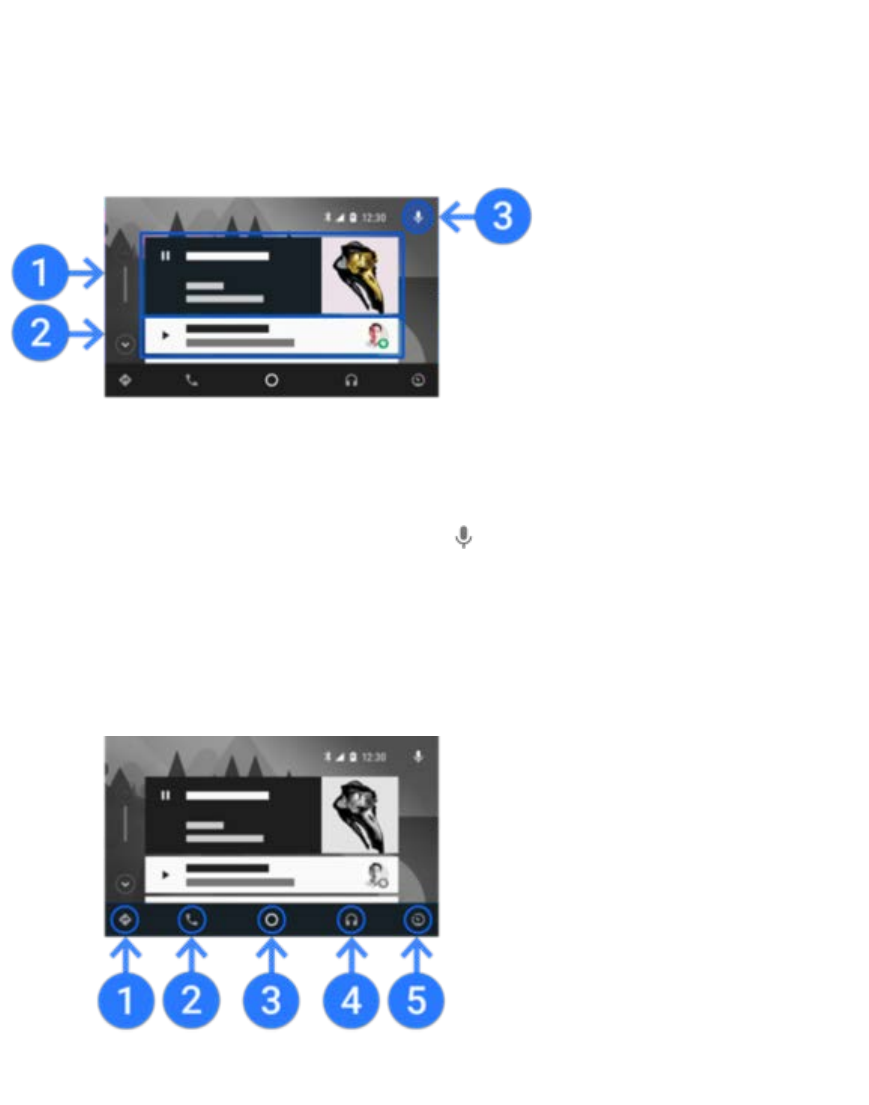
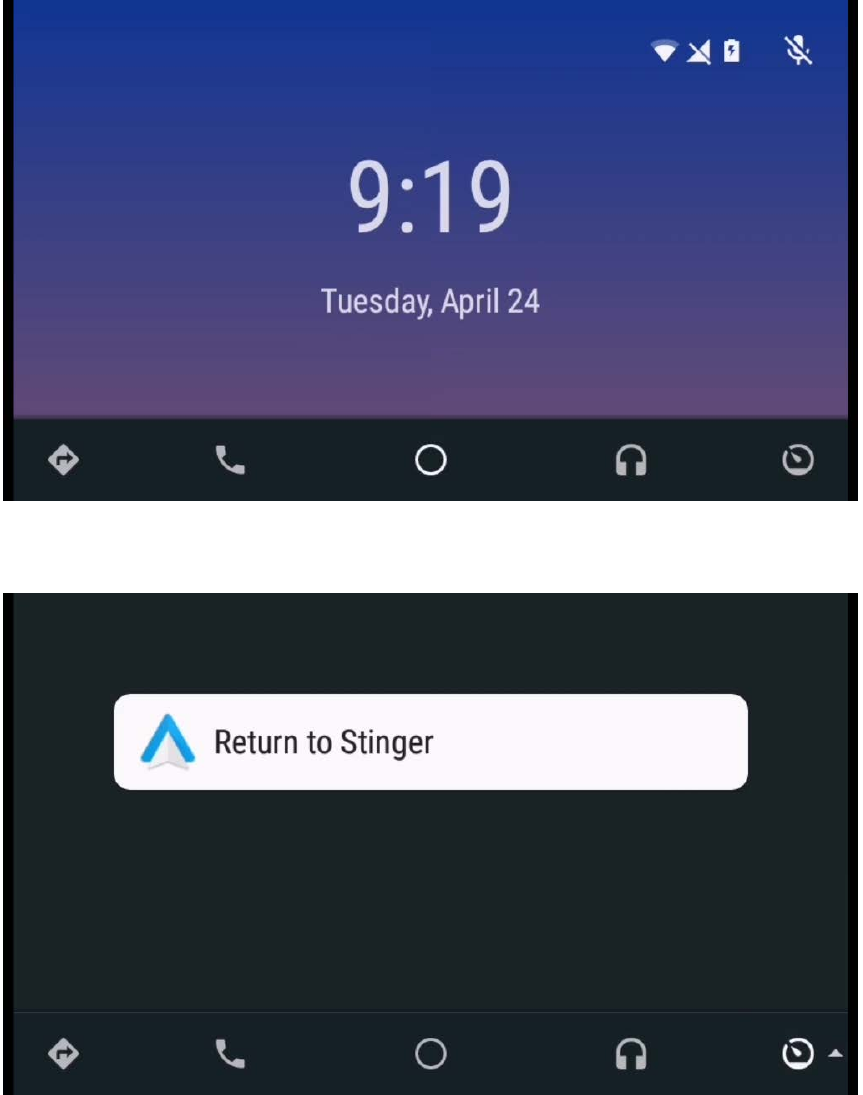
7
Android Auto
7.1 Using Android Auto
Home screen
The first screen you'll see when you start Android Auto is your Home Screen. You'll find
personalized information here, like time to your destination, reminders, recent calls incoming
messages, the song you're listening to, and Google Now cards.
Here's what your Home Screen looks like and information about each section:
1. Current media selection.
2. Reminders, messages, calls, and other alerts.
3. Microphone.
You can say "OK Google" or select the microphone to talk to Google. Your car might also have a
physical voice command button on the steering wheel that you can press and hold to talk to Google.
Check your user guide or consult your car's manufacturer for more information.
More screens
You'll find the rest of your apps and features on these screens:
1. Maps and navigation. 2. Calls and contacts. 3. Home Screen. 4. Music and audio. 5. Exit
19
20
8
NNG onboard Navigation (optional)
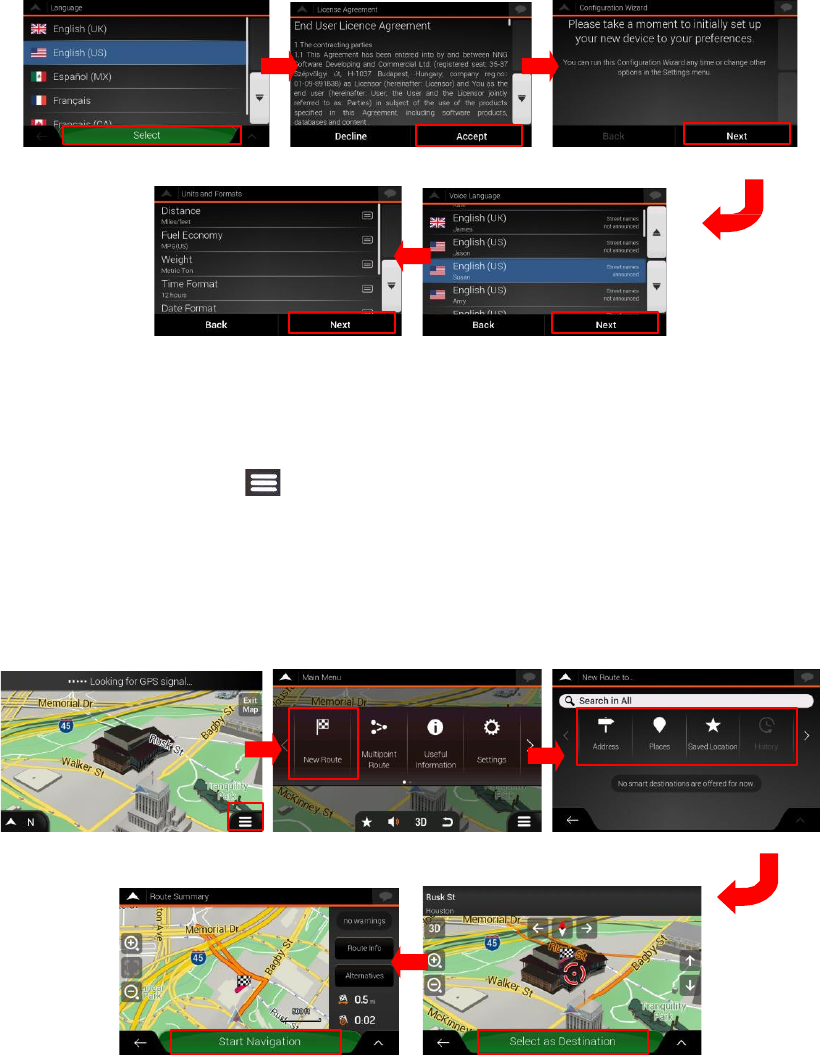
8.1. To initialize: (First power-up timing only)
Basically, just touch “Next” button. If you want, you can customize settings.
8.2. To Set Destination
1. Touch Navigation MENU “ ” icon.
2. Touch “New Route” button.
3. There are several ways to select your destination. Choose one of them.
4. Touch the “Select as Destination”.
5. Touch the “Start Navigation”.
21
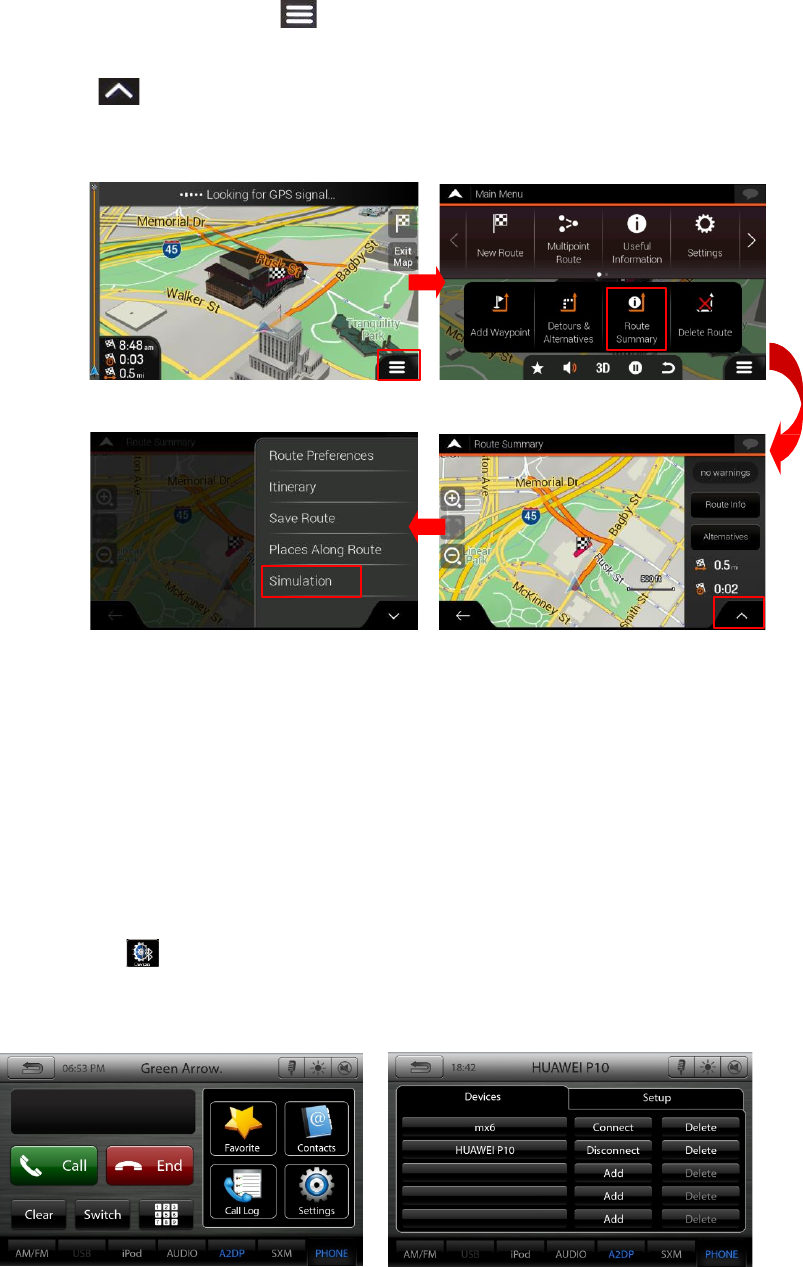
8.3. To Start Guidance Simulation
1. Touch Navigation MENU “ ” icon.
2. Touch “Route Summary” button.
3. Touch “ ” icon.
4. Select “Simulation”.
9
Bluetooth Operations
9.1. Bluetooth Paring
1. Turn on the power of the cellular phone you wish to register.
2. Touch the [ ] key to display the Device Select screen.
3. Touch the [Add] key to display the Inquiring Device screen.
22
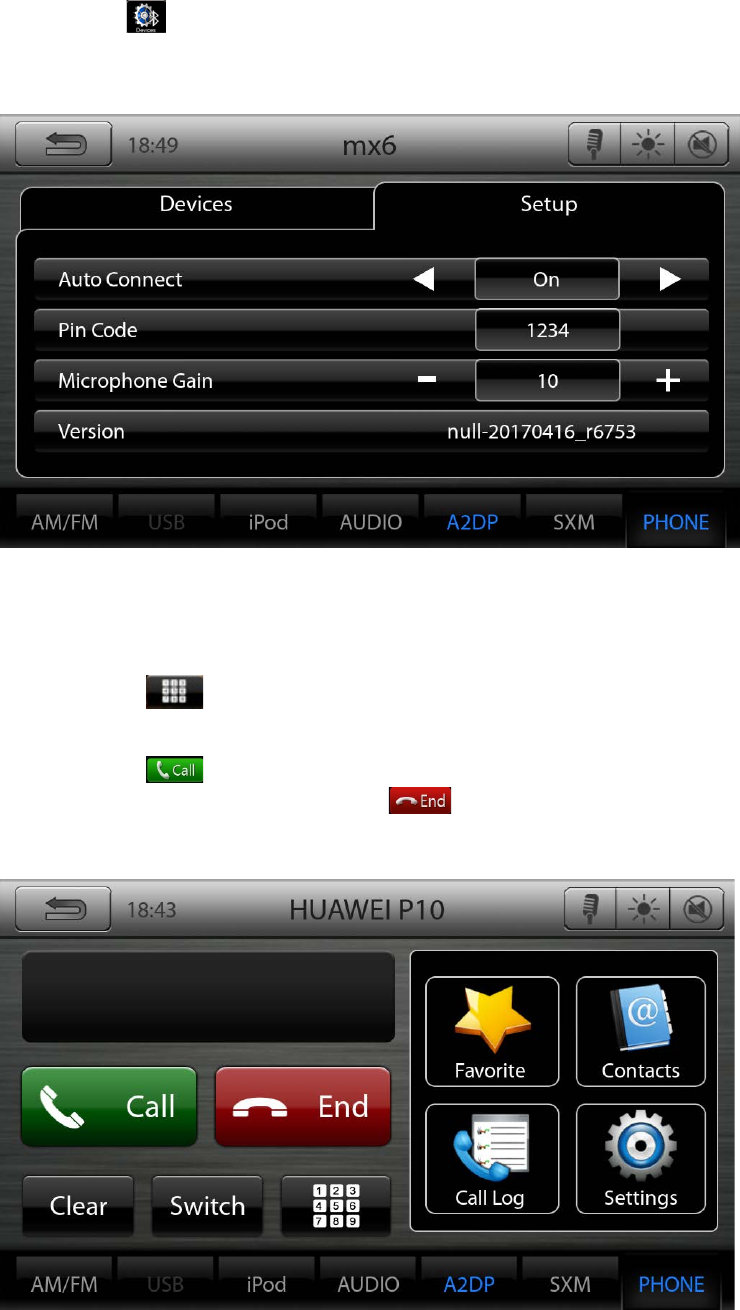
9.2. Bluetooth Setting
1. Touch the [ ] key to display the Devices information on the screen.
2. Touch the [Setup] key to display the Setup information on the screen.
9.3. Telephone operations
1. Touch the [ ] key to display the Ten-Key pad screen.
2. Enter the telephone number by using the Ten-Key pad displayed on the screen.
3. Touch the [ ] (Send) key to call the number.
4. When the call is finished, touch the [ ] (End) key to hang up.
23
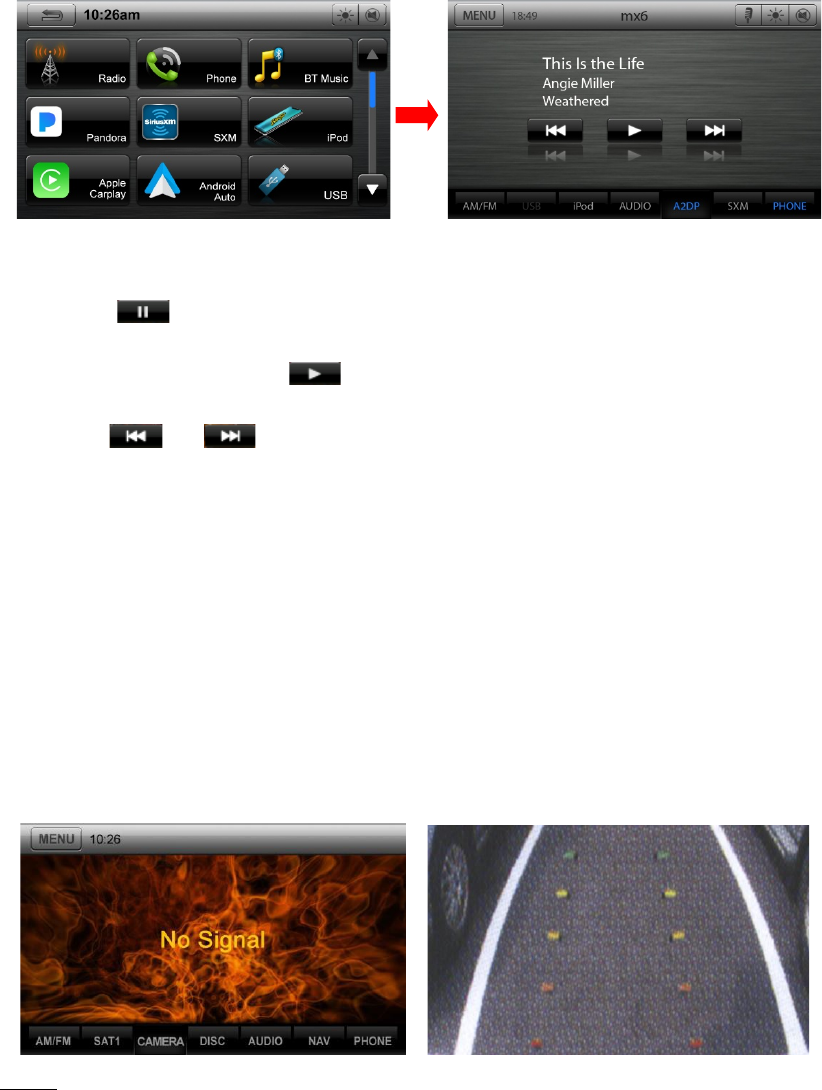
9.4. Bluetooth Audio Player Operations
1. Confirm that Bluetooth device is connected.
2. Press “HOME” button and choose “BT Music” source.
3. Bluetooth Audio mode screen will be displayed.
Pausing playback
• Touch the [ ] key during playback.
Playback pauses.
• To resume playback, touch the [ ] key. Playback resumes.
Skipping a track
• Press the [ ] or [ ] button during playback, Tracks are skipped.
10
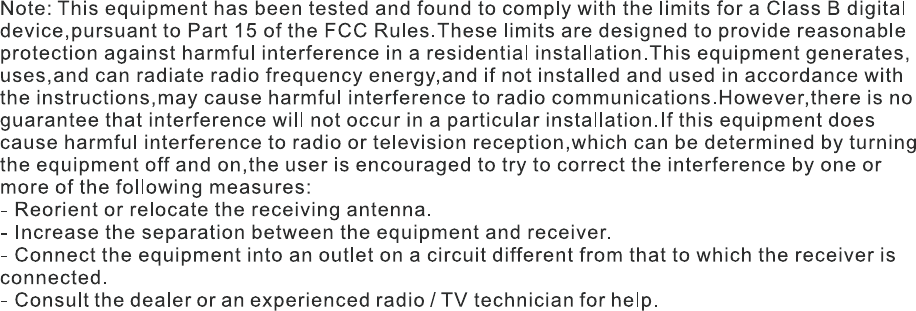
Camera Operations
Switching to Camera mode
• Touch the [Camera] key on Main Menu to select desired mode.
• The LCD will display the external camera video. The screen will display "No Video Signal"
menu, if a valid camera is not connect to this head unit.
• Press Menu button on Operational Panel to return to the Main Menu.
*Note:
If the reverse cable is connected correctly to the car, the head unit will go to camera mode
automatically when the car is in reverse.
2
Contents
Basic Operation Manual for UN1880 ........................................................................................................ 1
1
Operations.......................................................................................................................................... 4
1.1. Panel buttons............................................................................................................. 4
1.2. Change Audio Source ........................................................................................... 10
2
AM/FM Radio Operations.............................................................................................................. 11
3
SXM Operations .............................................................................................................................. 12
4
Settings Operation ........................................................................................................................... 13
4.1 Main Settings ........................................................................................................... 13
4.2 Camera Settings ........................................................... Error! Bookmark not defined.
4.3 Style Settings ........................................................................................................... 13
4.4 Set Bottom Tabs ..................................................................................................... 14
4.5 Display Setup Menu ............................................................................................... 14
5
Audio Setup Menu .......................................................................................................................... 15
6
CarPlay ............................................................................................................................................ 16
6.1 Set up CarPlay with your iPhone ........................................................................ 16
6.2 Set up CarPlay ......................................................................................................... 16
6.3 Troubleshooting: .................................................................................................... 17
7
Android Auto ................................................................................................................................... 18
7.1 Using Android Auto ............................................................................................... 18
Home screen ................................................................................................................................................................................. 18
More screens ................................................................................................................................................................................ 18
8
NNG onboard Navigation (optional) .............................................................................................. 20
8.1. To initialize: (First power-up timing only) ......................................................... 20
8.2. To Set Destination .................................................................................................. 20
8.3. To Start Guidance Simulation ............................................................................. 21
9
Bluetooth Operations ....................................................................................................................... 21
24
11
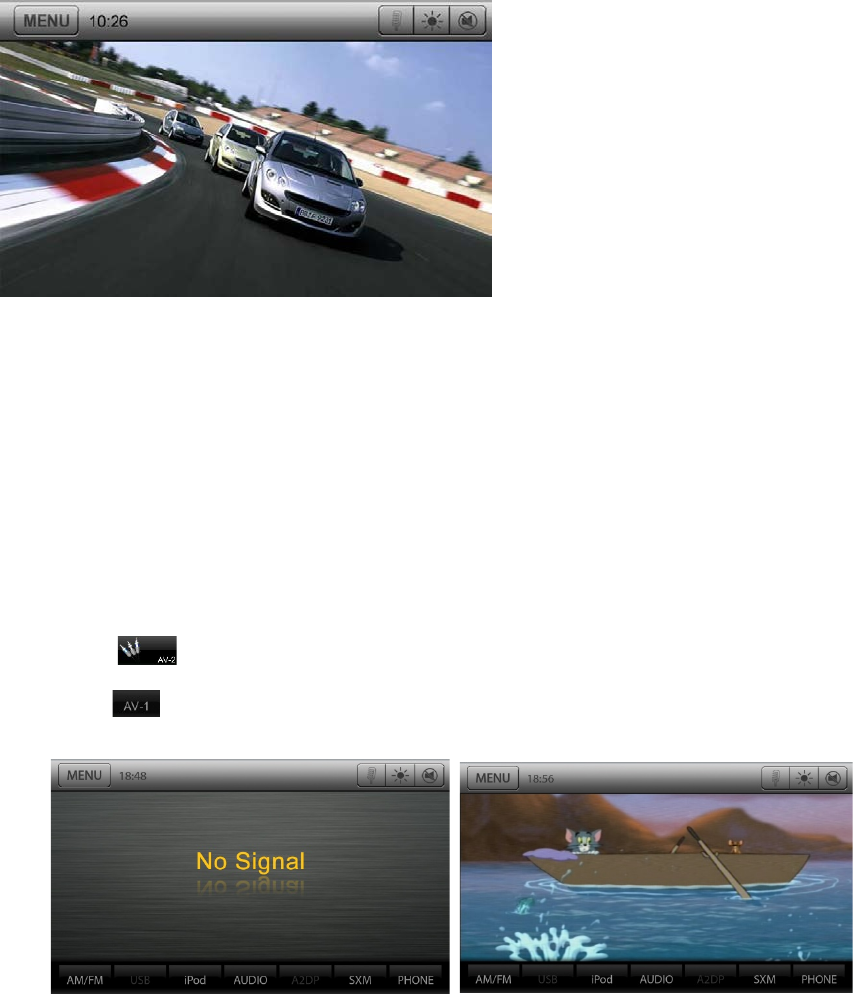
HDMI Operations
External peripheral devices, including android or iPhone etc. can be connected to the unit
through HDMI Line. Then you can see the phone screen on the HDMI app, you can watch movie
which in your phone on unit.
12
AV IN
External peripheral devices, including a game console, camcorder, navigation unit,
iPod/iPhone, etc. can be connected to the AUX 1 connector on the back of this unit using the A/V
media cables.
1. Touch [ ] button on Main Menu to select desired mode (when unit is reading).
2. Touch [ ] or [] button in other source to select desired mode.
Changes or modifications not expressly approved by the party responsible for compliance
could void the user’s authority to operate the equipment. This device complies with Part 15
of the FCC Rules. Operation is subject to the following two conditions:
(1) this device may not cause harmful interference, and
(2) this device must accept any interference received, including interference that may cause
undesired operation.
This equipment complies with FCC radiation exposure limits set forth for an uncontrolled
environment. This equipment should be installed and operated with a minimum distance of
20cm between the radiator & your body. This transmitter must not be co-located or operating
in conjunction with any other antenna or transmitter.