AAPICO ELECTRONICS A1LITE Dash Cam User Manual
AAPICO ELECTRONICS CO., LTD Dash Cam
UserManual.wiki
>
AAPICO ELECTRONICS
>
A1LITE User Manual
User manual
Navigation menu
Upload a User Manual
Namespaces
Wiki Guide
HTML
PDF
Info
Views
User Manual
Discussion / Help
Navigation

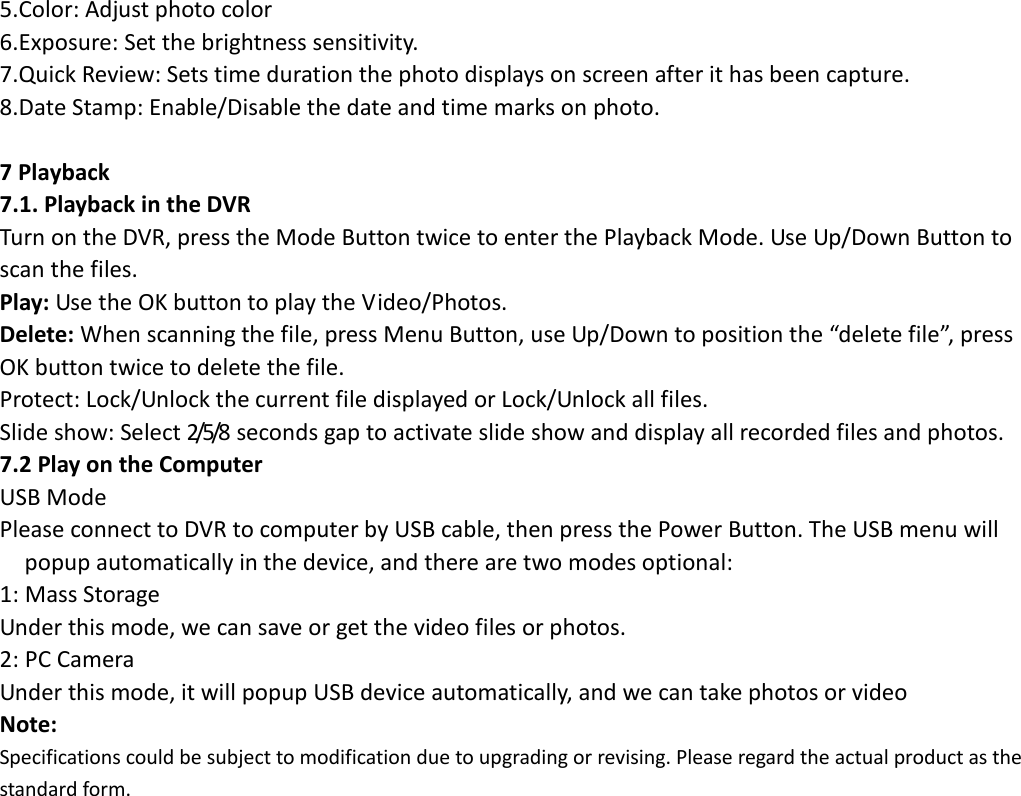
![1. LED Indicator 2. Power ON/OFF 3. Menu 4. MODE 5. UP/ File Lock 6. OK 7. Down/Audio Switch 8. Mount Sliding Slot 9. Lens 10. Speaker 11. HD Output 12. USB/Charging Port 13. Micro SD Card Slot 14. Reset 15. Microphone 1 Insert Memory card Insert a Micro SD card into the recorder to store video, static images or other folders, use a high-speed Micro SD card. (Class 6 and above) 2 Battery charging and USB connection 1. You can use our company specified charger for charging machine. 2. When DVR is connected to the computer, select 'Mass Storage', the DVR on "my computer" or "Windows Explorer" display "DASH CAM" as your disk. 3 Turn on DVR 1.Press on the power Button to turn on the DVR. 2. Please connect the DVR to car charger, it will turn on automatically. 4 Mode Switch There are three operating modes: Recording Mode, Photograph Mode and Playback Mode. When powered on, the DVR operate Recording Mode automatically. Press "mode key" to enter the Photograph Mode, press again to enter the Playback Mode, then press to back to Recording Mode. 5 Recording Mode 5.1 Menu Mode 1. Power on the DVR, Press the Menu Button to enter the menu mode, find the option "Resolution" by using UP/Down Button, then select 1080P or 720P and press OK button to confirm. 2. Press "MENU" to find the [Loop recording], Press "OK" to confirm, Press UP and DOWN to select the recorded video cycle time, Press "OK" to confirm. 3. Find the WDR option, Press OK button to confirm, press UP/Down to choose to turn on/off 4. Find Exposure compensation option: according to the light to adjust exposure compensation. 5. Motion Detection: the DVR records automatically when something moving in front of the DVR; Stop recording automatically when no Moving.](https://usermanual.wiki/AAPICO-ELECTRONICS/A1LITE/User-Guide-4051987-Page-3.png)
![6. Record AUDIO: When this function is on, the recorded video is recorded synchronously, and when this function is turned off, it is muted. 7. Date Stamp: When this function is enabled, the recorded video will display the date and time when the video was recorded, and the date and time will not be displayed when the watermark function is off. 8. Gravity sensing: G-sensor will detect significant or sudden shock and movement then automatically lock current recording from loop recording, Off/Low sensitivity/Medium sensitivity/High sensitivity available. 5.2 Settings Press "MENU" twice to enter the [SETUP] menu, which is set for all system items of the machine. Press "up key" and "down key" to select the setting item, press "OK" key to enter the setting menu, then press "up key" and "down key" to select the setting parameter, press OK key to save and save the setting, Press "MENU" to exit the setting. (1) Wi-Fi: Long press the Up key. The screen will appear the Wi-Fi icon, and the name and password of Wi-Fi also will appear. Then the Wi-Fi of the name will be found on the cell phone and linked with the mobile phone. (2) Date/Time: Before recording or taking pictures using the machine, correct the system time so that the date and time can be accurately recorded on your video or photos. Press the MENU key 3 times to exit the menu and return to the recording mode. (3) Beep sound: Turns on the function, when the operation machine sends out the warning sound, closes this function to be silent. (4) Language settings: Simplified Chinese, Traditional Chinese and English and other multi-language interface, according to the use of different languages to choose. (5) Light source frequency: You can choose a different frequency, the default value is 50Hz. (6) Screen Saver: the machine in the absence of operating conditions will be based on your choice of time to screen saver, the election does not enter the screen saver off. (7) Format: The formatting function will erase all the files in the memory card. Please use it carefully. Make sure you have backed up important Folders before formatting. Otherwise, do not operate this function casually. (8) Default: Restore the initial settings of the system, the parameters set by the customer will be restored to the default value. (9) Version: Record the software version of the machine for easy reference. 5.3 Record a Video 1.Turn on the DVR, under the Recording mode, press OK button to record a video. When recording, press the “DOWN” button to turn on/off VIDEO AUDIO. 2. When the DVR is off, connect it with the car charger, DVR starts to record video automatically. Note: Please insert a TF card before recording. For the first use of the card, format is necessary. 6 Photo Mode 6.1 Photo Mode Menu 1.Resolution: Set the photo resolution, 3MP/2MP/1.3MP/VGA available. 2.Quality: Defines the quality of image you capture, Fine/Normal/Economy available. 3.Sharpness: Defines the clarity of details in the photos. 4.White balance: Establishes the conditions to capture an image based on the option given.](https://usermanual.wiki/AAPICO-ELECTRONICS/A1LITE/User-Guide-4051987-Page-4.png)