AAPICO ELECTRONICS A1LITE Dash Cam User Manual
AAPICO ELECTRONICS CO., LTD Dash Cam
User manual
Dash Cam
A1 Lite
User manual
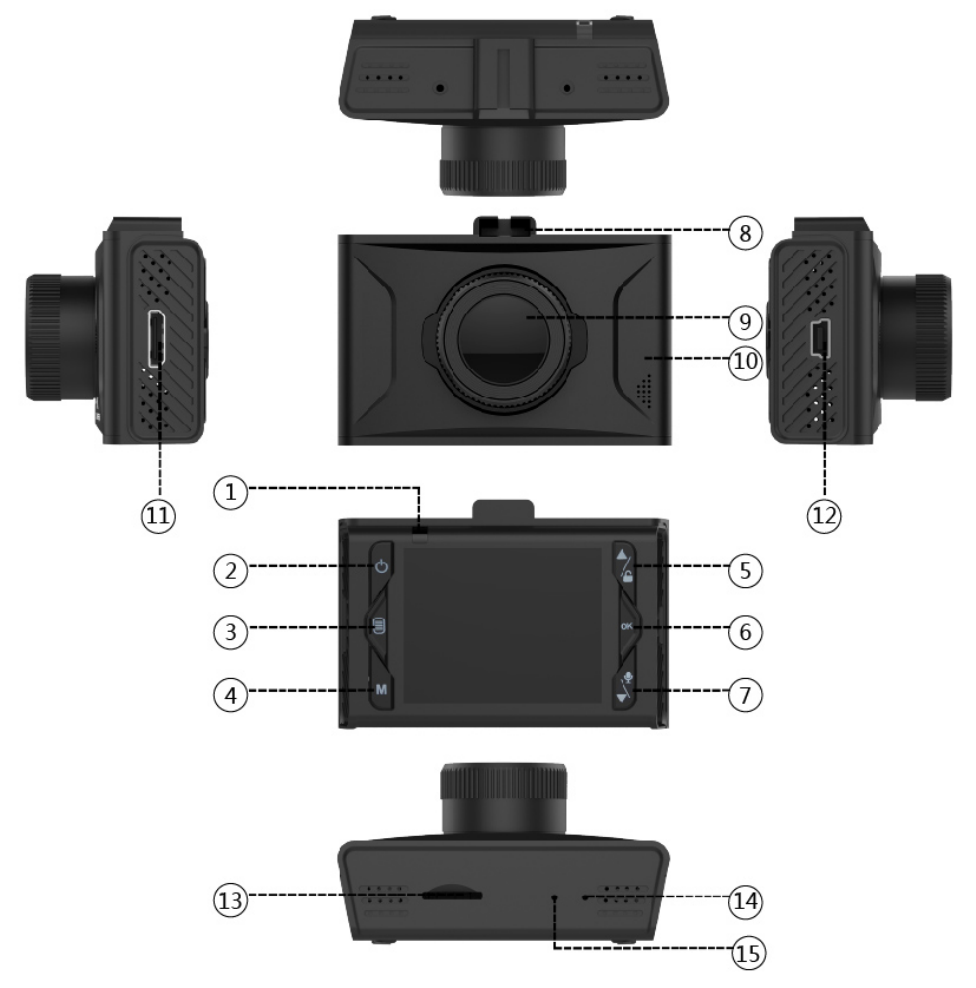
Product Structure
1. LED Indicator
2. Power ON/OFF
3. Menu
4. MODE
5. UP/ File Lock
6. OK
7. Down/Audio Switch
8. Mount Sliding Slot
9. Lens
10. Speaker
11. HD Output
12. USB/Charging Port
13. Micro SD Card Slot
14. Reset
15. Microphone
1 Insert Memory card
Insert a Micro SD card into the recorder to store video, static images or other folders, use a
high-speed Micro SD card. (Class 6 and above)
2 Battery charging and USB connection
1. You can use our company specified charger for charging machine.
2. When DVR is connected to the computer, select 'Mass Storage', the DVR on "my computer" or
"Windows Explorer" display "DASH CAM" as your disk.
3 Turn on DVR
1.Press on the power Button to turn on the DVR.
2. Please connect the DVR to car charger, it will turn on automatically.
4 Mode Switch
There are three operating modes: Recording Mode, Photograph Mode and Playback Mode. When
powered on, the DVR operate Recording Mode automatically. Press "mode key" to enter the
Photograph Mode, press again to enter the Playback Mode, then press to back to Recording Mode.
5 Recording Mode
5.1 Menu Mode
1. Power on the DVR, Press the Menu Button to enter the menu mode, find the option "Resolution"
by using UP/Down Button, then select 1080P or 720P and press OK button to confirm.
2. Press "MENU" to find the [Loop recording], Press "OK" to confirm, Press UP and DOWN to select
the recorded video cycle time, Press "OK" to confirm.
3. Find the WDR option, Press OK button to confirm, press UP/Down to choose to turn on/off
4. Find Exposure compensation option: according to the light to adjust exposure compensation.
5. Motion Detection: the DVR records automatically when something moving in front of the DVR;
Stop recording automatically when no Moving.
6. Record AUDIO: When this function is on, the recorded video is recorded synchronously, and when
this function is turned off, it is muted.
7. Date Stamp: When this function is enabled, the recorded video will display the date and time when
the video was recorded, and the date and time will not be displayed when the watermark function is
off.
8. Gravity sensing: G-sensor will detect significant or sudden shock and movement then automatically
lock current recording from loop recording, Off/Low sensitivity/Medium sensitivity/High sensitivity
available.
5.2 Settings
Press "MENU" twice to enter the [SETUP] menu, which is set for all system items of the machine.
Press "up key" and "down key" to select the setting item, press "OK" key to enter the setting menu,
then press "up key" and "down key" to select the setting parameter, press OK key to save and save
the setting, Press "MENU" to exit the setting.
(1) Wi-Fi: Long press the Up key. The screen will appear the Wi-Fi icon, and the name and password
of Wi-Fi also will appear. Then the Wi-Fi of the name will be found on the cell phone and linked
with the mobile phone.
(2) Date/Time: Before recording or taking pictures using the machine, correct the system time so that
the date and time can be accurately recorded on your video or photos. Press the MENU key 3
times to exit the menu and return to the recording mode.
(3) Beep sound: Turns on the function, when the operation machine sends out the warning sound,
closes this function to be silent.
(4) Language settings: Simplified Chinese, Traditional Chinese and English and other multi-language
interface, according to the use of different languages to choose.
(5) Light source frequency: You can choose a different frequency, the default value is 50Hz.
(6) Screen Saver: the machine in the absence of operating conditions will be based on your choice of
time to screen saver, the election does not enter the screen saver off.
(7) Format: The formatting function will erase all the files in the memory card. Please use it carefully.
Make sure you have backed up important Folders before formatting. Otherwise, do not operate
this function casually.
(8) Default: Restore the initial settings of the system, the parameters set by the customer will be
restored to the default value.
(9) Version: Record the software version of the machine for easy reference.
5.3 Record a Video
1.Turn on the DVR, under the Recording mode, press OK button to record a video. When recording,
press the “DOWN” button to turn on/off VIDEO AUDIO.
2. When the DVR is off, connect it with the car charger, DVR starts to record video automatically.
Note: Please insert a TF card before recording. For the first use of the card, format is necessary.
6 Photo Mode
6.1 Photo Mode Menu
1.Resolution: Set the photo resolution, 3MP/2MP/1.3MP/VGA available.
2.Quality: Defines the quality of image you capture, Fine/Normal/Economy available.
3.Sharpness: Defines the clarity of details in the photos.
4.White balance: Establishes the conditions to capture an image based on the option given.
5.Color: Adjust photo color
6.Exposure: Set the brightness sensitivity.
7.Quick Review: Sets time duration the photo displays on screen after it has been capture.
8.Date Stamp: Enable/Disable the date and time marks on photo.
7 Playback
7.1. Playback in the DVR
Turn on the DVR, press the Mode Button twice to enter the Playback Mode. Use Up/Down Button to
scan the files.
Play: Use the OK button to play the Video/Photos.
Delete: When scanning the file, press Menu Button, use Up/Down to position the “delete file”, press
OK button twice to delete the file.
Protect: Lock/Unlock the current file displayed or Lock/Unlock all files.
Slide show: Select 2/5/8 seconds gap to activate slide show and display all recorded files and photos.
7.2 Play on the Computer
USB Mode
Please connect to DVR to computer by USB cable, then press the Power Button. The USB menu will
popup automatically in the device, and there are two modes optional:
1: Mass Storage
Under this mode, we can save or get the video files or photos.
2: PC Camera
Under this mode, it will popup USB device automatically, and we can take photos or video
Note:
Specifications could be subject to modification due to upgrading or revising. Please regard the actual product as the
standard form.
FCC Warning
This device complies with part 15 of the FCC rules. Operation is subject to the following two
conditions: (1) this device may not cause harmful interference, and (2) this device must accept any
interference received, including interference that may cause undesired operation.
Changes or modifications not expressly approved by the party responsible for compliance could void
the user's authority to operate the equipment.
NOTE: This equipment has been tested and found to comply with the limits for a Class B digital device,
pursuant to part 15 of the FCC Rules. These limits are designed to provide reasonable protection
against harmful interference in a residential installation. This equipment generates uses and can
radiate radio frequency energy and, if not installed and used in accordance with the instructions, may
cause harmful interference to radio communications. However, there is no guarantee that
interference will not occur in a particular installation. If this equipment does cause harmful
interference to radio or television reception, which can be determined by turning the equipment off
and on, the user is encouraged to try to correct the interference by one or more of the following
measures:
- Reorient or relocate the receiving antenna.
- Increase the separation between the equipment and receiver.
- Connect the equipment into an outlet on a circuit different from that to which the receiver is
connected.
- Consult the dealer or an experienced radio/TV technician for help.
Radiation Exposure Statement
This equipment complies with FCC radiation exposure limits set forth for an uncontrolled
environment. This equipment should be installed and operated with minimum distance 20cm
between the radiator and your body.
This transmitter must not be co-located or operating in conjunction with any other antenna or
transmitter.