ACA Digital XT1100 XT1100 Rugged Tablet PC User Manual XT1100 UM EN
ACA Digital Corporation XT1100 Rugged Tablet PC XT1100 UM EN
User manual
Rugged Tablet
PC-XT1100
User Manual
Ver 1.0

XT1100 User Manual
Table of Contents
Preface ................................................................ i
CE Conformity Statement .............................................. i
FCC Compliance Statement ........................................... ii
Copyright Statement ...................................................iii
Safety Instructions ..................................................v
Rugged and Ready to Go ...........................................1
Symbols Used in this Manual ...........................................1
Product Features.........................................................1
Exploring the XT1100....................................................2
Front View.............................................................2
Left View ..............................................................3
Right View.............................................................3
Rear View..............................................................4
Getting Started ......................................................5
Inserting the Battery ....................................................5
Connecting the Power...................................................5
Inserting a Memory Card................................................6
Inserting a PC Card ......................................................7
Making Connections .....................................................8
Connecting to a Monitor.............................................8
Connecting USB Devices.............................................8
Connection to a Network............................................9
Connecting to a Telephone Line ...................................9
Connecting Headphones.............................................9
Connecting a Microphone ......................................... 10
Turning On.............................................................. 10
Controlling the XT1100................................................ 11
Using the Touch Screen ........................................... 11
Using the Control Panel Buttons ................................. 12
Using the On-Screen Keyboard................................... 13
Configuring the Function Buttons................................ 14

XT1100 User Manual
Adjusting Screen Brightness ...................................... 14
Adjusting the Volume.............................................. 14
Wireless Connections.............................................15
RaLink Wireless Utility................................................ 15
Link Status Screen.................................................. 16
Site Survey Screen ................................................. 16
Statistics Screen.................................................... 16
Advanced Screen ................................................... 17
QoS Screen .......................................................... 18
About Screen........................................................ 18
Windows Basics ....................................................19
General Use............................................................. 19
The Start Menu ..................................................... 19
Creating User Accounts............................................ 19
Logging Off.......................................................... 20
Turning Your XT1100 Off.......................................... 20
Programs and Applications ........................................... 20
Running Programs and Applications ............................. 20
Installing Software ................................................. 21
Uninstalling Software.............................................. 21
File Management....................................................... 22
Searching for Files ................................................. 22
Copying Files........................................................ 22
Renaming Files...................................................... 22
Deleting Files ....................................................... 23
Advanced Settings.................................................25
Configuring Pointer Device Settings ................................ 25
Devices Screen...................................................... 25
Hardware Screen ................................................... 26
Settings Screen ..................................................... 26
Advanced Screen ................................................... 27
General Screen ..................................................... 28
Windows Screen .................................................... 28

XT1100 User Manual
Calibration Screen ................................................. 29
Status Screen ....................................................... 30
About Screen........................................................ 30
Specifications ......................................................31

XT1100 User Manual

XT1100 User Manual
i
Preface
CE Conformity Statement
This product is compliant with the Electromagnetic
Compatibility Directive 89/336/EEC and the Low Voltage Direc-
tive 73/23/EEC of the European Union. This product meets the
following technical standards:
• EN 55022 — "Information Technology Equipment — Radio
Disturbance Characteristics — Limits and Methods of
Measurement."
• EN 55024 — "Information Technology Equipment - Immunity
Characteristics - Limits and Methods of Measurement."
• EN 61000-3-2 — "Electromagnetic Compatibility - Part 3:
Limits - Section 2: Limits for Harmonic Current Emissions
(Equipment Input Current Up to and Including 16 A Per
Phase)."
• EN 61000-3-3 — "Electromagnetic Compatibility - Part 3:
Limits - Section 3: Limitation of Voltage Fluctuations and
Flicker in Low-Voltage Supply Systems for Equipment With
Rated Current Up to and Including 16 A."
• EN 60950 — "Safety of Information Technology Equipment."
EN 55022 emissions requirements provide for two classifications:
• Class A is for typical commercial areas.
• Class B is for typical domestic areas.
To determine which classification applies to your product,
examine the FCC or ICES information on the regulatory label
located on the rear of the product. If the FCC or ICES informa-
tion on the label indicates a Class A rating, the following Class A
warning applies:
RF INTERFERENCE WARNING: This is a Class A product. In a
domestic environment this product may cause radio frequency
(RF) interference, in which case the user may be required to
take adequate measures.

XT1100 User Manual
ii
FCC Compliance Statement
This device complies with part 15 of the FCC Rules. Operation is
subject to the following two conditions:
1. This device may not cause harmful interference;
2. This device must accept any interference received,
including interference that may cause undesired
operation.
This equipment has been tested and found to comply with the
limits for a Class B digital device, pursuant to part 15 of the FCC
Rules. These limits are designed to provide reasonable protec-
tion against harmful interference in a residential installation.
This equipment generates, uses and can radiate radio frequency
energy and, if not installed and used in accordance with the
instructions, may cause harmful interference to radio communi-
cations.
However, there is no guarantee that interference will not occur
in a particular installation. If this equipment does cause harmful
interference to radio or television reception, which can be
determined by turning the equipment off and on, the user is
encouraged to try to correct the interference by one or more of
the following measures:
• Reorient or relocate the receiving antenna
• Increase the separation between the equipment and
receiver
• Connect the equipment into an outlet on a circuit different
from that to which the receiver is connected
• Consult the dealer or an experienced computer technician for help
This eqiupment marked in the USA is restricted by firmware to only
operate on 2.4 GHZ channel 1-11.
Caution : Exposure to Radio Frequency Radiation
The antenna used for this transmitter must be positioned to provide a
separate distance of at least 20 cm from all persons and must not be
co-located or operating in conjunction with any other antenna
or transmitter.

XT1100 User Manual
iii
Copyright Statement
© Copyright 2007 aca-digital ADVANCED CONVERGENCE
ALLIANCE, All Rights Reserved.
All rights reserved. This manual is protected by copyright and
distributed under licenses restricting its use, copying and distri-
bution. No part of this manual may be reproduced in any form,
electronic or otherwise, without the express permission of
Advanced Convergence Alliance.
This product features software manufactured by Advanced Con-
vergence Alliance, along with other third party software. All
described herein shall not be distributed, modified, reverse
engineered, or reproduced in any manner without the prior per-
mission of Advanced Convergence Alliance or of the other third
parties, to whom the software rights belong.
All other product names, trademarks or logos mentioned herein
and are the property of their respective owners.

XT1100 User Manual
iv

XT1100 User Manual
v
Safety Instructions
Pay careful attention to the following safety instructions when
setting up and using the XT1100.

XT1100 User Manual
vi
XT1100 User Manual
1
Rugged and Ready to Go
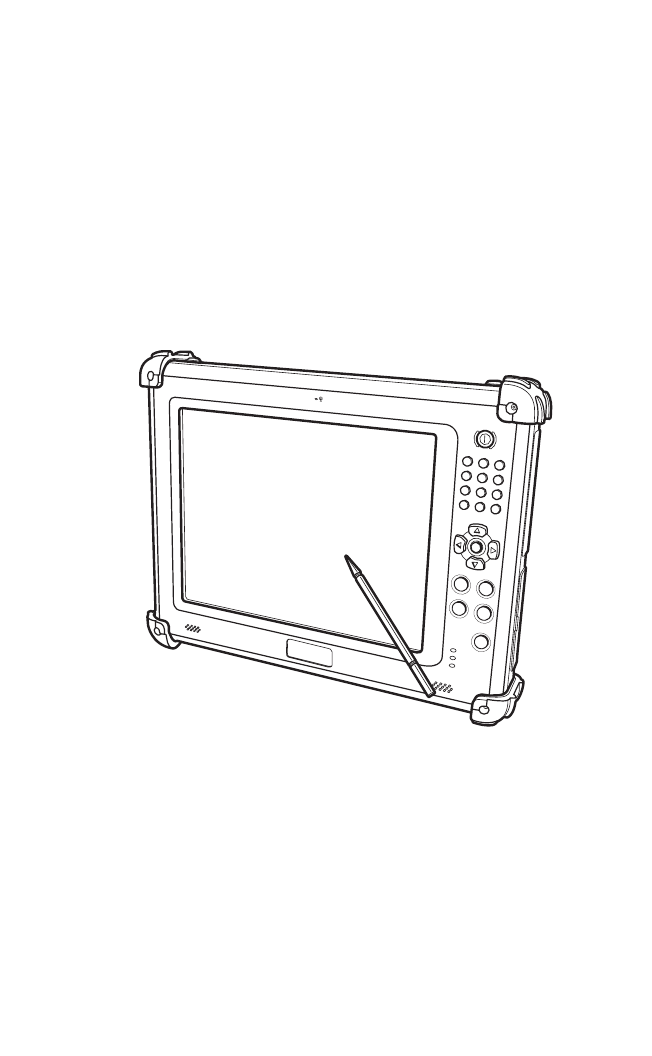
Congratulations on your purchase of the ACA Tablet PC-XT1100.
This product combines rugged design with reliable performance
and powerful functionality to best suit all your needs, in a wide
range of working conditions.
This user manual outlines all you need to know to set up and
use your XT1100. If you have any further questions or queries,
contact our technical support team via our website:
www.aca-digital.com.
Symbols Used in this Manual
Product Features
• Rugged design, up to military standard (MIL-STD-810F)
• Low power CPU
• Durable, shock-resistant magnesium alloy housing
• Built-in WLAN/Bluetooth/GPS functions
• IP54 compliant & built to withstand a 3 foot drop
• VIA Eden 1GHz processor (upgradeable to 1.5 GHz)
• 10.4” SVGA / XGA TFT LCD
• I/O ports for expansion
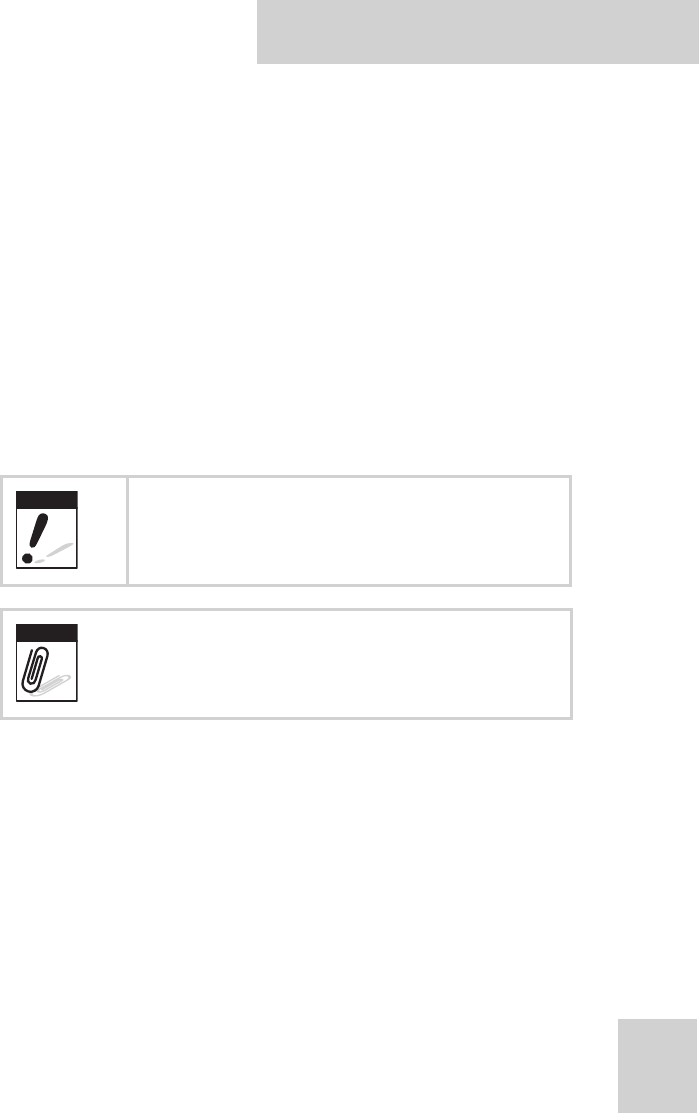
Denotes information that must be observed.
Failure to do so may result in personal harm or
damage to the product.
Denotes useful information that should be
noted to ensure you get the most out of the
product.
Warning
Note

XT1100 User Manual
2
Exploring the XT1100
Front View
No. Component
1Microphone
2Display
3 Power button
4 Number / Tab / Esc buttons
5 Arrow / Enter buttons
6 Favorite buttons
7 Brightness / volume button
8 Keyboard button
9
Status LEDs:
• WLAN connection status LED
• HDD activity LED
• Battery charge LED
10 Speakers
1 32
4 65
7 98
0
Tab ESC
F1 F2
F3
1
2
3
4
5
6
7
8
10
9
XT1100 User Manual
3
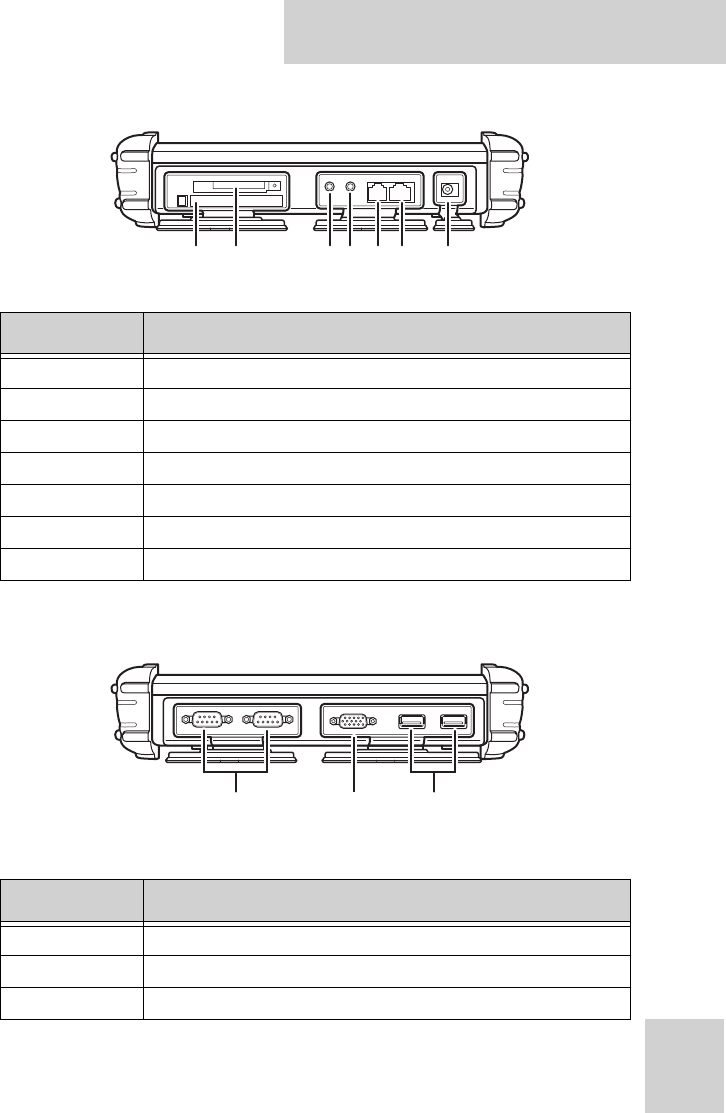
Left View
Right View
No. Component
1PC card slot
2 Compact Flash card slot
3 Headphone jack
4Microphone jack
5 Telephone line jack
6 RJ45 jack (for network cables)
7 Power jack
No. Component
1Serial ports
2VGA port
3USB ports
12 34567
123
XT1100 User Manual
4
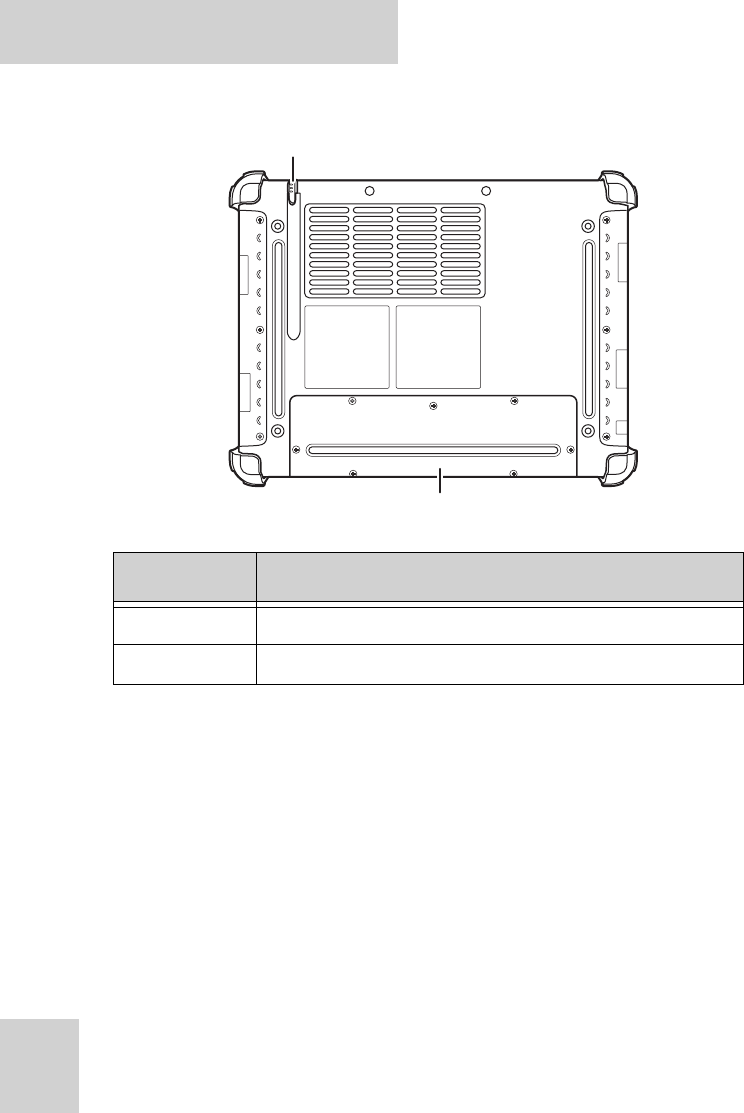
Rear View
No. Component
1Pen holder
2 Battery compartment cover
1
2
XT1100 User Manual
5
Getting Started
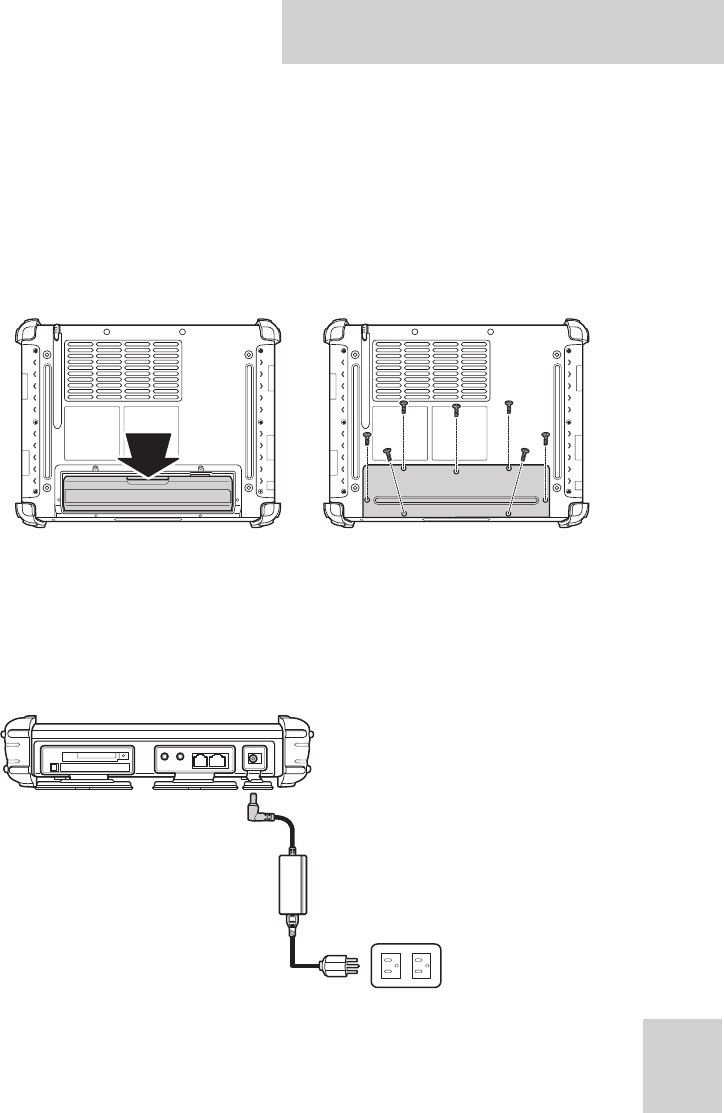
Inserting the Battery
Insert the battery as shown, and secure the battery
compartment door with the seven screws provided.
Connecting the Power
Before you can use your XT1100, you must fully charge the
battery. Connect the power adapter as shown and leave to
charge for a minimum of 4 hours before use.
XT1100 User Manual
6
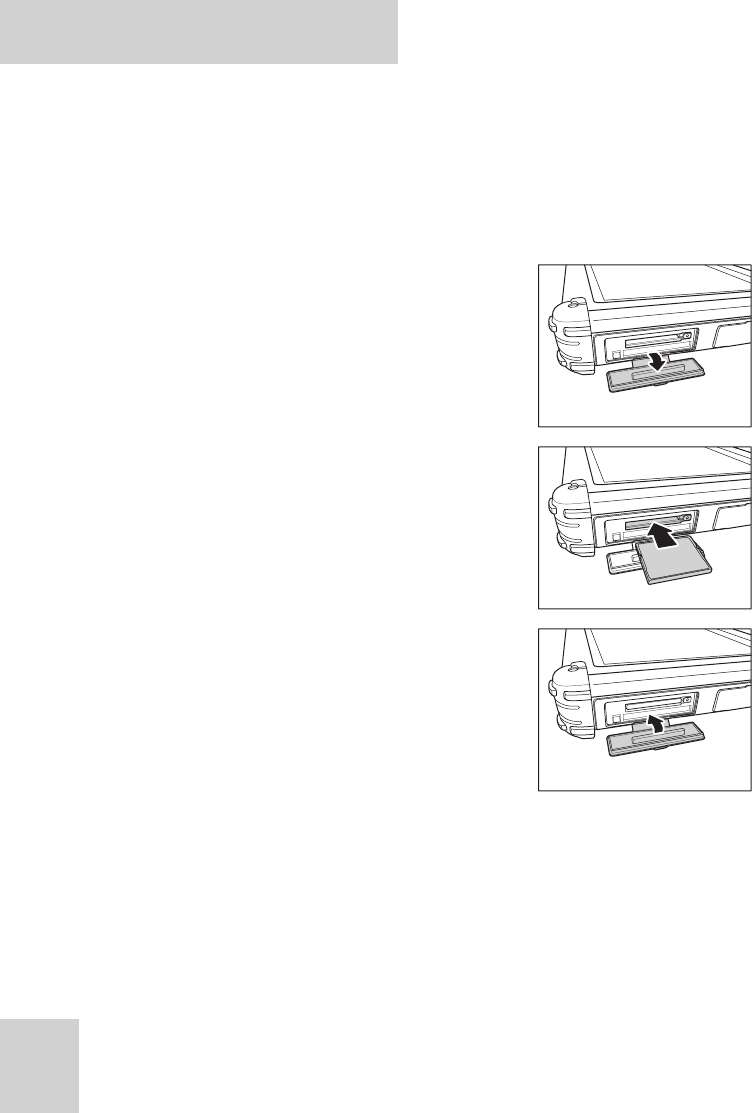
Inserting a Memory Card
You can insert a Compact Flash memory card to store data,
which needs to be later transferred to another machine, or to
simply expand the storage capacity of the XT1100. You can use
Compact Flash cards up to 2GB in size.
1. Open the memory card
compartment cover.
2. Insert the Compact Flash card, until
it clicks into place.
3. Close the memory card
compartment cover.
XT1100 User Manual
7
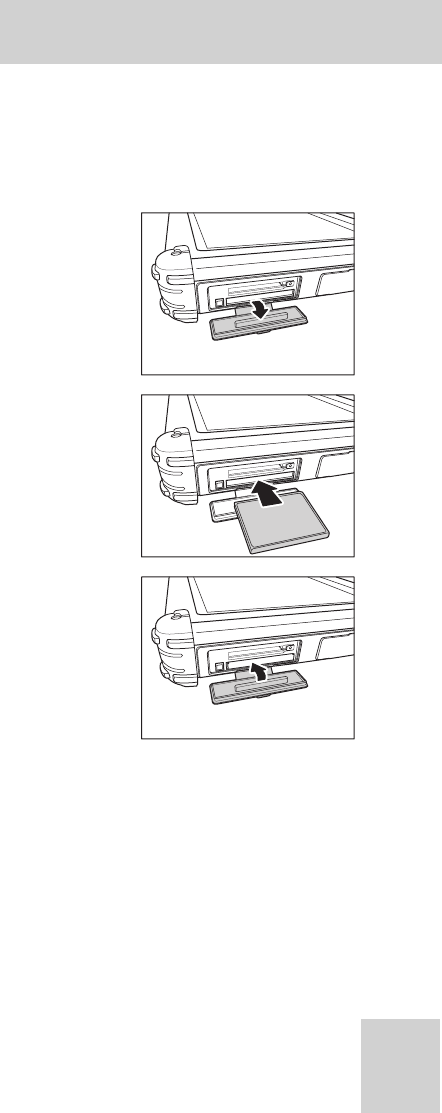
Inserting a PC Card
You can also insert a PC card to store and transfer data between
computers with compatible PC card capabilities.
1. Open the memory card
compartment cover.
2. Insert the PC card, until it clicks
into place.
3. Close the memory card
compartment cover.
XT1100 User Manual
8
Making Connections
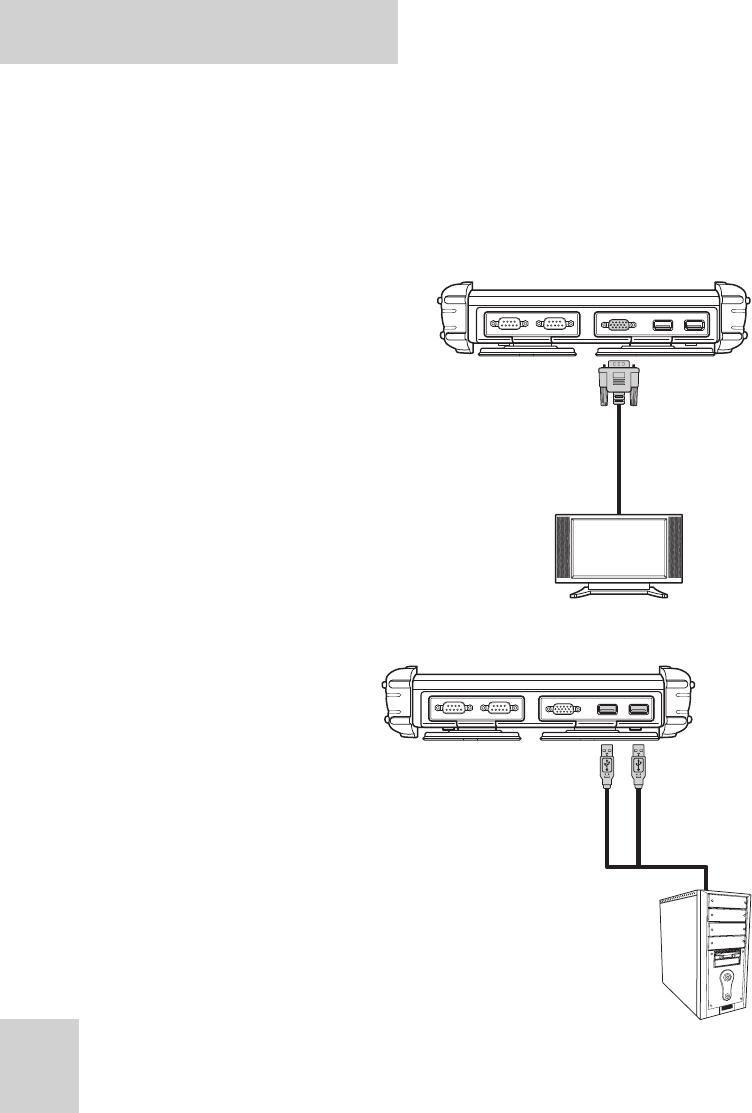
Connecting to a Monitor
You can connect the XT1100 to an external monitor for enhanced
viewing.
Connect one end of a VGA
cable to the VGA port on the
right side of the XT1100.
Connect the other end to the
VGA port on the monitor.
Connecting USB Devices
You can connect
peripheral devices, such
as a USB keyboard and
mouse, as well as other
wireless devices using the
USB ports on the right
side of the XT1100.
You can also connect
directly to another PC
using the USB ports.
MOLEX MOLEX
XT1100 User Manual
9
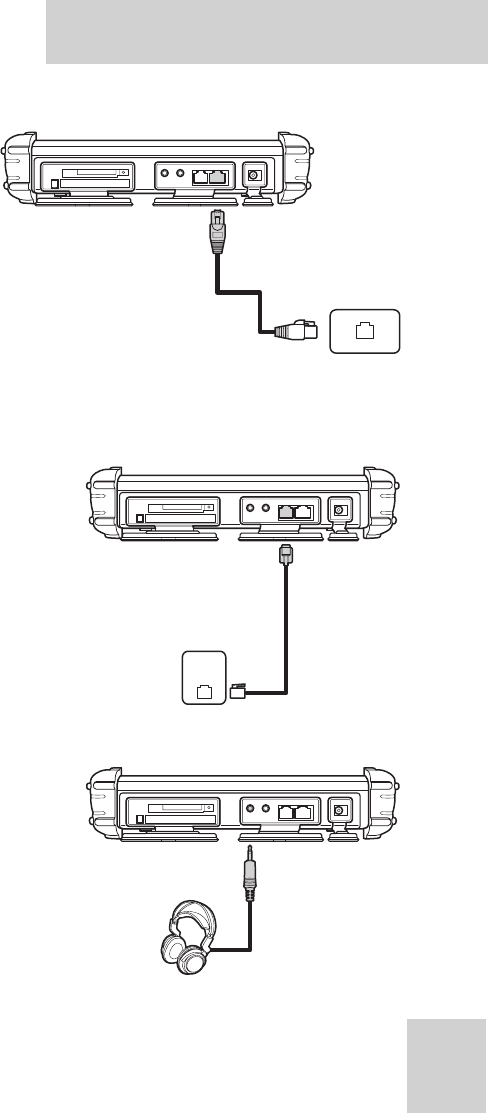
Connection to a Network
You can connect to
either a home or work
network using the RJ-
45 port. Connect one
end of the network
cable to the RJ-45
port on the left side of
the XT1100 and the
other to your network
hub or wall socket.
Connecting to a Telephone Line
If you are accessing the
Internet via a regular
telephone line, you can
connect the XT1100 using the
telephone jack on the left side
of the XT1100.
Connecting Headphones
You can connect a pair of
headphones using the
headphone jack on the left
side of the XT1100.
XT1100 User Manual
10
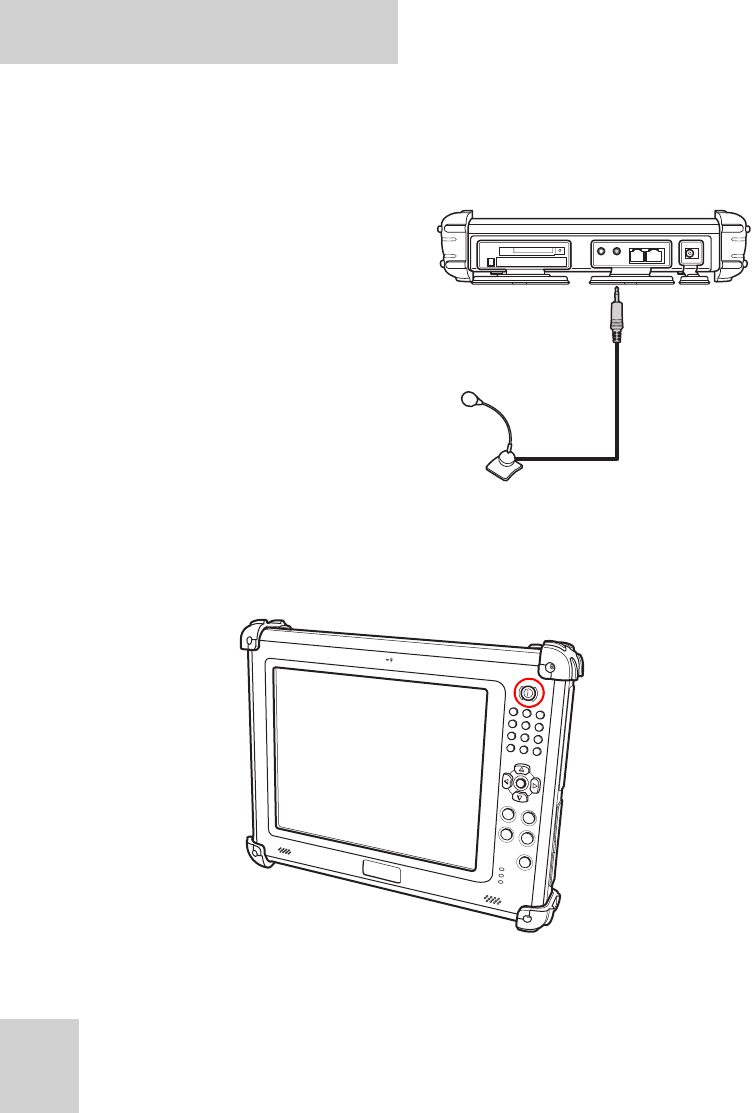
Connecting a Microphone
The XT1100 features and in-built microphone, but you can
connect an external microphone if needed.
Connect the microphone to the
microphone jack on the left
side of the XT1100 as shown.
Turning On
Press and hold the power button to turn on the XT1100.
XT1100 User Manual
11
Controlling the XT1100
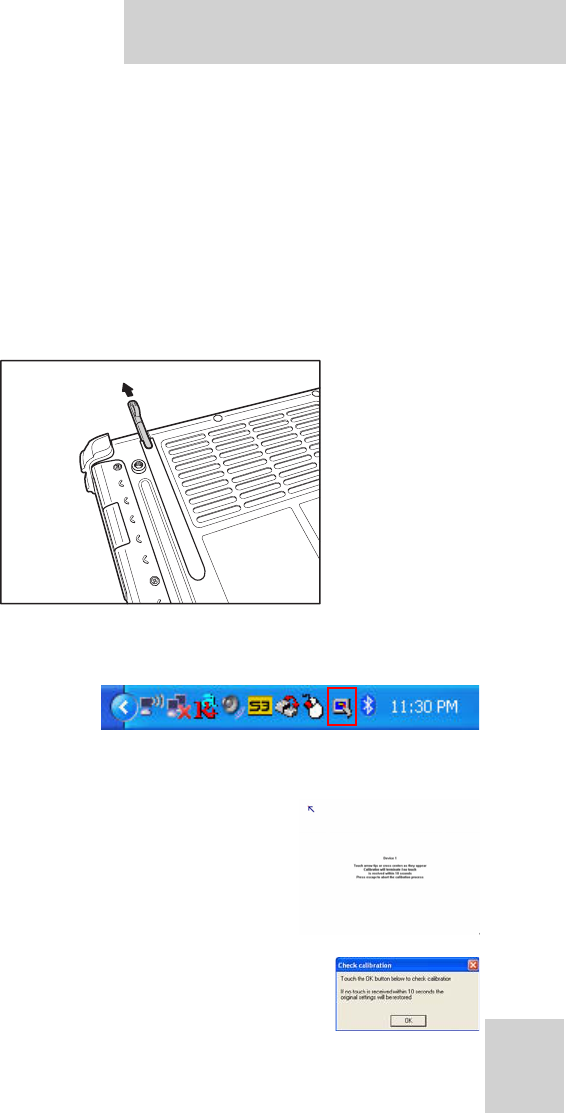
Using the Touch Screen
The XT1100 is equipped with touch screen technology, for ease
of use when you are on the go. Simply use the pen to select icons
and run applications.
Remove the pen from its holder at the rear of the XT1100 and
you are ready to go.
Calibrating the Touch Screen
To calibrate the touch
screen, tap the pointer
device icon in the
system tray.
Select Calibrate > Device 1 > Normal. The
calibration screen appears. Touch the four
points as displayed onscreen using the pen.
A confirmation window appears. Click OK to
confirm the new settings. If you do not do this
within 10 seconds, the new settings will not be
saved.
XT1100 User Manual
12
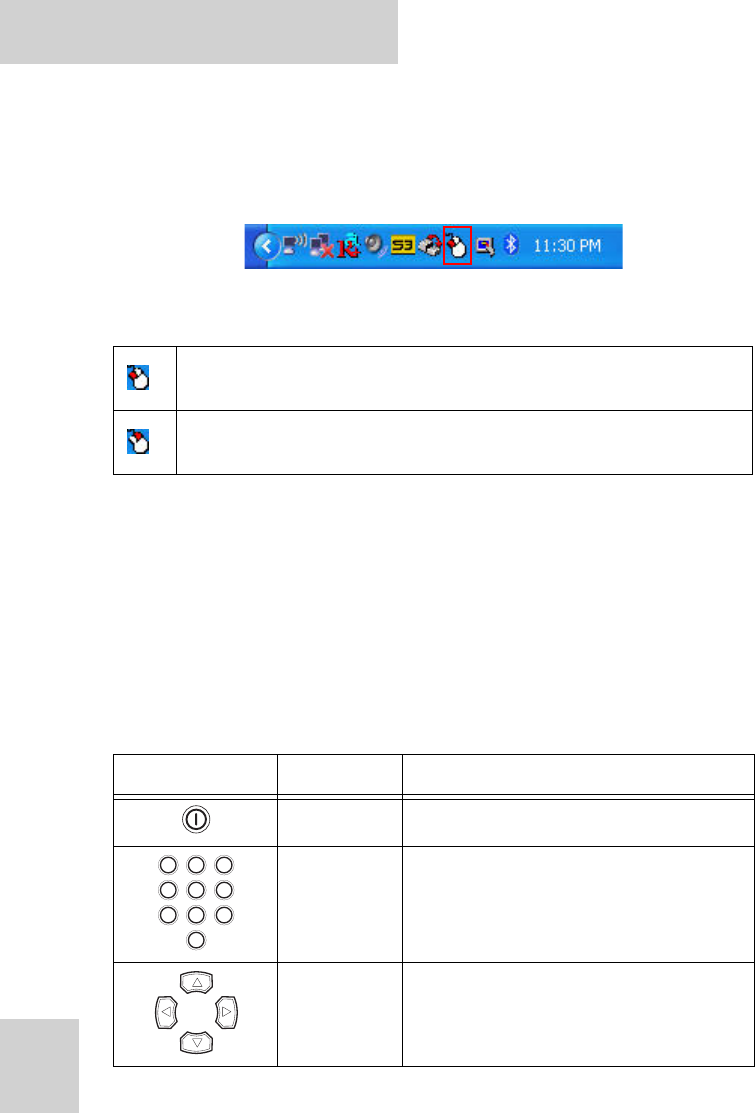
Configuring the Tap Function
When you tap on the screen with the pen, it emulates either a
right or left button click on a regular mouse. To configure this
setting, tap on the Event Selector icon in the system tray.
Tap again to toggle between right and left click functions.
See “Configuring Pointer Device Settings” on page 25 for details
on how to configure advanced settings for the touch screen
function.
Using the Control Panel Buttons
The control panel buttons are located on the right of the touch
screen. See below for a description of each button and its
function.
Indicates a left click function will be performed when the pen
is tapped on the screen.
Indicates a right click function will be performed when the
pen is tapped on the screen.
Button Name Function
Power Press the power on and off the XT1100
Numbers Press to enter numbers
Arrows Press to move up, down, left, right
1 32
4 65
7 98
0
XT1100 User Manual
13
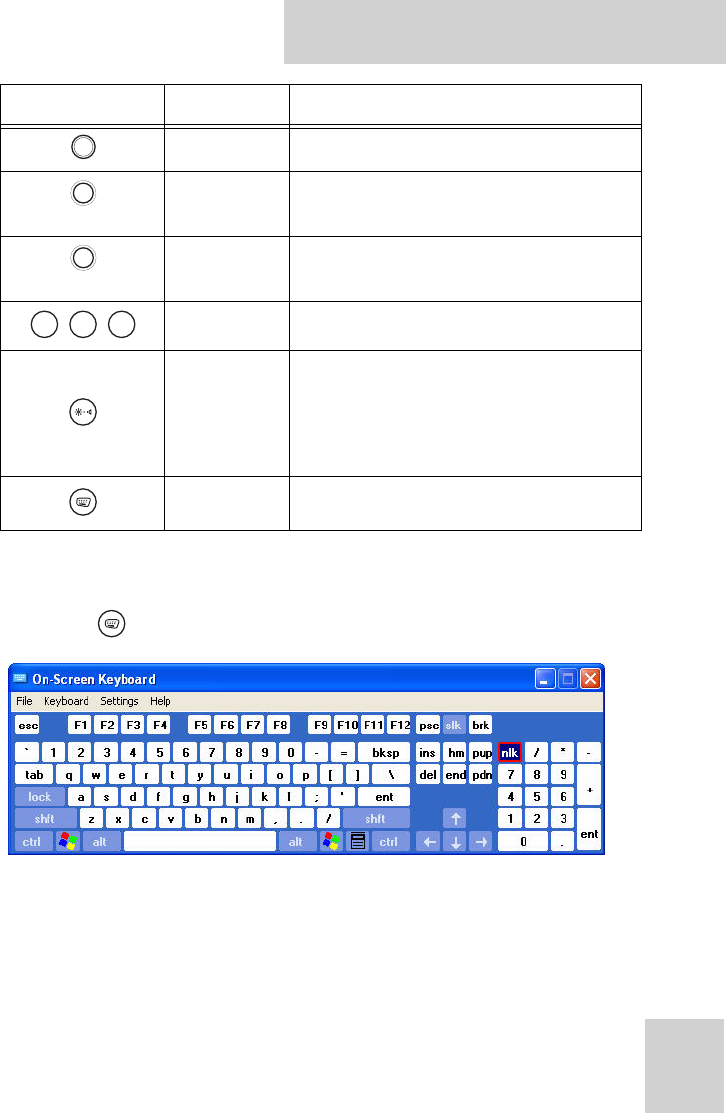
Using the On-Screen Keyboard
Press the button to bring up the on-screen keyboard.
Use pen to tap and enter letters, numbers and symbols as you
would with a regular keyboard.
Enter Press to emulate the Enter key
Tab Press to emulate the Tab key
Escape Press to emulate the ESC key
Function Press to access your favorite programs
Brightness/
Volume
Settings
Hold and press the up or down
buttons to adjust brightness.
Hold and press the left or right
buttons to adjust the volume level.
Keyboard Press to access the on-screen
keyboard
Button Name Function
Tab
ESC
F1 F2 F3
XT1100 User Manual
14
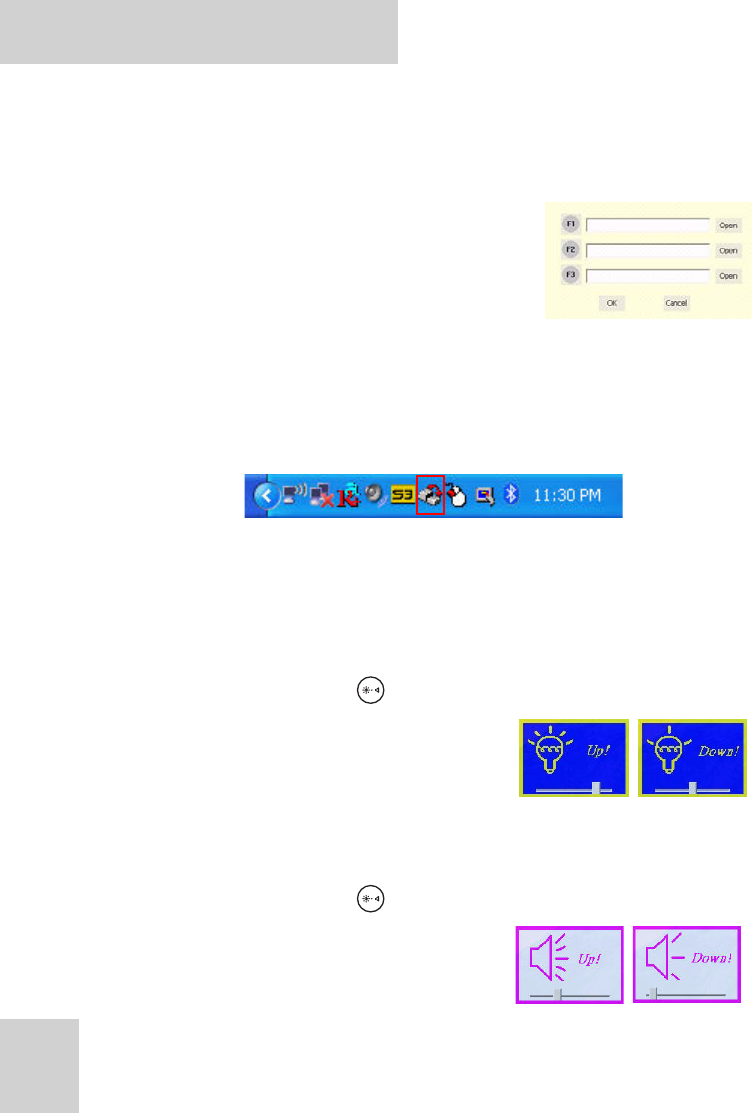
Configuring the Function Buttons
The three function buttons can be configured as shortcuts to
access your favorite or frequently used programs.
1. Press the function button to which
you want to assign a program
shortcut to. The function button
screen appears.
2. Tap Open and locate the program on
the hard drive.
3. Tap OK to save all new settings.
Once you have assigned a function to one of the buttons, you can
change it at a later date by tapping on the ACA Tray icon in the
system tray.
Select Function Key Setting from the menu and follow the
procedure described above from step 2 to make any changes.
Adjusting Screen Brightness
1. Press and hold the button.
2. Press the up arrow to increase
brightness, or the down arrow to
decrease brightness.
Adjusting the Volume
1. Press and hold the button.
2. Press the right arrow to increase
the volume, or the left arrow to
decrease the volume.
You can also adjust the screen
brightness through the ACA Tray. Tap the ACA Tray icon in the
system tray, and select Volume Adjustment. Move the slider to
make adjustments.
XT1100 User Manual
15
Wireless Connections
RaLink Wireless Utility
The XT1100 comes pre-loaded with the RaLink Wireless Utility
software. This software should automatically detect any local
WLAN (Wireless Local Area Network) and configure the
connection automatically.
We recommend that you do not adjust these connections
settings, for ease of use. Should you need to make changes, such
as in the case of experiencing problems with your connection,
see the following sections for help.
Tap the RaLink Wireless Utility icon in the system tray or tap
Start > All Programs > RaLink Wireless > RaLink Wireless
Utility.
Tap the tabs at the top of the screen to access the settings
screens.
Should you experience any problems while
attempting to configure a wireless connection,
consult your systems administrator.
Note

XT1100 User Manual
16
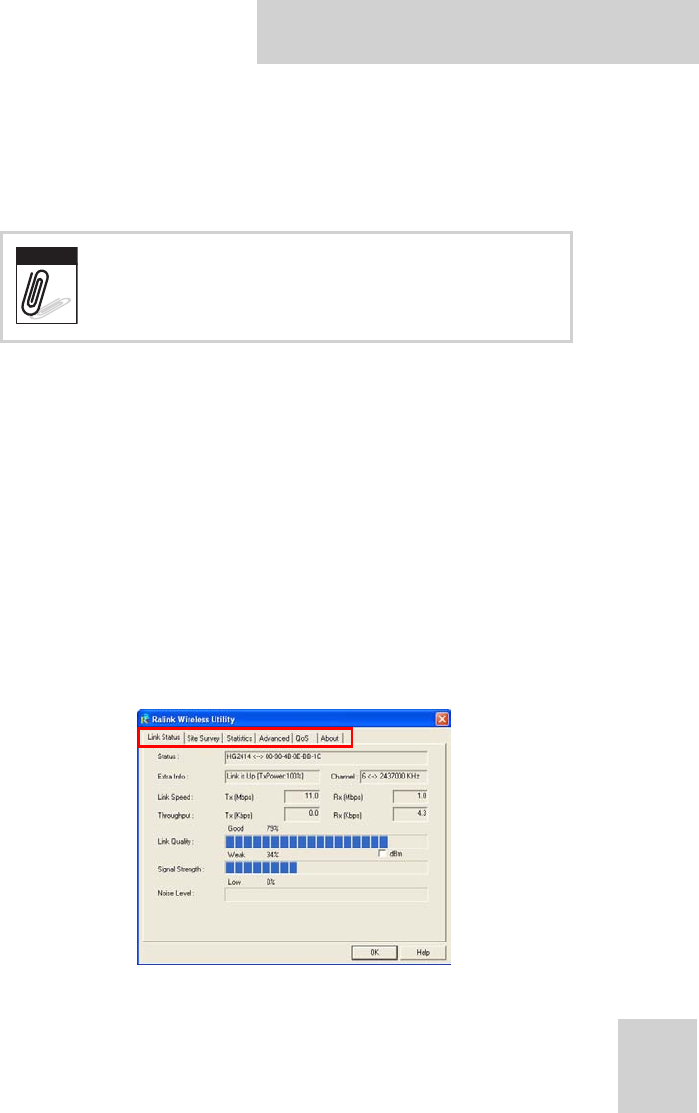
Link Status Screen
This screen displays all status
information for your current wireless
connections.
Site Survey Screen
This screen displays all available
wireless networks and a summary of
information for each connection.
Tap Rescan to scan the area again for
available networks.
Statistics Screen
This screen displays statistics for all
transmitted and received data.
Tap Reset Counter to reset all
counters.
XT1100 User Manual
17
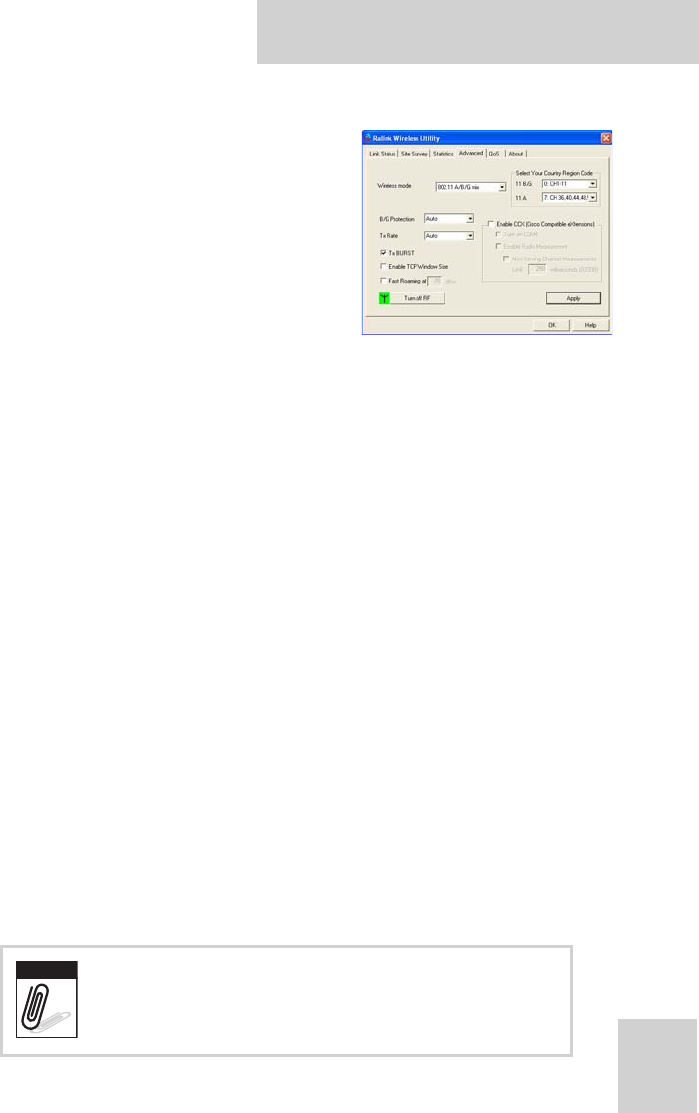
Advanced Screen
This screen displays detailed
information on your current
connection and is where you can
adjust advanced settings.
• Wireless mode: You can
configure the type of wireless
mode here. Select either a
single (802.11 A only / 802.11 B
only) or mixed (802.11 B/G mix / 802.11 A/B/G mix) mode.
• B/G Protection: If the wireless mode you are using is
‘mixed’, you can select this to enable protection for your
connection. Select from Auto, On, or Off.
• Tx Rate: You can configure the Tx rate for your connection
here. Select from Auto, 1 Mbps, 2 Mbps, 5.5 Mbps, 6
Mbps, or 11 Mbps.
• Tx BURST: Select this option to enable Tx BURST.
• Enable TCP Window Size: Select this option to enable TCP
window size.
• Fast Roaming at ---: Select and enter a power value above
which fast roaming will be enabled.
• Select your Country Region Code: Select your country
region code for this connection. For information on this,
contact your system administrator.
• Enable CCX (Cisco Compatible eXtensions): Select and
configure these settings if you want to connect to a
Cisco-compatible system.
Tap Apply then OK to save all changes.
You must tap Apply to save any changes. If
you only tap OK, any changes you have made
will be lost.
Note
XT1100 User Manual
18
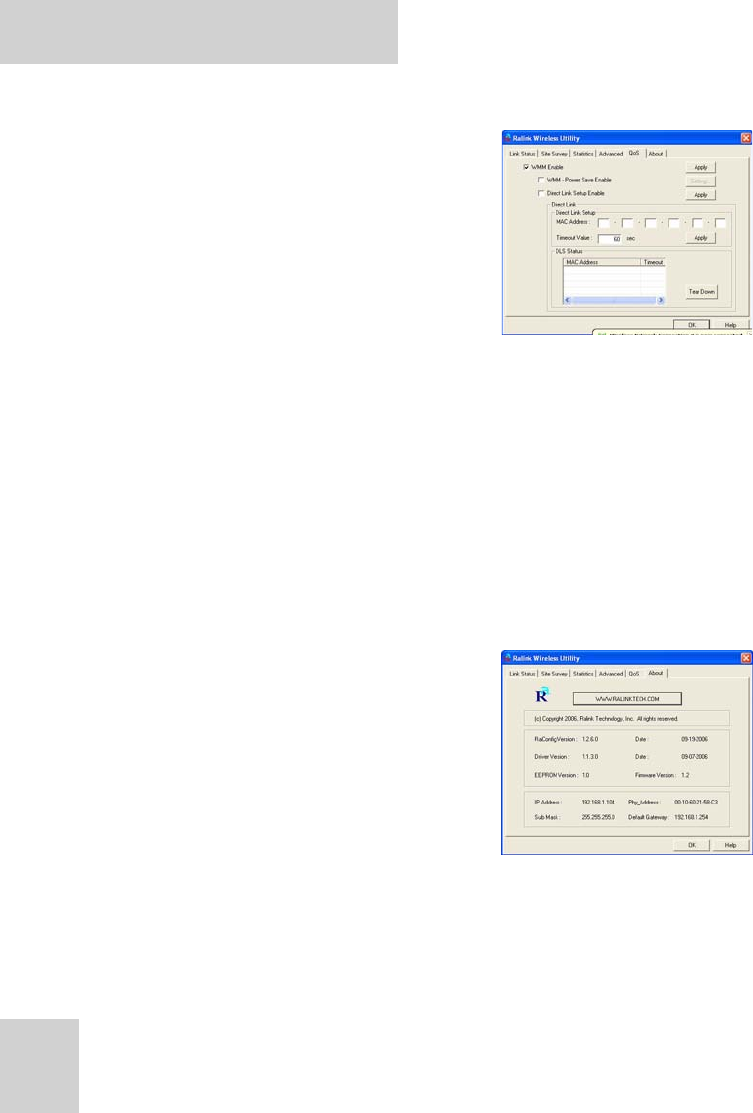
QoS Screen
You can configure various QoS
(Quality of Service) settings to best
suit your needs from this screen.
• WMM Enable: Select this option
to enable WMM. Tap Apply.
• WMM - Power Save Enable:
Select this option to enable the
power save function for the
WMM function. Tap Setting to
select a power save setting.
• Direct Link Setup Enable: Select this option to enable the
setup of a direct link. Enter the link information under
Direct Link Setup box and tap Apply.
To remove the direct link, tap Tear Down under the DLS
Status box.
Tap OK to save all changes.
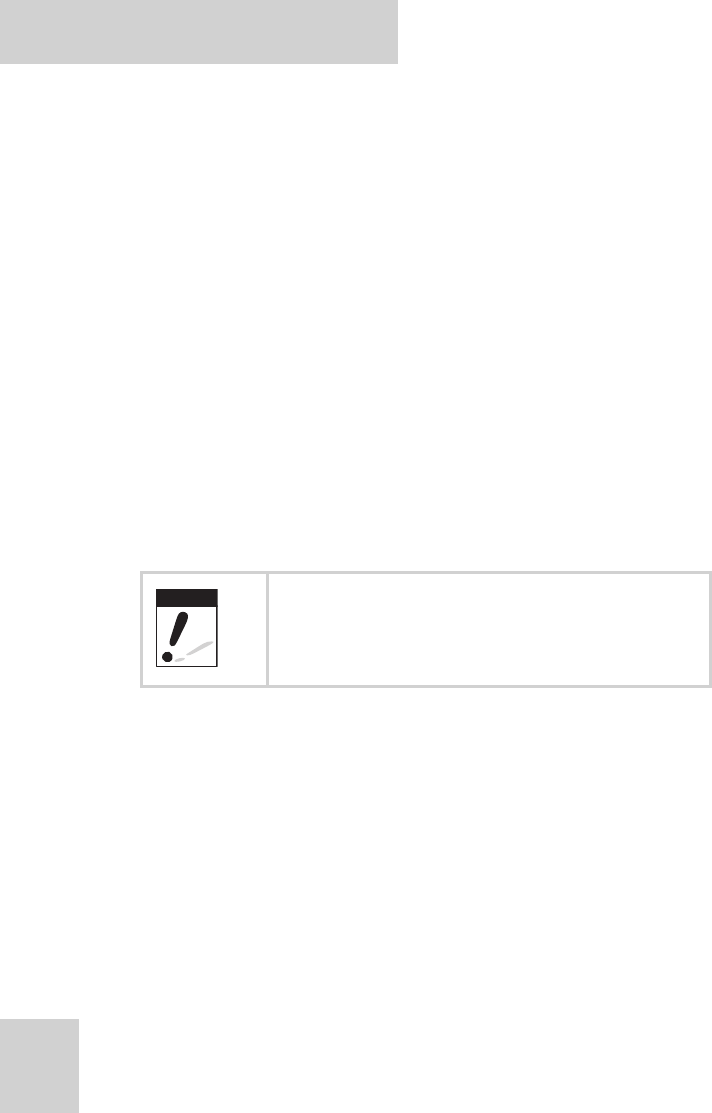
About Screen
This screen displays software version
information along with IP address,
sub mask, physical address and
gateway information.

XT1100 User Manual
19
Windows Basics
General Use
The Start Menu
Tap the Start button for easy access to your notebook's programs
and settings:
• Tap All Programs to view a list of all
installed programs.
• Tap Control Panel to view and adjust
your system settings.
• Tap My Computer to explore your sys-
tem and access any external storage
devices.
• Tap Log Off to log off as the current
user (see “Logging Off” on page 20).
• Tap Turn Off Computer to shutdown the system (see “Log-
ging Off” on page 20).
Creating User Accounts
When you start Windows XP for the first time, you are logged in
as the administrator. You can also create additional user
accounts should your XT1100 be used my multiple users.
1. Tap Start > Control Panel > User Accounts.
2. Under Pick a task, tap Create a new account.
3. Enter the name of the new user. Tap Next.
4. Under Pick an account type, choose one of the following
options:
• Computer administrator: The user can change all
computer settings.
• Standard (Windows XP Professional only): The user has
permission to install limited programs and hardware.
XT1100 User Manual
20
• Limited: The user can only change their own personal
settings. Limited users cannot install any programs,
hardware, or access the Internet.
5. Tap Create Account to create the new user.
Logging Off
You can switch users easily without turning off the computer.
1. Tap Start > Log Off > Log Off.
2. The Welcome screen will appear. To log on again, tap the
user you wish to log in as.
Turning Your XT1100 Off
To turn off your XT1100 safely, save any files you are working on,
exit all open programs and tap Start > Turn Off Computer >
Turn Off.
Programs and Applications
Running Programs and Applications
You can run a wide range of programs and applications on your
XT1100, the majority of which will be accessible via the Start
menu.
1. Tap Start > All Programs.
2. Tap to run a program from the list.
Turning off the computer by pressing and
holding the power button is not
recommended. You will lose unsaved files and
risk corrupting other programs.
Warning

XT1100 User Manual
21
Installing Software
You can install software located from external storage devices
(such as a USB flash disk or external hard drive) to your XT1100
provided they are correctly inserted to one of the XT1100’s input
ports.
1. Tap Start > My Computer.
2. Locate the device on which the software is stored, and
double tap its icon to browse files.
3. Locate the .exe (executable) file of the program you wish
to install and double tap.
4. Follow all on screen instructions.
Uninstalling Software
Uninstalling software is as simple as installing it.
1. Tap Start > Control Panel > Add or Remove Programs >
Change or Remove Programs.
2. Select the program that you want to remove and tap the
Change/Remove button.
3. Follow on screen instructions to uninstall the software.
Some programs cannot be uninstalled deleted in this way; these
programs often feature a dedicated Uninstall / Delete option in
the program folder in the All Programs list.
Before installing any new software, ensure
that its technical requirements match those of
your XT1100.
Note

XT1100 User Manual
22
File Management
Searching for Files
You can use the Search functions to locate files.
1. Tap Start > Search.
2. Enter either all or part of the file name, or a word or
phrase in the file.
3. Select a drive or drives to search from the drop down list.
4. Tap Search to begin searching.
5. Files found that match your search criteria are listed in the
Search Results window.
Copying Files
You can copy files from one location to another.
1. Tap Start > My Computer.
2. Locate the file you want to copy, and tap to select it.
3. Under File and Folder Tasks, tap Copy this file.
4. Select the location where you want to copy the file.
5. Tap Copy.
Renaming Files
Use either Windows exploring or the procedure described above
to locate the file you wish to rename.
1. Tap to select the file.
2. Tap File > Rename.
3. Type the new filename and press Enter.
Never change the last three letters (the file
extension) of a file. Doing so will render the
file unusable by the application for which it
was designed.
Warning

XT1100 User Manual
23
Deleting Files
Use either Windows exploring or the procedure described above
to locate the file you wish to delete.
1. Tap to select the file.
2. Tap File > Delete.
3. Tap OK when the confirmation dialog appears

XT1100 User Manual
24
XT1100 User Manual
25
Advanced Settings
Configuring Pointer Device Settings
Tap the pointer device icon in the system tray and select Adjust
settings, or tap Start > All Programs > UPDD > Settings to access
pointer device settings.
Tab the tabs at the top of the screen to access the settings
screens. See the following sections for detailed descriptions of
each screen.
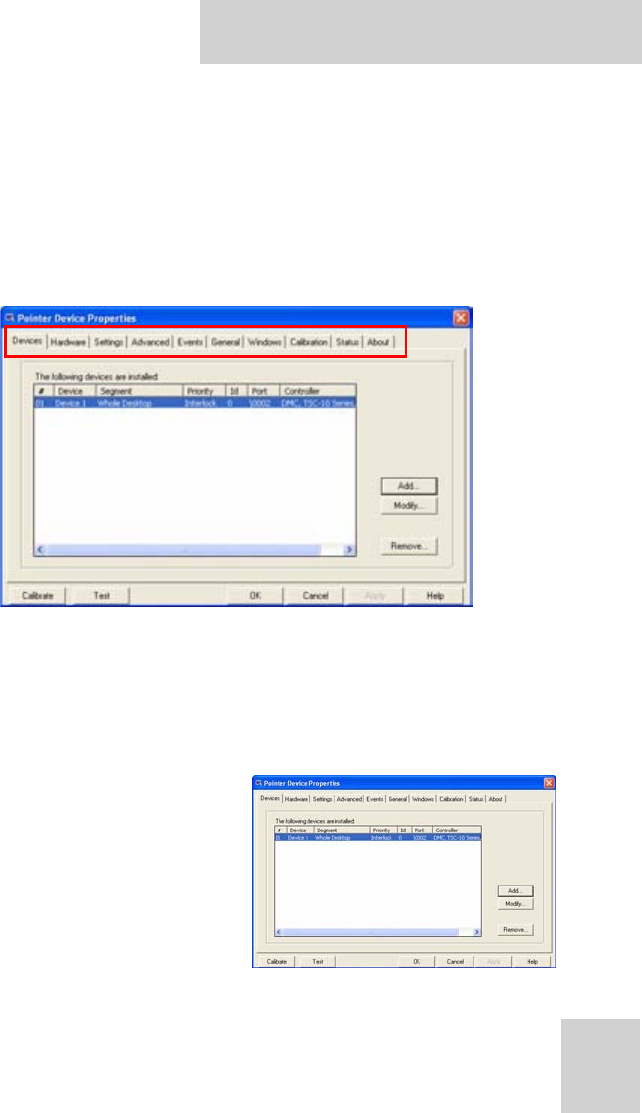
Devices Screen
This screen displays all installed
pointer devices. Device 1 is the
touch screen pointer driver by
default.
• Add: Tap to add a new
pointer device. Select the
device type from the list
that appears.
• Modify: Tap to modify the selected device.
Tap Apply and then OK to save any new settings.
XT1100 User Manual
26
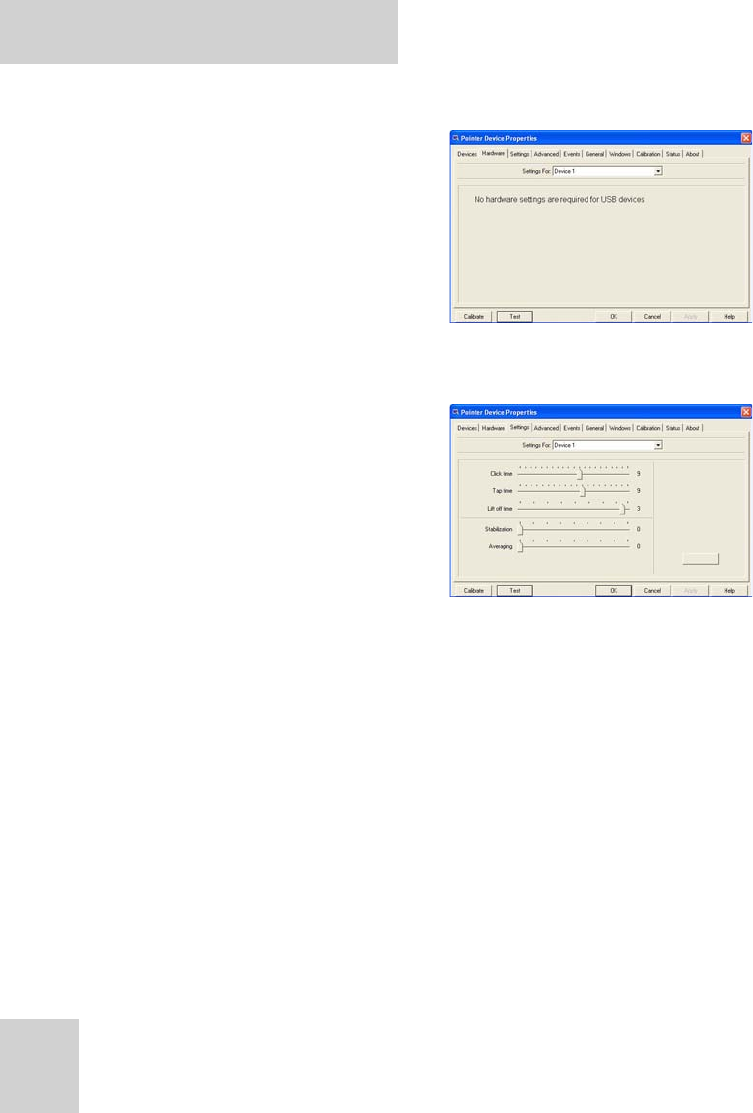
Hardware Screen
This screen displays any specific
hardware settings for the
installed pointer devices. Select
the device from the Settings
For: drop down list.
Settings Screen
You can configure various
settings for your pointer devices
from this screen.
1. Select the device from the
Settings For: drop down
list.
2. Tap and drag the sliders to
adjust the setting you require:
• Click time: Adjusts the amount of time between clicks.
• Tap time: Adjusts the amount of time between taps.
• Lift off time: Adjusts the amount of time between when
the pen is lifted from the screen and the system
registers this ‘lift off’. This setting only applies when the
Use liftoff packet option is selected. If this option is not
selected, the system will register a lift off as soon as the
pen loses contact with the screen.
• Stabilization: Adjusts the system’s sensitivity to small
movements made with the pointer device.
• Averaging: Applies a filter to inputted strokes to provide
a smoother line.
3. Tap Apply to save all changes or Defaults to return all
values to their default settings.
XT1100 User Manual
27
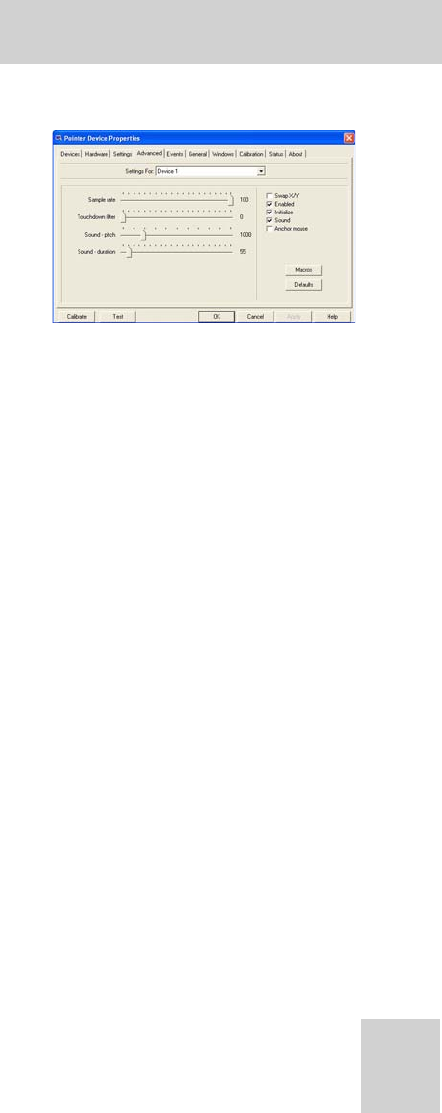
Advanced Screen
You can configure advanced
pointer device settings from this
screen.
1. Select the device from the
Settings For: drop down
list.
2. Tap and drag the sliders to
adjust the setting you
require:
• Sample rate: Adjusts the amount of information sent
from the pointer device to the computer. This should be
set at 100%.
• Touchdown filter: Adjusts the number of taps are
ignored before the system recognizes a tap on the
screen.
• Sound - pitch: Adjusts the pitch of the sound made
when a button on the pointer device is pressed.
• Sound - duration: Adjusts the length of the sound made
when a button on the pointer device is pressed.
You can also activate the following functions:
• Swap X/Y: Swaps the X and Y axis.
• Enabled: Check to enable the device.
• Initialize: Check to initialize the device.
• Sound: Check to enable sound when a button on the
pointer device is pressed.
• Anchor mouse: Check to return the cursor to its original
position after the pointer device has been used.
3. Tap Apply to save all changes or Defaults to return all
values to their default settings.
XT1100 User Manual
28
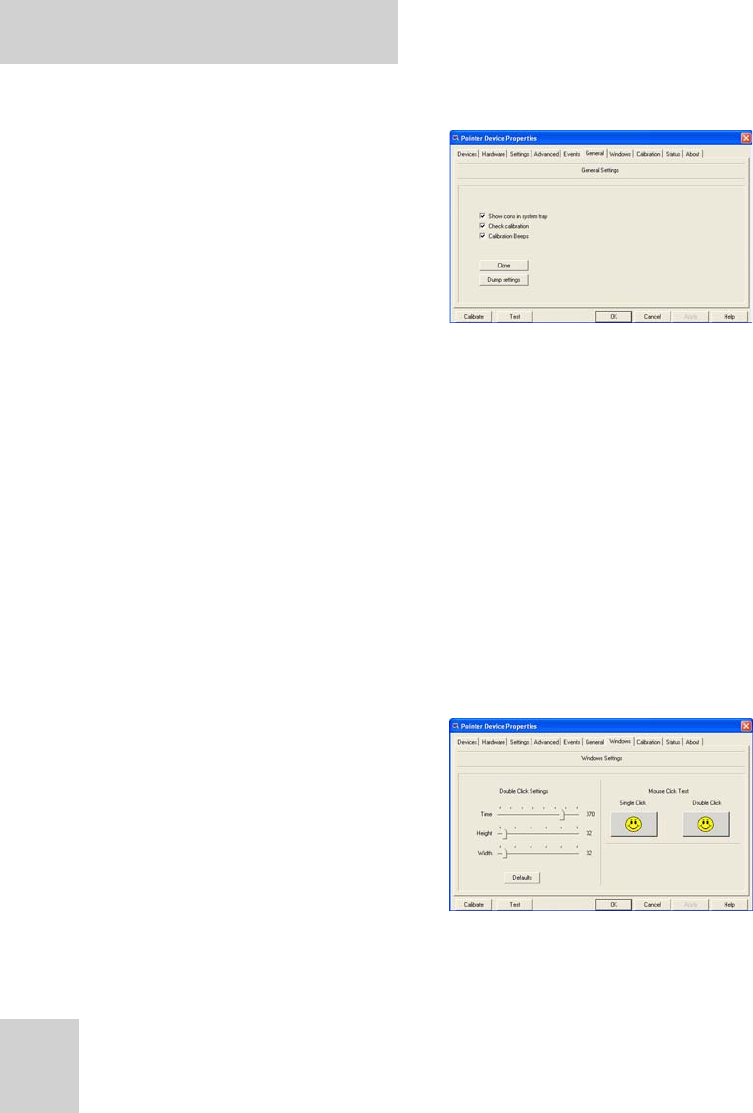
General Screen
You can configure general
pointer device settings from this
screen.
You can activate the following
functions:
• Show icons in system tray:
Check to display the
pointer device system tray
icon (recommended).
• Check calibration: Check to display a Check Calibration
dialog at the end of calibration (see “Calibrating the Touch
Screen” on page 11).
• Calibration Beeps: Check to enable a sound when each
calibration point is selected.
• Select Dump settings to export all settings to a .txt file, or
Clone to save the settings to a .reg file. This is useful
should you need to import the settings again during a future
installation of the software.
Select Apply to save all changes.
Windows Screen
You can configure how the
pointer device will behave when
a button is pressed from this
screen.
1. Tap and drag the sliders
for the setting you require:
• Time: Adjusts the amount
of time between within
which two clicks will be recognized as a double-click.
• Height: Adjusts the height of the area within which two
clicks will be recognized as a double-click.
• Width: Adjusts the width of the area within which two
clicks will be recognized as a double click.
XT1100 User Manual
29
2. You can test your new settings by clicking on the images
under Mouse Click Test.
3. Click Apply to save all settings.
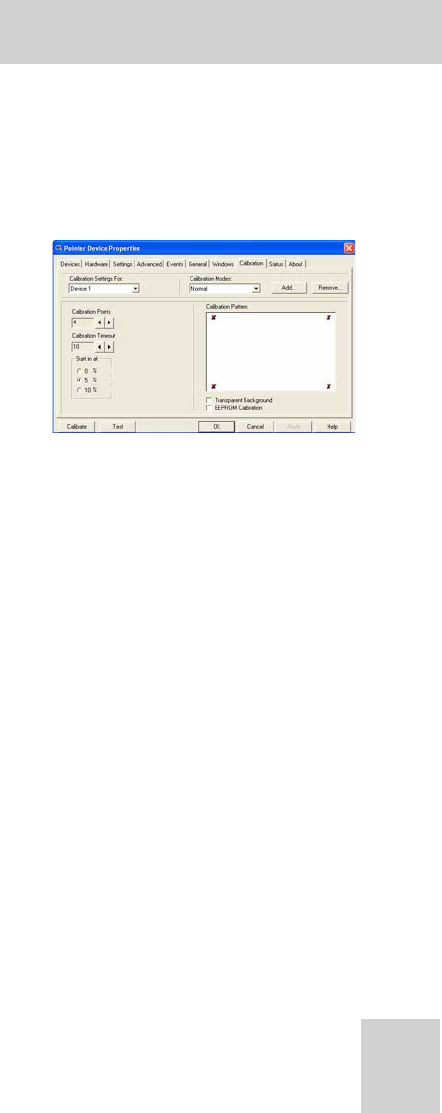
Calibration Screen
You can configure calibration
settings from this screen. This is
how the calibration screen will
appear when you calibrate
pointer devices. A preview can
be seen under Calibration
Pattern.
1. Select the device you wish
to calibrate from the Calibration Settings For: drop-down
list.
2. Select the number of calibration points to be displayed
during calibration under Calibration Points.
3. Set the calibration timeout length under Calibration
Timeout.
4. Select the distance between the edge of the screen and
calibration points under Start in at.
5. Select Transparent Background to calibrate on a
transparent screen, or EEPROM calibration (Electrically
Erasable Programmable Read-Only Memory) to use
previously stored calibration settings.
6. Once you have configured all settings, you can save them
under the standard Normal calibration mode, or as a new
mode. To save the settings as a new calibration mode, tap
Add, enter the name of the mode and tap OK to save.
7. Click Apply to save all changes.
XT1100 User Manual
30
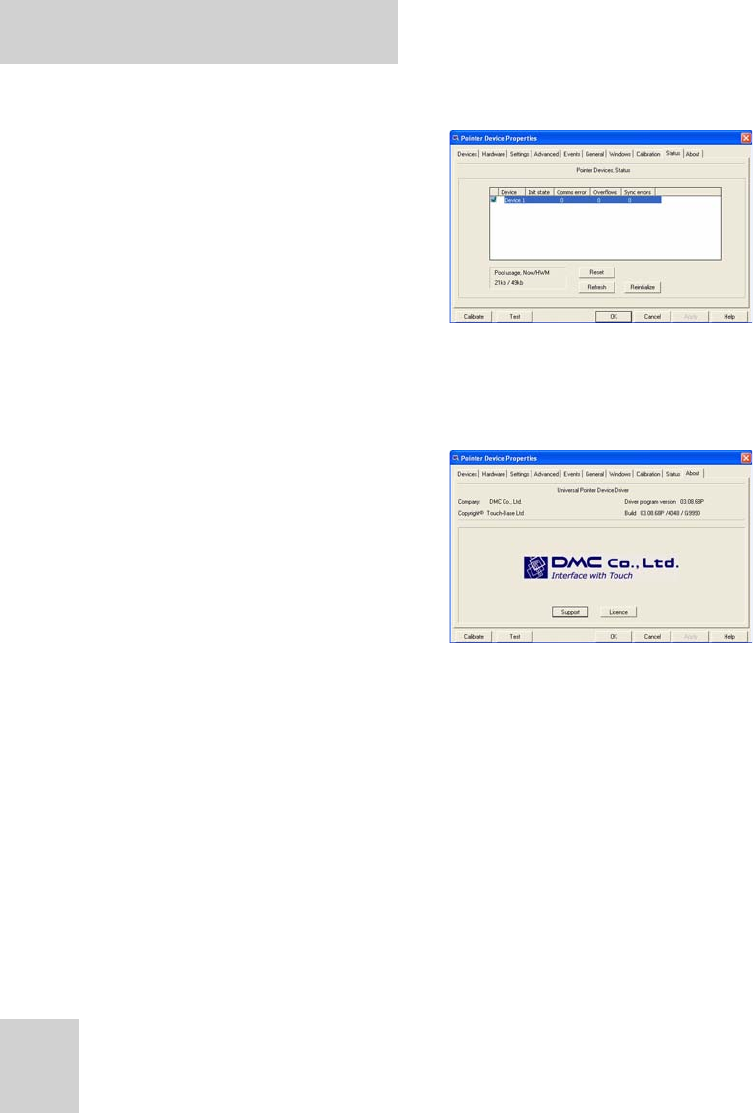
Status Screen
This screen displays status
information for all installed
pointer devices.
• Tap Reset to reset the list.
• Tap Refresh to refresh the
list.
• Tap Reinitialise to
reinitialise a dormant
pointer device.
About Screen
This screen displays software
version information. Tap
Support to access further
technical support should you
need it.
XT1100 User Manual
31
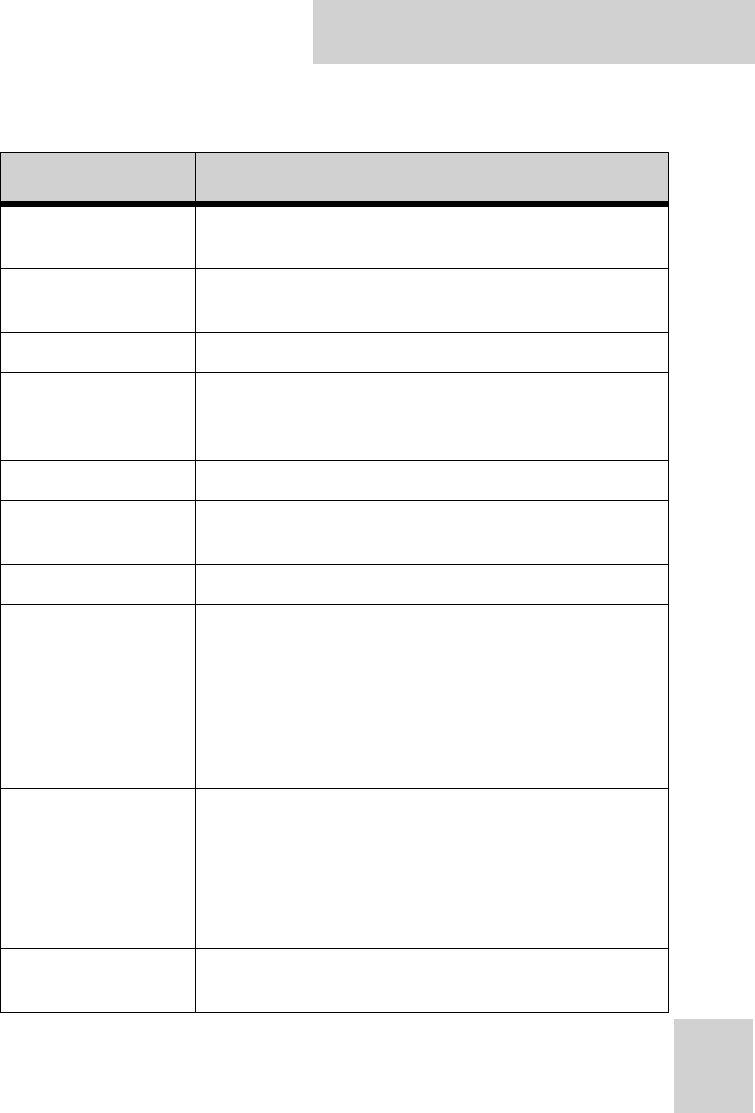
Specifications
Feature Description
Operating System Windows Xp Embedded/
Windows XP Pro / Windows CE 5.0
Processor VIA Eden 1GHz (Ultra Low Voltage Mobile, up to
1.5 GHz)
Chipset VIA CX700M (with video acceleration)
Memory DDRII400 256MB on board (Use BIOS setup to
adjust parameter for expansion memory)
1 x SO-DIMM up to 1GB (factory option)
Storage Compact Flash Memory Card or 2.5” HDD
Display 10.4” SVGA/XGA Transmissive TFT LCD, optional
10.4” sunlight readable XGA
Touch Panel 4-wire resistive touch panel (USB interface
Application Button
1 x Power Button
12 numeric keys (0~9, #, *)
1 x SIP button (Software keyboard button)
4 x Function programmable buttons for quick
selection of applications
4-Way navigation button with integrated enter
button
Wireless
802.11a/b/g WLAN (miniPCI) module with built-in
integral antenna (factory option)
Bluetooth class 2, v2.0+EDR with built-in integral
antenna (factory option)
GPS module with built-in integral antenna (fac-
tory option) (UART port)
Audio System CX700M built-in audio, uses high definition exter-
nal codec
XT1100 User Manual
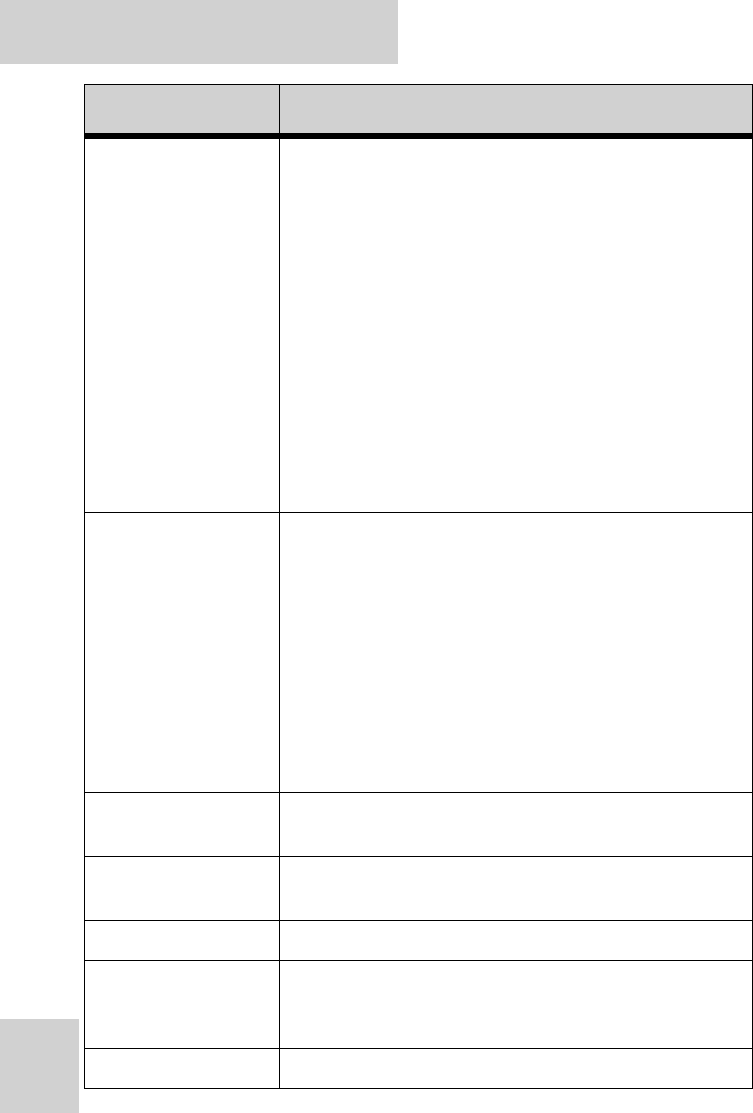
32
LED Status
Indicators
Power LED:
Off: Power off
Solid green: battery is charging, system is
off
Blinking green: battery is charging,
system is on
Solid yellow: Power on, battery low
Blinking yellow: Power on, battery
critically low
HDD LED:
Green when HDD is being accessed
WLAN LED:
Off: No RF signal / No LAN connection
Solid Green: WLAN activated
Blinking Green: TX/RX transmission
I/O Ports
2 x USB 2.0 host connectors
2 x RS-232/422/485One RGB output
1 x CF Type II slot
1 x PCMCIA Type II slot, supports CardBus 2.1
1 x internal mono micOne mono speaker
1 x RJ45 for 10/100/1000MB Ethernet
1 x RJ11 for 56kbps v.92/k56 flex modem
1 x audio jack for stereo headphone
1 x audio jack for microphone
1 x DC-IN
1 x docking connector
Main Battery Swappable battery back of 6 li-ion 18650
2400mAh cells (3S2P)
Power Adapter Universal AC 90V ~ 265V, 47 ~ 63Hz input; 19V,
3.16 A output
Physical 320x246x52 mm, 2.758 kg
Environment Operating Temperature: -20ºC to 60ºC
Storage Temperature -40ºC to 70ºC
Operating Humidity 5% ~ 95%
Rugged Spec. IP54, 3ft drop, MIL-STD-810F, MIL-STD-461E
Feature Description

XT1100 User Manual
33
Compliance CE, FCC, cUL/UL
Accessories
1 x AC adapter & power cord
1 x Cradle
1x Stylus
Others
Feature Description