ADC Telecommunications FWM0801A GSM Base Station User Manual Manual 1
ADC Telecommunications Inc GSM Base Station Manual 1
Contents
- 1. Manual 1
- 2. Manual 2
Manual 1
Mobile Network Solutions
FlexWave microBTS 1 x 1 and 2 x 1
Installation and Commissioning Guide, Release 4.0
D-640203-0-20 Ver. A
22576-A
ADCP-77-086 • Issue 2 • 04/2009

Mobile Network Solutions
FlexWave microBTS 1 x 1 and 2 x 1
Installation and Commissioning Guide, Release 4.0
ADCP-77-086 • Issue 2 • 04/2009
D-640203-0-20 Ver. A

ADCP-77-086 • Issue 2 • 04/2009 • Introduction
Page ii FlexWave microBTS Installation and Commissioning Guide
© 2009, ADC Telecommunications, Inc.
Copyright
© 2009, ADC Telecommunications, Inc.
All Rights Reserved
Revision History
List of Changes
The technical changes incorporated into this issue are listed below.
Trademark Information
ADC is a registered trademark and InterReach, InterReach Unison, InterReach Fusion, WAVEXchange, FlexWave are registered
trademarks and trademarks of ADC Telecommunications, Inc. or LGC Wireless, Inc. a wholly owned subsidiary of ADC. All other
products, company names, service marks, and trademarks mentioned in this document or website are used for identification
purposes only and may be owned by other companies.
Disclaimer of Liability
Contents herein are current as of the date of publication. ADC reserves the right to change the contents without prior notice. In no
event shall ADC be liable for any damages resulting from loss of data, loss of use, or loss of profits and ADC further
disclaims any and all liability for indirect, incidental, special, consequential or other similar damages. This disclaimer of
liability applies to all products, publications and services during and after the warranty period.
This publication may be verified at any time by contacting ADC’s Technical Assistance Center at 1-800-366-3891, extension 73476
(in U.S.A. or Canada) or 952-917-3476 (outside U.S.A. and Canada), or by e-mail to wireless.tac@adc.com.
ISSUE DATE REASON FOR CHANGE
2 04/2009 Product revisions
PAGE IDENTIFIER DESCRIPTION OF CHANGE
All New publication
All Added software commissioning and upgrade procedures
ADC Telecommunications, Inc.
P.O. Box 1101, Minneapolis, Minnesota 55440-1101
In U.S.A. and Canada: 1-800-366-3891
Outside U.S.A. and Canada: (952) 938-8080
Fax: (952) 917-1717

ADCP-77-086 • Issue 2 • 04/2009 • Introduction
FlexWave microBTS Installation and Commissioning Guide Page iii
© 2009, ADC Telecommunications, Inc.
Declarations of Conformity
Declaration of Conformity
With regard to the R&TTE Directive 1999/5/EC
Mailing Address: P.O. Box 1101, Minneapolis, Minnesota 55440-1101
World Headquarters: Minneapolis, Minnesota USA +1.952.938.8080 www.adc.com
Manufacturer’s Name: ADC Telecommunications, Inc.
Manufacturer’s Address: Mailing Address: P.O. Box 1101
Minneapolis, Minnesota 55440-1101 USA
Declares that this product:
Product Name: FlexWave™ 1800 MHz microBTS
Product Description: Wireless Network System
Model Name(s): FWB-MBTS-C20N00
Complies with appropriate essential requirements of the Article 3 of the R&TTE Directive:
Standards to which the conformity is declared:
Protection to Health and Safety: Directive: 2006/95/EC (previously 73/23/EEC)
Protection with respect to EMC: Directive: 2004/108/EC (previously 89/336/EEC)
EMC: ETSI EN 301 489-1, 8 V1.4.1 (2002-8)
Health & Safety: IEC 60950-1 (1st Edition): (2001-7)
Radio: ETSI EN 301 502 V8.1.2 (2001-7)
Name of authorized person: Mark Miska
Position: Compliance Engineer
Date of Issue: 7/18/2008 Signature
Mailing Address: P.O. Box 1101, Minneapolis, Minnesota 55440-1101
World Headquarters: Minneapolis, Minnesota USA +1.952.938.8080 www.adc.com
EC Declaration of Conformity
Under R&TTE Directive 1999/5/EC
Manufacturer Name : ADC Telecommunications, Inc.
Address : 541 E Trimble Road
San Jose, CA 95131, U.S.A.
Declares that the product InterReach PicoBSS
Product Description : Wireless Network System
Model Number : ADCIR-BSS-xxxx
(x = 0-9)
Complies with appropriate essential requirements of the Article 3 of the R&TTE directive.
Standard to which conformity is declared :
Protection to Health and Safety: Directive: 73/23/EEC
Protection with respect to EMC: Directive: 89/336/EEC
EMC: ETSI EN 301 489-1, 8 V1.4.1 (2002-8)
Safety: EN 60950-1:2001+A11
Radio: ETSI EN 301 502 V8.1.2 (2001-7)
Name of authorized person; Mark Schutzer
Position: Director, Hardware Engineering
Date: 8/12/2008 Signature
Mailing Address: P.O. Box 1101, Minneapolis, Minnesota 55440-1101
World Headquarters: Minneapolis, Minnesota USA +1.952.938.8080 www.adc.com
EC Declaration of Conformity
Under R&TTE Directive 1999/5/EC
Manufacturer Name : ADC Telecommunications, Inc.
Address : 541 E Trimble Road
San Jose, CA 95131, U.S.A.
Declares that the product Ultrawave Micro BTS/BSPlus System
Product Description : Wireless Network System
Model Number : MBTS-xxxx/MBSS-xxxx
(x = 0-9)
Complies with appropriate essential requirements of the Article 3 of the R&TTE directive.
Standard to which conformity is declared :
Protection to Health and Safety: Directive: 73/23/EEC
Protection with respect to EMC: Directive: 89/336/EEC
EMC: ETSI EN 301 489-1, 8 V1.4.1 (2002-8)
Safety: EN 60950-1:2001+A11
Radio: ETSI EN 301 502 V8.1.2 (2001-7)
Name of authorized person; Mark Schutzer
Position: Director, Hardware Engineering
Date: 8/12/2008 Signature
Mailing Address: P.O. Box 1101, Minneapolis, Minnesota 55440-1101
World Headquarters: Minneapolis, Minnesota USA +1.952.938.8080 www.adc.com
EC Declaration of Conformity
Under R&TTE Directive 1999/5/EC
Manufacturer Name : ADC Telecommunications, Inc.
Address : 541 E Trimble Road
San Jose, CA 95131, U.S.A.
Declares that the product Ultrawave NIB System
Product Description : Wireless Network System
Model Number : UNIB-xxxx
(x = 0-9)
Complies with appropriate essential requirements of the Article 3 of the R&TTE directive.
Standard to which conformity is declared :
Protection to Health and Safety: Directive: 73/23/EEC
Protection with respect to EMC: Directive: 89/336/EEC
EMC: ETSI EN 301 489-1, 8 V1.4.1 (2002-8)
Safety: EN 60950-1:2001+A11
Radio: ETSI EN 301 502 V8.1.2 (2001-7)
Name of authorized person; Mark Schutzer
Position: Director, Hardware Engineering
Date: 8/12/2008 Signature

ADCP-77-086 • Issue 2 • 04/2009 • Introduction
Page iv FlexWave microBTS Installation and Commissioning Guide
© 2009, ADC Telecommunications, Inc.
Mailing Address: P.O. Box 1101, Minneapolis, Minnesota 55440-1101
World Headquarters: Minneapolis, Minnesota USA +1.952.938.8080 www.adc.com
EC Declaration of Conformity
Under R&TTE Directive 1999/5/EC
Manufacturer Name : ADC Telecommunications, Inc.
Address : 2495 Leghorn St.
Mountain View, CA 94043, U.S.A.
Declares that the product Ultrawave Base Station Controller System
Product Description : Base Station Controller
Model Number : ASABxxxxxxxxxxxxxxxxxxxxxxxxx
(x = 0-9, A – Z or blank)
Complies with appropriate essential requirements of the Article 3 of the R&TTE directive.
Standard to which conformity is declared :
Protection to Health and Safety: Directive: 73/23/EEC
Protection with respect to EMC: Directive: 89/336/EEC
EMC: ETSI EN 300 386 V1.2.1 (2000-03)
Safety: EN 60950-1:2001+A11
Name of authorized person; Mark Schutzer
Position: Director, Hardware Engineering
Date: 1/6/2008 Signature
Mailing Address: P.O. Box 1101, Minneapolis, Minnesota 55440-1101
World Headquarters: Minneapolis, Minnesota USA +1.952.938.8080 www.adc.com
EC Declaration of Conformity
Under R&TTE Directive 1999/5/EC
Manufacturer Name : ADC Telecommunications, Inc.
Address : 541 E Trimble Road
San Jose, CA 95131, U.S.A.
Declares that the product Ultrawave BTS/BSPlus System
Product Description : GSM Base Transceiver Station
Model Number : UBTS-xxxx/UBSS-xxxx
(x = 0-9)
Complies with appropriate essential requirements of the Article 3 of the R&TTE directive.
Standard to which conformity is declared :
Protection to Health and Safety: Directive: 73/23/EEC
Protection with respect to EMC: Directive: 89/336/EEC
EMC: ETSI EN 301 489-1, 8 V1.4.1 (2002-8)
Safety: EN 60950-1:2001+A11
Radio: ETSI EN 301 502 V8.1.2 (2001-7)
Name of authorized person; Mark Schutzer
Position: Director, Hardware Engineering
Date: 8/12/2008 Signature

FlexWave microBTS Installation and Commissioning Guide Page v
© 2009, ADC Telecommunications, Inc.
ADCP-77-086 • Issue 2 • 04/2009 • Preface
About This Manual
Welcome to the FlexWave microBTS Installation and Commissioning Guide. It describes how
to perform local installation and commissioning of the microBTS at the customer’s site.
This document is intended for an ADC trained field service engineer (FSE) or operator who
performs local installation and commissioning at the customer’s site. The FSE or operator
should be equipped with the necessary tools for installation and commissioning, and a basic
understanding of the GSM cellular network. The FSE or operator should also be familiar with
the use of the Craft PC and procedures conducted using the Craft PC.
ADC assumes that pre-installation project planning has occurred, and is documented via a site
survey report. This site survey should include items such as the location of antennas, chassis,
power connections and other interface accesses and temperature control equipment.
Related Publications
Listed below are related manuals, their content, and their publication numbers. Copies of these
publications can be ordered by contacting the Technical Assistance Center at 1-800-366-3891,
extension 73476 (in U.S.A. or Canada) or 952-917-3476 (outside U.S.A. and Canada).
Mobile Network Solutions Documentation Index ADCP-76
United States Federal Communications Commission Required User Information
Located on the equipment is a label that contains, among other information, the FCC registra-
tion number. If requested, this information must be provided to the telephone company.
The UltraWAVE BTS Series AUAC series complies with Part 22 of the FCC Rules.
The 1900 MHz WAVEXpress Series M50 complies with Part 24 of the FCC Rules.
The WAVE2000 BS Plus 800 MHz complies with Part 22 of the FCC Rules.
The WAVE2000 Pico BS Plus (800 MHz and 1900 MHz) comply with Part 22 and Part 24 of
the FCC Rules and UL 1950 safety certification.
This equipment cannot be used on the telephone company-provided coin service. Connection
to Party Line Service is subject to State Tariffs.
If this equipment causes harm to the telephone network, the telephone company will notify
you in advance that temporary discontinuance of service may be required. If advance notice
isn't practical, the telephone company will notify the customer as soon as possible. Also, you
will be advised of your right to file a complaint with the FCC if you believe it is necessary.
The telephone company may make changes in its facilities, equipment, operations, of proce-
dures that could affect the operation of the equipment. If this happens, the telephone company
will provide advance notice in order for you to make the necessary modifications in order to
maintain uninterrupted service.
Title/Description ADCP Number

Page vi FlexWave microBTS Installation and Commissioning Guide
© 2009, ADC Telecommunications, Inc.
ADCP-77-086 • Issue 2 • 04/2009 • Preface
If the trouble is causing harm to the telephone network, the telephone company may request
you to remove the equipment from the network until the problem is resolved.
It is recommended that the customer install a surge arrester in the AC outlet to which that
device is connected. This is to avoid damaging the equipment caused by local lightning strikes
and other electrical surges.
This equipment uses the following USOC jacks and codes:
Note: This equipment has been tested and found to comply with the limits for a Class A digital
device, pursuant to Part 15 of the FCC Rules. These limits are designed to provide reasonable
protection against harmful interference when the equipment is operated in a commercial envi-
ronment. This equipment generates, uses and can radiate radio frequency energy and, if not
installed and used in accordance with the instruction manual, may cause harmful interference
to radio communications. Operation of this equipment in a residential area is likely to cause
harmful interference in which case the user will be required to correct the interference at his
own expense.
Changes of modifications not expressly approved by ADC can void the user's authority to
operate the equipment. FCC and IC certification labels denoting the product specific certifica-
tion numbers may be found on the product.
Industry Canada Required User Information
CP-O1, Issue 8, Part 1, Section 14.1
NOTICE: The Industry Canada label identifies certified equipment. This certification means
that the equipment meets certain telecommunications network protective, operational and
safety requirements as prescribed in the appropriate Terminal Equipment Technical Require-
ments document(s). The Department does not guarantee the equipment will operate to the
user's satisfaction.
Before installing this equipment, users should ensure that it is permissible to be connected to
the facilities of the local telecommunications company. The equipment must also be installed
using an acceptable method of connection. The customer should be aware that compliance
with the above conditions may not prevent degradation of service in some situations.
Model Name Facility Interface Code Service Order Code Jack Type
340122/340133 04DU9-BN 6.ON RJ-48C
340122/340133 04DU9-DN 6.ON RJ-48C
340122/340133 04DU9-1KN 6.ON RJ-48C
340122/340133 04DU9-1SN 6.ON RJ-48C
340122/340133 04DU9-1ZN 6.ON RJ-48C

FlexWave microBTS Installation and Commissioning Guide Page vii
© 2009, ADC Telecommunications, Inc.
ADCP-77-086 • Issue 2 • 04/2009 • Preface
Repairs to certified equipment should be coordinated by a representative designated by the
supplier. Any repairs or alterations made by the user to this equipment, or equipment malfunc-
tions, may give the telecommunications company cause to request the user to disconnect the
equipment.
Users should ensure for their own protection that the electrical ground connections of the
power utility, telephone lines and internal metallic water pipe system, if present, are connected
together. This precaution may be particularly important in rural areas.
CAUTION: Users should not attempt to make such connections themselves, but should
contact the appropriate electric inspection authority, or electrician, as appropriate.
The standard connecting arrangement (telephone jack type) for this equipment is CA81A.
CP-01, Issue 8, Part 1, Section 14.2
NOTICE: The Ringer Equivalence Number (REN) assigned to each terminal device provides
an indication of the maximum number of terminals allowed to be connected to a telephone
interface. The termination of an interface may consist of any combination of devices subject
only to the requirement that the sum of the Ringer Equivalence Numbers of all the devices
does not exceed 5.
This Class A digital apparatus complies with Canadian ICES-003.
Cet appareil numerique de la classe A est conforme a la norme NMB-003 du Canada.
This device complies with Industry Canada RSS-133 and SRSP-510 or RS132 & SRPS-503.
Disposal of Electronic and Electrical Waste
Pursuant to the WEEE EU Directive electronic and electrical waste must not be
disposed of with unsorted waste. Please contact your local recycling authority for
disposal of this product.

Page viii FlexWave microBTS Installation and Commissioning Guide
© 2009, ADC Telecommunications, Inc.
ADCP-77-086 • Issue 2 • 04/2009 • Preface
Admonishments
Important safety admonishments are used throughout this manual to warn of possible hazards
to persons or equipment. An admonishment identifies a possible hazard and then explains what
may happen if the hazard is not avoided. The admonishments — in the form of Dangers,
Warnings, and Cautions — must be followed at all times.
These warnings are flagged by use of an alert icon (seen below), and are listed in descending
order of severity of injury or damage and likelihood of occurrence.
Microwave Radio Radiation Warning
Although ADC products do not use microwave radio antennas, the equipment is often mounted
in the vicinity of microwave radio antennas. Under normal operating conditions, microwave
radio equipment complies with the limits for human exposure to radio frequency (RF) fields
adopted by the Federal Communications Commission (FCC). All ADC microwave radio
equipment is designed so that under normal working conditions, microwave radiation directly
from the radio is negligible when compared with the permissible limit of continuous daily
exposure recommended in the United States by ANSI/IEEE C95.1-1991 (R1997), Safety
Levels with Respect to Human Exposure to Radio Frequency Electromagnetic Fields, 3 kHz to
300 GHz.
DANGER: Danger is used to indicate the presence of a hazard that will cause severe personal
injury, death, or substantial property damage if the hazard is not avoided.
DANGER: Le terme « Danger » signale un danger qui causera des blessures physiques
graves, la mort ou des dommages matériels substantiels s’il n’est pas évité.
GEFAHR: “Gefahr” weist auf einen Zustand hin, der schwere körperliche Verletzungen, den
Tod oder schwere Sachschäden zur Folge haben wird, wenn die Gefahrenquelle nicht
gemieden wird.
WARNING: Warning is used to indicate the presence of a hazard that can cause severe
personal injury, death, or substantial property damage if the hazard is not avoided.
AVERTISSEMENT: Le terme « Avertissement » signale un danger qui peut provoquer des
blessures sérieuses graves, entraîner la mort ou causer des dommages matériels substantiels
s’il n’est pas évité.
WARNUNG: “Warnung” weist auf einen Zustand hin, der ernsthafte Verletzungen, den Tod
oder schwere Sachschäden verursachen kann, wenn die Gefahrenquelle nicht gemieden wird.
Caution: Caution is used to indicate the presence of a hazard that will or can cause minor
personal injury or property damage if the hazard is not avoided.
Attention: Le terme « Attention » signale un danger susceptible de causer des blessures
mineures ou des dommages matériels mineurs s’il n’est pas évité.
Vorsicht: “Vorsicht” weist auf einen Zustand hin, der leichte Verletzungen bzw. Sachschäden
zur Folge haben wird oder haben kann, wenn die Gefahrenquelle nicht gemieden wird.

FlexWave microBTS Installation and Commissioning Guide Page ix
© 2009, ADC Telecommunications, Inc.
ADCP-77-086 • Issue 2 • 04/2009 • Preface
Microwave signal levels that give rise to hazardous radiation levels can exist within transmit-
ter power amplifiers, associated RF multiplexers, and antenna systems.
AVERTISSEMENT: Dans des conditions normales de fonctionnement, le matériel radio
ADC Telecommunications est conforme aux limites d'exposition humaine aux champs de
radiofréquences adoptées par la FCC (Federal Communications Commission). Tous les appar-
eils d’ADC Telecommunications, Inc. sont conçus pour émettre un niveau de rayonnement de
radiofréquences négligeable dans des conditions normales d’utilisation, dans les limites
acceptables d’exposition continue quotidienne recommandées aux États-Unis selon la norme
ANSI/IEEE C95.1-19991 (R1997) qui définit les niveaux de sécurité pour l’exposition
humaine aux champs électromagnétiques radio de 3 kHz à 300 GHz. Les signaux RF émis
peuvent engendrer des niveaux de rayonnement dangereux à l'intérieur de l’émetteur, des
amplificateurs de puissance, des multiplexeurs RF et des systèmes d’antenne associés. Ne pas
débrancher les connecteurs coaxiaux RF sur l’appareil ou les systèmes d’antenne ADC
pendant le fonctionnement de l'équipement radio. Éviter tout contact physique avec le connec-
teur RF et ne pas regarder dans celui-ci lors des transmissions radio.
WARNUNG: Unter normalen Betriebsbedingungen erfüllen ADC Telecommunications
Funkanlagen die Schutzanforderungen der amerikanischen Federal Communications Commis-
sion (FCC) für Menschen vor HF-Feldern. Alle Funkanlagen der ADC Telecommunications,
Inc. sind so konstruiert, dass unter normalen Betriebsbedingungen die HF-Strahlen, die direkt
vom Funkgerät abgegeben werden, vernachlässigbar sind, im Vergleich zum zulässigen
Höchstwert der permanenten täglichen Strahlenbelastung, die in den USA nach ANSI/IEEE
C95.1-19991 (R1997) empfohlen wird: „Sichere elektromagnetische HF-Strahlenbelastung
beim Menschen, 3 kHz bis 300 GHz“. HF-Signale, die zu gefährlichen Strahlenwerten führen,
können innerhalb eines Senders, eines Leistungsverstärkers, eines angeschlossenen HF-Multi-
plexers oder eines Antennensystems entstehen. HF-Koaxialstecker bei ADC-Anlagen oder.
Antennensysteme dürfen nicht bei laufendem Betrieb der Funkanlage abgezogen werden. Man
darf nie einen Körperteil vor einem HF-Stecker platzieren bzw. den Stecker beim laufenden
Betrieb der Funkanlage angucken.
Conventions Used in This Manual
The following type and style conventions are used in this manual:
WARNING: Never look into the open end of a waveguide or any other open RF connection
as eyes are particularly vulnerable to radiation. Do not disconnect RF coaxial connectors, open
microwave units, or remove any microwave screening while the radio equipment is operating.
AVERTISSEMENT: Ne pas regarder dans l’extrémité ouverte d’un guide d’ondes ou de
toute autre connexion RF ouverte, du fait que les yeux sont particulièrement sensibles au ray-
onnement. Ne pas débrancher les connecteurs coaxiaux RF, ne pas ouvrir les unités à
hyperfréquences et ne pas démonter tout émetteur à hyperfréquences au cours du fonction-
nement de l’équipement radio.
WARNUNG: Man darf nie in das offene Ende eines Wellenleiters oder einer offenen
HF-Verbindung blicken, da die Augen sehr empfindlich gegenüber Strahlenemissionen sind.
Niemals HF-Koaxialstecker auftrennen, Mikrowelleneinheiten öffnen, oder Mikrowellenab-
schirmungen entfernen, während die Funkanlage eingeschaltet ist.

Page x FlexWave microBTS Installation and Commissioning Guide
© 2009, ADC Telecommunications, Inc.
ADCP-77-086 • Issue 2 • 04/2009 • Preface
Conventions Used in This Manual
Convention Meaning
Body Text Used for regular body text
Bold Indicates a menu or button choice
Command Indicates computer generated text and prompts
User Input Indicates user input
<hostname> In command syntax, indicates user-specified command line parameters
<variable> In body text, indicates user-specified command line parameters
[BRACKETS] Indicates a key on the keyboard or instrument
Note: Provides relevant additional information

FlexWave microBTS Installation and Commissioning Guide Page xi
© 2009, ADC Telecommunications, Inc.
ADCP-77-086 • Issue 2 • 04/2009 • Table of Contents
Table of Contents
Chapter 1 -
Introduction
1.1 Overview of the microBTS 1 x 1 and 2 x 1 . . . . . . . . . . . . . . . . . . . . . . . . . . . . . . . . . . . . . . . . . . . . . . . . . . . . . 2
1.2 microBTS Description . . . . . . . . . . . . . . . . . . . . . . . . . . . . . . . . . . . . . . . . . . . . . . . . . . . . . . . . . . . . . . . . . . . 3
1.2.1 Primary Components . . . . . . . . . . . . . . . . . . . . . . . . . . . . . . . . . . . . . . . . . . . . . . . . . . . . . . . . . . . . 3
1.2.2 Mounting . . . . . . . . . . . . . . . . . . . . . . . . . . . . . . . . . . . . . . . . . . . . . . . . . . . . . . . . . . . . . . . . . . . . 3
1.2.3 Fault Detection and Alarm Reporting . . . . . . . . . . . . . . . . . . . . . . . . . . . . . . . . . . . . . . . . . . . . . . . . . 3
1.2.4 IP Backhaul Connection . . . . . . . . . . . . . . . . . . . . . . . . . . . . . . . . . . . . . . . . . . . . . . . . . . . . . . . . . . 4
1.2.5 Network Listen Antenna Connection . . . . . . . . . . . . . . . . . . . . . . . . . . . . . . . . . . . . . . . . . . . . . . . . . 4
1.2.6 Base Station Antenna Cable Connection . . . . . . . . . . . . . . . . . . . . . . . . . . . . . . . . . . . . . . . . . . . . . . . 4
1.2.7 Powering . . . . . . . . . . . . . . . . . . . . . . . . . . . . . . . . . . . . . . . . . . . . . . . . . . . . . . . . . . . . . . . . . . . . 4
1.2.8 Grounding . . . . . . . . . . . . . . . . . . . . . . . . . . . . . . . . . . . . . . . . . . . . . . . . . . . . . . . . . . . . . . . . . . . 4
1.2.9 Cooling . . . . . . . . . . . . . . . . . . . . . . . . . . . . . . . . . . . . . . . . . . . . . . . . . . . . . . . . . . . . . . . . . . . . . 5
1.2.10 User Interface . . . . . . . . . . . . . . . . . . . . . . . . . . . . . . . . . . . . . . . . . . . . . . . . . . . . . . . . . . . . . . . . 5
1.2.11 Specifications . . . . . . . . . . . . . . . . . . . . . . . . . . . . . . . . . . . . . . . . . . . . . . . . . . . . . . . . . . . . . . . . 6
1.3 Accessory Items and Catalog Numbers . . . . . . . . . . . . . . . . . . . . . . . . . . . . . . . . . . . . . . . . . . . . . . . . . . . . . . . 8
1.3.1 Catalog Numbers for the microBTS . . . . . . . . . . . . . . . . . . . . . . . . . . . . . . . . . . . . . . . . . . . . . . . . . . 8
1.3.2 Strand Mount Kit . . . . . . . . . . . . . . . . . . . . . . . . . . . . . . . . . . . . . . . . . . . . . . . . . . . . . . . . . . . . . . 8
1.3.3 Lightning Protector . . . . . . . . . . . . . . . . . . . . . . . . . . . . . . . . . . . . . . . . . . . . . . . . . . . . . . . . . . . . . 8
1.3.4 Solar Shields . . . . . . . . . . . . . . . . . . . . . . . . . . . . . . . . . . . . . . . . . . . . . . . . . . . . . . . . . . . . . . . . . 9
1.3.5 Hardened RJ-45 Drop Cables . . . . . . . . . . . . . . . . . . . . . . . . . . . . . . . . . . . . . . . . . . . . . . . . . . . . . . 9
1.3.6 AC and DC Power Cords . . . . . . . . . . . . . . . . . . . . . . . . . . . . . . . . . . . . . . . . . . . . . . . . . . . . . . . . . . 9
1.3.7 UPS System with Battery Backup . . . . . . . . . . . . . . . . . . . . . . . . . . . . . . . . . . . . . . . . . . . . . . . . . . 10
Chapter 2 -
Unpacking and Inspection
2.1 Unpacking and Inspecting the microBTS . . . . . . . . . . . . . . . . . . . . . . . . . . . . . . . . . . . . . . . . . . . . . . . . . . . . . 12
Chapter 3 -
Mounting Procedures
3.1 Before Mounting the microBTS . . . . . . . . . . . . . . . . . . . . . . . . . . . . . . . . . . . . . . . . . . . . . . . . . . . . . . . . . . . 14
3.1.1 Introduction . . . . . . . . . . . . . . . . . . . . . . . . . . . . . . . . . . . . . . . . . . . . . . . . . . . . . . . . . . . . . . . . . 14
3.1.2 Mounting Considerations . . . . . . . . . . . . . . . . . . . . . . . . . . . . . . . . . . . . . . . . . . . . . . . . . . . . . . . . 14
3.1.3 Mounting Hardware Provided With the microBTS . . . . . . . . . . . . . . . . . . . . . . . . . . . . . . . . . . . . . . . 14
3.1.4 microBTS Dimensions . . . . . . . . . . . . . . . . . . . . . . . . . . . . . . . . . . . . . . . . . . . . . . . . . . . . . . . . . . 15
3.1.5 Tools and Additional Materials Required For Mounting . . . . . . . . . . . . . . . . . . . . . . . . . . . . . . . . . . . 16
3.1.6 Lift Ring Installation . . . . . . . . . . . . . . . . . . . . . . . . . . . . . . . . . . . . . . . . . . . . . . . . . . . . . . . . . . . 17
3.1.7 Standard Mounting Bracket Installation . . . . . . . . . . . . . . . . . . . . . . . . . . . . . . . . . . . . . . . . . . . . . . 17
Content Page

Page xii FlexWave microBTS Installation and Commissioning Guide
© 2009, ADC Telecommunications, Inc.
ADCP-77-086 • Issue 2 • 04/2009 • Table of Contents
Chapter 4 -
Installation Procedures
4.1 Installation Overview . . . . . . . . . . . . . . . . . . . . . . . . . . . . . . . . . . . . . . . . . . . . . . . . . . . . . . . . . . . . . . . . . . 26
4.1.1 Installation Hardware Provided with microBTS Enclosure . . . . . . . . . . . . . . . . . . . . . . . . . . . . . . . . . .26
4.1.2 Tools and Materials Required . . . . . . . . . . . . . . . . . . . . . . . . . . . . . . . . . . . . . . . . . . . . . . . . . . . . . 27
4.1.3 Ground Wire Installation . . . . . . . . . . . . . . . . . . . . . . . . . . . . . . . . . . . . . . . . . . . . . . . . . . . . . . . . 27
4.1.4 Network Listen Antenna Installation . . . . . . . . . . . . . . . . . . . . . . . . . . . . . . . . . . . . . . . . . . . . . . . . . 28
4.1.5 IP Backhaul Cable Installation . . . . . . . . . . . . . . . . . . . . . . . . . . . . . . . . . . . . . . . . . . . . . . . . . . . . 29
4.1.6 Base Station Antenna Cable Installation . . . . . . . . . . . . . . . . . . . . . . . . . . . . . . . . . . . . . . . . . . . . . . 30
4.1.7 AC Power Wiring Installation . . . . . . . . . . . . . . . . . . . . . . . . . . . . . . . . . . . . . . . . . . . . . . . . . . . . . 31
4.1.8 DC Power Wiring Installation . . . . . . . . . . . . . . . . . . . . . . . . . . . . . . . . . . . . . . . . . . . . . . . . . . . . . 34
4.1.9 Touch-Up Painting . . . . . . . . . . . . . . . . . . . . . . . . . . . . . . . . . . . . . . . . . . . . . . . . . . . . . . . . . . . . . 37
4.1.10 Shield Installation (option) . . . . . . . . . . . . . . . . . . . . . . . . . . . . . . . . . . . . . . . . . . . . . . . . . . . . . . . 37
4.2 microBTS Replacement . . . . . . . . . . . . . . . . . . . . . . . . . . . . . . . . . . . . . . . . . . . . . . . . . . . . . . . . . . . . . . . . . 38
Chapter 5 -
microBTS Initial Configuration
5.1 Equipment and Information Required for Initialization . . . . . . . . . . . . . . . . . . . . . . . . . . . . . . . . . . . . . . . . . . . . 41
5.2 Configuring the Equipment for IP Connection . . . . . . . . . . . . . . . . . . . . . . . . . . . . . . . . . . . . . . . . . . . . . . . . . . 42
5.2.1 Introduction . . . . . . . . . . . . . . . . . . . . . . . . . . . . . . . . . . . . . . . . . . . . . . . . . . . . . . . . . . . . . . . . . 42
5.3 Configure PC to Communicate with the microBTS . . . . . . . . . . . . . . . . . . . . . . . . . . . . . . . . . . . . . . . . . . . . . . . 43
5.4 Determining the MAC Address of the microBTS and Assigning DHCP IP Addresses . . . . . . . . . . . . . . . . . . . . . . . .45
5.5 Assigning OML Link IP Address and a Static IP Address to the microBTS . . . . . . . . . . . . . . . . . . . . . . . . . . . . . . . 55
5.6 Configuring a New Site Using the BSC Configuration Manager Utility . . . . . . . . . . . . . . . . . . . . . . . . . . . . . . . . . . 57
5.7 Creating the FlexWave Manager . . . . . . . . . . . . . . . . . . . . . . . . . . . . . . . . . . . . . . . . . . . . . . . . . . . . . . . . . . . 62
5.8 Verifying BTS Functionality Using the BSC Configuration Manager . . . . . . . . . . . . . . . . . . . . . . . . . . . . . . . . . . . 68
Appendix A -
Software Upgrade Procedure
A.1 Introduction . . . . . . . . . . . . . . . . . . . . . . . . . . . . . . . . . . . . . . . . . . . . . . . . . . . . . . . . . . . . . . . . . . . . . . . . . 70
A.2 Upgrading Micro Controller Software from 4.0.x.x . . . . . . . . . . . . . . . . . . . . . . . . . . . . . . . . . . . . . . . . . . . . . . 71
A.2.1 Automatic Upgrading of the microBTS Controller . . . . . . . . . . . . . . . . . . . . . . . . . . . . . . . . . . . . . . . . 71
A.2.2 Manual Upgrade Procedure . . . . . . . . . . . . . . . . . . . . . . . . . . . . . . . . . . . . . . . . . . . . . . . . . . . . . . 78
A.3 Upgrade Procedure for Micro Controller Software 3.2.x to Version 4.0.1.x. . . . . . . . . . . . . . . . . . . . . . . . . . . . . . 86

FlexWave microBTS Installation and Commissioning Guide Page 1
© 2009, ADC Telecommunications, Inc.
ADCP-77-086 • Issue 2 • 04/2009 • Chapter 1 - Introduction
Chapter 1 - Introduction
1.1 Overview of the microBTS 1 x 1 and 2 x 1 . . . . . . . . . . . . . . . . . . . . . . . . . . . . . . . . . . . . . . . . . . . . . . . . . . . . . 2
1.2 microBTS Description . . . . . . . . . . . . . . . . . . . . . . . . . . . . . . . . . . . . . . . . . . . . . . . . . . . . . . . . . . . . . . . . . . . 3
1.2.1 Primary Components . . . . . . . . . . . . . . . . . . . . . . . . . . . . . . . . . . . . . . . . . . . . . . . . . . . . . . . . . . . . 3
1.2.2 Mounting . . . . . . . . . . . . . . . . . . . . . . . . . . . . . . . . . . . . . . . . . . . . . . . . . . . . . . . . . . . . . . . . . . . . 3
1.2.3 Fault Detection and Alarm Reporting . . . . . . . . . . . . . . . . . . . . . . . . . . . . . . . . . . . . . . . . . . . . . . . . . 3
1.2.4 IP Backhaul Connection . . . . . . . . . . . . . . . . . . . . . . . . . . . . . . . . . . . . . . . . . . . . . . . . . . . . . . . . . . 4
1.2.5 Network Listen Antenna Connection . . . . . . . . . . . . . . . . . . . . . . . . . . . . . . . . . . . . . . . . . . . . . . . . . 4
1.2.6 Base Station Antenna Cable Connection . . . . . . . . . . . . . . . . . . . . . . . . . . . . . . . . . . . . . . . . . . . . . . . 4
1.2.7 Powering . . . . . . . . . . . . . . . . . . . . . . . . . . . . . . . . . . . . . . . . . . . . . . . . . . . . . . . . . . . . . . . . . . . . 4
1.2.8 Grounding . . . . . . . . . . . . . . . . . . . . . . . . . . . . . . . . . . . . . . . . . . . . . . . . . . . . . . . . . . . . . . . . . . . 4
1.2.9 Cooling . . . . . . . . . . . . . . . . . . . . . . . . . . . . . . . . . . . . . . . . . . . . . . . . . . . . . . . . . . . . . . . . . . . . . 5
1.2.10 User Interface . . . . . . . . . . . . . . . . . . . . . . . . . . . . . . . . . . . . . . . . . . . . . . . . . . . . . . . . . . . . . . . . 5
1.2.11 Specifications . . . . . . . . . . . . . . . . . . . . . . . . . . . . . . . . . . . . . . . . . . . . . . . . . . . . . . . . . . . . . . . . 6
1.3 Accessory Items and Catalog Numbers . . . . . . . . . . . . . . . . . . . . . . . . . . . . . . . . . . . . . . . . . . . . . . . . . . . . . . . 8
1.3.1 Catalog Numbers for the microBTS . . . . . . . . . . . . . . . . . . . . . . . . . . . . . . . . . . . . . . . . . . . . . . . . . . 8
1.3.2 Strand Mount Kit . . . . . . . . . . . . . . . . . . . . . . . . . . . . . . . . . . . . . . . . . . . . . . . . . . . . . . . . . . . . . . 8
1.3.3 Lightning Protector . . . . . . . . . . . . . . . . . . . . . . . . . . . . . . . . . . . . . . . . . . . . . . . . . . . . . . . . . . . . . 8
1.3.4 Solar Shields . . . . . . . . . . . . . . . . . . . . . . . . . . . . . . . . . . . . . . . . . . . . . . . . . . . . . . . . . . . . . . . . . 9
1.3.5 Hardened RJ-45 Drop Cables . . . . . . . . . . . . . . . . . . . . . . . . . . . . . . . . . . . . . . . . . . . . . . . . . . . . . . 9
1.3.6 AC and DC Power Cords . . . . . . . . . . . . . . . . . . . . . . . . . . . . . . . . . . . . . . . . . . . . . . . . . . . . . . . . . . 9
1.3.7 UPS System with Battery Backup . . . . . . . . . . . . . . . . . . . . . . . . . . . . . . . . . . . . . . . . . . . . . . . . . . 10
Content Page
Page 2 FlexWave microBTS Installation and Commissioning Guide
© 2009, ADC Telecommunications, Inc.
ADCP-77-086 • Issue 2 • 04/2009 • Chapter 1 - Introduction
1.1 Overview of the microBTS 1 x 1 and 2 x 1
The FlexWave microBTS is an environmentally hardened outdoor base station solution that
supports GSM/AMR voice traffic and GPRS/EDGE data traffic. The microBTS is available in
three versions; 1, 2 and 4 TRX. The 4 x 1 version of the microBTS is covered in ADC publica-
tion number ADCP 77-087. An Internet Protocol (IP) back haul provides the interface between
the microBTS and the Base Station Controller (BSC). All voice and data traffic and all opera-
tion and maintenance functions are transported by the IP back haul. A complete FlexWave
Operations and Maintenance Center - Radio (OMC-R) management solution is available that
provides total control of the microBTS, BSC, and other FlexWave system elements.
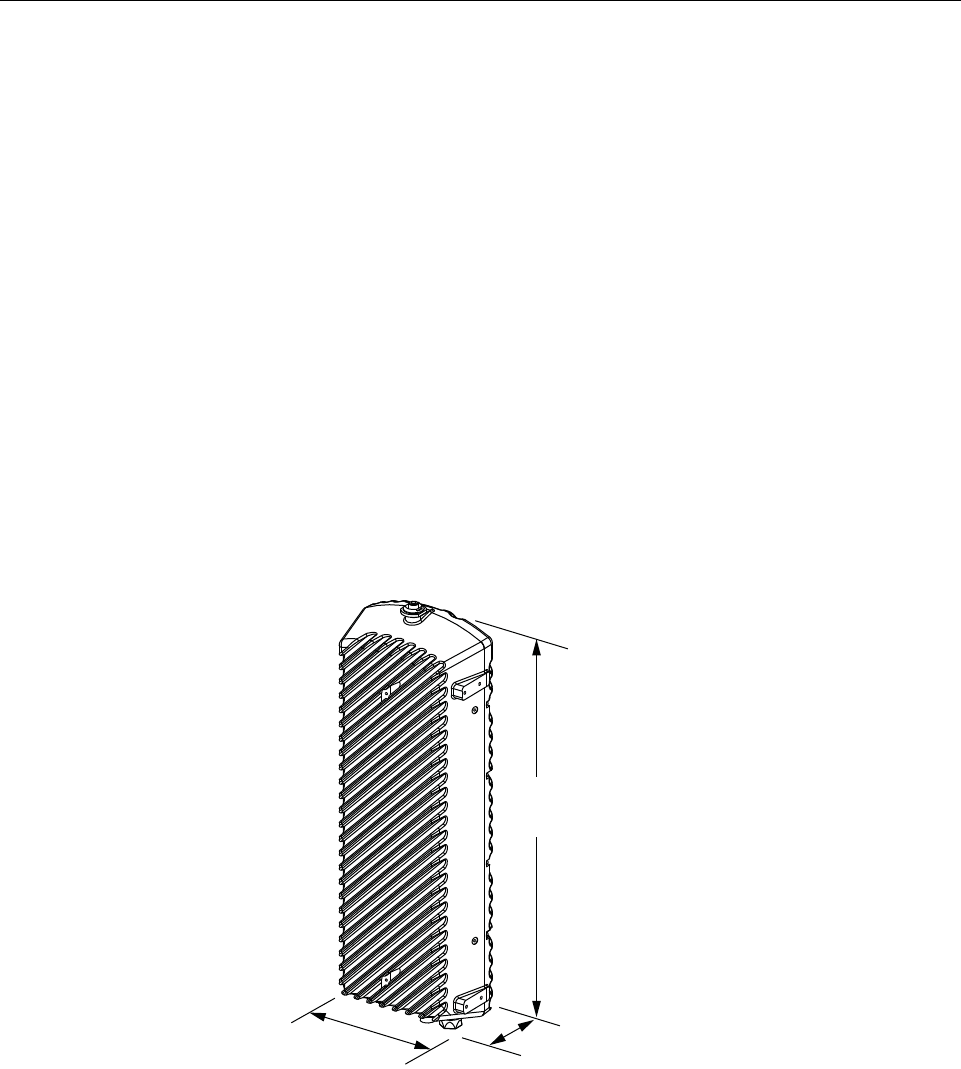
The microBTS, shown in Figure 1-1, consists of an environmentally-sealed enclosure and
various electronic modules that are housed within the enclosure. Excess heat is dissipated
using a passive cooling system which eliminates the need for external cooling fans. The low
profile design of the enclosure requires minimal real estate for installation. The enclosure may
be mounted from a wall, pole, or overhead cable (strand). A separate base station antenna (not
provided) mounts near the enclosure.
Figure 1-1: microBTS
29.4 IN.
(74.7 CM)
5.7 IN.
(14.5 CM)
9.7 IN.
(24.6 CM) 22577-A

FlexWave microBTS Installation and Commissioning Guide Page 3
© 2009, ADC Telecommunications, Inc.
ADCP-77-086 • Issue 2 • 04/2009 • Chapter 1 - Introduction
1.2 microBTS Description
The microBTS, supports or provides the following basic functions:
•Supports GSM/AMR voice traffic and GPRS/EDGE data traffic via four TRX units
•Supports OMC-R functions including provisioning, alarm management, and performance
management
•Supports IP back haul for voice and data traffic and OMC-R communications
•Provides Power Over Ethernet (POE) to the IP back haul device
•Provides an RF interface (antenna port) for the base station remote antenna
•Provides an RF interface (antenna port) for the GPS or Network Listen antenna
•Accepts AC power input
•Provides a visual indication of unit status
1.2.1 Primary Components
The microBTS is a fully integrated base station solution that includes the following: radio
transceivers, Linear Power Amplifier (LPA), RX Low Noise Amplifier (LNA), duplexer,
power supply, IP switches, Network Listen unit, processor board, carrier board, and enclosure.
The enclosure houses the electronic assemblies, controls RF emissions, seals out dirt and mois-
ture, and provides passive cooling. The internal components are not user replaceable or
accessible. The base station antenna cable connector, IP back haul connector, AC power con-
nector, and the unit status indicator are located on the bottom of the enclosure. The Network
Listen antenna connector is located on the top of the enclosure.
1.2.2 Mounting
The microBTS may be mounted on a flat vertical surface (such as the side of a building), on a
utility pole, or from a strand. A combination wall/pole mounting bracket is provided with each
unit. Wall or pole-mount installation consists of securing the bracket to the mounting surface
and then hanging the enclosure from the bracket. The bracket may be attached to a variety of
surfaces such as wood, concrete, or masonry. Various fasteners including hex-head capscrews,
tee-nuts, and concrete anchors are provided. A separate strand-mount kit (accessory item) is
available if it is necessary to mount the microBTS from a cable. The mircroBTS should be
mounted in a restricted access location only.
1.2.3 Fault Detection and Alarm Reporting
The microBTS detects and reports fault and alarm information. A single bottom-mounted
Light Emitting Diode (LED) indicator turns from off to red if a major fault is detected. The
status of the microBTS, the alarm state, and other fault information is summarized and

Page 4 FlexWave microBTS Installation and Commissioning Guide
© 2009, ADC Telecommunications, Inc.
ADCP-77-086 • Issue 2 • 04/2009 • Chapter 1 - Introduction
reported over the IP back haul. Fault and alarm information may be accessed using the
FlexWave OMC-R management solution.
1.2.4 IP Backhaul Connection
The IP back haul cable connection is through an Ethernet port that consists of a single bot-
tom-mounted hardened RJ-45 female connector. The IP back haul cable carries the voice and
data traffic plus all OMC-R provisioning, alarm, and performance monitoring communications
between the microBTS and the BSC. The IP back haul connection also provides DC power
(POE) to the IP back haul device with a 15 watt maximum power output at 48 VDC. The
maximum drop cable length is 300 feet (91.4 m).
1.2.5 Network Listen Antenna Connection
The Network Listen antenna connection is through a single top-mounted NMO (female) RF
connector. The Network Listen antenna attaches directly to the NMO connector.
1.2.6 Base Station Antenna Cable Connection
The base station antenna cable connection is through one 50 Ohm N-type female connector.
The microBTS includes an internal duplexer which allows a single antenna cable to carry both
forward and reverse path RF signals between the base station antenna and the microBTS.
An externally-mounted lightning protector is available as an accessory. The surge/antenna
connector on the lightning protector is an N-type female connector. The microBTS enclosure
must be properly grounded for the lighting protector to function properly.
1.2.7 Powering
The microBTS is powered by 90 to 265 VAC (nominal 120 or 240 VAC), 47 to 63 Hz power
or as an option -48 VDC. The AC or DC power is supplied through a 20-foot three-wire power
cable that is provided with the enclosure. The power cable connects to a mini 3-pin AC or DC
power connector mounted on the bottom of the microBTS enclosure. The power cable is rated
for indoor or outdoor use and must not be placed within electrical conduit as this will impede
the cooling of the cable during usage. Power cables in lengths of 40, 60, or 100 feet are avail-
able separately.
The stub end of the power cable must be routed to an external junction box (not provided) for
connection to the AC power source. A circuit breaker rated at 15 amps (120 VAC) or 5 amps
for 48 VDC applications should be used to provide overcurrent protection for the microBTS
power circuit. It is also recommended that an external AC outlet (not provided) be installed
near the microBTS enclosure to power test equipment and power tools.
1.2.8 Grounding
A grounding terminal (hex socket capscrew and washer) is provided on the bottom of the
enclosure for connecting a grounding cable to the enclosure. A 1.5 meter #6 stranded copper
FlexWave microBTS Installation and Commissioning Guide Page 5
© 2009, ADC Telecommunications, Inc.
ADCP-77-086 • Issue 2 • 04/2009 • Chapter 1 - Introduction
wire terminated with a ring terminal is provided with the microBTS for linking the enclosure
to an earth ground source.
1.2.9 Cooling
Passive cooling of the electronic assemblies is provided by conducting excess heat from the
internal electronic components to the aluminum enclosure. The heat is then dissipated to the
outside air by radiation and convection air flow over the enclosure’s external cooling fins. An
alarm is generated if a high temperature condition occurs within the enclosure.
1.2.10 User Interface
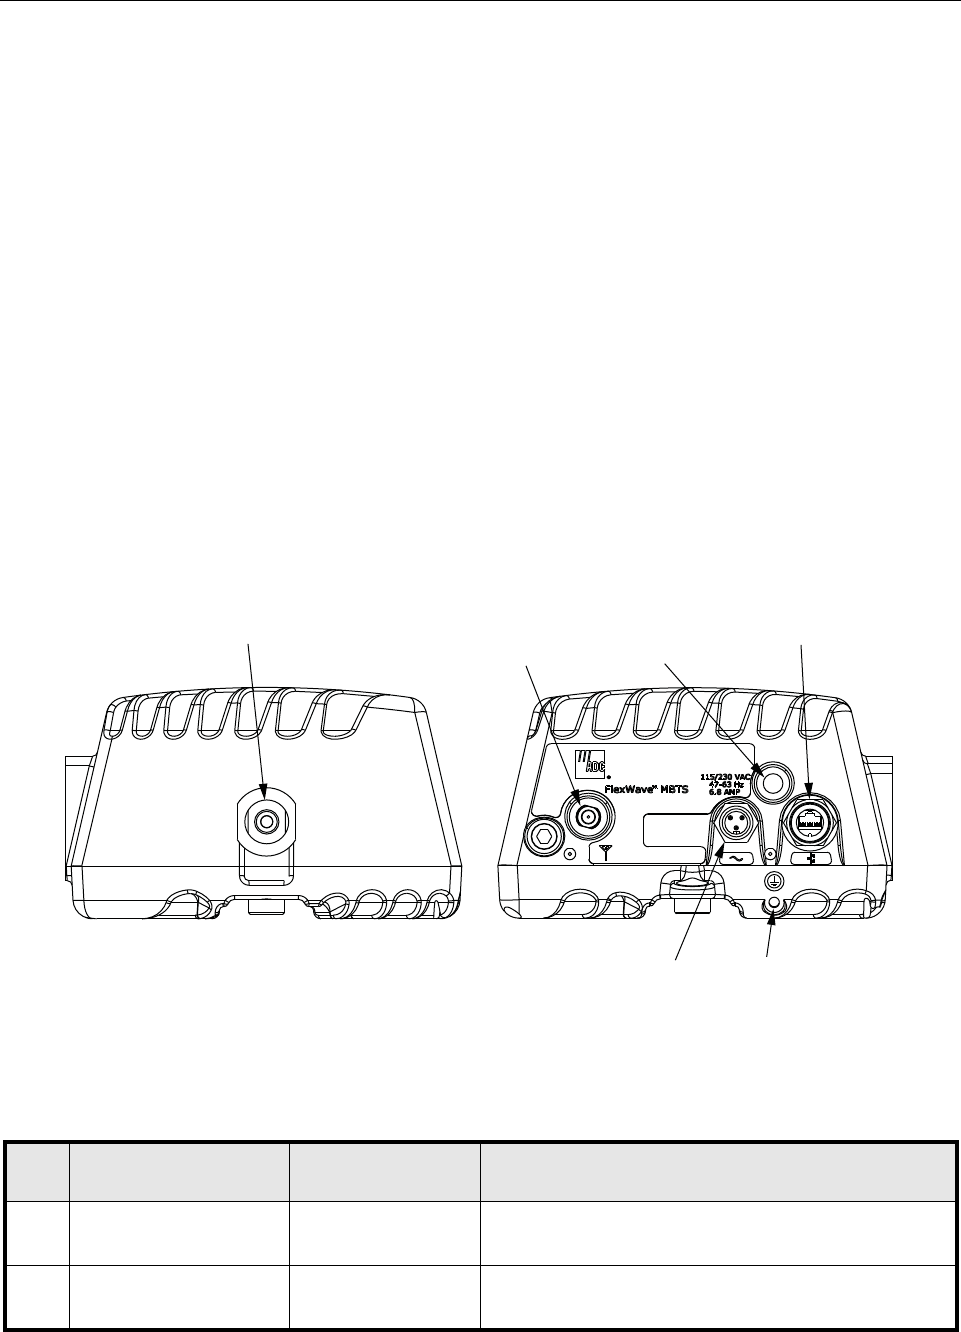
The microBTS user interface consists of the connectors, grounding lug, and LED that are
provided on the exterior of the enclosure. The microBTS user interface points are indicated in
Figure 1-2 and described in Table 1-1.
E
Figure 1-2: microBTS User Interface
Table 1-1: microBTS User Interface
Ref
No
User Interface
Designation Device Functional Description
1 No designation NMO female RF
connector Connection point for the Network Listen antenna.
2 Ground symbol Threaded hole with
hex socket screw Connection point for grounding wire.
22589-A
(5) LED
INDICATOR
TOP VIEW BOTTOM VIEW
(1) NETWORK LISTEN
ANTENNA CONNECTOR
(4) IP BACKHAUL
CABLE CONNECTOR
(2) GROUNDING WIRE
CONNECTION POINT
(6) AC POWER
CONNECTOR
NOTE: SHOWN WITH DUST CAPS REMOVED
(3) BASE STATION
ANTENNA
CONNECTOR

Page 6 FlexWave microBTS Installation and Commissioning Guide
© 2009, ADC Telecommunications, Inc.
ADCP-77-086 • Issue 2 • 04/2009 • Chapter 1 - Introduction
1.2.11 Specifications
The specifications for the microBTS are listed in Table 1-2.
E
3 Antenna symbol N-type female RF
coaxial connector Connection point for the base station antenna.
4Network symbol Sealed RJ-45 female
connector Connection point for the IP back haul cable
5 No designation Red LED (off/red) Indicates if the microBTS is powered and normal (off)
or if a major fault is detected (red).
6120/240 VAC 47-63 Hz
6.8 amps
Sealed 3-wire AC
power connector Connection point for the AC power cord.
Table 1-2: microBTS Specifications
Parameter Specification Remarks
Physical/ Environmental/ Electrical
Enclosure dimensions (L x W x D) 29.4 x 9.7 x 5.7 inches (747 x 246 x 145
mm) 0.94 cu. ft. (26.6L)
Mounting Wall, pole, or strand Strand mounting requires an
accessory mounting kit.
Weight 40 lbs (18.2 kg) Without shields installed
Weather resistance (see note 1) NEMA-6, IEC IP67 Indoor or outdoor installation
Operating temperature -30° to +55° C (-22° to +131° F)
Storage temperature -40° to +70° C (-40° to +158° F)
AC/DC power connector Sealed 3-pin AC/DC power
Antenna cable connector 50 Ohm N-type (female) 50 Ohms input/ output impedance
IP back haul connector Sealed RJ-45 (female) Ethernet port
Power over Ethernet port 48 VDC with 15 watt maximum
Network Listen antenna NMO (female)
Lightning suppression (for antenna
cable connector) 20 kA IEC 1000-4-5 8/20 µs waveform Provided by external lightning
protector (accessory)
Voltage input 90 to 265 VAC, 47-63 Hz
Power consumption maximum 600 VA at 120 VAC
Table 1-1: microBTS User Interface
Ref
No
User Interface
Designation Device Functional Description

FlexWave microBTS Installation and Commissioning Guide Page 7
© 2009, ADC Telecommunications, Inc.
ADCP-77-086 • Issue 2 • 04/2009 • Chapter 1 - Introduction
Note 1: The microBTS has been tested to assure it meets the dust and water
resistance requirements of IP67 as specified by IEC Publication60529. These tests
were conducted using closure caps attached to the cable ports. To assure the dust
and water resistance level is maintained, it is the responsibility of the user to
select AC power, antenna, and IP backhaul cable assemblies that have a dust and
water resistance level of IP67 or higher. If you are uncertain of cable
manufacturers that meet this requirement, please contact ADC Customer Service.
Current rating (maximum) 3.5 amps at 120 VAC (2 TRX’s on) Requires 15 amp circuit for 130
VAC operation
Downlink
Channel spacing 200 kHz
Frequency range 850 MHz Transmit: 869 to 894 MHz Receive: 824 to 849 MHz
Frequency range 900 MHz Transmit: 925 to 960 MHz Receive: 880 to 915 MHz
Frequency range 1800 MHz Transmit: 1805 to 1880 MHz Receive: 1710 to 1785 MHz
Frequency range1900 MHz Transmit: 1930 to 1990 MHz Receive: 1850 to 1910 MHz
Out-of-band emissions <-13 dBm per 1 MHz bandwidth from
30 MHz to 20 GHz
Transmitter output power per
carrier 33 dBm
Gain variation ± 3 dB over temperature and unit-to-unit
Gain flatness
Band flatness ± 1.5 dB across frequency
range
Channel flatness ± 1.0 db across any
1.25 MHz channel
Receiver sensitivity (voice) <-108 dB
Table 1-2: microBTS Specifications
Parameter Specification Remarks

Page 8 FlexWave microBTS Installation and Commissioning Guide
© 2009, ADC Telecommunications, Inc.
ADCP-77-086 • Issue 2 • 04/2009 • Chapter 1 - Introduction
1.3 Accessory Items and Catalog Numbers
This section provides the base catalog numbers for the microBTS product line and a descrip-
tion of the accessory items that are available separately for the microBTS. The accessory items
may or may not be required depending on the application. For sales or further information on
accessories available for the microBTS refer to the last page of this manual to contact ADC.
1.3.1 Catalog Numbers for the microBTS
Should service or spare parts be required for the microBTS, refer to Figure 1-3 which provides
information on the type of microBTS and the options it is equipped with.
1.3.2 Strand Mount Kit
A strand-mount kit is available if the application requires that the microBTS be mounted from
a horizontal cable system. Mounting pads are provided on the side of the enclosure for
securing a pair of cable-attachment clips. Screws are used to secure the cable-attachment clips
to the enclosure. All fasteners required for installation are provided with the kit. The Strand
Mount can be ordered using catalog number DGVC-STRNDKIT.
1.3.3 Lightning Protector
An external lightning protector is available separately for the microBTS. It is recommended
that a lightning protector be installed at the base station antenna port to reduce the chance of
Figure 1-3: microBTS Catalog Numbering Structure
FWB-MBTS-
Frequency
A = 850 MHz
B = 900 MHz
C = 1800 MHz
D = 1900 MHz
TRX Count
1
2
3
4
Place Holder
Default = 0
Connector
Type
N = Type N
DC Power
No = 0
Yes = 1
Place Holder
Default = 0
Example: A 4 TRX 1800 MHz microBTS With N-Type Connector Operating on AC Power
= FWB-MBTS-C40N00
AD105901

FlexWave microBTS Installation and Commissioning Guide Page 9
© 2009, ADC Telecommunications, Inc.
ADCP-77-086 • Issue 2 • 04/2009 • Chapter 1 - Introduction
damage to electronic components should a lightning strike occur. The lighting protector surge/
antenna port is an N-type female connector. Lightning protectors are available in two versions:
1.) Lightning arrestor, N-type male to N-type female, catalog number DGVX-LAP1MS1F1.
2.) Lightning arrestor, N-type male to DIN female, catalog number DGVX-LAP1MS2F1.
1.3.4 Solar Shields
A solar shield kit is available if the microBTS must be mounted in full sunlight for extended
periods of time with extremely high ambient temperatures. The solar shields attach to the
exterior of the microBTS enclosure and shade the enclosure from direct exposure to the sun.
The solar shields are constructed of sheet metal and are painted to match the color of the enclo-
sure. All fasteners and brackets required are provided with the kit. The solar shield kit can be
ordered using catalog number DGVC-00000SS2.
1.3.5 Hardened RJ-45 Drop Cables
Hardened RJ-45 drop cables of various lengths can be ordered. Refer to Table 1-3.
E
1.3.6 AC and DC Power Cords
Power cords suitable for both AC and DC applications are available in various lengths. The
microBTS is supplied with one 15 ft. AC/ DC power cable as standard. Refer to Table 1-4 for
the optional lengths available.
E
Table 1-3: Hardened RJ-45 Cable Options
Cable Length Catalog Number
20 ft. FWB-MACC-RJ45020B
60 ft. FWB-MACC-RJ45060B
100 ft. FWB-MACC-RJ45100B
Table 1-4: AC/DC Power Cable Options
Cable Length Catalog Number
40 ft. DGVX-SCSPWR020
60 ft. DGVX-SCSPWR060
100 ft. DGVX-SCSPWR100

Page 10 FlexWave microBTS Installation and Commissioning Guide
© 2009, ADC Telecommunications, Inc.
ADCP-77-086 • Issue 2 • 04/2009 • Chapter 1 - Introduction
1.3.7 UPS System with Battery Backup
For systems operating in environments with unreliable mains power, a UPS system with 750
VA, 17 amp-hour capacity is available through ADC. The UPS system can be ordered using
catalog number DGVX-UPS07501700. Contact ADC for more details.

FlexWave microBTS Installation and Commissioning Guide Page 11
© 2009, ADC Telecommunications, Inc.
ADCP-77-086 • Issue 2 • 04/2009 • Chapter 2 - Unpacking and Inspection
Chapter 2 - Unpacking and Inspection
2.1 Unpacking and Inspecting the microBTS . . . . . . . . . . . . . . . . . . . . . . . . . . . . . . . . . . . . . . . . . . . . . . . . . . . . . 12
Content Page

Page 12 FlexWave microBTS Installation and Commissioning Guide
© 2009, ADC Telecommunications, Inc.
ADCP-77-086 • Issue 2 • 04/2009 • Chapter 2 - Unpacking and Inspection
2.1 Unpacking and Inspecting the microBTS
This section provides instructions for opening the shipping boxes, verifying that all parts have
been received, and verifying that no shipping damage has occurred. The basic microBTS
includes the following items:
•microBTS enclosure
•Network Listen antenna
•Fasteners, cables, strapping, and mounting bracket as specified in Table 3-1, Section 3,
and Table 4-1, Section 4.
The following accessories may also be shipped with the microBTS:
•Strand mount kit (optional item)
•Lightning protector (optional item)
•Solar shields (optional item)
Use the following procedure to unpack and inspect the microBTS components:
1 Open the shipping cartons and carefully unpack each component from the protective
packing material.
2 Check each component for broken or missing parts. If there are damages, contact ADC
(see the last page in this document) for an RMA (Return Material Authorization) and to
reorder if replacement is required.

FlexWave microBTS Installation and Commissioning Guide Page 13
© 2009, ADC Telecommunications, Inc.
ADCP-77-086 • Issue 2 • 04/2009 • Chapter 3 - Mounting Procedures
Chapter 3 - Mounting Procedures
3.1 Before Mounting the microBTS . . . . . . . . . . . . . . . . . . . . . . . . . . . . . . . . . . . . . . . . . . . . . . . . . . . . . . . . . . . 14
3.1.1 Introduction . . . . . . . . . . . . . . . . . . . . . . . . . . . . . . . . . . . . . . . . . . . . . . . . . . . . . . . . . . . . . . . . . 14
3.1.2 Mounting Considerations . . . . . . . . . . . . . . . . . . . . . . . . . . . . . . . . . . . . . . . . . . . . . . . . . . . . . . . . 14
3.1.3 Mounting Hardware Provided With the microBTS . . . . . . . . . . . . . . . . . . . . . . . . . . . . . . . . . . . . . . . 14
3.1.4 microBTS Dimensions . . . . . . . . . . . . . . . . . . . . . . . . . . . . . . . . . . . . . . . . . . . . . . . . . . . . . . . . . . 15
3.1.5 Tools and Additional Materials Required For Mounting . . . . . . . . . . . . . . . . . . . . . . . . . . . . . . . . . . . 16
3.1.6 Lift Ring Installation . . . . . . . . . . . . . . . . . . . . . . . . . . . . . . . . . . . . . . . . . . . . . . . . . . . . . . . . . . . 17
3.1.7 Standard Mounting Bracket Installation . . . . . . . . . . . . . . . . . . . . . . . . . . . . . . . . . . . . . . . . . . . . . . 17
Content Page

Page 14 FlexWave microBTS Installation and Commissioning Guide
© 2009, ADC Telecommunications, Inc.
ADCP-77-086 • Issue 2 • 04/2009 • Chapter 3 - Mounting Procedures
3.1 Before Mounting the microBTS
3.1.1 Introduction
This section provides instructions for mounting the FlexWave microBTS. The microBTS may
be secured to an interior or exterior wall, attached to a utility pole, or attached to a horizontal
cable (strand-mount). Mounting the microBTS from a cable requires an accessory kit not
included with the unit. Read this section in its entirety prior to installing the microBTS.
3.1.2 Mounting Considerations
Before mounting the microBTS, verify that the installation site is in conformance with the
system design plan (not documented here). If a system design plan has not been prepared,
consult the ADC Customer Service for technical assistance. The site chosen must conform to
all local codes and any permits required must be obtained prior to the start of mounting. The
location must be accessible and provide adequate parking for worker and vehicle safety. The
installed unit must not create a visual or physical obstruction to vehicular or pedestrian traffic
or block pole-climbing access.
The microBTS must be located as specified in the system design plan and must have ready
access to the specified AC or DC power source. The site must provide adequate ventilation and
must comply with the unit environmental specifications. A minimum of 18 inches of clearance
must be provided on all sides (except the back) of the enclosure to allow free air circulation. In
addition, the bottom (cable entry end) and either the top, the front, or one of the sides must be
open to free air space. Adequate clearance must be allowed at the bottom of the enclosure to
provide access for attaching cables and for viewing the LED indicator.
3.1.3 Mounting Hardware Provided With the microBTS
The microBTS is shipped with the mounting hardware required for a typical wall-mount or
pole-mount installation. Table 3-1 lists the mounting hardware provided. Additional hardware
may have to be provided by the installer depending on the site requirements.
E
Note: The microBTS is intended for restricted access locations only.
Table 3-1: microBTS Mounting Hardware and Fasteners
Item Quantity
Hoisting ring assembly 1
Hoisting ring assembly mounting screws 2
Mounting bracket 1
Strapping 2
FlexWave microBTS Installation and Commissioning Guide Page 15
© 2009, ADC Telecommunications, Inc.
ADCP-77-086 • Issue 2 • 04/2009 • Chapter 3 - Mounting Procedures
3.1.4 microBTS Dimensions
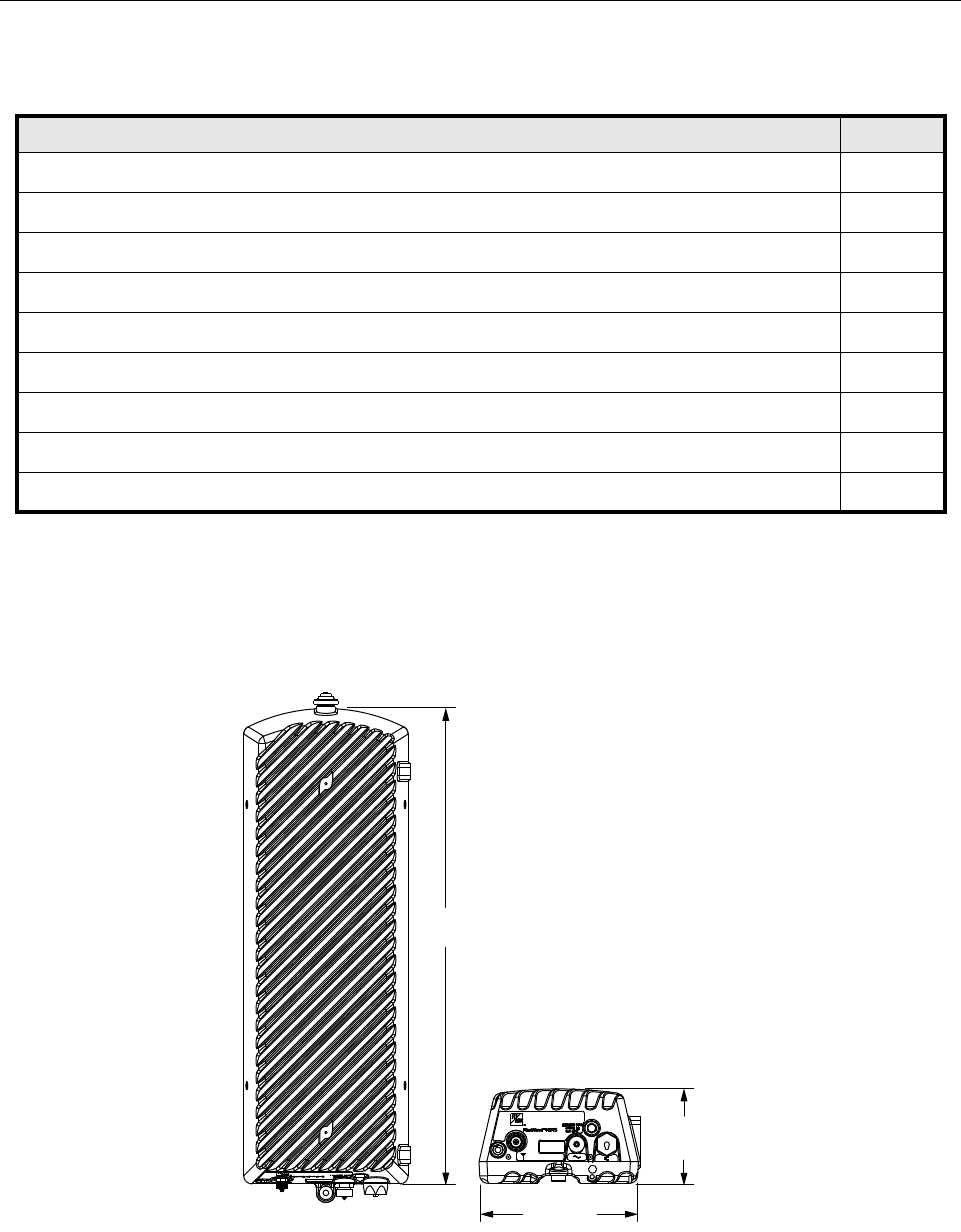
The basic dimensions of the microBTS are shown in Figure 3-1.
3/8 inch concrete anchors 4
3/8 x 1 inch cap screws 4
3/8 x 1.5 inch lag screws 4
3/8 x 1.5 inch flat washers 4
3/8 x 1.5 inch lock washers 4
5/16 x 1.25 inch cap screws 1
5/16 inch flat washer 1
5/16 inch lock washer 1
5/16 inch nut 1
Figure 3-1: microBTS Dimensions
Table 3-1: microBTS Mounting Hardware and Fasteners
Item Quantity
22636-A
9.7 IN.
(24.6 CM)
5.7 IN.
(14.5 CM)
29.4 IN.
(74.7 CM)

Page 16 FlexWave microBTS Installation and Commissioning Guide
© 2009, ADC Telecommunications, Inc.
ADCP-77-086 • Issue 2 • 04/2009 • Chapter 3 - Mounting Procedures
3.1.5 Tools and Additional Materials Required For Mounting
The tools and any additional materials required for mounting the microBTS are dependent on
the mounting system. The following sections list the tools required for the various mounting
systems and are not supplied by ADC.
Wood-Framed Wall Mounting
•9/16 inch wrench
•1/2 inch wrench (2)
•Torque wrench with 3/16-inch hex key socket
•Drill
•Pencil or marker
•4 foot (122 cm) x 2 foot (61 cm) sheet of pressure-treated 3/4 inch (19 mm) plywood
•Fasteners and tools for securing the 3/4 inch (19 mm) plywood to wall
•3/16 inch standard drill bit
Masonry Wall Mounting
•9/16 inch wrench
•1/2 inch wrench (2)
•Torque wrench with 3/16 inch hex key socket
•Drill
•Pencil or marker
•5/8 inch masonry drill bit
Wooden Utility Pole Mounting
•9/16 inch wrench
•1/2 inch wrench (2)
•Torque wrench with 3/16 inch hex key socket
•Drill
•Pencil or marker
•3/16 inch standard drill bit
Metal Utility Pole Mounting
•Clamp banding tool (BT1HT from Panduit)
•1/2 inch wrench (2)
FlexWave microBTS Installation and Commissioning Guide Page 17
© 2009, ADC Telecommunications, Inc.
ADCP-77-086 • Issue 2 • 04/2009 • Chapter 3 - Mounting Procedures
•Torque wrench with 3/16 inch hex key socket
3.1.6 Lift Ring Installation
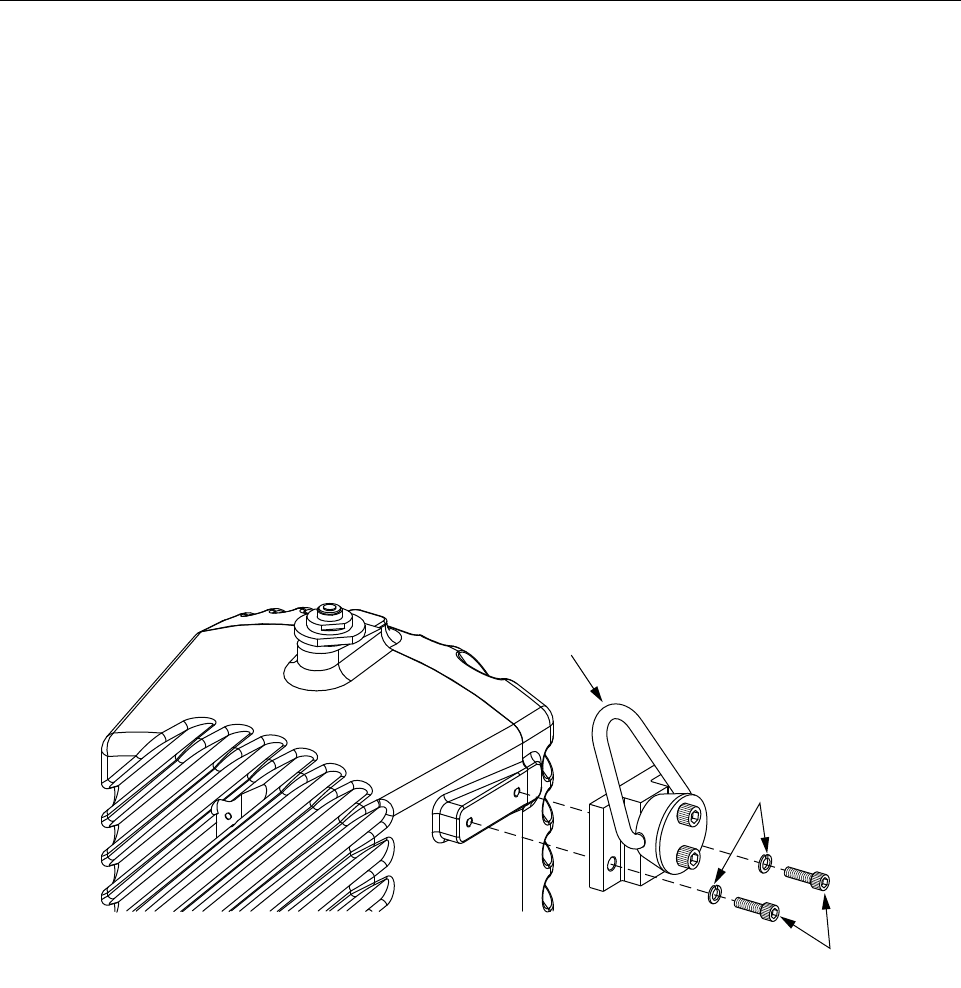
A lift ring is provided with the microBTS. Secure the lift ring to the side of the enclosure as
shown in Figure 3-2 using the two 5/8 inch long 1/4-20 socket head screws and two 1/4 inch
split washers provided. Use a torque wrench with a 3/16-inch hex key socket to tighten the cap
screws to 40 – 45 lbs/force-inches (4.5 to 5.1 Nm) of torque. Do not overtighten. If the threads
show signs of damage, yielding, or stripping when tightening the cap screws, discontinue lift
ring installation and remove the lift ring. Always use appropriate lifting equipment when
hoisting the enclosure into position for mounting. Remove the lift ring after the enclosure has
been mounted.
3.1.7 Standard Mounting Bracket Installation
A standard mounting bracket is provided with each enclosure. The standard mounting bracket
may be mounted vertically or horizontally. If mounted horizontally, it is recommended that the
bracket be oriented so the enclosure cooling fins will face upward or to the side with respect to
the ground. The following sections provide instructions for installing the standard mounting
bracket on a wood-framed wall, masonry wall, wooden utility pole, or metal pole. Refer to the
procedure that applies to the installation.
Figure 3-2: Hoist Ring Installation
22144-B
5/8-INCH LONG
1/4-20 CAP SCREWS
USE A TORQUE WRENCH
WITH A 3/16-INCH HEX KEY TO
TIGHTEN THE CAP SCREWS TO
40 TO 45 LBS/FORCE-INCHES
(4.5 TO 5.1 Nm) OF TORQUE
NOTE: IF THE THREADS SHOW SIGNS OF DAMAGE, YIELDING, OR STRIPPING
WHEN THE CAP SCREWS ARE TIGHTENED, DISCONTINUE INSTALLATION OF
THE LIFT RING. REMOVE LIFT RING AND DO NOT USE TO LIFT microBTS.
LIFT
RING
SPLIT
WASHERS
Page 18 FlexWave microBTS Installation and Commissioning Guide
© 2009, ADC Telecommunications, Inc.
ADCP-77-086 • Issue 2 • 04/2009 • Chapter 3 - Mounting Procedures
3.1.7.1 Wood-Framed Wall Mounting
When mounting the enclosure on a wood-framed wall, it is recommended that pressure-treated
plywood with a minimum thickness of 0.75-inch (19.0 cm) be used as a backer board. The
backer must be firmly secured to the interior framing of the wall. Use the following procedure
to install the standard mounting bracket on a wood-framed wall:
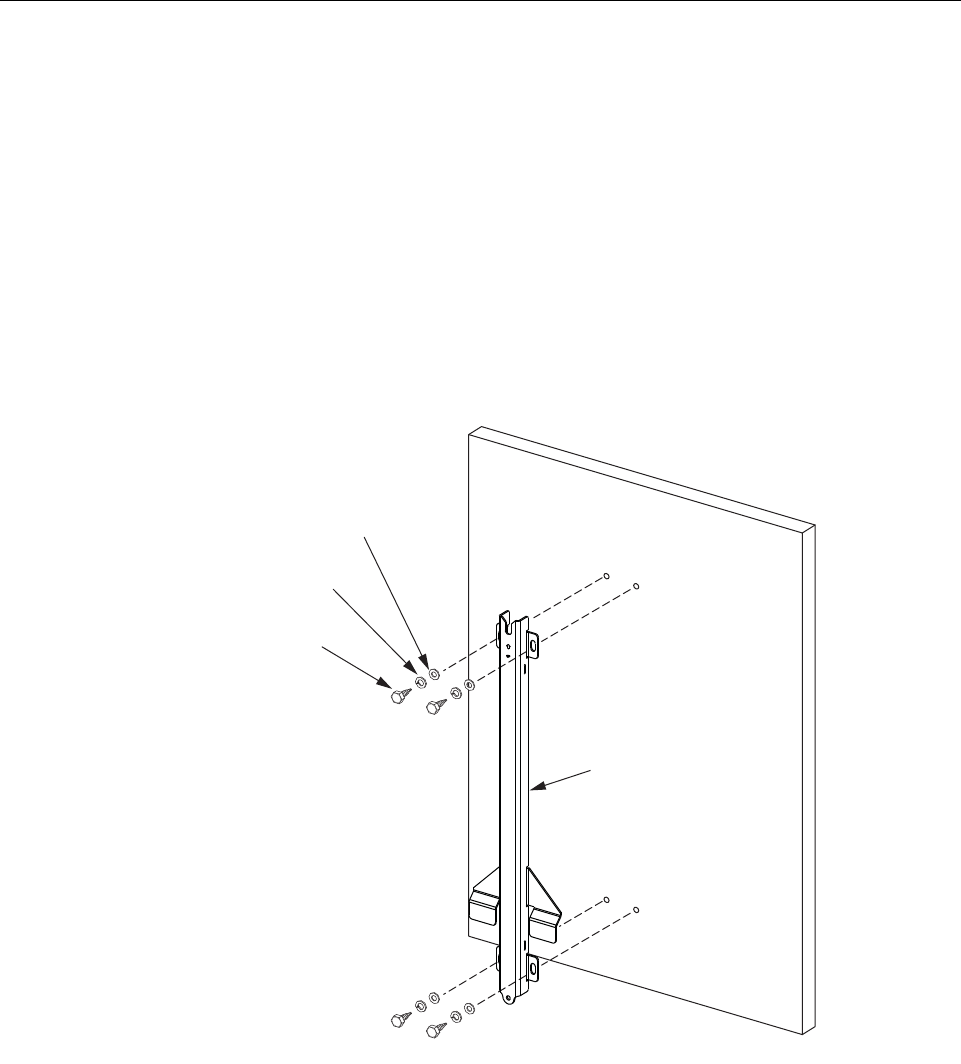
1 Mount the plywood backer (not-provided) on the wall and firmly secure it to the wall’s
interior studs.
2 Hold the enclosure mounting bracket in position for installation on the plywood backer as
shown in Figure 3-3. The end with the V-notch should be at the top.
3 Mark the location of the mounting bracket’s two mounting holes on the plywood backer.
4 Drill a 3/16inch hole in the backer board at each of the locations marked in step 3.
5 Locate the two 3/8 x 1-1/2-inch lag screws (provided with the enclosure) and place a 3/8
inch lock washer and 3/8 inch flat washer on each screw.
6 Secure the mounting bracket to the plywood using the screws and washers prepared in step
5. Tighten screws until bracket is securely attached to the plywood.
Figure 3-3: Secure Standard Mounting Bracket To Plywood Backer
20766-D
3/8 x 1-1/2-INCH
LAG SCREW (2)
3/8-INCH FLAT
WASHER (2)
3/4-INCH PLYWOOD
BACKER BOARD
(SECURE TO WALL STUDS)
3/8-INCH LOCK
WASHER (2)
MOUNTING
BRACKET
NOTE: THE MOUNTING BRACKET IS
SHOWN WITH A VERTICAL ORIENTATION.
THE MOUNTING BRACKET MAY ALSO
BE MOUNTED HORIZONTALLY IF REQUIRED.
FlexWave microBTS Installation and Commissioning Guide Page 19
© 2009, ADC Telecommunications, Inc.
ADCP-77-086 • Issue 2 • 04/2009 • Chapter 3 - Mounting Procedures
7 Hang the enclosure from the mounting bracket as described in Section 5.4.
3.1.7.2 Masonry Wall Mounting
When mounting the enclosure on a masonry surface, locate the mounting anchors as close as
possible to the center of any bricks or blocks, especially the upper anchors. Use the following
procedure to install the standard mounting bracket on a masonry wall:
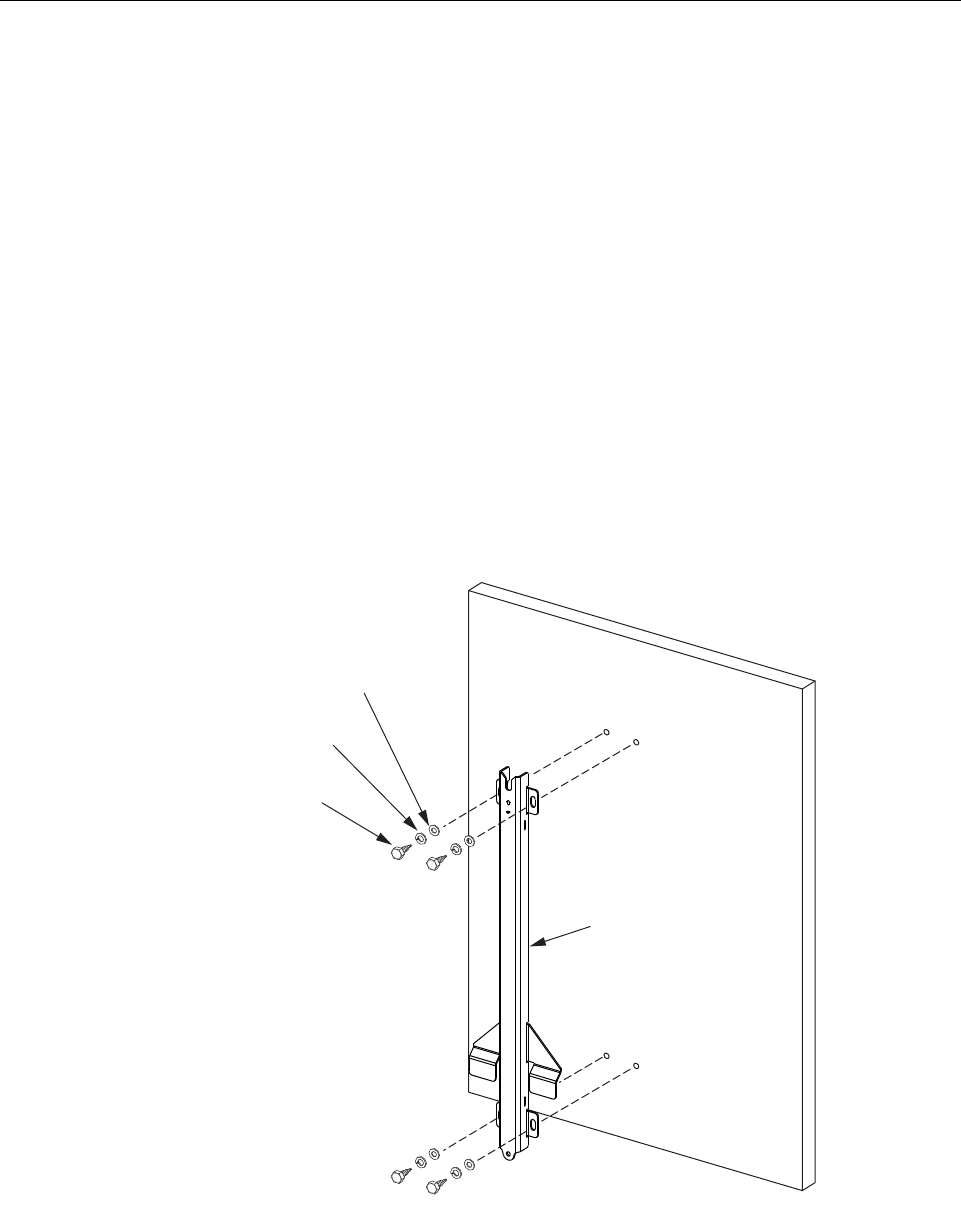
1 Hold the enclosure mounting bracket in position for installation on the masonry wall as
shown in Figure 3-4. The end with the V-notch should be at the top.
2 Using a pencil, mark the location of the mounting bracket’s two mounting holes on the
wall.
3 Drill holes in the wall (at the locations marked in step 2) that are the correct diameter for
the type of anchors being used. The recommended hole size for the ADC-provided
concrete anchors is 5/8 inch .
4 Set the anchors in the wall.
Figure 3-4: Secure Standard Mounting Bracket To a Masonry Wall
20766-D
3/8 x 1-1/2-INCH
LAG SCREW (2)
3/8-INCH FLAT
WASHER (2)
3/4-INCH PLYWOOD
BACKER BOARD
(SECURE TO WALL STUDS)
3/8-INCH LOCK
WASHER (2)
MOUNTING
BRACKET
NOTE: THE MOUNTING BRACKET IS
SHOWN WITH A VERTICAL ORIENTATION.
THE MOUNTING BRACKET MAY ALSO
BE MOUNTED HORIZONTALLY IF REQUIRED.
Page 20 FlexWave microBTS Installation and Commissioning Guide
© 2009, ADC Telecommunications, Inc.
ADCP-77-086 • Issue 2 • 04/2009 • Chapter 3 - Mounting Procedures
5 Locate the two 3/8 x 1-inch cap screws (provided with enclosure) and place a 3/8 inch lock
washer and 3/8 inch flat washer on each screw.
6 Place the mounting bracket in position for mounting on the wall and then thread the 3/8 x
1 inch cap screws (with installed washers) into the two anchors. Tighten cap screws until
secure.
7 Hang the enclosure from the mounting bracket as shown in Section 5.4.
3.1.7.3 Wooden Utility Pole Mounting
When mounting the enclosure from a wooden utility pole, make sure the pole is sound and has
not been damaged or weakened by decay. Use the following procedure to install the standard
mounting bracket on a wooden utility pole:
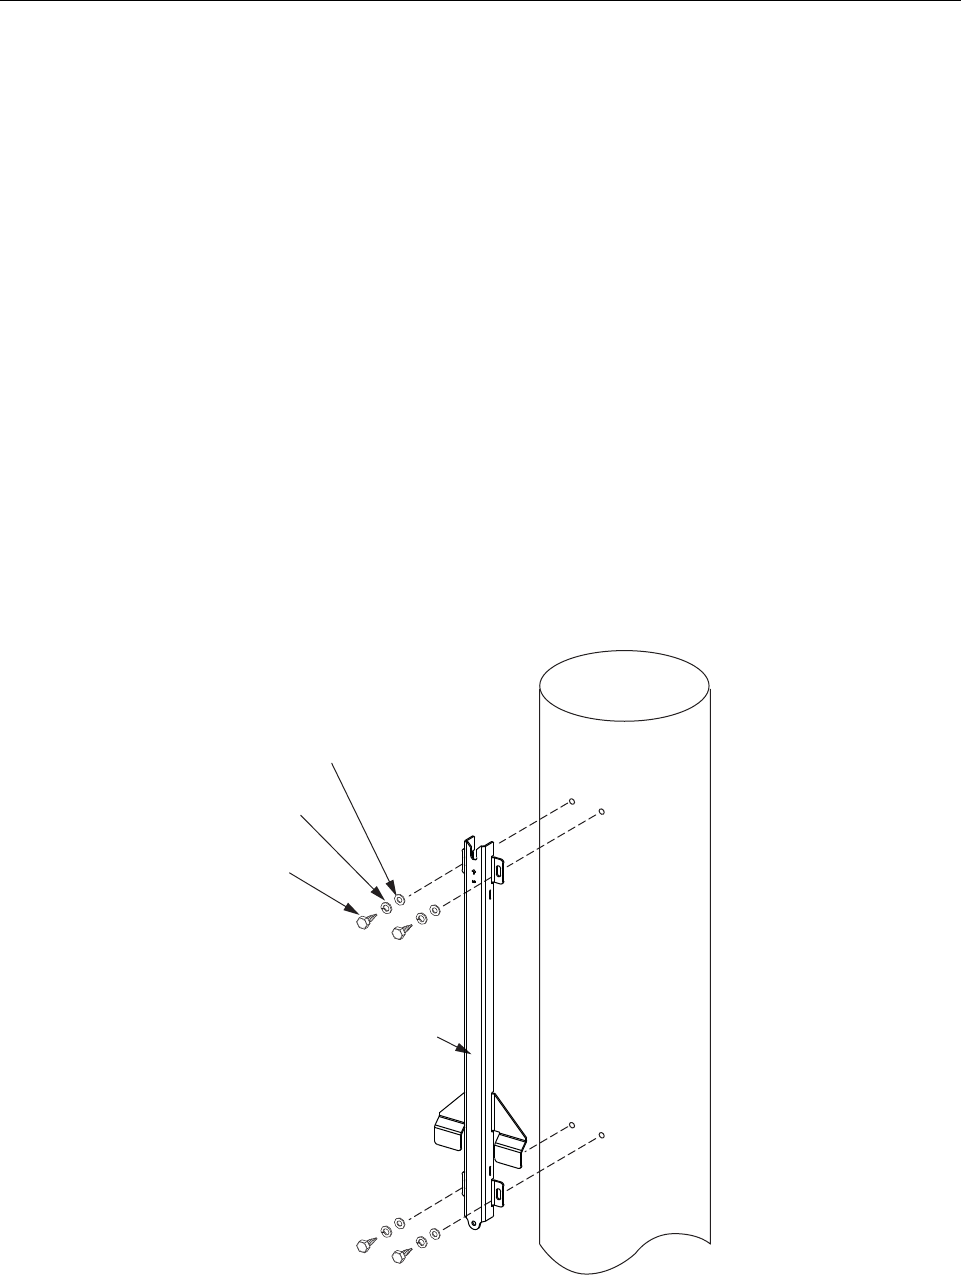
1 Hold the enclosure mounting bracket in position for installation on the wooden pole as
shown in Figure 3-5. The end with the V-notch should be at the top.
2 Using a pencil, mark the location of the mounting bracket’s two mounting holes on the
pole.
3 Mark the location of the mounting bracket’s two mounting holes on the wooden pole.
Figure 3-5: Secure Standard Mounting Bracket To a Wooden Pole
20767-D
3/8 x 1-1/2-INCH
LAG SCREW (4)
3/8-INCH FLAT
WASHER (4)
3/8-INCH LOCK
WASHER (4)
MOUNTING
BRACKET

FlexWave microBTS Installation and Commissioning Guide Page 21
© 2009, ADC Telecommunications, Inc.
ADCP-77-086 • Issue 2 • 04/2009 • Chapter 3 - Mounting Procedures
4 Drill a 3/16-inch hole in the utility pole at each of the locations marked in step 3.
5 Locate the two 3/8 x 1-1/2-inch lag screws (provided with the enclosure) and place a 3/8
inch lock washer and 3/8-inch flat washer on each screw.
6 Secure the mounting bracket to the pole using the screws and washers prepared in step 5.
Tighten screws until bracket is securely attached to the plywood.
7 Hang the enclosure from the mounting bracket as shown in Section 5.4.
3.1.7.4 Metal Utility Pole Mounting
Stainless steel strapping is provided for securing the mounting bracket to a cylindrical object
(such as a metal utility pole) that cannot be pierced with a screw or bolt. A special tool
(Panduit BT1HT) is required to properly secure and tension the strapping. Use the following
procedure to install the mounting bracket on a metal utility pole:
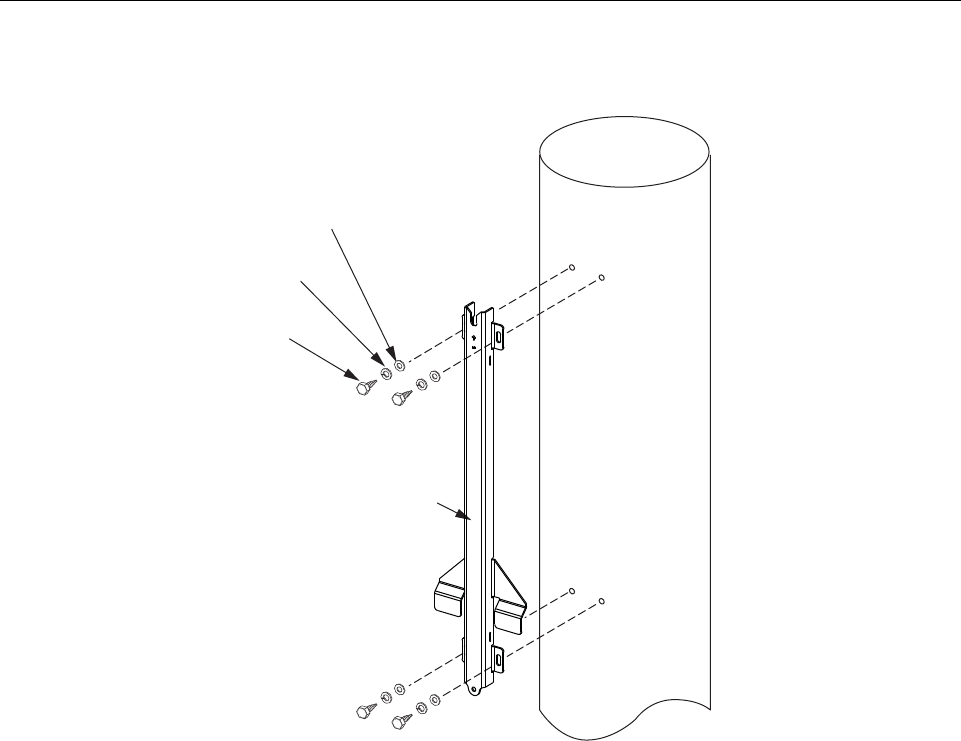
1 Insert the two sections of stainless steel metal strapping (provided with the enclosure)
through the slots in the mounting bracket and place in position for mounting as shown in
Figure 3-6. The end with the V-notch should be at the top.
Note: Two sections of stainless steel metal strapping are provided with the enclosure. If addi-
tional strapping is required, use 5/8 inch wide 304 AISI stainless steel strapping with a
minimum tensile strength of 700 lbs force.
Page 22 FlexWave microBTS Installation and Commissioning Guide
© 2009, ADC Telecommunications, Inc.
ADCP-77-086 • Issue 2 • 04/2009 • Chapter 3 - Mounting Procedures
2 Wrap the top section of strapping around the pole and secure using Panduit tool # BT1HT.
Adjust the tool tension setting to #7. Follow the instructions provided with the tool by the
tool manufacturer (see MS Strapping Tool Operation Instructions PA24808A01).
3 Repeat step 2 for the bottom section of strapping.
4 Hang the enclosure from the mounting bracket as shown in Section 5.4.
3.1.7.5 Installing the Enclosure on the Standard Mounting Bracket
Use the following procedure to install the microBTS on the standard mounting bracket.
Figure 3-6: Secure Standard Mounting Bracket To a Metal Pole
20767-D
3/8 x 1-1/2-INCH
LAG SCREW (4)
3/8-INCH FLAT
WASHER (4)
3/8-INCH LOCK
WASHER (4)
MOUNTING
BRACKET
FlexWave microBTS Installation and Commissioning Guide Page 23
© 2009, ADC Telecommunications, Inc.
ADCP-77-086 • Issue 2 • 04/2009 • Chapter 3 - Mounting Procedures
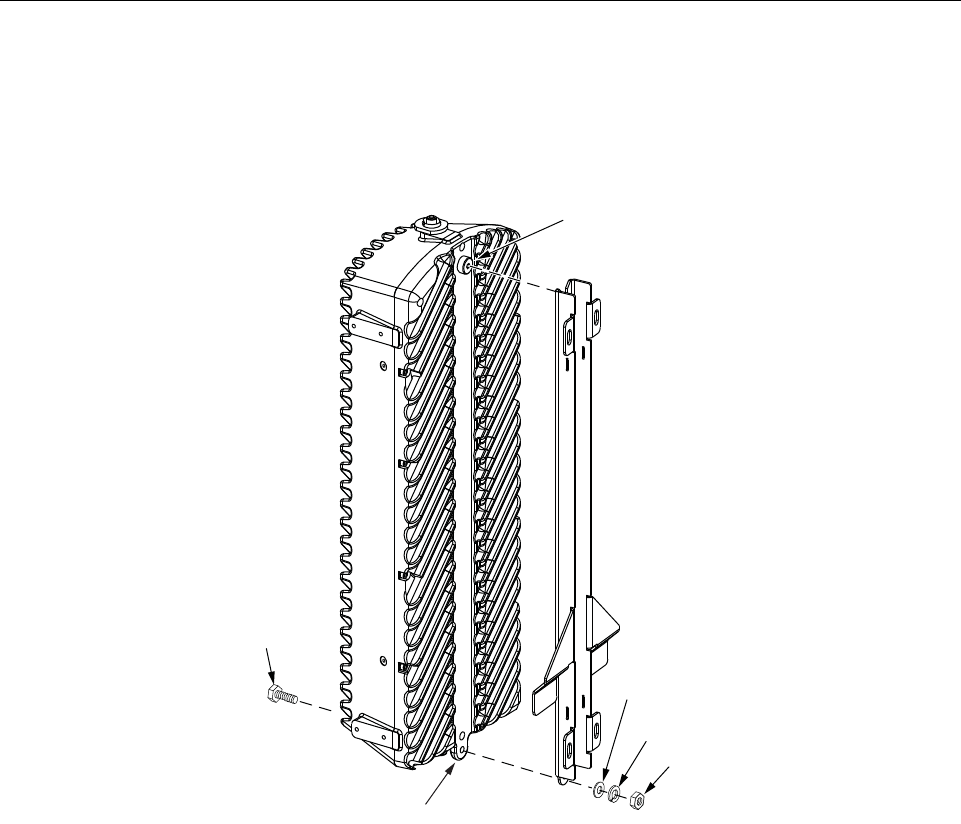
1 Hang the enclosure from the mounting bracket as shown in Figure 3-7. The shoulder
screw in the rear side of the enclosure fits into the notch at the top of the mounting bracket.
2 Insert a 5/16 x 1-1/4-inch hex bolt through the hole in the mounting tab located at the
bottom of the enclosure.
3 Place a 5/16-inch flat washer and 5/16-inch flat washer on the hex bolt.
4 Thread a 5/16-inch nut onto the hex bolt and tighten securely.
3.1.7.6 Strand-Mount Installation
An accessory kit is available for mounting the microBTS enclosure from an overhead wire or
strand. The strand-mount kit can accommodate wire cable that ranges in size from 0.25 to
0.625 inches in diameter. A minimum break strength of 4400 lbs. is recommended. Stainless
steel cable is preferred.
Figure 3-7: Secure Standard Mounting Bracket
5/16 x 1-1/4-INCH
HEX BOLT
5/16 INCH NUT
5/16 INCH
LOCK WASHER
5/16 INCH
FLAT WASHER
22632-A
MOUNTING TAB
SHOULDER
SCREW

Page 24 FlexWave microBTS Installation and Commissioning Guide
© 2009, ADC Telecommunications, Inc.
ADCP-77-086 • Issue 2 • 04/2009 • Chapter 3 - Mounting Procedures
An installat ion drawing is provided with each strand-mount kit. Fo llow the instructions provide d on the drawing when insta lling the strand-mount kit. For all strand-mount installations, form a drip-loop in the cables entering the enclosure.
Blank

FlexWave microBTS Installation and Commissioning Guide Page 25
© 2009, ADC Telecommunications, Inc.
ADCP-77-086 • Issue 2 • 04/2009 • Chapter 4 - Installation Procedures
Chapter 4 - Installation Procedures
4.1 Installation Overview . . . . . . . . . . . . . . . . . . . . . . . . . . . . . . . . . . . . . . . . . . . . . . . . . . . . . . . . . . . . . . . . . . 26
4.1.1 Installation Hardware Provided with microBTS Enclosure . . . . . . . . . . . . . . . . . . . . . . . . . . . . . . . . . . 26
4.1.2 Tools and Materials Required . . . . . . . . . . . . . . . . . . . . . . . . . . . . . . . . . . . . . . . . . . . . . . . . . . . . . 27
4.1.3 Ground Wire Installation . . . . . . . . . . . . . . . . . . . . . . . . . . . . . . . . . . . . . . . . . . . . . . . . . . . . . . . . 27
4.1.4 Network Listen Antenna Installation . . . . . . . . . . . . . . . . . . . . . . . . . . . . . . . . . . . . . . . . . . . . . . . . 28
4.1.5 IP Backhaul Cable Installation . . . . . . . . . . . . . . . . . . . . . . . . . . . . . . . . . . . . . . . . . . . . . . . . . . . . 29
4.1.6 Base Station Antenna Cable Installation . . . . . . . . . . . . . . . . . . . . . . . . . . . . . . . . . . . . . . . . . . . . . 30
4.1.7 AC Power Wiring Installation . . . . . . . . . . . . . . . . . . . . . . . . . . . . . . . . . . . . . . . . . . . . . . . . . . . . . 31
4.1.8 DC Power Wiring Installation . . . . . . . . . . . . . . . . . . . . . . . . . . . . . . . . . . . . . . . . . . . . . . . . . . . . . 34
4.1.9 Touch-Up Painting . . . . . . . . . . . . . . . . . . . . . . . . . . . . . . . . . . . . . . . . . . . . . . . . . . . . . . . . . . . . 37
4.1.10 Shield Installation (option) . . . . . . . . . . . . . . . . . . . . . . . . . . . . . . . . . . . . . . . . . . . . . . . . . . . . . . 37
4.2 microBTS Replacement . . . . . . . . . . . . . . . . . . . . . . . . . . . . . . . . . . . . . . . . . . . . . . . . . . . . . . . . . . . . . . . . 38
This section provides procedures for installing the Network Listen antenna; connecting the
grounding, base station antenna, IP backhaul, and AC/DC power cables; and installing the
optional solar shields. Installation of the microBTS may be done separately from the installa-
tion of the BSC. When the installation of the microBTS is completed, refer to chapter 5 for the
system turn-up and test procedures.
Content Page
DANGER: Wet conditions increase the potential for receiving an electrical shock when installing or
using electrically-powered equipment. To prevent electrical shock, never install or use electrical
equipment in a wet location or during a lightning storm.

Page 26 FlexWave microBTS Installation and Commissioning Guide
© 2009, ADC Telecommunications, Inc.
ADCP-77-086 • Issue 2 • 04/2009 • Chapter 4 - Installation Procedures
4.1 Installation Overview
Installation of the microBTS consists of the following basic steps:
1 Connecting a grounding cable to the microBTS grounding point.
2 Installing Network Listen antenna.
3 Connecting the IP backhaul cable.
4 Connecting the base station antenna coaxial cable to the microBTS antenna port.
5 Installing the AC/DC power cable and connecting it to the microBTS power port.
6 Installing the optional solar shields.
4.1.1 Installation Hardware Provided with microBTS Enclosure
The installation hardware that is provided with the microBTS is listed in Table 4-1.
E
Note: To insure that all connectors and ports remain dust-free during installation, leave all dust caps
and dust protectors in place until directed to remove them.
Note: If the microBTS will be horizontally mounted, provide drip loops for all cables that connect to
the enclosure.
Table 4-1: microBTS Installation Hardware
Item Quantity
M8 x 10 hex socket capscrew (for grounding cable) 1
M8 washer (for grounding screw) 1
Grounding cable (1.5 m) 1
AC Power Cable (20 feet) 1
Network Listen antenna 1
Front shield1 (option) 1
Side shield2 (option) 2
3/8-inch hex standoff 7
3/8-inch 10-32 screw with T25 TORX drive 7
#10 split washer 7

FlexWave microBTS Installation and Commissioning Guide Page 27
© 2009, ADC Telecommunications, Inc.
ADCP-77-086 • Issue 2 • 04/2009 • Chapter 4 - Installation Procedures
4.1.2 Tools and Materials Required
The following tools are required in order to complete the procedures in this instruction:
•#6 metric socket key or 7/32-inch hex key wrench
•Wire cutters
•Wire stripper
•Compression pliers for splicing grounding cable
•Tools for installing exterior AC circuit
•Tool kit for attaching N-type connectors to coaxial cable
The following materials are required in order to complete the installation procedures:
•#6 AWG (4 mm) copper wire and splice
•Connector for attaching #6 grounding wire to approved earth ground source
•Junction box, conduit, fasteners, connectors, and wire to install a 120/240 volt, 15 amp,
exterior AC circuit.
•N-type male connector
4.1.3 Ground Wire Installation
A hexagon socket-head capscrew is provided on the underside of the cabinet for attaching a #6
copper grounding wire to the enclosure. A 1.5 meter long #6 AWG copper wire terminated
with a ring terminal is provided for connecting the enclosure to an approved grounding source.
Use the following procedure to install the grounding wire:
1 Locate the 1.5 m #6 AWG (4 mm) copper grounding wire provided with the microBTS
enclosure.
2 Locate the grounding point provided on the underside of the enclosure as shown in
Figure 4-1.
3 Remove the socket-head capscrew and flat washer from the enclosure using a #6 metric
key or a 7/32-inch hex key wrench.
4 Secure the ring terminal end of the grounding wire to the enclosure using the screw and
washer removed in step 3. Tighten securely.
5 Route the free end of the grounding wire to an approved earth ground source.
Caution: For proper and safe equipment operation, an approved earth ground connection must be
provided. The recommended minimum wire size is #6 AWG copper wire.
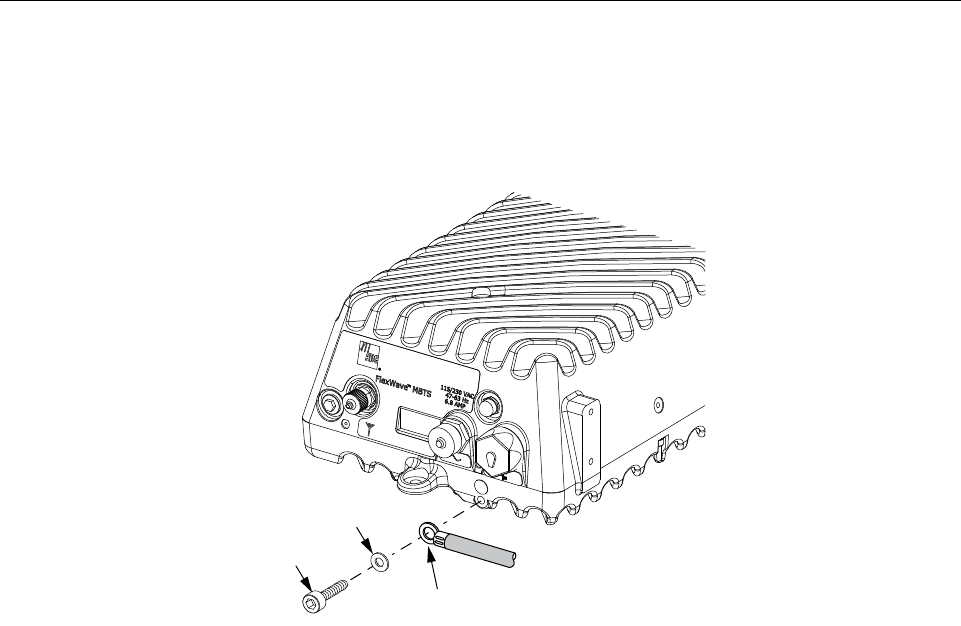
Page 28 FlexWave microBTS Installation and Commissioning Guide
© 2009, ADC Telecommunications, Inc.
ADCP-77-086 • Issue 2 • 04/2009 • Chapter 4 - Installation Procedures
6 Cut the ground wire to length and connect it to the earth ground source as specified by
local code or practice.
4.1.4 Network Listen Antenna Installation
The microBTS is shipped with a Network Listen antenna. A temporary dust proof cap is
installed at the factory for protection during shipment. Remove the temporary cap and install
the Network Listen antenna (included with the microBTS accessories) by threading it onto the
NMO connector located on the top of the microBTS as shown in Figure 4-2. Tighten antenna
by hand until secure.
Figure 4-1: Connecting the Grounding Cable to the Enclosure
GROUND
LUG
FLAT
WASHER
SOCKET
SCREW
22642-A
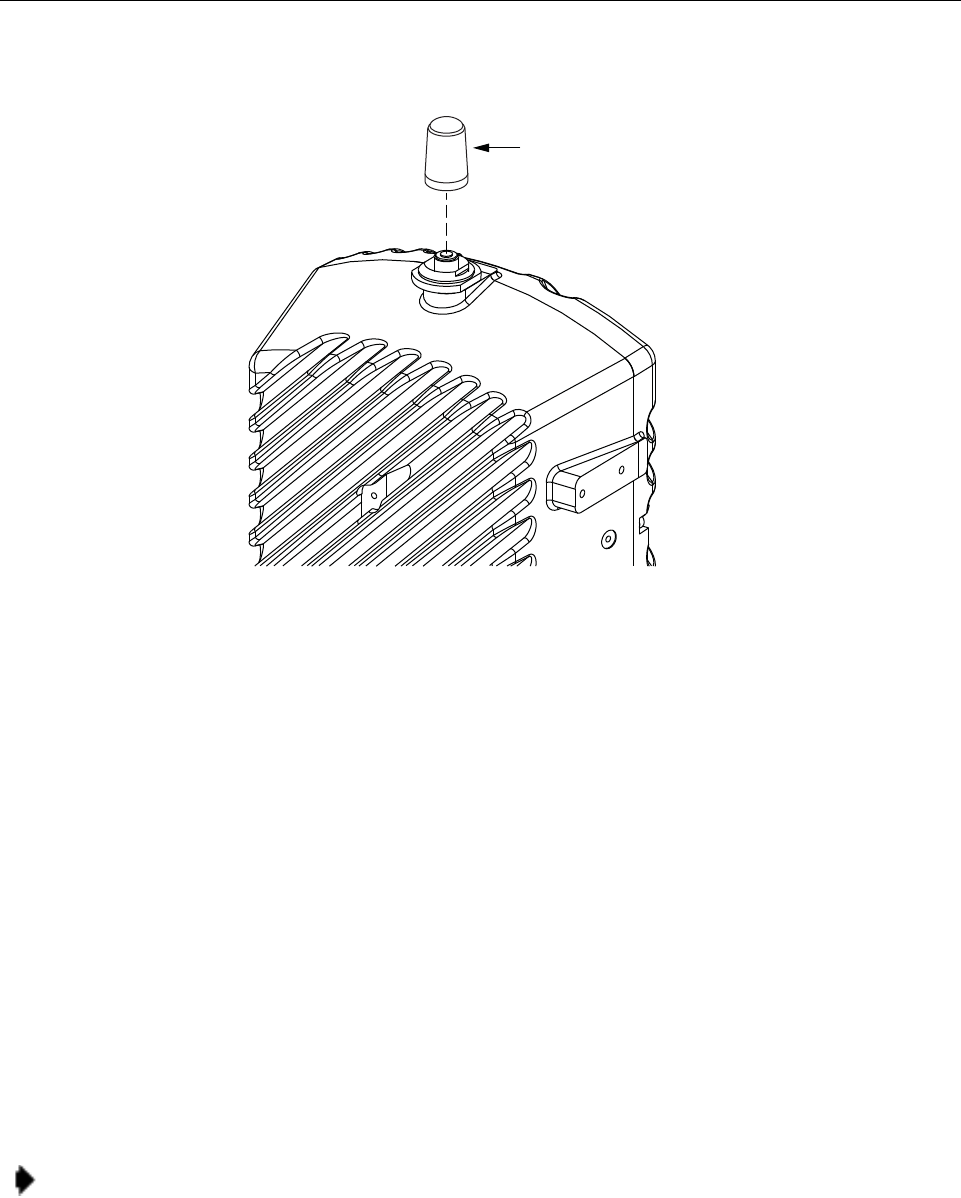
FlexWave microBTS Installation and Commissioning Guide Page 29
© 2009, ADC Telecommunications, Inc.
ADCP-77-086 • Issue 2 • 04/2009 • Chapter 4 - Installation Procedures
4.1.5 IP Backhaul Cable Installation
A backhaul cable must be routed from the backhaul device to the microBTS enclosure. The
backhaul cable must be terminated with a hardened RJ-45 male connector for connection to the
microBTS backhaul port. The maximum cable length is 300 feet (91.4 m).
Use the following procedure to install the backhaul cable:
1 Remove the dust cap from the RJ-45 connector located at the bottom of the enclosure as
shown in Figure 4-3.
2 Route the backhaul cable from the backhaul device to the underside of the enclosure.
3 Align the plug end of the RJ-45 cable connector with the RJ-45 port receptacle and then
insert the cable plug into the port receptacle.
4 Slide the connector nut up to the port until it engages the connector locking mechanism.
5 Tighten the connector nut in a clockwise direction (if necessary, use a wrench or pliers to
grip the connector nut) until it snaps past the detent position and locks into place.
Figure 4-2: Network Listen antenna Installation
Note: It may be necessary to apply 30 to 50 lbs/force-inches (3.4 to 5.6 Nm) of torque to the connec-
tor nut in order to turn it past the detent position
22650-A
NETWORK LISTEN
ANTENNA
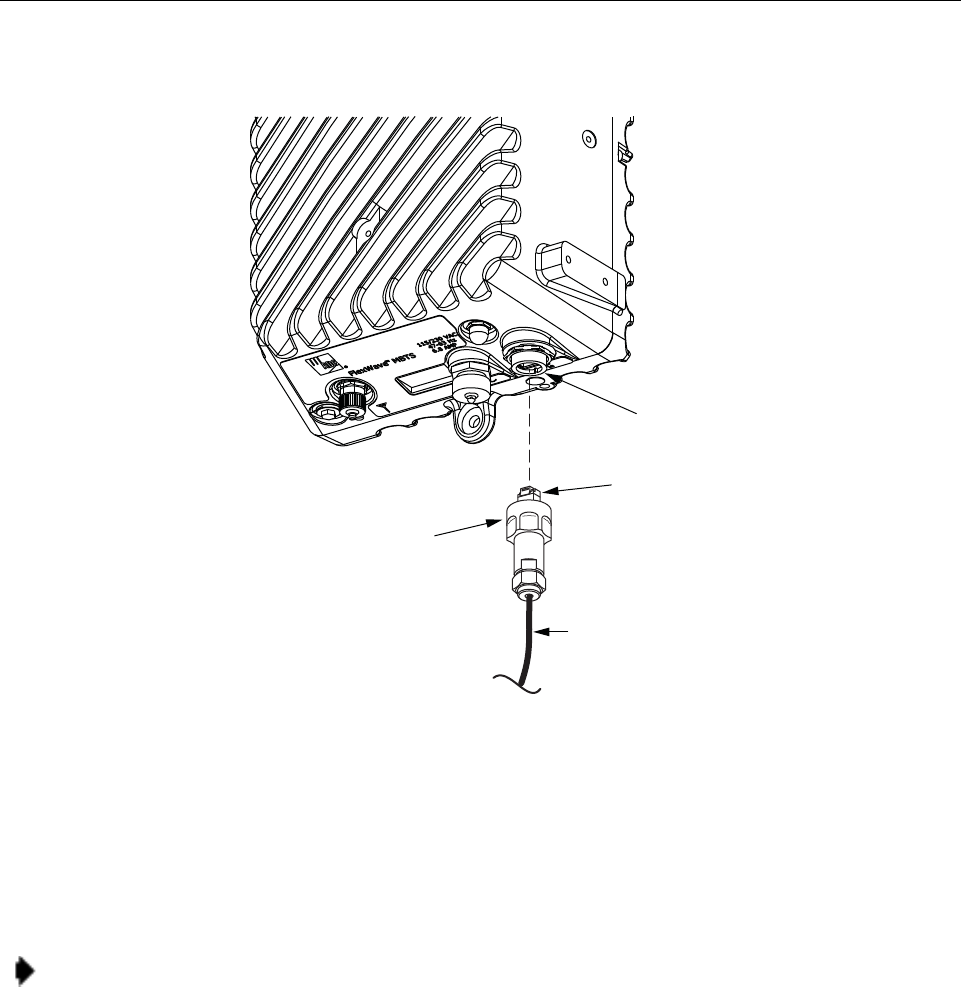
Page 30 FlexWave microBTS Installation and Commissioning Guide
© 2009, ADC Telecommunications, Inc.
ADCP-77-086 • Issue 2 • 04/2009 • Chapter 4 - Installation Procedures
4.1.6 Base Station Antenna Cable Installation
A coaxial antenna cable must be routed from the base station antenna to the microBTS enclo-
sure. The cable must be terminated with an N-type male connector for connection to the
microBTS antenna port or the lightning protector (accessory).
Use the following procedure to install the antenna cable(s):
1 Remove the dust cap from the N-type female connector located on the underside of the
enclosure as shown in Figure 4-4.
2 If specified, connect a lightning protector (accessory) to the antenna port.
3 Route the coaxial antenna cable from the base station antenna to the underside of the
enclosure.
4 Cut the antenna cable to the required length and terminate with an N-type male connector.
5 Connect the antenna cable to the lightning protector or to the antenna port.
Figure 4-3: IP backhaul Cable Installation
Note: To comply with Maximum Permissible Exposure (MPE) requirements, the maximum compos-
ite output from the antenna cannot exceed 1640 watts EIRP and the antenna must be permanently
installed in a fixed location that provides at least 6 meters (20 feet) of separation from all persons.
RJ-45 BACKHAUL
CONNECTOR PORT
BACKHAUL
CABLE
BOTTOM VIEW
22639-A
CONNECTOR
NUT
RJ-45
PLUG
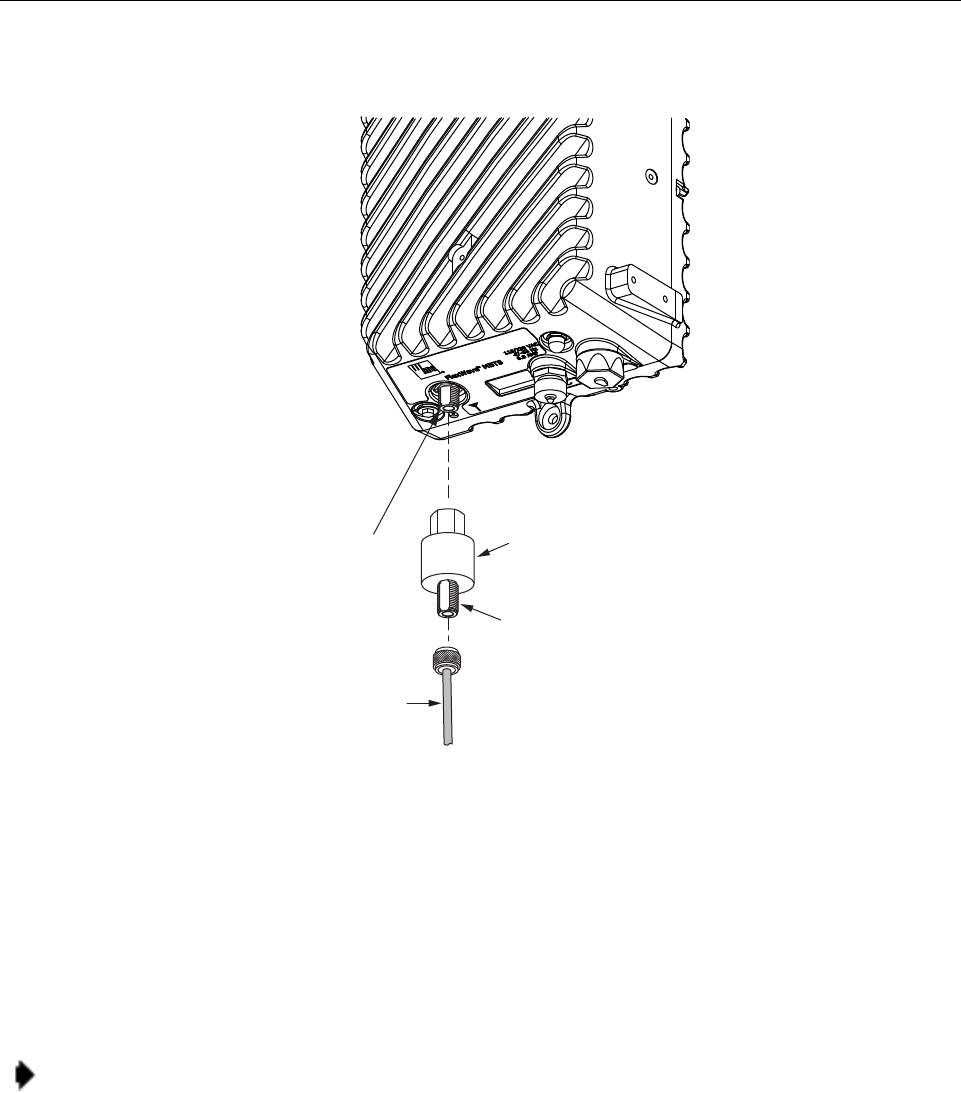
FlexWave microBTS Installation and Commissioning Guide Page 31
© 2009, ADC Telecommunications, Inc.
ADCP-77-086 • Issue 2 • 04/2009 • Chapter 4 - Installation Procedures
4.1.7 AC Power Wiring Installation
A 20-foot connectorized 3-wire cable (also available in lengths of 40, 60, or 100 feet) is
provided for the AC power connections. The connectorized end of the cable connects to the
AC power port located on the bottom of the enclosure. The stub end of the cable must be
routed to an external junction box (not provided) for permanent connection to the AC power
system wiring.
The AC power source must supply 120 or 240 VAC, 50 or 60 Hz, single-phase power through
a 15 amp circuit breaker. The AC power cable provides three wire leads for line, neutral, and
ground connections. The power cable is rated for indoor or outdoor use and must not be placed
within electrical conduit as this will impede the cooling of the cable during usage. The electri-
cal junction box and any conduit, wire, and fittings required must be provided by the installer.
Figure 4-4: Connecting Base Station Antenna Cable to Antenna Port
Note: It is recommended that an AC outlet be installed near the enclosure for powering tools and test
equipment. This outlet must include a GFCI device for protection.
BOTTOM VIEW
ANTENNA PORT
(N-TYPE FEMALE)
22640-A
ANTENNA
CABLE
LIGHTNING
PROTECTOR
(ACCESSORY)
SURGE PORT
CONNECTOR
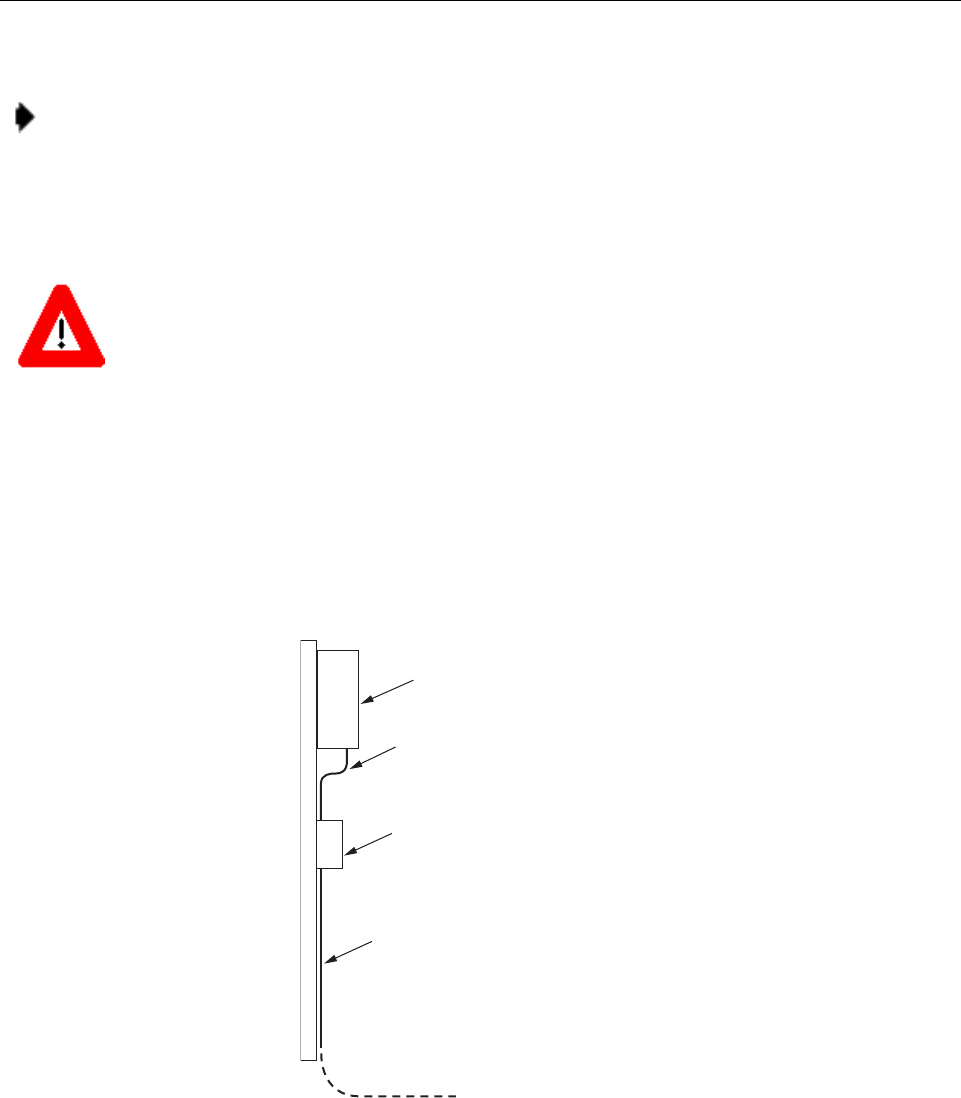
Page 32 FlexWave microBTS Installation and Commissioning Guide
© 2009, ADC Telecommunications, Inc.
ADCP-77-086 • Issue 2 • 04/2009 • Chapter 4 - Installation Procedures
Use the following procedure to install the AC power wiring:
1 Locate the AC power cable that is provided separately with the enclosure.
2 Route the power cable between the AC power port, located on the underside of the enclo-
sure and the nearest AC power junction box as shown in Figure 4-5. It may be necessary to
install a new junction box if an existing junction box is not available.
3 Secure the cable between the AC power port and the AC power junction box per local
practice. Leave sufficient slack in the cable to allow it to be easily connected and discon-
nected from the AC power port.
Note: All electrical work must comply with local codes and requirements. A locally licensed electri-
cal contractor is best qualified to perform this work. For additional information, consult with the ADC
Customer Service.
DANGER: Use extreme caution when working with high voltage AC power. Ensure all power is dis-
connected before working on power circuits.
Figure 4-5: Typical AC Power Cable Routing
microBTS
ENCLOSURE
22087-A
AC POWER
JUNCTION BOX
AC POWER
CABLE
AC POWER
WIRES ROUTED
TO CIRCUIT
BREAKER PANEL
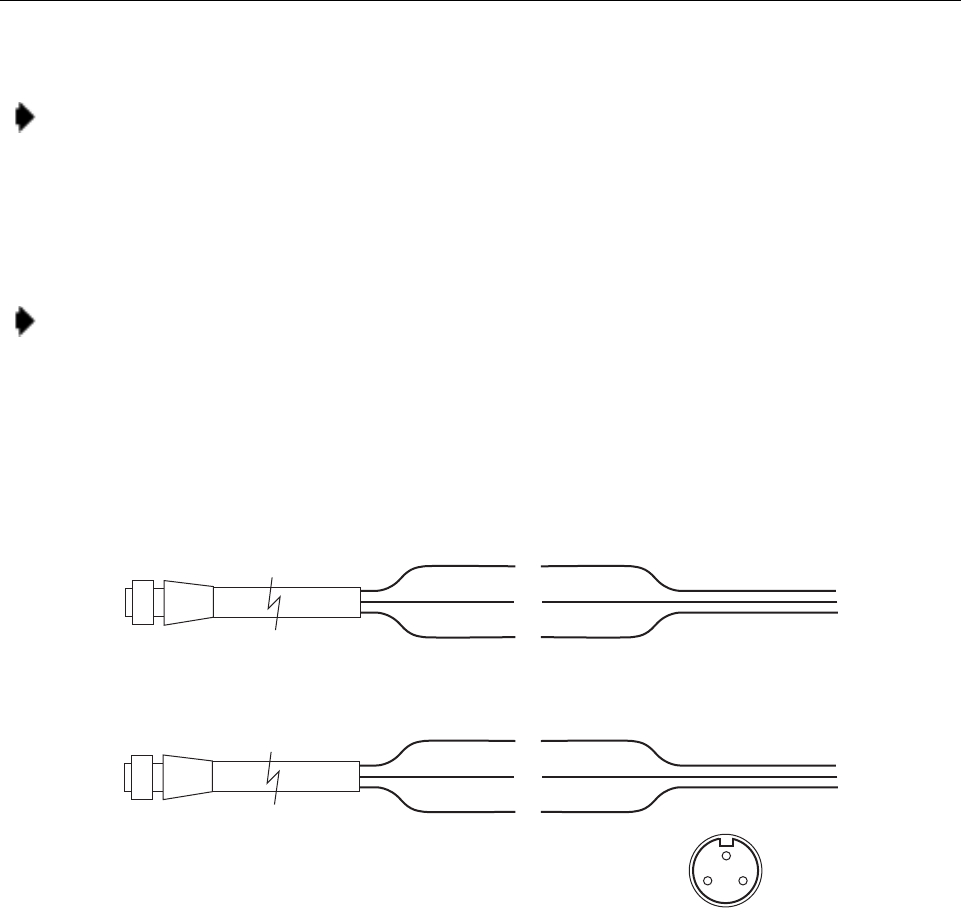
FlexWave microBTS Installation and Commissioning Guide Page 33
© 2009, ADC Telecommunications, Inc.
ADCP-77-086 • Issue 2 • 04/2009 • Chapter 4 - Installation Procedures
4 Install any AC power supply wires that may be required between the AC junction box and
the AC circuit breaker box.
5 Connect the AC power cable wires to the AC power supply wires. Refer to Figure 4-6 to
identify the color code and wire designations.
6 At the AC circuit breaker box, connect the AC power supply load wires to a 15 amp circuit
breaker.
7 Place the circuit breaker in the ON position and then test the connectorized end of the AC
power cable for proper voltage levels and correct polarity.
8 When testing is complete, place the circuit breaker in the OFF position.
9 Remove the dust cap from the AC power port located on the bottom of the enclosure as
shown in Figure 4-7.
Note: The power cable is rated for indoor or outdoor use and must not be placed within electrical
conduit as this will impede the cooling of the cable during usage. The cable run distance to the AC
power source must not exceed 100 feet.
Note: It is recommended that an AC outlet be installed near the enclosure for powering tools and test
equipment. This outlet must include a GFCI device for protection.
Figure 4-6: AC Power Cable Connections
AC POWER CORD
PROVIDED WITH ENCLOSURE BLACK
GREEN/YELLOW
WHITE
LINE
GROUND
NEUTRAL
120 VAC POWER
WIRING
AC POWER CORD
PROVIDED WITH ENCLOSURE BLACK
GREEN/YELLOW
WHITE
LINE 1
GROUND
LINE 2
240 VAC POWER
WIRING
120 VAC CONNECTIONS
240 VAC CONNECTIONS
20778-A
CONNECTOR PIN DESIGNATIONS
PIN 1 - GREEN/YELLOW
PIN 2 - WHITE
PIN 3 - BLACK
END VIEW OF
CONNECTOR
12
3
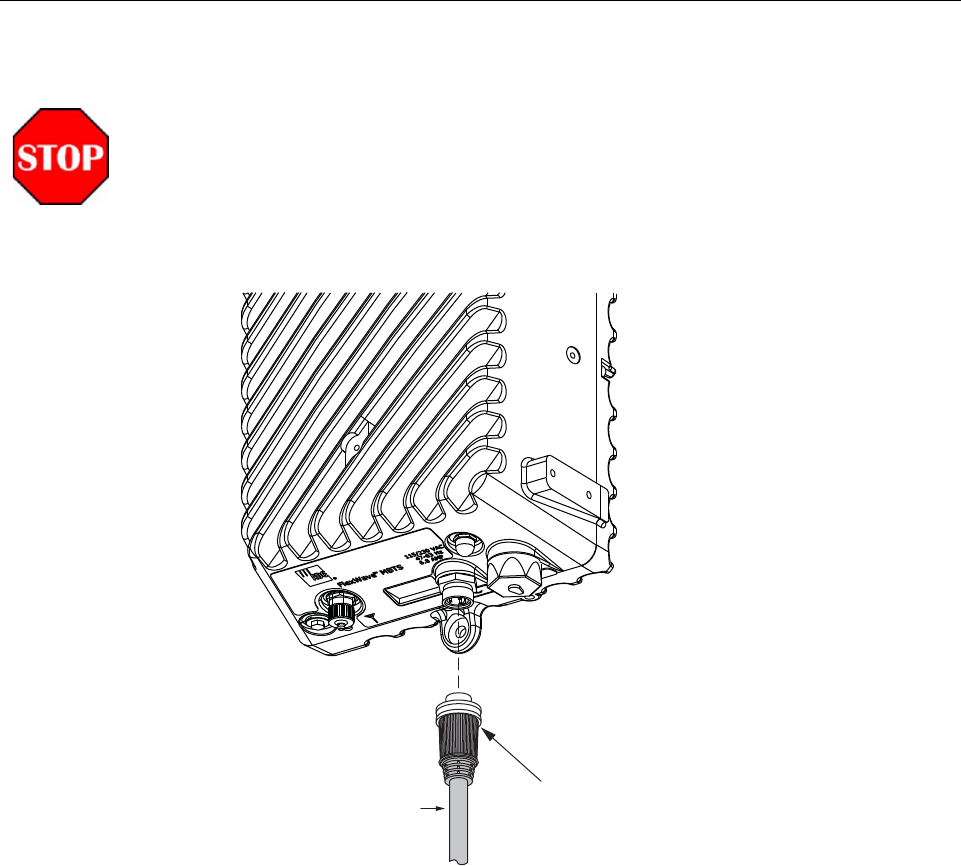
Page 34 FlexWave microBTS Installation and Commissioning Guide
© 2009, ADC Telecommunications, Inc.
ADCP-77-086 • Issue 2 • 04/2009 • Chapter 4 - Installation Procedures
10 Connect the power cable connector to the AC power port.
11 Tighten coupling nut until the green band at the top of the connector body is visible.
4.1.8 DC Power Wiring Installation
A 15-foot connectorized 3-wire cable (also available in lengths of 40, 60, or 100 feet) is
provided for the DC power connections. The connectorized end of the cable connects to the
DC power port located on the bottom of the enclosure. The stub end of the cable must be
routed to an external junction box (not provided) for permanent connection to the DC power
system wiring. The DC power source must supply 5 amps at -48 VDC through a 5 amp circuit
breaker. The DC power cable provides three wire leads for positive, negative, and ground con-
nections. The power cable is rated for indoor or outdoor use and must not be placed within
electrical conduit as this will impede the cooling of the cable during usage. The electrical
junction box and any conduit, wire, and fittings required must be provided by the installer.
DANGER: While trying to connect the AC power cable to the remote unit AC power port, it is
possible for the line terminal on the cable connector to contact the ground pin on the power port. If the
AC cable is energized, this will result in a direct short to ground for the AC power. To avoid possible
personal injury and equipment damage, always turn the AC power off before connecting the AC power
cable to the AC power port.
Figure 4-7: Connecting AC Power Cable to Enclosure
BOTTOM VIEW
22641-A
POWER
CABLE
GREEN BAND WILL BE
VISIBLE WHEN COUPLING
NUT IS TIGHTENED

FlexWave microBTS Installation and Commissioning Guide Page 35
© 2009, ADC Telecommunications, Inc.
ADCP-77-086 • Issue 2 • 04/2009 • Chapter 4 - Installation Procedures
Use the following procedure to install the DC power wiring:
1 Locate the DC power cable that is provided separately with the enclosure.
2 Route the power cable between the DC power port, located on the underside of the enclo-
sure and the DC power supply as shown in Figure 4-8. It may be necessary to install a new
junction box for the 5 amp breaker if an existing junction box is not available.
Note: All electrical work must comply with local codes and requirements. A locally licensed electri-
cal contractor is best qualified to perform this work. For additional information, consult with the ADC
Customer Service.
DANGER: Use extreme caution when working with DC power. Ensure all power is disconnected
before working on power circuits.
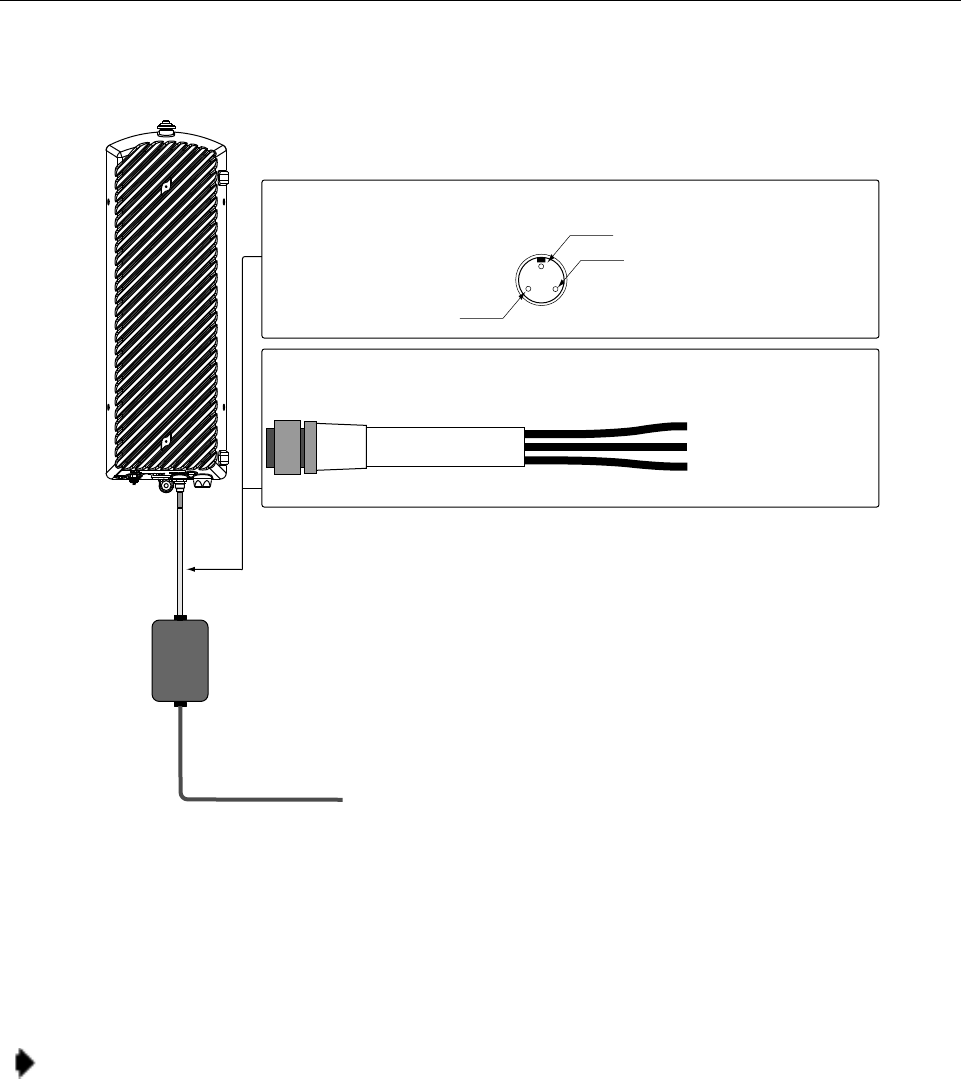
Page 36 FlexWave microBTS Installation and Commissioning Guide
© 2009, ADC Telecommunications, Inc.
ADCP-77-086 • Issue 2 • 04/2009 • Chapter 4 - Installation Procedures
3 Secure the cable between the DC power port and the DC power breaker box per local prac-
tice. Leave sufficient slack in the cable to allow it to be easily connected and disconnected
from the DC supply.
4 Install any DC power supply wires that may be required between the DC breaker box and
the DC supply.
5 Connect the DC power cable wires to the DC power supply. Refer to Figure 4-8 and
Table 4-1 shown below to identify the color code and wire designations.
Figure 4-8: Typical DC Power Cable Routing Detail
Note: The power cable is rated for indoor or outdoor use and must not be placed within electrical
conduit as this will impede the cooling of the cable during usage. The cable run distance to the DC
power source must not exceed 100 feet.
FlexWave microBTS
AD078901
End View of Cable Connector (48 VDC Power)
PIN 1: Ground (Green/ Yellow)
PIN 2: Negative (White)
Pin 3: Positive (Black)
Return Voltage
5 amp, 48 VDC Power Source
Breaker/ Junction Box Equipped with
5 amp breaker . Installed According to
Local Regulations.
White- Negative
Black- Positive/ Return
Green/ Yellow- Ground
Cable Color Code Detail (48 VDC Power)
FlexWave microBTS Installation and Commissioning Guide Page 37
© 2009, ADC Telecommunications, Inc.
ADCP-77-086 • Issue 2 • 04/2009 • Chapter 4 - Installation Procedures
E
6 At the DC circuit breaker box, connect the DC power supply.
7 Place the circuit breaker in the ON position and then test the connectorized end of the DC
power cable for proper voltage levels and correct polarity using a volt-ohm-meter.
8 When testing is complete, place the circuit breaker in the OFF position.
9 Remove the dust cap from the AC/DC power port located on the bottom of the enclosure
as shown in Figure 4-7.
4.1.9 Touch-Up Painting
An aerosol container of paint (Cardinal manufacturing part number A-2008-E10559, Gloss
Beige) is available for touching-up nicks and scratches in the factory coat of paint. Lightly
sand the area to be painted and then clean it thoroughly to remove and dirt, dust, or foreign
matter. Shake the paint container until thoroughly mixed and then apply a light coat of paint to
the damaged area. Wait until the paint is dry and apply a second coat if necessary.
4.1.10 Shield Installation (option)
A set of shields is provided with the microBTS as an option (part number DGVC-00000SS2).
The shields primarily reduce the effects of solar loading on the aluminum enclosure. The
shields also prevent accidental contact with surface areas of the enclosure that under extreme
service conditions may become hot enough to cause burns. Install the seven 3/8-inch hex
standoffs as shown in Figure 4-9. Secure the two side shields and the top shield to the standoffs
using the seven 3/8-inch 10-32 TORX drive screws and seven #10 split washers provided. A
T25 TORX drive bit is provided for tightening the screws.
Table 4-2: microBTS Installation Hardware
Wiring color Code DC Connection
Black + (positive) 48 VDC return
White - (negative) 48 VDC
Green/ Yellow Ground
DANGER: While trying to connect the DC power cable to the remote unit DC power port, it is
possible for the positive or negative terminal on the cable connector to contact the ground pin on the
power port. If the DC cable is energized, this will result in a direct short to ground for the DC power.
To avoid possible personal injury and equipment damage, always turn the DC power off before con-
necting the DC power cable to the DC power port.
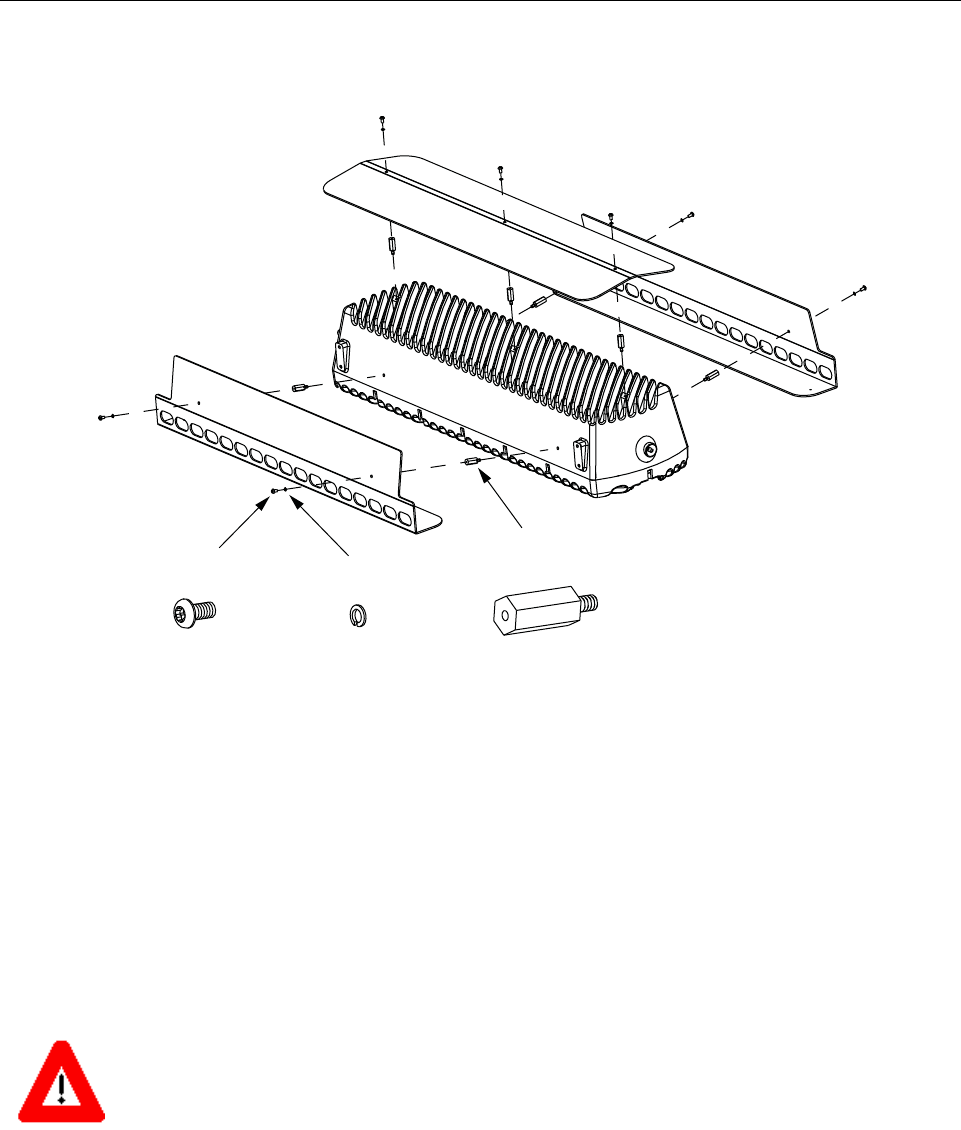
Page 38 FlexWave microBTS Installation and Commissioning Guide
© 2009, ADC Telecommunications, Inc.
ADCP-77-086 • Issue 2 • 04/2009 • Chapter 4 - Installation Procedures
4.2 MICROBTS REPLACEMENT
The microBTS enclosure contains no user-serviceable or field-serviceable components.
Failure of any internal component will require replacement of the entire unit. The enclosure
mounting hardware, the various cables, and any attached items may be reused with the replace-
ment unit. Opening the microBTS enclosure for any reason may cause the product warranty to
be voided.
Service to be conducted by qualified ADC service personnel only.
Figure 4-9: Solar shield Installation
Caution; Risk of explosion if the battery is replaced by an incorrect type. Dispose of used batteries
according to manufactures instructions.
3/8-INCH HEX
STANDOFF (7)
#10 SPLIT
WASHER (7)
3/8-INCH 10-32 SCREW
WITH T25 TORX DRIVE (7)
22153-A

FlexWave microBTS Installation and Commissioning Guide Page 39
© 2009, ADC Telecommunications, Inc.
ADCP-77-086 • Issue 2 • 04/2009 • Chapter 5 - microBTS Initial Configuration
Chapter 5 - microBTS Initial Configuration
5.1 Equipment and Information Required for Initialization . . . . . . . . . . . . . . . . . . . . . . . . . . . . . . . . . . . . . . . . . . . . 41
5.2 Configuring the Equipment for IP Connection . . . . . . . . . . . . . . . . . . . . . . . . . . . . . . . . . . . . . . . . . . . . . . . . . . 42
5.2.1 Introduction . . . . . . . . . . . . . . . . . . . . . . . . . . . . . . . . . . . . . . . . . . . . . . . . . . . . . . . . . . . . . . . . . 42
5.3 Configure PC to Communicate with the microBTS . . . . . . . . . . . . . . . . . . . . . . . . . . . . . . . . . . . . . . . . . . . . . . . 43
5.4 Determining the MAC Address of the microBTS and Assigning DHCP IP Addresses . . . . . . . . . . . . . . . . . . . . . . . . 45
5.5 Assigning OML Link IP Address and a Static IP Address to the microBTS . . . . . . . . . . . . . . . . . . . . . . . . . . . . . . . 55
5.6 Configuring a New Site Using the BSC Configuration Manager Utility . . . . . . . . . . . . . . . . . . . . . . . . . . . . . . . . . 57
5.7 Creating the FlexWave Manager . . . . . . . . . . . . . . . . . . . . . . . . . . . . . . . . . . . . . . . . . . . . . . . . . . . . . . . . . . 62
5.8 Verifying BTS Functionality Using the BSC Configuration Manager . . . . . . . . . . . . . . . . . . . . . . . . . . . . . . . . . . . 68
After installation of the microBTS is complete, it must be initialized with an IP Address to
allow it to communicate with the BSC over the OML/ Abis link.
Initializing the microBTS with an IP address is accomplished by performing the following
basic tasks:
1 Assemble all the tools, equipment and administrative information needed (request IP
addresses for the microBTS, and Abis link from the system administrator).
2 Connect the equipment.
3 Configure your PC to communicate with the microBTS.
4 Turn-up the equipment and assign a DHCP generated address to the microBTS.
5 Use the DHCP generated IP address to enable the microBTS web browser and set static IP
addresses for the microBTS and each of the TRX units.
6 Request the system administrator to provision the site using the BSC Configuration
Manager utility.
7 The system administrator will verify the microBTS is communicating with the BSC.
8 Verify that the microBTS is functioning correctly by making a phone call.
The following procedures will guide you through this process.
Content Page
Note: Further information regarding set up of the TRX’s contained within the microBTS can be found
in the nanoBTS Installer User Guide (ADCP-75-310). Further information regarding setup and config-
uration of the BSC can be found in the BSC Configuration Manager User Guide (ADCP-75-317).
Note: Verify the BTS Installer utility and the BSC Configuration Manager utility is the latest version
or the version appropriate to your system.

Page 40 FlexWave microBTS Installation and Commissioning Guide
© 2009, ADC Telecommunications, Inc.
ADCP-77-086 • Issue 2 • 04/2009 • Chapter 5 - microBTS Initial Configuration
Note: When setting the RF output power levels as described in BSC Configuration Manager
(ADCP-75-317) paragraph 6.44 “Radio Carrier.” The maximum settings are: No less than level 4 for
900 MHz products and no less than level 5 for 1800 MHz products. Failure to observe this precaution
may result in over driving the microBTS power amplifier which may require power cycling the equip-
ment to reset the Power Amplifier.

FlexWave microBTS Installation and Commissioning Guide Page 41
© 2009, ADC Telecommunications, Inc.
ADCP-77-086 • Issue 2 • 04/2009 • Chapter 5 - microBTS Initial Configuration
5.1 Equipment and Information Required for Initialization
The following equipment and information will be needed to initialize the microBTS:
•Windows XP based PC loaded with BTS Installer and BSC Configuration Manager
utilities.
•Four port Ethernet router or switch.
•Quantity 2 each, RJ-48 Cat 5 patch cables (length according to site requirements).
•RF termination (dummy load), 0-2 GHz, 50 Ohm, 20 watt capacity if no antenna system is
connected.
•Static IP addresses for the microBTS assigned by your network administrator (2 addresses
will be needed for 1 x 1 configurations. 3 addresses for 2 x 1 configurations).
•OML (operations and maintenance link) link address assigned by your network
administrator.
•Subnet mask and default gateway IP addresses assigned by your system administrator.
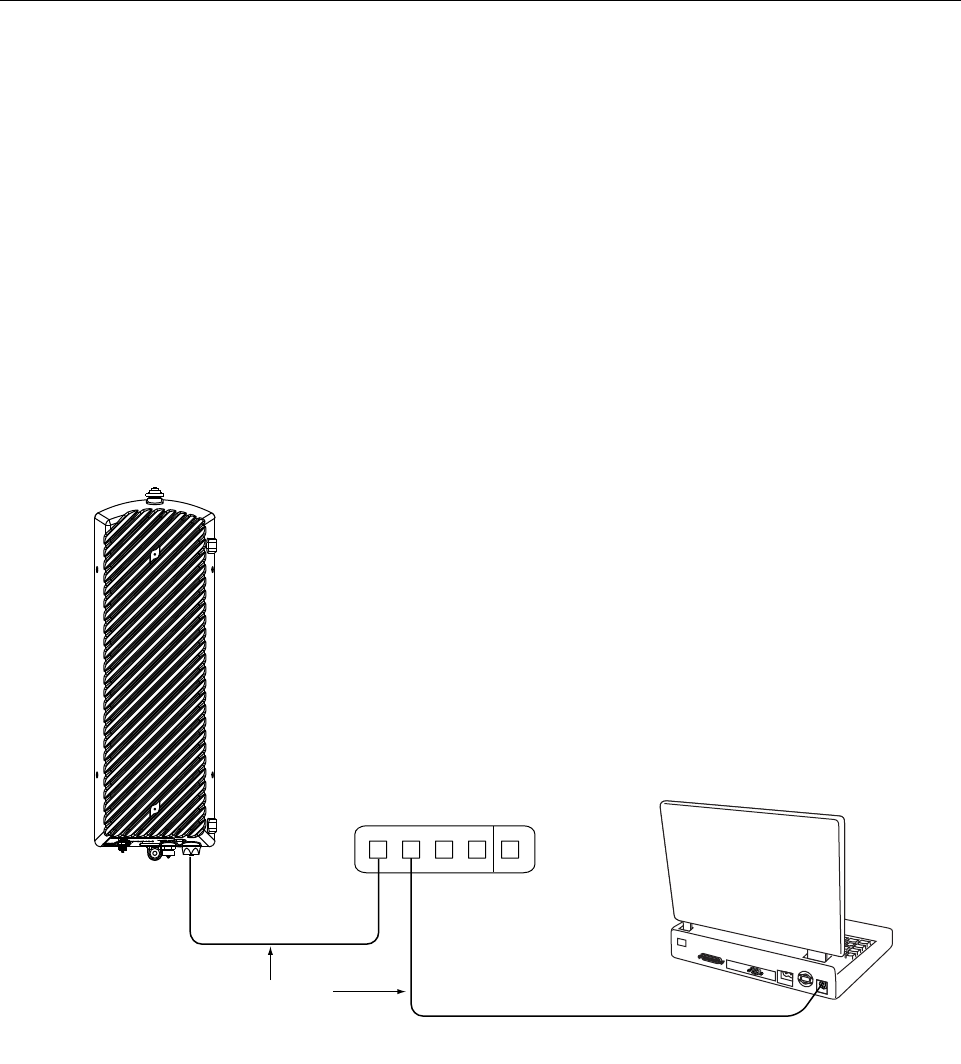
Page 42 FlexWave microBTS Installation and Commissioning Guide
© 2009, ADC Telecommunications, Inc.
ADCP-77-086 • Issue 2 • 04/2009 • Chapter 5 - microBTS Initial Configuration
5.2 Configuring the Equipment for IP Connection
5.2.1 Introduction
In order to initialize, test, and operate the microBTS it must be connected to an IP network. By
connecting the microBTS, Router, and PC to the IP network as shown in the following proce-
dure, the microBTS can be provisioned with a static or DHCP IP address and can be
configured for correct operation using the BTS Installer and BSC Configuration Manager
Utilities.
1 Connect the microBTS, PC, four port Ethernet router/switch and, RF termination (if no
antenna system is installed) as shown in Figure 5-1.
Figure 5-1: Connection Details for Initialization of the microBTS Terminal
FlexWave microBTS
Ethernet Router, Hub
or Switch
RJ-48 Ethernet
Patch cable
AD015901
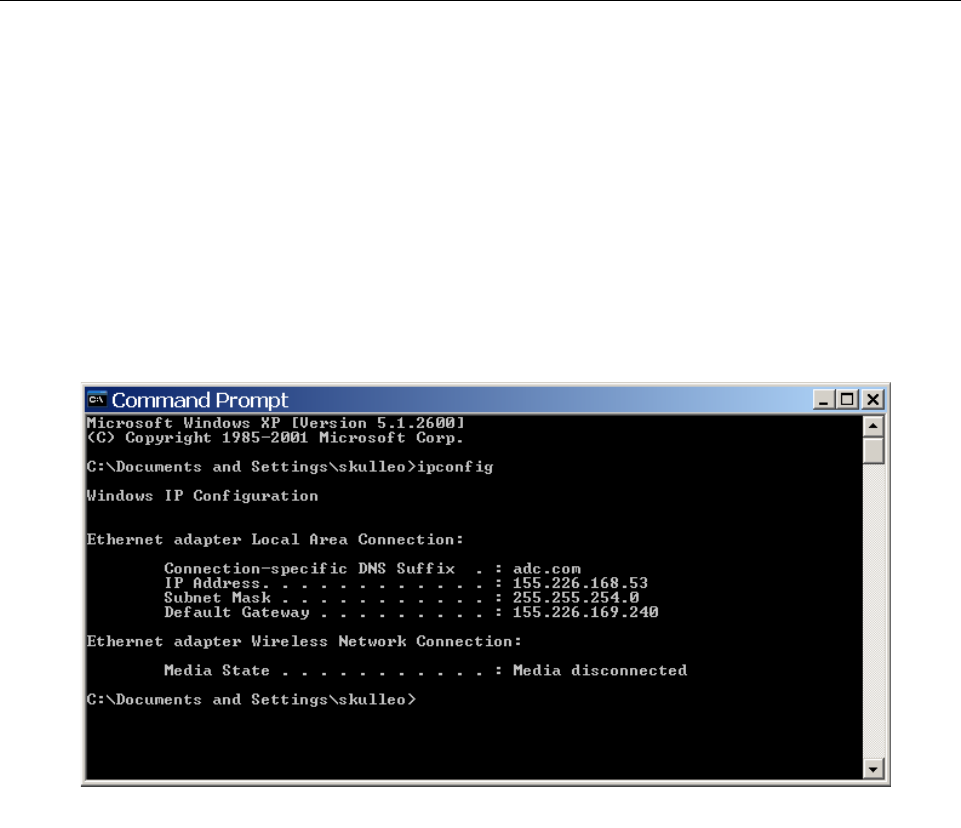
FlexWave microBTS Installation and Commissioning Guide Page 43
© 2009, ADC Telecommunications, Inc.
ADCP-77-086 • Issue 2 • 04/2009 • Chapter 5 - microBTS Initial Configuration
5.3 Configure PC to Communicate with the microBTS
1 To allow the PC to communicate with the configuration shown in Figure 5-1, the PC
network card must be configured with the correct IP address. If the microBTS is already
connected to the BSC via an Abis link use the Abis IP address. If the microBTS is not
connected to the BSC, determine the IP address of your PC by opening the Command
Prompt and type in “ipconfig” and use this address. The IP address shown is that of your
PC. Refer to Figure 5-2.
2 Open the Internet Protocol Properties screen of your PC network interface card and assign
the IP address discovered in the previous step as shown in Figure 5-2. If you are already
connected to the BSC via an Abis link select the Obtain an IP address automatically
button also shown in Figure 5-3.
Figure 5-2: The Command Prompt Screen Showing the IP Address of the PC
AD077914
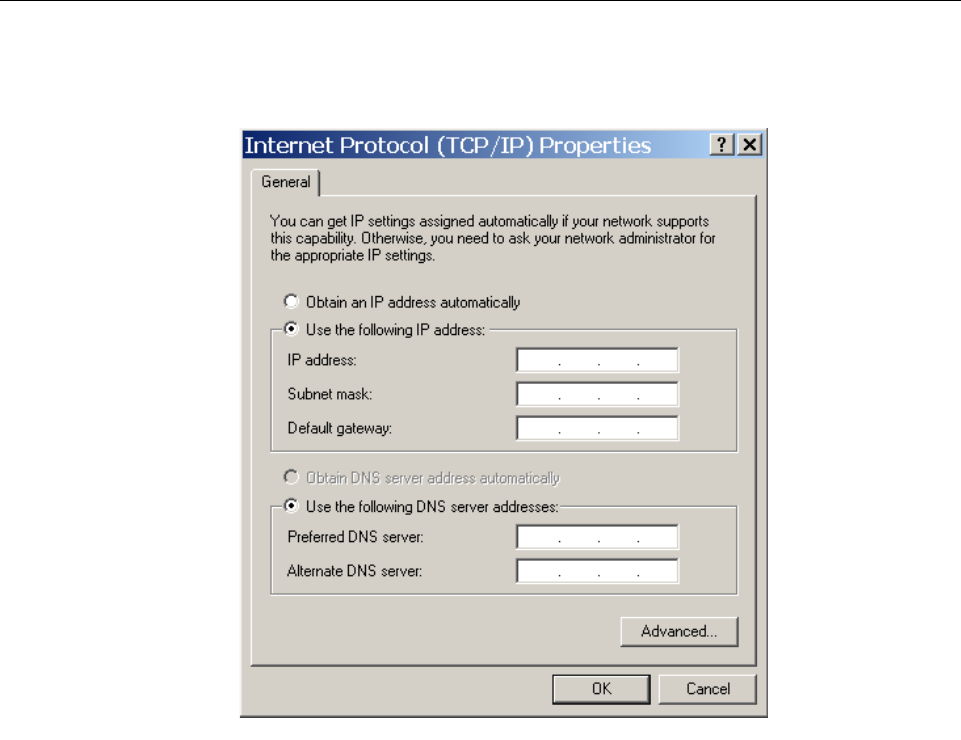
Page 44 FlexWave microBTS Installation and Commissioning Guide
© 2009, ADC Telecommunications, Inc.
ADCP-77-086 • Issue 2 • 04/2009 • Chapter 5 - microBTS Initial Configuration
Figure 5-3: Internet Protocol (TCP/IP) Properties
AD077913
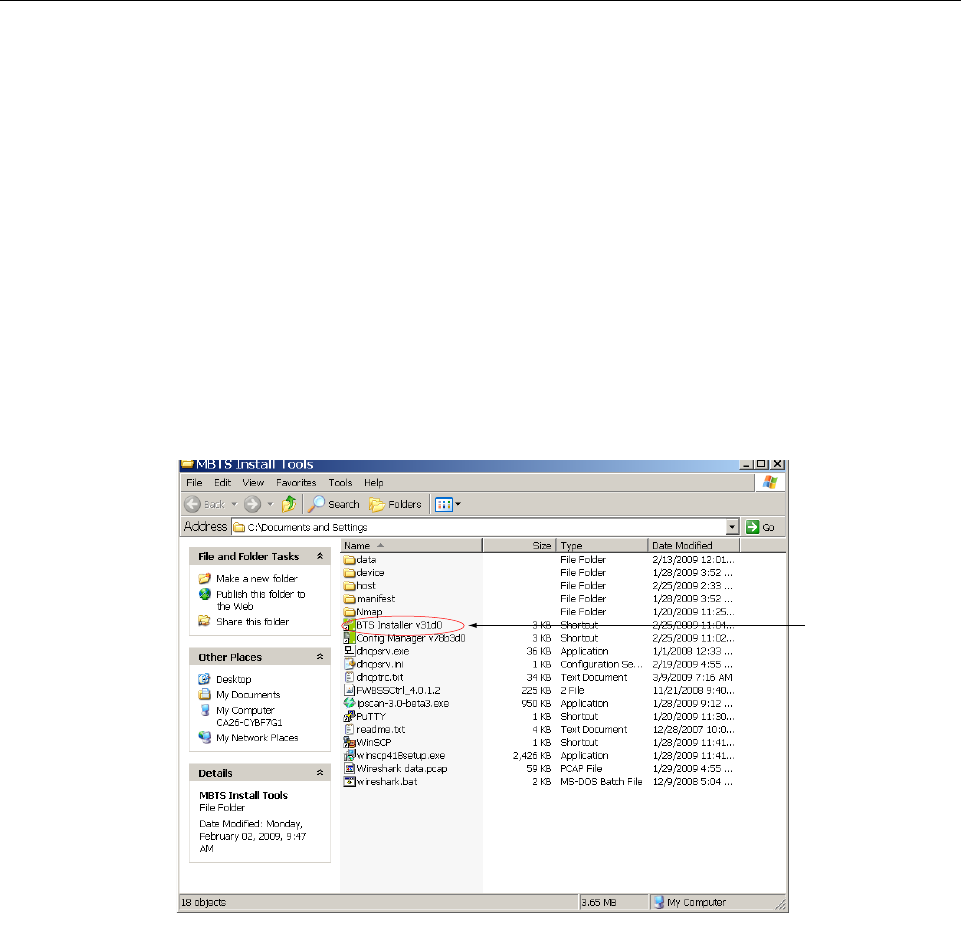
FlexWave microBTS Installation and Commissioning Guide Page 45
© 2009, ADC Telecommunications, Inc.
ADCP-77-086 • Issue 2 • 04/2009 • Chapter 5 - microBTS Initial Configuration
5.4 Determining the MAC Address of the microBTS and Assigning DHCP IP
Addresses
Use the following step-by-step procedure to assign an IP address to the microBTS terminal.
1 Connect the microBTS terminal to the AC/DC power source. The red LED alarm
indication will illuminate for about 5 minutes and extinguish once the terminal has
completed its start cycle.
2 Power on the Ethernet router/switch and PC.
3 Launch the BTS Installer utility from the PC desktop or folder as shown in Figure 5-4.
4 Once the BTS Installer is launched, the main configuration screen will appear as shown in
Figure 5-5.
Figure 5-4: Launching the BTS Installer
AD068901
Launch
The BTS
Installer
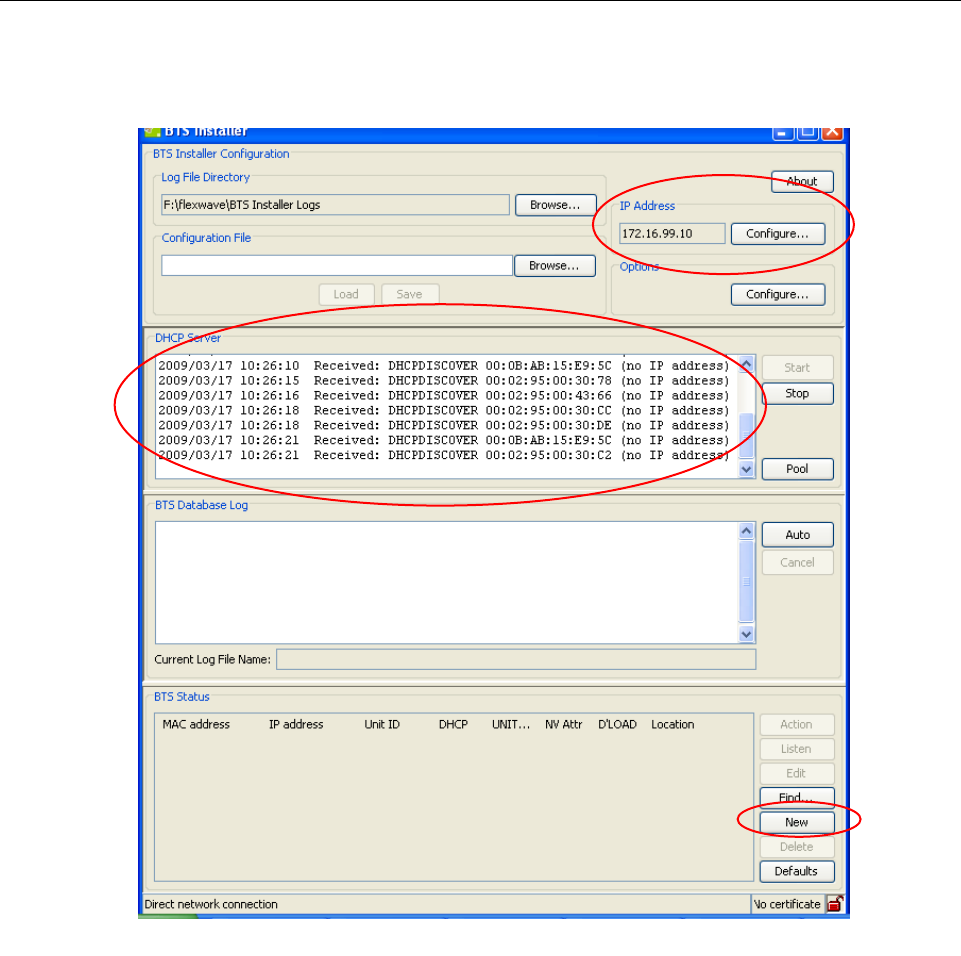
Page 46 FlexWave microBTS Installation and Commissioning Guide
© 2009, ADC Telecommunications, Inc.
ADCP-77-086 • Issue 2 • 04/2009 • Chapter 5 - microBTS Initial Configuration
5 Referring to Figure 5-5 click on the IP Address Configure button.
6A Configure BTS Installer screen will appear as shown in Figure 5-6.
7 A list of Network Adaptors and IP addresses will be shown.
8 Click on the + (plus) symbol to view the detail of the network adaptor card in your PC.
The IP address which was set in the previous steps will appear.
9 Highlight this address and it will appear in the DHCP Server IP Address dialog box.
10 Leave the Listen Only on This Address check box unchecked.
11 Click on the OK button.
Figure 5-5: The Main Configuration Screen Showing the MAC Address of Each microBTS and TRX
AD077904
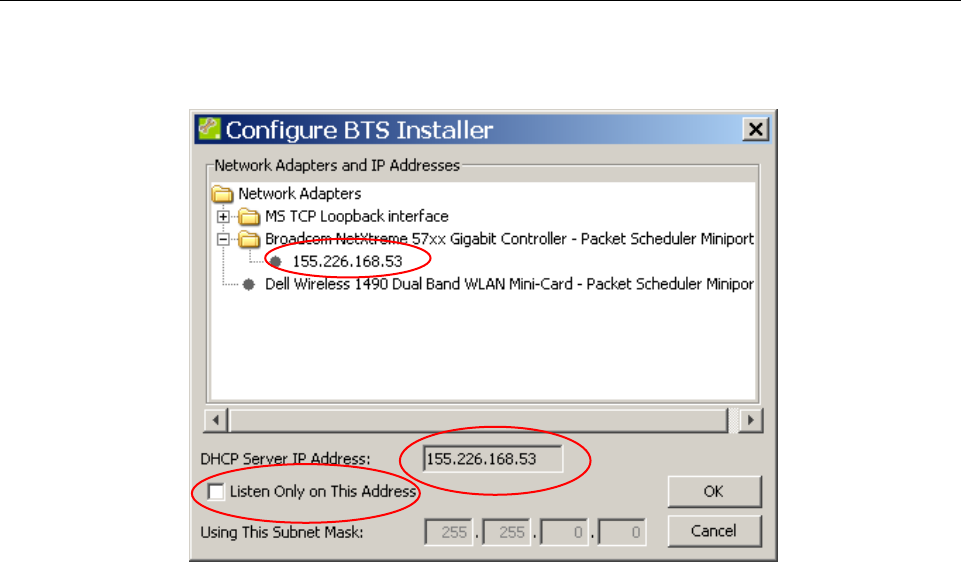
FlexWave microBTS Installation and Commissioning Guide Page 47
© 2009, ADC Telecommunications, Inc.
ADCP-77-086 • Issue 2 • 04/2009 • Chapter 5 - microBTS Initial Configuration
12 Verify that the MAC address for the microBTS matches the information provided in the
list shown in Figure 5-5. Verify these MAC addresses match the equipment label shown in
Figure 5-7.
The TRX’s on the label will be listed first. The last address will be the microBTS terminal.
This address will be used to access the web browser when setting a static IP address.
Record these numbers for future reference.
Figure 5-6: The Configure BTS Screen Used to Set the DHCP Server Address
AD090901
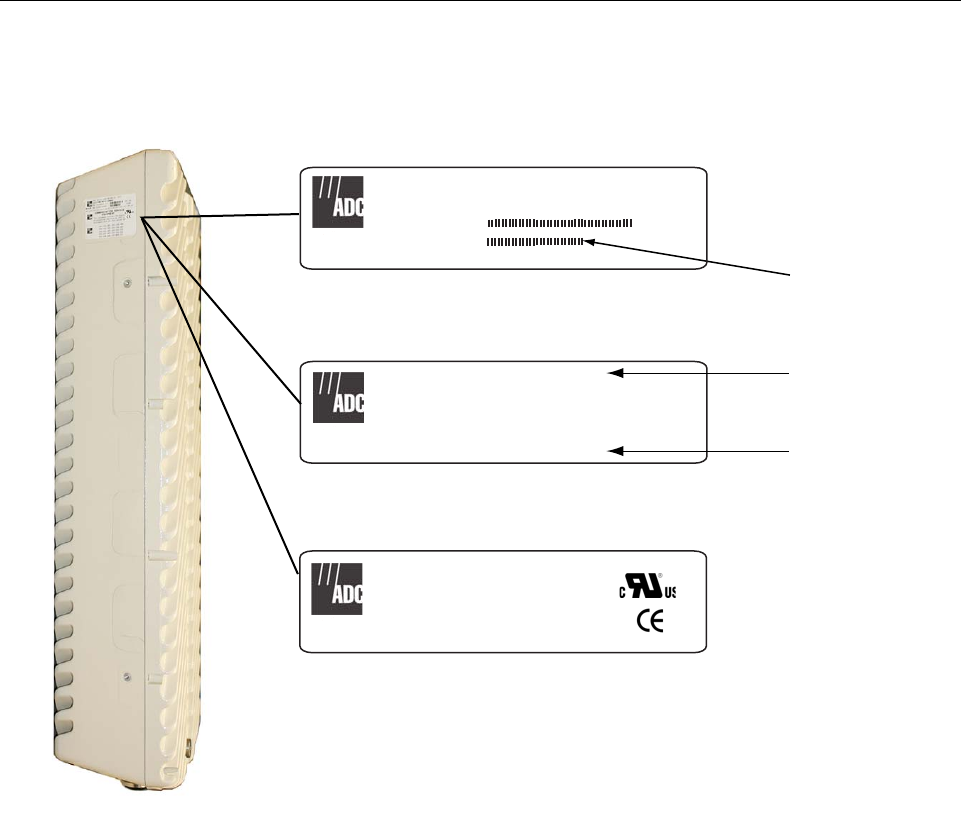
Page 48 FlexWave microBTS Installation and Commissioning Guide
© 2009, ADC Telecommunications, Inc.
ADCP-77-086 • Issue 2 • 04/2009 • Chapter 5 - microBTS Initial Configuration
Figure 5-7: Exterior Model Label Showing the MAC Addresses for the microBTS and Each TRX
Cust Service (800) 366-3891 Ext 73475
Cat# FWB-MBTS-B10N00
PN 1459911-11
SN 224319802
900 MHZ
Made in USA
SC 85
0309
PAT 5,627 ,879 5,657 ,374 5,644, 622 5,642,405 5,621, 786 5,852, 651
00:02:95:00:4B:3A
XX:XX:XX:XX:XX:XX
XX:XX:XX:XX:XX:XX
XX:XX:XX:XX:XX:XX
00:0B:AB:15:E9:45
Product Indentification Label (Sample)
MAC Address Label (Sample)
MAC Address
microBTS
MAC Address
nanoBTS
AD019904
microBTS Serial
Number
COMMUNICATION SERVICE
EQUIPMENT
This equipment provides the degree
of protection specified by IP67 in
accordance with IEC Publication 529
Certification Label (Sample)
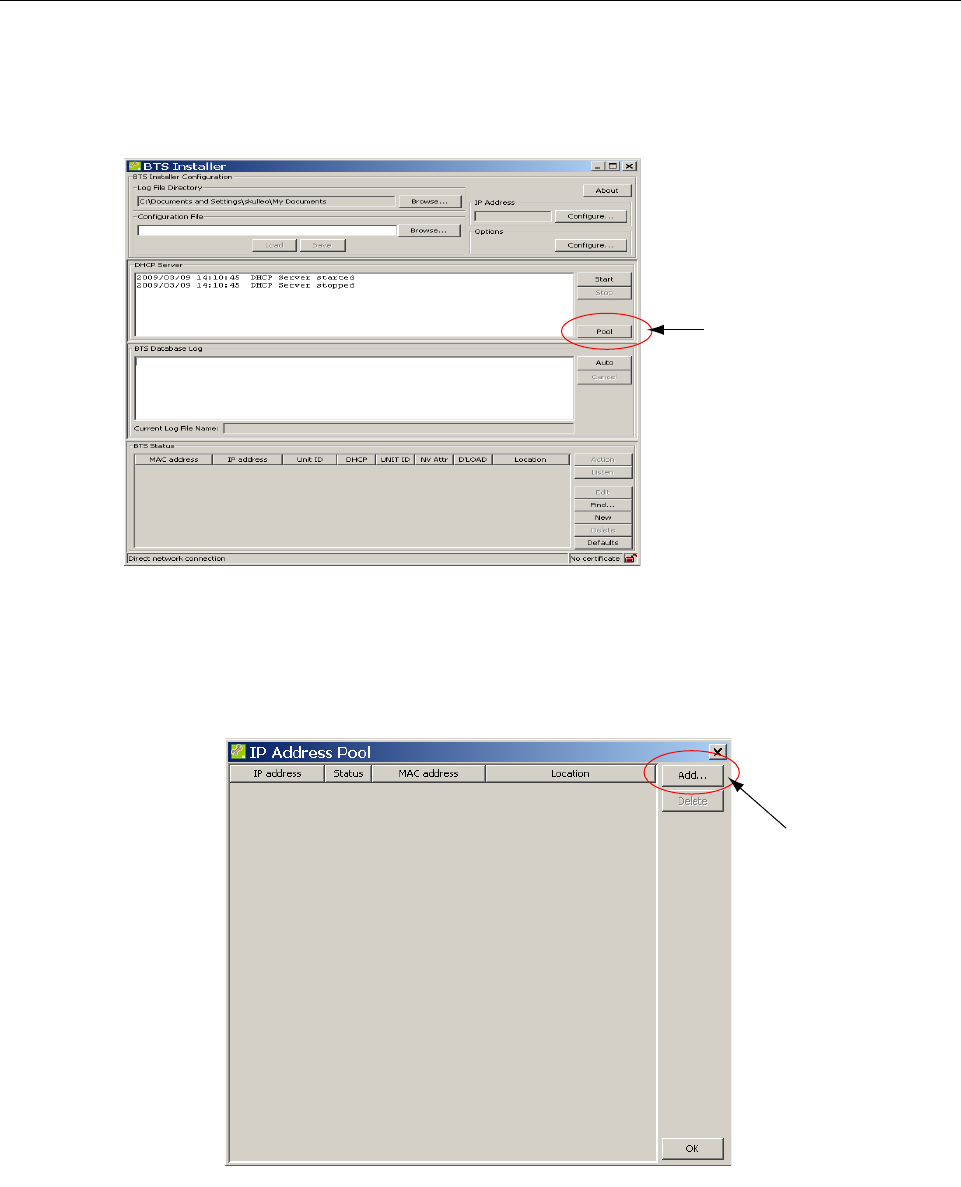
FlexWave microBTS Installation and Commissioning Guide Page 49
© 2009, ADC Telecommunications, Inc.
ADCP-77-086 • Issue 2 • 04/2009 • Chapter 5 - microBTS Initial Configuration
13 Select the Pool command icon as shown in Figure 5-8.
14 Select the Add command as shown in Figure 5-9.
Figure 5-8: Selecting the Pool Command Using the BTS Installer Utility
Figure 5-9: Selecting the Add Command Using the BTS Installer Utility
AD068903
Select the POOL
Command
Select the
Add Command
AD068904
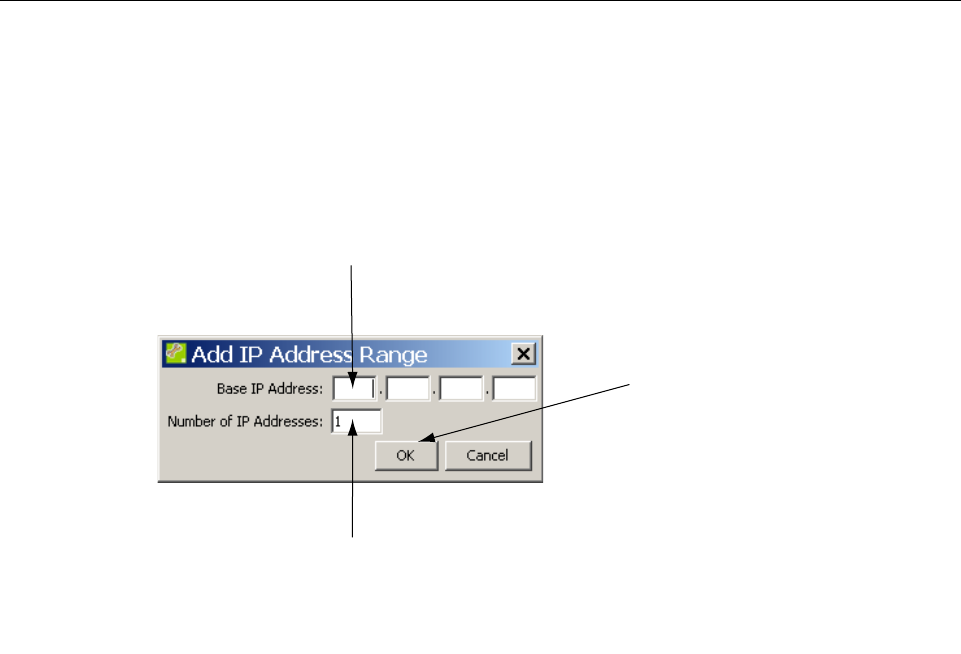
Page 50 FlexWave microBTS Installation and Commissioning Guide
© 2009, ADC Telecommunications, Inc.
ADCP-77-086 • Issue 2 • 04/2009 • Chapter 5 - microBTS Initial Configuration
15 Input a base IP number within the range of the OML Link IP address.
The number of addresses needed (1 x 1 configurations will need two addresses where as
the 2 x 1 will require 3). Click on OK. Refer to Figure 5-10.
Note: When setting the address range in the IP Pool, the range must be in the same range as the
OML/Abis link IP address. For example, if the OML Link IP address is 172.16.99.1, use a
range close to this, such as 172.16.99.11 through 172.16.99.15.
Figure 5-10: Adding an IP Address Range
1.) Select the base IP
Address
2.) Select the Number of IP addresses
Needed for Your Terminal (1 x 1
Systems require 2 addresses and
2 x 1 systems require 3)
AD068905
3.) Select OK and New
IP addresses Will Be
Assigned To The
MicroBTS Units
In Sequential Order
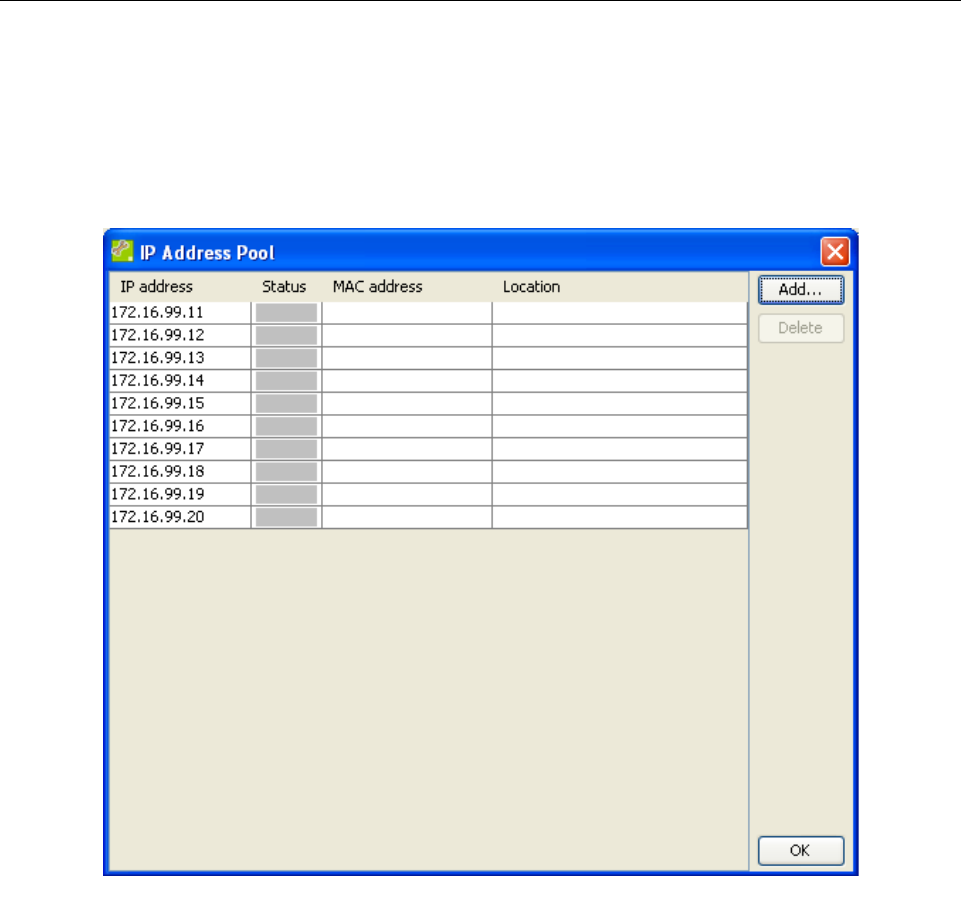
FlexWave microBTS Installation and Commissioning Guide Page 51
© 2009, ADC Telecommunications, Inc.
ADCP-77-086 • Issue 2 • 04/2009 • Chapter 5 - microBTS Initial Configuration
16 An address pool will be assigned according to the number and range of IP addresses
selected in the previous step. Refer to Figure 5-11. Click OK and return to the main menu.
Figure 5-11: IP Address Pool
AD077903
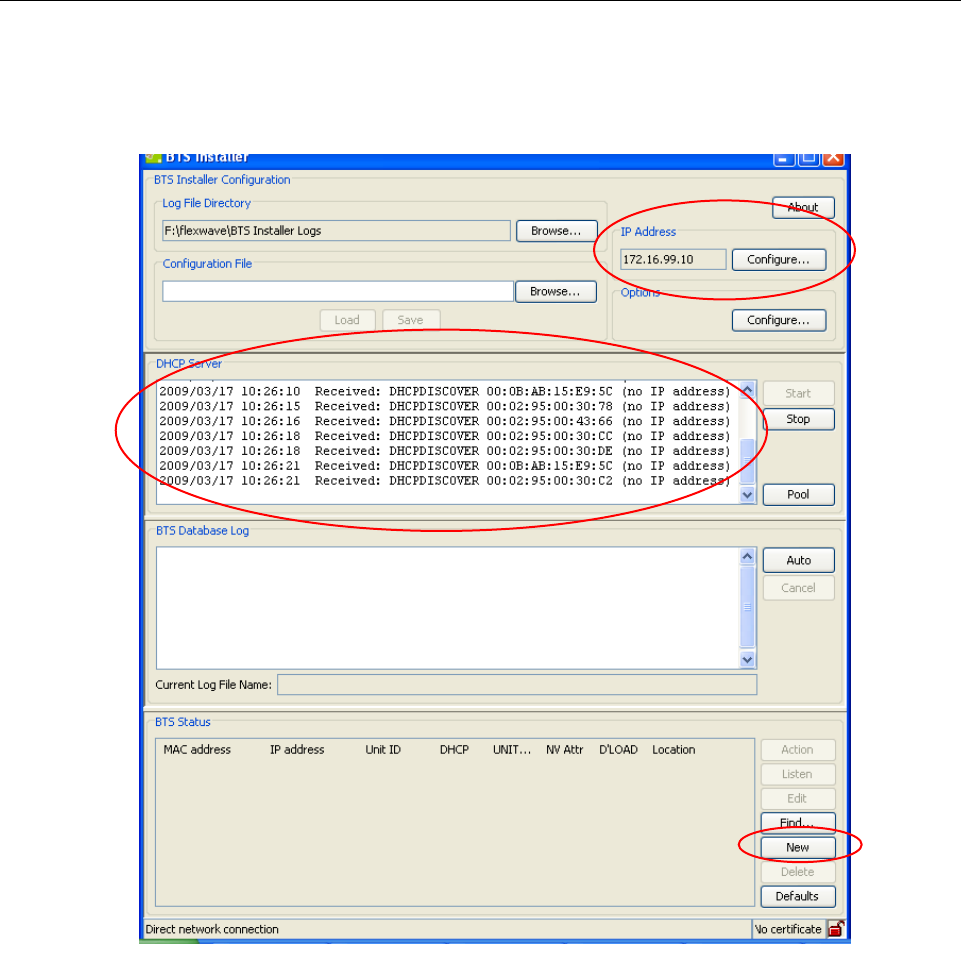
Page 52 FlexWave microBTS Installation and Commissioning Guide
© 2009, ADC Telecommunications, Inc.
ADCP-77-086 • Issue 2 • 04/2009 • Chapter 5 - microBTS Initial Configuration
17 Using the main menu screen, click on New. Refer to Figure 5-12.
Figure 5-12: Selecting New On the Main Configuration Screen
AD077904
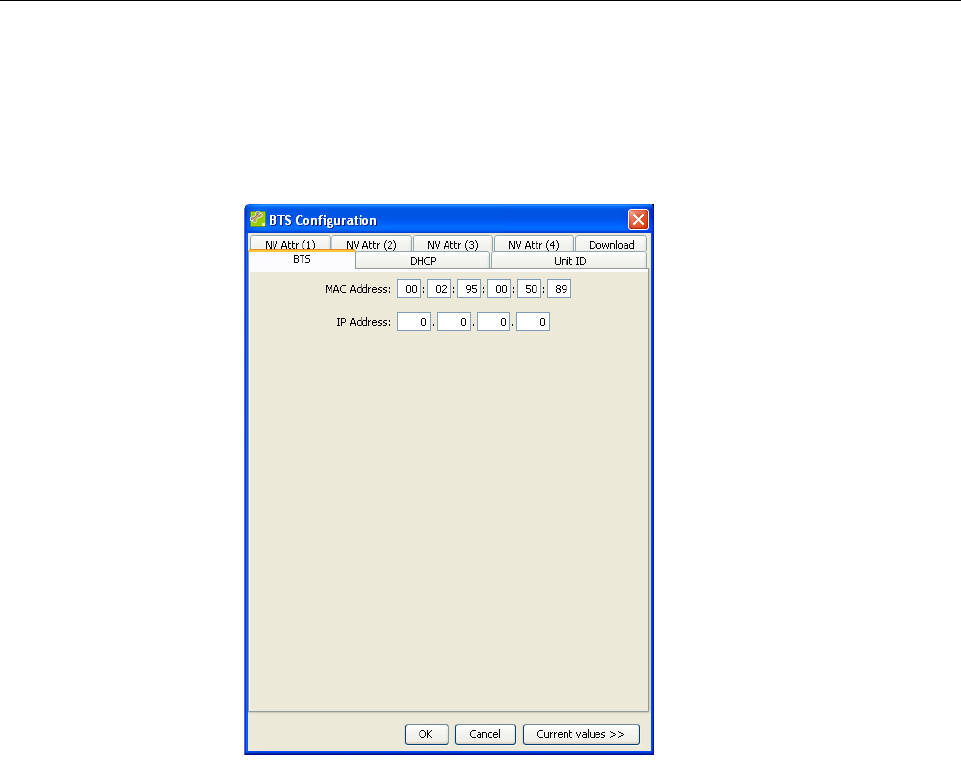
FlexWave microBTS Installation and Commissioning Guide Page 53
© 2009, ADC Telecommunications, Inc.
ADCP-77-086 • Issue 2 • 04/2009 • Chapter 5 - microBTS Initial Configuration
18 A BTS Configuration screen will appear. Select the BTS tab and set the MAC address for
each of the units as described in Step 12 of this procedure. Refer to Figure 5-13.
Figure 5-13: Setting MAC Addresses Using the BTS Tab on the BTS Configuration Screen
AD077905
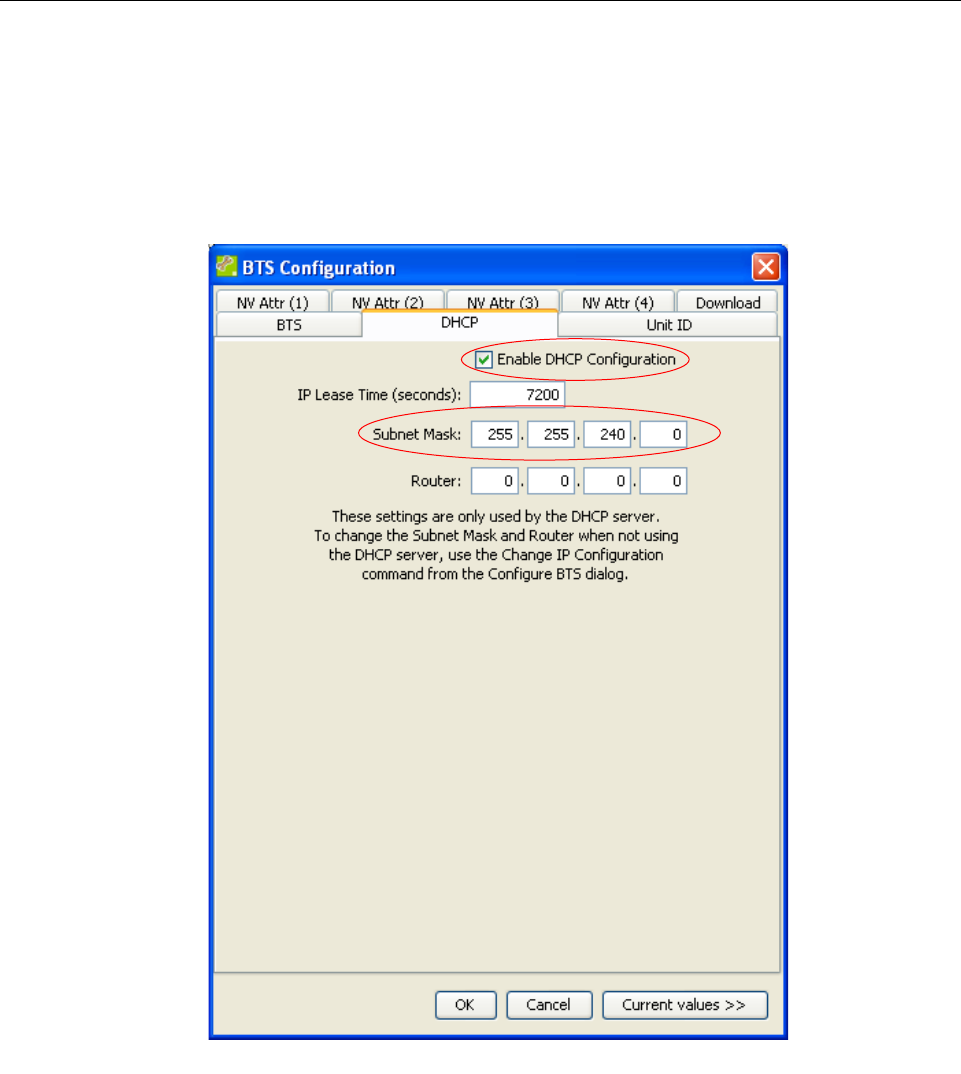
Page 54 FlexWave microBTS Installation and Commissioning Guide
© 2009, ADC Telecommunications, Inc.
ADCP-77-086 • Issue 2 • 04/2009 • Chapter 5 - microBTS Initial Configuration
19 Select the DHCP tab on the BTS Configuration screen.
Enable DHCP Configuration and set the Subnet Mask in a range of your network settings.
for example: 255. 255. 240. 0. Refer to Figure 5-14. Click OK when complete.
20 Repeat Step 18 through Step 19 in this procedure for each of MAC addresses in the
microBTS being installed.
21 The DHCP server will assign addresses to each unit within the microBTS. This can be
verified by reviewing the main menu screen or the DHCP Pool screen as shown in
Figure 5-11.
Figure 5-14: Enabling DHCP and Setting the Subnet Mask Using the DHCP Tab
AD077906