ADC Telecommunications FWM1901A FlexWave™ microBTS User Manual 01
ADC Telecommunications Inc FlexWave™ microBTS 01
UserManual.wiki
>
ADC Telecommunications
>
FWM1901A User Manual
>
User manual 01
Contents
1.
User manual 01
2.
User manual 02
3.
User manual 03
4.
User manual 04
User manual 01
Navigation menu
Upload a User Manual
Namespaces
Wiki Guide
HTML
PDF
Info
Views
User Manual
Discussion / Help
Navigation


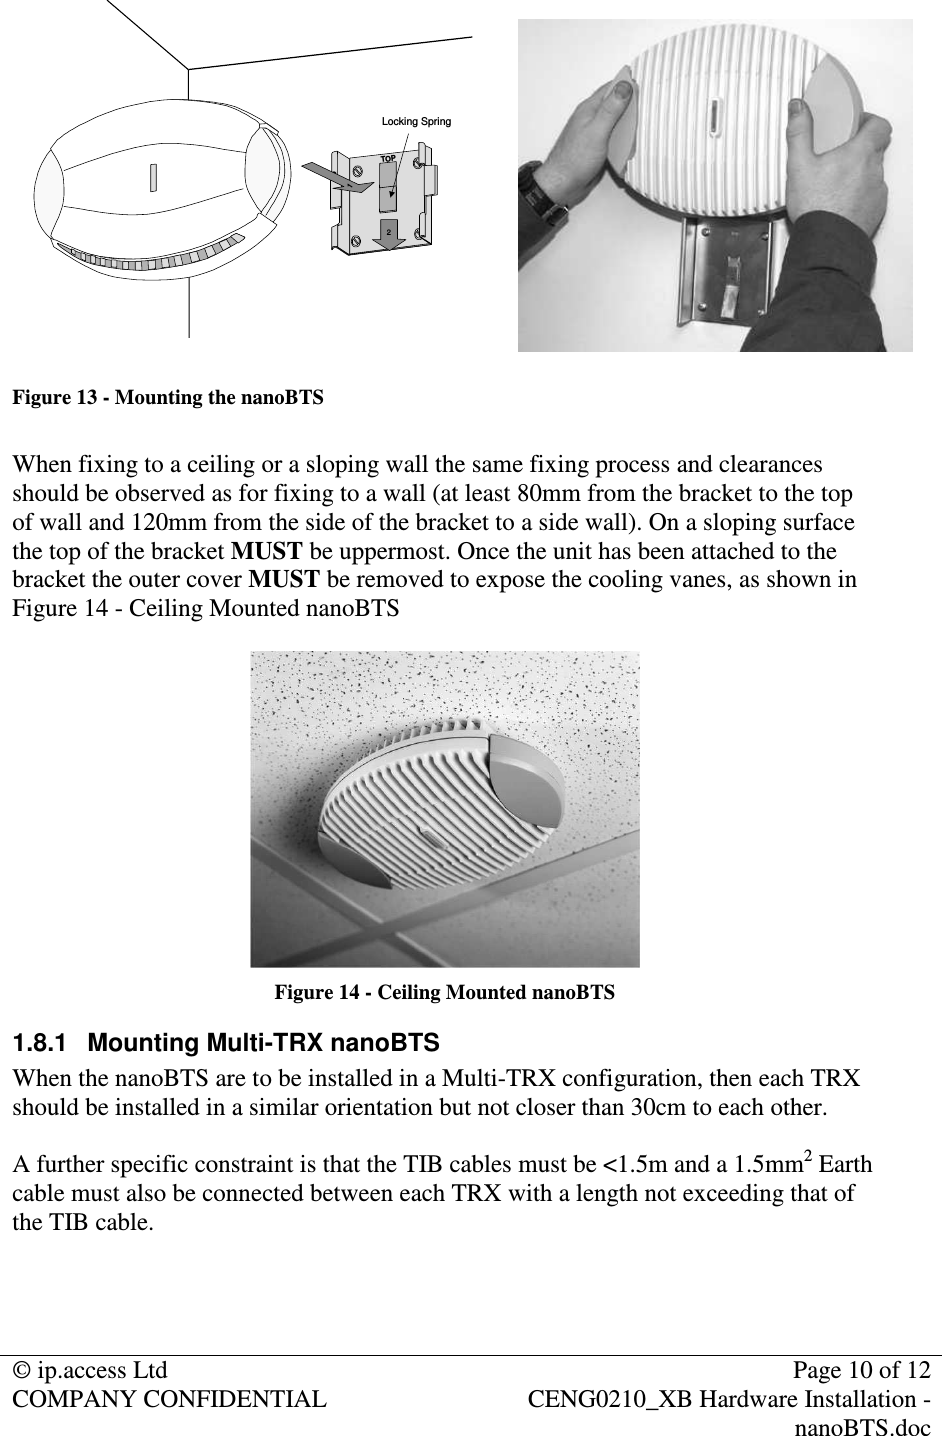
![© ip.access Ltd Page 12 of 12 COMPANY CONFIDENTIAL CENG0210_XB Hardware Installation - nanoBTS.doc 1.10 LED Status Indicators The following table shows the meaning of the state LED under normal and fault conditions. State Pattern When Precedence LED_SELF_TEST_FAILURE Red Steady In boot or application code when a power on self-test fails. 1 (High) LED_UNSPECIFIED_FAILURE Red Steady On s/w fatal errors. 2 LED_NO_ETHERNET Orange Slow Flash Ethernet disconnected. 3 LED_FACTORY_RESET Red Fast Blink Dongle detected at start up and the factory defaults have been applied. 4 LED_NOT_CONFIGURED Alternating Red/Green Fast Flash The unit has not been configured. 5 LED_DOWNLOADING_CODE Orange Fast Flash Code download procedure is in progress. 6 LED_ESTABLISHING_XML Orange Slow Blink A management link has not yet been established but is needed for the TRX to become operational. Specifically: for a master a Primary OML or Secondary OML is not yet established; for a slave an IML to its master or a Secondary OML is not yet established. 7 LED_SELF_TEST Orange Steady From power on until end of backhaul power on self-test 8 LED_NWL_TEST Green Fast Flash OML established, NWL test in progress 9 LED_OCXO_CALIBRATION Alternating Green/Orange Slow Blink The unit is in the fast calibrating state [SYNC]. 10 LED_NOT_TRANSMITTING Green Slow Flash The radio carrier is not being transmitted. 11 LED_OPERATIONAL Green Steady Default condition if none of the above apply. 12 (Low)](https://usermanual.wiki/ADC-Telecommunications/FWM1901A.User-manual-01/User-Guide-801789-Page-12.png)