AEE Technology AEEP6000001 Action Camcorder User Manual
Shenzhen AEE Technology CO., LTD. Action Camcorder Users Manual
Users Manual
Quick Start Guide
This Guide provides quick-start instructions on how to use this product.
Please read it carefully before use, and keep it handy for future reference.
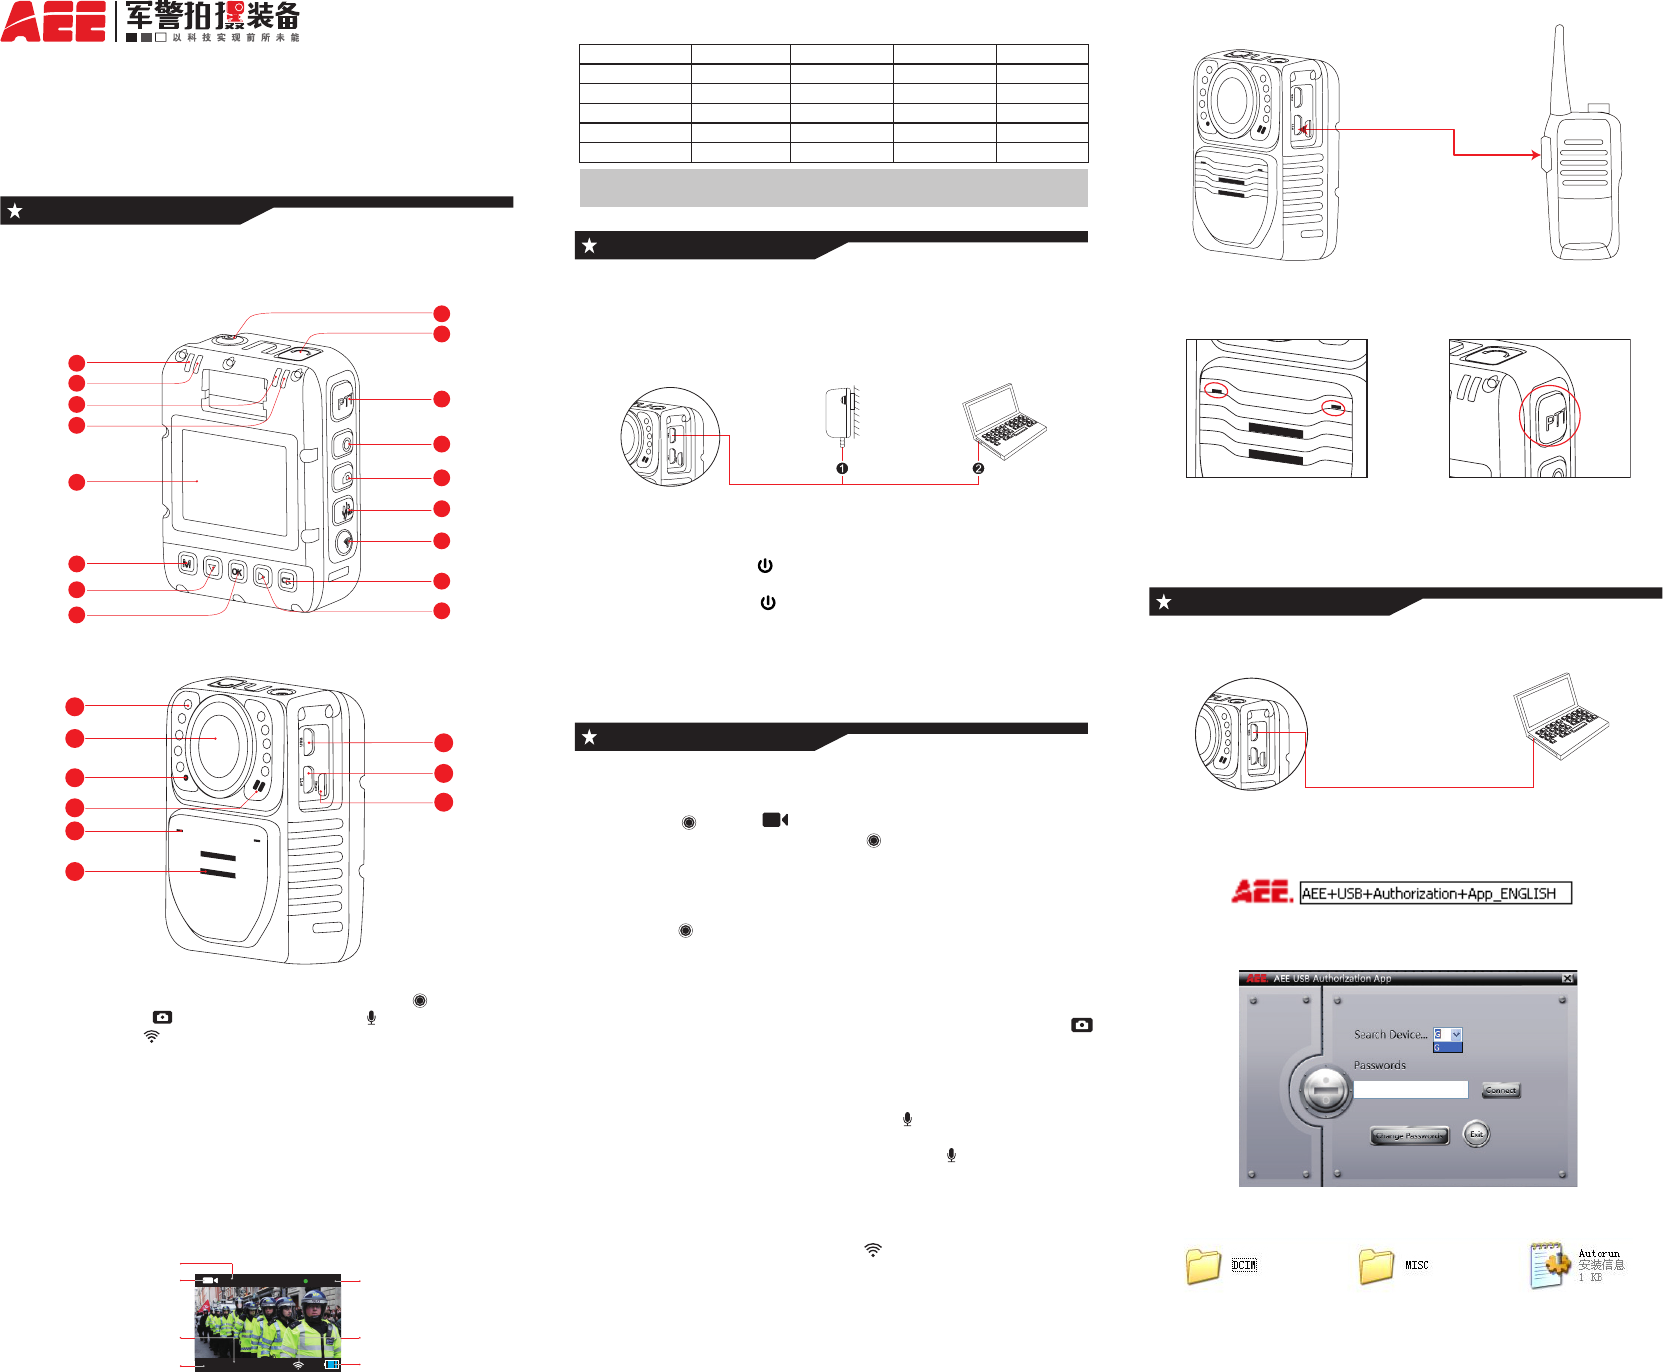
Appearance
>Component Guide
Front
1
2
3
10
11
12
16
17
4
5
6
7
8
9
15
14
13
Back
18
21
23
22
25
24
19
20
26
1.Power button 2.2.5mm headset jack
3.PTT button 4.Video recording button
5.Shutter button 6.Audio recording & Label button
7. Wi-Fi button 8.Viewle/Backbutton
9.Rightarrowbutton 10.Videorecording/Photoindicator
11.Audio recording indicator 12.Wi-Fi indicator
13.Power indicator 14.Display screen
15.Menu button 16.Down arrow button
17.OK button 18.Mini USB port
19.PTT port 20.Micro HDMI port
21.Infrared LED 22.Lens
23.Laser 24.WhiteLED/ultravioletLED
25.MIC jack 26.Buzzer
>Information on Display Screen:
Date & time
Video length
Battery level
Operating mode
Remaining
recording time
Video resolution Wi-Fi mode
+3
000:01:57
>Description of Indicator States
Red light Yellow light Blue light Green light
Startup / / Blink once Always on
Video recording Blink slowly / / /
Photo shooting Blink once / / Always on
Audio recording /Blink slowly / /
WI-FI / / Blink slowly Always on
Note: During charging, the green light blinks slowly; after full charging, the
green light is always on.
Preparation before Use
>Charging Mode
Use the Mini USB cable to connect the camera to the power adapter or a PC’s
USB port to charge the battery.
Mini USB cable Power adapter USB port
on the PC
USB port
on the camera
>Power On/Off
◆Power On: Long press " " for about 5s; the camera will start up after two
“beep” sounds are heard;
◆Power Off: Long press " " for about 5s; the camera will shut down after
three “beep” sounds are heard;
◆Standby: When there is no operation within the preset time, the camera will
enter the standby mode after three “beep” sounds are heard; if the standby
function is disabled, it will not enter the standby mode.
◆Wake up: Press any button on the camera to automatically wake it up.
Operation
>Video Recording
1.Start: Press " " when " " is shown at the display screen, the camera
will enter the video recording mode; press " " again to start video recording.
At this moment, the red indicator at the upper left corner of the camera blinks
slowly, and " ●000:00:00 " is shown at the upper right corner of the screen to
indicate the length of video recorded.
2. End: Press " " again; the recording will be ended after two “beep” sounds
are heard.
>Photo Shooting
In the photo shooting mode, the system will make a " click " sound when "
" is pressed once, indicating successful photo shooting.
>Audio Recording
1.The system will make a " beep " sound when " " is pressed, indicating the
start of audio recording;
2.The system will make two " beep " sounds when " " is pressed again,
indicating the end of audio recording.
>Wi-Fi
The system enters Wi-Fi mode when " " is pressed. Wi-Fi mode is
available only in the video recording preview or photo shooting preview mode,
but not in the audio recording mode.
>PTT Intercom Function
Use the intercom cable to connect this device to the interphone, as shown in
thegurebelow:
Intercom cable
Camera
Intercom port
PTT port
Interphone
After connection, this device can be used as a voice transmitter:
Talkback MICPTT button
1.Press the " PTT " button to transmit voice;
2.Release the " PTT " button to receive voice;
Connection to PC
Use the Mini USB cable to connect the camera to a PC, and power on the
camera:
Mini USB cable
Camera USB port
PC USB port
Enter"MyComputer";doubleclick"RemovableDisk"tondthefollowing
icon:
Double click this icon to open the “Password” dialog box :
Enter the default password “12345678” and click " Connect ". Then, enter "
MyComputer"againtoviewthelesrecordedbythisdevice.
To change the password, click the " Change Password " option in the
password entry interface to open the following dialog box:
*Entertheoriginalpasswordintherstbox
* Enter the new password in the second box
* Enter the new password again in the third box
▲Notice:
1.The new password entered in the second box must be identical to the one
entered in the third box;
2.Only 8-digit numeric password can be set.
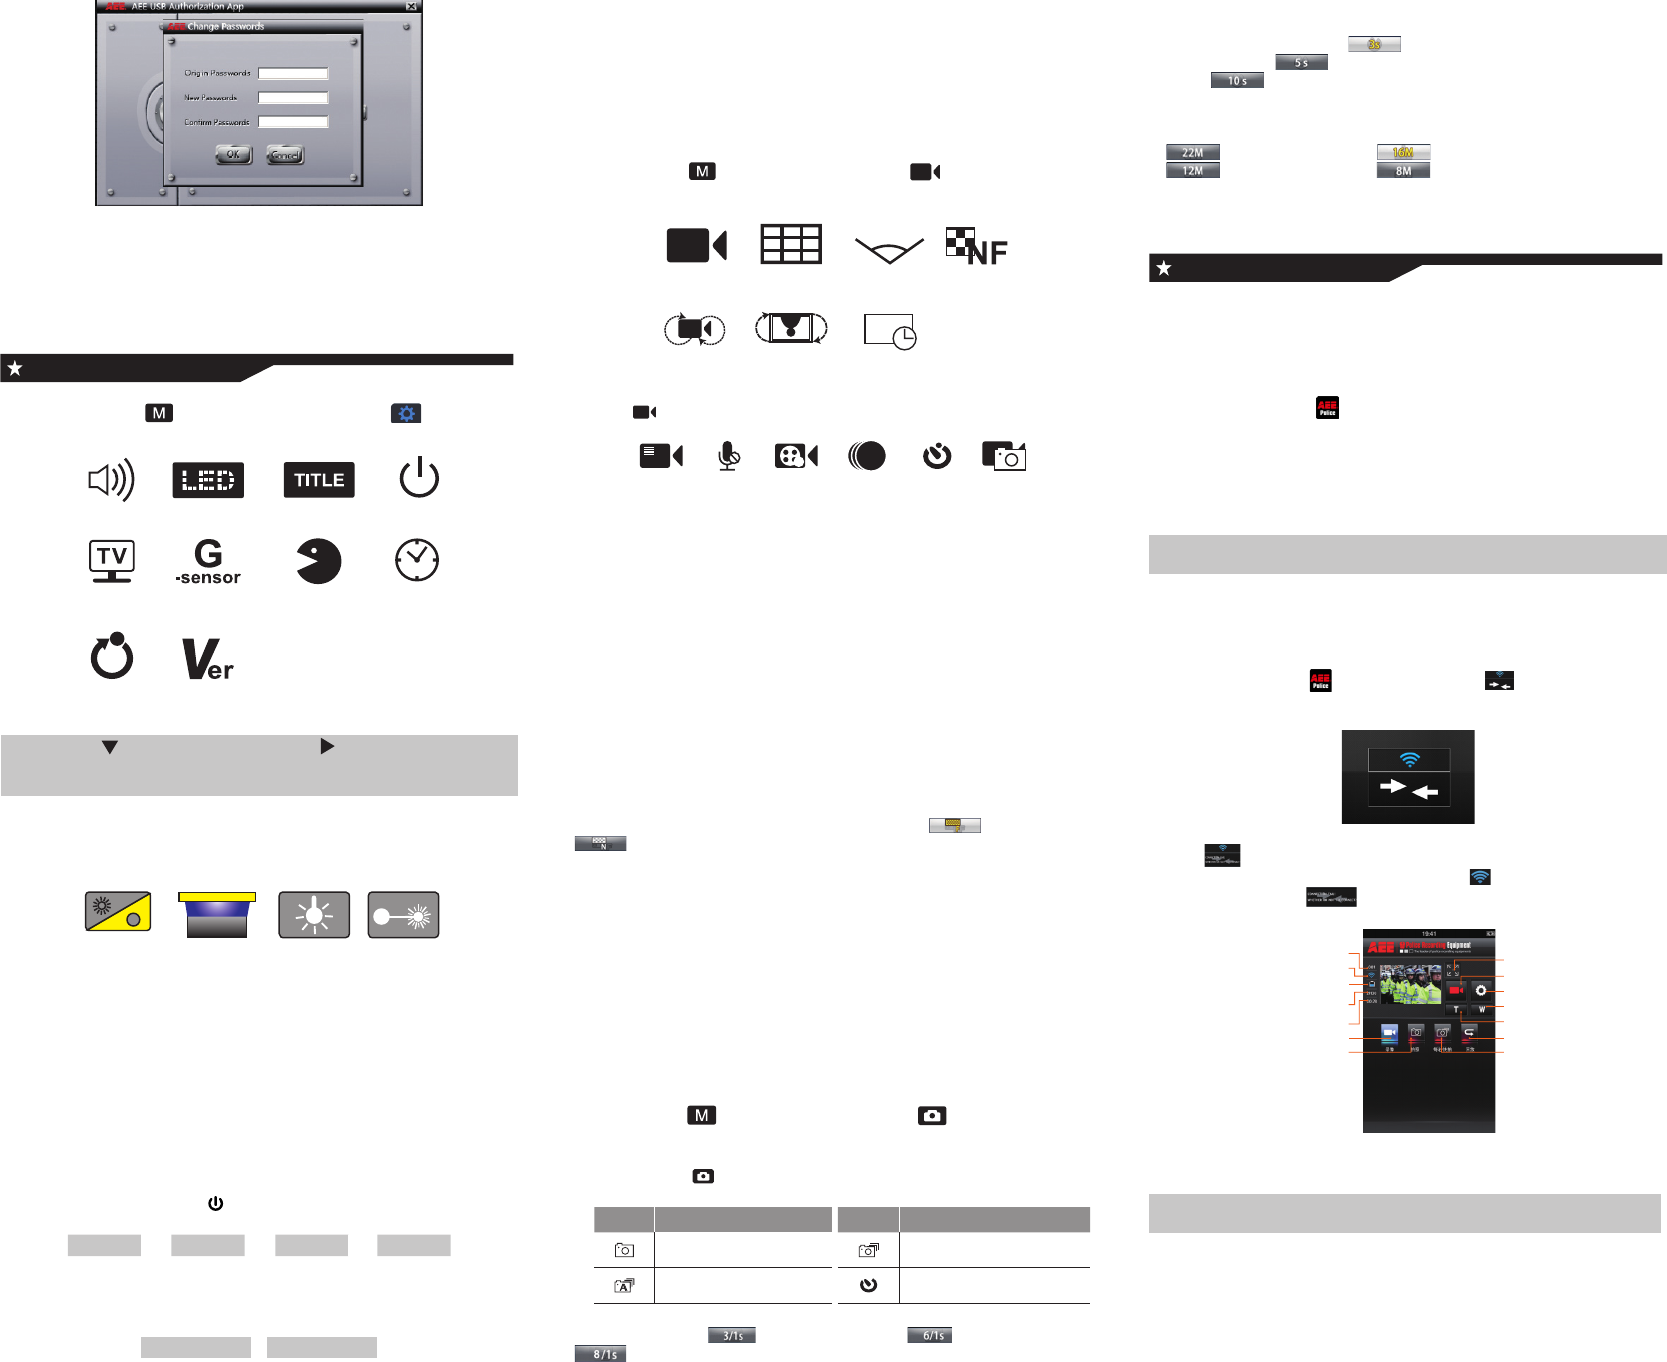
System Settings
> I. Press the " " button to enter the " " function
setting interface:
G-sensor
Warning tone
Language Display time
Recover factory
setting
Version
LED Screen DisplayStandby
TV output
format
!
Note: Press " " to switch the menu;Press" " for rightward selection;
press " OK " for confirmation; press " M " to go back to the menu
interface.
1. Warning tone: There are three options available: " OFF, 50%, and 100% ";
2. LED light: Select " LED " to enter the menu:
Infrared LED Ultraviolet LEDWhite LED Laser
D&N
◆Infrared LED mode: If enabled, the camera will have the infrared
function when the ambient light level is low; the system will enter this mode
automatically;
◆Ultraviolet LED mode: If enabled, the camera can identify invisible
watermarks;
◆White LED mode: This mode provides light compensation function; if
enabled, the photos taken or videos recorded will look brighter and clearer;
◆Laser mode: This mode provides laser indication function; if enabled, the
focusing will be faster and more accurate.
3.“TITLE”canbesetto"enable/disable"titledisplayonthescreen
4.Screen auto standby: Enter " " setting:
OFF ② ⑤ ⑩
OFF Enter in 2min Enter in 5min Enter in 10min
5.TV output mode: Enter “TV” setting:
NTSC PAL
NTSC Format PAL Format
6. G-Sensor: Enter “G-Sensor” setting; select " OFF " or " ON " as needed;
7.Language: Users can select among 10 languages including Chinese and
English;
8.Date/time:Userscansetthedateandtimedisplayedonthecamera;
9.Restore factory settings: Restore the camera to factory settings.
> Press the " " button to enter the " " video recording
setting interface:
Vedio
V
ideo content
loop
Display time180° photo
rollover
Vedio resolution View angle Bit rate
Angle
1.Click " " to enter the execution mode setting interface:
Video Video Only Pre-Video Time Lapse Auto video PIV
◆Video - It is the video recording mode under normal conditions;
◆ Pre-video - In this mode, the system will enter the pre-video recording state
when the video recording button is pressed, and timer will start in advance;
and the end time of video recording can also be delayed.
◆Time Lapse - One picture will be extracted within each preset period, and
the extract pictures will form a video;
◆Auto Video - The system will automatically enter the video recording state
according to the preset countdown time;
◆PIV - During video recording, the shutter button can be pressed to take
photos.
2. Resolution: 1080P(16:9) 960P(4:3) 720P(16:9)
3.View angle: here are four view angle options: Wide, Medium, Narrow, Small;
4.Bit rate:
This device provides two bit rate options: High " " and Normal "
"(Whenhighbitrateisselected,picturesareclearerbutthelesize
increases.)
5.Loop recording:
If this function is enabled, when the memory is used up, the latest video
segment (10min long) will automatically overwrite the oldest video segment
(10min long); when this function is disabled, the video length is 15min, and
video recording cannot proceed when the memory is full.
6.180° rotation of picture:
If enabled, normal videos or photos can be taken when the camera is
operated upside down.
>Press the " " button to enter the " "photo shooting
setting interface:
1.Description of " "modes:
Icon Function description Icon Function description
Normal Snapshot
Auto continuous shooting Time-lapse shooting
◆Normal mode: Only one photo is taken when the shutter button is pressed;
◆Snapshot mode: 3 photos per second 6 photos per second
8 photos per second;
◆Auto continuous shooting mode: Photos will be taken automatically and
continuouslyatthesettimeinterval;thereareveintervaloptions:2S,3S,
5S, 10S and 20S;
◆Time-lapse shooting mode: a photo will be taken 3s after the shutter
button is pressed; a photo will be taken 5s after the shutter button is
pressed; a photo will be taken 10s after the shutter button is pressed.
2.Resolution:
:22M 5392x4032 4:3; :16M 4608x3456 4:3;
:12M 4000x3000 4:3; : 8M 3200x2400 4:3;
3.Time display:When this function is enabled, the camera will automatically
display the date and time of shooting at the lower right corner of each photo.
Wi-Fi Function
The camera supports Wi-Fi function. The camera can be controlled remotely
after connected to a Wi-Fi enabled remote control or mobile device.
>App Installation
Please install the app " " provided by AEE on your mobile device. You
can download " AEE Police " from " Google Play " or " Apple Store ", and then
install it on your device.
>Wi-Fi Enabling and Connection
1. Press the Wi-Fi button; wait until the Wi-Fi blue indicator blinks slowly;
Note: When enabling or disabling the Wi-Fi function, please do not operate
any button on the camera.
2. Enable the Wi-Fi search function of the mobile receiving device; after
ndingthewirelesssignalsourceof“AEEMagicam”,enterthepasswordand
click “Connect” to connect to the camera. (Default password: AEE12345)
3. Click the app icon " " the interface icon " " will appear, and the
system will enter the following interface (Wi-Fi connection interface):
Wi-Fi Connection interface
Note: " " will appear if camera connection error. Select “Yes” to try
connection again; select “No” and click the " " icon to enter the Wi-Fi
setting interface; click " "entercameracanonlyviewinglocalles.
Total number of files
Wi-Fi state
Battery level
Remaining recordingtime /
number of photos allowed
Video length
Video recording mode
Photo shooting mode
Maximized preview
Current state icon
Parameter setting
Zoom out
Zoom in
Playback
Snapshot Mode
Wi-Fi Connection interface
Click the corresponding icon on the main interface to remotely operate the
camera.
Note: camera can be operated up to 100 meters away via a mobile device
under a barrier-free environment.
▲Notice:
1. In case that there are operation commands from the camera and remote
controller at the same time, the one from the camera has higher priority;
2. The pictures above are limited to Android system, and they are for
reference only;
3. The function and operation of different versions of the app released on the
network platform may vary slightly from each other.

FCC Information and Copyright
This equipment has been tested and found to comply with the limits for a Class B digital device,
pursuant to part 15 of the FCC Rules.
These limits are designed to provide reasonable protection against harmful interference in a residential
installation. This equipment generates,
uses and can radiate radio frequency energy and, if not installed and used in accordance with the
instructions, may cause harmful interference
to radio communications. However, there is no guarantee that interference will not occur in a particular
installation. If this equipment does
cause harmful interference to radio or television reception, which can be determined by turning the
equipment off and on, the user is
encouraged to try to correct the interference by one or more of the following measures:
—Reorient or relocate the receiving antenna.
—Increase the separation between the equipment and receiver.
—Connect the equipment into an outlet on a circuit different from that to which the receiver is
connected.
—Consult the dealer or an experienced radio/TV technician for help.
15.19 Labelling requirements.
This device complies with part 15 of the FCC Rules. Operation is subject to the
following two conditions:
(1)This device may not cause harmful interference, and
(2) this device must accept any interference received, including interference that may
cause undesired operation.
changes or modifications not expressly approved by the party responsible for compliance could
void the user's authority to operate the equipment.
FCC RF warning statement: the device has been evaluated to meet general RF exposure
requirement , The device can be used in portable exposure condition without restriction.