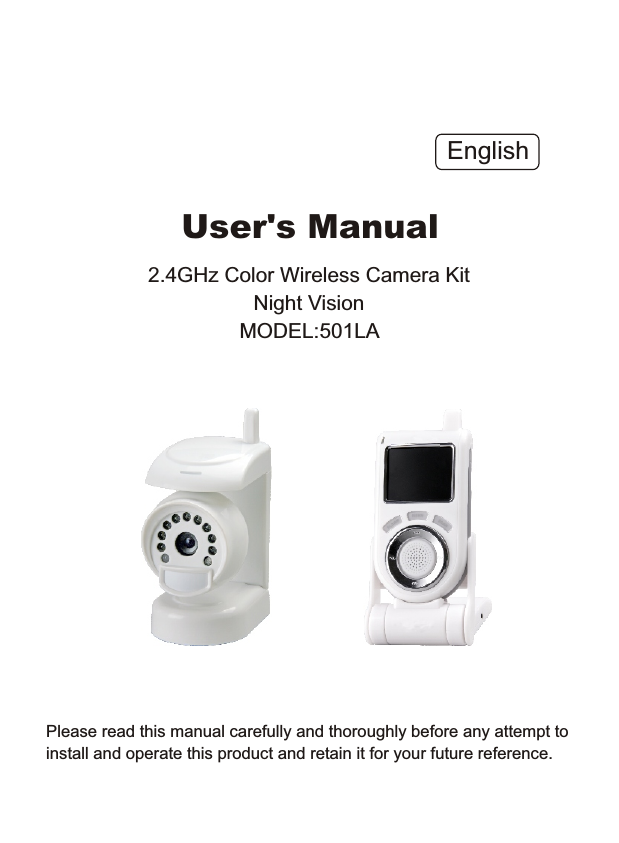
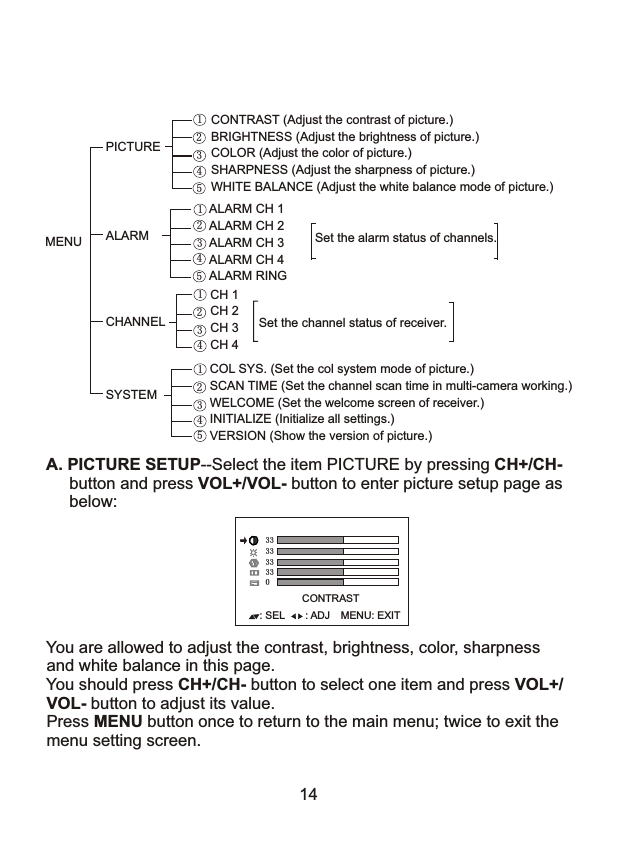
AEE Wireless Technology BT501 2.4 Ghz Wireless Camera User Manual S M501G190011 501LA OM

Shenzhen AEE Wireless Technology Co., Ltd. 2.4 Ghz Wireless Camera S M501G190011 501LA OM

User Manual

Please read this manual carefully and thoroughly before any attempt to install and operate this product and retain it for your future reference.User's Manual2.4GHz Color Wireless Camera KitNight VisionMODEL:501LA English
TABLE OF CONTENTSINTRODUCTION 1~3NoticeRestrictionsMaintenanceApproval Information (FCC/CE)1331~2PRODUCT 4~7Package ContentsFeature LocationsAdapter45-67SPECIFICATIONS 17TROUBLESHOOTING 18INSTALLATION & USAGE 8~16InstallationLocate the ReceiverFix the Camera8~10Camera Channel SetupNight Vision111212Receiver Mode Setup 13~16EU Environmental ProtectionWaste electrical products should not be disposed of with household waste. Please recycle where facilities exist. Check with your Local Authority or retailer for recycling advice.10-11
INTRODUCTIONThank you for purchase this wireless camera kit. This product eel confident that you will be pleased with thequality and features of this product. The camera builds in one CMOS image sensor and one transmitting module transmits the captured image wirelessly. works atISM-2.4GHz frequency band, which could be legally used worldwidewithout permission. We fNotice: This product may cause interferences with other wireless equipment that operates at 2.4GHz ISM band. Please turn off one ofthe equipments to eliminate the interference.Product Assurance: This camera will emit electromagnetic wave, just like other wireless products, however, its transmitting power is less than other wireless products such as mobile phones. The 2.4GHz wireless camera meets wireless frequency security standards and recommendedindexes while working. These standards and indexes are certificated byacademic organization and represent the cogitative research of the scientific workers who continuously explore and annotate the involved fields. So we believe that our products are safe for customers. 1All our products meet the requirements of approval FCC or CE, and obtained the FCC or CE certification. They are authorized to bear FCC or CE mark. Approval InformationNotice
FCCThis product complies with standards including Low Voltage Device Directive 73/23/EEC; EMC Directive 89/336/EEC and R&TTE Directive 1999/5/EC. It passed the subject tests by the authority concerned and is authorized to bear CE mark.CE 2This equipment has been tested and found to comply with the limits for a Class B digital device, pursuant to Part 15 of the FCC rules. These limits are designed to provide reasonable protection against harmful interference in a residential installation. This equipment generates, uses and can radiate radio frequency energy and, if not installed and used in accordance with the instructions, may cause harmful interference to radio communications. However, there is no guarantee that interference will not occur in a particular installation. If this equipment does cause harmful interference to radio or television reception, which can be determined by turning the equipment off and on, the user is encouraged to try to correct the interference by the following measures:-Reorient or relocate the receiving antenna.-Increase the separation between the equipment and the receiver.-Connect the equipment into an outlet on a circuit different from that to    which the receiver is connected.-Consult the dealer or an experienced radio/TV technician for help.This device complies with Part 15 of the FCC Rules. Operation is subject to the following two conditions: (1) This device may not cause harmful interference, and(2) this device must accept any interference received, including      interference that may cause undesired operation changes and      modification not expressly approved by the manufacturer or registrant     of this equipment can void your authority to operate this equipment     under Federal Communications Commissions rules.
 1. DO NOT use this product to violate one's privacy. Monitoring one's     activities without consent is illegal and this product is not designed     and manufactured for such purpose; 2. DO NOT put this product near any medical equipment. Radio     waves might potentially cause breakdown of electrical medical     equipment. So this product should be placed at least 1 feet away     from any heart pacemaker. Radio waves might potentially     influence heart pacemaker and lead to respiratory disturbance;3. DO NOT use this product for any illegal activities.  We will not be    responsible for any consequences of illegal acts committed by the    user.Restrictions1.   Ensure the sufficient ventilation space is available;2.   Do not shake or strike the product;3.   Keep it dry and dustless and avoid exposing it to direct sunlight;4.   Do not place product near any magnetic objects; 5.   Avoid putting the product in places where the constantly changed      temperature or humidity occurs;6.   Keep product away from heat sources such as electric heater;7.   Do not use the camera near aggressive chemicals;8.   Do not use this camera near water, for example, near a bath tub,       wash bowl, kitchen sink or laundry tub, in a wet basement or near      a swimming pool and the like;9.   Do not use the camera in the places which are enclosed by metal.      The surrounding metal like lifter, cabin, may shield the        electromagnetic wave, and result in failure of signal reception;10. Please obey the local government's environment protection policy;11. Please turn off the power when left unused;12. Do not disassemble or repair the camera or receiver; doing so      might cause damages to the product.Maintenance3
① 2.4GHz Wireless Camera ×1② 2.4GHz Wireless Receiver ×1③   ×1④ Adapter for Camera (DC 8V) ×1⑤ Adapter for Receiver (DC 5V) ×1⑥ AV Cable Base Charger    × 1⑦ Mounting Hardware × 1⑧ Earphone × 1⑨ Li-battery × 2     User’s Manual × 1     This package comes with the following items. Please check whether they are all included in the packaging box, if any item is missing, contact the retailer for replacement.Package ContentsPRODUCTNote: The pictures may vary from the actual objects.4① ② ③⑤⑥⑧⑦④Please read this manual carefully and thoroughly before any attempt to install and operate this product and retain it for your future reference.User's Manual2.4GHz Color Wireless Camera Kit MODEL: 502UA⑨1010
Feature Locations1. Camera5Feature LocationsChannel SwitchPower Switch(Only for dry batteries)Hanging HoleBaseDC Power JackMotion Detection SensorPower IndicatorLensInfrared LightsAntennaBattery Compartment
2. ReceiverBracketDC Power JackSpeakerALARM ButtonPower IndicatorLCD ScreenVOL- ButtonCH+ ButtonAntennaPower ON/OFFMENU ButtonSCAN ButtonVOL+ ButtonCH- ButtonBattery CompartmentDC Power JackAV OutputEarphoneBattery Box Socket6
This product always conforms to the authenticated AC adapter. Theadapter should be marked one of the following:Note: When using the power adapter, make sure the rating voltage is compatible          with that of the device to avoid potential damages resulting from incorrect           usage of power supply.   UL MarkAmerican powersupply authenticationSAA MarkAustralia powersupply authenticationGS MarkGerman powersupply authenticationEuropean Union powersupply authenticationCE Mark PSE MarkJapan powersupply authenticationAdapter7BS MarkBritish powersupply authentication
1. Connect the camera to the adapter (DC 8V 300mA).  The power     indicator lights up. Notes: This camera can also work on dry battery ; please load 4 AAA batteries to thebattery compartment at the bottom of camera with their polarities matched.And then slide the power switch to ON position, the power indicator lights up.(Not suitable for wall installation)INSTALLATION & USAGEThe AC adapter will work instead of batteries after it is plugged. If the camera isleft unused for a long period of time, please unplug the adapter and remove the batteries. The camera doesn’t have the charge function on the AAA batteries.Installation2. Set the camera to one desired channel (Please refer to Camera    Channel Setup section on page 12 for more detail).Channel8
4. Connect the adapter (DC 5V 2A) to the receiver and slide the     power switch to ON position. The power indicator lights up green.Power ON/OFFThe receiver also can work with Li-battery; load Li-battery to the compartmentwith their polarities matched.You are recommended to fully charge the li-battery before its first installationto optimize its life.The Li-battery will be charged after the adapter (DC 5V 2A) is plugged in. Thecharge indicator will light up red during charging and will turn green after a fullcharge.A full charge will take about 220 minutes hours, which can power the receiverfor about 180 minutes continuously. Charge the li-battery once you see a red icon bickers on the LCD.Do not burn or disassemble the Li-battery.Do not short-circuit the battery, it may cause fire or electric shock.You also can charge the receiver by base charger. Please locate the receiverto the base charger, then connect it with the adapter (DC 5V 2A). The receiverwill be charged. (Optional)3.  Rotate the camera to a suitable angle for surveillance. 180°Note:9
10Note: For bigger size pictures, please connect the receiver to a monitor/TV with           AV cable. In this case, the LCD display will be disabled and turns black;           the speaker of the receiver or the earphone will be deactivated at the           same time.Tip: Press and hold  MENU button will turn off the LCD. Receiver will go to STAND        BY mode. If alarm is triggered, the LCD will turn on automatically.    5. Set the receiver channel same as that of camera by pressing CH+/CH-     continuously, and the pictures are displayed on the LCD screen.CH+CH-Li-batteryInstall the Battery Charge by Base CharegerAV1. Press and hold the back side of the camera firmly and then pull the    base downwards to remove it.The camera can stand on desktop, it also can be mounted onto the wall. The steps of installation are as follows:Fix the Camera
2. Drive one hole in the wall. Insert one mounting anchor firmly then     insert a screw into the mounting anchor. Hang your camera on the    screw. Press,hold andPullLocate the ReceiverThe receiver can be located horizontally or stand upright. If standingupright the base charge will be needed.Horizontally Stand Upright11
Night VisionThe built-in Infra-red lights in camera provide night vision for 24hours surveillance. The Infra-red lights will be automatically activated in dark places. The picture will turn to Black & White (monochrome) in Night Vision status.12The camera has 4 selectable channels. You could adjust the channel switch of camera to set the channel for multi-camera working or avoiding the interference. Please tune the channel switch to the desiredchannel as the following diagram.Camera Channel SetupCH1=2,414MHzCH2=2,432MHzCH3=2,450MHzCH4=2,468MHzChannelBuilt-in IR lights for 5m Night Vision
PICTUREALARMCHANNELSYSTEM: SEL : OK MENU: EXIT13The OSD interface of this receiver facilitates your operation to achievethe optimized effect.1. Volume adjustment    Press VOL+/VOL- button to adjust the volume of the receiver.2. Channel selection    Press the CH+/CH- button to select the matched channel.3. Alarm mute ON/OFF    When abnormal situation occurs, the alarm sounds; press ALARM    button once to mute the alarm sound, it will not sound for the next     abnormal case detection unless you press the ALARM button again.4. SCAN     In the multi-camera working mode, press the SCAN button once, all    the available channels will be displayed one by one (default interval     is 3s); press one more time to resume normal display. 5. MENU setup    Press the MENU button once, the main menu pops up.Receiver Mode Setup
 You are allowed to adjust the contrast, brightness, color, sharpness and white balance in this page.           You should press CH+/CH- button to select one item and press VOL+/ VOL- button to adjust its value. Press MENU button once to return to the main menu; twice to exit the  menu setting screen.A. PICTURE SETUP--Select the item PICTURE by pressing CH+/CH-      button and press VOL+/VOL- button to enter picture setup page as      below:     33333333CONTRAST: SEL MENU: EXIT: ADJ014CONTRAST (Adjust the contrast of picture.)BRIGHTNESS (Adjust the brightness of picture.)COLOR (Adjust the color of picture.)SHARPNESS (Adjust the sharpness of picture.)WHITE BALANCE (Adjust the white balance mode of picture.)PICTUREMENU  ALARMALARM CH 1ALARM CH 2ALARM CH 3ALARM CH 4ALARM RINGSYSTEMCOL SYS. (Set the col system mode of picture.)SCAN TIME (Set the channel scan time in multi-camera working.)WELCOME (Set the welcome screen of receiver.)INITIALIZE (Initialize all settings.)VERSION (Show the version of picture.)  1234123Set the alarm status of channels.12345CHANNELCH 1CH 2CH 3CH 41234Set the channel status of receiver.455
You are allowed to adjust the channel status in this page. You should press CH+/CH- button to select one item and press VOL+/ VOL- buttonto choose one desired option.Press MENU button once to return to the main menu; twice to exit the menu setting screen.Note: If the channel is set to OFF, it will not be available for your selection by           pressing CH+/CH-button. : SEL MENU: EXIT: A DJC. CHANNEL SETUP---Select the item CHANNEL by pressing CH+/CH-      button  and press VOL+/VOL- button to enter channel setup  page as      below: CH 1CH 2CH 3CH 4ONONONON15You are allowed to set the alarm status of channels in this page. The choice of MOTION or VOICE will activate the alarm while OFF will deactivate it. You can choose the euphonious ring, RING 1-8 selectable.You should press CH+/CH- button to select one item and press VOL+/VOL- button to choose one desired option.Press MENU button once to return to the main menu; twice to exit the menu setting screen.: SEL MENU: EXIT: A DJALARM CH 3ALARM CH 2ALARM CH 1 V & MALARM CH 4 V & MV & MV & MB. ALARM SETUP---Select the item ALARM by pressing CH+/CH-      button and press VOL+/VOL- button to enter alarm setup page as       below: ALARM RING RING 1
16D. SYSTEM SETUP---Select the item SYSTEM by pressing CH+/CH-      button and press VOL+/VOL- button to enter special setup page as      below: You are allowed to adjust col system, scan time, welcome screen, initialization and version for the receiver in this page. COL SYS.:    You can choose PAL, NTSC or AUTO col in this page.SCAN TIME: You are allowed to set scan time from 3s to 60s for channel                      looping function.WELCOME:  When ON is selected, the word "WELCOME" appears after                      the receiver is powered on; otherwise, when OFF, it will not.INITIALIZE:  Select INITIALIZE through CH+/CH- button; press VOL+/                     VOL-  button once and "YES?" appears; if you are sure to                     resume the factory initial settings, press VOL+/VOL- button                     again and "YES”appears, the settings are initialized. Version:         You can see the version in this page.                    Press CH+/CH- button to select one item and press VOL+/VOL- buttonto choose one desired option or adjust its value.Press MENU button once to return to the main menu; twice to exit the menu setting screen.: SEL MENU: EXIT: A DJCOL SYS.SCAN TIMEWELCOMEINITIALIZEVERSIONAUTO3SONNO
SPECIFICATION * Actual transmission range may vary according to weather, location, interference   and building construction. * All the specifications are subject to minor change without prior notice.CAMERAImaging Sensor CMOSCMOS Total Pixels 628*582(PAL);510*492(NTSC)View AngleMinimum Illumination 5Lux/F1.2(IR OFF) & 0Lux(IR ON)Transmission Frequency ISM 2,400MHz~2,483MHzTransmission Power 10mW/CE; 2mW/FCCModulation Type FMBandwidth 18MHzPower Supply DC 8V 300mAMotion Detection Angle o     oHorizontal:+180 ; Vertical:+180 (Approx.)Sound Control Sensitivity 40dB(AGC OFF)Consumption Current 180mA & 230mA(IR ON)Unobstructed Effective Range 100mNight Vision Range 5mDimensions(W*D*H) 85*109*111(mm)Weight Appro. 185g(Main Body)o5517LCD 2.5 InchLCD Resolution 480*234Receiving Frequency ISM 2,400MHz~2,483MHzIntermediate Frequency 480MHzDemodulation Type FMReceiving SensitivityPower SupplyDimensions(W*D*H) 148*75*27*(mm)Weight Appro.140g(Main body)         Operating Temperature         Storage Temperature         Operating Humidity 85%RHo o o o-30 C~+85 C/-22 F~+185 FRECEIVER≤-85dBmo o o o-10 C~+50 C/+14 F~+122 F5V 2A
TROUBLESHOOTINGWhen you experience the operation problems, please check and try the following yourself before claiming that it is the defective product or consulting the experienced technician. Abnormal Phenomena Possible Reasons/SolutionsCheck whether the camera/receiveris connected to power supply and powered on.1. Check if the channel of receiver is    the same as that of camera;2. Check the distance & blocks.Mismatching the TV system of PAL or NTSC.1. Interfered with other devices;2. Check the distance & blocks.Interfered with other devices nearby; Remove or turn off such devices. No imageSnowflakeson imageNormal imageNo colorGhost imageNo soundNoisyNoisyNormal soundNormal soundNo image NoisyCheck wether the li-battery runs outS-M501G190011

Navigation menu