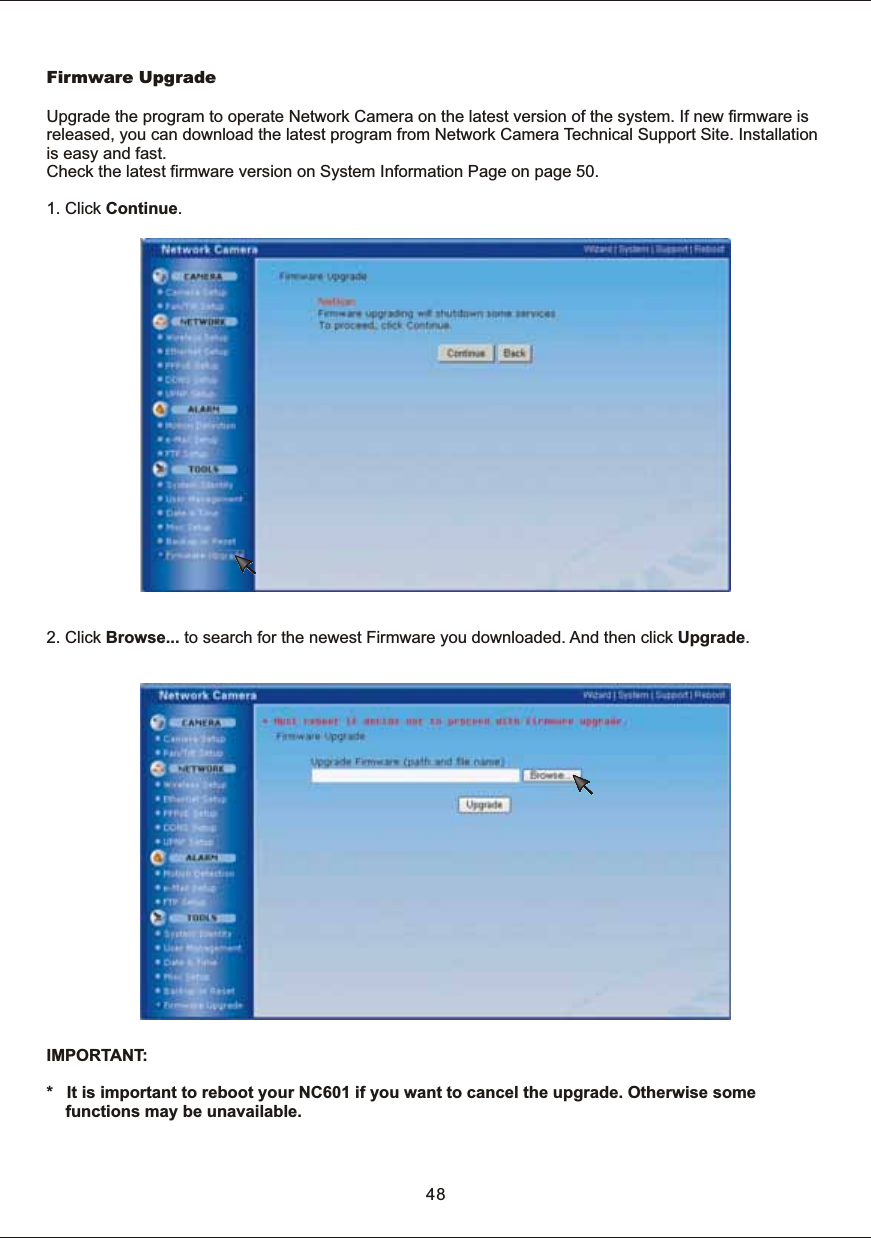
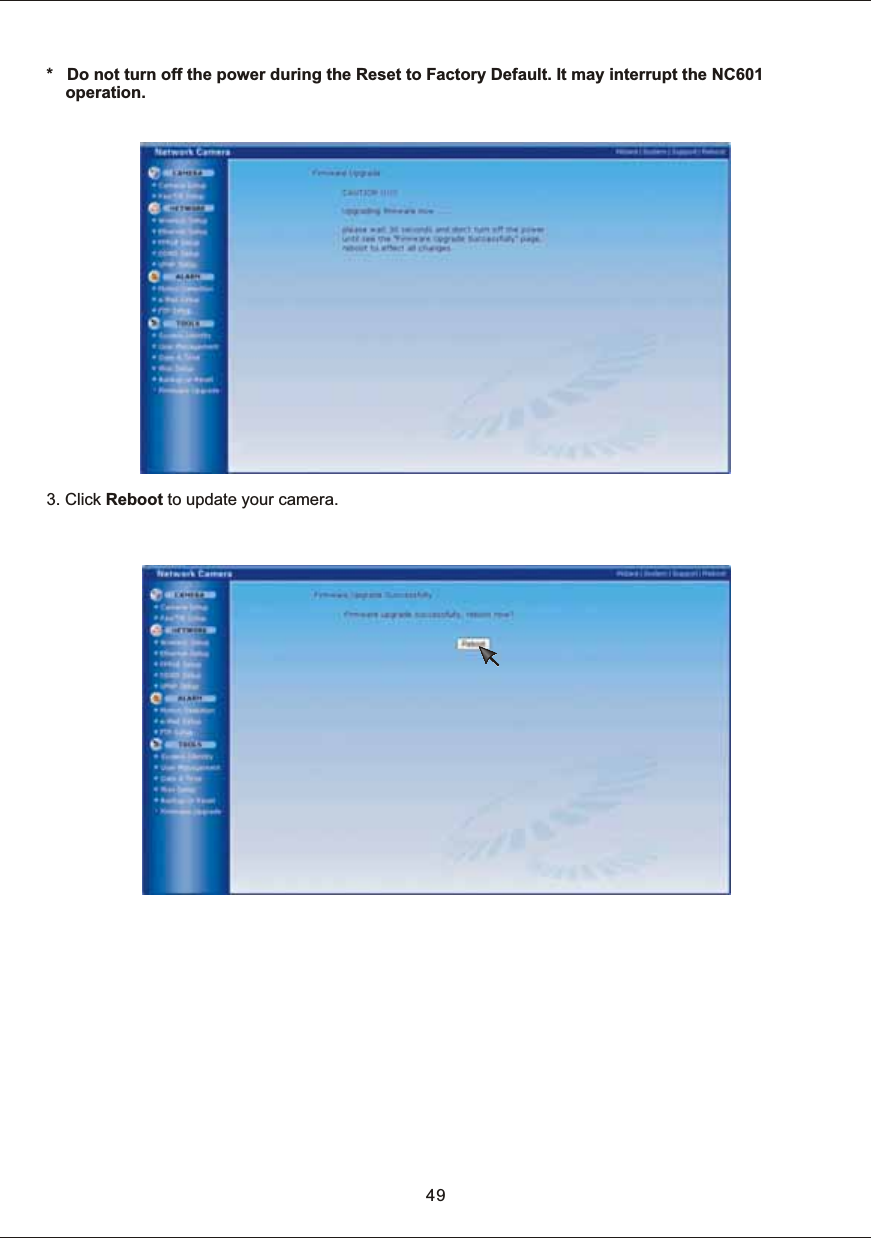
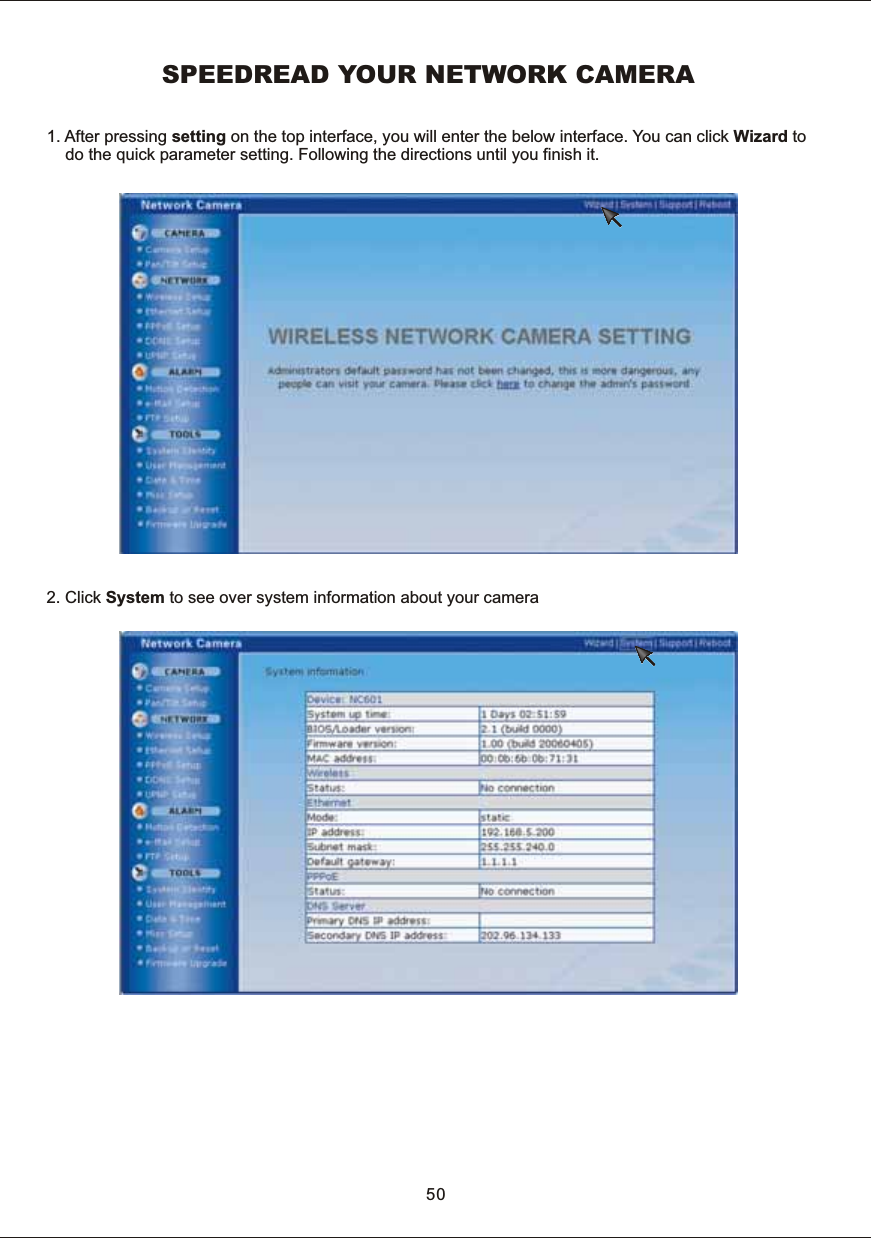
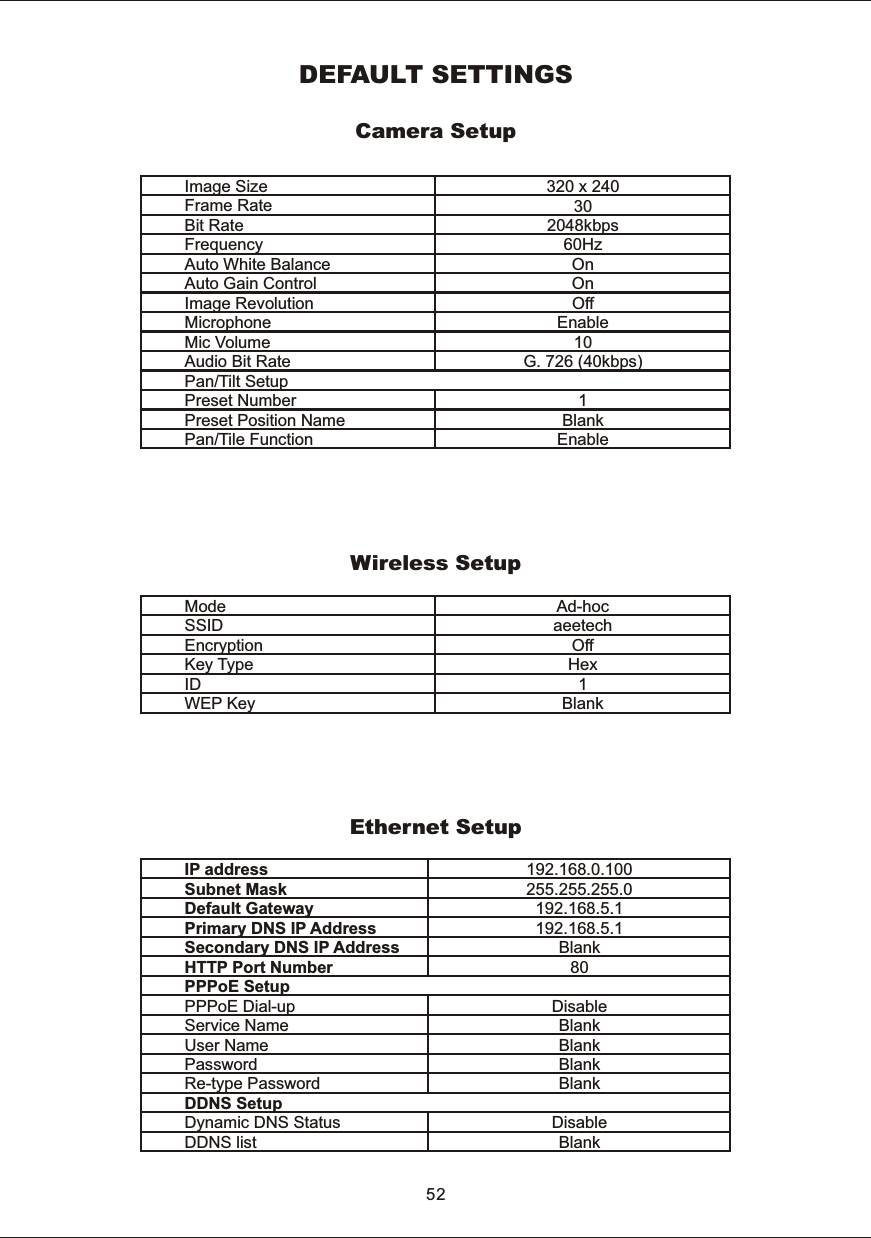
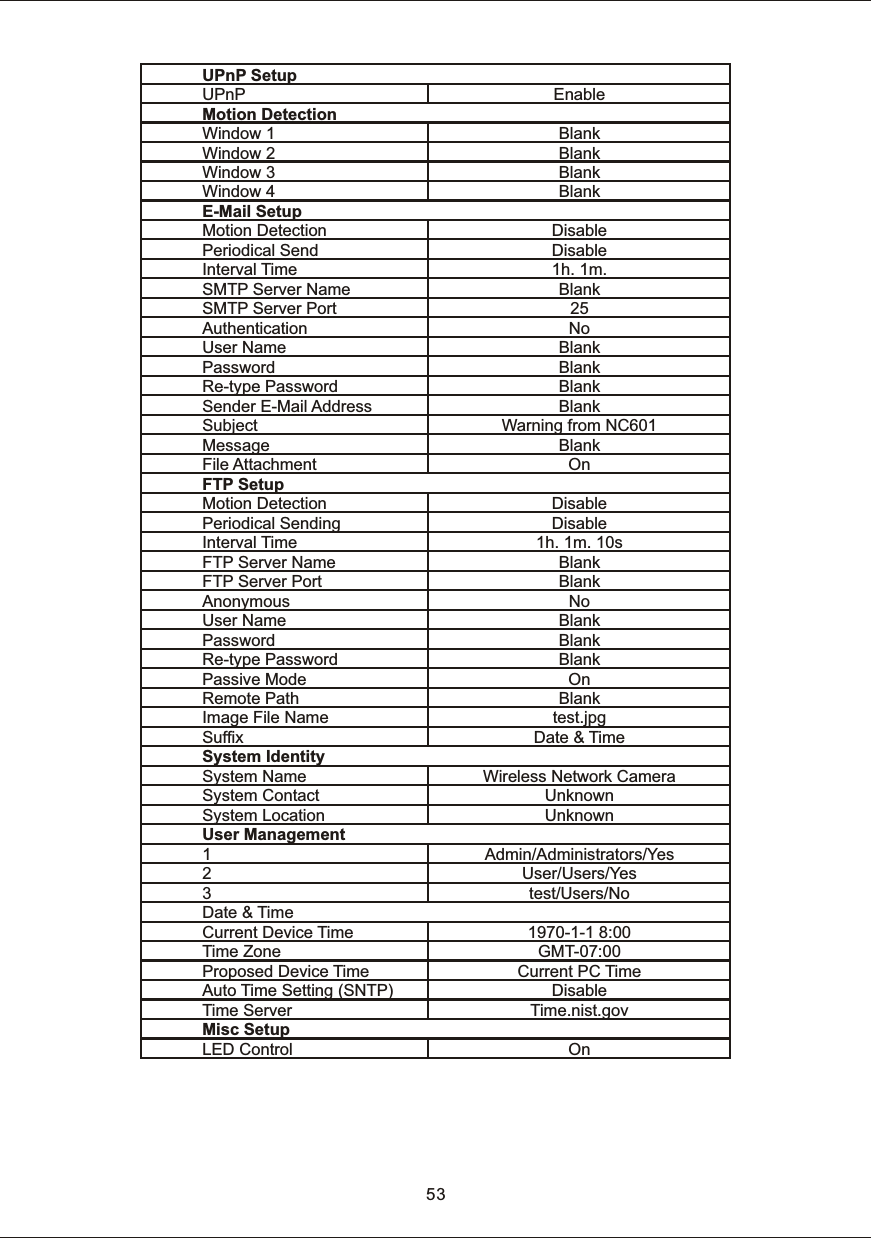
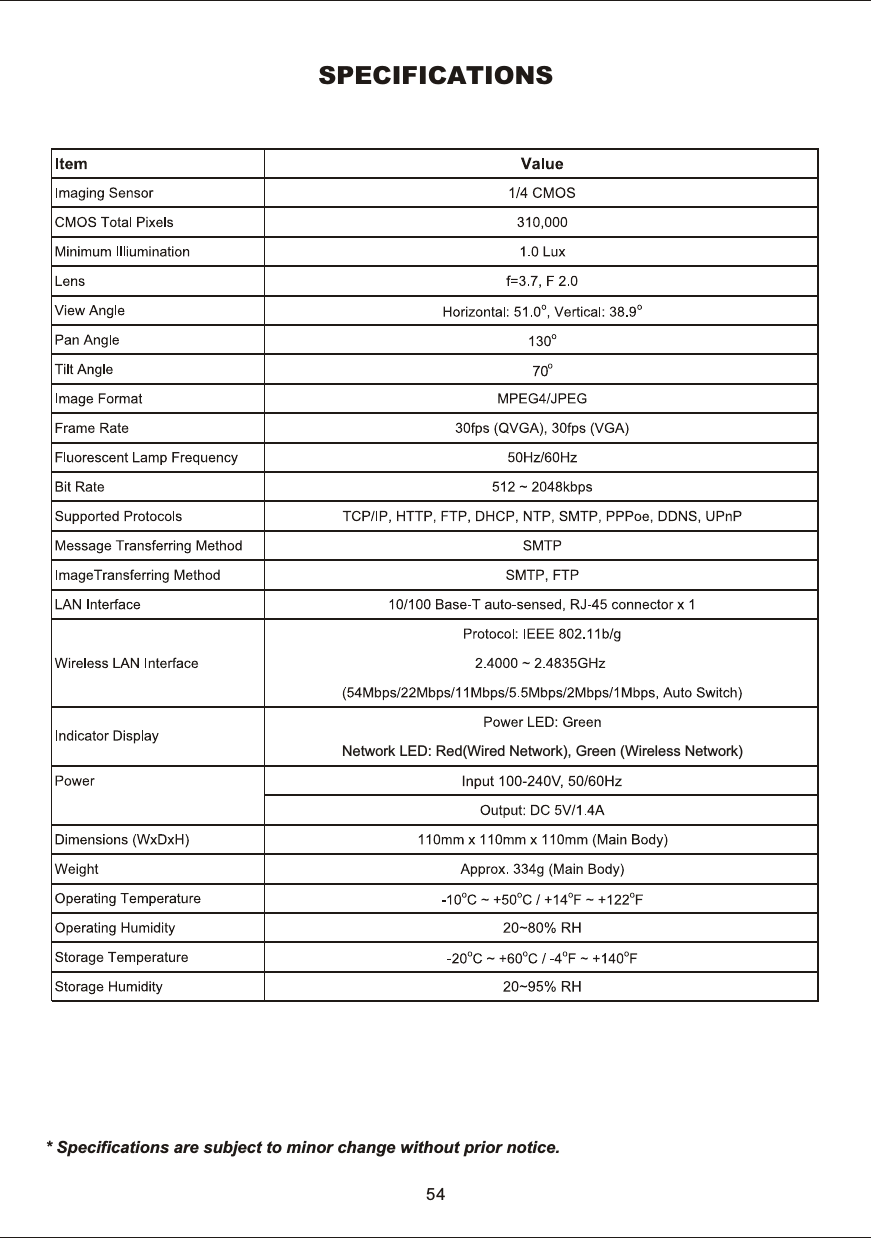
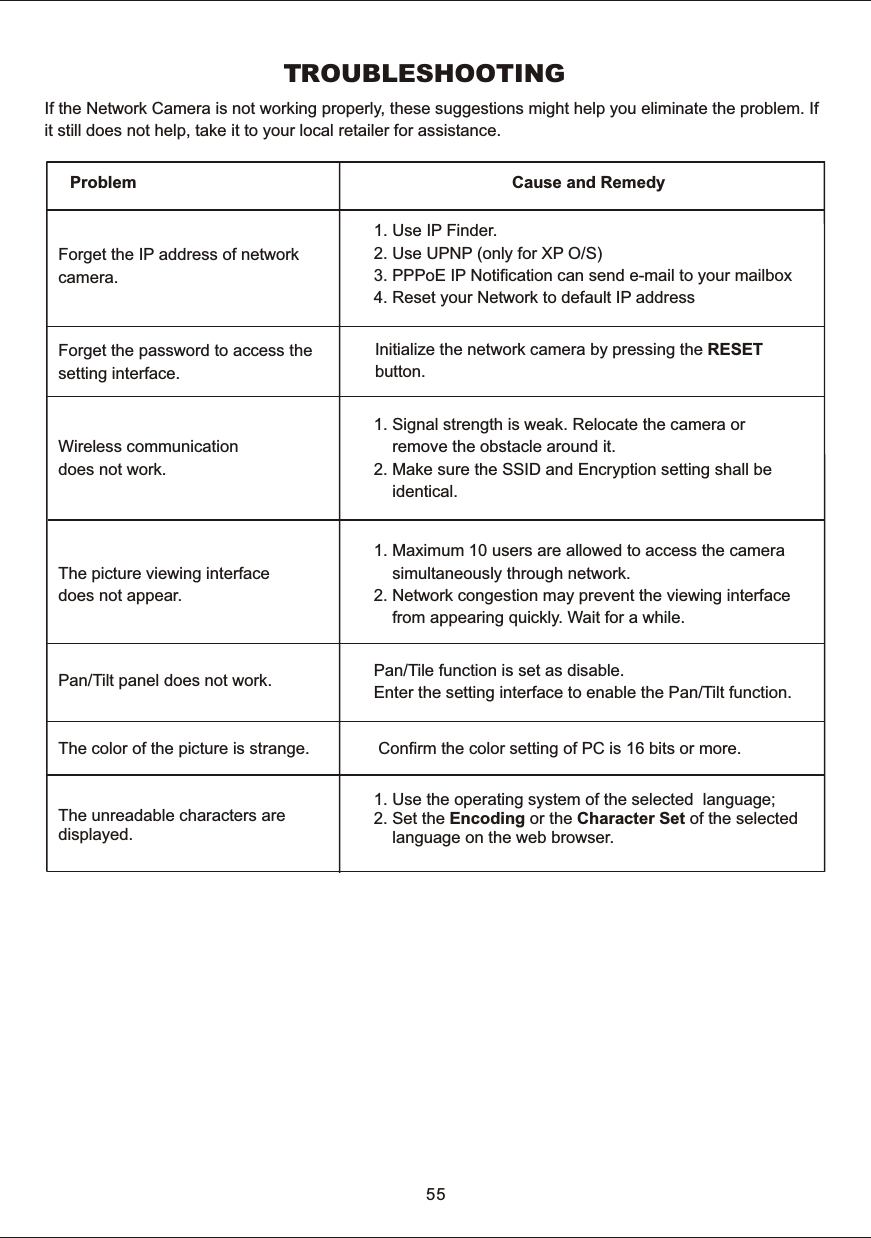
AEE Wireless Technology NC601 2.4GhZ Color Wireless MEPG-4 Video Network Camera User Manual
Shenzhen AEE Wireless Technology Co., Ltd. 2.4GhZ Color Wireless MEPG-4 Video Network Camera
UserManual.wiki
>
AEE Wireless Technology
>
NC601 User Manual
Manual
Navigation menu
Upload a User Manual
Namespaces
Wiki Guide
HTML
PDF
Info
Views
User Manual
Discussion / Help
Navigation


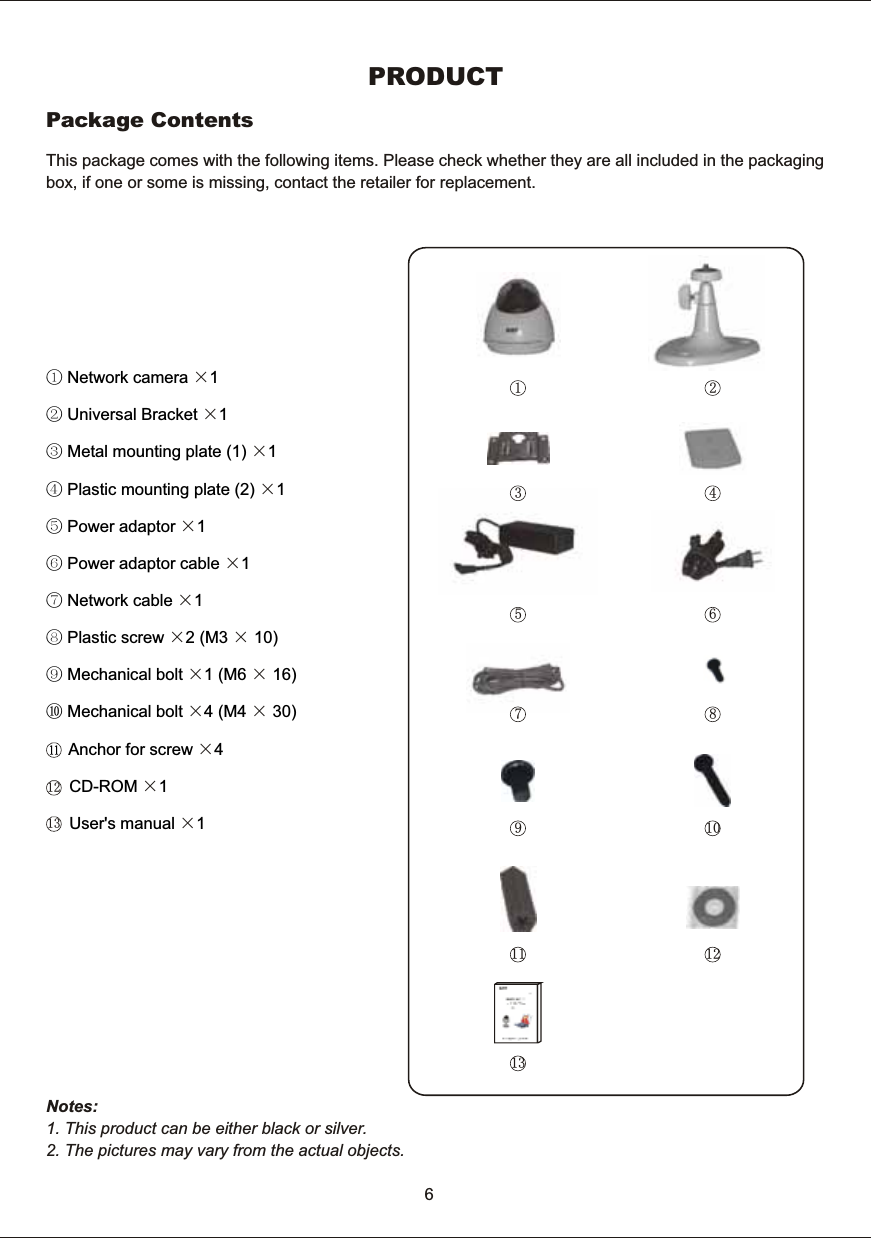


![Network ParametersHow to refer the network parameters from the PC If you cannot get the network parameters, you can refer to the network parameters except for IP address from the PC on the same network in the following procedure.When using Windows 2000 or Windows XP1. Click [Start] –> [Program] (–> [Accessories]) –> [MS-DOS® (Command) Prompt]. MS-DOS Prompt window opens. These steps are slightly different depending on the operating system.2. Enter "ipconfig /all" and press [Enter]. 3. Enter "exit" and press [Enter] to close the window. 15Use IP Finder to find IP address of your network camera1. Connect your NC601 and PC with RJ-45 cable.2. Double-click icon . The following window appears. IP address may differ according to different network environment. Take the 192.168.0.100 as example:](https://usermanual.wiki/AEE-Wireless-Technology/NC601/User-Guide-681385-Page-19.png)
![Setting IP Address of the PC1. Follow the steps below, appropriate for your operating system to open TCP/IP Properties window on the PC. Windows 2000 [Start] –> [Settings] –> [Control Panel] –> [Network and Dial-up Connections] –> [Local Area Connection Icon] in use –> [Properties] –> Select Internet Protocol [TCP/IP] –> [Properties] –> [Use the following IP address] Windows XP [Start] (–> [Settings]) –> [Control Panel] –> [Network and Internet Connections] –> [Network Connections] –> [Local Area Connection Icon] in use –> [Properties] –> Select Internet Protocol [TCP/IP] –> [Properties] –> [Use the following IP address] 2. TCP IP Properties window appears. Set "192.168.0.X” in the IP address data field and "255.255.255.0" in the Subnet Mask data field (X can be 0~255 except 100). This makes the camera and your PC in the same net segment. 3. Click [OK]. Shield CoverNote:If you forget your settings, you can remove the shield cover, press the RESET button on the NC601 to enable the defaultsettings. You may refer to the Default Settings section on page 52~53 for more details.16](https://usermanual.wiki/AEE-Wireless-Technology/NC601/User-Guide-681385-Page-20.png)
![Proxy Server SettingA proxy server may prevent you from connecting directly to NC601 in some corporate environments. The web browser can set up the IP address communication without using a proxy server. Consult your ISP ornetwork administrator. Note: A proxy server is generally used to maintain security on a network that offers an Internet connection. The network of NC601 with the proxy server may cause some problems to the image quality such as taking much time in refresh interval. Consult your ISP or network administrator for details. 1. Start up the Internet Explorer.2. Select [Tools] –> [Internet Options...] –> [Connections] tab and click [LAN Settings]. See if the Use a proxy server check box is checked or not in the next window. When checked, click [Advanced...].3. Enter the IP address of your NC601 assigned from your ISP or network administrator into the [Do not use proxy server for addresses beginning with data] field. 4. Click [OK] on all of the opening windows. 17See if the check boxis checked or notWhen checked, click[Advanced...]When not checked, click [Cancel]. Your proxy server settings cause no problems.](https://usermanual.wiki/AEE-Wireless-Technology/NC601/User-Guide-681385-Page-21.png)
![UPnP FunctionUPnP means Universal Plug and Play. This function is only suitable for Windows XP. Please take the following steps to activate this function.1. Click [Start] (–> [Settings]) –> [Control Panel]–> [Add/Remove Programs] 2. Click [Add/Remove Windows Components].18](https://usermanual.wiki/AEE-Wireless-Technology/NC601/User-Guide-681385-Page-22.png)
![3. Double-click [Networking Services].4. Activate the UPnP function.19](https://usermanual.wiki/AEE-Wireless-Technology/NC601/User-Guide-681385-Page-23.png)
![5. Click [OK].6. Click [Next].7. Click [Finish]. The UPnP function is enabled.20](https://usermanual.wiki/AEE-Wireless-Technology/NC601/User-Guide-681385-Page-24.png)
![Notes: After the UPnP function is enabled, click My Network Places, you will see the icon the Network Camera is connected correctly. 21Internet Explorer Security SettingsActiveX will be used during reviewing the pictures from the NC601 via Internet Explorer. Please take thefollowing steps to reset the Internet Explorer safety.1. Click [Start] (–> [Settings]) –> [Control Panel]–> [Internet Options].](https://usermanual.wiki/AEE-Wireless-Technology/NC601/User-Guide-681385-Page-25.png)
![2. Click [Security]–> [Custom Level].223. Set the security as the following, and reset the security to Medium, then click OK.](https://usermanual.wiki/AEE-Wireless-Technology/NC601/User-Guide-681385-Page-26.png)
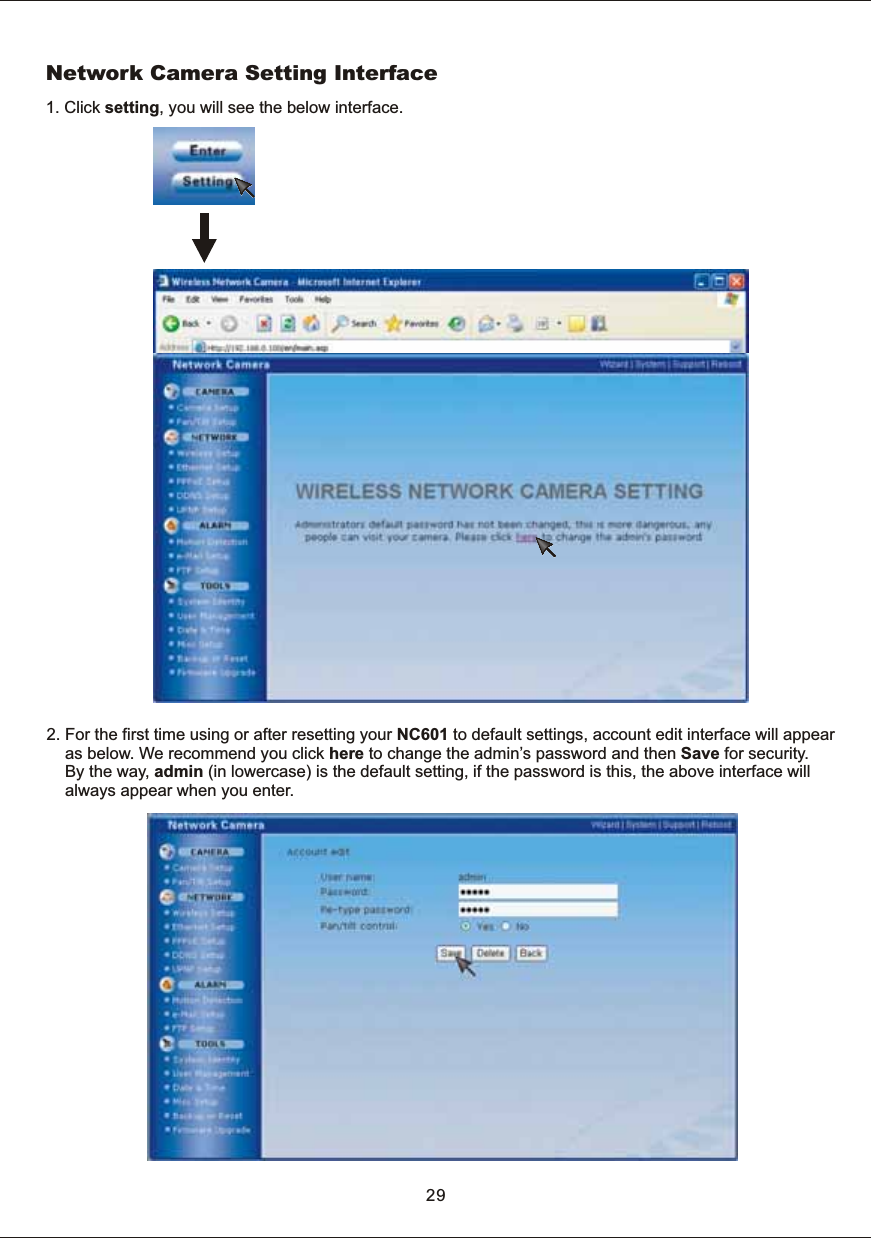
![NETWORK CAMERA SCREEN AND SETUP WINDOWYou can select one of the three ways to review the pictures from the NC601.1. Input the IP address (or URL) of the NC601 on the Web Browser. Yo u will see the home page. Click [Enter].Notes: Through this welcome page, you are allowed to enter the picture viewing interface or enter the system setting interface. After inputting the correct username (the default is admin, in lowercase) and password (the default is admin, in lowercase), you could choose to click on the item Enter to access the picture viewing interface or the item Setting to access the system setting interface. The general users assigned by the administrator are not allowed to enter the system setting interface. They can only be allowed to enter the picture viewing interface.25Review images from the Network Camera](https://usermanual.wiki/AEE-Wireless-Technology/NC601/User-Guide-681385-Page-29.png)
![2. If your OS is Windows XP, click [My Network Places], double click the icon You will see the home page, click [Enter].26Note: If DHCP server is installed in your network, the IP address of your network camera may not be the default value 192.168.0.100. We recommend you use IP Finder to get the default IP address of your camera then. 3. Make sure the IP address of the NC601 the same net segment as that of the PC . Run the IP Finder and double-click the related NC601 IP address.](https://usermanual.wiki/AEE-Wireless-Technology/NC601/User-Guide-681385-Page-30.png)

![(1) Pan/Tilt buttonEach surrounding arrow of Pan/Tilt moves the lens Up, Down, Right, Left.(2) Home position button Moves the lens to Home Position. (3) Preset ButtonsAll eight preset buttons and home position button can be overridden. Lens moves to the preset/ home position when clicking each registered button. Blue/ White buttons mean Registered/ Not registered.(4) Mute4.1) Press Mute button to turn on/off the volume4.2) Slide the slide block horizontally to adjust volume per your request(5) SnapshotPress the Snapshot button to obtain a snapshot of present detective image.Press Save to store it in your computer, and it will be automatically named by present data & timePress Cancel to exit.(6) Zoom inPress Zoom+ to magnify image area to see the details, and press Zoom- to return the normal view(7) Image size: Three Image Size options for your request: [640x480], [320x240] and [160x120].(1) Pan/Tilt button(2) Home position button4.1)Mute button(5) Snapshot button4.2) Slide block(6) Zoom in/out button(7) Image resolution(3) Preset button28Note: The Pan/Tilt function makes it possible that clicking on the Image Field will turn the lens to directions you like.](https://usermanual.wiki/AEE-Wireless-Technology/NC601/User-Guide-681385-Page-32.png)
![For camera setup, you can set Image size , Frame rate, Bit rate, Frequency and so on. You can also turn the built-in Microphone on, adjust Mic volume and set the Audio bit rate.[Image size] 640 x 480(VGA), 320 x 240(QVGA), 160 x 120(QQVGA)[Frame rate] 10/15/20/25/30(fps) five options for your request.[Bit rate] Five options for your request: 512, 768, 1024, 1536, 2048(kbps). [Frequency] 50Hz & 60Hz for your request.[Image revolution] Display images upside down. [Microphone] Turn on/off the built-in microphone.[Mic volume] Adjust the volume of the microphone, 0~15 options for your request.[Audio bit rate] Audio clips transmission speed. Click Apply to confirm your settings.Note:1. For Image size, smaller the image size, unclearer but smoother the picture.2. For Bit rate, lower the bit rate, lower the image quality3. For Frequency:3.1) Generally speaking, 50Hz is often used in China, Australia and Europe, 60Hz used in the USA, Canada, Japan and Korea. The frequency should match that of your country, otherwise, the interruption and interference occur. 3.2) For 50Hz, maximum admitted frame rate is 25fps, while 60Hz is 30fps.Camera Setup30CAMERA](https://usermanual.wiki/AEE-Wireless-Technology/NC601/User-Guide-681385-Page-34.png)
![[Preset number] 1~8 up to 8 preset positions can be memoried.Call: Turn the lens to the very position you select.Add: Add new preset position(s)Delete: Delete former preset position(s)[Preset position name] Name for the preset position you set.[Pan/ tilt function] Enable the lens circumvolution function or disable on the operation bar. Click on Apply to confirm your setting to enable/disable Pan/Tilt function. Pan/ Tilt setupPan/Tilt operation can move the lens 130° horizontally and 70° vertically. This movable lens extends your visual angle. The registered Preset Position can be demonstrated on the Operation bar(Refer to page 27).31](https://usermanual.wiki/AEE-Wireless-Technology/NC601/User-Guide-681385-Page-35.png)
![NETWORKWireless setupThe NC601 corresponds to the wireless system based on IEEE802.11b/g. Encryption establishes the security to prevent unauthorized users to access the wireless data communication.[SSID] Type the ID to identify the wireless network you want to access using up to 32 ASC characters. For your security, be sure to change the factory setting. [Mode] Infrastructure mode and Adhoc modeSelect Adhoc mode when connecting to computer directly,elect Infrastructure mode when connecting to computer via an access point or a radio router.[Status] Show the status of the wireless connection.[Encryption] Select the key length, either 64 or 128 bits.[Key type] You can type the WEP key either in hexadecimal numbers or ASC characters.[WEP key] Specify up to 4 WEP keys.Note: You can use the present SSID or you can click Search... to search new SSID. And then click Apply to use it, or Back to cancel it.ⅡAdhoc Mode: Infrastructure Mode: SⅡ32](https://usermanual.wiki/AEE-Wireless-Technology/NC601/User-Guide-681385-Page-36.png)
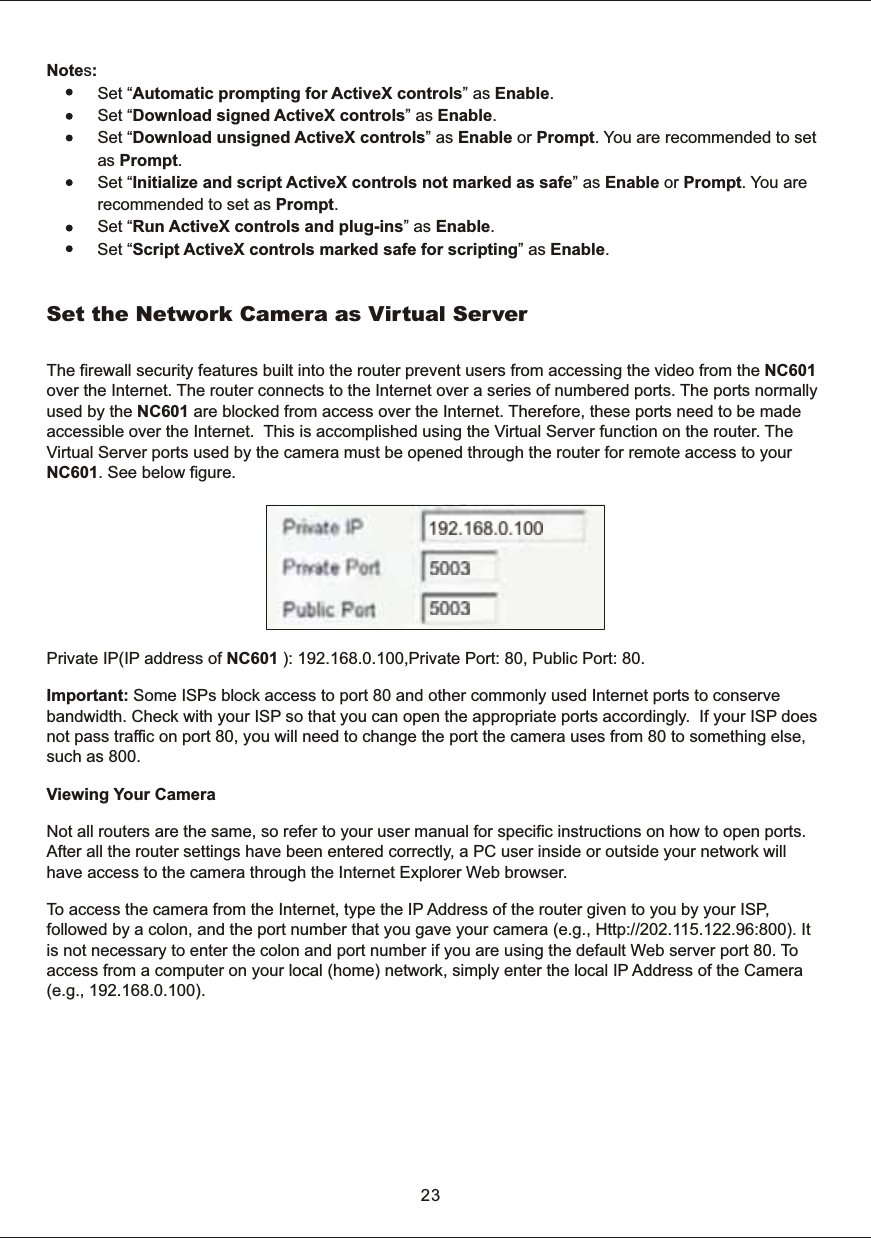
![Ethernet setupObtain an IP address automatically(DHCP): If DHCP server is installed on the network, select it when the IP address is assigned by DHCP server. IP address is assigned automatically.Note: If DHCP server is installed on your network, the interface may differ from the above image after clicking on Ethernet setup.Use the following IP address:Select this when a fixed IP is set.[IP address] Type the IP address of your camera[Subnet mask] Type the subnet mask[Default gateway] Type the default gatewayAlways use the following DNS server address: [Primary DNS IP address] Type the IP address of the primary DNS server[Secondary DNS IP address] Type the IP address of the secondary DNS server, if necessaryHTTP port numberThe default HTTP port number is 80.33](https://usermanual.wiki/AEE-Wireless-Technology/NC601/User-Guide-681385-Page-37.png)
![PPPoE setupThe NC601 can be installed alone without PC on the network. Some XDSL services use PPPoE (Point-to-Point Protocol over Ethernet ).[PPPoE dial-up] Enable or disable PPPoE connection[e-Mail notification] Remind you with IP address of your NC601 if Enable selected. The precondition is that you have set the relative parameters in your e-mail set (Refer to page 40 for E-mail alarm setup).[Service name] Either an ISP name or a class of service that is configured on the PPPoE server. [User name] Type a user name. [Password] Type a password.[Re-type password] To confirm the password, type the same characters as you typed in the Password box.Click on Apply to confirm your settings.34How to access via PPPoE connection1. After the , reboot your network camera.2. Connect the camera to internet. Refer to Wired Network-Type 3. Internet Direct Connection with a Modem on the network on Page 12.Thus you can access your camera via DDNS or IP address reminded by e-mail.setup](https://usermanual.wiki/AEE-Wireless-Technology/NC601/User-Guide-681385-Page-38.png)
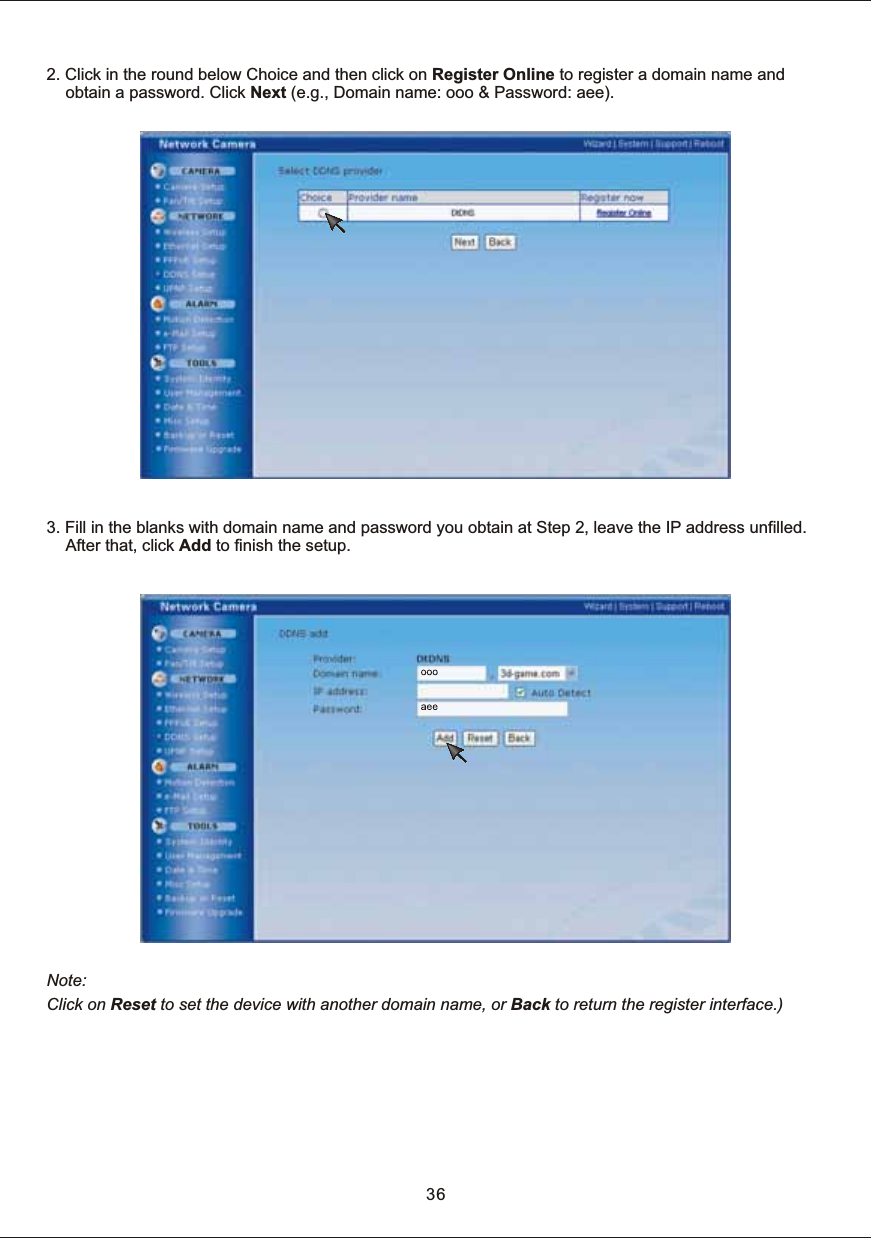
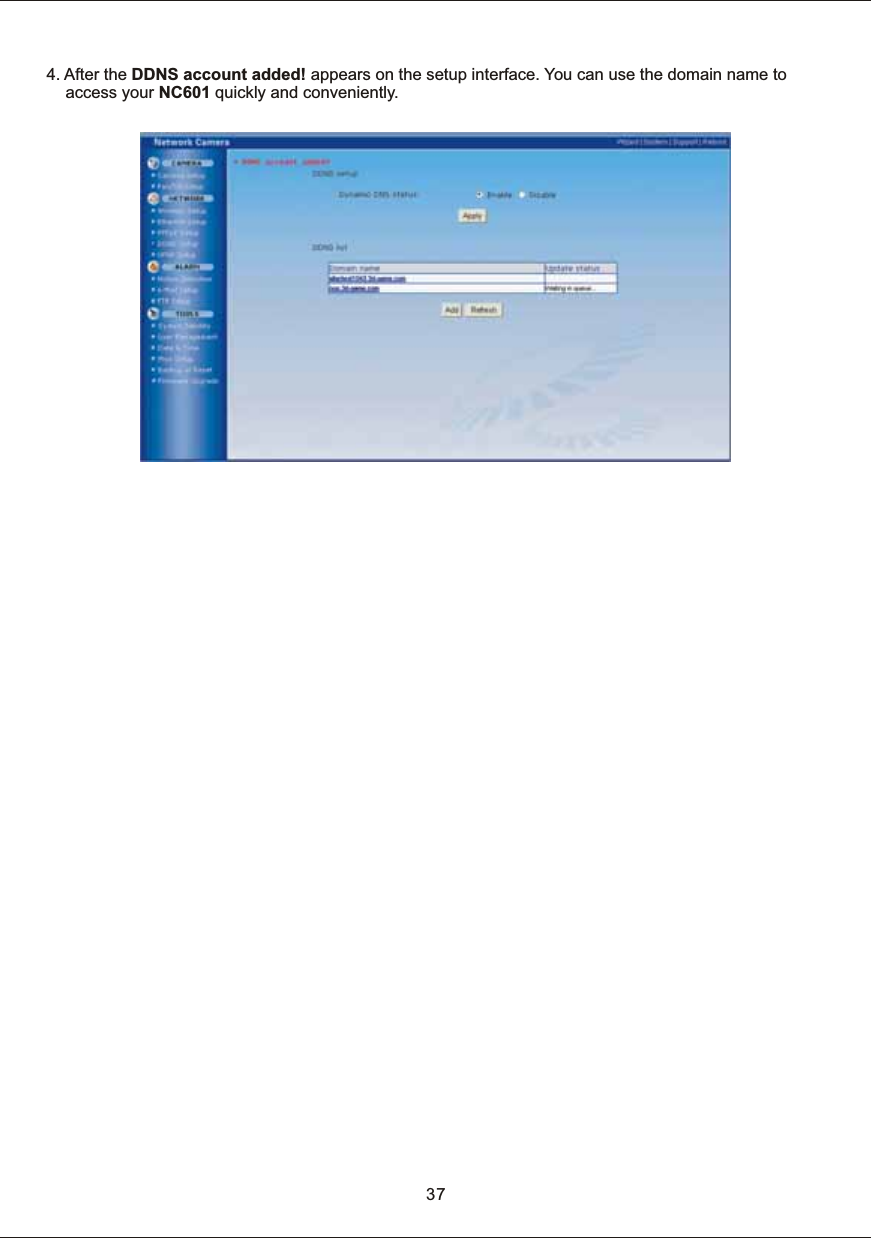
![35DDNS setupVerify that your ISP supports DHCP. If your ISP supports DHCP, or if you assign a domain name to the NC601, you need to contract and register for DDNS service. If you set static global IP address to the NC601 and the broadband router, you do not need to register DDNS service.[Dynamic DNS status] Enable or disable DDNS connectionClick Apply to confirm [Dynamic DNS status] setting (enable/disable)[DDNS list] Show the added dynamic domain nameClick Add to add new dynamic domain name(s)Click Refresh to Refresh DDNS statusHow to add DDNS1. Firstly Enable the Dynamic DNS function and then click Add.](https://usermanual.wiki/AEE-Wireless-Technology/NC601/User-Guide-681385-Page-39.png)
![UPNP setupUPnP function requires a Windows XP operating system. It is a quick way to find Network Camera in your network. Firstly you need to active the UPNP function on your PC, please refer to page 18-21 for more details.[UPNP] Enable or disable the UPNP function.Press Apply to enable or disable this function.38](https://usermanual.wiki/AEE-Wireless-Technology/NC601/User-Guide-681385-Page-42.png)
![ALARMMotion DetectionAs the alarm/timer trigger, Motion Detection can activate the Image Transfer feature, which can send the images via e-mail or FTP (File Transfer Protocol). The alarm/timer trigger can be set on this window.[Window] Up to four windows for you to detect and alarm.[Threshold] Setup the threshold, once exceed the limit, alarm will be triggered.[Sensitivity] Set the measurable difference between two sequential images that would indicate motion.Note: 1. When remove a window (for example, Window 1, to another place, please press Apply to make the new detective area in effect) .2. Only the checked window area is effectively set for alarm.3. It is easier to trigger the alarm that you slide the slide block of to left and that of the sensitivity to right. threshold The checked window is effectively set as an alarm trigger. External Sensor Input of External I/O activates the alarm trigger39](https://usermanual.wiki/AEE-Wireless-Technology/NC601/User-Guide-681385-Page-43.png)
![E-mail Alarm setupNC601 can transfer the image via E-mail. The alarm/timer trigger can be set on Motion Detection window. [Motion detection] Trigger to the alarm[Periodical send] Trigger to the alarm [Interval time] Sending image frequency when enable the Periodical send trigger[SMTP server name] Type the name or IP address of the SMTP server you want to use for sending an e-mail[SMTP server port] The default value is 25[Authentication] Select the authentication required when you send an e-mail.[User name] & [Password] Type the user name and password of the user who has the mail account. This setting is necessary when the SMTP server which sends e-mail performs authentication[Re-type password] Re-type the password above to confirm[Sender e-mail address] Set the e-mail address by which you want to send e-mail[Receiver e-mail address] Set the e-mail address by which you want to receive e-mail(Up to 3 receivers' e-mail address can be set)[Subject] Subject of the alarm e-mail[Message] Description of the e-mail[File attachment] Attach images shot by network camera or not (On/Off).Note: The Alarm mode , which uses the Network Camera internal clock., can send the e-mail without transferring the image. Make sure Date and Time has been configured.40](https://usermanual.wiki/AEE-Wireless-Technology/NC601/User-Guide-681385-Page-44.png)
![FTP Alarm setupNC601 can also transfer the image via FTP. The alarm/timer trigger can be set on MotionDetection window. [Motion detection] Trigger to the alarm[Periodical send] Trigger to the alarm[Interval time] Sending image frequency when the trigger is Periodical send[FTP server name] It can be domain name or IP address[FTP server port] The default port number is 21[Anonymous] Enable or disable anonymous visiting[User name] Type your user name[Password] Type your password[Re-type password] Re-type your password[Passive mode] Apply passive mode or not[Remote path] Path to FTP server where to save the alarm imagesClick on Apply to confirm your settings above.41](https://usermanual.wiki/AEE-Wireless-Technology/NC601/User-Guide-681385-Page-45.png)
![TOOLSSystem Identity[System Name] Name for the present NC601, to distinguish from other camera(s) in the network[System Contact] Note the connecting data of the NC601[System Location] Note the NC601 location42TIP:These information you fill in can be displayed on and very important to the IP Finder. It can help to distinguish different Network Cameras in the network. See the below figure.](https://usermanual.wiki/AEE-Wireless-Technology/NC601/User-Guide-681385-Page-46.png)
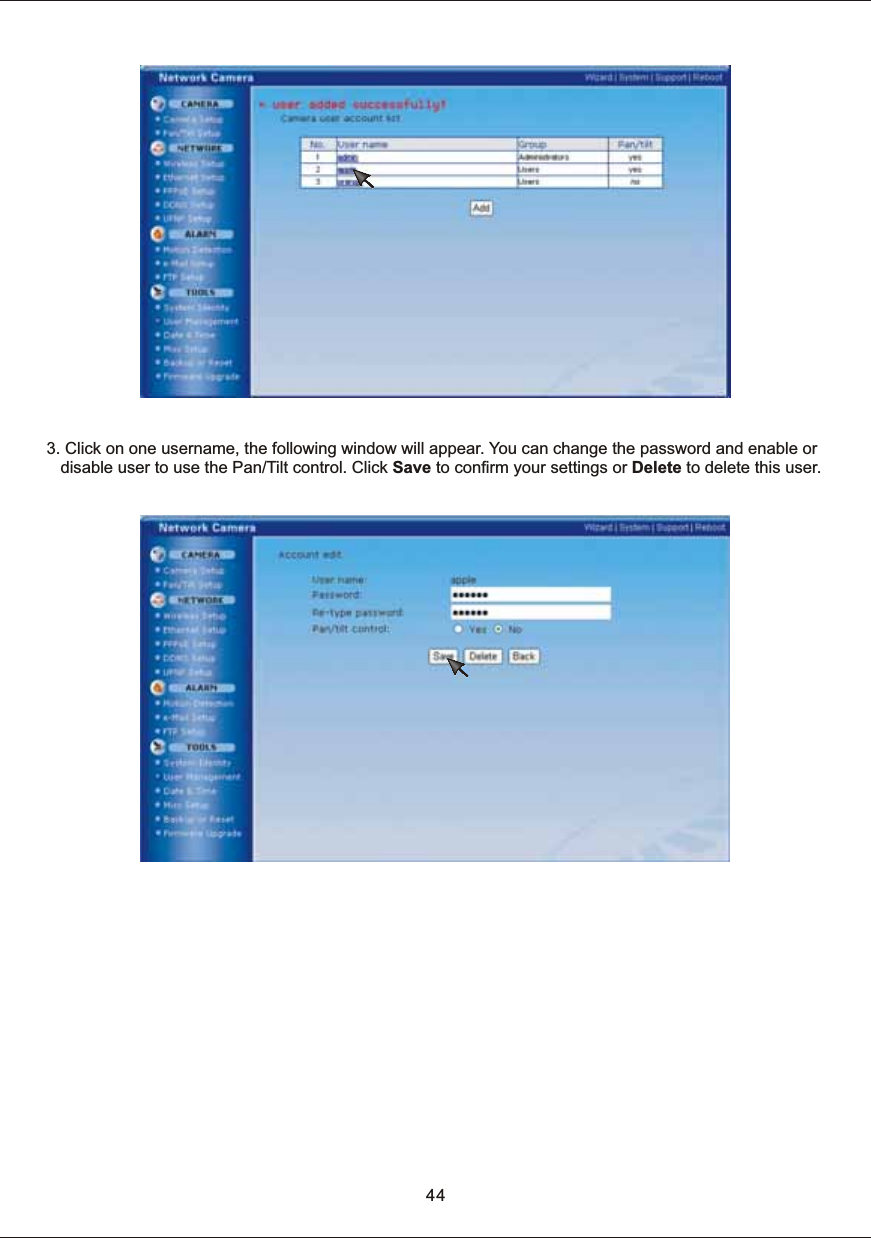
![43User Mana gement[Add] Up to 64 users (including the admin) can be set[Pan/tilt] Indicate whether or not users can use the Pan/tilt functionNote: 1. Maximum to 10 users are allowed to access the camera simultaneously. 2. As the number of users simultaneously connected to Network Camera increases, the overall motion performance will decrease.How to add users1. Click Add.2. Type a user name and password. Re-type the password to confirm your password. Select Yes or No for the Pan/Tilt control. Then click on Add. One user has been added.](https://usermanual.wiki/AEE-Wireless-Technology/NC601/User-Guide-681385-Page-47.png)
![[Current device time] Internal time for NC601[Proposed device time] External time for NC601 (time of client server PC) [Select to change the time zone for the device location] choose proper time zone [Auto time setting(SNTP)] Enable or disable this function[Time server] Type one NTP server name in the boxNote: 1. If this NTP server cannot work in gear, the NC601 will be synchro with the clients’ PC.2. With built-in RTC(Real-time Clock) , this device keeps track of the time even when the power supply is cut off.Date & Time45](https://usermanual.wiki/AEE-Wireless-Technology/NC601/User-Guide-681385-Page-49.png)
![MISC setup 46[LED control] Turn on/off the power & network LED indicator of NC601Click Apply to confirm your above setting.](https://usermanual.wiki/AEE-Wireless-Technology/NC601/User-Guide-681385-Page-50.png)
![Backup or ResetNote: 1. Do not turn off the power during the Reset to Factory Default. It may interrupt the NC601 operation.2. If Reset to Factory Default is used, all user settings will be lost, and you will have to reconfigure the entire camera.47[Reset] Initialize all the parameters to the factory default. Note that all customer-applied settings will be lost, requiring you to reconfigure Network Camera.[Backup] Backup the present configuration for future reference.[Search...] Search for the very backup configuration and click Restore to restore the configuration to your Network Camera.[Restore] Click Restore button to start restoring a former backup settings](https://usermanual.wiki/AEE-Wireless-Technology/NC601/User-Guide-681385-Page-51.png)