AFG 4.0AR User Manual RECUMBENT Manuals And Guides 1012538L
User Manual: AFG 4.0AR 4.0AR AFG RECUMBENT - Manuals and Guides View the owners manual for your AFG RECUMBENT #40AR. Home:Fitness Equipment Parts:AFG Parts:AFG RECUMBENT Manual
Open the PDF directly: View PDF ![]() .
.
Page Count: 19
op
i_" _L
', ,I
s/
/
i
r
_ J
p
\
i ,'
i,
II' i
_ _--S_ _
"'i _- i __
/
)
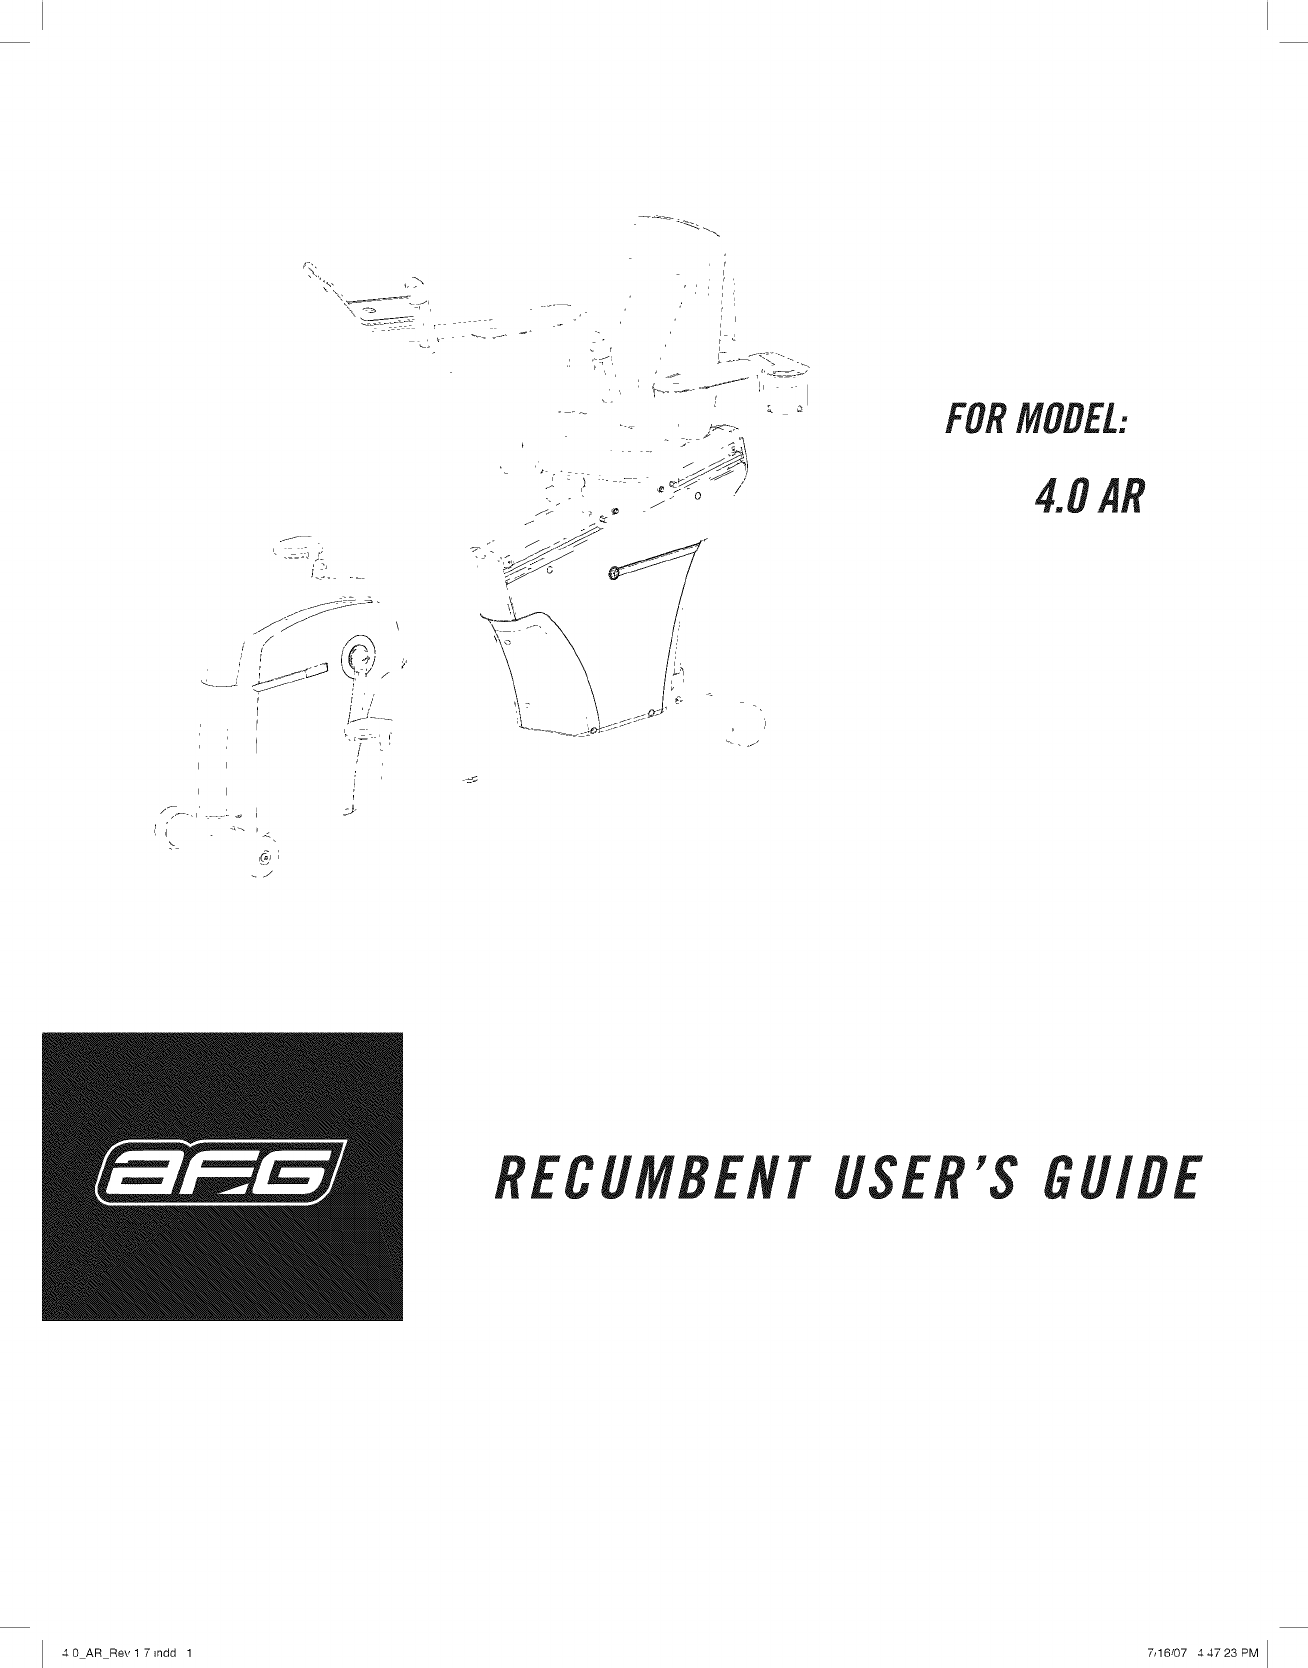
FORMODEL:
_q
RECUMBENTUSER'S GU! E
.40 AR Rev17ndd 1 7_16/07 .44723PM I
CONGRATULATIONSand THANKYOUforyourpurchaseof this AFGbike!
Whether your goal is to win races or simply enjoy a fuller, healthier fifestyle, an AFG bike can help
you attain it -adding club-quafity performance to your at-home workouts, with the ergonomics and
innovative features you need to get stronger and healthier, faster, Because we're committed to designing
fitness equipment from the inside out, weuse only the highest quafity components, It's a commitment
we back with one of the strongest frame-to-brake warranty packages in the industry,
Youwant exerciseequipment that offers the most comfort, the best reliability and the highest quality
in its class,
AFGderivers.
il i XI
Important Precautions 4
Assembly 5
Before YouBegin J6
Bike Operation J7
Conditioning Guidelines 23
Troubleshooting &Maintenance 30
Limited Warranty 34
CONTACTIIVFORMATION Back Panel
ii i I
4
7/16/07 4:47:23 PM
i ¸
m
B
SAVETNESEINSTRUCtiONS
Read aft instructions before using this bike. When using an electrical product, basic precautions should
always be foflowed, including the following: Read aft instructions before using this bike. It is the responsibility
of the owner to ensure that aft users of this bike are adequately inforrned of aft warnings and precautions. If
you have any questions after reading this manual, contact Customer TechSupport at the number listed on
the back panel of this manual
•If you experience chest pains, nausea, dizziness, or shortness of breath, stop exercising immediately and
consult your physician before continuing.
•Maintain a comfortable pace. Do not sprint above 125 rprns on this machine.
•Tomaintain balance, it is recommended to keep a grip on the handlebars while exercising, mounting or
dismounting the machine.
•Do not wear clothes that might catch on any part of the bike.
•Do not turn pedals by hand.
•Make sure seat is secure before each use.
•Do not insert or drop any object into any opening.
•Unplug bike before moving or cleaning it. Toclean, wipe surfaces down with soap and slightly damp cloth
only,, never use solvents. (SeeMAINTENANCE)
,, This bike should not be used by persons weighing more than 325 pounds. Failure to comply will void
the warranty,
,, This bike is intended for in-home use only, Do not use this bike in any commercial, rental, school or
institutional setting. Failure to comply will void the warranty,
oDo not use bike in any location that is not temperature controfled such as but not limited to: garages,
porches, pool rooms, bathrooms, car ports or outdoors. Failure to comply may void the warranty,
oUse the bike only as described in this manual
itisessentiaithatyour_ikeis,se"onlyindoors,aCiimate_ontroliedroomIfyou__ikehas_ee,exposedto
colder temperatures or high moisture Climates:it is Strongly recommended that warmed room
temperature before first fime usel Failure to
i
IMPORTANT..READTHESESAFETYINSTRUCtiONSBEFOREUSE!
ii!iiiillii:i!iilii!!iliiii_/ii /i! 1115/i!iiiiiiiiii!iii_i:i! i_iiii_iiiiii!!:i!51_iii:_iiiiiiiiii!iiiiiifillii
i!iiiiiii!/i_i_iiiii! iiiii!/ii!_!iiiiiiiiiii_ii!iiii_iiiiiiiiillii!iiiiiii_i(ii_iiii:i(iil/iiiiii!il_(i:i!il ;/_i:iiiii_iiiiii!i1111/5111111::i:iii iiiiiiill
Thereareseveralarea_durin_theassemblyprocessofabikethatspecia!attentionm"_t_epaid.!tisvery
important to follow the assembly instructions correct/y and to make sure a// parts are firmly tightened. If the
assembly instructions are not followed correctly, the bike could have frame parts that are not tightened anfl
damageto thebike,
must be reviewed and corrective actions Should'
UNPACKING
Unpack the product whereyou will be using it. Place the product on a level flat surface. It is recommended
that you place a protective covering on your floor. During each assembly step, ensure that ALL nuts and
bolts are in place and partially threaded in before completely tightening any ONE bolt.
NOTE:A light application of greasemay aid in the installation of hardware,Anygrease, such as lithium
bike greaseis recommended,
ENTERYOURSERIALNUMBERAND
MODELNAMEIN TNEBOXESBELOW:
SERIALNUMBER:
MODELNAME:
Referto the SERIALNUMBERand MODELNAMEwhencalling for service.
Alsoenterthis serial numberonyour WarrantyCard.
i iii_ i
_ii_ii_i_!!IiI_I_!I_II!
4.0 AR Rev.l.7.indd 4-5 7/16/07 4:47:25 PM
%
m
U
CONSOLE
PULSEGRIPHANDLEBARS
SEATBACH
SEATBASE
MAiNFRAME
PEDALS
SEATBACECOVER
WATERBOTTLEHOLDER
REARPLASTICCAP
SEATFRAME
REARSTABiLiZERTUBE
[] 5ramAllen Wrench
[] 13/15mmFlat Wrench
[] Phillip Screwdriver
[] 5ram TWrench
[] I Console
[] 2Pedals
[] I SeatBack
[] 1 SeatBackCover
[] 1 SeatBase
[] 7HardwareBags
[] 1 RearPlastic Cap
[] 1 RearStabilizer Tube
[] 1 Frame
[] 1 PulseGripHandlebar
[] 1 SeatFrame
[] 1 WaterBottle Holder
[] 1 WaterBottle
ARCWASHER(B)
BOLT(A) MAiNFRAME
REARSTABiLiZERTUBE
A)
B)
C)
OpenHARDWAREBAGFORSTEPI
Attachthe REARSTABiLiZERTUBEto the
MAiNFRAMEusing2 BOLTS(A) and 2
ARCWASHERS(B)
Removethe PREATTACHEDSCREWfrom
theMOUNTINGBRACKET.
PLASTICTABS
PRE-ATTACHEB
SCREW
REARPLASTICCAP
MOUNTINGBRACKET
SEAT-STOPASSEMBLY--
SCREWS(K)--
D)
E)
Attachthe REARPLASTICCAPto the MAINFRAMEusing 2SCREWS(K)and the PREATTACHEDSCREW.
NOTE:MakesurePLASTICTABSarepositionedonthe insideof the GOJBERAIL.
Removeoneof therubberbumpersfromtheSEATSTOPASSEMBLY.Slidethe SEATSTOPASSEMBLYthrough
the GOIBERAiLandre-attachthe rubberbumperto the SEATSTOPASSEMBLYusingthe screwandwasher.
F) Adjust3 PRE-ATTACHEDLEVELERSsothat the bikedoesnotrockand is levelonthe floor.
%_RDW_REB#OFORST[P f00_7_'_t'S;]
BOLT(A)
20mm
Qty:2
____ ARC15.4WASHERmm(B) _ SCREW15mm (H)
SIUEVIEW Qty:2 Qty:2
SEATSTOPASSEMBLY
Qty:l
i iii_ i
_ii_ii_i_!!IiI_I_!I_II!
4.0 AR Rev.l.7.indd 6-7 7/16/07 4:47:28 PM
m
U
SEAT
SEATSLIDE
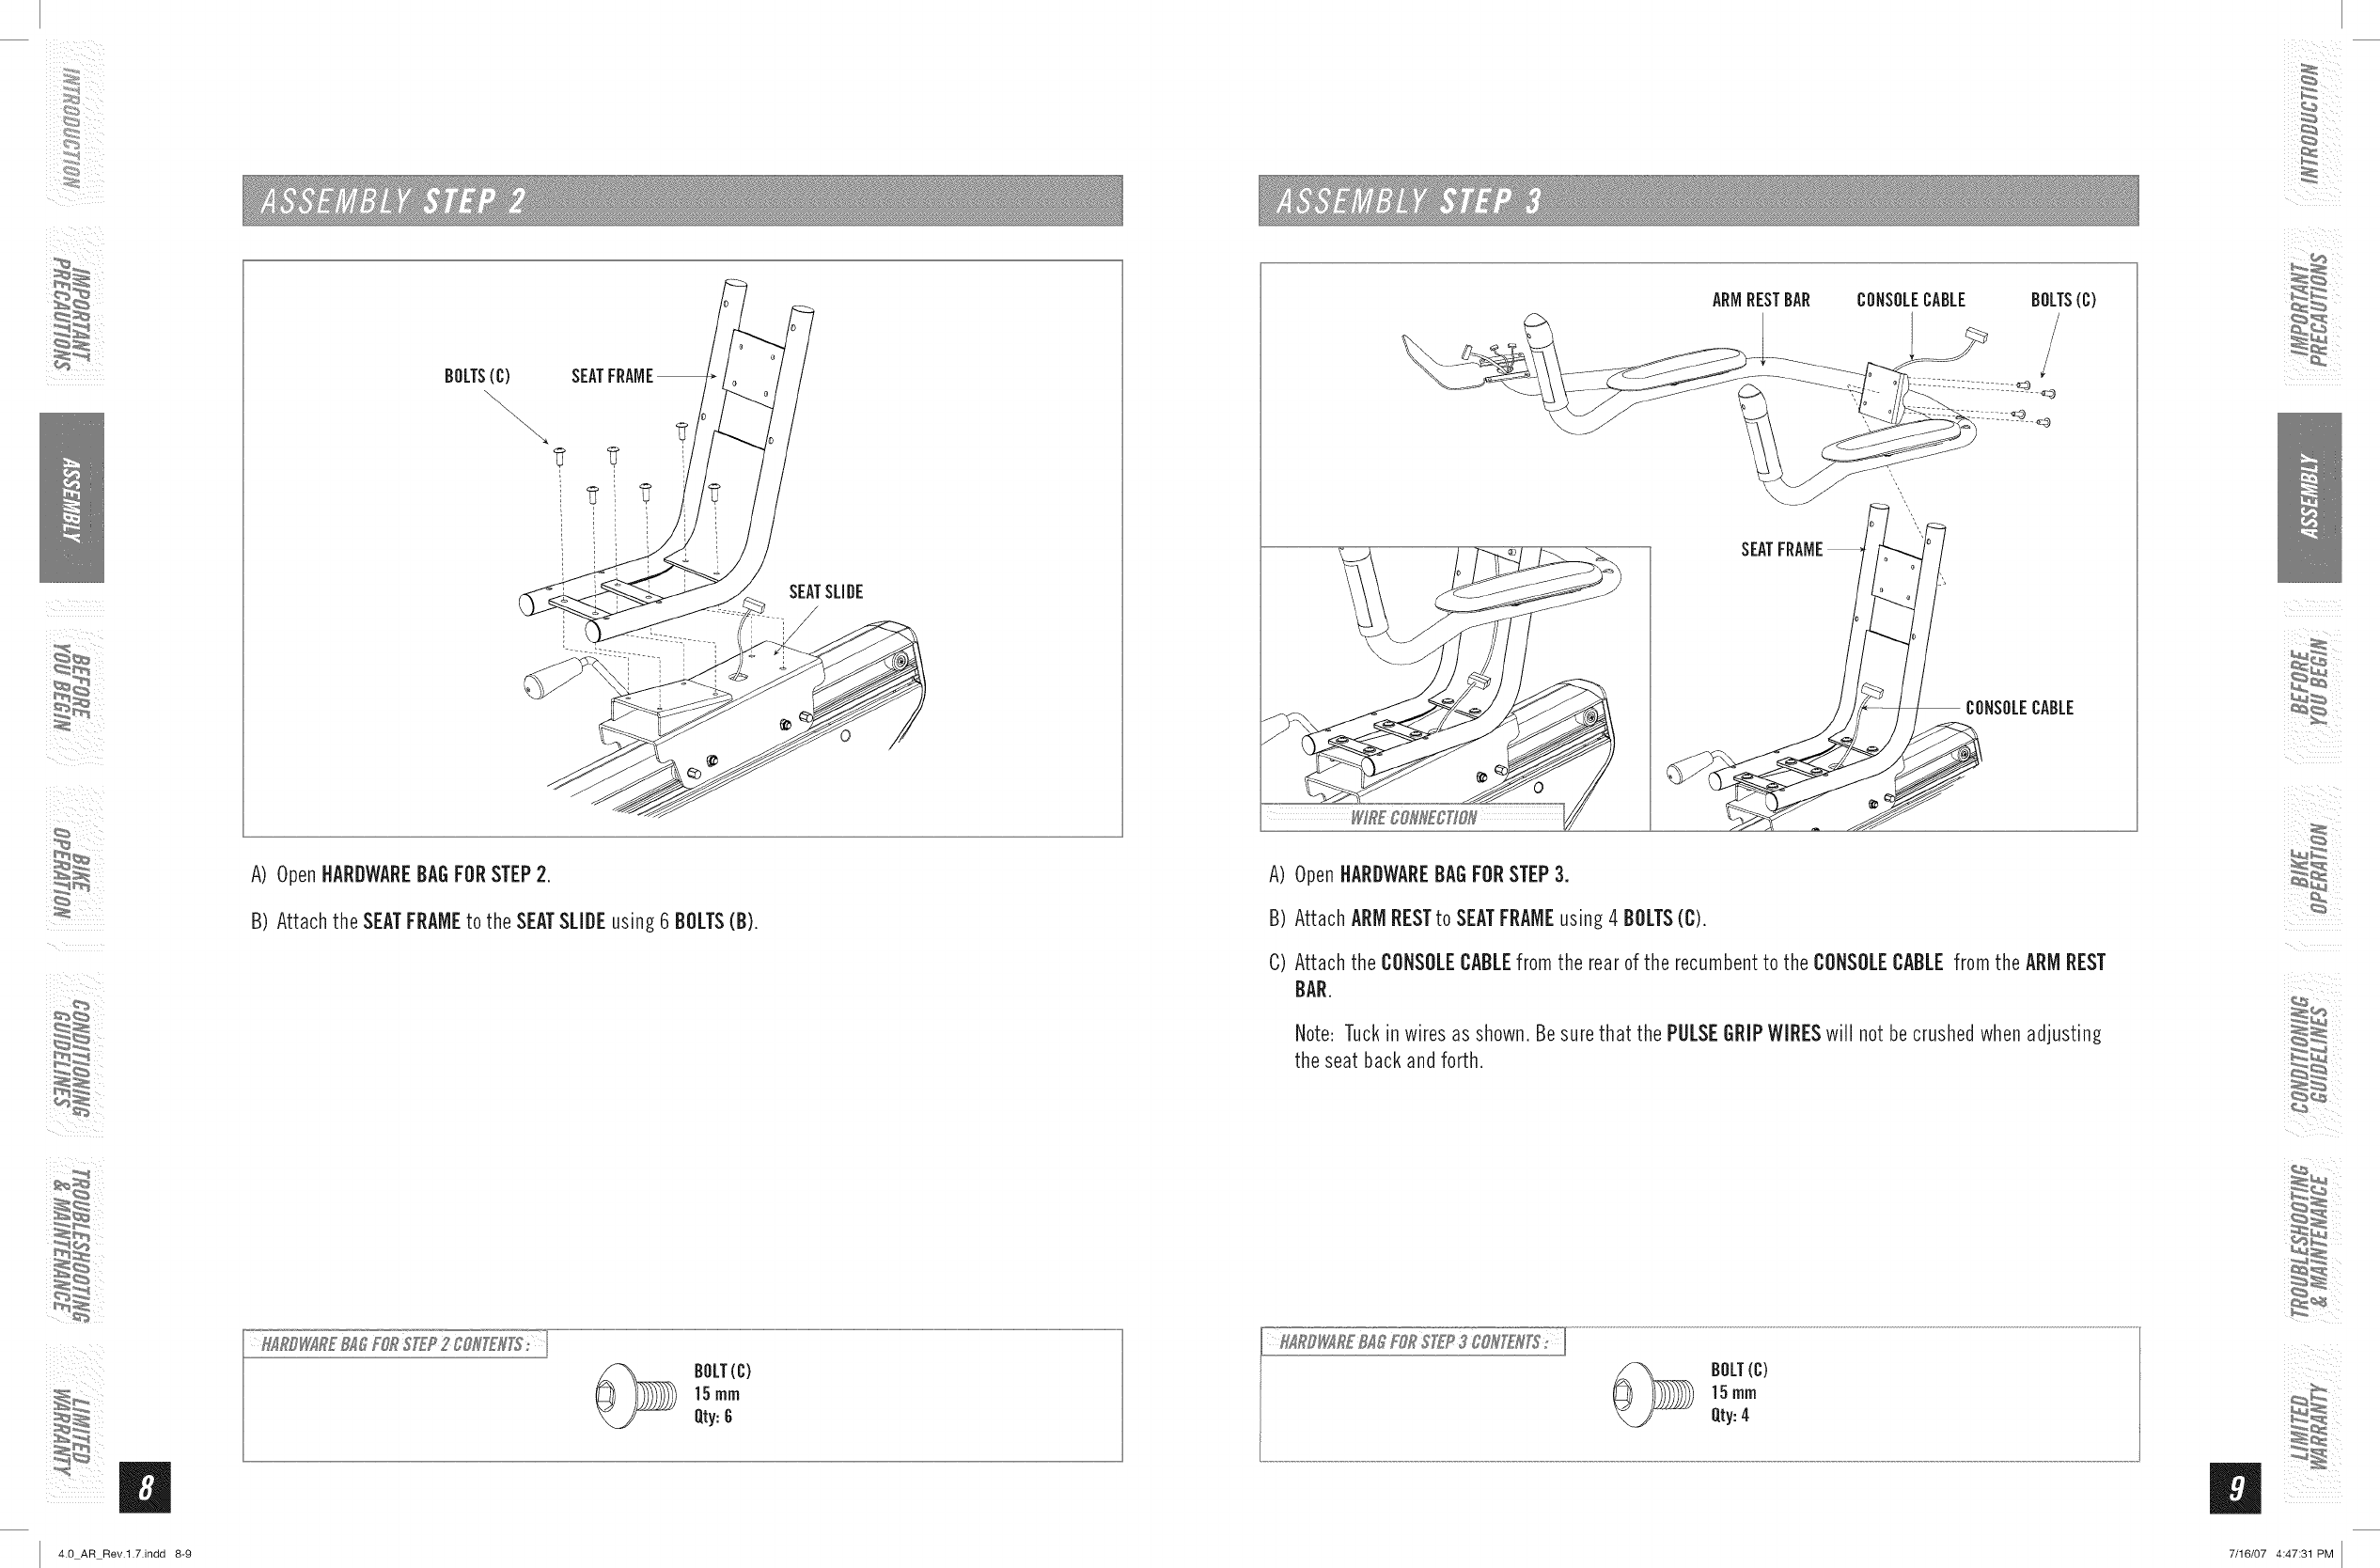
A) OpenHARDWAREBAGFORSTEP2.
B) Attach the SEATFRAMEto the SEATSLIDEusing 6 BOLTS(B).
BOLT(C)
15rnrn
Qty:8
ARMRESTBAR CONSOLECABLE BOLTS(C)
CONSOLECABLE
A) OpenHARDWAREBAGFORSTEP3.
B) Attach ARMRESTto SEATFRAMEusing 4 BOLTS(C).
C) Attach the CONSOLECABLEfrom the rearof the recumbentto the CONSOLECABLEfrom the ARMREST
BAR.
Note: Tuckin wires as shown.Besure that the POLSEGRiPWIRESwill not becrushedwhenadjusting
the seat back andforth.
BOLT(C)
15rnrn
Qty:4
i iii_ i
_ii_ii_i_!!IiI_I_!I_II!
4.0 AR Rev.l.7.indd 8-9 7/16/07 4:47:31 PM

m
W
SEATBASE
SEATFRAME
ARCWASHER(F)
BOLT(E)
A) OpenHARDWAREBAGFORSTEP4.
B) Attach the SEATBASEto the SEATFRAMEusing4 BOLTS(E) and4 ARCWASHERS(F).
BOLT(E)
45 mm
Qty:4
ARCWASHER(F)
15.4mrn
SIDEVlEW Qty:4
SEATBACKCUSHION ARCWASHER(F)
SEATFRAME i BOi (E)
A) OpenHARDWAREBAGFORSTEP5.
B) Attach the SEATBACKCUSHIONto the SEATFRAMEusing 4 BOLTS(E) and4 ARCWASHERS(F).
Qty: 4 " EV Qty:4
i iii_ i
_ii_ii_i_!!IiI_I_!I_II!
4.0 AR Rev.l.7.indd 10-11 7/16/07 4:47:33 PM
m
CLIP
CONSOLE
STRENGTHENINGPLATE
_CONSOLEWIRES
CONSOLEMAST
BOLT(G)
4_ 4_
/
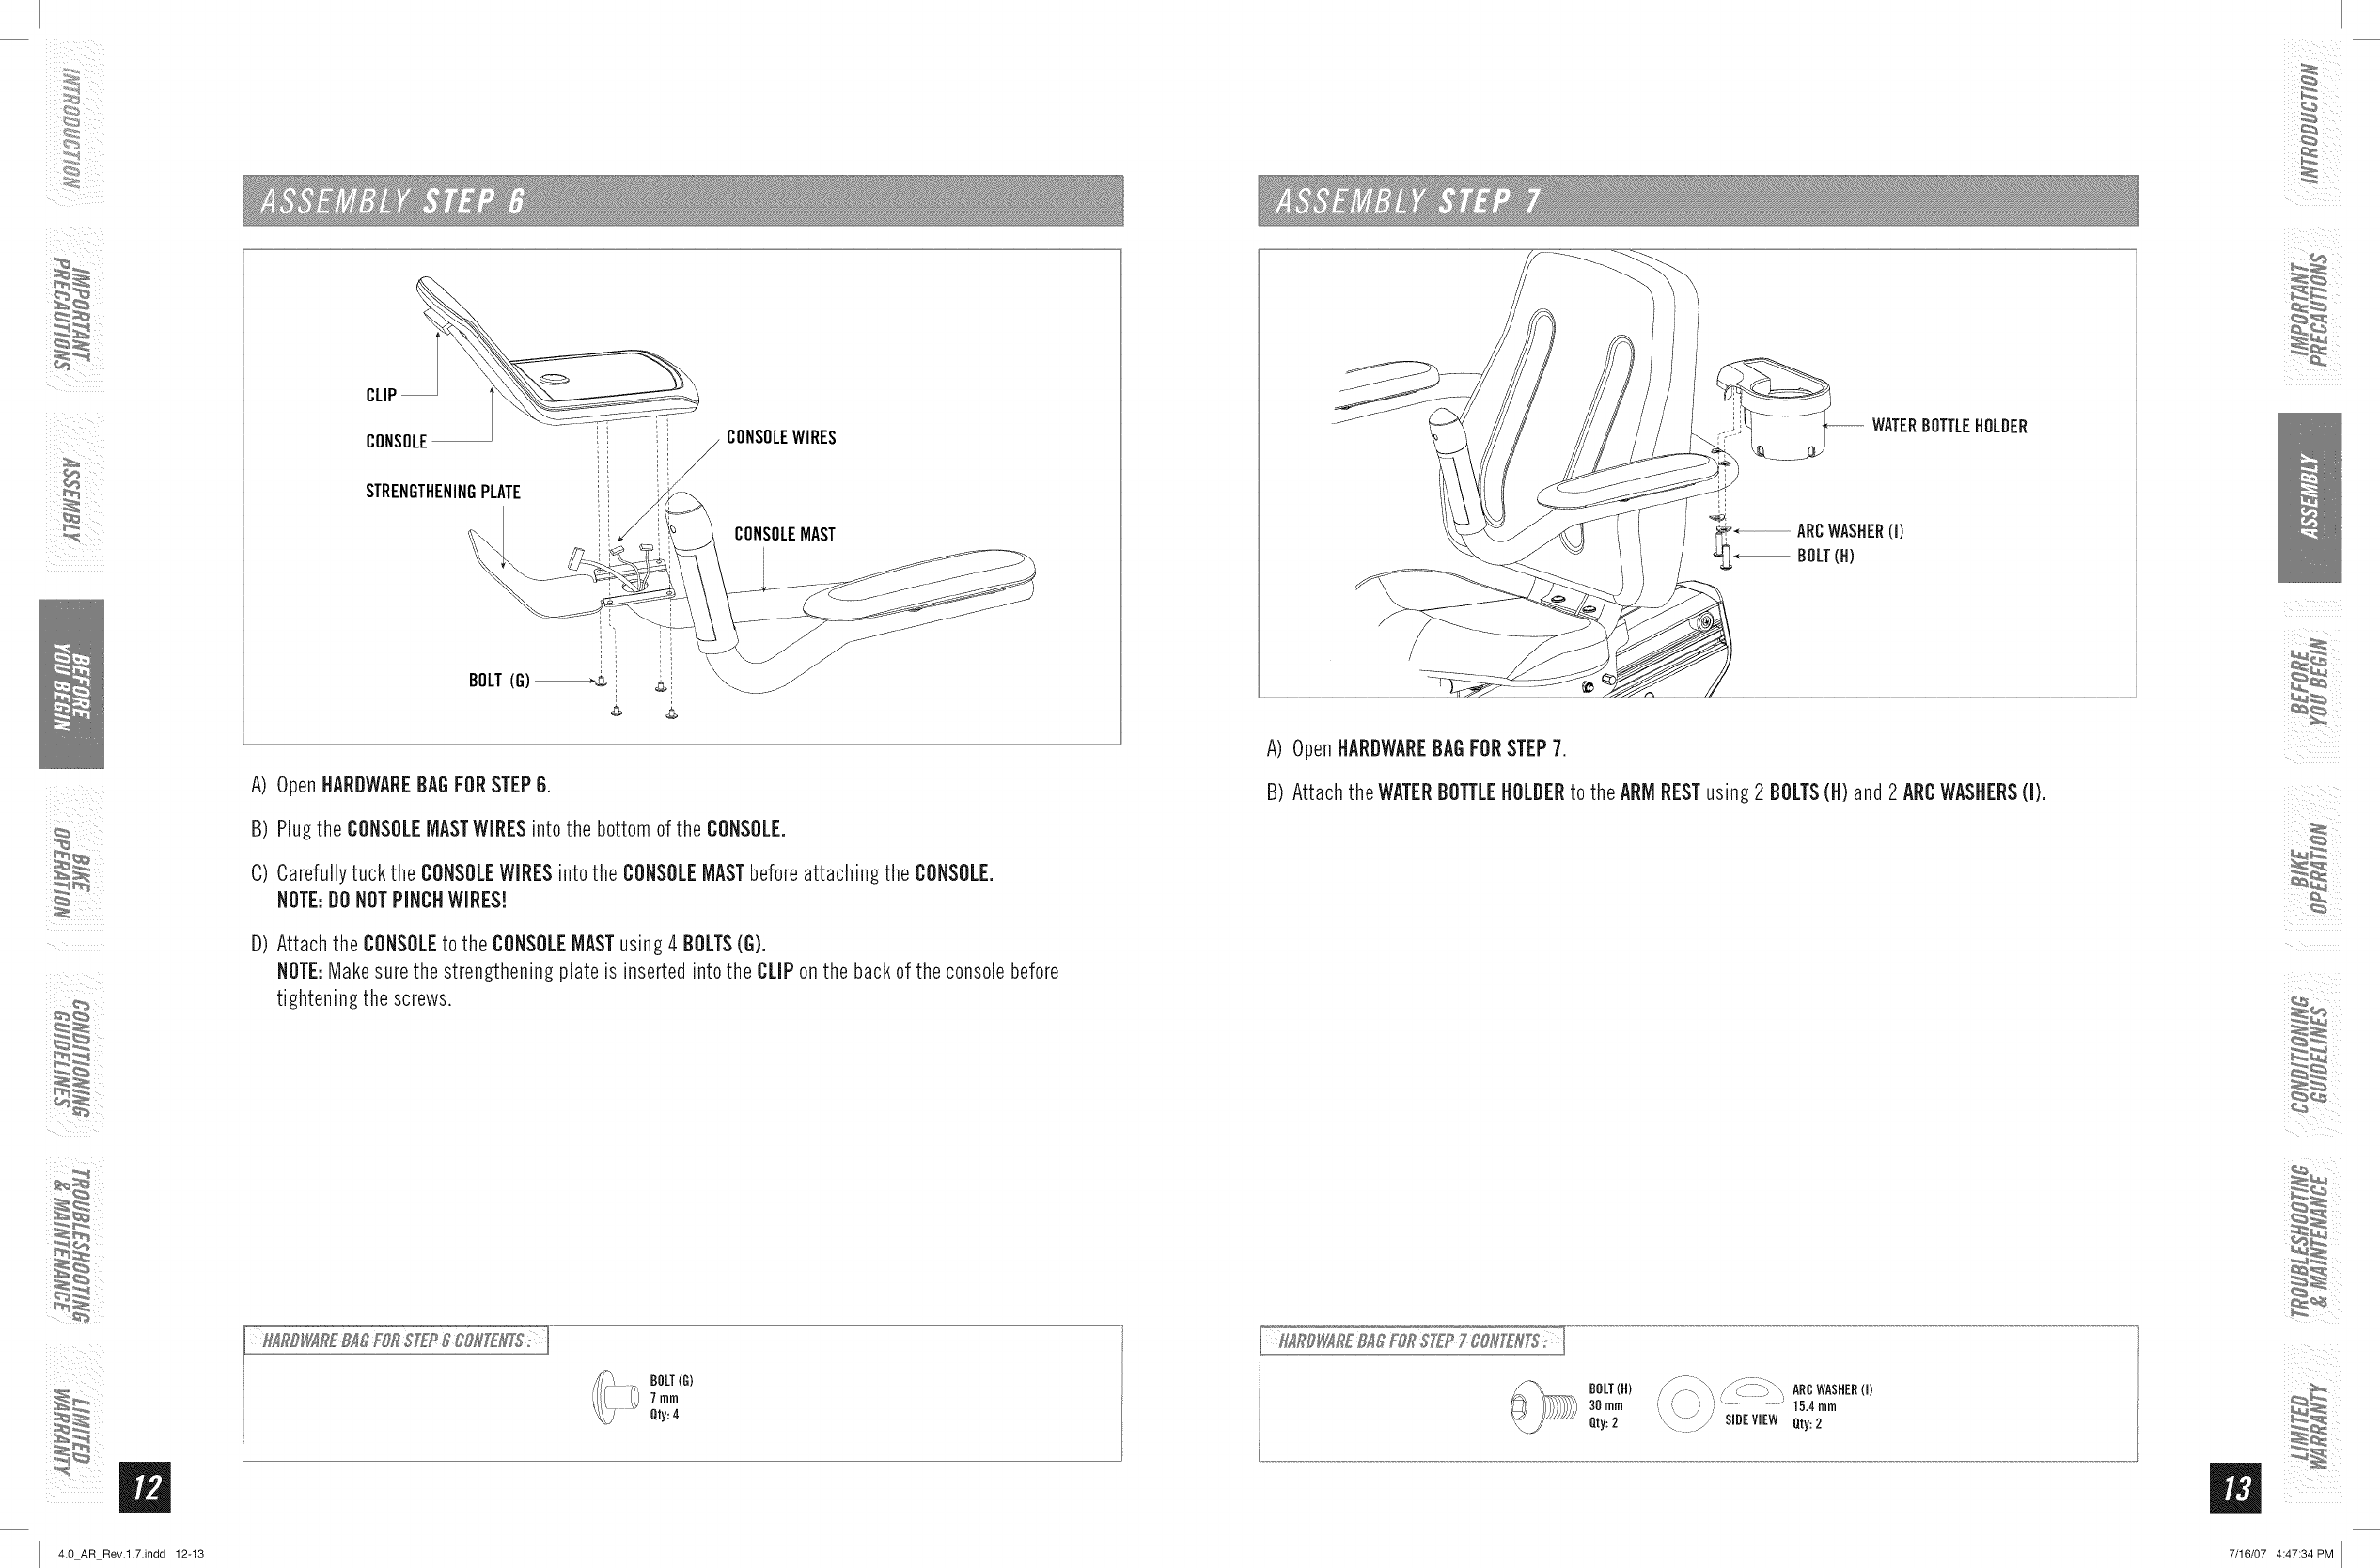
A) OpenHARDWAREBAGFORSTEP6.
B) Hug the CONSOLEMASTWIRESintothe bottomof the CONSOLE.
C) Carefullytuck the CONSOLEWIRESinto the CONSOLEMASTbeforeattaching the CONSOLE.
NOTE:DONOTPINCHWIRES!
D) Attach the CONSOLEto the CONSOLEMASTusing4 DOLTS(G).
NOTE:Makesurethe strengtheningplate is inserted into the CLiPonthe backof the consolebefore
tightening the screws.
BOLT(G)
7mm
Qty:4
-- WATERBOTTLEHOLDER
ARCWASHER(I)
BOLT(H)
A) OpenHARDWAREBAGFORSTEP7.
B) Attach theWATERBOTTLEHOLDERto the ARMRESTusing 2 BOLTS(H)and 2 ARCWASHERS(I).
BOLT(1t) /_-:::_ ARCWASHER(I)
30mm ")15.4mm
Qty:2SIDEVIEW Qty:2
i ii: i
P_R
4.0 AR Rev.l.7.indd 12-13 7/16/07 4:47:34 PM
m
m
SEATBACK
PLASTICPIECE
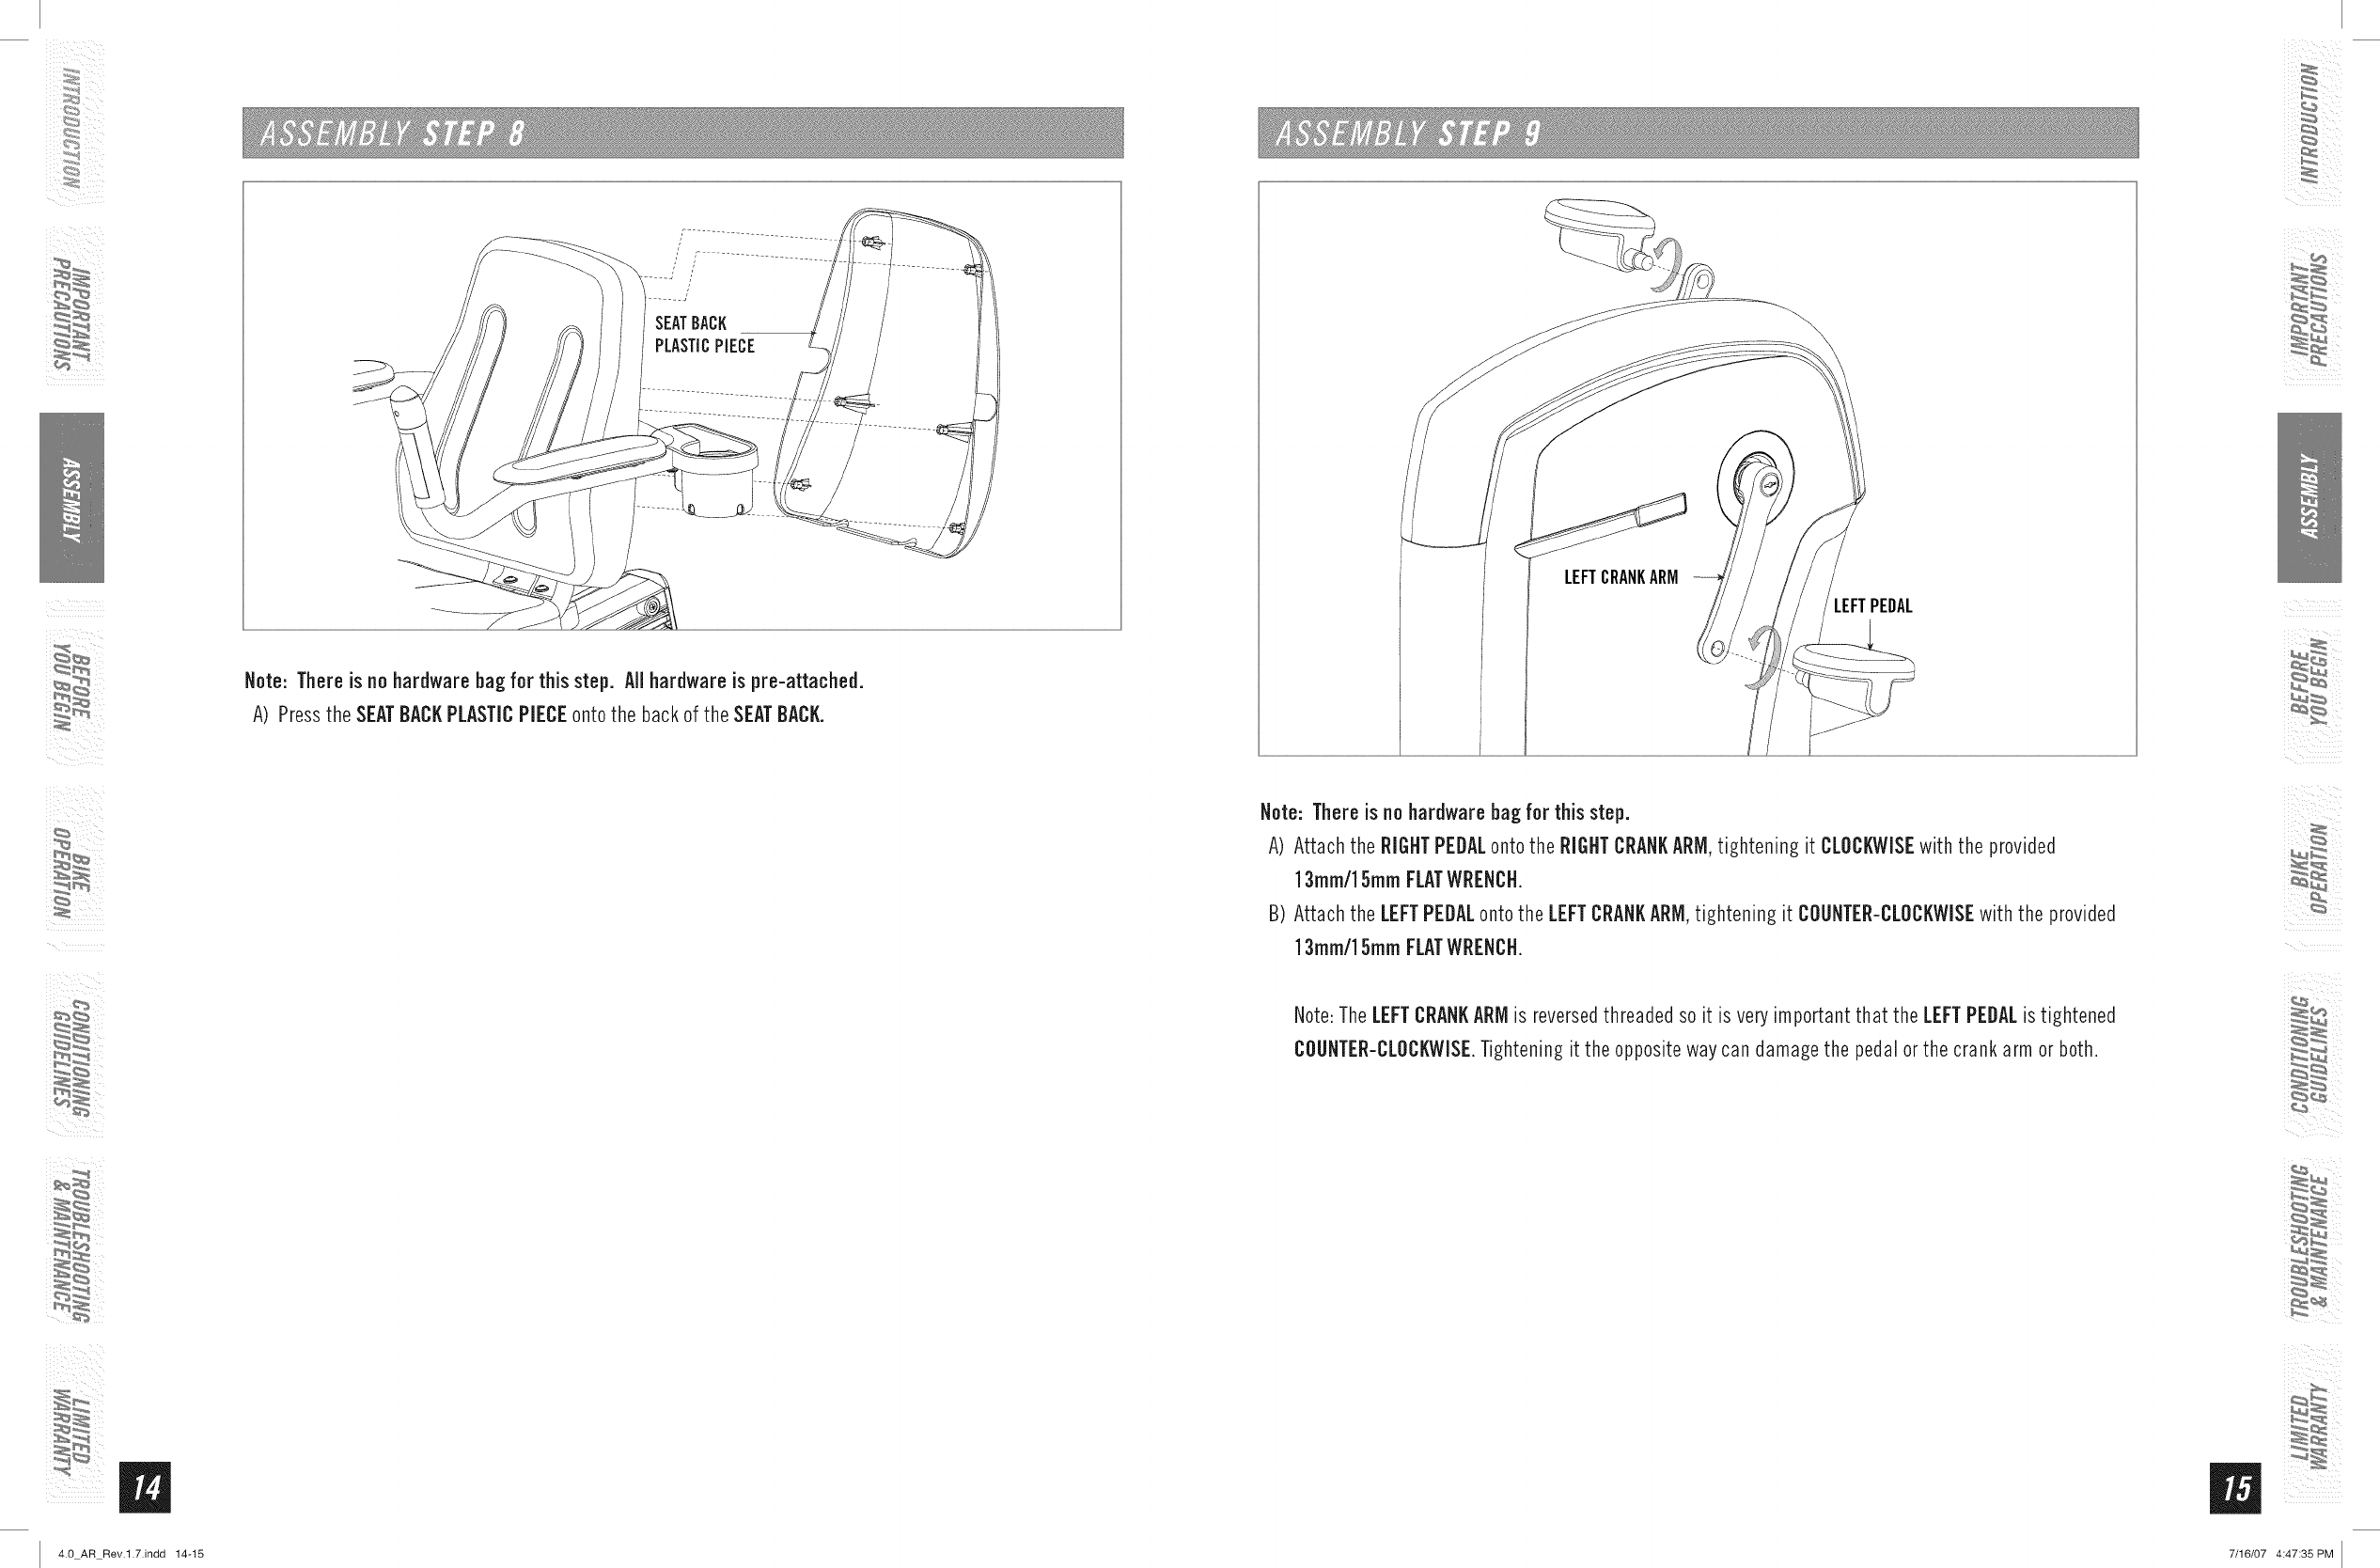
Note: Thereisno hardwarehagfor this step. Allhardwareis pre-attached.
A) Pressthe SEATBACKPLASTICPIECEontothe backof the SEATBACK.
LEFTPEDAL
Note: Thereisno hardwarebagfor this step.
A) Attach the RIGHTPEDALonto the RIGHTCRANKARM,tightening it CLOCKWISEwith the provided
13rnrn/15ramFLATWRENCH.
B) Attach the LEFTPEDALonto the LEFTCRANKARM,tightening it COUNTER-CLOCKWISEwith the provided
13mm/15ramFLATWRENCH.
Note:TheLEFTCRANKARMis reversedthreadedso it isveryimportantthat the LEFTPEDAListightened
COUNTER-CLOCKWISE.Tighteningit the oppositewaycan damagethe pedal orthe crank arm or both.
i iii_ i
_ii_ii_i_!!IiI_I_!I_II!
4.0 AR Rev.l.7.indd 14-15 7/16/07 4:47:35 PM

m
m
CONGRATULATIONS!onchoosingyourbike,You'vetakenanimpo_antstepindevelopingand
sustaining an exercise program! Your bike is a tremendously effective tool for achieving your personal
fitness goals, Regular use of your bike can improve the quality of your life in so many ways,
HEREAREYUSTA FEWOFTHEHEALTHBENEFITSOFEXERCISE:
•Weight Loss
•A Healthier Heart
•Improved Muscle Tone
•Increased Daily Energy Levels
The key to reaping these benefits is to develop an exercise habit. Yournew
bike will help you efiminate obstacles that prevent you from exercising.
Inclement weather and darkness won't interfere with your workout when you
use your bike in the comfort of your home. This guide provides you with basic
information for using and enjoying your new machine.
LOCATIONOFTHEBIKE
Place the bike on a level surface. Thereshould be 6 feet of clearance behind
the bike, 3 feet on each side and one foot in front for the power cord (See
diagram to the right), Do not place the bike in any area that will block any
vent or air openings. The bike should not be located in a garage, covered
patio, near water or outdoors.
3 feet
!foot
3 feet
6 feet
POWER
Yourbike is powered by a power supply, Thepower must be plugged into the power jack, which is located in
the front near the STABILIZERTUBE, TheON/OFFswitch is located on the back of the console,
MOVING
Yourbike has a pair of transport wheels built
into the FRONTSTABILIZERTUBE. Tomove, first
remove the power supply and firmly grasp the rear
stabilizer tube, carefully tilt and rod.
Ou_hikeSare weighingupto2001bs:US_careand
adflitional help if nOcessary when moving.
ADJUSTINGTHESEAT
Toadjust the seat, pull up on the handle and slide the seat to a position that puts you in a comfortable
pedaling range (one that keeps a slight bend in your knee while your legs are in the extended position).
Release handle to lock position in place.
dOTE:It is recommendedthat you do not sit on the seat whileadjusting its position.
i iii_ i
4.0 AR Rev.l.7.indd 16-17 7/16/07 4:47:36 PM

/
i ¸ ,,,,_
m
eSPEED
B.B.B.
•LEVEL
e CALORIES
B.B.B.
HEART RATE
•TiME e DISTANCE
• RPM •WATTS
START
_GLA_
Hear_ Raie Re_dy
STOP
HOLD TO RESET
CHANGE DISPLAY
Pr--°FILE" u_
PRESS TO SWITCH
CURRENTWORKOUT • • WEEKLY TOTAL
AVERAGE WORKOUT e •MONTHLYTOTAL
LAST WORKOUT •• LIFETIME TOTAL
PROGRAMS
LEVEL KEYS
,4) LED DISPLAYWINDOWS:Speed,
Time, Heart Rate, Distance,
Calories, Resistance Level,
RPMs and Watts,
B) LARGELEft WINDOW:Displays
prowam profiles,
C) STOP:Pressto pause/endyour
workout,Hold for 3 secondsto
reset the bike,
D) STARE.Press to begin
exercising, start your program,
or resume exercising after a
pause,
E) PROGRAMMINGBUTTON:Used
to select Prowam, Level,
Time, and other options,
Press to change display
feedback during workout,
During programming:
ARROWS:Scrolls through
programs and adjusts
program settings,
ENTER:Confirms setting and
advances to next step,
BACK: Returns to previous
step,
F) _DICK PROGRAMKEYS/ ONE-
TOUCHLEVELKEYS:Used to
select programs and reach
desired resistance level more
directly,
G) proFILE TM KEY..Used to scroll through proFILE display modes,
H) USER1 & 2 KEYS:Used to select which user's proFILE data to activate, access and update,
I) CLOCK/DATE KEY:Displays clock and date data in display windows,
SCAN VIEWINGWINDOWS
Tohave the display windows rotate continuously (Speed, Time,Heart Rate, Distance, Calories, Resistance
Level RPMs and Watts), hold the ENTERbutton for 4-5 seconds, Press ENTERagain to turn off scan feature,
1) Turn on Bike at the back of the console,
2) Press STARTbutton and begin exercish_g,
3) Program will automatically default to MANUAL(P1), the time will count up from 0:00, and the resistance will
default to level 1,
4) Theresistance level can be adjusted during the workout,
1) Select a program using the PROGRAMQUICKKEYand press ENTER,
*NOTE:If you press STARTinsteafl of ENTER,the program will begin and count up from 0:00 for the MANUAL
and CONSTANTWATTSprograms, and count down from 30:00 for aft other programs, The level defaults to 1,
2) Set TIME using the ARROWKEYSon the programming button and press ENTER,
3) Select a LEVELusing the ARROWKEYSon the programming button and press ENTER,
4) Press STARTto begin the program,
1) Select CONSTANTWATTSPROGRAMusing the PROGRAMQUICKKEYand press ENTER,
2) Set TIME using the ARROWKEYSon the programming button and press ENTER,
3) Select desired WATTSusing the ARROWKEYSon the programming button and press ENTER,
4) Press STARTto begin the program,
*NOTE:Toreset the memorypress and hold the ENTERbutton for 5 seconds,
/
i iii_ i
_ii_ii_i_!!IiI_I_!I_II!
4.0 AR Rev.l.7.indd 18-197/16/074:47:37 PM
/
m
W
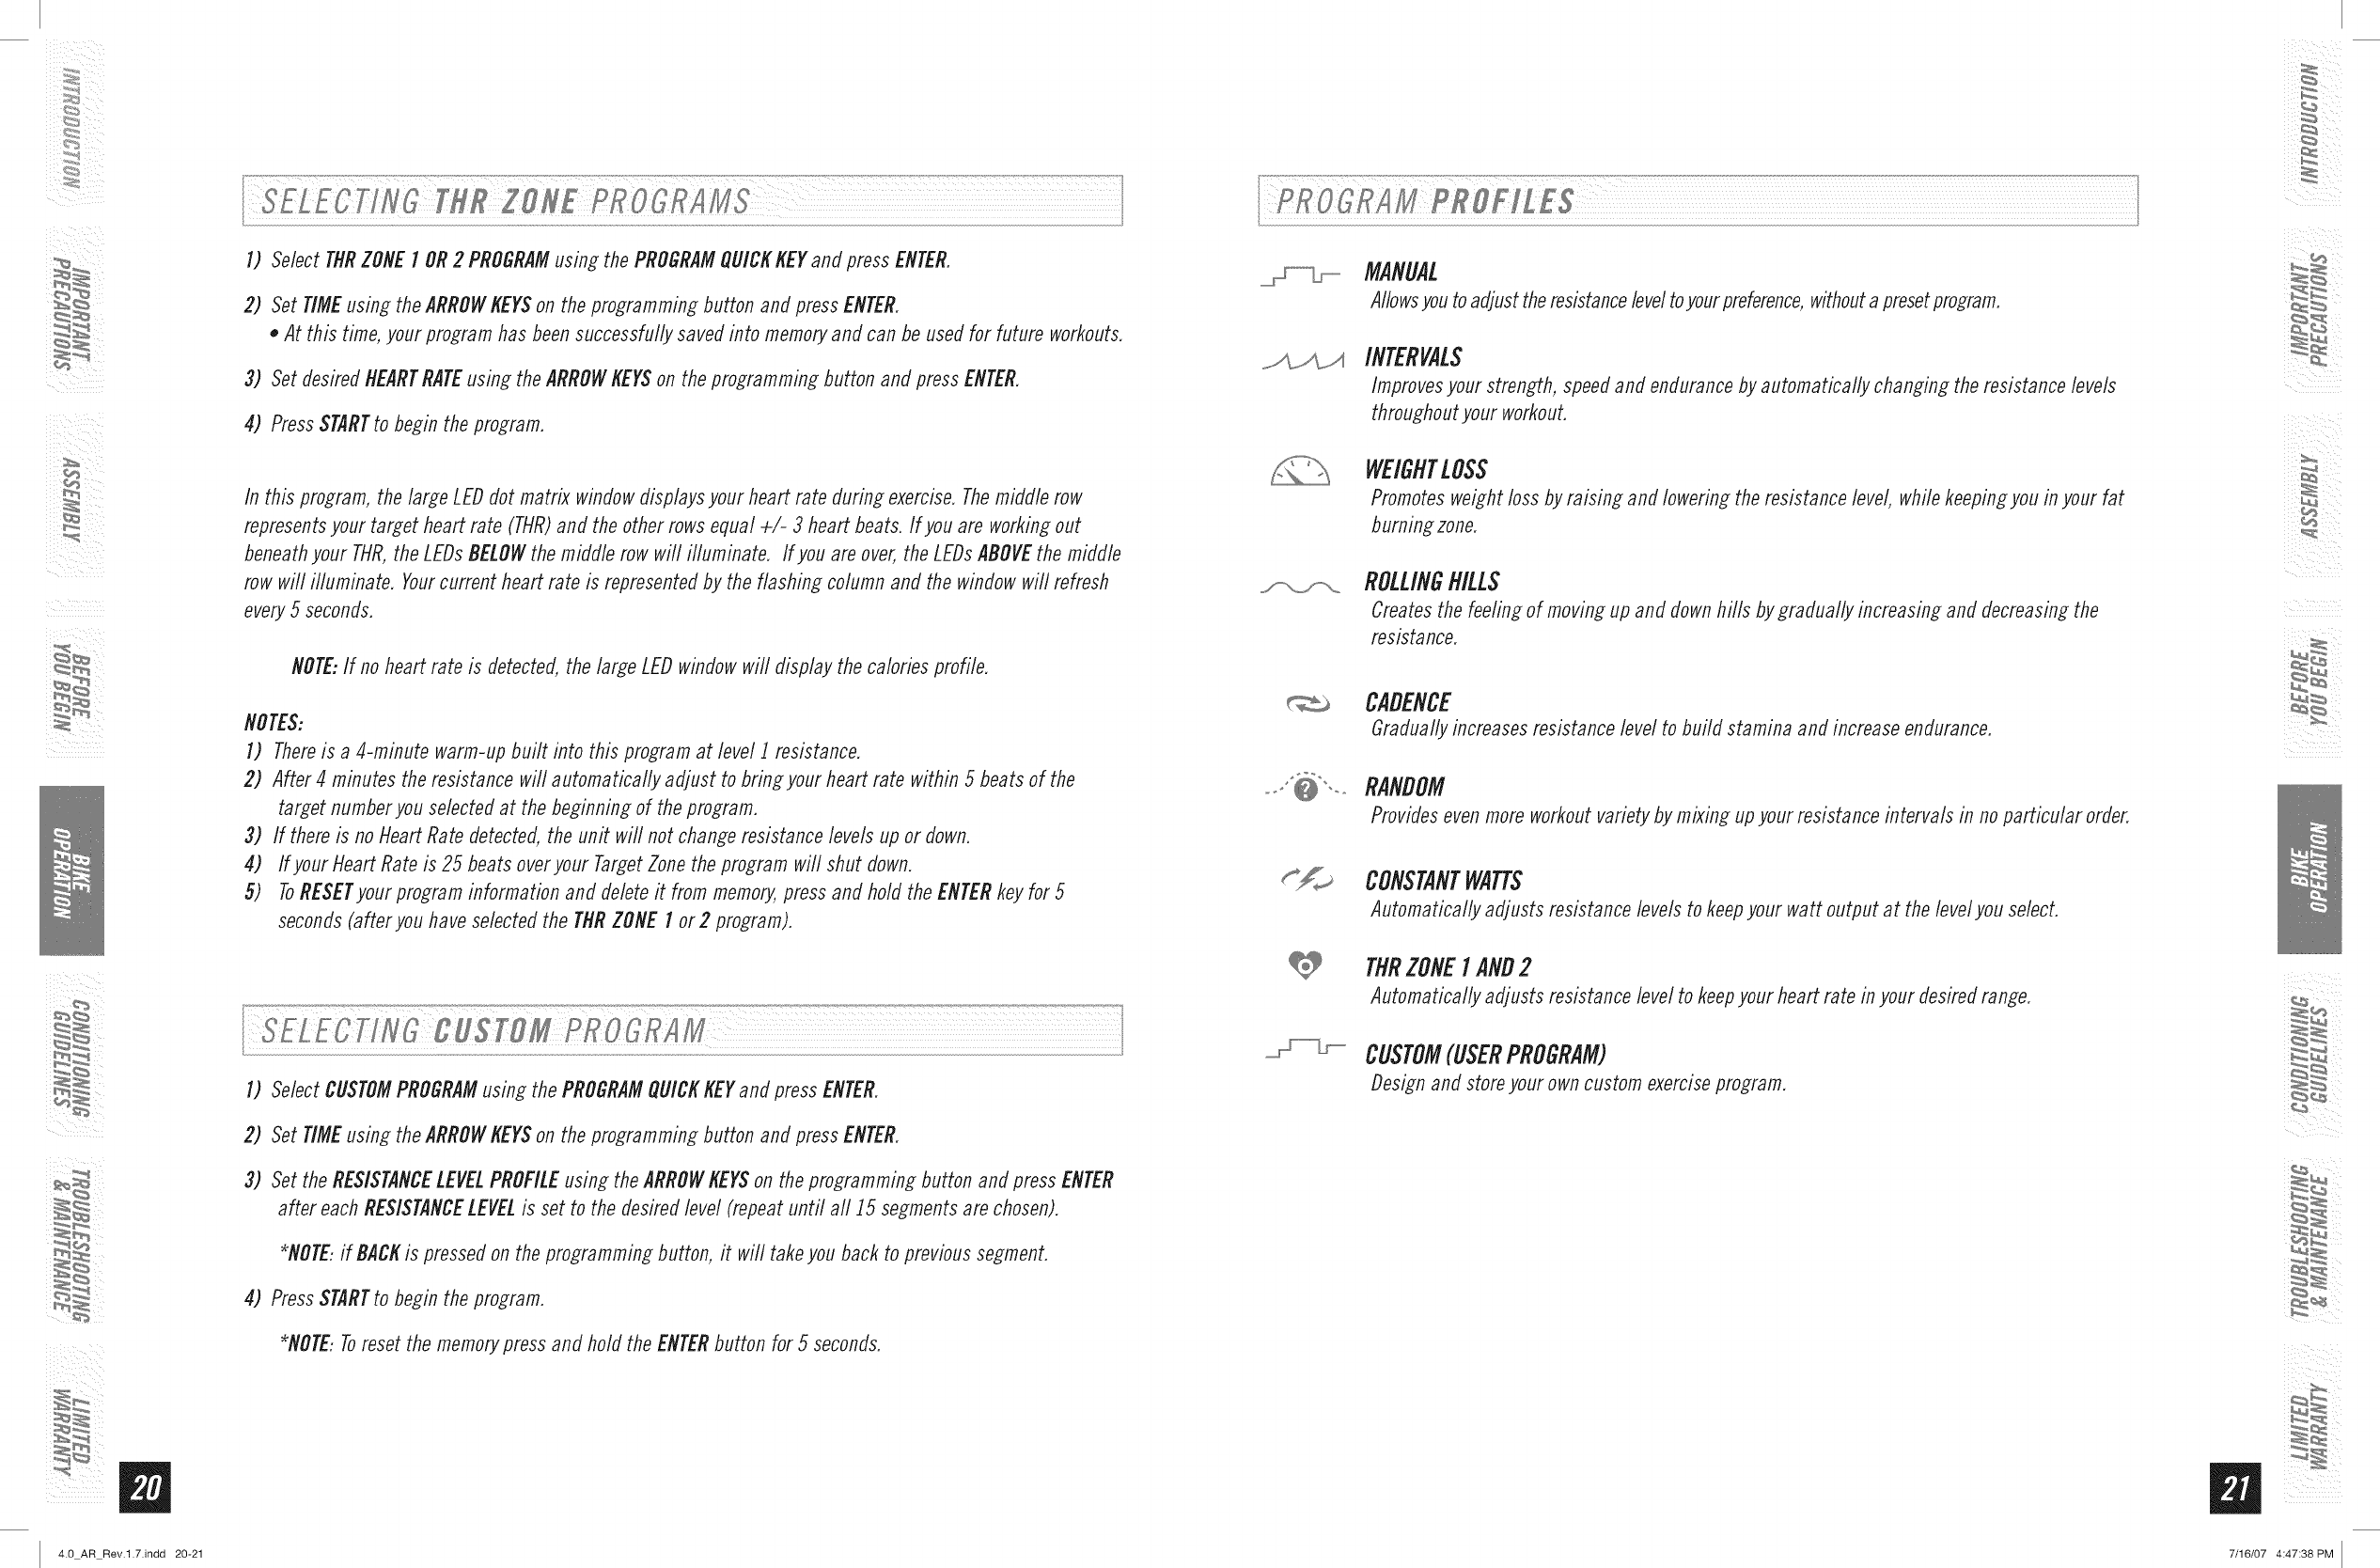
1) Select THRZONE 1 OR2 PROGRAMusing the PROGRAMQUICKt(EY anfl press ENTER.
2) Set TIME using the ARROWKEYSon the programming button and press ENTER.
•At this time, your program has been successfully saved into memory and can be used for future workouts.
3) Set desired HEARTRATEusing the ARROWKEYSon the programming button and press ENTER.
4) Press STARTto begin the program.
In this program, the large LED dot matrix window displays your heart rate during exercise. The middle row
represents your target heart rate (THR) and the other rows equal +/- 3 heart beats. If you are working out
beneath your THR,the LEDs BELOWthe middle row will illuminate. If you are over, the LEDsABOVEthe middle
row will illuminate. Yourcurrent heart rate is represented by the flashing column and the window will refresh
every 5 seconds.
NOTE:If no heart rate is detected, the large LED window will display the calories profile.
NOTES:
1) Thereis a 4-minute warm-up built into this program at level 1resistance.
2) After 4 minutes the resistance will automatically adjust to bring your heart rate within 5 beats of the
target number you selected at the beginning of the program.
3) If there is no Heart Rate detected, the unit will not change resistance levels up or down.
4) If your Heart Rate is 25 beats over your Target Zone the program will shut down.
5) ToRESETyour program information and delete it from memory, press and hold the ENTER key for 5
seconds (after you have selected the THR ZONE 1 or2 program).
1) Select CUSTOMPROGRAMusing the PROGRAMQUICK t(EY and press ENTER.
2) Set TIME using the ARROWKEYSon the programming button and press ENTER.
3) Set the RESISTANCELEVELPROFILEusing the ARROWKEYSon the programming button and press ENTER
after each RESISTANCELEVELis set to the desired level (repeat until aft J5 segments are chosen).
*NOTE:if BAC/( is pressed on the programming button, it will take you back to previous segment.
4) Press STARTto begin the program.
*NOTE:Toreset the memory press and hold the ENTERbutton for 5 seconds.
,,,,f"_\_
MANUAL
AIIowsyou to adjust the resistance level toyour preference, without a presetprogram.
INTERVALS
Improves your strength, speed and endurance by automatically changing the resistance levels
throughout your workout.
WEIGHTLOSS
Promotes weight loss by raising and lowering the resistance level, while keeping you in your fat
burning zone.
ROLLINGHILLS
Creates the feeling of moving up and down hills by gradually increasing and decreasing the
resistance.
CADENCE
Gradually increases resistance level to build stamina and increase endurance.
RANDOM
Provides even more workout variety by mixing up your resistance intervals in no particular order,
CONSTANTWATTS
Automatically adjusts resistance levels to keep your watt output at the level you select.
TNRZONE1AND2
Automatically adjusts resistance level to keep your heart rate in your desired range.
CUSTOM(USERPROGRAM)
Design and store your own custom exercise program.
/
i iii_ i
i
4.0 AR Rev.l.7.indd 20-21 7/16/07 4:47:38 PM
/
i ¸ ,,,,_
m
U
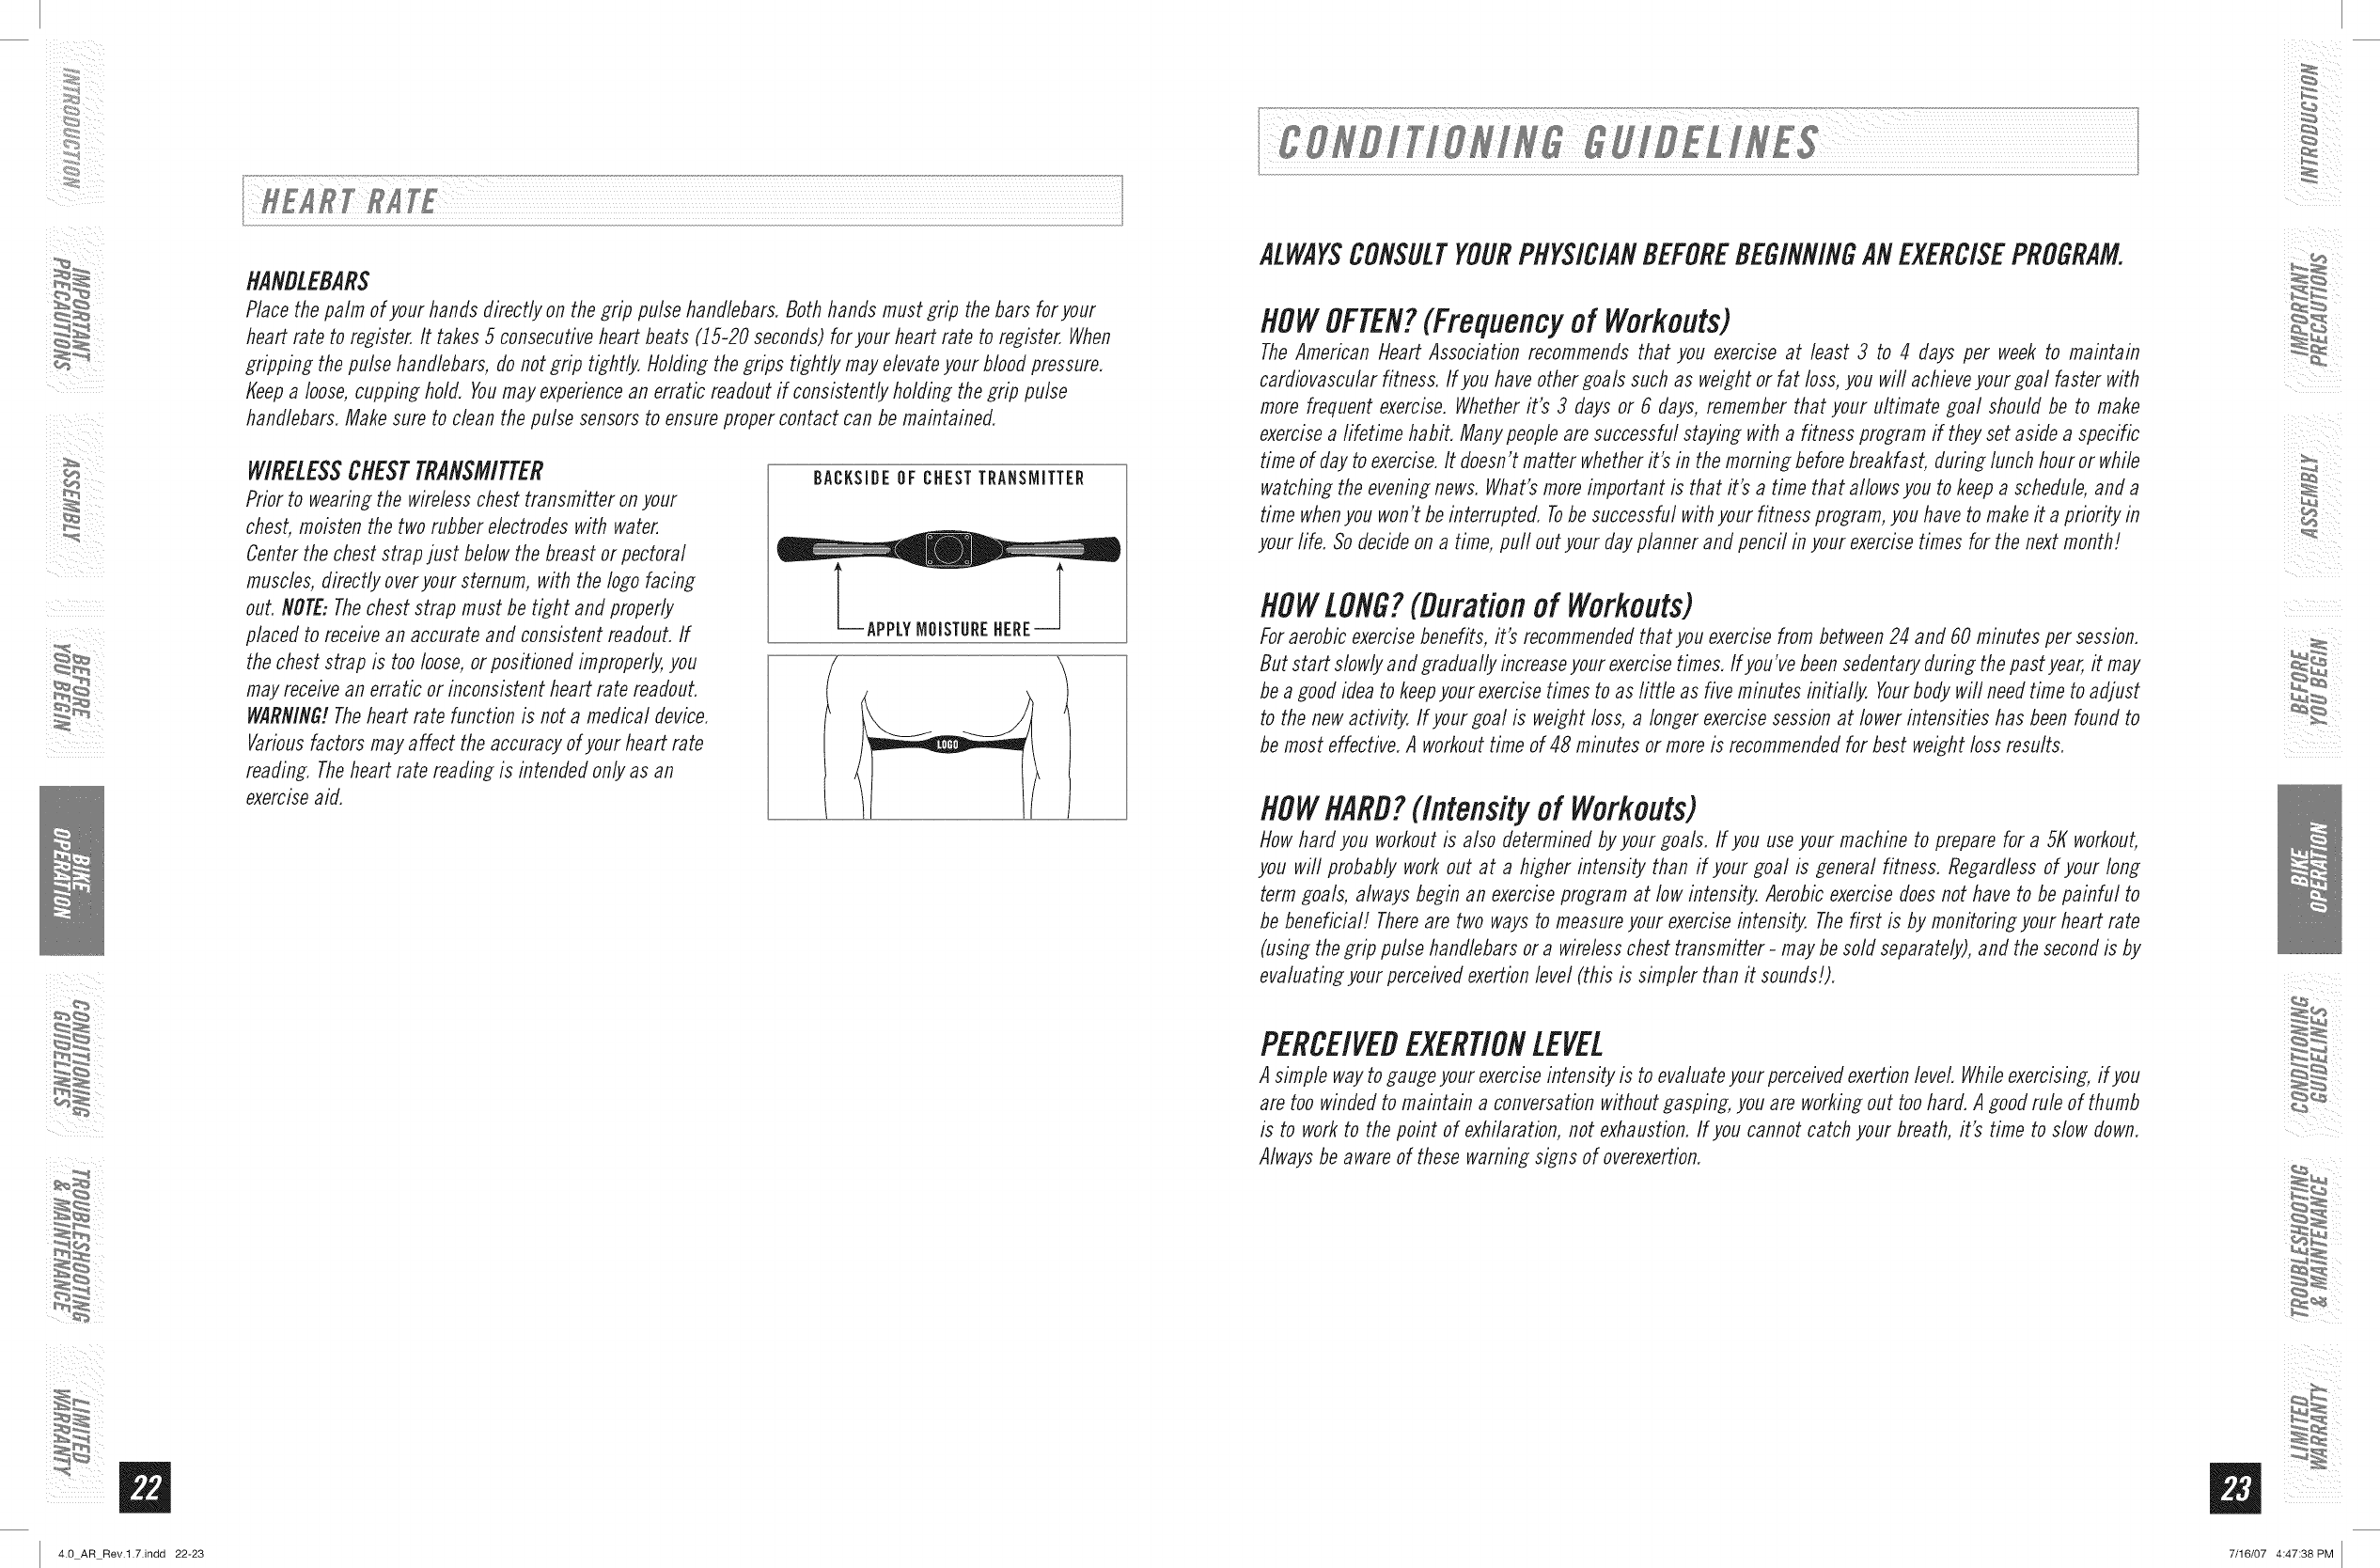
HANDLEBARS
Place the palm of your hands directly on the grip pulse handlebars, Both hands must grip the bars for your
heart rate to register, It takes 5 consecutive heart beats (15-20 seconds) for your heart rate to register, When
gripping the pulse handlebars, do not grip tightly, Holding the grips tightly may elevate your blood pressure,
Keep a loose, cupping hold, Youmay experience an erratic readout if consistently holding the grip pulse
handlebars, Make sure to clean the pulse sensors to ensure proper contact can be maintained,
WIRELESSCHESTTRANSMITTER
Prior to wearing the wireless chest transmitter on your
chest, moisten the two rubber electrodes with water,
Center the chest strap just below the breast or pectoral
muscles, directly over your sternum, with the logo facing
out, NOTE: The chest strap must be tight and properly
placed to receive an accurate and consistent readout, If
the chest strap is too loose, or positioned improperly, you
may receive an erratic or inconsistent heart rate readout,
WARNING!The heart rate function is not a medical device,
Various factors may affect the accuracy of your heart rate
reading, The heart rate reading is intended only as an
exercise aid,
LApPLY MOISTUREHEREil
ALWAYSCONSULTYOURPHYSICIANBEFOREBEGINNINGANEXERCISEPROGRAM.
NOWOFTEN?(Frequencyof Workouts)
The American Heart Association recommends that you exercise at least 3 to 4 days per week to maintain
cardiovascular fitness, If you have other goals such as weight or fat loss, you will achieve your goal faster with
more frequent exercise, Whether it's 3 flays or 6 flays, remember that your ultimate goal should be to make
exercise a fifetime habit, Many people are successful staying with a fitness program if they set aside a specific
time of day to exercise, It doesn't matter whether it's in the morning before breakfast, during lunch hour or while
watching the evening news, What's more important is that it's a time that allows you to keep a schedule, and a
time when you won't be interrupted, Tobe successful with your fitness program, you have to make it a priority in
your fife, So decide on a time, pull out your day planner and pencil in your exercise times for the next month!
NOWLONG?(Durationof Workouts)
For aerobic exercise benefits, it's recommended that you exercise from between 24 and 60 minutes per session,
But start slowly and gradually increase your exercise times, If you've been sedentary during the past year, it may
be a good idea to keep your exercise times to as tittle as five minutes initially, Yourbody will need time to adjust
to the new activity, If your goal is weight loss, a longer exercise session at lower intensities has been found to
be most effective, A workout time of 48 minutes or more is recommended for best weight loss results,
NOWNARD?(Intensityof Workouts)
How hard you workout is also determined by your goals, If you use your machine to prepare for a 5t( workout,
you will probably work out at a higher intensity than if your goal is general fitness, Regardless of your long
term goals, always begin an exercise program at low intensity, Aerobic exercise floes not have to be painful to
be beneficial! There are two ways to measure your exercise intensity, The first is by monitoring your heart rate
(using the grip pulse handlebars or a wireless chest transmitter - may be sold separately), and the second is by
evaluating your perceived exertion level (this is simpler than it sounds!),
PERCEIVEDEXERTIONLEVEL
A simple way to gauge your exercise intensity is to evaluate your perceived exertion level, While exercising, ifyou
are too winded to maintain a conversation without gasping, you are working out too hard, A good rule of thumb
is to work to the point of exhilaration, not exhaustion, If you cannot catch your breath, it's time to slow down,
Always be aware of these warning signs of overexertion,
/
i iii_ i
4.0 AR Rev.l.7.indd 22-23 7/16/07 4:47:38 PM
i ¸ ,,,,_
m
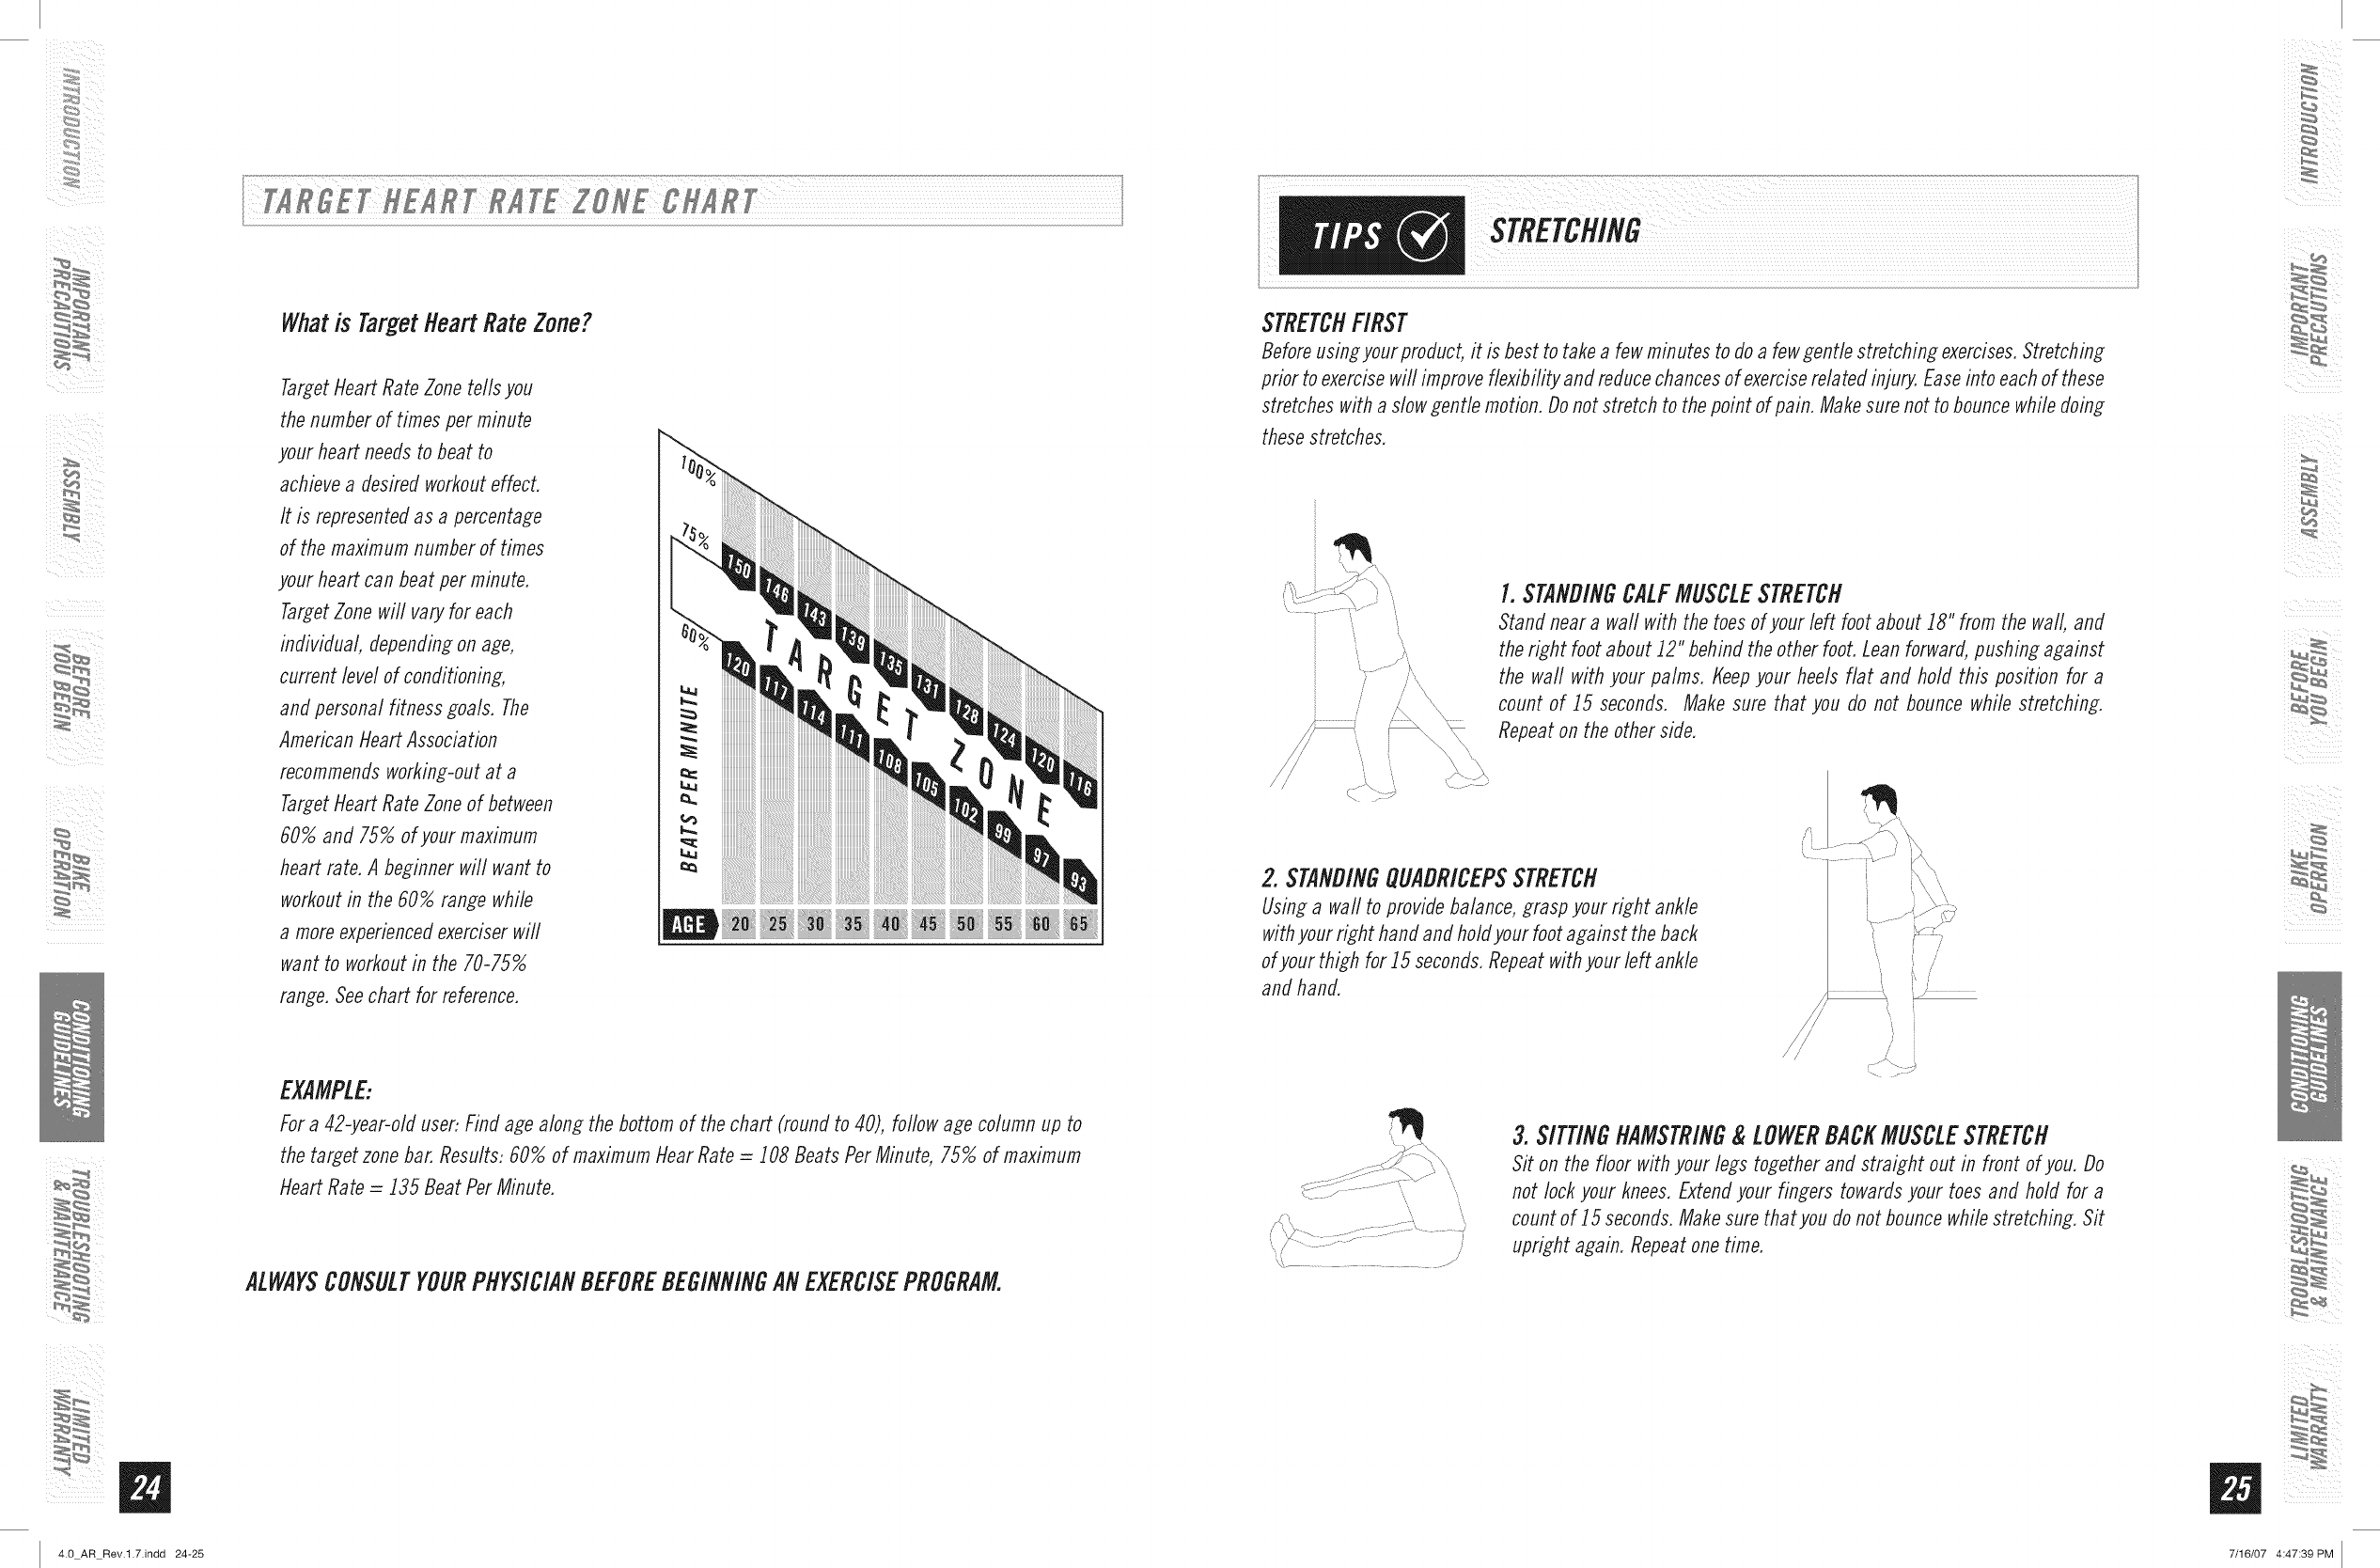
Whatis TarEetNeartRateZone?
TargetHeart Rate Zone tells you
the number of times per minute
your heart needs to beat to
achieve a desired workout effect.
It is represented as a percentage
of the maximum number of times
your heart can beat per minute.
TargetZone will vary for each
individual, depending on age,
current level of conditioning,
and personal fitness goals. The
American Heart Association
recommends working-out at a
TargetHeart Rate Zone of between
60% and 75% of your maximum
heart rate. A beginner will want to
workout in the 60% range while
a more experienced exerciser will
want to workout in the 70-75%
range. See chart for reference.
EXAMPLE:
For a 42-year-old user: Find age along the bottom of the chart (round to 40), follow age column up to
the target zone bar. Results: 60% of maximum Hear Rate =108 Beats Per Minute, 75% of maximum
Heart Rate =135 Beat Per Minute.
ALWAYSCONSULTYOURPHYSICIANBEFOREBEGINNINGAN EXERCISEPROGRAM.
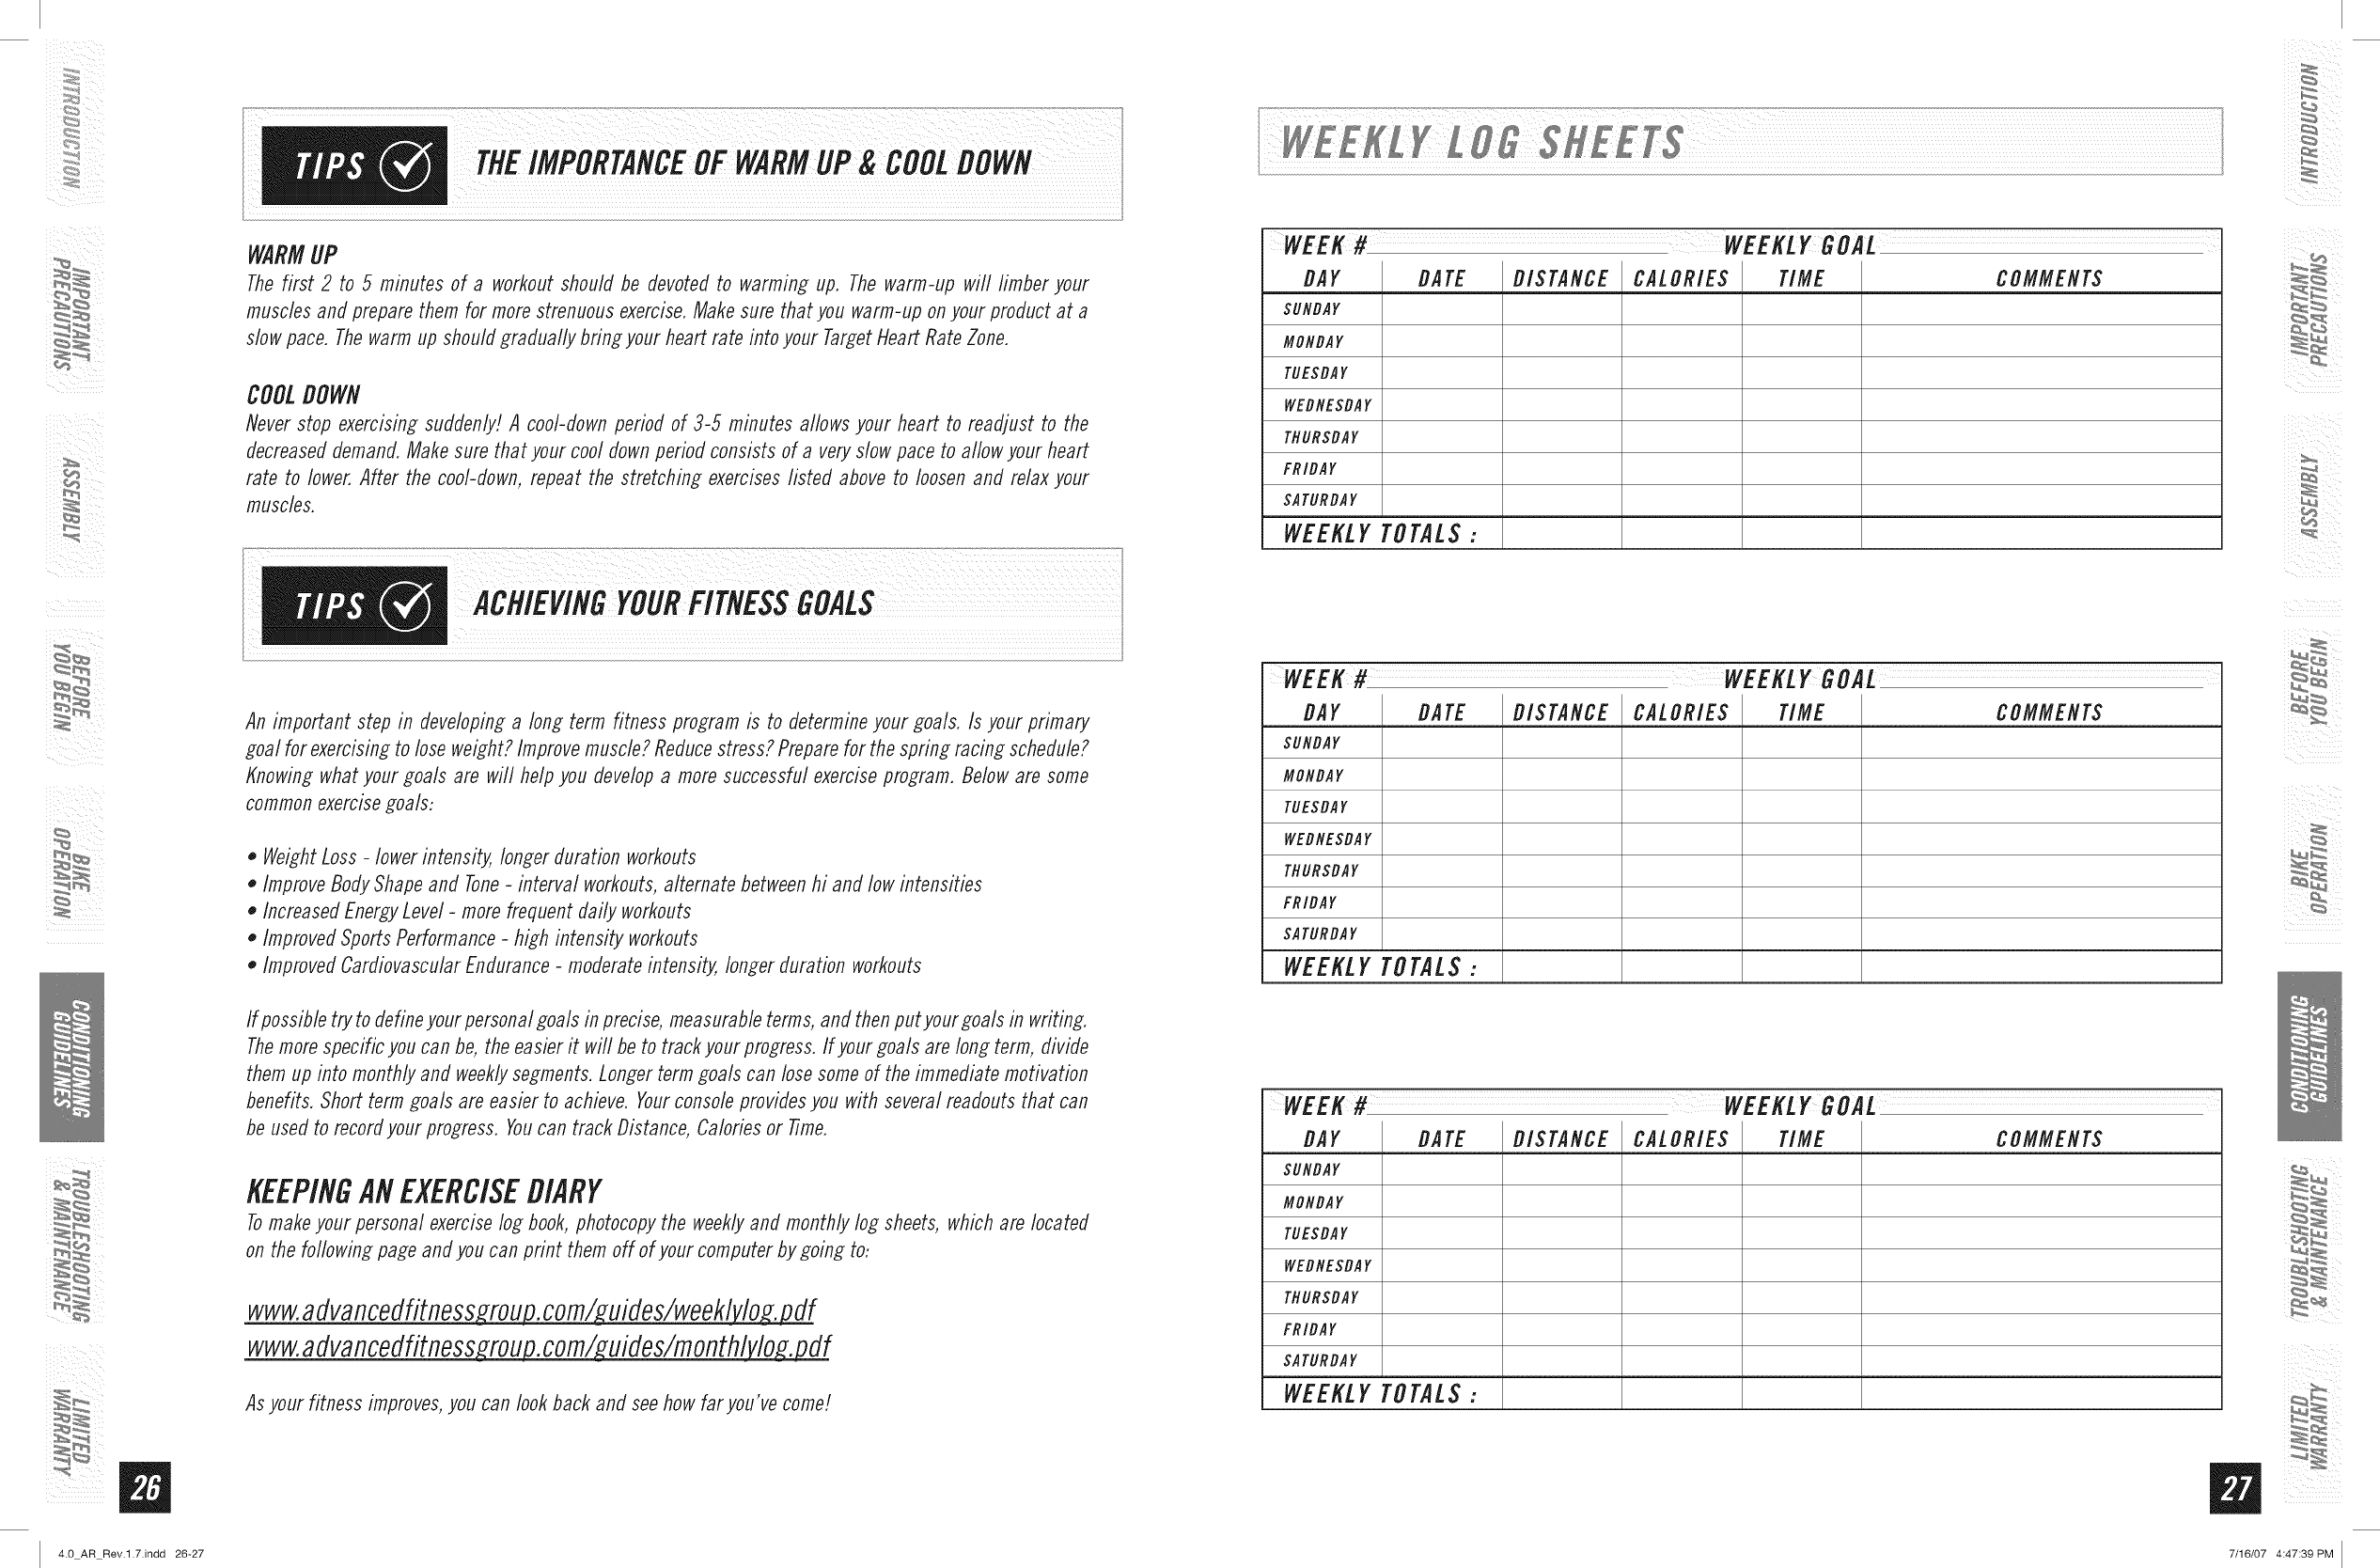
STRETCHFIRST
Before using your product, it is best to take a few minutes to do a few gentle stretching exercises. Stretching
prior to exercise will improve flexibility and reduce chances of exercise related injury. Ease into each of these
stretches with a slow gentle motion. Do not stretch to the point of pain. Make sure not to bounce while doing
these stretches.
/\,
LSTANDINGCALFMUSCLESTRETCH
Stand near a wall with the toes of your left foot about 18" from the wall, and
the right foot about 12" behind the other foot. Lean forward, pushing against
the waft with your palms. Keep your heels flat and hold this position for a
count of 15 seconds. Make sure that you do not bounce while stretching.
Repeat on the other side.
2. STANDINGQUADRICEPSSTRETCH
Using a wall to provide balance, grasp your right ankle
with your right hand and hold your foot against the back
of your thigh for 15 seconds. Repeat with your left ankle
and hand.
\
'\\\
3. SITTINGHAMSTRING&LOWERBACKMUSCLESTRETCH
Sit on the floor with your legs together and straight out in front of you. Do
not lock your knees. Extend your fingers towards your toes and hold for a
count of 15 seconds. Make sure that you do not bounce while stretching. Sit
upright again. Repeat one time.
i iii_ i
4.0 AR Rev.l.7.indd 24-25 7/16/07 4:47:39 PM
m
WARMUP
The first 2 to 5 minutes of a workout should be devoted to warmin_ up. The warm-up will limber your
muscles and prepare them for more strenuous exercise. Make sure that you warm-up on your product at a
slow pace. The warm up should _radually brin_ your heart rate into your Target Heart Rate Zone.
COOLDOWN
Never stop exercisin_ suddenly! A cool-down period of 3-5 minutes allows your heart to readjust to the
decreased demand. Make sure that your cool down period consists of a very slow pace to allow your heart
rate to lower, After the cool-down, repeat the stretchin_ exercises listed above to loosen and relax your
muscles.
An important step in developing a long term fitness program is to determine your goals. Is your primary
goal for exercising to lose weight? Improve muscle? Reduce stress? Prepare for the spring racing schedule?
Knowing what your goals are will help you develop a more successful exercise program. Below are some
common exercise goals:
Weight Loss -lower intensity, longer duration workouts
Improve Body Shape and Tone-interval workouts, alternate between hi and low intensities
Increased Energy Level -more frequent daily workouts
Improved Sports Performance -high intensity workouts
Improved Cardiovascular Endurance -moderate intensity, longer duration workouts
If possible try to define your personal goals in precise, measurable terms, and then put your goals in writing.
Themore specific you can be, the easier it will be to track your progress. If your goals are long term, divide
them up into monthly and weekly segments. Longer term goals can lose some of the immediate motivation
benefits. Short term goals are easier to achieve. Yourconsole provides you with several readouts that can
be used to record your progress. Youcan track Distance, Calories or Time.
KEEPINGlie EXERCISEDIARY
Tomake your personal exercise Io_ book, photocopy the weekly and monthly Io_ sheets, which are located
on the following page and you can print them off of your computer by going to:
www.advancedfitness_uides/weekl lo__ df
www.advancedfitness_uides/rnonthly_f
Asyour fitness improves,you can look back and seehowfar you'vecome!
WEEK# WEEKIF #_!
SUNDAY
MONDAY
TUESDAY
WEDNESDAY
THURSDAY
FRIDAY
SATURBAY
WEEKLYTOTALS:
WEEK # WEEKLYGOAL
BAY BATE BISTAflCE CALORIES TIME COMMENTS
SUNDAY
MONDAY
TUESDAY
WEDNESDAY
THURSDAY
FRIDAY
SATURDAY
WEEKLYTOTALS:
WEEK # WEEKLYGOAL
BAY BATE BISTAflCE CALORIES TIME COMMENTS
SUNDAY
MONDAY
TUESDAY
WEDNESDAY
THURSDAY
FRIDAY
SATURDAY
WEEKLYTOTALS:
_ii_ii_i_!!IiI_I_!I_II!
4.0 AR Rev.l.7.indd 26-27 7/16/07 4:47:39 PM
WEEK# WEEKIY P,flAI
SUNDAY
MONDAY
TUESDAY
WEDNESDAY
TNURSDAY
FRIDAY
SATURDAY
WEEKLY TOTALS:
WEEK# WEEKLY GOAL
DAY DATE DISTANCE CALORIES TIME COMMENTS
SUNDAY
MONDAY
TUESDAY
WEDNESDAY
THURSDAY
FRIDAY
SATURDAY
WEEKLY TOTALS:
i il "_ i
,_i¸¸o
m
W
WEEK# WEEKLY GOAL
DAY DATE DISTANCE CALORIES TIME COMMENTS
SUNDAY
MONDAY
TUESDAY
WEDNESDAY
THURSDAY
FRIDAY
SATURDAY
WEEKLY TOTALS:
MONTH MONTHLYGOAL
MONTHLYTOTALS:
MONTH MONTHLYGOAL
WEEK#DISTANCE CALORIES TIME
MONTHLYTOTALS:
MONTH MONTHLYGOAL
WEEK#DISTANCE CALORIES TIME
MONTHLYTOTALS:
4.0 AR Rev.l.7.indd 28-29 7/16/07 4:47:40 PM
/
i ¸ ,,,,_
m
W
YourAFGbike is designedto bereliable, However,if you doexperienceproblemswithyour bike, pleasereference
the troubleshootingguifle listed below,
PROBLEM:Theconsoledoesnotturnon.
S_LUTI_N: Verifythe foflowing:
Theoutlet the machine is plugged into is functional Doublecheck that the breaker has not tripped.
Thecorrect adapter is being used. Onlyuse the adapter provided or authorizedby AFG.
Theadapter is not pinched or damaged and is properlyplugged into the outlet ANDthe machine.
Thepower switch is turned to the ONposition (maynot apply to all models).
Turnoff the machineand unplug powercord. Removethe consoleand check that all connectionsto the console
are secureand not damaged or pinched.
NOTE:If your consoleusesbatteries, theymay needto be replaced.
PROBLEM: Theconsolelights up but the Time/RPM'sdo not count.
SOLUTION: Verifythe foflowing:
oTurnoff machine and unplug power cord. Removethe consoleand check that aft connections to the consoleare
secureand not damaged or pinched.
,, If doing the above does not fix the problem, the speed sensor and/or magnet may have become dislodged or
damaged.
PROBLEM: Theresistance levelsseem to be incorrect, seemingtoo hard or too easy.
SOLUTIOH; Verifythe foflowing:
oThecorrect adapter is being used. Onlyuse the adapter provided or authorizedbyAFG.
oReset the consoleand allow the resistance toreset to the default position. Restartand retry the resistance levels.
PROBLEM:Thebike makes a squeaking or chirping noise.
S_LUTZ_N: Verifythe following:
eThebike is ona level surface.
,, Loosenall bolts attached during the assemblyprecess,grease the threads, and tighten again.
H£1RT RIT£ TRQIILESH88 MRQ
PROBLEM:Thereis no heart rate reading.
SOLUTZON: Remove the console and verify that the heart rate cables are attached properly, making
sure that the cables are securely inserted into the console.
YOUMAYEXPERIENCEAN ERRATICREADOUTUNDERTHEFOLLOWINGCOi_DfflONS:
oGripping the heart rate handlebars too tight. Tryto maintain moderate pressure while holding onto the
heart rate handlebars.
oConstant movement and vibration flue to constantly holding the heart rate grips while exercising.
oWhenyou are breathing heavily fluting a workout.
oWhenyour hands are constricted by wearing a ring.
oWhenyour hands are dry or cold. Trymoistening your palms or rubbing them together to warm.
oAnyone with heavy arrhythmia.
oAnyone with arteriosclerosis or peripheral circulation disorder.
oAnyone whose skin on the measuring palms is especially thick.
NOTE: Outside interference sources such as computers, motors and fluorescent lights may cause the heart
rate reading to be erratic. Check your exercise environment for sources of interference such as high _ower lines,
large motors, etc.
If the abovetroubleshootingsectionfloesnot remedytheproblem, discontinueuse anfl turn the poweroff.
CALLCUSTOMERTECHSUPPORTATTttENUMBERONTttEBACKPANEL
WHENYOUARENEARTHEEQUIPMENT
Thefoflowing information may be asked of you when you call. Please have these items readily available:
•Model Name
,, Serial Number
oDate of Purchase (receipt or credit card statement)
In order for Customer Tech Support to service your bike they may need to ask fletailefl questions about the
symptoms that are occurring. Some troubleshooting questions that may be asked are:
oHow long has this problem been occurring?
oDoes this problem occur with every use? With every user?
•If you are hearing a noise, floes it come from the front, back or inside? What kind of noise is it (thumping,
grinding, squeaking, chirping etc.)?
oIf you are having a resistance problem what is occurring? Is the resistance always too hard or too easy?
Does the resistance respond when pushing the buttons on the console? Does the resistance constantly cycle
through the levels during the workout?
•Has the machine been maintained per the maintenance schedule?
oDoes the problem occur when using the handlebars? Without using the handlebars?
Answering these and other questions will give the technicians the ability to send proper replacement parts and
the service necessary to get you and your AFGbike running again! i iii_ i
_iiii_i_!!IiI_i_!iii!
4.0 AR Rev.l.7.indd 30-31 7/16/07 4:47:40 PM
/
m
U
ARETHESOUNDSMYBIKEMAKESNORMAL?
Our bikes are some of the quietest available because they use belt drives and friction free magnetic
resistance. Weuse the highest grade bearings and belts to minimize noise, However,because the resistance
system itself is so quiet, you will occasionally hear other slight mechanical noises. Unlike older, louder
technologies, there are no fans, friction belts, or alternator noises to mask these sounds on our bikes, These
mechanical noises, which may or may not be intermittent, are normal and are caused by the transfer of
significant amounts of energy to a rapidly spinning flywheel Aft bearings, belts and other rotating parts will
generate some noise which will transmit through the casing and frame, It is also normal for these sounds
to change slightly during a workout and over time because of thermal expansion of the parts,
WHYIS THEBIKEI HADDELIVEREDLOUDERTHANTHEONEATTHESTORE?
All fitness products seem quieter in a large store showroom because there is generally more background
noise than in your home, Also, there will be less reverberation on a carpeted concrete floor than on a wood
overlay floor, Sometimes a heavy rubber mat will help reduce reverberation through the floor, If a fitness
product is placed close to a wall, there will be more reflected noise,
NOWLONGWILLTHEDRIVEBELTLAST?
The computer modeling we have done indicated virtually thousands of maintenance free hours, Belts are
now commonly used in far more demanding applications such as motorcycle drives,
CANI MOVETHEBIKEEASILYONCEIT ISASSEMBLED?
Yourbike has a pair of transport wheels built into the front, It is easy to moveyour bike by rolling it on the
front transport wheels, It is important that you place your bike in a comfortable and inviting room, Your
bike is designed to use minimal floor space, Many people will place their bikes facing the TV or a picture
window, If at aft possible, avoid putting your bike in a unfinished basement, Tomake exercise a desirable
daily activity for you, the bike should be in a comfortable setting,
CANI PEDALBACKWARDSONMYBIKE?
Youcan pedal backwards on your bike, however, there will be no resistance,
ii!_:
WHATKINDOFROUTINEMAINTENANCEISREQUIRED?
Weuse sealed bearings throughout our bikes so lubrication is not needed, Themost important maintenance
step is to simply wipe your perspiration off the bike after each use,
NOWDOI CLEANMYBIKE?
Clean with soap and water cleaners only, Never use solvents on plastic parts,
Cleanliness of your bike and its operating environrnent will keep maintenance problems and service
calls to a minimum, For this reason, AFG recommends that the following preventive maintenance
schedule be followed,
AFTEREACHUSE(DAILY)
Turnoff the bike by unplugging the power cord from the wall outlet
•Wipe down the bike with a damp cloth, Never use solvents, as they can cause damage to
the bike.
•Inspect the power cord, If the power cord is damaged, contactAFG,
•Make sure the power cord is not underneath the bike or in any other area where it can become
pinched or cut.
WEEKLY
Clean underneath the bike, following these steps:
•Turn off the bike
•Move the bike to a remote location,
•Wipe or vacuum any dust particles or other objects that may have accumulated underneath
the bike,
•Return the bike to its previous position,
EVERYMONTH
•Inspect all assembly bolts and pedals on the machine for proper tightness,
•Clean any debris off of the seat guide rail,
i iii_ i
4.0 AR Rev.l.7.indd 32-33 7/16/07 4:47:41 PM

FRAME oLIFETIME
AFG warrants the frame against defects
in workmanship and materials for the
fifefime of the original owner so long as
the device remains in the possession of
the original owner. (The frame is defined
as the welded metal base of the unit and
does not include any parts that can be
removed.)
BRAKEoLIFETIME
WeightCapacity=325 Ibs
AFGwarrants the brake against defects
in workmanshipand materials for the
fifefime of the original owner so long as
the deviceremains in the possessionof
the original owner.
ELECTRONICS&PARTS_3 YEARS*
AFGwarrants the electronic components
and aft original parts for a period of 3
years from the dateof original purchase,
so long as the deviceremains in the
possessionof the original owner.
*By registering this product within 30
daysof purchase, AFGwill automatically
extendthe electronicsand parts warranty
of this product from 3 to 5years.
LABORo 1 YEAR
AFGshall coverthe labor cost for the
repair of the devicefor a period of
oneyear from the date of the original
purchase, so long as the deviceremains
in the possessionof the original owner.
EXCLUSIONSANDLIMITATIONS
Whois covered:
* Theoriginalownerandis nottransferable.
WhatIS covered:
• Repair or replacement of a defective motor, electronic component,or
defective part and is the sole remedyof the warranty.
WhatIS NOTcovered:
•Normal wear and tear, improper assembly or maintenance, or installation
of parts or accessoriesnot originally intended or compatible with the
equipment as sold.
•Damage or failure due to accident, abuse, corrosion,discoloration of paint
or plasfic, neglect, theft, vandafism, fire, flood, wind, lightning,freezing,
or other natural disasters of any kind, power reduction, fluctuation or
failure from whatevercause, unusual atmospheric conditions, collision,
introduction of foreign objects into the coveredunit, or modifications that
are unauthorized or not recommendedby AFG.
• Incidental or consequential damages.AFGis not responsible or liable for
indirect, special or consequential damages,economicloss, loss of property.
or profits, loss of enjoymentor use,or other consequential damages
of whatsoevernature in connection with the purchase, use, repair or
maintenance of the product.
•Equipment used for commercial purposes or any use other than a single
family or Household,unless endorsedbyAFGfor coverage.
•Equipment owner or operated outside the USand Canada.
• Delivery,assembly,installation, setup for original or replacement units or
labor or other costs associated with removal or replacementof the covered
unit.
• Anyattempt to repair this equipment creates a risk of injury. AFGis not
responsible or fiable for anydamage, loss or liability arising from any
personal injury incurred during the courseof, or as a result of any repair
or attempted repair of your fitness equipment by other than an authorized
service technician. All repairs attempted byyou on your fitness equipment
are undertakenAT YOUROWNRISKand AFGshall have no fiability for any
injury to the personor propertyarising from such repairs.
SERVICE/RETURNS
•In-homeserviceis availablewithinJ50 milesof the nearestauthorized
repaircenter(MileagebeyondJ50milesfroman authorizedservicecenteris
the responsibilityof the consumer).
• All returnsmust bepre-authorizedbyAFG.
• AFG'sobligationunderthis warrantyis limited to replacingor repairing,at
AFG'soption,the sameor comparablemodelat oneof its authorizedservice
centers.
• An AFGauthorizedservicecentermust receiveall equipmentfor whicha
warrantyclaim is made.Thisequipmentmust be receivedwith aft freight
and other transportationchargesprepaid,accompaniedby sufficient proof
of purchase.
• Replacementunits, parts and electroniccomponentsreconditionedto As-
newConditionbyAFGorits vendorsmaysometimesbesuppfiedas warranty
replacementandconstitutefulfillmentof warrantyterms.
•Thiswarrantygivesyou specificlegalrights, andyour rightsmayvaryfrom
state to state.
4.0 AR Rev.l.7.indd 34-35

For fast and friendly service, please contact one of our
trained customer technicians via phone, email or our website.
Customer Tech Support l-lotline: I-SZ7-GOAFG55
Emaih comments@advancedfitnessgroup.com
Website: www.advancedfitnessRroup,com
Everyemployeeat AFGtakespride in providingyou with a high quafity product,
Wewant to knowif you havea problemand wewant to havean opportunity to correctit foryou,
NOTE:Please read the TROUBLESHOOTINGsection before contacting Customer TechSupport.
Toreceive additional product information, visit us at www.aflvanceflfitnessgroup.com
4.0 ARRev.1.7 I © 2007AFGProductsIDesigned&Engineeredin the U.S.A.IMadein China
4.0 AR Rev.l.7.indd 36 7/16/07 4:47:41 PM
