AIJI System AP-100 Fixed WLL Telephone (CDMA) User Manual
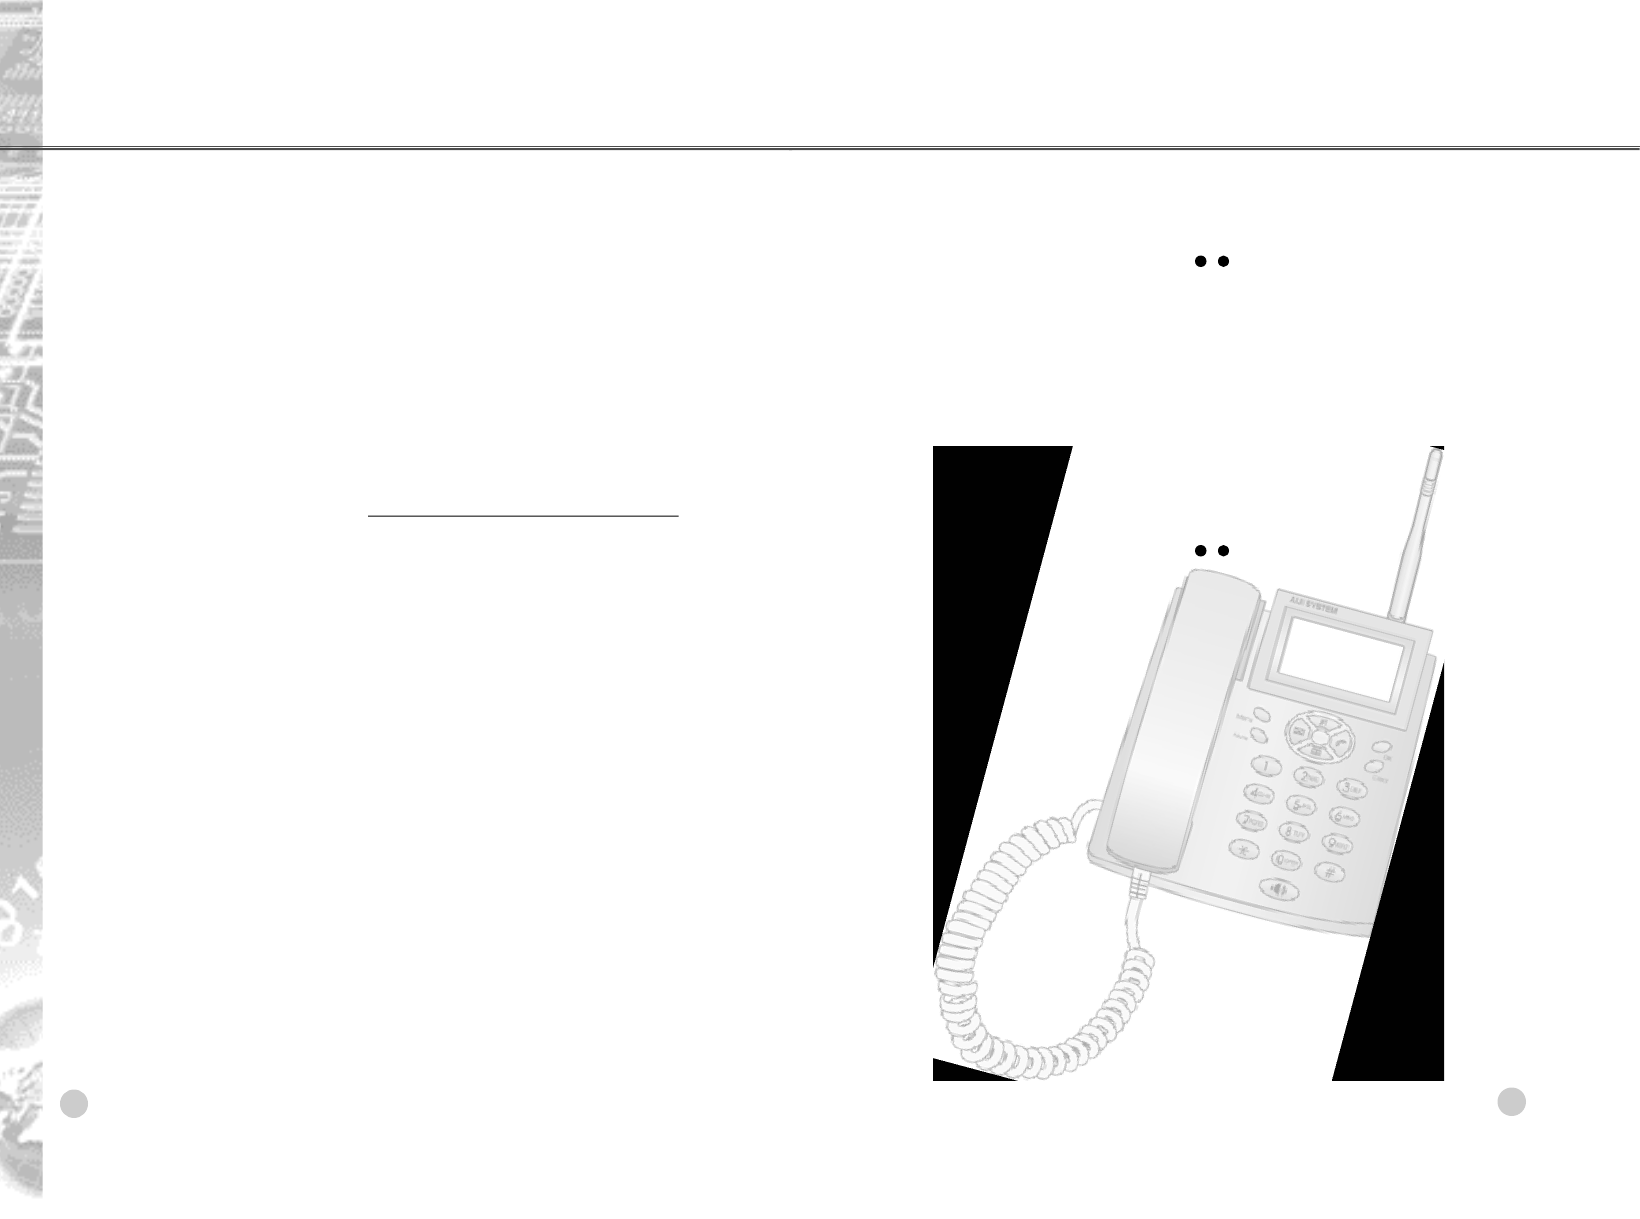
AIJI System Co., Ltd. Fixed WLL Telephone (CDMA) Users Manual
Users Manual

MODEL : AP Series
CDMA2000 1X RTT Fixed
Wireless Telephone
Quick Start Guide & User’s Manual
CDMA2000 1X RTT WLL Model : AP Series
Please read this manual before operating the
phone, and keep it for the future reference.
2005 Aiji System Co., Ltd. All rights reserved. No
reproduction in whole or in part is permitted,
without prior written approval.
The information in this user manual is subject to
change without notice and does not represent a
commitment on the part of Aiji System Co., Ltd.
Model Number: AP Series
Version: Initial Release, Feb. 28, 2005
Follow the directions on this page to start using
your phone now. For more information, refer to
the rest of this user manual.
REFERENCE & WARNING
3
Aiji System Co.,Ltd.
CDMA2000 1X RTT WLL Model : AP Series
D AT E CONTENTS OF CHANGES R E M A R K
Feb 28, 2005 Initial Re l e a s e
REVISED HISTORY
2
Aiji System Co.,Ltd.

CDMA2000 1X RTT WLL Model : AP SeriesCDMA2000 1X RTT WLL Model : AP Series
SAFETY INFORMATION
•To reduce the risk of fire or electric shock, do not expose this
product to rain or moisture.
•Do not use this product near swimming pools or other bodies of
w a t e r .
•Before using your phone, check your output voltage.
WARNING
IMPORTANT
Before installing or operating this product read this information.
OPTIMAL PHONE PERFORMANCE
•Do not operate your product when holding the antenna, or when
someone is within four inches (ten centimeters) of the antenna.
Holding the antenna affects call quality and may cause the
telephone to operate at a higher power level than needed.
•For the best call quality, keep the antenna free from obstructions
and point the antenna straight up.
•Do not use the unit with a damaged antenna. Have your antenna
replaced by a qualified technician immediately. Use only a
manufacturer-approved antenna. Non-approved antennas,
modifications, or attachments could impair call quality, damage the
p h o n e .
•RF energy may affect improperly installed or inadequately shielded
personal medical devices such as pace markers, hospital monitor.
Consult the manufacturer of any personal medical devices to
determine if they are adequately shielded from external RF energy.
Turn your terminal OFF in health care facilities when any regulations
posted in the areas instruct you to do so.
Hospitals or health care facilities may be using equipment that
could be sensitive to external RF energy.
•If this equipment does cause harmful interference to radio or
television reception, which can be determined by turning the
equipment off and on, the user is encouraged to try to correct the
interference by one or more of the following measures:
▷Reorient or relocate the receiving antenna
▷Increase the distance between the radio or television and the
t e l e p h o n e .
▷Connect the equipment into an outlet on a circuit different from
that to which the terminal is connected.
▷Consult you Authorized AIJI Dealer of an experienced radio/TV
technician for help.
•Use only the battery, antenna and AC power supply provided by
AIJI. Using any other type will invalidate the warranty.
•Only authorized personnel should service the phone and its
accessories. Faulty installation or service may be dangerous and
may invalidate the warranty.
•Do not use the unit in designated "No Cellular Phone Use" area.
•Avoid exposure to high temperature or humidity.
45
Aiji System Co.,Ltd. Aiji System Co.,Ltd.
CDMA2000 1X RTT WLL Model : AP Series
6
Aiji System Co.,Ltd.
7
Aiji System Co.,Ltd.
CDMA2000 1X RTT WLL Model : AP Series
CARE AND SERVICE
•Unplug the telephone from the wall outlet and remove antenna (or
disconnect antenna cable) before cleaning. Do not use liquid or
aerosol cleaners. Use a damp cloth for cleaning.
•If the unit fails for any reason, do not attempt to disassemble;
contact the telephone service provider for assistance.
•If any of the following conditions exist; unplug the unit at the wall
plug, remove battery, and call the service provider.
▷The power supply cord is damaged or frayed.
▷Liquid has been spilled into the unit.
▷The unit has been exposed to rain or water.
▷The unit has been dropped or damaged.
▷The unit does not work normally by following the operating
i n s t r u c t i o n s .
•Avoid wetting the unit with any liquids. If the unit gets wet, turn the
power off immediately and remove the backup battery and AC power
supply. If the unit is inoperable, then return to the service agent for
s e r v i c e .
•Avoid shock or impact.
•We recommend you to charge the backup battery before initial use.
Backup battery may be discharged during delivery.
CDMA2000 Fixed
Wireless Te l e p h o n e
Quick Start Guide
MODEL
…
AP Series
8
1.2 External Features
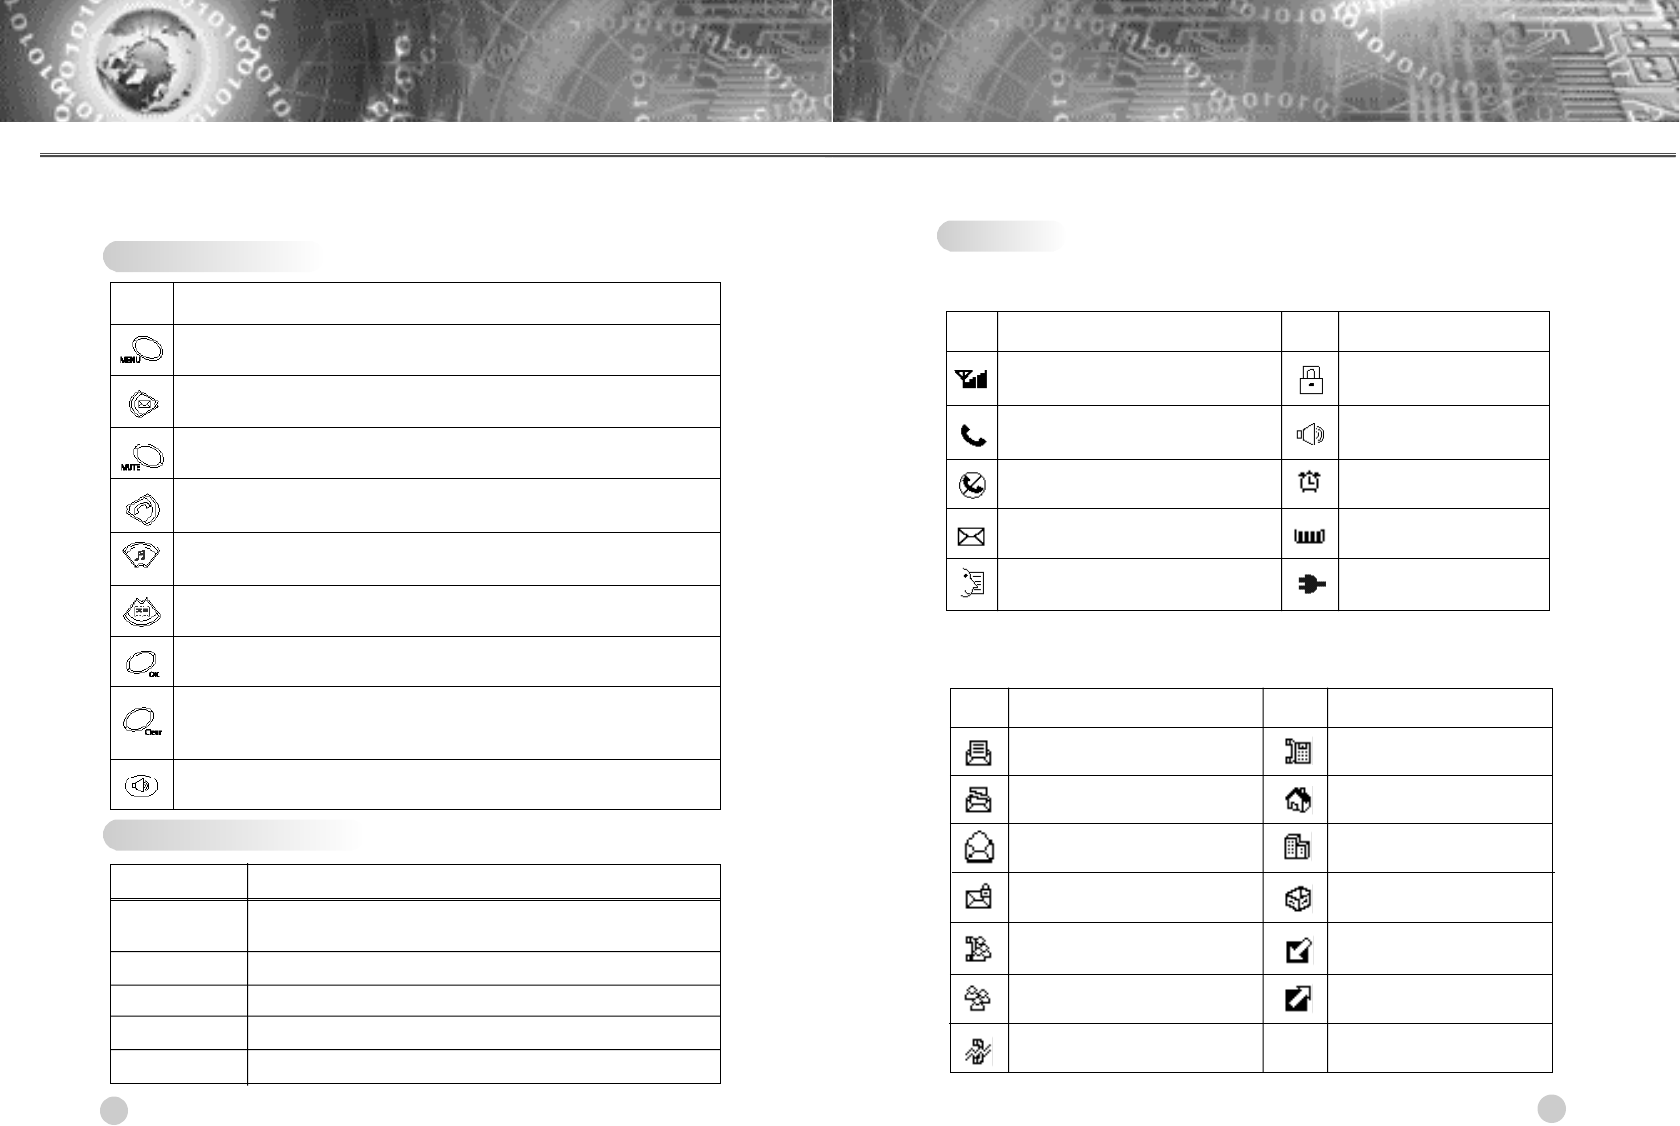
Description Icon Description
Message sent successfully M o b i l e
Message sending fail H o m e
Read Message Office
Locked Message Other
3-way Calling Incoming Call
G r o u p Outgoing Call
Missed Call
Description
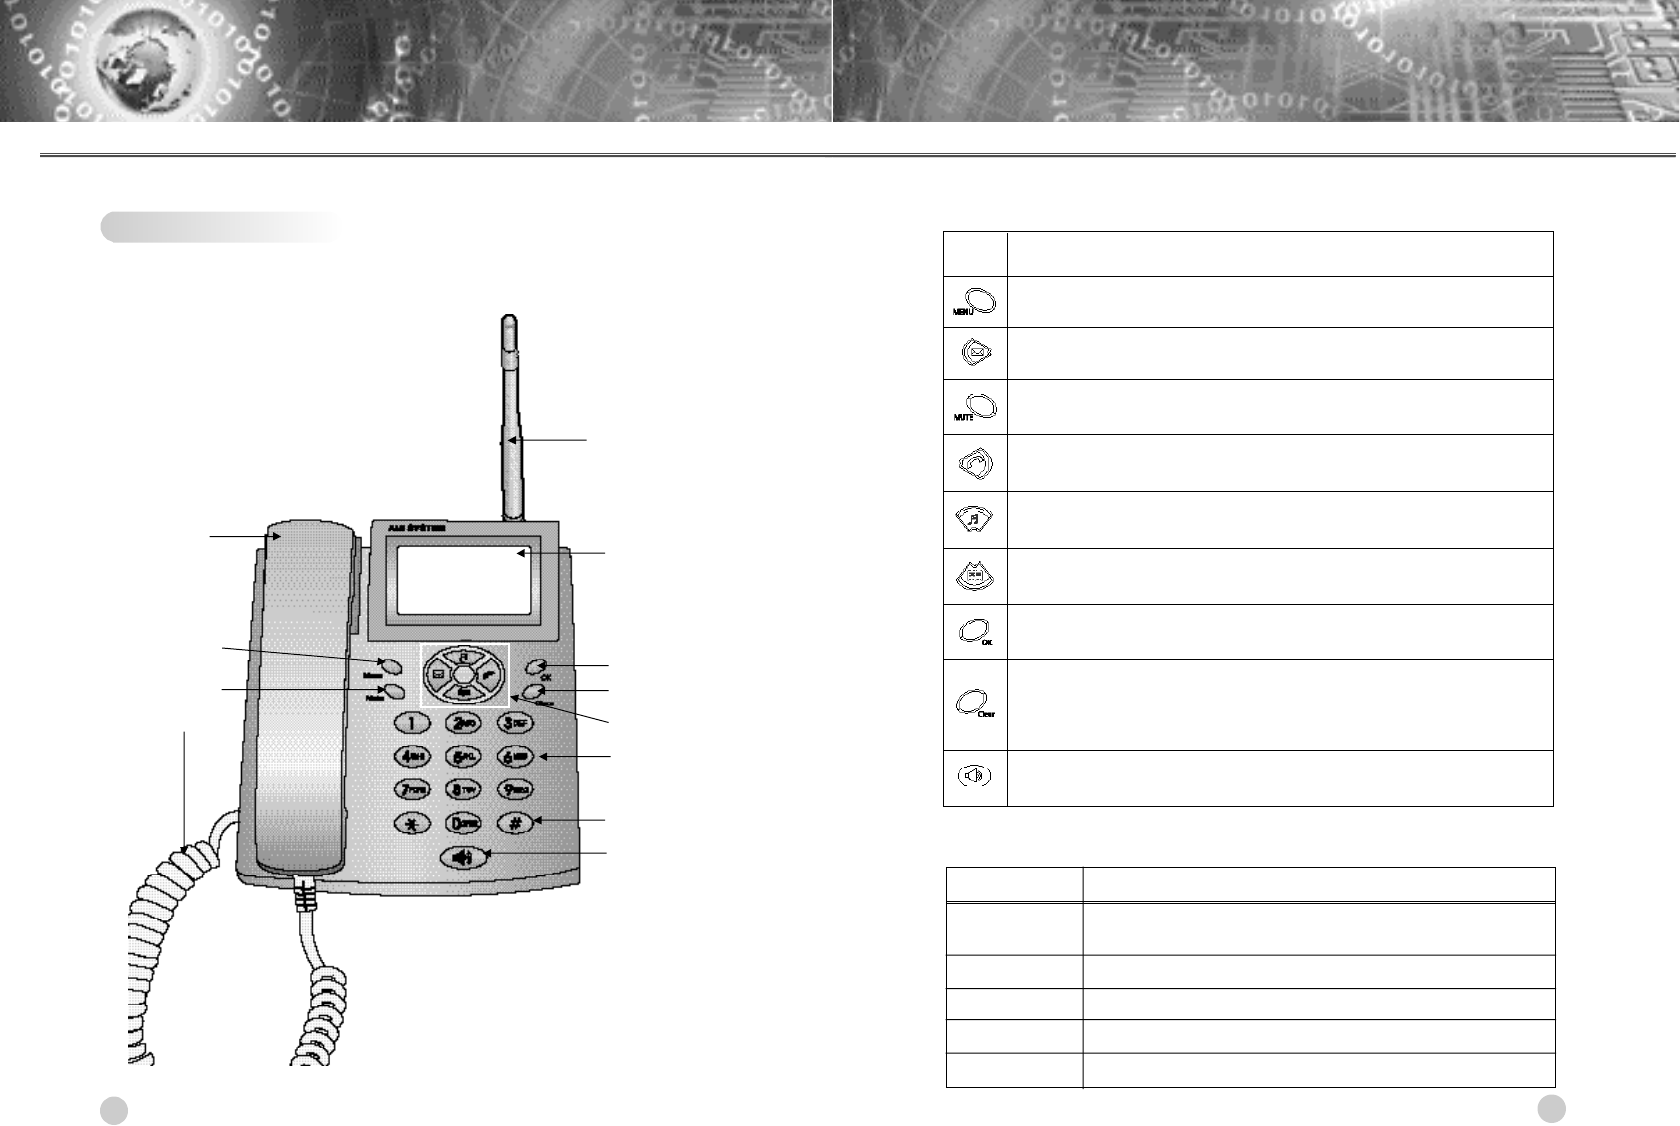
1. Activate MENU state (also MENU state in the call state)
1. Activate SMS and Voice Mail state
1. Set the [DND (Do Not Disturb)] function. It prohibits incoming
calls when the phone is in the idle-state
1. Send a dialed number when a call is placed and/or to redial
and \ send the last number dialed
1.
Sound: 31 Ring tones/Alerts/Volume
2. Volume up (also function as a cursor in the edit state)
1. Phone book
2. Volume down (also function as a cursor in the edit state)
1. Store phone numbers and any settings you select in the menu
within the phone's memory.
1.
Delete the last digit/dial number (also exit without storing in the
MENU state)
2. Deactivate a state - No store a value
1. To make or receive a call using the speakerphone.
9
CDMA2000 1X RTT WLL Model : AP SeriesCDMA2000 1X RTT WLL Model : AP Series
Aiji System Co.,Ltd. Aiji System Co.,Ltd.
1. Getting to Know Your Phone
1.1 Key Definition
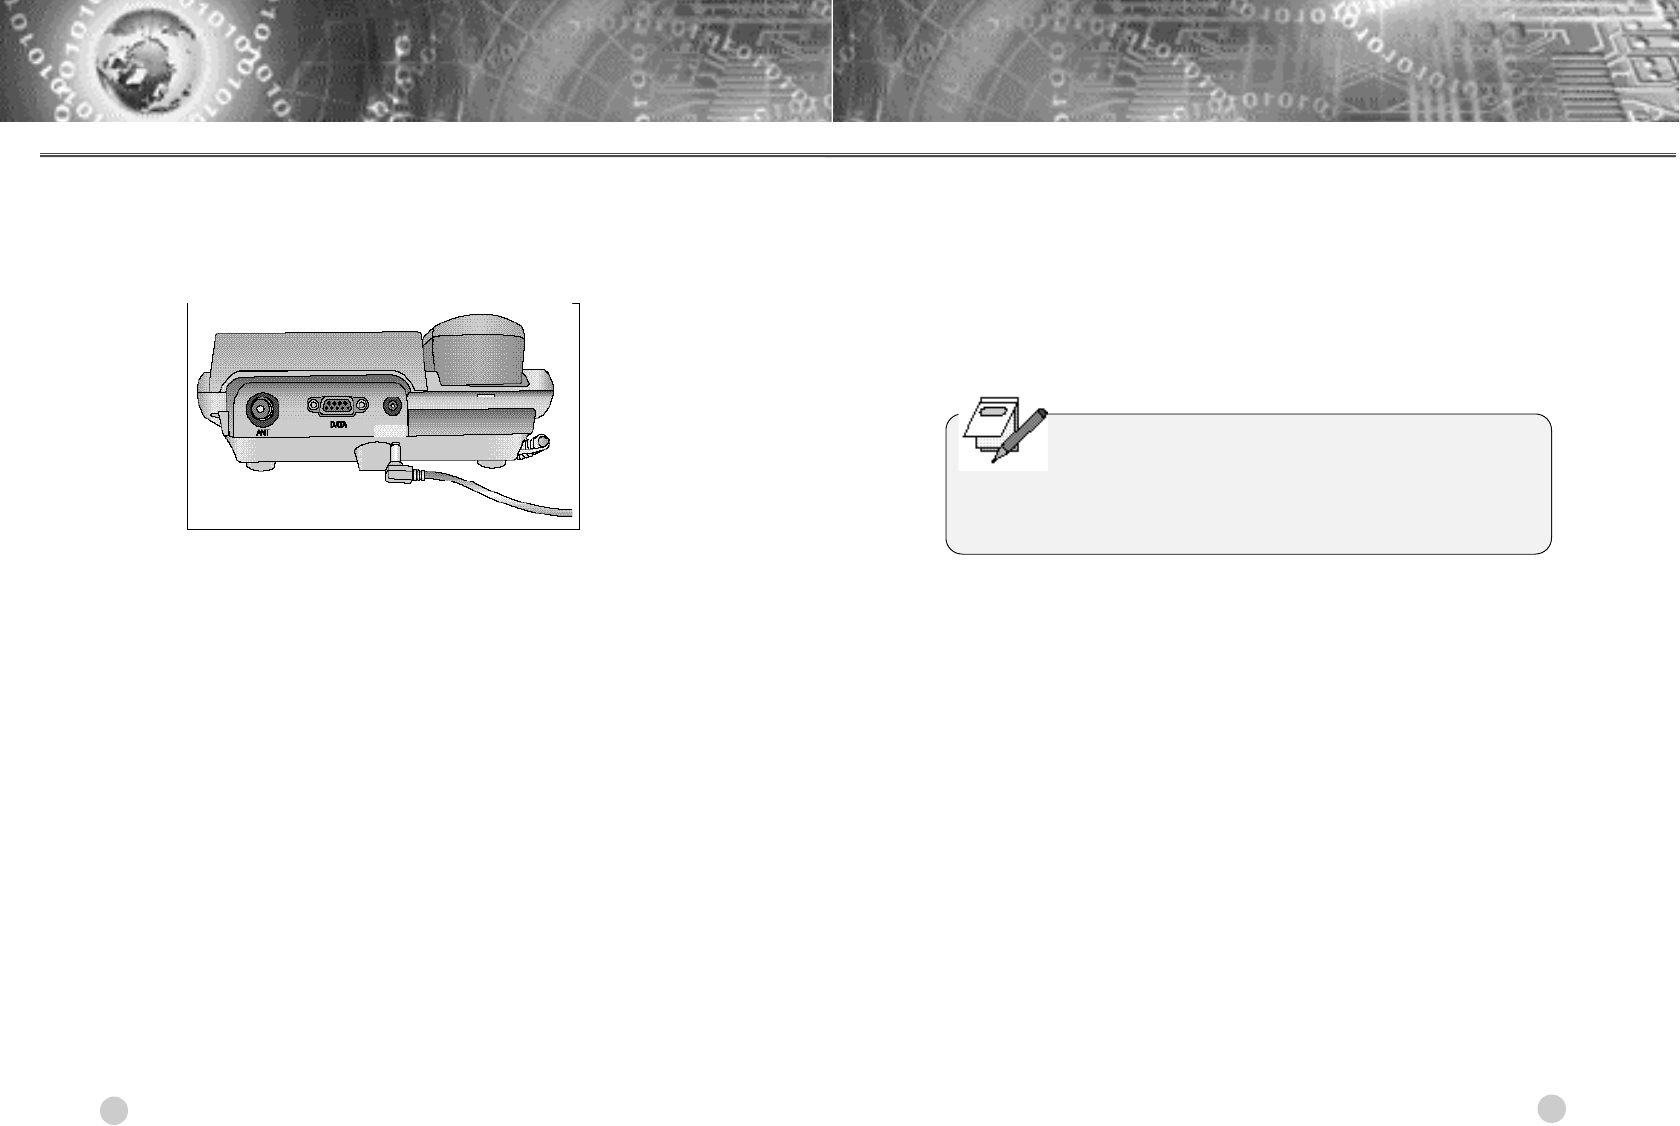
Features Description
A n t e n n a Adjusting direction of antenna improves the voice and
data quality
RF Connector
For connection to basic antenna or external antenna
DC Power Jack
For connection to power adapter
RS-232C port For connection to PC for Internet
Power Switch To turn on/off the phone
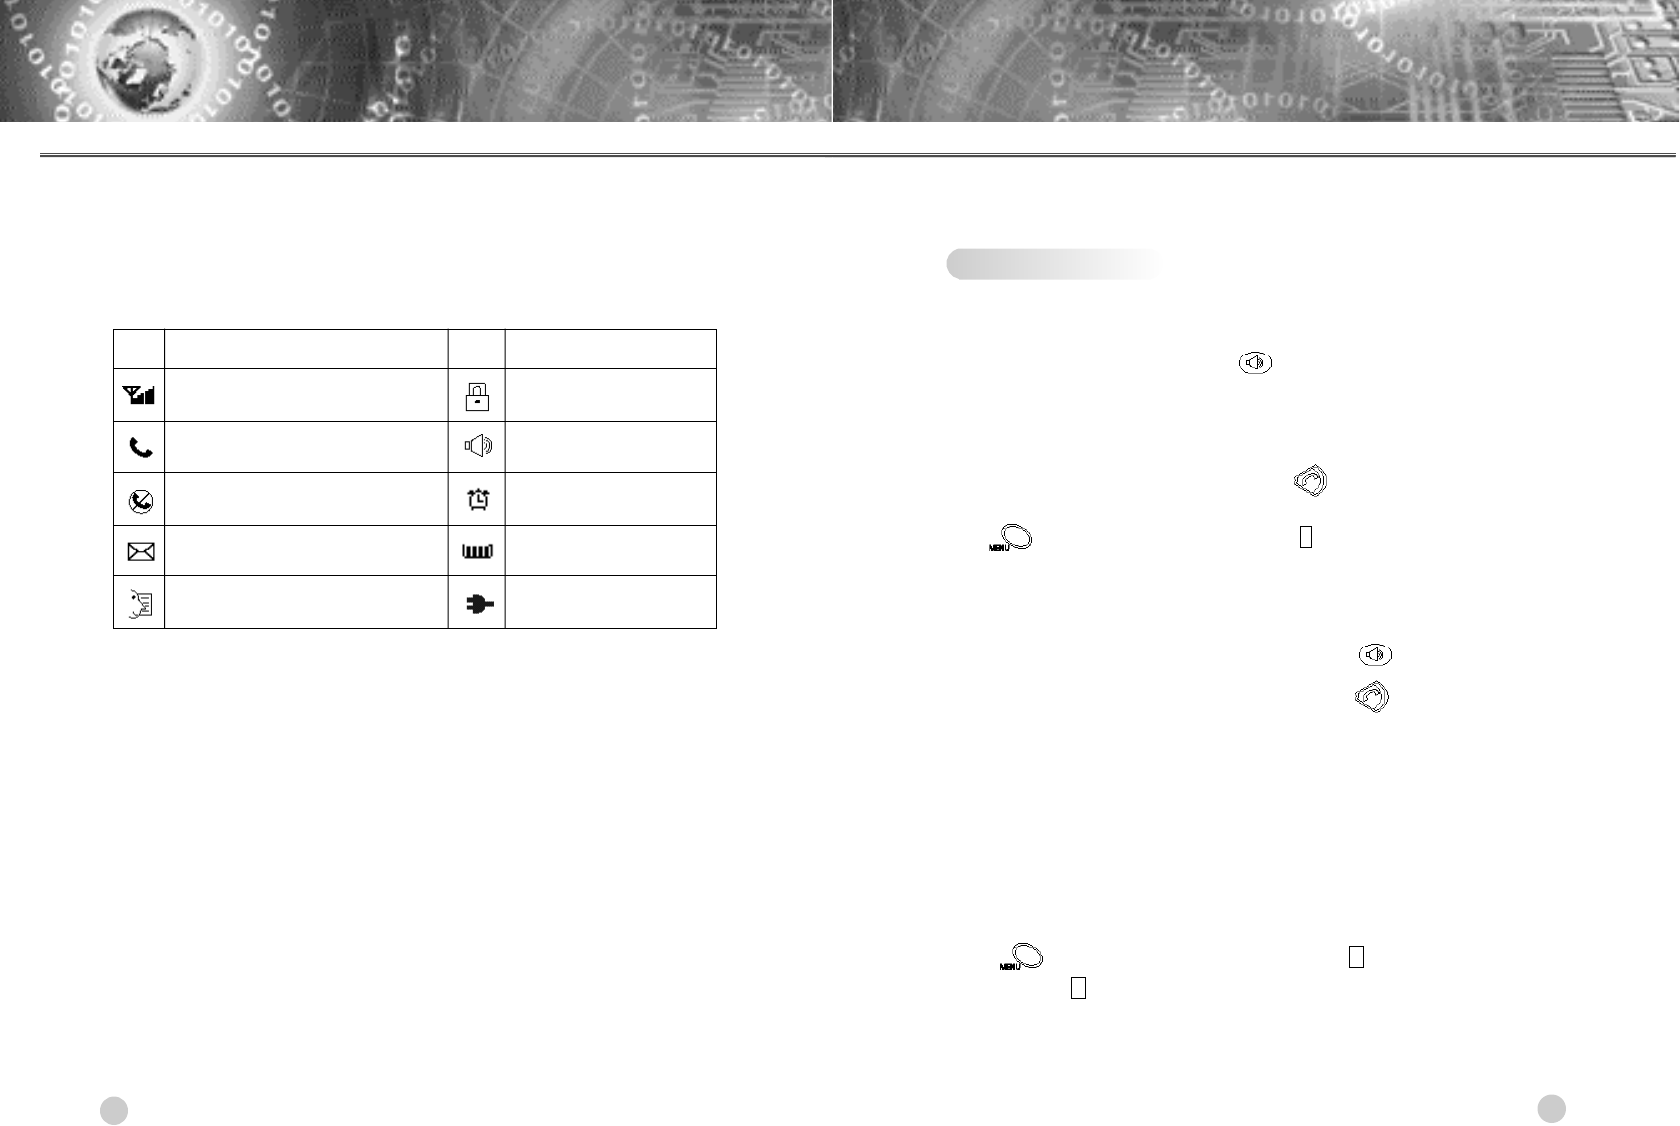
1.3 Icons
1.3.1 Standby Icons
1.3.2 Sub Icons
Description Icon Description
Signal strength in the service area
.Lock mode
In use Off-hook mode
No Service Alarm/Morning Call
New message Battery status
Voice message AC Power Mode
I c o n
Icon
K e y
10 11
Aiji System Co.,Ltd. Aiji System Co.,Ltd.
CDMA2000 1X RTT WLL Model : AP Series
CDMA2000 1X RTT WLL Model : AP Series
2. Basic Functions
Turn on
your phone
Make a Call
Answer a Call
End a Call
R e d i a l
Speed dial
(1- touch/2-touch)
Read new
m e s s a g e
Phone book
s e a r c h
1. Connect handset to the main set
2. Connect the antenna
3. Open the battery cover at the bottom of the main set
and Insert backup battery.
4. Turn "ON" the battery switch.
5. Close the battery cover and connect the AC power
s u p p l y .
1. Pick up the handset or press b u t t o n .
2. Enter phone number
When the phone rings, pick up the handset or press
b u t t o n
Replace the handset or press b u t t o n
1. Pick up the handset or press b u t t o n .
2. Press b u t t o n .
1. Pick up the handset or press b u t t o n .
2. For the location numbers of one digit, press and hold
the corresponding digit key.
For the other entry numbers, press the first digit key(s)
briefly and hold down the last digit key.
Press -> Inbox -> Select Card or Phone
Press button -> Enter the name
CDMA2000 Fixed
Wireless Te l e p h o n e
U s e r’s Manual
MODEL
…
AP Series
12 13
Aiji System Co.,Ltd. Aiji System Co.,Ltd.
CDMA2000 1X RTT WLL Model : AP SeriesCDMA2000 1X RTT WLL Model : AP Series
2.12.1.1 Saving Numbers in Your Personal Phone Book
2.12.1.2 Retrieving Numbers
2.12.2 Making a call from Your Phone Book
2.12.2.1 One-Touch Speed Dialing
2.12.2.2 Two-Touch Speed Dialing
2.12.2.3 Three-Touch Speed Dialing
2.12.2.4 Dialing from a Call History
3.1 General Guidelines to MENU Access and Settings
3.2 List of Menu State
3.3 Call History
3.3.1 Recent Calls
3.3.2 Incoming Calls
3.3.3 Outgoing Calls
3.3.4 Missed Calls
3.3.5 Call Timer
3.3.6 Call Memo
3.3.7 Clear History
3.4 Phone Book
3.4.1 Find Entry
3.4.2 New Entry
3.4.2.1 Creating a New Entry in the Phone's Memory
3.4.2.2 Storing Phone Numbers at Call's End
3.4.3 Edit Group
3.4.4 Memory Status
3.4.5 Phone Infomation
3.5 Message
3.5.1 Inbox
3.5.2 Write Message
3.5.2.1 How to write a Text
3.5.3 Outbox
3.5.4 Delete Messages
3.5.5 Message Settings
1.1 Highlights
1.2 Check Components
1.3 Installation
1.3.1 Connect Components
1.3.2 Installation Steps
1.3.3 Place the Terminal
1.4 Phone Overview
1.4.1 Key Definition
1.4.2 External Features
1.4.3 Viewing the Display Screen
1.4.4 Check the LCD Display
2.1 Making a Call
2.2 Correcting Dialing Mistakes
2.3 Receiving Calls
2.4 Lock Mode (Quick)
2.5 Call Waiting / Call Forwarding
2.5.1 Call Waiting
2.5.2 Call Forwarding
2.6 Mute
2.7 Redialing Calls
2.8 Adjusting the Volume
2.9 Signal Strength
2.10 Caller ID Display
2.11 Speed Dialing
2.12 Phone book Features
2.12.1 Personal Phone Book Memory
CONTENTS
1. Introduction
2. General Functions
3. Menu Features
1 5
1 5
1 7
1 8
1 8
2 0
21
2 2
2 3
2 3
2 4
2 4
2 5
2 6
2 6
2 6
2 6
2 7
2 7
2 7
2 7
2 7
2 8
2 8
2 8
2 9
2 9
2 9
29
30
30
30
30
31
3 1
3 1
3 1
3 1
3 7
3 7
3 7
3 7
3 8
3 8
3 8
3 9
3 9
3 9
3 9
3 9
4 0
4 0
4 0
4 1
4 1
4 1
4 2
4 3
4 3
4 3
4 3
14
Aiji System Co.,Ltd.
CDMA2000 1X RTT WLL Model : AP Series
15
CDMA2000 1X RTT WLL Model : AP Series
Aiji System Co.,Ltd.
Chapter 1. Introduction
1.1 Highlights and Features of AP series
Thanks for purchase of the AP Fixed Wireless Telephone. This
telephone has been designed to operate on the latest CDMA 2000 1x
RTT technology. This technology has greatly enhanced voice clarity
and can provide various advanced features. Basically this telephone is
designed for the desktop and the use in the office and a house. This
can be easily installed in any place using the wall mount bracket
(Optional Accessory).
The telephone provides:
•4-line LCD display with status indicator.
- 8-line LCD display to view text message easily.
•128 x 64 Graphic LCD display.
•Window UI (Graphic User Interface): Pop-Up Animation Menu.
•Phone book
-
200 memory locations to store names and telephone numbers
in the phone.
- Store name, 4 phone numbers (Mobile/Home/Office/Other),
group and ring sound per location.
- Group editing available.
•Brilliant 16-polyphonic midi sound
•A choice of 31 rings and melodies.
•Alarm (Morning Call): Various setting options
(Once/Daily/Weekdays only (Mon ~ Fri)/Weekends)
•50 text messages can be stored in the phone.
3.5.5.1 Display Message
3.5.5.2 Auto Save
3.5.5.3 Auto Delete
3.5.5.4 Font Size
3.5.5.5 Delivery Acknowledgement
3.5.5.6 Store Message
3.6 Sound
3.6.1 Ring Tones
3.6.2 Alerts / Tones
3.6.2.1 No Service
3.6.2.2 Minute Minder
3.6.2.3 Connect Tone
3.6.2.4 Disconnect
3.6.3 Volume
3.7 Phone Setting
3.7.1 Hot Line
3.7.2 Alarm Clock
3.7.3 Language
3.7.4 Font Select
3.7.5 LCD Contrast
3.8 Security
3.8.1 Lock Phone
3.8.2 Change Code
3.8.3 Restrict
3.8.4 Reset Phone
3.8.4.1 Reset Settings
3.8.4.2 Reset All
3.8.5 PIN
3.9 Data Service
Appendix A : Specification
4 4
4 4
4 4
4 4
4 4
4 5
4 5
4 5
4 5
4 6
4 6
4 6
4 6
4 6
4 7
4 7
4 7
4 7
4 8
4 8
4 8
4 8
4 9
4 9
4 9
4 9
4 9
4 9
5 0
5 1
16 17
CDMA2000 1X RTT WLL Model : AP SeriesCDMA2000 1X RTT WLL Model : AP Series
Aiji System Co.,Ltd. Aiji System Co.,Ltd.
1.2 Check Components
•
Your package contains the following items. The illustrations below may look
different from your phone and accessories;
[
Main Unit with handset
]
[ Dipole Antenna ]
[ User’s Manual ]
[ AC/DC power Adapter ]
[ Backup Battery ]
[ Power Cord ]
•Restrict Call
•S e c u r i t y
•
Internet connection up to 153Kbps through RS-232C serial data port.
•Support the Authentication Key (A-Key)
•Various supplementary services such as Last Number Redial, Dial
Tone and On Hook etc.
•
Optional Functions: R-UIM, Speaker phone, LCD backlight, Button backlight
•99 Voice Mail.
•Call History (Record&Time):
R e c e n t _ 3 0 / I n c o m i n g _ 2 0 / O u t g o i n g _ 2 0 / M i s s e d _ 2 0
•
Speed dialing (1- touch, 2-touch and 3-touch) with a 200 number memory.
•Call Forwarding/Call Waiting/Caller ID/Last Number Re-Dial
•
Alert (No Service / Minute Minder / Connect Tone / Disconnect Tone)
•Emergency Call
•Hot Line
18 19
CDMA2000 1X RTT WLL Model : AP SeriesCDMA2000 1X RTT WLL Model : AP Series
Aiji System Co.,Ltd. Aiji System Co.,Ltd.
•In addition, you can obtain the following accessories for your phone
from our local dealer in your country.
1) RS-232C Data Cable
2) Wall Mount Bracket
•Please make sure that these components are present before you
begin the unit installation. And then compare the following figures and
components. If components are missing or damage is found, contact
the store where you purchased the unit immediately.
1.3 Installation
1.3.1 Connect Components (See the figures in "Installation Steps")
You should follow each step carefully as shown below in order to
guarantee proper operation of CDMA Fixed Wireless Telephone.
•Connect the antenna to the TNC antenna connector
located at the top side of the terminal. If you placed the
terminal on the flat surface, bend the antenna up right.
•Open the battery case, securely connect the battery cord, place the
backup battery pack and close the case.
•Connect curl cord of handset assembly to the RJ-11C port located at
the left side of the terminal.
20 21
CDMA2000 1X RTT WLL Model : AP SeriesCDMA2000 1X RTT WLL Model : AP Series
Aiji System Co.,Ltd. Aiji System Co.,Ltd.
▷If it is good, beep tone is heard.
▷it is not good (Booting is fail or beep tone is not heard), you have to
connect the adapter or backup battery, again.
•Check output voltage.
•Connect the AC/DC Adapter cable to the DC input port located at the
topside of the terminal.
•Please follow the below to get better voice quality;
1) Keep away from electrical appliances such as TV, computer, radio
and so on.
2) Keep terminal in a high and central location with no obstructions,
such as metal walls.
3) Raise the integral antenna of terminal to get maximum strength of
receive signal as shown figure at the next page.
1.3.2 Installation Steps
Please follow the below procedure to install the unit properly.
1) Connect Base handset to the handset connector.
2) Connect the antenna to the TNC connector (Turn right).
3) Bend the antenna up right.
4) Open the battery cover at the bottom of the main unit.
5) Insert back-up battery in the bottom of the main unit. (Give care to polarity)
6) When you use terminal first, please turn "on" the battery switch.
7) Replace the Battery cover.
8) Connect the AC power supply.
1.3.3 Place the Terminal
•Place the terminal on the stable flat secure surface area (desk, table,
etc.). Serious damage may result if the unit falls. Do not place the
unit on, or within 1 meter of heaters or radiators. This unit is designed
for desktop usage. Avoid direct exposure to the sunlights and damp
a r e a .
•Read the SAFETY INFORMATION located at the first part of this
document before you place the terminal.
N o t i c e
Before using the terminal,please check battery
switch is on, after switching on it, use the phone.
1.4.2 External Features
Description
1. Activate MENU state (also MENU state in the call state)
1. Activate SMS and Voice Mail state
1. Set the [DND (Do Not Disturb)] function. It prohibits incoming
calls when the phone is in the idle-state
1. Send a dialed number when a call is placed and/or to redial
and \ send the last number dialed
1. Sound: 31 Ring tones/Alerts/Volume
2. Volume up (also function as a cursor in the edit state)
1. Phone book
2. Volume down (also function as a cursor in the edit state)
1. Store phone numbers and any settings you select in the menu
within the phone's memory.
1. Delete the last digit/dial number (also exit without storing in the
MENU state)
2. Deactivate a state - No store a value
3. Press this key once in a menu, to go back one level.
1. Off Hook mode
2. To make or receive a call using the speakerphone.
K e y
1.4.1 Key Definition
Features Description
A n t e n n a Adjusting direction of antenna improves the voice and
data quality
RF Connector
For connection to basic antenna or external antenna
DC Power Jack
For connection to power adapter
RS-232C port For connection to PC for Internet
Power Switch To turn on/off the phone
22 23
CDMA2000 1X RTT WLL Model : AP SeriesCDMA2000 1X RTT WLL Model : AP Series
Aiji System Co.,Ltd. Aiji System Co.,Ltd.
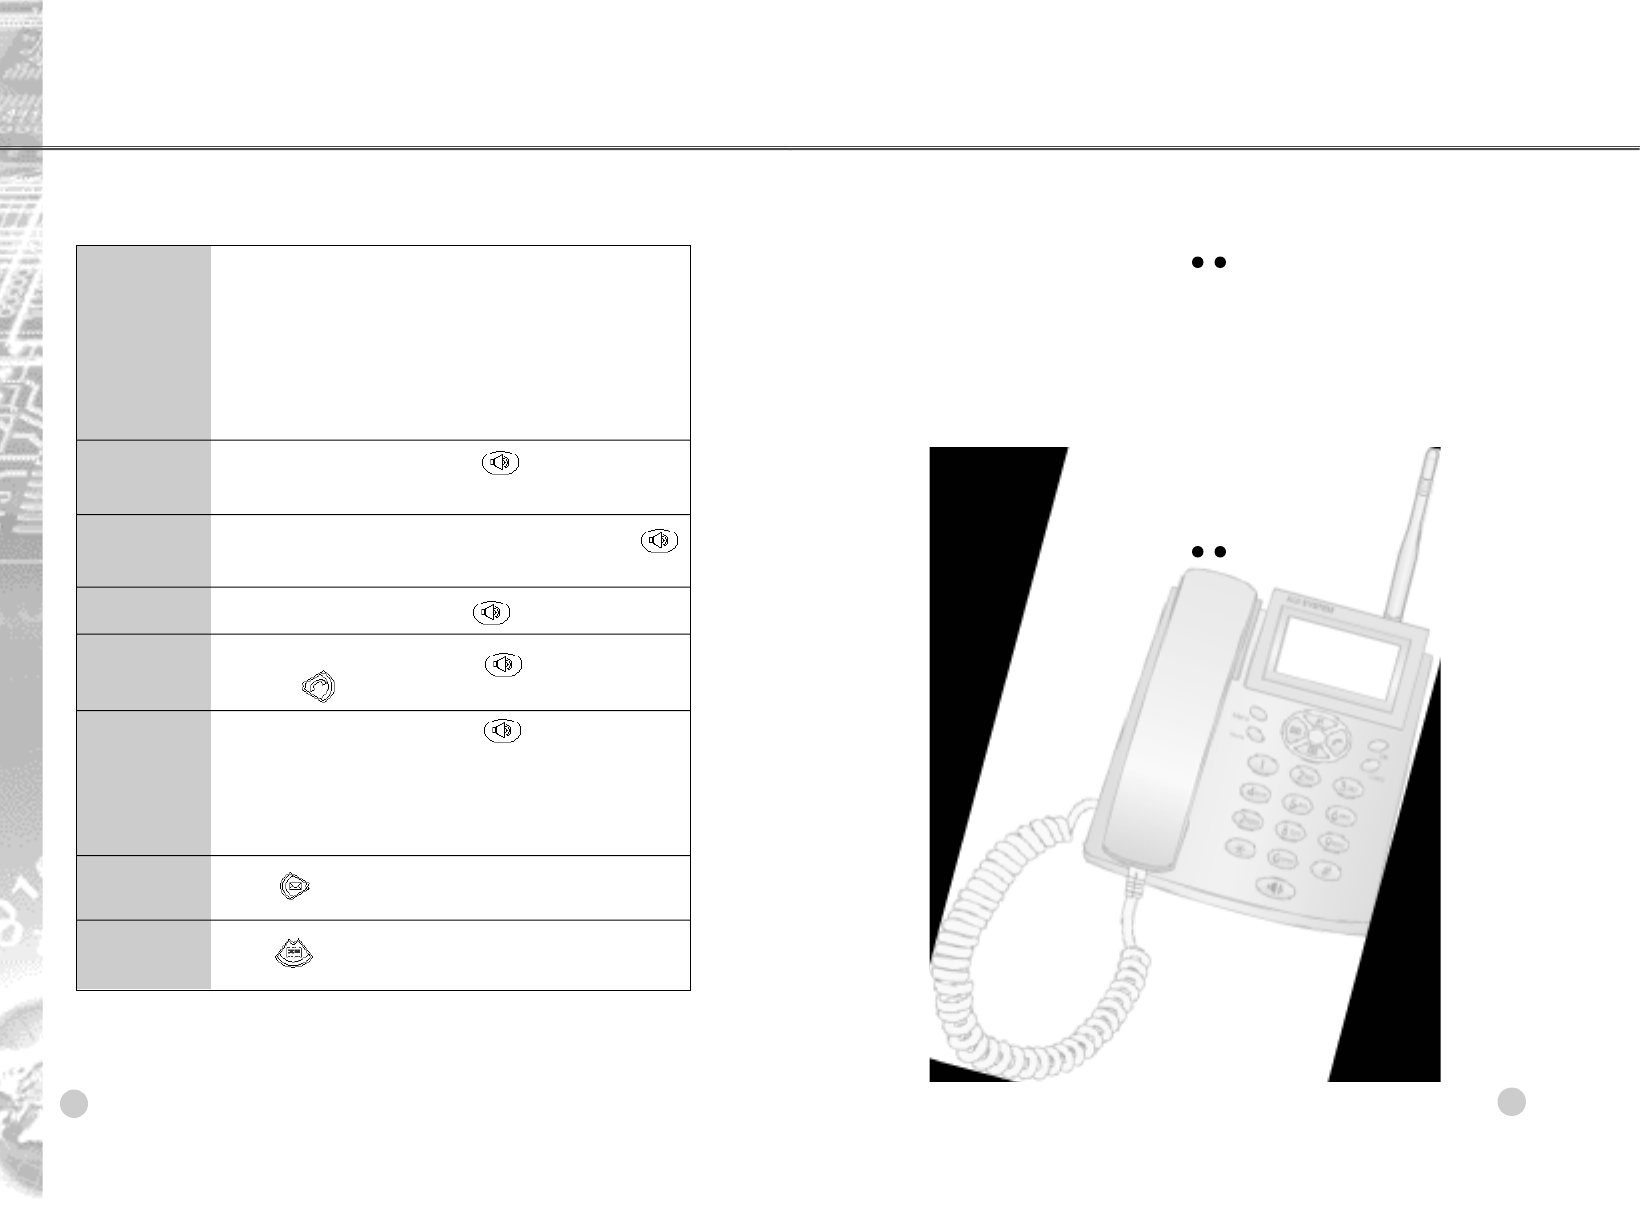
1.4 Phone Overview
The following shows key components of
your mobile phone.
5.TNC Antenna
6.LCD Screen
7.OK Key
9.Clear Key
8.Navigation Key
10.Alphanumeric
Keypad
11.Lock mode Key
12.OHD Key
4.Curl Cord
1.Handset
2.Menu Key
3.Mute Key
24 25
CDMA2000 1X RTT WLL Model : AP SeriesCDMA2000 1X RTT WLL Model : AP Series
Aiji System Co.,Ltd. Aiji System Co.,Ltd.
When you make a call, follow these simple steps:
1) Make sure your phone is turned on.
2) Pick up the handset or press button.
3) Listen for dial tone. If the service is not available, you hear a no
service tone.
4) Enter the phone number, with area code (if needed).
5) Wait for the Auto Time-out or press .
•If the phone is locked, take the following step.
→6. Security Enter Password →1Lock Phone Select ◉U n l o c k
•Call Failed indicates that the call did not go through. Please
check Antenna Icon and call again a few minutes later.
6) The call is connected and you can start conversation.
7) To end the call, replace the handset or press button.
Tip 1: To redial your latest outgoing call, press to dial.
Tip 2: Your phone offers many different ways to make calls, including
Speed Dialing ("Using One / Two / Three Speed Dialing" on page
30) and using Call History ("Viewing Call History (Incoming,
Outgoing and Missed)" on page 37).
Tip 3:
This phone has been restricted If this message displays on
your screen, then outgoing calls are in restricted mode. You can
only dial phone numbers saved in Emergency.
•If you want to turn off this function, take the following step.
→
6. Security
→
Enter Password
→
3 Restrict
→
2 Outgoing Call
→
Select ▣N o
Tip 4: When speed dialing is enabled, type in the phone book entry
number and hold the last digit until the call is made.
Chapter 2. General Functions
2.1 Making a Call
1.4.3 Viewing the Display Screen
1.4.4 Check the LCD Display
The LCD shows icons on the top of the LCD screen. The icons indicate
the setting status and operating status of the phone.
•After you follow the installation instruction 1.3.1 to 1.3.3, please
check the LCD for normal operation.
•If you may not see status of service, please repeat the 5th
instruction of 1.3.2. And conform Fixed Wireless Telephone to get
the proper signal strength from service operator system.
※The adapter type(with power cord) may be different by country
a d a p t a t i o n .
Description Icon Description
Signal strength in the service area
.Lock mode
In use Off-hook mode
No Service Alarm/Morning Call
New message Battery status
Voice message AC Power Mode
I c o n
26 27
CDMA2000 1X RTT WLL Model : AP SeriesCDMA2000 1X RTT WLL Model : AP Series
Aiji System Co.,Ltd. Aiji System Co.,Ltd.
2.5.1 Call Wa i t i n g
Your WLL service may offer a call waiting function. While a call is in
progress, you may hear two beeps indicating another incoming call.
When call waiting is enabled, you may put three active calls on hold while
you answer the other incoming call.
1) Press to receive a waiting call.
2) Press again to switch between calls.
2.5.2 Call Fo r w a r d i n g
This feature enables incoming calls to be rerouted to a number that you
specify. For example, you may wish to forward your business calls to
your mobile phone while you are not in the office.
2.6 Mute
The mute function prevents the other party from hearing your voice, but
allows you to hear the other party.
1) Press during a call.
2) To cancel Mute, press again.
2.7 Redialing Calls
1) Press to redial the last number in call history (Recent Calls).
•You can also redial any of the last 60 numbers you have dialed,
received and missed. The last 30 numbers are stored in the call
history (Recent Calls) list. (See the Call History List on page 37.)
2.2 Correcting Dialing Mistakes
2.3 Receiving Calls
If you make mistakes while dialing a number, press once to erase
the last digit entered or hold down for at least two seconds to delete
all digits.
1) Make sure your phone is on. If your phone is off, incoming calls go to
v o i c e m a i l .
2) When phone rings, pick up the handset (or press (Optional
f u n c t i o n ) ) .
3) Start conversation.
4) To disconnect the call, replace the handset (or press (Optional
f u n c t i o n ) ) .
2.4 Lock Mode (Quick)
2.5 Call Waiting / Call Forwarding
Use to prevent others from using your phone.
1) In standby mode, to activate the Lock Mode quickly, press the
for 3 seconds. Lock mode Setting! will be displayed.
The lock code (password) is commonly the last 4 digits of your phone number.
Note To cancel the Lock Mode, Press
→
6. Security Enter Password
1 Lock Phone Select Unlock
#
This menu contains network services, which allow you to forward
incoming calls when you can't answer a call, to receive a second call.
Please contact your service provider to check their availability and
d e t a i l s .
28 29
CDMA2000 1X RTT WLL Model : AP SeriesCDMA2000 1X RTT WLL Model : AP Series
Aiji System Co.,Ltd. Aiji System Co.,Ltd.
2.11 Speed Dialing
Speed dialing is a convenient feature, which allows you to make phone
calls quickly and easily. Your phone recalls the phone number from your
personal directory, displays it briefly and then dials it.
1) From off-hook stage, press the memory number (1 through 200)
corresponding to the appropriate entry, and hold for a few seconds.
Tip 1: You should check with your service provider to ensure they
offer this feature.
2.12 Phone Book Features
You can store up to 200 entries in your phone book with easy access to
your most frequently dialed phone numbers and make a call by pressing
entry number in off-hook state.
2.12.1 Personal Phone Book Memory
The phone has 200 personal phone book entry numbers where you can
store up 4 phone numbers with 16 digits for each phone number
2.12.1.1 Saving Numbers in Your Personal Phone Book
1) Input the phone number that you want to save (up to 16 digits).
2) Press
→
Select '1.Save'
→
Press
3) Select your desired label types Mobile, Home, Office, Other
using the upper key ( ) and the lower key ( ).
4) Enter a name for the phone number (up to 16 characters)Press .
If you do not want to enter a name, go to the next step.
5) You may select the desired ID ring type and group
No Group, Family, Friend, Office, Other.
2.8 Adjusting the Volume
The volume keys on the top side of the phone can be used to adjust the
earpiece, ringer, and keypad beep volumes. The upper key ( ) is
used to increase and the lower key ( ) is used to decrease the
v o l u m e .
•You may adjust the earpiece volume during a call.
2.9 Signal Strength
The call quality depends on the signal strength in your area. The current
signal strength is displayed on the screen as the number of bars next to
the signal strength icon: The more bars, the better the signal strength. If
the signal quality is poor, move to an open area. If you are in a building,
the reception may be better near a window. For maximum reception,
make sure that the antenna is fully extended.
2.10 Caller ID Display
Caller ID lets you know who is calling by displaying the number of the
person calling when your phone rings. If the caller's name and number
are already stored in your phone book, the corresponding name appears
with the number.
Tip 1: The LCD of the phone displays information such as:
•Date and Time
•Caller ID (caller's information [name and/or number])
•Number of missed calls
•Number of new messages
•No service status and Power Save Mode.
The phone will display most recent information.
30 31
CDMA2000 1X RTT WLL Model : AP SeriesCDMA2000 1X RTT WLL Model : AP Series
Aiji System Co.,Ltd. Aiji System Co.,Ltd.
1) Press the first digit.
2) Press and hold the key of the second digit.
O R
1) Press the first and second digit, then press .
2.12.2.3 Three-Touch Speed Dialing
This feature enables you to dial numbers in your phone book through
three keys (for entries 100 to 200.)
1) Press the first and second digits.
2) Press and hold the key of the third digit.
O R
1) Press the first, second and third digits, then press .
2.12.2.4 Dialing from a Call History
1) From a call history list, press the scroll keys to go to the number you
want to call.
2) Press .
Chapter 3. Menu Features
3.1 General Guidelines to MENU Access and Settings
1) Press . '1. Call History' menu will appear on the display screen.
2) Press to go other menu features.
3) Press the corresponding number to the menu item that you want to
select. Then the sub-menu list will appear on the screen.
4) Press the appropriate key to select the sub-menu you want to access.
5) Select preferred settings, using the . Press to go one
step backward while accessing menu or selecting settings.
6) Press . A confirmation prompt "Saved" displays on the phone.
2.12.1.2 Retrieving Numbers
1) Press , the sub-menu appears.
2) Enter the character(s) that you want to search for
(such as the few letters of the name.)
→
Press
3) You will see a list of matches.
→
Select the one using the upper
key ( ) and the lower key ( ).
4) Press to see specifics in that memory location, or press to
place the call.
2.12.2 Making a call from Your Phone Book
You can place a call from any memory location either by using speed
dialing or by entering the phone number and pressing in
off-hook state.
2.12.2.1 One-Touch Speed Dialing
This feature enables you to store your 9 (nine) most frequently used
numbers in your phone book in memory locations (1 through 9).
1) For entries 1 through 9, you can use one-touch dialing by pressing
and holding the corresponding key to the memory location to be dialed.
OR
1) Press a digit, then press .
2.12.2.2 Two-Touch Speed Dialing
This feature enables you to dial numbers in your phone book through
two keys (for entries 10 to 99.)
32 33
CDMA2000 1X RTT WLL Model : AP SeriesCDMA2000 1X RTT WLL Model : AP Series
Aiji System Co.,Ltd. Aiji System Co.,Ltd.
Setting Va l u e
1. Clear the call history in a sub-menu
- Recent Calls / Incoming Calls / Outgoing
Calls / Missed Calls
2. All History
- Clear all calls listed in Recent Calls,
Incoming Calls, Outgoing Calls / Missed
Calls and Missed Calls
1. By Name
- When the box appears, enter the name
and press [OK]
- You can just enter the first few letters of the
name, then press [OK]. Your phone shows
the closest matching name.
2. By Location
- Entry Number 001 ~ 200 in the phone
3. By Number
- When the box appears, enter the phone
number and press [OK]
- You can just enter the few digits of the full
number, then press [OK].
Your phone shows the closest matching
phone number.
4. By Group
- No Group / Family / Friend / O f f i c e / No
Group / No Group
- You can change Group name of 'No Group
1' and 'No Group 2'
Name (16chr) / Location (001~200) / Mobile
(16chr) / Home (16chr) / Office (16chr) /
Group(16chr) / Ring
Main Menu
Call
History
Phone
book
S u b - M e n u
7.Clear
H i s t o r y
1.Find Entry
2.New Entry
3.2 List of Menu State
Setting Va l u e
1. Display the latest 30 calls incoming,
outgoing and missed calls.
- No. and caller's name or phone number are listed
2. Check talk time
- Select one among listed calls and press [OK]
1. Latest 20 incoming calls are listed
- No., Caller's Name or Phone Number and
Call Time are listed
2. Check talk time
- Select one among listed calls and press [OK].
1. Latest 20 outgoing calls are listed
- No., Caller's Name or Phone Number and
Call Time are listed
2. Check talk time
- Select one among listed calls and press [OK].
1. Latest 20 missed calls are listed
- No., Caller's Name or Phone Number and
Call Time are listed
2. Check incoming time
- Select one among listed calls and press [OK].
Last call / Incoming calls / Outgoing calls
/ Total calls
During a call, used to save a phone number
the other party tells you during a call without
writing it down. The phone number is saved in
Call Memo up to 10.
Main Menu
Call
History
S u b - M e n u
1.Recent
C a l l s
2.Incoming
C a l l s
3.Outgoing
C a l l s
4.Missed
C a l l s
5.Call Timer
6.Call Memo
34 35
CDMA2000 1X RTT WLL Model : AP SeriesCDMA2000 1X RTT WLL Model : AP Series
Aiji System Co.,Ltd. Aiji System Co.,Ltd.
Setting Va l u e
3. Call Back #
- Display own number
- Write a phone number you want to receive
a call to.
20 messages are listed
1. Inbox
2. Outbox
3. All
1. Display Message
- Notify: Notify when the message is arrived.
- Direct View: Display message including
message information.
2. Auto Save
- Prompt: Save or not
- Auto Save: The latest 50 messages are
automatically saved.
- Do not Save: Delete message
3. Auto Delete
- On/Off
4. Font Size
- Font 8_16 / Font 8_8
5. Delivery Acknowledgement
- On / Off
31 ring tones and melodies
1. No Service
- On / Off
Main Menu
Message
Sound
S u b - M e n u
2.Write
Message
3.Outbox
4.Delete
Message
5.Message
Settings
1.RingTones
2.Alerts
/Tones
Setting Va l u e
1. No Group
2. Family
3. Friend
4. Office
5. Other
6. No Group
7. No Group
Phone 001/200
Card 01/200(*Max)
1. My Phone #
2. S/W Version
1. Card 00/20
2. Phone 00/50
3. Voice Message 00 ~
* Message Listed 01~50 with Caller ID or
Phone No.
- Select by Up/Down Key or Numeric Key
- [OK]: View message. Date and time of
received message, caller's phone number or
name and message are displayed.
- [Clear]: Move to message list
- [Menu]: Delete / Delete All / Lock
1. Send to
- Write phone number.
- Send a message to 10 persons at the same
t i m e .
2. Write Message
- Write a message up to 160 characters
Main Menu
Phone
book
Message
S u b - M e n u
3.Edit Group
4 . M e m o r y
S t a t u s
5.Phone Info
1 . I n b o x
2 . W r i t e
M e s s a g e
36 37
CDMA2000 1X RTT WLL Model : AP SeriesCDMA2000 1X RTT WLL Model : AP Series
Aiji System Co.,Ltd. Aiji System Co.,Ltd.
Setting Va l u e
1. Reset Settings (Yes / No)
2. Reset All (Yes / No)
Please Insert RUIM Card
1 9 2 0 0 b p s / 1 1 5 2 0 0 b p s / 2 3 0 4 0 0 b p s
Voice only / Modem only / FAX only
Main Menu
D a t a
S e r v i c e
S u b - M e n u
4 . R e s e t
P h o n e
5 . P I N
1.Data Rate
2 . I n c o m i n g
M o d e
3.3 Call History
3.3.1 Recent Calls
This menu allows you to view the 30 most recent outgoing, incoming
and missed phone calls.
•Press
→
1. Call History
→
1. Recent Calls
•You may place a call by pressing .
3.3.2 Incoming Calls
This menu allows you to view the last 20 calls received if you are
subscribed to the Caller Line Identification service.
•Press
→
1. Call History
→
2 . Incoming Calls
•You may place a call by pressing .
3.3.3 Outgoing Calls
This menu allows you to view the last 20 calls dialed.
•Press
→
1. Call History
→
3 . Outgoing Calls
•You may place a call by pressing .
Setting Va l u e
2. Minute Minder
- Off / 1 Minute
3. Connect Tone
- Off / Tone 1 ~ Tone 4
4. Disconnect
- Off / Tone 1 ~ Tone 4
1. Earpiece Volume: 1 ~ 4 Level
2. Ring Volume: 1 ~ 4 Level
3. Keypad Volume: 0 ~ 4 Level
Yes / No
You can make a phone call with picking up the
handset in a few second you set
Alarm 1 ~ Alarm3: Time / On or Off / Repeat
(Once / Daily / Weekdays only / Weekens) /
R i n g
Support English and one more language
Font 1 / Font 2 / Font 3
Level 1 ~ Level 30
Lock / Unlock
4 digit
1. Incoming Call (Yes / No)
2. Outgoing Call (Yes / No)
3. Messages (Yes / No)
4. Phone Book (Yes / No)
Main Menu
Sound
Phone
Setting
Security
S u b - M e n u
2.Alerts
/Tones
3 . V o l u m e
1.Hot Line
2 . A l a r m
C l o c k
3 . L a n g u a g e
4 . F o n t
S e l e c t
5 . L C D
C o n t r a s t
1.Lock
P h o n e
2 . C h a n g e
C o d e
3 . R e s t r i c t
38 39
CDMA2000 1X RTT WLL Model : AP SeriesCDMA2000 1X RTT WLL Model : AP Series
Aiji System Co.,Ltd. Aiji System Co.,Ltd.
3.3.7 Clear History
This menu enables you to erase all lists or part of Call History
/Recent Calls /Incoming Calls /Outgoing Calls /Missed Calls
/All History
3.4 Phone Book
You can store frequently used phone numbers and the corresponding
names in the memory of your phone and R-UIM. Although, they are
physically separate, used as if they were a single entity, called Phone
Book. Phone Book makes it easy for you to make a call without having
to remember or entering the phone number.
You can store up to 800numbers. (200 persons x 4 numbers)
3.4.1 Find Entry
This option allows you to search phone number you have stored in the
Phone Book by name, location (entry), number and group.
•Press
→
2. Phone Book
→
1 Find Entry
Note You can access this menu by pressing the key in
standby mode.
3.4.2 New Entry
This menu allows you to store a number with a name in your Phone
Book. You can save all the person's numbers, such as office number,
mobile number and home number, into one entry. In the phone's
memory, you can save 200 entries and each entry can contain up to 4
n u m b e r s .
3.4.2.1 Creating a New Entry in the Phone's Memory
•Press
→
2. Phone Book
→
2 New Entry
3.3.4 Missed Calls
This menu allows you to view the last 20 incoming calls that you failed
to answer if you are subscribed to the Caller Line Identification service.
•Press
→
1. Call History
→
4. Missed Calls
•You may place a call by pressing .
Tip 1 : Once you exceed the (total) 30-numbers or 20-numbers storage
limit, the oldest call history record is overwritten.
Tip 2 : Speed dialing a number in the Call History List is available.
•Select the number you want to call. Press to place a call.
Tip 3 : To see the details of the call, select the number you want to see.
→
Press .
*No Name Stored Name Display
* 0 1 4 9 1 3 3 5 5 9 3 Phone number
*05:23P Feb 01 The time of call connection
* 0 0 : 0 1 : 1 1 Call time used.
Tip 4 : To save the call from the list to a phone book, press
→
S e l e c t ' 1 . S a v e '
→
Press OK.
(If you need further information please refer to 2.12.1.1 Saving
Numbers in Your Personal Phone Book on page 29 )
Tip 5 : To delete the call from the list, select the call you want to delete.
→
Press
→
Press
→
Select ▣Y e s
3.3.5 Call Timer
This menu allows you to view call time you use.
3.3.6 Call Memo
Used to save a phone number the other party tells you during a call,
without writing it down. The phone number saved in [Menu]
→
1. Call
History
→
6 Call Memo
40 41
CDMA2000 1X RTT WLL Model : AP SeriesCDMA2000 1X RTT WLL Model : AP Series
Aiji System Co.,Ltd. Aiji System Co.,Ltd.
Memory Statu
Pho 004/200 The number of memory in the phone
Card 000/200 The number of memory in RUIM card
3.4.5 Phone Information
This option allows you to view your own phone number and software
version of your phone.
•Press
→
2. Phone Book
→
5 Phone Info
<< Phone Info >>
1 My Phone #
2 S/W Version
3.5 Message
Text message and voice message become available as soon as the
power is on. You can also send text and voice messages.
When the phone receives a new message, an alert sounds and a text
notification displays along with the name and the phone number of the
caller, if available. The New Message icon ( ) remains on the screen
until the new messages have been read or the new voice messages have
been listened.
You can access this menu by pressing the key in standby mode. In
addition, you can make a call to the call back number by pressing the
key during message check.
The phone can store up to 50 text messages at Inbox with 160
characters per message.
3.5.1 Inbox
Your phone can store up to 50 messages in the Inbox. If the memory is
1) Enter Name (16 characters)
→
Press
→
Enter mobile phone
number (16chr)
→
Press
→
Enter home phone number
→
Press
→
Enter office phone number
→
Press
→
Enter other phone
number
→
Press .
2) You may select group and the desired ID ring type using
and key.
Note 1
Group : No Group/Family/Friend/Office/Other/No Group
Note 2 Ring type : 31 ring tones and melodies
3) To save new entry, press and then select the primary number
among the numbers you enter
3.4.2.2 Storing Phone Numbers at Call History
To store a phone number at the end of your call:
•Press
→
1. Call History
→
1 Recent Calls
→
Save / Delete
3.4.3 Edit Group
This menu allows you to edit the settings (Phone numbers, ring type
and group) for the caller group.
•Press
→
2. Phone Book
→
3 Edit Group
1) Select the group you want to edit
→
Press
→
Display name of
group
→
If correct, press . If not, press to go back group
selection status.
2) Select the entry you want to edit and press
→
Press
→
Select [1. Edit / 2. Delete / 3. Cancel] with key.
3.4.4 Memory Status
This menu shows you how many Phone Book entries are empty.
•Press
→
2. Phone Book
→
4 Memory Status.
43
CDMA2000 1X RTT WLL Model : AP Series
Aiji System Co.,Ltd.
3.5.2.1 How to write a Text
At many times when you using your phone, you will need to enter text;
such as when storing a name in Phone Book, sending Text Message.
You can enter alphanumeric characters into your phone using your
phone's keys.
1) Press key to change the input method, abc / 123 / Symbol
2) Press to change input method, ab / AB.
3.5.3 Outbox
This message box is used to store the messages that you have already
sent or you failed to send. Up to 20 sent messages can be stored in the
Outbox. Users may view lists and contents of sent messages or
failed messages in this menu.
•Press
→
3. Message
→
3 Outbox or Press
→
3 Outbox
•If you want it to view the details of stored message, select one of
messages listed and press .
3.5.4 Delete Messages
Using this menu, you can delete all of the messages in each message
box; 1 Inbox and 2 Outbox. You can also delete all of the messages at
one time by selecting 3 All. Locked messages are not erased.
•Press
→
3. Message
→
4 Delete Msg or Press
→
4
Delete Msg
3.5.5 Message Settings
Using this menu, you can set up various options for using the messaging
f e a t u r e s .
*
42
CDMA2000 1X RTT WLL Model : AP Series
Aiji System Co.,Ltd.
full, a warning message displays and the phone deletes the old
messages to receive new ones.
Note 1 If your phone support R-UIM, you can store more messages into
your phone. The number of messages is depended on the
capability of R-UIM card.
Note 2
Store capacity of voice message depends on your carrier's service
capability. Please check how many voice messages can be stored
before using.
•Press
→
3. Message
→
1 Inbox or Press
→
1 Inbox
Ex) 01/03: '01' means the number of new messages.
'03' means the number of total messages stored.
•If you want it to view the details of stored message, select one of
messages listed and press .
3.5.2 Write Message
You can create short text messages and send it to other (mobile)
p h o n e s .
1) Enter a destination number by using the numeric keys up to 10
multiple destinations.
Press key allows you to search your Phone Book for a number.
2) When you are finished entering the destinations, press the key.
3) Write the message.
4) When you have finished, press .
5) Call back number is displayed. You can edit call back number using
key and numeric keys.
< Inbox >
1 Card 0 0 / 0 0
2 Phone 0 1 / 0 3
3 Voice Msg
45
CDMA2000 1X RTT WLL Model : AP Series
Aiji System Co.,Ltd.
This option allows you to be certain the message transmission has gone
t h r o u g h .
3.5.5.6 Store Message
This option is used for phone using R-UIM.
R-UIM phone : Card Only / Phone Only / C a r d - > P h o n e
No R-UIM phone : "Insert uim card please"
3.6 Sound
You can use the sounds menu to customize various sound settings,
such as the:
•
Ringer type, volume and tone.
•
Alert and tones
•
Volume for earpiece, ring and keypad.
3.6.1 Ring To n e s
This menu allows you to set unique ring and melody tones. When you
make a new entry in a Phone Book menu, you can select one of these
ring tones.
•Press
→
4. Sound
→
1 Ring Tones or Press
→
1 Ring
T o n e s
•
You may select 31 ring tones.
3.6.2 Alerts/To n e s
Your phone gives audible alerts (beeps) at specified times to inform you
that certain things have happened. Any of the four Alert options could
be turned on or off.
•Press
→
4. Sound
→
2Alerts/Tones or Press
→
2
A l e r t s / T o n e s
44
CDMA2000 1X RTT WLL Model : AP Series
Aiji System Co.,Ltd.
•Press
→
3. Message
→
5 Msg Settings o r Press
→
5
Msg Settings
3.5.5.1 Display Message
This menu allows you to select the display type for a new message.
Notify: Notify when the message is arrived.
Direct View: Display received message including message
i n f o r m a t i o n .
3.5.5.2
Auto Save
This menu allows you to select save method for transmitted messages
in the Outbox.
Prompt: The phone asks whether or not you want to save the
m e s s a g e .
Auto Save: The phone automatically saves the message.
Do not Save: The phone does not save the message.
3.5.5.3 Auto Delete
With this feature on, old messages are automatically deleted when you
exceed storage limit.
3.5.5.4 Font Size
This option allows you to select font size for your convenience when you
read and write message.
Font 8_16: 4-line display
Font 8_8: 8-line display
3.5.5.5 Delivery Acknowledgement
47
CDMA2000 1X RTT WLL Model : AP Series
Aiji System Co.,Ltd.
3.7 Phone Setting
Many different features of your phone can be customized to suit your
p r e f e r e n c e s .
3.7.1 Hot Line
•Press
→
5. Phone Setting
→
1 Hot Line
→
Yes / No
•
You can set number and delay time.
Examples) "911", "100", or your home telephone number
3.7.2 Alarm Clock
This option allows you to set an alarm to ring at a specific time.
•Press
→
5. Phone Setting
→
2 Alarm Clock
To set an alarm:
1) Select an alarm, Alarm 1 through Alarm 3, and press the key.
2) Enter the time for the alarm to ring by using the numeric keys
and press key.
3) Select On by pressing the or key and press key.
4) Select an alarm type by pressing the or key and press
k e y .
•
Alarm type: Once / Daily / Weekdays only / Weekends
5) Select an alarm melody by pressing . You may select 5 types
alarm bells.
3.7.3 Language
This phone support English and one another language.
•Press
→
5. Phone Setting
→
3 Language
46
CDMA2000 1X RTT WLL Model : AP Series
Aiji System Co.,Ltd.
3.6.2.1 No Service
When this option is set to on, the phone sounds an alert when you are
not in or leave a service area.
•
Off / On
3.6.2.2 Minute Minder
When this option is set to on, the phone sounds an alert before the end
of every minute during a call.
•
Off / 1 Minute
3.6.2.3 Connect To n e
When this option is set to on, the phone sounds a connect tone when
your call is connected to the system.
•
Off / Tone 1 ~ Tone 4
3.6.2.4 Disconnect
When this option is set to on, the phone sounds a disconnect tone when
a call is disconnected.
•
Off / Tone 1 ~ Tone 4
3.6.3 Vo l u m e
This menu allows you to adjust the ring volume.
•
Press
→
4. Sound
→
3 Volume or Press
→
3 Volume
•
Earpiece Volume: Level 1 ~ Level 4
•
Ring Volume: Level 1 ~ Level 4
•
Keypad Volume: Level 0 ~ Level 4
49
CDMA2000 1X RTT WLL Model : AP Series
Aiji System Co.,Ltd.
- - 3.8.2 Change Code
This menu allows you to enter a new four-digit lock code number.
•Press
→
6. Security
→
2 Change Code
3.8.3 Restrict
This menu allows you to restrict the following items.
•
Incoming Call / Outgoing Call / Messages / Phone Book
•
Press
→
6. Security
→
3 Restrict
3.8.4 Reset Phone
This feature has two options.
•
Press
→
6. Security
→
4 Reset Phone
3.8.4.1 Reset Settings.
This option allows you to reset preference settings.
3.8.4.2 Reset All
This option allows you to reset all settings and savings.
3.8.5 PIN (RUIM support model only)
•
PIN Check
When this feature is enabled, you must enter the PIN assigned to your
R-UIM each time you switch the phone on. Consequently, any person
who does not have your PIN cannot use your phone without your
approval. But emergency calls are available by pressing the key
without the PIN code.
48
CDMA2000 1X RTT WLL Model : AP Series
Aiji System Co.,Ltd.
3.7.4 Font Select
This menu allows you to select one among three font options (English
and 4-line display only).
•Press
→
5. Phone Setting
→
4 Font Select
•
Font 1 / Font 2 / Font 3
3.7.5 LCD Contra s t
This menu allows you to adjust the brightness of the LCD screen to see
them better in different lighting conditions.
To adjust the contrast:
1 )
Press
→
5. Phone Setting
→
5 LCD Contrast
→
Press the
k e y .
2) Adjust the contrast value by pressing or key.
3.8 Security
Your phone provides you with many security options, including a user-
programmable lock code and call restriction features.
To access the Security menu, you must enter the lock code. The lock
code is preset to "0000" at the factory.
3.8.1 Lock Phone
With this feature on, keeps your phone from unauthorized use. Once
the phone is locked, it is in restricted mode, until the lock code is
entered. This will allow you to receive phone calls and still make
emergency calls.
•Press
→
6. Security
→
1 Lock Phone
•
Lock / Unlock

50
CDMA2000 1X RTT WLL Model : AP Series
Aiji System Co.,Ltd.
Note : After enabling or disabling the PIN Check feature, you must
enter your PIN.
•
Change PIN
This feature allows you to change the PIN of the R-UIM to a new one,
provided that the PIN Check feature is enabled. You must enter the
current PIN before you can specify a new one.
•
R-UIM Lock
When this feature is enabled, your phone only works with the current
R-UIM. To use a different card, you need to enter the R-UIM lock code.
Once you have entered the lock code, you are asked to confirm it by
entering it again.
To unlock the R-UIM, you must enter the R-UIM lock code.
3.9 Data Servi c e
Your phone provides Data and PC Fax service. It is capable of
transmitting and receiving Data through a wireless path by being
connected to a laptop or desktop PC.
The following services are available.
•
Packet Data Service
- FTP, Internet, Intranet, LAN, E-Mail etc.
•
PC Fax Service
- Wireless Fax transmit/receive using the Winfax or Hotfax.
Note : In case of using USB to serial cable to connet the data
service,you may not connect with Internet service without DC
a d a p t o r .
51
CDMA2000 1X RTT WLL Model : AP Series
Aiji System Co.,Ltd.
Tx : 824~849MHz
Rx : 869~894MHz
Tx : 1850~1910MHz
Rx : 1930~1990MHz
Appendix A. Specification
Frequency Range
External Dimension
W e i g h t
A d a p t o r
B a t t e r y
Standby Time
Talk Time
AP-100/110
A P - 2 0 0 / 2 1 0
1 6 8 ( W ) X 1 8 9 ( L ) X 5 6 ( H ) m m
750g (With Back-up battery)
Input : AC 100~240V, 50/60Hz
Output : DC 5/12V, 1A
* You must check your output voltage!
Normal : 3.6V , 1,500 mAh
72hours (-83dBm/slot#2)
180Min (10dBm, Half Rate)
*Specifications are subject to change without Notice.

Safety Information
1 . SAFETY INFORMATION FOR FIXED WIRELESS TERMINALS
.POTE NTIALLY EXPLOSIVE ATMOSPHERES
Turn your phone OFF when in any area with a potentially explosive atmosphere
and obey all signs and instructions. Sparks in such areas could cauls e an
explosion or fire resulting in bodily injury or even death.
.
INTERFERENCE TO MEDICAL DIVICES
Certain electronic equipment may be shielded against RF signal from you wireless
phone. (pacemakers, Hearing Aids, and so on) Turn your phone OFF in health care
facilities when any regulations posted in these areas instruct you to do so.
RF signals may affect improperly installed or inadequately shielded electronic
system in motor vehicles.
.EXPOSURE TO RF ENERGY
Use only the supplied or an approved replacement antenna.
Do not touch the antenna unnecessarily when the phone is in use.
Do not move the antenna close to, or touching any exposed part of the body when
making a call.

SAR INFORMATION
THIS MODEL PHONE MEETS THE GOVERNMENT’S
REQUIREMENTS FOR EXPOSURE TO RADIO WAVES.
Your wireless modem is a radio transmitter and receiver. It is designed and manufactured not to
exceed the emission limits for exposure to radiofrequency (RF) energy set by the Federal
Communications Commission of the U.S. Government. These limits are part of comprehensive
guidelines and establish permitted levels of RF energy for the general population. The
guidelines are based on standards that were developed by independent scientific organizations
through periodic and thorough evaluation of scientific studies. The standards include a
substantial safety margin designed to assure the safety of all persons, regardless of age and
health. The exposure standard for wireless mobile phones employs a unit of measurement
known as the Specific Absorption Rate, or SAR. The SAR limit set by the FCC is 1.6 W/kg. *
Tests for SAR are conducted with the phone transmitting at its highest certified power level in all
tested frequency bands. Although the SAR is determined at the highest certified power level,
the actual SAR level of the phone while operating can be well below the maximum value. This is
because the phone is designed to operate at multiple power levels so as to use only the power
required to reach the network. In general, the closer you are to a wireless base station antenna,
the lower the power output. Before a phone model is available for sale to the public, it must be
tested and certified to the FCC that it does not exceed the limit established by the government
adopted requirement for safe exposure. The tests are performed in positions and locations (e.g.,
at the ear and worn on the body) as required by the FCC for each model. The highest SAR
value for this model when tested for use at the when worn on the body, as described in this user
guide, is 1.15 W/Kg . (Body-worn measurements differ among models, depending upon
available accessories and FCC requirements). While there may be differences between the
SAR levels of various and at various positions, they all meet the government requirement for
safe exposure. The FCC has granted an Equipment Authorization for this model with all
reported SAR levels evaluated as in compliance with the FCC RF exposure guidelines. SAR
information on this model is on file with the FCC and can be found under the Display Grant
section of http://www.fcc.gov/ oet/fccid after searching on FCC ID: S3FAP-100 .
Additional information on Specific Absorption Rates (SAR) can be found on the Cellular
Telecommunications Industry Association (CTIA) web-site at http://www.wow-com.com.
* In the United States and Canada, the SAR limit for mobile phones used by the public is 1.6
watts/kg (W/kg) averaged over one gram of tissue. The standard incorporates a sub-stantial
margin of safety to give additional protection for the public and to account for any variations in
measurements.

SAFETY INFORMATION FOR RF EXPOSURE
Body worn operation
This device was tested for typical body-worn operations with the back of the phone
kept 25 mm. from the body. To maintain compliance with FCC RF exposure
requirements, use only belt-clips, holsters or similar accessories that maintain a 25 mm.
separation distance between the user’s body and the back of the phone, including the
antenna. The use of belt-clips, holsters and similar accessories should not contain
metallic components in its assembly. The use of accessories that do not satisfy these
requirements may not comply with FCC RF exposure requirements, and should be
avoided.
FCC Compliance Information
This device complies with Part 15 of FCC Rules.
Operation is subject to the following two conditions:
(1) This device may not cause harmful interference, and
(2) This device must accept any interference received.
Including interference that may cause undesired operation.
U.S.A.
U.S.FEDERAL COMMUNICATIONS COMMISSION
RADIO FREQUENCY INTERFERENCE STATEMENT
INFORMATION TO THE USER
NOTE : This equipment has been tested and found to comply with the limits for a Class B
digital device pursuant to Part 15 of the FCC Rules.
These limits are designed to provide reasonable protection against harmful Interference in
a residential installation This equipment generates, uses, and can radiate radio frequency
energy and, if Not installed and used in accordance with the instructions, may cause
harmful Interference to radio communications. However, there is no guarantee that
interference will not occur in a particular Installation. If this equipment does cause harmful
interference to radio or television reception, which can be determined by turning the
equipment off and on, the user is encouraged to try to correct the interference by one or
more of the following measures:
z Reorient or relocate the receiving antenna.
z Increase the separation between the equipment and receiver.
z Connect the equipment into an outlet of a circuit different from that to which
the receiver is connected.
z Consult the dealer or an experienced radio/TV technician for assistance.
Changes or modification not expressly approved by the party responsible for Compliance
could void the user’s authority to operate the equipment. Connecting of peripherals requires
the use of grounded shielded signal cables.

CDMA2000 1X RTT Fixed Wireless Telephone
Quick Start Guide & User’s Manual
Made in KOREA
AIJI SYSTEM CO., LTD.
“Licensed by QUALCOMM Incorporated under one or more of following Patents :
4,901,307 5,490,165 5,056,109 5,504,779 5,101,501 5,778,338
5,506,865 5,109,390 5,511,073 5,228,054 5,535,239 5,710,784
5,267,261 5,544,196 5,267,262 5,568,483 5,337,338 5,659,569
5,600,754 5,414,796 5,657,420 5,416,797 ”