AISIN AW NA08A02 Car Navigation System with BT User Manual
AISIN AW CO., LTD. Car Navigation System with BT
AISIN AW >
Contents
- 1. User Manual Part 1
- 2. User Manual Part 2
- 3. User Manual Part 3
User Manual Part 3
OTHER FUNCTIONS
161
V573_E
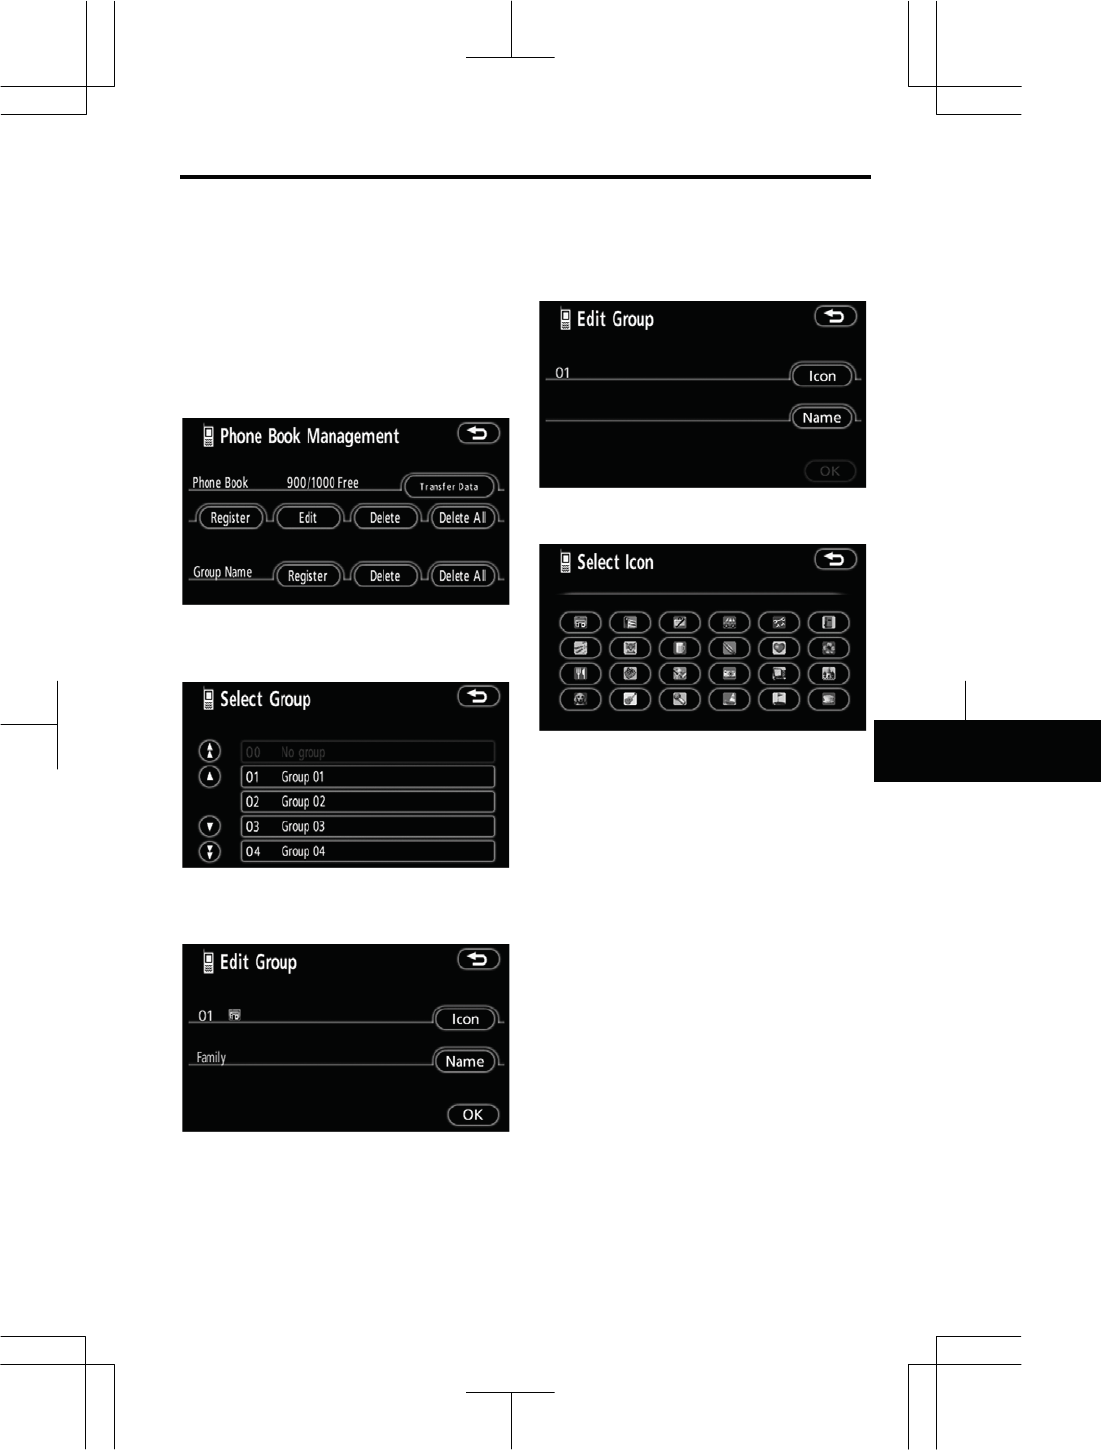
z Registering a group name
You can register 20 groups. “No
group”, “Group 01” - “Group 19” is
registered by default.
You can change “Group 01” - “Group
19” into desired names.
1. Touch “Register” of “Group
Name”.
2. Select the group you want to reg-
ister.
3. When you complete all the edit,
touch “OK”.
z Selecting a group icon
1. Touch “Icon”.
2. Select the desired icon.
OTHER FUNCTIONS
162
V573_E
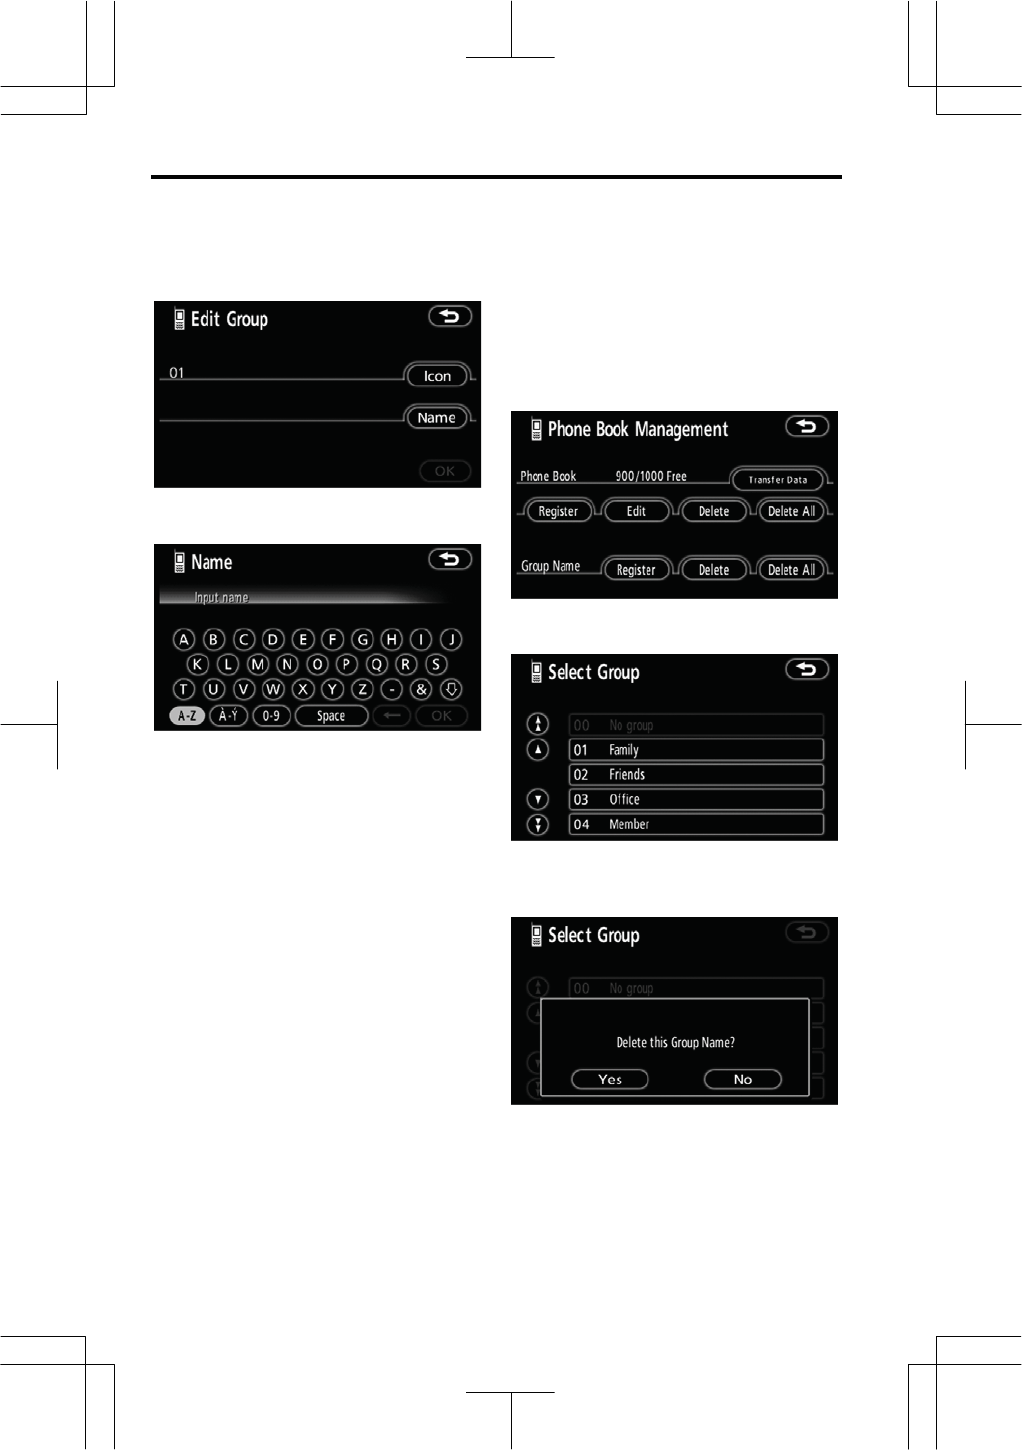
z Editing a group name
1. Touch “Name”.
2. Use the software keyboard to in-
put the name.
z Deleting a group name
You can delete the group names indi-
vidually or all at once. If you delete a
group name, that group will return to
the default setting (excluding “No
group”).
1. Touch “Delete” of “Group Name”.
2. Select the group you want to de-
lete the name of.
3. Touch “Yes”.
OTHER FUNCTIONS
163
V573_E
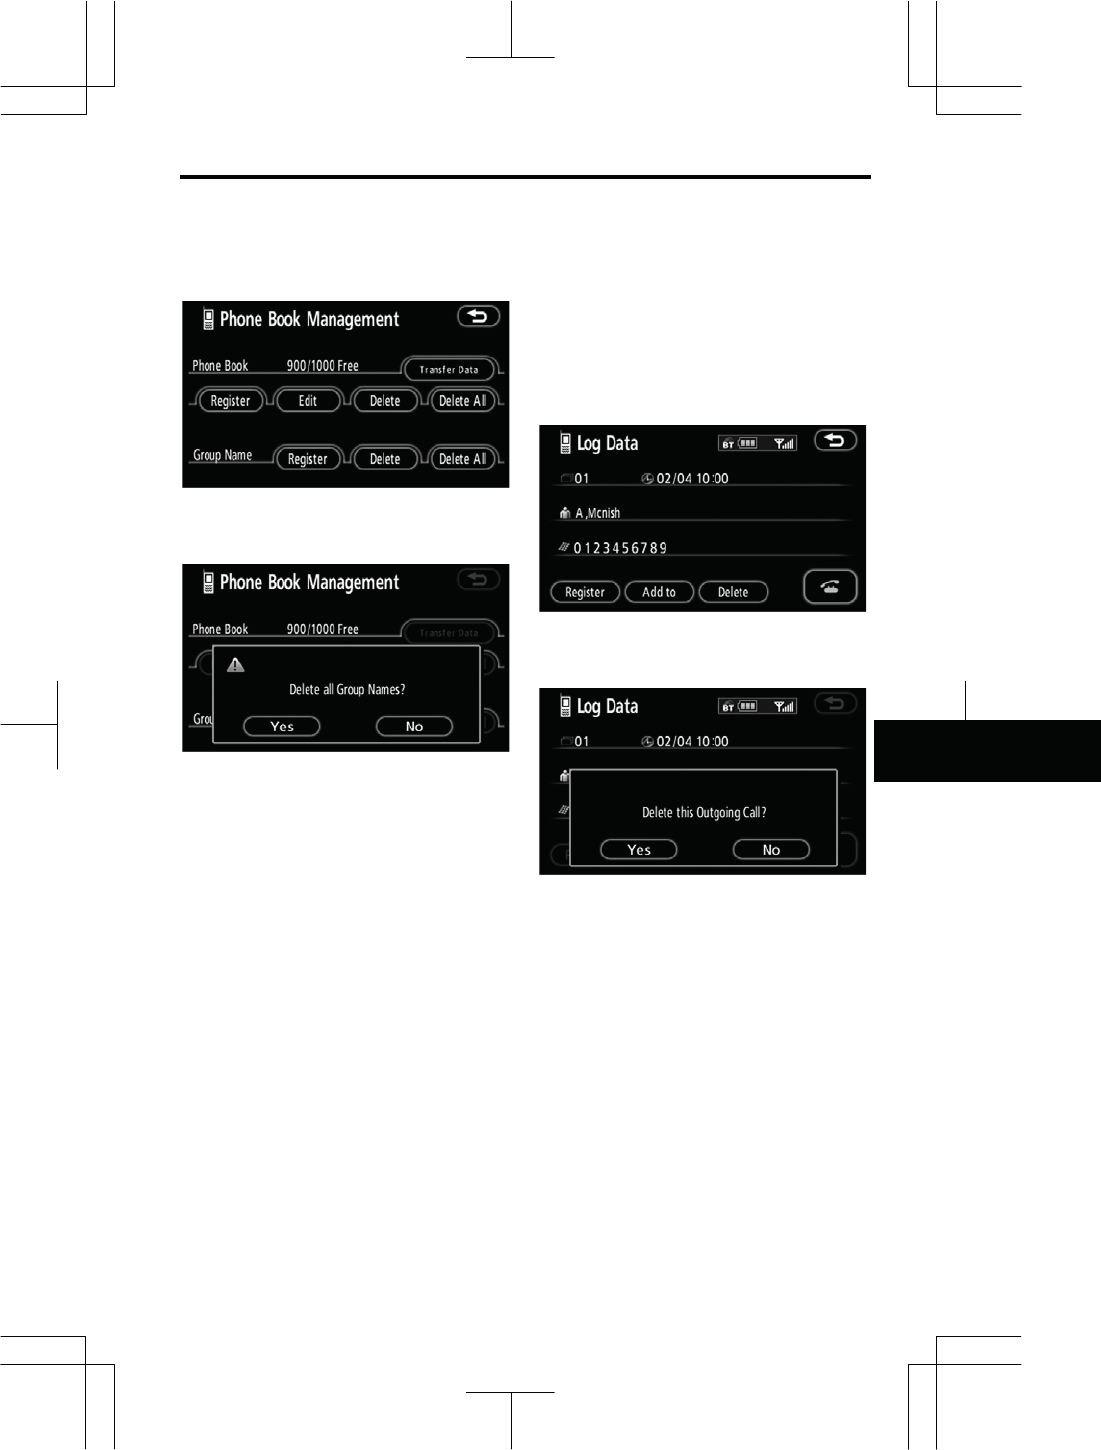
z Deleting all the group name
1. Touch “Delete All” of “Group
Name”.
2. Touch “Yes”.
z Deleting the log data
You can delete the log data individu-
ally or all at once.
When you release your car, delete all
the data on the system.
INDIVIDUALLY
1. Touch “Delete” on the “Log Data”
screen.
2. Touch “Yes”.
OTHER FUNCTIONS
164
V573_E
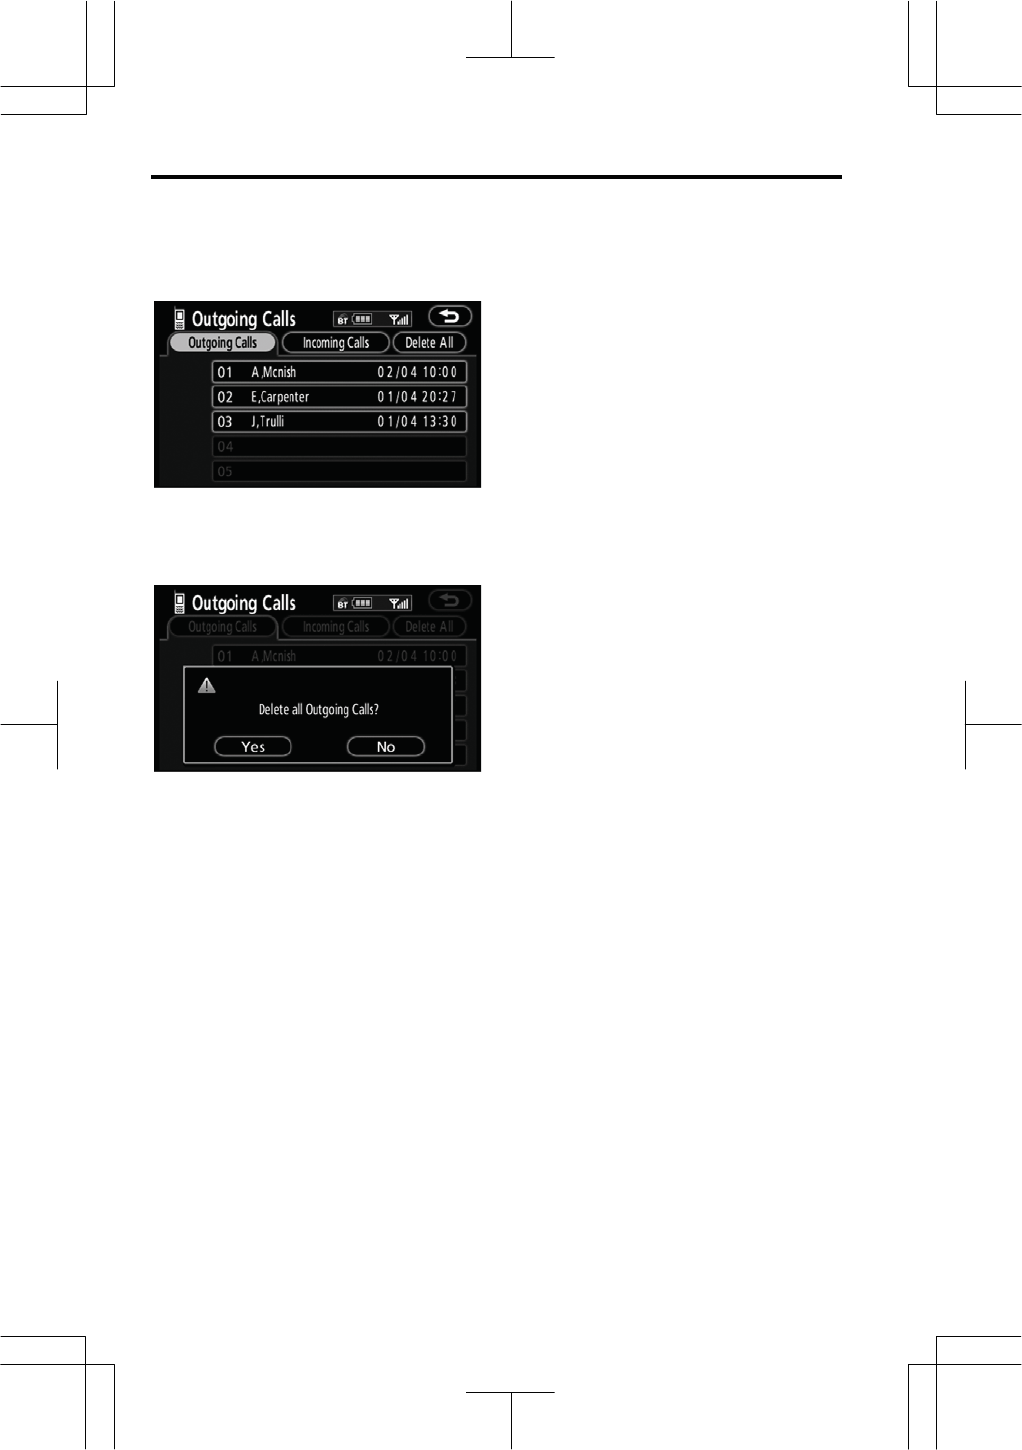
ALL AT ONCE
1. Touch “Delete All” on the “Out-
going Calls” or “Incoming Calls”
screen.
2. Touch “Yes”.
(f) Setting the security
When you set the security, you can
prevent people from using some
functions of the Hands-free system. It
is useful when you leave your car with
the hotel or you don’t want others to
see the data you registered.
When you set or unlock the security, you
have to input the security code. Be sure
to change the default code when you use
the security for the first time.
OTHER FUNCTIONS
165
V573_E
z Changing the security code
The security code is 4 digits and the
default is “0000”.
Change a new code that is hard for other
people to know.
When you change the security code,
don’t forget the code. The dealers cannot
unlock the security when you forget it.
If you forget the security code, initialize
your personal data. When you initialize
it, not only the phone book data but also
the memory points in the navigation
system, etc. will be deleted. (See “Ɣ
Initializing the security code” on page
161.)
1. Touch “Phone Book Lock”.
2. Touch “Change”.
3. Input the current code.
Each time you touchŻ, an inputted digit
is deleted.
4. Input a new code.
5. Touch “Yes”.
OTHER FUNCTIONS
166
V573_E
z Phone book Lock
When you set the phone book lock,
you can have the following functions
locked.
z Display of the phone book screen
and transferring, registering, editing,
deleting the phone book data.
z Display of speed dial screen, regis-
tering, deleting the speed dial and
speed dialing.
z Display of the other party’s name for
calls being received or made.
z Display of dialed numbers screen
and received calls screen, deleting
dialed numbers and received num-
bers.
z Display of phone information screen.
z Changing the security code.
When you set this function, the speed
dial screen is not displayed while you are
driving.
1. Touch “ON”.
2. Input the security code and touch
“OK”.
OTHER FUNCTIONS
167
V573_E
z Initializing the security code
You can initialize the settings.
1. Touch “Default”.
2. Input the security code and touch
“OK”.
3. Touch “Yes”.
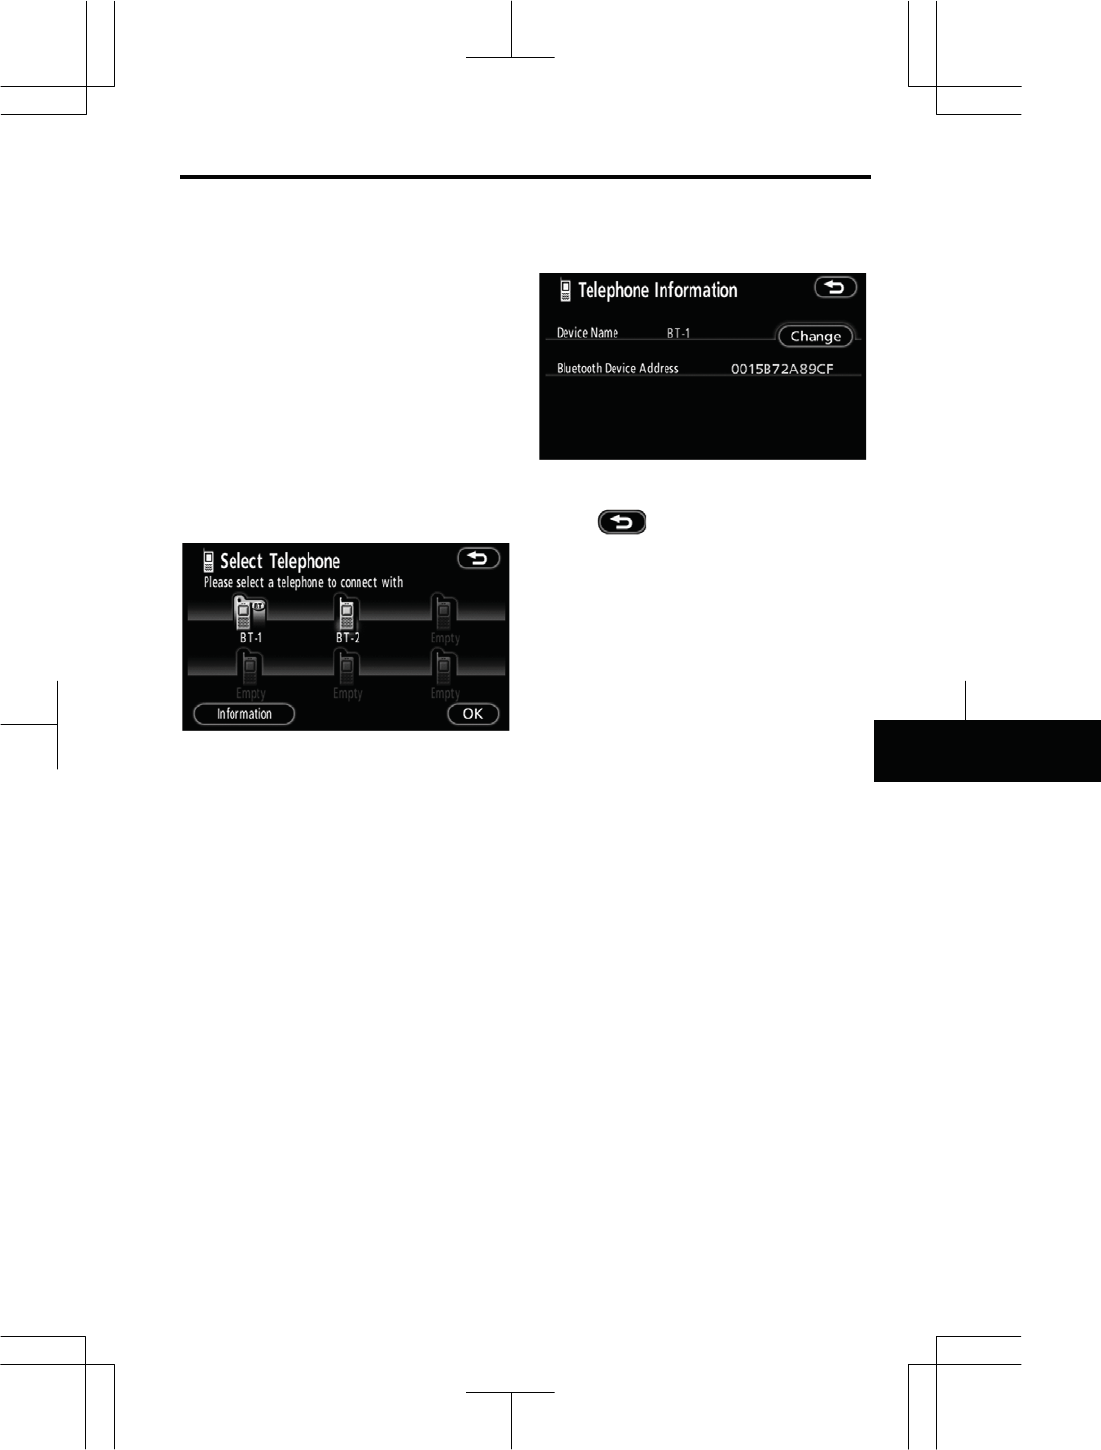
z Selecting a Bluetooth® phone
In case you register more than one
Bluetooth® phone, you need to
choose a favorite one.
1. Touch “Settings” to display the
“Settings” screen.
2. Touch “Select Telephone” to dis-
play the “Select Telephone” screen.
— Set a Bluetooth®
p
hone
OTHER FUNCTIONS
168
V573_E
You can select the Bluetooth® phone
from a maximum of 6 numbers.
“Empty” is displayed when you have not
registered a Bluetooth® phone yet.
Bluetooth® mark is displayed when you
choose the phone.
Although you can register up to 6 Blue-
tooth® phones in the system, only one
Bluetooth® phone can function at a time.
3. Touch “OK”.
When the result message is displayed,
you can use the Bluetooth® phone.
When another Bluetooth® phone is trying
to connect, this screen is displayed.
Touch “Yes” or “No”.
OTHER FUNCTIONS
169
V573_E
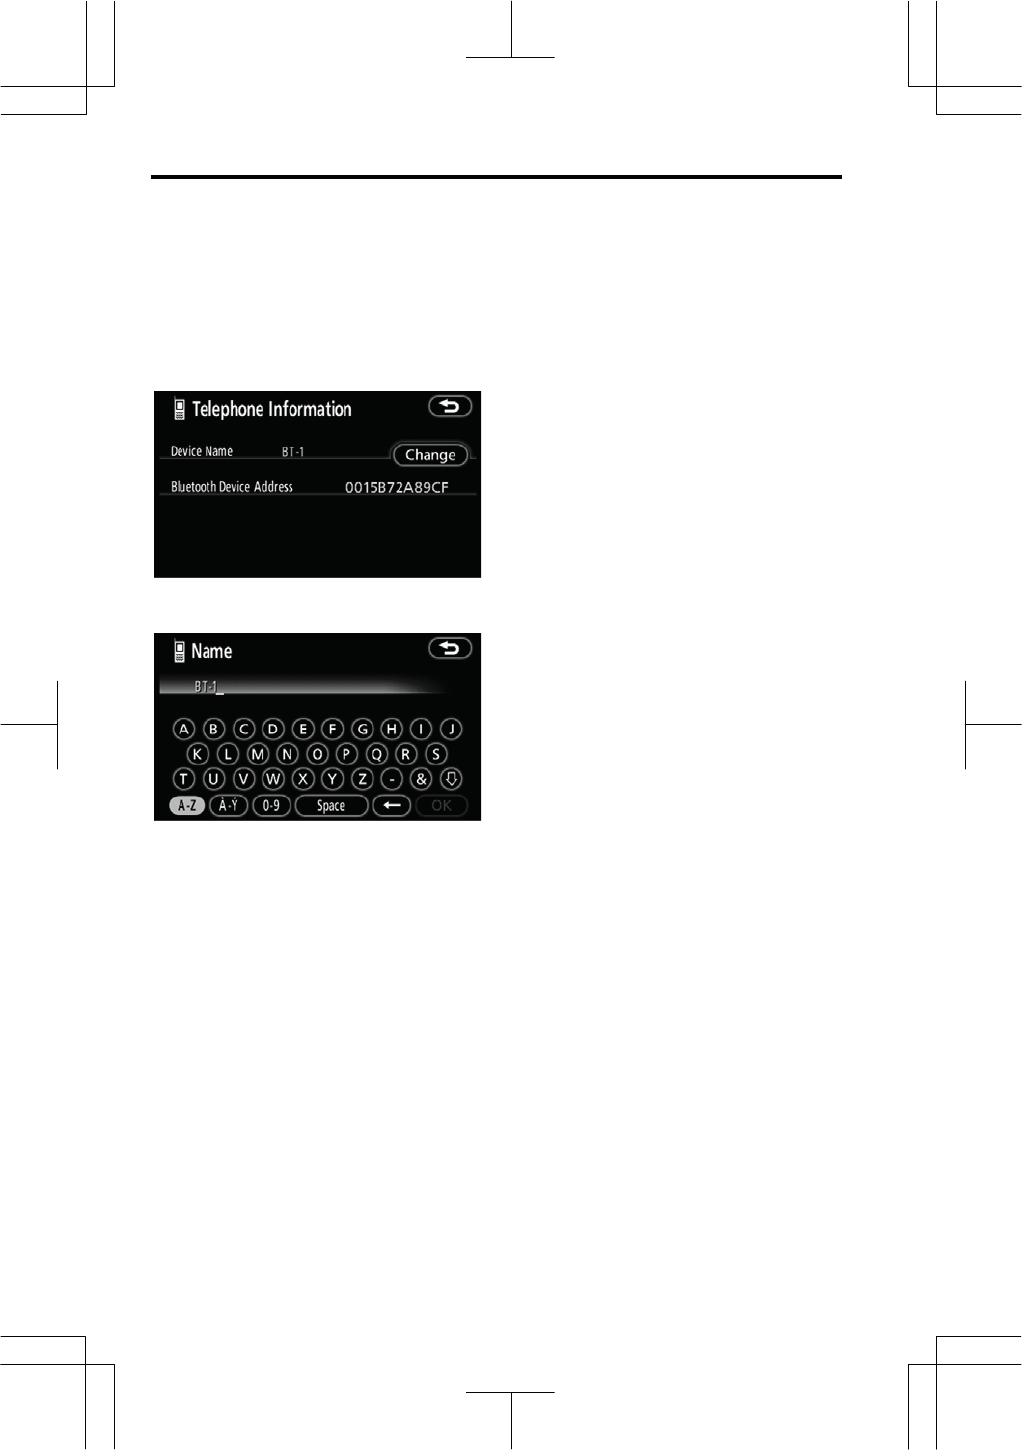
z Displaying Bluetooth® information
You can see or set the information of
the Bluetooth® phone on the system.
“Device Name”
....... The name of Bluetooth® phone
which is displayed on the
screen. You can change it into a
desired name.
“Bluetooth Device Address”
....... The address peculiar to the
system. You cannot change it.
1. Select the desired phone and
touch “Information”.
: Bluetooth is a registered trademark
of Bluetooth SIG. Inc.
2. When you complete confirming it,
touch .
OTHER FUNCTIONS
170
V573_E
z Changing a device name
You can change a device name. If you
change a device name, the name reg-
istered in your cellular phone is not
changed.
1. Touch “Change”.
2. Use the software keyboard to in-
put the device name.
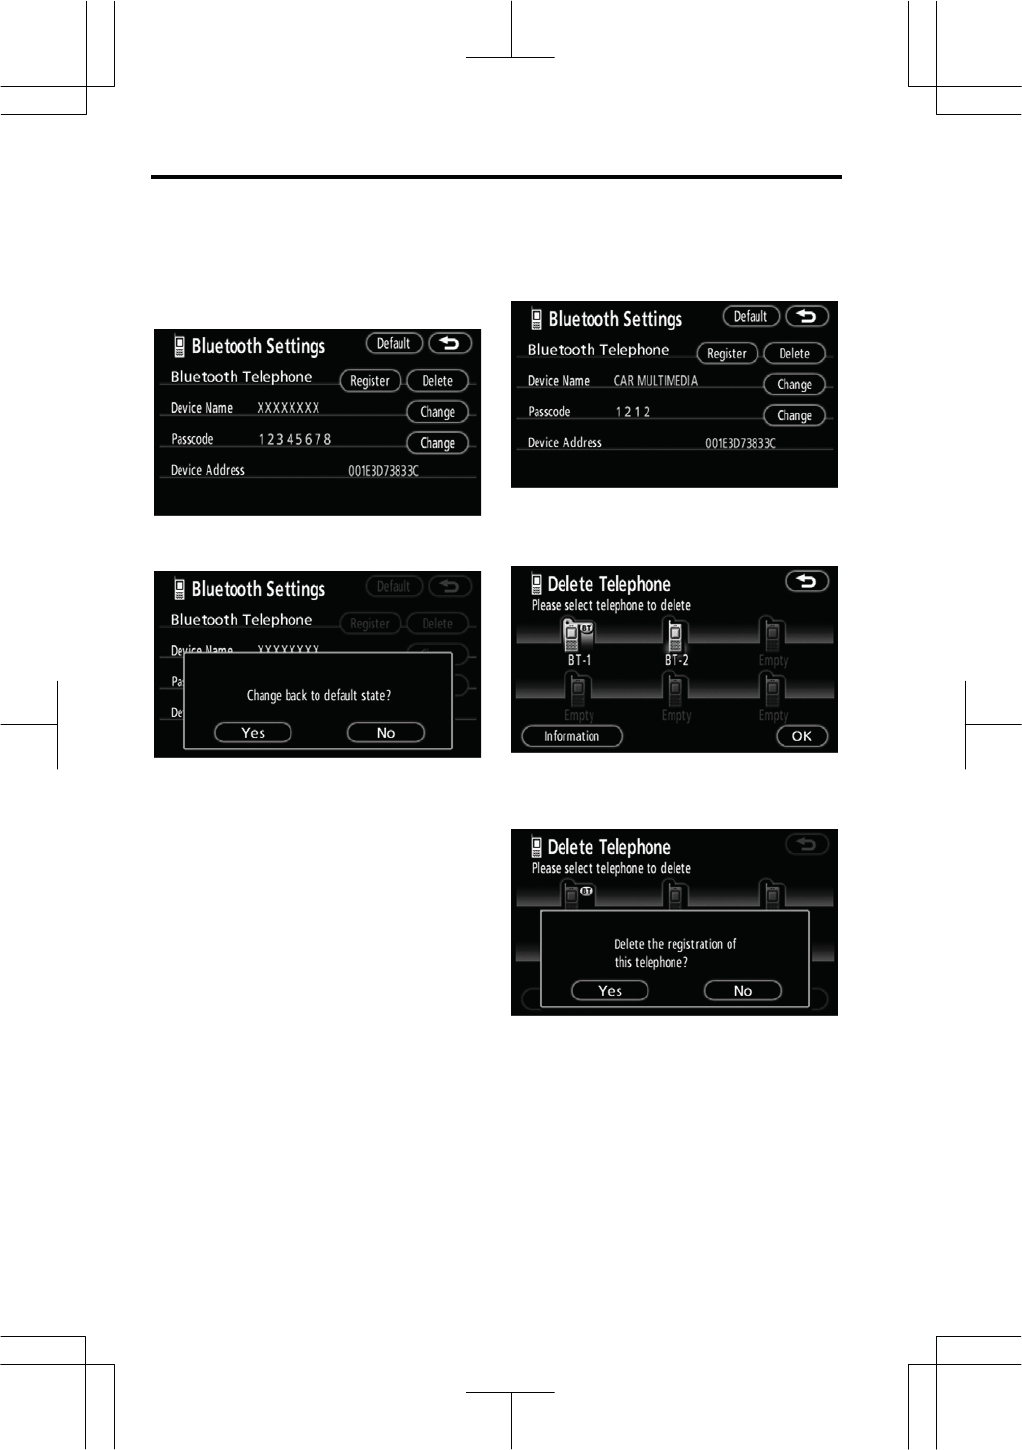
z Changing the Bluetooth® settings
You can change the display and settings
of Bluetooth® information on the system.
The information displays the following
items.
“Device Name”
....... The name in the Bluetooth®
network. You can change it.
“Passcode”
....... The password when you regis-
ter your cellular phone in the
system. You can change it into
the figure of 4-8 digits.
“Device Address”
....... The address peculiar to the
system. You can not change it.
If you have registered two
Bluetooth® phones with the
same device name or passcode
and you cannot distinguish one
from the other, refer to it.

OTHER FUNCTIONS
171
V573_E
When you change the device name or
passcode, do the followings.
1. Touch “Bluetooth”.
2. Touch “Change” of “Device
Name” or “Passcode”.
: Bluetooth is a registered trademark
of Bluetooth SIG. Inc.
3. Use the software keyboard to in-
put the device name.
You can input up to 20 characters.
4. Input a passcode with 4 - 8 digits.
When you touch Ż, the input number is
deleted.
OTHER FUNCTIONS
172
V573_E
z Initializing the Bluetooth® settings
You can initialize the settings.
1. Touch “Default”.
2. Touch “Yes”.
z Deleting a Bluetooth® phone
1. Touch “Delete” of “Bluetooth
Telephone”.
2. Select the telephone you want to
delete and touch “OK”.
3. Touch “Yes”.
: Bluetooth is a registered trademark
of Bluetooth SIG. Inc.
OTHER FUNCTIONS
173
V573_E
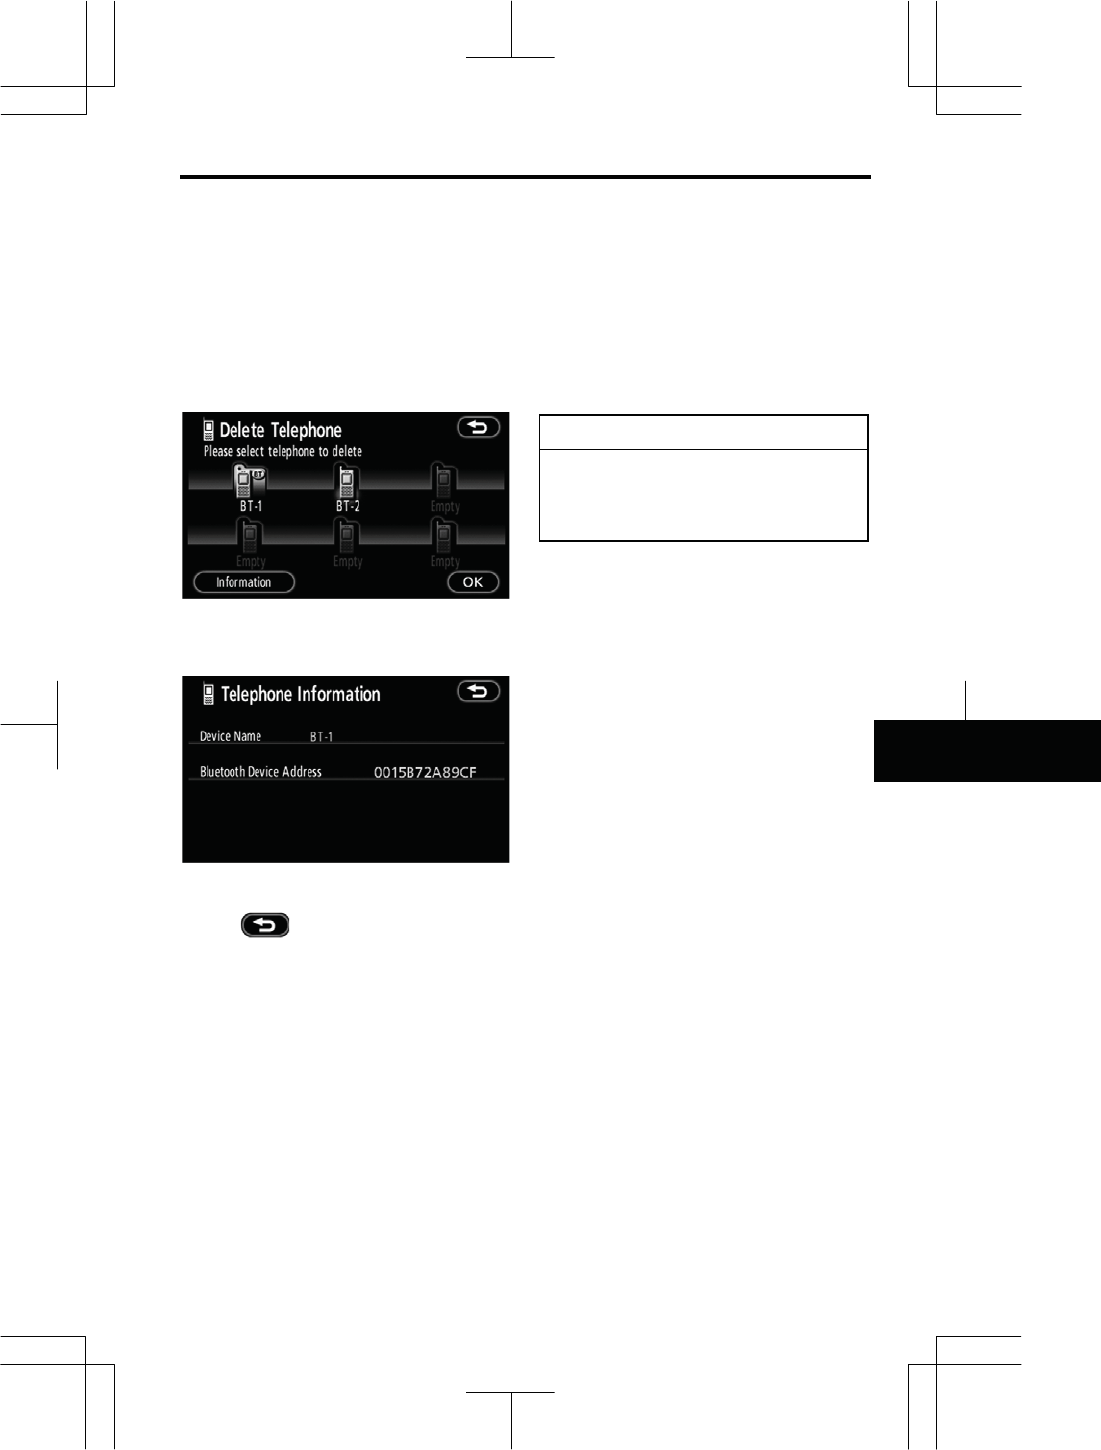
z Displaying the information of the
Bluetooth® phone you delete
You can display the information of the
Bluetooth® phone before you delete it
and you can make sure whether the
telephone you delete is correct or not.
1. Select the telephone you want to
display the information about.
2. When you complete confirming it,
touch .
The brightness and the contrast of the
screen can be adjusted depending on
the brightness of your surroundings.
You can also turn the display off. To
adjust the screen, see “z Brightness and
contrast adjustment” on page XX.
INFORMATION
If the display is adjusted when the
navigation screen is displayed, the
audio function button display screen
will also be adjusted.
Screen ad
j
ustment
OTHER FUNCTIONS
174
V573_E
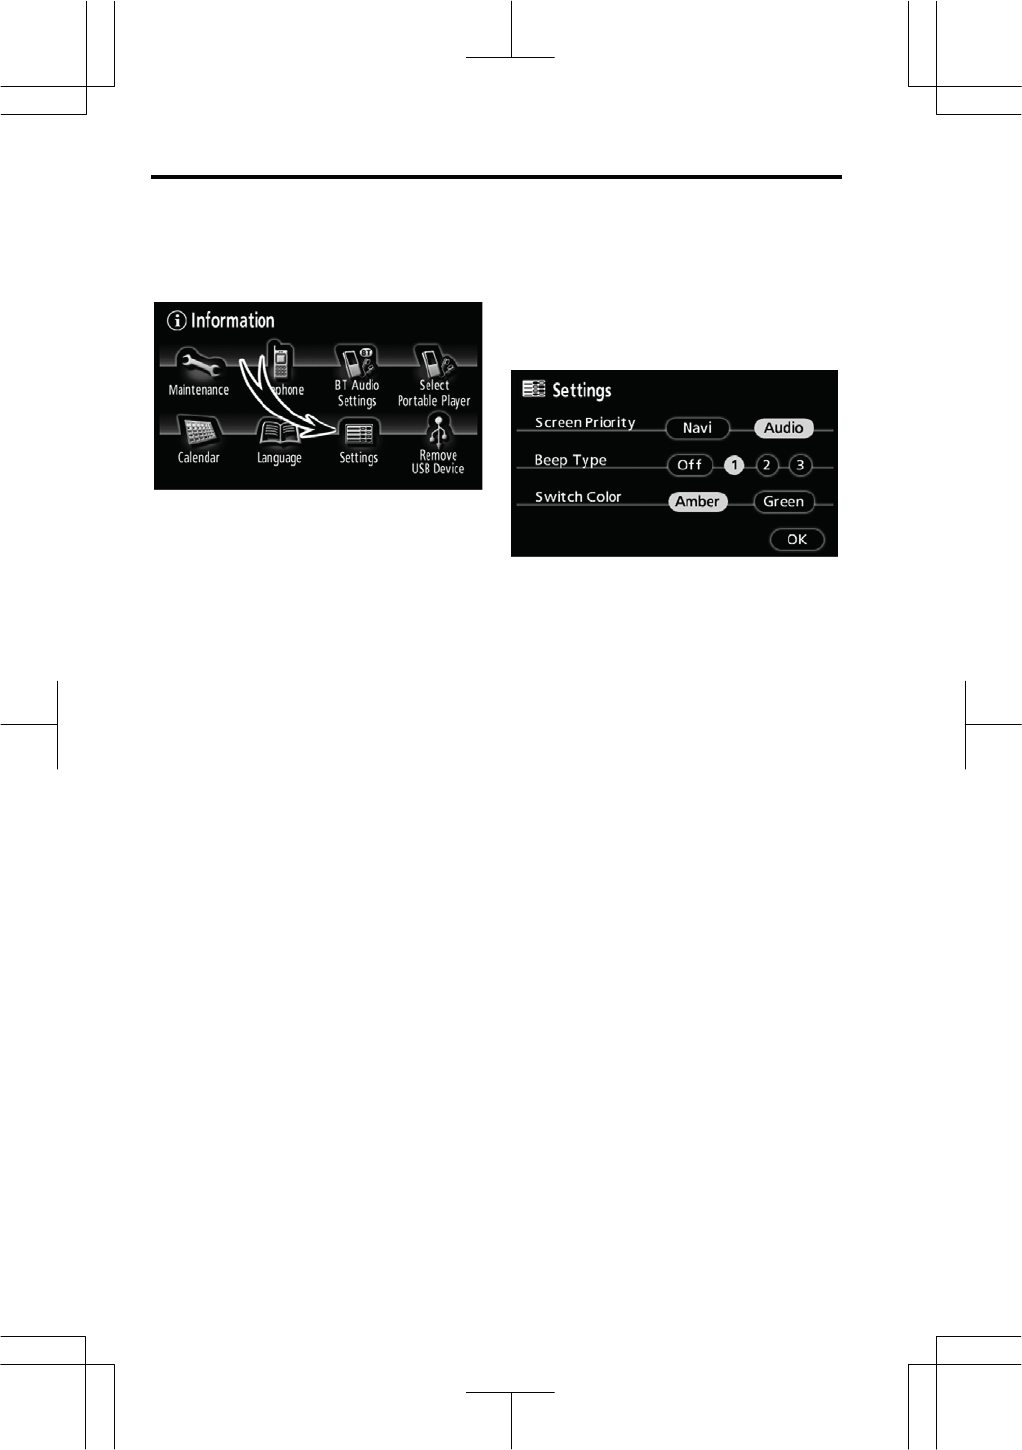
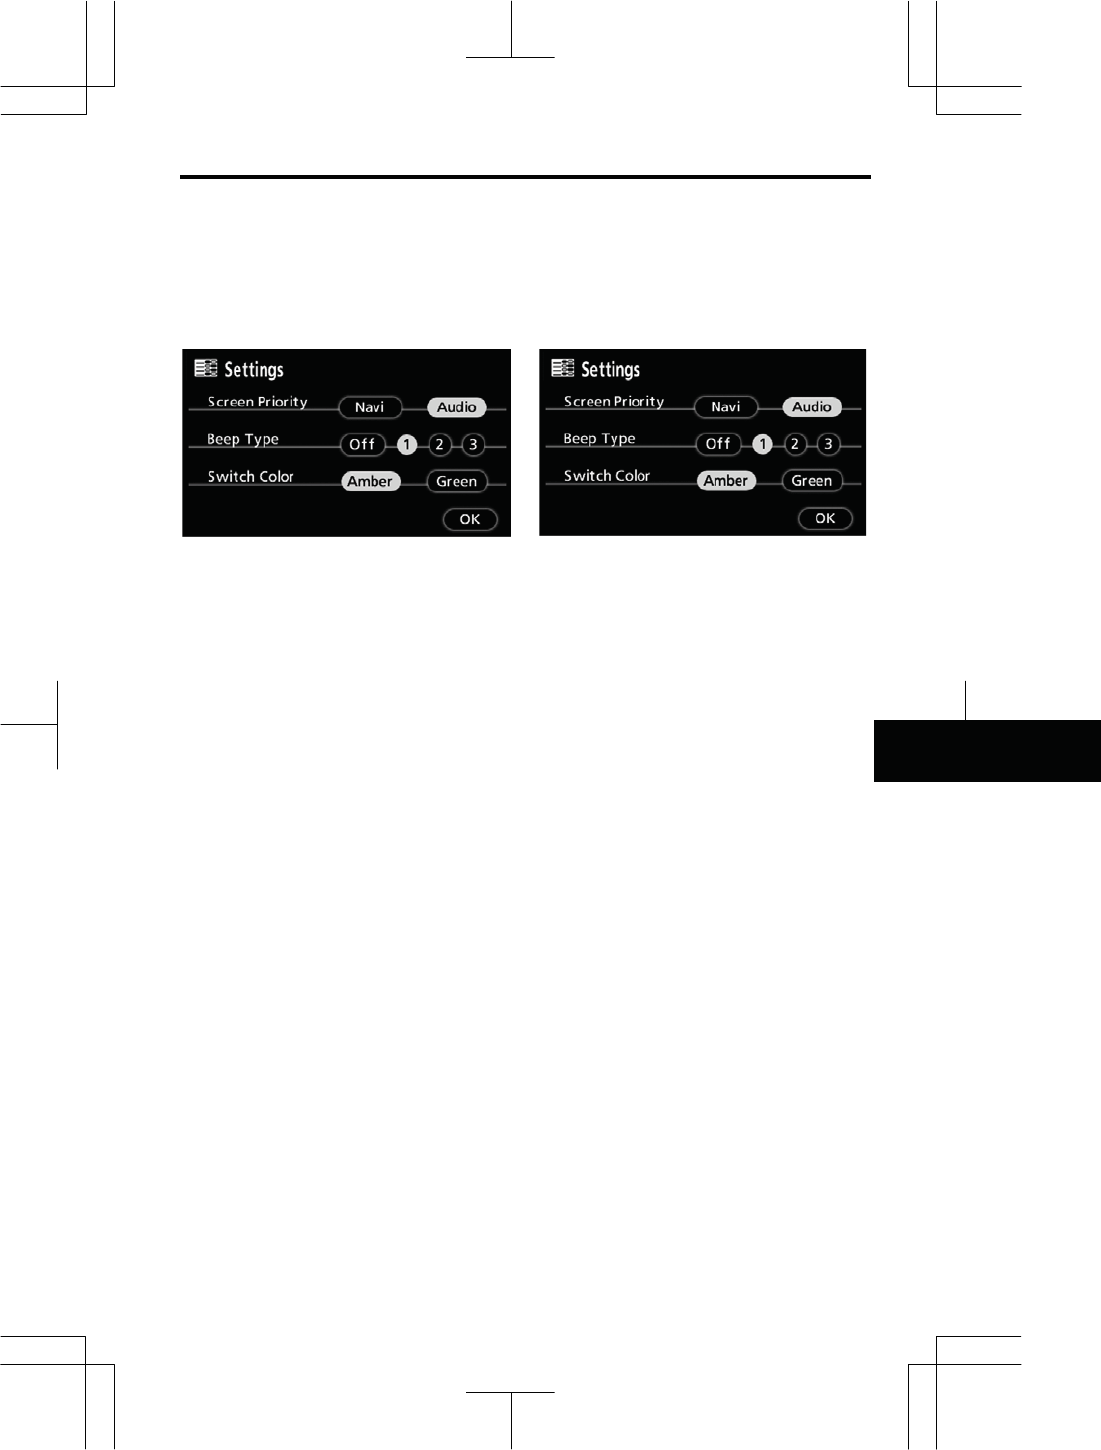
1. Push the “INFO” button.
2. Touch “Settings”.
(a) Screen priority
You can select a function that enables
automatic return to the navigation screen
from the audio screen.
Select “Navi” or “Audio” and then
touch “OK”.
“Navi”: The navigation screen auto-
matically returns from the audio screen
20 seconds after the end of audio screen
operation.
“Audio”: The audio screen remains on.
Settin
g
s
OTHER FUNCTIONS
175
V573_E
(b) Beep type
The beep sound type can be changed or
switched off.
Select “Off”, “1”, “2” or “3” and then
touch “OK”.
You can select the desired beep sound
type by touching the appropriate number.
If no beep sound is needed, touch
“OFF” to disable the feature.
When selected, the number or “OFF”
will be highlighted.
(c) Switch color
You can select the color of the touch
screen buttons.
Select “Amber” or “Green” and then
touch “OK”.
OTHER FUNCTIONS
176
V573_E
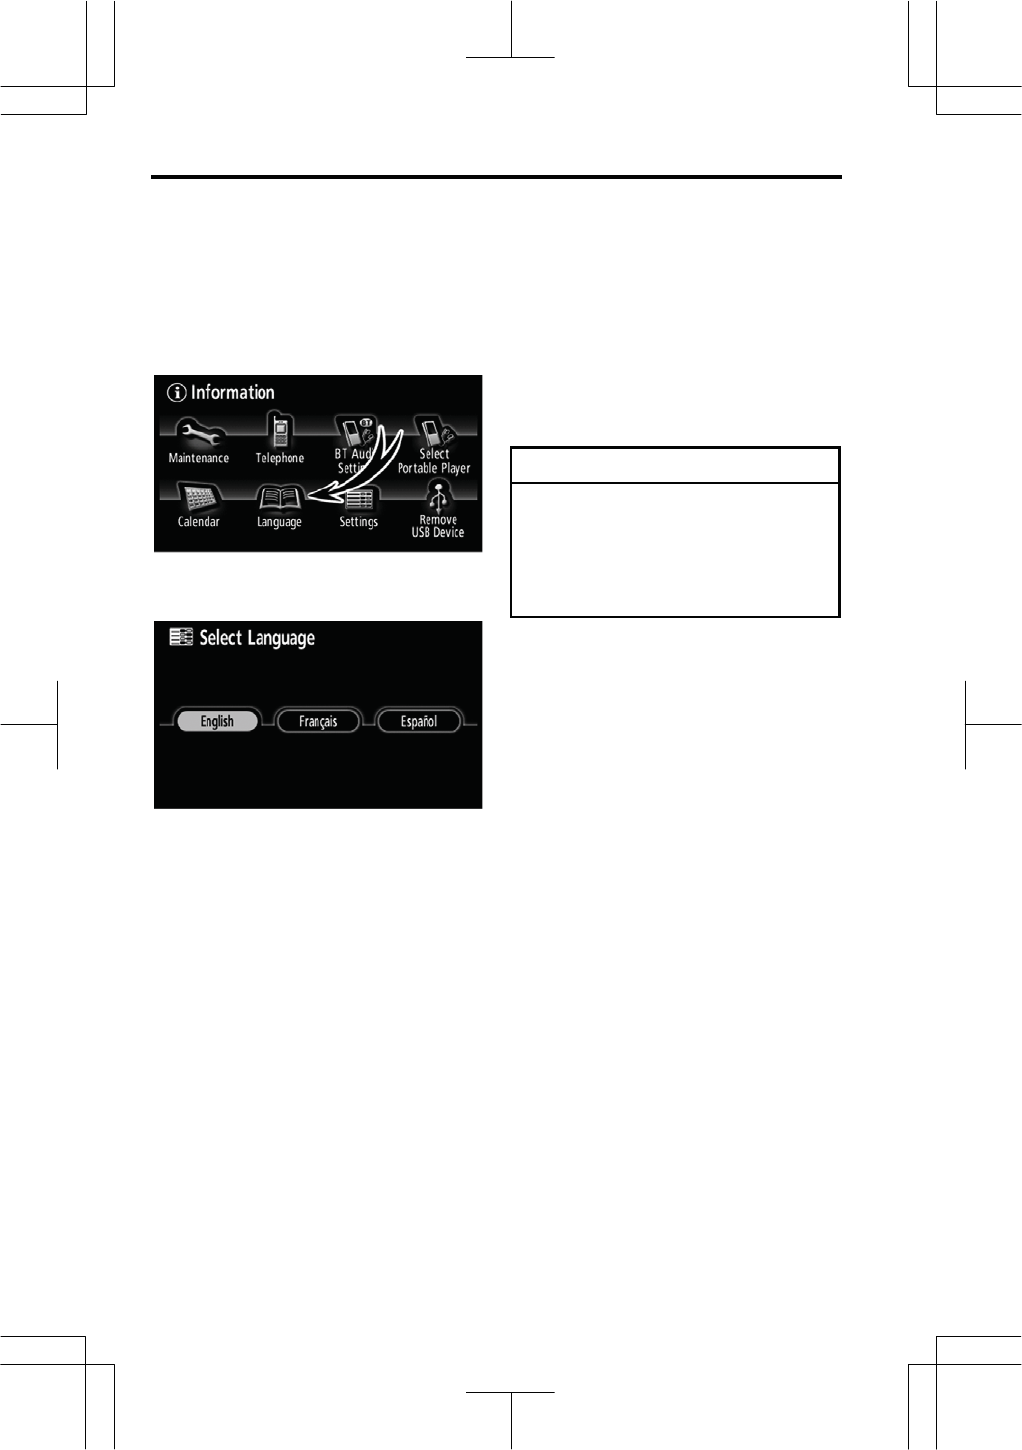
The language of the touch screen
buttons, popíup messages and the
voice guidance can be changed.
1. Push the “INFO” button.
2. Touch “Language”.
3. Touch “English”, “Français” or
“Español” to select a language.
The language is changed and the screen
returns to the map display.
A commercially available rear view
camera can be used by connecting it
to the RCA Relay Cable's RCA termi-
nals.
For further information and operation
procedures, refer to the device's
manual.
NOTICE
When connecting a rear view cam-
era, always use the vehicle wire
harness's ACC connector as the
power source. The rear view camera
may not work properly if any other
power source is used.
Select lan
g
ua
g
e Rear view camera s
y
stem

AUDIO/VIDEO SYSTEM
177
V573_E
SECTION 6
AUDIO/VIDEO SYSTEM
z Quick reference ················································································ 174
z Using your audio/video system ···················································· 175
Some basics ·················································································· 175
Screen adjustment ·········································································· XX
Radio operation·············································································· 181
CD player operation ······································································· 192
DVD player operation······································································ XX
USB player operation····································································· 202
Bluetooth® audio operation ···························································· 211
AUX operation················································································ 225
iPod operation················································································ 227
Video operation··············································································· XX
z Audio/video remote controls ····························································· 235
z Audio/video system operating hints·················································· 236
AUDIO/VIDEO SYSTEM
178
V573_E
Function button display screen
Touch the touch screen buttons dis-
played on the screen to control the
radio, CD/DVD player, USB player,
Bluetooth®audio, AUX, iPod or
Video. For details, see page 177.
“ OPEN” button
Push this button to open and close
the display, adjust the angle of the
display, and eject discs. For details,
see page XX.
“VOL” button
Push “
S
” or “
T
” button of “VOL”
to adjust the volume. For details,
see page 176.
“AV” button
Push this button to display the “AV
Menu” screen. For details, see
page XX.
“TRACK/TUNE” button
Push the “
S
” or “
T
” button of
“TRACK/TUNE” to move up or
down the frequency, track, file or
chapter.
Push and hold the “
S
” or “
T
”
button of “TRACK/TUNE” to seek
up or down for a station.
For details, see pages 182, 188,
194, 198, 207, 218 and 231.
Quick reference
AUDIO/VIDEO SYSTEM
179
V573_E
Vehicles with smart entry and start sys-
tem—
Your audio/video system works when the
“ENGINE START STOP” switch is in the
ACCESSORY or IGNITION ON mode.
Vehicles without smart entry and start
system—
Your audio/video system works when the
engine switch is in ACC or ON position.
NOTICE
To prevent the battery from being
discharged, do not leave the au-
dio/video system on longer than
necessary when the engine is not
running.
FCC ID: XEMNA08A02
IC ID: 8192A-NA08A02
MADE IN JAPAN
This device complies with Part 15 of
the FCC Rules and RSSí210 of in-
dustry Canada. Operation is subject
to the following two conditions: (1)
This device may not cause harmful
interference, and (2) This device must
accept any interference received, in-
cluding interference that may cause
undesired operation.
CAUTION
zPart 15 of the FCC Rules
FCC Warning:
Changes or modifications in con-
struction not expressly approved
by AISIN AW Co., Ltd for compli-
ance could void the user’s au-
thority to operate the equipment.
Radio frequency exposure. This
device is approved for Mobile Ap-
plication only and, to comply with
applicable FCC radio frequency
exposure regulations, must be
used with a distance of at least
7.9 in. (20 cm) between the an-
tenna and the body of any person
at all time during use.
zLaser products
zDo not take this unit apart or at-
tempt to make any changes
yourself. This is an intricate unit
that uses a laser pickup to re-
trieve information from the sur-
face of compact discs. The laser
is carefully shielded so that its
rays remain inside the cabinet.
Therefore, never try to disas-
semble the player or alter any of
its parts since you may be ex-
posed to laser rays and dan-
gerous voltages.
zThis product utilizes a laser. Use
of controls or adjustments or
performance of procedures
other than those specified
herein may result in hazardous
radiation exposure.
Using your audio/video
system —
— Some basics
AUDIO/VIDEO SYSTEM
180
V573_E
z Turning on the power
1. Push the “AV” button.
2. Turn on the power by touching
any one of the audio mode touch
screen buttons.
You can select the function that enables
automatic return to the previous screen
from the audio screen. See “(a) Screen
priority” on page XX for details.
z Turning off the power
Push the “AV” button and touch
“AUDIO OFF” to turn off the power.
z Adjusting the volume
Push “
S
” or “
T
” button of “VOL” to
adjust the volume.
z Inserting or ejecting disc
Vehicles with smart entry and start sys-
tem—
The “ENGINE START STOP” switch
must be in the ACCESSORY or
IGNITION ON mode.
Vehicles without smart entry and start
system—
The engine switch must be set at ACC or
ON position.
INSERTING A DISC
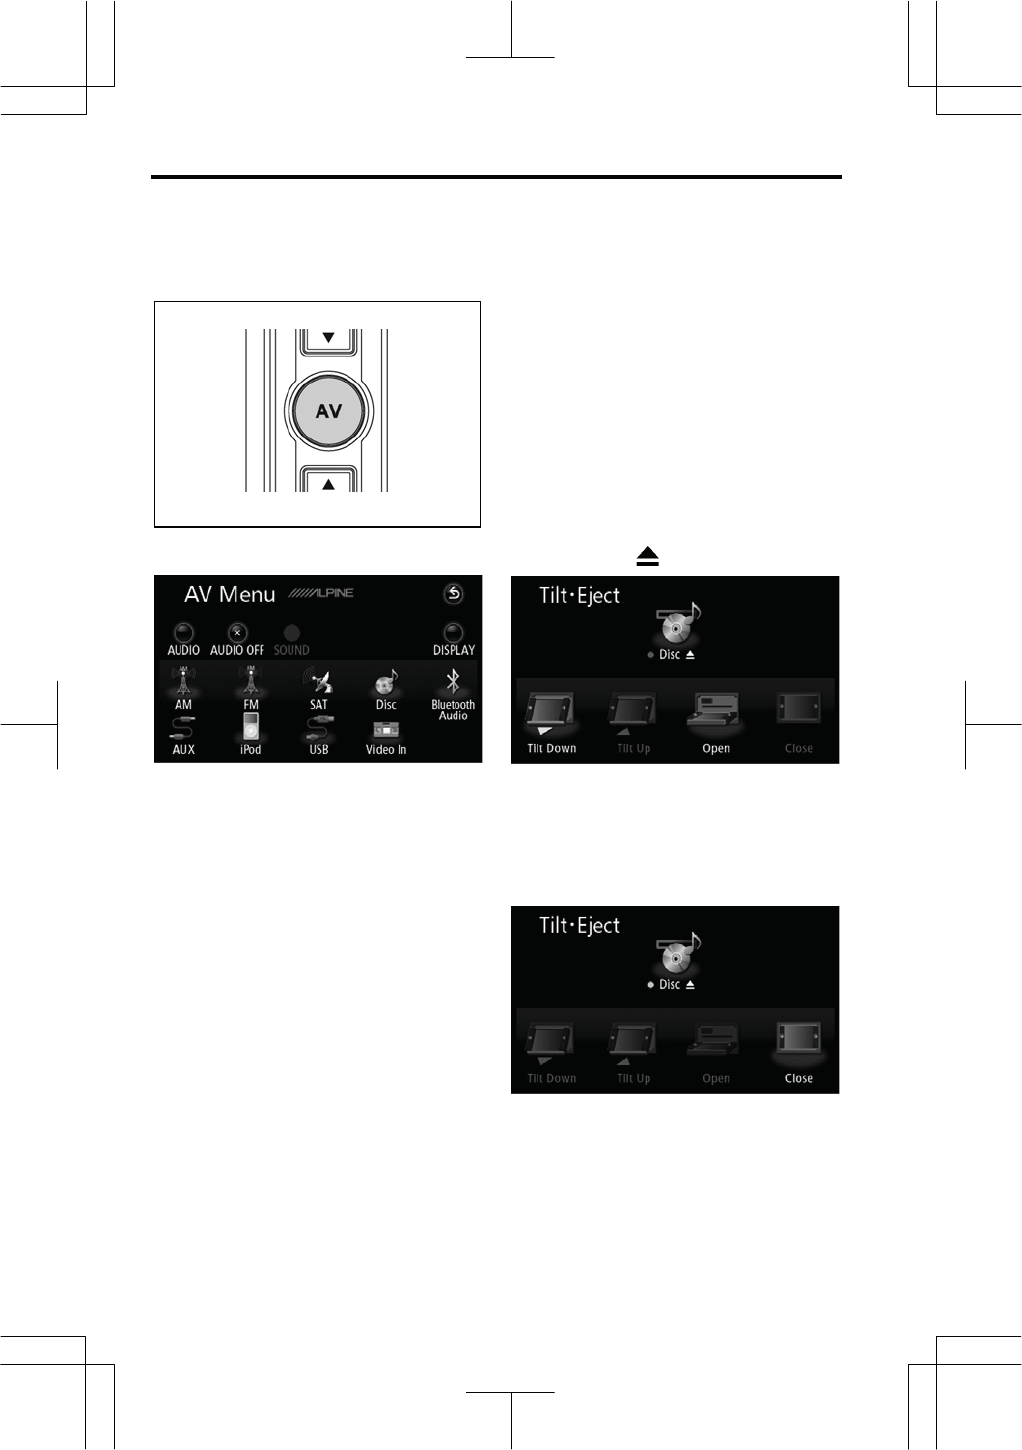
1. Push the “ OPEN” button.
2. Touch “Open”.
3. Insert a disc.
The disc is loaded automatically.
4. Touch “Close”.
If the label faces down, the disc cannot
be played. In this case, “Check Disc”
appears on the screen.
AUDIO/VIDEO SYSTEM
181
V573_E
EJECTING A DISC
1. Push the “ OPEN” button.
2. Touch “Disc ”.
The disc will be ejected. A disc can
then be inserted.
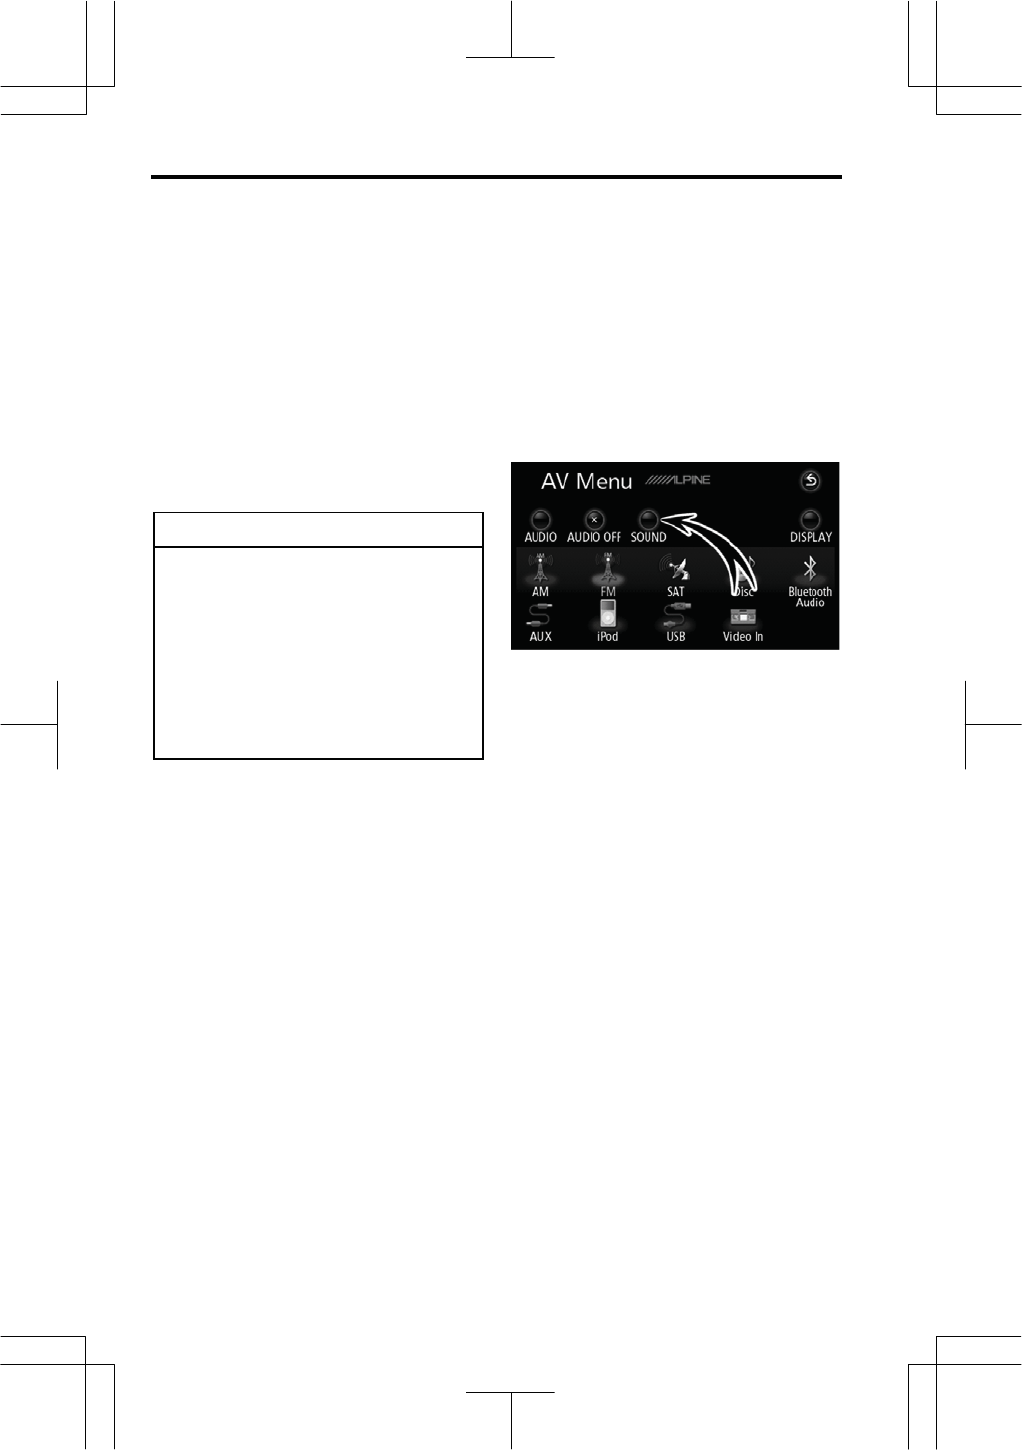
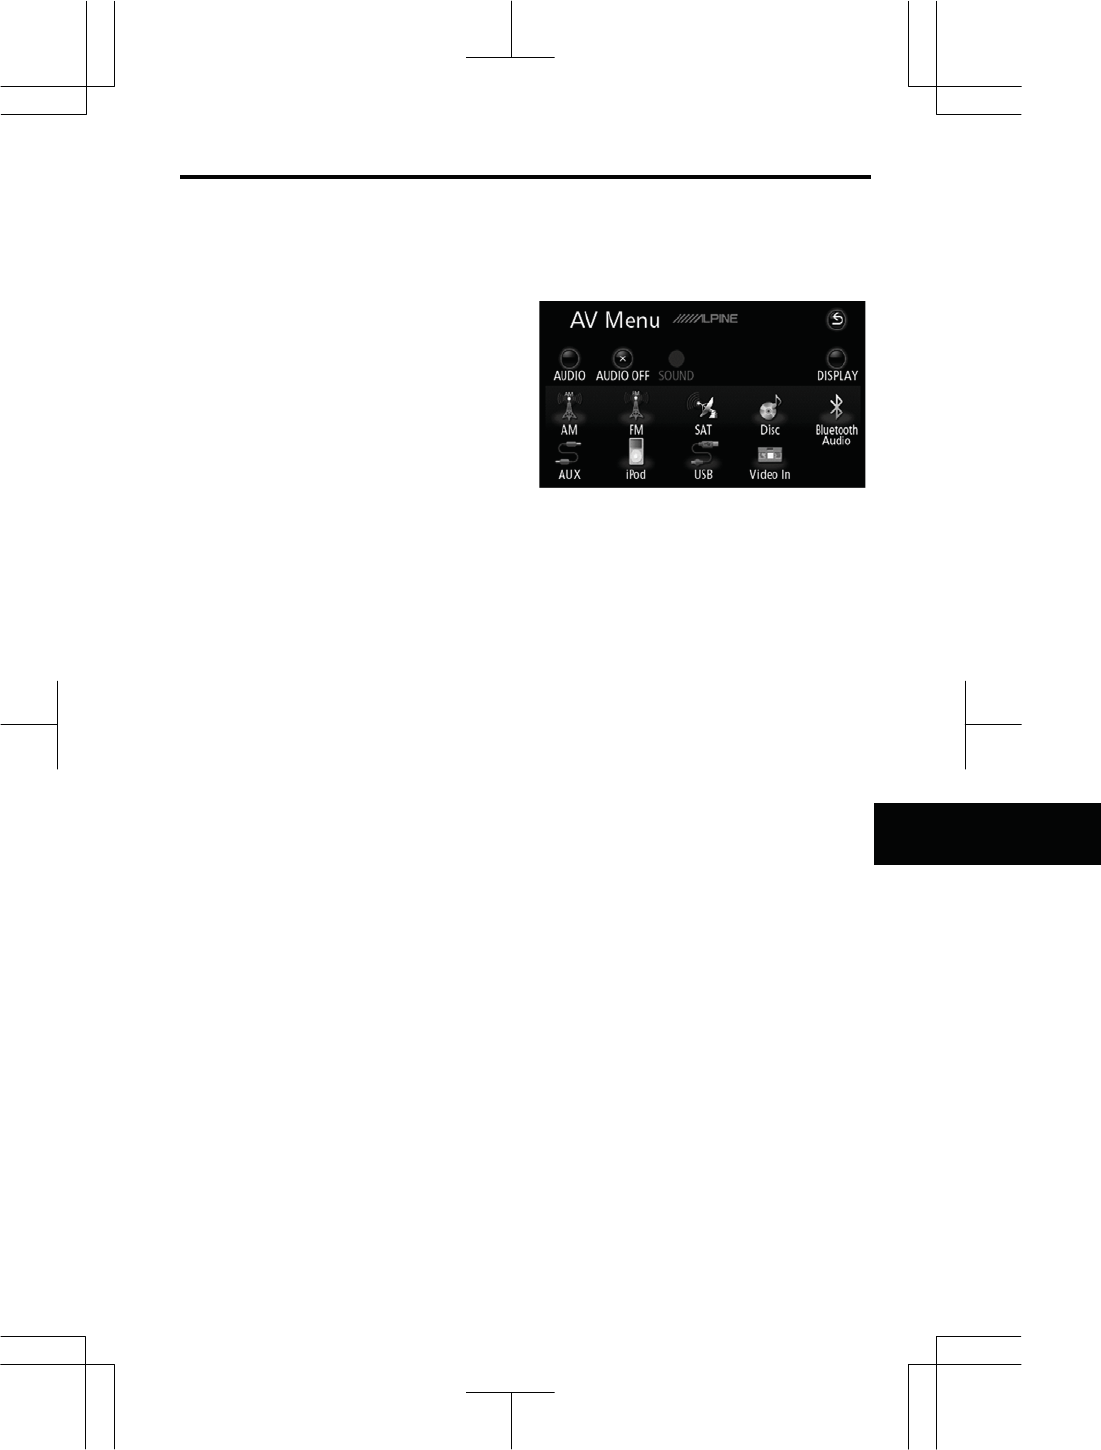
z Switching between functions
1. Push the “AV” button.
2. Touch the desired mode touch
screen button.
Touch these touch screen buttons if you
want to switch from one mode to an-
other.
Changing modes to Satellite Radio,
Bluetooth® audio, AUX, iPod, USB or
Video is not possible unless they are
connected.
If the disc is not set, the “CD” or “DVD”
screen will not appear.
AUDIO/VIDEO SYSTEM
182
V573_E
The selected audio mode will display on
the screen.
The touch screen button of the currently
selected audio mode is highlighted.
Push the “AV” button and touch
“AUDIO” to display the respective audio
mode operation screen.
You can turn off the CD/DVD player by
ejecting the disc. If the audio/video
system was previously off, then the en-
tire audio/video system will be turned off
when you eject the disc. If another
function was previously playing, it will
come on again.
AUDIO/VIDEO SYSTEM
183
V573_E
AUDIO/VIDEO SYSTEM
184
V573_E
The touch screen buttons for radio,
CD/DVD player, USB player, Bluetooth®
audio, AUX, iPod and Video operation
are displayed on the function button dis-
play screen when the audio operation
mode is selected.
Touch them lightly and directly on the
screen.
The selected touch screen button is
highlighted.
INFORMATION
zIf the system does not respond to
a touch of a touch screen button,
move your finger away from the
screen and then touch it again.
zYou cannot operate dimmed
touch screen buttons.
zWipe off fingerprints on the sur-
face of the display using a glass
cleaning cloth.
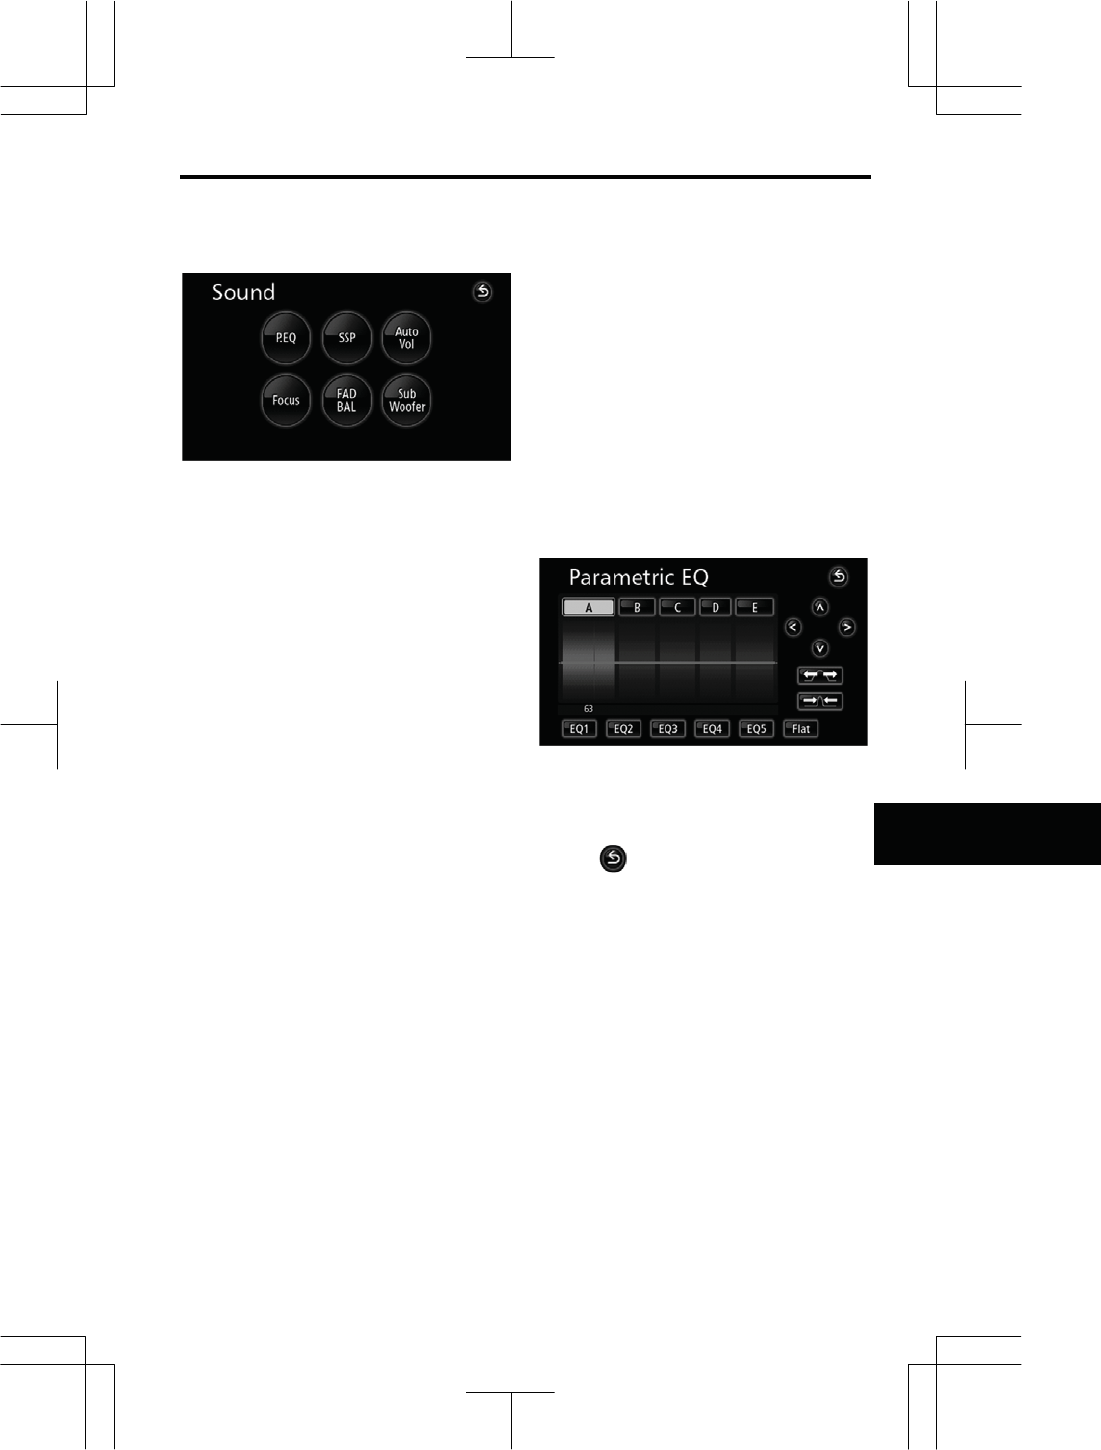
z Sound menu screen display
The sound quality inside the cabin will be
altered greatly by such factors as the
type of media or music used, and the
vehicle body type. This system allows
you to set the most appropriate sound
quality to suit these factors.
1. Push the “AV” button.
2. Touch “SOUND”.
AUDIO/VIDEO SYSTEM
185
V573_E
3. Touch the desired touch screen
button.
Settings such as the following can be
made from the “Sound” screen.
The tone of each mode (for such as AM,
FM and CD player) can be adjusted.
“P.EQ”: Allows the previously set
equalizer curve to be adjusted and the
preferred equalizer curve to be created.
(See page XX.)
“SSP”: The optimum acoustic environ-
ment can be created by setting vehicle
information. (See page XX.)
“Auto Vol”: Detects the vehicle speed
and adjusts the volume accordingly.
(See page XX.)
“Focus”: Allows the time taken for the
sound to reach the listener’s ear from
each speaker to be adjusted. (See page
XX.)
“FAD BAL”: Allows the front, rear, left,
and right volume balance to be adjusted.
(See page XX.)
“Sub Woofer”: Allows the subwoofer
output level and phase control to be set.
(See page XX.)
z P.EQ (Parametric Equalizer) ad-
justments
The parametric equalizer can be ad-
justed to the preferred sound quality
based on a variety of music genres and
sources.
ADJUSTING THE SOUND QUALITY
The currently set equalizer curve can be
selected and set to the preferred sound
quality.
1. Touch “P.EQ” to display the “Pa-
rametric EQ” screen.
2. Touch the touch screen button to
select the desired sound quality mode,
from the list written below.
Touch when settings are complete.
EQ 1: POP
EQ 2: ROCK
EQ 3: JAZZ
EQ 4: CLASSICAL
EQ 5: VOCAL
Flat: No EQ offset

AUDIO/VIDEO SYSTEM
186
V573_E
ADJUSTING AND STORING THE EQ
CURVE
Allows the equalizer curve to be adjusted
to a sound quality other than the cur-
rently set equalizer curve and then
stored in the memory.
1. Touch the band from “A” to “E” to
adjust it.
2. Touch or to adjust the
frequency of the band.
3. Touch or to adjust the
level of the band.
4. Touch the Q curve switch to ad-
just the Q curve (bandwidth).
The Q curve can be adjusted to three
phases.
: Widens the Q curve (bandwidth)
: Narrows the Q curve (bandwidth)
5. Repeat steps 1 to 4 for each band
from “A” to “E”.
6. Touch the switch to be stored in
the memory from “EQ 1” to “EQ 5”
until a beep sounds.
By touching “Flat” until a beep sounds,
it is possible to return the stored equal-
izer curve to the originally setting.
Touch when settings are complete.
Band
Median frequency Q curve (yellow) Q curve
switch
AUDIO/VIDEO SYSTEM
187
V573_E
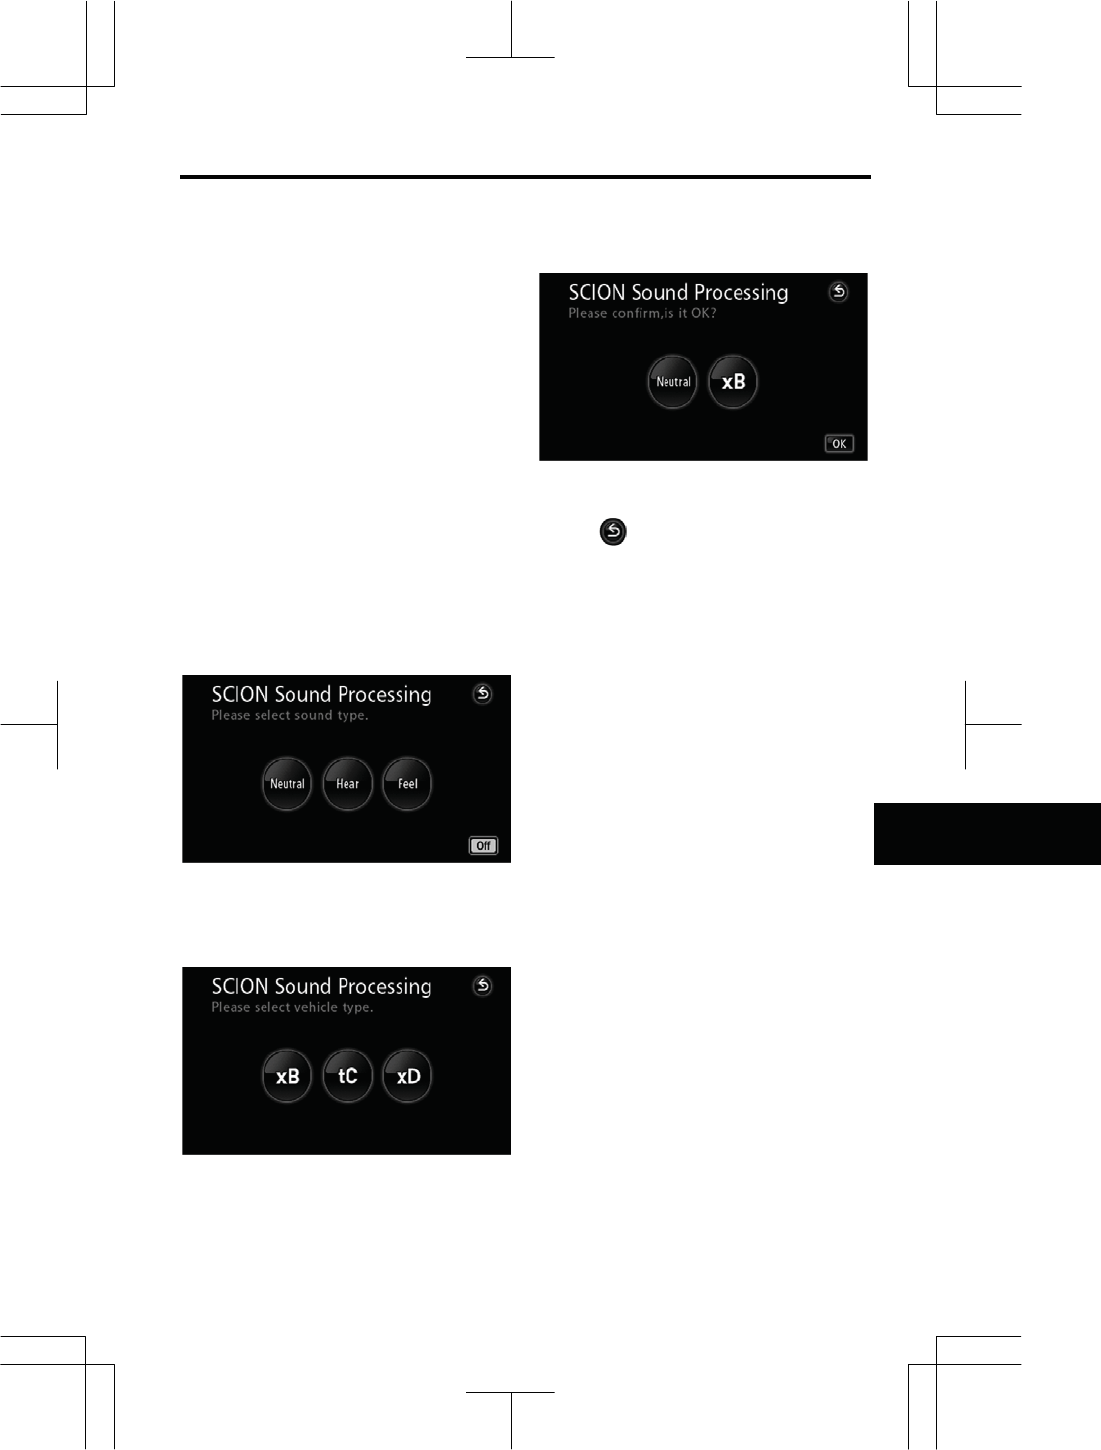
z SSP (SCION Sound Processing)
settings
SSP is a modified DSP (Digital Signal
Processing) system that provides a cus-
tomized sound for your vehicle. You
can select from the modes below.
“Neutral”: A subdued sound that does
not interfere with conversations.
“Hear”: A powerful, energetic, “live”
sound.
“Feel”: Player’s sound í> reproduces
the sound on the stage that musicians
hear.
For more details, please visit the SCION
Web site at http://www.scion.com/.
1. Touch “SSP” to display the
“SCION Sound Processing” screen.
2. Touch sound type.
Touch “Off” to cancel the SSP settings
and return to the “Sound” screen.
3. Touch vehicle type.
4. Touch “OK”.
Touch to change the setting.
When SSP has been determined, the
system is automatically set to the opti-
mum EQ value.
AUDIO/VIDEO SYSTEM
188
V573_E
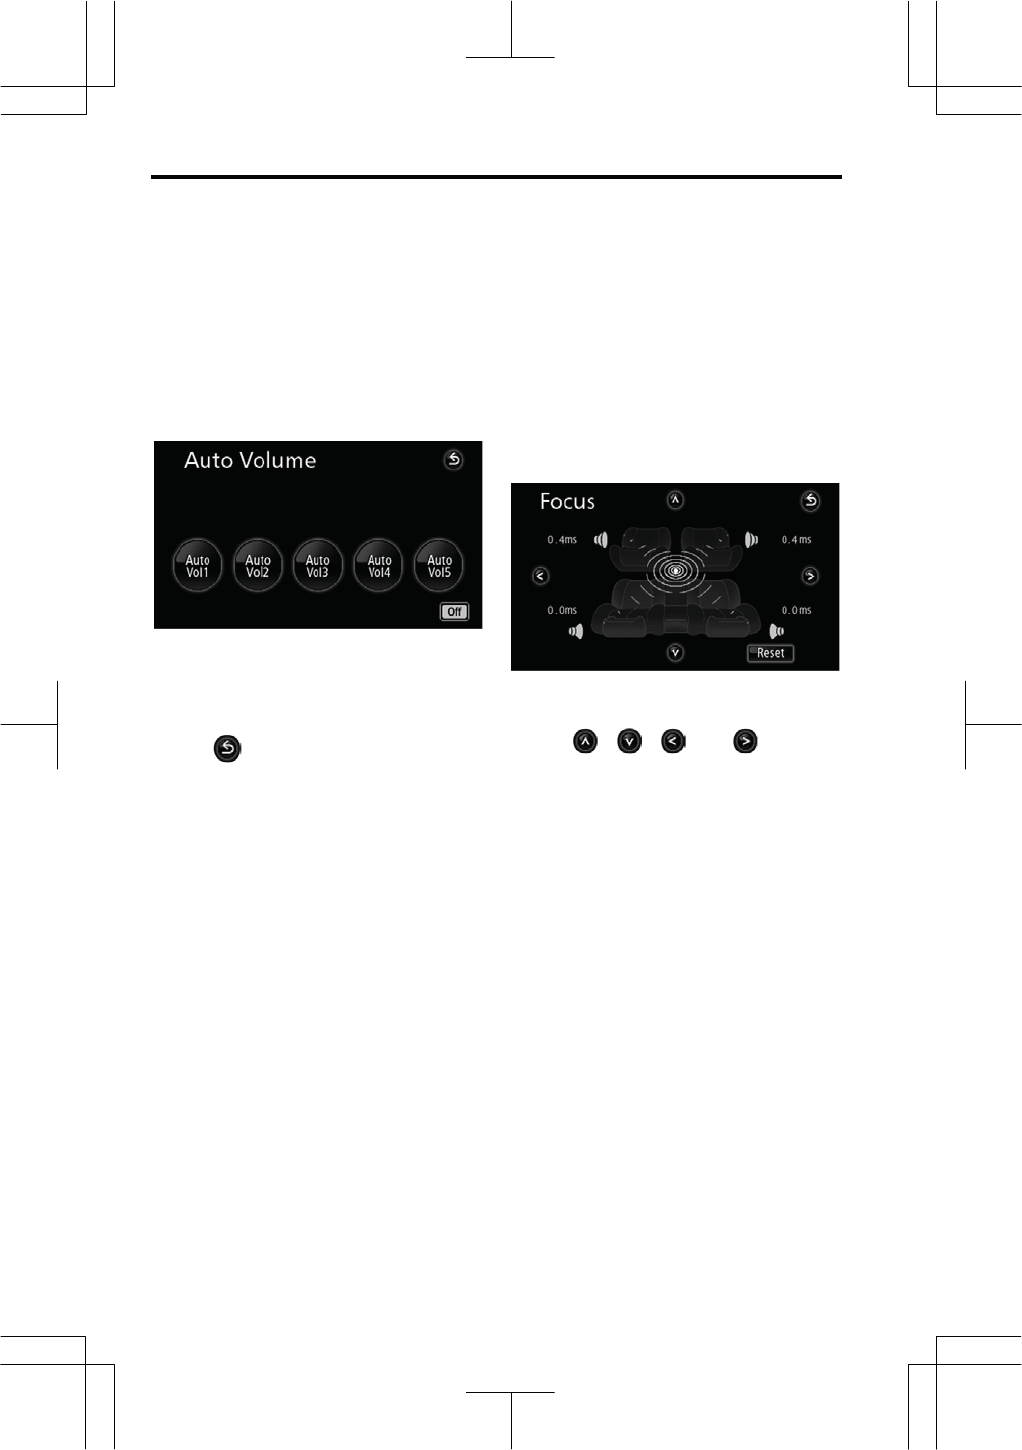
z Auto volume adjustment
(Auto Volume)
The volume can be set to increase
automatically to match road noise, which
varies based on the driving speed.
1. Touch “Auto Vol” to display the
“Auto Volume” screen.
2. Touch “Auto Vol 1” to “Auto Vol
5”.
Touch “Off” to clear the settings.
Touch when settings are complete.
z Sound travel time adjustment
(Focus)
It is possible to offset the variations in
sound travel time that occur due to dif-
ferences in distance, by adjusting the
time allowed for sound to reach the lis-
tener’s ears.
1. Touch “Focus” to display the
“Focus” screen.
2. Touch the preferred point.
Touch , , , or to make
fine adjustments.
Touch “Reset” to clear the setting.
AUDIO/VIDEO SYSTEM
189
V573_E
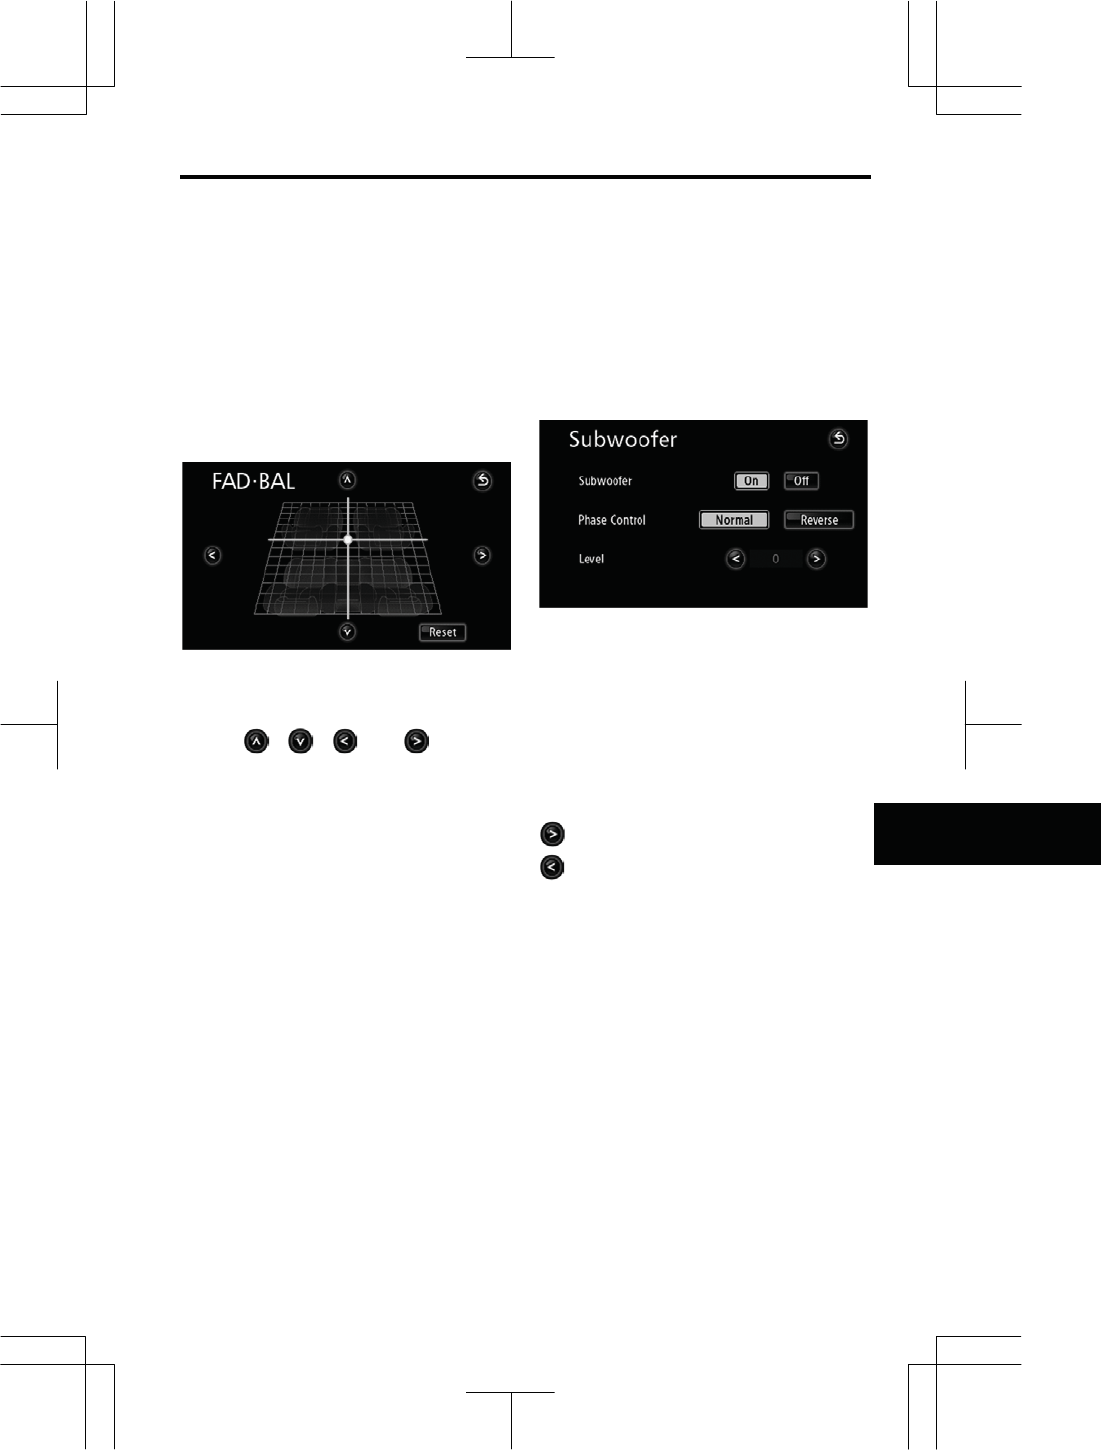
z Volume balance adjustments
(FAD BAL)
By individually adjusting the volume bal-
ance for the front, rear, left, and right
speakers, it is possible to enhance the
sound from distant speakers.
1. Touch “FAD BAL” to display the
“FAD·BAL” screen.
2. Touch the preferred balance
point.
Touch , , , or to make
fine adjustments.
Touch “Reset” to clear the setting.
z Subwoofer settings
The preferred output level for the audio
when a subwoofer is connected can be
set.
1. Touch “Sub Woofer” to display
the “Subwoofer” screen.
Touch “On” of “Subwoofer” and ad-
just the “Phase Control” and “Level”.
“Normal”: Sound will be output from the
subwoofer and the speakers simultane-
ously.
“Reverse”: Sound will be output from
the subwoofer at a different time to the
speakers.
: Decreases level.
: Increases level.
AUDIO/VIDEO SYSTEM
190
V573_E
You can adjust the brightness, contrast,
tone and color of the screen. You can
also turn the display off, and change the
screen to either day or night mode.
z Brightness and contrast adjust-
ment
The brightness and contrast of the
screen can be adjusted depending on
the brightness of your surroundings.
You can also turn the display off.
1. Push the “AV” button.
2. Touch “DISPLAY”.
3. Select the desired button to ad-
just brightness and contrast.
“Brightness” “ (brightens)”:
Brightens the screen.
“Brightness” “ (darkens)”: Darkens
the screen.
“Contrast” “ (strengthens)”:
Strengthens the contrast of the screen.
“Contrast” “ (weakens)”: Weakens
the contrast of the screen.
4. After adjusting the screen, touch
"OK”.
The screen goes off when “Screen Off”
is touched. To turn the display screen
back on, push any button such as “AV”,
etc. The selected screen appears.
INFORMATION
When you do not touch any touch
screen button on the “Display”
screen for 20 seconds, the previous
screen will be displayed.
— Screen ad
j
ustment
AUDIO/VIDEO SYSTEM
191
V573_E
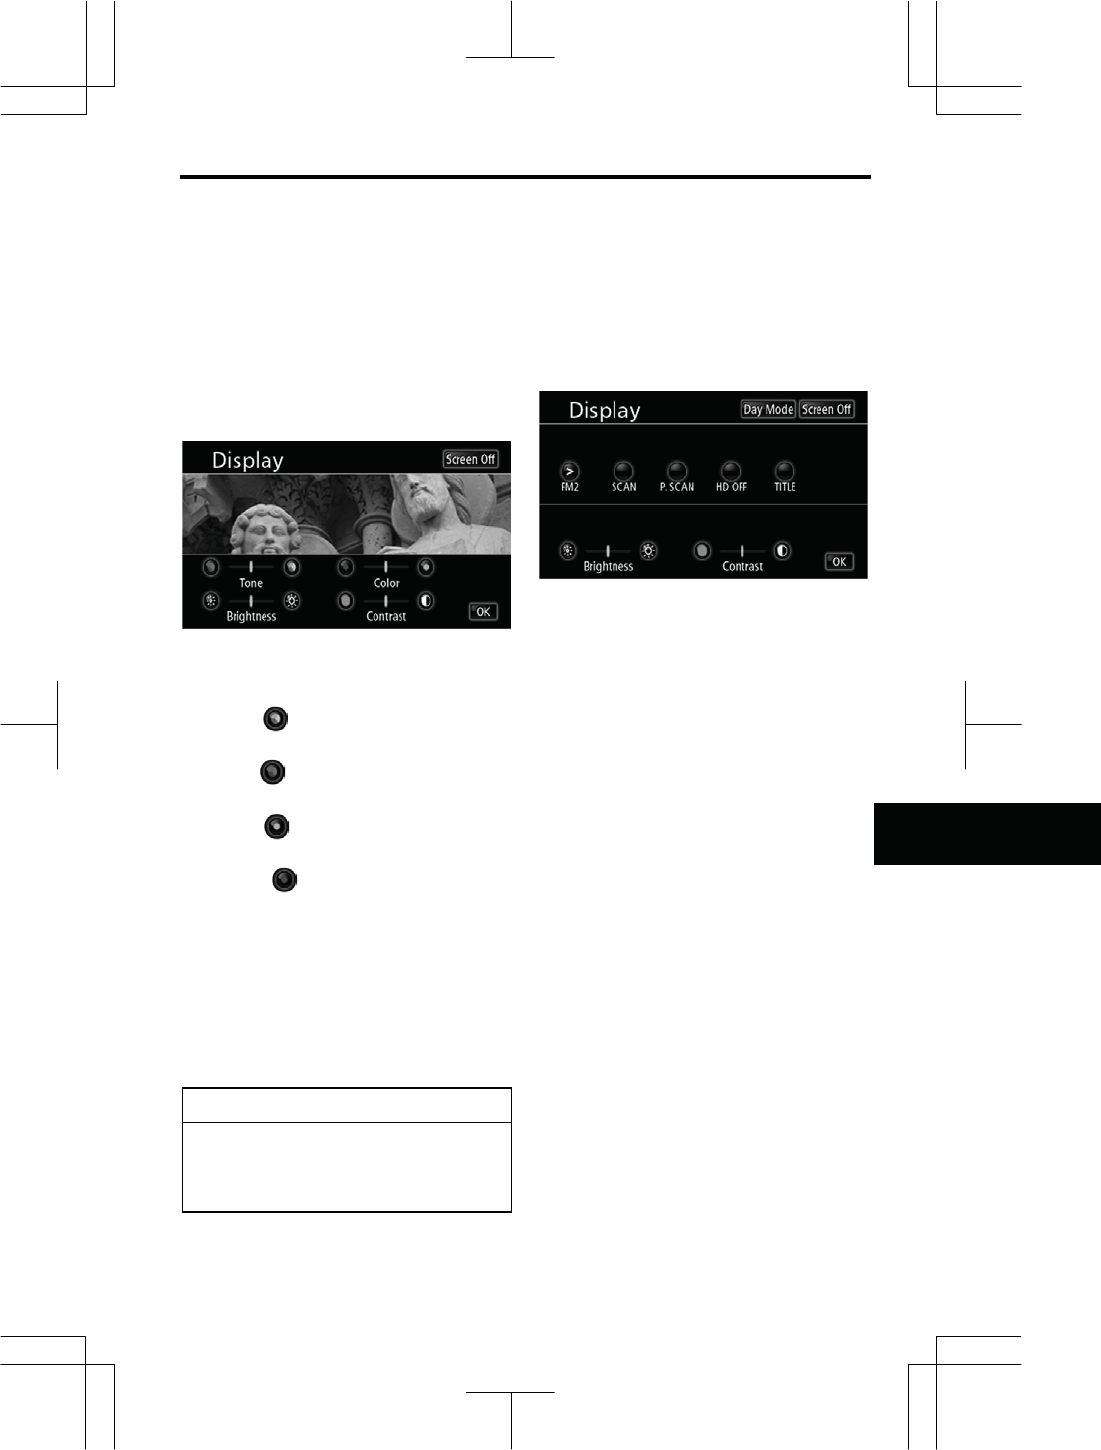
z Tone and color adjustment
The tone and color of the screen can be
adjusted while a DVD video, iPod Video
file or Video is being played.
1. Push the “AV” button to display
the “AV Menu” screen and touch
“DISPLAY”.
2. Select the desired button to ad-
just tone and color.
“Tone” “ (strengthens)”: Strength-
ens the tone of the screen.
“Tone” “ (weakens)”: Weakens the
tone of the screen.
“Color” “ (green)”: Strengthens the
green color of the screen.
“Color” “ (red)”: Strengthens the
red color of the screen.
3. After adjusting the screen, touch
“OK”.
The screen goes off when “Screen Off”
is touched. To turn the display screen
back on, push any button such as “AV”,
etc. The selected screen appears.
INFORMATION
When you do not touch any touch
screen button on the “Display”
screen for 20 seconds, the previous
screen will be displayed.
z Changing between day mode and
night mode
Depending on the position of the head-
light switch, the screen changes to the
day mode or night mode.
To display the screen in the day mode
even with the headlight switch on,
touch “Day Mode” on the adjustment
screen for brightness and contrast
control.
If the screen is set in the day mode with
the headlight switch turned on, this con-
dition is memorized in the system even
with the engine turned off.
AUDIO/VIDEO SYSTEM
192
V573_E
z Your CD/DVD player
When you insert a disc, insert it with the
label side up. The CD/DVD player will
play from track 1 through to the end of
the disc. Then it will play from track 1
again.
NOTICE
Never try to disassemble or oil any
part of the CD/DVD player. Do not
insert anything other than discs into
the slot.
The player is intended for use with 12 cm
(4.7 in.) discs only.
z Apple Composite AV cable
Using an Apple Composite AV Cable
allows iPod video files to be played.
For details, see page XX.
z Rear Seat LCD Monitor
A commercially available Rear Seat
LCD Monitor can be used by con-
necting it to the RCA Relay cable's
RCA terminals.
For further information and operation
procedures, refer to the device's
manual.
This product incorporates copyright
protection technology that is pro-
tected by U.S. patents and other in-
tellectual property rights. Use of this
copyright protection technology must
be authorized by Macrovision, and is
intended for home and other limited
viewing uses only unless otherwise
authorized by Macrovision. Reverse
engineering or disassembly is prohib-
ited.
z External amplifier
A commercially available external
amplifier can be connected to the
RCA Relay cable's RCA terminal to
enable the use of subwoofers etc.
For further information and operation
procedures, refer to the device's
manual.
AUDIO/VIDEO SYSTEM
193
V573_E
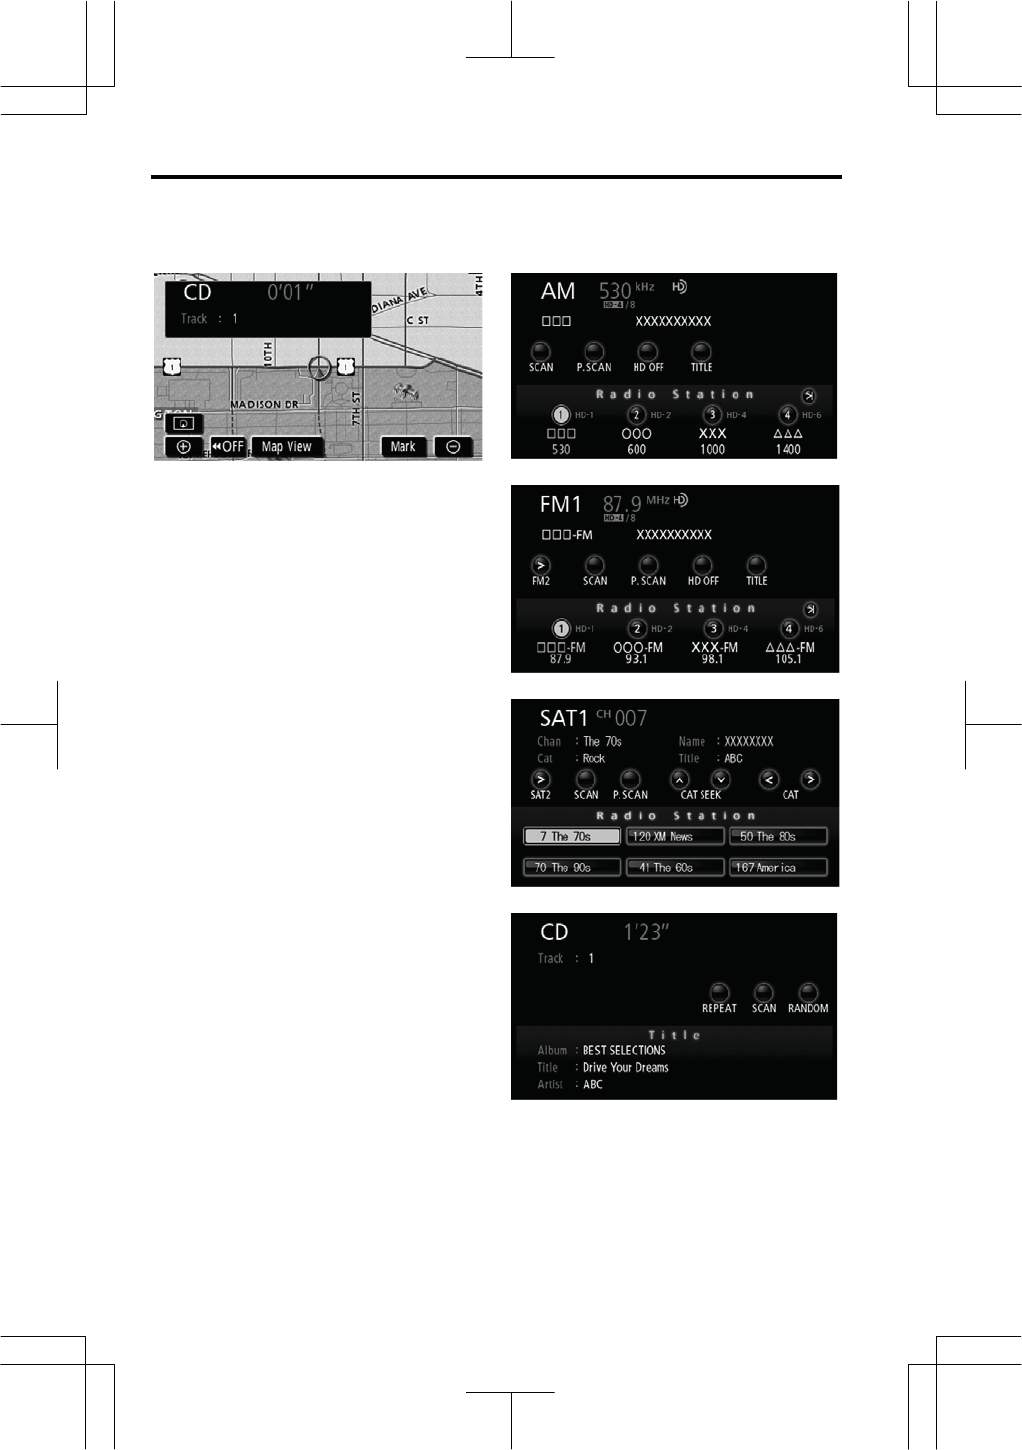
z Listening to the radio
1. Push the “AV” button.
2. Touch these touch screen buttons
to choose either an AM or FM station.
“AM”, “FM1” or “FM2” appears on the
screen.
Push the “AV” button and touch
“AUDIO” to display the radio operation
screen.
Changing between FM1 and FM2: Touch
“FM1” or “FM2” on the screen.
Your radio can receive terrestrial digital
broadcasts. When terrestrial digital
broadcasts are received, FM reception
has the same quality as a CD, and AM
reception has the same quality as con-
ventional FM sound. Depending on the
reception status, HD Radio can also re-
ceive analog broadcasts, which means
reception is still possible in regions with
no digital coverage.
z Presetting a station
1. Tune in the desired station.
2. Touch one of the channel selector
touch screen buttons (1 — 8) you
want and hold it until a beep is heard.
This sets the station to the touch screen
button and the frequency appears on the
touch screen button.
Each radio mode can store up to 8 sta-
tions. To change the preset station to a
different one, follow the same procedure.
The preset station memory is cancelled
when the power source is interrupted by
battery disconnection or a blown fuse.
— Radio o
p
eration
AUDIO/VIDEO SYSTEM
194
V573_E
z Selecting a station
Tune in the desired station using one of
the following methods.
Preset tuning: Touch the channel se-
lector (1 — 8) for the station you want.
The touch screen button is highlighted
and the station frequency appears on the
screen.
Frequency adjustment: Push the “
S
”
or “
T
” button of “TRACK/TUNE” to
increase or decrease the frequency.
Seek tuning: Push and hold the “
S
”or
“
T
”button of “TRACK/TUNE”. The
radio will begin seeking up or down for a
station of the nearest frequency and will
stop when a station is received. Each
time the button is pushed, the next
available station will be played.
To scan all the frequencies: Touch
“SCAN” on the screen. The radio will
find the next station and stay there for a
few seconds, and then scan again. To
select a station, touch “SCAN” again.
To scan the preset stations: Touch
“P.SCAN” on the screen. The radio
will tune in the next preset station, stay
there for a few seconds, and then move
to the next preset station. To select a
station, touch “P.SCAN” again.
z Listening to HD Radio
Touch “HD ON”.
When the HD radio signal is being re-
ceived, the sub channel number and the
total number of sub channels are dis-
played on the upper side of the display.
The reception status mark is displayed at
the top of the display.
Displayed: Normal reception.
Blinking: Weak reception.
Not displayed: No reception.
If a HD radio signal with broadcast in-
formation is received, touching “TITLE”
will display the album name, song title
and artist name.

AUDIO/VIDEO SYSTEM
195
V573_E
To listen to a satellite radio broadcast in
your vehicle, an additional genuine
Toyota satellite receiver and antenna
must be purchased and installed, and
the subscription to the XM® Satellite
Radio is necessary.
z How to subscribe to an XM® Satel-
lite Radio
An XM® Satellite Radio is a tuner de-
signed exclusively to receive broadcasts
provided under a separate subscription.
Availability is limited to the 48 contiguous
states and 10 Canadian provinces.
How to subscribe:
You must enter into a separate service
agreement with the XM® Satellite Radio
in order to receive satellite broadcast
programming in the vehicle. Additional
activation and service subscription fees
apply that are not included in the pur-
chase price of the vehicle and optional
digital satellite tuner.
For detailed information about XM® Sat-
ellite Radio or to subscribe:
U.S.A.—
Visit on the web at www.xmradio.com or
call 1í800í967í2346.
Canada—
Visit on the web at www.xmradio.ca or
call 1í877í438í9677.
The XM®Satellite Radio is solely re-
sponsible for the quality, availability and
content of the satellite radio services
provided, which are subject to the terms
and conditions of the XM® Satellite Radio
customer service agreement.
Customers should have their radio ID
ready; the radio ID can be found by se-
lecting “channel 000” on the radio. For
details, see the “Displaying the radio ID”
that follows.
All fees and programming are the re-
sponsibility of the XM® Satellite Radio
and are subject to change.
Satellite tuner technology notice:
Toyota’s satellite radio tuners are
awarded Type Approval Certificates from
XM® Satellite Radio Inc. as proof of
compatibility with the services offered by
the XM® Satellite Radio.
z Displaying the radio ID
Each XM® tuner is identified with a
unique radio ID. You will need the radio
ID when activating XM® service or when
reporting a problem.
If you select the “CH 000” using the “
S
”
or “
T
” button of “TRACK/TUNE”, the
ID code of 8 alphanumeric characters
appears. If you select another channel,
display of the ID code is canceled. The
channel (000) alternates the display be-
tween the radio ID and the specific radio
ID code.
INFORMATION
Cargo loaded on the roof luggage
carrier, especially metal objects,
may adversely affect the reception
of XM® Satellite Radio.
— Radio operation
(XM® Satellite Radio
broadcast
)
AUDIO/VIDEO SYSTEM
196
V573_E
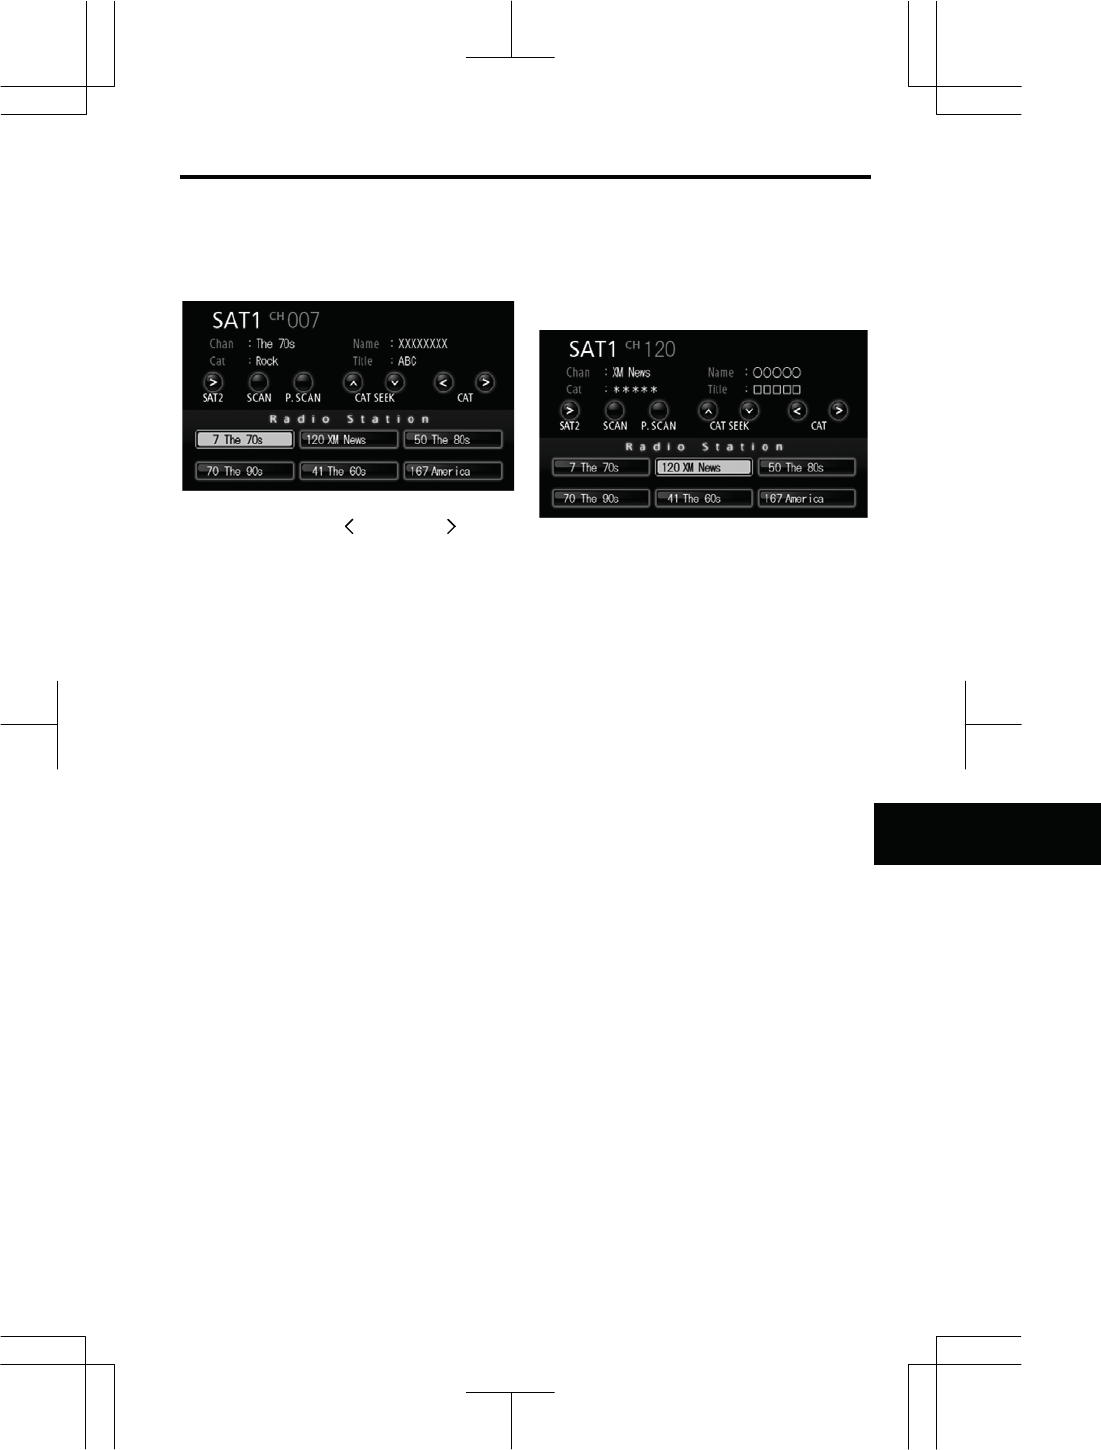
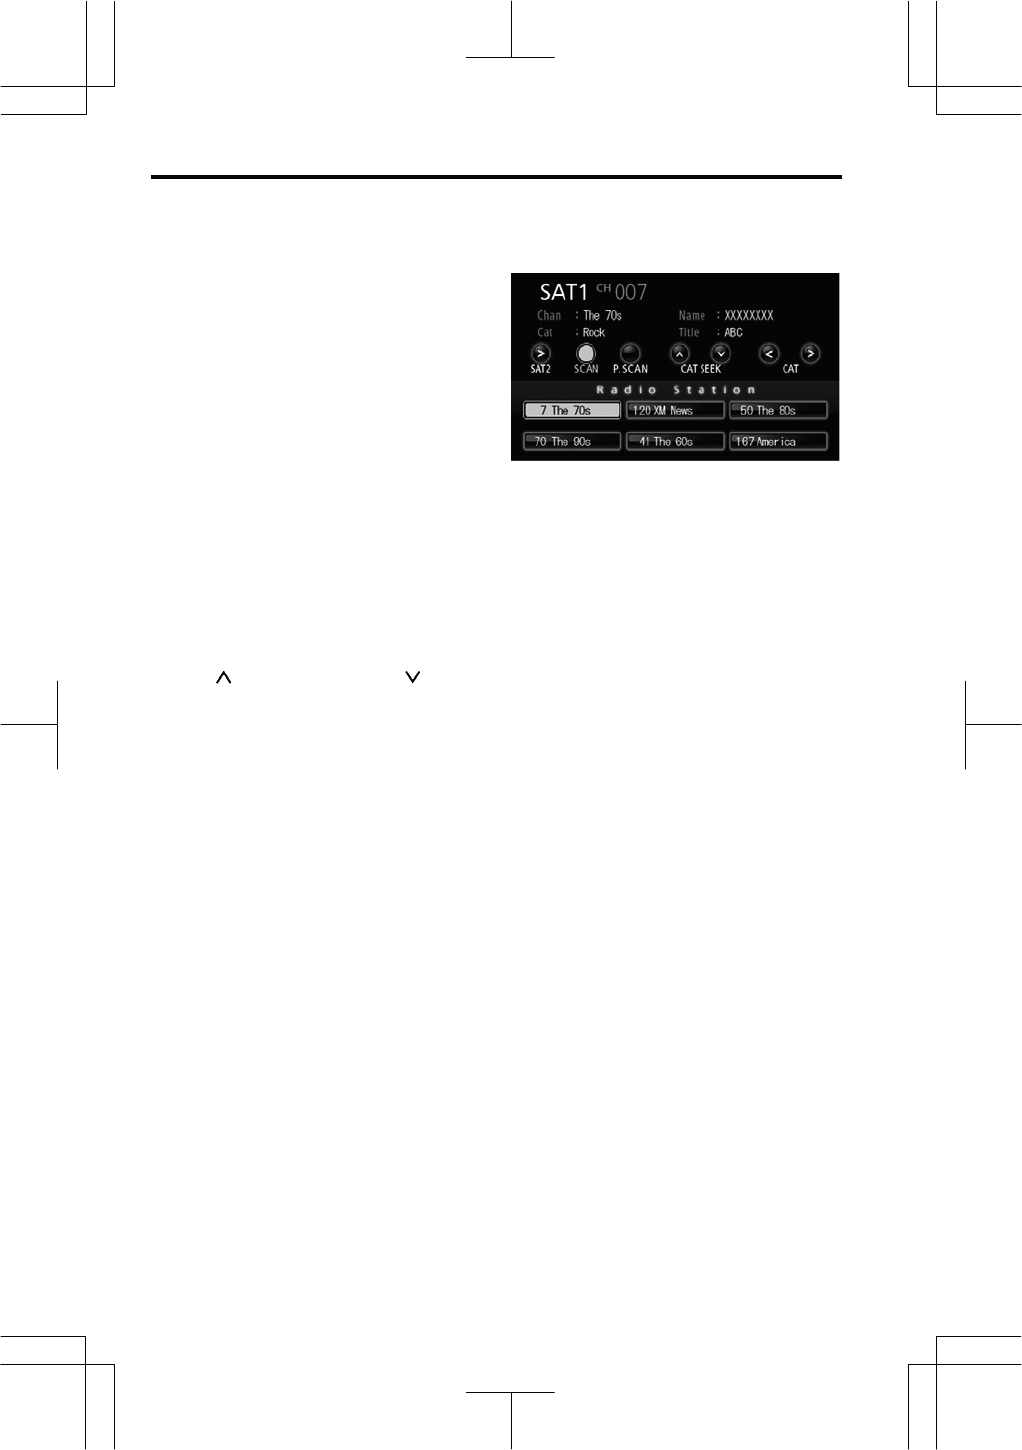
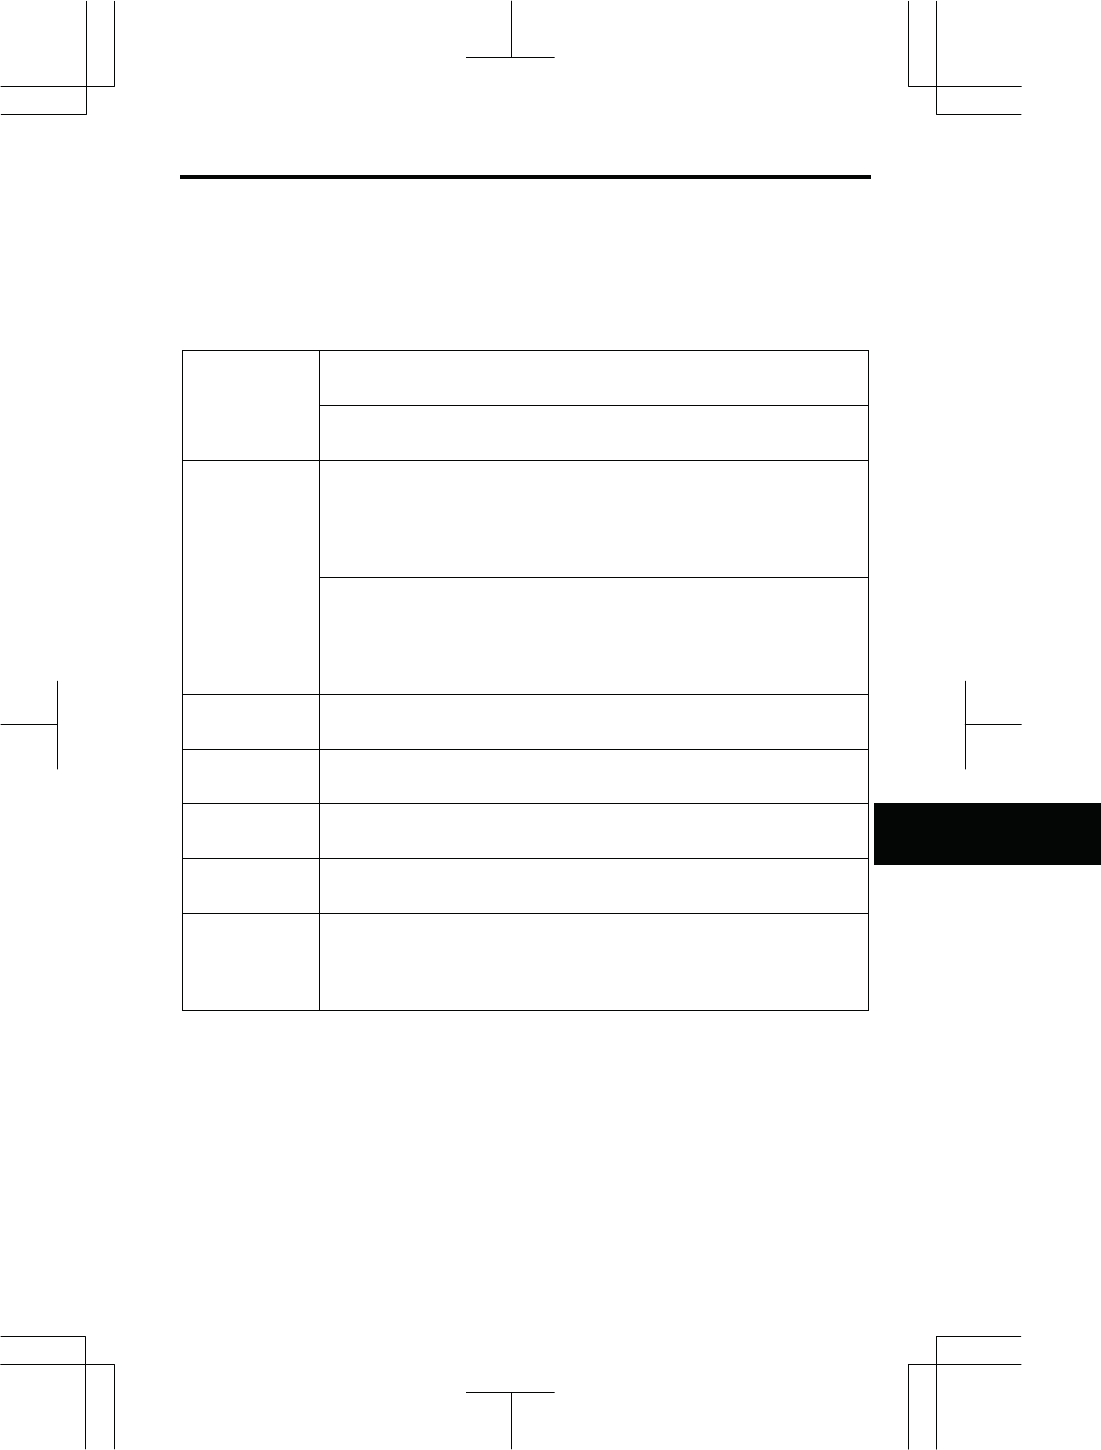
z Listening to satellite radio
1. Push the “AV” button.
2. Touch “SAT”.
Push the “AV” button and touch
“AUDIO” to display the satellite radio
operation screen.
z Changing the band
The band changes each time “SAT2”,
“SAT3”, and “SAT1” is touched.
The band changes sequentially between
“SAT1”,“SAT2”, and “SAT3”.
AUDIO/VIDEO SYSTEM
197
V573_E
z Channel category
Touch either “CAT ” or “CAT ” to go
to the next or previous category.
z Presetting a channel
1. Tune in the desired channel.
2. Touch one of the channel selector
touch screen buttons and hold it until
a beep is heard.
This sets the channel to the touch screen
button and the name and number of the
channel appears on the touch screen
button.
Each touch screen button can store
three SAT channels. To change the pre-
set channel to a different one, follow the
same procedure.
The preset channel memory is cancelled
when the power source is interrupted by
battery disconnection or a blown fuse.
AUDIO/VIDEO SYSTEM
198
V573_E
z Selecting a channel
Tune in the desired channel using one of
the following methods.
Preset tuning: Touch the channel se-
lector button for the channel you want.
The touch screen button is highlighted
and channel number appears on the
screen.
To select channel within the current
category: Push the “
S
” or “
T
” button
of “TRACK/TUNE”. The radio will step
up or down the receivable channel within
the current channel category. If you push
and hold the “
S
” or “
T
” button of
“TRACK/TUNE”, the radio will begin
seeking up or down for the next receiv-
able channel and will stop when the but-
ton is released. Touch either “CAT
SEEK ” or “CAT SEEK ”. The
radio will step up or down the channel
within the current channel category.
To scan the currently selected chan-
nel category: Touch “SCAN” on the
screen. The radio will find the next
channel in the same channel category,
stay there for a few seconds, and then
scan again. To select a channel, touch
“SCAN” again.
To scan the preset channels: Touch
“P.SCAN” on the screen. The radio
will find the next preset channel, stay
there for a few seconds, and then move
to the next preset channel. To select a
channel, touch “P.SCAN” again.
AUDIO/VIDEO SYSTEM
199
V573_E
z If the satellite radio tuner malfunctions
When problems occur with the XM® tuner, a message will appear on the display. Re-
ferring to the table below to identify the problem, take the suggested corrective action.
The XM® antenna is not connected. Check whether the XM® an-
tenna cable is attached securely.
ANTENNA
A short circuit occurs in the antenna or the surrounding antenna
cable. See a Toyota certified dealer for assistance.
You have not subscribed to the XM® Satellite Radio. The radio is
being updated with the latest encryption code. Contact the XM®
Satellite Radio for subscription information. When a contract is
canceled, you can choose the “CH000” and all freeítoíair chan-
nels.
UPDATING
The premium channel you selected is not authorized. Wait for
about 2 seconds until the radio returns to the previous channel or
“CH001”. If it does not change automatically, select another
channel. If you want to listen to the premium channel, contact the
XM® Satellite Radio.
NO SIGNAL The XM® signal is too weak at the current location. Wait until your
vehicle reaches a location with a stronger signal.
LOADING The unit is acquiring audio or program information. Wait until the
unit has received the information.
OFF AIR The channel you selected is not broadcasting any programming.
Select another channel.
ííííí There is no song/program title or artist name/feature associated
with the channel at that time. No action needed.
ííí
The channel you selected is no longer available. Wait for about 2
seconds until the radio returns to the previous channel or
“CH001”. If it does not change automatically, select another
channel.
Contact the XM® Listener Care Center at 1í800í967í2346 (U.S.A.) or
1í877í438í9677 (Canada).
AUDIO/VIDEO SYSTEM
200
V573_E
NOTICE
This equipment has been tested and
found to comply with the limits for a
class B digital device, pursuant to
Part 15 of the FCC Rules. These lim-
its are designed to provide reason-
able protection against harmful in-
terference in a residential installa-
tion. This equipment generates,
uses and can radiate radio fre-
quency energy and, if not installed
and used in accordance with the
instructions, may cause harmful in-
terference to radio communications.
However, there is no guarantee that
interference will not occur in a par-
ticular installation.
If this equipment does cause harm-
ful interference to radio or television
reception, which can be determined
by turning the equipment off and on,
the user is encouraged to try to cor-
rect the interference by one or more
of the following measures:
— Reorient or relocate the receiving
antenna.
— Increase the separation between
the equipment and receiver.
— Connect the equipment into an
outlet on a circuit different from that
to which the receiver is connected.
— Consult the dealer or an experi-
enced radio/TV technician for help.
Information to user
Alternation or modifications carried
out without appropriate authoriza-
tion may invalidate the user’s right
to operate the equipment.
INFORMATION
This XM® tuner supports “Audio
Services” (Music and Talk) of only
XM® Satellite Radio and “Text In-
formation”* linked to the respective
“Audio Services”.
*Text Information includes, Station
Name, (Artist) Name, (Song) Title
and Category Name.
AUDIO/VIDEO SYSTEM
201
V573_E
The CD player can play audio CDs, CD
text, WMA discs, MP3 discs.
zAudio CD, CD text .................194
zMP3/WMA disc ......................197
For appropriate discs for this player, see
“Audio/video system operating hints” on
page 236.
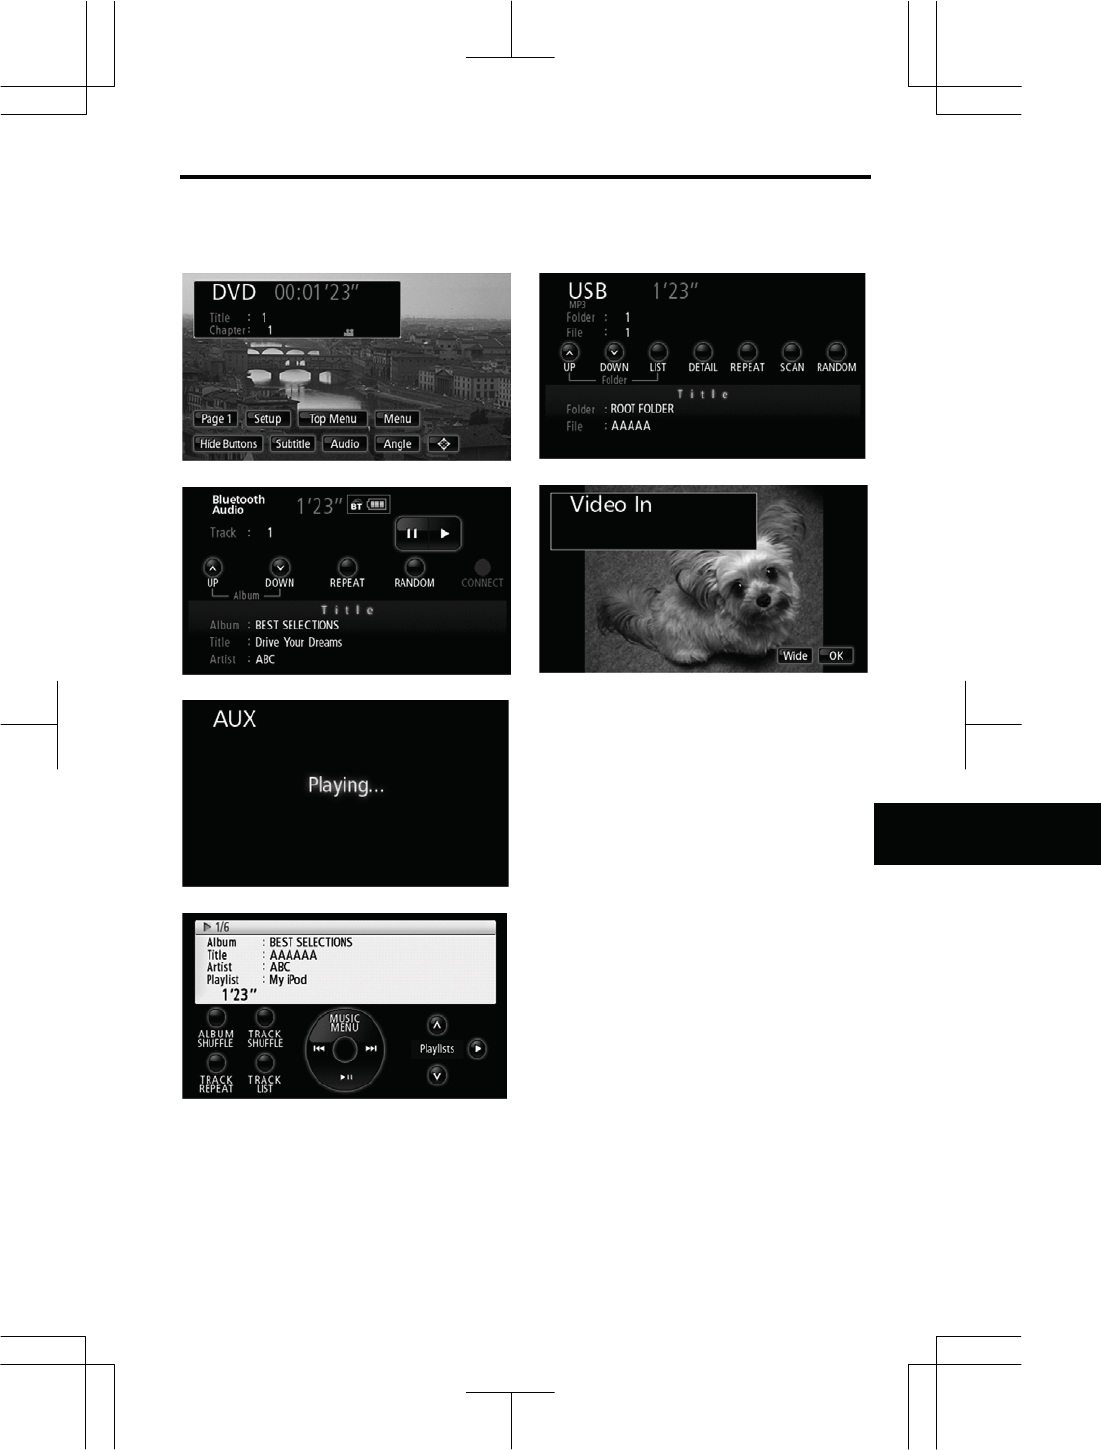
(a) Playing a disc
Push the “AV” button and touch
“Disc” if an audio CD or MP3/WMA
disc is already loaded in the CD/DVD
player.
The disc will begin playback.
— CD
p
la
y
er o
p
eration
AUDIO/VIDEO SYSTEM
202
V573_E
(b) Operating an audio CD
z Playing an audio CD
Push the “AV” button and touch
“AUDIO” to display this screen.
CD text only — The album title, track title
and artist name will appear on the
screen.
z Selecting a desired track
“
S
”or “
T
”button of “TRACK/TUNE”:
Use for a direct access to a desired
track.
Push the “
S
” or “
T
” button of
“TRACK/TUNE” until the desired track
number appears on the screen. As you
release the button, the player will start
playing the selected track from the be-
ginning.
Fast forward: Push the “
S
”button of
“TRACK/TUNE” and hold it to fast for-
ward the disc. When you release the
button, the player will resume playing
from that position.
Reverse: Push the “
T
”button of
“TRACK/TUNE” and hold it to reverse
the disc. When you release the button,
the player will resume playing.
AUDIO/VIDEO SYSTEM
203
V573_E
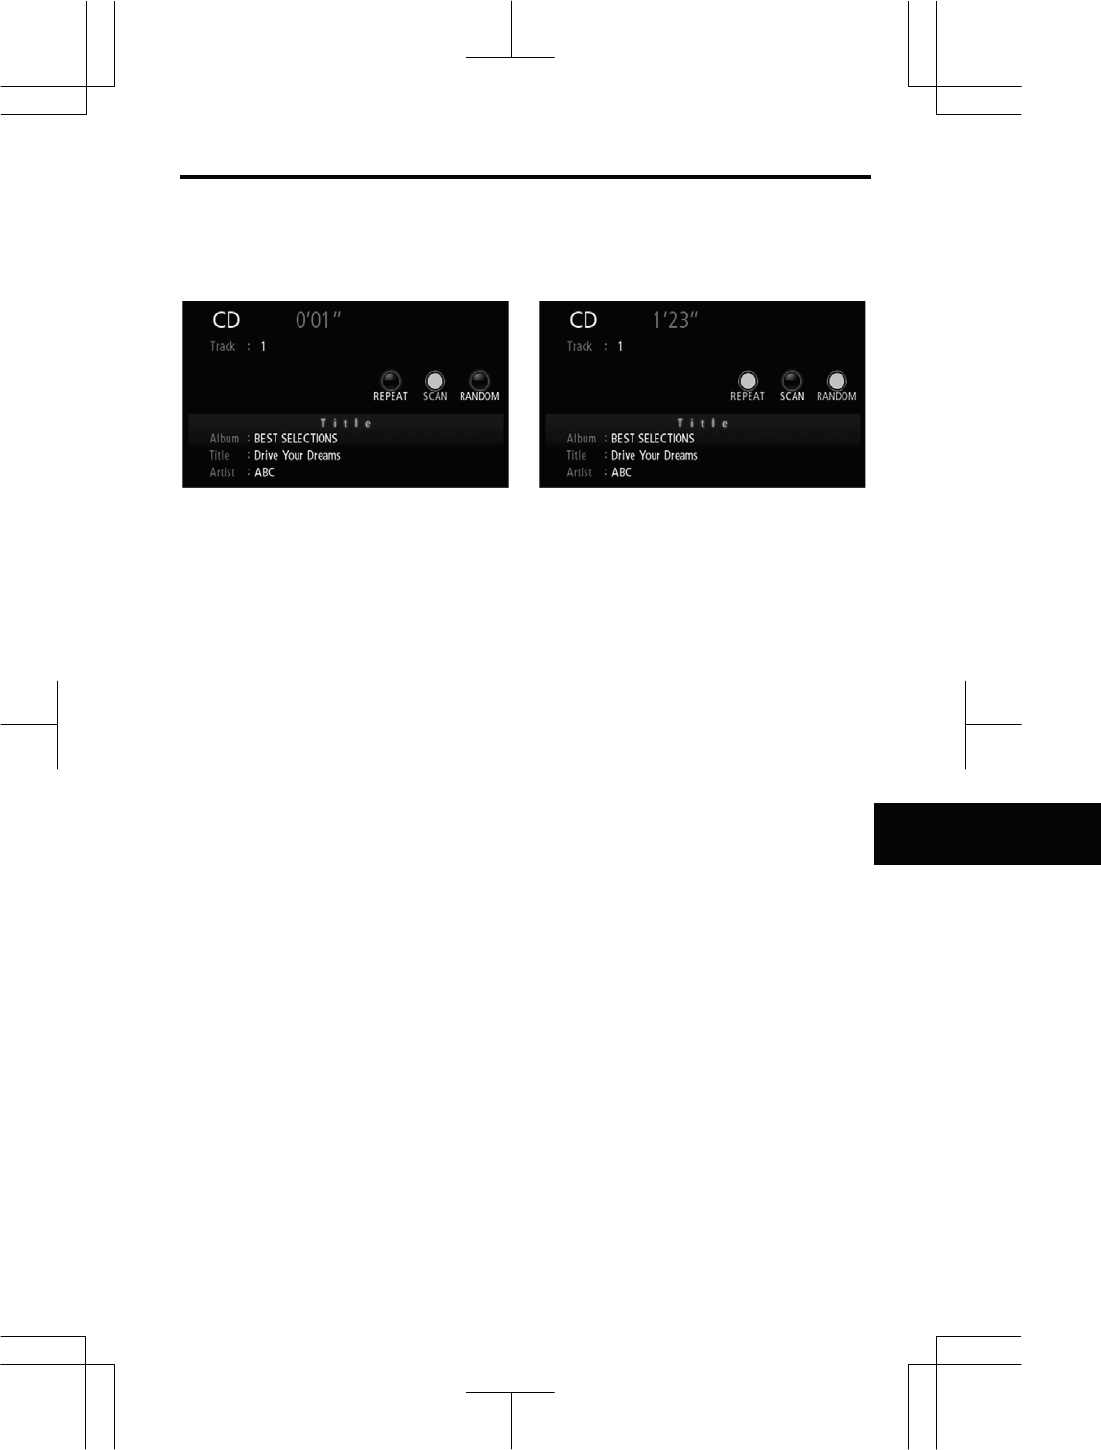
z Searching for a desired track
While the disc is playing, touch
“SCAN” briefly.
The player will play the next track for 10
seconds, then scan again. To select a
track, touch “SCAN” once again. If the
player reaches the end of the disc, it will
continue scanning at track 1.
After all the tracks are scanned in one
pass, normal play resumes.
z Other functions
“REPEAT”: Use it for automatic repeat
of the track you are currently listening to.
While the track is playing, touch
“REPEAT” briefly.
When the track is finished, the player will
automatically go back to the beginning of
the track and play the track again. To
cancel it, touch the “REPEAT” once
again.
“RANDOM”: Use it for automatic and
random selection.
While the disc is playing, touch
“RANDOM” briefly.
The system selects a track on the disc
being listened to in random order. To
cancel it, touch “RANDOM” once again.
If a CD-TEXT disc is inserted, the album
title, track title and artist name will be
displayed.
AUDIO/VIDEO SYSTEM
204
V573_E
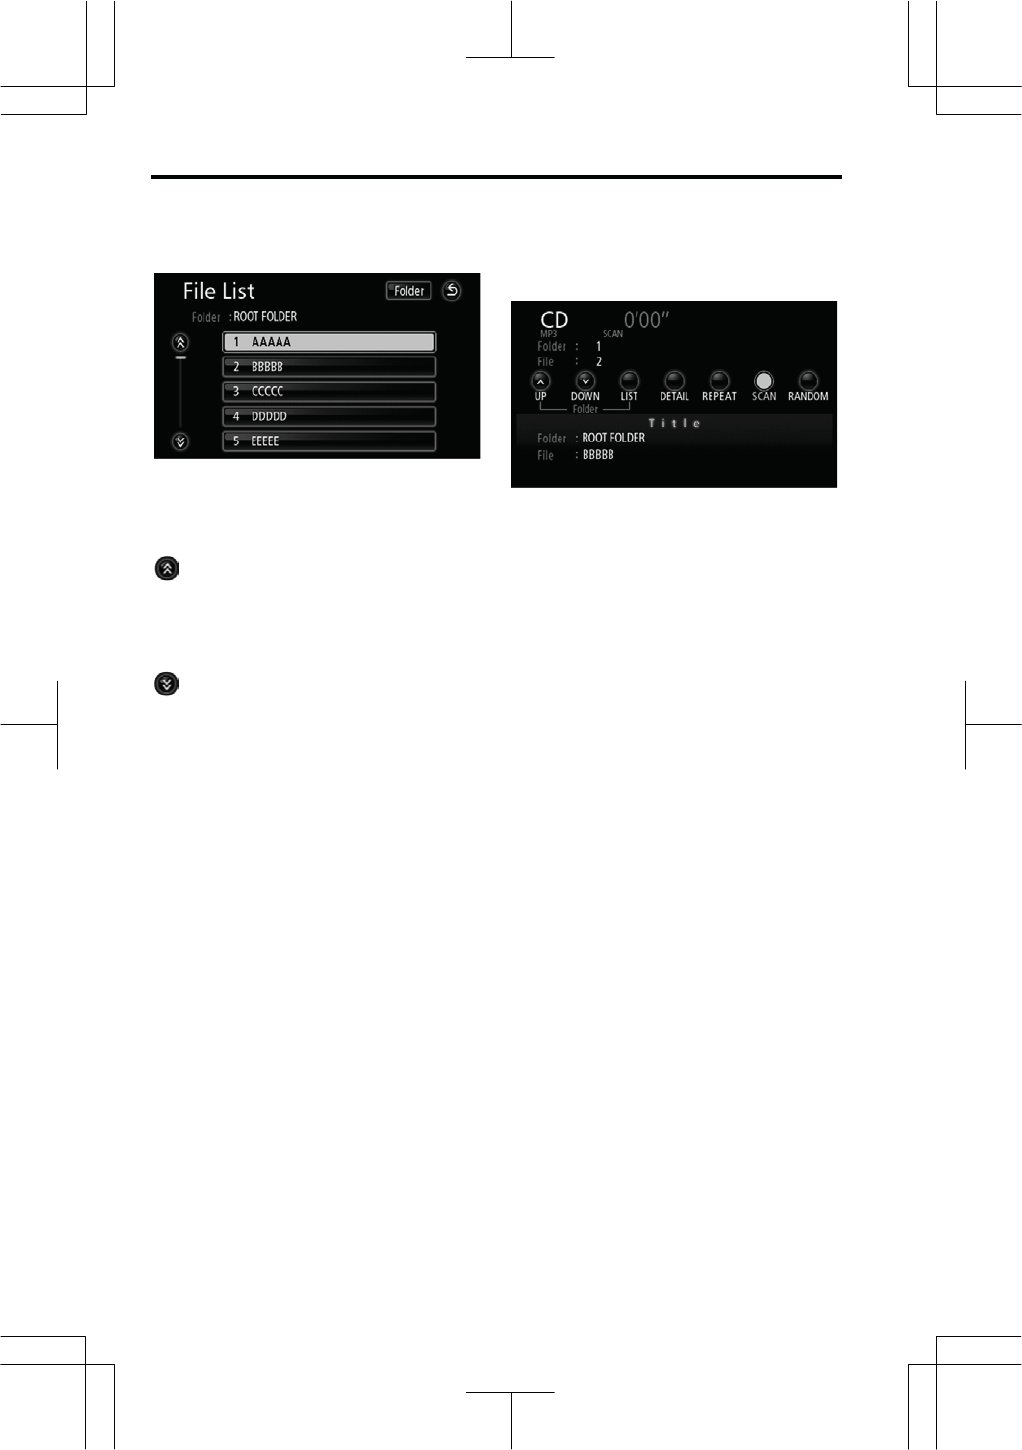
(c) Operating a MP3/WMA DISC
z Playing a MP3/WMA disc
Push the “AV” button and touch
“AUDIO” to display this screen.
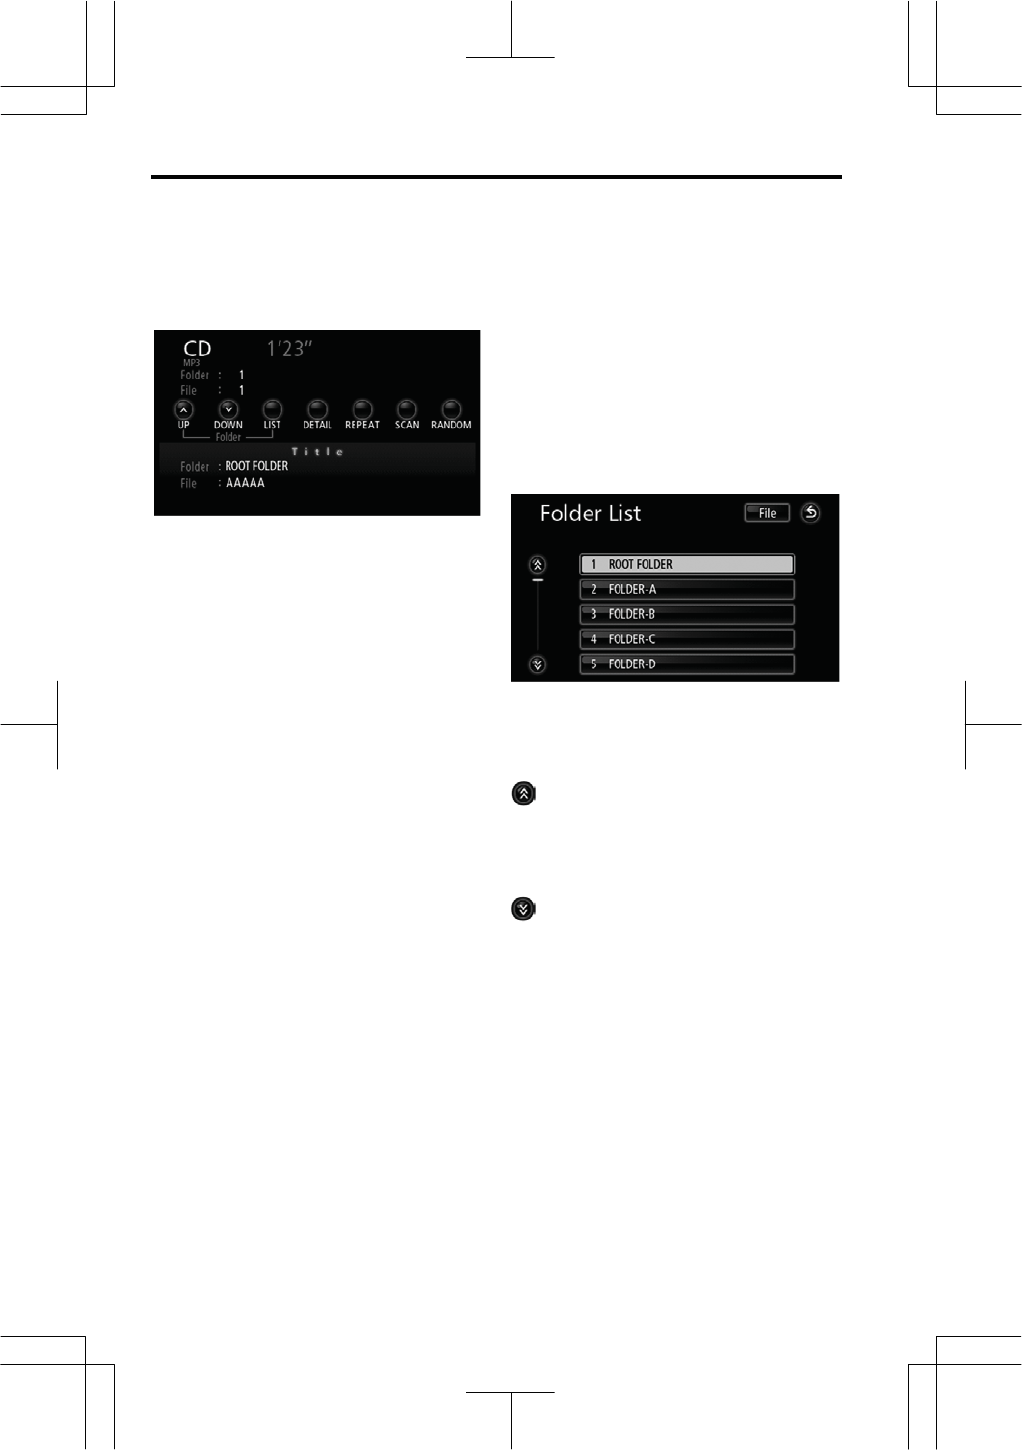
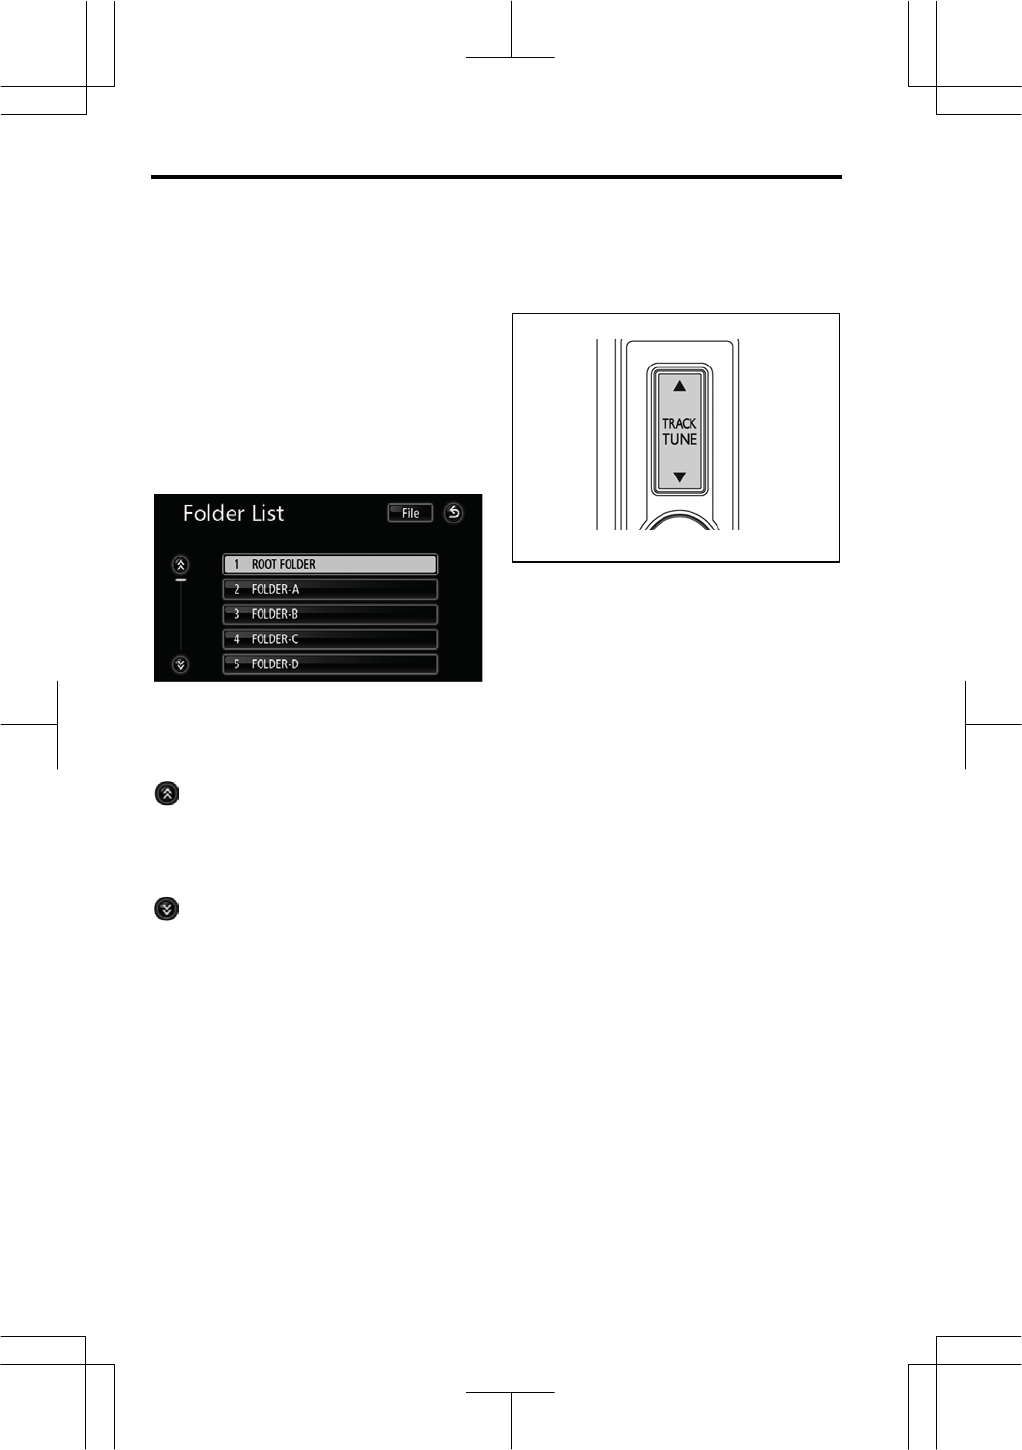
z Selecting a desired folder
“UP”: Touch this touch screen button to
go to the next folder.
“DOWN”: Touch this touch screen but-
ton to go to the previous folder.
“LIST”: The desired folder can be se-
lected in a list.
Touch “LIST”. The folder list is dis-
played.
Touch the desired folder number. The
player will start playing the first file of the
selected folder.
: By touching this touch screen button,
the list moves up by 5 folder groups. If
this touch screen button is touched when
the top page of the list is displayed, the
last page is displayed.
: By touching this touch screen button,
the list moves down by 5 folder groups.
If this touch screen button is touched
when the last page of the list is displayed,
the top page is displayed.
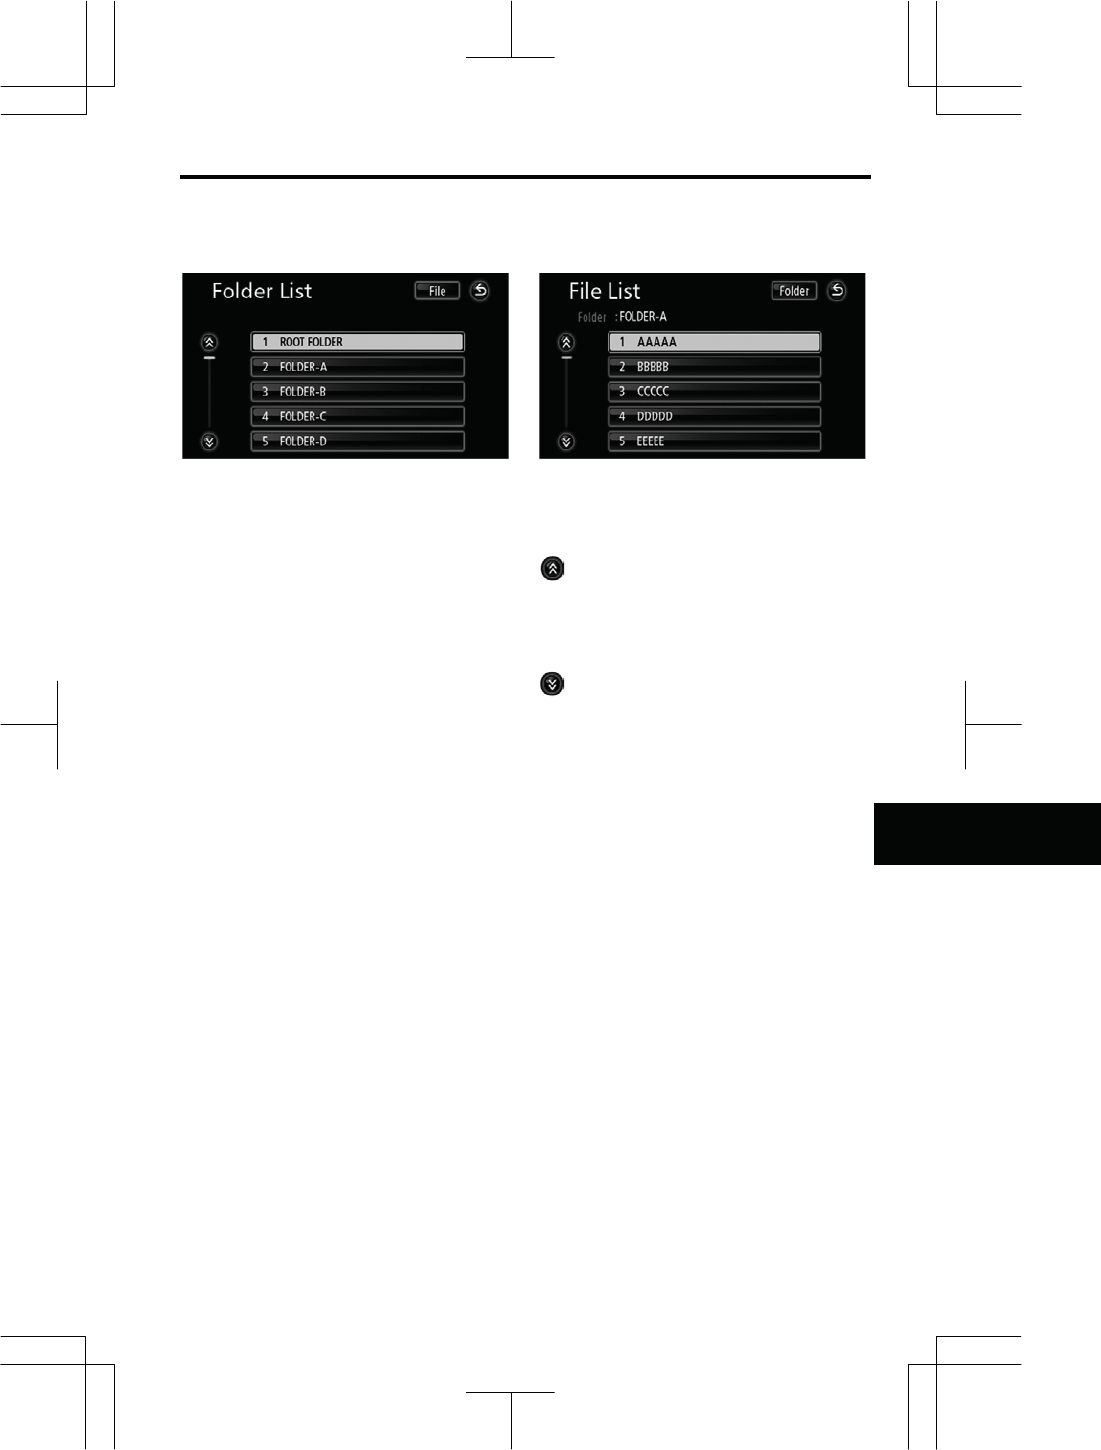
“File”: The file list is displayed.

AUDIO/VIDEO SYSTEM
205
V573_E
z Selecting a desired file
“
S
”or “
T
”button of “TRACK/TUNE”:
Use for direct access to a desired file.
Push the “
S
” or “
T
” button of
“TRACK/TUNE” and repeat until the
desired file number appears on the dis-
play. As you release the button, the
player will start playing the selected file
from the beginning.
Fast forward: Push the “
S
”button of
“TRACK/TUNE” and hold it to fast for-
ward the disc. When you release the
button, the player will resume playing
from that position.
Reverse: Push the “
T
”button of
“TRACK/TUNE” and hold it to reverse
the disc. When you release the button,
the player will resume playing.
“File”: The desired file can be selected
in a list.
Touch “File”. The file list is displayed.
AUDIO/VIDEO SYSTEM
206
V573_E
Touch the desired file number. The
player will start playing the selected
file from the beginning.
: By touching this touch screen button,
the list moves up by 5 file groups. If this
touch screen button is touched when the
top page of the list is displayed, the last
page is displayed.
: By touching this touch screen button,
the list moves down by 5 file groups. If
this touch screen button is touched when
the last page of the list is displayed, the
top page is displayed.
“Folder”: The folder list is displayed.
z Searching for a desired file
While the disc is playing, touch
“SCAN” briefly.
“SCAN” appears on the screen. The
player will play the next file in the folder
for 10 seconds, then scan again. To
select a file, touch “SCAN” once again.
If the player reaches the end of the folder,
it will continue scanning from file 1.
After all the files are scanned in one
pass, normal play resumes.

AUDIO/VIDEO SYSTEM
207
V573_E
z Searching for a desired folder
While the disc is playing, touch
“SCAN” and hold it until the
“F.SCAN” appears on the screen.
The program at the beginning of each
folder will be played for 10 seconds. To
continue listening to the program of your
choice, touch “SCAN” once again.
After all the folders are scanned in one
pass, normal play resumes.
z Other functions
“DETAIL”: Details of the file currently
playing is displayed.
“REPEAT”: Use it for automatic repeat
of the file or folder you are currently lis-
tening to.
Repeating a file —
While the file is playing, touch
“REPEAT” briefly.
“RPT” appears on the screen. When
the file is finished, the player will auto-
matically go back to the beginning of the
file and play the file again. To cancel it,
touch “REPEAT” once again.
Repeating a folder —
While the folder is playing, touch
“REPEAT” and hold it until the
“F.RPT” appears on the screen.
When the folder is finished, the player
will automatically go back to the begin-
ning of the folder and play the folder
again. To cancel it, touch “REPEAT”
once again.

AUDIO/VIDEO SYSTEM
208
V573_E
“RANDOM”: Use it for automatic and
random selection of the folder or the disc
which you are currently listening to.
Playing the files in one folder in ran-
dom order —
While the disc is playing, touch
“RANDOM” briefly.
“RAND” appears on the screen. The
system selects a file in the folder you are
currently listening to. To cancel it,
touch “RANDOM” once again.
Playing the files in all the folders on
one disc in random order —
While the disc is playing touch
“RANDOM” and hold it until the
“F.RAND” appears on the screen.
The system selects a file in all the folders.
To cancel it, touch “RANDOM” once
again.
(d) If the player malfunctions
If the player malfunctions, your audio
system will display following messages.
If “Check Disc” appears on the dis-
play: There is no disc in the player; the
disc is dirty, damaged or inserted upside
down; or the disc is not playable.
Correctly insert a clean, playable disc.
For appropriate discs for this player, see
“Audio/video system operating hints” on
page XX.
If “DVD Error” appears on the display:
The following causes are possible.
z There is a trouble inside the system.
Eject the disc.
z It indicates that the inside of the
player unit may be too hot due to the
very high ambient temperature.
Remove the disc from the player and
allow the player to cool down.
If the malfunction is not rectified:
Take your vehicle to your dealer.
If an MP3/WMA disc contains CD-DA
files, only CD-DA files are played. If an
MP3/WMA disc contains files other than
CD-DA, only MP3/WMA files are played.
AUDIO/VIDEO SYSTEM
209
V573_E
The DVD player can play DVD video
discs.
For appropriate discs for this player, see
“Audio/video system operating hints” on
page XX.
For safety reasons, you can enjoy DVD
video discs only when the vehicle is
completely stopped with the engine
switch is in “ACC” or “IGíON” mode and
the parking brake applied. While you are
driving, you can hear audio alone even in
the DVD video.
(a) Operating a DVD video disc
NOTE: The playback condition of some
DVD video discs may be determined by
a DVD video software producer. This
DVD player plays a disc as the soft-
ware producer intended. So some
functions may not work properly. Be
sure to read the manual for the DVD
video disc separately provided. For
the detailed information about DVD
video discs, see “(c) DVD player and
DVD video disc information” on page
XX.
z Precautions on DVD video disc
When recording with a DVD video, audio
tracks may not record in some cases
while the menu is displayed. As audio
will not play in this case, verify that the
video tracks are playing and then acti-
vate playback.
When playback of a disc is completed:
z If a DVD video is playing, playback
will stop or the menu screen will be
displayed.
The title/chapter number and playback
time display may not appear while play-
ing back certain DVD video discs.
CAUTION
Conversational speech on some
DVDs is recorded at a low volume to
emphasize the impact of sound ef-
fects. If you adjust the volume as-
suming that the conversations rep-
resent the maximum volume level
that the DVD will play, you may be
startled by louder sound effects or
when you change to a different au-
dio source. The louder sounds may
have a significant impact on the
human body or pose a driving haz-
ard. Keep this in mind when you
adjust the volume.
— DVD
p
la
y
er o
p
eration
AUDIO/VIDEO SYSTEM
210
V573_E
z Playing a DVD video disc
Insert a DVD in the disc slot to auto-
matically turn on the power and play the
DVD. The DVD can also be played by
pushing the “AV” button with a DVD in
the disc slot and then touching “Disc”.
INFORMATION
Please note that there are certain
discs that do not playback auto-
matically, or do not playback unless
an item from the menu recorded on
the disc is selected. “Description of
DVD controls” (See page XX.)
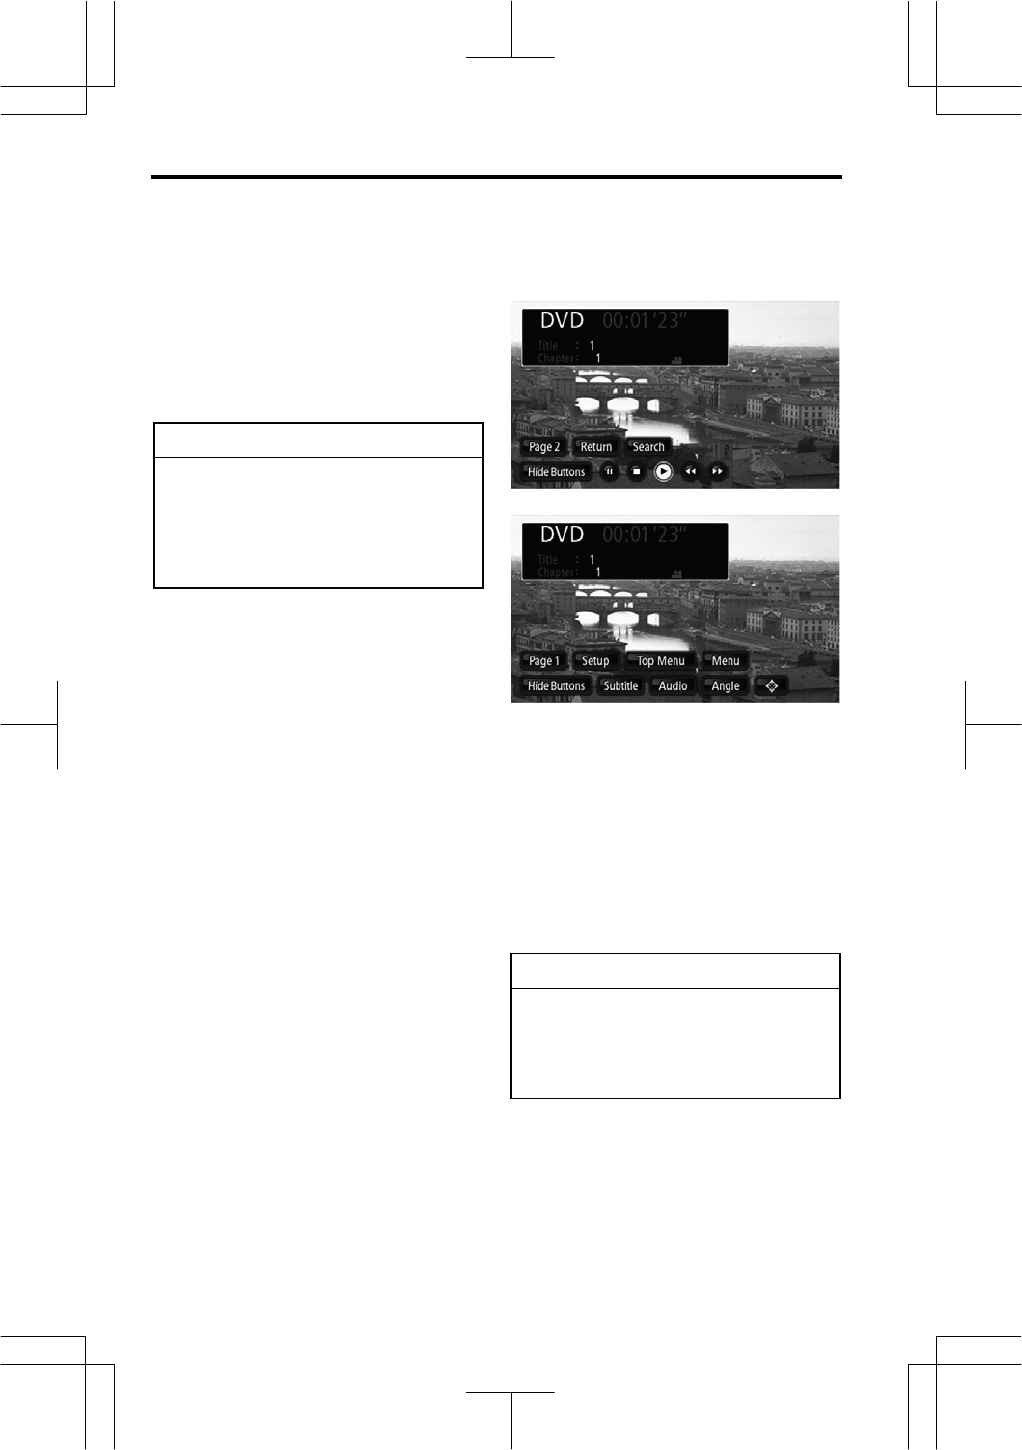
z Displaying DVD controls
If you touch a part of the screen, while
watching video, DVD controls will ap-
pear.
“Page 2”: Touching this will display on
the second page of DVD controls.
“Page 1”: Touching this will display the
top page of DVD controls.
“Hide Buttons”: Touching this will turn
off the controls from the screen.
INFORMATION
Each touch screen button displays
for approximately 6 seconds when
changed to the DVD operation
screen. Touch the screen to redis-
play the switches.
AUDIO/VIDEO SYSTEM
211
V573_E
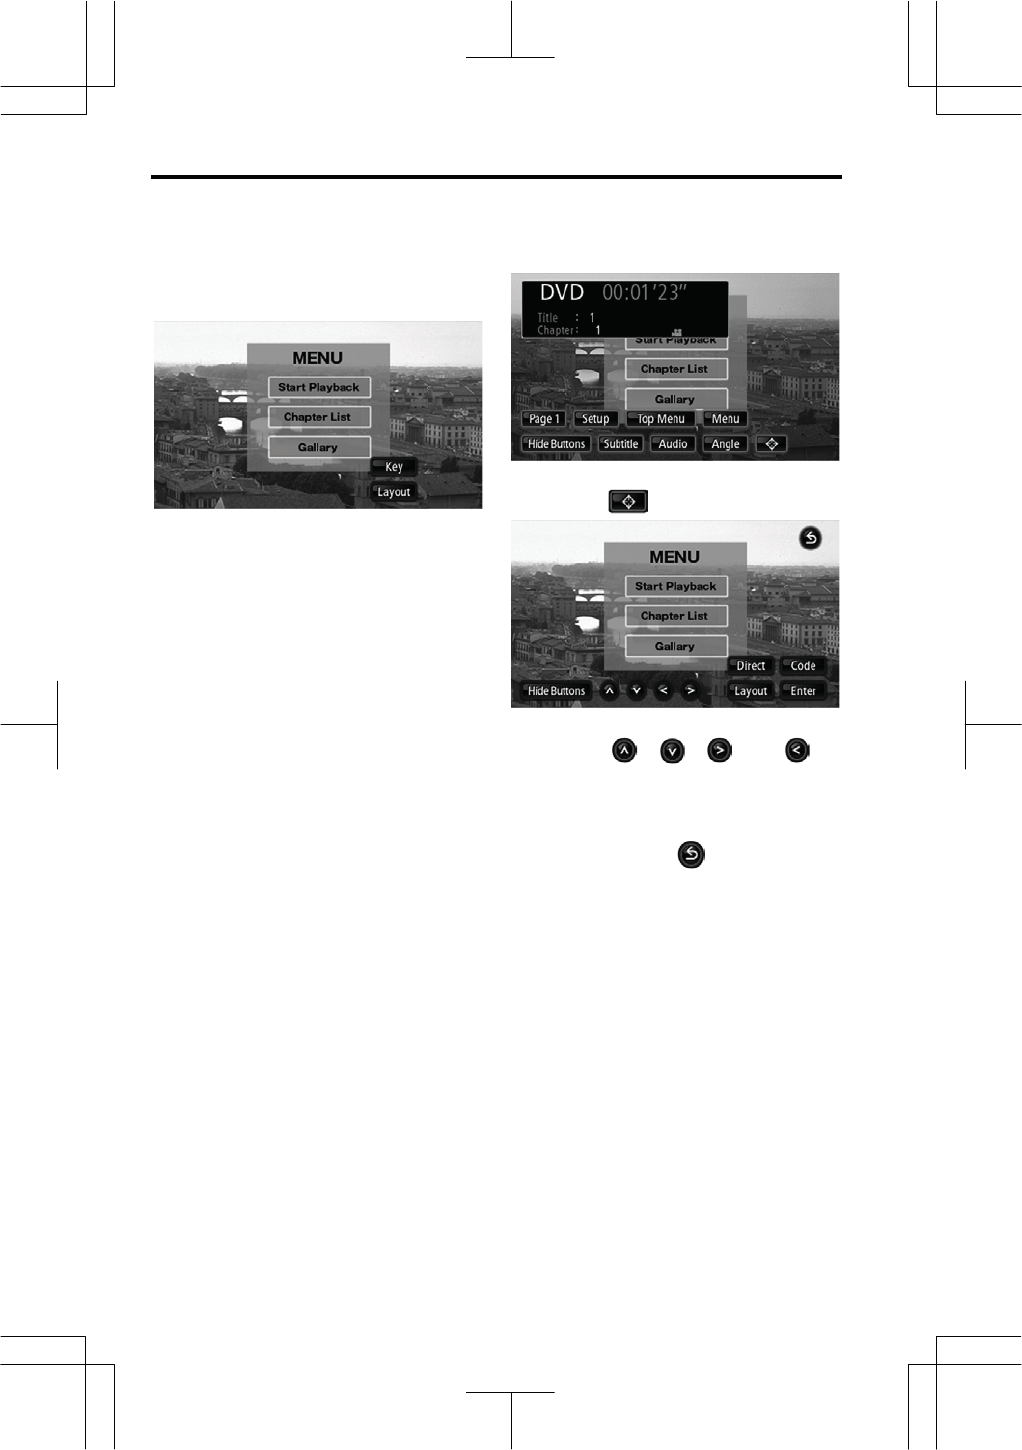
z Description of DVD controls
TOP PAGE OF DVD VIDEO
CONTROLS
“Return”: Touching this will return to the
predetermined scene and start playing
from there.
“Search”: The title search screen ap-
pears. (See page XX.)
:Touch to pause the video screen.
:Touching this will stop the DVD
video disc.
:Touching this will resume normal
play after stop or pause.
:Touching this will fast reverse.
:Touch to fast forward during play-
back.
Touch briefly while paused to play
slowly.
SECOND PAGE OF DVD VIDEO
CONTROLS
“Setup”: Touching this button will allow
you to change the screen size and set
the default settings. (See pages XX and
XX.)
“Top Menu” and “Menu”: If you touch
either button, the menu screen for DVD
video appears. (For the operation, see
the manual that come with the DVD
video disc provided separately.)
“Subtitle”: The subtitle changing screen
appears. (See page XX.)
“Audio”: The audio changing screen
appears. (See page XX.)
“Angle”: The angle selection screen
appears. (See page XX.)
:The menu control key appears on
the screen. (See page XX.)
z Selecting a menu item
The menu stored on the disc can be op-
erated.
For details, see the manual that comes
with the DVD video disc provided sepa-
rately.
DISPLAYING THE DISC MENU
If the disc menu does not display when
the disc is loaded, the following method
can be used to display the menu.
1. Touch “Page 2”.
2. Touch either “Top Menu” or
“Menu”.
The touch screen button display area
moves UP or DOWN each time you
touch the “Layout”.
Operating from the direct touch op-
eration screen —
If the disc menu displays when the
disc is loaded, selections can be
made by touching the menu icons
directly.
AUDIO/VIDEO SYSTEM
212
V573_E
Operating with the touch screen but-
ton —
1. Touch “Key”.
The disc menu items will vary depending
on the disc. Furthermore, discs are
played based on the disc content and
therefore there may be times when the
selected operation does not function as
expected.
2. Touch “Page 2”.
3. Touch .
4. Touch , , , or to
select a menu.
Touch “Direct” to enable direct touch
operation.
When you touch , the previous
screen returns.
5. Touch “Enter”.
AUDIO/VIDEO SYSTEM
213
V573_E
z Searching for desired footage
The desired video footage can be
searched for by title, chapter, or menu
number (number used to separate the
disc content).
SEARCHING BY CHAPTER
When you push the “S” or “T” button of
“TRACK/TUNE”, you can select a chap-
ter.
SEARCHING BY TITLE NUMBER
1. Touch “Search”.
2. Touch “+”, “í”, “+10”, or “í10”
and input the title number.
When you touch , the previous
screen returns.
3. Touch “Enter”.
Playback is commenced from the input
title number.
SEARCHING BY MENU NUMBER
1. Touch .
2. Touch “Code” to display the
menu number input screen.
3. Touch “+”, “í”, “+10”, or “í10”
and input the menu number.
When you touch , the previous
screen
returns.
4. Touch “Enter”.
AUDIO/VIDEO SYSTEM
214
V573_E
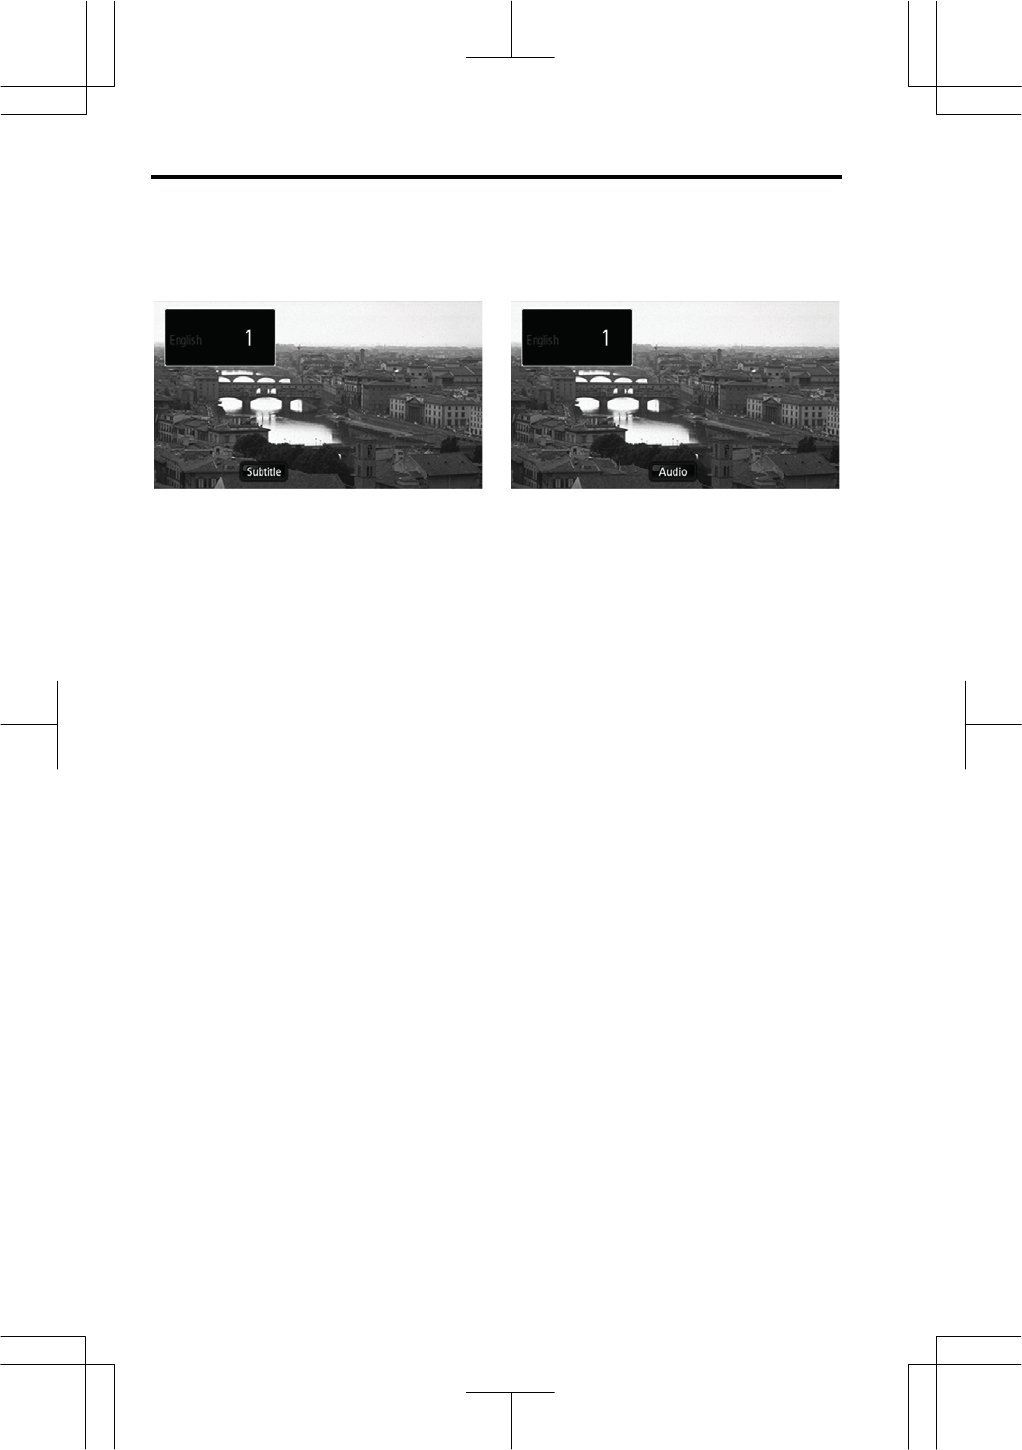
z Changing the subtitle language
Each time you touch “Subtitle”, the
language is selected from the ones
stored in the discs and changed.
z Changing the audio language
Each time you touch “Audio”, the lan-
guage is selected from the ones
stored in the discs and changed.
AUDIO/VIDEO SYSTEM
215
V573_E
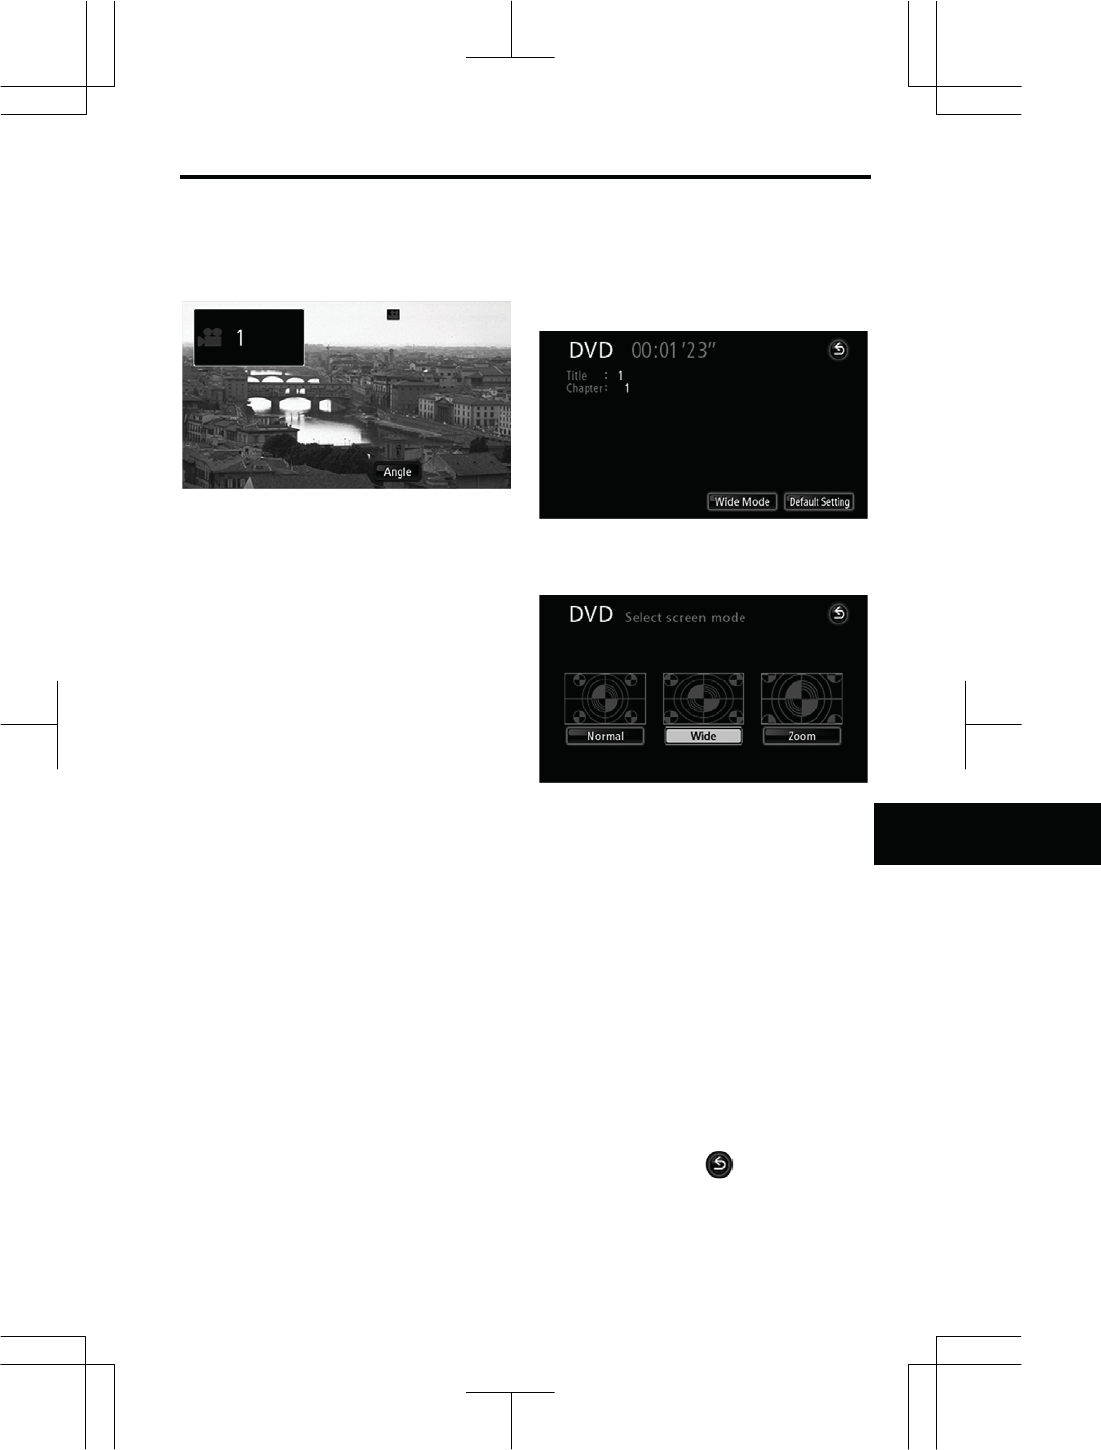
z Changing the angle
The angle can be selected for discs that
are multiíangle compatible when the
angle mark appears on the screen.
Each time you touch “Angle”, the an-
gle changes.
z Selecting screen size
1. Touch “Setup”.
2. Touch “Wide Mode” to display the
wide mode optional screen.
3. Touch “Normal”, “Wide”, or
“Zoom”.
“Normal”: Displays the 3 (H) × 4 (W)
screen with the remaining area at both
edges in black.
“Wide”: Displays the 3 (H) × 4 (W)
screen with the screen widened left and
right in the same ratio to fill the display
horizontally.
“Zoom”: Displays the 3 (H) × 4 (W)
screen with the screen stretched verti-
cally and horizontally in the same ratio to
fill the display.
Change to this mode to display a 9 (H) ×
16 (W) screen.
When you touch , the previous
screen returns.
AUDIO/VIDEO SYSTEM
216
V573_E
NOTICE
There are no issues regarding the
viewing of visual material in wideí
screen format provided that it is for
personal use. However, compress-
ing or enlarging the screen for
commercial purposes, or to make
material available for public viewing,
may infringe upon the rights of the
author as protected by copyright
laws, and therefore care should be
exercised.
z Default setting
1. Touch “Setup”
2. Touch “Default Setting” to display
the “Default setting” screen.
The initial setting can be changed.
After you change the initial setting, touch
“Enter”. The previous picture will be
displayed.
INFORMATION
If one of the switches used to
change the screen (“AV”) is pushed
without touching “Enter” after
changing settings at the default set-
tings screen, DVD playback will
stop. Touch at the video op-
eration screen to resume playback.
(See page XX.)

AUDIO/VIDEO SYSTEM
217
V573_E
AUDIO LANGUAGE
You can change the audio language.
1. Touch “Audio Lang.”.
2. Touch the language you want to
hear on the “Select audio language”
screen.
If you cannot find the language you want
to hear on this screen, touch “Other”
and enter a language code. For the entry
of language code, see page XX.
SUBTITLE LANGUAGE
You can change the subtitle language.
1. Touch “Subtitle Lang.”.
2. Touch a language you want to
read on the “Select subtitle language”
screen.
If you cannot find the language you want
to read on this screen, touch “Other”
and enter a language code. For the entry
of language code, see page XX.
DVD LANGUAGE
You can change the language on the
DVD video menu.
1. Touch “Menu Lang.”.
2. Touch the language you want to
read on the “Select menu language”
screen.
If you cannot find the language you want
to read on this screen, touch “Other”
and enter a language code. For the entry
of language code, see page XX.
ANGLE ICON
The multiíangle mark can be turned on
or off on the screen while the disc which
is multiíangle compatible is being
played.
Each time you touch “Angle Icon”, the
angle mark on the screen turns on or off
alternately.
PARENTAL LOCK
The level of viewer restrictions can be
changed.
1. Touch “Parental Lock”.
2. Enter the 4ídigit personal code
on the “Enter Personal Code” screen
and then touch “Enter”.
If you enter the wrong numbers, touch
to delete the numbers.
10 touches of will initialized the per-
sonal code.
3. Touch a parental level (1—8) on
the “Select restriction level”.
4. Touch “Enter”.
AUDIO/VIDEO SYSTEM
218
V573_E
CHANGING THE VIDEO OUTPUT
The screen size changes each time
“Screen Aspect” is touched.
“16:9”: The screen displays in the nor-
mal wide size.
In the case of DVD software recorded
with a screen size of 4:3, both the left
and right edges display in black, or the
screen is stretched to the left and right.
“4:3 Letter Box”: The upper and lower
edges of the screen display in black.
In the case of DVD software recorded
with a screen size of 4:3, the video fits
the screen size perfectly (4:3).
“4:3 Pan Scan”: Both the left and right
edges of the screen are cut.
In the case of DVD software recorded
with a screen size of 4:3, the video fits
the screen size perfectly (4:3).
NOTICE
There are no issues regarding the
viewing of visual material in wideí
screen format provided that it is for
personal use. However, compress-
ing or enlarging the screen for
commercial purposes, or to make
material available for public viewing,
may infringe upon the rights of the
author as protected by copyright
laws, and therefore care should be
exercised.
z Enter language code
If you touch “Other” on the “Select au-
dio language” screen, “Select subtitle
language” screen or “Select menu lan-
guage” screen, you can select the lan-
guage you want to hear or read by en-
tering a language code.
1. Enter the 4ídigit language code.
If you enter the wrong numbers, touch
to delete the numbers.
2. Touch “Enter”.
Code Language
1001 Japanese
0514 English
0618 French
0405 German
0920 Italian
0519 Spanish
2608 Chinese
1412 Dutch
1620 Portuguese
1922 Swedish
1821 Russian
1115 Korean
0512 Greek
AUDIO/VIDEO SYSTEM
219
V573_E
0101 Afar
0102 Abkhazian
0106 Afrikaans
0113 Amharic
0118 Arabic
0119 Assamese
0125 Aymara
0126 Azerbaijani
0201 Bashkir
0205 Byelorussian
0207 Bulgarian
0208 Bihari
0209 Bislama
0214 Bengali
0215 Tibetan
0218 Breton
0301 Catalan
0315 Corsican
0319 Czach
0325 Welsh
0401 Danish
0426 Bhutani
0515 Esperanto
0520 Estonian
0521 Basque
0601 Persian
0609 Finnish
0610 Fiji
0615 Faroese
0625 Frisian
0701 Irish
0704 ScotsíGaelic
0712 Galician
0714 Guarani
0721 Gujarati
0801 Hausa
0809 Hindi
0818 Croatian
0821 Hungarian
0825 Armenian
0901 Interlingua
0905 Interlingue
0911 Inupiak
0914 Indonesian
0919 Icelandic
0923 Hebrew
1009 Yiddish
1023 Javanese
1101 Georgian
1111 Kazakh
1112 Greenlandic
1113 Cambodian
1114 Kannada
1119 Kashmiri
1121 Kurdish
1125 Kirghiz
1201 Latin
1214 Lingala
1215 Laothian
1220 Lithuanian
1222 Latvian
1307 Malagasy
AUDIO/VIDEO SYSTEM
220
V573_E
1309 Maori
1311 Macedonian
1312 Malayalam
1314 Mongolian
1315 Moldavian
1318 Marathi
1319 Malay
1320 Maltese
1325 Burmese
1401 Nauru
1405 Nepali
1415 Norwegian
1503 Occitan
1513 (Afan)Oromo
1518 Oriya
1601 Panjabi
1612 Polish
1619 Pashto, Pushto
1721 Quechua
1813 RhaetoíRomance
1814 Kirundi
1815 Romanian
1823 Kinyarwanda
1901 Sanskrit
1904 Sindhi
1907 Sangho
1908 SerboíCroatian
1909 Sinhalese
1911 Slovak
1912 Slovenian
1913 Samoan
1914 Shona
1915 Somali
1917 Albanian
1918 Serbian
1919 Siswati
1920 Sesotho
1921 Sundanese
1923 Swahili
2001 Tamil
2005 Telugu
2007 Tajik
2008 Thai
2009 Tigrinya
2011 Turkmen
2012 Tagalog
2014 Setswana
2015 Tonga
2018 Turkish
2019 Tsonga
2020 Tatar
2023 Twi
2111 Ukrainian
2118 Urdu
2126 Uzbek
2209 Vietnamese
2215 Volapük
2315 Wolof
2408 Xhosa
2515 Yoruba
2621 Zulu

AUDIO/VIDEO SYSTEM
221
V573_E
(b) If the player malfunctions
If the player malfunctions, your au-
dio/video system will display following
messages.
If “Check Disc” appears on the dis-
play: There is no disc in the player; the
disc is dirty, damaged or inserted upside
down; or the disc is not playable.
Correctly insert a clean, playable disc.
For appropriate discs for this player, see
“Audio/video system operating hints” on
page XX.
If “Cannot read disc. Please check
disc.” appears on the display: It indi-
cates that the DVD region code of the
DVD may not be compatible with the
player.
If “DVD Error” appears on the display:
The following causes are possible.
z There is a trouble inside the system.
Eject the disc.
z It indicates that the inside of the
player unit may be too hot due to the
very high ambient temperature.
Remove the disc from the player and
allow the player to cool down.
If the malfunction is not rectified:
Take your vehicle to your dealer.
(c) DVD player and DVD video disc
information
z DVD video discs
This DVD player conforms to NTSC color
TV formats.
Region codes: Some DVD video discs
have a region code indicating a country
where you can use the DVD video disc
on this DVD player. If the DVD video
disc is not labeled as “ALL” or “1”, you
cannot use it on this DVD player. If you
attempt to play an inappropriate DVD
video disc on this player, “Cannot read
disc. Please check disc.” appears on
the screen. Even if the DVD video disc
does not have a region code, there is a
case that you cannot use it.
AUDIO/VIDEO SYSTEM
222
V573_E
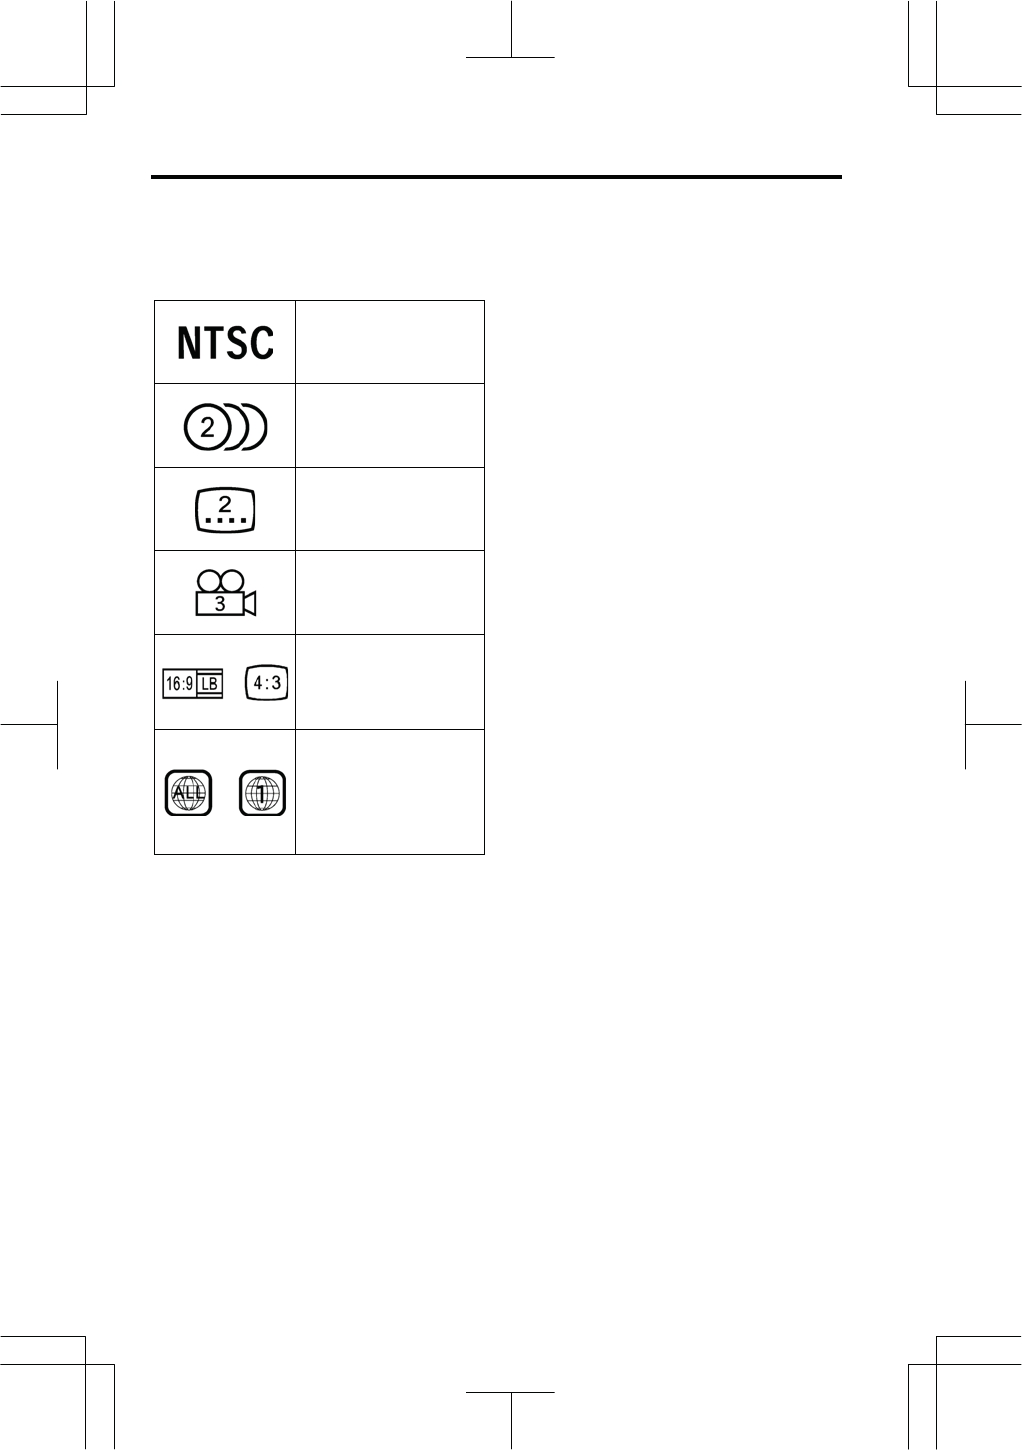
Marks shown on DVD video discs:
Indicates NTSC
format of color TV.
Indicates the number
of audio tracks.
Indicates the number
of language subtitles.
Indicates the number
of angles.
Indicates the screen
to be selected.
Wide screen: 16:9
Standard: 4:3
Indicates a region
code by which this
video disc can be
played.
ALL: in all countries
Number: region code
z DVD video disc glossary
DVD video discs: Digital versatile Disc
that holds video. DVD video discs have
adopted “MPEG2”, one of the world
standards of digital compression tech-
nologies. The picture data is com-
pressed by 1/40 on average and stored.
Variable rate encoded technology in
which the volume of data assigned to the
picture is changed depending on the
picture format has also been adopted.
Audio data is stored using PCM and
Dolby digital, which enables higher qual-
ity of sound. Furthermore, multiíangle
and multiílanguage features will also
help you enjoy the more advanced
technology of DVD video.
Viewer restrictions: This feature limits
what can be viewed in conformity with a
level of restrictions of the country. The
level of restrictions varies depending on
the DVD video disc. Some DVD video
discs cannot be played at all, or violent
scenes are skipped or replaced with
other scenes.
Level 1: DVD video discs for children
can be played.
Level 2 í 7: DVD video discs for chil-
dren and Gírated movie can be played.
Level 8: All types of the DVD video discs
can be played.
Multiíangle feature: You can enjoy the
same scene at different angles.
Multiílanguage feature: You can select
a language of the subtitle and audio.
Region codes: The region codes are
provided on DVD players and DVD discs.
If the DVD video disc does not have the
same region code as the DVD player,
you cannot play the disc on the DVD
player. For region codes, see page XX.
AUDIO/VIDEO SYSTEM
223
V573_E
Audio: This DVD player can play liner
PCM, Dolby digital and MPEG audio
format DVD. Other decoded type cannot
be played.
Title and chapter: Video and audio pro-
grams stored in DVD video disc are di-
vided in parts by title and chapter.
Title: The largest unit of the video and
audio programs stored on DVD video
discs. Usually, one piece of movie, one
album, or one audio program is assigned
as a title.
Chapter: The unit smaller than that of
title. A title comprises plural chapters.
Manufactured under license from
Dolby Laboratories. “Dolby”, “Pro
Logic”, and the doubleíD symbol are
trademarks of Dolby Laboratories.
Confidential unpublished works.
©1992í1997 Dolby Laboratories. All
rights reserved.
This product incorporates copyright
protection technology that is pro-
tected by U.S. patents and other in-
tellectual property rights. Use of this
copyright protection technology must
be authorized by Macrovision, and is
intended for home and other limited
viewing uses only unless otherwise
authorized by Macrovision. Reverse
engineering or disassembly is prohib-
ited.
The USB player can play USB memory
devices.
Some USB memory devices may not
operate properly.
For appropriate USB memory devices for
this player, see “Audio/video system
operating hints” on page 236.
CAUTION
Do not insert or eject the USB mem-
ory device while driving.
NOTICE
Do not insert foreign objects into the
USB port as this may damage the
USB memory device or their termi-
nals.
— USB
p
la
y
er o
p
eration
AUDIO/VIDEO SYSTEM
224
V573_E
(a) Plugging or unplugging a USB
memory device
z Setting a USB memory device
Plug a USB memory device into the
USB port.
After insertion, the set USB memory de-
vice is automatically loaded.
NOTICE
zDo not leave your USB memory
device in the car. In particular,
high temperatures inside the ve-
hicle may damage the USB mem-
ory device.
zDo not push down on or apply
unnecessary pressure to the USB
memory device while it is con-
nected as this may damage the
USB memory device or its termi-
nal.
INFORMATION
See the vehicle's owner's manual for
the location of the USB port and
other details.
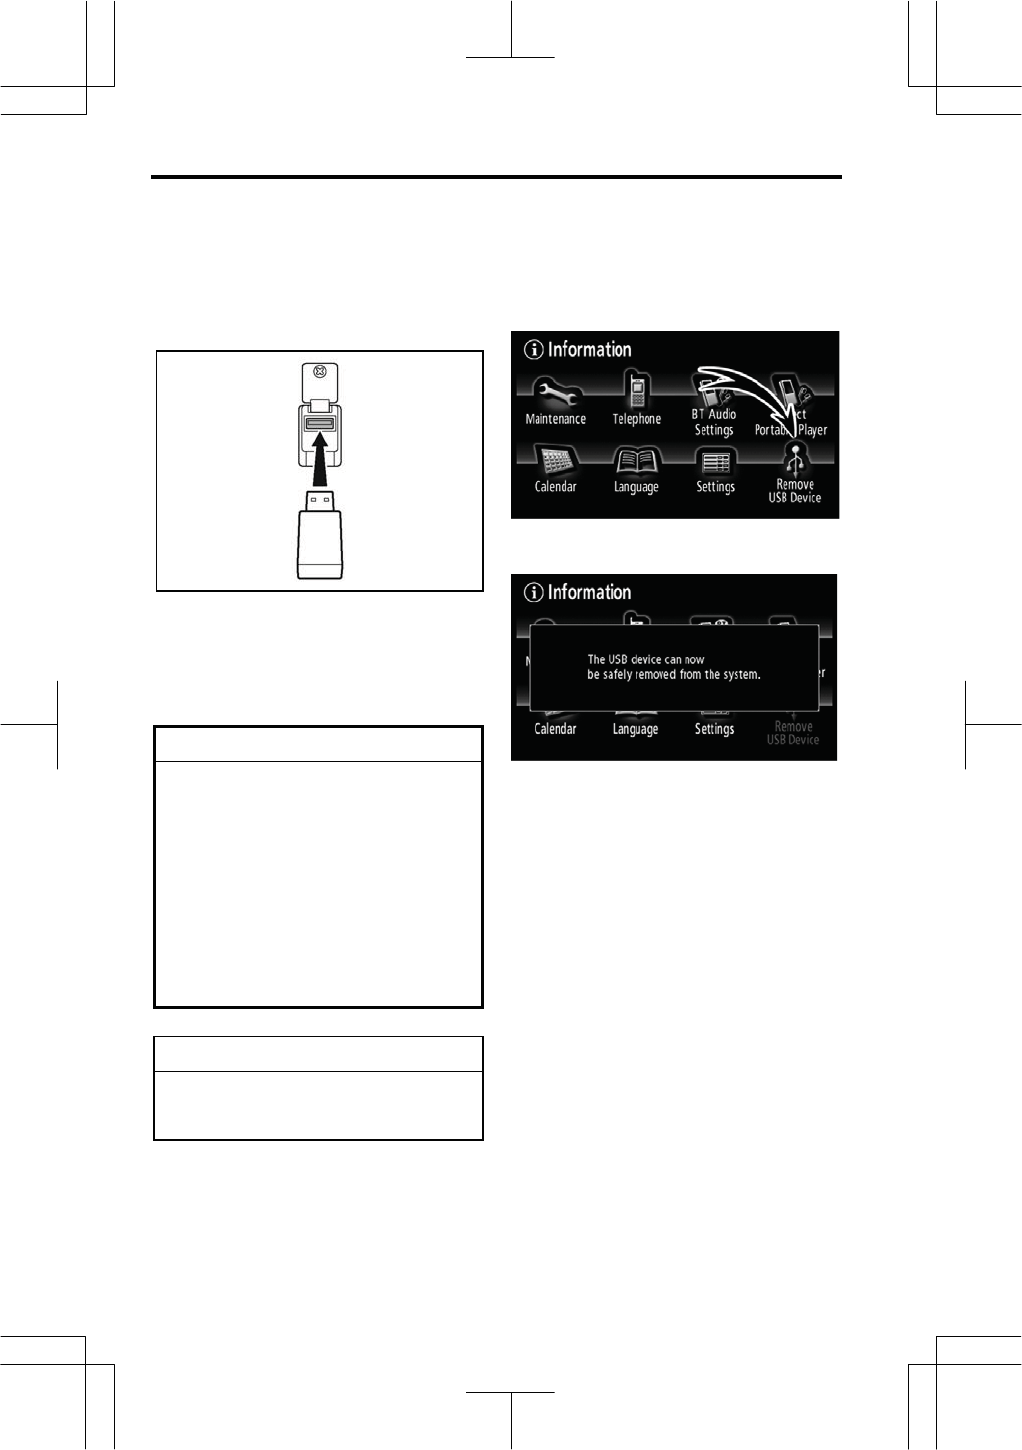
z Unplugging a USB memory device
1. Push the “INFO” button.
2. Touch “Remove USB Device”.
3. Unplug the USB memory device.
A USB memory device can then be in-
serted.
AUDIO/VIDEO SYSTEM
225
V573_E
(b) Playing a USB memory device
Push the “AV” button and touch
“USB” if a USB memory device is al-
ready loaded in the USB player.
The USB memory device will begin
playback.
(c) Operating a USB memory device
z Playing a USB memory device
Push the “AV” button and touch
“AUDIO” to display this screen.
AUDIO/VIDEO SYSTEM
226
V573_E
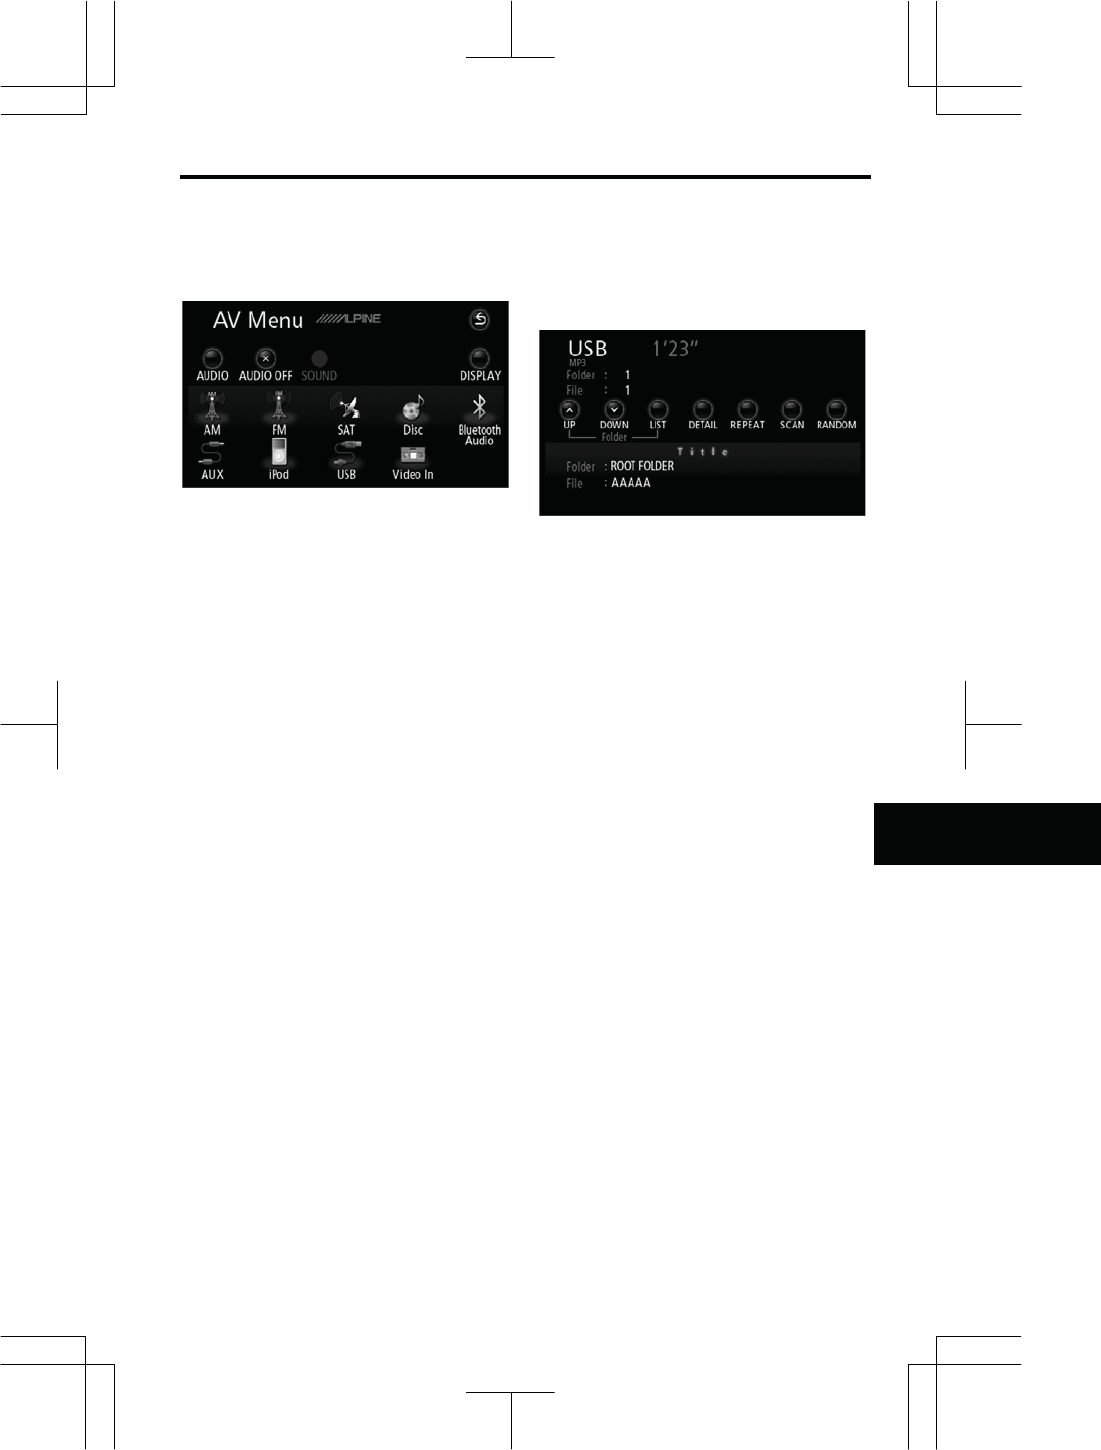
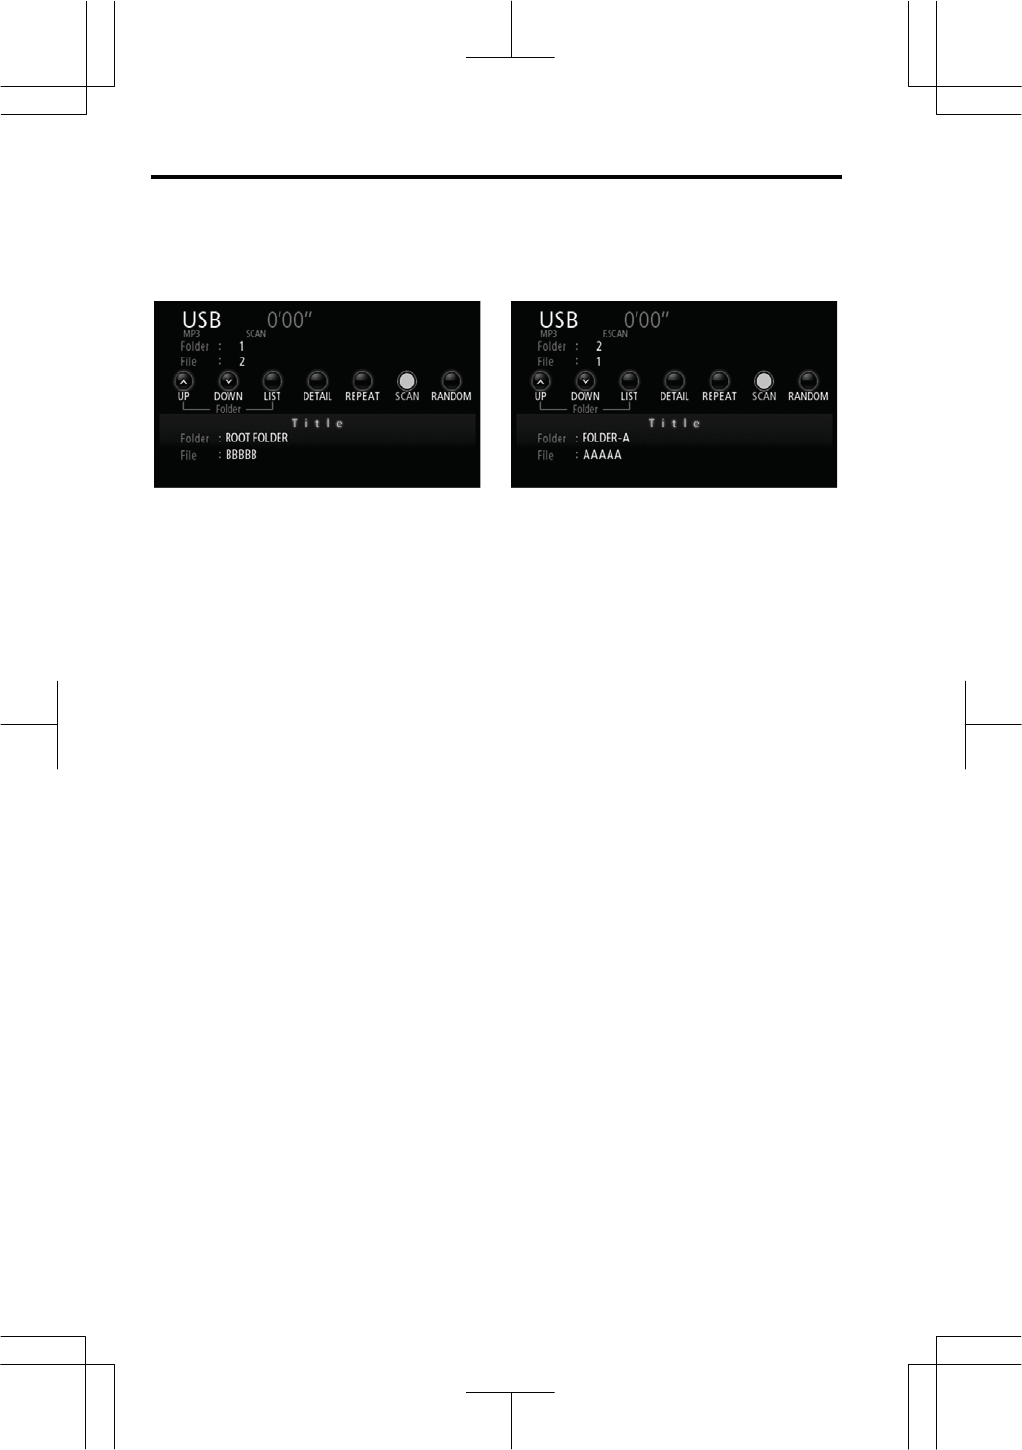
z Selecting a desired folder
“UP”: Touch this touch screen button to
go to the next folder.
“DOWN”: Touch this touch screen but-
ton to go to the previous folder.
“LIST”: The desired folder can be se-
lected in a list.
Touch “LIST”. The folder list is dis-
played.
Touch the desired folder number. The
USB player will start playing the first file
of the selected folder.
: By touching this touch screen button,
the list moves up by 5 folder groups. If
this touch screen button is touched when
the top page of the list is displayed, the
last page is displayed.
: By touching this touch screen button,
the list moves down by 5 folder groups.
If this touch screen button is touched
when the last page of the list is displayed,
the top page is displayed.
“File”: The file list is displayed.
z Selecting a desired file
“
S
”or “
T
”button of “TRACK/TUNE”:
Use for direct access to a desired file.
Push the “
S
” or “
T
” button of
“TRACK/TUNE” and repeat until the
desired file number appears on the dis-
play. As you release the button, the
USB player will start playing the selected
file from the beginning.
Fast forward: Push the “
S
”button of
“TRACK/TUNE” and hold it to fast for-
ward the USB memory device. When
you release the button, the USB player
will resume playing from that position.
Reverse: Push the “
T
”button of
“TRACK/TUNE” and hold it to reverse
the USB memory device. When you
release the button, the USB player will
resume playing.
AUDIO/VIDEO SYSTEM
227
V573_E
“File”: The desired file can be selected
in a list.
Touch “File”. The file list is displayed.
Touch the desired file number. The
USB player will start playing the se-
lected file from the beginning.
: By touching this touch screen button,
the list moves up by 5 file groups. If this
touch screen button is touched when the
top page of the list is displayed, the last
page is displayed.
: By touching this touch screen button,
the list moves down by 5 file groups. If
this touch screen button is touched when
the last page of the list is displayed, the
top page is displayed.
“Folder”: The folder list is displayed.
AUDIO/VIDEO SYSTEM
228
V573_E
z Searching for a desired file
While the USB memory device is
playing, touch “SCAN” briefly.
“SCAN” appears on the screen. The
USB player will play the next file in the
folder for 10 seconds, then scan again.
To select a file, touch “SCAN” once
again. If the USB player reaches the
end of the folder, it will continue scan-
ning from file 1.
After all the files are scanned in one
pass, normal play resumes.
z Searching for a desired folder
While the USB memory device is
playing, touch “SCAN” and hold it
until the “F.SCAN” appears on the
screen.
The program at the beginning of each
folder will be played for 10 seconds. To
continue listening to the program of your
choice, touch “SCAN” once again.
After all the folders are scanned in one
pass, normal play resumes.
AUDIO/VIDEO SYSTEM
229
V573_E
z Other functions
“DETAIL”: Details of the file currently
playing is displayed.
“REPEAT”: Use it for automatic repeat
of the file or folder you are currently lis-
tening to.
Repeating a file —
While the file is playing, touch
“REPEAT” briefly.
“RPT” appears on the screen. When
the file is finished, the USB player will
automatically go back to the beginning of
the file and play the file again. To can-
cel it, touch “REPEAT” once again.
Repeating a folder —
While the folder is playing, touch
“REPEAT” and hold it until the
“F.RPT” appears on the screen.
When the folder is finished, the USB
player will automatically go back to the
beginning of the folder and play the
folder again. To cancel it, touch
“REPEAT” once again.
“RANDOM”: Use it for automatic and
random selection of the folder or the
USB memory device which you are cur-
rently listening to.
Playing the files in one folder in ran-
dom order —
While the USB memory device is
playing, touch “RANDOM” briefly.
“RAND” appears on the screen. The
system selects a file in the folder you are
currently listening to. To cancel it,
touch “RANDOM” once again.
Playing the files in all the folders on
one USB memory device in random
order —
While the USB memory device is
playing touch “RANDOM” and hold it
until the “F.RAND” appears on the
screen.
The system selects a file in all the folders.
To cancel it, touch “RANDOM” once
again.
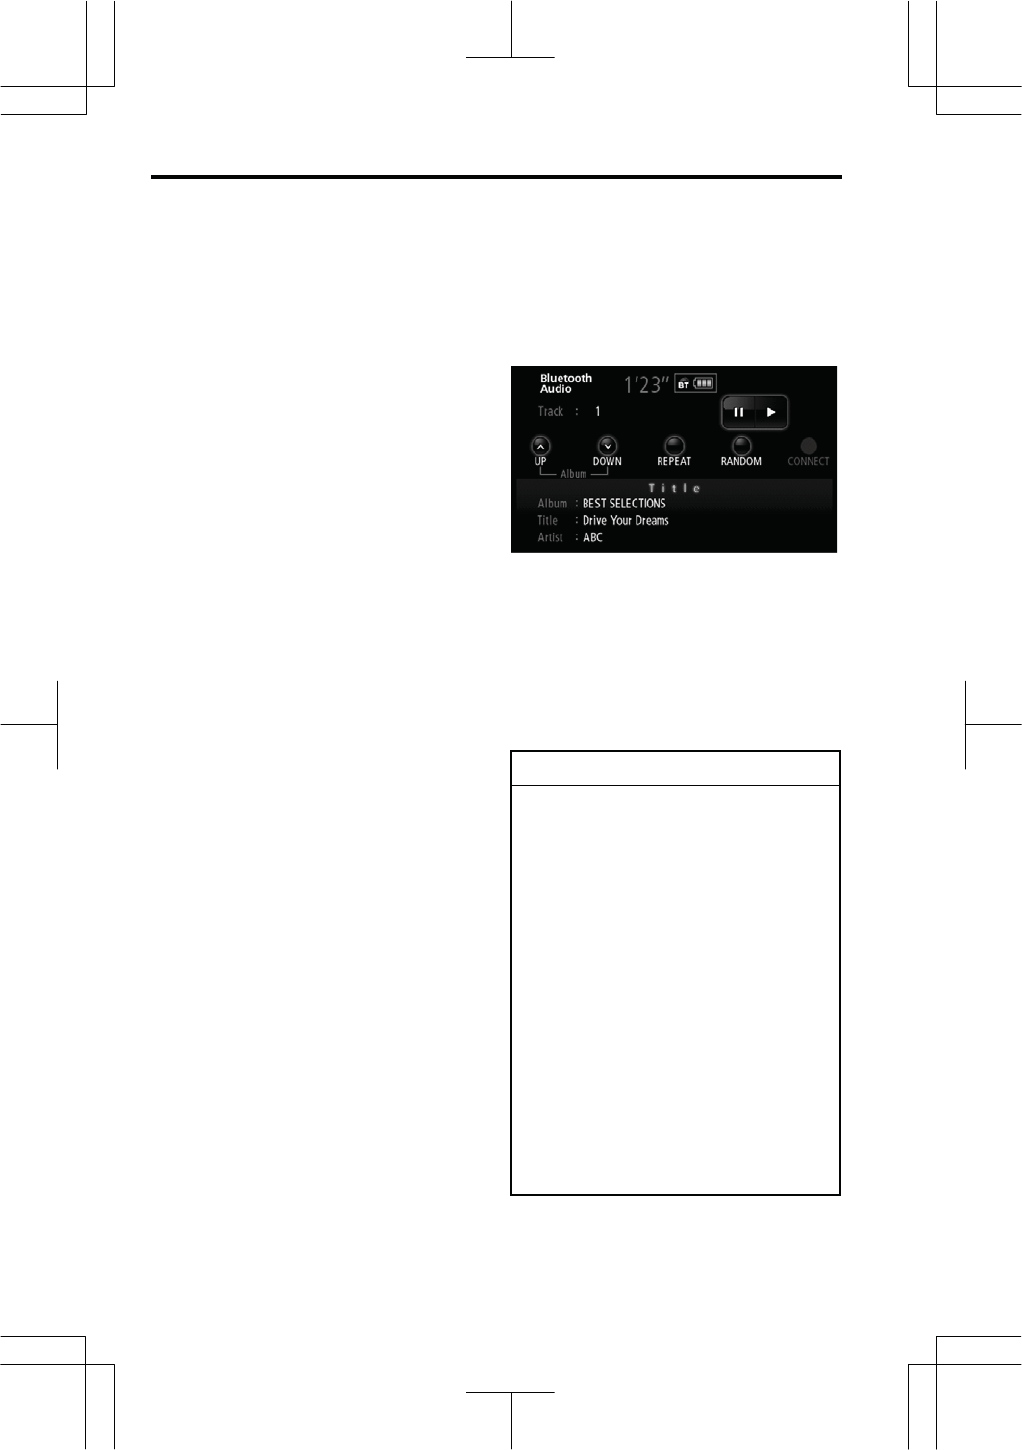
AUDIO/VIDEO SYSTEM
230
V573_E
(d) If the player malfunctions
If the player malfunctions, your audio
system will display following messages.
If “USB device is not connected.” ap-
pears on the display: This message
appears in cases such as when the USB
memory device is damaged. Ensure
that the USB memory device is correctly
connected and, if necessary, replace the
USB memory device with one that works
properly. If the USB memory device is
undamaged and connected correctly,
this indicates that there is a problem
inside the system or that the inside of the
player unit may be too hot due to a high
ambient temperature. Unplug the USB
memory device from the player. If it is
hot, allow the player to cool down.
If “No playable music data in the USB
device.” appears on the display: It
indicates that the USB memory device
has no playable data.
If the malfunction is not rectified:
Take your vehicle to your dealer.
The Bluetooth® audio system enables
users to enjoy music played on a
portable player from the vehicle
speakers via wireless communication.
This audio system supports Blue-
tooth®, a wireless data system capa-
ble of playing portable audio music
without cables.
If your portable player does not sup-
port Bluetooth®, the Bluetooth® audio
system will not function.
INFORMATION
Portable players must correspond to
the following specifications in order
to be connected to the Bluetooth®
audio system. However, please note
that some functions may be limited
depending on the type of portable
player.
zBluetooth®specifications:
Version: 1.1 or higher (Recom-
mended: Version. 2.0 + EDR or
higher)
zFollowing Profiles:
ƒA2DP (Advanced Audio Distri-
bution Profile) Ver.1.0
ƒAVRCP (Audio/Video Remote
Control Profile) Ver. 1.0 or higher
(Recommended: Ver. 1.3 or
higher)
—Bluetooth® audio
o
p
eration
AUDIO/VIDEO SYSTEM
231
V573_E
Bluetooth is a trademark owned by
Bluetooth SIG. Inc.
CAUTION
Use a portable player or connect the
Bluetooth®audio only when safe
and legal to do so.
NOTICE
Do not leave your portable player in
the car. In particular, high tempera-
tures inside the vehicle may damage
the portable player.
INFORMATION
zIn the following conditions, the
system may not function.
zThe portable player is turned off.
zThe portable player is not con-
nected.
zThe portable player has a low
battery.
zDepending on the portable player
that is connected to the system,
certain functions may not be
available.
zIf Bluetooth®devices are used for
hands-free phone and Bluetooth®
audio connections at the same
time, the following may occur.
zThe Bluetooth® connection may
be cut off.
zNoise may occur in the audio
played from the portable player.
zEven if using a cellular phone that
is capable of both hands-free
phone and Bluetooth® audio con-
nections, simultaneous connec-
tion may not be possible in some
cases.
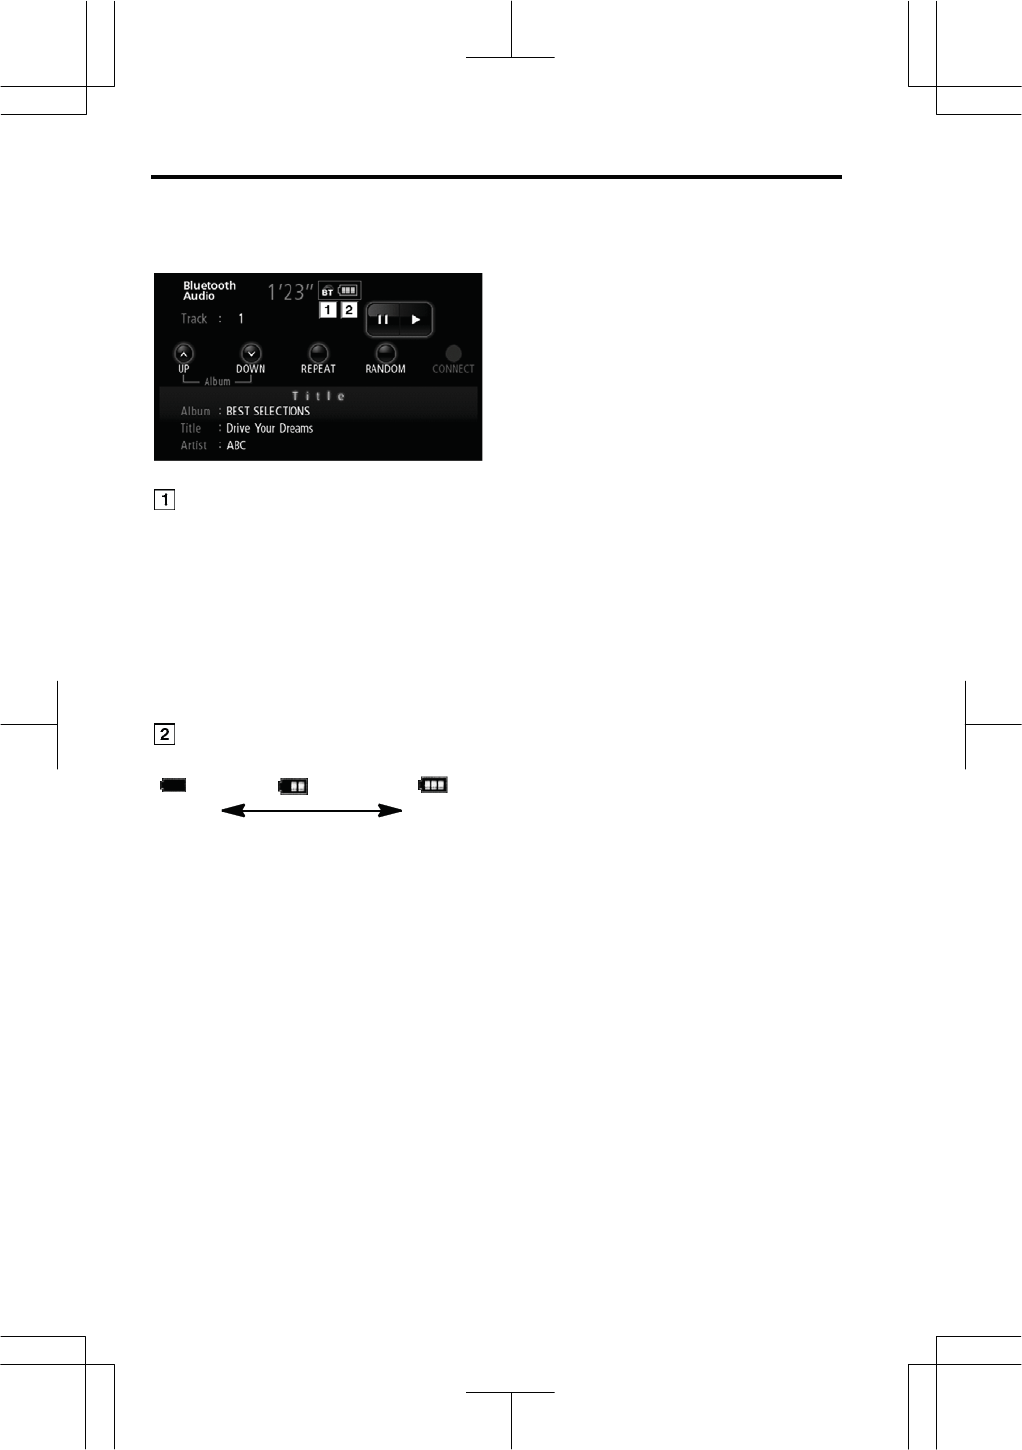
AUDIO/VIDEO SYSTEM
232
V573_E
Indicates the condition of the
Bluetooth® connection.
“Blue” indicates an excellent connection
to Bluetooth®.
“Yellow” indicates a bad connection to
Bluetooth®, resulting in possible deterio-
ration of audio quality.
“Portable player is not connected.”
indicates that Bluetooth® is not con-
nected.
Indicates the amount of battery
charge left.
Empty Full
It is not displayed while the Bluetooth®
is not connected.
The amount left does not always corre-
spond with the one on your portable
player. This system does not have a
charging function.
The Bluetooth® connection utilizes
the Bluetooth® antenna. The indica-
tion of the Bluetooth® connection may
turn yellow and the system may not
function when you use the Bluetooth®
portable player in the following condi-
tions:
z Your portable player is hidden be-
hind the display (behind the seat or
in the glove box or console box).
z Your portable player touches or is
covered with metal materials.
z Your portable player is in the trunk.
Leave the Bluetooth® portable player in a
place where the “Blue” indication is dis-
played.
The portable player information is regis-
tered when the Bluetooth® audio system
is connected. When you release posses-
sion of your vehicle, remove your port-
able player. (See “Deleting a portable
player” on page 224.)
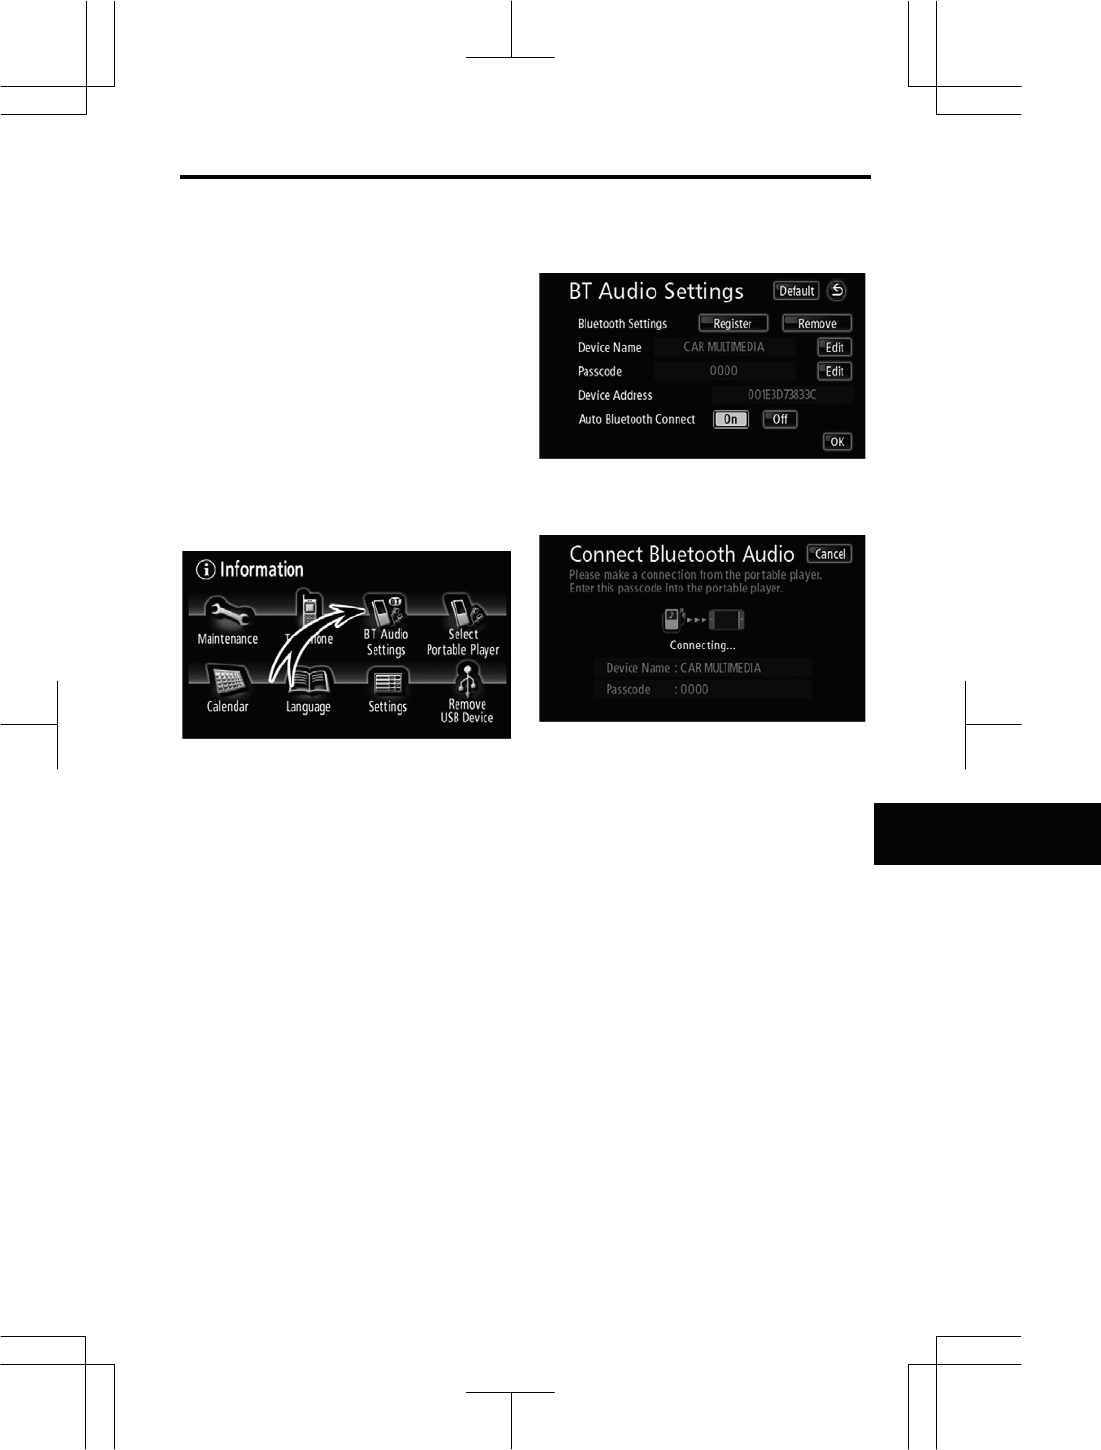
AUDIO/VIDEO SYSTEM
233
V573_E
(a) Enter a Bluetooth® audio player
To use the Bluetooth® audio system,
you need to enter your portable player
into the system. Once you have reg-
istered it, you can enjoy your music
on the vehicle’s audio system.
A maximum of two portable players can
be registered.
Please refer to the manual that comes
with your portable player for operation of
the portable player.
1. Push the “INFO” button.
2. Touch “BT Audio Settings” to
display the “BT Audio Settings”
screen.
3. Touch “Register” to connect your
portable player to the system.
4. When this screen is displayed,
enter the passcode displayed on the
screen into the portable player.
For the operation of the portable player,
see the manual that comes with your
portable player.
If you want to cancel the entry, touch
“Cancel”.
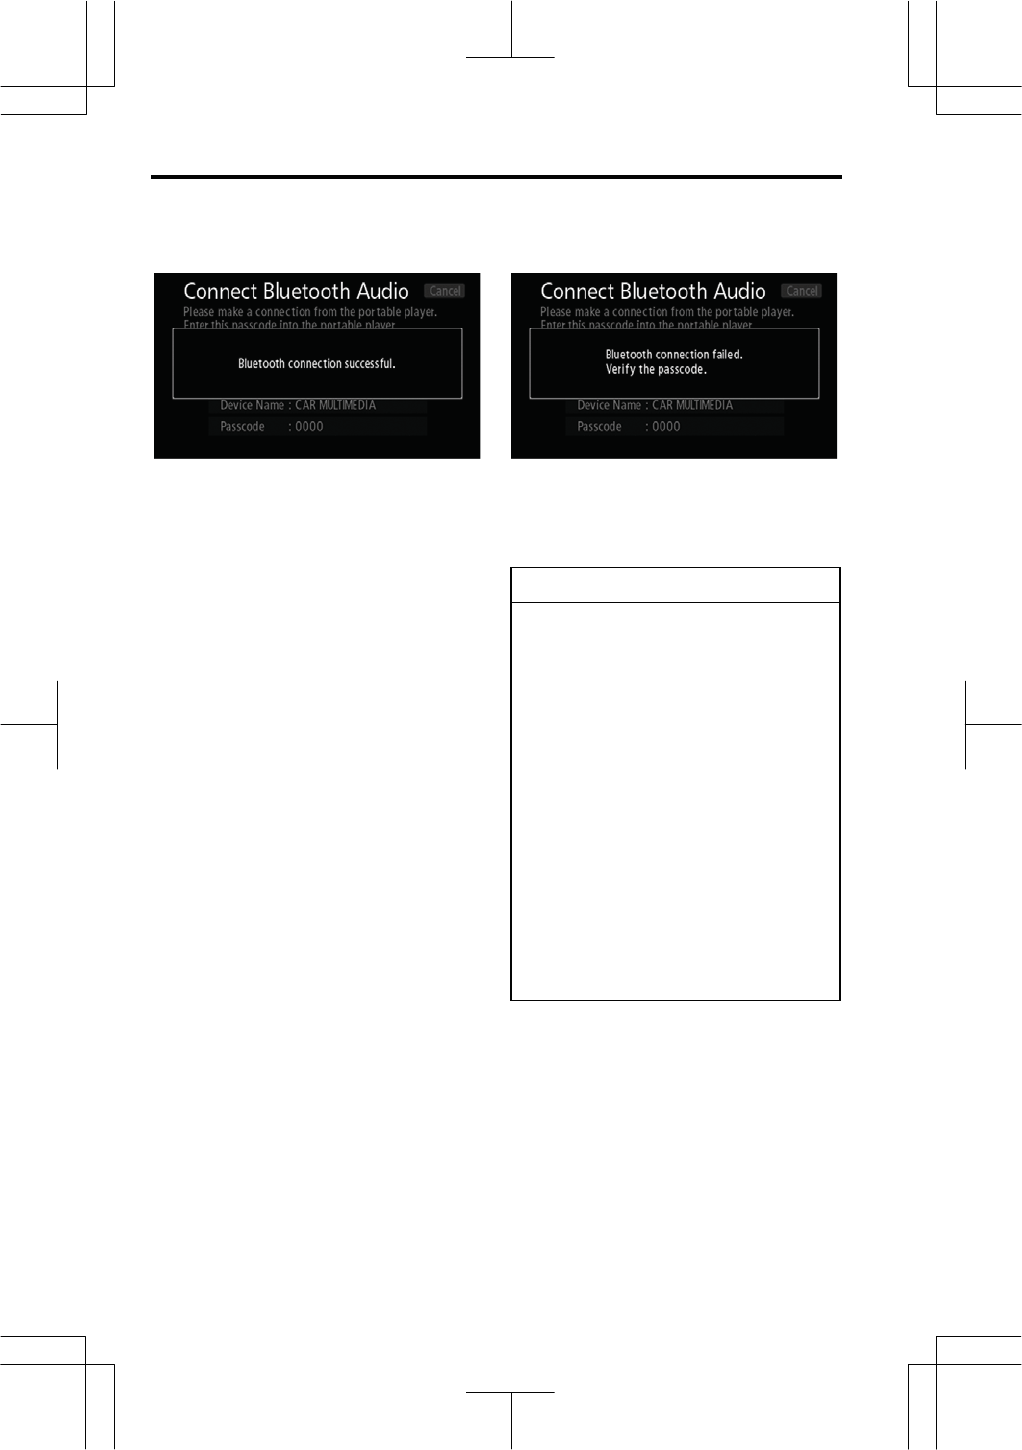
AUDIO/VIDEO SYSTEM
234
V573_E
5. When the connection is complete,
this screen is displayed.
You do not need to enter the portable
player in case of using the same one.
When this screen is displayed, follow the
guidance on the screen to try connecting
again.
INFORMATION
zThe passcode is used to register
the portable player in the vehi-
cle’s audio system. You can cre-
ate a password of your choice.
(See “Changing the Bluetooth®
audio settings” on page 220)
zFor portable players lacking
passcode entry capability, such
as those without operation
switches, change the audio sys-
tem’s passcode to that of the
portable player.
(See “Changing the Bluetooth®
audio settings” on page 220)
zRefer to the manual that comes
with the portable player for infor-
mation about the portable player’s
passcode.
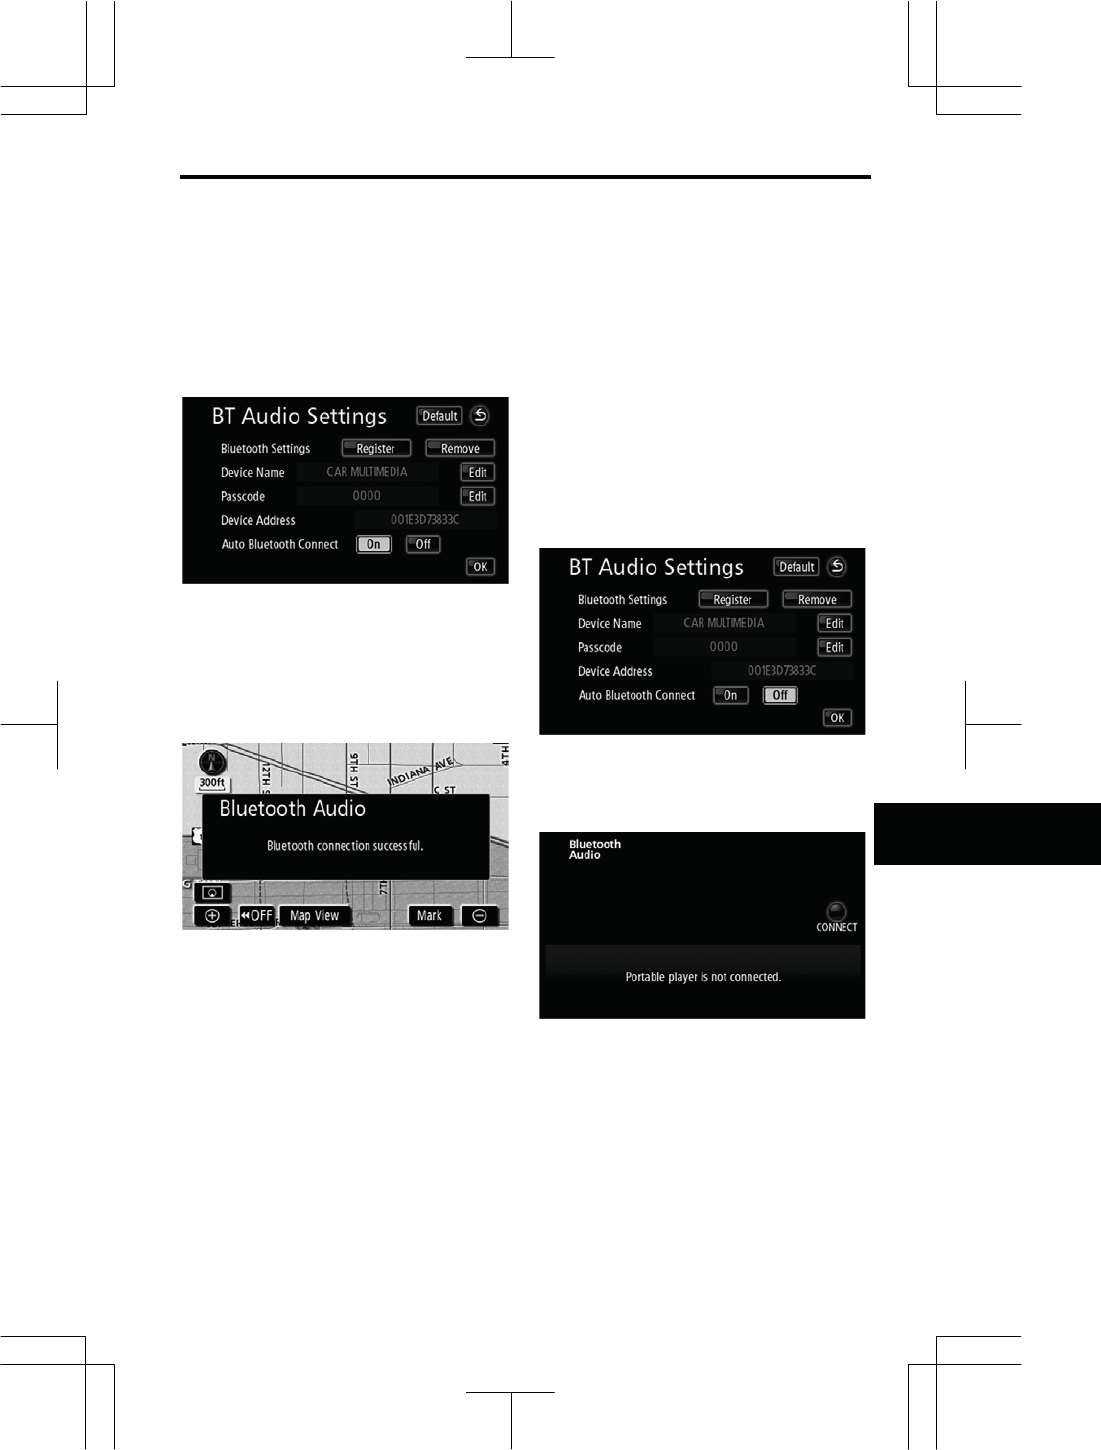
AUDIO/VIDEO SYSTEM
235
V573_E
z Connecting a portable player
The portable player can be connected
to the audio system either automati-
cally or manually.
AUTOMATICALLY
When you register your portable
player, auto connection will be turned
on. Always set it to this mode and
leave the Bluetooth® portable player
in a condition where connection can
be established.
Vehicles with smart entry and start sys-
tem—
When the “ENGINE START STOP”
switch is in the ACCESSORY or
IGNITION ON mode, the selected
Bluetooth® portable player will be
automatically connected and the
connection result is displayed.
This screen appears when the Blue-
tooth® portable player is first connected
after the “ENGINE START STOP” switch
is turned to the ACCESSORY or
IGNITION ON mode.
Vehicles without smart entry and start
system—
When the engine switch is in the ACC
or ON position, the selected Blue-
tooth® portable player will be auto-
matically connected and the connec-
tion result is displayed.
This screen appears when the Blue-
tooth® portable player is first connected
after the engine switch is turned to the
ACC or ON position.
MANUALLY
When the auto Bluetooth® connection
is “Off”, you have to connect Blue-
tooth® manually.
Touch “CONNECT” after having en-
abled the Bluetooth® connection on
the portable player.
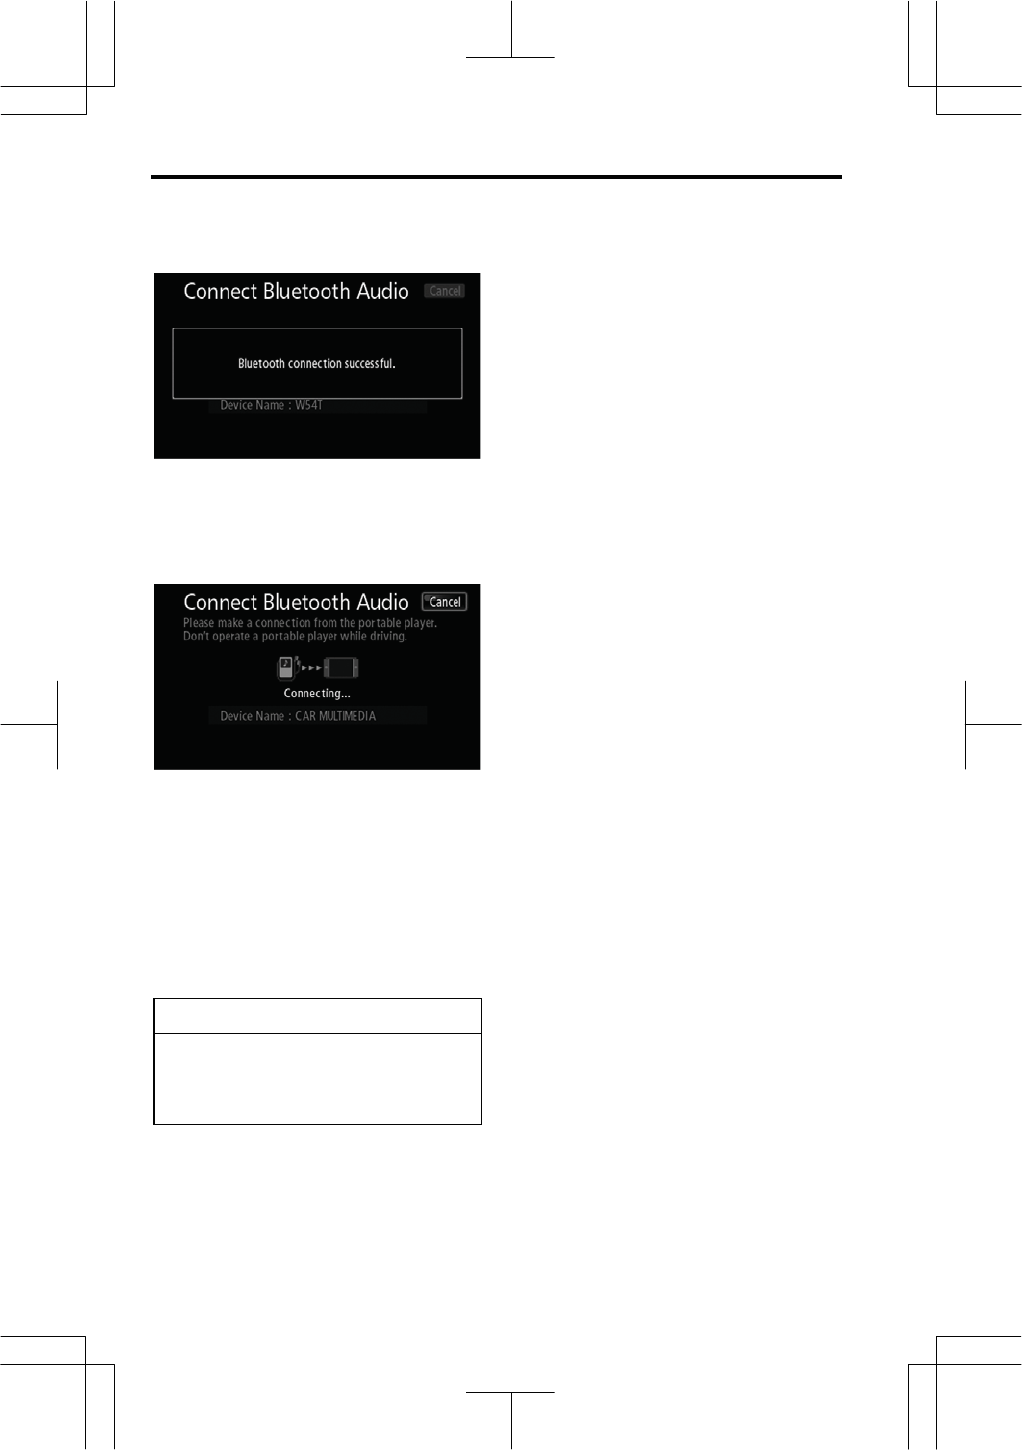
AUDIO/VIDEO SYSTEM
236
V573_E
When the connection is complete, this
screen is displayed. Now you can use
the Bluetooth® portable player.
From portable player
When making a connection from the
portable player, operate the portable
player controls to connect.
To make a connection from the portable
player, first display this “Connect Blue-
tooth Audio” screen.
: Bluetooth is a registered trademark
of Bluetooth SIG. Inc.
INFORMATION
Auto Bluetooth® connect may not be
available for certain portable play-
ers, which must be connected
manually.
z Reconnecting the Bluetooth® au-
dio player
Vehicles with smart entry and start sys-
tem—
If the Bluetooth® audio system is dis-
connected with a poor reception from
the Bluetooth® network when the
“ENGINE START STOP” switch is in
the ACCESSORY or IGNITION ON
mode, the system automatically re-
connects the Bluetooth® audio player.
In this case, the connection result is
not displayed.
Vehicles without smart entry and start
system—
If the Bluetooth® audio system is dis-
connected with a poor reception from
the Bluetooth® network when the en-
gine switch is in the ACC or ON posi-
tion, the system automatically recon-
nects the Bluetooth® audio player. In
this case, the connection result is not
displayed.
If the Bluetooth® is disconnected on
purpose, such as when you turn off your
portable player, this does not happen.
Reconnect it by the following methods.
z Select the portable player again.
z Enter the portable player.

AUDIO/VIDEO SYSTEM
237
V573_E
(b) Playing a Bluetooth® audio
Push the “AV” button and touch
“Bluetooth Audio” if Bluetooth con-
nection has already been completed
for your portable player. The player
will start playing.
: Bluetooth is a registered trademark
of Bluetooth SIG. Inc.
(c) Operating a Bluetooth® audio
player
z Playing a Bluetooth® audio
Push the “AV” button and touch
“AUDIO” to display this screen.
Depending on the portable player that is
connected to the system, functions such
as display of the artist name or control
touch screen buttons shown here may
not be available.
Touch “ ” and the music will pause.
Touch “Ź” and the music will start play-
ing.
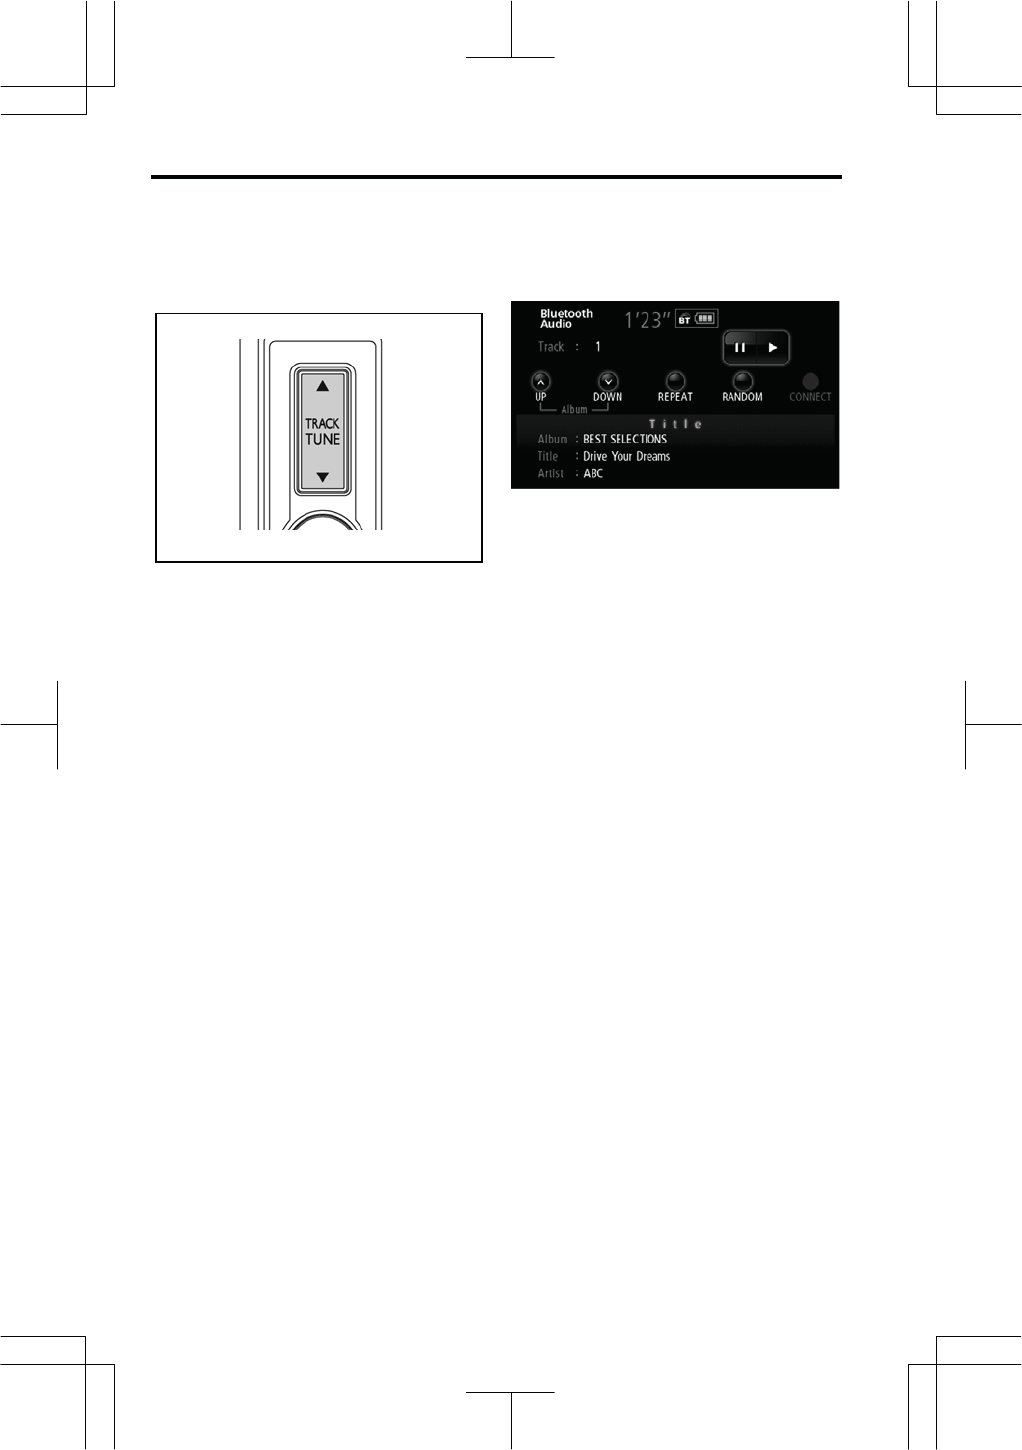
AUDIO/VIDEO SYSTEM
238
V573_E
z Selecting a desired track
“
S
”or “
T
”button of “TRACK/TUNE”:
Use for direct access to a desired au-
dio track.
Push the “
S
” or “
T
” button of
“TRACK/TUNE” and repeat until the
desired track number appears on the
screen. As you release the button, the
player will start playing the selected track
from the beginning.
Fast forward:
Push and hold the “
S
” button of
“TRACK/TUNE” to fast forward the
player. When you release the button, the
player will resume playing from that posi-
tion.
Reverse:
Push and hold the “
T
” button of
“TRACK/TUNE” to reverse the player.
When you release the button, the player
will resume playing.
z Selecting a desired album
“UP”: Touch this touch screen button
to select the next album.
“DOWN”: Touch this touch screen
button to select the previous album.
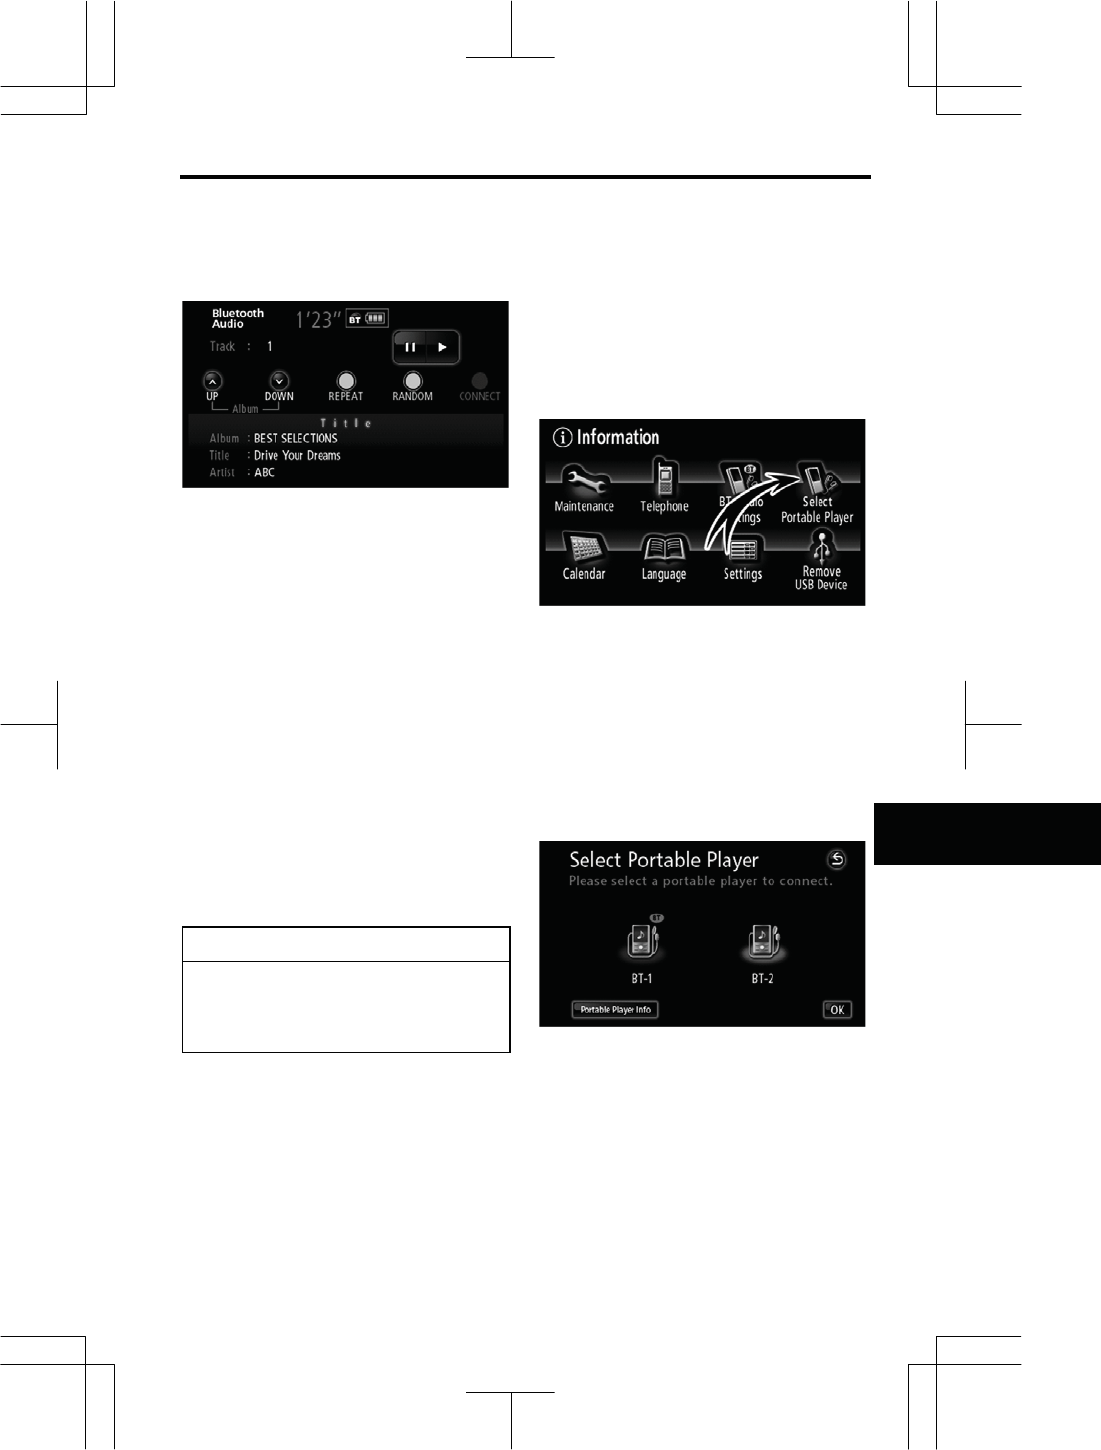
AUDIO/VIDEO SYSTEM
239
V573_E
z Other functions
“REPEAT”: Use this control to auto-
matically replay the track you are cur-
rently listening to.
Repeating a track —
While the track is playing, touch
“REPEAT” briefly.
When the track is finished, the player will
automatically play it again. To cancel the
repeat, touch “REPEAT” once again.
“RANDOM”: Use this for automatic and
random selection of tracks from the
portable audio player.
While a track is playing, touch
“RANDOM” briefly.
The system selects a track from the
portable audio player. To cancel this
function, touch “RANDOM” once again.
INFORMATION
Depending on the portable player
that is connected to the system,
certain functions may not be avail-
able.
(d) Change the Bluetooth® audio set-
tings
z Selecting a portable player
If you register a second portable
player, either one can be selected for
connection.
1. Touch “Select Portable Player” to
display the “Select Portable Player”
screen.
You can select from a maximum of
two Bluetooth® portable players.
“Empty” is displayed when you have not
registered a Bluetooth® portable player.
The Bluetooth® mark is displayed when
you choose the portable player.
2. Select desired portable player and
then touch “OK”.
Although you can register up to two
portable players in the system, only one
portable player can function at a time.
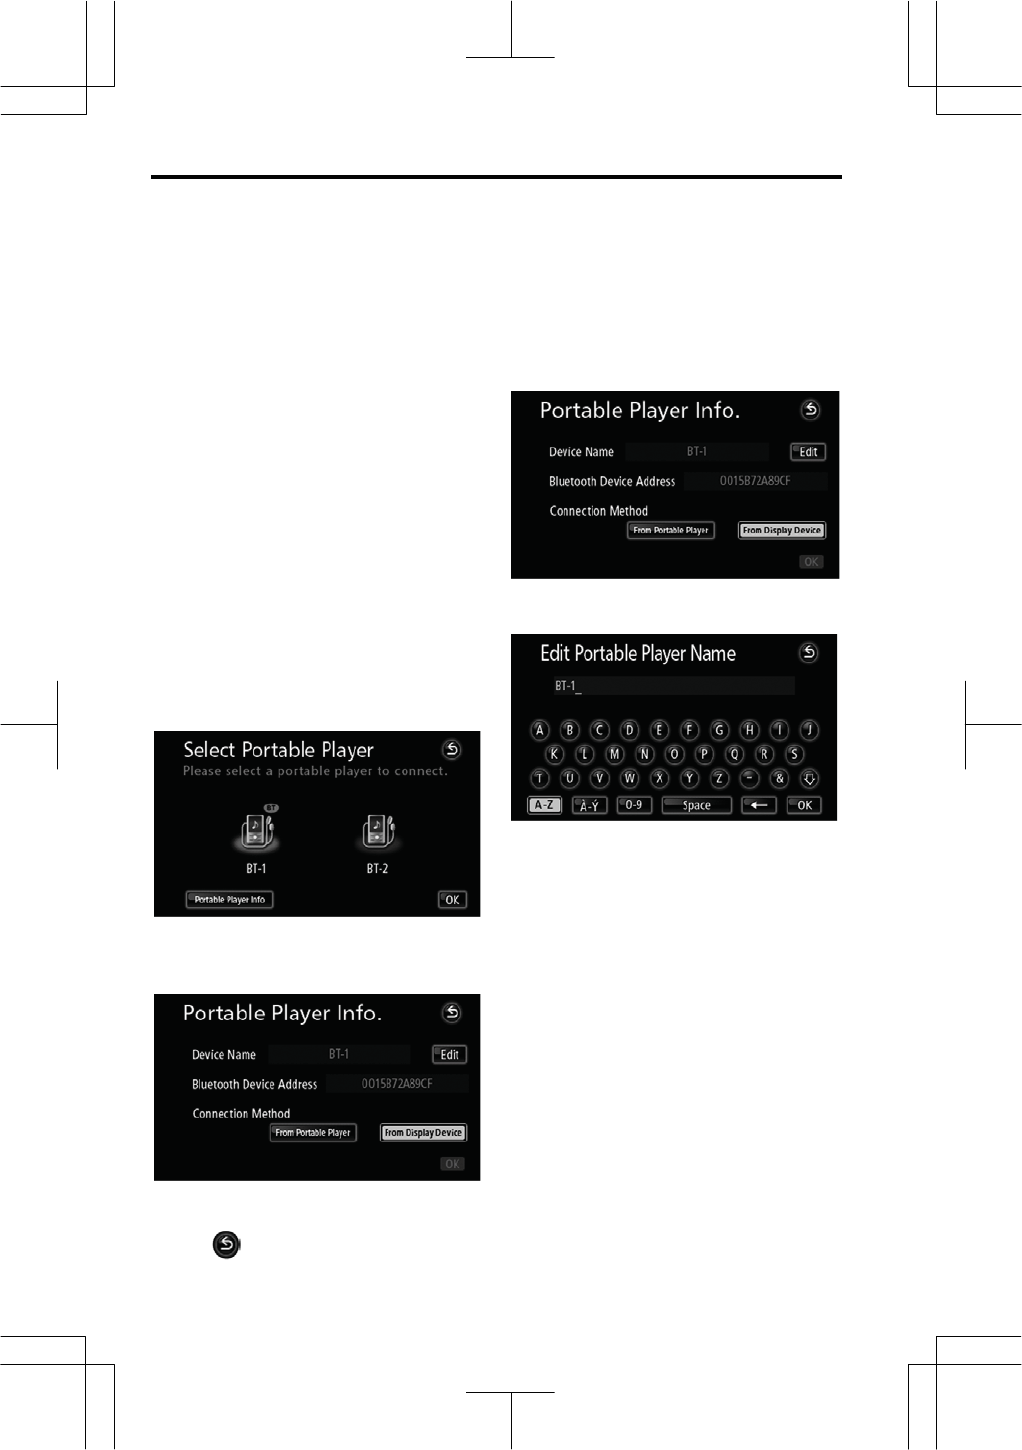
AUDIO/VIDEO SYSTEM
240
V573_E
z Displaying portable player infor-
mation
You can see the information of the
portable player on the system.
“Device Name”
..........The name of Bluetooth® portable
player which is displayed on the
screen. You can change it into a
desired name.
“BluetoothDevice Address”
..........The address peculiar to the sys-
tem. You cannot change it.
“Connection Method”
..........The connection method can be
switched between “From Portable
Player” and “From Display De-
vice”.
: Bluetooth is a registered trademark
of Bluetooth SIG. Inc.
1. Select desired portable player and
then touch “Portable Player Info”.
2. When you complete confirming it,
touch .
z Changing the device name
You can change a device name. If you
change a device name, the name reg-
istered in your portable player is not
changed.
1. Touch “Edit”.
2. Use the software keyboard to in-
put the device name and then touch
“OK”.
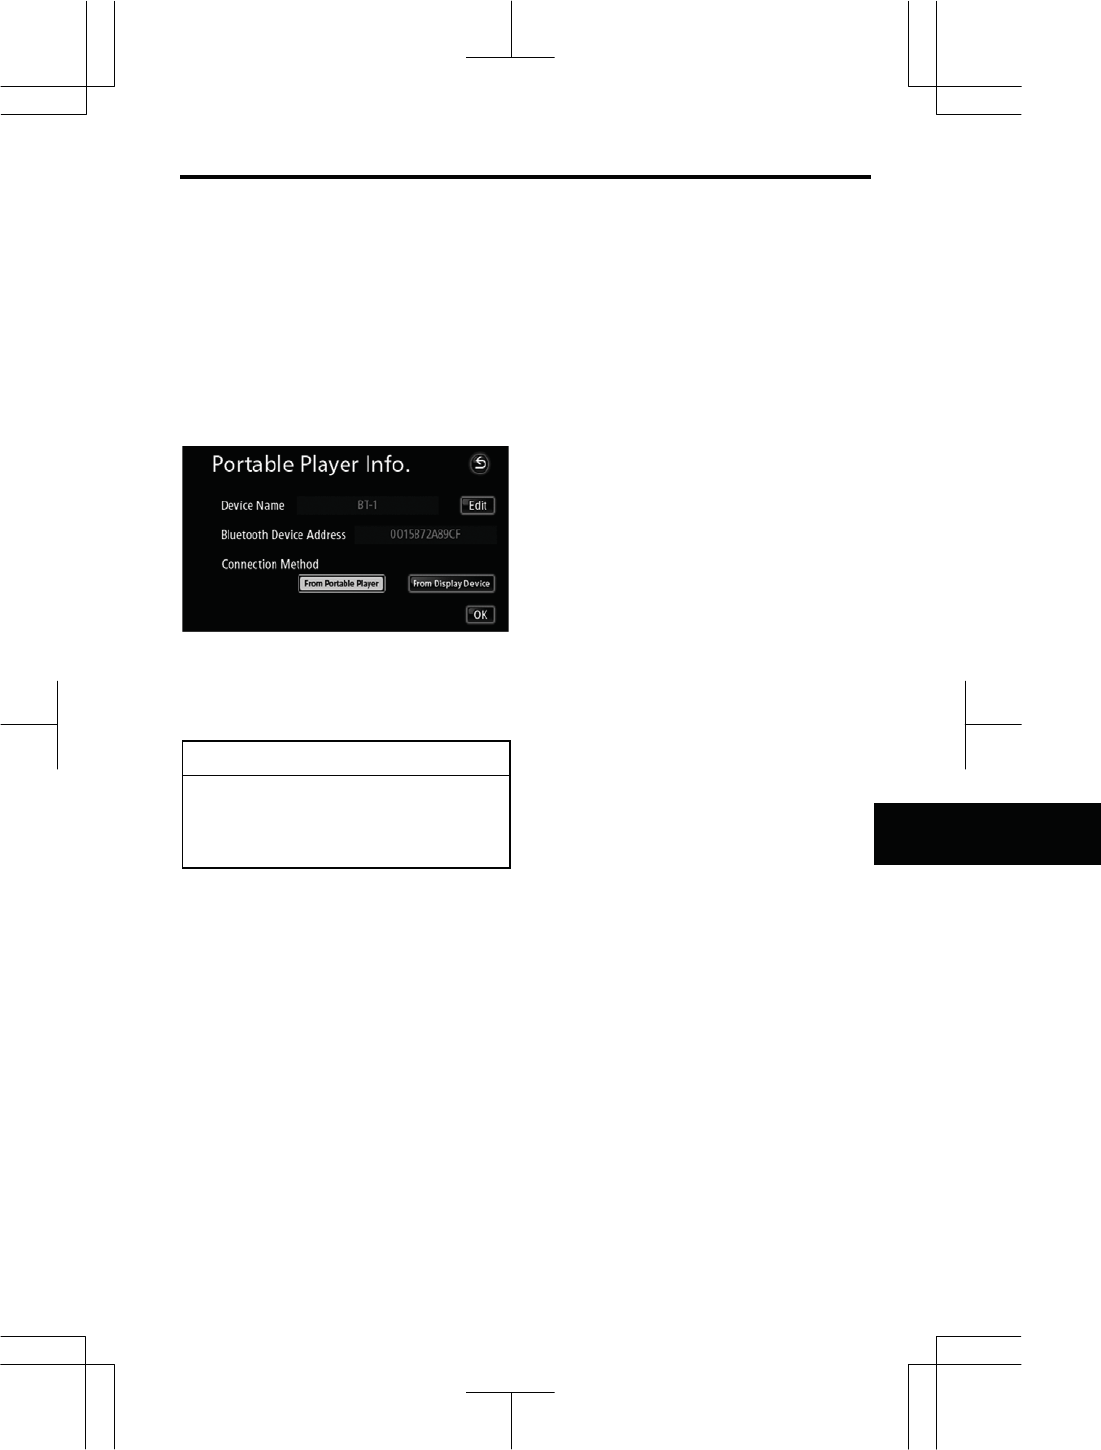
AUDIO/VIDEO SYSTEM
241
V573_E
z Changing the connection method
The connection method can be se-
lected.
From Portable Player: Connect the
portable player to the audio system.
From Display Device: Connect the
audio system to the portable player.
Select desired connection method
“From Portable Player” or “From Dis-
play Device” and then touch “OK”.
INFORMATION
If the connection method is set to
“From Portable Player”, “Auto
BluetoothConnect” (see page 215)
cannot be selected.
: Bluetooth is a registered trademark
of Bluetooth SIG. Inc.
z Displaying the Bluetooth® audio
settings
You can see the Bluetooth® audio
information settings on the system.
“Device Name”
.......... The name in the Bluetooth® net-
work. You can change it.
“Passcode”
.......... The password when you register
your portable audio player in the
system. You can change it into
the figure of 4-8 digits.
“Device Address”
.......... The address peculiar to the sys-
tem. You can not change it. If you
have registered two Bluetooth®
portable players with the same
device name or passcode and
you cannot distinguish one from
the other, refer to it.

AUDIO/VIDEO SYSTEM
242
V573_E
z Changing the device name or
passcode
1. Touch “BT Audio Settings”.
2. Touch “Edit” at “Device Name” or
“Passcode”.
3. Use the software keyboard to in-
put the device name.
You can input up to 20 characters.
4. Input a Passcode with 4-8 digits.
When you touch , the input num-
ber is deleted.
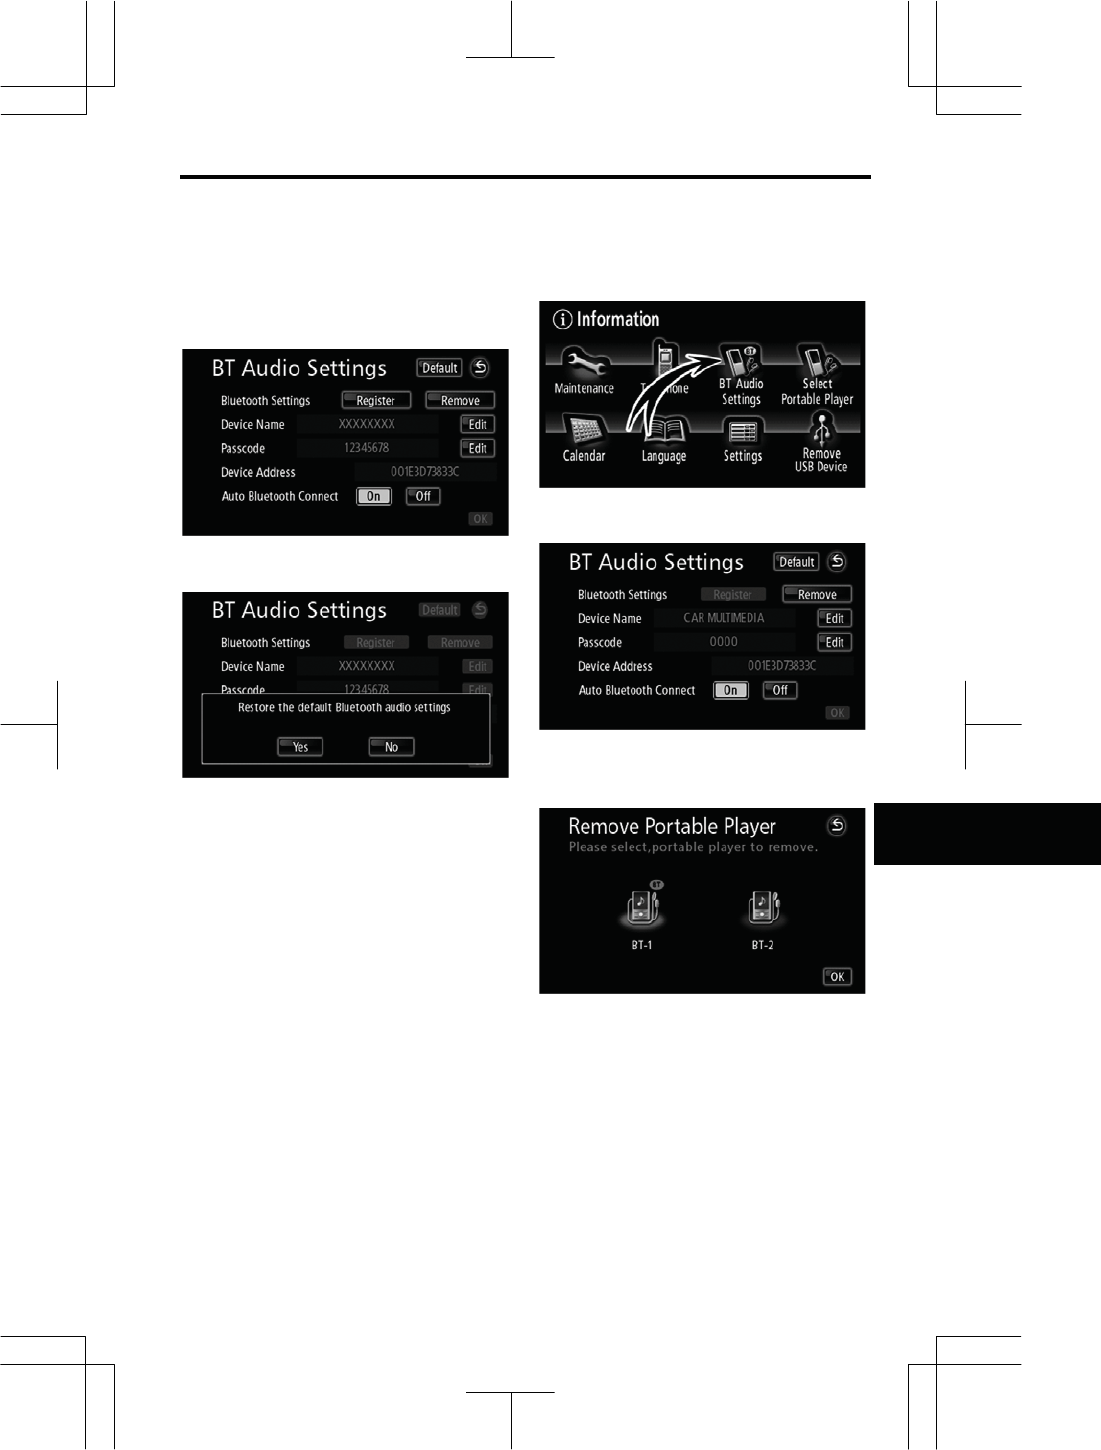
AUDIO/VIDEO SYSTEM
243
V573_E
z Initializing the Bluetooth® audio
settings
You can initialize the settings.
1. Touch “Default”.
2. Touch “Yes”.
z Deleting a portable player
1. Touch “BT Audio Settings”.
2. Touch “Remove” at “Bluetooth
Settings”.
3. Select the portable player you
want to delete and touch “OK”.
: Bluetooth is a registered trademark
of Bluetooth SIG. Inc.
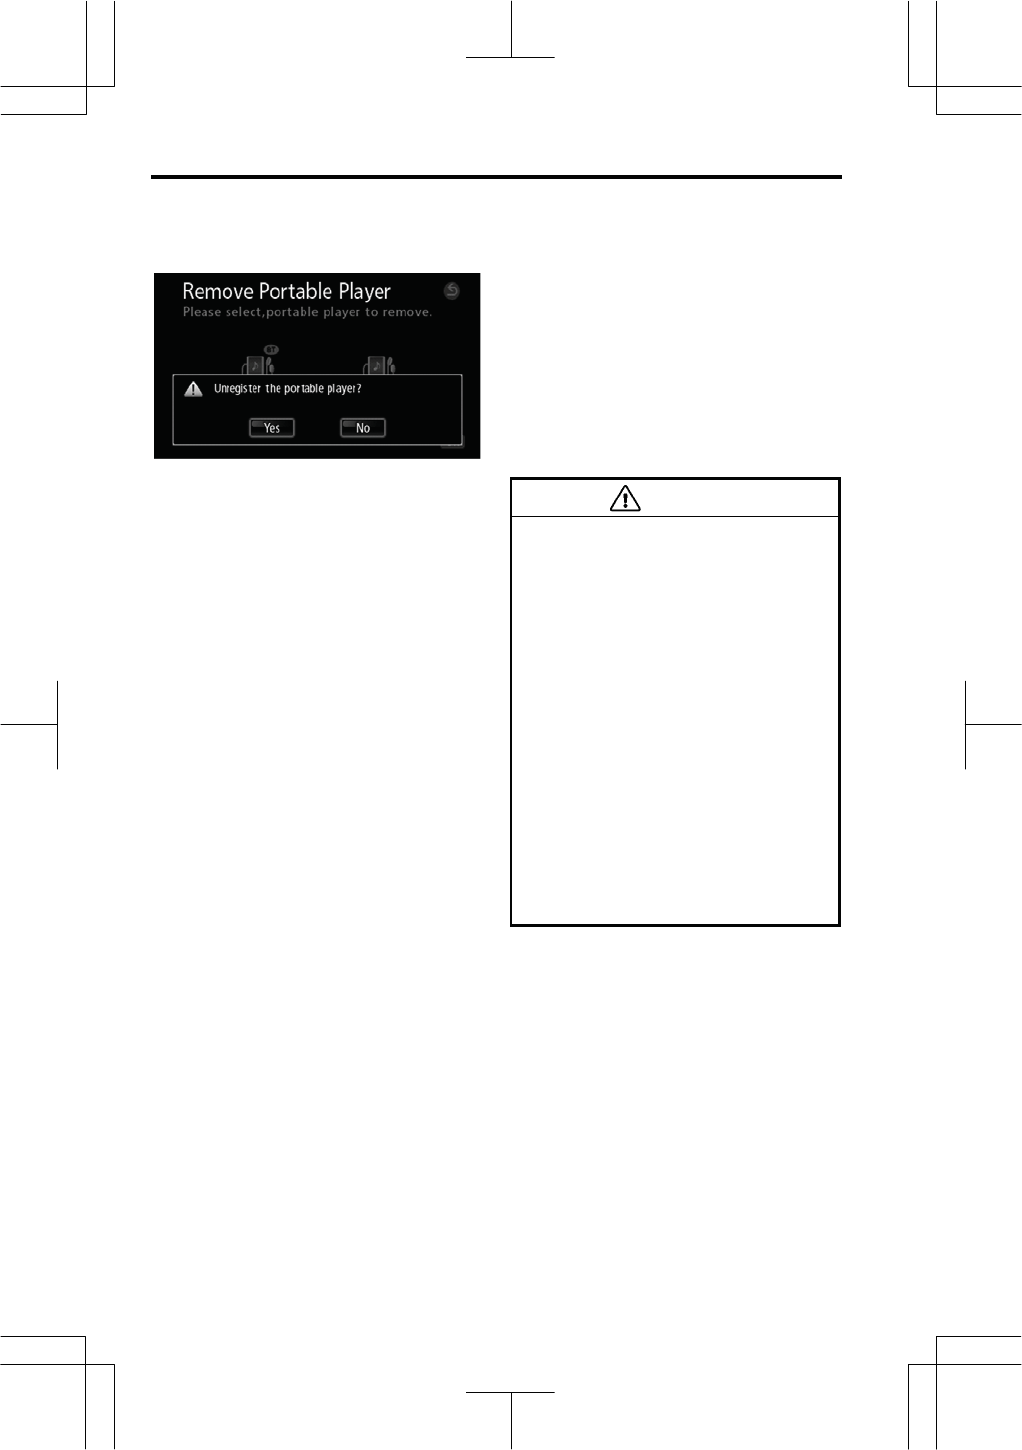
AUDIO/VIDEO SYSTEM
244
V573_E
4. Touch “Yes”.
Music stored on commercially available
portable audio devices can be played
back by connecting the devices to the
audio system.
When using portable audio devices with
the audio system, please read over the
portable audio device’s manual carefully
and ensure that the device is fully com-
patible prior to use.
CAUTION
zPlace the portable audio device in
a location that will not interfere
with SRS airbag deployment.
Failure to do so may result in
death or serious injury due to the
inability of the airbag to function
properly or if the portable audio
device is thrown during SRS air-
bag deployment.
Refer to the vehicle owner’s
manual for details of the SRS air-
bag deployment location.
z
Avoid placing the portable audio
device in a location that will in-
terfere with driving, or temporarily
secure in a location that will not
interfere with driving.
This may hinder driving or lead to
traffic accidents.
—AUX o
p
eration
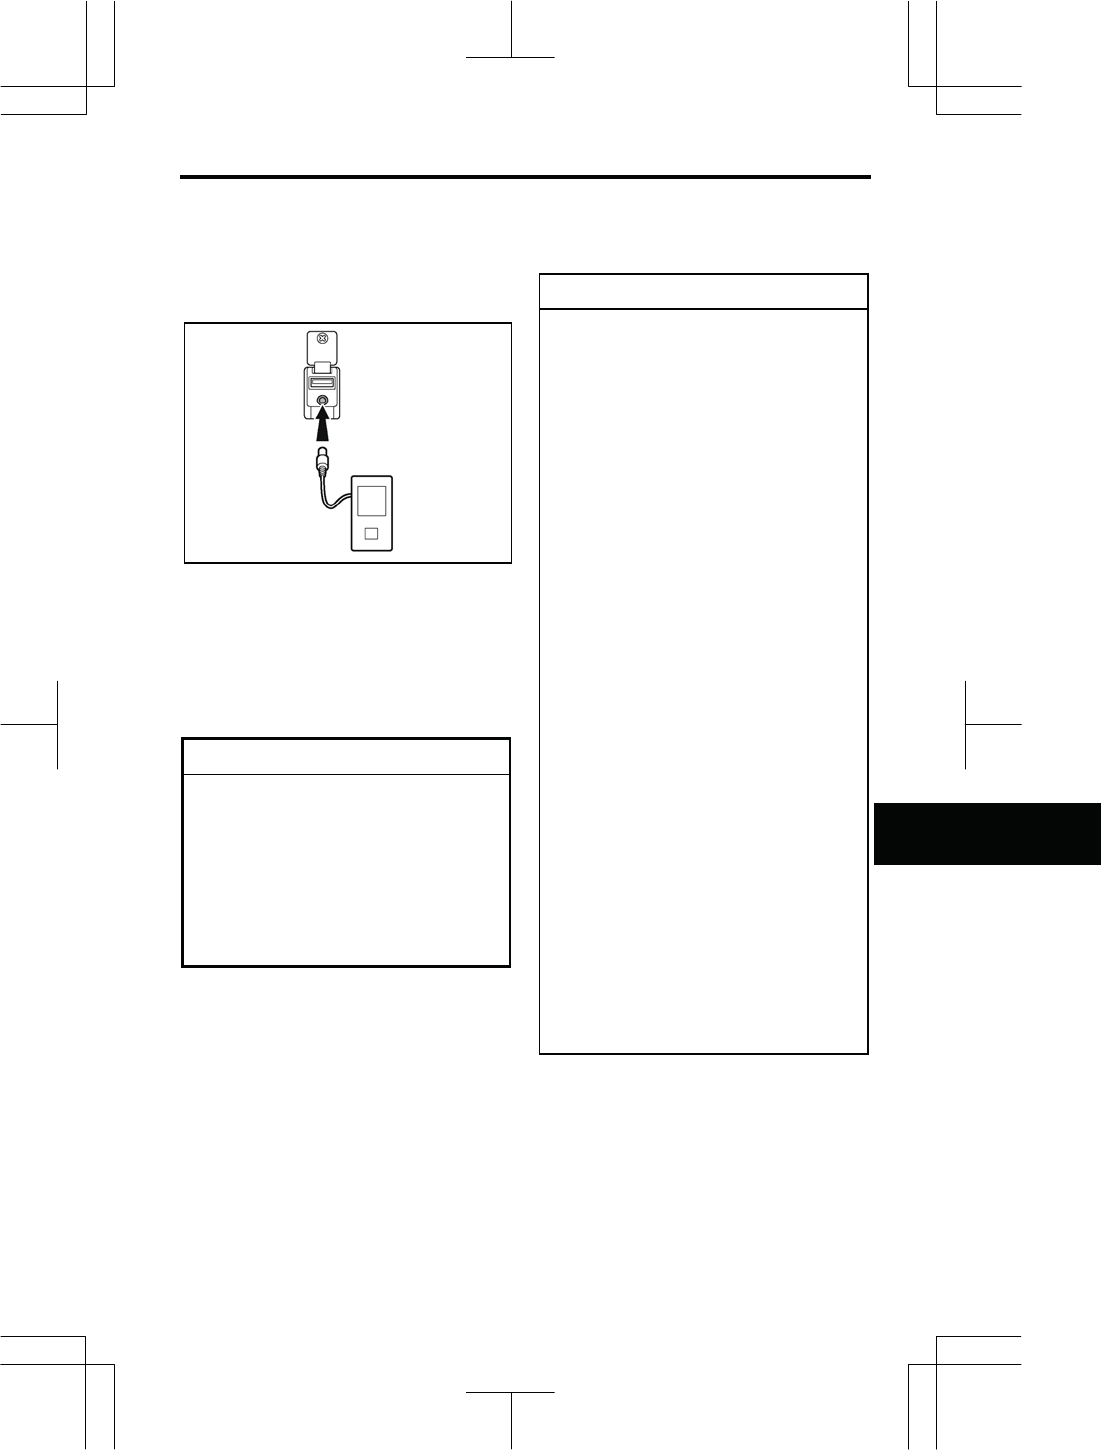
AUDIO/VIDEO SYSTEM
245
V573_E
(a) Connecting (disconnecting) port-
able audio devices
Ensure that the portable audio device
power is turned OFF.
Ensure that the audio mode is set to a
mode other than AUX, or that the au-
dio system power is turned OFF.
Connect (or disconnect) the AUX port.
NOTICE
z
A
void getting hands caught in the
AUX port.
zDo not connect, operate, or dis-
connect the portable audio device
while driving.
zStore portable audio devices
away from direct sunlight when
not in use.
INFORMATION
zDisconnecting or connecting the
portable audio device while in
AUX mode may lead to distortion
and speaker damage. Always
ensure to turn off the audio sys-
tem power or switch to another
mode prior to disconnecting or
connecting.
zChanging the portable audio de-
vice power supply while in AUX
mode may lead to distortion and
speaker damage. Always ensure
to turn off the audio system
power or switch to another mode
prior to changing the portable au-
dio device power supply.
zPlease note that the volume level
will vary due to differing output
levels depending on the con-
nected device.
zIf the volume is adjusted while in
AUX mode, the volume can be
stored as the volume level for
AUX mode. This stored volume
level will be returned to its default
setting if the portable audio de-
vice is disconnected.
zWhen using a portable audio de-
vice connected to the power out-
let or cigarette lighter, noise may
occur during playback.
If this happens, use the power
source (battery) of the portable
audio device.
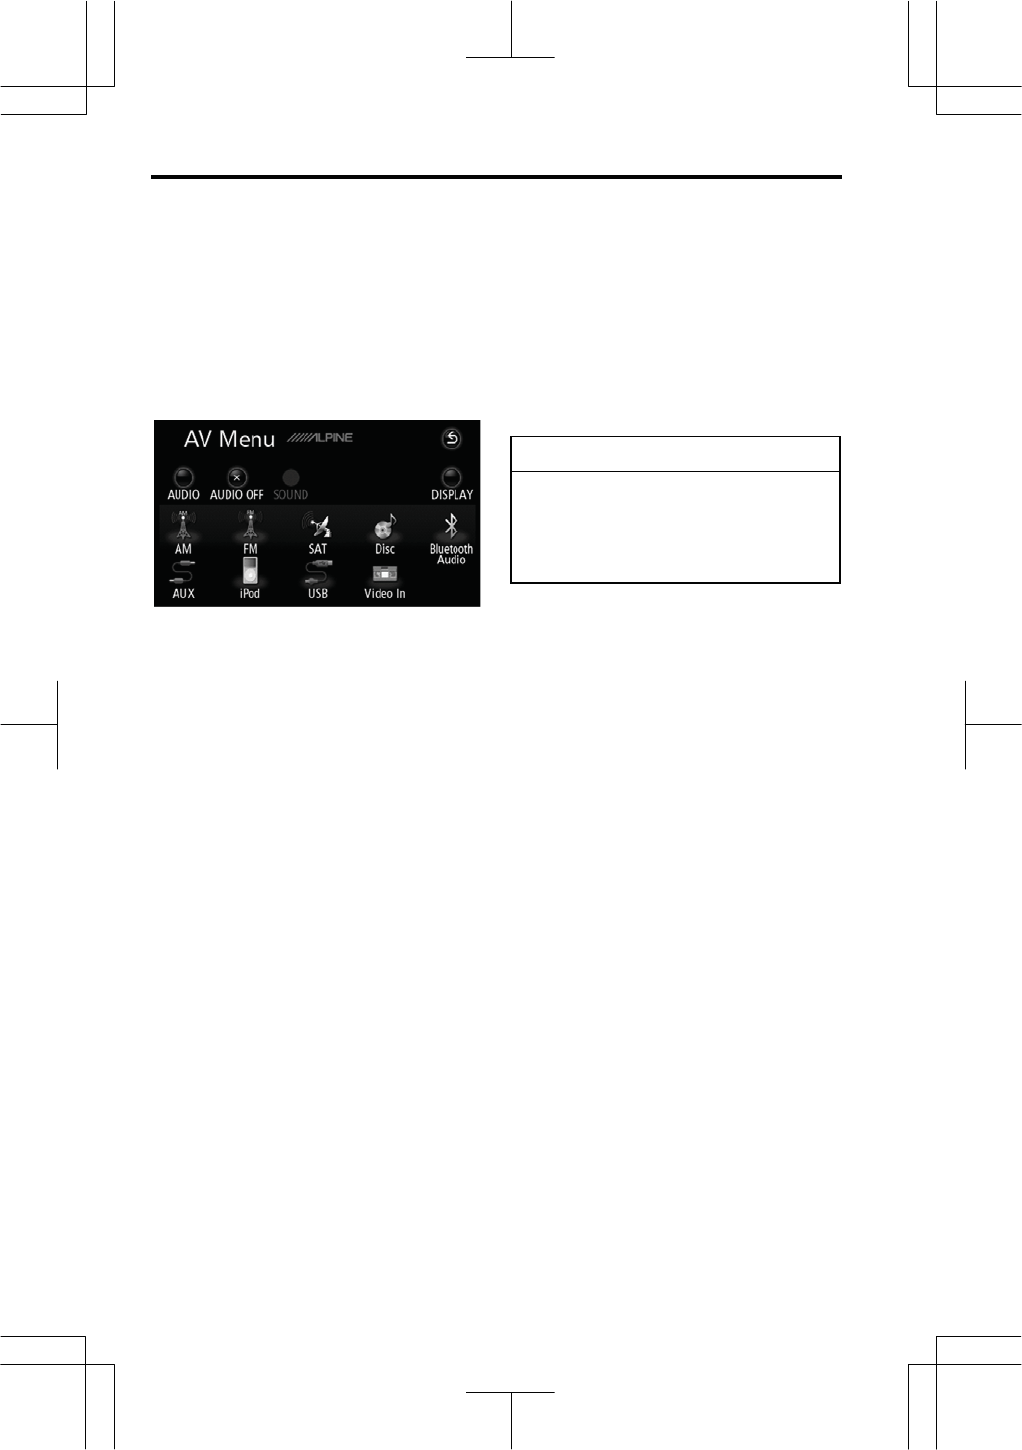
AUDIO/VIDEO SYSTEM
246
V573_E
(b) Playing a portable audio devices
1. Turn ON the portable audio device
power and playback music.
Refer to the manual provided with the
portable audio device for details of op-
eration.
2. Push the “AV” button and touch
“AUX”.
Played back audio from the portable
audio device is output from the speakers.
iPod music files can be played by con-
necting your iPod to the audio system.
Furthermore, it is also possible to per-
form such operations as selecting tracks
from the play list and changing the shuf-
fle mode at the audio system.
For details, refer to your iPod user guide.
INFORMATION
A different connection procedure
must be performed if playing video
files using a commercially available
Apple Composite AV Cable. For
details, see page XX.
— iPod o
p
eration
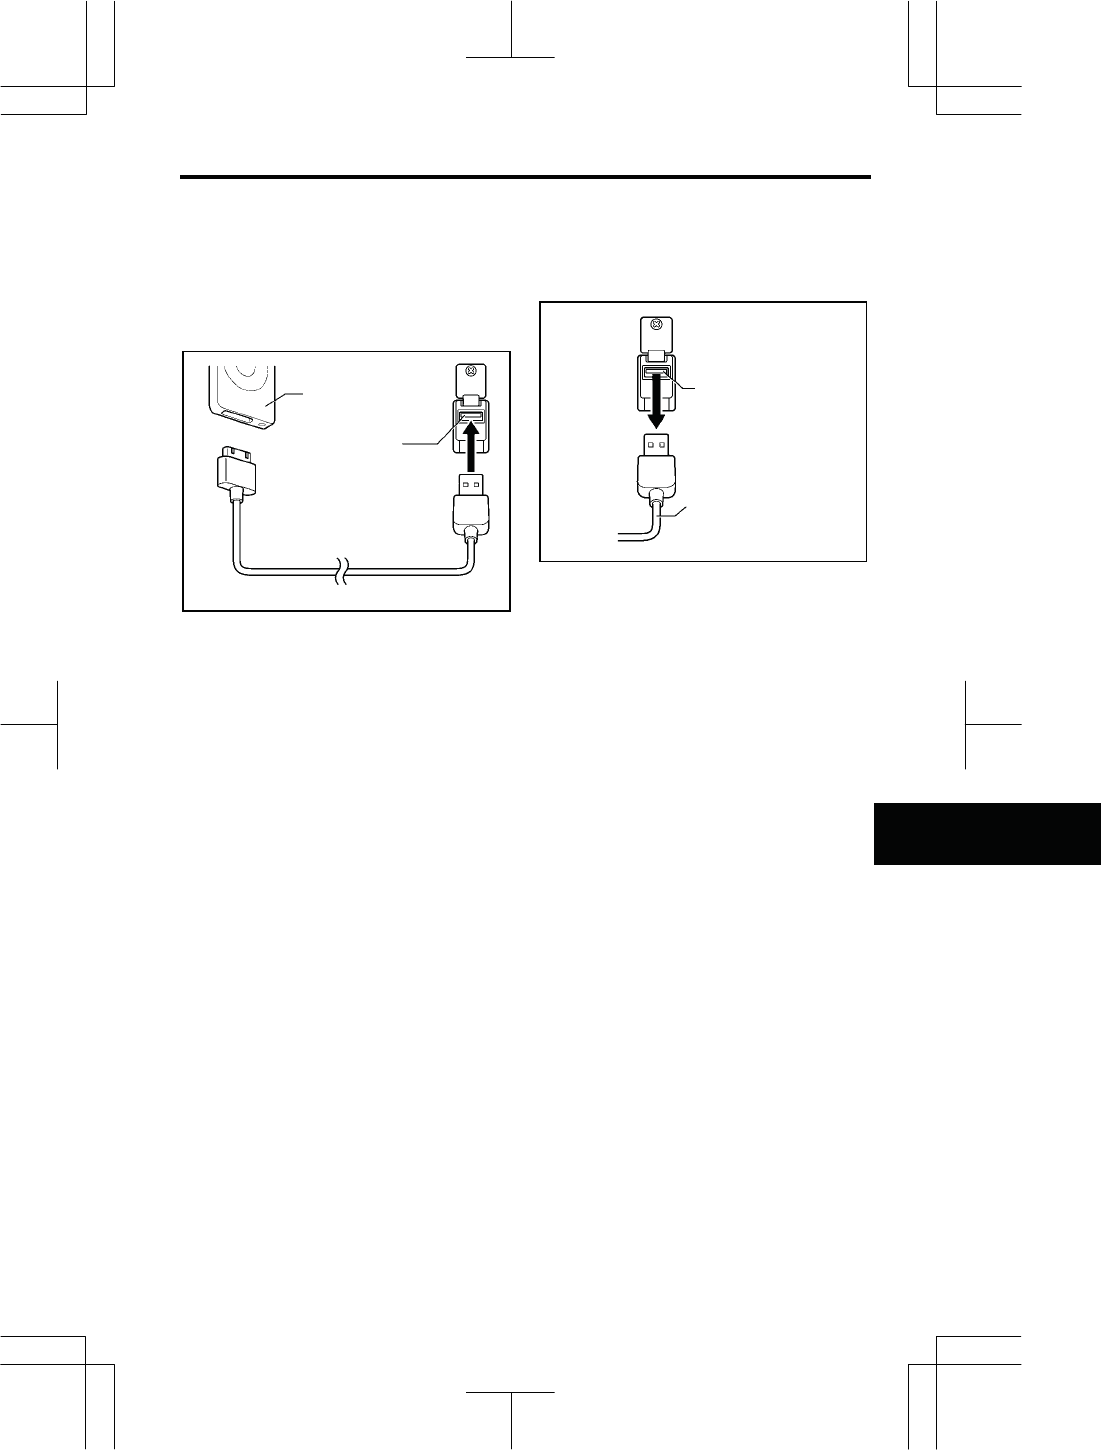
AUDIO/VIDEO SYSTEM
247
V573_E
(a) Connecting or disconnecting your
iPod
z Connecting your iPod
Connect your iPod with the Dock Con-
nector to USB Cable.
Disconnect all accessories currently
connected to the iPod.
As soon as the iPod is connected, its
power is automatically turned on.
z Disconnecting your iPod
Disconnect the Dock Connector to
USB Cable from the USB port.
Dock Connector to USB Cable
Your iPod
USB port
Dock Connector to
USB Cable
USB port
AUDIO/VIDEO SYSTEM
248
V573_E
NOTICE
zPlease understand that no com-
pensation can be awarded for lost
data, even if iPod data is lost
when connected to the audio
system.
zThe iPod may become deformed,
discolored, or damaged due to
heat if left exposed to direct
sunlight for long periods of time.
Store away from direct sunlight
when not in use.
zFix the iPod securely when using
with this unit. Do not let the iPod
fall onto the floor, where it may
become jammed under the brake
or accelerator pedal.
zYou may hear noise if you dis-
connect during iPod playback.
INFORMATION
zCheck that your iPod is supported
by the audio system. Refer to
“Supported iPods” (page 235) for a
list of supported iPods.
zThe system will not automatically
switch to iPod mode when the au-
dio system and iPod are connected.
z“SCION” displays at the iPod when
connected to the audio system.
Please note that operation cannot
be performed using your iPod while
“SCION” is displayed.
zIf your iPod is connected to the
audio system with the iPod power
OFF, “SCION” will not display, and
the “Charging complete” mark may
display. If this happens, push any
button on your iPod to display
“SCION”.
zVehicles with smart entry and start
system—
While the “ENGINE START STOP”
switch is in the ACCESSORY or
IGNITION ON mode, the battery of
the connected iPod will be charged.
Vehicles without smart entry and
start system—
While the engine switch is in the
ACC or ON position, the battery of
the connected iPod will be charged.
zThe track order in the play list dis-
played at the audio system may
differ from that at your iPod when
connected to the system.
zIf your iPod becomes inoperable,
disconnect and then reconnect af-
ter resetting. Refer to the iPod user
guide for details of the reset
method.
zWhile the iPod is connected to this
audio system, the iPod itself cannot
be turned on or off.

AUDIO/VIDEO SYSTEM
249
V573_E
zVehicles with smart entry and start
system—
The connected iPod will be turned
off about two minutes after the
“ENGINE START STOP” switch is
turned off.
Vehicles without smart entry and
start system—
The connected iPod will be turned
off about two minutes after the en-
gine switch is turned to the LOCK
position.
(b) Playing your iPod
Push the “AV” button and touch
“iPod” if your iPod is already con-
nected. The iPod will begin playing.
AUDIO/VIDEO SYSTEM
250
V573_E
(c) Operating your iPod
z Playing your iPod
Push the “AV” button and touch
“AUDIO” to display this screen.
Touch “Ź
II
” to pause playback.
Touch “Ź
II
” again to resume playback.
INFORMATION
zDepending on the number of mu-
sic files stored on your iPod, and
the software version, there may
be times when the system does
not respond immediately or func-
tion properly when performing
operations at the operation
screen.
z“OK to disconnect.”, displays on
the iPod unit. However, in order to
protect your iPod, it is recom-
mended that the Dock Connector
to USB Cable not be disconnected
during music playback.
zVehicles with smart entry and
start system—
If the system does not function
properly, disconnect your iPod
from the Dock Connector to USB
Cable and then turn the “ENGINE
START STOP” switch off. Turn the
iPod off then back on. Turn the
“ENGINE START STOP” switch
back to the ACCESSORY or
IGNITION ON mode and then
connect the iPod to the Dock
Connector to USB Cable again.
Vehicles without smart entry and
start system—
If the system does not function
properly, disconnect your iPod
from the Dock Connector to USB
Cable then turn the engine switch
off. Turn the iPod off then back
on. Turn the engine switch back
to the ACC or ON position and
then connect the iPod to the Dock
Connector to USB Cable again.
zYou cannot operate the iPod
Equalizer on products. We rec-
ommend that you set the iPod
Equalizer to off, before connect-
ing the iPod to this unit.
AUDIO/VIDEO SYSTEM
251
V573_E
z Selecting a desired music file
“
S
” or “
T
” button of
“TRACK/TUNE”/“ŹŹ
I
” or “
I
ŻŻ ”: These
buttons are used for direct access to a
desired audio track. Push the “
S
” or
“
T
” button of “TRACK/TUNE”or touch
“ŹŹ
I
” or “
I
ŻŻ ” until the desired track
number appears on the screen. When
operation of the button or the screen is
complete, the player will start playing the
selected track from the beginning.
Fast forward: Push and hold the “
S
”
button of “TRACK/TUNE” or continue
touching “ŹŹ
I
” to fast forward the player.
When you release the button, the player
will resume playing from that position.
Reverse: Push and hold the “
T
” button
of “TRACK/TUNE” or continue touching
“
I
ŻŻ ” to reverse the player. When you
release the button, the player will resume
playing.
“TRACK LIST”: When “TRACK LIST”
is touched, the list of files in which the
music files currently being played back is
displayed. The music file currently being
played back displays at the top.
Touch a music file to play back the se-
lected file.
AUDIO/VIDEO SYSTEM
252
V573_E
z Searching for the desired music
file from the Music menu
The desired music file can be searched
for by displaying the track play list from
the Music menu.
1. Touch “MUSIC MENU”.
Touch to return to the iPod op-
eration screen.
2. Touch the desired mode on the
Music menu screen.
The screen shown at step “4.” displays
when “SONGS” is selected.
3. Touch the desired touch screen
button on the mode list screen.
Touch the list to playback the first music
file in the selected list.
Touch “LIST” to display lists.
When there are 6 lists or more, touch
, or , to change the list.
Touch to return to the level
above.
Touch to return to the iPod op-
eration screen.
4. Touch the applicable touch
screen button to select the music file
to be played back.
Commence playback.
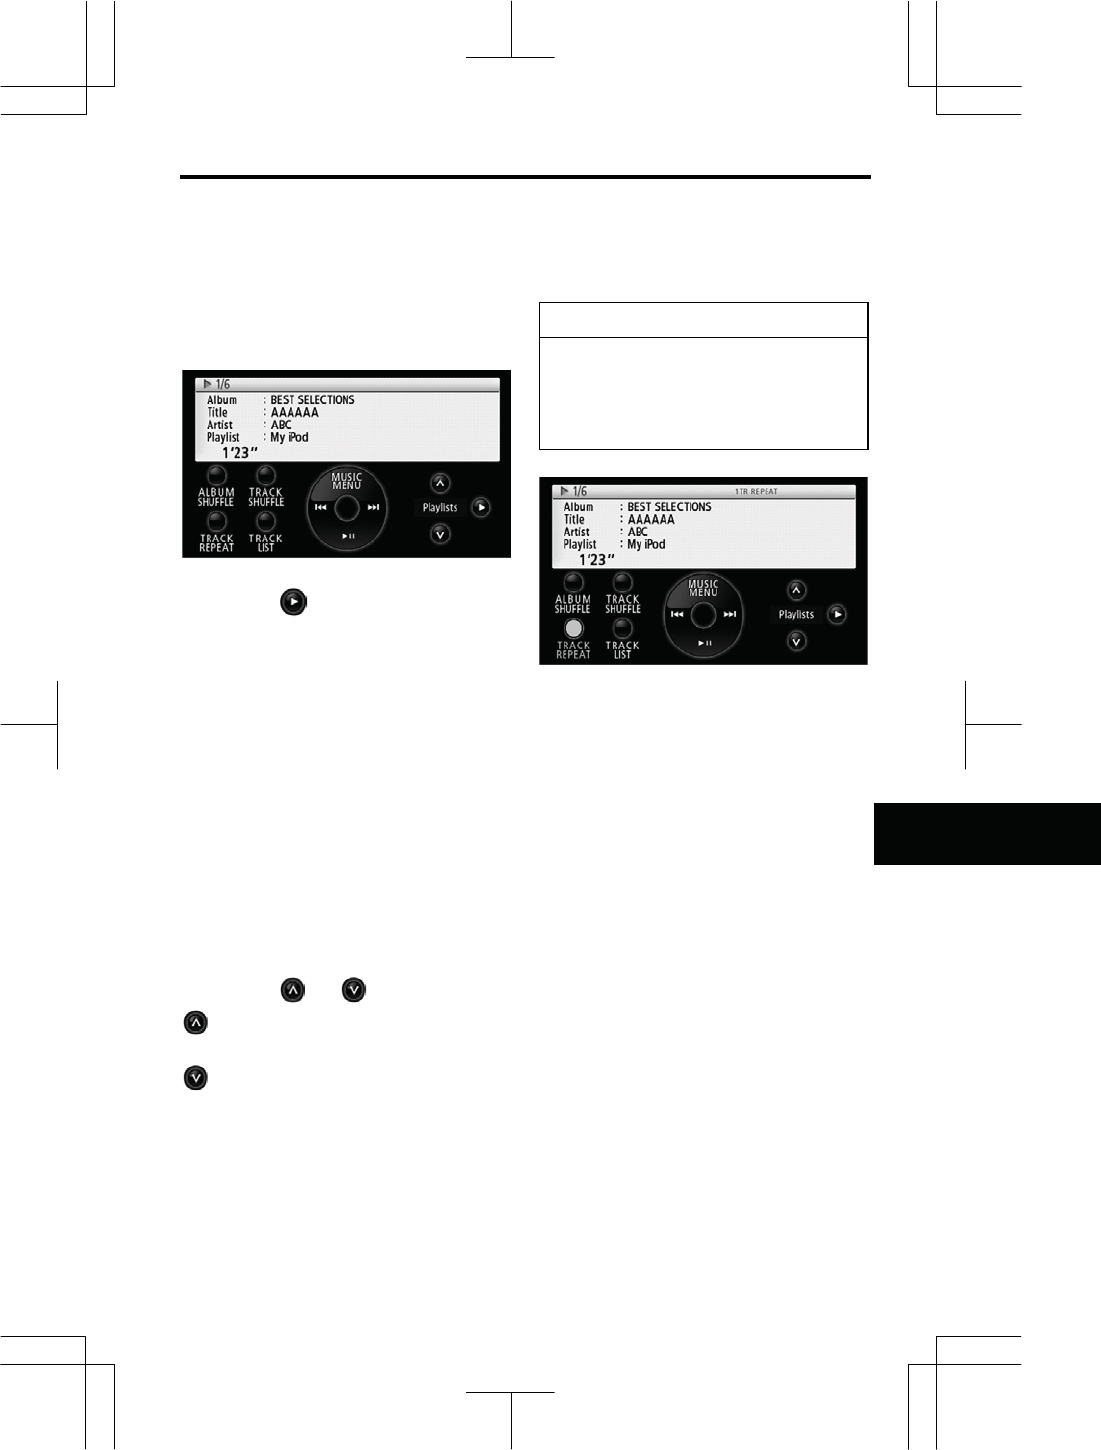
AUDIO/VIDEO SYSTEM
253
V573_E
z Searching for the desired music
files from play mode
Played back music files can be changed
in various individual modes.
1. Touch .
The mode changes to the selected mode
and the first music file is played.
The mode will change in the following order:
“Artists”, “Albums”, “Songs”, “Podcasts”,
“Genres”, “Composers”, “Playlists”.
“Playlists”: Plays back the iPod Playlist.
“Artists”: Plays back the Artists list.
“Albums”: Plays back the Albums list.
“Songs”: Plays back all songs.
“Podcasts”: Plays back the Podcasts
list.
“Genres”: Plays back the Genres list.
“Composers”: Plays back the Compos-
ers list.
2. Touch or .
:Touch to select the next list (music
files in Songs mode).
:Touch to select the previous list
(music files in Songs mode).
z Other functions
INFORMATION
If your iPod is disconnected while
“TRACK REPEAT”, “TRACK
SHUFFLE”, or “ALBUM SHUFFLE” is
set, the iPod will switch to the repeat
or shuffle setting.
“TRACK REPEAT”: Repeats playback
of the current track.
When the current track is finished, play-
back will begin again automatically from
the beginning of that track. Touch
“TRACK REPEAT” again to cancel.
Listening to tracks in the current play
list randomly —
Touch “TRACK SHUFFLE”.
The system selects a music file in the
play list you are currently listening to. To
cancel it, touch “TRACK SHUFFLE”
once again.
Listening to albums randomly —
Touch “ALBUM SHUFFLE”.
Albums can be listened to randomly.
However music files in albums are
played back from the first music file.
To cancel it, touch “ALBUM SHUFFLE”
once again.
AUDIO/VIDEO SYSTEM
254
V573_E
z Supported iPods
The following iPods can be used with the
audio system. However, operation may
not be possible depending on the condi-
tion of the iPod.
iPodí
5th generation
iPod nanoí
1st generation, 2nd generation, 3rd gen-
eration, 4th generation
iPod classicí
iPod touchí
1st generation, 2nd generation
iPhoneí
1st generation
iPhone 3Gí
INFORMATION
ziPod® is a trademark of Apple
Computer, Inc., registered in the
U.S. and other countries.
ziPhone is a trademark of Apple
Inc.
zThe use of iPods is authorized for
the copying and playback of
nonícopyrighted material or ma-
terial for which legal copying and
playback is authorized for per-
sonal use by individuals. Copy-
right infringements are prohibited
by law.
To play a video from a commercially
available Video device, connect the de-
vice to the Video cable’s RCA terminals.
Using an Apple Composite AV Cable
allows iPod video to be played. For
safety reasons, videos can be played
only when the ignition is switched to ON
or ACC and the vehicle is completely
stopped with the parking brake set. (If
the Video mode is activated while the
vehicle is in motion, only the audio will
be played. If the commercially available
Rear Seat LCD Monitor is connected, the
video is shown on the Rear Seat LCD
Monitor only.)
INFORMATION
Do not connect the USB connector
of the Apple Composite AV Cable to
the USB port when the RCA termi-
nals are connected.
— Video o
p
eration
Video cable
Video (Yellow)
Audio left (White)
A
udio right (Red)
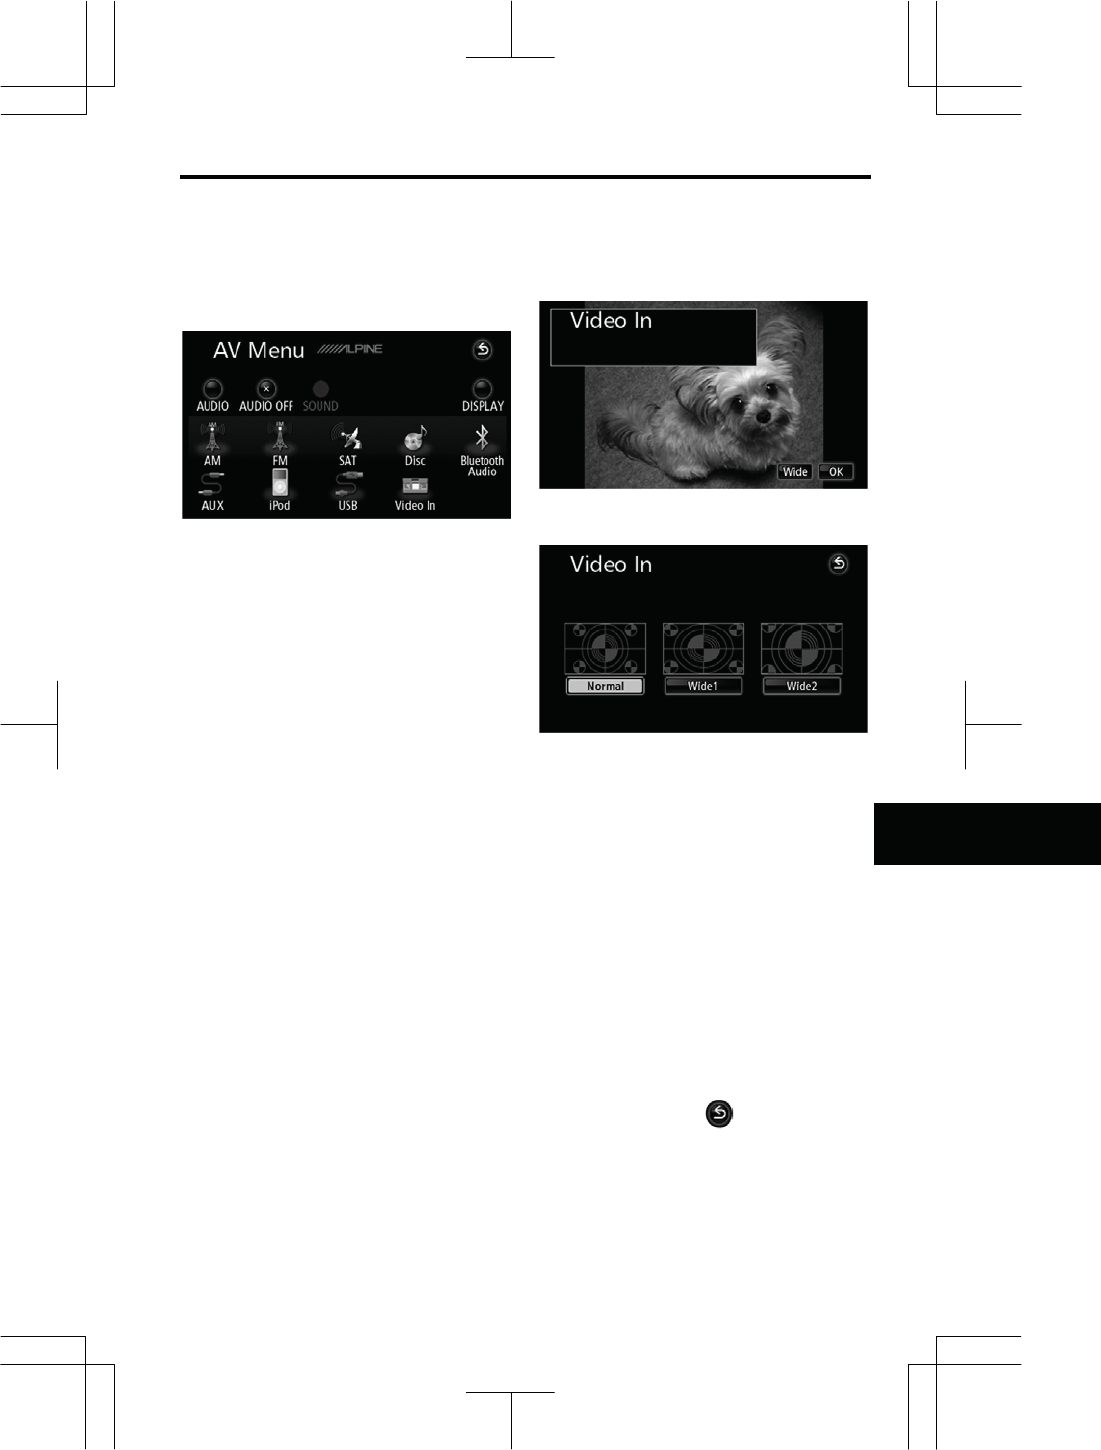
AUDIO/VIDEO SYSTEM
255
V573_E
z Viewing the Video
1. Push the “AV” button.
2. Touch “Video In”.
z Selecting screen size
1. Touch “Wide”.
2. Touch “Normal”, “Wide1”, or
“Wide2”.
“Normal”: Displays the 3 (H) × 4 (W)
screen with the remaining area at both
edges in black.
“Wide1”: Displays the 3 (H) × 4 (W)
screen with the screen widened left and
right in the same ratio to fill the display
horizontally.
“Wide2”: Displays the 3 (H) × 4 (W)
screen with the screen stretched verti-
cally and horizontally in the same ratio to
fill the display.
Change to this mode to display a 9 (H) ×
16 (W) screen.
When you touch , the previous
screen returns.
z Showing the short menu
Touch the display to show the short
menu.
z Hiding the short menu
Touch “OK” to hide the short menu.

AUDIO/VIDEO SYSTEM
256
V573_E
Some parts of the audio/video system
can be adjusted with the switches on the
steering wheel.
Depending on the model or grade,
steering wheel switches may not be
available.
Details of the specific switches, controls,
and features are described below.
Volume control switches
“ ” “ ” switches
“MODE” switch
Volume control switch
Push “+” side to increase the volume.
The volume continues to increase while
the switch is being pressed.
Push “–” side to decrease the volume.
The volume continues to decrease while
the switch is being pressed.
“ ” “ ” switches
Radio
To select a preset station:
Quickly push and release the “” or
“” switch. Do this again to select the
next preset station.
To seek a station:
Push and hold the “ ”or “ ” switch
until you hear a beep. Do this again to
find the next station. If you push either
the “” or “ ” switch in seek mode,
the seek mode will cancel.
CD/DVD player, Bluetooth® audio,
USB player and iPod player
Use this switch to skip up or down to a
different track, file or chapter in either
direction.
To select a desired track, file or chapter:
Quickly push and release the “ ”or
“” switch until the track, file or chapter
you want to play is set. If you want to
return to the beginning of the current
track, file or chapter, push the “”
switch once, quickly.
MP3/WMA disc, USB memory device,
Bluetooth® audio and iPod
To select a desired folder, album, or mode:
Push and hold the “ ” or “ ” switch until
you hear a beep. Repeat this until the
folder, album, or mode you want to listen to
is set.
Audio/video remote
controls —
— Steerin
g
switches
AUDIO/VIDEO SYSTEM
257
V573_E
DVD player
To fast-forward or reverse:
Push and hold the “ ” or “ ” switch
until after you hear a beep.
When the switch is released, the DVD
player will resume normal playback.
“MODE” switch
Each time you push the “MODE” switch,
the system changed the audio mode.
To turn the audio/video system on, push
the “MODE” switch.
To turn the audio/video system off, push
and hold the “MODE” switch until you
hear a beep.
NOTICE
To ensure correct audio/video sys-
tem operations:
zBe careful not to spill beverages
over the audio/video system.
zDo not put anything other than an
appropriate disc into the CD/DVD
player slot.
zThe use of a cellular phone inside
or near the vehicle may cause a
noise from the speakers of the
audio/video system which you are
listening to. However, this does
not indicate a malfunction.
Radio reception
Usually, the problem with radio reception
does not mean there is a problem with
your radio — it is just the normal result of
conditions outside the vehicle.
For example, nearby buildings and ter-
rain can interfere with FM reception.
Power lines or telephone wires can in-
terfere with AM signals. And of course,
radio signals have a limited range, and
the farther you are from a station, the
weaker its signal will be. In addition,
reception conditions change constantly
as your vehicle moves.
Here are some common reception prob-
lems that probably do not indicate a
problem with your radio:
Audio/video system
O
p
eratin
g
hints

AUDIO/VIDEO SYSTEM
258
V573_E
FM
Fading and drifting stations — Gener-
ally, the effective range of FM is about
25 miles (40 km). Once outside this
range, you may notice fading and drifting,
which increase with the distance from
the radio transmitter. They are often
accompanied by distortion.
Multi-path — FM signals are reflective,
making it possible for two signals to
reach your antenna at the same time. If
this happens, the signals will cancel
each other out, causing a momentary
flutter or loss of reception.
Static and fluttering — These occur
when signals are blocked by buildings,
trees, or other large objects. Increasing
the bass level may reduce static and
fluttering.
AM
Fading — AM broadcasts are reflected
by the upper atmosphere — especially at
night. These reflected signals can in-
terfere with those received directly from
the radio station, causing the radio sta-
tion to sound alternately strong and
weak.
Station interference — When a re-
flected signal and a signal received di-
rectly from a radio station are very nearly
the same frequency, they can interfere
with each other, making it difficult to hear
the broadcast.
Static — AM is easily affected by exter-
nal sources of electrical noise, such as
high tension power lines, lightening, or
electrical motors. This results in static.
MP3/WMA files
z MP3 (MPEG Audio Layer 3) and
WMA (Windows Media Audio) are
audio compression standards.
z The MP3/WMA player can play MP3
and WMA files on CD-R and CD-RW
discs.
The unit can play disc recordings
compatible with ISO 9660 level 1
and level 2 and with the Romeo and
Joliet file system.
z The USB player can play MP3 and
WMA files on USB memory device.
z When naming an MP3 or WMA file,
add the appropriate file extension
(.mp3 or .wma).
z The MP3/WMA player and USB
player play back files with .mp3
or .wma file extensions as MP3 or
WMA files. To prevent noise and
playback errors, use the appropriate
file extensions.
z The player can play only the first
session using multi-session com-
patible CDs.
z MP3 files are compatible with the
ID3 Tag Ver. 1.0, Ver. 1.1, Ver. 2.2,
Ver. 2.3 and Ver. 2.4 formats. The
unit cannot display disc title, track ti-
tle, artist name, and so on in other
formats.
z WMA files can contain a WMA tag
that is used in the same way as an
ID3 tag. WMA tags carry informa-
tion such as track title, artist name.
z The emphasis function is available
only when playing MP3/WMA files
recorded at 22.05, 32, 44.1 and 48
kHz. (The system can play MP3
files with sampling frequencies of 8,
11.025, 12, 16 and 24 kHz. How-
ever, the emphasis function is not
available for files recorded at these
frequencies.)
z The sound quality of MP3/WMA files
generally improves with higher bit
rates. In order to achieve a rea-
sonable level of sound quality, discs
and USB memory device recorded
with a bit rate of at least 128 kbps
are recommended.
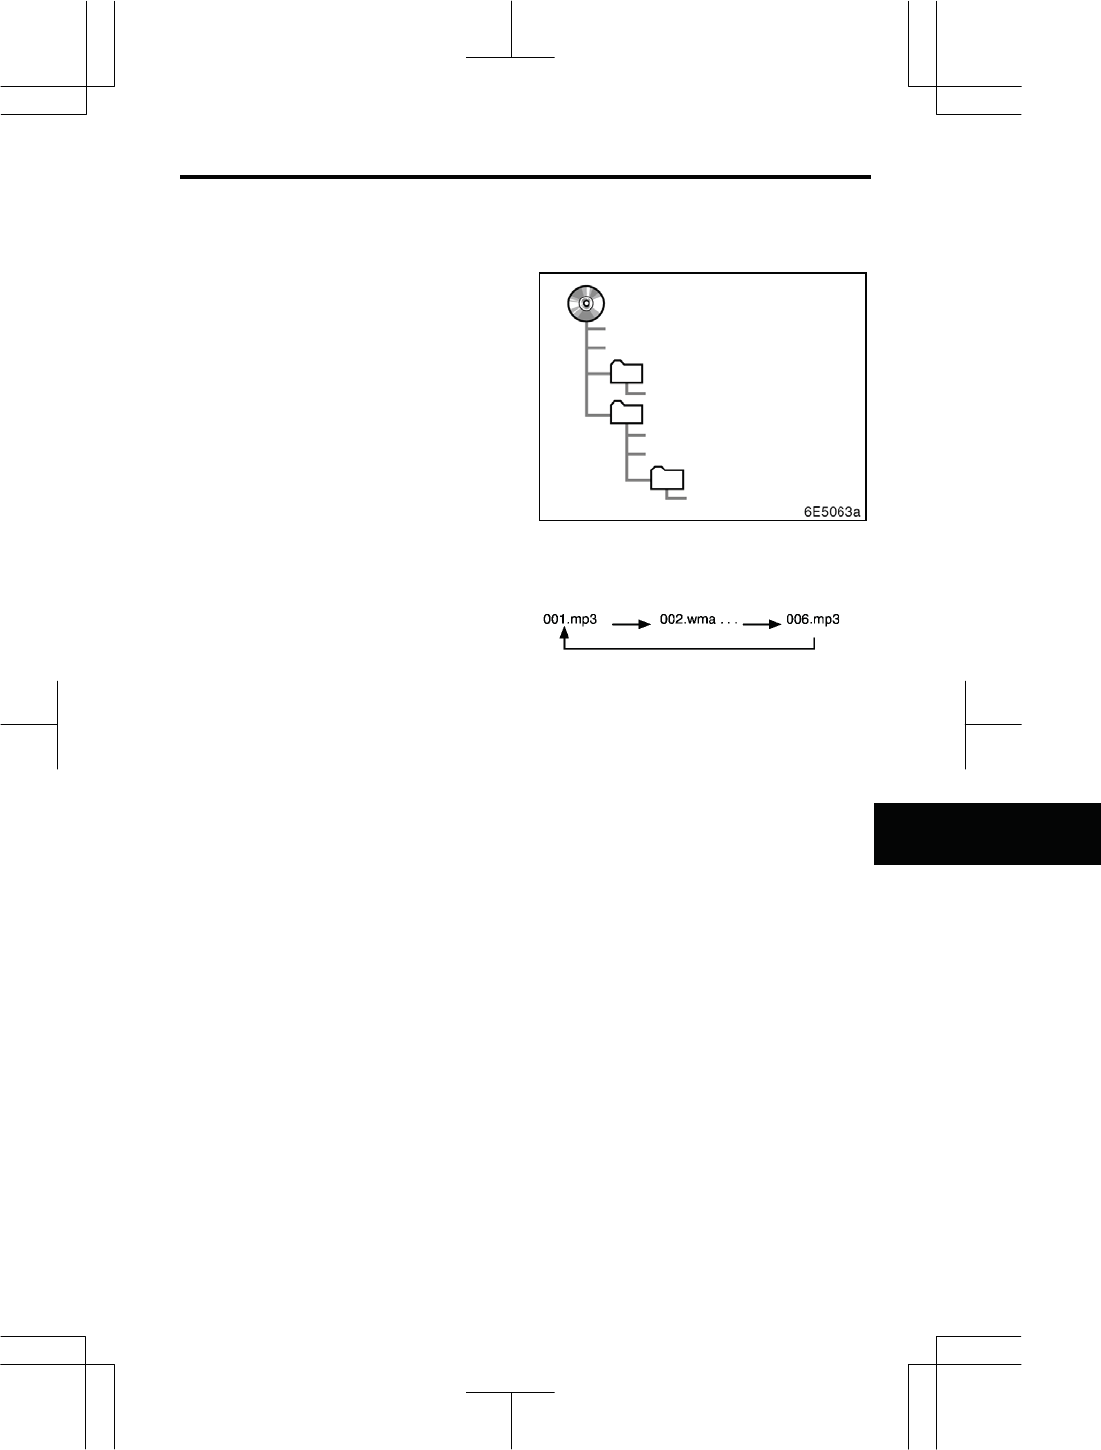
AUDIO/VIDEO SYSTEM
259
V573_E
Playable bit rates
MP3 files:
MPEG1 LAYER3—32 to 320 kbps
MPEG2 LAYER3—8 to 160 kbps
MPEG2.5 LAYER3—8 to 160 kbps
WMA files:
Ver. 7, 8, 9—32 to 320 kbps
z The MP3/WMA player does not play
back MP3/WMA files from discs re-
corder using packet write data
transfer (UDF format). Discs
should be recorded using
“pre-mastering” software rather than
packet-write software.
z The m3u playlists are not compatible
with the audio player.
z MP3i (MP3 interactive) and
MP3PRO formats are not compatible
with the audio player.
z The MP3 player is compatible with
VBR (Variable Bit Rate).
z When playing back files recorded as
VBR (Variable Bit Rate) files, the
play time will not be correctly dis-
played if fast-forward or reverse op-
erations are used.
z It is not possible to check folders
that do not include MP3/WMA files.
z MP3/WMA files in folders up to 8
levels deep can be played. How-
ever, the start of playback may be
delayed when using discs containing
numerous levels of folders. For this
reason, we recommend creating
discs and USB memory device with
no more than two levels of folders.
z It is possible to play up to 255 fold-
ers or 999 files on one disc and USB
memory device.
z The play order of the compact disc
and USB memory device with the
structure shown above is as follows:
001.mp3
002.wma
Folder 1
003.mp3
Folder 2
004.mp3
005.wma
Folder 3
006.mp3
AUDIO/VIDEO SYSTEM
260
V573_E
CD-R and CD-RW discs
z CD-R/CD-RW discs that have not
been subject to the “finalizing proc-
ess” (a process that allows discs to
be played on a conventional CD
player) cannot be played.
z It may not be possible to play
CD-R/CD-RW discs recorded on a
music CD recorder or a personal
computer because of disc charac-
teristics, scratches or dirt on the disc,
or dirt, condensation, etc. on the
lens of the unit.
z It may not be possible to play discs
recorded on a personal computer
depending on the application set-
tings and the environment. Record
with the correct format. (For details,
contact the appropriate application
manufacturers of the applications.)
z CD-R/CD-RW discs may be dam-
aged by direct exposure to sunlight,
high temperatures or other storage
conditions. The unit may be unable
to play some damaged discs.
z If you insert a CD-RW disc into the
player, playback will begin more
slowly than with a conventional CD
or CD-R disc.
z Recordings on CD-R/CD-RW cannot
be played using the DDCD (Double
Density CD) system.
Caring for your CD/DVD player and
discs
z Your CD/DVD player is intended for
use with 12 cm (4.7 in.) discs only.
z Extremely high temperature can
keep your CD/DVD player from
working. On hot days, use air con-
ditioning to cool the vehicle interior
before you listen to a disc.
z Bumpy roads or other vibrations may
make your CD/DVD player skip.
z If moisture gets into your CD/DVD
player, you may not hear any sound
even though your CD/DVD player
appears to be working. Remove
the discs from the CD/DVD player
and wait until it dries.
CAUTION
zCD/DVD player uses an invisible
laser beam which could cause
hazardous radiation exposure if
directed outside the unit. Be
sure to operate the player cor-
rectly.
zUse of controls or adjustments or
performance of procedures other
than those specified herein may
result in hazardous radiation ex-
posure.
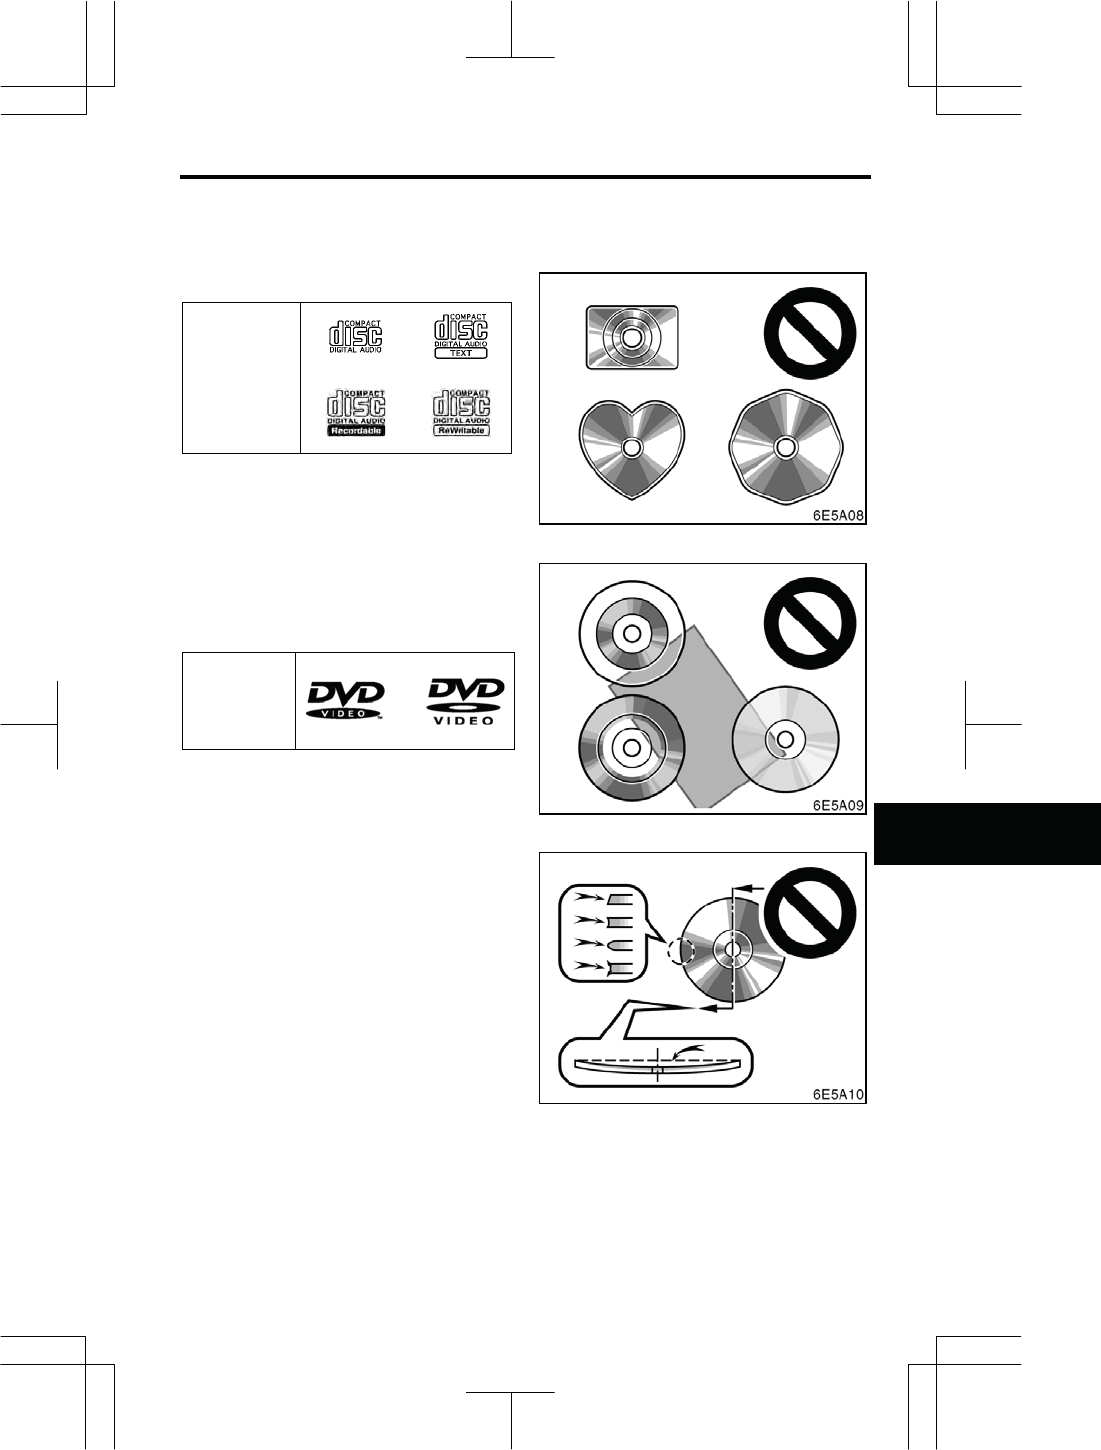
AUDIO/VIDEO SYSTEM
261
V573_E
CD player
Audio CDs
z Use only discs marked as shown
above. The following products may
not be playable on your CD player.
SACDs
dts CDs
Copy-protected CDs
DVD player
DVD video
discs
z Use only discs marked as shown
above. The following products may
not be playable on your DVD player.
DVDíRAM
ŹSpecial shaped discs
ŹTransparent / translucent discs
ŹLow quality discs
AUDIO/VIDEO SYSTEM
262
V573_E
ŹLabeled discs
NOTICE
zDo not use special shaped,
transparent/translucent, low qual-
ity or labeled discs such as those
shown in the illustrations. The
use of such discs may damage
the player, or it may be impossi-
ble to eject the disc.
zThis system is not designed for
use of Dual Disc. Do not use
Dual Disc because it may cause
damage to the player.
ŹCorrect ŹWrong
z Handle discs carefully, especially
when you are inserting them. Hold
them on the edge and do not bend
them. Avoid getting fingerprints on
them, particularly on the shiny side.
z Dirt, scratches, warping, pin holes,
or other disc damage could cause
the player to skip or to repeat a sec-
tion of a track. (To see a pin hole,
hold the disc up to the light.)
z Remove discs from the player when
you are not using them. Store them
in their plastic cases away from
moisture, heat, and direct sunlight.
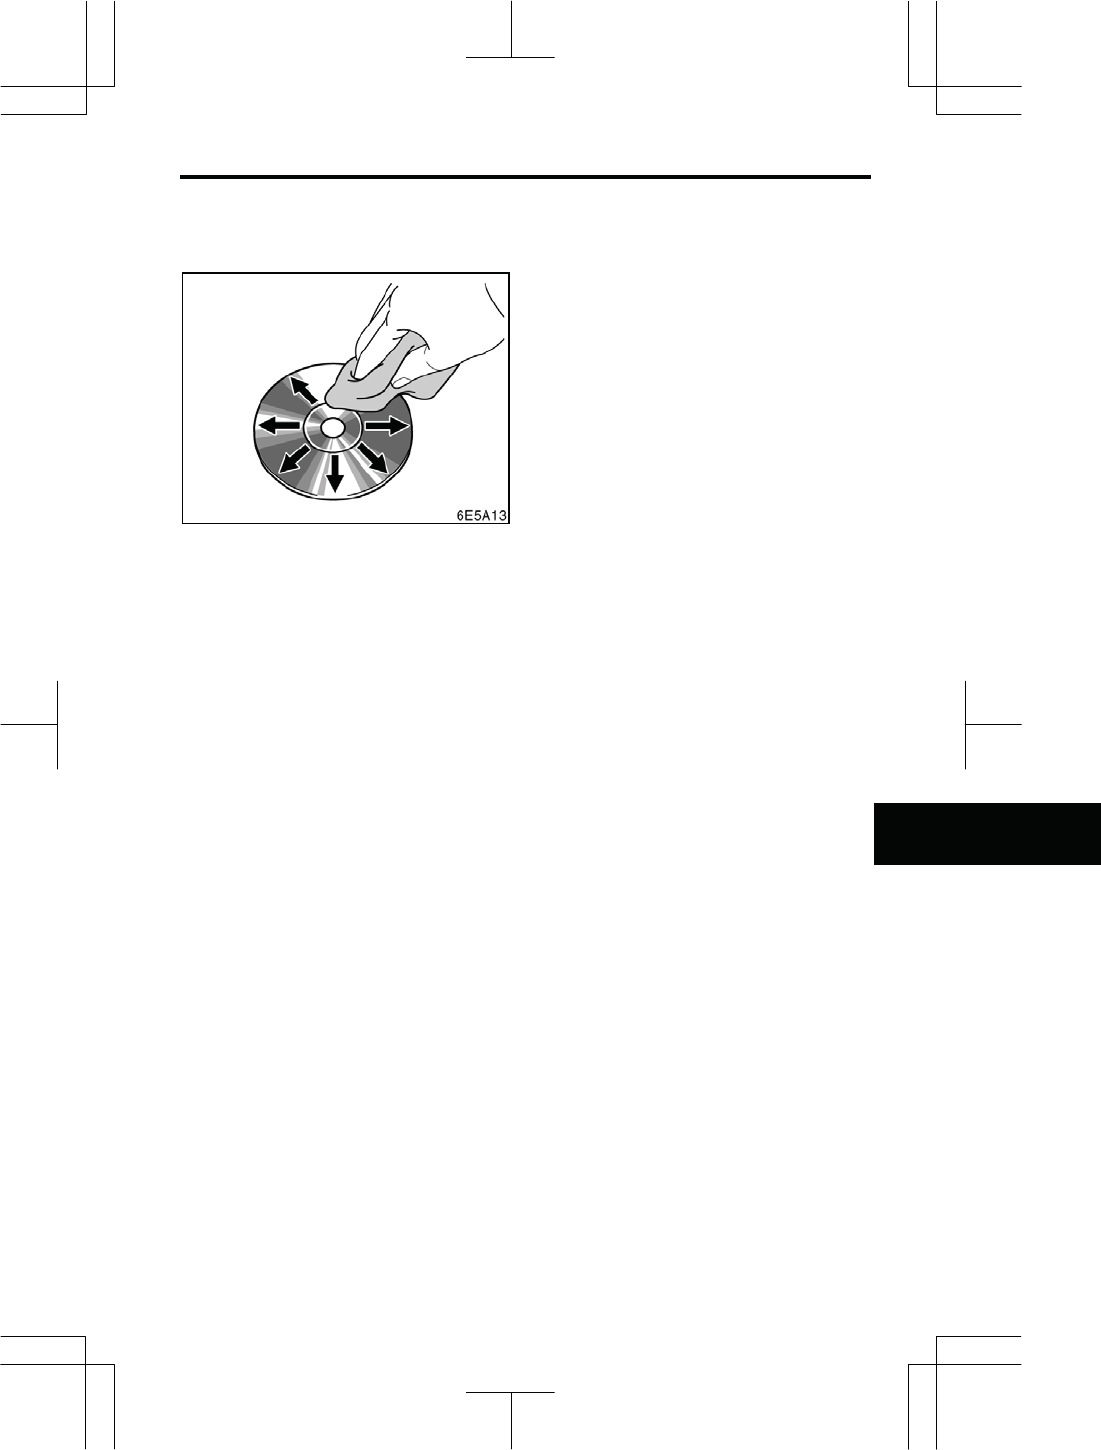
AUDIO/VIDEO SYSTEM
263
V573_E
To clean a disc: Wipe it with a soft,
lint-free cloth that has been dampened
with water. Wipe in a straight line from
the center to the edge of the disc (not in
a circle). Do not use a conventional
record cleaner or anti-static device.
Files in a USB memory device
If there are many files other than MP3 or
WMA files in the USB memory device, it
may take time to search for an MP3 or
WMA file, adversely affecting the smooth
operation of the device. (It is recom-
mended that files other than .mp3
or .wma are not stored in these memory
devices.)
USB memory devices with external
power sources
Vehicles with smart entry and start sys-
tem —
USB memory devices with external
power sources such as USB audio de-
vices may not be recognized correctly
even if the “ENGINE START STOP”
switch is turned to ACCESSORY or
IGNITION ON mode. In this case, turn
the “ENGINE START STOP” switch to
ACCESSORY or IGNITION ON mode
again, or remove the USB memory de-
vice and then plug it in again.
Vehicles without smart entry and start
system —
USB memory devices with external
power sources such as USB audio de-
vices may not be recognized correctly
even if the engine switch is turned to the
“ACC” or “ON” position. In this case,
turn the engine switch to the “ACC” or
“ON” position again, or remove the USB
memory device and then plug it in again.
AUDIO/VIDEO SYSTEM
264
V573_E
USB memory device
The table below shows the tested USB memory devices. Depending on its condition,
the USB memory device may not operate properly.
Model Manufacturer Serial No. Capacity
JetFlash V30 1GB Transcend 505024-2172 1GB
JetFlash V10 8GB Transcend 201061-2998 8GB
DataTraveler 1GB Kingston EC08610-3475122 1GB
DataTraveler 8GB Kingston CC12823-00039574 8GB
attache 2GB PNY TECHNOLOGIES 8E80-0009 2GB
POCKETBIT MINI 1GB SONY 07718BBCB 1GB
POCKETBIT MINI
512MB SONY 08214BCCV 512MB
USB FLASH MEMORY
1GB TOSHIBA 7441H910168NM8N 1GB
Swivel Flash Drive 8GB Imation 8E80-0014 8GB
Swivel Flash Drive
256MB Imation 8E80-0016 256MB
USB Drive 4GB Verbatim 07070406604G088058AA 4GB
Cruzer Contour 8GB San Disk 8E80-0020 8GB
CruzerMicro512MB
(White) San Disk 8E80-0021 512MB
USB Drive 2GB Verbatim 07071706602G030669AA 2GB
USB 2GB extrememory 8E80-0024 2GB
POCKETBIT 16GB SONY 08529EDCB 16GB
USB Drive 2GB CORSAIR 8E80-0027 8GB
JumpDrive Lightning
2GB Lexar 8E80-0029 2GB
Flash Drive 1GB EMTEC 8E80-0031 1GB

AUDIO/VIDEO SYSTEM
265
V573_E
TERMS
Packet write—
This is a general term that describes the
process of writing data on-demand to
CD-R, etc., in the same way that data is
written to floppy or hard discs.
ID3 Tag—
This is a method of embedding
track-related information in an MP3 file.
This embedded information can include the
track title, the artist’s name, the album title,
the music genre, the year of production,
comments and other data. The contents
can be freely edited using software with
ID3 tag editing functions. Although the
tags are restricted to the number of char-
acters, the information can be viewed
when the track is played back.
WMA Tag—
WMA files can contain a WMA tag that is
used in the same way as an ID3 tag.
WMA tags carry information such as track
title, artist name.
ISO 9660 format—
This is the international standard for the
formatting of CD-ROM folders and files.
For the ISO 9660 format, there are two
levels of regulations.
Level 1:
The file name is in 8.3 format (8 character
file names, with a 3 character file extension.
File names must be composed of one-byte
capital letters and numbers. The “_”
symbol may also be included.)
Level 2:
The file name can have up to 31 charac-
ters (including the separation mark “.” and
file extension). Each folder must contain
fewer than 8 hierarchies.
m3u—
Playlists created using “WINAMP” software
have a playlist file extension (.m3u).
MP3—
MP3 is an audio compression standard
determined by a working group (MPEG) of
the ISO (International Standard Organiza-
tion). MP3 compresses audio data to
about 1/10 the size of that on conventional
discs.
WMA—
WMA (Windows Media Audio) is an audio
compression format developed by Micro-
soft. It compresses files into a size
smaller than that of MP3 files. The de-
coding formats for WMA files are Ver. 7, 8,
and 9.

AUDIO/VIDEO SYSTEM
266
V573_E

APPENDIX
267
V573_E
SECTION 7
APPENDIX
z Limitations of the navigation system ················································ 246
z Map database information and updates······································· 248
Confirming the database version and
SD memory card coverage area···················································· 249
Changing the map SD memory card ············································· 249
z Specifications ··················································································· 251
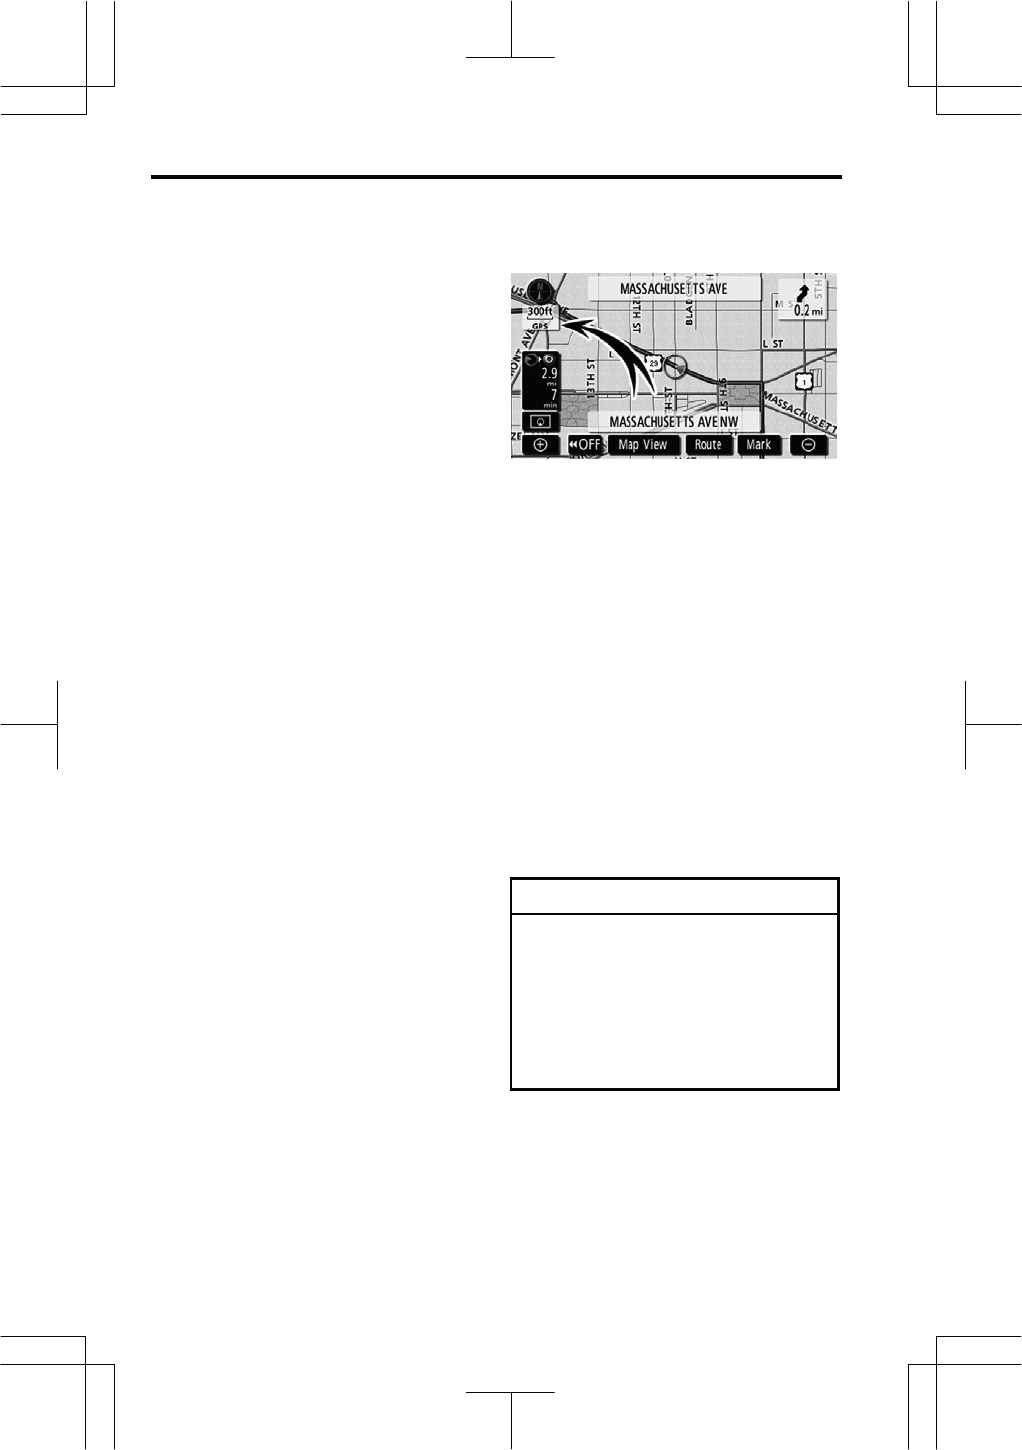
APPENDIX
268
V573_E
This navigation system calculates the
current vehicle position using satellite
signals, various vehicle signals, map
data, etc. However, the accurate po-
sition may not be shown depending
on the satellite condition, road con-
figuration, vehicle condition or other
circumstances.
The Global Positioning System (GPS)
developed and operated by the U.S.
Department of Defense provides an ac-
curate current vehicle position, normally
using 4 or more satellites, and in some
cases 3 satellites. The GPS system
has a certain level of inaccuracy. While
the navigation system will compensate
for this most of the time, occasional posi-
tioning errors of up to 300 feet (100 m)
can and should be expected. Generally,
position errors will be corrected within a
few seconds.
When your vehicle is receiving signals
from the satellites, the “GPS” mark ap-
pears at the top left of the screen.
The GPS signal may be physically ob-
structed, leading to inaccurate vehicle
position on the map display. Tunnels,
tall buildings, trucks, or even the place-
ment of objects on the instrument panel
may obstruct the GPS signals.
The GPS satellites may not send signals
due to repairs or improvements being
made to them.
Even when the navigation system is re-
ceiving clear GPS signals, the vehicle
position may not be shown accurately or
inappropriate route guidance may occur
in some cases.
NOTICE
The installation of window tinting
may obstruct the GPS signals.
Most window tinting contains some
metallic content that will interfere
with GPS signal reception. We ad-
vise against the use of window tint-
ing on vehicles equipped with navi-
gation systems.
Limitations of the
navi
g
ation s
y
stem
APPENDIX
269
V573_E
(a) Accurate current vehicle position
may not be shown in the following
cases:
z When driving on a small angled
Y-shaped road.
z When driving on a winding road.
z When driving on a slippery road
such as in sand, gravel, snow, etc.
z When driving on a long straight road.
z When freeway and surface streets
run in parallel.
z After moving by ferry or vehicle car-
rier.
z When a long route is searched dur-
ing high speed driving.
z When driving without setting the
current position calibration correctly.
z After repeating a change of direction
by going forward and backward, or
turning on a turntable in the parking
lot.
z When leaving a covered parking lot
or parking garage.
z When a roof carrier is installed.
z When driving with tire chains in-
stalled.
z When the tires are worn.
z After replacing a tire or tires.
z When using tires that are smaller or
larger than the factory specifications.
z When the tire pressure in any of the
four tires is not correct.
INFORMATION
If your vehicle cannot receive GPS
signals, you can correct the current
position manually. For information
on setting the current position cali-
bration, see page 111.
(b) Inappropriate route guidance may
occur in the following cases:
z When turning at an intersection off
the designated route guidance.
z If you set more than one destination
but skip any of them, auto reroute
will display a route returning to the
destination on the previous route.
z When turning at an intersection for
which there is no route guidance.
z When passing through an intersec-
tion for which there is no route
guidance.
z During auto reroute, the route guid-
ance may not be available for the
next turn to the right or left.
z It may take a long time to operate
auto reroute during high speed driv-
ing. In auto reroute, a detour route
may be shown.
z After auto reroute, the route may not
be changed.
z An unnecessary U-turn may be
shown or announced.
z A location may have multiple names
and the system will announce one or
more.
z Some routes may not be searched.
z If the route to your destination in-
cludes gravel, unpaved roads or al-
leys, the route guidance may not be
shown.
z Your destination point might be
shown on the opposite side of the
street.
z When a portion of the route has
regulations prohibiting the entry of
the vehicle that vary by time or sea-
son or other reasons.
z The road and map data stored in
your navigation system may not be
complete or may not be the latest
version.
APPENDIX
270
V573_E
After replacing a tire, implement the
operation described in the “TIRE
CHANGE CALIBRATION”. (See page
112.)
This navigation system uses tire turning
data and is designed to work with fac-
tory-specified tires for your vehicle.
Installing tires that are larger or smaller
than the originally equipped diameter
may cause inaccurate display of the ve-
hicle’s position. The tire pressure also
affects the diameter of the tires so
please make sure the tire pressure of all
four tires are correct.
In order to provide you with as accurate
map information as possible, we are
always gathering information such as on
road repairs and carrying out on-site
investigations. However, the names of
roads, streets, facilities, and their loca-
tions frequently change. In some
places, construction on roads may be in
progress. For that reason, information
on some areas in this system might be
different from the actual location.
The map database is normally updated
once a year. Contact your dealer for
information about the availability and
pricing of an update.
INFORMATION
Do not attempt to store audio or
other data files in the map SD mem-
ory card.
Map database information
and u
p
dates —

APPENDIX
271
V573_E
1. Push the “NAVI” button.
2. Touch “Map SD”.
Confirm the database version on this
screen.
To display the SD memory card cover-
age area, touch “Covered Area”. Con-
firm the covered area on the screen.
Contact any your dealer to find out if
there is a more recent update available.
1. Push the “ OPEN” button.
2. Touch “Open”.
The display can also be opened by
pushing the “ OPEN” button for ap-
proximately 1 second until a beep sound
is emitted.
The display opens to reveal SD memory
card slot.
3. Open the SD memory card slot
cover and push the map SD memory
card lightly to remove it.
— Confirming the database
version and SD memory
card covera
g
e area
— Changing the map SD
memor
y
card
SD memory card slot
APPENDIX
272
V573_E
4. Insert the new map SD memory
card and close the slot cover.
5. Touch “Close” to close the dis-
play.
The display can also be closed by push-
ing the “ OPEN” button for approxi-
mately 1 second until a beep sound is
emitted.
The map database is normally updated
once a year. Contact any your dealer
for information about the availability and
pricing of an update.
CAUTION
zDo not place anything on the
opened display, as such items
may be thrown about and possi-
bly injure people in the vehicle
during sudden braking or in an
accident.
zTo reduce the chance of injury in
the case of an accident or sudden
stopping while driving, keep the
display closed.
zTake care not to jam your hand
while the display is moving. Oth-
erwise, you could be injured.
zKeep SD memory cards out of
reach of children as there is a
danger of swallowing. If swal-
lowed, seek medical advice im-
mediately.
NOTICE
Do not obstruct the display while it
is moving. It could damage your
navigation system.

APPENDIX
273
V573_E
<GPS antenna>
Dimensions 26.0 x 30.0 x 12.9 (mm)
Weight 50 (g)
Power supply voltage 4.0 to 5.0 (V)
Power consumption 10 to 30 (mA)
Usage temperature -30 to +90 (°C)
Storage temperature -40 to +110 (°C)
<Display>
Liquid crystal panel 7” wide (16:9) lowíglare panel
Screen dimensions 158.6 mm (width), 84.3 mm (height), 179.6 mm
(diagonal)
Pixel count 280,800 dots (400 (width) × 234 (height) × 3 RGB)
Active pixel rate More than 99.99%
Display format Transmissive color filter format
Drive system TFT (thin membrane transistor) active matrix format
Usage temperature range -20 to +65 (°C)
Storage temperature range -40 to +85 (°C)
<Radio tuner>
Reception frequency Ɣ AM 530 to 1,710 kHz
Ɣ FM 87.75 to 107.9 MHz
Noise limited sensitivity Ɣ Less than AM 34 dBµ (S/N = 20 dB)
Ɣ Less than FM 14 dBµ (S/N = 30 dB)
Stereo separation More than 25 dB
<CD>
Distortion Less than 0.3%
Frequency characteristic 20 to 20,000 Hz
S/N ratio More than 65 dB (1 kHz)
Stereo separation More than 60 dB
S
p
ecifications

APPENDIX
274
V573_E
<Common component>
Rated output More than 14 W x 4 (test voltage 14.4V)
Maximum output More than 20 W x 4 (test voltage 14.4V)
Suitable load impedance 4 (each channel)
Power consumption Ɣ 1 W x 4 output time about 4.1 A
Ɣ About 15 A max
Exterior dimensions 205.5 mm (width), 104 mm (height), 161.5 mm
(depth)
Weight About 2.7 kg
z Please note that due to changes in specifications and external appearance, the
content of this manual may not correspond exactly with the actual device.
z The number of parts and circuits may be changed to improve functionality without
prior notice.

INDEX
275
V573_E
INDEX
For navigation system function, please also refer to the
“Navigation system function index” on page 10.

INDEX
276
V573_E
Numbers/Symbols
? button ........................................ 14,17,18
3 Routes selection.................................. 63
3D landmark .................................... 18,108
3D map.............................................. 12,36
3D map symbol.................................. 12,36
A
Adaptive volume control .................. 87,143
Adding a memo .................................... 120
Adding destinations ................................ 72
Adding the data to the phone book....... 151
Address button ....................................... 14
Alphabet keys......................................... 24
Area to avoid .............................. 98,99,102
Arrow screen ..................................... 33,68
AUDIO button ....................................... 174
Audio/video remote controls ................. 235
Auto answer ......................................... 146
Auto avoid traffic.................................... XX
Auto voice guidance ........................ 18,109
Auto volume adjustment
(Auto Volume) .................................... XX
Automatic volume settings for
high speed ........................................144
AUX operation ...................................... 225
AUX port........................................ 174,225
AV button............................................... XX
B
Beep type ............................................. 171
Bluetooth®..................................... 123,211
Bluetooth® audio system....................... 211
Bluetooth® information.......................... 167
Brightness ............................................ 168
C
Calendar with memo............................. 118
Calibration ....................................... 18,111
Call by dialed numbers ......................... 132
Call by key pad..................................... 131
Call by phone book............................... 132
Call by POI ........................................... 135
Call by received calls............................ 133
Call by speed dial ................................. 134
Call on the Bluetooth® phone................ 131
Categories ............................... 52,54,79,80
CAUTION screen.................................... 22
CD player operation.............................. 192
CD slot ................................................. 174
Cellular phone ...................................... 123
Change “Area Size”.............................. 101
Change “Icon” ........................................ 93
Change “Location”........................... 95,101
Change “Name”............................... 95,100
Change “Phone #”.................................. 96
Change “Quick Access”.......................... 94
Change button................................... 14,42
Change the route ................................... 62
Change the settings of the
Bluetooth® phone.............................. 138
Changing a device name............... 164,221
Changing the angle ................................XX
Changing the audio language.................XX
Changing the Bluetooth®
settings ............................................. 165
Changing the map SD memory card .... 249
Changing the security code.................. 159
Changing the subtitle language ..............XX
Chapter ..................................................XX
City center.............................................. 53
City name.......................................... 47,50
City to search ......................................... 50
Color ......................................................XX
Compass mode ...................................... 35
Compass mode screen .......................... 33
Connecting a Bluetooth® phone ........... 129
Connecting a portable player ............... 215
Connecting or disconnecting
your iPod .......................................... 227
Connecting (disconnecting) portable
audio devices.................................... 225
Contrast .................................................XX
Coordinates button................................. 14
Current position as the search point....... 53
Current position display.......................... 28
Current position/tire change
calibration ......................................... 111
Cursor position as a destination ............. 29
Cursor position as a memory point......... 29
D
Database version ................................. 249
Dealer setting....................................... 116
Default..................18,144,147,161,166,223
Deleting “Quick Access” ......................... 94
Deleting a Bluetooth® phone ................ 167
Deleting a portable player .................... 224
Deleting a group name ......................... 157
Deleting all of the speed dial ................ 140
Deleting all the group name ................. 157
Deleting all the phone data................... 154
Deleting all the speed tone ................... 143
Deleting area to avoid .......................... 102

INDEX
277
V573_E
Deleting destinations ..............................74
Deleting home ........................................98
Deleting memory points ..........................96
Deleting previous points .......................102
Deleting the data ..................................152
Deleting the log data.............................158
Deleting the speed dial individually.......139
Deleting the speed tone
individually ........................................143
DEST button................................. 12,14,42
Destination information ...........................32
Destination screen..................................14
Destination search..................................42
Destination search by “Address”.............46
Destination search by “Coordinates”....... 60
Destination search by “Intersection”........58
Destination search by “Map”...................57
Destination search by “Memory” .............56
Destination search by “Phone #”.............60
Destination search by
“POI Category” ....................................52
Destination search by “POI Name” .........49
Destination search by “Previous” ............57
Destination search by home ...................45
Destination search by quick access........45
Detour setting ......................................... 76
Disc loading ........................................... XX
Display operation ................................... XX
Display POI icons ....................... 18,78,107
Displaying DVD controls ........................ XX
Distance and time to destination........ 12,71
Distance unit.................................... 18,103
Dual map ................................................ 34
Dual map screen ....................................33
DVD controls ......................................... XX
DVD player and DVD video disc
information ......................................... XX
DVD player operation ............................ XX
DVD video disc...................................... XX
DVD video disc glossary........................ XX
E
Edit “Dealer” or “Contact”...................... 117
Edit “Location” ......................................117
Edit “Phone #”.......................................118
Editing a group name............................ 156
Editing a memo.....................................121
Editing area to avoid...............................99
Editing memory points ............................92
Editing the data..................................... 151
Editing the name...................................149
Editing the phone number..................... 150
Editing the speed tone.......................... 141
Eject OPEN button ............................... 193
Emergency button ............................. 14,55
Enter a Bluetooth® audio player............ 213
Enter language code ............................. XX
Equalizer system.................................. 180
Estimated arrival time............................. 71
Estimated travel time.................. 18,71,104
F
FOLDER LIST button ........................... 197
Freeway information screen .............. 33,66
Function button display screen............. 174
Function help.......................................... 27
G
GPS ..................................................... 246
GPS mark............................................... 12
Guidance screen on the freeway....... 33,66
Guiding the route.................................... 37
H
Hands-free system ............................... 123
Heading-up........................................ 12,36
Heading-up symbol ........................... 12,36
HFP (Hands Free Profile)..................... 125
Home ........................................... 38,97,98
Home touch screen button ..................... 14
House number................................... 38,46
I
If the player malfunctions....................... XX
INFO button........................................... XX
Information about the icon...................... 30
Information items.................................. 115
Information screen................................. XX
Initial screen........................................... 22
Initializing the Bluetooth®
settings ...................................... 166,223
Initializing the security code.................. 161
Inputting a street name.......................... XX
Inputting letters and numbers ................. 24
Inserting or ejecting disc....................... 192
Intersection button.................................. 14
Intersection guidance screen............. 33,67
iPod operation ...................................... 227

INDEX
278
V573_E
K
Keyboard layout............................... 18,105
L
Last 5 cities ....................................... 48,51
Limitations of the navigation system ..... 246
List.......................................................... 25
List all categories button ............... 52,54,79
List screen operation .............................. 24
Listening to satellite radio ..................... 186
Listening to the radio ............................ 181
Local POI list .......................................... 80
M
Maintenance information ................. 22,114
Maintenance information setting........... 114
Map button ............................................. 14
Map database information and
updates ............................................. 248
Map scale............................................... 35
Map screen operation............................. 28
Map SD button........................................ 17
Map view ................................................ 78
Map View button..................................... 12
MAP button........................................ 12,28
Mark button ............................................ 12
Marks shown on DVD video discs ......... XX
Memo information...................................23
Memo list .............................................. 121
Memory button........................................ 14
Memory point information ....................... 32
Memory point names .............................. 95
Memory points screen ............................ 91
Memos for a specified period of time.... 122
Menu screen........................................... 16
Microphone........................................... 124
MP3/WMA ..................................... 197,237
MSG button .......................................... 184
My Places...............................................90
My Places button .................................... 17
N
Names of areas to be avoided .............. 100
NAVI button .................................. 12,17,18
Nearest 5 Cities................................. 48,51
North-up ............................................ 12,36
North-up symbol ................................ 12,36
Numbers and symbols............................ 25
O
OFF function ...............................12,18,106
On route button ................................. 54,80
One-touch scroll ..................................... 28
Operating a Bluetooth® audio player .... 217
Operating a DVD video disc ...................XX
Operating a MP3/WMA disc ................. 197
Operating an audio CD......................... 194
Operating a USB memory device ......... 206
Operating your iPod ...............................XX
OPP (Object Push Profile).................... 125
Changing map orientation and
configuration....................................... 36
P
P.EQ (Parametric Equalizer)
adjustments ........................................XX
Phone book.......................................... 147
Phone book lock................................... 160
Phone # button....................................... 14
Playing a Bluetooth® audio ................... 218
Playing a disc....................................... 193
Playing a MP3/WMA disc..................... 197
Playing an audio CD ............................ 194
Playing a DVD video disc .......................XX
Playing a portable audio devices.......... 226
Playing a USB memory device............. 205
Playing your iPod ................................. 230
Plugging or unplugging a USB
memory device ................................. 204
POI as a destination............................... 81
POI button.............................................. 14
POI category button ............................... 14
POI category change............................ 107
POI information ...................................... 31
POIs near the search point..................... 54
POIs to be displayed .............................. 79
Pop-up message ............................. 18,110
Position/direction calibration................. 111
Presetting a station .............................. 182
Previous button ...................................... 14
PWR button.......................................... 176
Q
Quick access touch screen button.......... 14

INDEX
279
V573_E
R
Radio ID ...............................................186
Radio operation ............................. 181,185
RANDOM button.............. 196,200,209,219
Rear seat entertainment system ............ XX
Rear view camera system ..................... XX
Receive on the Bluetooth® phone .........135
Receiving call display ........................... 145
Region codes......................................... XX
Register a Bluetooth® phone.................128
Registering a group name ....................155
Registering area to avoid ........................98
Registering home ..............................38,97
Registering memory points ..................... 91
Registering the phone book data .......... 149
Registering the speed dial ....................138
Registering the speed tone................... 140
Reordering destinations..........................73
REPEAT button ........ 196,200,209,219,234
Resume guidance...................................86
Resume guidance button........................17
Route button...........................................12
Route guidance screen...........................66
Route overview.......................................81
Route preference............................... 62,77
Route preview......................................... 82
Route trace.............................................83
S
Satellite radio channel category............ 187
Satellite tuner........................................ 186
Settings ................................................. XX
Scale indicator ........................................12
SCAN button.................................. 182,188
Screen adjustment................................168
Screen configuration touch screen
button..................................................12
Screen layout function ..........................106
Screen off .............................................168
Screen priority ....................................... XX
Screen scroll operation ...........................28
Screen size............................................ XX
SD memory card coverage area ...........249
SD memory card slot ............................ 174
Search condition.....................................75
Search point from destinations ...............54
Search point via the map screen ............53
Searching for a desired file ............ 199,208
Searching for a desired folder........200,209
Searching for a desired track ................195
Searching for desired footage................ XX
Searching for the desired music files
from play mode................................. 233
Searching for the desired music file
from the Music menu ........................ 232
Security code ....................................... 159
Select user button .................................. 17
Selecting a desired file .................. 198,207
Selecting a desired folder.............. 197,206
Selecting a desired track ............... 195,218
Selecting a group icon.......................... 156
Selecting a language............................ 172
Selecting a menu item ........................... XX
Selecting a satellite radio channel ........ 188
Selecting a station................................ 182
Selecting the group .............................. 150
Selecting screen size ............................ XX
Selecting the search area....................... 42
Sending a tone by the speed tone........ 137
Set a Bluetooth® phone ........................ 162
Setting and deleting destination ............. 72
Setting route........................................... 75
Setting the phone book ........................ 147
Setup.................................................... 103
Setup button........................................... 17
Setup screen.......................................... 18
Show free flowing traffic ........................ XX
Show XM® NavTraffic information ......... XX
Single map ............................................. 34
Single map screen.................................. 33
Sort ........................................................ 26
Sound icons ........................................... 93
Sound menu screen .............................. XX
Sound travel time adjustment (Focus) ... XX
Specifications ....................................... 251
Speed dial ..................................... 134,138
Speed tone.................................... 137,140
SSP (SCION Sound Processing)
settings .............................................. XX
Starting route from adjacent road ........... 78
Starting route guidance .......................... 61
Steering switches ................................. 235
Street name............................................ 66
Subwoofer settings................................ XX
Suspend guidance.................................. 86
Suspend guidance button....................... 17
Suspending and resuming guidance ...... 86
Switch color.......................................... 170
Switching the screens ............................ 33

INDEX
280
V573_E
T
Talk on the Bluetooth® phone ............... 136
Time zone........................................ 18,106
Tire change calibration ......................... 112
Title ....................................................... XX
Tone ...................................................... XX
Touch screen operation .......................... 23
TRACK LIST button....................... 194,231
Traffic Restrict. Notification.............. 18,108
Traffic voice guidance............................ XX
Transfer data ........................................ 148
Transferring a telephone number.......... 148
Turn list screen............................. 33,68,81
Turning on the power............................ 176
TYPE SEEK button............................... 184
Typical voice guidance prompts..............69
U
USB player operation ........................... 202
USB port............................................... 174
User selection......................................... 88
V
Video operation ..................................... XX
Viewer restrictions ................................. XX
Voice guidance in all modes ............ 18,109
VOL button .................................... 174,176
Volume ....................... 87,135,143,176,235
Volume balance adjustments
(FAD BAL) ......................................... XX
Volume button ........................................ 17
X
XM® indicator......................................... XX
XM® NavTraffic ...................................... XX
XM® NavTraffic icon............................... XX
XM® NavTraffic indicator........................ XX
XM® NavTraffic flow information ............ XX
XM® NavTraffic text information............. XX
XM®Satellite Radio broadcast .............. 185
Z
Zoom in button........................................ 12
Zoom out button ..................................... 12