AISIN AW NA08A02 Car Navigation System with BT User Manual
AISIN AW CO., LTD. Car Navigation System with BT
AISIN AW >
Contents
- 1. User Manual Part 1
- 2. User Manual Part 2
- 3. User Manual Part 3
User Manual Part 2
ROUTE GUIDANCE
81
V573_E
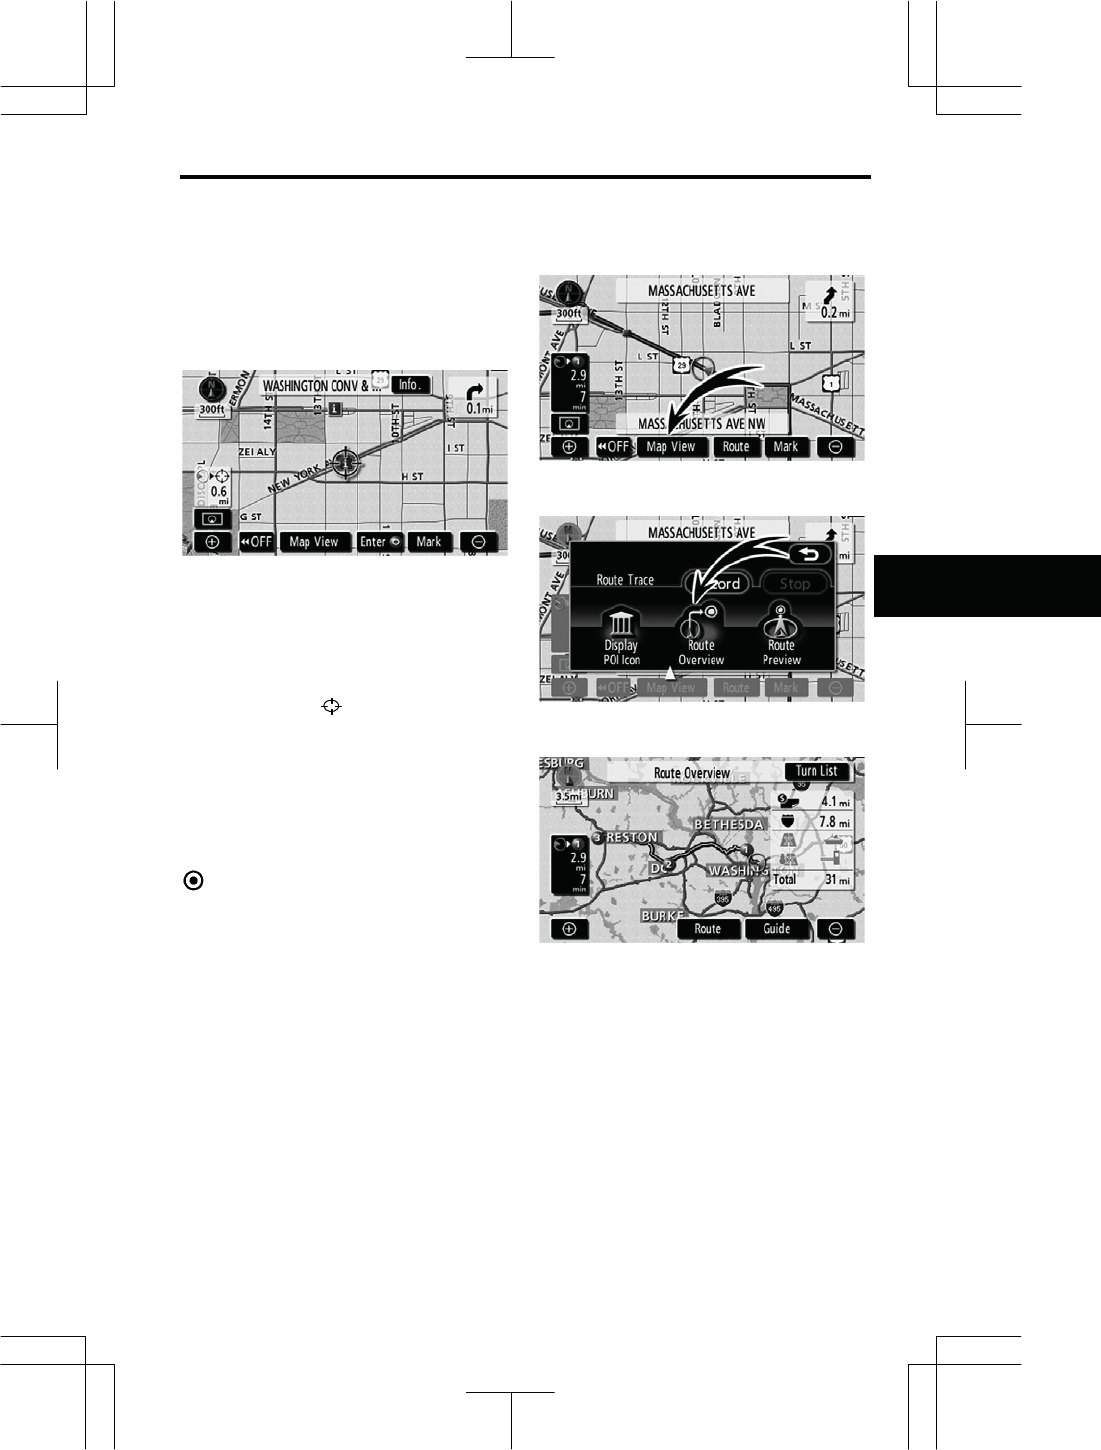
z To set a POI as a destination
You can select one of the Points of In-
terest icons on the map screen as a des-
tination and use it for route guidance.
1. Directly touch the Point of Interest
icon that you want to set as a destina-
tion.
The map will shift so that the icon is
centered on the screen and overlaps
with the cursor . At this time, the
distance from the current position is dis-
played on the screen. The distance
shown is measured as a straight line
from the current vehicle position to the
POI.
2. When the desired Point of Interest
overlaps with the cursor, touch “Enter
”.
The screen changes and displays the
map location of the selected destination
and route preference. (See “Starting
route guidance” on page 61.)
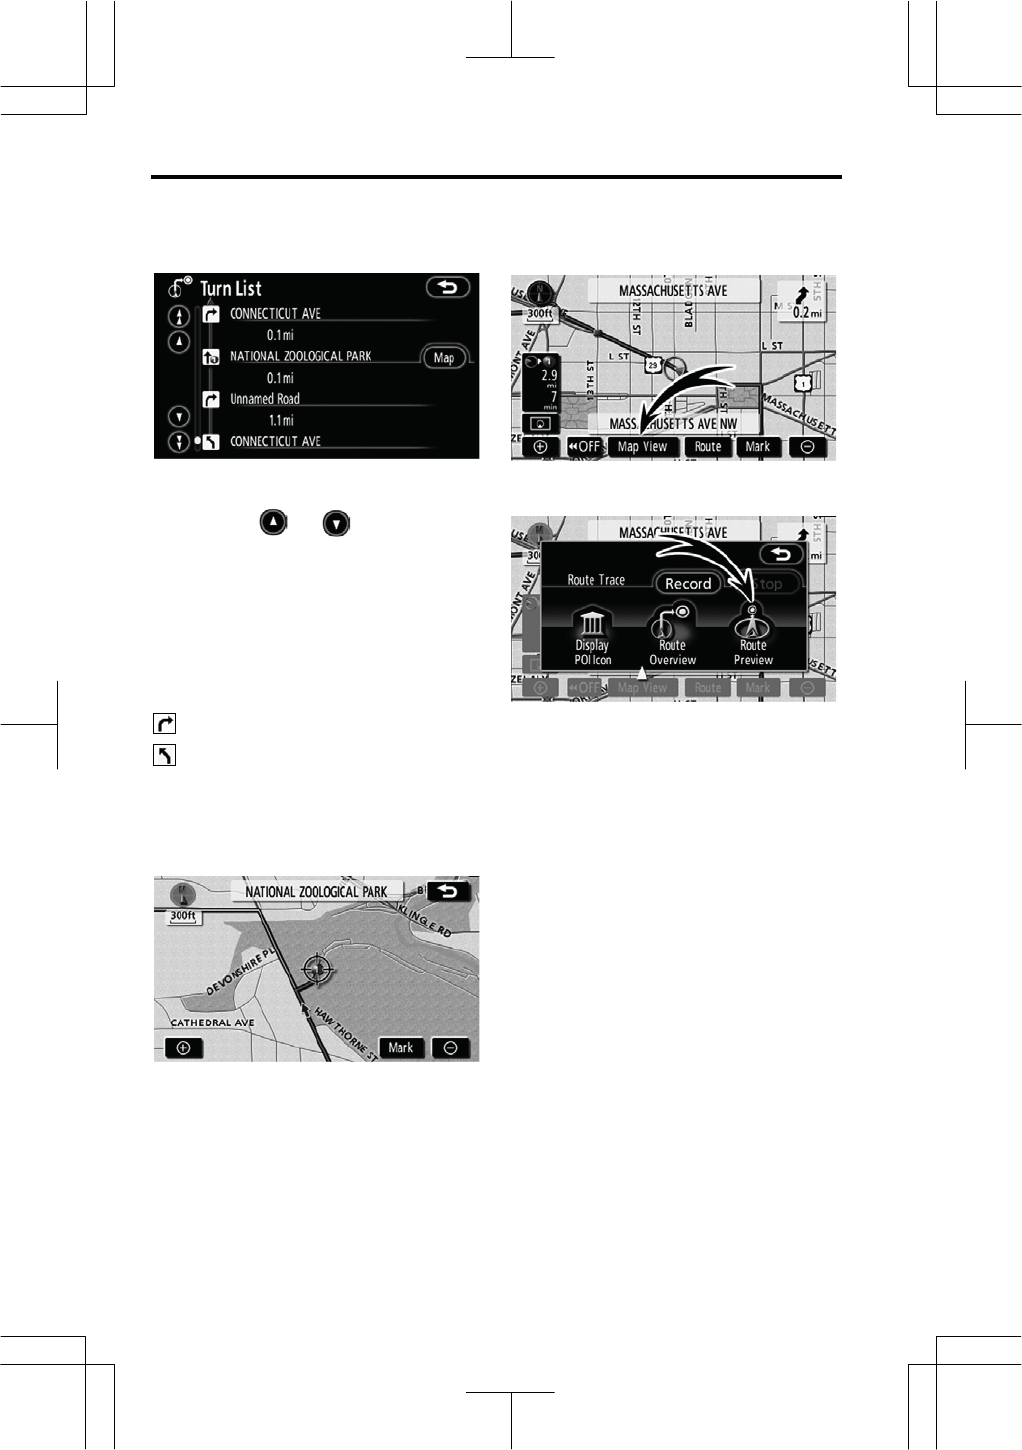
1. Touch “Map View”.
2. Touch “Route Overview”.
The entire route from the current position
to the destination is displayed.
“Guide”: To start guidance.
“Route”: To change the route. (See
pages 72 and 75.)
“Turn List”: The following screen dis-
plays the list of the roads up to the des-
tination.
— Route overview
ROUTE GUIDANCE
82
V573_E
You can scroll through the list of roads
by touching or . However, not
all road names in the route may appear
on the list. If a road changes its name
without requiring a turn (such as on a
street that runs through two or more cit-
ies), the name change will not appear on
the list. The street names will be dis-
played in order from the starting point,
along with the distance to the next turn.
These marks indicate the direction
in which you should turn at an in-
tersection.
Touch “Map” of the “Turn List”
screen.
The point which you choose is displayed
on the map screen.
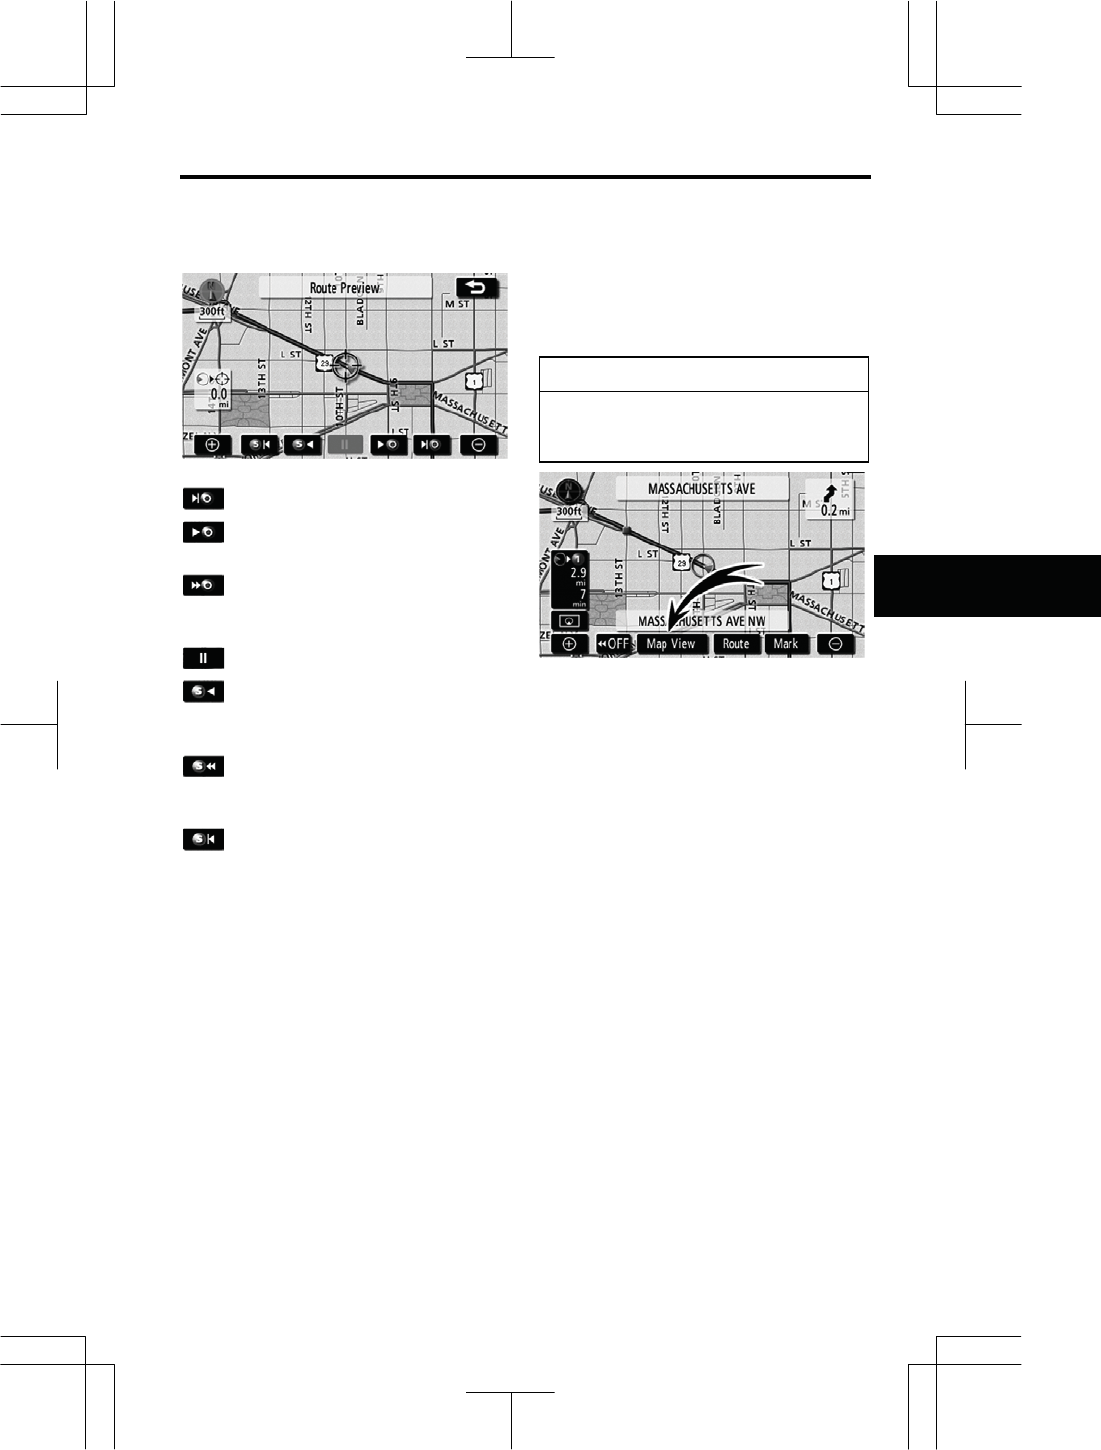
1. Touch “Map View”.
2. Touch “Route Preview”.
— Route
p
review
ROUTE GUIDANCE
83
V573_E
: To indicate the next destination.
: To preview the route to the next
destination.
: To preview the route to the next
destination in fast-forward
mode.
: To pause preview.
: To review the route to the pre-
vious destination or starting
point.
: To review the route to the pre-
vious destination or starting
point in fast-forward mode.
: To indicate the previous desti-
nation or starting point.
It is possible to store the traveled route
up to 124 miles (200 km) and retrace the
route on the display.
INFORMATION
This feature is available on the map
with more detailed map scale than
30 miles (50 km).
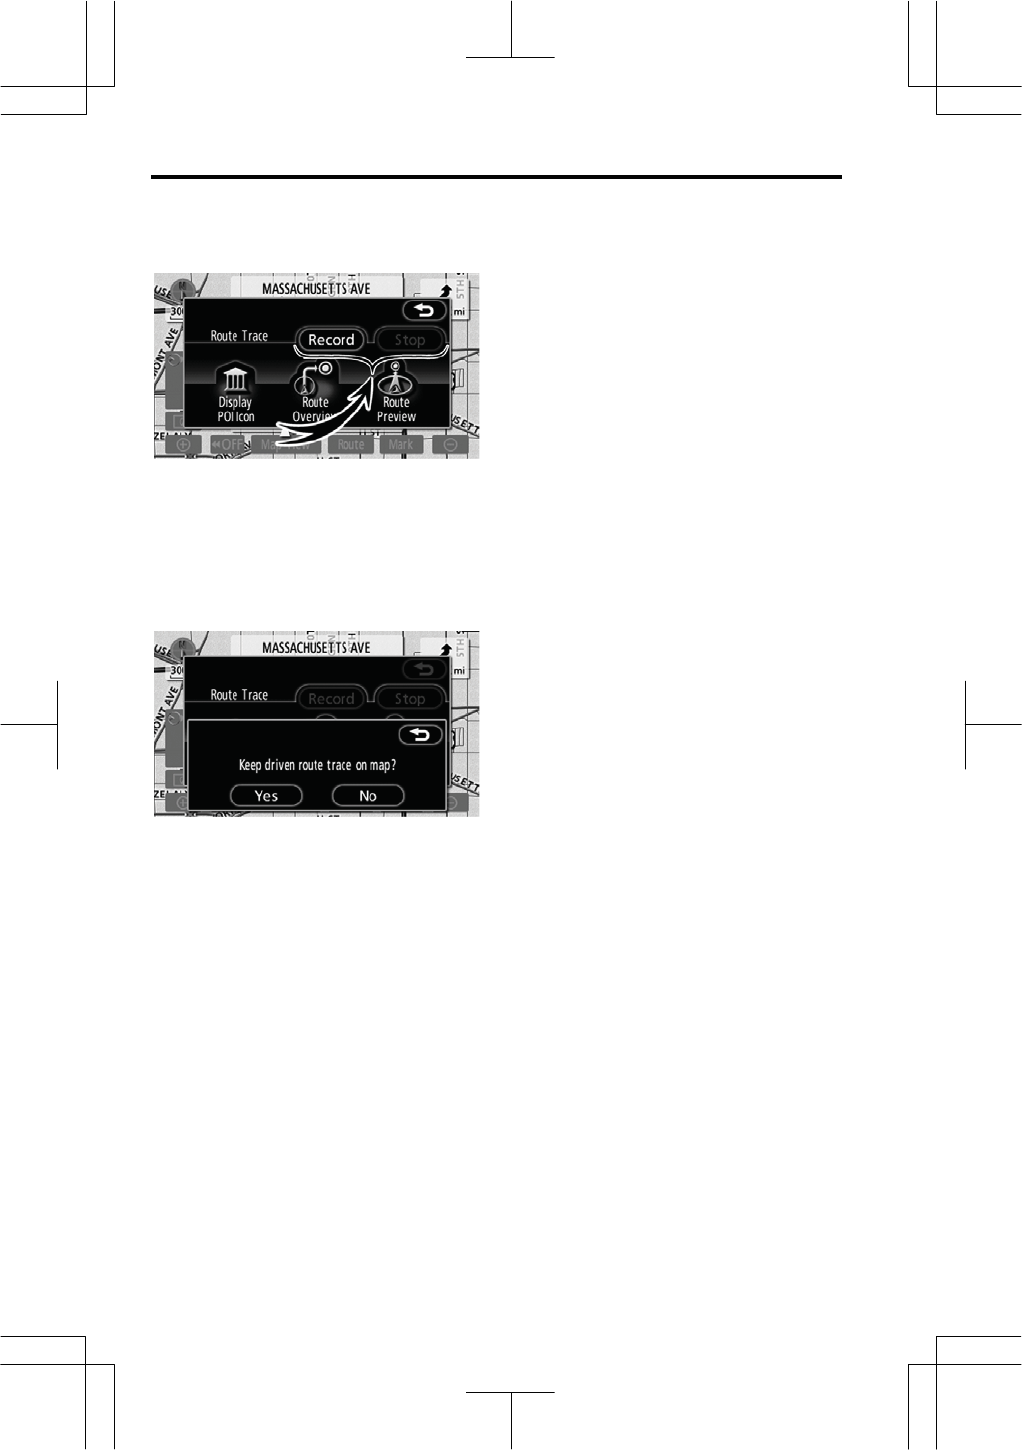
Touch “Map View”.
— Route trace
ROUTE GUIDANCE
84
V573_E
“Record”: To start recording the route
trace.
“Stop”: To stop recording the route
trace.
If you touch “Stop”, the following screen
will be displayed.
Touching “Yes” stops recording and the
route trace remains displayed on the
screen.
Touching “No” stops recording and the
route trace is erased.

ADVANCED FUNCTIONS
85
V573_E
SECTION 4
ADVANCED FUNCTIONS
Descriptions of functions for more effective use
z Suspending and resuming guidance ·················································· 86
z Volume································································································ 87
z User selection····················································································· 88
z XM® NavTraffic ·················································································· XX
z My Places ·························································································· 90
Registering memory points ······························································ 91
Editing memory points ····································································· 92
Deleting memory points ··································································· 96
Registering home············································································· 97
Deleting home·················································································· 98
Registering area to avoid ································································· 98
Editing area to avoid ········································································ 99
Deleting area to avoid ···································································· 102
Deleting previous points································································· 102
z Setup ································································································ 103
ADVANCED FUNCTIONS
86
V573_E
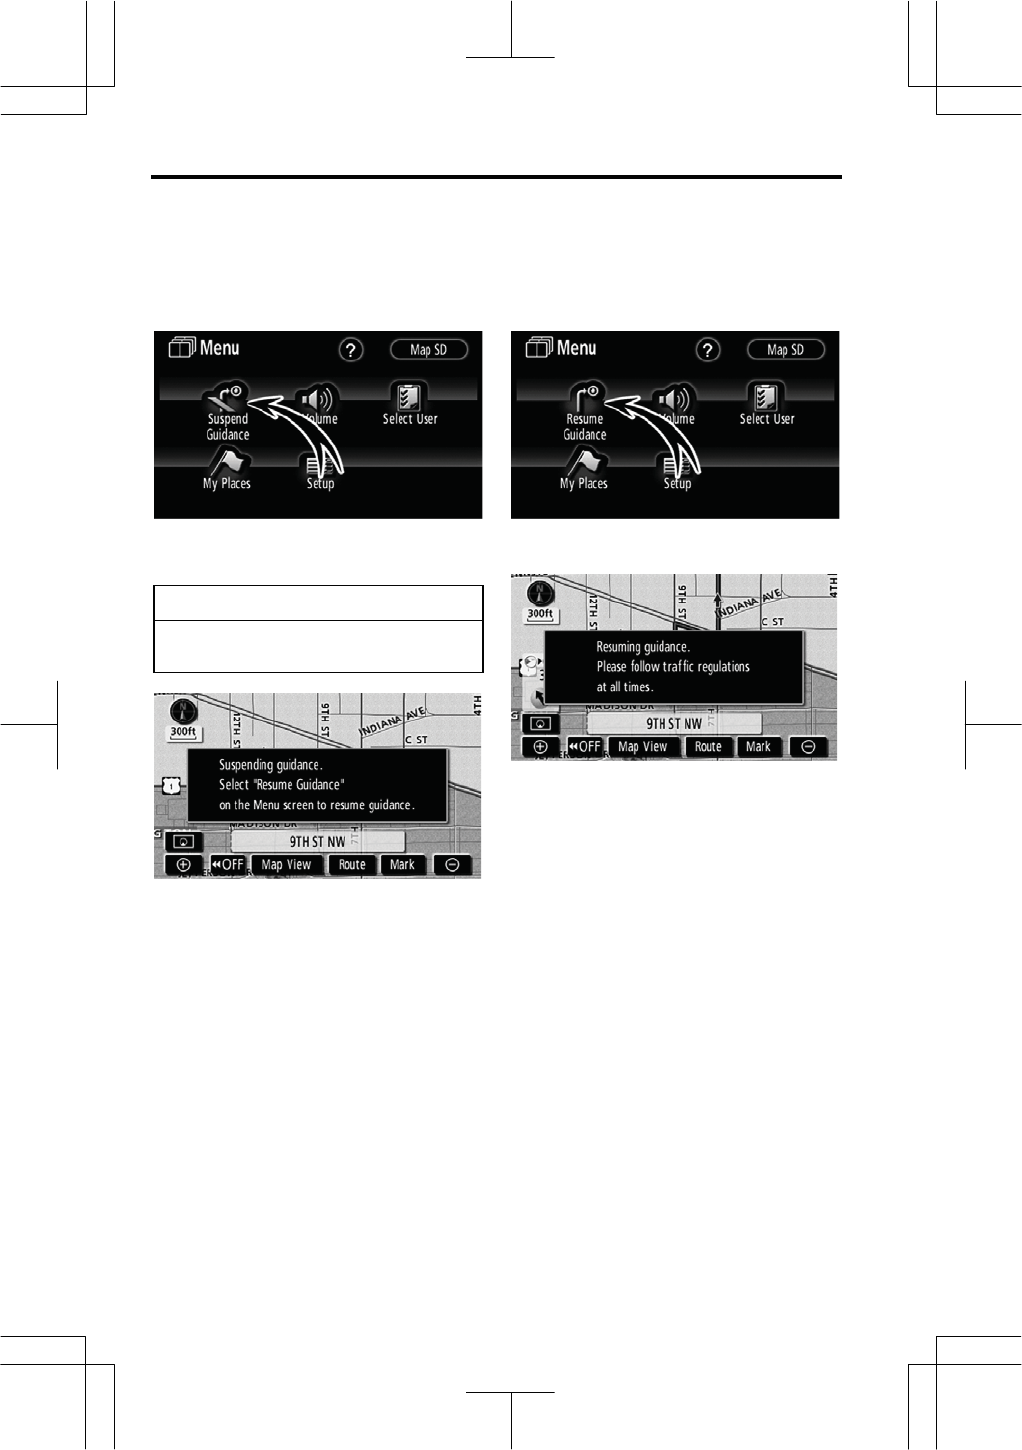
z To suspend guidance
1. Push the “NAVI” button.
2. Touch “Suspend Guidance”.
INFORMATION
Without route guidance, the “Sus-
pend Guidance” cannot be used.
The screen will return to the current posi-
tion map without route guidance.
z To resume guidance
1. Push the “NAVI” button.
2. Touch “Resume Guidance”.
The screen will change to the current
position map with route guidance.
Suspending and resuming
g
uidance
ADVANCED FUNCTIONS
87
V573_E
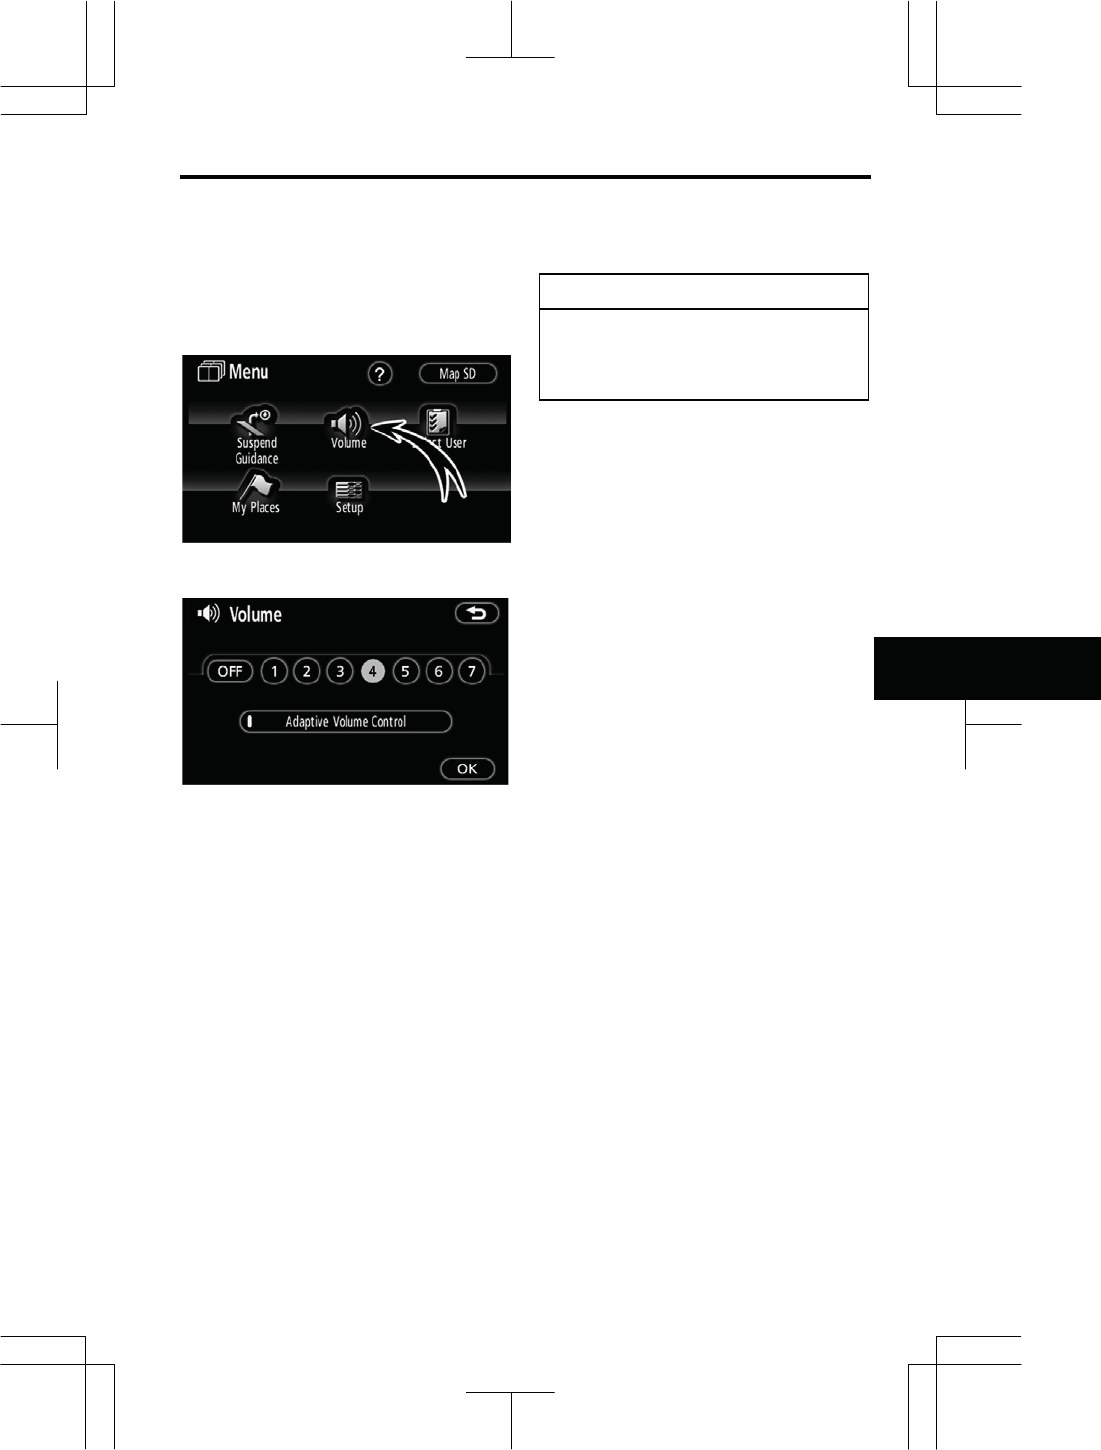
The voice guidance volume can be ad-
justed or switched off.
1. Push the “NAVI” button.
2. Touch “Volume”.
To adjust the volume, select the desired
level by touching the appropriate num-
ber.
If voice guidance is not needed, touch
“OFF” to disable the feature.
When selected the number or “OFF” will
be highlighted.
3. Touch “OK” to confirm your se-
lection.
INFORMATION
During route guidance, the voice
guidance continues even if the
navigation screen is changed to
other screens.
“Adaptive Volume Control”: By turning
“Adaptive Volume Control” on, the vol-
ume is turned up automatically when the
vehicle speed exceeds 50 mph (80
km/h).
To turn the “Adaptive Volume Control”
system on, touch the button. The indi-
cator will be highlighted.
Volume
ADVANCED FUNCTIONS
88
V573_E
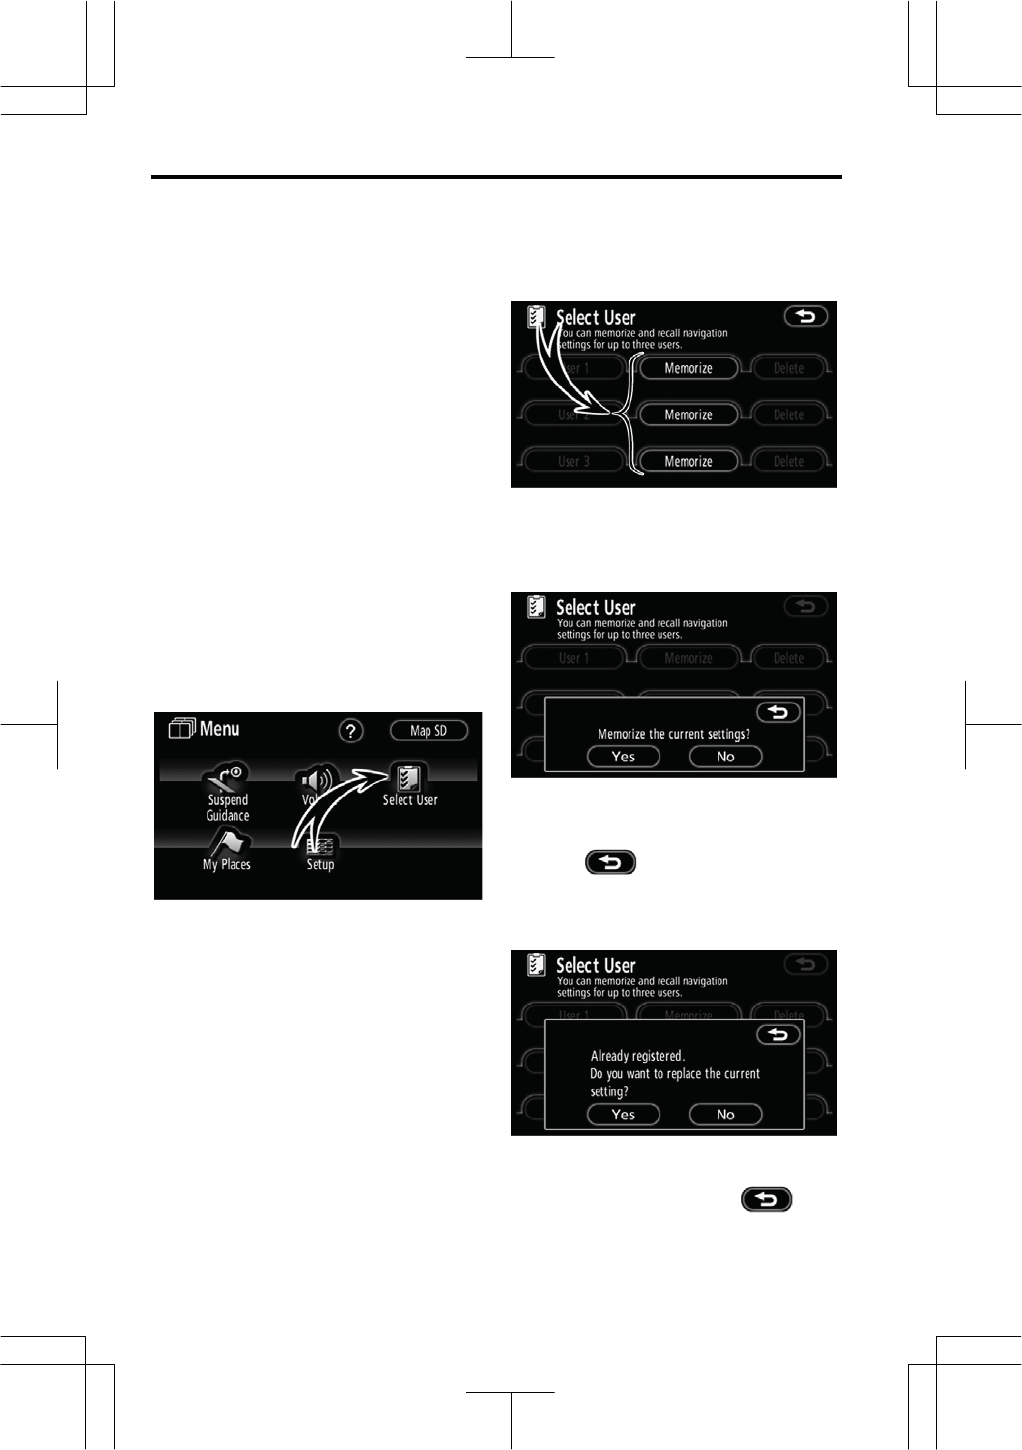
The system can memorize the following
settings for up to three users.
z Map direction
z Map scale
z Map configuration
z Guidance mode
z Setup
z Volume
z Language
z Route trace
z Travel time/arrival time
z Right screen of dual map
z Route preference
z Maintenance notification
z XM® NavTraffic
1. Push the “NAVI” button.
2. Touch “Select User”.
z To register
1. Touch “Memorize”.
The confirmation screen will be dis-
played.
2. To register, touch “Yes”. To re-
turn to the previous screen, touch
“No” or .
When a touch screen button that is al-
ready registered is touched, the following
screen appears.
To replace, touch “Yes”. To cancel the
replacement, touch “No” or .
User selection
ADVANCED FUNCTIONS
89
V573_E
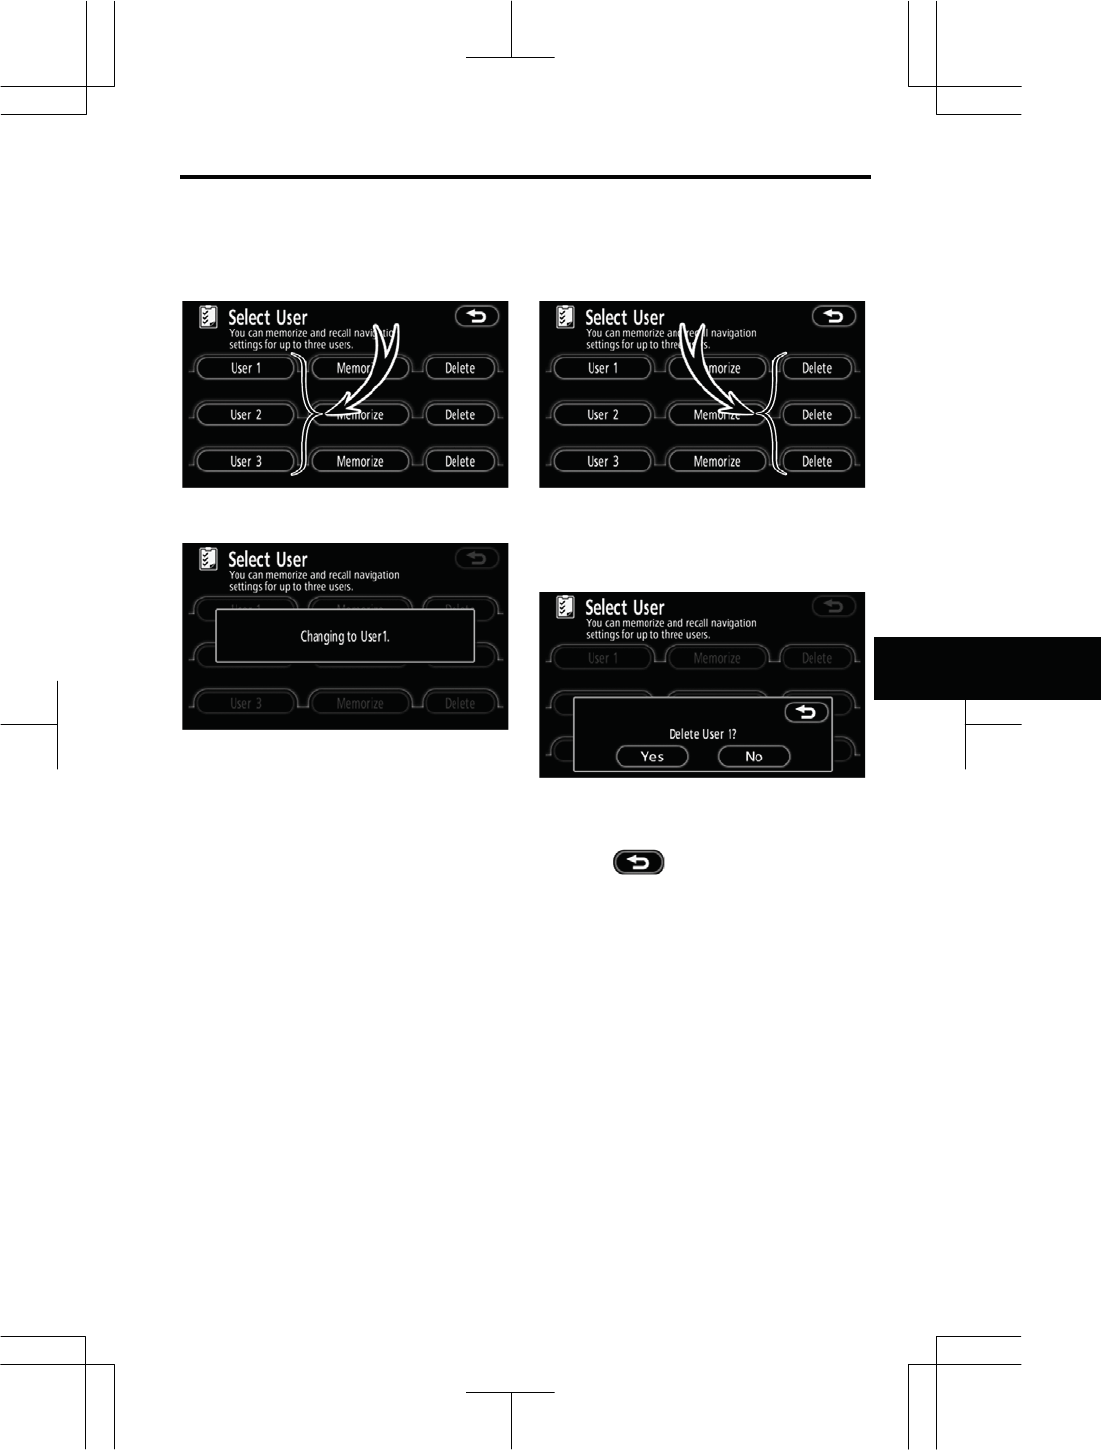
z To change user
Touch “User number”.
The above message appears, then the
map screen will be displayed.
z To delete user
1. Touch “Delete”.
The confirmation screen will be dis-
played.
2. To delete, touch “Yes”. To re-
turn to the previous screen, touch
“No” or .
ADVANCED FUNCTIONS
90
V573_E
The XM® NavTraffic service that allows
the navigation system to display traffic
information on the map is available if
your satellite radio tuner can receive
traffic information.
To receive the XM® NavTraffic service, a
subscription to the XM® Satellite Radio
with NavTraffic is necessary.
The XM® NavTraffic is available in the
contiguous 48 U.S. states and some
Canadian cities. For details about the
XM® NavTraffic service coverage area,
refer to www.xmradio.com (U.S.A.) or
www.xmradio.ca (CANADA).
zHow to activate the XM® NavTraffic
service
To receive the XM® NavTraffic ser-
vice, it is necessary to activate the
service. To activate the service, an
extra fee is required in addition to
subscription fees for the XM® Satel-
lite Radio. For details about service
and activation, call XM® Listener
Care Center at 1-800-967-2346
(U.S.A.) or 1-877-438-9677
(CANADA).
Customers should have their radio ID
ready; the radio ID can be found by se-
lecting “channel 000” on the radio. For
details, see “z Displaying the radio ID”
on page 155.
XM® Satellite Radio has the responsibil-
ity for all fees and service, they are sub-
ject to change.
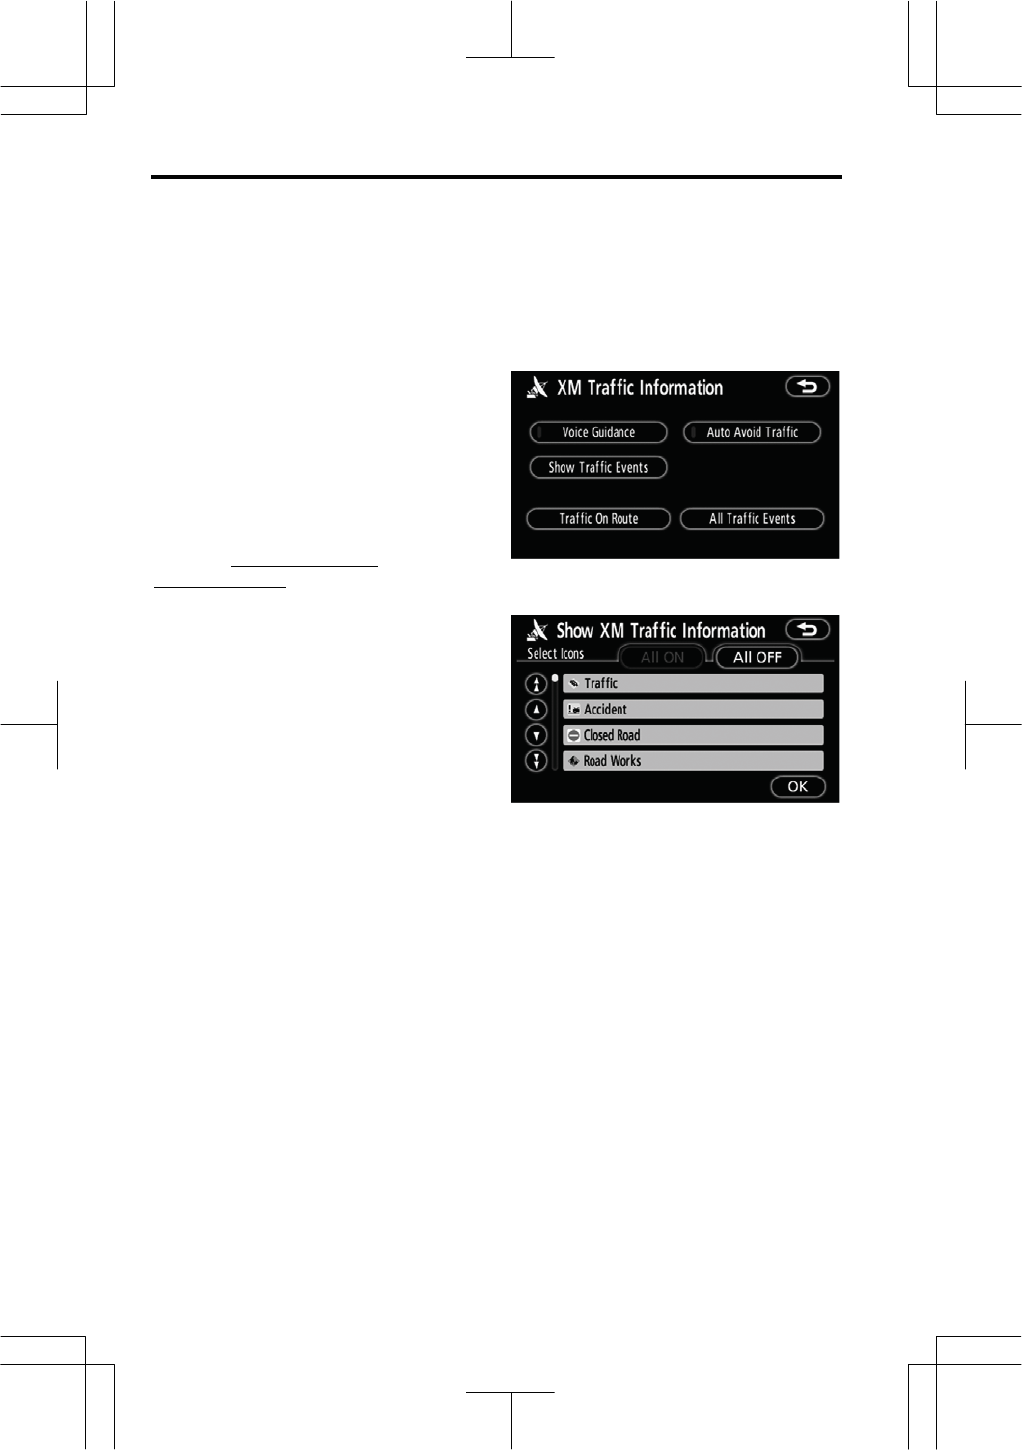
(a) Show XM® NavTraffic information
1. Push the “NAVI” button to display
the “Menu” screen and touch the “XM
Traffic”.
2. Touch “Show Traffic Events”.
3. Select the desired item by touch-
ing the touch screen button (while the
vehicle is not moving).
To select all the icons or reset, touch “All
ON” or “All OFF” and then touch “OK”.
XM® Na
v
Traffic
ADVANCED FUNCTIONS
91
V573_E
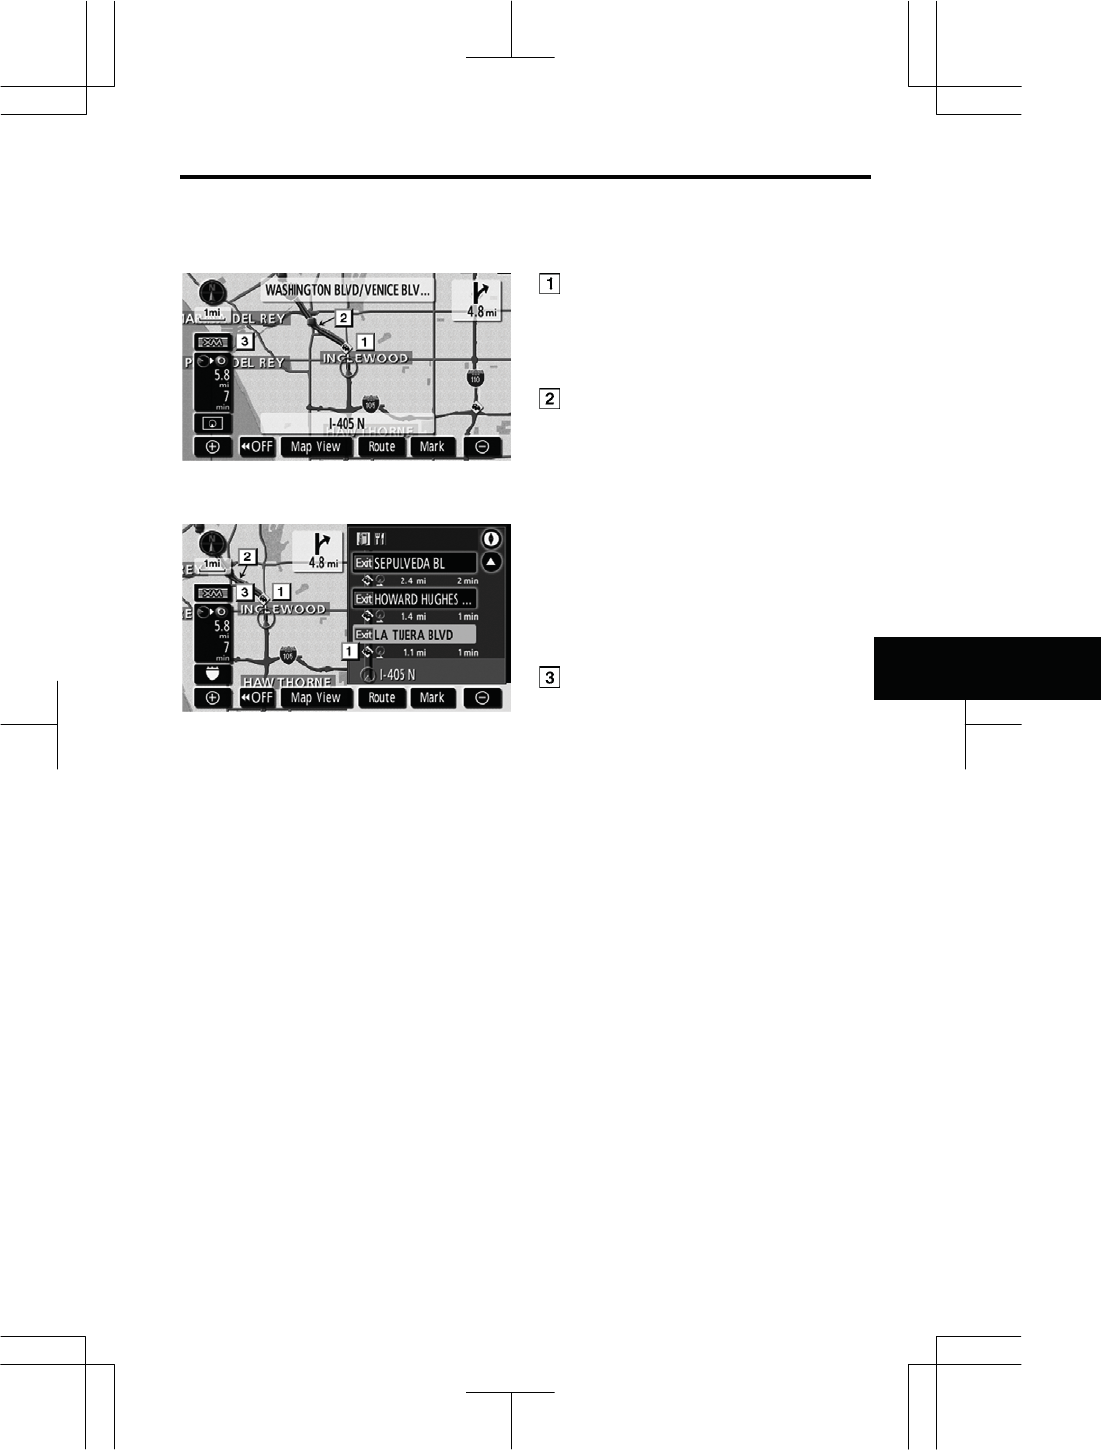
Ź On map screen
Ź On Freeway information screen
XM® NavTraffic icon
When any traffic information has been
received, the XM® NavTraffic icon will
appear on the map screen.
XM® NavTraffic flow information
A color coded bar appears on the map to
represent traffic flow when XM® NavTraf-
fic information is available. The color of
the bar changes according to traffic con-
ditions.
“Red”: Heavy congestion
“Yellow”: Moderate traffic
“Green”: Freely flowing traffic
“Orange”: Controlled traffic
“Black”: Closed road
XM® NavTraffic indicator
When any XM® NavTraffic information
has been received, the XM® NavTraffic
indicator will appear on the screen. The
color of the indicator changes depending
on the traffic information received.
“White”: Traffic information has been
received.
“Blue”: Other traffic information on the
guidance route has been received (touch
switch*).
“Yellow”: Traffic restriction information
on the guidance route has been received
(touch switch*).
“Red”: Congestion information on the
guidance route has been received (touch
switch*).
*: Touching the XM® NavTraffic indicator
will start voice guidance.
ADVANCED FUNCTIONS
92
V573_E
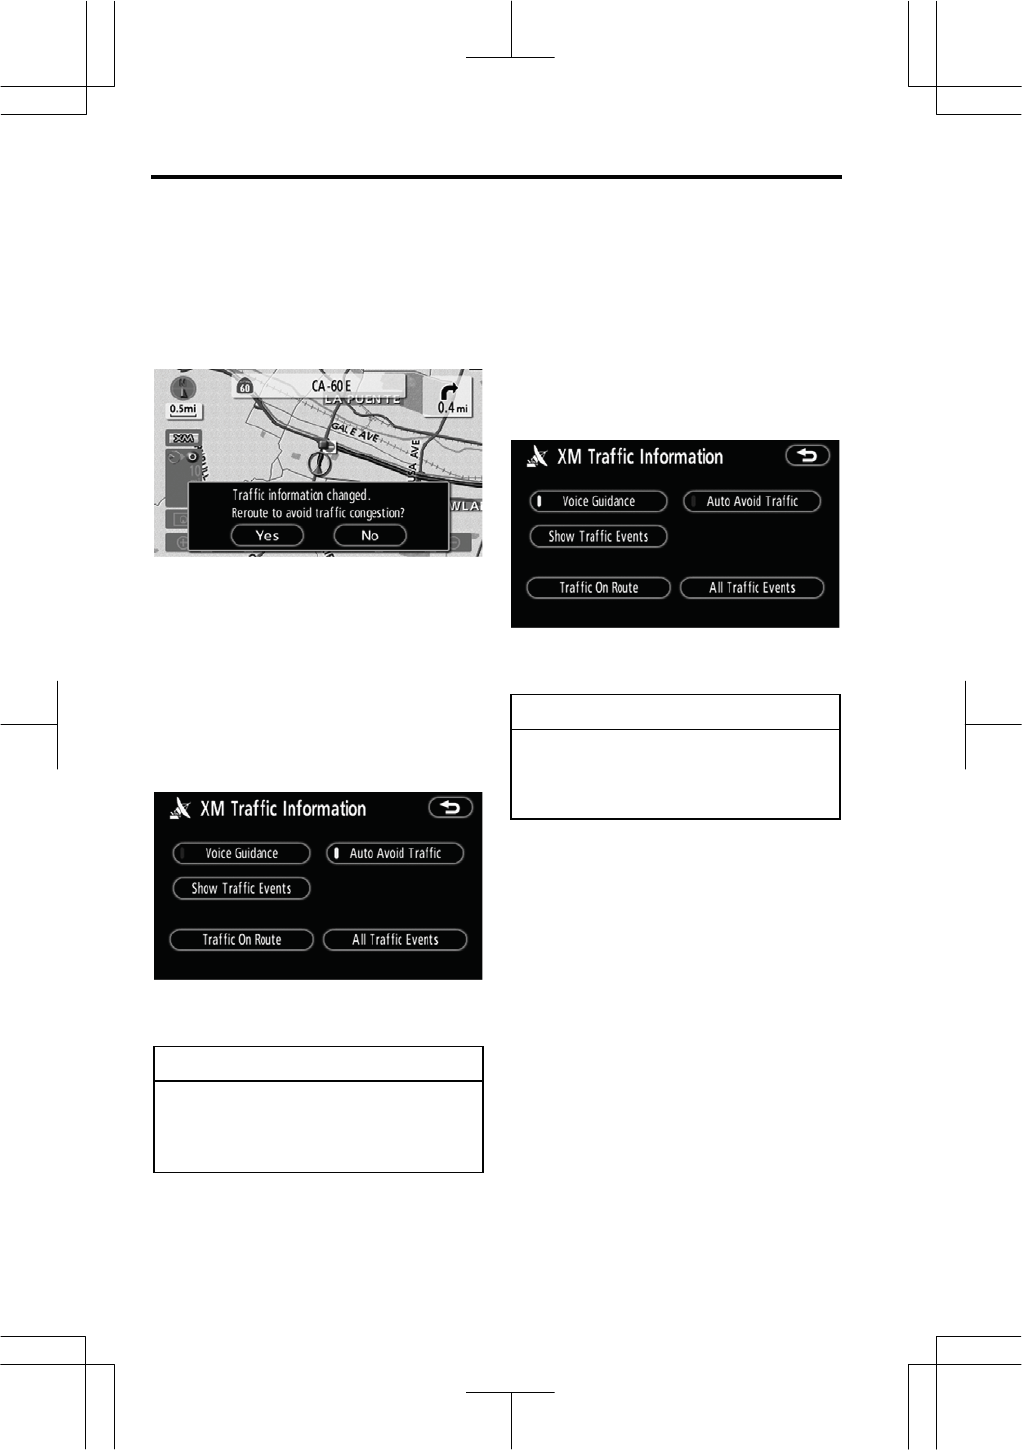
(b) Auto avoid traffic
Using XM® NavTraffic information, the
system automatically calculates a new
route.
When the system calculates a new route,
a confirmation to accept the new route is
displayed on the screen.
If you touch “Yes”, the system changes
the guidance route to the new route.
Touch “No” to keep the current route.
1. Push the “NAVI” button to display
the “Menu” screen and touch “XM
Traffic”.
2. Touch “Auto Avoid Traffic”.
INFORMATION
When the “Traffic Information” indi-
cator is dimmed, “Auto Avoid Traf-
fic” and “Voice Guidance” will not
operate.
(c) Traffic voice guidance
When there are some traffic events on
the guidance route, the system will notify
you via voice.
1. Push the “NAVI” button to display
the “Menu” screen and touch “XM
Traffic”.
2. Touch “Voice Guidance”.
INFORMATION
When the “Traffic Information” indi-
cator is dimmed, “Auto Avoid Traf-
fic” and “Voice Guidance” will not
operate.
ADVANCED FUNCTIONS
93
V573_E
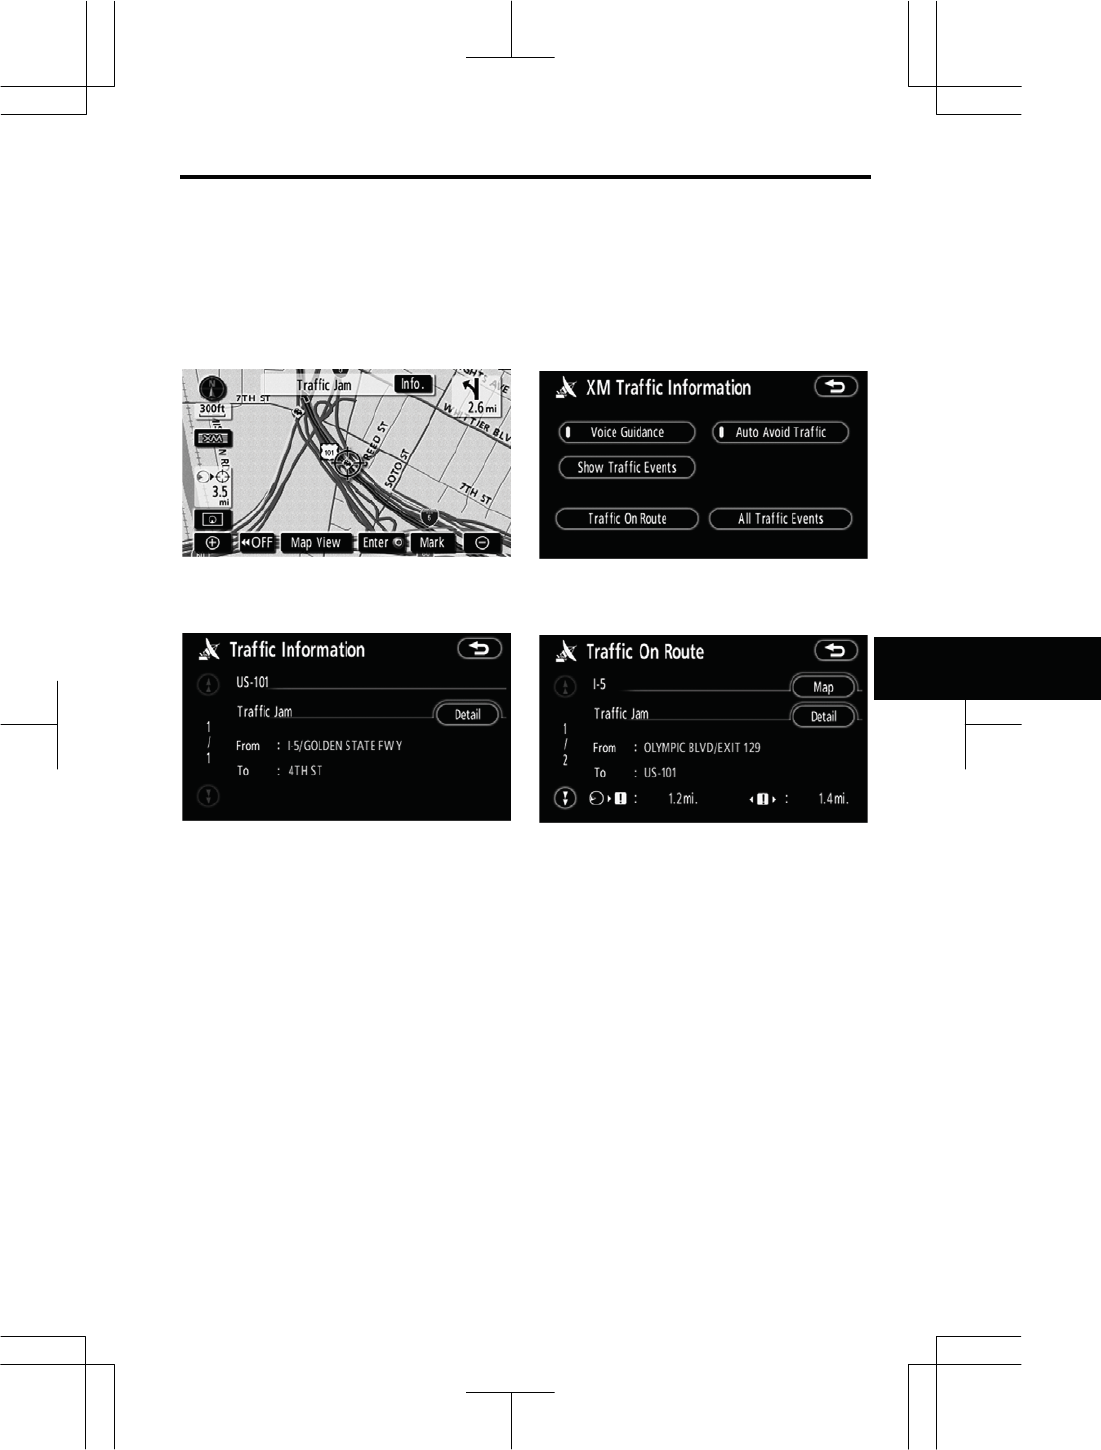
(d) XM® NavTraffic text information
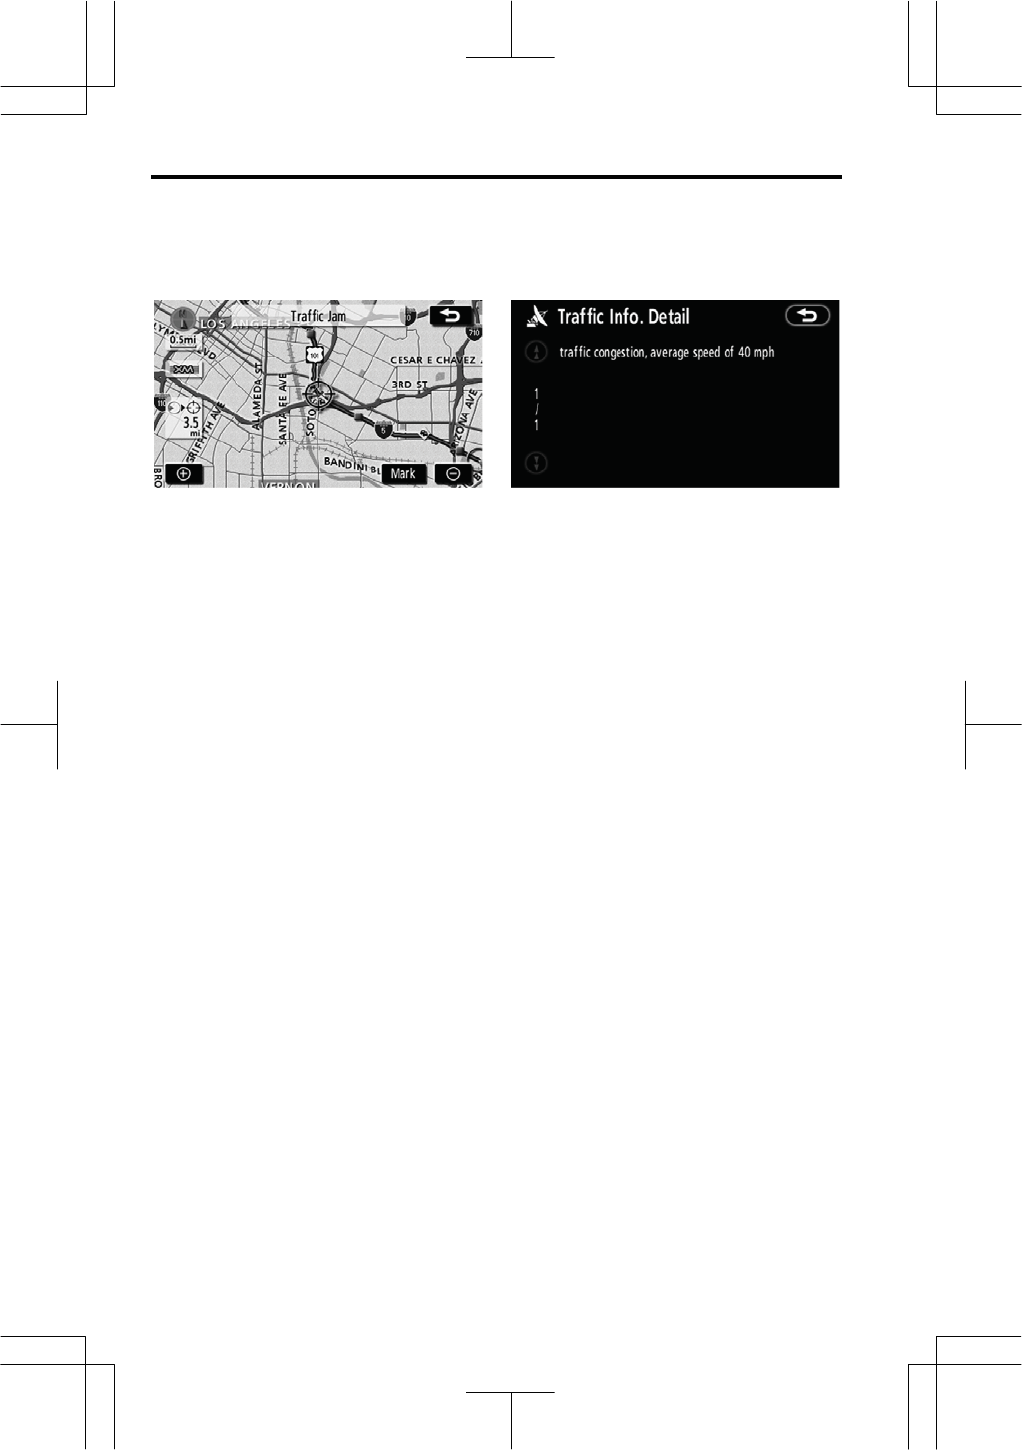
When you touch the XM® NavTraffic icon
on the map, the “Traffic info.” bar ap-
pears on the top of the screen.
1. Touch “Info.” on the bar to dis-
play the“Traffic information” screen.
2. Touch “Detail” to display detailed
traffic event information.
This “Detail” function is not available
while driving.
(e) Traffic on route
1. Push the “NAVI” button to display
the “Menu” screen and touch “XM
Traffic”.
2. Touch “Traffic On Route” to dis-
play the “Traffic On Route” screen.
Guidance route traffic information is dis-
played on the screen.
To show the map or detailed information,
touch “Map” or “Detail”.
This “Detail” function is not available
while driving.
ADVANCED FUNCTIONS
94
V573_E
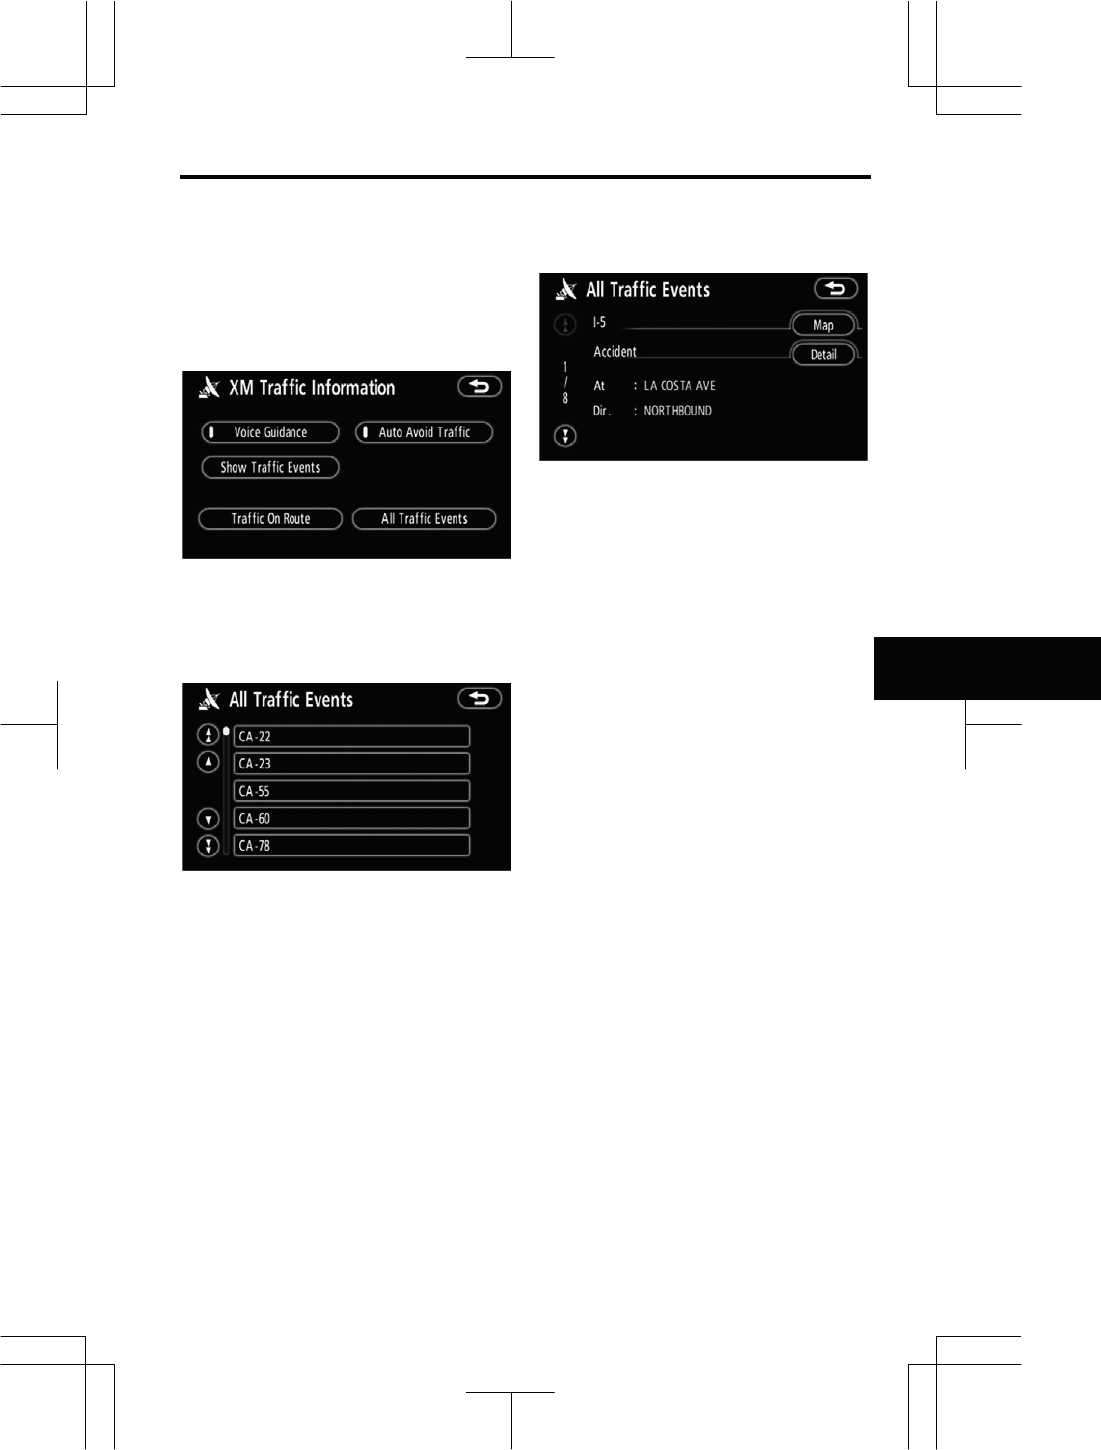
MAP
The map around the traffic event is
displayed. The type of traffic event is
displayed at the top of the screen.
DETAILED INFORMATION
Detailed traffic event information is
displayed.
This “Detail” function is not available
while driving.
ADVANCED FUNCTIONS
95
V573_E
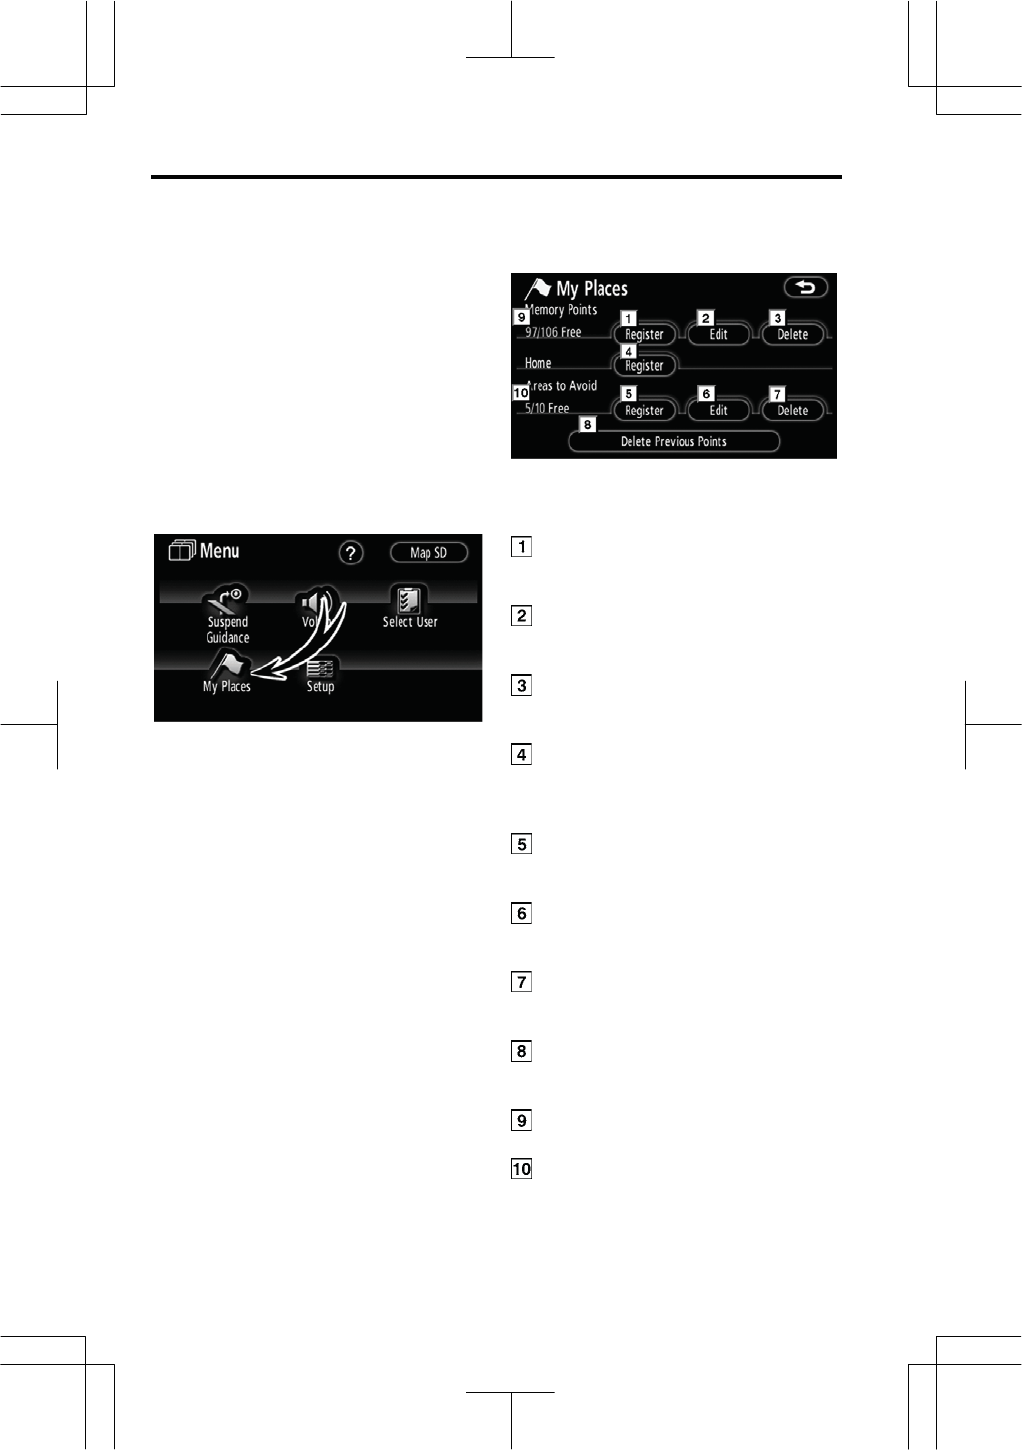
(f) All traffic events
1. Push the “NAVI” button to display
the “Menu” screen and touch “XM
Traffic”.
2. Touch “All Traffic Events” to dis-
play the “All Traffic Events” screen.
This “All Traffic Events” function is not
available while driving.
3. Touch the desired road name
from the list.
4. All XM® NavTraffic information is
displayed, regardless of the guidance
route.
5. Touch “Map” or “Detail”. (See “(e)
Traffic on route” on page XX.)
This “Detail” function is not available
while driving.
ADVANCED FUNCTIONS
96
V573_E
Points or areas on the map can be reg-
istered.
The registered points can be used on the
“Destination” screen. (See “ — Desti-
nation search by Home” on page 45 or
“ — Destination search by Quick access”
on page 45 and “ — Destination search
by Memory” on page 56.)
Registered areas are avoided at the time
of route search.
1. Push the “NAVI” button.
2. Touch “My Places”.
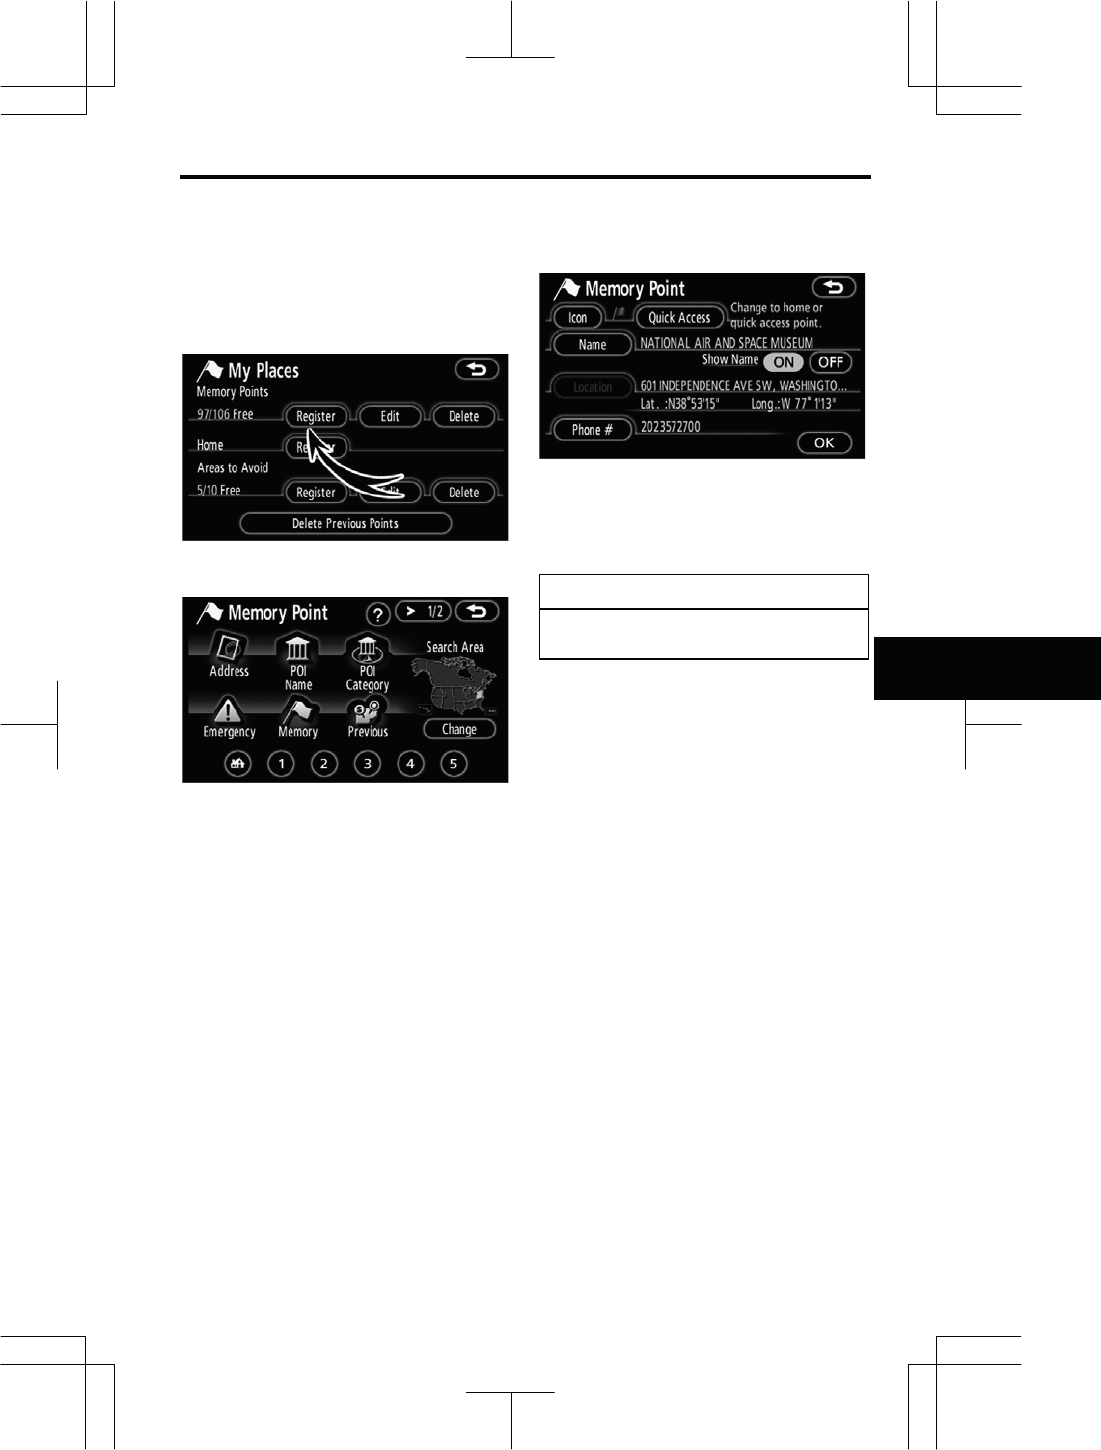
On this screen, the following operations
can be performed.
Registers memory points
(See “ — Registering memory
points” on page 91.)
Edits memory points
(See “ — Editing memory points” on
page 92.)
Deletes memory points
(See “ — Deleting memory points”
on page 96.)
Registers or deletes home
(See “ — Registering home” on
page 97 or “ — Deleting home” on
page 98.)
Registers areas to avoid
(See “ — Registering area to avoid”
on page 98.)
Edits areas to avoid
(See “ — Editing area to avoid” on
page 99.)
Deletes areas to avoid
(See “ — Deleting area to avoid” on
page 102.)
Deletes previous points
(See “ — Deleting previous points”
on page 102.)
Number of remaining memory
points
Number of remaining areas to
avoid
M
y
Places —
ADVANCED FUNCTIONS
97
V573_E
1. Push the “NAVI” button.
2. Touch “My Places” on the “Menu”
screen.
3. Touch “Register”.
4. Enter the location in the same
way as for a destination search. (See
“Destination search” on page 42.)
After memory point registration is com-
pleted, the “Memory Point” screen will be
displayed.
5. Touch “OK”.
To edit registered information, see “ —
Editing memory points” on page 92.
INFORMATION
Up to 106 memory points can be
registered.
— Registering memory
p
oints
ADVANCED FUNCTIONS
98
V573_E
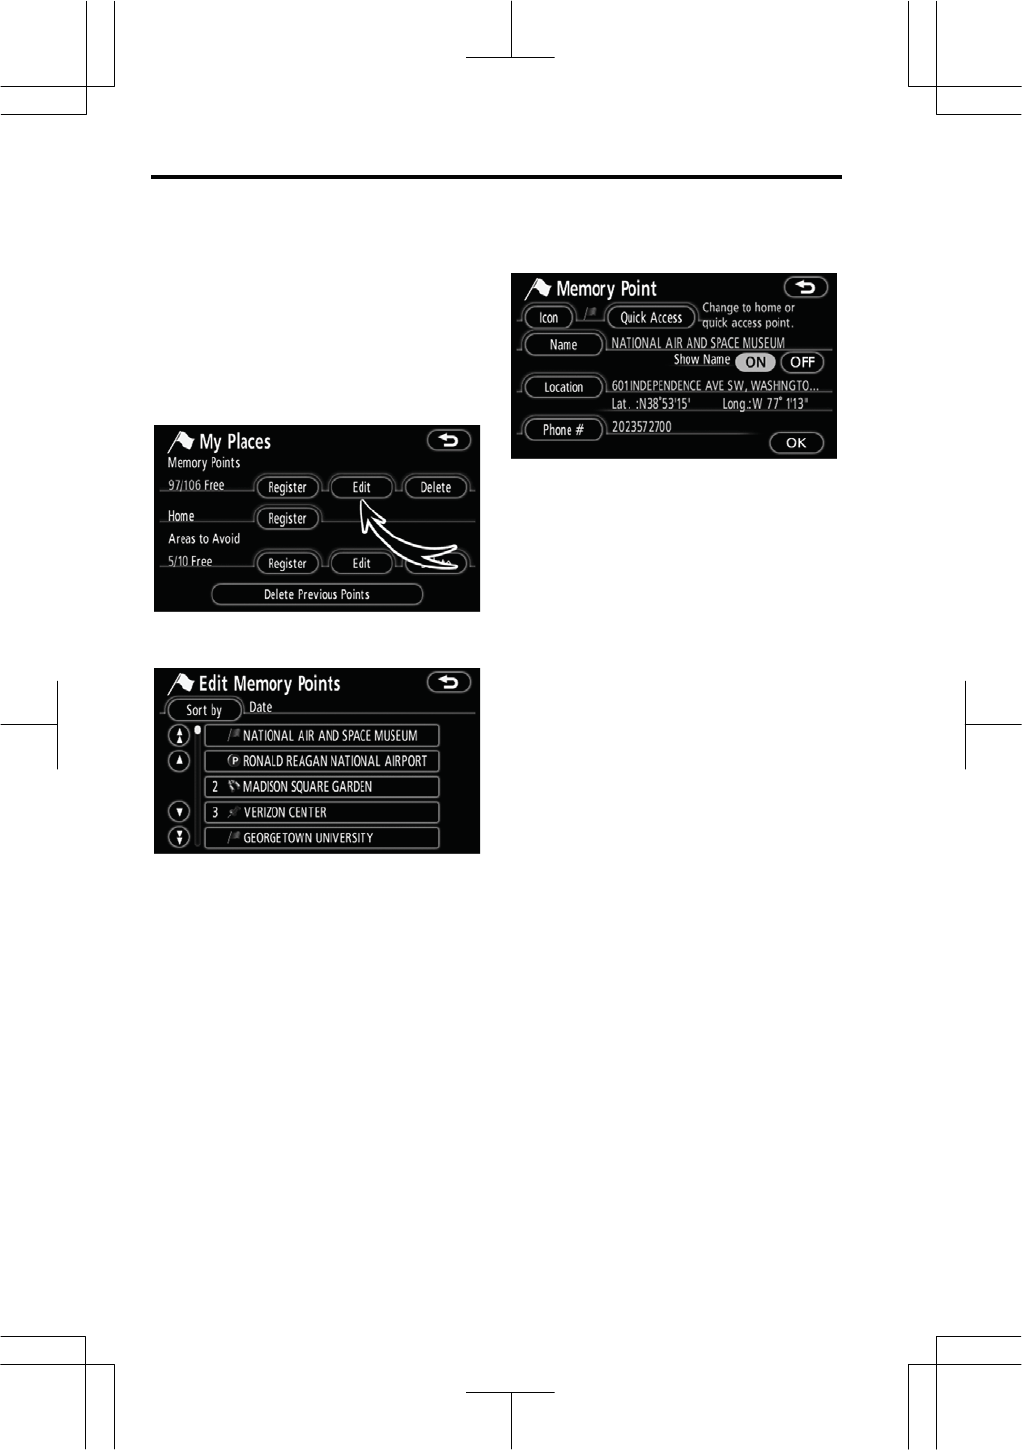
The icon, attribute, name, location and/or
telephone number of a registered mem-
ory point can be edited.
1. Push the “NAVI” button.
2. Touch “My Places” on the “Menu”
screen.
3. Touch “Edit”.
4. Touch the desired memory point
button.
5. Touch the touch screen button to
be edited.
“Icon”: To select icons to be displayed
on the map. (See page 93.)
“Quick Access”: To set an attribute.
Memory points with a set attribute can be
used as a “Quick Access” or “Home”
touch screen button. (See page 94.)
“Name”: To edit memory point names.
The names can be displayed on the map.
(See page 95.)
“Location”: To edit location information.
(See page 95.)
“Phone #”: To edit telephone numbers.
(See page 96.)
6. Touch “OK”.
— Editin
g
memor
yp
oints
ADVANCED FUNCTIONS
99
V573_E
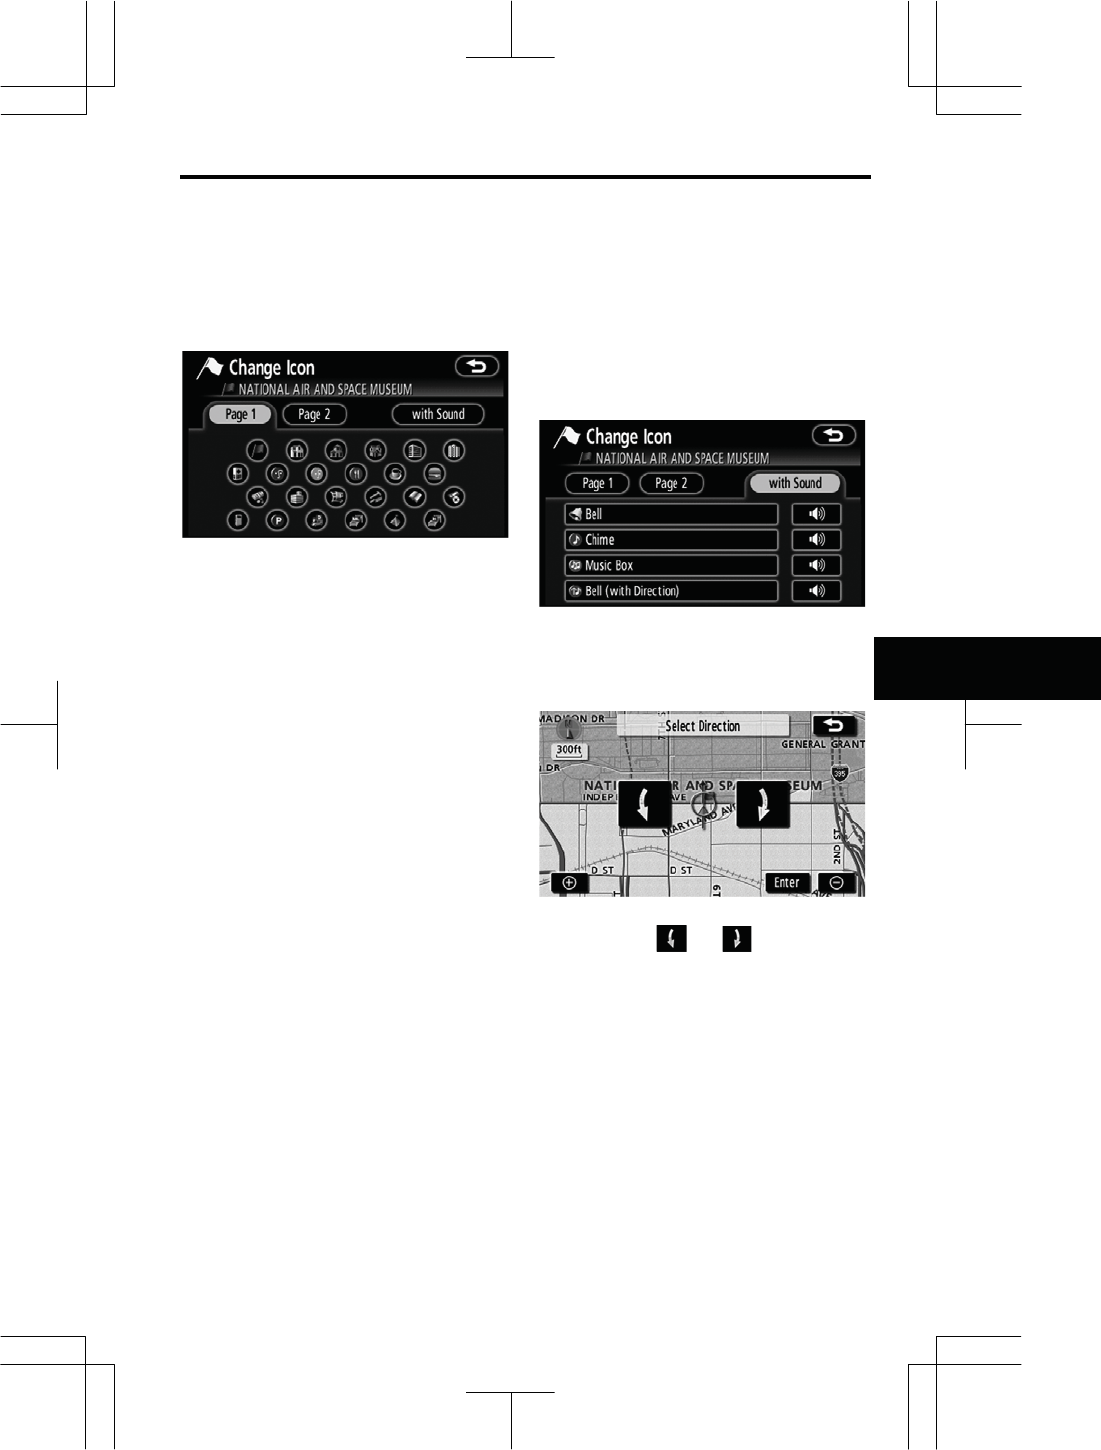
z To change “Icon”
1. Touch “Icon” on the “Memory
Point” screen.
2. Touch the desired icon.
Turn the page by touching “Page 1”,
“Page 2” or “with Sound”.
SOUND ICONS
When the vehicle approaches the mem-
ory point, the selected sound will be
heard.
1. Touch “with Sound” on the
“Change Icon” screen.
2. Touch the desired sound icon.
The next screen appears when “Bell
(with Direction)” is touched.
Touch either or to adjust the
direction. Touch “Enter”.
The bell sounds only when the vehicle
approaches this point in the direction that
has been set.
ADVANCED FUNCTIONS
100
V573_E
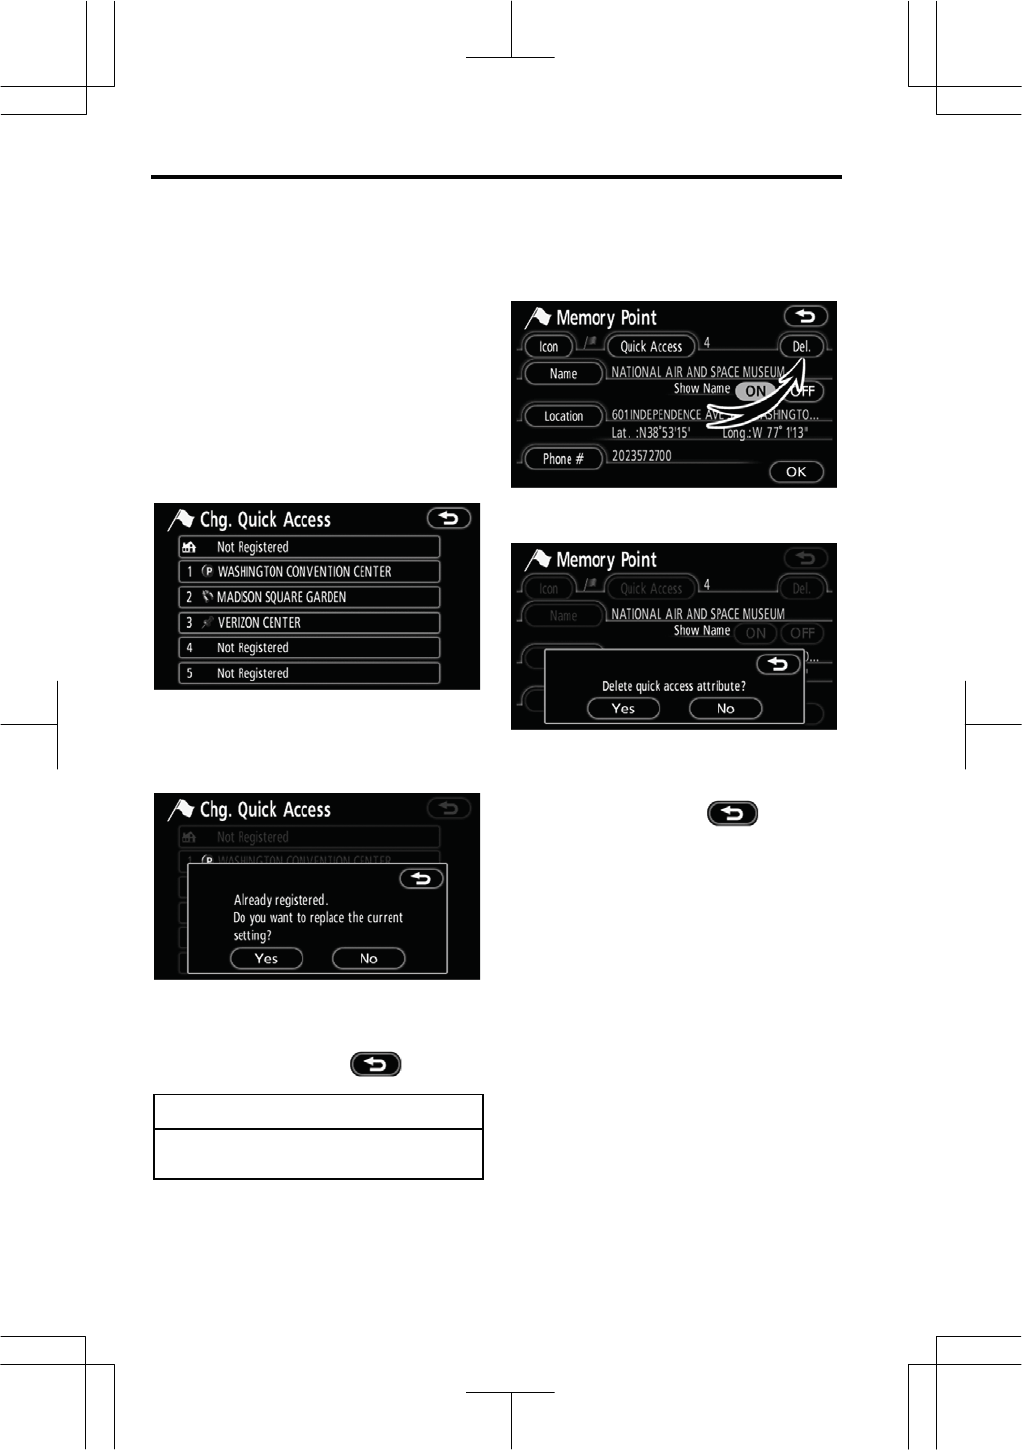
z To change “Quick Access”
It is possible to change attributes of the
quick access points. Memory points
with a set attribute can be used as a
“Quick Access” or “Home” touch screen
button. (See “ — Destination search by
Home” on page 45 and “ — Destination
search by Quick access” on page 45.)
1. Touch “Quick Access” on the
“Memory Point” screen.
2. Touch the desired attribute.
It is possible to replace a registered at-
tribute.
3. To replace the attribute, touch
“Yes”. To return to the previous
screen, touch “No” or .
INFORMATION
One “Home” and five “Quick Ac-
cess” can be set.
DELETING “Quick Access”
1. Touch “Del.”.
2. To delete an attribute, touch
“Yes”. To return to the previous
screen, touch “No” or .
ADVANCED FUNCTIONS
101
V573_E
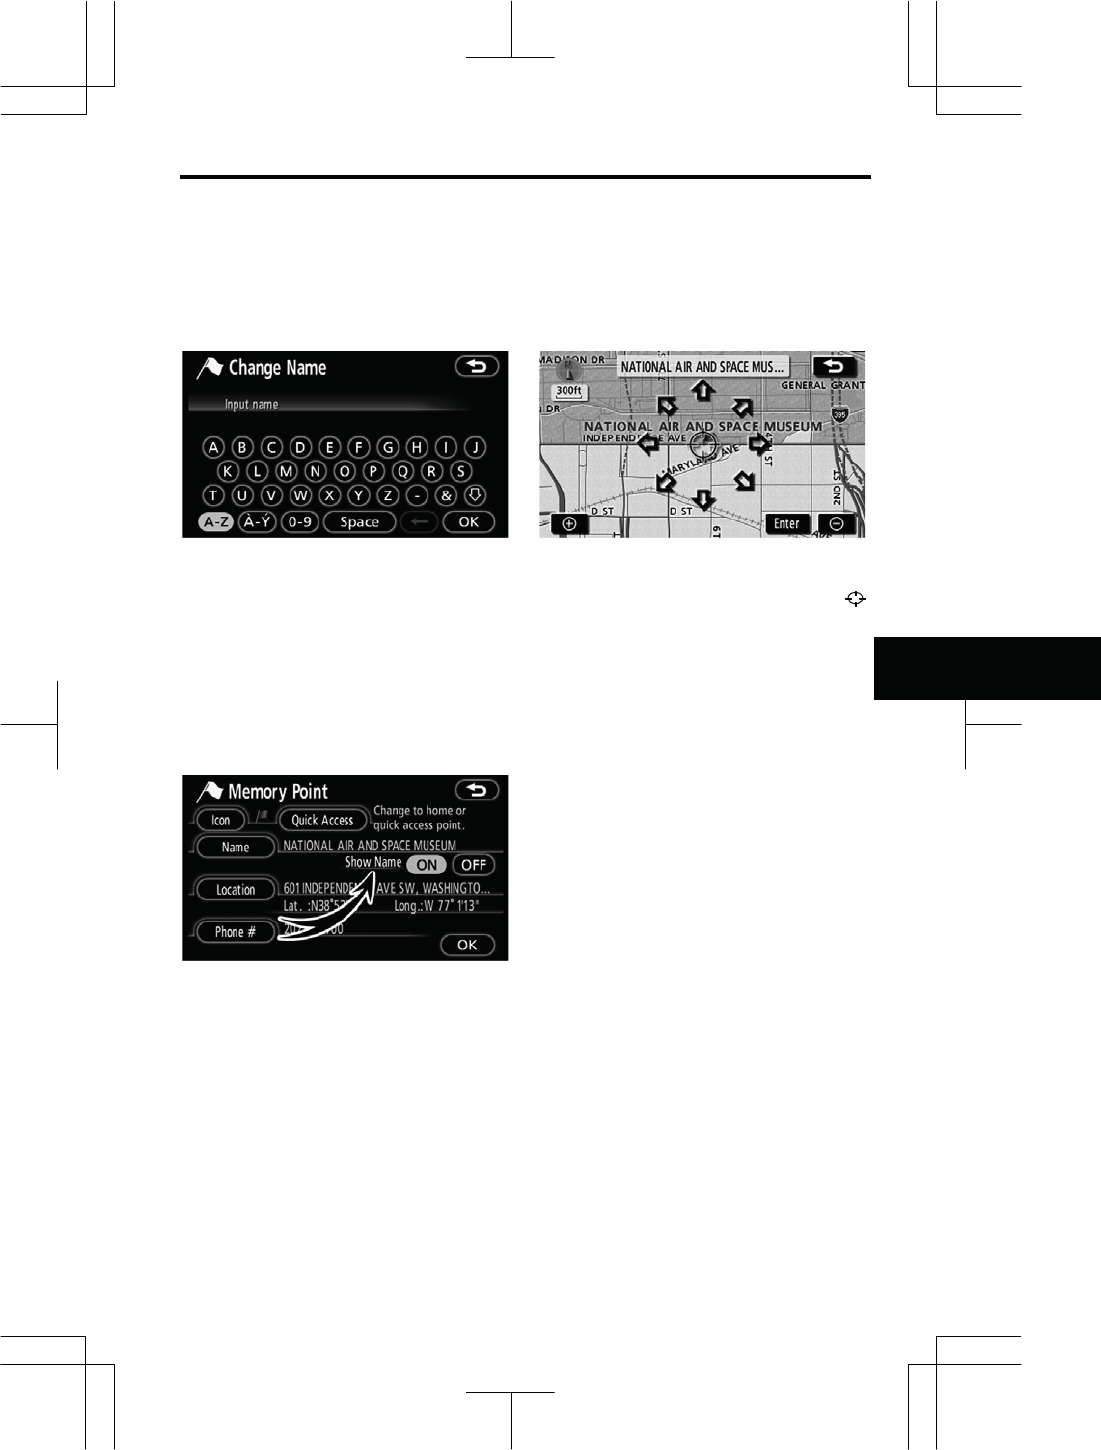
z To change “Name”
1. Touch “Name” on the “Memory
Point” screen.
2. Enter the name using the alpha-
numeric keys.
Up to 24 letters can be entered.
3. Touch “OK”.
The previous screen will be displayed.
DISPLAYING MEMORY POINT NAMES
The name of a memory point that may
be displayed on the map can be set.
To show the name, touch “ON” on the
“Memory Point” screen. To not
show it, touch “OFF”.
z To change “Location”
1. Touch “Location” on the “Memory
Point” screen.
2. Touch the eight directional touch
screen button to move the cursor
to the desired point on the map.
3. Touch “Enter”.
The previous screen will be displayed.
ADVANCED FUNCTIONS
102
V573_E
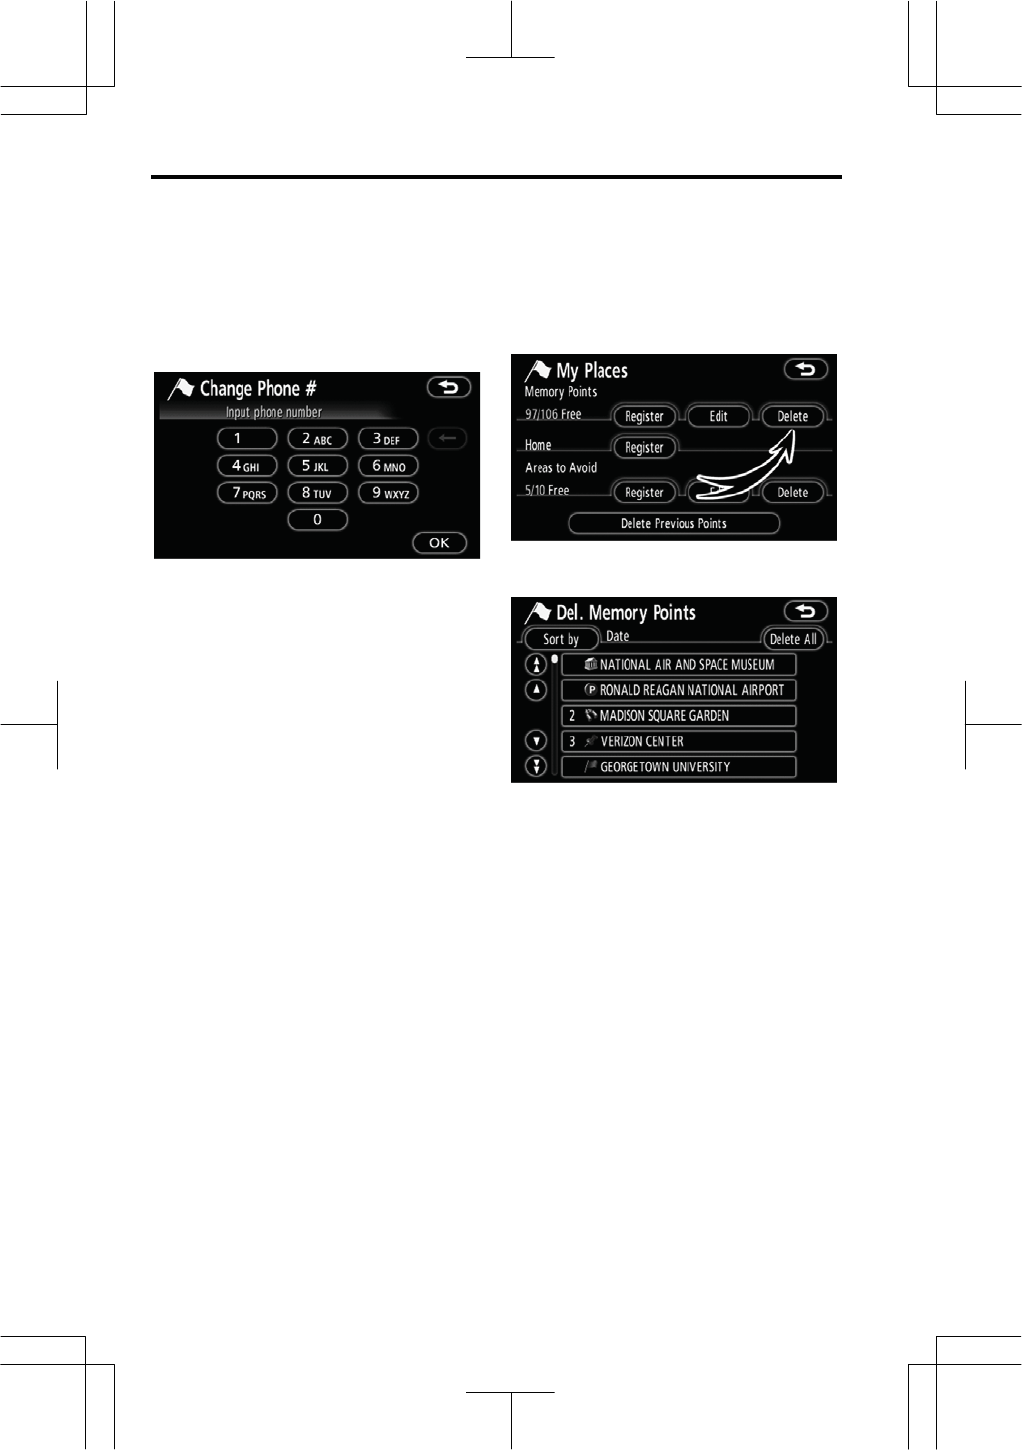
z To change “Phone #” (telephone
number)
1. Touch “Phone #” on the “Memory
Point” screen.
2. Enter the number using numeral
keys.
3. Touch “OK”.
The previous screen will be displayed.
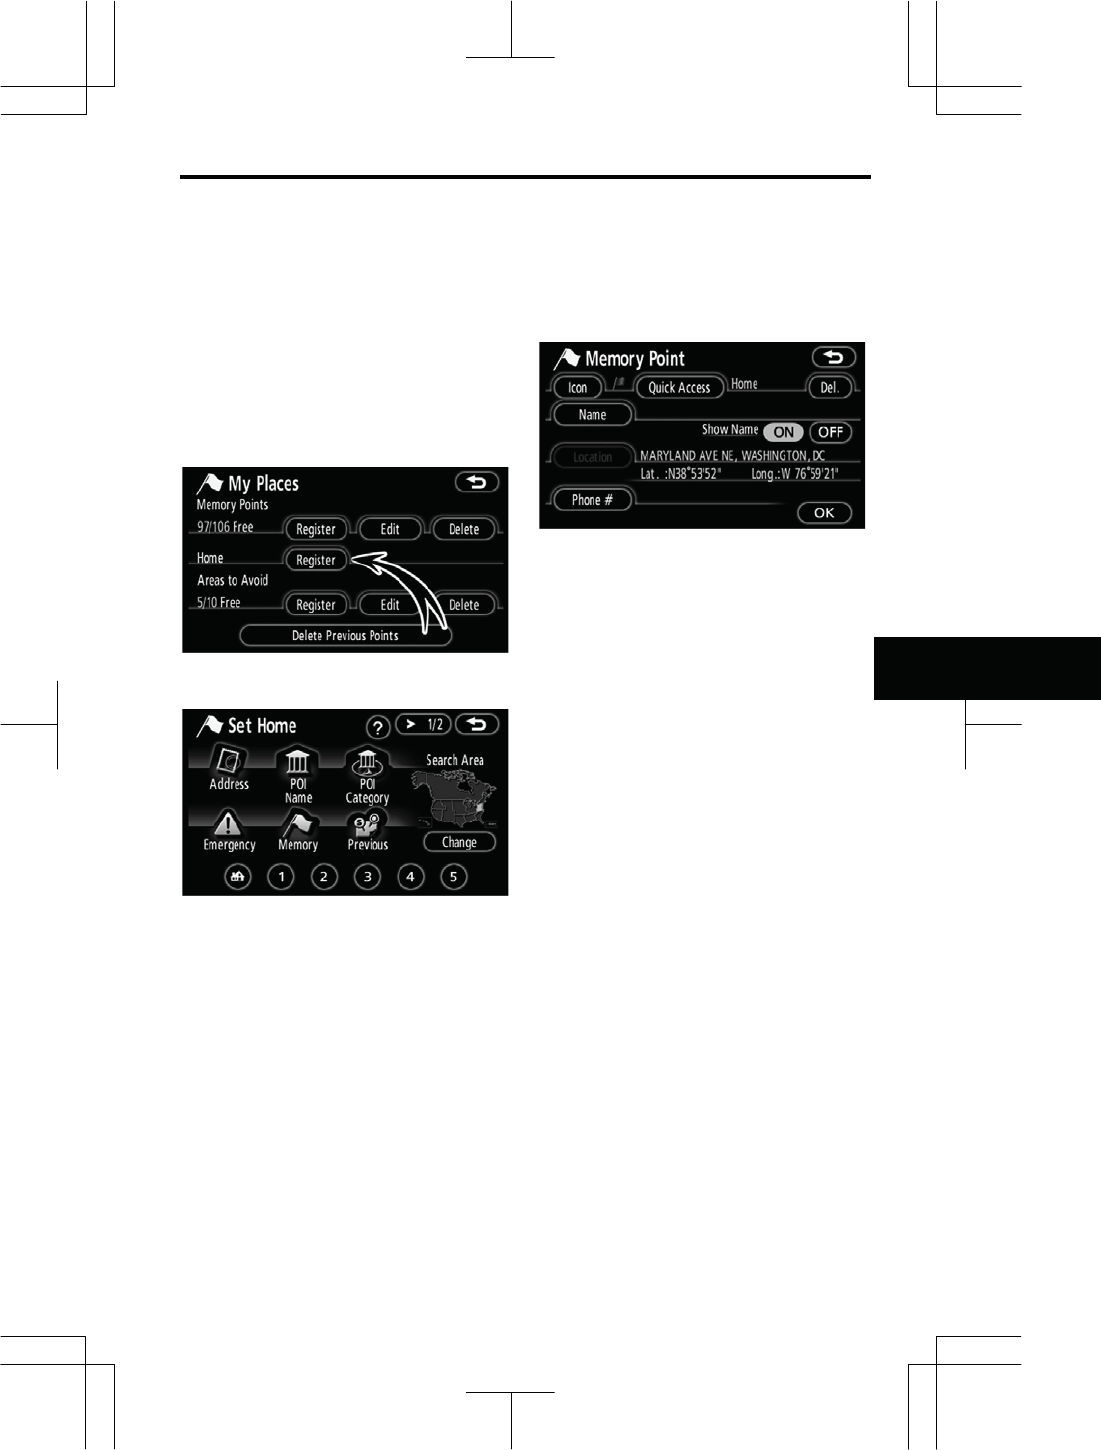
1. Push the “NAVI” button.
2. Touch “My Places” on the “Menu”
screen.
3. Touch “Delete”.
4. Touch the touch screen button to
be deleted.
“Delete All”: To delete all memory
points in the system.
5. To delete the memory point, touch
“Yes”. To cancel the deletion, touch
“No”.
— Deletin
g
memor
yp
oints
ADVANCED FUNCTIONS
103
V573_E
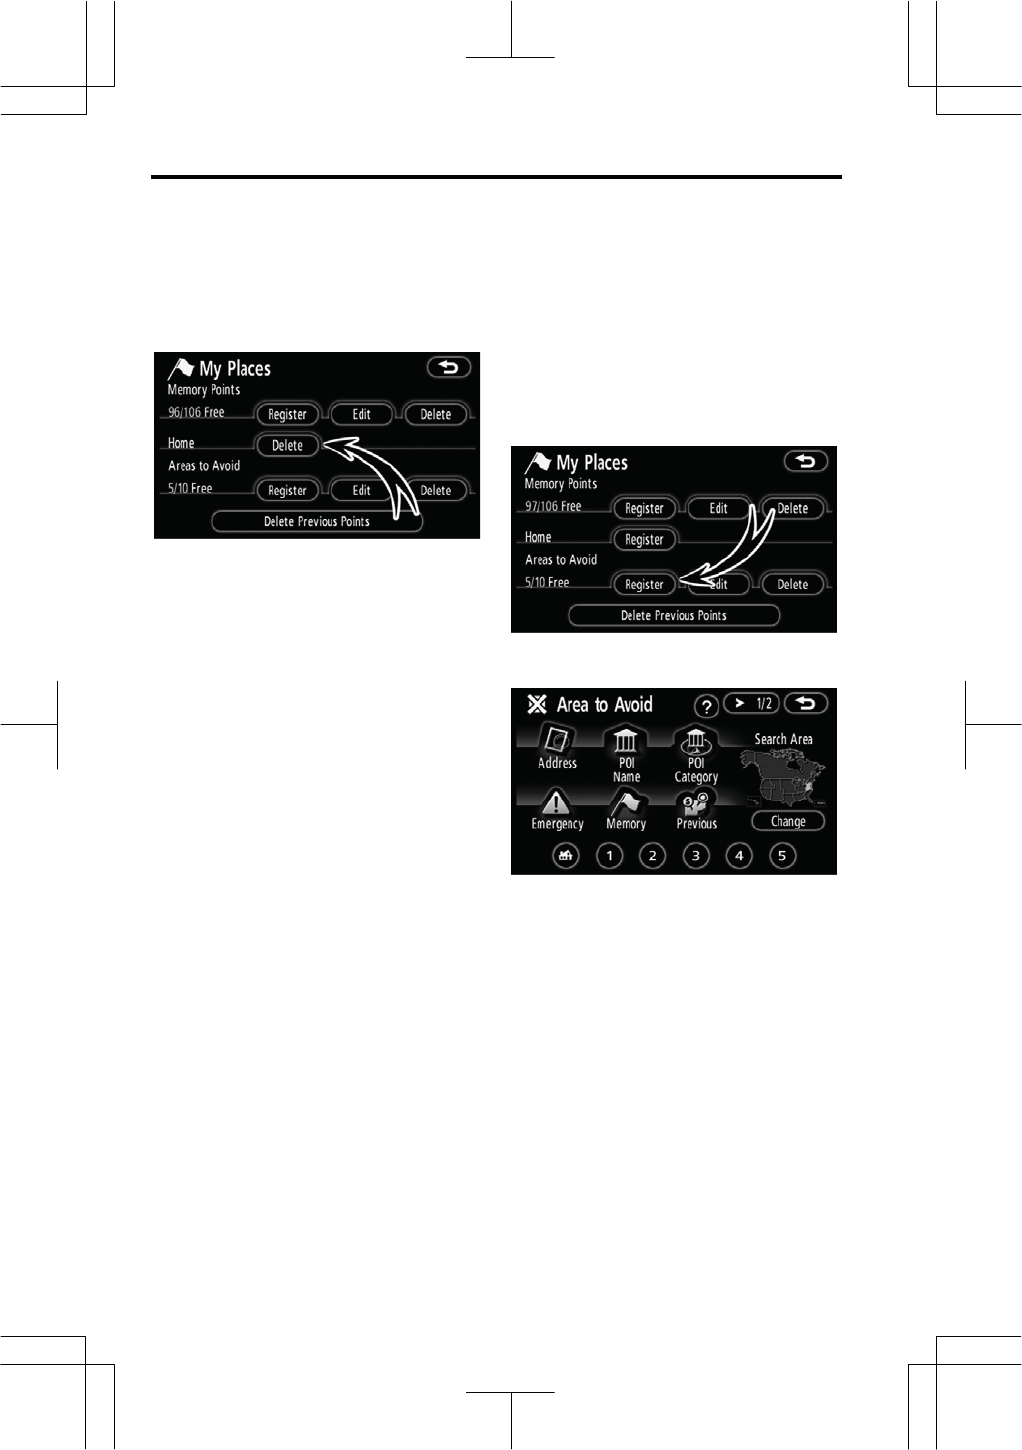
If home has been registered, that infor-
mation can be recalled by using the
“Home” touch screen button on the “Des-
tination” screen. (See “ — Destination
search by Home” on page 45.)
1. Push the “NAVI” button.
2. Touch “My Places” on the “Menu”
screen.
3. Touch “Register”.
4. Enter the location in the same
way as for a destination search. (See
“Destination search” on page 42.)
When registration of home is completed,
the “Memory Point” screen will be dis-
played.
5. Touch “OK”.
To edit registered information, see “ —
Editing memory points” on page 92.
— Re
g
isterin
g
home
ADVANCED FUNCTIONS
104
V573_E
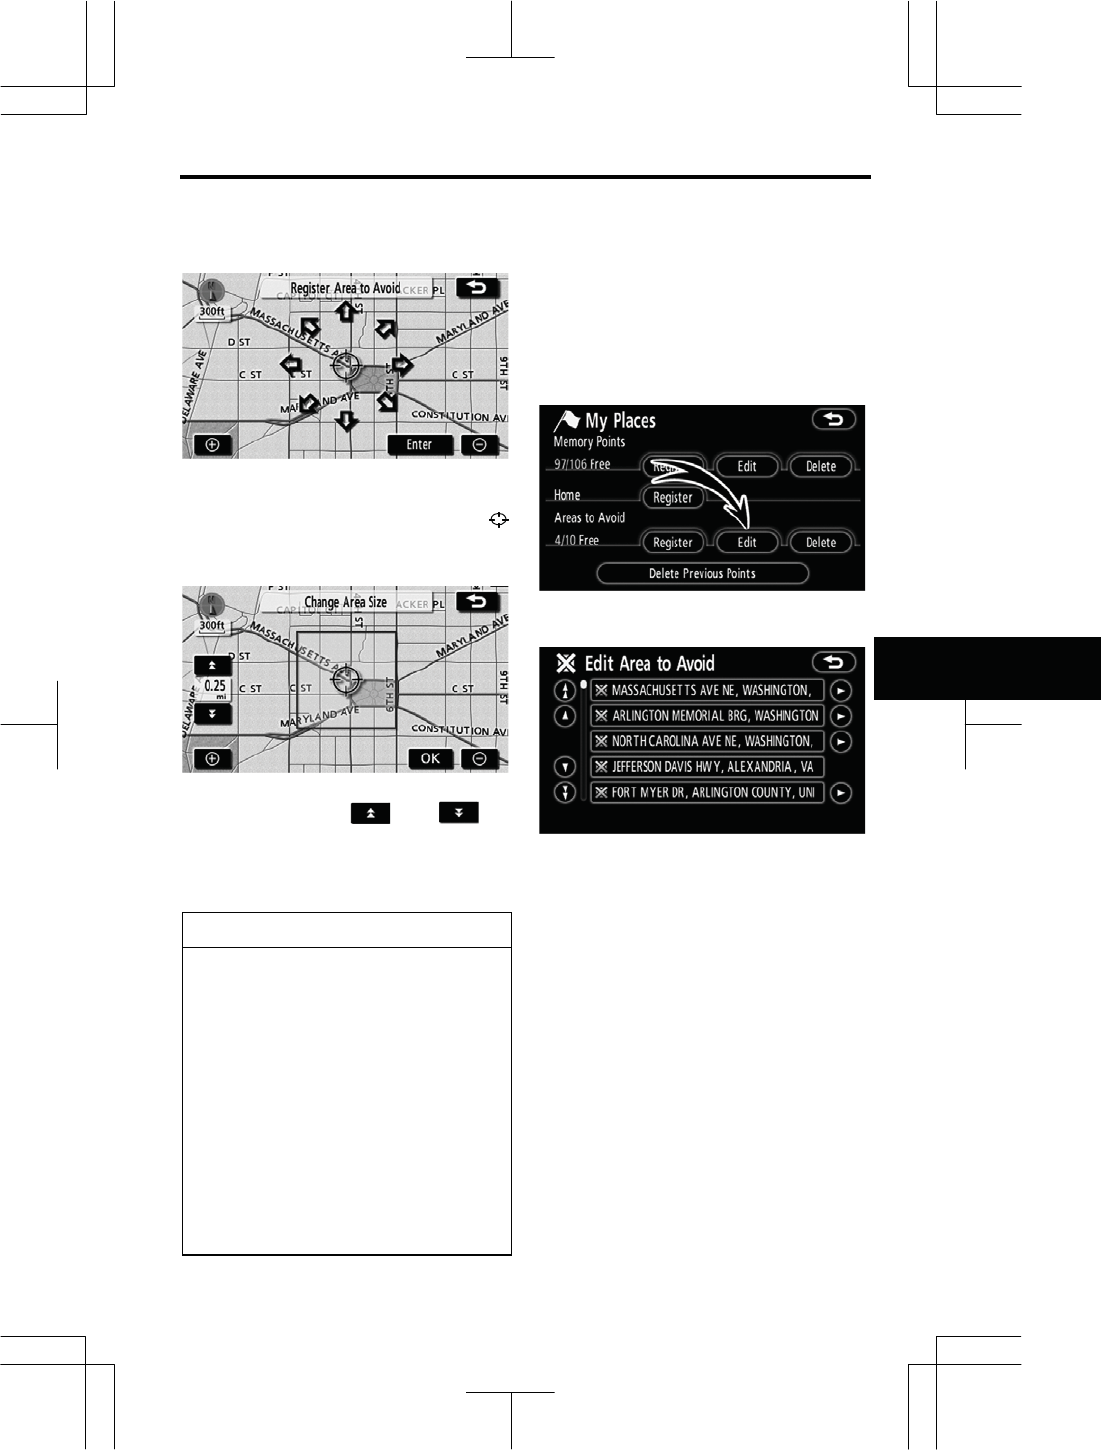
1. Push the “NAVI” button.
2. Touch “My Places” on the “Menu”
screen.
3. Touch “Delete”.
4. To delete home, touch “Yes”. To
cancel the deletion, touch “No”.
Areas you want to avoid because of traf-
fic jams, construction work or other rea-
sons can be registered as areas to
avoid.
1. Push the “NAVI” button.
2. Touch “My Places” on the “Menu”
screen.
3. Touch “Register”.
4. Enter the location in the same
way as for a destination search, or
display the map of the area to be
avoided. (See “Destination search” on
page 42.)
— Deletin
g
home — Re
g
isterin
g
area to avoid
ADVANCED FUNCTIONS
105
V573_E
5. Touch the eight directional touch
screen button to move the cursor
to the desired point on the map.
6. Touch “Enter”.
7. Touch either or to
change the size of the area to be
avoided.
8. Touch “OK”.
INFORMATION
zIf a destination is input in the area
to avoid or the route calculation
cannot be made without running
through the area to avoid, a route
passing through the area to be
avoided may be shown.
zUp to 10 locations can be regis-
tered as points/areas to avoid. If
there are 10 locations already
registered, the following message
will be displayed: “Unable to reg-
ister additional points. Please
try again after deleting unneces-
sary points.”.
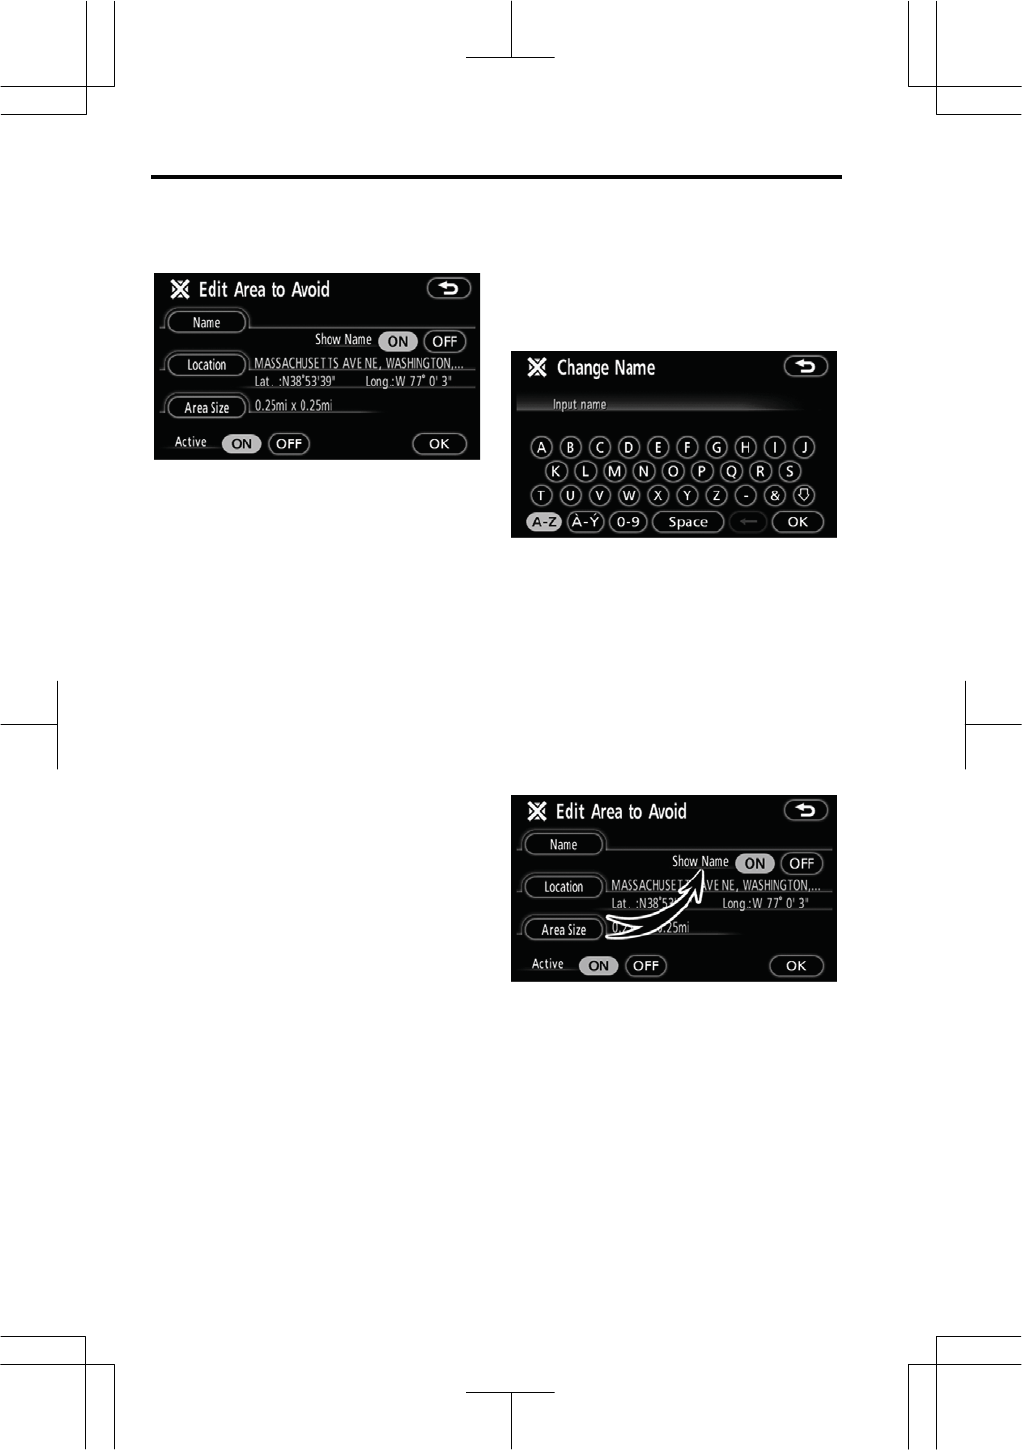
The name, location and/or area size of a
registered area can be edited.
1. Push the “NAVI” button.
2. Touch “My Places” on the “Menu”
screen.
3. Touch “Edit”.
4. Touch the desired area button.
— Editin
g
area to avoid
ADVANCED FUNCTIONS
106
V573_E
5. Touch the touch screen button to
be edited.
“Name”: To edit the name of the area to
avoid. The names can be displayed on
the map. (See page 100.)
“Location”: To edit area location. (See
page 101.)
“Area Size”: To edit area size. (See
page 101.)
“Active”: To turn on or off the area to
avoid feature. To turn on the feature
touch “ON” on the “Edit Area to Avoid”
screen. To turn off the feature touch
“OFF” on the “Edit Area to Avoid”
screen.
6. Touch “OK”.
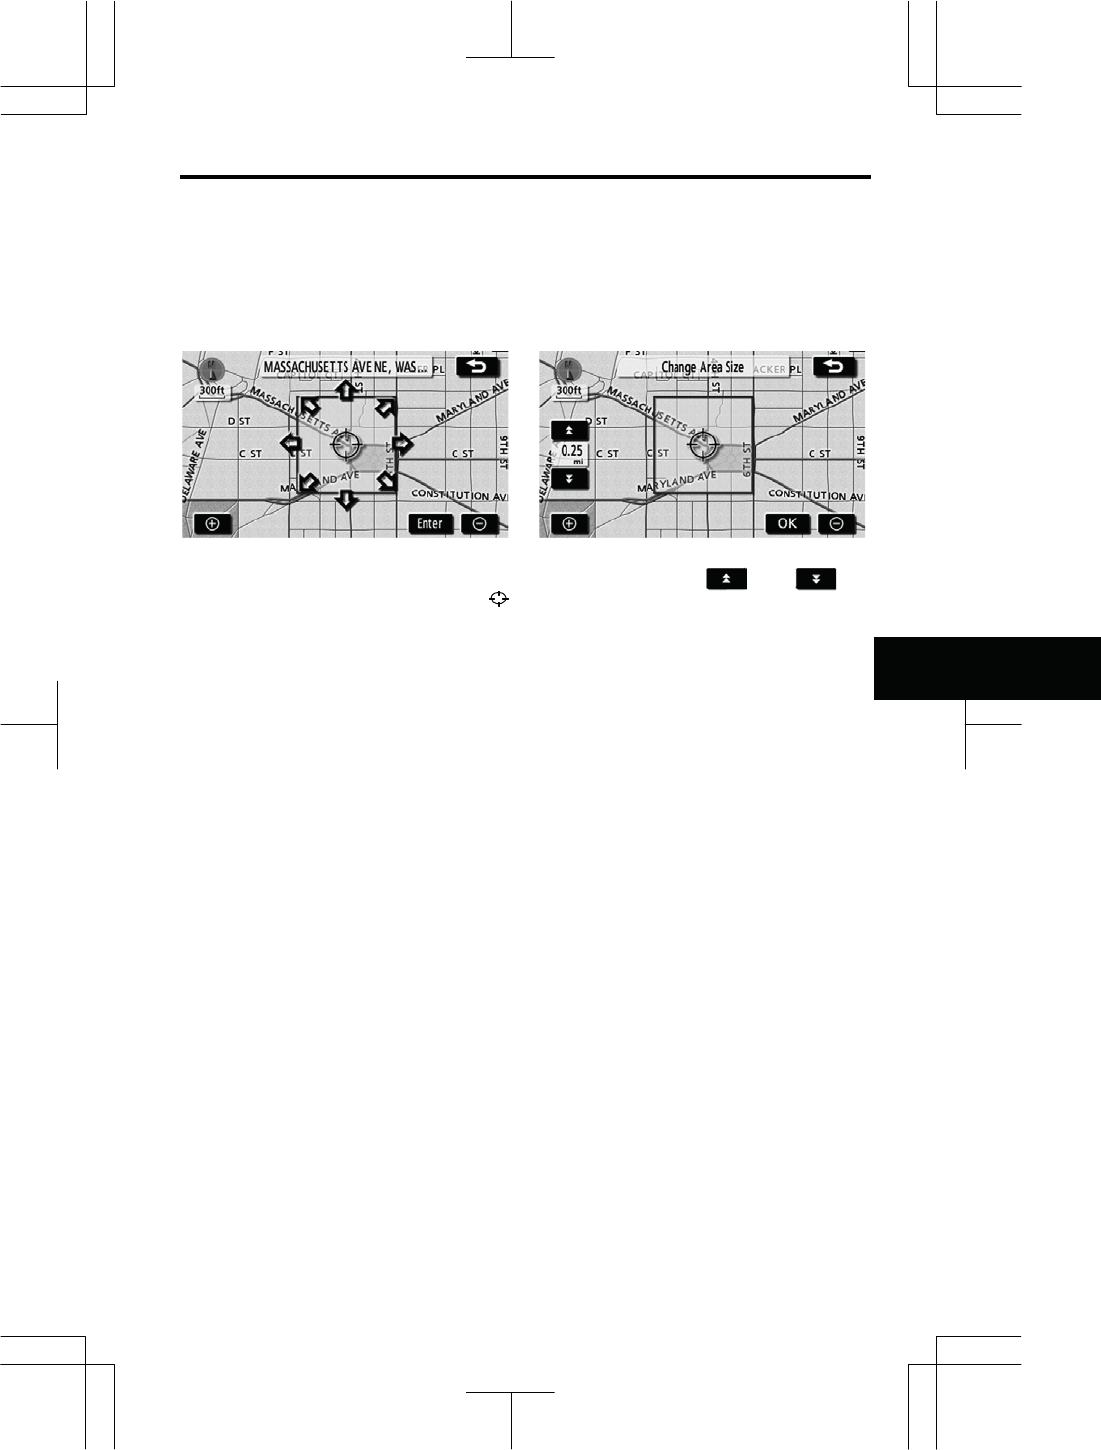
z To change “Name”
1. Touch “Name” on the “Edit Area
to Avoid” screen.
2. Enter the name using alphanu-
meric keys.
Up to 24 letters can be entered.
3. Touch “OK”.
The previous screen will be displayed.
DISPLAYING NAMES OF AREAS TO
BE AVOIDED
The name of an area to be avoided that
may be displayed on the map can be set.
To show the name, touch “ON” on the
“Edit Area to Avoid” screen. To not
show it, touch “OFF”.
ADVANCED FUNCTIONS
107
V573_E
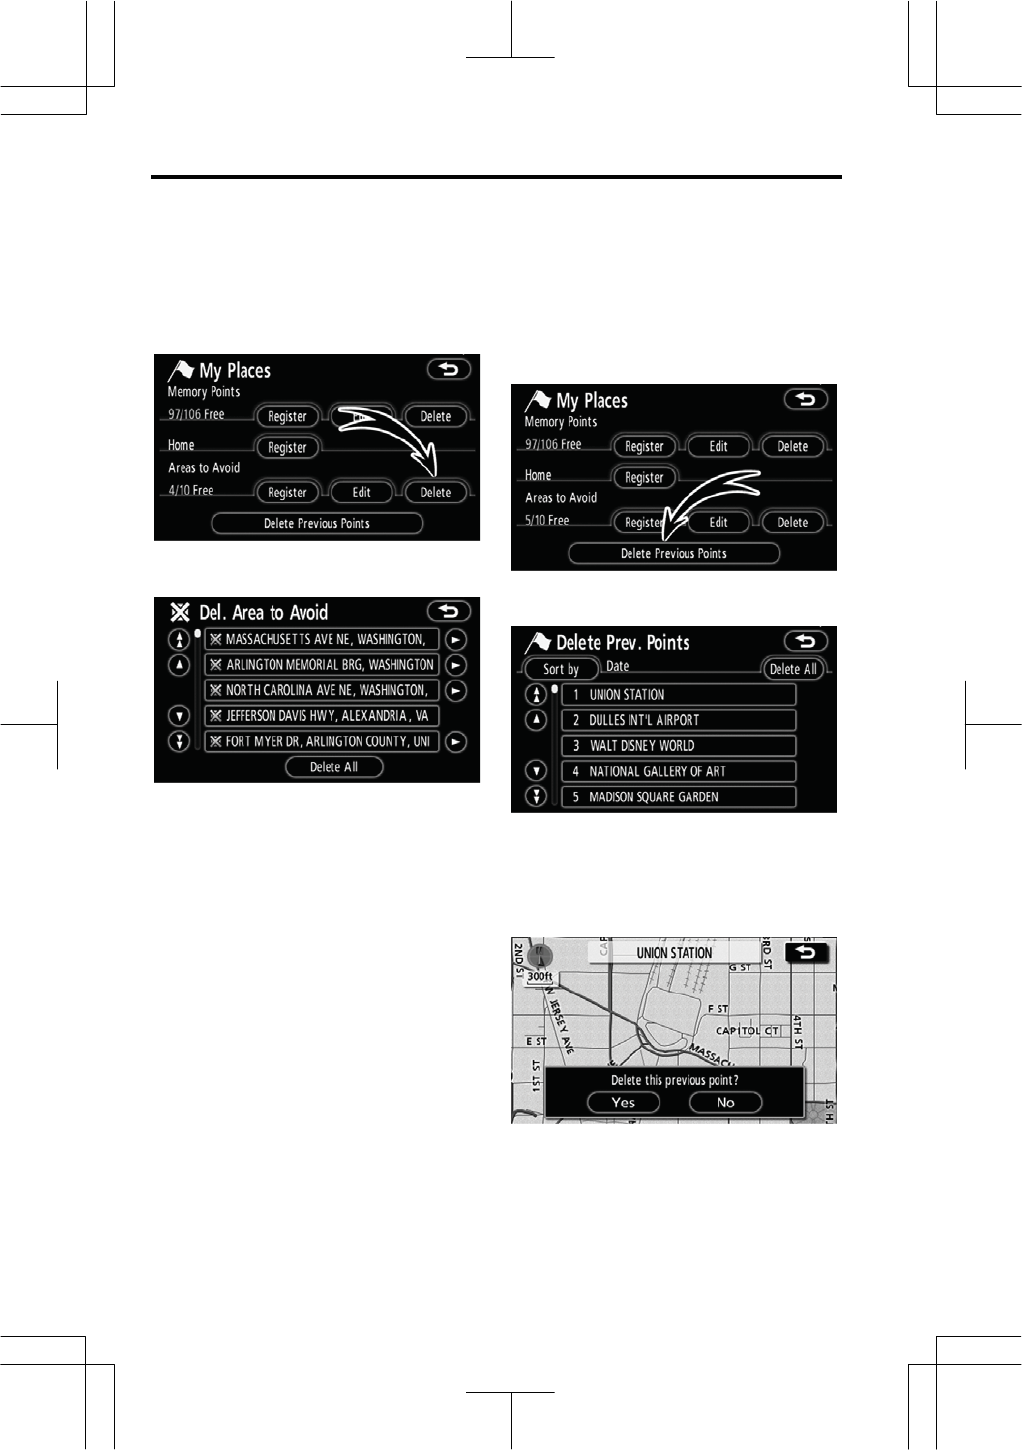
z To change “Location”
1. Touch “Location” on the “Edit
Area to Avoid” screen.
2. Touch the eight directional touch
screen button to move the cursor
to the desired point on the map.
3. Touch “Enter”.
The previous screen will be displayed.
z To change “Area Size”
1. Touch “Area Size” on the “Edit
Area to Avoid” screen.
2. Touch either or to
change the size of the area to be
avoided.
3. Touch “OK”.
The previous screen will be displayed.
ADVANCED FUNCTIONS
108
V573_E
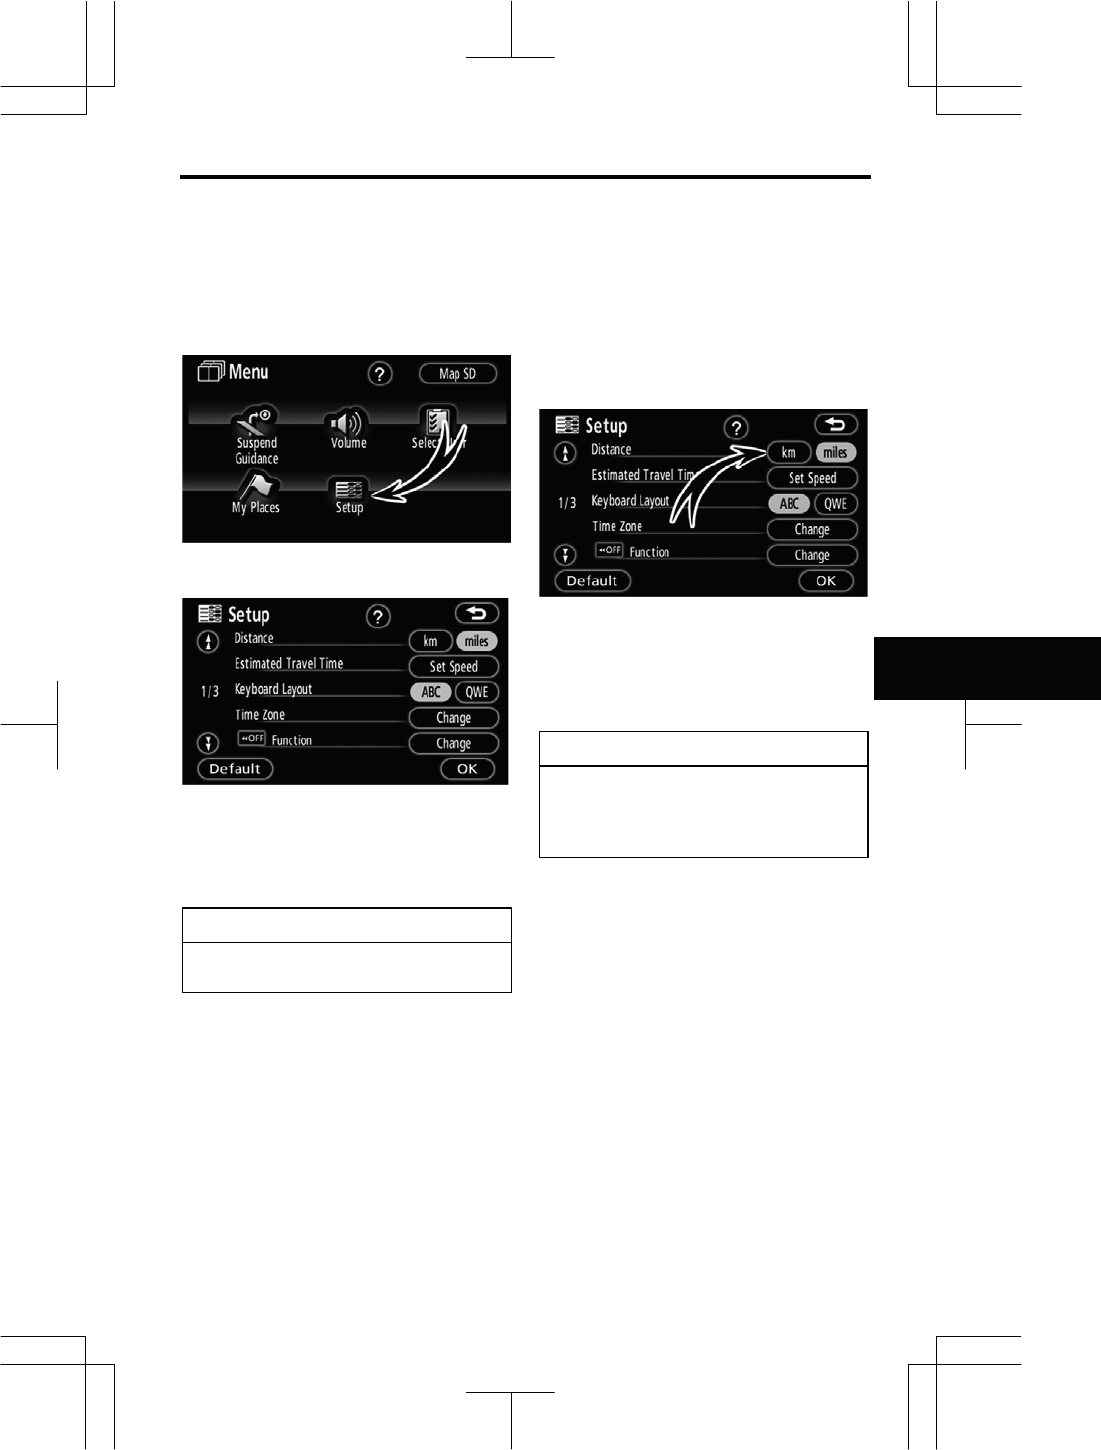
1. Push the “NAVI” button.
2. Touch “My Places” on the “Menu”
screen.
3. Touch “Delete”.
4. Touch the touch screen button to
be deleted.
“Delete All”: To delete all registered
areas to avoid in the system.
5. To delete the area, touch “Yes”.
To cancel the deletion, touch “No”.
The previous destination can be deleted.
1. Push the “NAVI” button.
2. Touch “My Places” on the “Menu”
screen.
3. Touch “Delete Previous Points”.
4. Touch the touch screen button to
be deleted.
“Delete All”: To delete all previous
points in the system.
5. To delete the point, touch “Yes”.
To cancel the deletion, touch “No”.
— Deletin
g
area to avoid — Deletin
gp
revious
p
oints
ADVANCED FUNCTIONS
109
V573_E
Setting the items shown on the “Setup”
screen can be done.
1. Push the “NAVI” button.
2. Touch “Setup”.
3. Touch the items to be set.
4. Touch “OK” on the screen.
The previous screen will be displayed.
INFORMATION
To reset all setup items, touch “De-
fault”.
z Distance unit
Distance unit can be changed.
1. Push the “NAVI” button.
2. Touch “Setup” on the “Menu”
screen.
3. Touch “km” or “miles” of “Dis-
tance” to choose the distance unit.
The selected button is highlighted.
4. Touch “OK”.
INFORMATION
This function is available only in
English or Spanish. To switch lan-
guage, see “Select language” on
page 172.
Setu
p
ADVANCED FUNCTIONS
110
V573_E
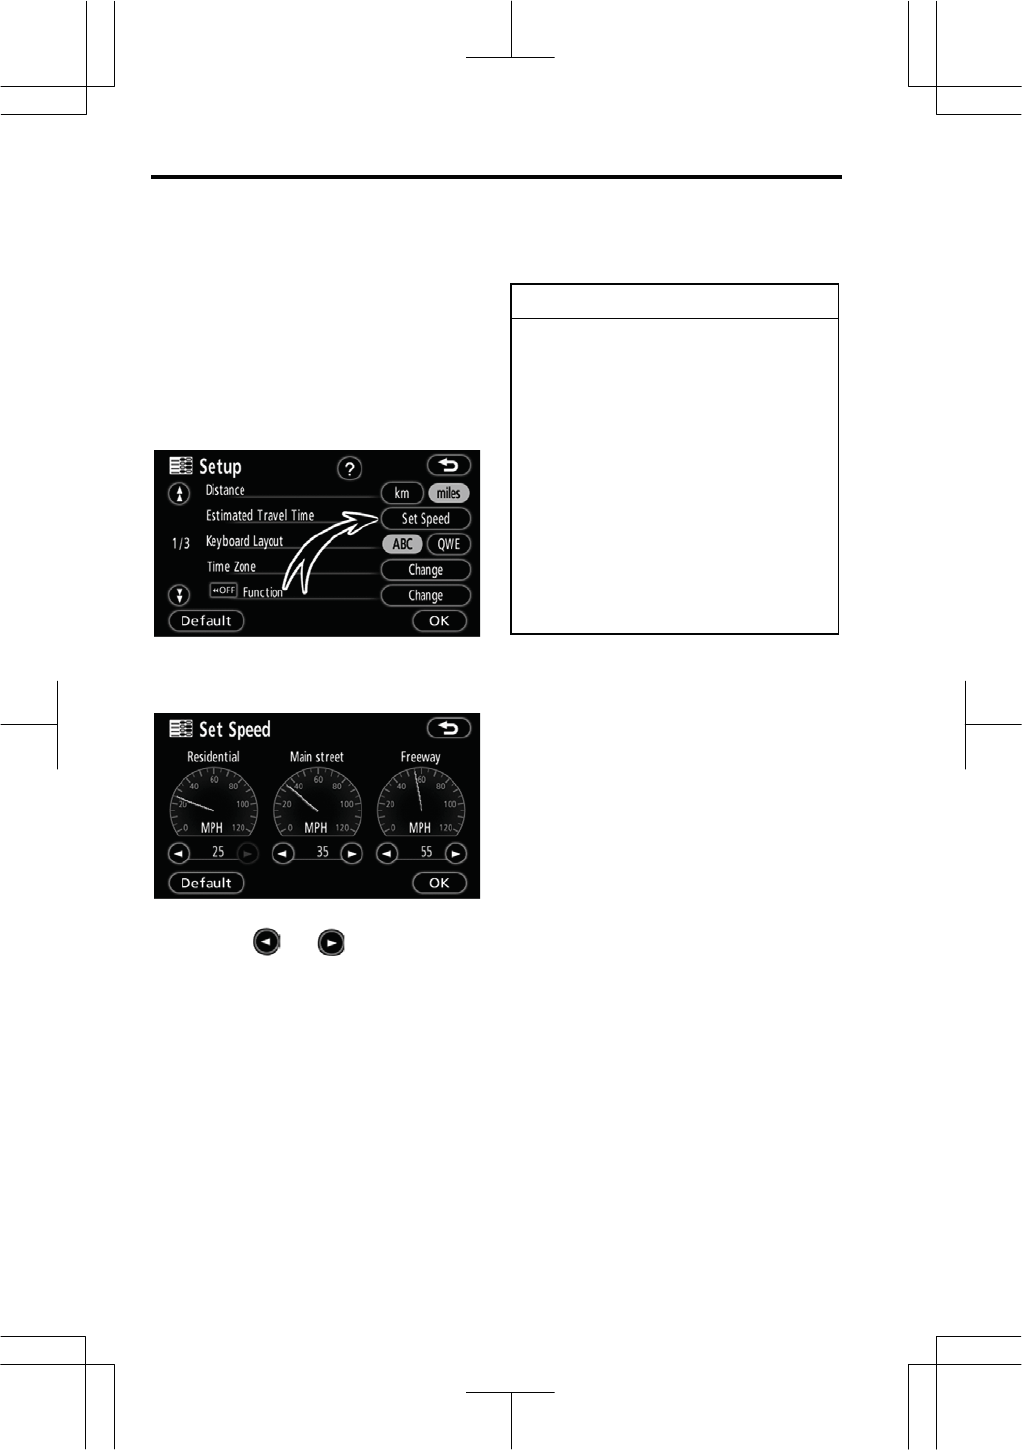
z Estimated travel time
The speed that is used for the calculation
of the estimated travel time and the es-
timated arrival time can be set.
1. Push the “NAVI” button.
2. Touch “Setup” on the “Menu”
screen.
3. Touch “Set Speed” of the “Esti-
mated Travel Time”.
4. Touch or to set the av-
erage vehicle speeds for “Residen-
tial”, “Main street”, and “Freeway”.
To set the default speeds, touch “De-
fault”.
5. After setting of the desired
speeds is completed, touch “OK”.
INFORMATION
zThe displayed time to the destina-
tion is the approximate driving
time that is calculated based on
the selected speeds and the ac-
tual position along the guidance
route.
zThe time shown on the screen
may vary greatly depending on
progress along the route, which
may be affected by road condi-
tions such as traffic jams and,
construction work.
zIt is possible to display up to 99
hours 59 minutes.
ADVANCED FUNCTIONS
111
V573_E
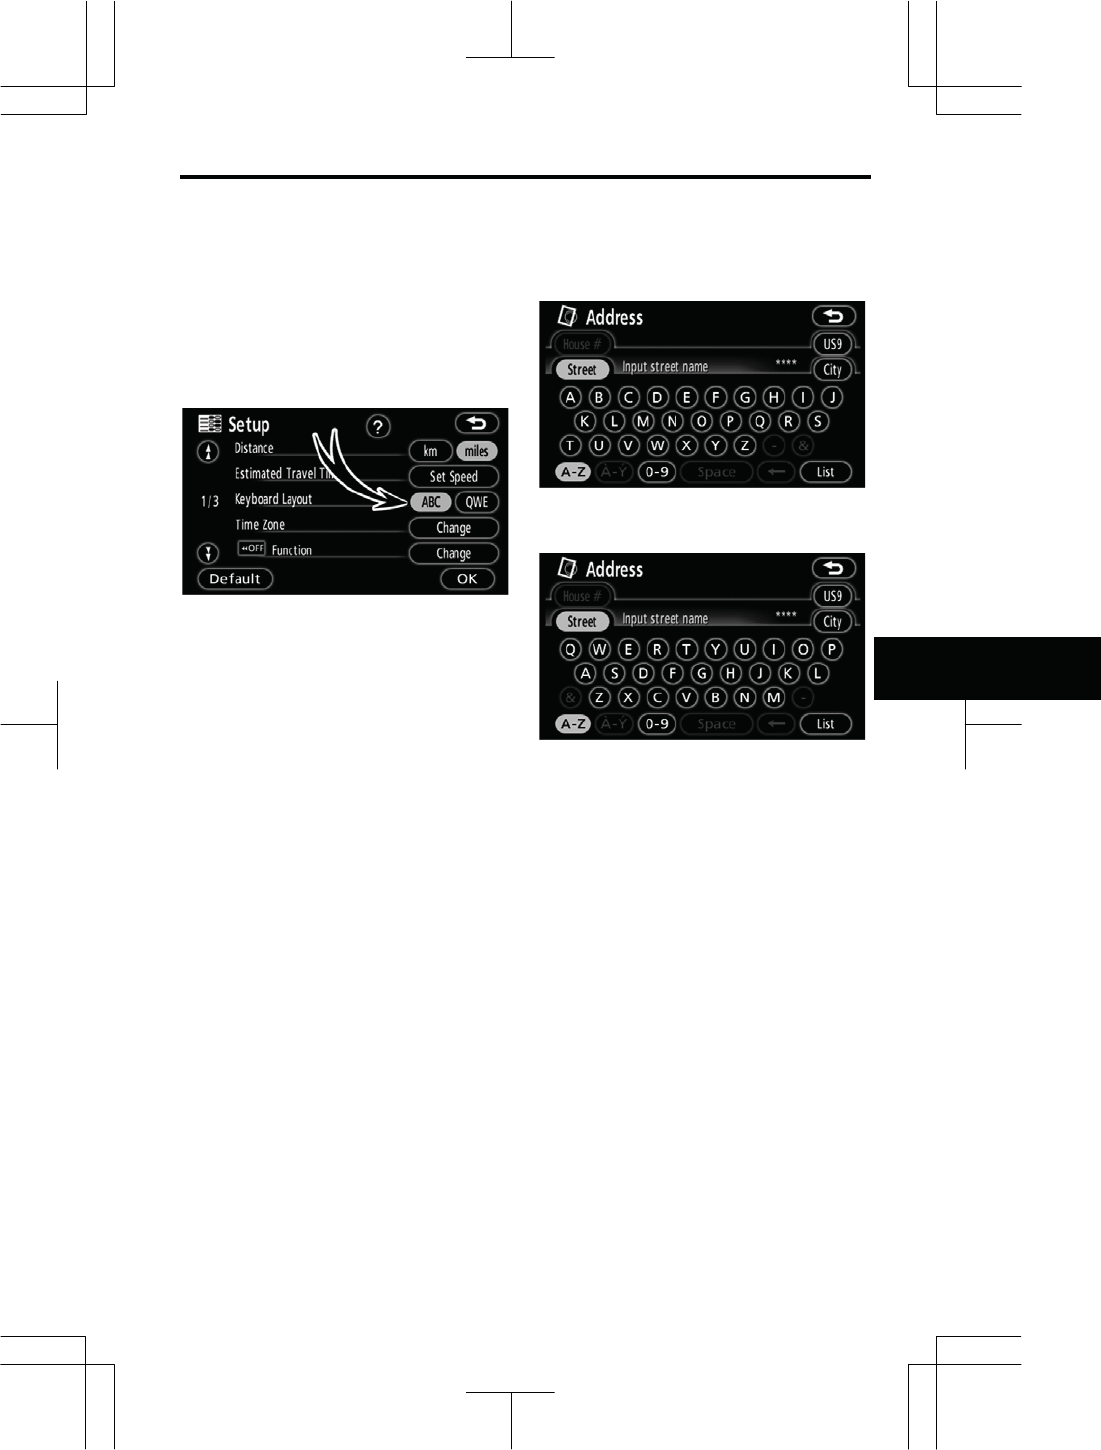
z Input keyboard layout
Keyboard layout can be changed.
1. Push the “NAVI” button.
2. Touch “Setup” on the “Menu”
screen.
3. Touch “ABC” or “QWE” of “Key-
board Layout” to choose the key-
board layout.
LAYOUT TYPE
Ź“ABC” type
Ź“QWE” type
The selected button is highlighted.
4. Touch “OK”.
ADVANCED FUNCTIONS
112
V573_E
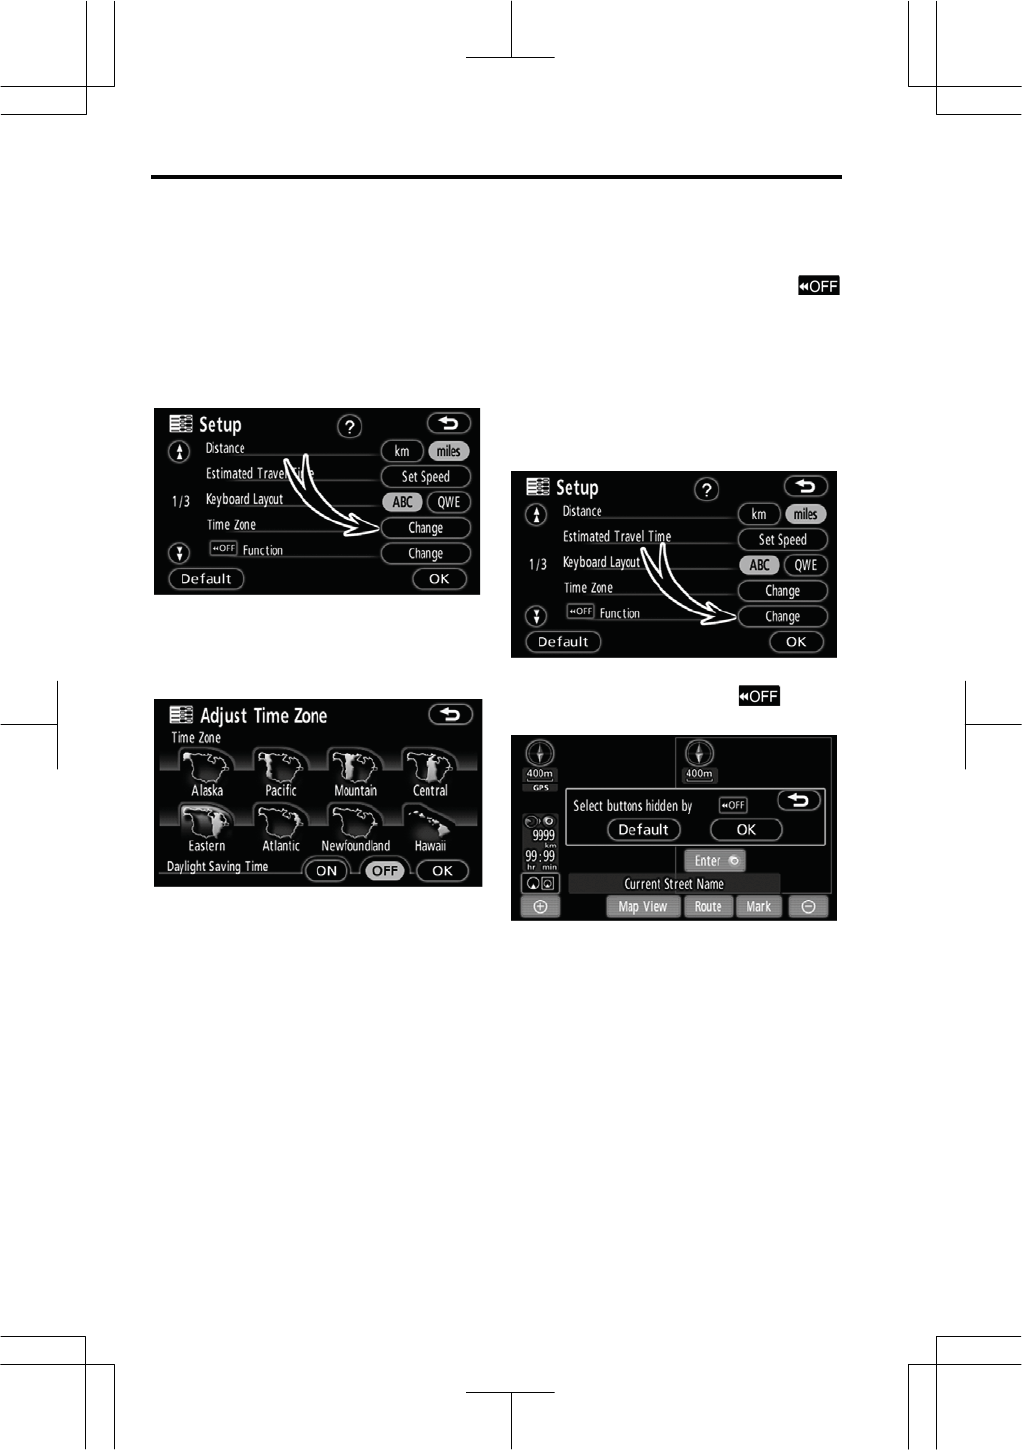
z Time zone
Time zone can be changed.
1. Push the “NAVI” button.
2. Touch “Setup” on the “Menu”
screen.
3. Touch “Change” of “Time Zone”.
The “Adjust Time Zone” screen will be
displayed on the display.
4. Touch the desired time zone.
The selected button is highlighted.
“Daylight Saving Time”: Daylight sav-
ing time can be set or cancelled.
To set daylight saving time, touch “ON”,
and to cancel it, touch “OFF”.
5. Touch “OK”.
z Screen layout function (
Function)
Each touch screen button and current
street name on the map screen can be
displayed or hidden.
1. Push the “NAVI” button.
2. Touch “Setup” on the “Menu”
screen.
3. Touch “Change” of “ Func-
tion”.
4. Touch the touch screen button to
be turned off. The button becomes
dimmed.
To set the default, touch “Default”.
5. Touch “OK”.
ADVANCED FUNCTIONS
113
V573_E
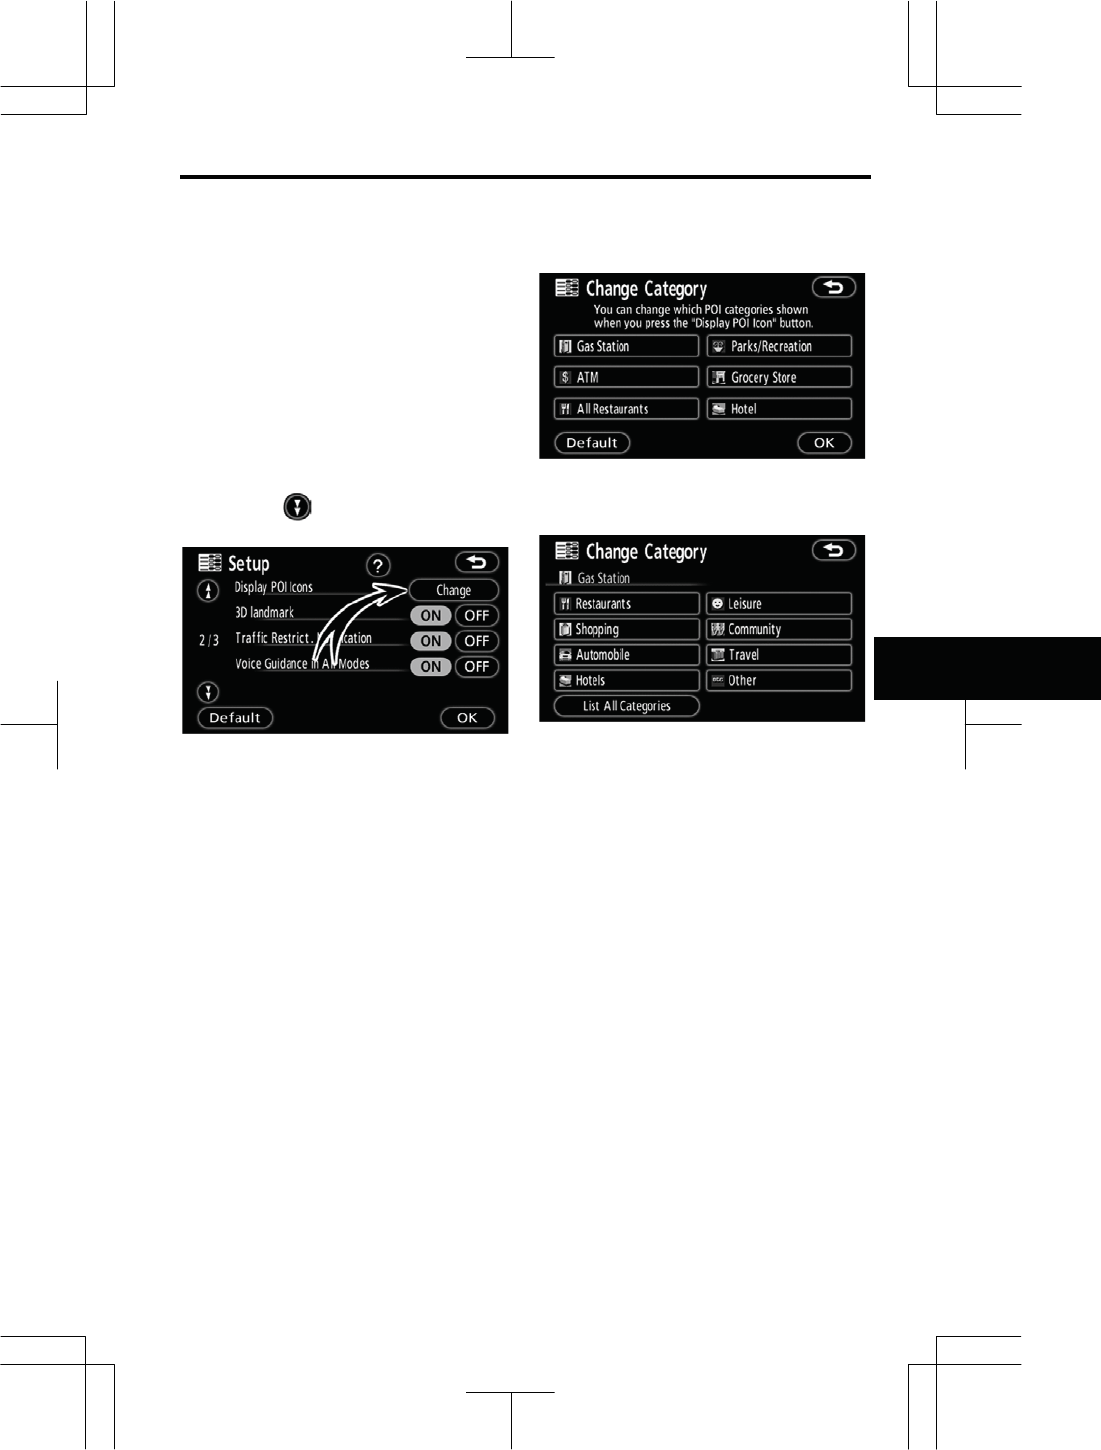
z POI category change
(Display POI Icons)
Select from among the 6 icons displayed
on the “Display POI Icons” top screen, so
that setting of the icons to be displayed
on the map screen can be done easily.
1. Push the “NAVI” button.
2. Touch “Setup” on the “Menu”
screen.
Then touch to display page 2 of the
“Setup” screen.
3. Touch “Change” of “Display POI
Icons”.
4. Touch the category button to be
changed.
5. Touch the category button to be
displayed on the “Display POI Icons”
top screen.
6. Touch “OK”.
ADVANCED FUNCTIONS
114
V573_E
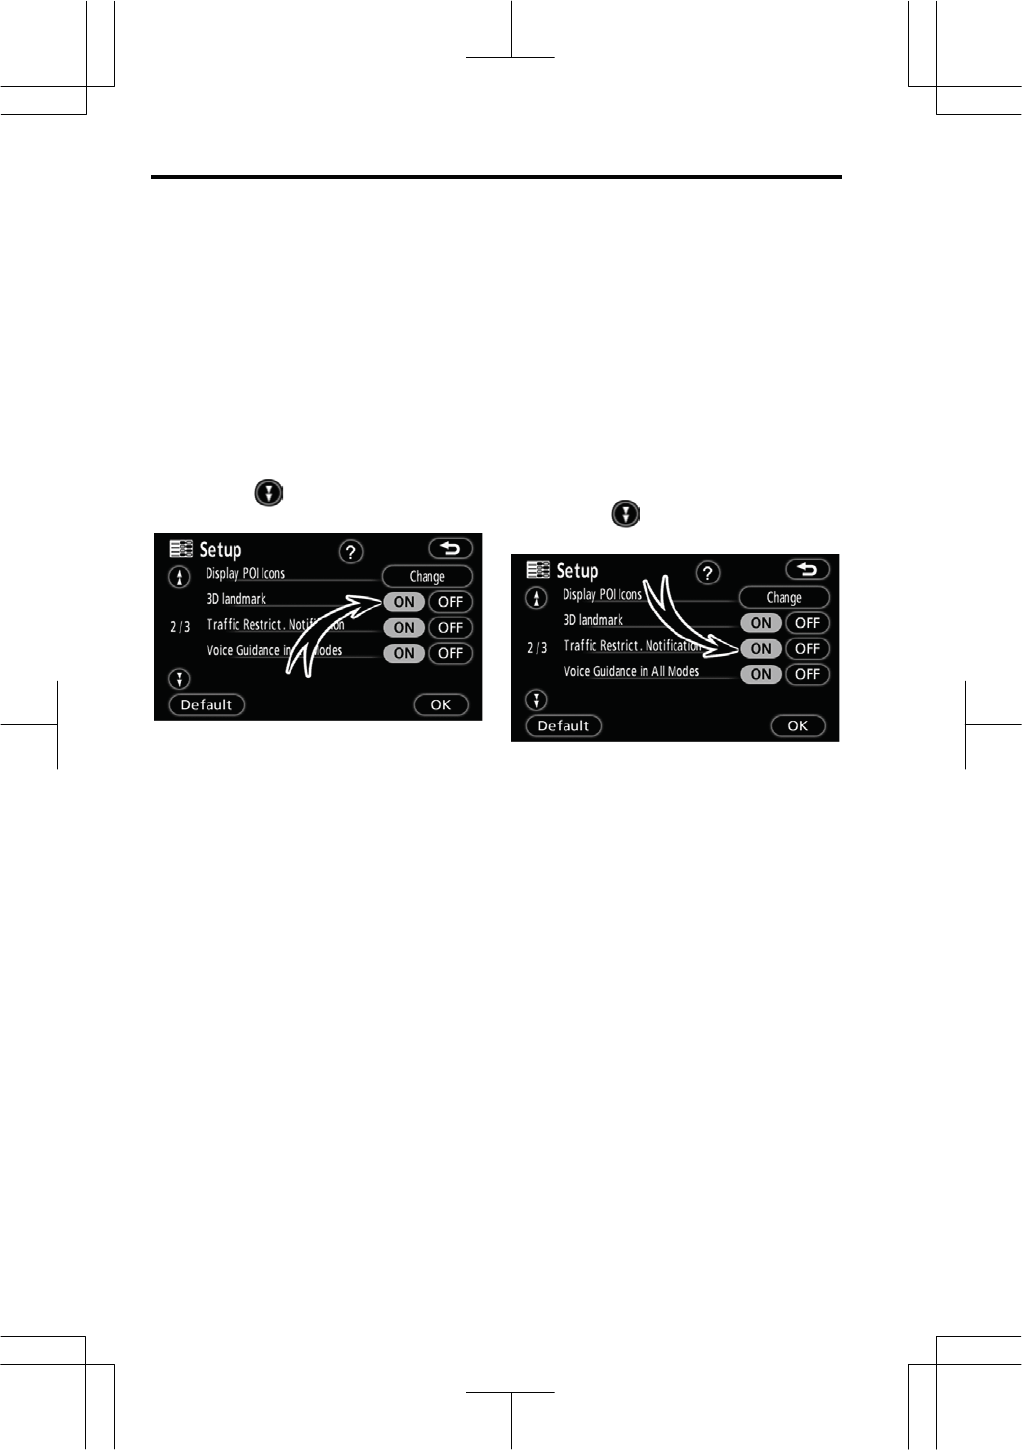
z 3D landmark
When the “3D landmark” feature is
turned on, the system will display the 3D
landmark on the map.
To turn the “3D landmark” mode on:
1. Push the “NAVI” button.
2. Touch “Setup” on the “Menu”
screen.
Then touch to display page 2 of the
“Setup” screen.
3. Touch “ON” of “3D landmark”.
The selected button is highlighted.
4. Touch “OK”.
z Notifying traffic restriction
When the “Traffic Restrict. Notification”
feature is turned on, the system notifies
you of traffic or seasonal restrictions.
To turn the “Traffic Restrict. Notification”
on:
1. Push the “NAVI” button.
2. Touch “Setup” on the “Menu”
screen.
Then touch to display page 2 of the
“Setup” screen.
3. Touch “ON” of “Traffic Restrict.
Notification”.
The selected button is highlighted.
4. Touch “OK”.
ADVANCED FUNCTIONS
115
V573_E
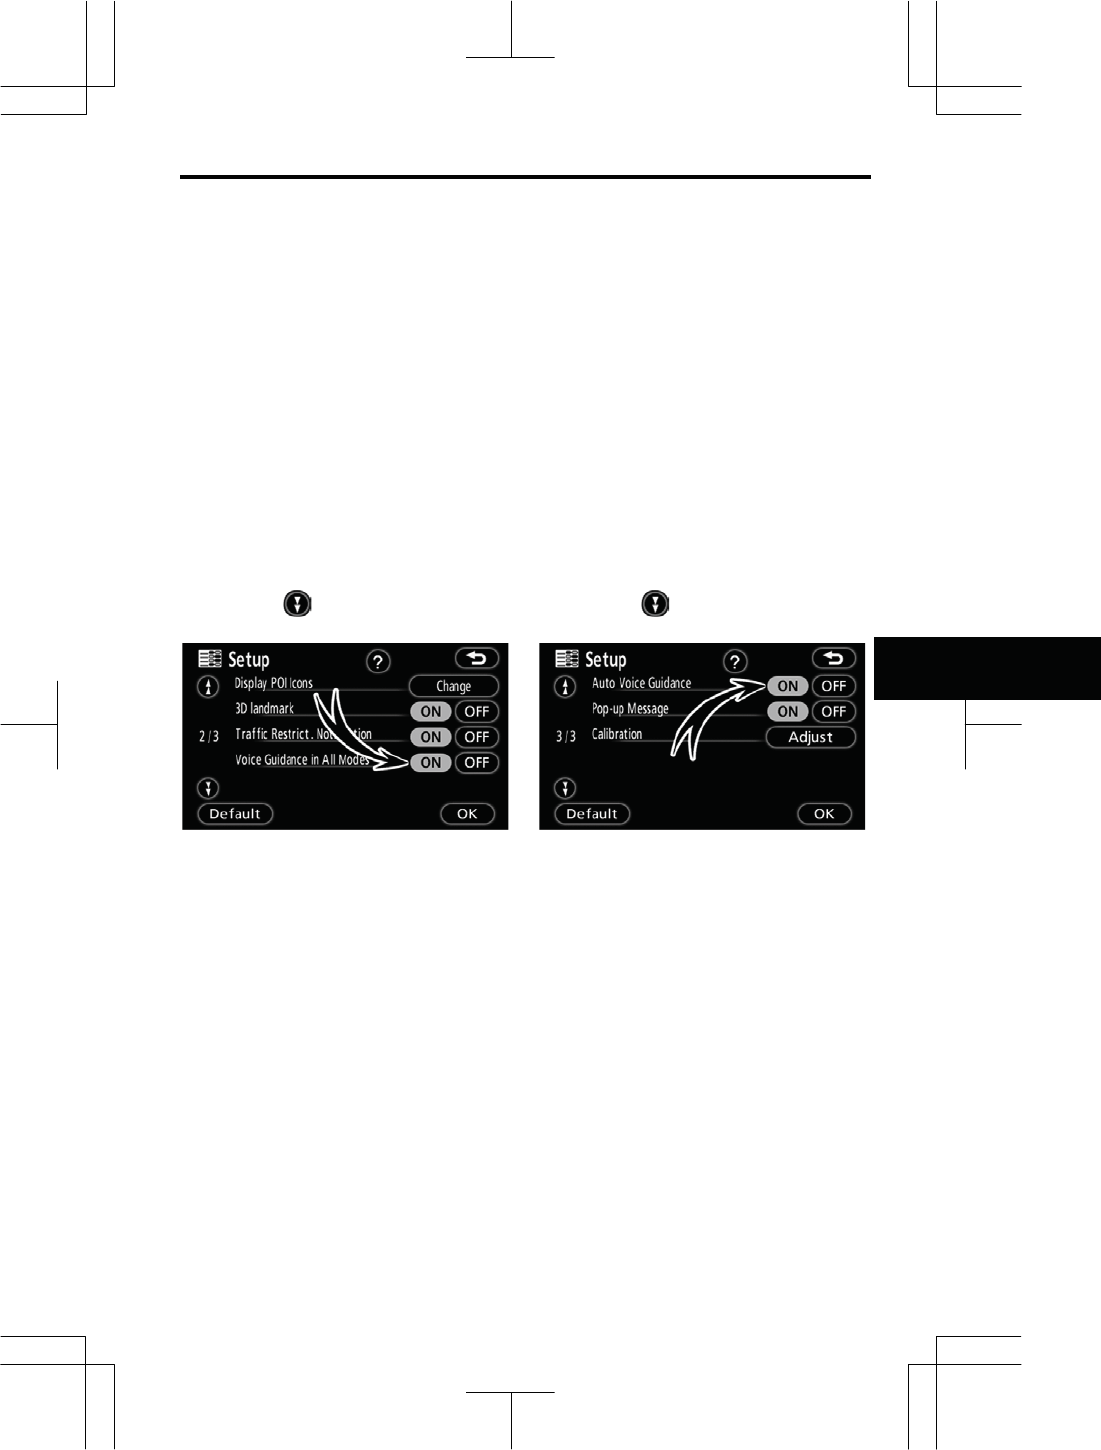
z Voice guidance in all modes
When the “Voice Guidance in All Modes”
feature is turned on, the voice guidance
in all modes can be heard.
When the “Voice Guidance in All Modes”
feature is turned off, the voice guidance
cannot be heard when using the au-
dio/video system.
To turn the “Voice Guidance in All
Modes” on:
1. Push the “NAVI” button.
2. Touch “Setup” on the “Menu”
screen.
Then touch to display page 2 of the
“Setup” screen.
3. Touch “ON” of “Voice Guidance
in All Modes”.
The selected button is highlighted.
4. Touch “OK”.
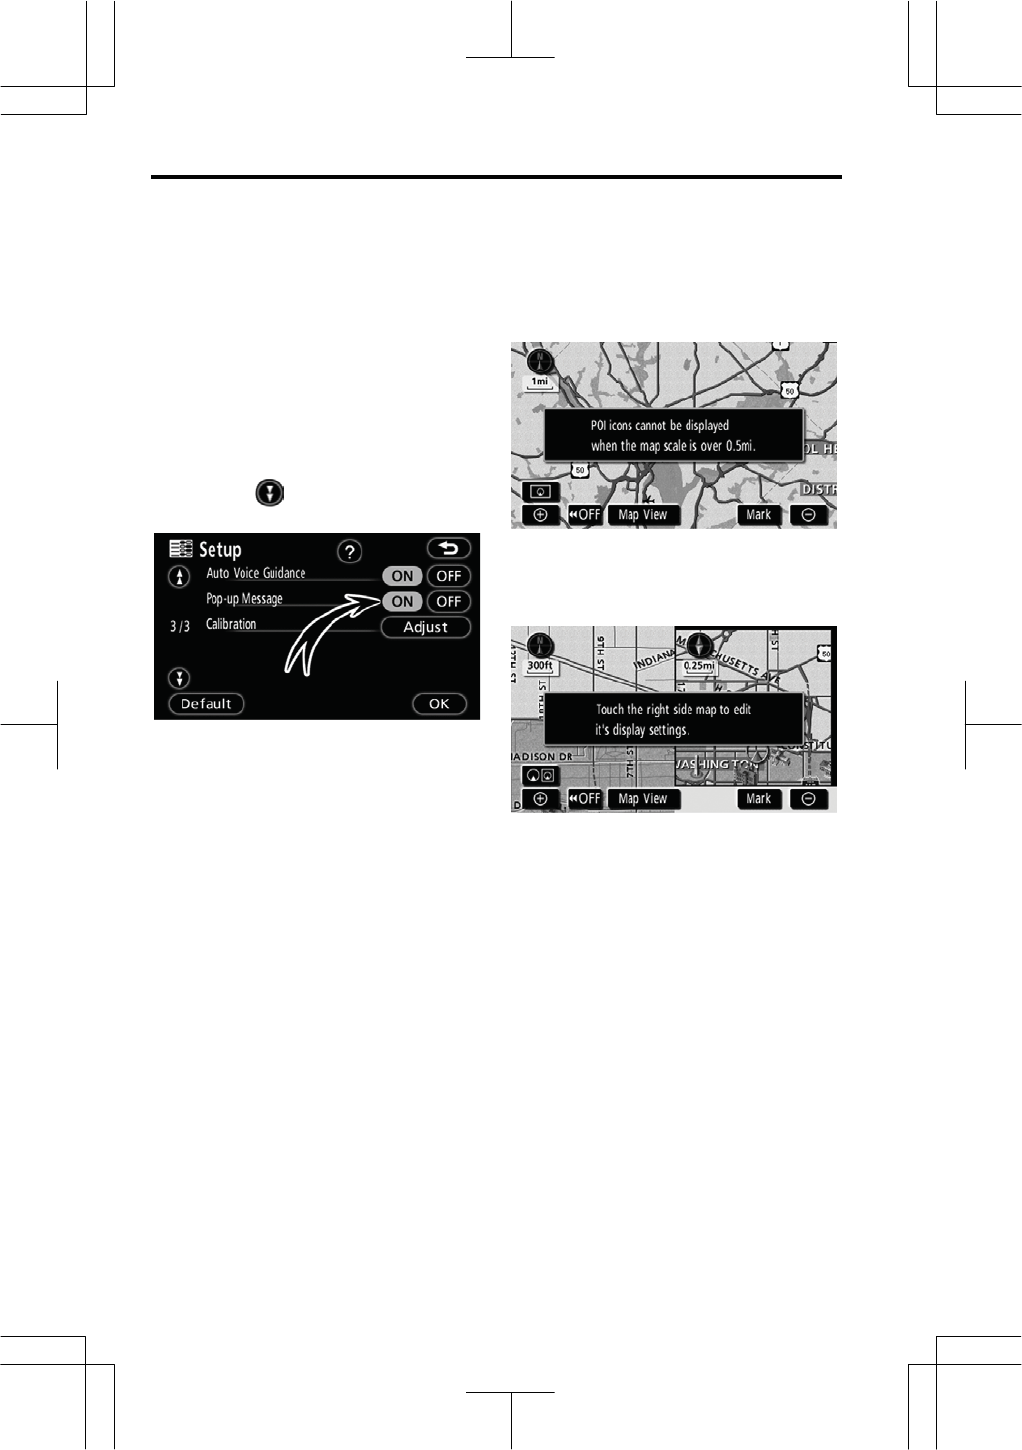
z Auto voice guidance
When the “Auto Voice Guidance” feature
is turned on, the voice guidance can be
heard automatically.
When the “Auto Voice Guidance” feature
is turned off, the voice guidance can be
heard only if the “MAP” button is
pushed.
To turn the “Auto Voice Guidance” mode
on:
1. Push the “NAVI” button.
2. Touch “Setup” on the “Menu”
screen.
Then touch twice to display page 3
of the “Setup” screen.
3. Touch “ON” of “Auto Voice Guid-
ance”.
The selected button is highlighted.
4. Touch “OK”.
ADVANCED FUNCTIONS
116
V573_E
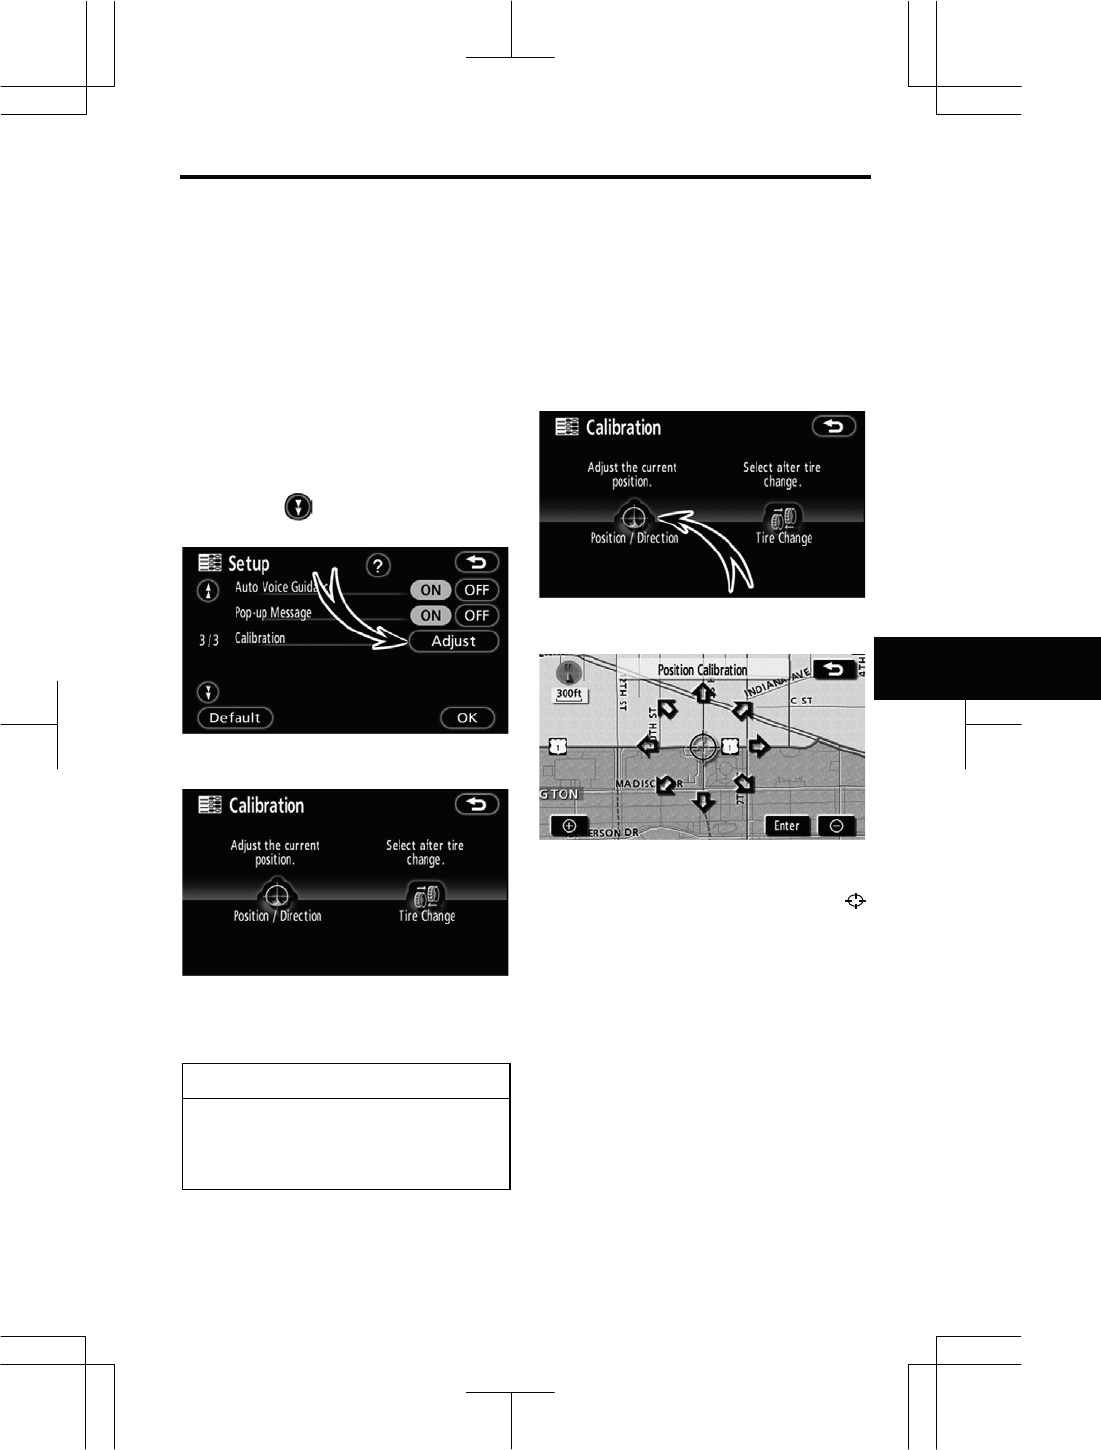
z Pop-up message
When the “Pop-up Message” is turned
on, the pop-up message will be dis-
played.
To turn the “Pop-up Message” on:
1. Push the “NAVI” button.
2. Touch “Setup” on the “Menu”
screen.
Then touch twice to display page 3
of the “Setup” screen.
3. Touch “ON” of “Pop-up Mes-
sage”.
The selected button is highlighted.
4. Touch “OK”.
When the “Pop-up Message” is turned
off, the following messages will not be
displayed.
This message appears when the system
is in the POI mode and the map scale is
over 0.5 mile (800 m) or greater.
The message appears when the map is
switched to the dual map screen mode.
ADVANCED FUNCTIONS
117
V573_E
z Current position/tire change cali-
bration
The current vehicle position mark can be
adjusted manually. Miscalculation of
the distance caused by tire replacement
can also be adjusted.
1. Push the “NAVI” button.
2. Touch “Setup” on the “Menu”
screen.
Then touch twice to display page 3
of the “Setup” screen.
3. Touch “Adjust” of “Calibration”.
4. Touch the desired touch screen
button.
INFORMATION
For additional information on the
accuracy of a current vehicle posi-
tion, see “Limitations of the naviga-
tion system” on page 246.
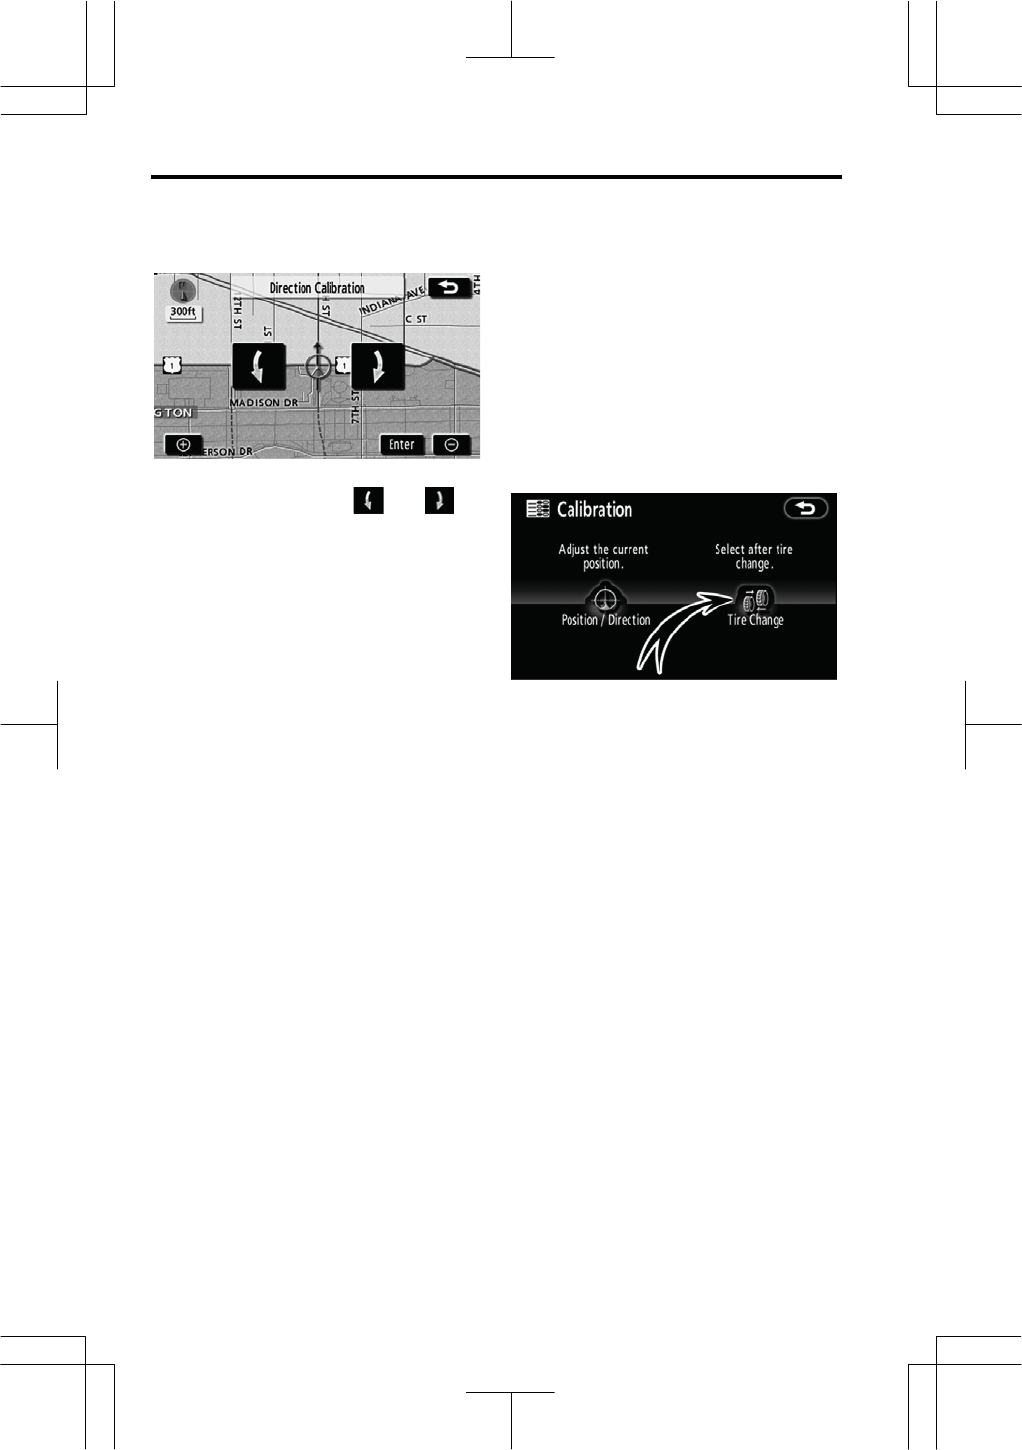
POSITION/DIRECTION CALIBRATION
When driving, the current vehicle posi-
tion mark will be automatically corrected
by GPS signals. If GPS reception is
poor due to location, you can manually
adjust the current vehicle position mark.
1. Touch “Position / Direction”.
2. Touch the eight directional touch
screen button to move the cursor
to the desired point on the map.
3. Touch “Enter”.
ADVANCED FUNCTIONS
118
V573_E
4. Touch either the or to
adjust the direction of the current ve-
hicle position mark.
5. Touch “Enter”.
The map screen will be displayed.
TIRE CHANGE CALIBRATION
The tire change calibration function will
be used when replacing the tires. This
function will adjust the miscalculation
caused by the circumference difference
between the old and new tires. If this
procedure is not performed when the
tires are replaced, the current vehicle
position mark may be incorrectly dis-
played.
To perform a distance calibration
procedure, touch “Tire Change” on
the “Calibration” screen.
The message appears and the quick
distance calibration is automatically
started. A few seconds later, a map
screen will be displayed.

OTHER FUNCTIONS
119
V573_E
SECTION 5
OTHER FUNCTIONS
z Maintenance information ······························································· 114
Maintenance information setting···················································· 114
Dealer setting················································································· 116
z Calendar with memo ······································································ 118
Adding a memo·············································································· 120
Editing a memo ·············································································· 121
Memo list························································································ 121
z Hands-free system (for cellular phone)········································ 123
Enter a Bluetooth® phone ······························································ 128
Call on the Bluetooth® phone························································· 131
Receive on the Bluetooth® phone·················································· 135
Talk on the Bluetooth® phone ························································ 136
Change the settings of the Bluetooth® phone································ 138
Set a Bluetooth® phone·································································· 162
z Screen adjustment············································································ 168
z Settings····························································································· 169
z Select language················································································ 172
z Rear view camera system ································································· XX
OTHER FUNCTIONS
120
V573_E
When the navigation system is turned on,
the “Information” screen displays when it
is time to replace a part or certain com-
ponents. (See page 22.)
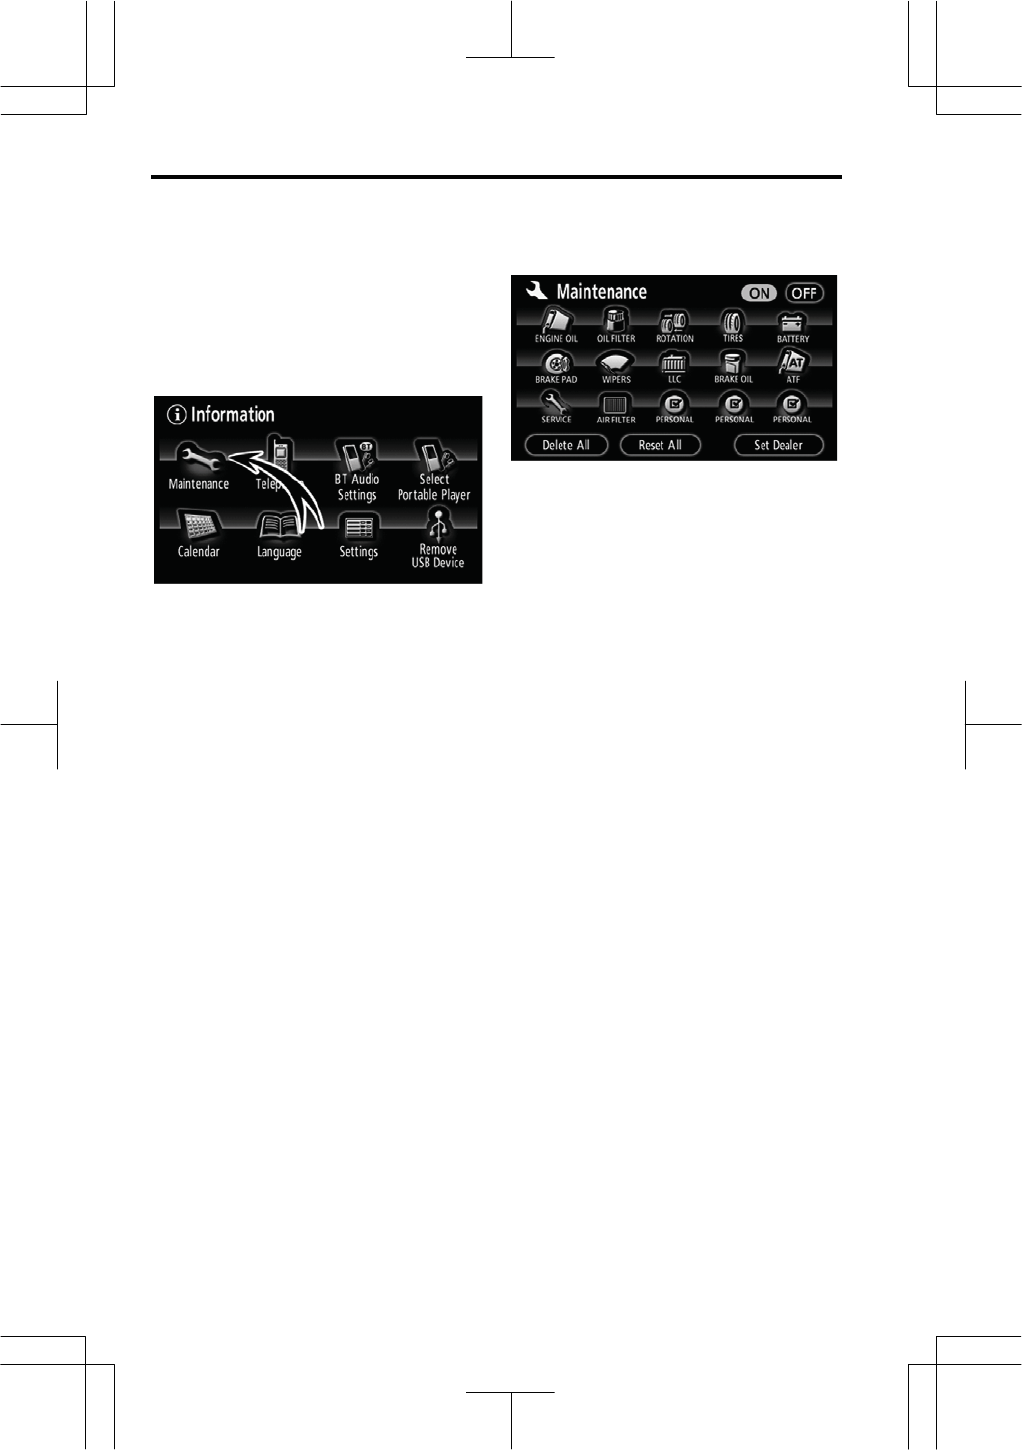
1. Push the “INFO” button.
2. Touch “Maintenance”.
3. Touch the desired touch screen
button.
For details of each touch screen button,
see “INFORMATION ITEMS” on page
115.
“Delete All”: To cancel all conditions
which have been inputted.
“Reset All”: To reset the item which has
satisfied a condition.
“Set Dealer”: To register or edit dealer
information. (See “ — Dealer setting”
on page 116.)
If “ON” is selected, the system gives
maintenance information with the “In-
formation” screen when the system is
turned on. (See page 22.)
If “OFF” is selected, the “Information”
screen is disabled.
When the vehicle needs to be serviced,
the touch screen button color will change
to orange.
Maintenance information —
—Maintenance information
settin
g
OTHER FUNCTIONS
121
V573_E
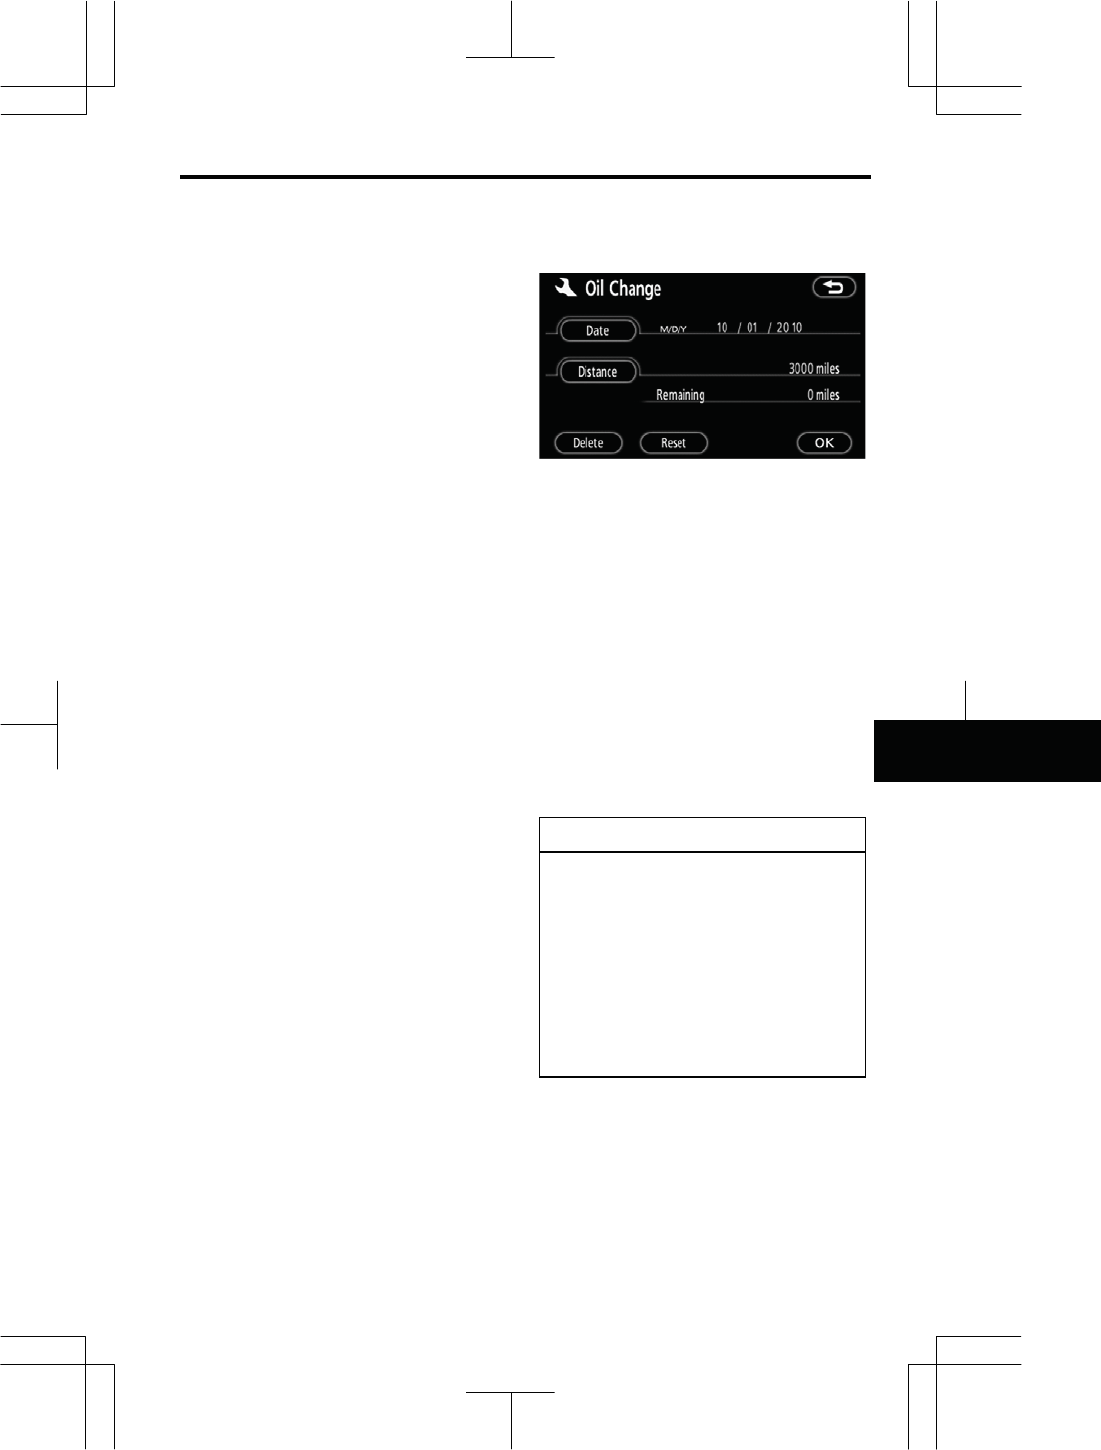
INFORMATION ITEMS
“ENGINE OIL”: Replace engine oil
“OIL FILTER”: Replace engine oil filter
“ROTATION”: Rotate tires
“TIRES”: Replace tires
“BATTERY”: Replace battery
“BRAKE PAD”: Replace brake linings
“WIPERS”: Replace wiper blades
“LLC”: Replace engine coolant
“BRAKE OIL”: Replace brake fluid
“ATF”: Replace ATF (Automatic Trans-
mission Fluid)
“SERVICE”: Scheduled maintenance
“AIR FILTER”: Replace air filter
“PERSONAL”: New information items
can be created separately from provided
ones
4. Input the conditions.
Notice of “Date”: The next maintenance
date can be input.
Notice of “Distance”: The driving dis-
tance until the next maintenance check
can be input.
“Delete”: To cancel the date and dis-
tance conditions.
“Reset”: To reset the date and distance
conditions.
5. Touch “OK”.
The screen then returns to the “Mainte-
nance” screen.
INFORMATION
zFor scheduled maintenance in-
formation, please refer to the
“Scheduled Maintenance Guide”
or “Owner’s Manual Supple-
ment”.
zDepending on driving or road
conditions, the actual date and
distance may differ from the
stored date and distance in the
system.
OTHER FUNCTIONS
122
V573_E
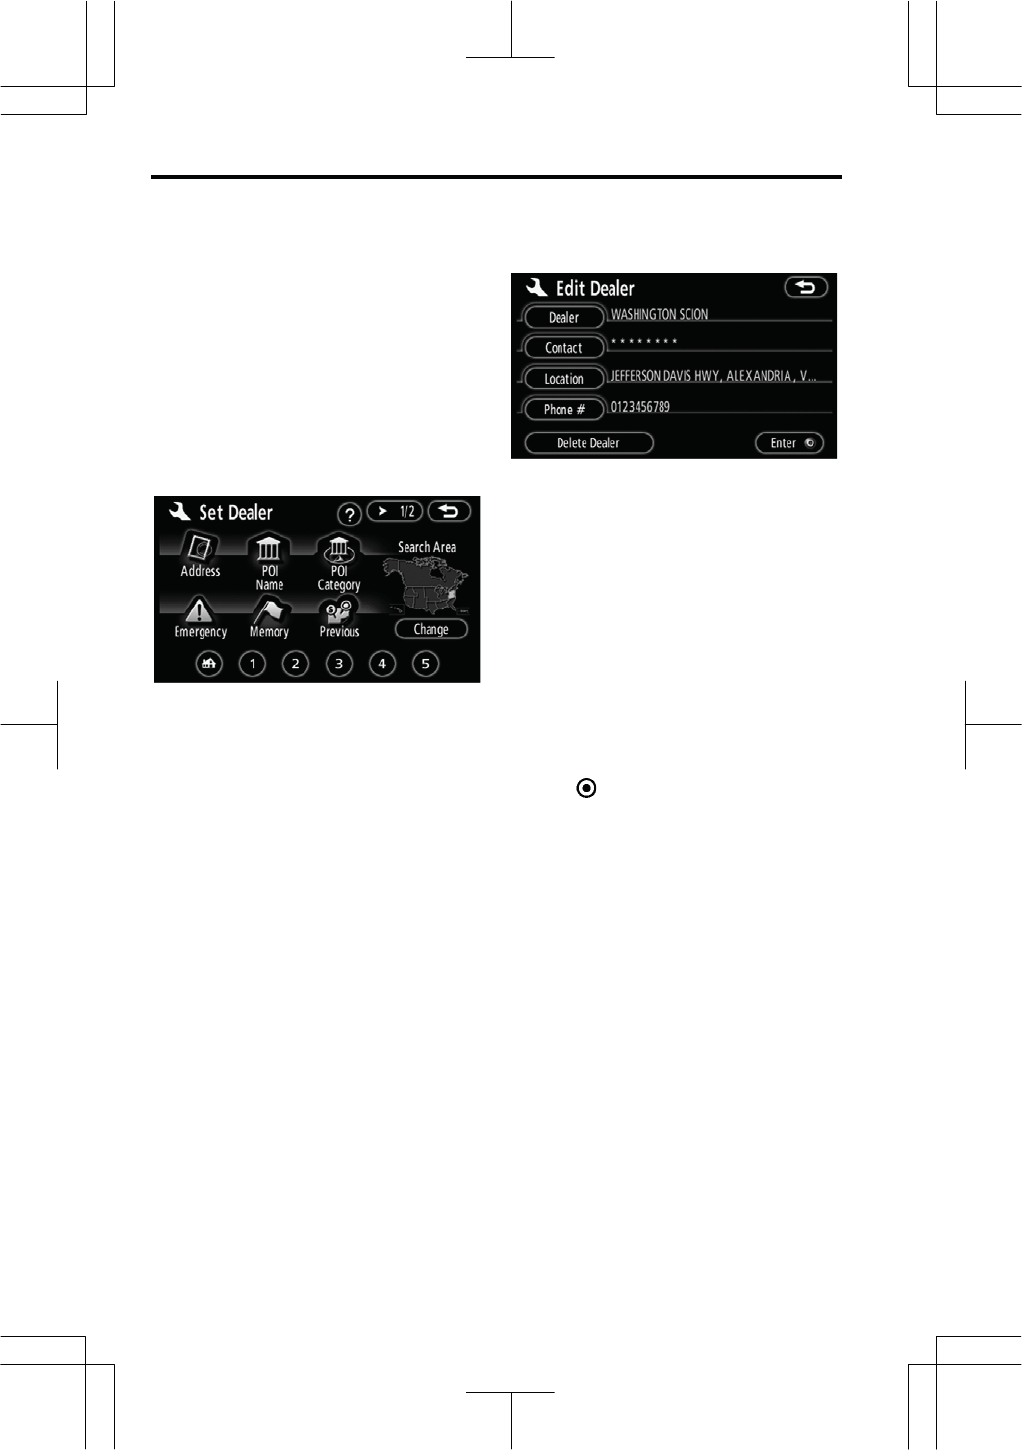
It is possible to register a dealer in the
system. With dealer information regis-
tered, route guidance to the dealer is
available.
1. Push the “INFO” button.
2. Touch “Maintenance” on the “In-
formation” screen.
3. Touch “Set Dealer” on the “Main-
tenance” screen.
4. If the dealer has not been regis-
tered, enter the location of the dealer
in the same way as for a destination
search. (See “Destination search” on
page 42.)
When “Set Dealer” registration is finished,
the “Edit Dealer” screen will be dis-
played.
5. Touch the touch screen button to
be edited.
“Dealer”: To enter the name of a dealer.
(See page 117.)
“Contact”: To enter the name of a
dealer member. (See page 117.)
“Location”: To set a location. (See
page 117.)
“Phone #”: To set a telephone number.
(See page 118.)
“Delete Dealer”: To delete the dealer
information displayed on the screen.
“Enter ”: To set the displayed dealer
as a destination. (See “Starting route
guidance” on page 61.)
— Dealer settin
g
OTHER FUNCTIONS
123
V573_E
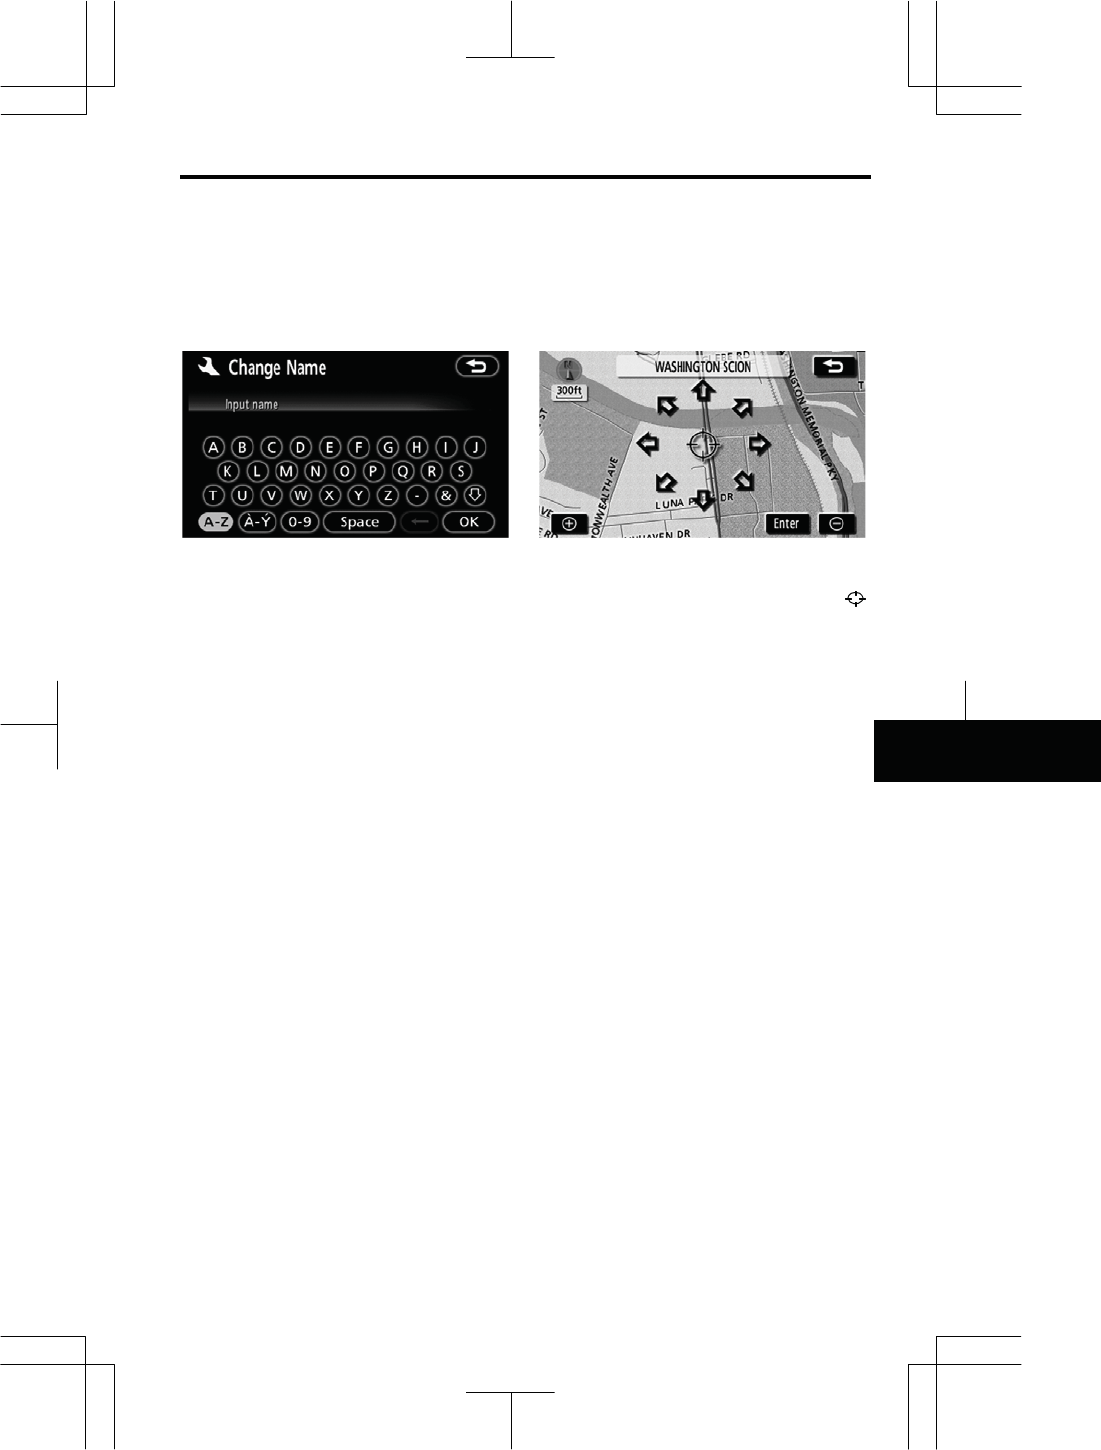
z To edit “Dealer” or “Contact”
1. Touch “Dealer” or “Contact” on
the “Edit Dealer” screen.
2. Enter the name using the alpha-
numeric keys.
Up to 24 letters can be entered.
3. Touch “OK”.
The previous screen will be displayed.
z To edit “Location”
1. Touch “Location” on the “Edit
Dealer” screen.
2. Touch the eight directional touch
screen button to move the cursor
to the desired point on the map.
3. Touch “Enter”.
The previous screen will be displayed.
OTHER FUNCTIONS
124
V573_E
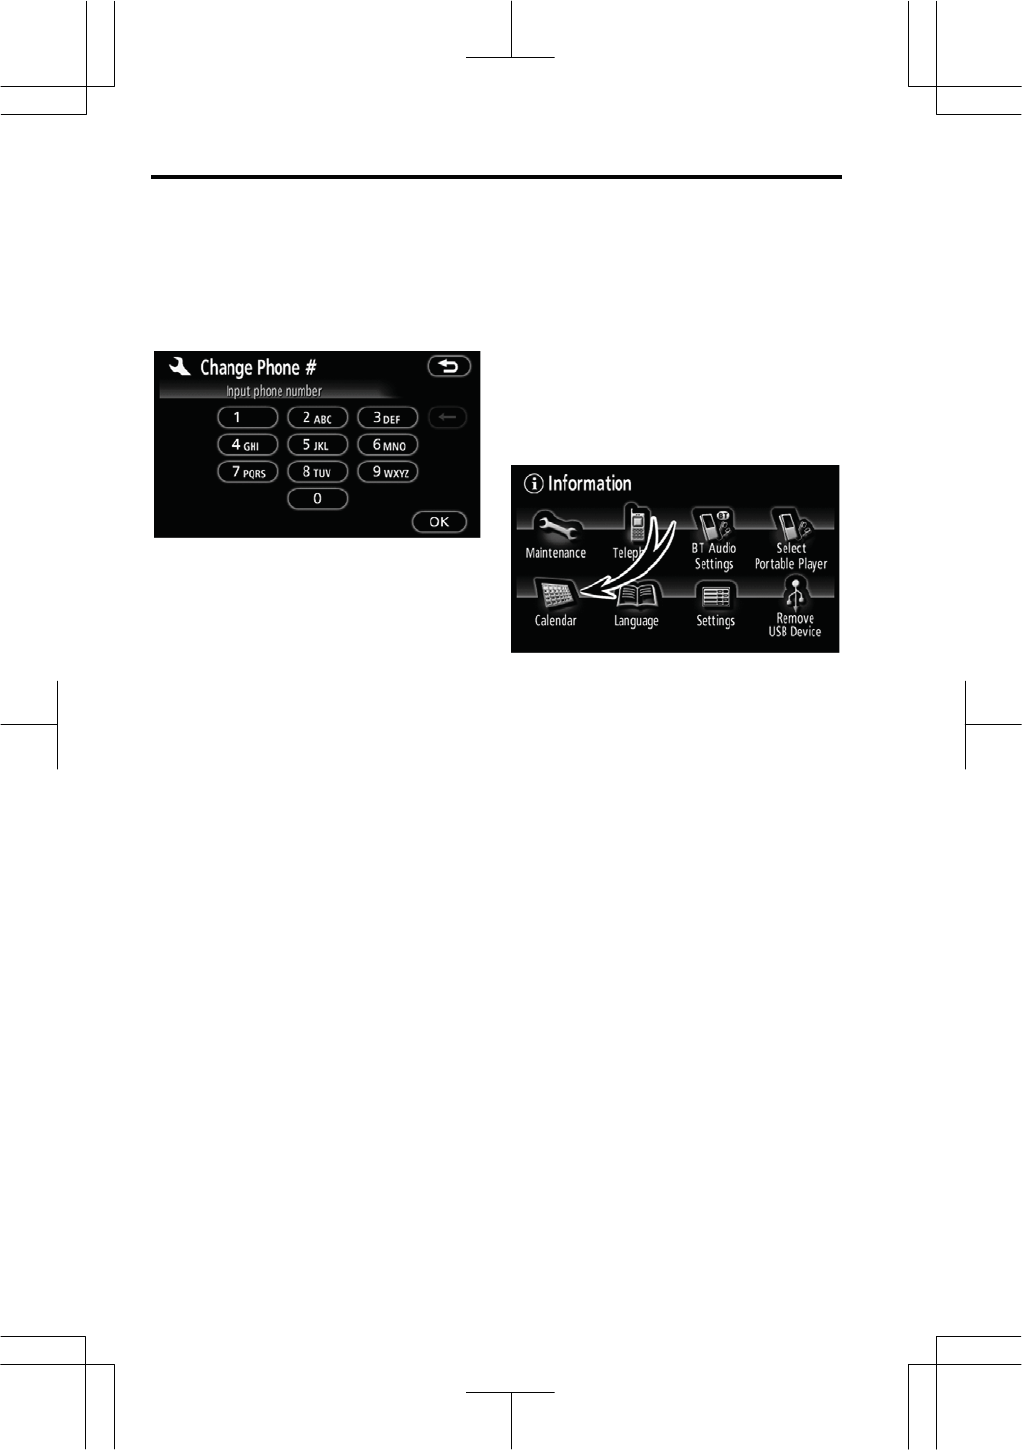
z To edit “Phone #”
1. Touch “Phone #” on the “Edit
Dealer” screen.
2. Enter the number using numeral
keys.
3. Touch “OK”.
The previous screen will be displayed.
It is possible to enter memos for particu-
lar dates on the calendar. The system
informs you of the memo entry when the
system is turned on. (See page 23.)
Memos can also be used for route guid-
ance if the memo has been registered
with location information.
1. Push the “INFO” button.
2. Touch “Calendar”.
Calendar with memo —
OTHER FUNCTIONS
125
V573_E
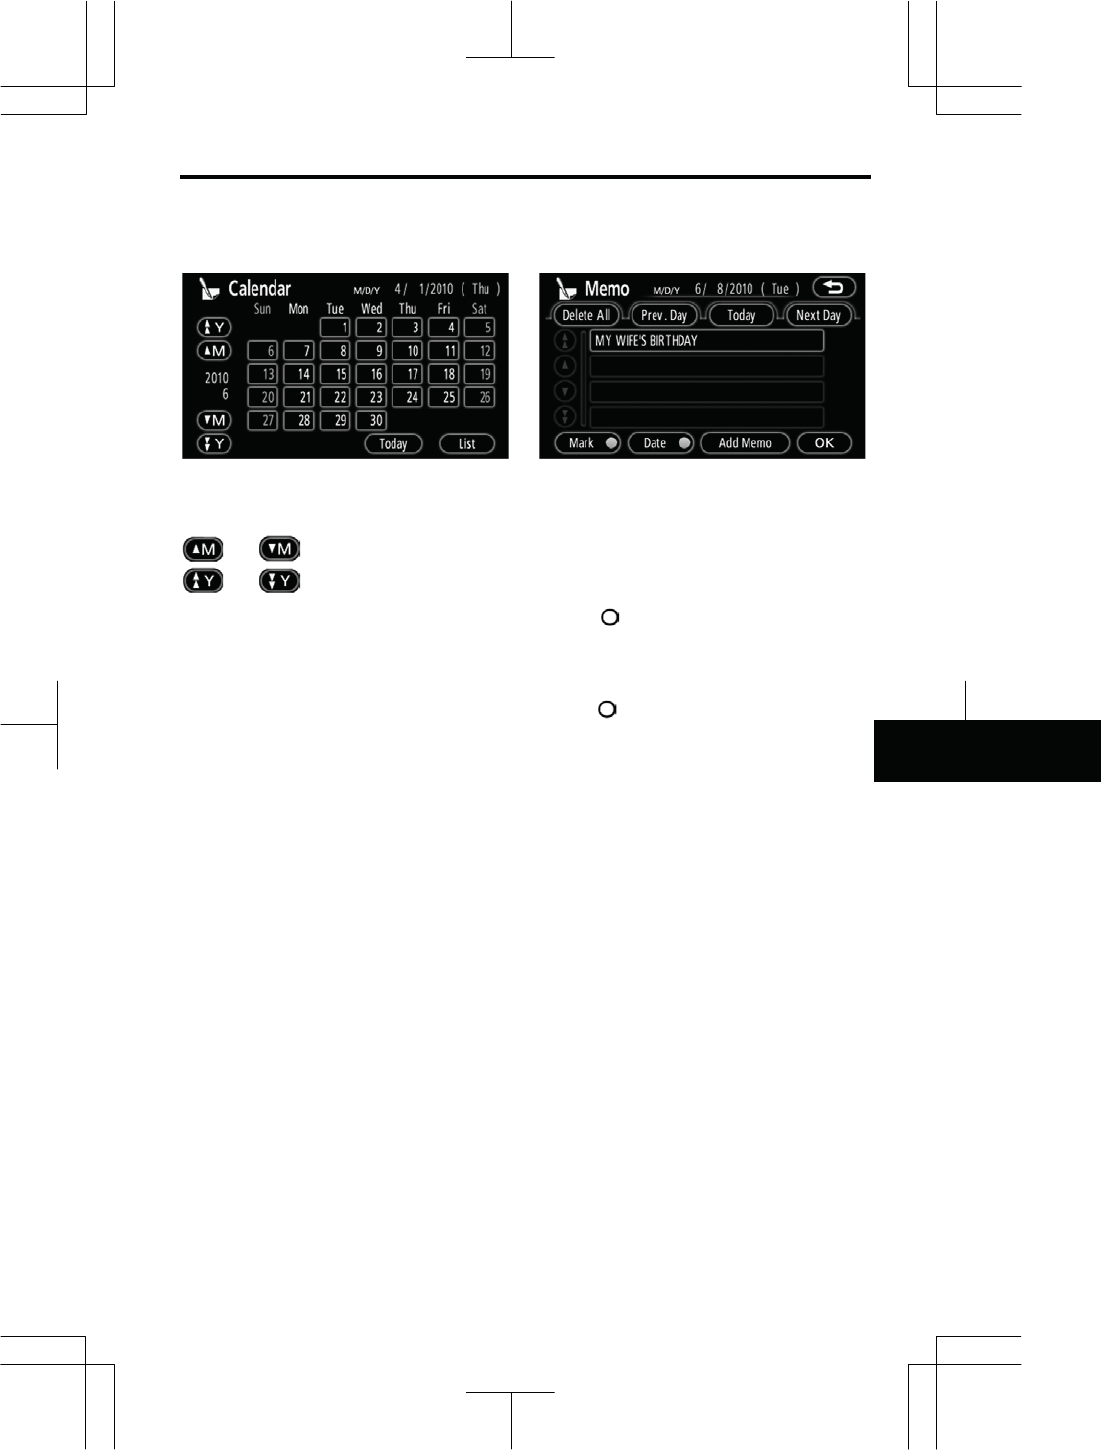
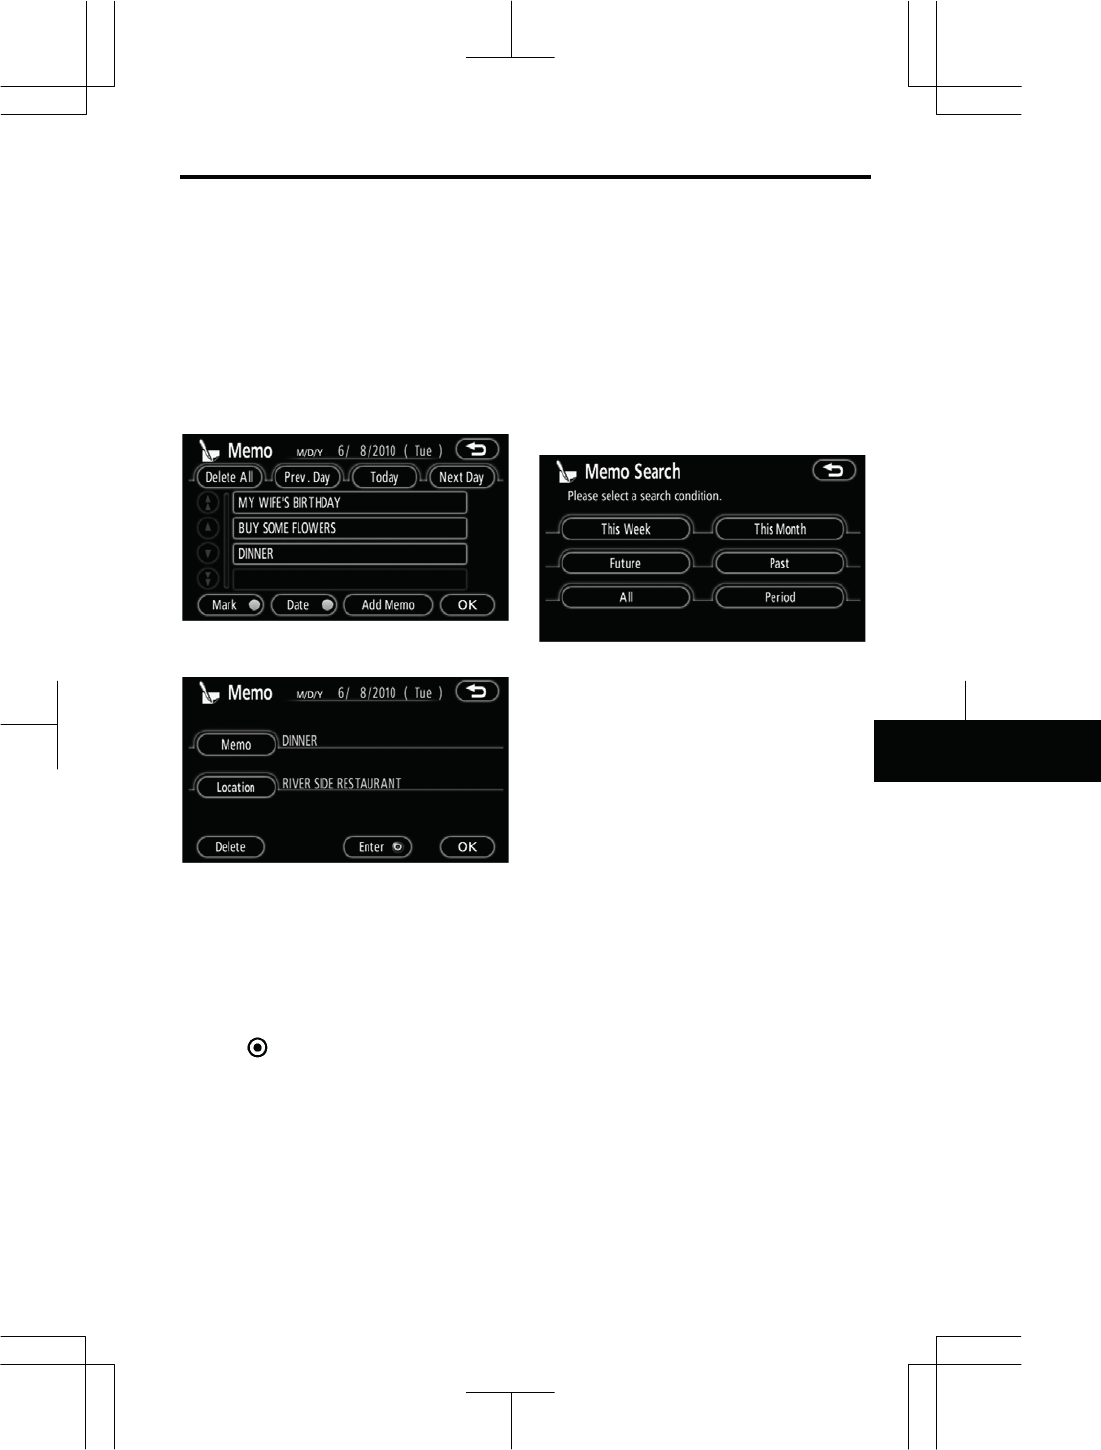
On this screen, the current date is high-
lighted in yellow.
or :To change month.
or :To change year.
“Today”: To display the current month
calendar (if another month will be dis-
played).
“List”: To display the list of registered
memos. (See “ — Memo list” on page
121.)
Touching a date button on the “Calen-
dar” screen displays the “Memo” screen.
Memos can be edited by touching the list
button. (See “ — Editing a memo” on
page 121.)
“Add Memo”: To add a memo. (See
“ — Adding a memo” on page 120.)
“Mark ”: To change the color of the
mark displayed next to the date. To
default the mark color, touch “Delete”
on the “Mark Color” screen.
“Date ”: To change the color of the
date. To default the date color, touch
“Delete” on the “Date Color” screen.
“Prev. Day”: To go to the “Memo”
screen of the previous date.
“Today”: To go to the “Memo” screen
for the current day.
“Next Day”: To go to the “Memo” screen
of the next date.
OTHER FUNCTIONS
126
V573_E
If a memo is added, the system informs
of the memo entry when the system is
started on the memo date. (See page
23.)
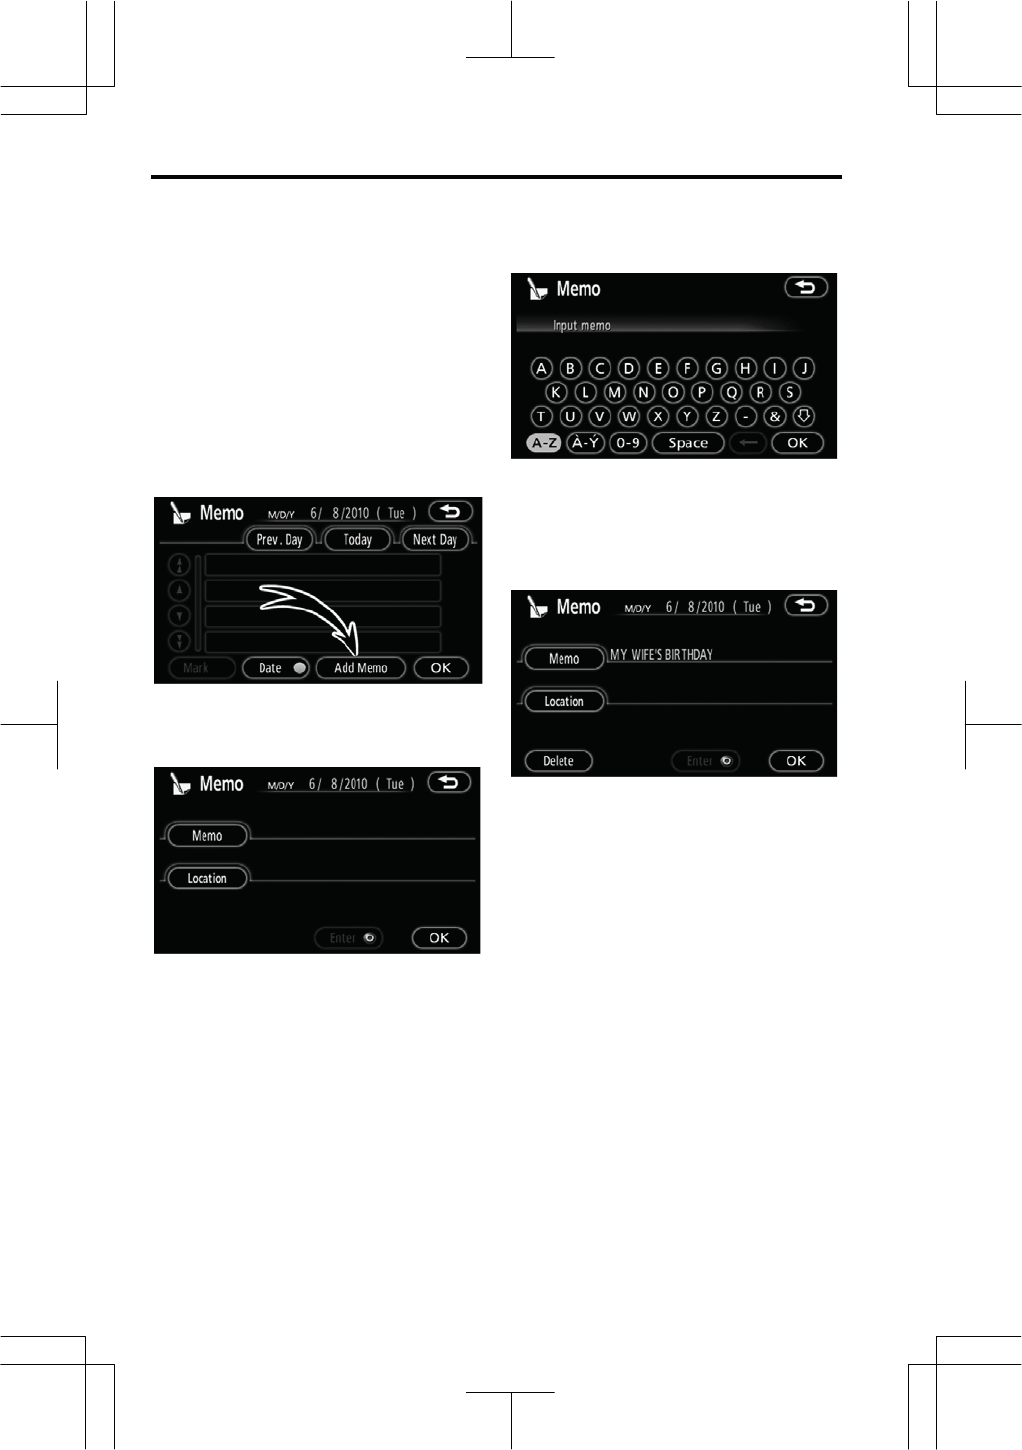
1. Push the “INFO” button.
2. Touch “Calendar” on the “Infor-
mation” screen.
3. Touch the date you want to add a
memo on the “Calendar” screen.
4. Touch “Add Memo”.
Up to 100 memos can be added.
5. Touch “Memo”.
6. Enter text using the keys.
Up to 24 letters can be entered.
After entering the text, touch “OK” at the
bottom right of the screen.
7. When registering information on
the memo, touch “Location”.
A screen similar to the destination
search screen appears. Search the
same way as searching a destination.
(See “Destination search” on page 42.)
— Addin
g
a memo
OTHER FUNCTIONS
127
V573_E
The registered memo can be edited.
1. Push the “INFO” button.
2. Touch “Calendar” on the “Infor-
mation” screen.
3. Touch the day you want to edit a
memo on the “Calendar” screen.
4. Touch the memo to be edited.
5. Touch the item to be edited.
“Memo”: To edit a memo. (See “ —
Adding a memo” on page 120.)
“Location”: To change a registered
location. (See “ — Adding a memo” on
page 120.)
“Enter ”: To set the registered loca-
tion as a destination. (See “Starting
route guidance” on page 61.)
“Delete”: To delete the memo.
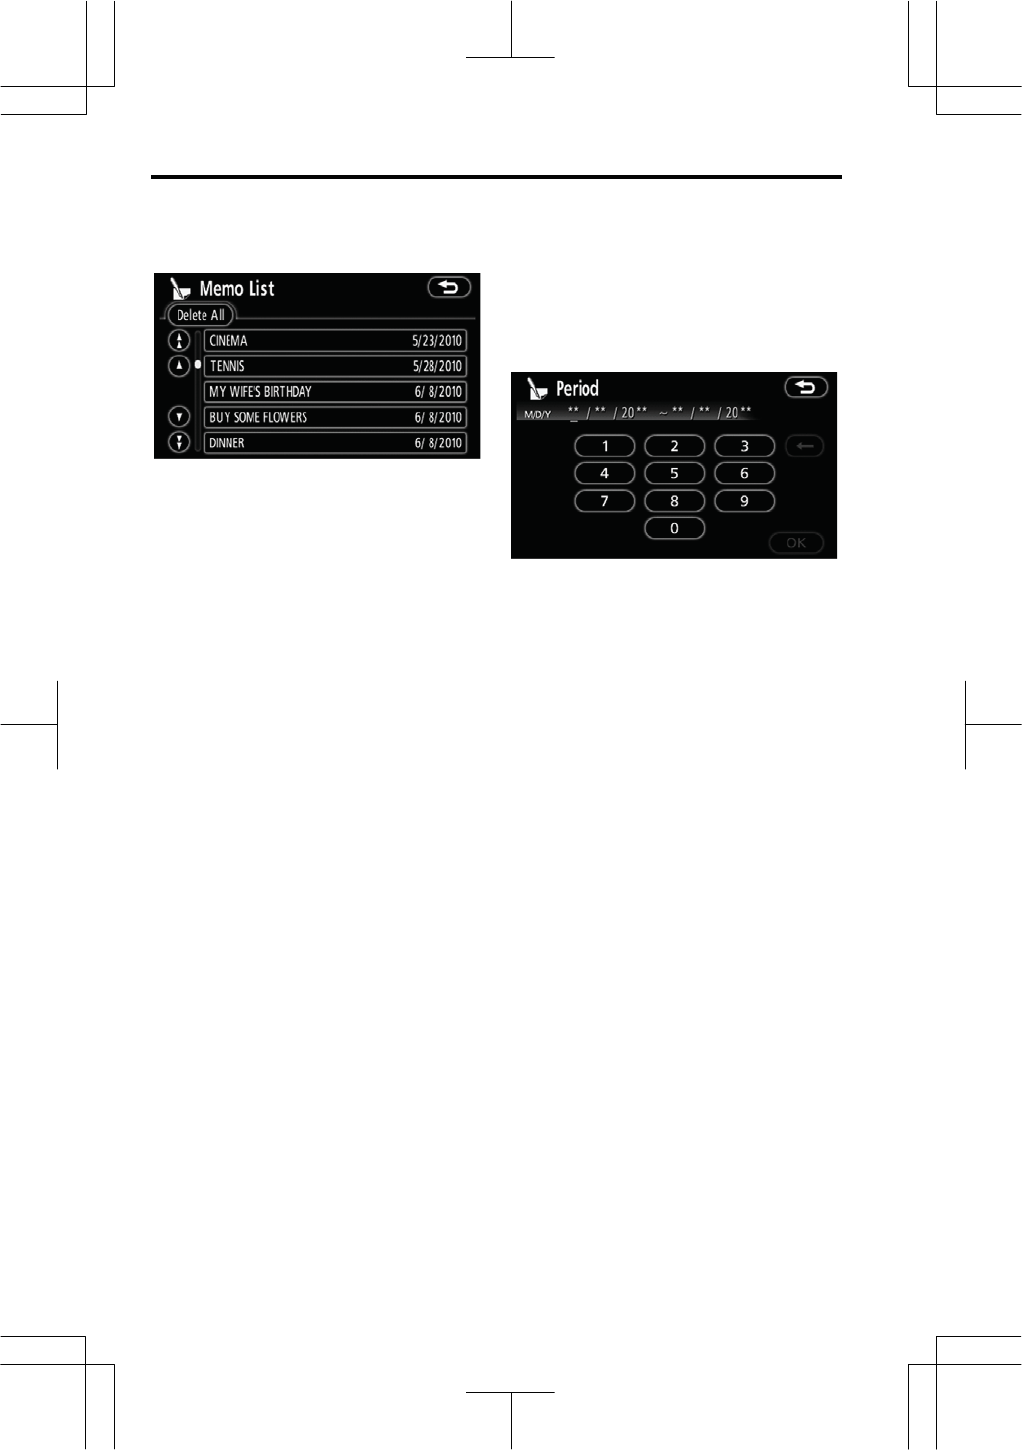
It is possible to display a memo list by
setting a condition.
1. Push the “INFO” button.
2. Touch “Calendar” on the “Infor-
mation” screen.
3. Touch “List” on the “Calendar”
screen.
4. Touch the desired search condi-
tion to list the memos.
“This Week”: To display the list of
memos for the current week.
“This Month”: To display the list of
memos for the current month.
“Future”: To display a list of future
memos.
“Past”: To display the list of past
memos.
“All”: To display the list of all memos.
“Period”: To display the list of memos
for a specified period. (See page 122.)
— Editin
g
a memo — Memo list
OTHER FUNCTIONS
128
V573_E
5. To delete and/or edit the memo,
touch the desired memo button.
“Delete All”: To delete all the displayed
memos.
A message will be displayed.
6. To delete, touch “Yes”. To cancel
the deletion, touch “No”.
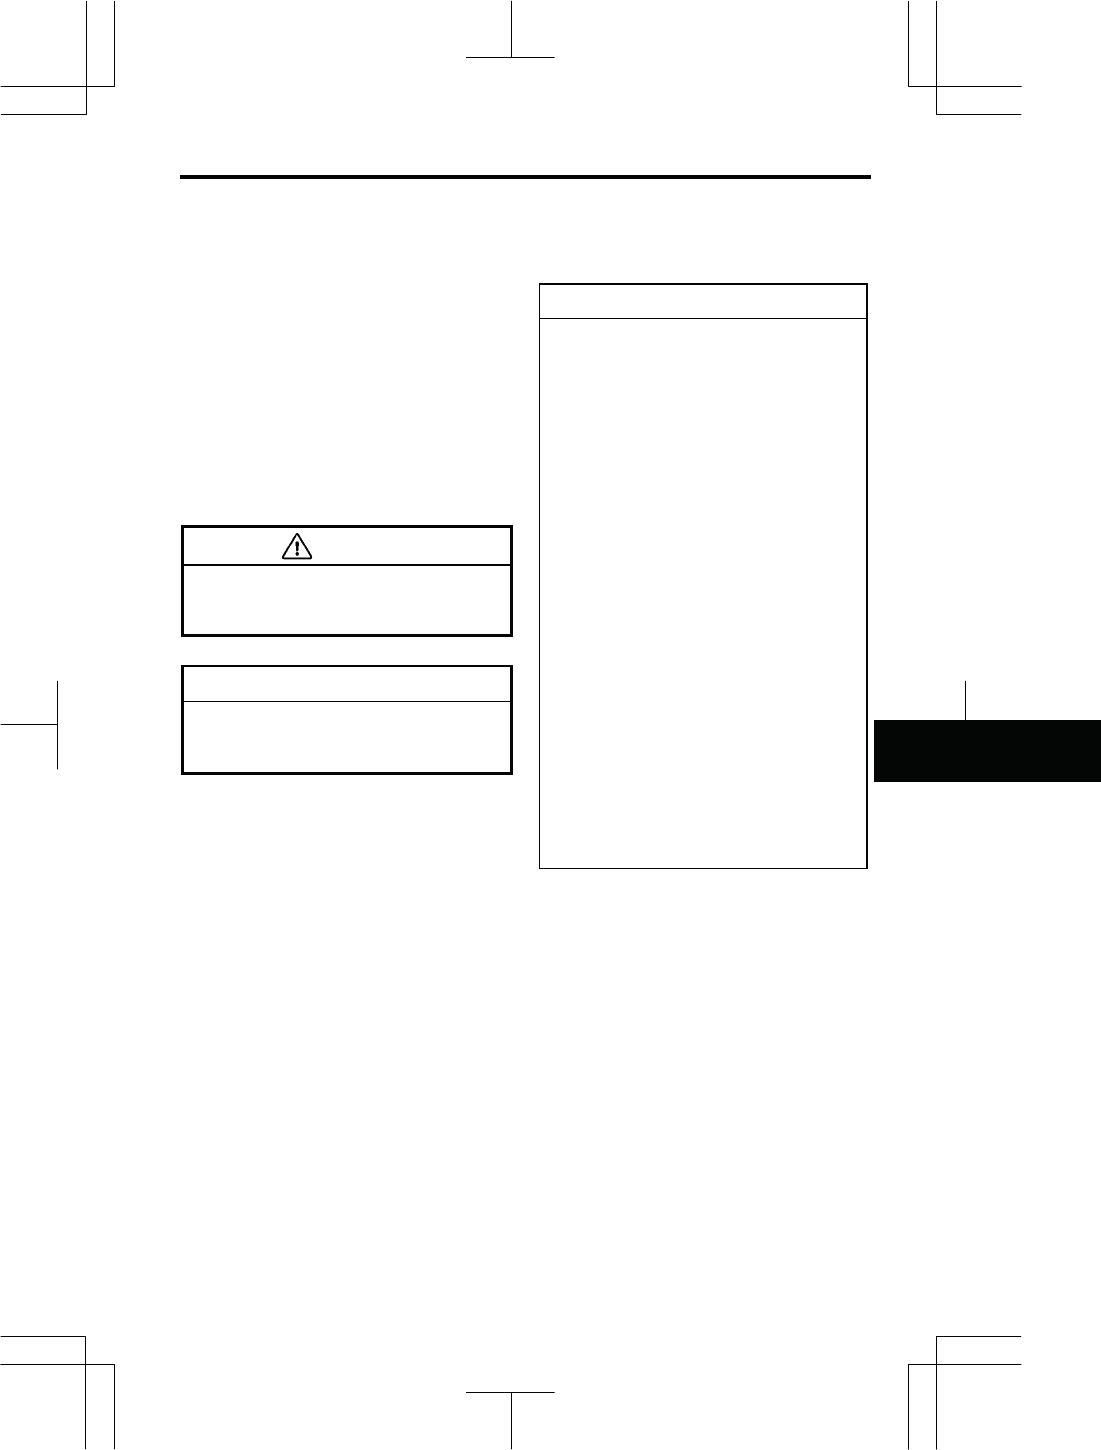
z To display memos for a specified
period of time
1. Touch “Period” on the “Memo
Search” screen.
2. Enter the period using the nu-
meral keys.
The period from January 1, 2009 through
December 31, 2028 can be set for
searching.
3. After setting the period, touch
“OK”.
The “Memo List” screen will be dis-
played.
OTHER FUNCTIONS
129
V573_E
Hands-free system allows you to
make or receive a call without taking
your hands off the steering wheel by
connecting your cellular phone.
This system supports Bluetooth®. Blue-
tooth® is a wireless data system by
which you can call without your cellular
phone being connected with a cable or
placed on a cradle.
If your cellular phone does not support
Bluetooth®, this system can not function.
CAUTION
Use a cellular phone or connect the
Bluetooth®phone only when safe
and legal to do so.
NOTICE
Do not leave your cellular phone in
the car. The temperature indoor
may be high and damage the phone.
INFORMATION
zIn the following conditions, the
system may not function.
zThe cellular phone is turned off.
zThe current position is outside
the communication area.
zThe cellular phone is not con-
nected.
zThe cellular phone has a low
battery.
zIf Bluetooth® devices are used for
hands-free phone and Bluetooth®
audio connections at the same
time, the following may occur.
zThe Bluetooth® connection may
be cut off.
zNoise may occur in the audio
played from the portable player.
zEven if using a cellular phone that
is capable of both hands-free
phone and Bluetooth® audio
connections, simultaneous con-
nection may not be possible in
some cases.
Handsífree system
(
for cellular
p
hone
)
—
OTHER FUNCTIONS
130
V573_E
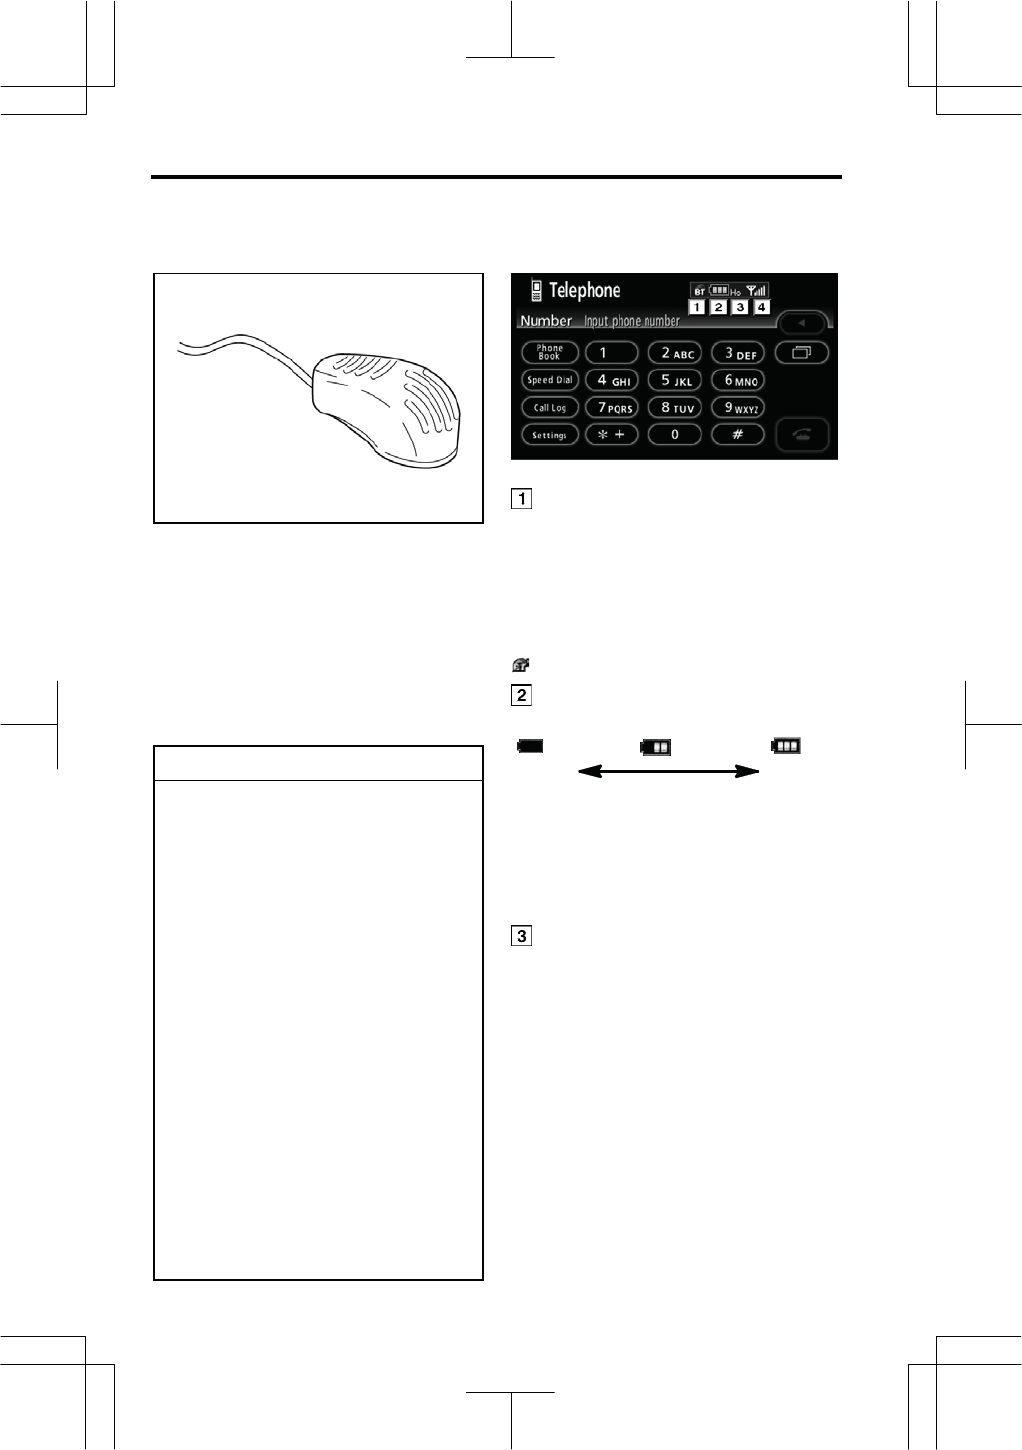
Ź Microphone
You can use the microphone above
when talking on the phone.
The other party’s voice outputs from the
driver’s speaker. When the received
calls or received voice outputs, the audio
from the Audio/video system or voice
guidance from the navigation system will
be muted.
INFORMATION
zTalk alternately with the other party
on the phone. If you talk at the same
time, the voice may not reach each
other. (It is not a malfunction.)
zKeep the volume of receiving voice
down. Otherwise, echo is coming
up. When you talk on the phone,
speak clearly towards the micro-
phone.
zIn the following situations, your
voice may not reach the other party.
zDriving on unpaved road. (Mak-
ing a traffic noise.)
zDriving at the high speed.
zThe window is open.
zTurning the air-conditioning vents
towards the microphone.
zThe sound of the air-conditioning
fan is loud.
zThe cellular phone network has a
problem.
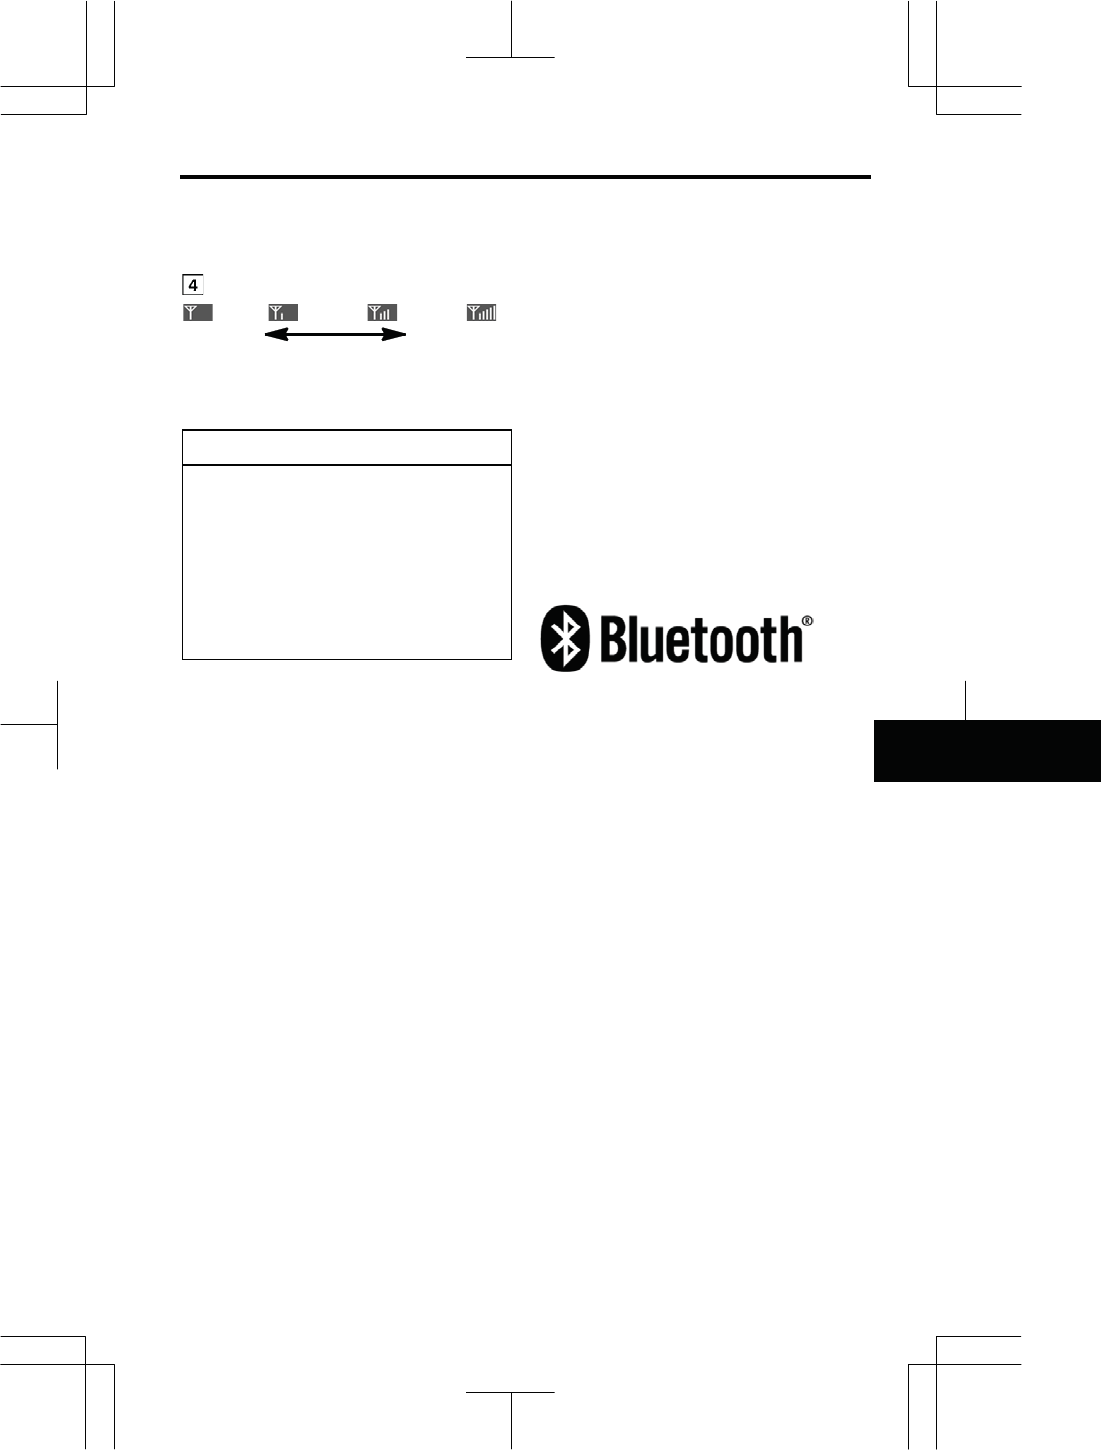
Indicates the condition of the
Bluetooth® connection.
“Blue” indicates an excellent connection
to Bluetooth®.
“Yellow” indicates a bad connection to
Bluetooth®, resulting in possible deterio-
ration of voice quality.
: No connection to Bluetooth®.
Indicates the amount of battery
charge left.
Empty Full
It is not displayed while the Bluetooth®
is not connected.
The amount left does not always corre-
spond with the one of your cellular phone.
This system doesn’t have a charging
function.
Indicates the receiving area.
“Rm” is displayed when receiving in
Roaming area.
“Ho” is displayed when receiving in
Home area.
OTHER FUNCTIONS
131
V573_E
Indicates the level of reception.
Too bad Excellent
The level of reception does not always
correspond with the one of your cellular
phone.
INFORMATION
This system supports the following
service.
zHFP (Hands Free Profile) Ver. 1.0
zOPP (Object Push Profile) Ver. 1.1
If your cellular phone does not sup-
port HFP, you cannot enter the
Bluetooth® phone, and take OPP
service individually.
The Bluetooth® connection utilizes
the Bluetooth® antenna. The indica-
tion of the Bluetooth® connection may
turn yellow and the system may not
function when you use the Bluetooth®
phone in the following conditions:
z Your cellular phone is hidden behind
the display (behind the seat or in the
glove box or console box).
z Your cellular phone touches or is
covered with metal materials.
z Your cellular phone is in the trunk.
Leave the Bluetooth® phone in a place
where the “Blue” indication is displayed.
Bluetooth is a trademark owned by
Bluetooth SIG, Inc.
When you change ownership of your
car:
Personal information is stored when
using Hands-free system. To protect
your privacy, it is recommended to
initialize the system before changing
ownership of your car. (See “(c) De-
lete personal data” on page 170.)
If you initialize the system, previously
stored data will be deleted permanently.
Please be aware that once initialize the
system, deleted personal data can not
be restored.
You can initialize the following data in
the system.
z Phone book data
z Dialed numbers and received calls
z Speed dial
z Bluetooth® phone data
z Security code
OTHER FUNCTIONS
132
V573_E
FCC ID: XEMNA08A02
IC ID: 8192A-NA08A02
MADE IN JAPAN
This device complies with Part 15
of the FCC Rules and RSSí210 of
industry Canada. Operation is sub-
ject to the following two condi-
tions: (1) This device may not
cause harmful interference, and (2)
This device must accept any inter-
ference received, including inter-
ference that may cause undesired
operation.
CAUTION
FCC Warning:
Changes or modifications not ex-
pressly approved by AISIN AW Co.,
Ltd for compliance could void the
user’s authority to operate the
equipment.
NOTE: This equipment has been
tested and found to comply with the
limits for a Class B digital device, pur-
suant to part 15 of the FCC Rules.
These limits are designed to provide
reasonable protection against harmful
interference in a residential installation.
This equipment generates, uses and
can radiate radio frequency energy
and, if not installed and used in accor-
dance with the instructions, may cause
harmful interference to radio commu-
nications. However, there is no guar-
antee that interference will not occur in
a particular installation. If this equip-
ment does cause harmful interference
to radio or television reception, which
can be determined by turning the
equipment off and on, the user is en-
couraged to try to correct the interfer-
ence by one or more of the following
measures:
íReorient or relocate the receiving an-
tenna.
íIncrease the separation between the
equipment and receiver.
íConnect the equipment into an outlet
on a circuit different from that to which
the receiver is connected.
íConsult the dealer or an experienced
radio/TV technician for help.
OTHER FUNCTIONS
133
V573_E
CAUTION: Radio Frequency Radiation
Exposure
This equipment complies with FCC
radiation exposure limits set forth for
uncontrolled equipment and meets the
FCC radio frequency (RF) Exposure
Guidelines in Supplement C to OET65.
This equipment has very low levels of
RF energy that it deemed to comply
without maximum permissive exposure
evaluation (MPE). But it is desirable
that it should be installed and operated
with at least 20 cm and more between
the radiator and person’s body (ex-
cluding extremities: hands, wrists, feet
and legs).
Coílocation: This transmitter must not
be coílocated or operated in conjunc-
tion with any other antenna or trans-
mitter.
To use the hands-free system, you
need to enter your phone into the
system. Once you have registered it,
you can make a hands-free call.
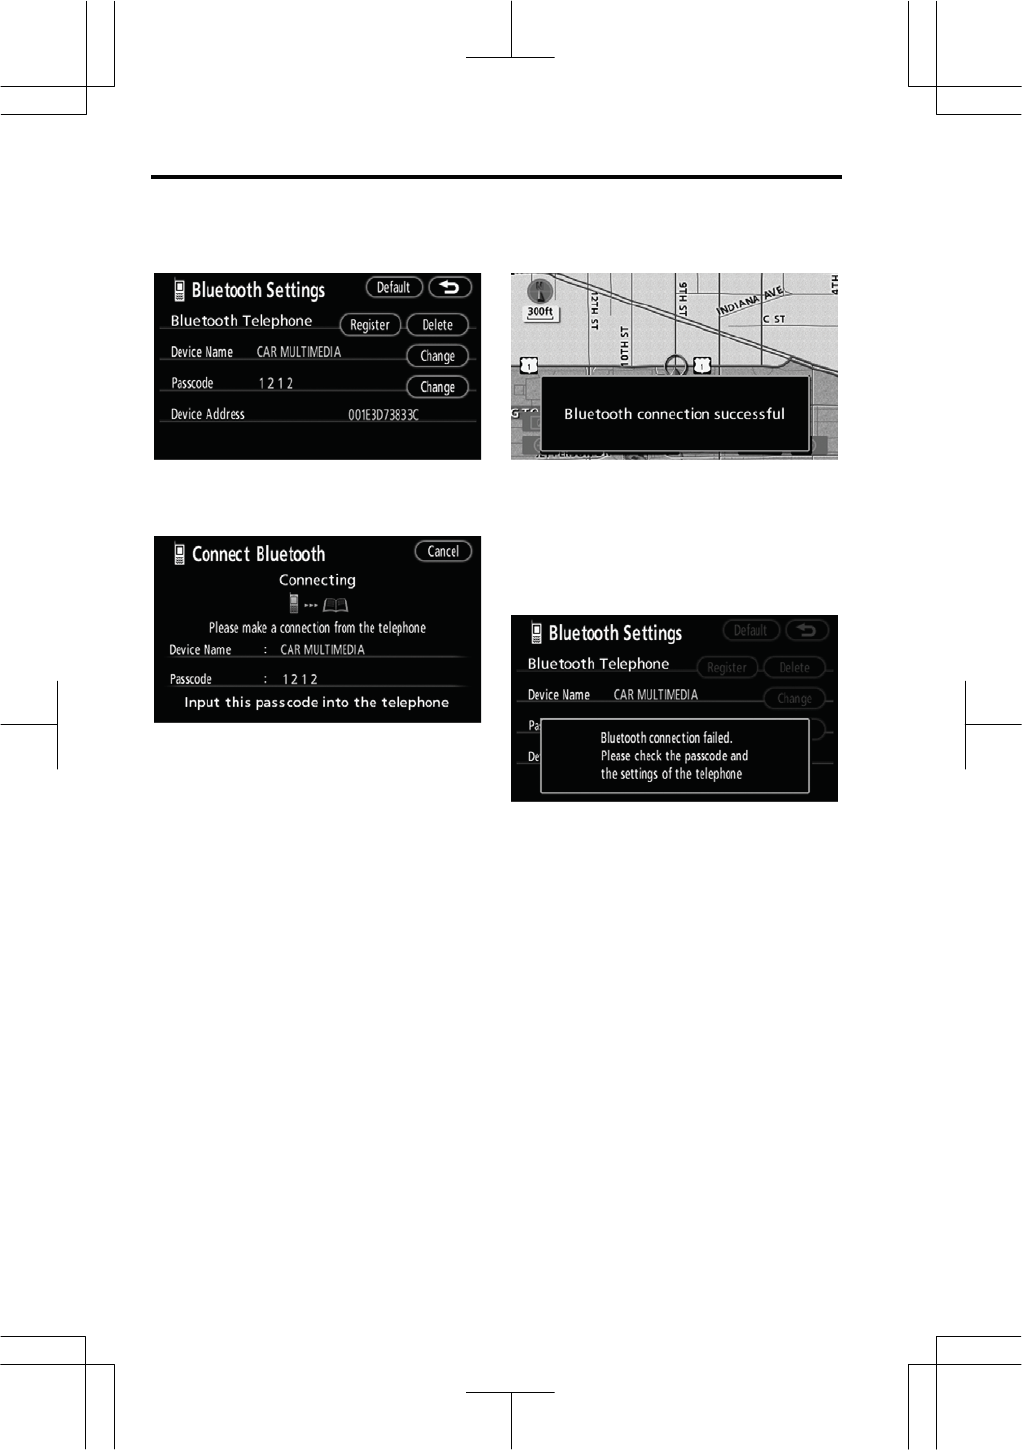
1. Push the “INFO” button.
2. Touch “Telephone” to display the
“Telephone” screen.
3. Touch “Settings” to display the
“Settings” screen.
4. Touch “Bluetooth” to display the
“Bluetooth Settings” screen.
: Bluetooth is a registered trademark
of Bluetooth SIG. Inc.
— Register a Bluetooth®
p
hone
OTHER FUNCTIONS
134
V573_E
5. Touch “Register” to connect your
cellular phone to the system.
6. When this screen is displayed,
input the passcode displayed on the
screen into the phone.
For the operation of the phone, see the
manual that comes with your cellular
phone.
If you want to cancel it, touch “Cancel”.
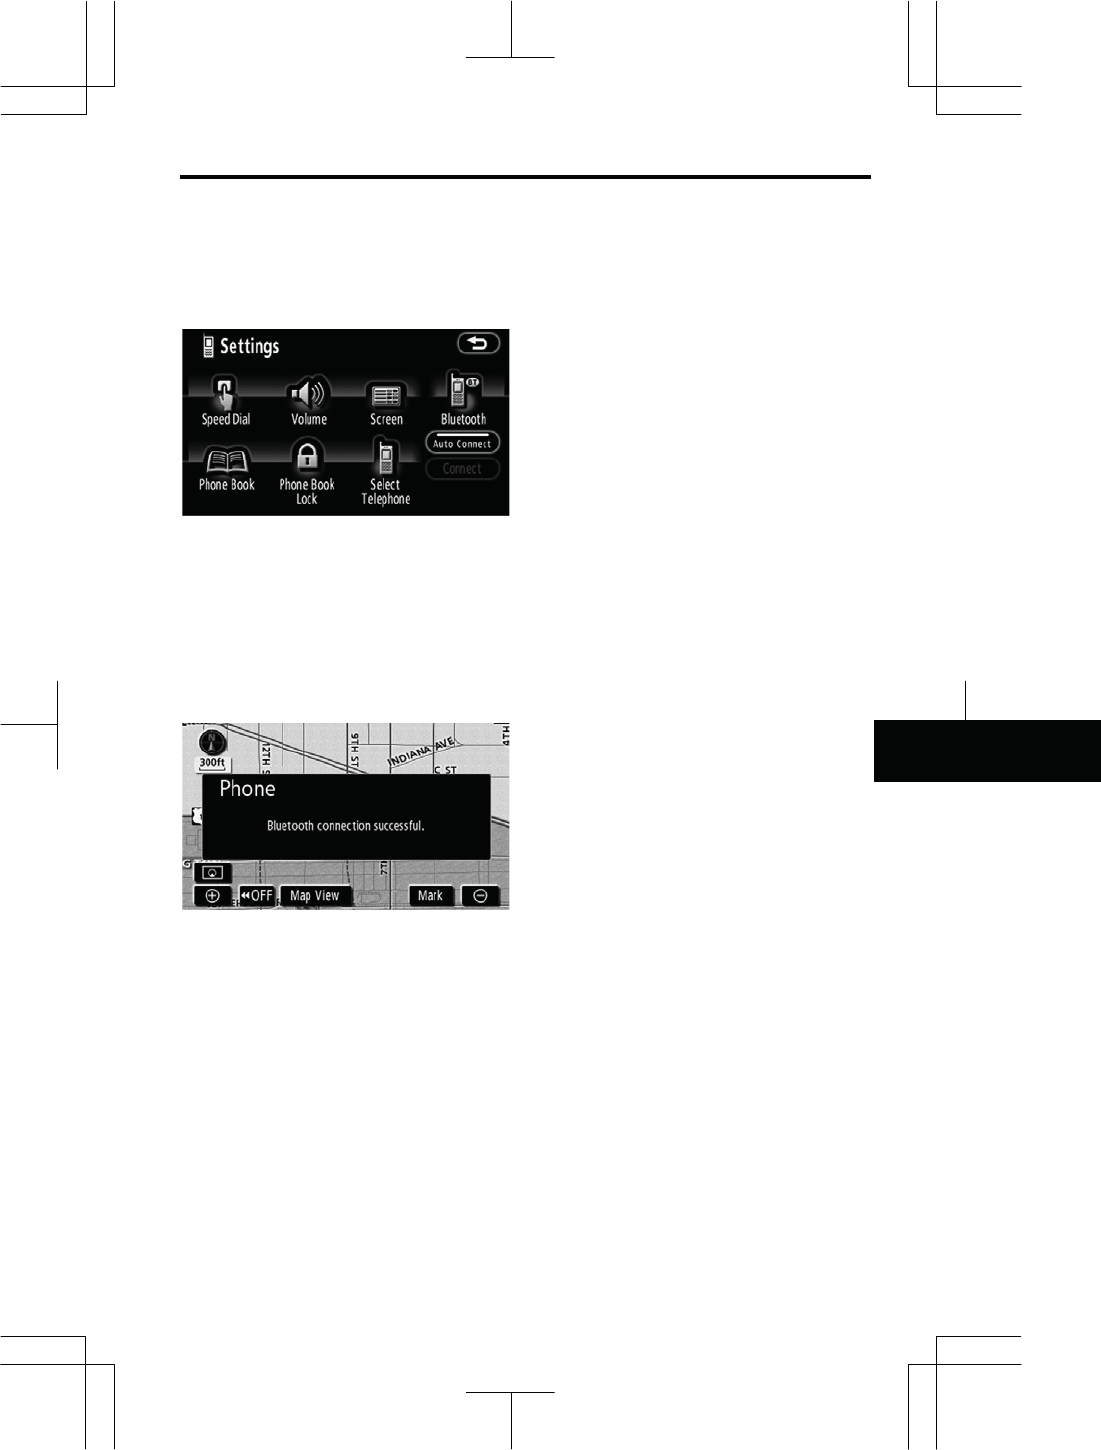
7. When the connection is com-
pleted, this screen is displayed.
You do not need to enter the phone in
case of using the same one.
When this screen is displayed, follow the
instructions on the screen and start
again from step 5.
OTHER FUNCTIONS
135
V573_E
z Connecting a Bluetooth® phone
AUTOMATICALLY
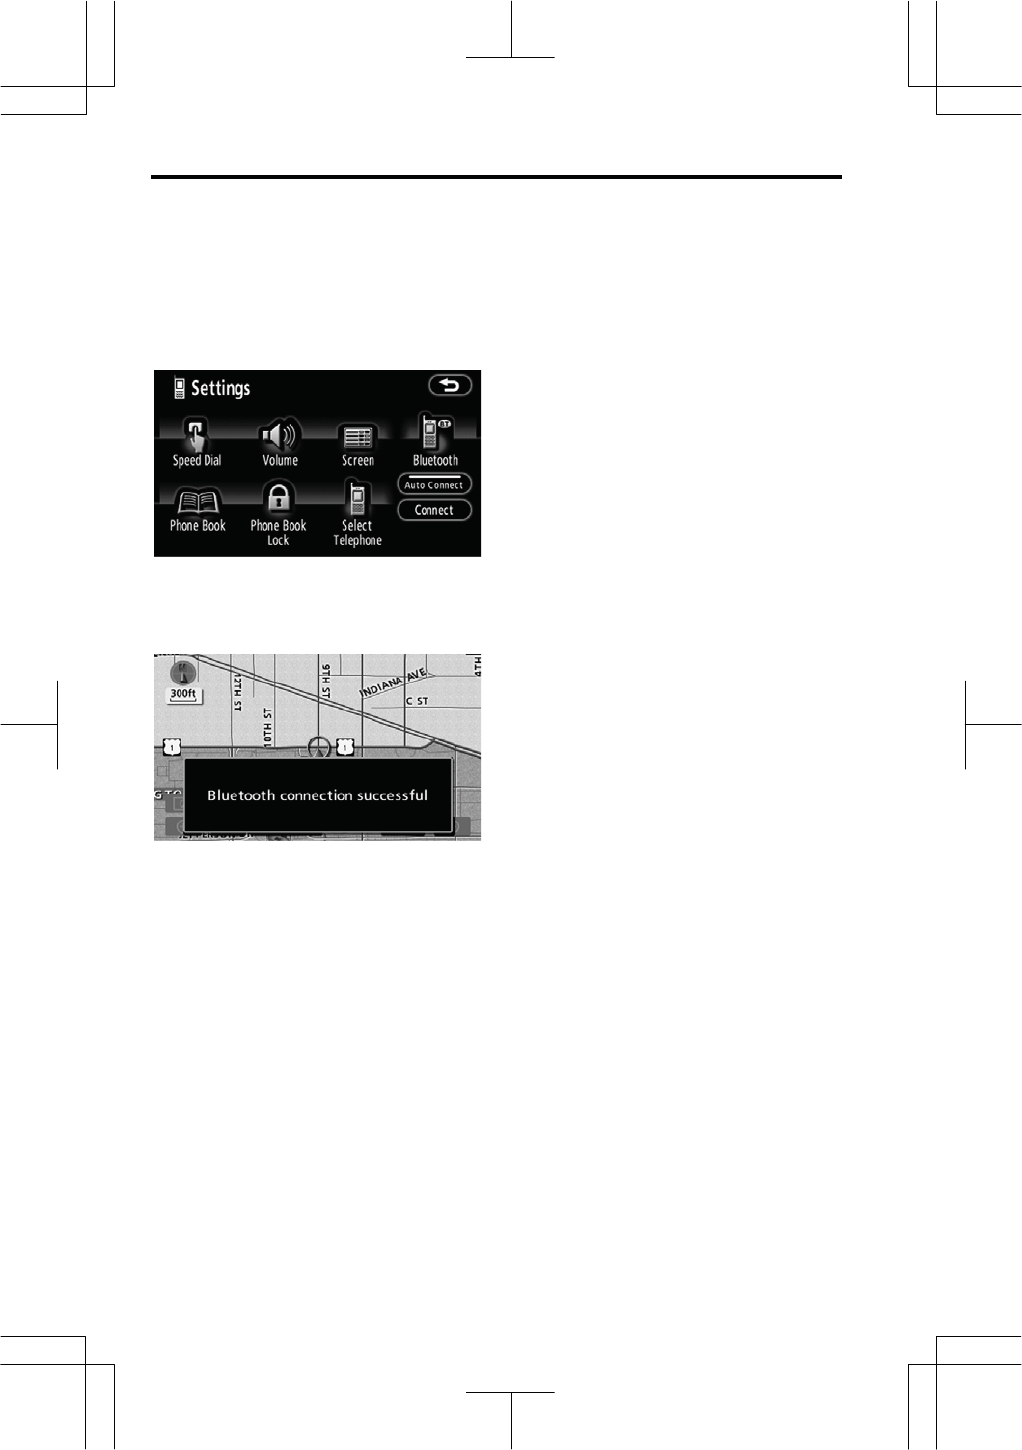
When you register your phone, auto
connection will be turned on. Always
set it to this mode and leave the
Bluetooth® phone in a condition
where connection can be established.
Each time you touch “Auto Connect”,
auto connection will be switched on or
off.
Vehicles with smart entry and start sys-
tem—
When the “ENGINE START STOP”
switch is in the ACCESSORY or
IGNITION ON mode, the selected
Bluetooth® phone will be automati-
cally connected and the connection
result is displayed.
This screen appears when the Blue-
tooth® phone is first connected after the
“ENGINE START STOP” switch is turned
to the ACCESSORY or IGNITION ON
mode.
Vehicles without smart entry and start
system—
When the engine switch is in ACC or
ON position, the selected Bluetooth®
phone will be automatically con-
nected and the connection result is
displayed.
This screen appears when the Blue-
tooth®phone is first connected after the
engine switch is in ACC or ON position.
OTHER FUNCTIONS
136
V573_E
MANUALLY
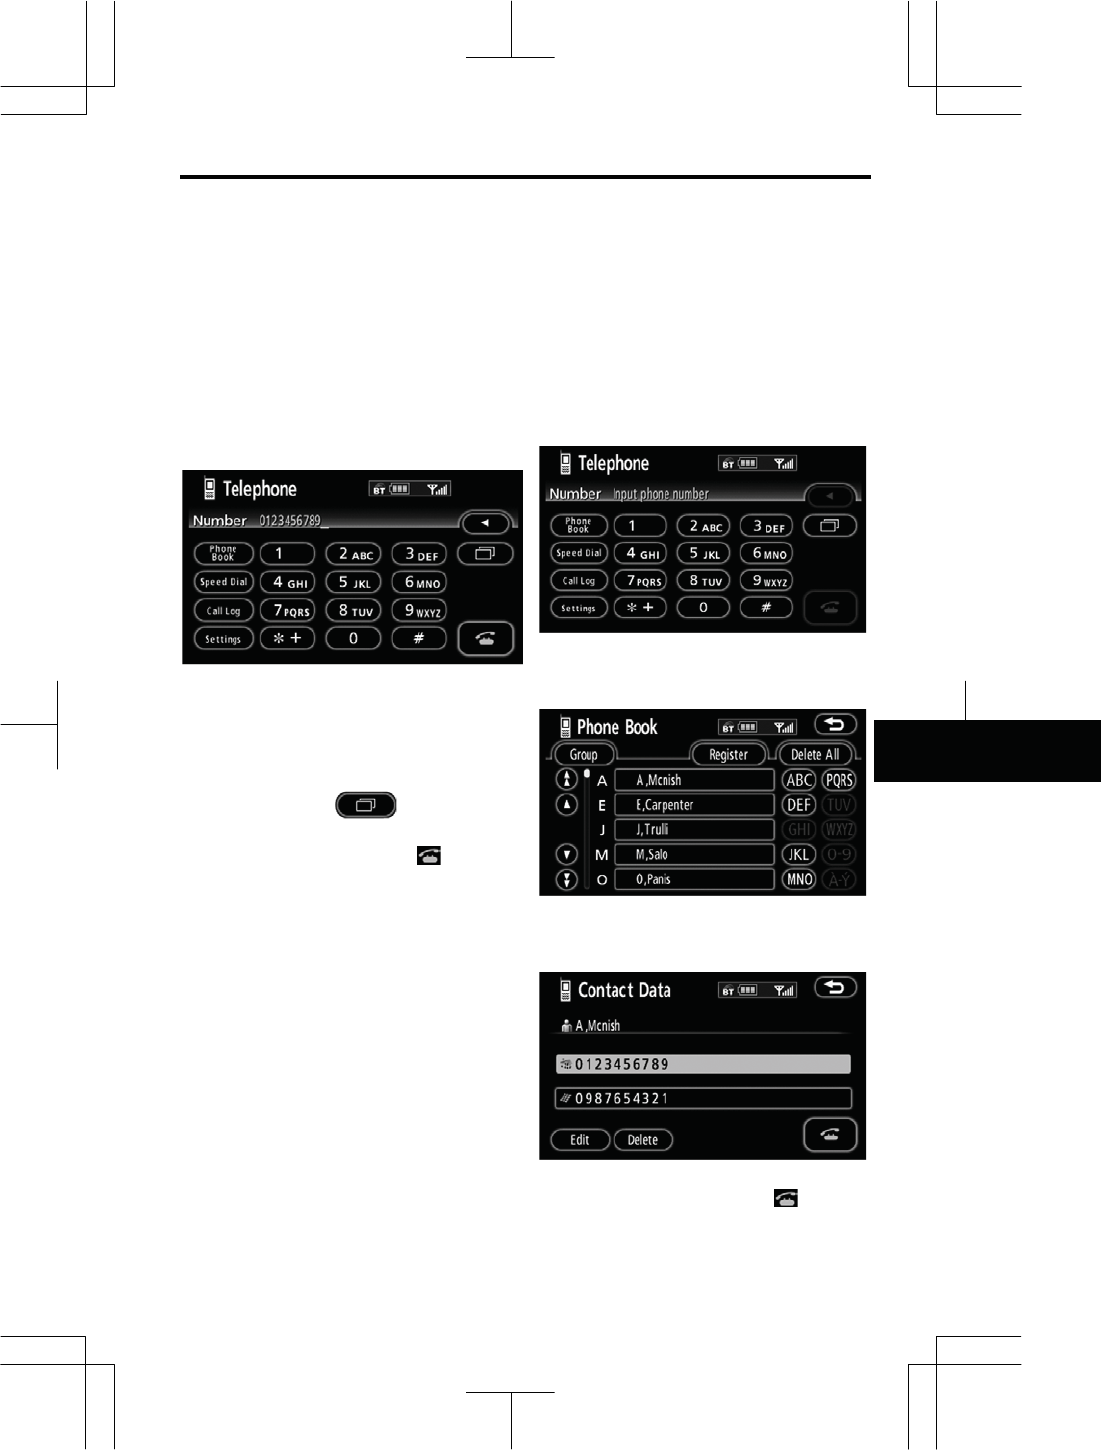
When the auto connection failed or
turned off, you have to connect Blue-
tooth® manually.
Touch “Connect” after having en-
abled the Bluetooth® connection on
the phone.
When the connection is completed, this
screen is displayed.
Now you can use the Bluetooth® phone.
z Reconnecting the Bluetooth®
phone
Vehicles with smart entry and start sys-
tem—
If the Bluetooth® phone is discon-
nected with a poor reception from the
Bluetooth® network when the
“ENGINE START STOP” switch is in
the ACCESSORY or IGNITION ON
mode, the system automatically re-
connects the Bluetooth® phone. In
this case, the connection result is not
displayed.
If the Bluetooth® is disconnected on pur-
pose such as you turned your cellular
phone off, this does not happen. Re-
connect it by the following methods.
z Select the Bluetooth® phone again.
z Enter the Bluetooth® phone.
Vehicles without smart entry and start
system—
If the Bluetooth®phone is discon-
nected with a poor reception from the
Bluetooth®network when the engine
switch is in ACC or ON position, the
system automatically reconnects the
Bluetooth® phone. In this case, the
connection result is not displayed.
If the Bluetooth®is disconnected on pur-
pose such as you turned your cellular
phone off, this does not happen. Re-
connect it by the following methods.
z Select the Bluetooth® phone again.
z Enter the Bluetooth® phone.
OTHER FUNCTIONS
137
V573_E
After you enter the Bluetooth® phone,
you can call by using hands-free sys-
tem. You can call using the 6 meth-
ods described below.
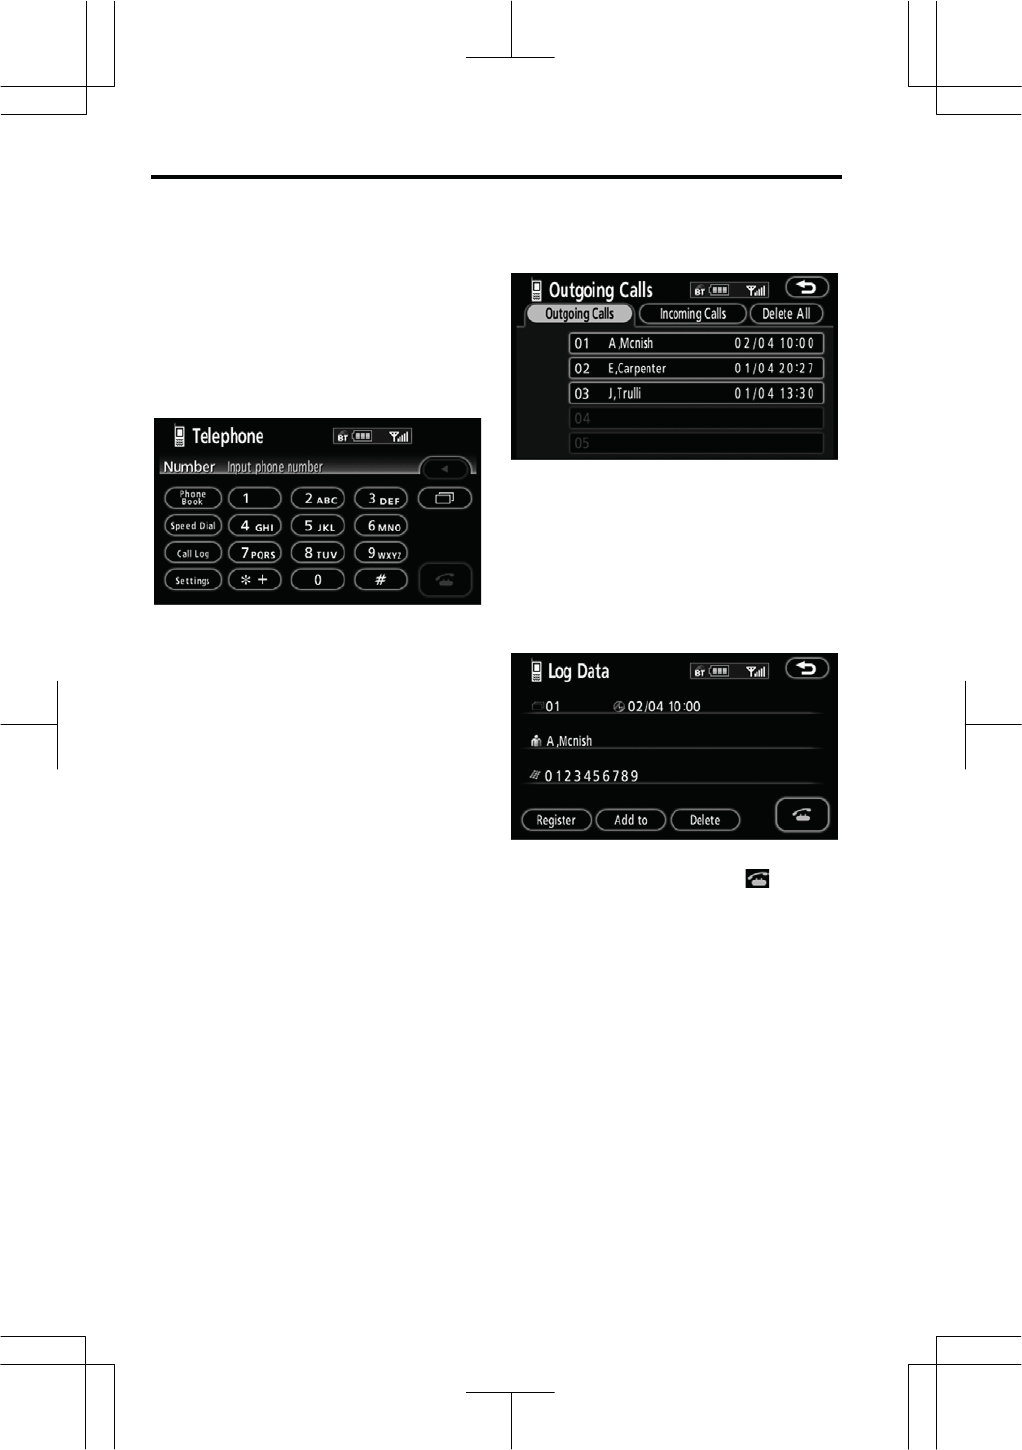
z By key pad
You can call by inputting the tele-
phone number.
This cannot be operated while driving.
Touch the desired key to input the
telephone number.
Each time you touch Ż, an inputted digit
is deleted.
When you touch , the number
you called last is inputted.
Touch the on-hook button ( ) on the
screen.
z By phone book
You can call by phone book data
which is transferred from your cellular
phone.
The system has one phone book.
You can register up to 1000 numbers.
This cannot be operated while driving.
1. Touch “Phone Book” to display
the “Phone Book” screen.
2. Select the desired number from
the list.
Touch the on-hook button ( ) on the
screen.
— Call on the Bluetooth®
p
hone
OTHER FUNCTIONS
138
V573_E
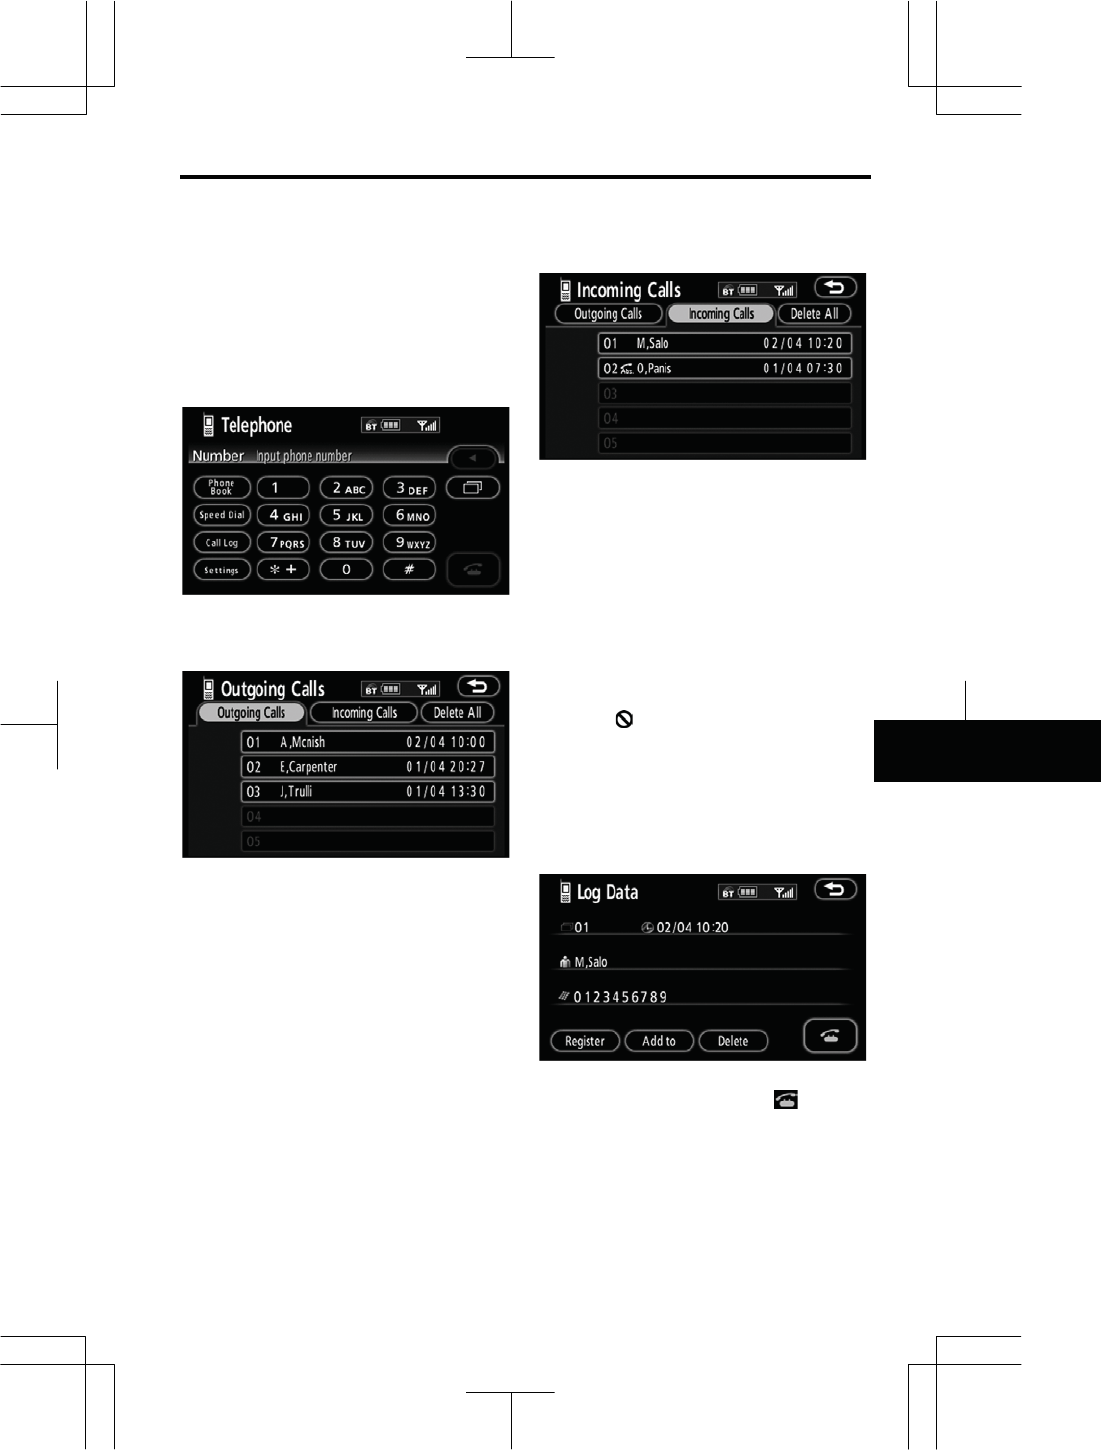
z By dialed numbers
You can call by dialed number. The
system memorizes up to 5 dialed
numbers. If it is more than 5, the
oldest number is deleted.
This cannot be operated while driving.
1. Touch “Call Log” to display the
“Outgoing Calls” screen.
z When you call by phone book, the
name (if registered) is displayed.
z When you call the same number
continuously, only the newest num-
ber is registered.
2. Select the desired number from
the list.
Touch the on-hook button ( ) on the
screen.
OTHER FUNCTIONS
139
V573_E
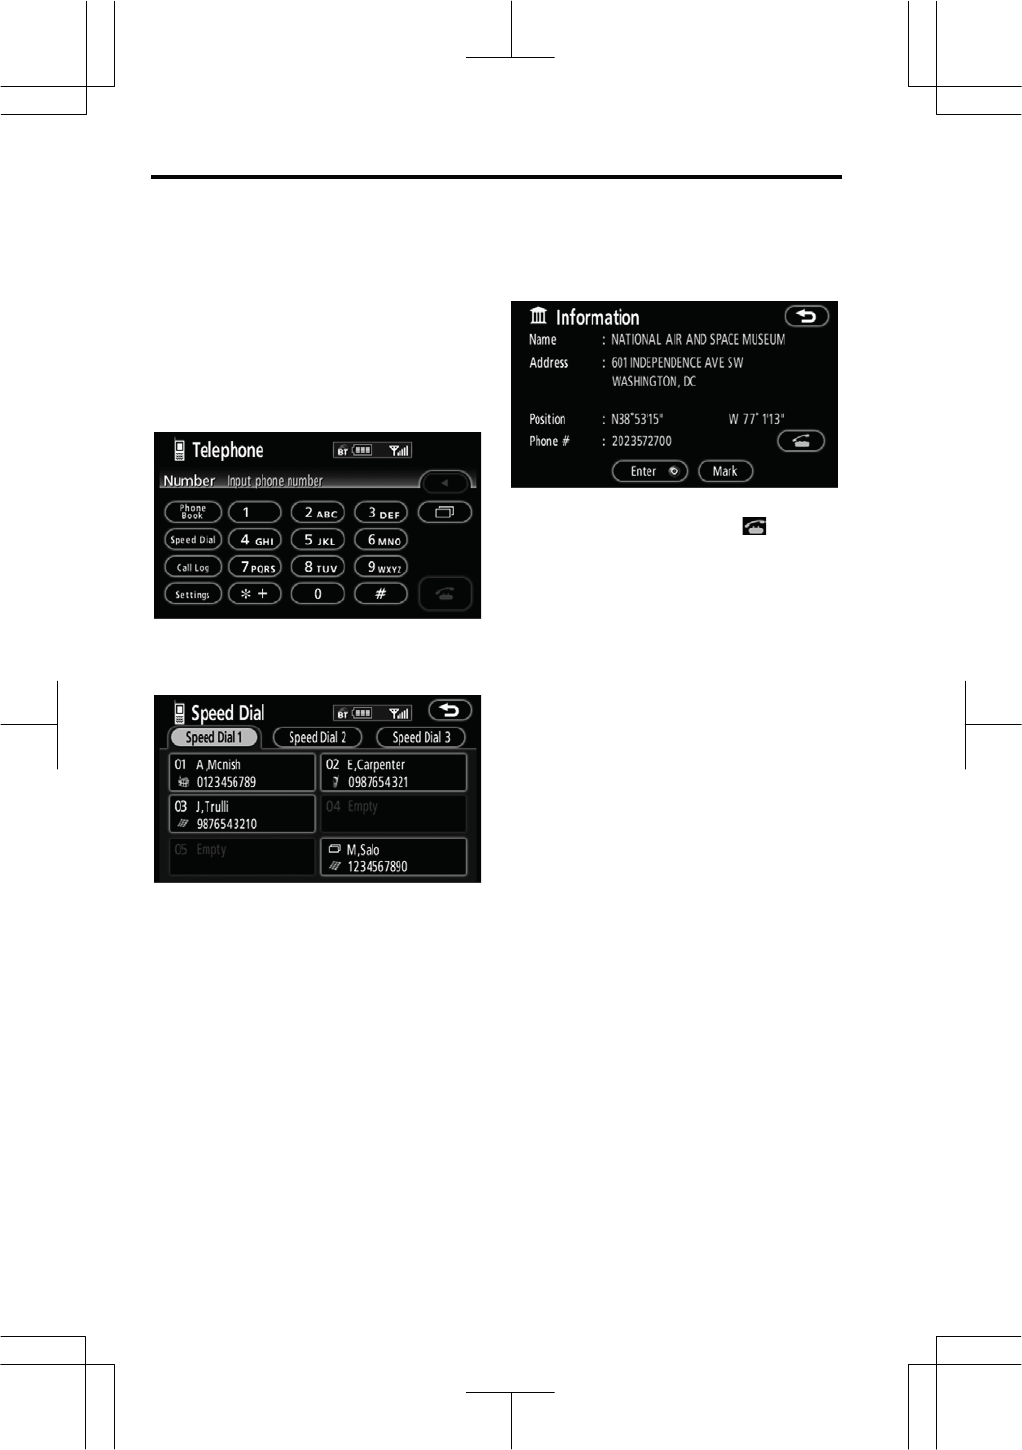
z By received calls
You can call by received calls. When
a call is received, the system memo-
rizes up to 5 numbers. If it is more
than 5, the oldest number is deleted.
This cannot be operated while driving.
1. Touch “Call Log” to display the
“Outgoing Calls” screen.
2. Touch “Incoming Calls” to display
the “Incoming Calls” screen.
z When a telephone number regis-
tered in the phone book is received,
the name and the number are dis-
played.
z Received calls which you did not
answer are also memorized in the
system and “Abs.” is displayed on
the left side of the number.
z Received calls which you refused
are also memorized in the system
and “ ” is displayed on the left side
of the number.
z Unnoticed telephone number such
as a public telephone is not memo-
rized in the system.
3. Select the desired number from
the list.
Touch the on-hook button ( ) on the
screen.
z An international phone call may not
be made depending on the cellular
phone which you have.
OTHER FUNCTIONS
140
V573_E
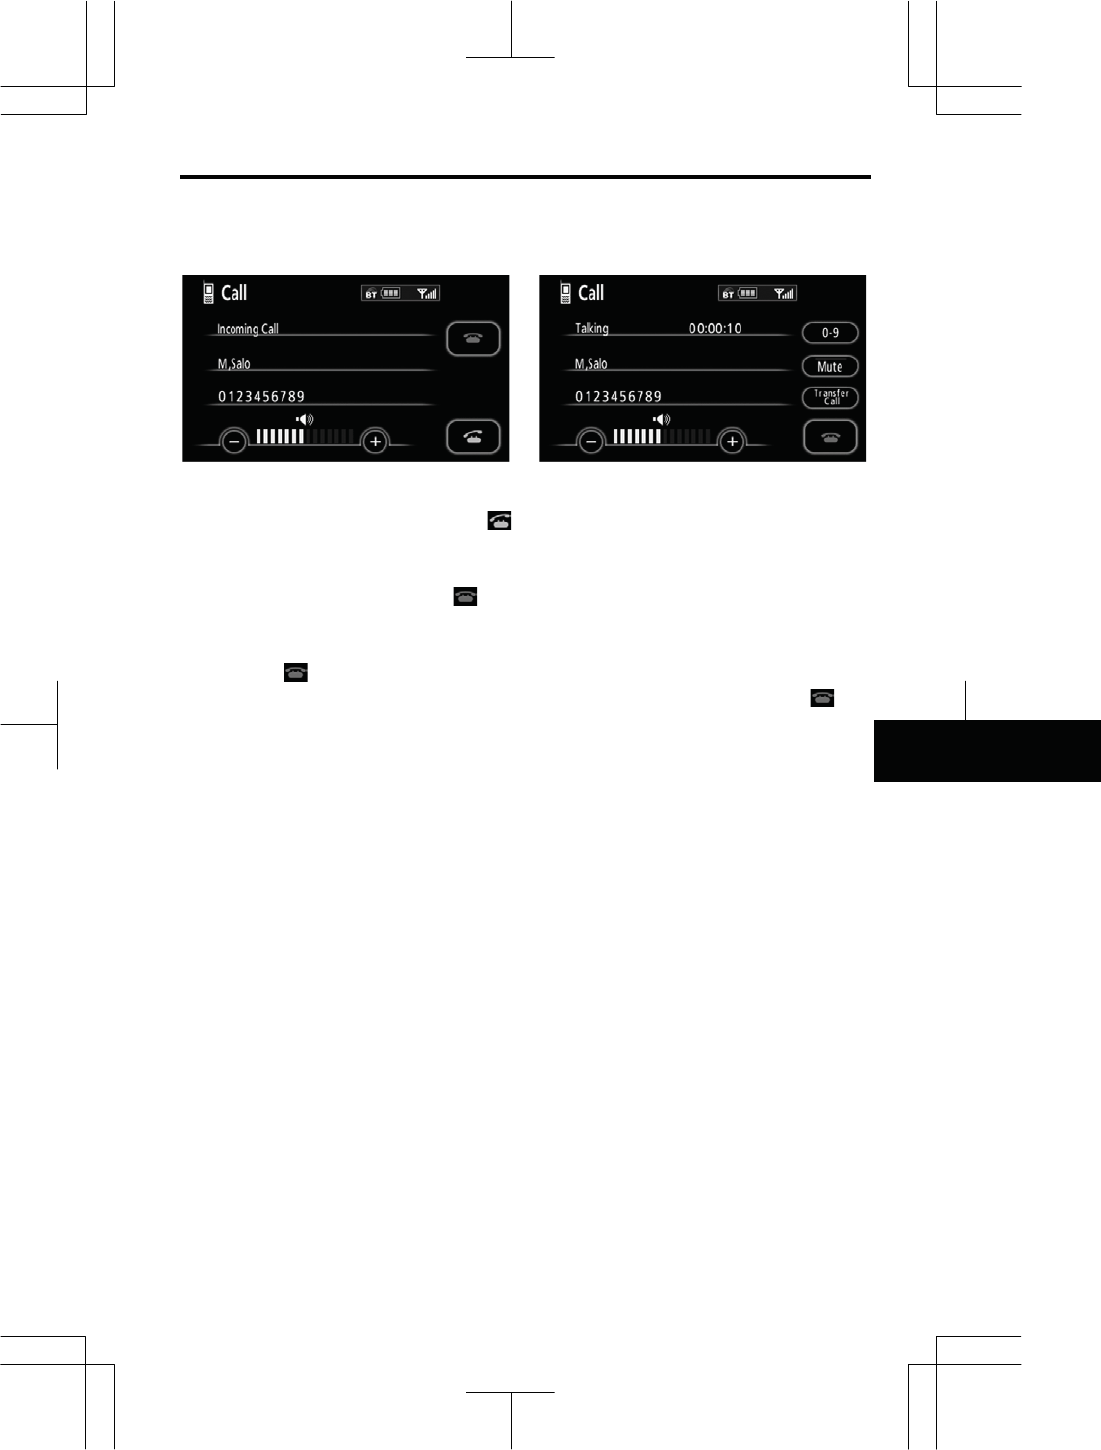
z By speed dial
You can call by registered telephone
number which you selected from a
phone book, dialed numbers and re-
ceived calls. (See “(a) Registering
the speed dial” on page 138 for regis-
tering the speed dial.)
1. Touch “Speed Dial” to display the
“Speed Dial” screen.
2. Touch the desired number to call.
You can change the page by touching
“Speed Dial 2” or “Speed Dial 3”.
When you push the telephone button
while driving, the screen above appears.
Touch the desired name to call. (The
telephone number is not displayed.)
z By POI call
You can call by touching when it
is displayed on the screen from navi-
gation system. (See page 31 for de-
tails.)
OTHER FUNCTIONS
141
V573_E
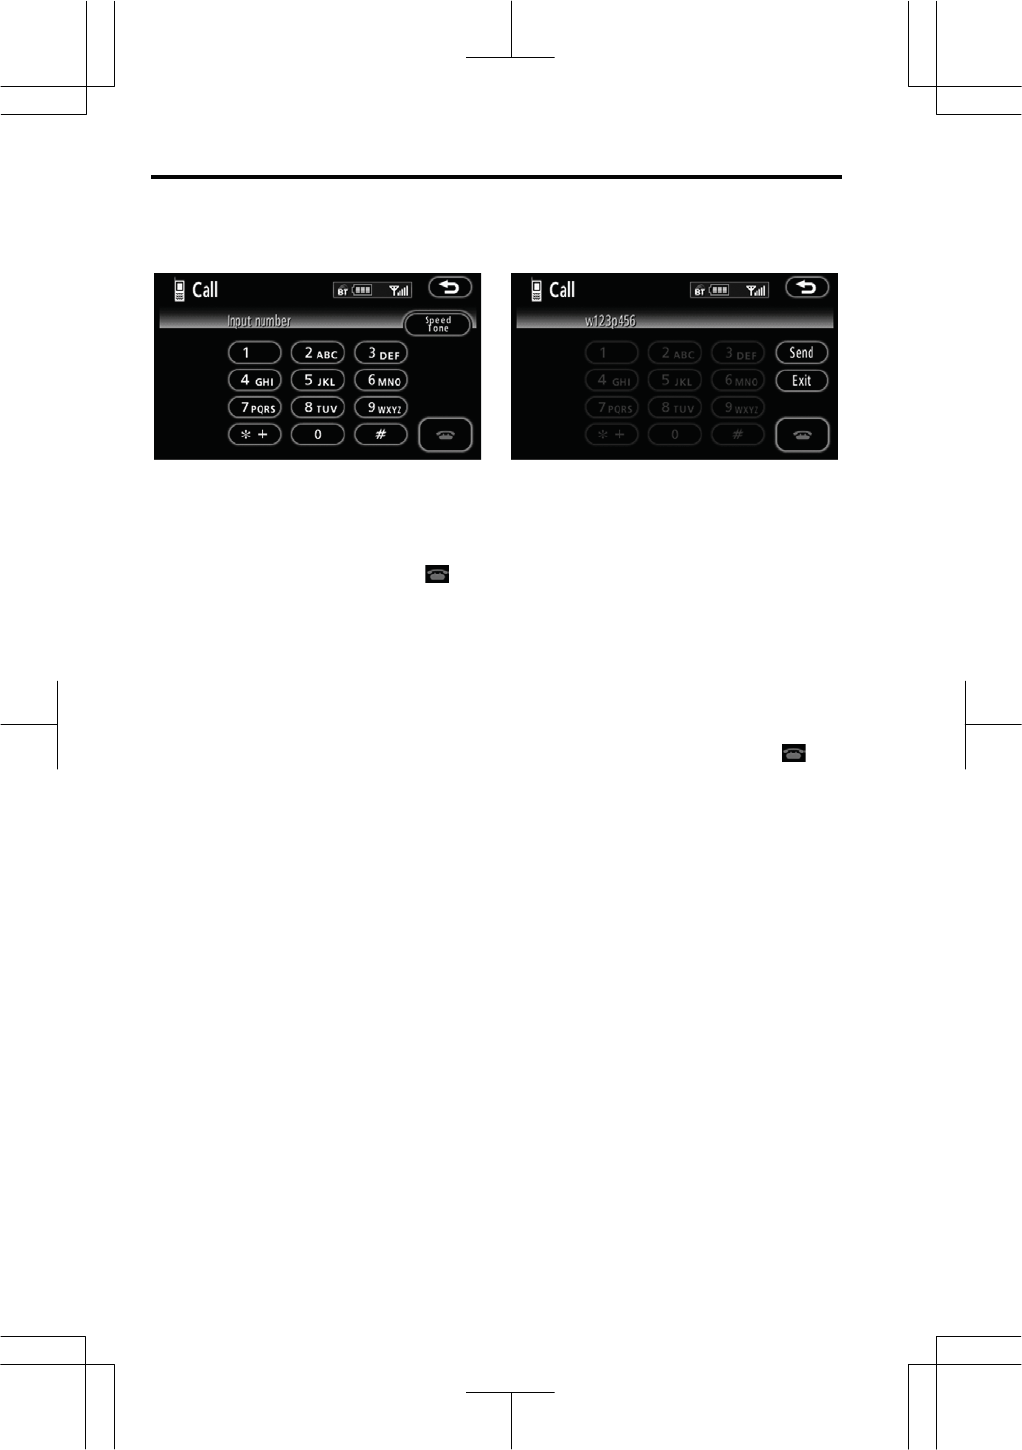
When a call is received, this screen is
displayed with a sound. Touch
to talk on the phone.
To hang up the phone:
Touch the off-hook button ( ) on
the screen.
To refuse to receive the call:
Touch and hold it.
To adjust the volume of received call:
Touch “–” or “+” or use the vol-
ume switch of the steering wheel.
On the international phone call, the other
party’s name may not be displayed cor-
rectly depending on the cellular phone
which you have.
While you are talking on the phone,
this screen is displayed. You can do
the operation below on the screen.
To adjust the volume of the other party’s
voice:
Touch “–” or “+” or use the vol-
ume switch of the steering wheel.
To hang up the phone:
Touch the off-hook button ( ) on
the screen.
To mute your voice:
Touch “Mute”.
To input a Key:
Touch “0-9”.
To transfer the call:
Touch “Transfer Call”.
You cannot change from Handsífree call
to cellular phone call while driving.
When you change from cellular phone
call to Hands-free call, the Hands-free
screen will be displayed and you can
operate it on the screen.
Transferring method and behavior are
different depending on the cellular phone
which you have.
For the operation of the phone, see the
manual that comes with your cellular
phone.
— Receive on the
Bluetooth®
p
hone
— Talk on the Bluetooth®
p
hone
OTHER FUNCTIONS
142
V573_E
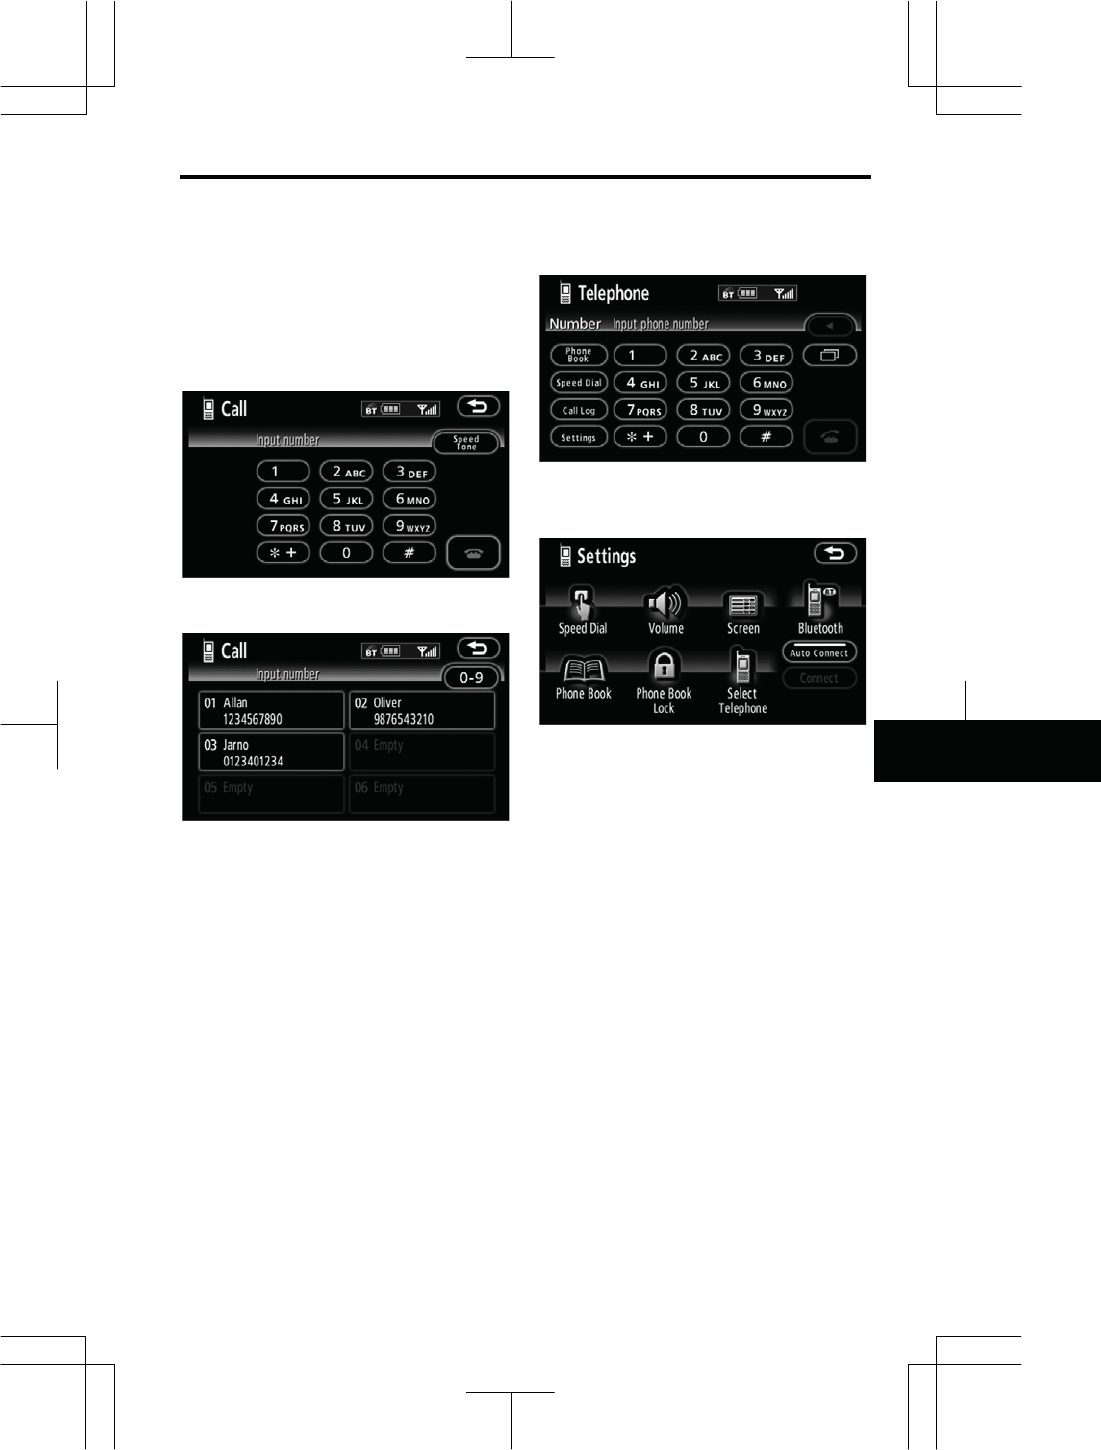
Touch the desired number to input the
key.
To hang up the phone:
Touch the off-hook button ( ) on
the screen.
This cannot be operated while driving.
If the continuous tone signal is regis-
tered in a phone book, this screen
appears. (If not registered, “Send”
and “Exit” are not displayed.)
Confirm the number displayed on the
screen and touch “Send”. The num-
ber before marked sign will be sent.
When you touch “Exit”, this function will
be finished and normal tone screen ap-
pears.
To hang up the phone:
Touch the off-hook button ( ) on
the screen.
The continuous tone signal is the marked
sign (p or w) and the number following
telephone number.
(ex. 056133w0123p#1)
You can do this operation when you
want to operate an answering machine
or use a telephone service in bank for
example. You can register the phone
number and the code number in the
phone book.
OTHER FUNCTIONS
143
V573_E
z Sending a tone by the speed tone
You can send a tone by the speed
tone. (For registering the speed tone,
see “(b) Registering the speed tone”
on page 140.)
1. Touch “Speed Tone”.
2. Touch the desired touch screen
button to send a tone.
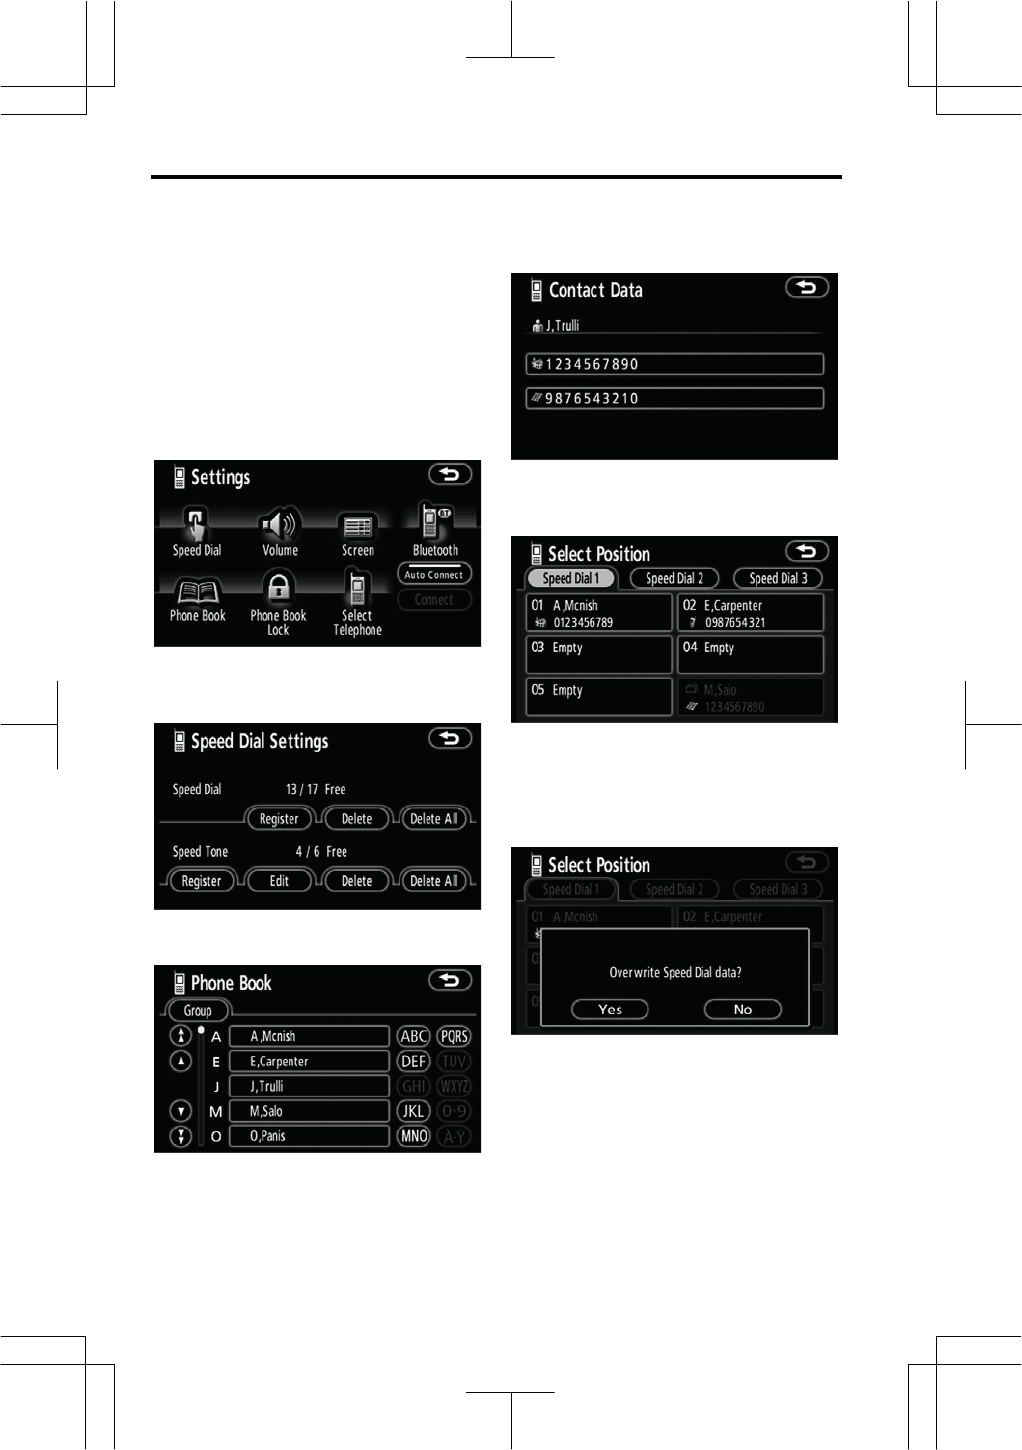
Touch “Settings” to display the “Set-
tings” screen.
You can change the settings of the
phone.
— Change the settings of
the Bluetooth®
p
hone
OTHER FUNCTIONS
144
V573_E
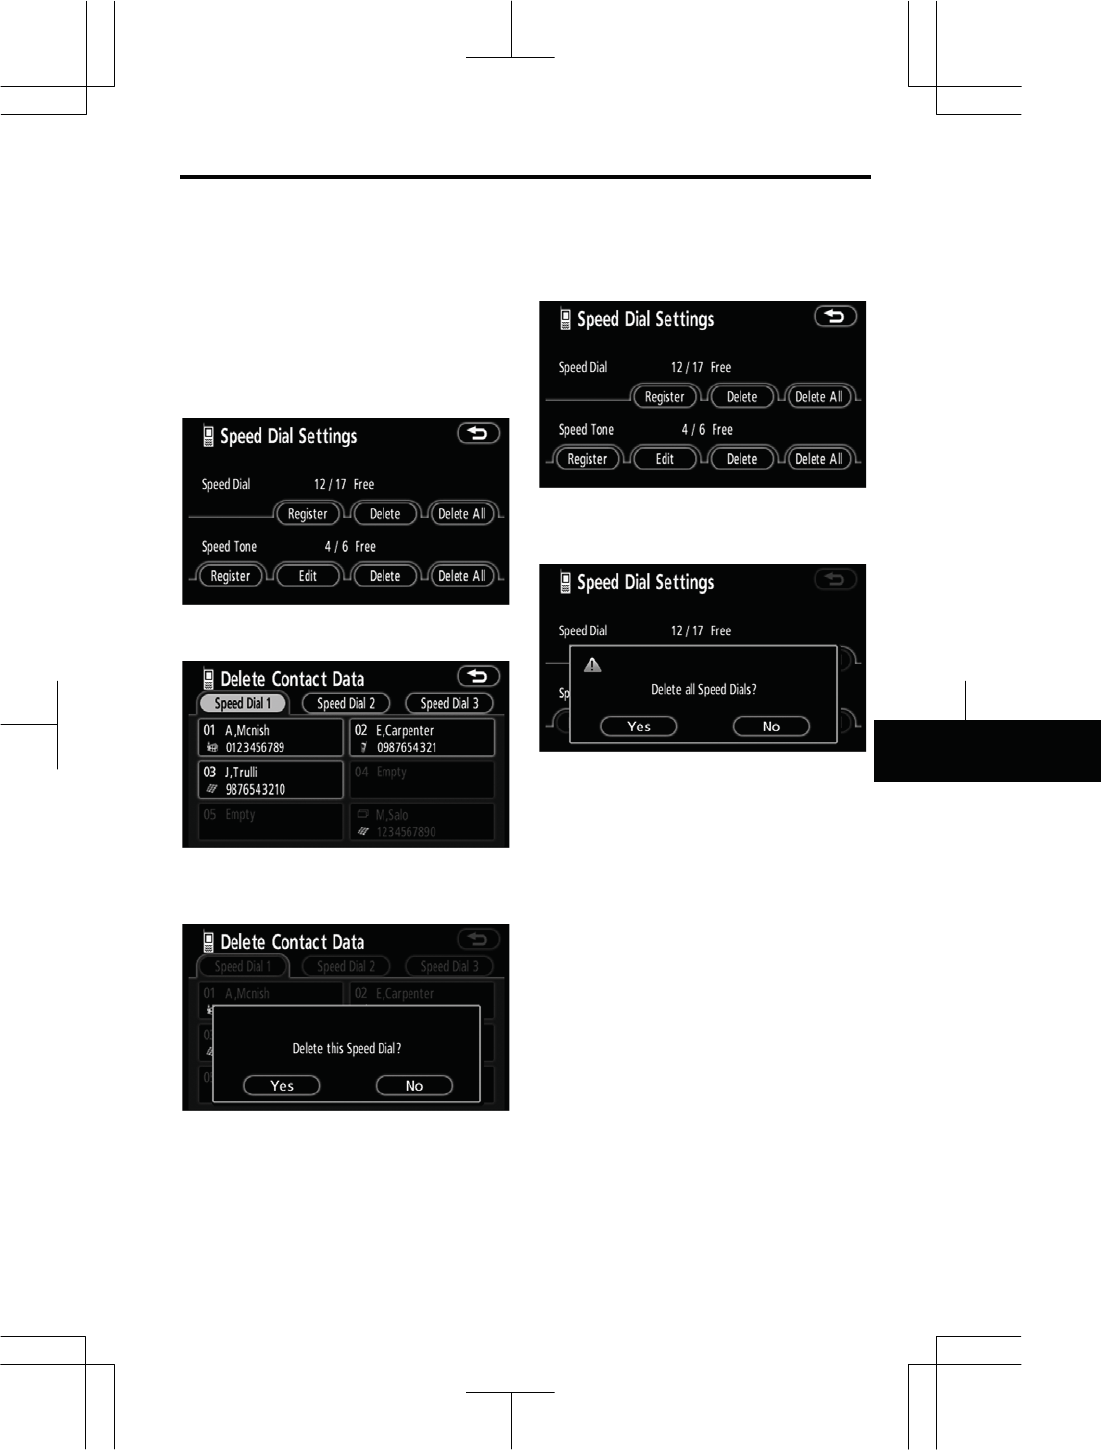
(a) Registering the speed dial
You can register the desired tele-
phone number from phone book, di-
aled numbers and received calls. Up
to 17 speed dial numbers can be reg-
istered.
The 6th entry is the speed dial for redial-
ing.
1. Touch “Speed Dial” to display the
“Speed Dial Settings” screen.
2. Touch “Register” of “Speed Dial”.
3. Select the data you want to regis-
ter.
4. Touch the desired telephone
number.
5. Touch the touch screen button
you want to register in.
The latest dialed number is registered in
the 6th item (speed redial).
If you select a touch screen button
you registered before, this screen is
displayed.
6. Touch “Yes” if you want to over-
write it.
OTHER FUNCTIONS
145
V573_E
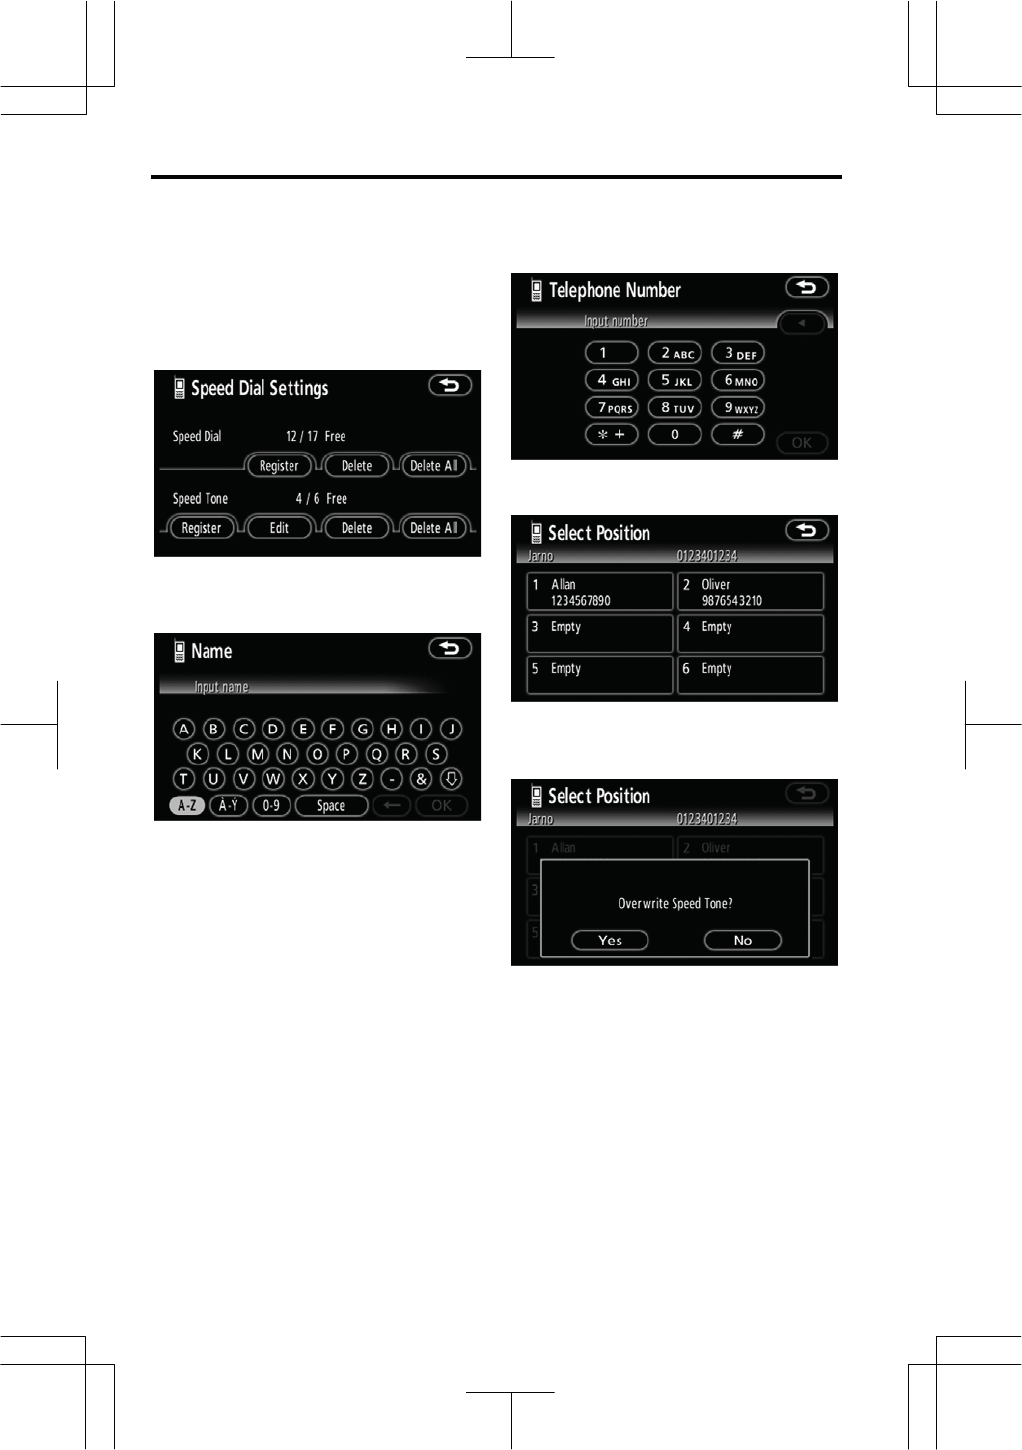
z Deleting the speed dial individu-
ally
You can delete “01” - “17” of the
speed dial individually.
If you delete them all at once, all of 17
numbers are deleted.
1. Touch “Delete” of “Speed Dial”.
2. Touch the touch screen button
you want to delete.
3. Touch “Yes”.
z Deleting all of the speed dial
1. Touch “Delete All” of “Speed
Dial”.
2. Touch “Yes”.
OTHER FUNCTIONS
146
V573_E
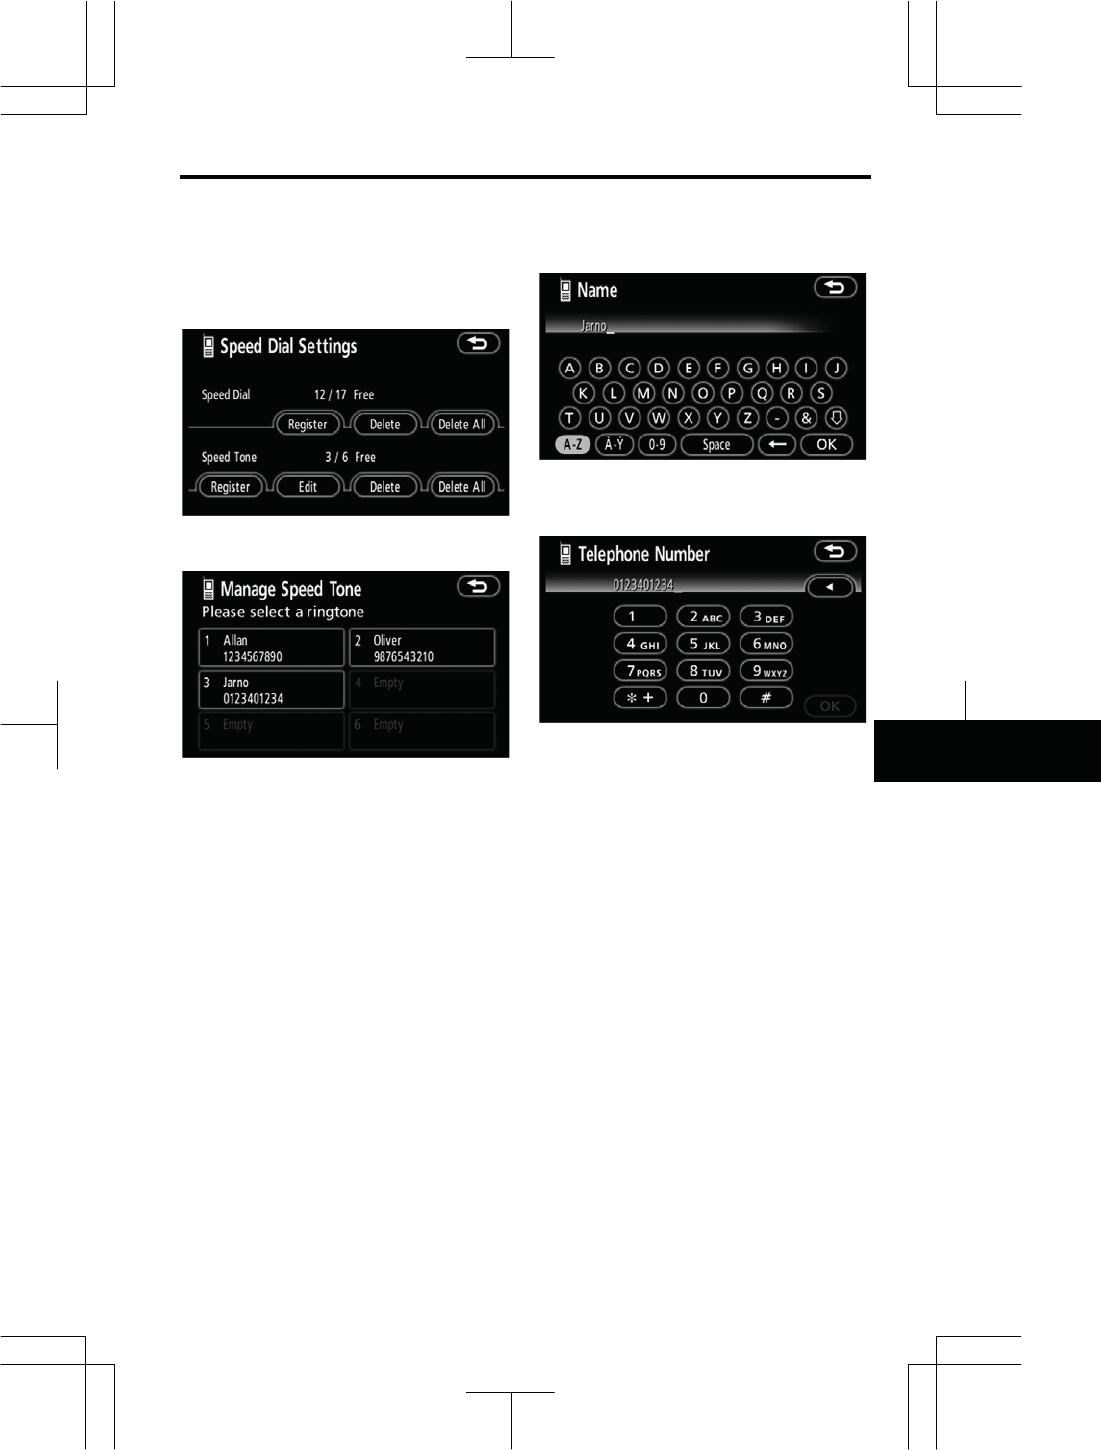
(b) Registering the speed tone
You can register the desired tone
number. Up to 6 speed tone numbers
can be registered.
1. Touch “Register” of “Speed
Tone”.
2. Use the software keyboard to in-
put the name.
3. Input the number and touch “OK”.
4. Touch the desired touch screen
button you want to register in.
If you select a touch screen button
you registered before, this screen is
displayed.
5. Touch “Yes” if you want to over-
write it.
OTHER FUNCTIONS
147
V573_E
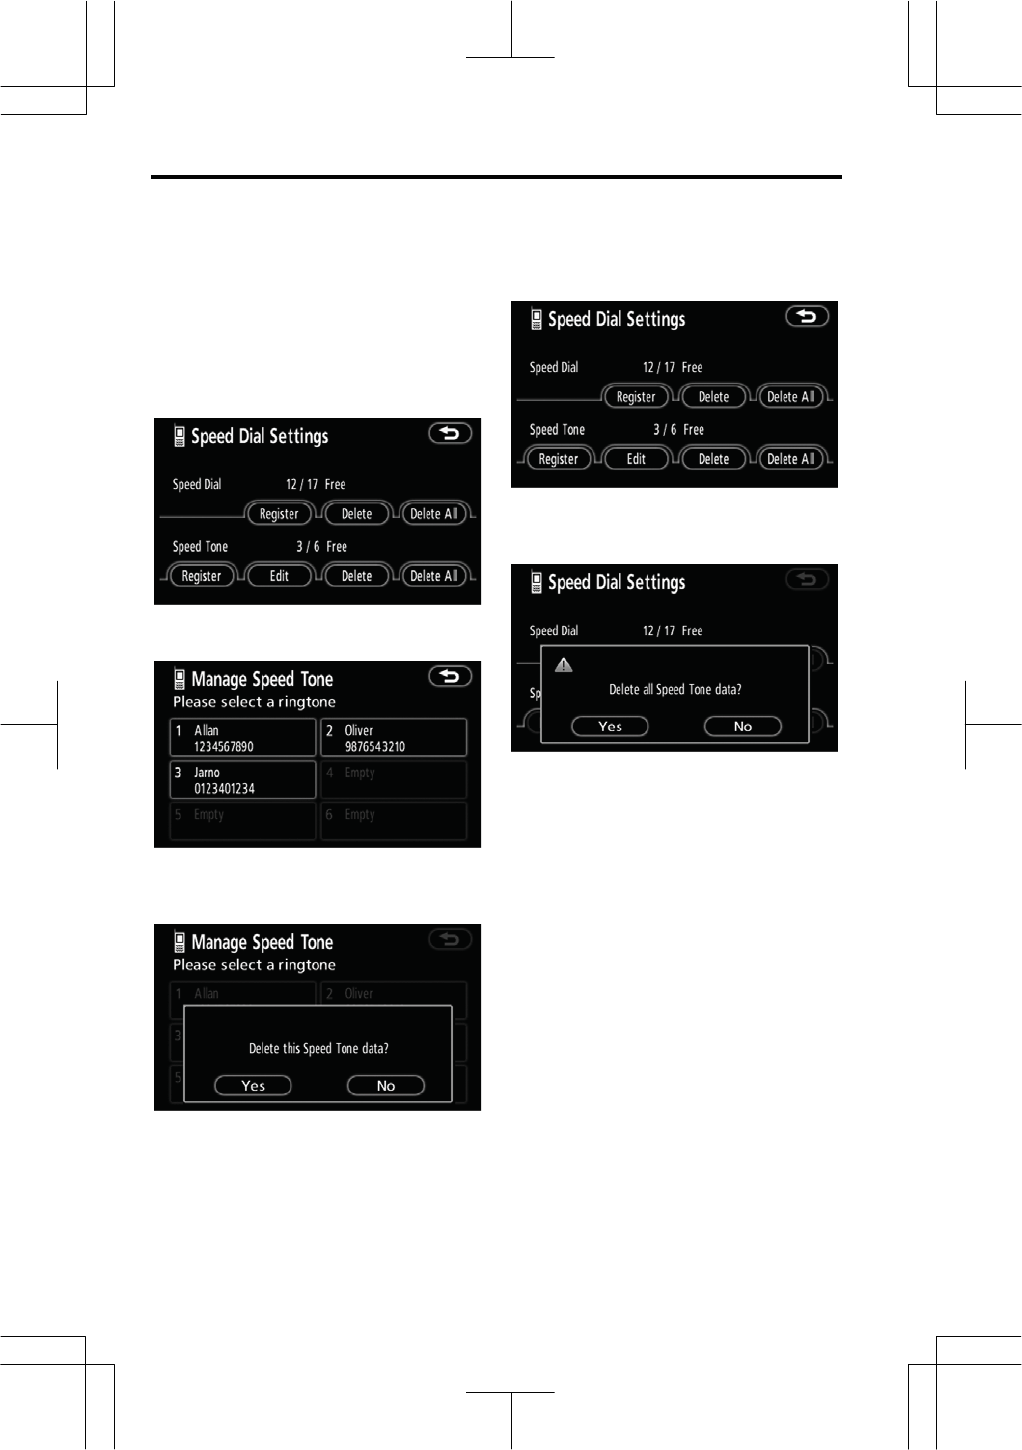
z Editing the speed tone
You can edit the speed tone.
1. Touch “Edit” of “Speed Tone”.
2. Touch the touch screen button
you want to edit.
3. Use the software keyboard to in-
put the name.
4. Input the number and touch “OK”.
OTHER FUNCTIONS
148
V573_E
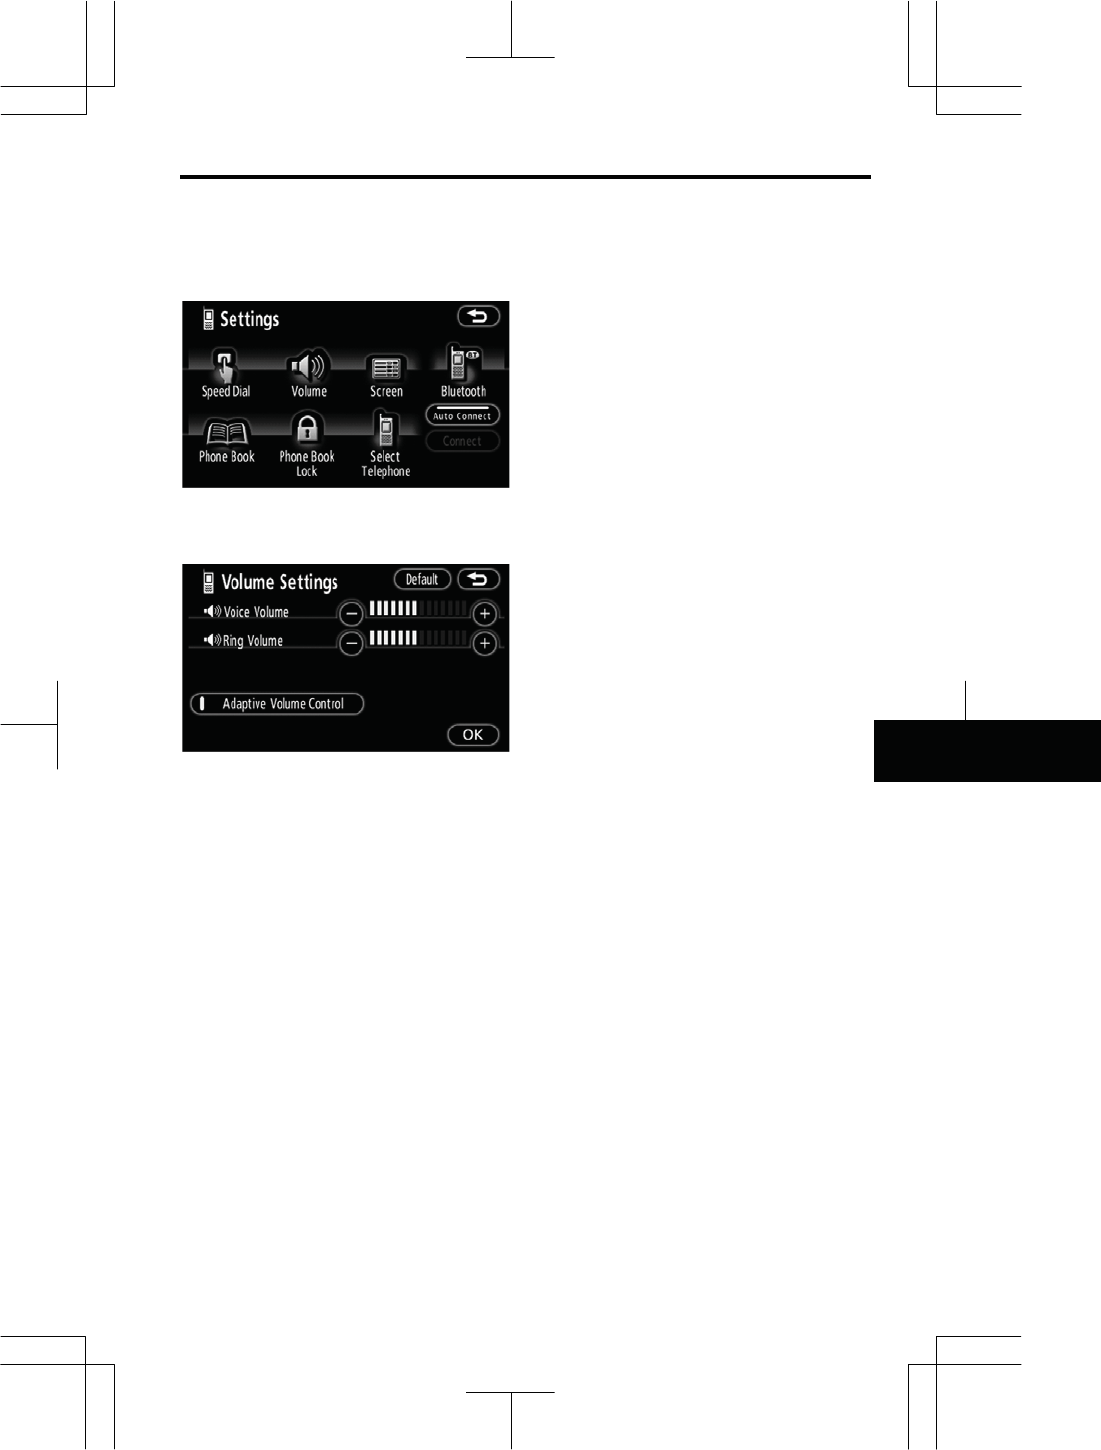
z Deleting the speed tone individu-
ally
You can delete “1” to “6” of the speed
tone.
If you delete them all at once, all of 6
numbers are deleted.
1. Touch “Delete” of “Speed Tone”.
2. Touch the touch screen button
you want to delete.
3. Touch “Yes”.
z Deleting all the speed tone
1. Touch “Delete All” of “Speed
Tone”.
2. Touch “Yes”.
OTHER FUNCTIONS
149
V573_E
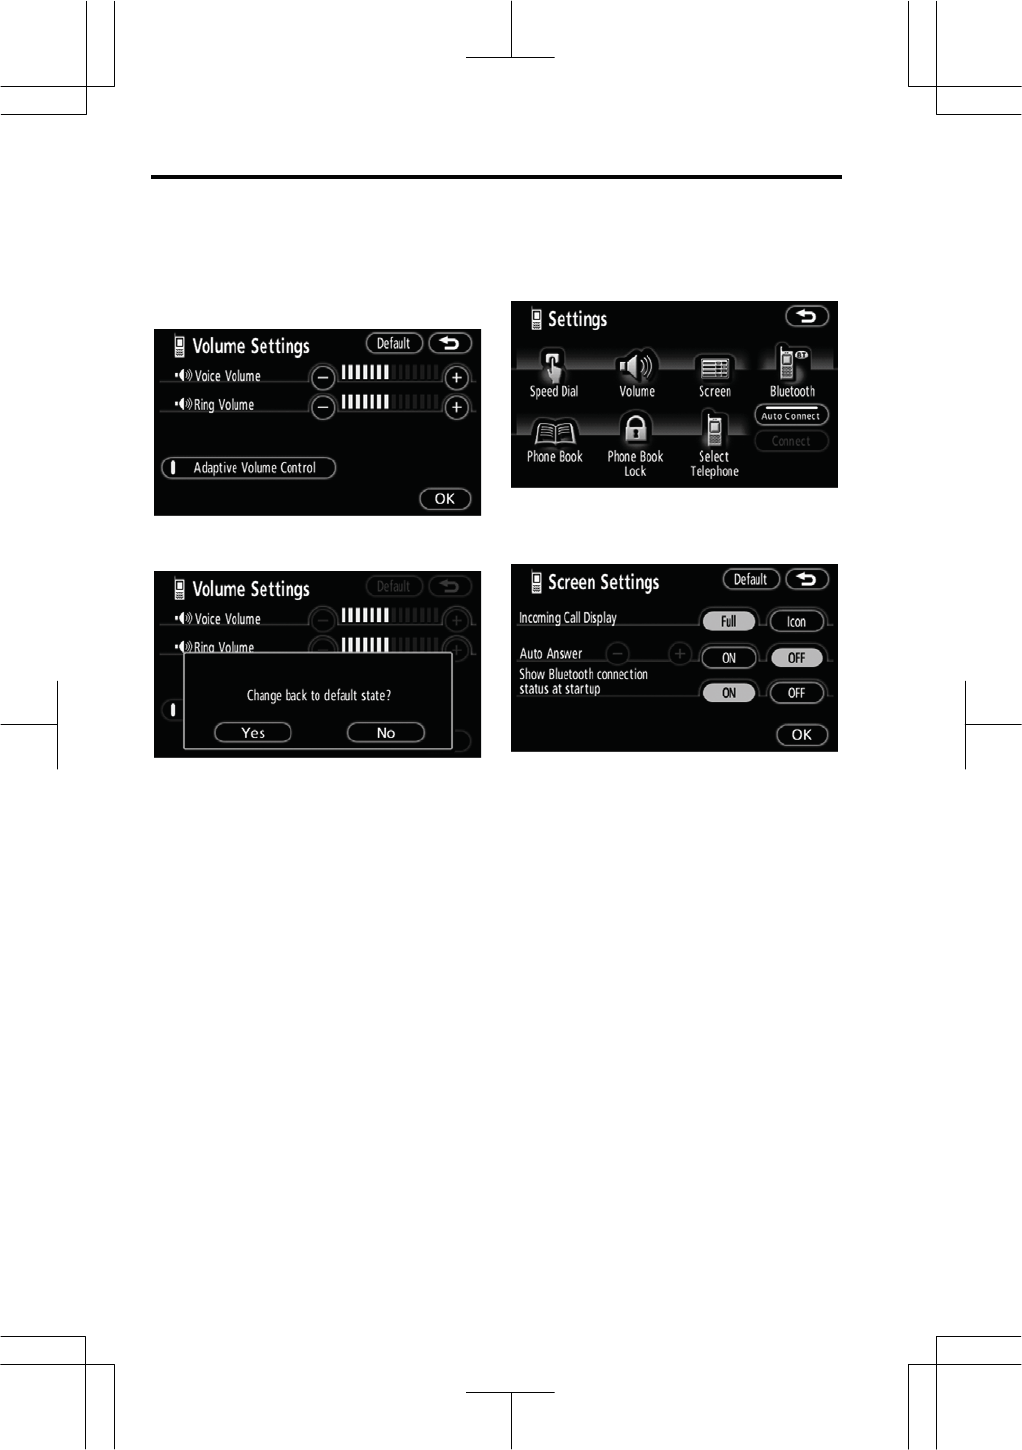
(c) Setting the volume
1. Touch “Volume” to display the
“Volume Settings” screen.
2. Touch “-” or “+” to adjust the
“Voice Volume” or “Ring Volume”.
“Voice Volume” ..... Adjusting the other
party’s voice.
“Ring Volume” ....... Adjusting the ring
volume.
z Automatic volume settings for
high speed
You can set the volume one step up
when the speed is over 50 mph (80
km/h). (When it is under 43 mph (70
km/h), previous volume is back.)
Each time you touch “Adaptive Volume
Control”, you can switch on or off.
OTHER FUNCTIONS
150
V573_E
z Initializing the settings
You can initialize the settings.
Touch “Default”.
Touch “Yes”.
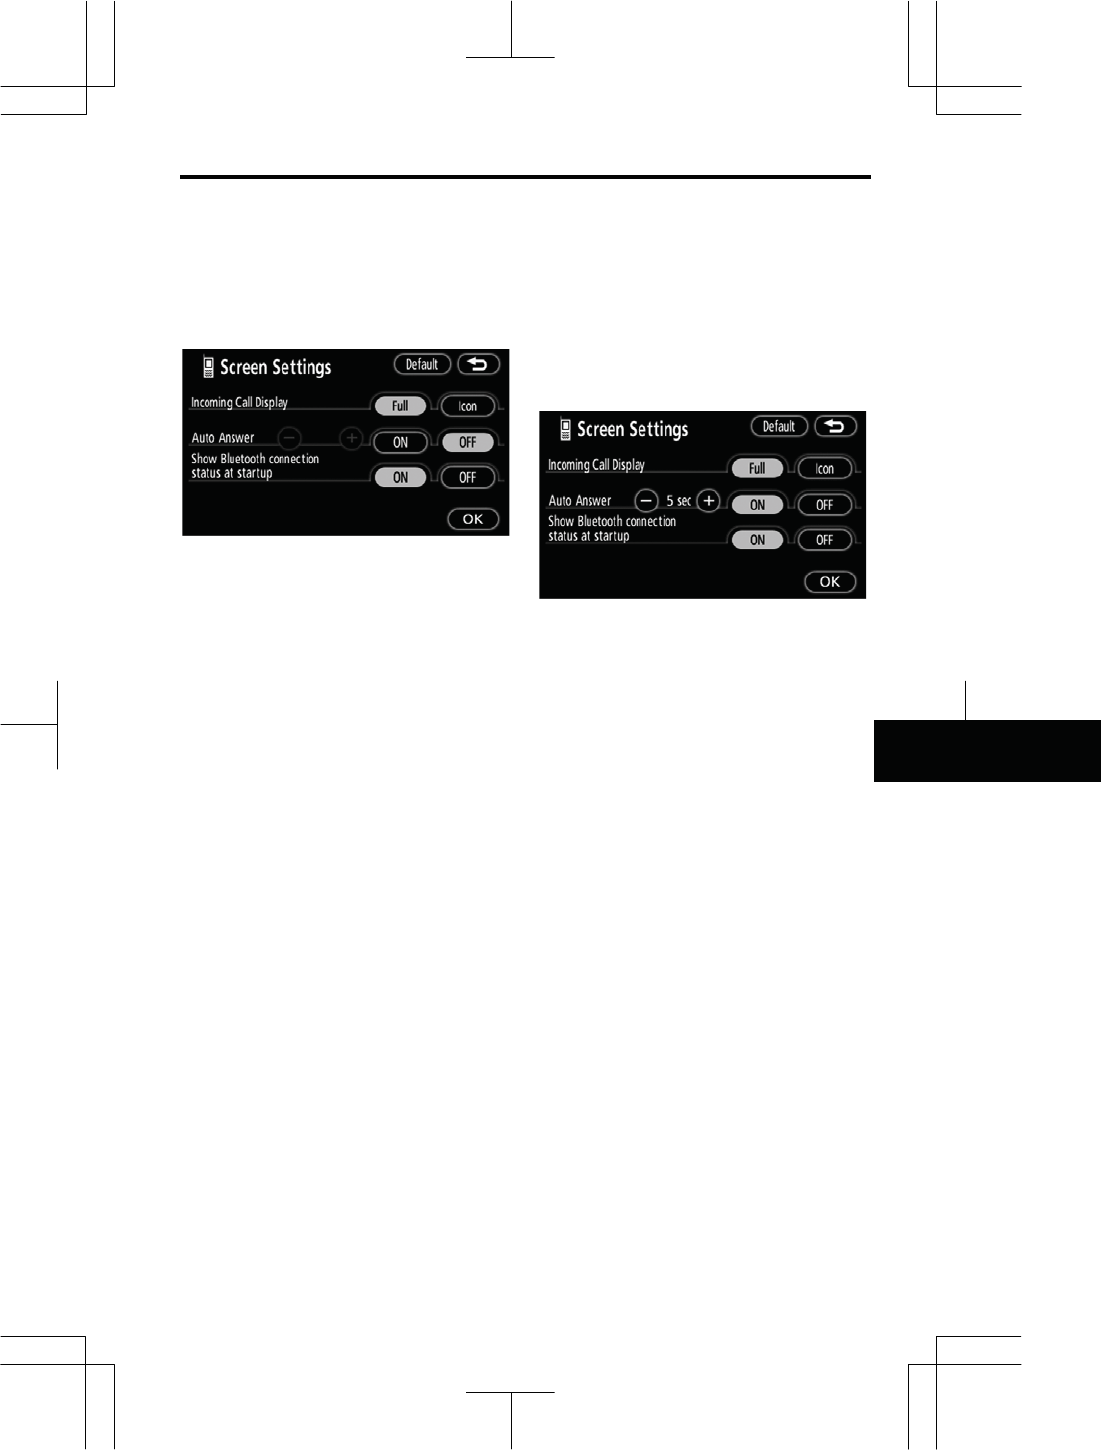
(d) Setting the screen
1. Touch “Screen” to display the
“Screen Settings” screen.
2. Do the detail settings of the
screen and touch “OK”.
OTHER FUNCTIONS
151
V573_E
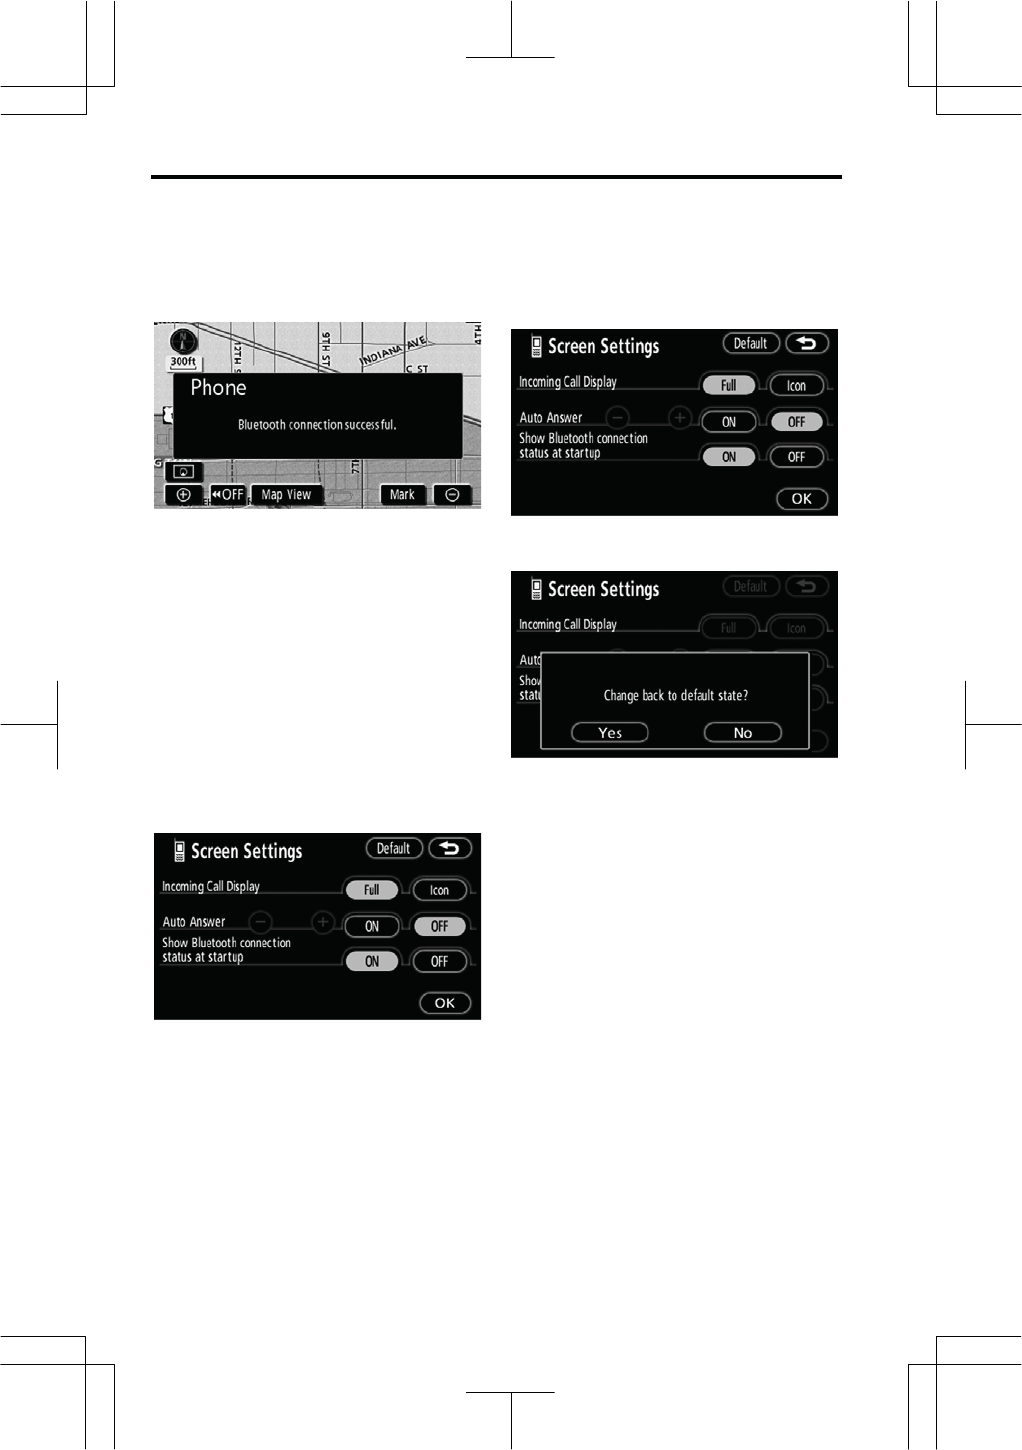
z Receiving call display
You can select the method of the re-
ceiving call display.
Touch “Full” or “Icon”.
“Full” mode.......When a call is received,
the Hands-free screen is
displayed and you can
operate it on the screen.
“Icon” mode......The message is dis-
played on the screen.
z Auto answer
When a call is received, the display
automatically changes to the talking
screen and you can start to talk on
the phone (without touching any but-
ton) after the preset time.
Touch “ON” of “Auto Answer” and “-”
or “+” to adjust the waiting time of
auto answer within 1 - 60 seconds.
OTHER FUNCTIONS
152
V573_E
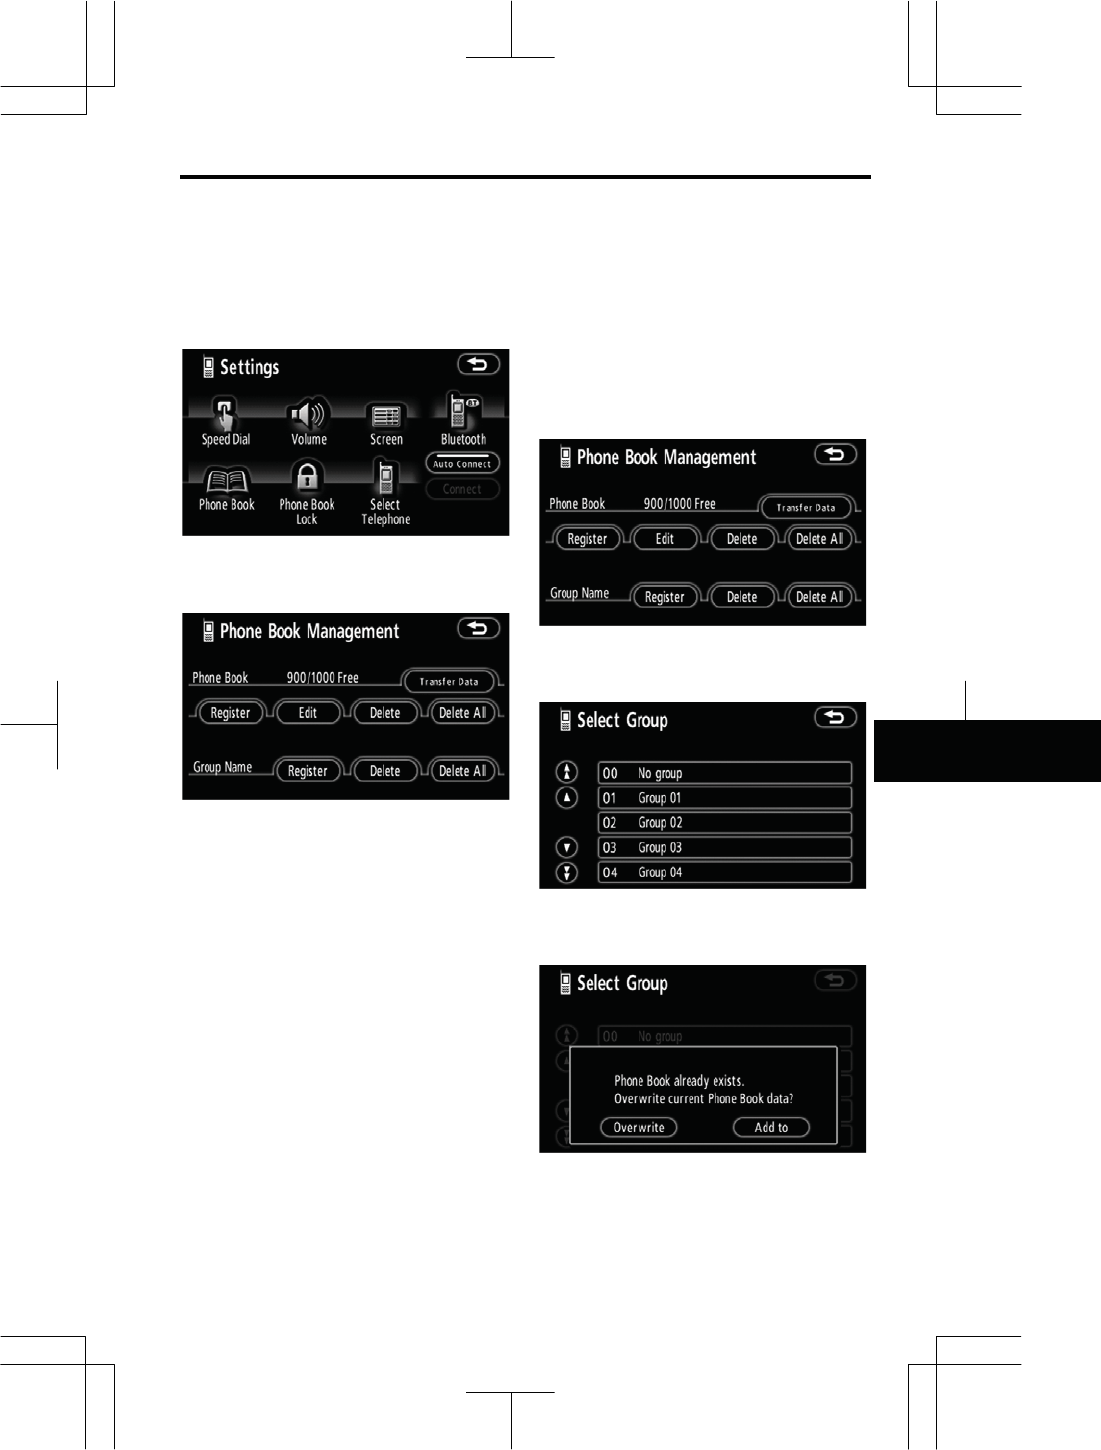
z The Bluetooth® connection status
at startup
Vehicles with smart entry and start sys-
tem—
When the “ENGINE START STOP”
switch is in the ACCESSORY or
IGNITION ON mode and the Blue-
tooth® is automatically connected, the
connection check is displayed.
Vehicles without smart entry and start
system—
When the engine switch is in ACC or
ON position and the Bluetooth®is
automatically connected, the connec-
tion check is displayed.
Touch “ON” or “OFF” of “Show Blue-
tooth connection status at startup”.
: Bluetooth is a registered trademark
of Bluetooth SIG. Inc.
z Initializing the settings
You can initialize the settings.
Touch “Default”.
Touch “Yes”.
OTHER FUNCTIONS
153
V573_E
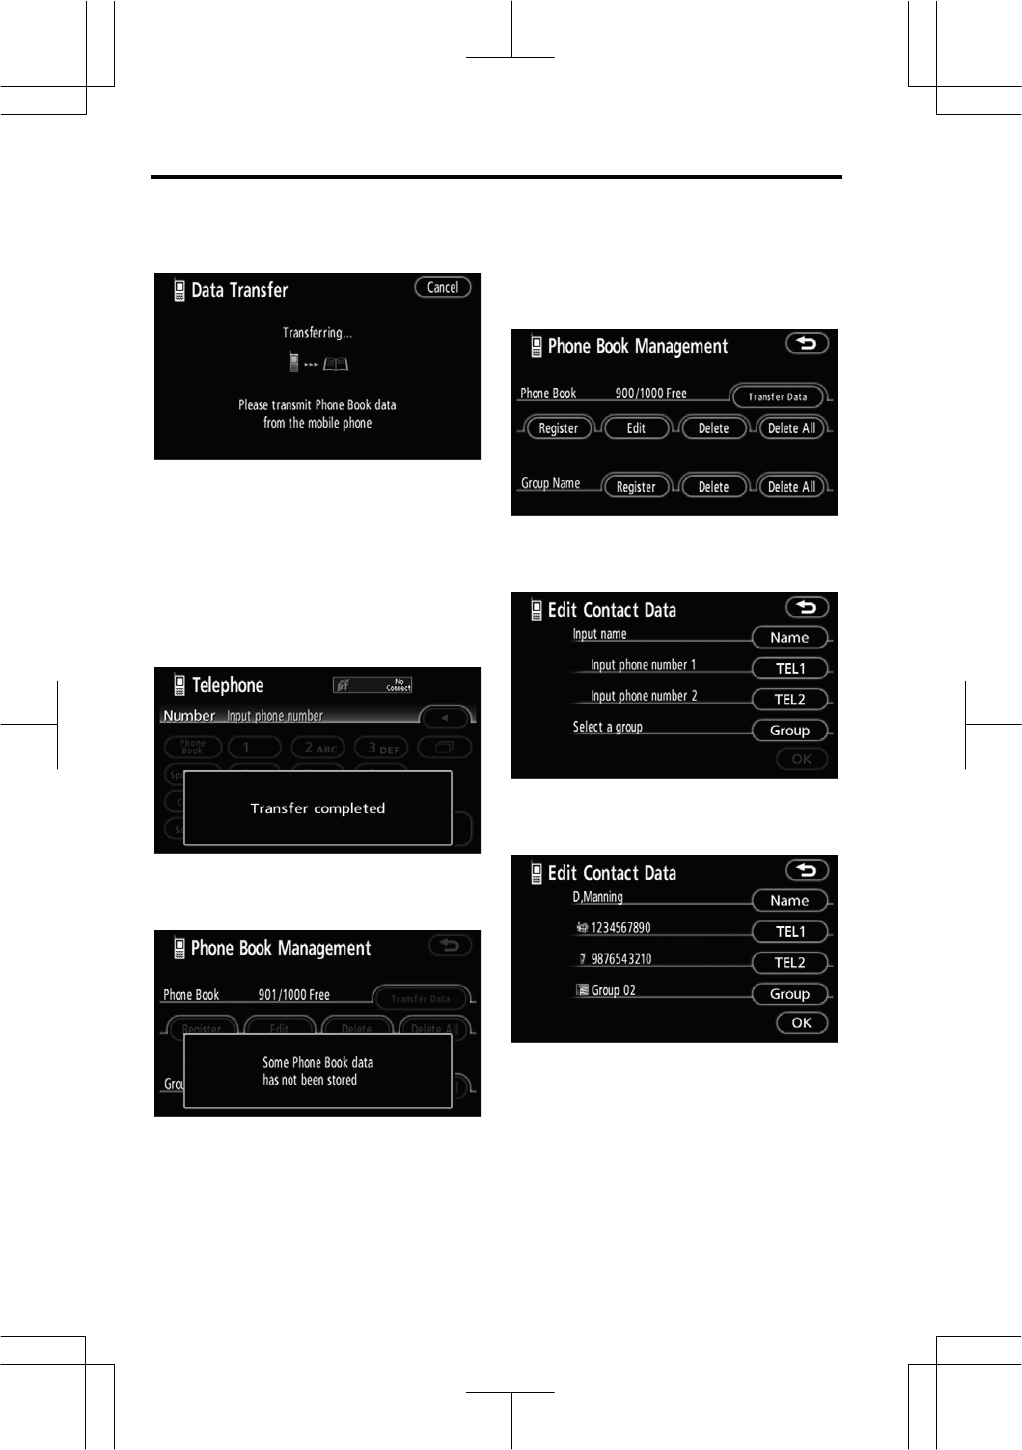
(e) Setting the phone book
You can register phone numbers in
the phone book.
Touch “Phone Book” to display the
“Phone Book Management” screen.
You can do the detail settings of
phone book.
z Transferring a telephone number
You can transfer the telephone num-
bers in your Bluetooth® phone to the
system. Up to 1000 person’s data
(up to 2 numbers a person) can be
registered in the phone book.
Transfer it while the engine is running.
1. Touch “Transfer Data” to display
the “Select Group” screen.
2. Select the group you want to
transfer to.
3. Touch “Overwrite” or “Add to”.
OTHER FUNCTIONS
154
V573_E
4. Transfer the phone book data to
the system using the Bluetooth®
phone.
This screen appears while transferring.
To cancel it, touch “Cancel”. If the
transferring is interrupted on the way, the
phone book data transferred until then
can be memorized in the system.
5. When this screen is displayed, the
transfer is completed.
When this screen is displayed, try the
transfer operation again.
z Registering the phone book data
You can register the phone book data.
1. Touch “Register” of “Phone
Book”.
2. Touch the desired touch screen
button to edit the phone book.
3. When you complete the edit,
touch “OK”.
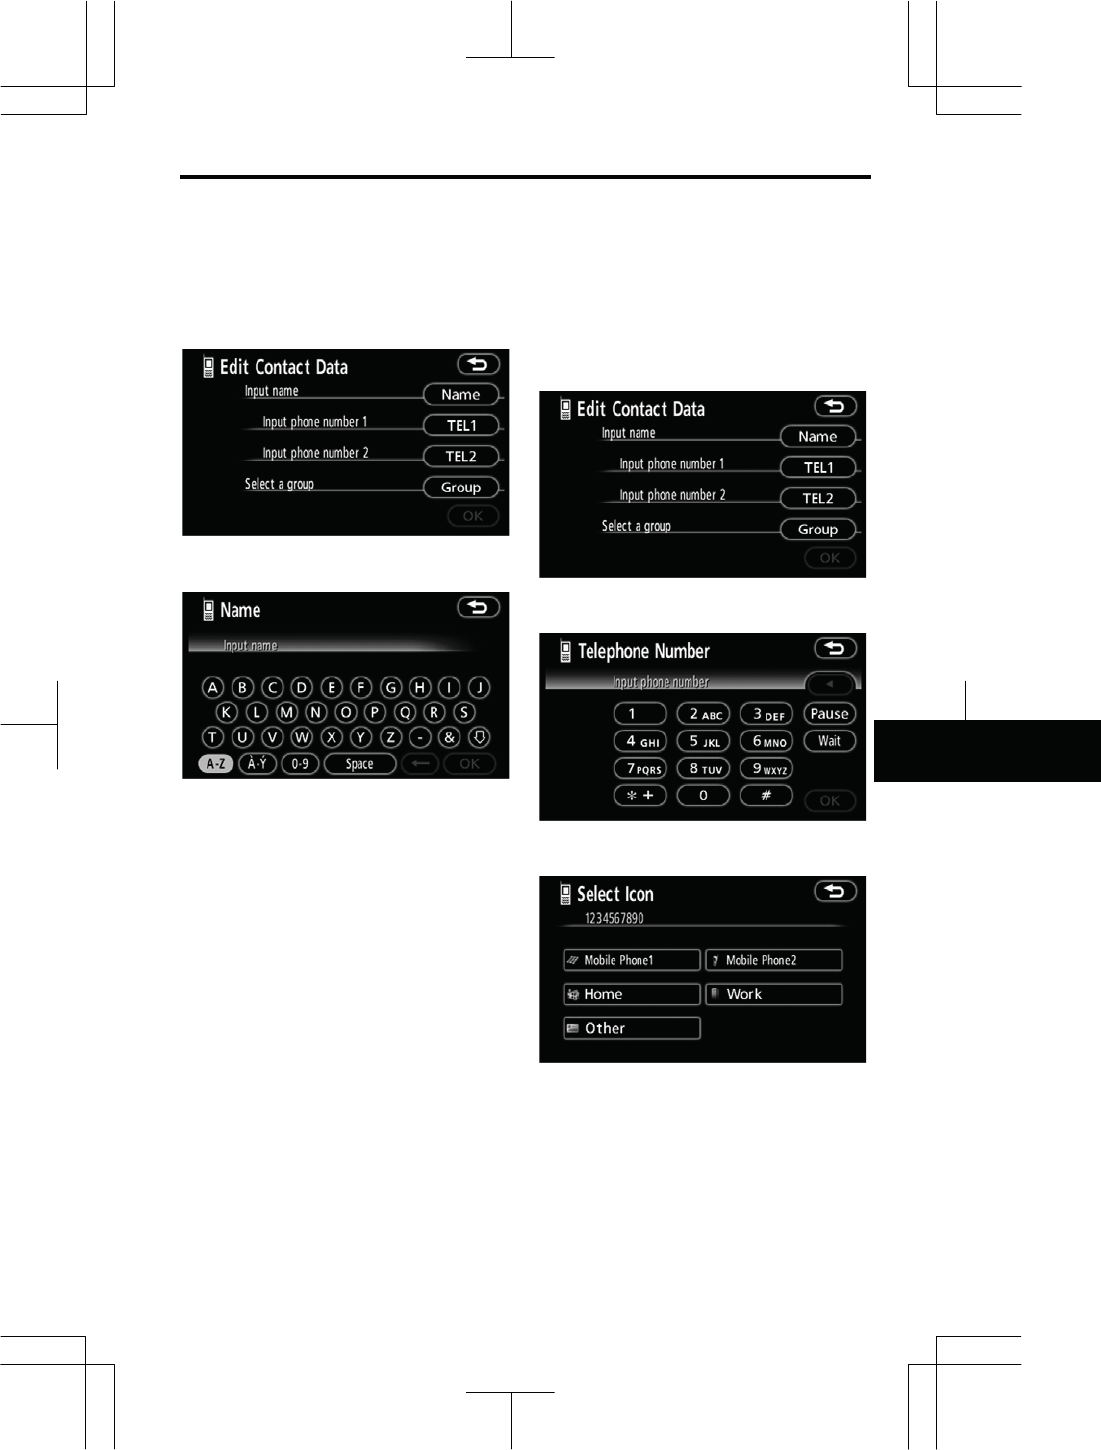
OTHER FUNCTIONS
155
V573_E
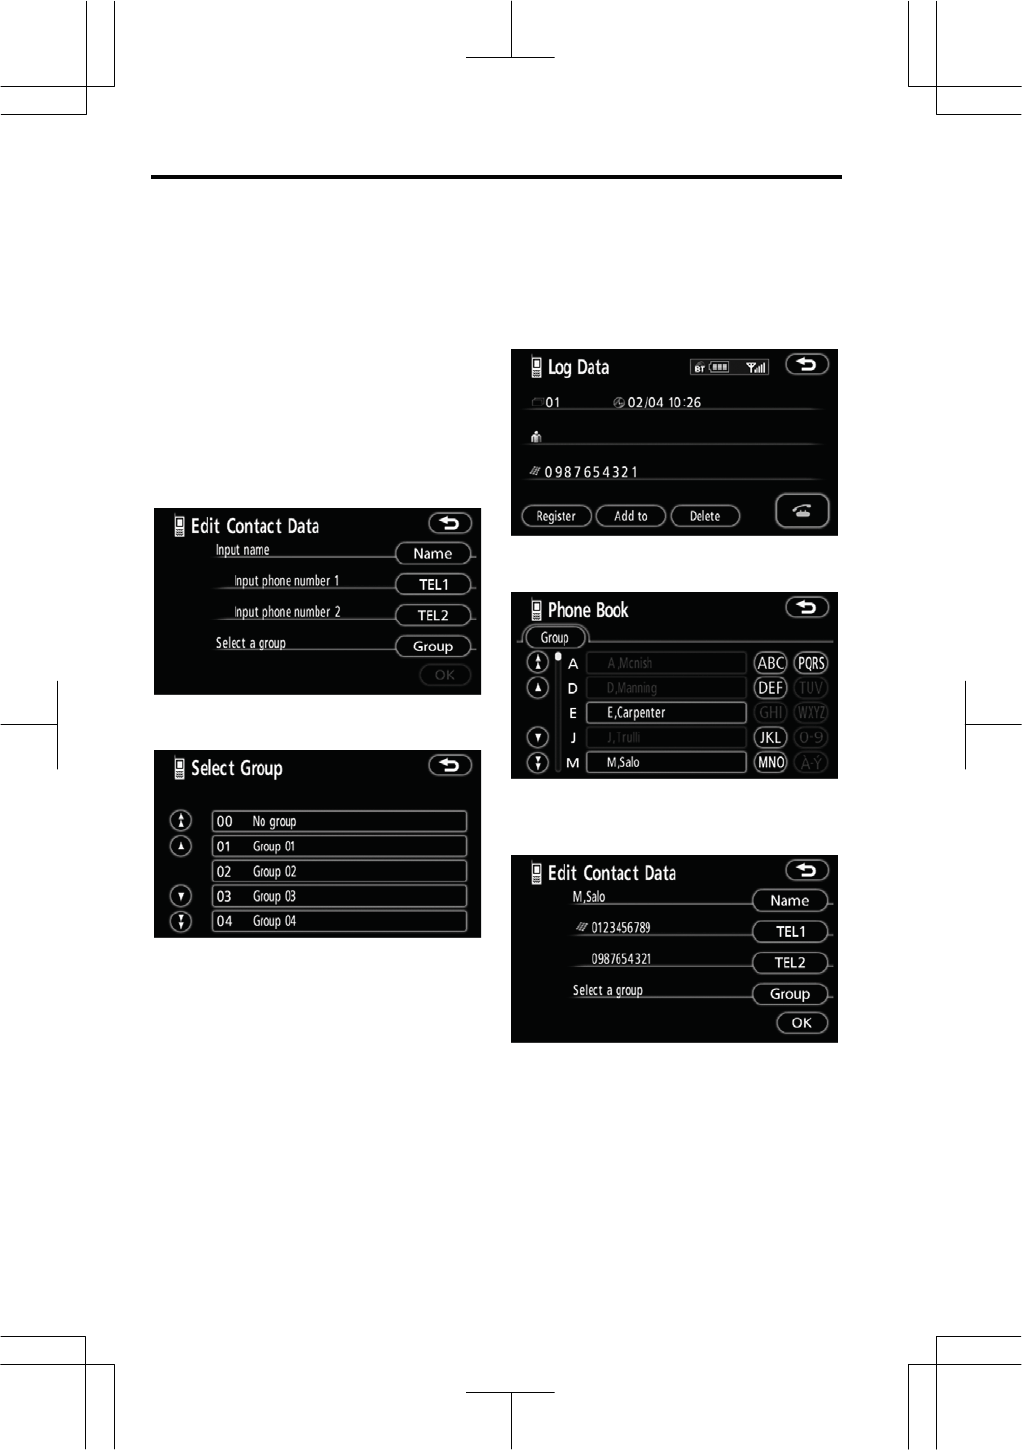
z Editing the name
When you don’t input the name, the
number is displayed.
1. Touch “Name”.
2. Use the software keyboard to in-
put the name.
z Editing the phone number
You can register the phone number in
“TEL1” and “TEL2” separately. Up to
2 numbers a person can be regis-
tered.
1. Touch “TEL1” or “TEL2”.
2. Input the number and touch “OK”.
3. Select the desired icon.
OTHER FUNCTIONS
156
V573_E
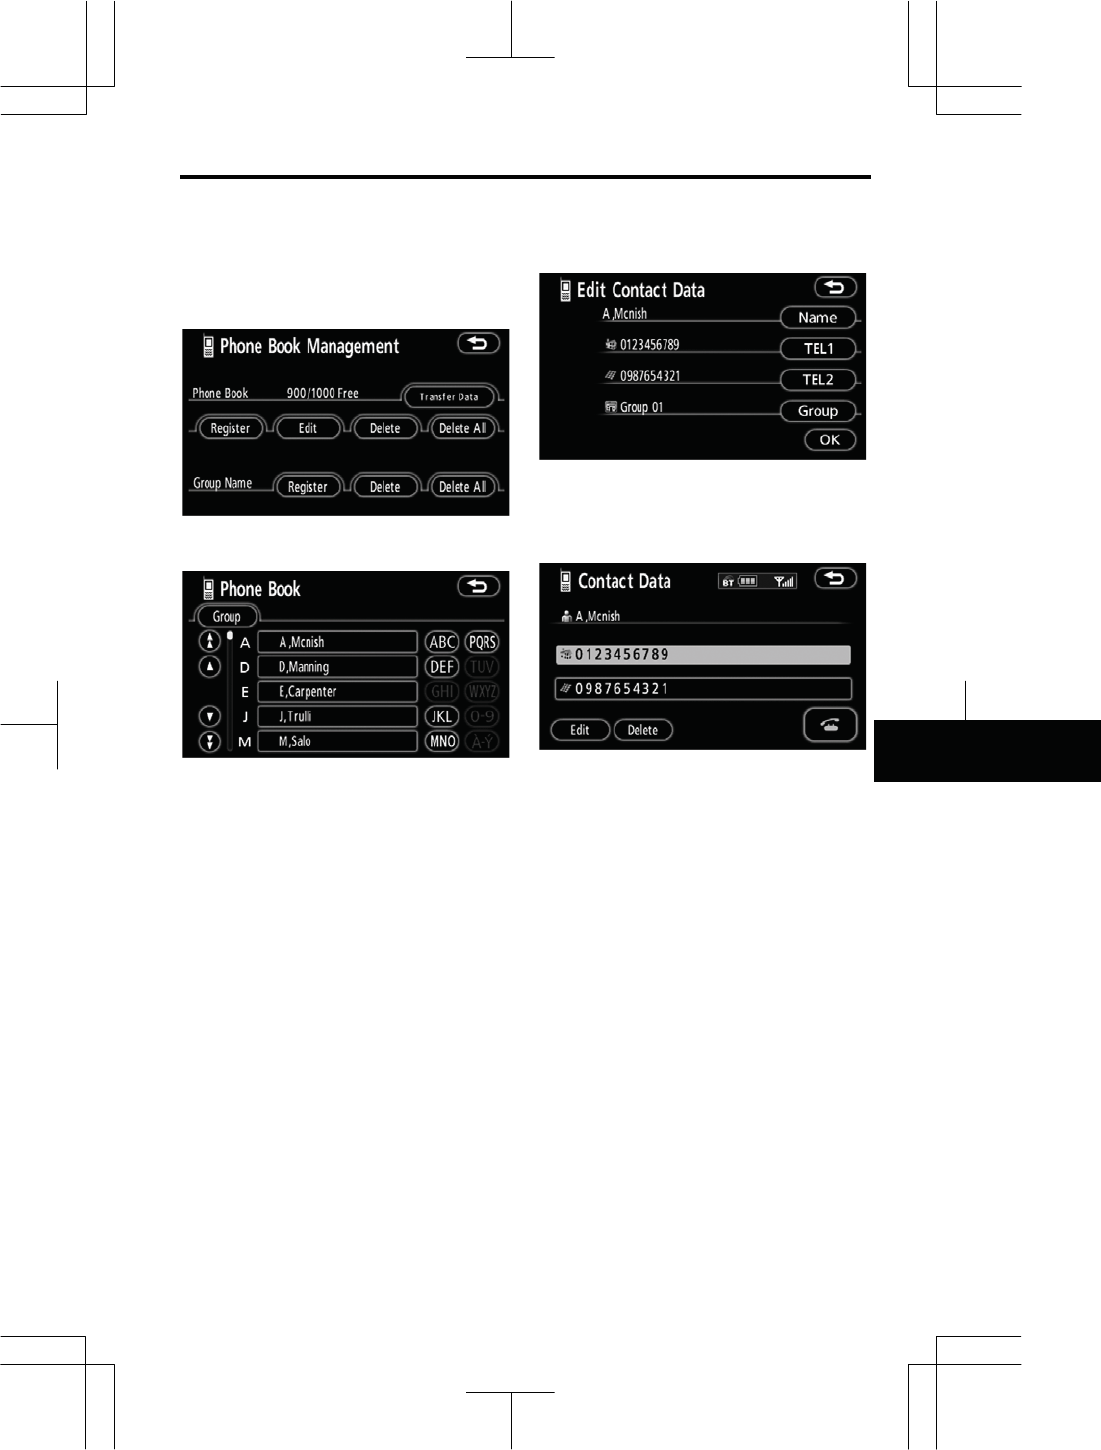
z Selecting the group
You can set a group for a contact (for
example: “Family”, “Friends”, “Of-
fice”...). It will then be easier for you
to find this contact when needed, by
using the group display.
You can select “No group” or “Group
01” to “Group 19”.
“No group” is displayed if you don’t set
the group.
1. Touch “Group”.
2. Select the desired group.
z Adding the data to the phone
book
You can add data to the phone book.
1. Touch “Add to”.
2. Select the data you want to add
log data to.
3. Confirm the added data on the
screen and touch “OK”.
OTHER FUNCTIONS
157
V573_E
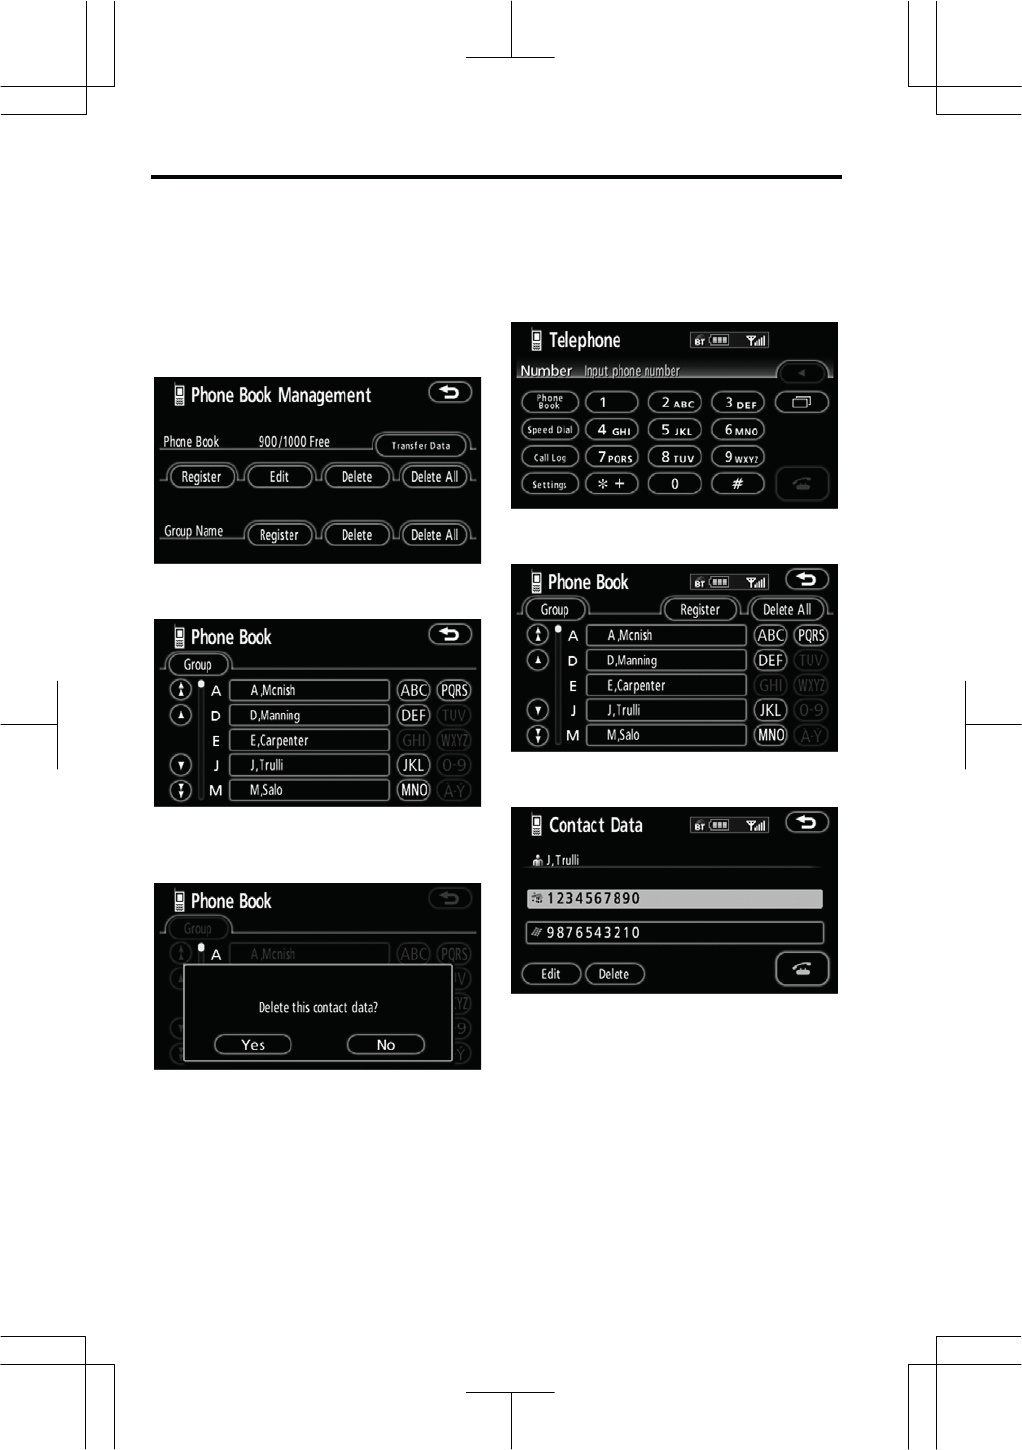
z Editing the data
You can edit the registered data.
1. Touch “Edit”.
2. Select the data you want to edit.
3. Touch the desired touch screen
button.
When you edit the data, touch “OK”.
When you also touch “Edit” on this
screen, you can edit it.
OTHER FUNCTIONS
158
V573_E
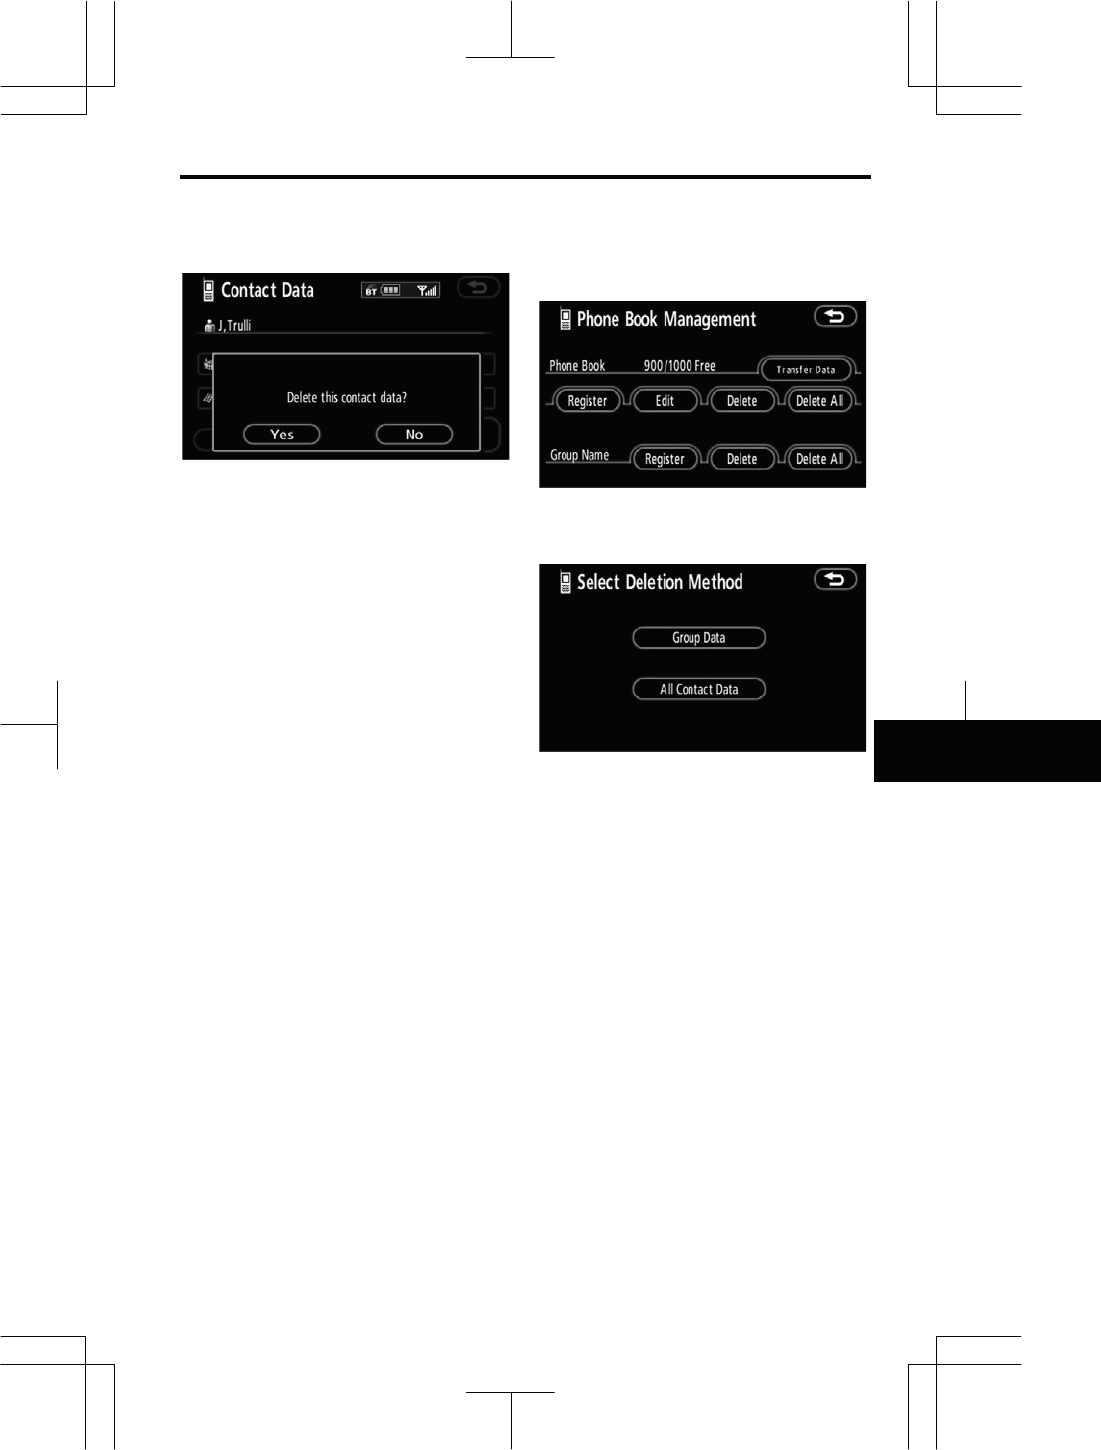
z Deleting the data
You can delete the data.
When you release your car, delete all
your data on the system.
1. Touch “Delete” of “Phone Book”.
2. Touch the desired touch screen
button.
3. Touch “Yes”.
You can also delete it in the following
way.
1. Touch “Phone Book”.
2. Select the desired data.
3. Touch “Delete”.
OTHER FUNCTIONS
159
V573_E
4. Touch “Yes”.
z Deleting all the phone data
1. Touch “Delete All” of “Phone
Book”.
2. Select the deleting method.
“Group Data”
....... Deleting all the phone data in
group.
“All Contact Data”
....... Deleting all the phone data.
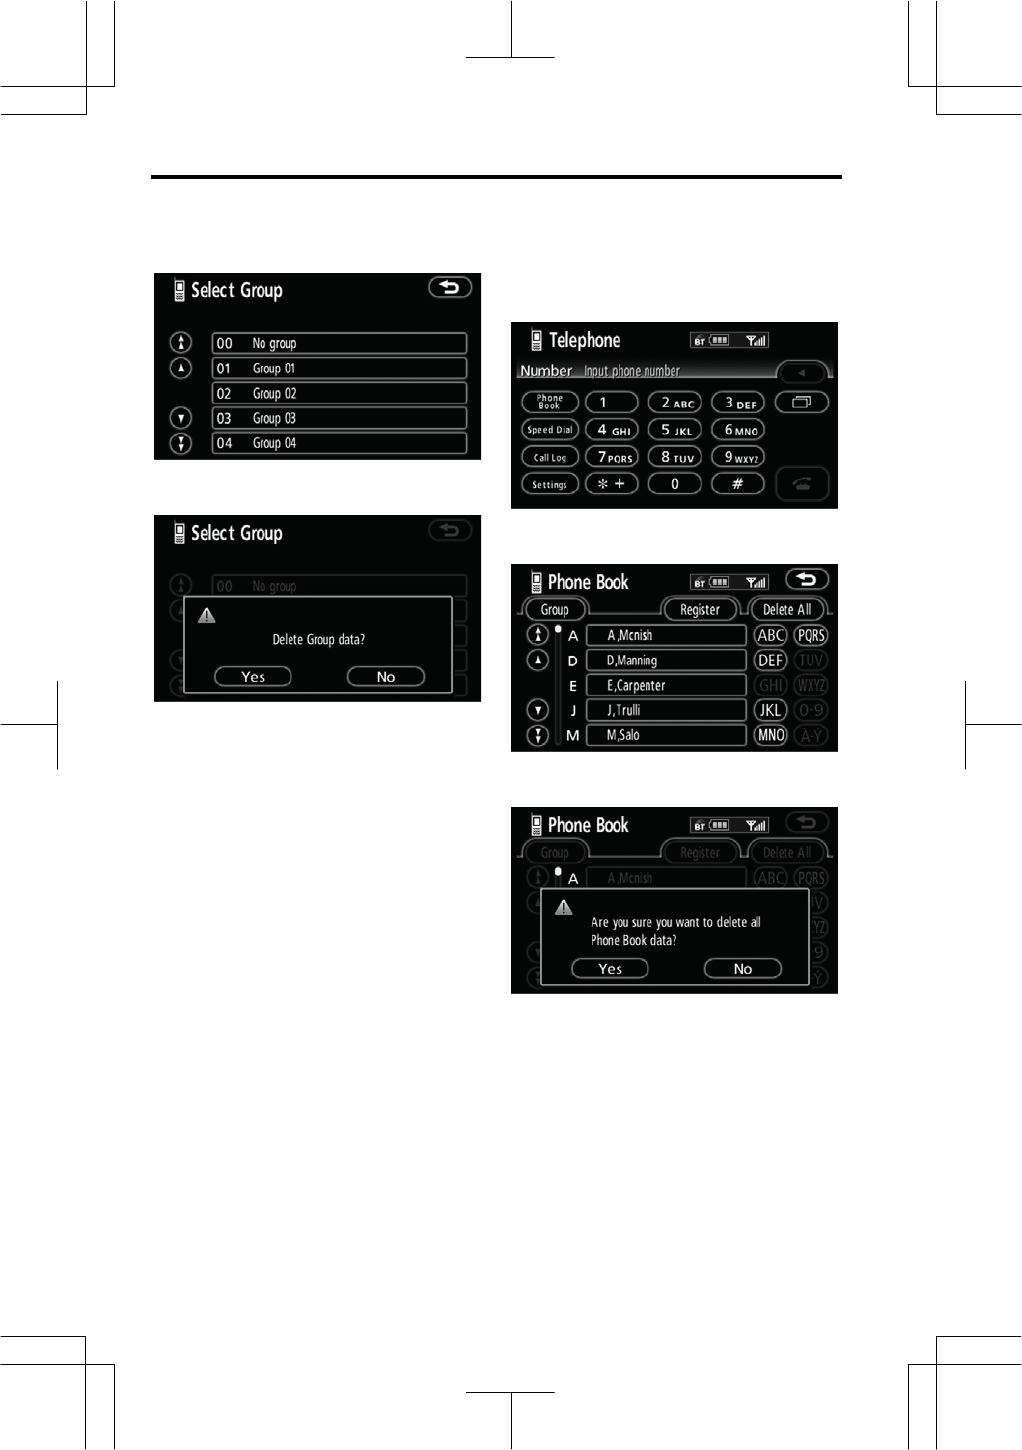
3. When you select “Group Data”,
the “Select Group” screen is dis-
played.
OTHER FUNCTIONS
160
V573_E
4. Select the desired group.
5. Touch “Yes”.
You can also delete it in the following
way.
1. Touch “Phone Book”.
2. Touch “Delete All”.
3. Touch “Yes”.