AISOLUTION KDC250 Barcode Scanner(Bluetooth) User Manual
AISOLUTION CO., LTD. Barcode Scanner(Bluetooth) Users Manual
UserManual.wiki
>
AISOLUTION
>
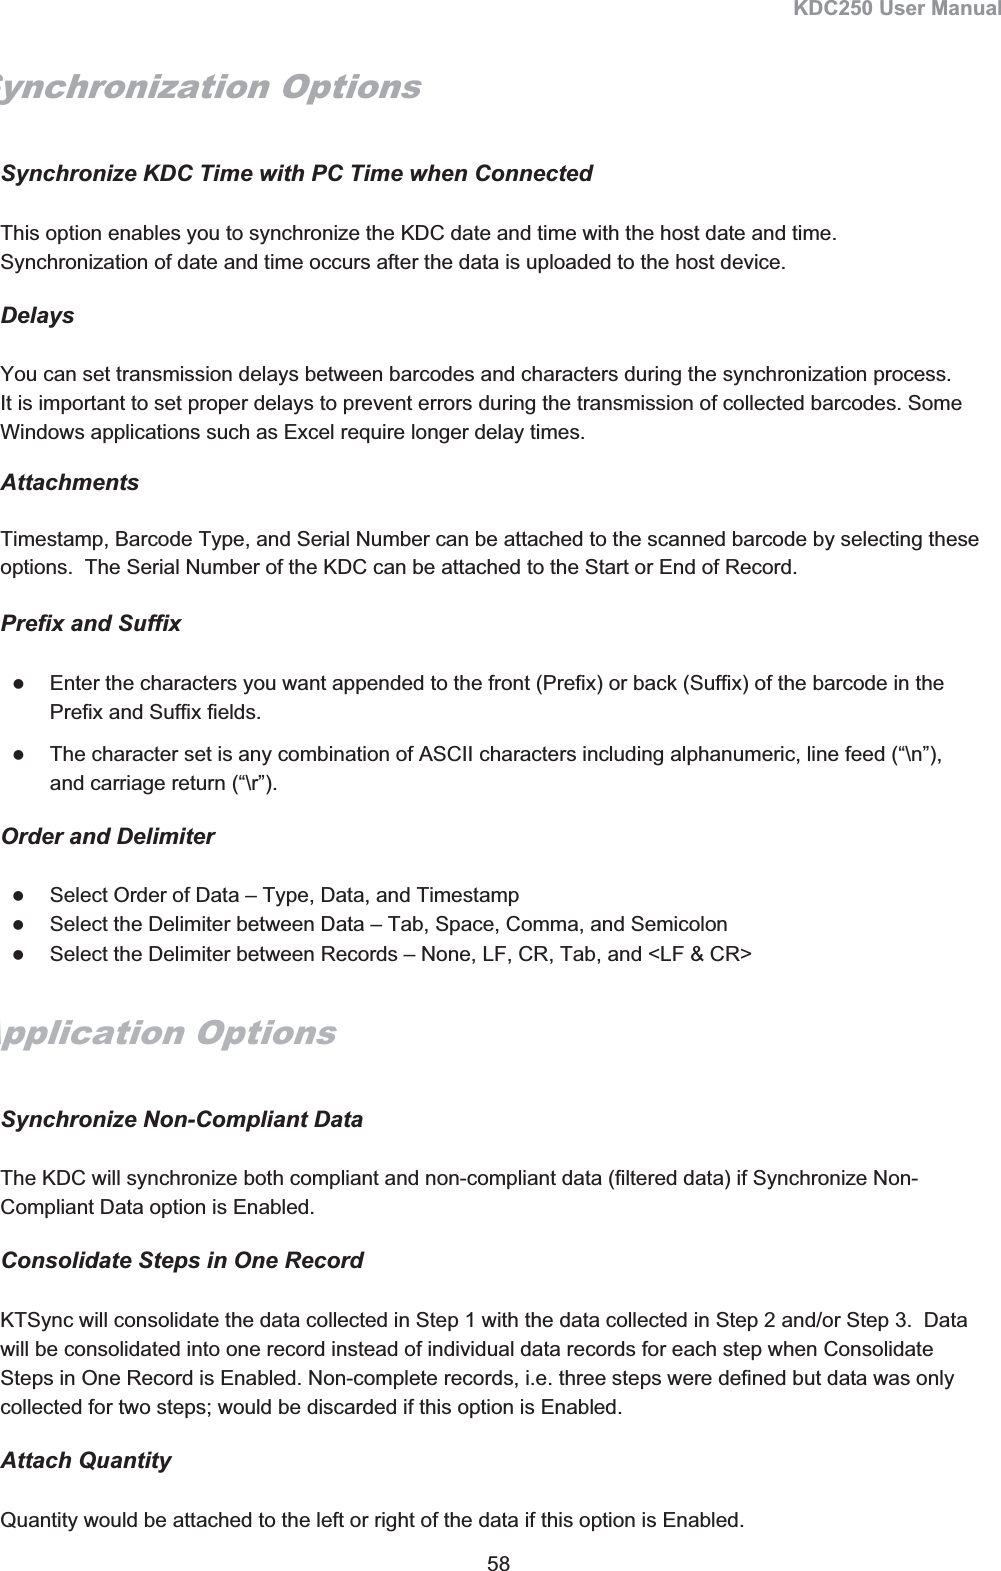
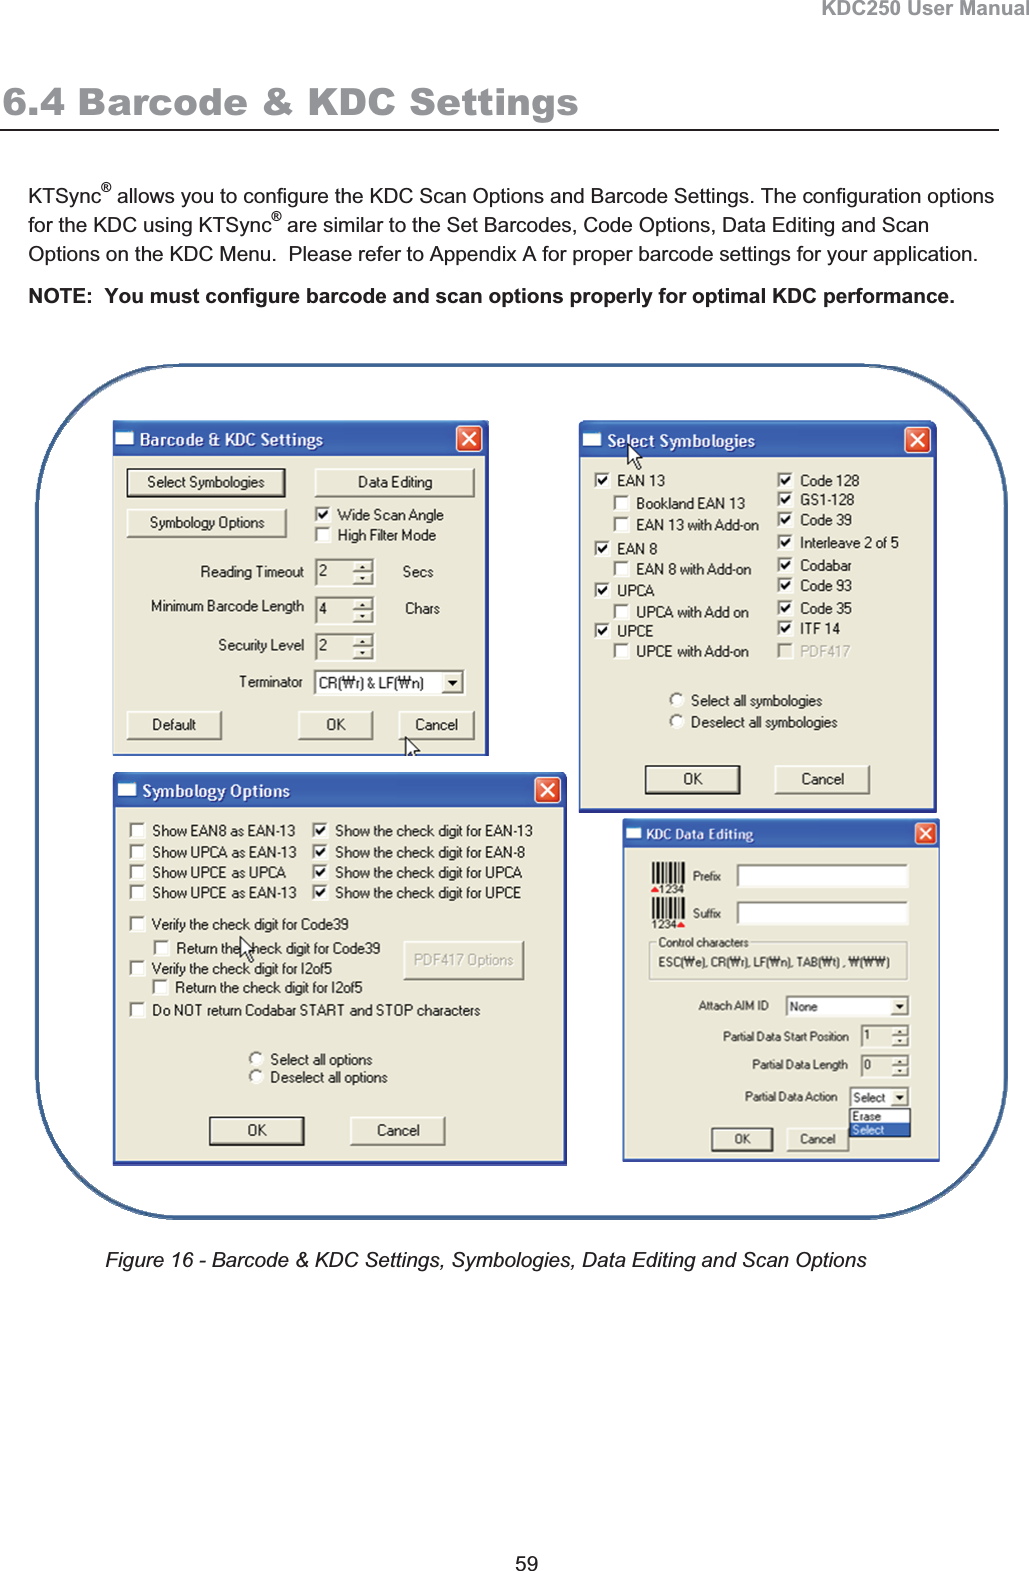
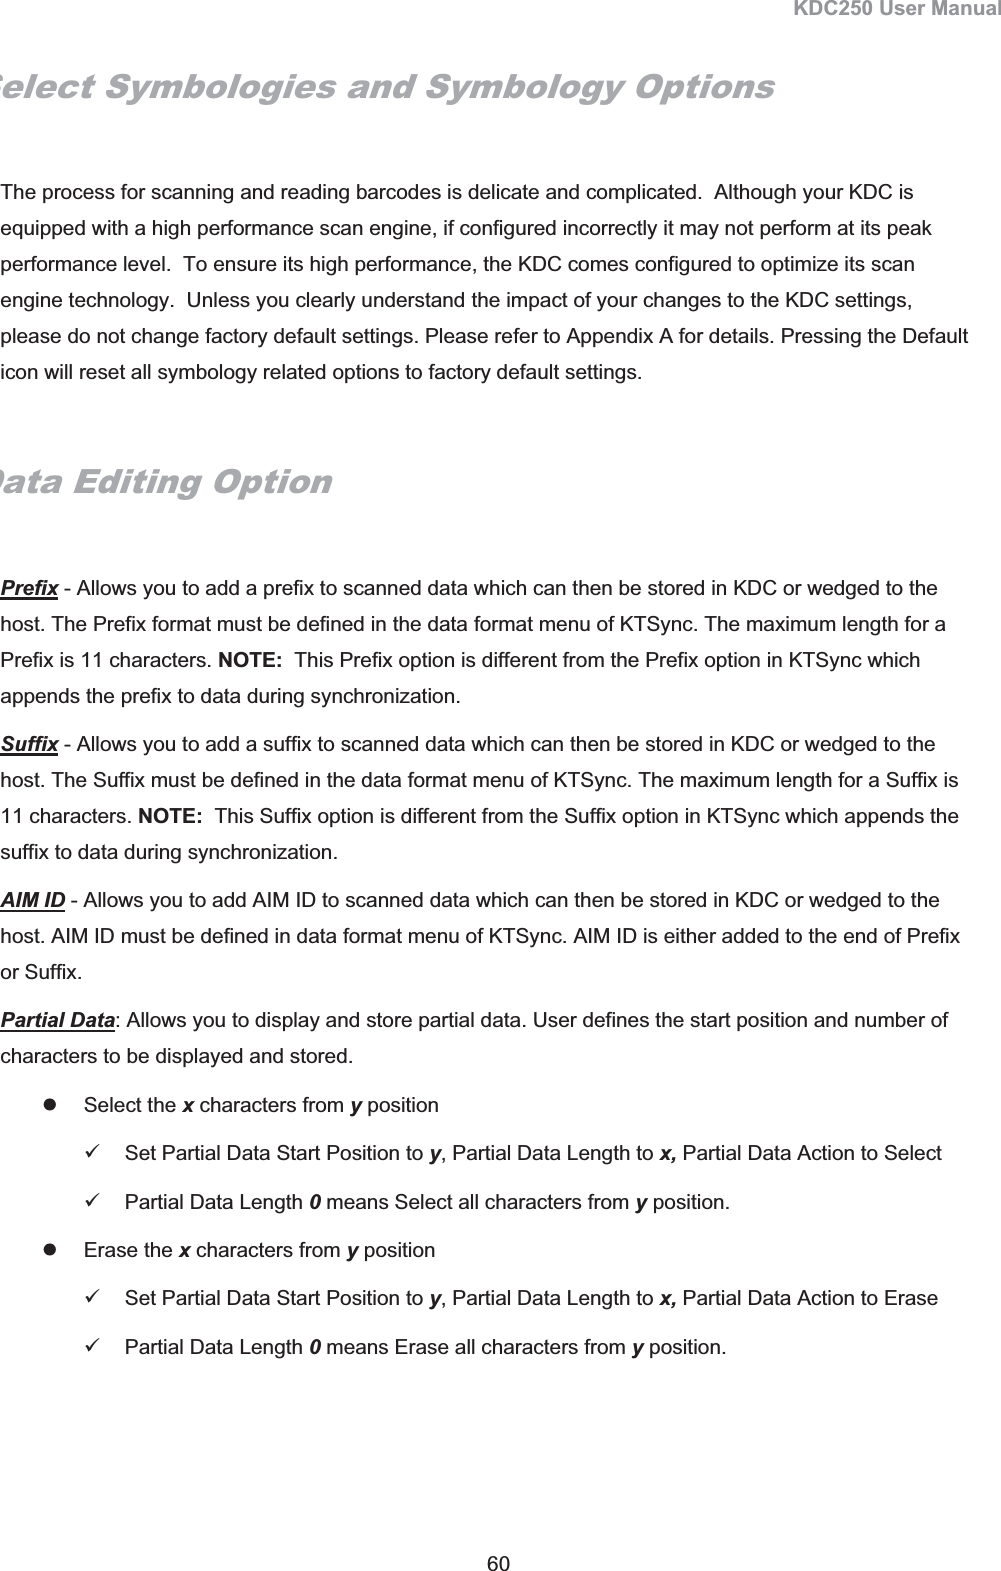
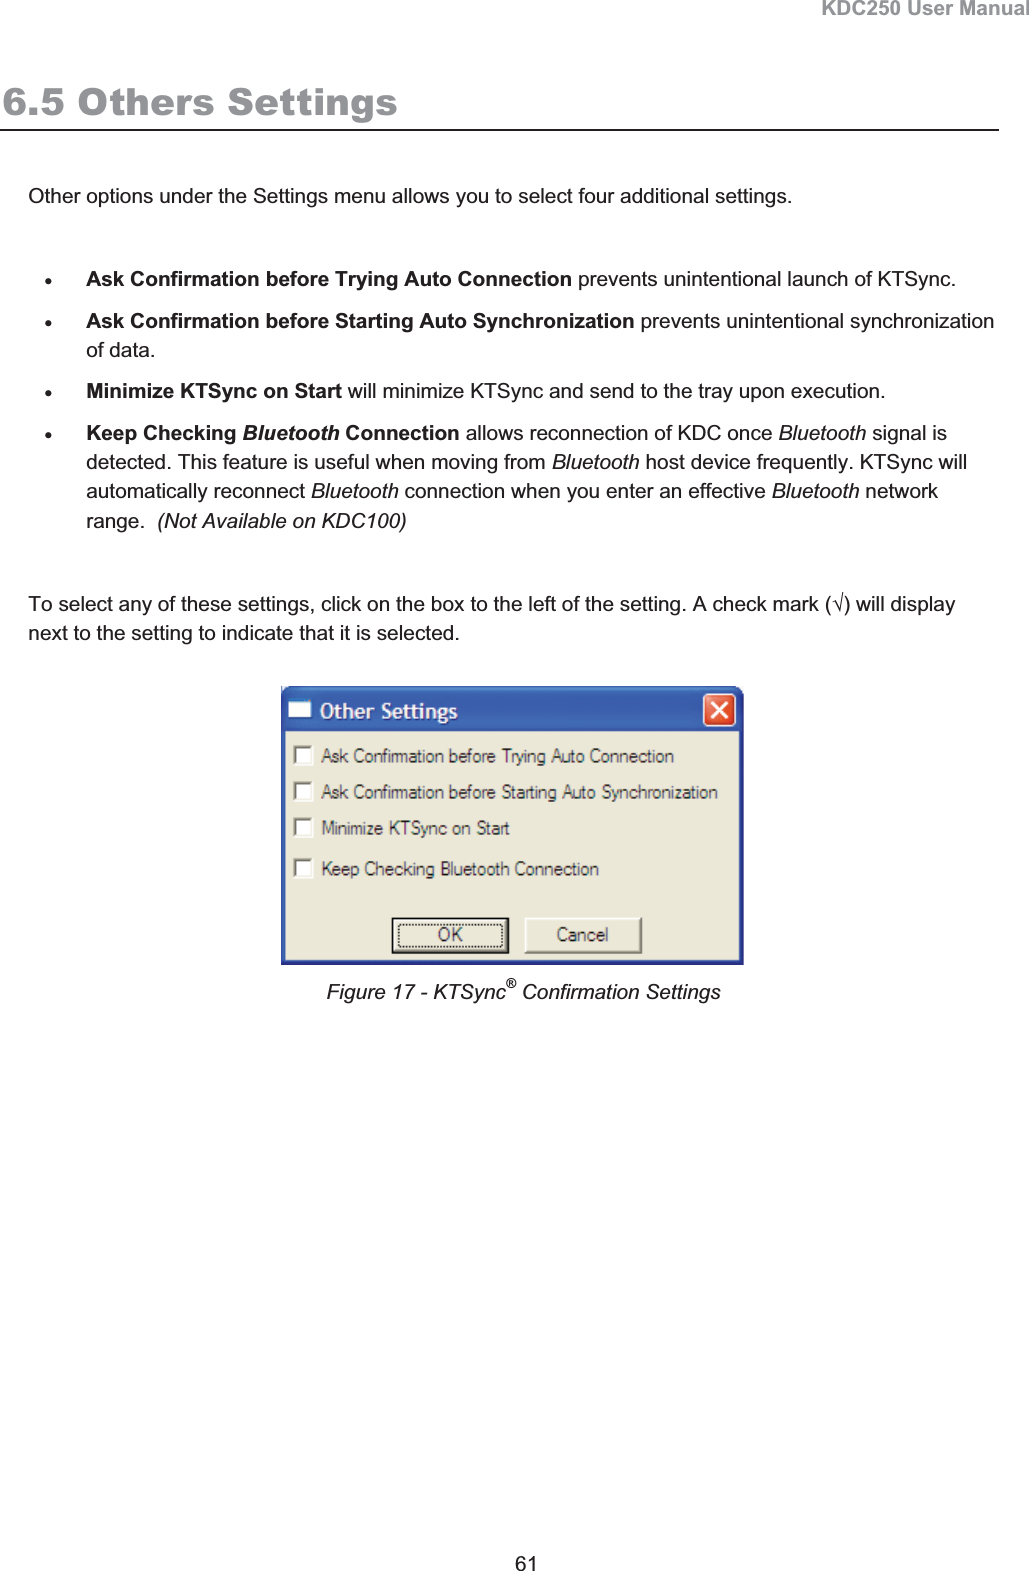
KDC250 User Manual
Users Manual
Navigation menu
Upload a User Manual
Namespaces
Wiki Guide
HTML
PDF
Info
Views
User Manual
Discussion / Help
Navigation


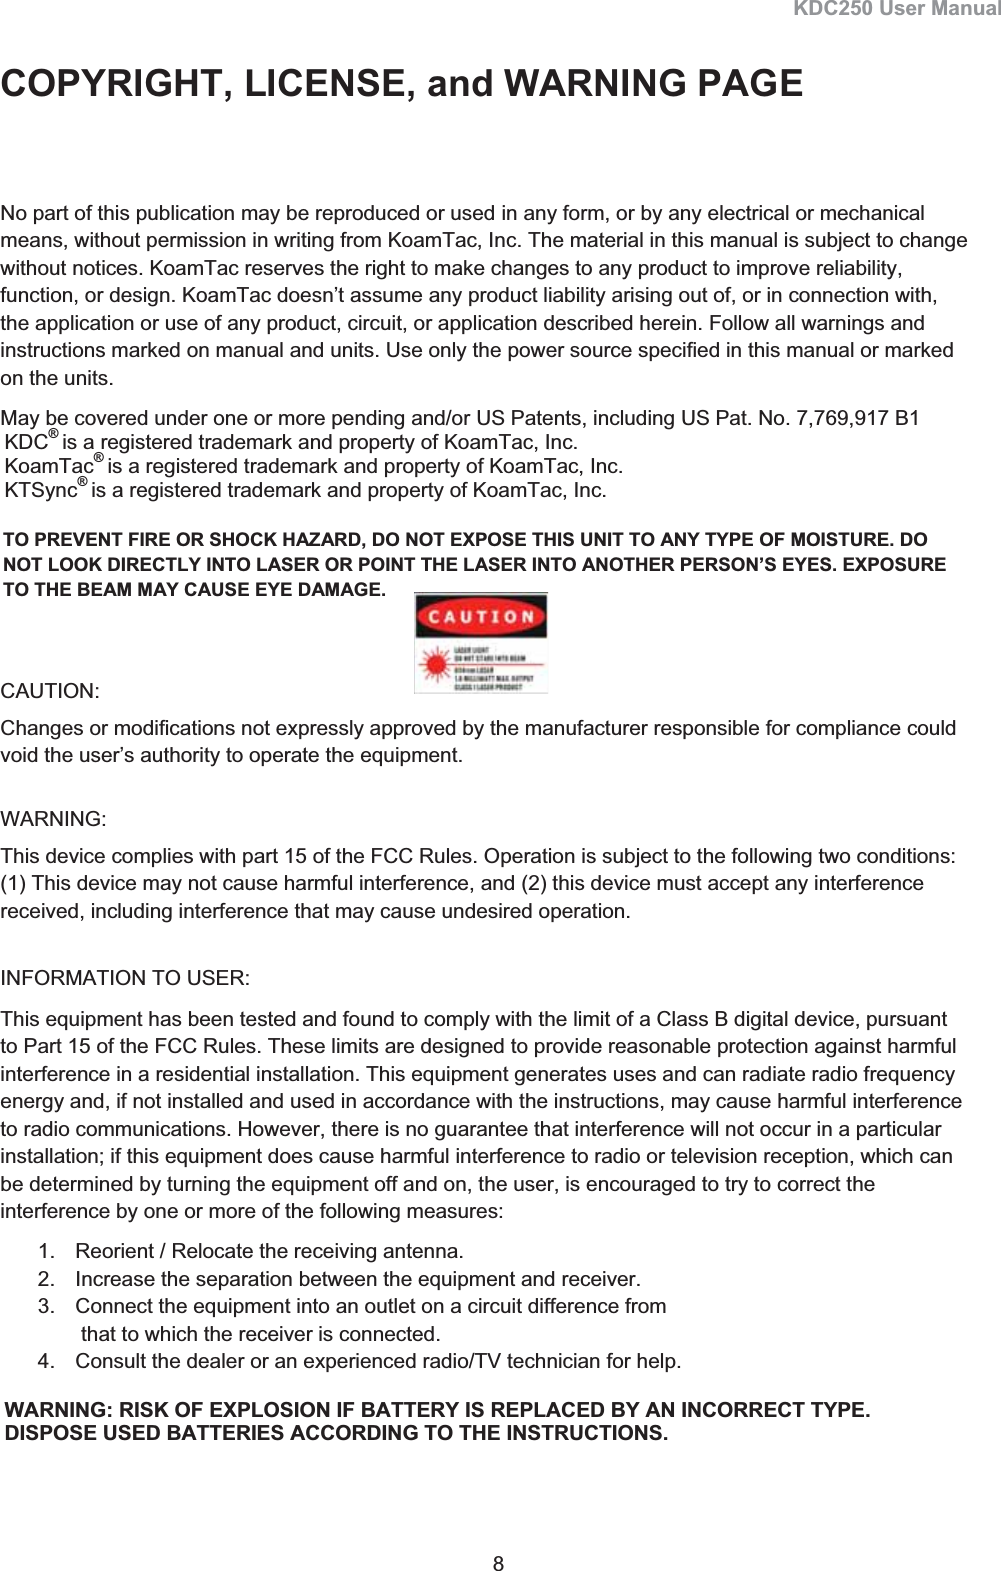


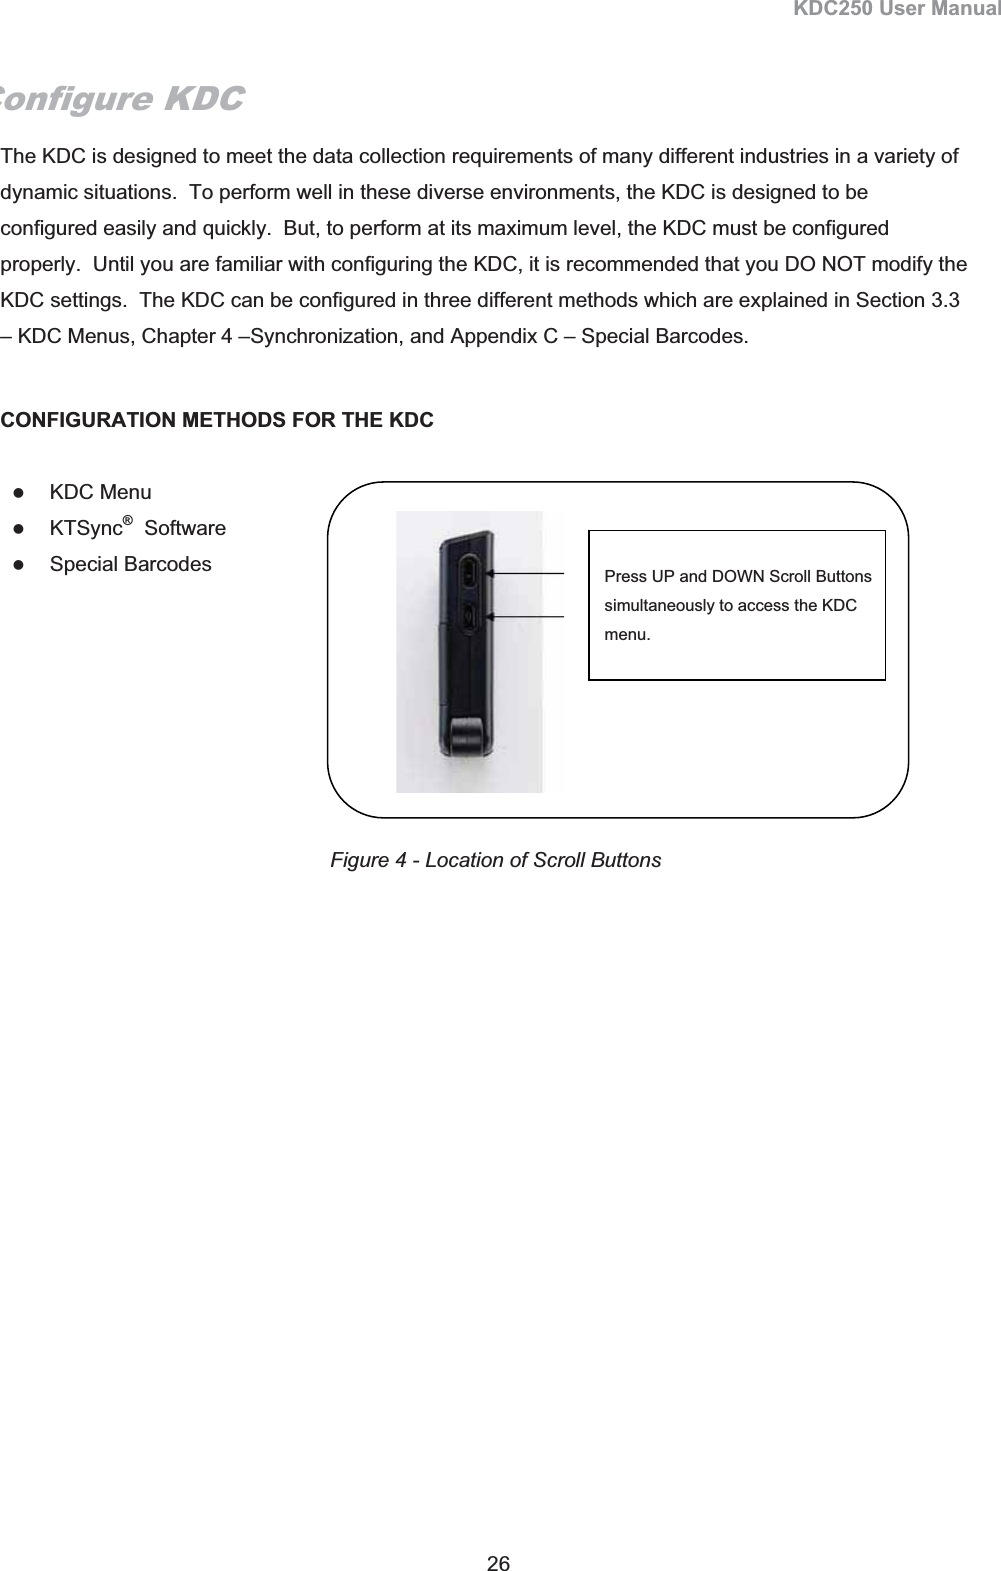

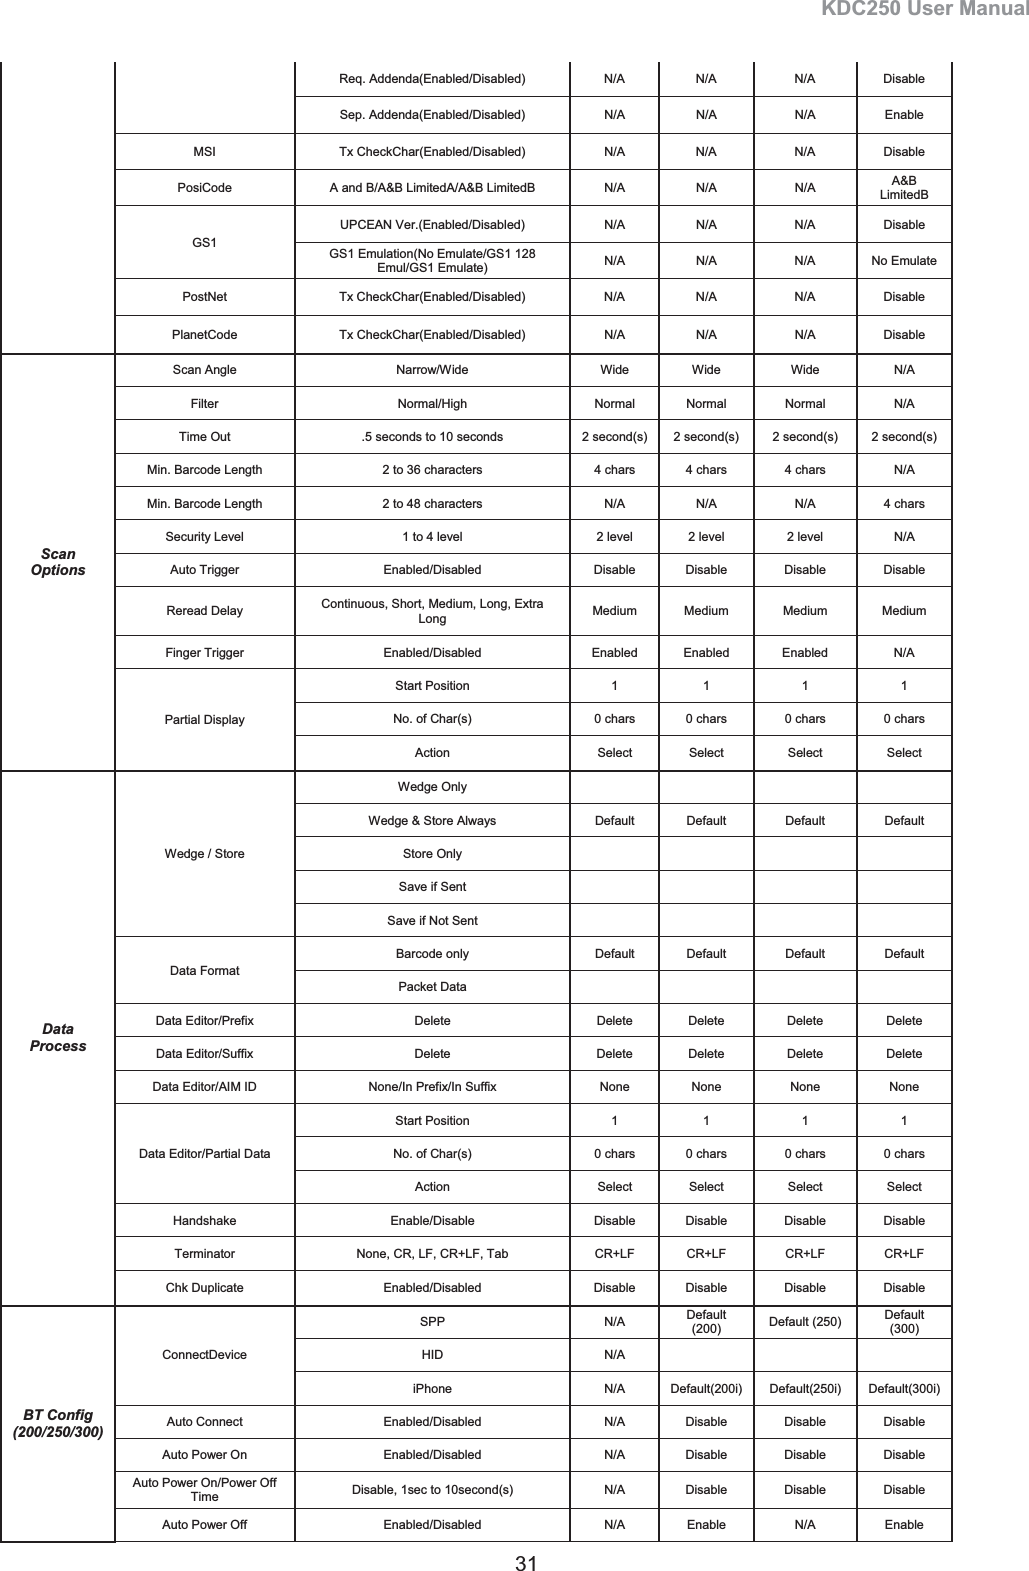

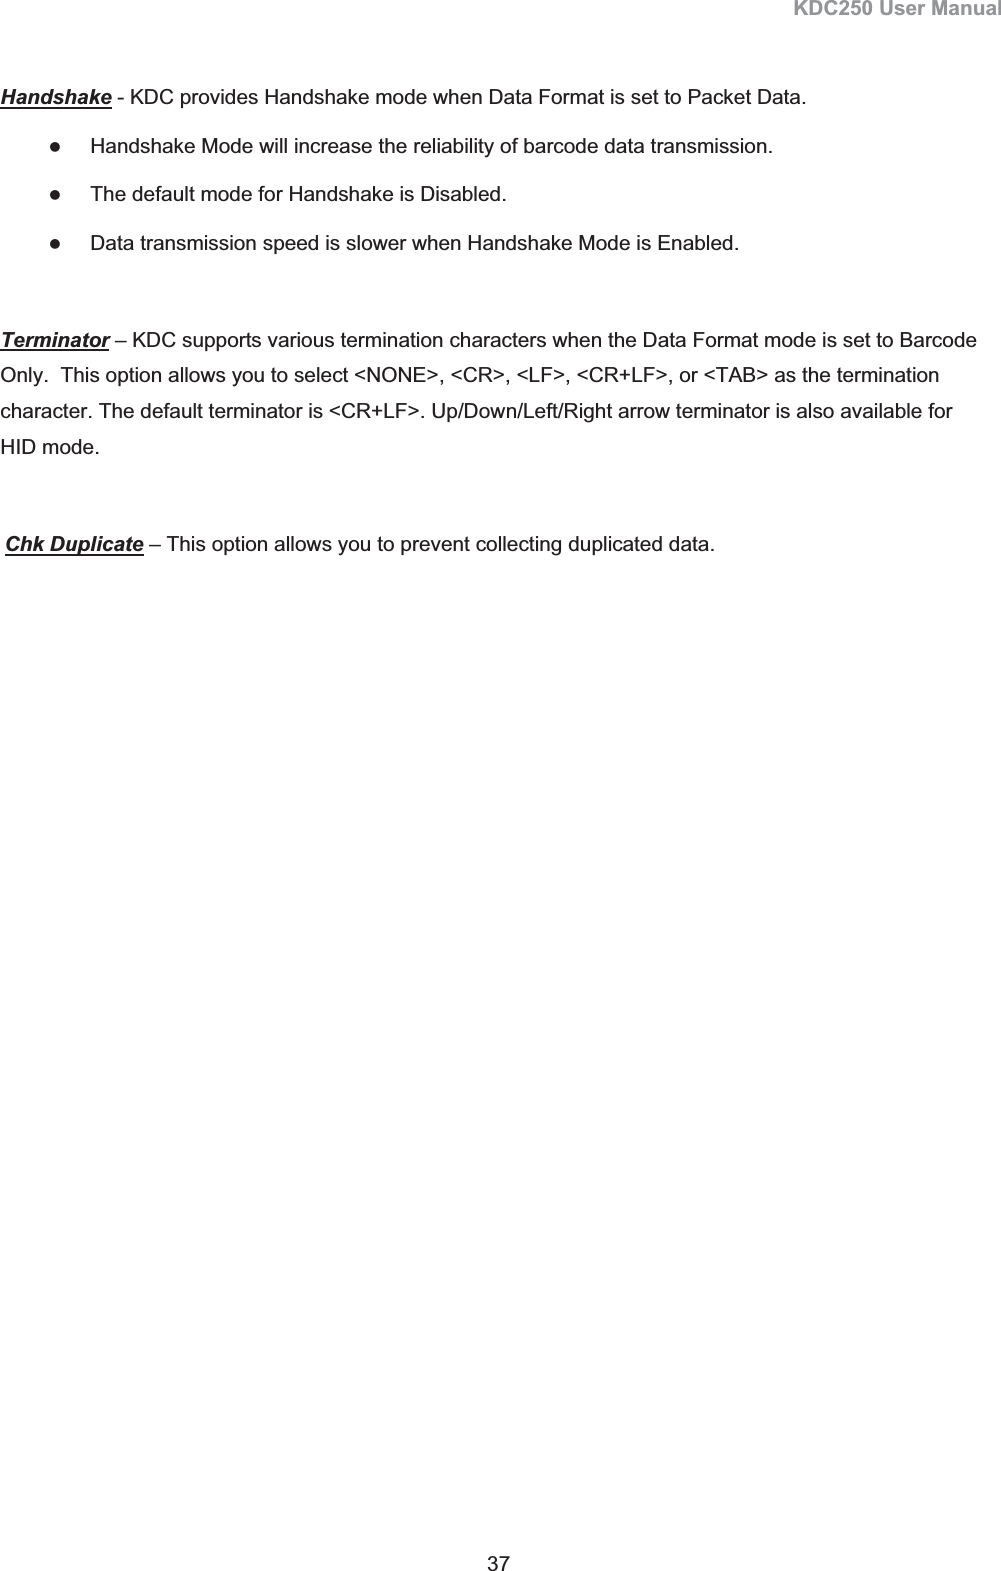
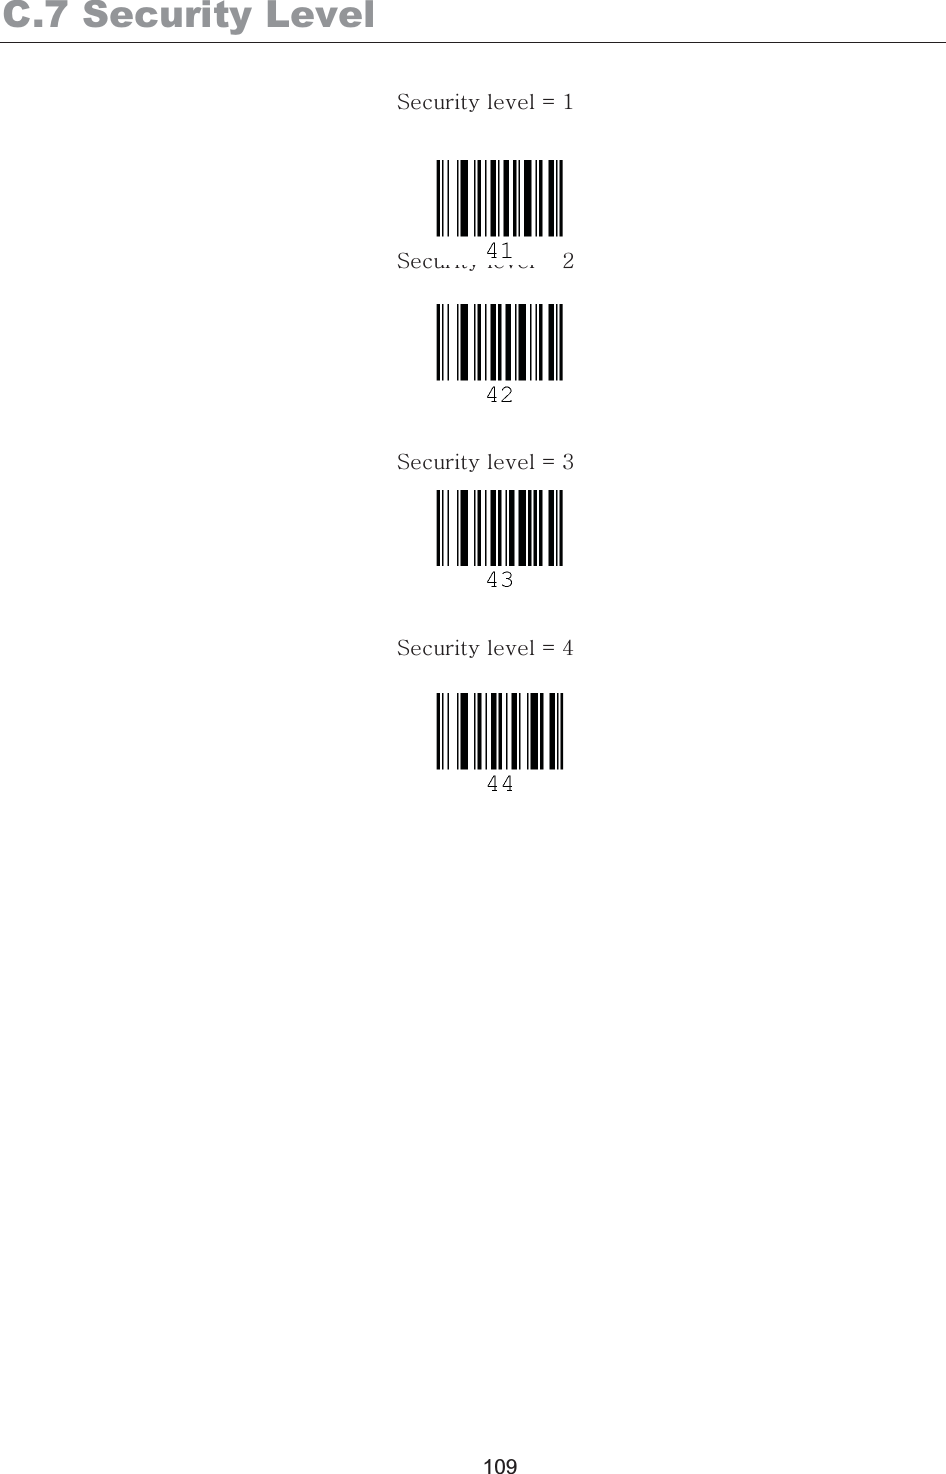
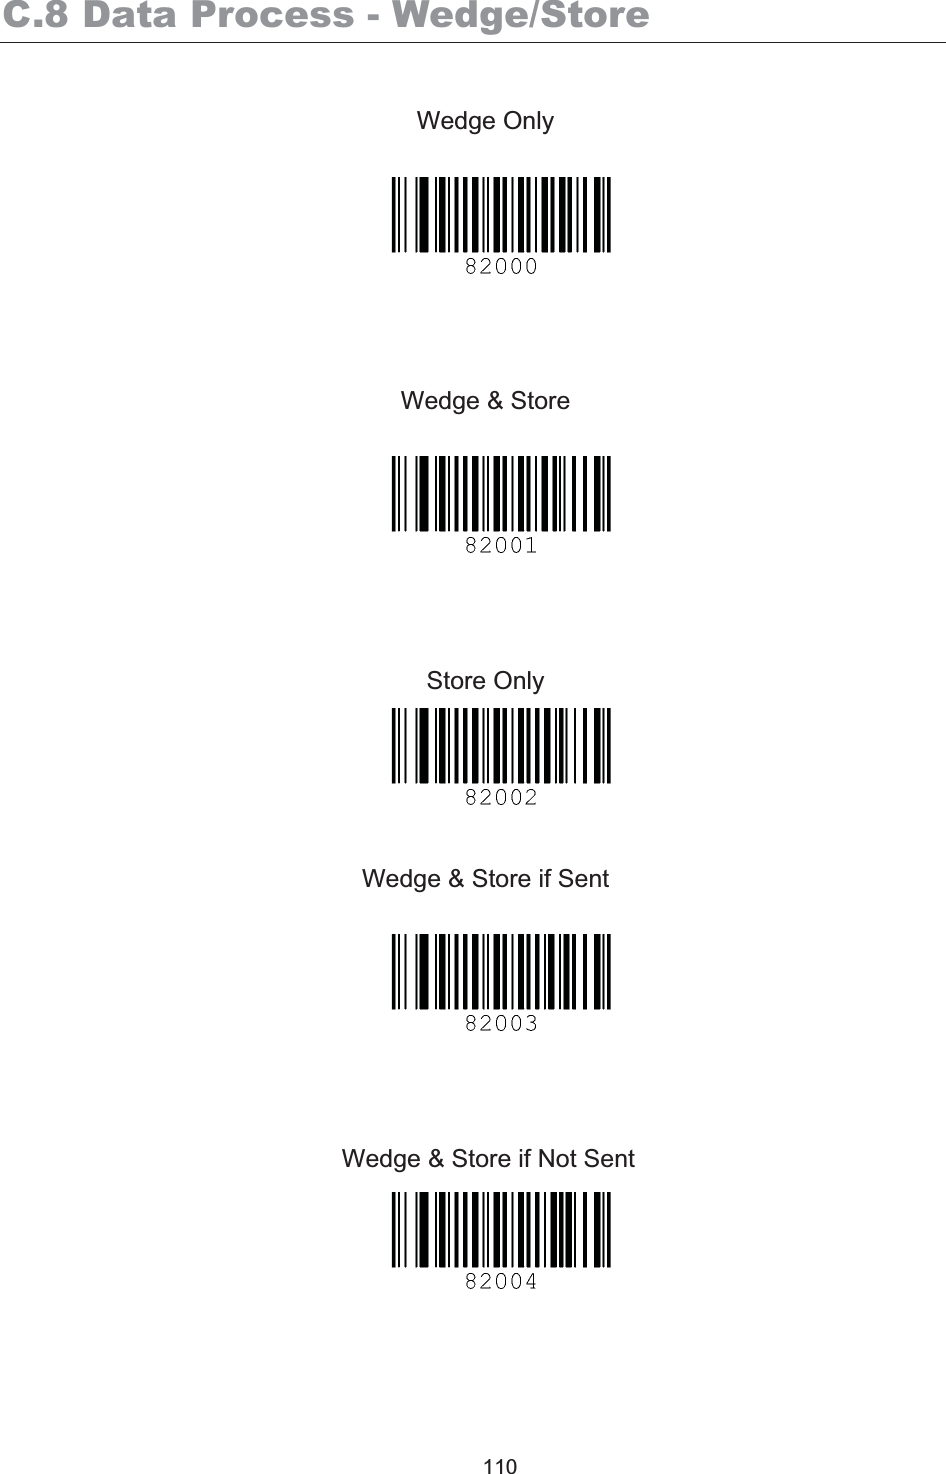
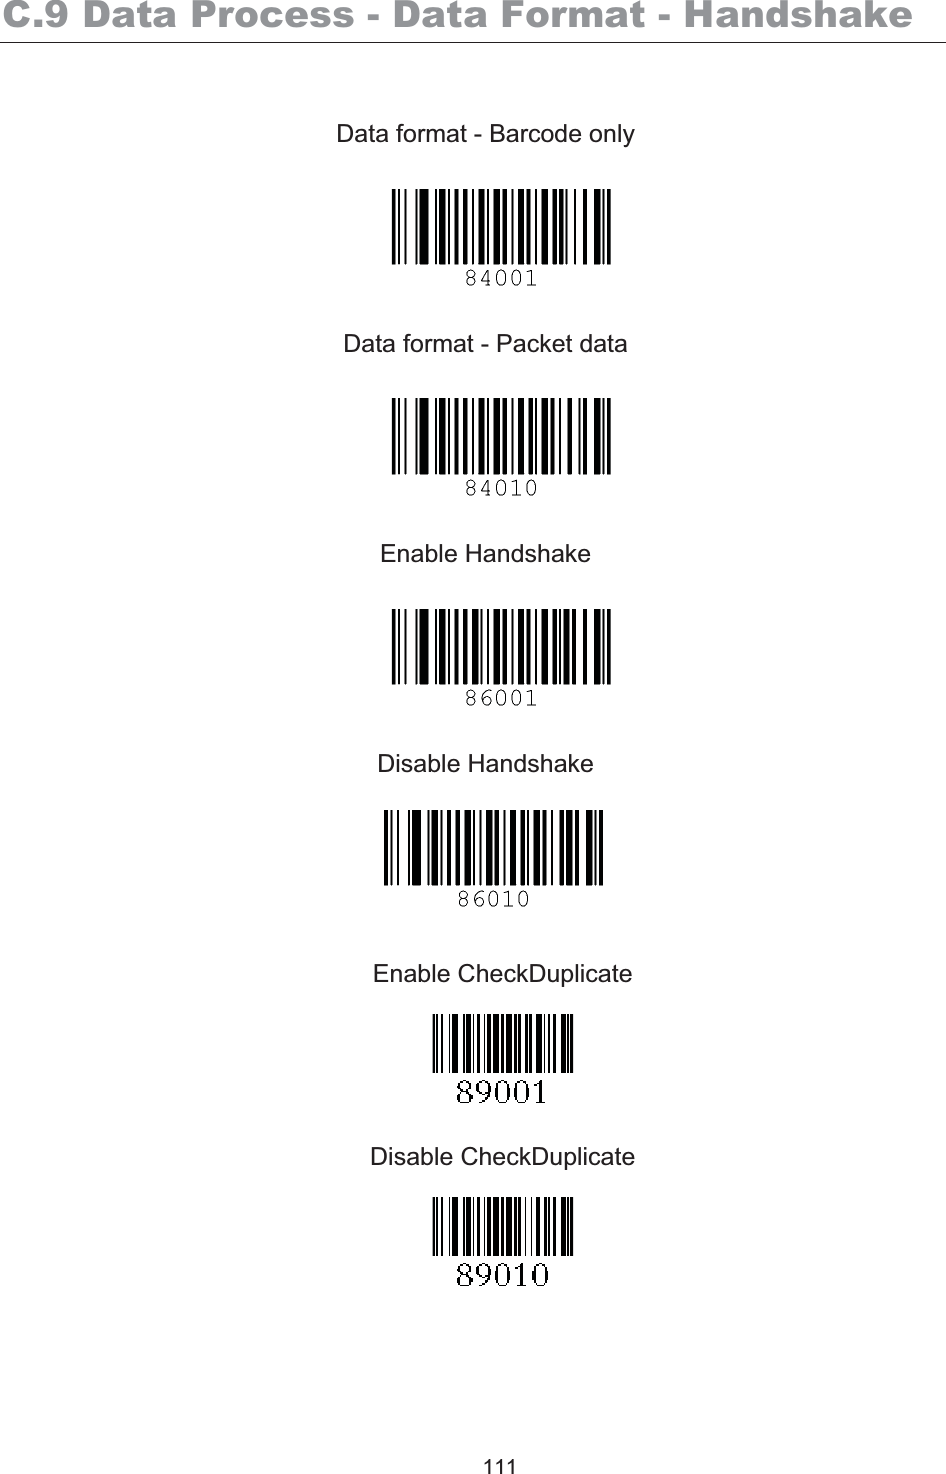
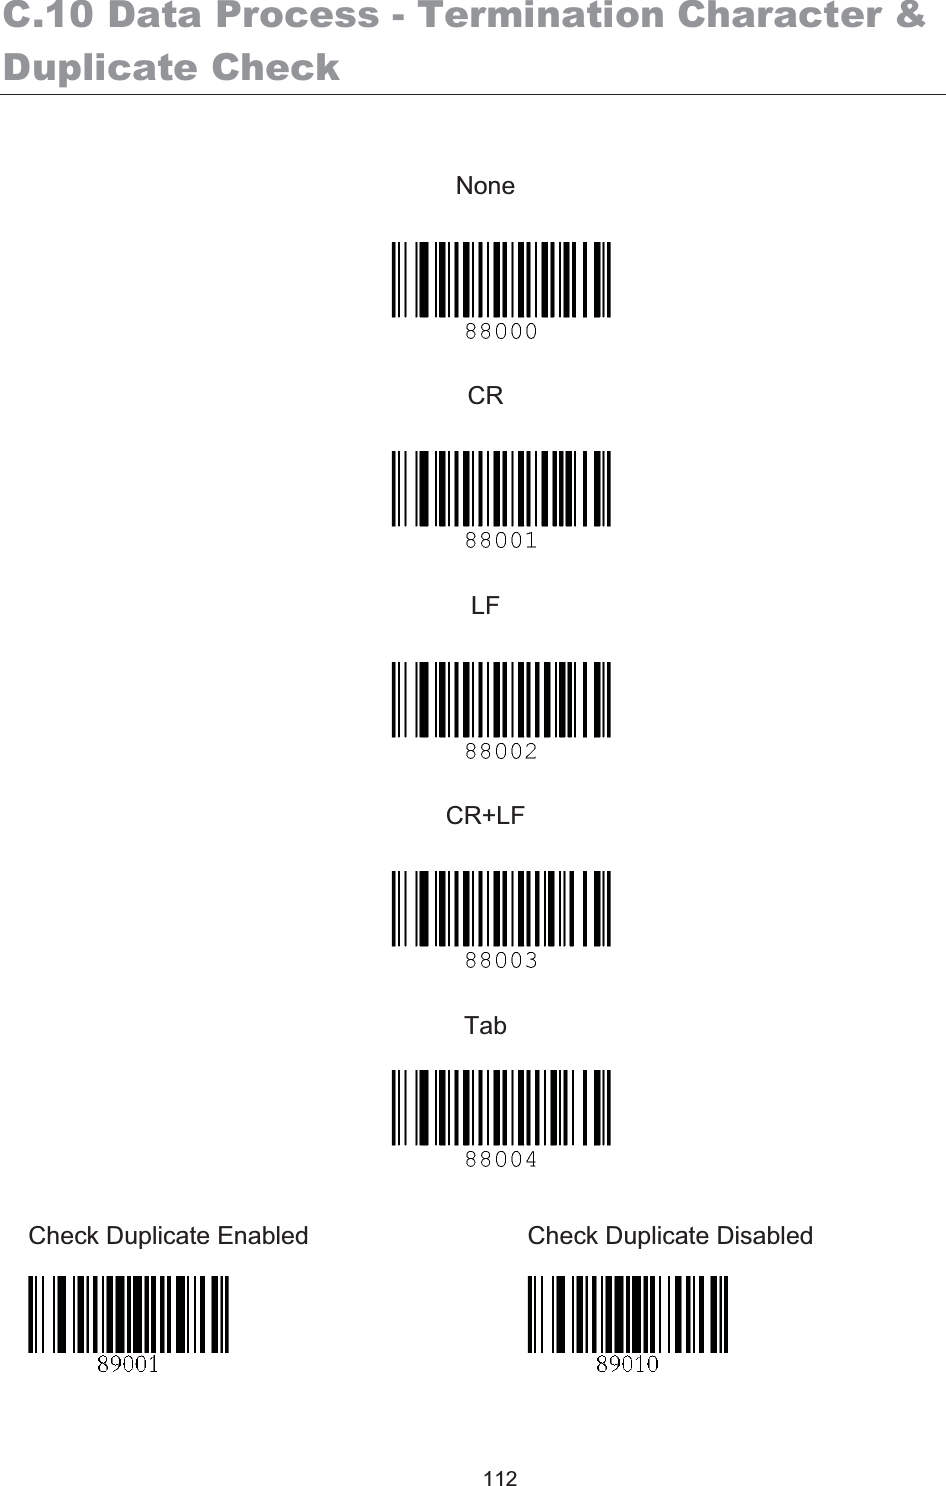
![KDC250 User Manual 34 the KDC will read a barcode. Security Level is set from 1 up to 4. The higher security level means more reliable readings though some performance degradation is likely. For poor quality barcodes, we recommend increasing the security level. The default is 2. zAuto Trigger: Allows users to scan a barcode automatically once Auto Trigger is enabled and USB cable is connected. User can adjust Reread delay from Continuous to Extra Long. Auto Trigger mode always enables duplicate check option. zPartial Display: Allows you to display partial data. User defines the start position and number of characters to be displayed. Data Process Menu Wedge/Store - The KDC provides five modes of data transmission in keyboard wedging mode. zWedge Only: Barcode data is NOT stored in memory but transmitted to the host. zWedge & Store Only: Barcode data is stored in memory and transmitted to the host. zStore Only: Barcode data is stored in memory but NOT transmitted to the host. zSave if Sent: If data transmission is successful, barcode data is stored in memory. zSave if Not Sent: If data transmission is NOT successful, barcode data is stored in memory. Data Format - The KDC provides two data formats, Barcode Only and Packet Data. zBarcode Only: KDC transmits scanned barcodes only. User may incorporate proper data transmission error detection and correction mechanism in this mode. KDC supports various termination characters for barcode only format. User can select <NONE>, <CR>, <LF>, <CR+LF> or <TAB> as the termination character. zPacket Data: KDC transmits packet data with checksum to minimize transmission errors. KTSync® sets Data Format to Packet Data format upon execution. User may change Data Format to Barcode only if user prefers to use Barcode only mode but either KTSync program terminates abnormally or user disconnects KDC without exiting KTSync program normally. [Note] Barcode Index: KDC200i/300i add 4 bytes barcode index to support maintaining last synchronized barcode information. This optional index would be added if data format is “Packet Data” and (1) 4 bytes index would be added before “@” when responding to “p” command (2) 4 bytes index plus “@” character would be added after checksum byte if user scan a barcode and wedging to the host](https://usermanual.wiki/AISOLUTION/KDC250/User-Guide-1509689-Page-36.png)
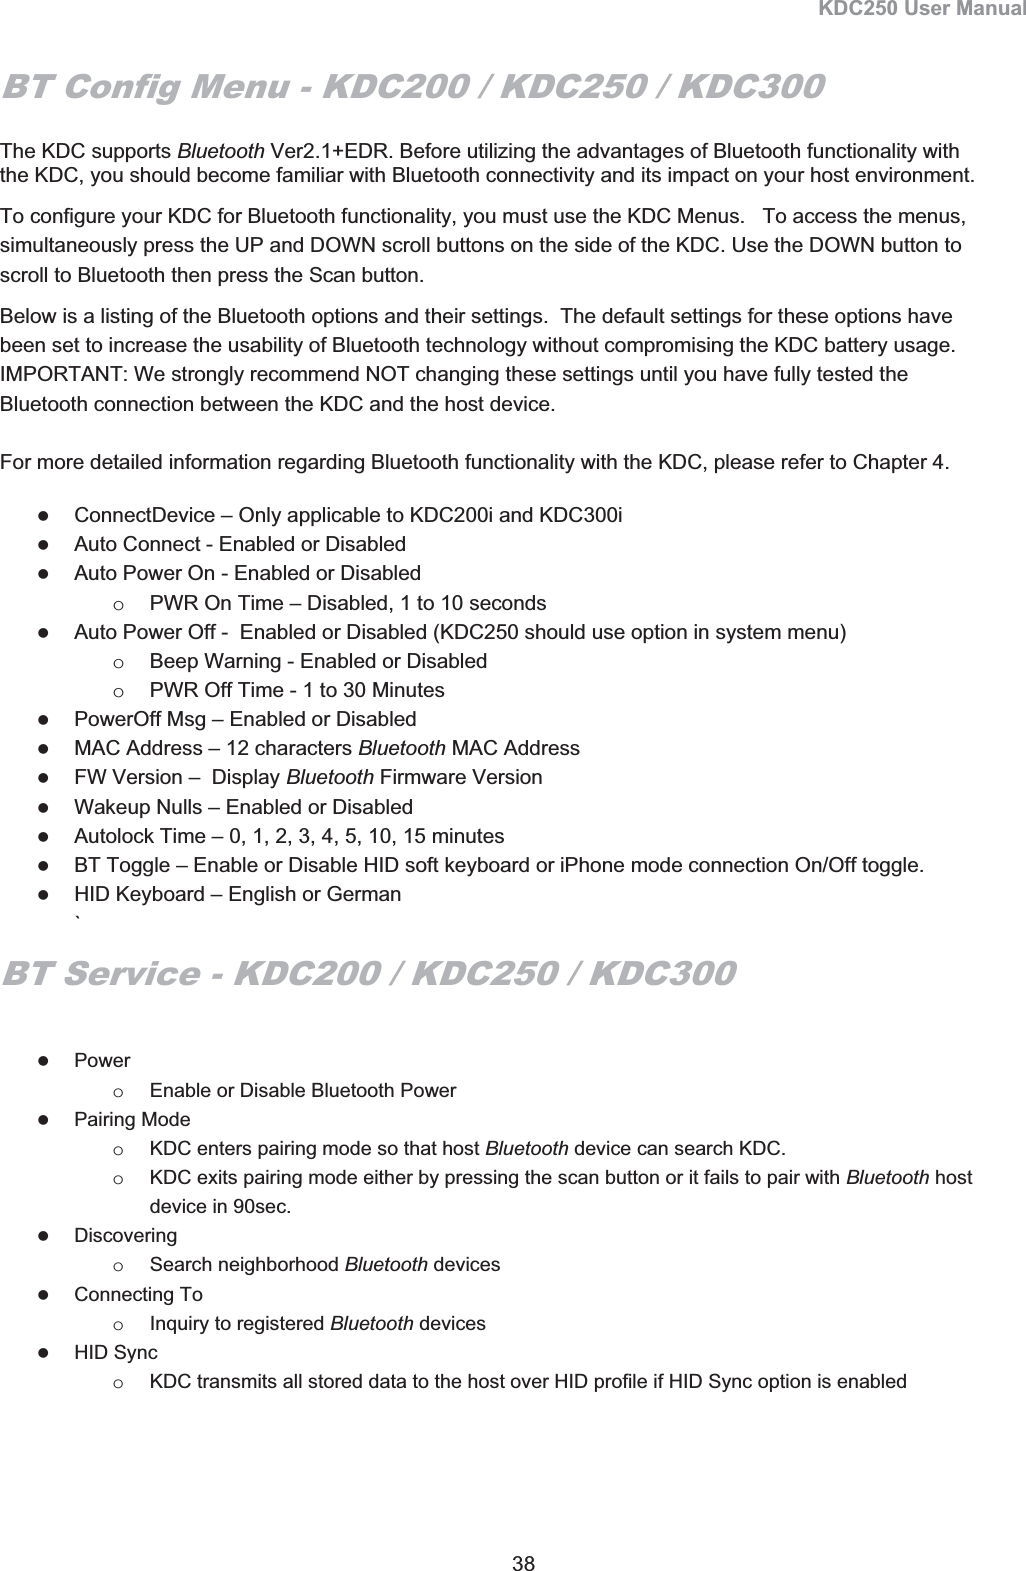
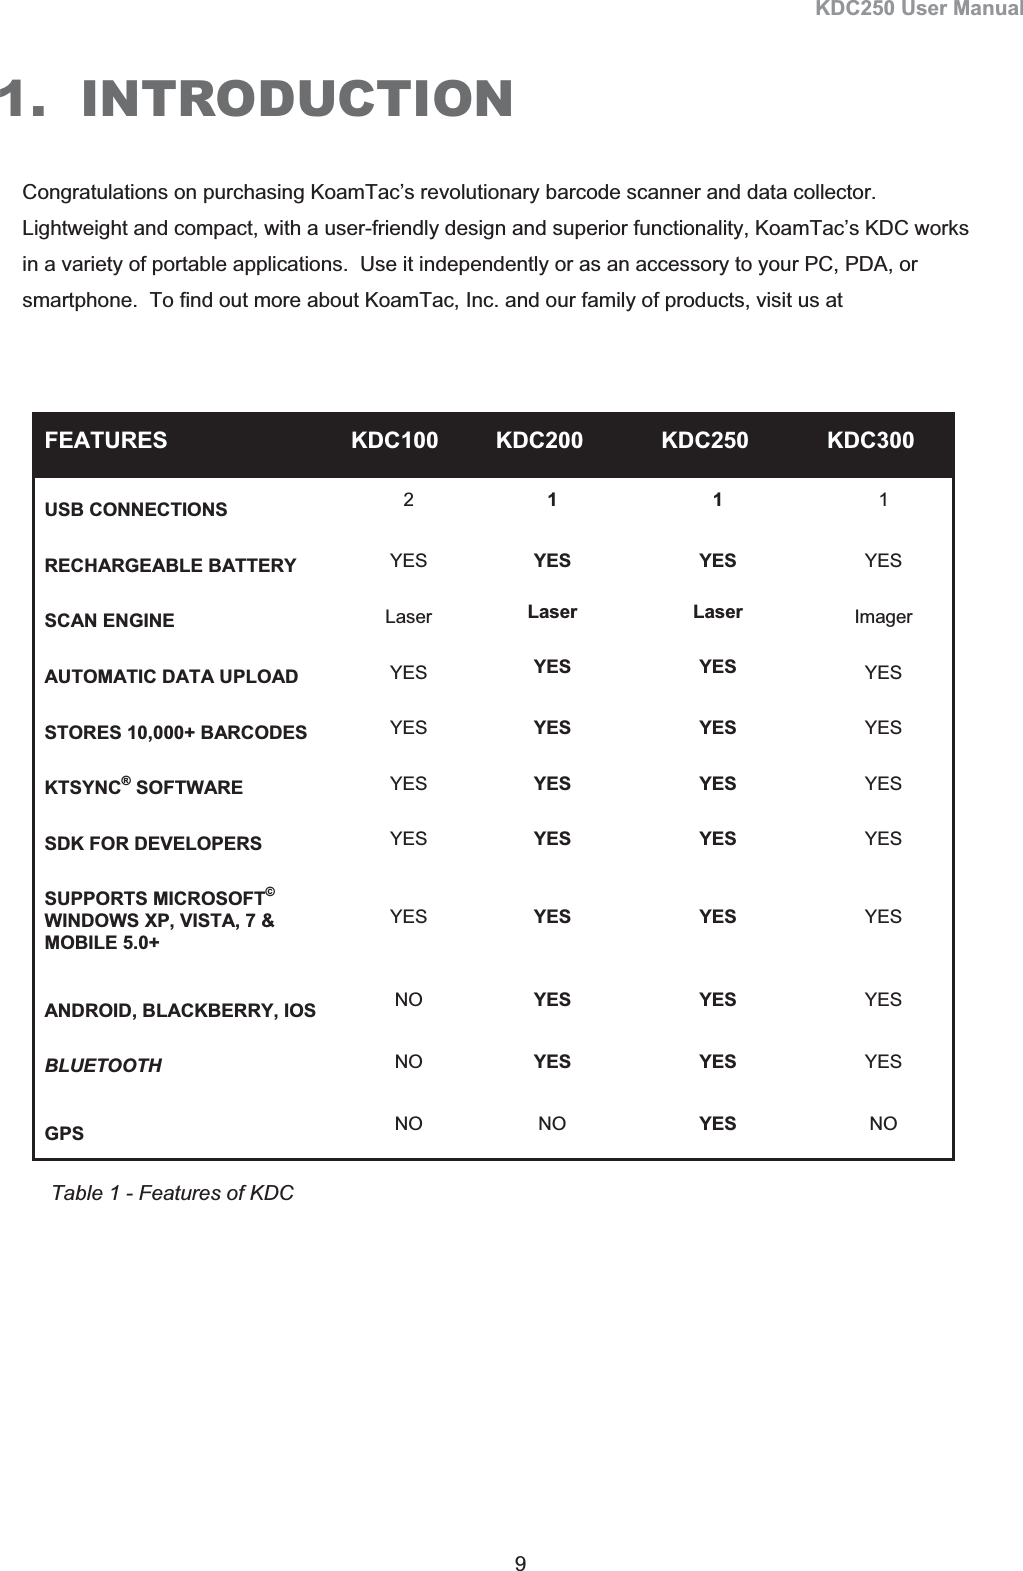
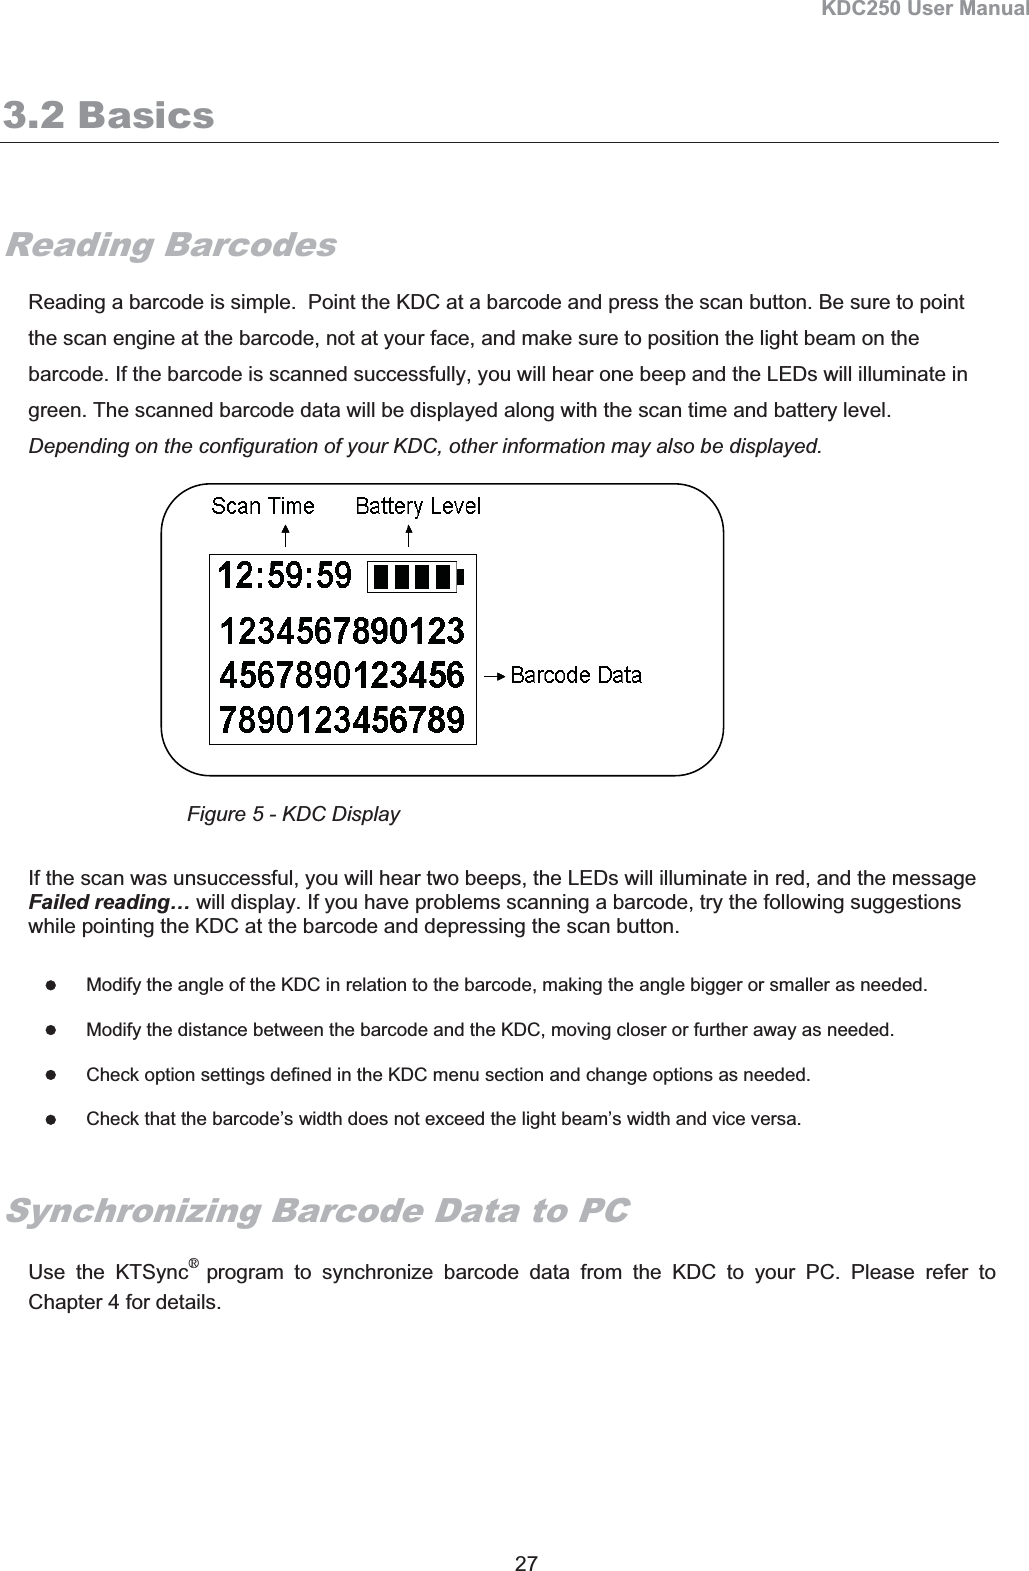
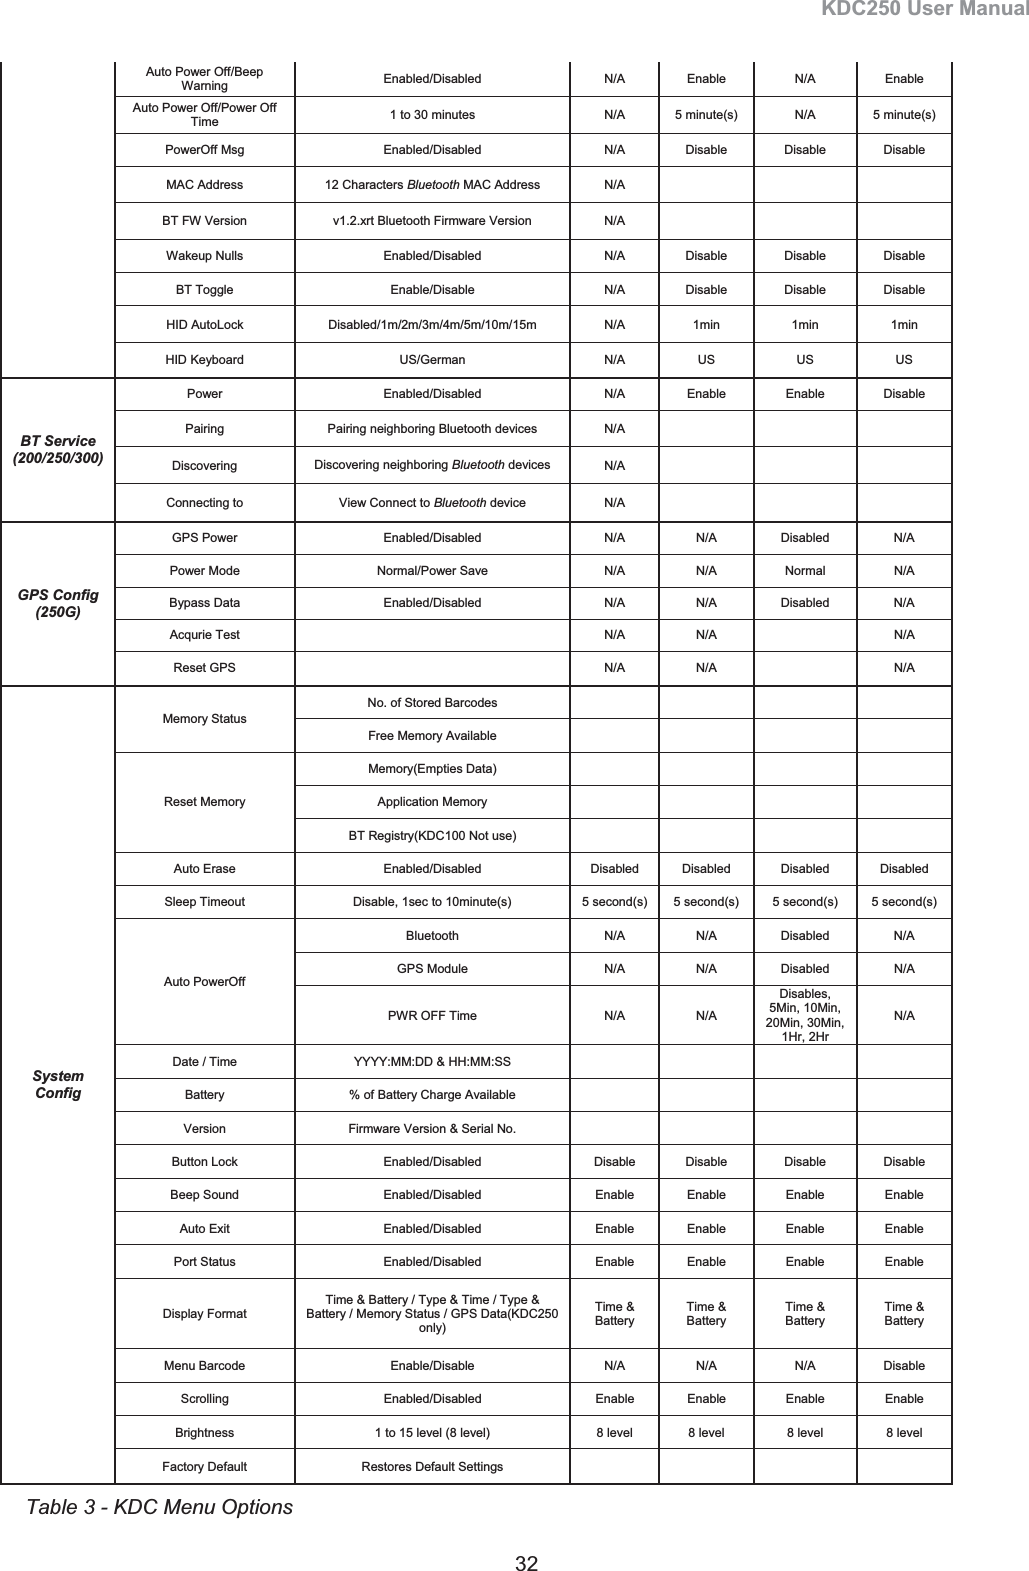
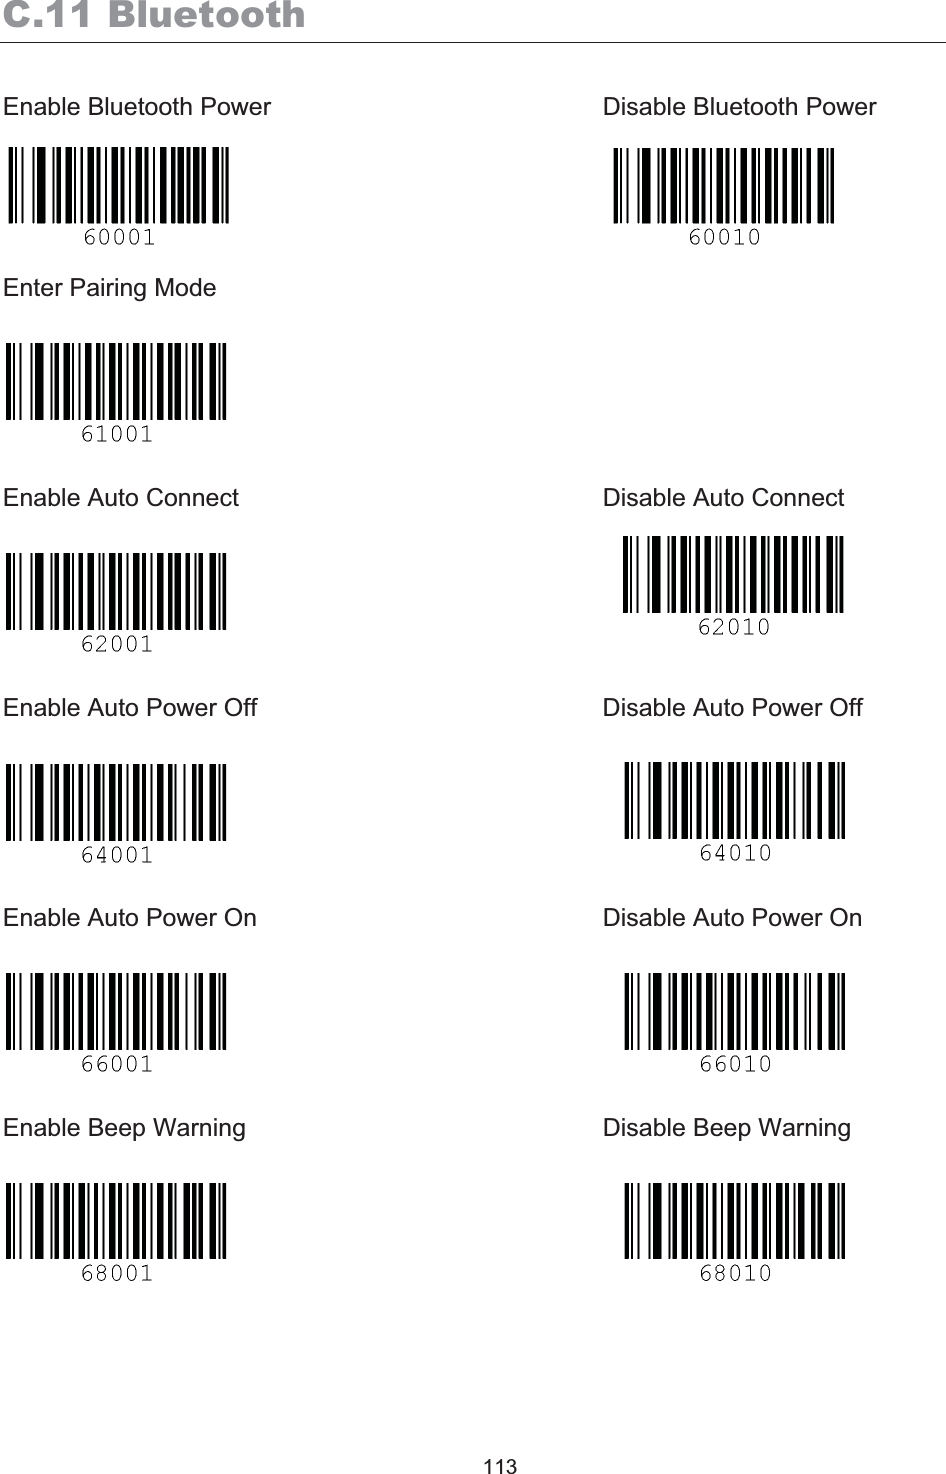
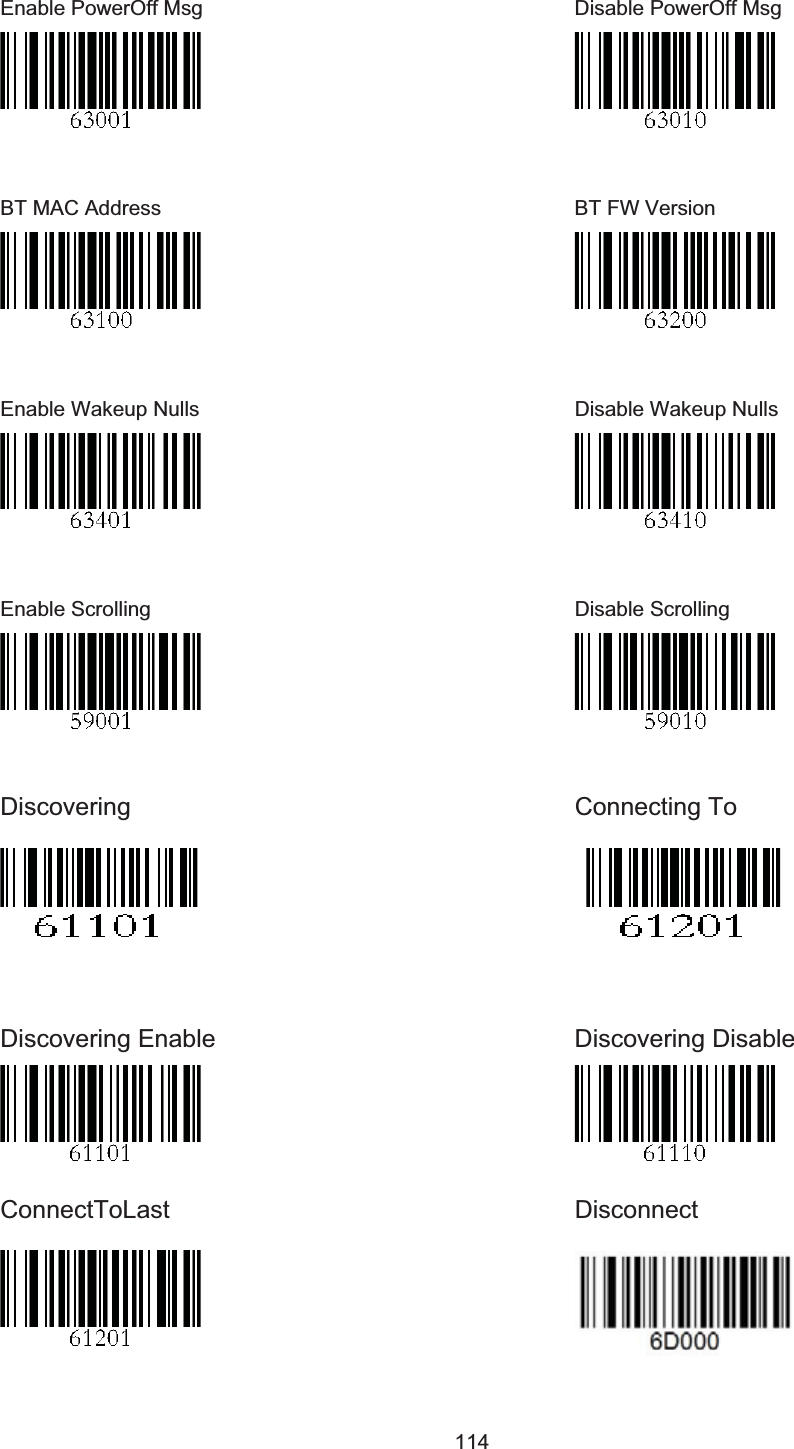
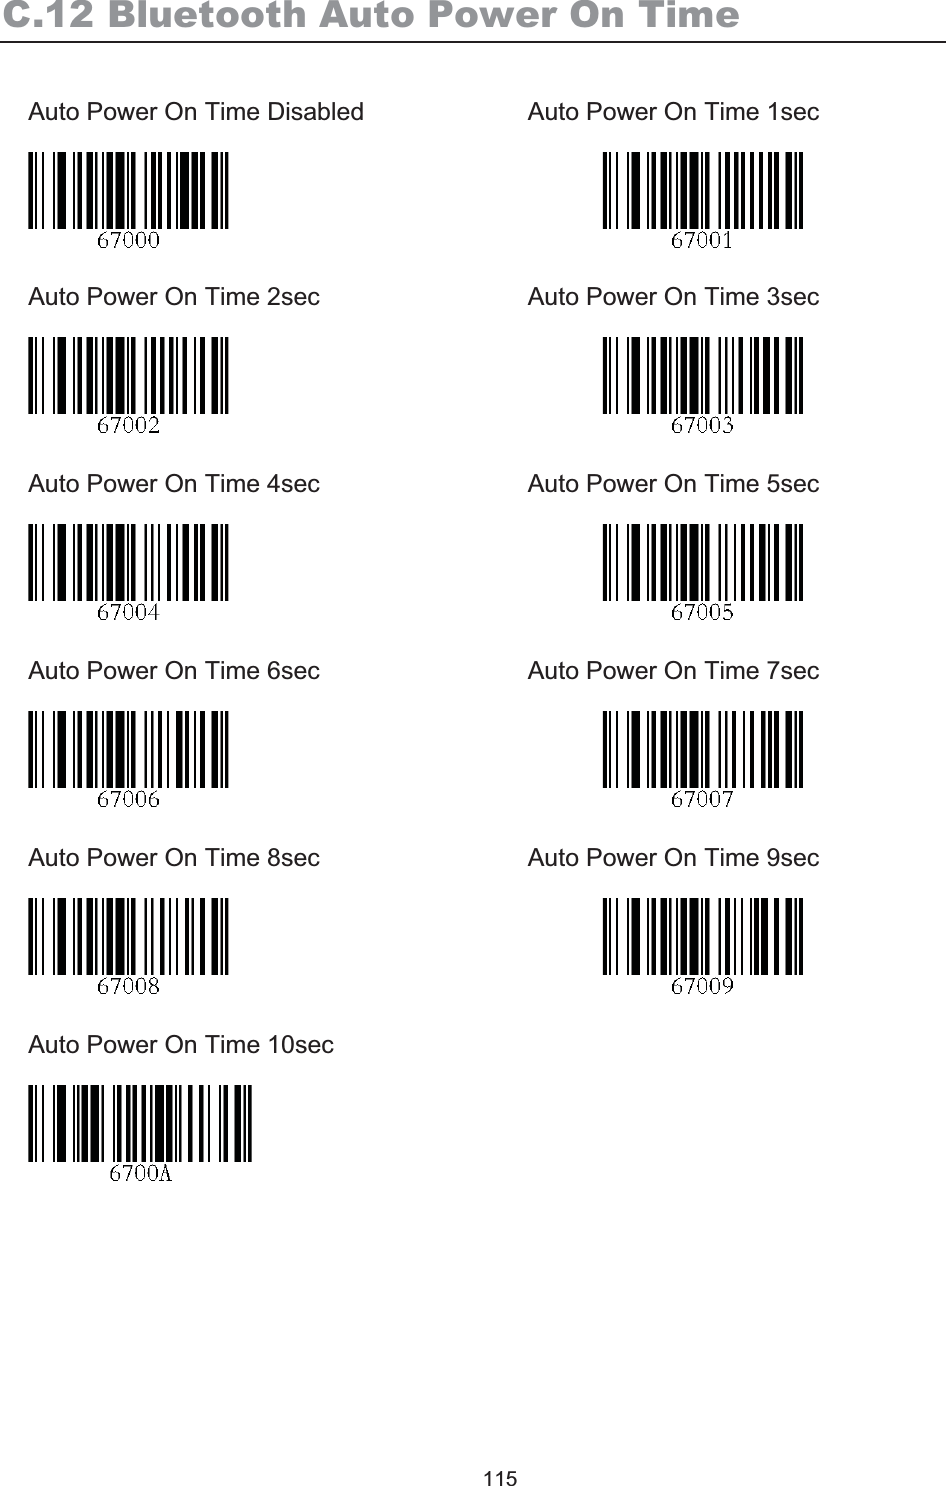
![KDC250 User Manual 43 4. BLUETOOTH - KDC200/250/300The KDC200/250/300 support HID (Human Interface Device) and SPP (Serial Port Profile). KDC200i/250i/300i support HID, SPP and MFI (Made for iPhone). They are compatible with the following Bluetooth stacks. zBlueSoleilzBroadcom (Widcomm)zMicrosoft Windows XP, Vista, 7, and Mobile5.0+ zToshiba Bluetooth Config 4.1 ConnectDeviceKDC supports both Serial Port Profile (SPP) and Human Interface Device Profile (HID). User can choose SPP2.0, SPP2.1 or HID profile to communicate with the host device. Additional iPhone option is available for KDC200i/300i models. User can connect and disconnect Bluetooth connection with the host device by pressing Up and Down key if BT Toggle option in BT Config menu is enabled. It normally takes 3 seconds to connect and 1 second to disconnect. This is a very useful feature for iPhone and iPad application. User can enable and disable iPhone and iPad softkey instantly using this BT Toggle option. Up key shows Bluetooth connection status and Downkey shows time if KDC is connected using SPP profile. 4.2 Auto ConnectThis feature allows the KDC to connect automatically to the host device when the KDC is powered on. IMPORTANT: Until the host device and KDC have been fully tested, it is strongly recommended that this feature be set to Disable because a host device that does not support this feature can cause problems such as power loss or upload delays. [Note] KDC tries to connect automatically to the host 10 times during two minutes if Bluetooth power is ON, Bluetooth is disconnected, Auto Connect is enabled and system Sleep Timeout is set to 5 seconds 4.3 Auto Power OnThe Auto Power On option allows the KDC to automatically power on Bluetooth when the SCAN button is depressed. The default setting is Disabled. NOTE: The host may have to open the COM port before reconnecting with the KDC. Power on time determines the scan button pressing time to activate auto power on feature.](https://usermanual.wiki/AISOLUTION/KDC250/User-Guide-1509689-Page-45.png)
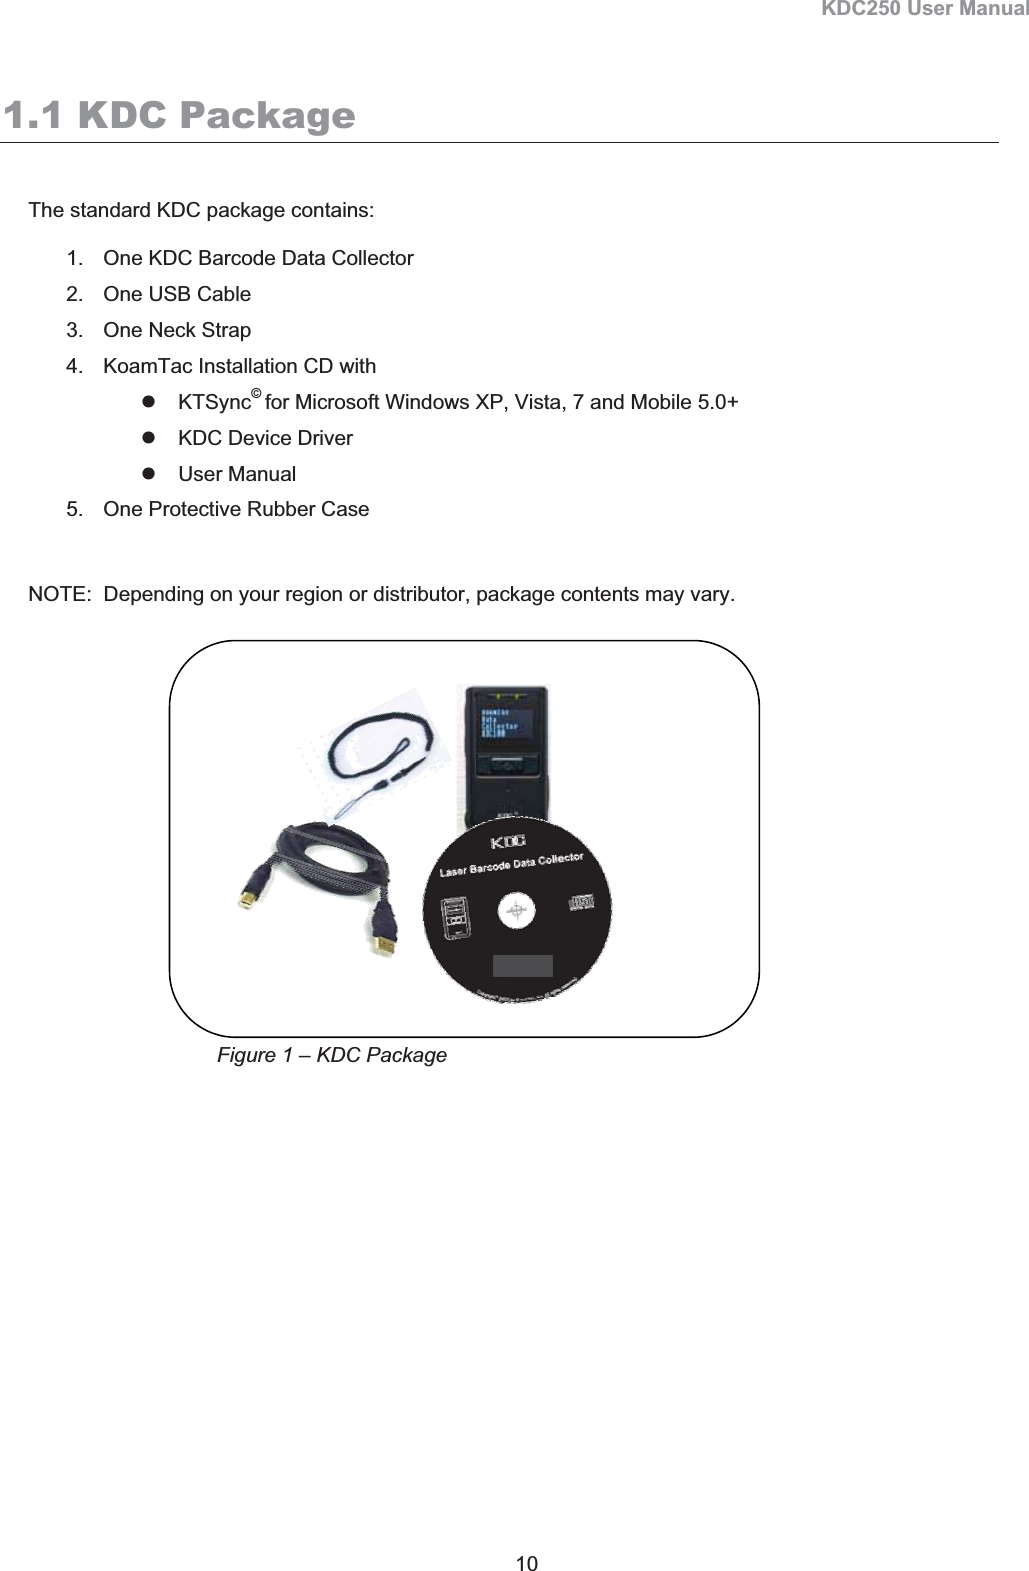
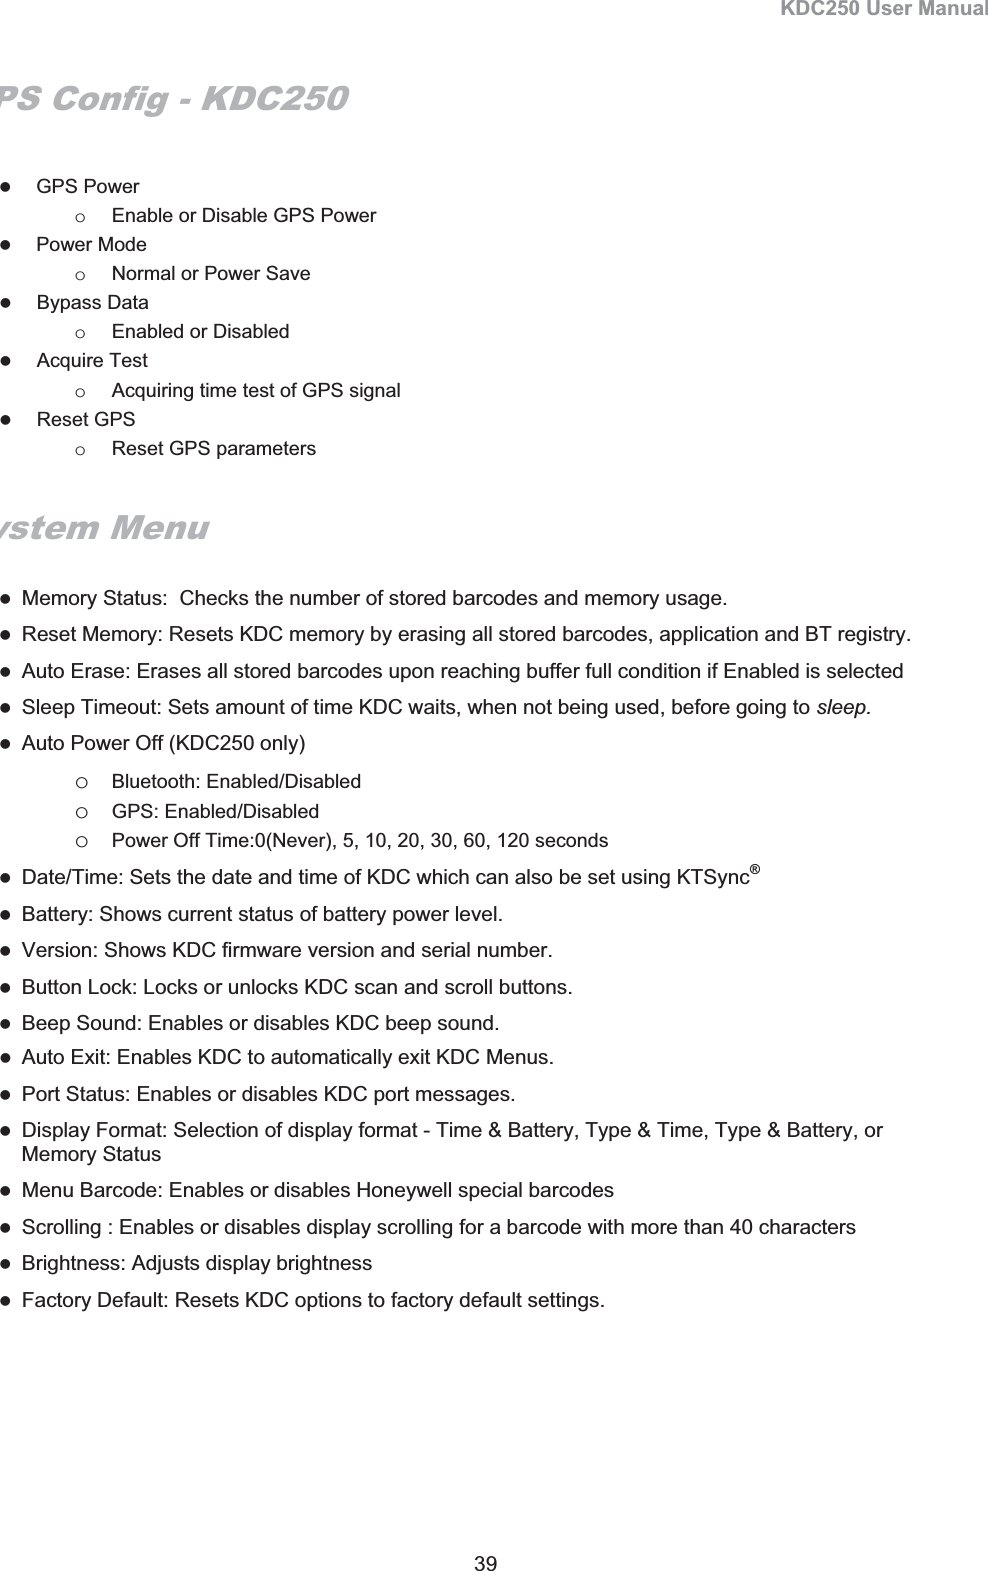
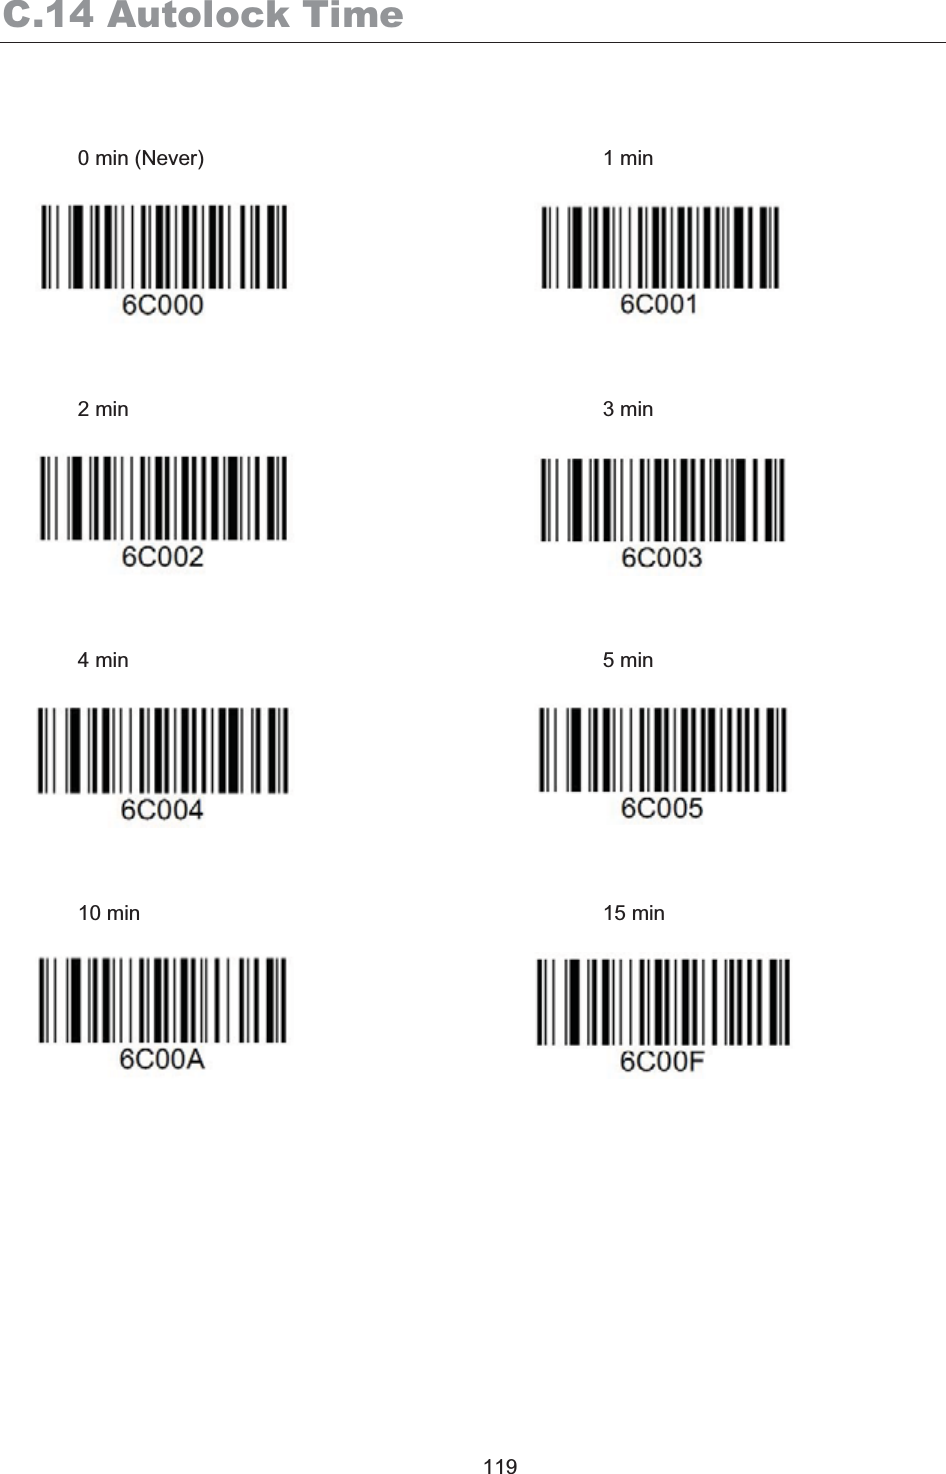
![KDC250 User Manual 45 4.9 FW VersionUser can verify KDC Bluetooth firmware version in BT FW menu. 4.10 Wakeup Nulls The KDC sends three leading Null bytes to wake up connected Bluetooth device. This feature can be disabled if connected Bluetooth device doesn’t require additional bytes to wake up. 4.11 Autolock Time iPhone/iPad/iPod touch loses incoming Bluetooth data in sleep mode. Users can set KDC Autolock time to the same Autolock time of your iPhone/iPad/iPod touch to use automatic wakeup feature in HID mode to prevent data loss. There would be a one second delay of barcode transmission if Autolock time is set to more than one minute and the barcode scan interval is larger than auto lock time. The autolock time would be set as 0, 1, 2, 3, 4, 5, 10, 15 minutes. 0 means iPhone/iPad/iPod touch never enters sleep mode. 4.12 BT Toggle User can enable or disable HID soft keyboard or iPhone mode connection On/Off toggle using BT Toggle option. Setting Mode Up key Down key Enabled HID Reconnect to the last connected device if the Bluetooth is disconnected Toggle Soft Keyboard iPhone Disconnect the Bluetooth connection Disabled Display Bluetooth connection status Display KDC date/time [Note1] New soft keyboard toggle option using Down key inHIDmodeiseffectivefromBTFWversion1.2.6orhigherandKDCFWversionis2.85(6).200(300).Iorhigher.PriortoBTFWversion1.2.5orKDCFW2.85(6).200(300).HenablesthesoftkeyboardbypressingtheDownkeyanddisablesthesoftkeyboardbypressingtheUpkey.[Note2]iPhone/iPad/iPodtouchlosesincomingBluetoothdatainsleepmode.UsersshouldwakeupiPhone/iPad/iPodtouchbeforescanningabarcodeinHIDmode.[Note3]KDCsupportsautoiPhone/iPad/iPodtouchwakeupfeatureinHIDmodefromBTFW1.2.6andKDCFW2.85(6).200(300).Iversion.UsersshouldsetKDCAutolocktimetothesameAutolocktimeofyouriPhone/iPad/iPodtouchtouseautomaticwakeupfeatureinHIDmode.TherewouldbeaoneseconddelayofbarcodetransmissionifAutolocktimeissettomorethanoneminuteandthebarcodescanintervalislargerthanautolocktime.](https://usermanual.wiki/AISOLUTION/KDC250/User-Guide-1509689-Page-47.png)
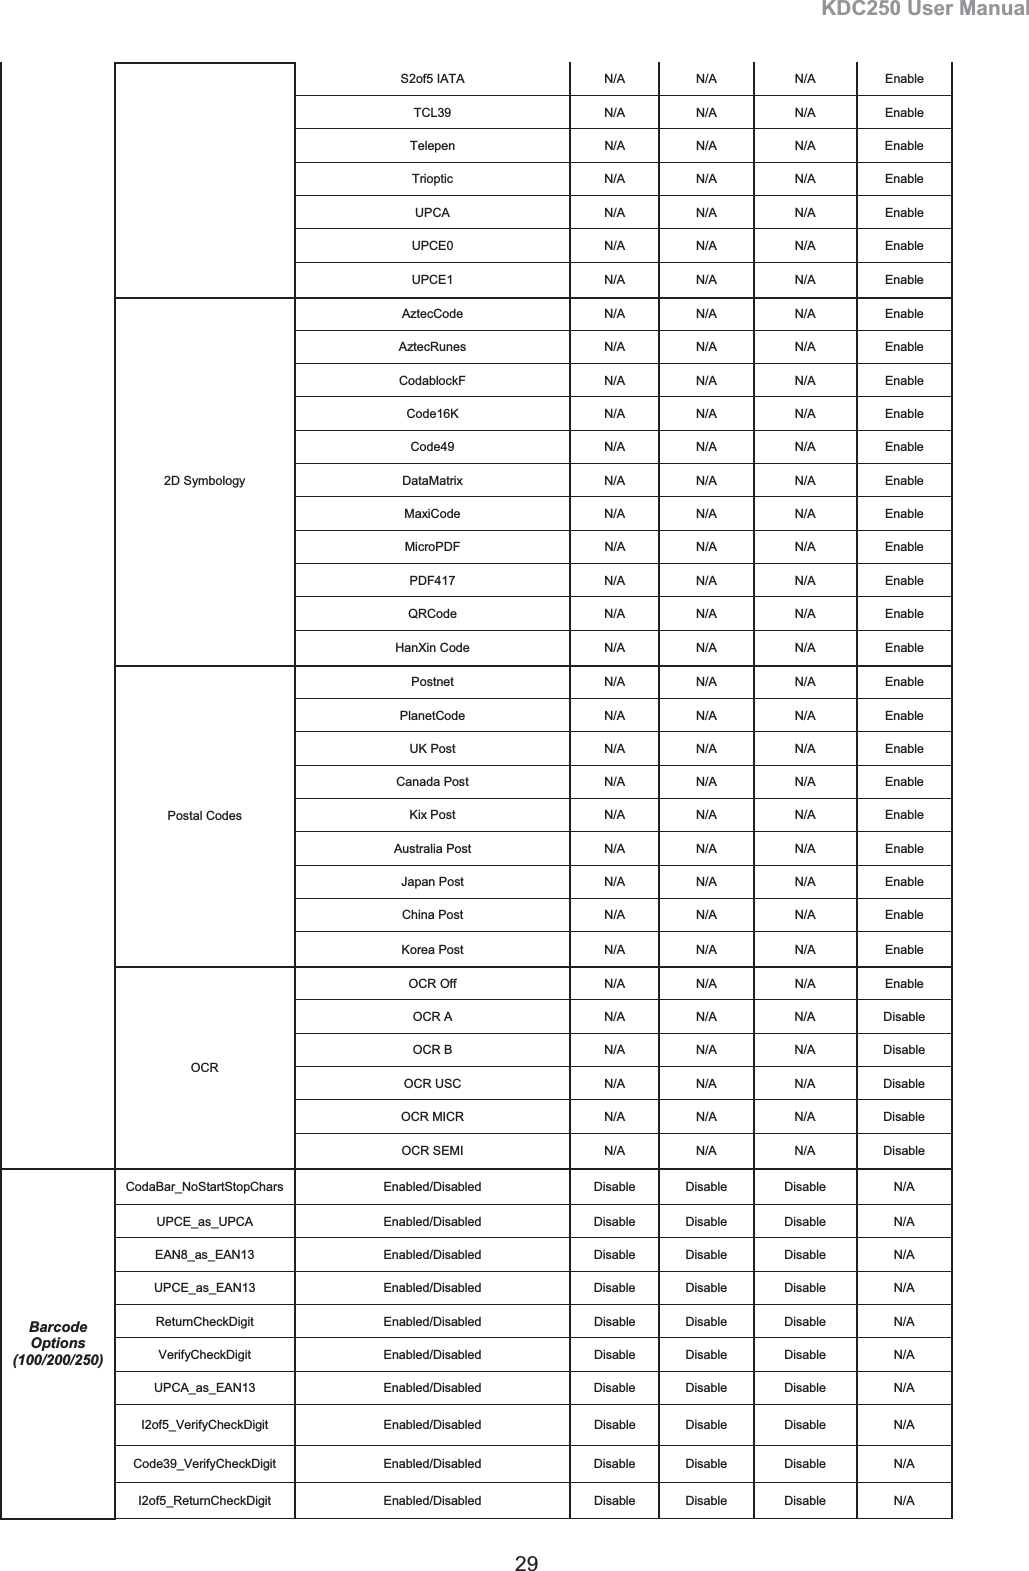
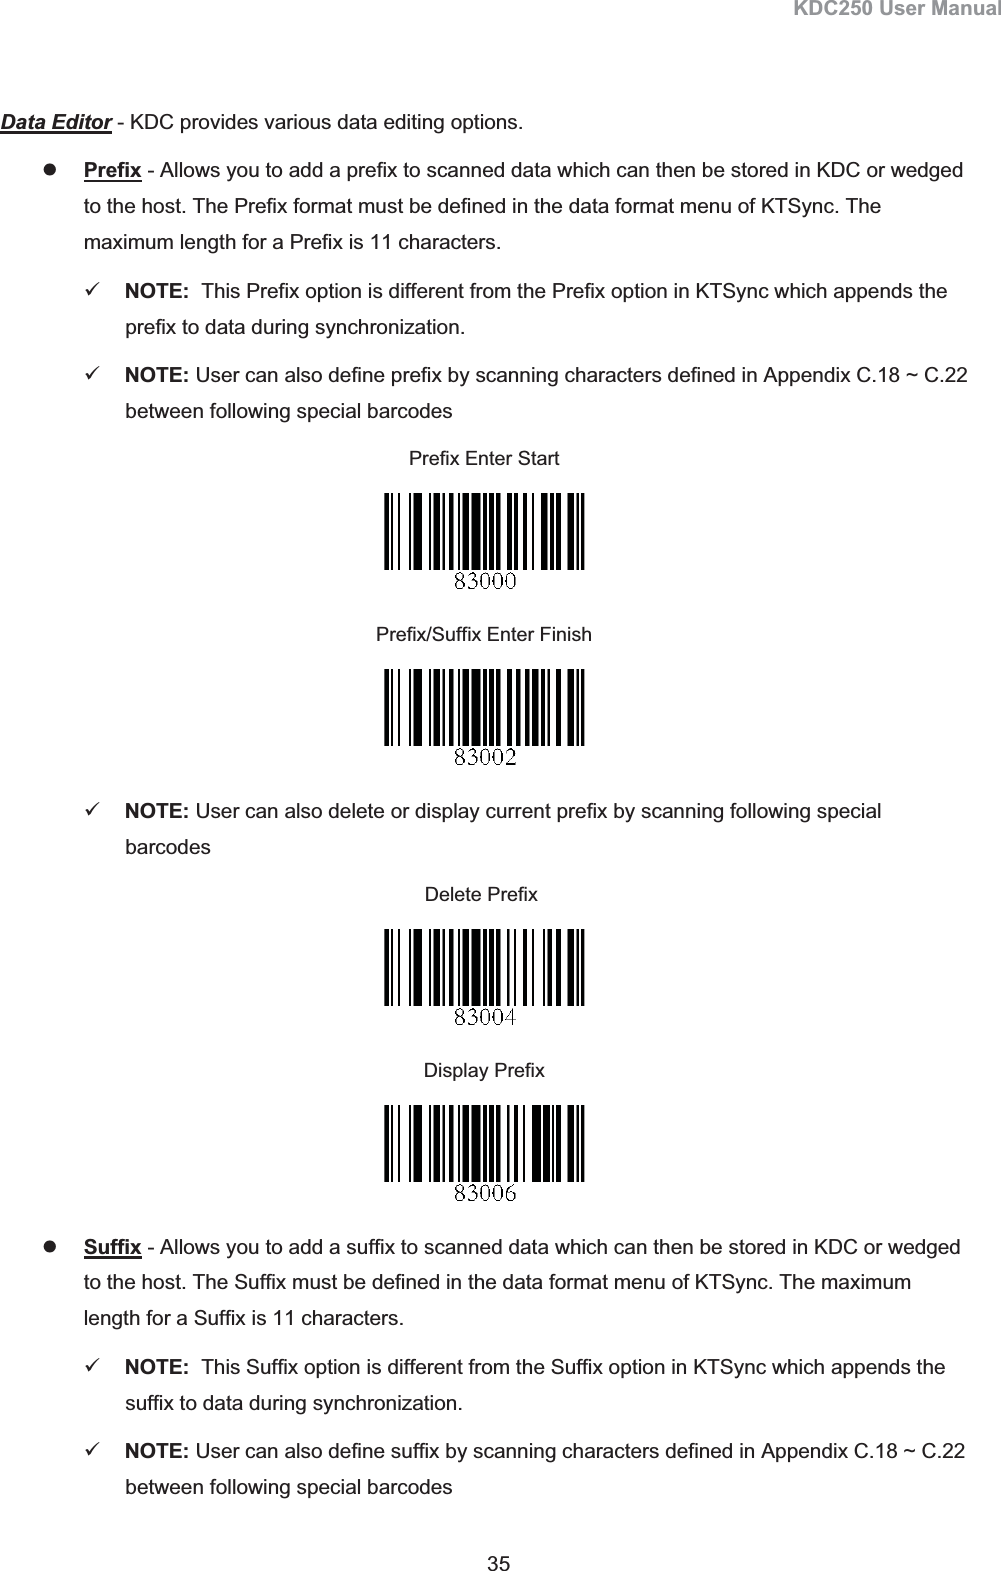
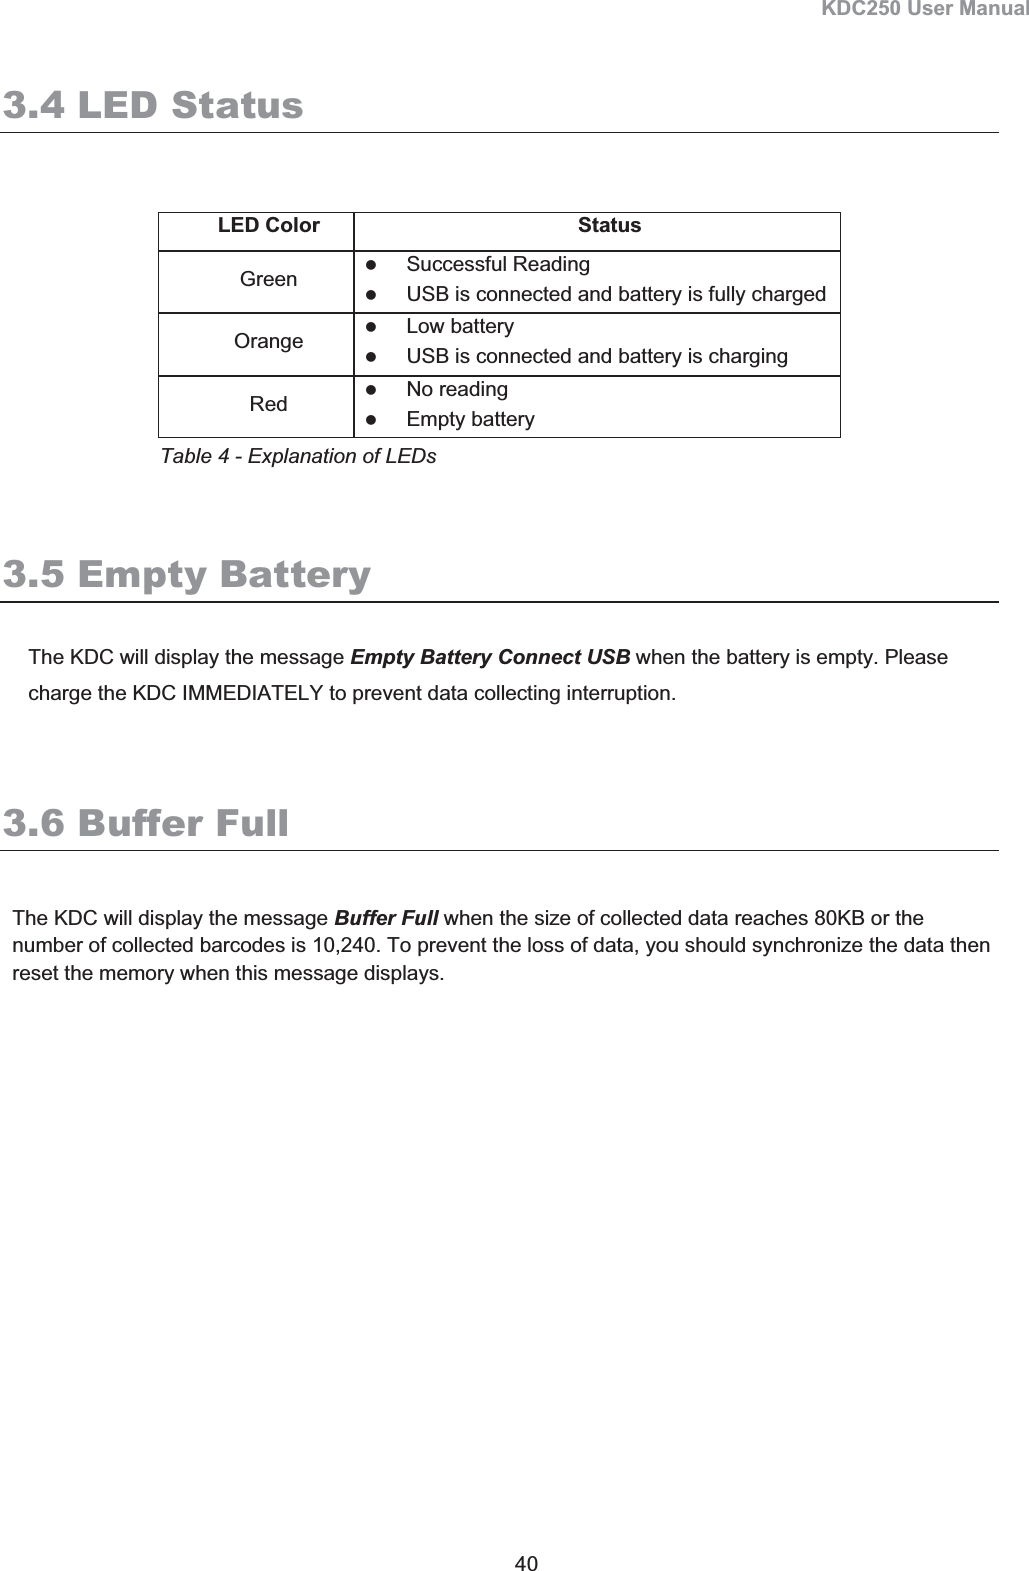
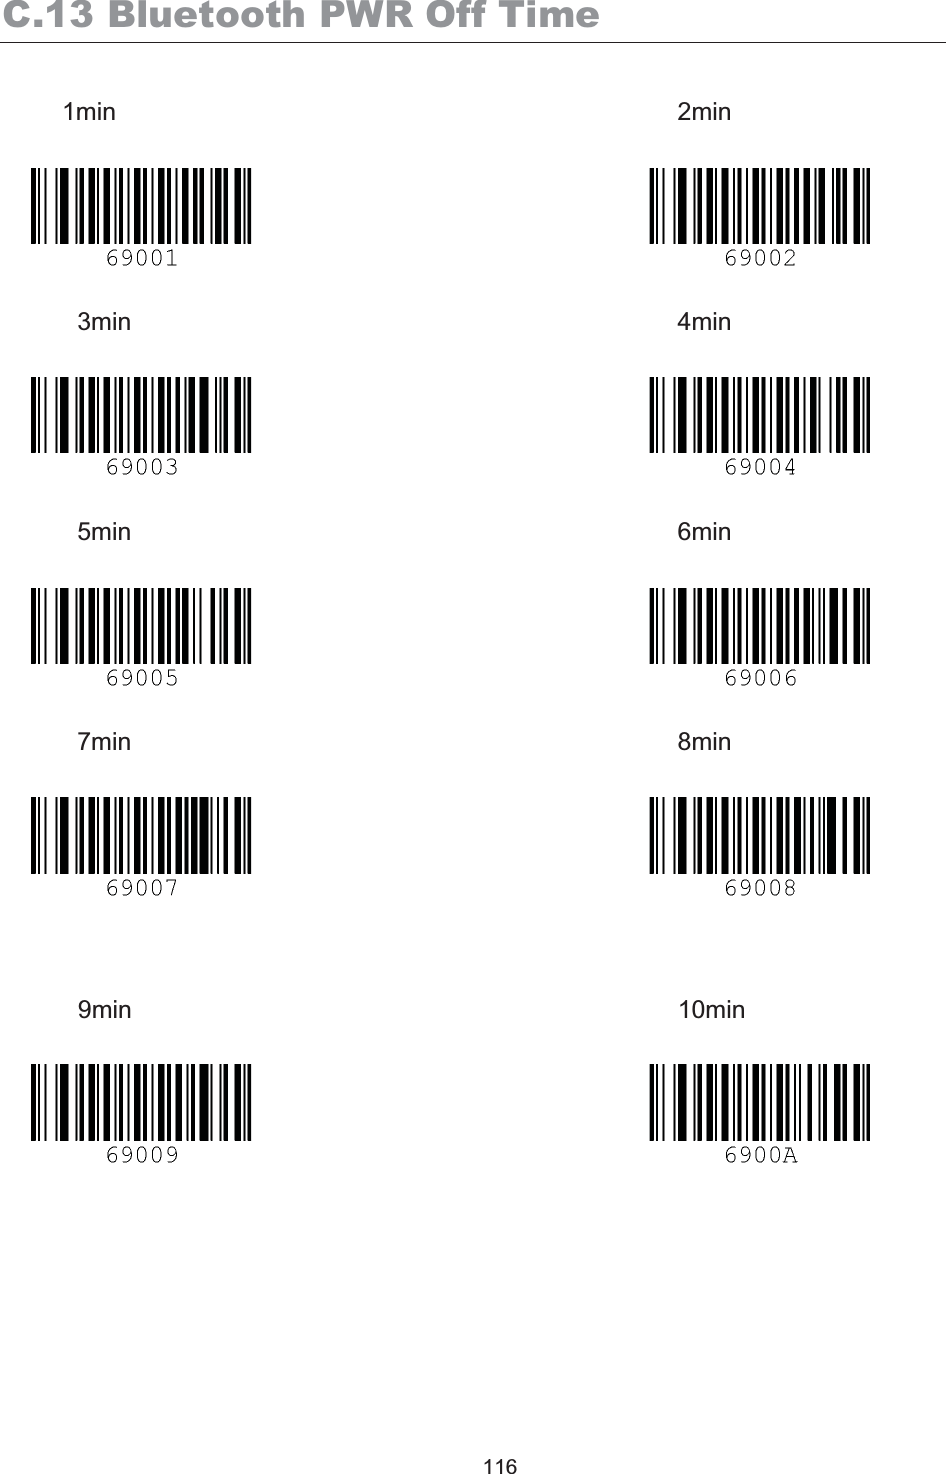
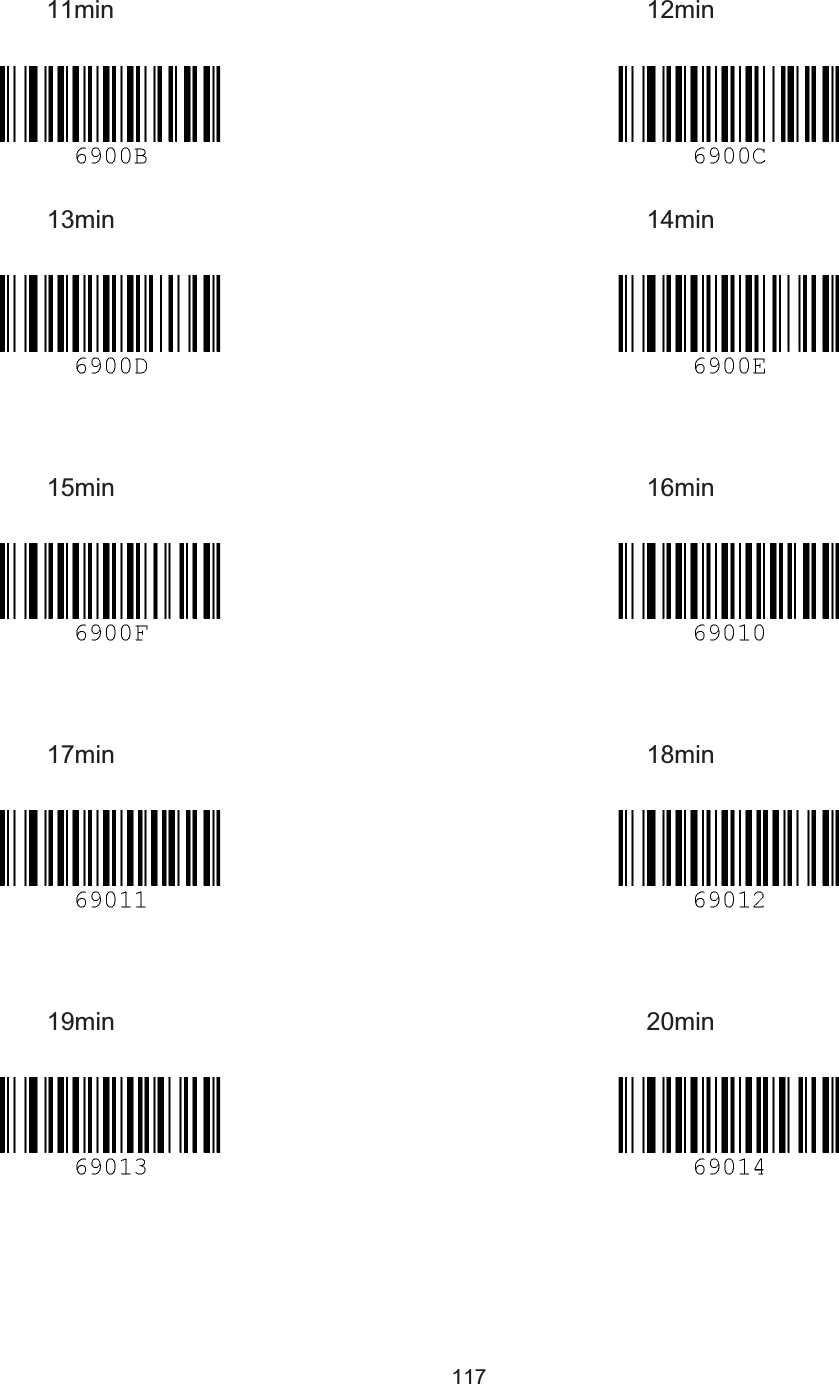
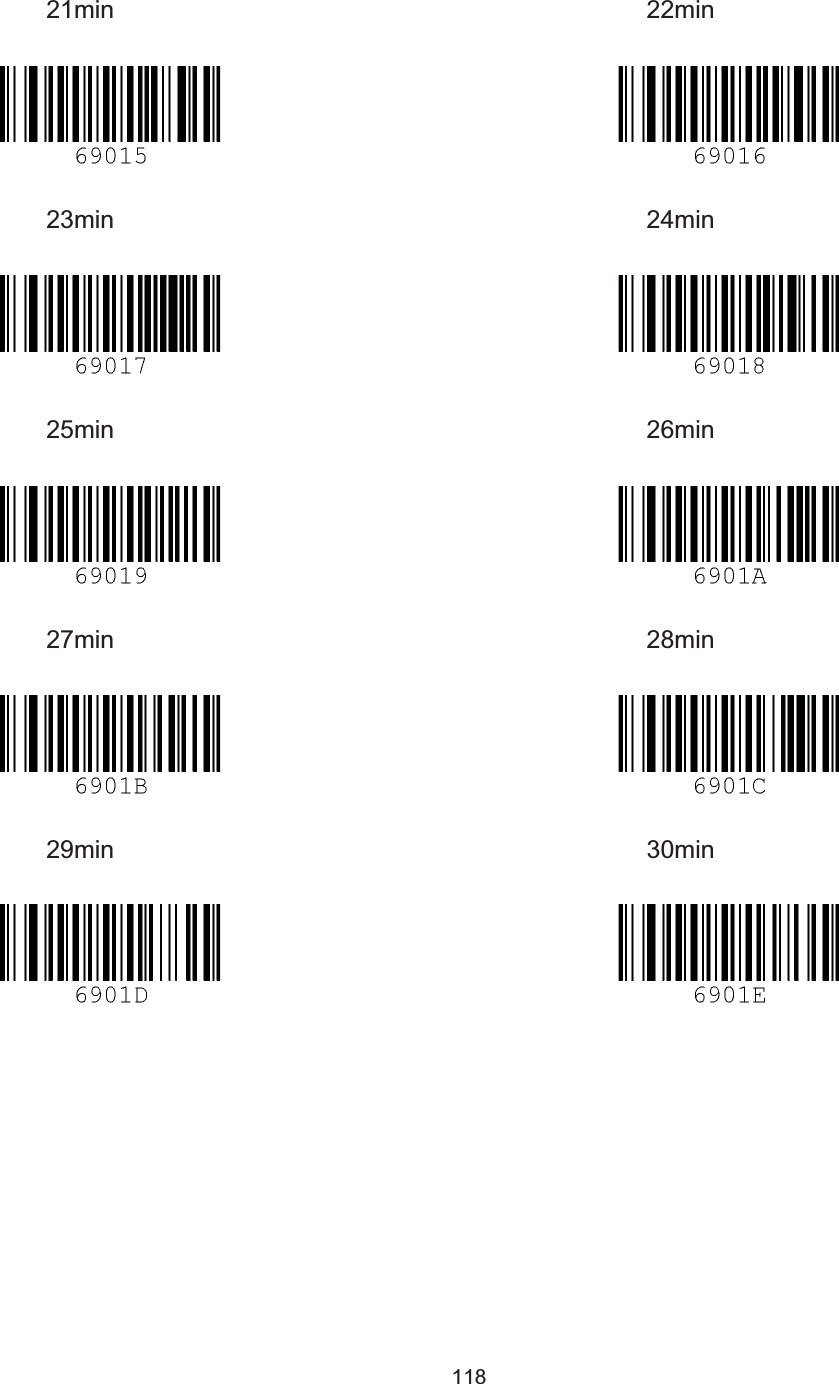
![KDC250 User Manual 46 Bluetooth Service 4.13 PowerThe POWER option allows you to Enable or Disable the Bluetooth functionality of the KDC. To use Bluetooth, this option must be set to Enable. However, like all devices enabled for Bluetooth, the KDC will search constantly to connect with a Bluetooth host when set to enable. Constant searching uses battery power.Unless you are using Bluetooth with your KDC, this option should be set to Disable. IMPORTANT: To prevent unnecessary power problems, it is strongly recommended that the POWER option be set to Disable if the KDC is idle for an extended period of time. 4.14 PairingBefore you are able to use Bluetooth, the KDC must be paired with the host device. This paring process only needs to be completed once with each host device. After pairing, the host device will always recognize the KDC as a Bluetooth device unless the Bluetooth configuration is modified. If it is modified, you may need to pair the devices again. IMPORTANT: The host device must be configured for Bluetooth before it can be paired to the KDC. [NOTE] KDC with Bluetooth Spec2.1+EDR doesn’t prompt Pin code entry menu To pair the KDC with the host, follow these instructions. 1. Select Pairing from the Bluetooth menu. The message “Pairing started…” will displayed. 2. When prompted by the host device, enter the Security PIN “0000”. 3.The“Pairing success” message will display when the Bluetooth connection is successfully established. The connection must be established before the pairing timeout which is 60 seconds. zIf “Pairing failed...” message displays, the Bluetooth connection with the host device failed. If the message “Connected” displays, a Bluetooth connection was established. zIt is possible for the message “Pairing failed...” to display on the KDC while the host device displays “Connected” message. If this occurs, a Bluetooth connection is established. 4.15 DiscoveringKDC200/250/300 start to search neighboring Bluetooth device if this Discovering menu is executed. It would take about 30 seconds to finish search and lists available neighboring Bluetooth devices. Use may enter corresponding Bluetooth MAC address in KTSync Bluetooth menu instead of searching neighborhood Bluetooth devices.](https://usermanual.wiki/AISOLUTION/KDC250/User-Guide-1509689-Page-48.png)
![KDC250 User Manual 47 4.16 Connect To This option lets you easily connect KDC to Bluetooth devices either previously registered in KTSync under the File Menu or discovered/connected from KDC Bluetooth Service menu [Note] There could be an interoperability issue depending on corresponding device Bluetooth stack. Master Bluetooth device may request to follow master Bluetooth device security procedure if KDC tries to connect to the master Bluetooth device. 4.17 HID Sync User can synchronize stored barcode data over HID using HID Sync option. KDC starts to transmit all stored barcode data upon executing HID Sync option.](https://usermanual.wiki/AISOLUTION/KDC250/User-Guide-1509689-Page-49.png)
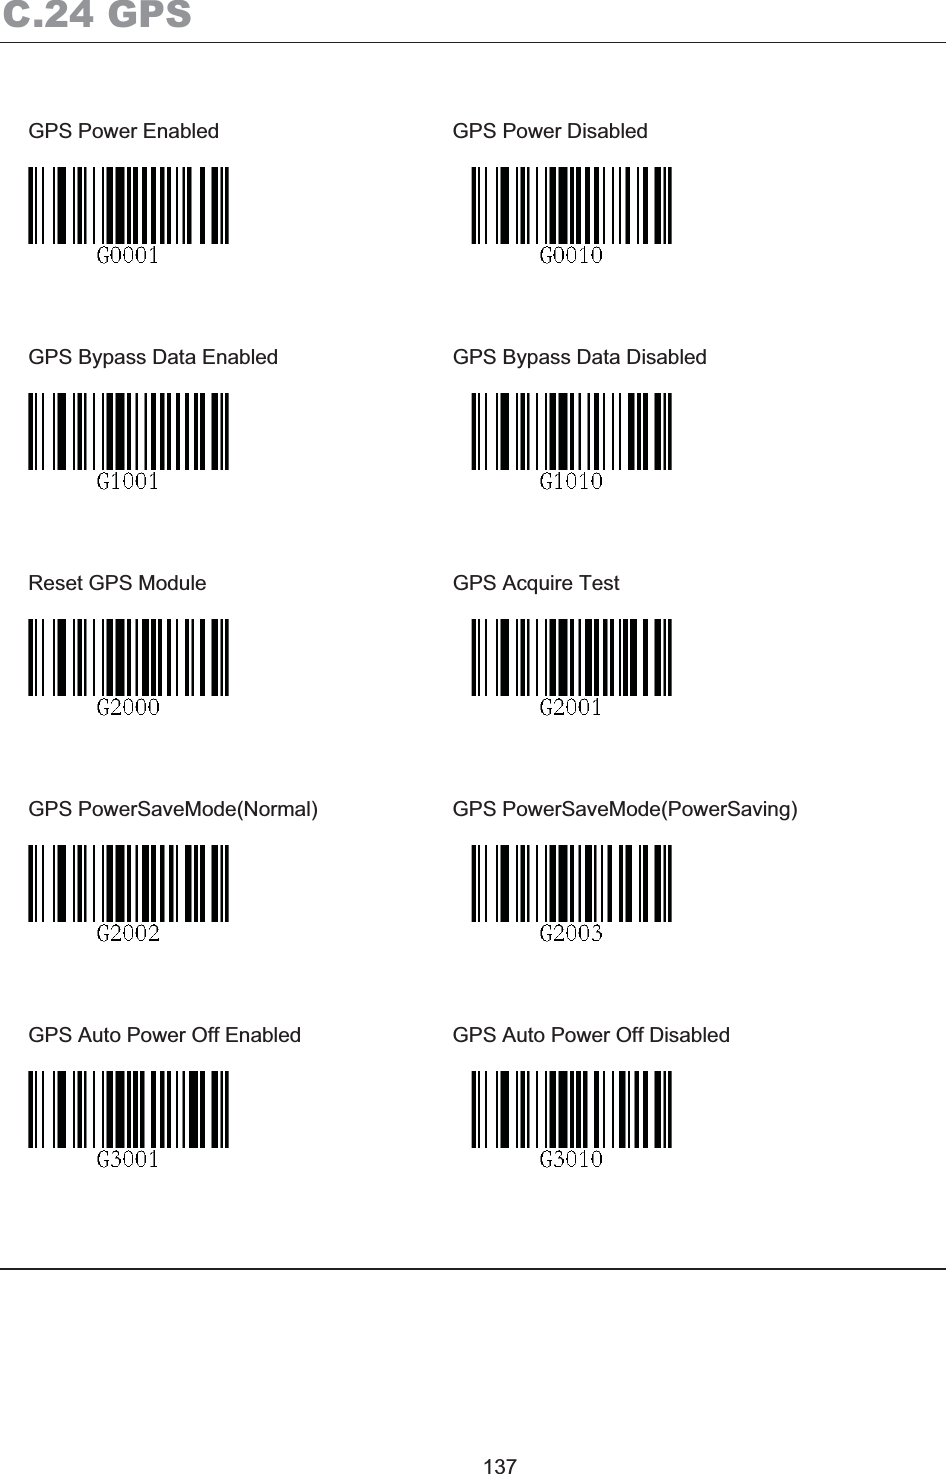
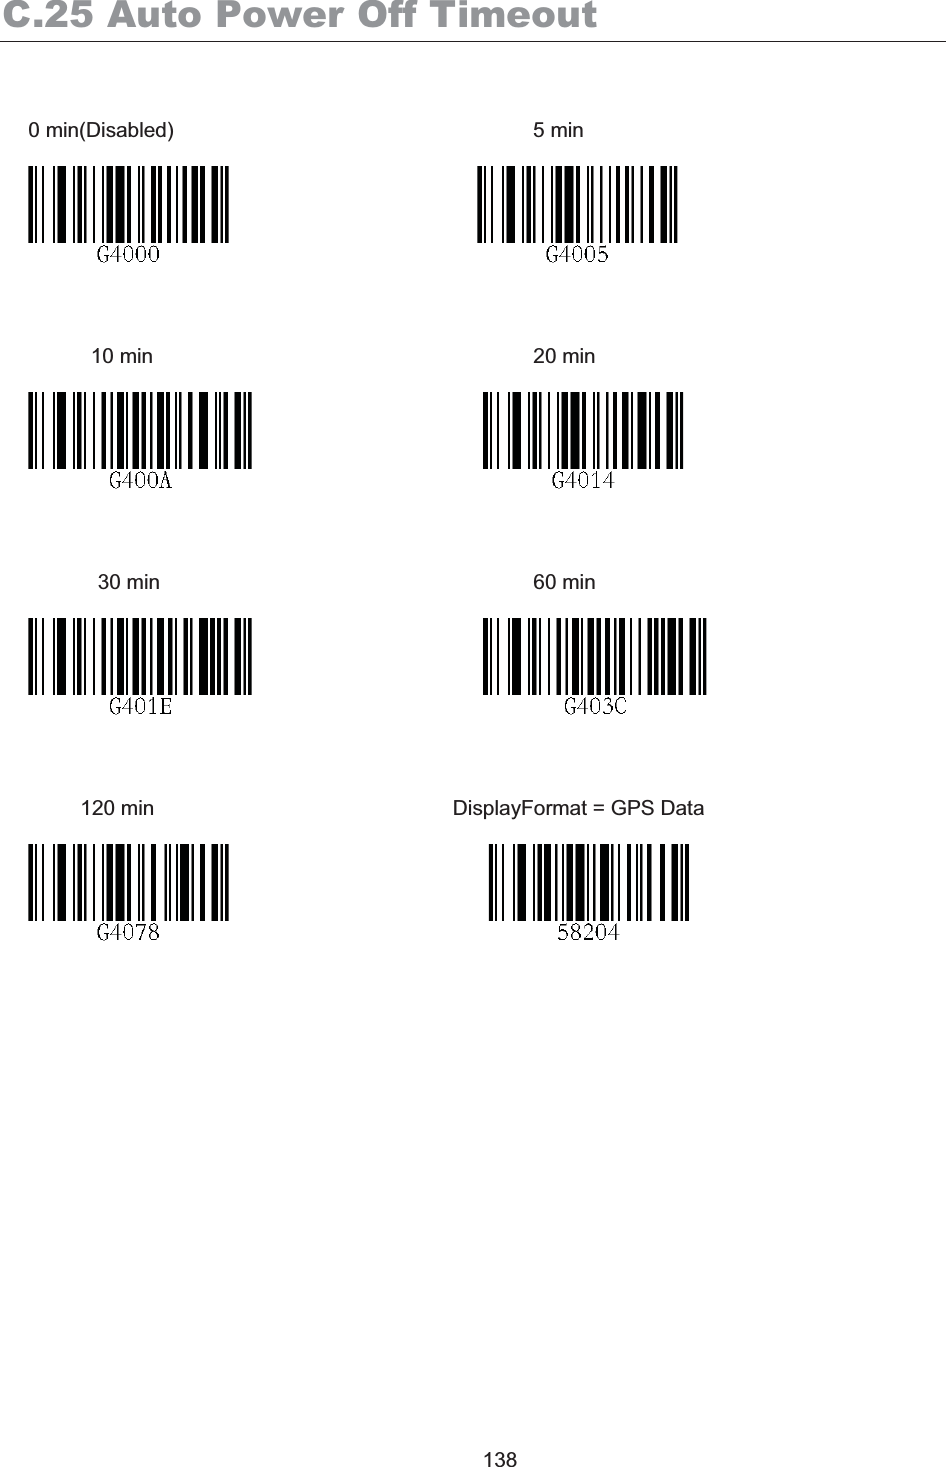
![KDC250 User Manual 48 5. GPS - KDC250The KDC250 supports the GPS feature. One can record the GPS coordinate with a barcode or use KDC250 as a Bluetooth GPS receiver. 5.1 Barcode and GPS data format KDC250 adds the GPS coordinate after barcode data if GPS data is available. GPS data starts with “<G|P/S\”and ends with “:”. For example, KDC250 would record barcode “1234567890” and GPS coordinate “4354.45275,N;07925.81993,W” as “1234567890<G|P/S]4354.45275,N;07925.81993,W:” in the barcode data field.5.2 GPS MenuKDC250 provides the following GPS menu. GPS Power Menu zUsers can enable or disable the GPS Power. zThe GPS module consumes a lot of battery power and it is strongly recommended to turn off the GPS if KDC250 is not used for a for a period of time. zIt is also recommended to use GPS Auto Power Off option in the System menu. This option would turn off the GPS power automatically if a barcode is not scanned for a period of time. Power Mode Menu zUsers can extend the battery life of the KDC250 in Power Save mode zUsers should use normal mode if accurate GPS data is required zKDC250 will last about 15 hours in normal non-bypass data mode and 18 hours in power save non-bypass data mode zKDC250 will last about 7 hours in normal bypass data mode and 8 hours in power save bypass data mode Bypass Menu zThis option should be disabled if users want to record the GPS data with a scanned barcode data. zKDC250 would bypass GPS data to the host if the bypass option is enabled zKDC250 becomes Bluetooth GPS receiver if this bypass data option is selected](https://usermanual.wiki/AISOLUTION/KDC250/User-Guide-1509689-Page-50.png)
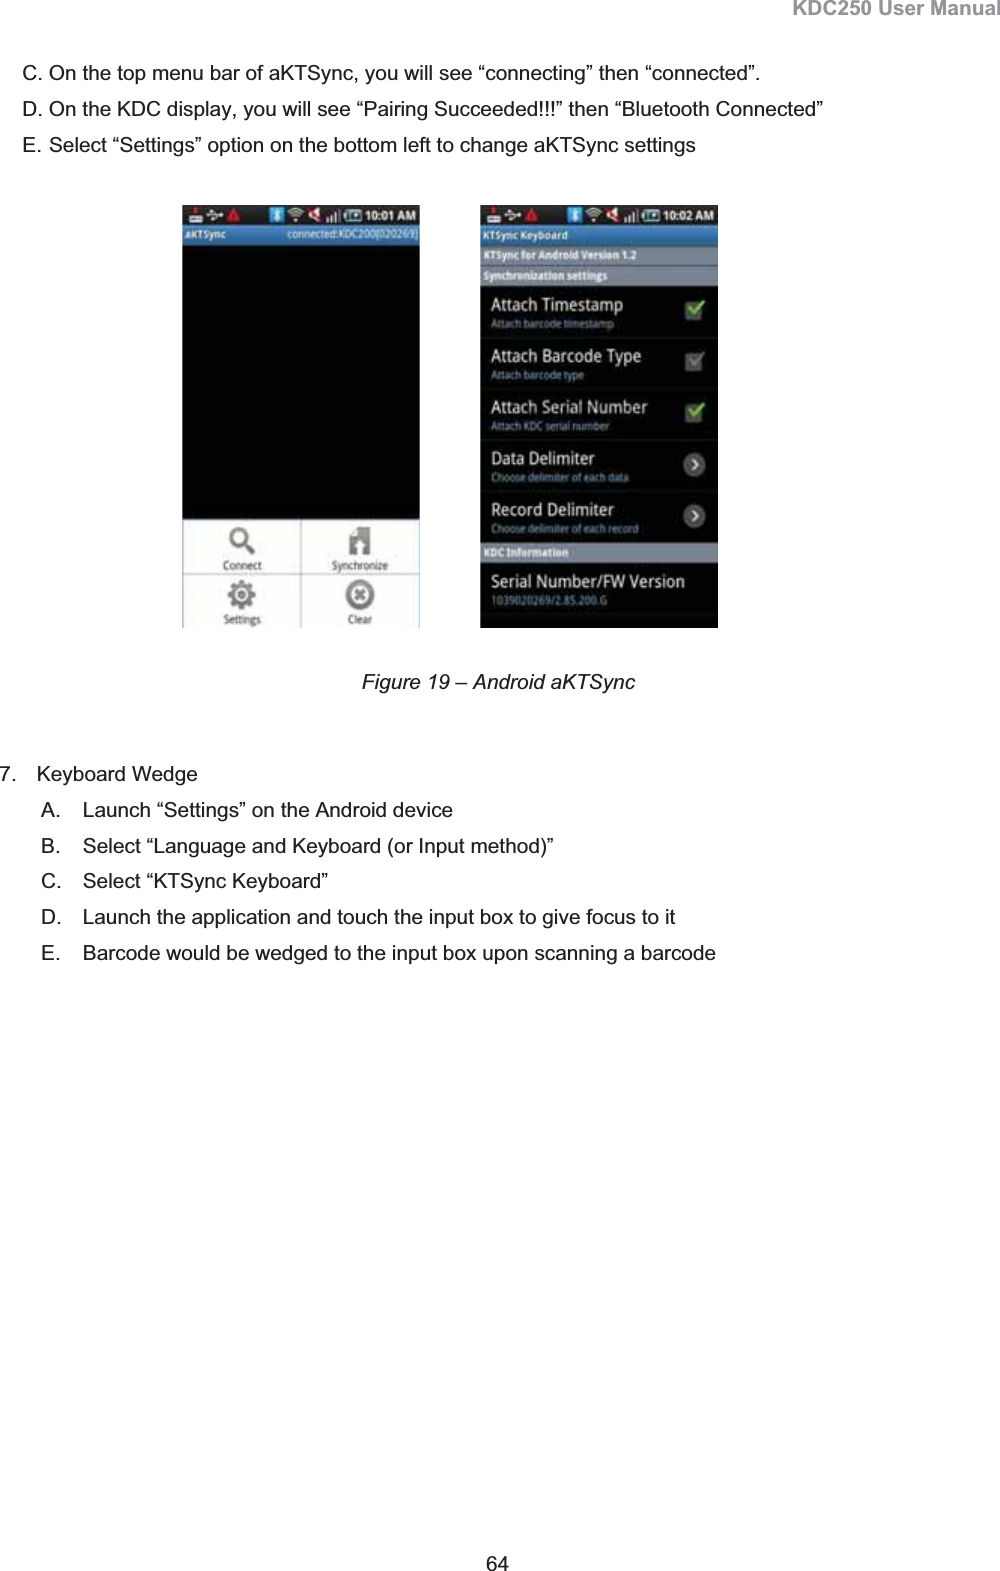
![KDC250 User Manual 63 6.7 Android aKTSync The aKTSync provides limited functionality of PC KTSync to Android users. [NOTE 1] aKTSync only supports Android devices with 2.1+ OS version and that are compatible with BluetoothChat application. [NOTE 2] KDC with Bluetooth Spec2.1+EDR doesn’t prompt Pin code entry menu KDC and Android Pairing 1. Pairing zSelect “SPP” Bluetooth profile from KDC ConnectDevice submenu in BT Config menu. zSearch KDC200/200i/300/300i from Android and pairing two devices. zKDC200/200i/300/300i PIN code is “0000” 2. Connection zClick “Connect” icon in aKTSync zAndroid would list up paired Bluetooth devices and user should select the target KDC. 3. Synchronization - Provides data upload functionality to your applications. 4. Settings – User can change various Synchronization options in settings menu. 5. Wedging – User can wedge barcode data to any Android application. Press home key and launch the target application. Launch KTSync 1. Download and install aKTSync from the Android Market. http://www.androidzoom.com/android_applications/productivity/ktsync_luxv.html 2. Change KDC Bluetooth “ConnectDevice” option to “SPP” 3. Execute Android Bluetooth device scan option and KDC Bluetooth pairing option A. Execute KDC Bluetooth “Pairing” option B. Launch “Settings” on the Android device C. Select “Wireless and Networks” D. Click on “Bluetooth Settings” E. Click on “Scan devices” F. The Android device will display the KDC model and 6 digits of the serial number. 4. Press the KDC list entry, enter “0000” PIN code and press “OK” 5. When paired, the Android device will display “Paired but not connected”. 6. Launch aKTSync program A. Press menu key and select the “Connect” option on the top left B. From the list of paired devices, choose the KDC to use](https://usermanual.wiki/AISOLUTION/KDC250/User-Guide-1509689-Page-65.png)
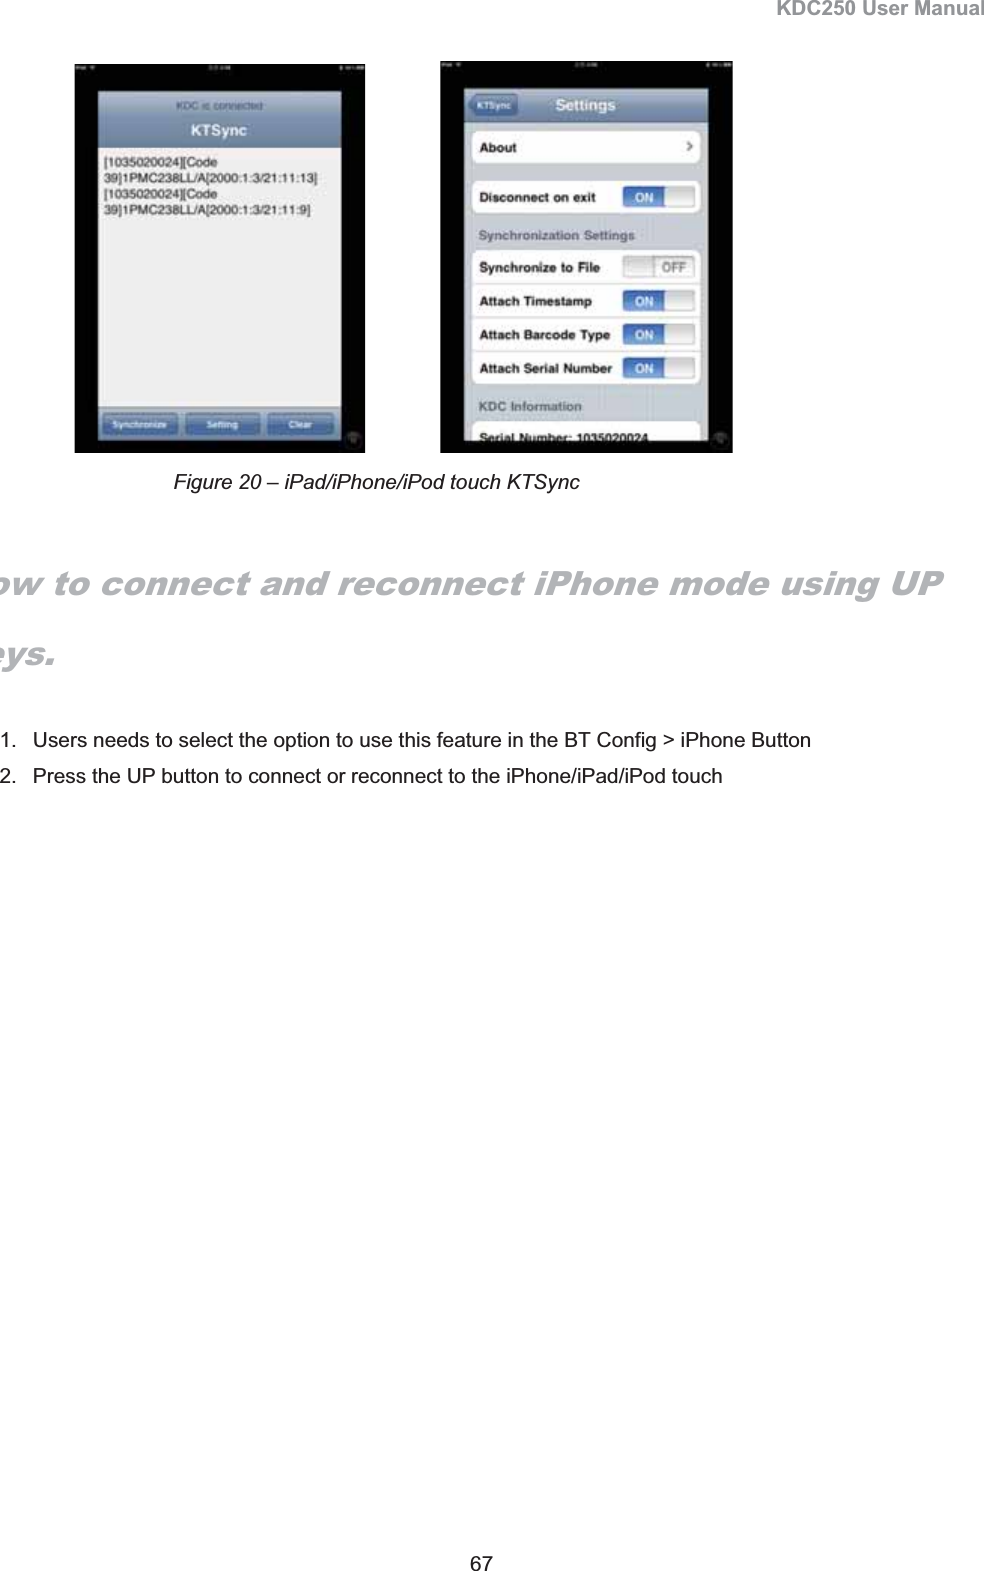
![KDC250 User Manual 65 6.8 iPad/iPhone/iPod touch KTSync The KTSync for iPad/iPhone/iPod touch provides limited functionality of PC KTSync for iPad, iPhone and iPod touch users. KDC200i/300i and iPhone/iPad/iPod touch connection instructions.1. The KDC200i/300i supports “SPP”, “HID” and “iPhone” Bluetooth profiles. 2. The iPhone/iPad/iPod touch should use either “HID” or “iPhone” Bluetooth profiles. “iPhone” is the default profile. 3. Users can select the Bluetooth profile in the BT Config > Connect Device menu. 4. Download the KTSync program from the App Store. 5. Enable the iPhone/iPad/iPod touch Bluetooth power from the Setting > General > Bluetooth menu Pair and connect KDC200i/300i and iOS4.0+ in HID mode [Note 1] Users have to RESET the iPhone/iPad/iPod touch to change “HID to iPhone mode” or “vice versa”. [Note 2] KDC with Bluetooth Spec. 2.1+EDR stack doesn’t require 4 or 6 digits PIN digits entry 1. Go to the iPhone/iPad/iPod touch Bluetooth setting menu. Settings > General > Bluetooth 2. Change KDC connect device to HID from BT Config > ConnectDevice 3. Change KDC to pairing Mode 4. The iPhone/iPad/iPod touch will find a new device as “Keyboard”. 5. Click “Keyboard” device- the iPhone/iPad/iPod touch will ask for the PIN number. The iPAD will ask for 6 digits and the iPhone/iPod touch will ask for 4 digits 6. As soon as the iPhone/iPad/iPod touch asks for the PIN number, KDC will display the PIN digits selection menu. By default, it is 6 digits. 7. Press the scan button to select the 6 digit PIN code for the iPad. Press the side down button and press the scan button to select the 4 digit PIN code for the iPhone/iPod touch. 8. The iPhone/iPad/iPod touch will display the PIN code that users should enter into the KDC. 9. By default the KDC displays pin codes 555555(5555). Users can change the PIN code by using the side UP button to increase numbers, side DOWN button to decrease numbers, and the SCAN button to confirm and move to next digit](https://usermanual.wiki/AISOLUTION/KDC250/User-Guide-1509689-Page-67.png)
![KDC250 User Manual 66 10. Once the last PIN number is entered, press and hold the SCAN button for a few seconds. KDC will display “HID connected” and the iPAD/iPhone/iPod touch will display “Connected” if paired successfully How to disconnect and reconnect HID mode using Up and Down Button keys. 1. Users needs to select the option to use this feature in the BT Config > HID Control. 2. Press the DOWN button to disconnect the HID connection and bring a soft keyboard. 3. Press the UP button to connect HID 4. The BT toggle is a useful feature if users desire to use both the KDC and soft keyboard. KDC200i/300i connection using iPhone mode [NOTE 1] Users have to RESET the iPhone/iPad/iPod touch to change “HID to iPhone mode” or “vice versa”. [NOTE 2] KDC with Bluetooth Spec2.1+EDR doesn’t prompt Pin code entry menu. 1. Download and install iKTSync from the Apple App Store. http://itunes.apple.com/us/app/ktsync/id372916602?mt=82. Press the two KDC side buttons together to enter menu mode 3. Scroll down to “Bluetooth” menu using KDC Down button 4. Press the front middle scan button 5. Scroll down to “Discovering” and press the front middle scan button A. “Discovering Started …” message will be displayed on KDC screen B. Discovering will take about 30 seconds. 6. Select discovered iPhone/iPod touch device name and press the front middle scan button A. [Pin Code] User Default/Enter PinCode will be displayed B. Press the front middle scan button to select the “Use Default” option C. “Connencting to iPhone/iPod touch device name” will be displayed D. iPhone/iPad/iPod touch will ask for the PIN number. E. Please enter “0000” and hit “connect” icon F. “iPhone Connected” message will be displayed 7. Launch KTSync and configure Settings](https://usermanual.wiki/AISOLUTION/KDC250/User-Guide-1509689-Page-68.png)
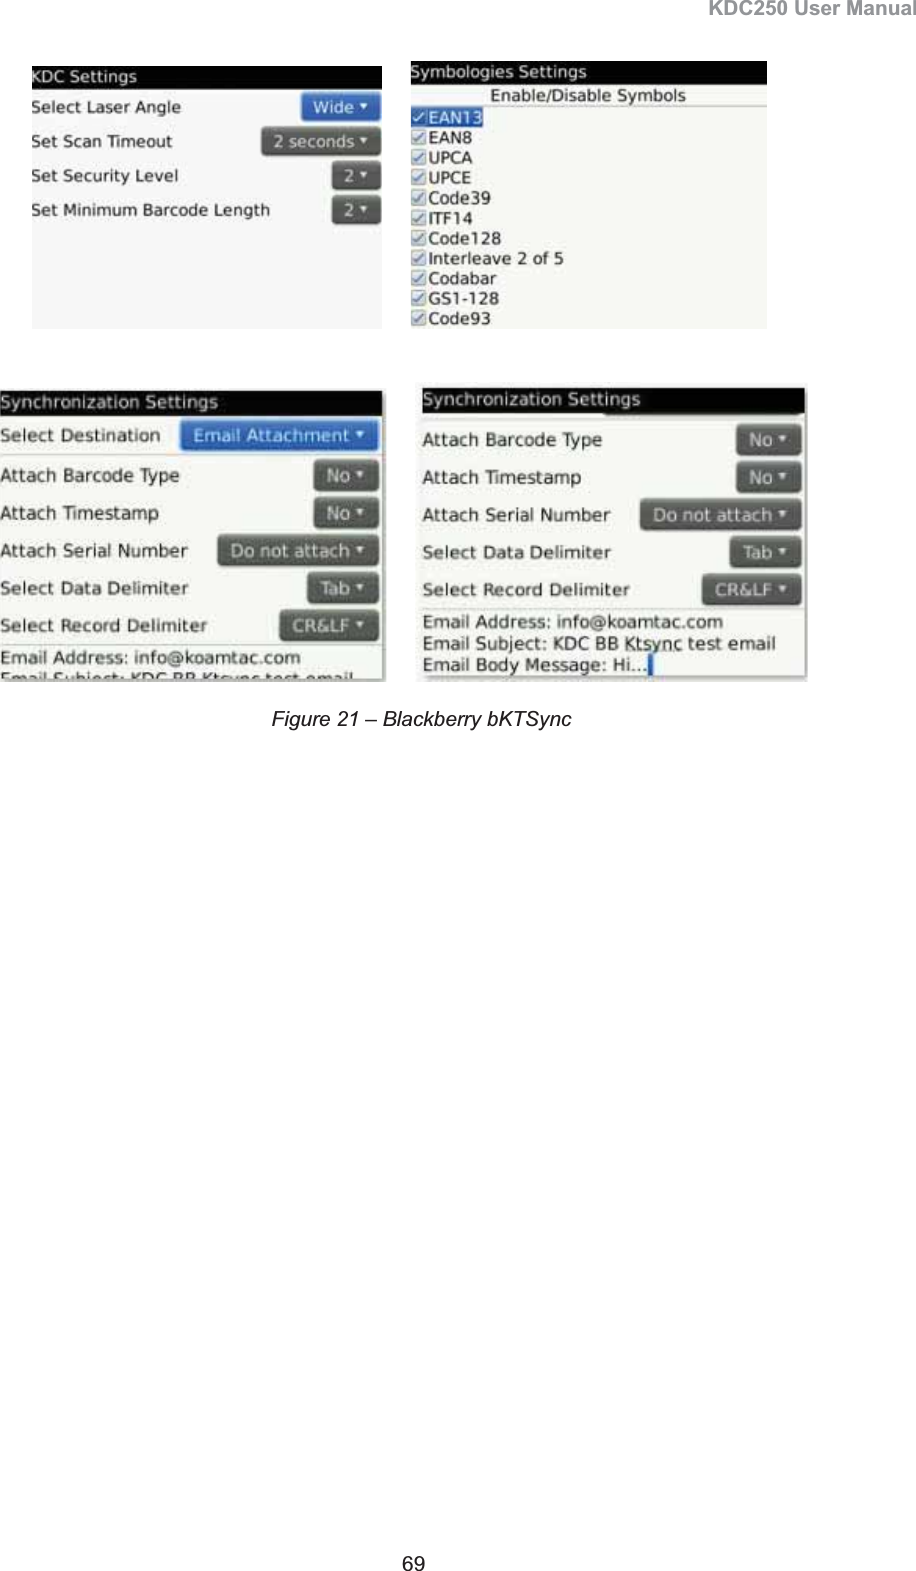
![KDC250 User Manual 68 6.9 Blackberry bKTSync The bKTSync provides limited functionality of PC KTSync for Blackberry users. [NOTE] KDC with Bluetooth Spec2.1+EDR doesn’t prompt Pin code entry menu 1. Download and install bKTSync from the Blackberry App World. http://appworld.blackberry.com/webstore/search/ktsync?lang=en 2. Go to Blackberry Options > Applications menu and Enable ˈInput Simulationˉ option 3. Change KDC Bluetooth profile in “ConnectDevice” option to “SPP” 4. Execute Blackberry Bluetooth manager and KDC Bluetooth pairing option A. Execute KDC Bluetooth “Pairing” option B. Launch the Blackberry Bluetooth manager and select “Search”. The KDC model and 6 digits of the serial number would be displayed. C. Highlight the KDC and press the Enter or Select Key D. Enter “0000” PIN code and press the Enter or Select Key E. The Blackberry will display “Pairing with KDC”…”complete.” F. Close the Blackberry Bluetooth manager 5. Go to Downloads folder and execute KTSync 6. User can configure KDC options in KDC settings and Symbologies Settings menu 7. Go to KTSync Synchronization Settings and select Destination. To send collected barcode as an email attachment, choose ˈEmail Attachmentˉ as destination, enter email address, subject and body message. You can enter multiple email addresses using the semicolon(;) separator. 8. To scan barcodes into any application (like email, notes, worksheet or web browser), press the menu key and select “Running in the background” option. bKTSync will maintain the connection and place the scanned barcode data where ever the cursor is flashing.](https://usermanual.wiki/AISOLUTION/KDC250/User-Guide-1509689-Page-70.png)
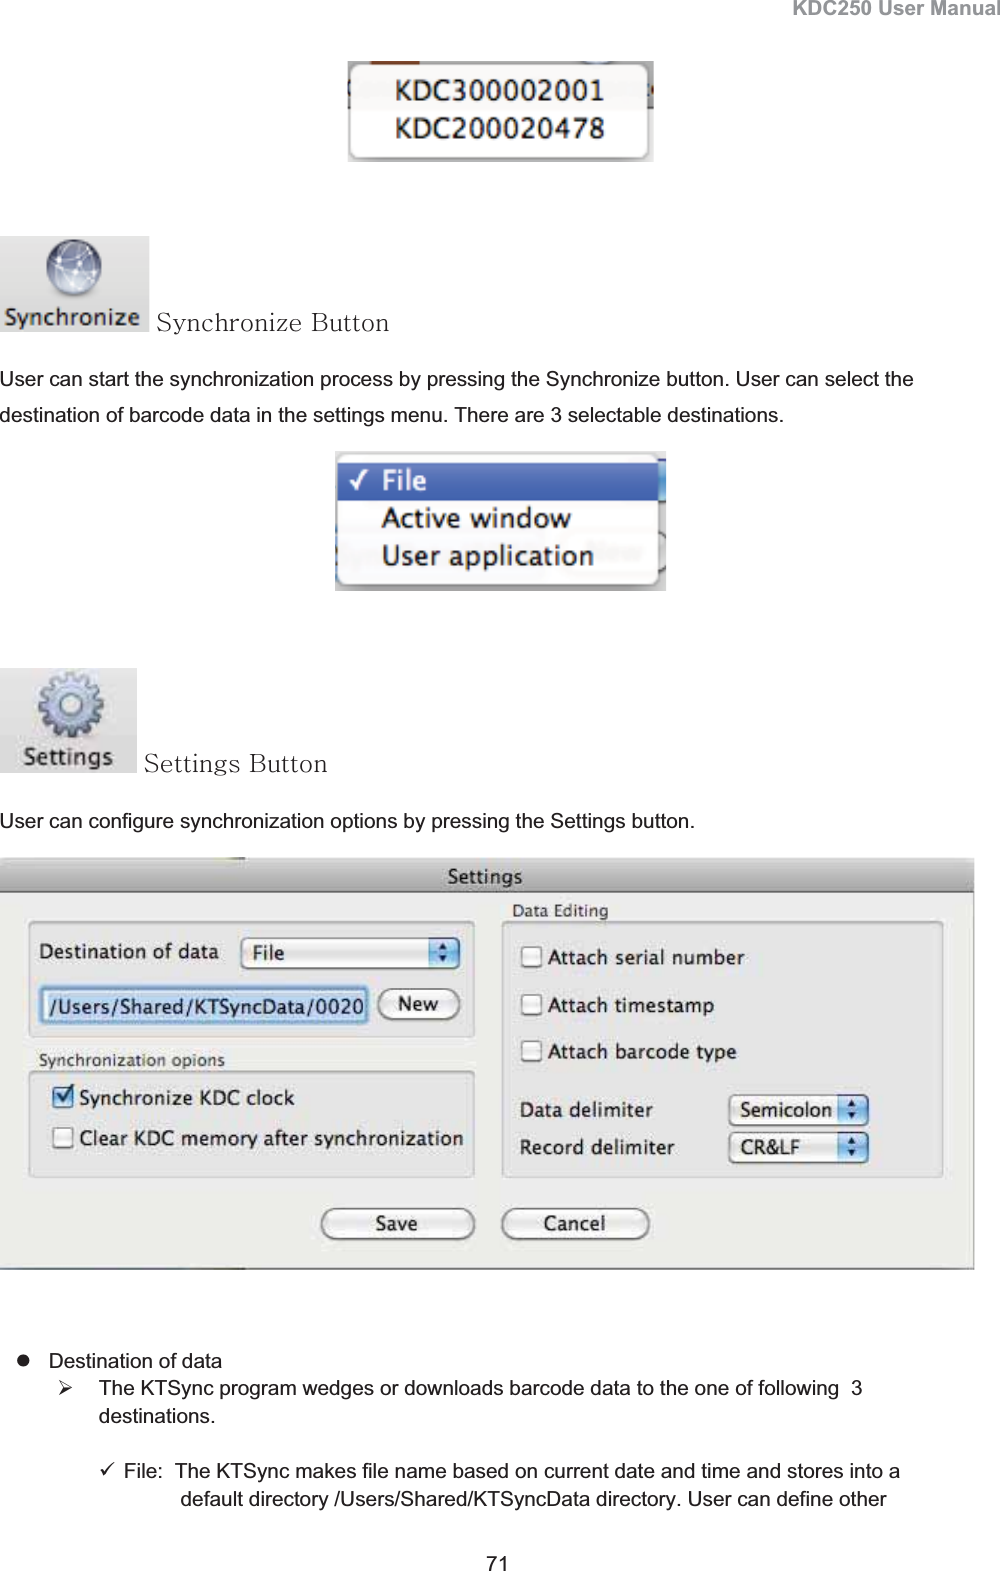
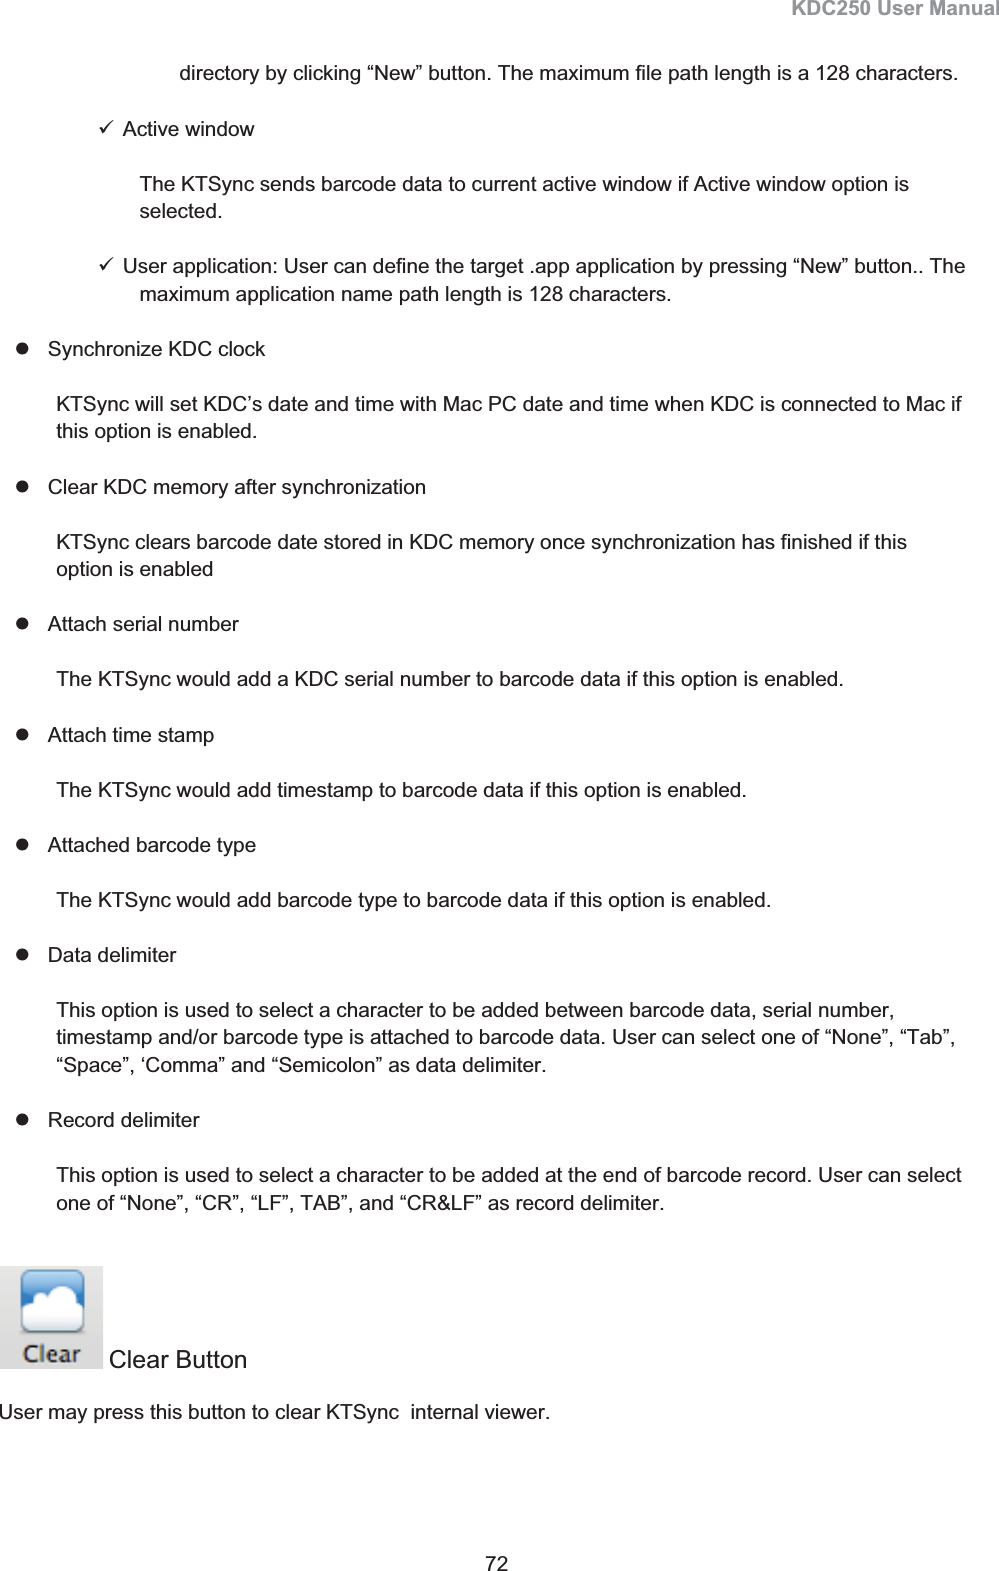
![KDC250 User Manual 70 6.10 KTSync for Mac OS X The KTSync Mac OS X version provides limited functionality of PC Windows KTSync for Mac OS X users. [NOTE 1] KTSync for Mac OS X version only supports Bluetooth SPP profile. User should pair KDC with Mac before launching KTSync program. [NOTE 2] Mac OS X version KTSync is built as a X86 binary application and works with the Intel based Mac. It is verified on Mac PC running Mac OS X 10.6.5 only. KTSync Mac OS X version supports following features. z Keyboard wedge function to the active window or any registered user application z Synchronize to a file, active window and user defined application. z It allows adding serial number, timestamp and various data and record delimiters. User will see the following initial KTSync screen once launching the program. Connect Button User can connect the Mac with paired KDC by clicking the Connect button. The following screen will be displayed when this button is pressed and KTSync will start to connect to the selected KDC.](https://usermanual.wiki/AISOLUTION/KDC250/User-Guide-1509689-Page-72.png)
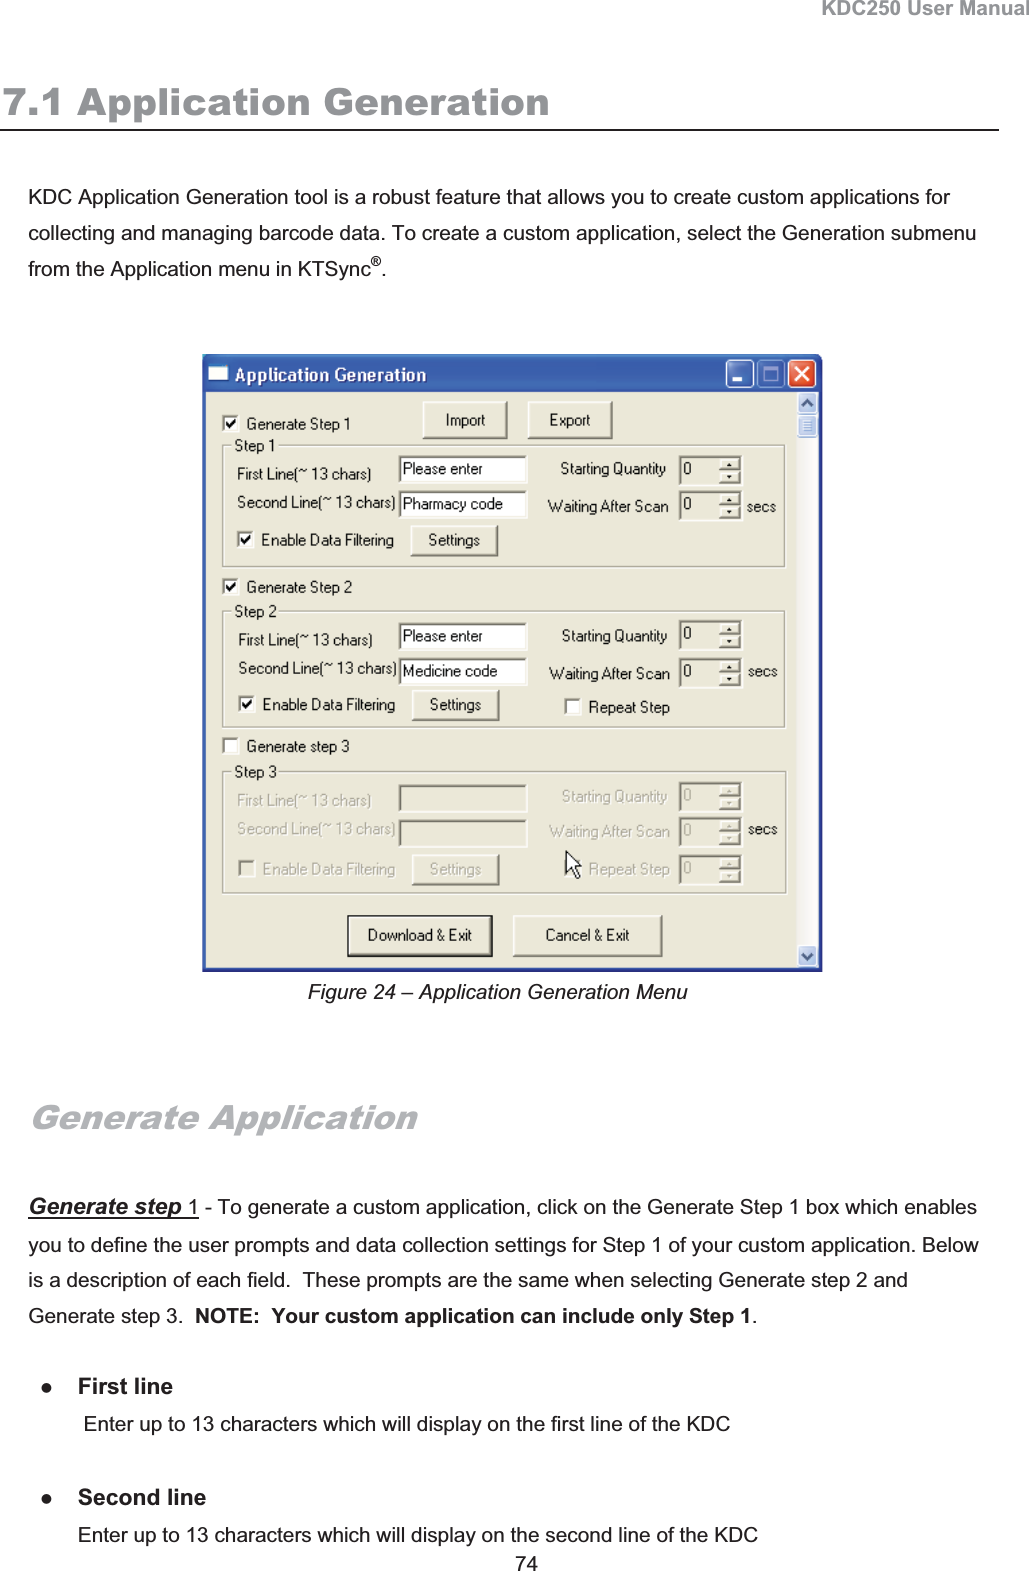
![KDC250 User Manual 73 7. APPLICATION GENERATION [NOTE] KDC FW2.85.200.x doesn’t supports the Application Generation feature. Users should upgrade FW2.85.200.x to FW2.86.200.x to use Application Generation featureWhen you select Application menu from the KTSync, you can choose from the following five Applications – Generation, DB Lookup, Master/Slave, Pick/BIN, and Inventory. Users can also download saved programs using Import & Download option. When the Application tool is selected, the KDC will beep once to acknowledge a connection between the KDC and the Application tool. KTSync would popup the following warning window if downloaded application in KDC doesn’t match with KTSync application tool. [Note] KDC would wedge barcode data to the host in application mode if “wedge and store always” option in data process menu is selected and KDC firmware version is higher than 2.86.xxx.G. Figure 22 – Application Menu Figure 23 – Application Warning Window](https://usermanual.wiki/AISOLUTION/KDC250/User-Guide-1509689-Page-75.png)
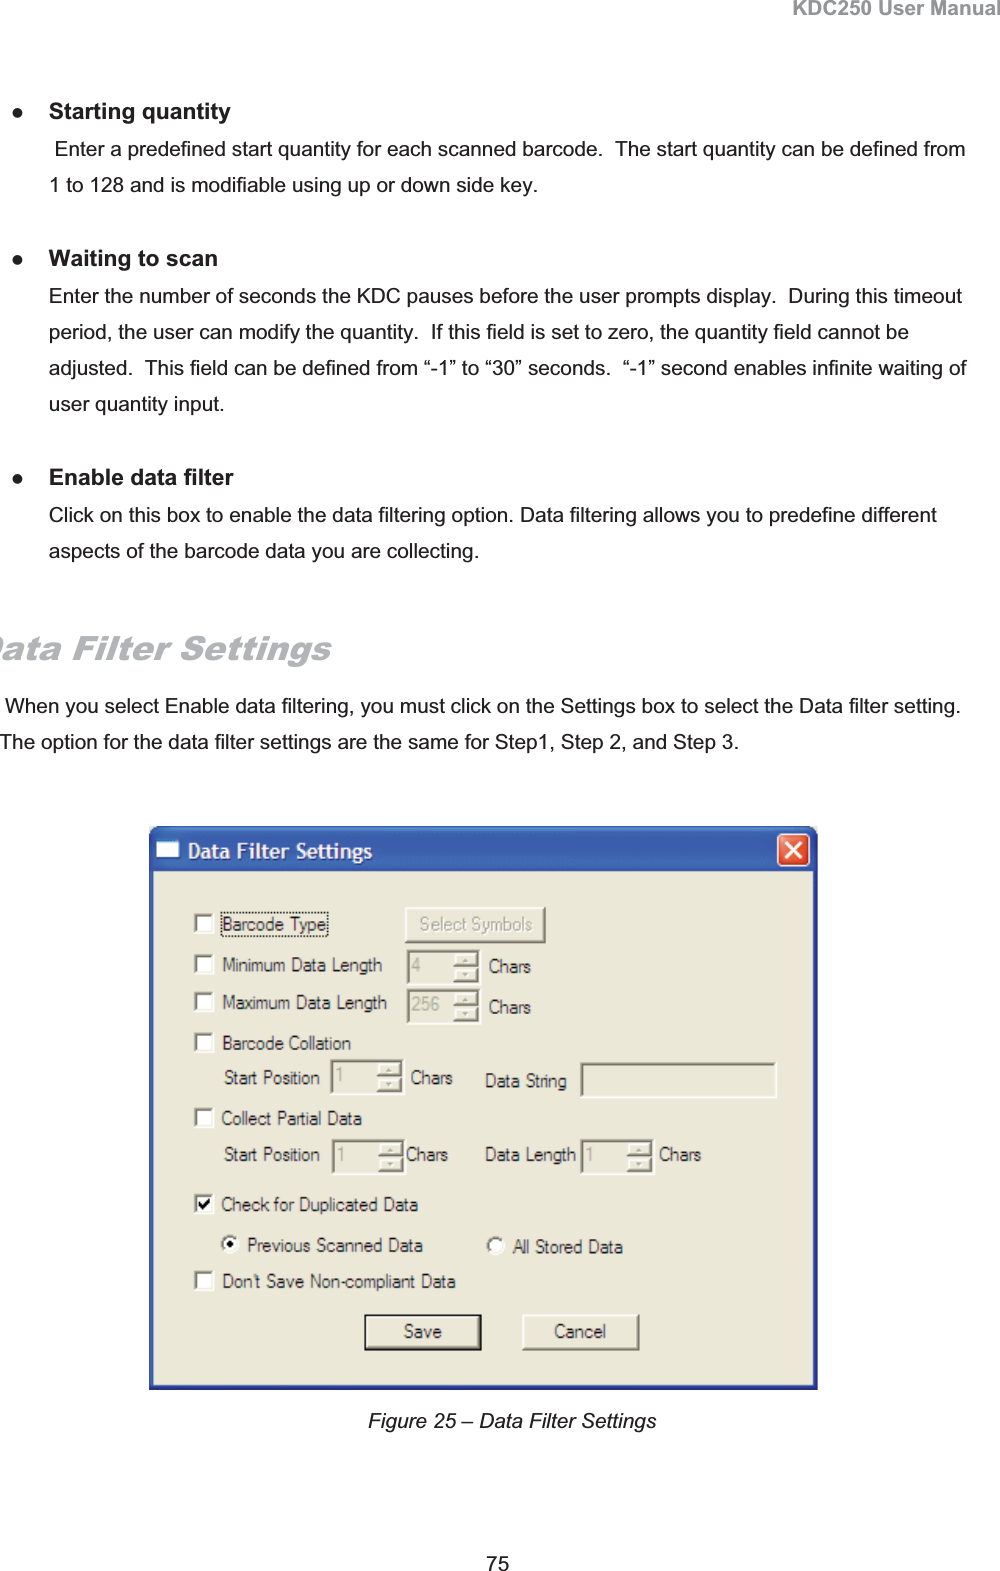
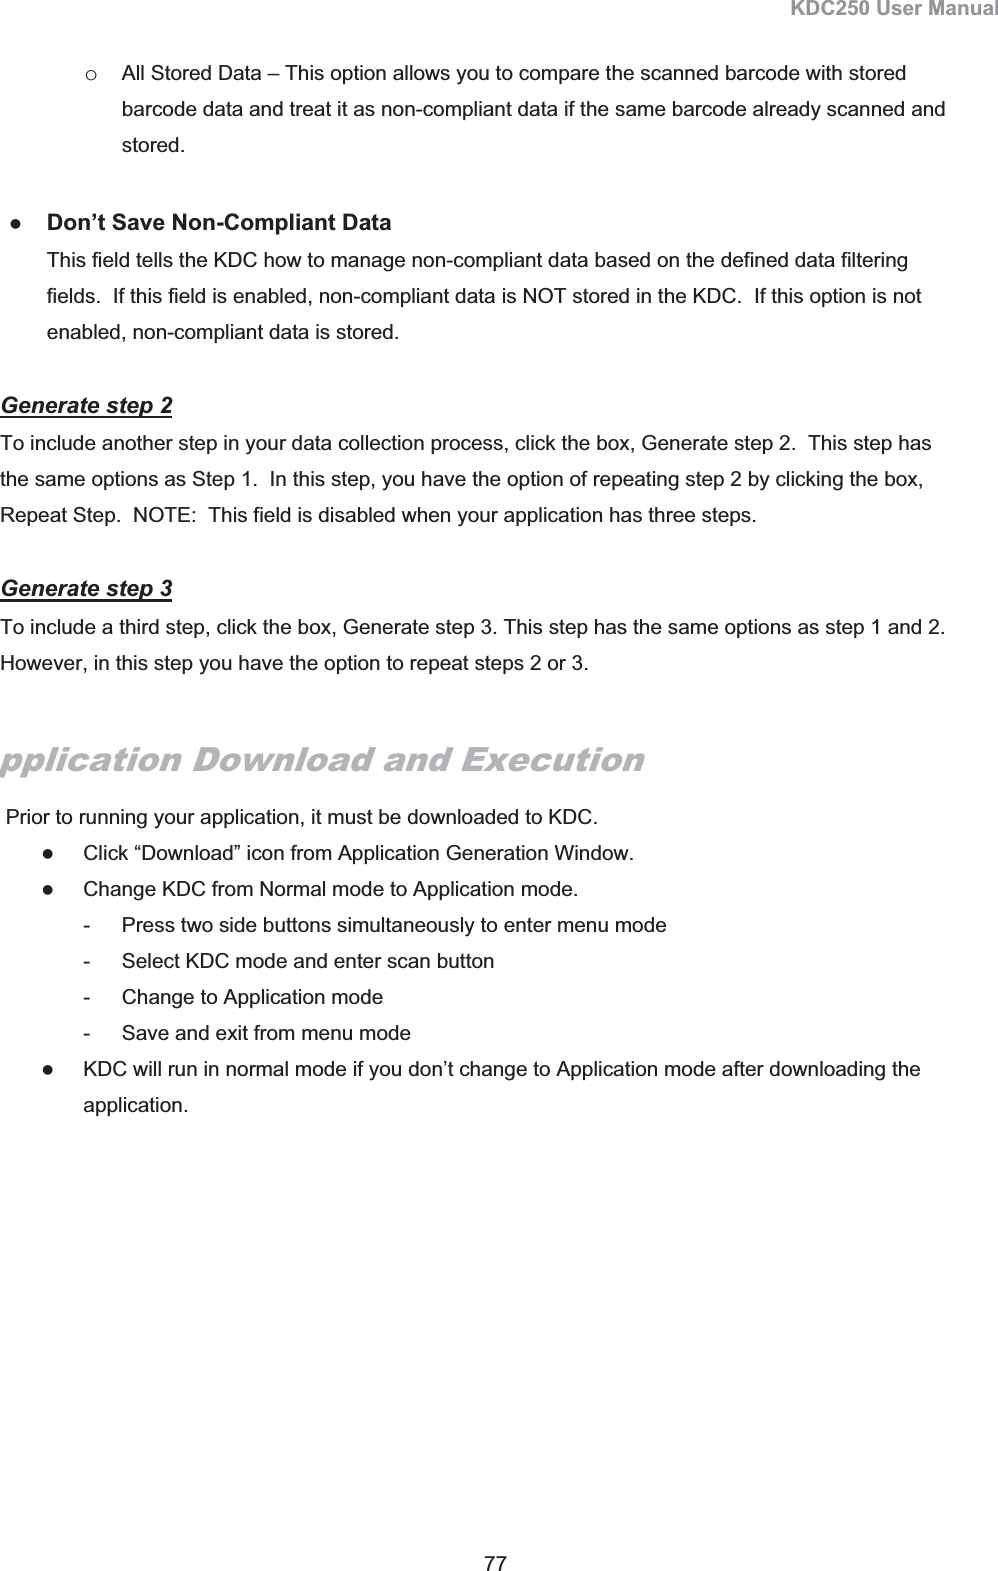
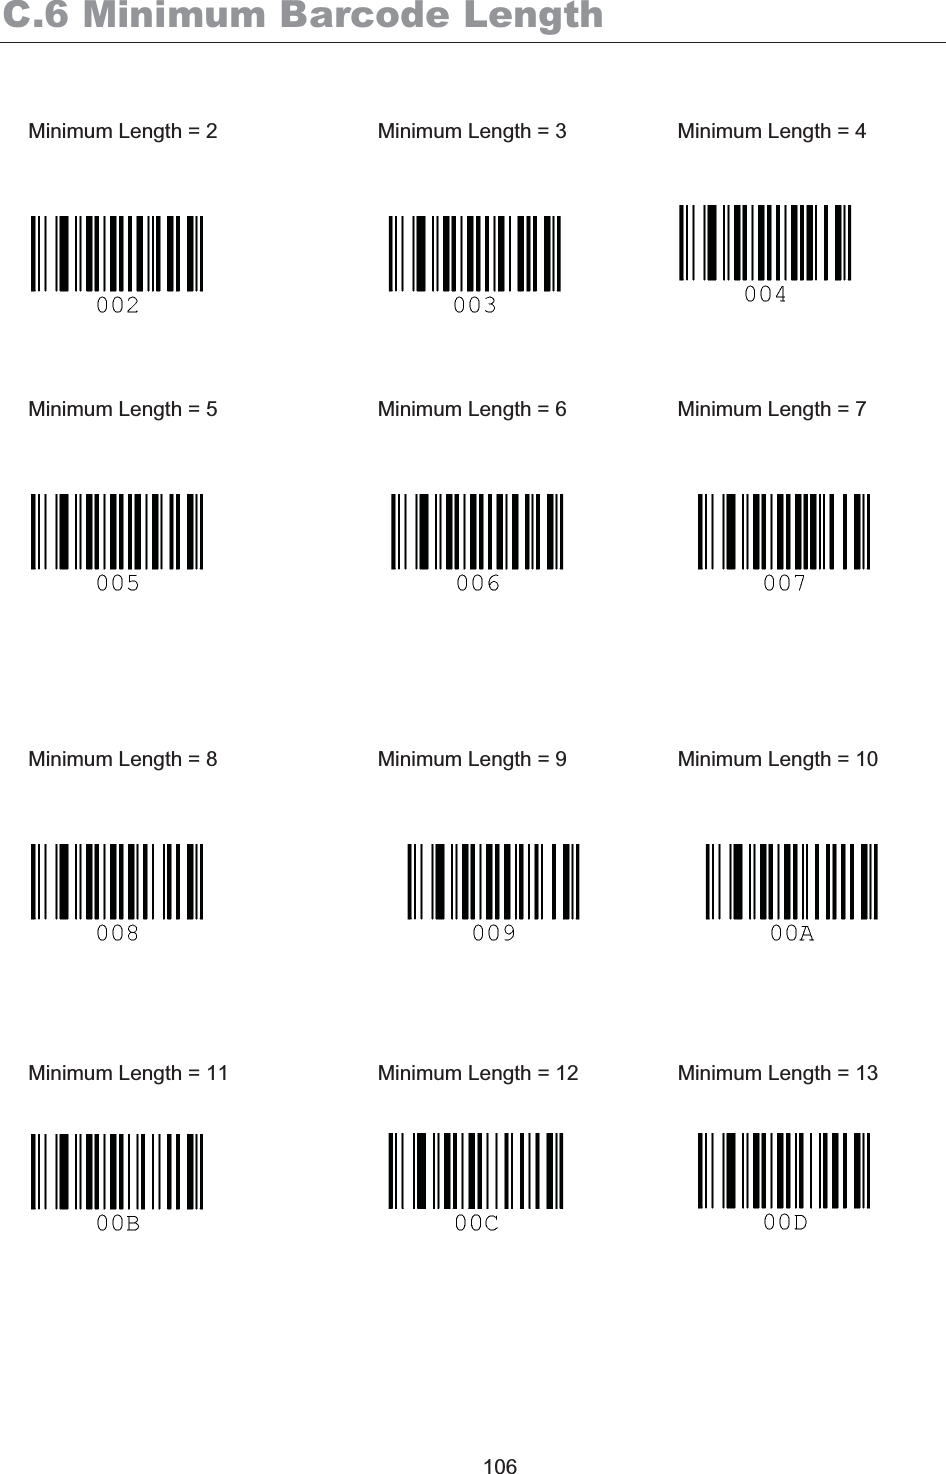
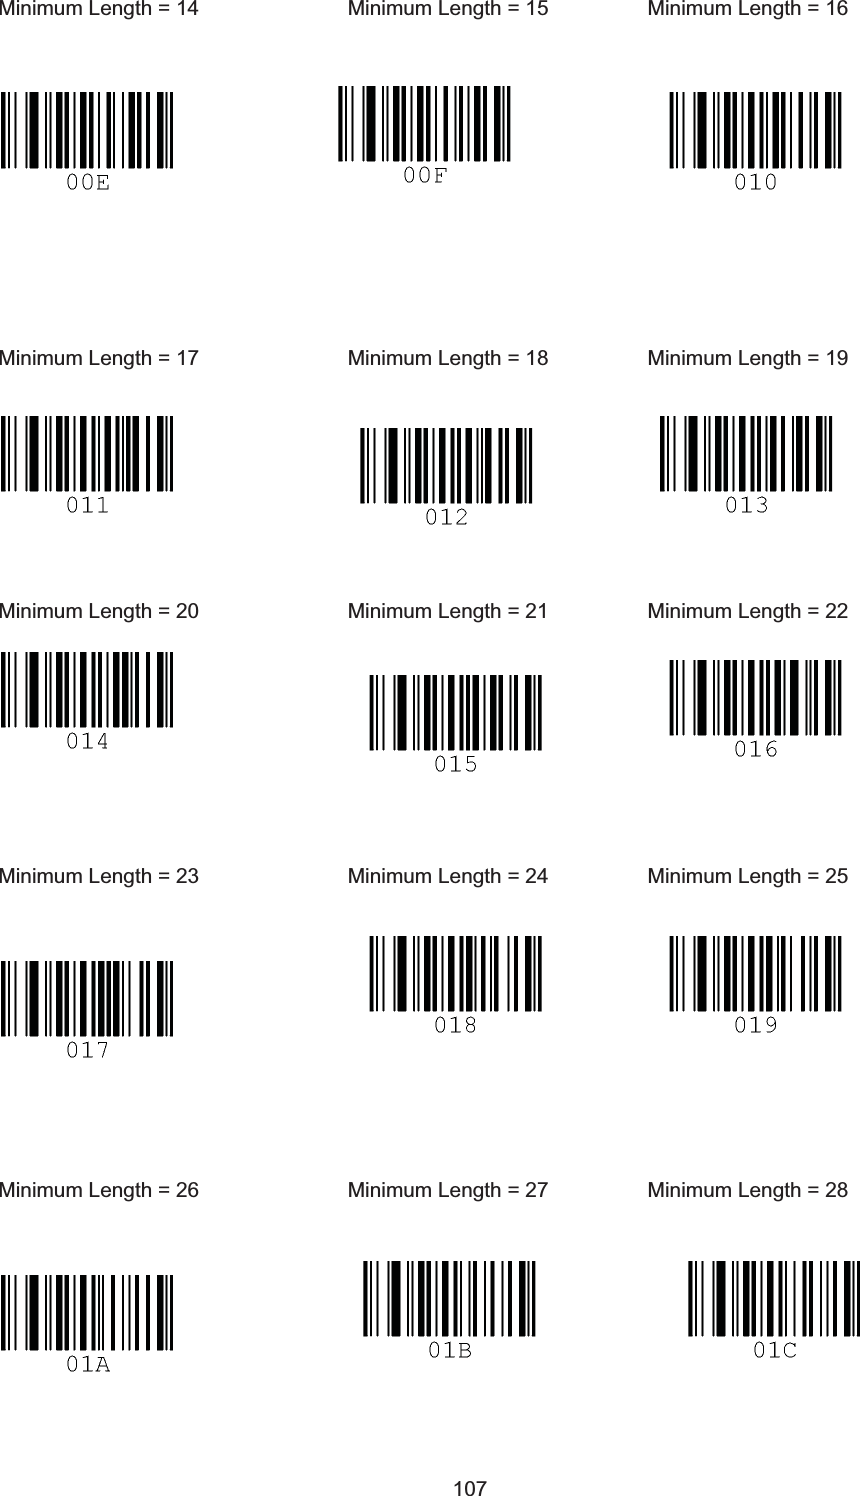
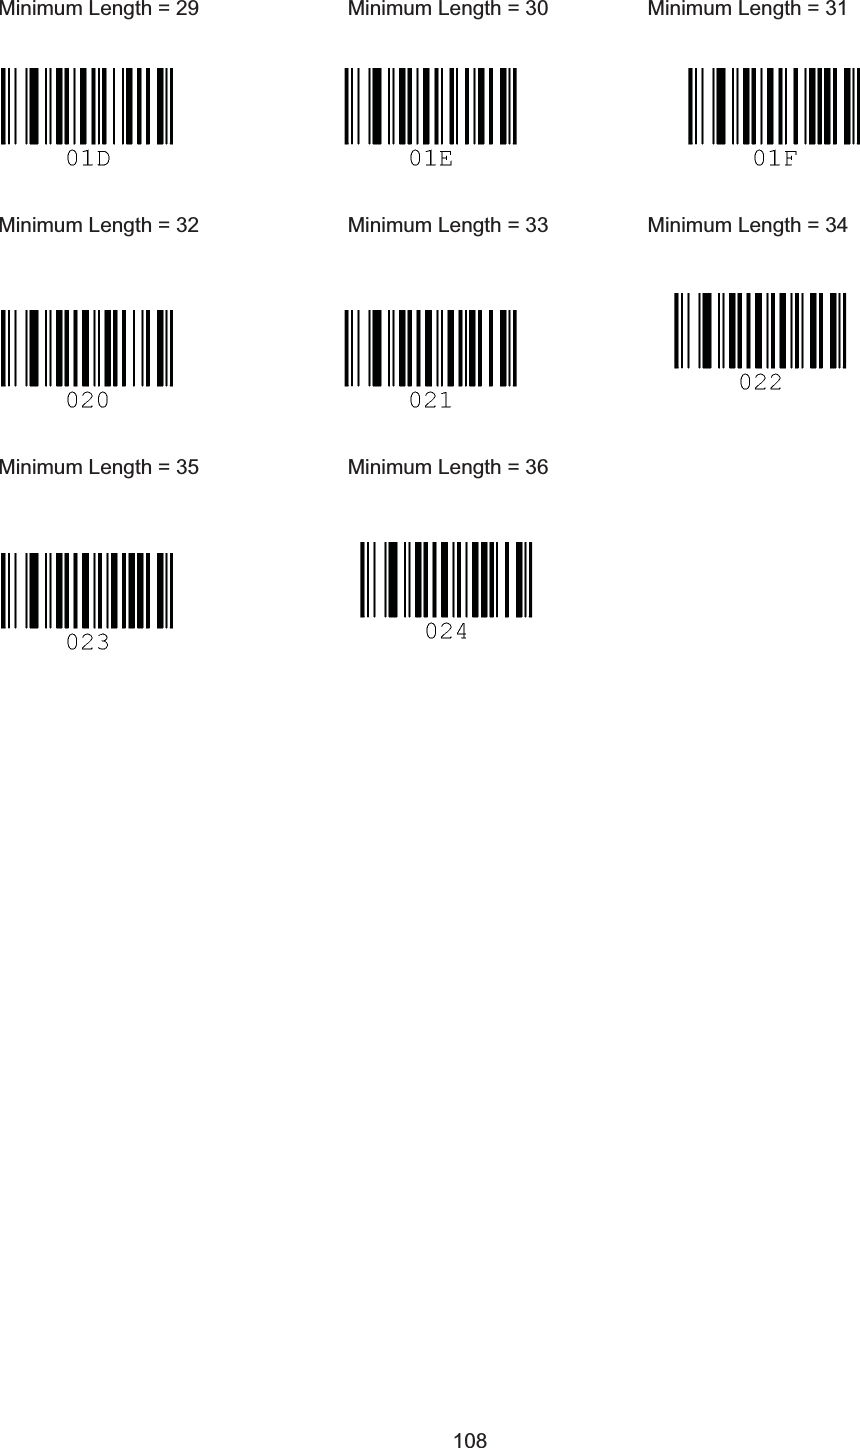
![KDC250 User Manual 76 zBarcode Type This field allows you to select the type of barcodes the KDC will collect. When you click on the box, Select Symbols is enabled. A listing of the symbologies supported by the KDC displays. To select a barcode symbology, click on the box associated with the symbology. zMinimum Data Length This field allows you to define the minimum length of the scanned barcode. The length can be between 2 and 36 characters. If a user scans a barcode whose length is less than the defined length, the barcode data is not collected. [Note] The default KDC minimum barcode length defined in scan option is 4. Therefore, users should change KDC minimum barcode length to 2 or 3 to define minimum data length to 2 or 3. zMaximum Data Length This field allows you to define the maximum length of a scanned barcode. The defined length can be between 2 and 256 characters. If a user scans a barcode whose length is greater than the defined length, the barcode data is not collected. [Note] The default KDC minimum barcode length defined in scan option is 4. Therefore, users should change KDC minimum barcode length to 2 or 3 to define maximum data length to 2 or 3. zBarcode Collation This option enables you to define a data string that the KDC will use to compare scanned barcodes. o Starting Position – This is the start position of the scanned barcode data to be compared with the defined data string. o Data String – This is the defined value to be compared with scanned barcode data. This value can be up to 32 characters zCollect Partial Data This option allows you to define partial barcode data to be collected when a barcode is scanned. Only the partial data will be stored in the KDC. o Start position – This is the starting position that the KDC will use when collecting scanned barcode data. oData Length – This is the length of partial data to be stored by the KDCzCheck for Duplicated Data This option allows you to prevent collecting duplicated data. o Previous Scanned Data – This option allows you to compare the scanned barcode with the previously scanned barcode and treat it as non-compliant data if you scanned the same barcode twice.](https://usermanual.wiki/AISOLUTION/KDC250/User-Guide-1509689-Page-78.png)


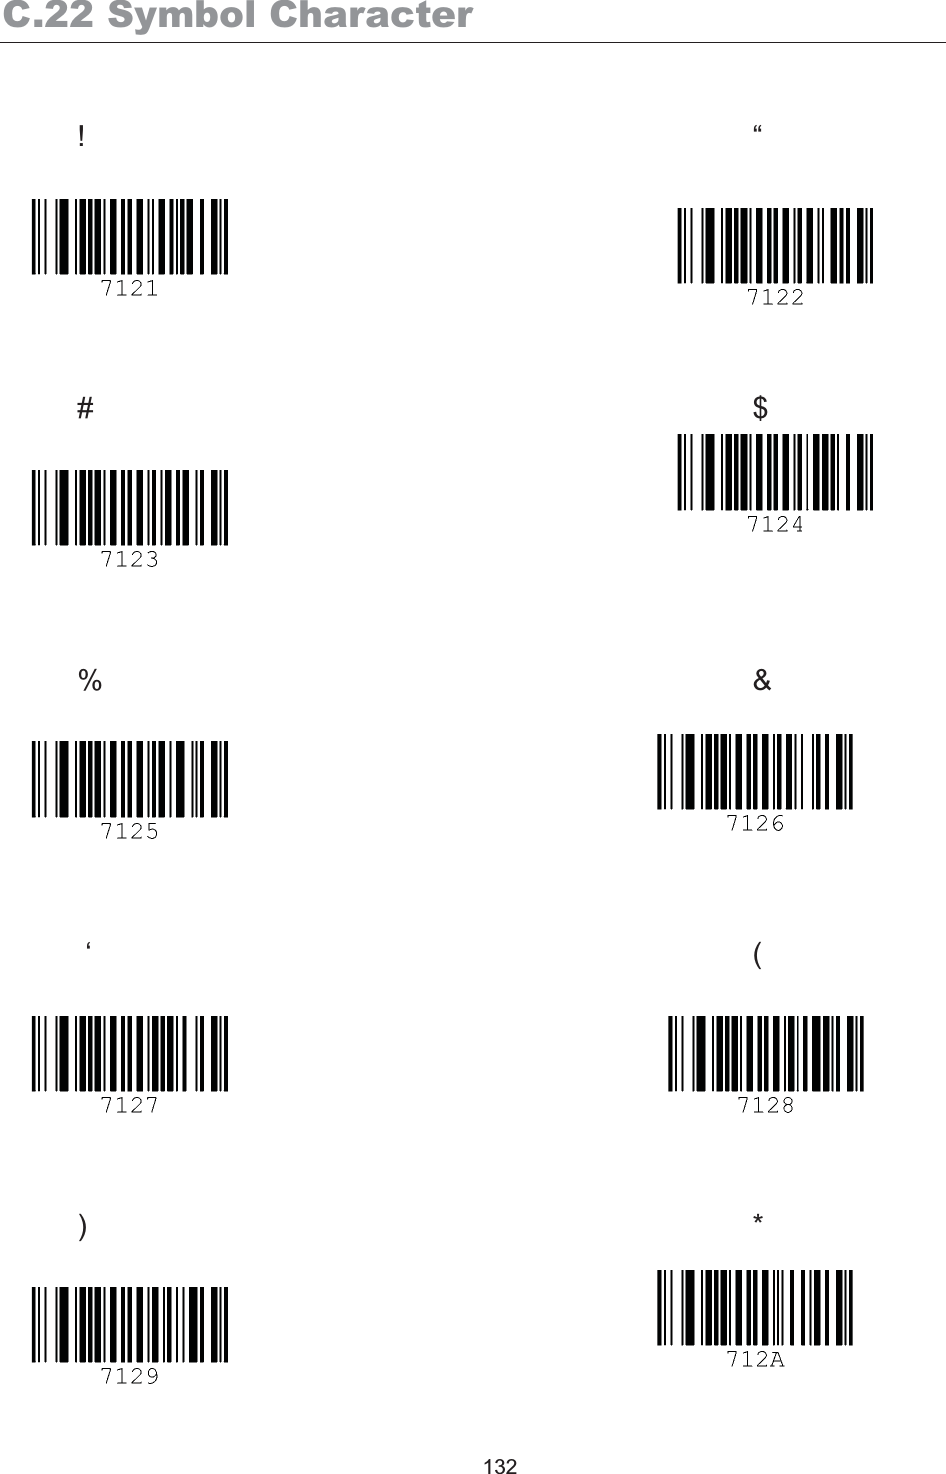
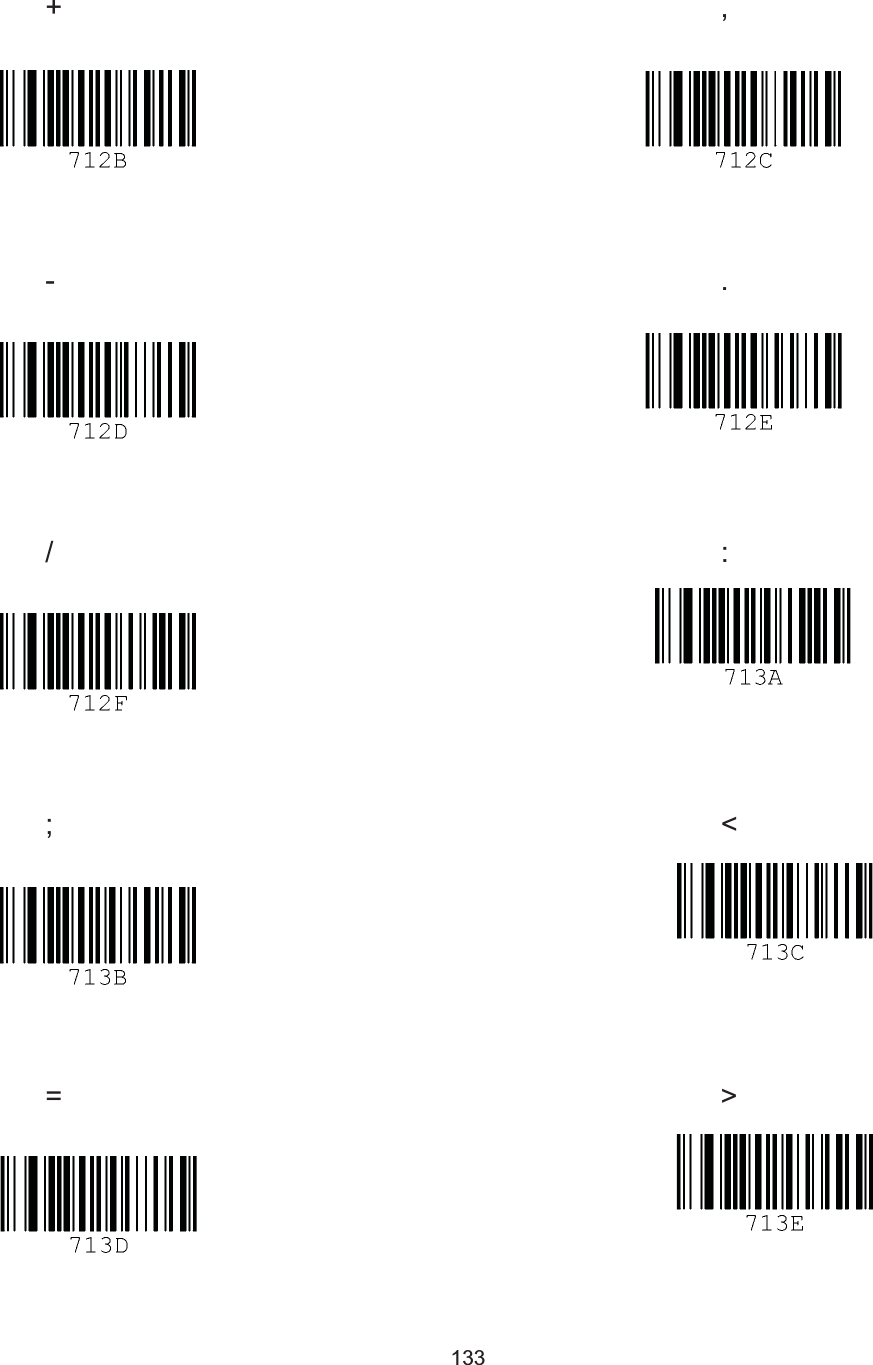
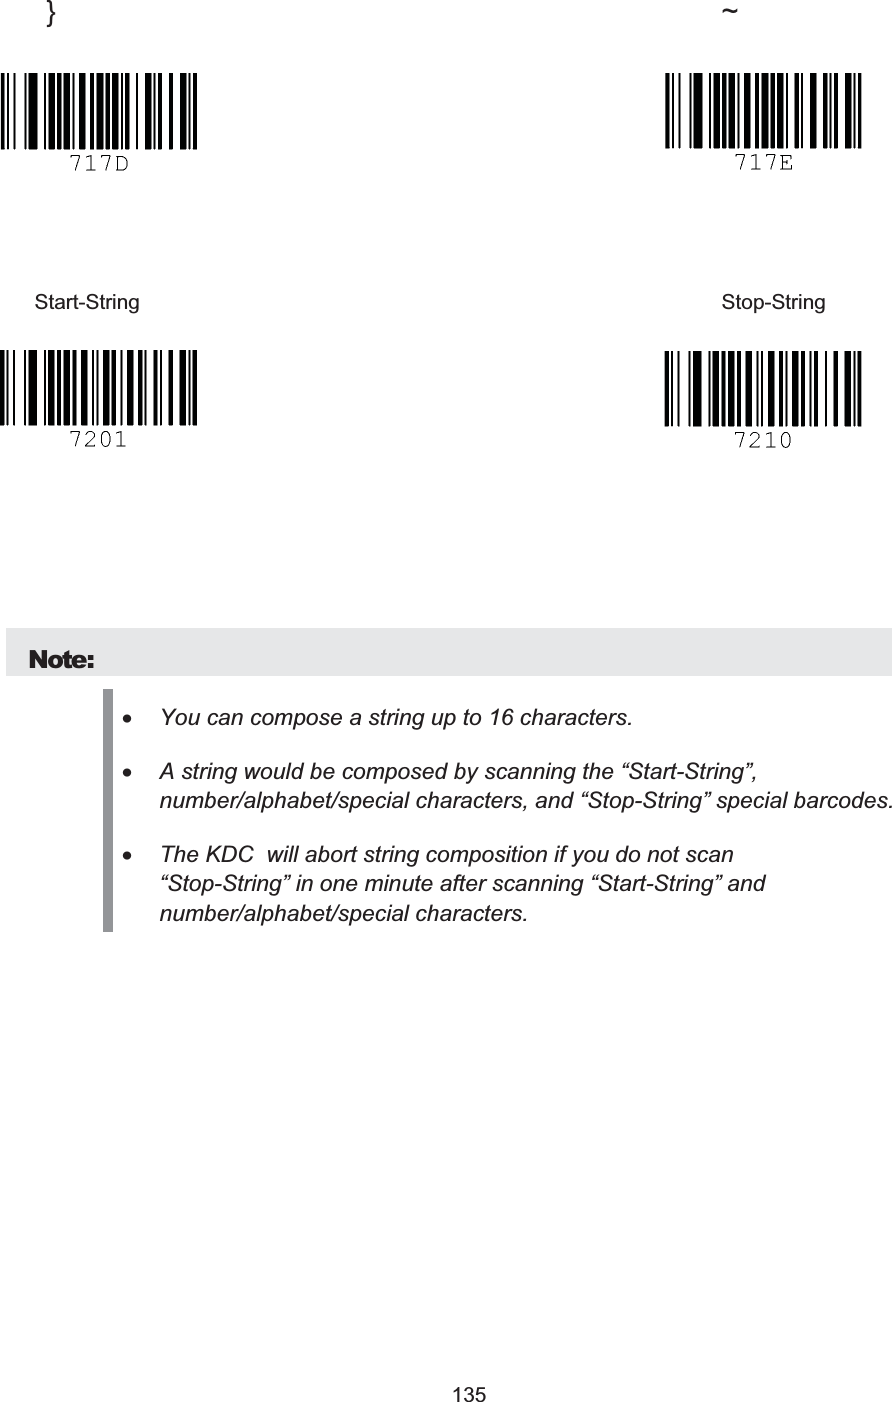
![KDC200 User Manual 134 ? @ [ \ ] ^ _ ` |](https://usermanual.wiki/AISOLUTION/KDC250/User-Guide-1509689-Page-136.png)