ALANGO TECHNOLOGIES ABH-101 BeHear Now User Manual
ALANGO TECHNOLOGIES, LTD. BeHear Now
Contents
- 1. User Manual
- 2. user manual
User Manual
2. Headset
Charging Port
micro-USB
Le Hand Control Box:
Call/Audio controls
Right Hand Control Box:
Personal hearing controls
Ear Buds
Power
buon
This light indicates power
and hearing states.
Indicaon
State
•
Red/blue alternang
•
Bluetooth pairing
•
Yellow, steady
•
Charging
•
Green, steady
•
Baery fully charged
•
Red, blinking
•
Baery low
•
If unit is on, press
•Green
•Yellow
•Red, blinking
•
Baery level:
•good > 50%
•fair < 50%
•low < 10
% (needs charging!)
•
Yellow, blinking
•
Hearing funcon acve
12. Headset LED
Call/Music/Audio Controls
11. Hardware: Le-Hand Control Box
Phone Call Music/Audio
Volume up Volume up
Call answer (short press)
Call end (short press)
Call reject (long press)
Play/pause
Volume down Volume down
Mode
9. Audio Play
Use the le-hand control box on the headset
to handle audio play:
Toggle Play/Pause with a short press on .
Increase audio volume by pressing and
decrease it by pressing .
ListenThrough™ – Stay Safe & Alert Funcon
Enjoy audio content while staying aware of
important ambient sounds. During audio play,
a long press on in the right-hand control
box toggles the ListenThrough funcon on/off.
Short presses on gradually increase volume
of ambient sound, while short presses on
decrease it.
8. Handling Phone Calls
Use the le-hand control box on the headset to
handle phone calls:
Answer incoming calls with a short press on .
End the call with another short press on .
Reject an incoming call with a long press on .
Increase call volume by pressing and decrease
it by pressing .
EasyListen™ – Slow Down Incoming Speech
You can slow down incoming phone speech,
making it more intelligible.
Enable EasyListen and adjust speech tempo
using the W&H app (downloadable from
Google Play Store or Apple Store).
7. Personal Hearing Amplificaon
Your BeHear device operates as a Personal
Hearing Amplifier (no Bluetooth needed).
Toggle hearing on/off with a long press on .
Short presses on the and will increase
and decrease the volume, respecvely.
Scroll through pre-defined hearing profiles:
Indoor, Outdoor, Crowd or Live Music with a
short press on . A tone will play for each
switched profile.
Use the W&H BeHear app to customize
hearing based on your preferences and
capabilies. Download the app from
the Google Play Store or Apple Store.
Launch the app and follow the prompts.
6. Ear Fings
Your BeHear device comes with three sets of silicon
ear ps and ear hooks of varying sizes.
If the default set does not fit snugly and comfortably,
remove the silicon covers from the ear buds and try
different opons. It is recommended to do this one at
a me, to avoid confusion between right and le:
A. Peel off
default ear
p and hook
B. Place hole of new
ear hook over ear
bud microphone
C. Place new
ear p over
microphone
D. Add wind
protecon covers
(oponal)
5. Wearing Recommendaons
Ear hook
Le/Right
indicaon Ear pCables in clips
1. Place neck band behind neck.
2. Insert ear buds into ears.
3. Tuck ear hooks into ears.
4. Shorten cables by folding them
back into clips (oponal).
5. When not in use, secure ear buds to
each other with built-in magnets.
Magnezed ear buds
LED
Power buon
4. Pairing with Bluetooth®
To be used as a Bluetooth headset BeHear must be
paired with a Bluetooth device, e.g., a mobile phone.
Pairing Using Bluetooth Device
1. Make sure BeHear headset is off.
2. Press on headset for up to 5
seconds, unl LED alternates
red/blue to enter pairing mode.
3. Use the Bluetooth device’s setup program. The
headset will be idenfied as Alango BeHearTM.
Pairing Using BeHear App
1. Download the W&H BeHear app from
the Google Play Store or Apple Store.
2. Launch the app and follow the prompts.
3. Charging the Baery
The BeHear baery should be charged
before using it for the first me.
Charging via Computer’s USB Port
A. Plug larger end of supplied cable into
a computer’s USB port. Connue to step B, below.
Charging via AC Outlet
A. Plug larger end of supplied cable into a standard
AC outlet USB charger adapter (sold separately)
and insert the adapter into an AC outlet.
B. Plug cable’s smaller end into the Micro USB port
located in the BeHear neck band.
C. The LED is yellow during charging, and green when
BeHear is fully charged.
A full charge will be achieved aer ~ two hours.
B
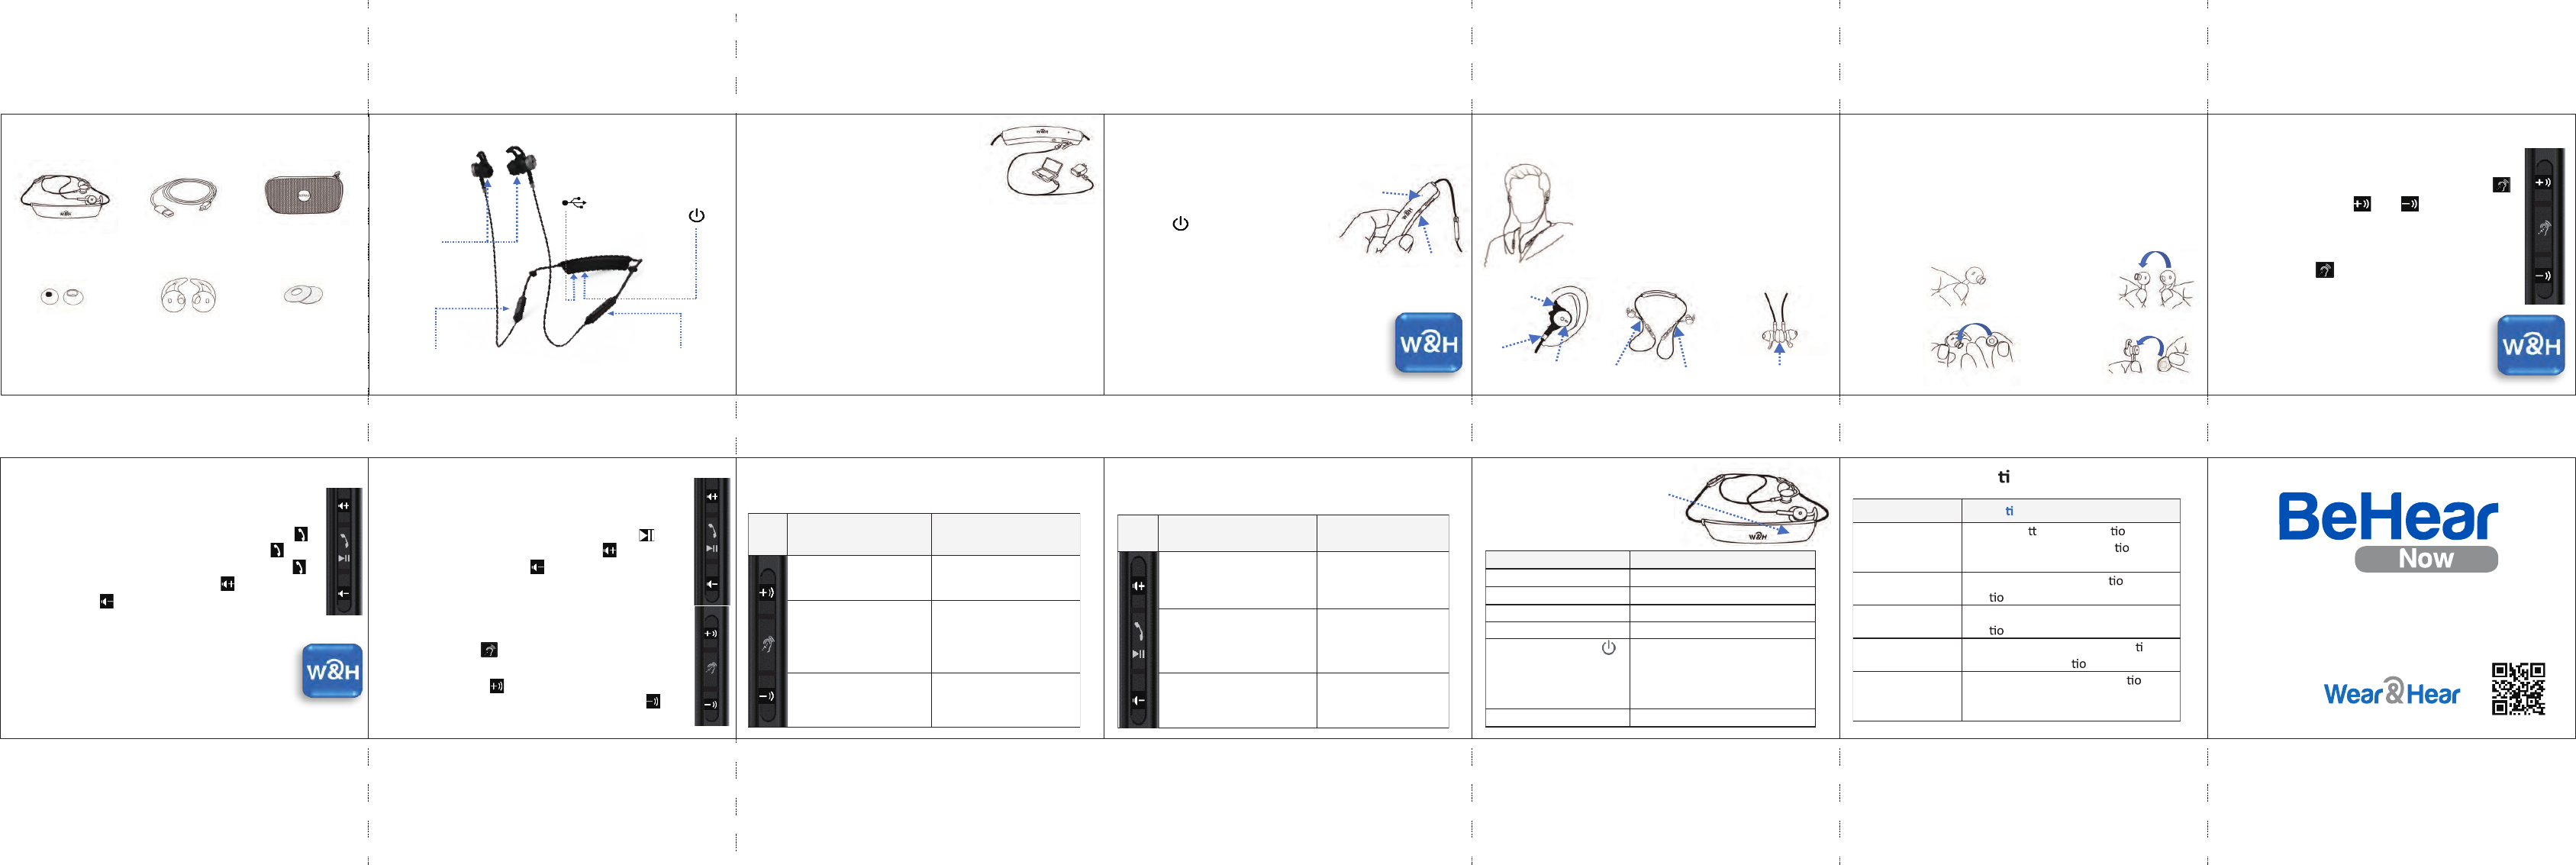
A
Headset USB charging
cable
Travel pouch
Silicon ear ps
(3 pairs)
Silicon ear
hooks (3 pairs)
Wind
protecon
covers x2
1. Package Contents
Call/Music/Audio Controls
11. Hardware: Le-Hand Control Box
Phone Call Music/Audio
Volume up Volume up
Call answer (short press)
Call end (short press)
Call reject (long press)
Play/pause
Volume down Volume down
Mode
Personal Hearing Controls
10. Hardware: Right-Hand Control Box
Ambient Hearing ListenThrough™
(during audio play)
Volume up
(short presses)
Ambient sound volume
up (short presses)
Amplificaon On/Off
(long press)
Scroll through profiles
(short press)
On/Off (long press)
Ambient volume down
(short presses)
Ambient sound volume
down (short presses)
Mode
This light indicates power
and hearing states.
Indicaon
State
•Red/blue alternang •Bluetooth pairing
•Yellow, steady •Charging
•Green, steady •Baery fully charged
•Red, blinking •Baery low
•If unit is on, press
•Green
•Yellow
•Red, blinking
•Baery level:
•good > 50%
•fair < 50%
•low < 10% (needs charging!)
•Yellow, blinking •Hearing funcon acve
12. Headset LED
Problem Sugges on
No sound •Verify ba ery level (Sec n 11)
•Adjust volume level (Sec n 6)
•Check ear caps for debris
Wind noise Use supplied wind protec n covers
(Sec n 6)
Ambient noise
too loud
Reduce ListenThrough transparency
(Sec n 9)
Uncomfortable
ear buds
Experiment with different ear ps
and ear hooks (Sec n 6)
Phone calls or
music not routed
to BeHear
Verify Bluetooth pairing (Sec n 4)
13. Troubleshoo ng
www.WearAndHear.com
Quick Start Guide
(for detailed, visual instrucons visit our Web site)
NOTE: This equipment has been tested and found to comply with the limits for a
Class B digital device, pursuant to part 15 of the FCC Rules. These limits are
designed to provide reasonable protection against harmful interference in a
residential installation. This equipment generates uses and can radiate radio
frequency energy and, if not installed and used in accordance with the instructions,
may cause harmful interference to radio communications. However, there is no
guarantee that interference will not occur in a particular installation. If this
equipment does cause harmful interference to radio or television reception, which
can be determined by turning the equipment off and on, the user is encouraged to
try to correct the interference by one or more of the following measures:
- Reorient or relocate the receiving antenna.
- Increase the separation between the equipment and receiver.
-Connect the equipment into an outlet on a circuit different from that to which the
receiver is connected.
-Consult the dealer or an experienced radio/TV technician for help
Changes or modifications not expressly approved by the party responsible for compliance
could void the user's authority to operate the equipment. This device complies with Part
15 of the FCC Rules. Operation is subject to the following two conditions:
(1) this device may not cause harmful interference, and
(2) this device must accept any interference received, including interference that may
cause undesired operation.