ALPS ALPINE 9ZUA145 Car Navigation Unit User Manual 68 29530Z12 A c3 comm FCC
Alpine Electronics Inc Car Navigation Unit 68 29530Z12 A c3 comm FCC
Contents
- 1. (Short-Term Confidential) User Manual_1
- 2. (Short-Term Confidential) User Manual_2
- 3. (Short-Term Confidential) User Manual_3
(Short-Term Confidential) User Manual_2
30-EN
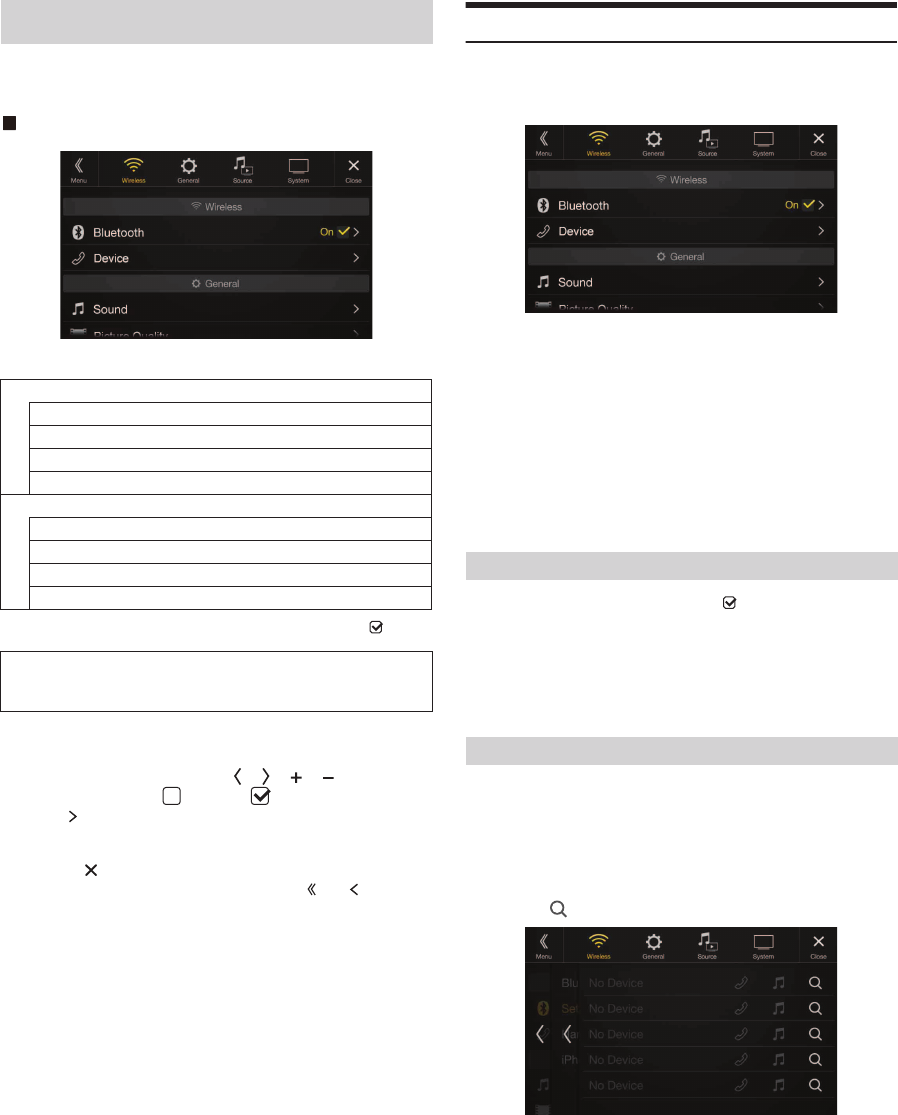
[Wireless] is selected on the Setup main screen in step 3. See “Setup
Operation” (page 29).
Wireless Setup Menu screen
<Setting items>
*This setting is only available when “Bluetooth” is set to “On” ( ).
1Select the desired item.
2To switch the setting, touch [ ], [ ], [ ], [ ], or mark the
checkboxes “Off”( ) or “On”( ).
• If “ ” appears, there is a further hierarchy. Touch the desired
item.
3Touch [ ] to return to the main source screen.
• To return to the previous List screen, touch [ ] or [ ] in the
previous page. For details, see “About Basic Operation for List
Screen” (page 18).
Bluetooth Setup
[Bluetooth] is selected on the Wireless Setup Menu screen in step 1. See
“Wireless (Bluetooth) Setup” (page 30).
You can register and set up Bluetooth compatible devices.
Setting item:
Bluetooth
Setting contents:
Off / On (Initial setting)
*Turn this setting “On” to automatically connect a registered Bluetooth
device whenever this unit is turned ON. See “Registering the Bluetooth
Device” if no device is registered.
Make sure the “Bluetooth” setting is “On” ( ). See “Bluetooth Setup”
(page 30).
You can display the Bluetooth device name and device address of this
unit.
Setting item:
Bluetooth Information
The Bluetooth device is used when a connectable Bluetooth compatible
device is searched and connected from this unit, or a new Bluetooth
compatible device is registered.
Setting item:
Set Bluetooth Device
1Touch [ ] (Search) of “No Device.”
Wireless (Bluetooth) Setup
Bluetooth
Bluetooth Information*
Set Bluetooth Device*
Hands-free Device Priority*
iPhone Auto Pairing*
Device
Passcode Change
Default Phone Book Format
Phone Speaker
Microphone Select (X108U/INE-W967HD only)
The following steps 1 to 3 are common to each “Setting
item” of Wireless Setup. See each section for details.
Off: Bluetooth function is not used.
On*: Select when you would like to pair your Bluetooth
compatible phone with this unit.
Displaying Bluetooth Information
Registering the Bluetooth Device
31-EN
2Touch [ ] (Audio), [ ] (Hands-free) or [ ] (Both)
of the device you want to connect from the list.
• You can register up to 5 Bluetooth compatible mobile phones.
• You can connect three Bluetooth Devices; two exclusively for
Hands-Free Phone and one exclusively for Bluetooth Audio.
• When you register a Hands-Free Phone for the first time, Priority1
is set automatically. When you connect two Hands-Free Phones,
select “HFT” or “Both.” You can then set the priority on the
Priority setting screen. For details, see “Hands-free Device Priority
Setting” (page @@).
3When the device registration is complete, a message
appears and the device returns to normal mode.
• The Bluetooth registration process differs depending on the device
version and SSP (Simple Secure Pairing). If a 4 or 6 character Passcode
appears on this device, enter the Passcode using the Bluetooth
compatible device.
If a 6 character Passkey appears on this device, make sure the same
passkey is displayed on the Bluetooth compatible device and touch “Yes.”
• If all 5 devices have been registered, you cannot register a 6th device. To
register another device, you need to delete one of the other
5 devices first.
Setting the Bluetooth Device
Select one of 5 paired Bluetooth compatible devices that you previously
registered.
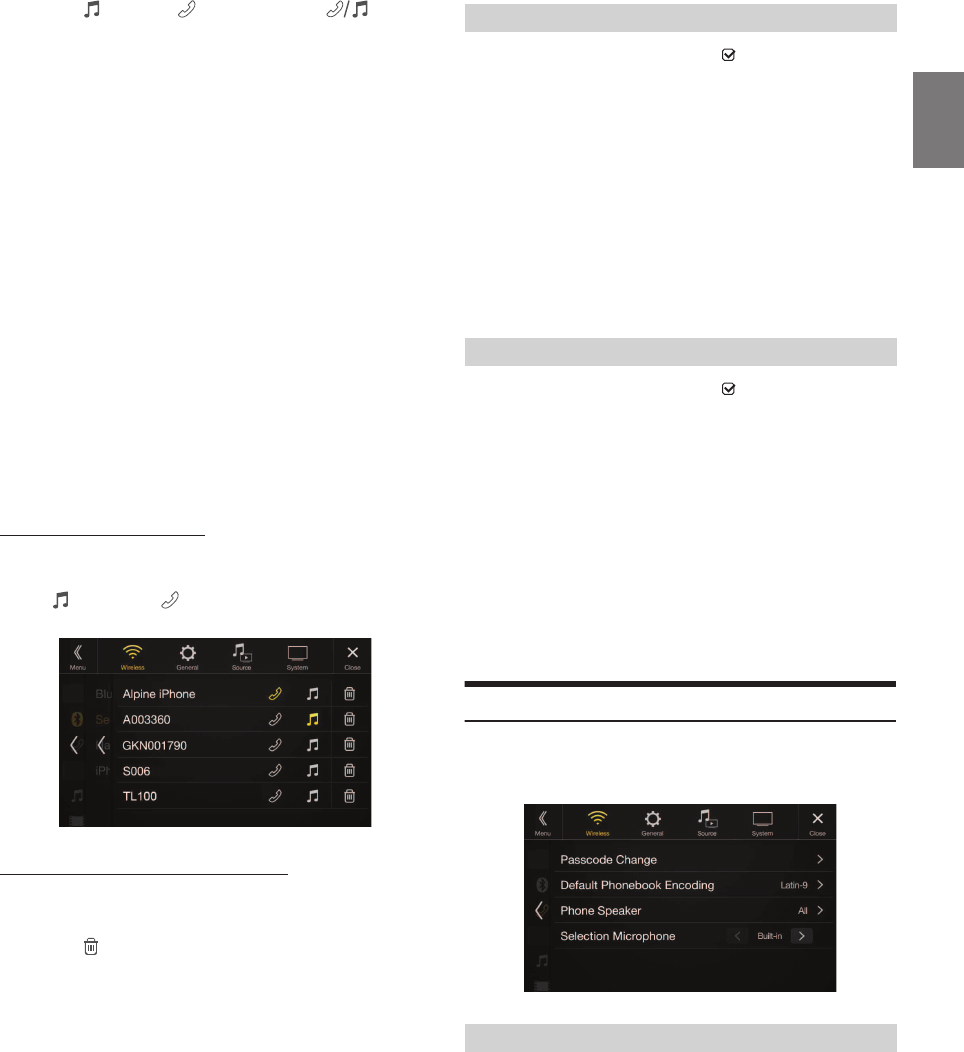
Touch [ ] (Audio) or [ ] (Hands free) of the device you
want to connect from the Paired Device list.
Deleting a Bluetooth Device from the list
You can delete the information of a previously connected Bluetooth
compatible device.
1Touch [ ] (Delete) of the Bluetooth compatible device
to delete from the Paired Device list.
2Touch [OK].
• Touching [Cancel] will cancel the setting.
Make sure the “Bluetooth” setting is “On” ( ). See “Bluetooth Setup”
(page @@).
When you connect two Hands-Free Phones, set the priority of the
operation and the setting of incoming-outgoing calls.
Setting item:
Hands-free Device Priority
Setting contents:
Priority1 / Priority2
Touch the checkbox of Priority1/Priority2 of the Device
names that are connected to the unit to set them.
• When connected to two hands-free phones, operating restrictions apply
to the hands-free phone registered to Priority2. For details, see “Hands-
free Phone Control” (page @@).
Make sure the “Bluetooth” setting is “On” ( ). See “Bluetooth Setup”
(page 30).
When an iPhone is connected via USB and it is not on the Registered
Device list, it will be paired automatically.
Setting item:
iPhone Auto Pairing
Setting contents:
On / Off (Initial setting)
• This setting supports iPhones with iOS Ver.5.5 or later.
• When more than 5 Bluetooth devices are registered, Auto Pairing does
not start.
Device Setup
[Device] is selected on the Wireless Setup Menu screen in step 1. See
“Wireless (Bluetooth) Setup” (page 30).
You can make various settings for a Bluetooth compatible device.
You can set the code for connecting with a Bluetooth compatible device.
Setting item:
Passcode Change
Enter a 4-digit passcode, and then touch [OK].
• The initial number is 0000.
• For details on how to input the numeric keypad, see “Numeric Keypad
Input Operations” (page 75).
Audio: Sets for use as an Audio device.
Hands-free: Sets for use as a Hands Free Device.
Both: Sets for use as both an Audio device and Hands Free
Device.
Hands-free Device Priority Setting
iPhone Auto Pairing Setting
On: Performs iPhone Auto Pairing setting.
Off: Does not perform iPhone Auto Pairing setting.
Setting the Passcode
32-EN
You can select the character code that is used when transferring the
phone book or history from a mobile phone. If unreadable characters
appear in the transferred data, select the correct character code.
Setting item:
Default Phone Book Format
Setting contents:
Latin-1 / Latin-9 (Initial setting) / Russian / Chinese / Thai / Arabic / UTF-8 /
UTF-16LE / UTF-16BE
You can select which speaker in the car will output the audio from the
phone.
Setting item:
Phone Speaker
Setting contents:
All (Initial setting) / Front Left / Front Right / Front Left + Right
• The setting cannot be adjusted during a phone call. Adjust the setting
before placing a call.
• This option is not available when “External Audio Processor” (page 49)
is set to On.
You can select the built-in microphone or the supplied microphone as a
Hands-Free Microphone.
Setting item:
Microphone Select
Setting contents:
Built-in (Initial setting) / Add-on
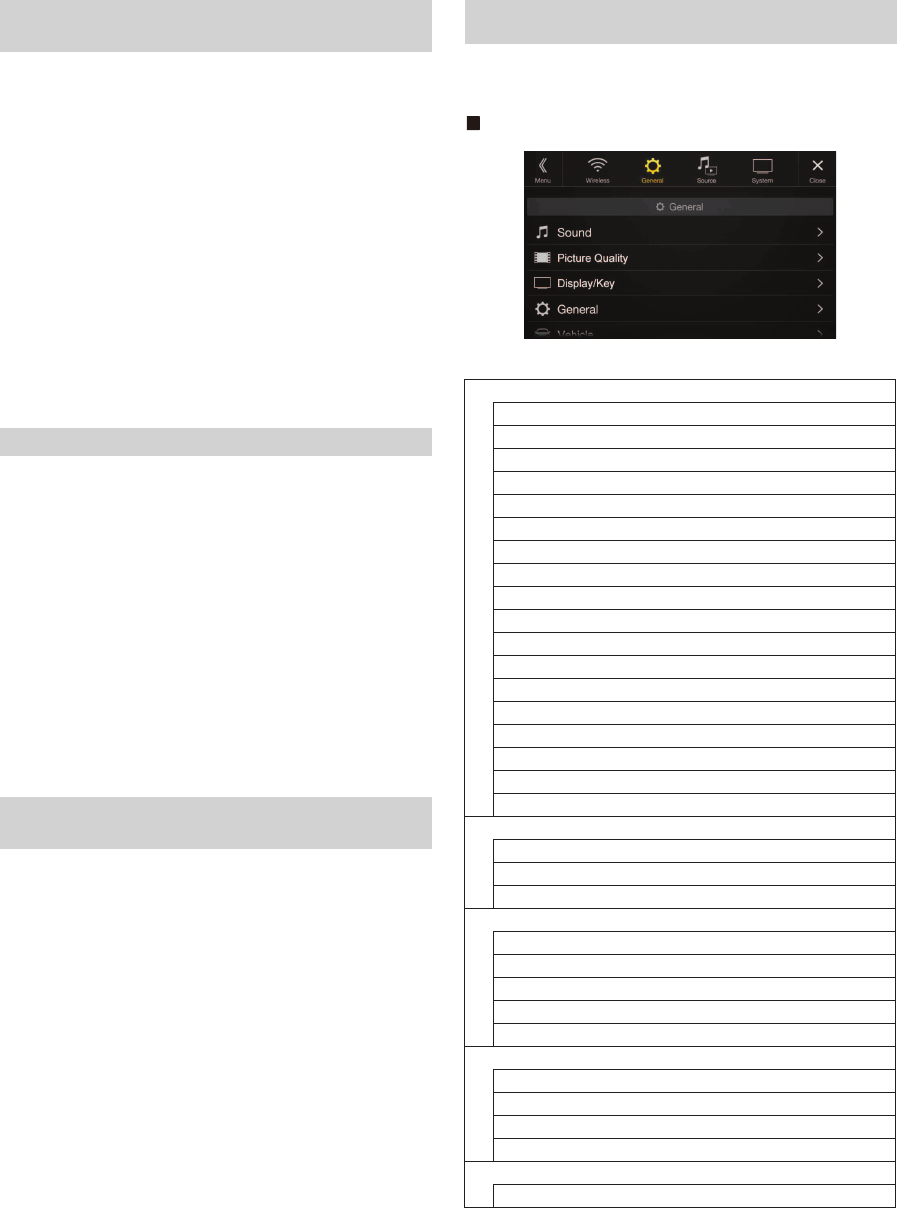
[General] is selected on the setup main screen in step 3. See “Setup
Operation” (page 29).
General Setup Menu screen
<Setting item>
*1 You can make this setting in the Sound Setup screen of the Shortcut
Setup. For details, see “Sound Setup Function” (page 19).
Changing the Character Code of the Phone
Book
Latin-1: ISO 8859-1
Latin-9: ISO 8859-15
Russian: ISO 8859-5
Chinese: GB18030
Thai: CP874
Arabic: CP1256
UTF-8
UTF-16LE
UTF-16BE
Selecting the Output Speaker
All: The sound is output from all speakers in car.
Front Left: The sound is only output from the front left speaker.
Front Right: The sound is only output from the front right speaker.
Front Left +
Right:
The sound is output from the front left and front right
speakers.
Setting the Microphone Select (X801D-U/INE-
W997D only)
Built-in: Use the built-in microphone.
Add-on: Use the supplied microphone.
General Setup
Sound
Balance / Fader *1
Rear Speaker*2
Subwoofer*2
Subwoofer Level*1, 2, 3, 5
Subwoofer Phase*2, 3
MX HD*1, 4, 5
EQ Presets*4, 5
Dual HD EQ*4, 5
X-Over*5
Time Correction (TCR)
Defeat
Source Volume Setup
Caller Level
Microphone Level
Ring Tone Level
Key Sound Feedback
Mute While Backing Up
Default Sound Settings
Picture Quality.
Video*6
Camera*7
Navigation
Display/Key
Screen/Lighting
Screen Color
Illumination Color (X108U/INE-W967HD only)
Text Scroll
Artwork Position
General
Language
Format
About
Demo Mode
Vehicle
Installation Status
33-EN
*2 You can also make the setting in the Bal./Fad. screen.
For details on how to adjust, see “Setting the Balance/Fader/Rear
Speaker/Subwoofer” (page 33).
*3 This setting is only available when “Subwoofer” is set to “On” ( ).
*4 When the Defeat setting is “On,” you cannot perform the set up.
*5 When the Sound Setup of the Shortcut Setup is selected to ”BASS
ENGINE SQ,” you cannot perform the set up.
*6 “Video” can be selected while a video is playing.
*7 The camera names are not displayed when Camera Select (page 46) is
set to “Off.”
1Select the desired item.
2To switch the setting, touch [ ], [ ], [ ], [ ], or mark the
checkboxes “Off” ( ) or “On” ( ).
• If “ ” appears, there is a further hierarchy. Touch the desired
item.
3Touch [ ] to return to the main source screen.
• To return to the previous List screen, touch [ ] or [ ] in the
previous page. For details, see “About Basic Operation for List
Screen” (page 18).
Sound Setup
[Sound] is selected on the General Setup Menu screen in step 1. See
“General Setup” (page 32).
You can set up items related to the sound quality.
Set Balance/Fader/Rear Speaker/Subwoofer/Subwoofer Level/
Subwoofer Phase in the Bal./Fad. screen.
Setting item:
Balance*1 / Fader*1 / Rear Speaker / Subwoofer*2 / Subwoofer Level*1, 2 /
Subwoofer Phase*1
*1 When selecting either of the above setting items, the Bal./Fad. screen is
displayed.
*2 When the Sound Setup of the Shortcut Setup is selected to “BASS
ENGINE SQ,” you cannot perform the set up.
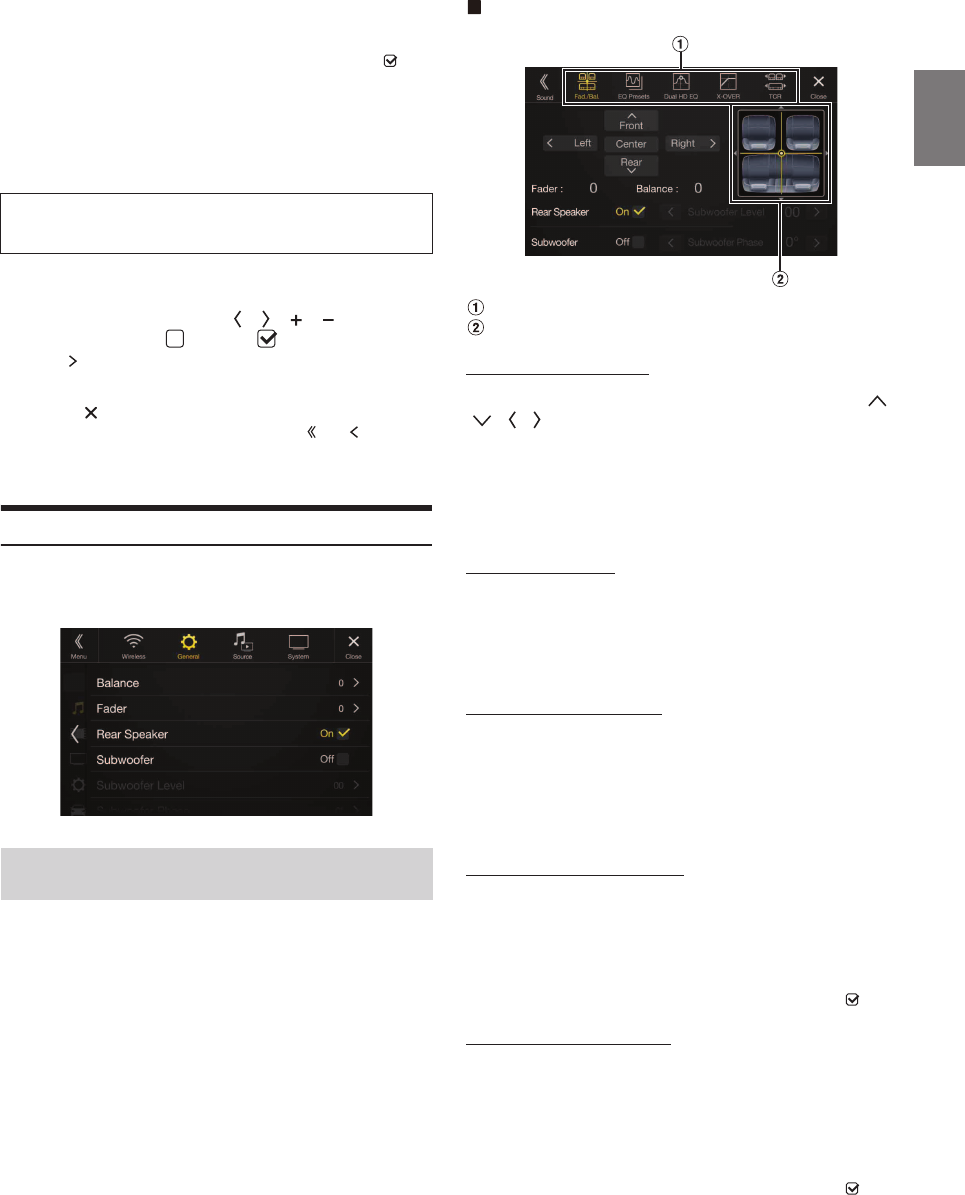
Fad./Bal. screen
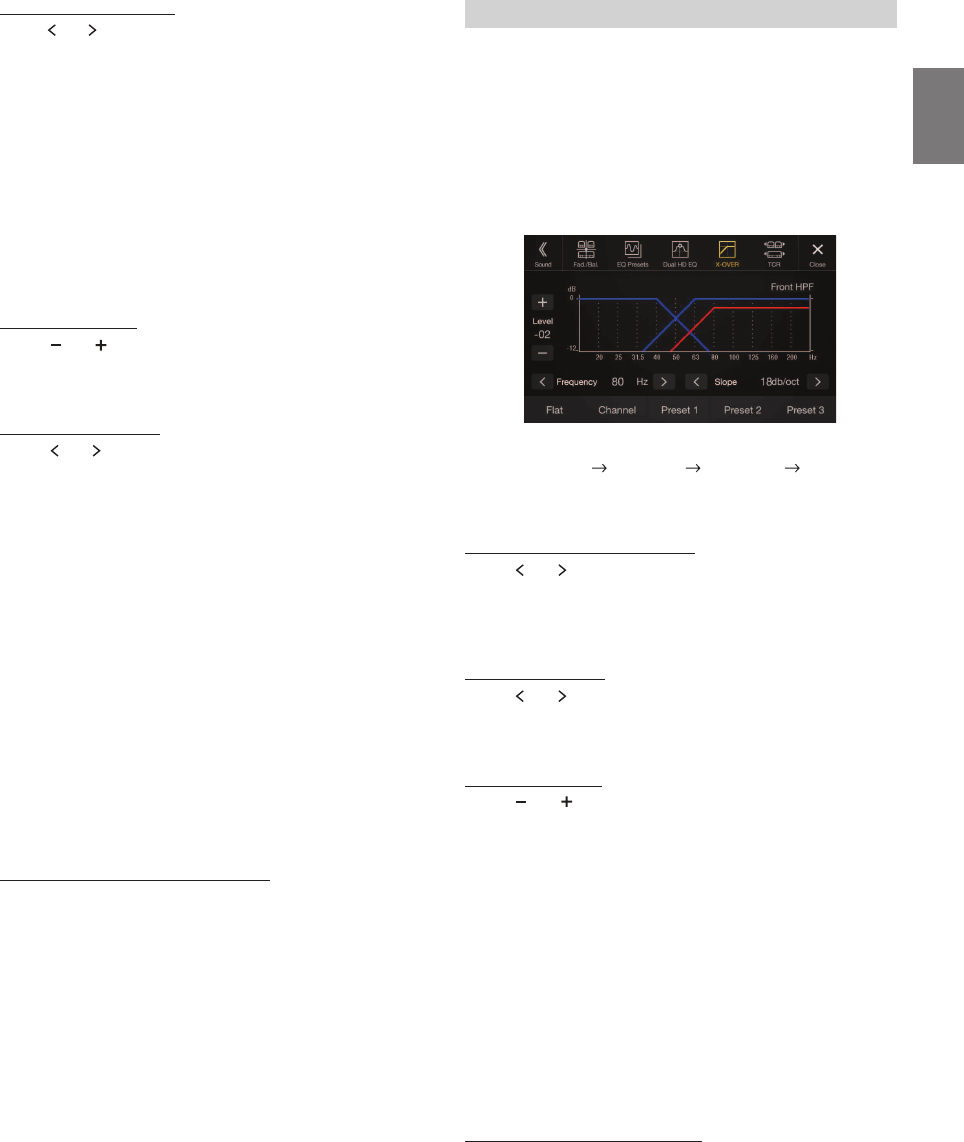
Enables you to change to each setting screen.
Balance/Fader Image area
Setting the Balance/Fader
Touch the desired point within the image area. Or touch [ ]
[ ] [ ] [ ].
Balance:
L15 to R15
Fader:
F15 to R15
• To reset to the initial setting (Balance: 0, Fader: 0), touch [Center].
Rear Speaker Setting
You can set the rear speaker output to “Off.”
Setting item:
Rear Speaker
Setting contents:
On (Initial setting) / Off
Turning Subwoofer ON/OFF
If an optional subwoofer is connected to the unit, make the following
setting.
Setting item:
Subwoofer
Setting contents:
On / Off (Initial setting)
Adjusting the Subwoofer Level
You can set the Subwoofer level when a Subwoofer is connected.
Setting item:
Subwoofer Level
Setting contents:
0 to 15 (Initial setting: 0)
• This setting is only available when “Subwoofer” is set to “On” ( ).
Setting the Subwoofer Phase
The subwoofer output phase is toggled Subwoofer Normal (0°) or
Subwoofer Reverse (180°).
Setting item:
Subwoofer Phase
Setting contents:
0° (Initial setting) / 180°
• This setting is only available when “Subwoofer” is set to “On” ( ).
The following steps 1 to 3 are common to each “Setting
item” of General Setup. See each section for details.
Setting the Balance/Fader/Rear Speaker/
Subwoofer
34-EN
Media Xpander (MX HD) makes vocals or instruments sound distinct
regardless of the music source. The HD-Radio (FM)/SiriusXM, USB
Flash drive and iPod/iPhone, will be able to reproduce the music clearly
even in cars with a lot of road noise.
Setting item:
MX HD
• When the Defeat setting is “On,” you cannot perform the set up.
• When the Sound Setup of the Shortcut Setup is selected to “BASS
ENGINE SQ,” you cannot perform the set up.
• The MX HD setting can be performed only when a source is currently
selected.
Adjustable source (media) and setting value
HD-Radio (FM)/SiriusXM: Off (Initial setting) / Level1 / Level2 / Level3
The medium to high frequencies become more clear, and produces
well balanced sound in all the bands.
Compressed Media: Off (Initial setting) / Level1 / Level2 / Level3
This corrects information that was omitted at the time of
compression. This reproduces a well-balanced sound close to the
original.
HDMI/AUX: Off (Initial setting) / Compressed Media / Movie / Music
Choose the MX HD mode (Compressed Media, Movie, or Music) that
corresponds to the media connected.
(Movie)
The dialog portion of the video is reproduced more clearly
(Music)
This disc contains a large quantity of data such as music clip. MX uses
this data to reproduce the sound accurately.
• The effectiveness increases as the MX HD setting value increases Level1
Level2 Level3.
• You can set this for each source.
• iPod/iPhone/USB Audio/Bluetooth Audio/Pandora/Bluetooth Pandora
correspond to Compressed Media.
10 typical equalizer settings are preset at the factory for a variety of
musical source material.
Setting item:
EQ Presets
Setting contents:
FLAT (Initial setting) / POP / ROCK / NEWS / JAZZ / ELECTRONIC /
HIP HOP / EASY LISTENING / COUNTRY / CLASSICAL
• Only one type can be set to ON.
• When Equalizer Presets is set, the linked Dual HD EQ settings are also
changed. We recommend storing Dual HD EQ settings in a Preset in
advance.
• The Equalizer Presets setting can be configured when Defeat is “Off.”
Parametric Equalizer (Dual HD EQ) can adjust the center frequency/Q
Adjustment (bandwidth)/level in the front seats and the rear seats,
respectively.
You can adjust only to the approximate frequency zone, but can then
compensate by performing advanced correction of the sound.
Setting item:
Dual HD EQ
• When the Defeat setting is “On,” you cannot perform the set up.
• When the Sound Setup of the Shortcut Setup is selected to “BASS
ENGINE SQ,” you cannot perform the set up.
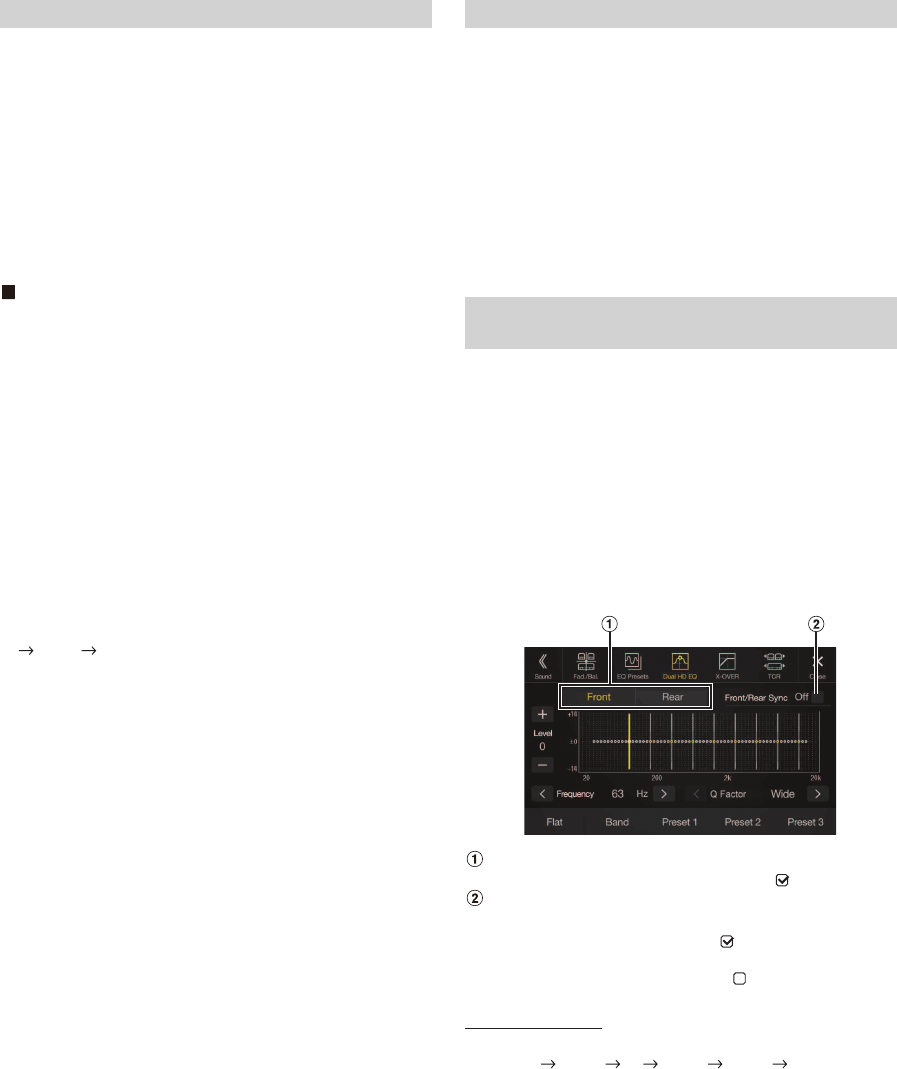
1Adjust the Dual HD EQ to your preference.
Front/Rear speaker switching button
Not displayed when Front/Rear Sync is ”On” ( ).
Front/Rear speaker interlock button
Adjusting the Band
Touch [Band] to select the band to be adjusted.
Band1 Band2 ••• Band8 Band9 Band1
• You can select a band directly by touching the screen.
Setting the Media Xpander (MX HD) Equalizer Presets
Adjusting the Parametric Equalizer Curve
(Dual HD EQ)
On: When you want the Front and Rear speakers to have the
same setting, set to ”On” ( ).
Off: When you want to set the Front and Rear speakers
independently, set to ”Off” ( ).
35-EN
Adjusting the Frequency
Touch [ ] or [ ] of “Frequency” to adjust the frequency of the
selected band.
Adjustable frequency bands:
20 Hz to 20 kHz (in 1/3 octave steps)
Adjusting the Level
Touch [ ] or [ ] of “Level” to adjust the level of selected band.
Setting contents:
-14 to +14 (Initial setting: 0)
Setting the Bandwidth
Touch [ ] or [ ] of “Q Factor” to select the bandwidth.
Setting contents:
Wide (Initial setting) / Medium / Narrow
2To adjust another band, repeat step 1, and adjust all
bands.
3To store the adjusted setting value, touch and hold
[Preset 1], [Preset 2], or [Preset 3] for at least 2 seconds.
• Band2 and Band8 are the same as the Bass and Treble controls.
• For details on setting Bass and Treble, see “Adjusting Bass Level/Treble
Level” (page 20).
• Settings exceeding the frequency of adjacent bands are not available.
• While adjusting the Dual HD EQ, you should consider the frequency
response of the connected speakers.
• When the Dual HD EQ is adjusted, the Equalizer Presets are
overridden.
• When Equalizer Presets is set, the linked Dual HD EQ settings are also
changed. We recommend storing Dual HD EQ settings in a Preset in
advance.
• Touch [Flat] to initialize all values.
Calling the Dual HD EQ adjusted value
Calling the pre-set Dual HD EQ adjusted value.
Touch [Preset 1], [Preset 2], or [Preset 3] on the Dual HD EQ
screen.
The setting stored in the Preset will be recalled.
Before performing the following procedures, see “About the Crossover”
(page 37).
Setting item:
X-Over
• When the Sound Setup of the Shortcut Setup is selected to “BASS
ENGINE SQ,” you cannot perform the set up.
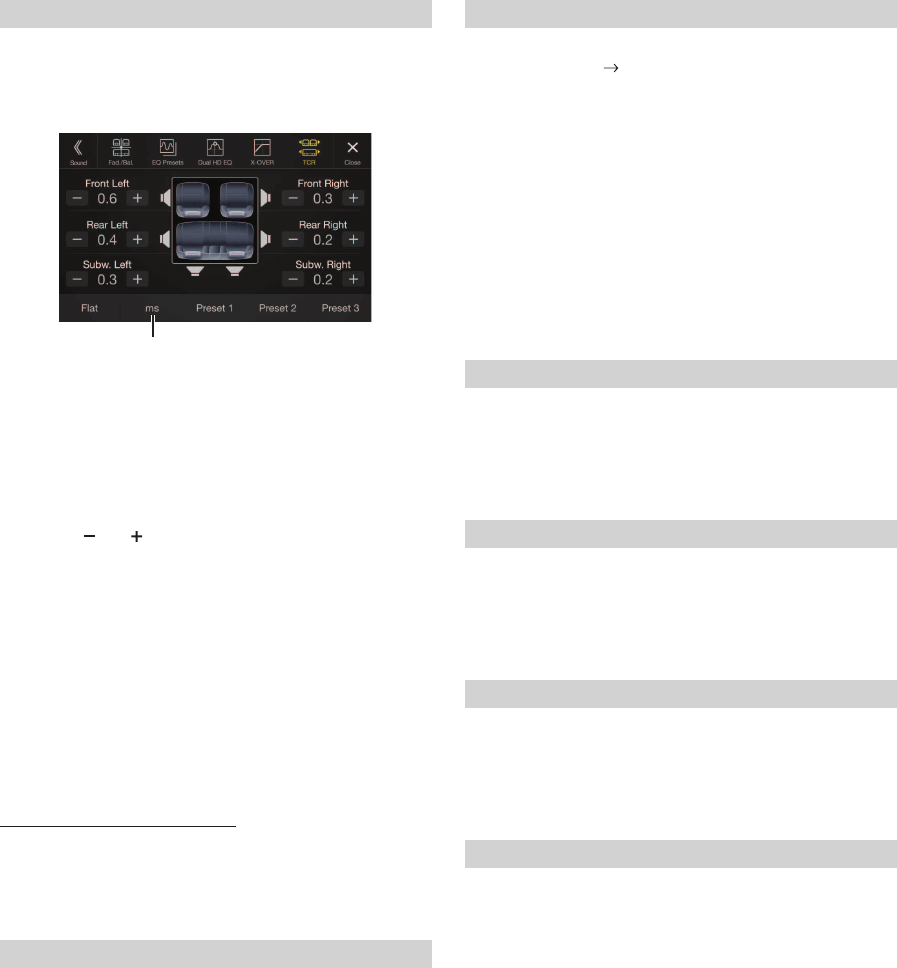
1Touch [Channel] to select the channel.
Each time you touch, the channel switches.
• The channel being adjusted is displayed in red.
2Adjust the crossover to your preference.
Selecting the Cut-Off Frequency
Touch [ ] or [ ] of “Frequency,” and then select the cut-off
frequency.
Setting contents:
20 / 25 / 31.5 / 40 / 50 / 63 / 80 (Initial setting) / 100 / 125 / 160 / 200 Hz
Adjusting the Slope
Touch [ ] or [ ] of “Slope,” and then adjust the HPF or LPF slope.
Setting contents:
0 (Initial setting) / 6 / 12 / 18 / 24 dB/oct.
Adjusting the Level
Touch [ ] or [ ] of “Level,” and then adjust the HPF or LPF level.
Setting contents:
-12 to 0 dB (Initial setting: 0)
3Repeat steps 1 to 2 to make adjustment to the other
channels.
4To store the adjusted setting value, touch and hold
[Preset 1], [Preset 2], or [Preset 3] for at least 2 seconds.
• Touch [Flat] to initialize all values.
• If the Rear Speaker setting is “Off,” the Rear Speaker setting cannot be
edited (page 33).
• If the Subwoofer setting is “Off,” the Subwoofer setting cannot be edited
(page 33).
• While adjusting the X-Over you should consider the frequency response
of the connected speakers.
Calling the X-Over adjusted value
Calling the pre-set X-Over adjusted value.
Touch [Preset 1], [Preset 2], or [Preset 3] on the X-Over
screen.
The setting stored in the Preset will be recalled.
Band1: 20 Hz~100 Hz (63 Hz)
Band2: 63 Hz~315 Hz (125 Hz)
Band3: 125 Hz~500 Hz (250 Hz)
Band4: 250 Hz~1 kHz (500 Hz)
Band5: 500 Hz~2 kHz (1 kHz)
Band6: 1 kHz~4 kHz (2 kHz)
Band7: 2 kHz~7.2 kHz (4 kHz)
Band8: 5.8 kHz~12 kHz (8 kHz)
Band9: 9 kHz~20 kHz (16 kHz)
Adjusting the Crossover Settings (X-Over)
Front HPF Rear HPF Subw. LPF Front HPF
36-EN
Before performing the following procedures, see “About Time
Correction” (page 38).
Setting item:
Time Correction
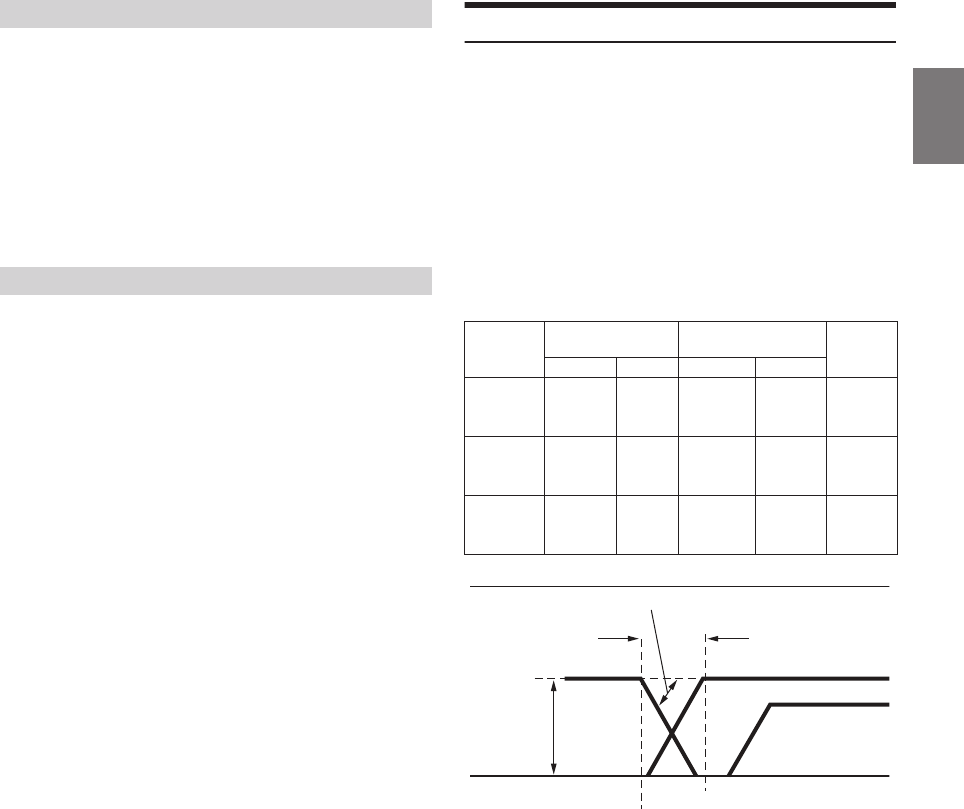
1Touch the Correction mode button.
The pop up screen for selecting the correction mode is
displayed.
2Touch [ms], [cm] or [inch] to select the mode for making
adjustments.
The selected mode is displayed on the Correction mode button.
3Touch [ ] or [ ] for each speaker to adjust the time or
distance.
0.0 msec to 9.9 msec (0.1 msec/step)
0.0 cm (0.0 inch) to 336.6 cm (132.7 inch) (3.4 cm/step)
All speaker setting values are adjustable in the range of 15 ms or 510
cm.
4To store the adjusted setting value, touch and hold
[Preset 1], [Preset 2], or [Preset 3] for at least 2 seconds.
• Touch [Flat] to set all values to 0.0.
• If the Rear Speaker setting is “Off,” the Rear Speaker setting cannot be
edited (page 33).
• If the Subwoofer setting is “Off,” the Subwoofer setting cannot be edited
(page 33).
Calling the Time Correction Value
Calling the pre-set time correction value.
Touch [Preset 1], [Preset 2], or [Preset 3] on the time
correction screen.
The setting stored in the Preset will be recalled.
If Defeat is “On,” MX HD, Equalizer Presets and Dual HD EQ functions
are turned Off. This disables any settings made for these functions.
Setting item:
Defeat
Setting contents:
Off (Initial setting) / On
Setting item:
Source Volume Setup Radio / SiriusXM*1 / Compressed Media*2 /
iPod Music / iPod Video or AUX*3, 4 / HDMI*4, 5 / Bluetooth Audio /
Factory Audio*6
Setting contents:
-14 to +14 (Initial setting: 0)
*1 Not displayed when a SiriusXM Tuner is not connected.
*2 Compressed Media is the music data in a USB flash drive (MP3/
WMA/AAC/FLAC).
*3 The item selected in AUX Source Select (iPod Video or AUX) is
displayed. For details, see “Setting the AUX Mode” (page 44).
*4 The source name set in “HDMI Setup” (page 45) and “Setting the
Auxiliary (AUX) Name” (page 45) is displayed.
*5 Not displayed when an HDMI device is not connected.
*6 Not displayed when an iDataLink module is not connected.
• Settable source differs depending on the connected device and settings.
You can adjust the volume of the incoming call.
Setting item:
Caller Level
Setting contents:
1 to 11 (Initial setting: 5)
You can adjust the transmit volume, during the call.
Setting item:
Microphone Level
Setting contents:
1 to 11 (Initial setting: 5)
You can adjust the receive volume, during the call.
Setting item:
Ring Tone Level
Setting contents:
1 to 6 (Initial setting: 3)
You can change the volume of the sound heard when a button is
touched.
Setting item:
Key Sound Feedback
Setting contents:
0 to 6 (Initial setting: 3)
Adjusting the Time Correction (TCR)
Setting Defeat
Correction mode
Setting the Volume for Each Source
Adjusting the Caller Level
Adjusting the Microphone Level
Adjusting the Ring Tone Level
Volume Setting
37-EN
The sound can be muted when the shift gear lever is set to the reverse
(R) position enabling you to easily hear sensors, etc., while reversing
your car.
Setting item:
Mute While Backing Up
Setting contents:
Off / On (Initial setting)
You can restore the Dual HD EQ*/X-Over*/Time Correction*/MX HD
Level/Rear Speaker/Subwoofer/Subwoofer Level/Subwoofer Phase to
factory settings.
Setting item:
Default Sound Settings
Touch [Set], and the confirmation message appears.
To initialize, touch [OK].
*The setting values that are stored in Preset 1 to Preset 3 cannot be
initialized.
About the Crossover
Crossover (X-Over):
This unit is equipped with an active crossover. The crossover limits the
frequencies delivered to the outputs. Each channel is controlled
independently. Thus, each speaker pair can be driven by the frequencies
for which they have been optimally designed.
The crossover adjusts the HPF (high pass filter) or LPF (low pass filter)
of each band, and also the slope (how fast the filter rolls off the highs or
lows).
Adjustments should be made according to the reproduction
characteristics of the speakers. Depending on the speakers, a passive
network may not be necessary. If you are unsure about this point, please
consult your authorized Alpine dealer.
• HPF (high pass filter): Cuts the lower frequencies and allows the higher
frequencies to pass.
• LPF (low pass filter): Cuts the higher frequencies and allows the lower
frequencies to pass.
• Slope: The level change (in dB) for a frequency change of one octave.
• The higher the slope value, the steeper the slope becomes.
• Adjust the slope to FLAT to bypass the HP or LP filters.
• Do not use a tweeter without the HPF on or set to a low frequency, as it
may cause damage to the speaker due to the low frequency content.
• Adjustment should be made according to the recommended crossover
frequency of the connected speakers. Determine the recommended
crossover frequency of the speakers. Adjusting to a frequency range
outside that recommended may cause damage to the speakers.
For the recommended crossover frequencies of Alpine speakers, refer to
the respective Owner’s Manual.
We are not responsible for damage or malfunction of speakers caused by
using the crossover outside the recommended value.
Setting Audio Mute On/Off while Backing up
Off: Does not mute.
On: Mutes when the shift gear lever is set to the reverse (R)
position.
Default Sound Settings
Cut-off frequency
(1/3 octave steps) Slope Level
HPF LPF HPF LPF
Subwoofer
(LPF) ---- 20 Hz -
200 Hz ----
FLAT, –6,
–12, –18,
–24 dB/oct.
0 to
–12 dB
Rear
speaker
(HPF)
20 Hz -
200 Hz ----
FLAT, –6,
–12, –18,
–24 dB/oct.
---- 0 to
–12 dB
Front
speaker
(HPF)
20 Hz -
200 Hz ----
FLAT, –6,
–12, –18,
–24 dB/oct.
---- 0 to
–12 dB
Level
adjusting
(0 to –12 dB)
Output frequency
range Output frequency range
Slope adjusting
20 Hz
(Different from actual
display) LPF cut-off
frequency
HPF cut-off
frequency
Low range High range
Slope
FLAT
Subwoofer Rear speaker
Front speaker
200 Hz
38-EN
About Time Correction
The distance between the listener and the speakers in a car vary widely
due to the complex speaker placement. This difference in the distances
from the speakers to the listener creates a shift in the sounds image and
frequency characteristics. This is caused by the time delay between the
sound reaching the listener’s right versus the left ear.
To correct this, this unit is able to delay the audio signal to the speakers
closest to the listener. This effectively creates a perception of increased
distance for those speakers. The listener can be placed at an equal
distance between the left and right speakers for optimum staging.
The adjustment will be made for each speaker in 3.4 cm steps.
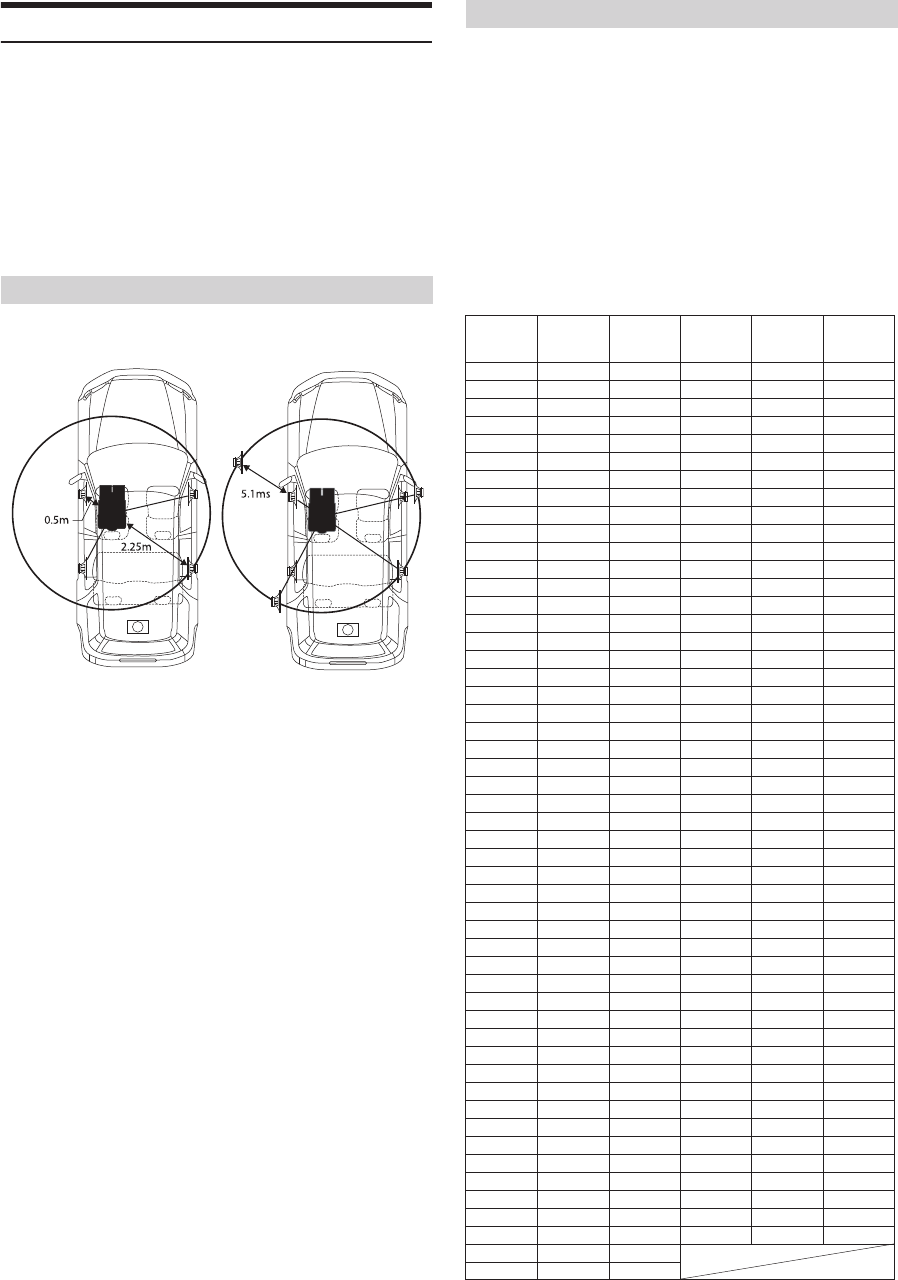
Adjust the time correction level of the front left speaker to a high value
and the rear right to zero or a low value.
The sound is not balanced because the distance between the listening
position and the various speakers is different.
The difference in distance between the front left speaker and the rear right
speaker is 1.75 m (68-7/8").
Here we calculate the time correction value for the front left speaker in the
diagram on the above.
Conditions:
Farthest Speaker – listening position : 2.25 m (88-9/16")
Front left speaker – listening position : 0.5 m (19-11/16")
Calculation: L = 2.25 m – 0.5 m = 1.75 m (68-7/8")
Time correction = 1.75 ÷ 343* × 1,000 = 5.1 (ms)
*Speed of sound: 343 m/s (765 mph) at 20°C
In other words, giving the front left speaker a time correction value of 5.1
ms makes it seem as if its distance from the listener is the same as the
distance to the farthest speaker.
Time correction eliminates the differences in the time required for the
sound to reach the listening position.
The time of the front left speaker is corrected by 5.1 ms so that its sound
reaches the listening position at the same time as the sound of other
speakers.
Adjust the time correction level of each speaker to almost the same level.
1Sit in the listening position (driver’s seat, etc.) and
measure the distance (in meters) between your head and
the various speakers.
2Calculate the difference between the distance correction
value to the farthest speaker and the other speakers.
L = (distance to farthest speaker) – (distance to other speakers)
These values are the time correction values for the different speakers.
Setting these values to make each sound reach the listening position
at the same time as the sound of other speakers.
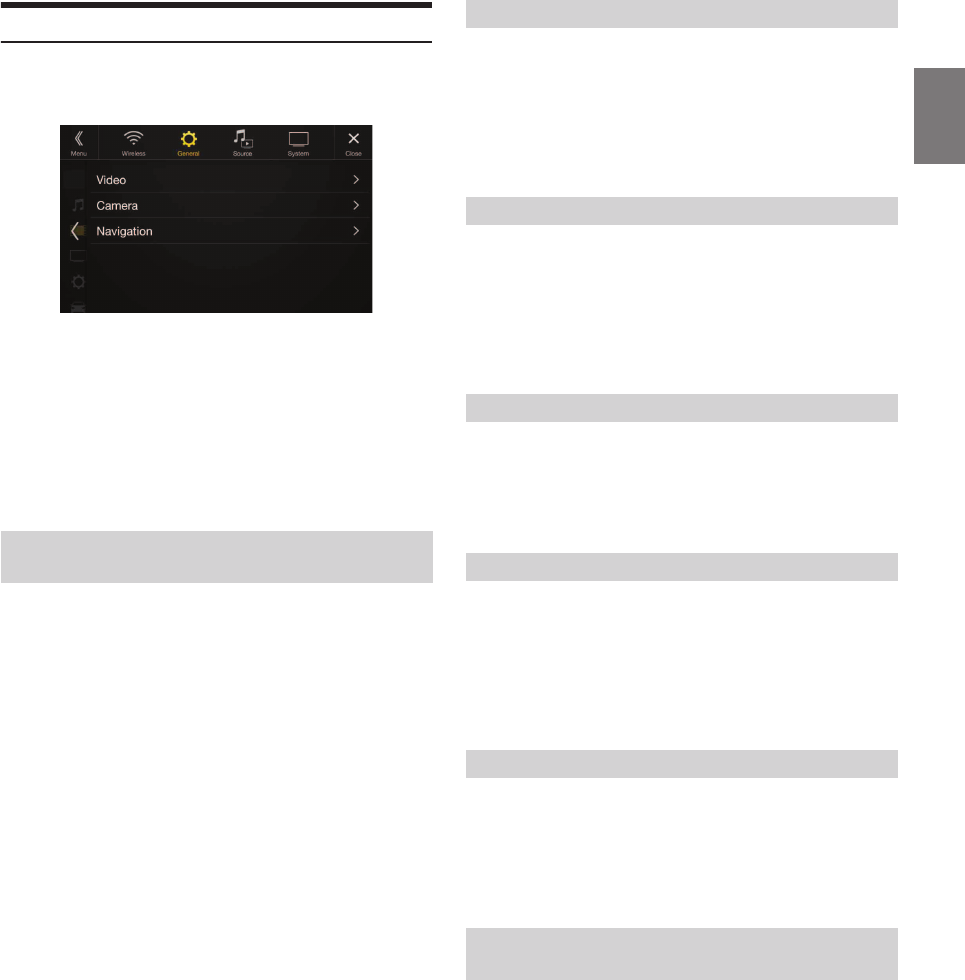
Time Correction Value List
Example 1. Listening Position: Front Left Seat
Example 2. Listening Position: All Seats
Time
Difference
(msec)
Distance
(cm)
Distance
(inch)
Time
Difference
(msec)
Distance
(cm)
Distance
(inch)
0.0 0.0 0.0 5.1 173.4 68.3
0.1 3.4 1.3 5.2 176.8 69.7
0.2 6.8 2.7 5.3 180.2 71.0
0.3 10.2 4.0 5.4 183.6 72.4
0.4 13.6 5.4 5.5 187.0 73.7
0.5 17.0 6.7 5.6 190.4 75.0
0.6 20.4 8.0 5.7 193.8 76.4
0.7 23.8 9.4 5.8 197.2 77.7
0.8 27.2 10.7 5.9 200.6 79.1
0.9 30.6 12.1 6.0 204.0 80.4
1.0 34.0 13.4 6.1 207.4 81.7
1.1 37.4 14.7 6.2 210.8 83.1
1.2 40.8 16.1 6.3 214.2 84.4
1.3 44.2 17.4 6.4 217.6 85.8
1.4 47.6 18.8 6.5 221.0 87.1
1.5 51.0 20.1 6.6 224.4 88.4
1.6 54.4 21.4 6.7 227.8 89.8
1.7 57.8 22.8 6.8 231.2 91.1
1.8 61.2 24.1 6.9 234.6 92.5
1.9 64.6 25.5 7.0 238.0 93.8
2.0 68.0 26.8 7.1 241.4 95.1
2.1 71.4 28.1 7.2 244.8 96.5
2.2 74.8 29.5 7.3 248.2 97.8
2.3 78.2 30.8 7.4 251.6 99.2
2.4 81.6 32.2 7.5 255.0 100.5
2.5 85.0 33.5 7.6 258.4 101.8
2.6 88.4 34.8 7.7 261.8 103.2
2.7 91.8 36.2 7.8 265.2 104.5
2.8 95.2 37.5 7.9 268.6 105.9
2.9 98.6 38.9 8.0 272.0 107.2
3.0 102.0 40.2 8.1 275.4 108.5
3.1 105.4 41.5 8.2 278.8 109.9
3.2 108.8 42.9 8.3 282.2 111.2
3.3 112.2 44.2 8.4 285.6 112.6
3.4 115.6 45.6 8.5 289.0 113.9
3.5 119.0 46.9 8.6 292.4 115.2
3.6 122.4 48.2 8.7 295.8 116.6
3.7 125.8 49.6 8.8 299.2 117.9
3.8 129.2 50.9 8.9 302.6 119.3
3.9 132.6 52.3 9.0 306.0 120.6
4.0 136.0 53.6 9.1 309.4 121.9
4.1 139.4 54.9 9.2 312.8 123.3
4.2 142.8 56.3 9.3 316.2 124.6
4.3 146.2 57.6 9.4 319.6 126.0
4.4 149.6 59.0 9.5 323.0 127.3
4.5 153.0 60.3 9.6 326.4 128.6
4.6 156.4 61.6 9.7 329.8 130.0
4.7 159.8 63.0 9.8 333.2 131.3
4.8 163.2 64.3 9.9 336.6 132.7
4.9 166.6 65.7
5.0 170.0 67.0
39-EN
Picture Quality. Setup
[Picture Quality.] is selected on the General Setup Menu screen in step
1. See “General Setup” (page 32).
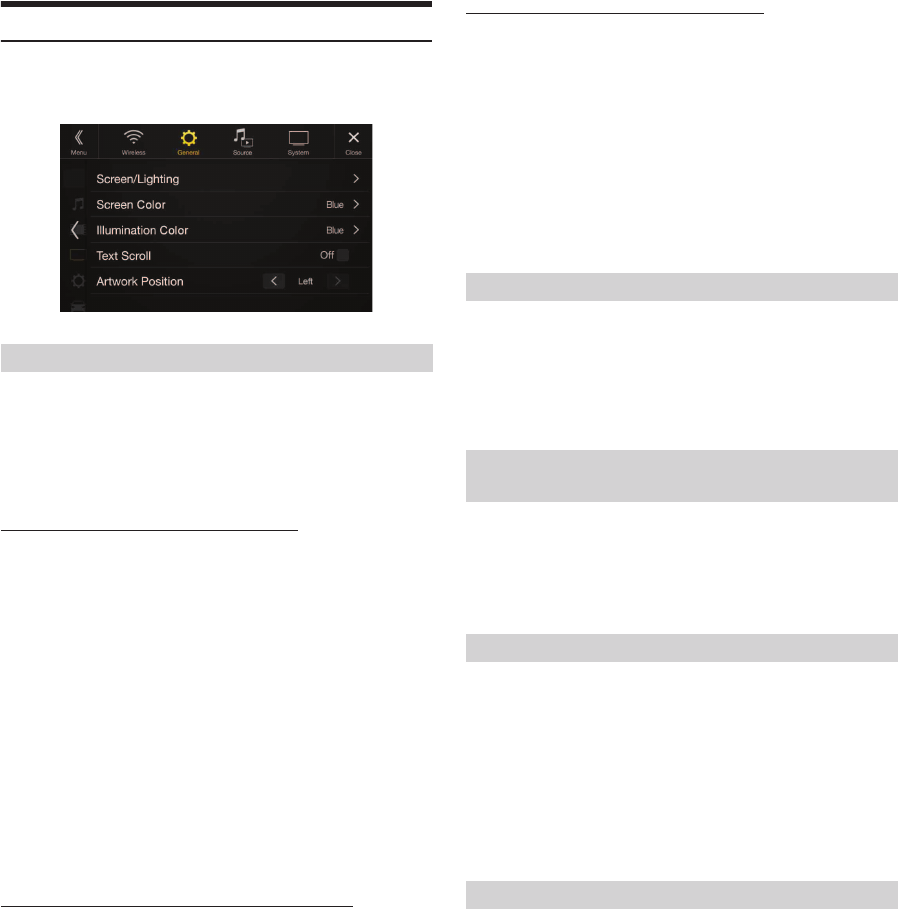
You can set up items related to an image.
Settable items differ depending on the application.
[Video] (Video media)*1:
Visual EQ / Brightness / Color / Tint / Contrast / Sharpness
[Camera]*2:
Brightness / Color / Contrast
[Navigation]:
Brightness / Contrast
*1 “Video” can be selected while a video is playing.
*2 The camera names are not displayed when “Off ” is set (page 46).
You can select a mode suitable for the subject image.
Setting item:
Visual EQ
Setting contents:
Off (Initial setting) / Night / Soft / Sharp / Contrast
• To return to the default video settings, set this function to Off. Any
Visual EQ selection or changes made are reset their initial settings.
Setting item:
Brightness
Setting content:
-15 to +15 (Initial setting: 0)
You can adjust the brightness between MIN (-15) and MAX (+15).
When it reaches the minimum or maximum point, the display shows
“MIN” or “MAX” respectively.
Setting item:
Color
Setting content:
-15 to +15 (Initial setting: 0)
You can adjust the color between MIN (-15) and MAX (+15). When it
reaches the minimum or maximum point, the display shows “MIN” or
“MAX” respectively.
Setting item:
Tint
Setting content:
R15 to G15 (Initial setting: 0)
Adjust the Color from R15 to G15.
Setting item:
Contrast
Setting content:
-15 to +15 (Initial setting: 0)
You can adjust the contrast between MIN (-15) and MAX (+15). When
it reaches the minimum or maximum point, the display shows “LOW”
or “HIGH” respectively.
Setting item:
Sharpness
Setting content:
-5 to +5 (Initial setting: 0)
Picture quality adjustment range is -5 to +5. “SOFT” and “HARD”
appear as the minimum and maximum values specified.
When adjusting audio (video media), you can store the settings made for
“Adjusting Brightness, Color, Tint, Contrast and Sharpness.”
Setting item:
Preset 1 / Preset 2
1After completing “Adjusting Brightness, Color, Tint,
Contrast and Sharpness” (page 39), touch and hold
[Preset 1] or [Preset 2] to save the settings.
2Touch [Preset 1] or [Preset 2] to call the saved settings.
Selecting the Visual EQ Mode
(Factory’s setting)
Off: Initial Setting
Night: Suitable for movies in which dark scenes frequently
appear.
Soft: Suitable for CGs and animated films.
Sharp: Suitable for old movies where images are not clearly
shown.
Contrast: Suitable for recent movies.
Adjusting Brightness
Adjusting Color of Picture
Adjusting Tint of Picture
Adjusting Image Contrast
Adjusting Picture Quality
Saving and calling the adjusted picture
quality
40-EN
Display/Key Setup
[Display/Key] is selected on the General Setup Menu screen in step 2.
See “General Setup” (page 32).
You can set up the brightness, color, display, etc., of the screen.
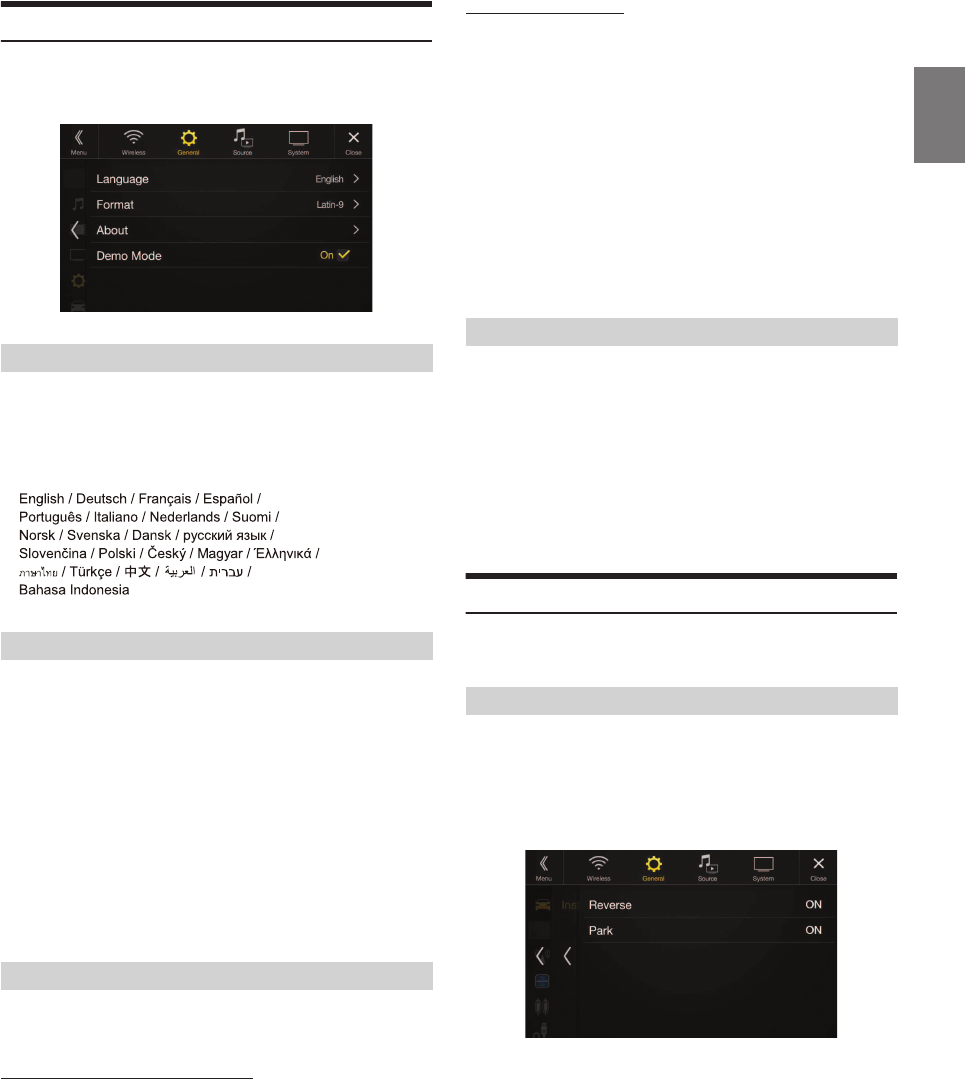
1Touch [Screen/Lighting] in the Display/Key Setup Menu
screen.
The Screen/Lighting setup screen appears.
Setting item:
Dimmer / Key Illumination Level / Screen Dimmer Level
Setting the Brightness of the Backlighting
Backlighting is provided by LEDs light built into the liquid crystal panel.
The illumination control adjusts the brightness of the backlighting based
on the car ambient lighting for easier viewing.
Setting item:
Dimmer
Setting contents:
Auto (Initial setting) / On / Off
• When “On” is set, the setting is also applied for the button lighting in
“Adjusting the Dimmer of Button Lighting at Night” (page 40), and
“Adjusting the Minimum Level of Backlight” (page 40).
Adjusting the Dimmer of Button Lighting at Night
You can adjust the brightness of the button lighting at night with the
dimmer.
Setting item:
Key Illumination Level
Setting level:
-2 to +2 (Initial setting: 0)
• This setting is only available when “Dimmer” is set to “On.”
Adjusting the Minimum Level of Backlight
You can adjust the brightness of the backlight. This function could be
used, for instance, to change the screen brightness while traveling at
night.
Setting item:
Screen Dimmer Level
Setting content:
-15 to +15 (Initial setting: 0)
You can adjust the level between MIN (-15) and MAX (+15). When it
reaches the minimum or maximum point, the display shows “MIN” or
“MAX” respectively.
• This setting is only available when “Dimmer” is set to “On.”
You can choose from 8 different display colors.
Setting item:
Screen Color
Setting contents:
Blue (Initial setting) / Light Blue / Aqua / Red / Green / Amber / Yellow /
White
You can choose the color of the Front Panel button from one of 7 colors.
Setting item:
Illumination Color
Setting contents:
Blue (Initial setting) / Light Blue / Aqua / Red / Green / Amber / Yellow
Scroll display is available if folder name, file name or tag information is
entered.
Setting item:
Text Scroll
Setting contents:
Off (Initial setting) / On
You can set the artwork position to the center or the left.
Setting item:
Artwork Position
Setting contents:
Center / Left (Initial setting)
Screen/Lighting Customize
Auto: Adjust the brightness of the background illumination of
the monitor automatically to the brightness of the car
interior.
On: Keep the background illumination of the monitor dark.
Off: Deactivate Auto Dimmer mode to keep the background
illumination of the monitor bright.
Switching the Display Color
Switching the Illumination Color (X108U/INE-
W967HD only)
Setting the Text Scroll
Off: Turns off the scroll mode.
On: Turns on the Auto scroll mode. Scroll display is repeated
as long as the mode is turned on.
Switching the Artwork Position
41-EN
General Setup
[General] is selected on the General Setup Menu screen in step 1. See
“General Setup” (page 32).
You can set up items related to the language, etc.
The Setup menu, feedback information, etc. for this unit can be changed
to appear in the selected language.
Setting item:
Language
Setting contents:
The character code to be used for tag text information displayed on the
screen can be selected from 7 character codes.
Setting item:
Format
Setting contents:
Latin-1 / Latin-9 (Initial setting) / Russian / Chinese / Thai / Arabic / Hebrew
[About] enables you to check the Serial No., Firmware Version, Model
Name, and to initialize various settings.
Displaying the Product Information
You can view the version information of this product. Make note of this
information and refer to it whenever you contact Alpine Tech Support
or an Alpine-authorized dealer.
Setting contents:
Serial No. / Firmware Version / Model Name
Initializing the System
You can initialize all data, to restore the factory settings. Remove the
USB flash drive, etc. from the system before operation
Setting item:
Clear All Settings
1Touch [Reset] of “Clear All Settings.”
2After the confirmation message appears, touch [OK].
The confirmation screen appears again.
3Touch [OK].
The system starts initialization.
• Do not turn on/off the power, change the ignition key position or
remove the screen panel until system restart is completed.
This unit has a Demonstration feature for the display. When you install
and use the unit for the first time, the unit will enter demo mode
automatically. To quit demo mode, set Demo mode to Off.
Setting item:
Demo mode
Setting contents:
Off / On (Initial setting)
• If you perform an operation during the Demo mode, the demonstration
is temporarily stopped.
Vehicle Setup
[Vehicle] is selected on the General Setup Menu screen in step 1. See
“General Setup” (page 32).
Vehicle Setup enables you to check the connection status of Reverse
Lead/Parking Brake Lead.
Setting item:
Installation Status
The Installation check screen is displayed.
Setting the Menu Language
Format settings
Latin-1: ISO 8859-1
Latin-9: ISO 8859-15
Russian: ISO 8859-5
Chinese: GB18030-2005
Thai: CP874
Arabic: CP1256
Hebrew: CP1255
About X110/X108U/INE-W967HD
Setting Demo mode to Off/On
Installation Setup
42-EN
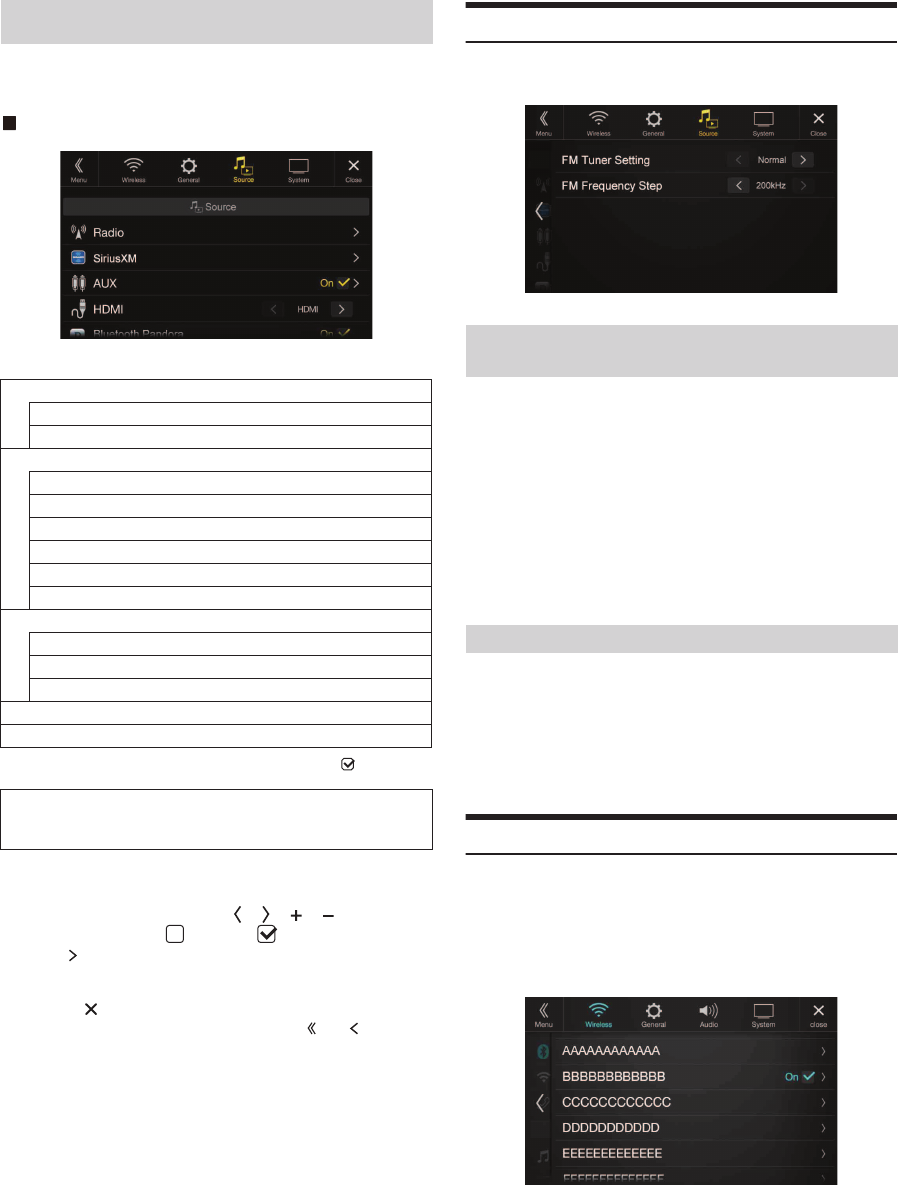
[Source] is selected on the Setup main screen in step 3. See “Setup
Operation” (page 29).
Source Setup Menu screen
<Setting items>
*This setting is only available when “AUX” is set to “On” ( ).
1Select the desired item.
2To switch the setting, touch [ ], [ ], [ ], [ ], or mark the
checkboxes “Off” ( ) or “On” ( ).
• If “ ” appears, there is a further hierarchy. Touch the desired
item.
3Touch [ ] to return to the main source screen.
• To return to the previous List screen, touch [ ] or [ ] in the
previous page. For details, see “About Basic Operation for List
Screen” (page 18).
Radio Setup
[Radio] is selected on the Source Setup Menu screen in step 1. See
“Source Setup” (page 42).
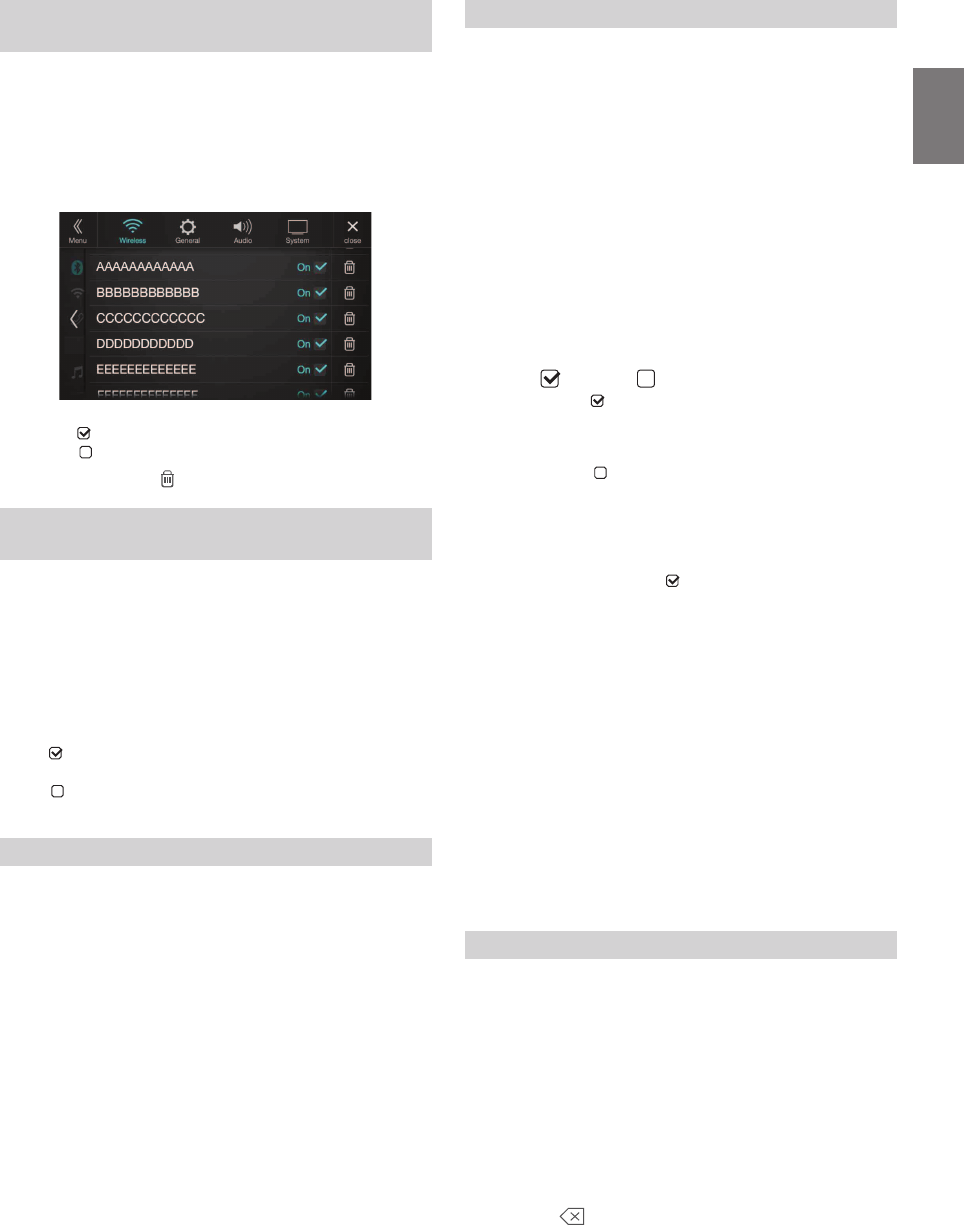
This unit can set your preferred tone quality for FM radio source.
Setting item:
FM Tuner Setting
Setting contents:
Normal (Initial setting) / HiFi / Stable
• Noise may be more noticeable when HiFi is set, depending on the
reception status. In this case, the Normal setting is recommended.
During manual tuning, you can select the frequency step for FM analog
radio station searching.
Setting item:
FM Frequency Step
Setting contents:
200kHz (Initial setting) / 100kHz
SiriusXM Setup
[SiriusXM] is selected on the Source Setup Menu screen in step 1. See
“Source Setup” (page @@).
The following operations can be performed to manage the stored Songs,
Artists and Sports Teams information. (To learn about how to store the
information, see “Storing the desired Song/Artist” on page @@ and
“Setting the Favorite Sports Team Alerts” on page @@.)
Source Setup
Radio
FM Tuner Setting
FM Frequency Step
SiriusXM
Alert Setup
Alert
Alert Delete All
Favorite Team Setup
Parent Lock
Signal Indicator
AUX
AUX Source Select*
AUX Name*
Signal*
HDMI
Bluetooth Pandora
The following steps 1 to 3 are common to each “Setting
item” of Source Setup. See each section for details.
Setting the TUNER (FM) Tone Quality (Tuner
Condition)
Normal: Standard setting
HiFi: High-quality setting
Stable: Control noise
Setting the TUNER (FM) Frequency Step
43-EN
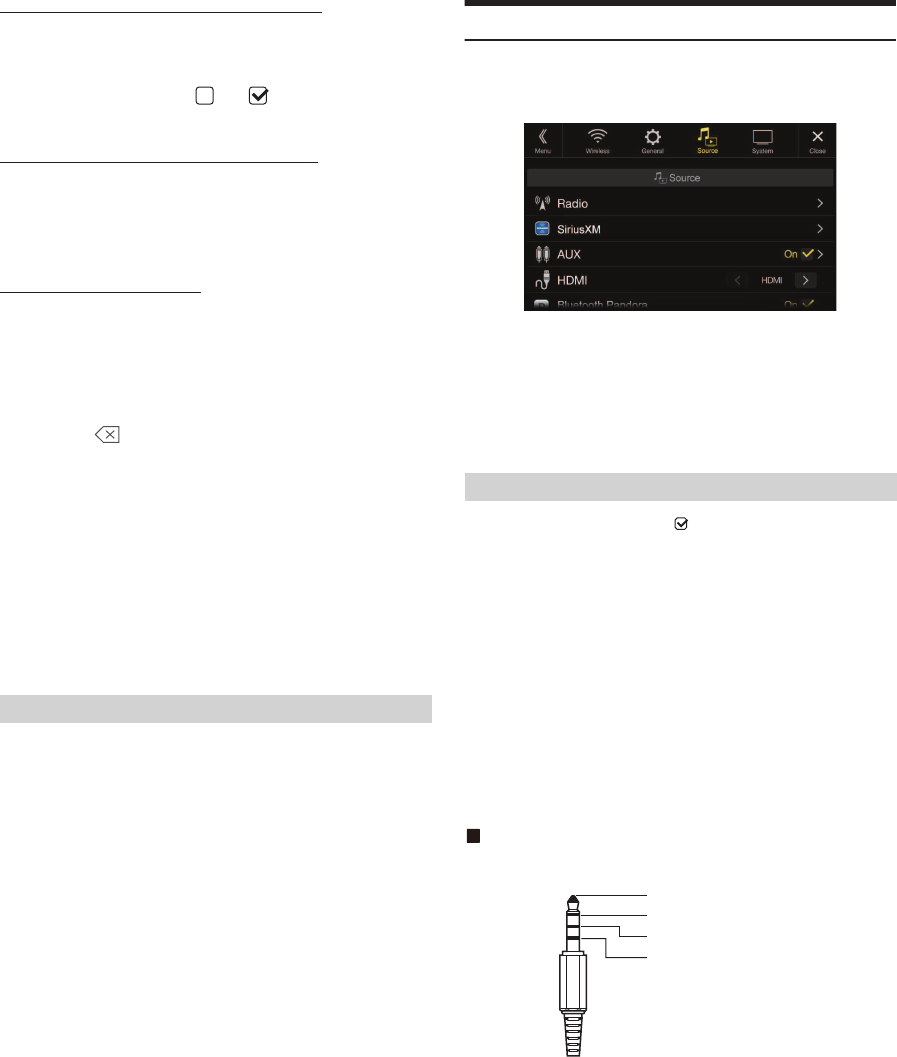
This menu option allows you to enable the Artist/Song/Team alert for
individual Artists/Songs/Teams (On or Off) or to delete individual
stored Artist/Song/Team alerts (Delete).
Setting item:
Alert Setup
Setting contents:
On / Off / Delete
Set to “On” ( ) to enable the alert for the Artist/Song or Team.
Set to “Off” ( ) to disable the alert for the Artist/Song or Team.
• To delete the list, touch [ ] (Delete), and then touch [OK].
This menu option allows you to temporarily disable the Artist/Song/
Game Alerts for all Artists/Songs/Games. When the Alerts are re-
enabled, individual Artist/Song/Game Alert disabled in the Alert List
menu setting remain disabled.
Setting item:
Alert
Setting contents:
On / Off
If “On” ( ) is set, the alert for all stored Artists/Songs/Games is
enabled.
If “Off” ( ) is set, the alerts for all stored Artists/Songs/Games are
disabled.
This operation will delete all alerts (artists, songs and teams) stored in
memory.
Setting item:
Alert Delete All
1Touch [Reset] of “Alert Delete All.”
A message is displayed.
2Touch [OK] to clear the information of all stored Artist,
Song, and Game alert items.
Touch [Cancel] to cancel.
This menu option allows you to select your favorite teams, organized by
leagues, so that you will be alerted later when your favorite teams are
playing on other channels. Once selected, you will be alerted when
games that those teams are playing in can be heard on a SiriusXM
channel.
Setting item:
Favorite Team Setup
Setting contents:
On / Off
1Touch [Favorite Team Setup].
A sports league list is displayed.
2Select the desired league.
The display changes to the team list of the selected league.
3Touch the checkbox of your Favorite Team to set it to
“On” ( ) or “Off” ( ).
• When “On” ( ) is set, scrolling text of the Team name, Total
registrations, and Remaining number of registration slots is
displayed for two seconds, then the team is registered as a Favorite
Team.
When “Off” ( ) is set, the registration of your Favorite Team is
canceled.
• The maximum number of registered Teams, Artists, and Songs is
50. For details on how to register an Artist alert or Song alert, see
“Storing the desired Song/Artist” (page @@).
• If the total number of registered Teams, Artists, and Songs is
already at 50 when “On” ( ) is set, then scrolling text is
displayed, asking whether you want to replace a registered Artist/
Song/Team with the new one. If you want to replace one, go to step
4.
4Touch [OK].
The list of registered Artists/Songs/Teams is displayed.
• If you want to cancel the registration of your Favorite Team, then
touch [Cancel], and return to step 3.
5Touch the Artist, Song, or Team name that you want to
replace.
Scrolling text of the Team name, Total registrations, and
Remaining number of registration slots is displayed for 2
seconds, then the team is registered as a Favorite Team.
• For details on deleting a registered Artist, Song, or Team beforehand, to
secure a registration slot in advance, see “Setting the Alert individually
for an Artist/Song/Sport Team” (page @@).
You can lock out channels with passcode protection. Channels that are
locked cannot be accessed without entering the passcode. You can
unlock a channel or change the passcode using this menu option.
Setting item:
Parental Lock
1Touch [Parental Lock].
A passcode input screen is displayed.
2Touch the numeric keypad to input a 4-digit passcode.
The initial default 4-digit passcode is set to 0000.
After entering the digit, it is displayed as “*” (asterisk).
• Touch [ ] to delete an entered number.
• Touch [Delete All] to delete all entered numbers.
3Touch [Enter].
Setting the Alert individually for an Artist/
Song/Favorite Team
Setting ON/OFF of all Songs/Artists/Games
Alert
Deleting all stored Alert
Setting the Favorite Sports Team Alerts
Setting the Parental Lock
44-EN
Setting the Lock status of individual channels
4Touch [Locked Channels].
The channels list screen is displayed.
5Touch the checkboxes [ ] or [ ] of the channels list to
set the Parent Lock Off/On.
Clearing the Lock of ALL the locked Channels
4Touch [Clear All Locked Channels].
5Touch [OK] to clear the lock of all the locked channels.
Touch [Cancel] to cancel.
Changing the Lock Passcode
4Touch [Edit Code].
The numeric keypad screen is displayed.
5Use the keypad to enter the current (old) 4-digit
passcode.
The initial passcode is set to 0000.
• Touch [ ] to delete an entered number.
• Touch [Delete All] to delete all entered numbers.
6Touch [Enter] to confirm the entry.
7Now use the keypad to enter the new 4-digit passcode.
8Touch [Enter].
9Then use the keypad to enter the new 4-digit passcode a
second time to verify it.
• Remember to keep a note of the passcode in a safe place in case you
forget the code.
While listening to a SiriusXM Channel, the Signal strength of the
current channel will be displayed.
Setting item:
Signal Indicator
This menu item displays the SiriusXM signal strength as Strong, Good,
Weak or No Signal.
• If the Signal Indicator reports Weak or No Signal and your vehicle is
parked outside with no obstructions to the southern sky, then your
SiriusXM antenna may not be properly installed or may have become
damaged.
AUX Setup
[AUX] is selected on the Source Setup Menu screen in step 1. See
“Source Setup” (page 42).
You can set up the items related to the Auxiliary device.
Setting item:
AUX
Setting contents:
Off / On (Initial setting)
Make sure the AUX is set to “On” ( ). See “AUX Setup” (page 44).
Connection with external input devices is available through the AUX
Input connector. An optional adapter cable is required (standard RCA to
3.5ø mini-phono plug or 3.5ø to 3.5ø mini phono plug).
You can also play back video connecting with an optional AV cable
(4-pole mini AV plug to 3-RCA).
Setting item:
AUX Source Select
Setting contents:
iPod Video / AUX (Initial setting)
• When an iPod video is selected or the current source is AUX, this setting
cannot be adjusted.
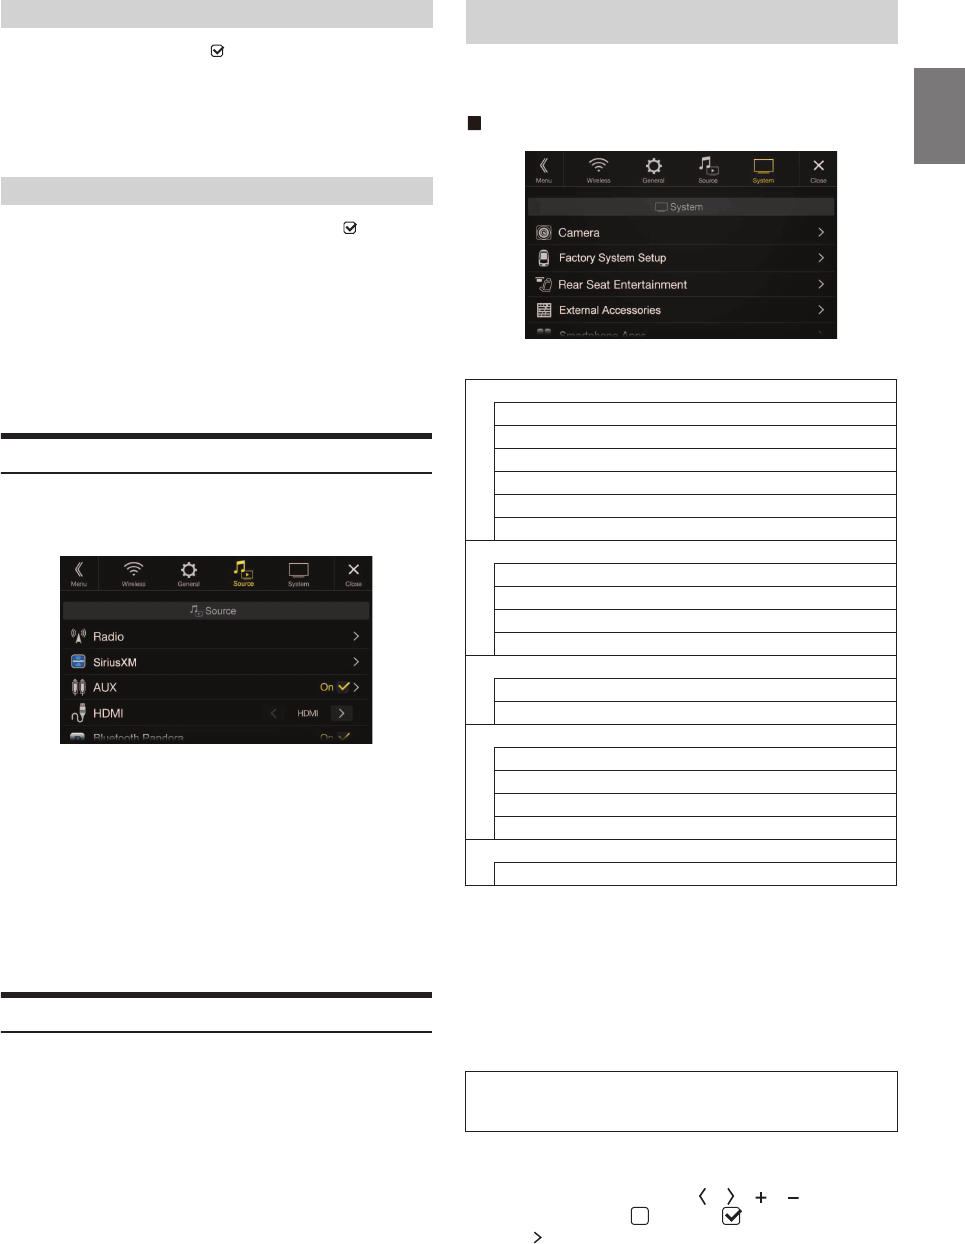
Usable 4-pole mini AV plug
The unit accepts the following 4-pole mini AV plug pin-out:
• Please check pin-out carefully before use of this product. Depending on
the cable, there may be no picture and/or sound.
Signal Strength Information
Off: AUX source is not displayed.
On: AUX source is displayed.
Setting the AUX Mode
iPod Video: Set when connected to an iPod or iPhone.
AUX: Set when connected to an external input device.
Audio L (White)
Audio R (Red)
Ground
Video (Yellow)
45-EN
Make sure the AUX is set to “On” ( ). See “AUX Setup” (page 44).
Setting item:
AUX Name
Setting contents:
AUX (Initial setting) / AUX DVD / GAME / External DVD / DVD Changer /
DVB-T / TV / USB Player
You can make this setting only when AUX is set to “On” ( ). See “AUX
Setup” (page 44).
Setting item:
Signal
Setting contents:
Auto (Initial setting) / NTSC/PAL
HDMI Setup
[HDMI] is selected on the Source Setup Menu screen in step 1. See
“Source Setup” (page 42).
You can set the name of an external device connected via HDMI.
Setting item:
HDMI
Setting contents:
HDMI (HDMI 1*) (Initial setting) / DVD
*When the HDMI selector is set to “On,” “HDMI 1” is displayed in the
Setting contents. For details on setting the HDMI selector, see “Setting
the HDMI selector On/Off ” (page @@).
Setting the Bluetooth Pandora®
[Bluetooth Pandora] is selected on the Source Setup Menu screen in
step 1. See “Source Setup” (page @@).
To use Bluetooth Pandora, set the Bluetooth Pandora setting to “On.”
Setting item:
Bluetooth Pandora
Setting contents:
Off / On (Initial Setting)
• When “On” is set, the Bluetooth Pandora® source is displayed on the
Menu screen.
• When the current source is Bluetooth Pandora, this setting cannot be
adjusted.
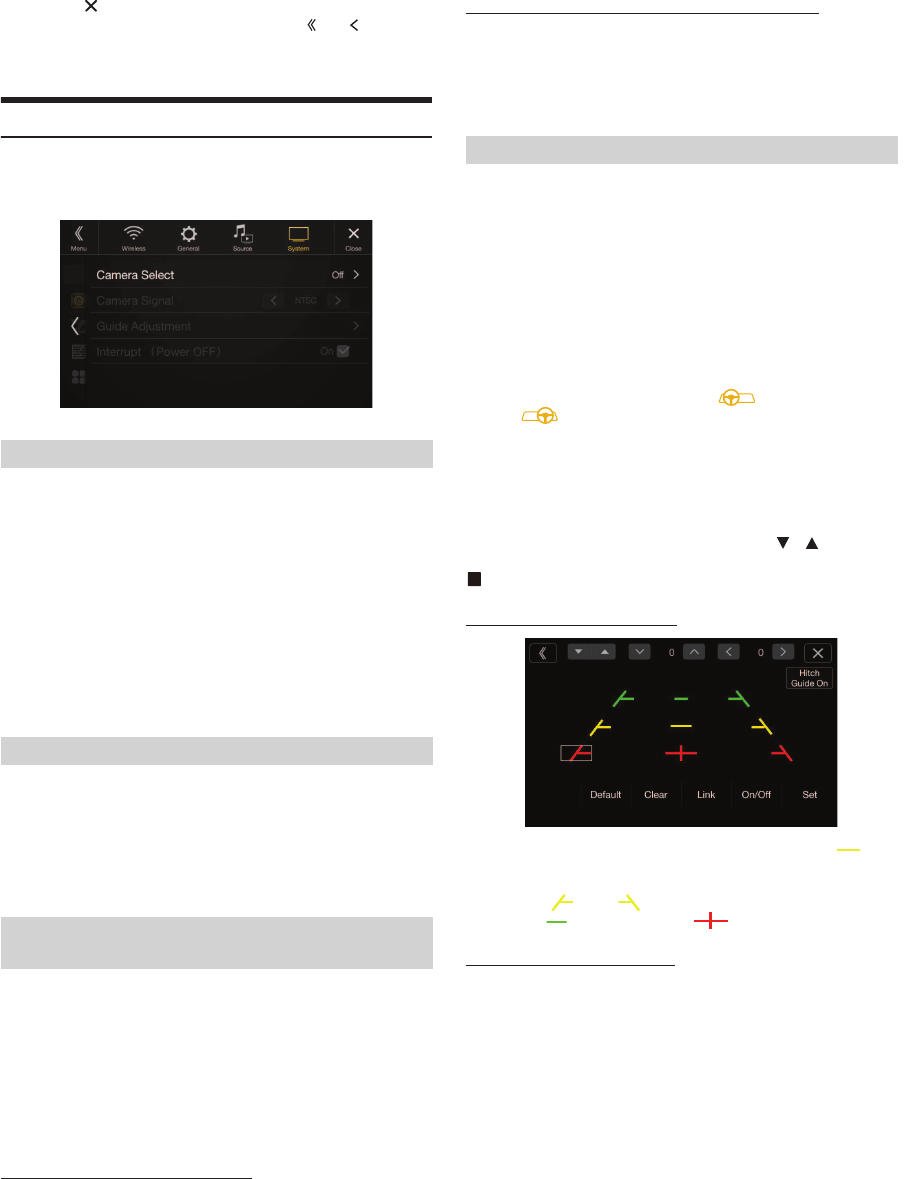
[System] is selected on the Setup main screen in step 3. See “Setup
Operation” (page 29).
System Setup Menu screen
<Setting items>
*1 When Camera Select is set to “Off,” you cannot select this item.
*2 You can select this item only when Camera Select is “Front” or “Rear.”
*3 You can select this item only when Camera Select is “Rear.”
*4 Not displayed when you select “Camera Selector” in Camera Select.
*5 Displayed when you select “Camera Selector” in Camera Select.
*6 You can change the Default Camera only when you set more than one
camera among Front Camera/Rear Camera/Side Camera to “On.” For
details, see “Default Camera setting” (page @@).
*7 Set this setting after closing the Alpine TuneIt App.
1Select the desired item.
2To switch the setting, touch [ ], [ ], [ ], [ ], or mark the
checkboxes “Off” ( ) or “On” ( ).
• If “ ” appears, there is a further hierarchy. Touch the desired
item.
Setting the Auxiliary (AUX) Name
Switching the Visual Input Signal System
Auto: The video input signal type (NTSC or PAL) will be
automatically selected.
NTSC/PAL: Choose the video input signal type manually.
HDMI
(HDMI 1):
Set when a smartphone is connected via HDMI.
DVD: Set when an external DVD player is connected.
System Setup
Camera
Camera Select
Camera Signal*1, 4
Guide Adjustment*2, 4
Camera Interrupt (Power Mode)*3, 4
Front Camera / Rear Camera / Side Camera*5
Default Camera*6
Factory System Setup
USB/iPod / SiriusXM / Bluetooth Audio
Hands-free Connection
Default Vehicle Screen
Maestro Module
Rear Seat Entertainment
Rear Seat Entertainment
Remote Sensor
External Accessories
External Audio Processor
RSE Aux Switch Box
HDMI selector
External Accessory Ctrl
Smartphone Apps
Alpine TuneIt App*7
The following steps 1 to 3 are common to each “Setting
item” of System Setup. See each section for details.
46-EN
3Touch [ ] to return to the main source screen.
• To return to the previous List screen, touch [ ] or [ ] in the
previous page. For details, see “About Basic Operation for List
Screen” (page 18).
Camera Setup
[Camera] is selected on the System Setup Menu screen in step 1. See
“System Setup” (page 45).
You can set up items related to the Camera.
Setting item:
Camera Select
Setting contents:
Off (Initial setting) / Front / Rear / Other / Camera Selector
*When selecting Camera Selector, you can set the Front Camera/Rear
Camera/Side Camera to On/Off. For details, see “Setting Multi Camera
to On/Off” (Page@@).
When the camera is connected, the video input signal type can be
chosen.
Further setting item:
Camera Signal
Setting contents:
NTSC (Initial setting) / PAL
The video pattern can be changed when connected to Multi View
Camera.
When Camera Select is set to “Off,” you cannot select this item.
Setting item:
Guide Adjustment
1Touch [Guide Adjustment].
The camera guide adjustment screen is displayed.
Multi View compatible Side Camera
2Touch [Front] or [Rear].
The camera guide adjustment screen is displayed.
Multi View compatible Front Camera/Rear Camera
2Touch [Back], [Panorama], [Corner], or [Top].
The view will change to the selected view.
•[Back] will not appear for the Front camera.
• For an explanation of video patterns, see the camera Owner’s Manual.
You can adjust the camera guide position.
Setting item:
Guide Adjustment
1Touch [Guide Adjustment].
The camera guide adjustment screen is displayed.
• If the video pattern is set to “Corner (Rear/Front Camera only),”
the camera guide will not be displayed.
• When you connect a Multi View compatible camera, select a
Video Pattern to make a guide adjustment.
• When you connect a Multi View compatible Side Camera, after
selecting the Video Pattern, touch [ ] (Left steering) or
[ ] (Right steering) to make the guide adjustment that
matches the position of the steering wheel in your vehicle.
2Touch [Adjust].
• If [Adjust] does not appear, proceed to step 3.
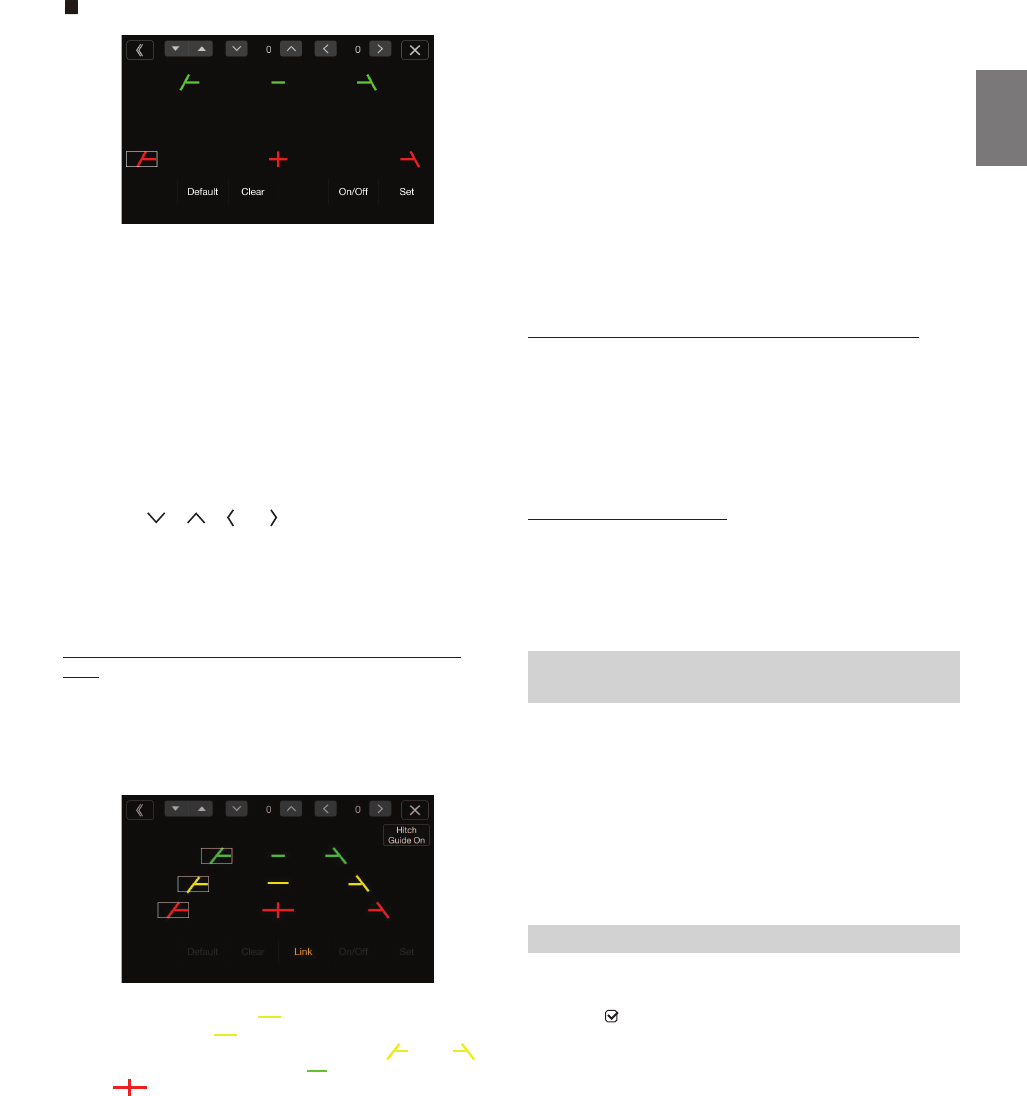
3Touch the guide you intend to adjust.
Guide line can also be selected by touching [ ] [ ].
Rear Camera screen example
When Hitch Guide is set to Off
• You cannot adjust the position of the yellow guide line “ ” in
the center independently.
It is controlled by a system to be the center of the two yellow guide
lines “ ” and “ ” on the left and right, or the central green
line “ ” and red guide line “ ”.
When Hitch Guide is set to On
• You can adjust the Hitch Guide to mark the position of the junction
between your vehicle and your trailer.
Setting the Camera Input
Front: Front camera
Rear: Rear camera
Other: Side camera, Room camera, etc.
Camera
Selector*:
Front Camera/Rear Camera/Side Camera connected to
the optional Multi Camera Interface box.
Setting the Camera Signal Input
Switching Video Patterns for Multi View
Camera
Adjusting the Rear/Front/Side Camera Guide
47-EN
Front Camera screen example
Side Camera screen example
4Touch [ ], [ ], [ ] or [ ] to adjust the position of the
guide.
• Touching [Clear] clears adjustments and returns to the setting
before guide line alteration.
5After the adjustment is completed, touch [Set].
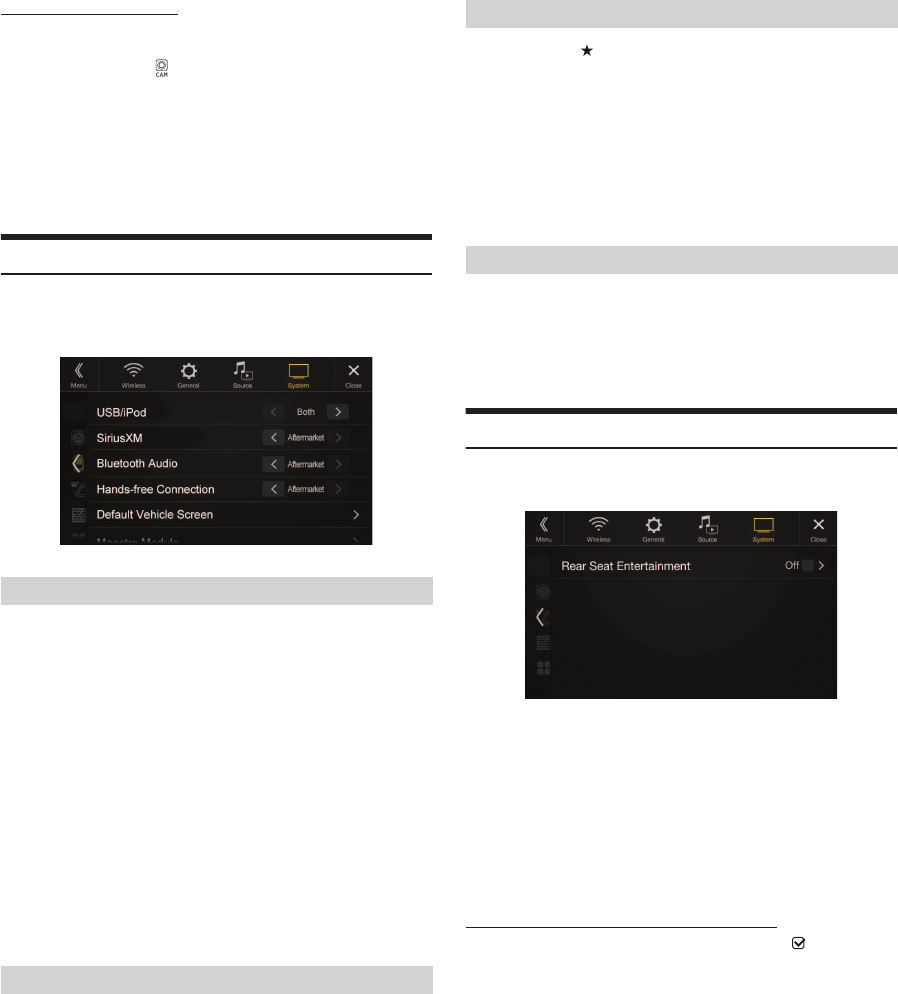
Adjusting Guides Simultaneously (for Rear/Side Camera
only)
<Rear Camera>
1Touch [Link].
The 3 vertical guides of the currently-selected guide link
together, allowing them to be adjusted simultaneously.
• Note on the yellow guide line “ ” in the center
The yellow guide line “ ” in the center is controlled by a system that
locates it in the center of the two yellow guide lines, “ ” and “ ”
on the left and right, or the green line “ ” on the top and red guide
line “ ” below. Therefore you cannot move it manually.
<Side Camera>
1Touch [Link].
The 2 vertical guides of the currently-selected guide link
together, allowing them to be adjusted simultaneously.
Turning Guide Display On/Off (Rear/Front Camera only)
Turning the selected guide off.
1Touch [On/Off].
The currently selected guide will turn off.
2To turn the guide on, touch [On/Off] again.
• Guides that are turned off are still adjustable.
Returning Guides to Default
1Touch [Default].
A message window will appear.
2Touch [OK].
Adjusted values will return to default settings.
You can set whether to display the rear camera image when the gear
lever is moved to the reverse (R) position while the unit is turned off.
You can select this item only when Camera Select is “Rear.”
Setting item:
Camera Interrupt (Power Mode)
Setting contents:
On (Initial setting) / Off
When connecting the optional Multi Camera Interface box, you can
connect up to 3 cameras as Front Camera/Rear Camera/Side Camera.
Set to “On” ( ) to enable each camera.
Setting item:
Front Camera / Rear Camera / Side Camera
Setting contents:
Off (Initial setting) / On
Set to “On” and touch the camera name to make individual
adjustments.
Camera Interrupt Setting (Power OFF Mode)
(Rear Camera Only)
On: The rear camera image is displayed
Off: The rear camera image is not displayed
Setting Multi Camera to On/Off
Camera
Signal:
See “Setting the Camera Signal Input” (page @@)
Guide
Adjustment:
See “Setting the Camera Signal Input” (page @@)
Camera
Interrupt
(Power Mode):
See “Camera Interrupt Setting (Power OFF Mode)” (page
@@)
48-EN
Setting a Default Camera
When connecting an optional Multi View Camera, you can set which
camera image is displayed when you touch the Camera button on the
Menu screen or press the (CAMERA) button (X110 only).
Setting item:
Default Camera
Setting contents:
Front / Rear / Side
• The initial setting differs depending on the cameras set to “On” in
“Setting Multi Camera to On/Off.”
Factory System Setup
[Factory System Setup] is selected on the System Setup Menu screen in
step 1. See “System Setup” (page @@).
You can make this setting only when an iDataLink module is connected.
You can set whether the following source icon in the Menu screen is
available.
Setting item:
USB/iPod (Initial setting: Both) / SiriusXM (Initial setting: Aftermarket) /
Bluetooth Audio (Initial setting: Aftermarket)
Setting contents:
Both / OEM / Aftermarket
*USB/iPod only.
• The iDataLink source icons not displayed on the Menu screen when no
iDataLink module is connected even though “Both” or “OEM” is set.
• You cannot set the source that is currently being played.
Select to pair the Bluetooth compatible phone with this unit or the
connected iDataLink module.
Setting item:
Hands-free Connection
Setting contents:
OEM / Aftermarket (Initial setting)
• When “OEM” is selected, the screen changes to the Phone menu screen
of the iDataLink module.
Press and hold the (Favorite) button for at least 2 seconds or touch
the Menu screen (page @@) to display the Info mode screen, and then
set the following.
Setting item:
Default Vehicle Screen
Setting contents:
Climate / Vehicle Info. / Gauges / Parking Assist / Last mode (Initial setting)
• Depending on the car, some setting contents or this setting item may not
be displayed.
You can change the setting of the connected iDataLink module.
Setting item:
Maestro Module
• Depending on the iDataLink module, the setting contents may differ.
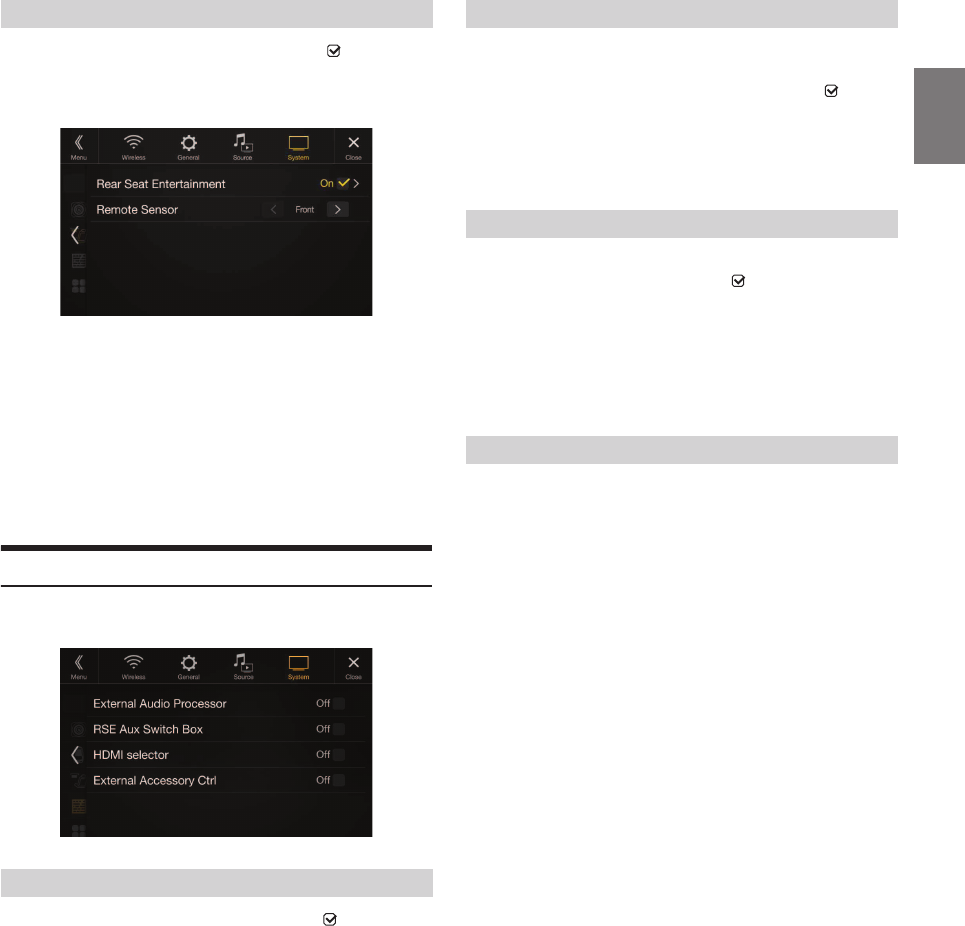
Rear Seat Entertainment Setup
[Rear Seat Entertainment] is selected on the System Setup Menu screen
in step 1. See “System Setup” (page 45).
When a Rear monitor equipped with HDMI input is connected to this
unit, change this setting to “On.” You can output images to the Rear
monitor. For details, see “Rear Seat Entertainment Function” (page 20).
Setting item:
Rear Seat Entertainment
Setting contents:
Off (Initial setting) / On
• When this setting is “On,” you can use this unit to switch the
Illumination of a Rear monitor with the Illumination function.
Setting the Rear Seat Entertainment System
Make sure the Rear Seat Entertainment is set to “On” ( ). See “Rear
Seat Entertainment Setup” (page 48).
Setting item:
Plasmacluster/Illumination Color
Setting contents:
Off (Initial setting) / On
• For details on adjusting Plasmacluster/Illumination, see “Rear Seat
Entertainment Function” (page 20).
• When the Rear Seat Entertainment setting is set to “Off,” you cannot
select this item.
• Set the coordination color and Plasmacluster controls on the Rear
monitor to “Navi.” When set to “Rear monitor,” you cannot operate
them from this unit.
Setting the Source Category
Both*: Both the sources listed above from this unit and
iDataLink module are available.
OEM: Only the source listed above from iDataLink module is
available.
Aftermarket: Only the source listed above from this unit is available.
Setting the Hands-free Connection
OEM: Select to pair the Bluetooth compatible phone with the
connected iDataLink module.
Aftermarket: Select to pair the Bluetooth compatible phone with this
unit.
Setting the Default Vehicle Screen
Setting the Maestro Module
49-EN
Make sure the Rear Seat Entertainment is set to “On” ( ). See “Rear
Seat Entertainment Setup” (page 48).
For remote control operation, the remote sensor of the external device
(Rear monitor, etc.) can be switched, as you prefer.
Setting item:
Remote Sensor
Setting contents:
Front (Initial setting) / Rear
• You can also control this setting from the Rear Seat Entertainment
System Setup screen. For details, see “Rear Seat Entertainment
Function” (page 20).
External Accessories Setup
[External Accessories] is selected on the System Setup Menu screen in
step 1. See “System Setup” (page 45).
When using an external audio processor, set to “On” ( ).
Setting item:
External Audio Processor
Setting contents:
Off (Initial setting) / On
• When this setting is “On,” the Volume level is fixed at 10. Also, Balance/
Fader/Subwoofer Level/Subwoofer Phase/Bass/Treble/MX HD/EQ
Presets/Dual HD EQ/X-Over/Time Correction/Defeat/Phone Speaker/
Default Sound Settings are set to “Off ” or “Flat” and cannot be
adjusted.
• Use the external AP to adjust volume.
When displaying an AUX image in the rear monitor, you need an
external AUX distribution box.
When using an external AUX distribution box, set to “On” ( ).
Setting item:
RSE Aux Switch Box
Setting contents:
Off (Initial setting) / On
If you connect an HDMI selector, you can connect two HDMI devices.
When using an HDMI selector, set to “On” ( ).
Setting item:
HDMI selector
Setting contents:
Off (Initial setting) / On
• For details on switching the HDMI source when two HDMI devices are
connected, see “HDMI Operation” (page @@).
When you have connected the optional External Accessory Control box,
set this setting to “On” to turn the headlights ON/OFF or adjust the air
suspension from this unit.
Setting item:
External Accessory Ctrl
Setting contents:
Off (Initial setting) / On
• When set to “On,” the [##] (Ext Acc Ctrl) icon is displayed on the Menu
screen.
• For details on the External Accessory screen and its operation, see
“External Accessory Control Operation” (page @@).
Remote Sensor Setting
Front: The remote sensor of this unit is effective.
Rear: The remote sensor of Rear monitor is effective.
Setting the External Audio Processor
Setting the Additional AUX BOX
Setting the HDMI Selector On/Off
Setting the External Accessory Control
50-EN
Smartphone Apps Setup
[Smartphone Apps] is selected on the System Setup Menu screen in step
1. See “System Setup” (page 45).
Set TuneIt to USB (iPhone) when an iPhone is connected, or set to
Bluetooth (Android) when an Android Smartphone is paired.
Setting item:
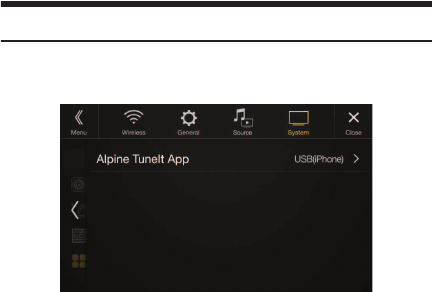
Alpine TuneIt App
Setting contents:
Off / USB (iPhone) (Initial setting) / Bluetooth (Android)*
• Set this setting after closing the Alpine TuneIt App.
• For this function to work properly, specific applications must be
installed on your Smartphone before connection. Consult your Alpine
dealer or the Alpine website for details.
• Only the iPhone and certain Android Smartphones support this
function.
*Not displayed when Bluetooth is set to Off. For details, see “Bluetooth
Setup” (page 30)
Off: No Smartphone is connected.
USB (iPhone): When an iPhone is connected to the unit’s USB port, you
can programme the unit’s sound tuning parameters, or
communicate with SNS.
Bluetooth
(Android):
Set this when an Android Smartphone is paired with this
unit via Bluetooth technology. And after Bluetooth
Audio is connected, you can programme the unit’s
sound tuning parameters, or communicate with SNS.
51-EN
The unit can receive HD Radio signals based on digital radio broadcast
standards, in addition to analog radio broadcasts using RBDS.
HD Radio signals are broadcast in the service areas of the current AM/
FM broadcasters where they provide digital audio distribution and data
services. This unit receives the above digital broadcasts for your high-
quality sound enjoyment.
Depending on the signal strength in TUNER mode, the unit will
automatically switch between digital signals if they can be received, and
analog radio using RBDS if digital signals cannot be received. For
details, please see “Switching between Digital and Analog,” “Forced
Analog Mode.”
• RBDS mode is only available during FM broadcast reception.
This unit is able to receive signals based on the terrestrial digital radio
broadcasting standard.
When current AM/FM broadcasters are transmitting digital audio and
data services, HD Radio signals are on-the-air in their service area. You
can receive their digital broadcast and enjoy high quality sound.
If there is no HD Radio signal in the current area, after 10 seconds, this
unit will switch to receive the RBDS Radio signal automatically.
However, the display is still HD Radio mode screen.
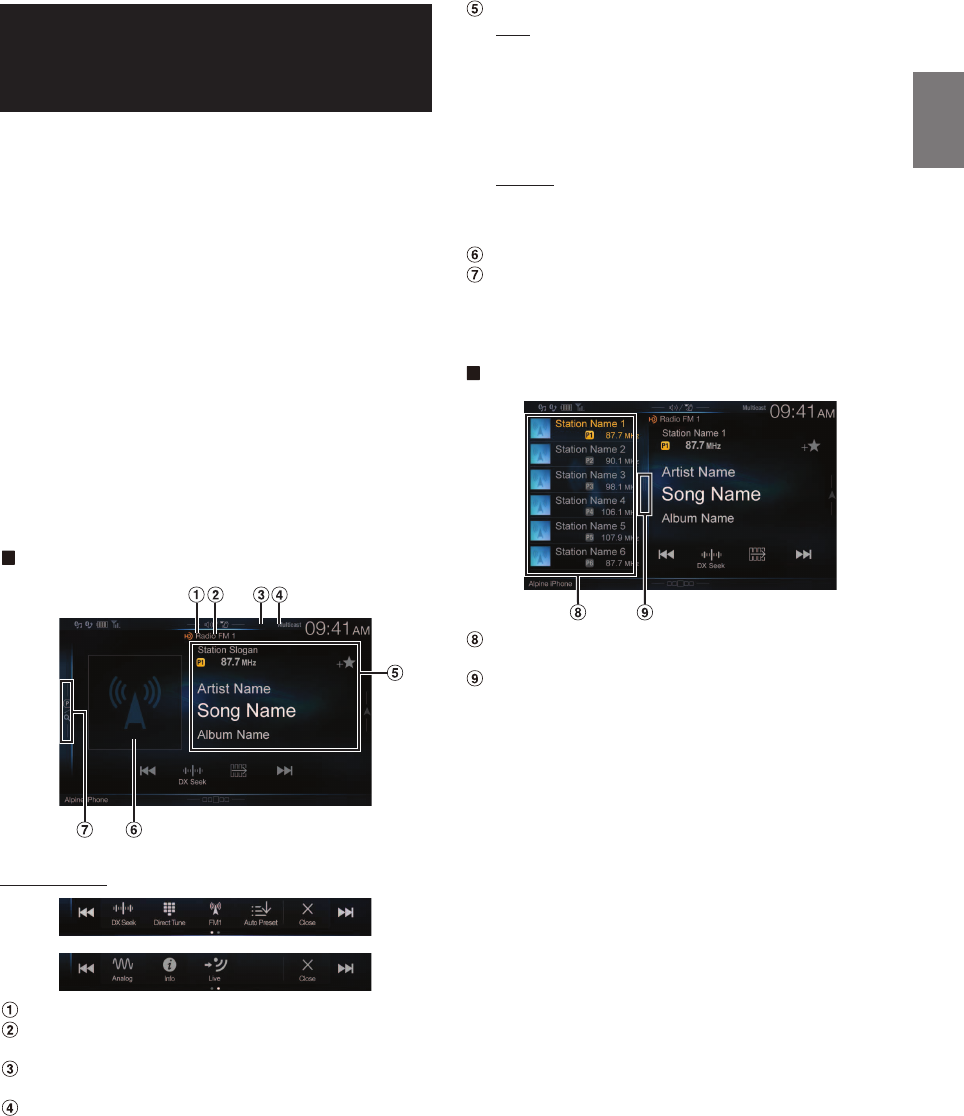
HD Radio main screen example
Function mode
HD Radio Indicator *1
Band display
Displays the band of the signal currently being received.
Tag Indicator
When Tagging is available, the Tag indicator is shown.
Multicast Indicator*2
Lights during multicast reception.
Info area
RBDS
Station Info. mode:
PTY/Frequency or PS Name/Artist Name/Song Name/Album
Name
Radio Text mode:
Frequency/ Radio Text
• For details on switching the display of the Radio text, see
“Displaying Radio Text (RBDS FM Radio mode only)” (page @@).
HD Radio
Station Info. mode:
Station Slogan or Long Station Name/Frequency/Artist
Name/Song Name/Album Name
Artwork etc./Station Logo display*1
Preset mode button
Swipe to the right when you use the Preset mode screen.
*1 HD Radio mode only.
*2 Lights during multicast reception.
Preset mode screen example
Preset button
Swipe vertically in the list to change pages.
PTY list button (RBDS FM Radio mode only)
Swipe to the right when you use the PTY list screen.
Radio/HD Radio™/
RBDS
52-EN
Listening to the Radio
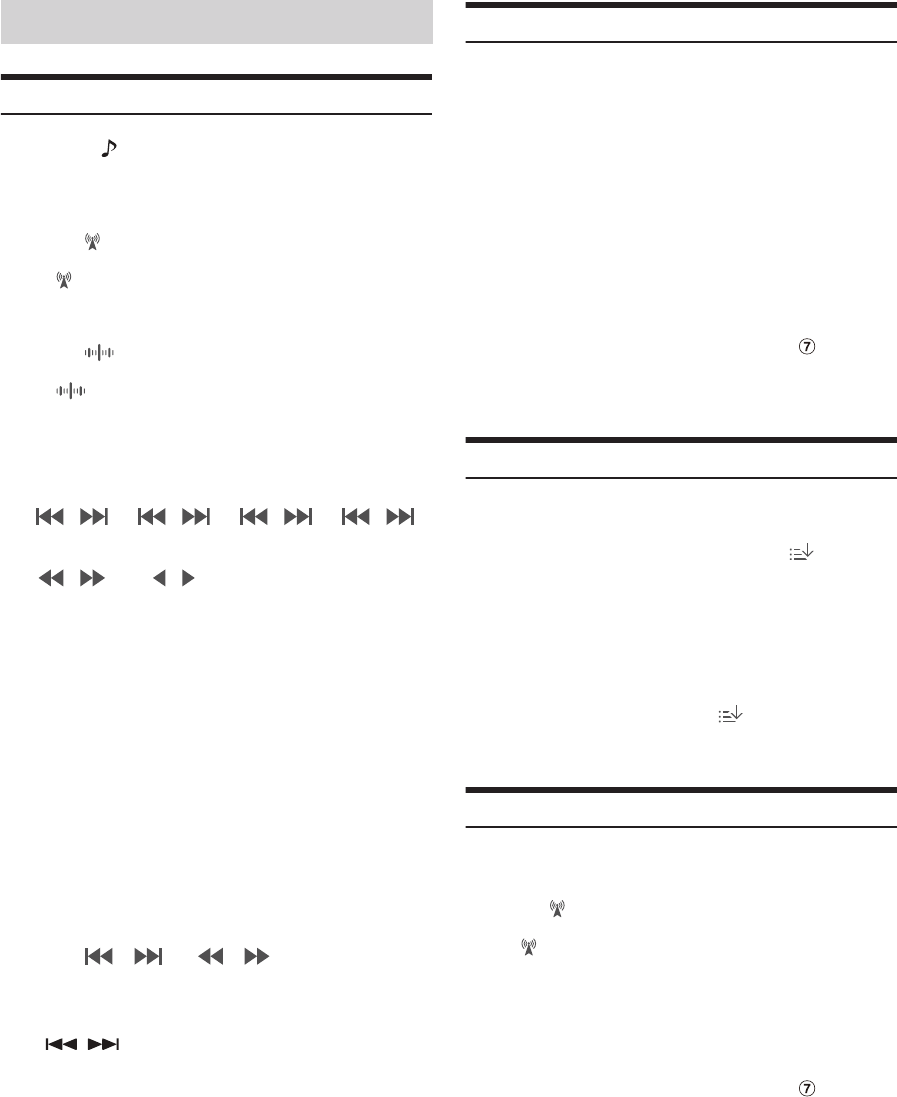
1Press the (AUDIO) button to select radio mode.
The display shows the radio mode screen.
• You can select and change the source from the Menu screen
(page 21) or the Favorite screen (page 24).
2Touch [ ].
The radio band select pop up screen is displayed.
•[ ] button displays the current selected band. (e.g. [FM1])
3Select the desired band from FM1/FM2/AM.
4Touch [ ].
The tuning mode selection popup is displayed.
•[ ] button displays the current selected mode. (e.g. [DX Seek])
5Touch the desired tuning mode.
The radio frequency up or down button changes depending on
the tuning mode.
• There are two modes you can select for auto tuning, DX and Local:
- DX Seek (Distance) mode*;
Both strong and weak stations will be tuned in.
- Local Seek mode*;
Only strong stations will be tuned in.
The initial setting is DX.
- D (Digital).DX Seek mode;
Automatically receives a receivable digital broadcast.
- D (Digital).Local Seek mode;
Automatically receives a strong digital broadcast only.
- Manual mode;
The frequency is manually tuned in steps
- PTY Seek mode (RBDS FM Radio mode only);
The currently selected programme type station will be tuned.
• During Forced Analog mode, digital broadcasts cannot be
received.
*Depending on the signal, a digital or analog broadcast is received.
6Touch [ ], [ ] or [ ], [ ] to change the radio
frequency up or down respectively.
In manual mode, touch and hold to change the frequency
continuously.
• The , buttons provide the same functions above.
Presetting Stations Manually
1Tune in a desired radio station you wish to store in the
preset memory by manual or automatic seek tuning.
2Touch the Preset number you want to store, for at least 2
seconds.
The selected station is stored.
3Repeat the procedure to store up to 11 other stations
onto the same band.
To use this procedure for other bands, simply select the desired
band and repeat the procedure.
A total of 36 stations can be stored in the preset memory
(12 stations for each band; FM1, FM2, or AM).
• For details on switching to the Preset mode screen, see in “Radio
main screen example” (page @@).
• If a preset memory has already been set in the same preset number, it
will be cleared and the new station will be memorized.
Presetting Stations Automatically
The tuner can automatically seek and store 12 strong stations in the
selected band in order of signal strength.
Select the desired band then touch and hold [ ] (Auto
Memory).
The tuner automatically seeks and stores 12 strong stations into the
preset buttons in order of signal strength.
When automatic storing has completed, the station stored in the
preset 1 is selected.
• If no stations are stored, the tuner will return to the original station you
were listening to before the automatic storing procedure began.
• You can cancel this process by touching [ ] (Auto Memory) while
the tuner is automatically seeking stations. Canceling will return the
tuner preset to the previous setting.
Tuning to Preset Stations
You can tune in the preset stations in memory on either band using its
preset number.
1Touch [ ].
The radio band select pop up screen is displayed.
•[ ] button displays the current selected band. (e.g. [FM1])
2Select the desired band from FM1/FM2/AM.
3Touch any one of the Preset numbers you have already
stored in the Preset mode screen.
The preset station is received.
• For details on switching to the Preset mode screen, see in “Radio
main screen example” (page @@).
Radio Basic Operation
DX Seek Local Seek D.DX Seek D.Local Seek
Manual PTY
53-EN
Inputting Frequency Directly and Receiving the
Radio Station
You can input a frequency of the same band directly and receive the
radio station.
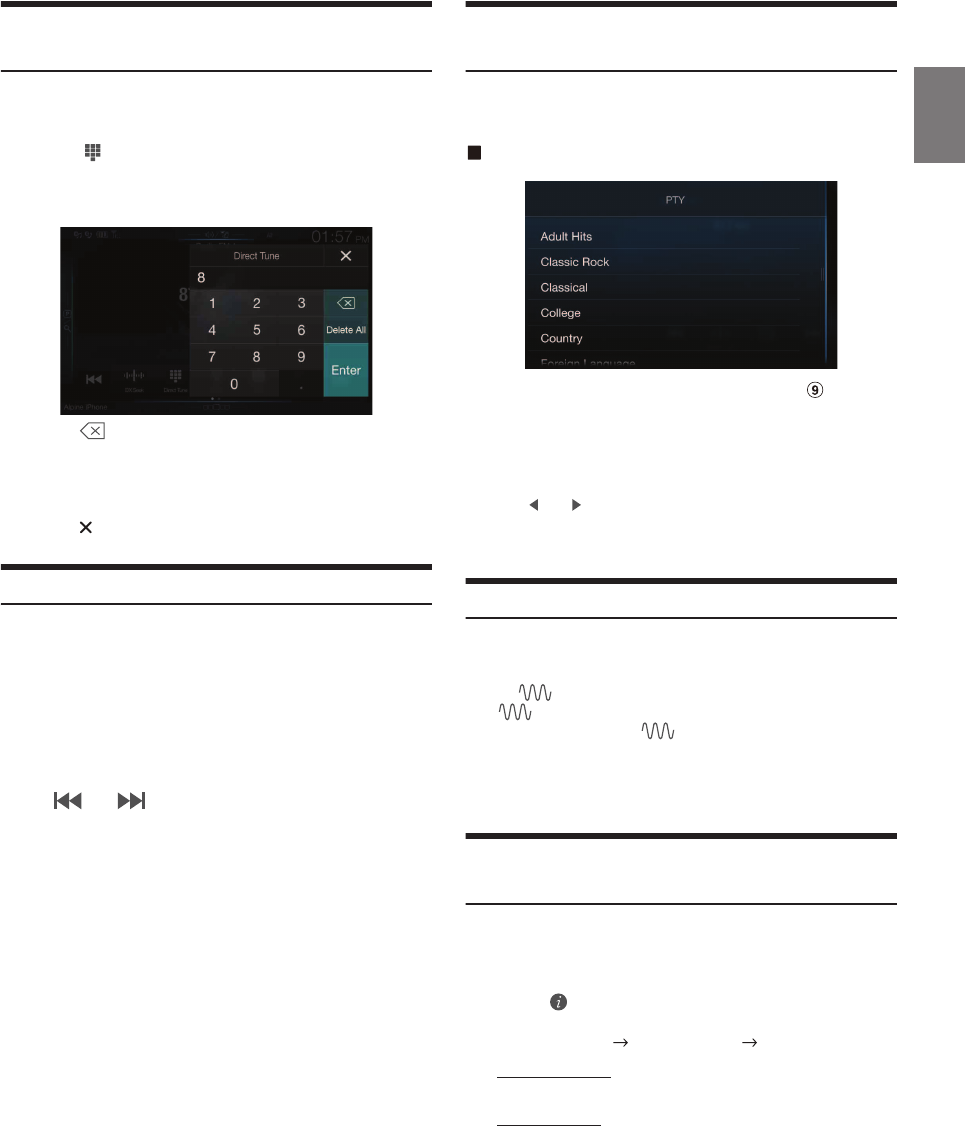
1Touch [ ] (Direct Tune).
The numeric keypad input mode screen appears.
2Touch a desired number.
Touch [ ] to delete an entered number.
Touch [Delete All] to delete all entered numbers.
3Touch [Enter] on the numeric keypad mode screen to
confirm your selection.
Touch [ ] to hide the keypad display.
Receiving a Multicast (HD Radio Mode only)
Multicasting is the ability to broadcast multiple program streams over a
single FM frequency. This increases the amount and diversity of content
choices. A maximum of 8 multicast station channels can be selected on
this unit.
• “Multicast” indicator appears when signal reception is possible.
• The station number of the current broadcast station appears behind the
frequency (ex. 90.3 MHz-HD5 means there are 5 stations on
90.3 MHz).
Touch [ ] or [ ].
The sub channel of the received radio station is changed.
• If reception is lost during SPS broadcasting due to weak or no signal, the
screen will display “HDx Signal loss.”
Selecting the Receivable PTY (RBDS FM Radio
mode only)
You can select and receive the currently receivable stations in the PTY
list screen.
PTY list screen example
• For details on switching to the PTY list screen, see in “Preset
mode screen example” (page 51).
Select the desired programme type in the PTY list screen.
PTY Seek starts and the receivable programme type is received.
If no PTY station is found, “No PTY.” will be displayed.
• Touch [ ] or [ ] to select the same programme type station as the
currently selected programme type after switching the tuning mode to
PTY (PTY Seek) mode.
Forced Analog Mode
Activate the Compulsory Analog Radio mode to receive only analog
radio signals.
Touch [ ] (Analog).
The [ ] (Analog) button is highlighted. To cancel Compulsory
Analog Radio mode, touch [ ] (Analog) again.
• During Forced Analog mode, only analog broadcasts will be received
even when digital broadcasts become available.
• While Digital is receiving, the “HD” indicator is displayed.
Displaying Radio Text (RBDS FM Radio mode
only)
Text messages from a radio station can be displayed.
1Tune in a radio station that transmits text messages.
2Touch [ ] (Info) in the FM radio mode repeatedly to
switch to the desired display.
Station Info.Mode Radio Text Mode Station Info.Mode
Station Info. Mode
PTY/Frequency or PS/Artist Name/Song Name/Album Name
Radio Text Mode
Frequency/Radio Text
54-EN
Using Ballgame Mode
In live broadcast, such as sportscasts, etc., a time lag occurs between
digital sound and analog sound. Therefore, when live broadcasts are
received, a time lag between the real broadcast may occur and the unit
can change to analog broadcasting automatically.
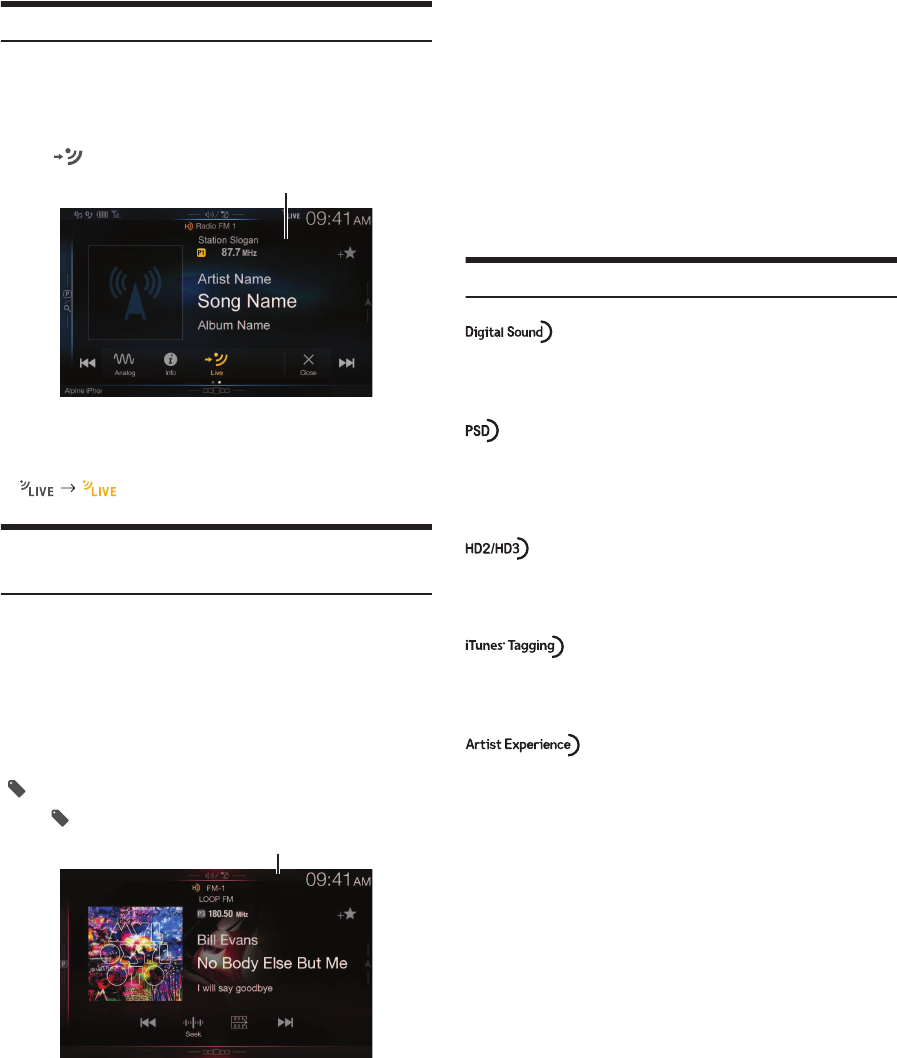
Touch [ ] (Live) to switch On/Off.
The LIVE Indicator is displayed when Ballgame Mode is set to “On.”
• When receiving a live broadcast while the Ballgame mode is on, the
LIVE indicator is highlighted.
(During live broadcast)
Storing the tag information (HD Radio Mode
only)
iTunes Tagging lets you tag songs heard on HD Radio FM stations. You
can preview, buy and download later, songs from your iTunes tagged
playlist the next time you sync your iPod/iPhone. If the unit is
connected to a Tagging compatible iPod/iPhone, you can use the iTunes
Tagging function. For details, refer to the Owner’s Manual of the
Tagging compatible iPod/iPhone.
When Tagging is available, the “Tag” indicator is shown.
When a desired song is heard on an HD Radio station, touch
[ ] (Tag) to save its tag information.
• The [ ] (Tag) button can be selected only when Tagging is available.
If no iPod/iPhone is connected, “Tag Count X” is displayed (X is the
total amount of the tag information stored in this unit).
• During tagging, the iPod/iPhone takes priority to save the tag
information. If no iPod/iPhone is connected, the tag information is
saved to this unit.
• When the memory of iPod/iPhone is full, “iPod memory full.” is
displayed. The tag information will be stored to the unit.
• If the tagging operation is interrupted by a hands-free phone call, the
tagging operation will be canceled and the unit will display “Cannot
Tag”.
• This unit can store up to 50 tagged songs. When the memory of the unit
is full, “Tag count 50. Tuner memory full. Connect iPod.” may be
displayed.
• When the iPod/iPhone is disconnected from the unit during tagging, its
tag information will be stored in the unit.
• If there is stored tag information on the unit, when an iPod/iPhone
supporting the tag function is connected, the stored tag information will
be transferred to the iPod/iPhone automatically. When the iPod/iPhone
memory becomes full, “iPod memory full.” will be displayed, and any
remaining tag information on the unit will not be transferred to the
iPod/iPhone.
• If tag information already exists, “Already Tagged” will be displayed
when you try to tag information again.
About the Feature Logos
• Digital, CD-quality sound. HD Radio Technology enables local
radio stations to broadcast a clean digital signal. AM sounds like
today’s FM and FM sounds like a CD.
• Program Service Data: Contributes to the superior user
experience of HD Radio Technology. Presents song name, artist,
station IDs, HD2/HD3 Channel Guide, and other relevant data
streams.
• Adjacent to traditional main stations are extra local FM channels.
These HD2/HD3 Channels provide new, original music as well as
deep cuts into traditional genre.
• iTunes® Tagging provides you the opportunity to discover a wide
range of content and the means to “tag” that content for later
review and purchase from the iTunes® Store.
• Visual information related to content being played on your HD
Radio receiver, such as Album Art, historical photographs, still
art from live broadcasts, among other related content.
LIVE Indicator
Tag Indicator
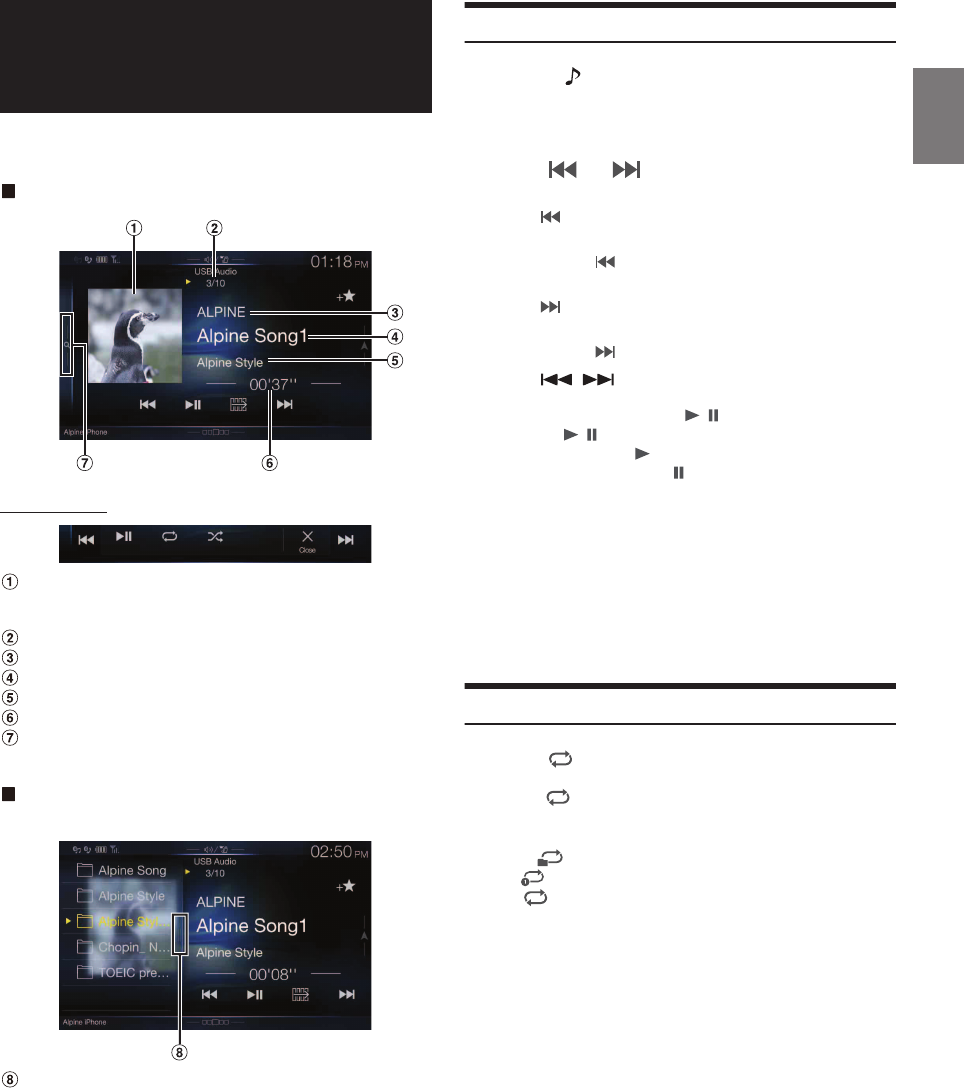
55-EN
You can play back music files (MP3/WMA/AAC/FLAC) stored in a USB
flash drive on the internal player of this system.
USB Audio main screen example
Function mode
Artwork display
• You can change the artwork position. For details, see “Switching
the Artwork Position” (page 40).
Current track no./Total song no.
Artist title
Song title
Album title
Elapsed time
Quick Search button
Touch or swipe to the right to use the Quick Search mode.
Quick Search mode screen example
Swipe vertically in the list to change pages.
Full Search mode button
Swipe to the right when you use the Full Search mode screen.
Playback
1Press the (AUDIO) button to select USB mode.
The display shows the USB mode screen.
• You can select and change the source in the Menu screen (page 21)
or Favorite screen (page 24).
2Touch [ ] or [ ] or to select the desired track (file).
Returning to the beginning of the current (or previous) track (file):
Touch [ ].
Fast reverse :
Touch and hold [ ].
Advancing to the beginning of the next track (file) :
Touch [ ].
Fast forward :
Touch and hold [ ].
• The , buttons provide the same functions above.
3To pause playback, touch [/].
Touching [ / ] again will resume playback.
During playback, the [ ] indicator is displayed in Audio main
screen. During a pause, the [ ] indicator is displayed in the
Audio main screen.
• The playback time may not be correctly displayed when a VBR
(Variable Bit Rate) recorded file is played back.
• If there is tag information, artist name/album name/track name is
displayed.
• ID3 tag/WMA tag
If an MP3/WMA/AAC/FLAC file contains ID3 tag/WMA tag
information, the ID3 tag/WMA tag information is displayed. (e.g., song
name, artist name, and album name)
Repeat Play
1Touch [ ].
The Repeat mode select pop up screen is displayed.
• The [ ] button displays the currently selected mode.
2Select your desired Repeat mode.
USB Flash drive
(Optional)
Folder : Only files in a folder are repeatedly played back.
File : Only the file currently playing is repeatedly played back.
OFF : Repeat mode Off.
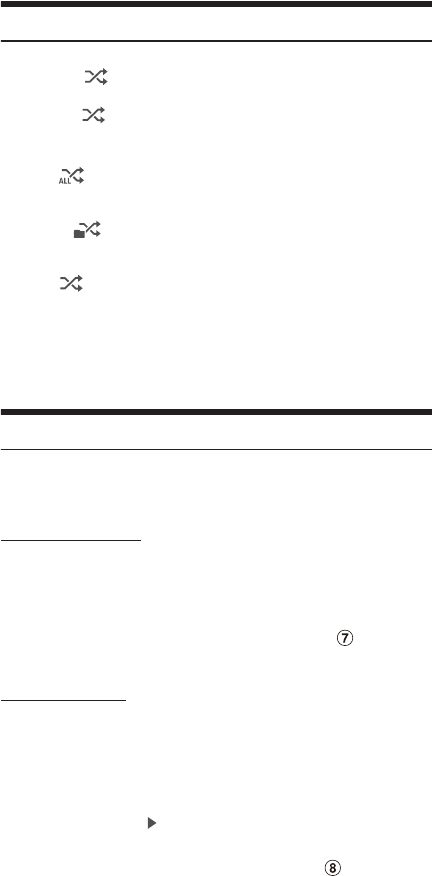
56-EN
Random Play
1Touch [ ].
The Random Play mode select pop up screen is displayed.
• The [ ] button displays the currently selected mode.
2Select your desired Random Play mode.
• If the Random Play mode is activated during Repeat playback, the
Repeat Play mode will be canceled.
• If you select a track by using the search mode, the Random Play mode
will be canceled.
Searching for a Desired Song
You can search for your desired song by using one of two modes; the
Quick Search mode and the Full Search mode.
Quick Search mode
Touch your desired Folder name or File name.
The selected Folder*1 or File is played.
*1 The first file in the selected folder is played back.
• For details on switching to the Quick Search mode, see in “USB
Audio main screen example” (page 55).
Full Search mode
Touch your desired Folder name*2 or File name.
When you select a File name, the selected song is played.
When you select a Folder name, repeat the same procedure to select
another Folder name or File name.
*2 When you touch the [ ] by a Folder name, the unit plays from the first
song in the Folder.
• For details on switching to the Full Search mode, see in “Quick
Search mode screen example” (page 55).
• To switch the displayed list or return to the previous page in the Full
Search mode, see “About Basic Operation for List Screen” (page 18).
ALL : All songs in the USB flash drive are played back in
random sequence. Any one song does not play back
again until all songs have been played back.
Folder : A Folder is selected randomly and songs in the Folder
are played back in order. After all songs are played in a
Folder, the next Folder is selected randomly.
OFF : Random mode Off.
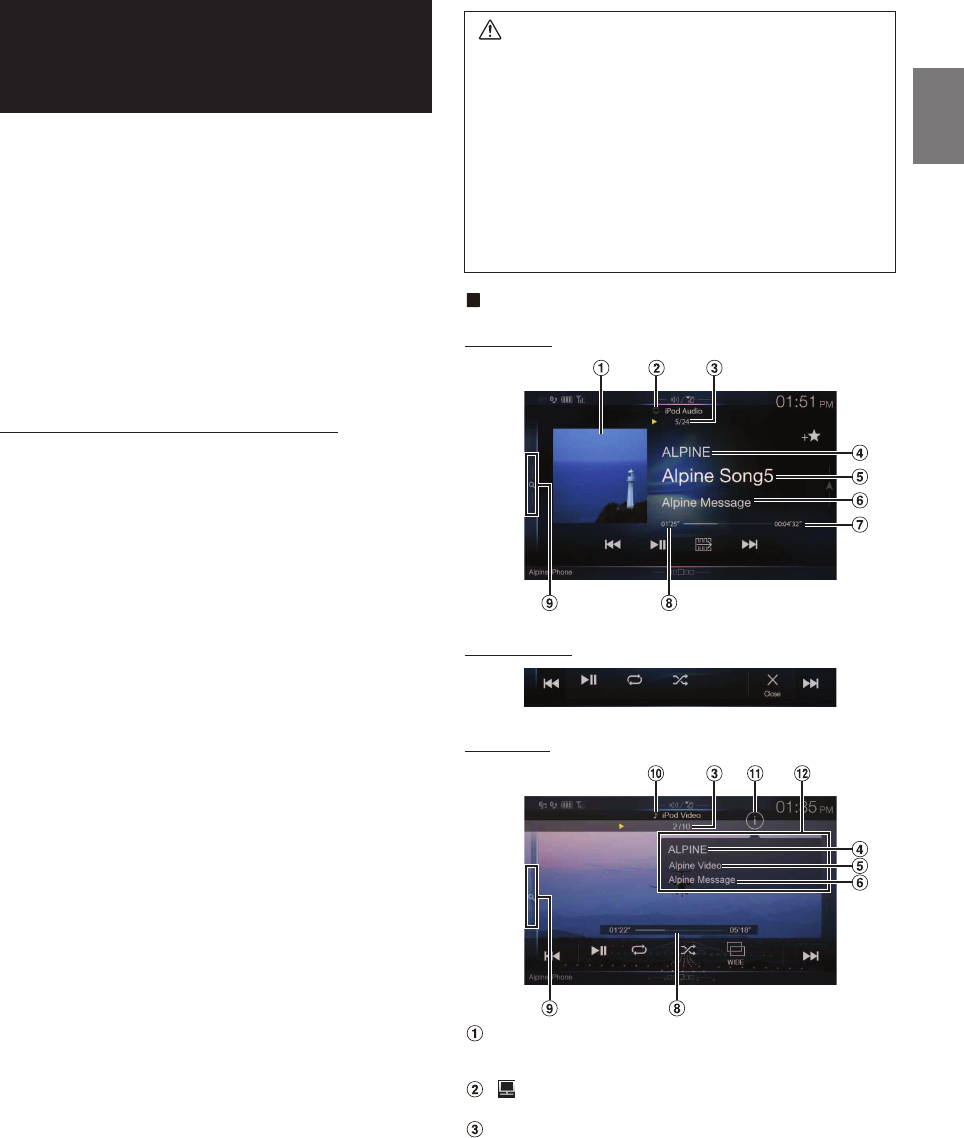
57-EN
A separately sold USB iPod/iPhone AV cable (KCU-461iV) or a
separately sold Lightning to USB cable (KCU-471i) is required
depending on the type of iPod/iPhone.
When the unit is connected by the above cable, the controls on the iPod
are disabled.
• This unit does not support video playback from iPhone 5, etc., which
uses Apple’s Lightning Connector.
• Internet or telephone functions, etc., of the iPhone or iPod touch are not
controllable from the unit, but these functions can be controlled using
the iPhone or iPod touch itself.
• To watch the video screen of the file in the iPod/iPhone, the parking
brake must be engaged.
• For automatic transmission vehicles, place the transmission lever in the
Park position.
About iPod/iPhone models usable with this unit
• The following devices have been tested and shown to work with
this unit. Correct function of earlier versions cannot be
guaranteed.
iPod touch 5th generation 32GB/64GB: Ver.7.1.1
iPod touch 4th generation 8GB/32GB/64GB: Ver.6.1.3
iPod touch 3rd generation 32GB/64GB: Ver.5.1.1
iPod touch 2nd generation 8GB/16GB/32GB: Ver.4.2.1
iPod touch 1st generation 8GB/16GB/32GB: Ver.3.1.3
iPod nano 7th generation 16GB: Ver.1.0.2
iPod nano 6th generation 8GB/16GB: Ver.1.2
iPod nano 5th generation (video camera) 8GB/16GB: Ver.1.0.2
iPod nano 4th generation (video) 8GB/16GB: Ver.1.0.4
iPod nano 3rd generation (video) 4GB/8GB: Ver.1.1.3
iPod classic (Late2009) 160GB: Ver.2.0.4
iPod classic 120GB: Ver.2.0.1
iPod classic 80GB/160GB: Ver.1.1.2
• The following devices have been tested and shown to work with
this unit. Correct function of earlier versions cannot be
guaranteed.
iPhone 5S 16GB/32GB/64GB: Ver.7.1.1
iPhone 5C 16GB/32GB/64GB: Ver.7.1.1
iPhone 5 16GB/32GB/64GB: Ver.7.1.1
iPhone 4S 16GB/32GB/64GB: Ver.7.1.1
iPhone 4 16GB/32GB: Ver.7.1.1
iPhone 3GS 8GB/16GB/32GB: Ver.6.1.3
iPhone 3G 8GB/16GB: Ver.4.2.1
iPhone 4GB/8GB/16GB: Ver.3.1.3
• For clarity in identifying your model of iPod, please see Apple’s
own document “Identifying iPod models” at
http://support.apple.com/kb/HT1353.
iPod/iPhone main screen example
Audio mode
Function mode
Video mode
Artwork display
• You can change the artwork position. For details, see “Switching
the Artwork Position” (page 40).
: During audio-only playback of a video file in a Playlist,
the Video icon is displayed.
Current song no./Total song no.
iPod/iPhone
(Optional)
WARNING
It is dangerous for the driver to watch video while driving
the vehicle. The driver may be distracted from looking
ahead and an accident could occur.
Install the unit correctly so that the driver cannot watch a
video unless the car is stopped and the parking brake is
applied.
If the unit is not installed correctly, the driver will be able
to watch a video while driving and may be distracted
from looking ahead and cause an accident. The driver or
other people could be severely injured.
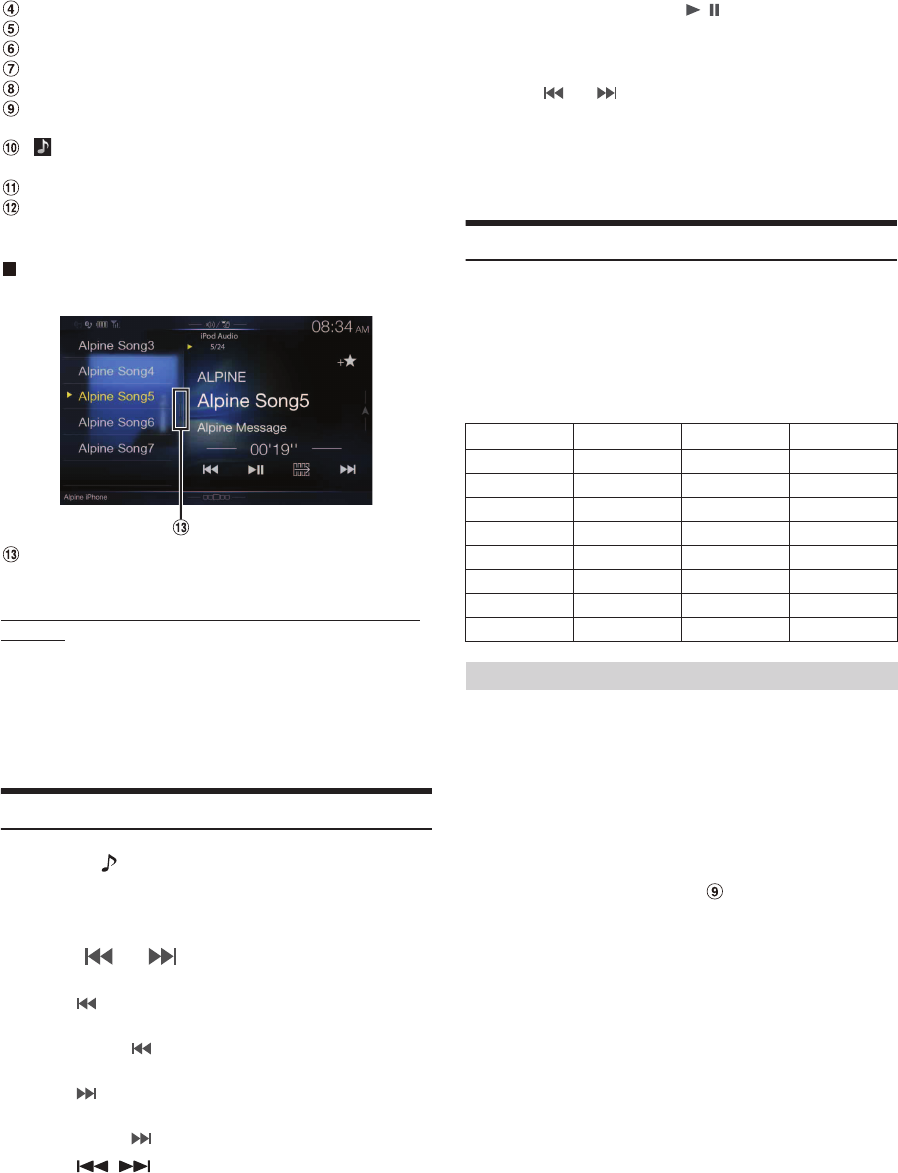
58-EN
Artist title/Release Date*
Song title/Episode title*
Album title/Podcast title*
Total time for playing
Elapsed time
Quick Search button
Touch or swipe to the right when using Quick Search mode.
: During audio-only playback of a music file in a video
Playlist, the Music icon is displayed.
Info mode switching button (Video mode only)
Info mode display
*Podcast mode.
Quick Search mode screen example
Swipe vertically in the list to change pages.
Full Search button
Swipe to the right when using Full Search mode.
The iPod/iPhone operation screen display during video file
playback
Touch the screen while the iPod/iPhone playback screen is
displayed.
The iPod/iPhone operation screen is displayed.
• The operation screen changes to the visual screen in the iPod mode for 5
seconds after an operation has been performed.
Playback
1Press the (AUDIO) button to select iPod mode.
The display shows the iPod mode screen.
• You can select and change the source in the Menu screen (page 21)
or Favorite screen (page 24).
2Touch [ ] or [ ] or to select the desired track (file).
Returning to the beginning of the current (or previous) track (file):
Touch [ ].
Fast reverse the current track :
Touch and hold [ ].
Advancing to the beginning of the next track (file) :
Touch [ ].
Fast forward the current track :
Touch and hold [ ].
• The , buttons provide the same functions above.
3To pause playback, touch [/].
• If a song is playing on the iPod/iPhone before it is connected to the unit,
it will continue playing when it is connected.
• An episode may have several chapters. The chapter can be changed by
touching [ ] or [ ].
• If the artist, album or song name, created in iTunes, has too many
characters, songs may not be played back when connected to the unit.
Therefore, a maximum of 64 characters is recommended. The
maximum number of characters for the unit is 64.
• Some characters may not be correctly displayed.
Searching for a Music File
An iPod/iPhone can contain thousands of songs. For this reason, this
unit can make various searches using the search function as shown
below.
Using the Playlist/Artist/Album/Podcast/Audiobook/Genre/Composer/
Song search mode’s individual hierarchy, you can narrow down your
search as shown in the table below.
<MUSIC Search Menu>
In Quick Search mode, the list from the previous search mode is
displayed. For example, if the last time you searched for songs was is in
Albums, the Album list is displayed. If you have not used the search
mode, the list is not displayed in the Quick Search mode. In this case, go
to the Full Search mode.
In Quick Search mode, touch the desired list (for example,
Album list).
The selected Album is played.
• To switch into Quick Search mode, see in “iPod/iPhone main screen
example” (page 57).
• To search within an Album, go to the Full Search mode.
Hierarchy 1 Hierarchy 2 Hierarchy 3 Hierarchy 4
Playlists Songs — —
Artists Albums Songs —
Albums Songs — —
Songs — — —
Podcasts Episodes — —
Genres Artists Albums Songs
Composers Albums Songs —
Audiobooks — — —
Quick Search Mode
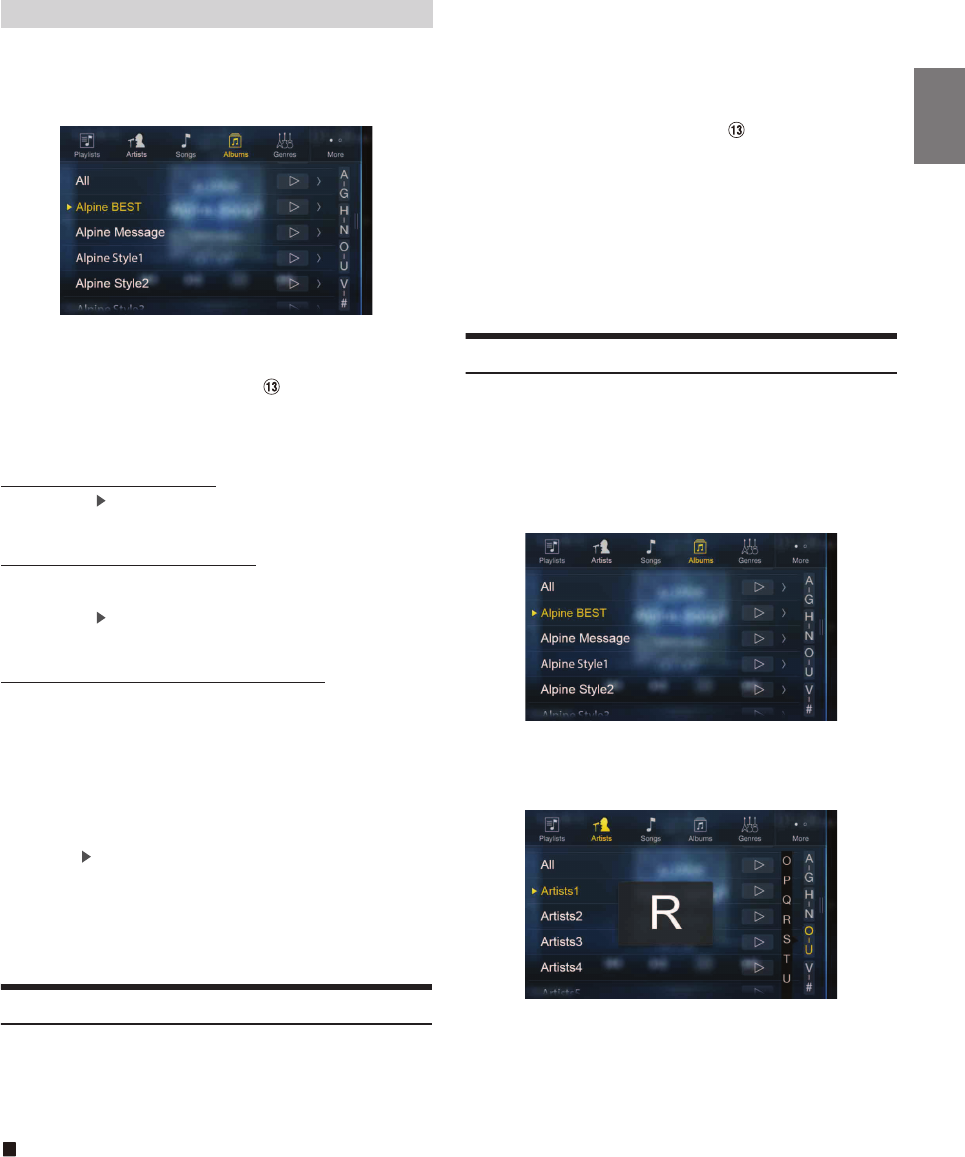
59-EN
For example: Searching by Artist name
The following example explains how an Artists search is performed.
Another search mode can be used for the same operation, although the
hierarchy differs.
1Touch [Artists] in the Full Search mode screen.
The Artists search screen is displayed.
• To switch into Full Search mode, see in “Quick Search mode
screen example” (page 58).
2Select the desired artist.
To play back the Artist directly
1 Touch [ ] of the artist’s name.
All songs of the selected artist are played back.
To search for the Album of the Artist
1 Touch the selected artist name.
The Albums search screen of the selected artist is displayed.
2 Touch [ ] of the desired album’s name.
All songs of the selected album are played back.
To search for a Song in the Album of the Artist
1 Touch the desired artist’s name.
All albums of the selected artist are displayed.
3Touch the desired album’s name.
All songs of the selected album are displayed.
4Touch the desired song’s name.
The selected song is played back.
• Touching [ ] of “All” will play back all songs in the list.
• Touching “All” will display the search list in the next hierarchy.
• An alphabet skip function is available. See “Alphabet Search Function”
(page 59).
• To switch the displayed list or return to the previous page in the Full
Search mode, see “About Basic Operation for List Screen” (page 18).
Searching for a Desired Video File
You can select a movie, music video, etc., from the list screen.
• Video search mode depends on the iPod/iPhone. If the specification of
the iPod/iPhone is changed, the search mode on this unit will also be
changed.
Examples for the video search mode
• Video Playlists
• Movies
• Music Videos, etc.
For example: Searching by Movie
The following example explains how a Movie search is performed. Another
search mode can be used for the same operation, although the hierarchy
differs.
1Touch the [Video] icon in the Full Search mode screen.
The Video search screen is displayed.
• To switch into Full Search mode, see in “Quick Search mode
screen example” (page 58).
• If the Video icon is not displayed, touch [More] to change the
Search mode.
2Touch [Movies].
The Movies search screen is displayed.
3Touch the desired movie.
The selected movie is played back.
Alphabet Search Function
The unit is provided with an alphabet search function for effective
searching. When you use this function in the search mode, you can
quickly search an artist or a song, etc.
This is an example of how to search Artist Name for names beginning
with “R”.
1Touch “O-U” of the alphabet group.
“O P Q R S T U” of the alphabet group “O - U” is displayed.
2Touch “R” you want to search.
Artist names beginning with “R” are displayed.
3Touch your desired artist name.
• If there are no names in the list beginning with that letter, the next letter
of the alphabet is searched.
For example: If there are no names beginning with “R,” the search list
begins with “S.”.
Full Search Mode