ALPS ALPINE WB1U733 Transmitter Assy-Lock System Remote Control User Manual Part3
Alps Electric Co., Ltd. Transmitter Assy-Lock System Remote Control Users Manual Part3
Contents
- 1. Users Manual Cover
- 2. Users Manual Part1
- 3. Users Manual Part2
- 4. Users Manual Part3
Users Manual Part3

6 In case of emergency
Flat tire ...........................................6-2
Tire pressure monitoring system..................6-2
Changing a flat tire .............................6-2
Jump starting .....................................6-7
Push starting......................................6-9
If your vehicle overheats ...........................6-10
Towing your vehicle ...............................6-11
Towing recommended by NISSAN ..............6-11
Vehicle recovery (freeing a stuck vehicle) .........6-13
੬REVIEW COPY—
2007 Versa (vrs)
Owners Manual—USA_English (nna)
03/06/06—arosenma
੭

TIRE PRESSURE MONITORING
SYSTEM
This vehicle is equipped with the tire pressure
monitoring system (TPMS). It monitors tire pres-
sure of all tires except the spare. When the low
tire pressure warning light is lit, one or more of
your tires is significantly under-inflated. If the
vehicle is being driven with low tire pressure, the
TPMS will activate and warn you of it by the low
tire pressure warning light. This system will acti-
vate only when the vehicle is driven at speeds
above 16 MPH (25 km/h). For more details, refer
to “Warning/indicator lights and audible remind-
ers” in the “Instruments and controls” section,
and “Tire pressure monitoring system (TPMS)” in
the “Starting and driving” section.
WARNING
●If the low tire pressure warning light
illuminates while driving, avoid sudden
steering maneuvers or abrupt braking,
reduce vehicle speed, pull off the road
to a safe location and stop the vehicle
as soon as possible. Serious vehicle
damage could occur and may lead to an
accident and could result in serious
personal injury. Check the tire pressure
for all four tires. Adjust the tire pressure
to the recommended COLD tire pres-
sure shown on the Tire and Loading
Information label to turn the low tire
pressure warning light OFF. If you have
a flat tire, replace it with a spare tire as
soon as possible.
●When a spare tire is mounted or a wheel
is replaced, tire pressure will not be
indicated, the TPMS will not function
and the low tire pressure warning light
will flash. Contact your NISSAN dealer
as soon as possible for tire replacement
and/or system resetting.
●Replacing tires with those not originally
specified by NISSAN could affect the
proper operation of the TPMS.
●Do not inject any tire liquid or aerosol
tire sealant into the tires, as this may
cause a malfunction of the tire pressure
sensors.
CHANGING A FLAT TIRE
If you have a flat tire, follow the instructions be-
low.
Stopping the vehicle
1. Safely move the vehicle off the road and
away from traffic.
2. Turn on the hazard warning flashers.
3. Park on a level surface and apply the parking
brake. Shift the manual transmission into R
(Reverse), or the CVT into P (Park).
4. Turn off the engine.
5. Raise the hood to warn other traffic and to
signal professional road assistance person-
nel that you need assistance.
6. Have all passengers get out of the vehicle
and stand in a safe place, away from traffic
and clear of the vehicle.
FLAT TIRE
6-2 In case of emergency
੬REVIEW COPY—
2007 Versa (vrs)
Owners Manual—USA_English (nna)
03/06/06—arosenma
੭
WARNING
●Make sure the parking brake is securely
applied and the manual transmission is
shifted into R (Reverse), or the CVT is
shifted into P (Park).
●Never change tires when the vehicle is
on a slope, ice or slippery areas. This is
hazardous.
●Never change tires if oncoming traffic is
close to your vehicle. Wait for profes-
sional road assistance.
Stopping the vehicle
1. Safely move the vehicle off the road and
away from traffic.
2. Turn on the hazard warning flashers.
3. Park on a level surface and apply the parking
brake. Shift the manual transmission into R
(Reverse), or the automatic transmission
into P (Park).
4. Turn off the engine.
5. Raise the hood to warn other traffic and to
signal professional road assistance person-
nel that you need assistance.
6. Have all passengers get out of the vehicle
and stand in a safe place, away from traffic
and clear of the vehicle.
WARNING
●Make sure the parking brake is securely
applied and the manual transmission is
shifted into R (Reverse), or the auto-
matic transmission into P (Park).
●Never change tires when the vehicle is
on a slope, ice or slippery areas. This is
hazardous.
●Never change tires if oncoming traffic is
close to your vehicle. Wait for profes-
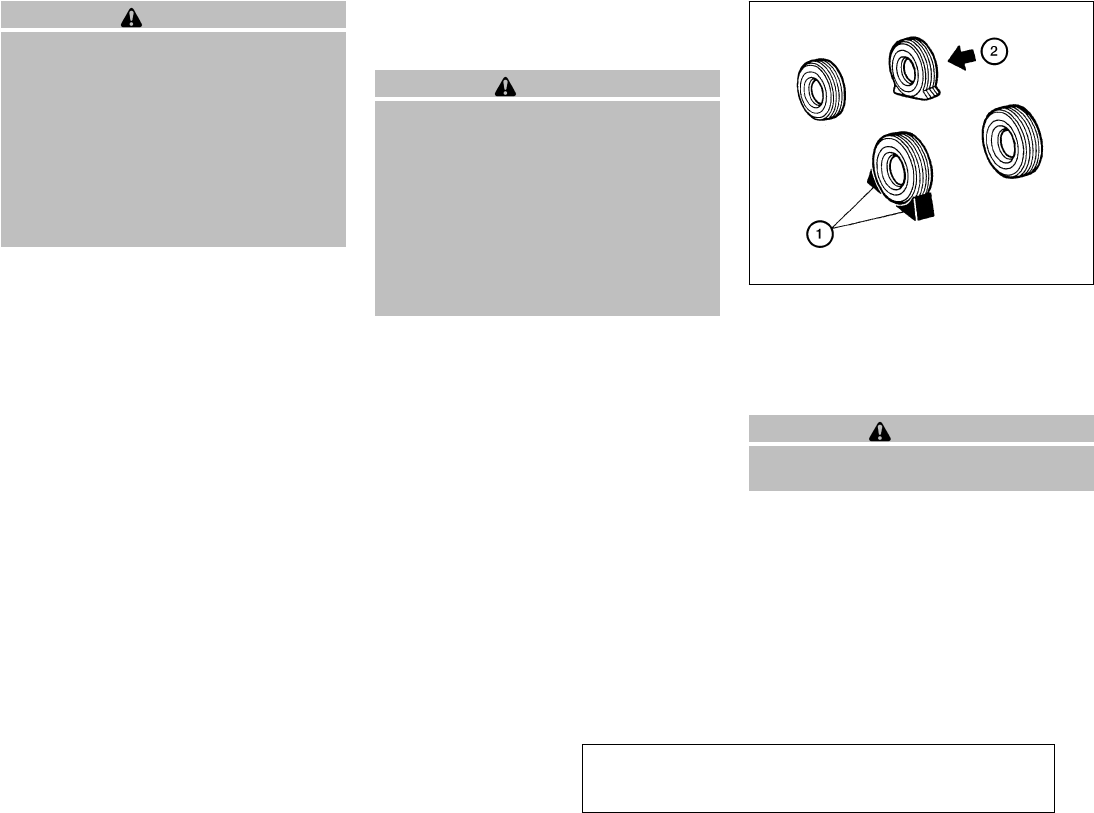
sional road assistance. Blocking wheels
Place suitable blocks ᭺
1at both the front and
back of the wheel diagonally opposite the flat tire
᭺
2to prevent the vehicle from moving when it is
jacked up.
WARNING
Be sure to block the wheel as the vehicle
may move and result in personal injury.
WCE0044
In case of emergency 6-3
੬REVIEW COPY—
2007 Versa (vrs)
Owners Manual—USA_English (nna)
03/06/06—arosenma
੭
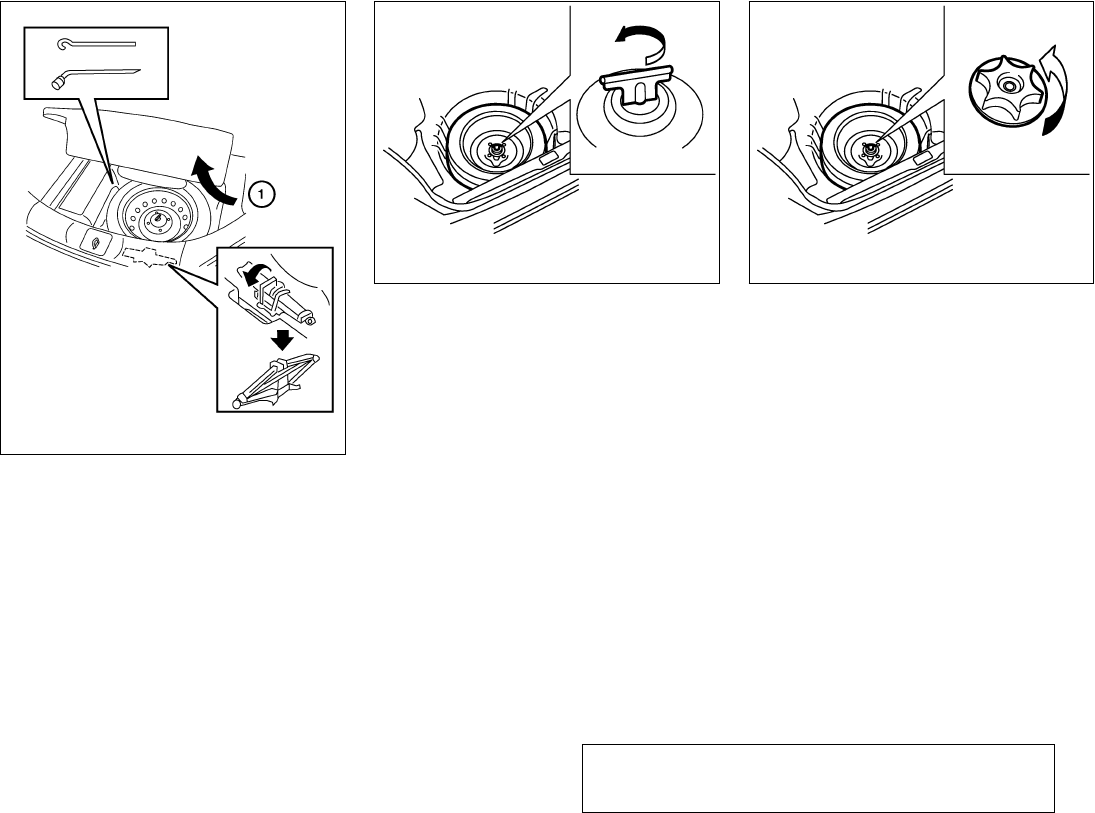
Getting the spare tire and tools
Open the hatch. Lift the floor board and spare tire
cover ᭺
A.
To remove the jack, take off the strap. If necessary
remove the spare tire first to easily access the
jack strap.
If spacers are equipped, remove them before
removing the spare tire.
WCE0129
Type A
SAI0484
Type B
SCE0608
6-4 In case of emergency
੬REVIEW COPY—
2007 Versa (vrs)
Owners Manual—USA_English (nna)
03/06/06—arosenma
੭

Removing wheel cover (if so
equipped)
CAUTION
Do not use your hands to pry off wheel
caps or wheel covers. Doing so could re-
sult in personal injury.
To remove the wheel cover, use the jack rod ᭺
1
as illustrated.
Apply cloth ᭺
2between the wheel and jack rod to
prevent damaging the wheel and wheel cover.
Use caution not to scratch the wheel cover or
wheel surface.
Jacking up vehicle and removing the
damaged tire
WARNING
●Never get under the vehicle while it is
supported only by the jack. If it is nec-
essary to work under the vehicle, sup-
port it with safety stands.
●Use only the jack provided with your
vehicle to lift the vehicle. Do not use the
jack provided with your vehicle on other
vehicles. The jack is designed for lifting
only your vehicle during a tire change.
●Use the correct jack-up points. Never
use any other part of the vehicle for jack
support.
●Never jack up the vehicle more than
necessary.
●Never use blocks on or under the jack.
●Do not start or run the engine while
vehicle is on the jack. It may cause the
vehicle to move. This is especially true
for vehicles with limited slip
differentials.
●Do not allow passengers to stay in the
vehicle while it is on the jack.
●Never run the engine with a wheel(s) off
the ground. It may cause the vehicle to
move.
SCE0630 WCE0131
In case of emergency 6-5
੬REVIEW COPY—
2007 Versa (vrs)
Owners Manual—USA_English (nna)
03/06/06—arosenma
੭
Always refer to the proper illustrations for the
correct placement and jack-up points for your
specific vehicle model and jack type.
Carefully read the caution label attached to
the jack body and the following instruc-
tions.
1. Loosen each wheel nut one or two turns by
turning counterclockwise with the wheel nut
wrench. Do not remove the wheel nuts
until the tire is off the ground.
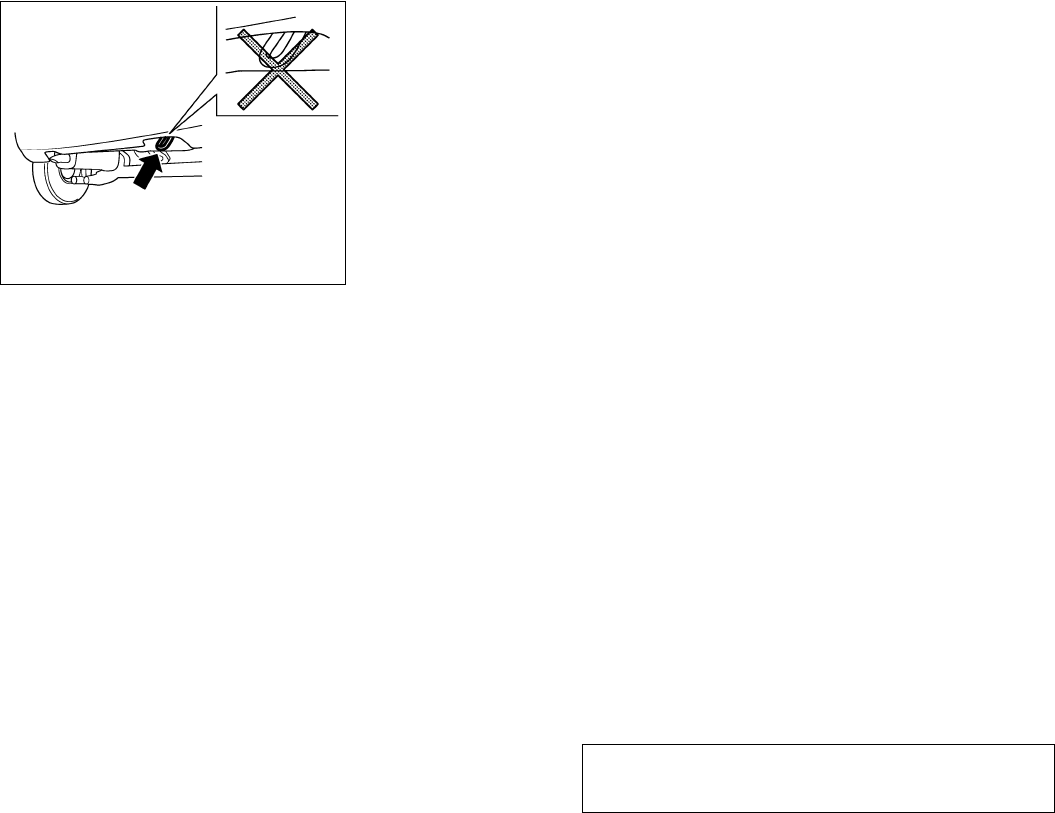
2. Place the jack directly under the jack-up
point as illustrated so the top of the jack
contacts the vehicle at the jack-up point.
Align the jack head between the two
notches in the front or the rear as shown.
Also fit the groove of the jack head between
the notches as shown.
The jack should be used on firm and
level ground.
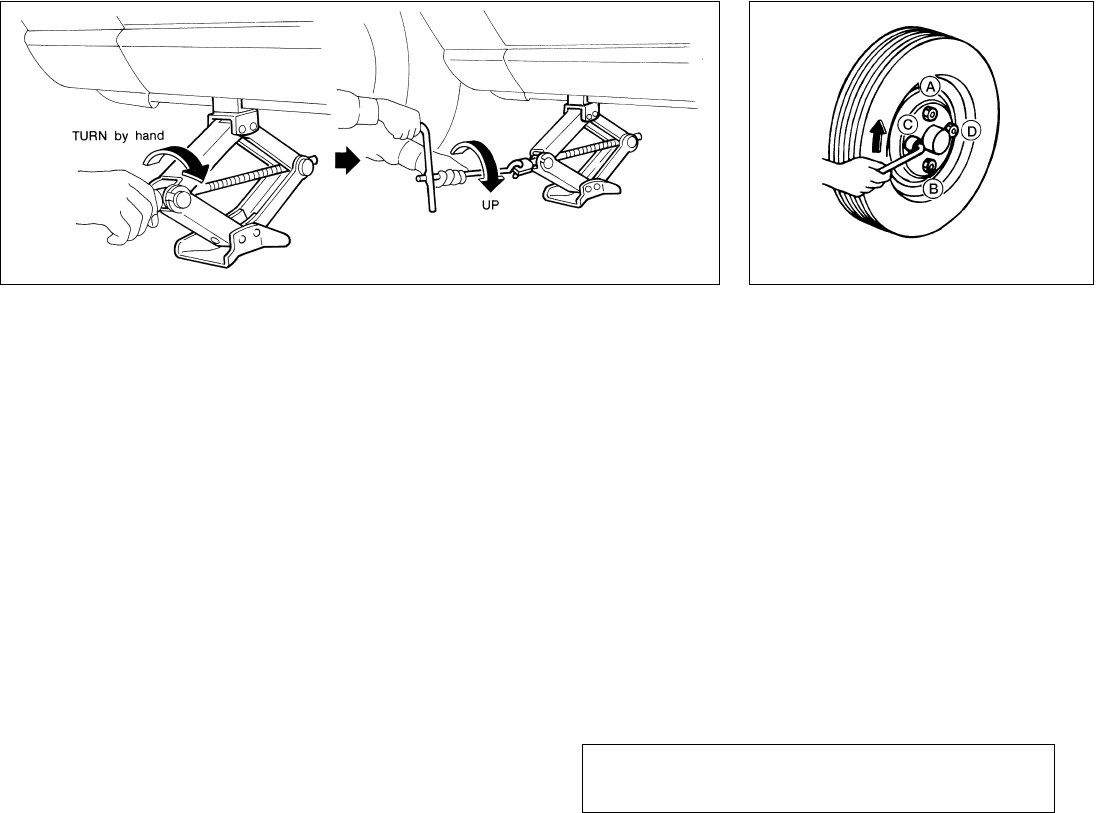
3. To lift the vehicle, securely hold the jack lever
and rod with both hands. Carefully raise the
vehicle until the tire clears the ground. Re-
move the wheel nuts, and then remove the
tire.
Installing the spare tire
The spare tire is designed for emergency
use. See specific instructions under the
heading “Wheels and tires” in the “Mainte-
nance and do-it-yourself” section of this
manual.
1. Clean any mud or dirt from the surface be-
tween the wheel and hub.
2. Carefully put the spare tire on and tighten
the wheel nuts finger tight.
3. With the wheel nut wrench, tighten wheel
nuts alternately and evenly as illustrated until
they are tight.
SCE0002 WCE0048
6-6 In case of emergency
੬REVIEW COPY—
2007 Versa (vrs)
Owners Manual—USA_English (nna)
03/06/06—arosenma
੭
4. Lower the vehicle slowly until the tire
touches the ground. Then, with the wheel
nut wrench, tighten the wheel nuts securely
in the sequence illustrated (᭺
A,᭺
B,᭺
C,᭺
D).
Lower the vehicle completely.
WARNING
●Incorrect wheel nuts or improperly
tightened wheel nuts can cause the
wheel to become loose or come off.
This could cause an accident.
●Do not use oil or grease on the wheel
studs or nuts. This could cause the nuts
to become loose.
●Retighten the wheel nuts when the ve-
hicle has been driven for 600 miles
(1,000 km) (also in cases of a flat tire,
etc.).
As soon as possible, tighten the wheel nuts
to the specified torque with a torque
wrench.
Wheel nut tightening torque:
83 ft-lb (113 N·m)
The wheel nuts must be kept tightened to
specification at all times. It is recom-
mended that wheel nuts be tightened to
specification at each lubrication interval.
Adjust tire pressure to the COLD pressure.
COLD pressure: After vehicle has been
parked for three hours or more or driven
less than 1 mile (1.6 km).
COLD tire pressures are shown on the Tire
and Loading Information label affixed to
the driver side center pillar.
5. Securely store the flat tire in the vehicle.
6. Install the jack in its storage area and tighten
the jack strap.
7. Place the spare tire cover and the hatch floor
carpeting over the damaged tire.
8. Close the hatch.
WARNING
●Always make sure that the spare tire
and jacking equipment are properly se-
cured after use. Such items can become
dangerous projectiles in an accident or
sudden stop.
●The spare tire is designed for emer-
gency use. See specific instructions un-
der the heading “Wheels and tires” in
the “Maintenance and do-it-yourself”
section of this manual.
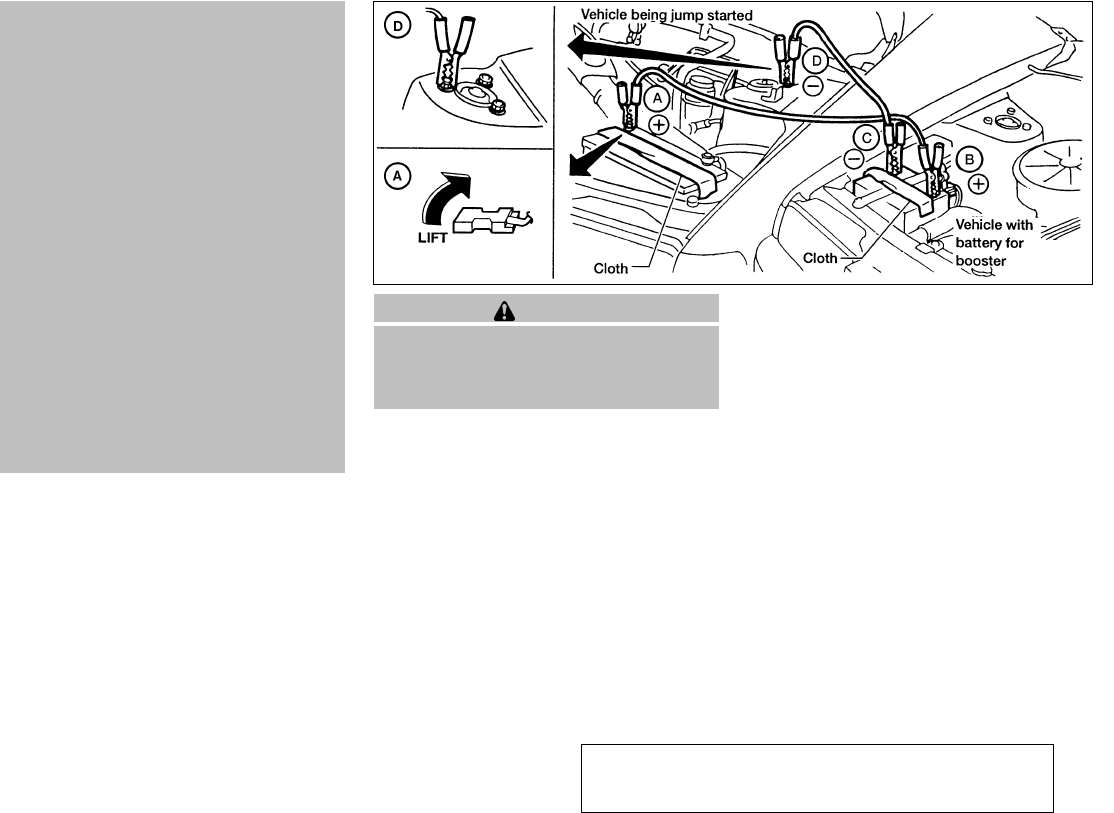
To start your engine with a booster battery, the
instructions and precautions below must be fol-
lowed.
WARNING
●If done incorrectly, jump starting can
lead to a battery explosion, resulting in
severe injury or death. It could also
damage your vehicle.
●Explosive hydrogen gas is always
present in the vicinity of the battery.
Keep all sparks and flames away from
the battery.
●Do not allow battery fluid to come into
contact with eyes, skin, clothing or
painted surfaces. Battery fluid is a cor-
rosive sulfuric acid solution which can
cause severe burns. If the fluid should
come into contact with anything, imme-
diately flush the contacted area with
water.
●Keep battery out of the reach of
children.
●The booster battery must be rated at 12
volts. Use of an improperly rated battery
can damage your vehicle.
JUMP STARTING
In case of emergency 6-7
੬REVIEW COPY—
2007 Versa (vrs)
Owners Manual—USA_English (nna)
03/06/06—arosenma
੭
●Whenever working on or near a battery,
always wear suitable eye protectors (for
example, goggles or industrial safety
spectacles) and remove rings, metal
bands, or any other jewelry. Do not lean
over the battery when jump starting.
●Do not attempt to jump start a frozen
battery. It could explode and cause se-
rious injury.
●Your vehicle has an automatic engine
cooling fan. It could come on at any
time. Keep hands and other objects
away from it.
●If the battery of a vehicle equipped with
the Intelligent Key system is dis-
charged, the ignition switch cannot be
moved from the LOCK position, even
using the mechanical key or the valet
key. Connect the jumper cables to an-
other vehicle, as in the case of a dis-
charged battery, and then the ignition
knob can be moved from the LOCK po-
sition. Then, jump start the vehicle.
WARNING
Always follow the instructions below.
Failure to do so could result in damage to
the charging system and cause personal
injury.
1. If the booster battery is in another vehicle,
position the two vehicles to bring their bat-
teries near each other.
Do not allow the two vehicles to touch.
2. Apply the parking brake. Move the shift lever
to N (Neutral) (manual transmission) or to P
(Park) (Continuously Variable Transmission).
Switch off all unnecessary electrical sys-
tems (lights, heater, air conditioner, etc.).
3. Remove vent caps on the battery (if so
equipped). Cover the battery with an old
cloth to reduce explosion hazard.
4. Connect jumper cables in the sequence il-
lustrated (᭺
A,᭺
B,᭺
C,᭺
D).
WCE0054
6-8 In case of emergency
੬REVIEW COPY—
2007 Versa (vrs)
Owners Manual—USA_English (nna)
03/06/06—arosenma
੭

CAUTION
●Always connect positive (ϩ) to positive
(ϩ) and negative (Ϫ) to body ground (for
example, strut mounting bolt, engine
lift bracket, etc.) — not to the battery.
●Make sure the jumper cables do not
touch moving parts in the engine com-
partment and that the cable clamps do
not contact any other metal.
5. Start the engine of the booster vehicle and
let it run for a few minutes.
For Intelligent Key system equipped models,
use the mechanical key to start the engine.
6. Keep the engine speed of the booster ve-
hicle at about 2,000 rpm, and start the en-
gine of the vehicle being jump started.
CAUTION
Do not keep the starter motor engaged for
more than 10 seconds. If the engine does
not start right away, turn the key off and
wait 3 to 4 seconds before trying again.
7. After starting the engine, carefully discon-
nect the negative cable and then the positive
cable.
8. Replace the vent caps (if so equipped). Be
sure to dispose of the cloth used to cover
the vent holes as it may be contaminated
with corrosive acid.
CAUTION
●Three-way catalyst equipped models
should not be started by pushing. The
three-way catalyst may be damaged.
●Continuously Variable Transmission
(CVT) models cannot be push-started or
tow-started. Attempting to do so may
cause transmission damage.
●For manual transmission models, never
try to start the vehicle by towing it.
When the engine starts, the forward
surge could cause the vehicle to collide
with the tow vehicle.
PUSH STARTING
In case of emergency 6-9
੬REVIEW COPY—
2007 Versa (vrs)
Owners Manual—USA_English (nna)
03/06/06—arosenma
੭
If your vehicle is overheating (indicated by an
extremely high temperature gauge reading), or if
you feel a lack of engine power, detect abnormal
noise, etc. take the following steps.
WARNING
●Do not continue to drive if your vehicle
overheats. Doing so could cause engine
damage or a vehicle fire.
●To avoid the danger of being scalded,
never remove the radiator cap while the
engine is still hot. When the radiator
cap is removed, pressurized hot water
will spurt out, possibly causing serious
injury.
●Do not open the hood if steam is com-
ing out.
1. Move the vehicle safely off the road, apply
the parking brake and move the shift lever to
N (Neutral) (manual transmission) or to P
(Park) (CVT).
Do not stop the engine.
2. Turn off the air conditioner (if so equipped).
Open all the windows, move the heater or air
conditioner temperature control to maximum
hot and fan control to high speed.
3. Get out of the vehicle. Look and listen for
steam or coolant escaping from the radiator
before opening the hood. (If steam or cool-
ant is escaping, turn off the engine.) Do not
open the hood further until no steam or
coolant can be seen.
4. Open the engine hood.
WARNING
If steam or water is coming from the en-
gine, stand clear to prevent getting
burned.
5. Visually check drive belts for damage or
looseness. Also check if the cooling fan is
running. The radiator hoses and radiator
should not leak water. If coolant is leaking,
the water pump belt is missing or loose, or
the cooling fan does not run, stop the en-
gine.
WARNING
Be careful not to allow your hands, hair,
jewelry or clothing to come into contact
with, or get caught in, engine belts or the
engine cooling fan. The engine cooling
fan can start at any time when the coolant
temperature is high.
6. After the engine cools down, check the cool-
ant level in the engine coolant reservoir tank
with the engine running. Add coolant to the
engine coolant reservoir tank if necessary.
Have your vehicle repaired at a NISSAN
dealer.
IF YOUR VEHICLE OVERHEATS
6-10 In case of emergency
੬REVIEW COPY—
2007 Versa (vrs)
Owners Manual—USA_English (nna)
03/06/06—arosenma
੭
When towing your vehicle, all State (Provincial in
Canada) and local regulations for towing must be
followed. Incorrect towing equipment could dam-
age your vehicle. Towing instructions are avail-
able from a NISSAN dealer. Local service opera-
tors are generally familiar with the applicable laws
and procedures for towing. To assure proper
towing and to prevent accidental damage to your
vehicle, NISSAN recommends having a service
operator tow your vehicle. It is advisable to have
the service operator carefully read the following
precautions:
WARNING
●Never ride in a vehicle that is being
towed.
●Never get under your vehicle after it has
been lifted by a tow truck.
CAUTION
●When towing, make sure that the trans-
mission, axles, steering system and
powertrain are in working condition. If
any unit is damaged, dollies must be
used.
●Always attach safety chains before
towing.
For information about towing your vehicle behind
a recreational vehicle (RV), refer to “Flat towing”
in the “Technical and consumer information” sec-
tion of this manual.
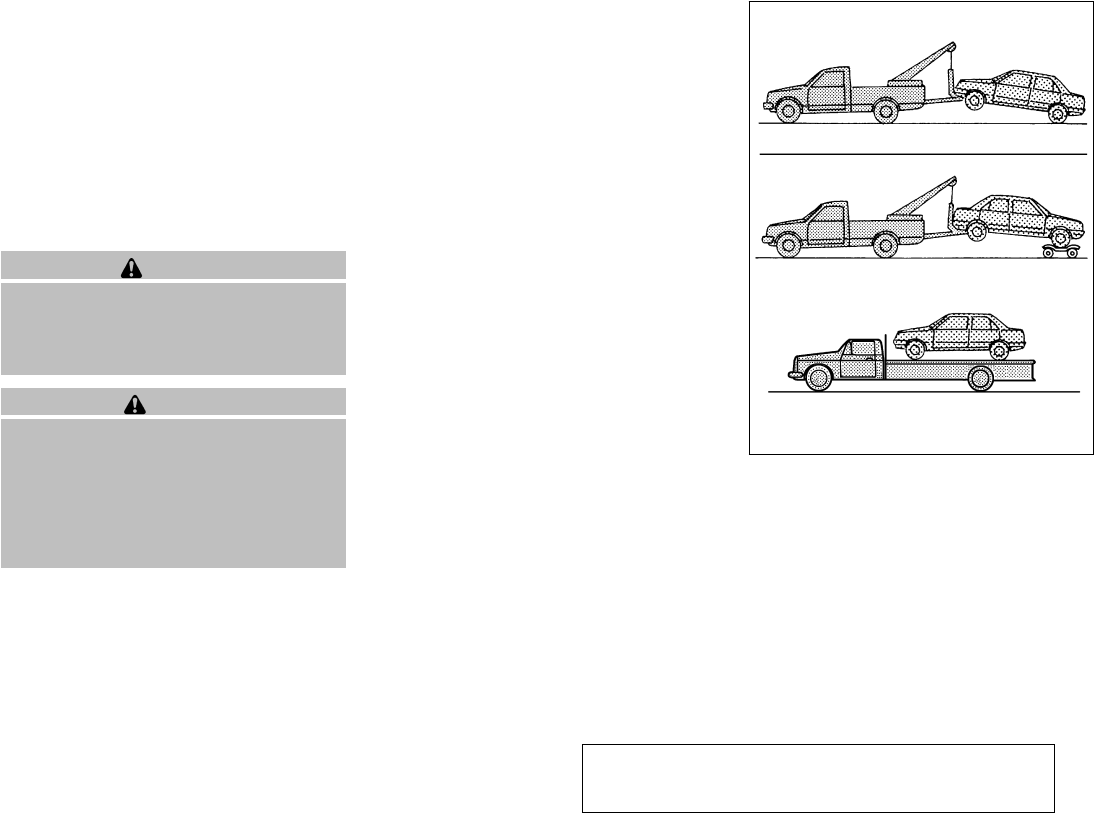
TOWING RECOMMENDED BY
NISSAN
NISSAN recommends that your vehicle be towed
with the driving (front) wheels off the ground or
place the vehicle on a flat bed truck as illustrated.
ACE0511
TOWING YOUR VEHICLE
In case of emergency 6-11
੬REVIEW COPY—
2007 Versa (vrs)
Owners Manual—USA_English (nna)
03/06/06—arosenma
੭
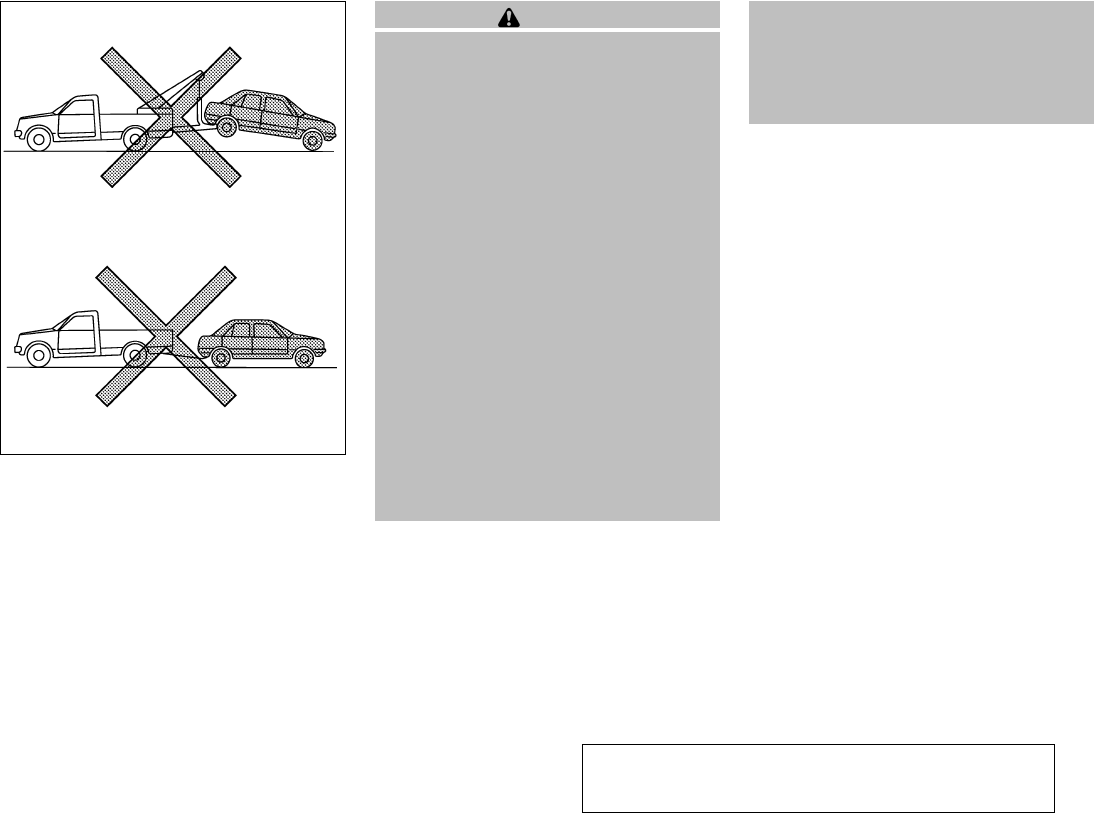
CAUTION
●Never tow Continuously Variable Trans-
mission (CVT) models with the front
wheels on the ground or four wheels on
the ground (forward or backward), as
this may cause serious and expensive
damage to the transmission. If it is nec-
essary to tow the vehicle with the rear
wheels raised always use towing dollies
under the front wheels.
●When towing Continuously Variable
Transmission (CVT) models with the
front wheels on towing dollies, or when
towing manual transmission models
with the front wheels on the ground:
– Turn the ignition key to the OFF po-
sition, and secure the steering wheel
in a straight-ahead position with a
rope or similar device. Never secure
the steering wheel by turning the ig-
nition key to the LOCK position. This
may damage the steering lock
mechanism.
– Move the gearshift lever to the N
(Neutral) position.
●When towing Continuously Variable
Transmission (CVT) or manual trans-
mission models with the rear wheels on
the ground (if you do not use towing
dollies): Always release the parking
brake.
SCE0199A
6-12 In case of emergency
੬REVIEW COPY—
2007 Versa (vrs)
Owners Manual—USA_English (nna)
03/06/06—arosenma
੭
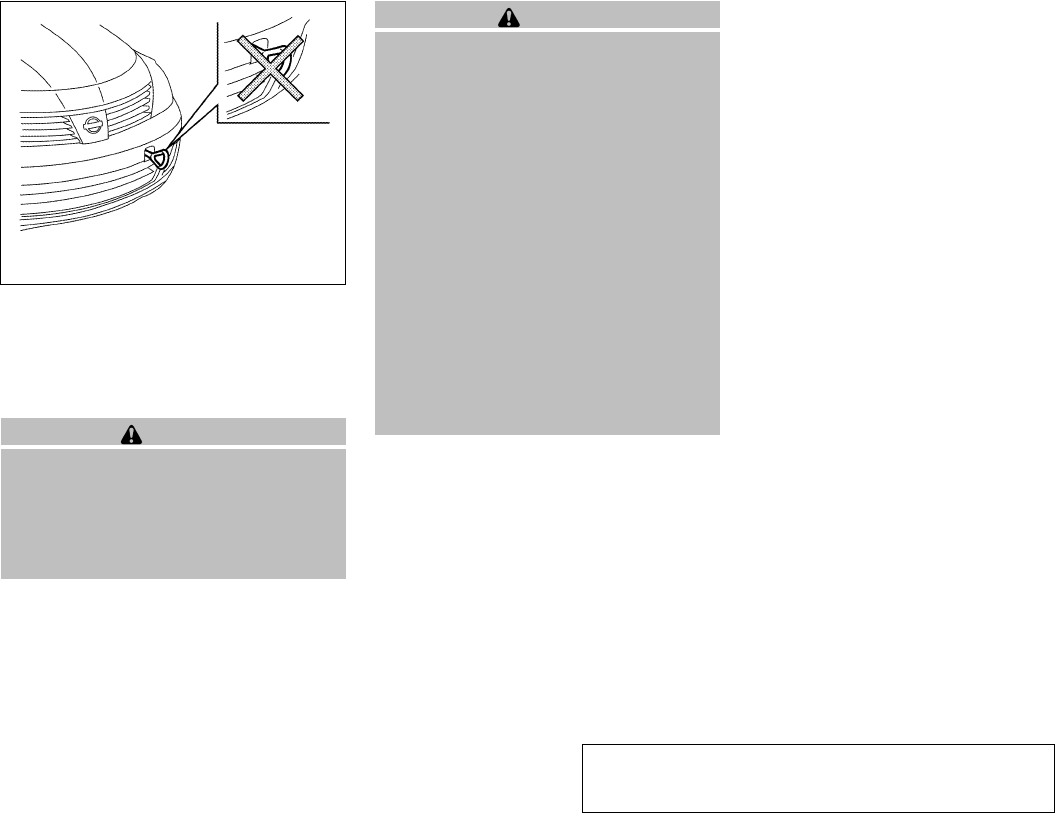
VEHICLE RECOVERY (freeing a stuck
vehicle)
Front
Do not use the hook to tow the vehicle.
WARNING
●Stand clear of a stuck vehicle.
●Do not spin your tires at high speed.
This could cause them to explode and
result in serious injury. Parts of your
vehicle could also overheat and be
damaged.
CAUTION
●Tow chains or cables must be attached
only to the main structural members of
the vehicle or the towing hooks (if so
equipped). Otherwise, the vehicle body
will be damaged.
●Do not use the vehicle tie downs to free
a vehicle stuck in sand, snow, mud, etc.
Never tow the vehicle using the vehicle
tie downs or recovery hooks.
●Always pull the cable straight out from
the front or rear of the vehicle. Never
pull the vehicle at an angle.
●Pulling devices should be routed so
they do not touch any part of the sus-
pension, steering, brake or cooling
systems.
●Pulling devices such as ropes or canvas
straps are not recommended for use in
vehicle towing or recovery.
If your vehicle is stuck in sand, snow, mud, etc.,
use the following procedure:
1. Make sure the area in front and behind the
vehicle is clear of obstructions.
2. Turn the steering wheel right and left to clear
an area around the front tires.
3. Slowly rock the vehicle forward and back-
ward.
●Shift back and forth between R (reverse)
and D (drive) (CVT models) or 1st (low)
and R (reverse) (manual transmission
models).
●Apply the accelerator as little as possible
to maintain the rocking motion.
●Release the accelerator pedal before
shifting between R and D (CVT models)
or 1st and R (manual transmission mod-
els).
●Do not spin the tires above 35 mph (55
km/h).
4. If the vehicle can not be freed after a few
tries, contact a professional towing service
to remove the vehicle.
WCE0132
In case of emergency 6-13
੬REVIEW COPY—
2007 Versa (vrs)
Owners Manual—USA_English (nna)
03/06/06—arosenma
੭
Rear
Do not use the hook to tow the vehicle.
SCE0578
6-14 In case of emergency
੬REVIEW COPY—
2007 Versa (vrs)
Owners Manual—USA_English (nna)
03/06/06—arosenma
੭

7 Appearance and care
Cleaning exterior ..................................7-2
Washing ......................................7-2
Waxing ........................................7-2
Removing spots ................................7-2
Underbody ....................................7-3
Aluminum alloy wheels ..........................7-3
Chrome parts ..................................7-3
Tire dressings ..................................7-3
Cleaning interior...................................7-3
Floor mats .....................................7-4
Seat belts .....................................7-4
Corrosion protection ...............................7-5
Most common factors contributing to vehicle
corrosion ......................................7-5
Environmental factors influence the rate of
corrosion ......................................7-5
To protect your vehicle from corrosion ............7-5
੬REVIEW COPY—
2007 Versa (vrs)
Owners Manual—USA_English (nna)
03/06/06—arosenma
੭

In order to maintain the appearance of your ve-
hicle, it is important to take proper care of it.
To protect the paint surfaces, please wash your
vehicle as soon as you can:
●after a rainfall to prevent possible damage
from acid rain.
●after driving on coastal roads.
●when contaminants such as soot, bird drop-
pings, tree sap, metal particles or bugs get
on the paint surface.
●when dust or mud builds up on the surface.
Whenever possible, store or park your vehicle
inside a garage or in a covered area.
When it is necessary to park outside, park in a
shady area or protect the vehicle with a body
cover.
Be careful not to scratch the paint surface
when putting on or removing the body
cover.
WASHING
Wash dirt off with a wet sponge and plenty of
water. Clean the vehicle thoroughly using a mild
soap, a special vehicle soap or general purpose
dishwashing liquid mixed with clean, lukewarm
(never hot) water.
CAUTION
●Do not wash the vehicle with strong
household soap, strong chemical deter-
gents, gasoline or solvents.
●Do not wash the vehicle in direct sun-
light or while the vehicle body is hot, as
the surface may become water-spotted.
●Avoid using tight-napped or rough
cloths, such as washing mitts. Care
must be taken when removing
caked-on dirt or other foreign sub-
stances so the paint surface is not
scratched or damaged.
Rinse the vehicle thoroughly with plenty of clean
water.
Inside flanges, seams and folds on the doors,
hatches and hood are particularly vulnerable to
the effects of road salt. Therefore, these areas
must be cleaned regularly. Take care that the
drain holes in the lower edge of the door are
open. Spray water under the body and in the
wheel wells to loosen the dirt and wash away
road salt.
A damp chamois can be used to dry the vehicle to
avoid water spots.
WAXING
Regular waxing protects the paint surface and
helps retain new vehicle appearance. Polishing is
recommended to remove built-up wax residue
and to avoid a weathered appearance before
re-applying wax.
A NISSAN dealer can assist you in choosing the
proper product.
●Wax your vehicle only after a thorough wash-
ing. Follow the instructions supplied with the
wax.
●Do not use a wax containing any abrasives,
cutting compounds or cleaners that may
damage the vehicle finish.
Machine compounding or aggressive polishing
on a base coat/clear coat paint finish may dull the
finish or leave swirl marks.
REMOVING SPOTS
Remove tar and oil spots, industrial dust, insects,
and tree sap as quickly as possible from the
surface of the paint to avoid lasting damage or
staining. Special cleaning products are available
at a NISSAN dealer or any automotive accessory
store.
CLEANING EXTERIOR
7-2 Appearance and care
੬REVIEW COPY—
2007 Versa (vrs)
Owners Manual—USA_English (nna)
03/06/06—arosenma
੭
UNDERBODY
In areas where road salt is used in winter, it is
necessary to clean the underbody regularly in
order to prevent dirt and salt from building up and
causing the acceleration of corrosion on the un-
derbody and suspension. Before the winter pe-
riod and again in the spring, the underseal must
be checked and, if necessary, retreated.
ALUMINUM ALLOY WHEELS
Wash the wheels regularly, especially during win-
ter months in areas where road salt is used. If not
removed, road salt can discolor the wheels.
CHROME PARTS
Clean all chrome parts regularly with a non-
abrasive chrome polish to maintain the finish.
TIRE DRESSINGS
NISSAN does not recommend the use of tire
dressings. Tire manufacturers apply a coating to
the tires to help reduce discoloration of the rub-
ber. If a tire dressing is applied to the tires, it may
react with the coating and form a compound. This
compound may come off the tire while driving and
stain the vehicle paint.
If you choose to use a tire dressing, take the
following precautions:
●Use a water-based tire dressing. The coat-
ing on the tire dissolves more easily with an
oil-based tire dressing.
●Apply a light coat of tire dressing to help
prevent it from entering the tire
tread/grooves (where it would be difficult to
remove).
●Wipe off excess tire dressing using a dry
towel. Make sure the tire dressing is com-
pletely removed from the tire tread/grooves.
●Allow the tire dressing to dry as recom-
mended by tire dressing manufacturer.
Occasionally remove loose dust from the interior
trim, plastic parts and seats using a vacuum
cleaner or soft bristled brush. Wipe the vinyl and
leather surfaces with a clean, soft cloth damp-
ened in mild soap solution, then wipe clean with a
dry, soft cloth.
Regular care and cleaning is required in order to
maintain the appearance of the leather.
Before using any fabric protector, read the manu-
facturer’s recommendations. Some fabric pro-
tectors contain chemicals that may stain or
bleach the seat material.
Use a cloth dampened only with water to clean
the meter and gauge lens.
CAUTION
●Never use benzine, thinner or any simi-
lar material.
●Small dirt particles can be abrasive and
damaging to leather surfaces and
should be removed promptly. Do not
use saddle soap, car waxes, polishes,
oils, cleaning fluids, solvents, deter-
gents or ammonia-based cleaners as
they may damage the leather’s natural
finish.
CLEANING INTERIOR
Appearance and care 7-3
੬REVIEW COPY—
2007 Versa (vrs)
Owners Manual—USA_English (nna)
03/06/06—arosenma
੭
●Never use fabric protectors unless rec-
ommended by the manufacturer.
●Do not use glass or plastic cleaner on
meter or gauge lens covers. It may dam-
age the lens cover.
FLOOR MATS
The use of genuine NISSAN floor mats can ex-
tend the life of your vehicle carpet and make it
easier to clean the interior. No matter what
mats are used, be sure they are fitted for
your vehicle and are properly positioned in
the footwell to prevent interference with
pedal operation. Mats should be maintained
with regular cleaning and replaced if they be-
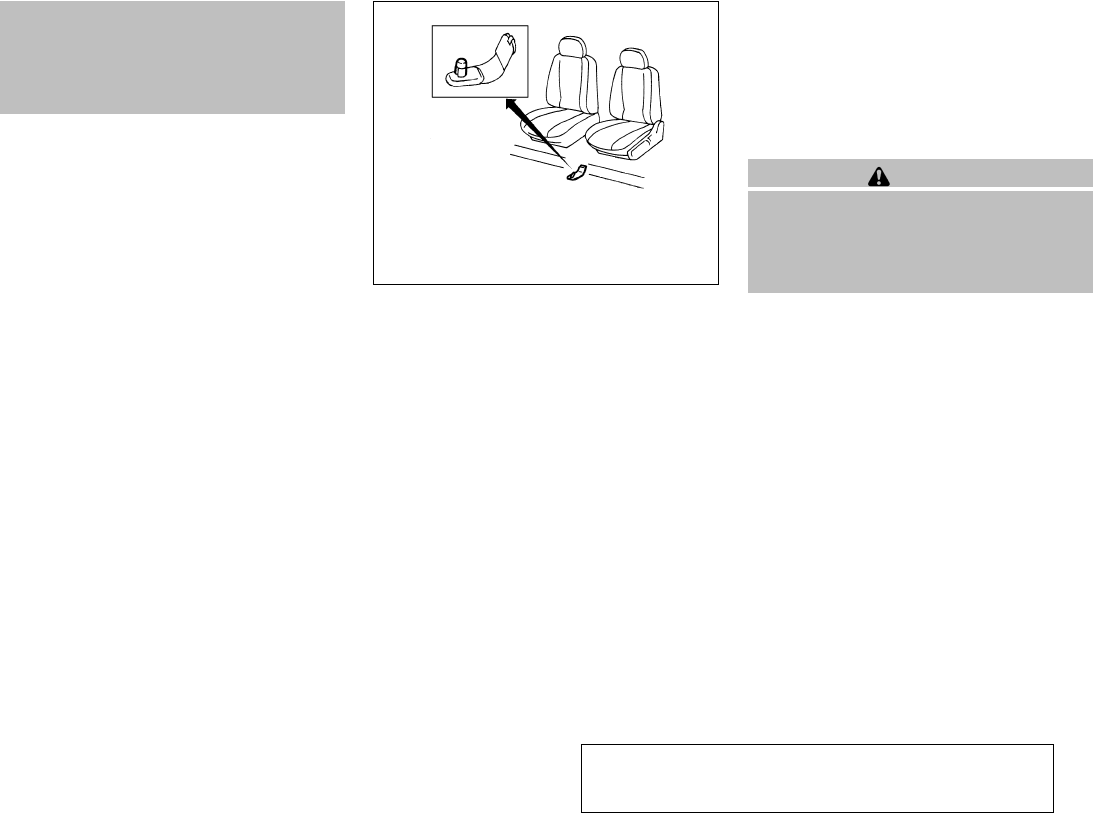
come excessively worn. Floor mat positioning aid (driver’s side
only)
This vehicle includes a front floor mat bracket to
act as a floor mat positioning aid. NISSAN floor
mats have been specially designed for your ve-
hicle model. The driver’s side floor mat has a
grommet hole incorporated in it. Position the mat
by placing the floor mat bracket hook through the
floor mat grommet hole while centering the mat in
the footwell.
Periodically check to make certain the mats are
properly positioned.
SEAT BELTS
The seat belts can be cleaned by wiping them
with a sponge dampened in a mild soap solution.
Allow the belts to dry completely in the shade
before using them. See “Seat belt maintenance”
in the “Safety – Seats, seat belts and supplemen-
tal restraint system” section of this manual.
WARNING
Do not allow wet seat belts to roll up in the
retractor. NEVER use bleach, dye or
chemical solvents to clean the seat belts,
since these materials may severely
weaken the seat belt webbing.
WAI0006
7-4 Appearance and care
੬REVIEW COPY—
2007 Versa (vrs)
Owners Manual—USA_English (nna)
03/06/06—arosenma
੭

MOST COMMON FACTORS
CONTRIBUTING TO VEHICLE
CORROSION
●The accumulation of moisture-retaining dirt
and debris in body panel sections, cavities,
and other areas.
●Damage to paint and other protective coat-
ings caused by gravel and stone chips or
minor traffic accidents.
ENVIRONMENTAL FACTORS
INFLUENCE THE RATE OF
CORROSION
Moisture
Accumulation of sand, dirt and water on the ve-
hicle body underside can accelerate corrosion.
Wet floor coverings will not dry completely inside
the vehicle, and should be removed for drying to
avoid floor panel corrosion.
Relative humidity
Corrosion will be accelerated in areas of high
relative humidity, especially those areas where
the temperatures stay above freezing and where
atmospheric pollution exists and road salt is
used.
Temperature
High temperatures accelerate the rate of corro-
sion to those parts which are not well ventilated.
Air pollution
Industrial pollution, the presence of salt in the air
in coastal areas, or heavy road salt use acceler-
ates the corrosion process. Road salt also accel-
erates the disintegration of paint surfaces.
TO PROTECT YOUR VEHICLE
FROM CORROSION
●Wash and wax your vehicle often to keep the
vehicle clean.
●Always check for minor damage to the paint
and repair it as soon as possible.
●Keep drain holes at the bottom of the doors
open to avoid water accumulation.
●Check the underbody for accumulation of
sand, dirt or salt. If present, wash with water
as soon as possible.
CAUTION
●NEVER remove dirt, sand or other de-
bris from the passenger compartment
by washing it out with a hose. Remove
dirt with a vacuum cleaner or broom.
●Never allow water or other liquids to
come in contact with electronic compo-
nents inside the vehicle as this may
damage them.
Chemicals used for road surface de-icing are
extremely corrosive. They accelerate corrosion
and deterioration of underbody components
such as the exhaust system, fuel and brake lines,
brake cables, floor pan and fenders.
In winter, the underbody must be cleaned
periodically.
For additional protection against rust and corro-
sion, which may be required in some areas, con-
sult a NISSAN dealer.
CORROSION PROTECTION
Appearance and care 7-5
੬REVIEW COPY—
2007 Versa (vrs)
Owners Manual—USA_English (nna)
03/06/06—arosenma
੭
7-6 Appearance and care
MEMO

8 Maintenance and do-it-yourself
Maintenance requirements..........................8-2
General maintenance . . ............................8-2
Explanation of general maintenance items .........8-2
Maintenance precautions ...........................8-4
Engine compartment check locations ................8-6
Engine cooling system .............................8-7
Checking engine coolant level ...................8-7
Changing engine coolant ........................8-8
Engine oil.........................................8-8
Checking engine oil level ........................8-8
Changing engine oil ............................8-9
Changing engine oil filter .......................8-10
Continuously variable transmission (CVT) fluid .......8-11
Brake and clutch fluid . . ...........................8-11
Brake fluid ....................................8-11
Clutch fluid ...................................8-12
Window washer fluid . . ...........................8-12
Window washer fluid reservoir ..................8-12
Battery ..........................................8-13
Jump starting .................................8-14
Drive belts .......................................8-14
Spark plugs......................................8-15
Replacing spark plugs .........................8-15
Air cleaner .......................................8-16
Windshield wiper blades ..........................8-16
Cleaning .....................................8-16
Replacing ....................................8-17
Brake Pedal......................................8-18
Fuses ...........................................8-19
Engine compartment...........................8-19
Passenger compartment .......................8-21
Battery replacement ..............................8-22
Keyfob .......................................8-22
Intelligent key battery ..........................8-23
Lights ...........................................8-24
Headlights....................................8-24
Exterior and interior lights.......................8-25
Wheels and tires .................................8-28
Tire pressure..................................8-28
Tire labeling...................................8-31
Types of tires..................................8-34
Tire chains....................................8-35
Changing wheels and tires .....................8-35
੬REVIEW COPY—
2007 Versa (vrs)
Owners Manual—USA_English (nna)
03/06/06—arosenma
੭

Your new NISSAN has been designed to have
minimum maintenance requirements with longer
service intervals to save you both time and
money. However, some day-to-day and regular
maintenance is essential to maintain your NIS-
SAN’s good mechanical condition, as well as its
emission and engine performance.
It is the owner’s responsibility to make sure that
the scheduled maintenance, as well as general
maintenance, is performed.
As the vehicle owner, you are the only one who
can ensure that your vehicle receives proper
maintenance. You are a vital link in the mainte-
nance chain.
Scheduled maintenance
For your convenience, both required and optional
scheduled maintenance items are described and
listed in your “NISSAN Service and Maintenance
Guide.” You must refer to that guide to ensure
that necessary maintenance is performed on your
NISSAN at regular intervals.
General maintenance
General maintenance includes those items which
should be checked during normal day-to-day op-
eration. They are essential for proper vehicle op-
eration. It is your responsibility to perform these
maintenance procedures regularly as prescribed.
Performing general maintenance checks requires
minimal mechanical skill and only a few general
automotive tools.
These checks or inspections can be done by you,
a qualified technician, or, if you prefer, a NISSAN
dealer.
Where to go for service
If maintenance service is required or your vehicle
appears to malfunction, have the systems
checked and corrected by a NISSAN dealer.
NISSAN technicians are well-trained specialists
who are kept up-to-date with the latest service
information through technical bulletins, service
tips, and in-dealership training programs. They
are completely qualified to work on NISSAN ve-
hicles before they work on your vehicle, rather
than after they have worked on it.
You can be confident that a NISSAN dealer’s
service department performs the best job to meet
the maintenance requirements on your vehicle —
in a reliable and economical way.
During the normal day-to-day operation of the
vehicle, general maintenance should be per-
formed regularly as prescribed in this section. If
you detect any unusual sounds, vibrations or
smells, be sure to check for the cause or have a
NISSAN dealer do it promptly. In addition, you
should notify a NISSAN dealer if you think that
repairs are required.
When performing any checks or maintenance
work, closely observe the “Maintenance precau-
tions” later in this section.
EXPLANATION OF GENERAL
MAINTENANCE ITEMS
Additional information on the following
items with “*” is found later in this section.
Outside the vehicle
The maintenance items listed here should be
performed from time to time, unless otherwise
specified.
Doors and engine hood Check that the doors
and engine hood operate properly. Also ensure
that all latches lock securely. Lubricate hinges,
latches, latch pins, rollers and links as necessary.
Make sure that the secondary latch keeps the
hood from opening when the primary latch is
released.
MAINTENANCE REQUIREMENTS GENERAL MAINTENANCE
8-2 Maintenance and do-it-yourself
੬REVIEW COPY—
2007 Versa (vrs)
Owners Manual—USA_English (nna)
03/06/06—arosenma
੭

When driving in areas using road salt or other
corrosive materials, check lubrication frequently.
Lights* Clean the headlights on a regular basis.
Make sure that the headlights, stop lights, tail
lights, turn signal lights, and other lights are all
operating properly and installed securely. Also
check headlight aim.
Road wheel nuts* When checking the tires,
make sure no wheel nuts are missing, and check
for any loose wheel nuts. Tighten if necessary.
Tire rotation* Tires should be rotated every
7,500 miles (12,000 km).
Tires* Check the pressure with a gauge often
and always prior to long distance trips. If neces-
sary, adjust the pressure in all tires, including the
spare, to the pressure specified. Check carefully
for damage, cuts or excessive wear.
Wheel alignment and balance If the vehicle
should pull to either side while driving on a
straight and level road, or if you detect uneven or
abnormal tire wear, there may be a need for wheel
alignment. If the steering wheel or seat vibrates at
normal highway speeds, wheel balancing may be
needed.
●For additional information regarding tires,
refer to “Important Tire Safety Information”
(US) or “Tire Safety Information” (Canada) in
the Warranty Information Booklet .
Windshield
Clean the windshield on a regular ba-
sis. Check the windshield at least every six months
for cracks or other damage. Have a damaged wind-
shield repaired by a qualified repair facility.
Windshield wiper blades* Check for cracks or
wear if they do not wipe properly.
Inside the vehicle
The maintenance items listed here should be
checked on a regular basis, such as when performing
periodic maintenance, cleaning the vehicle, etc.
Additional information on the following
items with an “*”is found later in this section.
Accelerator pedal Check the pedal for smooth
operation and make sure the pedal does not bind
or require uneven effort. Keep the floor mat away
from the pedal.
Brake pedal* Check the pedal for smooth op-
eration. If the brake pedal suddenly goes down
further than normal, the pedal feels spongy or the
vehicle seems to take longer to stop, see a
NISSAN dealer immediately. Keep the floor mat
away from the pedal.
Brakes Check that the brakes do not pull the
vehicle to one side when applied.
Continuously Variable Transmission (CVT)
P (Park) position mechanism: On a fairly
steep hill check that the vehicle is held securely
with the selector lever in the P (Park) position
without applying any brakes.
Clutch pedal*
Make sure the pedal operates
smoothly and check that it has the proper free travel.
Parking brake Check the parking brake opera-
tion regularly. The vehicle should be securely held
on a fairly steep hill with only the parking brake
applied. If the parking brake needs adjusted, see
a NISSAN dealer.
Seats Check seat position controls such as seat
adjusters, seatback recliner, etc. to ensure they
operate smoothly and all latches lock securely in
every position. Check that the head restraints
move up and down smoothly and the locks (if so
equipped) hold securely in all latched positions.
Seat belts Check that all parts of the seat belt
system (for example, buckles, anchors, adjusters
and retractors) operate properly and smoothly,
and are installed securely. Check the belt web-
bing for cuts, fraying, wear or damage.
Steering wheel Check for changes in the steer-
ing system, such as excessive freeplay, hard
steering or strange noises.
Warning lights and chimes Make sure all
warning lights and chimes are operating properly.
Windshield wiper and washer* Check that
the wipers and washer operate properly and that
the wipers do not streak.
Maintenance and do-it-yourself 8-3
੬REVIEW COPY—
2007 Versa (vrs)
Owners Manual—USA_English (nna)
03/07/06—cathy
੭

Windshield defroster Check that the air
comes out of the defroster outlets properly and in
sufficient quantity when operating the heater or
air conditioner.
Under the hood and vehicle
The maintenance items listed here should be
checked periodically (for example, each time you
check the engine oil or refuel).
Battery* Check the fluid level in each cell. It
should be between the MAX and MIN lines. Ve-
hicles operated in high temperatures or under
severe conditions require frequent checks of the
battery fluid level.
Brake and clutch fluid levels* Make sure that
the brake and clutch fluid level is between the
MIN and MAX lines on the reservoir.
Engine coolant level* Check the coolant level
when the engine is cold.
Engine drive belts* Make sure the drive belts
are not frayed, worn, cracked or oily.
Engine oil level* Check the level after parking
the vehicle on a level surface with the engine off.
Wait more than 10 minutes for the oil to drain
back into the oil pan.
Exhaust system Make sure there are no loose
supports, cracks or holes. If the sound of the
exhaust seems unusual or there is a smell of
exhaust fumes, immediately have the exhaust
system inspected by a NISSAN dealer. See the
carbon monoxide warning in the “Starting and
driving” section of this manual.
Fluid leaks Check under the vehicle for fuel, oil,
water or other fluid leaks after the vehicle has
been parked for a while. Water dripping from the
air conditioner after use is normal. If you should
notice any leaks or if gasoline fumes are evident,
check for the cause and have it corrected imme-
diately.
Radiator and hoses Check the front of the
radiator and clean off any dirt, insects, leaves,
etc., that may have accumulated. Make sure the
hoses have no cracks, deformation, rot or loose
connections.
Underbody The underbody is frequently ex-
posed to corrosive substances such as those
used on icy roads or to control dust. It is very
important to remove these substances from the
underbody, otherwise rust may form on the floor
pan, frame, fuel lines and exhaust system. At the
end of winter, the underbody should be thor-
oughly flushed with plain water, in those areas
where mud and dirt may have accumulated. See
the “Appearance and care” section of this
manual.
Windshield washer fluid* Check that there is
adequate fluid in the reservoir.
When performing any inspection or maintenance
work on your vehicle, always take care to prevent
serious accidental injury to yourself or damage to
the vehicle. The following are general precau-
tions which should be closely observed.
WARNING
●Park the vehicle on a level surface, ap-
ply the parking brake securely and
block the wheels to prevent the vehicle
from moving. For manual transmission
models, move the shift lever to N (Neu-
tral). For CVT models, move the selector
lever to P (Park).
●Be sure the ignition key is in the OFF or
LOCK position when performing any
parts replacement or repairs.
●Never leave the engine or the CVT re-
lated component harness connector
disconnected while the ignition switch
is in the ON position.
●Never connect or disconnect the battery
or any transistorized component while
the ignition switch is in the ON position.
MAINTENANCE PRECAUTIONS
8-4 Maintenance and do-it-yourself
੬REVIEW COPY—
2007 Versa (vrs)
Owners Manual—USA_English (nna)
03/06/06—arosenma
੭
●Your vehicle is equipped with an auto-
matic engine cooling fan. It may come
on at any time without warning, even if
the ignition key is in the OFF position
and the engine is not running. To avoid
injury, always disconnect the negative
battery cable before working near the
fan.
●If you must work with the engine run-
ning, keep your hands, clothing, hair
and tools away from moving fans, belts
and any other moving parts.
●It is advisable to secure or remove any
loose clothing and remove any jewelry,
such as rings, watches, etc. before
working on your vehicle.
●Always wear eye protection whenever
you work on your vehicle.
●If you must run the engine in an en-
closed space such as a garage, be sure
there is proper ventilation for exhaust
gases to escape.
●Never get under the vehicle while it is
supported only by a jack. If it is neces-
sary to work under the vehicle, support
it with safety stands.
●Keep smoking materials, flame and
sparks away from the fuel tank and
battery.
●On gasoline engine models with the
multiport fuel injection (MFI) system,
the fuel filter or fuel lines should be
serviced by a NISSAN dealer because
the fuel lines are under high pressure
even when the engine is off.
CAUTION
●Do not work under the hood while the
engine is hot. Turn the engine off and
wait until it cools down.
●Avoid contact with used engine oil and
coolant. Improperly disposed engine
oil, engine coolant and/or other vehicle
fluids can damage the environment. Al-
ways conform to local regulations for
disposal of vehicle fluid.
This “Maintenance and do-it-yourself” section
gives instructions regarding only those items
which are relatively easy for an owner to perform.
A genuine NISSAN service manual is also avail-
able. See “Owner’s Manual/Service Manual or-
der information” in the “Technical and consumer
information” section of this manual.
You should be aware that incomplete or improper
servicing may result in operating difficulties or
excessive emissions, and could affect warranty
coverage. If in doubt about any servicing,
have it done by a NISSAN dealer.
Maintenance and do-it-yourself 8-5
੬REVIEW COPY—
2007 Versa (vrs)
Owners Manual—USA_English (nna)
03/06/06—arosenma
੭
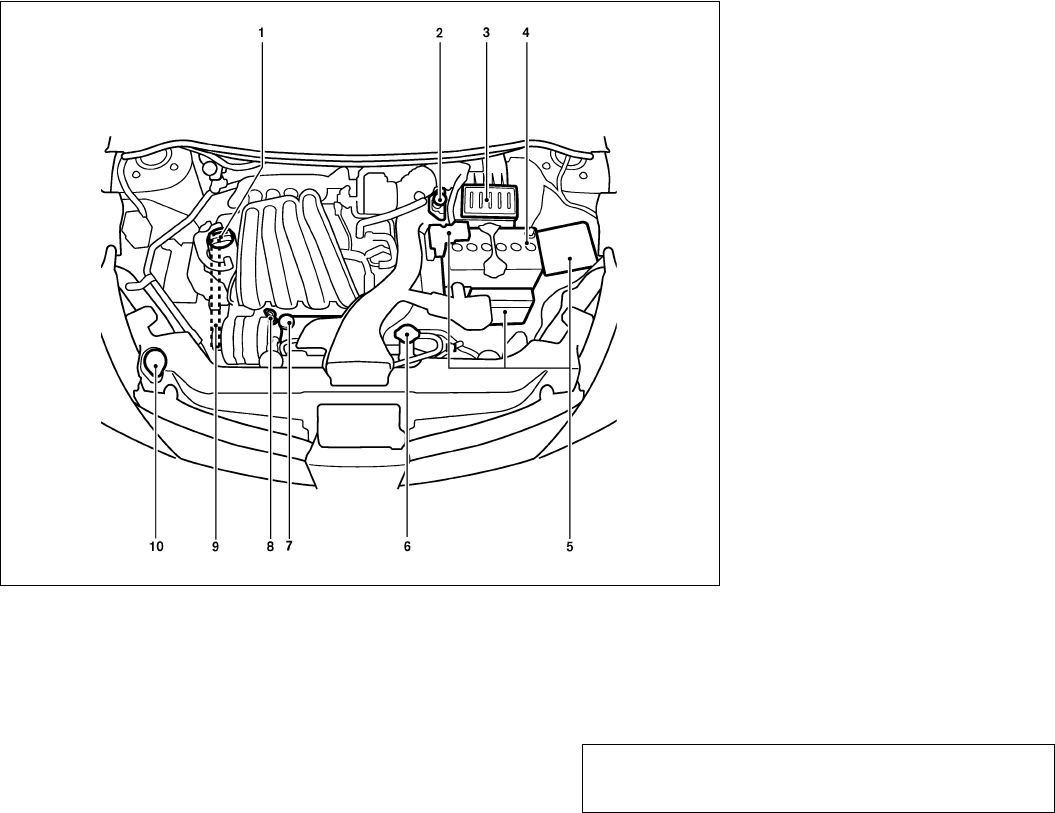
1. Engine oil filler cap
2. Brake and clutch (*1) fluid reservoir
3. Air cleaner
4. Battery
5. Fuse/Fusible link box
6. Radiator cap
7. Engine coolant reservoir
8. Engine oil dipstick
9. Drive belt location
10. Windshield washer fluid reservoir
*1: For Manual Transmission (M/T) model
NOTE:
Engine cover removed for clarity.
WDI0519
ENGINE COMPARTMENT CHECK
LOCATIONS
8-6 Maintenance and do-it-yourself
੬REVIEW COPY—
2007 Versa (vrs)
Owners Manual—USA_English (nna)
03/06/06—arosenma
੭
The engine cooling system is filled at the factory
with Genuine NISSAN Long Life
Antifreeze/Coolant to provide year-round anti-
freeze and coolant protection. The anti-freeze
solution contains rust and corrosion inhibitors.
Additional engine cooling system additives are
not necessary.
WARNING
●Never remove the radiator or coolant
reservoir cap when the engine is hot.
Wait until the engine and radiator cool
down. Serious burns could be caused
by high pressure fluid escaping from
the radiator. See precautions in “If your
vehicle overheats” found in the “In case
of emergency” section of this manual.
●The radiator is equipped with a pres-
sure type radiator cap. To prevent en-
gine damage, use only a genuine
NISSAN radiator cap.
Outside temperature
down to
Genuine
NISSAN
Long Life
Antifreeze/
Coolant or
equivalent
Demineral-
ized or dis-
tilled water
°C °F
-35 -30 50% 50%
CAUTION
When adding or replacing coolant, be sure
to use only a Genuine NISSAN Long Life
Antifreeze/Coolant (green) or equivalent
with the proper mixture ratio of 50% anti-
freeze and 50% demineralized or distilled
water. The use of other types of coolant
solutions or coolant colors, such as or-
ange, may damage the engine cooling
system.
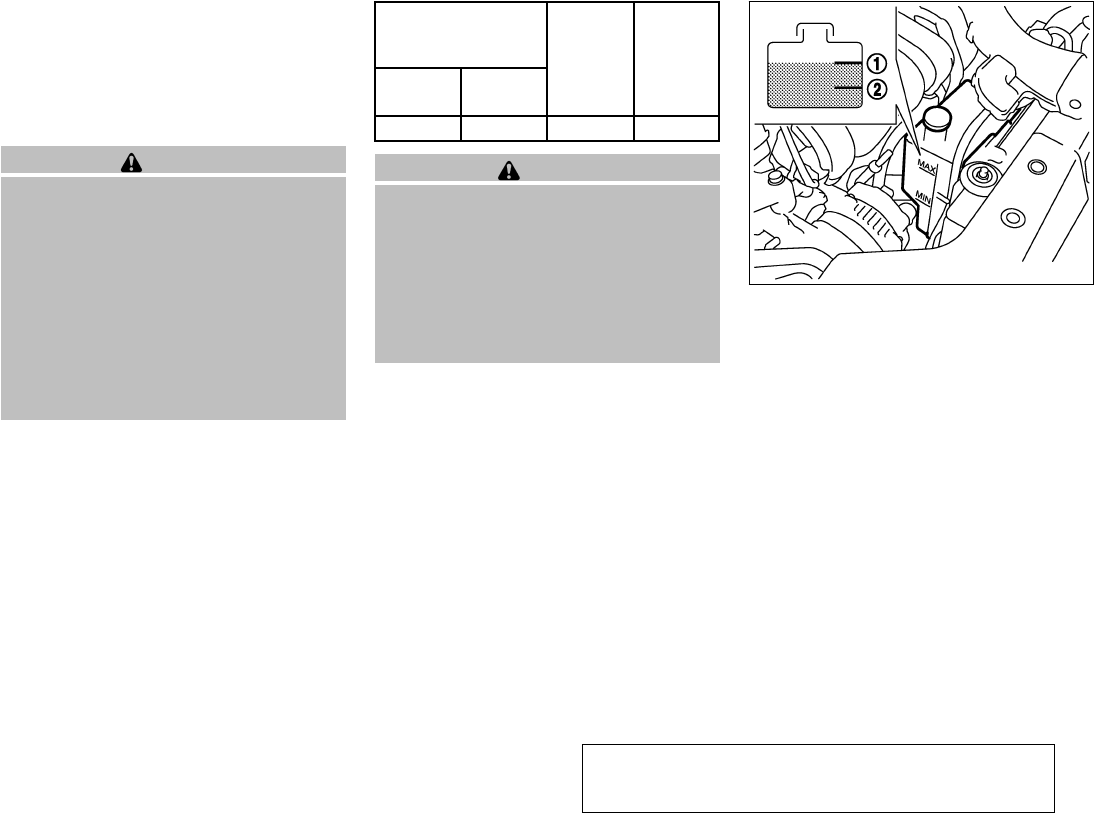
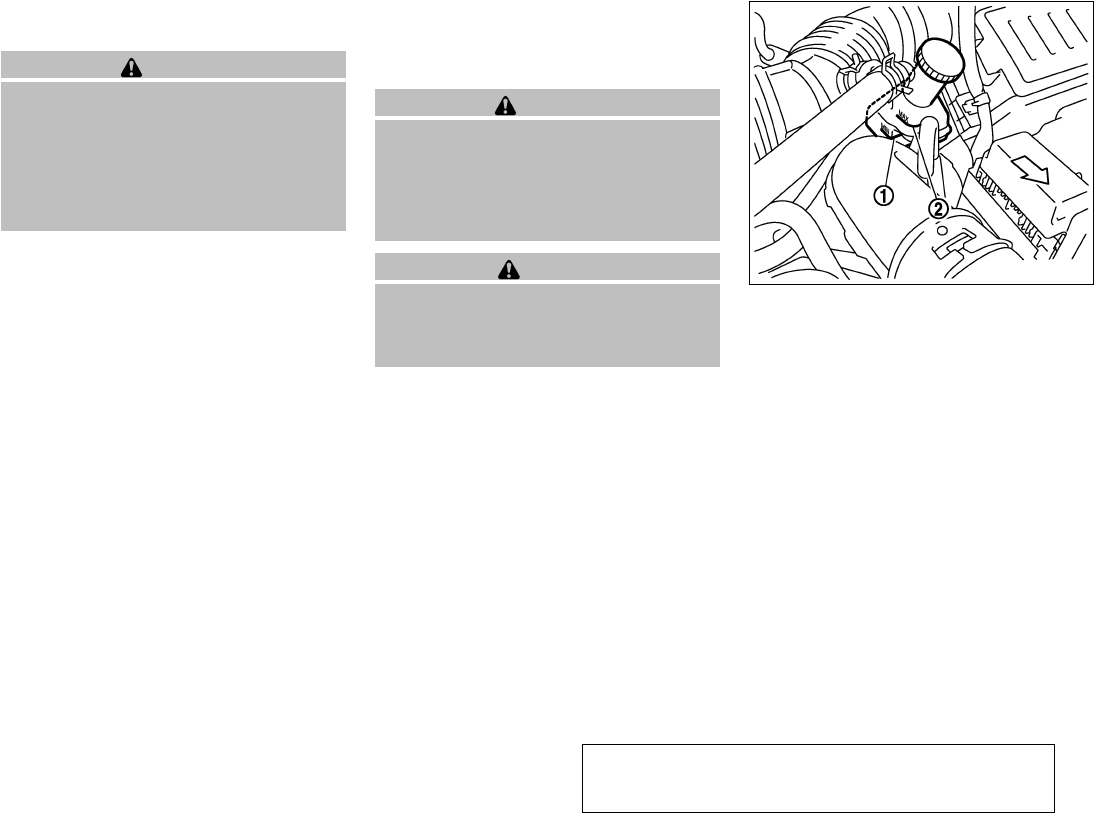
CHECKING ENGINE COOLANT
LEVEL
Check the coolant level in the reservoir when
the engine is cold. If the coolant level is below
the MIN level ᭺
2, add coolant to the MAX level
᭺
1. If the reservoir is empty, check the coolant
level in the radiator when the engine is cold. If
there is insufficient coolant in the radiator, fill the
radiator with coolant up to the filler opening and
also add it to the reservoir up to the MAX level ᭺
1.
If the cooling system frequently requires
coolant, have it checked by a NISSAN
dealer.
SDI1860
ENGINE COOLING SYSTEM
Maintenance and do-it-yourself 8-7
੬REVIEW COPY—
2007 Versa (vrs)
Owners Manual—USA_English (nna)
03/06/06—arosenma
੭

CHANGING ENGINE COOLANT
A NISSAN dealer can change the engine coolant.
The service procedure can be found in the
NISSAN Service Manual.
Improper servicing can result in reduced
heater performance and engine overheat-
ing.
WARNING
●To avoid the danger of being scalded,
never change the coolant when the en-
gine is hot.
●Never remove the radiator cap when the
engine is hot. Serious burns could be
caused by high pressure fluid escaping
from the radiator.
●Avoid direct skin contact with used
coolant. If skin contact is made, wash
thoroughly with soap or hand cleaner
as soon as possible.
●Keep coolant out of the reach of chil-
dren and pets.
Engine coolant must be disposed of properly.
Check your local regulations.
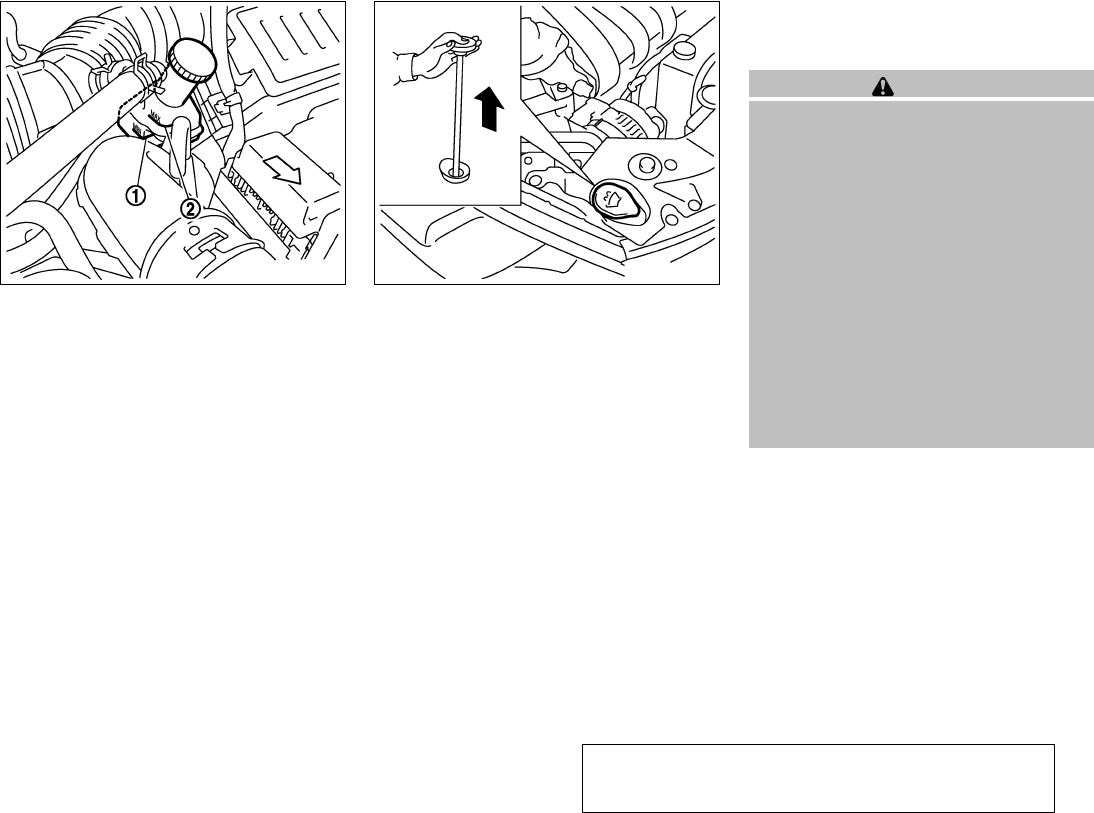
CHECKING ENGINE OIL LEVEL
1. Park the vehicle on a level surface and apply
the parking brake.
2. Start the engine and let it idle until it reaches
operating temperature.
3. Turn off the engine. Wait more than 10
minutes for the oil to drain back into
the oil pan.
4. Remove the dipstick and wipe it clean. Re-
insert it all the way.
5. Remove the dipstick again and check the oil
level. It should be between the H (High) and
L (Low) marks ᭺
1. This is the normal oper-
ating oil level range. If the oil level is below
the L (Low) mark ᭺
2, remove the oil filler cap
and pour recommended oil through the
opening. Do not overfill ᭺
3.
6. Recheck oil level with the dipstick.
It is normal to add some oil between oil
maintenance intervals or during the
break-in period, depending on the severity
of operating conditions.
LDI0520 SDI1597
ENGINE OIL
8-8 Maintenance and do-it-yourself
੬REVIEW COPY—
2007 Versa (vrs)
Owners Manual—USA_English (nna)
03/06/06—arosenma
੭
CAUTION
Oil level should be checked regularly. Op-
erating the engine with an insufficient
amount of oil can damage the engine, and
such damage is not covered by warranty.
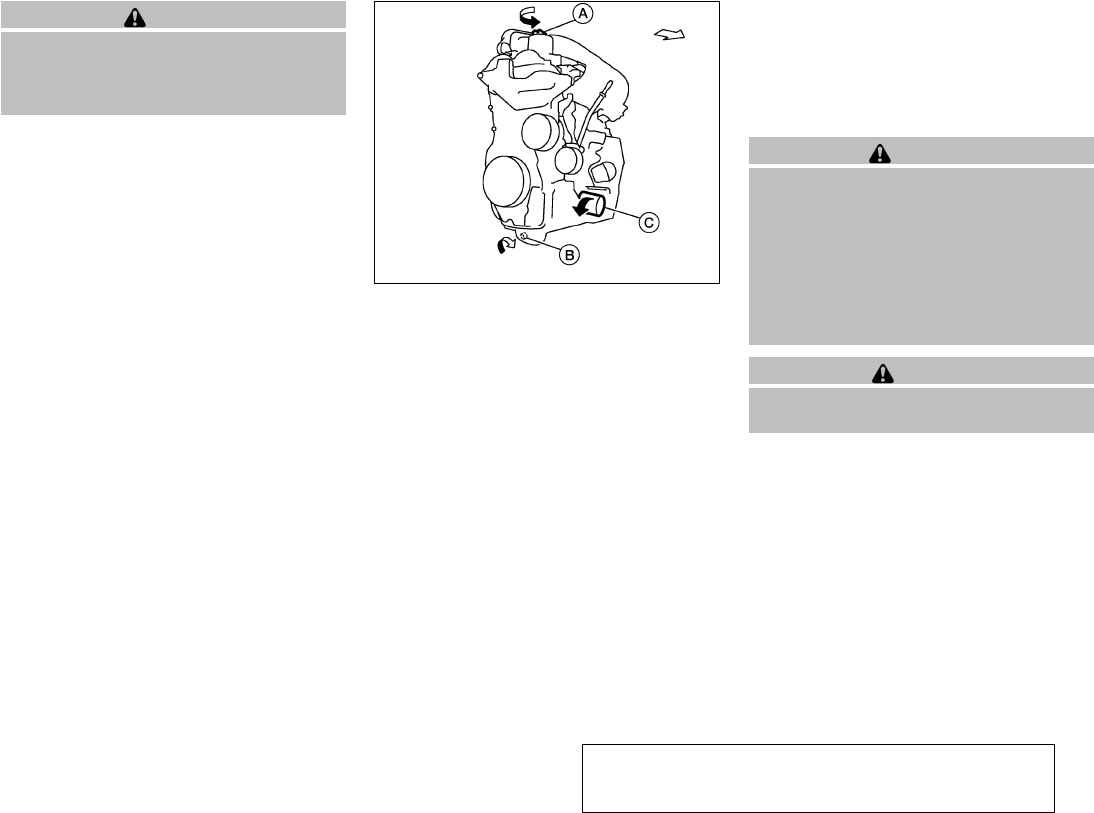
CHANGING ENGINE OIL
1. Park the vehicle on a level surface and apply
the parking brake.
2. Start the engine and let it idle until it reaches
operating temperature, then turn it off.
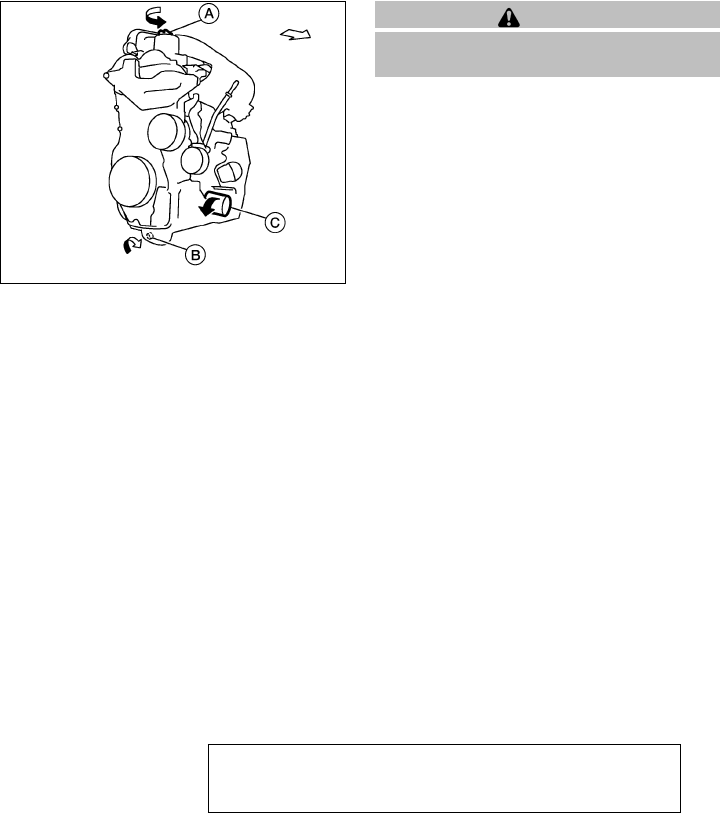
3. Remove the oil filler cap ᭺
Aby turning it
counterclockwise.
4. Place a large drain pan under the drain plug
᭺
B.
5. Remove the drain plug ᭺
Bwith a wrench by
turning it counterclockwise and completely
drain the oil.
If the oil filter is to be changed, remove and
replace it at this time. See “Changing engine
oil filter” later in this section.
WARNING
●Prolonged and repeated contact with
used engine oil may cause skin cancer.
●Try to avoid direct skin contact with
used oil. If skin contact is made, wash
thoroughly with soap or hand cleaner
as soon as possible.
●Keep used engine oil out of reach of
children.
CAUTION
Be careful not to burn yourself. The engine
oil may be hot.
●Waste oil must be disposed of prop-
erly.
●Check your local regulations.
᭺
AOil filler cap
᭺
BOil drain plug
᭺
COil filter
WDI0521
Maintenance and do-it-yourself 8-9
੬REVIEW COPY—
2007 Versa (vrs)
Owners Manual—USA_English (nna)
03/06/06—arosenma
੭
6. Clean and reinstall the drain plug and a new
washer. Securely tighten the drain plug with
a wrench. Do not use excessive force.
Drain plug tightening torque:
22 - 29 ft-lb (29 - 39 N·m)
7. Refill engine with recommended oil through
the oil filler opening, then install the oil filler
cap securely.
See “Capacities and recommended
fuel/lubricants” in the “Technical and con-
sumer information” section of this manual for
drain and refill capacity.
The drain and refill capacity depends on the
oil temperature and drain time. Use these
specifications for reference only. Always use
the dipstick to determine when the proper
amount of oil is in the engine.
8. Start the engine. Check for leakage around
the drain plug and oil filter. Correct as re-
quired.
9. Turn the engine off and wait more than 10
minutes. Check the oil level with the dipstick.
Add engine oil if necessary.
CHANGING ENGINE OIL FILTER
1. Park the vehicle on a level surface and apply
the parking brake.
2. Turn the engine off.
3. Place a large drain pan under the oil filter ᭺
C.
4. Loosen the oil filter with an oil filter wrench
by turning it counterclockwise. Then remove
the oil filter by turning it by hand.
CAUTION
Be careful not to burn yourself. The engine
oil may be hot.
5. Wipe the engine oil filter sealing surface with
a clean rag.
Be sure to remove any old gasket material
remaining on the sealing surface of the en-
gine.
6. Coat the gasket on the new filter with clean
engine oil.
7. Screw on the oil filter until a slight resistance
is felt, then tighten an additional 2/3 turn.
8. Start the engine and check for leakage
around the oil filter. Correct as required.
9. Turn the engine off and wait more than 10
minutes. Check the oil level. Add engine oil if
necessary.
᭺
AOil filler cap
᭺
BOil drain plug
᭺
COil filter
WDI0521
8-10 Maintenance and do-it-yourself
੬REVIEW COPY—
2007 Versa (vrs)
Owners Manual—USA_English (nna)
03/06/06—arosenma
੭
When checking or replacement is required, we
recommend your NISSAN dealer for servicing.
WARNING
●Use only Genuine NISSAN CVT Fluid
NS-2. Do not mix with other fluids.
●Using transmission fluid other than
Genuine NISSAN CVT Fluid NS-2 will
damage the CVT transmission, which is
not covered by the NISSAN new vehicle
limited warranty.
The specified CVT fluid is also described on
caution labels located in the engine compart-
ment.
For further brake and clutch fluid specification
information, refer to “Capacities and recom-
mended fuel/lubricants” in the “Technical and
consumer information” section of this manual.
WARNING
Use only new fluid from a sealed con-
tainer. Old, inferior or contaminated fluid
may damage the brake and clutch sys-
tems. The use of improper fluids can dam-
age the brake system and affect the vehi-
cle’s stopping ability.
CAUTION
Do not spill the fluid on any painted sur-
faces. This will damage the paint. If fluid is
spilled, immediately wash the surface
with water.
BRAKE FLUID
Check the brake fluid level in the reservoir. If the
fluid level is below the MIN line ᭺
1or the brake
warning light comes on, add Genuine NISSAN
Super Heavy Duty Brake Fluid or equivalent DOT
3fluid up to the MAX line ᭺
2. If fluid must be
added frequently, the system should be checked
by a NISSAN dealer.
SDI1958
CONTINUOUSLY VARIABLE
TRANSMISSION (CVT) FLUID
BRAKE AND CLUTCH FLUID
Maintenance and do-it-yourself 8-11
੬REVIEW COPY—
2007 Versa (vrs)
Owners Manual—USA_English (nna)
03/06/06—arosenma
੭
CLUTCH FLUID
Check the clutch fluid level in the reservoir
(manual transmissions only). If the fluid level is
below the MIN line ᭺
1, add Genuine NISSAN
Super Heavy Duty Brake Fluid or equivalent DOT
3fluid up to the MAX line ᭺
2. If fluid must be
added frequently, the system should be checked
by a NISSAN dealer.
For further brake and clutch fluid specification
information, refer to “Capacities and recom-
mended fuel/lubricants” in the “Technical and
consumer information” section of this manual.
WINDOW WASHER FLUID
RESERVOIR
To check the fluid level, use your finger to plug the
center hole of the cap/tube assembly, then re-
move it from the reservoir. If there is no fluid in the
tube, add fluid.
Add a washer solvent to the washer for better
cleaning. In the winter season, add a windshield
washer antifreeze. Follow the manufacturer’s in-
structions for the mixture ratio.
Refill the reservoir more frequently when driving
conditions require an increased amount of win-
dow washer fluid.
Recommended fluid is Genuine NISSAN Wind-
shield Washer Concentrate Cleaner & Anti-
freeze or equivalent.
CAUTION
●Do not substitute engine anti-freeze
coolant for window washer solution.
This may result in damage to the paint.
●Do not fill the window washer reservoir
tank with washer fluid concentrates at
full strength. Some methyl alcohol
based washer fluid concentrates may
permanently stain the grille if spilled
while filling the window washer reser-
voir tank.
●Pre-mix washer fluid concentrates with
water to the manufacturer’s recom-
mended levels before pouring the fluid
into the window washer reservoir tank.
Do not use the window washer reservoir
tank to mix the washer fluid concen-
trate and water.
SDI1958 SDI1866
WINDOW WASHER FLUID
8-12 Maintenance and do-it-yourself
੬REVIEW COPY—
2007 Versa (vrs)
Owners Manual—USA_English (nna)
03/06/06—arosenma
੭
●Keep the battery surface clean and dry. Any
corrosion should be washed off with a solu-
tion of baking soda and water.
●Make certain the terminal connections are
clean and securely tightened.
●If the vehicle is not to be used for 30 days or
longer, disconnect the negative (-) battery
terminal cable to prevent discharge.
WARNING
●Do not expose the battery to flames or
electrical sparks. Hydrogen gas gener-
ated by the battery is explosive. Do not
allow battery fluid to contact your skin,
eyes, fabrics or painted surfaces. After
touching a battery or battery cap, do not
touch or rub your eyes. Thoroughly
wash your hands. If the acid contacts
your eyes, skin or clothing, immediately
flush with water for at least 15 minutes
and seek medical attention.
●Do not operate the vehicle if the fluid in
the battery is low. Low battery fluid can
cause a higher load on the battery
which can generate heat, reduce bat-
tery life, and in some cases lead to an
explosion.
●When working on or near a battery, al-
ways wear suitable eye protection and
remove all jewelry.
●Battery posts, terminals and related ac-
cessories contain lead and lead com-
pounds. Wash hands after handling.
●Keep battery out of the reach of
children.
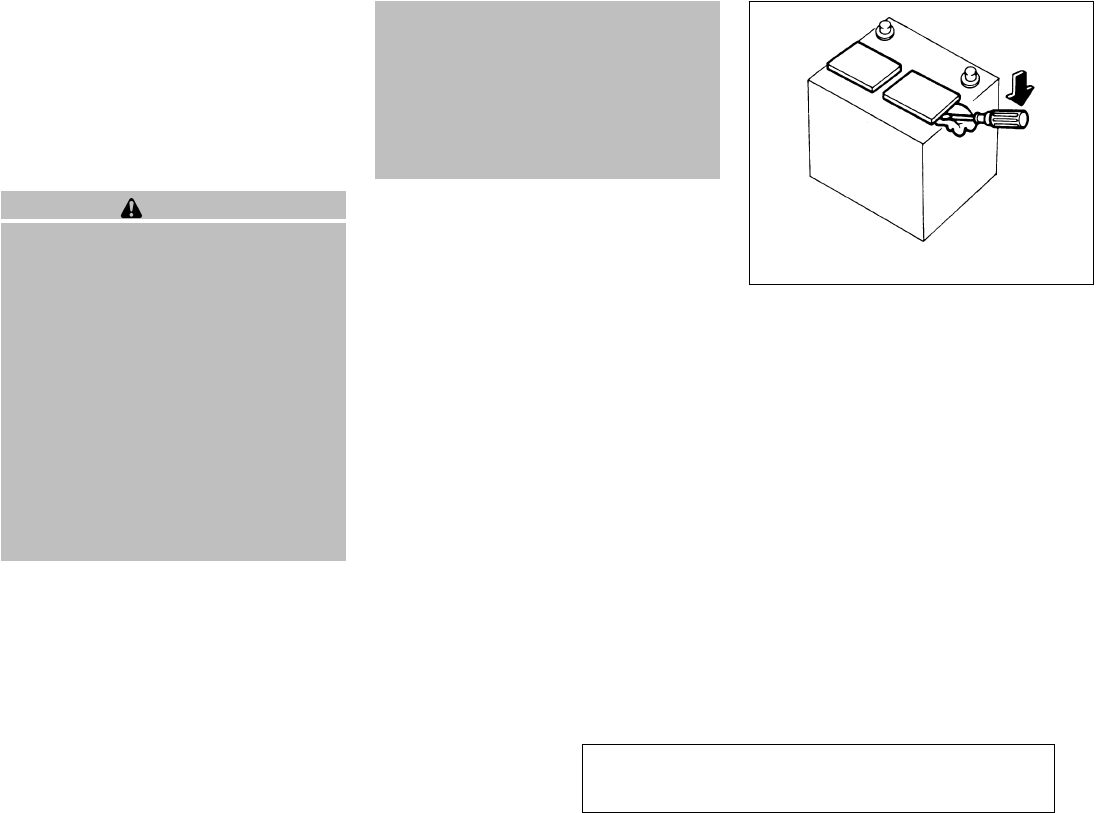
1. Remove the battery caps with a screwdriver
as shown. Use a cloth to protect the battery
case.
WDI0224
BATTERY
Maintenance and do-it-yourself 8-13
੬REVIEW COPY—
2007 Versa (vrs)
Owners Manual—USA_English (nna)
03/06/06—arosenma
੭
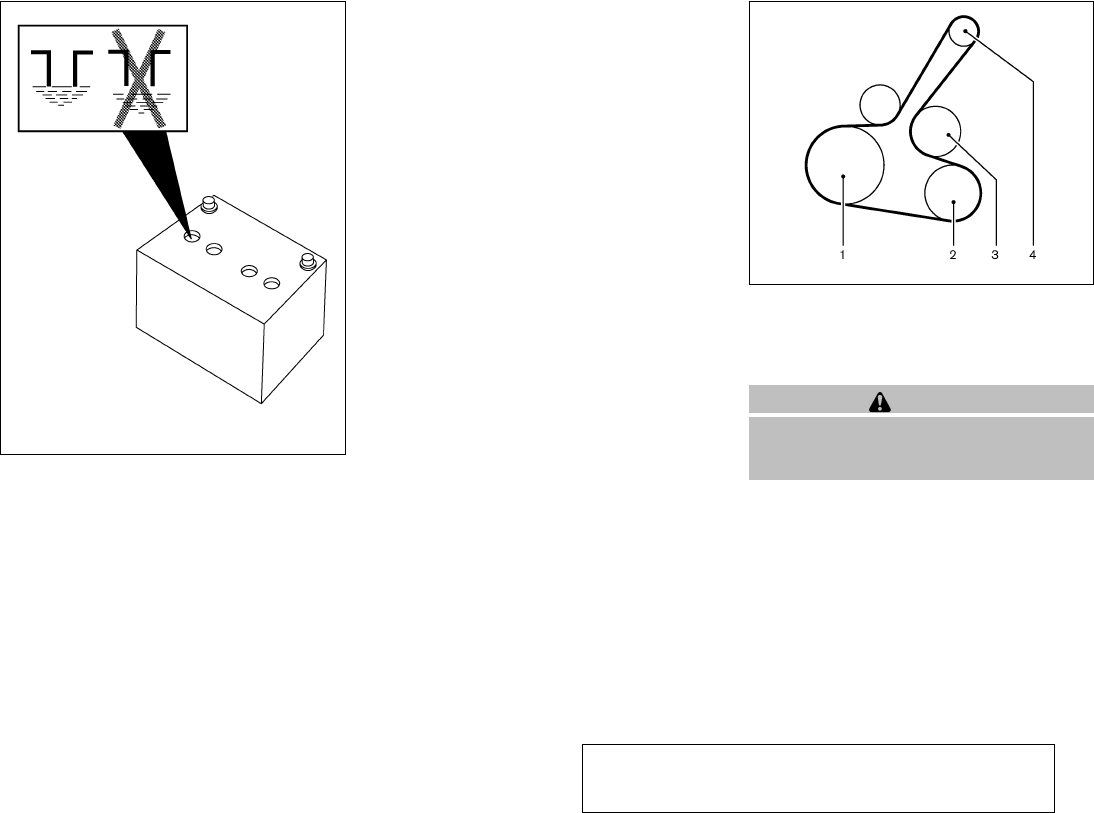
2. Check the fluid level in each cell If it is
necessary to add fluid, add only distilled
water to bring the level up to the bottom of
the filler opening. Do not overfill.
Vehicles operated in high temperatures or under
severe conditions require frequent checks of the
battery fluid level.
JUMP STARTING
If jump starting is necessary, see “Jump starting”
in the “In case of emergency” section of this
manual. If the engine does not start by jump
starting, the battery may have to be replaced.
Contact a NISSAN dealer.
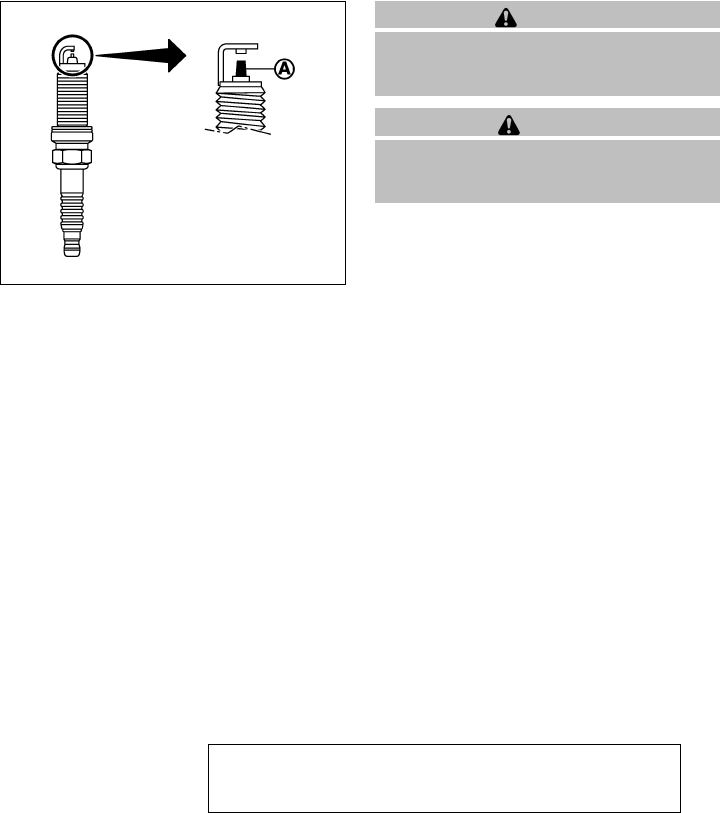
1. Crankshaft pulley
2. Air conditioner compressor
3. Water pump
4. Generator
WARNING
Be sure the ignition key is in the OFF or
LOCK position. The engine could rotate
unexpectedly.
1. Visually inspect the belt(s) for signs of un-
usual wear, cuts, or fraying. If the belt is in
poor condition, have it replaced or adjusted
by a NISSAN dealer.
LDI0302
SDI1979
DRIVE BELTS
8-14 Maintenance and do-it-yourself
੬REVIEW COPY—
2007 Versa (vrs)
Owners Manual—USA_English (nna)
03/06/06—arosenma
੭
2. Have the belts checked regularly for condi-
tion.
REPLACING SPARK PLUGS
Iridium-tipped spark plugs (if so
equipped)
It is not necessary to replace iridium-tipped ᭺
A
spark plugs as frequently as conventional type
spark plugs because they last much longer. Fol-
low the maintenance log shown in the “NISSAN
Service and Maintenance Guide”. Do not service
iridium-tipped spark plugs by cleaning or regap-
ping.
●Always replace spark plugs with rec-
ommended or equivalent ones.
WARNING
Be sure the engine and ignition switch are
off and that the parking brake is engaged
securely.
CAUTION
Be sure to use the correct socket to re-
move the spark plugs. An incorrect socket
can damage the spark plugs.
If replacement is required, see your NISSAN
dealer for assistance.
SDI1895
SPARK PLUGS
Maintenance and do-it-yourself 8-15
੬REVIEW COPY—
2007 Versa (vrs)
Owners Manual—USA_English (nna)
03/06/06—arosenma
੭
The air cleaner filter should not be cleaned and
reused. Replace it according to the maintenance
log shown in the “NISSAN Service and Mainte-
nance Guide.” When replacing the filter, wipe the
inside of the air cleaner filter housing and the
cover with a damp cloth.
To remove the air cleaner filter, push the tabs ᭺
1
and pull the unit upward ᭺
2.
WARNING
●Operating the engine with the air
cleaner removed can cause you or oth-
ers to be burned. The air cleaner not
only cleans the air, it stops the flame if
the engine backfires. If it isn’t there, and
the engine backfires, you could be
burned. Do not drive with the air cleaner
removed, and be careful when working
on the engine with the air cleaner
removed.
●Never pour fuel into the throttle body or
attempt to start the engine with the air
cleaner removed. Doing so could result
in serious injury.
CLEANING
If your windshield is not clear after using the
windshield washer or if a wiper blade chatters
when running, wax or other material may be on
the blade or windshield.
Clean the outside of the windshield with a washer
solution or a mild detergent. Your windshield is
clean if beads do not form when rinsing with clear
water.
Clean each blade by wiping it with a cloth soaked
in a washer solution or a mild detergent. Then
rinse the blades with clear water. If your wind-
shield is still not clear after cleaning the blades
and using the wiper, replace the blades.
CAUTION
Worn windshield wiper blades can dam-
age the windshield and impair driver
vision.
SDI1864
AIR CLEANER WINDSHIELD WIPER BLADES
8-16 Maintenance and do-it-yourself
੬REVIEW COPY—
2007 Versa (vrs)
Owners Manual—USA_English (nna)
03/06/06—arosenma
੭
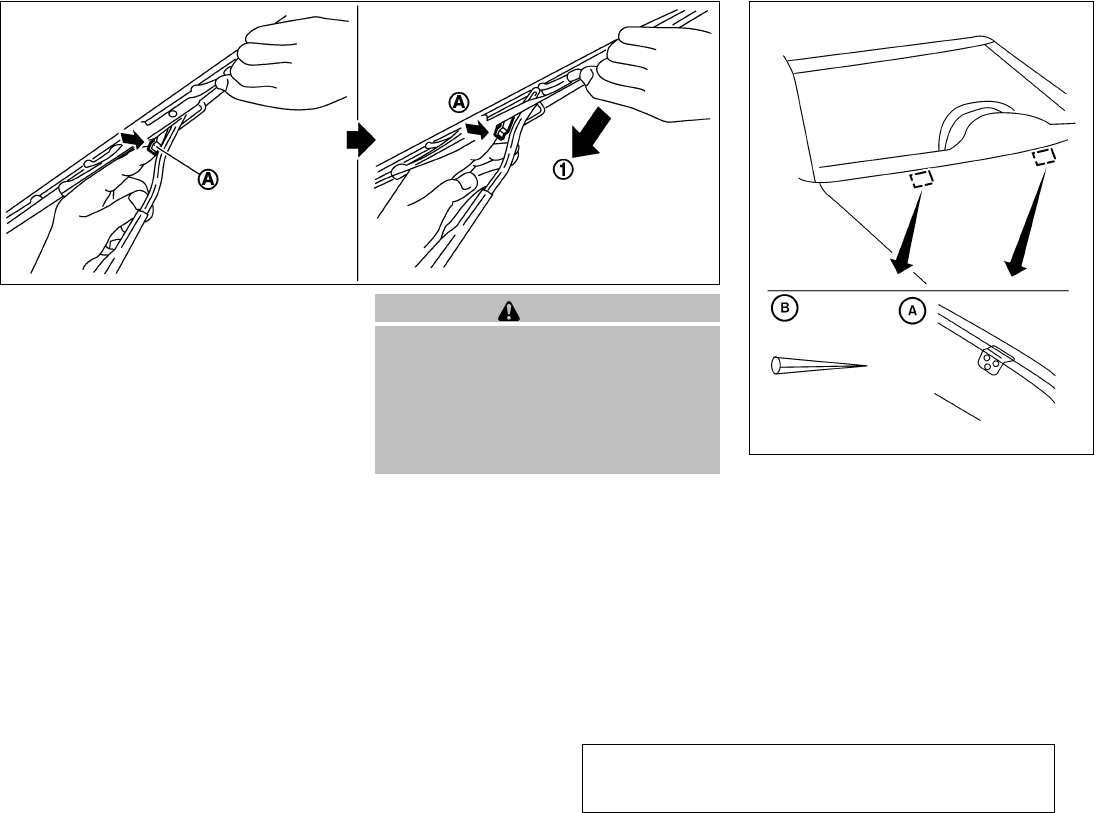
REPLACING
Replace the wiper blades if they are worn.
1. Lift the wiper arm away from the windshield.
2. Push and hold the release tab ᭺
A, and then
move the wiper blade down ᭺
1the wiper
arm to remove.
3. Remove the wiper blade.
4. Insert the new wiper blade onto the wiper
arm until it clicks into place.
CAUTION
●After wiper blade replacement, return
the wiper arm to its original position;
otherwise it may be damaged when the
hood is opened.
●Make sure the wiper blades contact the
glass; otherwise the arms may be dam-
aged from wind pressure. Be careful not to let anything get into the washer
nozzle ᭺
A. This may cause clogging or improper
windshield washer operation. If something gets
into the nozzle, remove it with a needle or small
pin ᭺
B.
SDI1803
WDI0526
Maintenance and do-it-yourself 8-17
੬REVIEW COPY—
2007 Versa (vrs)
Owners Manual—USA_English (nna)
03/06/06—arosenma
੭
Rear window wiper blade
Contact a NISSAN dealer if checking or replace-
ment is required.
Self-adjusting brakes
Your vehicle is equipped with self-adjusting
brakes.
The front and rear disc-type brakes self-adjust
every time the brake pedal is applied.
WARNING
See a NISSAN dealer for a brake system
check if the brake pedal height does not
return to normal.
Brake pad wear indicators
The disc brake pads on your vehicle have audible
wear indicators. When a brake pad requires re-
placement, a high pitched scraping or screech-
ing sound will be heard when the vehicle is in
motion. The noise will be heard whether or not the
brake pedal is depressed. Have the brakes
checked as soon as possible if the wear indicator
sound is heard.
Under some driving or climate conditions, occa-
sional brake squeak, squeal or other noise may
be heard. Occasional brake noise during light to
moderate stops is normal and does not affect the
function or performance of the brake system.
Proper brake inspection intervals should
be followed. For more information regarding
brake inspections, see the appropriate mainte-
nance schedule information in the “NISSAN Ser-
vice and Maintenance Guide”.
BRAKE PEDAL
8-18 Maintenance and do-it-yourself
੬REVIEW COPY—
2007 Versa (vrs)
Owners Manual—USA_English (nna)
03/06/06—arosenma
੭
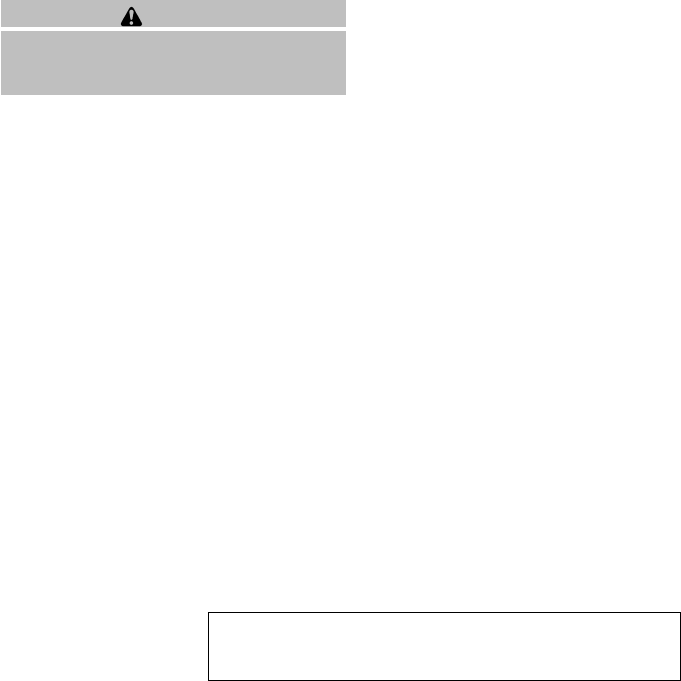
Two types of fuses are used. Type A is used in the
fuse boxes in the engine compartment. Type B is
used in the passenger compartment fuse box.
Type A fuses are provided as spare fuses. They
are stored in the passenger compartment fuse
box.
Type A fuses can be installed in the engine com-
partment and passenger compartment fuse
boxes.
If a type A fuse is used to replace a type B fuse,
the type A fuse will not be level with the fuse
pocket as shown in the illustration. This will not
affect the performance of the fuse. Make sure the
fuse is installed in the fuse box securely.
Type B fuses cannot be installed in the under-
hood fuse boxes. Only use type A fuses in the
underhood fuse boxes.
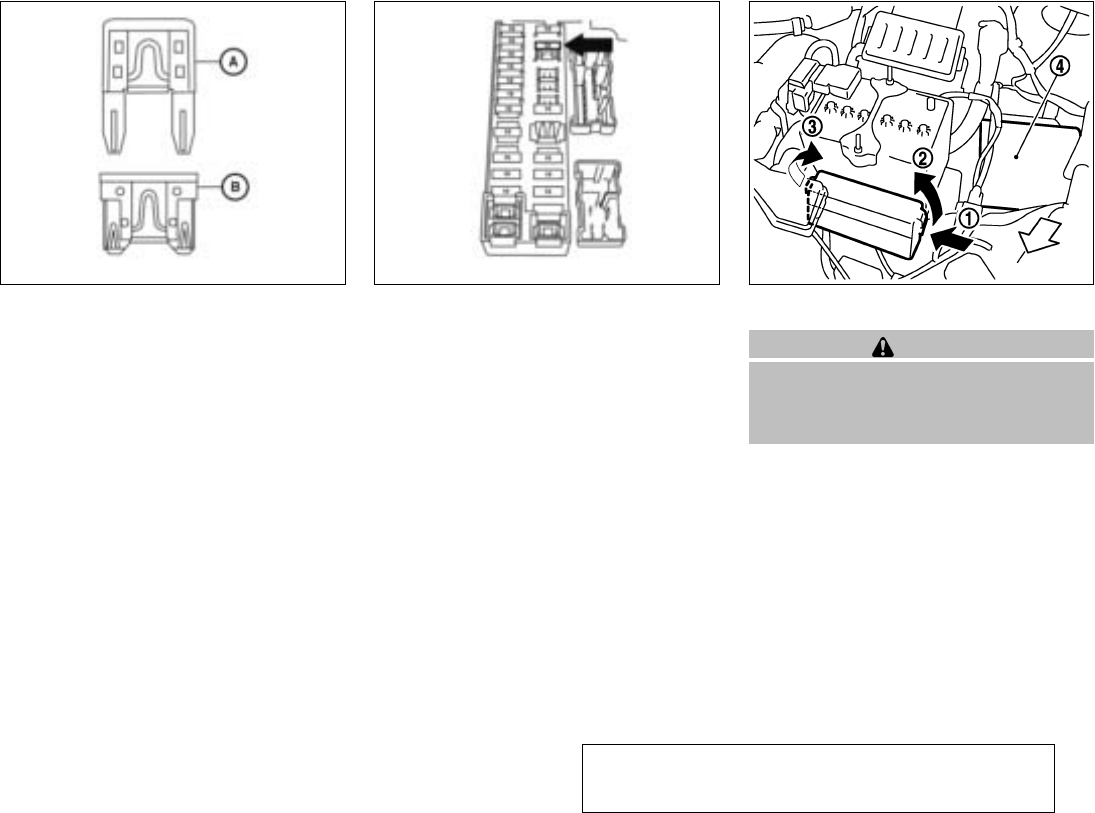
ENGINE COMPARTMENT
CAUTION
Never use a fuse of a higher or lower
amperage rating than specified on the
fuse box cover. This could damage the
electrical system or cause a fire.
If any electrical equipment does not come on,
check for an open fuse.
1. Be sure the ignition switch and the headlight
switch are OFF.
2. Open the engine hood.
LDI0455 LDI0457 SDI1959
FUSES
Maintenance and do-it-yourself 8-19
੬REVIEW COPY—
2007 Versa (vrs)
Owners Manual—USA_English (nna)
03/06/06—arosenma
੭
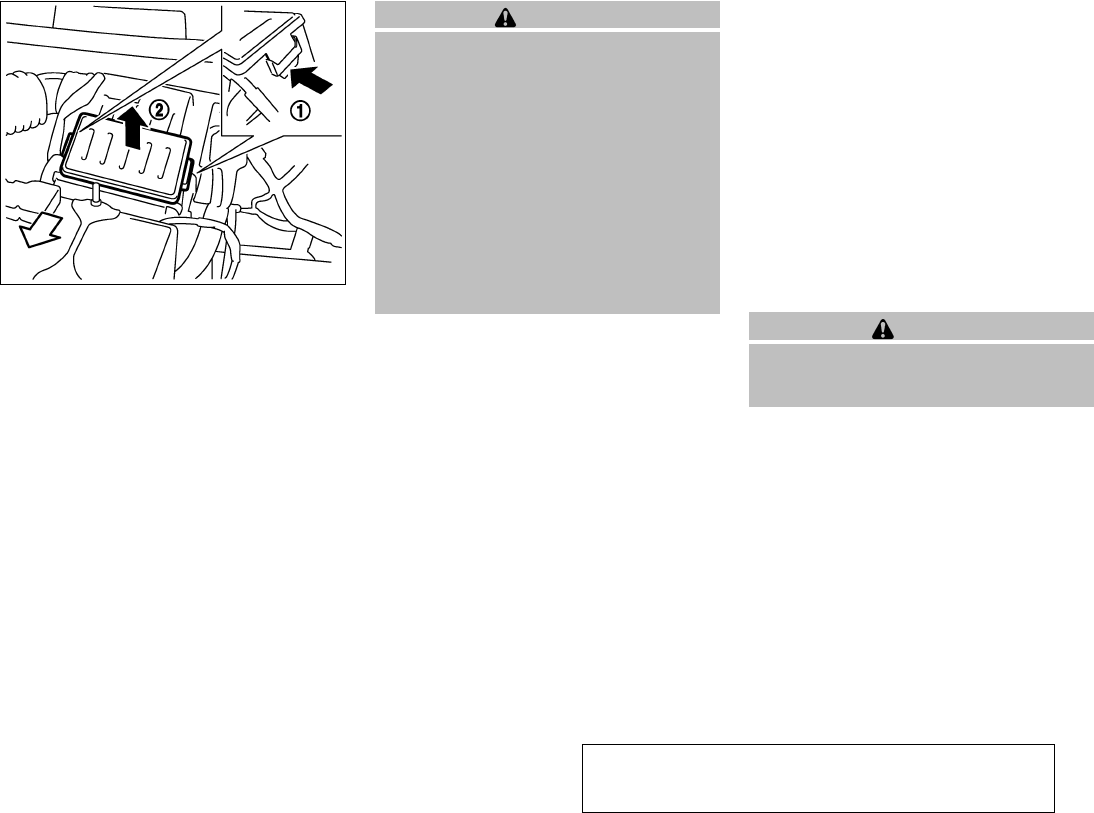
3. Remove the fuse box cover by pushing the
tab ᭺
1and lifting the cover up from the right
side ᭺
2, then the left side ᭺
3.
4. Remove the fuse with the fuse puller. The
fuse puller is located in the center of the fuse
block in the passenger compartment.
5. If the fuse is open ᭺
A, replace it with a new
fuse ᭺
B.
6. If a new fuse also opens, have the electrical
system checked and repaired by a NISSAN
dealer.
Fusible links
If any electrical equipment does not operate and
the fuses are in good condition, check the fusible
links in the holders ᭺
1,᭺
2and ᭺
3. If any of these
fusible links are melted, replace only with genuine
NISSAN parts.
For checking and replacing the fusible links in
holders ᭺
2and ᭺
3, see a NISSAN dealer.
WDI0452 SDI1869
8-20 Maintenance and do-it-yourself
੬REVIEW COPY—
2007 Versa (vrs)
Owners Manual—USA_English (nna)
03/06/06—arosenma
੭
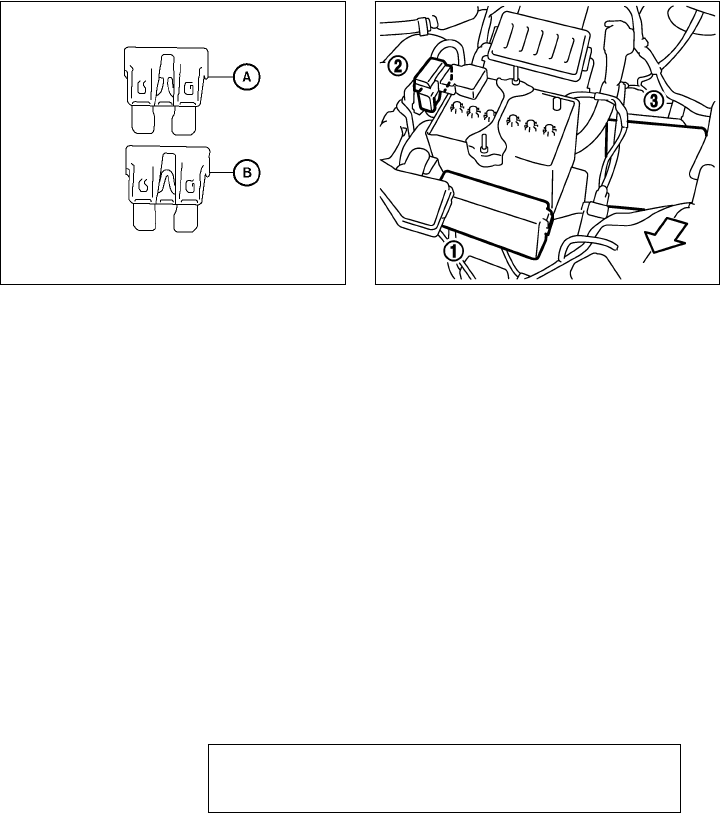
PASSENGER COMPARTMENT
CAUTION
Never use a fuse of a higher or lower
amperage rating than specified on the
fuse box cover. This could damage the
electrical system or cause a fire.
If any electrical equipment does not operate,
check for an open fuse.
1. Be sure the ignition switch and the headlight
switch are OFF.
2. Pull the fuse box cover to remove ᭺
1.
3. Remove the fuse with the fuse puller ᭺
2.
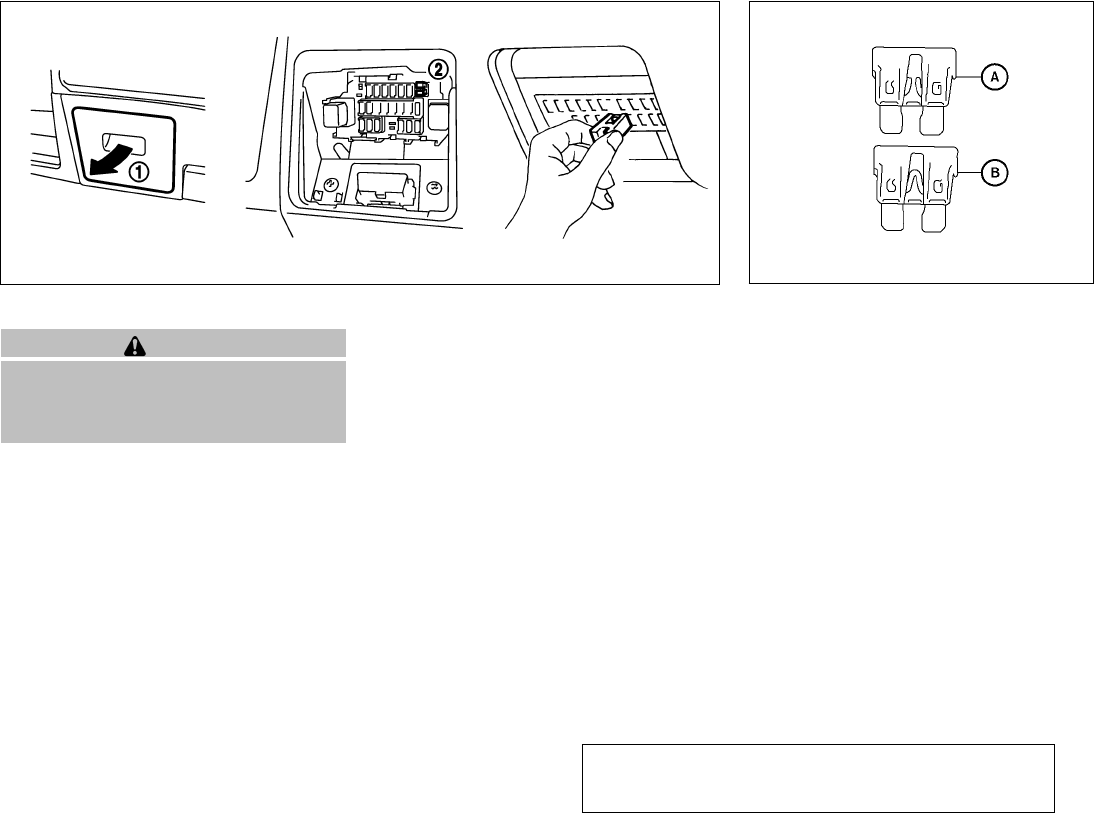
4. If the fuse is open ᭺
A, replace it with a known
good fuse ᭺
B.
5. Push the fuse box cover to install.
6. If a new fuse also opens, have the electrical
system checked and repaired by a NISSAN
dealer.
SDI1870
Type A
WDI0452
Maintenance and do-it-yourself 8-21
੬REVIEW COPY—
2007 Versa (vrs)
Owners Manual—USA_English (nna)
03/06/06—arosenma
੭
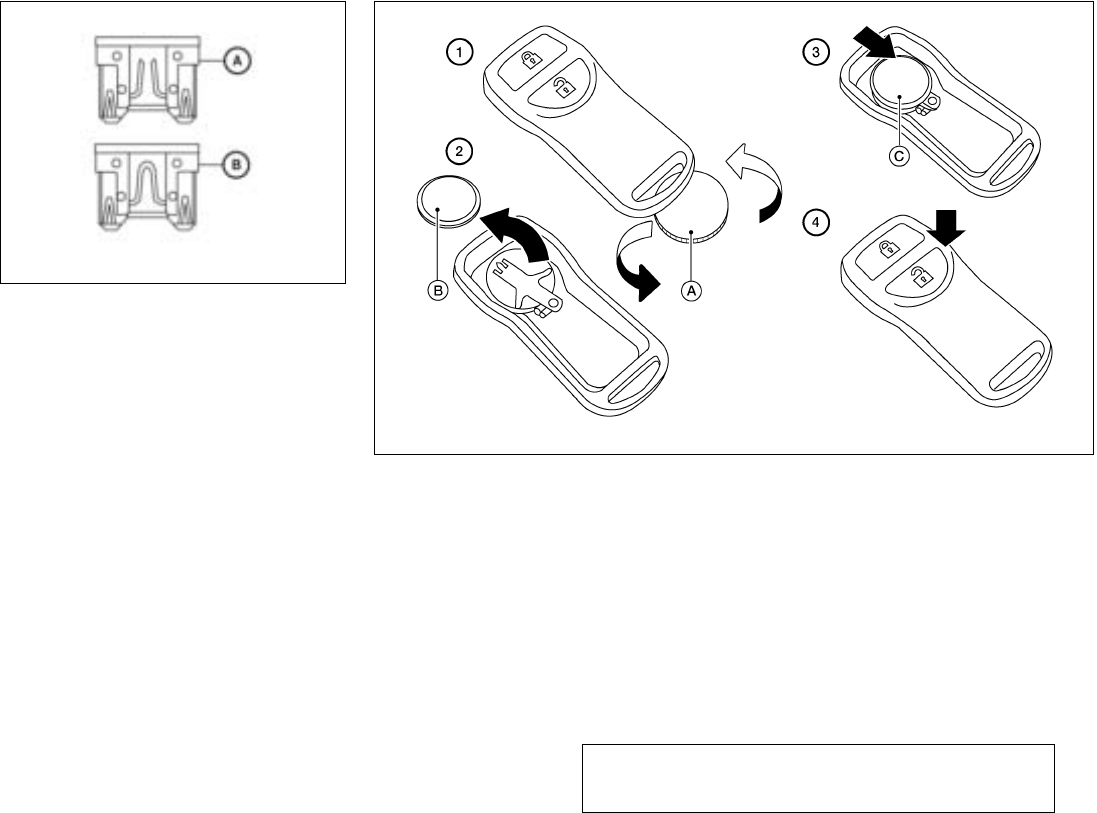
KEYFOB
Replace the battery in the keyfob as follows:
᭺
1Open the lid using a coin ᭺
A.
᭺
2Remove the battery ᭺
B.
᭺
3Install a new battery ᭺
Cwith the “+” facing
down.
Recommended battery: CR2025 or equivalent.
᭺
4Close the lid securely.
Type B
LDI0456
LDI0484
BATTERY REPLACEMENT
8-22 Maintenance and do-it-yourself
੬REVIEW COPY—
2007 Versa (vrs)
Owners Manual—USA_English (nna)
03/06/06—arosenma
੭

5. Press the button, then the
button two or three times to check the key-
fob operation.
If the battery is removed for any reason
other than replacement, perform step 5.
●An improperly disposed battery can
hurt the environment. Always confirm
local regulations for battery disposal.
●The keyfob is water-resistant; how-
ever, if it does get wet, immediately
wipe completely dry.
●The operational range of the keyfob
extends to approximately 33 ft (10 m)
from the vehicle. This range may vary
with conditions.
FCC Notice:
Changes or modifications not expressly ap-
proved by the party responsible for compli-
ance could void the user’s authority to op-
erate the equipment.
This device complies with Part 15 of the FCC
Rules and RSS-210 of Industry Canada.
Operation is subject to the following two
conditions: (1) This device may not cause
harmful interference, and (2) this device
must accept any interference received, in-
cluding interference that may cause undes-
ired operation of the device.
INTELLIGENT KEY BATTERY
Replace the battery in the intelligent key as fol-
lows:
1. Remove the mechanical key from the intelli-
gent key.
2. Insert a small screwdriver ᭺
Ainto the slit ᭺
B
of the corner and twist it to separate the
upper part from the lower part.
3. Replace the battery with a new one.
Recommended battery: CR2025 or equiva-
lent.
●Do not touch the internal circuit and elec-
tric terminals as doing so could cause a
malfunction.
●Hold the battery by the edges. Holding
the battery across the contact points will
seriously deplete the storage capacity.
●Make sure that the + side faces the bot-
tom of the case.
SDI1867
Maintenance and do-it-yourself 8-23
੬REVIEW COPY—
2007 Versa (vrs)
Owners Manual—USA_English (nna)
03/06/06—arosenma
੭
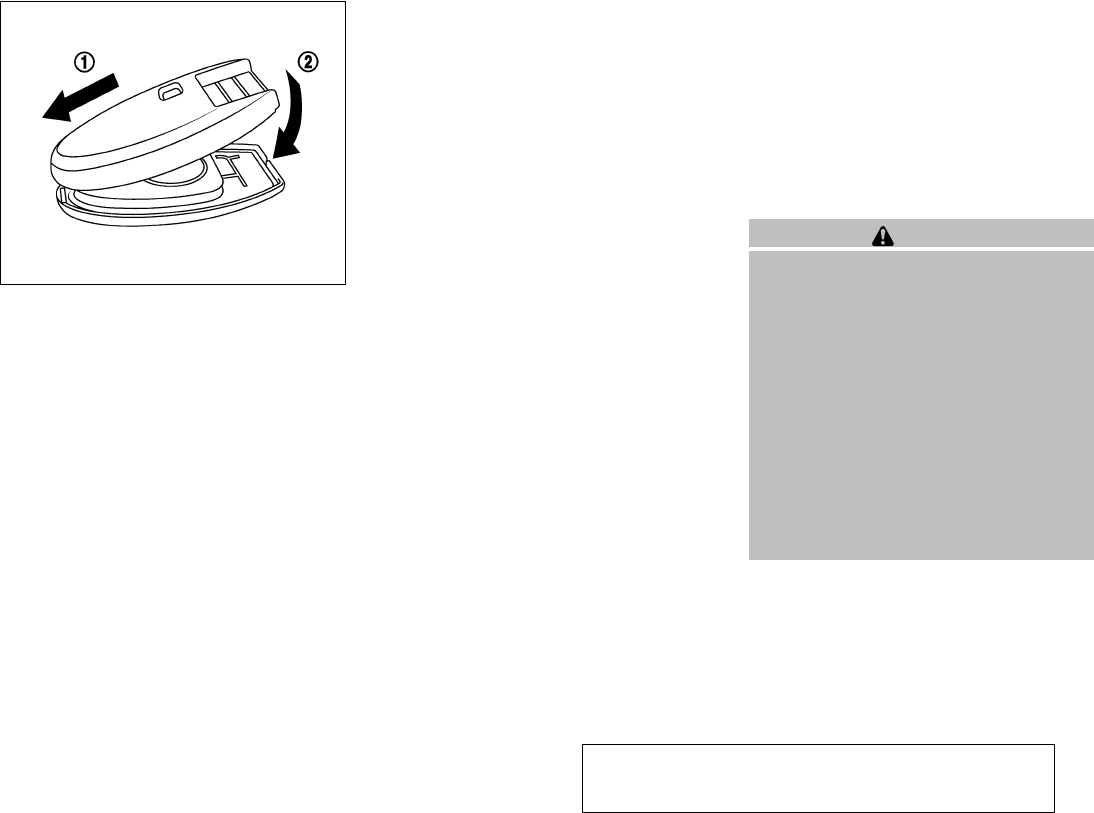
4. Close the lid securely as illustrated ᭺
1᭺
2.
5. Operate the buttons to check its operation.
See a NISSAN dealer if you need assistance for
replacement.
FCC Notice:
Changes or modifications not expressly ap-
proved by the party responsible for compli-
ance could void the user’s authority to op-
erate the equipment.
This device complies with Part 15 of the
FCC Rules and RSS-210 of Industry
Canada.
Operation is subject to the following two
conditions: (1) This device may not cause
harmful interference, and (2) this device
must accept any interference received, in-
cluding interference that may cause undes-
ired operation of the device.
HEADLIGHTS
Replacing the halogen headlight bulb
The headlight is a semi-sealed beam type which
uses a replaceable headlight (halogen) bulb.
They can be replaced from inside the engine
compartment without removing the headlight as-
sembly.
See a NISSAN dealer for replacing the head-
lights.
CAUTION
●Aiming is not necessary after replacing
the bulb. When aiming adjustment is
necessary, contact a NISSAN dealer.
●Do not leave the headlight assembly
open without a bulb installed for a long
period of time. Dust, moisture, smoke,
etc. entering the headlight body may
affect bulb performance. Remove the
bulb from the headlight assembly just
before a replacement bulb is installed.
●Only touch the plastic base when han-
dling the bulb. Never touch the glass
envelope. Touching the glass could sig-
nificantly affect bulb life and/or head-
light performance.
SDI1787A
LIGHTS
8-24 Maintenance and do-it-yourself
੬REVIEW COPY—
2007 Versa (vrs)
Owners Manual—USA_English (nna)
03/06/06—arosenma
੭
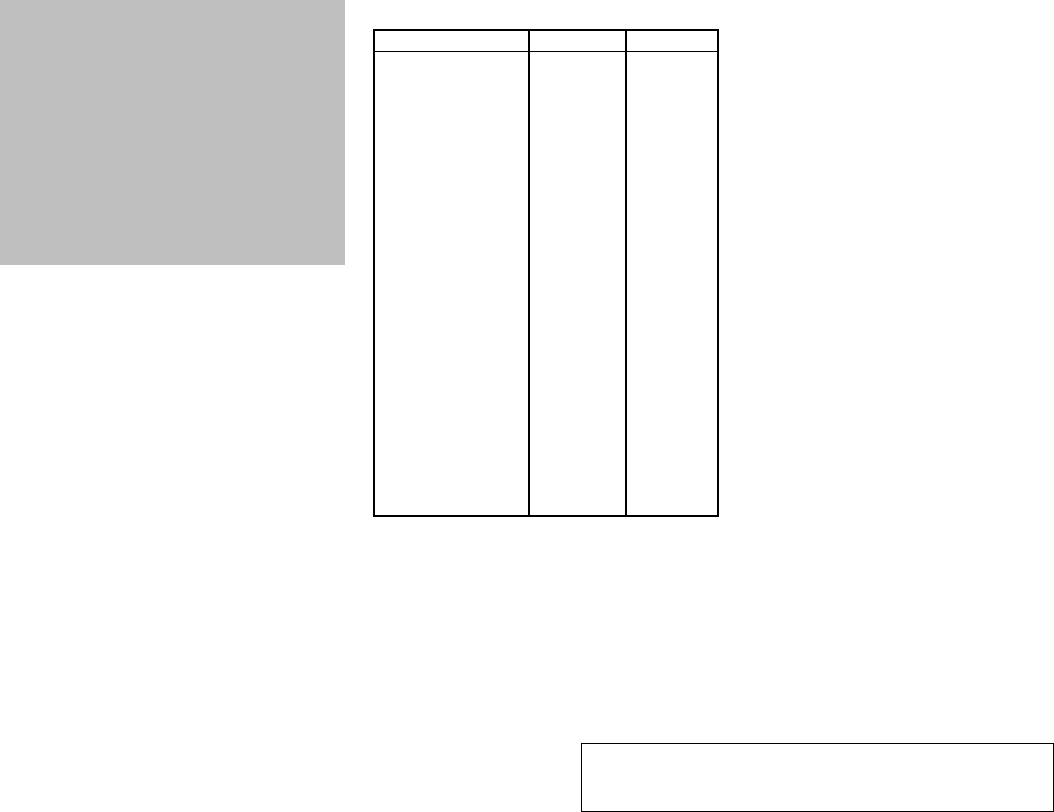
●High pressure halogen gas is sealed
inside the halogen bulb. The bulb may
break if the glass envelope is scratched
or the bulb is dropped.
●Use the same number and wattage as
originally installed:
High/low beam:
Wattage: 55
Bulb no.: H4
*: Always check with the Parts Depart-
ment at a NISSAN dealer for the latest
parts information.
EXTERIOR AND INTERIOR LIGHTS
Item Wattage (W) Bulb No.*
Headlight assembly
High/low (Halogen) 55 HB2
Park/Turn* 21 7507 LF
Front clearance
light* 5 WY5W
Front fog light* (if so
equipped) 35 H8
Front map lights* 8 AL54
Room light 8 AL54
Glove box light* (if so
equipped) 1.4 —
Luggage compartment
light 5—
High-mounted stop
light* LED —
Rear combination light
Turn signal light 21 7507 LF
Stop/Tail 21 12499
Backup (reversing) 21 7506 LF
License plate light* 5 2J8
* Always check with the Parts Department at a
NISSAN dealer for the latest parts information.
Maintenance and do-it-yourself 8-25
੬REVIEW COPY—
2007 Versa (vrs)
Owners Manual—USA_English (nna)
03/06/06—arosenma
੭
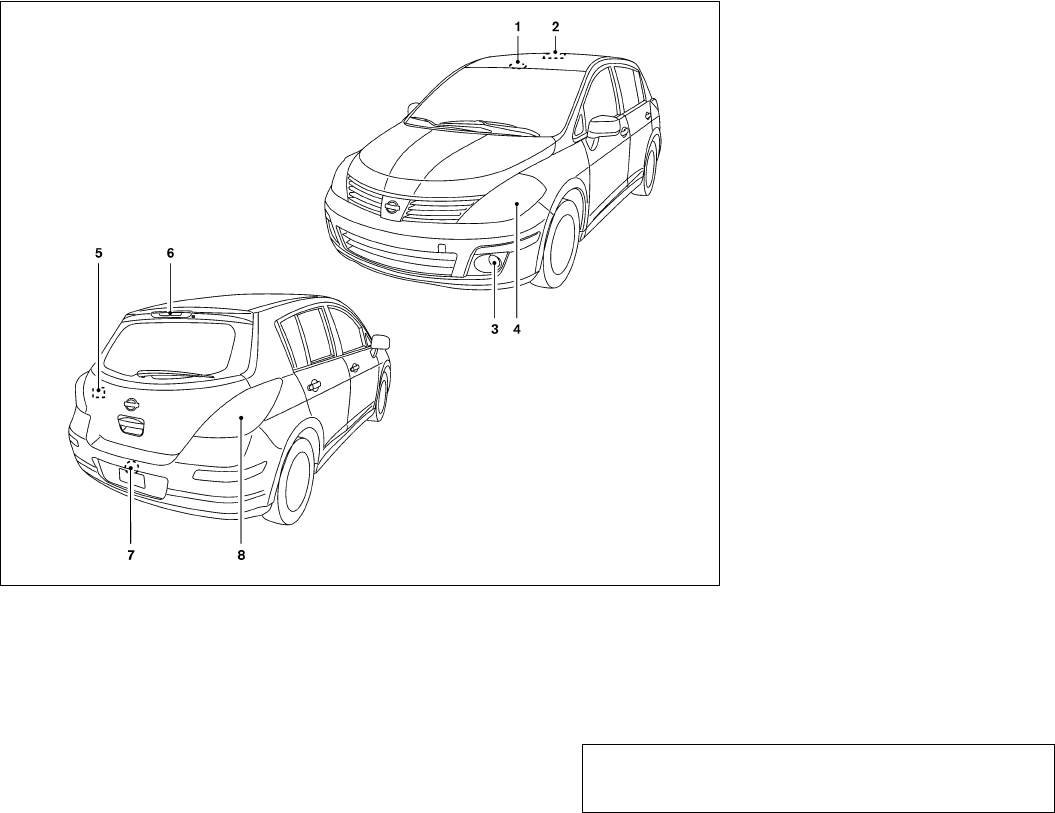
1. Front map lights
2. Room light
3. Front fog light (if so equipped)
4. Headlight assembly
5. Luggage compartment light
6. High-mounted stop light
7. License plate light
8. Rear combination light
WDI0524
8-26 Maintenance and do-it-yourself
੬REVIEW COPY—
2007 Versa (vrs)
Owners Manual—USA_English (nna)
03/06/06—arosenma
੭
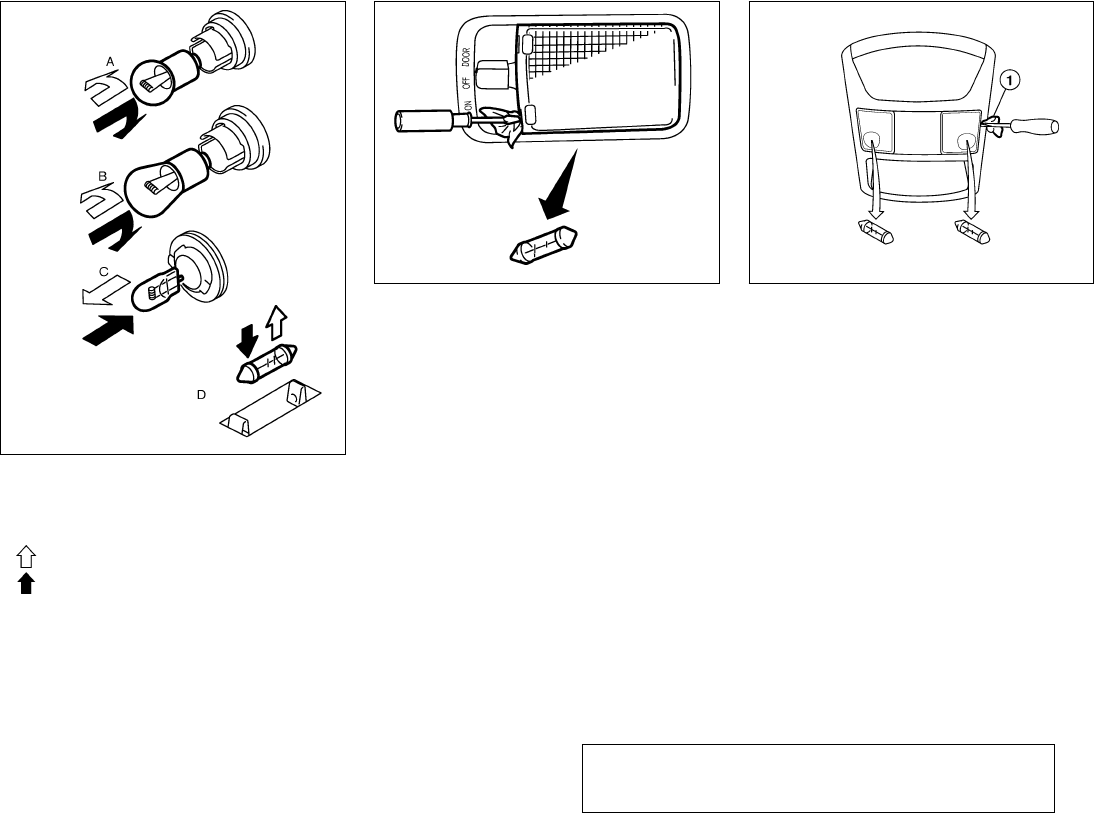
Replacement procedures
All other lights are either type A, B, C or D. When
replacing a bulb, first remove the lens, lamp
and/or cover.
Indicates bulb removal
Indicates bulb installation
Use a cloth to protect the housing.
SDI1805
Room light
SDI1499A
Map lights
LDI0517
Maintenance and do-it-yourself 8-27
੬REVIEW COPY—
2007 Versa (vrs)
Owners Manual—USA_English (nna)
03/06/06—arosenma
੭
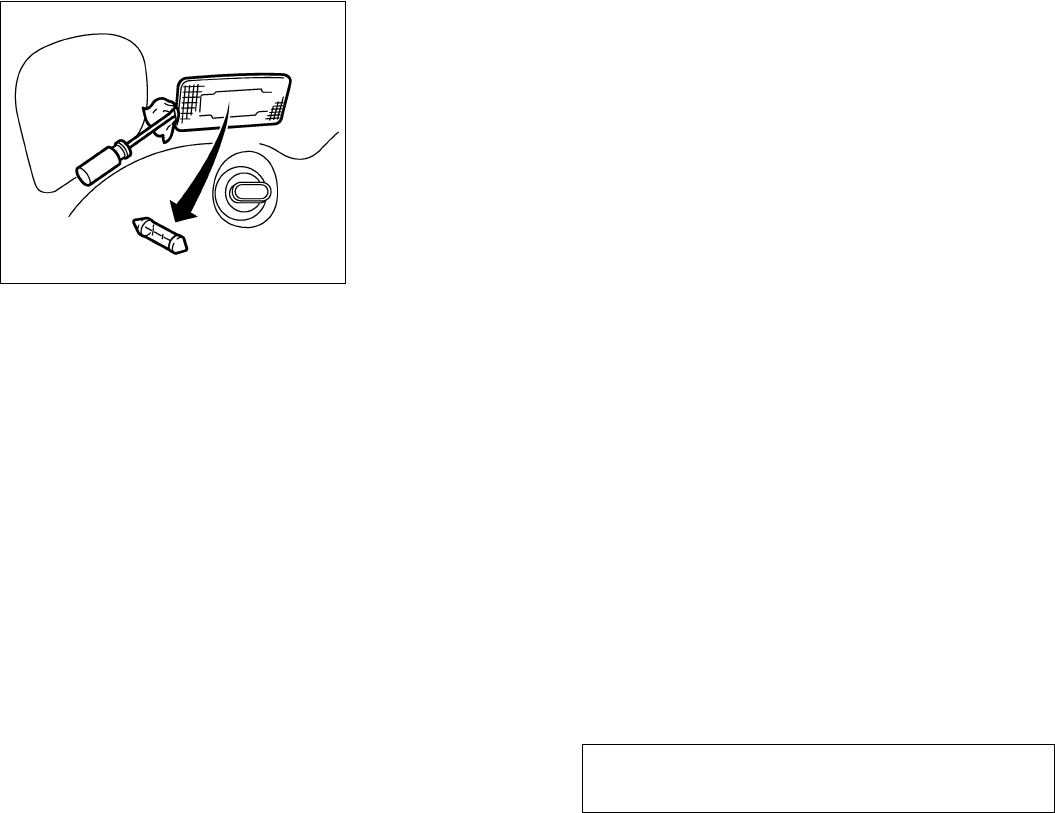
Use a cloth to protect the housing.
If you have a flat tire, see the “In case of
emergency” section of this manual.
TIRE PRESSURE
Tire pressure monitoring system
(TPMS)
This vehicle is equipped with the Tire
Pressure Monitoring System (TPMS). It
monitors tire pressure of all tires except
the spare. When the low tire pressure
warning light is lit, one or more of your
tires is significantly underinflated.
The TPMS will activate only when the
vehicle is driven at speeds above 16 MPH
(25 km/h). Also, this system may not de-
tect a sudden drop in tire pressure (for
example a flat tire while driving).
For more details, refer to “Low tire pres-
sure warning light”in the “Instruments and
controls” section, “Tire pressure monitor-
ing system (TPMS)” in the “Starting and
driving” section, and “Flat tire” in the “In
case of emergency” section.
Tire inflation pressure
Check the tire pressures (including the
spare) often and always prior to long dis-
tance trips. The recommended tire pres-
sure specifications are shown on the
F.M.V.S.S./C.M.V.S.S. label or the Tire
and Loading Information label under the
ЉCold Tire Inflation PressureЉheading.
The Tire and Loading Information label is
affixed to the driver side center pillar. Tire
pressures should be checked regularly
because:
●Most tires naturally lose air over time.
●Tires can lose air suddenly when
driven over potholes or other objects
or if the vehicle strikes a curb while
parking.
The tire pressures should be checked
when the tires are cold. The tires are
considered COLD after the vehicle has
been parked for 3 or more hours, or driven
less than 1 mile (1.6 km) at moderate
speeds.
Luggage compartment light
SDI1873
WHEELS AND TIRES
8-28 Maintenance and do-it-yourself
੬REVIEW COPY—
2007 Versa (vrs)
Owners Manual—USA_English (nna)
03/06/06—arosenma
੭

Incorrect tire pressure, including un-
der inflation, may adversely affect
tire life and vehicle handling.
WARNING
●Improperly inflated tires can fail
suddenly and cause an accident.
●The Gross Vehicle Weight Rating
(GVWR) is located on the
F.M.V.S.S./C.M.V.S.S. label. The
vehicle weight capacity is indi-
cated on the Tire and Loading
Information label. Do not load
your vehicle beyond this capac-
ity. Overloading your vehicle may
result in reduced tire life, unsafe
operating conditions due to pre-
mature tire failure, or unfavor-
able handling characteristics and
could also lead to a serious acci-
dent. Loading beyond the speci-
fied capacity may also result in
failure of other vehicle
components.
●Before taking a long trip, or
whenever you heavily load your
vehicle, use a tire pressure gauge
to ensure that the tire pressures
are at the specified level.
●Do not drive your vehicle over 85
MPH (137 km/h) unless it is
equipped with high speed rated
tires. Driving faster than 85 MPH
(137 km/h) may result in tire fail-
ure, loss of control and possible
injury.
●For additional information re-
garding tires, refer to “Important
Tire Safety Information” (US) or
“Tire Safety Information”
(Canada) in the Warranty Infor-
mation Booklet.
Maintenance and do-it-yourself 8-29
੬REVIEW COPY—
2007 Versa (vrs)
Owners Manual—USA_English (nna)
03/06/06—arosenma
੭
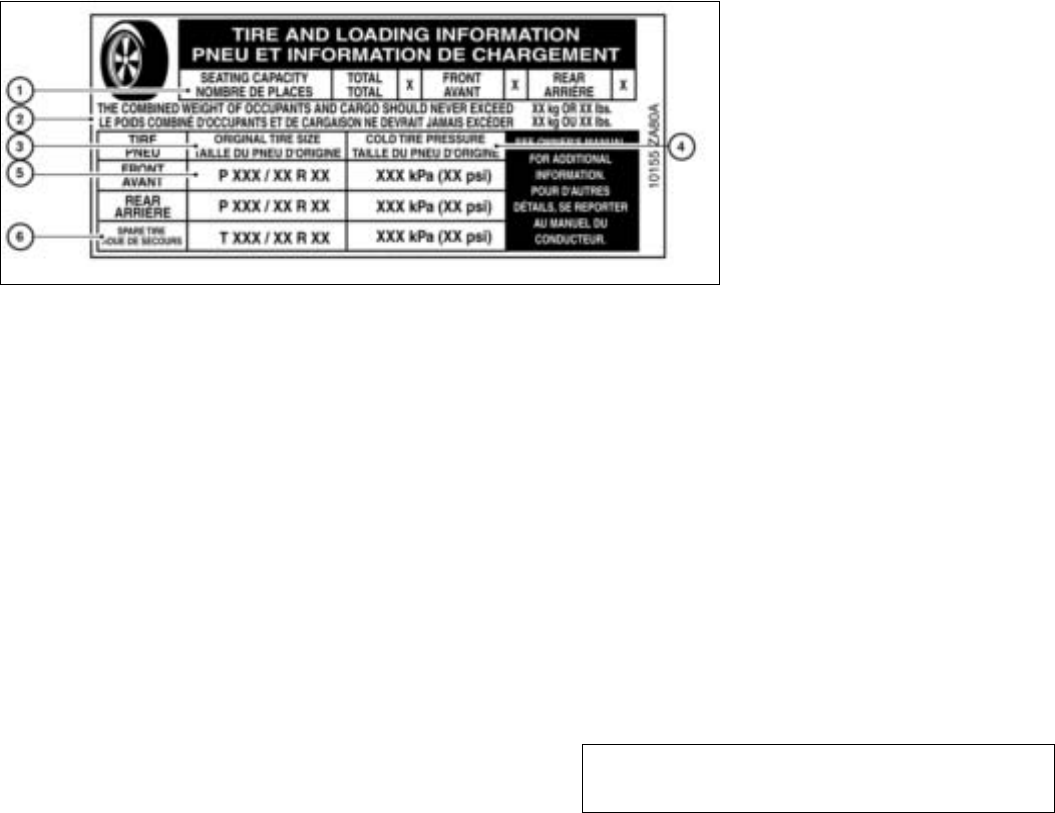
Tire and loading information label
᭺
1Seating capacity: The maximum num-
ber of occupants that can be seated
in the vehicle.
᭺
2Vehicle load limit: See loading infor-
mation in the “Technical and con-
sumer information” section.
᭺
3Original tire size: The size of the tires
originally installed on the vehicle at
the factory.
᭺
4Cold tire pressure: Inflate the tires to
this pressure when the tires are cold.
Tires are considered COLD after the
vehicle has been parked for 3 or more
hours, or driven less than 1 mile (1.6
km) at moderate speeds. The recom-
mended cold tire inflation is set by the
manufacturer to provide the best bal-
ance of tire wear, vehicle handling,
driveability, tire noise, etc., up to the
vehicle’s GVWR.
᭺
5Tire size – refer to “Tire labeling” later
in this section.
᭺
6Spare tire size (if so equipped).
WDI0509
8-30 Maintenance and do-it-yourself
੬REVIEW COPY—
2007 Versa (vrs)
Owners Manual—USA_English (nna)
03/06/06—arosenma
੭
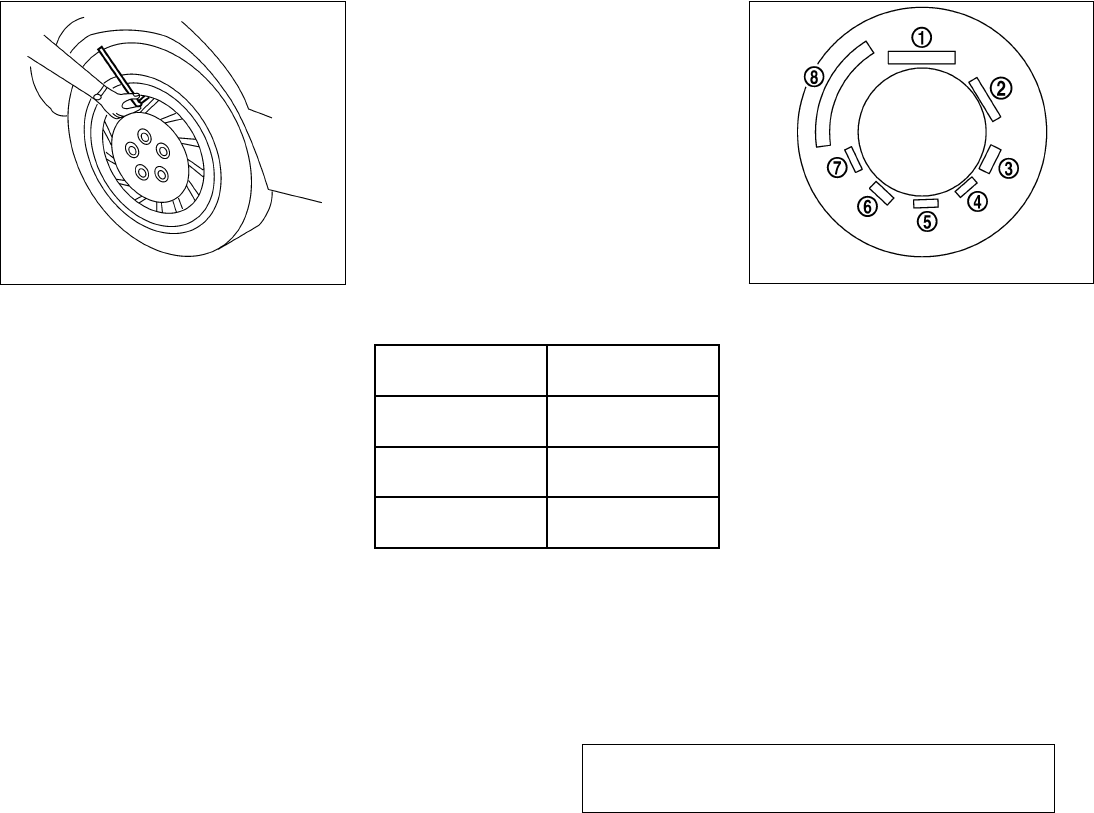
Checking tire pressure
1. Remove the valve stem cap from the
tire.
2. Press the pressure gauge squarely
onto the valve stem. Do not press too
hard or force the valve stem side-
ways, or air will escape. If the hissing
sound of air escaping from the tire is
heard while checking the pressure,
reposition the gauge to eliminate this
leakage.
3. Remove the gauge.
4. Read the tire pressure on the gauge
stem and compare to the specifica-
tion shown on the Tire and Loading
Information label (if so equipped) or
Tire Placard (if so equipped).
5. Add air to the tire as needed. If too
much air is added, press the core of
the valve stem briefly with the tip of
the gauge stem to release pressure.
Recheck the pressure and add or
release air as needed.
6. Install the valve stem cap.
7. Check the pressure of all other tires,
including the spare.
Size Cold Tire Inflation
Pressure
Front Original Tire:
P185/65R15 230 kPa, 33 PSI
Rear Original Tire:
P185/65R15 230 kPa, 33 PSI
Spare Tire:
T125/70*15 420 kPa, 60 PSI
TIRE LABELING
Federal law requires tire manufacturers to
place standardized information on the
sidewall of all tires. This information iden-
tifies and describes the fundamental
characteristics of the tire and also pro-
vides the tire identification number (TIN)
for safety standard certification. The TIN
can be used to identify the tire in case of a
recall.
LDI0393
Example
WDI0394
Maintenance and do-it-yourself 8-31
੬REVIEW COPY—
2007 Versa (vrs)
Owners Manual—USA_English (nna)
03/06/06—arosenma
੭
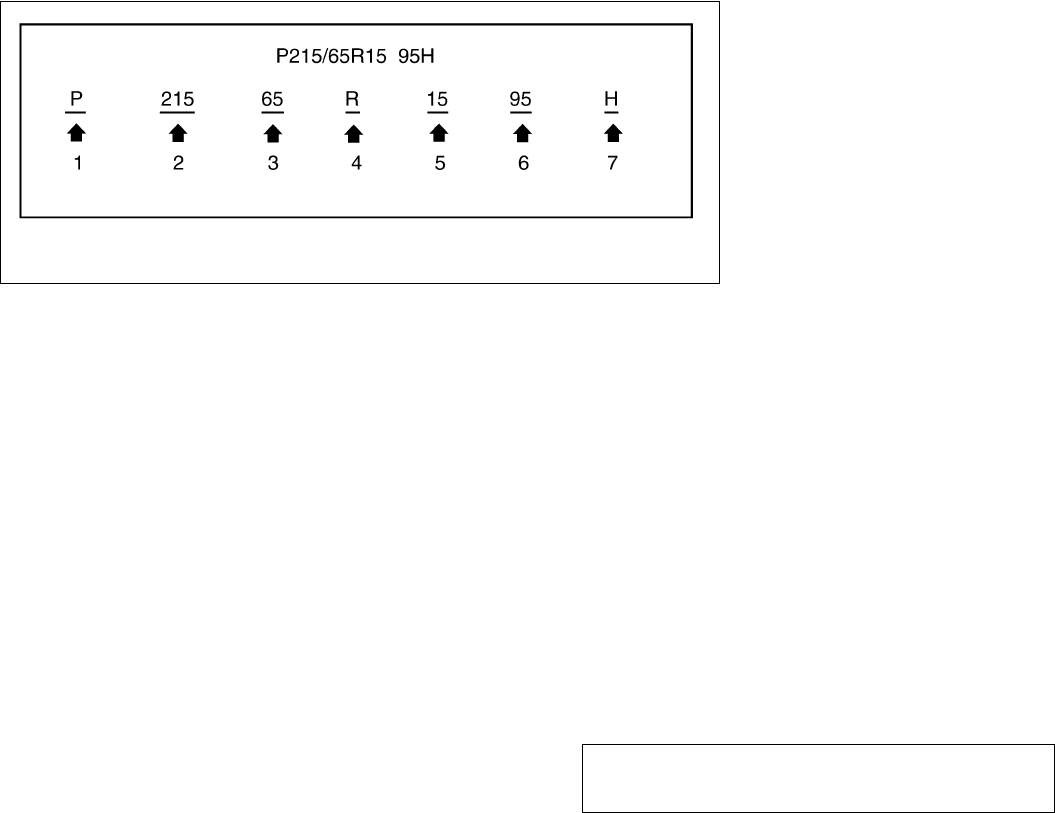
᭺
1Tire size (example: P215/65R15 95H)
1. P: The ЉPЉindicates the tire is de-
signed for passenger vehicles (not all
tires have this information).
2. Three-digit number (215): This num-
ber gives the width in millimeters of
the tire from sidewall edge to side-
wall edge.
3. Two-digit number (65): This number,
known as the aspect ratio, gives the
tire’s ratio of height to width.
4. R: The ЉRЉstands for radial.
5. Two-digit number (15): This number
is the wheel or rim diameter in inches.
6. Two- or three-digit number (95): This
number is the tire’s load index. It is a
measurement of how much weight
each tire can support. You may not
find this information on all tires be-
cause it is not required by law.
7. H: Tire speed rating. You should not
drive the vehicle faster than the tire
speed rating.
Example
WDI0395
8-32 Maintenance and do-it-yourself
੬REVIEW COPY—
2007 Versa (vrs)
Owners Manual—USA_English (nna)
03/06/06—arosenma
੭
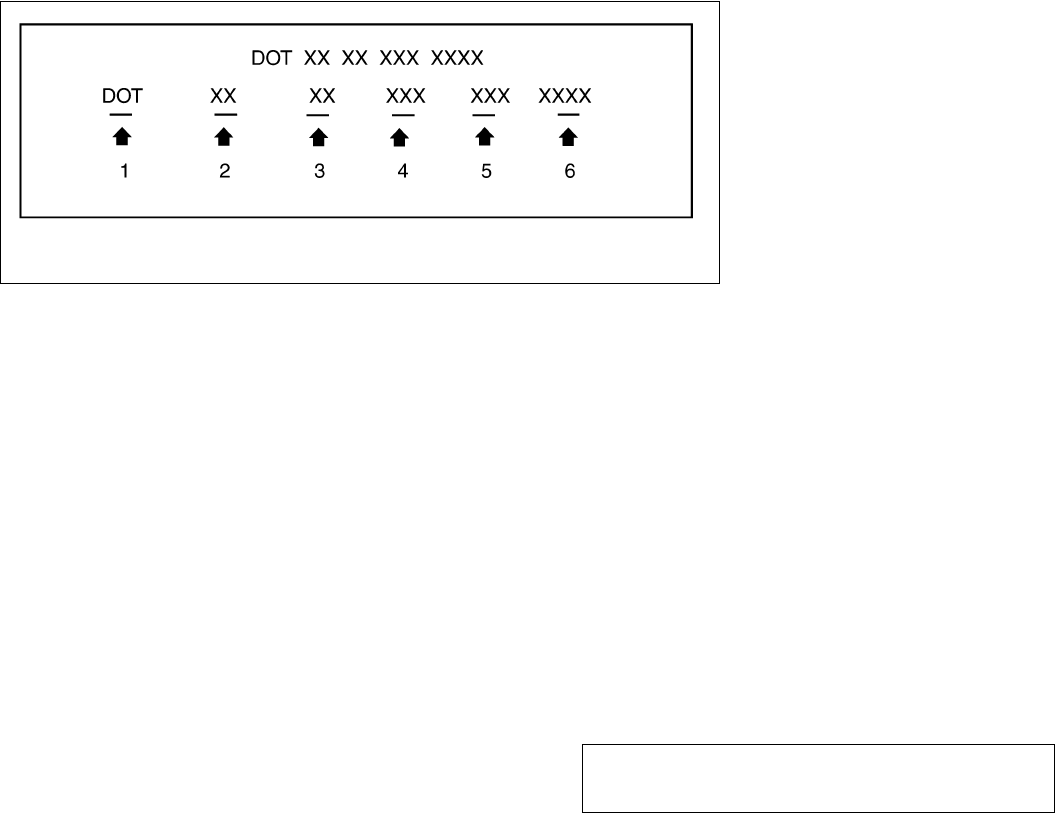
᭺
2TIN (Tire Identification Number) for a
new tire (example: DOT XX XX XXX
XXXX)
1. DOT: Abbreviation for the ЉDepart-
ment Of Transportation.ЉThe symbol
can be placed above, below or to the
left or right of Tire Identification Num-
ber.
2. Two-digit code: Manufacturer’s
identification mark
3. Two-digit code: Tire size
4. Three-digit code: Tire type code
(Optional)
5. Three-digit code: Date of Manufac-
ture
6. Four numbers represent the week
and year the tire was built. For ex-
ample, the numbers 3103 means the
31st week of 2003. If these numbers
are missing, then look on the other
sidewall of the tire.
᭺
3Tire ply composition and material
The number of layers or plies of rubber-
coated fabric in the tire. Tire manufactur-
ers also must indicate the materials in the
tire, which include steel, nylon, polyester,
and others.
᭺
4Maximum permissible inflation pres-
sure
This number is the greatest amount of air
pressure that should be put in the tire. Do
not exceed the maximum permissible in-
flation pressure.
᭺
5Maximum load rating
This number indicates the maximum load
in kilograms and pounds that can be car-
ried by the tire. When replacing the tires
on the vehicle, always use a tire that has
the same load rating as the factory in-
stalled tire.
᭺
6Term of ”tubeless” or ”tube type”
Indicates whether the tire requires an in-
ner tube (“tube type”) or not (“tubeless”).
᭺
7The word ”radial”
Example
WDI0396
Maintenance and do-it-yourself 8-33
੬REVIEW COPY—
2007 Versa (vrs)
Owners Manual—USA_English (nna)
03/06/06—arosenma
੭

The word ЉradialЉis shown if the tire has
radial structure.
᭺
8Manufacturer or brand name
Manufacturer or brand name is shown.
Other Tire-related Terminology
In addition to the many terms that are
defined throughout this section, Intended
Outboard Sidewall is (1) the sidewall that
contains a whitewall, bears white lettering
or bears manufacturer, brand, and/or
model name molding that is higher or
deeper than the same molding on the
other sidewall of the tire, or (2) the out-
ward facing sidewall of an asymmetrical
tire that has a particular side that must
always face outward when mounted on a
vehicle.
TYPES OF TIRES
WARNING
●When changing or replacing tires, be
sure all four tires are of the same type
(i.e., Summer, All Season or Snow) and
construction. A NISSAN dealer may be
able to help you with information about
tire type, size, speed rating and
availability.
●Replacement tires may have a lower
speed rating than the factory equipped
tires, and may not match the potential
maximum vehicle speed. Never exceed
the maximum speed rating of the tire.
●For additional information regarding
tires, refer to “Important Tire Safety In-
formation” (US) or “Tire Safety Informa-
tion” (Canada) in the Warranty Informa-
tion Booklet.
All season tires
NISSAN specifies All Season tires on some mod-
els to provide good performance all year, includ-
ing snowy and icy road conditions. All Season
tires are identified by ALL SEASON and/or M&S
on the tire sidewall. Snow tires have better snow
traction than All Season tires and may be more
appropriate in some areas.
Summer tires
NISSAN specifies summer tires on some models
to provide superior performance on dry roads.
Summer tire performance is substantially re-
duced in snow and ice. Summer tires do not have
the tire traction rating “M&S” on the tire sidewall.
If you plan to operate your vehicle in snowy or icy
conditions, NISSAN recommends the use of
SNOW tires or ALL SEASON tires on all four
wheels.
Snow tires
If snow tires are needed, it is necessary to select
tires equivalent in size and load rating to the
original equipment tires. If you do not, it can
adversely affect the safety and handling of your
vehicle.
Generally, snow tires have lower speed ratings
than factory equipped tires and may not match
the potential maximum vehicle speed. Never ex-
ceed the maximum speed rating of the tire.
If you install snow tires, they must be the same
size, brand, construction and tread pattern on all
four wheels.
For additional traction on icy roads, studded tires
may be used. However, some U.S. states and
Canadian provinces prohibit their use. Check
local, state and provincial laws before installing
8-34 Maintenance and do-it-yourself
੬REVIEW COPY—
2007 Versa (vrs)
Owners Manual—USA_English (nna)
03/06/06—arosenma
੭

studded tires. Skid and traction capabilities of
studded snow tires on wet or dry surfaces may be
poorer than that of non-studded snow tires.
TIRE CHAINS
Use of tire chains may be prohibited according to
location. Check the local laws before installing
tire chains. When installing tire chains, make sure
they are the proper size for the tires on your
vehicle and are installed according to the chain
manufacturer’s suggestions. Use only SAE
class “S” chains. Class “S” chains are used on
vehicles with restricted tire to vehicle clearance.
Vehicles that can use Class “S” chains are de-
signed to meet the minimum clearances between
the tire and the closest vehicle suspension or
body component required to accommodate the
use of a winter traction device (tire chains or
cables). The minimum clearances are determined
using the factory equipped tires. Other types may
damage your vehicle. Use chain tensioners when
recommended by the tire chain manufacturer to
ensure a tight fit. Loose end links of the tire chain
must be secured or removed to prevent the pos-
sibility of whipping action damage to the fenders
or underbody. If possible, avoid fully loading your
vehicle when using tire chains. In addition, drive
at a reduced speed. Otherwise, your vehicle may
be damaged and/or vehicle handling and perfor-
mance may be adversely affected.
Tire chains must be installed only on the
front wheels and not on the rear wheels.
Never install tire chains on a TEMPORARY USE
ONLY spare tire.
Do not use tire chains on dry roads. Driving with
chains in such conditions can cause damage to
the various mechanisms of the vehicle due to
some overstress.
CHANGING WHEELS AND TIRES
Tire rotation
NISSAN recommends rotating the tires
every 7,500 miles (12,000 km).
See “Flat tire” in the “In case of emer-
gency” section of this manual for tire re-
placing procedures.
As soon as possible, tighten the
wheel nuts to the specified torque
with a torque wrench.
WDI0258
Maintenance and do-it-yourself 8-35
੬REVIEW COPY—
2007 Versa (vrs)
Owners Manual—USA_English (nna)
03/06/06—arosenma
੭
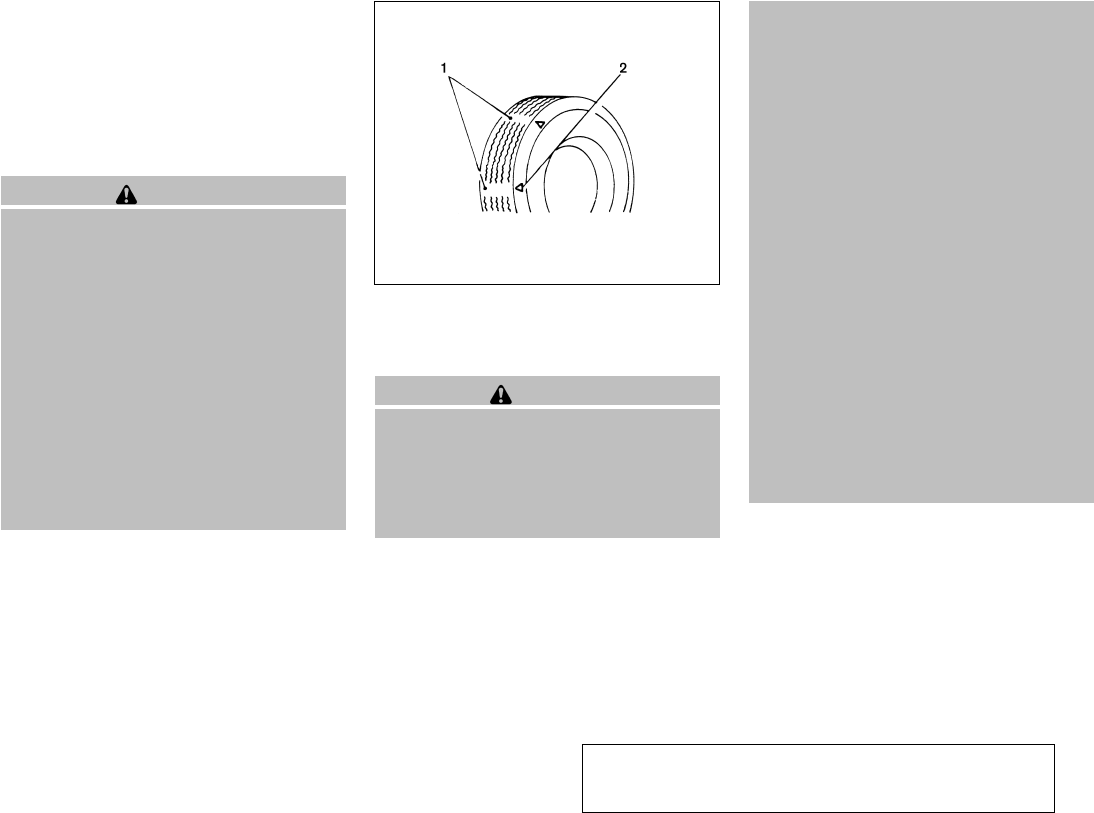
Wheel nut tightening torque:
83 ft-lb (113 N·m)
The wheel nuts must be kept tight-
ened to specifications at all times. It
is recommended that wheel nuts be
tightened to specification at each
tire rotation interval.
WARNING
●After rotating the tires, check and
adjust the tire pressure.
●Retighten the wheel nuts when
the vehicle has been driven for
600 miles (1,000 km) (also in
cases of a flat tire, etc.).
●Do not include the spare tire in
the tire rotation.
●For additional information re-
garding tires, refer to “Important
Tire Safety Information” (US) or
“Tire Safety Information”
(Canada) in the Warranty Infor-
mation Booklet.
1. Wear indicator
2. Location mark
Tire wear and damage
WARNING
●Tires should be periodically in-
spected for wear, cracking, bulg-
ing or objects caught in the tread.
If excessive wear, cracks, bulging
or deep cuts are found, the tire(s)
should be replaced.
●The original tires have built-in
tread wear indicators. When the
wear indicators are visible, the
tire(s) should be replaced.
●Tires degrade with age and use.
Have tires, including the spare,
over 6 years old checked by a
qualified technician because
some tire damage may not be ob-
vious. Replace the tires as neces-
sary to prevent tire failure and
possible personal injury.
●Improper service of the spare tire
may result in serious personal in-
jury. If it is necessary to repair the
spare tire, contact a NISSAN
dealer.
●For additional information re-
garding tires, refer to “Important
Tire Safety Information” (US) or
“Tire Safety Information”
(Canada) in the Warranty Infor-
mation Booklet.
WDI0259
8-36 Maintenance and do-it-yourself
੬REVIEW COPY—
2007 Versa (vrs)
Owners Manual—USA_English (nna)
03/06/06—arosenma
੭

Replacing wheels and tires
When replacing a tire, use the same size, tread
design, speed rating and load carrying capacity
as originally equipped. Recommended types and
sizes are shown in “Wheels and tires” in the
“Technical and consumer information” section of
this manual.
WARNING
●The use of tires other than those recom-
mended or the mixed use of tires of
different brands, construction (bias,
bias-belted or radial), or tread patterns
can adversely affect the ride, braking,
handling, ground clearance, body-to-
tire clearance, tire chain clearance,
speedometer calibration, headlight aim
and bumper height. Some of these ef-
fects may lead to accidents and could
result in serious personal injury.
●If the wheels are changed for any rea-
son, always replace with wheels which
have the same off-set dimension.
Wheels of a different off-set could
cause premature tire wear, degrade ve-
hicle handling characteristics and/or
interference with the brake
discs/drums. Such interference can
lead to decreased braking efficiency
and/or early brake pad/shoe wear. Re-
fer to “Wheels and tires” in the “Techni-
cal and consumer information” section
of this manual for wheel off-set
dimensions.
●When a spare tire is mounted or a wheel
is replaced, tire pressure will not be
indicated, the TPMS will not function
and the low tire pressure warning light
will flash. Contact your NISSAN dealer
as soon as possible for tire replacement
and/or system resetting.
●Replacing tires with those not originally
specified by NISSAN could affect the
proper operation of the TPMS.
●Do not install a deformed wheel or tire
even if it has been repaired. Such
wheels or tires could have structural
damage and could fail without warning.
●The use of retread tires is not
recommended.
●For additional information regarding
tires, refer to “Important Tire Safety In-
formation” (US) or “Tire Safety Informa-
tion” (Canada) in the Warranty Informa-
tion Booklet.
Wheel balance
Unbalanced wheels may affect vehicle handling
and tire life. Even with regular use, wheels can get
out of balance. Therefore, they should be bal-
anced as required.
Wheel balance service should be per-
formed with the wheels off the vehicle.
Spin balancing the wheels on the vehicle
could lead to mechanical damage.
●For additional information regarding
tires, refer to “Important Tire Safety
Information” (US) or “Tire Safety Infor-
mation” (Canada) in the Warranty In-
formation Booklet .
Care of wheels
●Wash the wheels when washing the vehicle
to maintain their appearance.
Maintenance and do-it-yourself 8-37
੬REVIEW COPY—
2007 Versa (vrs)
Owners Manual—USA_English (nna)
03/06/06—arosenma
੭

●Clean the inner side of the wheels when the
wheel is changed or the underside of the
vehicle is washed.
●Do not use abrasive cleaners when washing
the wheels.
●Inspect wheel rims regularly for dents or
corrosion. Such damage may cause loss of
pressure or poor seal at the tire bead.
●NISSAN recommends waxing the road
wheels to protect against road salt in areas
where it is used during winter.
Spare tire (TEMPORARY USE ONLY
spare tire)
Observe the following precautions if the TEM-
PORARY USE ONLY spare tire must be used.
Otherwise, your vehicle could be damaged or
involved in an accident:
WARNING
●The spare tire should be used for emer-
gency use only. It should be replaced
with the standard tire at the first oppor-
tunity to avoid possible tire or differen-
tial damage.
●Drive carefully while the TEMPORARY
USE ONLY spare tire is installed. Avoid
sharp turns and abrupt braking while
driving.
●Periodically check spare tire inflation
pressure. Always keep the pressure of
the TEMPORARY USE ONLY spare tire
at 60 psi (420 kPa, 4.2 bar).
●With the TEMPORARY USE ONLY spare
tire installed do not drive the vehicle at
speeds faster than 50 MPH (80 km/h).
●When driving on roads covered with
snow or ice, the TEMPORARY USE
ONLY spare tire should be used on the
rear wheels and the original tire used
on the front wheels (drive wheels). Use
tire chains only on the front (original)
tires.
●Tire tread of the TEMPORARY USE
ONLY spare tire will wear at a faster rate
than the standard tire. Replace the
spare tire as soon as the tread wear
indicators appear.
●Do not use the spare tire on other
vehicles.
●Do not use more than one spare tire at
the same time.
●Do not tow a trailer when the TEMPO-
RARY USE ONLY spare tire is installed.
CAUTION
●Do not use tire chains on a TEMPO-
RARY USE ONLY spare tire. Tire chains
will not fit properly and may cause dam-
age to the vehicle.
●Because the TEMPORARY USE ONLY
spare tire is smaller than the original
tire, ground clearance is reduced. To
avoid damage to the vehicle, do not
drive over obstacles. Also, do not drive
the vehicle through an automatic car
wash since it may get caught.
8-38 Maintenance and do-it-yourself
੬REVIEW COPY—
2007 Versa (vrs)
Owners Manual—USA_English (nna)
03/06/06—arosenma
੭

9 Technical and consumer information
Capacities and recommended fuel/lubricants .........9-2
Fuel recommendation ...........................9-3
Engine oil and oil filter recommendation ...........9-5
Recommended SAE viscosity number ............9-6
Air conditioner system refrigerant and oil
recommendations . . ............................9-6
Specifications.....................................9-7
Engine ........................................9-7
Wheels and tires ...............................9-8
Dimensions and weights ........................9-8
When traveling or registering your vehicle in
another country ...................................9-9
Vehicle identification . . . ............................9-9
Vehicle identification number (VIN) plate ..........9-9
Vehicle identification number
(chassis number) . . . ............................9-9
Engine serial number...........................9-10
F.M.V.S.S./C.M.V.S.S. certification label ..........9-10
Emission control information label ...............9-10
Tire and loading information label................9-11
Air conditioner specification label................9-11
Installing front license plate ........................9-12
Vehicle loading information ........................9-12
Terms ........................................9-12
Determining vehicle load capacity ...............9-13
Loading tips ..................................9-15
Measurement of weights .......................9-15
Towing a trailer ...................................9-16
Flat towing....................................9-16
Uniform tire quality grading ........................9-16
Emission control system warranty ..................9-17
Reporting safety defects (US only) .................9-18
Readiness for inspection/maintenance (I/M) test .....9-18
Event data recorders..............................9-19
Owner’s Manual/Service Manual order information . . .9-19
In the event of a collision .......................9-20
੬REVIEW COPY—
2007 Versa (vrs)
Owners Manual—USA_English (nna)
03/06/06—arosenma
੭
The following are approximate capacities. The actual refill capacities may be a little different. When refilling, follow the procedure
described in the “Maintenance and do-it-yourself” section to determine the proper refill capacity.
Capacity (Approximate) Recommended Fluids and Lubricants
US measure Imp measure Liter
Fuel 13-7/8 gal 11-1/2 gal 52.4 Unleaded gasoline with an octane rating of at least 87 AKI (RON 91) *1
Engine oil *7
Drain and Refill
With oil filter change 4-1/8 qt 3-3/8 qt 3.9 • API Certification Mark *2 *3
•API grade SH, SJ, SL or SM, Energy Conserving *2 *3
• ILSAC grade GF-2, GF-3 or GF-4 *2 *3
Without oil filter change 3-7/8 qt 3-1/4 qt 3.7
Cooling system
With reservoir 1-3/4 gal 1-1/2 gal 6.8 Genuine NISSAN Long Life Antifreeze/Coolant or equivalent
Continuously Variable Transmission (CVT)
fluid —— — Genuine NISSAN CVT fluid NS-2 *4
Manual transmission gear oil Refill to the proper level according to the instructions in
the “Maintenance and do-it-yourself” section.*8
ELF XT4447 M+ 75W-80 or API GL-4, Viscosity SAE 75W-80
Brake and clutch fluid Genuine NISSAN Super Heavy Duty Brake Fluid*5
Multi-purpose grease — — — NLGI No. 2 (Lithium Soap base)
Air conditioning system refrigerant — — — HFC-134a (R-134a) *6
Air conditioning system oil
M/T — — — NISSAN A/C System Oil Type R or equivalent *6
CVT — — — NISSAN A/C System Oil Type S or equivalent *6
Windshield washer fluid — — — Genuine NISSAN Windshield Washer Concentrate Cleaner & Antifreeze fluid
or equivalent
*1: For further details, see “Fuel recommendation.”
*2: For further details, see “Engine oil and oil filter recommendations.”
*3: For further details, see “Recommended SAE viscosity number.”
*4: Use only Genuine NISSAN CVT Fluid NS-2. Using transmission fluid other than Genuine NISSAN CVT Fluid NS-2 will damage the CVT transmission, which is not
covered by the NISSAN new vehicle limited warranty.
*5: Never mix different types of fluids.
*6: For further details, see “Air conditioner system refrigerant and oil recommendations.”
*7: For further details, see “Engine oil” in the “Maintenance and do-it-yourself” section of this manual.
*8: See your NISSAN dealer for service.
CAPACITIES AND RECOMMENDED
FUEL/LUBRICANTS
9-2 Technical and consumer information
੬REVIEW COPY—
2007 Versa (vrs)
Owners Manual—USA_English (nna)
03/06/06—arosenma
੭

FUEL RECOMMENDATION
Use unleaded regular gasoline with an octane
rating of at least 87 AKI (Anti-Knock Index) num-
ber (Research octane number 91).
CAUTION
●Using a fuel other than that specified
could adversely affect the emission
control system, and may also affect the
warranty coverage.
●Under no circumstances should a
leaded gasoline be used, because this
will damage the three-way catalyst.
●Do not use E-85 fuel in your vehicle.
Your vehicle is not designed to run on
E-85 fuel. Using E-85 fuel can damage
the fuel system components and is not
covered by the NISSAN new vehicle lim-
ited warranty.
Gasoline specifications
NISSAN recommends using gasoline that meets
the World-Wide Fuel Charter (WWFC) specifi-
cations where it is available. Many of the automo-
bile manufacturers developed this specification
to improve emission control system and vehicle
performance. Ask your service station manager if
the gasoline meets the WWFC specifications.
Reformulated gasoline
Some fuel suppliers are now producing reformu-
lated gasolines. These gasolines are specially
designed to reduce vehicle emissions. NISSAN
supports efforts towards cleaner air and sug-
gests that you use reformulated gasoline when
available.
Gasoline containing oxygenates
Some fuel suppliers sell gasoline containing oxy-
genates such as ethanol, MTBE and methanol
with or without advertising their presence.
NISSAN does not recommend the use of fuels of
which the oxygenate content and the fuel com-
patibility for your NISSAN cannot be readily de-
termined. If in doubt, ask your service station
manager.
If you use oxygenate-blend gasoline, please take
the following precautions as the usage of such
fuels may cause vehicle performance problems
and/or fuel system damage.
●The fuel should be unleaded and have
an octane rating no lower than that
recommended for unleaded gasoline.
●If an oxygenate-blend other than
methanol blend is used, it should con-
tain no more than 10% oxygenate.
(MTBE may, however, be added up to
15%.)
●If a methanol blend is used, it should
contain no more than 5% methanol
(methyl alcohol, wood alcohol). It
should also contain a suitable amount
of appropriate cosolvents and corro-
sion inhibitors. If not properly formu-
lated with appropriate cosolvents and
corrosion inhibitors, such methanol
blends may cause fuel system damage
and/or vehicle performance problems.
At this time, sufficient data is not avail-
able to ensure that all methanol blends
are suitable for use in NISSAN ve-
hicles.
If any driveability problems such as engine stall-
ing and difficult hot-starting are experienced after
using oxygenate-blend fuels, immediately
change to a non-oxygenate fuel or a fuel with a
low blend of MTBE.
Take care not to spill gasoline during refu-
eling. Gasoline containing oxygenates can
cause paint damage.
E–85 fuel
E-85 fuel is a mixture of approximately 85% fuel
ethanol and 15% unleaded gasoline. E-85 can
only be used in a Flexible Fuel Vehicle (FFV). Do
Technical and consumer information 9-3
੬REVIEW COPY—
2007 Versa (vrs)
Owners Manual—USA_English (nna)
03/06/06—arosenma
੭

not use E-85 in your vehicle. U.S. government
regulations require fuel ethanol dispensing
pumps to be identified by a small, square, orange
and black label with the common abbreviation or
the appropriate percentage for that region.
Aftermarket fuel additives
NISSAN does not recommend the use of any
aftermarket fuel additives (for example, fuel injec-
tor cleaner, octane booster, intake valve deposit
removers, etc.) which are sold commercially.
Many of these additives intended for gum, varnish
or deposit removal may contain active solvents or
similar ingredients that can be harmful to the fuel
system and engine.
Octane rating tips
Using unleaded gasoline with an octane
rating lower than recommended can cause
persistent, heavy “spark knock.” (“Spark
knock” is a metallic rapping noise.) If se-
vere, this can lead to engine damage. If you
detect a persistent heavy spark knock even
when using gasoline of the stated octane
rating, or if you hear steady spark knock
while holding a steady speed on level
roads, have a NISSAN dealer correct the
condition. Failure to correct the condition
is misuse of the vehicle, for which NISSAN
is not responsible.
Incorrect ignition timing may result in spark
knock, after-run and/or overheating, which may
cause excessive fuel consumption or engine
damage. If any of the above symptoms are en-
countered, have your vehicle checked at a
NISSAN dealer.
However, now and then you may notice
light spark knock for a short time while
accelerating or driving up hills. This is not a
cause for concern, because you get the
greatest fuel benefit when there is light
spark knock for a short time under heavy
engine load.
CAUTION
●Your vehicle is not designed to run on
E-85 fuel. Using E-85 fuel in a vehicle
not specifically designed for E-85 fuel
can damage fuel system components
and is not covered by the NISSAN new
vehicle limited warranty.
●E-85 is a mixture of approximately 85%
fuel ethanol and 15% unleaded
gasoline.
●U.S. government regulations require
ethanol dispensing pumps to be identi-
fied by a small, square, orange and
black label with the common abbrevia-
tion or the appropriate percentage for
that region.
9-4 Technical and consumer information
੬REVIEW COPY—
2007 Versa (vrs)
Owners Manual—USA_English (nna)
03/06/06—arosenma
੭
ENGINE OIL AND OIL FILTER
RECOMMENDATION
Selecting the correct oil
It is essential to choose the correct grade, quality
and viscosity engine oil to ensure satisfactory
engine life and performance. See ЉCapacities
and recommended fuel/lubricantsЉearlier in this
section. NISSAN recommends the use of an
energy conserving oil in order to improve fuel
economy.
Select only engine oils that meet the American
Petroleum Institute (API) certification or Interna-
tional Lubricant Standardization and Approval
Committee (ILSAC) certification and SAE vis-
cosity standard. These oils have the API certifica-
tion mark on the front of the container. Oils which
do not have the specified quality label should not
be used as they could cause engine damage.
Oil additives
NISSAN does not recommend the use of oil
additives. The use of an oil additive is not neces-
sary when the proper oil type is used and main-
tenance intervals are followed.
Oil which may contain foreign matter or has been
previously used should not be used.
Oil viscosity
The engine oil viscosity or thickness changes
with temperature. Because of this, it is important
to select the engine oil viscosity based on the
temperatures at which the vehicle will be oper-
ated before the next oil change. The chart “Rec-
ommended SAE viscosity number” shows the
recommended oil viscosities for the expected
ambient temperatures. Choosing an oil viscosity
other than that recommended could cause seri-
ous engine damage.
Selecting the correct oil filter
Your new NISSAN vehicle is equipped with a
high-quality genuine NISSAN oil filter. When re-
placing, use a genuine NISSAN oil filter or its
equivalent for the reason described in “Change
intervals”.
Change intervals
The oil and oil filter change intervals for your
engine are based on the use of the specified
quality oils and filters. Using engine oil and filters
that are not of the specified quality, or exceeding
recommended oil and filter change intervals
could reduce engine life. Damage to the engine
caused by improper maintenance or use of incor-
rect oil and filter quality and/or viscosity is not
covered by the NISSAN new vehicle limited war-
ranty.
WTI0082
Technical and consumer information 9-5
੬REVIEW COPY—
2007 Versa (vrs)
Owners Manual—USA_English (nna)
03/06/06—arosenma
੭
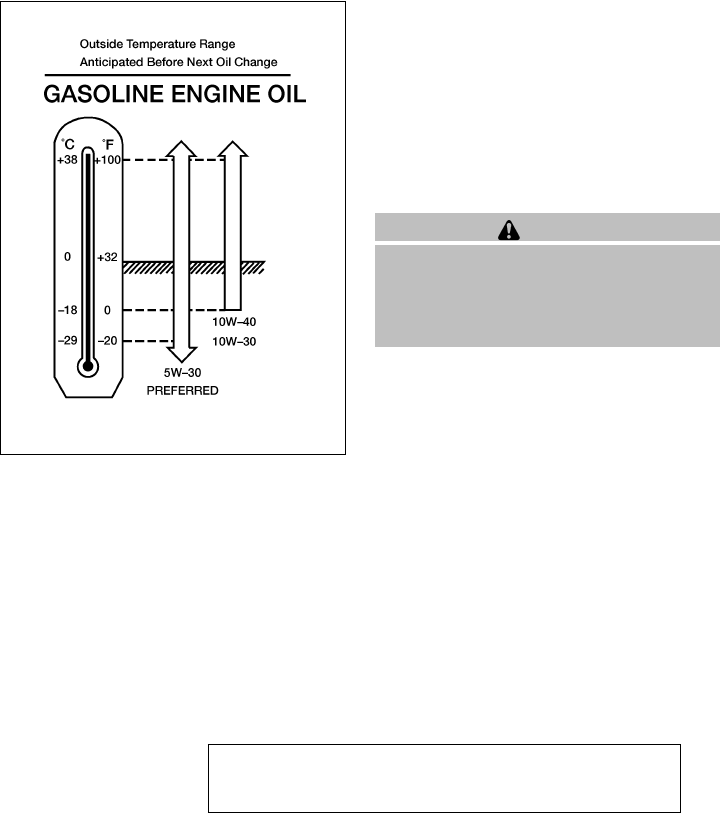
Your engine was filled with a high-quality engine
oil when it was built. You do not have to change
the oil before the first recommended change
interval. Oil and filter change intervals depend
upon how you use your vehicle.
Operation under the following conditions may
require more frequent oil and filter changes:
●repeated short distance driving at cold out-
side temperatures
●driving in dusty conditions
●extensive idling
●towing a trailer
●stop and go commuting
Refer to the ЉNISSAN Service and Maintenance
GuideЉfor the maintenance schedule.
RECOMMENDED SAE VISCOSITY
NUMBER
●
SAE 5W-30 viscosity oil is preferred for all
temperatures. SAE 10W-30 or SAE
10W-40 viscosity oils may be used if the
ambient temperature is above 0°F (-18°C).
AIR CONDITIONER SYSTEM
REFRIGERANT AND OIL
RECOMMENDATIONS
The air conditioner system in your NISSAN
vehicle must be charged with the refriger-
ant HFC-134a (R-134a) and the oil, NISSAN
A/C system oil Type R (manual transmis-
sion only), Type S (CVT only) or the exact
equivalents.
CAUTION
The use of any other refrigerant or oil will
cause severe damage to the air condition-
ing system and will require the replace-
ment of all air conditioner system
components.
The refrigerant HFC-134a (R-134a) in your
NISSAN vehicle does not harm the earth’s ozone
layer. Although this refrigerant does not affect the
earth’s atmosphere, certain government regula-
tions require the recovery and recycling of any
refrigerant during automotive air conditioner sys-
tem service. A NISSAN dealer has the trained
technicians and equipment needed to recover
and recycle your air conditioner system refriger-
ant.
Contact a NISSAN dealer when servicing your air
conditioner system.
ATI1028
9-6 Technical and consumer information
੬REVIEW COPY—
2007 Versa (vrs)
Owners Manual—USA_English (nna)
03/06/06—arosenma
੭
ENGINE
Model MR18DE
Type Gasoline, 4-cycle, DOHC
Cylinder arrangement 4-cylinder, inline
Bore x Stroke in (mm) 3.307 x 3.193 (84.0 x 81.1)
Displacement cu in (cm
3
) 109.65 (1,798)
Firing order 1–3–4–2
Idle speed
No adjustment is necessary.
M/T
CVT (in “N” position)
Ignition timing (degree B.T.D.C. at idle speed)
CO % at idle
Spark plug FXE20HR11
Spark plug gap (Nominal) in (mm) 0.043 (1.1)
Camshaft operation Timing chain
The spark ignition system of this vehicle meets all requirements of the Canadian Interference-Causing Equipment Regulations.
SPECIFICATIONS
Technical and consumer information 9-7
੬REVIEW COPY—
2007 Versa (vrs)
Owners Manual—USA_English (nna)
03/06/06—arosenma
੭
WHEELS AND TIRES
Wheel type Size Offset in (mm)
Aluminum and steel 15 x 5.5JJ 1.57 (40)
Tire size P185/65R15
Spare tire T125/70D15
DIMENSIONS AND WEIGHTS
Unit: in (mm)
Body Type Hatchback
Overall length 169.1(4,295)
Overall width 66.7(1,695)
Overall height 60.4(1,535)
Front tread 58.3(1,480)
Rear tread 58.5(1,485)
Wheelbase 102.4(2,600)
Gross vehicle weight
rating
lb (kg) See the “F.M.V.S.S./C.M.
V.S.S. certification label”
on the center pillar be-
tween the driver’s side
front and rear doors.
Gross axle weight rating
Front lb (kg)
Rear lb (kg)
9-8 Technical and consumer information
੬REVIEW COPY—
2007 Versa (vrs)
Owners Manual—USA_English (nna)
03/06/06—arosenma
੭
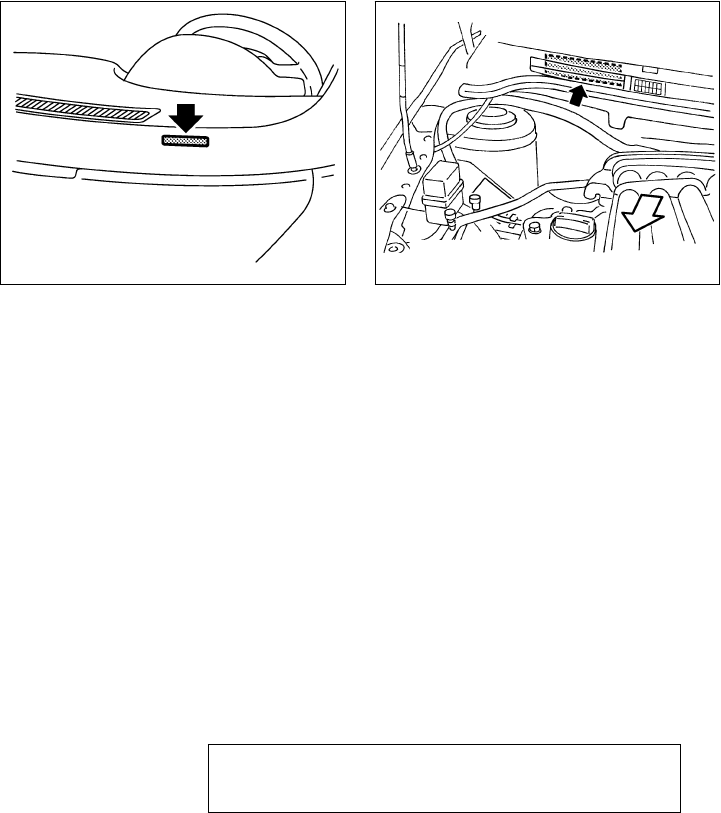
When planning to drive your NISSAN ve-
hicle in another country, you should first find
out if the fuel available is suitable for your vehi-
cle’s engine.
Using fuel with an octane rating that is too low
may cause engine damage. All gasoline vehicles
must be operated with unleaded gasoline. There-
fore, avoid taking your vehicle to areas where
appropriate fuel is not available.
When transferring the registration of your
vehicle to another country, state, province
or district, it may be necessary to modify the
vehicle to meet local laws and regulations.
The laws and regulations for motor vehicle emis-
sion control and safety standards vary according
to the country, state, province or district; there-
fore, vehicle specifications may differ.
When any vehicle is to be taken into an-
other country, state, province or district
and registered, its modifications, transpor-
tation, and registration are the responsibil-
ity of the user. NISSAN is not responsible
for any inconvenience that may result.
VEHICLE IDENTIFICATION NUMBER
(VIN) PLATE
The vehicle identification number (VIN) plate is
attached as shown. This number is the identifica-
tion for your vehicle and is used in the vehicle
registration.
VEHICLE IDENTIFICATION NUMBER
(chassis number)
The vehicle identification number is located as
shown.
STI0457 STI0465
WHEN TRAVELING OR REGISTERING
YOUR VEHICLE IN ANOTHER
COUNTRY
VEHICLE IDENTIFICATION
Technical and consumer information 9-9
੬REVIEW COPY—
2007 Versa (vrs)
Owners Manual—USA_English (nna)
03/06/06—arosenma
੭
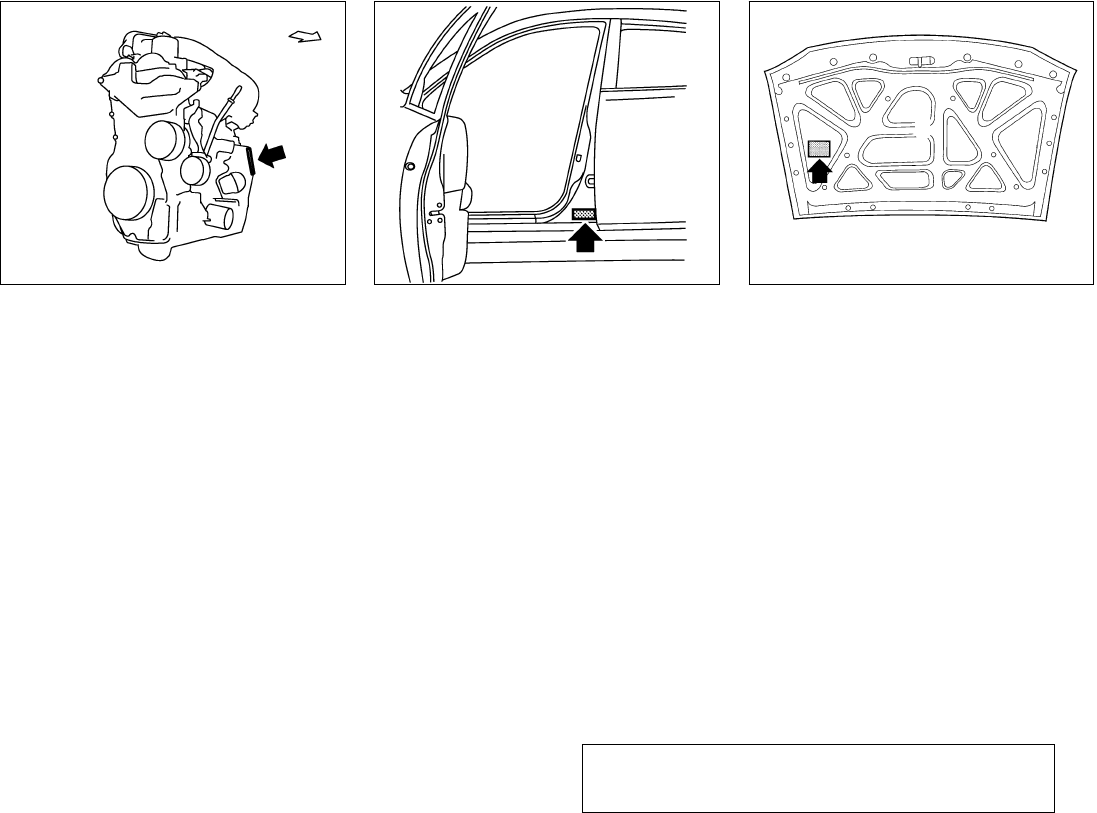
ENGINE SERIAL NUMBER
The number is stamped on the engine as shown.
F.M.V.S.S./C.M.V.S.S.
CERTIFICATION LABEL
The Federal/Canadian Motor Vehicle Safety
Standard (F.M.V.S.S./C.M.V.S.S.) certification la-
bel is affixed as shown. This label contains valu-
able vehicle information, such as: Gross Vehicle
Weight Ratings (GVWR), Gross Axle Weight
Rating (GAWR), month and year of manufacture,
Vehicle Identification Number (VIN), etc. Review
it carefully.
EMISSION CONTROL
INFORMATION LABEL
The emission control information label is at-
tached as shown.
STI0466 STI0349 WTI0059
9-10 Technical and consumer information
੬REVIEW COPY—
2007 Versa (vrs)
Owners Manual—USA_English (nna)
03/06/06—arosenma
੭
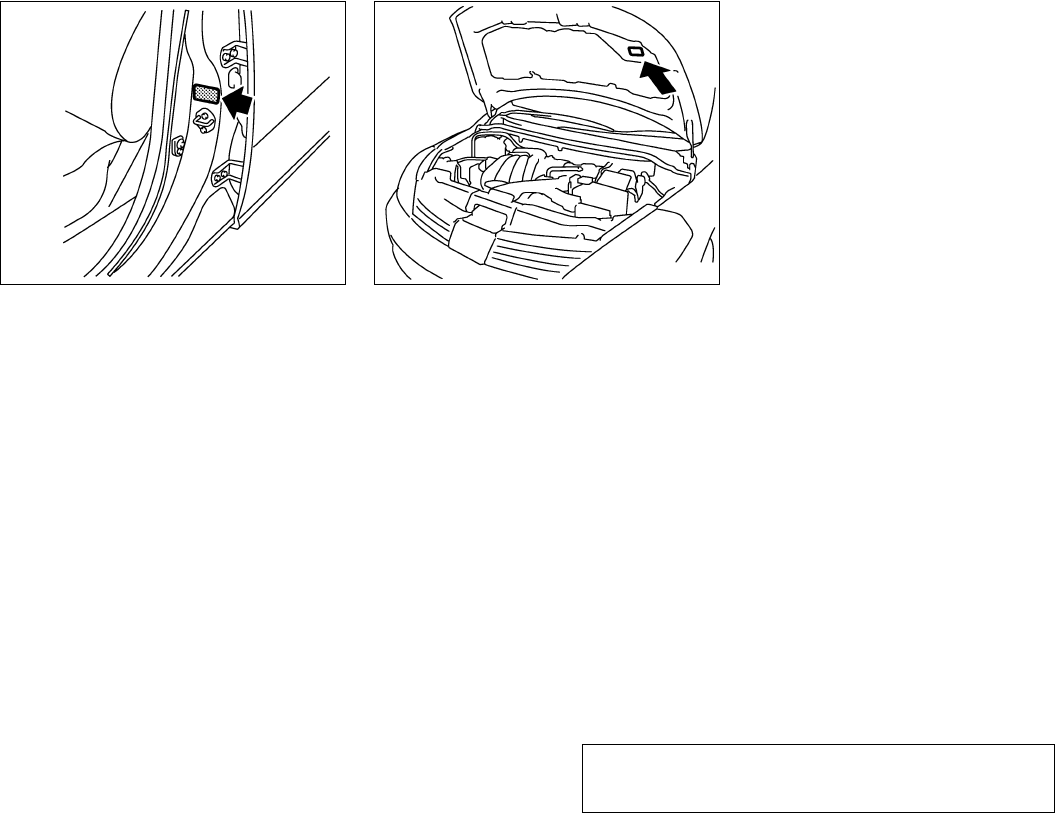
TIRE AND LOADING INFORMATION
LABEL
The cold tire pressure is shown on the Tire and
Loading Information label. The label is located as
shown.
AIR CONDITIONER SPECIFICATION
LABEL
The air conditioner specification label is affixed as
shown.
STI0453 STI0430
Technical and consumer information 9-11
੬REVIEW COPY—
2007 Versa (vrs)
Owners Manual—USA_English (nna)
03/06/06—arosenma
੭
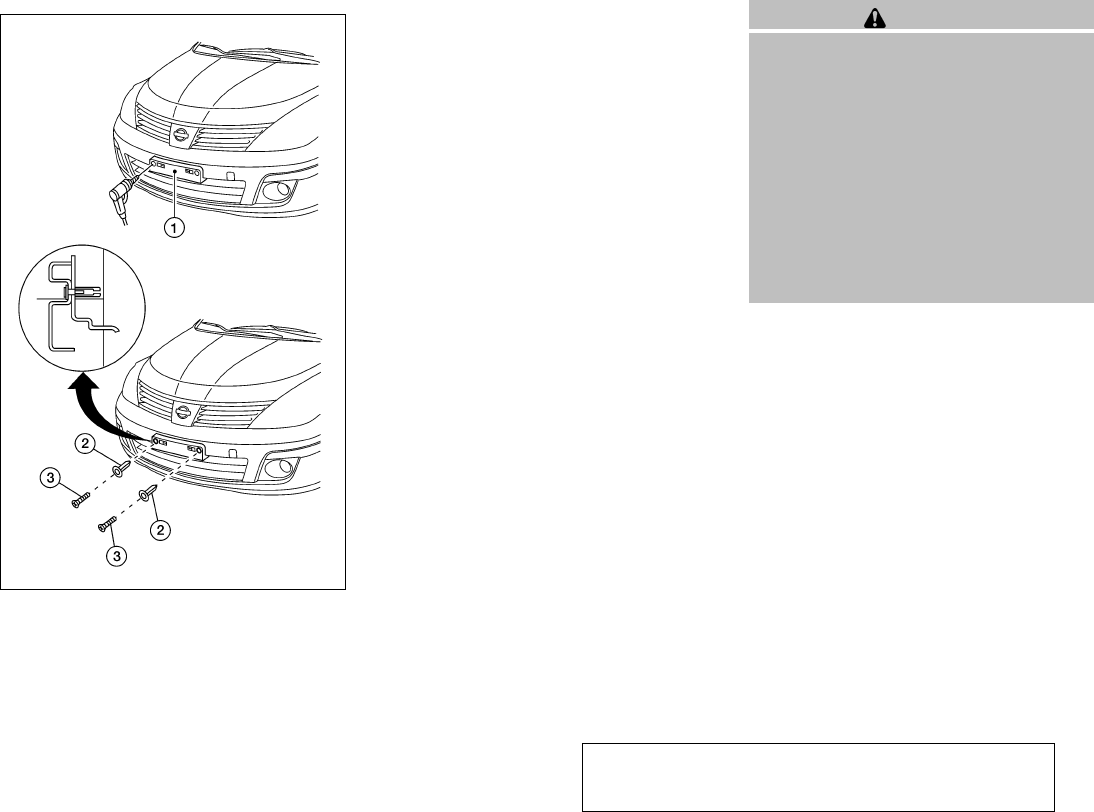
Use the following steps to mount the front license
plate:
Before mounting the license plate, confirm that
the following parts are enclosed in the plastic
bag:
●License plate bracket
●License plate bracket screws x 2
●License plate screws x 2
●Screw grommets x 2
1. Hold the license plate bracket ᭺
1and make
a shallow hole in the bumper fascia at the
location marks (small dimples) using a 0.39
in (10 mm) drill. To avoid damaging the area
behind the fascia, apply only light pressure
to the drill.
2. Insert the grommets ᭺
2into the holes in the
bumper fascia.
3. Insert a small flat-bladed screwdriver into
the grommet hole to turn the threaded part of
the grommet 90°.
4. Mount the license plate bracket using the
two longer screws ᭺
3.
5. Use the two shorter hex head screws to
mount the license plate to the license plate
bracket using the two M6-14 mm bolts.
WARNING
●It is extremely dangerous to ride
in a cargo area inside a vehicle. In
a collision, people riding in these
areas are more likely to be seri-
ously injured or killed.
●Do not allow people to ride in any
area of your vehicle that is not
equipped with seats and seat
belts.
●Be sure everyone in your vehicle
is in a seat and using a seat belt
properly.
TERMS
It is important to familiarize yourself with
the following terms before loading your
vehicle:
●Curb Weight (actual weight of your
vehicle) - vehicle weight including:
standard and optional equipment, flu-
ids, emergency tools, and spare tire
assembly. This weight does not in-
clude passengers and cargo.
LTI0170
INSTALLING FRONT LICENSE PLATE VEHICLE LOADING INFORMATION
9-12 Technical and consumer information
੬REVIEW COPY—
2007 Versa (vrs)
Owners Manual—USA_English (nna)
03/06/06—arosenma
੭

●GVW (Gross Vehicle Weight) - curb
weight plus the combined weight of
passengers and cargo.
●GVWR (Gross Vehicle Weight Rat-
ing) - maximum total combined
weight of the unloaded vehicle, pas-
sengers, luggage, hitch, trailer
tongue load and any other optional
equipment. This information is lo-
cated on the F.M.V.S.S./C.M.V.S.S.
label.
●GAWR (Gross Axle Weight Rating) -
maximum weight (load) limit specified
for the front or rear axle. This informa-
tion is located on the
F.M.V.S.S./C.M.V.S.S. label.
●GCWR (Gross Combined Weight
rating) - The maximum total weight
rating of the vehicle, passengers,
cargo, and trailer.
●Vehicle Capacity Weight, Load limit,
Total load capacity - maximum total
weight limit specified of the load
(passengers and cargo) for the ve-
hicle. This is the maximum combined
weight of occupants and cargo that
can be loaded into the vehicle. If the
vehicle is used to tow a trailer, the
trailer tongue weight must be in-
cluded as part of the cargo load. This
information is located on the Tire and
Loading Information label (if so
equipped).
●Cargo capacity - permissible weight
of cargo, the subtracted weight of
occupants from the load limit.
DETERMINING VEHICLE LOAD
CAPACITY
The load capacity of this vehicle is deter-
mined by weight, not by available cargo
space. For example, a luggage rack, bike
carrier, cartop carrier or similar equipment
does not increase load carrying capacity
of your vehicle.
To determine vehicle load capacity:
Vehicle weight can be determined by us-
ing a commercial-grade scale, found at
places such as a truck stop, gravel quarry,
grain elevator, or a scrap metal recycling
facility.
1. Determine the curb weight of your
vehicle.
2. Compare the curb weight amount to
the GVWR specified for your vehicle
to determine how much more weight
your vehicle can carry.
3. After loading (cargo and passen-
gers), re-weigh your vehicle to deter-
mine if either GVWR or GAWR for
your vehicle is exceeded. If GVWR is
exceeded, remove cargo as neces-
sary. If either the front or rear GAWR
is exceeded, shift the load or remove
cargo as necessary.
Technical and consumer information 9-13
੬REVIEW COPY—
2007 Versa (vrs)
Owners Manual—USA_English (nna)
03/06/06—arosenma
੭
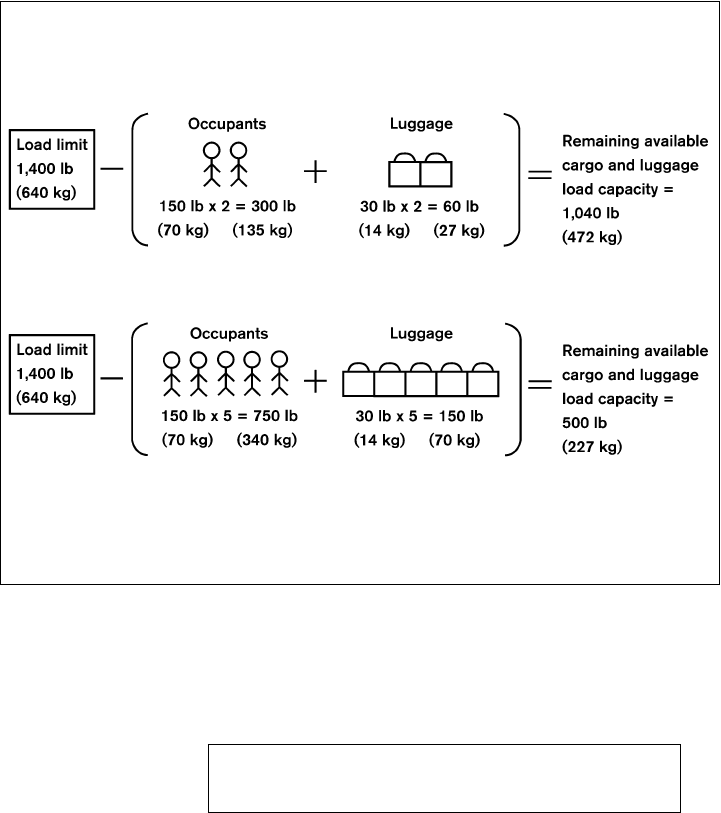
Steps for determining correct load
limit
1. Locate the statement “The combined
weight of occupants and cargo
should never exceed XXX kg or XXX
lbs” on your vehicle’s placard.
2. Determine the combined weight of
the driver and passengers that will be
riding in your vehicle.
3. Subtract the combined weight of the
driver and passengers from XXX kg
or XXX lbs.
4. The resulting figure equals the avail-
able amount of cargo and luggage
load capacity. For example, if the
XXX amount equals 1400 lbs. and
there will be five 150 lb. passengers
in your vehicle, the amount of avail-
able cargo and luggage load capac-
ity is 650 lbs. (1400-750 (5 X 150)
= 650 lbs) or (640-340 (5 X 70) =
300 kg.)
Example
WTI0169
9-14 Technical and consumer information
੬REVIEW COPY—
2007 Versa (vrs)
Owners Manual—USA_English (nna)
03/06/06—arosenma
੭

5. Determine the combined weight of
luggage and cargo being loaded on
the vehicle. That weight may not
safely exceed the available cargo and
luggage load capacity calculated in
Step 4.
Before driving a loaded vehicle, confirm
that you do not exceed the Gross Vehicle
Weight Rating (GVWR) or the Gross Axle
Weight Rating (GAWR) for your vehicle.
See “Measurement of Weights” later in
this section.
Also check tires for proper inflation pres-
sures. See the Tire and Loading Informa-
tion label.
LOADING TIPS
●The GVW must not exceed GVWR
or GAWR as specified on the
F.M.V.S.S./C.M.V.S.S. certification
label.
●Do not load the front and rear axle to
the GAWR. Doing so will exceed the
GVWR.
WARNING
●Properly secure all cargo with
ropes or straps to help prevent it
from sliding or shifting. Do not
place cargo higher than the seat-
backs. In a sudden stop or colli-
sion, unsecured cargo could
cause personal injury.
●Do not load your vehicle any
heavier than the GVWR or the
maximum front and rear GAWRs.
If you do, parts of your vehicle
can break, tire damage could oc-
cur, or it can change the way your
vehicle handles. This could result
in loss of control and cause per-
sonal injury.
●Overloading not only can shorten
the life of your vehicle and the
tire, but can also cause unsafe
vehicle handling and longer brak-
ing distances. This may cause a
premature tire failure which
could result in a serious accident
and personal injury. Failures
caused by overloading are not
covered by the vehicle’s
warranty.
MEASUREMENT OF WEIGHTS
Secure loose items to prevent weight
shifts that could affect the balance of your
vehicle. When the vehicle is loaded, drive
to a scale and weigh the front and the rear
wheels separately to determine axle
loads. Individual axle loads should not ex-
ceed either of the gross axle weight rat-
ings (GAWR). The total of the axle loads
should not exceed the gross vehicle
weight rating (GVWR). These ratings are
given on the vehicle certification label. If
weight ratings are exceeded, move or re-
move items to bring all weights below the
ratings.
Technical and consumer information 9-15
੬REVIEW COPY—
2007 Versa (vrs)
Owners Manual—USA_English (nna)
03/06/06—arosenma
੭

Do not tow a trailer with your vehicle.
FLAT TOWING
Towing your vehicle with all four wheels on the
ground is sometimes called flat towing. This
method is sometimes used when towing a vehicle
behind a recreational vehicle, such as a motor
home.
CAUTION
●Failure to follow these guidelines can
result in severe transmission damage.
●Whenever flat towing your vehicle, al-
ways tow forward, never backward.
●DO NOT tow any automatic transmis-
sion vehicle with all four wheels on the
ground (flat towing). Doing so WILL
DAMAGE internal transmission parts
due to lack of transmission lubrication.
●DO NOT tow any continuously variable
transmission vehicle with all four
wheels on the ground (flat towing). Do-
ing so WILL DAMAGE internal transmis-
sion parts due to lack of transmission
lubrication.
●For emergency towing procedures refer
to “Towing recommended by NISSAN”
in the “In case of emergency” section of
this manual.
Continuously VariableTransmission
To tow a vehicle equipped with a continuously
variable transmission, an appropriate vehicle
dolly MUST be placed under the towed vehicle’s
drive wheels. Always follow the dolly manufac-
turer’s recommendations when using their prod-
uct.
Manual Transmission
●Always tow with the manual transmission in
Neutral.
●After towing 500 miles (805 km), start and
idle the engine with the transmission in Neu-
tral for two minutes. Failure to idle the engine
after every 500 miles (805 km) of towing
may cause damage to internal transmission
parts.
DOT (Department of Transportation) Quality
Grades: All passenger car tires must conform to
federal safety requirements in addition to these
grades.
Quality grades can be found where applicable on
the tire sidewall between tread shoulder and
maximum section width. For example:
Treadwear 200 Traction AA Temperature A
Treadwear
The treadwear grade is a comparative rating
based on the wear rate of the tire when tested
under controlled conditions on a specified gov-
ernment test course. For example, a tire graded
150 would wear one and one-half (1 1/2) times
as well on the government course as a tire graded
100. The relative performance of tires depends
upon the actual conditions of their use, however,
and may depart significantly from the norm due to
variations in driving habits, service practices and
differences in road characteristics and climate.
Traction AA, A, B and C
The traction grades, from highest to lowest, are
AA, A, B, and C. Those grades represent the
tire’s ability to stop on wet pavement as mea-
sured under controlled conditions on specified
government test surfaces of asphalt and con-
crete. A tire marked C may have poor traction
performance.
TOWING A TRAILER UNIFORM TIRE QUALITY GRADING
9-16 Technical and consumer information
੬REVIEW COPY—
2007 Versa (vrs)
Owners Manual—USA_English (nna)
03/06/06—arosenma
੭

WARNING
The traction grade assigned to this tire is
based on straight-ahead braking traction
tests, and does not include acceleration,
cornering, hydroplaning, or peak traction
characteristics.
Temperature A, B and C
The temperature grades are A (the highest), B,
and C, representing the tire’s resistance to the
generation of heat, and its ability to dissipate heat
when tested under controlled conditions on a
specified indoor laboratory test wheel. Sustained
high temperature can cause the material of the
tire to degenerate and reduce tire life, and exces-
sive temperature can lead to sudden tire failure.
The grade C corresponds to a level of perfor-
mance which all passenger car tires must meet
under the Federal Motor Safety Standard No.
109. Grades B and A represent higher levels of
performance on the laboratory test wheel than
the minimum required by law.
WARNING
The temperature grade for this tire is es-
tablished for a tire that is properly inflated
and not overloaded. Excessive speed,
under-inflation, or excessive loading, ei-
ther separately or in combination, can
cause heat build-up and possible tire
failure.
Your NISSAN vehicle is covered by the following
emission warranties:
For USA
1. Emission Defects Warranty
2. Emissions Performance Warranty
Details of these warranties may be found with
other vehicle warranties in your Warranty Infor-
mation Booklet which comes with your NISSAN
vehicle. If you did not receive a Warranty Informa-
tion Booklet, or it is lost, you may obtain a re-
placement by writing to:
●Nissan North America, Inc.
Consumer Affairs Department
P.O. Box 191
Gardena, CA 90248-0191
For Canada
Emission Control System Warranty
Details of these warranties may be found with
other vehicle warranties in your Warranty Infor-
mation Booklet which comes with your NISSAN
vehicle. If you did not receive a Warranty Informa-
tion Booklet, or it is lost, you may obtain a re-
placement by writing to:
●Nissan Canada Inc.
5290 Orbitor Drive
Mississauga, Ontario, L4W 4Z5
EMISSION CONTROL SYSTEM
WARRANTY
Technical and consumer information 9-17
੬REVIEW COPY—
2007 Versa (vrs)
Owners Manual—USA_English (nna)
03/06/06—arosenma
੭

If you believe that your vehicle has a de-
fect which could cause a crash or could
cause injury or death, you should immedi-
ately inform the National Highway Traffic
Safety Administration (NHTSA) in addi-
tion to notifying NISSAN.
If NHTSA receives similar complaints, it
may open an investigation, and if it finds
that a safety defect exists in a group of
vehicles, it may order a recall and remedy
campaign. However, NHTSA cannot be-
come involved in individual problems be-
tween you, your dealer, or NISSAN.
To contact NHTSA, you may call the Ve-
hicle Safety Hotline toll-free at 1-888-
327-4236 (TTY: 1-800-424-9153); go
to http://www.safercar.gov; or write to:
Administrator, NHTSA, 400 Seventh
Street, SW., Washington, D.C. 20590.
You can also obtain other information
about motor vehicle safety from
http://www.safercar.gov.
You may notify NISSAN by contacting our
Consumer Affairs Department, toll-free, at
1-800-NISSAN-1.
Due to legal requirements in some states and
Canadian Provinces, your vehicle may be re-
quired to be in what is called the “ready condi-
tion” for an Inspection/Maintenance (I/M) test of
the emission control system.
The vehicle is set to the “ready condition” when it
is driven through certain driving patterns. Usually,
the ready condition can be obtained by ordinary
usage of the vehicle.
If a powertrain system component is repaired or
the battery is disconnected, the vehicle may be
reset to a “not ready” condition. Before taking the
I/M test, check the vehicle’s
inspection/maintenance test readiness condi-
tion. Turn the ignition switch ON without starting
the engine. If the Malfunction Indicator Light
(MIL) comes on steady for 20 seconds and then
blinks for 10 seconds , the I/M test condition is
Љnot readyЉ. If the MIL does not blink after 20
seconds, the I/M test condition is Љready.ЉIf the
MIL indicates the vehicle is in a Љnot readyЉcon-
dition, drive the vehicle through the following
pattern to set the vehicle to the ready condition. If
you cannot or do not want to perform the driving
pattern, a NISSAN dealer can conduct it for you.
WARNING
Always drive the vehicle in a safe and
prudent manner according to traffic con-
ditions and obey all traffic laws.
1. Start the engine when the engine coolant
temperature gauge needle points to C. Al-
low the engine to idle until the gauge needle
points between the C and H (normal oper-
ating temperature).
2. Accelerate the vehicle to 55 MPH (88
km/h), then quickly release the accelerator
pedal completely and keep it released for at
least 10 seconds.
3. Quickly depress the accelerator pedal for a
moment, then drive the vehicle at a speed of
53 - 60 MPH (86 - 96 km/h) for at least 9
minutes.
4. Stop the vehicle.
5. Accelerate the vehicle to 35 MPH (55 km/h)
and maintain the speed for 20 seconds.
6. Repeat steps 4 through 5 at least 10 times.
7. Accelerate the vehicle to 55 MPH (88 km/h)
and maintain the speed for at least 3 min-
utes.
REPORTING SAFETY DEFECTS (US
only)
READINESS FOR INSPECTION/
MAINTENANCE (I/M) TEST
9-18 Technical and consumer information
੬REVIEW COPY—
2007 Versa (vrs)
Owners Manual—USA_English (nna)
03/06/06—arosenma
੭

8. Stop the vehicle. Place the transmission se-
lector lever in the P (Park) or N (Neutral)
position.
9. Turn the engine off.
10. Repeat steps1-8atleast one more time.
If steps 1 through 7 are interrupted, repeat the
preceding step. Any safe driving mode is accept-
able between steps. Do not stop the engine until
step 7 is completed.
Your vehicle is equipped with a variety of comput-
ers that monitor and control a number of systems
to optimize performance and help service techni-
cians with diagnosis and repair. Some of the
computers monitor emission control systems,
braking systems, engine systems, transmission
systems, tire pressure systems, and airbag sys-
tems. Some data about vehicle operation may be
stored in the computers for use during servicing.
Other data may be stored if a crash event occurs.
For example, vehicle speed, brake application,
steering angle, air bag readiness, air bag perfor-
mance, and seat belt use by the driver or passen-
ger may be recorded. These types of systems are
sometimes called Event Data Recorders.
Special equipment can be used to access the
electronic data that may be stored in the vehicle’s
computers (sounds are not recorded). NISSAN
and NISSAN dealers have equipment to access
some of this data; others may also have this
equipment. The data may be retrieved during
routine vehicle servicing or for special research. It
might also be accessed with the consent of the
vehicle owner or lessee, in response to a request
by law enforcement, or as otherwise required or
permitted by law.
A genuine NISSAN Service Manual is the best
source of service and repair information for your
vehicle. Filled with wiring diagrams, illustrations
and step-by-step diagnostic and adjustment pro-
cedures, this manual is the same one used by the
factory-trained technicians working at NISSAN
dealerships. Also available are genuine NISSAN
Owner’s Manuals, and genuine NISSAN Service
and Owner’s Manuals for older NISSAN models.
For USA
For current pricing and availability of genuine
NISSAN Service Manuals for the 2000 model
year and later contact:
Tweddle Litho Company
1-800-450-9491
www.nissan-techinfo.com
For current pricing and availability of genuine
NISSAN Service Manuals for the 1999 model
year and prior, see a NISSAN dealer, or contact:
Resolve Corporation
20770 Westwood Road
Strongsville, OH 44136
1-800-247-5321
EVENT DATA RECORDERS OWNER’S MANUAL/SERVICE
MANUAL ORDER INFORMATION
Technical and consumer information 9-19
੬REVIEW COPY—
2007 Versa (vrs)
Owners Manual—USA_English (nna)
03/06/06—arosenma
੭

For current pricing and availability of genuine
NISSAN Owner’s Manuals for this model year
and prior, see a NISSAN dealer, or contact:
Resolve Corporation
20770 Westwood Road
Strongsville, OH 44136
1-800-247-5321
For Canada
To purchase a copy of a genuine NISSAN Ser-
vice Manual or Owner’s Manual please contact
your nearest NISSAN dealer. For the phone num-
ber and location of a NISSAN dealer in your area
call the NISSAN Information Center at 1-800-
387-0122 and a bilingual NISSAN representa-
tive will assist you.
Also available are genuine NISSAN Service and
Owner’s Manuals for older NISSAN models.
IN THE EVENT OF A COLLISION
Unfortunately, accidents do occur. In this unlikely
event, there is some important information you
should know.
Many insurance companies routinely authorize
the use of non-genuine collision parts in order to
cut costs, among other reasons.
Insist on the use of genuine NISSAN
collision parts!
If you want your vehicle to be restored using parts
made to NISSAN’s original exacting specifica-
tions – if you want to help it to last and hold its
resale value, the solution is simple. Tell your
insurance agent and your repair shop to
only use Genuine NISSAN Collision Parts.
NISSAN does not warrant non-NISSAN parts,
nor does NISSAN’s warranty apply to damage
caused by a non-genuine part.
Using Genuine NISSAN Parts can help protect
your personal safety, preserve your warranty pro-
tection and maintain the resale value of your
vehicle. And if your vehicle was leased, using
Genuine NISSAN Parts may prevent or limit un-
necessary excess wear and tear expenses at the
end of your lease.
NISSAN designs its hoods with crumple zones to
minimize the risk that the hood will penetrate the
windshield of your vehicle in an accident. Non-
genuine (imitation) parts may not provide such
built-in safeguards. Also, non-genuine parts of-
ten show premature wear, rust and corrosion.
Why should you take a chance?
In over 40 states, the law says you must be
advised if non-genuine parts are used to repair
your vehicle. And some states have enacted laws
that restrict insurance companies from authoriz-
ing the use of non-genuine collision parts during
the new vehicle warranty. These laws help pro-
tect you, so you can take action to protect your-
self.
It’s your right!
If you should need further information visit us at:
www.nissanusa.com.
9-20 Technical and consumer information
੬REVIEW COPY—
2007 Versa (vrs)
Owners Manual—USA_English (nna)
03/06/06—arosenma
੭

10 Index
A
Active head restraint ...............1-4
Air bag (See supplemental restraint
system) .....................1-33
Air bag system
Front (See supplemental front impact
air bag system) ...............1-40
Air bag warning labels .............1-47
Air bag warning light...........1-47, 2-11
Air cleaner housing filter ............8-16
Air conditioner
Air conditioner operation...........4-5
Air conditioner service ............4-9
Air conditioner specification label .....9-11
Air conditioner system refrigerant and
oil recommendations .............9-6
Heater and air conditioner controls .....4-3
Servicing air conditioner ...........4-9
Air flow charts ..................4-6
Alarm system
(See vehicle security system) .........2-14
Anchor point locations .............1-18
Antenna .....................4-26
Anti-lock brake warning light ..........2-7
Anti-lock braking system (ABS) ........5-23
Audible reminders................2-13
Audio system ..................4-10
Compact Disc (CD) changer .......4-23
Compact disc (CD) player .........4-18
FM-AM radio with compact disc (CD)
player .................4-16, 4-20
Radio ....................4-10
Steering wheel audio control switch. . . .4-25
Automatic
Automatic power window switch .....2-29
Driving with automatic transmission . . . .5-12
Transmission selector lever lock
release ....................5-14
B
Battery ......................8-13
Charge warning light .............2-8
Before starting the engine ...........5-10
Belts (See drive belts) .............8-14
Bluetoothாhands-free phone system .....4-27
Booster seats ..................1-28
Brake
Anti-lock braking system (ABS) ......5-23
Brake fluid ..................8-11
Brake light (See stop light).........8-25
Brake system ................5-23
Brake warning light..............2-7
Brake wear indicators ........2-13, 8-18
Parking brake operation ..........5-17
Self-adjusting brakes ............8-18
Brake pedal ...................8-18
Break-in schedule................5-19
Brightness control
Instrument panel ..............2-20
Bulb check/instrument panel ..........2-7
Bulb replacement ................8-25
C
Capacities and recommended
fuel/lubricants...................9-2
Car phone or CB radio .............4-27
Cargo (See vehicle loading information) . . .9-12
CD care and cleaning .............4-25
CD changer (See audio system)........4-23
CD player (See audio system) .........4-18
Child restraint with top tether strap ......1-17
Child restraints ........1-8, 1-9, 1-14, 1-16
Precautions on child
restraints............1-14, 1-22, 1-28
Top tether strap anchor point locations . .1-18
Child safety rear door lock............3-6
Chimes, audible reminders ...........2-13
Cleaning exterior and interior ..........7-2
Clock ...................4-17, 4-21
Clutch
Clutch fluid .................8-12
C.M.V.S.S. certification label ..........9-10
Cold weather driving ..............5-25
Compact disc (CD) player ...........4-18
Controls
Audio controls (steering wheel) ......4-25
Heater and air conditioner controls .....4-3
੬REVIEW COPY—
2007 Versa (vrs)
Owners Manual—USA_English (nna)
03/06/06—arosenma
੭

Coolant
Capacities and recommended
fuel/lubricants.................9-2
Changing engine coolant ..........8-8
Checking engine coolant level........8-7
Corrosion protection ...............7-5
Cruise control ..................5-18
Cup holders ...................2-25
D
Daytime running light system
(Canada only) ..................2-20
Defroster switch
Rear window and outside mirror defroster
switch ....................2-18
Dimensions and weights .............9-8
Dimmer switch for instrument panel ......2-20
Door locks ....................3-4
Door open warning light .............2-8
Drive belts ....................8-14
Driving
Cold weather driving ............5-25
Driving with automatic transmission . . . .5-12
Driving with manual transmission .....5-15
Precautions when starting and driving . . .5-2
E
Economy - fuel .................5-20
Emission control information label .......9-10
Emission control system warranty .......9-17
Engine
Before starting the engine .........5-10
Capacities and recommended
fuel/lubricants.................9-2
Changing engine coolant ..........8-8
Changing engine oil .............8-9
Changing engine oil filter..........8-10
Checking engine coolant level........8-7
Checking engine oil level ..........8-8
Engine compartment check locations. . . .8-7
Engine cooling system ............8-7
Engine oil ...................8-8
Engine oil and oil filter recommendation . .9-5
Engine oil pressure warning light ......2-8
Engine oil viscosity ..............9-5
Engine serial number ............9-10
Engine specifications.............9-7
Starting the engine .............5-10
Event data recorders ..............9-19
Exhaust gas (Carbon monoxide) ........5-2
Eyeglass case ..................2-24
F
Flashers
(See hazard warning flasher switch)......2-21
Flat tire ......................6-2
Floor mat positioning aid.............7-4
Fluid
Brake fluid ..................8-11
Capacities and recommended
fuel/lubricants.................9-2
Clutch fluid .................8-12
Engine coolant ................8-7
Engine oil ...................8-8
Window washer fluid ............8-12
F.M.V.S.S. certification label ..........9-10
Fog light switch .................2-21
Front air bag system
(See supplemental restraint system) .....1-40
Front seats ....................1-2
Fuel
Capacities and recommended
fuel/lubricants.................9-2
Fuel economy ................5-20
Fuel gauge ..................2-5
Fuel octane rating ..............9-4
Fuel recommendation ............9-3
Fuel-filler door and cap ...........3-25
Fuel-filler door lock opener lever......3-25
Fuses ......................8-19
Fusible links ...................8-20
G
Gascap.....................3-25
Gauge
Fuel gauge ..................2-5
Odometer ...................2-4
Speedometer .................2-3
Tachometer ..................2-4
Trip odometer .................2-4
General maintenance ..............8-2
Glove box ....................2-26
H
Hazard warning flasher switch .........2-21
Head restraints ..................1-5
Active head restraint .............1-4
Headlight and turn signal switch........2-19
10-2
੬REVIEW COPY—
2007 Versa (vrs)
Owners Manual—USA_English (nna)
03/06/06—arosenma
੭

Headlight control switch ............2-19
Heater
Heater and air conditioner controls .....4-3
Heater operation ...............4-4
Hood release ..................3-22
Horn .......................2-22
I
Ignition switch ..................5-5
Immobilizer system ..........2-15, 3-2, 5-9
Important vehicle information label.......9-10
Increasing fuel economy ............5-20
Indicator lights and audible reminders
(See warning/indicator lights and audible
reminders).....................2-6
Inside mirror ...................3-27
Instrument brightness control .........2-20
Instrument panel ..............0-6, 2-2
Instrument panel dimmer switch ........2-20
Intelligent Key system..............3-10
Key operating range ............3-12
Key operation ................3-13
Mechanical key ................3-3
Remote keyless entry operation ......3-16
Troubleshooting guide ...........3-21
Warning signals...............3-21
Interior light ...................2-32
ISOFIX child restraints .............1-16
J
Jump starting ...................6-7
K
Keyfob battery replacement ..........8-22
Keyless entry
With Intelligent Key system (See Intelligent
Key system) .................3-16
Without Intelligent Key system (See remote
keyless entry system).............3-7
Keys, Except Intelligent Key ...........3-2
Keys, For Intelligent Key system .........3-3
L
Labels
Air conditioner specification label .....9-11
C.M.V.S.S. certification label ........9-10
Emission control information label .....9-10
Engine serial number ............9-10
F.M.V.S.S. certification label ........9-10
Vehicle identification number (VIN) plate . .9-9
Warning labels (for SRS)..........1-47
LATCH (Lower Anchors and Tethers for CHildren)
System......................1-16
License plate
Installing the license plate .........9-12
Light
Air bag warning light.........1-47, 2-11
Brake light (See stop light).........8-25
Bulb check/instrument panel ........2-7
Bulb replacement ..............8-25
Charge warning light .............2-8
Fog light switch ...............2-21
Headlight and turn signal switch......2-19
Headlight control switch ..........2-19
Interior light .................2-32
Light bulbs..................8-24
Low tire pressure warning light .......2-9
Low washer fluid warning light.......2-10
Passenger air bag and status light.....1-41
Security indicator light ...........2-13
Warning/indicator lights and audible
reminders ...................2-6
Lights
Map lights ..................2-33
Lock
Child safety rear door lock..........3-6
Door locks ..................3-4
Fuel-filler door lock opener lever......3-25
Power door locks...............3-6
Low fuel warning light ..............2-9
Low tire pressure warning light .........2-9
Low washer fluid warning light.........2-10
Luggage (See vehicle loading information) . .9-12
M
Maintenance
General maintenance ............8-2
Inside the vehicle ...............8-3
Maintenance precautions ..........8-4
Outside the vehicle..............8-2
Seat belt maintenance ...........1-13
Under the hood and vehicle .........8-4
Malfunction indicator light ...........2-12
Manual front seat adjustment ..........1-2
Manual windows ................2-30
Map lights ....................2-33
Map pocket ...................2-23
Meters and gauges................2-3
10-3
੬REVIEW COPY—
2007 Versa (vrs)
Owners Manual—USA_English (nna)
03/06/06—arosenma
੭

Instrument brightness control .......2-20
Mirror
Inside mirror .................3-27
Outside mirror control ...........3-28
Outside mirrors ...............3-28
Vanity mirror .................3-27
N
NISSAN vehicle immobilizer
system ................2-15, 3-2, 5-9
O
Octane rating (See fuel octane rating) .....9-4
Odometer .....................2-4
Oil
Capacities and recommended
fuel/lubricants.................9-2
Changing engine oil .............8-9
Changing engine oil filter..........8-10
Checking engine oil level ..........8-8
Engine oil ...................8-8
Engine oil and oil filter recommendation . .9-5
Engine oil viscosity ..............9-5
Outside mirror control .............3-28
Outside mirrors .................3-28
Overheat
If your vehicle overheats ..........6-10
Owner’s manual order form ..........9-19
Owner’s manual/service manual order
information....................9-19
P
Parking
Parking brake operation ..........5-17
Parking/parking on hills...........5-21
Power
Power door locks...............3-6
Power outlet.................2-22
Power rear windows ............2-29
Power steering system ...........5-22
Power windows ...............2-28
Rear power windows ............2-29
Precautions
Maintenance precautions ..........8-4
Precautions on child restraints . . .1-14, 1-22,
1-28
Precautions on seat belt usage .......1-6
Precautions on supplemental restraint
system ....................1-33
Precautions when starting and driving . . .5-2
Push starting ...................6-9
R
Radio
Car phone or CB radio ...........4-27
Compact Disc (CD) changer .......4-23
FM-AM radio with compact disc (CD)
player .................4-16, 4-20
Steering wheel audio control switch. . . .4-25
Readiness for inspection maintenance (I/M)
test........................9-18
Rear power windows ..............2-29
Rear seat .....................1-4
Rear window and outside mirror defroster
switch ......................2-18
Rear window wiper and washer switches. . .2-18
Recorders
Event data ..................9-19
Refrigerant recommendation ..........9-6
Registering your vehicle in another country. . .9-9
Remote keyless entry system ..........3-7
Reporting safety defects (US only) ......9-18
S
Safety
Child safety rear door lock..........3-6
Child seat belts ........1-14, 1-22, 1-28
Reporting safety defects (US only) . . . .9-18
Seat adjustment
Front manual seat adjustment ........1-2
Rear seat adjustment.............1-4
Seat belt
Child safety ..................1-8
Infants and small children ..........1-9
Injured Person................1-10
Larger children ................1-9
Precautions on seat belt usage .......1-6
Pregnant women ..............1-10
Seat belt extenders .............1-13
Seat belt maintenance ...........1-13
Seat belts ...................1-6
Shoulder belt height adjustment ......1-12
Three-point type with retractor.......1-10
Seat belt warning light .............2-11
Seats
Adjustment ..................1-2
Front seats ..................1-2
10-4
੬REVIEW COPY—
2007 Versa (vrs)
Owners Manual—USA_English (nna)
03/06/06—arosenma
੭

Manual front seat adjustment ........1-2
Rear seat ...................1-4
Security indicator light .............2-13
Security system (NISSAN vehicle immobilizer
system), engine start.........2-15, 3-2, 5-9
Self-adjusting brakes ..............8-18
Service manual order form ...........9-19
Servicing air conditioner .............4-9
Shift lock release ................5-14
Shifting
Automatic transmission...........5-12
Manual transmission ............5-16
Shoulder belt height adjustment ........1-12
Spark plug replacement ............8-15
Speedometer ...................2-3
SRS warning label ...............1-47
Starting
Before starting the engine .........5-10
Jump starting .................6-7
Precautions when starting and driving . . .5-2
Push starting .................6-9
Starting the engine .............5-10
Steering
Power steering system ...........5-22
Tilting steering wheel ............3-26
Steering wheel audio control switch......4-25
Stop light ....................8-25
Storage .....................2-23
Storage tray ...................2-23
Sunglasses case ................2-24
Sunglasses holder ...............2-24
Sunroof .....................2-30
Supplemental air bag warning labels .....1-47
Supplemental air bag warning light. . .1-47, 2-11
Supplemental front impact air bag system . .1-40
Supplemental restraint system
Information and warning labels.......1-47
Precautions on supplemental restraint
system ....................1-33
Supplemental restraint system
(Supplemental air bag system).........1-33
Switch
Automatic power window switch .....2-29
Fog light switch ...............2-21
Hazard warning flasher switch .......2-21
Headlight and turn signal switch......2-19
Headlight control switch ..........2-19
Ignition switch ................5-5
Power door lock switch ...........3-6
Rear window and outside mirror defroster
switch ....................2-18
Rear window wiper and washer
switches ...................2-18
Turn signal switch..............2-21
Windshield wiper and washer switch . . .2-17
T
Tachometer ....................2-4
Theft (NISSAN vehicle immobilizer system),
engine start ..............2-15, 3-2, 5-9
Three-way catalyst ................5-2
Tilting steering wheel ..............3-26
Tire
Flat tire ....................6-2
Spare tire................6-4, 8-38
Tire chains..................8-35
Tire placard .................9-11
Tire pressure ................8-28
Tire rotation .................8-35
Types of tires ................8-34
Uniform tire quality grading.........9-16
Wheels and tires ..............8-28
Wheel/tire size ................9-8
Tire pressure
Low tire pressure warning light .......2-9
Tire pressure monitoring system ........5-3
Top tether strap child restraint .........1-17
Towing
Flat towing..................9-16
Tow truck towing ..............6-11
Trailer towing ................9-16
Transmission
Driving with automatic transmission . . . .5-12
Driving with manual transmission .....5-15
Selector lever lock release .........5-14
Travel (See registering your vehicle in another
country) ......................9-9
Trip odometer ...................2-4
Turn signal switch................2-21
U
Uniform tire quality grading...........9-16
V
Vanity mirror ...................3-27
Vehicle dimensions and weights ........9-8
Vehicle identification ...............9-9
Vehicle identification number (VIN)
(Chassis number).................9-9
Vehicle identification number (VIN) plate . . . .9-9
Vehicle loading information...........9-12
10-5
੬REVIEW COPY—
2007 Versa (vrs)
Owners Manual—USA_English (nna)
03/06/06—arosenma
੭

Vehicle recovery .............6-13, 6-14
Vehicle security system.............2-14
Vehicle security system
(NISSAN vehicle immobilizer system),
engine start ..............2-15, 3-2, 5-9
Ventilators .....................4-2
W
Warning
Air bag warning light.........1-47, 2-11
Anti-lock brake warning light ........2-7
Battery charge warning light.........2-8
Brake warning light..............2-7
Door open warning light ...........2-8
Engine oil pressure warning light ......2-8
Hazard warning flasher switch .......2-21
Low fuel warning light ............2-9
Low tire pressure warning light .......2-9
Low washer fluid warning light.......2-10
Passenger air bag and status light.....1-41
Seat belt warning light ............2-9
Vehicle security system...........2-14
Warning labels (for SRS)..........1-47
Warning/indicator lights and audible
reminders ...................2-6
Warning lights ..................2-6
Washer switch
Rear window wiper and washer
switches ...................2-18
Windshield wiper and washer switch . . .2-17
Weights (See dimensions and weights) . . . .9-8
Wheels and tires ................8-28
Wheel/tire size ..................9-8
When traveling or registering your vehicle in
another country ..................9-9
Window washer fluid ..............8-12
Windows
Locking passengers’ windows .......2-29
Manual windows ..............2-30
Power rear windows ............2-29
Power windows ...............2-28
Rear power windows ............2-29
Windshield wiper and washer switch .....2-17
Wiper
Rear window wiper and washer
switches ...................2-18
Windshield wiper and washer switch . . .2-17
Wiper blades ................8-16
10-6
੬REVIEW COPY—
2007 Versa (vrs)
Owners Manual—USA_English (nna)
03/06/06—arosenma
੭
MEMO
MEMO

RECOMMENDED FUEL:
Use unleaded regular gasoline with an octane
rating of at least 87 AKI (Anti-Knock Index) num-
ber (Research octane number 91).
CAUTION
●Using a fuel other than that specified
could adversely affect the emission
control system, and may also affect the
warranty coverage.
●Under no circumstances should a
leaded gasoline be used, because this
will damage the three-way catalyst.
●Do not use E-85 fuel in your vehicle.
Your vehicle is not designed to run on
E-85 fuel. Using E-85 fuel can damage
the fuel system components and is not
covered by the NISSAN new vehicle lim-
ited warranty.
For additional information, see “Capacities and
recommended fuel/lubricants in the “Technical
and consumer information” section.
RECOMMENDED ENGINE OIL:
●API Certification Mark
●API grade SJ, SL or SM
●ILSAC grade GF-2, GF-3 or GF-4
●5W-30 Viscosity preferred
See “Engine oil and oil filter recommendation” in
the “Technical and consumer information” sec-
tion of this manual.
TIRE COLD PRESSURE:
See Tire and Loading Information label.
RECOMMENDED NEW VEHICLE
BREAK-IN PROCEDURE:
During the first 1,200 miles (2,000 km) of vehicle
use, follow the recommendations outlined in the
“BREAK-IN SCHEDULE” information found in
the “Starting and driving” section of this manual.
Follow these recommendations for the future re-
liability and economy of your new vehicle. Failure
to follow these recommendations may result in
vehicle damage or shortened engine life.
GAS STATION INFORMATION
੬REVIEW COPY—
2007 Versa (vrs)
Owners Manual—USA_English (nna)
03/06/06—arosenma
੭
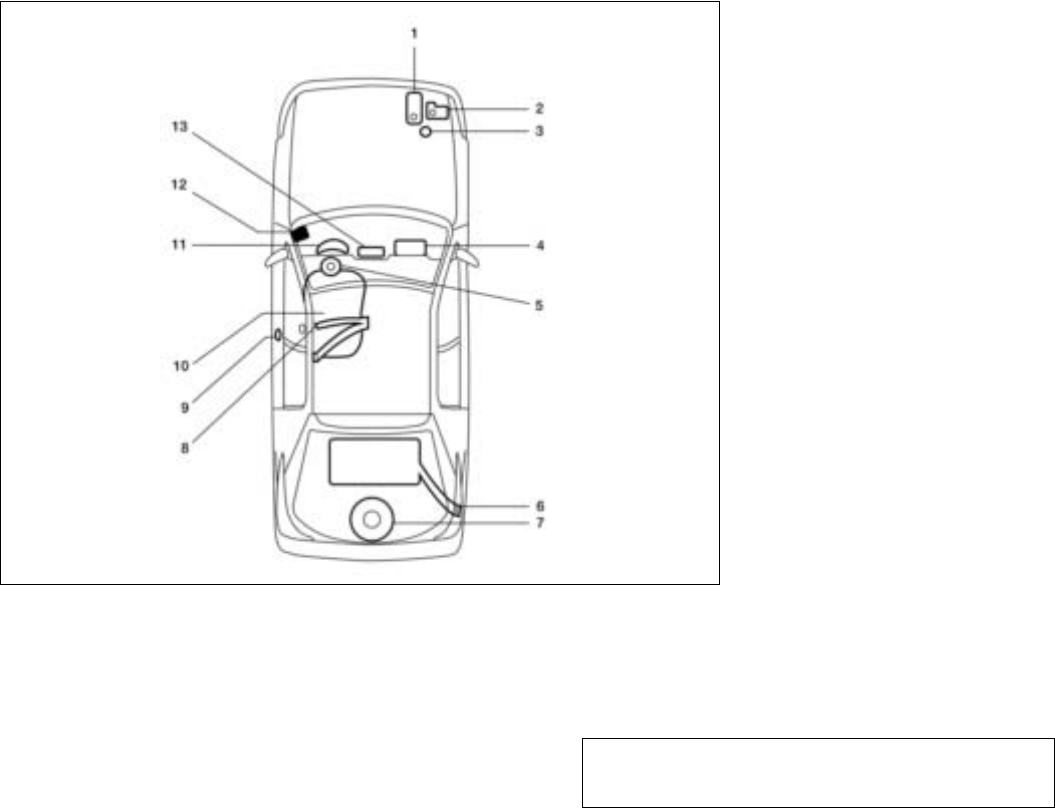
1. Engine coolant 8-7
2. Window washer fluid 8-12
3. Engine oil 8-8
4. Passenger supplemental air bag 1-33
5. Driver supplemental air bag 1-33
6. Fuel recommendation 9-3
7. Spare tire 6-2
8. Seat belts 1-6
9. Door locks 3-4
10. Seats 1-2
11. Meters and gauges 2-3
12. Fuel-filler door release 3-25, Hood
release 3-22
13. Audio system 4-10, Heater and air
conditioner 4-3
WGS0028
QUICK REFERENCE
੬REVIEW COPY—
2007 Versa (vrs)
Owners Manual—USA_English (nna)
03/06/06—arosenma
੭