AMOI Electronics DA6 PCS1900 (Mobile Phone) User Manual 442950
AMOI Electronics Co., Ltd. PCS1900 (Mobile Phone) 442950
User Manual

1
Hello!
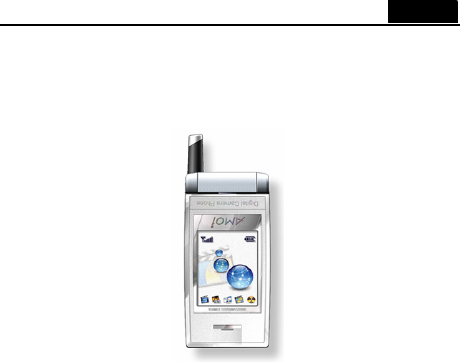
Thank you very much for choosing Amoi DA6 mobile phone. The
DA6 is perfect integration of unparalleled contemporary design and
consummate precise crafts manship, bringing you easy
communication, funny entertainment, we are sure that you will find it
easy to use this phone.
Key Features:
Camera (300K pixels) 180-degree rotating LCD
65K TFD Colour Screen Internet Access
MMS SMS Chat
EMS Smart Dial
Personalized phonebook with 750 entries in v-card
Biorhythm Query Recorder with huge memo
Pictures, ringtone download Voice Mail, E-mail
Basic Functions:
Tri-Band Auto-switch GPRS Technology
40-Polyphonic Ring Tone HR, FR and EFR
PC Sync Large LCD Display
Chinese Text Input Call Indication
Chinese SMS Chinese Phonebook
Sound/Vibration Indication E-mail
Multifarious Themes Calculator
Lunar Calendar Conversion Calendar
Support STK Card Alarm Clock
Games Sms Group-sending
Numbers-Grouping Units Conversion
The manufacturer may, at any time and without notice, make changes or
improvements to the products offered, but provide necessary corrigendum with
this manual or release new version of this manual for the following lot. The
Amoi logo and trademark are the property of the manufacturer. April 2004.
www.amoi.com

2
TABLE OF CONTENTS
Description…………………………………………………..1
Safety precautions……………………………………………………6
Unpacking…………………………………………………………….8
Your Phone………………….……………………………….10
Phone Layout………………………………………………………. 10
Keys Description…………………………………………………..14
Display Layout………………………………………………………16
Getting Started…………………………………………….18
Installing a SIM Card……………………………………………….18
Charging a Battery………………………………………………….20
Switching the Phone On/Off………………….…………………..25
Your Phone’s Mode....................................................27
Call Function……………………………………………………..…28
Making a Call…………………………………………..……….….28
Receiving a Call………………………………….………………….30
Missed Calls………………………………………………..……...31
Call Menu………..…………………………………………………32
Entering Text…………………………….…………………33
Changing Text Input Mode…………………………………………..34
Options………………………………………………………………34

3
Smart Pinyin Mode............................…....................34
English Mode...........……………………………………………..35
Multitap Mode.......................................…………………35
Stroke Mode………………………………………………………..37
123………………………………………………………………….37
The Using of Menu……………………………………...38
Accessing a Menu Functions ..…………………………………38
List of Menu Functions ...........……………….................……39
Camera..........………………........………………………………….49
New Image (1-1) ...........………………........………………….49
Album (1-2)...........………………........……………………………49
Settings (1-3) ...........………………........……………………….50
Personality...........………………........………………………….52
Sound (2-1)..………………........………………………………….52
Display (2-2)..………………........…………………………………53
Settings...........………………........……………………………….54
Clock (3-1)…………........…………………………………………54
Phone (3-2)……………........……………………………………….55
Call (3-3)…........……………………………………………………57
Security (3-4)..………………........………………………………..58
Network (3-5)...………………........………………………………60

4
Internet (3-6)....………………........………………………………..61
Call Forwarding (3-7)..………………........…………………….63
PIM...........………………........……………………………………..65
Call Information (4-1).………………........……………………….65
Call List (4-2)......…………………………………………………..65
Calendar (4-3).......…………………………………………………..66
Biorhythm (4-4)…........…………………………………………….68
Toolbox...........………………........…………………………………69
Recorder (5-1).......…………………………………………………..69
Calculator (5-2)....………………........……………………………..70
Lunar Calendar (5-3)....……………………………....71
IDD Country Code (5-4)...………………........……………….71
DDD Area Code (5-5).....………………........…………………71
Postal Code (5-6)....………………........………………………..71
Common Phone No. (5-7)......………………........…………72
Units Conversion (5-8)...………………........…………………73
Amusement...........………………........……………………….74
Games (6-1)....………………........…………………………………74
Stop Watch (6-2).....………………........………………………..74
Timer (6-3).....………………........………………………………….75
WAP.........………………........…………………………………….76

5
Messages...........………………........…………………………..82
SMS (8-1)....………………........………………………………….82
MMS (8-2)....………………........………………………………….87
Voice Mail (8-3).....………………........…………………………..91
Chat (8-4).....………………........…………………………………92
E-mail (8-5).....………………........…………………………………93
Phonebook…………………………………………………97
Browser.....………………........…………………………………….97
Search.....………………........………………………………………99
Add Entry…..……........………………………………………….100
User-Grouping.………………........………………………………100
Management....………………........…………………..…………..101
Reference Information .……………………………...103
Access Codes ....…………….......................................103
Using the Batteries ..……………...............................106
Care and Maintenance .............................…………….108
Glossary .......................………………………………..110
TroubeShooting ...….....................................…….116

6
NOTES:
In this user’s manual, there are many functions called network service,
which are mobile phone and network dependent. Before you use this
kind of function, please consult your service provider about the related
service, subscribe it, and ask for its user’s guide.
SAFETY PRECAUTIONS
Read these brief guidelines. Failure to comply with them
may be dangerous or illegal.
Road safety comes first
Do not use a hand-held mobile phone while driving;
park the vehicle first. Remember that in some countries,
it is illegal to use a mobile phone while driving.
Switch off on aircraft
Mobile phones can cause interference. Using them on
aircraft is both illegal and dangerous. (Please also close
the power-off alarm clock.)
Switch off near an explosion place
Do not use the phone near an area where explosives are
detonated. May disturb the detonator remote control
operation.
7
Switch off when refueling
Do not use the phone at a refueling point (service station)
or near fuels or chemicals.
Switch off in hospital
Follow any regulations or rules. Switch phone off near
medical equipment.
Interference
All wireless phones may be subject to radio interference,
which may affect their performance.
Accessories and batteries
Use only approved accessories and batteries.
Use sensibly
Use only in the normal position (next to ear). Do not
touch the antenna unnecessarily when the phone is
switched on.
8
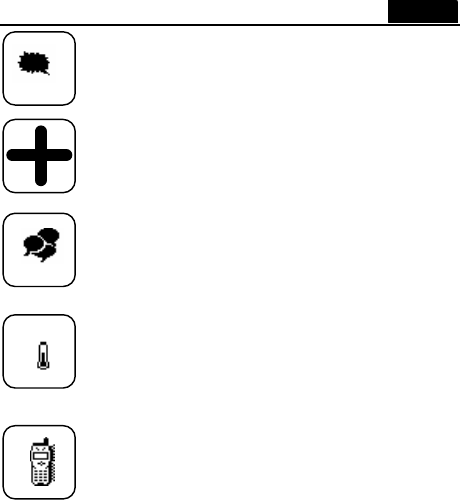
UNPACKING
Your package contains the following items:
User’s Manual
Travel Charger
Phone Slim Battery
Earphone

9
In addition, you can buy the following accessories for your phone
from your local dealer:
l Standard/Slim Li-Ion batteries
l Desktop Charger
l Data Kit
l Leather Case
l Car Charger
10
YOUR PHONE
Phone Layout
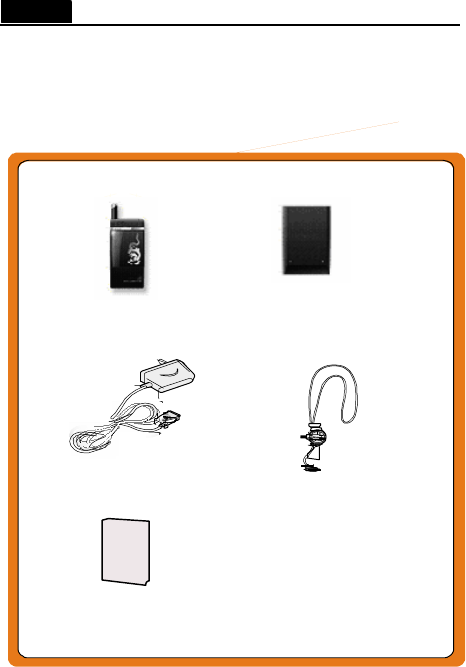
The following illustrations show the main elements of DA6:
1. Open View:
Microphone
Display
Function Keys
Alphanumeric Keys
Earpiece

11
2. Flank View:
Record Key
Volume Key
Antenna
12
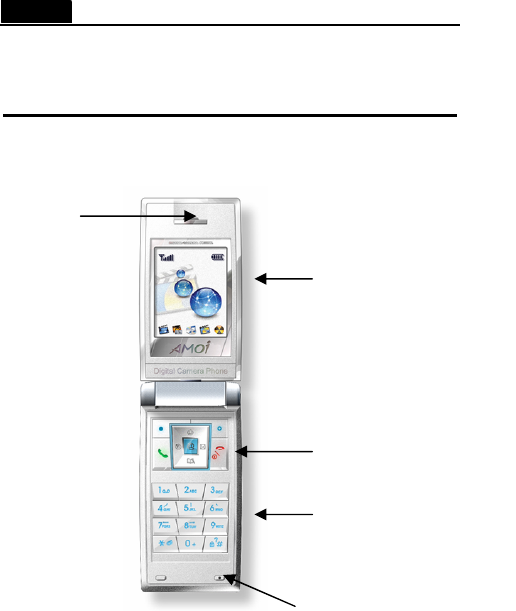
3. Rear View:
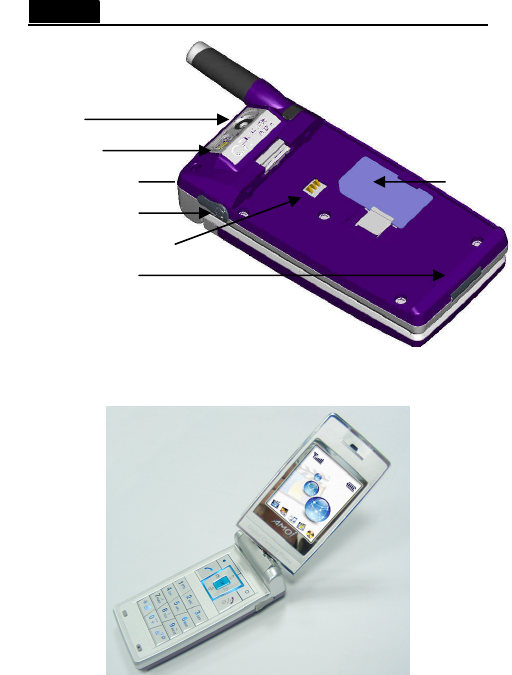
4. Rotatable Display:
Battery Lock
Battery Terminals
Charger Slot
Earphone Slot
Camera
Flashlight
SIM Slot
13
You can contrarotat the display at 180 degrees, after rotating
180-degree and close the flip cover, the display will adjust itself
automatically.
14
Keys Description
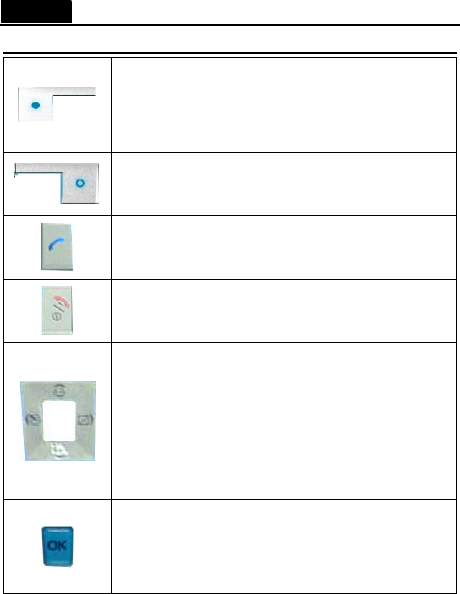
Left soft key:Enter menu directly in standby
mode,perform the functions indicated by the text
in the left bottom of the display.
Right soft key:Enter phonebook directly in
standby mode,delete characters from the display.
Send key: Make or answer a call.
Power On/Off key:Hold it to switch on/off the
phone; End a call;
Navigation Keys: Scroll through the menus;In
the standby mode, press p to enter Internet
menu,press? to read Call list,hold ? to enter
Calendar menu, press ? to enter SMS menu, hold
? to enter E-mail menu.
Ok key: In the menu facility, confirm your
selection or entry; enter status menu in standby
mode.

15
Alphanumeric Key:Enter numbers, letters and
some special characters.
* key:Press and hold it to switch on/off the mute
mode.
# key:When inputting text ,show/conceal the
indication,switch some common punctuation marks.
Press and hold # to lock the keypad, hold down # to
unlock the keypad.
Record key:In standby mode, press it to enter Voice
Memo Menu, press and hold it to enter Camera. In
call mode,press it to record a voice memo.
Volume keys:During a call, adjusts the earpiece
volume;

16
Display
Display Layout
The display comprises three areas:
Icons
Battery Status: Shows the level of your battery. The
more green area you see, the more power you have
left.
Signal Strength: Shows the received signal strength.
The greater the number of bars, the better the signal
strength. (GPRS unsupported)
Icons Area.Displays various icons
Text and Graphic Area.
Displays messages, instructions
and any information you enter
Soft key indications. Shows the
functions currently assigned to the
two soft keys.
17
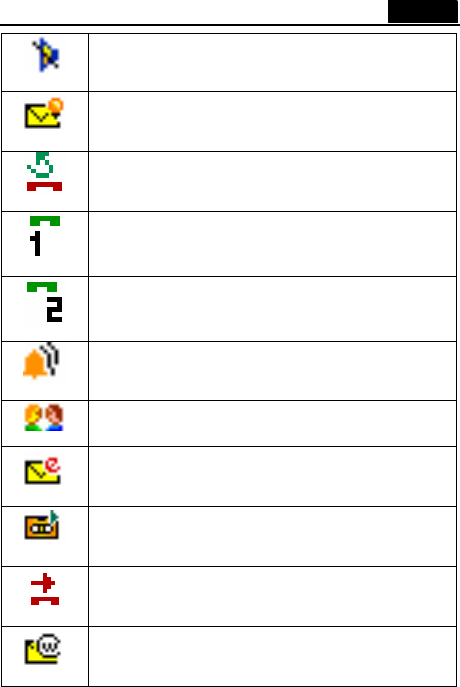
Mute Mode: Appears when the mute mode is active.
New Message: Appears when a new message has
been received.
Missed Calls: Appears when a new call has been
missed.
Line 1: The icon shows that line 1 is dialing a call.
Line 2: The icon shows that line 2 is dialing a call.
Alarm:Appears when the alarm is active.
Chat:Appears when the Chat is active.
New E-mail: Appears when a new E-mail has been
received.
New Record: Appears when exist one or more new
Record .
Call Screening: Appears when call screenging is
active.
New push message: Appears when a new push
message has been received.

18
GETTING STARTED
You must insert a plug-in SIM card from a GSM Service provider
before you can start using your phone.
Installing a SIM Card
The SIM card can be easily damaged by scratching or bending, so you
should be careful when handling, inserting or removing the card.
Follow the instructions supplied with the SIM card.
Note:
? Avoid placing the SIM card near electromagnetism equipment,
otherwise you may lose the information of SIM card.
? Please switch the phone off when you lift the SIM card or battery
away.
Please confirm that you have switched the phone off before installing
a SIM card, and then lift the battery away.
1. Switch the phone off by holding down the key.
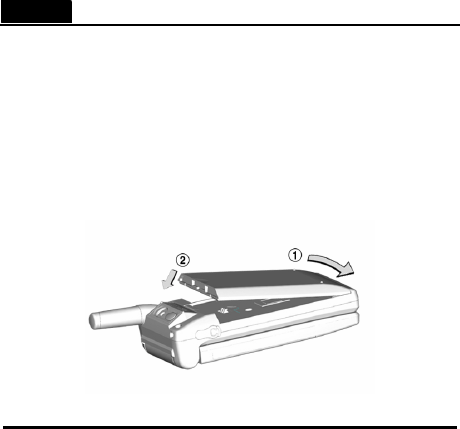
2. Remove the battery. To do so:
? Pull the battery lock above the battery toward the top of the
phone and hold it in the position.
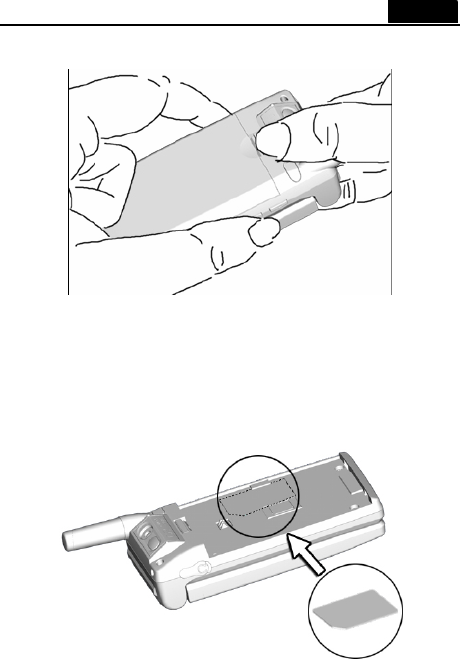
19
? Lift the battery away as shown.
3. Insert the SIM card under the two taps on the phone,ensuring that
the cut corner is top left and the gold contacts of the card face
into the phone ,slide the metal lock as the following:
20
4. Reinstall the battery. To do so:
? Place the battery so that the tabs on it align to the notches at
the bottom of the phone.
? Push the battery down until it clicks into place. Make sure
that the battery is properly installed before switching on the
phone.
Charging a Battery
The DA6 phone is powered by a rechargeable Li-Ion battery. So you
must use only approved batteries and chargers. The phone can be used
while the battery is charging. We suggest that you should fully
charge/discharge the battery twice or thrice before using your phone
for the first time. Make sure that the charging time should be at least 4
hours. And the battery should be used until the phone switches off
automatically because of the battery low. To prolong the battery life,
you should fully charge it when charging the battery.
21
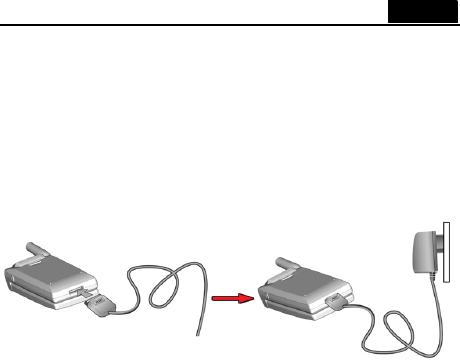
Charging the Battery with the travel charger
To do so as follows:
1. Place the battery on the back of the phone, connect the lead from
the travel adapter to the connector at the bottom of the phone.
2. Connect the adapter to a standard AC wall outlet.
3. Charging when the phone is switched off , the charging log will
be displayed until the charging is finished; Charging when the
phone is switched on, the charging log will be displayed for a
while, then you can still use the phone normally.
4. When charging is finished (the full battery icon becomes solid),
disconnect the adapter from the AC wall outlet, then from the
phone as shown.
22
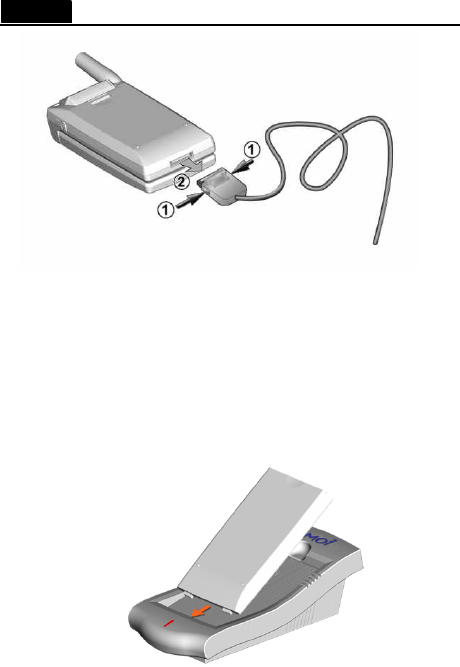
Note: When disconnect the lead of the adapter from the phone, you
should press the buttons on both sides of it, otherwise it’s easily damaged.
Charging a battery with the desktop charger
To charge the battery alone, use the desktop charger unit.
1. Insert the battery alone into the slot, making sure that the
terminals on the battery contact the terminals on the charger.
23
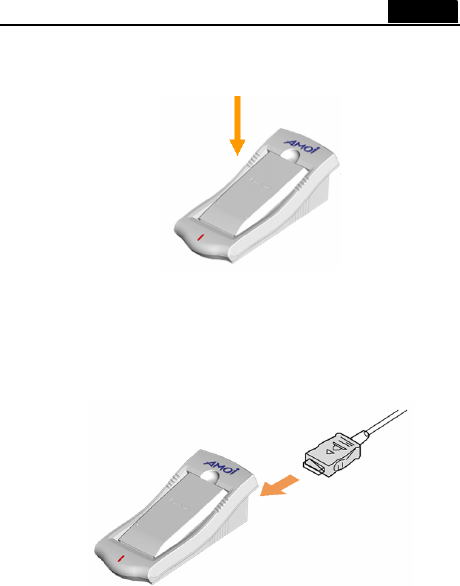
2. Push down the battery until you hear a click.
3. Insert the lead of the travel charger into the connector socket of
the desktop charger.
4. Connect the charger to a standard AC wall outlet.
5. The colour indication of the LED on the charger is as follows:
• Red: charging

24
• Green: fully charged
6. When charging is finished, unplug the power cord of the charger
from the AC outlet and remove the battery from the charger.
Note: The desktop charger is only applicable for the Li-Ion battery of
DA6.
The indication of Battery Low:
When the battery is low, you will see an empty battery
icon ,you will hear a warning tone to remind you to charge
the battery. If the battery is too low, the phone will turn itself off
automatically, and the phone will cancel any operation you have done.
If during a call, then the call will drop.
Note:
1. If the indication tone is set off in the menu, the phone will only show
the text indication.
2. If the battery is too low, when the travel charger connects to the phone,
the phone may be no response for a long period, please wait for a
moment.

25
Switching the Phone On/Off
1. Open the phone, press and hold the key for about
three seconds until switch the phone on. If the battery is too low,
the phone will turn itself off automatically, please replace the
battery with a charged one or charge the battery immediately.
2. If you have not inserted a SIM card, the phone will indicate that you
should insert a SIM card. After inserting the SIM card, the phone
will check the SIM card whether is available or not.
3. Enter your PIN, if you have one for your SIM card. Press the OK
soft key, then your phone connects to the GSM network.
Note: if you enter an incorrect PIN three times in succession, the code is
disabled and cannot be used until you re-enable it by entering the PUK.
4. When the GSM network is found, the current network operator’s
name, symbol icons, time, date and standby picture are shown in the
display. If the phone is out of service, “No Service” appears in the
display. In this case, you cannot place and receive calls. Wait a little
while for a better signal or move into an open area to regain the
service.
5. To switch the phone off, hold down the key for about
three seconds. If lift the battery away when using the phone,
everything unsaved will be lost, what’s more, the phone or the SIM
card may be damaged.

26
WARNING:
Do not switch on the phone when the mobile phone use is prohibited or when it may
cause interference or danger.
Note: Do not touch the antenna on the phone unnecessarily when the phone is
switched on. Contacting with the antenna affects call quality and may cause the
phone to operate at a higher power level than otherwise needed. And switching the
phone off unconventionally may cause increasing the time for switching the phone
on.
Adjusting the Volume
During a call, if you want to adjust the earpiece volume, use the key
on the left side of the phone to adjust volume. Press the upper one of
the key to increase and lower one to decrease the volume.
Switching to the Quiet Mode by shortcut
Press and hold the * key can switch the Microphone off quickly. In
this mode, the phone will remind you by vibrating when there’s an
incoming call or a new message. To do so:
The icon will appear indicating that the phone is in quiet mode. To
switch into the normal mode, just press the * key for 2 seconds again.
27
Your Phone’s Mode
Standby Mode
Standby is the most basic state of your phone. The phone goes into
Standby mode soon after you press the key. When your
phone is in Standby mode, you will typically see the current date?time
and the status about battery or memory by pressing the OK soft key .
If you enter a phone number, you can press the key to dial it, or
you can save the number into the internal phonebook or SIM card by
pressing the left soft key.
In the menu facility,press the right soft key repeatedly will move back
to the standby mode., press the key at any time to return to
Standby mode.
Be careful : If you press the key when you are on a call, you
will disconnect the call , and the call time will be shown in the display,
five seconds later the phone will return to Standby mode
automatically.
Talk Mode
When you make or receive a call, the phone is in Talk mode.
28
CALL FUNCTIONS
Making a Call
Before you can make or receive a call, you must turn on the phone and
be within range of a network.
1. In Standby mode, enter the phone number. (If you make a
mistake while dialing, use ƒ or „ key to move the cursor to the
right of the digit, press the right soft key to erase it; Press and
hold to erase the entire number.)
2. Press the key to make the call.
3. When you finish talking, press or close the phone to end
the call.
Note: If you have set Auto Redial menu on, when nobody answers you or
The line is busy, the phone automatically retries to make the call.
Making IDD Calls
Enter the country code, area code, and phone number, then press the
key to begin dialing (without any blank). Press and hold the “0” key
until a “+” sign appears in the display when you inputting the country
code.

29
Making a Call from the Phonebook
Search a desired number from the phonebook, and press the
key to dial.
Last number redialing
In standby mode, press the key thrice to call the number you last
called. The number you last called will automatically be saved in the
call list.
In standby mode, press the key to access the call list, scroll to
the number you want, and press the key to call the number.
Smart Dial
This Option allows you to find an entry quickly in your PB.
In current mode
1) For a Chinese name, enter the first letter of every character (for
example: enter 52* to search the name ?? (LiBai) ).
2) For a English name, enter the corresponding numerical key of the
desired name
3) For a data-stored name, enter the corresponding numerical key?
4) For a symbol-stored name, press the “0” key.
30
Receiving a Call
When a call is received, the phone alerts you by ringing and/or
vibrating; the screen displays an incoming call message. If you have
subscribed to the Line Identification Service (contact your service
provider), the caller’s phone number is displayed; if you have saved
the number in your phone book, the name is displayed.
Refer to Settings/Phone/Answer mode for the details of answer mode.
Note:If you receive a call while using the phone functions and menus,
the current operation will be halted. When the call ends, the phone will
return to standby mode.
Press to answer a call; Press to reject a call. When
the call ends,the display will show the latest call’s time.
Note: When the phone is closed, you can reject a call by pressing volume
key twice rapidly.
If you use the earphone to receive a call, you can end the call by pressing
the “ Send/End ” button on the earphone.

31
Missed Calls
When an incoming call is not answered, the missed call will
automatically be saved in the Call Missed of call list.
To view the missed call immediately, press the ? soft key, the
number or the name is displayed in the list. If necessary, scroll
through the missed calls; press to call the number back.
The amount of missed calls is also displayed on the screen.
The following options will be displayed when you press the left soft
key in the call list. You can press the ? or ? key and press the OK
key to perform the functions.
Send SMS:Send shot message to the number.
Save Phonebook: To store the number to the phonebook.
Delete: To delete the number you choose from the call list.
Delete All:Delete all missed calls from the call list.

32
Call Menu
During a call, press Option soft key to enter Call Menu. The followings
are the possible items.
Turn off tones: Select it to prevent the caller from hearing you;
Hold call: Select it to hold the current call;
Switch calls:Select it to switch calls between the current call and the
held call;
Release active : Select it to end the current call;
Join meeting:It allows up to six people to take part simultaneously in
a call;(If the network supports.)
Transfer call:Select it to transfer to other call;
Release all: Select it to end all the calls;
Call information:Select it to enter the Call information;
Mute:Select it to switch microphone off the caller can’t hear you;
Select it to set the call mute.
Note:
1?The Call Menu will provides a number of functions according to the
current situation at any time during a call.
2?Many of the In-Call Options are network services.

33
ENTERING TEXT
The phone uses the ZI8 input mode. This mode enables the phone to
predict the words you are entering so as to save your time when
composing or editing text messages.
You are provided with the following text input methods.
1. Multitap : The traditional text entry mode, allows you to enter
letters by pressing the alphanumeric key ( 2—9 ) once, twice,
three or four times until the letter is displayed.
2. 123: Input numbers into a text message.
3. eZi English : The English mode automatically compares your
keystrokes with an internal linguistic dictionary to determine the
correct word, thus requiring far fewer keystrokes than the ABC
mode.
4. Stroke: Use Stroke to input Chinese characters.
5. Pinyin: Use Pinyin to input Chinese characters.
6. Smart Pinyin: The English mode automatically compares your
keystrokes with an internal linguistic dictionary to determine the
correct word, thus requiring far fewer keystrokes than the ABC
mode.

34
Changing Text Input Mode
When in a text entry screen,press Left soft key to scroll among the
options and select Input Method to change the text inputting mode; Or
hold the # key to enter options,then press the ? or ? key to choose
the desired one.
The icon of input method
When you are inputting text, an indicator at the center of the display
indicates the current text entry mode.
Options
You can press Left soft key or hold the # key to enter Options.
l Add Symbol: To enter some various symbols.
l Insert Object: Such as picture, sound and melody.
l Input Method: Show the list of input methods.
l Help: Some helpful information to consult with.
Note: When the input method is “Multitap”, you can press the “ 1” key
to input some common punctuation marks.
Smart Pinyin Mode
With the smart pinyin input method, you can enter Chinese characters
by keying in the pinyin string from the phone keypad.

35
In this manual for English-spoken users only, the details on how to
use this text input method are omitted accordingly.
If you want to know how to use the pinyin input method, please
contact your dealer.
English Mode
This mode allows you to enter words with only one keystroke per
letter. Each key on the keypad has more than one letter – when you
press once, J, K or L may be displayed. The English mode
automatically compares your keystrokes with an internal linguistic
dictionary to determine the correct word, thus requiring far fewer
keystrokes than the ABC mode.
For example: to enter ‘hello’, press the following keystrokes: 4, 3, 5, 5, 6.
If the word that appears in the display is not the word that you desire,
press the „ or ƒ key to display alternate word choices for the keys
you have typed. (For example, ‘of’ and ‘me’ both shares the sequence
6, 3) The phone displays the most commonly used choice first.
Tip: Press the # key to alternate between English mode and
ENGLISH mode.
Multitap Mode
This mode allows you to enter letters by pressing the key labeled with

36
the required letter once, twice, three or four times until the letter is
displayed.
For example, you press the 2 key three times quickly to display the
character “C”, the 5 key two times quickly to display the character
“L”.
Note: When entering the same character twice (or a different character
on the same key), just wait for a few seconds for the cursor to move right
automatically, and then select the next character.
List of characters available
Key Characters
1
2
3
4
5
6
7
8
9
0
A B C 2
G H I 4
D E F 3
J K L 5
M N O 6
P Q R S 7
T U V 8
W X Y Z 9
+&@/?%$\etc.
Space -?!,.:;”’<=.()_1

37
Stroke Mode
This mode allows you to enter individual Chinese strokes, in written
order - from top to bottom, and from left to right. Even though there
are many different strokes used to create Chinese characters, the
strokes are classified into 5 basic categories; heng, shu, pie, dian and
zhe.
In this manual for English-spoken users only, the details on how to
use this text input method are omitted accordingly.
If you want to know how to use the stroke input method, please
contact your dealer.
123
123 indicate numeric mode. It enables you to enter numbers into a text
message.

38
THE USING OF MENU
The phone offers a range of functions that allows you to tailor the
phone to your needs. These functions are arranged in menus and
submenus.
Accessing a menu function
By scrolling
1. In Standby mode, press Menu soft key.
2. Scroll with • or ‚ through the menu and select, for
example, Camera by pressing Ok soft key.
3. If the menu contains submenus, select the one you want,
for example Album.
4. If the selected submenu contains further submenus, repeat
step 3.
5. Select the setting of your choice.
Note: Press Cancel key to return to the previous menu level, and
key to exit the menu without changing the menu settings.
By shortcut
The menus, submenus and setting options are numbered and you can
enter them by using their shortcut number.

39
1. In Standby mode, press the Menu soft key.
2. Within three seconds, key the index number of the menu function
you want to access.
Example: Setting “English“ as language,
Press the Menu soft key, and Press 3,2,1,2 in succession.
Notes: The STK menu will be located at the number 9 of the main
menu.
List of Menu Functions
1? Camera
1-1:New Image
Store
Cancel
1-1-1:Rename
1-1-2:Send MMS
1-1-3:Set as Wallpaper
1-1-4:Set as Start Up
1-1-5:Set as Shut Down
1-1-6:Set as Phonebook
1-1-7:Delete
1-1-8:Delete All
1-1-9: Picture Info.

40
1-2:Album
1-3:Settings
1-2-1:Rename
1-2-2:Send MMS
1-2-3:Set as Wallpaper
1-2-4:Set as Start up
1-2-5:Set as Shut down
1-2-6:Set as Phonebook
1-2-7:Delete
1-2-8:Delete All
1-2-9: Picture Info.
1-3-1:Resolution
1-3-2:Quality Level
1-3-3:Flash Mode
1-3-4:Filename Header
1-3-1-1:480*640
1-3-1-2:240*320
1-3-1-3:120*160
1-3-1-4:128*132
1-3-1-5:60*80
1-3-3-1: On
1-3-3-2: Off
1-3-2-1: Super
1-3-2-2: High
1-3-2-3: Normal

41
2?Personality
2-1:Sound
2-2:Display
3?Settings
3-1:Clock
2
-
2
-
1
:
Set Wallpaper
2-2-2:Start Up Display
2-2-3:Shut Down Display
2-1-1:Ring Signal
2-1-2:Key Tone
2-1-3:Service Tone
2-1-4:Start Up Melody
2-1-5:Shut Down Melody
2-1-6:Listening Volume
2-1-1-1:Voice Calls
2-1-1-2:Alarm
2-1-1-3:MMS
2-1-1-4:E-mail
2-1-1-5:SMS
2-1-1-6:Cell Broadcast
2-1-1-7:Cell Broadcast
3-1-1:Date & Time
3-1-2:Date & Time Format
3-1-3: Auto PhoneOn&off
3
-
1
-
4: Alarm Clock

42
3-2: Phone
3-3:Call
3-4:Security
3-2-1:Language
3-2-2:Contrast
3-2-3:Themes
3-2-4:Answer Mode
3-2-5:Flip Answer
3-2-6:Master Reset
3-3-1:Auto Redial
3-3-2:Minute Remind
3-3-3:Call Waiting
3-3-4:Conceal ID
3-3-5: Call screening
3-4-1:Code Control
3-4-2:Fixed Dialing
3-4-3:Passwd Protect
3-4-4:PIN Lock
3-4-5:Call Barring
3-4-5-1:All Outgoing
3-4-5-2:Outgoing Intl
3-4-5-3:All Incoming
3-4-5-4:Outg.Intl Roam
3-4-5-5:Inc.When Roam
3-4-5-6:Clear all Barring
3-4-5-7:ChangePassword

43
3-5: Network
3-6: Internet
3-7: Call
Forwarding
3-5-1:Configuration
3-5-1-1:Select Network
3-5-1-2:Search Mode
3-5-1-3:Preferred Network
3-5-1-2-1:Auto
3-5-1-2-2:Manual
3-6-1: Data Accounts
3-6-2: Pref. Service
3-6-3: SMS Access
3-7-1:Voice Calls
3-7-2:Data Calls
3-7-3:Check All
3-7-1-1:All Unanswered
3-7-1-2:All Calls
3-7-1-3:Busy
3-7-1-4:Not Reachable
3-7-2-1:Activate
3-7-2-2:Cancel
3-7-2-3:Get Status

44
4?PIM
4-1:Call Information
4-2:Call List
4-3:Calendar
4-4:Biorhythm
4-2-1:Call Dialed
4-2-2:Call Received
4-2-3:Call Missed
4-3-1:View Today
4-3-2:View All Tasks
4-3-3:View Month
4-3-4:View Week
4-3-5:Add Appointment
4-3-6:Add Task
4-3-7:Options
4-1-1:Outgoing Call Time
4-1-2:Incoming Call Time
4-1-3:Last Call Time
4-1-4:Total Call Time
4-1-5:Total Call Cost
4-1-6:SMS Sent Counter
4-1-7:Total GPRS
4-1-8:Last GPRS
4-1-9:Reset All

45
5?Toolbox
5-1:Recorder
5-2:Calculator
5-3:Lunar Calendar
5-4:IDD Country Code
5-5:DDD Area Code
5-6:Postal Code
5-7:Common Phone No.
5-8:Unit Conversion
5-1-1:Record
5-1-2:Memo List
5-1-3:Delete All
5-1-4:Set View
5-8-1:Length Conversion
5-8-2:Weight Conversion
5-8-3:Area Conversion
5-8-4:Volume Conversion
5-3-1:Solar to Lunar
5-3-2:Lunar to Solar
5-3-3:Search by Animal
5-7-1:Fixed Numbers
5-7-2:My Numbers
5-7-3:SOS Numbers

46
6?Amusement
6-1:Games
6-2: Stop Watch
6-3:Timer
7?WAP
7-1: Monternet
7-2: Bookmarks
7-3: Enter Address
7-4: Select Profile
7-5: Push Inbox
7-6: Resume
7-7: Advanced
7-8: Settings
8?Messages
6-1-1:Ballpop
6-1-2:E-Maze
6-1-3:Wuziqi

47
8-1:SMS
8-2:MMS
8-1-1:Write New
8-1-2:Inbox
8-1-3:Sent Items
8-1-4:Drafts
8-1-5:Settings
8-1-6:Cell Broadcast
8-1-7:Template
8-1-9: Check Space
8-1-5-1:Service Center
8-1-5-2:Message Type
8-1-5-3:Validity Period
8-1-5-4:Status Request
8-1-5-5:Request Reply
8-2-1:Inbox
8-2-2:New
8-2-3:Templates
8-2-4:Sent Items
8-2-5:Drafts
8-2-6:Settings
8-2-7:Memory Status
8-2-6-1:Validity
8-2-6-2:Read Report
8-2-6-3:Delivery Report
8-2-6-4:Auto Download
8-2-6-5:Sent Items
8-2-6-6:Message Server
8-2-6-7:WAP Profile
8-2-6-8:Display Options

48
8-3:Voice Mail
8-4-1: Chat
8-4:Chat
8-4-2: Chat Name
8-5:E-mail
8-5-1:Send & Receive
8-5-2:Incoming Box
8-5-3:Compose
8-5-4:Sent Items
8-5-5:Drafts
8-5-6:Settings 8-5-6-1:Set Account
8-5-6-2:Edit Account

49
1. CAMERA
1-1. New Image
Take a suitable point of the scenery, and then press the Store key or
to save the picture of view. Press Options key to edit this picture
Rename, Send MMS, Set as (Wallpaper, Start up, Shut down,
Phonebook), Delete, Delete all, and Picture Info.
1-2. Album
You can view all the pictures which are stored. Press the • or ‚ key
to choose one of them and make the operations below:
1. Rename
Rename the picture.
2. Send MMS
You can send your picture as MMS to others (needs GPRS support,
please contact your service provider).
3. Set as Wallpaper
You can set the picture as the wallpaper of your phone.
4. Set as Start Up
You can set the picture as the display when start up.
5. Set as Shut Down

50
You can set the picture as the display when shut down.
6. Set as phonebook
You can set the picture in your phonebook.
7. Delete
Delete the picture chosen.
8. Delete All
Delete all the pictures
9. Picture Info.
You can see the properties of the picture here.
1-3. Settings
1. Resolution
You can preset the size of the picture. There are five patterns:
480*640,240*320,120*160,128*132 (the maximum size that can
be displayed in the screen), 80*60 (the size you can dispose in the
phonebook).
2. Quality Level
There are three levels to choose: Super, High and Normal.
3. Flash Mode
You can turn on or turn off the photoflash lamp when taking
pictures.

51
4. Filename Header
Set the header of the name of the pictures.
Tips: The quantity of the pictures is usually limited by the memory. You
may take more pictures if appropriate parameters are selected.
Notes:
1. Please turn on the flash lamp when there isn’t enough illuminance.
2. The larger size and higher quality the pictures possess, the more
memory space would be occupied.
3. Flash memory:The higher the red line is, the more flash is used; the
lower the green line is, the less flash is used.
4. A new picture unnamed shall be nominated with the date and serial
number automatically (e.g. 0401010001).
5. The use of flash lamp will decrease the duration of the battery.

52
2. PERSONALITY
DA6 offers various kinds of music and display patterns so that you
can arrange different profiles according to your own personality.
2-1. Sound
2-1-1. Ring Signal
You can set different melody, mode and volume for Incoming Calls,
Alarm, SMS, MMS, E-mail and Cell Broadcast.
Mode: There are four kinds of prompt mode: Ringer, Vibration,
Ringer + Vibration and Silent.
Melody: There are kinds of rings, melody and downloaded music for
you to choose. Press ? or ? key to scroll then Ok soft key to select
and confirm.
Volume: There are 6 levels for you to adjust volume. Use ? or ?
key to increase or decrease it.
2-1-2. Key Tone
You can turn on or off the tone of pressing key.
2-1-3. Service Tone
Enable you to turn on or off the tone when a network is found or a call
is connected.

53
2-1-4. Start Up Melody
Use ? or ? key to scroll and listen, then Ok soft key to select it.
2-1-5. Shut Down Melody
Use ? or ? key to scroll and listen, then Ok soft key to select it.
2-1-6. Listening Volume
Use ? or ? key to increase or decrease volume of music.
2-2. Display
2-2-1. Set Wallpaper
The phone offers you several types of display for the standby mode.
You can set wallpaper from the Calendar, Picture and Chinese
Horoscope.
2-2-2. Start Up Display
Display the Animation or Text when the phone is switched on.
2-2-3. Shut Down Display
Display the Animation or Text when the phone is switched off.
2-2-4. Edit Line Tags
Edit the names of lines.

54
3. SETTINGS
Many different features of your phone can be customized for your
preferences.
3-1. Clock
This function allows you to change the current time, date and alarm
clock displayed in standby state.
The following functions are available.
3-1-1. Date & Time
Set Date: Enter the day, month and year according to the preset
format.
Set Time: Enter the time according to the preset format.
Note:1?An invalid time will not be performed.
2?Press ?or? to correct the false numbers.
3-1-2. Date & Time Format
Set Date Format: Select the day format.
Set Time Format: Choose between 24 hours mode and 12 hours
mode.

55
3-1-3. Auto Phone On & Off
Set the time when the phone can be switched on or off automatically.
Note:When the setting is made to switch on/off the phone everyday, the
other seetings on this option made before will be canceled.
3-1-4. Alarm Clock
You have three ordinary alarm clocks and a recurrent alarm clock to
set.
Alarm: Select Alarm 1, 2 or 3 and input the alarm time, then Ok key
to confirm the setting. The clock rings only once at the preset time.
Recurrent Alarm: Select the recurrent alarm, set the alarm time and
the recurrence rule.
Cacel Alarm: Select the desired one, press the corresponding numeric
key(1,2,3,4) or the “#” key to cancel the alarm setting.
Notes:
1. When the clock rings, use the side keys or the exit soft key to stop it.
2. The clock still works when power off.
3-2. Phone
3-2-1. Language
Select the language: Automatic, English, Traditional Chinese or
Sample Chinese.

56
3-2-2. Contrast
You can adjust the contrast of LCD by pressing ? or ? key.
3-2-3. Themes
Select one theme to change the appearance of the phone.
3-2-4. Answer Mode
Select the mode that you want to answer an incoming call by pressing
the Send key or Any key.
3-2-5. Flip Answer
When this option is activate, you can answer a call just by opening the
phone directly.
3-2-6. Master Reset
This function enables you to reset some settings to default status.
Reset Settings: Some of the settings would be reset, but it has no
damage to user data (phonebook, E-mail, album, text, etc).
Reset All: All the menus and settings will be reset to default, and all
user data will be erased.
Notes: The phone code would not be reset to 0000.

57
3-3. Call
3-3-1. Auto Redial
If this option is activate, the phone will redial at most 10 times after an
unsuccessful dialing.
3-3-2. Minute Remind
Set to hear an elapsed time reminder on the 45th or 50th or 55th
second of every minute during your calls.
3-3-3. Call Waiting
The phone supports the function of call waiting of GSM network. If
you select this function, the network will tell you there is a new call
coming in during another call.
3-3-4. Conceal ID
Your phone number will be hidden or displayed according to the
network when making a call.
Notes: The functions of Call Waiting and Conceal ID need the support
of network. Please contact your service provider.
3-3-5. Call Screening

58
Using the call screening function, your phone enables you to choose to
answer calls from given numbers while refuse others.
3-4. Security
3-4-1. Code Control
3-4-1-1. Phone Lock: You can choose On, Automatic or off.
3-4-1-2. Change PIN:
1. Press the Ok soft key.
2. Input the old PIN code and press the Ok soft key.
3. Input the new PIN code (four to eight digit) and press the Ok soft
key.
4. Input the new PIN code again and press the Ok soft key.
Note: Only firstly start up the PIN code can you alter the PIN code.
3-4-1-3. Change PIN2: The process is the same as "Change PIN".
PIN2 code is provided with SIM card, which is used in some
special service such as "call charge" function etc. If you want
to know whether your SIM card can support these functions,
please contact the network service.

59
3-4-1-4. Change Phone Code: The process is the same as "Change
PIN".
3-4-2. Fixed Dialing
If the function is supported by both the network service and your SIM
card, you can limit the outgoing telephone number. If the "On" mode
is set, your mobile phone can only call the number in the fixed
telephone number book. If you dial the other number (except the
urgent number), the phone will display "Forbidden number". You
need to input PIN2 code to set this function.
3-4-3. Passwd protect
If enabled, you need input password when start up PIM, Phonebook,
Message and Camera functions.
3-4-4. PIN Lock
If the function is set on, you can only use the right SIM card, and you
should input the pin password if another SIM card is inserted.
3-4-5. Call Barring
The calling limitation function can help you to limit the incoming and

60
outgoing calls. This service may not be available on all networks.
Contact your service provider if necessary.
l All Outgoing: To select this item, none call dialed (except
the urgent calls) will be allowed by the phone.
l Outgoing Intl: To select this item, the phone will be
restricted to dialing domestic calls only.
l All Incoming: To select this item,none incoming call will be
allowed by the phone.
l Outgoing Intl. Roaming: To select this item, none call
dialed overseas during international roaming will be allowed.
l Incoming Intl. Roaming: To select this item, none incoming
call during international roaming will be allowed.
l Clear All Barring: To select this item, the phone will allow
dialing and answering all the calls.
l Change Password: To change your network password.
3-5. Network
You can get more network services such as network information and
call forwarding by alternating line service. Contact your service
provider for details.

61
3-5-1. Configuration
l Select Network: select a network from existing networks.
l Searching Mode: Switch between Automatic and Manual
mode.
l Preferred Network: Select your preferred network provider if
you leave the network which you had the account.
3-6. Internet
1. Data Account
You can input several data accounts according to different purpose.
The main setting of data account is account type (connect mode).
Notes: Contact your service provider for more information about
payment. The subscriber needs engaged services supported by GPRS.
To create a new data account:
1. Choose Add Account.
2. Choose access type (GPRS or GSM).
3. Enter your name.
4. Input the settings you get from the service provider (Phone No.,
User ID and Password)
5. Save.

62
There are some available settings of GPRS:
l APN: The external network address which the subscriber want
to connect with can be IP address or text strings.
l User ID: The identifier when user logs on to the external
network.
l Password: The password needed when user logs on to the
external network
l Password Request: You need to enter the password every time.
l Allow Calls: Choose Automatic if you want to answer a call,
otherwise please choose GPRS only.
l IP Address: The IP used when connects with a network. The
network will provide the user a temporary IP if you entered no
IP address.
l DNS Address: You can input the DNS address if the network
didn’t provide the DNS server address automatically.
l Advanced Settings: All the settings are optional; please contact
your service provider.
There are some special options for GSM:
Phone Number: The number of the network service provider.
Data Rate: Select the stated connective rate.

63
Dial Type: Select between Analogue and ISDN type.
Notes: You must create a new data account in order to change the access
type.
3-6-2. Pref. Service
You can choose the preferred service between GPRS & GSM and
GSM Only.
3-6-3. SMS Access
You can choose the access type by GSM or GPRS.
3-7. Call Forwarding
This network service enables the incoming calls to be transferred to
the number that you specified.
3-7-1. Voice Calls
l All Unanswered: Calls are transferred if you do not answer the
call.
l All Calls: All line 1 calls are transferred.
l Busy: Calls are transferred if you are already making another
call.
l Not Reachable: Calls are transferred if the phone is switched

64
off or you are not in an area covered by your service provider.
Select one item to divert your phone, you should:
1. Scroll to the desired item then press OK soft key.
2. Select Activate and press OK soft key (If you want to cancel this
operation, select Cancel).
3. Input the number you want to divert to, press OK soft key.
4. The info is displayed to indicate if you’ve succeeded this execution
or not.
3-7-2. Data Calls
l Activate: Calls are transferred to a data phone appointed if the
phone is switched off or you are not in an area covered by your
service provider.
l Cancel: This function is canceled.
l Get Status: You can inquire the network about the current
status of Data Call function.
3-7-3. Check All
You can inquire the network about the current status of Call
Forwarding function.

65
4. PIM
PIM is the abbreviation for Personal Information Management.
4-1. Call Information
This menu allows you to view the timers for calls made and received.
The following timers are available: Outgoing Call, Incoming Call,
Last Call, Total Call, Total Call Cost, SMS Sent, Total GPRS, and
Last GPRS.
You can use Reset All to reset the entire statistic.
Notes: The item of Total Call Cost depends on the function of network
therefore the bill given by the service provider may not match your
record.
4-2. Call List
You can look over the numbers and its time of Call Dialed, Call
Received and Call Missed. The phone can store 30 numbers for each
menu, select one desired number and press left soft key then you can
perform the following functions: Send SMS, Save Phonebook, Delete
and Delete All.

66
4-3. Calendar
You can use the calendar to manage appointed meetings, phone calls
or tasks to be fulfilled, etc. The calendar can store 300 appointments
and 80 tasks at most. You can either add a new appointment (task) or
use a former one as the template.
4-3-1. View Today
Display all the appointments and unfinished tasks intraday.
4-3-2. View All Tasks
Display all tasks you have engaged. Scroll to the task you want to see,
press key, then press the left soft key to enter the options.
4-3-3. View Month
Use the navigation keys to see the appointments in a month. The days
with appointments are shown in bold. Select a day and press the
key to see the desired date.
4-3-4. View Week
Use the navigation keys to see the appointments in a week. The days
with appointments are shown with a short line in the time column.
Press the key to enter the options.

67
4-3-5. Add Appointment
Add a new appointment of Meeting, Date, Travel, Vacation, Phone
Call, Anniversary or Miscellaneous.
You can add an appointment as follows:
1. Choose one kind of appointment you want in the category, then
press OK soft key to edit.
2. Input corresponding information of each item.
3. Press Continue to proceed and then press Continue to confirm.
4. Set a reminder to this appointment or not and press OK soft key to
proceed.
5. Set the Recurrent rules, Class and Time Zone. If everything has
been done validly, select Save and Close to finish.
4-3-6. Add Task
Add a new task of Phone Call, Message and Miscellaneous. The steps
are similar to adding appointments. You can add tasks of Call, E-mail,
SMS, Fax, Letter, Make Budget, Forecast, Investigate, Laundry, Pay,
Plan, Make presentation, Read, Report, Review, Shopping, etc.
4-3-7. Options
l Status: To check the latest time when made the

68
synchronization of calendar, and show how much space the
appointments and tasks have been used.
l Class View: To select the type of how to look over the records:
Private, Public, or All.
l Delete All: To delete all the appointments and tasks.
l Reminders: You can select Always if you want to be reminded
when the phone is power off, or select If Power On contrarily.
Notes: In the view of Month and Week you can use key 3 to jump to next
week, key 6 to next month and key 9 to next year. Likewise key 1, 4, 7 to
jump to last week, month and year.
4-4. Biorhythm
You can check your physical, emotional, or intellectual rhythm or
your friend’s for today or a specified day. To check the biorhythm,
you must enter your or your friend’s birthday in Birthday menu first.
The main interface shows your or your friend’s biorhythm. You can
see the graph and numerical values at the same time for each
biorhythm index. Press ƒ or „ key to select date back and forth.

69
5. TOOLBOX
5-1. Recorder
5-1-1. Record
Press the OK soft key to record the voice memo by speaking to the
microphone. A timer displays to show you the elapsed time. When
recording time expires, the phone will automatically save the memo
already recorded by that time. When recording is completed, press
Store soft key to save or Cancel to abort.
5-1-2. Memo List
All the memos are listed here. Select one of them and press the left
soft key to edit. You can Play, Rename, or Delete this file. When
playing, you can use the right soft key to stop and exit the playback
mode.
5-1-3. Delete All
You can delete all the voice memos expediently.
5-1-4. Set View

70
You can setting the recording date and length to be displayed with
file’s name.
Notes: Recording voice conversations is illegal in some countries. Make
sure the other party has stated its consent to being recorded.
5-2. Calculator
Using this feature, you can use the phone as a calculator. The
calculator provides the basic arithmetic functions: addition,
subtraction, multiplication and division.
Performing a calculation:
1. Enter the first number by using the numeric keys.
2. Press the ƒ or „ key to set the operator for your calculation
referring to the screen: + (add), - (subtract), × (multiply), / (divide).
3. Enter the second number.
4. Press the Calculate key to reckon the result.
5. Repeat step 1 to 4 as many times as required.
You can use the Delete key to modify the number and reset the
calculator. Use the * key to enter a decimal point or % signal.
6. If the result has not been cleared by pressing the key, It will
become the first number for next calculation.
Notes: The calculator has limited precision so may cause error when
round off.

71
5-3. Lunar Calendar
5-3-1. Solar to Lunar
Enter the date you want to convert then press the OK soft key to run.
5-3-2. Lunar to Solar
Select the lunar calendar date and press the Convert key to run.
5-3-3. Search by Animal
Select the Chinese zodiac of the person and press the OK soft key to
find the year when he (she) was born in.
5-4. IDD Country Code
You can find a country code quickly by pressing the numeric keys to
input the first letter of the country.
5-5. DDD Area Code
Use the ? or ? key to find the province and enter to find the city you
want to look for.
5-6. Postal Code
This item has the same operations as finding the DDD Area Code.

72
5-7. Common Phone No.
5-7-1. Fixed Numbers
This function makes the user dial some of the numbers stored in the
SIM card only. It needs the support of SIM and the numbers are
protected by PIN2.
5-7-2. My Numbers
The numbers of the local SIM, including Line1, Line2 and a Data
number.
5-7-3. SOS Numbers
Some emergency numbers are listed here. DA6 supports these
numbers to be dialed without a SIM card only when in the area
covered by GSM network.
Notes: Some service providers need SIM card inserted or even input PIN
in some circumstances. The list of fixed numbers has no effect on SOS
numbers.

73
5-8. Units Conversion
You can convert the units of Length, Weight, Area and Volume.
Performing a conversion:
1. Select a kind of unit and press the left soft key to enter.
2. Input the number you want to convert.
3. Press the left soft key to quit and enter the unit you want to convert
to, and then the value will be displayed.
4.Press the Back soft key to perform a new conversion.

74
6. AMUSEMENT
6-1. Games
You can enjoy three games with your phone.
Scroll to a game, using the ? or ? key and press the OK key to
choose one game. The following options are available:
Resume game: Allows you to continue the last game you played.
New game: Start a new game, you can choose the different levels.
Highscore: Shows you the High Score table.
Options: Make some setting for the games.
Help: Shows you the key operations for the game.
6-1-1. Ballpop
Move the baffle left and right to reflect the ball to clear up the blocks
above.
6-1-2. E-Maze
Eat up all the green and red beans without touching the yellow sprites.
6-1-3. Wuziqi
Attempt to get five stones in a row.

75
6-2. Stop Watch
Use the left soft key to start / stop. You can see the time taken in every
lap by press the right soft key. Press the right soft key to reset and
quit.
6-3. Timer
You can set a timer to count down. The timer will display in the
standby mode when it works. The phone alarms when the time
expires.

76
7. WAP
WAP is a platform of combining wireless communication with
internet, you can gain abundant internet information and some
appliance of e-commerce by phone.
Before you use it, be sure that:
1. you have applied the service from network operator.
2. The data account of WAP are set up correctly.
7-1. Monternet
The default homepage is http://wap.monternet.com, when the
WAP are set, you can press ? to access it.
Of course, you can change it in setting.
When accessing homepage, the screen will show “connecting”. After
connected, you will see the information of the homepage. You can
press the options to do some jobs while browsing the homepage. And
press the back soft key to return the browser.
The guider will guide you how to set the data account about wap.
1. Scroll to the Internet menu from topmenu, then select the
homepage(such as Monternet).
2. “create now? “ will shown on the screen, press yes.

77
3. Input the profile name. Press ok.
4. Set connect using to Always to ask. Press ok.
5. Select add account. Press ok.
6. Select from the account type of GSM data and GPRS data.
7. Select add account, then press edit to input:
(1) The name of the data account.
(2) Input the telephone number for GSM user and the APN for
GPRS user.
(3) Input user ID.
(4) Input password.
(5) Select save to save the data account.
8. Input the IP adddress of the gateway.
The default monternet setting is APN: cmwap IP: 10.0.0.172
Homepage: http://wap.monternet.com.
7-2. Bookmark
You can save the useful addresses in the bookmark for quick linking
later. You can store 25 WAP website addresses.
To set the bookmark, you can do:
Go to bookmark: open the list of the bookmark, select one of the
links, you can go to this website.

78
Edit the bookmark: open the list of the bookmark, select one of the
links, you can edit the title and address.
Delete the bookmark: press ok to delete the address and title.
Send as link: send the current link to another phone as SMS.
New homepage: set the current page as homepage.
Some websites need password protection, you must input user name
and password to visit it. Mostly you can access it as passenger, but
you may not completely access the whole website. Some websites will
request you to receive mail by WAP. This kind of business requires
you to provide the detailed account number and password. Then they
will notify you by mail, for the detailed information please contact the
website executive.
7-3. Enter Address
Select Enter Address and input the website address, you can also
select an address from the 10 lastest addresses you input. Select delete
all you can delete all addresses stored in phone.
Go to: connect to the current website directly.
Edit address: edit the website, then press ok to access it.
Delete: delete the current website.

79
Add bookmark: Add current address to bookmark, you can edit a
new title.
7-4. Wap Profile
The WAP settings are stored in a WAP profile, In most cases you can
only need to use one profile to access the Internet.
You set up and use additional WAP profiles, for example, when
accessing secure Internet sites, such as a news site or a corporate
intranet. You then simply switch between profiles when you need to
change network connection.
7-5. Push Inbox
You can receive messages from WAP SP if they provide the push
service. The message you received will be stored in the push inbox
automatically.
Receive push message: When you receive push message, the push
inbox will be shown on the screen, you can make the following
response to the message.
Postpone: Save the PUSH message, you can load it later.
Download: Link to URL contained push message and download the
webpage.
Delete: Delete push information.

80
7-6. Resume: Return to the website you just leave.
7-7. Advanced
In order to quickly visit the websites you like, you can keep relative
information in the cache.
1. Clear away Cache: increase memo database usage efficiency.
2. Clear away Push inbox: receive the message sent by the WAP
provider on time.
3. Clear away Password: increase the efficiency of the net connecting.
4. Clear away cookies: increase the efficiency of the net connecting.
You’d better clear all relevant sensitive information of websites you
visited before. In case your phone is lost or robbed, this operation can
keep you away from security problem.
7-8. Settings
7-8-1. Common
PUSH access
If you don’t hope to receive PUSH message, you can make the
PUSH message closed. This setting is available to all WAP profiles.
Public security
Agent authentication
Look into the safe WAP link certificate.
Customer authentication

81
Look into the particular WAP service name and certificate.
7-8-2. WAP profile
. rename
change the WAP name.
. the using link
select or add new data account, more information to see menu
monternet.
. IP address
change the current IP address.
. advance
(1) change the homepage: input the website address that would be
used as homepage.
(2) The second account: if the first account failed in linking, you
can choose the second account.
(3) The customer label: input the customer label of the WAP
gateway.
(4) Password: input the password of the WAP gateway.
(5) Public security: set open or close.
(6) Pictures download: to look into the picture while browsing.
. delete
delete the current WAP mode.

82
MESSAGES
The messages functions are network service and may not be supported
by your network. The message can be sent in form of character, email
and call according to the different networks. You must apply for the
number of the SMS center from your service provider. Mostly it is
automatically available after you insert your SIM.
The phone support EMS, EMS and MMS. If the message memory is
full, is displayed and you cannot receive or save any new
messages. Use the ‘Delete’ menu to delete obsolete messages.
Press ? to enter Message menu.
8-1. SMS
You must get the number of the SMS center from your service
provider. Mostly it is automatically available after you insert your
SIM.
Setting the number of the SMS center:
1. Scroll to messages->SMS->settings->service centre. If the number
of service centre has been stored in the SIM card, it will be displayed
on the screen.
2. If the number is not displayed, please choose Add New to add it.

83
3. Input the number including international sign “+” and country/area
code, then press ok.
8-1-1. Write new
You can write a message made up of 160 characters or 70 words at the
most. The phone can link two or more messages to send out longer
message automatically. Please note that you are charged for every
message linked.
Send message
1. Scroll to messages->SMS->new.
2. Edit message, press ok to continue.
3. Input the receiver’s number, then press ok or press options to
choose from phonebook or groups.
4. Press ok to send out.
If you use groups to send messages, you will put each member in the
groups.
Insert items in text message
1. Scroll to messages->SMS->new.
2. Press options to insert items.

84
3. Select insert object.
4. Select picture, sound, melody, animation etc.
5. Select items, then press ok.
8-1-2. Inbox
When you receive a message, the screen will ask you whether read it
now or later, and there will be melody or vibration at the same time.
The icon of new message will be shown on the screen. Press left soft
key to read the message now and right soft key to read it later. You
may not be able to receive the whole long message at one time, so
while reading this type of message, you can do other things, for
example, chat with the sender or go to the WAP address in the text
message. After reading the message, press to look over options
table, or press to close the message.
. call the number in the message
Select the number, then press twice to call the number.
. save the message
The message can be stored in the phone database or SIM card.
. save from message
Phone number, WAP address and pictures highlighted will be
stored after press

85
1. Save the picture into my album.
2. Save the number into phonebook.
3. Save the WAP address into bookmark.
8-1-3. Sent items
Press ?or? to select a message and ok to read it under the sent
items. Press ƒ to do something such as delete, forward, chat, status
request, view status, call, save number and save information etc.
8-1-4. Drafts
The unsent messages caused by the network or other reasons will be
stored in the drafts automatically. Press ? or ? to select a
message in the drafts. Press left soft key to edit the message, send the
message, call, save, delete etc.
8-1-5. Settings
By this function, you can set some default characteristics of SMS. You
can set as bellow:
. service centre
Input the service centre number, press ok to save it.
. message type

86
The SP may provide some tools to convert the received message to
the receivable format.(such as email).
. validity period
If the message can not be sent successfully, the service centre may
store the message and send it later according to the time you set.
. status request
Requests the network to send out the report about the situation of
message sending. If the receiver has received your message, your
phone will hint to you.
. request reply
If you hope the receiver to make a reply, please make your request.
8-1-6. Cell Broadcast
Broadcast SM: If you select this option, you can receive public
information from Network Operators such as Weather Broadcasting,
the traffic report, the share-list and so on. Every kind of information
has its code, please consult with the local operator.
·Topics:The topic to receive the broadcast message, you
can edit the code.
·Reception:You can choose on or off.
·Language:Helps you to select the language you prefer in which the
broadcast message is displayed.

87
8-1-7. Template
By this function, you can create SMS template. You can create ten
personal template.
. create template
1. Scroll to messages->SMS->template->add new.
2. Edit text message, press ok.
3. Press yes to use template to create message now, press no to
save the template.
8-1-8. Check Space
8-2. MMS
By MMS function you can send text, pictures, voice and other
multimedia messages with MMS service. To use this service, the user
are requested to have the prearranged service that supports MMS. The
phone can receive more than 200 messages. You should delete old
messages to receive a new one if the storage is full.
Before sending MMS, be sure that you have set up the message server
http://mmsc.monternet.com and the WAP setting. For details to see
menu monternet.

88
8-2-1. Inbox
When a message come, there will be a ring you have set to hint you,
and the screen will show “read it now?”, the message will be stored in
the inbox automatically. You can choose to read it now or later.
Press ? or ? to select a desired one. Press ok to read it. Then
press left soft key to edit, forward, save the melody, picture, call, and
save the number etc.
8-2-2. New
You can create a new message by selecting new. By this function, you
can edit text message, ring, pictures, photos etc.
1. Scroll to messages->MMS->new.
You will see:
(1) object
Add characters: edit text message.
Add picture: add photos stored in the phone.
Add voice: add from my melody.
(2) send
Search: the number or email address can be found in the
phonebook.
Make a copy for: input the number or email address.

89
Bcc to-: input the number or email address.
Title: edit the title.
(3) New slide
Insert pages of pictures and the phone can refurbish them
automatically.
(4) Delete slide: delete the slide inserted.
(5) Next slide: show the next slide inserted.
(6) Last slide: show the last slide inserted.
(7) Preview: review the message before sending.
(8) Lasting time: set the show time on the receiver’s screen
by seconds.
(9) Insert template: insert the template stored in the phone.
(10)Save as template: Save the MMS just edited as a
template in the phone.
8-2-3. Template
. create template
1. Scroll to message->MMS->new.
2. Edit message, press ok.
3. Press options, choose save as template.

90
8-2-4. Sent items
The sent MMS will be saved in the sent items automatically. Press?
or ? to select a MMS, then press options to edit the message and
send it.
8-2-5. Draft
The unsent MMS caused by network or other reasons will be saved in
the draft automatically. Press ? or ? to select a MMS, then
press options to edit the message and send it.
8-2-6. Settings
By this function, you can set some default characteristics of MMS.
You can set as shown bellow:
1. Validity : if you can’t send the message successfully, the service
centre may store the message and send it later according to the
time you set.
2. Read report: requests the network to send out the report about
the situation of message reading. If the receiver has read your
message, your phone will hint you.
3. Delivery report: requests the network to send out the report
about the situation of message sending. If the receiver has

91
received your message, your phone will hint you.
4. Auto download: ask you to download or save it in the server.
5. Sent items: set to whether save the sent MMS or not.
6. Message server: the default server is http://mmsc.monternet.com
7. WAP profile: more details to see menu monternet.
8. Display options: set the MMS in the inbox and sent items to
show sender or show subject .
8-2-7. Memory status
By this function, you can check the memory status, including used
memory and unused memory.
8-3. Voice mail
The service allows the caller to leave her/his speech information. You
can save the number of the voice mail service, and call the service by
pressing and holding the key 1. the number is provided by the network
provider.
Press ? or ? to select line 1 or line 2, then press left soft key to
edit the number of voice mail. You can hold the key1 to listen to the
voice message in the standby window after you have set the number.
You can use this service only under the network provider’s support.

92
8-4. Chat
You can chat with others in the form of text message just like chatting
on the Interent. The chat icon will be shown on the screen while you
chatting.
.new chat
scroll to message->chat, to start new chat you should input the number
of the receiver, then press ok, you can also search it in the phonebook.
Then edit message to send.
. accept chat invitation
when you receive a chat invitation, the phone will ring, and the screen
will show “begin chat?”. Press yes to read the message, and edit
message then press send to reply. If you want to hang up the chat,
press the if you want to get back to the chat, scroll to
messages->chat->resume
if you press and hold the , the phone will show you whether to
stop the chat or not.
. chat name
You can choose to edit chat name. The chat name will be shown on
the receiver’s screen when he or she receives your chat message.

93
8-5. Email
You can send and receive a mail via this function, and before using
this function you should apply for the service supporting data
transfers.
8-5-1. Send&receive
You can send email stored in the Incoming box, and check if there’s
a new email.
8-5-2. Incoming box
When you receive a message, the icon of new email will be shown on
the screen, and there will be melody or vibration at the same time. The
new email will be saved in the incoming box automatically. Press left
soft key to read the message and right soft key to read it later.
When you press the left soft key, there are four choices for you to
choose:
Reply: reply the email you received.
Forward: send the email to others.
Mark as delete: when link to the server to send/receive email, the
email that is marked as delete will be deleted.
Mark as unread: make a lable of unread email.
Copy to record: to store the email so that you can read it later.

94
8-5-3. Compose
To: press ok to add name, input or choose from the phonebook.
Cc: press ok to input the email address that you want to send a copy
to.
Priority: set the email’s priority, press ok to set high, normal or low.
Subject: press ok to edit the subject.
Content: press ok to edit the message.
After you finish editting , press ok to continue. Then you can:
Send now: send the email right now.
Save in the incoming box: save the email in the incoming box.
Save in the draft: save the email in the draft.
8-5-4. Sent items
Save the sent emails, press left soft key to do some edit:
Forward: send this email to others.
Resend: resend this email.
Delete: delete this email.
Delete all: delete all emails saved in the sent items.
8-5-5. Draft
Used to store the unsent email. Select an email and press left soft key,

95
then you can edit the email.
Send: send the email.
Delete: delete the email.
Delete all: delete all emails saved in the draft.
8-5-6. Settings
there are two ways to create email account.
1 Create manually.
2 Use the Internet.
Create an email account
1 Scroll to messages->email->settings.
2 Choose edit account.
3 Press ok to add new.
4 Input the account name (such as home or office).
If there are office email account and home email account, you may set
one as default.
(1) Connect using.
Select the data account to be used in the email account . More
details to see menu monternet.
Input other settings in the list. All the settings are the same as the
email settings in pc. If you have not applied for the email service,

96
please contact the SP.
(2) POP3 server: input the name of the email receiving service
provider or ip address. Such as pop3.com or 10.1.1.1.
(3) POP3 port: If necessary, please correct the port no.
(4) Mailbox: input the email account name.
(5) Password: input the password of the email account.
(6) SMTP server: input the name of the SMTP server or ip address.
Such as: smtp.***.com or 10.1.1.1
(7) SMTP port: if necessary, please correct the port no..
(8) Email address: input the address of email.
(9) From name: input the name of sender.
(10) Copy outgoing: choose on ,then the sent email will be copied
and saved
(11) Check interval: set the interval of connecting the phone to the
email server and checking the received emails.
All the emails are also stored in the email server.

97
PHONEBOOK
You can store your phone numbers and the relative name in SIM card
or in your phone memory. So the phonebook include SIM card
phonebook and local phonebook.
Local phonebook: Phone memory can store 750 entries at the most;
every entry includes a name, three phone numbers, one QQ number
and one email address, one group name, one personal ring and one
personal photograph.
SIM card phonebook: The quantities of the entries, which SIM can
store, depend on the type of SIM; for every entry including a name
and a number.
Tip: If you change phones, any numbers stored in your SIM card are
available with the new phone.
You can press right softkey to enter phonebook in standby mode.
Browser
Scroll to browser in phonebook, then press OK key to enter it.
1. View all the entries:The current entry is displayed in the first line
of A area. Press ?or?to view the other entries,if there is a photo
attached, it will be displayed in B area.
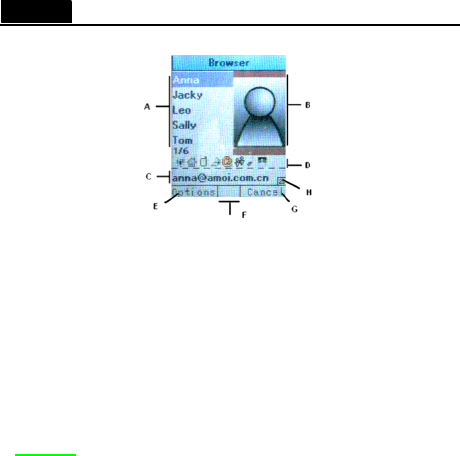
98
2.View the details of the entry:Press ?or? to view the details of
every entry in C area: number-group, familly phone number, mobile
number, office phone number, email address, OICQ number, personal
ringer, and photograph; in the D area the correspondent icons will be
displayed. And in the H area will show the record is stored in SIM
card or in local phonebook.
3. Options: Select one entry, then press left soft key to display the
following options:
Edit: Press ? or ? to select entries to edit, then press save soft
key to save the modification.
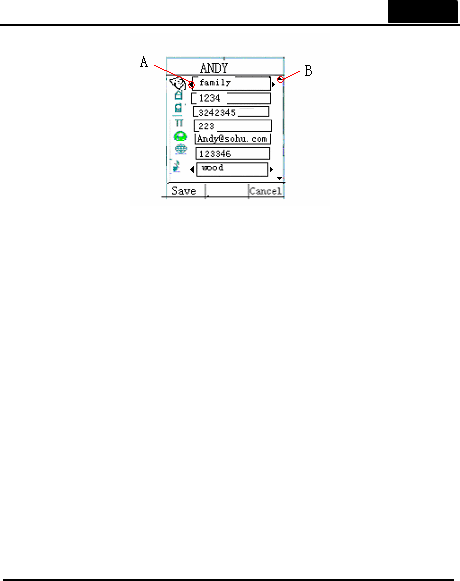
99
Send contact as SM: Send all the numbers in this entry to the
appointed number.
Delete: Press OK key and phone will display “Delect?”, select “Yes”
to delete this entry and “No” to cancel this operation.
Delete All: Press OK key then choose “SIM” or “Phonebook” to
delect all the entries in it.
Copy: Press OK key, this entry will be copied to the other
phonebook(SIM or Local).
Move: Press OK key, this entry will be moved to the other
phonebook(SIM or Local).
Search
Enter the character(s) of the desired name by pressing the associated
alphanumeric key(s) and press the Search soft key to see the details in
your phonebook.

100
Add Entry
1. Add to SIM:
1) Select SIM, press left soft key.
2) Select the first entry and press left soft key to enter the Name editor,
input the name and press OK key.
3) Select the second entry to edit the number, press left soft key to
stroe it.
2. Add to local PB:
1) Choose Phonebook and press left soft key to edit.
2) Press ? or ? to select different entries, for the entry of Name,
Personal Ring and Personal Photo, press left soft key to edit; for the
other entries, input the details directly.
3) Press to save the edit.
Note:The entries are stored in the sequence of the characters of user’s
Name.
User-Guoup
This option allows you to sort your Phonebook. So you can send a
message to many receivers.
Group List: Display all the groups names.
Send Message: Send the message to the members of the group.

101
Rename: Rename the existed groups. After you rename a group, each
member’s group name will correspondingly be renamed in PB.
Delete: Delete the existed groups. After you delete a group, each
member’s group will correspondingly be deleted in PB.
Management
1. My Numbers:Your SIM card number is stored in this entry.
This function needs the SIM card to support, you can set the
line1, line2 and the data phone number.
2. Copy: You can copy the entries mutually stored in the phone and
SIM card.
. Copy from SIM: Copy the records from the SIM card PB to
local PB.
. Copy all to SIM: copy the records from the local PB to SIM
card.
3. Move: You can move the records stored in the phone and SIM
card, the record will be deleted after being moved.
. Move from SIM: Copy the records stored in the SIM card to
local PB, then delete all records stored in the SIM card.
. Move all to SIM: Copy the records stored in the local PB to
SIM card, then delete all records stored in local PB.

102
4. Send PB: Send the number entry to the appointed number.
5. Check Capacity: Check the total capacity and the amount of
used entries of PB of SIM card and Local.
6. Delete All:
. SIM : Delete all the entries in SIM card.
. Phonebook: Delete all the entries in local PB.

103
REFERENCE INFORMATION
Access Codes
There are several access codes that are used by your phone and its
SIM card. These codes help you protect the phone and SIM card
against unauthorized use.
Phone Password
The security code can be used to avoid unauthorized use of your
phone. The security code 0000 is usually supplied with the phone.
Change the security code before you start using your phone. Keep the
new code secret and in a safe place, which is separate from the phone.
PIN Code
The PIN (Personal Identification Number) code protects your SIM
card against unauthorized use. The PIN code is usually supplied with
the SIM card. When the PIN code request is enabled, the code is asked
each time the phone is switched on.
If you key in an incorrect PIN code three times in succession, the SIM

104
card will be locked. To unlock the SIM card, you’d key in the PUK
code and press the OK soft key, and key in a new PIN code twice.
PIN2 code
The PIN2 code, supplied with some SIM cards, is required to access
some functions, such as charging unit counters. These functions are
only available if supported by your SIM card.
If you key in an incorrect PIN2 code three times in succession, the
PIN2 will be locked. To unlock the PIN2, you’d key in the PUK2
code and press the OK soft key (or OK key), and key in a new PIN2
code twice.
PUK code
The PUK (Personal Unblocking Key) code is required to change a
blocked PIN code. The PUK code may be supplied with the SIM card.
If not, contact your local service provider for the code.
If you key in an incorrect PUK code ten times in succession, the SIM
card cannot be used anymore. Contact your service provider for a new
card.

105
You cannot change the PUK code. If you lose the code, contact your
service provider.
PUK2 code
The PUK2 code, supplied with some SIM cards, is required to change
a blocked PIN2 code.
If you key in an incorrect PUK2 code ten times in succession, you
cannot use the functions requiring the PIN2 code. Contact your
service provider for a new card.
You cannot change the PUK2 code. If you lose the code, contact your
service provider.

106
Using the Batteries
A rechargeable Li-ion standard battery powers your phone. The
following batteries are also available (ask your local dealer for further
details):
Type Capacity Talk Time Standby Time
Li-ion Slim 600mAh 3-5hrs 80-200hrs
Li-ion Standard 900mAh 4-6hrs 120-300hrs
Precautions When Using Batteries
Never use any charger or battery that is damaged in any way.
Use the battery only for its intended purpose.
If you use the phone near the network’s base station, it uses less power;
talk and standby times are greatly affected by the signal strength on
the cellular network and the parameters set by the network operator.
Battery charging times depend on the remaining battery charge and
the type of battery and charger used. The battery can be charged and
discharged hundreds of times, but it will gradually wear out. When the
operation time (talk time and standby time) is noticeably shorter than
normal, it is time to buy a new battery.

107
If left unused, a fully charged battery will discharge itself over time.
Use only approved batteries; and recharge your battery only with
approved chargers. When a charger is not in use, disconnect it from
the power source. Do not leave the battery connected to a charger for
more than a week, since overcharging may shorten its life.
Extreme temperatures will affect the charging capacity of your battery:
it may require cooling or warming first. Do not leave the battery in
hot or cold places, such as in a car in summer or winter conditions, as
you will reduce the capacity and lifetime of the battery. Always try to
keep the battery at room temperature. A phone with a hot or cold
battery may temporarily not work, even when the battery is fully
charged. Li-ion batteries are particularly affected by temperatures
below 0 °C.
Do not short-circuit the battery. Accidental short-circuiting can occur
when a metallic object (coin, clip or pen) causes a direct connection
between the + and - terminals of the battery (metal strips on the back
of the battery), for example when you carry a spare battery in a pocket
or bag. Short-circuiting the terminals may damage the battery or the
object causing the short-circuit.

108
Dispose of used batteries in accordance with local regulations. Always
recycle. Do not dispose of batteries in a fire.
Care and Maintenance
Your phone is a product of superior design and craftsmanship and
should be treated with care. The suggestions below will help you to
fulfill any warranty obligations and allow you to enjoy this product for
many years. When using your phone, battery, charger, or any
accessory:
Keep it and all its parts and accessories out of small children’s reach.
Keep it dry. Precipitation, humidity and liquids contain minerals that
will corrode electronic circuits.
Do not use or store it in dusty, dirty areas as its moving parts can be
damaged.
Do not store it in hot areas. High temperatures can shorten the life of
electronic devices, damage batteries, and warp or melt certain plastics.
Do not store it in cold areas. When the phone warms up (to its normal
operating temperature), moisture can form inside the phone, which

109
may damage the phone’s electronic circuit boards.
Do not drop, knock or shake it. Rough handling can break internal
circuit boards.
Do not use harsh chemicals, cleaning solvents, or strong detergents to
clean it. Wipe it with a soft cloth slightly dampened in a mild
soap-and-water solution.
Do not paint it. Paint can clog the device’s moving parts and prevent
proper operation.
Use only the supplied or an approved replacement antenna.
Unauthorized antennas, modifications of attachments could damage
the phone and may violate regulations governing radio devices.
If the phone, battery, charger, or any accessory is not working
properly, take it to your nearest qualified service facility.
This phone features large display screens, which are damageable.
Please be most careful to avoid dropping or knocking it or scratch it
with a sharp thing.

110
GLOSSARY
Antenna
A device for transmitting or receiving signals. The size and shape of
antennas is determined, in part, by the frequency of the signal they
receive. Wireless phones and the base station must have antennas.
ALS (Alternate Line Service)
ALS provides the capability of associating two alternate lines with one
SIM card. You can make and receive calls on either line as desired
with this service.
Call Barring
Ability to restrict outgoing and incoming calls.
Call Diverting
Ability to reroute calls to another mobile or fixed line.
Call Holding
Ability to put one call on standby while answering or making another
call; you can then switch between the two calls, as required.

111
Call Waiting
Ability to inform users that they have an incoming call when engaged
on another call.
Conference Calling
Ability to establish a conference call involving up to five additional
parties.
DTMF (Dual-Tone Modulated Frequency)
You send DTMF signals when you enter numbers by pressing the
digit keys.
Hands-Free
A feature that permits a driver to use a wireless phone without lifting
or holding the handset - an important safety feature for automobiles,
tractors and most other motorized vehicles.
GSM (Global System for Mobile communication)
International standard for cellular communication, guaranteeing
compatibility between the various network operators. GSM covers
most European countries and many other parts of the world.

112
LCD (Liquid Crystal Display)
Commonly used to refer to the screen display on the wireless phone.
LED (Light Emitting Diode)
Commonly used to refer to a small light on the wireless phone or on
the Desktop Charger. The LED lights on the phone to indicate an
incoming call. The lights on the charger indicate that battery charging
is taking place.
Line Identification Services
Service allowing subscribers to view or block the telephone numbers
of callers.
PIN (Personal Identification Number)
Security code that protects the phone against unauthorised use. The
PIN is supplied by the service provider with the SIM card. It may be a
four to eight-digit number and can be changed, as required.
PUK (PIN Unlocking Key)
Security code used to unlock the phone when an incorrect PIN has
been entered three times in succession. The eight-digit number is
supplied by the service provider with the SIM card.

113
Roaming
Use of your phone when you are outside your home area (when
traveling for example).
SIM (Subscriber Identification Module)
Card containing a chip with all the information required to operate the
phone (network and memory information, as well as the subscriber’s
personal data). The SIM card fits into a small slot on the back of the
phone and is protected by the battery.
SMS (Short Message Service)
Network service sending and receiving messages to and from another
subscriber without having to speak to the correspondent. The message
created or received (up to 160 characters long) can be displayed,
received, edited or sent.
EMS (enhanced message service)
Allow to send a long message contain 456 characters at the most. And
allow to insert pictures, voice in the message to be sent out.
MMS

114
Multimedia message service. Some multimedia such as videos and
audios and so on can be inserted in the message.
Soft Keys
Keys marked • and o on the phone, the purpose of which:
• Varies according to the function that you are currently using
• Is indicated on the bottom line of the display just above the
corresponding key
ZI8
A type of smart text input mode. Make it easy to edit text
message.
Voice Mail
Computerized answering service that automatically answers your calls
when you are not available, plays a greeting (Optionally in your own
voice) or records a message.
Dual band
The dual-band cellular phone can cut over different frequency.
And can be used in several bands, such as 900MHZ and 1800
MHZ.

115
APN
The abbreviation of accessing point name, it is the URL address of
mobile internet.
GPRS
A kind of protocol based on GSM. GPRS allow several users to use
the same communication connection. The charge based on the data
flow which super than charge based time.
CSD
A kind of wireless service protocol in WAP. It is a standard of circuit
switch. It can create a persistent connect and charged based on the
connect time.
IMEI
International mobile equipment identification. We can
recognize each mobile phone by it. If the phone rob, you can
prohibit the phone used in all available networks by the IMEI.
MCC
Mobile country code, used to recognize the country the user
live in.
MNC

116
Mobile network code, used to recognize the network that the
consumer use.
WAP
A kind of wireless application protocol, you can access the
mobile internet use WAP. You can enjoy many services such
as news, weather forecast, prearrange service or shopping,
access database etc..
URL
Universal resource location. It is an address system to locate address
information used in the Internet. Every WAP homepage has its own
address. URL is usually head of http://wap, followed by an address.
ISP
Internet service provider.
TROUBLESHOOTING
If the phone does not works properly, please check the following
troubleshooting and find a solution. If you can’t solve the problems,
please contact your local dealer for helps.

117
We hold the privilege of modify the product described in this
manual without pre-notify. For the publish error or program
improvement, we will make some necessary modify in the new edion.
Question Solution
Cannot make or receive
calls.
.Check whether the phone is power on or not.
.Check whether the battery is lack of power.
.Check whether the field signal strength is enough.
.Check whether to set up the Call Barring, SDN or
the other options in Call Set menu.
.Check whether to set up the Call Divert.
.Check whether to place the SIM card properly.
Conversation volume is low. .Check whether to set the Voice Volume too low.
Does not ring when an
incoming calls comes in.
.Check whether to select the Silent or Vibrator
modes.
.Check whether the ring volume is set too low.
.Check whether the surrounding noise is too loud.
.Check whether to set up the Call Divert.
LCD is not clear. .Check whether the LCD Contrast is set too low.
The keypad does not work .Check whether the keypad is locked or not.
The other part cannot hear
you.
.Check whether to select Mute.
.Speak near the MIC.

118
For body worn operation this phone has been tested and meets FCC
RF exposure guidelines when used with an accessory that contains no
metal and that positions the headset a minimum of 1.5cm from the
body. Use of other accessories may not ensure compliance with FCC
RF exposure guidelines.