AMOI Electronics F8 GSM Tri-band Digital Mobile Phone User Manual F8 User s Manual
AMOI Electronics Co., Ltd. GSM Tri-band Digital Mobile Phone F8 User s Manual
Users Manual

-1-
Thank you very much for choosing AMOI F8, the fashionable and
elegant camera phone, especially for youngster. F8 is a perfect
integration of unparalleled contemporary design and consummate
precise craftsmanship, bringing you easy communication, funny
entertainment, as well as highlighting your tastes.
Key features:
GSM World Tr-iband Unlocked
Compatible with Most Standard GSM Networks
65K Colors CSTN Main and External Displays
GPRS Class 10, WAP 2.0
AMOI Smart Dial
JAVA Enabled: J2ME
SMS (Short Messaging Service)
MMS (Multimedia Messaging Service)
Downloadable 40-Polyphonic Ring Tones
Built-in 300K pixels CMOS Video Camera
Built-in Amusing Games
Tool Kit (PC Sync, Alarm Clock, Calculator, Voice Memo, Unit
Conversion, World Time)

-2-
Specifications:
GSM/GPRS: 900 /1800 /1900 MHz
Screen: Internal: 65k colors CSTN display (128 x 128 pixels)
External: 65k colors CSTN display ( 96 x 64 pixels)
Size: 80 x 42 x 21 mm; 3.15" x 1.65" x 0.83"
Weight: 69 g; 2.43 oz
Battery Capacity: 720 mAh
Standby Time: 60-100 hrs
Talk Time: 2-3 hrs
Voice Encoding: FR / EFR / HR
The manufacturer may, at any time and without notice, make changes or
improvements to the products offered, but provide necessary corrigendum with this
manual or release new version of this manual for the following lot. The Amoi logo
and trademark are the property of the manufacturer. Oct. 2004

-3-
Intellectual Property
All Intellectual Property, as defined below, owned by or which is
otherwise the property of AMOI or its respective suppliers relating to
the AMOI mobile phones, including but not limited to, accessories,
parts, or software relating thereto (the “Phone System”), is proprietary
to AMOI and protected under federal laws, state laws, and
international treaty provisions. Intellectual Property includes, but is
not limited to, inventions (patentable or unpatentable), patents, trade
secrets, copyrights, software, computer programs, and related
documentation and other works of authorship. You could not infringe
on it, otherwise you may violate the rights secured by the Intellectual
Property. Moreover, you must agree that you will not (and will not
attempt to) modify, prepare derivative works, recompile, disassemble,
or attempt to create source code from the software. No title or
ownership in the Intellectual Property is transferred to you. All
applicable rights of the Intellectual Property shall remain with AMOI
and its suppliers.

-4-
TABLE OF CONTENTS
Safety precautions………………………………………….8
Unpacking…………………………………………………10
Your Phone………………………………………………11
Phone Layout……………………………………………….11
Keys Description………………………………………….13
Display………………………………………………………14
Getting Started…………………………………………….16
Installing a SIM Card………………………………………16
Charging a Battery…………………………….……….…..18
Switching the Phone On/Off………………………………..20
Your Phones Mode………………………….……………...21
Call Function………………………………………………22
Making Calls……………………………………………......23
Receiving/ Rejecting Calls……...……………….……….....24
Volume Adjusting…………………………………………24
Missed Calls………………….………………….......25
Call Menu…..………………….…………………….......25
Entering Text………………………………………………28
Changing Text Input Mode………………………………....28
English Mode……………………………….………...30
BoPoMoFo Mode…………………………………….……..31
Abc Mode……………………………….……...….…......31
Numeric/123 Mode…………………………………….…...32
Insert Symbol..…………………………………….……...32
Insert Template..…………………………………….……...33
Insert Phone Num..………………………………….……...33

-5-
Using User’s Dictionary…………………………………….32
Phonebook……………………………………………….....34
Storing a Phone Number in PB……………………………...34
PB Menu…………………………………………………….37
Using Menus………………………………………….........40
Select functions of options……………………………….....40
List of Menu Function……………...………….……………41
Messages....……………………………………………...….47
SMS…….………………………………….…...…………...47
MMS………………………………………………………...51
Voice Mail…………………………………………………54
Broadcast……………………………………………………55
Memory……………………………………………………55
Settings……………………………………………………56
Data Service..……….……………………...……………….58
Browser……………………………………………………...58
PC Sync……………………………………………………..59
JAVA………………………………………………………...59
Settings..…………………………………………………….62
Personality………..…..……..…...…………………………64
Music Select…………………………………………………64
Alert Type…………………………………………………...64
Ring Volume………………………………………………64
Standby Interface....................................................................64
Power On/ Off Display...........................................................65
Settings……………………………………………………...66
Time.………………………………………………………66
Mobile……………………………………………………..66

-6-
Call…………………………………………………………68
Network……………………………………………………..70
Toolbox…...…………………………………………………72
Alarm………………………………………………………72
Record………………………………………………………72
World Time…………………………………………………73
Calculator……………………………………………………74
Unit Conversion……………………………………………74
Private Info…………………………………………………76
Lovey Dial..............................................................................76
Calls…………………………………………………………76
Security Info………………………………………...………77
Security………...……………………………………………79
Entertainment……...…...…………………………….........82
Eat Bean……………………………………………………82
Snake………………………………………………………..82
Tetris.…..………………………………….………………83
Shrew Mouse………………………………………………..83
Multimedia…………………………………………….…...84
Voice Memo………………………………………………84
Camera……………………………………………………..84
PhBook……………………………………………………86
Download Resource…………………………………………86
User Custom1……………………………………………….86
User Custom2……………………………………………….87
Camera ……………………………………………………..88
Take Photo…………………………………………………..88
Video Recording…………………………………………….90

-7-
Photo Browse………………………………………………..90
Play Video……………………………………………….…..90
PhotoBase…………………………………………………...90
Reference Information………………………………….....92
Access Code………………………………………………92
Using the Batteries………………………………………......94
Care And Maintenance……………………………………...96
Glossary……………………………………………………..98
TroubeShooting ...….....................................…….107
Important SAR Information…………….…………….....…108
Body-Worn Operation……………………………..…...….109
FCC Part 15 Notice…………………...……...…………….110
Warning……………………………………...……………..110
FCC Radiation Exposure Statement……………….....…....111
Caution…...………………………………………...………111
-8-
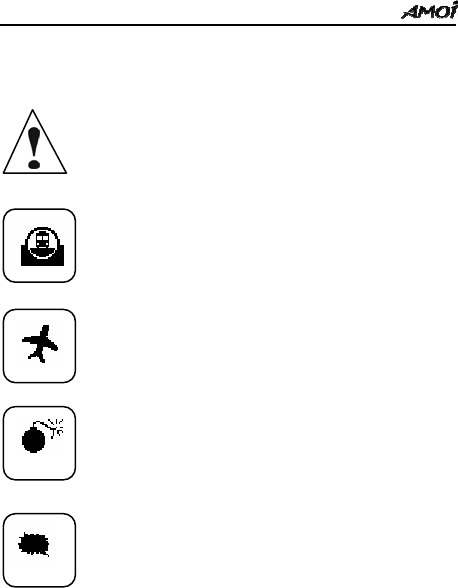
SAFETY PRECAUTIONS
Read these brief guidelines. Failure to comply with them
may be dangerous or illegal.
Road safety comes first
Do not use a hand-held mobile phone while driving;
park the vehicle first. Remember that in some countries,
it is illegal to use a mobile phone while driving.
Switch off on aircraft
Mobile phones can cause interference. Using them on
aircraft is both illegal and dangerous. (Please also close
the power-off alarm clock.)
Switch off near an explosion place
Do not use the phone near an explosion place, because it
likely disturbs the remote control of the explosion.
Switch off when refueling
Do not use the phone at a refueling point (service station)
or near fuels or chemicals.
-9-
Switch off in hospital
Follow any regulations or rules. Switch phone off near
medical equipment.
Interference
All wireless phones may be subject to radio interference,
which may affect their performance.
Accessories and batteries
Use only approved accessories and batteries.
Use sensibly
Use only in the normal position (to ear). Do not touch
the antenna unnecessarily when the phone is switched
on.
Emergency Call (SOS)
By pressing the soft key SOS you can reach an emergency
call on any network without a SIM card and without
entering a PIN ( not available in all countries )
Radio frequency exposure information
These guidelines are consistent with the safety standard for human
exposure to radio frequency electromagnetic energy previously set by
both U.S. and international standards bodies. The design of this phone
complies with the FCC guidelines and these international standards.

-10-
Unpacking
Your package contains the following items:
Note: Accessory availability may vary in different markets.
Handset Battery
Travel Charger Hands-free Headset
User’s Manual Addendum to User’s Manual
-11-
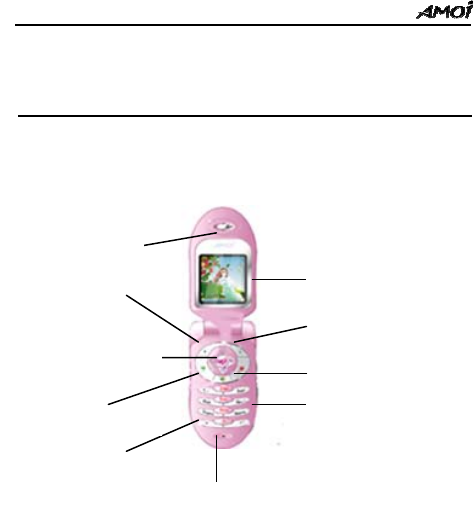
YOUR PHONE
Phone Layout
The following illustrations show the main elements of your phone.
Open View
Earpiece
Display
Alphanumeric Key
Microphone
Special Function key
Right Soft Key
Left Soft Key
Power On/Off Key
Send Key
Navigation Keys
-12-
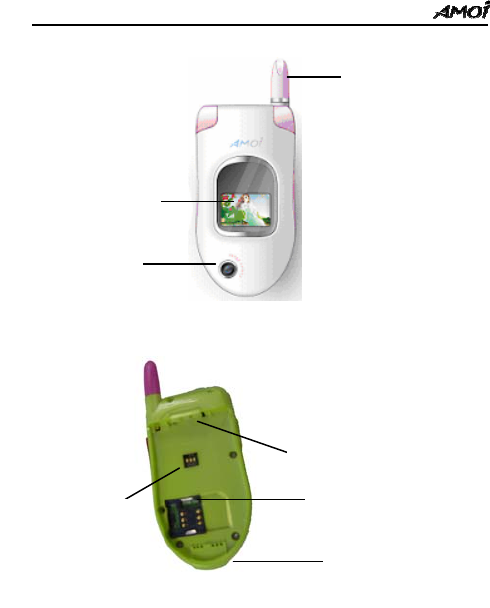
Closed View
Rear View
Battery Lock
Battery Terminals
SIM Card Socket
Cable Connector
Slot
Antenna
External Screen
Camera
-13-
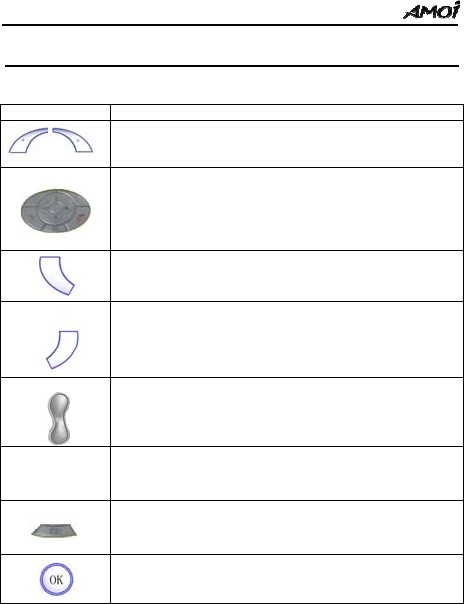
Keys Description
Keys Description
Two soft keys perform the functions indicated by the text above
them (in the bottom line of the display).
Navigation Keys: In the menu facility, scroll through the menu;
In Standby mode, press d key to enter the Phonebook; press e
key to view the call lists; press f key to use Messages and c
key to enter the Entertainment
Call key (Send key): Makes or answers a call. In standby mode,
press it to view the outgoing call list.
Power On/Off key: Hold it to switch the phone on/off; back to
the standby mode or cancel your inputting.
Volume key: Adjust the volume during a call or when playing
games; when a call coming, press it to end the ring tone; hold it
to reject the call. In standby mode, hold the Up key to enter the
Camera, Down key to exit.
* * key: Press it to switch between the Silent mode and Typical
mode.
In standby mode, press it to enter the Camera; press and hold it
to take the photo directly.
OK soft key: Hold it to enter the Browser.
-14-
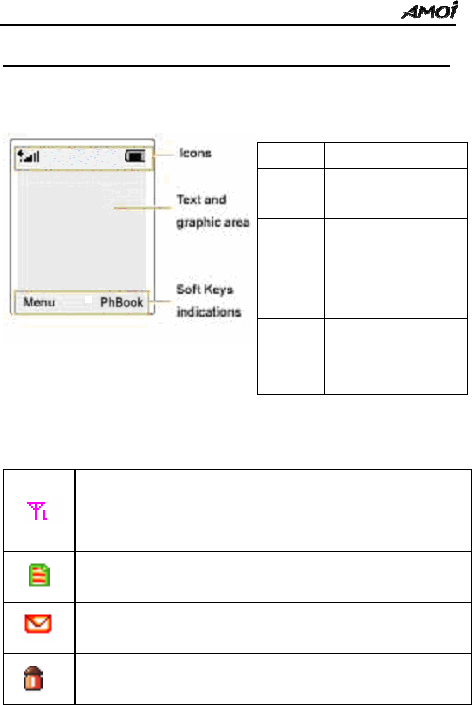
Display
Display Layout
The display is comprised of three areas.
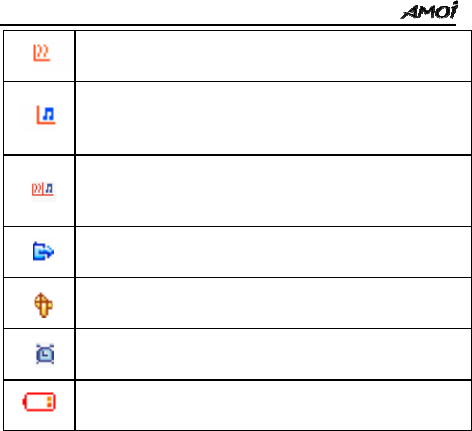
Icons
Signal Strength: Shows the received signal strength. The
more the number of bars, the better the signal strength.
MMS: Appears when a new MMS is received
New Message: Appears when a new message is received;
flashing indicates that your message box is full.
WAP Security: Indicates the WAP security level.
Areas Description
First
area
Displays various icons
Middle
area
Displays phone
numbers, messages,
graphics and any data
that you enter.
Last
area
Shows the functions
currently assigned to the
two soft keys.
-15-
Vibrator Mode: Appears when the vibration mode is active.
Ring: Indicates that the phone rings when a call coming.
Ring + Vibrator: Indicates that your phone will ring and
vibrate when a call coming.
Roaming: Appears when you are out of your home area and
have registered with a different network.
WAP Push indication
Alarm Clock: Appears when the alarm clock is set.
Battery Status: Shows the level of your battery. The more
black area you see, the more power you have left.

-16-
GETTING STARTED
You must insert the SIM card and charge the battery before you can
use the phone.
Installing a SIM Card
When you subscribe to a mobile network, you are provided with a
plug-in SIM (Subscriber Identity Module) card loaded with your
subscription details (PIN, Phonebook information, and so on).
Note: The SIM card can be easily damaged by scratching or bending, so
you should be careful when handling, inserting or removing the card.
Follow the instructions supplied with the SIM card. Keep all SIM cards
out of reach of small children.
1, Switch the phone off.
2, Remove the battery. To do so:
① Press down the catch above the battery and hold it in that
position.
② Slide the battery and lift it away, as shown.
① ②
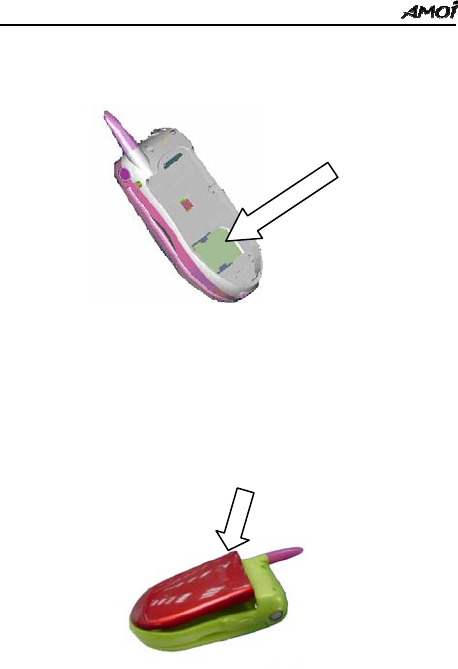
-17-
3, Slide the SIM card into the SIM card holder so that the holder locks
the card in position. Make sure that the notched corner is at the top left
and the gold contacts of the card face into the phone.
4, Reinstall the battery. To do so:
Place the battery back, taking care to match the tabs in the battery
with the grooves on the phone. Push down the battery until it clicks
into place. Make sure that the battery is properly installed before
switching on the phone.
-18-
Charging a Battery
Your phone is powered with a rechargeable Li-ion battery.
You are provided with a travel charger when buying the phone. Use
only approved batteries and chargers. Ask your local dealer for further
details.
Note: You must fully charge the battery before using your phone for the
first time. The phone can be used while the battery is being charged.
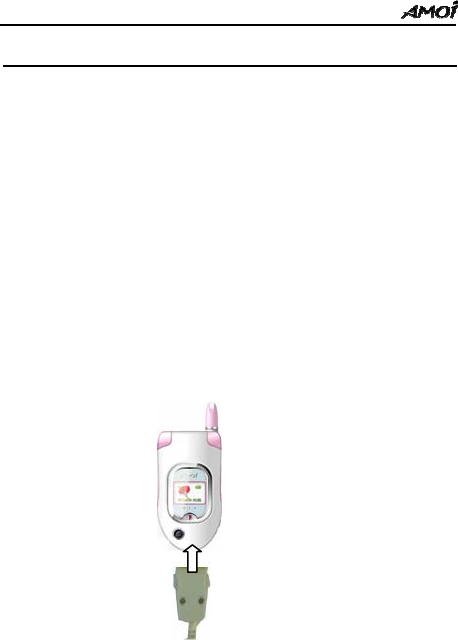
Using a Travel Charger
1. Place the battery on the back of the phone, connect the lead (with
arrow icon side adown) of the travel charger to the connectting slot
at the bottom of the phone.
2. Connect the adapter to a standard AC wall outlet.
-19-
3. When charging is finished (the full battery icon becomes solid),
disconnect the adapter from the AC wall outlet first, and then
disconnect the lead from the phone.
Note: When disconnecting the lead of the travel charger from the phone,
you should press the buttons on both sides of it; otherwise it’s easily
damaged.
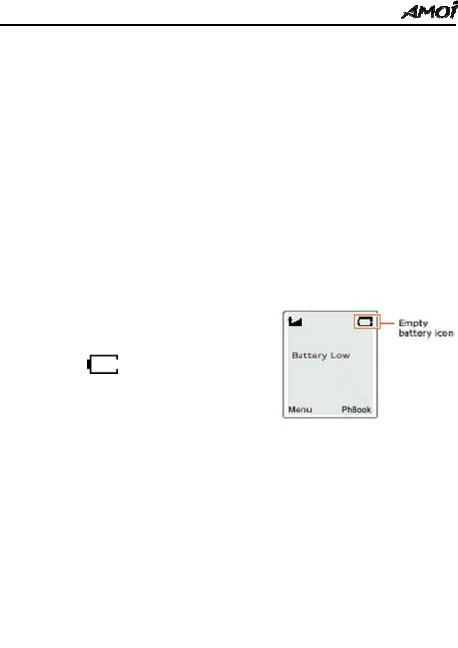
Low Battery Indicator
When the battery charge level gets
too low, you can see an empty
battery icon on the top right
of the display and a text notification.
Notes: If the battery level gets too low, the phone will turn off
automatically. Unfortunately, if this happens, you’ll lose whatever you
are doing, including dropping your call. Pay attention to the battery
strength icon and make sure your battery is adequately charged.
-20-
Switching the Phone On / Off
1. Open the folder.
2. Press and hold the key until the phone is switched on.
3. Enter your PIN , if you have one for your SIM card.
4. Press the OK soft key, then your phone connects to the GSM
network, and you’ll see the following idle screen.
Note: If the network singal is too weak, ‘No Service’ appears in the
display. In this case, you cannot make or receive calls. Wait a little while
for a better signal or move into an open area to regain the service.
5. To switch the phone off, hold down the key for more than two
seconds.
WARNING!
Do not switch on the phone when the mobile phone use is prohibited or when it may
cause interference or danger.
Note: Unnecessary touch of the antenna when the phone is switched on
may affect the call quality and cause the phone to operate at a higher
power level than otherwise needed.
Service Provider
07/20 FRI 08:00
Menu PhBoo
k
-21-
Your Phone’s Mode
Standby Mode
Standby is the most basic state of your phone. The phone goes into
Standby mode soon after you switch it on, or whenever you briefly
press the key. When your phone is in Standby mode, you will
typically see the current date and time. If you enter a phone number,
you can press the key to dial it.
Press the key at any time to return to Standby mode. Be
careful, if you are on a call when you press the key, you
will return to Standby mode, and it also disconnects the call.
Talk Mode
You can make and answer calls only when your phone is switched on
and in network. During a call, the phone is in Talk mode. While you
are in Talk mode and see ‘Options’ and ‘Phbook’ in the main screen,
pressing the left soft key gives you a list of options referred to as ‘Call
Menu’;pressing the right soft key gives you a list of options referred
to as “PhoneBook Menu”.

-22-
CALL FUNCTIONS
Making Calls
Before you can make or receive a call, you must switch on the phone
and be within range of the network.
1. In Standby mode, enter the phone number.
Tips: When inputting a number, you can insert a pause by holding the #
key (for example: between the switchboard and the extension), the latter
number will be dialed several seconds later after the former one.
2. Press the key to make the call.
3. When you finish talking, press the key or simply close the
phone to end the call.
Making Calls from the Phonebook
Enter the phonebook, choose the desired number and press the
key to dial it.
Last number redialing
In standby mode, press the key twice to redial the last number
you called. The number last dialed will be recorded in the outgoing

-23-
call list automatically. In standby mode, press the key once to
enter the list, choose the desired one and dial it.
Making International Calls
1. Press and hold the “0” key until a “+” character appears in the
display.
2. Enter the country code, area code, and phone number, then press the
key to begin dialing.
Receiving / Rejecting Calls
When somebody calls you, the phone rings or vibrates; the screen
displays an incoming call message. If you have subscribed to the Line
Identification Service (contact your service provider), the caller’s
phone number displays; if you have saved the number in your phone
book, the caller’s name displays.
To answer a call
Three modes are provided for receiving a call. Refer to
Settings/Call/Answer mode for details.
1. If the answer mode is set to be ‘Call key’, Press the key or left
soft key to answer the call.
2. If the answer mode is set to be ‘Open mobile’, open the folder to

-24-
answer to call. If the phone is unfolded already, press any key except
the key and right soft key to answer.
3. If the answer mode is set to be ‘Auto’, or the hands-free unit is used,
when a call coming, the mobile answers the call automatically in
about three seconds.
To reject a call
Unfold the phone, press the key or right soft key. When the
phone is closed, hold the side key to reject it.
To end a call
Press the key.
Note: 1. If the Car Kit is used, press and hold the answer key on the
Car Kit for about three seconds to answer or end a call.
2. When you are using the mobile or the menu, answering the call
will intermit the current operation.
Adjusting Call Volume
During a call, if you want to adjust the earpiece volume, use the Up
and Down keys on the left side of the phone. Up key to increase; the
Down key to decrease the volume.
Missed Calls
When an incoming call is not answered, the Missed Call log is

-25-
displayed on your screen. To view the missed call immediately, press
the left soft key to enter ‘List’, then the number or the name will be
displayed. Scroll through the desired one, press the send key to dial it.
By entering ‘Options’ in the Missed Calls list, the following
operations are available:
Call To call the number.
Detail To view the details (caller’s name, number and calling
time)
Save To store the phone number to the phonebook.
Write SMS To send SMS to the desired number.
Delete To delete the selected number from the Missed Calls
list.
Delete All To delete all the missed call numbers
Tips: In standby mode, press the e key to enter
‘
Missed
’
in
‘
Call Lists
’
to view the missed calls
Call Menu
There are many options you can use during a call if supported by your
network service.
During a call, press ‘Options’ soft key to enter the Call Menu. The
options change in different conversation circumstance.
The followings are the possible options:

-26-
Record
Record the conversation during a call. It can be recorded up to 30
seconds.
Mute
You can switch the microphone off so that the caller can’t hear you.
Hold ( current call )
You can hold the current call.
Resume held call
Connect the held call.
Hold current call/Dial new number
You can dial a new number while holding the current call.
Hold current call/ Answer new call
You can answer a new call while holding the current call.
Switch Call
Hold the current call and connect the held call
Connect the held call to a conference call
You can connect the held call to a conference call.
End the current call
Select it to end the current call.
End held call
Select it to end the held call.

-27-
End current call/ Answer new call
You can end the current call and answer the new call.
End current call/ Answer held call
You can end the current call and answer the held call.
End all calls
Select it to end all the calls.
Message
Enter the Message / SMS feature.
Note: Call Waiting, Holding and Conference Call need the support of the
network. More details about it, please consult your local service provider.

-28-
ENTERING TEXT
When you are editing messages, storing names in the phonebook,
creating your personal greeting or scheduling events in your calendar,
you will need to enter text.
You are provided with the following text input methods.
• Symbol
• English / english / ENGLISH
• BoPoMoFo (Traditional Chinese)
• Abc / abc / ABC
• 123 / Numeric
• Template
Changing Text Input Mode
When you are in the text input mode, press the key to change text
input modes or when entering text, press OK key to enter the eZi
menu to select one. You will see the text input method indicator on the
top right of the text editing display:
•Insert symbol ›eZi Symbol mode
• English / english / ENGLISH ›eZi English mode
• BoPoMoFo (Traditional Chinese) ›eZi BoPoMoFo mode
• Abc / abc / ABC ›abc mode
• 123 ›Numeric mode
-29-
Symbol
. , : ; ? ! “
‘( ) * + - / =
<> # % _ [ ] @
{}$ ~ ^ \ ` |
1 2 3 4 5 6 7 8
Note: The current input method will be the same as the one you last used
before you quit the input mode.
Insert Symbol
Symbols mode enables you to enter symbols into a text message.
To enter a symbol, you should:
1. When entering text, press the OK key to enter the ‘eZi Menu’.
2. Enter the ‘Insert Symbol’ and you will see a symbol chart as
below. Press the c or d key to select the column which
includes the symbol you want to use.
3. Press the corresponding numeric key on the bottom of the chart
to insert the desired symbol mark.
Insert Template
There are 8 daily used templates stored in the phone that allows you to
insert directly when editing the message.

-30-
Insert Phone No.
In text entering mode, press the OK soft key to enter ‘Menu/ Insert
Phone No.’. Press the c or d key to choose the number, then press
the OK soft key. The number will be inserted to the message.
eZi English Mode
This mode allows you to enter words with only one keystroke per
letter. Each key on the keypad has more than one letter – when you
press once, every letter on it may be displayed. The English mode
automatically compares your keystrokes with an internal linguistic
dictionary to determine the correct word, thus requiring far fewer
keystrokes than the ABC mode.
For example: to enter ‘hello’, press the following keystrokes: 4, 3, 5, 5,
6.
If the word that appears in the display is not the word you desire, press
the f or e key to display alternate word choices for the keys you
have typed. (For example, ‘of ’ and ‘me’ both shares keystrokes 6, 3
in the same sequence) The phone displays the most commonly used
choice first.
BoPoMoFo Mode
With the BoPoMoFo input method, you can edit text in Traditional
Chinese.
-31-
Details as follows:
Key Character The Corresponding Chinese
Pinyin
0 ㄧ ㄨ ㄩ i/ㄧ u/ㄨ ü/ㄩ
1 ㄅ ㄆ ㄇ ㄈ b/ㄅ p/ㄆ m/ㄇ f/ㄈ
2 ㄉ ㄊ ㄋ ㄌ d/ㄉ t/ㄊ n/ㄋ L/ㄌ
3 ㄍ ㄎ ㄏ g/ㄍ k/ㄎ h/ㄏ
4 ㄐ ㄑ ㄒ j/ㄐ q/ㄑ x/ㄒ
5 ㄓ ㄔ ㄕ ㄖ zh/ㄓ ch/ㄔ sh/ㄕ r/ㄖ
6 ㄗ ㄘ ㄙ z/ㄗ c/ㄘ s/ㄙ
7 ㄚ ㄛ ㄜ ㄝ a/ㄚ o/ㄛ e/ㄜ ie/ㄝ
8 ㄞ ㄟ ㄠ ㄡ ai/ㄞ ei/ㄟ ao/ㄠ ou/ㄡ
9 ㄦ ㄢ ㄣ ㄤ ㄥ
er/ㄦ an/ㄢ en/ㄣ ang/ㄤ
eng/ㄥ
* *
# #
ABC Mode
This mode allows you to enter letters by pressing the key labeled with
the required letter, once for the first letter, twice for the second letter,
and so on.
For example, press the key “2” three times in succession to display the
letter “C”, press the key “5” two times quickly to display the letter
“K”.
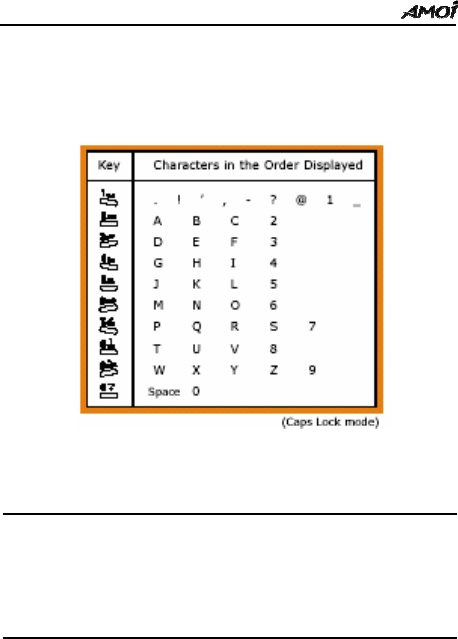
-32-
Note: When you require the same letter twice or more in succession (or a
different letter on the same key), just wait for a few seconds for the
cursor to automatically move right , and then select the next letter.
List of characters available:
123 (Numeric) Mode
123 Mode enables you to enter numbers into a text. You can enter
your desired digits by simply pressing the key on which the digit is.
Using User’s Dictionary
While entering a SMS message, you can use your own dictionary that
allows you to add a new word and then the word has a high priority in

-33-
eZi English mode.
Adding a word to the Dictionary
1. In the text entry mode, press the OK key to enter the ‘eZi Menu’.
2. Scroll to ‘Dictionary’ and press the OK soft key to enter.
3. Select “New” and input the word you want to add.
4. Press ‘Option’ and select ‘Save’, then the word is saved in your
dictionary.
Now, the word saved in your dictionary becomes the one with first
priority for the associated key press. You can check the added words
in the ‘List’ of ‘Dictionary’.
Dictionary List
1. When entering the text, press the OK soft key.
2. Scroll to the Dictionary List, and press the OK soft key.
3. All the words will be listed out, choose the desired one and press
the OK soft key.
4. Press the c or d key to choose the desired function.

-34-
PHONEBOOK (NAMES)
You can store your phone numbers and the corresponding name in
SIM card or in your phone memory. Phone memory can store up to
300 entries; every entry includes a name, three phone numbers, one
E-mail address and one remark. The numbers of the entries, which
SIM card can store, depend on the type of SIM for every entry
including a name and a number.
Tip: If you change phones, any numbers stored in your SIM card are
available with the new phone.
Storing a Phone Number in PB
1. Key in the number to be stored.
2. Press the Save soft key.
3. Select Save Local or SIM then press Left soft key.
Save Local:
(1) Input name, press Left soft key.
(2) Enter three phone numbers by sequence (after inputting the Mobile
Number, press d key to enter the Family Number, then press the
Left soft key and then the Office Number).
(3) Enter Private E-mail address, Public E-mail address, and Memo
separately (the same method as step 2).
(4) Press Left soft key and “Saved” is displayed.

-35-
Save SIM:
(1) Input name, press Left soft key.
(2) Key in the numbers, press Store soft key.
(3) Press Left soft key and “Saved” is displayed.
Tip: In standby mode, press the d key to enter PB Menu.
Smart Dial
This Option allows you to find an entry quickly in your PB.
1. When Smart Dial is highlighted, press the left soft key to enter.
2. Input the corresponding numeric key of the desired name.
3. Scroll to your desired entry and press the Left soft key.
4. Press the Send key to dial it or press Select soft key to enter “Select
operation” to display the following Options:
Edit: Edit the details of the selected entry.
Duplicate: Allow you to copy the selected entry from the phone
memory to the SIM memory and vice versa.
Delete: Press the Left key and phone will display ‘Delete? OK or
Back’. Select "OK" to delete this entry. Select "Back" to
cancel this operation.
Call: Press the OK key to dial this number.
Write SMS: Refer to Messages/Write.
Send number: Send all the numbers in this entry to the appointed
number.

-36-
View
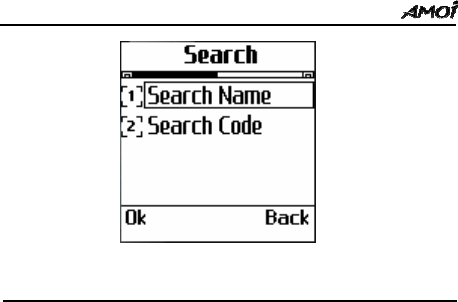
This Option allows you to find a Phonebook entry by searching from
the list of all entries sorted by name.
(1) Press c or d key to view the entries.
(2) If the entry contains more than one item, press the f or e key to
view the items. The cursor is right to the current item. Press the OK
soft key, all the items will be listed out, press the c or d to view.
(2) Press the Select soft key, you’ll have the following operations:
Edit: Edit all the items of the current entry.
Search: Search a new entry from the Phonebook.
Duplicate: Allows you to copy the selected entry from the phone
memory to the SIM memory and vice versa.
Delete: Delete the selected entry.
Call: Dial this number.
Write SMS: Refer to Messages/Write.
Send number: Send all the numbers in this entry to the appointed
number.
Search Name
Press the corresponding alphanumeric key(s) of the entry and you can
also do the operations in the Option menu.
New
When new contact is highlighted, press Left soft key. Choose the Save
Local or SIM. (Referring to Storing a phone number in PB)

-37-
Number Group
The phone allows you to group the numbers stored in the Phone. (The
numbers stored in the SIM card cannot be grouped.) It allows you to
set 6 groups, such as Family, Friend, VIP and so on. When the number
in the group dialed, the phone rings and lights in the way you’ve set.
Enter one desired group, you’ll have the following options:
Group List: List all the members stored in the group.
Add from Ph: Add the number chosen from the phonebook to the
desired group.
Ring Tone Alert: Set the ring tone for the group.
Group Picture: Set the image for the group.
Change Name: Allows you to rename the group.
PhBook Mana
g
er
Duplicate (Take “Local to SIM” for example)
(1) Duplicate One: Press c or d to view the phone number one by
one and press left soft key to copy the desired one.
(2) Duplicate Range: Input the beginning number and the last number,
then press Left soft key to copy these entries you want to SIM
card. (view the following picture)
(3) Duplicate All: Copy all the numbers stored in phone to SIM card.
Note: If the entry already exists in target PB, the entry will not be copied.
If the space of target PB is not enough for the copy, only the front phone
numbers will be copied until the target PB is full.
If the name length of target PB is less than that of original PB, the

-38-
exceeded part will be lost.
Delete
Just same as Copy, you can delete One, All and the specified Range.
Fixed Number
If the network service provider and your SIM card support the
function, you can limit the outgoing telephone number. If this function
is set On, your mobile phone can only dial the number in the fixed
number list. If you dial the other number (except the urgent number),
the phone displays ‘Forbidden Number’. You need to input the PIN2
code to set the function for the first time.
Memory
Check the total capacity and the amount of used entries of PB in SIM
card and Local.
Own Number
Store the SIM card number of local phone for reference.
Info
Country / Area Codes
Select this function, press e or f to view the country/area code;
Press left soft key to search by name or by code:
-39-
Speed Dial
Enter the number you desire for speed dial, then press the left soft key
to save the option. In standby mode, hold the corresponding numeric
key, the number can be dialed quickly and directly.

-40-
USING MENUS
The phone offers a range of functions that allow you to tailor the
phone to your needs. These functions are arranged in menus and
submenus.
Accessing a menu function
By scrolling
1. In Standby mode, press ‘Menu’ soft key.
2. Scroll with c or d through the menus and press OK to enter the
one you desire.
3. If the menu contains submenus, select the one you want, for
example Call settings.
4. If the selected submenu contains further submenus, repeat step 3.
5. Press the OK soft key to confirm the desired setting.
By shortcut
The menus, submenus and setting options are numbered and can be
accessed directly by using their corresponding shortcut keys.
1. In Standby mode, press the ‘Menu’ soft key.
2. Within three seconds, key in the corresponding number of the menu
function you want to access.
Example: To set the Vibrator On, enter the ‘Menu’, and key in 3, 2, 2
in succession.
-41-
Notes: The numbers assigned to each menu function are indicated on the
list of the following pages. They may not match the menu number on the
phone. It depends on the services supported by the SIM card.
List of Menu Functions
1. Messages
1-1: SMS
1-2: MMS
1-3: Voice Mail
1-4: Broadcast
1-1-1: Inbox
1-1-2: Write SMS
1-1-3: Outbox
1-1-4: Status Report
1-1-5: Delete 1-1-5-1: Inbox
1-1-5-2: Outbox
1-1-5-3: Status Report
1-2-1: Inbox
1-2-2: New
1-2-3: Outbox
1-2-4: Drafts
1-2-5: Sent
1-2-6: Templates
1-3-1: Call
1-3-2: Number
1-4-1: Read
1-4-2: Auto Display
1-4-3: Channel List
1-4-3-1:All
1-4-3-2:None
1-4-3-3:List
-42-
1-5: Memory
1-6:Settings
2. Data Service
2-1: Browser
2-2: PC Sync
2-3: Java
2-4: Settings
1-5-1: SMS
1-5-2: MMS
1-6-1: SMS
1-
6
-2
:
MM
S
1-6-1-1: Auto Display
1-6-1-2: SMS Center
1-6-1-3: Status Report
1-6-1-4: SMS Filter
1-6-1-5: Models
1-6-2-1: Connection
1-6-2-2: Reception
1-6-2-3: Adverts
1-6-2-4: Save Sent
2-1-1: Homepage
2-1-2: Bookmarks
2-1-3: Go to URL
2-4-1: Browser
2-4-2: Java
2-4-1-1: Connection
2-4-1-2: Clear Cache
2-4-1-3: Reset
2-4-2-1: CMCC GPRS
2-4-2-2: New
2-4-2-3: From List

-43-
3. Personality
3-1: Music Select
3-2-1: Tone
3-2: Alert Type 3-2-2: Vibrator
3-2-3: Tone & Vibrator
3-2-4: No Notify
3-3: Ring Volume
3-4: Standby Interface
3-5: Power On/Off Display
3-1-1: Incoming Tone
3-1-2: Message Tone
3-1-3: Alarm Clock Tone
3-1-4: Calendar Tone
3-1-5: Power on Tone
3-1-6: Other RingSet
3-4-1: Main Screen
3-4-2: Sub Screen
3-4-1-1: Text
3-4-1-2: Picture
3-4-1-3: Animations
3-4-1-4: Multimedia
3-4-1-5: Network
3-4-2-1: Digital Clock
3-4-2-2: Simulant Clock
3-4-2-3: Picture
3-5-1: Power On
3-5-2: Power Off
3-5-1-1: Animations
3-5-1-2: Text
3-5-2-1: Animations
3-5-2-2: Text
-44-
4. Settings
4-1: Time
4-2-1: Auto On/Off
4-2: Mobile 4-2-2: Backlight Level
4-2-3: Language
4-2-4: Contrast
4-2-5: Reset All
4-3-1-1: Not Reachable
4-3-1-2: No Reply
4-3-1: Divert 4-3-1-3: Busy
4-3-1-4: All
4-3: Call 4-3-1-5: Cancel All
4-3-2: Incoming Filter
4-3-3: Answer Mode
4-3-4: Send Number
4-3-5: Call Waiting
4-4-1: Mode
4-4: Network 4-4-2: Search
4-4-3: Sequence
4-4-4: Band
5. Toolbox
5-1: Alarm
5-2: Record
5-3: World Time
5-4: Calculator

-45-
5-4-1: Length
5-5: Unit Conversion 5-4-2: Surface
5-4-3: Volume
5-4-4: Weight
6. Private info
6-1: Lovey Dial
6-2: Calls
6-1-5: Total
6-1-6: Charge Info 6-1-6-1: Total Charge
6-1-6-2: Max Charge
6-1-6-3: Unit Price
6-2: Security Info
6-3: Calendar
6-1-1: Missed
6-1-2: Incoming
6-1-3: Outgoing
6-1-4: Last
6
1
5T l
6-2-1: Check PIN
6-2-2: SIM Lock
6-2-3: Access Code
6-2-4: PWD Manager
6-2-5: Bar Calls
6-2-4-1: PCK Change
6-2-4-2: PIN Change
6-2-4-3:PIN2 Change
6-2-5-1: All Out
6-2-5-2: Out Intl
6-2-5-3: Out Intl Roam
6-2-5-4: All In
6-2-5-5: In When Roam
6-2-5-6: Cancel All

-46-
7. Entertainment
7-1-1: Eat Bean
7-1: Games 7-1-2: Snake
7-1-3: Tetris
7-1-4: Shrew Mouse
8. Multimedia
8-1: Voice Memo
8-2: Camera
8-3: PhBook
8-4: Download Resource
8-5: User Custom1
8-6: User Custom2
8-7: View
9. Camera
9-1: Take Photo
9-2: Video Recording
9-3: Photo Browse
9-4: Play Video
9-5: Photo Base
10. STK
Note: STK is a function that must be supported by the SIM card, so
please ask the provider for more details.
8-5-1: Image
8-5-2: Audio

-47-
SMS
The SMS (Short Messaging Service) function is network service and
may not be supported by your network. You must obtain the number
of the SMS center from your service provider. Mostly it is
automatically available from your SIM card.
Two message boxes are available: Personal SMS and Broadcasting
SMS.
Personal SMS: It is the message for mobile users to transmit personal
information.
Broadcasting SMS: If you select this option, you will receive public
information from Network Operators such as
Weather Broadcasting and so on.
SMS Indicator: When you receive a new message, an icon
appears on the screen. If the message memory is full,
continues flashing and you cannot receive any
new messages. Then use the ‘Delete’ menu to delete
obsolete messages.
Note: In standby mode, you can simply press the
f
key to enter the menu
of ‘Messages’ .

-48-
Inbox
Inbox stores the messages that you have received. If the number is
stored in the phonebook, the name displays; if not, only the number
displays. The one with ‘*’ is the new message. Enter the Inbox:
①.Press or key to choose the desired message.
②.Press Left soft key to view details of message (receiving time,
sender’s number and content of the message).
Press the or key to sroll to different lines, the f or e key to
move to the last or next message.
③.Press Left soft key to enter the Options, you can operate as follows:
Reply: Reply to the sender. You can write a piece of new message and
then choose ‘Send’, ‘Save & Send’, ‘Save’ or ‘Multiple
Send’.
Forward: Send the received message to others. You can edit the
message and then choose ‘Send’, ‘Save& Send’, ‘Save’ or
‘Multiple Send’.
Extract Number: You can extract numbers from this message. The
number extracted is allowed to be stored and
dialed.
Store to SIM/ Phone: You can store the message to the SIM card or
phone.
Delete: Delete this message.

-49-
Write SMS
The text message can be made up to 160 letters. Write down your own
words or press the OK soft key to enter the eZi Menu, then select
‘Insert Template’, choose the desired one to add to your message.
Press the left soft key:
Send: Send the message to the desired number.
Save & Send: Allows you to save and send the message. Even if the
sending fails, the message can be stored in the Outbox.
Save: Allows you to save the message so that it can be sent later.
Multiple Send: Allows you to send the message to up to 5 receivers.
After choosing one of the options above, enter the number to which
the message is to be sent, and finally press OK key to send the
message. You can also press left soft key to ‘Search’ phone numbers
from your phonebook.
To… Then…
Send the message to this number Press OK soft key
Input a new number Hold Delete soft key to erase
then input a new number
Search a number from PB Press the Left soft key to enter
the phonebook, then select the
desired one

-50-
Outbox
Outbox stores the messages that you have already sent or will send.
Messages with ‘*’ are unsent messages. Enter the Outbox:
①. Press or key to move to different line, the f or e key to the
last and next message.
②.Press Left soft key to view details of message.
③.Press Left soft key and you can operate as follows:
Edit: You can write a piece of new message or edit the message and
then choose ‘Send’, ‘Save & Send’, ‘Save’ or ‘Multiple
Send’.
Extract Number: You can extract phone number from this
message.
Store to SIM / Phone: You can store this message to your SIM
card or phone.
Delete: Delete this message.
Status Report
You can set this function ‘On’ to require the SMS center to inform
whether your message has been sent or not.
Delete
You can delete messages from Inbox, Outbox or the Status Report.
Note: The messages deleted cannot be gotten back.

-51-
MMS
MMS is a current technology of message development with highest
standard. Its feature contains: supporting multimedia function,
supporting sending kinds of message (letters, pictures, voice and other
multimedia message). It makes multimedia sending as phone-to-phone
and phone terminal-to-network possible. MMS also needs the support
of your SIM card and service provider. Contact with your network
service for more details.
The following icons are possible to display when you are using the
MMS:
Icon Description
New Message
The message that fail to be received
The message that fail to be sent
New message to be read
Message that has been read
Forwarded Message
Replied Message
File with Image

-52-
MIDI audio file
AMR audio file
Fr audio file
Inbox
When a new MMS is received, the phone rings or vibrates (if you
have set for that), a new MMS icon displays. The message will be
stored in the Inbox automatically.
① Press or key to choose the desired message.
② Press OK soft key to view details of message.
③ Press ‘Options’ left soft key and you can have the following
options:
View/Receive: View the MMS or receive the missed MMS.
Delete: Delete this message.
Details: View the title of the message, the sender, the time and the
size.
New
You can create a new message by selecting ‘New’ or ‘Templates’
The following is the process to edit and send a MM:
1. After entering ‘MMS’, scroll to ‘New’ and press OK to enter the
MMS editing display. You’ll have four options as follows:
Add Text: Enter the text. Press left soft key to enter, the cursor
glints in the editing frame, enter the text directly. Press
key to change the text input mode; press OK soft

-53-
key to enter the eZi input mode.
Add Image: Press left soft key to select the stored pictures;
Add Sound: Press left soft key to select the stored music or voice
memo;
Add Slide: Press left soft key to add one slide. It allows you to add
up to 9 slides.
2.When you finish editing, press Menu soft key, you’ll have the
following possible options:
Send: Select ‘Send’ to enter the Number editing interface. Press the
Left soft key to select the number or E-mail address from
your Phonebook, or input a new number or E-mail address.
Only when the cursor is in the editing frame can you make
the editing. The phone allows you to send the message to
multi receivers, use the blank mark to separate the receivers.
Press the right soft key to erase the input.
Preview: Preview the edited MMS.
Save: Save the MMS to the Draftbox or to the Template.
Slide Duration: Allows you to set the duration for the slide.
Add Slide: Allows you to add the Slide.
Slide Format: Allows you to set the format for the slide.
Outbox
①. Press or key to choose the desired message.
②. Press ‘Option’ soft key and you can operate as follows:
Send: Send the MMS.
Delete: Delete the MMS.

-54-
Details: View the details of the MMS (name, number, time, etc).
Draftbox
①. Press or key to choose the desired message.
②. Press ‘Option’ soft key and the following options are available:
Edit: Edit the MMS.
Delete: Delete the MMS.
Sent
①. Press or key to choose the desired message.
②. Press ‘Option’ soft key and you can operate as follows:
View: View the MMS.
Delete: Delete the MMS.
Details: View the details of the multimedia message (name,
number, time, etc).
Templates
① Press the Option soft key, you are allowed to do the ‘Edit’ &
‘Delete’ options.
② Press or key to choose the Template you want to read. When
you’ve finished editting, you can do the above mentioned options.
Voice Mail
This menu provides you a quick way to access your voice mail (if

-55-
provided by your network):
Call: Press the ‘OK’ soft key to listen to your messages. If there is no
mailbox number, enter the number first.
Number: Allows you to input or modify the mailbox number obtained
from your service provider.
Broadcast
You can receive broadcast messages with various contents via this
network service, such as weather or traffic.
Read: You can view the up to date broadcast message.
Auto display: If you set this function to be ‘On’, messages will be
displayed immediately when they are received.
Channel List: Set the channel list for receiving broadcast message:
All: Allows you to receive all the broadcast messages.
None: No broadcast messages will be received.
List: Only the message sent from the list can be received. You are
allowed to add or delete the channel to the list.
Memory
This menu allows you to view how many messages are currently
stored in your SIM card and Phone. The phone can store up to 50 short
messages; the numbers of message that SIM card can store depend on
the type of the card.

-56-
Settings
Use the function to set the special features for the SMS & MMS.
SMS
Auto display: Select this function and set ‘On’. When you receive a
new message, it will display automatically. Press the
left soft key to read it directly, the right soft key to
close the alert window. You can select ‘Off ’to cancel
this function.
SMS Center: Allows you to store or change the number of your SMS
center while sending messages. You can obtain this
number from your service provider.
Status Report: You can select ‘On’ to require the SMS center to
inform whether your message has been sent or not.
SMS Filter: By setting this function, you’re able to avoid messages
from the numbers you specify.
Models: There are several message models stored to be edited. It
allows you to send the message conveniently and quickly
whenever you want.
MMS
Connection
By setting ‘Connection’, there are 9 servers at most to be stored.
The three options you’ll have by entering ‘Connection’ are as follows:
MMS GPRS: To enable the server, choose ‘Activate’;
To modify the settings of the server, choose ‘Modify’;

-57-
To delete the server, choose ‘Delete’.
New: It enables you to not only add new servers to the Connection
list, but also to select some certain server to execute the
re-settings of the parameters.
List: Add new servers from the list.
Reception
It allows you to set the receiving mode for your MMS. Two modes are
provided for you to choose: Auto and Manual.
Adverts
You can choose whether or not to receive the adverts.
Save Sent
To set whether or not to store the messages which have been sent.

-58-
DATA SERVICE
Browser
WAP is a platform for combining wireless communication with
Internet. WAP allows you to access the Internet and also provides you
with some E-commerce applications by phone.
Note: To connect WA P net, your network must provide the service and
you should perform the dredging operation described in detail in
‘Settings / Browser’.
Homepage
By selecting this item, your mobile phone will connect the homepage
that you’ve preset directly.
Bookmarks
You can store the commonly used websites in your favorite and entitle
them. Choose one to connect to it automatically.
Go To URL
Enter a URL and press the OK key to connect to the page. When your
mobile phone cannot connect to the URL, it will connect to the
homepage automatically.
-59-
PC Sync
With this function, your PC can make a data communication with your
phone through ‘PC Sync Program’.
For more details, please refer to the Help menu of ‘PC Sync’.
Java
MIDlet (Mobile Information Device let) Download
You can download the midlet through the WAP OTA download. Before
downloading, you must check if the WAP setting is correct. Select ‘Data
Service’ from the Main Menu,and select “Settings / Browser /
Connection”,check the HomePage, IP Adrress, APN etc.
If the connection setting is all right,you can select ‘Browser’ from
‘Data Service’ menu, and select “Go to URL” or select ‘Homepage’ to
enter the corresponding homepage.
Press ▲ and ▼ to choose one midlet to download, and it will prompt:
Enter URL
http://ftp.esmertec.co
m/midlets/agere/test.
wml
Ok ▲▼ Cancel
Information!
1.MIDPman
2.Esmertec Demo
3.Sun UI Demo
Ok ▲▼ Cancel
-60-
N
ame: UIDemo
Version:1.0
Vendor:Sun
Microsystems
Size:20k
get ▲▼ Cancel
downloading
Cancel ▲▼ back
Choose “get”,it will start downloading the Jad and Jar file to the
phone.
Working
Cancel ▲▼ back
After downloading the files,it will start installing it.
After downloading and installing, you can run the mildet:
-61-
UIDemo saved to
/usr/java/
Do you want to launch the
application?
Yes ▲▼ no
MIDlet Launch
Run the Java application.
MIDlet Info
Show the information about MIDlet-Name, MIDlet-Version,
MIDlet-Jar-URL,MIDlet-Vendor, MIDlet-Jar-Size etc.
MIDlet Delete
Delete the Java application from phone.
Menu
1. launch
2. .info
3. delete
select ▲▼ cancel
JAM
1. UIDEMO
menu ▲▼ Exit

-62-
Settings
Browser
Press the OK soft key to enter the Browser Submenu, you’ll have the
following options:
1. Connection:
Scroll with ▲ or ▼ to choose ‘WAP GPRS’, ‘New’ or ‘From List’.
You can perform the following operations in ‘WAP GPRS’:
● Activate
● Modify
● Delete
Note: To connect WAP net, you need the network suppport and you
should apply for the service of surfing Internet. For setting details, please
see ‘Setiings / Browser’.
Select ‘Modify’, you can make some modifications, take WAP GPRS
for example:
WAP GPRS: You can change WAP GRPS to your favorite name.
Bearer: Set the types of data service, choose from GPRS and Data
Service.
Homepage: You can set a homepage, such as http://wap.organge.com.
DNS IP Address: Set IP address linking to homepage. For example:
172.016.126.070
APN: Input AP name, such as ORANGEWAP.COM.DO.
User ID: Set the user name for the WAP.
Password: Set password for WAP.
-63-
Security: You can set it as ‘On’ or set it as ‘Off’.
Save: Save the operation.
Tips: Press and hold key @ to visit the default homepage directly.
2. Clear Cache
Clear the Cache.
3. Reset
Reset all of the settings.
Shortcut
In any WAP window, press 1-9 key to link directly to the
corresponding websites in your bookmark; press and hold key 0 to
enter the ‘Alert Inbox’; hold * key to exit the browser. When the text
input is needed, press the key to enter the menu of eZi input
mode.

-64-
PERSONALITY
Music select
Enter the Music Select. The phone allows you to set the ring tone for
the incoming call, message, alarm clock, and so on. You can select the
tone from Immobile Data or from the Multimedia.
Alert Type
It allows you to set the alert type for a new incoming call & message.
There are four types provided for you: Tone, Vibrator, Tone &
Vibrator or None. Scroll to the option you want, press OK soft key to
confirm.
Note: In standby mode, hold the * key to switch among the alert types.
Ring Volume
You can adjust the volume of the ring tone. Press f key to increase
volume and e key to decrease .
Standby Interface
By using this menu, you can customize various settings of the Main
Screen (Internal Screen) and the Sub Screen (External Screen).

-65-
Main Screen (Internal Screen)
The phone offers you four types for the standby mode of the Main
Screen.
Picture: Set the picture stored in the phone as the standby interface.
Animations: Set the selected animation as the standby interface.
Text: Displays your own greetings when the phone is being powered
on. The greeting can be made up to 10 characters.
Multimedia: Choose the desired standby interface from the
Multimedia.
Network: Choose to show or hide the network service name in the
standby interface.
Sub Screen (External Screen)
The phone offers you three types for the standby interface of the Sub
Screen.
Digital Clock: Press OK to save the digital clock for the sub screen
interface.
Simulant Clock: There’re three types of simulant clocks for you to
choose. Scroll the cursor to one of the types and
press OK to confirm.
Picture: There’re three styles of pictures for you to choose. Scroll the
cursor to one of the styles and press OK to confirm.
Power On/Off Display
It allows you to set the animation or text as the power-on/ off interface.
The text can be made up to 19 characters.
-66-
SETTINGS
Many different features of your phone can be customized for your
preference.
Time
This function allows you to adjust the current time and date displayed
in standby screen.
The following functions are available.
Time: Make an adjustment of the current time.
Time Format: Choose between 24 hours mode and 12 hours mode.
Date: Make an adjustment to the current date.
Date Format: Select the date format:
D/M/Y
M/D/Y
Y/M/D
Mobile
Auto On / Off
Set the time when you want your phone to be powered on/ off. Enable
the function, your phone will power on/ off automatically at the preset
time.
Backlight level
There are three levels to be chosen: High Backlight, Middle Backlight,
Low Backlight.

-67-
Language
Traditional Chinese: All the menus and information is displayed
in Traditional Chinese.
English: All the menus and information to be displayed in
English.
Enter the menu, press the f or e key to switch between the two
languages, press the left soft key to confirm your setting.
Note: Press the *,9,9,# in succession to switch the two language in
standby mode.
Contrast
It allows you to adjust the contrast of the Main LCD and Sub LCD.
Press the f or e key to adjust the level, the OK soft key to save your
option.
Setting SevClr
Set the function On, when there is the incoming call, message or
charging battery, the phone will give light in the preset way. Seven
colors’ light are provided for you.
Reset All
You can reset some settings back to factory set. You need to enter the
PWD number. The original PWD number is 0000.

-68-
Call
Enter the Call setting function, press the OK soft key, you’ll have the
following operations:
Divert
This network service enables the incoming calls to be transferred to
the number that you specify. For example: You may hope to transfer
your business calls to a colleague when you are on holiday. 5 options
are available:
Not reachable: Calls will be transferred to the appointed number when
you are not in an area covered by your service
network or when the phone is switched off.
No reply: Calls will be transferred if you do not answer the call.
Busy: Calls will be transferred when your line is busy or the call is
rejected.
All: All incoming calls will be transferred.
Cancel All: All Call Transfer functions are cancelled.
Incoming Filter
With this operation, you can put phone numbers into ‘Reject List’ so
that they will never get through your phone; and put numbers into
‘Accept List’, only the number in the Accept List can get through.
Reject List: It allows you to enter 10 rejected numbers. The option
allows you to view all the numbers recorded in the list.
Reject Number: Press numeric keys to enter the numbers you want to

-69-
reject, or search the number from the phonebook
memory.
Accept List: The same as the Reject List.
Accept Number: The same as the Reject Number.
Note: Only when your SIM card is subscribed to the incoming number
displayed, can you use the function.
Answer Mode
There are three methods to answer a call.
Call Key: You can answer the call only by pressing the Call key.
Open Mobile: Open the phone to answer the call.
Auto: If you insert a Car Kit, the phone can answer the call
automatically 3 seconds later. Before the Auto answer, you can
also press the Call key to answer it.
Send Number
This function must be supported by the network.
Set by Net: Your phone number will be hidden or displayed
depending on the network when making a call
On: Your phone number will be displayed to receiver.
Off: Your phone number will be hidden and unknown to receiver.
Note: The function needs the support of the network service.
Call Waiting
The phone supports the function of ‘Call Waiting’ and ‘Call Holding’

-70-
of GSM net. If you select this function, the network will tell you there
is a new incoming call during another call. You can answer the new
call by holding the current call.
On: Set the function On, when there is a new incoming call, the
network alerts you that there is a call incoming. You can hold the
current call, and answer the new call.
Off: Select ‘Off’ to invalidate the Call Waiting function.
Status: Select this option to see the status of this network function:
‘On’ or ‘Off’.
Note: For more details about the Send Number & Call Waiting, please
contact with your local service provider.
Network
When you use the phone, the phone will automatically select the
Internet service. When the phone is out of the service area or in abroad,
you can select the appropriate Internet manually.
Mode
Switch between these two modes: Auto & Manual.
Search
To select this item, the phone displays " Searching …..". After you get
it, the GSM will auto display the found networks. If there are more

-71-
than one available network, you can use the ▲ or ▼ to select.
Networks marked with * are forbidden to use.
Sequence
This item allows you to list the networks you can use when your GSM
is in roaming. If the listed network can be used, your phone will select
the network from the prior list. Three operations are available.
Move: To press the ▲ or ▼ key to shift it to your desired place.
New: You can add new networks. Input the country code and the
network code then press OK soft key.
Delete: You can cancel the chosen network.
Band
Press the ▲ or ▼ key to view choose the desired band, press the OK
soft key to confirm.
There are three bands are provided: GSM1900, GSM900/1800 and
Automatic. You can select one of them.

-72-
TOOLBOX
Alarm
There are three alarm clocks to be used. For every alarm, you can
make the following operations:
1. On/ Off: Press the Select soft key repeatedly to switch between
the On & Off. An ‘√’ indication displays when you set the
alarm activated.
2. Time: Set the time when you want your phone to alarm.
3. Mode: Set the mode for your alarm.
① Everyday: The alarm bell rings at the set time every day.
② Workday: The alarm bell rings at the set time from Monday to
Friday.
③ Personal: You can choose one or several days of one week for
the alarm bell to ring at the set time.
Note: When the alarm rings at the set time, press any key to stop it; if not,
it continues to ring for one minute.
Record
With your phone, you can record up to 5 voice memos (including
recording conversation during a call). And each memo can be
recorded up to 30 seconds in length. Make the record in this menu
facility. After recording, enter the menu of Multimedia to view the
property of the memo. It also allows you to send or delete the menu in
the Multimedia menu facility.

-73-
Notes: 1. Recording voice conversations during a call is illegal in some
countries. Make sure the other part on the line has stated his
consent to being recorded.
2. Hold down @ key to record a conversation during a call.
Record
1. Scroll to ‘Record’, press OK soft key.
2. Record the voice memo by speaking into the microphone.
Note: When recording, press ‘Pause’ soft key to have a pause then
‘Record’ key to continue. A timer displays to show you the elapsed time.
When recording time expires, the phone will automatically save the
memo already recorded during that time.
3. When recording is completed, press ‘End’ soft key.
World Time
The display shows:
• City name
• Current date and time according to the time format setting (12/24
Hours)
To… Then…
Select the time zone Press e or f
Select the city in the Press c or d
same time zone.
Make some settings (Set Press OK soft key and

-74-
as local, Enable DS, scroll to desired one
Disable DS)
Calculator
By this function, you can use the phone as a calculator. The calculator
provides the basic arithmetic functions: addition, subtraction,
multiplication and division.
Performing the Calculation
1. Use the numeric key to enter the first desired number.
2. Press c for plus sign ‘+’, d for subtraction sign ‘-’, e for
multiplication sign ‘x’ and f for division sign ‘/’;
3. Enter the second number.
4. To calculate the result, press ‘Equal’ to have the result.
5. Repeat steps 1 to 4 as many times as needed.
Notes: To erase any mistakes and clear the display, press the ‘Clear’
soft key. Press the # key to enter a decimal point and the * key to
change the sign of a number to a negative (-).
Unit Conversion
This menu allows you to convert the original unit to the desired one.
To use the Unit Conversion, do as follows:

-75-
1. Press the c or d key to scroll to the desired category; Length,
Surface, Volume and Weight.
2. Press OK or Left soft key to enter one of the categories you
desire and you can see two columns. The upper unit column is
comprised of the current units, while the lower unit column is
comprised of the units which you want to convert to.
3. Put the cursor to the upper column, press e or f key to move to
the current unit. Move the cursor to the lower column by
pressing d and press e or f key to choose one of the units that
you want the current value to be converted to.
4. Enter the current numerical value below the upper column and
the converted value will be automatically displayed below the
lower unit column.
To reset the Unit Conversion and do new conversion, press the ‘Reset’
soft key.

-76-
PRIVATE INFO
This menu allows you to store your personal information and activate
the password to keep the phone from being used by unauthorized
persons.
Lovey Dial
Enter the menu. Key in the desired number, and press OK or Left soft
key to store it. In standby mode, the number can be dialed by pressing
the OK soft key. Enter the function again to change the number.
Calls
This menu allows you to view the timers for calls made and received.
The following timers are available:
Missed Calls
Incoming Calls
Outgoing Calls
Last: You can view the duration of your last call.
Total: You can view the duration of your total calls (incoming and
outgoing).
Call charge: It allows you to view the charge for your call. It allows
you to set a Unit Price and Max Charge for you calls,
and you can also view the Total Charge for the calls. To
set the call charge, you need to input the PIN2 code.

-77-
Security info
Check PIN:
Press the "OK" left soft key to enter this function.
1. To select "On".
2. Input the PIN code and enable the function of PIN check by
pressing the left soft key.
Note: If you have enabled the function of PIN check, you’ll have to
input the PIN code each time you switch on your mobile phone. If you
input the wrong number for three times in succession, the SIM card will
be locked. In this case, you’ll need to enter the PUK code to unlock the
SIM card. More details, please contact with your service provider.
3. Select “Off” to cancel this function.
SIM lock
If you activate this function by choosing ‘On’, only the current SIM
card is valid. When changing to another SIM card, phone code will be
required.
Access Code
Press OK or left soft key to enter this function. You can set access
code for ‘Call lists’, ‘SMS PWD’, ‘Phonebook’, ‘Photo’ or ‘All’.
1. Enter the one you would like to set its access code and select "On".
2. Input the PWD and activate the function of Access Code by
pressing left soft key.

-78-
3. Select “Off” to cancel this function.
PWD Management
PCK Change:
1. Press OK or left soft key and input the old PCK, then press left soft
key.
2. Input the new password and press left soft key.
3. Re-input the new phone password and press left soft key.
4. "Phone Password Changed" displays.
PIN Change:
1. Press OK soft key to enter ‘PIN Change’.
2. Input the old PIN code and press left soft key.
3. Input the new PIN code (four to eight digits) and press left soft key.
4. Re-input the new PIN code and press left soft key.
5. LCD indicates "PIN Changed".
Note: Only when the PIN check is set on can you alter the PIN code.
PIN2 Change:
The process is the same as "PIN1 Changed"
Note: PIN code is provided with the SIM card, which is used for some
special service such as "Call Charge" function etc. If you want to know
whether your SIM card can support these functions, please contact the
network service supplier.

-79-
Bar calls
The Call Barring function helps you to restrict the incoming and
outgoing calls. But this service may not be available in all networks.
The following operations are available:
All Out: To select this option, the phone will be restricted to make
any calls (except the urgent calls).
Out Intl: To select this option, the phone will be restricted to make
any international calls.
Out Intl Roam: To select this item, the phone will be restricted to
make any international calls except to your home
country when roaming (out of the network service
area).
All In: To select this item, it will restrict all incoming calls.
In When Roam: To select this item, it will restrict all incoming
calls when roaming.
Cancel All: To select this item, the phone will allow making and
answering all calls.
Note: You need to input the Net PWD to set above functions.
Calendar
When you enter the menu, a calendar displays with the current date
highlighted.
Scrolling the calendar:
1. You can move the underscore to Year, Month and Day fields by
pressing e or f.

-80-
2. When the desired field is highlighted, press the c or d to move up
or down the Date.
You can also enter the desired date by using the numeric key.
Enter the Log Manager Menu
Highlight a desired date in calendar, press left soft key. The following
operations are available:
Set
To create a new log, you should:
(1) Select one type of schedule:
• Memo: Make a note of general schedule, i.e. appointments or
meetings. It allows you to set the title and reminder date for
your memo.
• Call: Schedule a call.
• Anniversary: Select to make notes for anniversaries.
(2) Enter a subject of your schedule up to 40 characters and press
the Select soft key. If you are scheduling a call, enter the phone
number.
(3) Set the reminder time when you would like your phone to inform
you of the scheduled event.
Note: At the specified time on the scheduled day, the alarm will ring
and the note will display. If you schedule a call, the phone will dial it
automatically.
-81-
For example: Make the settings as the above diagrams show, the
phone will reminds you that Jan 18 is Ran’s birthday at 7:00 on Jan.
17.
View
Press the View soft key to view the schedules you’ve set, press ▲or▼
to scroll through these notes.
Delete
Delete this note.
z Delete One by One
z Delete All
z Expired
Set
1 Memo
2 Call
3 Anniversary
Ok ▲▼ Back
Reminder time
24 hour mode
07:00
Ok ▲▼ Back
abc @ Anniver
Jan. 18-Ran’s
birthday
Ok ▲▼ Back
Time before
1 On Time
2. An Hour
3 One Day
Select ▲▼ Back

-82-
ENTERTAINMENT
Games
Eat Bean
Eat Bean: A big mouth eating beans.
Put the cursor to ‘Eat Bean’, press OK left soft key to enter the game,
then choose the options as follows:
Start: Start playing the game
Load Game
Help: Provides you with some instructions on playing the game.
Beep: Select ‘On’ to have beep during playing, and ‘Off’ the cancel
the beep.
Snake
The directional keys control the direction of snake moving. The snake
will lengthen when you eat. The more you can eat without bumping
the wall and itself, the higher score you’ll get.
The following options are available:
Start: Begin to play the game.
Settings: Allows you to set the level for the game. 3 levels are
provided: low, middle and high level.
Beep: Select ‘On’ to have beep during playing, and ‘Off’ to cancel the
beep.
Scores: The best five scores will be recorded.
Help: Provides you with some instructions on playing the game.

-83-
Tetris
Start: Start playing the game.
Level: Set the level for the speed. Four levels are provided: Very Easy,
Easy, Norma & Hard.
Scores: The best five scores will be recorded.
Beep: Select ‘On’ to have beep during playing, and ‘Off’ to cancel the
beep.
Help: Provides you with some instructions on playing the game.
Shrew Mouse
New Game: Begin the new game.
Settings: Set the play time and beep for the game.
Scores: Make a record of the best five players.
Game Rule: Illustrate the rules of the game.

-84-
MULTIMEDIA
The Multimedia is a menu that helps to manage the mobile phone
resources.
Voice Memo
Enter
Press OK soft key or left soft key to enter the Voice Memo. All the
voice memos list out. Choose one, the following options are available:
Play: Play the voice memo.
Copy: Copy the voice memo to “User Custom 1” or “User Custom
2”.
Move: Move the voice memo to “User Custom 1” or “User Custom
2”.
Rename: Rename the voice memo.
Property: View the title, size and recording time of the voice
memo.
Delete: Delete the voice memo.
Send as MMS: Edit the voice memo as MMS.
Property
View total files and file size of all the voice memos.
Delete
Delete all the voice memos.

-85-
Camera
The taken pictures are stored here.
Press the Options soft key, 3 options are available:
Enter
By selecting the Enter, all the taken pictures list out. Scroll to the
desired one and press the Options soft key, you’ll have the following
options:
Preview: View the photo.
Copy: Copy the photo to “User Custom1” or “User Custom2”.
Move: Move the photo to “User Custom1” or “User Custom2”.
Rename: Rename the photo.
Property: View the title, size and taking time of the photo.
Delete: Delete the photo.
Send as MMS: Edit the photo as MMS. See the menu of
“Message-MMS”.
Set as Standby Picture: Set the selected photo as the Standby
picture.
Property
View total files and file size of all the photos.
Delete
Delete all the photos.

-86-
PhBook
The operations are the same as Camera and Recorder.
Download Resource
The downloaded images and audios are stored here. They are allowed
to be set as the standby picture and Music Select ring tone respectively.
Enter the Download Resource, you’ll have the following 2 choices:
Image
The available options are the same as the Camera.
Audio
The available options are the same as the Camera.
User Custom1
You can store the voice memos, pictures, phonebook, photos and ring
tones in User Custom1.
Enter
Press OK soft key to enter User Custom1. Operations are the same as
in “Camera” and “Voice Memo”.
Property
View the total files and file size of all the files.

-87-
Delete
Delete all the files.
Rename
Rename User Custom1.
User Custom2
You can store voice memos, pictures, phonebook, photos and ring
tones in User Custom2.
The options are the same as the User Custom1.
View
View the free and used space of the Multimedia.

-88-
CAMERA
Using the camera module built in your phone, you can take pictures of
people or events while on the move. Additionally, you can send
photos to other people in a picture. The camera produces JPEG
pictures.
Note:
• Do not take photos of people without their permission.
• Do not take photos in a place where photo taking are prohibited.
• Do not take photos in a place where you may interfere with another
person’s privacy.
Take Photo
Enter‘Take Photo’, press OK soft key or Take left soft key to take
photos. When taking photos, press the f key, you’ll have the
following options:
Focus: In NOR mode, users can change the focal length of the
digital camera lens on six levels. Press the ▲ or ▼ key adjust the
length to your desire.
In the VGA mode, users cannot operate this function.
Rotate: Allows you to take pictures from 4 angles: Left, Right, Up
and Down. Press the ▲ or ▼ key to change the angle.
Mode: There are NOR and VGA modes. Press the ▲ or ▼ key to
-89-
switch between the two modes.
Photo Quality: Allows you to change the image quality.
Brightness: Adjust the brightness of the image. There are all
together 6 levels to be chosen. Press the ▲ or ▼ key to
select the desired level.
Color Saturation: Adjust the color saturation. 6 choices are
provided. Press the ▲ or ▼ key to select the desired
one.
Time for shooting: Allows you to set the shooting time. Press the
▲ or ▼ to set the shooting time as Right now or taking
10 seconds later.
Frame: Allows you to add a frame to your photo. Press the ▲ or
▼ key to select one from the phone.
NOR Effect: There are eight effects to be chosen. Press the ▲ or
▼ key to choose one you favour.
Press the Take key to take the photo, then you’ll have the following
options:
Save: Press ‘Save’ to enter the name to save the photos. You can
also edit a name for your picture.
Back: Press right soft key to cancel the picture.

-90-
Video Recording
Enter the Video Recording.
Press left soft key to begin recording.
Other operations are similar to operations in “Take Photos”.
Photo Browse
Press OK soft key to browse the photos you’ve taken and saved. Put
the cursor to the one you want and then press ‘Options’ to view the
real-size photo.
Play Video
Press OK soft key and you can see a list of video files you’ve saved.
Put the cursor to the one you want to view and press ‘Play’. Press
‘Delete’ to delete the current one you select while press ‘Delete All’ to
delete all the video files.
PhotoBase
Enter the PhotoBase, choose the desired photo and press the Options
soft key, you’ll have the following options:
View: View the photo. 3 view modes are provided for you: Full
Picture, Thumbnail and Slideshow.
Go to Camera: Choose this function to enter the Camera again.
Manage: Allows you to delete, rename and view the property of the

-91-
picture.
Apply as Wallpaper: Allows you to set it as the wallpaper.
About: View the copyright of the photobase.
Exit Album: Back to the Photobase menu facility.

-92-
REFERENCE INFORMATION
Access Codes
There are several access codes that are used by your phone and its
SIM card. These codes help you protect the phone against
unauthorized use.
Phone Password
The security code can be used to avoid unauthorized use of your
phone. The security code 0000 is usually supplied with the phone.
Change the security code before you start using your phone. Keep the
new code secret and in a safe place, which is separate from the phone.
PIN Code
The PIN (Personal Identification Number) code protects your SIM
card against unauthorized use. The PIN code is usually supplied with
the SIM card. When the PIN code is enabled, the code is required each
time the phone is switched on.
Note: If you key in an incorrect PIN code three times in succession, the
SIM card will be locked. To unlock the SIM card, you’d key in the PUK
code and press the OK soft key, and key in a new PIN code twice.
PIN2 code
The PIN2 code, supplied with some SIM cards, is required to access
some functions, such as charging unit counters. These functions are

-93-
only available if supported by your SIM card.
If you key in an incorrect PIN2 code three times in succession, the
PIN2 will be locked. To unlock the PIN2, you’d key in the PUK2
code and press the OK soft key (or OK key), and key in a new PIN2
code twice.
PUK code
The PUK (Personal Unblocking Key) code is required to change a
blocked PIN code. The PUK code may be supplied with the SIM card.
If not, contact your local service provider for the code.
If you key in an incorrect PUK code ten times in succession, the SIM
card cannot be used anymore. Contact your service provider for a new
card.
You cannot change the PUK code. If you lose the code, contact your
service provider.
PUK2 code
The PUK2 code, supplied with some SIM cards, is required to change
a blocked PIN2 code.
If you key in an incorrect PUK2 code ten times in succession, you
cannot use the functions requiring the PIN2 code. Contact your
service provider for a new card.
You cannot change the PUK2 code. If you lose the code, contact your
service provider.

-94-
Using the Batteries
A rechargeable Li-ion standard battery powers your phone. The
following batteries are also available (ask your local dealer for further
details):
Precautions When Using Batteries
Never use any charger or battery that is damaged in any way.
Use the battery only for its intended purpose.
If you use the phone near the network’s base station, it uses less
power; talk and standby times are greatly affected by the signal
strength on the cellular network and the parameters set by the
network operator.
Battery charging times depend on the remaining battery charge
and the type of battery and charger used. The battery can be
charged and discharged hundreds of times, but it will gradually
wear out. When the operation time (talk time and standby time) is
noticeably shorter than normal, it is time to buy a new battery.
Type Capacity Talk Time Standby Time
Li-ion 720 mAh 2~3 hrs 60~100 hrs

-95-
If left unused, a fully charged battery will discharge itself over
time.
Use only approved batteries and recharge your battery only
with approved chargers. When a charger is not in use, disconnect it
from the power source. Do not leave the battery connected to a
charger for more than a week, since overcharging may shorten its
life.
Extreme temperatures will affect the charging capacity of your
battery: it may require cooling or warming first. Do not leave the
battery in hot or cold places, such as in a car in summer or winter
conditions, as you will reduce the capacity and lifetime of the
battery. Always try to keep the battery at room temperature. A
phone with a hot or cold battery may temporarily not work, even
when the battery is fully charged. Li-ion batteries are particularly
affected by temperatures below 0 °C.
Do not short-circuit the battery. Accidental short-circuiting may
occur when a metallic object (coin, clip or pen) causes a direct
connection between the + and - terminals of the battery (metal
strips on the back of the battery), for example when you carry a
spare battery in a pocket or bag. Short-circuiting the terminals may
damage the battery or the object causing the short-circuit.
Dispose of used batteries in accordance with local regulations.
Always recycle. Do not dispose of batteries in fire.

-96-
Care and Maintenance
Your phone is a product of superior design and craftsmanship and
should be treated with care. The suggestions below will help you to
fulfill any warranty obligations and allow you to enjoy this product for
many years. When using your phone, you should:
Keep it and all its parts and accessories out of small children’s
reach.
Keep it dry. Precipitation, humidity and liquids contain
minerals that will corrode electronic circuits.
Do not use or store it in dusty, dirty areas as its moving parts
may be damaged.
Do not store it in hot areas. High temperatures may shorten the
life of electronic devices, damage batteries, and warp or melt
certain plastics.
Do not store it in cold areas. When the phone warms up (to its
normal operating temperature), moisture can form inside the phone,
which may damage the phone’s electronic circuit boards.
Do not drop, knock or shake it. Rough handling may break
internal circuit boards.
Do not use harsh chemicals, cleaning solvents, or strong
detergents to clean it. Wipe it with a soft cloth slightly dampened

-97-
in a mild soap-and-water solution.
Do not paint it. Paint may clog the device’s moving parts and
prevent proper operation.
Use only supplied or approved replacement antenna.
Unauthorized antennas, modifications of attachments may damage
the phone and violate regulations governing radio devices.
If the phone, battery, charger, or any accessory is not working
properly, take it to your nearest qualified service facility.
This phone features large inner & outer display screens,
which are damageable. Please be most careful to avoid
dropping or knocking it or scratching it with sharp things.

-98-
GLOSSARY
Antenna
A device for transmitting or receiving signals. The size and shape of
antennas is determined, in part, by the frequency of the signal they
receive. Wireless phones and the base station must have antennas.
Alarm Clock
Your pager alarm can be set for a specific time and date or can used as
a daily alarm.
ALS (Alternate Line Service)
ALS provides the capability of associating two alternate lines with one
SIM card. You can make and receive calls on either line as desired
with this service.
AMOI Smart Dial
An intelligent way to dial a number which is stored in your phonebook.
Say you want to dial Steven, at idle, press st, then press *, you can
find the number of Steven. Or press st when you select Smart Dial in
phonebook.

-99-
Band
Range of radio frequencies between two defined limits which are used
in wireless communications.
Call Barring
Enable it to restrict outgoing and incoming calls.
Call Divert
Allows you to set your phone to forward calls to an alternate phone
number. (network and subscription dependent feature -- not available
in all areas).
Call Holding
You can put callers on hold. (network and subscription dependent
feature -- not available in all areas).
Call Waiting
While making a call, the phone will alert you that another person is
trying to call you. You can choose to answer the call or it will forward
to your voice mail. (Network and subscription dependent feature -- not
available in all areas).

-100-
Conference Calling
Able to establish a conference call involving up to five additional
parties.
DTMF (Dual-Tone Modulated Frequency)
You send DTMF signals when you enter numbers by pressing the
digit keys.
GPRS—General Packet Radio Service
GSM (Global System for Mobile Communication)
GSM is the pan-European standard for digital cellular telephone
service. It is also one of the technologies available in the Americas.
GSM was designed for markets to provide the advantage of automatic,
international roaming in multiple countries. The SIM (Subscriber
Identification Module) card is a vital component in GSM operation.
The user can store all relevant data for the phone on a removable
plastic card. The card can be plugged into any GSM compatible phone
and the phone is instantly personalized to the user.
GSM900
GSM900, called GSM, is the most widely used digital network and

-101-
now operating in more than 100 countries around the world.
GSM1800--The digital GSM network used in Europe and Asia.
GSM1900
The digital GSM network of GSM1900 is widely used in North
America and Latin America.
Hands-Free
A feature that permits a driver to use a wireless phone without lifting
or holding the handset - an important safety feature for automobiles,
tractors and most other motorized vehicles.
J2ME
J2ME is a technology that allows programmers to use the Java
programming language and related tools to develop programs for
mobile wireless information devices such as cellular phones and
personal digital assistants.
LCD (Liquid Crystal Display)
Commonly used to refer to the screen display on the wireless phone.

-102-
Line Identification Services
Service allowing subscribers to view or block the telephone numbers
of callers.
Mobile Phone
The term that can be inter-changed with cellular phone or wireless
phone.
MMS (Multimedia Messaging Service)
MMS is current technology of message development with highest
standard. Its feature contains: supporting multimedia function,
supporting sending kinds of message (letters, pictures, voice and other
multimedia message). It makes multimedia sending as phone-to-phone
and phone terminal-to-network possible.
PIN (Personal Identification Number)
Security code that protects the phone against unauthorized use. The
PIN is supplied by the service provider with the SIM card. It may be a
four to eight-digit number and can be changed, if required.
PUK (PIN Unlocking Key)
Security code used to unlock the phone when an incorrect PIN has

-103-
been entered three times in succession. The eight-digit number is
supplied by the service provider with the SIM card.
Roaming
A service offered by most cellular service providers that allows
subscribers to use cellular service while traveling outside their home
service area. When they are outside their home service area and come
within range of another cellular system, the ROAM indicator on the
cellular phone will light to show that they are in range.
SIM (Subscriber Identification Module)
Card containing a chip with all the information required to operate the
phone (network and memory information, as well as the subscriber’s
personal data). The SIM card fits into a small slot in the back of the
phone and is protected by the battery.
SMS (Short Message Service)
Network service that allows you to send and receive messages to and
from another subscriber without speaking to the correspondent. The
message created or received (up to 160 characters) can be displayed,
received, edited or sent.
Soft Keys
Keys marked • and o on the phone, the purpose of which:

-104-
• Varies according to the function that you are currently using
• Is indicated on the bottom line of the display just above the
corresponding key.
Standby Time
The time a battery can power a phone in the standby mode, ready to
make or receive a call, without being used for an actual call. The
longer a phone is in standby mode, the less standby time remains in
the battery.
Talk Time
The total time a battery can power a phone for cellular calls. As the
phone drains the battery during a call, the talk time left in the battery
diminished until the phone is turned off or the battery is recharged.
Tri-Band
Wireless phone that operates on any of the three digital GSM
frequencies-typically, 900 MHz, 1800 MHz and 1900 MHz-to
increase service coverage. (1800 MHz is a GSM digital network used
in Europe. This frequency allows for global roaming, where roaming
agreements are in place.)
Voice Mail
Computerized answering service that automatically answers your calls
when you are not available, plays a greeting (Optionally in your own

-105-
voice) or records a message.
WAP (Wireless Application Protocol)
By working on top of standard data link protocols, WAP provides a
complete set of specifications to support Internet protocols. Simply
put, it's a special way of formatting content so that it can appear on
small screens, like those on wireless phones or PDAs. WAP is
becoming a global standard for developing and delivering Internet
content to wireless devices.

-106-
TROUBLESHOOTING
If the phone does not work properly, please check the following
troubleshooting and find a solution. If you can’t solve the problems,
please contact your local dealer for help.
Questions Solutions
Cannot make or receive
calls.
● Check whether the phone is powered on or not.
● Check if the battery is lack of power.
● Check if the signal is strong enough.
● Check if you’ve set ‘Call Barring’, SDN or the
other options in Call Set menu.
● Check if you’ve set the ‘Call Divert’.
● Check if you’ve placed the SIM card properly.
Conversation volume is low. ● Check if you’ve set the Voice Volume too low.
Does not ring when an
incoming calls comes in.
● Check if you’ve set ‘Silent’ or ‘Vibrator’ modes.
● Check if the ring volume is set too low.
● Check if the surrounding noise is too loud.
● Check if you’ve set the ‘Call Divert’.
LCD is not clear. ● Check if you’ve set the LCD contrast too low.
The keypad doesn’t work. ● Check if you’ve locked the keypad.
The one on the other part of
the line cannot hear you.
● Check if you’ve set ‘Mute’.
● Check whether you speak near the MIC.

-107-
IMPORTANT SAR INFORMATION
Your wireless phone is a radio transmitter and receiver. It is
designed and manufactured not to exceed the emission limits
for exposure to radiofrequency (RF) energy set by the FCC of
USA. These limits are part of comprehensive guidelines and
establish permitted levels of RF energy for the general
population. The guidelines are based on standards that were
developed by independent scientific organizations through
periodic and thorough evaluation of scientific studies. The
standards include a substantial safety margin designed to
assure the safety of all persons, regardless of age and health.
The exposure standard for wireless mobile phones employs a
unit of measurement known as the Specific Absorption Rate,
or SAR. The SAR limit set by the FCC is 1.6 W/kg. *
Tests for SAR are conducted with the phone transmitting at its
highest certified power level in all tested frequency bands.
Although the SAR is determined at the highest certified power
level, the actual SAR level of the phone while operating can
be well below the maximum value. This is because the phone
is designed to operate at multiple power levels so as to use
only the power required to reach the network. In general, the
closer you are to a wireless base station antenna, the lower the
power output.
Before a phone model is available for sale to the public, it
must be tested and certified to the FCC that it does not exceed
the limit established by the government adopted requirement
for safe exposure. The tests are performed in positions and
locations (e.g., at the ear and worn on the body) as required by
the FCC for each model. The highest SAR value for this
model phone when tested for use at the ear is 1 W/Kg and
when worn on the body, as described in this user guide, is
0.667 W/Kg. (Body-worn measurements differ among phone

-108-
models, depending upon available accessories and FCC
requirements). While there may be differences between the
SAR levels of various phones and at various positions, they all
meet the government requirement for safe exposure.
* In the United States and Canada, the SAR limit for mobile
phones used by the public is 1.6 watts/kg (W/kg) averaged
over one gram of tissue. The standard incorporates a
substantial margin of safety to give additional protection for
the public and to account for any variations in measurements.
Use only the supplied or an approved antenna. Unauthorized
antennas, modifications, or attachments could impair call
quality, damage the phone, or result in violation of FCC
regulations. Do not use the phone with a damaged antenna. If
a damaged antenna comes into contact with the skin, a minor
burn may result. Please contact your local dealer for
replacement antenna.
This transmitter must not be co-located or operating in
conjunction with any other antenna or transmitter.
Body-worn Operation
This device was tested for typical body-worn operations. To
comply with RF exposure requirements, a minimum
separation distance of 1.5 cm must be maintained between the
user’s body and the handset, including the antenna.
Third-party belt-clips, holsters, and similar accessories used
by this device should not contain any metallic components.
Body-worn accessories that do not meet these requirements
may not comply with RF exposure requirements and should be
avoided.

-109-
Use only the supplied or an approved antenna. Unauthorized
antennas, modifications, or attachments could impair call
quality, damage the phone, or result in violation of regulations.
Do not use the phone with a damaged antenna. If a damaged
antenna comes into contact with the skin, a minor burn may
result. Please contact your local dealer for replacement
antenna.
3. Also, you need following info, if cell phone is considering a
digital peripheral
FCC Part 15 Notice
This device complies with part 15 of the FCC Rules.
Operation is subject to the following two conditions: (1) This
device may not cause harmful interference, and (2) this device
must accept any interference received, including interference
that may cause undesired operation.
Warning: This device has been tested and found to comply
with the limits for a Class B digital device pursuant to Part 15
of the Federal Communications Commissions Rules and
Regulations. These limits are designed to provide reasonable
protection against harmful interference when the equipment is
operated in a commercial environment. This equipment
generates, uses, and can radiate radio frequency energy and, if
not installed and used in accordance with the instruction
manual, may cause harmful interference to radio
communications. However, there is no guarantee that
interference will not occur in a particular installation.
If this equipment does cause harmful interference to radio or
television reception, which can be determined by turning the
equipment off and on, the user is encouraged to try and correct
the interference by one or more of the following measures:

-110-
. Relocate this device
. Increase the separation between the device and the receiver
. Connect the device into an outlet on a circuit different from
that of other electronics. Consult the dealer or an experienced
radio technician for help.
FCC Radiation Exposure Statement
Important Note: To comply with FCC RF exposure
compliance requirement, the antenna used for this transmitter
must not be co-located or operating in conjunction with any
other transmitter.
Caution
Any changes or modifications not expressly approved by the
party responsible for compliance could void the user's
authority to operate this equipment.
Printed in China
FKV2.198.560SS01
English-USA.10/2004.Rev.1.0