ARRIS Global A5520N A5520N Home Network Interface System User Manual Manual 1
Pace Micro Technology plc A5520N Home Network Interface System Manual 1
Contents
- 1. Manual 1
- 2. Manual 2
Manual 1

A5500 Configuration
Guide
S r i R a m K i s h o r e
F e b r u a r y 2 0 1 2
Table of contents
Gateway Configuration ............................................................... 3
Accessing your gateway configuration tool................................................................... 3
Configuring your broadband Internet access ................................................................ 3
Configuring your local network ..................................................................................... 4
Configuring your wireless network ................................................................................ 5
Securing your wireless network .................................................................................... 7
Authorising programs to access the Internet ................................................................ 9
Configuring port forwarding ........................................................................................ 10
Defining a DMZ .......................................................................................................... 11
Configuring phone lines .............................................................................................. 11
Displaying the activated services ............................................................................... 13
Displaying the broadband status ................................................................................ 13
Home Network ........................................................................... 16
Displaying the devices connected to your gateway .................................................... 16
Administration ........................................................................... 17
Creating system password ......................................................................................... 17
Restarting your gateway ............................................................................................. 17
Restoring the factory settings ..................................................................................... 18
Displaying diagnostic information ............................................................................... 18
Using built-in IP utilities .............................................................................................. 19
G
ATEWAY
C
ONFIGURATION
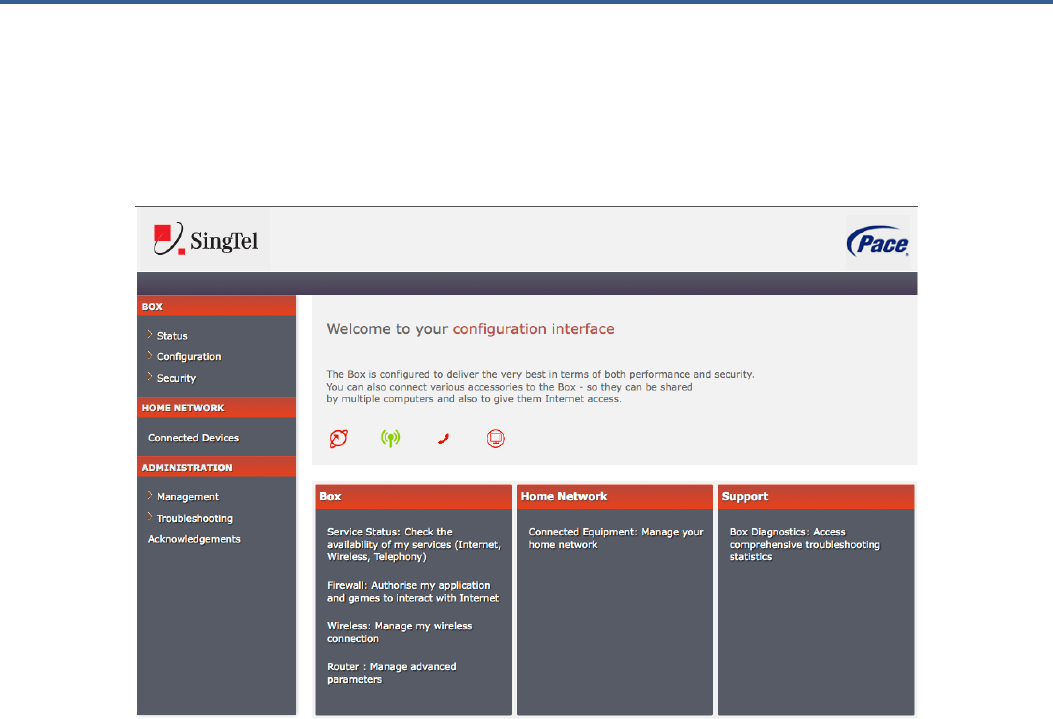
Accessing your gateway configuration tool
Connect a computer to your home gateway using an Ethernet cable or WiFi.
Open an Internet browser and enter the "http://192.168.1.254" or
“http://app.singnet.com.sg” web address to access your home gateway configuration tool.
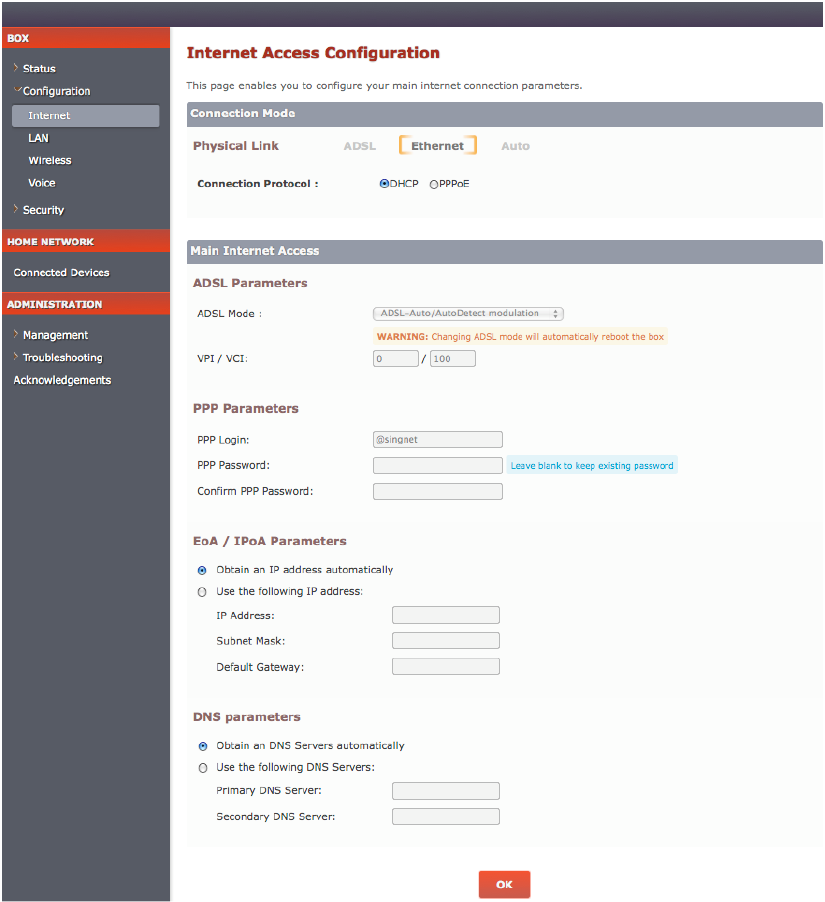
Configuring your broadband Internet access
To configure your internet connection:
Under the Box heading, click Configuration, and then click Internet.
Select the Physical Link type:
If your broadband connectivity is through the Ethernet port of your gateway, leave the
setting as Ethernet, which is the default.
If your broadband connectivity is through the ADSL port of your gateway, click ADSL.
Select your preferred Connection Protocol: DHCP (for Ethernet connectivity), PPPoE, or
PPPoA (for ADSL connectivity).
If you set the connection protocol to PPPoE or PPPoA, enter the connection
identifiers (PPP Login and PPP Password) given to you by your Internet service
provider.
If you set the connection protocol to DHCP, you do not need to enter your username
and password.
If necessary, change the DNS server address.
For configuring static IP address, select the Use the following IP address radio button in
the EOA / IPoA Parameters panel. Enter the IP address, subnet mask, and default
gateway in the respective text boxes.
Click OK to confirm. Note that your gateway then restarts to affect your changes.
Configuring your local network
The default local IP address of your gateway is 192.168.1.254. The DHCP server is
enabled by default and your connected hardware items will have an IP address in the range
192.168.1.1 to 192.168.1.253. The default lease time for an IP address is 240 minutes. To
change these default settings:
Click LAN under the Configuration sub-heading. The LAN Configuration page shows up.
If necessary, change the IP address of your gateway and the subnet mask of your wireless
network.
If necessary, change the IP address range. You can also change the default lease time,
which represents the number of minutes you can use the assigned IP address before the
DHCP lease expires.
To disable the DHCP server, click Disabled next to DHCP server.
Some LAN clients require fixed IP addresses. For such clients, you must reserve and
assign an IP address on the DHCP server. These reservations are permanent lease
assignments, which are used to ensure that a specified LAN client on your network is
always assigned the same IP address. To reserve an IP address for a LAN client:
Navigate to the Fixed IP addresses assigned by the DHCP server panel.
Click + Add a DHCP rule.
Edit the default name of the LAN client, its MAC address, and the IP address you want to
reserve for it.
Click OK to confirm.
Configuring your wireless network
Your gateway supports WiFi standard 802.11g and 802.11n, but is also compatible with
standard 802.11b.
To change your WiFi mode, click Wireless under the Configuration sub-heading. On the
Wireless Configuration page that shows up, use the Wireless Mode drop-down list to
change your WiFi mode:
802.11b: to connect with 802.11b devices only.
802.11g: to connect with 802.11g devices only.
802.11n: to connect with 802.11n devices only.
802.11b+g: to connect with both 802.11b and 802.11g WiFi device types.
80211g+n: to connect with both 802.11g and 802.11n WiFi device types.
80211b+g+n: to connect with all WiFi device types.
Auto: to let your gateway select the best WiFi mode.
Note that, by default, your gateway is configured to allow wireless connections. You can
disable this by setting Wireless State to Disabled.
By default, your gateway automatically selects the best WiFi channel. However, you can
select a channel manually.
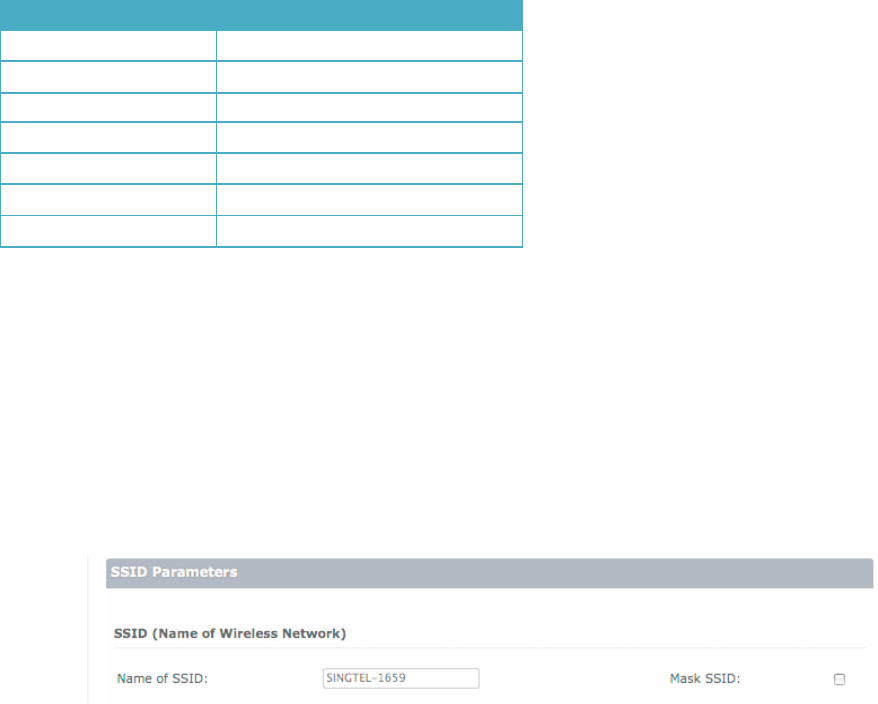
Select an appropriate power level for your wireless connection from the Transmit Power
drop-down box. The available range is 1 through 7. Higher the setting, higher is the power
the transmitted signals and, therefore, coverage of your wireless network. The table below
shows the relation between the transmit power value and its associated radio output power
levels.
Enter a name assigned to your wireless network in the Name of SSID text box. The default
name is SINGTEL-XXXX, where XXXX represents the last four digits of your gateway serial
number (for example, SINGTEL-1659).
By default, your gateway broadcasts the SSID, which enables the visibility of your gateway
to users who scan to connect to a wireless network. You can choose to disable the
broadcast by selecting the Mask SSID check box. Note that when you disable the SSID
broadcast, you will have to manually add a wireless profile in the LAN client to connect to
your wireless network instead of selecting your SSID from a typical scan.
Transmit Power
Radio Output Power (dBm)
1
14
2
15
3
16
4
17
5
18
6
19
7
23
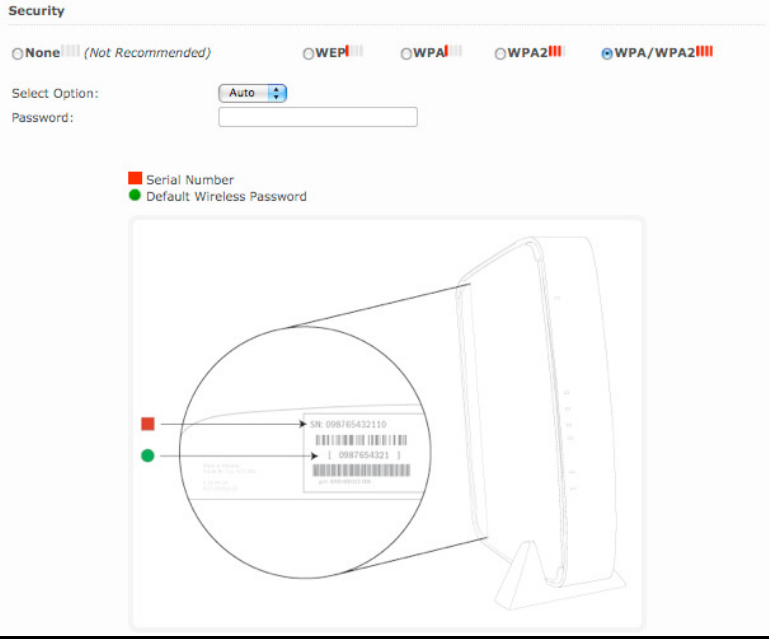
Securing your wireless network
To secure your wireless network, click Wireless under the Configuration sub-heading. On
the Wireless Configuration page that shows up, navigate to the Security panel.
The default encryption type is WPA/WPA2, but you can choose another. The default WPA2
password is printed on the label on the right bottom side of your gateway.

The following table provides more information about the
You can also secure your wireless network using the Wi
WPS is enabled, your gateway automatically detects the presence of a WPS
client; thus, simplifying the
process of accessing your wireless network
supports both the WPS configuration methods: PIN
(PBC) based.
To set up WPS:
Select the
Enable WPS
method.
Click either the
Push Button
gateway. You can then use the PUSH method on your LAN client (as advised by its
manufacturer).
The synchronization between the access point and the client should
seconds.
Authentication type
Description
WEP
The Wireless Encryption Protocol (WEP) is an older security
protocol that allows
access your network without an
provides the least
select this setting unless there is a compatibility issue with an
older wireless client. For added protection, set an encryption key
on your access
wireless clients.
Use the
and
WPA
This setting provides good security and works with most
wireless clients.
access point and the wireless client
Protected Access
encryption key.
With WPA, you can use only
(
TKIP
WPA2
This setting requires that wireless clients use only WPA2 to
access your
the access point and entered
currently t
be available on older wireless clients.
With WPA2, you can use only the
Standard
WPA/WPA2
This setting allows a wireless client to use either WPA
to
access your network. An encryption key
on the access point
wireless client.
Use the
(for clients that support WPA)
WPA2)
the setting as
use the appropriate encryption mechanism depending on the
wireless client.
The following table provides more information about the
supported
encryption types
You can also secure your wireless network using the Wi
-
Fi Protected Setup (WPS). When
WPS is enabled, your gateway automatically detects the presence of a WPS
process of accessing your wireless network
supports both the WPS configuration methods: PIN
-
based and Push Button Configuration
Enable WPS
check box. This enables the configuration of WPS using the PBC
Push Button
on the page or the WPS
button on the front panel of your
gateway. You can then use the PUSH method on your LAN client (as advised by its
The synchronization between the access point and the client should
Description
The Wireless Encryption Protocol (WEP) is an older security
protocol that allows
any wireless clients within the radio range to
access your network without an
encryption key. This setting
provides the least
level of security. For security
select this setting unless there is a compatibility issue with an
older wireless client. For added protection, set an encryption key
on your access
point and en
ter the same key into your other
wireless clients.
Use the
Select Option drop-
down list to select between
and
128-bit encryption mechanisms for WEP.
This setting provides good security and works with most
wireless clients.
This setting
requires an encryption key on the
access point and the wireless client
configured to use Wi
Protected Access
– Pre-Shared Key (WPA-
PSK) with the
encryption key.
With WPA, you can use only
the
Temporal Key Integrity Protocol
TKIP
) encryption mechanism.
This setting requires that wireless clients use only WPA2 to
access your
networks. An encryption key must be configured on
the access point and entered
into the wireless client. WPA2
currently t
he most secure Wi-Fi encryption
protocol b
be available on older wireless clients.
With WPA2, you can use only the
Advanced Encryption
Standard
(AES) encryption mechanism.
This setting allows a wireless client to use either WPA
access your network. An encryption key
must be configured
on the access point
and the same key must be entered on the
wireless client.
Use the
Select Option drop-
down list to select between
(for clients that support WPA)
and AES
(for clients that support
WPA2)
encryption mechanisms. We recommend you to leave
the setting as
Auto
(default), which will enable your gateway to
use the appropriate encryption mechanism depending on the
wireless client.
encryption types
:
Fi Protected Setup (WPS). When
WPS is enabled, your gateway automatically detects the presence of a WPS
-enabled LAN
process of accessing your wireless network
. Your gateway
based and Push Button Configuration
check box. This enables the configuration of WPS using the PBC
button on the front panel of your
gateway. You can then use the PUSH method on your LAN client (as advised by its
The synchronization between the access point and the client should
be complete within 120
The Wireless Encryption Protocol (WEP) is an older security
any wireless clients within the radio range to
encryption key. This setting
level of security. For security
reasons, do not
select this setting unless there is a compatibility issue with an
older wireless client. For added protection, set an encryption key
ter the same key into your other
down list to select between
64-bit
This setting provides good security and works with most
recent
requires an encryption key on the
configured to use Wi
-Fi
PSK) with the
same
Temporal Key Integrity Protocol
This setting requires that wireless clients use only WPA2 to
networks. An encryption key must be configured on
into the wireless client. WPA2
is
protocol b
ut may not
Advanced Encryption
This setting allows a wireless client to use either WPA
or WPA2
must be configured
and the same key must be entered on the
down list to select between
TKIP
(for clients that support
encryption mechanisms. We recommend you to leave
(default), which will enable your gateway to
use the appropriate encryption mechanism depending on the

If you want to use the PIN method instead, select
box. Enter the PIN generated by the LAN client in the Enter PIN text box. Click
establish the wireless connection.
MAC address filtering is disabled by default. When enabled, the wireless connection is
granted only to those LAN clients whose MAC addresses are registered.
The Delivery Traffic Indication Message period (
which the access point sends its broadcast traffic.
Authorising programs to access the Internet
Your gateway is
, by default,
This function may affect how some a
tools (email, chat, video
conferencing, etc.),
To allow some of your applications to
Under the Box
heading, click
On the
Configuring Applications
down lists.
Click OK to confirm.
If you want to use the PIN method instead, select
PIN from the
WPS Method
box. Enter the PIN generated by the LAN client in the Enter PIN text box. Click
establish the wireless connection.
MAC address filtering is disabled by default. When enabled, the wireless connection is
granted only to those LAN clients whose MAC addresses are registered.
The Delivery Traffic Indication Message period (
DTIM Period
) determines the interval at
which the access point sends its broadcast traffic.
Authorising programs to access the Internet
, by default,
configured to block all
communications initiated from outside.
This function may affect how some a
pplications operate: online games, communication
conferencing, etc.),
and
server applications (FTP, SMTP).
To allow some of your applications to
access your network
from outside
heading, click
Security, and then click
Applications
Configuring Applications
page, select the applications
you need
WPS Method
drop-down list
box. Enter the PIN generated by the LAN client in the Enter PIN text box. Click
Connect to
MAC address filtering is disabled by default. When enabled, the wireless connection is
granted only to those LAN clients whose MAC addresses are registered.
) determines the interval at
communications initiated from outside.
pplications operate: online games, communication
server applications (FTP, SMTP).
from outside
:
Applications
.
you need
from the drop-
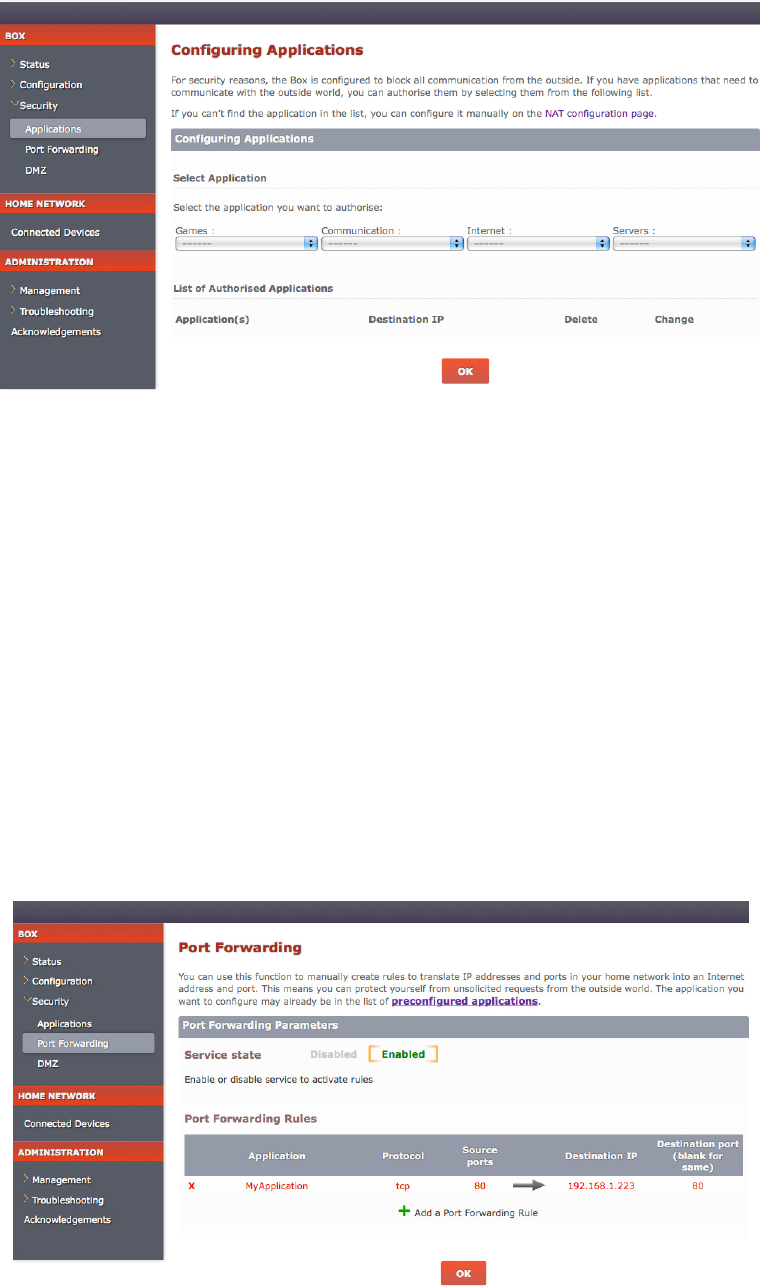
Configuring port forwarding
The forwarding table allows all the packets received via a specific port to be transmitted to a
specific machine on the internal network. Therefore, if you want to be able to access a web
server operating on machine 192.168.1.135 from outside, you will have to define a
forwarding rule that redirects all the TCP packets received via port 80 to another defined
port on machine 192.168.1.135.
To configure port forwarding:
Under the Box heading, click Security, and then click Port Forwarding.
On the Port Forwarding page, click + Add a Port Forwarding Rule.
If required, edit the default application name by clicking on it.
Select the protocol type: TCP or UDP.
Enter the port that has to be forwarded to the internal service.
Indicate the address of the hardware on the local network, followed by the destination port.
The request will be forwarded to this private address.
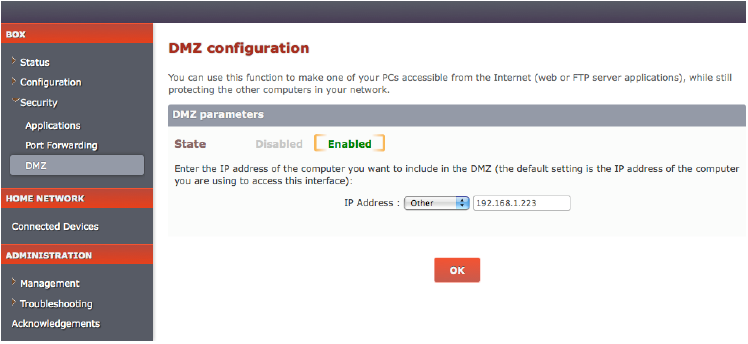
Defining a DMZ
The DMZ enables you to show a machine on the Internet with no restriction on the ports
used. It allows you to open all previously undefined ports (port forwarding) to a single LAN
machine:
Under the Box heading, click Security, and then click DMZ.
On the DMZ configuration page, click Enabled to enable the service.
Enter the IP address of the machine that will be in the DMZ. You can also select the name of
the host from the drop-down list.
Click OK to confirm.
Configuring phone lines
You can configure one or two phone lines at a time on your gateway. In addition, you can
configure the user name and password of your VOIP account to prevent unauthorized
access.
To configure your phone lines:
Under the Box heading, click Configuration, and then click Voice.
On the Router: Voice Configuration page, select the voice profile (singtel1 or singtel2)
you want to edit or set up.
On the Line Configuration tab, click Line 1 or Line 2 and then select the Enable This Line
checkbox. This activates the line for use.
Enter the Phone Number, Username, and Password provided by the Internet Service
Provider in the corresponding text boxes.
Click Save Current Profile. Click OK in the confirmation window that pops up.
The page refreshes and status of the phone line along with a refresh button displays next to
the Enable This Line checkbox:
Inactive or registering: Click the refresh button after some time. If the problem
persists, verify the details you entered and try again.
Registration error: The phone lines have not been registered successfully. Verify
the details you entered and try again.
Registered: The phone lines have been registered successfully.
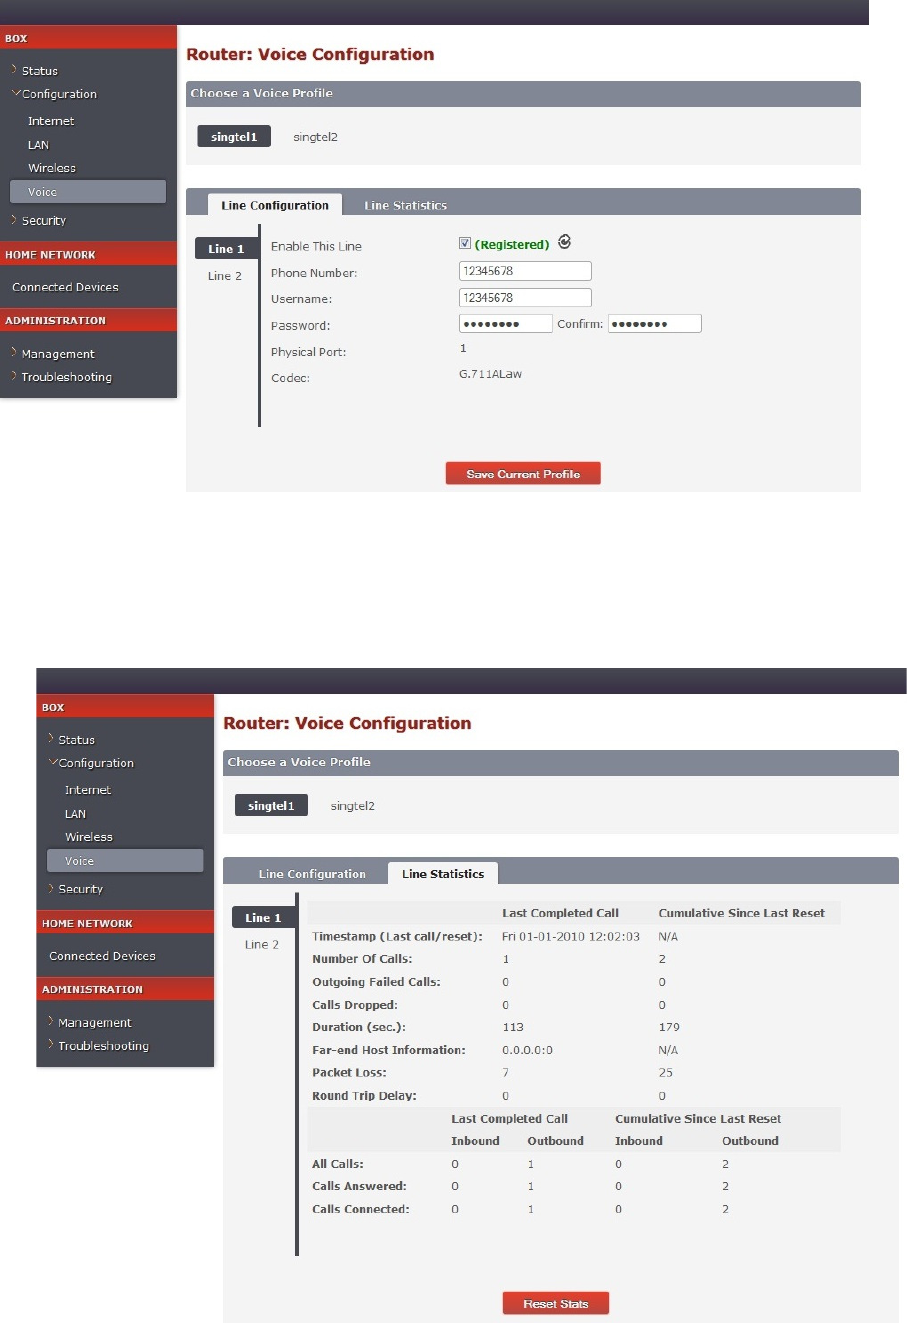
After you successfully register your phone lines, you can click the Line Statistics tab to
view detailed information such as the number of incoming and outgoing calls, duration of
calls, etc.
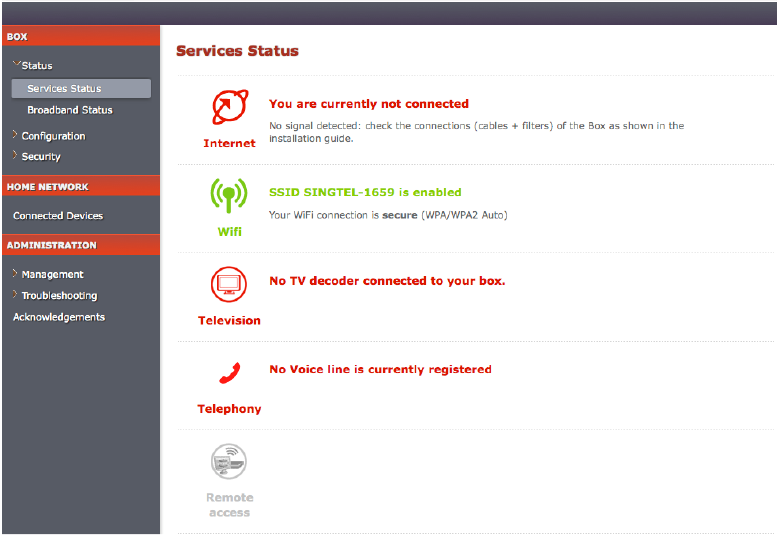
Displaying the activated services
Under the Box heading, click Status, and then click Services Status.
This interface will allow you to view the services that are currently activated on your
gateway.
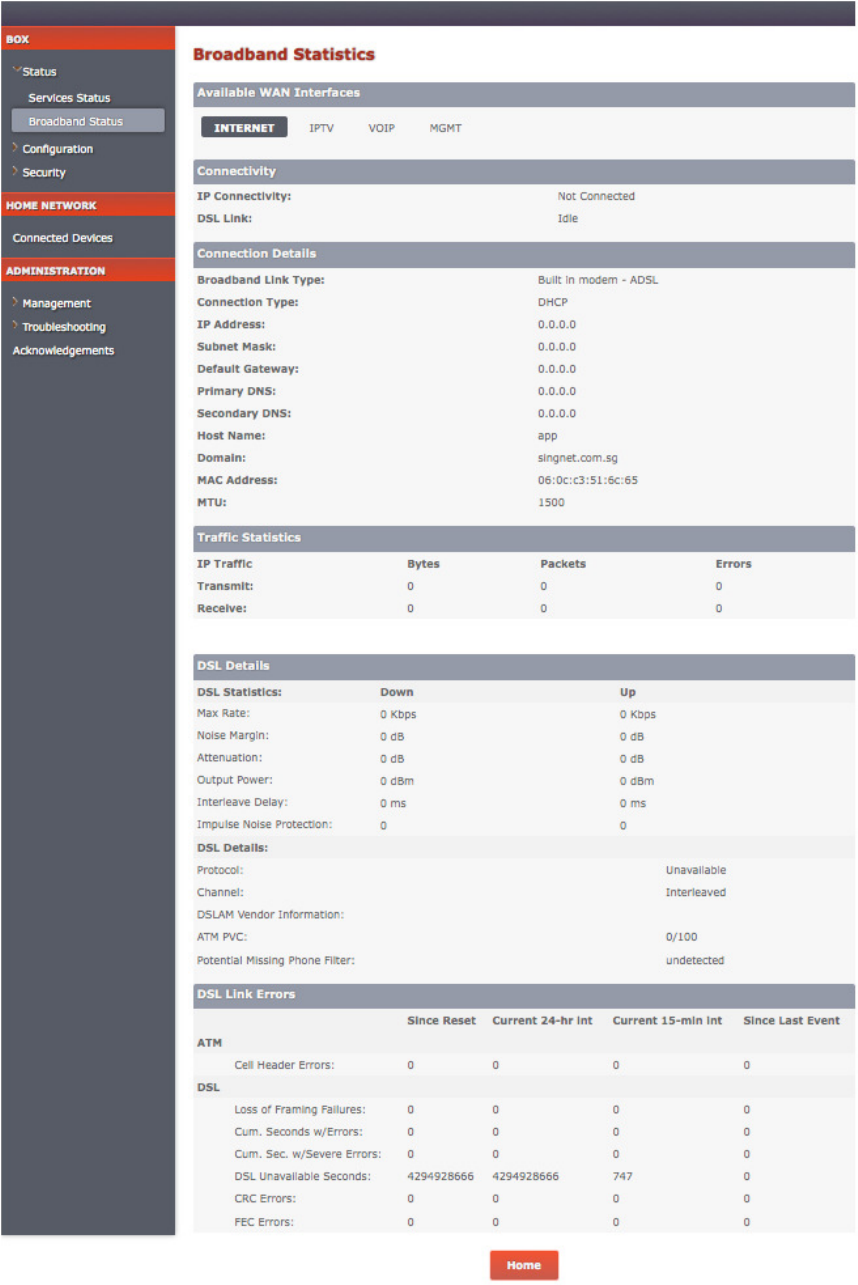
Displaying the broadband status
Under the Box heading, click Status, and then click Broadband Status.
This interface will allow you to view the connectivity status, Internet connection details, and
traffic statistics.
The following is an example of the Broadband Statistics page when the physical link is set
to ADSL. For information on how to configure the physical link, see the “Configuring your
broadband Internet access” section on page 3.
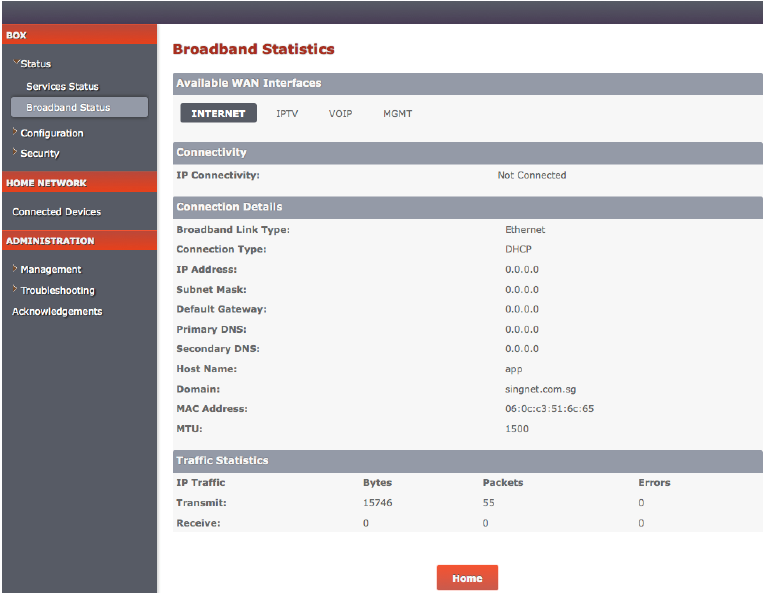
The following is an example of the Broadband Statistics page when the physical link is set
to Ethernet.
H
OME
N
ETWORK
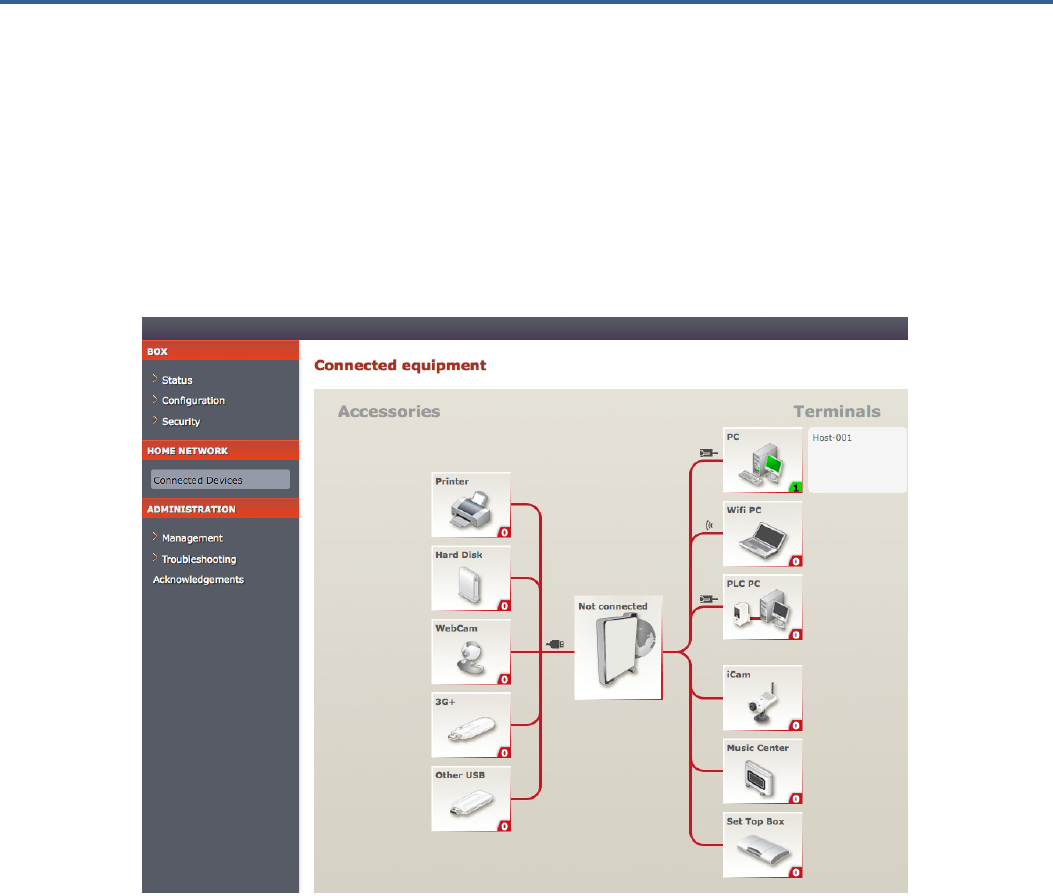
Displaying the devices connected to your gateway
To display the devices connected to your gateway, click Connected Devices under the
Home Network heading. The devices that are currently connected and active are shown in
green, whereas the devices that are not currently connected but have been part of your
network are shown in red. You can view more information (such as IP address, MAC
address, etc.) about the connected devices by hovering your mouse pointer over the
hostname.
A
DMINISTRATION
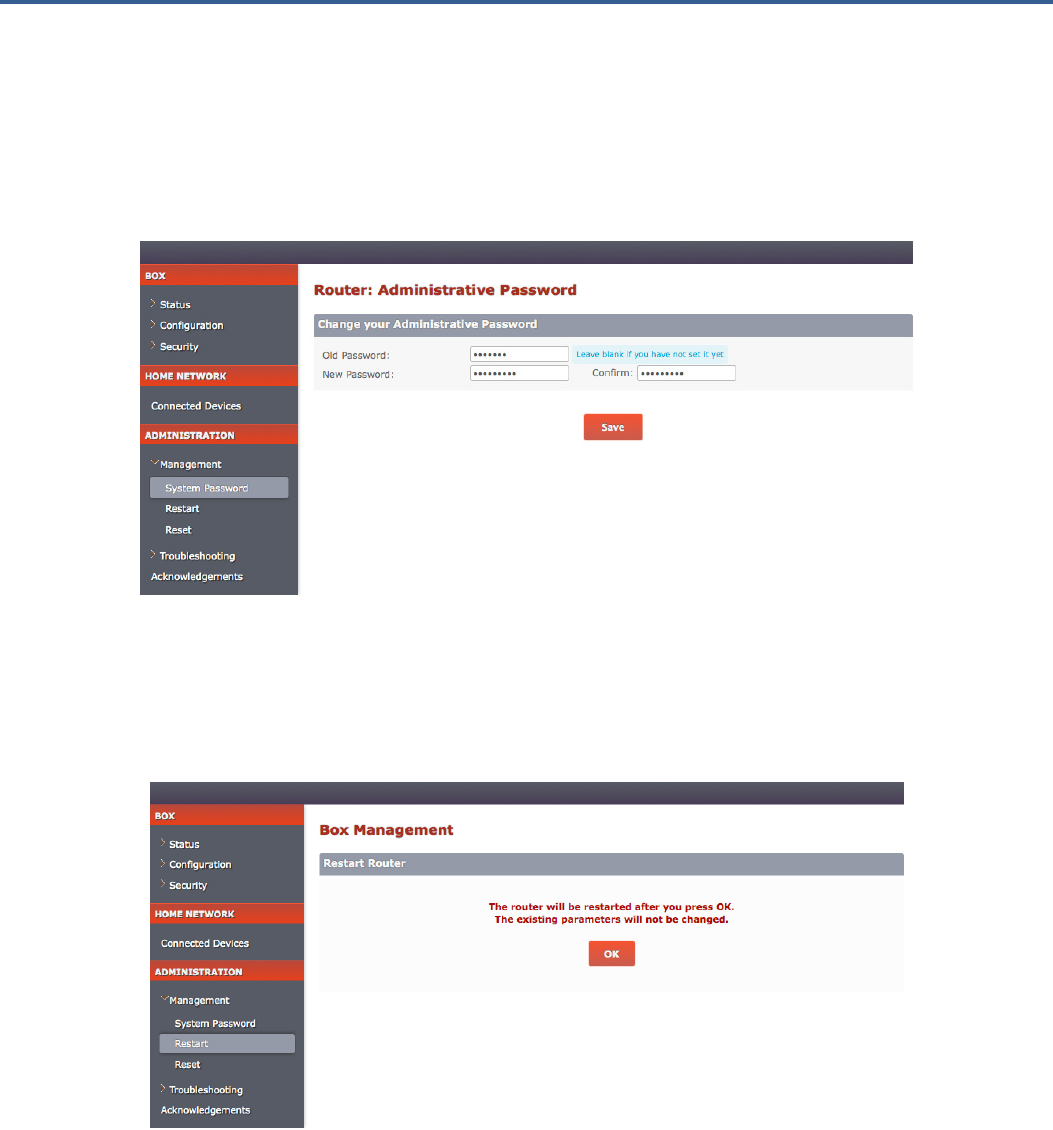
Creating system password
To set or change your gateway’s administrative password, click System Password under
the Management heading. Note that the password is case-sensitive and must have at least
8 alpha-numeric characters. You can also include any of the following symbols: $ @ ! | & { }
\ / ?
Restarting your gateway
To restart your gateway, click Restart under the Management heading. Your settings will
be saved.
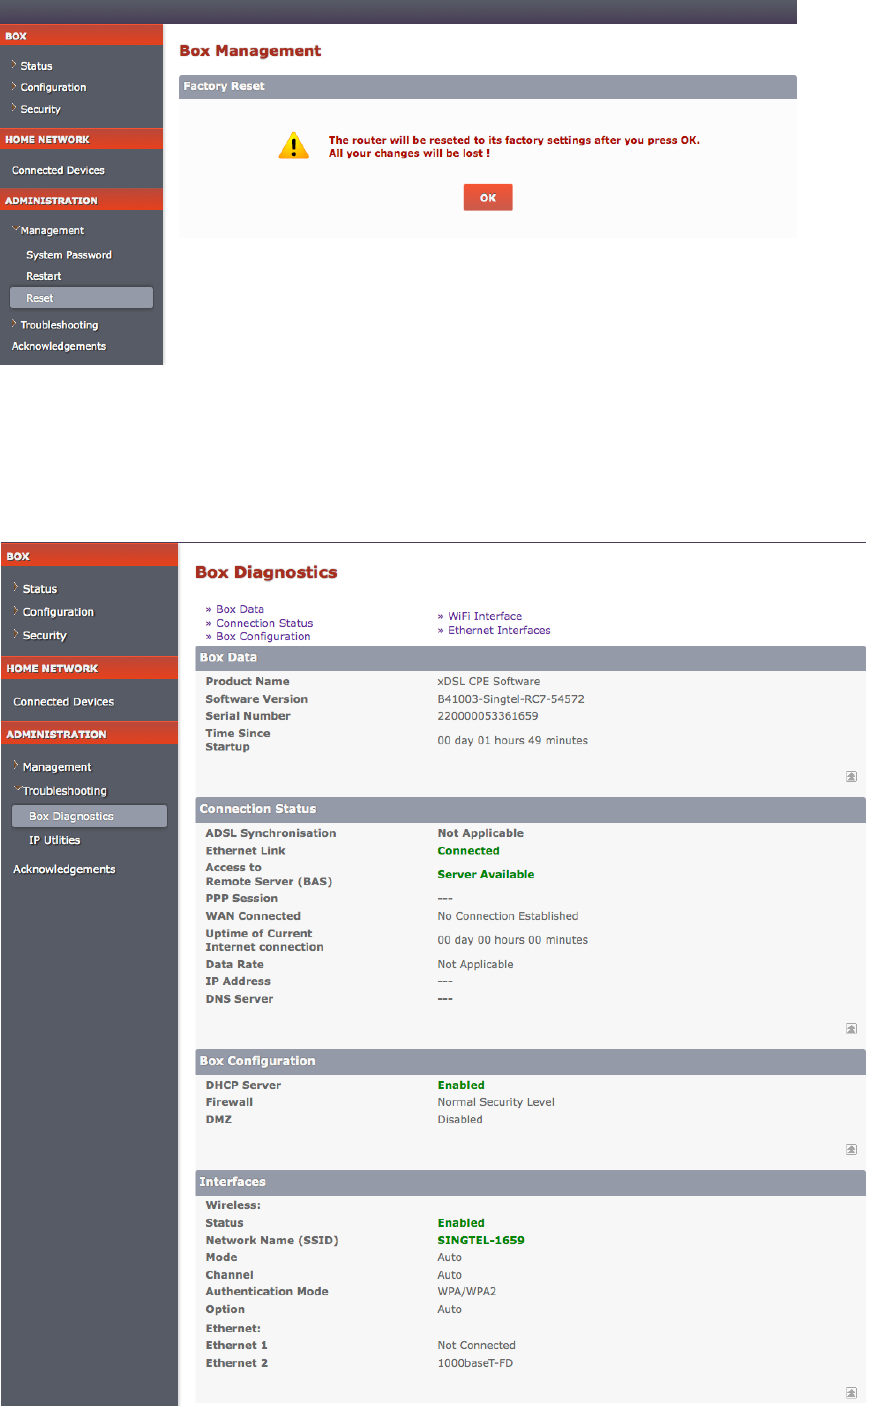
Restoring the factory settings
To force your gateway to return to its original factory settings, click Reset under the
Management heading. All your gateway settings will then be lost.
Displaying diagnostic information
To view detailed diagnostic information about your gateway and Internet connection, click
Box Diagnostics under the Troubleshooting heading.
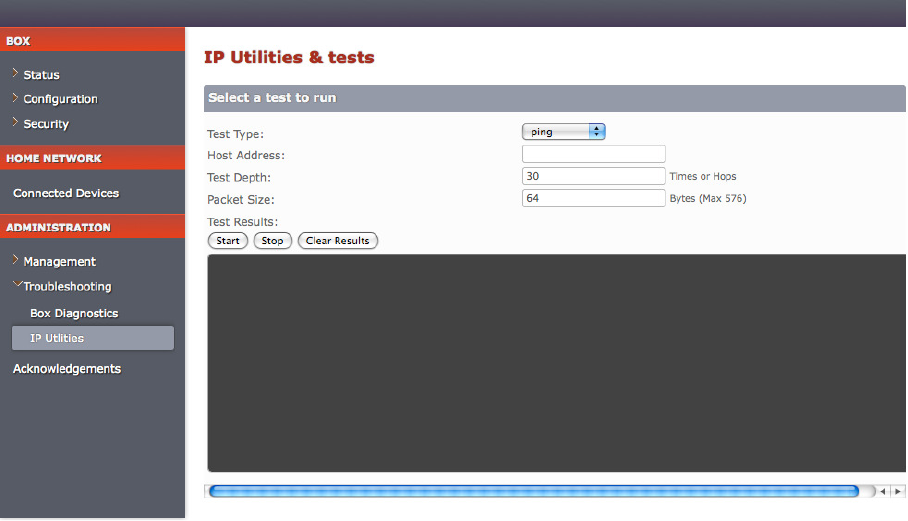
Using built-in IP utilities
You can use the inbuilt IP utilities such as ping, traceroute, and dnsquery to determine if
there are any communication issues between your gateway and the host/Internet.
To access these utilities:
Under the Administration heading, click Troubleshooting, and then click IP Utilities.
Select the test you want to run from the Test Type drop-down list:
If you select ping, you can test whether a particular host is reachable across an IP
network. In addition, you can self-test the network interface card of your gateway or
use the tool for latency test.
If you select traceroute, you can determine the route taken by the data packets
across an IP network.
If you select dnsquery, you can test if your gateway is resolving domain names to IP
addresses.
Enter the IP address of the destination in the Host Address text box.
Click Start or Stop testing. You can view the results in the Test Results text box.
To clear previous test logs, click Clear Results.