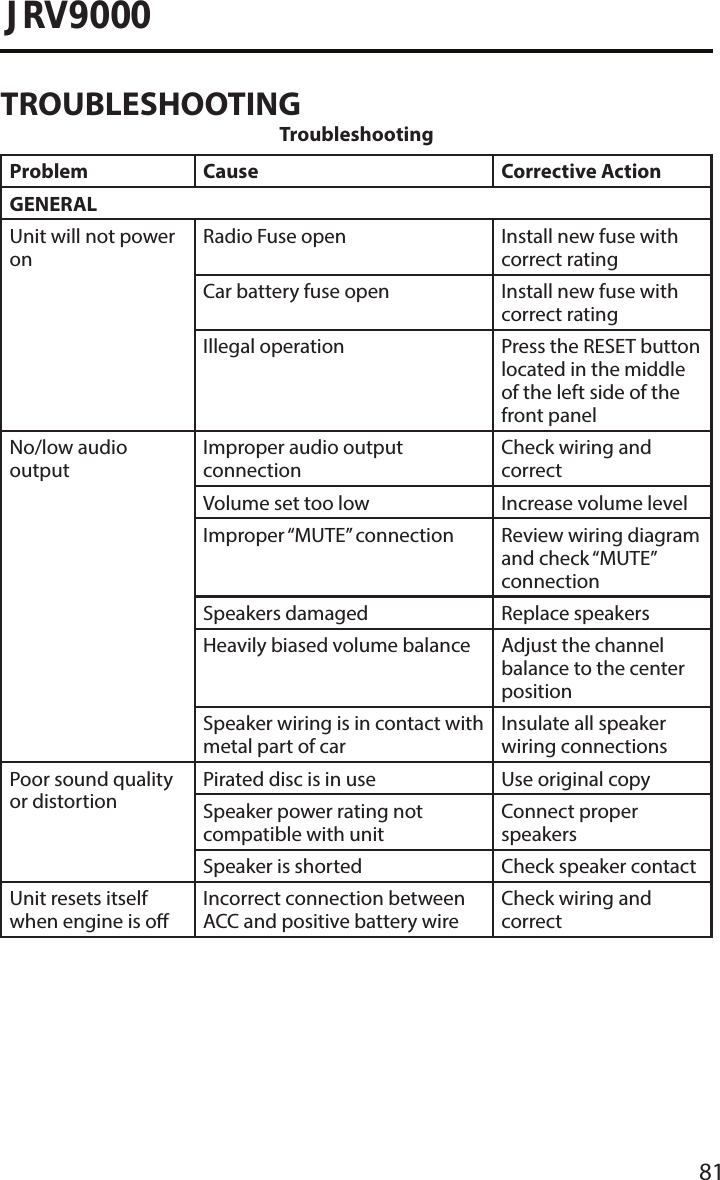
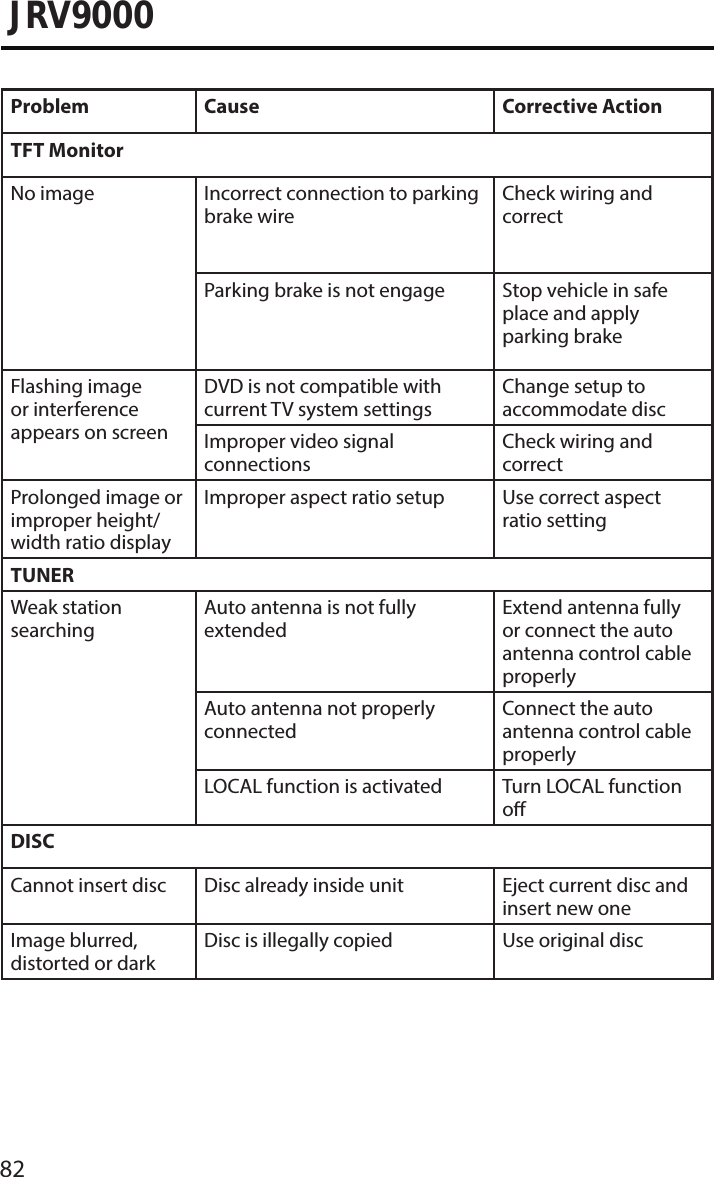
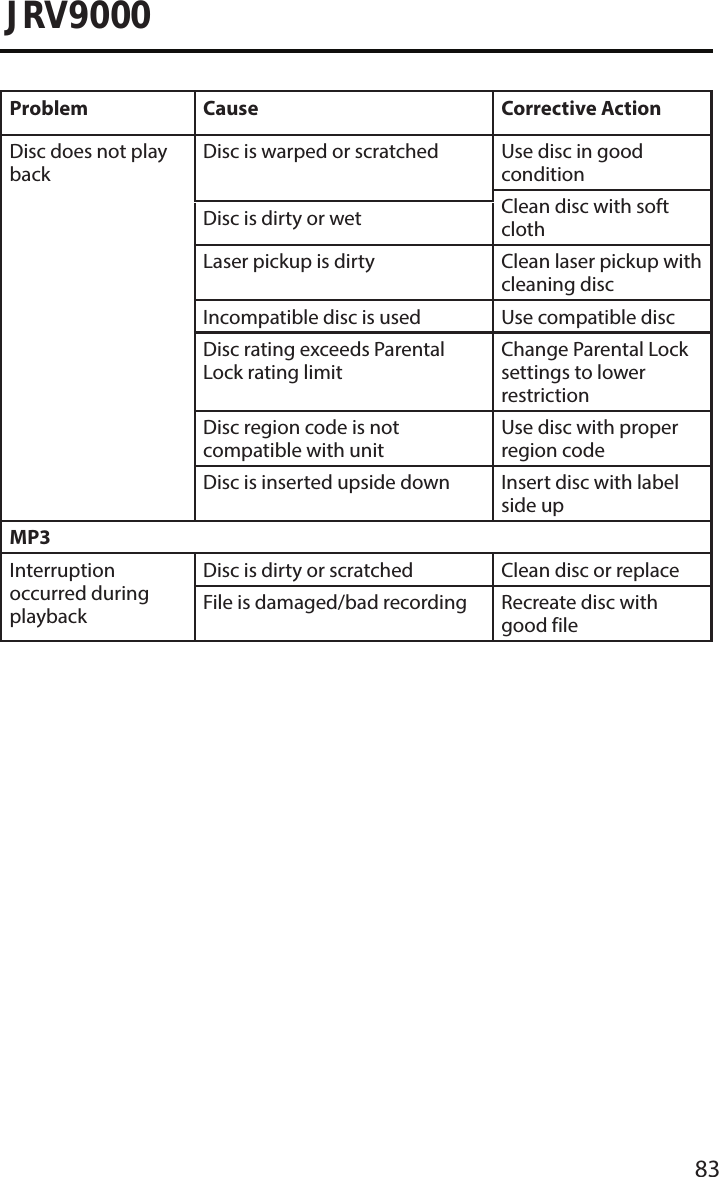
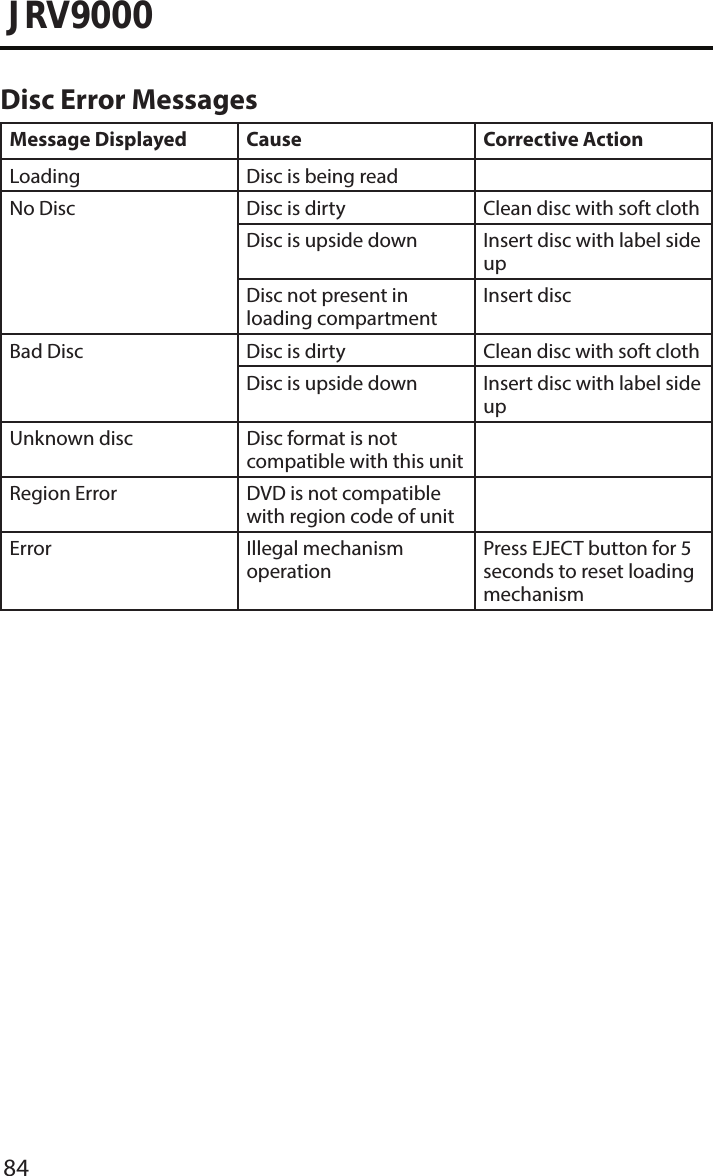
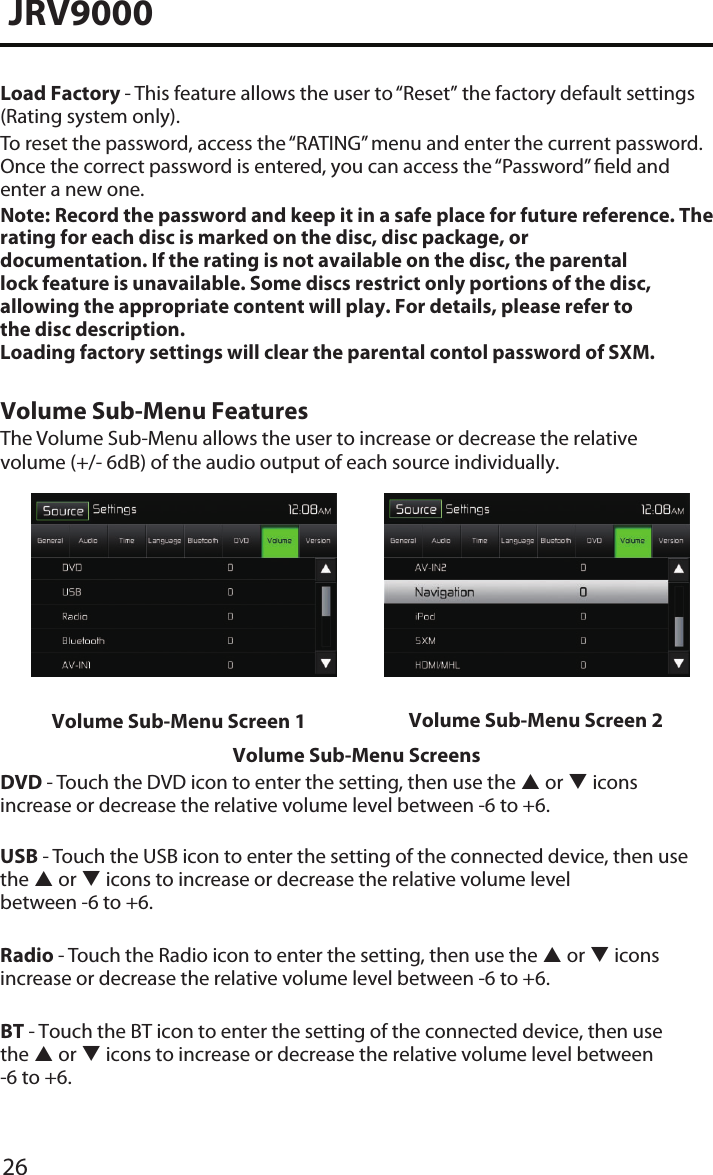
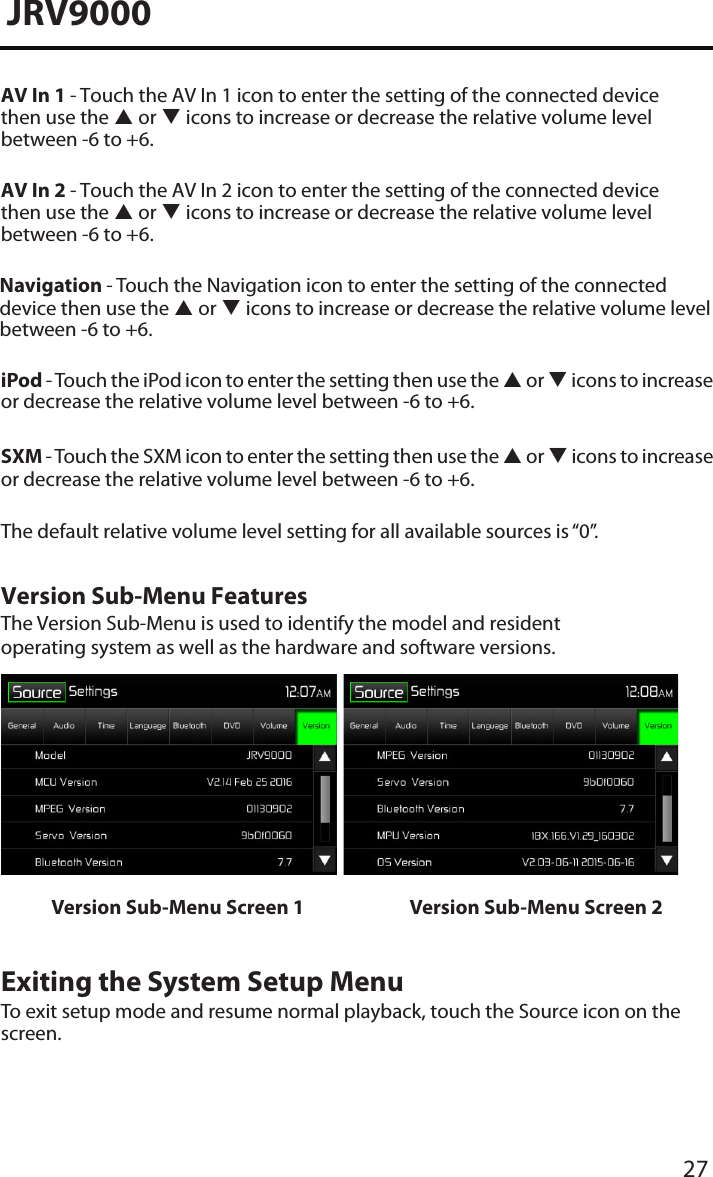
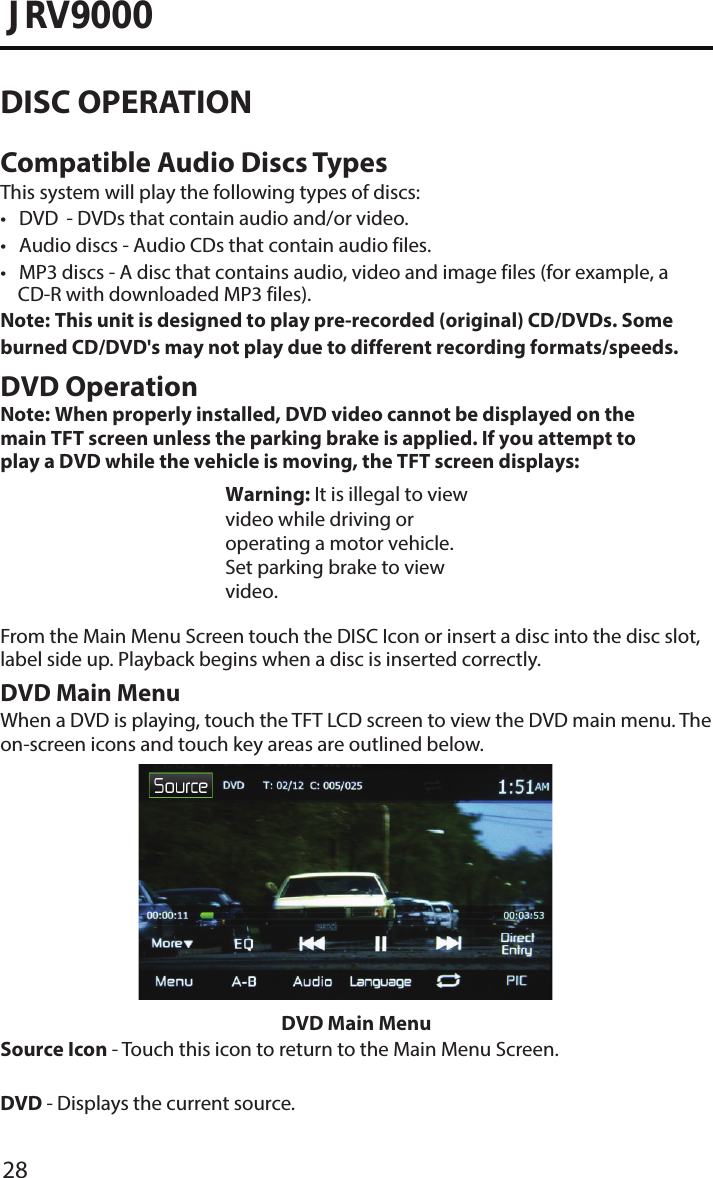
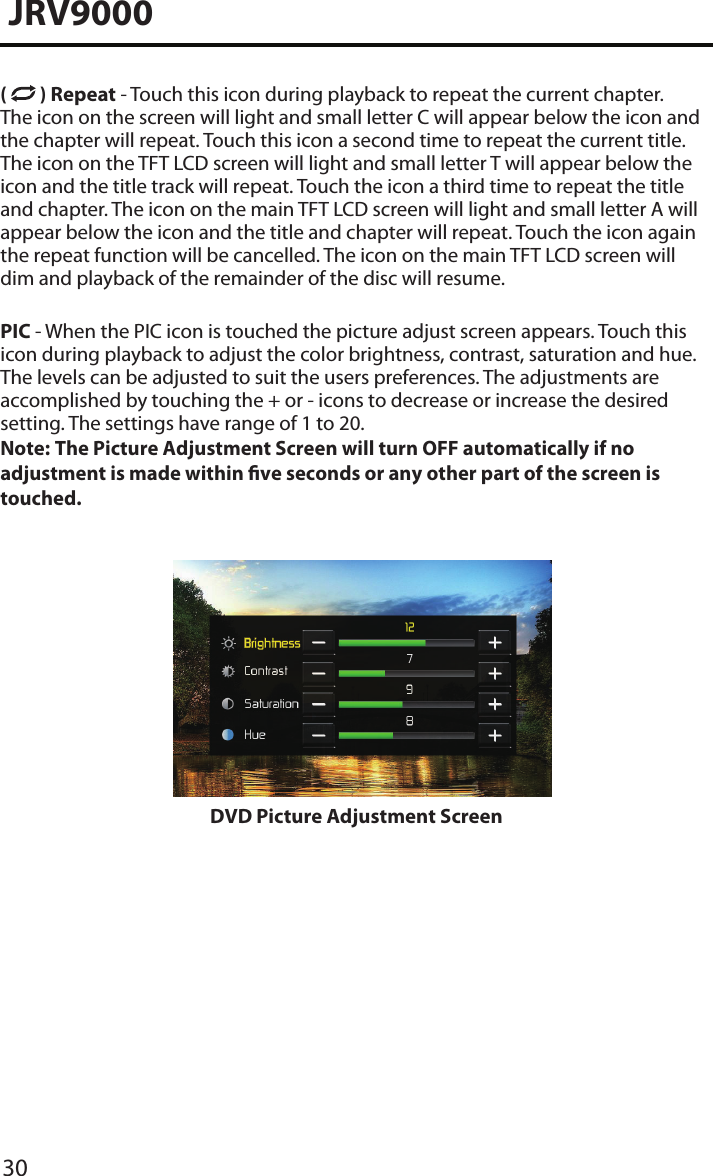
ASA Electronics JRV9000 Car Multimedia Player User Manual
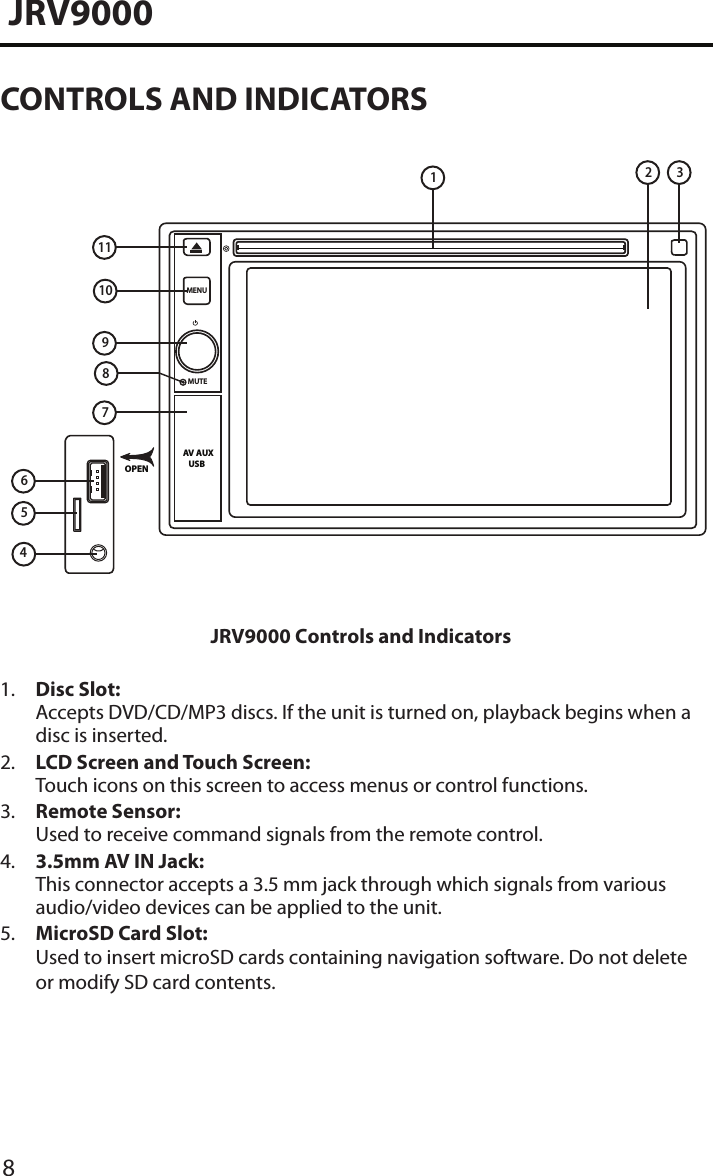
ASA Electronics Shenzhen Limited Car Multimedia Player
UserManual.wiki
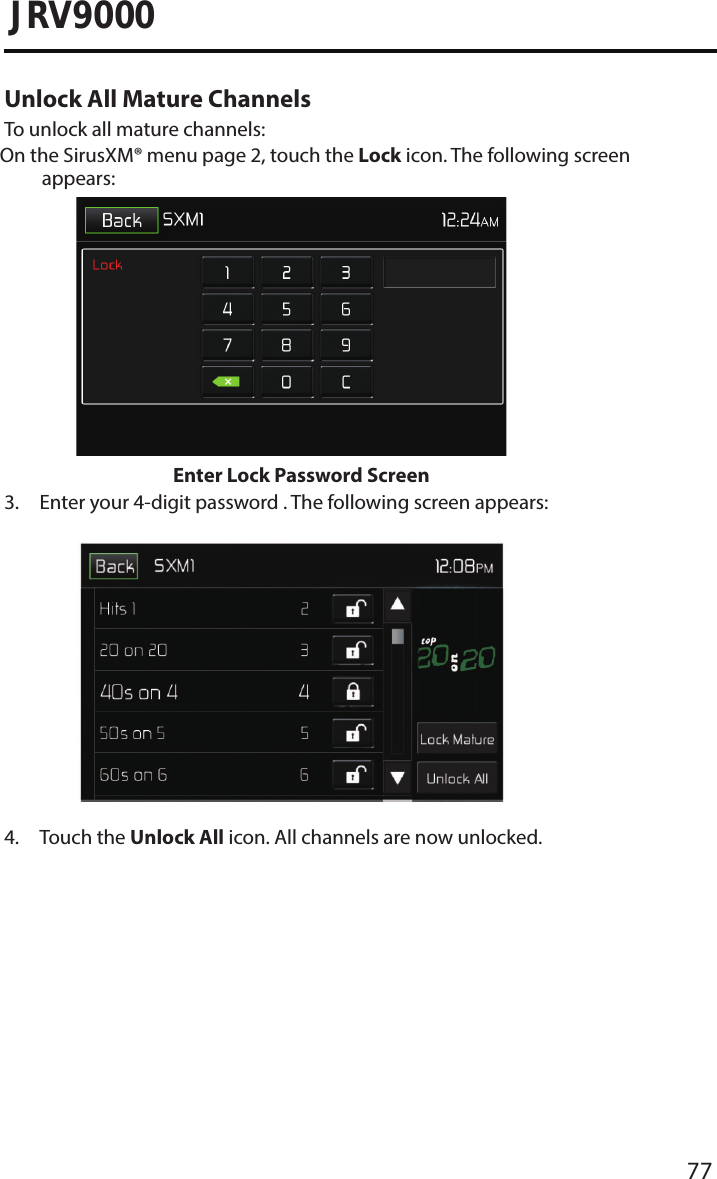
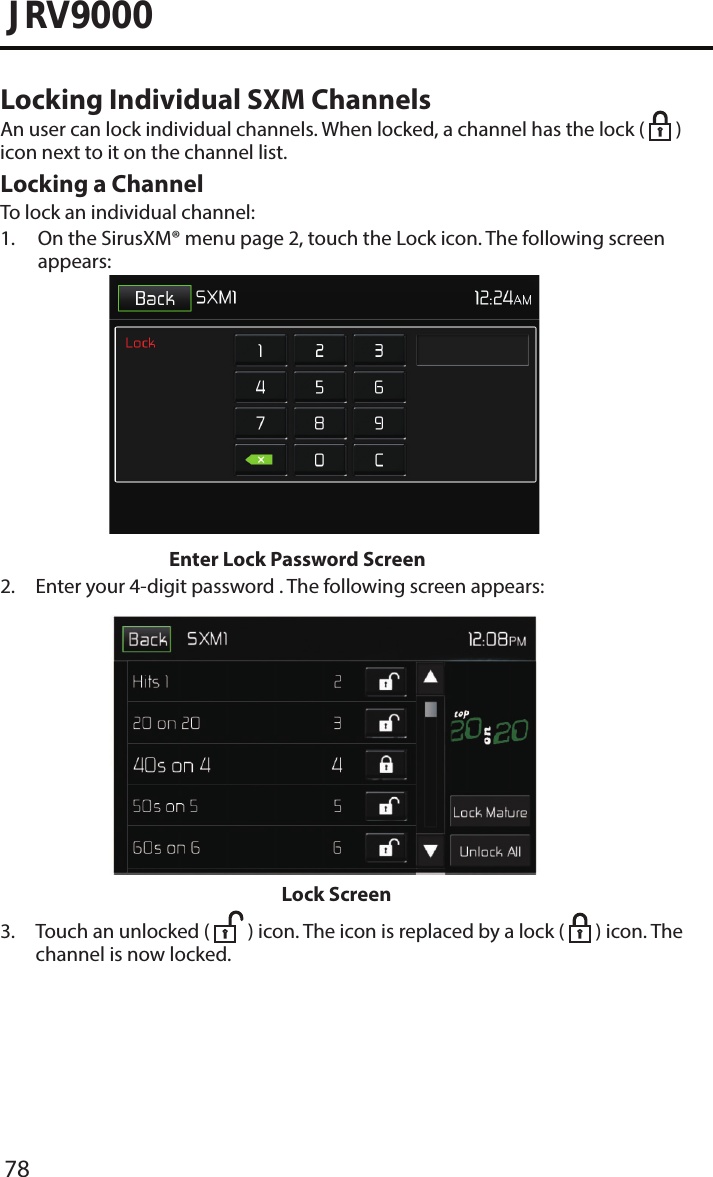
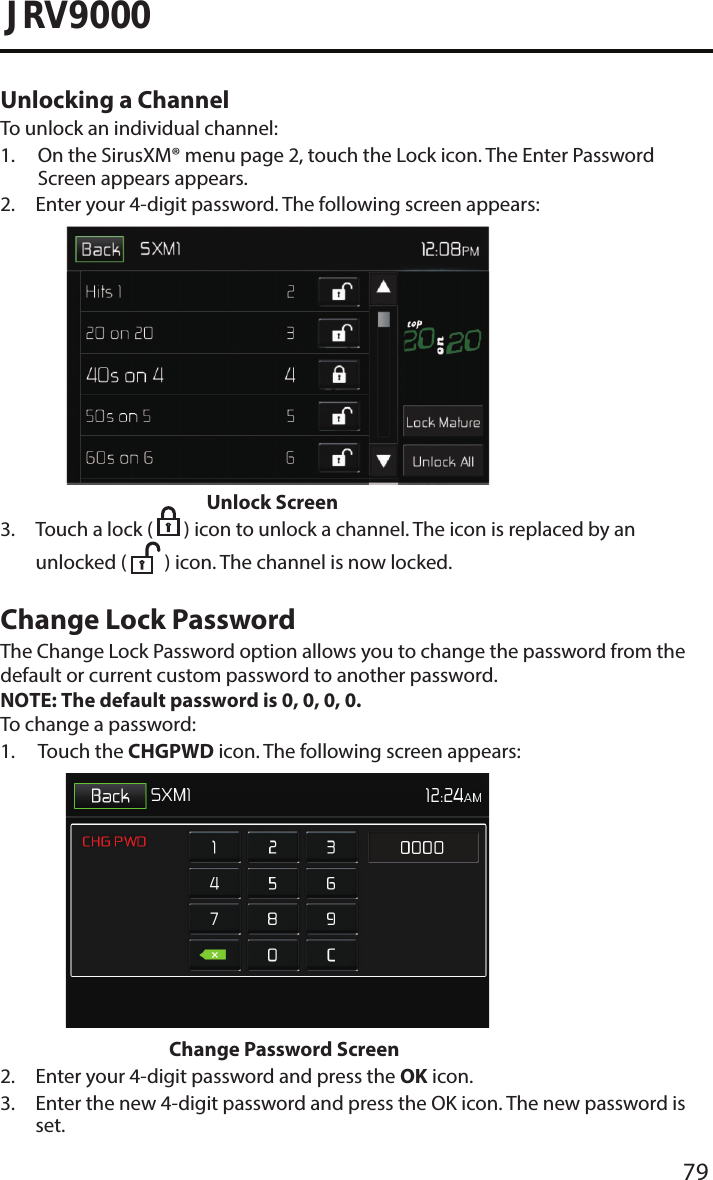
>
ASA Electronics
>
JRV9000 User Manual
User Manual
Navigation menu
Upload a User Manual
Namespaces
Wiki Guide
HTML
PDF
Info
Views
User Manual
Discussion / Help
Navigation
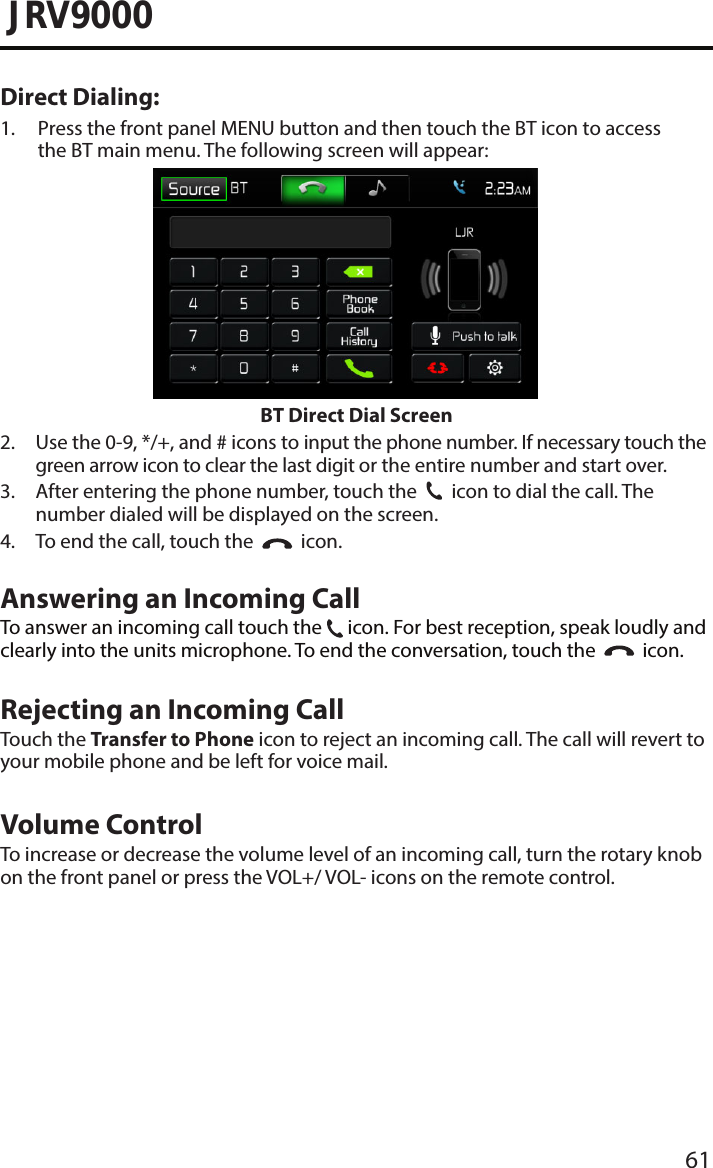
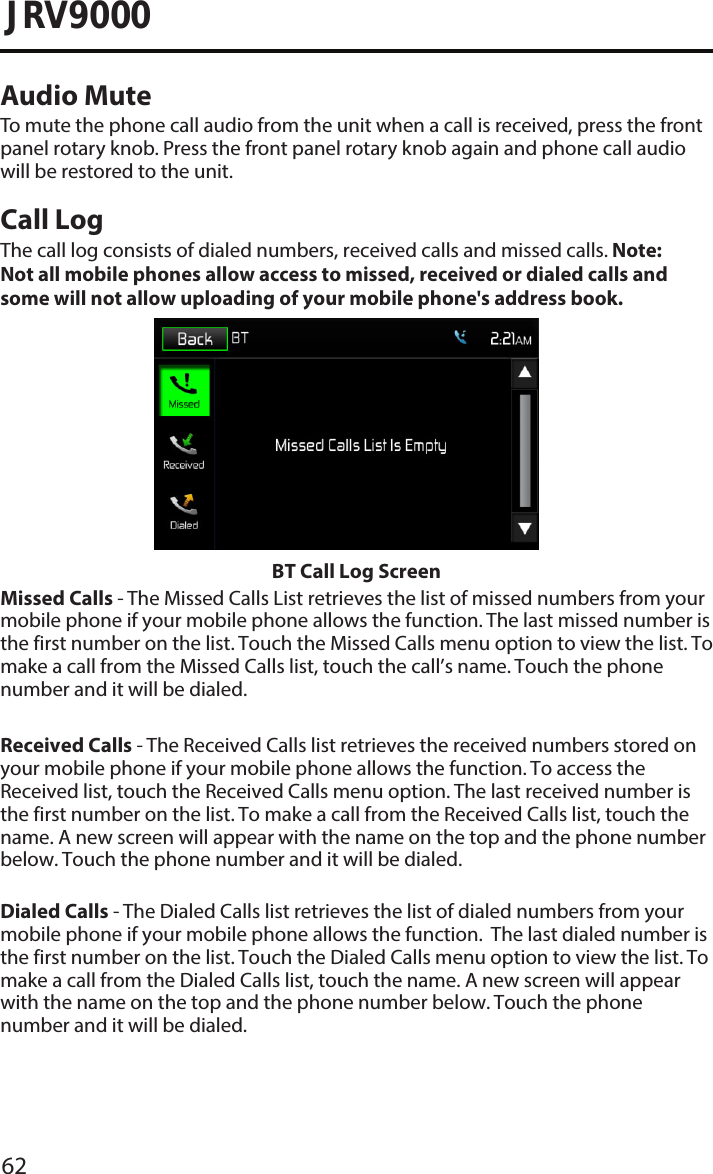
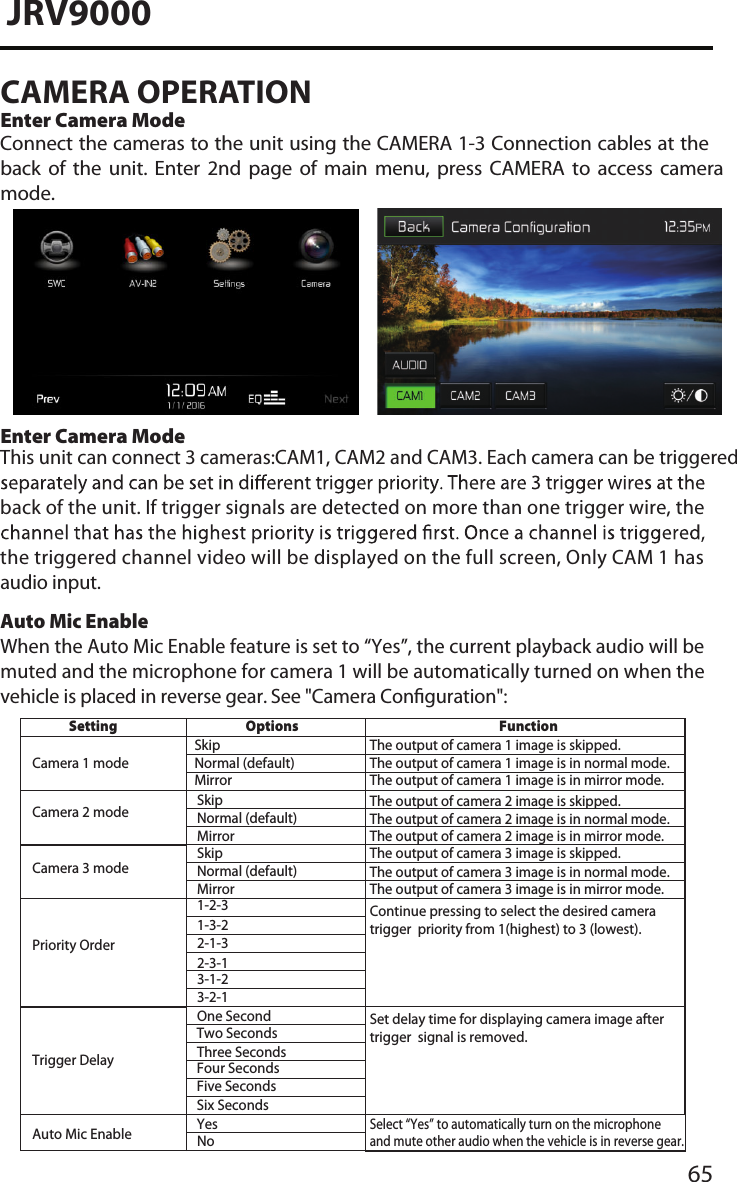
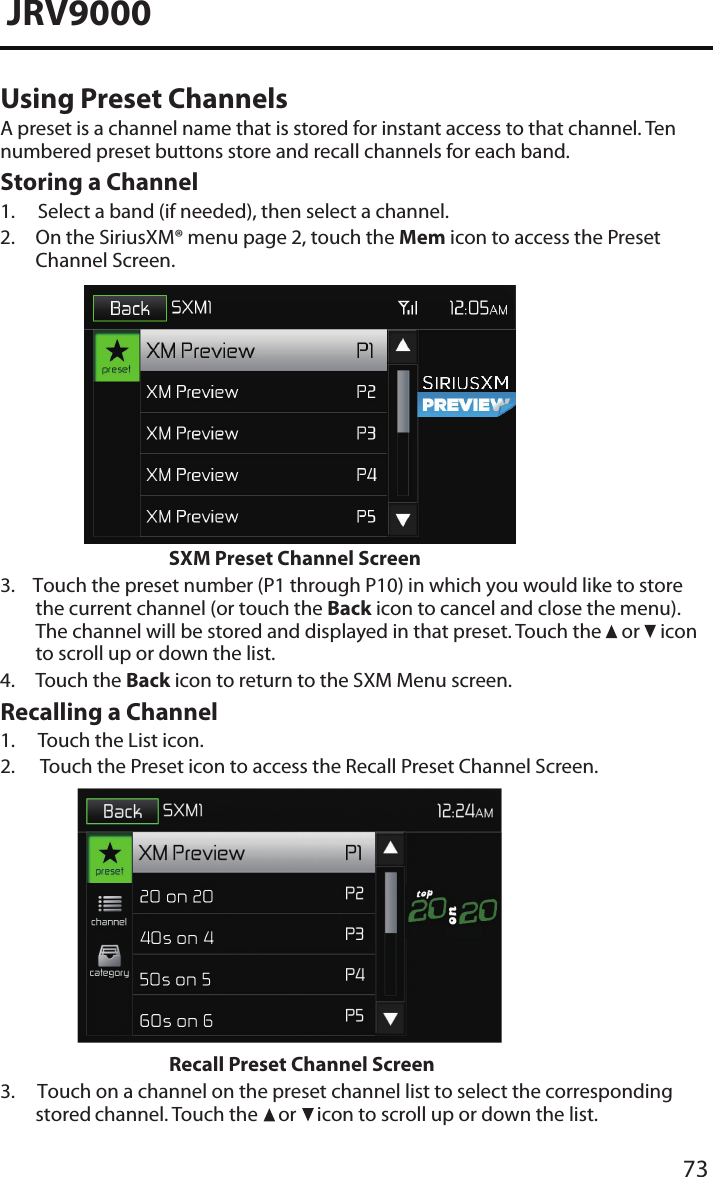
![11JRV9000Remote Control Function Description1.SOURCE (SRC) Button: Press this button to switch between and selectavailable sources. (Radio/Disc/Phone/USB/Phone-Audio/SWC/AUX-1/AUX-2/Camera)2. EJECT Button ( ): Press this button to eject a DVD/CD/MP3 disc. Disc play isstopped, the disc is ejected and the unit will change to radio operation. If thedisc is not removed from the unit and the button is pressed again, the disc willbe re-loaded. If the disc is not removed from the disc slot within 10 secondsof being ejected, it will be automatically reloaded to prevent it from beingaccidentally damaged.3. AUDIO Button: Press to display and select the audio language in DVD mode.Each time the button is pressed, the language changes. NOTE: The languagesfor audio vary from disc to disc.4. EMULOV Button (VOL + and -): Press these buttons to increase or decreasethe playback volume.7. MUTE Button: Press this button to turn the audio output ON and OFF.8. POWER Button ( ): Press this button to turn the unit ON and OFF.9. SUBTITLE (SUB-T) Button: Press to display and select the subtitle language in DVD mode. Each time the button is pressed, the subtitle language changes. NOTE:The type and number of languages for subtitles vary from disc to disc.10. MENU Button: Press this button to access the root menu of a DVD or CDduring playback. The disc will return to normal playback and the root menuwill disappear if no selection is made within 10 seconds.11. FAST FORWARD [ ] Button: Press this button to forward Disc play 2x, 4x, 8xor 20x normal speed. Press this button while in Radio mode to search availableradio station by increasing tuning frequency.5. BAND Button: Press this button to scroll though preset stations or when indisc mode, this button is used for Fast playback / Slow playback. Press thisbutton to answer an incoming BT phone call.6. REPEAT (RPT) Button: Repeat playback](https://usermanual.wiki/ASA-Electronics/JRV9000/User-Guide-3490710-Page-11.png)
![12JRV900015. FAST REVERSE [ ] Button: Press this button to reverse Disc play 2x, 4x, 8xor 20x normal speed. Press this button while in Radio mode to search availableradio station by decreasing tuning frequency.16. NUMBER Buttons (1-6): Press these buttons to directly access chapters and tracks, dialing phone numbers, or entering passwords.17. RANDOM (RDM) Button: Press this button to play tracks or chapters inrandom order while playing a disc.12. NEXT (l) Button: Press this button to skip to the next chapter, track orsong during playback of a disc. Press this button while in Radio mode tosearch available radio station by increasing tuning frequency.13. PLAY / PAUSE ( ) Button: Press this button to pause the playback of adisc. Press this button again to resume normal playback.14. PREVIOUS (l) Button :: Press this button to go back to the previouschapter, track or song during playback of a disc. Press this button while inRadio mode to search available radio station by decreasing tuning frequency.](https://usermanual.wiki/ASA-Electronics/JRV9000/User-Guide-3490710-Page-12.png)


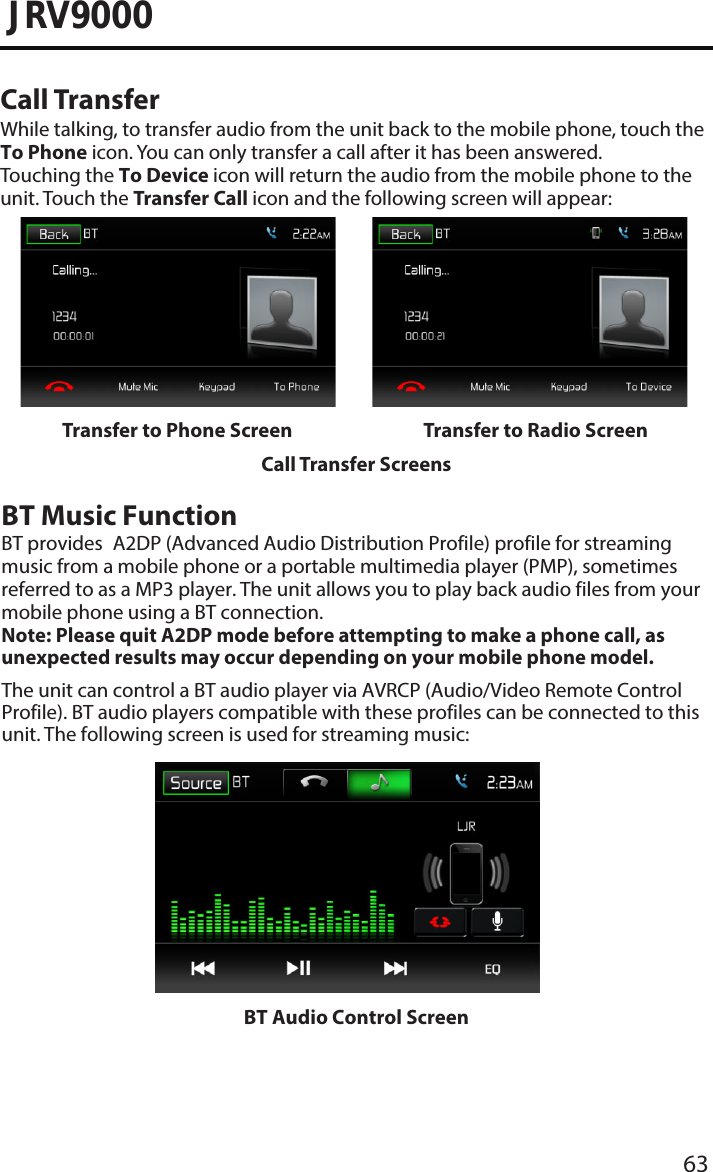
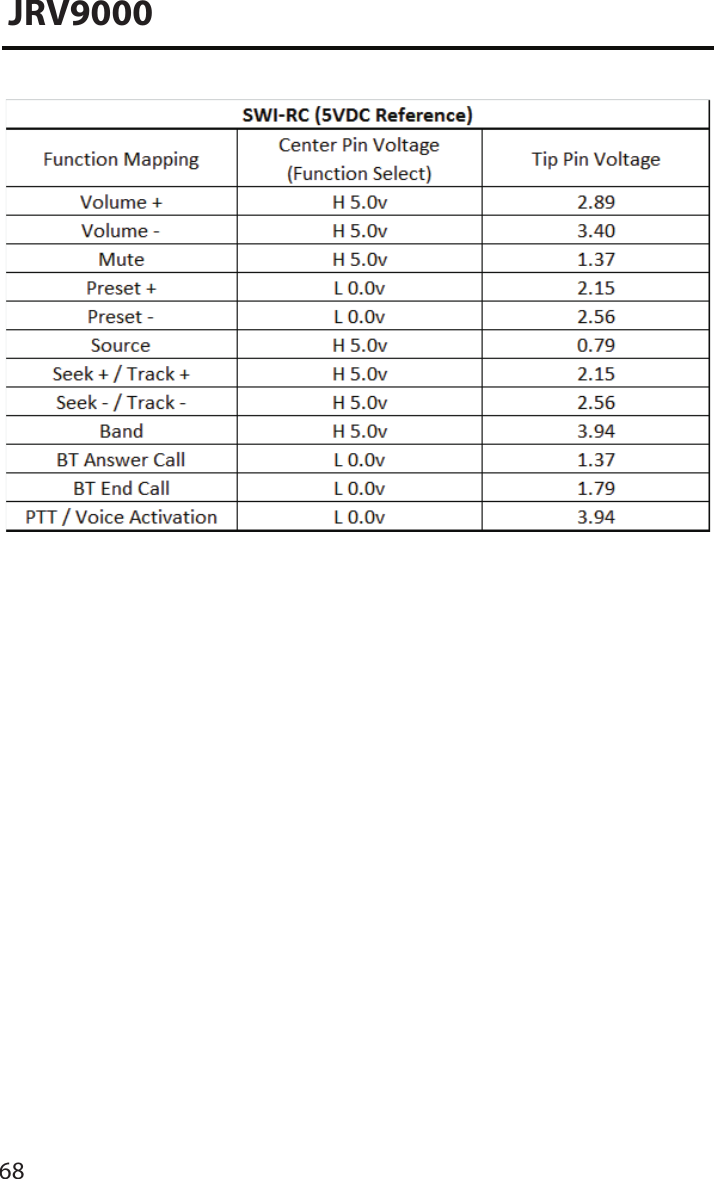
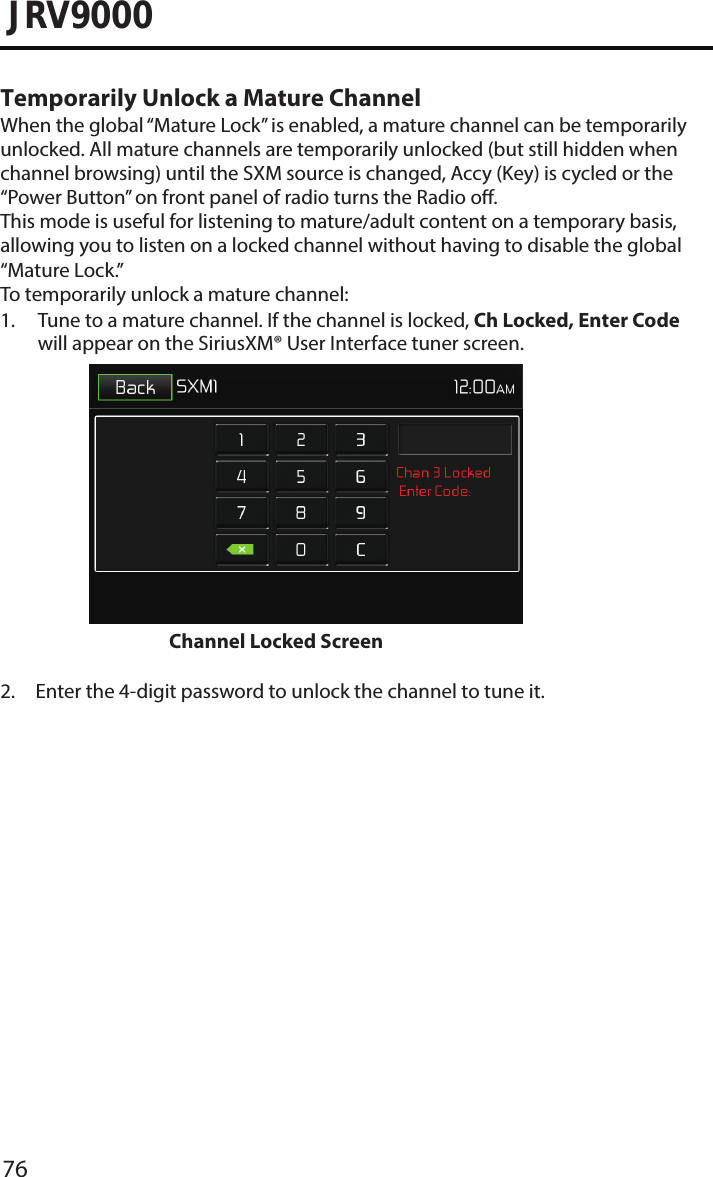
![80JRV9000SiriusXM® Radio Advisory MessagesSiriusXM® user advisory messages are listed below:Advisory Displayed CauseCheck SXM Tuner Check the SiriusXM® tuner connection on the back of the unit to ensure that it’s correctly connected. Check SXM Antenna Ensure the SiriusXM® antenna cable is connected to the SiriusXM® tuner correctly.Check the SiriusXM® antenna wire for breaks or sharp bends.Replace the antenna if necessary. If the message remains, the antenna may have been damaged.No SXM Signal The vehicle must be outside, and the antenna must have a clear view of the southern sky. The magnetic antenna must be mounted on the outside of the vehicle for the best reception.Channel Not Subscribed This channel is not included in your SiriusXM® subscription plan. Call 1-866-635-2349 to subscribe.Channel Not Available This channel is not a valid SiriusXM® channel. The channel number has been entered incorrectly, or the channel was removed from the SiriusXM® channel lineup. Channel Locked The selected channel has been locked by the parental controls, or a mature channel has been selected. A prompt to enter the unlock code will appear. Enter the unlock code.Subscription Updated An update to your SiriusXM subscription has been received by the SiriusXM tuner. Press [ Enter ] button to continue.](https://usermanual.wiki/ASA-Electronics/JRV9000/User-Guide-3490710-Page-80.png)