ASA Electronics XRV10 Car Multimedia Player User Manual
ASA Electronics Shenzhen Limited Car Multimedia Player
UserManual.wiki
>
ASA Electronics
>
XRV10 User Manual
User Manual
Navigation menu
Upload a User Manual
Namespaces
Wiki Guide
HTML
PDF
Info
Views
User Manual
Discussion / Help
Navigation

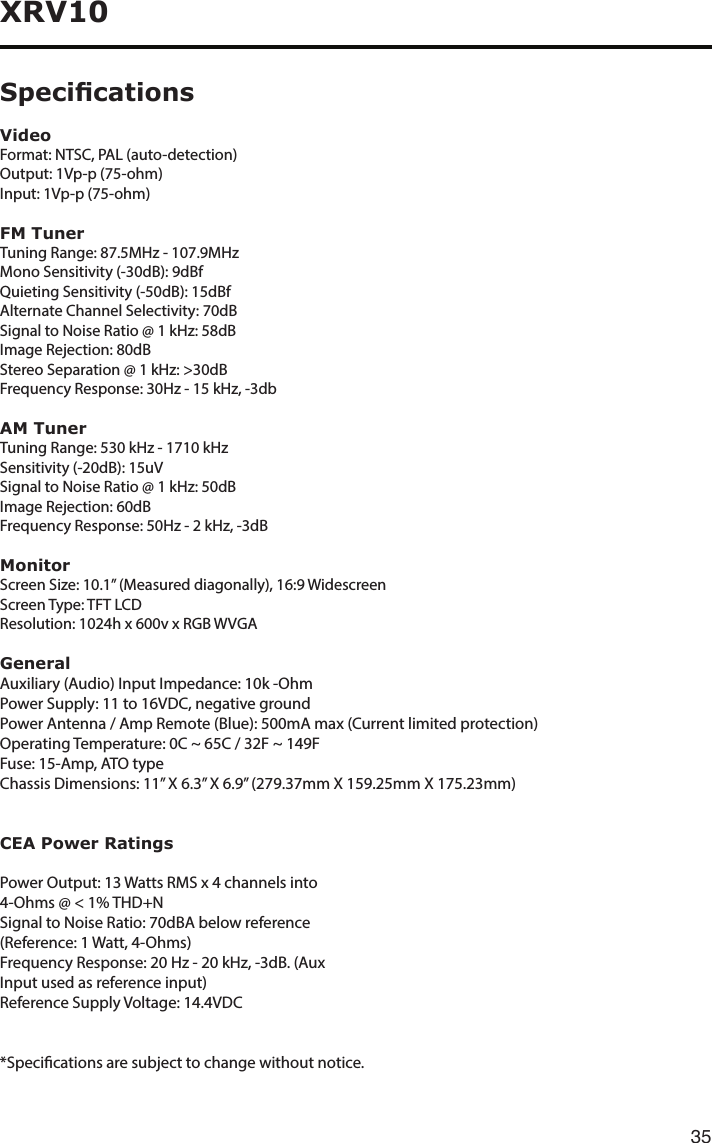
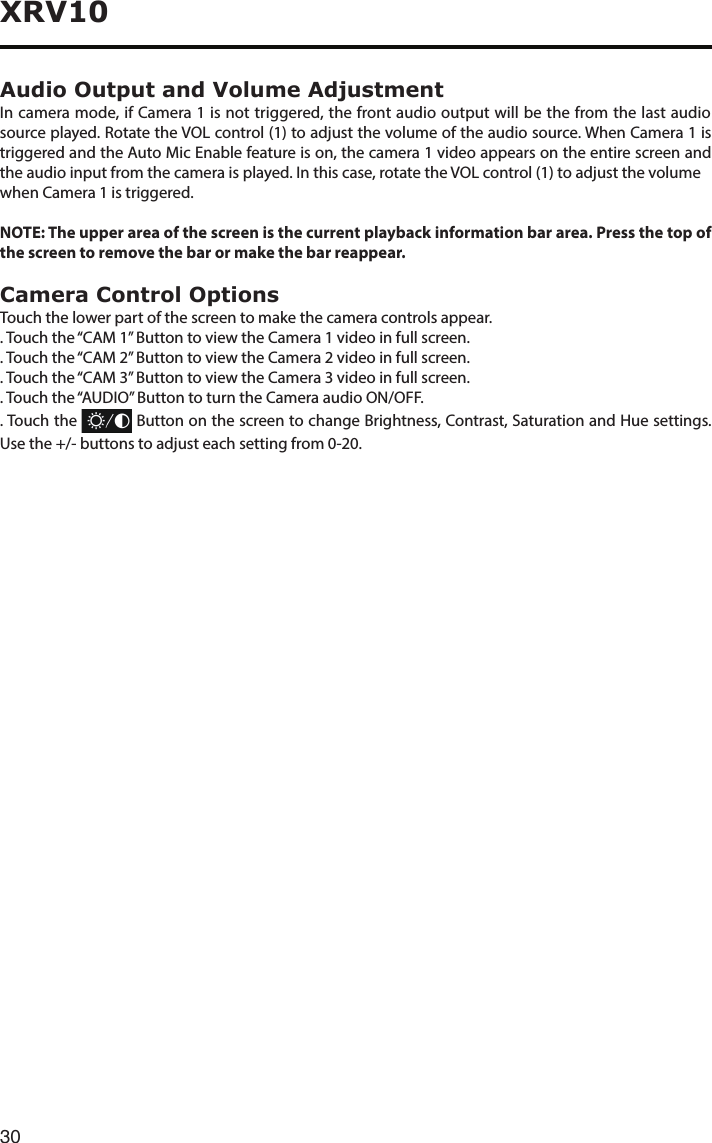
![6XRV10CONTROLS AND INDICATORS1. [ ] Knob Rotate to adjust the volume. Press momentarily to activate the MUTE function. Press again to resume normal listening. Press to turn the unit ON. Press and hold to turn the unit OFF.2. [ ] Button Press to switch between the sources menu and the previous source.3. [ ] Button Press to adjust the brightness of the screen.4. [ ] Button Next / Seek up5. [ ] Button Previous / Seek down6. Interface Cover Coversthe3.5mmAVIn,USBslot,andResetbutton.7. USB Connector Connect a USB device for playback of music/video les.8. Reset Button Press to reset system settings to factory default (except password and parental lock settings).9. A/V Input Acceptsa3.5mmjackthroughwhichsignalsfromvariousaudio/videodevicescanbeapplied to the unit.Notice:The graphic in this manual is for reference only, and may be different from the actual unit. Reference to actual unit is suggested.129378456OPEN](https://usermanual.wiki/ASA-Electronics/XRV10/User-Guide-3245769-Page-6.png)
![7XRV10NOTES ON REMOTE CONTROL USAGE• AimtheremotecontrolattheTFT/screen.• Removethebatteryfromtheremotecontrolorinsertabatteryinsulatoriftheremotecontrolwillnot be used for a month or longer.• DONOTstoretheremotecontrolindirectsunlightorinahightemperatureenvironment,oritmaynot function properly.• Thebatterywilllastfor6monthsundernormalconditions.Iftheremotecontroldoesnotwork,please change the battery.• UselithiumbatterytypeCR2025(3V)only.• DONOTrecharge,disassemble,heatorexposethebatterytore.• Insertthebatteryintheproperdirectionaccordingtothe(+)and(-)polaritymarks.• Storethebatteryinaplacewherechildrencannotreachittoavoidtheriskofanaccident.Remote Control Function Description1. SOURCE (SRC) Button: Press this button to switch between and select available sources. (Radio/Phone/USB/Phone-Audio/SWC/AUX-1/AUX-2/ Camera)3. AUDIO Button: Press to display and select the audio language. Each time the button is pressed, the language changes. NOTE: The languages for audio vary from le format.4. VOLUME Button (VOL + and -): Press these buttons to increase or decrease the playback volume.5. BAND Button: Press this button to scroll though preset stations or when in playback mode, this button is used for Fast playback / Slow playback. Press this button to answer an incoming BT phone call.6. REPEAT (RPT) Button: Repeat playback7. POWER/MUTE Button ( /MUTE ): Press this button to turn the unit ON, and long press to OFF. When on, press this button to turn the audio output ON and OFF.8. SUB-T Button: Press to display and select the subtitle language in USB mode. Each time the button is pressed, the subtitle language changes. NOTE: The type and number of languages for subtitles vary from le format.9. MENU Button: Press this button to access the root menu during playback. The playback will return to normal playback and the root menu will disappear if no selection is made within 10 seconds.10. FAST FORWARD [ ] Button:Pressthisbuttontoforwardplay2x,4x,8xor20xnormalspeed.Press this button while in Radio mode to search available radio station by increasing tuning frequency.11. NEXT ( ) Button: Press this button to skip to the next chapter, track or song during playback. Press this button while in Radio mode to search available radio station by increasing tuning frequency.12. PLAY / PAUSE ( / ) Button: Press this button to pause the playback. Press this button again to resume normal playback.13. PREVIOUS ( ) Button: : Press this button to go back to the previous chapter, track or song during playback. Press this button while in Radio mode to search available radio station by decreasing tuning frequency.14. FAST REVERSE [ ] Button:Pressthisbuttontoreverseplay2x,4x,8xor20xnormalspeed.Pressthis button while in Radio mode to search available radio station by decreasing tuning frequency.15. NUMBER Buttons (1-6): Press these buttons to directly access chapters and tracks, dialing phone numbers, or entering passwords.16. RANDOM (RDM) Button: Press this button to play tracks or chapters in random order while playing music.](https://usermanual.wiki/ASA-Electronics/XRV10/User-Guide-3245769-Page-7.png)
![8XRV10Power On / OffPress the [ ] knob on the unit to turn the unit on. The buttons on the front of the unit light up for a moment and the current mode status appears in the LCD. Press and hold the [ ] knob to power off the unit. Playing Source SelectionPress the [ ] button on the front panel to display the playing source menu.1. Prev or Next: Touch to view the previous or next page of playing sources.2. Playing source icon: touch to access corresponding work mode.3. Clock4. Enter EQ setting menuVolume AdjustmentTo increase or decrease the volume level, turn the [ ] knob on the front panel. The volume range is from “0” to “50”. The LCD or TFT screen displays the volume level for 3 seconds.MutePress [ ] knob to mute the volume from the unit. Press again to restore the volume. [ ] is displayed on the LCD. Adjusting the volume or using any of the audio setup features cancels the mute function. Parking Brake Inhibit• Whenthe“BRAKE” cable isconnectedtothebrakeswitch,thedisplayontheTFTmonitorwill display video only when the vehicle is applied.• ParkingbrakefunctionisoverriddenwhenthevideosourceissettoREVERSE.• Whentheparkingbrakeinhibit is active, the front monitor displays Warninginformation,preventingthedriverfromwatchingcontentwhiledriving.Rearvideoscreensarenotaffected.DemoDemo mode is used to illustrate the functions of the unit. Touch the screen to exit it.Demomodeisdefaulton.YoucanturnitoffinSettingmenu.Audible Beep ConrmationAnaudiblebeeptoneconrmseachfunctionselection.TheBeeptonecanbedisabledthroughtheSetupmenu.QUICK START GUIDE1 123](https://usermanual.wiki/ASA-Electronics/XRV10/User-Guide-3245769-Page-8.png)
![9XRV10EQUALIZER CONTROL MENUThe Audio Control feature allows you to easily adjust your audio system to meet the acoustical characteristics of your vehicle, which vary depending on the type of vehicle and its measurements. Proper setting oftheFaderandBalancebooststheeectsofthecabinequalizer.Select Preset Equalizer1. Enter the EQ setup mode Touch the [ EQ ] icon in the user interface and the EQ setup interface will display on the screen.2. Select EQ mode Touch the desired EQ selection: [ Optimal ] / [ Classic ] / [ Rock ] / [ Jazz]/[Techno]/[Pop],andtheEQmodewillchange.Adjust EQ ParametersTo adjust EQ parameters, select [User] and touch and drag the parameters adjustment bar. [ User ]: Set the desired audio eect. [ Flat ]: Select the original audio eect.[ Reset ]: Reset the user settings.Adjust Fader BalanceYou can adjust front/back/left/right balance of the speaker and the subwoofer volume to get balanced listening effect according to the surroundings and your interest. 1. Enter the EQ setup mode Touch the [ Fader Balance ] icon in the user interface and the EQ setup interface will display on the screen.2. Adjust subwoofer volume Touch [ ] / [ ]toadjustsubwoofervolumefrom-12to+12.3.Adjustfader/balancevalue Touch [ ] / [ ] / [ ] / [ ] to adjust fader / balance value from -20to+20. [ ]: Front speaker [ ]: Rear speaker [ ]: Left speaker [ ]: Right speakerNotes:1. The parameters of the EQ modes has been preset and you can not change them besides ‘User’.2. The value of Sub is independent of EQ mode and can be adjusted separately.](https://usermanual.wiki/ASA-Electronics/XRV10/User-Guide-3245769-Page-9.png)
![10XRV10Display System1. Touch the upper left corner to display main menu. 2. Touch [ Settings ]. The settings menu is displayed.Adjust General Settings1. Touch[General],ifnecessary.2. Touch to highlight a setting.3. Touchontheoptiontodisplay/selectanoption.General settings Options DescriptionRadio Region USA/China/Japan/Europe/Europe (LW)/OIRT Select one that matches your location.Radio Lo/Dx Local Select radio local or distance. When select local, only stations with sucient strength will be detected.DistanceTFT Standby O/10s/20s Select the TFT standby status.Display Adjust Night/Dark/Normal/Bright Select the brightness of the screen.Beep On Turn on the beep sound. Each time you press a button, the unit beeps.O Turn o the beep sound.Illumination Setup the the backlight color of the buttons..UI Color Green/Red/Amber/Blue/Purple Select the UI color.Demo On Enable the demo of operations.O Disable the demo of operations.Camera Conguration To show the camera settings.4. Touch top left of the screen to exit. Adjust sound settings1. Touch [Audio].2. Touch an option repeatedly to select:Sound settings Options DescriptionSubwoofer On Turn on the subwoofer.O Turn o the subwooferSub Woofer Filter80HzSelect subwoofer lter criteria.120Hz160Hz3. Touchtopleftofthescreentoexit.SYSTEM SETTINGS](https://usermanual.wiki/ASA-Electronics/XRV10/User-Guide-3245769-Page-10.png)
![11XRV10Adjust Time Settings1. Touch [ Time ].2. Touch an option repeatedly to select:Time settings Options DescriptionDate Y/M/D Touch [ ] or [ ] to set year, month and day. Press and hold for rapid adjustmentClock Mode 12Hr/24Hr Touch [12Hr] or [24Hr] to switch clock mode.Time H/M/AM/PMTouch [ ] or [ ] to set hour and minute. Press and hold for rapid adjustmentTouch [ ] or [ ] to set AM/PM (only for 12Hr).3. Touchtopleftofthescreentoexit.Adjust Language Settings1. Touch [Language].2. Touch an option repeatedly to select:Language settings DescriptionOSD Select on-screen display language.3. Touchtopleftofthescreentoexit.Adjust Bluetooth Settings1. Touch [ Bluetooth ], if necessary.2. Touch to highlight a setting.3. Touchontheoptiontodisplay/selectanoption.General settings Options DescriptionBluetooth On/O Select Bluetooth On or O.Auto Connect On/O Select Auto Connect On or O.Auto Answer On/O Select Auto Answer On or O.Pairing Code Setup the pairing code.Reset the system1. Touch [Reset].2. Touch an option repeatedly to select:Reset settings DescriptionLoad Factory Load the factory settings.3. Touchtopleftofthescreentoexit.](https://usermanual.wiki/ASA-Electronics/XRV10/User-Guide-3245769-Page-11.png)
![12XRV10Adjust Volume SettingsYou can set dierent volume for dierent modes. 1. Touch [Volume]. The volume setting sub-menu is displayed.2. Touch to select a source.3. Selectavaluefrom00to06. When switching to the source, the volume increases automatically.4. Touch top left of the screen to exit. Version Sub-Menu FeaturesThe Version Sub-Menu is used to identify the model and resident operating system as well as the hardware and software versions.Exiting the System Setup MenuTo exit setup mode and resume normal playback, touch the Source icon on the screen.](https://usermanual.wiki/ASA-Electronics/XRV10/User-Guide-3245769-Page-12.png)
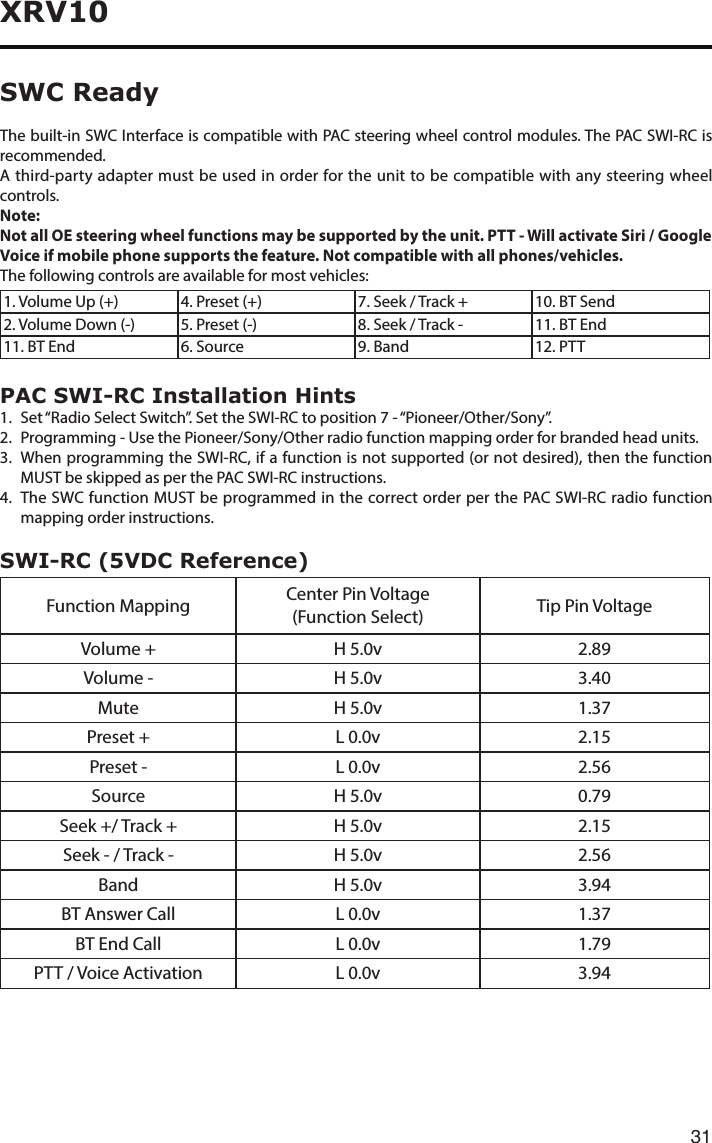
![13XRV10Select Radio as Playing SourceOpen the Source Menu and then touch [Radio].Select One Radio BandTouchthe[Band]iconontheuserinterfacetoselectoneradiobandamongFM1,FM2,FM3,AM1andAM2.TuneAuto TuningPress [ ] / [ ] icon on the user interface to seek a higher / lower station.To stop searching, repeat the operation above or press other keys having radio functions.Note:When a station is received, searching stops and the station is played.Manual TuningMethod 1:During manual tuning, the frequency will be changed in steps.Press and hold [ ] / [ ] icon on the user interface more than 1 second to tune in a higher / lower station.RADIO TUNER OPERATION1. Return to home menu.2. Preset stations list.3. Show/Hidethenextlineofoptionsmenu. 4. Seek backward Tune backward(long press)5. Auto searching.6. Seek forward Tune forward(long press)7. Band switch.8. Show RDS options9. Show the save list10. Choose local or distant seeking mode.11. Enter frequency directly.12. Enter EQ menu.Tuner TFT Display 123 4 5 76910 11 128](https://usermanual.wiki/ASA-Electronics/XRV10/User-Guide-3245769-Page-13.png)
![14XRV10Method 2: 1. Touch the numeric keypad icon [ Direct Entry ]. Numeric keyboard is displayed, touch numbers to input frequency.2. Touch [ ] to delete the input numbers step by step.3. Touch[OK]toenter.Preset StationTheunithas5bands,suchasFM1,FM2,FM3,AM1,AM2,andeachbandcanstore6stations;hencetheunitcanstore30stationsintotal.Search Stations AutomaticallyTouch [ AS/PS ] to search station and store 6 strongest stations in current band automatically.Manual Store1. Tune to a station.2. Press and hold one of the channels 1 to 6 on the screen to save the selected station.Tune to a Preset Station1. At radio mode, select a band (if needed).2. Touch one of the preset channels on the screen.Local SeekingPress the [ More ] and [ Local/Distance ] icons to choose the Radio Distance or Local .When the [ Local ] displays, only stations with a strong signal strength will be detected . EQ SelectionPress the [ More ] and [ EQ ] icon to enter the EQ setup menu.Option ScreenTouching the Options icon will display the following RDS, CT and PTY functions on the Tuner TFT LCD display screen.RDS ON/OFF - The Radio Data System (RDS) enables traffic reports to be received and provides many facilities, including enabling the radio station name to be displayed.PTY - The Program Type (PTY) function displays the program category of the current station such as category (news, sports, talk etc.) Use the scroll bar to select various categories. After selecting a category, press the Search or down arrow icon to scan to the next station of the selected category. Touching the Back icon returns the user to main tuner screen.](https://usermanual.wiki/ASA-Electronics/XRV10/User-Guide-3245769-Page-14.png)
![15XRV10Connecting the USB Device1. Open the USB door.2. Connect an USB device into the USB connector. Play starts automatically.NOTES:1. If there are audio files supported on the USB stick, the system will enter the audio files menu automatically. If there are no audio les, but there are video les supported on the USB stick, the system will enter the video les menu automatically. If there are no audio or video les, but there are picture les supported on the USB stick, the system will enter the picture les menu automatically. If there no above audio/video/picture les supported in the USB stick, the screen will display “Load Error!”.2. Not all USB devices are compatible with the unit.Removing the USB Device1. Select another source in the main menu.2. Remove the USB device.Audio playbackTheprinciplesofaudioplayback(MP3/WMA)fromdatacarriersareidenticalforallsources.Select the desired source via the main menu.The device changes to the desired source and the playback starts.If the playback does not start with the audio playback, touch the [ List ] icon to change to the folder/le list.Touch the [ ] icon to display all the folders and les of the data carrier.- Or -Press the [ ] icon to display all the audio les of the data carrier.After starting a title, the playback menu is displayed.USB OPERATION](https://usermanual.wiki/ASA-Electronics/XRV10/User-Guide-3245769-Page-15.png)
![16XRV1011. Show/Hide the next line of options menu.2. Display the folder/le list.3. Shortpress:Previoustrack. Long press: Fast backward.4. Pause playback and continue playback.5. Short press: Next track. Long press: Fast forward.Tap on [ More ] to display additional operating options of the playback menu.6. Shue playback.7. Start and end REPEAT function. Repeat mode: Repeat One → Repeat Folder → Repeat All → Repeat O8. Displayequalizer.9. Display keypad to directly enter the number of the desired title.Video playbackSelect the desired source via the main menu.The device changes to the desired source and the playback starts.If the playback does not start with the video playback, touch the [ List ] icon to change to the folder/le list.Touch the [ ] icon to display all the folders and les of the data carrier.- Or -Touch the [ ] icon to display all the audio les of the data carrier.If you selected a movie, the playback is started. During the movie playback, the playback menu is hidden.](https://usermanual.wiki/ASA-Electronics/XRV10/User-Guide-3245769-Page-16.png)
![17XRV10Brieytouchthescreenoncetodisplaytheplaybackmenuagain.The playback menu is shown.11. Show/Hide the next line of options menu.2. Enter EQ menu.3. Shortpress:Previousmovie. Long press: Fast backward.4. Pause playback and continue playback.5. Short press: Next movie. Long press: Fast forward.6. Display keypad to directly enter the number of the desired title.Tap on [ More ] to display additional operating options of the playback menu.7. Display the folder/le list.8. StartandendREPEATfunction. Repeat mode: Repeat One → Repeat Folder → Repeat All → Repeat O9. Adjust the brightness, contrast, and saturation.Image playbackSelect the desired source via the main menu.The device changes to the desired source and the playback starts.If the playback does not start with the image playback, touch the [ List ] icon to change to the folder/le list.Touch the [ ] icon to display all the folders and les of the data carrier.- Or -Touch the [ ] icon to display all the images of the data carrier.If you selected a image, the playback is started. During the playback, the playback menu is hidden.Brieytouchthescreenoncetodisplaytheplaybackmenuagain.](https://usermanual.wiki/ASA-Electronics/XRV10/User-Guide-3245769-Page-17.png)
![18XRV1011. Show/Hide the next line of options menu.2. Enter EQ menu.3. Previousimage.4. Pause playback and continue playback.5. Next image.6. Display keypad to directly enter the number of the desired title.Tap on [ More ] to display additional operating options of the playback menu.7. Display the folder/le list.8. Showtheoriginalphoto.9. Rotate images .10. Zoom in/out.11. Adjust the brightness, contrast, and saturation.](https://usermanual.wiki/ASA-Electronics/XRV10/User-Guide-3245769-Page-18.png)
![19XRV10You can make or receive phone calls with Bluetooth-enabled phones through the unit. You can also listen to music from a Bluetooth-enabled device.Pair the Bluetooth-enabled DevicesTo connect your Bluetooth device to the unit, you need to pair the device to the unit. Pairing needs only to be done once. You can pair up to ve devices. You also can search for Bluetooth devices by mobile phone.1. Turn ON the Bluetooth function on the device.2. Search for Bluetooth devices by mobile phone. 3. SelecttheBluetoothdeviceID(shownonthescreenoftheunit)inthepairing list.4. Enterdefaultpassword“1234”ifnecessary. Tip:• TheoperationalrangebetweenthisunitandaBluetoothdeviceisapproximately 5 meters .• BeforeyouconnectaBluetoothdevicetothisunit,familiarizeyourselfwith the Bluetooth capabilities of the device.• CompatibilitywithallBluetoothdeviceisnotguaranteed.• AnyobstaclebetweenthisunitandaBluetoothdevicecanreducetheoperational range.• Keepthisunitawayfromanyotherelectronicdevicethatmaycauseinterference.Disconnect Bluetooth DeviceTo disconnect one device, touch [ ] .Tip• Thedevicewillalsobedisconnectedwhenthedeviceismovedbeyond the operational range.• Ifyouwanttoreconnectthedevicetotheunit,placeitwithintheoperational range.• Ifyoudonotwanttoreconnectthedevicetotheunitautomatically,touch [ ], then set [ Auto connect ] to Off (the green icon turns grey). For details, see the “Adjust Bluetooth Settings” section.Make a Call1. Select Bluetooth function in the home menu.2. Pair the phone with the unit.3. Searchforphonenumberfromthefollowinglist: [Phone Book] [Call History] [Missed calls] [Received calls] [Dialed calls]Or touch the number pad directly, then touch [ ] to dial.Bluetooth Mode](https://usermanual.wiki/ASA-Electronics/XRV10/User-Guide-3245769-Page-19.png)
![20XRV10Receive a CallBy default, all incoming calls are received automaticaly.1. If there is an incoming call, the screen will appear “Incoming call...”. 2. You may touch the screen to select [ ] or [ ]. Speak into the Bluetooth microphone.Tip• Youcanselecttoreceivecallsmanuallybyset[AutoAnswer]toOstatus.Push to TalkPress[PushtoTalk]onthescreentoaccessSiriorGoogleVoicethroughthe head unit when connected via BT. You mobile phone must support SiriorGoogleVoiceinorderforthisfeaturetobesupportedonthehead unit.NOTE: Samsung “S” Voice and other third-party apps may not be supported.Adjust Bluetooth Settings1. In Bluetooth menu, touch [ ]. The option menu is displayed.2. Touch on the selected option to change the setting.∙ [BT]: To turn on or o “Bluetooth” function.∙ [Auto Connect]: To turn on or o “Auto connect” function.∙ [Auto Answer]: To turn on or o “Auto answer” function.∙ [Pairing code]: To set paring code.∙ [Phonebook Sync]: Phonebook sync may take several minutes to load on initial setup.Music ModeA2DPA2DP is short for Advanced Audio Distribution Profile. The mobile phones supporting this function can transmit stereo audio, whereas the ones not supporting this function can transmit mono audio only.AVRCPAVRCP is short for Audio/Video Remote Control Profile. The mobile phones supporting this function can control the playback of a Bluetooth audio player.In the mode of the music player working, if you want to make a phone call, you can press the number keys on the mobile phone. At the same time the music player will stop. The TFT screen will display “Calling”, after the call received, the voice will be transferred to the unit. When the call ends, the screen will display music playing menu. If there is an incoming phone call, the music player will stop, and the screen will display “Incoming”. When the call ends, the screen will display music playing menu.](https://usermanual.wiki/ASA-Electronics/XRV10/User-Guide-3245769-Page-20.png)
![21XRV10Accessing iPod modeTouch [iPod] on the main menu to enter iPod menu.If [iPod] is not on the current source menu, hold the center of screen and drag left/right to show more icons.Pausing play1. Touch the [ ] button on the bottom of the screen to pause play. The playback pauses, and [ ] button becomes [ ] .2. Touch [ ] button to resume play.Selecting a trackTrack-up Touch the [ ] button to move to the beginning of the next track.Track-down1. Touch the [ ] button to move back to the beginning of the current track.2. Touch the [ ] button twice to move back to the beginning of the previous track.Fast forward/Fast reverseFast forwardTouch and hold the [ ] button .Fast reverse Touch and hold the [ ] button .Repeat playThis function allows you to play the track repeatedly.Touch the [ ] button to select Repeat one or Repeat all.Random playThis function allows you to play all tracks recorded in a random order.Touch the [ ] button to perform random play. Touch it to resume normal play.Connect an iPod or iPhone to the unit via an iPod cable.iPod Mode](https://usermanual.wiki/ASA-Electronics/XRV10/User-Guide-3245769-Page-21.png)
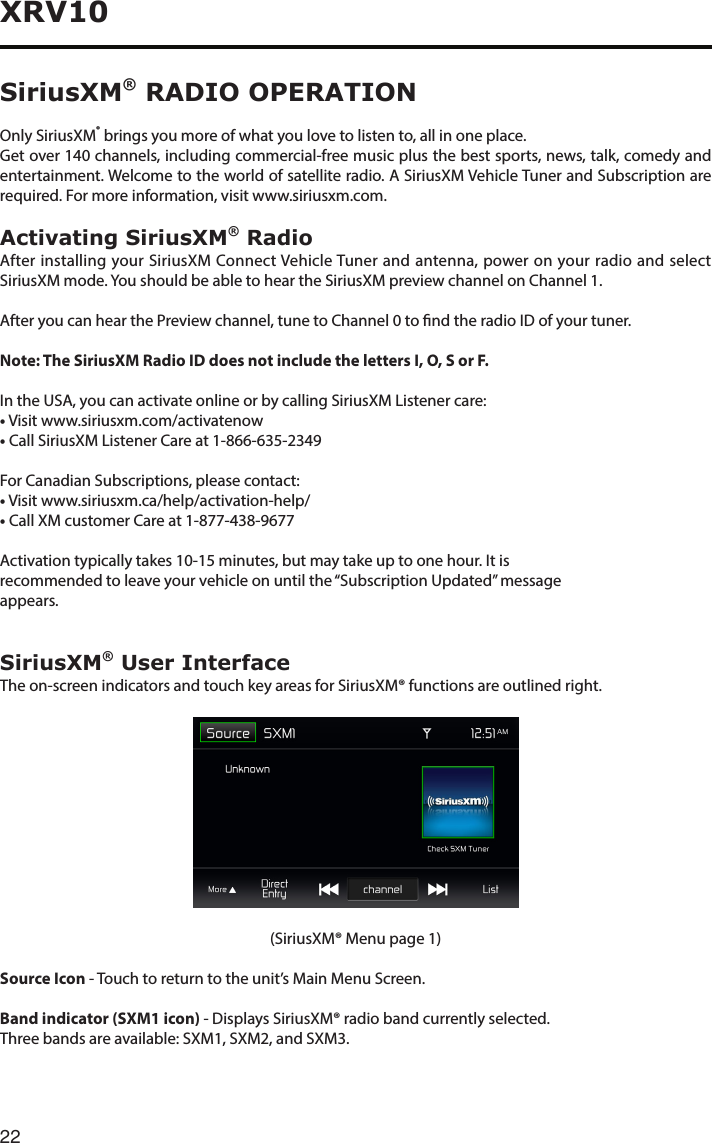
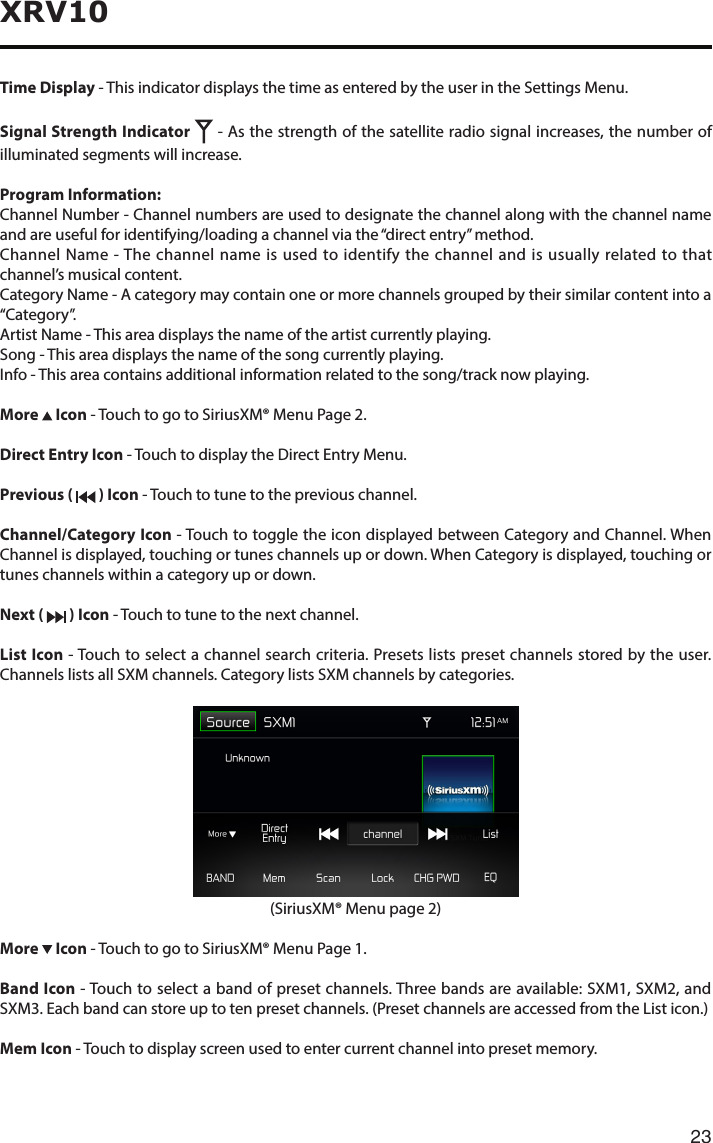
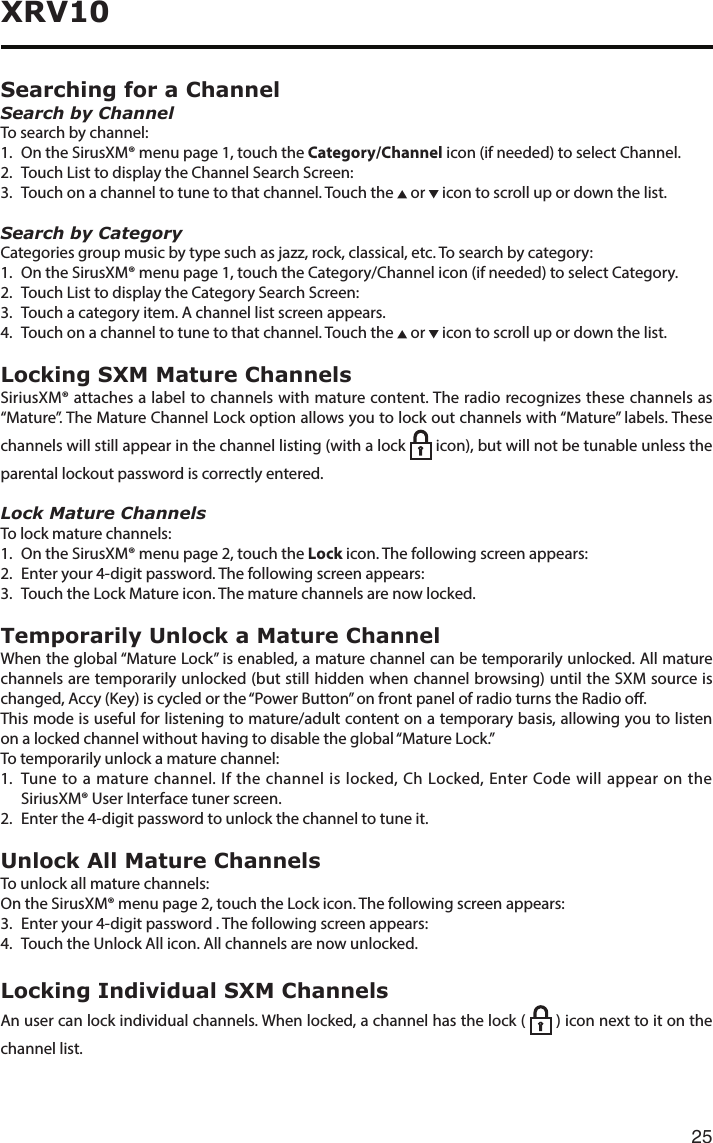
![24XRV10Scan Icon - Touch to scan all channels starting at channel 1. The tuner will pause for approximately e seconds at that channel. Touch scan again to listen to that channel. If scan is not touched, the tuner will automatically seek the next channel.Lock Icon - Touch to display the SXM Lock Screen.CHG PWD Icon - Touch to go to the change password screen.EQ Icon-TouchtoaccesstheEqualizerlevelsettingsmenu.Switching to SiriusXM® Radio• Touchthetopleftcornerofthescreen(theSourcebox)toviewtheMainMenuscreen.FromtheMain menu screen, touch the SXM icon.• Pressthe[ ] button on the front panel to switch to the SXM source.Selecting the SiriusXM® BandTouch the Band icon on the SXM Menu screen to change between the following bands: SXM1, SXM2, andSXM3.Seek Tuning• Tofastseekthenexthigherchannel,touchandholdtheicon .• Tofastseekthenextlowerchannel,touchandholdtheicon .Direct TuningTo enter a SiriusXM® radio channel directly:1. On the SiriusXM® menu page 1, touch the Direct Entry icon to display the Direct Entry Menu.2. Enter the desired SiriusXM® radio channel using the on-screen number pad then touch the Ok icon. If you wish to delete an entry number touch the X icon.3. Toexitthescreenwithoutchangingthechannel,touchtheBack icon.Using Preset ChannelsA preset is a channel name that is stored for instant access to that channel. Ten numbered preset buttons store and recall channels for each band.Storing a Channel1. Select a band (if needed), then select a channel.2. On the SiriusXM® menu page 2, touch the Mem icon to access the Preset Channel Screen.3. Touchthepresetnumber(P1throughP10)inwhichyouwouldliketostorethecurrentchannel(ortouch the Back icon to cancel and close the menu). The channel will be stored and displayed in that preset. Touch the or icon to scroll up or down the list.4. Touch the Back icon to return to the SXM Menu screen.Recalling a Channel1. Touch the List icon.2. Touch the Preset icon to access the Recall Preset Channel Screen.3. Touchonachannelonthepresetchannellisttoselectthecorrespondingstoredchannel.Touchtheor icon to scroll up or down the list.](https://usermanual.wiki/ASA-Electronics/XRV10/User-Guide-3245769-Page-24.png)
![26XRV10Locking a ChannelTo lock an individual channel:1. On the SirusXM® menu page 2, touch the Lock icon. The following screen appears:2. Enter your 4-digit password . The following screen appears:3. Touchanunlocked( ) icon. The icon is replaced by a lock ( ) icon. The channel is now locked.Unlocking a ChannelTo unlock an individual channel:1. On the SirusXM® menu page 2, touch the Lock icon. The Enter Password Screen appears appears.2. Enter your 4-digit password. The following screen appears:3. Touchalock( ) icon to unlock a channel. The icon is replaced by an unlocked ( ) icon. The channel is now locked.Change Lock PasswordThe Change Lock Password option allows you to change the password from the default or current custom password to another password.NOTE: The default password is 0, 0, 0, 0.To change a password:1. Touch the CHGPWD icon. The following screen appears:2. Enteryour4-digitpasswordandpresstheOKicon.3. Enterthenew4-digitpasswordandpresstheOKicon.Thenewpasswordisset.SiriusXM® Radio Advisory MessagesSiriusXM® user advisory messages are listed below:Advisory Displayed CauseCheck SXM Tuner Check the SiriusXM® tuner connection on the back of the unit to ensure that it’s correctly connected.Check SXM Antenna Ensure the SiriusXM® antenna cable is connected to the SiriusXM® tuner correctly.Check the SiriusXM® antenna wire for breaks or sharp bends.Replace the antenna if necessary. If the message remains, the antenna may have been damaged.No SXM Signal The vehicle must be outside, and the antenna must have a clear view of the southern sky. The magnetic antenna must be mounted on the outside of the vehicle for the best reception.Channel Not Subscribed This channel is not included in your SiriusXM® subscription plan. Call 1-866-635-2349tosubscribe.Channel Not Available This channel is not a valid SiriusXM® channel. The channel number has been entered incorrectly, or the channel was removed from the SiriusXM® channel lineup.Channel Locked The selected channel has been locked by the parental controls, or a mature channel has been selected. A prompt to enter the unlock code will appear. Enter the unlock code.Subscription Updated An update to your SiriusXM subscription has been received by the SiriusXM tuner. Press [ Enter ] button to continue.](https://usermanual.wiki/ASA-Electronics/XRV10/User-Guide-3245769-Page-26.png)
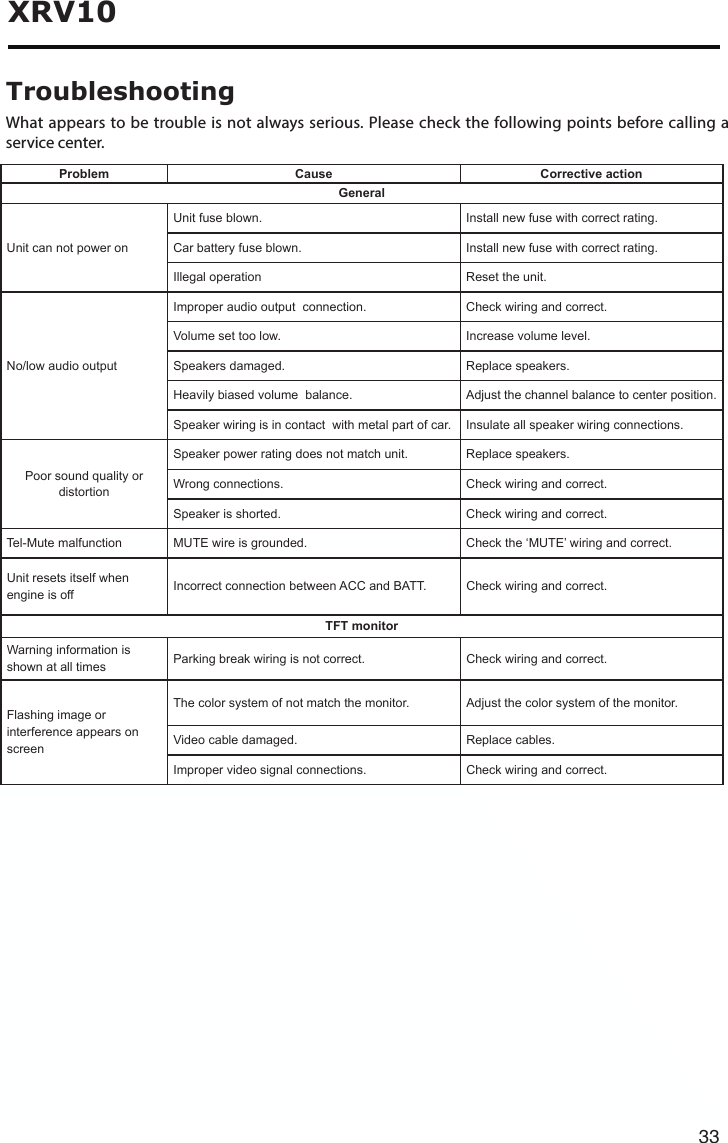
![32XRV10Listen to Other DevicesYou can connect an external audio/video device to the unit.1. Connect the external device with the AV cable.2. Touch the upper left corner to display the main menu.3. Touch[AV-IN1]/[AV-IN2]toaccessexternaldevice.ResetWhen the unit hangs up, you can reset it.Open the cap located on the bottom left of the panel, press [ Reset ] button with a ball-point pen or similar tool.TipWhen the unit has been reset, all the settings will return to default settings.Replace a FuseIf there is no power, the fuse may be damaged and need to be replaced.1. Take out the unit from dashbpard.2. Check all electrical connections.3. Buyafusethatmatchestheamperageofthedamagedfuse.4. Replace the fuse while the units power is disconnected.Other ModesReset](https://usermanual.wiki/ASA-Electronics/XRV10/User-Guide-3245769-Page-32.png)
![34XRV10CARE AND MAINTENANCE1. Never disassemble or adjust the unit without any professional guidance. For details, please consult any professional car shop / dealer for inquiry.2. If the front panel or TFT monitor is dirty, please use a clean silicone cloth and neutral detergent to wipe o the spot. Using a rough cloth and non-neutral detergent such as alcohol for cleaning may result in scratching or decoloration to the monitor.3. Ifanyabnormalbehavioroftheunitisfound,pleaserefertotroubleshootingguideofthismanual.If no relevant information is found, please press the [RESET] key on the front panel to resume factory default.4. If you have parked the car in hot or cold weather for a long time, please wait until the temperature in the car becomes normal before operating the unit.5. Using the car heater in low temperature environment may result in moisture inside the unit, DO NOT use the unit in this situation. If the unit still doesn’t work after a few hours, please contact the service center.6. Do not impact the LCD monitor which could cause damage.7. To prevent damage to the screen, avoid touching it with sharp objects.8. Toprovideacleardemonstrationandanalternativeforeasyunderstandingtotheoperationofthisunit, graphic illustrations are used. However, some illustrations are dierent from the actual images displayed on the screen.9. Operate the unit correctly according to this manual to prevent unnecessary problem. The guarantee won’t be valid if the problem is caused by inappropriate operation.](https://usermanual.wiki/ASA-Electronics/XRV10/User-Guide-3245769-Page-34.png)