ASA Electronics XRV10 Car Multimedia Player User Manual
ASA Electronics Shenzhen Limited Car Multimedia Player
User Manual

XRV10
Operating Instructions
10.1” Double DIN Multimedia Receiver
SiriusXM Ready™ / Built-In BT Technology /
iPhone® - iPod® / MHL / HDMI / USB / AV In

2
XRV10
Contents
CONTROLS AND INDICATORS ................................................................ 6
QUICK START GUIDE ............................................................................. 8
EQUALIZER CONTROL MENU .................................................................. 9
SYSTEM SETTINGS............................................................................... 10
RADIO TUNER OPERATION .................................................................. 13
USB OPERATION .................................................................................. 15
Bluetooth Mode ................................................................................... 19
iPod Mode ........................................................................................... 21
SiriusXM® RADIO OPERATION ............................................................. 22
Using a Smartphone via HDMI/MHL .................................................... 27
CAMERA OPERATION ........................................................................... 29
SWC Ready .......................................................................................... 31
Other Modes ........................................................................................ 32
Troubleshooting .................................................................................. 33
Specications ...................................................................................... 35

3
XRV10
FCC STATEMENT
This device complies with Part 15 of the FCC Rules. Operation is subject to the following two conditions:
(1)This device may not cause harmful interference,and
(2)This device must accept any interference received, including interference that may cause undesired
operation.
Changes or modications not expressly approved by the party responsible for compliance could void
the user’s authority to operate the equipment.
NOTE:
This equipment has been tested and found to comply with the limits for a Class B digital device,
pursuant to Part 15 of the FCC Rules. These limits are designed to provide reasonable protection
against harmful interference in a residential installation.
This equipment generates uses and can radiate radio frequency energy and, if not installed and used in
accordance with the instructions, may cause harmful interference to radio communications. However,
there is no guarantee that interference will not occur in a particular installation. If this equipment does
cause harmful interference to radio or television reception, which can be determined by turning the
equipment o and on, the user is encouraged to try to correct the interference by one or more of the
following measures:
• Reorientorrelocatethereceivingantenna.
• Increasetheseparationbetweentheequipmentandreceiver.
• Connecttheequipmentintoanoutletonacircuitdifferentfromthattowhichthereceiveris
connected.
• Consultthedealeroranexperiencedradio/TVtechnicianforhelp.
FCC Radiation Exposure Statement
This equipment complies with FCC radiation exposure limits set forth for an uncontrolled environment.
This equipment should be installed and operated with minimum distance 20cm between the radiator
& your body.
This unit supports only the following iPod/iPhone models:
· iPhone SE
· iPhone 6s Plus
· iPhone 6s
· iPhone 6 Plus
· iPhone 6
· iPhone 5s
· iPhone 5c
· iPhone 5
· iPod touch (6th generation)
· iPod touch (5th generation)
“Made for iPod,” and “Made for iPhone” mean that an electronic accessory has been designed to
connect specically to iPod, or iPhone, respectively, and has been certied by the developer to meet
Apple performance standards.
Apple is not responsible for the operation of this device or its compliance with safety and regulatory
standards. Please note that the use of this accessory with iPod or iPhone may affect wireless
performance.
iPhone and iPod are trademarks of Apple Inc., registered in the U.S. and other countries.
Sirius, XM and all related marks and logos are registered trademarks of Sirius XM Radio Inc. All rights
reserved.

4
XRV10
Thank you for choosing a ASA product. We hope you will nd the instructions in this owner’s manual
clear and easy to follow. If you take a few minutes to look through it, you’ll learn how to use all the
features of your new unit Multimedia Receiver for maximum enjoyment. Please save this manual for
future reference.
We recommend having your unit Multimedia Receiver installed by a reputable installation shop.
FEATURES
MP3 / WMA
• ID3TagCompatible
• DirectorySearch(MP3/WMAOnly)
• Random,RepeatandIntro
• Play,Pause,Stop,NextTrackandPreviousTrack
AM-FM
• USA/EuropeanFrequencySpacing
• 30StationPresets(18FM/12AM)
• AutoStereo/Mono
• Local/Distance
• AutoStore/PreviewScan
iPod®/iPhone®
• iPod® iPhone® via USB
• HighSpeedDirectConnectInterfacetoAccessiPhone® and iPod® Playlists, Artists, Albums
• PowerManagementChargesiPhone® / iPod® while Connected
SiriusXM Ready®
• SatelliteChannelName,Artist,Song,andCategoriesDisplayedonMonitor(VehicleTunerand
Subscription required and sold separately)
Chassis
• FixedFrontPanel
• HighDenitionTFTLCD
General
• BeepToneConrmation(ON-OFFOption)
• BTHands-FreeoperationforsafetyandconvenienceandA2DPforstreamingmusicfromyour
smartphone.
• OneCompositeVideoOutputforAdditionalScreens
• FrontPanelAudio/VideoInput
• FrontPanelUSB-PlaybackMusic/VideoFilesviaPortableHardDrives/USBashdrives
• Ten-BandGraphicEqualizer
• 6VRMSFront/Rear/SubwooferRCALineOutput
• TouchScreenCalibrationMode
• RotaryEncoderAudioControl
• HDMI/MHLConnectivity-SeeandcontrolsmartphoneappsonthelargerTFTscreen.*Someapps
may not be supported.
• USBChargingCurrent-2.1AmpSupport
Camera
• Theunitcanconnectwith3cameras:CAM1,CAM2,CAM3.Eachcameracanbetriggeredseparately
and can be set in dierent trigger priority.

5
XRV10
WARNING! Never install this unit where operation and viewing could interfere with safe driving
conditions.
WARNING! To reduce the risk of a trac accident (except when using for rear view video camera)
never use the video display function while driving the vehicle. This is a violation of federal law.
WARNING! Never disassemble or adjust the unit.
WARNING! To prevent injury from shock or re, never expose this unit to moisture or water.
WARNING! Using an improper fuse may cause damage to the unit and result in re.
6
XRV10
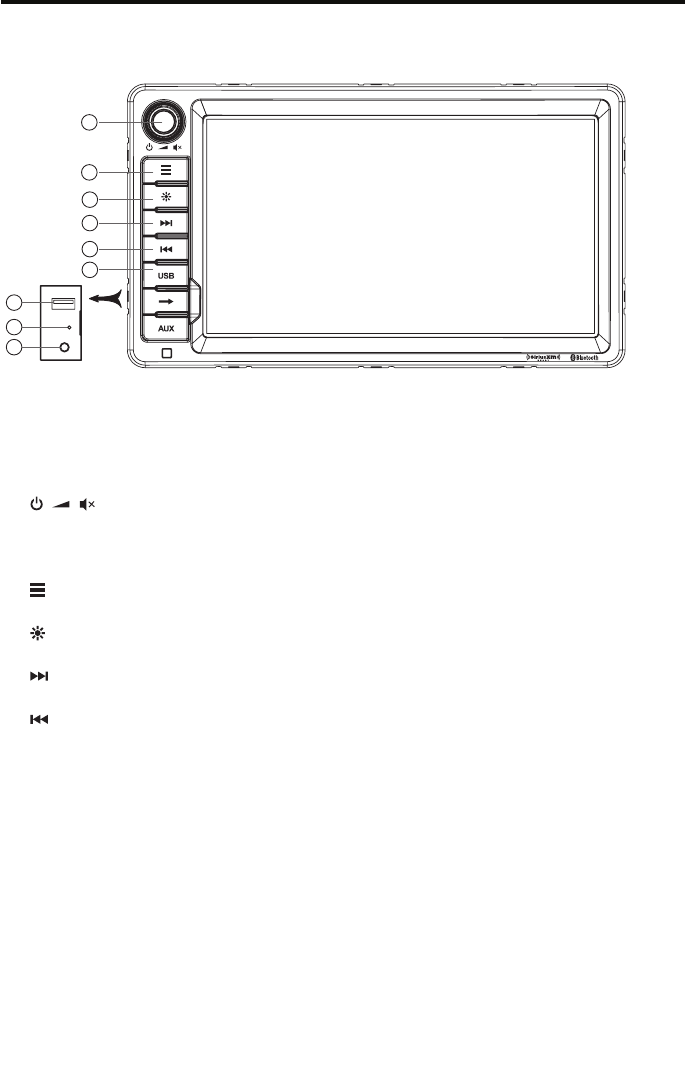
CONTROLS AND INDICATORS
1. [ ] Knob
Rotate to adjust the volume.
Press momentarily to activate the MUTE function. Press again to resume normal listening.
Press to turn the unit ON. Press and hold to turn the unit OFF.
2. [ ] Button
Press to switch between the sources menu and the previous source.
3. [ ] Button
Press to adjust the brightness of the screen.
4. [ ] Button
Next / Seek up
5. [ ] Button
Previous / Seek down
6. Interface Cover
Coversthe3.5mmAVIn,USBslot,andResetbutton.
7. USB Connector
Connect a USB device for playback of music/video les.
8. Reset Button
Press to reset system settings to factory default (except password and parental lock
settings).
9. A/V Input
Acceptsa3.5mmjackthroughwhichsignalsfromvariousaudio/videodevicescanbe
applied to the unit.
Notice:
The graphic in this manual is for reference only, and may be different
from the actual unit. Reference to actual unit is suggested.
1
2
9
3
7
8
4
5
6
OPEN

7
XRV10
NOTES ON REMOTE CONTROL USAGE
• AimtheremotecontrolattheTFT/screen.
• Removethebatteryfromtheremotecontrolorinsertabatteryinsulatoriftheremotecontrolwill
not be used for a month or longer.
• DONOTstoretheremotecontrolindirectsunlightorinahightemperatureenvironment,oritmay
not function properly.
• Thebatterywilllastfor6monthsundernormalconditions.Iftheremotecontroldoesnotwork,
please change the battery.
• UselithiumbatterytypeCR2025(3V)only.
• DONOTrecharge,disassemble,heatorexposethebatterytore.
• Insertthebatteryintheproperdirectionaccordingtothe(+)and(-)polaritymarks.
• Storethebatteryinaplacewherechildrencannotreachittoavoidtheriskofanaccident.
Remote Control Function Description
1. SOURCE (SRC) Button: Press this button to switch between and select available sources. (Radio/
Phone/USB/Phone-Audio/SWC/AUX-1/AUX-2/ Camera)
3. AUDIO Button: Press to display and select the audio language.
Each time the button is pressed, the language changes.
NOTE: The languages for audio vary from le format.
4. VOLUME Button (VOL + and -): Press these buttons to increase or decrease the playback volume.
5. BAND Button: Press this button to scroll though preset stations or when in playback mode, this
button is used for Fast playback / Slow playback. Press this button to answer an incoming BT phone
call.
6. REPEAT (RPT) Button: Repeat playback
7. POWER/MUTE Button ( /MUTE ): Press this button to turn the unit ON, and long press to OFF.
When on, press this button to turn the audio output ON and OFF.
8. SUB-T Button: Press to display and select the subtitle language in USB mode. Each time the button
is pressed, the subtitle language changes.
NOTE: The type and number of languages for subtitles vary from le format.
9. MENU Button: Press this button to access the root menu during playback. The playback will return
to normal playback and the root menu will disappear if no selection is made within 10 seconds.
10. FAST FORWARD [ ] Button:Pressthisbuttontoforwardplay2x,4x,8xor20xnormalspeed.
Press this button while in Radio mode to search available radio station by increasing tuning
frequency.
11. NEXT ( ) Button: Press this button to skip to the next chapter, track or song during playback.
Press this button while in Radio mode to search available radio station by increasing tuning
frequency.
12. PLAY / PAUSE ( / ) Button: Press this button to pause the playback. Press this button again to
resume normal playback.
13. PREVIOUS ( ) Button: : Press this button to go back to the previous chapter, track or song
during playback. Press this button while in Radio mode to search available radio station by
decreasing tuning frequency.
14. FAST REVERSE [ ] Button:Pressthisbuttontoreverseplay2x,4x,8xor20xnormalspeed.Press
this button while in Radio mode to search available radio station by decreasing tuning frequency.
15. NUMBER Buttons (1-6): Press these buttons to directly access chapters and tracks, dialing phone
numbers, or entering passwords.
16. RANDOM (RDM) Button: Press this button to play tracks or chapters in random order while
playing music.
8
XRV10
Power On / Off
Press the [ ] knob on the unit to turn the unit on. The buttons on the front of the unit
light up for a moment and the current mode status appears in the LCD.
Press and hold the [ ] knob to power off the unit.
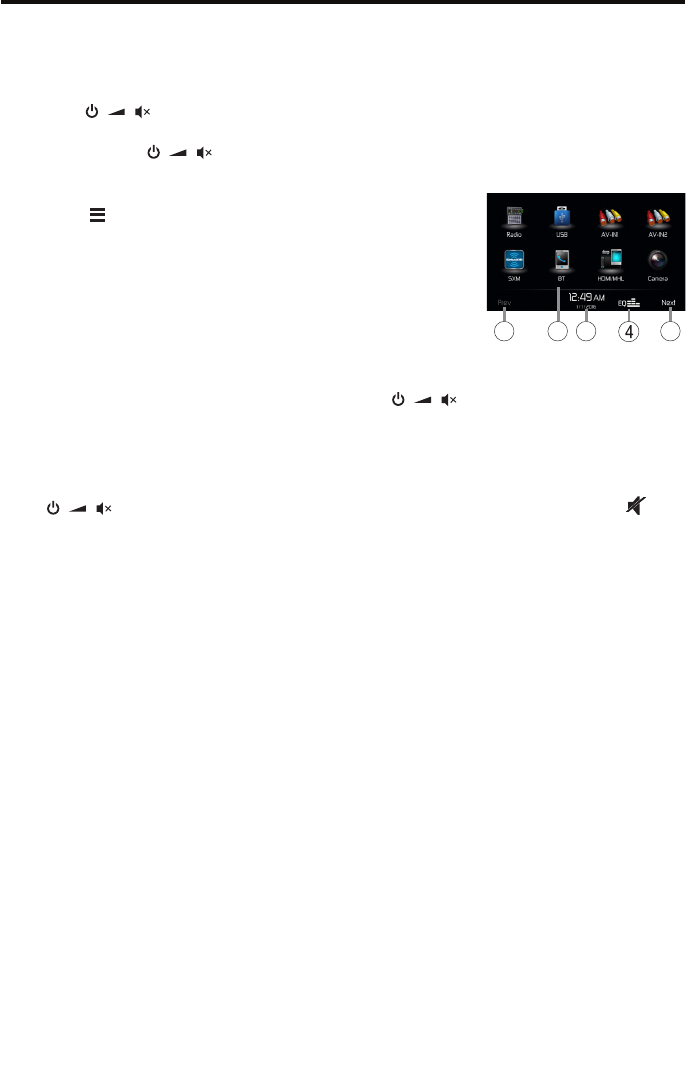
Playing Source Selection
Press the [ ] button on the front panel to display the playing
source menu.
1. Prev or Next: Touch to view the previous or next page of playing
sources.
2. Playing source icon: touch to access corresponding work mode.
3. Clock
4. Enter EQ setting menu
Volume Adjustment
To increase or decrease the volume level, turn the [ ] knob on the front panel. The
volume range is from “0” to “50”. The LCD or TFT screen displays the volume level for 3
seconds.
Mute
Press [ ] knob to mute the volume from the unit. Press again to restore the volume. [ ] is
displayed on the LCD. Adjusting the volume or using any of the audio setup features cancels the mute
function.
Parking Brake Inhibit
• Whenthe“BRAKE” cable isconnectedtothebrakeswitch,thedisplayontheTFTmonitor
will display video only when the vehicle is applied.
• ParkingbrakefunctionisoverriddenwhenthevideosourceissettoREVERSE.
• Whentheparkingbrakeinhibit is active, the front monitor displays Warninginformation,
preventingthedriverfromwatchingcontentwhiledriving.Rearvideoscreensarenotaffected.
Demo
Demo mode is used to illustrate the functions of the unit. Touch the screen to exit it.
Demomodeisdefaulton.YoucanturnitoffinSettingmenu.
Audible Beep Conrmation
Anaudiblebeeptoneconrmseachfunctionselection.TheBeeptonecanbedisabledthrough
theSetupmenu.
QUICK START GUIDE
1 1
23
9
XRV10
EQUALIZER CONTROL MENU
The Audio Control feature allows you to easily adjust your audio system
to meet the acoustical characteristics of your vehicle, which vary
depending on the type of vehicle and its measurements. Proper setting
oftheFaderandBalancebooststheeectsofthecabinequalizer.
Select Preset Equalizer
1. Enter the EQ setup mode
Touch the [ EQ ] icon in the user interface and the EQ setup interface
will display on the screen.
2. Select EQ mode
Touch the desired EQ selection: [ Optimal ] / [ Classic ] / [ Rock ] / [
Jazz]/[Techno]/[Pop],andtheEQmodewillchange.
Adjust EQ Parameters
To adjust EQ parameters, select [User] and touch and drag the
parameters adjustment bar.
[ User ]: Set the desired audio eect.
[ Flat ]: Select the original audio eect.
[ Reset ]: Reset the user settings.
Adjust Fader Balance
You can adjust front/back/left/right balance of the speaker and the
subwoofer volume to get balanced listening effect according to the
surroundings and your interest.
1. Enter the EQ setup mode
Touch the [ Fader Balance ] icon in the user interface and the EQ
setup interface will display on the screen.
2. Adjust subwoofer volume
Touch [ ] / [ ]toadjustsubwoofervolumefrom-12to+12.
3.Adjustfader/balancevalue
Touch [ ] / [ ] / [ ] / [ ] to adjust fader / balance value from
-20to+20.
[ ]: Front speaker
[ ]: Rear speaker
[ ]: Left speaker
[ ]: Right speaker
Notes:
1. The parameters of the EQ modes has been preset and you can not
change them besides ‘User’.
2. The value of Sub is independent of EQ mode and can be adjusted
separately.
10
XRV10
Display System
1. Touch the upper left corner to display main menu.
2. Touch [ Settings ].
The settings menu is displayed.
Adjust General Settings
1. Touch[General],ifnecessary.
2. Touch to highlight a setting.
3. Touchontheoptiontodisplay/selectanoption.
General settings Options Description
Radio Region USA/China/Japan/Europe/Europe
(LW)/OIRT Select one that matches your location.
Radio Lo/Dx Local Select radio local or distance. When select local, only
stations with sucient strength will be detected.
Distance
TFT Standby O/10s/20s Select the TFT standby status.
Display Adjust Night/Dark/Normal/Bright Select the brightness of the screen.
Beep On Turn on the beep sound. Each time you press a button, the
unit beeps.
O Turn o the beep sound.
Illumination Setup the the backlight color of the buttons..
UI Color Green/Red/Amber/Blue/Purple Select the UI color.
Demo On Enable the demo of operations.
O Disable the demo of operations.
Camera
Conguration To show the camera settings.
4. Touch top left of the screen to exit.
Adjust sound settings
1. Touch [Audio].
2. Touch an option repeatedly to select:
Sound settings Options Description
Subwoofer On Turn on the subwoofer.
O Turn o the subwoofer
Sub Woofer Filter
80Hz
Select subwoofer lter criteria.120Hz
160Hz
3. Touchtopleftofthescreentoexit.
SYSTEM SETTINGS
11
XRV10
Adjust Time Settings
1. Touch [ Time ].
2. Touch an option repeatedly to select:
Time settings Options Description
Date Y/M/D Touch [ ] or [ ] to set year, month and day. Press and hold for rapid
adjustment
Clock Mode 12Hr/24Hr Touch [12Hr] or [24Hr] to switch clock mode.
Time H/M/AM/
PM
Touch [ ] or [ ] to set hour and minute. Press and hold for rapid
adjustment
Touch [ ] or [ ] to set AM/PM (only for 12Hr).
3. Touchtopleftofthescreentoexit.
Adjust Language Settings
1. Touch [Language].
2. Touch an option repeatedly to select:
Language settings Description
OSD Select on-screen display language.
3. Touchtopleftofthescreentoexit.
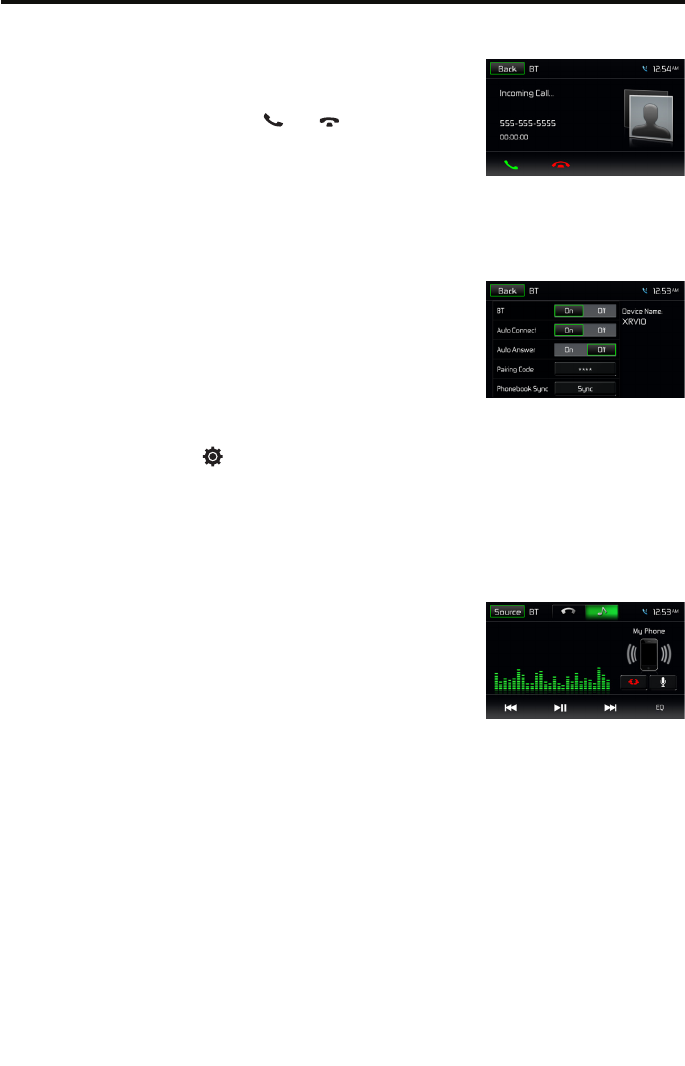
Adjust Bluetooth Settings
1. Touch [ Bluetooth ], if necessary.
2. Touch to highlight a setting.
3. Touchontheoptiontodisplay/selectanoption.
General settings Options Description
Bluetooth On/O Select Bluetooth On or O.
Auto Connect On/O Select Auto Connect On or O.
Auto Answer On/O Select Auto Answer On or O.
Pairing Code Setup the pairing code.
Reset the system
1. Touch [Reset].
2. Touch an option repeatedly to select:
Reset settings Description
Load Factory Load the factory settings.
3. Touchtopleftofthescreentoexit.

12
XRV10
Adjust Volume Settings
You can set dierent volume for dierent modes.
1. Touch [Volume].
The volume setting sub-menu is displayed.
2. Touch to select a source.
3. Selectavaluefrom00to06.
When switching to the source, the volume increases automatically.
4. Touch top left of the screen to exit.
Version Sub-Menu Features
The Version Sub-Menu is used to identify the model and resident operating system as well as the
hardware and software versions.
Exiting the System Setup Menu
To exit setup mode and resume normal playback, touch the Source icon on the screen.
13
XRV10
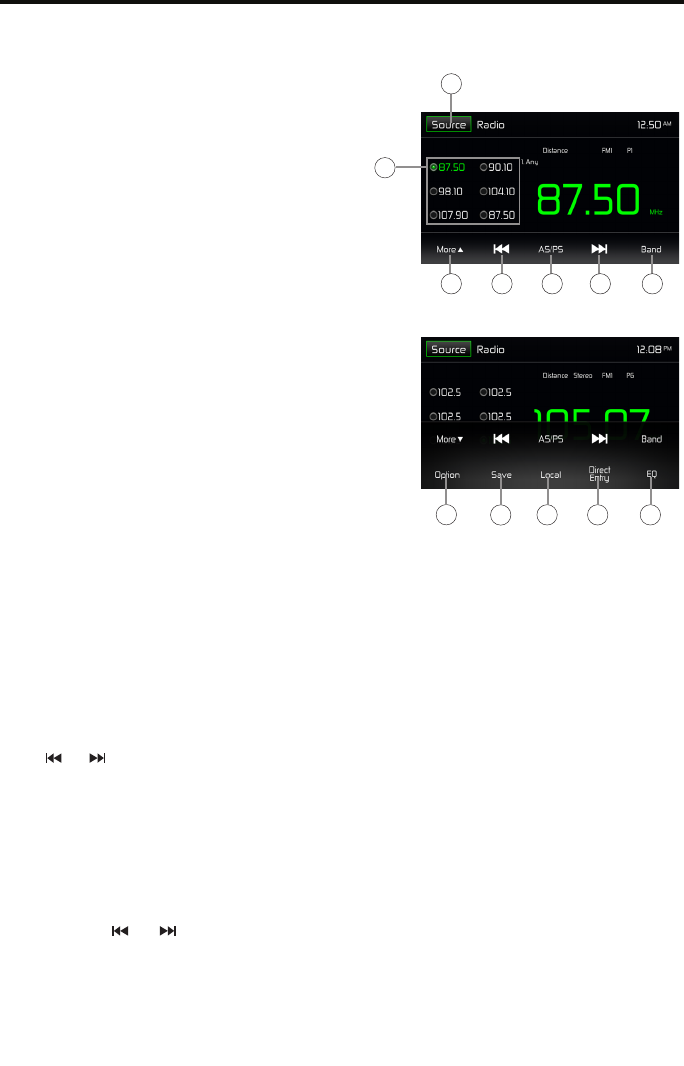
Select Radio as Playing Source
Open the Source Menu and then touch [Radio].
Select One Radio Band
Touchthe[Band]iconontheuserinterfacetoselectoneradiobandamongFM1,FM2,FM3,AM1and
AM2.
Tune
Auto Tuning
Press [ ] / [ ] icon on the user interface to seek a higher / lower station.
To stop searching, repeat the operation above or press other keys having radio functions.
Note:
When a station is received, searching stops and the station is played.
Manual Tuning
Method 1:
During manual tuning, the frequency will be changed in steps.
Press and hold [ ] / [ ] icon on the user interface more than 1 second to tune in a higher / lower
station.
RADIO TUNER OPERATION
1. Return to home menu.
2. Preset stations list.
3. Show/Hidethenextlineofoptionsmenu.
4. Seek backward
Tune backward(long press)
5. Auto searching.
6. Seek forward
Tune forward(long press)
7. Band switch.
8. Show RDS options
9. Show the save list
10. Choose local or distant seeking mode.
11. Enter frequency directly.
12. Enter EQ menu.
Tuner TFT Display 1
2
3 4 5 76
910 11 12
8
14
XRV10
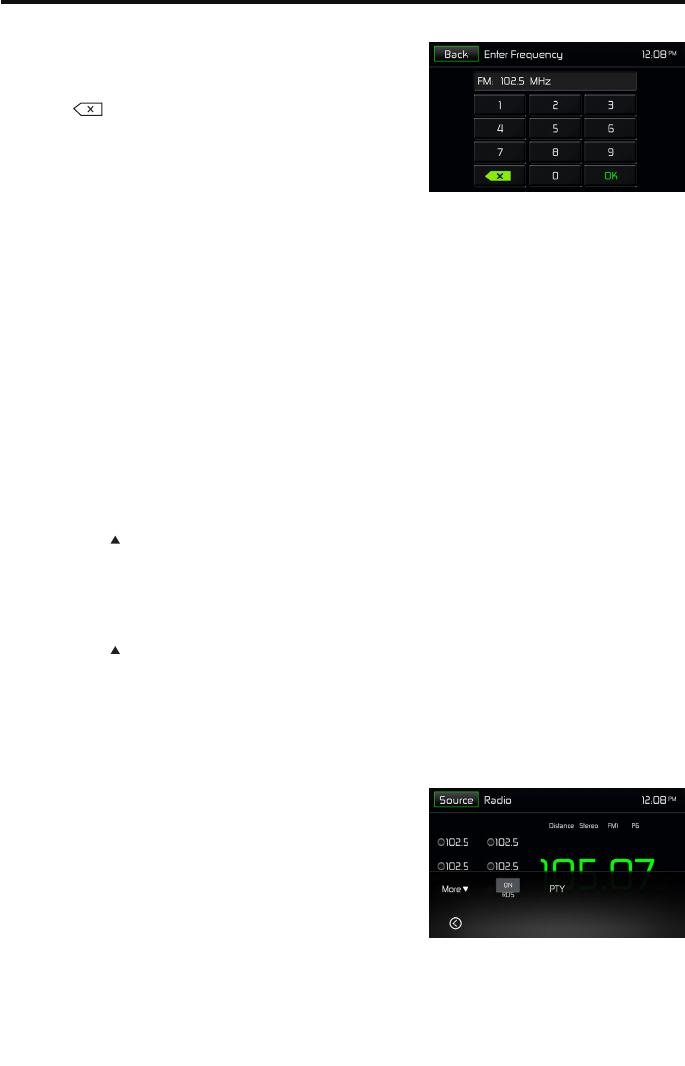
Method 2:
1. Touch the numeric keypad icon [ Direct Entry ]. Numeric
keyboard is displayed, touch numbers to input frequency.
2. Touch [ ] to delete the input numbers step by step.
3. Touch[OK]toenter.
Preset Station
Theunithas5bands,suchasFM1,FM2,FM3,AM1,AM2,andeachbandcanstore6stations;hencethe
unitcanstore30stationsintotal.
Search Stations Automatically
Touch [ AS/PS ] to search station and store 6 strongest stations in current band automatically.
Manual Store
1. Tune to a station.
2. Press and hold one of the channels 1 to 6 on the screen to save the selected station.
Tune to a Preset Station
1. At radio mode, select a band (if needed).
2. Touch one of the preset channels on the screen.
Local Seeking
Press the [ More ] and [ Local/Distance ] icons to choose the Radio Distance or Local .
When the [ Local ] displays, only stations with a strong signal strength will be detected .
EQ Selection
Press the [ More ] and [ EQ ] icon to enter the EQ setup menu.
Option Screen
Touching the Options icon will display the following RDS, CT and PTY functions on the Tuner TFT LCD
display screen.
RDS ON/OFF - The Radio Data System (RDS) enables traffic
reports to be received and provides many facilities, including
enabling the radio station name to be displayed.
PTY - The Program Type (PTY) function displays the program
category of the current station such as category (news, sports,
talk etc.) Use the scroll bar to select various categories. After
selecting a category, press the Search or down arrow icon to
scan to the next station of the selected category. Touching the
Back icon returns the user to main tuner screen.
15
XRV10
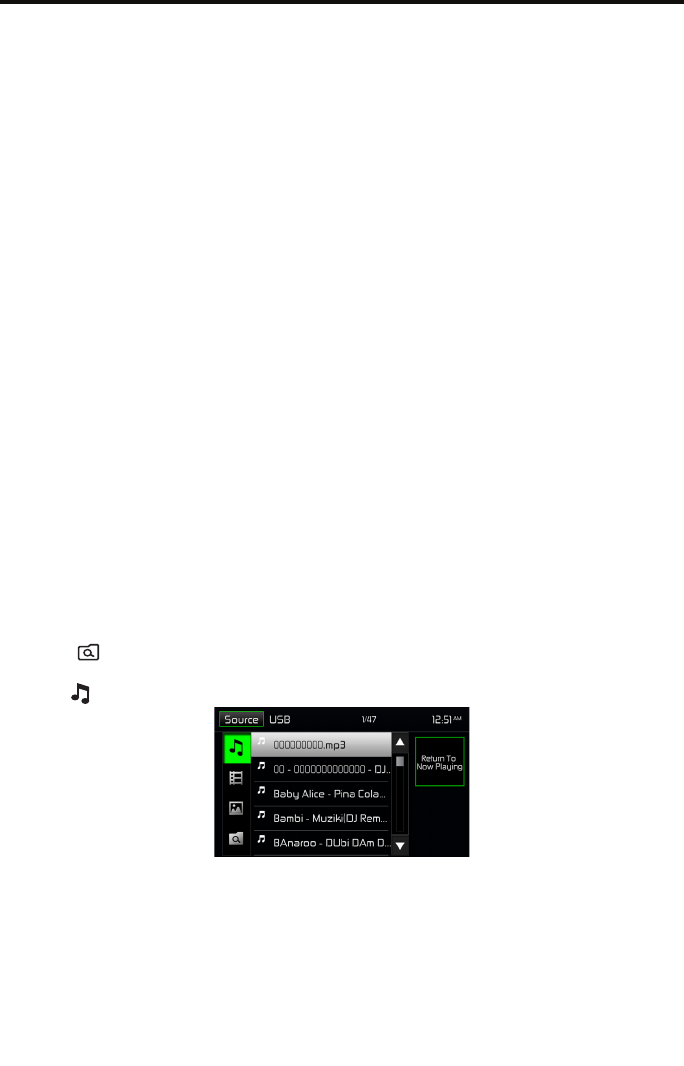
Connecting the USB Device
1. Open the USB door.
2. Connect an USB device into the USB connector.
Play starts automatically.
NOTES:
1. If there are audio files supported on the USB stick, the system will enter the audio files menu
automatically.
If there are no audio les, but there are video les supported on the USB stick, the system will enter
the video les menu automatically.
If there are no audio or video les, but there are picture les supported on the USB stick, the system
will enter the picture les menu automatically.
If there no above audio/video/picture les supported in the USB stick, the screen will display “Load
Error!”.
2. Not all USB devices are compatible with the unit.
Removing the USB Device
1. Select another source in the main menu.
2. Remove the USB device.
Audio playback
Theprinciplesofaudioplayback(MP3/WMA)fromdatacarriersareidenticalforallsources.
Select the desired source via the main menu.
The device changes to the desired source and the playback starts.
If the playback does not start with the audio playback, touch the [ List ] icon to change to the folder/le
list.
Touch the [ ] icon to display all the folders and les of the data carrier.
- Or -
Press the [ ] icon to display all the audio les of the data carrier.
After starting a title, the playback menu is displayed.
USB OPERATION
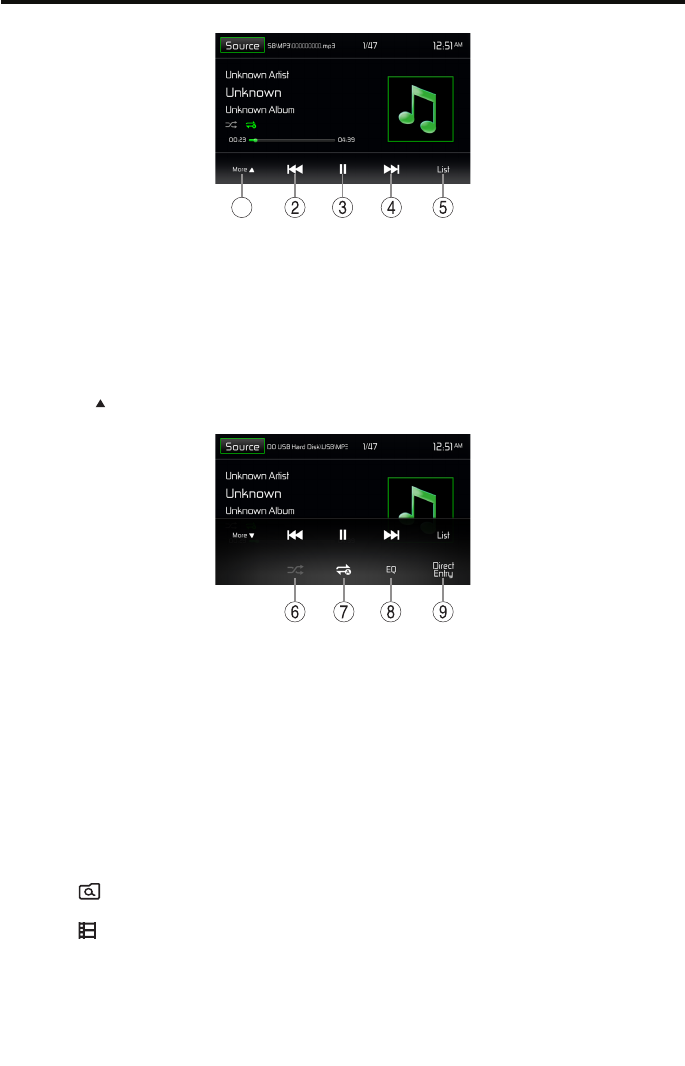
16
XRV10
1
1. Show/Hide the next line of options menu.
2. Display the folder/le list.
3. Shortpress:Previoustrack.
Long press: Fast backward.
4. Pause playback and continue playback.
5. Short press: Next track.
Long press: Fast forward.
Tap on [ More ] to display additional operating options of the playback menu.
6. Shue playback.
7. Start and end REPEAT function.
Repeat mode: Repeat One → Repeat Folder → Repeat All → Repeat O
8. Displayequalizer.
9. Display keypad to directly enter the number of the desired title.
Video playback
Select the desired source via the main menu.
The device changes to the desired source and the playback starts.
If the playback does not start with the video playback, touch the [ List ] icon to change to the folder/le
list.
Touch the [ ] icon to display all the folders and les of the data carrier.
- Or -
Touch the [
] icon to display all the audio les of the data carrier.
If you selected a movie, the playback is started. During the movie playback, the playback menu is
hidden.
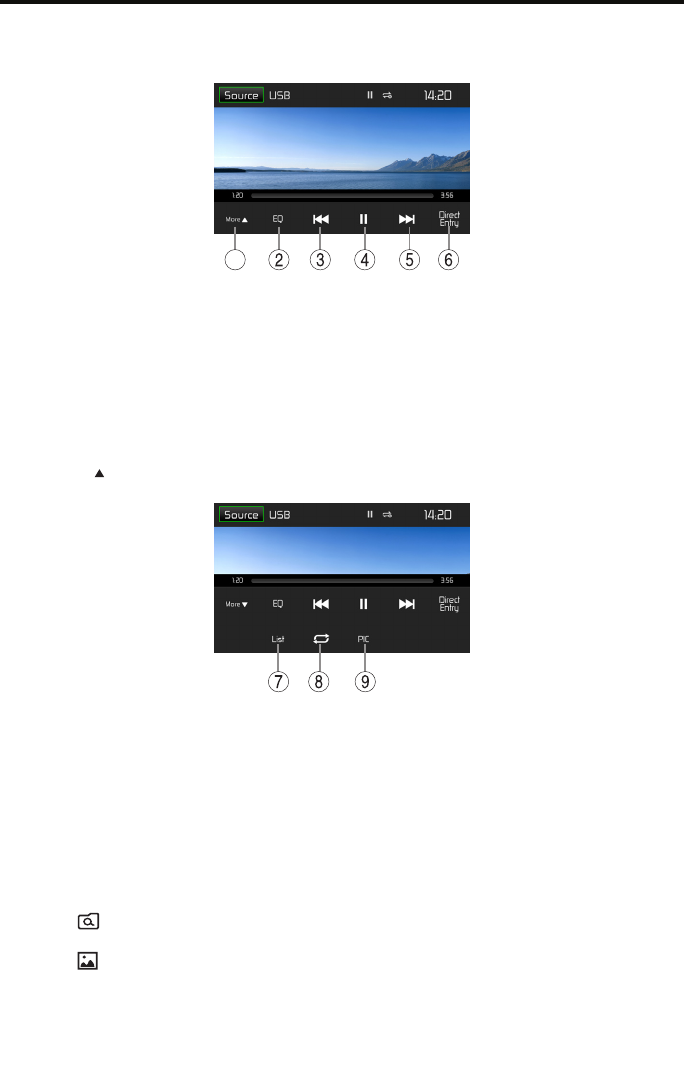
17
XRV10
Brieytouchthescreenoncetodisplaytheplaybackmenuagain.
The playback menu is shown.
1
1. Show/Hide the next line of options menu.
2. Enter EQ menu.
3. Shortpress:Previousmovie.
Long press: Fast backward.
4. Pause playback and continue playback.
5. Short press: Next movie.
Long press: Fast forward.
6. Display keypad to directly enter the number of the desired title.
Tap on [ More ] to display additional operating options of the playback menu.
7. Display the folder/le list.
8. StartandendREPEATfunction.
Repeat mode: Repeat One → Repeat Folder → Repeat All → Repeat O
9. Adjust the brightness, contrast, and saturation.
Image playback
Select the desired source via the main menu.
The device changes to the desired source and the playback starts.
If the playback does not start with the image playback, touch the [ List ] icon to change to the folder/
le list.
Touch the [ ] icon to display all the folders and les of the data carrier.
- Or -
Touch the [ ] icon to display all the images of the data carrier.
If you selected a image, the playback is started. During the playback, the playback menu is hidden.
Brieytouchthescreenoncetodisplaytheplaybackmenuagain.
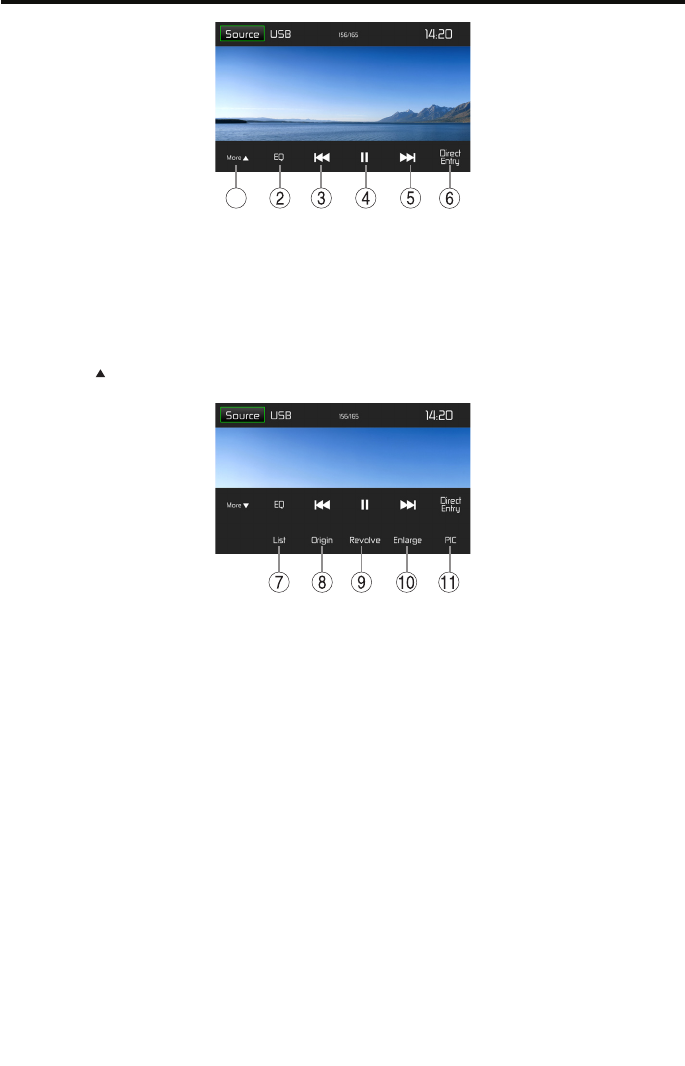
18
XRV10
1
1. Show/Hide the next line of options menu.
2. Enter EQ menu.
3. Previousimage.
4. Pause playback and continue playback.
5. Next image.
6. Display keypad to directly enter the number of the desired title.
Tap on [ More ] to display additional operating options of the playback menu.
7. Display the folder/le list.
8. Showtheoriginalphoto.
9. Rotate images .
10. Zoom in/out.
11. Adjust the brightness, contrast, and saturation.
19
XRV10
You can make or receive phone calls with Bluetooth-enabled phones
through the unit. You can also listen to music from a Bluetooth-enabled
device.
Pair the Bluetooth-enabled Devices
To connect your Bluetooth device to the unit, you need to pair the device
to the unit. Pairing needs only to be done once. You can pair up to ve
devices. You also can search for Bluetooth devices by mobile phone.
1. Turn ON the Bluetooth function on the device.
2. Search for Bluetooth devices by mobile phone.
3. SelecttheBluetoothdeviceID(shownonthescreenoftheunit)inthe
pairing list.
4. Enterdefaultpassword“1234”ifnecessary.
Tip:
• TheoperationalrangebetweenthisunitandaBluetoothdeviceis
approximately 5 meters .
• BeforeyouconnectaBluetoothdevicetothisunit,familiarizeyourself
with the Bluetooth capabilities of the device.
• CompatibilitywithallBluetoothdeviceisnotguaranteed.
• AnyobstaclebetweenthisunitandaBluetoothdevicecanreducethe
operational range.
• Keepthisunitawayfromanyotherelectronicdevicethatmaycause
interference.
Disconnect Bluetooth Device
To disconnect one device, touch [ ] .
Tip
• Thedevicewillalsobedisconnectedwhenthedeviceismoved
beyond the operational range.
• Ifyouwanttoreconnectthedevicetotheunit,placeitwithinthe
operational range.
• Ifyoudonotwanttoreconnectthedevicetotheunitautomatically,
touch [ ], then set [ Auto connect ] to Off (the green icon turns
grey).
For details, see the “Adjust Bluetooth Settings” section.
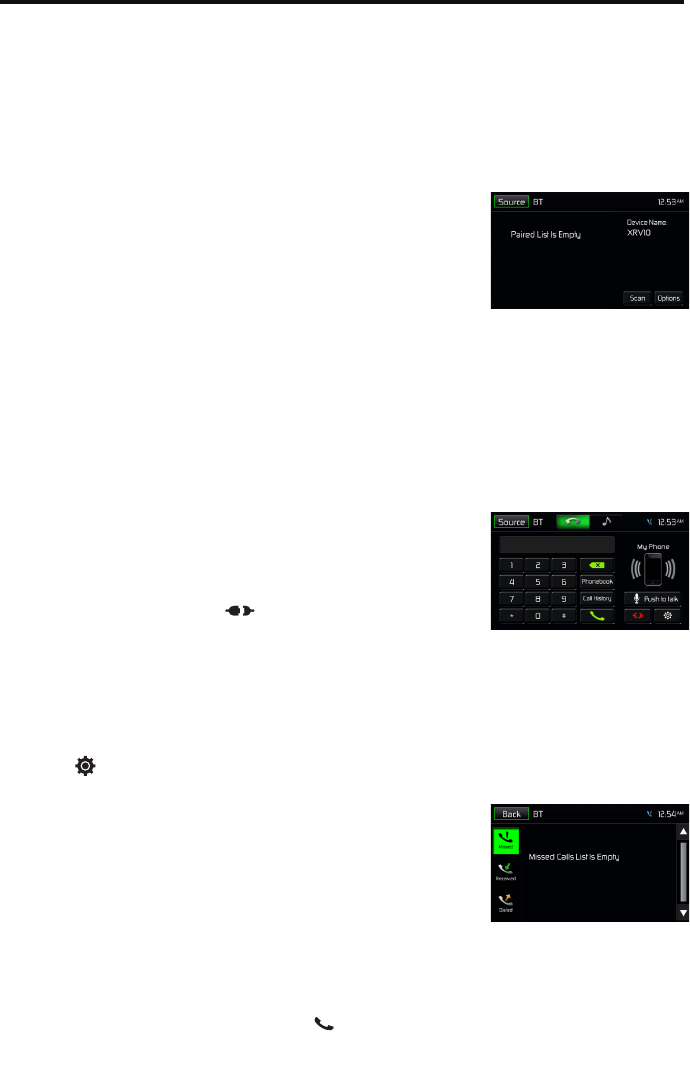
Make a Call
1. Select Bluetooth function in the home menu.
2. Pair the phone with the unit.
3. Searchforphonenumberfromthefollowinglist:
[Phone Book]
[Call History]
[Missed calls]
[Received calls]
[Dialed calls]
Or touch the number pad directly, then touch [ ] to dial.
Bluetooth Mode
20
XRV10
Receive a Call
By default, all incoming calls are received automaticaly.
1. If there is an incoming call, the screen will appear “Incoming
call...”.
2. You may touch the screen to select [ ] or [ ].
Speak into the Bluetooth microphone.
Tip
• Youcanselecttoreceivecallsmanuallybyset[AutoAnswer]toO
status.
Push to Talk
Press[PushtoTalk]onthescreentoaccessSiriorGoogleVoicethrough
the head unit when connected via BT. You mobile phone must support
SiriorGoogleVoiceinorderforthisfeaturetobesupportedonthe
head unit.
NOTE: Samsung “S” Voice and other third-party apps may not be
supported.
Adjust Bluetooth Settings
1. In Bluetooth menu, touch [ ].
The option menu is displayed.
2. Touch on the selected option to change the setting.
∙ [BT]: To turn on or o “Bluetooth” function.
∙ [Auto Connect]: To turn on or o “Auto connect” function.
∙ [Auto Answer]: To turn on or o “Auto answer” function.
∙ [Pairing code]: To set paring code.
∙ [Phonebook Sync]: Phonebook sync may take several minutes to load
on initial setup.
Music Mode
A2DP
A2DP is short for Advanced Audio Distribution Profile. The mobile
phones supporting this function can transmit stereo audio, whereas the
ones not supporting this function can transmit mono audio only.
AVRCP
AVRCP is short for Audio/Video Remote Control Profile. The mobile
phones supporting this function can control the playback of a
Bluetooth audio player.
In the mode of the music player working, if you want to make a phone
call, you can press the number keys on the mobile phone. At the same
time the music player will stop. The TFT screen will display “Calling”, after
the call received, the voice will be transferred to the unit. When the call
ends, the screen will display music playing menu.
If there is an incoming phone call, the music player will stop, and the
screen will display “Incoming”. When the call ends, the screen will
display music playing menu.
21
XRV10
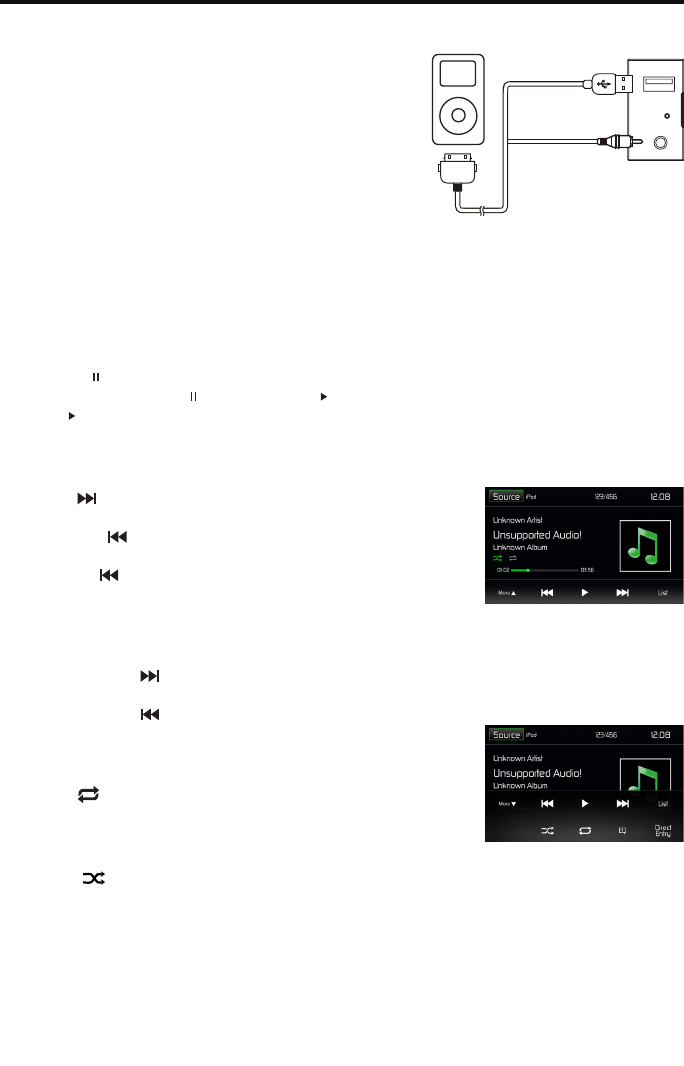
Accessing iPod mode
Touch [iPod] on the main menu to enter iPod menu.
If [iPod] is not on the current source menu, hold the center
of screen and drag left/right to show more icons.
Pausing play
1. Touch the [ ] button on the bottom of the screen to pause play.
The playback pauses, and [ ] button becomes [ ] .
2. Touch [ ] button to resume play.
Selecting a track
Track-up
Touch the [ ] button to move to the beginning of the next track.
Track-down
1. Touch the [ ] button to move back to the beginning of the
current track.
2. Touch the [ ] button twice to move back to the beginning of the
previous track.
Fast forward/Fast reverse
Fast forward
Touch and hold the [ ] button .
Fast reverse
Touch and hold the [ ] button .
Repeat play
This function allows you to play the track repeatedly.
Touch the [ ] button to select Repeat one or Repeat all.
Random play
This function allows you to play all tracks recorded in a random order.
Touch the [ ] button to perform random play. Touch it to resume
normal play.
Connect an iPod or iPhone to the unit via an iPod cable.
iPod Mode
22
XRV10
SiriusXM® RADIO OPERATION
Only SiriusXM® brings you more of what you love to listen to, all in one place.
Getover140channels,includingcommercial-freemusicplusthebestsports,news,talk,comedyand
entertainment. Welcome to the world of satellite radio. A SiriusXM Vehicle Tuner and Subscription are
required. For more information, visit www.siriusxm.com.
Activating SiriusXM® Radio
After installing your SiriusXM Connect Vehicle Tuner and antenna, power on your radio and select
SiriusXM mode. You should be able to hear the SiriusXM preview channel on Channel 1.
After you can hear the Preview channel, tune to Channel 0 to nd the radio ID of your tuner.
Note: The SiriusXM Radio ID does not include the letters I, O, S or F.
In the USA, you can activate online or by calling SiriusXM Listener care:
• Visit www.siriusxm.com/activatenow
•CallSiriusXMListenerCareat1-866-635-2349
For Canadian Subscriptions, please contact:
• Visit www.siriusxm.ca/help/activation-help/
•CallXMcustomerCareat1-877-438-9677
Activation typically takes 10-15 minutes, but may take up to one hour. It is
recommended to leave your vehicle on until the “Subscription Updated” message
appears.
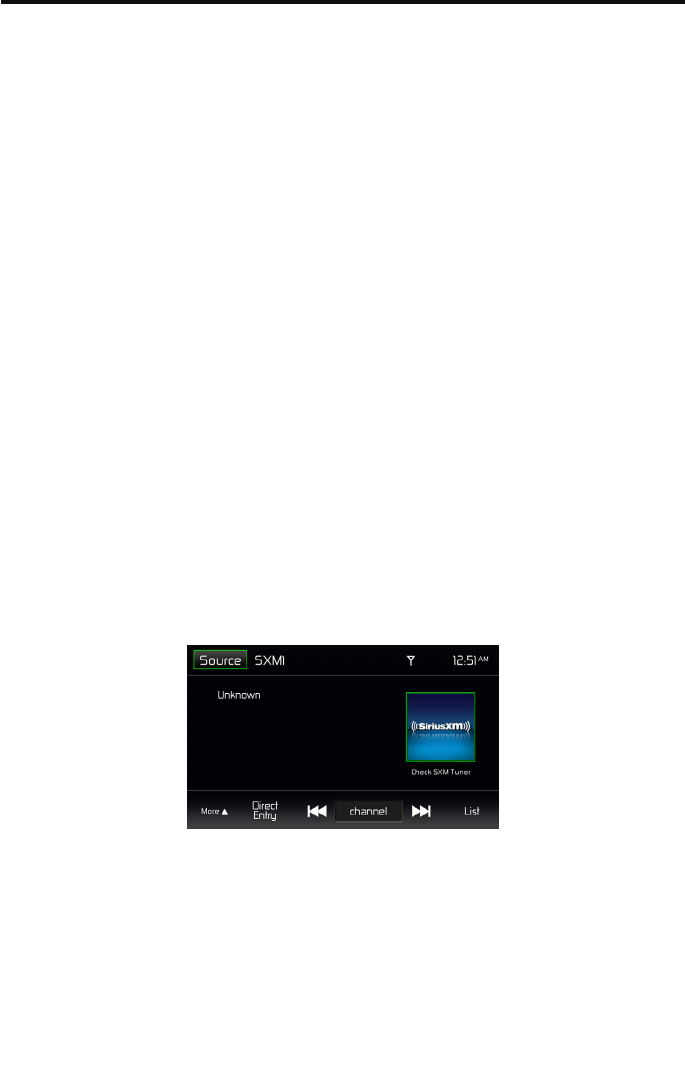
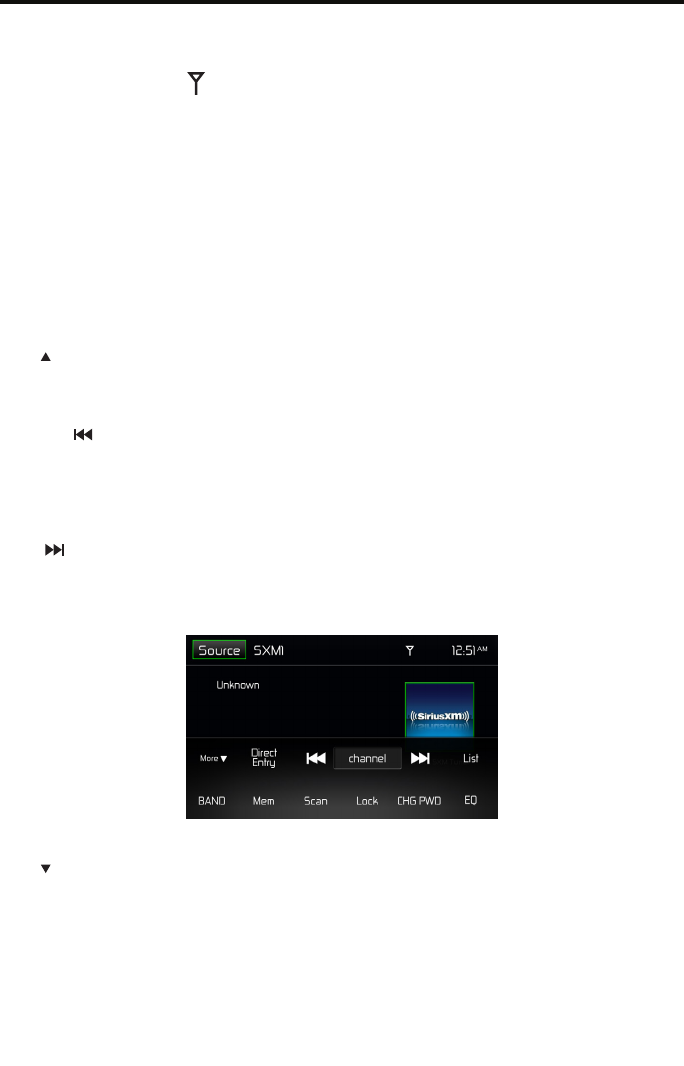
SiriusXM® User Interface
The on-screen indicators and touch key areas for SiriusXM® functions are outlined right.
(SiriusXM® Menu page 1)
Source Icon - Touch to return to the unit’s Main Menu Screen.
Band indicator (SXM1 icon) - Displays SiriusXM® radio band currently selected.
Threebandsareavailable:SXM1,SXM2,andSXM3.
23
XRV10
Time Display - This indicator displays the time as entered by the user in the Settings Menu.
Signal Strength Indicator - As the strength of the satellite radio signal increases, the number of
illuminated segments will increase.
Program Information:
Channel Number - Channel numbers are used to designate the channel along with the channel name
and are useful for identifying/loading a channel via the “direct entry” method.
Channel Name - The channel name is used to identify the channel and is usually related to that
channel’s musical content.
Category Name - A category may contain one or more channels grouped by their similar content into a
“Category”.
Artist Name - This area displays the name of the artist currently playing.
Song - This area displays the name of the song currently playing.
Info - This area contains additional information related to the song/track now playing.
More Icon - Touch to go to SiriusXM® Menu Page 2.
Direct Entry Icon - Touch to display the Direct Entry Menu.
Previous ( ) Icon - Touch to tune to the previous channel.
Channel/Category Icon - Touch to toggle the icon displayed between Category and Channel. When
Channel is displayed, touching or tunes channels up or down. When Category is displayed, touching or
tunes channels within a category up or down.
Next ( ) Icon - Touch to tune to the next channel.
List Icon - Touch to select a channel search criteria. Presets lists preset channels stored by the user.
Channels lists all SXM channels. Category lists SXM channels by categories.
(SiriusXM® Menu page 2)
More Icon - Touch to go to SiriusXM® Menu Page 1.
Band Icon - Touch to select a band of preset channels. Three bands are available: SXM1, SXM2, and
SXM3.Eachbandcanstoreuptotenpresetchannels.(PresetchannelsareaccessedfromtheListicon.)
Mem Icon - Touch to display screen used to enter current channel into preset memory.

24
XRV10
Scan Icon - Touch to scan all channels starting at channel 1. The tuner will pause for approximately e
seconds at that channel. Touch scan again to listen to that channel. If scan is not touched, the tuner will
automatically seek the next channel.
Lock Icon - Touch to display the SXM Lock Screen.
CHG PWD Icon - Touch to go to the change password screen.
EQ Icon-TouchtoaccesstheEqualizerlevelsettingsmenu.
Switching to SiriusXM® Radio
• Touchthetopleftcornerofthescreen(theSourcebox)toviewtheMainMenuscreen.Fromthe
Main menu screen, touch the SXM icon.
• Pressthe[ ] button on the front panel to switch to the SXM source.
Selecting the SiriusXM® Band
Touch the Band icon on the SXM Menu screen to change between the following bands: SXM1, SXM2,
andSXM3.
Seek Tuning
• Tofastseekthenexthigherchannel,touchandholdtheicon .
• Tofastseekthenextlowerchannel,touchandholdtheicon .
Direct Tuning
To enter a SiriusXM® radio channel directly:
1. On the SiriusXM® menu page 1, touch the Direct Entry icon to display the Direct Entry Menu.
2. Enter the desired SiriusXM® radio channel using the on-screen number pad then touch the Ok icon.
If you wish to delete an entry number touch the X icon.
3. Toexitthescreenwithoutchangingthechannel,touchtheBack icon.
Using Preset Channels
A preset is a channel name that is stored for instant access to that channel. Ten numbered preset
buttons store and recall channels for each band.
Storing a Channel
1. Select a band (if needed), then select a channel.
2. On the SiriusXM® menu page 2, touch the Mem icon to access the Preset Channel Screen.
3. Touchthepresetnumber(P1throughP10)inwhichyouwouldliketostorethecurrentchannel(or
touch the Back icon to cancel and close the menu).
The channel will be stored and displayed in that preset. Touch the or icon to scroll up or down the
list.
4. Touch the Back icon to return to the SXM Menu screen.
Recalling a Channel
1. Touch the List icon.
2. Touch the Preset icon to access the Recall Preset Channel Screen.
3. Touchonachannelonthepresetchannellisttoselectthecorrespondingstoredchannel.Touchthe
or icon to scroll up or down the list.

25
XRV10
Searching for a Channel
Search by Channel
To search by channel:
1. On the SirusXM® menu page 1, touch the Category/Channel icon (if needed) to select Channel.
2. Touch List to display the Channel Search Screen:
3. Touchonachanneltotunetothatchannel.Touchthe or icon to scroll up or down the list.
Search by Category
Categoriesgroupmusicbytypesuchasjazz,rock,classical,etc.Tosearchbycategory:
1. On the SirusXM® menu page 1, touch the Category/Channel icon (if needed) to select Category.
2. Touch List to display the Category Search Screen:
3. Touchacategoryitem.Achannellistscreenappears.
4. Touch on a channel to tune to that channel. Touch the or icon to scroll up or down the list.
Locking SXM Mature Channels
SiriusXM®attachesalabeltochannelswithmaturecontent.Theradiorecognizesthesechannelsas
“Mature”. The Mature Channel Lock option allows you to lock out channels with “Mature” labels. These
channels will still appear in the channel listing (with a lock
icon), but will not be tunable unless the
parental lockout password is correctly entered.
Lock Mature Channels
To lock mature channels:
1. On the SirusXM® menu page 2, touch the Lock icon. The following screen appears:
2. Enter your 4-digit password. The following screen appears:
3. TouchtheLockMatureicon.Thematurechannelsarenowlocked.
Temporarily Unlock a Mature Channel
When the global “Mature Lock” is enabled, a mature channel can be temporarily unlocked. All mature
channels are temporarily unlocked (but still hidden when channel browsing) until the SXM source is
changed,Accy(Key)iscycledorthe“PowerButton”onfrontpanelofradioturnstheRadioo.
This mode is useful for listening to mature/adult content on a temporary basis, allowing you to listen
on a locked channel without having to disable the global “Mature Lock.”
To temporarily unlock a mature channel:
1. Tune to a mature channel. If the channel is locked, Ch Locked, Enter Code will appear on the
SiriusXM® User Interface tuner screen.
2. Enter the 4-digit password to unlock the channel to tune it.
Unlock All Mature Channels
To unlock all mature channels:
On the SirusXM® menu page 2, touch the Lock icon. The following screen appears:
3. Enteryour4-digitpassword.Thefollowingscreenappears:
4. Touch the Unlock All icon. All channels are now unlocked.
Locking Individual SXM Channels
An user can lock individual channels. When locked, a channel has the lock (
) icon next to it on the
channel list.

26
XRV10
Locking a Channel
To lock an individual channel:
1. On the SirusXM® menu page 2, touch the Lock icon. The following screen appears:
2. Enter your 4-digit password . The following screen appears:
3. Touchanunlocked( ) icon. The icon is replaced by a lock (
) icon. The channel is now locked.
Unlocking a Channel
To unlock an individual channel:
1. On the SirusXM® menu page 2, touch the Lock icon. The Enter Password Screen appears appears.
2. Enter your 4-digit password. The following screen appears:
3. Touchalock(
) icon to unlock a channel. The icon is replaced by an unlocked ( ) icon. The
channel is now locked.
Change Lock Password
The Change Lock Password option allows you to change the password from the default or current
custom password to another password.
NOTE: The default password is 0, 0, 0, 0.
To change a password:
1. Touch the CHGPWD icon. The following screen appears:
2. Enteryour4-digitpasswordandpresstheOKicon.
3. Enterthenew4-digitpasswordandpresstheOKicon.Thenewpasswordisset.
SiriusXM® Radio Advisory Messages
SiriusXM® user advisory messages are listed below:
Advisory Displayed Cause
Check SXM Tuner Check the SiriusXM® tuner connection on the back of the unit to ensure
that it’s correctly connected.
Check SXM Antenna Ensure the SiriusXM® antenna cable is connected to the SiriusXM® tuner
correctly.
Check the SiriusXM® antenna wire for breaks or sharp bends.
Replace the antenna if necessary. If the message remains, the antenna
may have been damaged.
No SXM Signal The vehicle must be outside, and the antenna must have a clear view of
the southern sky. The magnetic antenna must be mounted on the outside
of the vehicle for the best reception.
Channel Not Subscribed This channel is not included in your SiriusXM® subscription plan. Call
1-866-635-2349tosubscribe.
Channel Not Available This channel is not a valid SiriusXM® channel. The channel number has
been entered incorrectly, or the channel was removed from the SiriusXM®
channel lineup.
Channel Locked The selected channel has been locked by the parental controls, or a
mature channel has been selected. A prompt to enter the unlock code will
appear. Enter the unlock code.
Subscription Updated An update to your SiriusXM subscription has been received by the
SiriusXM tuner. Press [ Enter ] button to continue.

27
XRV10
Using a Smartphone via HDMI/MHL
What is HDMI/MHL?
HDMI (High Denition Multimedia Interface) is a digital interface for audio and video sources. HDMI is a
digital replacement for analog video standards.
Mobile High-Denition Link (MHL) is an industry standard for a mobile audio video interface that allows
consumers to connect mobile phones, tablets, and other portable consumer electronics (CE) devices to
high-denition televisions (HDTVs) and mobile multimedia receivers.
HDMI/MHL allows you to use the multimedia TFT touch screen to control your mobile device.
Note: It may not be legal to view apps on a smartphone while driving or controlling a vehicle. It
is the drivers responsibility to obey local and federal laws while driving or controlling a vehicle.
Interfacing your Smartphone - Android
Depending on your model and brand of smartphone HDMI / MHL may not be supported. Check your
smartphone documentation for supported features.
AndroidsmartphoneswillrequireanappthatmustbedownloadedfromGooglePlayStore.Searchfor
“Jensen HDMI/MHL Connect” in the search bar.
Note: In order to connect your smartphone to your unit, you will need an HDMI/MHL adapter for
your particular brand of smartphone. In some cases, you may need to connect the additional
micro USB port (On the adapter itself) to a power source in order for the HDMI/MHL adapter to
function properly.
Smartphone HDMI/MHL adapters are available at your local mobile phone retailer. For example, if you
haveaSamsungS3/S4orNote2,youwouldbuythebelowHDMI/MHLadapter:
Samsung ET-H10FAUWESTA Micro USB to HDMI
1080PHDTVAdapterCable
ForSamsungGalaxyS3/S4andNote2
Smartphone brands are usually only compatible with the same brand of HDMI / MHL adapter.
Interfacing your Smartphone - iPhone 6® / iPhone 6 Plus® /
iPhone 5® / iPhone 5S® / iPhone 5C® / iPod touch® (5th Gen)
/ iPod nano® (7th Gen)
Note: In order to connect your smartphone to your unit, you will need the “Apple Lightning
Digital AV Adapter” (HDMI/MHL adapter). No app or software is needed for Apple devices.
Smartphone HDMI/MHL adapters are available at your local mobile phone retailer.
Mirror Mode (HDMI/MHL Adapter Required)
Mirror Mode allows the image from the smartphone to be displayed on the larger head unit TFT. There
is no touch screen control from the head unit TFT. You must control the apps from the smartphone.
Mirror Mode w/ Touch Screen Control (HDMI/MHL Adapter
Required)
Mirror Mode w/ Touch Screen Control allows the image from the smartphone to be displayed on the
larger head unit TFT as well as full touch screen control of the smartphone screen from the head unit.
Note: All apps may not be supported / displayed when connected via HDMI/ MHL.

28
XRV10
General
1. Some devices (smartphones) may not be compatible with HDMI/MHL connectivity.
2. Incoming calls or messages may pause media output. Media will resume after the call or message.
3. Simultaneouslyrunningmultipleappsonyoursmartphonewhilescreensharingplacesheavy
demand on the smartphone, potentially affecting its performance. Close unused apps on your
smartphone to enhance the screen sharing feature of the unit.
4. If you are having trouble seeing your smartphone display on the head unit TFT, try connecting your
smartphone(WithHDMI/MHLadapter)toanotherdevicesuchasaatpanelTVwithHDMIinput.
IfyoucannotseethesmartphonedisplayontheatpanelTV,thesmartphonedoesnotsupport
HDMI/MHL.
Connecting Your Smartphone to the unit
1. Jensen HDMI/MHL Connect App Installation Procedure
DownloadandinstalltheJensenHDMI/MHLConnectappfromGooglePlayontoyoursmartphone.
2. Smartphone / Head Unit BT Connection
In order to have full touch screen control from the head unit TFT (via the HDMI/ MHL Connect app),
a BT connection is required between your smartphone and head unit. Refer to the head unit /
smartphone documentation for further information on pairing / connecting devices.
3. Connect Your Smartphone
Most Android smartphones will require an HDMI/MHL adapter in addition to an HDMI cable with
2 Type A male connectors. These adapters are available at smartphone retail stores. See head unit
documentation for more information about HDMI/MHL adapters. Connect your smartphone to
the HDMI/MHL adapter. Connect one end of the HDMI cable to the HDMI/MHL adapter. Connect
the remaining end of the HDMI cable to the multimedia head unit HDMI input (Rear chassis panel).
Consult your smartphone documentation for instructions on how to access HDMI/MHL on your
device.
4. Touch Screen Calibration Start
Launch the HDMI/MHL Connect app on your smartphone. Using the head unit touch screen, go to
Settings in the HDMI/MHL Connect app. Scroll down slightly, and press the Touch Screen Calibration
“Start” button.
5. Touch Screen Calibration
Once the touch screen is calibrated, scroll up, and press System Settings to return to the main HDMI/
MHL Connect page. Press Mobile Home Page to access your smartphone from the touch screen of
the multimedia head unit. Touch the Car Home Page to return to the Main Source Menu of the head
unit. This calibration is performed once per phone when initially set-up.

29
XRV10
CAMERA OPERATION
Enter Camera Mode
ConnectthecamerastotheunitusingtheCAMERA1-3Connectioncablesatthebackoftheunit.Enter
2nd page of main menu, press CAMERA to access camera mode.
Enter Camera Mode
Thisunitcanconnect3cameras:CAM1,CAM2andCAM3.Eachcameracanbetriggeredseperatelyand
canbesetindierenttriggerpriority.Thereare3triggerwiresatthebackoftheunit.Iftriggersignals
are detected on more than one trigger wire, the channel that has the highest priority is triggered rst.
Once a channel is triggered, the triggered channel video will be displayed on the full screen, Only CAM
1 has audio input.
Auto Mic Enable
When the Auto Mic Enable feature is set to “Yes”, the current playback audio will be muted and the
microphone for camera 1 will be automatically turned on when the vehicle is placed in reverse gear.
See “Camera Conguration”:
Setting Func Function
Camera 1 mode Skip The output of camera 1 image is skipped.
Normal (default) The output of camera 1 image is in normal mode.
Mirror The output of camera 1 image is in mirror mode.
Camera 2 mode Skip The output of camera 2 image is skipped.
Normal (default) The output of camera 2 image is in normal mode.
Mirror The output of camera 2 image is in mirror mode.
Camera3mode Skip Theoutputofcamera3imageisskipped.
Normal (default) Theoutputofcamera3imageisinnormalmode.
Mirror Theoutputofcamera3imageisinmirrormode.
Priority Order 1-2-3 Continue pressing to select the desired camera trigger
priorityfrom1(highest)to3(lowest).
1-3-2
2-1-3
2-3-1
3-1-2
3-2-1
Trigger Delay One Second Set delay time for displaying camera image after trigger
signal is removed.
Two Seconds
Three Seconds
Four Seconds
Five Seconds
Six Seconds
Auto Mic Enable Yes Select “Yes” to automatically turn on the microphone and
mute other audio when the vehicle is in reverse gear
No

30
XRV10
Audio Output and Volume Adjustment
In camera mode, if Camera 1 is not triggered, the front audio output will be the from the last audio
source played. Rotate the VOL control (1) to adjust the volume of the audio source. When Camera 1 is
triggered and the Auto Mic Enable feature is on, the camera 1 video appears on the entire screen and
the audio input from the camera is played. In this case, rotate the VOL control (1) to adjust the volume
when Camera 1 is triggered.
NOTE: The upper area of the screen is the current playback information bar area. Press the top of
the screen to remove the bar or make the bar reappear.
Camera Control Options
Touch the lower part of the screen to make the camera controls appear.
. Touch the “CAM 1” Button to view the Camera 1 video in full screen.
. Touch the “CAM 2” Button to view the Camera 2 video in full screen.
.Touchthe“CAM3”ButtontoviewtheCamera3videoinfullscreen.
. Touch the “AUDIO” Button to turn the Camera audio ON/OFF.
. Touch the Button on the screen to change Brightness, Contrast, Saturation and Hue settings.
Usethe+/-buttonstoadjusteachsettingfrom0-20.

31
XRV10
SWC Ready
The built-in SWC Interface is compatible with PAC steering wheel control modules. The PAC SWI-RC is
recommended.
A third-party adapter must be used in order for the unit to be compatible with any steering wheel
controls.
Note:
Not all OE steering wheel functions may be supported by the unit. PTT - Will activate Siri / Google
Voice if mobile phone supports the feature. Not compatible with all phones/vehicles.
The following controls are available for most vehicles:
1.VolumeUp(+) 4.Preset(+) 7.Seek/Track+ 10. BT Send
2. Volume Down (-) 5. Preset (-) 8.Seek/Track- 11. BT End
11. BT End 6. Source 9. Band 12. PTT
PAC SWI-RC Installation Hints
1. Set “Radio Select Switch”. Set the SWI-RC to position 7 - “Pioneer/Other/Sony”.
2. Programming - Use the Pioneer/Sony/Other radio function mapping order for branded head units.
3. WhenprogrammingtheSWI-RC,ifafunctionisnotsupported(ornotdesired),thenthefunction
MUST be skipped as per the PAC SWI-RC instructions.
4. The SWC function MUST be programmed in the correct order per the PAC SWI-RC radio function
mapping order instructions.
SWI-RC (5VDC Reference)
Function Mapping Center Pin Voltage
(Function Select) Tip Pin Voltage
Volume+ H 5.0v 2.89
Volume - H 5.0v 3.40
Mute H 5.0v 1.37
Preset+ L 0.0v 2.15
Preset - L 0.0v 2.56
Source H 5.0v 0.79
Seek+/Track+ H 5.0v 2.15
Seek - / Track - H 5.0v 2.56
Band H 5.0v 3.94
BT Answer Call L 0.0v 1.37
BT End Call L 0.0v 1.79
PTT / Voice Activation L 0.0v 3.94

32
XRV10
Listen to Other Devices
You can connect an external audio/video device to the unit.
1. Connect the external device with the AV cable.
2. Touch the upper left corner to display the main menu.
3. Touch[AV-IN1]/[AV-IN2]toaccessexternaldevice.
Reset
When the unit hangs up, you can reset it.
Open the cap located on the bottom left of the panel, press [ Reset ]
button with a ball-point pen or similar tool.
Tip
When the unit has been reset, all the settings will return to default
settings.
Replace a Fuse
If there is no power, the fuse may be damaged and need to be replaced.
1. Take out the unit from dashbpard.
2. Check all electrical connections.
3. Buyafusethatmatchestheamperageofthedamagedfuse.
4. Replace the fuse while the units power is disconnected.
Other Modes
Reset

33
XRV10
Troubleshooting
What appears to be trouble is not always serious. Please check the following points before calling a
service center.
Problem Cause Corrective action
General
Unit can not power on
Unit fuse blown. Install new fuse with correct rating.
Car battery fuse blown. Install new fuse with correct rating.
Illegal operation Resettheunit.
No/low audio output
Improper audio output connection. Check wiring and correct.
Volumesettoolow. Increase volume level.
Speakersdamaged. Replacespeakers.
Heavily biased volume balance. Adjustthechannelbalancetocenterposition.
Speakerwiringisincontactwithmetalpartofcar. Insulate all speaker wiring connections.
Poor sound quality or
distortion
Speakerpowerratingdoesnotmatchunit. Replacespeakers.
Wrongconnections. Check wiring and correct.
Speakerisshorted. Check wiring and correct.
Tel-Mute malfunction MUTEwireisgrounded. Checkthe‘MUTE’wiringandcorrect.
Unit resets itself when
engine is off IncorrectconnectionbetweenACCandBATT. Check wiring and correct.
TFT monitor
Warninginformationis
shown at all times Parking break wiring is not correct. Check wiring and correct.
Flashing image or
interference appears on
screen
The color system of not match the monitor. Adjustthecolorsystemofthemonitor.
Videocabledamaged. Replacecables.
Improper video signal connections. Check wiring and correct.

34
XRV10
CARE AND MAINTENANCE
1. Never disassemble or adjust the unit without any professional guidance.
For details, please consult any professional car shop / dealer for inquiry.
2. If the front panel or TFT monitor is dirty, please use a clean silicone cloth and neutral detergent to
wipe o the spot. Using a rough cloth and non-neutral detergent such as alcohol for cleaning may
result in scratching or decoloration to the monitor.
3. Ifanyabnormalbehavioroftheunitisfound,pleaserefertotroubleshootingguideofthismanual.
If no relevant information is found, please press the [RESET] key on the front panel to resume factory
default.
4. If you have parked the car in hot or cold weather for a long time, please wait until the temperature
in the car becomes normal before operating the unit.
5. Using the car heater in low temperature environment may result in moisture inside the unit, DO
NOT use the unit in this situation. If the unit still doesn’t work after a few hours, please contact the
service center.
6. Do not impact the LCD monitor which could cause damage.
7. To prevent damage to the screen, avoid touching it with sharp objects.
8. Toprovideacleardemonstrationandanalternativeforeasyunderstandingtotheoperationofthis
unit, graphic illustrations are used.
However, some illustrations are dierent from the actual images displayed on the screen.
9. Operate the unit correctly according to this manual to prevent unnecessary problem. The guarantee
won’t be valid if the problem is caused by inappropriate operation.

35
XRV10
Video
Format: NTSC, PAL (auto-detection)
Output: 1Vp-p (75-ohm)
Input: 1Vp-p (75-ohm)
FM Tuner
TuningRange:87.5MHz-107.9MHz
MonoSensitivity(-30dB):9dBf
Quieting Sensitivity (-50dB): 15dBf
Alternate Channel Selectivity: 70dB
SignaltoNoiseRatio@1kHz:58dB
ImageRejection:80dB
StereoSeparation@1kHz:>30dB
FrequencyResponse:30Hz-15kHz,-3db
AM Tuner
TuningRange:530kHz-1710kHz
Sensitivity (-20dB): 15uV
SignaltoNoiseRatio@1kHz:50dB
Image Rejection: 60dB
FrequencyResponse:50Hz-2kHz,-3dB
Monitor
ScreenSize:10.1”(Measureddiagonally),16:9Widescreen
Screen Type: TFT LCD
Resolution:1024hx600vxRGBWVGA
General
Auxiliary (Audio) Input Impedance: 10k -Ohm
Power Supply: 11 to 16VDC, negative ground
Power Antenna / Amp Remote (Blue): 500mA max (Current limited protection)
OperatingTemperature:0C~65C/32F~149F
Fuse: 15-Amp, ATO type
ChassisDimensions:11”X6.3”X6.9”(279.37mmX159.25mmX175.23mm)
CEA Power Ratings
PowerOutput:13WattsRMSx4channelsinto
4-Ohms@<1%THD+N
Signal to Noise Ratio: 70dBA below reference
(Reference: 1 Watt, 4-Ohms)
FrequencyResponse:20Hz-20kHz,-3dB.(Aux
Input used as reference input)
Reference Supply Voltage: 14.4VDC
*Specicationsaresubjecttochangewithoutnotice.
Specications
XRV10
2602 Marina Drive, Elkhart, IN 46514
WWW.ASAELECTRONICS.COM
© 2016
Printed in China
XRV10 Common Replacement Parts
Microphone (4M), mating harness 31914310B
Remote Control PXRV10REM
Wire Harness - Bulk Pack separately for ASA 30314310
Operation manuals and other material online at:
https://www.asaelectronics.com/manuals-guides