ASOKA USA PL8660-ETH PLUGLAN 8660 SMARTBRIDGE AV ETHERNET ADAPTER User Manual PL8660 ETH 20100514 new
ASOKA USA Corporation PLUGLAN 8660 SMARTBRIDGE AV ETHERNET ADAPTER PL8660 ETH 20100514 new
Users Manual

PlugLAN 8660 SmartBridge AV Ethernet Adapter
User’s Guide
PL8660-ETH
Q
UICK
F
IND
L
OCATOR
Contact Information
Getting Help
Table of Contents
About This Guide
Getting Started
Installing the SmartBrid
Configuring the SmartBridge
66-0350-00 Rev.001

PlugLAN 8660 SmartBridge AV E
t
herne
t
Adap
t
er User's Guide
© 2010 Asoka USA Corporation
ALL RIGHTS RESERVED
Notice: No part of this publication may be reproduced or transmitted in any form or by any means, electronic
or mechanical, including photocopying and recording, or stored in a database or retrieval system for any
purpose without the express written permission of Asoka USA Corporation.
Asoka USA Corporation reserves the right to make changes to this user’s guide at any time without notice and
assumes no responsibility for its use. Asoka USA products and services can only be ordered under the terms
and conditions of Asoka USA Corporation's applicable agreements. All of the features described in this user’s
guide may not be currently available. Refer to the most recent product announcement for information about
feature and product availability.
This user’s guide contains the most current information available at the time of publication. When new and/
or revised information becomes available, this entire user’s guide is updated and distributed to all registered
users.
Asoka, PlugLAN, and the Asoka logo are registered trademarks or trademarks of Asoka USA Corporation.
All company and product names mentioned herein are trademarks of their respective companies. Mention of
third-party products is for informational purposes only and constitutes neither an endorsement nor a
recommendation. Asoka USA Corporation assumes no responsibility with regard to the performance or use of
these products.
Revision
Date
Description
66-0350-00 Rev.001 May 2010 Preliminary Release
Changes in This Revision
• Not applicable (preliminary release)
ii

PlugLAN 8660 SmartBridge E
t
hernet Adap
t
er User's Guide
Contact Information
For more
information
about the PlugLAN 8660 SmartBridge AV Ethernet Adapter
or any of
Asoka’s other leading-edge solutions, please contact us using any of the following methods:
• Voice calls: We welcome your calls Monday through Friday, from 9:00 am to 6:00 pm
Pacific Time at (408) 550-8167. Voice mail is available during non-business hours.
• Email: If you prefer, you can send information requests to our e-mail address:
sales@asokausa.com.
• Fax calls: You can also send your requests for information to our 24-hour fax number:
(408) 884-2390.
• Web site: Our Web site contains valuable information about our products, solutions, and
services. We encourage you to visit us at http://www.asokausa.com.
Getting Help
Asoka USA backs its products with unparalleled customer service and technical support for our
valued customers.
Customer Service
Customer service, the customer-satisfaction arm of Asoka USA, is available Monday through
Friday, from 9:00 am to 5:00 pm Pacific Time, by calling (408) 550-8167 or through email at
custserv@asokausa.com.
Technical Support
Technical support is available Monday through Friday, from 6:00 am to 6:00 pm Pacific Time, by
calling (408) 550-8173 or through email at support@asokausa.com.
Please provide the following information about the problem:
• Product name, model number, part number (if applicable) and serial number
• System configuration, including a description of the devices connected to your PlugLAN
8660 SmartBridge
• The circumstances surrounding the error or failure
• A detailed description of the problem and what has been done to try to solve it
iii

Rela
t
The en
t
www.a
The fol
b
Gener
• Plu
g
htt
p
• Plu
g
htt
p
• Plu
g
htt
p
Gate
w
• Plu
g
htt
p
• Plu
g
htt
p
Smar
t
• Plu
g
htt
p
• Plu
g
htt
p
Gate
w
• Plu
g
htt
p
• Plu
g
htt
p
iv
t
ed Do
c
t
ire docu
m
sokausa.c
o
lowing do
c
NOTE: Al
b
e availabl
e
al Plu
g
L
A
g
LAN Site
S
p
://www.a
g
LAN Fami
l
p
://www.a
g
LAN Trou
b
p
://www.a
w
ay docu
m
g
LAN 8960
p
://www.a
g
LAN 8960
p
://www.a
t
Clip In
j
e
c
g
LAN 1300
p
://www.a
g
LAN 1300
p
://www.a
w
ay Expa
n
g
LAN 1350
p
://www.a
g
LAN 1350
p
://www.a
PlugLA
N
c
umen
t
m
entation s
e
o
m
.
c
uments co
l documen
t
e
at the sa
m
A
N docu
m
S
urvey Que
s
sokausa.c
o
l
y Overvie
w
sokausa.c
o
b
leshootin
g
sokausa.c
o
m
entatio
n
Gateway
Q
sokausa.c
o
Gateway I
n
sokausa.c
o
c
tion Kit
d
SmartClip
sokausa.c
o
SmartClip
sokausa.c
o
n
sion Ad
a
Gateway
E
sokausa.c
o
Gateway
E
sokausa.c
o
N
8660 Smar
t
t
ation
e
t for Aso
k
mpose the
t
ation migh
t
m
e URLs sp
e
m
entation
s
tionnaire
o
m/suppo
r
w
o
m/suppo
r
g
Guide
o
m/suppo
r
n
Q
uick Start
o
m/suppo
r
n
stallation
o
m/suppo
r
d
ocumen
t
Injection
K
o
m/suppo
r
Injection
K
o
m/suppo
r
a
pter doc
u
E
xpansion
A
o
m/suppo
r
E
xpansion
A
o
m/suppo
r
t
Bridge AV E
t
k
a’s MDU so
Asoka MD
U
t
be upgra
d
e
cified in t
h
r
t/plu
g
lan
_
r
t/plu
g
lan
_
r
t/pluglan
_
Guide
r
t/plu
g
lan
_
and User’s
r
t/plu
g
lan
_
t
ation
K
it Quick S
t
r
t/smartcli
p
K
it Installa
t
r
t/smartcli
p
u
mentati
o
A
dapter Qu
i
r
t/plu
g
lan
_
A
dapter Ins
t
r
t/plu
g
lan
_
t
hernet Ada
p
lutions ca
n
U
documen
d
ed over ti
m
h
is guide.
_
survey.pd
_
overview.
_
troublesh
o
_g
ateway_
q
Guide
_g
ateway_
g
t
art Guide
p
_qs
g
.pd
f
t
ion and Us
p
_
g
uide.p
d
o
n
i
c
k
Start G
_
1350
_
qs
g
t
allation a
n
_
1350
_g
ui
d
p
t
er User's G
u
n
be acces
s
tation set.
m
e. All upg
r
f
pdf
o
otin
g
.pdf
q
s
g
.pdf
g
uide.pdf
er's Guide
d
f
uide
.pd
f
n
d User's G
d
e.pd
f
u
ide
s
ed at:
htt
p
r
aded docu
m
uide
p
://
m
entation
w
w
ill

PlugLAN 8660 SmartBridge E
t
hernet Adap
t
er User's Guide
Customer Premises Equipment documentation
• PlugLAN 8660 SmartBridge AV Ethernet Adapter Ethernet Adapter User's Guide
http://www.asokausa.com/support/pluglan_8660_guide.pdf
• PlugLAN 8660 SmartBridge AV Ethernet Adapter Ethernet Adapter Quick Start Guide
http://www.asokausa.com/support/pluglan_8660_qsg.pdf
• PlugLAN 8550 Wireless SmartPoint Access Point / Ethernet Adapter User's Guide
http://www.asokausa.com/support/pluglan_8550_guide.pdf
• PlugLAN 8550 Wireless SmartPoint Access Point / Ethernet Adapter Quick Start Guide
http://www.asokausa.com/support/pluglan_8550_qsg.pdf
• PlugLAN 8250 SmarTAP Ethernet Adapter User’s Guide
http://www.asokausa.com/support/pluglan_8250_guide.pdf
• PlugLAN 8250 SmarTAP Ethernet Adapter Quick Start Guide
http://www.asokausa.com/support/pluglan_8250_qsg.pdf
• PlugLAN 8350 Wireless SmarTAP Access Point / Ethernet Adapter User's Guide
http://www.asokausa.com/support/pluglan_8350_guide.pdf
• PlugLAN 8350 Wireless SmarTAP Access Point / Ethernet Adapter Quick Start Guide
http://www.asokausa.com/support/pluglan_8350_qsg.pdf
v

PlugL
A
N 8660 Smar
t
Bridge AV Ethernet Adapter User’s Guide
Table of Contents
1 Simple Installation . . . . . . . . . . . . . . . . . . . . . . . . . . . . . . . . . . . . . . . 1-1
Package Contents . . . . . . . . . . . . . . . . . . . . . . . . . . . . . . . . . . . . . . . . . . . . 1-2
How the PlugLAN 8660 SmartBridge AV Ethernet Adapter Fits into Your
Network. . . . . . . . . . . . . . . . . . . . . . . . . . . . . . . . . . . . . . . . . . .1-2
Connecting the PlugLAN 8660 SmartBridge AV Ethernet Adapter . . . . . . . . . . . 1-3
2 Advanced Configuration (Expert Users Only) . . . . . . . . . . . . . . . . . . 2-1
Launching the Web Management Utility . . . . . . . . . . . . . . . . . . . . . . . . . . . . . 2-2
Understanding the Pages in the Web Management Utility . . . . . . . . . . . . . . . . 2-3
Using the System Menu . . . . . . . . . . . . . . . . . . . . . . . . . . . . . . . . . . . . . . . . 2-4
Viewing System Information . . . . . . . . . . . . . . . . . . . . . . . . . . . . . . . . . . 2-4
Changing the Login User ID and Password and Auto-Logout Time . . . . . . . 2-5
Changing the User ID and Login Password . . . . . . . . . . . . . . . . . . . . . . 2-5
Changing the Auto-Logout Time . . . . . . . . . . . . . . . . . . . . . . . . . . . . . 2-6
Viewing System Logs . . . . . . . . . . . . . . . . . . . . . . . . . . . . . . . . . . . . . . . 2-6
Resetting the PlugLAN 8660 SmartBridge AV Ethernet Adapter . . . . . . . . . . 2-7
Factory Default Settings . . . . . . . . . . . . . . . . . . . . . . . . . .. . . . . . . . . . . 2-8
Backing Up Configuration Settings . . . . . . .. . . . . . . . . . . . . . . . . . . . . . 2-10
Restoring Backup Settings . . . . . . . . . . . . . . . . . . . . . . . . . . . . . . . . . . 2-11
Updating Firmware and FTP Settings . . . . . . . . . . . . . . . . . . . . . . . . . . . 2-13
Updating Firmware . . . . . . . . . . . . . . . . . . . . . . . . . . . . . . . . . . . . . 2-13
Defining FTP Server Settings. . . . . . . . . . . . . . . . . . . . . . . . . . . . . . . 2-14
Using the Advanced Menu . . . . . . . . . . . . . . . . . . . . . . . . . . . . . . . . . . . . . 2-15
Enabling VLAN Functionality . . . . . . . . . . . . . . . . . . . . . . . . . . . . . . . . . 2-15
Configuring Packet Priority . . . . . . . . . . . . . . . . . . . . . . . . . . . . . . . . . . 2-16
Configuring Bandwidth Control . . . . . . . . . . . . . . . . . . . . . . . . . . . . . . . 2-17
Configuring SNMP Settings . . . . . . . . . . . . . . . . . . . . . . . . . . . . . . . . . . 2-18
Using the IP Address Menu. . . . . . . . . . . . . . . . . . . . . . . . . . . . . . . . . . . . . 2-20
Using the Powerline Menu . . . . . . . . . . . . . . . . . . . . . . . . . . . . . . . . . . . . . 2-21
Scanning Powerline Devices . . . . . . . . . . . . . . . . . . . . . . . . . . . . . . . . . 2-21
Changing the Powerline Network Password . . . . . . . . . . . . . . . . . . . . . . 2-21
vii

PlugLAN 8660 Smar
t
Bridge AV Ethernet Adapter User’s Guide
3 Troubleshooting . . . . . . . . . . . . . . . . . . . . . . . . . . . . . . . . . . . . . . . . 3-1
A Components . . . . . . . . . . . . . . . . . . . . . . . . . . . . . . . . . . . . . . . A-1
LEDs . . . . . . . . . . . . . . . . . . . . . . . . . . . . . . . . . . . . . . . . . . . . . . . . . . . . . A-1
Rear Label . . . . . . . . . . . . . . . . . . . . . . . . . . . . . . . . . . . . . . . . . . . . . . . . . A-2
B Specifications . . . . . . . . . . . . . . . . . . . . . . . . . . . . . . . . . . . . . . B-1
C Warranty. . . . . . . . . . . . . . . . . . . . . . . . . . . . . . . . . . . . . . . . . . C-1
D FCC Notes . . . . . . . . . . . . . . . . . . . . . . . . . . . . . . . . . . . . . . . . . D-1
Index
viii

PlugL
A
N 8660 Smar
t
Bridge AV Ethernet Adapter User’s Guide
1
Simple Installation
Congratulations on your purchase of the PlugLAN 8660 SmartBridge
AV Ethernet Adapter is a portable customer premises
equipment
(CPE) device that
provides
instant
network
connectivity by simply
plugging into any PlugLAN-enabled electrical outlet. A high speed
Ethernet connection to the PlugLAN system is securely established
over existing electrical lines, delivering up to 85Mbps throughput.
The PlugLAN 8660 SmartBridge AV Ethernet Adapter combines
robust performance with advanced security and network
management functionalities. Built- in data encryption and VLAN
capabilities ensure security and privacy to every client. Each
device can be controlled either independently or by using Asoka's
PowerView™ management software.
Fully plug-and-play, the PlugLAN 8660 SmartBridge AV Ethernet
Adapter provides the perfect combination of functionality and
convenience
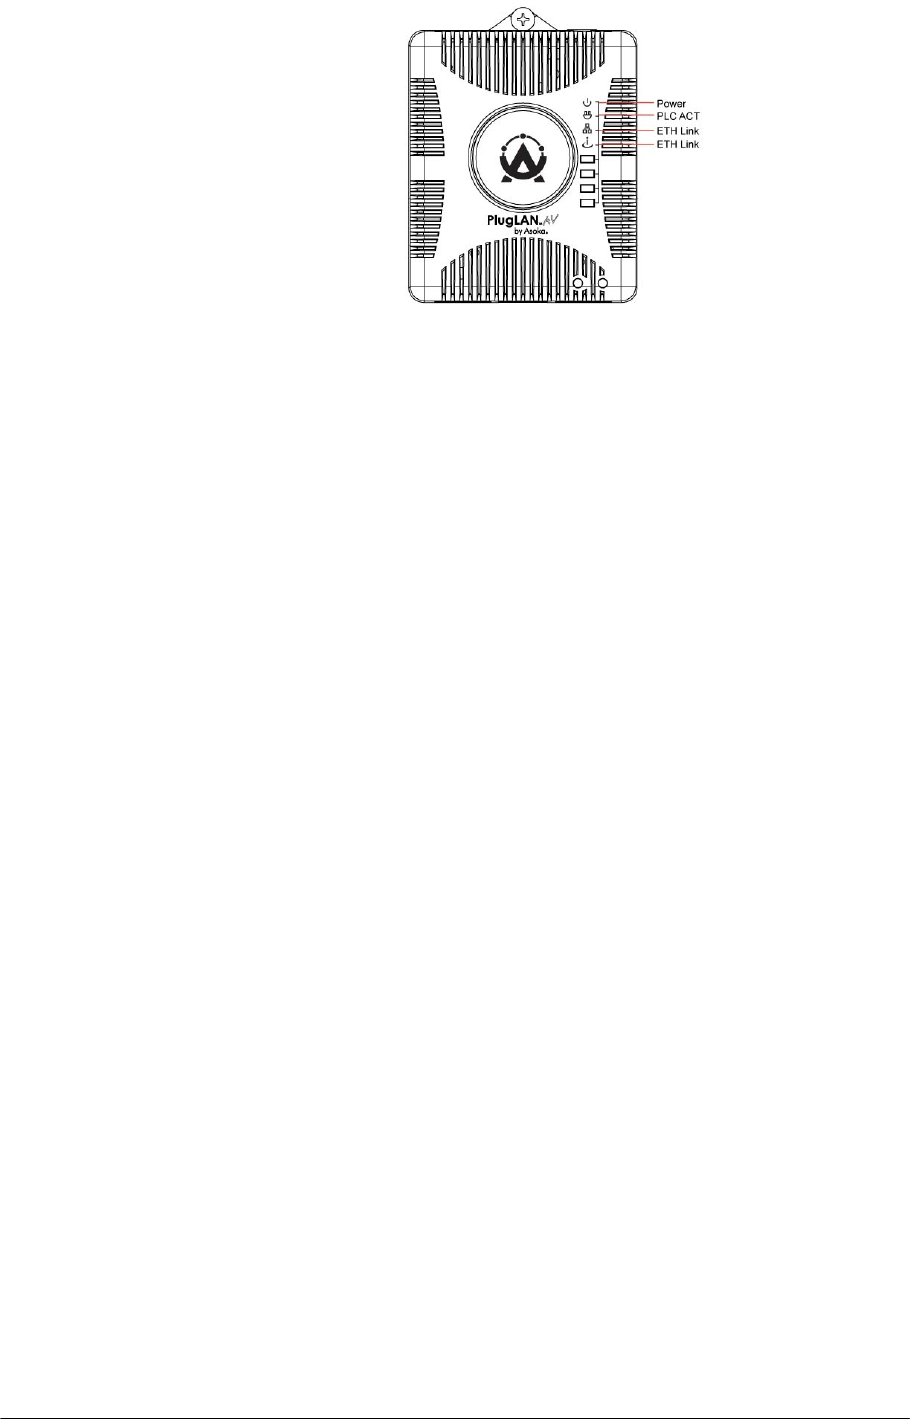
Your PlugLAN 8660 SmartBridge AV Ethernet Adapter has four light-
emitting diode (LED)
indicators and two RJ-45 Ethernet ports.
• The LEDs show the connection status as well as other
information, allowing you to identify network problems.
• The RJ-45 Ethernet ports can be used to connect your PlugLAN
8660 SmartBridge to a device in your
network.
Please take a few minutes to read this chapter to install your
PlugLAN 8660 SmartBridge AV Ethernet Adapter.
Simple Installation 1–1
PlugLAN 8660 Smar
t
Bridge AV Ethernet Adapter User’s Guide
Figure 1-1: PlugLAN 8660 SmartBridge AV Ethernet Adapter
Package Contents
After receiving your PlugLAN 8660 SmartBridge AV Ethernet Adapter,
perform the following steps to ensure that your contents arrived safely.
1. Inspect the outer shipping container for damage during shipping. Report
any sign of damage to the appropriate shipping carrier.
2. Remove the contents from the shipping container and check for the
following items:
• One PlugLAN 8660 SmartBridge AV Ethernet Adapter Adapter
• One Ethernet cable
• One CD containing user documentation (this User’s Guide)
• PlugLAN 8660 SmartBridge AV Ethernet Adapter Quick Start Guide
• Warranty and Support Information Card
3. Inspect your PlugLAN 8660 SmartBridge AV Ethernet Adapter thoroughly.
If you see any signs of damage, contact the shipping carrier.
How the PlugLAN 8660 SmartBridge AV Ethernet Adapter
Fits into Your Network
The PlugLAN 8660 SmartBridge AV Ethernet Adapter plugs into a PlugLAN-
enabled power outlet to extend network services to any electrical outlet in
any room. Your PlugLAN
8660 SmartBridge is compatible with all TCP/IP-based operating systems and
requires no new cabling or drivers to be installed. All that is required is a
PLugLAN Gateway and/or Gateway Expansion Adapters injecting network
services into the powerline, and a compatible network-interface card (NIC)
installed in your computers or other devices. This makes your PlugLAN 8660
SmartBridge compatible with any device including Microsoft Windows, Apple
Macintosh, and Unix machines.
1–2 Simple Installation
C
o
A
d
o
nnecti
d
apter
or surg
e
netwo
r
Plu
g
Devices c
a
transfer r
a
For securi
t
equipped
w
combinati
o
your Plug
L
secure th
a
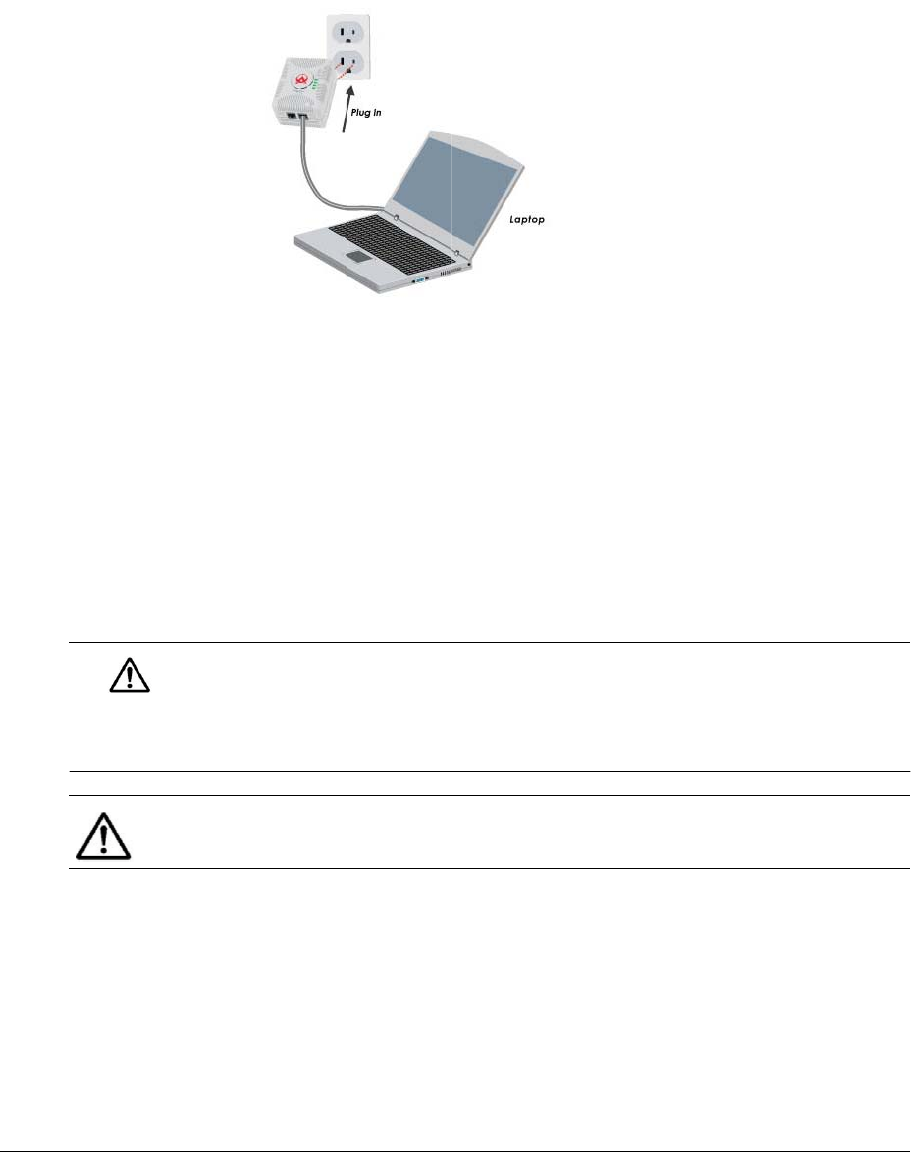
Figure
ng the
To connec
t
1. Plug y
o
outlet
n
LEDs o
n
show s
t
NOTE: D
Adap
t
e
protecto
r
r
k performa
NOTE: I
t
Adapter
in
2. Conne
c
netwo
r
two RJ
8660 S
m
g
L
A
N 8660
S
a
n commun
a
tes (pleas
e
t
y, your Pl
u
w
ith 56-bi
t
o
n of the p
L
AN 8660 S
m
a
n wireless
1-2: Exam
p
PlugL
A
t
devices t
o
o
ur PlugLA
N
n
ear the c
o
n
the top
o
t
atus infor
m
o not conn
e
t
er to a po
w
r
. This may
nce.
t
is
importa
n
to the wall
c
t either e
n
r
k (RJ-45)
p
-45 conne
c
m
artBridg
e
S
mar
t
Bridge
A
icate with
e
contact
y
u
gLAN 866
0
t
Data Encr
y
rivacy of t
h
m
artBridg
e
products.
p
le of How
Y
A
dapte
r
A
N 866
0
o
your Plu
g
N
8660 Sm
a
o
mputer t
h
o
f your Plu
g
m
ation (se
e
e
ct the Plu
g
w
er strip, e
prevent th
e
n
t
that you
p
outlet righ
t
n
d of the s
u
p
ort. Conn
e
c
tors label
e
e
(see
Figu
r
Simple In
s
A
V Etherne
t
A
each othe
r
y
our Asoka
0
SmartBri
d
y
ption Sta
n
h
e home p
o
e
AV Ether
n
Y
our Plu
g
L
A
r
Fits into
Y
o
0
Smar
t
g
LAN 8660
S
a
rtBridge A
V
h
at you wa
n
g
LAN 8660
e
Appendi
x
g
LAN 8660
S
xtension c
o
e
unit from
p
lug the Pl
u
t
-side up.
u
pplied Et
h
e
ct the oth
e
e
d LAN Po
r
r
e 1-3
).
s
tallation
A
dapter Use
r
r
quickly a
n
reseller fo
d
ge AV Eth
e
n
dard (DES
)
o
wer grid
p
n
et Adapte
r
A
N 8660 S
m
o
ur
Networ
k
t
Bridg
e
S
martBrid
g
V
Etherne
t
n
t to conn
e
SmartBrid
g
x
A Comp
o
S
martBridg
e
o
rd, uninte
r
working p
r
u
gLAN 8660
h
ernet cab
l
e
r end of t
h
r
t on the b
o
r
’s Guide
n
d securel
y
r more inf
o
e
rnet Ada
p
)
encrypti
o
p
lus encry
p
r
significa
n
m
artBrid
g
e
A
k
e
AV Et
h
g
e AV Ethe
r
t
Adapter i
n
e
ct (see
Fi
g
g
e AV Ethe
r
o
nents
).
e
AV Ether
n
r
ruptible p
o
r
operty or
d
SmartBrid
g
l
e to your
c
h
e cable t
o
o
ttom of y
o
y
at high d
a
o
rmation).
p
ter is
o
n. The
p
tion make
s
n
tly more
A
V Ethernet
h
ernet
r
net Adapt
e
n
to a wall
g
ure 1-2
).
T
r
net Adap
t
n
et
o
wer suppl
y
d
egrade
g
e AV Ethe
r
c
omputer’
s
o
either of
t
o
ur PlugLA
N
1
a
ta
s
e
r:
T
he
t
er
y
,
r
net
s
t
he
N
1
–3

1–4
F
i
3. Th
e
Adapt
e
19
2
to
u
to
2
Eth
ple
a
Congr
a
proced
Your Pl
Smart
B
NOTE:
3 for t
PlugLAN 86
6
ig
ure 1-3:
L
e
default I
P
e
r is
2
.168.1.
2
u
se the sa
m
2
53) or ch
a
ernet Ada
p
a
se refer t
o
a
tulations!
ures for y
o
ugLAN 866
0
B
ridge is n
o
In the un
roubleshoo
6
0 Smar
t
Bri
d
L
AN Ports o
P
address f
o
2
53
. Eithe
r
m
e subnet
(
a
nge the IP
p
ter to ma
t
o
Chapter
You have
n
o
ur PlugLA
N
0
o
w ready f
o
likely even
t
ting sugges
t
Simpl
e
d
ge AV Ethe
r
n the Botto
m
A
V Ether
n
o
r the Plug
r
configure
(
192.168.
address o
f
t
ch your n
e
2
.
n
ow compl
e
N
8660 Sm
a
o
r use.
t
you encou
t
ions.
e
Installatio
n
r
net Adapter
m
of the Pl
u
n
et Adapter
LAN 8660
S
your
comp
u
1.
xxx
wh
f
your Plug
L
e
twork’s su
e
ted the h
a
a
rtBridge A
V
nter a prob
n
User’s Guid
e
ug
LAN 8660
S
martBridg
u
ter
and
n
e
ere
xxx
is
L
AN 8660 S
bnet. For
m
a
rdware in
s
V
Etherne
t
lem, pleas
e
e
SmartBrid
g
e AV Ethe
r
e
tworking
d
a number
f
martBridg
e
m
ore infor
m
s
tallation
t
Adapter.
e
refer to C
h
g
e
r
net
d
evices
f
rom 1
e
AV
m
ation,
h
apter

PlugL
A
N 8660 Smar
t
Bridge AV Ethernet Adapter User’s Guide
2
Advanced Configuration
(Expert Users Only)
After you install the PlugLAN 8660 SmartBridge AV Ethernet
Adapter, use the information in this chapter to configure the
SmartBridge. Topics in this chapter are:
ˆ
Launching the Web Management Utility on page 2-2
ˆ
Understanding the Pages in the Web Management Utility
on page 2-3
ˆ
Using the System Menu on page 2-4
ˆ
Using the Advanced Menu on page 2-15
ˆ
Using the IP Address Menu on page 2-20
ˆ
Using the Powerline Menu on page 2-21
WARNING! This chapter is for expert users who
understand networking concepts and terminology.
Advanced Configuration (Expert Users Only) 2–1
PlugLAN 8660 Smar
t
Bridge AV Ethernet Adapter User’s Guide
Launching the Web Management Utility
Your PlugLAN 8660 SmartBridge AV Ethernet Adapter provides a Web-based
Web Management utility for performing advanced
configuration
activities.
After you install your PlugLAN 8660 SmartBridge AV Ethernet Adapter, use
the following procedure to launch the Web Management utility.
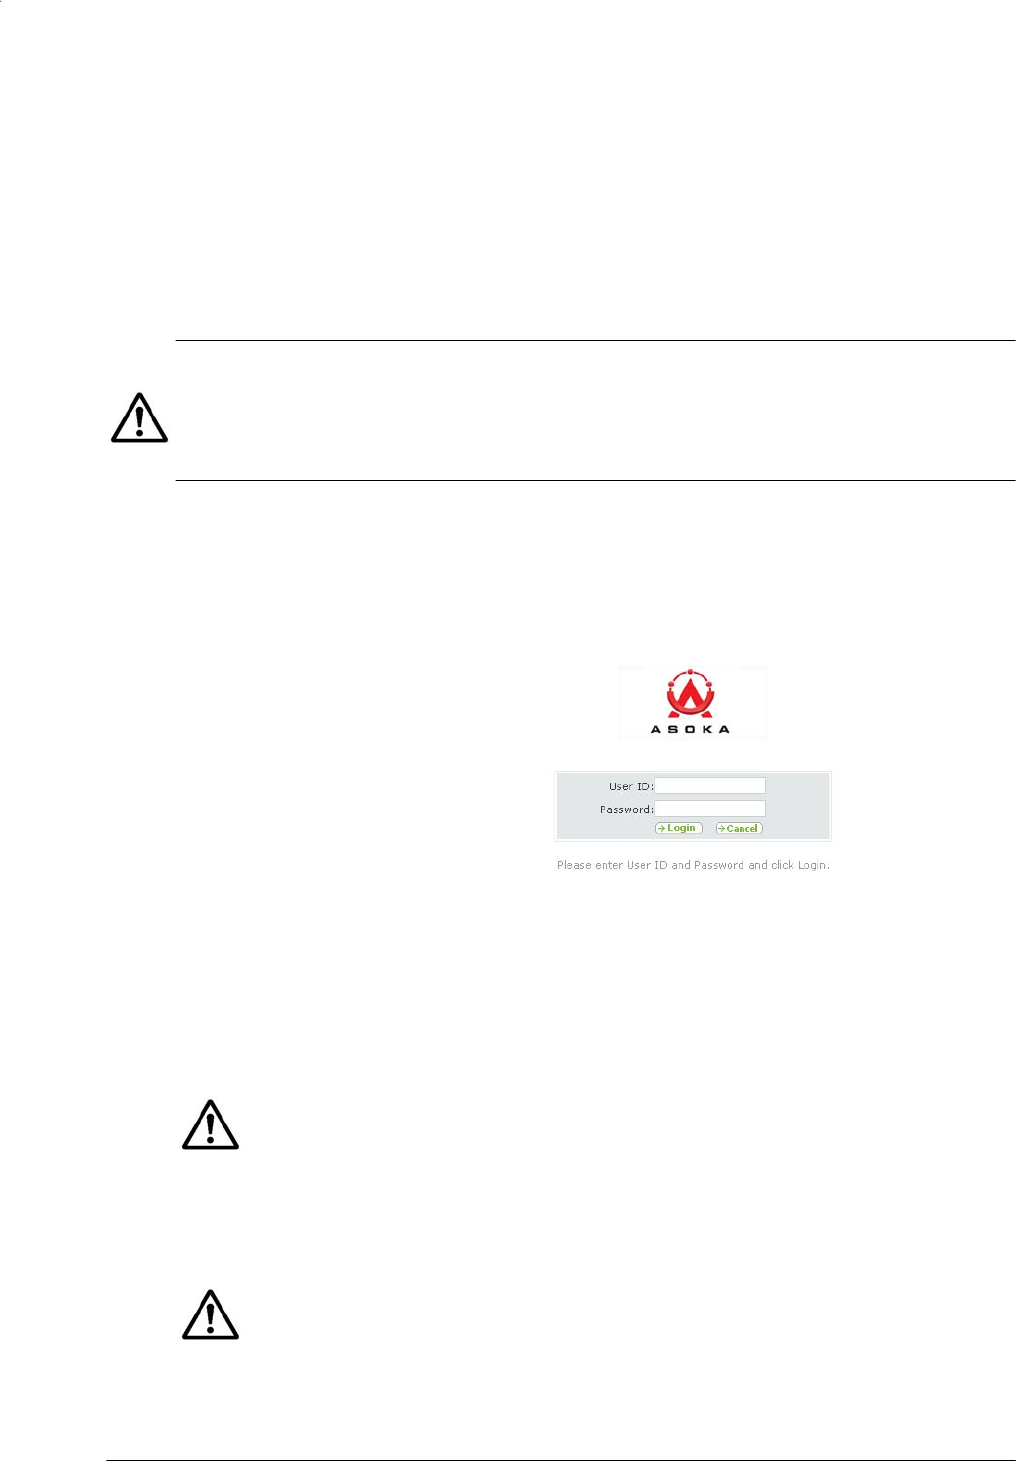
1. Start your Web browser and point it to the following default IP address:
192.168.1.253. The Welcome page in Figure 2-1 appears, with your
cursor in the User ID field.
NOTE: To connect to the Web Management utility, your PC’s IP address must
be on the same subnet
(
192.168.1.xxx
,
where
xxx
is a number from 1 to 253)
as the PlugLAN 8660 SmartBridge AV Ethernet Adapter.
Figure 2-1: Welcome
Page
2. Enter your user ID and
password
in the
appropriate
fields. The default user
ID is admin and the default case-sensitive password is welcome.
NOTE: For security, every password character appears as a bullet (•).
3. Click the Login button on the Welcome page. The System Details page
appears. For more information about this page, see Viewing System
Information on page 2-4.
NOTE: By default, a login session lasts 3 minutes, after which the session ends
automatically. To change the auto-logout time, see Changing the Auto-Logout
Time on page 2-6.
2–2 Advanced Configuration (Expert Users Only)
PlugL
A
N 8660 Smar
t
Bridge AV Ethernet Adapter User’s Guide
Understanding the Pages in the Web Management Utility
The PlugLAN 8660 SmartBridge AV Ethernet Adapter Web Management utility
provides an intuitive user interface for viewing and changing configuration
settings.
• The quick links panel appears at the top-right side on every page. It
provides buttons for returning to the Home page (System Details page),
viewing a glossary of terms that appear in the Web Management utility,
viewing help about using the Web Management utility, and logging out of
the Web Management utility.
• The menu bar appears below the Quick Links panel on every page. It
provides links for accessing each of the five menus in the Web
Management utility. When you go to a menu, the pages associated with
that menu appear in the navigation panel.
• The navigation panel appears below the menu bar on the left side of the
Web Management utility. The navigation panel shows the pages in each
menu of the Web Management utility.
• The main panel is the viewing area on the page. This is where you view
and change your PlugLAN 8660 SmartBridge AV Ethernet Adapter’s
configuration settings.
Quick
Links
Menu Bar
Navigation
Panel
Main
Panel
Figure 2-2: Areas in the Web Management Utility Screen
Advanced Configuration (Expert Users Only) 2–3
PlugLAN 8660 Smar
t
Bridge AV Ethernet Adapter User’s Guide
Using the System Menu
The System menu lets you perform the following system activities:
• View the status of your PlugLAN 8660 SmartBridge AV Ethernet Adapter.
See page 2-4.
• Change the login user ID, password, and auto-logout time. See page 2-5.
• View the system log entries. See page 2-6.
• Reset your PlugLAN 8660 SmartBridge AV Ethernet Adapter. See page 2-7
• Factory Default Settings. See page 2-8
• Backup and restore configuration settings. See page 2-10.
• Backup and restore configuration settings. See
page 2-11.
• Update the firmware or configure the PlugLAN 8660 SmartBridge
AV Ethernet Adapter to access an FTP server. See page 2-13.
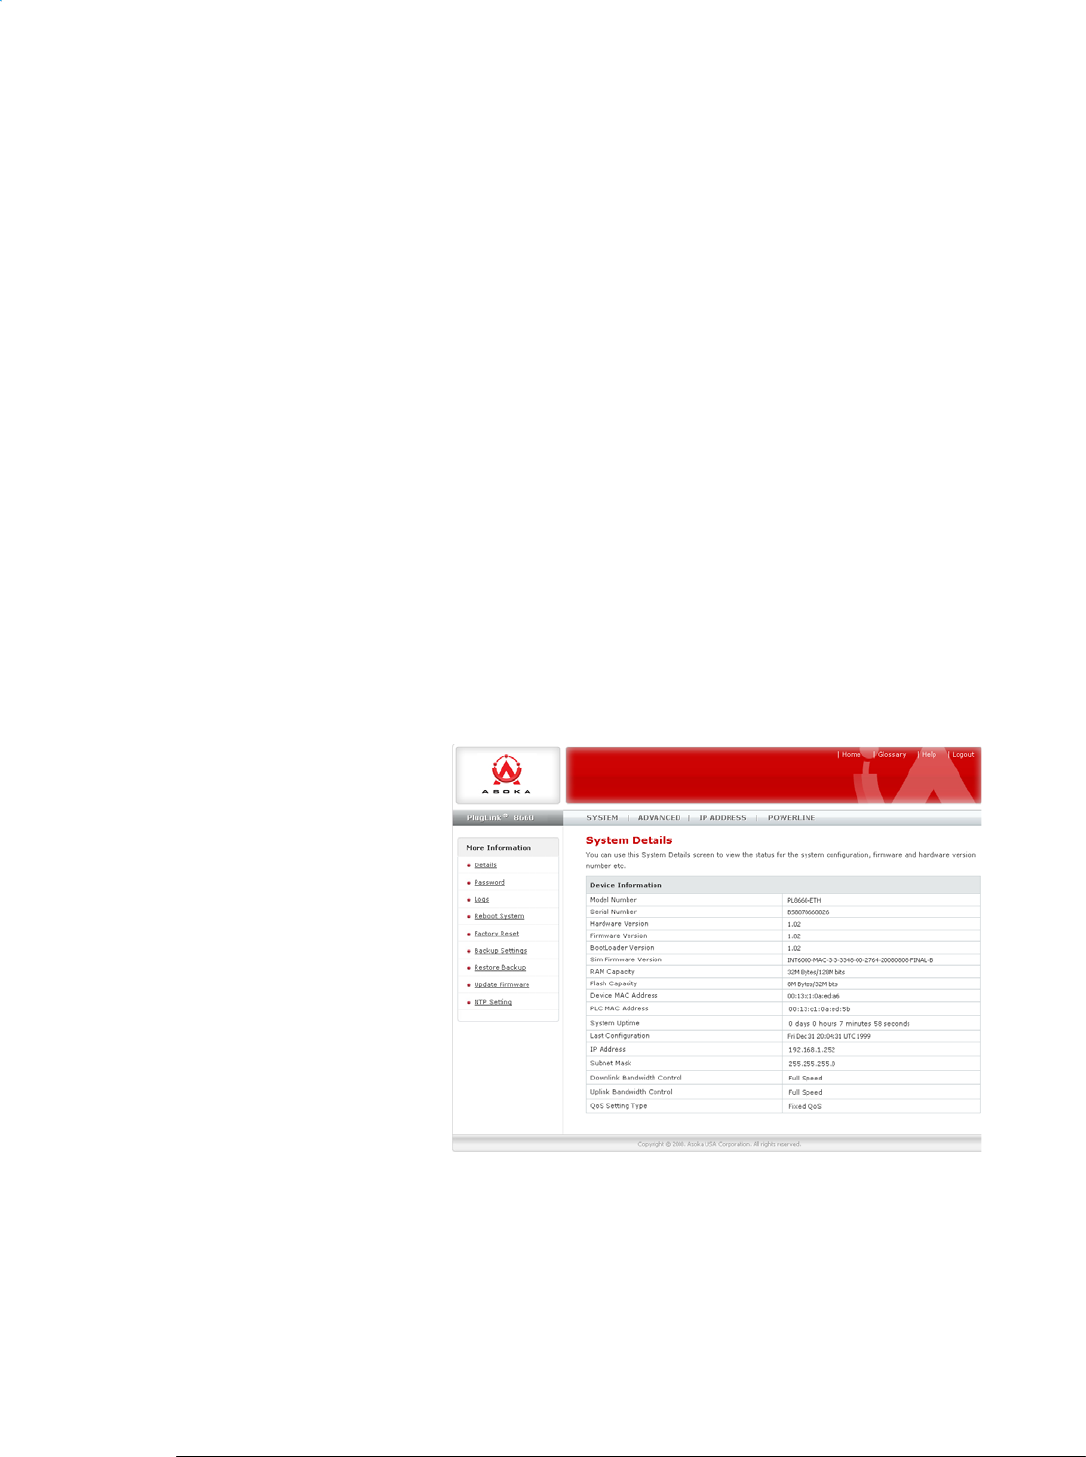
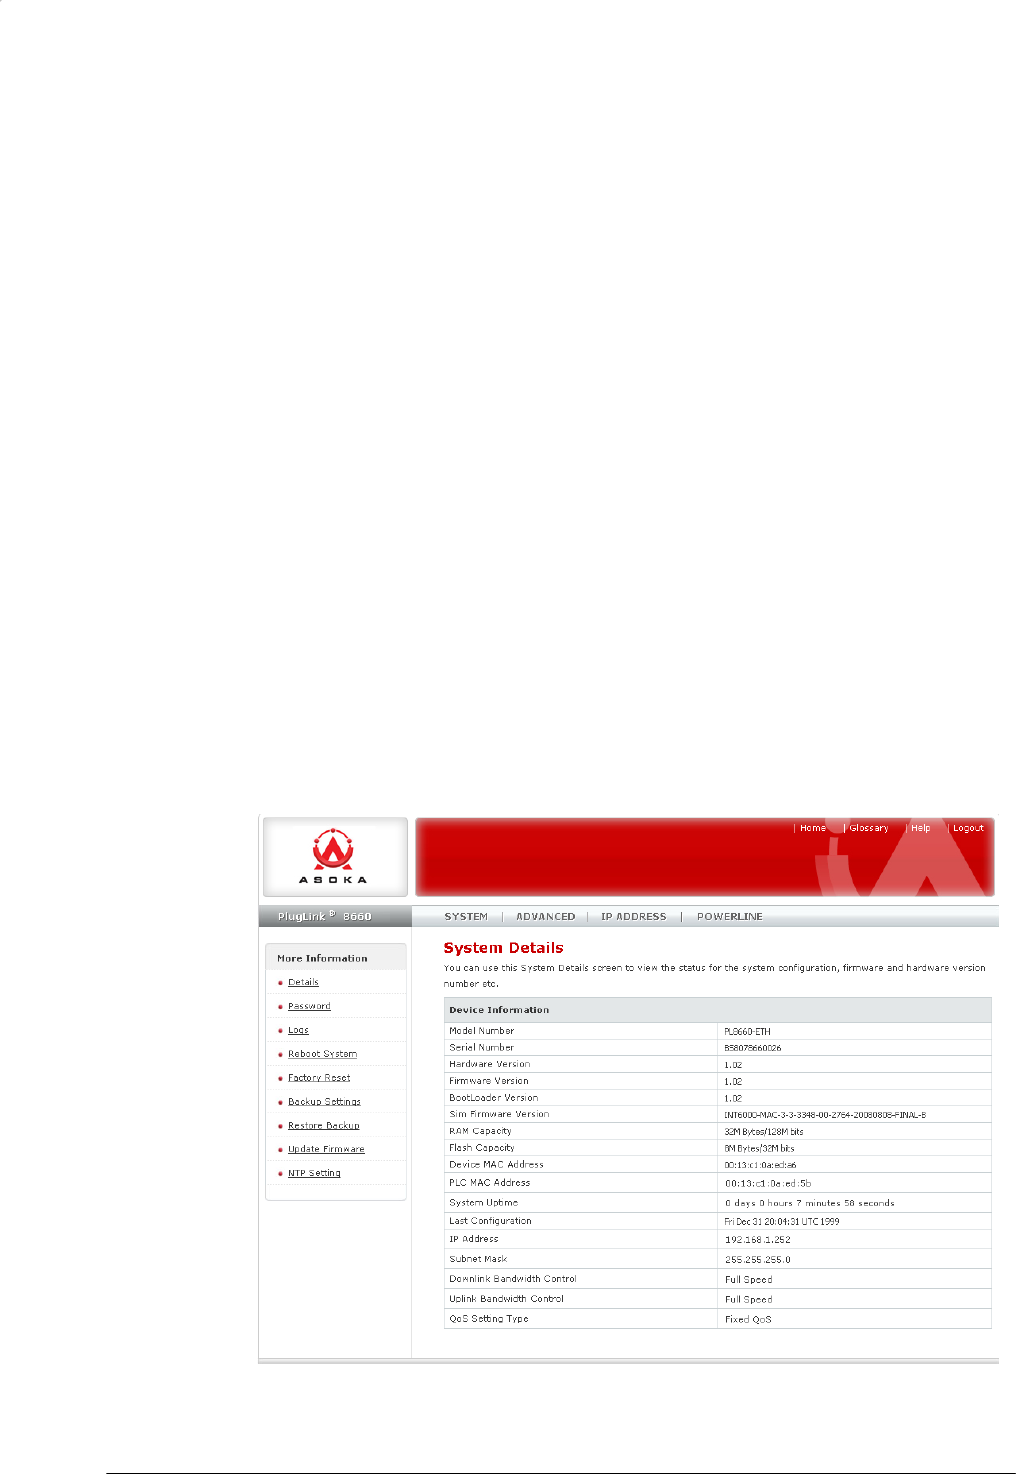
Viewing System Information
The System Details page is a read-only screen that shows the status of your
PlugLAN 8660 SmartBridge AV Ethernet Adapter.
This page is the first one to appear when you log in to the PlugLAN 8660
SmartBridge Web Management utility. If you are already in the System menu,
click Details in the navigation panel to display this page.
Figure 2-3: System Details
Page
2–4 Advanced Configuration (Expert Users Only)

Ch
Ch
a
anging
t
a
n
g
in
g
t
h
Plu
g
t
he Log
i
Using the
S
used to lo
g
the auto-l
o
Managem
e
panel.
h
e User I
D
The defau
l
security,
w
To change
NOTE: F
o
appears a
s
1. From t
h
the cu
r
2. Click i
n
3. Click i
n
passw
o
4. Click i
n
you w
a
charac
t
g
L
A
N 8660
S
i
n User
I
S
ystem Pas
g
in to the
W
o
gout time
e
nt utility
m
D
and Lo
g
l
t user ID i
s
w
e recomm
the login
u
o
r security
,
s
a bullet (
•
h
e System
r
rent user
I
n
the
New
n
the
Ente
r
o
rd.
n
the
Ente
r
a
nt to use.
t
ers and c
a
Advanced
C
S
mar
t
Bridge
A
I
D and
P
sword pag
e
W
eb Mana
g
. To displa
y
m
enu bar a
Figure 2-
4
g
in Pass
w
s
admin
an
end that y
o
u
ser ID and
,
each pass
w
•
).
Password
p
I
D.
User ID
fi
e
r
Current
P
r
New Pass
w
The passw
o
a
n be from
C
onfiguratio
n
A
V Etherne
t
A
P
asswor
d
e
, you can
g
ement uti
l
y
this page
nd then cl
i
4
: System
P
w
ord
d the defa
o
u change
password,
w
ord chara
c
p
age, click
e
ld and ent
e
P
assword
f
i
word
field
o
rd can co
n
0 to 16 ch
a
n
(Expert Us
e
A
dapter Use
r
d
and A
u
change th
e
l
ity. This p
a
, click
Sys
t
i
ck
Passw
o
P
assword P
a
ult passwo
these setti
use the f
o
c
ter you ty
p
in the
Old
e
r the ne
w
i
eld and e
n
and enter
n
sist of al
p
a
racters lo
e
rs Only)
r
’s Guide
u
to-Log
o
e
user ID a
n
a
ge also le
t
t
em
in the
o
rd
in the
n
ag
e
rd is
welc
o
ngs.
o
llowing pr
o
p
e in this p
User ID
fi
e
w
user ID.
n
ter the cu
the new l
o
p
ha and/or
ng.
o
ut
T
im
e
n
d passwo
r
t
s you cha
n
Web
n
avigation
o
me
. For
o
cedure.
rocedure
e
ld and en
t
rrent login
o
gin passw
o
numeric
2
e
r
d
n
ge
t
er
o
rd
2
–5

PlugLAN 8660 Smar
t
Bridge AV Ethernet Adapter User’s Guide
5. Click in the Confirm Your New Password field and enter the same login
password you entered in step 2.
.
NOTE: Passwords are case sensitive. This means, for example, that the Web
Management utility considers zeus and Zeus as different passwords. Be sure to
type
the
correct upper- and lower-case characters when confirming your
password here and when logging in to the Web Management utility.
6. Click the Apply button below the Confirm Your New Password field.
Changing the Auto-Logout Time
Auto-logout time is the number of minutes that elapse since logging in to the
Web Management utility before a user session expires automatically. The
auto-logout time is specified in seconds. The default setting is 180 seconds (3
minutes).
To change the auto-logout time, use the following procedure.
1. From the System Password page, click in Auto-Logout Time field.
2. Delete the current value shown and enter a new value from 60 (1 minute)
to 3600 (60 minutes).
3. Click the Apply button below the Auto-Logout Time field.
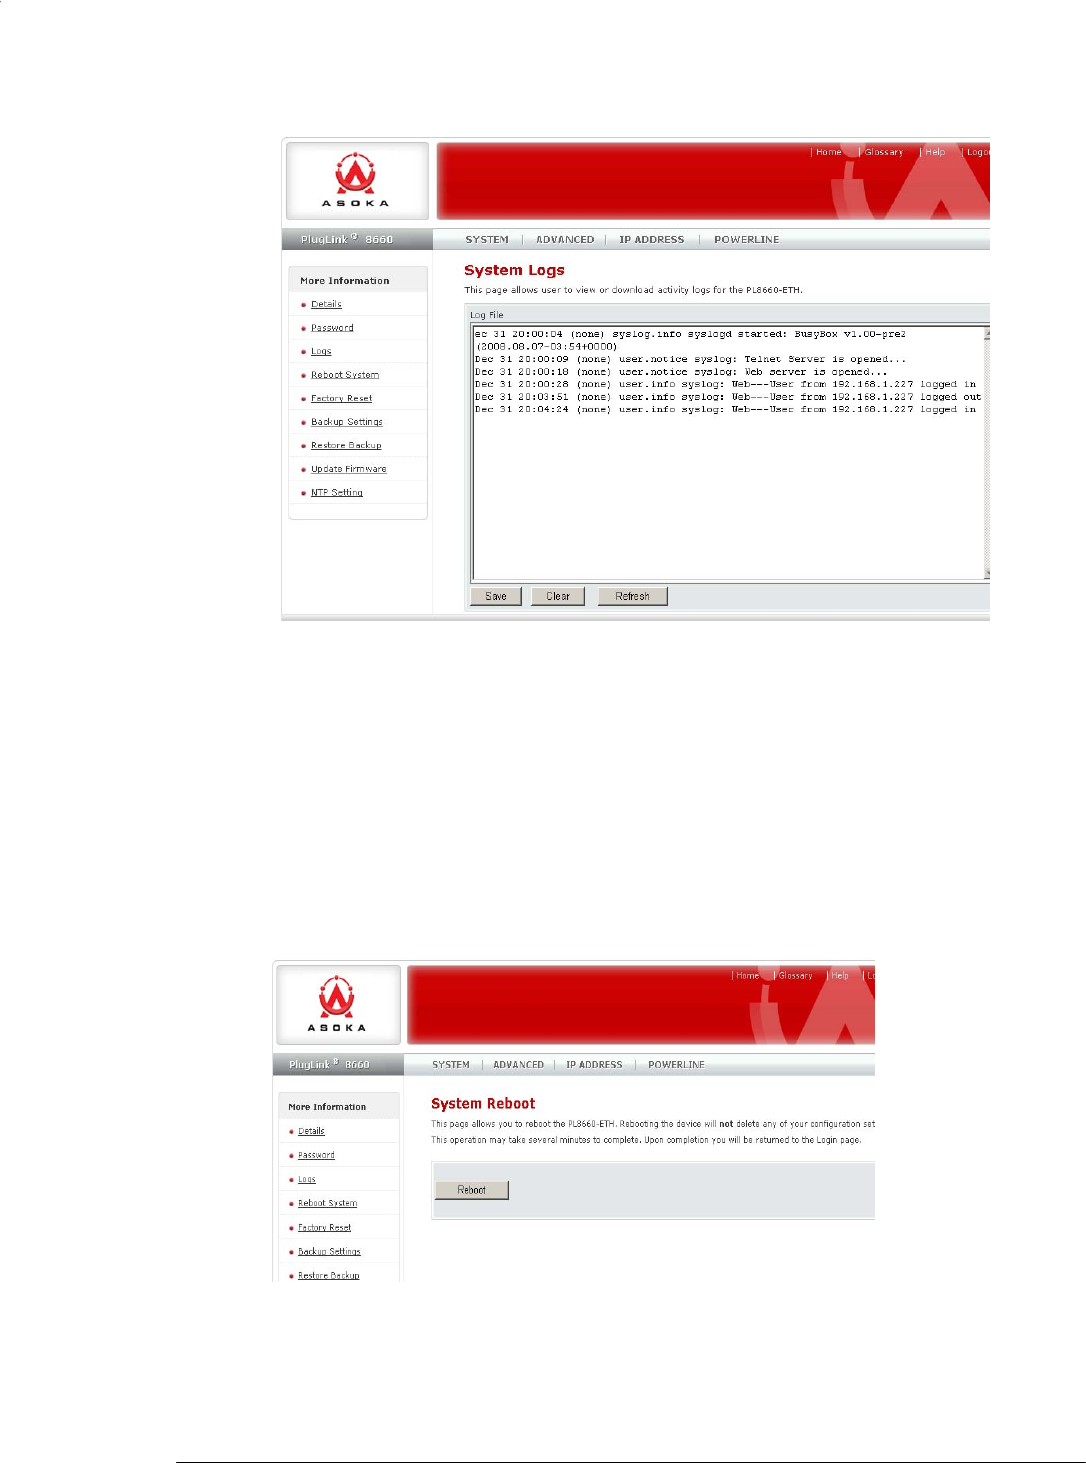
Viewing System Logs
Your PlugLAN 8660 SmartBridge AV Ethernet Adapter keeps a system log that
records potential security threats and system information. Using the System
Logs page, you can view the log. To display this page, click System in the Web
Management
utility menu bar and then click Logs in the navigation panel.
Each row in the log represents an event, and includes the date and time of
the event and a brief description of the event. The most current entry in the
log appears at the bottom of the log.
If desired, you can copy log entries by selecting the entries you want to copy,
pressing Ctrl + C or right-clicking and selecting Copy from the pop-up menu,
and then pasting them into another application using the Paste tools in the
other program.
The following buttons appear at the bottom of the System Logs page:
• Download — lets you save the log and email it if desired.
• Clear — removes the current entries in the log.
• Refresh — updates the information shown in the page.
2–6 Advanced Configuration (Expert Users Only)
PlugL
A
N 8660 Smar
t
Bridge AV Ethernet Adapter User’s Guide
Figure 2-5: System Logs
Page
Resetting Your PlugLAN 8660 SmartBridge AV Ethernet Adapter
Using the Reset page, you can reset your PlugLAN 8660 SmartBridge AV
Ethernet Adapter. To display this page, click System in the Web
Management utility menu bar and then click Reboot System in the
navigation panel.
Figure 2-6: Reset
Page
Advanced Configuration (Expert Users Only) 2–7

PlugLAN 8660 Smar
t
Bridge AV Ethernet Adapter User’s Guide
To reset your PlugLAN 8660 SmartBridge AV Ethernet Adapter, use the
following procedure:
NOTE: Resetting does not change or delete any configuration settings you
changed. Therefore, if you changed any default configuration values, the
changed values will be preserved when you reset your PlugLAN 8660
SmartBridge.
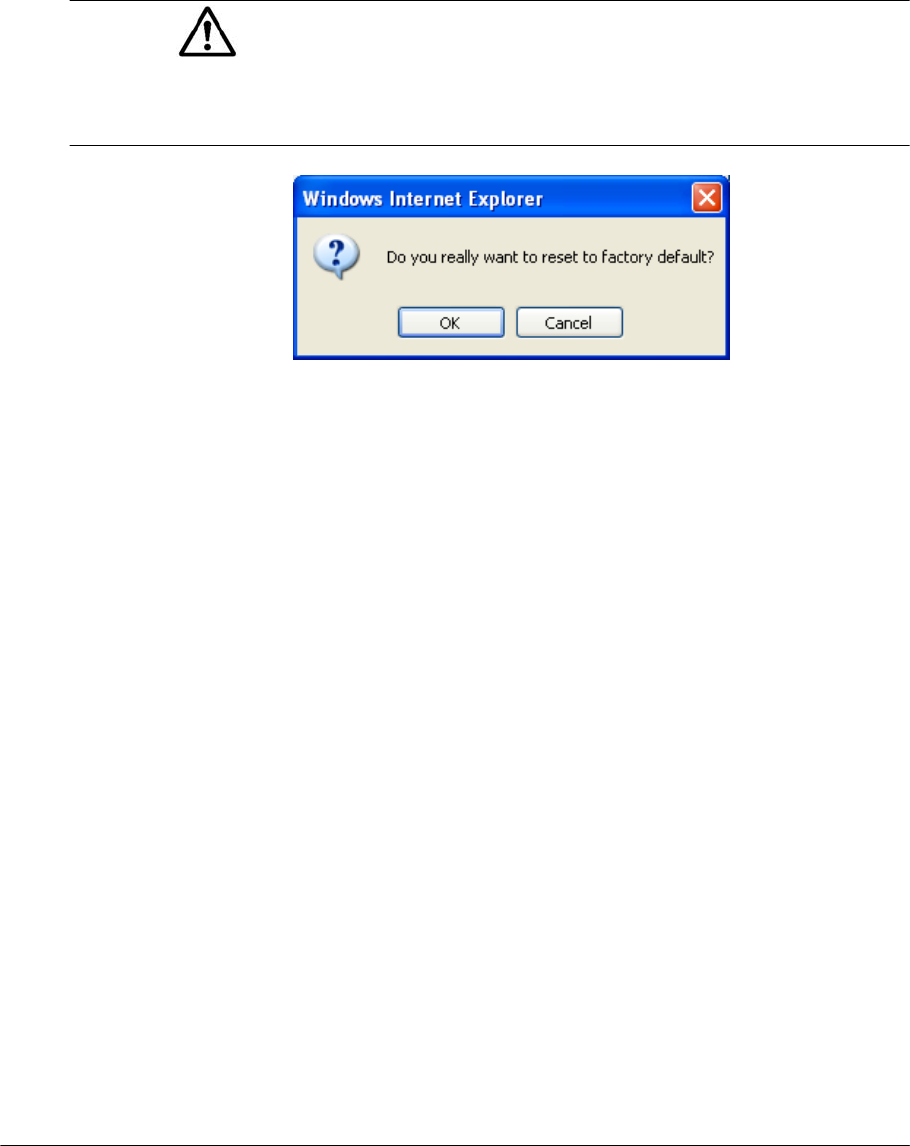
1. Click the System Reset button on the Reset page.
2. When the message in Figure 2-7 appears, click OK to reset your PlugLAN
8660 SmartBridge (or click Cancel to not reset it).
Figure 2-7: Reboot
Message
Factory Default Settings
Using the Reset page, you can return the SmartBridge to its factory default
settings. To display this page, click System in the Web Management utility
menu bar and then click Factory Reset in the navigation panel.
To return your PlugLAN 8660 SmartBridge AV Ethernet Adapter to the factory
default configuration that was in effect whe you first
unpacked
the
SmartBridge,
use the following procedure:
2–8 Advanced Configuration (Expert Users Only)
PlugL
A
N 8660 Smar
t
Bridge AV Ethernet Adapter User’s Guide
1. Click the Factory Default button on the Reset page.
2. When the message in Figure 2-8 appears, click OK to return your PlugLAN
8660 SmartBridge to its factory default configuration (or click Cancel to
keep its current configuration). If you returned to te factory default
settings, a message tells you that your PlugLAN 8660 SmartBridge AV
Ethernet Adapter is rebooting. After the reboot completes, the Welcome
page appears.
NOTE:To log in to the Web Management utility after returning to the
factory default settings, use the default user ID admin and the default
case-sensitive password welcome to log in to the Web Management
utility.
Figure 2-8: Factory Default Message
2–9 Advanced Configuration (Expert Users Only)

Ba
cking U
p
PlugLAN 86
6
p
Confi
g
The config
Adapter a
r
Settings p
a
display thi
then click
To save th
e
procedure
1. Click t
h
Settin
g
2. When
t
click
S
a
3. Use th
e
drive f
o
contai
n
NOTE: I
f
Restorin
g
B
Adva
6
0 Smar
t
Bri
d
g
uration
uration se
t
r
e recorde
d
a
ge, you c
a
s page, cli
c
Backup S
e
e
file cont
a
:
h
e
Save
bu
g
s page.
t
he File Do
w
a
ve
.
e
Save As
d
o
r the file
n
ing the co
f
you save t
h
B
ackup Setti
n
nced Config
u
d
ge AV Ethe
r
Setting
t
tings for y
o
d
in a binar
y
a
n save thi
s
c
k
System
e
ttings
in t
h
Figure 2-
9
a
ining the
c
tton unde
r
w
nload dia
l
d
ialog box
t
and click
S
nfiguratio
n
h
e configur
a
ng
s on pa
ge
u
ration (Exp
e
r
net Adapter
s
o
ur PlugLA
N
y
file calle
d
s
file to a l
o
in the We
b
h
e navigat
i
9
: Backup
S
c
onfigurati
r
Backup S
e
l
og box in
F
t
o select a
S
ave
(or cli
n
settings).
a
tion settin
e
2-10
to re
s
e
rt Users On
l
User’s Guid
e
N
8660 Sm
a
d
config.b
i
o
cation fo
r
b
Managem
i
on panel.
S
ettings
Pa
g
on setting
s
e
ttings
on
F
i
g
ure 2-1
0
location o
n
ck
Cancel
gs, you can
s
tore them
l
y)
e
a
rtBridge
A
i
n
. Using t
h
r
future re
s
ent utility
g
e
s
, use the
f
the Backu
p
0
on pa
g
e
2
n
your co
m
to not sav
e
use the pr
o
if necessa
r
A
V Etherne
t
h
e Backup
s
tore. To
menu bar
a
f
ollowing
p
2
-11
appe
a
m
puter’s ha
r
e
the file
o
cedure un
d
r
y.
2
–
t
a
nd
a
rs,
r
d
d
er
–
10

PlugL
A
N 8660 Smar
t
Bridge AV Ethernet Adapter User’s Guide
Figure 2-10: File Download Dialog
Box
Restoring Configuration Settings
Using the Backup Settings page, you restore the settings when necessary. To
display this page, click System in the Web Management utility menu bar and
then click Restore Settings in the navigation panel.
If you used the procedure under Resetting Your PlugLAN 8660 SmartBridge
AV Ethernet Adapter on page 2-10 to back up the configuration settings for
your PlugLAN 8660
SmartBridge, you can use the Restore Settings area to restore the backup
settings if necessary (for example, if they become corrupt).
To restore settings form a previous binary configuration file you backed up,
use the following procedure:
1. Click the Browse button under Restore Settings on the Backup Settings
page.
2–11 Advanced Configuration (Expert Users Only)
PlugLAN 8660 Smar
t
Bridge AV Ethernet Adapter User’s Guide
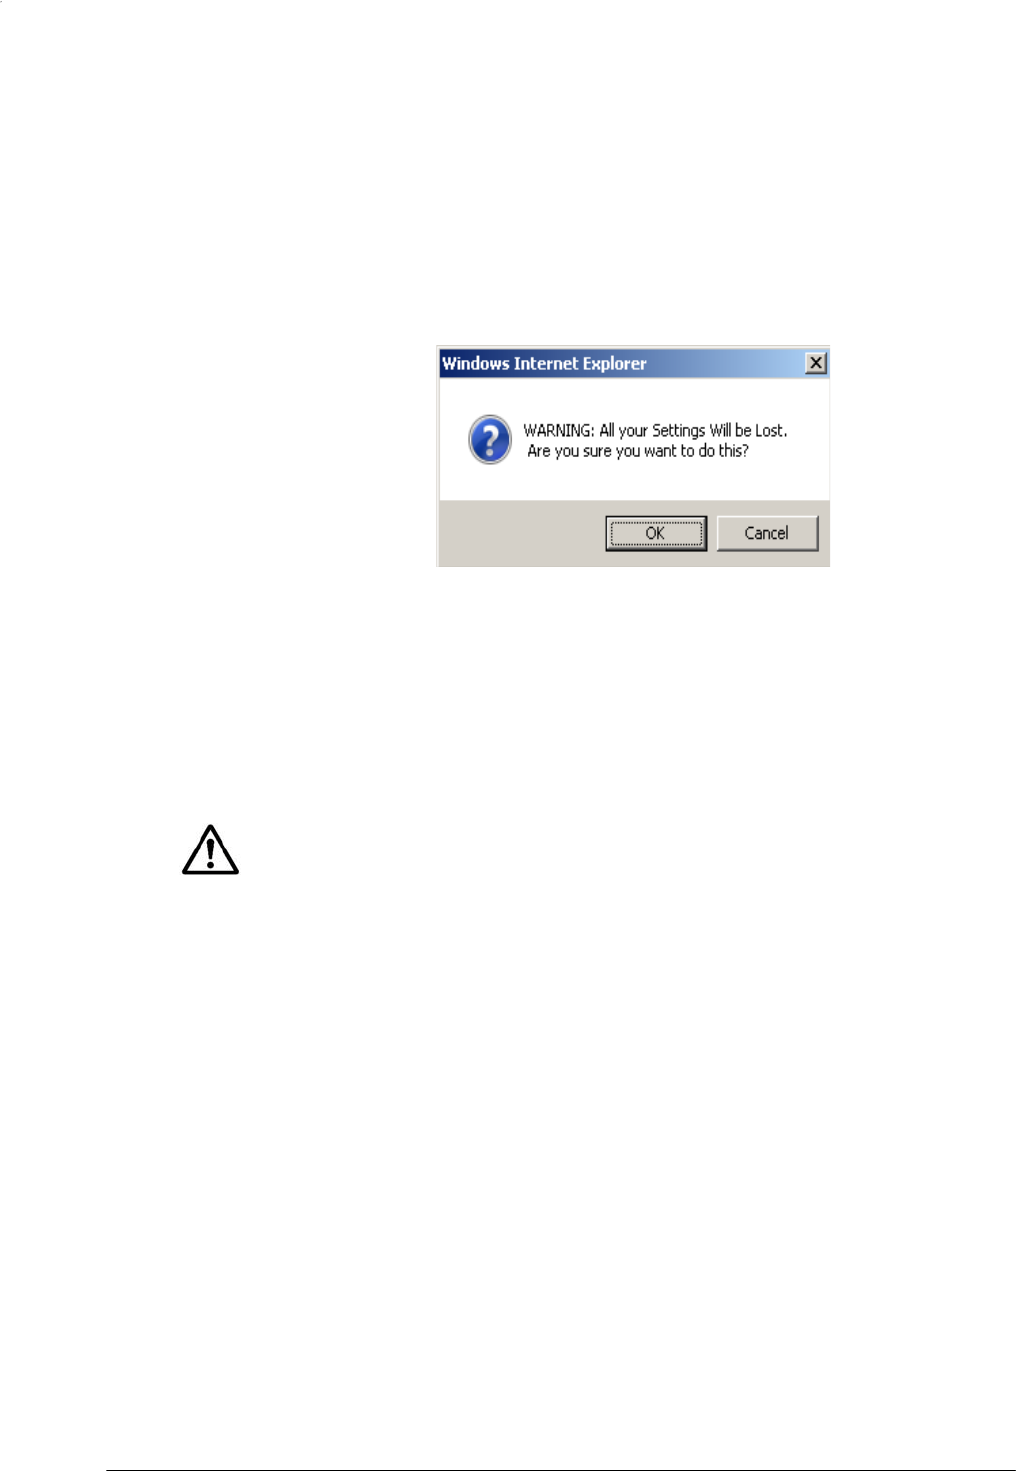
2. When the Choose file dialog box appears, locate the binary configuration
file, select it, and click the Open button. The name of the file appears in
the Browse field.
3. Click the Restore button. The precautionary message in Figure 2-11
appears, warning that any default settings you changed will be
lost.
Figure 2-11: Restore Warning
Message
4. Click the OK button to restore the settings (or click Cancel to retain the
current settings). If you restored the configuration settings, a message
tells you that your PlugLAN 8660 SmartBridge AV Ethernet Adapter is
resetting. After the reset completes, the Welcome page appears.
NOTE: To log in to the Web
Management
utility after restoring
settings,
use the
user ID and default case-sensitive password associated with the configuration
settings you restored.
2–12 Advanced Configuration (Expert Users Only)
PlugL
A
N 8660 Smar
t
Bridge AV Ethernet Adapter User’s Guide
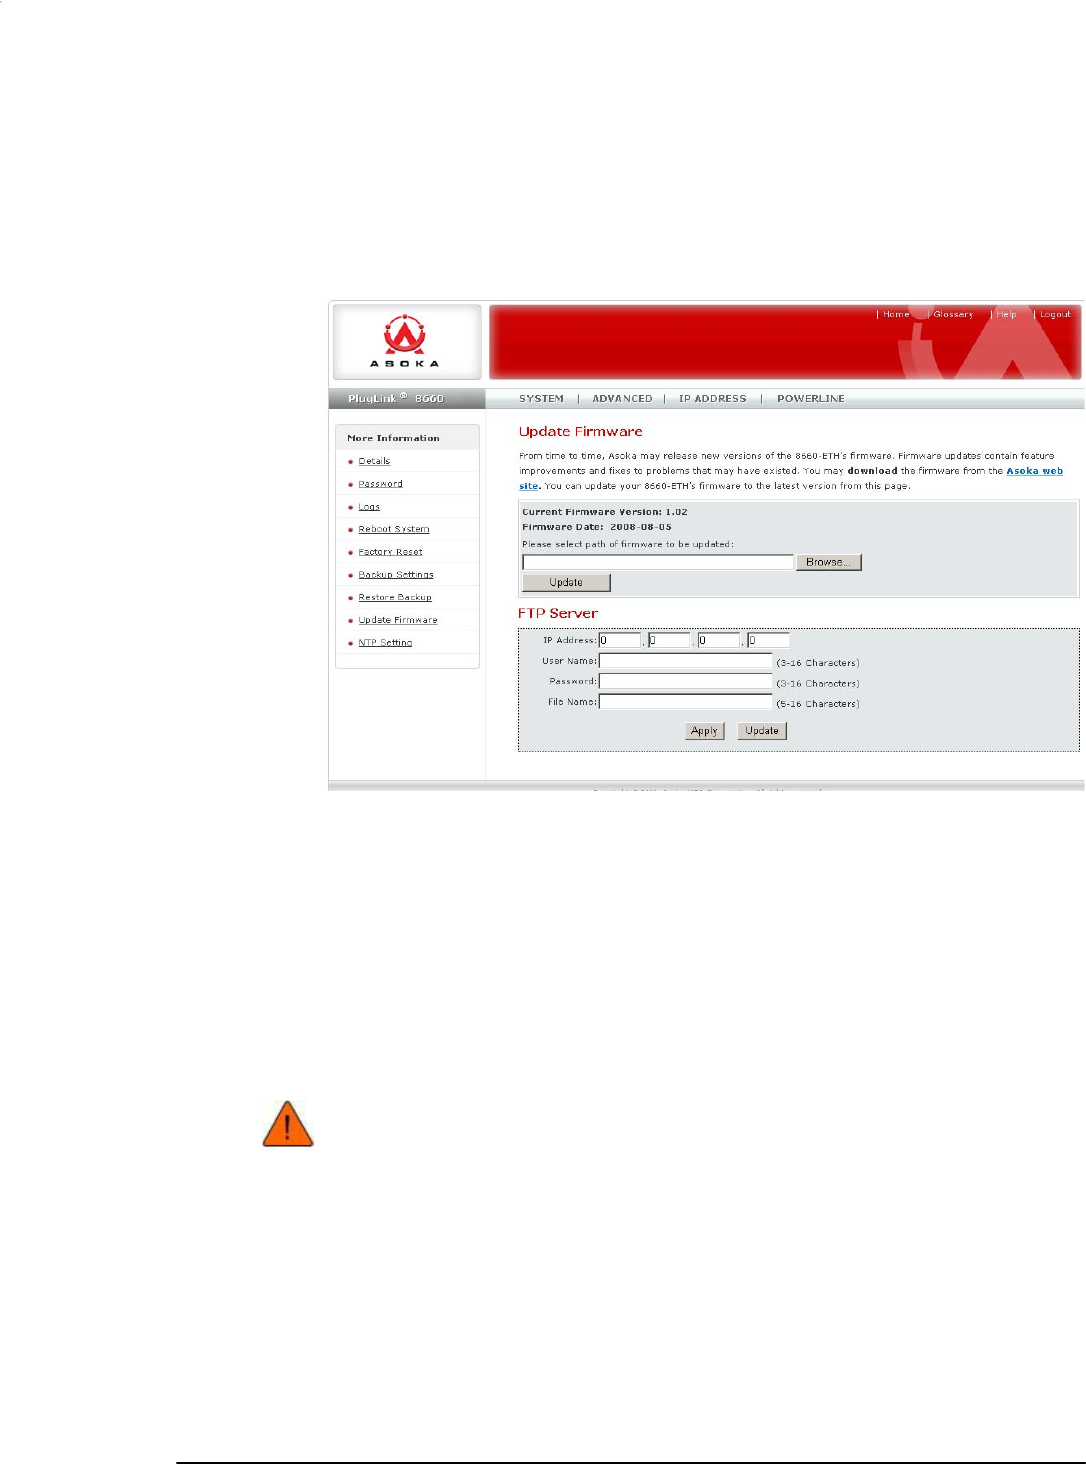
Updating Firmware and FTP Settings
From time to time, firmware upgrades will be made available that contain
feature improvements. Using the Update Firmware page, you can update the
firmware of your PlugLAN 8660 SmartBridge AV Ethernet Adapter. To display
this page, click System in the Web Management utility menu bar and then
click Firmware Upgrade in the navigation panel.
Figure 2-12: Upgrade Firmware Page
Updating Firmware
To update firmware:
1. Go to the Asoka Web site at www.asokausa.com and download the latest
firmware file. Remember the location where you download the file,
because you will select that file later in this procedure.
2. Click the Browse button on the Update Firmware page.
CAUTION! If you are not sure which firmware file you downloaded,
please contact Asoka Technical Support to verify before you
upgrade the firmware.
Advanced Configuration (Expert Users Only) 2–13
PlugLAN 8660 Smar
t
Bridge AV Ethernet Adapter User’s Guide
3. When the Choose file dialog box appears, locate the firmware file you
downloaded, select it, and click the Open button. The name of the file
appears in the Browse field, and the current firmware version and date
appear above the field.
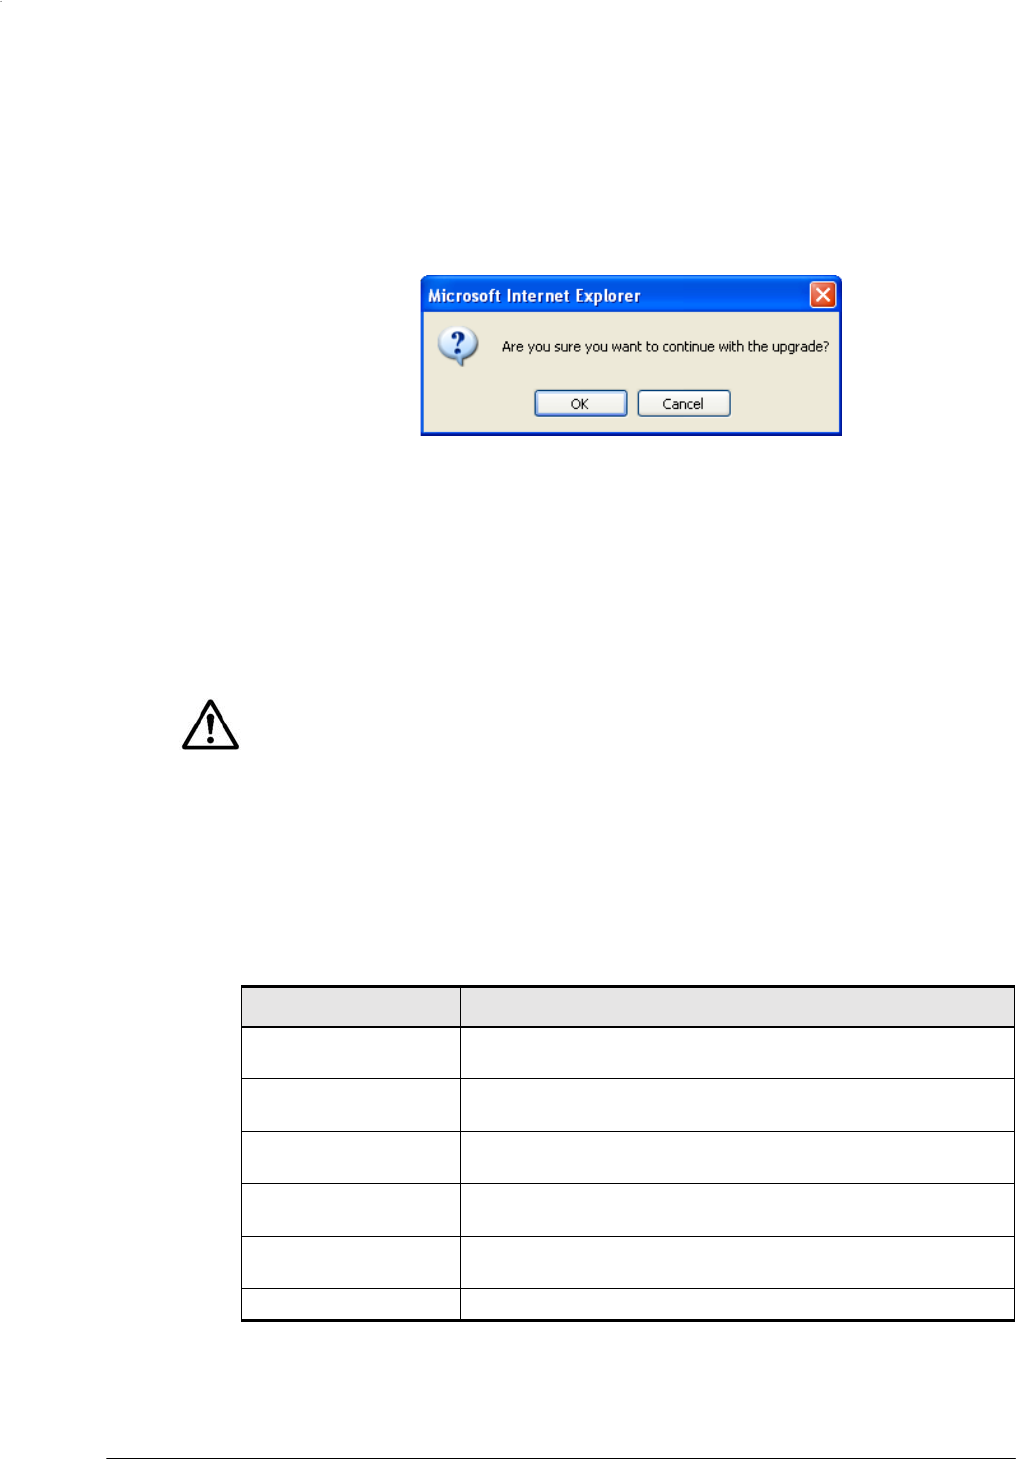
4. Click the Update button. The precautionary message in Figure 2-13
appears.
Figure 2-13: Firmware Upgrade Warning Message
5. Click the OK button to
proceed
with the
upgrade
(or click
Cancel
to cancel
the upgrade). If you clicked OK, one or more messages indicate that your
PlugLAN 8660 SmartBridge AV Ethernet Adapter may not respond for up
to one minute as the firmware is upgraded and the device resets.
6. Click OK to
continue.
When the
firmware
upgrade and reset are complete,
the System Details page appears automatically.
NOTE: If the System Details page does not appear, enter the PlugLAN 8660
SmartBridge IP address (default is 192.168.1.253) in your Web browser to
access the Web Management utility.
Defining FTP Server Settings
You can configure your PlugLAN 8660 SmartBridge AV Ethernet Adapter to
access an FTP server by completing the fields in the FTP Server area on the
Update Firmware page. Table 2-1 describes the fields in this area of the
page.
Table 2-1: FTP Server Area on the Upgrade Firmware Page
Field
Description
IP Address Enter the IP address of the FTP server that the PlugLAN 8660
SmartBridge will access.
User Name Enter the user name, from 3 to 16 characters, required to
access the FTP server.
Password Enter the password, from 3 to 16 characters, required to
access the FTP server.
File Name Enter the name of the file, from 5 to 16 characters, to be
downloaded from the FTP server.
Apply After you enter your configuration settings, click this button to
apply the settings.
Update Click this button to connect to the FTP server.
2–14 Advanced Configuration (Expert Users Only)

PlugL
A
N 8660 Smar
t
Bridge AV Ethernet Adapter User’s Guide
Using the Advanced Menu
The Advanced menu lets you perform the following activities:
• Enable VLAN functionality. See page 2-15.
• Set packet priority settings. See page 2-16.
• Configure bandwidth control. See page 2-17.
• Configure SNMP settings. See page 2-18.
Enabling VLAN Functionality
The VLAN Configuration page lets you enable or disable VLAN settings. This
page is the first one to appear when you log in to the Advanced menu. If you
are already in the Advanced menu, click VLAN Configuration in the
navigation panel to display this page.
Figure 2-14: VLAN Configuration Page
A VLAN is an administrative grouping of network devices that is logically
segmented, by functions, project teams, or applications rather than a
physical or geographical basis. VLANs provide the segmentation services
traditionally provided by routers in LAN configurations. For example, all
workstations and servers used by a particular workgroup team can be
connected to the same VLAN, regardless of their physical connections to the
network. In this way, you can use VLANs to reconfigure the network through
software rather than physically unplugging and moving devices or wires.
Table 2-2 on page 2-16 describes the fields on this page.
Advanced Configuration (Expert Users Only) 2–15
PlugLAN 8660 Smar
t
Bridge AV Ethernet Adapter User’s Guide
Table 2-2: VLAN Configuration Page
Field
Description
Set VLAN Type & ID Enter a VLAN value from 1 to 4093. Default value is 2.
Apply Button After you enter your configuration settings, click this button
to apply the settings.
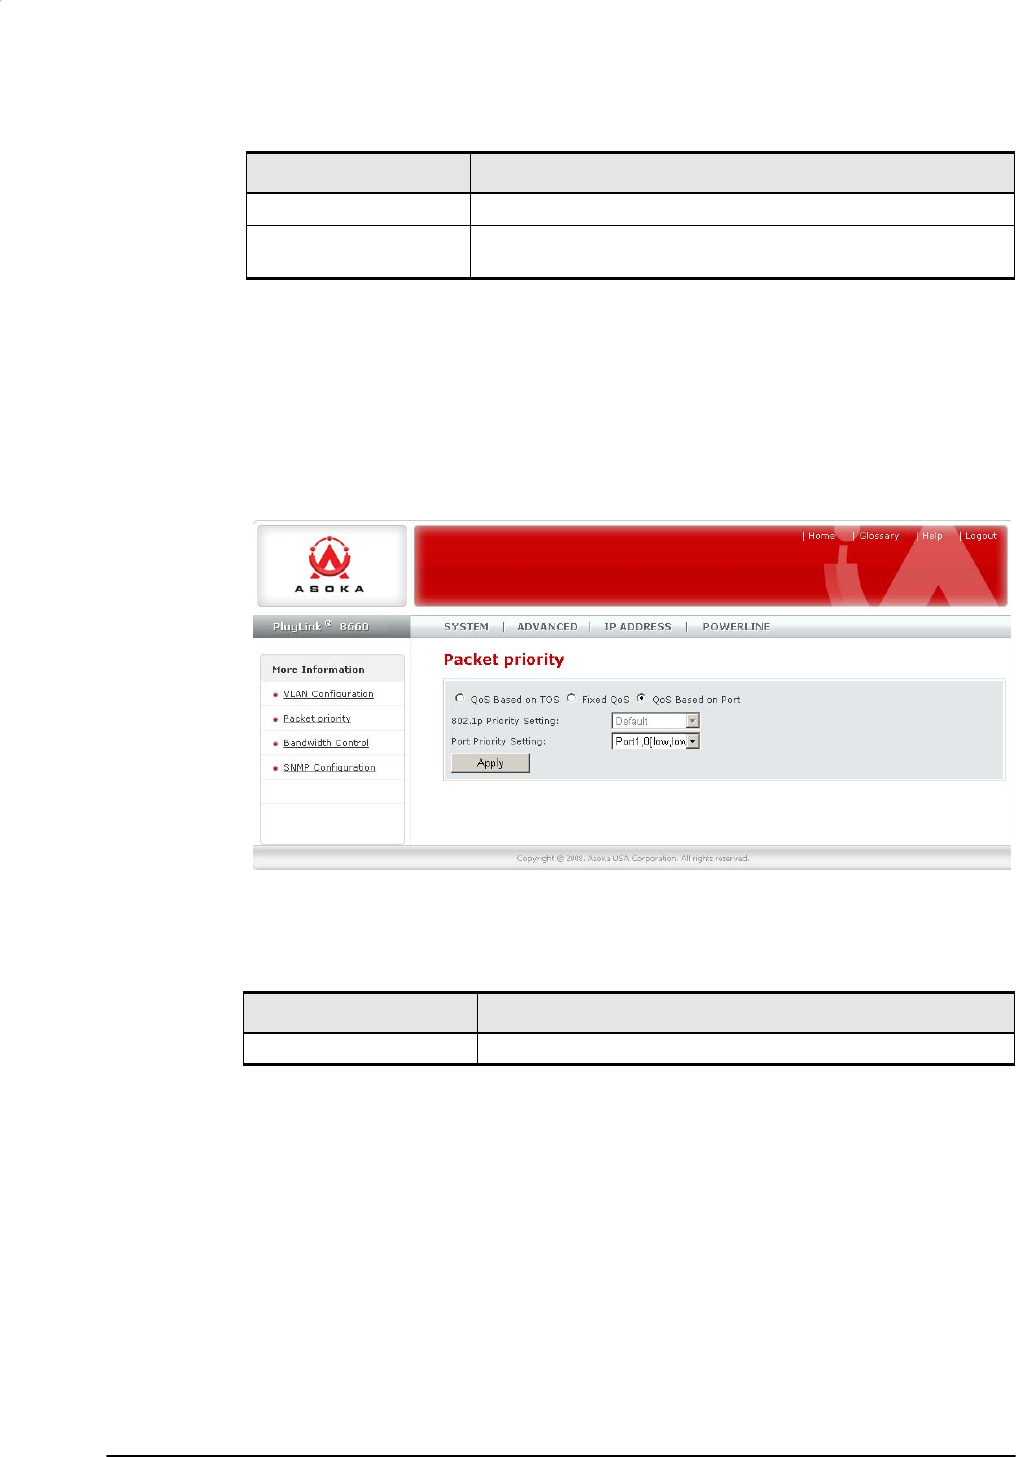
Configuring Packet Priority
The Packet Priority page lets you control the priority of the packets and
priority settings. To display the Packet Priority page, click Advanced in the
Web Management utility menu bar and then click Packet priority in the
navigation panel. Table 2-3 describes the fields on this page.
Figure 2-15: Packet Priority Page
Table 2-3: Packet Priority Page
Field
Description
QoS Based on ToS Configure packet priority based on Type of Service.
2–16 Advanced Configuration (Expert Users Only)
PlugL
A
N 8660 Smar
t
Bridge AV Ethernet Adapter User’s Guide
Table 2-3: Packet Priority Page (Continued)
Field
Description
Fixed QOS Select the 802.1p priority setting to be used. Choices are:
• Default = use this setting when none of the other
settings is suitable. (default)
• Background
• Best effort
• Excellent effort
• Control load
• Video or Audio
• Voice
• Network Control
QoS Based on Port Select the port priority setting to be used.
Choices are:
• Default = use this setting when none of the other
settings is suitable. (default)
• Port 1 priority
• Port 2 priority
Apply Button After you enter your configuration settings, click this button
to apply the settings.
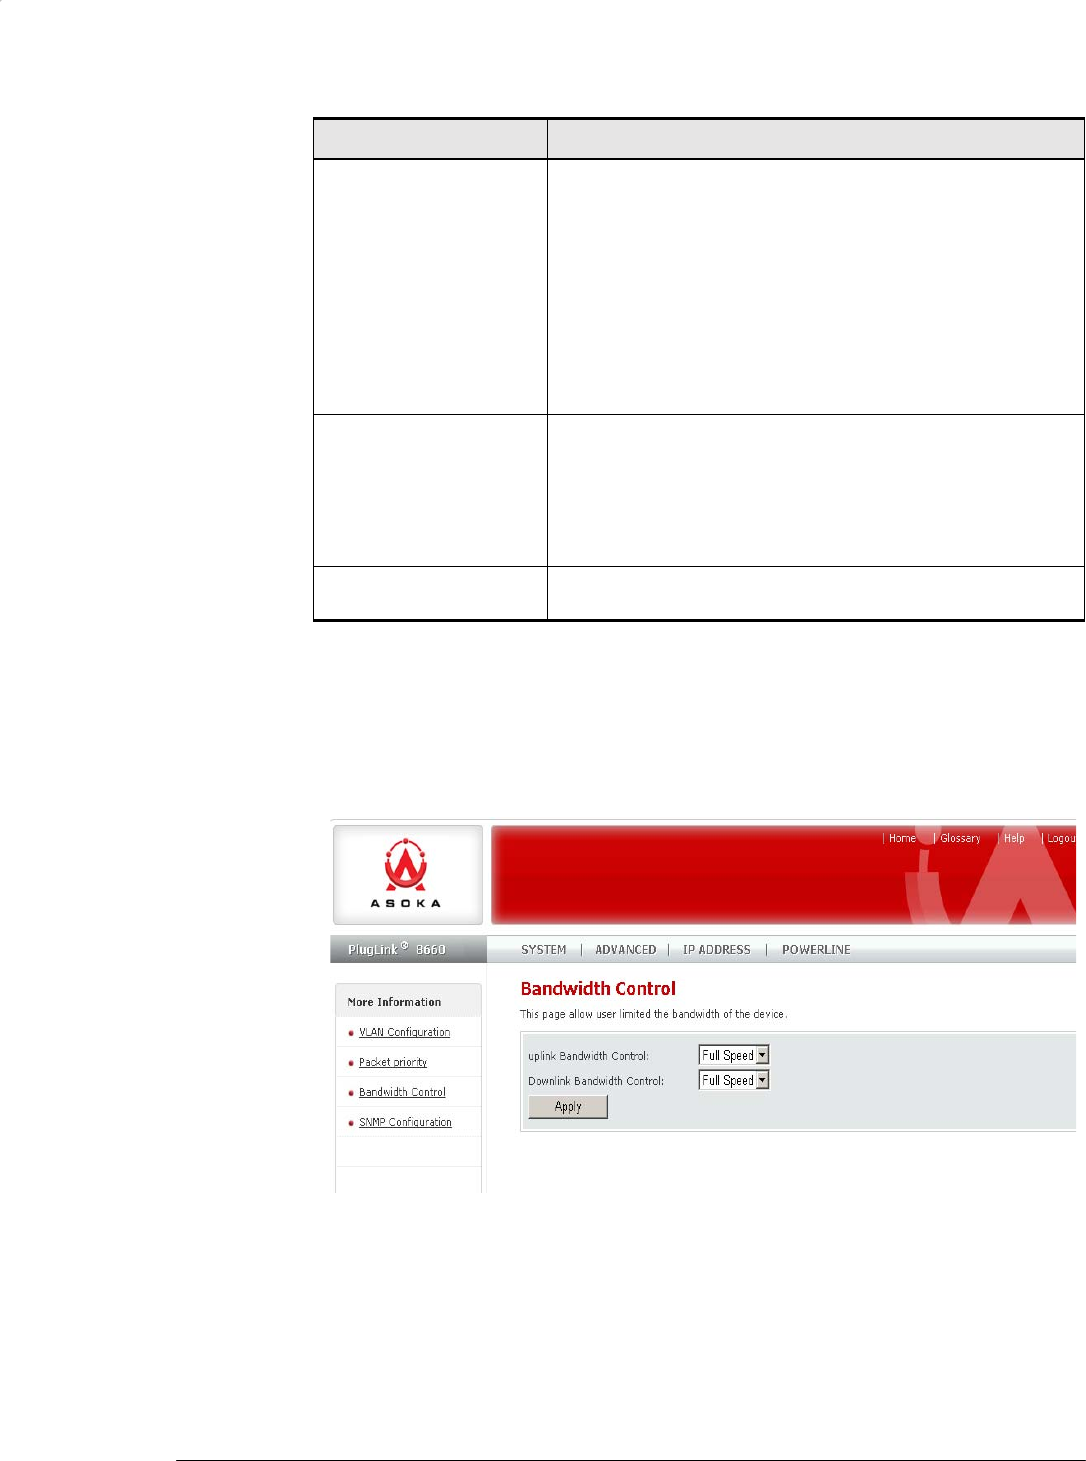
Configuring Bandwidth Control
The Bandwidth Control page lets you set the upload and download speeds to
a fixed speed. To display this page, click Advanced in the Web Management
utility menu bar and then click Bandwidth Control in the navigation panel.
Table 2-4 on page 2-16 describes the fields on this page.
Figure 2-16: Bandwidth Control Page
Advanced Configuration (Expert Users Only) 2–17

PlugLAN 8660 Smar
t
Bridge AV Ethernet Adapter User’s Guide
Table 2-4: Bandwidth Control Page
Field
Description
Downlink Bandwidth Control Select the download speed that the PlugLAN
8660 SmartBridge will use. Supported
downlink speeds are:
• Full Speed (default)
• 64k bps
• 128k bps
• 256k bps
• 512k bps
• 1M bps
• 4M bps
• 10M bps
Uplink Bandwidth Control Select the upload speed that the PlugLAN
8660 SmartBridge will use. Supported uplink
speeds are:
• Full Speed (default)
• 64k bps
• 128k bps
• 256k bps
• 512k bps
• 1M bps
• 4M bps
• 10M bps
Apply Button After you enter your configuration settings,
click this button to apply the settings.
Configuring SNMP Settings
The SNMP Configuration page lets you set the configure the SNMP settings for
your PlugLAN 8660 SmartBridge AV Ethernet Adapter. SNMP is an
application-layer protocol that provides a message format for
communication between SNMP managers and agents. SNMP provides a
standardized framework and a common language used for the monitoring
and management of devices in a network. For more information, refer to
the documentation that came with your SNMP application.
You specify SNMP settings from the SNMP Configuration page. To display this
page, click Advanced in the Web
Management
utility menu bar and then click
SNMP Configuration in the navigation panel. Table 2-5 on page 2-19
describes the fields on this page.
2–18 Advanced Configuration (Expert Users Only)

PlugL
A
N 8660 Smar
t
Bridge AV Ethernet Adapter User’s Guide
Figure 2-17: SNMP Configuration
Page
Table 2-5: SNMP Configuration
Page
Field
Description
SNMP Get Community Enter the correct Get Community.
SNMP Set Community Enter the correct Set Community.
SNMP Admin Community Enter the name of the admin community.
Trap 1 IP Address Enter the IP address of the trap 1 destination
device.
Trap 1 Community String Enter the community string for trap 1.
Trap 2 IP Address Enter the IP address of the trap 2 destination
device.
Trap 2 Community String Enter the community string for trap 2.
Trap 3 IP Address Enter the IP address of the trap 3 destination
device.
Trap 3 Community String Enter the community string for trap 3.
Apply Button After you enter your configuration settings,
click this button to apply the settings.
Advanced Configuration (Expert Users Only) 2–19
PlugLAN 8660 Smar
t
Bridge AV Ethernet Adapter User’s Guide
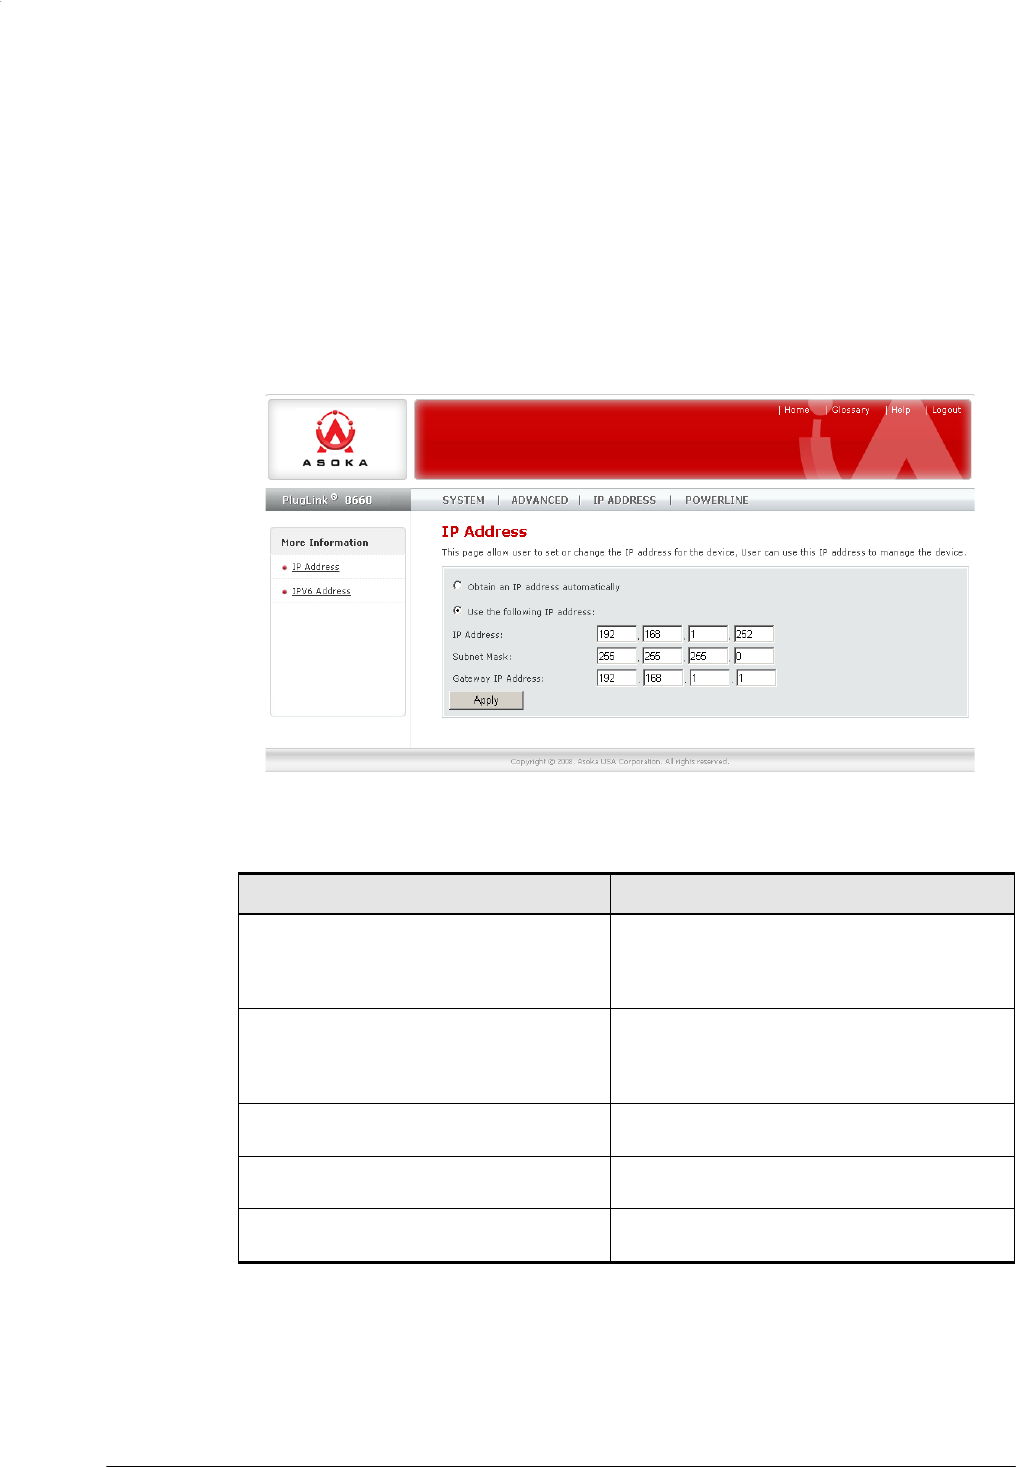
Using the IP Address Menu
Configuring IP Address
The IP Address menu lets you set or change the IP address for the device. You
can use this IP address to manage your PlugLAN 8660 SmartBridge AV
Ethernet Adapter. To display this page, click IP Address in the Web
Management utility menu bar. Table 2-
6 describes the fields on this page.
Figure 2-18: IP Address
Page
Table 2-6: IP Address
Page
Field
Description
Obtain an IP address automatically Select this option if the PlugLAN 8660
SmartBridge will obtain its IP address
automatically (for example, from a DHCP
server).
Use the following IP address Select this option if the PlugLAN 8660
SmartBridge will obtain its IP address
manually from the settings you specify in the
following three fields.
IP Address Enter the IP address for the PlugLAN 8660
SmartBridge.
Subnet Mask Enter the subnet mask for the PlugLAN 8660
SmartBridge.
GAteway IP Address Enter the gateway IP address for the
PlugLAN 8660 SmartBridge AV Ethernet
Adapte
Configuring IPV6 Address
This page allow user to set or change the IPV6 address for the device,
2–20 Advanced Configuration (Expert Users Only)
PlugL
A
N 8660 Smar
t
Bridge AV Ethernet Adapter User’s Guide
User can use this IPV6 address to manage the device, Don't support in this
firmware now.
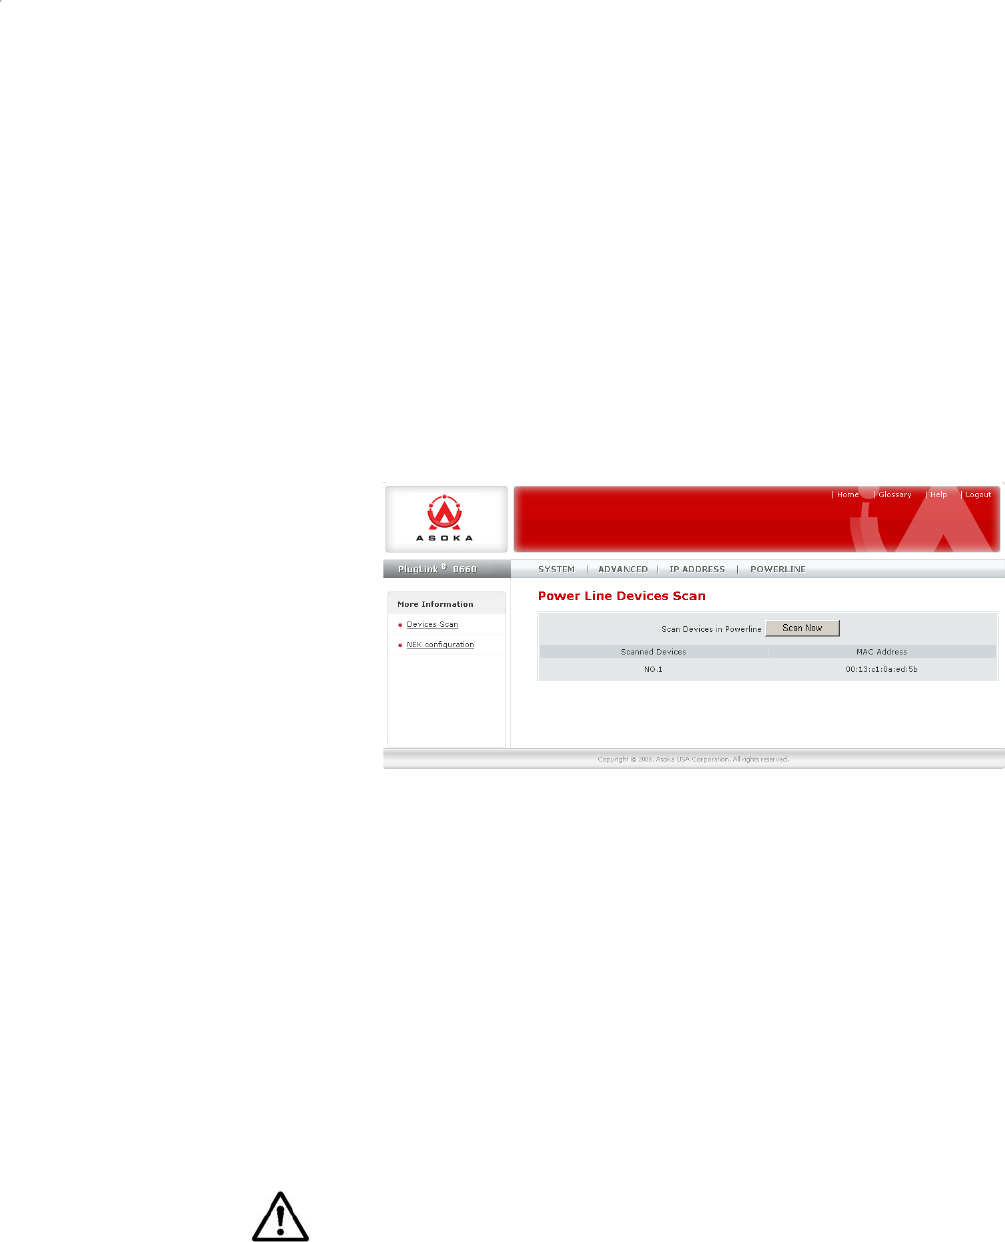
Using the Powerline Menu
Using the Powerline Device Scan page of the Web
Management
utility, you can
scan the devices on your
Powerline
network and view or change the Powerline
network password.
1. Start the Web Management utility (see Launching the Web Management
Utility on page 2-2).
2. Click Powerline in the Web Management utility menu bar. The PowerLine
Device Scan page appears (see Figure 2-19).
Figure 2-19: Powerline Device Scan
Page
Scanning Powerline Devices
The Powerline Device Scan page shows all Powerline devices on your
Powerline network. It also includes a Scan Now button that you can click to
scan the Powerline devices on your Powerline network. When you click this
button, the page reflects any Powerline devices that have been added to or
removed from the Powerline network.
Changing the Powerline Network Password
Using the
Powerline
Network
Password
page, you can change the
password
for
your Powerline network. The default password is PlugLAN.
NOTE: We recommend that you change the default network password on all
your PlugLAN 8660 devices. Changing the network password prevents neighbors
or outsiders from accessing your network. However, it also requires you to
configure your other Powerline devices to use the same password.
To change the Powerline network password:
1. Using the Web Management utility, click Powerline in the Web
Management utility menu bar. Then click NEK Configuration in the
Advanced Configuration (Expert Users Only) 2–21

PlugLAN 8660 Smar
t
Bridge AV Ethernet Adapter User’s Guide
navigation panel. The Powerline Network Password appears (see Figure 2-
20 on page 2-20).
Figure 2-20: Powerline Network Password
2. In the Network Password field, enter the case-sensitive Powerline
network password. The password can be from 4 to 18 alphanumeric
characters long.
3. Click the Apply button.
Advanced Configuration (Expert Users Only) 2–22

PlugL
A
N 8660 Smar
t
Bridge AV Ethernet Adapter User’s Guide
3
Troubleshooting
This chapter contains troubleshooting suggestions you will find
helpful in the unlikely event you encounter a problem with your
PlugLAN 8660 SmartBridge AV Ethernet Adapter.
PlugLAN 8660 SmartBridge AV Ethernet
Adapter is Not Working
1. Confirm that the PlugLAN 8660 SmartBridge AV Ethernet
Adapter is plugged into a working AC outlet.
2. Plug a device that is known to work (such as a lamp) into the
outlet to confirm that the outlet is working.
3. Verify that the AC outlet is not controlled by a wall switch,
which can inadvertently remove power from the outlet.
Wired Connections are Not Working
1. Verify that the Ethernet LAN cable is connected securely to
your PlugLAN 8660 SmartBridge AV Ethernet Adapter and
the attached device.
2. See whether an event was generated in the system log (see
Viewing System Logs on page 2-6).
You Cannot Access the Web Management
Utility
1. If you changed the default IP address of the Web Management
utility, enter the new IP address in your Web browser to access
the Web Management utility and make sure your PC is on the
same subnet as your PlugLAN 8660 SmartBridge AV Ethernet
Adapter.
2. If you restored your configuration from a binary configuration
file (see Restoring Backup Settings on page 2-10), enter the
IP address associated with the configuration file
Troubleshooting 3–1

PlugLAN 8660 Smar
t
Bridge AV Ethernet Adapter User’s Guide
Web Management Utility Times Out Too Quickly
By default, the Web Management utility remains open for 3 minutes. If you
want to change this time interval, change the
auto-logout
time on the System
Password page (see Changing the Auto-Logout Time on page 2-6).
One of the LEDs Does Not Behave as Expected
1. Be sure you understand the normal behavior of the LED (see Appendix A).
2. Disconnect and reconnect the PlugLAN 8660 SmartBridge AV Ethernet
Adapter to the AC outlet.
3. If the problem continues, please contact Asoka Technical Support (see
Technical Support on page iii).
You Forgot the Login Password
1. The default case-sensitive password is welcome. You can change this
password to one that is more meaningful using the Web Management
utility. For more information, see Changing the User ID and Login
Password on page 2-5.
2. If you forget the password, return the PlugLAN 8660 SmartBridge AV
Ethernet Adapter to its factory default settings (see Returning to
Factory Default Settings on page 2-8).
.
CAUTION! If you return the PlugLAN 8660 SmartBridge AV
Ethernet Adapter to factory default settings, the Adapter discards all
custom settings you set and returns to the settings that were in effect
when you removed the bridge from the box.
NOTE: All Powerline devices on your Powerline network must use the same
Powerline password (NEK). If you encounter a problem, please contact Asoka
Technical Support (see Technical Support on page iii).
3–2 Troubleshooting
PlugL
A
N 8660 Smar
t
Bridge AV Ethernet Adapter User’s Guide
A
Components
This appendix describes the LEDs and rear label on your PlugLAN
8660 SmartBridge.
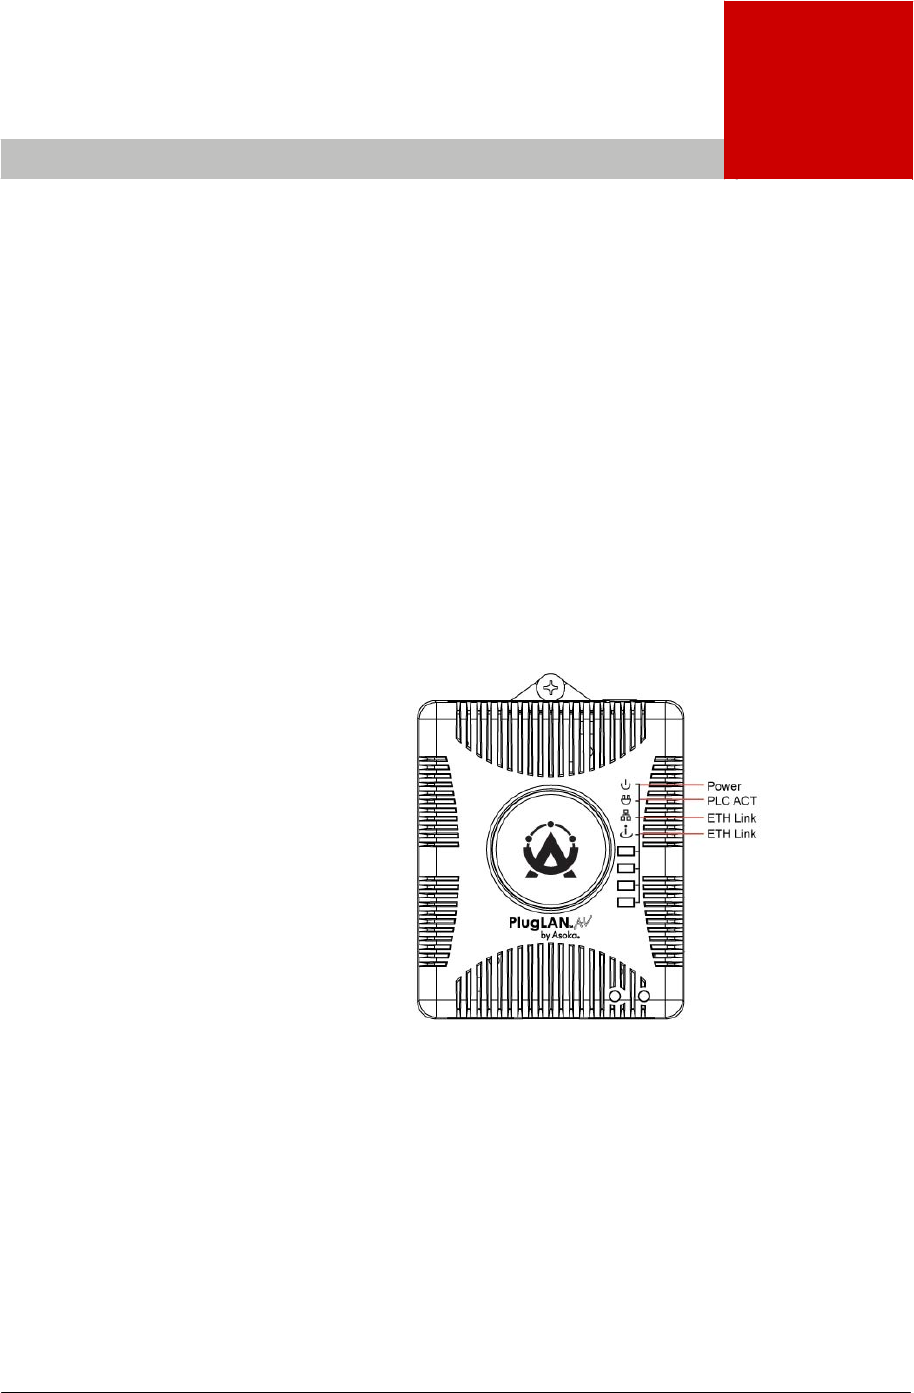
LEDs
The top panel of your PlugLAN 8660 SmartBridge AV Ethernet
Adapter has several light- emitting diodes (LEDs) that show status
information (see Figure A-
1). Table A-1 describes the meanings of the LEDs.
Figure A-1: Front Panel LEDs
Components A–1

Rear L
a
A–2
a
bel
The re
a
Adapt
e
• Mo
d
• Uni
q
• IP
A
• WA
N
• Po
w
• Eth
e
• Ser
i
Fi
g
ure
NOTE
card f
o
PlugLAN 86
6
LE
D
Power
P
L
C A
C
ETH 1
ETH 2
a
r label on
e
r shows th
e
d
el numbe
r
q
ue devic
e
A
ddress
N
MAC Add
r
w
erline MA
C
e
rnet MAC
i
al number
A-2
shows
: Please
w
o
r future r
e
Figure A-
2
Ethernet
A
6
0 Smar
t
Bri
d
D
Stat
u
ON
OFF
C
T
OFF
Blinki
n
OFF
Blink
ON
OFF
Blink
ON
your Plug
L
e
followin
g
r
e
password
r
ess
C
Address
Address
an examp
w
rite this in
e
ference.
2
: Example
A
dapter
Co
m
d
ge AV Ethe
r
Table A-
1
u
s
PlugLA
N
ii
PlugLA
N
t
There
i
s
ng
There
i
s
There
i
s
There
i
s
There
i
s
There
i
s
There
i
s
There
i
s
L
AN 8660 S
g
informati
le of the i
n
formation
of Rear La
b
m
ponents
r
net Adapter
1
: Top P
a
N
8660 Smar
t
g
N
8660 Smar
t
ii
s
no
activity
s
activity
on
s
a
no
Ether
n
s
a
Ethernet
s
Ethernet
c
o
s
a
no
Ether
n
s
a
Ethernet
s
Ethernet
c
o
martBridg
e
on:
n
formation
in your W
a
b
el on Plu
gL
User’s Guid
e
a
nel LED
s
Descriptio
n
t
Bridge AV E
t
Bridge AV E
on
the
P
ow
e
the
P
owerli
n
n
et
activit
y
.
traffic.
o
nnectivit
y
.
n
et
activit
y
.
traffic.
o
nnectivit
y
.
e
AV Ether
shown on
a
rranty Su
p
L
AN 8660 S
m
e
s
n
E
thernet Ada
E
thernet Ada
e
rline
netwo
n
e
network.
net
the rear l
a
p
m
artBrid
g
e
pte
r
is
pte
r
is
rk.
a
bel.
mation
AV

PlugL
A
N 8660 Smar
t
Bridge AV Ethernet Adapter User’s Guide
B
Specifications
This appendix lists the specifications for your PlugLAN 8660
SmartBridge.
Standards
Compliance: • HomePlug® 1.0
• IEEE 802.3 10BASE-T Ethernet
• IEEE 802.3x Flow Control
• IEEE 802.1D Spanning Tree Protocol
• IEEE 802.1p Priority
• IEEE 802.q VLAN
• IEFT RFC1332 IP Control Protocol
• IEFT RFC 2684 Bridged Ethernet
• IEFT RFC 1157 SNMP v2 & v3
• IEFT RFC 1213 MIB II
• IEFT RFC 826 ARP
Network Protocol: TCP/IP
Network
Interfaces: • Two RJ-45 10/100 Base-TX auto-negotiation LAN ports
Modulation: • OFDM
• QAM 256/64/16
• DQPSK
• DBPSK
• ROBO
LEDs: • Power
• PLC Activity
• ETH Link
• ETH Link
Memory: • 4 MBytes NOR Flash
• 16 MBytes SDRAM
Specifications B–1

PlugLAN 8660 Smar
t
Bridge AV Ethernet Adapter User’s Guide
Processor: • MIPS 4Kc CPU
• Embedded cache, 8K-byte I-cache, 8K-cache
• Embedded memory management unit (MMU) 32-entry TLB
• 175MHz/227 MIPS
• Address Assignment: Static IP
• Powerline Security: 56-bit DES encryption
Bandwidth: • Up to 85 Mbps PHY rate or 25 Mbps TCP rate over the powerline
Distance: • 300 meters (1000 feet)
Operating Frequency: • 4 to 21 mHz
Modulation Schemes: • Orthogonal Frequency Division Multiplexing (OFDM)
• Symbol Modulation DQPSK
• DBPSK
• ROBO Carrier Modulation
Management Features: • Administration Interface: Web graphical user interface with
protected user name and password, remotely accessible from
designated IP address
Maintenance: • Save/restore configuration
• Diagnostics
• Upgrades via Web browser
• Logging
Power Supply: • 100-240V 50-60Hz Internal Universal Power
Maximum Power: • 7W
Dimensions: • Size
9.5 x 6.5 x 4 cm (L x W x H)
• Weight
150g(.33lbs)
• Cable length
6'
Environmental
Specifications: • Operating temperature:
32°F to 122°F (0°C to 50°C)
• Operating humidity:
10% to 90% Non-condensing
• Storage temperature:
-40°F to 158°F (-40°C to 70°C)
• Storage humidity:
10% to 90% Non-condensing
Electromagnetic
Emissions • FCC Part 15 Class B
• UL (US and Canada)
• CE
Warranty: lifetime
B–2 Specifications

PlugL
A
N 8660 Smar
t
Bridge AV Ethernet Adapter User’s Guide
C
Warranty
Asoka warrants that (a) the hardware components of the product will be free
from defects in materials and workmanship under normal use from the date of
purchase when used within the limits set forth in the Specifications section of
the User’s Guide, and (b) the software components will perform substantially in
accordance with Asoka's published specifications for ninety (90) days from the
date of purchase, but does not warrant that the software will be error-free or
free of all defects.
Should a product fail to perform as described in the User’s Guide, it will be
repaired or replaced with the same or functionally equivalent product by Asoka,
at its discretion, free of charge provided that you: (a) return the failed product
to an Asoka designated repair facility with shipping charge
prepaid,
and (b)
provide Asoka with proof of the original date of purchase. Repaired or
replacement products will be returned to you with shipping charges prepaid.
Asoka warrants any replaced or repaired product or component for life of the
product.
This warranty extends only to you, the original purchaser and is not transferable
to any subsequent purchasers.
This warranty does not apply if, in the judgment of Asoka, the product fails due
to damage from shipment, handling, storage, accident, abuse, misapplication or
misuse, or if it has been used or maintained in a manner not conforming to
product manual instructions, has been modified in any way, or has had any serial
number removed or defaced. Repair by anyone other than Asoka or an approved
agent will void this warranty. The maximum liability of Asoka under this warranty
is limited to the purchase price of the product covered by the warranty. Prior to
returning any defective product, the purchaser or the authorized merchant from
whom the purchaser originally bought the product must obtain a Return Material
Warranty C–1

C
–
2 Warranty
PlugLAN 8660 SmartBridge AV Ethernet Adapter User’s Guide
Authorization
(RMA) number from Asoka. All defective products should be returned to
Asoka with shipping charges prepaid. Asoka will not accept collect shipments.
WHILE ASOKA HAS MADE EVERY EFFORT TO PROVIDE CLEAR AND ACCURATE TECHNICAL
INFORMATION ABOUT ITS PRODUCTS, ASOKA ASSUMES NO LIABILITY FOR ANY EVENTS
ARISING OUT OF THE USE OF THE TECHNICAL INFORMATION OR THE PRODUCT, EXCEPT
AS
SPECIFICALLY PROVIDED
IN THIS
AGREEMENT
OR AS
REQUIRED
BY LAW. THE
WARRANTIES
AND REMEDIES STATED ABOVE ARE EXCLUSIVE AND IN LIEU OF ALL OTHERS, ORAL OR
WRITTEN, EXPRESS OR IMPLIED. ANY AND ALL OTHER WARRANTIES, INCLUDING IMPLIED
WARRANTIES OF MERCHANTABILITY, FITNESS FOR A PARTICULAR PURPOSE AND NON-
INFRINGEMENT OF THIRD PARTY RIGHTS ARE EXPRESSLY EXCLUDED. ASOKA SHALL NOT BE
LIABLE, UNDER ANY CIRCUMSTANCES, TO ANY PERSON OR ENTITY FOR ANY SPECIAL,
INCIDENTAL, INDIRECT OR CONSEQUENTIAL DAMAGES, INCLUDING WITHOUT LIMITATION,
DAMAGES RESULTING FROM THE USE OR MALFUNCTION OF THE PRODUCTS, LOSS OF
PROFITS OR REVENUES, BUSINESS INTERRUPTION, OR COSTS OF REPLACEMENT GOODS,
EVEN IF ASOKA IS INFORMED IN ADVANCE OF THE POSSIBILITY OF SUCH DAMAGES.

D-1 PlugLAN 8660 SmartBridge AV Ethernet Adapter User's Guide
FCC Notice
FCC Statement
This equipment has been tested and found to comply with the
limits for a Class B digital device, pursuant to part 15 of FCC Rules.
These limits are designed to provide reasonable protection against
harmful interference in a residential installation. This equipment
generates and can radiate radio frequency energy and, if not
installed and used in accordance with the instructions, may cause
harmful interference to radio communications. However, there is
no guarantee that interference will not occur in a particular
installation. If this equipment does cause harmful interference to
radio or television reception, which can be determined by turning
the equipment off and on, the user is encouraged to try to correct
the interference by one or more of the following measures:
z Reorient or relocate the receiving antenna.
z Increase the separation between the equipment and receiver.
z Connect the equipment into an outlet on a circuit different from
that to which the receiver is connected.
z Consult the dealer or an experienced radio/TV technician for help
This device complies with Part 15 of FCC Rules.
Operation is subject to the following two conditions:
1 This device may not cause harmful interference, and
2 This device must accept any interference received, including
interference that may cause undesired operation.
PlugL
A
N 8660 Smar
t
Bridge AV Ethernet Adapter User’s Guide
FCC RF Radiation Exposure Statement
This equipment complies with FCC RF radiation exposure limits set forth for an
uncontrolled environment. This equipment should be installed and operated
with a minimum distance of 20 centimeters between the radiator and your
body.
Note: The manufacturer is not responsible for any radio or TV interference
caused by unauthorized modifications to this equipment. such modifications
could void the user’s authority to operate the equipment.

PlugLAN 8660 SmartBridge AV Ethernet Adapter User¡¯s Guide
Index
A
Auto-logout time 2-6
B
Backing up configuration settings 2-9
Bandwidth control 2-15
C
Changing
auto-logout time 2-6
login password 2-5
PowerLine network password 2-19
Configuration settings
backing up 2-9
restoring 2-10
Connecting the PlugLAN 8660 SmartBridge AV
Ethernet Adapter 1-3
Contact information iii
Contents of package 1-2
Customer service iii
F
Firmware, updating 2-11
G
Getting help iii
H
How the PlugLAN 8660 SmartBridge AV Ethernet
Adapter fits into your network 1-2
I
Information about the system 2-4
Installing PlugLAN 8660 SmartBridge AV
Ethernet Adapter 1-3
L
Launching the Web Management 2-2
LEDs A-1
Login password 2-5
N
Network password 2-19
P
Package contents 1-2
Packet priority 2-14
packet priority 2-14
Pages in the Web Management 2-3
Password for Powerline network 2-19
PlugLAN 8660 SmartBridge AV Ethernet Adapter
backing up configuration settings 2-9
bandwidth control 2-15
connecting 1-3
in your network 1-2
LEDs A-1
package contents 1-2
packet priority 2-14
rebooting 2-7
restoring configuration settings 2-10
SNMP 2-16
specifications B-1
updating firmware 2-11
warranty C-1
PowerLine network password 2-19
PowerLine Network Password page 2-19
R
Rear label A-2
Rebooting PlugLAN 8660 SmartBridge AV Ethernet
Adapter 2-7
Restoring configuration settings 2-10
S
Scanning Powerline devices 2-19
SNMP 2-16
System information 2-4
System logs 2-6
System pages 2-4, 2-18
T
Technical support iii
Index-1

Index-2 PlugLAN 8660 SmartBridge AV Ethernet Adapter User¡¯s Guide
Top panel LEDs A-1
Troubleshooting 3-1
U
Updating firmware 2-11
V
Viewing system information 2-4
Viewing system logs 2-6
W
Warranty C-1
Web Management 2-5, 2-14, 2-15, 2-16
auto-logout time 2-6
backing up configuration settings 2-9
launching 2-2
pages in 2-3
PowerLine Network Password page 2-19
rebooting PlugLAN 8660 SmartBridge AV
Ethernet Adapter 2-7 restoring
configuration settings 2-10
system logs 2-6
system pages 2-4, 2-18
viewing system information 2-4

Asoka USA Corporation
2344-A Walsh Avenue
Santa Clara, CA95051 USA USA
Phone: (408) 550–8167
Fax: (408) 884–2390
www.asokausa.com
66-0350-00 Rev.001