ASOKA USA PL9650-ETH Ethernet Adapter User Manual PL9650UG ENG 0717 0214
ASOKA USA Corporation Ethernet Adapter PL9650UG ENG 0717 0214
Users Manual

User’s Guide
PlugLink 9650 Ethernet Adapter
PL9650-ETH
© 2008 Asoka USA Corporation. Asoka, PlugLink and the Asoka logo are registered trademarks or
trademarks of Asoka USA Corporation. Information is subject to change without notice. All rights
reserved.
PL9650UG-66-0302-011

Asoka® User’s Guide
PlugLink 9650 Ethernet Adapter PL9650-ETH
Page 2
Table of Content
Chapter Title Page
1 Introduction 3
2 Important Safety Information 4
3 Learning About your Powerline Ethernet Adapter 5
4 Preparing to Install 7
5 Installing the Powerline Ethernet Adapter 9
6 Using Setup Assistant 14
7 Using Admin Utility 17
8 Technical Support Information 21
9 Technical Specifications 22
10 FCC Statement 23
11 CE Statement 24
12 Warranty Information 25
Asoka® User’s Guide
PlugLink 9650 Ethernet Adapter PL9650-ETH
Page 3
Chapter 1
Introduction
Thank you for purchasing a PlugLink 9650 Ethernet Adapter (PL9650-ETH) from Asoka. This
adapter lets you network your home or office by simply plugging directly into your wall outlet.
Now, networking is as easy as plugging in a night light. With your PlugLink 9650 Ethernet Adapter,
you can easily share your high-speed Internet broadband, mp3s, video and gaming throughout
the home or office without pulling any new cabling.
This unit will not interfere with other household appliances such as hair dryers, vacuum cleaners
or microwave ovens. Consuming only 5 watts of power, it is environmentally friendly and will not
noticeably increase your electrical bill. It is a simple, secure and reliable choice for web surfing,
playing games, complimenting your existing wireless network, mp3 streaming and even high-
definition (HD) video sharing.
This User’s Guide shows you how to connect your PlugLink 9650 Ethernet Adapter to your PC or
cable/DSL router. Setup is easy, just follow the instructions in this guide and your network will be
up and running in a matter of minutes.
NOTE: THE MANUFACTURER IS NOT RESPONSIBLE FOR ANY RADIO OR TV INTERFERENCE CAUSED
BY UNAUTHORIZED MODIFICATIONS TO THIS EQUIPMENT. SUCH MODIFICATIONS COULD VOID
THE USER¡¯S AUTHORITY TO OPERATE THE EQUIPMENT.

Asoka® User’s Guide
PlugLink 9650 Ethernet Adapter PL9650-ETH
Page 4
Chapter 2
Important Safety Instruction for the PlugLink 9650 Ethernet Adapter
The following precautions should be taken when using this product:
Read all instructions before installing and operating this product.
Do not open the cover on this product and/or alter this product in any way.
Follow common household electrical safety practices.
If you have any questions or concerns regarding these safety measures, please contact
Technical Support at 1-888-ASOKAUSA(276-5287) or email at support@asokausa.com
Monday through Friday from 9:00 am to 5:00 pm PST, excluding holidays.
Asoka® User’s Guide
PlugLink 9650 Ethernet Adapter PL9650-ETH
Page 5
Chapter 3
Learning about your PlugLink 9650 Ethernet Adapter
Package Contents
PlugLink 9650 Ethernet Adapter (PL9650-ETH)
6 feet Ethernet cable
Quick Installation Guide
Installation Resource CD
Warranty and Support Information Card
If any of the parts are incorrect, missing, or damaged, contact the retailer where you made your
purchase. Keep the carton, including the original packing materials, in case you need to return
the unit for repair.
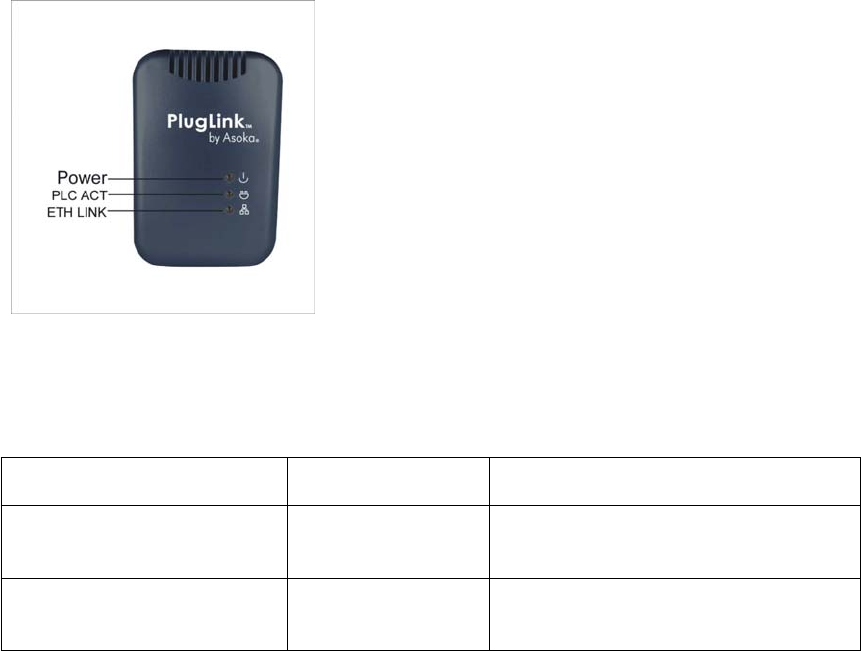
The Front Panel
The front panel of the PL9650-ETH Adapter contains the status lights described below.
Figure 3-1: PL9650-ETH Front Panel
You can use the status lights to verify connections. Viewed from top to bottom, left to right, the
table describes the lights on the front panel of the unit.
Table 3-1: Status Light Descriptions
Power On
Off
Indicates Device Powered On
Indicates No Power
PLC Activity Blinking
Off
Indicates Activity on Powerline
Indicates No Activity on Powerline
(Should blink Intermittently)
ETH Link On
Blinking
Off
Indicates Ethernet Connectivity
Indicates Ethernet Traffic
Indicates No Ethernet Activity
Asoka® User’s Guide
PlugLink 9650 Ethernet Adapter PL9650-ETH
Page 6
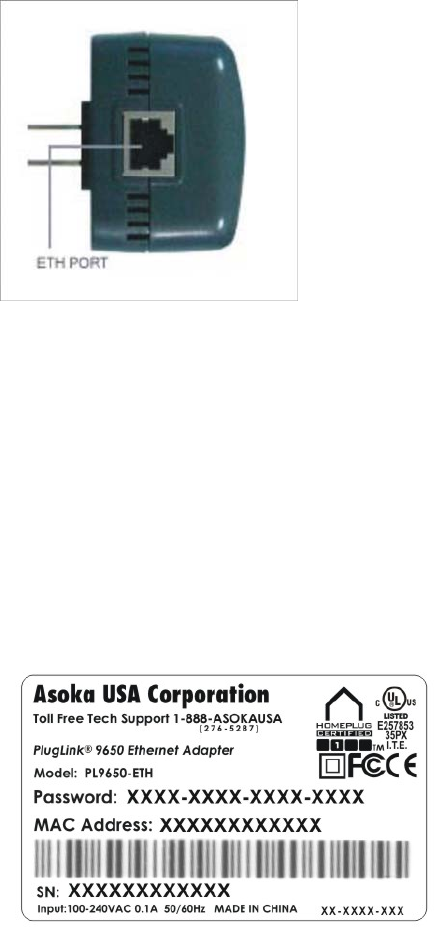
The Bottom Panel
The bottom panel of the PL9650-ETH contains an Ethernet (RJ-45) port as shown in figure 3-2.
Figure 3-2: PL9650-ETH Front Panel
The Rear Panel
The label on the rear panel of the PL9650-ETH Adapter contains the items listed below.
MAC address
Model number
Part number
Serial number
Unique device password
Note: For future convenience, please write this information down in your Warranty Support
Information card.
Figure 3-3: Rear Label
Asoka® User’s Guide
PlugLink 9650 Ethernet Adapter PL9650-ETH
Page 7
Chapter 4
Preparing to Install the PlugLink 9650 Ethernet Adapter
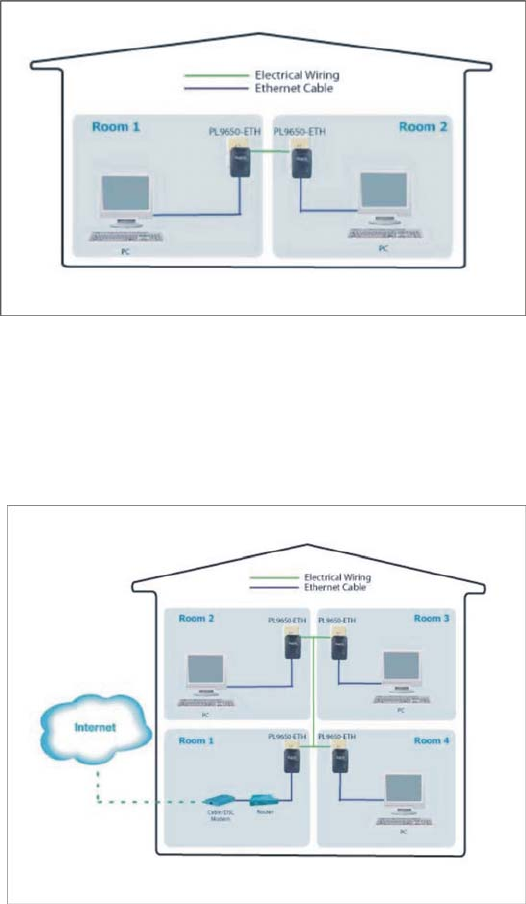
The PlugLink 9650 Ethernet Adapter lets you set up a home or an office network using your
existing electrical outlets. It can also easily compliment your existing network by connecting to
any device with a 10BaseT/ 100BaseT Ethernet-capable device.
In order to share a peer-to-peer connection between computers, all you will need is:
One (1) PL9650-ETH device attached to each computer.
Figure 4-1: Peer-to-peer network diagram.
In order to share a Broadband connection between computers, all you will need is:
One (1) PL9650-ETH device attached to each computer
Standard Cable/DSL Modem
Standard Cable/DSL Router or Wireless Router
[
Figure 4-2: Sharing broadband connection network diagram.
Asoka® User’s Guide
PlugLink 9650 Ethernet Adapter PL9650-ETH
Page 8
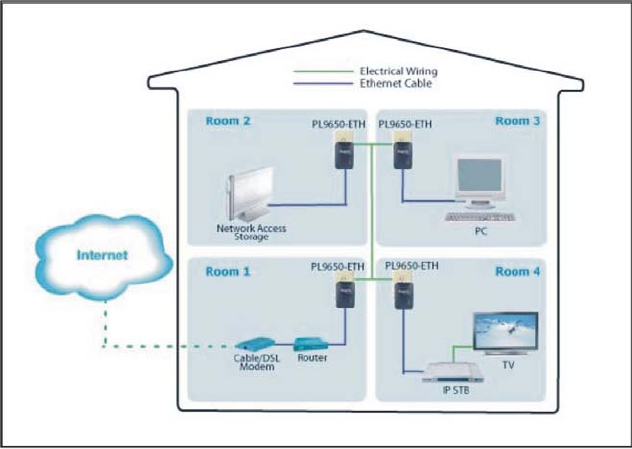
You can also use the PlugLink 9650 Ethernet Adapter with other Ethernet enabled device like IP
Cameras, IP STB, game consoles, and many more.
Figure: 4-3: Networking other Ethernet enabled devices.
Asoka® User’s Guide
PlugLink 9650 Ethernet Adapter PL9650-ETH
Page 9
Chapter 5
Installing the PlugLink 9650 Ethernet Adapter
Note: Do not connect the PlugLink 9650 Ethernet Adapter into a power strip, extension cord,
uninterruptible power supply (UPS), or surge protector. This may prevent the unit from working
properly or degrade the network performance.
1. Connect each of your PlugLink 9650 Ethernet Adapters.
a) Connect the unit into a nearby wall outlet
b) Connect the enclosed Ethernet cable to the Ethernet port of the unit
c) Connect the other end of the cable to the Ethernet port of the PC
2. Insert the enclosed Installation Resource CD into your CD-ROM drive. The PlugLink 9650
Ethernet Adapter Installation Utility should appear automatically. If it does not appear within
30 seconds, select your CD-ROM drive and double-click on the icon named “Setup.exe” to
initiate the Installation Utility.
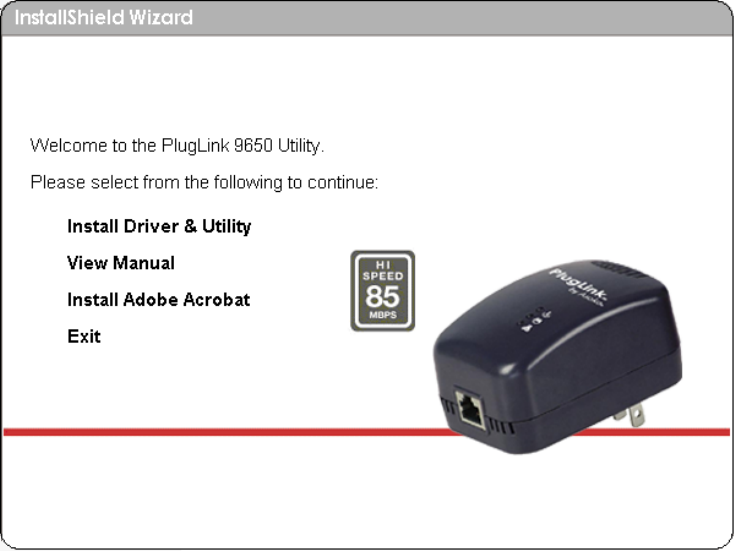
3. The Welcome screen should appear. Click on “Install Driver and Utility” to proceed to
installation.
Figure: 5-1: Welcome screen.
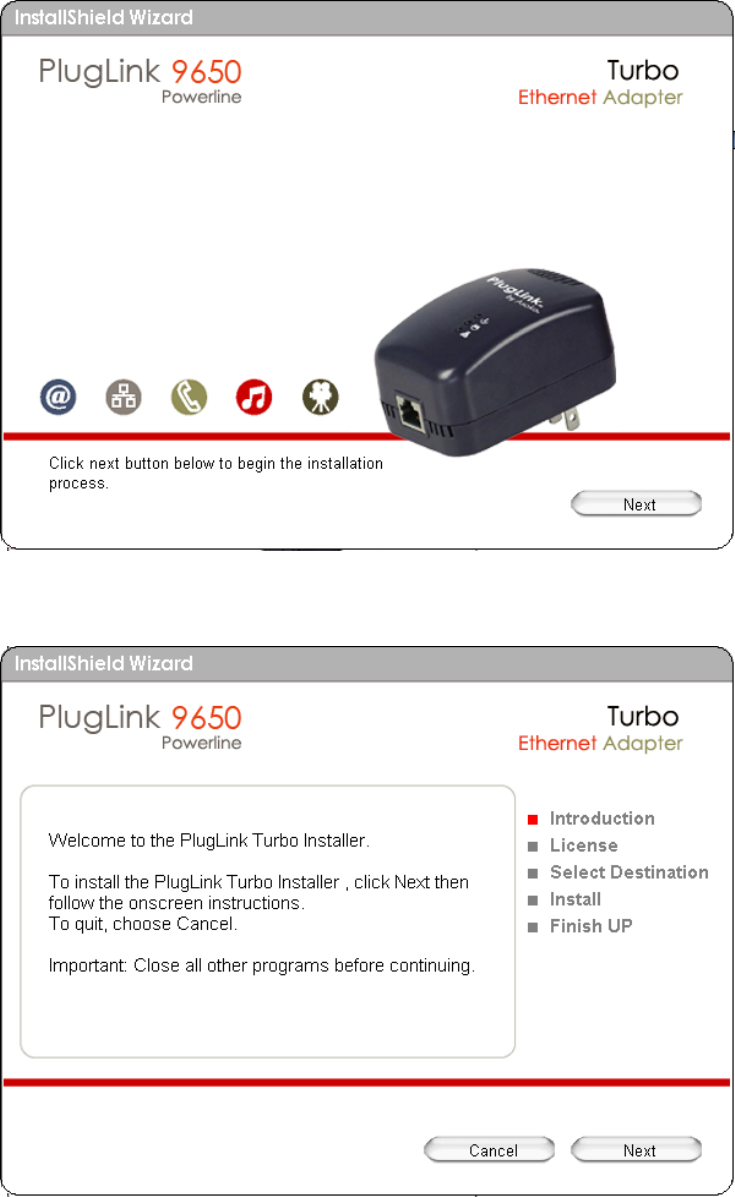
4. Click “Next” to begin the installation process.
Asoka® User’s Guide
PlugLink 9650 Ethernet Adapter PL9650-ETH
Page 10
Figure: 5-2: Begin Installation Screen.
5. Click “Next” to continue Installation.
Figure: 5-3: InstallShield Installation Welcome Screen.
Asoka® User’s Guide
PlugLink 9650 Ethernet Adapter PL9650-ETH
Page 11
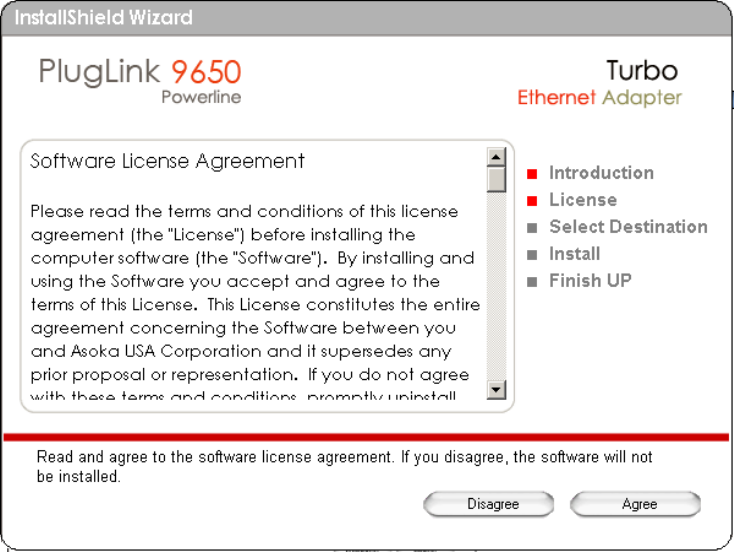
6. An End User Software License Agreement (EULA) should appear. Read thoroughly, click
“Agree” to continue.
Figure: 5-4: End User License Agreement screen.
7. Select the destination folder where you want to install and Click ''Install''.

Asoka® User’s Guide
PlugLink 9650 Ethernet Adapter PL9650-ETH
Page 12
Figure: 5-5: Installation Destination screen.
8. Click “Begin” to start the installation.
Figure: 5-6: Begin Installation screen.
Asoka® User’s Guide
PlugLink 9650 Ethernet Adapter PL9650-ETH
Page 13
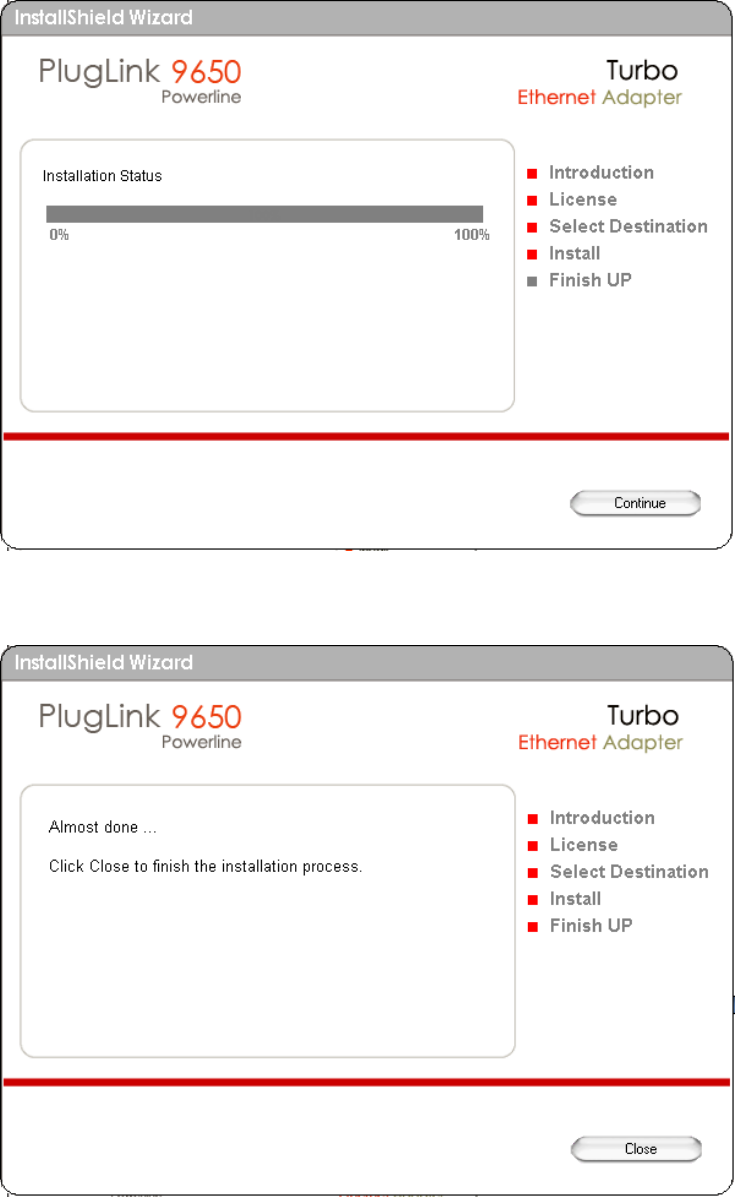
9. Click ”Continue” to complete the installation.
Figure: 5-7: Complete Installation screen.
10. Click “Close” to complete the installation.
Asoka® User’s Guide
PlugLink 9650 Ethernet Adapter PL9650-ETH
Page 14
Figure: 5-8: Finish Installation screen.
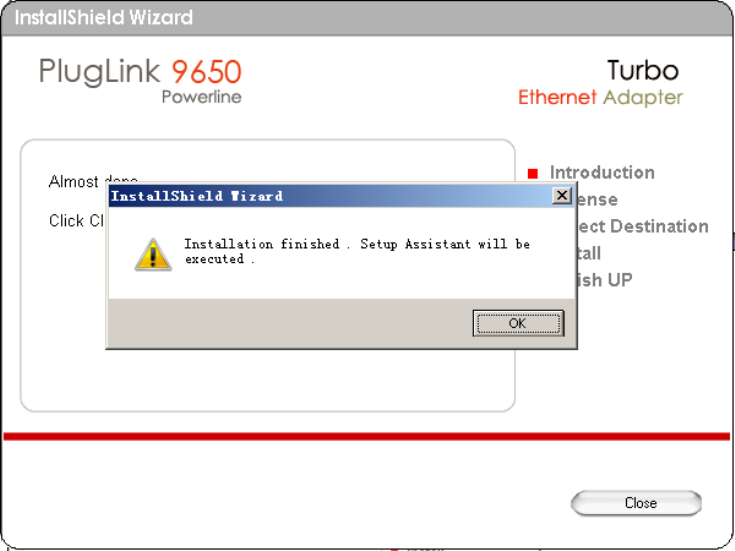
11. A notification window will appear confirming the completion of the installation. Click “OK” to
begin the Setup Assistant.
Figure: 5-9: Installation completion notification screen.
Asoka® User’s Guide
PlugLink 9650 Ethernet Adapter PL9650-ETH
Page 15
Chapter 6
Using the Setup Assistant
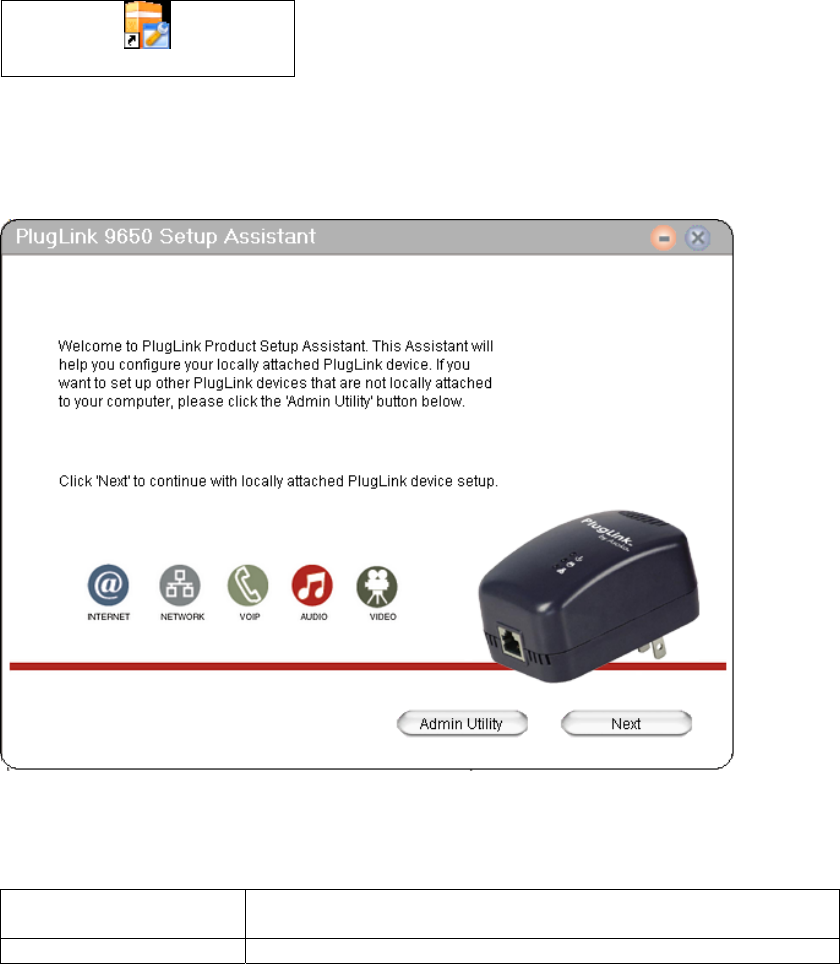
Setup Assistant will help guide you to configure your PlugLink 9650 Ethernet Adapter.
1. The Setup Assistant automatically starts after completing the installation. You may also start
the Setup Assistant manually by clicking on the Setup Assistant icon on your desktop.
PlugLink 9650 Setup Assistant.lnk
Figure: 6-1: Setup Assistant Icon
2. Click “Next” to begin the Setup Assistant. For advanced users, you may bypass the Setup
Assistant and click on “Admin Utility” to manually configure settings. For instructions on using
the Admin Utility, go to Chapter 7.
Figure 6-2: Setup Assistant Welcome Screen.
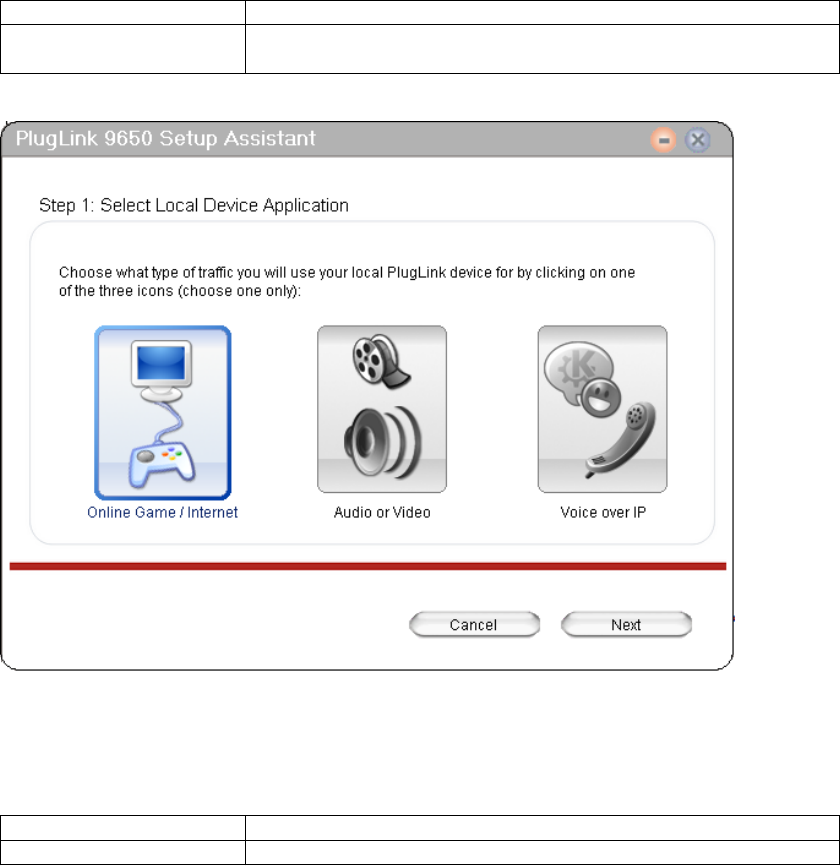
3. Select which application you are using the PlugLink 9650 Adapter for and Click “Next”. There
are three applications options available.
Online Game/ Internet Select this if you are going to use the device with your PC or
game console.
Audio or Video Select this if you are going to use this device for IPTV or audio
Asoka® User’s Guide
PlugLink 9650 Ethernet Adapter PL9650-ETH
Page 16
and video streaming.
Voice over IP Select this if you are going to use this device with your VoIP
phone.
Table 6-1: Applications options.
Figure 6-3: Applications screen.
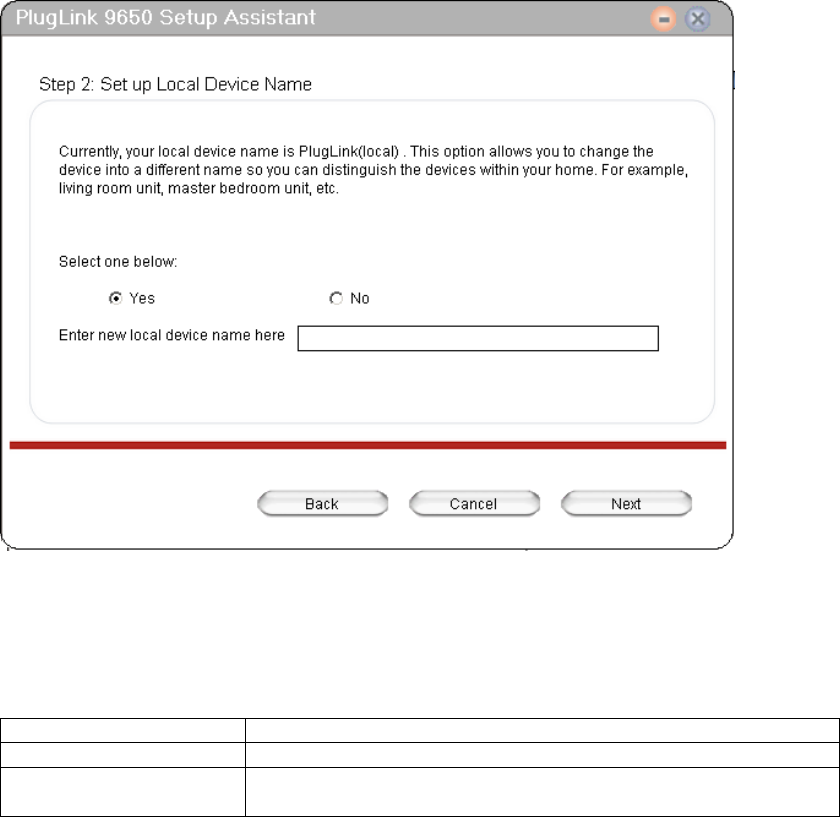
4. Select to change the device name and Click “Next”. Changing your device name can help
enable easier device recognition. For example, you can name the devices according to
where each unit is located in your building. (Ex. Bedroom, Office, Living Room, etc.)
Yes To change device name.
No To keep the default device name, ‘PlugLink(local)’.
Table 6-2: Device Name options.
Asoka® User’s Guide
PlugLink 9650 Ethernet Adapter PL9650-ETH
Page 17
Figure 6-4: Device Name option screen.
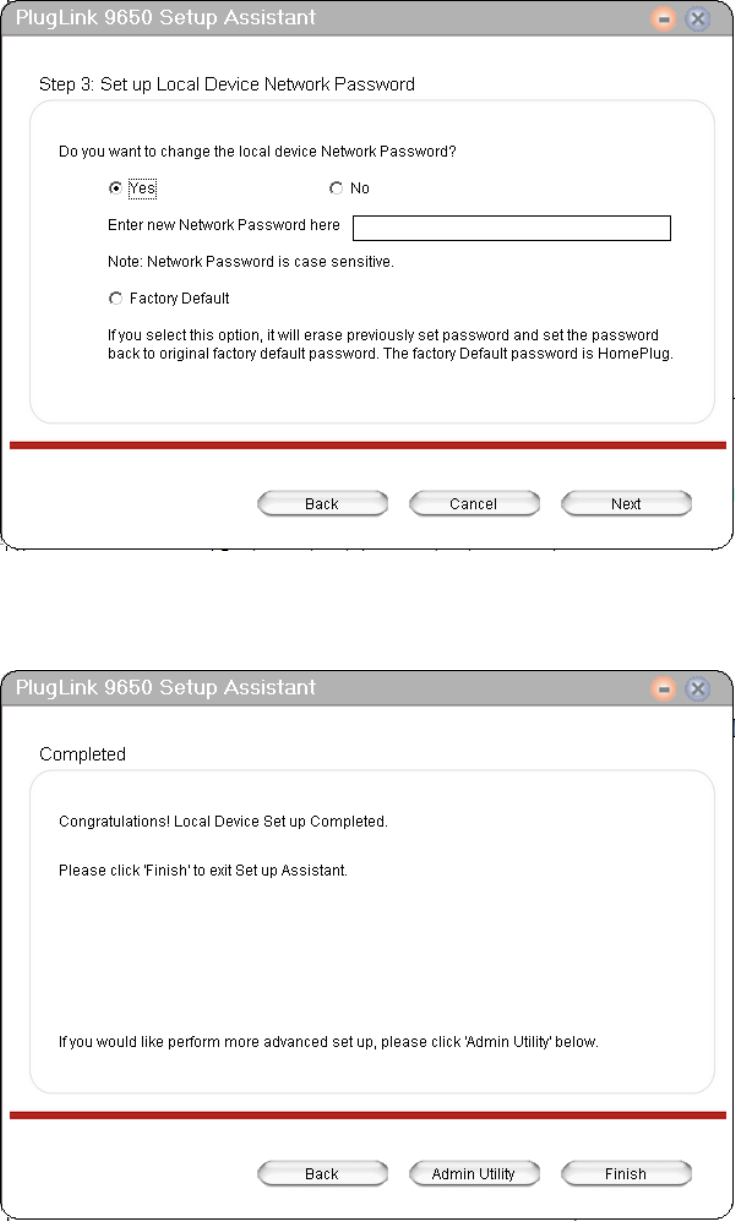
5. Select to change the network password and Click “Next”. The local device network
password screen allows you to change your network password. It is highly recommended to
change the network password on all your PlugLink devices. Changing the network password
will prevent your neighbors or outsiders from accessing the network.
Yes To change local device network password.
No To keep the existing local device network password.
Factory Default To reset to the default local device network password,
‘HomePlug’.
Table 6-3: Local Device Network Password Options.
Asoka® User’s Guide
PlugLink 9650 Ethernet Adapter PL9650-ETH
Page 18
Figure 6-5: Local Device Network Password Screen.
6. Click ‘Finish’ to complete the configuration and exit the Setup Assistant or Click ‘Admin
Utility’ for advanced settings.
Figure 6-6: Setup Assistant Completion Screen.
Asoka® User’s Guide
PlugLink 9650 Ethernet Adapter PL9650-ETH
Page 19
Chapter 7
Using the Admin Utility
The Admin Utility is a tool for Advanced Users. It allows you to manually configure a PlugLink 9650
Ethernet Adapter that is directly connected to your Personal Computer or any PlugLink 9650
Ethernet Adapters that are remotely residing on your PlugLink Powerline network.
PlugLink Admin Utility.lnk
Figure 7-1: Admin Utility Icon
The Admin Utility consists of four (4) screens.
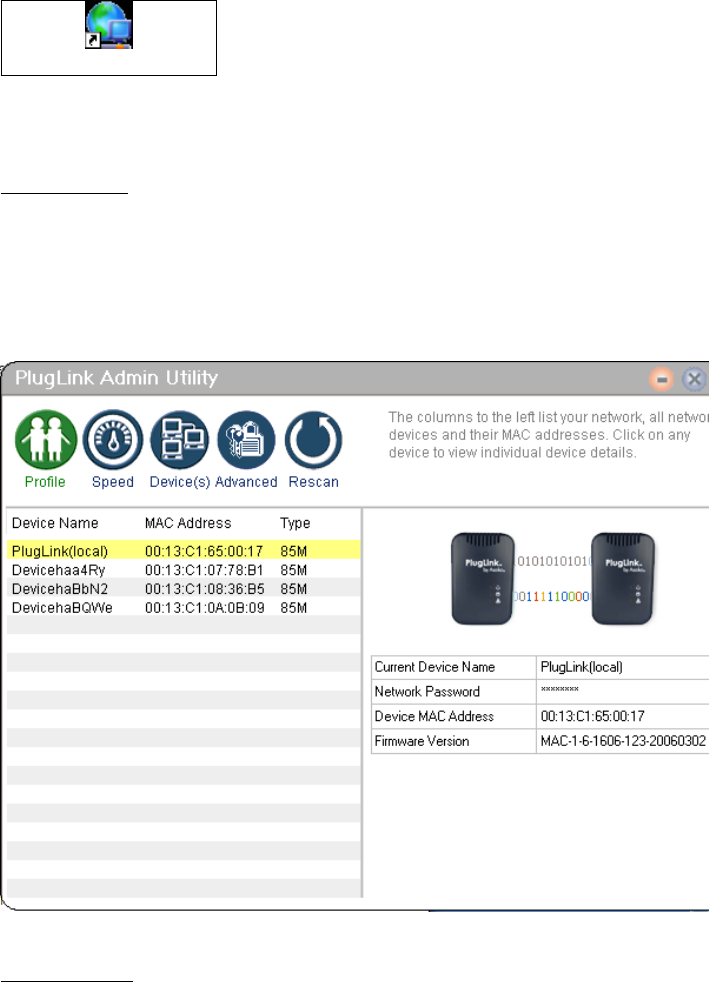
Profile Screen
The Profile Screen displays information about all Powerline devices attached directly to your PC
and other Powerline devices on your network. The screen displays the Device Name, MAC
Address, and Type (local or remote; 14mbps or 85mbps) of connection for each device on your
network. To refresh the list of Powerline devices, Click on the ‘Rescan’ icon. (Note: Devices set up
with a different network password will NOT show up on this list.)
Figure 7-2: Profile Screen.
Speed Screen
Asoka® User’s Guide
PlugLink 9650 Ethernet Adapter PL9650-ETH
Page 20
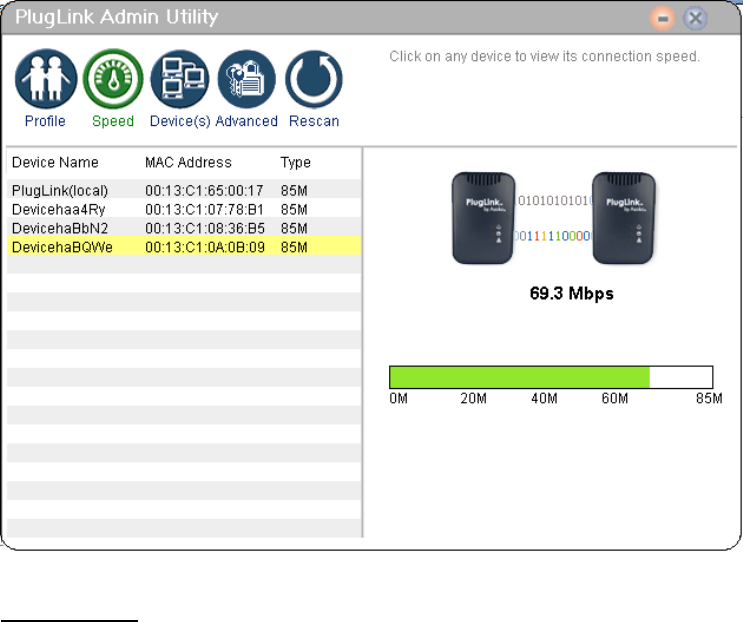
The Speed Screen displays the speed of your device’s connection to the Powerline network.
You can check the speed of the other devices by clicking on them.
Figure 7-3: Speed Screen.
Device Screen
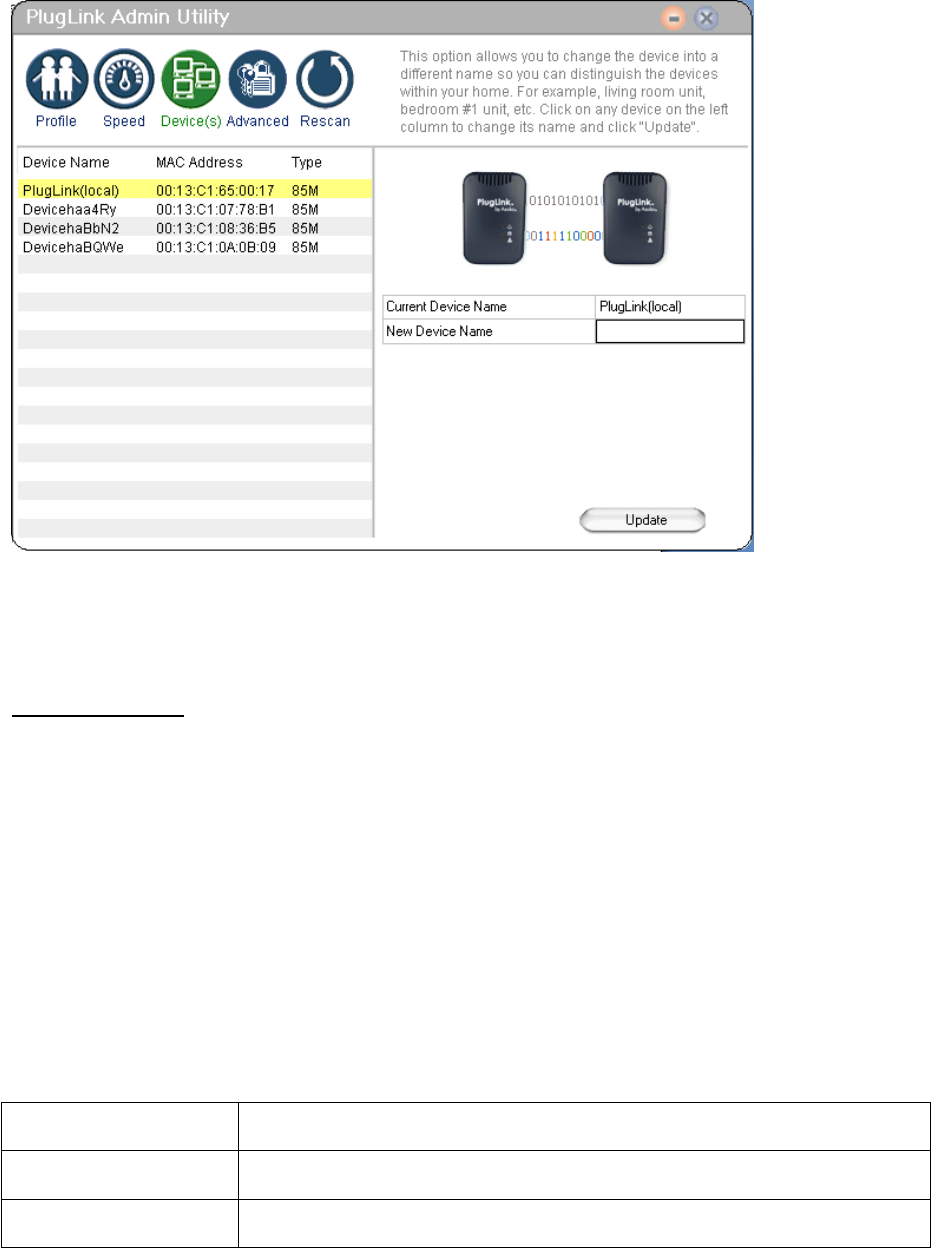
The Device Screen displays the names of all the devices on your network. It also allows you to
rename devices enabling easier device recognition. To rename the device:
1. Double-click on the device you want to rename on the left.
2. Enter new device name in the field box on the right and click “Update”.
3. A confirmation screen will appear to inform you if the device name change was successful
or unsuccessful.
Asoka® User’s Guide
PlugLink 9650 Ethernet Adapter PL9650-ETH
Page 21
Figure 7-4: Device Screen
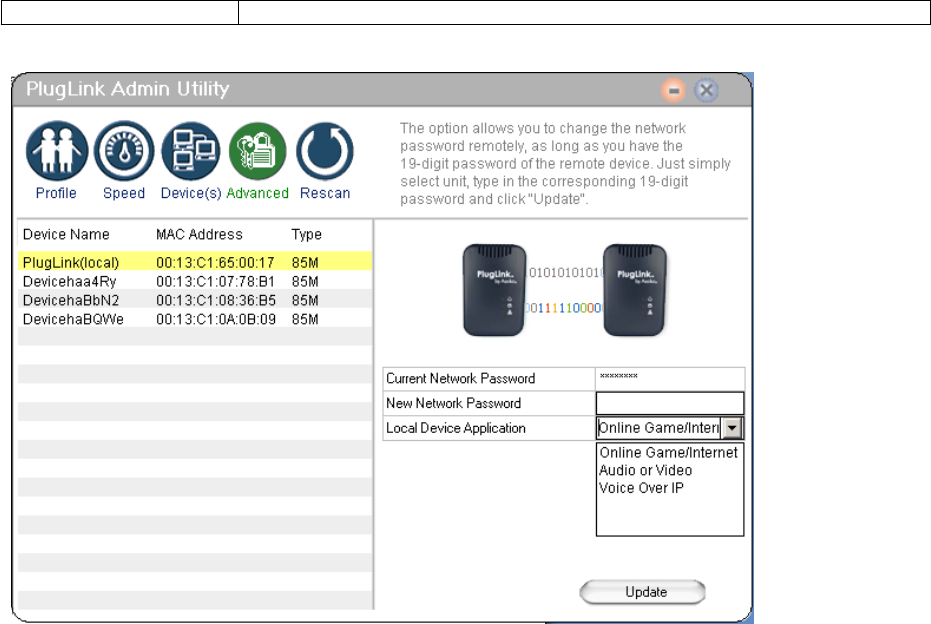
Advanced Screen
The Advanced Screen allows you to
Maintain security and application for the device that is attached directly to your PC
Maintain security for other Powerline devices on your network.
To modify the security and application on a device that is directly connected to your PC:
1. Select the device connected directly to your computer on the left panel
2. Type in the current network password in the field box next to “New Network Password”.
3. Type the new password in the field box labeled New Network Password.
4. Click on the drop down menu next to “Local Device Application.”
5. Select the application you would like to change to. See table 7.1 for options.
6. Click ‘Update’.
7. A screen will appear asking if you are sure you want to these changes. Click “Yes”.
8. A confirmation screen will appear to inform you if the changes were successful or
unsuccessful.
Online Game/ Internet Select this if you are going to use the device with your PC or game
console.
Audio or Video Select this if you are going to use the device for IPTV or any video and
audio streaming.
Voice over IP Select this device if you are going to use the device for VoIP services.
(This excludes web-based voice programs such as Yahoo Voice or
Asoka® User’s Guide
PlugLink 9650 Ethernet Adapter PL9650-ETH
Page 22
Skype. These should default to the ‘Online Game/ Internet’ option).
Table 7-1: Local Device Application Options
Figure 7-5: Advanced Screen
To modify the security on a device that is remotely connected but on the same Powerline
network:
1. Select the remotely connected device you would like to change the password on.
2. Type in the device password found on the product label located in the back of your device
in the field box Device Password.
3. Type the new password in the field box labeled ‘New Network Password’.
4. Click ‘Update’.
5. A screen will appear asking if you are sure you want to change the password. Click ‘Yes’.
6. A confirmation screen will appear to inform you if the password change was successful or
unsuccessful.

Asoka® User’s Guide
PlugLink 9650 Ethernet Adapter PL9650-ETH
Page 23
Figure 7-6: Advanced Screen
Rescan Icon
The Rescan Icon allows you to rescan the devices on the Powerline network.

Asoka® User’s Guide
PlugLink 9650 Ethernet Adapter PL9650-ETH
Page 24
Chapter 8
Technical Support
PLEASE REFER TO THE WARRANTY AND SUPPORT INFORMATION CARD THAT WAS SHIPPED WITH
YOUR PRODUCT.
By registering your product at www.asokausa.com/register, we can provide you with faster
expert technical support and timely notices of product and software upgrades.
Support Information
Phone: 1-888-ASOKAUSA(276-5287)
Email: support@asokausa.com
URL: www.asokausa.com

Asoka® User’s Guide
PlugLink 9650 Ethernet Adapter PL9650-ETH
Page 25
Chapter 9
Technical Specifications
Standards Compliance
HomePlug® I
IEEE 802.3 10BASE-T Ethernet
System Requirements
Windows® 98 SE, 2000, ME and XP OS
Network Protocol
TCP/IP
Network Interface
Ethernet (RJ-45)
Bandwidth
85 Mbps
Operating Frequency
4 to 21 MHz
Modulation Schemes
Orthogonal Frequency Division Multiplexing
(OFDM)
Symbol Modulation DQPSK
DBPSK
ROBO Carrier Modulation
Security
56-bit DES Encryption
Additional Protocols
Forward Error Correction (FEC)
Automatic Channel Adaptation
Power Supply
100-240V
LEDs
Power
PLC Activity
Ethernet Activity
Dimensions
Size: 3.5x2.4x1.8'' (L x W x H)
Weight: 125g
Cable length: 6’
Environmental Specifications
Operating temperature: 32°F to 113°F (0°C
to 45°C)
Operating humidity: 10% to 85% Non-
condensing
Storage temperature: -4°F to 158°F (-20°C
to 70°C)
Storage humidity: 5% to 90% Non-
condensing
Electromagnetic Emissions
FCC Part 15 Class B
UL (US and Canada)
CE
Asoka® User’s Guide
PlugLink 9650 Ethernet Adapter PL9650-ETH
Page 26
Chapter 10
FCC Statement
This equipment has been tested and found to comply with the limits for a Class B digital device,
pursuant to part 15 of FCC Rules. These limits are designed to provide reasonable protection
against harmful interference in a residential installation. This equipment generates and can
radiate radio frequency energy and, if not installed and used in accordance with the
instructions, may cause harmful interference to radio communications. However, there is no
guarantee that interference will not occur in a particular installation. If this equipment does
cause harmful interference to radio or television reception, which can be determined by turning
the equipment off and on, the user is encouraged to try to correct the interference by one or
more of the following measures:
Reorient or relocate the receiving antenna.
Increase the separation between the equipment and receiver.
Connect the equipment into an outlet on a circuit different from that to which the
receiver is connected.
Consult the dealer or an experienced radio/TV technician for help.
This device complies with Part 15 of FCC Rules.
Operation is subject to the following two conditions:
(1) This device may not cause harmful interference, and
(2) This device must accept any interference received, including interference that may
cause undesired operation.
FCC RF Radiation Exposure Statement:
This equipment complies with FCC RF radiation exposure limits set forth for an uncontrolled
environment. This equipment should be installed and operated with a minimum distance of 20
centimeters between the radiator and your body.
Asoka® User’s Guide
PlugLink 9650 Ethernet Adapter PL9650-ETH
Page 27
Chapter 11
Asoka® User’s Guide
PlugLink 9650 Ethernet Adapter PL9650-ETH
Page 28
Chapter 12
Warranty and Support Information
Thank you for selecting an Asoka product! Please retain the receipt as proof of purchase and write down
the information below in case you need to obtain support.
Date of Purchase: __________________________________
Model: ________________________________________
Serial No: ________________________________________
Device Password: __________________________________
MAC Address: ______________________
Warranty
Asoka warrants that (a) the hardware components of the product will be free from defects in materials and
workmanship under normal use for one (1) year from the date of purchase when used within the limits set
forth in the Specifications section of the User Guide, and (b) the software components will perform
substantially in accordance with Asoka’s published specifications for ninety (90) days from the date of
purchase, but does not warrant that the software will be error-free or free of all defects.
Should a product fail to perform as described in the User Guide within the warranted period, it will be
repaired or replaced with the same or functionally equivalent product by Asoka, at its discretion, free of
charge provided that you: (a) return the failed product to an Asoka designated repair facility with shipping
charge prepaid, and (b) provide Asoka with proof of the original date of purchase. Repaired or
replacement products will be returned to you with shipping charges prepaid. Asoka warrants any replaced
or repaired product or component for the remainder of the initial warranty period whichever is longer.
Replacement products may be refurbished or contain refurbished materials or components. If Asoka, by its
sole determination, is unable to restore the product to proper operating condition, it will refund the
depreciated purchase price of the product.
This warranty extends only to you, the original purchaser and is not transferable to any subsequent
purchasers. Warranty is void on products purchased or used outside the United States and Canada.
This warranty does not apply if, in the judgment of Asoka, the product fails due to damage from shipment,
handling, storage, accident, abuse, misapplication or misuse, or if it has been used or maintained in a
manner not conforming to product manual instructions, has been modified in any way, or has had any
serial number removed or defaced. Repair by anyone other than Asoka or an approved agent will void this
warranty. The maximum liability of Asoka under this warranty is limited to the purchase price of the product
covered by the warranty. Prior to returning any defective product, the purchaser or the authorized
merchant from whom the purchaser originally bought the product must obtain a Return Material
Authorization (RMA) number from Asoka. All defective products should be returned to Asoka with shipping
charges prepaid. Asoka will not accept collect shipments.
WHILE ASOKA HAS MADE EVERY EFFORT TO PROVIDE CLEAR AND ACCURATE TECHNICAL
INFORMATION ABOUT ITS PRODUCTS, ASOKA ASSUMES NO LIABILITY FOR ANY EVENTS ARISING OUT
OF THE USE OF THE TECHNICAL INFORMATION OR THE PRODUCT. EXCEPT AS SPECIFICALLY
PROVIDED IN THIS AGREEMENT OR AS REQUIRED BY LAW, THE WARRANTIES AND REMEDIES STATED
ABOVE ARE EXCLUSIVE AND IN LIEU OF ALL OTHERS, ORAL OR WRITTEN, EXPRESS OR IMPLIED. ANY
AND ALL OTHER WARRANTIES, INCLUDING IMPLIED WARRANTIES OF MERCHANTABILITY, FITNESS FOR
A PARTICULAR PURPOSE AND NON-INFRINGEMENT OF THIRD PARTY RIGHTS ARE EXPRESSLY
EXCLUDED. NEITHER ASOKA NOR BELLSOUTH SHALL BE LIABLE, UNDER ANY CIRCUMSTANCES, TO
ANY PERSON OR ENTITYFOR ANY SPECIAL, INCIDENTAL, INDIRECT OR CONSEQUENTIAL DAMAGES,
INCLUDING WITHOUT LIMITATION, DAMAGES RESULTING FROM THE USE OR MALFUNCTION OF THE
PRODUCTS, LOSS OF PROFITS OR REVENUES, BUSINESS INTERRUPTION, OR COSTS OF REPLACEMENT
GOODS, EVEN IF ASOKA OR BELLSOUTH IS INFORMED IN ADVANCE OF THE POSSIBILITY OF SUCH DAMAGES.
7HFKQLFDO6XSSRUW,QIRUPDWLRQ
- Online knowledgebase and FAQs
- Support contact:1-888-ASOKAUSA(276 2587); support@asokausa.com
© 2007 Asoka USA Corporation. PlugLink, Asoka and the Asoka logo are registered trademarks or
trademarks of Asoka USA Corporation. Information is subject to change without notice. All rights reserved.

Asoka USA Corporation
558 Pilgrim Drive Ste H
Foster City CA 94404
Sales: (650) 286-1700; sales@asokausa.com
Support: 1-888-ASOKAUSA(276-5287); support@asokausa.com
URL: www.asokausa.com