ASUSTeK Computer 1210 3G SMART PHONE User Manual USERS MANUAL 1
ASUSTeK Computer Inc 3G SMART PHONE USERS MANUAL 1
Contents
- 1. USERS MANUAL 1
- 2. USERS MANUAL 2
USERS MANUAL 1
USER MANUAL
VDA IV
SMARTPHONE
VDA IV Smartphone
User Manual
E2696
First edition V1.07b
August 2006
Copyright © 2006 XXXXX. All Rights Reserved.
No part of this manual, including the products and software described in it, may be reproduced, transmitted,
transcribed, stored in a retrieval system, or translated into any language in any form or by any means, except
documentation kept by the purchaser for backup purposes, without the express written permission of XXXXX.
(“”).
Product warranty or service will not be extended if: (1) the product is repaired, modied or altered, unless such repair,
modication of alteration is authorized in writing by ; or (2) the serial number of the product is defaced or missing.
PROVIDES THIS MANUAL “AS IS” WITHOUT WARRANTY OF ANY KIND, EITHER EXPRESS OR IMPLIED,
INCLUDING BUT NOT LIMITED TO THE IMPLIED WARRANTIES OR CONDITIONS OF MERCHANTABILITY
OR FITNESS FOR A PARTICULAR PURPOSE. IN NO EVENT SHALL , ITS DIRECTORS, OFFICERS,
EMPLOYEES OR AGENTS BE LIABLE FOR ANY INDIRECT, SPECIAL, INCIDENTAL, OR CONSEQUENTIAL
DAMAGES (INCLUDING DAMAGES FOR LOSS OF PROFITS, LOSS OF BUSINESS, LOSS OF USE OR DATA,
INTERRUPTION OF BUSINESS AND THE LIKE), EVEN IF HAS BEEN ADVISED OF THE POSSIBILITY OF SUCH
DAMAGES ARISING FROM ANY DEFECT OR ERROR IN THIS MANUAL OR PRODUCT.
SPECIFICATIONS AND INFORMATION CONTAINED IN THIS MANUAL ARE FURNISHED FOR INFORMATIONAL
USE ONLY, AND ARE SUBJECT TO CHANGE AT ANY TIME WITHOUT NOTICE, AND SHOULD NOT BE
CONSTRUED AS A COMMITMENT BY . ASSUMES NO RESPONSIBILITY OR LIABILITY FOR ANY ERRORS
OR INACCURACIES THAT MAY APPEAR IN THIS MANUAL, INCLUDING THE PRODUCTS AND SOFTWARE
DESCRIBED IN IT.
Microsoft, Activesync, Outlook, Pocket Outlook, Windows, and the Windows logo are either registered trademarks or
trademarks of Microsoft Corporation in the United States and/or in other countries. Microsoft products are licensed
to OEMs by Microsoft Licensing, Inc., a wholly owned subsidiary of Microsoft Corporation.
Table of Contents
Chapter 1 Getting Started ........................................................................................... 1
1-1 Introducing the VDA IV Smartphone ...........................................................................1
1-2 Getting to know your Smartphone ................................................................................2
1-3 Installing the SIM card and battery ...............................................................................5
1-4 Installing and removing a micro SD card ......................................................................6
1-5 Charging your Smartphone ..........................................................................................7
1-6 Turning your Smartphone ON/OFF ..............................................................................8
Chapter 2 Learning to Use Your Smartphone ........................................................... 9
2-1 Navigating ....................................................................................................................9
2-2 Home screen ..............................................................................................................11
2-3 Start menu ..................................................................................................................13
2-4 Quick List ....................................................................................................................14
Chapter 3 Using Call Features ................................................................................. 15
3-1 Making a voice call .....................................................................................................15
3-2 Retrieving voice mail messages .................................................................................19
3-3 Responding to a voice call .........................................................................................19
3-4 Options during a call ...................................................................................................20
Chapter 4 Synchronizing with ActiveSync .............................................................. 23
4-1 Microsoft ActiveSync ..................................................................................................23
4-2 Installing ActiveSync on your PC ................................................................................24
4-3 Connecting your phone to a PC .................................................................................25
4-4 Creating a partnership ................................................................................................25
4-5 Synchronizing with a PC ............................................................................................26
4-6 Synchronizing with an Exchange Server ....................................................................28
4-7 Creating a synchronization schedule .........................................................................29
4-8 Remote synchronization .............................................................................................30
Chapter 5 Managing Your Smartphone ................................................................... 31
5-1 Personalizing your Smartphone .................................................................................31
5-2 Improving performance ..............................................................................................35
5-3 Turning on/off wireless mode .....................................................................................37
5-4 Keeping your Smartphone secure ..............................................................................37
5-4 Setting network options ..............................................................................................41
5-5 Emergency restarting of your phone ..........................................................................41
5-6 Resetting your phone .................................................................................................41
5-7 Adding and removing programs .................................................................................42
5-8 Managing and backing up les ...................................................................................43
Chapter 6 Getting Connected ................................................................................... 47
6-1 Connecting to the Internet ..........................................................................................47
6-2 Using your phone as an external modem ...................................................................50
6-3 Using Opera Browser .................................................................................................52
6-4 Using Internet Explorer Mobile ...................................................................................54
6-5 Using Bluetooth® .......................................................................................................56
Chapter 7 Messaging ................................................................................................ 59
7-1 Entering text and numbers .........................................................................................59
7-2 Setting up accounts ....................................................................................................63
7-3 Managing accounts ....................................................................................................65
7-4 Text and e-mail messages ..........................................................................................66
7-5 VoiceMail Messages ...................................................................................................69
7-6 MMS messaging .........................................................................................................70
7-7 Using Pocket MSN .....................................................................................................73
Chapter 8 Organizing Your Life ................................................................................ 76
8-1 Using Contacts ...........................................................................................................76
8-2 Using Calendar ...........................................................................................................80
8-3 Using Tasks ................................................................................................................82
8-4 Using Voice Notes ......................................................................................................83
Chapter 9 Multimedia ................................................................................................ 84
9-1 Working with pictures and videos ...............................................................................84
9-2 Listening to music and watching videos .....................................................................86
9-3 Using Java (MIDIet Manager) ....................................................................................90
Chapter10 Ofceapplications ................................................................................... 92
10-1 Common features .......................................................................................................92
10-2 ClearVue Document ...................................................................................................93
10-3 ClearVue PDF ............................................................................................................93
10-4 ClearVue Presentation ...............................................................................................93
10-5 ClearVue Worksheet ..................................................................................................94
Appendix Notices ...................................................................................................... 95

VDAIVspecications
Processor
Intel PXA270 312MHz
Operating system
Microsoft® Windows Mobile™ 5.0 (Smartphone)
Network system
UMTS (3GPP Band I), Tri-Band GSM (900/1800/1900), GPRS class 10
Memory
128MB Flash ROM. 64MB SDRAM
Display
2.2-inch 65K color TFT-LCD (240 x 320 pixels)
Expansion slot
One slot for micro SD cards
Wireless transmission
Bluetooth® v1.2 / USB v1.1 (Client + Host)
Audio
3.5 mm stereo earphone jack / built-in microphone / built-in speakerphone
Dimensions
109.5 mm x 46.9 mm x 18 mm
Weight
103.3 grams (with battery)
Battery
1100mAh removable/rechargeable Lithium-Ion
Battery life
Standby time: Up to 250 hours (GSM) / 280 hours (WCDMA)
Talk time: 5 hours (GSM) / 2.5 hours (WCDMA)
Audio/Video
Music formats accepted: MP3. WMA, AAC and ACC+. A/V Streaming supported
Internet browsing
HTTP and WAP2.0
Messaging
SMS, MMS 1.2 and E-mail
JAVA
J2ME (CLDC 1.1 + MIDP2.0)
Ringtones
40 channels polyphonic ringer & MP3
* USB Host only support the following devices: UID devices (mouse, keyboard,...) and Self-powered/Low-power
storage devices (Flash disk, Hard Drives,...)
** The battery life will depend on multiple factors, including network and usage environment.

Package contents
Your package includes several accessories for the Smartphone. After unpacking, check the items
against the list below and make sure that they are in good condition. If any item is missing or
damaged, contact your dealer or retailer immediately.
Standard items
• VDA IV Smartphone
• USB sync cable
• AC adapter
• Companion CD
• Removable/ rechargeable 1100mAh Li-ion battery
• Stereo Headset
• Quick start guide
• User manual
• Warranty card
IMPORTANT To avoid damaging your Smartphone and accessories, it is recommendable
to operate this unit within a temperature range of 0 ~ 40 oC (68 ~ 86 oF) and
50% humidity. Anything that goes beyond or below this temperature range
may damage the unit and/or shorten the battery life.

1
Chapter 1 Getting Started
1-1 Introducing the VDA IV Smartphone
The VDA IV 3G Smartphone comes with the latest mobile technology that ts your world into your
hands. This Smartphone is a tri-band mobile phone with messaging capabilities, organizer, GPRS,
and a micro SD card slot.
In addition to 128 MB of phone memory, the micro SD card extends storage space, allowing you to
save photos, messages, texts, graphics, and audio les like no other mobile phone can, making it a
perfect partner whether you’re on or off the road.
With these features and many more, the VDA IV is sure to give you a satisfying mobile phone
experience.
Chapter 1
2
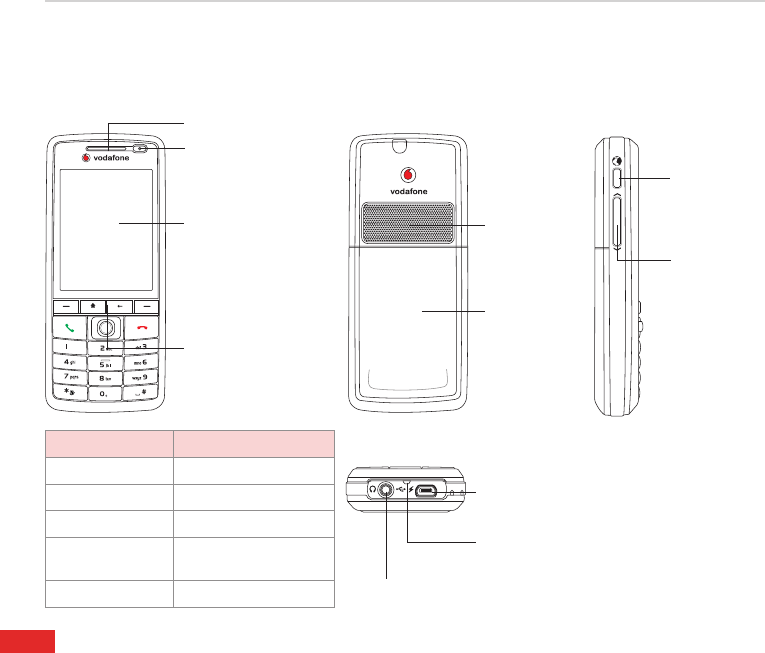
Earphone jack
Insert a headphone to listen to
music or to use your phone in
handsfree mode.
1-2 Getting to know your Smartphone
Speakerphone
Use to listen to
music or to talk
handsfree.
Battery cover
Power On-Off Button /
Multi-color LED indicator
See table below for more
information.
External display
Displays current time
and date, battery power,
signal strength, and
current prole. See
5-1 Personalizing your
Smartphone for more
information.
Windows Media controls
See 9-3 Listening to
music and watching
videos for more
information.
LED INDICATOR STATUS
Steady amber Battery is charging.
Steady green Battery is fully charged.
Flashing green Signal/network detected.
Flashing blue Bluetooth is set to “On” or
“Discoverable.”
Flashing amber Event alarm/notication
Back featuresFront features Side features
Volume button
Press to turn
the volume of
a call up or
down.
Internet button
Press to
launch Opera
Browser
Bottom features
Mini USB sync/power connector
Use to synchronize data with
your PC or to charge your
phone.
Microphone
Earpiece
3
Getting Started
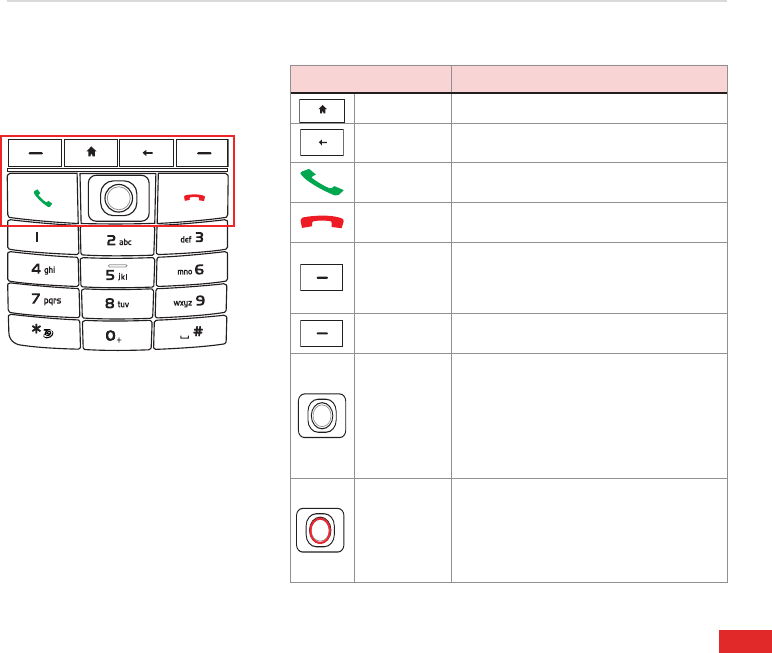
KEY FUNCTION
Home Press to return to the Home screen.
Back Press to go back to the previous screen.
Press to delete in a text eld.
Call Press to answer a call or dial a number.
Press twice to redial last number.
End Press to end a call. Press and hold to
lock the keypad.
Left soft
Use to select the command right above it
on the main display. When the keypad is
locked, press this key followed quickly by
the Asterisk key to unlock.
Right soft Use to select the command right above it
on the main display.
4-way
navigation
Thumbstick
Use this to move up, down, right, and left
through selections on the display.
The primary use of the Up and Down
navigation keys is for movement within
menus and navigation through contacts.
The primary use of the Left and Right
keys is for change settings and edit text.
Action
Located in the thumbstick, this button
acts much like the Enter key on a
keyboard. Press over the thumbstick to
conrm an action. When you scroll to a
check box, pressing the Action button
selects or clears the check box.
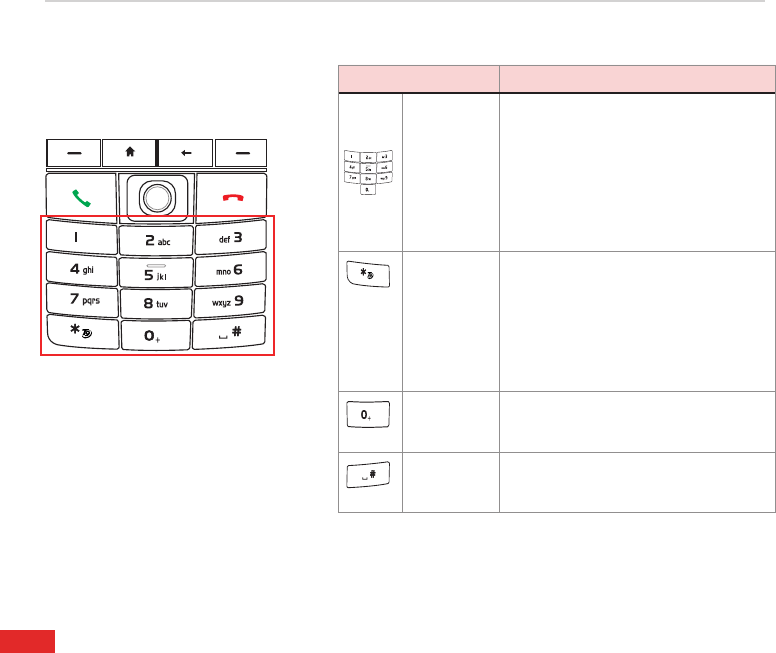
The Keypad
Chapter 1
4
KEY FUNCTION
Alphanumeric
keypad
Press to enter text and numbers. For
more information see 7-1 Entering text
and numbers.
You can also use the alphanumeric
keypad to quickly select programs and
settings on your Smartphone. Press the
number on the keypad that corresponds
to the number shown next to the program
or setting that you want to select.
Asterisk key Press to switch between upper case,
lower case, and caps lock within a text
input mode; press and hold within a
text eld to display an entire list of input
modes from which to make a selection.
When the keypad is locked, press the
left soft key followed quickly by this key
to unlock the keypad.
0 Press to enter a zero (0) in a text eld.
Press and hold to enter a plus (+) sign
for making international calls.
# Press to enter a space in a text eld.
Press and hold to access the symbols
menu to insert symbols in a text eld.
The Keypad (Cont.)
5
Getting Started
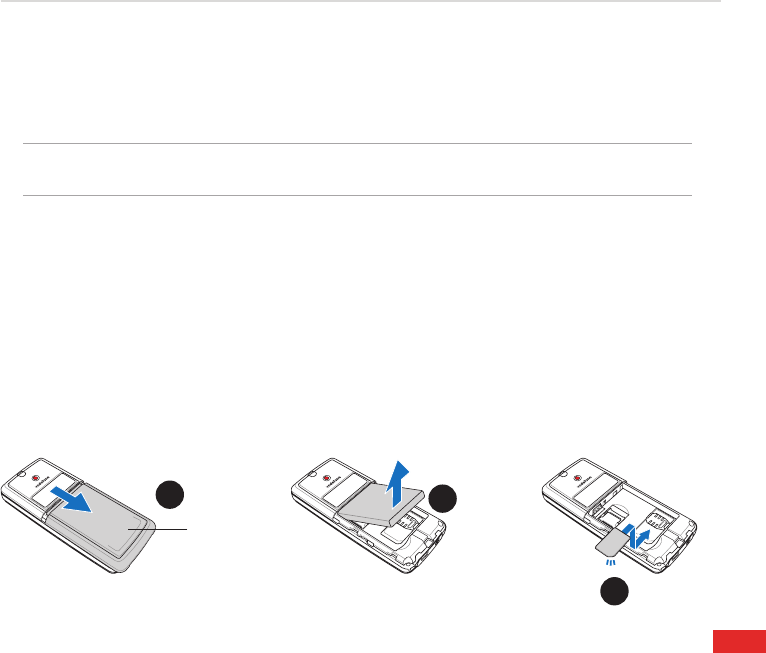
1-3 Installing the SIM card and battery
The phone operator provides you with a Subscriber Identity Module (SIM) card that stores your
mobile phone number, phone book entries, SMS/MMS messages, etc. Install the SIM card before
you install the battery.
NOTE
The SIM card usually comes embedded on a plastic card. Read the SIM card documentation before
removing the SIM card. Remove any rough edges on the SIM card before you install it into the phone.
To install the SIM card
1. Remove the back cover by pressing down on the back cover release latch (A) with your thumb
and sliding it open in the direction of the arrow shown in the illustration.
2. Remove the battery by lifting up from the bottom edge.
3. Position the SIM card with its nicked corner as shown and its contacts face down.
4. Insert the SIM card into the slot.
1
A
2
3
Chapter 1
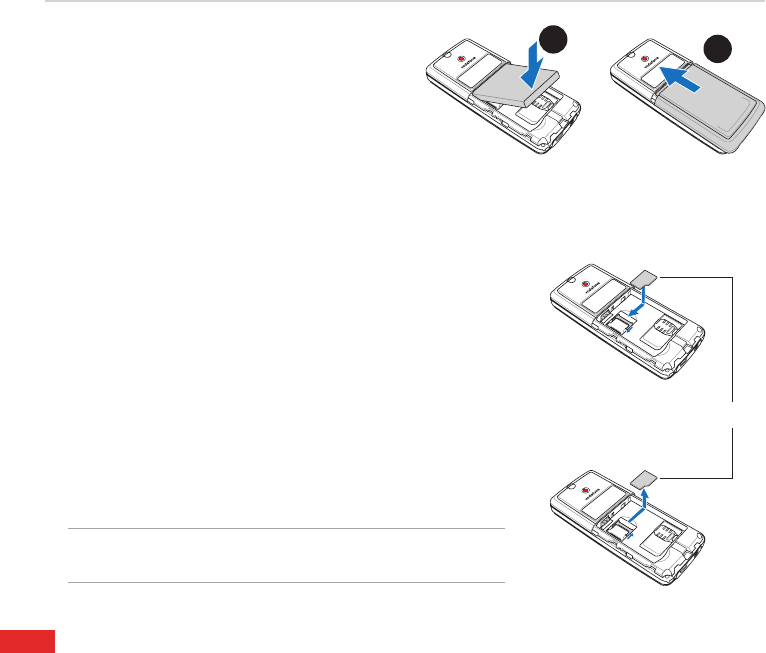
6
To insert the battery
1. Insert the battery as shown, aligning the
exposed metal contacts on the edge of the
battery with the contacts on the phone.
2. Slide the back cover onto your phone.
12
1-4 Installing and removing a micro SD card
To install / remove a micro SD card
1. Remove the back cover and battery, in the way indicated previously.
2. You can nd the micro SD car slot located above the SIM card slot.
Slide the metallic part of the slot to the left, and ip it open.
2. To install a micro SD card: With the label side (usually the side with
the card manufacturer’s name) face up, and the barcode/serial number
side face down, slide the card gently into the micro SD card slot.
To uninstall a micro SD card: Slide the micro SD card out.
3. Flip the metallic part of the cover back into its position, and slide
it to the right to secure it.
4. Replace the battery and the phone cover as described previously.
Label side
CAUTION A micro SD card ts only in one orientation. DO
NOT force the card into the slot!
7
Getting Started
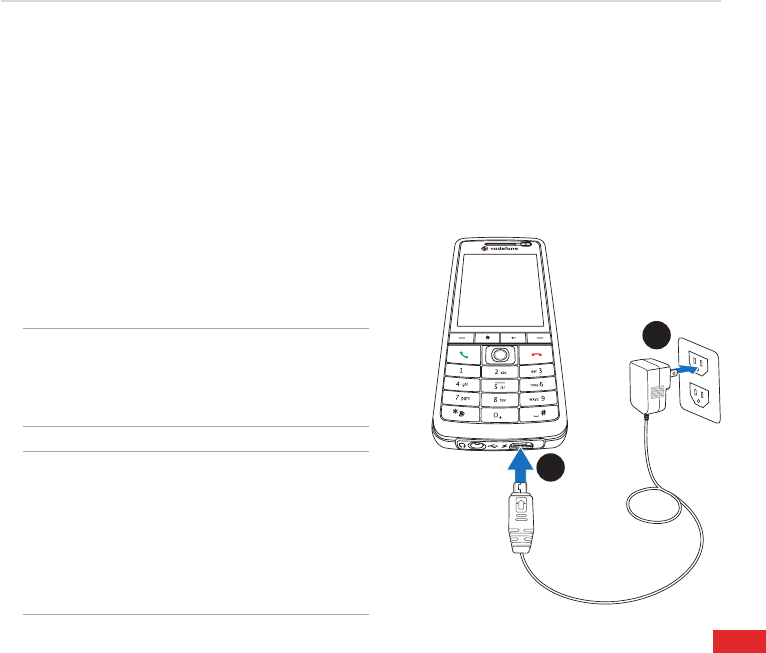
1-5 Charging your Smartphone
Make sure that the battery is fully charged before using the phone for the rst time. Initial battery charging
may take about eight (8) hours. You can charge the battery when the phone is either on or off.
A battery icon on the main and external displays indicates the battery power level. Refer to “Status
indicator icons” in 2-2 Home screen for battery icon indications.
To charge the battery
1. Connect the AC adapter to a power source.
2. Connect the power cable plug to the mini USB sync
and power connector.
NOTE The power LED lights up amber to
indicate that the battery is charging
and lights up green when the
battery is fully-charged.
WARNING Do not use a different model of AC
charger than the one supplied with
your Smartphone or compatible.
Doing so will create dangers of,
among others, damages to your
device, fire, and/or electrical
shocks.
1
2
Chapter 1
8
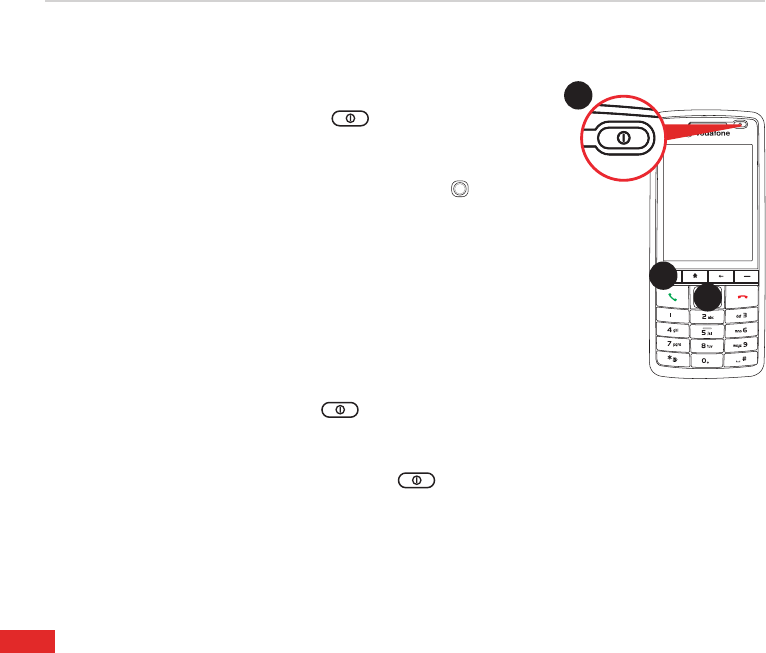
1-6 Turning your Smartphone ON/OFF
To turn ON your phone
1. Press and hold the Power button for approximately three
seconds until the display turns on.
2. If you are asked for a Personal Identication Number (PIN) code,
key in the code using the keypad, then press Action . The main
display shows the idle screen.
Wait for your operator and Microsoft screens to load.
To turn OFF the phone
Do one of the following:
• Press and hold the Power button for approximately three
seconds until the Microsoft Mobile power off screen shows and
wait for the display to turn off.
• Press and quickly release the Power button and select
Power off from the Quick List screen.
1
2
3

9
Chapter 2 Learning to Use Your Smartphone
2-1 Navigating
Your Smartphone has several keys to help you navigate through your Smartphone’s screens and
make selections.
Thumbstick
The thumbstick of an small joystick with four positions, and
provides an easy way to move or scroll through selections
on the screen.
The primary use of the Up and Down navigation keys is for
movement within menus and navigation through contacts.
The primary use of the Left and Right keys is change
settings and edit text.
Action button
Press on the thumbstick as you would press the Enter key
on a keyboard. Pressing the Action button on a highlighted
item conrms that you want to carry out the function.
When you scroll to a check box, pressing the Action button
selects or clears the check box.
Up
Down
Left Right
Action
Chapter 2
10
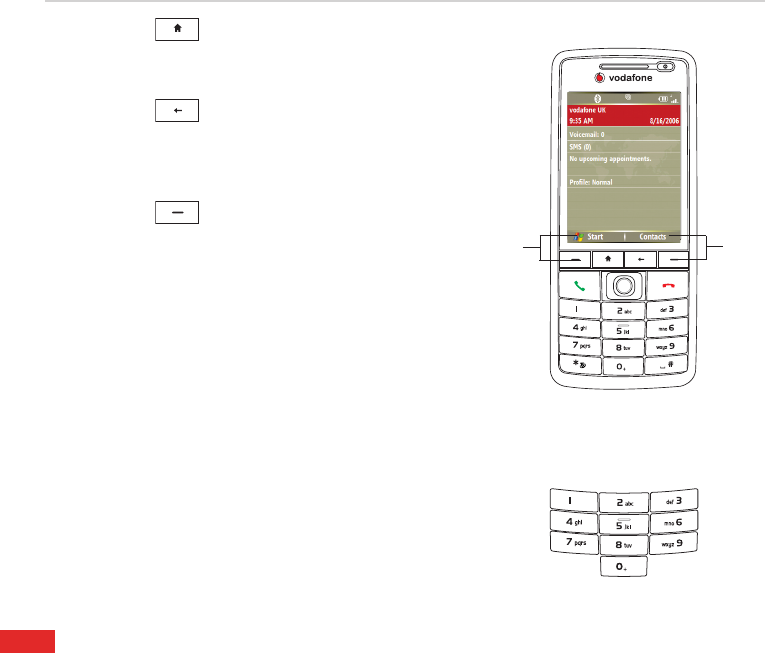
Home key
The Home key takes you to the Home screen.
Back key
The Back key takes you to the previous screen. In a text eld,
the Back key deletes characters to the left of the cursor.
Soft keys
The two soft keys on your Smartphone are located directly
below the display screen. Each soft key performs the action
displayed right above it on the soft key bar. These two soft
keys are context-sensitive; that is, the function of these two
keys vary depending on what you are doing.
Alphanumeric keypad
You can use the alphanumeric keypad to quickly select
programs and settings on your Smartphone. Press the
number on the keypad that corresponds to the number shown
next to the program or setting that you want to select.
Left
soft
key
Right
soft
key
11
Learning to Use Your Smartphone
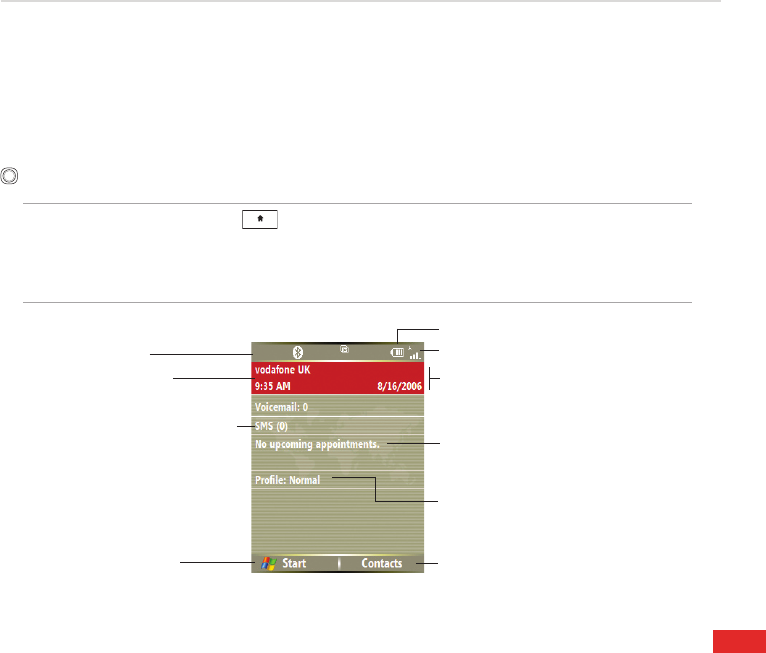
2-2 Home screen
The Home screen automatically displays when you turn on your Smartphone or leave it idle.
The top of the Home screen displays the status indicators, battery status and network signal The
center of the display shows the service provider, the time, your next appointment, your current
prole, and the number of new text messages. Scrolling to any of these items and pressing Action
opens the associated program.
NOTE Pressing Home at any time takes you back to this screen.
To customize the Home screen (layout, color scheme, background image),
press Start > Settings > Home Screen.
Time/Date
Your next appointment
Select and press Action to open Calendar
Your service provider
Select and press Action to open
Wireless Manager
Number of unread text messages
Select and press Action to open
Messages
Current ring tone or volume prole
Select and press Action to change the
prole
Status indicators
Left soft key command
Press the Left soft key to launch
the Start menu, which displays all
the installed programs
Right soft key command
Press the Right soft key to open Contacts,
Messages, or Call History.
Network signal strength
Power status
Chapter 2
12
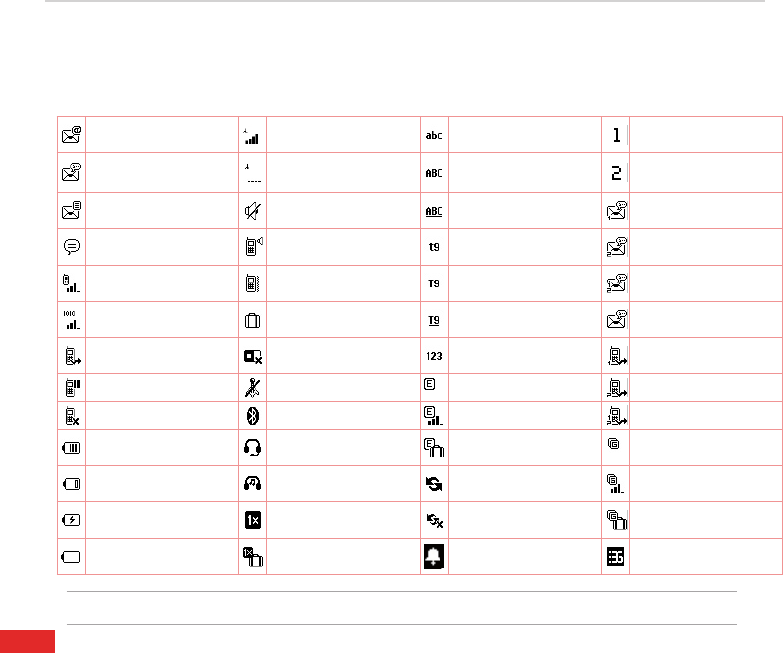
Status indicator icons
Status indicators appear at the top of the screen and on the Home screen. The following table lists
common status indicators and their meanings.
New e-mail Signal strength Multipress input
mode, lowercase Line 1
New voice mail No signal Multipress input
mode, uppercase Line 2
New sms Ringer off Multipress input
mode, caps lock VoiceMail line 1
New instant message Speakerphone T9 text input mode,
lowercase VoiceMail line 2
Voice call in progress Vibration mode T9 text input mode,
smart case Voicemail Lines 1&2
Data call in progress Roaming T9 text input mode,
caps lock
Voice mail when multiline
is not supported
Calls are forwarded Faulty / Missing SIM
card Numeric input mode Call forwarding line 1
Call on hold Radio off / No service Edge available Call forwarding line 2
Missed call Bluetooth Edge signal strength Call forwarding lines 1&2
Battery level Bluetooth headset Edge available and
roaming GPRS available
Low battery Bluetooth A2DP
headset Beaming data GPRS signal strength
Battery charging 1XRTT connection
available Sync connection error GPRS available and
roaming
No battery 1XRTT connection
available and roaming Pending alarm 3G active
NOTE Actual status indicator icons may vary from the ones represented in this guide.
13
Learning to Use Your Smartphone
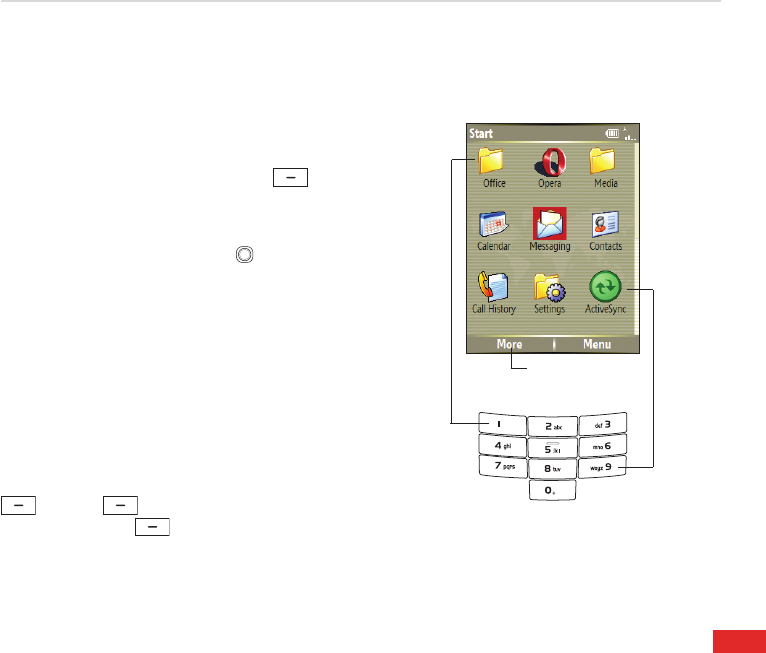
2-3 Start menu
Your Smartphone comes with many pre-installed programs that you can start using right away. These
programs can be accessed from the Start menu.
To use the Start menu
1. On the Home screen, press Start .
2. Do one of the following:
• Scroll to a program using the navigation
keypad and press Action .
• Press the corresponding number on the
alphanumeric keypad. For example, press 1
to open Ofce and 9 to open Settings.
Displays the next
page of programs
Press to open
Ofce
Press
to open
ActiveSync
You can add programs to the Start menu by
downloading them from the internet on your PC and
using ActiveSync to copy it to your phone.
To remove programs, use File Explorer (Start
> More > File Explorer) or Remove
Programs (Start > Settings > Remove
Programs).
Chapter 2
14
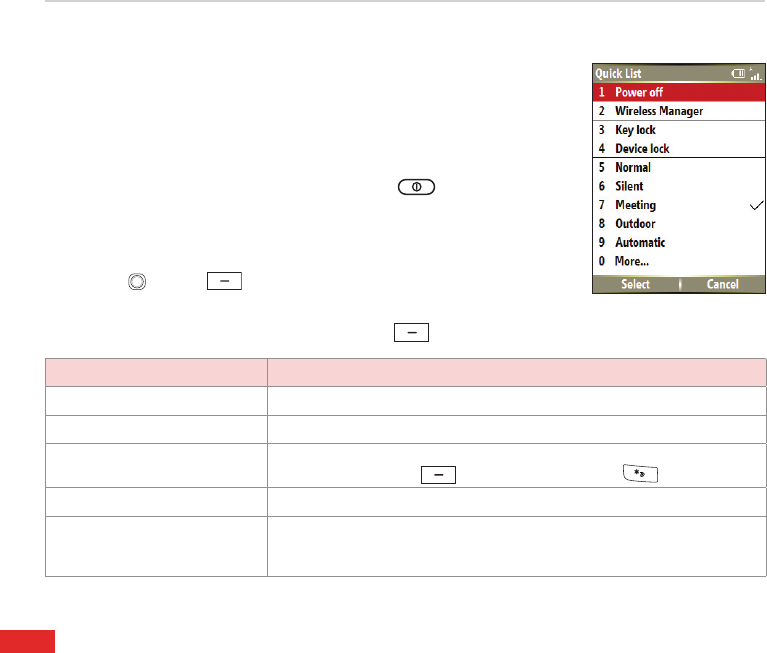
2-4 Quick List
The Quick List saves you time by providing quick and convenient access
to a list of common commands, such as turning off the phone, locking the
phone, turning off wireless capabilities, and changing the prole type.
To use the Quick List
1. Press and quickly release the Power button to display the
Quick List.
NOTE: If you press and hold too long, the phone will be powered off.
2. Select the command you want by scrolling to it and pressing
Action , Select ,or by pressing the corresponding number on
the alphanumeric keypad.
3. To return to the Home screen, press Cancel
QUICK LIST COMMAND DESCRIPTION
Power off Turns off the phone
Wireless Manager Turns on/off the phone and/or all wireless capability.
Key lock Locks the keypad so that you cannot accidentally press keys. To unlock the
keypad, press Unlock , and then press the * key .
Device lock Select how soon your phone will lock after the last keypress.
Normal / Silent / Meeting /
Outdoor / Automatic / Headset /
Car / Speakerphone
Select to make one of these preset proles the active one. A check
indicates the current prole. To change prole settings, you will need to go
to Start>Settings>Proles>Menu>Edit.

15
Chapter 3 Using Call Features
3-1 Making a voice call
Calling from the Home screen
To call from the Home screen
1. On the Home screen, start entering the phone number you want to call
using the alphanumeric keypad.
If you entered the wrong number, press Back to delete the last
digit; press and hold to delete all digits.
2. Once you have entered the number, press Send to make the
call.
3. Press End to end the call.
NOTE As you enter a phone number, the Smartphone searches Contacts, Call History,
and the Speed Dial lists to nd a matching name and/or number. When you see
the name or number of the person you want to call listed, select it using the
Up/Down navigation keys.
To redial the last number called, press Send twice from the Home screen.
Chapter 3
16
Calling a Contacts entry
To call a Contacts entry
1. On the Home screen, press Contacts .
2. Select the contact name to call by using the Up/Down navigation keys.
TIP To quickly nd a contact in a long list of contacts, you can enter the rst few letters
of the contact’s name to narrow the search.
3. Press Send to dial the default number assigned to the selected contact.
NOTE By default, the mobile telephone number (m) of a contact is dialed when you
make a call from Contacts unless you specify otherwise.
To change the default number for a Contact
1. On the Home screen, press Contacts .
2. Select the contact whose default phone number you want to change.
3. Use the Left/Right navigation keys to change the default number. The letter to the right of the
contact’s name indicates the default number — m (mobile), w (work), or h (home).
Calling a number from the Call History list
To make a call from the Call History list
1. On the Home screen, press Send or press Start > Call History.
2. Select the number or name you want to call, and press Send .

17
Using Call Features
Calling using speed dial
You can create speed dials for frequently-called phone numbers or frequently-accessed items by simply
pressing and holding one or two keys. You may choose Speed Dial entries from 2-99; Speed Dial 1 is
reserved for voice mail access and the number is congured in your settings. You can create a Speed
Dial for a phone number, a program on the Start menu, an E-mail address, or Web page address (URL)
that is stored in Contacts.
NOTE You must assign a speed dial key to a phone number before you can use the
speed dial feature.
You can create a speed dial only for a phone number, e-mail address, or Web
page address that is stored in Contacts. You cannot create a speed dial for a
contact stored in the SIM card.
To create a speed dial for a phone number, e-mail address, or URL address
1. On the Home screen, press Start > Contacts.
2. Select a contact and press Action to view the contact details.
3. Select the phone number, e-mail address, or URL address, for which you want to assign a speed
dial and press Menu > Add to Speed Dial.
4. Enter appropriate details in Name, Value, and Keypad assignment . In Keypad assignment, use
the Left/Right navigation keys to select, or press Action to view the full list of choices.
5. Press Done .
NOTE To quit at any time during this process, press Menu > Cancel.

Chapter 3
18
To make a call using speed dial
On the Home screen, press and hold the number on the keypad that you have assigned as a speed
dial for a number. If the keypad assignment consists of two digits, press the rst digit then press and
hold the second digit.
To create a speed dial for an item on the Start menu
1. On the Home screen, press Start .
2. Select an item and press Menu > Add Speed Dial.
4. Enter appropriate details in Name, Value, and Keypad assignment . In Keypad assignment, use
the Left/Right navigation keys to select, or press Action to view the full list of choices.
5. Press Done .
Making emergency calls
Calls to emergency service numbers can be made under any circumstances, even if you have locked
the SIM card and/or your phone.
To place an emergency call
Enter the emergency number appropriate for your location, and press Send .
Making international calls
To make international calls, you must rst enter the international prex (+), followed by the country
code and the rest of the phone number.

19
Using Call Features
To place an international call
1. Press and hold 0 on the keypad to enter a plus sign.
2. Enter the full phone number with the country code, area code, and phone number, and then press
Send .
3-2 Retrieving voice mail messages
On the Home screen, press Voice Mail or press and hold 1 . Follow the voice instructions
to retrieve your messages.
3-3 Responding to a voice call
Depending on your settings, the phone rings, vibrates, or rings and vibrates when it receives an incoming
call. When you receive a call, the screen displays the caller’s name and phone number. If the caller
is not in your Contacts list, the screen displays the number only. When you receive a phone call, you
have the option to answer it or ignore it.
To answer a voice call
Press Answer or Send .
To ignore a voice call
Press Ignore or End .
NOTE Selecting Ignore or End will send the caller to your voice mailbox if it
is enabled. If it is not, the caller will hear a busy tone.
Chapter 3
20
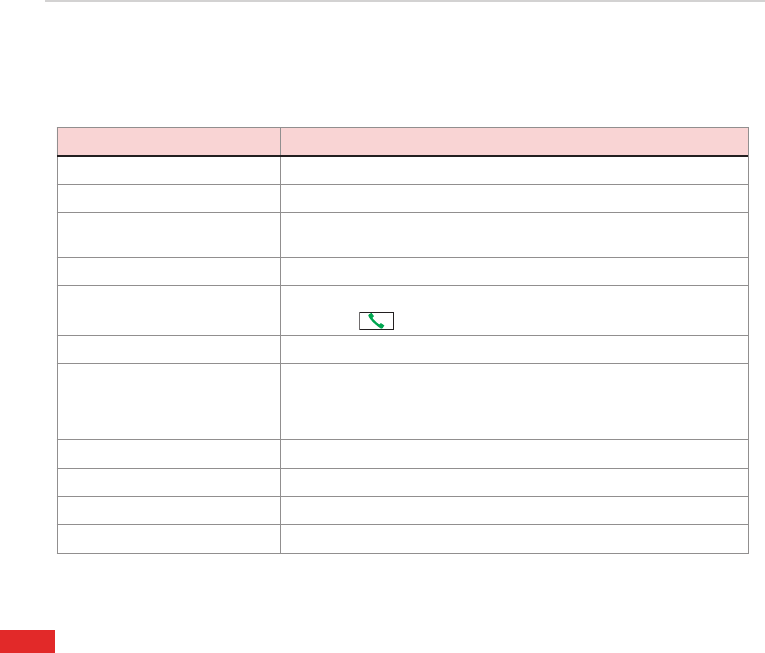
3-4 Options during a call
Listed in the table below are the possible menu options for when a call is in progress. Some of these
options are available only when multiple calls are in progress or during a conference call.
IN-CALL MENU OPTION DESCRIPTION
Hold Places the active call on hold.
Unhold Activates the call that’s on hold.
Mute on Switches off the microphone for the active call (you can hear the caller
but the caller can’t hear you).
Mute off Turns the microphone for the active call back on.
Speakerphone On/Off Activates/deactivates the speakerphone. NOTE: You can also press and
hold Send during an active call.
Conference Joins together all existing calls if you have subscribed to this service.
Turn Hands-free On/Off Activates/deactivates the hands-free function. This function is only
available if your phone has been connected to a hands-free kit. When
activated, the call will be redirected to the hands-free kit, allowing you to
talk using the remote earphone/microphone set.
Contacts Opens the Contacts list.
View Contact Display information about the caller.
View Calendar Opens the Calendar program
Call History Opens the Call History list.

21
Using Call Features
Managing multiple calls
To answer another call
1. Press Answer to place the rst call on hold and answer the second call.
2. To end the second call and return to the rst call, press End .
To hold a call to make a second call
1. Press Hold to place the rst call on hold and call a second number. When you have nished
the second call, press End to take you back to the rst call.
To switch between calls
To switch between two calls, press Swap .
To set up a conference call
With multiple calls in progress, press Menu > Conference.

Chapter 3
22

23
4-1 Microsoft ActiveSync
With ActiveSync, you can synchronize the information on your PC with the information on your
Smartphone. Synchronization compares the data on your phone with your PC and updates both with
the most recent information. You can also use synchronization to add new programs to your phone.
Before you can synchronize your phone with your PC, you need to complete the following steps:
1. Install ActiveSync on your PC.
2. Connect your phone to the PC.
3. Create a partnership between the two devices.
NOTE For more information about synchronization, see the ActiveSync Help on your PC.
Chapter 4 Synchronizing with ActiveSync

Chapter 4
24
4-2 Installing ActiveSync on your PC
The ActiveSync program is already installed on your Smartphone. To synchronize information on your
phone with your PC, you must also install ActiveSync on your PC. Install ActiveSync from the Getting
Started CD that came with your product package.
NOTE Before starting the ActiveSync installation, make sure that you have Microsoft® Outlook®
installed on your PC. If you do not have Outlook, install the Microsoft® Outlook® from
the Getting Started CD. If you have Outlook 98 or Outlook 2000 installed, you are
encouraged to update to the Outlook bundled in the Getting Started CD.
IMPORTANT Do not connect your phone to your PC until you have nished installing
ActiveSync.
To install ActiveSync on your PC
1. Place the Getting Started CD into the optical drive of your PC and follow the on-screen instructions
to install ActiveSync.
2. Click Start Here to display the Overview screen.
3. If you have not installed Outlook, install it now. Click Install Outlook and follow the screen instructions
to complete the installation.
4. Click Install ActiveSync, then follow the on-screen instructions to complete installation.
25
Synchronizing with ActiveSync
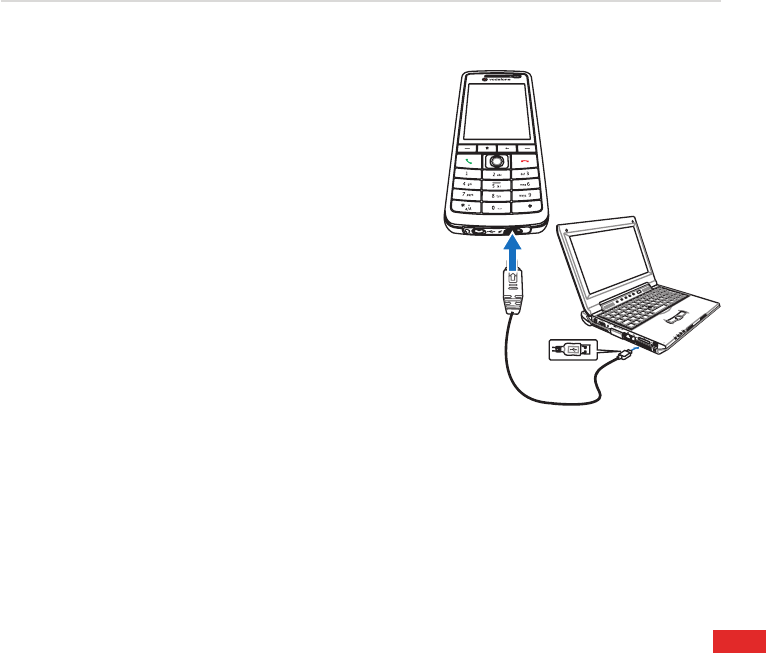
4-3 Connecting your phone to a PC
To connect your Smartphone to a PC
1. When prompted, connect the appropriate end of the USB
sync cable to the mini USB and power connector at the
bottom of your phone and the other end to a USB port
on your PC.
2. ActiveSync will autostart when it detects your phone, and
the Smartphone Sync Setup Wizard will open.
4-4 Creating a partnership
The wizard steps you through the steps to create a partnership.
In the Sync Setup Wizard, you can do the following:
• Create a synchronization relationship between your PC
and the phone.
• Congure an Exchange Server connection to synchronize directly with Exchange Server. To
synchronize your phone with Exchange Server, obtain the name of the Exchange Server, your
user name, password, and domain name from your administrator before completing the wizard.
• Choose information types (Calendar, Contacts, Tasks, Outlook E-mail, Favorites) to synchronize.
When you nish the wizard, ActiveSync synchronizes your phone automatically. Once synchronization
completes, you can disconnect your phone from your PC. After the rst synchronization, you will notice
that the information from your PC that you selected now appears on your Smartphone.

Chapter 4
26
4-5 Synchronizing with a PC
Changing information to synchronize
By default, ActiveSync does not automatically synchronize all Outlook information. You can use
ActiveSync options to turn synchronization for specic information types on and off:
1. On the Home screen, press Start > ActiveSync.
2. Press Menu > Options.
3. Do one or more of the following:
• Select the check box for the items you want to synchronize.
• Clear the check box for any items you do not want to synchronize.
• To customize synchronization of a PC, select the PC name then press Menu >
Settings.
• To customize synchronization of a particular type of information, select the information type then
press Settings .
• To stop synchronizing with a PC completely, select the PC name and press Menu >
Delete.
NOTE E-mail can be synchronized with only one PC.

27
Synchronizing with ActiveSync
Using USB sync cable
When you connect your phone to the PC, ActiveSync should detect it automatically and start
synchronizing.
1. Connect your phone to a PC using the USB sync cable.
2. ActiveSync should detect it automatically and start synchronizing. If not, on the Home screen, press
Start > ActiveSync.
3. Press Sync to start synchronizing.
4. Press Stop to stop synchronization before it completes.
Using Bluetooth
You can synchronize your phone with a PC using local wireless technologies, such as Bluetooth.
1. Follow the instructions in ActiveSync Help on the PC for conguring Bluetooth on your PC to support
ActiveSync.
2. On the Home screen, press Start > ActiveSync.
3. Press Menu > Connect via Bluetooth. Ensure that the phone and PC are within close
range.
NOTE If this is the rst time you have connected to this PC using Bluetooth, you must
complete the Bluetooth wizard on the phone and set up a Bluetooth partnership
with the PC before synchronizing. For more information about setting up a Bluetooth
partnership, see “Creating a Bluetooth partnership” in 6-4 Using Bluetooth.
4. Press Sync.
5. When nished, press Menu > Disconnect Bluetooth. To preserve battery power, turn off
Bluetooth.

Chapter 4
28
4-6 Synchronizing with an Exchange Server
To set up an Exchange Server connection, you will need to get the name of the server and the server
domain name from your service provider or system administrator. You must also know your Exchange
user name and password.
NOTE Before you change synchronization settings on the phone, disconnect it from your
PC.
1. On the Home screen, press Start > ActiveSync > Menu >CongureServer. If you
have not yet set up sync with Exchange Server, this will say Add Server Source.
2. In Server address, enter the name of the server running Exchange Server, and press Next
.
3. Enter your user name, password, and domain name, and press Next .
If you want the phone to save your password so that you will not need to enter it again when
connecting, select the Save password check box.
4. Select the check boxes for the types of information items that you want to synchronize with the
Exchange Server.
5. To change available synchronization settings, select the type of information, and press Menu
> Settings.
6. To change the rules for resolving synchronization conicts, Menu > Advanced.
7. Press Finish .
29
Synchronizing with ActiveSync
4-7 Creating a synchronization schedule
You can create a schedule for automatically synchronizing information on your Smartphone with your
PC or with Microsoft Exchange Server.
To set up a synchronization schedule with your PC, you must use ActiveSync on the PC. For more
information on synchronization, see ActiveSync Help on the PC.
To set up a synchronization schedule with an Exchange server, you must use ActiveSync on your
phone. See the next section for details.
Scheduling synchronization
Before changing synchronization settings on the phone, disconnect the phone from your PC.
NOTE The rst time you use ActiveSync you may need to click in the link set up your
device to sync with it from ActiveSync main screen.
To schedule a synchronization
1. On the Home screen, press Start > ActiveSync > Menu > Schedule.
2. Do one or more of the following:
TO SYNCHRONIZE DO THIS
Automatically as items arrive. Under Peak times, select As items arrive. It’s more cost-efcient to
synchronize on at regular intervals when mail volume is high.
Under Off-peak times, select As items arrive. This can be more cost-efcient
than synchronizing on a regular schedule when mail volume is low.
Chapter 4
30
TO SYNCHRONIZE DO THIS
When you are working, or e-mail
volume is high.
Select an appropriately frequent interval in the Peak times list.
When e-mail volume is low. Select a longer interval or As items arrive in the Off-peak times list.
While roaming Select the Use above settings while roaming check box. To minimize
roaming charges, clear the check box, and synchronize manually while
roaming.
When you press Send in
Messaging on the phone
Select the Send outgoing items immediately check box.
NOTE To change peak time settings to more accurately adjust to periods of e-mail volume
for you, press Menu > Peak Times.
4-8 Remote synchronization
Remote synchronization is when your phone is synchronized over a wireless connection instead of
using a direct local connection to a PC. Synchronizing remotely with your PC may depend on your
network conguration. For example, you may need to set up a virtual private network (VPN) connection
to your network.
To synchronize remotely, you need to set up a connection rst and then congure your phone. For
more information on remote synchronization, see the ActiveSync Help on the PC.
31
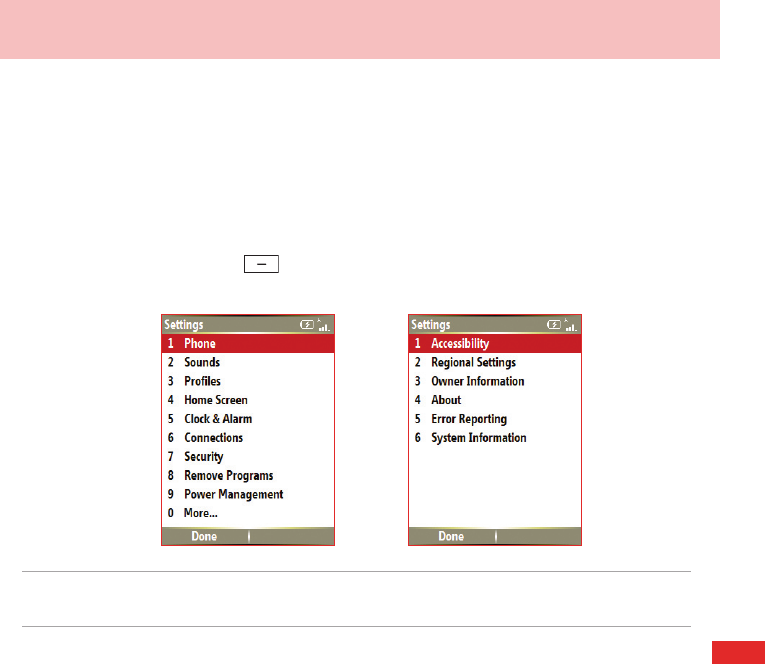
5-1 Personalizing your Smartphone
Settings screens
You can view and change the settings on your Smartphone to make it look and behave according to
your preferences. This includes changing the Home screen layout, adding your own ring tone, and
set options for received calls, call forwarding or call waiting.
On the Home screen, press Start > Settings to display the Settings screen.
Chapter 5 Managing Your Smartphone
NOTE Selecting More from the Settings screen will display a second screen of
Settings options.

Chapter 5
32
Personalizing your Home screen
To personalize your Home screen
1. On the Home screen, press Start > Settings > Home Screen.
2. Make your desired changes and press Done .
To personalize the Home screen with your own image
1. On the Home screen, press Start > Media > Pictures & Videos.
2. Select an image to use as the background image and press Action .
3. Press Menu > Use as Home Screen.
4. Use the Left/Right navigation keys to select the display area and press Next .
5. Use the Left/Right navigation keys to adjust the transparency and press Finish .
Setting the date, time, and alarm
To set the date and time
1. On the Home screen, press Start > Settings > Clock and Alarm > Date and Time.
2. Enter the correct information and press Done .
To set an alarm
1. On the Home screen, press Start > Settings > Clock and Alarm > Alarm.
2. Enter the correct information and press Done .

33
Managing Your Smartphone
Changing regional settings
To change regional settings
1. On the Home screen, press Start > Settings > More > Regional Settings.
2. In Language, select your preferred language for the phone interface and menus.
3. In Locale, select your current location. The Locale option automatically changes the format of the
remaining options, such as date, time, and currency, to reect those used in that locale.
4. Press Done after you have nished making changes.
NOTE To activate the new language settings, you will need to turn the phone off and
back on.
Changingprolesettings
A prole determines how you get notied of events such as incoming calls, upcoming appointments,
and new messages. Your current prole is displayed on the Home screen.
Toquicklychangethecurrentprole
To quickly switch to a different prole, press and quickly release the Power Button and scroll
to the desired prole in the Quick List screen and press Select . To open the second page of the
Quick List screen for more prole options, select More.
NOTE When prole is set to Automatic, your phone will automatically switch to Silent
mode whenever you have a meeting set up in Calendar.

Chapter 5
34
Tomodifyaprole
1. On the Home screen, press Start >Settings>Proles.
2. Scroll to the prole you want to change, press Menu , and select Edit.
3. Change the settings and press Done .
NOTE To restore the default settings of a prole, press Menu and select Reset to
default.
Customizing sounds for ring tones
Use Sounds settings to customize the sounds for ring tones, notications, reminders, alarm clock,
alert, and key tones. The phone comes with 20 pre-installed polyphonic ring tones from which you
can choose.
To change the sound
1. On the Home screen, press Start > Settings > Sounds.
2. Highlight the item for which you want to change the sound.
3. Do one of the following:
• Scroll left/right to select a different sound.
• Press Action to open the Select an Item screen, which allows you to select from a full list of
sounds available for that event.
To use your own sound
1. Locate the sound le on your PC and copy the le.
NOTE The le must be in .wav, mid, .wma, or .mp3 format.

35
Managing Your Smartphone
2. Connect your phone to the PC.
3. Open ActiveSync on your PC and click Explore.
4. Go to the Storage\Application Data\Sounds folder on your Smartphone and paste the le.
5. On the Home screen of your phone, press Start > Settings > Sounds.
6. Highlight the item to customize and scroll left/right to nd the sound le.
Entering your contact information
The Owner Information screen is for entering and displaying personal information, such as your name,
phone number, and e-mail address. Entering this information is strongly recommended as it allows the
person who nds the phone to be able to contact you in case it is lost.
To enter owner information
1. On the Home screen, press Start > Settings > More > Owner Information.
2. Enter your details and press Done .
5-2 Improving performance
Changing accessibility settings
To change accessibility settings
1. On the Home screen, press Start > Settings > More > Accessibility.
Chapter 5
36
2. You may set your preferences for the following:
System font size: Set the size of all the displayed text as “normal” or “large”.
NOTE System font size only affects submenus. The main screen or the text below icons
will not be affected.
Multipress time out: Set the length of time to wait between keypresses when entering text in
Multipress mode.
Conrmationtimeout:Set the delay before an unconrmed action times out.
In-call alert volume: Set the volume for incoming call or receiving new message alerts while you
are on the phone.
3. Press Done when nished.
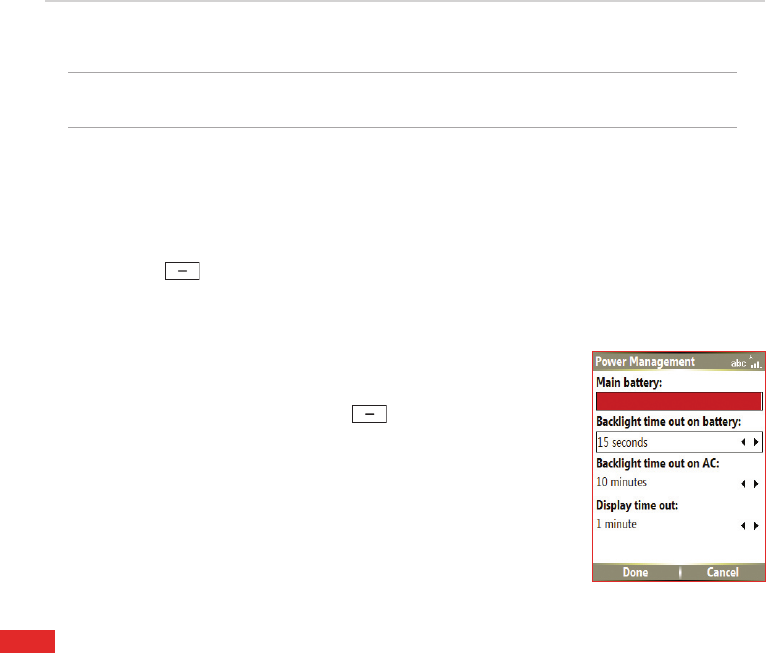
Changing power settings
Use Power Management to check the battery level and to congure power-
saving settings, such as backlight and display time-outs.
1. On the Home screen, press Start > Settings > Power
Management.
The rst item showed is Main battery indicator , where you can see
how much power is left in the battery. This item is not adjustable.
2. You may set your preferences for the following:
Backlight time out on battery: Set the amount of time for the phone
to be idle before the backlight turns off.
In Backlight time out on AC: Set the amount of time for the phone
to be idle before the backlight turns off when using AC power.

37
Managing Your Smartphone
Display time out: Set the time limit for the phone to be idle before the screen turns off.
3. Press Done when nished.
5-3 Turning on/off wireless mode
To turn on/off Bluetooth
Do one of the following:
• Press and quickly release the Power button to display the Quick List screen and select
Wireless Manager. Select Bluetooth and press Action .
• On the Home screen, press Start > Settings > Connections > Bluetooth. Select On,
Discoverable, or Off.
To turn on/off radio mode
Press and quickly release the Power button to display the Quick List screen and select Wireless
Manager. Select All and press Action to toggle between on and off mode.
NOTE Turn off all radio interfaces of your phone when on an aircraft or in a hospital.
You will not be able to make calls or send messages/emails but will still be able
to use the organizer functions of your phone.
5-4 Keeping your Smartphone secure
Customize the level of security you want your phone to have by locking the keypad, the SIM card, or
the entire phone.

Chapter 5
38
Locking the keypad and multimedia player controls
To lock the keypad
Press and quickly release the Power button to display the Quick List screen and select Key lock.
To unlock the keypad
Press Unlock followed quickly by the * key .
Locking the SIM card
Locking the SIM card prevents you and others from using the Smartphone until the correct password
is entered, but you will still be able to make emergency calls. When you turn on the phone, you will be
asked to enter your PIN1 password.
To lock the SIM card and set the PIN
1. On the Home screen, press Start > Settings > Security > Enable SIM PIN.
2. Enter the password (SIM card’s PIN1), and press Done .
Once the PIN is enabled, your Smartphone will ask you to enter the PIN whenever you turn it on.
To unlock the SIM card
1. On the Home screen, press Start > Settings > Security > Disable SIM PIN.
2. Enter the password (SIM card’s PIN1), and press Done .
To change the PIN
1. On the Home screen, press Start > Settings > Security > Change SIM PIN.
2. Enter the original PIN1 code.
3. Enter and conrm the new PIN, and then press Done .

39
Managing Your Smartphone
To change PIN2
1. On the Home screen, press Start > Settings > Security > Change PIN2.
2. Enter the original PIN2 code (SIM card’s PIN2).
3. Enter and conrm the new PIN2, and then press Done .
Locking the phone
To lock the phone
1. Do one of the following:
• On the Home screen, press Start > Settings > Security > Device Lock.
• Press and quickly release the Power button to display the Quick List screen and select
Device lock.
2. Select the Prompt if device unused for check box by pressing Action .
3. Scroll down to the eld below and select the amount of time for the phone to be inactive before it
locks automatically.
4. In Password type, select the type of password you want to use.
5. Enter and conrm your password, and then press Done .

Chapter 5
40
Controlling outgoing calls
Fixed dialing allows you to restrict your outgoing calls to selected phone numbers, if supported by your
SIM card. You need the PIN2 code for this function. When this function is active, you can only call
those phone numbers that are included in the xed dialing list. Call barring, on the other hand, blocks
certain types of call. Before you can use it, you must set up a Fixed dialling list.
1. On the Home screen, press Start > Settings > Phone > Fixed Dialing.
2. Select Enablexeddialing by pressing Action and then press Done .
3. Enter your SIM PIN 2, and press Done .Once xed dialing has been turned on, you can begin
to store xed dialing numbers.
4. Press Menu > Edit Numbers.
5. Press Menu > Add and enter the phone number to add to your xed dialing list.
6. Press Done .
7. Repeat steps 2 and 3 to add more numbers.
Blocking incoming/outgoing calls
Emergency calls can still be made with Call Barring on.
1. On the Home screen, press Start > Settings > Phone > Call Barring.
2. In Block incoming calls, select Off, When roaming, or All calls.
3. In Block outgoing calls, select Off, Int’l except to home, Int’l calls, or All calls.
4. Press Done .

41
Managing Your Smartphone
5-4 Setting network options
To change the phone network, press Start > Settings > Phone > GSM/3G Networks. You may
choose between GMS, 3G or automatic, which automatically detects your network every time you
power on your phone.
NOTE Changes on the network changes will only take effect after the phone has been
restarted. Turn the phone off and on to apply changes.
5-5 Restarting your phone
Occasionally, you may need to restart your phone; for example, when a program is not performing
properly or the phone does not respond to key presses.
To restart the phone
1. Remove the battery.
2. Reinsert the battery and turn on your phone.
5-6 Resetting your phone
Resetting your phone will remove all data from memory and restore the phone back to the factory
default settings.
NOTE When you reset your phone, all data entered in your device including all les,
system settings, and additional programs you have installed, will be erased.