ASUSTeK Computer A686 ASUS MYPAL A686 POCKET PC User Manual A696 UserMan
ASUSTeK Computer Inc ASUS MYPAL A686 POCKET PC A696 UserMan
UserManual.wiki
>
ASUSTeK Computer
>
A686 User Manual
users manual
Navigation menu
Upload a User Manual
Namespaces
Wiki Guide
HTML
PDF
Info
Views
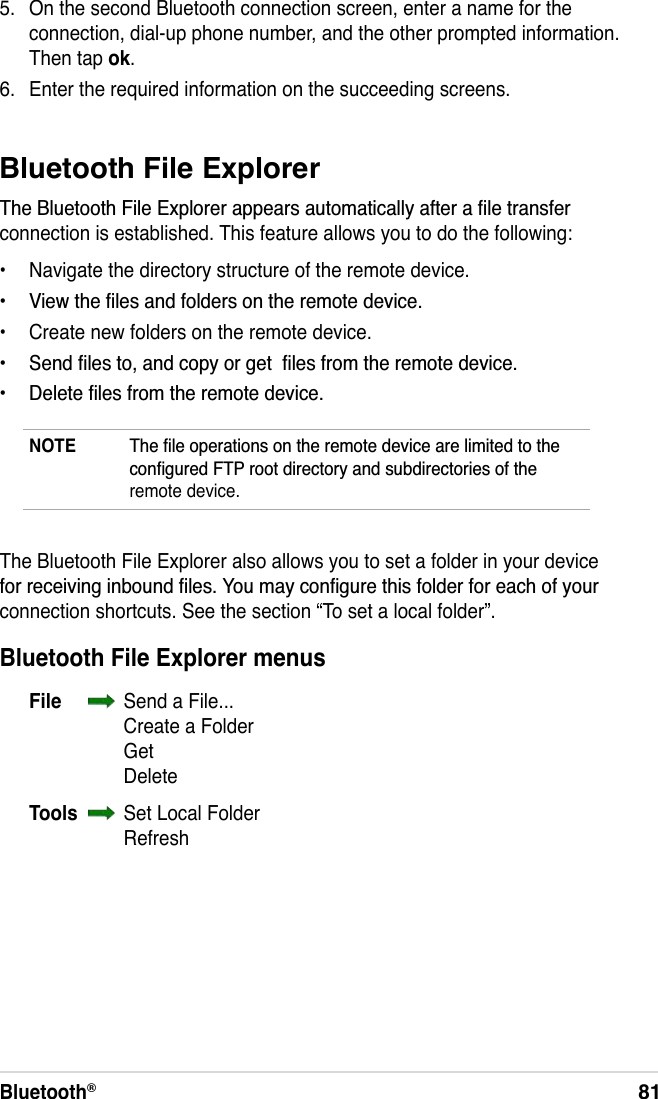
User Manual
Discussion / Help
Navigation
![iiCopyright © 2006 ASUSTeK COMPUTER INC. All Rights Reserved.No part of this manual, including the products and software described in it, may be reproduced, transmitted, transcribed, stored in a retrieval system, or translated into any language in any form or by any means, except documentation kept by the purchaser for backup purposes, without the express written permission of ASUSTeK COMPUTER INC. (“ASUS”).3URGXFWZDUUDQW\RUVHUYLFHZLOOQRWEHH[WHQGHGLIWKHSURGXFWLVUHSDLUHGPRGLÀHGRUDOWHUHGXQOHVVVXFKUHSDLUPRGLÀFDWLRQRIDOWHUDWLRQLVDXWKRUL]HGLQZULWLQJE\$686RUWKHVHULDOnumber of the product is defaced or missing.ASUS PROVIDES THIS MANUAL “AS IS” WITHOUT WARRANTY OF ANY KIND, EITHER EXPRESS OR IMPLIED, INCLUDING BUT NOT LIMITED TO THE IMPLIED WARRANTIES OR CONDITIONS OF MERCHANTABILITY OR FITNESS FOR A PARTICULAR PURPOSE. IN NO EVENT SHALL ASUS, ITS DIRECTORS, OFFICERS, EMPLOYEES OR AGENTS BE LIABLE FOR ANY INDIRECT, SPECIAL, INCIDENTAL, OR CONSEQUENTIAL DAMAGES (INCLUDING DAMAGES FOR LOSS OF PROFITS, LOSS OF BUSINESS, LOSS OF USE OR DATA, INTERRUPTION OF BUSINESS AND THE LIKE), EVEN IF ASUS HAS BEEN ADVISED OF THE POSSIBILITY OF SUCH DAMAGES ARISING FROM ANY DEFECT OR ERROR IN THIS MANUAL OR PRODUCT.SPECIFICATIONS AND INFORMATION CONTAINED IN THIS MANUAL ARE FURNISHED FOR INFORMATIONAL USE ONLY, AND ARE SUBJECT TO CHANGE AT ANY TIME WITHOUT NOTICE, AND SHOULD NOT BE CONSTRUED AS A COMMITMENT BY ASUS. ASUS ASSUMES NO RESPONSIBILITY OR LIABILITY FOR ANY ERRORS OR INACCURACIES THAT MAY APPEAR IN THIS MANUAL, INCLUDING THE PRODUCTS AND SOFTWARE DESCRIBED IN IT.Microsoft, Activesync, Outlook, Pocket Outlook, Windows, and the Windows logo are either registered trademarks or trademarks of Microsoft Corporation in the United States and/or in other countries. Microsoft products are licensed to OEMs by Microsoft Licensing, Inc., a wholly owned subsidiary of Microsoft Corporation.E2775First EditionSeptember 2006](https://usermanual.wiki/ASUSTeK-Computer/A686/User-Guide-734691-Page-2.png)
![iiiTable of ContentsChapter 1 Getting Started..................................................1Introducing MyPal ..................................................................................1Installing and removing the battery........................................................5Connecting to a power source ...............................................................5Setting up GPS ......................................................................................6Additional storage ..................................................................................7Activating MyPal ....................................................................................8Basic screens on MyPal ........................................................................9Chapter 2 Basics .............................................................. 11Viewing system information ................................................................11Entering information.............................................................................11)LQGLQJDQGRUJDQL]LQJLQIRUPDWLRQ......................................................18Using the File Explorer .......................................................................18&XVWRPL]LQJ\RXUGHYLFH......................................................................19Using simple applications ....................................................................Chapter 3 Synchronize and Enhance .............................31Microsoft® ActiveSync®.........................................................................316\QFKURQL]LQJ\RXUGHYLFH...................................................................33Chapter 4 Microsoft® Pocket Outlook............................. 39Calendar ..............................................................................................39Contacts ..............................................................................................Tasks ...................................................................................................45Notes ..................................................................................................46Messaging ...........................................................................................48Chapter 5 Companion Programs ....................................53Word Mobile ........................................................................................53Excel Mobile .......................................................................................56](https://usermanual.wiki/ASUSTeK-Computer/A686/User-Guide-734691-Page-3.png)
![v0\3DO$$$VSHFLÀFDWLRQVProcessorOperating systemMemoryDisplayBatteryExpansion slotBluetoothWLANAudioGPSSizeWeight$,QWHO®;6FDOH3URFHVVRU0+]A686: Intel®;6FDOH3URFHVVRU0+]A696: Intel®;6FDOH3URFHVVRU0+]Microsoft® Windows Mobile™ 5.0 (Pocket PC)$0%)ODVK5200%6'5$0$0%)ODVK5200%6'5$0$0%)ODVK5200%6'5$0LQFKEULOOLDQWWUDQVÁHFWLYH7)7/&'65,000 Full-color, 16-bit display49*$[UHVROXWLRQ7RXFK3DGSupport Anti-glare technologyP$KUHPRYDEOH/LLRQOne slot-SD card slot (SDIO/SD/MMC), at least 4GBBluetooth®Y('586%&OLHQW:/$1EJZLWK7%'VXSSRUW$only)3.5 mm stereo SiRF Star III / GPS chip with built-in GPS Antenna (A686/696 only)117 mm x 70.8 mm x 15.7 mm $JUDPVZLWKEDWWHU\A686: 165 grams (with battery)A696: 165 grams (with battery)IMPORTANT To avoid damaging your Pocket PC and accessories, it is best to operate this unit (including the protection case) ZLWKLQDWHPSHUDWXUHUDQJHRIoC (68-86 oF) and 50% humidity. Anything that goes beyond or below the ideal temperature range may damage the unit, and may shorten the battery life.6SHFLÀFDWLRQVDUHVXEMHFWWRFKDQJHZLWKRXWQRWLFH](https://usermanual.wiki/ASUSTeK-Computer/A686/User-Guide-734691-Page-5.png)
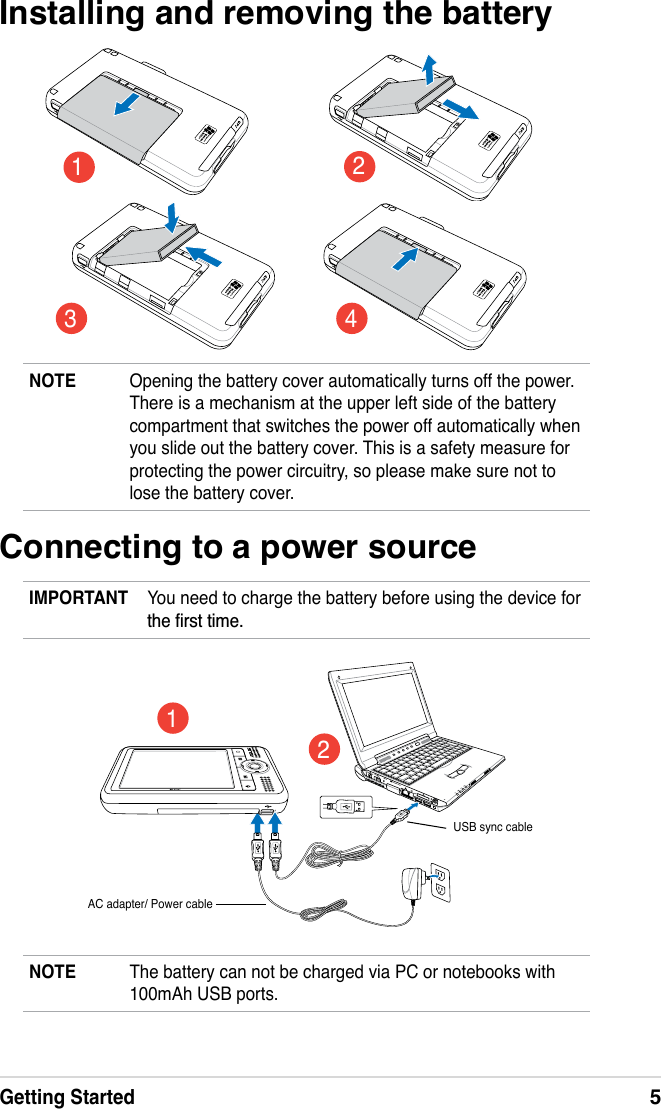
![Getting Started1Chapter 1 Getting Started•Power LEDVKRZVDVWHDG\UHGOLJKWZKHQWKHEDWWHU\LVFKDUJLQJsteady green when the battery is fully charged and the device is connected to an AC power source.•LCD touch screen - allows you to enter, read, send, receive or edit data by tapping on it. The screen lumination is increased or decreased by changing the backlight settings (Anti-glare technology supported).•Speaker - allows you to hear alarms and other sound output from the device.Introducing MyPalThe ASUS®0\3DO$$$LVWUXO\DJRRGFRPSDQLRQZKHUHYHU\RXJR3RZHUHGE\D0+]0\3DO$RU0+]0\3DO$$,QWHO®;6FDOHSURFHVVRUHTXLSSHGZLWK0%6'5$0DQG0%)ODVK5200\3DO$RU0%)ODVK5200\3DO$$DQGbundled with the Microsoft® Windows Mobile® 5.0 plus a host of useful utilities, you have everything you need in your pocket!0\3DO$$FRPHVZLWKDGGLWLRQDO:L)LIHDWXUHWKDWDOORZV\RXWRFRQQHFWWRZLUHOHVV/$1DQG,QWHUQHW0\3DO$$$KDVDVLQJOHSD card slot.SpeakerLaunch buttonLCD touch screenNotes button Calendar buttonMode/TaskSwitcher buttonContacts button4-way Navigaition button3RZHU1RWLÀFDWLRQ/('Front featuresBluetooth/Wi-Fi/GPS LED](https://usermanual.wiki/ASUSTeK-Computer/A686/User-Guide-734691-Page-7.png)
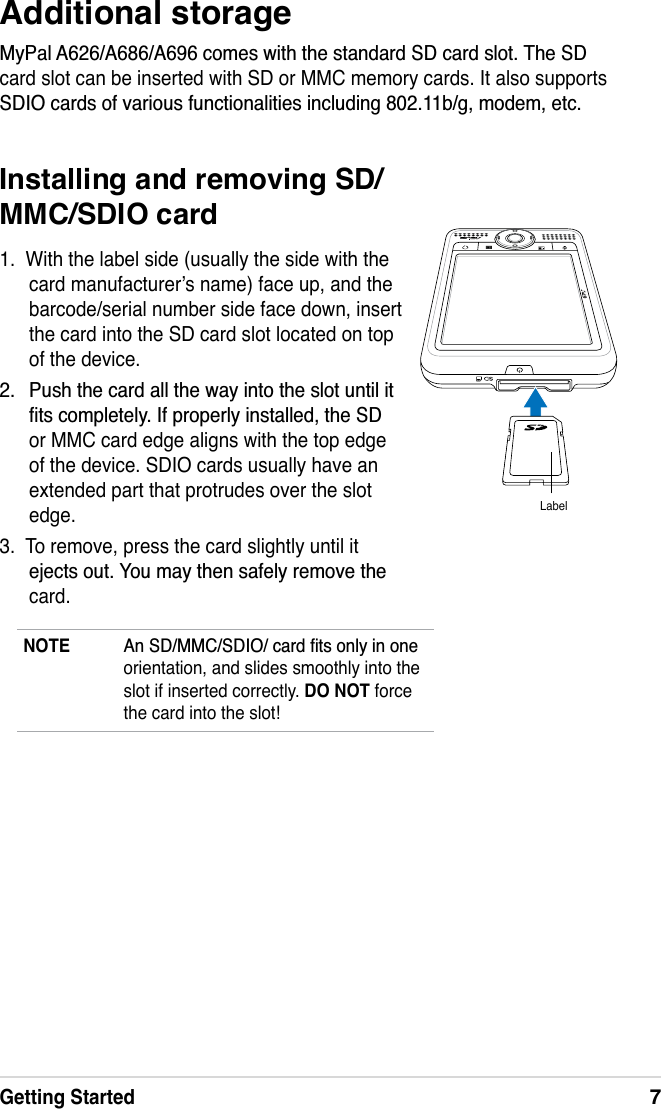
![2Chapter 1SD card slot(SD/SDIO/MMC)•4-way navigation button - functions like the four arrow keys on a keyboard. This button allows you to move through the program icons, IROGHUVRUÀOHVLQDPHQXE\VFUROOLQJXSRUGRZQOHIWRUULJKWIf ASUS® MyPal is bundled with GPS map software, you may use the EXWWRQVWR]RRPLQ]RRPRXWDQGDGMXVWWKHYROXPH•Launch button - functions like the enter/return key on a keyboard. 3UHVVRQFHWRODXQFKDVHOHFWHGSURJUDPOLVWIROGHUFRQWHQWVRURSHQDÀOH•Contacts button - opens your contacts list at any time.•Calendar button - opens the Calendar program at any time.•Mode Switcher button - allows you to switch between Today, Windows Media Player and Rotate screen. The Mode Switcher button can also function as a Task Switcher, which allows you to switch between currently running programs on your device.•Notes button - opens the Notes program at any time.•Bluetooth/GPS/Wi-Fi LED - lights up blue when the Bluetooth® feature LVRQOLJKWVXSJUHHQZKHQ*36LVRQOLJKWVXSUHGZKHQ:L)LLVRQ•Battery cover - provides protection to the battery compartment of the device.•SD card slot - accommodates an SD memory card, MMC memory FDUGRUDQ6',2LQWHUIDFHFDUGHJEJPRGHPHWF•External antenna jack - connects to an external GPS antenna (A686/A696 only). ExternalDQWHQQDMDFNBattery coverBack features](https://usermanual.wiki/ASUSTeK-Computer/A686/User-Guide-734691-Page-8.png)
![Getting Started3Right Side features•Stylus - used for tapping or writing on the LCD touch screen. •Hold key - provides a safety measure to avoid users from accidentally tapping the screen or turning on the device. Move the switch towards the word Hold to turn off the screen and prevent it from turning back on even when you tap the screen or press a button. Move the switch towards the opposite direction to disable this feature.•Headphone port - connects to a headphone.Top features•Power button - turns the device power on or off if you press the button quickly.NOTES As a precaution, the Power button is automatically disabled when you remove the battery cover. You can only turn on the power when the battery cover is installed to the unit.The battery cover is removable, and allows you to remove or replace the main battery.Left Side features•Sync and power cable connector - connect the Mini USB sync FDEOHGLUHFWO\WRWKLVFRQQHFWRUWRV\QFKURQL]H\RXUGHYLFHZLWK\RXUcomputer. This also charges the battery at the same time.Sync and power cable connectorPower buttonSD card slot(SD/SDIO/MMC)Hold keyStylus+HDGSKRQHMDFNScreenScreen](https://usermanual.wiki/ASUSTeK-Computer/A686/User-Guide-734691-Page-9.png)
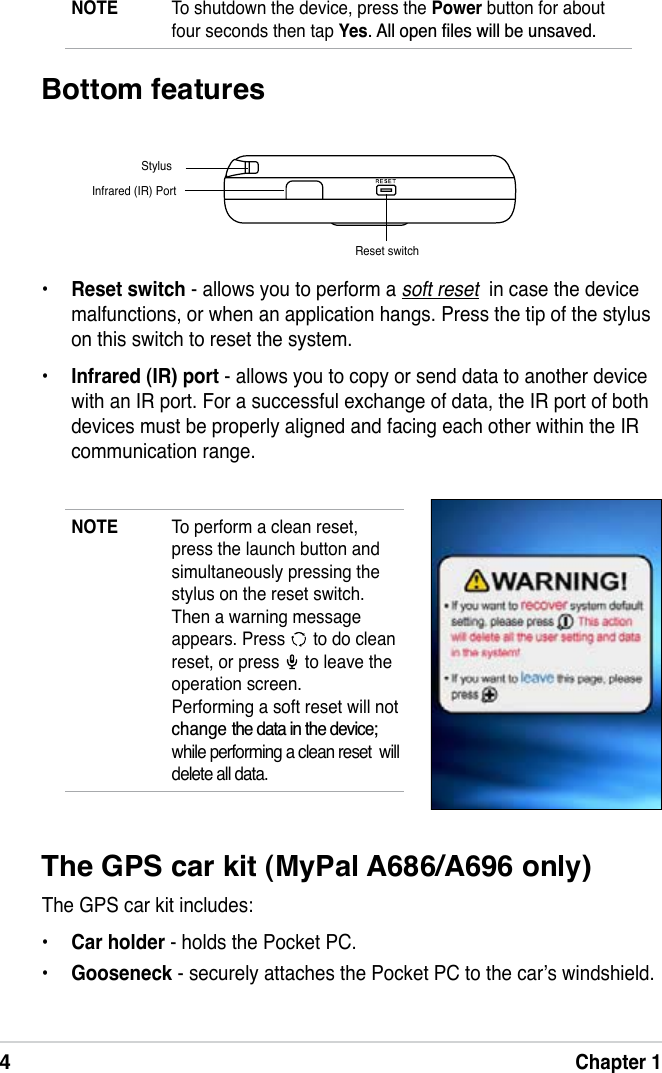
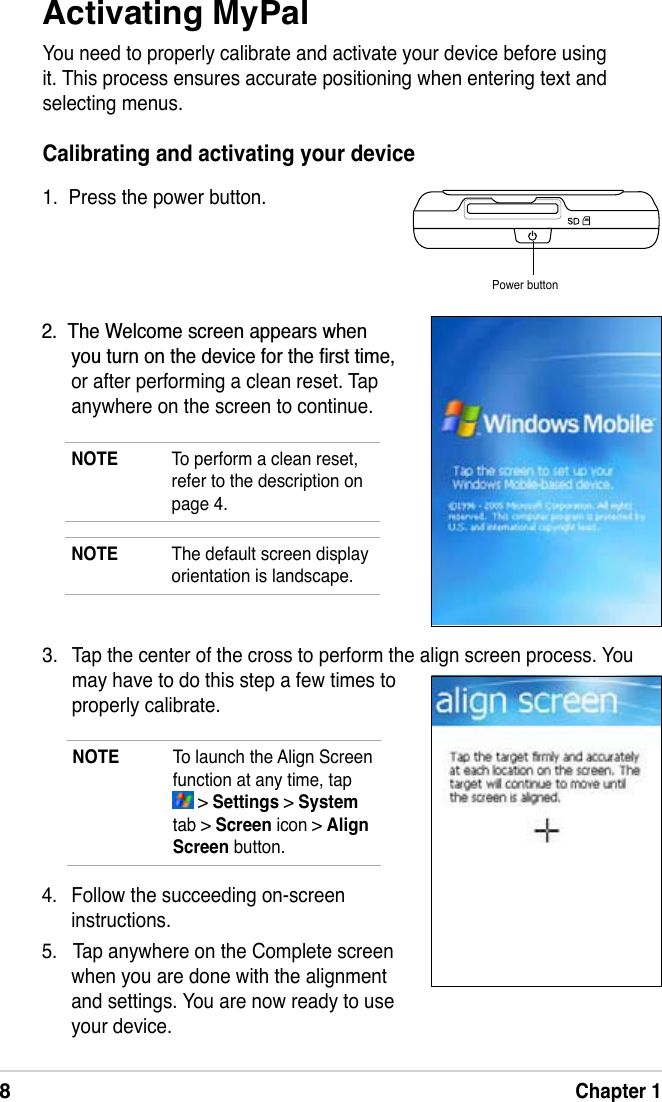
![6Chapter 1Setting up GPS (MyPal A696/A686 only)To use the GPS car kit:NOTE *HQWO\EHQGWKHJRRVHQHFNZKHQDGMXVWLQJWKHorientation. Do not forcibly bend the gooseneck. The device must be carefully placed into the holder to avoid damaging the mini USB connector and causing the device to breakdown. NOTE For optimal GPS signal performance, we recommend that you use the PDA aside from the window of your car in landscape mode.+RUL]RQWDORULHQWDWLRQ.52*9*134Press latch downNOTE Do not the device in the car holder when you leave the car. NOTE As soon as the power cable is connected to a power source, the battery will start charging and the power LED will show a steady red light. See “Changing the battery power settings” LQ&KDSWHURQKRZWRGLVSOD\WKHEDWWHU\SRZHUVWDWXV](https://usermanual.wiki/ASUSTeK-Computer/A686/User-Guide-734691-Page-12.png)

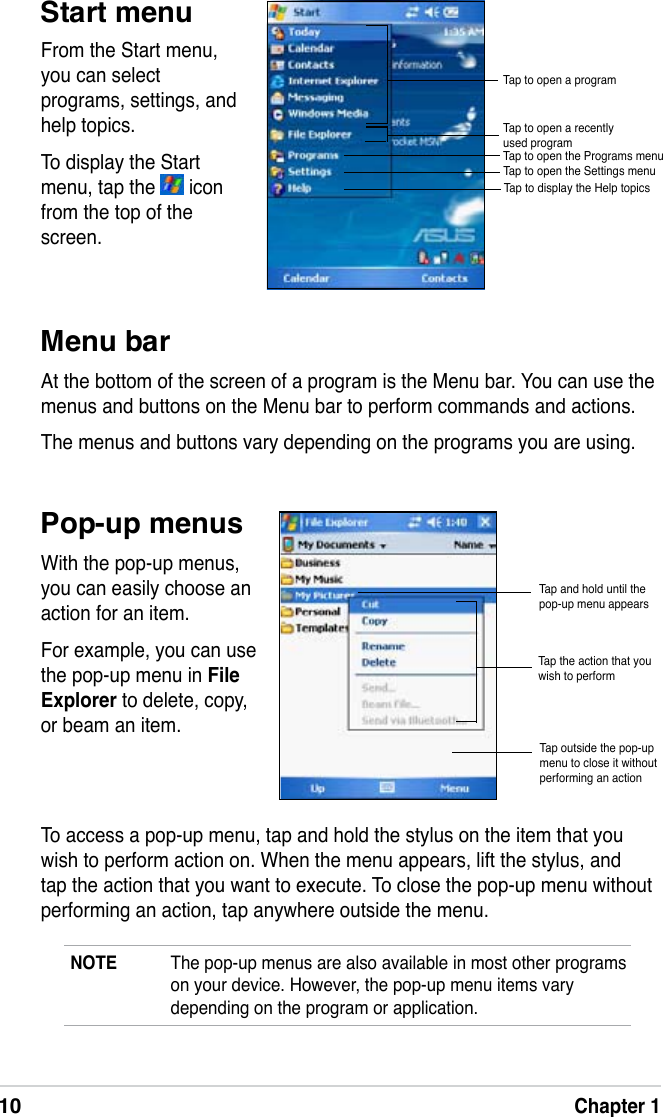
![Basics11Entering informationYou can enter information in your device in any of the following ways:• Use the input panel to enter text using either the soft keyboard, the /HWWHU5HFRJQL]HUWKH%ORFN5HFRJQL]HURUWKH7UDQVFULEHU• Write directly on the screen with the stylus• Draw pictures on the screen• Speak into the device microphone to record a message• Use the Microsoft® ActiveSync®WRV\QFKURQL]HRUFRS\LQIRUPDWLRQfrom your desktop computer to your deviceEntering text using the Input PanelUse the Input Panel to enter information in any program on your device. You can either type using the soft keyboard or write using the Letter Recognizer,Block Recognizer, or Transcriber. In either case, the characters appear as typed text on the screen.To show or hide the input panel, tap . To see input options, tap .To display the system information:1. Tap > Settings > System tab > System Information icon 7RGLVSOD\WKHGHYLFHVSHFLÀFDWLRQVWDSDevice Info tab. This will display various information such as the device ID, system memory, and wireless capabilities. 3. Tap the Version tab to view other information about the device.NOTE appears beside only when the input panel is not hidden.Chapter 2 BasicsViewing system information<RXUGHYLFHDOORZV\RXWRHDVLO\GLVSOD\WKHEXLOWLQVSHFLÀFDWLRQVNOTE You cannot change the information you see in the system information screens.](https://usermanual.wiki/ASUSTeK-Computer/A686/User-Guide-734691-Page-17.png)
![12Chapter 2To use Letter Recognizer::LWKWKH/HWWHU5HFRJQL]HU\RXFDQZULWHOHWWHUVRQWKHVFUHHQZLWKWKHVW\OXVas you would on paper.1. Tap > Letter Recognizer. :ULWHDOHWWHUZLWKLQWKHZULWLQJDUHDWhen you write a letter, it is converted to a typed text that appears on the screen. For instructions and a demonstation on using the Letter 5HFRJQL]HUWDS next to the writing area.To type with the soft keyboard:1. Tap > Keyboard.7DSWKHNH\VRQWKHRQVFUHHQkeyboard with the stylus to enter information.Word completion featureWhen you use the Input Panel and the soft keyboard, your device anticipates the word you are typing and displays it above the Input Panel. When you tap the displayed word, it is inserted into your text at the insertion point. The more you use your device, the more words it learns to anticipate.To change options on the word completion feature:1. Tap > Settings > Personal tab > Input > Word Completion tab. 0DNH\RXUGHVLUHGFKDQJHVWKHQWDSok.Select an input methodTap to show or hide the input panelTap to display the input method optionsTap here if this is the word you wish to use](https://usermanual.wiki/ASUSTeK-Computer/A686/User-Guide-734691-Page-18.png)
![Basics13To use Block Recognizer::LWKWKH%ORFN5HFRJQL]HU\RXFDQLQSXWFKDUDFWHUVWURNHVWKDWDUHVLPLODUto those used on other devices.1. Tap > Block Recognizer. :ULWHDOHWWHUZLWKLQWKHZULWLQJDUHDWhen you write a letter, it is converted to a typed text that appears on the screen. For instructions and a demonstration on XVLQJWKH%ORFN5HFRJQL]HUWDSnext to the writing area.To use Transcriber:With Transcriber, you can use the stylus to write anywhere on the screen DV\RXZRXOGRQSDSHU8QOLNH/HWWHU5HFRJQL]HUDQG%ORFN5HFRJQL]HUyou can write a sentence or additional information. Pause after writing and let Transcriber convert the written characters to typed characters.1. Tap > Transcriber. :ULWHDQ\ZKHUHRQWKHVFUHHQFor instructions and demonstration on using Transcriber, with Transcriber open, tap at the lower right corner of the screen.To edit typed text:1. Select the text that you wish to edit using either one of the following:• drag the stylus over the text• tap twice to select a word• tap three times to select a paragraph 7DSMenu on the Menu bar and select an action, or use one of the tools in the Input Panel to enter a new text.](https://usermanual.wiki/ASUSTeK-Computer/A686/User-Guide-734691-Page-19.png)
![14Chapter 2To edit your writing:1. Tap and hold the stylus next to the text that you wish to select until the insertion point appears. ,QRUGHUWRVHOHFWDWH[WWDSMenu > Draw. Make sure Draw has nocheck mark beside it.3. Drag the stylus across the text you want to select.If you accidentally write on the screen, tap Menu > Undo Ink and try again.4. Tap Menu on the Menu bar then select an action, or use one of the tools in the Input Panel to enter a new text.To convert writing to text:• Tap Menu > Tools > Recognize.To select a zoom level:• Tap Menu > Zoom)URPWKHOLVWWDSD]RRPSHUFHQWDJHWriting on the screenIn any program that accepts writing, such as the Notes program, and in the Notes tab in Calendar, Contacts, and Tasks, you can use the stylus to write directly on the screen. Write the way you do on paper. You can edit and format what you have written and convert the writing to text at a later time.To write on the screen:1. Tap > Programs > Notes > New 7KHVFUHHQGLVSOD\VDEODQNVSDFHZLWKlines to help you write.3. Write your text.NOTE Some programs that accept writing may not have the Pen button. See the documentation IRUWKDWSURJUDPWRÀQGRXWKRZto switch to writing mode.](https://usermanual.wiki/ASUSTeK-Computer/A686/User-Guide-734691-Page-20.png)
![Basics15If the conversion is incorrect, you can select different words from a list of alternates or return to the original writing.1. Tap and hold the incorrect word. :KHQWKHSRSXSPHQXDSSHDUVWDSAlternates to display a list of alternate words for the selection.3. Tap the word that you want to use, or tap the writing at the top of the menu to return to the original writing.Tips for getting good writing recognition• Write neatly.• Write on the line and draw descenders below the line. Write the cross of the “t” and apostrophes below the top line so that they are not confused with the word above. Write periods and commas above the line. )RUEHWWHUUHFRJQLWLRQWU\LQFUHDVLQJWKH]RRPOHYHOWRXVLQJWKHTools menu.• Write the letters of a word closely and leave big gaps between words so that the device can easily tell where the words begin and end.• Hyphenated words, foreign words that use special characters such as accents, and some punctuation cannot be converted.• If you add writing to a word or change it after the word has been UHFRJQL]HGWKHZULWLQJWKDW\RXDGGHGZLOOEHLQFOXGHGZKHQ\RXWU\WRUHFRJQL]HWKHZULWLQJDJDLQTap to return to your original writingOr, tap the word that you want to use](https://usermanual.wiki/ASUSTeK-Computer/A686/User-Guide-734691-Page-21.png)
![16Chapter 2Drawing on the screenYou can draw on the screen in the same way that you write on the screen. The difference between writing and drawing on the screen is how you select items and how they can be edited. For example, selected drawings FDQEHUHVL]HGZKLOHZULWLQJFDQQRWTo create a drawing:1. Use the stylus to make a stroke that extends over three lines on the screen. A drawing box appears around the stroke.NOTE If the drawing does not cross over three lines, the drawing box does not appear.NOTE To easily work on or view your drawing, change the ]RRPOHYHOE\WDSSLQJMenu > Zoom and selecting your desired ]RRPTo edit your drawing:1. Tap and hold the stylus on the drawing until the selection handle appears. To select multiple drawings, drag to select the drawings you want. 7DSDQGKROGWKHVHOHFWHGGUDZLQJWKHQWDSDQHGLWLQJFRPPDQGRQthe pop-up menu or tap a command on the Menu. 5HVL]HWKHGUDZLQJE\GUDJJLQJDVHOHFWLRQKDQGOHWR\RXUGHVLUHGVL]HThe drawing box indicates the boundaries of the drawing &RQWLQXHGUDZLQJ,I\RXUVXEVHTXHQWstrokes extend outside the box, you will notice that the drawing box expands to enclose all the strokes.](https://usermanual.wiki/ASUSTeK-Computer/A686/User-Guide-734691-Page-22.png)

![18Chapter 2To use the Help feature:1. Tap > Help. 7DSDOLQNWRWKHWRSLFWKDW\RXZLVKWRdisplay.NOTE Compared to other settings, the Pulse Code Modulation (PCM) provides slightly better sound quality but takes up 50 times more storage space than Mobile Voice recordings. Finding and organizing informationThe Search and Help features on your device helps you quickly locate information.Using the Search functionTo search for information:1. Tap > Help > Search. (QWHUWKHWH[WWKDW\RXZDQWWRÀQGselect a data type, then tap SearchWRVWDUWWKHVHDUFK7RTXLFNO\ÀQGinformation that is taking up space on your device, select Larger than 64 KB in Type.7\SHDZRUGWRÀQGTap to search for the wordTopics found containing the searched wordTo change the recording format:1. In the note list, tap Menu > Options > Global Input Options link > Options tab. 6HOHFW\RXUGHVLUHGUHFRUGLQJIRUPDWIURPWKHVoice recording format pull-down menu then tap ok when done.Using the File Explorer 7RXVHWKH)LOH([SORUHUWRÀQGDQGRUJDQL]HÀOHV• Tap > Programs > File ExplorerLFRQWRGLVSOD\WKHÀOHVLQ\RXUdevice.](https://usermanual.wiki/ASUSTeK-Computer/A686/User-Guide-734691-Page-24.png)
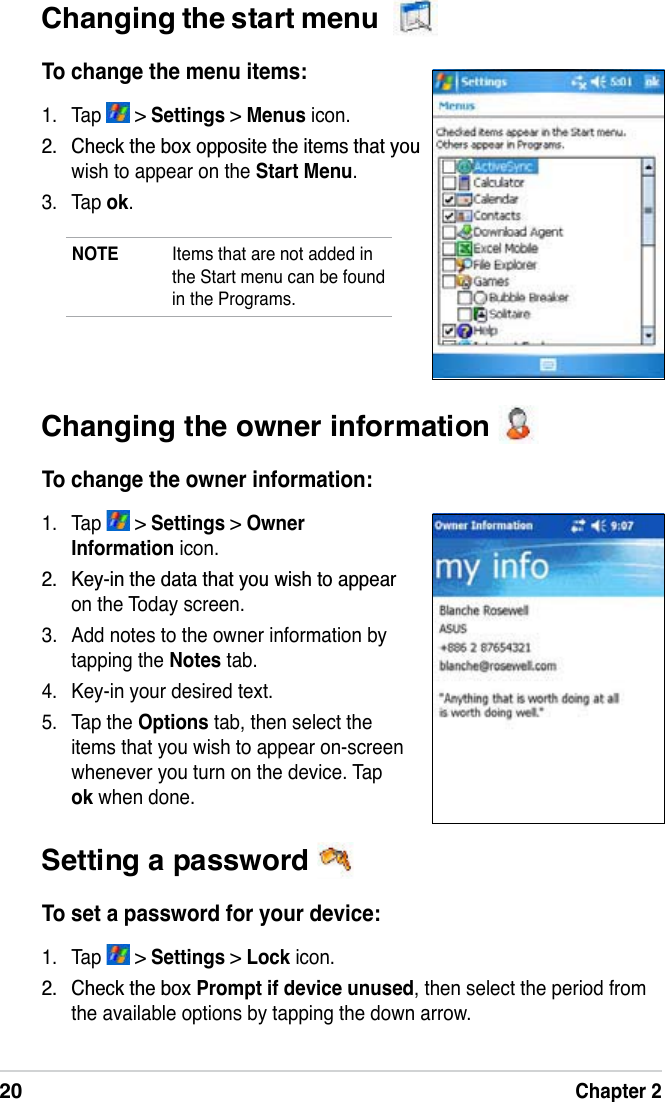
![Basics19Changing the date and time To change the date and time settings:1. Tap > Settings > System tab > Clock & Alarms icon. 8QGHUWKHTime tab, make your desired settings. NOTE Tap the More tab and select Display the clock in the title bar in all programs to display the clock on the top right corner of the screen all the time.Customizing your device<RXFDQFXVWRPL]H\RXUGHYLFHE\DGMXVWLQJWKHVHWWLQJVXVLQJWKHEXLOWLQprograms, and installing additional software.To see the available options:• Tap > Settings > Personal or System tab.NOTE Tap and hold the slider on the right side of the screen to display other Settings icons.To change the alarm settings:1. Tap > Settings > System tab > Clock & Alarms icon > Alarms tab. 0DNH\RXUGHVLUHGVHWWLQJV](https://usermanual.wiki/ASUSTeK-Computer/A686/User-Guide-734691-Page-25.png)

![22Chapter 2To enable the ClearType feature:1. Tap > Settings > System tab > Screen icon > Clear Type tab. &KHFNWKHEnable Clear Type box, then tap ok.To change the screen text size:1. Tap > Settings > System tab > Screen icon > Text Size tab. 0RYHWKHVOLGHUWRZDUGWKHSmallest or Largest until you attain your GHVLUHGWH[WVL]H7DSok.NOTE The slider is set on the middle by default.Changing the screen theme To specify the items to appear on the Today screen:1. Tap > Settings > Today icon > Items tab. &KHFNWKHER[RSSRVLWH\RXUGHVLUHGLWHPV7DSok when done.Changing the button assignments To change the screen theme:1. Tap > Settings > Today icon.6HOHFW\RXUGHVLUHGWKHPHIURPWKHDYDLODEOHRSWLRQVorCheck the box Use this picture as the background, then tap BrowseWRVHOHFWDQLPDJHIURP\RXUSLFWXUHÀOHV3. Tap ok when done.To change the button assignments:1. Tap > Settings > Buttons icon. +LJKOLJKWDEXWWRQE\WDSSLQJRQLW3. Tap the down arrow to display the programs that you can assign to the button. 5HSHDWVWHSVWRWRFKDQJHRWKHUEXWWRQDVVLJQPHQWV5. Tap ok when done.](https://usermanual.wiki/ASUSTeK-Computer/A686/User-Guide-734691-Page-28.png)
![24Chapter 2Changing the battery power settings To change the battery power settings:1. Tap > Settings > System tab > Power icon to display the battery power status. This screen shows the detected percentages of the remaining battery power. You may not change the information on this screen. 7DSWKHAdvancedWDEWRFXVWRPL]HWKHVHWWLQJVIRUWKHEDWWHU\WRconserve power.3. Tap the CPU Mode tab to set the processing power to use when using programs.•Maximum - allows better CPU performance. Set to this mode when playing games or playing video. However, setting to Turbo mode may reduce the battery life.•Normal - allows for a normal CPU speed and more stable SHUIRUPDQFH6HWWRWKLVPRGHZKHQOLVWHQLQJWR03DXGLRÀOHVRUfor applications that do not require very fast CPU speed.•Power Save - sets the CPU to a lower speed. This mode has a lower CPU performance but extends the battery life. Set to this mode when using text based applications such as Word, Excel, etc.• For automatic power saving, tick the circle beside Auto. This PRGHDGMXVWVWKH&38VSHHGGHSHQGLQJRQWKHSURJUDPWKDW\RXare running.4. Tap ok when done.Setting the backlight To set the backlight:1. Tap > Settings > System tab > Backlight icon. $GMXVWWKHGLVSOD\EULJKWQHVVE\GUDJJLQJWKHVOLGHUWRZDUGVDark or Bright until you achieve your desired screen brightness.3. Tap the AdvanceWDEDQGFXVWRPL]HWKHEDFNOLJKWVHWWLQJVZKHQXVLQJbattery power and AC power.4. Tap ok when done.](https://usermanual.wiki/ASUSTeK-Computer/A686/User-Guide-734691-Page-30.png)
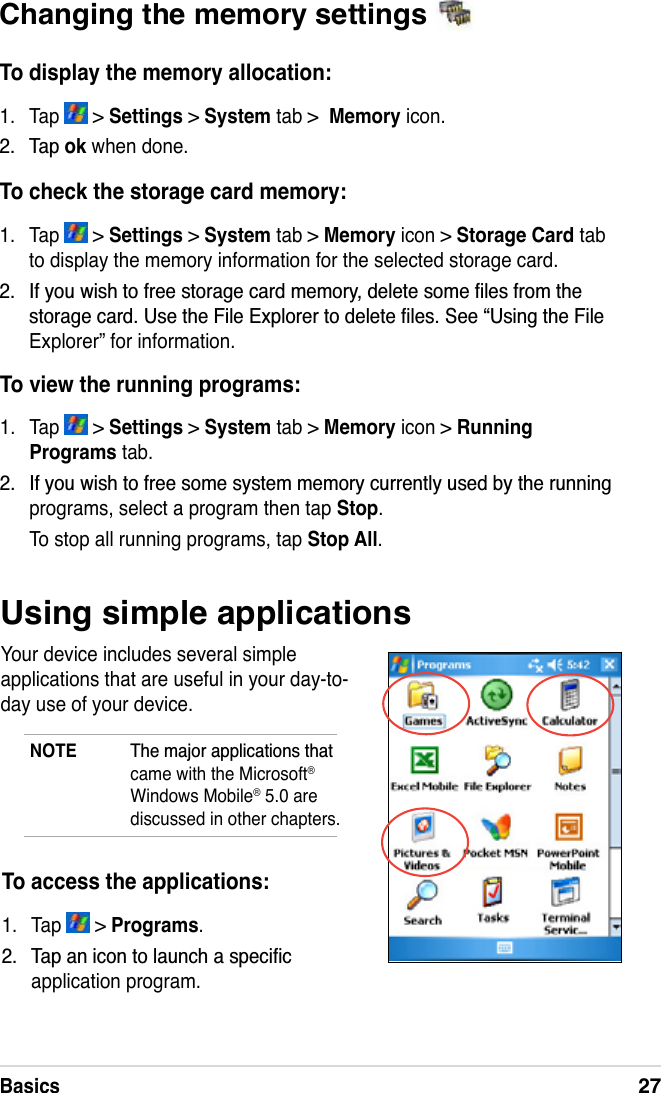
![28Chapter 2CalculatorTap the Calculator icon to use basic calculator functions. GamesTap the Games icon to display the available games.Bubble Breaker 7KHPDLQREMHFWLYHRIWKLVJDPHLVWREXUVWDOOWKHEXEEOHV7RGRVRWDStwo or more bubbles of the same color that are connected to each other. The more bubbles you burst at a time, the higher your score.Pictures & Videos Use Pictures & Videos to view pictures and play back videos of variousformats stored in your device or in a storage card. You can then send them to your friends, view a slideshow of your pictures, play back the video or set a picture as background on the Today screen.Refer also to the online help on your device for more information on using this feature.To use Pictures:1. Tap > Programs > Pictures & Videos icon. 7DSWKHWKXPEQDLORIWKHSLFWXUHRUYLGHRWKDW\RXZLVKWRRSHQ3. When the picture or video appears on the screen, tap MenuWR]RRP]RRPLQ]RRPRXWRUÀWWKHLPDJHWRZLQGRZSOD\VOLGHVKRZHGLWyour picture or play back the video.Solitaire7KHPDLQREMHFWLYHRIWKLVJDPHLVWRXVHDOOWKHFDUGVLQWKHGHFNWREXLOGup four suit stacks in ascending order, beginning with the aces.NOTE For details on the game rules, see the Help information on your device by tapping > Help > Contents > PlayGames.](https://usermanual.wiki/ASUSTeK-Computer/A686/User-Guide-734691-Page-34.png)
![Synchronize and Enhance31Chapter 3Synchronize and EnhanceMicrosoft® ActiveSync®The Microsoft® ActiveSync® is one of the important bundled programs in 0\3DO:LWK$FWLYH6\QF\RXFDQV\QFKURQL]HWKHLQIRUPDWLRQRQ\RXUGHVNWRSFRPSXWHUZLWKWKHLQIRUPDWLRQRQ\RXUGHYLFH6\QFKURQL]DWLRQcompares the data on your device with your desktop computer and updates both computers with the most recent information. To get the latest version of Microsoft® ActiveSync®, visit the website: www. microsoft.com/ windowsmobile/help/activesync/default.mspx#disclaimer.For example: .HHS3RFNHW2XWORRNGDWDXSWRGDWHE\V\QFKURQL]LQJ\RXUGHYLFHwith Microsoft Outlook data on your desktop computer. 6\QFKURQL]H0LFURVRIW:RUGDQG0LFURVRIW([FHOÀOHVEHWZHHQ\RXUGHYLFHDQGGHVNWRSFRPSXWHU<RXUÀOHVDUHDXWRPDWLFDOO\FRQYHUWHGWRthe correct format.NOTE %\GHIDXOW$FWLYH6\QFGRHVQRWDXWRPDWLFDOO\V\QFKURQL]Hall types of information. Use the ActiveSync options to turn V\QFKURQL]DWLRQRQRURIIIRUVSHFLÀFLQIRUPDWLRQW\SHVWith ActiveSync, you can also: &RS\UDWKHUWKDQV\QFKURQL]HÀOHVEHWZHHQ\RXUGHYLFHDQGGHVNWRScomputer &RQWUROZKHQV\QFKURQL]DWLRQRFFXUVE\VHOHFWLQJDV\QFKURQL]DWLRQPRGH)RUH[DPSOH\RXFDQV\QFKURQL]HFRQWLQXDOO\ZKLOHFRQQHFWHGWR\RXUGHVNWRSFRPSXWHURURQO\ZKHQ\RXFKRRVHWRV\QFKURQL]H 6HOHFWZKLFKLQIRUPDWLRQW\SHVDUHV\QFKURQL]HGDQGFRQWUROKRZPXFKGDWDLVV\QFKURQL]HG)RUH[DPSOH\RXFDQFKRRVHWRV\QFKURQL]Hyour appointments of the past two weeks only, appointments older than WZRZHHNVDUHQRWV\QFKURQL]HGFor more information about using ActiveSync:1. Start ActiveSync on your desktop computer. 2QWKH$FWLYH6\QFPHQXEDUFOLFNHelp > Microsoft ActiveSync Help.](https://usermanual.wiki/ASUSTeK-Computer/A686/User-Guide-734691-Page-37.png)
![32Chapter 3Installing ActiveSync® on your computerThe ActiveSync program is already installed on your device. To V\QFKURQL]HLQIRUPDWLRQRQ\RXUGHYLFHZLWK\RXUFRPSXWHU\RXPXVWalso install ActiveSync on your computer. Install ActiveSync from the Companion CD that came with your product package.NOTE Before starting the ActiveSync installation, make sure that you have Microsoft® Outlook® installed on your computer. If you do not have Outlook, install the Microsoft® Outlook®from the Companion CD. If you have Outlook 98 or Outlook LQVWDOOHG\RXDUHHQFRXUDJHGWRXSGDWHWRWKH2XWORRNbundled in the Companion CD.To install ActiveSync on your computer:1. Turn on your computer and monitor.IMPORTANT Do not connect your device to your computer until you KDYHÀQLVKHGLQVWDOOLQJ$FWLYH6\QF 3ODFHWKH&RPSDQLRQ&'LQWRWKHRSWLFDOGULYHRI\RXUFRPSXWHU7KHCD autoruns and displays the initial screen, then the Main Menu from which you can start the installation.3. Read the Overview before installing ActiveSync and Outlook to make sure that you perform the installation sequence correctly, and then click “Next”.4. Follow the instructions on the succeeding screens.If you have previously installed ActiveSync in your computer, the LQVWDOODWLRQZL]DUGGHWHFWVLWDQGSURPSWV\RXZLWKDPHVVDJH](https://usermanual.wiki/ASUSTeK-Computer/A686/User-Guide-734691-Page-38.png)
![Synchronize and Enhance33NOTE You may connect your Pocket PC to your computer right after installing ActiveSync. Make sure that the Transmission as Network Interface or Transmission as Serial Interfaceoption is selected in Settings > Connections tab > USBSettings.Click Next to continue installing and replace the current version.Click Cancel to quit and keep the current version.:DLWXQWLOWKHZL]DUGÀQLVKHVFRS\LQJDOOWKHQHFHVVDU\ÀOHVDQGupdates your system. Synchronizing your deviceConnecting your device to a computer1. Connect the mini USB device plug of the sync cable to the mini USB connector at the left side of your device. &RQQHFWWKHRWKHUend of the sync cable to a USB port on your computer.1Setting up a sync relationshipImmediately after you have completed the installation, the Sync Setup ZL]DUGZLOOVWDUWDXWRPDWLFDOO\WRKHOS\RXHVWDEOLVKDV\QFUHODWLRQVKLSDQGFXVWRPL]H\RXUV\QFKURQL]DWLRQVHWWLQJV$WWKLVSRLQW\RXFDQGHFLGHH[DFWO\ZKLFKW\SHVRILQIRUPDWLRQ\RXZRXOGOLNHWRV\QFKURQL]HZLWK\RXUFRPSXWHUA sync relationshipLVDÀOHWKDWDOORZV\RXWRV\QFKURQL]H\RXUGHYLFHZLWK\RXUGHVNWRSFRPSXWHU7KLVÀOHLVVWRUHGRQ\RXUGHVNWRSFRPSXWHU$QDGGLWLRQDOÀOHWKDWHQDEOHV\RXUGHVNWRSFRPSXWHUWRUHFRJQL]H\RXUGHYLFHLVVWRUHGRQ\RXUGHYLFH](https://usermanual.wiki/ASUSTeK-Computer/A686/User-Guide-734691-Page-39.png)
![34Chapter 3To set up a sync relationship: 2QWKH6\QFKURQL]DWLRQ6HWXS:L]DUGVFUHHQFOLFNNext. 6HOHFWWKHW\SHRILQIRUPDWLRQWKDW\RXZLVKWRV\QFKURQL]Hthen click Next. If you wish to FXVWRPL]HDV\QFKURQL]HGLWHPhighlight the item then click Settings. 2QWKH&DOHQGDU6\QFKURQL]DWLRQSettings window, for example, select from the options on how \RXZLVKWRV\QFKURQL]HWKHappointments on your device with your computer, then click OK.3. Click Finish to complete the sync relationship setup.Immediately after you set up a sync relationship, ActiveSync starts automatically and initiates WKHÀUVWV\QFKURQL]DWLRQEHWZHHQyour device and your computer.Refer to the succeeding sections for more details on V\QFKURQL]DWLRQ](https://usermanual.wiki/ASUSTeK-Computer/A686/User-Guide-734691-Page-40.png)
![Synchronize and Enhance35Checking synchronized information$IWHU\RXUÀUVWV\QFKURQL]DWLRQWDNHDORRNDW&DOHQGDU&RQWDFWVDQGTasks on your device. You will notice that the calendar information in Microsoft Outlook on your computer was copied to your device, and the information that you have on your device was copied to your computer.NOTE Open Microsoft Outlook on your desktop computer to see the details of copied information from your device.Manually initiating synchronization2QFH\RXKDYHVHWXS$FWLYH6\QFDQGFRPSOHWHGWKHÀUVWV\QFKURQL]DWLRQSURFHVV\RXFDQLQLWLDWHV\QFKURQL]DWLRQIURP\RXUGHYLFHDWDQ\WLPHTo manually initiate synchronization:1. Tap > Programs > ActiveSync to display the ActiveSync screen.Connection status7DSWRVWRSVWDUWV\QFKURQL]DWLRQ 7DSWRFKDQJHV\QFKURQL]DWLRQVHWWLQJV](https://usermanual.wiki/ASUSTeK-Computer/A686/User-Guide-734691-Page-41.png)
![36Chapter 3 7RVWDUWV\QFKURQL]DWLRQFRQQHFW\RXUGHYLFHWR\RXUFRPSXWHUWKHQtap Sync. 7RHQGV\QFKURQL]DWLRQWDSStop.<RXPD\V\QFKURQL]HYLD,5LQIUDUHGSRUWRUEHIRUHFKDQJLQJV\QFKURQL]DWLRQVHWWLQJV7RGRWKLV\RXQHHGWRVWRSV\QFKURQL]DWLRQZLWK\RXUFRPSXWHUÀUVWNOTE )RUPRUHLQIRUPDWLRQRQV\QFKURQL]DWLRQWDS while in the ActiveSync screen, then tap Help. &KHFNWKHER[EHVLGHWKHLWHPWKDW\RXZLVKWRV\QFKURQL]H +LJKOLJKWDFKHFNHGLWHPWKHQFOLFNRQSettings to specify V\QFKURQL]DWLRQRSWLRQVIRUWKHLWHPFor example, highlight Calendar then click on Settings to display the Calendar Synchronization SettingsZLQGRZ&XVWRPL]HWKHDYDLODEOHsettings, then click OK when done.3. Do the same for the other checked items. Synchronization options7KH0LFURVRIW$FWLYH6\QFSURJUDPDOORZV\RXWRFXVWRPL]H\RXUV\QFKURQL]DWLRQVHWWLQJVDWDQ\WLPH<RXFDQVHOHFWWKHLWHPVWRV\QFKURQL]HVHWWKHV\QFKURQL]DWLRQVFKHGXOHDQGVSHFLI\WKHV\QFKURQL]DWLRQUXOHVTo display the synchronization options:• From the ActiveSync window on your desktop computer, click on the Options icon, or• From the menu bar, click on Tools, then Options.To select items to synchronize:4. Click OK when done.NOTE You cannot set the options for unchecked items.](https://usermanual.wiki/ASUSTeK-Computer/A686/User-Guide-734691-Page-42.png)
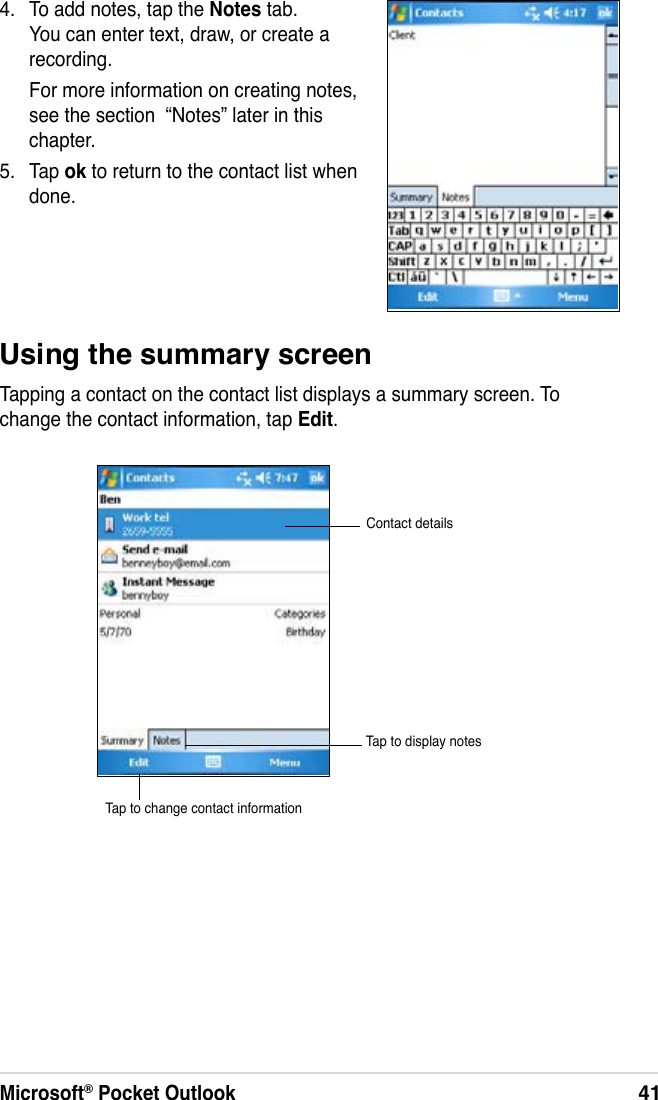
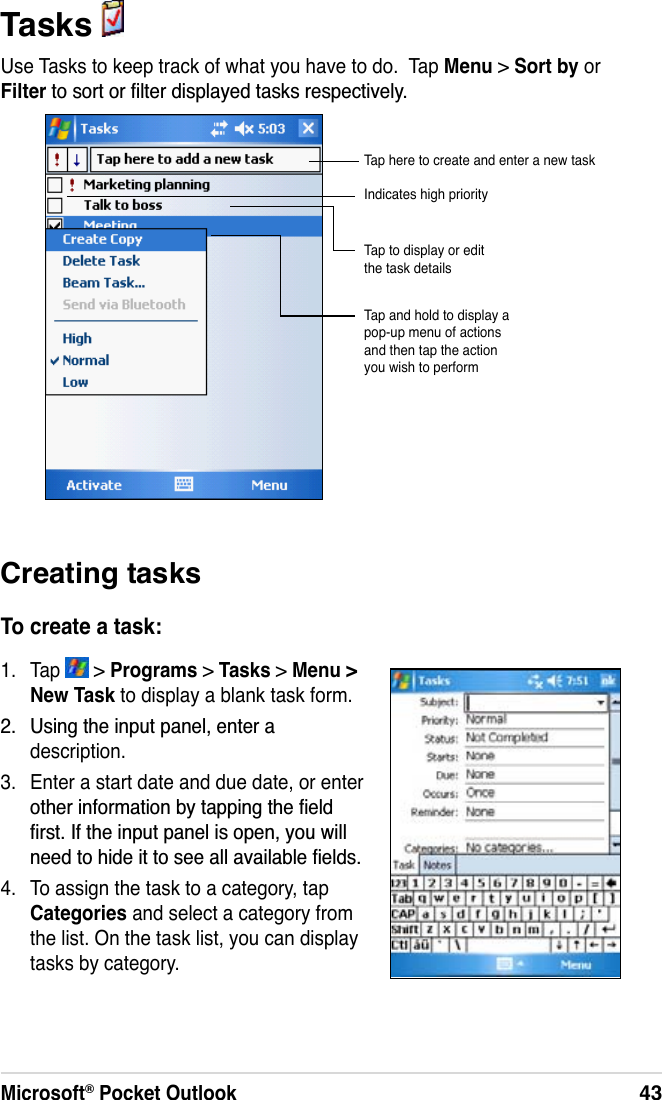
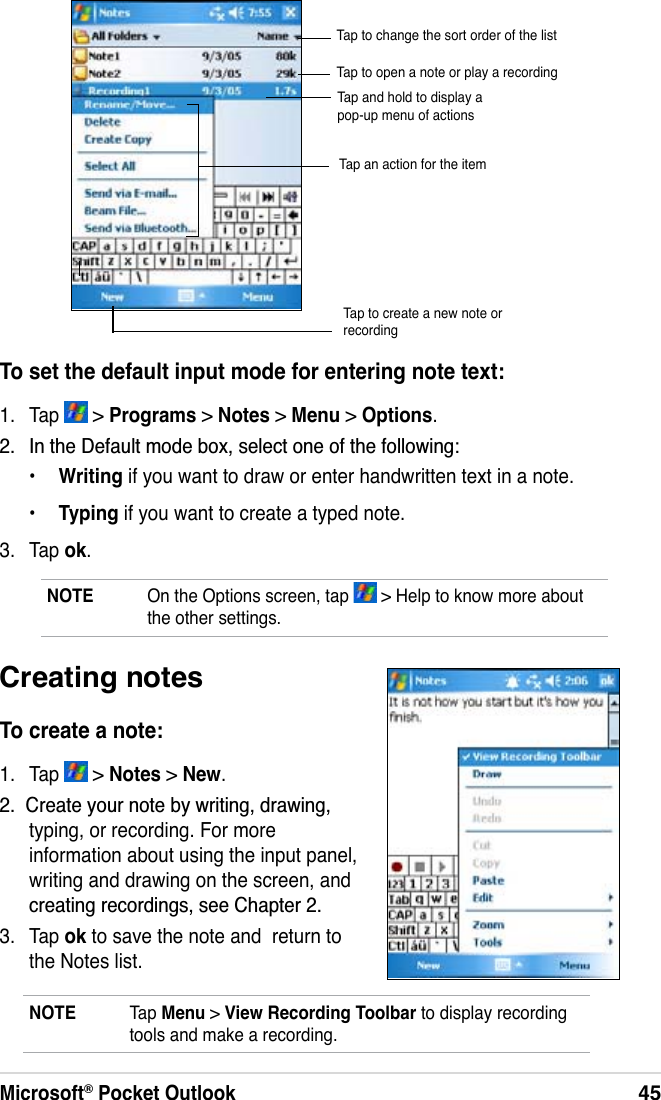
![Microsoft® Pocket Outlook37Chapter 4 Microsoft® Pocket OutlookMicrosoft® Pocket Outlook includes Calendar, Contacts, Tasks, Notes, and Messaging. You can use these programs individually or together. For example, you can use an e-mail address stored in Contacts to address e-mail messages in Messaging.Using ActiveSync®\RXFDQV\QFKURQL]HLQIRUPDWLRQLQ0LFURVRIW2XWORRNor Microsoft Exchange on your desktop computer with your device. You FDQDOVRV\QFKURQL]HWKLVLQIRUPDWLRQGLUHFWO\ZLWKD0LFURVRIW([FKDQJHVHUYHU(DFKWLPH\RXV\QFKURQL]H$FWLYH6\QFFRPSDUHVWKHFKDQJHV\RXmade on your device and desktop computer or server and updates both computers with the latest information. For information on using ActiveSync, see ActiveSync Help on your desktop computer.You can switch to any of the Pocket Outlook programs by tapping .CalendarUse Calendar to schedule appointments, including meetings and other events. You can check your appointments in one of several views (Agenda, Day, Week, Month, and Year) and easily switch views using the View menu.NOTE <RXFDQFXVWRPL]HWKH&DOHQGDUGLVSOD\VXFKDVFKDQJLQJWKHÀUVWGD\RIWKHZHHNE\WDSSLQJMenu > Options.Tap to display or edit the appointment detailsTap to create a new appointmentTap to change the calendar display by Day, Week, Month, Year or Agenda](https://usermanual.wiki/ASUSTeK-Computer/A686/User-Guide-734691-Page-43.png)

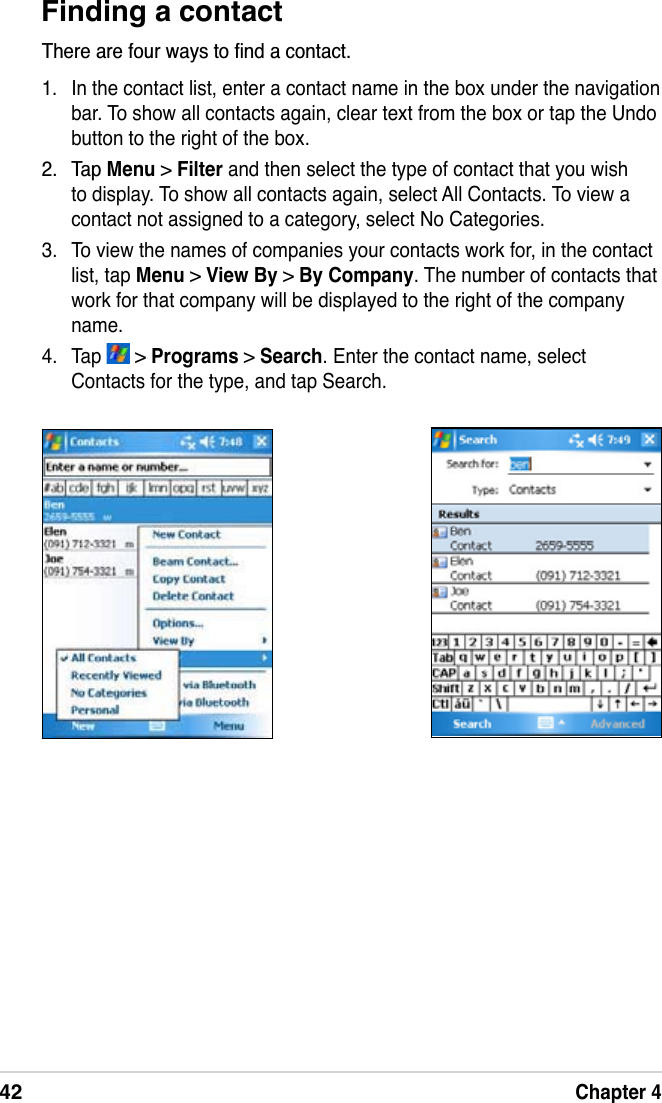
![Microsoft® Pocket Outlook39Using the summary screenWhen you tap an appointment in Calendar, a summary screen appears. To change the appointment, tap Edit.Creating meeting requestsYou can set up meetings with users of Outlook and Pocket Outlook. The meeting request will be created automatically and sent either when you V\QFKURQL]H,QER[RUZKHQ\RXFRQQHFWWR\RXUHPDLOVHUYHUTo create a meeting request:1. Tap Menu > Options > Appointments tab to indicate how you want meeting requests sent. ,I\RXVHQGDQGUHFHLYHHPDLOPHVVDJHVWKURXJK$FWLYH6\QFVHOHFWActiveSync.To schedule a meeting:1. Create an appointment. ,QWKHDSSRLQWPHQWGHWDLOVKLGHWKHLQSXWSDQHOWKHQWDSAttendees.3. From the list of e-mail addresses you have entered in Contacts, select the meeting attendees. Tap Add to select more contacts. Tap ok when done.The meeting notice is created automatically and placed in the Outbox folder. For more information on sending and receiving meeting requests, see Calendar and Messaging online help on the device.Appointment detailsNotes/additional information on the appointmentTap to change details of the appointmentTap to show beam, delete and send via bluetooth options for an appointment](https://usermanual.wiki/ASUSTeK-Computer/A686/User-Guide-734691-Page-45.png)
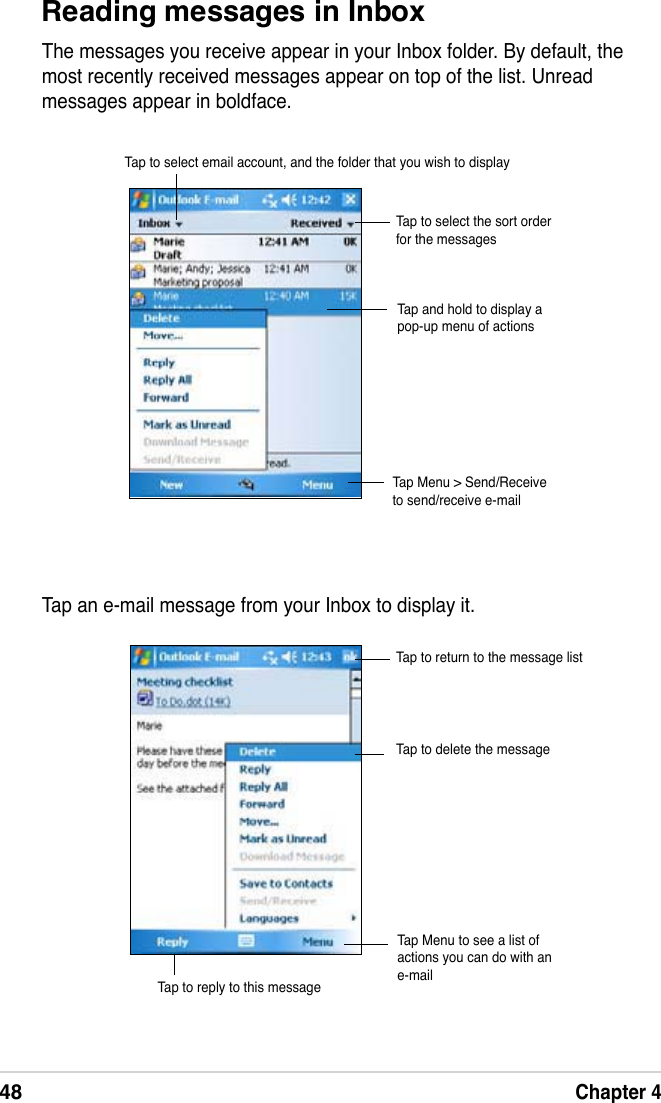
![46Chapter 4Connecting directly to an e-mail server,QDGGLWLRQWRV\QFKURQL]LQJHPDLOPHVVDJHVZLWK\RXUGHVNWRSFRPSXWHUyou can send and receive e-mail messages by connecting to an e-mail server using a modem or network card connected to your device. You need to set up a remote connection to a network or an ISP, and a connection to your e-mail server. For more information, see Chapter 7.When you connect to the e-mail server, new messages are downloaded to the device Inbox folder, messages in the device Outbox folders are sent, MessagingUse Messaging to send and receive e-mail messages in one of these ways: 6\QFKURQL]HHPDLOPHVVDJHVZLWK0LFURVRIW([FKDQJHRU0LFURVRIWOutlook on your desktop computer• Send and receive e-mail messages by connecting directly to an e-mail server through an Internet service provider (ISP) or a networkSynchronizing e-mail messages<RXFDQHPDLOPHVVDJHVDVSDUWRIWKHJHQHUDOV\QFKURQL]DWLRQSURFHVV<RXZLOOQHHGWRHQDEOHPDLOV\QFKURQL]DWLRQLQ$FWLYH6\QF)RUPRUHLQIRUPDWLRQRQHQDEOLQJPDLOV\QFKURQL]DWLRQVHHWKH$FWLYH6\QFRQOLQHhelp on your desktop computer.During synchronization:• Messages are copied from the mail folders of Exchange or Outlook on your desktop computer to the ActiveSync folder in Inbox on your GHYLFH%\GHIDXOW\RXZLOOUHFHLYHPHVVDJHVIURPWKHSDVWÀYHGD\VRQO\DQGWKHÀUVWOLQHVRIHDFKPHVVDJH• E-mail messages in the Outbox folder on your device are transferred to Exchange or Outlook, then send from those programs.• E-mail messages in subfolder must be selected in ActiveSync on your desktop computer in order to be transferred.NOTE <RXFDQDOVRV\QFKURQL]HHPDLOPHVVDJHVZLWK\RXUGHVNWRScomputer from a remote location. For more information on connecting your device, see Chapter 7.](https://usermanual.wiki/ASUSTeK-Computer/A686/User-Guide-734691-Page-52.png)
![Microsoft® Pocket Outlook47and messages that have been deleted on the e-mail server are removed from the device Inbox folder.Messages that you receive directly from an e-mail server are linked to your e-mail server rather than your desktop computer. When you delete a message on your device, it is also deleted from the e-mail server the next time you connect, based on the settings you selected in ActiveSync.<RXFDQZRUNRQOLQHRURIÁLQH:KHQZRUNLQJRQOLQH\RXUHDGDQGrespond to messages while connected to the e-mail server. Messages are sent as soon as you tap Send, which saves space in your device.:KHQZRUNLQJRIÁLQHRQFH\RXKDYHGRZQORDGHGQHZPHVVDJHKHDGHUVor partial messages, you can disconnect from the e-mail server and decide which messages to download completely. The next time you connect, Inbox downloads the complete messages you have marked for retrieval and sends the messages you have composed.:KHQ\RXFRQQHFWWR\RXUHPDLOVHUYHURUV\QFKURQL]HZLWK\RXUGHVNWRScomputer, by default, you will receive messages from the last three days RQO\DQGWKHPDLOLVOHVVWKDQ.%LQVL]H,IWKHPDLOVL]HLVODUJHUWKDQ0.5KB, you need to download it through hyperlink. The original messages remain on the e-mail server or your desktop computer.You can mark the messages that you want to retrieve in full during your QH[WV\QFKURQL]DWLRQRUHPDLOVHUYHUFRQQHFWLRQ,QWKHPHVVDJHOLVWWDSand hold the message that you want to retrieve. On the pop-up menu, tap Download Message. The icons in the Inbox message list give you visual indications of message status.You can specify your downloading preferences when you set up the VHUYLFHRUVHOHFW\RXUV\QFKURQL]DWLRQRSWLRQV<RXFDQFKDQJHWKHPDWany time. &KDQJHRSWLRQVIRU,QER[V\QFKURQL]DWLRQXVLQJ$FWLYH6\QFRSWLRQVFor more information, see ActiveSync Help on your desktop computer.• Change options for direct e-mail server connections in Inbox on your device. Tap Menu > Tools > Options. On the Accounts tab, tap the account that you wish to change. Tap and hold the account and select Delete to remove an account.](https://usermanual.wiki/ASUSTeK-Computer/A686/User-Guide-734691-Page-53.png)
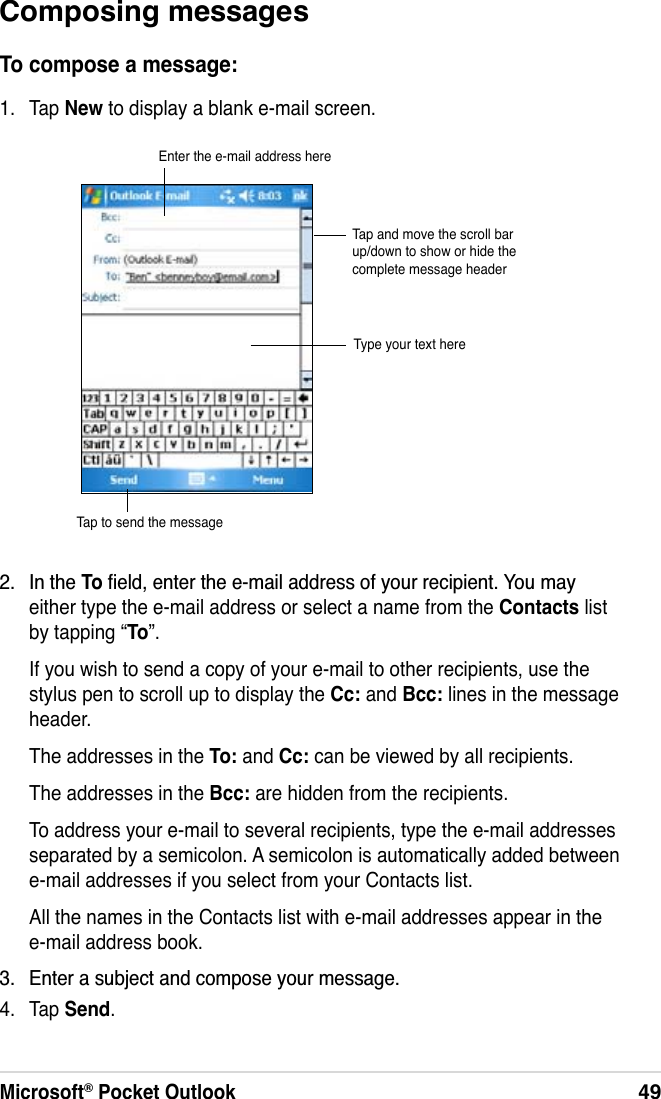
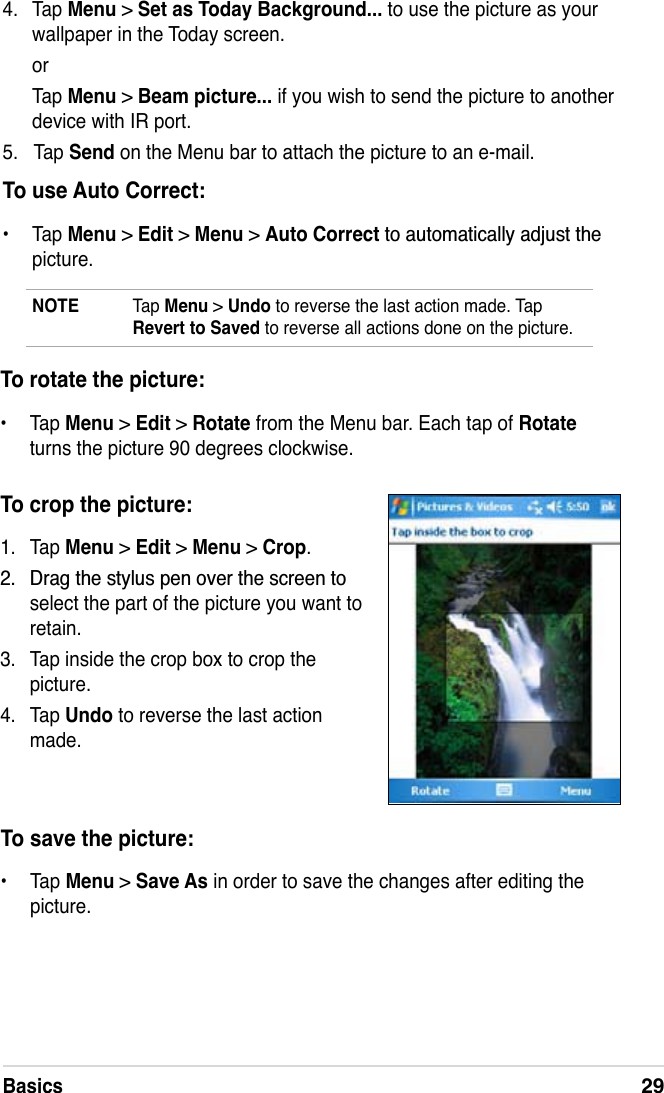
![50Chapter 4Managing e-mail messages and foldersThe behavior of the folders you create depends on whether you are using ActiveSync, SMS, POP3, or IMAP4.• If you use ActiveSync, e-mail messages in the Inbox folder in Outlook ZLOODXWRPDWLFDOO\EHV\QFKURQL]HGZLWK\RXUGHYLFH7KHIROGHUV\RXcreate and the messages you move will then be mirrored on the server.• If you use SMS, messages are stored in the Inbox folder.• If you use POP3 and you move e-mail messages to a folder you created, the link is broken between the messages on the device and their copies on the mail server. The next time you connect, the mail server will see that the messages are missing from the device Inbox and delete them from the server. This prevents you from having duplicate copies of a message, but it also means that you will no longer have access to messages that you move to folders created from anywhere except the device.• If you use IMAP4, the folders you create and the e-mail messages you move are mirrored on the server. Therefore, messages are available to you anytime you connect to your mail server, whether it is from your GHYLFHRUGHVNWRSFRPSXWHU7KLVV\QFKURQL]DWLRQRIIROGHUVRFFXUVwhenever you connect to your mail server, create new folders, or rename/delete folders when connected.To save composed messages:,I\RXDUHZRUNLQJRIÁLQHWKHPHVVDJHLVPRYHGWRWKHOutbox folder and will be sent the next time you connect.If you do not wish to send the message immediately, tap ok after composing the message to save it to the Drafts folder.When you are ready to send the message, open the Drafts folder and tap the message. Tap Send to send the message.NOTE To enter preset or frequently used messages, tap Menu > MyText and select your desired message.To create or edit a preset message before adding it to the message body, tap Menu > My Text > Edit My Text Messages, select a message to change or select a blank line at the bottom of the list, then enter your text and tap ok.](https://usermanual.wiki/ASUSTeK-Computer/A686/User-Guide-734691-Page-56.png)
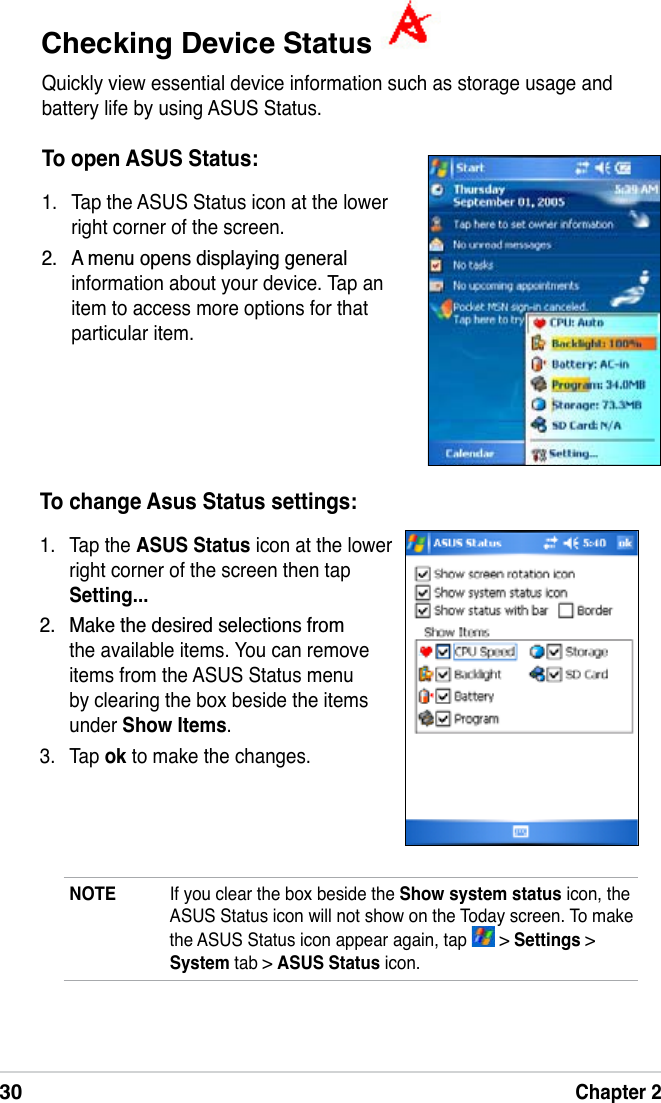
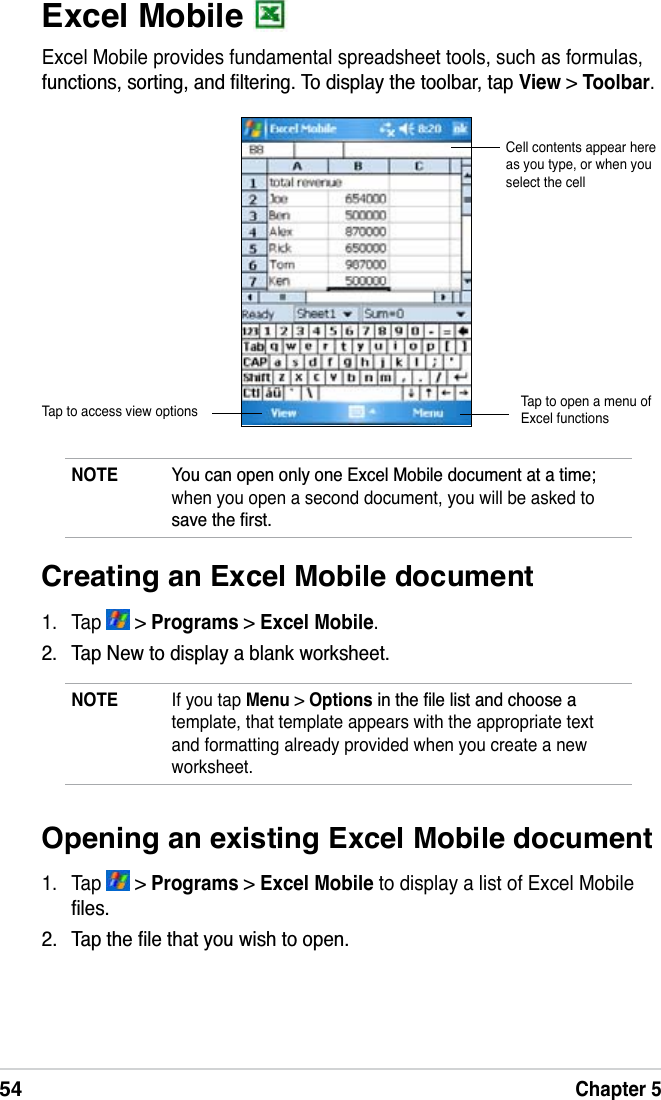
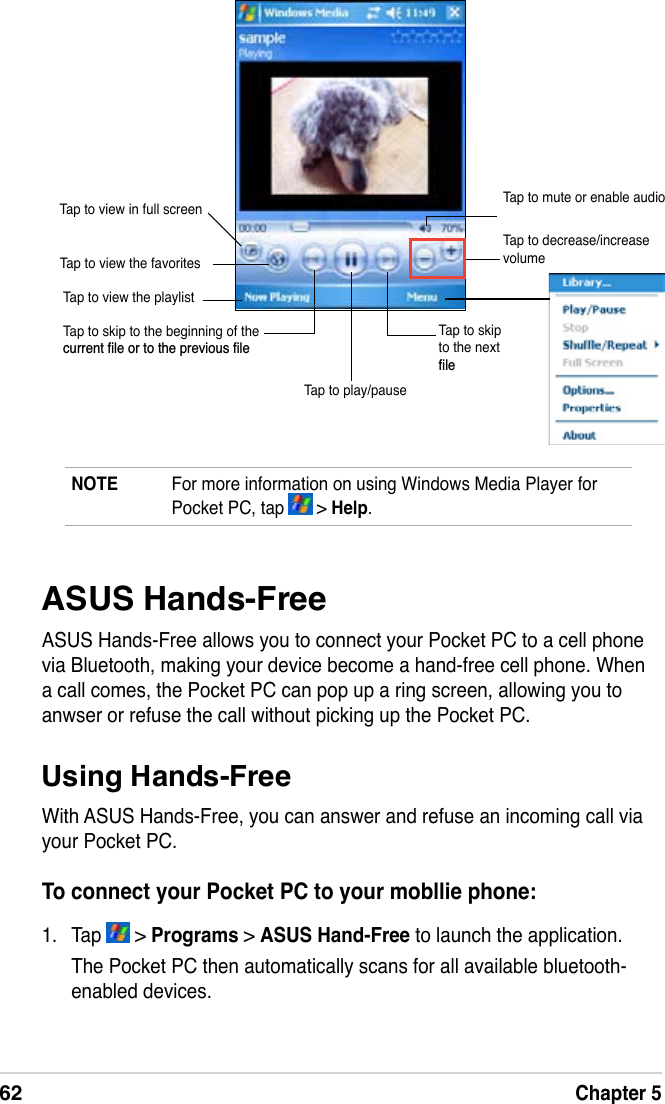
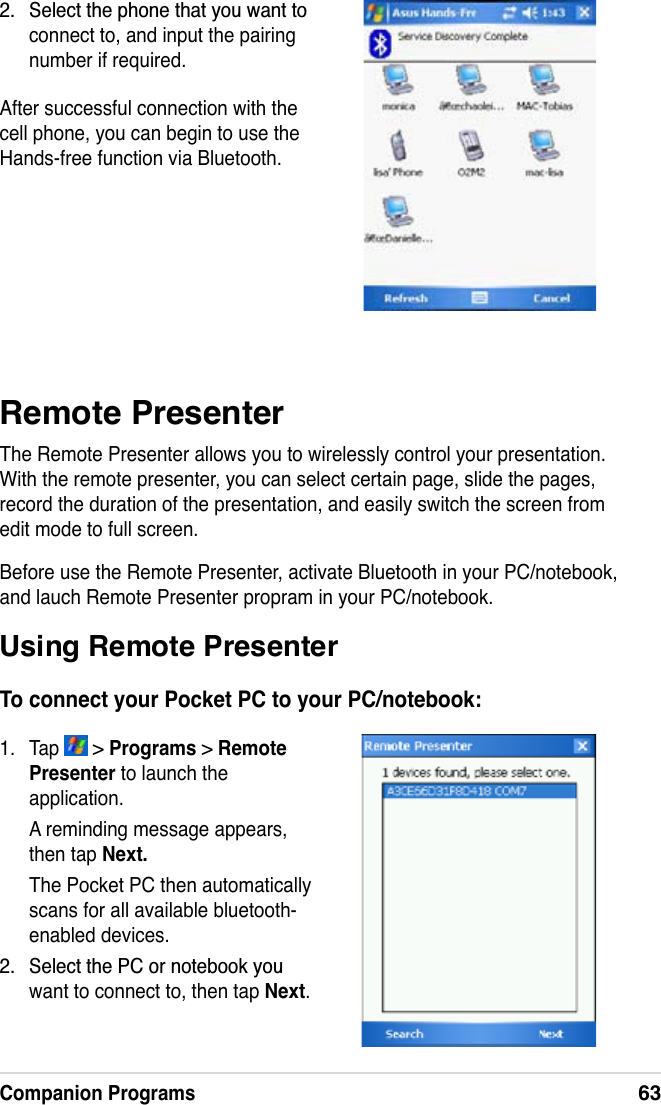
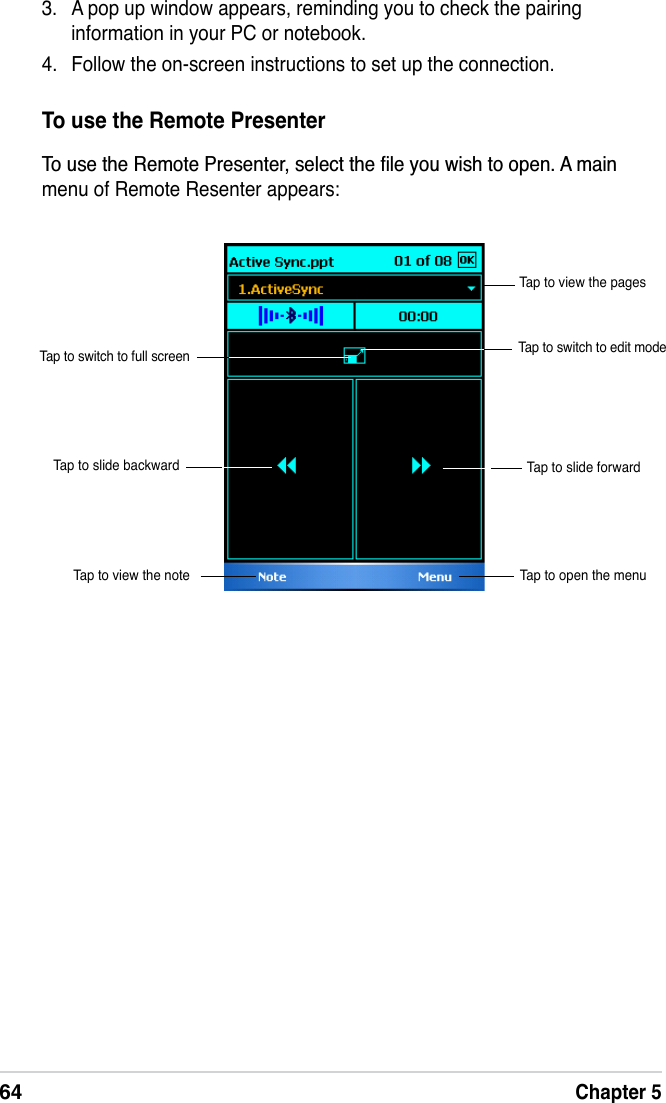
![Companion Programs51NOTE If you tap Menu > Options and choose a template, that template appears with the appropriate text and formatting already provided.Chapter 5Companion ProgramsThe companion programs consist of Microsoft® Word Mobile, Microsoft®Excel Mobile, Microsoft® PowerPoint Mobile, Pocket MSN, and Windows Media™ Player for Pocket PC.To switch to a companion program on your device, tap Programs on the menu, then tap the program that you wish to open.Word Mobile Word Mobile works with Microsoft Word on your desktop computer to give you easy access to copies of your documents. You can create new documents on your device, or you can copy documents from your desktop FRPSXWHUWR\RXUGHYLFH6\QFKURQL]HGRFXPHQWVEHWZHHQ\RXUGHVNWRScomputer and your device so that you have the most up-to-date content in both locations.Use Word Mobile to create documents, such as letters, meeting minutes, or trip reports.Creating Word Mobile documentsTo create a new Word document:1. Tap > Programs >Word Mobile to launch the application.If you have existing Microsoft Word or Word Mobile documents in your device, a list of the documents appears. 7DSNew on the Menu bar to display a blank document.3. Use any of the tools in the input panel to type your text.](https://usermanual.wiki/ASUSTeK-Computer/A686/User-Guide-734691-Page-57.png)
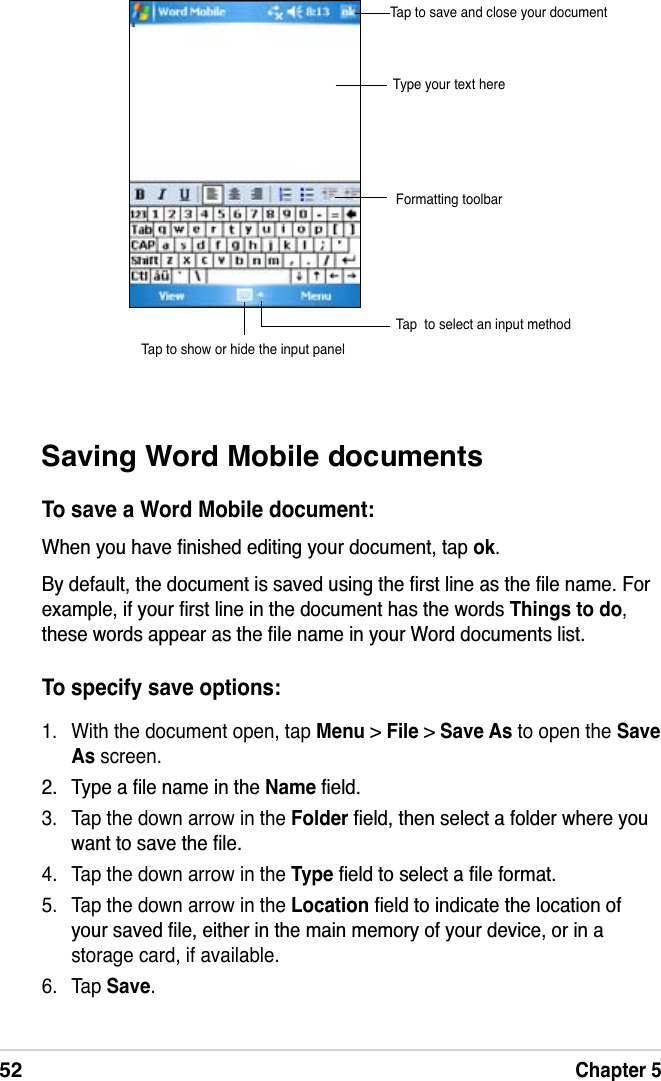
![Companion Programs53NOTE ,I\RXRSHQHGDQH[LVWLQJ:RUGÀOHWDSMenu > File > Rename/Move... WRFKDQJHWKHÀOHQDPHIROGHUDQGVWRUDJHORFDWLRQWRXVHIRUVDYLQJWKHÀOHYou can open only one Word Mobile document at a time. When you open a second document, you will be asked to VDYHWKHFXUUHQWGRFXPHQWÀUVWOpening an existing Word Mobile document:RUG0RELOHFRQWDLQVDOLVWRIWKHÀOHVVWRUHGRQ\RXUGHYLFH7DSDÀOHLQWKHOLVWWRRSHQ7RGHOHWHPDNHFRSLHVRIDQGVHQGÀOHVWDSDQGKROGDÀOHLQWKHOLVWWKHQVHOHFWWKHDSSURSULDWHDFWLRQRQWKHSRSXSPHQXTap to select the folder you want to displayTap to change the sort order of the listTap a document to open itTap to create a new documentViewing documentsIf you are opening a Word document created on a desktop computer, tap View > Wrap to Window to see the entire document.<RXFDQDOVRDGMXVWWKHYLHZLQJVL]HRIDGRFXPHQWE\]RRPLQJTo zoom in or out of a document:Tap View > Zoom, then select your desired percentage.](https://usermanual.wiki/ASUSTeK-Computer/A686/User-Guide-734691-Page-59.png)

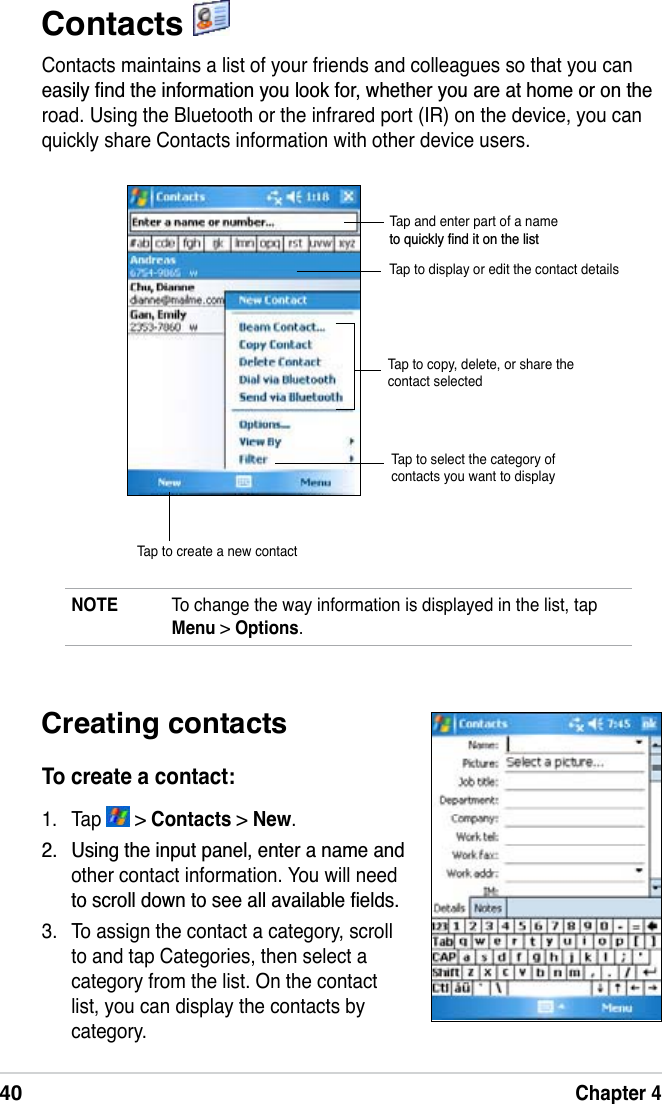
![56Chapter 5PowerPoint Mobile PowerPoint Mobile works with Microsoft PowerPoint on your computer to give you easy access to copies of your PowerPoint presentations. Copy 3RZHU3RLQWSUHVHQWDWLRQÀOHVIURP\RXUFRPSXWHUWR\RXUGHYLFHDQGYLHZWKHPRQWKHJR6\QFKURQL]HSUHVHQWDWLRQÀOHVLQ\RXUFRPSXWHUDQG\RXUdevice so that you have the most up-to-date contents in both locations.NOTE <RXFDQRQO\YLHZ3RZHU3RLQWSUHVHQWDWLRQÀOHVLQPowerPoint Mobile.2SHQLQJD3RZHU3RLQWSUHVHQWDWLRQÀOH,I\RXKDYHSUHYLRXVO\FRSLHG3RZHU3RLQW0RELOHSUHVHQWDWLRQÀOHVLQWRWKHdevice, a list of the documents appear after you tap the PowerPoint Mobile icon.7RRSHQD3RZHU3RLQW0RELOHÀOH1. Tap > Programs > PowerPoint Mobile to display a list of 3RZHU3RLQWÀOHV 7DSWKHÀOH\RXZLVKWRRSHQ•Show and hide window elements. Tap View > Show.•Freeze and unfreeze panes on a worksheet. First select the cell ZKHUH\RXZDQWWRIUHH]HSDQHV7DSView >Freeze Panes. You might ZDQWWRIUHH]HWKHWRSDQGOHIWPRVWSDQHVLQDZRUNVKHHWWRNHHSthe row and column labels visible as you scroll through a sheet. To XQIUHH]HSDQHVWDSView > Unfreeze Panes.•Split panes to view different areas of a large worksheet. Tap View >Split. Drag the split bar to where you want it. To remove the split, tap View >Remove Split.•Show and hide rows and columns. To hide a row or column, select a cell in the row or column that you want to hide. Tap Menu > Format > Row or Column > Hide. To show a hidden row or column, tap Menu > Edit > Go To, and type a reference that is in the hidden row or column. Tap Menu >Format >Row or Column > Unhide.For more information on using Excel Mobile, tap > Help.](https://usermanual.wiki/ASUSTeK-Computer/A686/User-Guide-734691-Page-62.png)
![Companion Programs579LHZLQJD3RZHU3RLQW0RELOHÀOHTo go to the previous or next slide: :KLOHYLHZLQJD3RZHU3RLQWÀOHWDSWKHDUURZRQWKHORZHUOHIWVLGHRIthe screen to open the menu. ,QWKHPHQXWDSNext or Previous to go forward or go back in your 3RZHU3RLQW0RELOHÀOH7DSGo to SlideWRLPPHGLDWHO\JRWRDVSHFLÀFslide in your presentation.NOTE :KLOHYLHZLQJD3RZHU3RLQWÀOH\RXFDQDOVRWDSWKHVFUHHQto go to the next slide.To zoom in on a slide: :KLOHYLHZLQJD3RZHU3RLQWÀOHWDSWKHDUURZRQWKHORZHUOHIWVLGHRIthe screen to open the menu. ,QWKHPHQXWDSZoom In. In the lower-right side of the screen, drag WKHUHGER[ZLWKWKHVW\OXVSHQWRJRWRDVSHFLÀFDUHDRQWKHVOLGH 7DSWKHPDJQLI\LQJJODVVHVWR]RRPLQRU]RRPRXWRIWKHVOLGH7DSFitto ScreenWRÀWWKHVOLGHWRWKHZKROHVFUHHQNOTE When you are in a view other than Fit to Screen, the menu is not available.Viewing a Custom Show (slideshow) :KLOHYLHZLQJD3RZHU3RLQWÀOHWDSWKHDUURZRQWKHORZHUOHIWVLGHRIthe screen to open the menu. 7DSCustom Show then select the custom show you want to view.Setting show options :KLOHYLHZLQJD3RZHU3RLQWÀOHWDSWKHDUURZRQWKHORZHUOHIWVLGHRIthe screen to open the menu. 7DSShow Options. In the Orientation tab, select the slideshow orientation you want to use.3. Tap the Playback tab. Tap 2YHUULGHSOD\EDFNRSWLRQVIRUDOOÀOHVif\RXGRQRWZDQWWRXVHWKHHPEHGGHGVHWWLQJVRID3RZHU3RLQWÀOHWKDWyou created in your desktop computer.](https://usermanual.wiki/ASUSTeK-Computer/A686/User-Guide-734691-Page-63.png)
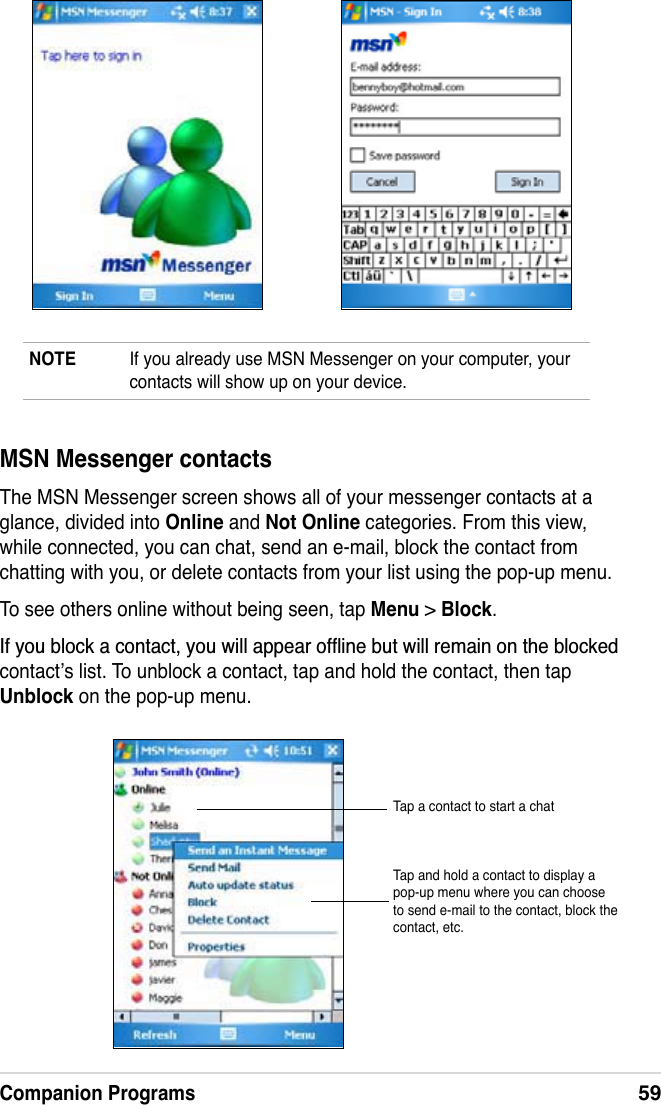
![60Chapter 5Chatting with contactsTap a contact name to open a chat window. Enter your message in the text entry area at the bottom of the screen, or tap My Text to enter a preset message, then tap Send. To invite another contact to a multi-user chat, tap Menu >Invite, then tap the contact that you want to invite.Using MSN HotmailWith MSN Hotmail, you can access your hotmail mailbox on your Pocket PC and send and receive e-mails.To open MSN Hotmail:1. Tap Pocket MSN on the Today screen then tap MSN Hotmail. ORTap > Programs >Pocket MSN > MSN Hotmail.Entermessage hereTap to send messageView full chatTap to switch between chat windowsTap to change your MSN statusTap to switch back to the contacts list without closing a chatTap to add a new contactTap to choose a preset messageTap to enter your own MSN statusTap to invite more contacts to your chat Tap to block a contact from seeing your status Tap to display the current contacts you are chatting withTap to change your display name DQGFXVWRPL]HRWKHUVHWWLQJVNOTE On the MSN Messenger screen, tap > Help for more information.](https://usermanual.wiki/ASUSTeK-Computer/A686/User-Guide-734691-Page-66.png)
![Internet Explorer Mobile63Use Microsoft Internet Explorer Mobile to view Web or WAP pages in any of these ways. 'XULQJV\QFKURQL]DWLRQZLWK\RXUGHVNWRSFRPSXWHUGRZQORDGyour favorite links and mobile favorites that are stored in the Mobile Favorites sub-folder in the Internet Explorer on the desktop computer.• Connect to an Internet service provider (ISP) or network and browse WKH:HE7RGRWKLV\RXQHHGWRFUHDWHWKHFRQQHFWLRQÀUVW6HHChapter 7 for information on creating a connection.:KHQFRQQHFWHGWRDQ,63RUQHWZRUN\RXFDQDOVRGRZQORDGÀOHVDQGprograms from the Internet or intranet.Using Internet Explorer MobileYou can use Internet Explorer Mobile to browse mobile favorites and channels that have been downloaded to your device without connecting to the Internet. You can also connect to the Internet through an ISP or a network connection to browse the Web.To launch Internet Explorer Mobile:1. Tap > Internet Explorer to display the Mobile Services from MSN. 7DSMenu > Home to display the Internet Explorer Mobile with links to some useful Web sites. 7DSDQ\RIWKH:HEVLWHEXWWRQVWRJRWRDVSHFLÀFVLWHChapter 6Internet Explorer MobileChanging View settingsTo change View settings:1. Tap Menu > View then select view options. Tap Full Screen, for example, to set explorer window to full-screen mode. To disable full-screen mode, tap and hold anywhere on the explorer, then select FullScreen again.](https://usermanual.wiki/ASUSTeK-Computer/A686/User-Guide-734691-Page-71.png)
![64Chapter 6Mobile Favorites folderOnly the items stored in the Mobile Favorites sub-folder on your desktop FRPSXWHUZLOOEHV\QFKURQL]HGZLWK\RXUGHYLFH7KLVIROGHUZDVFUHDWHGautomatically when you installed ActiveSync.Favorite links'XULQJV\QFKURQL]DWLRQWKHOLVWRIIDYRULWHOLQNVLQWKH0RELOH)DYRULWHVIROGHURQ\RXUGHVNWRSFRPSXWHULVV\QFKURQL]HGZLWK,QWHUQHW([SORUHU0RELOHRQyour device. Both computers are updated with changes made to either list HDFKWLPH\RXV\QFKURQL]H8QOHVV\RXPDUNWKHIDYRULWHOLQNDVDPRELOHfavorite, only the link will be downloaded to your device, and you will need to connect to your ISP or network to view the content. For more information on V\QFKURQL]DWLRQVHH$FWLYH6\QF+HOSRQWKHGHVNWRSFRPSXWHUBrowsing the InternetTo browse the Internet:1. Set up a connection to your ISP or corporate network using Connections.See Chapter 7 for details. 7DSZoom to see another pop-up IRUVHOHFWLQJ\RXUGHVLUHGWH[WVL]Hdisplay. 'RRQHRIWKHIROORZLQJWRFRQQHFWDQGVWDUWEURZVLQJ• Tap Favorites on the Menu Bar, then tap the favorite that you wish to view.• Enter the Web address in the Address Bar that you want to visit then tap Go.](https://usermanual.wiki/ASUSTeK-Computer/A686/User-Guide-734691-Page-72.png)
![Internet Explorer Mobile65To create a mobile favorite:1. In Internet Explorer on your desktop computer, click Tools > Create Mobile Favorite. 7RFKDQJHWKHOLQNQDPHHQWHUDnew name in the Name box.3. Click OK. Internet Explorer downloads the latest version of the page to your desktop computer.Mobile FavoritesIf you are using Microsoft Internet Explorer 4.01 or later on your desktop computer, you can download mobile favorites to your device. 6\QFKURQL]LQJPRELOHIDYRULWHVGRZQORDGV:HEFRQWHQWWR\RXUGHYLFHVRthat you can view pages while you are disconnected from your ISP and desktop computer.Use the Internet Explorer plug-in installed with ActiveSync to create mobile favorites quickly.4. If you want to download the pages that are linked to WKHPRELOHIDYRULWH\RXMXVWcreated, in Internet Explorer on the desktop computer, click Favorites >Mobile Favorites,WKHQULJKWFOLFNDVSHFLÀFmobile favorite item, then click Properties. In the Download tab, specify the number of links deep you want to download. To conserve device memory, go only one level deep. 6\QFKURQL]H\RXUGHYLFHDQGyour desktop computer. Mobile favorites that are stored in the Mobile Favorites folder in Internet Explorer are downloaded to your device.](https://usermanual.wiki/ASUSTeK-Computer/A686/User-Guide-734691-Page-73.png)
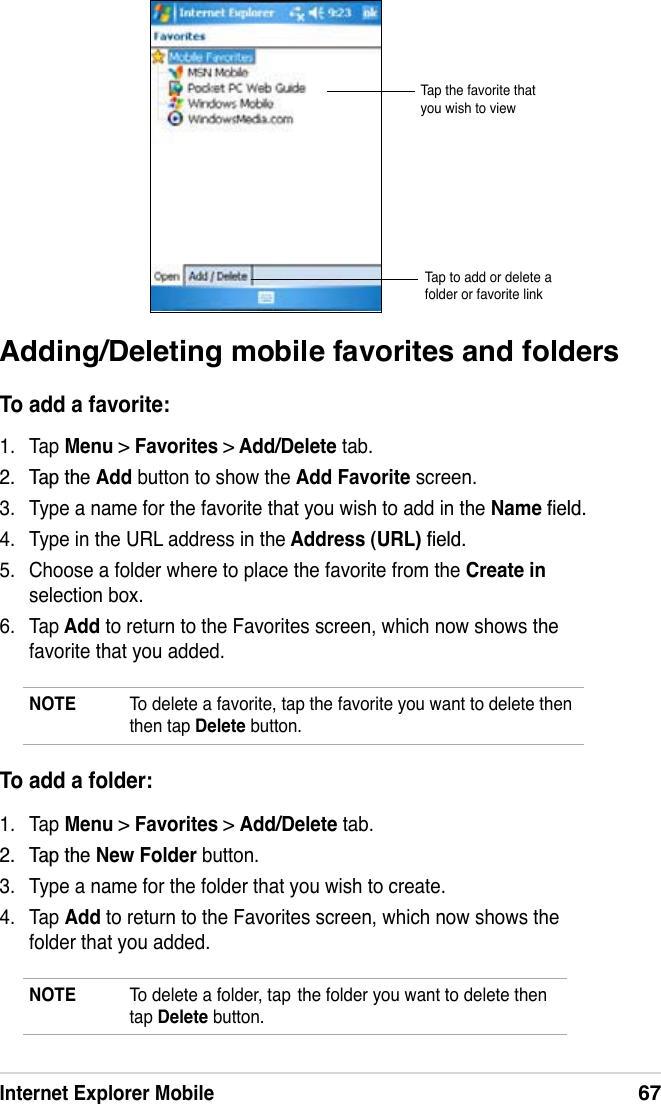
![66Chapter 6Viewing mobile favorites and channelsTo view mobile favorites and channels:1. Tap Menu > Favorites to display your list of favorites. 7DSD)DYRULWHVSDJHWKDW\RXZLVKWRYLHZYou will see the page that was downloaded the last time you V\QFKURQL]HGZLWK\RXUGHVNWRSFRPSXWHU,IWKHSDJHLVQRWRQ\RXUGHYLFHWKHIDYRULWHLVGLPPHG<RXQHHGWRV\QFKURQL]HZLWK\RXUdesktop computer again to download the page to your device, or connect to the Internet to view the page.Saving device memory0RELOHIDYRULWHVWDNHXSVWRUDJHPHPRU\RQ\RXUGHYLFH7RPLQLPL]HWKHamount of memory used:• In the settings for the Favorites information type in ActiveSync options, turn off pictures and sounds, or stop some mobile favorites from being downloaded to the device. For more information, see ActiveSync Help.• Limit the number of downloaded linked pages. In Interner Explorer on your desktop computer, click Favorites >Mobile Favorites, then ULJKWFOLFNDVSHFLÀFPRELOHIDYRULWHLWHP\RXZDQWWRFKDQJHWKHQFOLFNProperties. In the Download tab, specify 0 or 1 for the number of linked pages you want to download.NOTE You will need to manually download content or set a schedule to keep the information updated on your desktop computer and device. %HIRUHV\QFKURQL]LQJZLWK\RXUGHYLFHLQ,QWHUQHW([SORUHUon your desktop computer, click Tools > Synchronize. You will see the last time content was downloaded to the desktop computer, and you can manually download content if needed or set a schedule to automatically update contents. To set a VFKHGXOHWRXSGDWHDVSHFLÀFPRELOHIDYRULWHVHOHFWDVSHFLÀFmobile favorite from the list then click Properties button. On the Schedule tab, you can set the mobile favorite to use a VSHFLÀFVFKHGXOHWRXSGDWHLWVFRQWHQWYou can add a button to the Internet Explorer toolbar for creating mobile favorites. In Internet Explorer on your desktopcomputer, click View > Toolbars > Customize.](https://usermanual.wiki/ASUSTeK-Computer/A686/User-Guide-734691-Page-74.png)
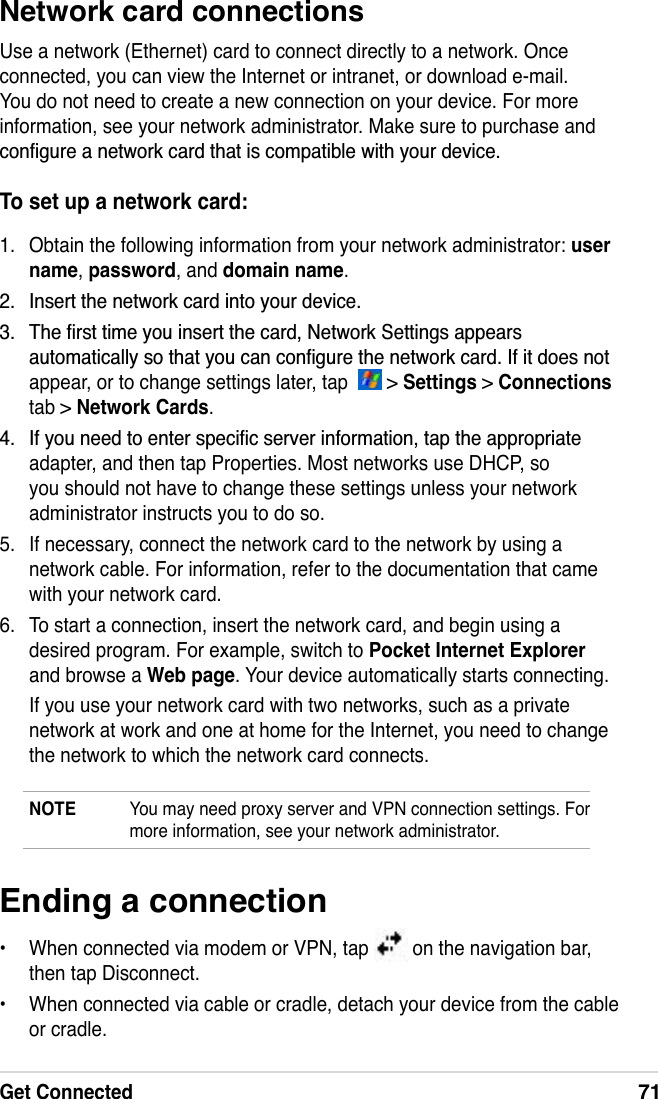
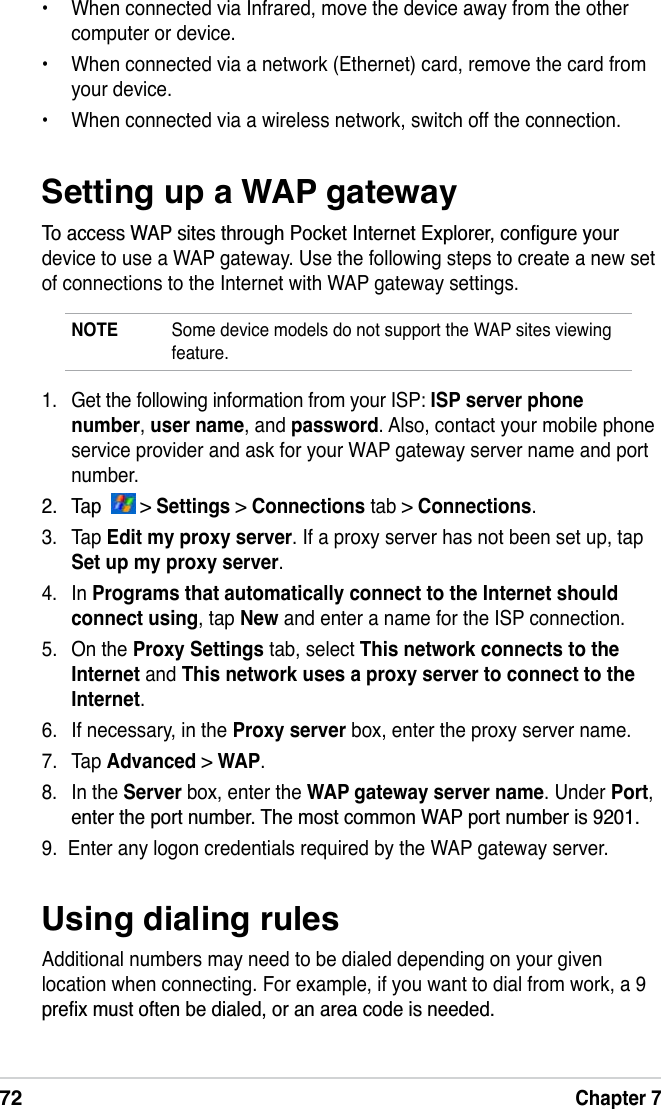
![68Chapter 7Chapter 7 Get ConnectedYou can set up connections to the Internet and corporate network at work to do such activities as browse the Internet or intranet, send and receive e-PDLODQGLQVWDQWPHVVDJHVDQGV\QFKURQL]HLQIRUPDWLRQXVLQJ$FWLYH6\QFConnections can be made using a modem,wireless network, or network (Ethernet) card. A modem connection can be used to set up connections with an external modem, or through your mobile phone network using a cellular line.Your device has two groups of connection settings: My ISP and My Work Network. My ISP settings are used to connect to the Internet, and My Work Network settings can be used to connect to any private network, VXFKDVDFRUSRUDWHQHWZRUN\RXXVHDWZRUN6LPSO\ÀOOLQWKHVHWWLQJVand get ready to start connecting. For more information, see the sections “Connect to the Internet” or “Connect to Work.”You may also establish connection to another device with infrared (IR) or Bluetooth features. For more information, see the section “Infrared (IR) connection” later in this chapter, or “Chapter 8 Bluetooth® connection.”Connecting to the InternetTo connect to the Internet:1. Obtain the following information from your ISP: ISP server phone number,user name, and password. 7DS > Settings > Connections tab > Connections.3. Under My Network, tap Add a new modem connection.4. Create a modem connection. For more information, see section “Set up modem connections.”5. To start the connection, begin using the desired program. For example, switch to Pocket Internet Explorer and browse a Web page. Your device automatically connects.NOTE To set up a network card or wireless network connection to your ISP, add a new connection under My Work Network.](https://usermanual.wiki/ASUSTeK-Computer/A686/User-Guide-734691-Page-76.png)
![Get Connected69Connecting to Work1. Obtain the following information from your network administrator: server phone number,user name, and password. 7DS > Settings > Connections tab > Connections.3. Under My Work Network, set up either a modem, network card, wireless network, or VPN server connection. Refer to the section “Set up connections” for the procedure.4. To start the connection, start using a desired program. For example, switch to Pocket Internet Explorer and browse to a Web page. Your device automatically starts connecting.Setting up connectionsModem connectionsTo set up a modem connection:Obtain the following information from your ISP or network administrator: telephone number, user name, password, domain name, and TCP/IP settings.If your device does not have access to a mobile phone network, insert a modem card.1. Tap > Settings > Connections tab > Connections. 7RFUHDWHDQHZFRQQHFWLRQLQHLWKHUMy ISP or My Work Network,tap Add a new modem connection, then follow the instructions in the 1HZ&RQQHFWLRQZL]DUG 7RYLHZDGGLWLRQDOLQIRUPDWLRQIRUDQ\VFUHHQLQWKHZL]DUGRUZKLOHchanging settings, tap .NOTE To change modem connection settings in either My ISP or My Work Network, tap Manage existing connections > Modem tab. Select the desired modem connection, tap Edit,and follow the instructions on the screen.](https://usermanual.wiki/ASUSTeK-Computer/A686/User-Guide-734691-Page-77.png)
![70Chapter 7VPN server connectionsA VPN connection helps you to securely connect to servers, such as a corporate network, via the Internet. Ask your network administrator for your user name, password, domain name, TCP/IP settings, and host name or IP address of the VPN server.To set up a VPN server connection:1. Tap > Settings > Connections tab > Connections. 7RFUHDWHDQHZ931VHUYHUFRQQHFWLRQLQ0\:RUN1HWZRUNWDSAdda new VPN server connection, then follow the screen instructions. 7RYLHZDGGLWLRQDOLQIRUPDWLRQIRUDQ\VFUHHQLQWKHZL]DUGRUZKLOHchanging settings, tap .NOTE To change existing settings, in My Work Network, tap Manage existing connections > VPN tab. Select your desired VPN connection under the VPN tab, tap Edit, then follow the instructions on the screen.Proxy server settings,I\RXDUHFRQQHFWHGWR\RXU,63RUSULYDWHQHWZRUNGXULQJV\QFKURQL]DWLRQyour mobile device should download the proper proxy settings from your PC. If these settings are not on your PC or need to be changed, ask your ISP or network administrator for the proxy server name, server type, port, type of Socks protocol used, and your user name and password.To change proxy server settings:1. Tap > Settings > Connections tab > Connections icon. 8QGHU My Work Network category, tap Setup my proxy server.3. Check the boxes beside This network connects to the Internet andThis network uses a proxy server to connect to the Internet.4. In the Proxy server box, enter the proxy server name.5. To change the server and port settings for HTTP, WAP, Secure WAP, and Socks, tap Advanced.6. Tap ok when done.](https://usermanual.wiki/ASUSTeK-Computer/A686/User-Guide-734691-Page-78.png)
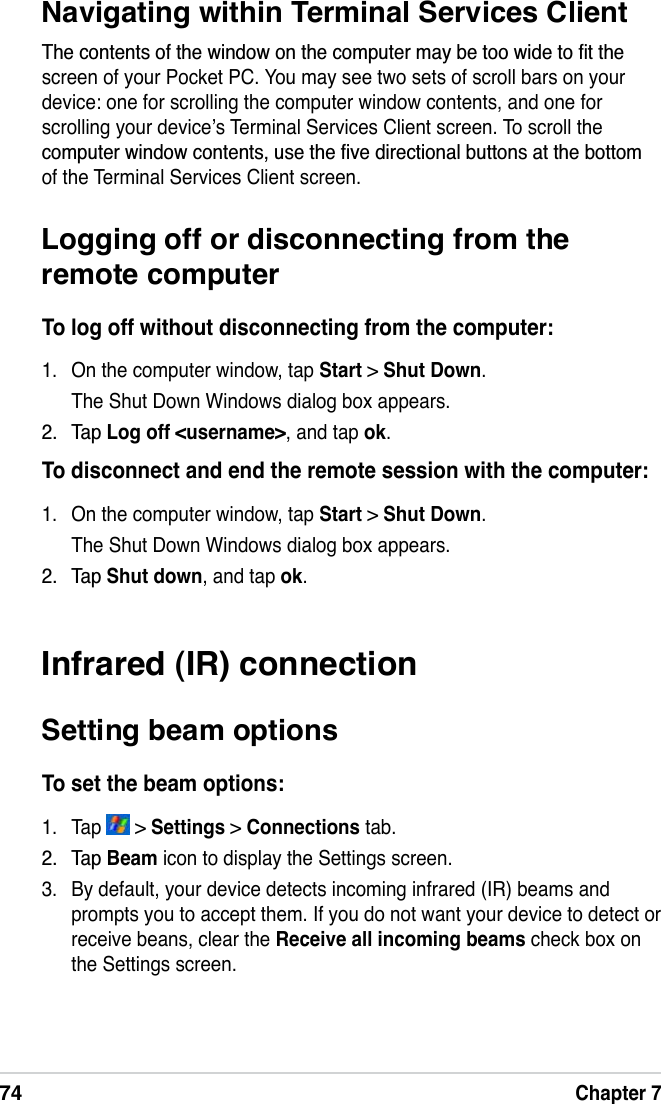
![Get Connected731. Tap > Settings > Connections tab > Connections > Advancedtab > Dialing Rules... button. 7DSWKHER[EHVLGHUse dialing rules.3. Select a location.•Home'LDOVWKHQXPEHUDVDORFDOFDOOZLWKRXWWKHSUHÀ[•Work'LDOVWKHQXPEHUDVORFDOFDOOZLWKWKHSUHÀ[4. Tap Edit... button and make your desired changes.5. Tap ok when done.NOTE To create a new location, tap New and follow the directions on the screen. To view additional information, tap .Using Terminal Services ClientUse Terminal Services Client to log onto a computer and use all of the programs available on that computer from your Pocket PC. For example, instead of running Word Mobile, you can run the desktop computer version RI:RUGDQGDFFHVVDOORIWKHGRFÀOHVRQWKDWFRPSXWHUIURP\RXUGHYLFHTo have remote access to a computer, it must be running the Terminal 6HUYLFHVRU5HPRWH'HVNWRSSURJUDPLQ:LQGRZVRU;3To connect and have remote access to a computer:1. On your Pocket PC, tap > Programs > Terminal Services Client. 6SHFLI\WKHVHUYHUQDPHWKDWLVXVHGE\WKH7HUPLQDO6HUYLFHVRURemote Desktop program in the computer.You can also select the server name from the Recent servers list if you have previously connected to a computer. 7RUXQDSURJUDPIURPWKHFRPSXWHUWKDWDUHVSHFLÀFDOO\VL]HGIRUXVHwith your Pocket PC, you can select the Limit size of server desktop WRÀWRQWKLVVFUHHQRSWLRQWREHWWHUÀWWKHSURJUDPRQWKHGHYLFHscreen.4. Tap Connect.To avoid creating a new modem connection for each situation, set dialing rules for the locations from which you often connect to. Three dialing locations, Home, Mobile, and Work, have been created for you, and you can create more. If a connection cannot be made, your device gives you an opportunity to change the dialing location.](https://usermanual.wiki/ASUSTeK-Computer/A686/User-Guide-734691-Page-81.png)
![76Chapter 8Chapter 8 Bluetooth®Bluetooth is a short-range wireless communications technology. Devices with Bluetooth capabilities can exchange information without requiring a physical connection. Unlike infrared, you do not need to line up devices to exchange information through Bluetooth. The devices only need to be within a range of about 10 meters (30 feet) in an open space environment. You can even beam information to a device in a different room, as long as LWLVZLWKLQWKHVSHFLÀHGUDQJHBluetooth allows your Pocket PC to:• Locate other Bluetooth devices within the vicinity• Discover the services that those devices offer• Connect to, use, and disconnect from those services• Enable or disable individual services 8VHVHFXULW\IHDWXUHVLQFOXGLQJDXWKHQWLFDWLRQDXWKRUL]DWLRQDQGencryptionNOTE If you experience problems using Bluetooth® in a landscapedisplay orientation, revert to portrait.Using BluetoothThe Bluetooth icon is located on the lower right corner of the Today screen.When Bluetooth is enabled (turned ON), the icon is blue , and the Bluetooth LED blinks blue.When Bluetooth is disabled (turned OFF), the icon is grayed with a red X on its lower right corner .Tapping the icon displays a menu that allows you to:• Turn Bluetooth on or off.• Open the Bluetooth Manager. &XVWRPL]H%OXHWRRWK6HWWLQJVBluetooth icon](https://usermanual.wiki/ASUSTeK-Computer/A686/User-Guide-734691-Page-84.png)
![Bluetooth®77Bluetooth settings7RFRQÀJXUH%OXHWRRWKVHWWLQJV1. Tap > Bluetooth Settings. 7DSRQHRIWKHWDEVDWWKHERWWRPRIWKHSettings screen to access and modify various settings.GeneralAllows you to:• Select or create a user SURÀOH• Check the Bluetooth status (ON/OFF).• Turn Bluetooth ON or OFF.• Tap a link to the Bluetooth Manager.AccessibilityAllows you to: 6SHFLI\DQDPHWKDWLGHQWLÀHVyour Pocket PC as a Bluetooth device.• Check the Bluetooth Device Address (BDA).• Specify whether to allow all other Bluetooth devices or only paired devices to connect to your Pocket PC.• Specify whether to allow remote devices to detect your device.ServicesUnder Bluetooth Services, you may enable/disable services such as File Transfer, Information Exchange, Serial Port, Personal Network server and Audio Gateway. Tap a service from the list, then choose whether to enable and share the selected service to other devices and whether to UHTXLUHDXWKRUL]DWLRQDVZHOODVSDVVNH\DXWKHQWLFDWLRQEHWZHHQ%OXHWRRWKdevices.•File TransferDOORZVRWKHU%OXHWRRWKGHYLFHVWRKDYHDFFHVVWRÀOHVRQ\RXU3RFNHW3&DQGWRSHUIRUPÀOHUHODWHGRSHUDWLRQVVXFKDVWRJHWÀOHVGHOHWHÀOHVHWF7DSAdvanced to set a target directory on your device that remote devices can access.See the section “Remote device services” for more information.•Information Exchange - allows you to specify a contact to be sent to Bluetooth devices when they request for your business card. Tap Advanced, then tap to choose a contact as your default business card.](https://usermanual.wiki/ASUSTeK-Computer/A686/User-Guide-734691-Page-85.png)
![78Chapter 8Bluetooth Connection Wizard7KH%OXHWRRWK&RQQHFWLRQ:L]DUGKHOSV\RXVHWXSFRQQHFWLRQVZLWKremote Bluetooth devices.Bluetooth Manager7KH%OXHWRRWK0DQDJHUDOORZV\RXWRSUHFRQÀJXUHPDQDJHDQGXVHvarious types of Bluetooth connections to connect to remote devices.To open the Bluetooth Manager:• Tap > Bluetooth Manager.There are two tabs in the Bluetooth Manager:•My Shortcuts GLVSOD\VDOLVWRISUHFRQÀJXUHGFRQQHFWLRQVLIDQ\Tap New to make a new connection with other devices via Bluetooth. Tap and hold a connection icon to open a pop-up menu containing options for connecting to devices, disconnecting, checking connection status, and more.•Active Connections - displays active incoming and outgoing connections. Tap New to make a new connection. Tap and hold a connection icon to open a pop-up menu containing options for disconnecting from devices and for checking connection status.•Serial Port - indicates the serial port address assignments. Tap Advanced to check the current serial port addresses. These cannot be changed. See the section “Remote device services” for details.•Personal Network Server - allows hosting of a Bluetooth-based personal area network. See the section“Remote device services” for details.•Audio Gateway - allows your Pocket PC to connect to a remote headset or other audio device.](https://usermanual.wiki/ASUSTeK-Computer/A686/User-Guide-734691-Page-86.png)
![Bluetooth®79NOTE Refer to the device online help for more information on Bluetooth.To launch the Bluetooth Connection Wizard:1. Tap New from the Bluetooth Manager Menu bar. The %OXHWRRWK&RQQHFWLRQ:L]DUGscreen appears. 6HOHFWDW\SHRIFRQQHFWLRQWKDWyou want to set up. Tap Next.3. Follow the on-screen instructions to set up the connection.Business Card ExchangeThe Business Card Exchange feature allows you to send or receive a business card to or from a remote device, or exchange business cards with multiple remote devices.To access Business Card Exchange:1. Tap Menu > Business Card Exchange from the Menu bar. 6HOHFWWKHDFWLRQWKDW\RXZLVKWRPDNHNOTE On this screen, tap the link Select the business card to go to the Information Exchange settings.](https://usermanual.wiki/ASUSTeK-Computer/A686/User-Guide-734691-Page-87.png)
![80Chapter 8Dial-up networkingThe Dial-up Networking feature allows you to connect your Pocket PC to another Bluetooth-enabled device which can access internet through a phone line. Once connected, you can browse the Internet, check/read emails, etc. on your Pocket PC.The Bluetooth device that will provide the Dial-up Networking service to your Pocket PC should have access to a telephone system, either a hard-wired or a cellular connection, and capable of answering a call. Such device can be a Bluetooth-enabled mobile phone, Bluetooth-enabled desktop computer attached to a telephone system, or Bluetooth modem.To set up Dial-up Networking:1. Tap > Bluetooth Manager. &UHDWHDFRQQHFWLRQWRWKHGHYLFHWKDWZLOOSURYLGHWHOHSKRQHDFFHVV6HHWKHVHFWLRQ´%OXHWRRWK&RQQHFWLRQ:L]DUGµ3. On the My Shortcuts screen, tap and hold the newly created shortcut, then select Connect from the pop-up menu. 2QWKHÀUVW%OXHWRRWKFRQQHFWLRQVFUHHQGRXEOHWDSNewConnection...Remote device servicesWireless serial portUsing a Bluetooth serial port is equivalent to using a physical serial cable connection between two devices. As with a physical connection, you have WRFRQÀJXUHWKHDSSOLFDWLRQWKDWZLOOXVHWKHVHULDOSRUW7RFRQÀJXUHWKH%OXHWRRWK6HULDO3RUW1. Tap > Bluetooth Settings > Services tab. )URPWKH6HUYLFHVOLVWVHOHFWSerial Port.3. Tap Advanced. Note the assigned Outbound COM Port (port 8).NOTE Refer to the application’s documentation for more information DERXWFRQÀJXULQJ\RXUDSSOLFDWLRQҋV2XWERXQG&20SRUW](https://usermanual.wiki/ASUSTeK-Computer/A686/User-Guide-734691-Page-88.png)
![Bluetooth®85Bluetooth Personal Area NetworkA Bluetooth personal area network is a private, temporary, ad-hoc network of up to eight (8) devices. A Bluetooth personal area network allows you to easily exchange information that normally requires a TCP/IP network. Most chat utilities, multi-player games, etc. are fully functional in a Bluetooth personal area network environment.%OXHWRRWKSULYDWHDUHDQHWZRUNVDUHVXEMHFWWRWKHVDPHVHFXULW\VHWWLQJVVHUYLFHDYDLODELOLW\DXWKRUL]DWLRQDXWKHQWLFDWLRQDQGHQFU\SWLRQWKDWgovern other Bluetooth communications.One Bluetooth device must be the host of the personal area network. 2WKHU%OXHWRRWKGHYLFHVMRLQWKHQHWZRUNDVFOLHQWV7KHKRVWFDQDFFHSWDQGUHMHFWFOLHQWVRQDQLQGLYLGXDOEDVLVTo set up a Bluetooth personal area network:1. In the Bluetooth Manager, tap New > Join a personal network. 2QWKHZL]DUGVFUHHQVHOHFWHost a personal network, then tap Next.3. Add remote devices to the Bluetooth personal network, if desired.a. Tap the Add button and select the device that you wish to add.b. Add other devices, if desired. There can be up to eight devices, including the host.4. After adding devices, tap ok to FRPSOHWHWKHVHWXSDQGFORVHWKHZL]DUGNOTE Adding devices is optional. You do not have to add devices to WKHSHUVRQDOQHWZRUNZKLOHFRQÀJXULQJWKHKRVW<RXFDQOHWRWKHUGHYLFHVMRLQWKHSHUVRQDOQHWZRUNODWHU](https://usermanual.wiki/ASUSTeK-Computer/A686/User-Guide-734691-Page-93.png)
![86Chapter 8Setting up High Quality Audio setup or Hands-free/Headset setup1. Tap icon > Bluetooth Manager. 7DSNew > High Quality Audio setup or Hands-free/ Headset setup > Next.3. Follow the on-screen instructions to complete the setup.NOTE Please ensure the Hands-free device you are trying to connect to is ready to receive incoming connection requests. Please refer to the device’s manual for more information.To join a personal network:1. In the Bluetooth Manager, tap New > Join a personal network. 2QWKHZL]DUGVFUHHQVHOHFWJoin a personal network, then tap Next.3. Select the host of the personal network, then tap Next to establish a connection to the personal area network.If you are asked to enter the IP network settings, select Use server-assigned IP address, then tap ok.Setting up ActiveSync via Bluetooth1. Tap icon > Bluetooth Manager. 7DSNew > ActiveSync via Bluetooth > Next.3. Follow the on-screen instructions to complete the setup. Please make sure the COM Port number that is set on the ActiveSync program on the computer is the same as the COM Port setting on MyPal. 2QWKH%OXHWRRWK&RQQHFWLRQ:L]DUGVFUHHQVHOHFWWKHQDPHRIWKHFRPSXWHUWRV\QFKURQL]H0\3DOZLWKWKHQWDSNext.5. Select the COM Port setting used by the computer and tap Next.6. Tap Finish.](https://usermanual.wiki/ASUSTeK-Computer/A686/User-Guide-734691-Page-94.png)
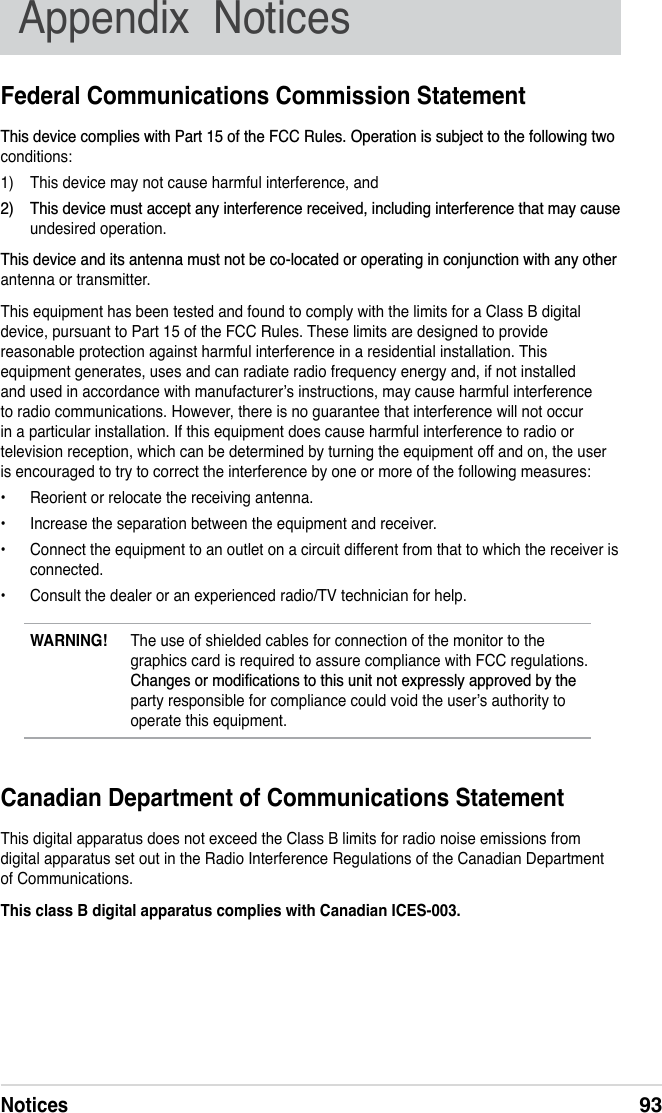
![94AppendixUL Safety NoticesRequired for UL 1459 covering telecommunications (telephone) equipment intended to be electrically connected to a telecommunication network that has an operating voltage to JURXQGWKDWGRHVQRWH[FHHG9SHDN9SHDNWRSHDNDQG9UPVDQGLQVWDOOHGRUused in accordance with the National Electrical Code (NFPA 70).When using the Pocket PC, basic safety precautions should always be followed to reduce the risk RIÀUHHOHFWULFVKRFNDQGLQMXU\WRSHUVRQVLQFOXGLQJWKHIROORZLQJ• Do not use the Pocket PC near water, for example, near a bath tub, wash bowl, kitchen sink or laundry tub, in a wet basement or near a swimming pool. •Do not use the Pocket PC during an electrical storm. There may be a remote risk of electric shock from lightning.•Do not use the Pocket PC in the vicinity of a gas leak.5HTXLUHGIRU8/FRYHULQJSULPDU\QRQUHFKDUJHDEOHDQGVHFRQGDU\UHFKDUJHDEOHOLWKLXPbatteries for use as power sources in products. These batteries contain metallic lithium, or a lithium alloy, or a lithium ion, and may consist of a single electrochemical cell or two or more cells connected in series, parallel, or both, that convert chemical energy into electrical energy by an irreversible or reversible chemical reaction. •Do notGLVSRVHWKH3RFNHW3&EDWWHU\SDFNLQDÀUHDVWKH\PD\H[SORGH&KHFNZLWKORFDOFRGHVIRUSRVVLEOHVSHFLDOGLVSRVDOLQVWUXFWLRQVWRUHGXFHWKHULVNRILQMXU\WRSHUVRQVGXHWRÀUHRUH[SORVLRQ•Do notXVHSRZHUDGDSWHUVRUEDWWHULHVIURPRWKHUGHYLFHVWRUHGXFHWKHULVNRILQMXU\WRSHUVRQVGXHWRÀUHRUH[SORVLRQ8VHRQO\8/FHUWLÀHGSRZHUDGDSWHUVRUEDWWHULHVVXSSOLHGE\WKHPDQXIDFWXUHURUDXWKRUL]HGUHWDLOHUVReplaceable batteriesIf an equipment is provided with a replaceable battery and if replacement by an incorrect type could result in an explosion (e.g. with some lithium batteries), the following applies:– if the battery is placed in an OPERATOR ACCESS AREA, there shall be a marking close WRWKHEDWWHU\RUDVWDWHPHQWLQERWKWKHRSHUDWLQJDQGWKHVHUYLFLQJLQVWUXFWLRQV– if the battery is placed elsewhere in the equipmen, there shall be a marking close to the battery or a statement in the servicing instructions.The marking or statement shall include the following or similar text:CAUTIONRISK OF EXPLOSION IF BATTERY IS REPLACEDBY AN INCORRECT TYPE.DISPOSE OF USED BATTERIES ACCORDINGTHE INSTRUCTIONSCompliance is checked by inspection.Operator access with a toolIf a TOOL is necessary to gain access to an OPERATOR ACCESS AREA, either all other FRPSDUWPHQWVZLWKLQWKDWDUHDFRQWDLQLQJDKD]DUGVKDOOEHLQDFFHVVLEOHWRWKH23(5$725E\the use of the same TOOL, or such compartments shall be marked to discourage OPERATOR access.$QDFFHSWDEOHPDUNLQJIRUDQHOHFWULFVKRFNKD]DUGLV,621REquipment for restricted access locationsFor equipment intended only for installation in a RESTRICTED ACCESS LOCATION, the installation instructions shall contain a statement to this effect.](https://usermanual.wiki/ASUSTeK-Computer/A686/User-Guide-734691-Page-102.png)
![Notices95Checklist of Regulatory Statement 15.21<RXDUHFDXWLRQHGWKDWDQ\FKDQJHVRUPRGLÀFDWLRQVQRWH[SUHVVO\DSSURYHGLQWKLVPDQXDOFRXOGYRLG\RXUDXWKRUL]DWLRQWRXVHWKHGHYLFH&$87,21$Q\FKDQJHVRUPRGLÀFDWLRQVQRWH[SUHVVO\DSSURYHGE\WKHSDUW\UHVSRQVLEOHfor compliance could void the user’s authority to operate the equipment.Prohibition of co-location7KLVGHYLFHPXVWQRWEHFRORFDWHGRURSHUDWLQJLQFRQMXQFWLRQZLWKDQ\RWKHUDQWHQQDRUtransmitter15.105 Federal Communications Commission (FCC) Requirements, Part 15This equipment has been tested and found to comply with the limits for a class B digital device, pursuant to part 15 of the FCC Rules. These limits are designed to provide reasonable protection against harmful interference in a residential installation.This equipment generates, uses and can radiate radio frequency energy and, if not installed and used in accordance with the instructions, may cause harmful interference to radio communications. However, there is no guarantee that interference will not occur in a particular installation. If this equipment does cause harmful interference to radio or television reception, which can be determined by turning the equipment off and on, the user is encouraged to try to correct the interference by one or more of the following measures:—Reorient or relocate the receiving antenna.—Increase the separation between the equipment and receiver.—Connect the equipment into an outlet on a circuit different from that to which the receiver is connected.—Consult the dealer or an experienced radio/TV technician for help.Regulatory information / DisclaimersInstallation and use of this Wireless LAN device must be in strict accordance with the instructions included in the user documentation provided with the product. Any changes or PRGLÀFDWLRQVLQFOXGLQJWKHDQWHQQDVPDGHWRWKLVGHYLFHWKDWDUHQRWH[SUHVVO\DSSURYHGE\the manufacturer may void the user’s authority to operate the equipment. The manufacturer LVQRWUHVSRQVLEOHIRUDQ\UDGLRRUWHOHYLVLRQLQWHUIHUHQFHFDXVHGE\XQDXWKRUL]HGPRGLÀFDWLRQRIWKLVGHYLFHRUWKHVXEVWLWXWLRQRIWKHFRQQHFWLQJFDEOHVDQGHTXLSPHQWRWKHUWKDQPDQXIDFWXUHUVSHFLÀHG,WLVWKHUHVSRQVLELOLW\RIWKHXVHUWRFRUUHFWDQ\LQWHUIHUHQFHFDXVHGE\VXFKXQDXWKRUL]HGPRGLÀFDWLRQVXEVWLWXWLRQRUDWWDFKPHQW0DQXIDFWXUHUDQGLWVDXWKRUL]HGUHVHOOHUVRUGLVWULEXWRUVZLOODVVXPHQROLDELOLW\IRUDQ\GDPDJHRUYLRODWLRQRIgovernment regulations arising from failing to comply with these guidelines.CAUTION: To maintain compliance with FCC’s RF exposure guidelines, this equipment VKRXOGEHLQVWDOOHGDQGRSHUDWHGZLWKPLQLPXPGLVWDQFHFPEHWZHHQWKHUDGLDWRUDQG\RXUERG\8VHRQWKHVXSSOLHGDQWHQQD8QDXWKRUL]HGDQWHQQDPRGLÀFDWLRQRUDWWDFKPHQWVcould damage the transmitter and may violate FCC regulations.MPE Statement (Safety Information)Your device contains a low power transmitter. When device is transmitted it sends out Radio Frequency (RF) signal.](https://usermanual.wiki/ASUSTeK-Computer/A686/User-Guide-734691-Page-103.png)
![96AppendixSafety InformationIn order to maintain compliance with the FCC RF exposure guidelines, this equipment should EHLQVWDOOHGDQGRSHUDWHGZLWKPLQLPXPGLVWDQFHFPEHWZHHQWKHUDGLDWRUDQG\RXUERG\8VHRQO\ZLWKVXSSOLHGDQWHQQD8QDXWKRUL]HGDQWHQQDPRGLÀFDWLRQRUDWWDFKPHQWVFRXOGdamage the transmitter and may violate FCC regulations.Caution Statement of the FCC Radio Frequency ExposureFCC RF exposure requirements: Use in portable RF exposure conditions is limited to the specific product and antenna configurations evaluated in the filing under FCCID: MSQA696.The antenna(s) used for this transmitter must not be co-located or operating in conjunction with any other antenna or transmitter within this host device, except as described in this filing.](https://usermanual.wiki/ASUSTeK-Computer/A686/User-Guide-734691-Page-104.png)