ASUSTeK Computer A686 ASUS MYPAL A686 POCKET PC User Manual A696 UserMan
ASUSTeK Computer Inc ASUS MYPAL A686 POCKET PC A696 UserMan
users manual
User Manual
MyPal A626/A686/A696

ii
Copyright © 2006 ASUSTeK COMPUTER INC. All Rights Reserved.
No part of this manual, including the products and software described in it, may be reproduced,
transmitted, transcribed, stored in a retrieval system, or translated into any language in any form
or by any means, except documentation kept by the purchaser for backup purposes, without
the express written permission of ASUSTeK COMPUTER INC. (“ASUS”).
3URGXFWZDUUDQW\RUVHUYLFHZLOOQRWEHH[WHQGHGLIWKHSURGXFWLVUHSDLUHGPRGLÀHGRUDOWHUHG
XQOHVVVXFKUHSDLUPRGLÀFDWLRQRIDOWHUDWLRQLVDXWKRUL]HGLQZULWLQJE\$686RUWKHVHULDO
number of the product is defaced or missing.
ASUS PROVIDES THIS MANUAL “AS IS” WITHOUT WARRANTY OF ANY KIND, EITHER
EXPRESS OR IMPLIED, INCLUDING BUT NOT LIMITED TO THE IMPLIED WARRANTIES
OR CONDITIONS OF MERCHANTABILITY OR FITNESS FOR A PARTICULAR PURPOSE.
IN NO EVENT SHALL ASUS, ITS DIRECTORS, OFFICERS, EMPLOYEES OR AGENTS BE
LIABLE FOR ANY INDIRECT, SPECIAL, INCIDENTAL, OR CONSEQUENTIAL DAMAGES
(INCLUDING DAMAGES FOR LOSS OF PROFITS, LOSS OF BUSINESS, LOSS OF USE OR
DATA, INTERRUPTION OF BUSINESS AND THE LIKE), EVEN IF ASUS HAS BEEN ADVISED
OF THE POSSIBILITY OF SUCH DAMAGES ARISING FROM ANY DEFECT OR ERROR IN
THIS MANUAL OR PRODUCT.
SPECIFICATIONS AND INFORMATION CONTAINED IN THIS MANUAL ARE FURNISHED
FOR INFORMATIONAL USE ONLY, AND ARE SUBJECT TO CHANGE AT ANY TIME WITHOUT
NOTICE, AND SHOULD NOT BE CONSTRUED AS A COMMITMENT BY ASUS. ASUS
ASSUMES NO RESPONSIBILITY OR LIABILITY FOR ANY ERRORS OR INACCURACIES
THAT MAY APPEAR IN THIS MANUAL, INCLUDING THE PRODUCTS AND SOFTWARE
DESCRIBED IN IT.
Microsoft, Activesync, Outlook, Pocket Outlook, Windows, and the Windows logo are either
registered trademarks or trademarks of Microsoft Corporation in the United States and/or in
other countries. Microsoft products are licensed to OEMs by Microsoft Licensing, Inc., a wholly
owned subsidiary of Microsoft Corporation.
E2775
First Edition
September 2006

iii
Table of Contents
Chapter 1 Getting Started..................................................1
Introducing MyPal ..................................................................................1
Installing and removing the battery........................................................5
Connecting to a power source ...............................................................5
Setting up GPS ......................................................................................6
Additional storage ..................................................................................7
Activating MyPal ....................................................................................8
Basic screens on MyPal ........................................................................9
Chapter 2 Basics .............................................................. 11
Viewing system information ................................................................11
Entering information.............................................................................11
)LQGLQJDQGRUJDQL]LQJLQIRUPDWLRQ......................................................18
Using the File Explorer .......................................................................18
&XVWRPL]LQJ\RXUGHYLFH......................................................................19
Using simple applications ....................................................................
Chapter 3 Synchronize and Enhance .............................31
Microsoft® ActiveSync®.........................................................................31
6\QFKURQL]LQJ\RXUGHYLFH...................................................................33
Chapter 4 Microsoft® Pocket Outlook............................. 39
Calendar ..............................................................................................39
Contacts ..............................................................................................
Tasks ...................................................................................................45
Notes ..................................................................................................46
Messaging ...........................................................................................48
Chapter 5 Companion Programs ....................................53
Word Mobile ........................................................................................53
Excel Mobile .......................................................................................56

iv
PowerPoint Mobile ..............................................................................58
Pocket MSN ........................................................................................60
Windows Media Player for Pocket PC .................................................64
Chapter 6 Internet Explorer Mobile.................................65
Using Internet Explorer Mobile ............................................................65
Mobile Favorites folder ........................................................................66
Chapter 7 Get Connected ................................................70
Connecting to the Internet ...................................................................70
Connecting to Work .............................................................................71
Setting up connections ........................................................................71
Ending a connection ...........................................................................73
Setting up a WAP gateway ..................................................................74
Using dialing rules ...............................................................................74
Using Terminal Services Client ............................................................75
Infrared (IR) connection .......................................................................76
Chapter 8 Bluetooth®........................................................78
Using Bluetooth ...................................................................................78
Bluetooth settings ................................................................................79
Bluetooth Manager ..............................................................................81
Remote device services.......................................................................
Setting up High Quality Audio setup or Hands-free/Headset setup .....88
Setting up ActiveSync via Bluetooth ....................................................88
Chapter 9 Wi-Fi .................................................................89
Using Wi-Fi ..........................................................................................89
The Wi-Fi Manager ..............................................................................
Appendix Notices .............................................................95
Federal Communications Commission Statement...............................95
Canadian Department of Communications Statement ........................95
UL Safety Notices ................................................................................96
Checklist of Regulatory Statement ......................................................97
v
0\3DO$$$VSHFLÀFDWLRQV
Processor
Operating system
Memory
Display
Battery
Expansion slot
Bluetooth
WLAN
Audio
GPS
Size
Weight
$,QWHO®;6FDOH3URFHVVRU0+]
A686: Intel®;6FDOH3URFHVVRU0+]
A696: Intel®;6FDOH3URFHVVRU0+]
Microsoft® Windows Mobile™ 5.0 (Pocket PC)
$0%)ODVK5200%6'5$0
$0%)ODVK5200%6'5$0
$0%)ODVK5200%6'5$0
LQFKEULOOLDQWWUDQVÁHFWLYH7)7/&'
65,000 Full-color, 16-bit display
49*$[UHVROXWLRQ7RXFK3DG
Support Anti-glare technology
P$KUHPRYDEOH/LLRQ
One slot-SD card slot (SDIO/SD/MMC), at
least 4GB
Bluetooth®Y('586%&OLHQW
:/$1EJZLWK7%'VXSSRUW$
only)
3.5 mm stereo
SiRF Star III / GPS chip with built-in GPS
Antenna (A686/696 only)
117 mm x 70.8 mm x 15.7 mm
$JUDPVZLWKEDWWHU\
A686: 165 grams (with battery)
A696: 165 grams (with battery)
IMPORTANT To avoid damaging your Pocket PC and accessories, it
is best to operate this unit (including the protection case)
ZLWKLQDWHPSHUDWXUHUDQJHRIoC (68-86 oF) and
50% humidity. Anything that goes beyond or below the
ideal temperature range may damage the unit, and may
shorten the battery life.
6SHFLÀFDWLRQVDUHVXEMHFWWRFKDQJHZLWKRXWQRWLFH

vi
Package contents
Your package includes several accessories for the Pocket PC. After
unpacking, check the items against the list below and make sure that they
are in good condition. If any item is missing or damaged, contact your dealer
or retailer immediately.
Standard items
$6860\3DO$$$3RFNHW3&
• USB travel sync cable
• AC adapter
• Microsoft Companion CD: includes Microsoft® Outlook®
DQG0LFURVRIW®ActiveSync®
[6W\OXV
• Protection case
5HPRYDEOHUHFKDUJHDEOHP$K/LLRQEDWWHU\
• Manual
• Quick Start Guide
Extra items for A686 and A696
• Car kit (car holder and gooseneck)
• Car charger
• Warranty card
Optional accessories
• Stylus x 3 / package • AC adapter
• Battery • Car charger
•USB travel sync cable
•Car kit (car holder and gooseneck)
•Stereo headset with microphone
•Bluetooth headset
•Leather protection case (landscape orientation)
Getting Started
1
Chapter 1 Getting Started
•Power LEDVKRZVDVWHDG\UHGOLJKWZKHQWKHEDWWHU\LVFKDUJLQJ
steady green when the battery is fully charged and the device is
connected to an AC power source.
•LCD touch screen - allows you to enter, read, send, receive or edit
data by tapping on it. The screen lumination is increased or decreased
by changing the backlight settings (Anti-glare technology supported).
•Speaker - allows you to hear alarms and other sound output from the
device.
Introducing MyPal
The ASUS®0\3DO$$$LVWUXO\DJRRGFRPSDQLRQZKHUHYHU
\RXJR3RZHUHGE\D0+]0\3DO$RU0+]0\3DO$
$,QWHO®;6FDOHSURFHVVRUHTXLSSHGZLWK0%6'5$0DQG0%
)ODVK5200\3DO$RU0%)ODVK5200\3DO$$DQG
bundled with the Microsoft® Windows Mobile® 5.0 plus a host of useful
utilities, you have everything you need in your pocket!
0\3DO$$FRPHVZLWKDGGLWLRQDO:L)LIHDWXUHWKDWDOORZV\RXWR
FRQQHFWWRZLUHOHVV/$1DQG,QWHUQHW0\3DO$$$KDVDVLQJOH
SD card slot.
Speaker
Launch button
LCD touch screen
Notes button Calendar button
Mode/Task
Switcher button
Contacts button
4-way Navigaition
button
3RZHU1RWLÀFDWLRQ/('
Front features
Bluetooth/Wi-Fi/GPS LED
2
Chapter 1
SD card slot
(SD/SDIO/MMC)
•4-way navigation button - functions like the four arrow keys on a
keyboard. This button allows you to move through the program icons,
IROGHUVRUÀOHVLQDPHQXE\VFUROOLQJXSRUGRZQOHIWRUULJKW
If ASUS® MyPal is bundled with GPS map software, you may use the
EXWWRQVWR]RRPLQ]RRPRXWDQGDGMXVWWKHYROXPH
•Launch button - functions like the enter/return key on a keyboard.
3UHVVRQFHWRODXQFKDVHOHFWHGSURJUDPOLVWIROGHUFRQWHQWVRURSHQDÀOH
•Contacts button - opens your contacts list at any time.
•Calendar button - opens the Calendar program at any time.
•Mode Switcher button - allows you to switch between Today,
Windows Media Player and Rotate screen. The Mode Switcher button
can also function as a Task Switcher, which allows you to switch
between currently running programs on your device.
•Notes button - opens the Notes program at any time.
•Bluetooth/GPS/Wi-Fi LED - lights up blue when the Bluetooth® feature
LVRQOLJKWVXSJUHHQZKHQ*36LVRQOLJKWVXSUHGZKHQ:L)LLVRQ
•Battery cover - provides protection to the battery compartment of the
device.
•SD card slot - accommodates an SD memory card, MMC memory
FDUGRUDQ6',2LQWHUIDFHFDUGHJEJPRGHPHWF
•External antenna jack - connects to an external GPS antenna (A686/
A696 only).
External
DQWHQQDMDFN
Battery cover
Back features
Getting Started
3
Right Side features
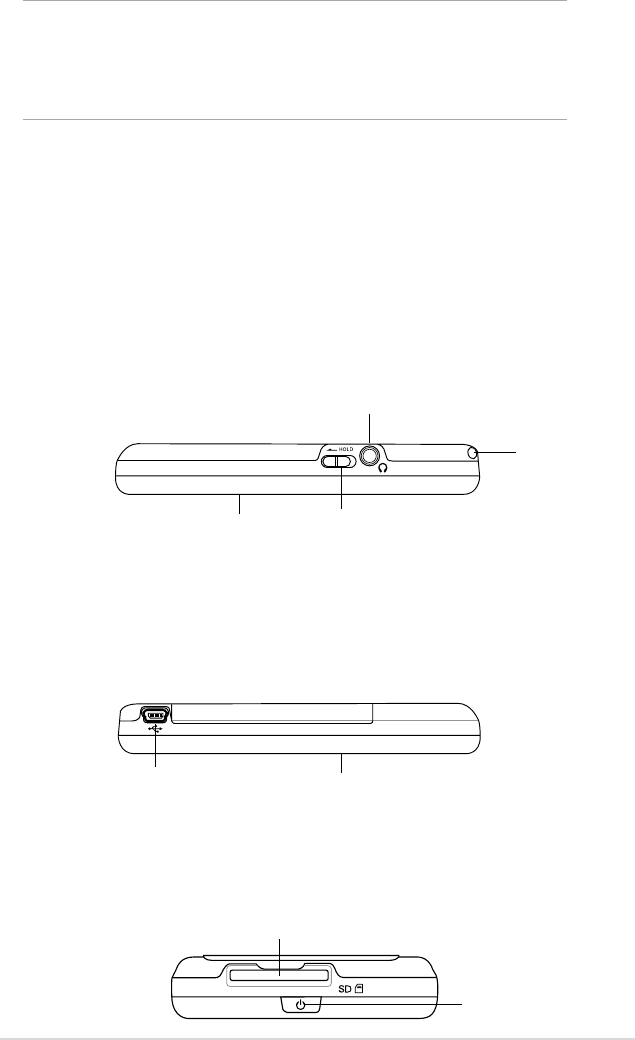
•Stylus - used for tapping or writing on the LCD touch screen.
•Hold key - provides a safety measure to avoid users from accidentally
tapping the screen or turning on the device. Move the switch towards
the word Hold to turn off the screen and prevent it from turning back
on even when you tap the screen or press a button. Move the switch
towards the opposite direction to disable this feature.
•Headphone port - connects to a headphone.
Top features
•Power button - turns the device power on or off if you press the button
quickly.
NOTES As a precaution, the Power button is automatically disabled
when you remove the battery cover. You can only turn on the
power when the battery cover is installed to the unit.
The battery cover is removable, and allows you to remove or
replace the main battery.
Left Side features
•Sync and power cable connector - connect the Mini USB sync
FDEOHGLUHFWO\WRWKLVFRQQHFWRUWRV\QFKURQL]H\RXUGHYLFHZLWK\RXU
computer.
This also charges the battery at the same time.
Sync and power cable connector
Power button
SD card slot
(SD/SDIO/MMC)
Hold key
Stylus
+HDGSKRQHMDFN
Screen
Screen
4
Chapter 1
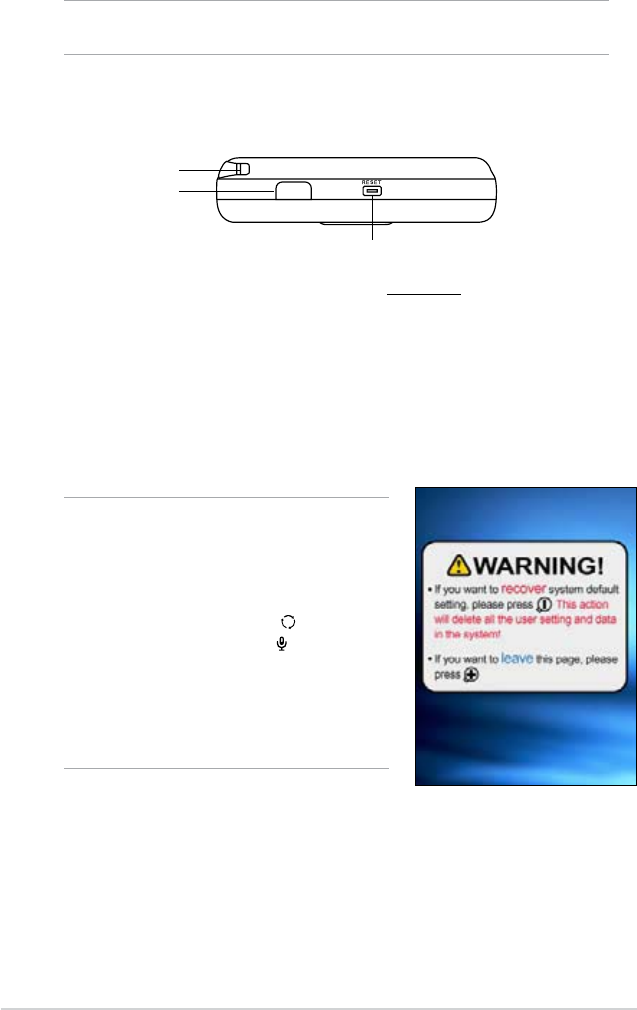
The GPS car kit (MyPal A686/A696 only)
The GPS car kit includes:
•Car holder - holds the Pocket PC.
•Gooseneck - securely attaches the Pocket PC to the car’s windshield.
•Reset switch - allows you to perform a
soft reset
in case the device
malfunctions, or when an application hangs. Press the tip of the stylus
on this switch to reset the system.
•Infrared (IR) port - allows you to copy or send data to another device
with an IR port. For a successful exchange of data, the IR port of both
devices must be properly aligned and facing each other within the IR
communication range.
Reset switch
Bottom features
NOTE To shutdown the device, press the Power button for about
four seconds then tap Yes$OORSHQÀOHVZLOOEHXQVDYHG
NOTE To perform a clean reset,
press the launch button and
simultaneously pressing the
stylus on the reset switch.
Then a warning message
appears. Press to do clean
reset, or press to leave the
operation screen.
Performing a soft reset will not
FKDQJHWKHGDWDLQWKHGHYLFH
while performing a clean reset will
delete all data.
Infrared (IR) Port
Stylus
Getting Started
5
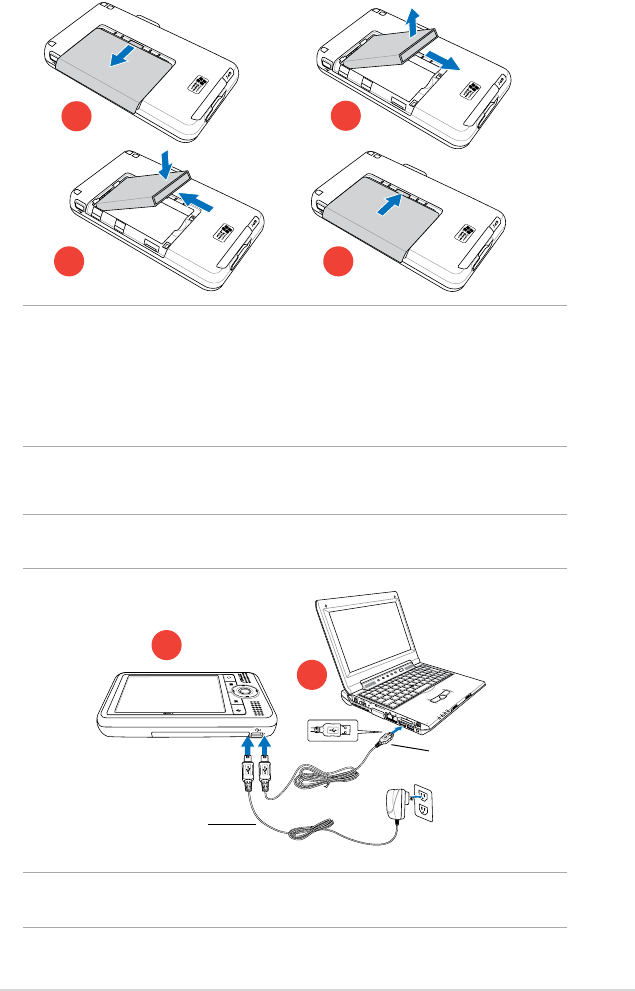
Installing and removing the battery
NOTE Opening the battery cover automatically turns off the power.
There is a mechanism at the upper left side of the battery
compartment that switches the power off automatically when
you slide out the battery cover. This is a safety measure for
protecting the power circuitry, so please make sure not to
lose the battery cover.
1
3 4
Connecting to a power source
IMPORTANT You need to charge the battery before using the device for
WKHÀUVWWLPH
1
NOTE The battery can not be charged via PC or notebooks with
100mAh USB ports.
AC adapter/ Power cable
USB sync cable
6
Chapter 1
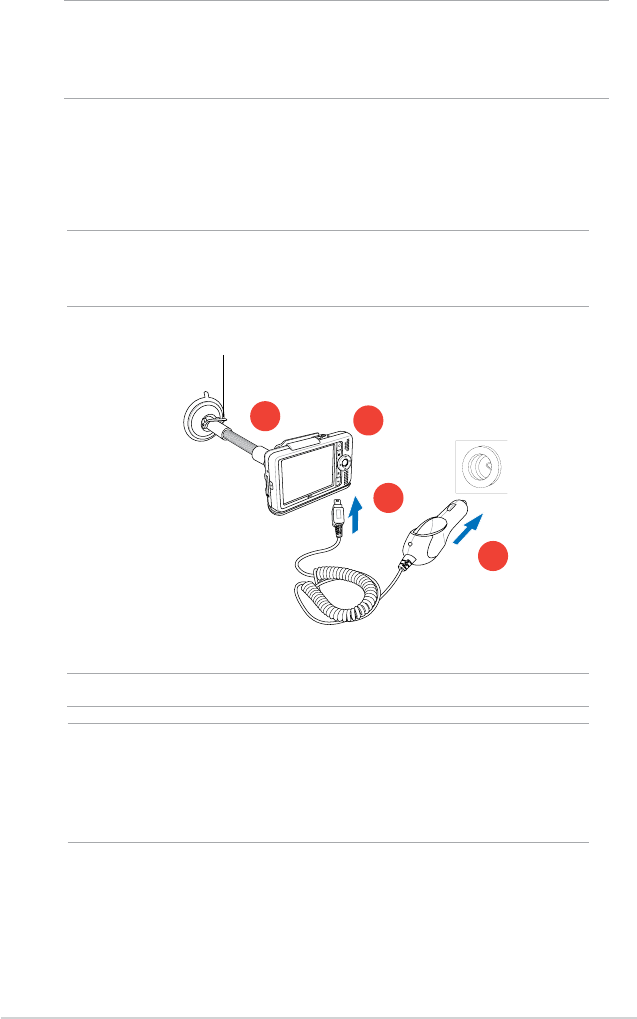
Setting up GPS (MyPal A696/A686 only)
To use the GPS car kit:
NOTE *HQWO\EHQGWKHJRRVHQHFNZKHQDGMXVWLQJWKH
orientation. Do not forcibly bend the gooseneck. The
device must be carefully placed into the holder to avoid
damaging the mini USB connector and causing the
device to breakdown.
NOTE For optimal GPS signal performance, we recommend
that you use the PDA aside from the window of your car
in landscape mode.
+RUL]RQWDORULHQWDWLRQ
.52*
9*
1
3
4
Press latch down
NOTE Do not the device in the car holder when you leave the car.
NOTE As soon as the power cable is connected to a power source,
the battery will start charging and the power LED will show a
steady red light. See “Changing the battery power settings”
LQ&KDSWHURQKRZWRGLVSOD\WKHEDWWHU\SRZHUVWDWXV
Getting Started
7
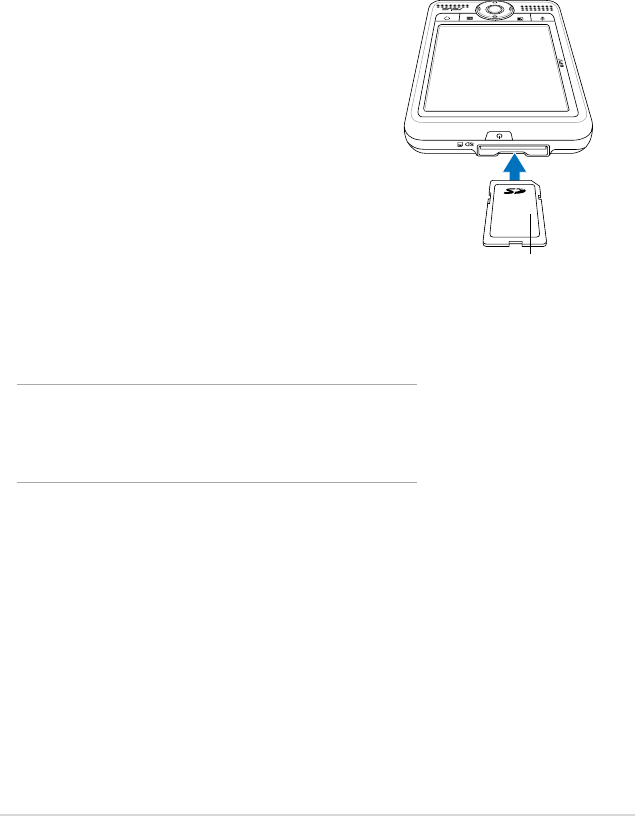
Additional storage
0\3DO$$$FRPHVZLWKWKHVWDQGDUG6'FDUGVORW7KH6'
card slot can be inserted with SD or MMC memory cards. It also supports
6',2FDUGVRIYDULRXVIXQFWLRQDOLWLHVLQFOXGLQJEJPRGHPHWF
Label
Installing and removing SD/
MMC/SDIO card
1. With the label side (usually the side with the
card manufacturer’s name) face up, and the
barcode/serial number side face down, insert
the card into the SD card slot located on top
of the device.
3XVKWKHFDUGDOOWKHZD\LQWRWKHVORWXQWLOLW
ÀWVFRPSOHWHO\,ISURSHUO\LQVWDOOHGWKH6'
or MMC card edge aligns with the top edge
of the device. SDIO cards usually have an
extended part that protrudes over the slot
edge.
3. To remove, press the card slightly until it
HMHFWVRXW<RXPD\WKHQVDIHO\UHPRYHWKH
card.
NOTE $Q6'00&6',2FDUGÀWVRQO\LQRQH
orientation, and slides smoothly into the
slot if inserted correctly. DO NOT force
the card into the slot!
8
Chapter 1
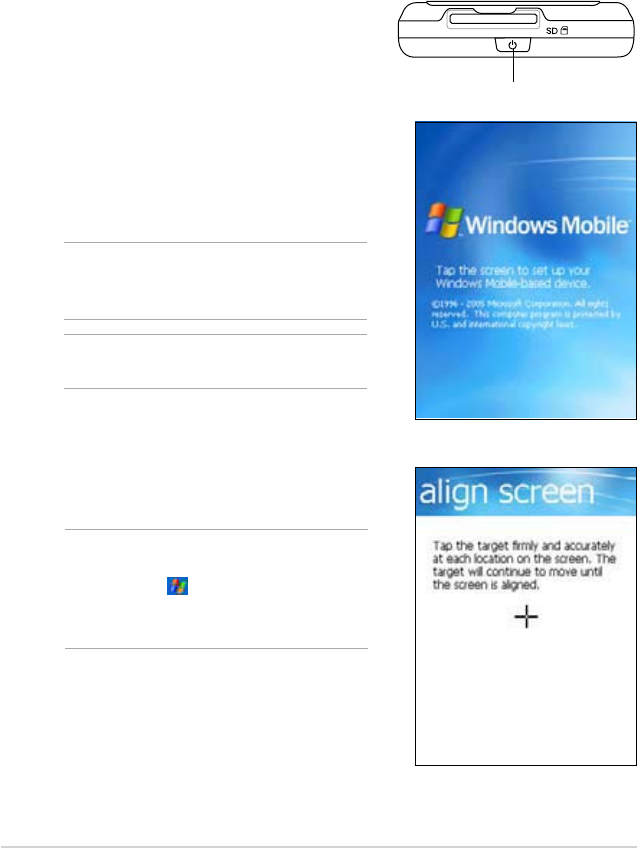
Power button
7KH:HOFRPHVFUHHQDSSHDUVZKHQ
\RXWXUQRQWKHGHYLFHIRUWKHÀUVWWLPH
or after performing a clean reset. Tap
anywhere on the screen to continue.
3. Tap the center of the cross to perform the align screen process. You
may have to do this step a few times to
properly calibrate.
NOTE To launch the Align Screen
function at any time, tap
> Settings >System
tab > Screen icon > Align
Screen button.
4. Follow the succeeding on-screen
instructions.
5. Tap anywhere on the Complete screen
when you are done with the alignment
and settings. You are now ready to use
your device.
NOTE To perform a clean reset,
refer to the description on
page 4.
Activating MyPal
You need to properly calibrate and activate your device before using
it. This process ensures accurate positioning when entering text and
selecting menus.
Calibrating and activating your device
1. Press the power button.
NOTE The default screen display
orientation is landscape.
Getting Started
9
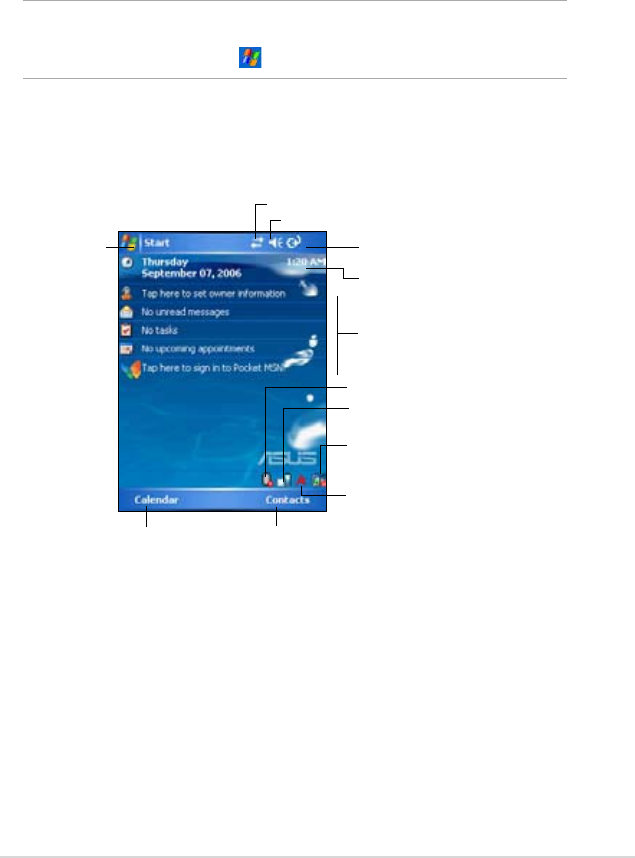
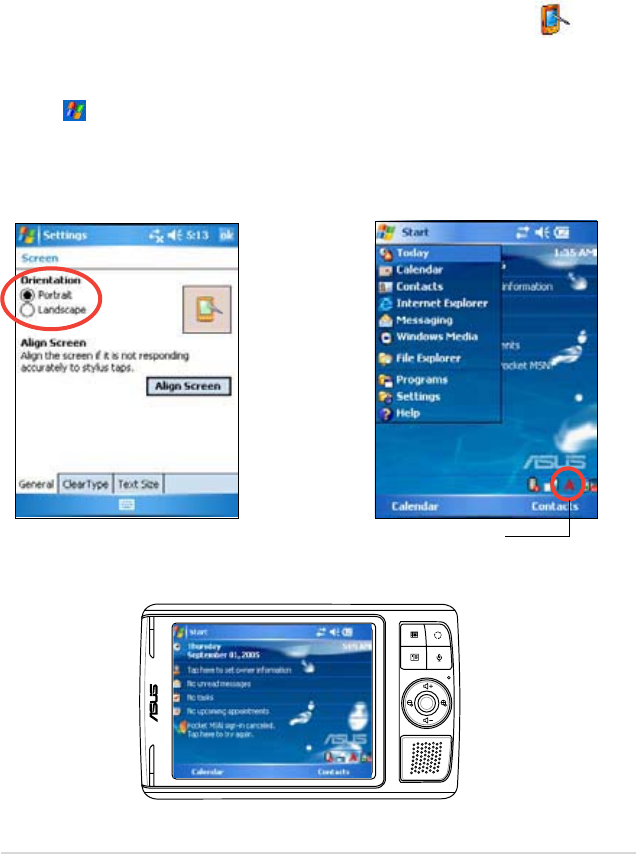
Basic screens on MyPal
Today screen
Normally, the Today screen appears when you turn on your device for the
ÀUVWWLPHHDFKGD\
NOTE When the device is already on and the screen displays
another program, you may return to the Today screen any
time by tapping > Today.
As shown in the sample below, the Today screen lets you see at a glance
the summary of the important information for the day.
From the Today screen, tap any of the listed items with the stylus to
GLVSOD\WKHGHWDLOV6HH´&KDSWHU%DVLFVµRQKRZWRPRGLI\WKHFXUUHQW
tasks or activities, or to add new items or information.
Tap to set up or change network or modem connections
Tap to open the Start
menu and to choose
from the available
programs
7DSWRDGMXVWWKHYROXPHRUPXWHDOOVRXQGV
Tap to see the battery level
Tap to change the date and time
Your day at a glance
Tap to open ASUS Status menu where you can
see common device status and settings (such as
backlight setting, battery level, memory usage,
and more)
Tap to shift display to landscape or portrait
orientation
Tap to display the Bluetooth® menu
Tap to display the Wi-Fi® menu
Tap to open the
Calendar program Tap to open the
Contacts program
10
Chapter 1
NOTE The pop-up menus are also available in most other programs
on your device. However, the pop-up menu items vary
depending on the program or application.
To access a pop-up menu, tap and hold the stylus on the item that you
wish to perform action on. When the menu appears, lift the stylus, and
tap the action that you want to execute. To close the pop-up menu without
performing an action, tap anywhere outside the menu.
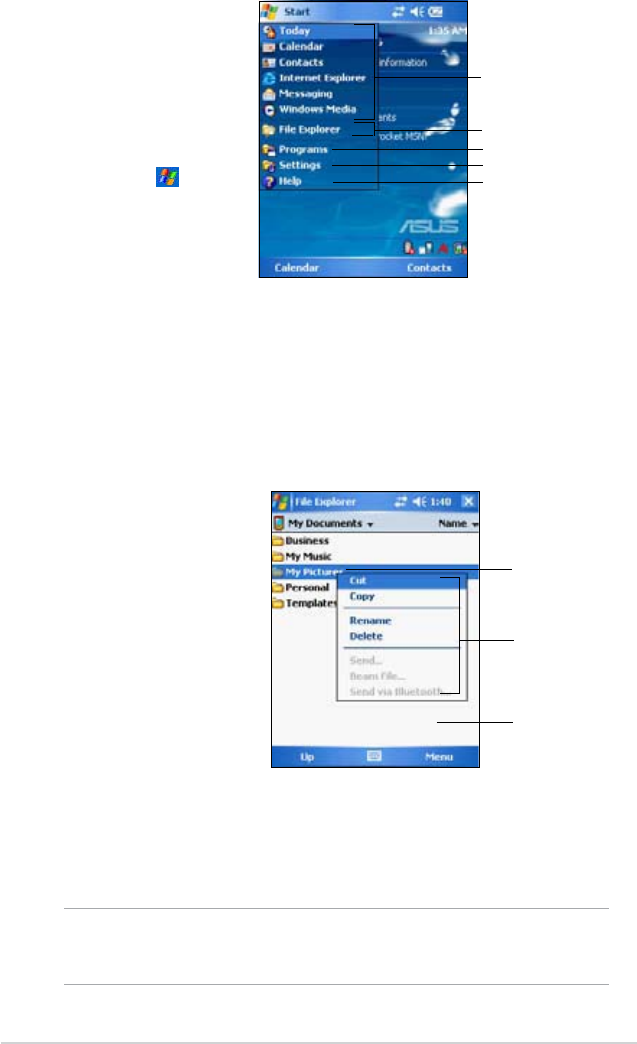
Start menu
Pop-up menus
Menu bar
At the bottom of the screen of a program is the Menu bar. You can use the
menus and buttons on the Menu bar to perform commands and actions.
The menus and buttons vary depending on the programs you are using.
From the Start menu,
you can select
programs, settings, and
help topics.
To display the Start
menu, tap the icon
from the top of the
screen.
With the pop-up menus,
you can easily choose an
action for an item.
For example, you can use
the pop-up menu in File
Explorer to delete, copy,
or beam an item.
Tap and hold until the
pop-up menu appears
Tap the action that you
wish to perform
Tap outside the pop-up
menu to close it without
performing an action
Tap to open a recently
used program
Tap to open a program
Tap to open the Programs menu
Tap to open the Settings menu
Tap to display the Help topics

Basics
11
Entering information
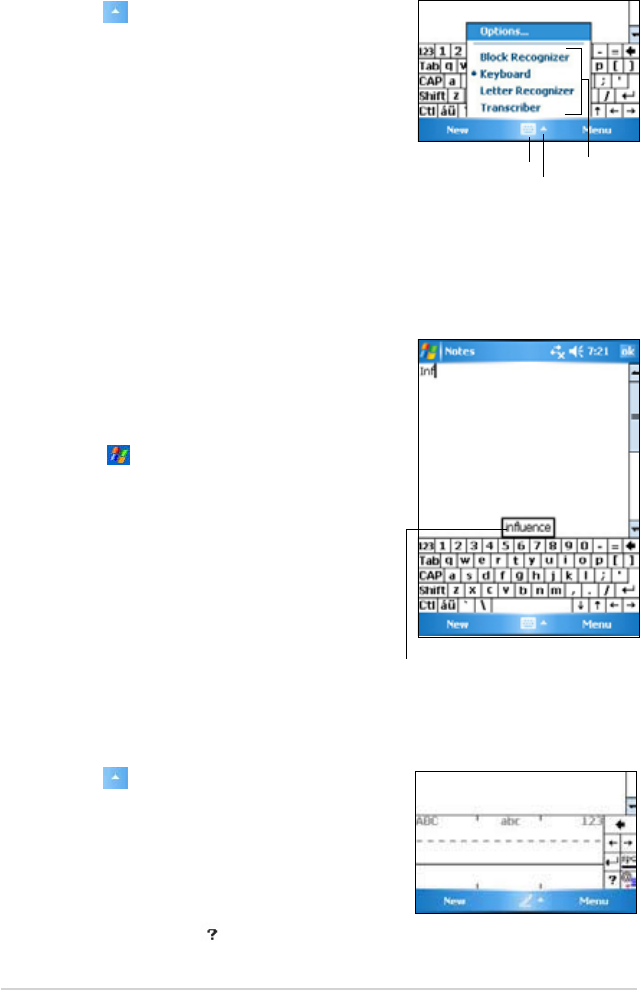
You can enter information in your device in any of the following ways:
• Use the input panel to enter text using either the soft keyboard, the
/HWWHU5HFRJQL]HUWKH%ORFN5HFRJQL]HURUWKH7UDQVFULEHU
• Write directly on the screen with the stylus
• Draw pictures on the screen
• Speak into the device microphone to record a message
• Use the Microsoft® ActiveSync®WRV\QFKURQL]HRUFRS\LQIRUPDWLRQ
from your desktop computer to your device
Entering text using the Input Panel
Use the Input Panel to enter information in any program on your device.
You can either type using the soft keyboard or write using the Letter
Recognizer,Block Recognizer, or Transcriber. In either case, the
characters appear as typed text on the screen.
To show or hide the input panel, tap . To see input options, tap .
To display the system information:
1. Tap > Settings > System tab > System Information icon
7RGLVSOD\WKHGHYLFHVSHFLÀFDWLRQVWDSDevice Info tab. This will
display various information such as the device ID, system memory, and
wireless capabilities.
3. Tap the Version tab to view other information about the device.
NOTE appears beside only when the input panel is not
hidden.
Chapter 2 Basics
Viewing system information
<RXUGHYLFHDOORZV\RXWRHDVLO\GLVSOD\WKHEXLOWLQVSHFLÀFDWLRQV
NOTE You cannot change the information you see in the system
information screens.
12
Chapter 2
To use Letter Recognizer:
:LWKWKH/HWWHU5HFRJQL]HU\RXFDQZULWHOHWWHUVRQWKHVFUHHQZLWKWKHVW\OXV
as you would on paper.
1. Tap > Letter Recognizer.
:ULWHDOHWWHUZLWKLQWKHZULWLQJDUHD
When you write a letter, it is converted
to a typed text that appears on the
screen. For instructions and a
demonstation on using the Letter
5HFRJQL]HUWDS next to the writing
area.
To type with the soft keyboard:
1. Tap > Keyboard.
7DSWKHNH\VRQWKHRQVFUHHQ
keyboard with the stylus to enter
information.
Word completion feature
When you use the Input Panel and the soft keyboard, your device
anticipates the word you are typing and displays it above the Input Panel.
When you tap the displayed word, it is inserted into your text at the
insertion point. The more you use your device, the more words it learns to
anticipate.
To change options on the word
completion feature:
1. Tap > Settings > Personal tab >
Input > Word Completion tab.
0DNH\RXUGHVLUHGFKDQJHVWKHQWDS
ok.
Select an
input method
Tap to show or hide the input panel
Tap to display the input method options
Tap here if this is the word you wish to use

Basics
13
To use Block Recognizer:
:LWKWKH%ORFN5HFRJQL]HU\RXFDQLQSXWFKDUDFWHUVWURNHVWKDWDUHVLPLODU
to those used on other devices.
1. Tap > Block Recognizer.
:ULWHDOHWWHUZLWKLQWKHZULWLQJDUHD
When you write a letter, it is converted to
a typed text that appears on the screen.
For instructions and a demonstration on
XVLQJWKH%ORFN5HFRJQL]HUWDS
next to the writing area.
To use Transcriber:
With Transcriber, you can use the stylus to write anywhere on the screen
DV\RXZRXOGRQSDSHU8QOLNH/HWWHU5HFRJQL]HUDQG%ORFN5HFRJQL]HU
you can write a sentence or additional information. Pause after writing and
let Transcriber convert the written characters to typed characters.
1. Tap > Transcriber.
:ULWHDQ\ZKHUHRQWKHVFUHHQ
For instructions and demonstration on
using Transcriber, with Transcriber open,
tap at the lower right corner of the
screen.
To edit typed text:
1. Select the text that you wish to edit using either one of the following:
• drag the stylus over the text
• tap twice to select a word
• tap three times to select a paragraph
7DSMenu on the Menu bar and select an action, or use one of the
tools in the Input Panel to enter a new text.
14
Chapter 2
To edit your writing:
1. Tap and hold the stylus next to the text that you wish to select until the
insertion point appears.
,QRUGHUWRVHOHFWDWH[WWDSMenu > Draw. Make sure Draw has no
check mark beside it.
3. Drag the stylus across the text you want to select.
If you accidentally write on the screen, tap Menu > Undo Ink and try
again.
4. Tap Menu on the Menu bar then select an action, or use one of the
tools in the Input Panel to enter a new text.
To convert writing to text:
• Tap Menu > Tools > Recognize.
To select a zoom level:
• Tap Menu > Zoom)URPWKHOLVWWDSD]RRPSHUFHQWDJH
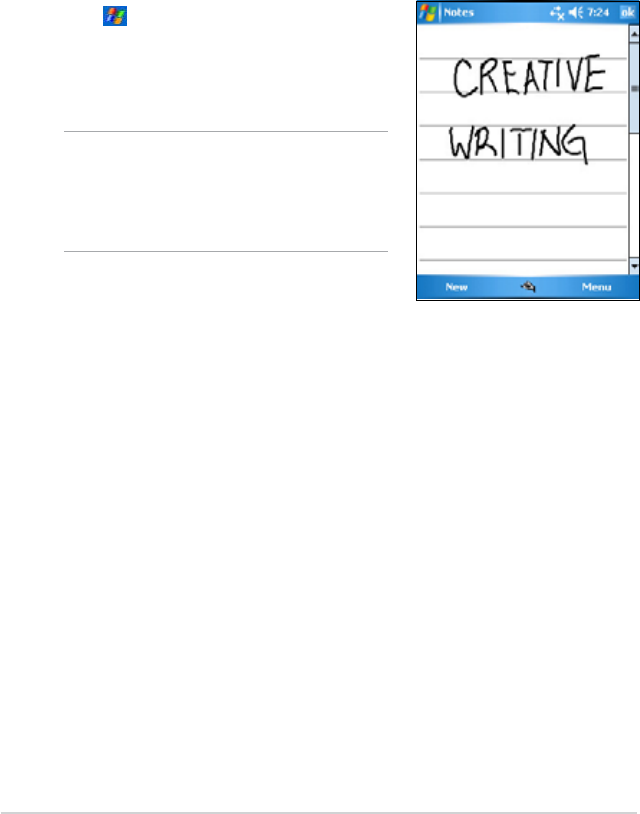
Writing on the screen
In any program that accepts writing, such as the Notes program, and in
the Notes tab in Calendar, Contacts, and Tasks, you can use the stylus to
write directly on the screen. Write the way you do on paper. You can edit
and format what you have written and convert the writing to text at a later
time.
To write on the screen:
1. Tap > Programs > Notes > New
7KHVFUHHQGLVSOD\VDEODQNVSDFHZLWK
lines to help you write.
3. Write your text.
NOTE Some programs that accept
writing may not have the Pen
button. See the documentation
IRUWKDWSURJUDPWRÀQGRXWKRZ
to switch to writing mode.
Basics
15
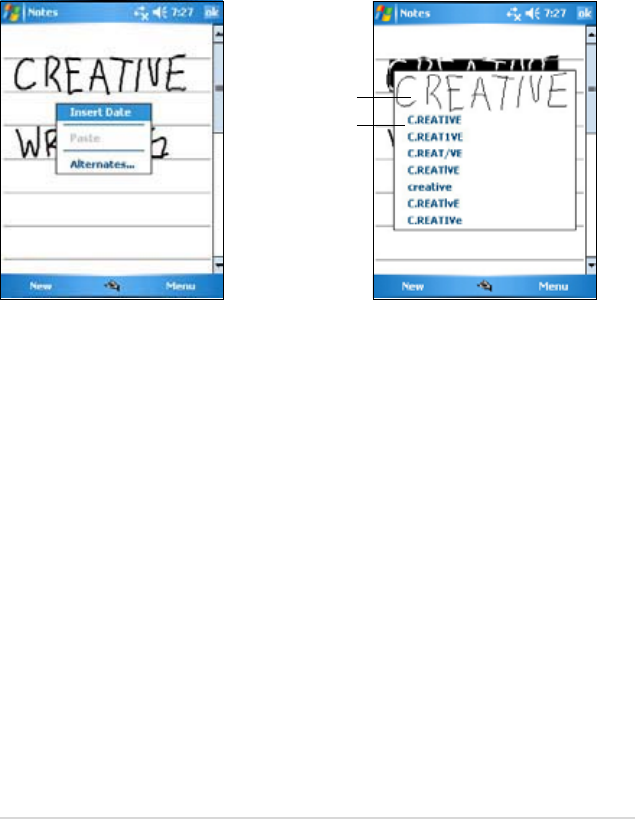
If the conversion is incorrect, you can select different words from a list of
alternates or return to the original writing.
1. Tap and hold the incorrect word.
:KHQWKHSRSXSPHQXDSSHDUVWDSAlternates to display a list of
alternate words for the selection.
3. Tap the word that you want to use, or tap the writing at the top of the
menu to return to the original writing.
Tips for getting good writing recognition
• Write neatly.
• Write on the line and draw descenders below the line. Write the cross
of the “t” and apostrophes below the top line so that they are not
confused with the word above. Write periods and commas above the
line.
)RUEHWWHUUHFRJQLWLRQWU\LQFUHDVLQJWKH]RRPOHYHOWRXVLQJWKH
Tools menu.
• Write the letters of a word closely and leave big gaps between words
so that the device can easily tell where the words begin and end.
• Hyphenated words, foreign words that use special characters such as
accents, and some punctuation cannot be converted.
• If you add writing to a word or change it after the word has been
UHFRJQL]HGWKHZULWLQJWKDW\RXDGGHGZLOOEHLQFOXGHGZKHQ\RXWU\WR
UHFRJQL]HWKHZULWLQJDJDLQ
Tap to return to your
original writing
Or, tap the word that
you want to use
16
Chapter 2
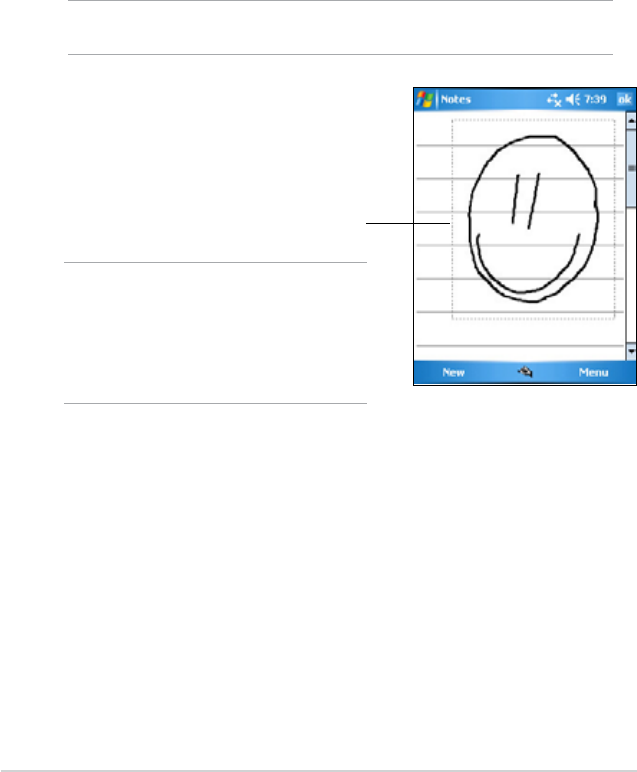
Drawing on the screen
You can draw on the screen in the same way that you write on the screen.
The difference between writing and drawing on the screen is how you
select items and how they can be edited. For example, selected drawings
FDQEHUHVL]HGZKLOHZULWLQJFDQQRW
To create a drawing:
1. Use the stylus to make a stroke that extends over three lines on the
screen. A drawing box appears around the stroke.
NOTE If the drawing does not cross over three lines, the drawing
box does not appear.
NOTE To easily work on or view
your drawing, change the
]RRPOHYHOE\WDSSLQJ
Menu > Zoom and
selecting your desired
]RRP
To edit your drawing:
1. Tap and hold the stylus on the drawing until the selection handle
appears. To select multiple drawings, drag to select the drawings you
want.
7DSDQGKROGWKHVHOHFWHGGUDZLQJWKHQWDSDQHGLWLQJFRPPDQGRQ
the pop-up menu or tap a command on the Menu.
5HVL]HWKHGUDZLQJE\GUDJJLQJDVHOHFWLRQKDQGOHWR\RXUGHVLUHG
VL]H
The drawing box indicates the
boundaries of the drawing
&RQWLQXHGUDZLQJ,I\RXUVXEVHTXHQW
strokes extend outside the box, you will
notice that the drawing box expands to
enclose all the strokes.
Basics
17
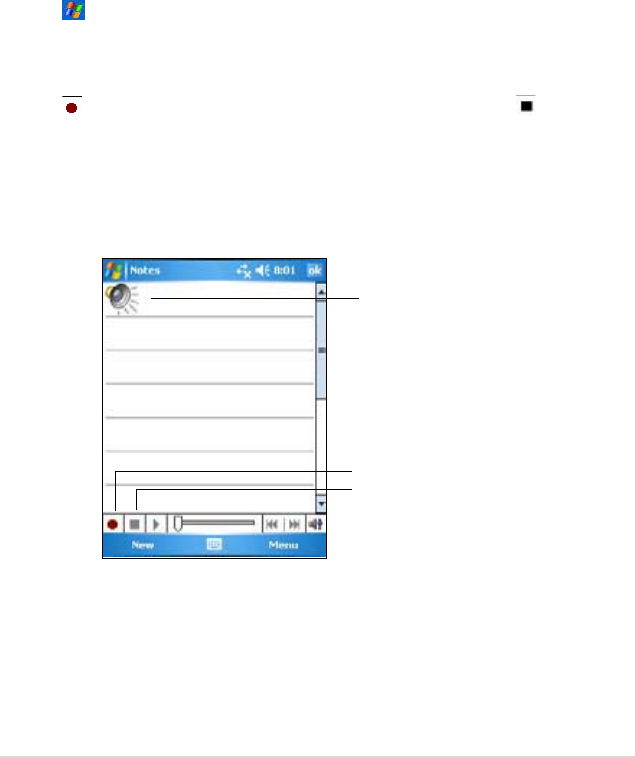
Recording a message
In any program where you can write or draw on the screen, you can also
quickly capture thoughts, reminders, and phone numbers by recording a
message. In Calendar, Tasks, and Contacts, you can include a recording
in the Notes tab. In the Notes program, you can either create a standalone
recording or include a recording in a written note. If you want to include the
UHFRUGLQJLQDQRWHRSHQWKHQRWHÀUVW,QWKH,QER[SURJUDP\RXFDQDGG
a recording to an e-mail message.
To create a recording:
1. Tap > Programs > Notes > Menu > View Recording Toolbar.
+ROG\RXUGHYLFHZLWKWKHPLFURSKRQHQHDU\RXUPRXWKRURWKHUVRXUFH
of sound.
3. Tap (red button) to begin recording. To stop recording, tap .
You will hear two beeps when you stop recording.
4. The new recording appears in the Notes list, or as an embedded icon.
To play the recording, tap it from the list, or if embedded in a note, tap
the Speaker icon.
Speaker icon indicates an
embedded recording
Tap to begin recording
Tap to stop recording
18
Chapter 2
To use the Help feature:
1. Tap > Help.
7DSDOLQNWRWKHWRSLFWKDW\RXZLVKWR
display.
NOTE Compared to other settings, the Pulse Code Modulation
(PCM) provides slightly better sound quality but takes up 50
times more storage space than Mobile Voice recordings.
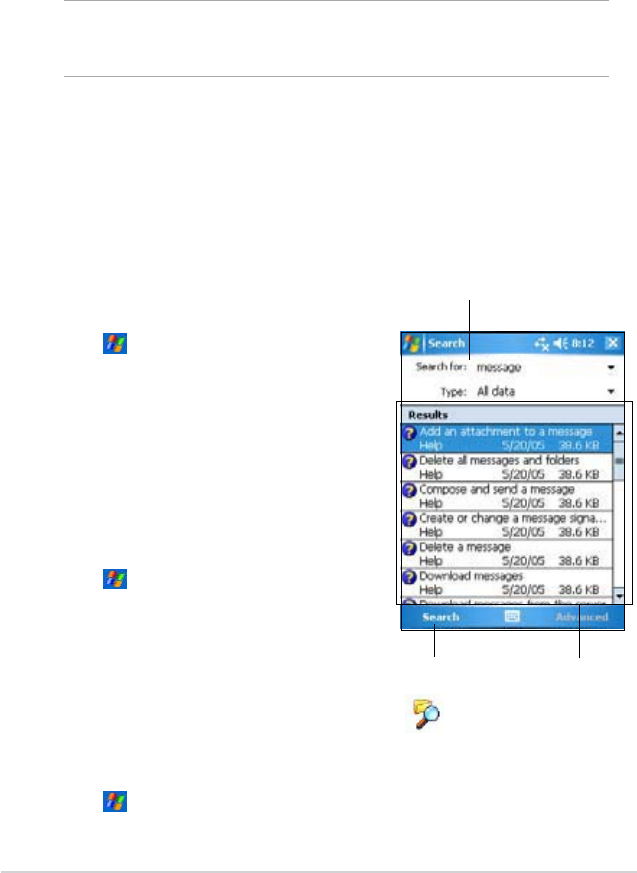
Finding and organizing information
The Search and Help features on your device helps you quickly locate
information.
Using the Search function
To search for information:
1. Tap > Help > Search.
(QWHUWKHWH[WWKDW\RXZDQWWRÀQG
select a data type, then tap Search
WRVWDUWWKHVHDUFK7RTXLFNO\ÀQG
information that is taking up space on
your device, select Larger than 64
KB in Type.
7\SHDZRUGWRÀQG
Tap to search for the word
Topics found containing
the searched word
To change the recording format:
1. In the note list, tap Menu > Options > Global Input Options link >
Options tab.
6HOHFW\RXUGHVLUHGUHFRUGLQJIRUPDWIURPWKHVoice recording format
pull-down menu then tap ok when done.
Using the File Explorer
7RXVHWKH)LOH([SORUHUWRÀQGDQGRUJDQL]HÀOHV
• Tap > Programs > File ExplorerLFRQWRGLVSOD\WKHÀOHVLQ\RXU
device.
Basics
19
Changing the date and time
To change the date and time settings:
1. Tap > Settings > System tab > Clock & Alarms icon.
8QGHUWKHTime tab, make your desired settings.
NOTE Tap the More tab and select Display the clock in the title
bar in all programs to display the clock on the top right
corner of the screen all the time.
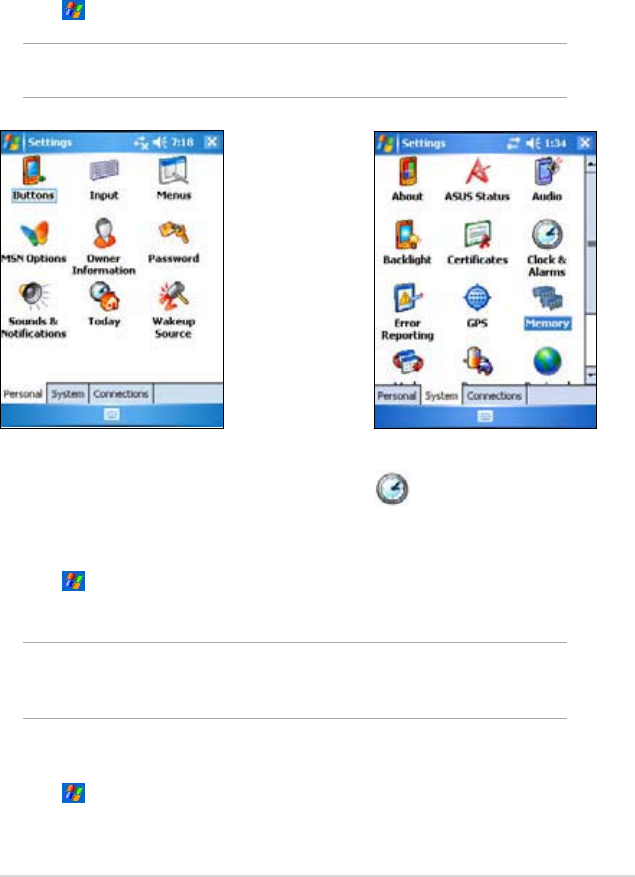
Customizing your device
<RXFDQFXVWRPL]H\RXUGHYLFHE\DGMXVWLQJWKHVHWWLQJVXVLQJWKHEXLOWLQ
programs, and installing additional software.
To see the available options:
• Tap > Settings > Personal or System tab.
NOTE Tap and hold the slider on the right side of the screen to
display other Settings icons.
To change the alarm settings:
1. Tap > Settings > System tab > Clock & Alarms icon > Alarms tab.
0DNH\RXUGHVLUHGVHWWLQJV
20
Chapter 2
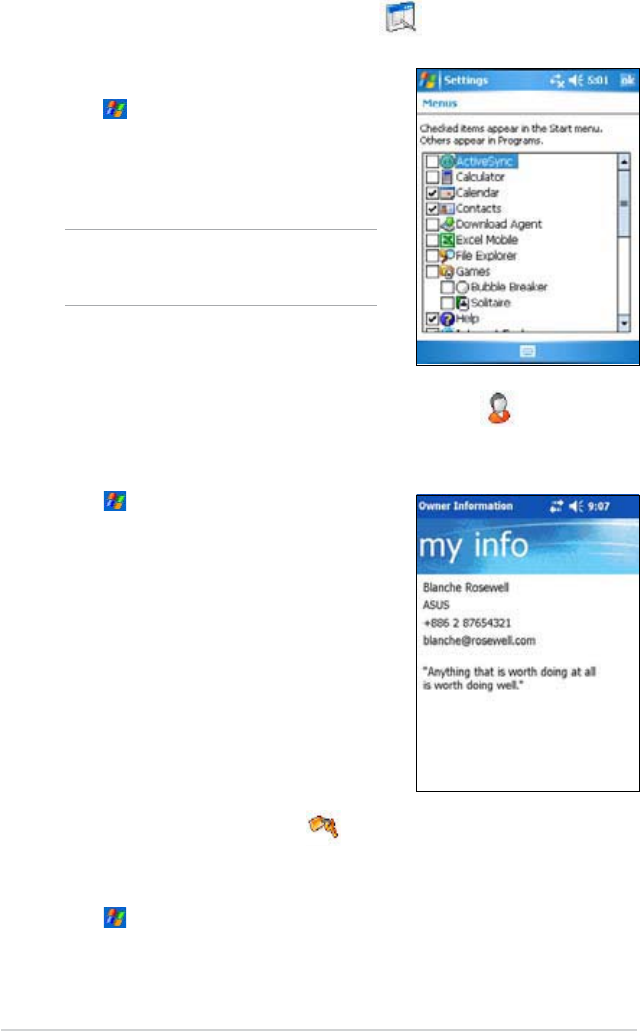
Changing the owner information
To change the owner information:
1. Tap > Settings > Owner
Information icon.
.H\LQWKHGDWDWKDW\RXZLVKWRDSSHDU
on the Today screen.
3. Add notes to the owner information by
tapping the Notes tab.
4. Key-in your desired text.
5. Tap the Options tab, then select the
items that you wish to appear on-screen
whenever you turn on the device. Tap
ok when done.
Changing the start menu
To change the menu items:
1. Tap > Settings > Menus icon.
&KHFNWKHER[RSSRVLWHWKHLWHPVWKDW\RX
wish to appear on the Start Menu.
3. Tap ok.
NOTE Items that are not added in
the Start menu can be found
in the Programs.
Setting a password
To set a password for your device:
1. Tap > Settings > Lock icon.
&KHFNWKHER[Prompt if device unused, then select the period from
the available options by tapping the down arrow.
Basics
21
3. Select the password type, Simple 4 digit or Strong alphanumeric.
4. Key-in a password. If you selected the Strong alphanumeric type of
password, you need to key-in the password twice.
5. Tap the Hint tab to create a kind of reminder in case you forget your
password.
6. Tap ok when done.
Changing the screen display orientation
To change the screen display orientation:
1. Tap > Settings > System tab > Screen icon.
6HOHFW\RXUGHVLUHGRULHQWDWLRQWKHQWDSok.
Portrait orientation
Tap to change the screen display orientation
Landscape orientation (Default)
22
Chapter 2
To enable the ClearType feature:
1. Tap > Settings > System tab > Screen icon > Clear Type tab.
&KHFNWKHEnable Clear Type box, then tap ok.
To change the screen text size:
1. Tap > Settings > System tab > Screen icon > Text Size tab.
0RYHWKHVOLGHUWRZDUGWKHSmallest or Largest until you attain your
GHVLUHGWH[WVL]H7DSok.
NOTE The slider is set on the middle by default.
Changing the screen theme
To specify the items to appear on the Today screen:
1. Tap > Settings > Today icon > Items tab.
&KHFNWKHER[RSSRVLWH\RXUGHVLUHGLWHPV7DSok when done.
Changing the button assignments
To change the screen theme:
1. Tap > Settings > Today icon.
6HOHFW\RXUGHVLUHGWKHPHIURPWKHDYDLODEOHRSWLRQV
or
Check the box Use this picture as the background, then tap Browse
WRVHOHFWDQLPDJHIURP\RXUSLFWXUHÀOHV
3. Tap ok when done.
To change the button assignments:
1. Tap > Settings > Buttons icon.
+LJKOLJKWDEXWWRQE\WDSSLQJRQLW
3. Tap the down arrow to display the programs that you can assign to the
button.
5HSHDWVWHSVWRWRFKDQJHRWKHUEXWWRQDVVLJQPHQWV
5. Tap ok when done.

Basics
23
To customize the button setttings:
1. Tap the Up/Down Control tab.
7DSWKHVOLGHUWR\RXUGHVLUHGVHWWLQJVRI8S'RZQEXWWRQUHDFWLRQWLPH
3. Tap the Advance tab to set options for the key light and hold switch.
4. Tap ok when done.
Using Mode Switcher and Task Switcher
On the rightmost group of buttons on the device (see Chapter 1),
its right button functions, by default, as the Mode Switcher button which
allows you to quickly toggle between the Today screen, Windows Media
Player, and Rotate screen. The Mode Switcher box appears on-screen
when you press this button.
To customize Mode Switcher:
1. Tap > Settings > System tab > Mode Switcher > Display
settings tab.
7KHWKUHHSURJUDPVPHQWLRQHGHDUOLHUDUHVHOHFWHGE\GHIDXOWWREH
included in the Mode Switcher box. You may remove a program by
deselecting the corresponding checkbox.
3. To change the ordering of the programs, tap or button.
4. Select the checkbox under if you want to add an Exit icon to the
Mode Switcher box.
5. Tap ok when done.
If you want to change the button assignment to become the Task Switcher
button, follow the steps below. Task Switcher allows you to toggle between
currently running programs.
To enable Task Switcher:
1. Tap > Settings > System tab > Mode Switcher > Basic tab, then
select Task Switcher.
7DSok.
NOTE In the Basic tab, you can increase the delay time for showing
the Mode Switcher or Task Switcher box to give you more
time to make selections.

24
Chapter 2
Changing the battery power settings
To change the battery power settings:
1. Tap > Settings > System tab > Power icon to display the battery
power status. This screen shows the detected percentages of the
remaining battery power. You may not change the information on this
screen.
7DSWKHAdvancedWDEWRFXVWRPL]HWKHVHWWLQJVIRUWKHEDWWHU\WR
conserve power.
3. Tap the CPU Mode tab to set the processing power to use when using
programs.
•Maximum - allows better CPU performance. Set to this mode
when playing games or playing video. However, setting to Turbo
mode may reduce the battery life.
•Normal - allows for a normal CPU speed and more stable
SHUIRUPDQFH6HWWRWKLVPRGHZKHQOLVWHQLQJWR03DXGLRÀOHVRU
for applications that do not require very fast CPU speed.
•Power Save - sets the CPU to a lower speed. This mode has
a lower CPU performance but extends the battery life. Set to this
mode when using text based applications such as Word, Excel, etc.
• For automatic power saving, tick the circle beside Auto. This
PRGHDGMXVWVWKH&38VSHHGGHSHQGLQJRQWKHSURJUDPWKDW\RX
are running.
4. Tap ok when done.
Setting the backlight
To set the backlight:
1. Tap > Settings > System tab > Backlight icon.
$GMXVWWKHGLVSOD\EULJKWQHVVE\GUDJJLQJWKHVOLGHUWRZDUGVDark or
Bright until you achieve your desired screen brightness.
3. Tap the AdvanceWDEDQGFXVWRPL]HWKHEDFNOLJKWVHWWLQJVZKHQXVLQJ
battery power and AC power.
4. Tap ok when done.

Basics
25
Changing the audio settings
To change the Audio settings:
1. Tap > Settings > System tab > Audio icon.
$GMXVWWKHYROXPHEDODQFHWUHEOHDQGEDVVDQG'VHWWLQJVE\
dragging the slider to the left or to the right until you achieve your
desired sound output.
3. Tap ok when done.
NOTE Tap the Default button to restore the default audio settings.
6HOHFWLQJVRXQGVDQGQRWLÀFDWLRQV
Your device can remind you of things you have to do in several ways. For
example, if you have set up an appointment in Calendar, a task with a due
GDWHRUDQDODUPLQ&ORFN\RXZLOOEHQRWLÀHGLQDQ\RIWKHIROORZLQJZD\V
• A message box appears on the screen
• A sound is played (you can select the type of sound)
$OLJKWÁDVKHVRQWKHGHYLFH
7RVHWVRXQGVDQGQRWLÀFDWLRQV
1. Tap > Settings > Personal tab > 6RXQGV1RWLÀFDWLRQVicon >
Sounds tab then select the items that you wish to enable.
7DSWKH1RWLÀFDWLRQVWDEDQGVHWWKHHYHQWQRWLÀFDWLRQGHWDLOV
3. Tap ok when done.
To change the Microphone settings:
1. Tap Mic tab from the audio settings screen.
,QMIC Gain ControlFKRRVHHLWKHUWRPDQXDOO\DGMXVWWKHJDLQFRQWURO
RUOHWWKHGHYLFHDXWRPDWLFDOO\DGMXVWWKHUHFRUGLQJYROXPH$GMXVWWKH
volume to high or low by dragging the slider to the left or to the right.
NOTE Tap Default to revert to the default settings.

26
Chapter 2
Changing the wakeup settings
1. Tap > Settings > Personal tab > Wakeup Source icon.
&KHFNWKHER[HVRIWKHLWHPVWRFRQWUROZKDWIXQFWLRQVFRQGLWLRQVZLOO
turn on the device’s power. Pressing any one of the function buttons on
the front panel wakes up the device.
3. Tap ok when done.
Changing the USB settings
To change the USB settings:
1. Tap > Settings > Connections tab > USB Settings icon.
&KRRVHD86%,QWHUIDFH
•Transmission as Network InterfaceFRQÀJXUHV\RXUGHYLFHDV
a network card so that you can connect it to a PC to browse the
Internet, etc.
•Transmission as Serial Interface - allows a serial connection
between your device and PC. Select this when using ActiveSync.
•Simulation as Card Reader - turns your device into a mass
storage unit similar to a card reader.
•Simulation as Flash Disk - turns your device into a mass storage
XQLWVLPLODUWRDQH[WHUQDOÁDVKGLVN7KHLQWHUQDOÁDVKLVPRUHWKDQ
800MB for map storage and more.
3. Tap ok when done.
To change the USB charging mode:
1. Tap USB Charger tab from the USB Settings screen.
&KRRVHD86%FKDUJLQJPRGH
•Slow Charging - to use this mode, your PC needs to support 100mA.
•Fast Charging - to use this mode, your PC needs to support 500mA.
3. Tap ok when done.
NOTE To avoid overcharge, charging automatically stops after 5
hours. In Fast Charging mode, the device is able to be fully
charged within 5 hours, but in Slow Charging mode, it is
neccessary to connect the device again to the power source
to get it fully charged.
Basics
27
Changing the memory settings
To check the storage card memory:
1. Tap > Settings > System tab > Memory icon > Storage Card tab
to display the memory information for the selected storage card.
,I\RXZLVKWRIUHHVWRUDJHFDUGPHPRU\GHOHWHVRPHÀOHVIURPWKH
VWRUDJHFDUG8VHWKH)LOH([SORUHUWRGHOHWHÀOHV6HH´8VLQJWKH)LOH
Explorer” for information.
To display the memory allocation:
1. Tap > Settings > System tab > Memory icon.
7DSok when done.
To view the running programs:
1. Tap > Settings > System tab > Memory icon > Running
Programs tab.
,I\RXZLVKWRIUHHVRPHV\VWHPPHPRU\FXUUHQWO\XVHGE\WKHUXQQLQJ
programs, select a program then tap Stop.
To stop all running programs, tap Stop All.
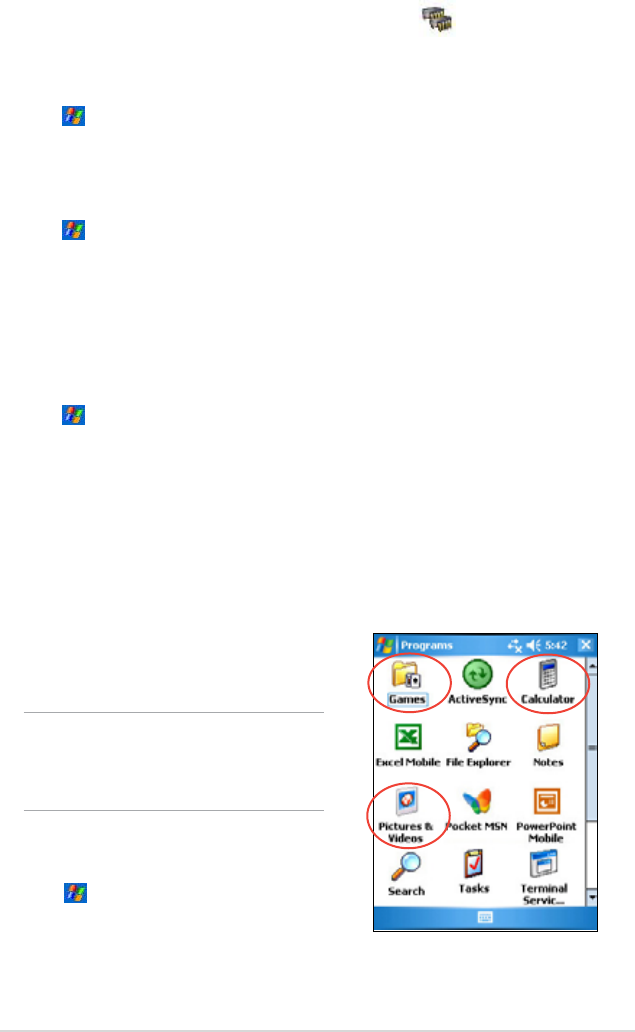
Using simple applications
Your device includes several simple
applications that are useful in your day-to-
day use of your device.
NOTE 7KHPDMRUDSSOLFDWLRQVWKDW
came with the Microsoft®
Windows Mobile® 5.0 are
discussed in other chapters.
To access the applications:
1. Tap > Programs.
7DSDQLFRQWRODXQFKDVSHFLÀF
application program.
28
Chapter 2
Calculator
Tap the Calculator icon to use basic calculator functions.
Games
Tap the Games icon to display the available games.
Bubble Breaker
7KHPDLQREMHFWLYHRIWKLVJDPHLVWREXUVWDOOWKHEXEEOHV7RGRVRWDS
two or more bubbles of the same color that are connected to each other.
The more bubbles you burst at a time, the higher your score.
Pictures & Videos
Use Pictures & Videos to view pictures and play back videos of various
formats stored in your device or in a storage card. You can then send them
to your friends, view a slideshow of your pictures, play back the video or
set a picture as background on the Today screen.
Refer also to the online help on your device for more information on using
this feature.
To use Pictures:
1. Tap > Programs > Pictures & Videos icon.
7DSWKHWKXPEQDLORIWKHSLFWXUHRUYLGHRWKDW\RXZLVKWRRSHQ
3. When the picture or video appears on the screen, tap MenuWR]RRP
]RRPLQ]RRPRXWRUÀWWKHLPDJHWRZLQGRZSOD\VOLGHVKRZHGLW
your picture or play back the video.
Solitaire
7KHPDLQREMHFWLYHRIWKLVJDPHLVWRXVHDOOWKHFDUGVLQWKHGHFNWREXLOG
up four suit stacks in ascending order, beginning with the aces.
NOTE For details on the game rules, see the Help information
on your device by tapping > Help > Contents > Play
Games.
Basics
29
To use Auto Correct:
• Tap Menu > Edit > Menu > Auto Correct WRDXWRPDWLFDOO\DGMXVWWKH
picture.
NOTE Tap Menu > Undo to reverse the last action made. Tap
Revert to Saved to reverse all actions done on the picture.
4. Tap Menu > Set as Today Background... to use the picture as your
wallpaper in the Today screen.
or
Tap Menu > Beam picture... if you wish to send the picture to another
device with IR port.
5. Tap Send on the Menu bar to attach the picture to an e-mail.
To rotate the picture:
• Tap Menu > Edit > Rotate from the Menu bar. Each tap of Rotate
turns the picture 90 degrees clockwise.
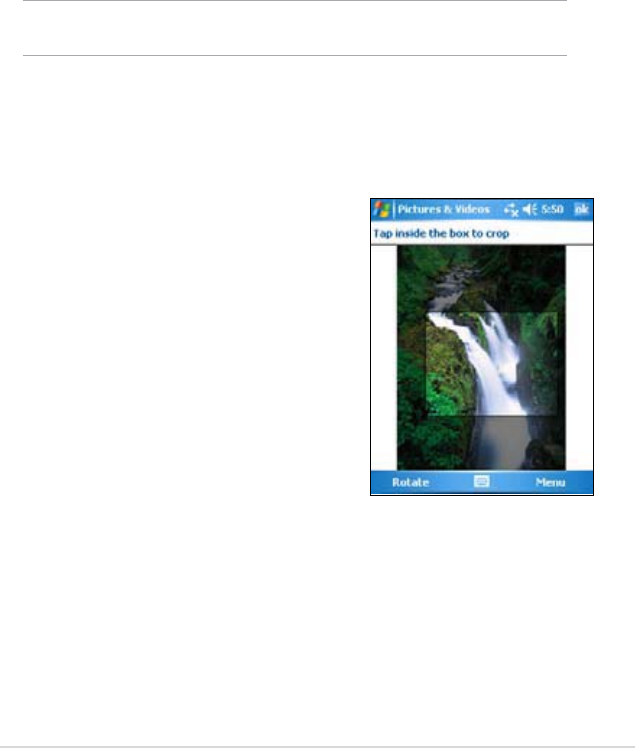
To crop the picture:
1. Tap Menu > Edit > Menu > Crop.
'UDJWKHVW\OXVSHQRYHUWKHVFUHHQWR
select the part of the picture you want to
retain.
3. Tap inside the crop box to crop the
picture.
4. Tap Undo to reverse the last action
made.
To save the picture:
• Tap Menu > Save As in order to save the changes after editing the
picture.
30
Chapter 2
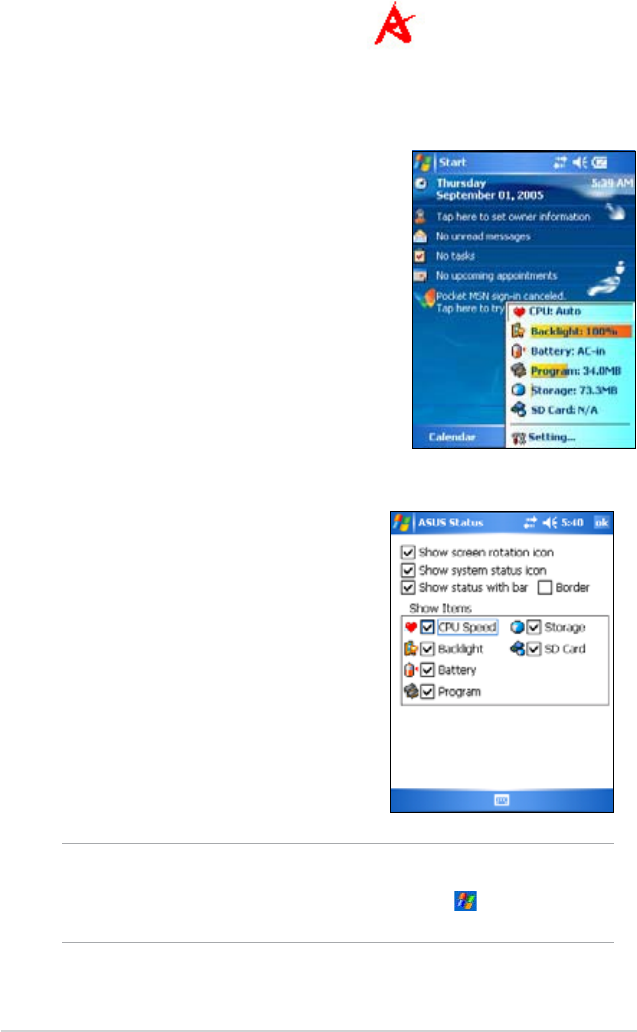
Checking Device Status
Quickly view essential device information such as storage usage and
battery life by using ASUS Status.
To open ASUS Status:
1. Tap the ASUS Status icon at the lower
right corner of the screen.
$PHQXRSHQVGLVSOD\LQJJHQHUDO
information about your device. Tap an
item to access more options for that
particular item.
To change Asus Status settings:
1. Tap the ASUS Status icon at the lower
right corner of the screen then tap
Setting...
0DNHWKHGHVLUHGVHOHFWLRQVIURP
the available items. You can remove
items from the ASUS Status menu
by clearing the box beside the items
under Show Items.
3. Tap ok to make the changes.
NOTE If you clear the box beside the Show system status icon, the
ASUS Status icon will not show on the Today screen. To make
the ASUS Status icon appear again, tap > Settings >
System tab > ASUS Status icon.

Synchronize and Enhance
31
Chapter 3
Synchronize and Enhance
Microsoft® ActiveSync®
The Microsoft® ActiveSync® is one of the important bundled programs in
0\3DO:LWK$FWLYH6\QF\RXFDQV\QFKURQL]HWKHLQIRUPDWLRQRQ\RXU
GHVNWRSFRPSXWHUZLWKWKHLQIRUPDWLRQRQ\RXUGHYLFH6\QFKURQL]DWLRQ
compares the data on your device with your desktop computer and
updates both computers with the most recent information. To get the latest
version of Microsoft® ActiveSync®, visit the website: www. microsoft.com/
windowsmobile/help/activesync/default.mspx#disclaimer.
For example:
.HHS3RFNHW2XWORRNGDWDXSWRGDWHE\V\QFKURQL]LQJ\RXUGHYLFH
with Microsoft Outlook data on your desktop computer.
6\QFKURQL]H0LFURVRIW:RUGDQG0LFURVRIW([FHOÀOHVEHWZHHQ\RXU
GHYLFHDQGGHVNWRSFRPSXWHU<RXUÀOHVDUHDXWRPDWLFDOO\FRQYHUWHGWR
the correct format.
NOTE %\GHIDXOW$FWLYH6\QFGRHVQRWDXWRPDWLFDOO\V\QFKURQL]H
all types of information. Use the ActiveSync options to turn
V\QFKURQL]DWLRQRQRURIIIRUVSHFLÀFLQIRUPDWLRQW\SHV
With ActiveSync, you can also:
&RS\UDWKHUWKDQV\QFKURQL]HÀOHVEHWZHHQ\RXUGHYLFHDQGGHVNWRS
computer
&RQWUROZKHQV\QFKURQL]DWLRQRFFXUVE\VHOHFWLQJDV\QFKURQL]DWLRQ
PRGH)RUH[DPSOH\RXFDQV\QFKURQL]HFRQWLQXDOO\ZKLOHFRQQHFWHG
WR\RXUGHVNWRSFRPSXWHURURQO\ZKHQ\RXFKRRVHWRV\QFKURQL]H
6HOHFWZKLFKLQIRUPDWLRQW\SHVDUHV\QFKURQL]HGDQGFRQWUROKRZPXFK
GDWDLVV\QFKURQL]HG)RUH[DPSOH\RXFDQFKRRVHWRV\QFKURQL]H
your appointments of the past two weeks only, appointments older than
WZRZHHNVDUHQRWV\QFKURQL]HG
For more information about using ActiveSync:
1. Start ActiveSync on your desktop computer.
2QWKH$FWLYH6\QFPHQXEDUFOLFNHelp > Microsoft ActiveSync
Help.
32
Chapter 3
Installing ActiveSync® on your computer
The ActiveSync program is already installed on your device. To
V\QFKURQL]HLQIRUPDWLRQRQ\RXUGHYLFHZLWK\RXUFRPSXWHU\RXPXVW
also install ActiveSync on your computer. Install ActiveSync from the
Companion CD that came with your product package.
NOTE Before starting the ActiveSync installation, make sure that
you have Microsoft® Outlook® installed on your computer.
If you do not have Outlook, install the Microsoft® Outlook®
from the Companion CD. If you have Outlook 98 or Outlook
LQVWDOOHG\RXDUHHQFRXUDJHGWRXSGDWHWRWKH2XWORRN
bundled in the Companion CD.
To install ActiveSync on your computer:
1. Turn on your computer and monitor.
IMPORTANT Do not connect your device to your computer until you
KDYHÀQLVKHGLQVWDOOLQJ$FWLYH6\QF
3ODFHWKH&RPSDQLRQ&'LQWRWKHRSWLFDOGULYHRI\RXUFRPSXWHU7KH
CD autoruns and displays the initial screen, then the Main Menu from
which you can start the installation.
3. Read the Overview before installing ActiveSync and Outlook to make
sure that you perform the installation sequence correctly, and then click
“Next”.
4. Follow the instructions on the succeeding screens.
If you have previously installed ActiveSync in your computer, the
LQVWDOODWLRQZL]DUGGHWHFWVLWDQGSURPSWV\RXZLWKDPHVVDJH
Synchronize and Enhance
33
NOTE You may connect your Pocket PC to your computer right after
installing ActiveSync. Make sure that the Transmission as
Network Interface or Transmission as Serial Interface
option is selected in Settings > Connections tab > USB
Settings.
Click Next to continue installing and replace the current version.
Click Cancel to quit and keep the current version.
:DLWXQWLOWKHZL]DUGÀQLVKHVFRS\LQJDOOWKHQHFHVVDU\ÀOHVDQG
updates your system.
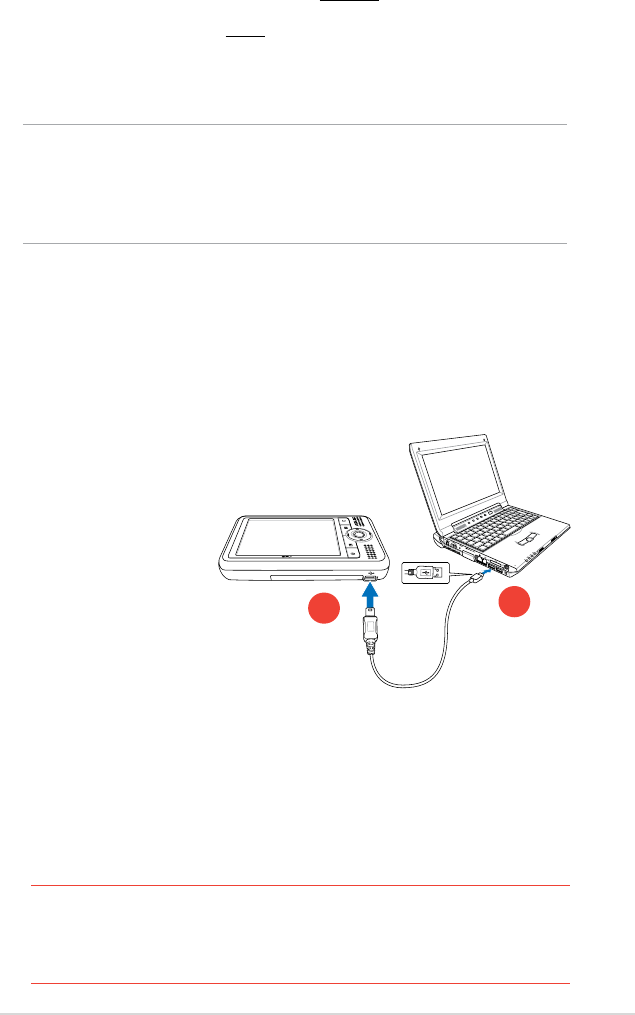
Synchronizing your device
Connecting your device to a computer
1. Connect the mini
USB device plug of
the sync cable to the
mini USB connector
at the left side of
your device.
&RQQHFWWKHRWKHU
end of the sync cable
to a USB port on
your computer.
1
Setting up a sync relationship
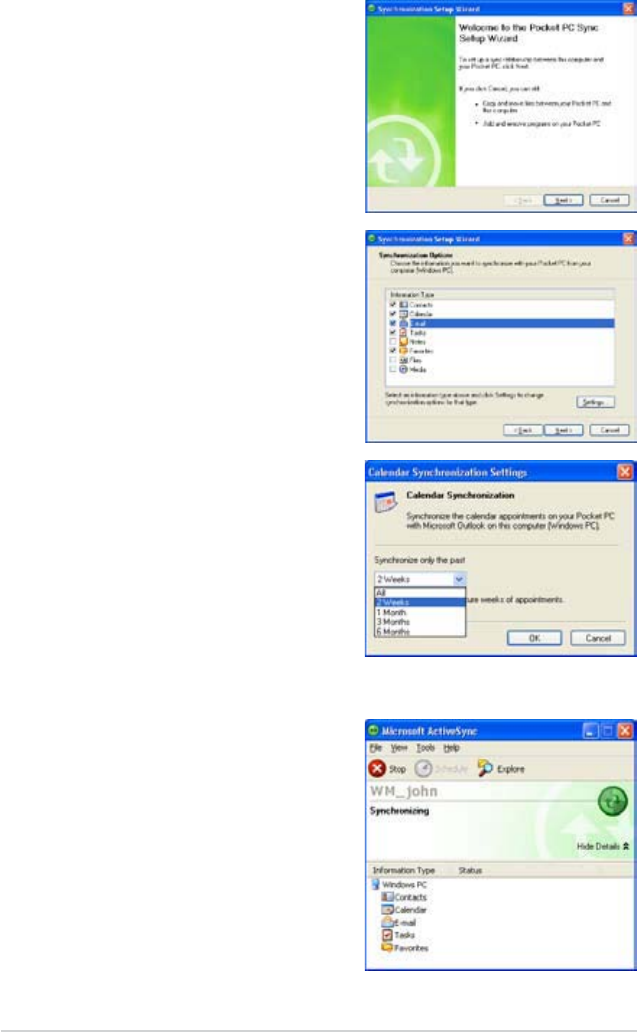
Immediately after you have completed the installation, the Sync Setup ZL]DUG
ZLOOVWDUWDXWRPDWLFDOO\WRKHOS\RXHVWDEOLVKDV\QFUHODWLRQVKLSDQGFXVWRPL]H
\RXUV\QFKURQL]DWLRQVHWWLQJV$WWKLVSRLQW\RXFDQGHFLGHH[DFWO\ZKLFK
W\SHVRILQIRUPDWLRQ\RXZRXOGOLNHWRV\QFKURQL]HZLWK\RXUFRPSXWHU
A sync relationshipLVDÀOHWKDWDOORZV\RXWRV\QFKURQL]H\RXU
GHYLFHZLWK\RXUGHVNWRSFRPSXWHU7KLVÀOHLVVWRUHGRQ\RXU
GHVNWRSFRPSXWHU$QDGGLWLRQDOÀOHWKDWHQDEOHV\RXUGHVNWRS
FRPSXWHUWRUHFRJQL]H\RXUGHYLFHLVVWRUHGRQ\RXUGHYLFH
34
Chapter 3
To set up a sync relationship:
2QWKH6\QFKURQL]DWLRQ6HWXS
:L]DUGVFUHHQFOLFNNext.
6HOHFWWKHW\SHRILQIRUPDWLRQ
WKDW\RXZLVKWRV\QFKURQL]H
then click Next. If you wish to
FXVWRPL]HDV\QFKURQL]HGLWHP
highlight the item then click
Settings.
2QWKH&DOHQGDU6\QFKURQL]DWLRQ
Settings window, for example,
select from the options on how
\RXZLVKWRV\QFKURQL]HWKH
appointments on your device with
your computer, then click OK.
3. Click Finish to complete the sync
relationship setup.
Immediately after you set up a
sync relationship, ActiveSync
starts automatically and initiates
WKHÀUVWV\QFKURQL]DWLRQEHWZHHQ
your device and your computer.
Refer to the succeeding
sections for more details on
V\QFKURQL]DWLRQ

Synchronize and Enhance
35
Checking synchronized information
$IWHU\RXUÀUVWV\QFKURQL]DWLRQWDNHDORRNDW&DOHQGDU&RQWDFWVDQG
Tasks on your device. You will notice that the calendar information in
Microsoft Outlook on your computer was copied to your device, and the
information that you have on your device was copied to your computer.
NOTE Open Microsoft
Outlook on your
desktop computer
to see the
details of copied
information from
your device.
Manually initiating synchronization
2QFH\RXKDYHVHWXS$FWLYH6\QFDQGFRPSOHWHGWKHÀUVWV\QFKURQL]DWLRQ
SURFHVV\RXFDQLQLWLDWHV\QFKURQL]DWLRQIURP\RXUGHYLFHDWDQ\WLPH
To manually initiate synchronization:
1. Tap > Programs > ActiveSync to display the ActiveSync screen.
Connection status
7DSWRVWRSVWDUWV\QFKURQL]DWLRQ 7DSWRFKDQJHV\QFKURQL]DWLRQVHWWLQJV

36
Chapter 3
7RVWDUWV\QFKURQL]DWLRQFRQQHFW\RXUGHYLFHWR\RXUFRPSXWHUWKHQ
tap Sync.
7RHQGV\QFKURQL]DWLRQWDSStop.
<RXPD\V\QFKURQL]HYLD,5LQIUDUHGSRUWRUEHIRUHFKDQJLQJ
V\QFKURQL]DWLRQVHWWLQJV7RGRWKLV\RXQHHGWRVWRSV\QFKURQL]DWLRQZLWK
\RXUFRPSXWHUÀUVW
NOTE )RUPRUHLQIRUPDWLRQRQV\QFKURQL]DWLRQWDS while in the
ActiveSync screen, then tap Help.
&KHFNWKHER[EHVLGHWKHLWHPWKDW\RXZLVKWRV\QFKURQL]H
+LJKOLJKWDFKHFNHGLWHPWKHQFOLFNRQSettings to specify
V\QFKURQL]DWLRQRSWLRQVIRUWKHLWHP
For example, highlight Calendar then click on Settings to display the
Calendar Synchronization SettingsZLQGRZ&XVWRPL]HWKHDYDLODEOH
settings, then click OK when done.
3. Do the same for the other checked items.
Synchronization options
7KH0LFURVRIW$FWLYH6\QFSURJUDPDOORZV\RXWRFXVWRPL]H\RXU
V\QFKURQL]DWLRQVHWWLQJVDWDQ\WLPH<RXFDQVHOHFWWKHLWHPVWR
V\QFKURQL]HVHWWKHV\QFKURQL]DWLRQVFKHGXOHDQGVSHFLI\WKH
V\QFKURQL]DWLRQUXOHV
To display the synchronization options:
• From the ActiveSync window on your desktop computer, click on the
Options icon, or
• From the menu bar, click on Tools, then Options.
To select items to synchronize:
4. Click OK when done.
NOTE You cannot set the options for unchecked items.
Microsoft
®
Pocket Outlook
37
Chapter 4
Microsoft® Pocket Outlook
Microsoft® Pocket Outlook includes Calendar, Contacts, Tasks, Notes,
and Messaging. You can use these programs individually or together. For
example, you can use an e-mail address stored in Contacts to address
e-mail messages in Messaging.
Using ActiveSync®\RXFDQV\QFKURQL]HLQIRUPDWLRQLQ0LFURVRIW2XWORRN
or Microsoft Exchange on your desktop computer with your device. You
FDQDOVRV\QFKURQL]HWKLVLQIRUPDWLRQGLUHFWO\ZLWKD0LFURVRIW([FKDQJH
VHUYHU(DFKWLPH\RXV\QFKURQL]H$FWLYH6\QFFRPSDUHVWKHFKDQJHV\RX
made on your device and desktop computer or server and updates both
computers with the latest information. For information on using ActiveSync,
see ActiveSync Help on your desktop computer.
You can switch to any of the Pocket Outlook programs by tapping .
Calendar
Use Calendar to schedule appointments, including meetings and other
events. You can check your appointments in one of several views
(Agenda, Day, Week, Month, and Year) and easily switch views using the
View menu.
NOTE <RXFDQFXVWRPL]HWKH&DOHQGDUGLVSOD\VXFKDVFKDQJLQJ
WKHÀUVWGD\RIWKHZHHNE\WDSSLQJMenu > Options.
Tap to display or edit the
appointment details
Tap to create a new
appointment
Tap to change the
calendar display by Day,
Week, Month, Year or
Agenda
38
Chapter 4
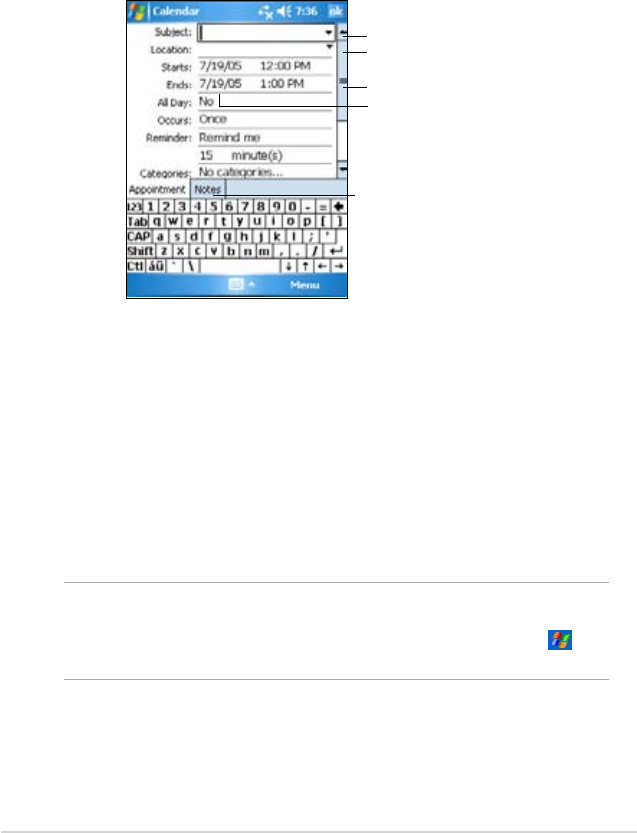
Creating appointments
To create an appointment:
1. If you are in Day or Week view, tap your desired date for the
appointment,
7DSMenu > New Appointment.
3. Using the input panel, enter a description and a location. Tap to select
WKHÀHOG
4. If needed, tap the date and time to change them.
5. Enter other desired information. You will need to hide the input panel to
VHHDOODYDLODEOHÀHOGV
6. To add notes, tap the Notes tab. You can enter text, draw, or create
a recording. For more information on creating notes, see the section
“Notes” later in this chapter.
7. When done, tap ok to return to Calendar.
7DSWRVHOHFWIURPDSUHGHÀQHGWH[W
Tap to select from previously
entered locations
Tap to specify the time of appointment
Tap to specify the date of appointment
Tap to add notes to the appointment
NOTE Tap Menu > Options... > Appointments tab to set the
device to remind you of all your new appointments. Your
device will remind you according to the options set in ,
Settings,Personal tab, 6RXQGV1RWLÀFDWLRQV.
Microsoft
®
Pocket Outlook
39
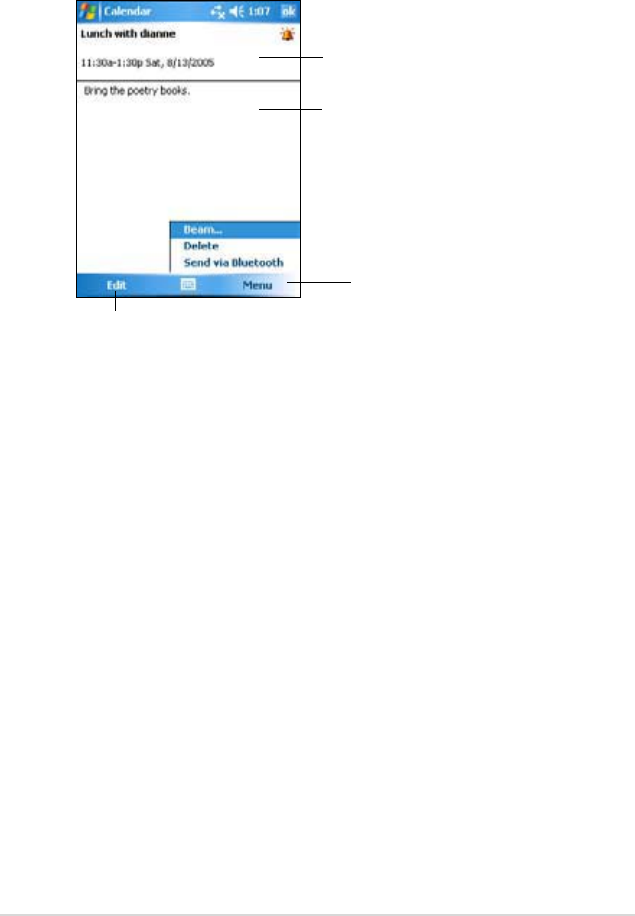
Using the summary screen
When you tap an appointment in Calendar, a summary screen appears. To
change the appointment, tap Edit.
Creating meeting requests
You can set up meetings with users of Outlook and Pocket Outlook. The
meeting request will be created automatically and sent either when you
V\QFKURQL]H,QER[RUZKHQ\RXFRQQHFWWR\RXUHPDLOVHUYHU
To create a meeting request:
1. Tap Menu > Options > Appointments tab to indicate how you want
meeting requests sent.
,I\RXVHQGDQGUHFHLYHHPDLOPHVVDJHVWKURXJK$FWLYH6\QFVHOHFW
ActiveSync.
To schedule a meeting:
1. Create an appointment.
,QWKHDSSRLQWPHQWGHWDLOVKLGHWKHLQSXWSDQHOWKHQWDSAttendees.
3. From the list of e-mail addresses you have entered in Contacts, select
the meeting attendees. Tap Add to select more contacts. Tap ok when
done.
The meeting notice is created automatically and placed in the Outbox
folder. For more information on sending and receiving meeting
requests, see Calendar and Messaging online help on the device.
Appointment details
Notes/additional information
on the appointment
Tap to change details of the appointment
Tap to show beam, delete
and send via bluetooth
options for an appointment
40
Chapter 4
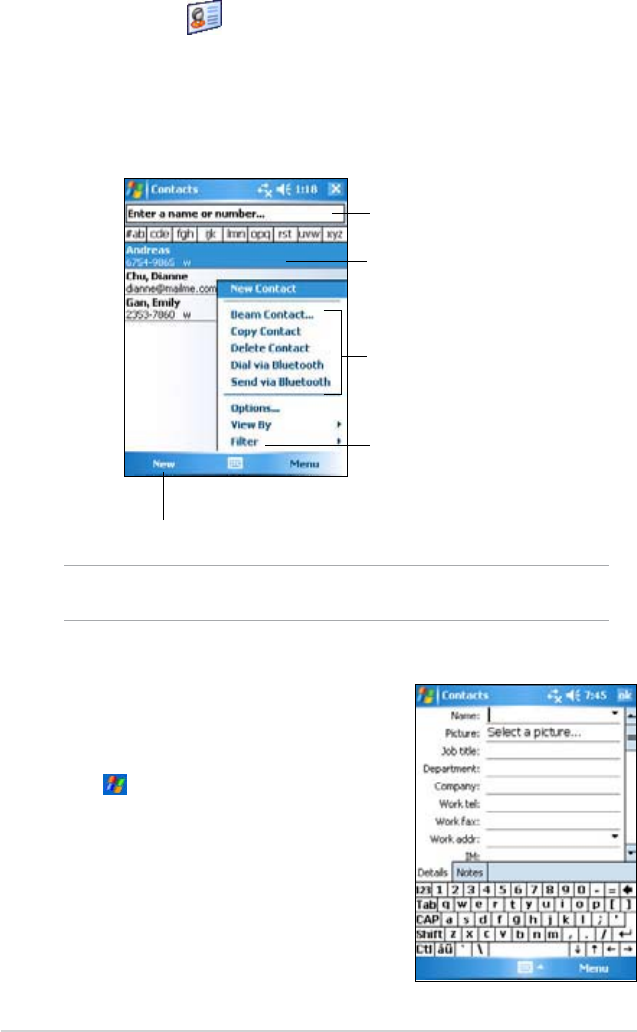
Contacts
Contacts maintains a list of your friends and colleagues so that you can
HDVLO\ÀQGWKHLQIRUPDWLRQ\RXORRNIRUZKHWKHU\RXDUHDWKRPHRURQWKH
road. Using the Bluetooth or the infrared port (IR) on the device, you can
quickly share Contacts information with other device users.
NOTE To change the way information is displayed in the list, tap
Menu > Options.
Tap and enter part of a name
WRTXLFNO\ÀQGLWRQWKHOLVW
Tap to select the category of
contacts you want to display
Tap to display or edit the contact details
Tap to create a new contact
Creating contacts
To create a contact:
1. Tap > Contacts > New.
8VLQJWKHLQSXWSDQHOHQWHUDQDPHDQG
other contact information. You will need
WRVFUROOGRZQWRVHHDOODYDLODEOHÀHOGV
3. To assign the contact a category, scroll
to and tap Categories, then select a
category from the list. On the contact
list, you can display the contacts by
category.
Tap to copy, delete, or share the
contact selected
Microsoft
®
Pocket Outlook
41
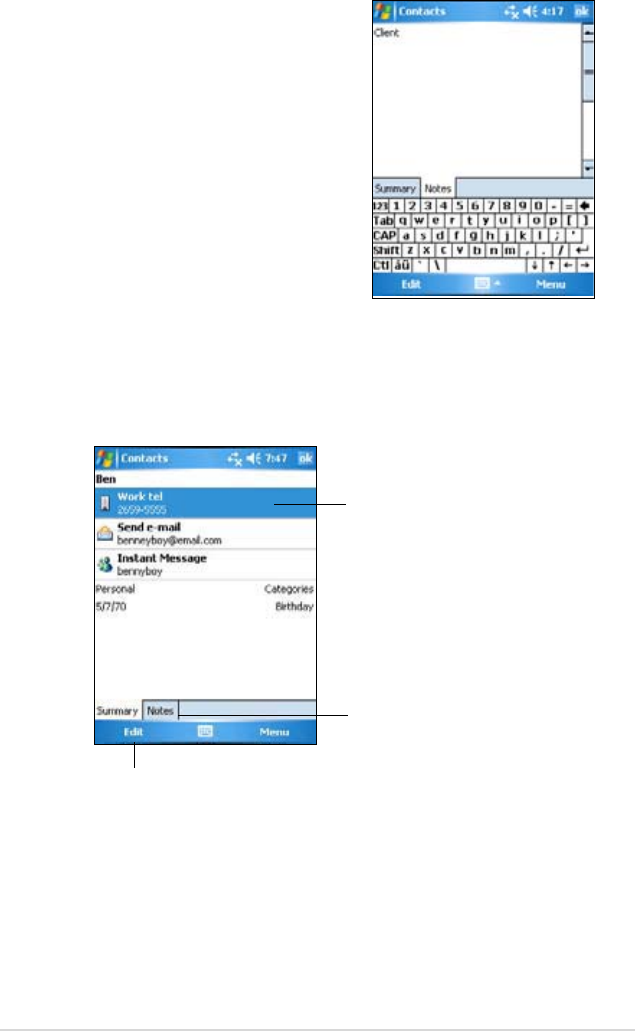
Using the summary screen
Tapping a contact on the contact list displays a summary screen. To
change the contact information, tap Edit.
Contact details
Tap to display notes
Tap to change contact information
4. To add notes, tap the Notes tab.
You can enter text, draw, or create a
recording.
For more information on creating notes,
see the section “Notes” later in this
chapter.
5. Tap ok to return to the contact list when
done.
42
Chapter 4
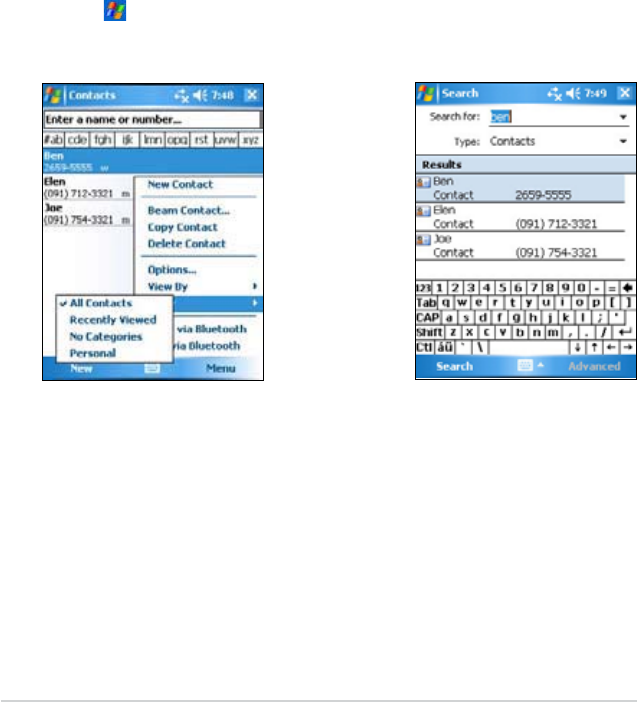
Finding a contact
7KHUHDUHIRXUZD\VWRÀQGDFRQWDFW
1. In the contact list, enter a contact name in the box under the navigation
bar. To show all contacts again, clear text from the box or tap the Undo
button to the right of the box.
7DSMenu > Filter and then select the type of contact that you wish
to display. To show all contacts again, select All Contacts. To view a
contact not assigned to a category, select No Categories.
3. To view the names of companies your contacts work for, in the contact
list, tap Menu > View By > By Company. The number of contacts that
work for that company will be displayed to the right of the company
name.
4. Tap > Programs > Search. Enter the contact name, select
Contacts for the type, and tap Search.
Microsoft
®
Pocket Outlook
43
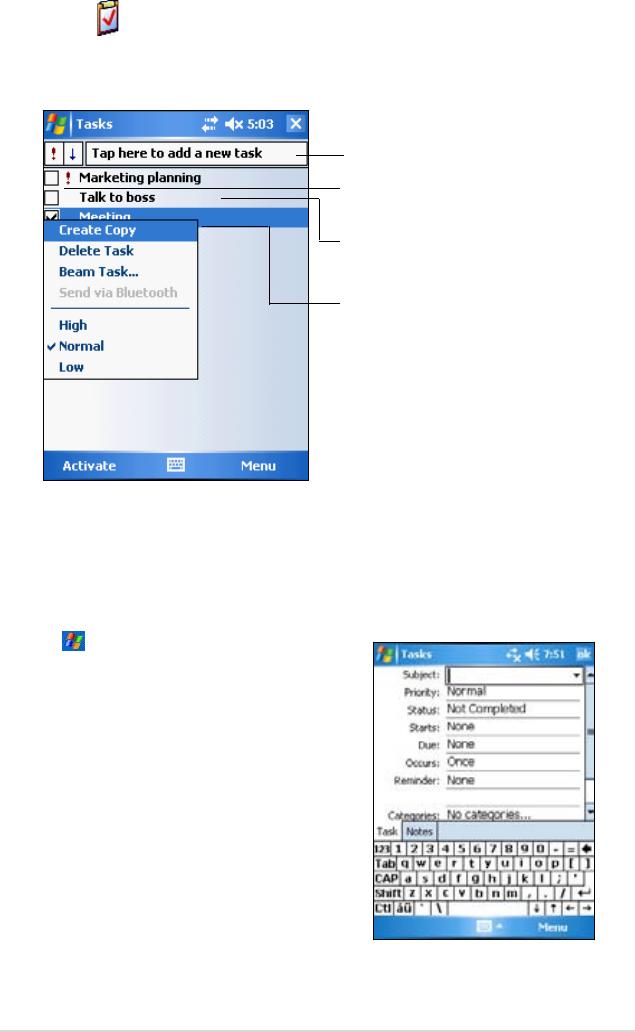
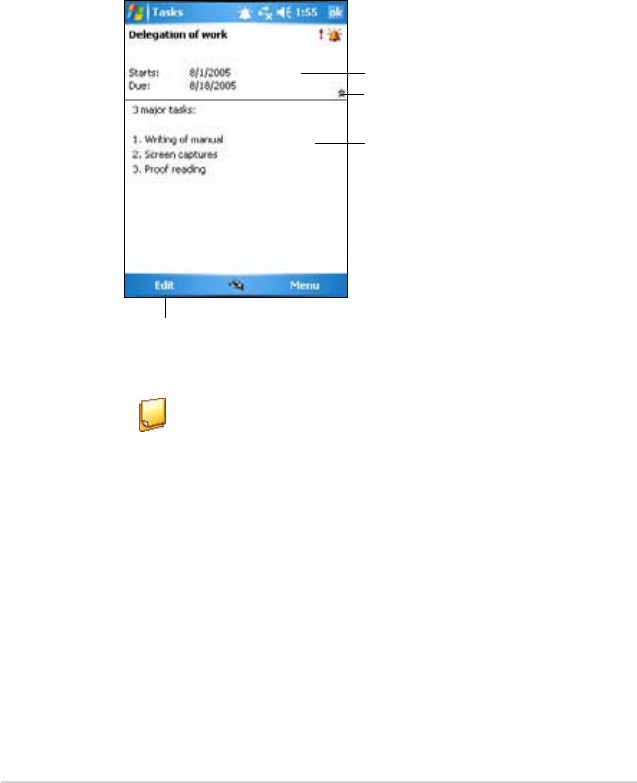
Tasks
Use Tasks to keep track of what you have to do. Tap Menu > Sort by or
Filter WRVRUWRUÀOWHUGLVSOD\HGWDVNVUHVSHFWLYHO\
Creating tasks
To create a task:
1. Tap > Programs >Tasks > Menu >
New Task to display a blank task form.
8VLQJWKHLQSXWSDQHOHQWHUD
description.
3. Enter a start date and due date, or enter
RWKHULQIRUPDWLRQE\WDSSLQJWKHÀHOG
ÀUVW,IWKHLQSXWSDQHOLVRSHQ\RXZLOO
QHHGWRKLGHLWWRVHHDOODYDLODEOHÀHOGV
4. To assign the task to a category, tap
Categories and select a category from
the list. On the task list, you can display
tasks by category.
Indicates high priority
Tap and hold to display a
pop-up menu of actions
and then tap the action
you wish to perform
Tap to display or edit
the task details
Tap here to create and enter a new task
44
Chapter 4
Notes
Quickly capture thoughts, reminders, ideas, and phone numbers with
Notes. You can create a written note or a recording. You can also include
a recording in a note. If a note is open when you create the recording, it
will be included in the note as an icon. If the note is displayed, it will be
created as a standalone recording.
You may change the default Notes options including the writing mode,
WHPSODWHÀOHVWRUDJHDQGUHFRUGEXWWRQDFWLRQ
5. To add notes, tap the Notes tab. You can enter text, draw, or create
a recording. For more information on creating notes, see the section
“Notes” later in this chapter.
6. Tap ok to return to the task list when done.
Using the summary screen
Tapping a task on the task list displays a summary screen. To change the
task details, tap Edit.
Task details
Tap to show or hide the task details
Notes/additional information on the task
Tap to change the task details
Microsoft
®
Pocket Outlook
45
To set the default input mode for entering note text:
1. Tap > Programs > Notes > Menu > Options.
,QWKH'HIDXOWPRGHER[VHOHFWRQHRIWKHIROORZLQJ
•Writing if you want to draw or enter handwritten text in a note.
•Typing if you want to create a typed note.
3. Tap ok.
Tap to create a new note or
recording
NOTE On the Options screen, tap > Help to know more about
the other settings.
Creating notes
To create a note:
1. Tap > Notes >New.
&UHDWH\RXUQRWHE\ZULWLQJGUDZLQJ
typing, or recording. For more
information about using the input panel,
writing and drawing on the screen, and
FUHDWLQJUHFRUGLQJVVHH&KDSWHU
3. Tap ok to save the note and return to
the Notes list.
NOTE Tap Menu >View Recording Toolbar to display recording
tools and make a recording.
Tap to change the sort order of the list
Tap to open a note or play a recording
Tap and hold to display a
pop-up menu of actions
Tap an action for the item

46
Chapter 4
Connecting directly to an e-mail server
,QDGGLWLRQWRV\QFKURQL]LQJHPDLOPHVVDJHVZLWK\RXUGHVNWRSFRPSXWHU
you can send and receive e-mail messages by connecting to an e-mail
server using a modem or network card connected to your device. You need
to set up a remote connection to a network or an ISP, and a connection to
your e-mail server. For more information, see Chapter 7.
When you connect to the e-mail server, new messages are downloaded to
the device Inbox folder, messages in the device Outbox folders are sent,
Messaging
Use Messaging to send and receive e-mail messages in one of these
ways:
6\QFKURQL]HHPDLOPHVVDJHVZLWK0LFURVRIW([FKDQJHRU0LFURVRIW
Outlook on your desktop computer
• Send and receive e-mail messages by connecting directly to an e-mail
server through an Internet service provider (ISP) or a network
Synchronizing e-mail messages
<RXFDQHPDLOPHVVDJHVDVSDUWRIWKHJHQHUDOV\QFKURQL]DWLRQSURFHVV
<RXZLOOQHHGWRHQDEOHPDLOV\QFKURQL]DWLRQLQ$FWLYH6\QF)RUPRUH
LQIRUPDWLRQRQHQDEOLQJPDLOV\QFKURQL]DWLRQVHHWKH$FWLYH6\QFRQOLQH
help on your desktop computer.
During synchronization:
• Messages are copied from the mail folders of Exchange or Outlook
on your desktop computer to the ActiveSync folder in Inbox on your
GHYLFH%\GHIDXOW\RXZLOOUHFHLYHPHVVDJHVIURPWKHSDVWÀYHGD\V
RQO\DQGWKHÀUVWOLQHVRIHDFKPHVVDJH
• E-mail messages in the Outbox folder on your device are transferred to
Exchange or Outlook, then send from those programs.
• E-mail messages in subfolder must be selected in ActiveSync on your
desktop computer in order to be transferred.
NOTE <RXFDQDOVRV\QFKURQL]HHPDLOPHVVDJHVZLWK\RXUGHVNWRS
computer from a remote location. For more information on
connecting your device, see Chapter 7.

Microsoft
®
Pocket Outlook
47
and messages that have been deleted on the e-mail server are removed
from the device Inbox folder.
Messages that you receive directly from an e-mail server are linked to
your e-mail server rather than your desktop computer. When you delete a
message on your device, it is also deleted from the e-mail server the next
time you connect, based on the settings you selected in ActiveSync.
<RXFDQZRUNRQOLQHRURIÁLQH:KHQZRUNLQJRQOLQH\RXUHDGDQG
respond to messages while connected to the e-mail server. Messages are
sent as soon as you tap Send, which saves space in your device.
:KHQZRUNLQJRIÁLQHRQFH\RXKDYHGRZQORDGHGQHZPHVVDJHKHDGHUV
or partial messages, you can disconnect from the e-mail server and decide
which messages to download completely. The next time you connect,
Inbox downloads the complete messages you have marked for retrieval
and sends the messages you have composed.
:KHQ\RXFRQQHFWWR\RXUHPDLOVHUYHURUV\QFKURQL]HZLWK\RXUGHVNWRS
computer, by default, you will receive messages from the last three days
RQO\DQGWKHPDLOLVOHVVWKDQ.%LQVL]H,IWKHPDLOVL]HLVODUJHUWKDQ
0.5KB, you need to download it through hyperlink. The original messages
remain on the e-mail server or your desktop computer.
You can mark the messages that you want to retrieve in full during your
QH[WV\QFKURQL]DWLRQRUHPDLOVHUYHUFRQQHFWLRQ,QWKHPHVVDJHOLVWWDS
and hold the message that you want to retrieve. On the pop-up menu, tap
Download Message. The icons in the Inbox message list give you visual
indications of message status.
You can specify your downloading preferences when you set up the
VHUYLFHRUVHOHFW\RXUV\QFKURQL]DWLRQRSWLRQV<RXFDQFKDQJHWKHPDW
any time.
&KDQJHRSWLRQVIRU,QER[V\QFKURQL]DWLRQXVLQJ$FWLYH6\QFRSWLRQV
For more information, see ActiveSync Help on your desktop computer.
• Change options for direct e-mail server connections in Inbox on your
device. Tap Menu > Tools > Options. On the Accounts tab, tap the
account that you wish to change. Tap and hold the account and select
Delete to remove an account.
48
Chapter 4
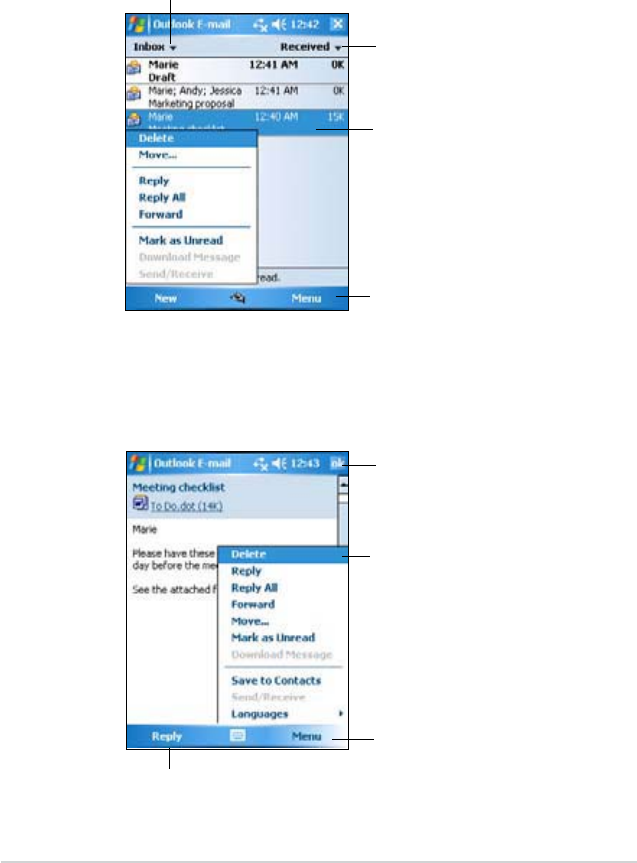
Reading messages in Inbox
The messages you receive appear in your Inbox folder. By default, the
most recently received messages appear on top of the list. Unread
messages appear in boldface.
Tap an e-mail message from your Inbox to display it.
Tap to select the sort order
for the messages
Tap and hold to display a
pop-up menu of actions
Tap Menu > Send/Receive
to send/receive e-mail
Tap to select email account, and the folder that you wish to display
Tap to return to the message list
Tap Menu to see a list of
actions you can do with an
e-mail
Tap to reply to this message
Tap to delete the message
Microsoft
®
Pocket Outlook
49
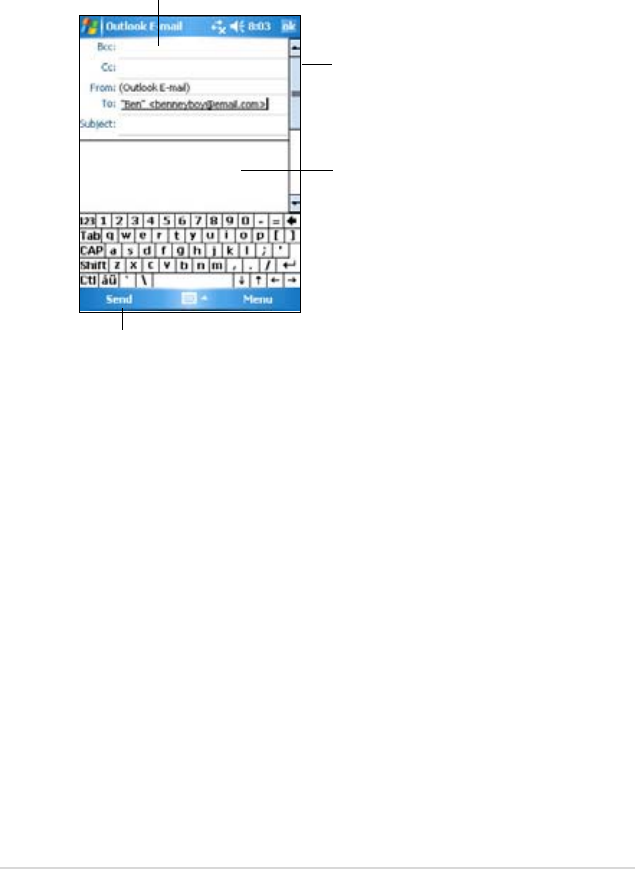
Composing messages
To compose a message:
1. Tap New to display a blank e-mail screen.
Tap and move the scroll bar
up/down to show or hide the
complete message header
Tap to send the message
Enter the e-mail address here
Type your text here
,QWKHToÀHOGHQWHUWKHHPDLODGGUHVVRI\RXUUHFLSLHQW<RXPD\
either type the e-mail address or select a name from the Contacts list
by tapping “To”.
If you wish to send a copy of your e-mail to other recipients, use the
stylus pen to scroll up to display the Cc: and Bcc: lines in the message
header.
The addresses in the To: and Cc: can be viewed by all recipients.
The addresses in the Bcc: are hidden from the recipients.
To address your e-mail to several recipients, type the e-mail addresses
separated by a semicolon. A semicolon is automatically added between
e-mail addresses if you select from your Contacts list.
All the names in the Contacts list with e-mail addresses appear in the
e-mail address book.
(QWHUDVXEMHFWDQGFRPSRVH\RXUPHVVDJH
4. Tap Send.

50
Chapter 4
Managing e-mail messages and folders
The behavior of the folders you create depends on whether you are using
ActiveSync, SMS, POP3, or IMAP4.
• If you use ActiveSync, e-mail messages in the Inbox folder in Outlook
ZLOODXWRPDWLFDOO\EHV\QFKURQL]HGZLWK\RXUGHYLFH7KHIROGHUV\RX
create and the messages you move will then be mirrored on the server.
• If you use SMS, messages are stored in the Inbox folder.
• If you use POP3 and you move e-mail messages to a folder you
created, the link is broken between the messages on the device and
their copies on the mail server. The next time you connect, the mail
server will see that the messages are missing from the device Inbox
and delete them from the server. This prevents you from having
duplicate copies of a message, but it also means that you will no
longer have access to messages that you move to folders created from
anywhere except the device.
• If you use IMAP4, the folders you create and the e-mail messages you
move are mirrored on the server. Therefore, messages are available
to you anytime you connect to your mail server, whether it is from your
GHYLFHRUGHVNWRSFRPSXWHU7KLVV\QFKURQL]DWLRQRIIROGHUVRFFXUV
whenever you connect to your mail server, create new folders, or
rename/delete folders when connected.
To save composed messages:
,I\RXDUHZRUNLQJRIÁLQHWKHPHVVDJHLVPRYHGWRWKHOutbox folder and
will be sent the next time you connect.
If you do not wish to send the message immediately, tap ok after
composing the message to save it to the Drafts folder.
When you are ready to send the message, open the Drafts folder and tap
the message. Tap Send to send the message.
NOTE To enter preset or frequently used messages, tap Menu > My
Text and select your desired message.
To create or edit a preset message before adding it to
the message body, tap Menu > My Text > Edit My Text
Messages, select a message to change or select a blank line
at the bottom of the list, then enter your text and tap ok.

Companion Programs
51
NOTE If you tap Menu > Options and choose a template, that
template appears with the appropriate text and formatting
already provided.
Chapter 5
Companion Programs
The companion programs consist of Microsoft® Word Mobile, Microsoft®
Excel Mobile, Microsoft® PowerPoint Mobile, Pocket MSN, and Windows
Media™ Player for Pocket PC.
To switch to a companion program on your device, tap Programs on the
menu, then tap the program that you wish to open.
Word Mobile
Word Mobile works with Microsoft Word on your desktop computer to
give you easy access to copies of your documents. You can create new
documents on your device, or you can copy documents from your desktop
FRPSXWHUWR\RXUGHYLFH6\QFKURQL]HGRFXPHQWVEHWZHHQ\RXUGHVNWRS
computer and your device so that you have the most up-to-date content in
both locations.
Use Word Mobile to create documents, such as letters, meeting minutes,
or trip reports.
Creating Word Mobile documents
To create a new Word document:
1. Tap > Programs >Word Mobile to launch the application.
If you have existing Microsoft Word or Word Mobile documents in your
device, a list of the documents appears.
7DSNew on the Menu bar to display a blank document.
3. Use any of the tools in the input panel to type your text.
52
Chapter 5
To specify save options:
1. With the document open, tap Menu > File >Save As to open the Save
As screen.
7\SHDÀOHQDPHLQWKH NameÀHOG
3. Tap the down arrow in the FolderÀHOGWKHQVHOHFWDIROGHUZKHUH\RX
ZDQWWRVDYHWKHÀOH
4. Tap the down arrow in the TypeÀHOGWRVHOHFWDÀOHIRUPDW
5. Tap the down arrow in the LocationÀHOGWRLQGLFDWHWKHORFDWLRQRI
\RXUVDYHGÀOHHLWKHULQWKHPDLQPHPRU\RI\RXUGHYLFHRULQD
storage card, if available.
6. Tap Save.
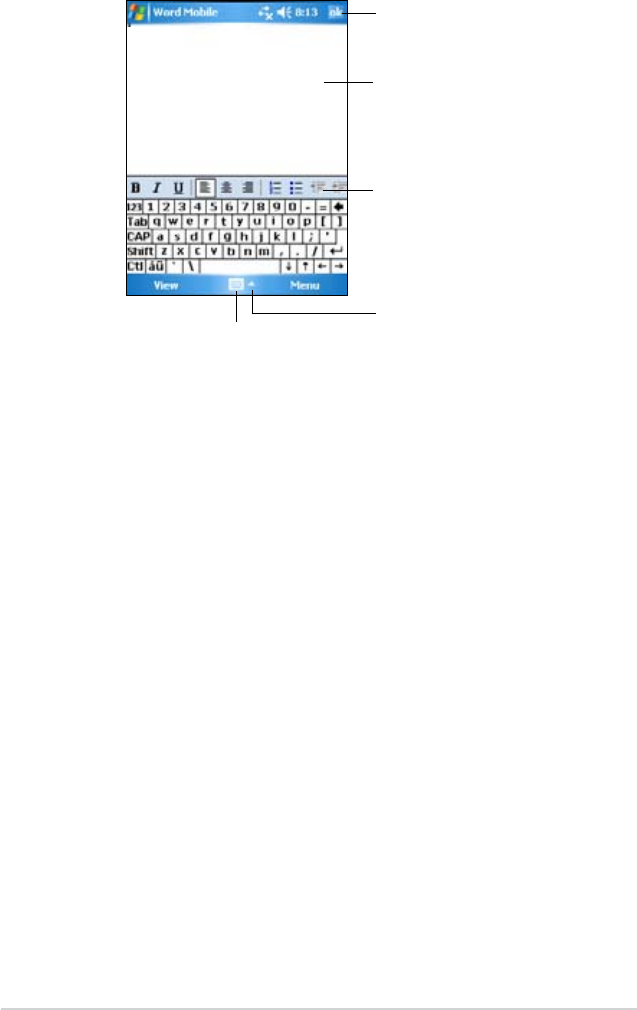
Saving Word Mobile documents
To save a Word Mobile document:
:KHQ\RXKDYHÀQLVKHGHGLWLQJ\RXUGRFXPHQWWDS ok.
%\GHIDXOWWKHGRFXPHQWLVVDYHGXVLQJWKHÀUVWOLQHDVWKHÀOHQDPH)RU
H[DPSOHLI\RXUÀUVWOLQHLQWKHGRFXPHQWKDVWKHZRUGVThings to do,
WKHVHZRUGVDSSHDUDVWKHÀOHQDPHLQ\RXU:RUGGRFXPHQWVOLVW
Type your text here
Tap to select an input method
Tap to show or hide the input panel
Tap to save and close your document
Formatting toolbar
Companion Programs
53
NOTE ,I\RXRSHQHGDQH[LVWLQJ:RUGÀOHWDSMenu > File >
Rename/Move... WRFKDQJHWKHÀOHQDPHIROGHUDQGVWRUDJH
ORFDWLRQWRXVHIRUVDYLQJWKHÀOH
You can open only one Word Mobile document at a time.
When you open a second document, you will be asked to
VDYHWKHFXUUHQWGRFXPHQWÀUVW
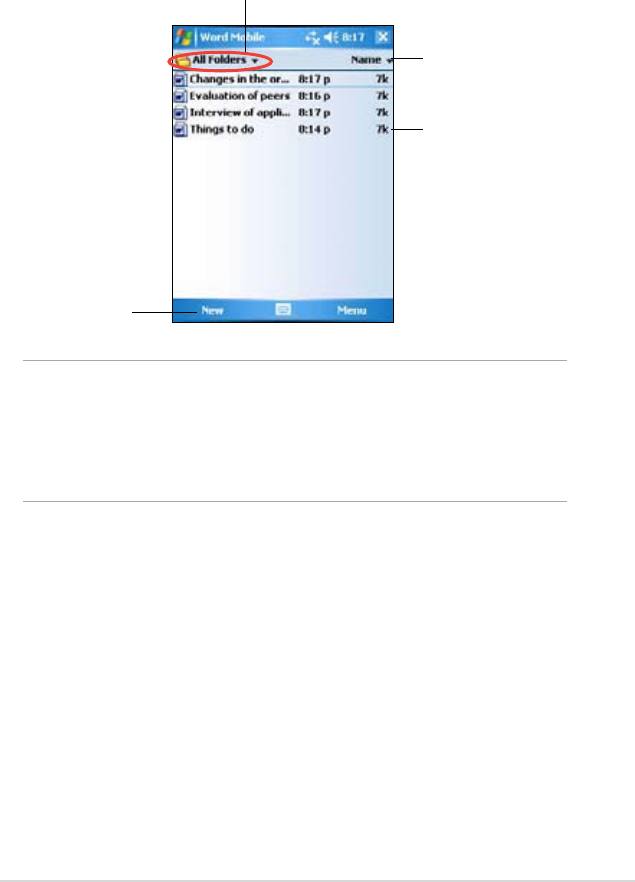
Opening an existing Word Mobile document
:RUG0RELOHFRQWDLQVDOLVWRIWKHÀOHVVWRUHGRQ\RXUGHYLFH7DSDÀOHLQ
WKHOLVWWRRSHQ7RGHOHWHPDNHFRSLHVRIDQGVHQGÀOHVWDSDQGKROGD
ÀOHLQWKHOLVWWKHQVHOHFWWKHDSSURSULDWHDFWLRQRQWKHSRSXSPHQX
Tap to select the folder you want to display
Tap to change the
sort order of the list
Tap a document
to open it
Tap to create a
new document
Viewing documents
If you are opening a Word document created on a desktop computer, tap
View > Wrap to Window to see the entire document.
<RXFDQDOVRDGMXVWWKHYLHZLQJVL]HRIDGRFXPHQWE\]RRPLQJ
To zoom in or out of a document:
Tap View > Zoom, then select your desired percentage.
54
Chapter 5
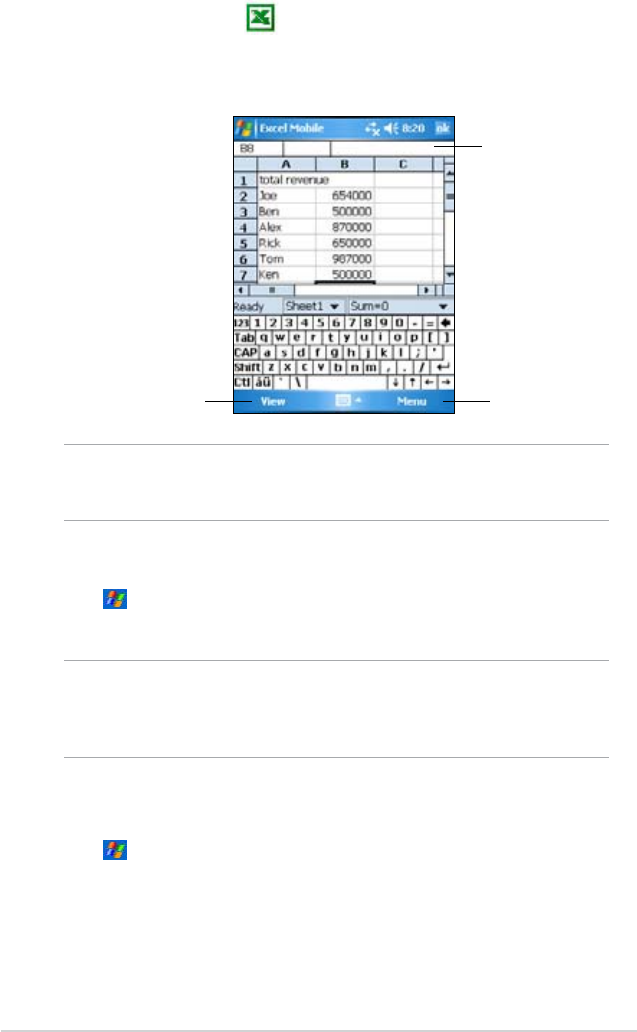
Excel Mobile
Excel Mobile provides fundamental spreadsheet tools, such as formulas,
IXQFWLRQVVRUWLQJDQGÀOWHULQJ7RGLVSOD\WKHWRROEDUWDSView >Toolbar.
NOTE <RXFDQRSHQRQO\RQH([FHO0RELOHGRFXPHQWDWDWLPH
when you open a second document, you will be asked to
VDYHWKHÀUVW
Cell contents appear here
as you type, or when you
select the cell
Tap to access view options Tap to open a menu of
Excel functions
Creating an Excel Mobile document
1. Tap > Programs > Excel Mobile.
7DS1HZWRGLVSOD\DEODQNZRUNVKHHW
NOTE If you tap Menu >OptionsLQWKHÀOHOLVWDQGFKRRVHD
template, that template appears with the appropriate text
and formatting already provided when you create a new
worksheet.
Opening an existing Excel Mobile document
1. Tap > Programs > Excel Mobile to display a list of Excel Mobile
ÀOHV
7DSWKHÀOHWKDW\RXZLVKWRRSHQ

Companion Programs
55
Saving an Excel Mobile document
To save an Excel Mobile document:
:KHQ\RXKDYHÀQLVKHGHGLWLQJ\RXUGRFXPHQWWDSok.
By default, your document is saved as Book1DVWKHÀOHQDPH<RXFDQ
FKDQJHWKHÀOHQDPHWRRQHWKDWLVPRUHGHVFULSWLYHRI\RXUGRFXPHQW
See the procedure below for saving options.
To specify save options:
1. With the document open, tap Menu >File >Save As... to display the
Save As screen.
&KDQJHWKHÀOHQDPHE\VLPSO\W\SLQJDQHZRQHLQWKHNameÀHOG
3. Tap the down arrow in the FolderÀHOGWRVHOHFWDIROGHUZKHUH\RX
ZLVKWRSODFHWKHÀOH
4. Tap the down arrow in the Type ÀHOGWRVHOHFWDÀOHIRUPDW
5. Tap the down arrow in the Location ÀHOGWRLQGLFDWHWKHORFDWLRQ
RI\RXUVDYHGÀOHHJPDLQPHPRU\ÁDVKGLVNRUVWRUDJHFDUGLI
available.
6. Tap Save.
7RUHQDPHPRYHDÀOH
1. With the document open, tap Menu >File > Rename/Move... to
display the Rename/Move screen.
&KDQJHWKHÀOHQDPHLQWKHNameÀHOG
3. Tap the down arrow in the FolderÀHOGWRVHOHFWDIROGHUZKHUH\RX
ZLVKWRPRYHWKHÀOH
4. Tap the down arrow in the Location box to select the folder location.
5. Tap ok when done.
Tips for working in Excel Mobile
Take note of the following when working on large worksheets in Pocket
Excel:
•View in full-screen mode to see as much of your worksheet as
possible. Tap View >Full Screen. To exit full-screen mode, tap
Restore.
56
Chapter 5
PowerPoint Mobile
PowerPoint Mobile works with Microsoft PowerPoint on your computer to
give you easy access to copies of your PowerPoint presentations. Copy
3RZHU3RLQWSUHVHQWDWLRQÀOHVIURP\RXUFRPSXWHUWR\RXUGHYLFHDQGYLHZ
WKHPRQWKHJR6\QFKURQL]HSUHVHQWDWLRQÀOHVLQ\RXUFRPSXWHUDQG\RXU
device so that you have the most up-to-date contents in both locations.
NOTE <RXFDQRQO\YLHZ3RZHU3RLQWSUHVHQWDWLRQÀOHVLQ
PowerPoint Mobile.
2SHQLQJD3RZHU3RLQWSUHVHQWDWLRQÀOH
,I\RXKDYHSUHYLRXVO\FRSLHG3RZHU3RLQW0RELOHSUHVHQWDWLRQÀOHVLQWRWKH
device, a list of the documents appear after you tap the PowerPoint Mobile
icon.
7RRSHQD3RZHU3RLQW0RELOHÀOH
1. Tap > Programs > PowerPoint Mobile to display a list of
3RZHU3RLQWÀOHV
7DSWKHÀOH\RXZLVKWRRSHQ
•Show and hide window elements. Tap View > Show.
•Freeze and unfreeze panes on a worksheet. First select the cell
ZKHUH\RXZDQWWRIUHH]HSDQHV7DSView >Freeze Panes. You might
ZDQWWRIUHH]HWKHWRSDQGOHIWPRVWSDQHVLQDZRUNVKHHWWRNHHS
the row and column labels visible as you scroll through a sheet. To
XQIUHH]HSDQHVWDSView > Unfreeze Panes.
•Split panes to view different areas of a large worksheet. Tap View >
Split. Drag the split bar to where you want it. To remove the split, tap
View >Remove Split.
•Show and hide rows and columns. To hide a row or column, select a
cell in the row or column that you want to hide. Tap Menu > Format >
Row or Column > Hide. To show a hidden row or column, tap Menu >
Edit > Go To, and type a reference that is in the hidden row or column.
Tap Menu >Format >Row or Column > Unhide.
For more information on using Excel Mobile, tap > Help.

Companion Programs
57
9LHZLQJD3RZHU3RLQW0RELOHÀOH
To go to the previous or next slide:
:KLOHYLHZLQJD3RZHU3RLQWÀOHWDSWKHDUURZRQWKHORZHUOHIWVLGHRI
the screen to open the menu.
,QWKHPHQXWDSNext or Previous to go forward or go back in your
3RZHU3RLQW0RELOHÀOH7DSGo to SlideWRLPPHGLDWHO\JRWRDVSHFLÀF
slide in your presentation.
NOTE :KLOHYLHZLQJD3RZHU3RLQWÀOH\RXFDQDOVRWDSWKHVFUHHQ
to go to the next slide.
To zoom in on a slide:
:KLOHYLHZLQJD3RZHU3RLQWÀOHWDSWKHDUURZRQWKHORZHUOHIWVLGHRI
the screen to open the menu.
,QWKHPHQXWDSZoom In. In the lower-right side of the screen, drag
WKHUHGER[ZLWKWKHVW\OXVSHQWRJRWRDVSHFLÀFDUHDRQWKHVOLGH
7DSWKHPDJQLI\LQJJODVVHVWR]RRPLQRU]RRPRXWRIWKHVOLGH7DSFit
to ScreenWRÀWWKHVOLGHWRWKHZKROHVFUHHQ
NOTE When you are in a view other than Fit to Screen, the menu is
not available.
Viewing a Custom Show (slideshow)
:KLOHYLHZLQJD3RZHU3RLQWÀOHWDSWKHDUURZRQWKHORZHUOHIWVLGHRI
the screen to open the menu.
7DSCustom Show then select the custom show you want to view.
Setting show options
:KLOHYLHZLQJD3RZHU3RLQWÀOHWDSWKHDUURZRQWKHORZHUOHIWVLGHRI
the screen to open the menu.
7DSShow Options. In the Orientation tab, select the slideshow
orientation you want to use.
3. Tap the Playback tab. Tap 2YHUULGHSOD\EDFNRSWLRQVIRUDOOÀOHVif
\RXGRQRWZDQWWRXVHWKHHPEHGGHGVHWWLQJVRID3RZHU3RLQWÀOHWKDW
you created in your desktop computer.

58
Chapter 5
Pocket MSN
Pocket MSN on your device is an instant messaging program that allows
you to:
• See who among your contacts is online and chat with them by sending
and receiving instant messages.
• Access your hotmail account, if you have one, and send and receive
e-mails.
To use Pocket MSN:
You must have a Microsoft Passport™ account or a Microsoft Exchange
e-mail account.
You must have a Passport to use the MSN Messenger Service. If you have
a Hotmail® or MSN account, you already have a Passport. Once you have
obtained either a Microsoft Passport or Microsoft Exchange account, you
are ready to set up your account.
Sign up for a Microsoft Passport account at http://www.passport.com.
Get a free Microsoft Hotmail e-mail address at http://www.hotmail.com.
To open MSN Messenger:
1. Tap Pocket MSN on the Today screen then tap MSN Messenger.
OR
Tap > Programs >Pocket MSN > MSN Messenger.
4. Select your desired options. When done, tap ok.
Signing up in MSN Messenger
To sign in to MSN Messenger service:
1. Tap the Tap here to sign in link.
OR
Tap Sign In or Menu > Sign In.
2QWKH0616LJQ,QVFUHHQHQWHU\RXUHPDLODGGUHVVDQGSDVVZRUG
Then tap Sign In.
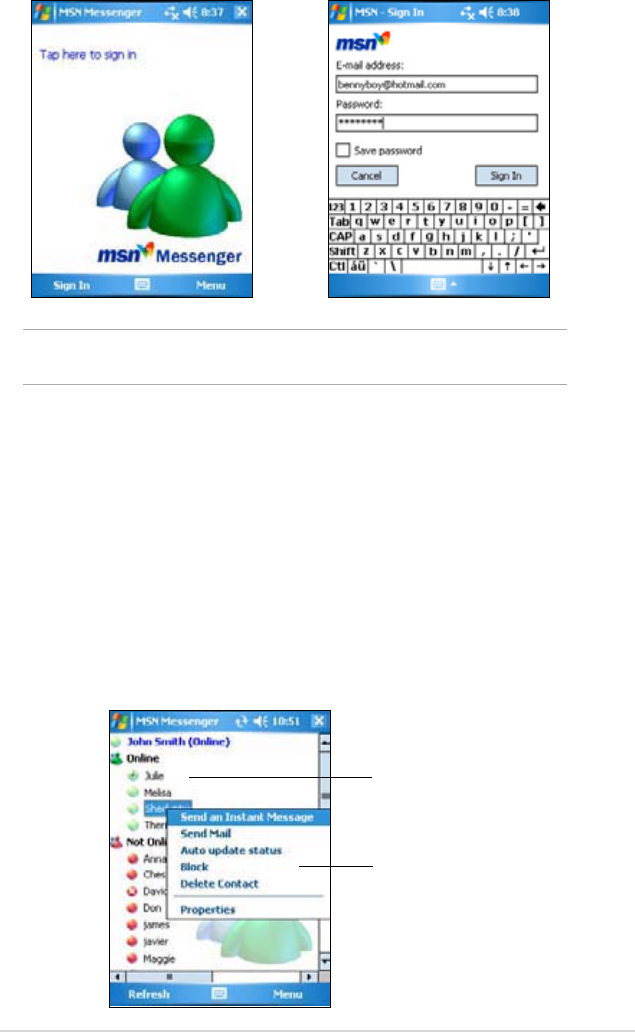
Companion Programs
59
NOTE If you already use MSN Messenger on your computer, your
contacts will show up on your device.
MSN Messenger contacts
The MSN Messenger screen shows all of your messenger contacts at a
glance, divided into Online and Not Online categories. From this view,
while connected, you can chat, send an e-mail, block the contact from
chatting with you, or delete contacts from your list using the pop-up menu.
To see others online without being seen, tap Menu >Block.
,I\RXEORFNDFRQWDFW\RXZLOODSSHDURIÁLQHEXWZLOOUHPDLQRQWKHEORFNHG
contact’s list. To unblock a contact, tap and hold the contact, then tap
Unblock on the pop-up menu.
Tap a contact to start a chat
Tap and hold a contact to display a
pop-up menu where you can choose
to send e-mail to the contact, block the
contact, etc.
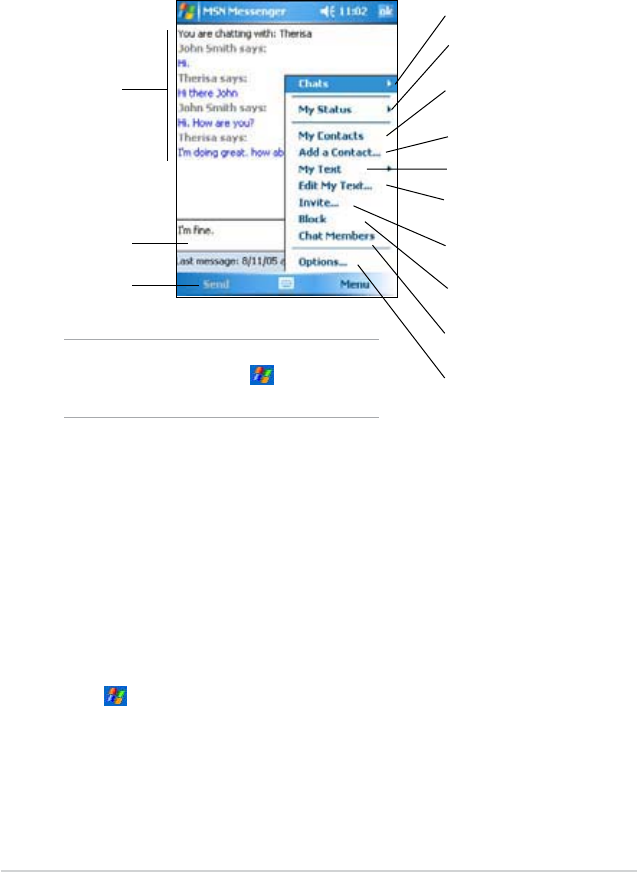
60
Chapter 5
Chatting with contacts
Tap a contact name to open a chat window. Enter your message in the text
entry area at the bottom of the screen, or tap My Text to enter a preset
message, then tap Send. To invite another contact to a multi-user chat, tap
Menu >Invite, then tap the contact that you want to invite.
Using MSN Hotmail
With MSN Hotmail, you can access your hotmail mailbox on your Pocket
PC and send and receive e-mails.
To open MSN Hotmail:
1. Tap Pocket MSN on the Today screen then tap MSN Hotmail.
OR
Tap > Programs >Pocket MSN > MSN Hotmail.
Enter
message here
Tap to send
message
View full chat
Tap to switch between chat
windows
Tap to change your MSN status
Tap to switch back to the
contacts list without closing a
chat
Tap to add a new contact
Tap to choose a preset message
Tap to enter your own MSN
status
Tap to invite more contacts to
your chat
Tap to block a contact from
seeing your status
Tap to display the current
contacts you are chatting with
Tap to change your display name
DQGFXVWRPL]HRWKHUVHWWLQJV
NOTE On the MSN Messenger
screen, tap > Help for
more information.
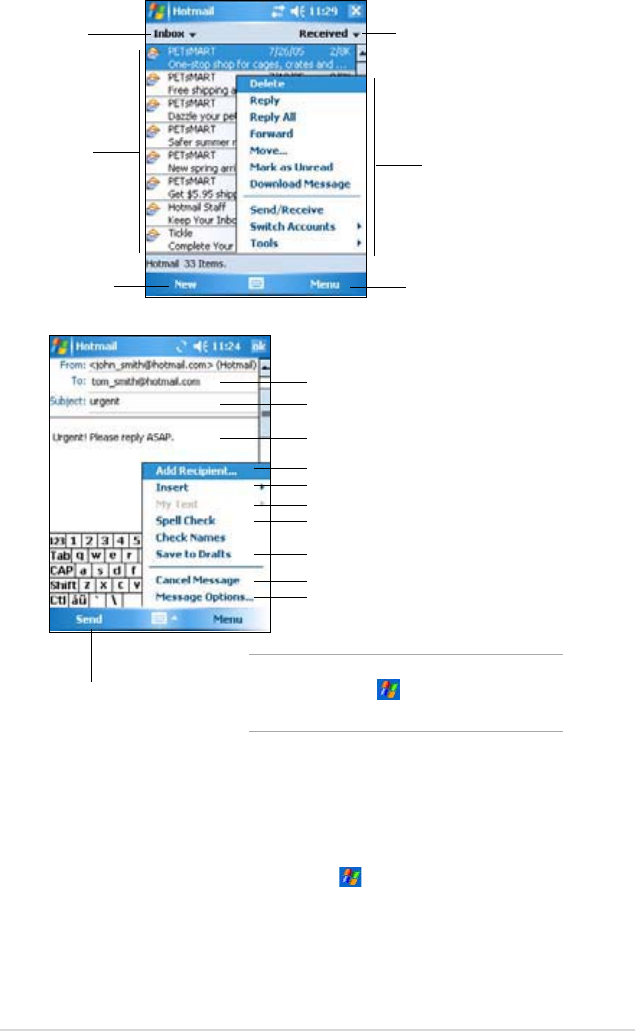
Companion Programs
61
Tap a message to
open it
Tap to create
a new e-mail
After selecting a
message, choose what
you want to do with the
e-mail from the menu.
Tap to open the menu
Enter the recipient’s e-mail address
(QWHUDVXEMHFW
Enter the message
Tap to add a recipient from Outlook Contacts
7DSWRDWWDFKDQLPDJHYRLFHQRWHRUÀOH
Tap to choose a preset message
Tap to do a spelling check
Tap to save the message to the Drafts
folder for later editing
Tap to cancel the message without sending it
Tap to set the priority, language encoding,
and more for the message
Tap to send the e-mail
Tap to display the
message folders
Tap to sort the messages
by order of message type,
sender name, etc.
NOTE On the MSN Hotmail screen,
tap > Help for more
information.
Windows Media Player for Pocket PC
Use Microsoft® Windows Media Player for Pocket PC to play digital audio
DQGYLGHRÀOHVWKDWDUHVWRUHGRQ\RXUGHYLFHRURQDQHWZRUN7RVZLWFKWR
Windows Media Player for Pocket PC, tap > Windows Media.
Use Microsoft Windows Media Player on your desktop computer to copy
digital audio and video to your Pocket PC. You can play Windows Media
DQG03ÀOHVRQ\RXU3RFNHW3&
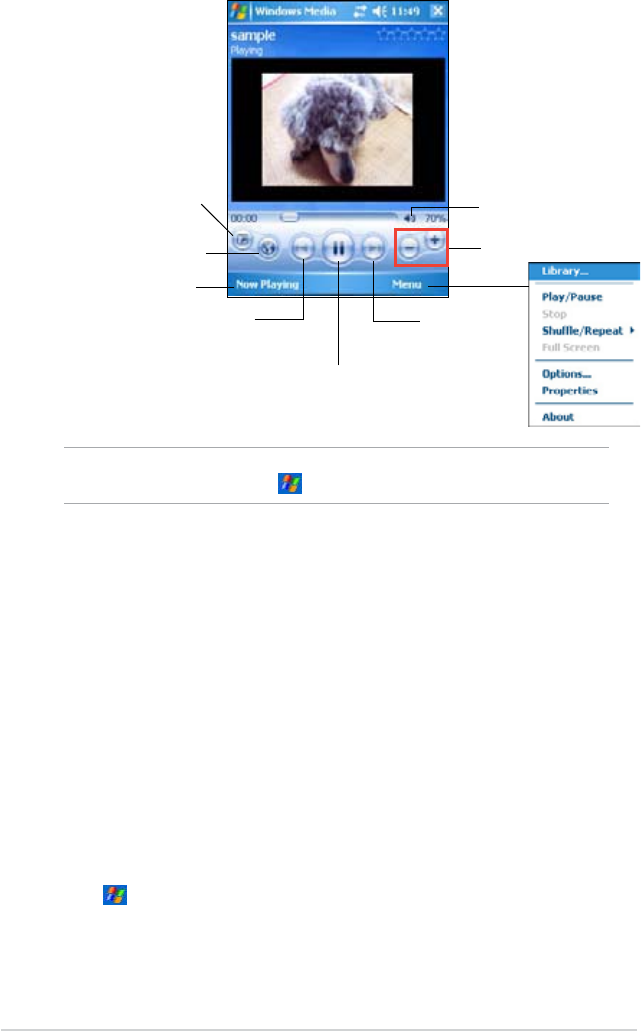
62
Chapter 5
Tap to view the playlist
Tap to play/pause
Tap to view in full screen
Tap to skip to the beginning of the
FXUUHQWÀOHRUWRWKHSUHYLRXVÀOH
Tap to skip
to the next
ÀOH
Tap to decrease/increase
volume
Tap to mute or enable audio
NOTE For more information on using Windows Media Player for
Pocket PC, tap > Help.
ASUS Hands-Free
ASUS Hands-Free allows you to connect your Pocket PC to a cell phone
via Bluetooth, making your device become a hand-free cell phone. When
a call comes, the Pocket PC can pop up a ring screen, allowing you to
anwser or refuse the call without picking up the Pocket PC.
Using Hands-Free
With ASUS Hands-Free, you can answer and refuse an incoming call via
your Pocket PC.
To connect your Pocket PC to your mobllie phone:
1. Tap > Programs >ASUS Hand-Free to launch the application.
The Pocket PC then automatically scans for all available bluetooth-
enabled devices.
Tap to view the favorites
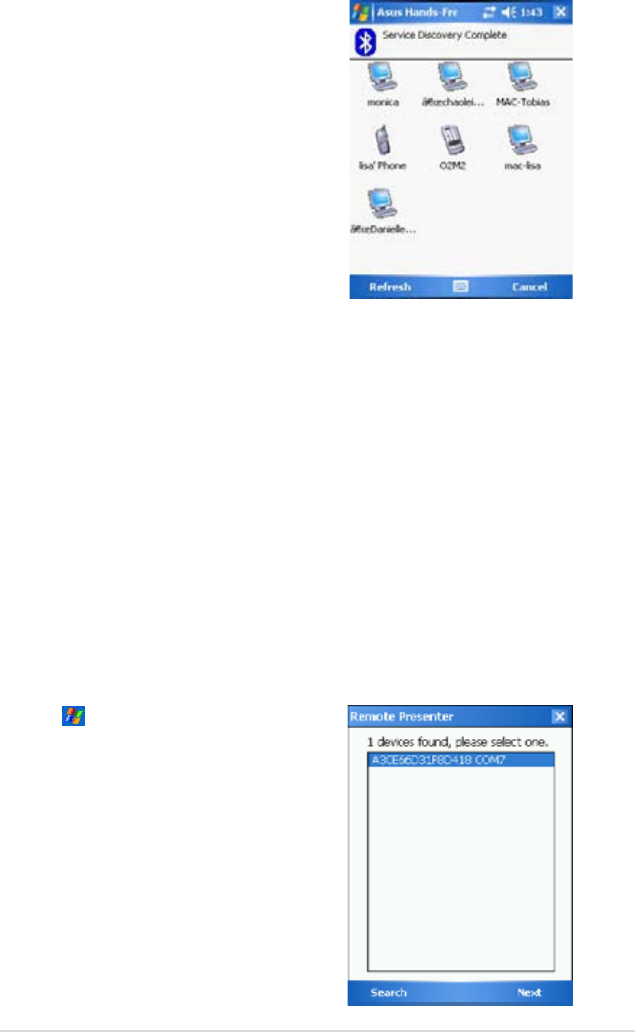
Companion Programs
63
6HOHFWWKHSKRQHWKDW\RXZDQWWR
connect to, and input the pairing
number if required.
After successful connection with the
cell phone, you can begin to use the
Hands-free function via Bluetooth.
Remote Presenter
The Remote Presenter allows you to wirelessly control your presentation.
With the remote presenter, you can select certain page, slide the pages,
record the duration of the presentation, and easily switch the screen from
edit mode to full screen.
Before use the Remote Presenter, activate Bluetooth in your PC/notebook,
and lauch Remote Presenter propram in your PC/notebook.
Using Remote Presenter
To connect your Pocket PC to your PC/notebook:
1. Tap > Programs >Remote
Presenter to launch the
application.
A reminding message appears,
then tap Next.
The Pocket PC then automatically
scans for all available bluetooth-
enabled devices.
6HOHFWWKH3&RUQRWHERRN\RX
want to connect to, then tap Next.
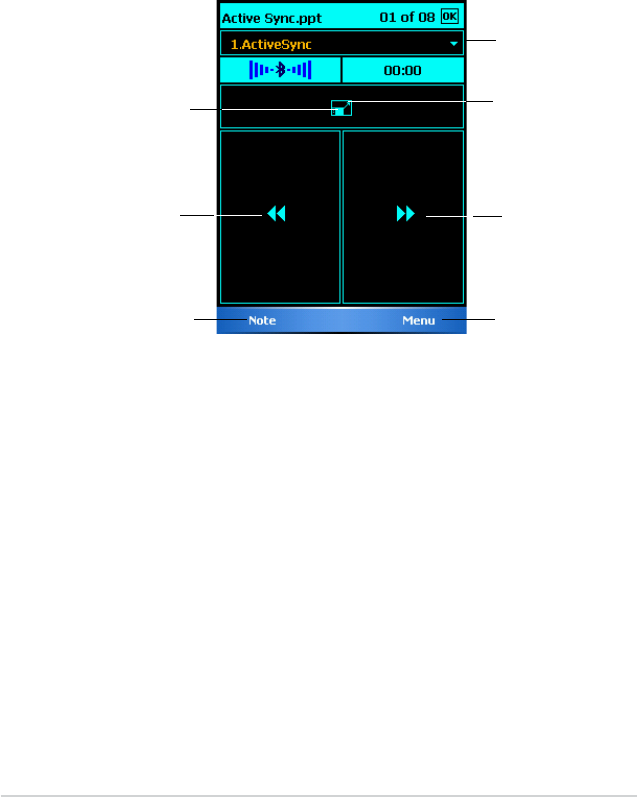
64
Chapter 5
3. A pop up window appears, reminding you to check the pairing
information in your PC or notebook.
4. Follow the on-screen instructions to set up the connection.
To use the Remote Presenter
7RXVHWKH5HPRWH3UHVHQWHUVHOHFWWKHÀOH\RXZLVKWRRSHQ$PDLQ
menu of Remote Resenter appears:
Tap to slide forward
Tap to slide backward
Tap to open the menu
Tap to view the note
Tap to switch to full screen Tap to switch to edit mode
Tap to view the pages

Internet Explorer Mobile
63
Use Microsoft Internet Explorer Mobile to view Web or WAP pages in any
of these ways.
'XULQJV\QFKURQL]DWLRQZLWK\RXUGHVNWRSFRPSXWHUGRZQORDG
your favorite links and mobile favorites that are stored in the Mobile
Favorites sub-folder in the Internet Explorer on the desktop computer.
• Connect to an Internet service provider (ISP) or network and browse
WKH:HE7RGRWKLV\RXQHHGWRFUHDWHWKHFRQQHFWLRQÀUVW6HH
Chapter 7 for information on creating a connection.
:KHQFRQQHFWHGWRDQ,63RUQHWZRUN\RXFDQDOVRGRZQORDGÀOHVDQG
programs from the Internet or intranet.
Using Internet Explorer Mobile
You can use Internet Explorer Mobile to browse mobile favorites and
channels that have been downloaded to your device without connecting
to the Internet. You can also connect to the Internet through an ISP or a
network connection to browse the Web.
To launch Internet Explorer Mobile:
1. Tap > Internet Explorer to display the Mobile Services from MSN.
7DSMenu > Home to display the Internet Explorer Mobile with links to
some useful Web sites.
7DSDQ\RIWKH:HEVLWHEXWWRQVWRJRWRDVSHFLÀFVLWH
Chapter 6
Internet Explorer Mobile
Changing View settings
To change View settings:
1. Tap Menu > View then select view options. Tap Full Screen, for
example, to set explorer window to full-screen mode. To disable full-
screen mode, tap and hold anywhere on the explorer, then select Full
Screen again.

64
Chapter 6
Mobile Favorites folder
Only the items stored in the Mobile Favorites sub-folder on your desktop
FRPSXWHUZLOOEHV\QFKURQL]HGZLWK\RXUGHYLFH7KLVIROGHUZDVFUHDWHG
automatically when you installed ActiveSync.
Favorite links
'XULQJV\QFKURQL]DWLRQWKHOLVWRIIDYRULWHOLQNVLQWKH0RELOH)DYRULWHVIROGHU
RQ\RXUGHVNWRSFRPSXWHULVV\QFKURQL]HGZLWK,QWHUQHW([SORUHU0RELOHRQ
your device. Both computers are updated with changes made to either list
HDFKWLPH\RXV\QFKURQL]H8QOHVV\RXPDUNWKHIDYRULWHOLQNDVDPRELOH
favorite, only the link will be downloaded to your device, and you will need to
connect to your ISP or network to view the content. For more information on
V\QFKURQL]DWLRQVHH$FWLYH6\QF+HOSRQWKHGHVNWRSFRPSXWHU
Browsing the Internet
To browse the Internet:
1. Set up a connection to your ISP or
corporate network using Connections.
See Chapter 7 for details.
7DSZoom to see another pop-up
IRUVHOHFWLQJ\RXUGHVLUHGWH[WVL]H
display.
'RRQHRIWKHIROORZLQJWRFRQQHFWDQGVWDUWEURZVLQJ
• Tap Favorites on the Menu Bar, then tap the favorite that you wish
to view.
• Enter the Web address in the Address Bar that you want to visit
then tap Go.
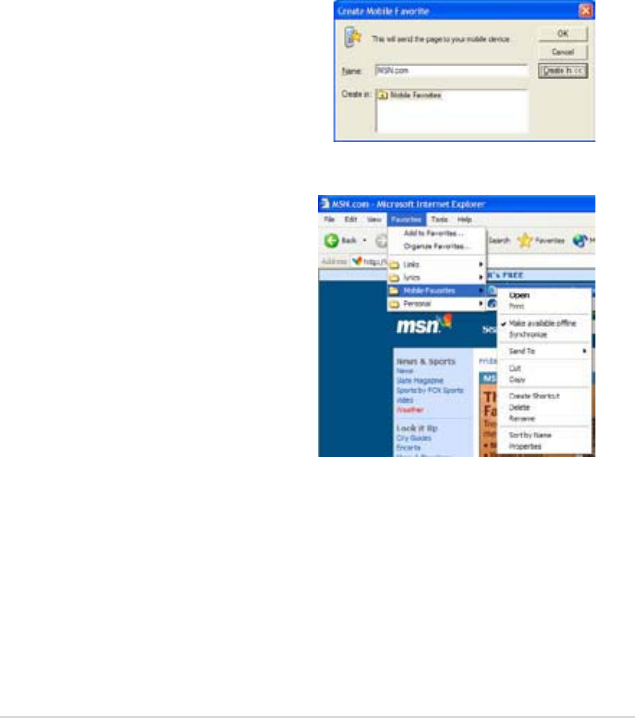
Internet Explorer Mobile
65
To create a mobile favorite:
1. In Internet Explorer on your
desktop computer, click Tools >
Create Mobile Favorite.
7RFKDQJHWKHOLQNQDPHHQWHUD
new name in the Name box.
3. Click OK. Internet Explorer
downloads the latest version of the
page to your desktop computer.
Mobile Favorites
If you are using Microsoft Internet Explorer 4.01 or later on your
desktop computer, you can download mobile favorites to your device.
6\QFKURQL]LQJPRELOHIDYRULWHVGRZQORDGV:HEFRQWHQWWR\RXUGHYLFHVR
that you can view pages while you are disconnected from your ISP and
desktop computer.
Use the Internet Explorer plug-in installed with ActiveSync to create mobile
favorites quickly.
4. If you want to download
the pages that are linked to
WKHPRELOHIDYRULWH\RXMXVW
created, in Internet Explorer
on the desktop computer, click
Favorites >Mobile Favorites,
WKHQULJKWFOLFNDVSHFLÀF
mobile favorite item, then click
Properties. In the Download
tab, specify the number of links
deep you want to download. To
conserve device memory, go
only one level deep.
6\QFKURQL]H\RXUGHYLFHDQG
your desktop computer. Mobile
favorites that are stored in the
Mobile Favorites folder in Internet
Explorer are downloaded to your
device.

66
Chapter 6
Viewing mobile favorites and channels
To view mobile favorites and channels:
1. Tap Menu > Favorites to display your list of favorites.
7DSD)DYRULWHVSDJHWKDW\RXZLVKWRYLHZ
You will see the page that was downloaded the last time you
V\QFKURQL]HGZLWK\RXUGHVNWRSFRPSXWHU,IWKHSDJHLVQRWRQ\RXU
GHYLFHWKHIDYRULWHLVGLPPHG<RXQHHGWRV\QFKURQL]HZLWK\RXU
desktop computer again to download the page to your device, or
connect to the Internet to view the page.
Saving device memory
0RELOHIDYRULWHVWDNHXSVWRUDJHPHPRU\RQ\RXUGHYLFH7RPLQLPL]HWKH
amount of memory used:
• In the settings for the Favorites information type in ActiveSync options,
turn off pictures and sounds, or stop some mobile favorites from being
downloaded to the device. For more information, see ActiveSync Help.
• Limit the number of downloaded linked pages. In Interner Explorer
on your desktop computer, click Favorites >Mobile Favorites, then
ULJKWFOLFNDVSHFLÀFPRELOHIDYRULWHLWHP\RXZDQWWRFKDQJHWKHQFOLFN
Properties. In the Download tab, specify 0 or 1 for the number of
linked pages you want to download.
NOTE You will need to manually download content or set a schedule
to keep the information updated on your desktop computer
and device.
%HIRUHV\QFKURQL]LQJZLWK\RXUGHYLFHLQ,QWHUQHW([SORUHU
on your desktop computer, click Tools > Synchronize. You
will see the last time content was downloaded to the desktop
computer, and you can manually download content if needed
or set a schedule to automatically update contents. To set a
VFKHGXOHWRXSGDWHDVSHFLÀFPRELOHIDYRULWHVHOHFWDVSHFLÀF
mobile favorite from the list then click Properties button. On
the Schedule tab, you can set the mobile favorite to use a
VSHFLÀFVFKHGXOHWRXSGDWHLWVFRQWHQW
You can add a button to the Internet Explorer toolbar for
creating mobile favorites. In Internet Explorer on your desktop
computer, click View > Toolbars > Customize.
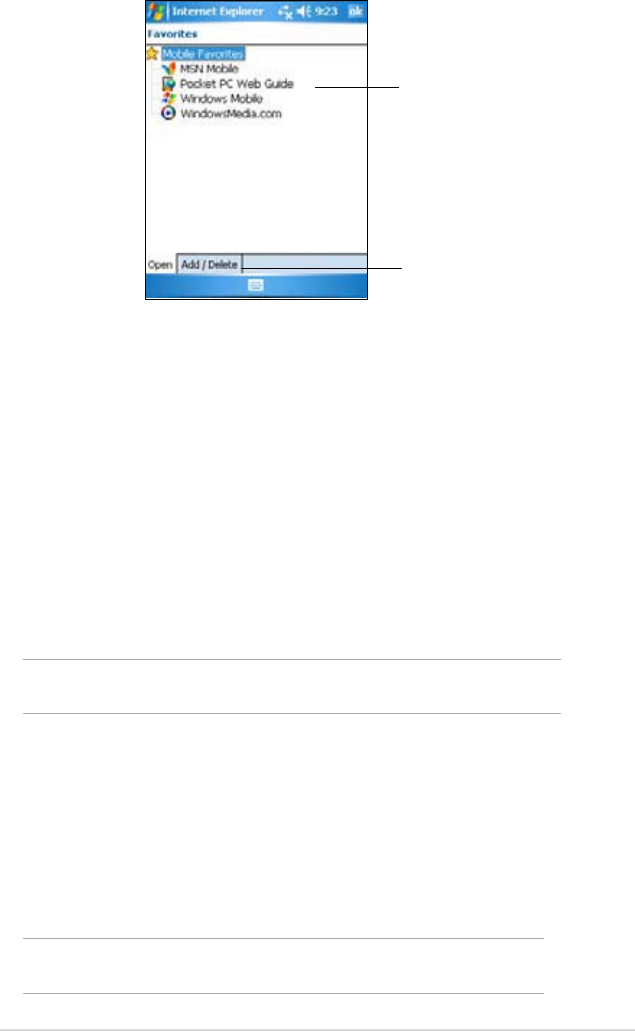
Internet Explorer Mobile
67
Tap the favorite that
you wish to view
Tap to add or delete a
folder or favorite link
Adding/Deleting mobile favorites and folders
To add a favorite:
1. Tap Menu > Favorites > Add/Delete tab.
7DSWKHAdd button to show the Add Favorite screen.
3. Type a name for the favorite that you wish to add in the NameÀHOG
4. Type in the URL address in the Address (URL)ÀHOG
5. Choose a folder where to place the favorite from the Create in
selection box.
6. Tap Add to return to the Favorites screen, which now shows the
favorite that you added.
NOTE To delete a favorite, tap the favorite you want to delete then
then tap Delete button.
To add a folder:
1. Tap Menu > Favorites > Add/Delete tab.
7DSWKHNew Folder button.
3. Type a name for the folder that you wish to create.
4. Tap Add to return to the Favorites screen, which now shows the
folder that you added.
NOTE To delete a folder, tap the folder you want to delete then
tap Delete button.

68
Chapter 7
Chapter 7 Get Connected
You can set up connections to the Internet and corporate network at work
to do such activities as browse the Internet or intranet, send and receive e-
PDLODQGLQVWDQWPHVVDJHVDQGV\QFKURQL]HLQIRUPDWLRQXVLQJ$FWLYH6\QF
Connections can be made using a modem,wireless network, or
network (Ethernet) card. A modem connection can be used to set up
connections with an external modem, or through your mobile phone
network using a cellular line.
Your device has two groups of connection settings: My ISP and My Work
Network. My ISP settings are used to connect to the Internet, and My
Work Network settings can be used to connect to any private network,
VXFKDVDFRUSRUDWHQHWZRUN\RXXVHDWZRUN6LPSO\ÀOOLQWKHVHWWLQJV
and get ready to start connecting. For more information, see the sections
“Connect to the Internet” or “Connect to Work.”
You may also establish connection to another device with infrared (IR) or
Bluetooth features. For more information, see the section “Infrared (IR)
connection” later in this chapter, or “Chapter 8 Bluetooth® connection.”
Connecting to the Internet
To connect to the Internet:
1. Obtain the following information from your ISP: ISP server phone
number,user name, and password.
7DS > Settings > Connections tab > Connections.
3. Under My Network, tap Add a new modem connection.
4. Create a modem connection. For more information, see section “Set
up modem connections.”
5. To start the connection, begin using the desired program. For example,
switch to Pocket Internet Explorer and browse a Web page. Your
device automatically connects.
NOTE To set up a network card or wireless network connection to
your ISP, add a new connection under My Work Network.

Get Connected
69
Connecting to Work
1. Obtain the following information from your network administrator:
server phone number,user name, and password.
7DS > Settings > Connections tab > Connections.
3. Under My Work Network, set up either a modem, network card,
wireless network, or VPN server connection. Refer to the section “Set
up connections” for the procedure.
4. To start the connection, start using a desired program. For example,
switch to Pocket Internet Explorer and browse to a Web page. Your
device automatically starts connecting.
Setting up connections
Modem connections
To set up a modem connection:
Obtain the following information from your ISP or network administrator:
telephone number, user name, password, domain name, and TCP/IP
settings.
If your device does not have access to a mobile phone network, insert a
modem card.
1. Tap > Settings > Connections tab > Connections.
7RFUHDWHDQHZFRQQHFWLRQLQHLWKHUMy ISP or My Work Network,
tap Add a new modem connection, then follow the instructions in the
1HZ&RQQHFWLRQZL]DUG
7RYLHZDGGLWLRQDOLQIRUPDWLRQIRUDQ\VFUHHQLQWKHZL]DUGRUZKLOH
changing settings, tap .
NOTE To change modem connection settings in either My ISP or
My Work Network, tap Manage existing connections >
Modem tab. Select the desired modem connection, tap Edit,
and follow the instructions on the screen.

70
Chapter 7
VPN server connections
A VPN connection helps you to securely connect to servers, such as a
corporate network, via the Internet. Ask your network administrator for your
user name, password, domain name, TCP/IP settings, and host name or
IP address of the VPN server.
To set up a VPN server connection:
1. Tap > Settings > Connections tab > Connections.
7RFUHDWHDQHZ931VHUYHUFRQQHFWLRQLQ0\:RUN1HWZRUNWDSAdd
a new VPN server connection, then follow the screen instructions.
7RYLHZDGGLWLRQDOLQIRUPDWLRQIRUDQ\VFUHHQLQWKHZL]DUGRUZKLOH
changing settings, tap .
NOTE To change existing settings, in My Work Network, tap
Manage existing connections > VPN tab. Select your
desired VPN connection under the VPN tab, tap Edit, then
follow the instructions on the screen.
Proxy server settings
,I\RXDUHFRQQHFWHGWR\RXU,63RUSULYDWHQHWZRUNGXULQJV\QFKURQL]DWLRQ
your mobile device should download the proper proxy settings from your
PC. If these settings are not on your PC or need to be changed, ask your
ISP or network administrator for the proxy server name, server type, port,
type of Socks protocol used, and your user name and password.
To change proxy server settings:
1. Tap > Settings > Connections tab > Connections icon.
8QGHU My Work Network category, tap Setup my proxy server.
3. Check the boxes beside This network connects to the Internet and
This network uses a proxy server to connect to the Internet.
4. In the Proxy server box, enter the proxy server name.
5. To change the server and port settings for HTTP, WAP, Secure WAP,
and Socks, tap Advanced.
6. Tap ok when done.

Get Connected
71
Network card connections
Use a network (Ethernet) card to connect directly to a network. Once
connected, you can view the Internet or intranet, or download e-mail.
You do not need to create a new connection on your device. For more
information, see your network administrator. Make sure to purchase and
FRQÀJXUHDQHWZRUNFDUGWKDWLVFRPSDWLEOHZLWK\RXUGHYLFH
To set up a network card:
1. Obtain the following information from your network administrator: user
name,password, and domain name.
,QVHUWWKHQHWZRUNFDUGLQWR\RXUGHYLFH
7KHÀUVWWLPH\RXLQVHUWWKHFDUG1HWZRUN6HWWLQJVDSSHDUV
DXWRPDWLFDOO\VRWKDW\RXFDQFRQÀJXUHWKHQHWZRUNFDUG,ILWGRHVQRW
appear, or to change settings later, tap > Settings > Connections
tab > Network Cards.
,I\RXQHHGWRHQWHUVSHFLÀFVHUYHULQIRUPDWLRQWDSWKHDSSURSULDWH
adapter, and then tap Properties. Most networks use DHCP, so
you should not have to change these settings unless your network
administrator instructs you to do so.
5. If necessary, connect the network card to the network by using a
network cable. For information, refer to the documentation that came
with your network card.
6. To start a connection, insert the network card, and begin using a
desired program. For example, switch to Pocket Internet Explorer
and browse a Web page. Your device automatically starts connecting.
If you use your network card with two networks, such as a private
network at work and one at home for the Internet, you need to change
the network to which the network card connects.
NOTE You may need proxy server and VPN connection settings. For
more information, see your network administrator.
Ending a connection
• When connected via modem or VPN, tap on the navigation bar,
then tap Disconnect.
• When connected via cable or cradle, detach your device from the cable
or cradle.

72
Chapter 7
• When connected via Infrared, move the device away from the other
computer or device.
• When connected via a network (Ethernet) card, remove the card from
your device.
• When connected via a wireless network, switch off the connection.
Setting up a WAP gateway
7RDFFHVV:$3VLWHVWKURXJK3RFNHW,QWHUQHW([SORUHUFRQÀJXUH\RXU
device to use a WAP gateway. Use the following steps to create a new set
of connections to the Internet with WAP gateway settings.
NOTE Some device models do not support the WAP sites viewing
feature.
1. Get the following information from your ISP: ISP server phone
number,user name, and password. Also, contact your mobile phone
service provider and ask for your WAP gateway server name and port
number.
7DS > Settings > Connections tab > Connections.
3. Tap Edit my proxy server. If a proxy server has not been set up, tap
Set up my proxy server.
4. In Programs that automatically connect to the Internet should
connect using, tap New and enter a name for the ISP connection.
5. On the Proxy Settings tab, select This network connects to the
Internet and This network uses a proxy server to connect to the
Internet.
6. If necessary, in the Proxy server box, enter the proxy server name.
7. Tap Advanced > WAP.
8. In the Server box, enter the WAP gateway server name. Under Port,
HQWHUWKHSRUWQXPEHU7KHPRVWFRPPRQ:$3SRUWQXPEHULV
9. Enter any logon credentials required by the WAP gateway server.
Using dialing rules
Additional numbers may need to be dialed depending on your given
location when connecting. For example, if you want to dial from work, a 9
SUHÀ[PXVWRIWHQEHGLDOHGRUDQDUHDFRGHLVQHHGHG

Get Connected
73
1. Tap > Settings > Connections tab > Connections > Advanced
tab > Dialing Rules... button.
7DSWKHER[EHVLGHUse dialing rules.
3. Select a location.
•Home'LDOVWKHQXPEHUDVDORFDOFDOOZLWKRXWWKHSUHÀ[
•Work'LDOVWKHQXPEHUDVORFDOFDOOZLWKWKHSUHÀ[
4. Tap Edit... button and make your desired changes.
5. Tap ok when done.
NOTE To create a new location, tap New and follow the directions
on the screen. To view additional information, tap .
Using Terminal Services Client
Use Terminal Services Client to log onto a computer and use all of the
programs available on that computer from your Pocket PC. For example,
instead of running Word Mobile, you can run the desktop computer version
RI:RUGDQGDFFHVVDOORIWKHGRFÀOHVRQWKDWFRPSXWHUIURP\RXUGHYLFH
To have remote access to a computer, it must be running the Terminal
6HUYLFHVRU5HPRWH'HVNWRSSURJUDPLQ:LQGRZVRU;3
To connect and have remote access to a computer:
1. On your Pocket PC, tap > Programs > Terminal Services Client.
6SHFLI\WKHVHUYHUQDPHWKDWLVXVHGE\WKH7HUPLQDO6HUYLFHVRU
Remote Desktop program in the computer.
You can also select the server name from the Recent servers list if you
have previously connected to a computer.
7RUXQDSURJUDPIURPWKHFRPSXWHUWKDWDUHVSHFLÀFDOO\VL]HGIRUXVH
with your Pocket PC, you can select the Limit size of server desktop
WRÀWRQWKLVVFUHHQRSWLRQWREHWWHUÀWWKHSURJUDPRQWKHGHYLFH
screen.
4. Tap Connect.
To avoid creating a new modem connection for each situation, set dialing
rules for the locations from which you often connect to. Three dialing
locations, Home, Mobile, and Work, have been created for you, and you
can create more. If a connection cannot be made, your device gives you
an opportunity to change the dialing location.

74
Chapter 7
Navigating within Terminal Services Client
7KHFRQWHQWVRIWKHZLQGRZRQWKHFRPSXWHUPD\EHWRRZLGHWRÀWWKH
screen of your Pocket PC. You may see two sets of scroll bars on your
device: one for scrolling the computer window contents, and one for
scrolling your device’s Terminal Services Client screen. To scroll the
FRPSXWHUZLQGRZFRQWHQWVXVHWKHÀYHGLUHFWLRQDOEXWWRQVDWWKHERWWRP
of the Terminal Services Client screen.
Logging off or disconnecting from the
remote computer
To log off without disconnecting from the computer:
1. On the computer window, tap Start > Shut Down.
The Shut Down Windows dialog box appears.
7DSLog off <username>, and tap ok.
To disconnect and end the remote session with the computer:
1. On the computer window, tap Start > Shut Down.
The Shut Down Windows dialog box appears.
7DSShut down, and tap ok.
Infrared (IR) connection
Setting beam options
To set the beam options:
1. Tap > Settings > Connections tab.
7DSBeam icon to display the Settings screen.
3. By default, your device detects incoming infrared (IR) beams and
prompts you to accept them. If you do not want your device to detect or
receive beans, clear the Receive all incoming beams check box on
the Settings screen.
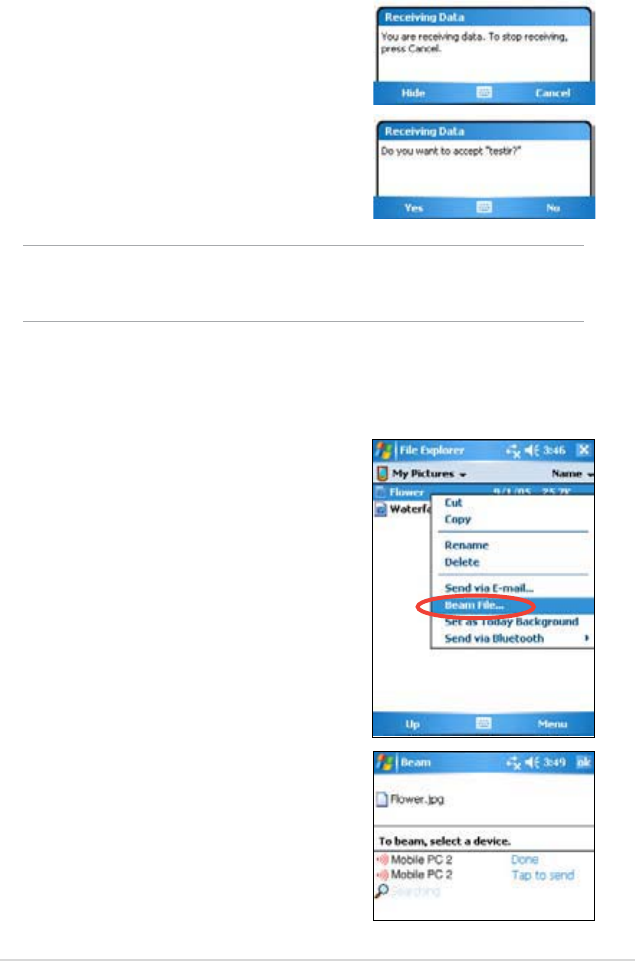
Get Connected
75
Receiving infrared beams
7RUHFHLYHDÀOHYLDLQIUDUHGEHDP
1. When another infrared device within
UDQJHEHDPVÀOHRUGDWDWR\RX\RXU
GHYLFHUHFHLYHVWKHÀOHRUGDWDDQG
prompts a receiving data status.
NOTE Make sure to align the IR ports so that they are unobstructed
DQGZLWKLQWKHUHTXLUHGUDQJH5HFHLYHGÀOHVDUHDXWRPDWLFDOO\
saved in the My Documents folder.
$IWHUGDWDWUDQVPLVVLRQWDSYes to accept
or NoWRUHMHFW
Sending infrared beams
7RVHQGDÀOHYLDLQIUDUHGEHDP
7DSDQGKROGDÀOHWREHDPWKHQWDS
Beam File... from the pop-up menu.
$OLJQWKH,5SRUWVRIWKHGHYLFHVVR
that they are unobstructed and within a
close range. If the ports are not aligned,
a message appears asking you to do
so.
When an IR port is found, a screen
message appears indicating the
sending process.
The message Done appears when the
ÀOHWUDQVIHULVFRPSOHWH
76
Chapter 8
Chapter 8 Bluetooth®
Bluetooth is a short-range wireless communications technology. Devices
with Bluetooth capabilities can exchange information without requiring a
physical connection. Unlike infrared, you do not need to line up devices
to exchange information through Bluetooth. The devices only need to be
within a range of about 10 meters (30 feet) in an open space environment.
You can even beam information to a device in a different room, as long as
LWLVZLWKLQWKHVSHFLÀHGUDQJH
Bluetooth allows your Pocket PC to:
• Locate other Bluetooth devices within the vicinity
• Discover the services that those devices offer
• Connect to, use, and disconnect from those services
• Enable or disable individual services
8VHVHFXULW\IHDWXUHVLQFOXGLQJDXWKHQWLFDWLRQDXWKRUL]DWLRQDQG
encryption
NOTE If you experience problems using Bluetooth® in a landscape
display orientation, revert to portrait.
Using Bluetooth
The Bluetooth icon is located on the lower
right corner of the Today screen.
When Bluetooth is enabled (turned ON),
the icon is blue , and the Bluetooth LED
blinks blue.
When Bluetooth is disabled (turned OFF),
the icon is grayed with a red X on its lower
right corner .
Tapping the icon displays a menu that
allows you to:
• Turn Bluetooth on or off.
• Open the Bluetooth Manager.
&XVWRPL]H%OXHWRRWK6HWWLQJV
Bluetooth icon

Bluetooth
®77
Bluetooth settings
7RFRQÀJXUH%OXHWRRWKVHWWLQJV
1. Tap > Bluetooth Settings.
7DSRQHRIWKHWDEVDWWKHERWWRPRIWKH
Settings screen to access and modify
various settings.
General
Allows you to:
• Select or create a user
SURÀOH
• Check the Bluetooth status
(ON/OFF).
• Turn Bluetooth ON or OFF.
• Tap a link to the Bluetooth
Manager.
Accessibility
Allows you to:
6SHFLI\DQDPHWKDWLGHQWLÀHV
your Pocket PC as a Bluetooth
device.
• Check the Bluetooth Device
Address (BDA).
• Specify whether to allow all
other Bluetooth devices or only
paired devices to connect to your
Pocket PC.
• Specify whether to allow remote
devices to detect your device.
Services
Under Bluetooth Services, you may enable/disable services such as
File Transfer, Information Exchange, Serial Port, Personal Network server
and Audio Gateway. Tap a service from the list, then choose whether to
enable and share the selected service to other devices and whether to
UHTXLUHDXWKRUL]DWLRQDVZHOODVSDVVNH\DXWKHQWLFDWLRQEHWZHHQ%OXHWRRWK
devices.
•File TransferDOORZVRWKHU%OXHWRRWKGHYLFHVWRKDYHDFFHVVWRÀOHV
RQ\RXU3RFNHW3&DQGWRSHUIRUPÀOHUHODWHGRSHUDWLRQVVXFKDVWRJHW
ÀOHVGHOHWHÀOHVHWF7DSAdvanced to set a target directory on your
device that remote devices can access.
See the section “Remote device services” for more information.
•Information Exchange - allows you to specify a contact to be sent
to Bluetooth devices when they request for your business card. Tap
Advanced, then tap to choose a contact as your default business card.
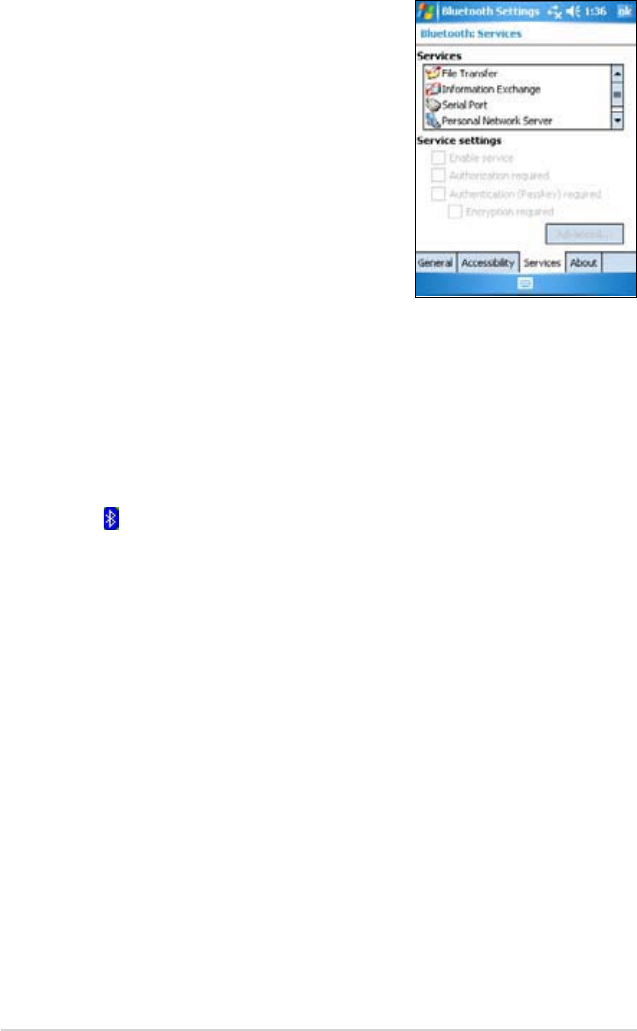
78
Chapter 8
Bluetooth Connection Wizard
7KH%OXHWRRWK&RQQHFWLRQ:L]DUGKHOSV\RXVHWXSFRQQHFWLRQVZLWK
remote Bluetooth devices.
Bluetooth Manager
7KH%OXHWRRWK0DQDJHUDOORZV\RXWRSUHFRQÀJXUHPDQDJHDQGXVH
various types of Bluetooth connections to connect to remote devices.
To open the Bluetooth Manager:
• Tap > Bluetooth Manager.
There are two tabs in the Bluetooth Manager:
•My Shortcuts GLVSOD\VDOLVWRISUHFRQÀJXUHGFRQQHFWLRQVLIDQ\
Tap New to make a new connection with other devices via Bluetooth.
Tap and hold a connection icon to open a pop-up menu containing
options for connecting to devices, disconnecting, checking connection
status, and more.
•Active Connections - displays active incoming and outgoing
connections. Tap New to make a new connection. Tap and hold
a connection icon to open a pop-up menu containing options for
disconnecting from devices and for checking connection status.
•Serial Port - indicates the serial
port address assignments. Tap
Advanced to check the current serial
port addresses. These cannot be
changed. See the section “Remote
device services” for details.
•Personal Network Server - allows
hosting of a Bluetooth-based personal
area network. See the section
“Remote device services” for details.
•Audio Gateway - allows your Pocket
PC to connect to a remote headset or
other audio device.
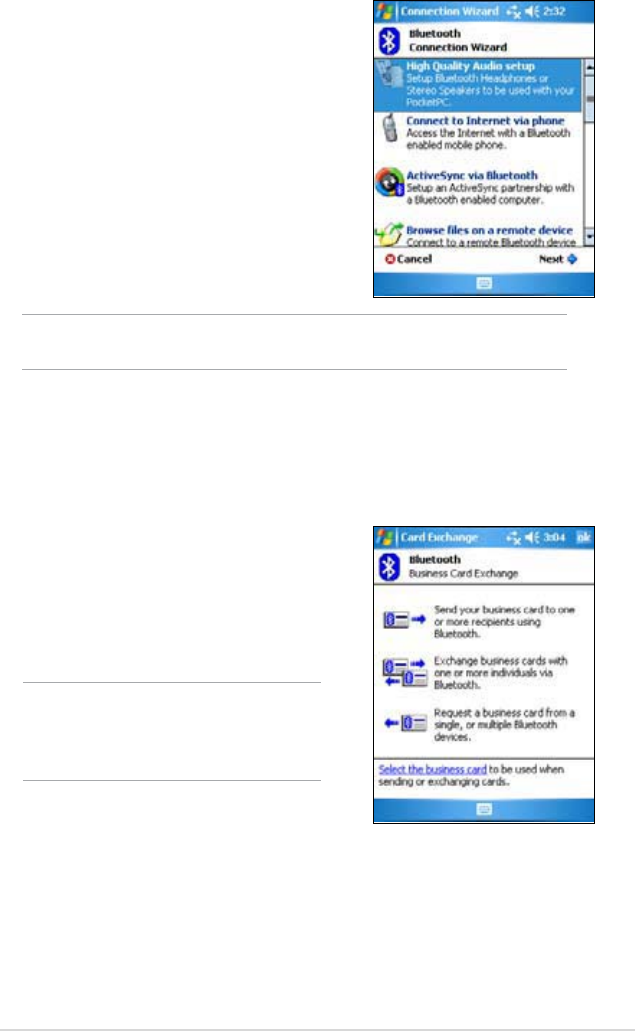
Bluetooth
®79
NOTE Refer to the device online help for more information on
Bluetooth.
To launch the Bluetooth
Connection Wizard:
1. Tap New from the Bluetooth
Manager Menu bar. The
%OXHWRRWK&RQQHFWLRQ:L]DUG
screen appears.
6HOHFWDW\SHRIFRQQHFWLRQWKDW
you want to set up. Tap Next.
3. Follow the on-screen instructions
to set up the connection.
Business Card Exchange
The Business Card Exchange feature allows you to send or receive a
business card to or from a remote device, or exchange business cards
with multiple remote devices.
To access Business Card Exchange:
1. Tap Menu > Business Card Exchange
from the Menu bar.
6HOHFWWKHDFWLRQWKDW\RXZLVKWRPDNH
NOTE On this screen, tap the link
Select the business card
to go to the Information
Exchange settings.

80
Chapter 8
Dial-up networking
The Dial-up Networking feature allows you to connect your Pocket PC
to another Bluetooth-enabled device which can access internet through
a phone line. Once connected, you can browse the Internet, check/read
emails, etc. on your Pocket PC.
The Bluetooth device that will provide the Dial-up Networking service
to your Pocket PC should have access to a telephone system, either a
hard-wired or a cellular connection, and capable of answering a call. Such
device can be a Bluetooth-enabled mobile phone, Bluetooth-enabled
desktop computer attached to a telephone system, or Bluetooth modem.
To set up Dial-up Networking:
1. Tap > Bluetooth Manager.
&UHDWHDFRQQHFWLRQWRWKHGHYLFHWKDWZLOOSURYLGHWHOHSKRQHDFFHVV
6HHWKHVHFWLRQ´%OXHWRRWK&RQQHFWLRQ:L]DUGµ
3. On the My Shortcuts screen, tap and hold the newly created shortcut,
then select Connect from the pop-up menu.
2QWKHÀUVW%OXHWRRWKFRQQHFWLRQVFUHHQGRXEOHWDSNew
Connection...
Remote device services
Wireless serial port
Using a Bluetooth serial port is equivalent to using a physical serial cable
connection between two devices. As with a physical connection, you have
WRFRQÀJXUHWKHDSSOLFDWLRQWKDWZLOOXVHWKHVHULDOSRUW
7RFRQÀJXUHWKH%OXHWRRWK6HULDO3RUW
1. Tap > Bluetooth Settings > Services tab.
)URPWKH6HUYLFHVOLVWVHOHFWSerial Port.
3. Tap Advanced. Note the assigned Outbound COM Port (port 8).
NOTE Refer to the application’s documentation for more information
DERXWFRQÀJXULQJ\RXUDSSOLFDWLRQҋV2XWERXQG&20SRUW

Bluetooth
®81
Bluetooth File Explorer
7KH%OXHWRRWK)LOH([SORUHUDSSHDUVDXWRPDWLFDOO\DIWHUDÀOHWUDQVIHU
connection is established. This feature allows you to do the following:
• Navigate the directory structure of the remote device.
9LHZWKHÀOHVDQGIROGHUVRQWKHUHPRWHGHYLFH
• Create new folders on the remote device.
6HQGÀOHVWRDQGFRS\RUJHWÀOHVIURPWKHUHPRWHGHYLFH
'HOHWHÀOHVIURPWKHUHPRWHGHYLFH
NOTE 7KHÀOHRSHUDWLRQVRQWKHUHPRWHGHYLFHDUHOLPLWHGWRWKH
FRQÀJXUHG)73URRWGLUHFWRU\DQGVXEGLUHFWRULHVRIWKH
remote device.
5. On the second Bluetooth connection screen, enter a name for the
connection, dial-up phone number, and the other prompted information.
Then tap ok.
6. Enter the required information on the succeeding screens.
The Bluetooth File Explorer also allows you to set a folder in your device
IRUUHFHLYLQJLQERXQGÀOHV<RXPD\FRQÀJXUHWKLVIROGHUIRUHDFKRI\RXU
connection shortcuts. See the section “To set a local folder”.
Bluetooth File Explorer menus
File Send a File...
Create a Folder
Get
Delete
Tools Set Local Folder
Refresh

82
Chapter 8
To change the remote device folder:
1. To move down in the directory structure of the remote device, tap the
New Folder from the main window of Bluetooth File Explorer.
7RPRYHup in the directory structure of the remote device, tap the
down-arrow to the right of the currently selected folder and select the
New Folder from the drop-down list.
To create a folder on the remote device:
1. Select the folder in which you wish to place the new folder.
)URPWKH)LOHPHQXWDSCreate a Folder.
3. Enter a name for the new folder while the default name New Folder is
highlighted.
7RVHQGDÀOHWRWKHUHPRWHGHYLFH
1. From the File menu, tap Send a File... to display the Open screen.
The Open screen includes the following:
FolderWDSWKHGRZQDUURZDQGVHOHFWWKHIROGHUWKDWFRQWDLQVWKHÀOH
you wish to send.
Type - default and only option is “All Files (*.*).
$OLVWRIÀOHVLQWKHVHOHFWHGIROGHUWDSDÀOHWKDW\RXZLVKWRVHQG
Cancel button - abort the Send a File... operation.
7DS\RXUGHVLUHGRSHUDWLRQ
7KHÀOHWKDW\RXVHOHFWHGLVDXWRPDWLFDOO\VHQWZKHQWDSSHGDIWHU
which the Bluetooth File Explorer re-appears.

Bluetooth
®83
7RJHWDÀOHIURPWKHUHPRWHGHYLFH
6HOHFWWKHIROGHUFRQWDLQLQJWKHÀOH
7DSWKHÀOHWKDW\RXZLVKWRJHWRUFRS\
3. From the File menu, tap Get.
OR
7DSDQGKROGWKHGHVLUHGÀOHDQGVHOHFWGet from the pop-up menu.
7KHÀOHLVFRSLHGWRWKHORFDOIROGHUOLVWHGLQWKH/RFDO)ROGHUÀHOGDWWKH
bottom of the screen.
7RGHOHWHDÀOHIURPWKHUHPRWHGHYLFH
7DSWKHÀOHWKDW\RXZLVKWRGHOHWH
)URPWKH)LOHPHQXWDSDelete.
3. Tap okLQWKHFRQÀUPDWLRQGLDORJER[
OR
7DSDQGKROGWKHGHVLUHGÀOHDQGVHOHFWDelete from the pop-up menu
7RVHWDORFDOIROGHUIRULQFRPLQJÀOHV
1. From the Tools menu, tap Set Local Folder.
8VHWKHGURSGRZQPHQXDWWKHWRSRIWKHVFUHHQWRJRWR\RXUGHVLUHG
folder.
3. Tap ok to return to the main screen of the Bluetooth File Explorer.
<RXZLOOVHHWKH/RFDO)ROGHUÀHOGLVXSGDWHGWRUHÁHFWWKHQHZIROGHU
selection.
NOTE The Local Folder information is associated with the currently
RSHQVKRUWFXWDQGLVVDYHGZLWKWKHDFWLYHSURÀOH<RXFDQ
VHSDUDWHO\FRQÀJXUH\RXU/RFDO)ROGHUIRUHDFKFRQQHFWLRQ
shortcut.
7RUHIUHVKWKHOLVWRIGLVSOD\HGÀOHVDQGIROGHUVRQWKHUHPRWHGHYLFH
simply tap Refresh from the Tools menu.
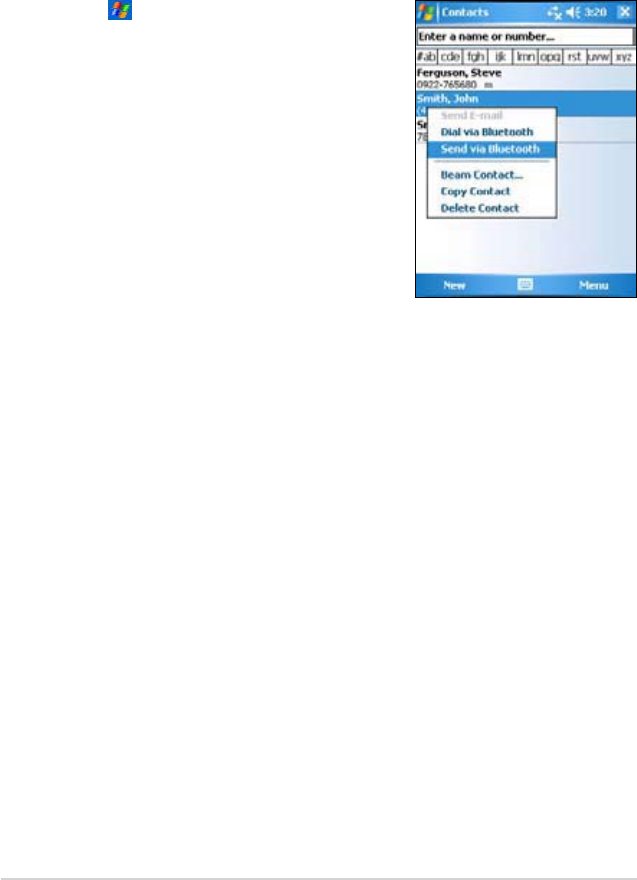
84
Chapter 8
Dial via Bluetooth
The Dial via Bluetooth option allows you to select a contact from the
contacts list, and have your paired cell phone dial the contact’s phone
number. If a contact has more than one phone number, select the number
that you wish to dial.
To dial via Bluetooth:
1. On the Contacts screen, tap and hold a contact and select Dial via
Bluetooth.
,I\RXUGHYLFHLVSDLUHGZLWKPRUHWKDQRQHFHOOSKRQHRULIDSKRQH
is not yet selected, tap the phone icon next to Select a phone, and
choose the phone that you wish to use.
3. Select the number that you wish to dial, then tap Dial Number.
After the number is sent to the cell phone, the connection on the device is
closed.
After the cell phone completes the dialing process, you can use the phone
the normal way.
Send via Bluetooth
You can conveniently send your Outlook contacts, calendar items, and
tasks individually or collectively to the remote device via Bluetooth.
To send data via Bluetooth:
1. Tap , then open either Contacts,
Calendar, or Tasks.
7DSDQGKROGWKHLWHP\RXZLVKWRVHQG
to the remote device, then tap Send via
Bluetooth from the pop-up menu.
OR
Tap Menu >Send via Bluetooth.
3. On the Select a Bluetooth Device
screen, tap the name of the destination,
then tap ok.
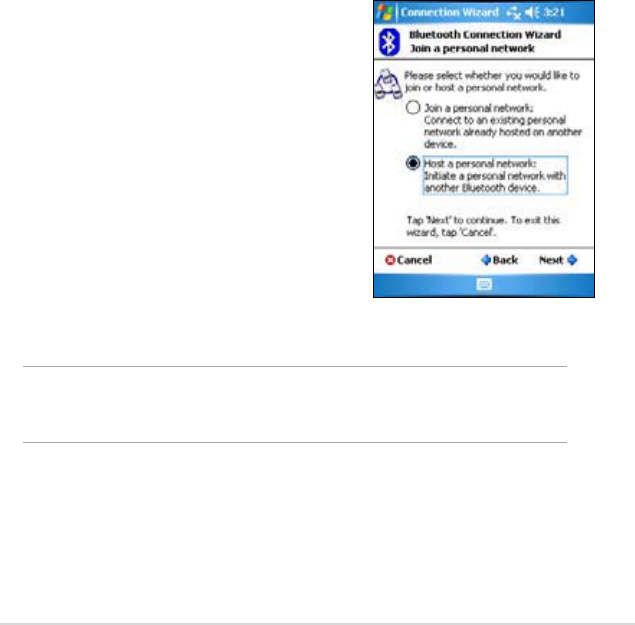
Bluetooth
®85
Bluetooth Personal Area Network
A Bluetooth personal area network is a private, temporary, ad-hoc network
of up to eight (8) devices. A Bluetooth personal area network allows you to
easily exchange information that normally requires a TCP/IP network. Most
chat utilities, multi-player games, etc. are fully functional in a Bluetooth
personal area network environment.
%OXHWRRWKSULYDWHDUHDQHWZRUNVDUHVXEMHFWWRWKHVDPHVHFXULW\VHWWLQJV
VHUYLFHDYDLODELOLW\DXWKRUL]DWLRQDXWKHQWLFDWLRQDQGHQFU\SWLRQWKDW
govern other Bluetooth communications.
One Bluetooth device must be the host of the personal area network.
2WKHU%OXHWRRWKGHYLFHVMRLQWKHQHWZRUNDVFOLHQWV7KHKRVWFDQDFFHSW
DQGUHMHFWFOLHQWVRQDQLQGLYLGXDOEDVLV
To set up a Bluetooth personal area network:
1. In the Bluetooth Manager, tap New >
Join a personal network.
2QWKHZL]DUGVFUHHQVHOHFWHost a
personal network, then tap Next.
3. Add remote devices to the Bluetooth
personal network, if desired.
a. Tap the Add button and select the
device that you wish to add.
b. Add other devices, if desired. There
can be up to eight devices, including
the host.
4. After adding devices, tap ok to
FRPSOHWHWKHVHWXSDQGFORVHWKHZL]DUG
NOTE Adding devices is optional. You do not have to add devices to
WKHSHUVRQDOQHWZRUNZKLOHFRQÀJXULQJWKHKRVW<RXFDQOHW
RWKHUGHYLFHVMRLQWKHSHUVRQDOQHWZRUNODWHU

86
Chapter 8
Setting up High Quality Audio setup or
Hands-free/Headset setup
1. Tap icon > Bluetooth Manager.
7DSNew > High Quality Audio setup or Hands-free/ Headset setup >
Next.
3. Follow the on-screen instructions to complete the setup.
NOTE Please ensure the Hands-free device you are trying to
connect to is ready to receive incoming connection requests.
Please refer to the device’s manual for more information.
To join a personal network:
1. In the Bluetooth Manager, tap New >
Join a personal network.
2QWKHZL]DUGVFUHHQVHOHFWJoin a
personal network, then tap Next.
3. Select the host of the personal network,
then tap Next to establish a connection
to the personal area network.
If you are asked to enter the IP network
settings, select Use server-assigned
IP address, then tap ok.
Setting up ActiveSync via Bluetooth
1. Tap icon > Bluetooth Manager.
7DSNew > ActiveSync via Bluetooth > Next.
3. Follow the on-screen instructions to complete the setup. Please make
sure the COM Port number that is set on the ActiveSync program on
the computer is the same as the COM Port setting on MyPal.
2QWKH%OXHWRRWK&RQQHFWLRQ:L]DUGVFUHHQVHOHFWWKHQDPHRIWKH
FRPSXWHUWRV\QFKURQL]H0\3DOZLWKWKHQWDSNext.
5. Select the COM Port setting used by the computer and tap Next.
6. Tap Finish.
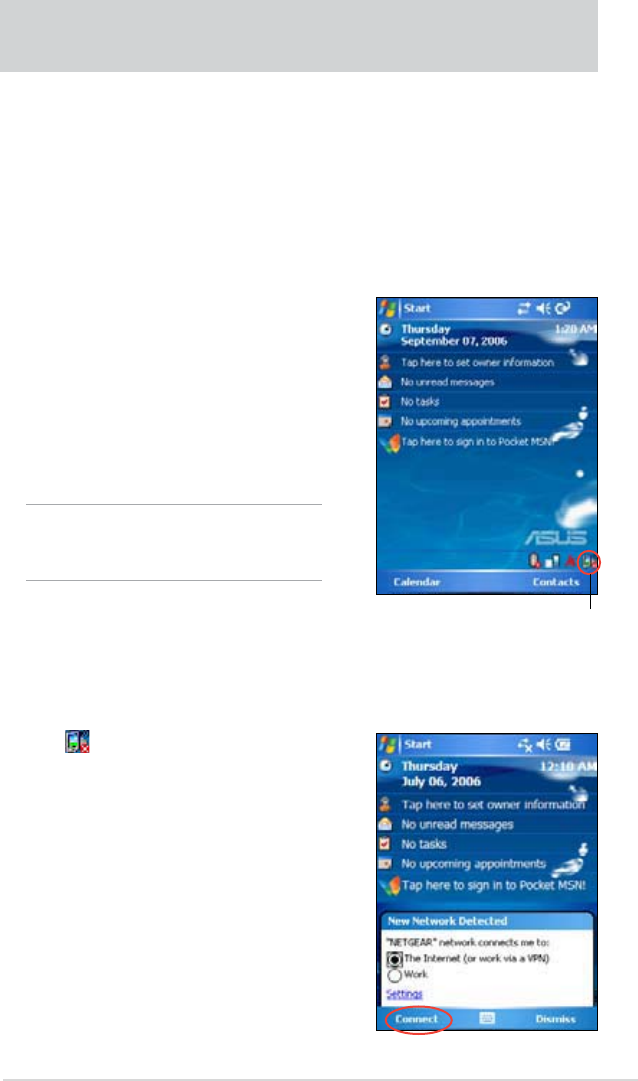
Wi-Fi®
87
Chapter 9 Wi-Fi (A696 only)
0\3DO$$FRPHVZLWKDEXLOWLQ:LUHOHVV)LGHOLW\:L)L®) feature
that allows you to connect to wireless local area networks and the
,QWHUQHW8VLQJWKH,(((EJVWDQGDUGIRUZLUHOHVV/$10\3DO
$$FDQFRQQHFWDWVSHHGVRIXSWR0ESVWRDQDFFHVVSRLQW
(Infrastructure mode) or to another wireless device (Ad-hoc mode).
Using Wi-Fi
The Wi-Fi icon on the Today screen gives
you easy access to the Wi-Fi (Wireless
Fidelity) feature on your device. Tapping the
icon displays a menu that allows you to:
• Turn Wi-Fi on or off.
&RQÀJXUH:L)LVHWWLQJV
NOTE You can use the
Bluetooth
®
and Wi-Fi
features simultaneously.
Turning on Wi-Fi
To turn on Wi-Fi:
1. Tap > Enable Wi-Fi.
The Pocket PC then automatically
scans for all available wireless networks
within the Wi-Fi range.
)URPWKHOLVWRIGHWHFWHGZLUHOHVV
networks, select a wireless network that
you want to connect the device to.
3. Select whether the wireless network
connects to The Internet or Work
network.
4. Tap Connect. The device then connects
to the selected network.
Wi-Fi icon

88
Chapter 9
7RFRQÀJXUHDQHWZRUNDGDSWHU
1. Tap the Network Adapters tab.
0DNH\RXUGHVLUHGFKDQJHVWRWKHDYDLODEOHDGDSWHUVRQWKHOLVW
3. Tap ok when done.
4. After changing the network adapter settings, a message appears
instructing you to remove then re-install the network card to have your
changes take effect. Tap ok to close the window.
Adding a wireless network
If the device fails to automatically detect the wireless network you want
to connect to, you can add the network provided you know the wireless
network settings. Ask for the wireless network settings from your network
administrator.
To add a wireless network:
1. Open the &RQÀJXUH:LUHOHVV1HWZRUNV window by:
• Tapping on Settings in the Multiple Networks Detected callout.
OR
&RQÀJXULQJZLUHOHVVQHWZRUNV
7RFRQÀJXUHDZLUHOHVVQHWZRUN
1. After selecting a wireless network to connect your device to, tap
Settings.
The Settings screen then appears.
7DSNetwork Cards > Wireless tab.
2QWKH&RQÀJXUH:LUHOHVV1HWZRUNVVFUHHQWDSRQDQDYDLODEOH
wireless LAN, then make your desired changes as necessary.
If the wireless LAN you want to connect to is not on the list, tap Add
New... Refer to the suceeding sections for details on how to add new
wireless LANs.
4. Tap ok when done.
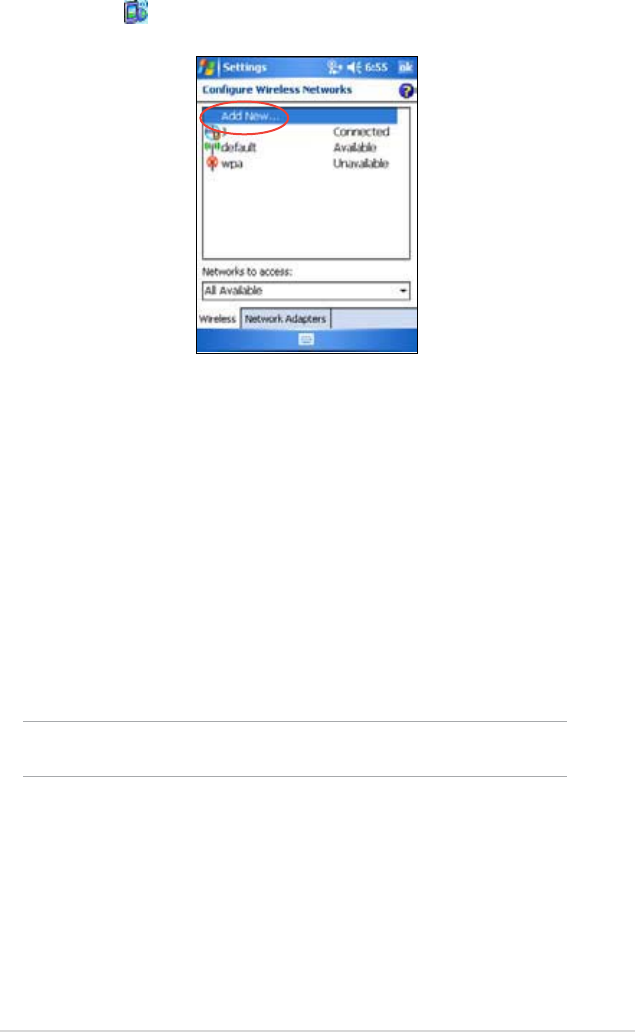
Wi-Fi®
89
• Tapping > Settings > Connections tab > Network Cards.
,QWKH:LUHOHVVWDERIWKH&RQÀJXUH:LUHOHVV1HWZRUNVVFUHHQWDS
Add New.
,QWKH*HQHUDOWDERIWKH&RQÀJXUH:LUHOHVV1HWZRUNVFUHHQHQWHUWKH
Network name by using the input panel.
Then choose whether the wireless network connects to The Internet
or Work network.
If you want to connect to another wireless device (Ad-hoc mode),
select the option, This is a device-to-device (ad-hoc) connection.
Otherwise, tap the Network KeyWDEWRFRQÀJXUHWKHZLUHOHVV/$1ҋV
network security settings.
4. In the Network Key tab, select the Authentication and Data
Encryption settings of the wireless LAN you want to add.
NOTE Inquire the network security settings from the network
administrator.
5. Tap the 802.1xWDEWRFRQÀJXUHRWKHUQHWZRUNVHFXULW\VHWWLQJV
6. Tap ok to add the wireless network.
The new wireless network is then added to the list under the Wireless
tab.
7. Tap and hold the stylus on the new wireless network in the list, then tap
Connect in the pop-up menu to connect your device to that network.

90
Chapter 9
The Wi-Fi Manager
The Wi-Fi Manager shows connection status and information on a wireless
network, and allows you to manually scan your area for available wireless
networks.
To open Wi-Fi Manager:
• Tap > WLAN Setting. Or,
• Tap > Settings > Connections tab > Wi-Fi Manager.
There are four tabs in the Wi-Fi Manager:
Wi-Fi Status
This tab indicates whether Wi-Fi is currently connected, and shows
LQIRUPDWLRQDERXWWKHZLUHOHVVFRQQHFWLRQ6SHFLÀFDOO\WKHIROORZLQJ
information are displayed:
Status - shows the Wi-Fi connection status.
•Connected - the station is associated with one wireless LAN
device. This status also indicates the MAC
address of the device.
•Disconnected - a previous link existed but no beacon was
received. The connection to the adapter is
terminated.
ESSIDVKRZVWKH([WHQGHG6HUYLFH6HW,QGHQÀHU(66,'WRZKLFK
WKHZLUHOHVVGHYLFHLVFRQQHFWHG7KHWH[WRQWKLVÀHOGLVXVXDOO\DQ
unreadable alphanumeric string.
BSSID - shows the Basic Service Set ID (BSSID) to which the wireless
device is connected. In ESS mode, this is the MAC address of the access
point to which your device is connected.
BSS Mode - tells you whether the device is connected to an access point
(Infrastructure mode) or to another wireless device (Ad-hoc mode).
Channel - shows the channel used by the wireless device.
IP Address - shows the IP address of the wireless device.
Signal Strength - shows the signal strength level between the Wi-Fi device
and the access point (or another wireless device) to which it is currently
connected.
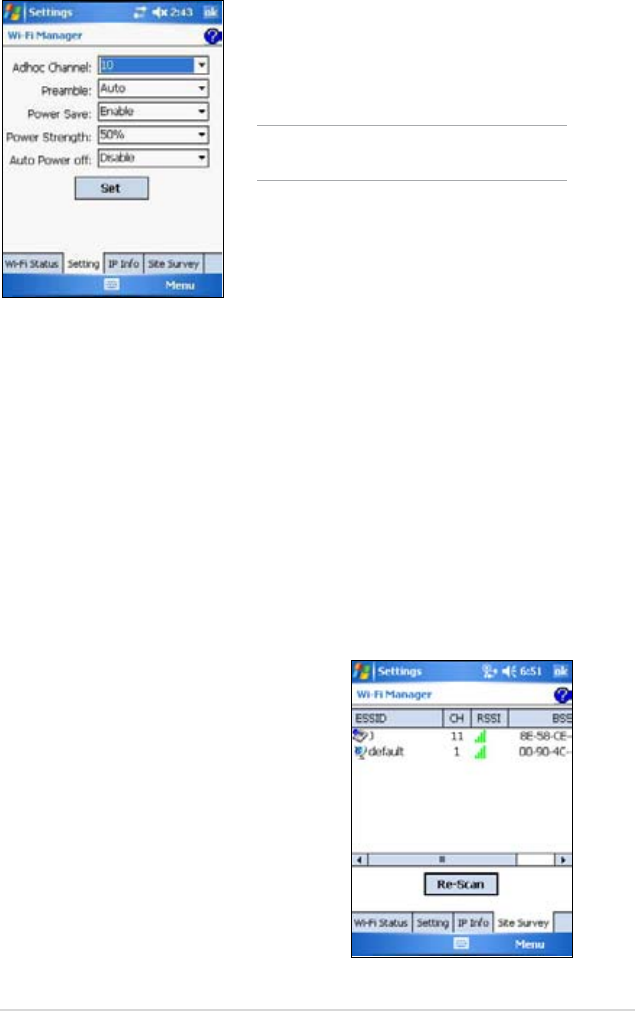
Wi-Fi®
91
IP Info
This tab displays the device’s Internet Protocol (IP) information including
the host name, domain, DNS server, IP address, etc.
In this tab, you can renew the IP address when the wireless network uses
WKH'\QDPLF+RVW&RQÀJXUDWLRQ3URWRFRO'+&37DSSLQJWKHRenew
button forces the device to refresh its server-assigned IP address. The
process may take several seconds while the system updates the IP
information.
You can also try to detect if the wireless device is currently connected to
the wireless network by tapping the Ping button.
Site Survey
This tab allows you to search for
available wireless networks within your
location. Tap the Re-scan button to
scan all available wireless networks and
display the results on the screen.
Each wireless network is preceded by an
LFRQIRUHDV\LGHQWLÀFDWLRQ7KHQHWZRUN
channel, RSSI, and BSSID are also
displayed in columns.
NOTE We recommend to set the
Power Save to Enable.
7KLVWDEDOORZV\RXWRGHÀQHVHWWLQJVIRU
establishing a device-to-device wireless
connection as well as power saving
settings.
Setting
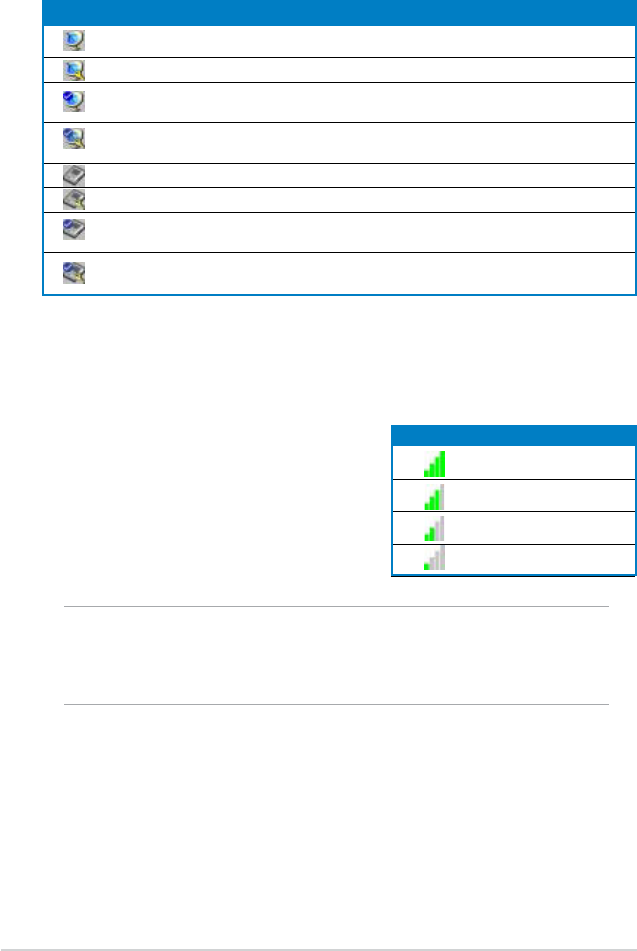
92
Chapter 9
ESSIDVKRZVWKH([WHQGHG6HUYLFH6HW,QGHQÀHU(66,'RIWKHZLUHOHVV
network found in the search.
CH - shows the channel used by a wireless device.
RSSI - shows the Received Signal
Strength Indication (RSSI) transmitted by
each wireless network. This information
is helpful in determining which network
you wish to associate your device. This
signal is normally represented by a dBm
value.
NOTE The icon may be green or orange. The green icon indicates
WKHVLJQDOUHFHLYHGIURP,(((EGHYLFHZKLOHWKH
RUDQJHLFRQLQGLFDWHVWKHVLJQDOUHFHLYHGIURP,(((J
device.
BSSID - shows the Media Access Control (MAC) address of the access
point, or the Basic Service Set ID (BSSID) in an ad-hoc mode.
Table of icon indications:
Refer to the table of icon indications and column descriptions below.
Icon Indicates that the wireless network is
an Access Point with disabled Wired Equivalent Privacy (WEP) encryption
an Access Point with enabled WEP encryption
an Access Point with disabled WEP encryption and MyPal is currently
connected to this network
an Access Point with enabled WEP encryption and MyPal is currently
connected to this network
a wireless device with disabled WEP encryption
a wireless device with enabled WEP encryption
a wireless device with disabled WEP encryption and MyPal is currently
connected to this network
a wireless device with enabled WEP encryption and MyPal is currently
connected to this network
Icon Link Quality
Excellent
Good
Fair
Poor

Notices
93
Appendix Notices
Federal Communications Commission Statement
7KLVGHYLFHFRPSOLHVZLWK3DUWRIWKH)&&5XOHV2SHUDWLRQLVVXEMHFWWRWKHIROORZLQJWZR
conditions:
1) This device may not cause harmful interference, and
7KLVGHYLFHPXVWDFFHSWDQ\LQWHUIHUHQFHUHFHLYHGLQFOXGLQJLQWHUIHUHQFHWKDWPD\FDXVH
undesired operation.
7KLVGHYLFHDQGLWVDQWHQQDPXVWQRWEHFRORFDWHGRURSHUDWLQJLQFRQMXQFWLRQZLWKDQ\RWKHU
antenna or transmitter.
This equipment has been tested and found to comply with the limits for a Class B digital
device, pursuant to Part 15 of the FCC Rules. These limits are designed to provide
reasonable protection against harmful interference in a residential installation. This
equipment generates, uses and can radiate radio frequency energy and, if not installed
and used in accordance with manufacturer’s instructions, may cause harmful interference
to radio communications. However, there is no guarantee that interference will not occur
in a particular installation. If this equipment does cause harmful interference to radio or
television reception, which can be determined by turning the equipment off and on, the user
is encouraged to try to correct the interference by one or more of the following measures:
• Reorient or relocate the receiving antenna.
• Increase the separation between the equipment and receiver.
• Connect the equipment to an outlet on a circuit different from that to which the receiver is
connected.
• Consult the dealer or an experienced radio/TV technician for help.
Canadian Department of Communications Statement
This digital apparatus does not exceed the Class B limits for radio noise emissions from
digital apparatus set out in the Radio Interference Regulations of the Canadian Department
of Communications.
This class B digital apparatus complies with Canadian ICES-003.
WARNING! The use of shielded cables for connection of the monitor to the
graphics card is required to assure compliance with FCC regulations.
&KDQJHVRUPRGLÀFDWLRQVWRWKLVXQLWQRWH[SUHVVO\DSSURYHGE\WKH
party responsible for compliance could void the user’s authority to
operate this equipment.

94
Appendix
UL Safety Notices
Required for UL 1459 covering telecommunications (telephone) equipment intended to
be electrically connected to a telecommunication network that has an operating voltage to
JURXQGWKDWGRHVQRWH[FHHG9SHDN9SHDNWRSHDNDQG9UPVDQGLQVWDOOHGRU
used in accordance with the National Electrical Code (NFPA 70).
When using the Pocket PC, basic safety precautions should always be followed to reduce the risk
RIÀUHHOHFWULFVKRFNDQGLQMXU\WRSHUVRQVLQFOXGLQJWKHIROORZLQJ
• Do not use the Pocket PC near water, for example, near a bath tub, wash bowl, kitchen
sink or laundry tub, in a wet basement or near a swimming pool.
•Do not use the Pocket PC during an electrical storm. There may be a remote risk of electric
shock from lightning.
•Do not use the Pocket PC in the vicinity of a gas leak.
5HTXLUHGIRU8/FRYHULQJSULPDU\QRQUHFKDUJHDEOHDQGVHFRQGDU\UHFKDUJHDEOHOLWKLXP
batteries for use as power sources in products. These batteries contain metallic lithium, or a
lithium alloy, or a lithium ion, and may consist of a single electrochemical cell or two or more cells
connected in series, parallel, or both, that convert chemical energy into electrical energy by an
irreversible or reversible chemical reaction.
•Do notGLVSRVHWKH3RFNHW3&EDWWHU\SDFNLQDÀUHDVWKH\PD\H[SORGH&KHFNZLWKORFDO
FRGHVIRUSRVVLEOHVSHFLDOGLVSRVDOLQVWUXFWLRQVWRUHGXFHWKHULVNRILQMXU\WRSHUVRQVGXHWR
ÀUHRUH[SORVLRQ
•Do notXVHSRZHUDGDSWHUVRUEDWWHULHVIURPRWKHUGHYLFHVWRUHGXFHWKHULVNRILQMXU\
WRSHUVRQVGXHWRÀUHRUH[SORVLRQ8VHRQO\8/FHUWLÀHGSRZHUDGDSWHUVRUEDWWHULHV
VXSSOLHGE\WKHPDQXIDFWXUHURUDXWKRUL]HGUHWDLOHUV
Replaceable batteries
If an equipment is provided with a replaceable battery and if replacement by an incorrect type
could result in an explosion (e.g. with some lithium batteries), the following applies:
– if the battery is placed in an OPERATOR ACCESS AREA, there shall be a marking close
WRWKHEDWWHU\RUDVWDWHPHQWLQERWKWKHRSHUDWLQJDQGWKHVHUYLFLQJLQVWUXFWLRQV
– if the battery is placed elsewhere in the equipmen, there shall be a marking close to the
battery or a statement in the servicing instructions.
The marking or statement shall include the following or similar text:
CAUTION
RISK OF EXPLOSION IF BATTERY IS REPLACED
BY AN INCORRECT TYPE.
DISPOSE OF USED BATTERIES ACCORDING
THE INSTRUCTIONS
Compliance is checked by inspection.
Operator access with a tool
If a TOOL is necessary to gain access to an OPERATOR ACCESS AREA, either all other
FRPSDUWPHQWVZLWKLQWKDWDUHDFRQWDLQLQJDKD]DUGVKDOOEHLQDFFHVVLEOHWRWKH23(5$725E\
the use of the same TOOL, or such compartments shall be marked to discourage OPERATOR
access.
$QDFFHSWDEOHPDUNLQJIRUDQHOHFWULFVKRFNKD]DUGLV,621R
Equipment for restricted access locations
For equipment intended only for installation in a RESTRICTED ACCESS LOCATION, the
installation instructions shall contain a statement to this effect.

Notices
95
Checklist of Regulatory Statement
15.21
<RXDUHFDXWLRQHGWKDWDQ\FKDQJHVRUPRGLÀFDWLRQVQRWH[SUHVVO\DSSURYHGLQWKLV
PDQXDOFRXOGYRLG\RXUDXWKRUL]DWLRQWRXVHWKHGHYLFH
&$87,21$Q\FKDQJHVRUPRGLÀFDWLRQVQRWH[SUHVVO\DSSURYHGE\WKHSDUW\UHVSRQVLEOH
for compliance could void the user’s authority to operate the equipment.
Prohibition of co-location
7KLVGHYLFHPXVWQRWEHFRORFDWHGRURSHUDWLQJLQFRQMXQFWLRQZLWKDQ\RWKHUDQWHQQDRU
transmitter
15.105 Federal Communications Commission (FCC) Requirements, Part 15
This equipment has been tested and found to comply with the limits for a class B digital
device, pursuant to part 15 of the FCC Rules. These limits are designed to provide
reasonable protection against harmful interference in a residential installation.
This equipment generates, uses and can radiate radio frequency energy and, if not
installed and used in accordance with the instructions, may cause harmful interference to
radio communications. However, there is no guarantee that interference will not occur in a
particular installation. If this equipment does cause harmful interference to radio or television
reception, which can be determined by turning the equipment off and on, the user is
encouraged to try to correct the interference by one or more of the following measures:
—Reorient or relocate the receiving antenna.
—Increase the separation between the equipment and receiver.
—Connect the equipment into an outlet on a circuit different from that to which the receiver is
connected.
—Consult the dealer or an experienced radio/TV technician for help.
Regulatory information / Disclaimers
Installation and use of this Wireless LAN device must be in strict accordance with the
instructions included in the user documentation provided with the product. Any changes or
PRGLÀFDWLRQVLQFOXGLQJWKHDQWHQQDVPDGHWRWKLVGHYLFHWKDWDUHQRWH[SUHVVO\DSSURYHGE\
the manufacturer may void the user’s authority to operate the equipment. The manufacturer
LVQRWUHVSRQVLEOHIRUDQ\UDGLRRUWHOHYLVLRQLQWHUIHUHQFHFDXVHGE\XQDXWKRUL]HG
PRGLÀFDWLRQRIWKLVGHYLFHRUWKHVXEVWLWXWLRQRIWKHFRQQHFWLQJFDEOHVDQGHTXLSPHQWRWKHU
WKDQPDQXIDFWXUHUVSHFLÀHG,WLVWKHUHVSRQVLELOLW\RIWKHXVHUWRFRUUHFWDQ\LQWHUIHUHQFH
FDXVHGE\VXFKXQDXWKRUL]HGPRGLÀFDWLRQVXEVWLWXWLRQRUDWWDFKPHQW0DQXIDFWXUHUDQG
LWVDXWKRUL]HGUHVHOOHUVRUGLVWULEXWRUVZLOODVVXPHQROLDELOLW\IRUDQ\GDPDJHRUYLRODWLRQRI
government regulations arising from failing to comply with these guidelines.
CAUTION: To maintain compliance with FCC’s RF exposure guidelines, this equipment
VKRXOGEHLQVWDOOHGDQGRSHUDWHGZLWKPLQLPXPGLVWDQFHFPEHWZHHQWKHUDGLDWRUDQG
\RXUERG\8VHRQWKHVXSSOLHGDQWHQQD8QDXWKRUL]HGDQWHQQDPRGLÀFDWLRQRUDWWDFKPHQWV
could damage the transmitter and may violate FCC regulations.
MPE Statement (Safety Information)
Your device contains a low power transmitter. When device is transmitted it sends out Radio
Frequency (RF) signal.

96
Appendix
Safety Information
In order to maintain compliance with the FCC RF exposure guidelines, this equipment should
EHLQVWDOOHGDQGRSHUDWHGZLWKPLQLPXPGLVWDQFHFPEHWZHHQWKHUDGLDWRUDQG\RXUERG\
8VHRQO\ZLWKVXSSOLHGDQWHQQD8QDXWKRUL]HGDQWHQQDPRGLÀFDWLRQRUDWWDFKPHQWVFRXOG
damage the transmitter and may violate FCC regulations.
Caution Statement of the FCC Radio Frequency Exposure
FCC RF exposure requirements: Use in portable RF exposure conditions is limited to the
specific product and antenna configurations evaluated in the filing under FCCID: MSQA696.
The antenna(s) used for this transmitter must not be co-located or operating in conjunction
with any other antenna or transmitter within this host device, except as described in this filing.