ASUSTeK Computer A716 BLUETOOTH POCKET PC User Manual USERS MANUAL 1
ASUSTeK Computer Inc BLUETOOTH POCKET PC USERS MANUAL 1
Contents
- 1. USERS MANUAL 1
- 2. USERS MANUAL
- 3. USERS MANUAL 2
USERS MANUAL 1

MyPal A716
User’s manual

ii
Copyright © 2004 ASUSTeK COMPUTER INC. All Rights Reserved.
No part of this manual, including the products and software described in it, may be
reproduced, transmitted, transcribed, stored in a retrieval system, or translated into any
language in any form or by any means, except documentation kept by the purchaser for
backup purposes, without the express written permission of ASUSTeK COMPUTER INC.
(“ASUS”).
Product warranty or service will not be extended if: (1) the product is repaired, modified or
altered, unless such repair, modification of alteration is authorized in writing by ASUS; or (2)
the serial number of the product is defaced or missing.
ASUS PROVIDES THIS MANUAL “AS IS” WITHOUT WARRANTY OF ANY KIND, EITHER
EXPRESS OR IMPLIED, INCLUDING BUT NOT LIMITED TO THE IMPLIED WARRANTIES
OR CONDITIONS OF MERCHANTABILITY OR FITNESS FOR A PARTICULAR PURPOSE.
IN NO EVENT SHALL ASUS, ITS DIRECTORS, OFFICERS, EMPLOYEES OR AGENTS BE
LIABLE FOR ANY INDIRECT, SPECIAL, INCIDENTAL, OR CONSEQUENTIAL DAMAGES
(INCLUDING DAMAGES FOR LOSS OF PROFITS, LOSS OF BUSINESS, LOSS OF USE
OR DATA, INTERRUPTION OF BUSINESS AND THE LIKE), EVEN IF ASUS HAS BEEN
ADVISED OF THE POSSIBILITY OF SUCH DAMAGES ARISING FROM ANY DEFECT OR
ERROR IN THIS MANUAL OR PRODUCT.
SPECIFICATIONS AND INFORMATION CONTAINED IN THIS MANUAL ARE FURNISHED
FOR INFORMATIONAL USE ONLY, AND ARE SUBJECT TO CHANGE AT ANY TIME
WITHOUT NOTICE, AND SHOULD NOT BE CONSTRUED AS A COMMITMENT BY ASUS.
ASUS ASSUMES NO RESPONSIBILITY OR LIABILITY FOR ANY ERRORS OR
INACCURACIES THAT MAY APPEAR IN THIS MANUAL, INCLUDING THE PRODUCTS
AND SOFTWARE DESCRIBED IN IT.
Microsoft, Activesync, Outlook, Pocket Outlook, Windows, and the Windows logo are either
registered trademarks or trademarks of Microsoft Corporation in the United States and/or in
other countries. Microsoft products are licensed to OEMs by Microsoft Lincensing, Inc., a
wholly owned subsidiary of Microsoft Corporation.
E1462
First edition V1
February 2004

iii
Contents at a glance
This user’s manual contains the information you need to efficiently use
ASUS
®
MyPal A716 Pocket PC.
•Chapter 1 - Get started!.............................................................. 1-1
This chapter introduces the ASUS MyPal A716 Pocket PC, how to
set and power it up, and basic screens that will familiarize you with
its many features.
•Chapter 2 - Learn the basics ..................................................... 2-1
This chapter will teach you the basic functions in MyPal A716. You will
learn how to enter, find, and organize information, customize the
device, and use the bundled ASUS utilities.
•Chapter 3 - Microsoft
®
ActiveSync
®
........................................... 3-1
This chapter tells you how to use the Microsoft
®
ActiveSync
®
to
synchronize your device with your desktop computer.
•Chapter 4 - Microsoft
®
Pocket Outlook ..................................... 4-1
This chapter details the procedures for the Microsoft
®
Pocket Outlook
Calendar, Contacts, Tasks, Notes, and Inbox.
•Chapter 5 - Companion programs............................................. 5-1
This chapter includes information on Pocket Word, Pocket Excel,
MSN Messenger, Windows Media Player for Pocket PC, and
Microsoft Reader.
•Chapter 6 - Pocket Internet Explorer ......................................... 6-1
This chapter gives information on using Pocket Internet Explorer,
Mobile Favorites folder, and AvantGo interactive service.
•Chapter 7 - Get connected ......................................................... 7-1
This chapter provides the procedures for connecting to the Internet,
and for transferring data using infrared (IR).
•Chapter 8 - Bluetooth
®...................................................................................................
8-1
This chapter provides information on using the Bluetooth feature
built-in the device.
•Chapter 9 - Wireless LAN........................................................... 9-1
This chapter provides information on launching and using the
Wireless LAN feature of your device.
•Appendix - Notices ..................................................................... A-1
This part includes the safety notices and regulations.

iv
MyPal A716 specifications
MyPal A716 package
Your package includes several accessories for the Pocket PC. After
unpacking, check the items against the list below and make sure that they
are in good condition. If any item is missing or damaged, contact your
dealer or retailer immediately.
* English version keyboard. Visit the ASUS website to check the availability of other language version keyboards.
Standard package contents
• ASUS MyPal A716
• USB cradle
• USB sync cable
• AC adapter/power cord
Input: 100V~240V
Output: 5V 2.4A 10W
• Stylus
• Microsoft Companion CD
• Bonus CD
• User’s Manual
• Quick Start Guide
• Warranty card
Optional accessories
• Stylus
• Car charger
• Foldable keyboard*
• Leather handheld case
• Traveling USB sync cable
• AC adapter/power cord (UL/CEE/UK/SAA/CCEE)
• GPS mouse
• CF GPS card
• CF FM radio card
• CF camera card
• Bluetooth GPS
• 3000 mAH Lithium Ion
Processor
Operating system
Memory
Display
Removable battery
Card slot
Connection
Audio
Size
Weight
Intel
®
PXA255 400 MHz
Microsoft
®
Windows Mobile™ 2003
64MB Flash
64MB SDRAM
(55MB /53MB user accessible for Western/
Eastern languages, respectively)
3.5-inch, brilliant transflective TFT LCD
65,536 colors, 240x320 resolution
1500 mAH Lithium Ion
Up to 19-hour battery life
CF card slot, SD card slot
Wireless LAN (802.11b)
Bluetooth
®
FIR: 4Mbps, SIR: 115.2Kbps
3.5mm stereo headphone jack
Built-in microphone and speaker
138mm x 78mm x 17.6mm (L x W x H)
5.43in. x 3.07in. x 0.69in. (L x W x H)
197g

Get started!
1-1
Chapter 1
Get started!
♦♦
♦♦
♦Introducing MyPal ................................................ 1-2
Front features........................................................................... 1-2
Side features ............................................................................ 1-4
Top features ............................................................................. 1-5
Bottom features........................................................................ 1-5
Back features ........................................................................... 1-6
The stylus................................................................................. 1-7
The cradle ................................................................................ 1-7
♦♦
♦♦
♦Setting up MyPal................................................... 1-8
Placing on the cradle ............................................................... 1-8
Connecting the AC adapter ...................................................... 1-8
Charging the battery ................................................................ 1-9
Activating MyPal ...................................................................... 1-9
♦♦
♦♦
♦Basic screens on MyPal..................................... 1-10
Today screen .......................................................................... 1-10
Start menu ..............................................................................1-11
Command bar ........................................................................ 1-12
Pop-up menus........................................................................ 1-12
♦♦
♦♦
♦Additional storage .............................................. 1-14
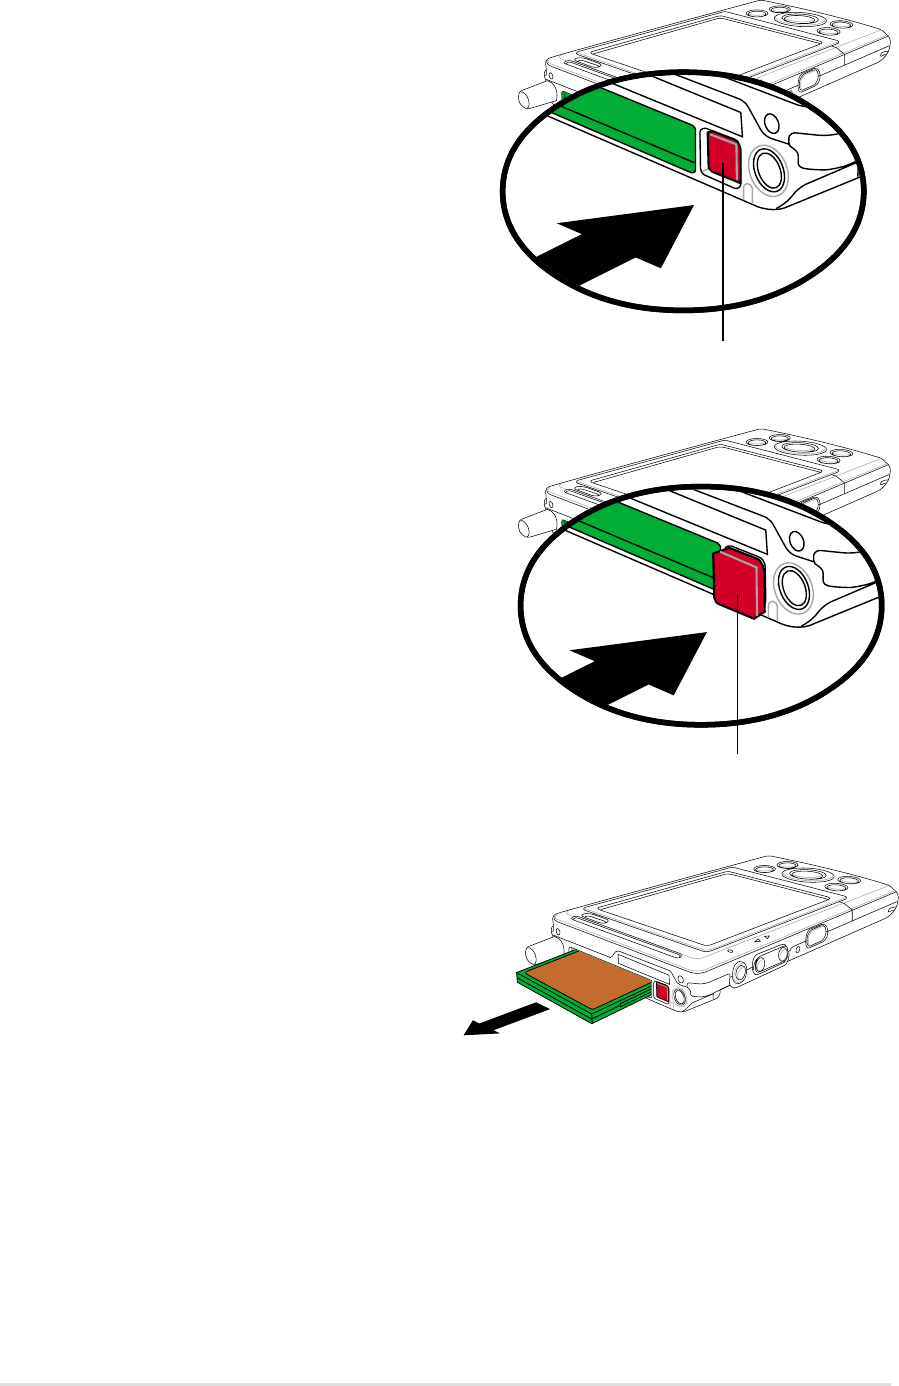
Installing and removing an SD card ....................................... 1-14
Installing and removing a CF card ......................................... 1-15
1-2
Chapter 1
Introducing MyPal
The ASUS
®
MyPal A716 is truly a good companion wherever you go.
Powered by a 400MHz Intel
®
PXA255 processor, equipped with 64MB
SDRAM and 64MB Flash ROM, and bundled with the Microsoft
®
Windows
Mobile
®
2003 plus a host of useful utilities, you have everything you need
in your pocket!
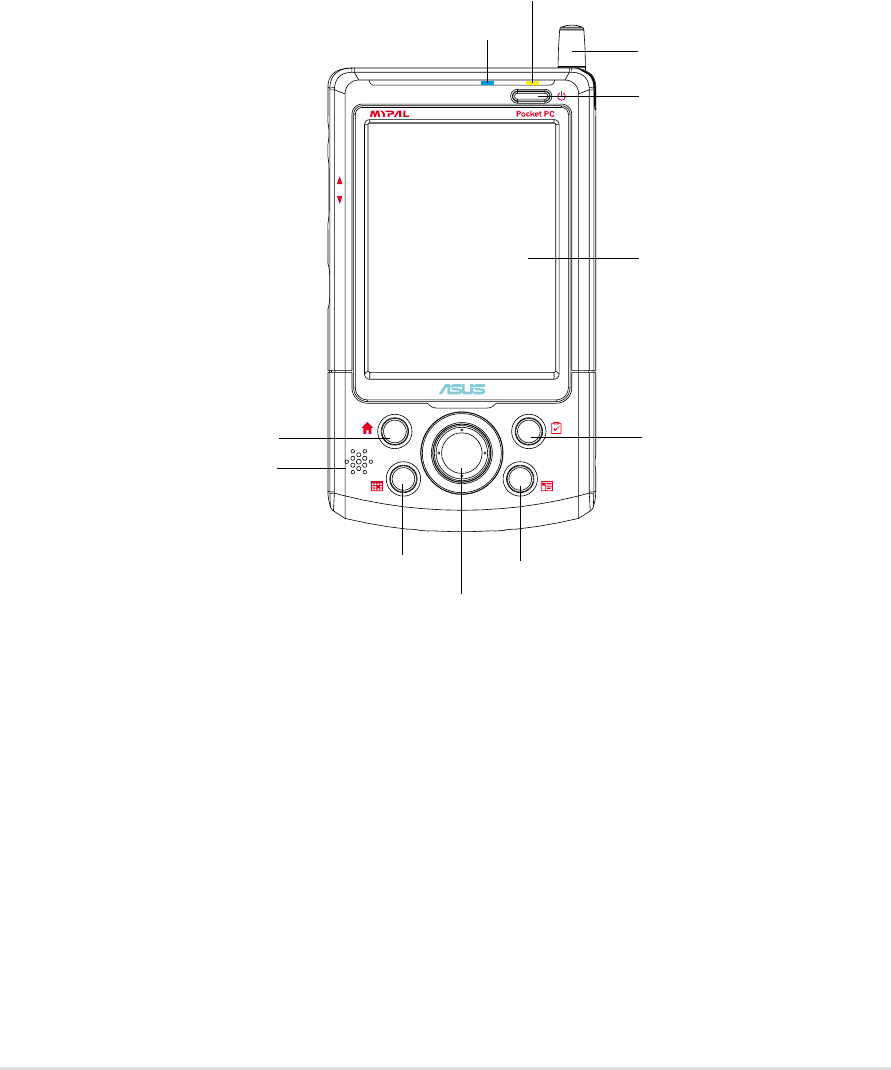
Front features
•Power LED - blinks yellow when the battery is charging; steady yellow
when the battery is fully charged and the device is connected to an AC
power source.
•Bluetooth/Wireless LAN LED - lights up blue when either Bluetooth™
or Wireless LAN feature is ON.
•Wireless antenna - allows you to obtain signal and use the wireless LAN
feature.
LCD touch screen
Navigation button
Tasks button
Contacts button
ASUS Launcher button
Calendar button
Speaker
Power button/
Backlight button
Wireless antenna
Bluetooth/Wireless LAN LED
Power LED

Get started!
1-3
•Power/Backlight button - turns the device power on or off if you press
the button quickly. Pressing and holding the button for a few seconds
turns the backlight on or off. Turning off the backlight saves battery
power.
NOTE Press this button and the Tasks button simultaneously if you
wish to launch the Align Screen function.
•LCD touch screen - allows you to enter, read, send, receive, or edit data
by tapping on it. The screen lumination is increased or decreased by
changing the backlight settings.
•ASUS Launcher, Calendar, Tasks, and Contacts buttons - allow you
quick access to commonly used programs.
•Navigation button - functions like the four arrow keys and the Enter key
on a keyboard. This multifunction button allows you to:
- move through the program icons, folders, or files in a menu by
scrolling up or down
- launch a selected program, list folder contents, or open a file by
pressing the center of the button
•Speaker - allows you to hear alarms and other sound outputs from the
device.
1-4
Chapter 1
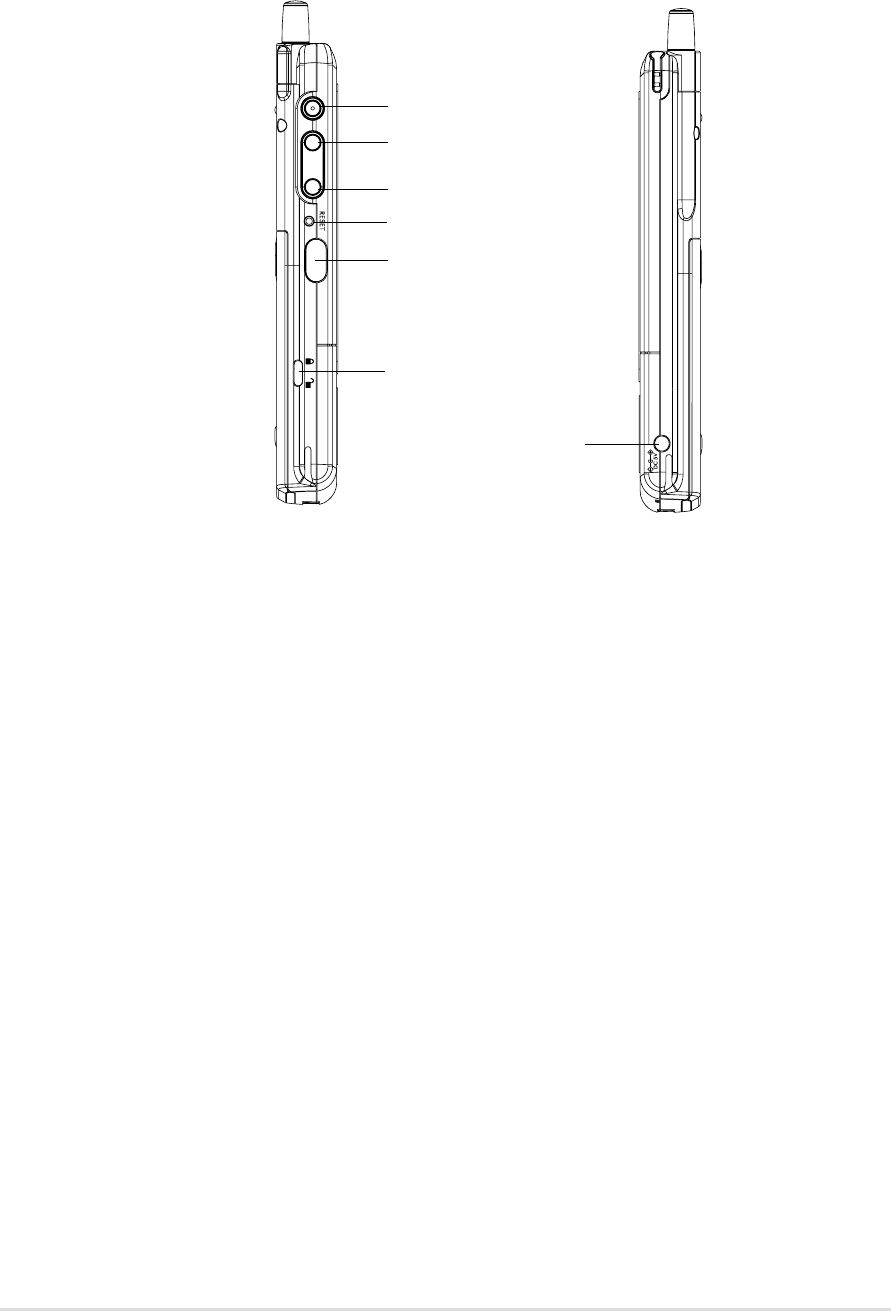
Side features
•Power connector - connects the AC adapter cable. Use this connector if
you wish to use AC power without the cradle.
•Enter button - executes the selected application icon or command.
•Back button - selects the previous application icon or command. This
button functions like the left arrow on the navigation button.
•Next button - selects the next application icon or command. This button
functions like the right arrow on the navigation button.
•Reset switch - allows you to perform a soft reset in case the device
malfunctions, or when an application hangs. Press the tip of the stylus on
the switch to reset the system.
•Infrared (IR) port - allows you to copy or send data to another device
that has an IR port.
•Battery latch - secures the battery to the unit.
Left side Right side
Enter button
Back button
Infrared (IR) port
Reset switch
Next button
Power connector
Battery latch
Get started!
1-5
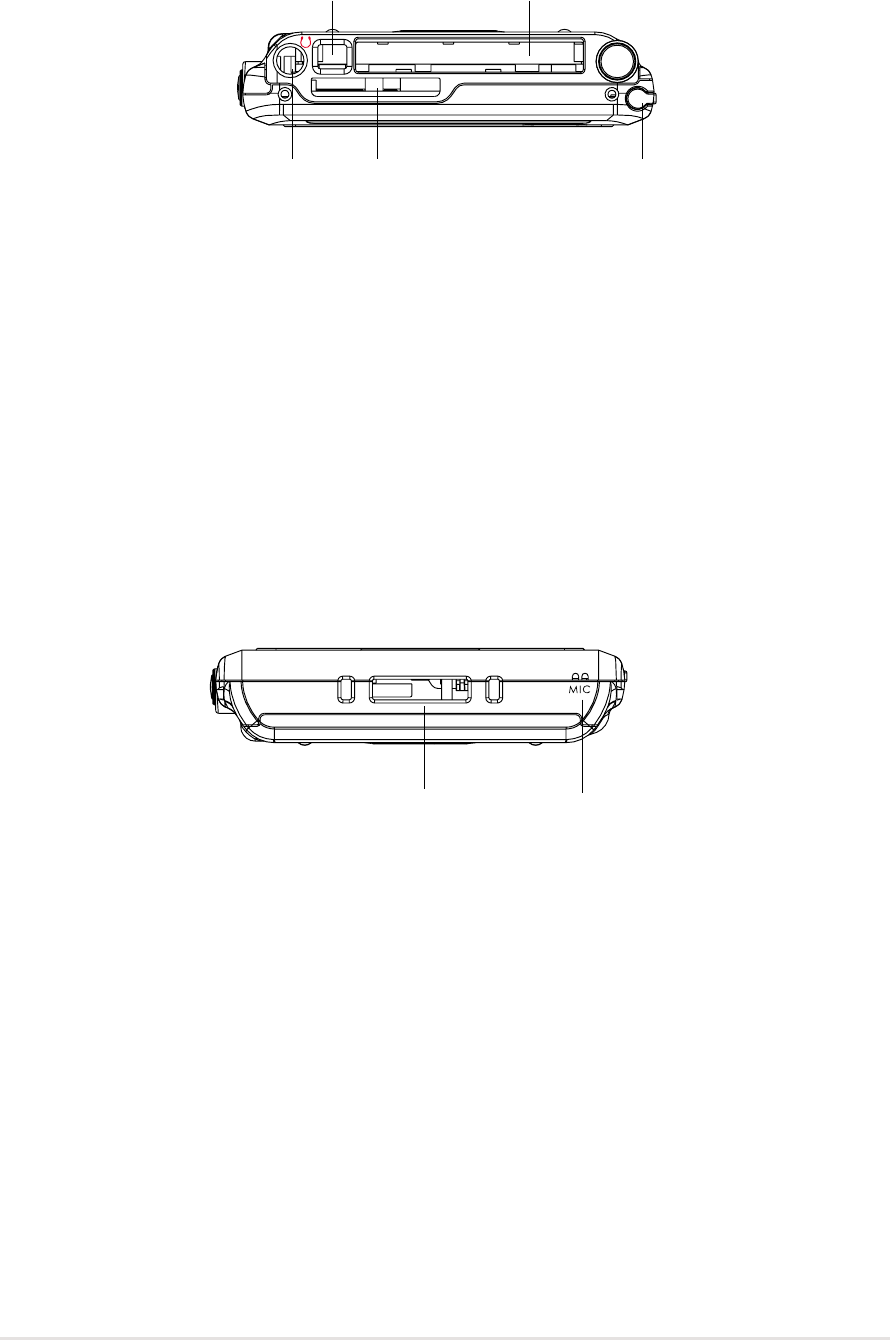
Top features
Bottom features
•CF card eject button - releases the CF card from the slot.
•CF card slot - accommodates a CompactFlash (CF) card.
•Headphone jack - connects a headphone.
•SD card slot - accommodates an SD card.
•Stylus - used for tapping or writing on the LCD touch screen. Slide out
the stylus from its compartment. Refer to the description of the stylus on
the next page.
•Cradle connector / Sync cable connector - connects to the 26-pin
female connector on the cradle. If you are not using the cradle, connect
the 26-pin USB sync cable directly to this connector to synchronize your
device with your computer.
•Built-in microphone - magnifies your sound recording.
Cradle connector /
Sync cable connector Built-in microphone
Stylus
CF card slot
Headphone jack SD card slot
CF card eject button
1-6
Chapter 1
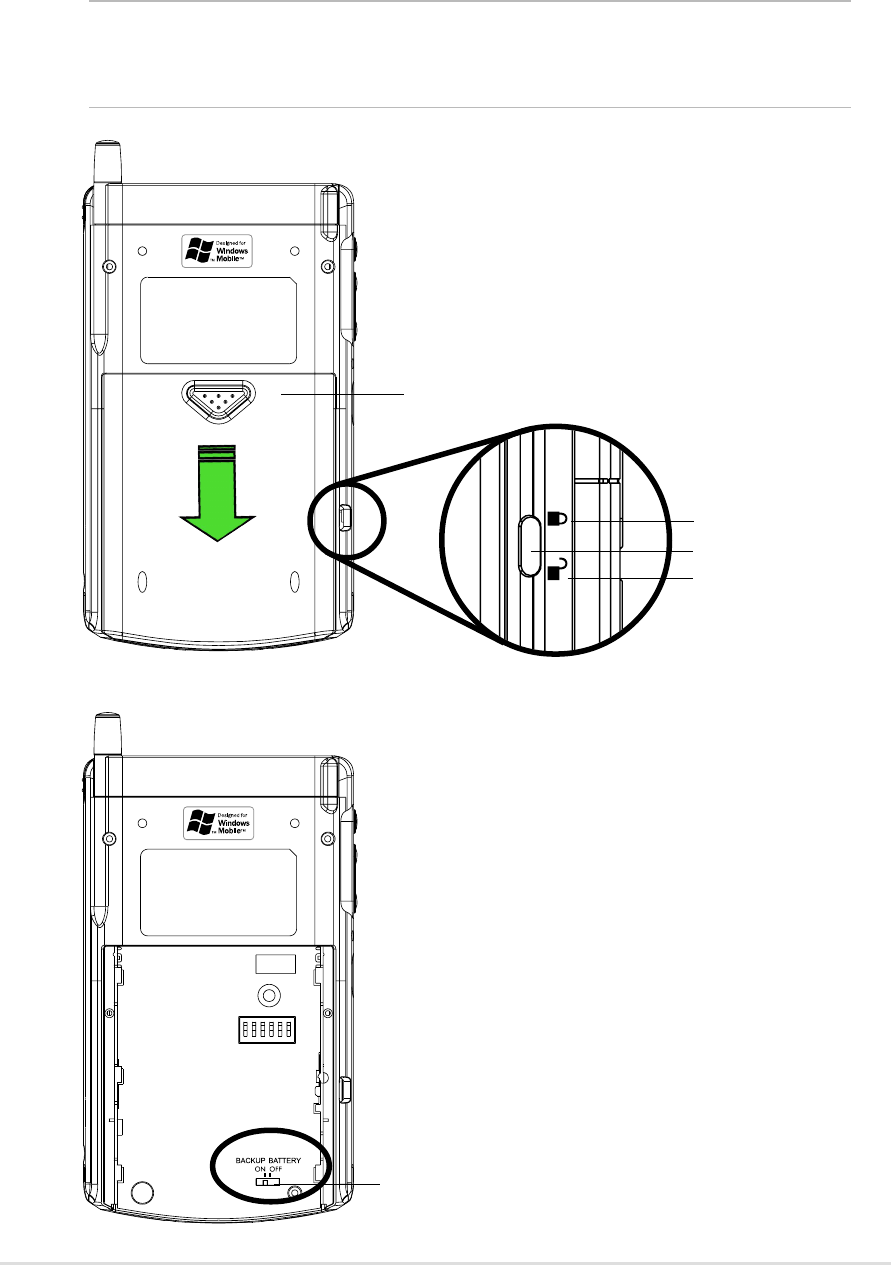
Back features
The device has a removable external battery secured by a latch. If you
wish to remove the battery, use the stylus to slide the latch toward the
unlocked icon, then slide the battery downward.
Without the battery, the back of the device
appears as shown.
In addition to the external battery, the
device includes a built-in backup battery.
The backup battery contains a copy of
your operating system settings.
The backup battery has an ON/OFF
switch. The default setting is ON for
normal operation. Slide the switch to OFF
only if you wish perform a hardware reset.
CAUTION! A hardware reset erases all of
your data!
NOTE As a precaution, the power button is automatically disabled
when you unlock the battery latch. You may only turn on the
power when the battery is securely locked to the unit.
External battery
Locked icon
Unlocked icon
Battery latch
Switch for backup battery
Get started!
1-7
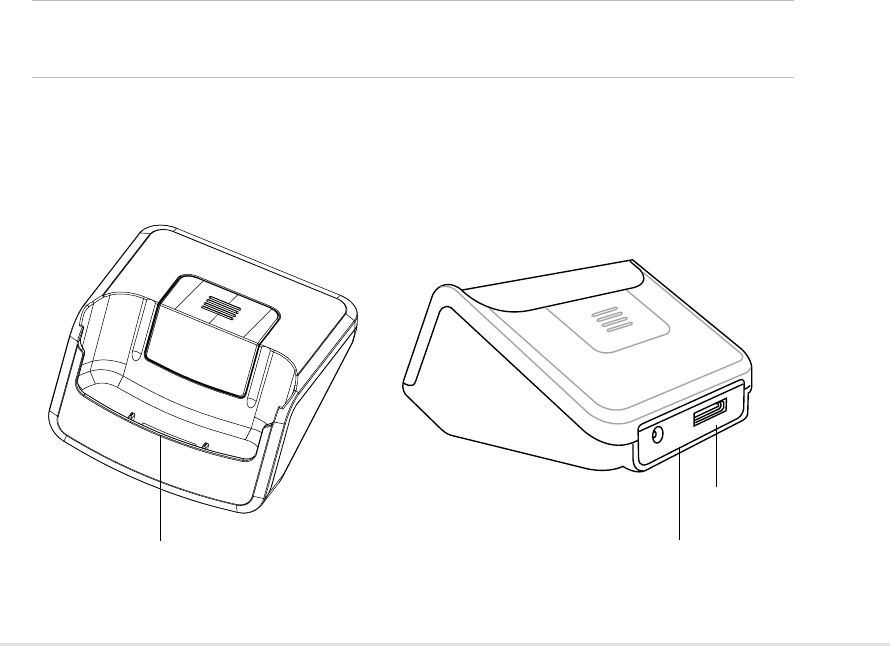
The cradle
The cradle has three connectors.
•Device connector - holds the device in place. This is a 26-pin connector
that matches the connector on the bottom of the device.
•USB connector - synchronizes the device with your PC.
NOTE The USB cable/connector is not detachable from the back of
the cradle.
•Power connector - connects the bundled AC adapter. This connector is
located at the back side of the cradle.
Device connector
USB connector
Power connector
The stylus
The stylus functions on a Pocket PC the same way a mouse functions on
a standard PC. Use the stylus to tap or drag on the LCD touch screen to
open programs or execute commands.
•Tap. Touch the screen once with the stylus to open programs and select
options.
•Drag. Hold the stylus on the screen and drag across the screen to select
text and images. Drag in a list to select multiple items.
•Tap and hold. Tap and hold the stylus on an item to see a list of actions
available for that item. On the displayed pop-up menu, tap the action that
you want to perform.
1-8
Chapter 1
Setting up MyPal
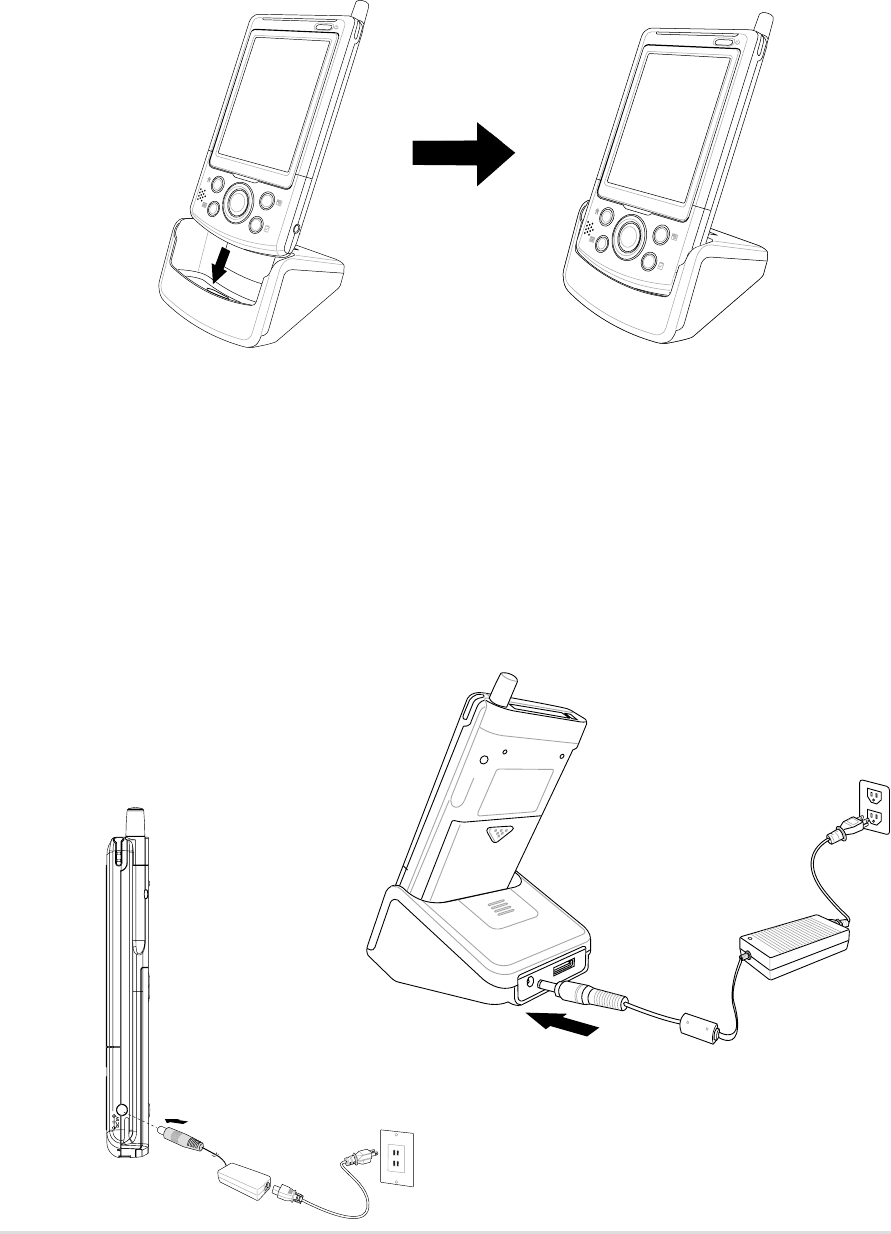
Placing on the cradle
Position the device on the cradle as shown. Match the connectors and
carefully insert the device until it fits in place.
Connecting the AC adapter
•Connect the AC adapter cable to the connector at the back of the cradle.
Connect the power plug to a grounded wall socket. See Figure 1.
•If you are not using the cradle, connect the AC adpater cable directly to
the power connector at the bottom of the device. Connect the power plug
to a grounded wall socket. See Figure 2.
Figure 1
Figure 2

Get started!
1-9
Charging the battery
Your device includes a rechargeable Lithium
Ion battery. You must charge the battery
before using the device the first time. The
battery starts charging as soon as you
connect the AC adapter to a power source.
Use the AC adapter to plug your device to a
power source whenever possible, especially
when you are using a modem or other
peripherals, using the device backlight,
connecting to a PC, or letting notification
light flash for extended time periods.
To display the power status, tap ,
Settings, System tab, and the Power icon.
Activating MyPal
It is important that you properly calibrate and activate your device before
using it. This process ensures accurate positioning when entering text and
selecting menus.
Follow these steps to calibrate and activate MyPal.
1. Press the power button.
2. Use the stylus to tap the LCD touch screen to start the calibration and
activation.
3. At the prompt to align the screen, tap the center of the cross whenever
the travelling cross stops on the screen. You may have to do this step
several times to properly calibrate.
4. When done with the screen calibration, follow the screen instructions to
complete the activation.
•at the “Stylus” screen, tap Next to continue.
•at the “Pop-up menus” screens, perform the indicated operations.
•at the “Congratulations” screen, tap Next to continue.
•at the “Location” screen, select your time zone and tap Next to
continue.
•at the “Completion” screen, tap the screen to continue.
5. When the Today screen appears, MyPal is ready to use. Proceed to
the next section for information on the basic screens on your device.
1-10
Chapter 1
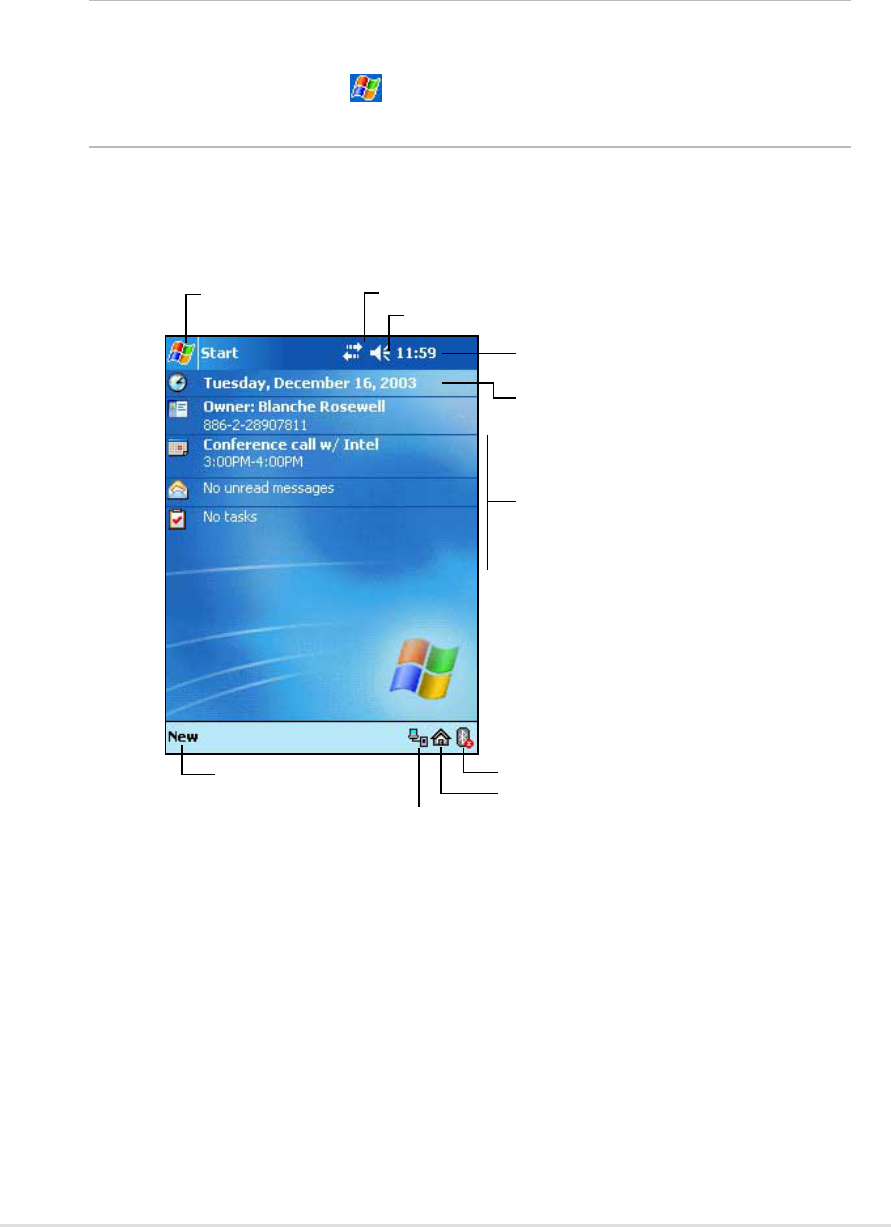
Basic screens on MyPal
Today screen
Normally, the Today screen appears when you turn on your device for the
first time each day.
NOTE When the device is already on and the screen displays
another program, you can display the Today screen by
tapping the icon. Then from the Navigation bar, tap
Today.
As shown in the sample below, the Today screen lets you see at a glance
the summary of the important information for the day.
From the Today screen, tap any of the listed items with the stylus to
display the details. See “Chapter 2: Learn the basics” to learn how to
modify the current tasks or activities, or to add new items or information.
Tap to switch
to a program
Tap to set up or change network or modem connections
Tap to change volume or mute all sounds
Tap to display the date, time,
and your next appointment
Tap to change the date and time
Your day at a glance
Tap to display the Bluetooth menuTap to create a new item
Tap to view PC connection status
Tap to display the Wireless LAN menu
Get started!
1-11
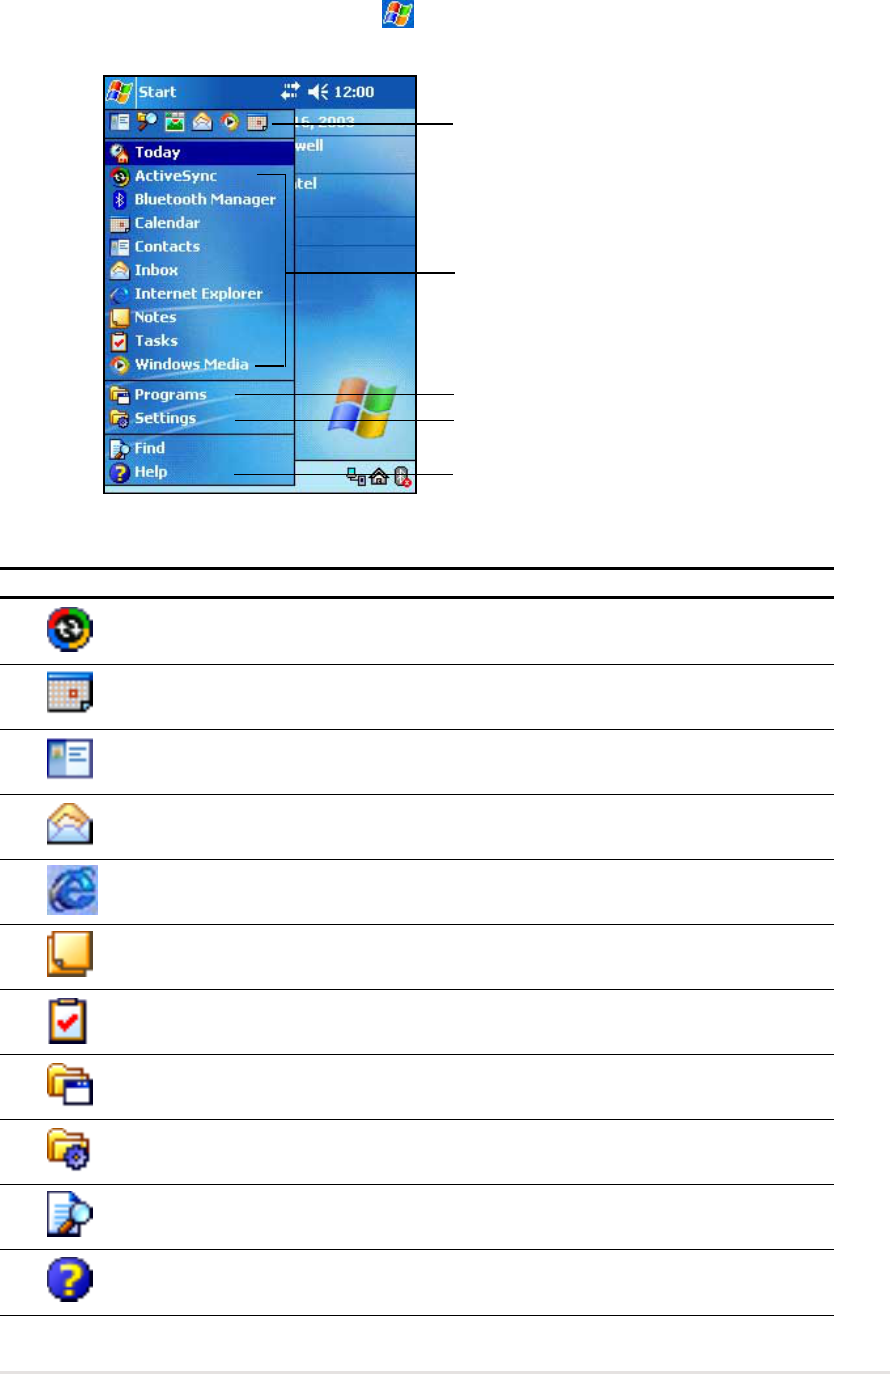
Start menu
From the Start menu, you can select programs, settings, and Help topics.
To display the Start menu, tap the icon from the top of the screen.
Icon Program Description
ActiveSync Synchronize information between your
device and your desktop computer.
Calendar Keep track of your appointments and create
meeting requests.
Contacts Keep track of your friends and colleagues.
Inbox Send and receive e-mail messages.
Internet Explorer Browse Web and WAP sites, and download
new programs and files from the Internet.
Notes Create handwritten or typed notes, drawings,
and recordings.
Tasks Keep track of your tasks.
Programs Tap to see additional programs installed in
your device.
Settings Tap to see items that you can customize or
adjust to your preference.
Find Tap to find data in your device.
Help Tap to see the Help contents.
Tap to open a recently used program
Tap to open a program
Tap to open the Programs menu
Tap to open the Settings menu
Tap to display the Help topics
1-12
Chapter 1
Command bar
At the bottom of the screen is the Command bar. You can use the menus
and buttons on the Command bar to perform tasks in programs.
NOTE The menus and buttons vary depending on the programs you
are using.
Tap to select menu
commands Tap to select
button commands Tap to display
the input panel
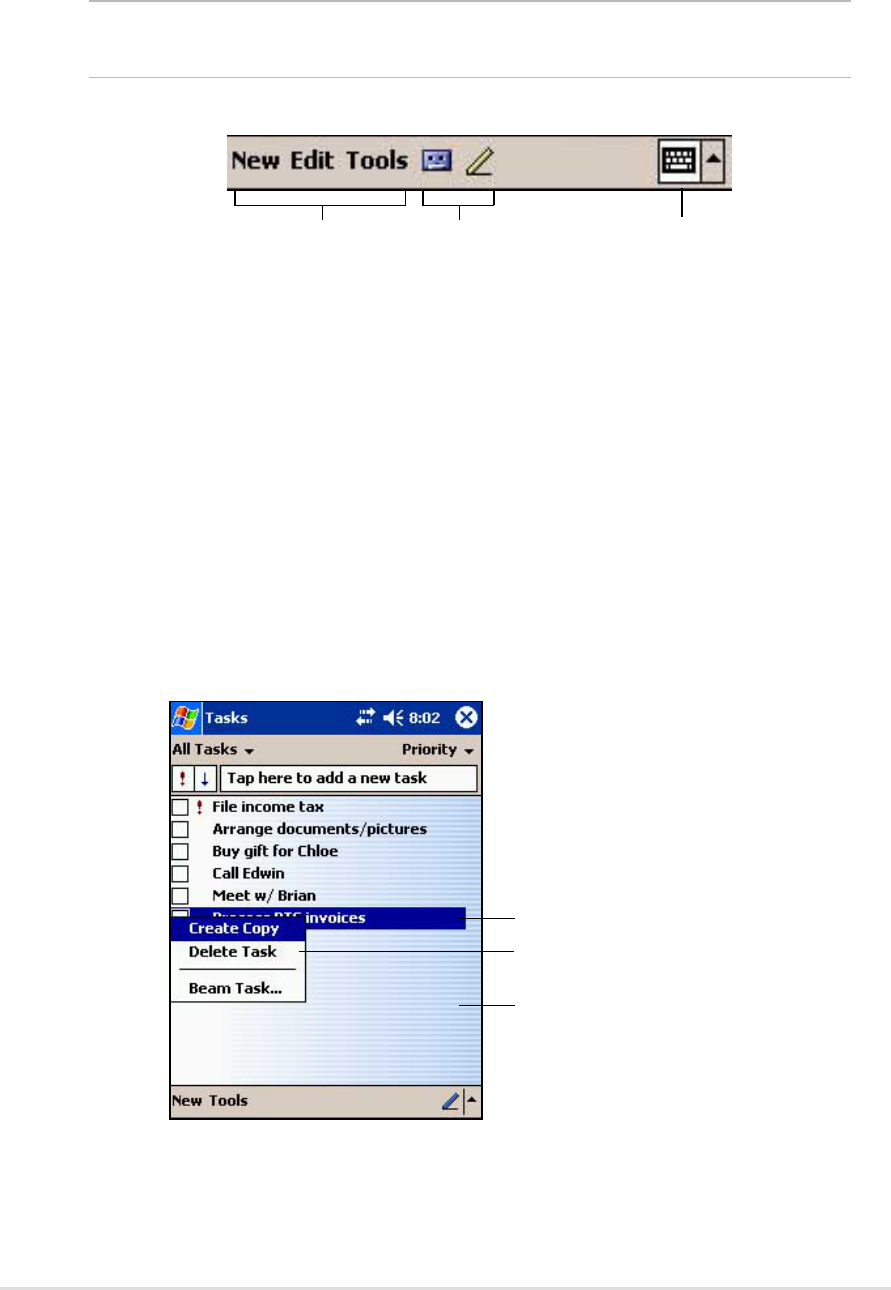
Pop-up menus
With the pop-up menus, you can easily choose an action for an item.
For example, you can use the pop-up menu in Tasks to delete, copy, or
beam a task. The actions in the pop-up menus vary from program to
program. To access a pop-up menu, tap and hold the stylus on the item
that you wish to perform action on. When the menu appears, lift the stylus,
and tap the action that you want to execute. To close the pop-up menu
without performing an action, tap anywhere outside the menu.
Tap and hold until the pop-up menu appears
Tap the action that you wish to perform
Tap outside the pop-up menu to close it
without performing an action
Get started!
1-13
Tap and hold until the pop-up menu appears
Tap the action that you wish to perform
Tap outside the pop-up menu to close it
without performing an action
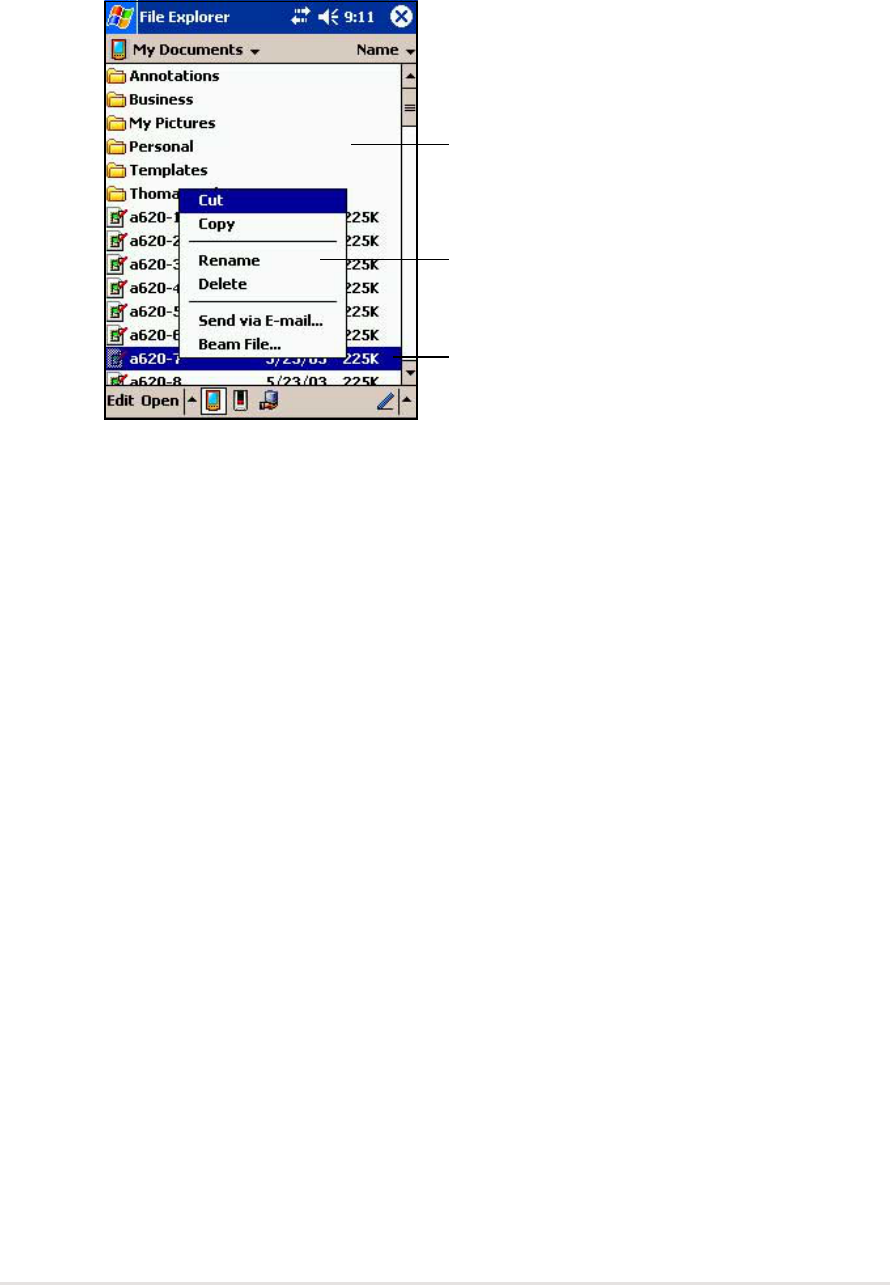
The pop-up menus are also available in most other programs in your
device. The pop-up menu items vary depending on the program or
application. For example, the File Explorer pop-up menu includes more
items than in Tasks.
1-14
Chapter 1
Additional storage
Your device comes with two kinds of memory card slots for additional
storage. The CF card slot supports the multimedia cards listed under
“Optional Accessories” on page iv of this manual. The SD card slot
supports the SecureDigital memory card.
NOTE Install an SD card or CF card if you wish to use the ASUS
backup features.
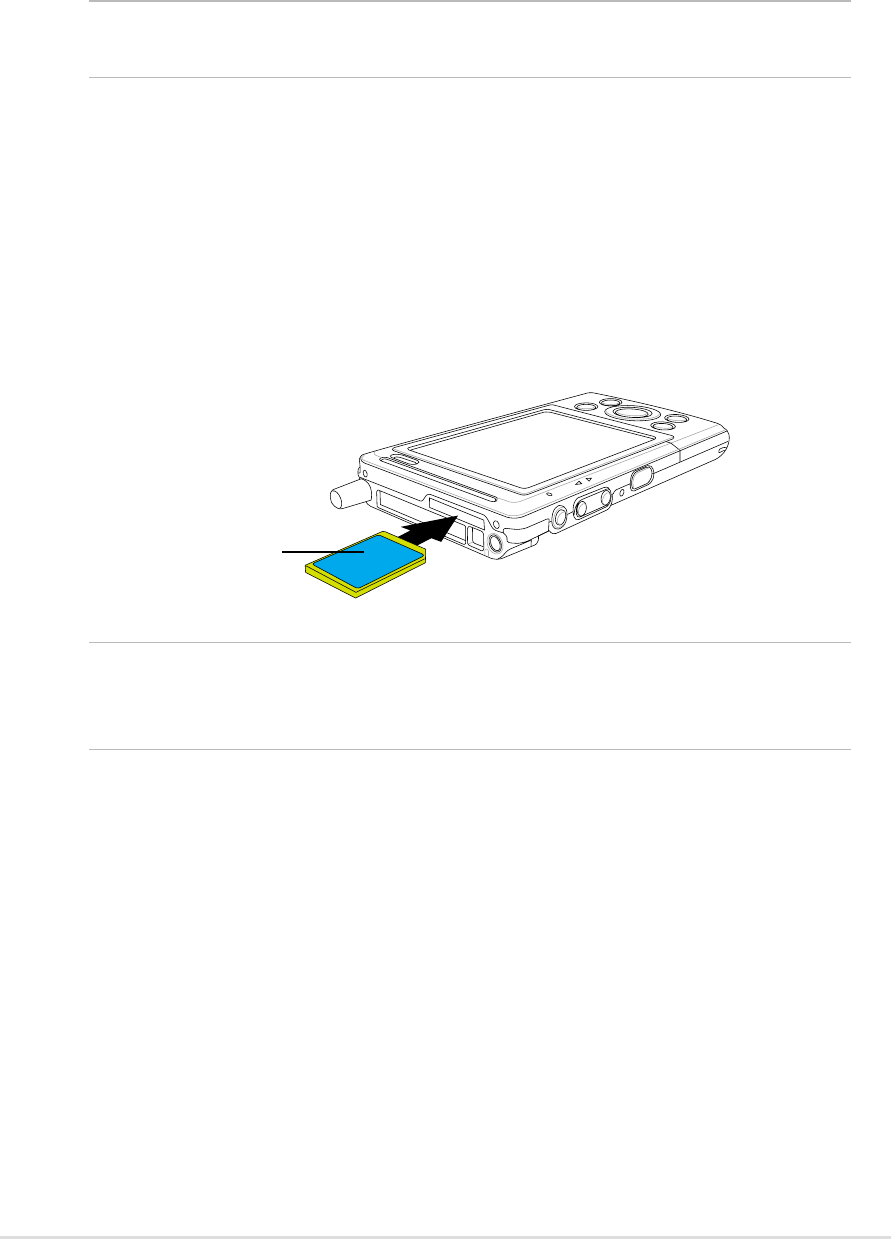
NOTE An SD card fits only in one orientation, and slides smoothly
into the slot if inserted correctly. DO NOT force the SD card
into the slot!
2. Push the card all the way into the slot until it fits completely. If properly
installed, the SD card edge aligns with the top edge of the device.
Installing and removing an SD card
To install an SD card:
1. With the label side (usually the side with the card manufacturer’s
name) face up, and the bar code/serial number side face down, insert
the card into the SD slot.
Label side
To remove an SD card:
Press the card slightly until it ejects.
Get started!
1-15
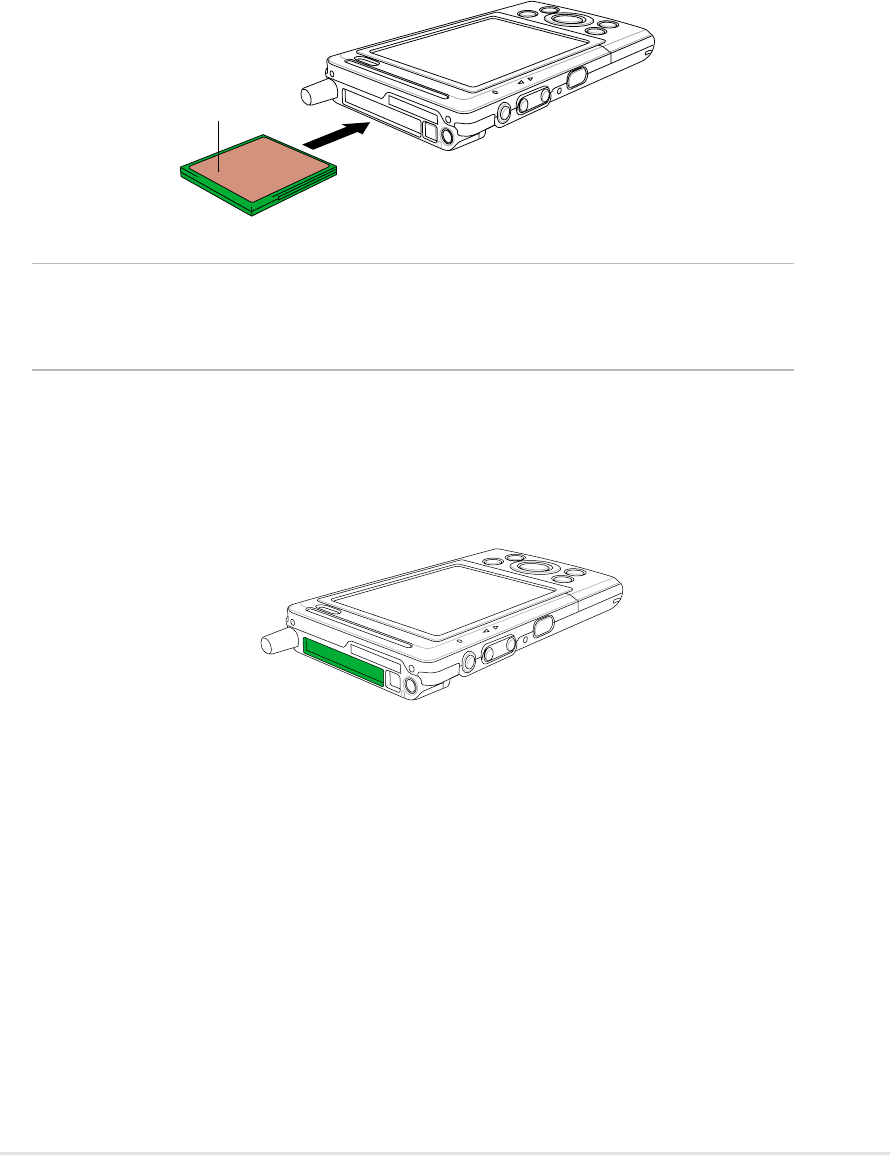
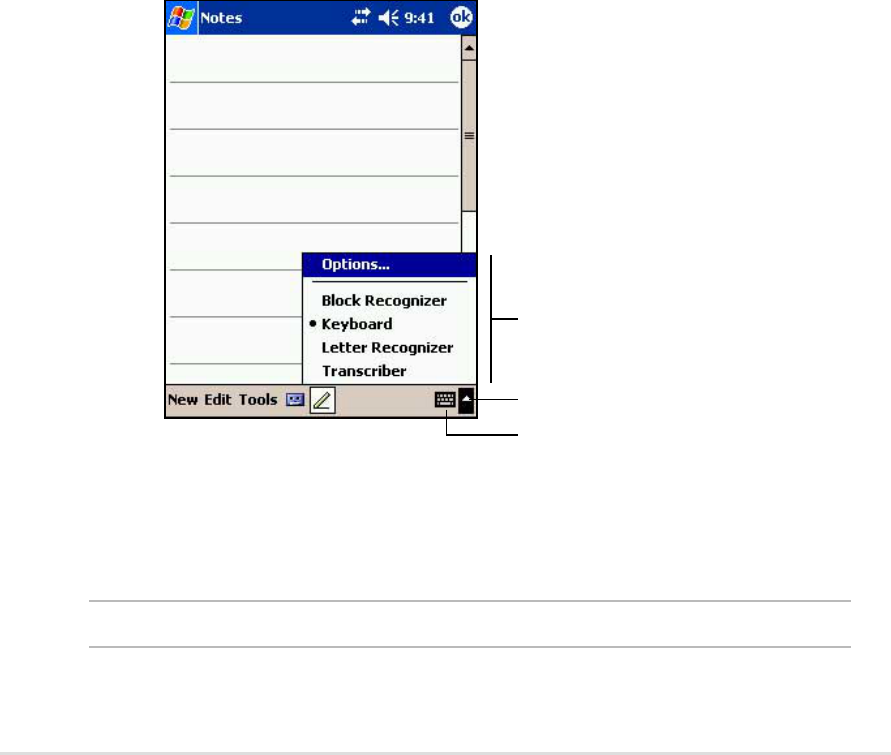
NOTE A CF card fits only in one orientation, and slides smoothly into
the slot if inserted correctly. DO NOT force the CF card into
the slot!
Label side
Installing and removing a CF card
To install a CF card:
1. Locate the card side with the 50-pin female connector and insert into
the slot. The label side (usually the side with the card manufacturer’s
name) face up, and the bar code/serial number side face down.
2. Push the card all the way into the slot until it fits completely. If properly
installed, the CF card edge aligns with the top edge of the device.
1-16
Chapter 1
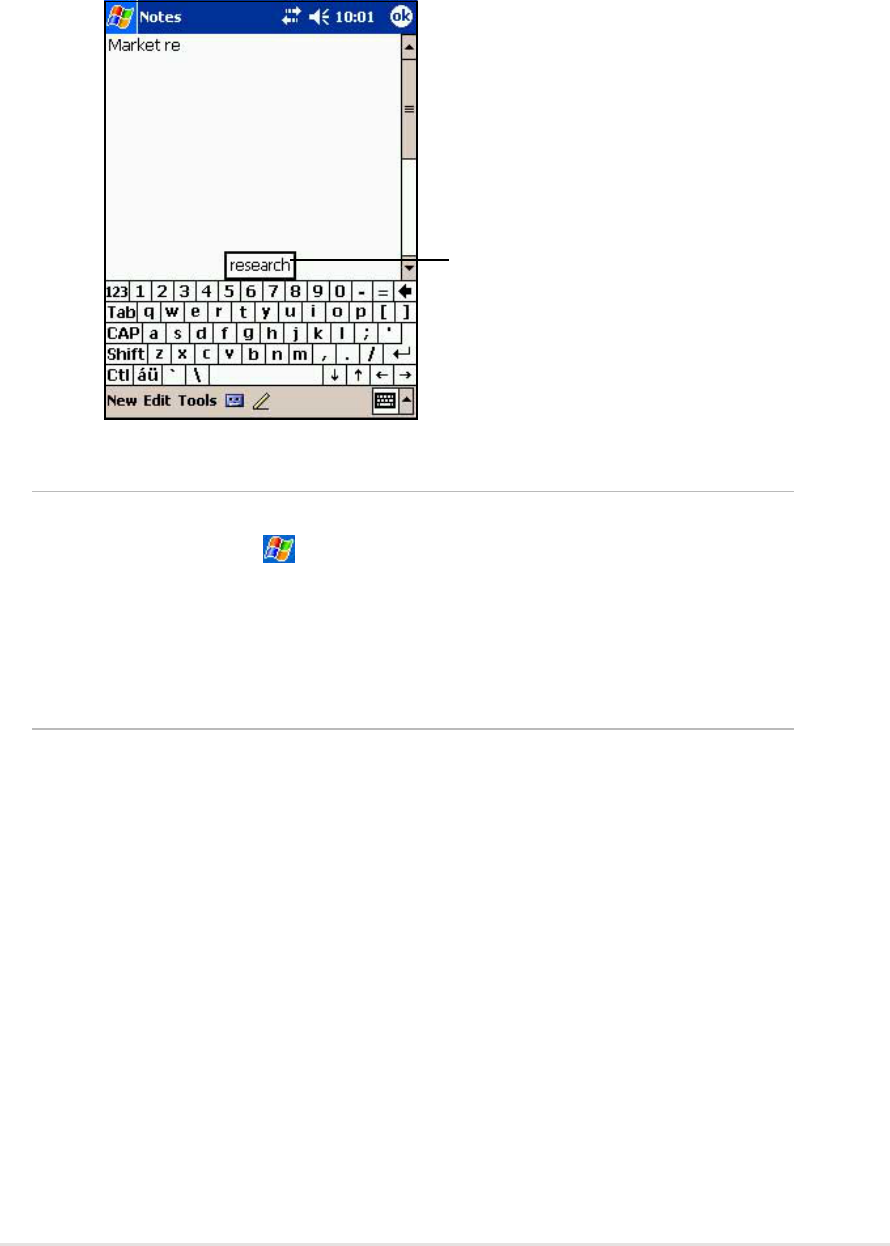
To remove a CF card:
1. Press the CF card eject button
unti it pops out. (This button is
normally pressed in and aligns
with the top of the device.)
Button is pressed in
Button popped out
2. When the button has popped out,
press it in again to release the CF
card. (The button goes back to its
“pressed in” position.)
3. Slide out the CF card.

Learn the basics
2-1
Chapter 2
Learn the basics
♦♦
♦♦
♦Entering information ............................................ 2-2
Entering text using the Input Panel .......................................... 2-2
Writing on the screen ............................................................... 2-5
Drawing on the screen ............................................................. 2-8
Recording a message .............................................................. 2-9
Using a preset message ........................................................ 2-10
♦♦
♦♦
♦Finding and organizing information ..................2-11
Using the File Explorer........................................................... 2-12
♦♦
♦♦
♦Customizing your device ................................... 2-13
Adjusting settings ................................................................... 2-13
Selecting sounds and notifications......................................... 2-15
Using AsusLauncher .............................................................. 2-16
Adding or removing programs................................................ 2-20
♦♦
♦♦
♦ASUS utilities ...................................................... 2-23
ASUS Backup ........................................................................ 2-23
ASUS Settings ....................................................................... 2-29
♦♦
♦♦
♦Bundled programs.............................................. 2-33
ASUS Programs..................................................................... 2-33
Games ................................................................................... 2-33
Calculator ............................................................................... 2-34
File Explorer ........................................................................... 2-34
Microsoft Reader.................................................................... 2-34
MSN Messenger .................................................................... 2-35
Pocket MSN ........................................................................... 2-35
Pocket Word .......................................................................... 2-35
Pocket Excel .......................................................................... 2-36
Pictures .................................................................................. 2-36
Terminal Services Client ........................................................ 2-36
2-2
Chapter 2
Entering information
You can enter information in your device in any of the following ways.
• Use the input panel to enter text using the soft keyboard or the Letter
Recognizer
• Write directly on the screen with the stylus
• Draw pictures on the screen
• Speak into the device microphone to record a message
• Use the Microsoft
®
ActiveSync
®
to synchronize or copy information from
your desktop computer to your device
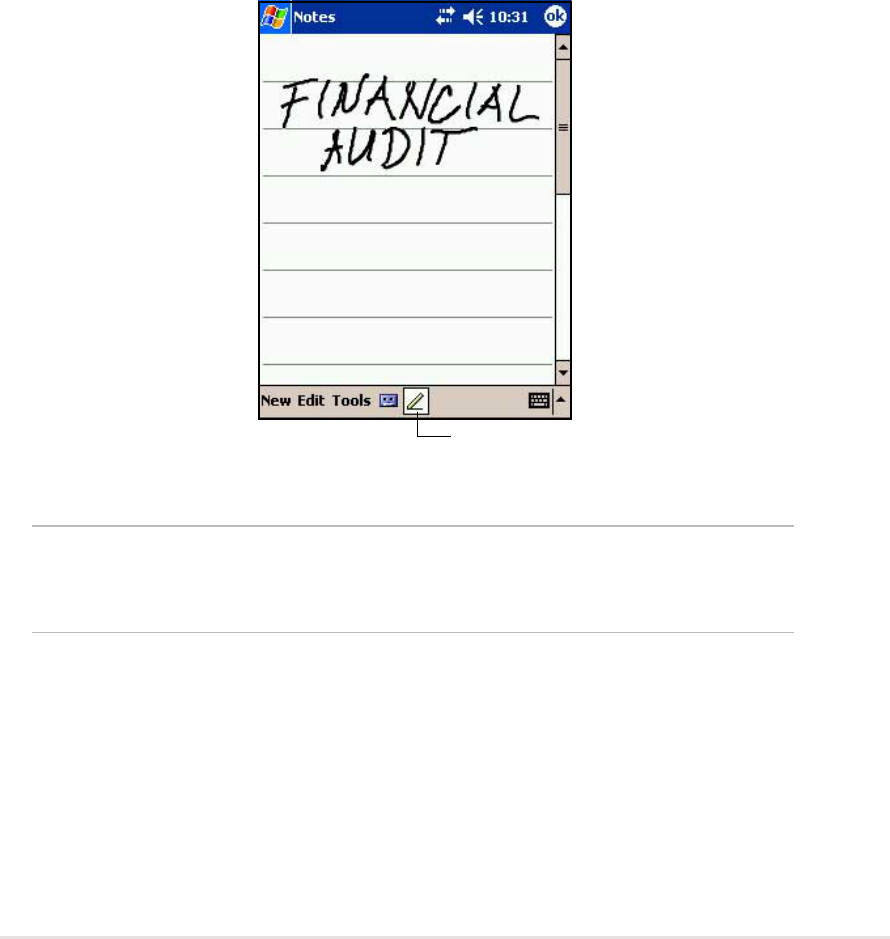
Entering text using the Input Panel
Use the Input Panel to enter information in any program on your device.
you can either type using the soft keyboard or write using the Letter
Recognizer, Block Recognizer, or Transcriber. In either case, the
characters appear as typed text on the screen.
To show or hide the input panel, tap the Input Panel button. Tap the arrow
next to the Input Panel button to see your options.
To type with the soft keyboard:
1. Tap the arrow next to the Input Panel button, then tap Keyboard.
NOTE To demonstrate, open Notes.
2. Tap the keys with the stylus to enter information.
Select an input method
Tap to show or hide the input panel
Tap to display the input method options
Learn the basics
2-3
When you use the Input Panel and the soft keyboard, your device
anticipates the word you are typing and displays it above the Input Panel.
When you tap the displayed word, it is inserted into your text at the
insertion point. The more your use your device, the more words it learns to
anticipate.
NOTE To change options on word completion feature:
1. Tap .
2. Tap Settings.
3. Tap Personal tab.
4. Tap Input.
5. Tap Word Completion tab.
6. Make your desired changes.
To use Letter Recognizer:
With the Letter Recognizer, you can write letters on the screen with the
stylus as you would on paper.
1. Tap the arrow next to the Input Panel button, then tap Letter
Recognizer.
2. Write a letter in the box.
When you write a letter, it is converted to a typed text that appears on
the screen. For instructions and demonstation on using the Letter
Recognizer, tap the question mark next to the writing area.
Tap here if this is the word you wish to use

2-4
Chapter 2
To use Block Recognizer:
With the Block Recognizer, you can input character strokes that are similar
to those use on other devices.
1. Tap the arrow next to the Input Panel button, then tap Block
Recognizer.
2. Write a letter in the box.
When you write a letter, it is converted to a typed text that appears on
the screen. For instructions and demonstation on using the Block
Recognizer, tap the question mark next to the writing area.
To use Transcriber:
With Transcriber, you can use the stylus to write anywhere on the screen
as you would on paper. Unlike Letter Recognizer and Block Recognizer,
you can write a sentence or additional information. Pause after writing and
let Transcriber convert the written characters to typed characters.
1. Tap the arrow next to the Input Panel button, then tap Transcriber.
2. Write anywhere on the screen.
For instructions and demonstration on using Transcriber, with
Transcriber open, tap the question mark in the lower right corner of
the screen.
To edit typed text:
1. Select the text that you wish to edit using either one of the following:
•drag the stylus over the text
•tap twice to select a word
•tap three times to select a paragraph
2. Tap Edit on the Command bar and select an action, or use one of the
tools in the Input Panel to enter a new text.
Learn the basics
2-5
Writing on the screen
In any program that accepts writing, such as the Notes program, and in the
Notes tab in Calendar, Contacts, and Tasks, you can use the stylus to
write directly on the screen. Write the way you do on paper. You can edit
and format what you have written and convert the information to text at a
later time.
To write on the screen:
1. Open the Notes program.
2. Tap the Pen button to switch to the writing mode. The screen displays
blank space with lines to help you write.
3. Write your text.
NOTE Some programs that accept writing may not have the Pen
button. See the documentation for that program to find out
how to switch to writing mode.
Tap the Pen button and use
your stylus like a pen
2-6
Chapter 2
To edit your writing:
1. Tap and hold the stylus next to the text that you wish to select until the
insertion point appears.
2. Without lifting, drag the stylus across the text to select it.
If you accidentally write on the screen, tap Tools, then Undo and try
again. You can also select text by tapping the Pen button to deselect it,
then dragging the stylus across the screen.
3. Tap Edit on the Command bar and select an action, or use one of the
tools in the Input Panel to enter a new text.
To convert writing to text:
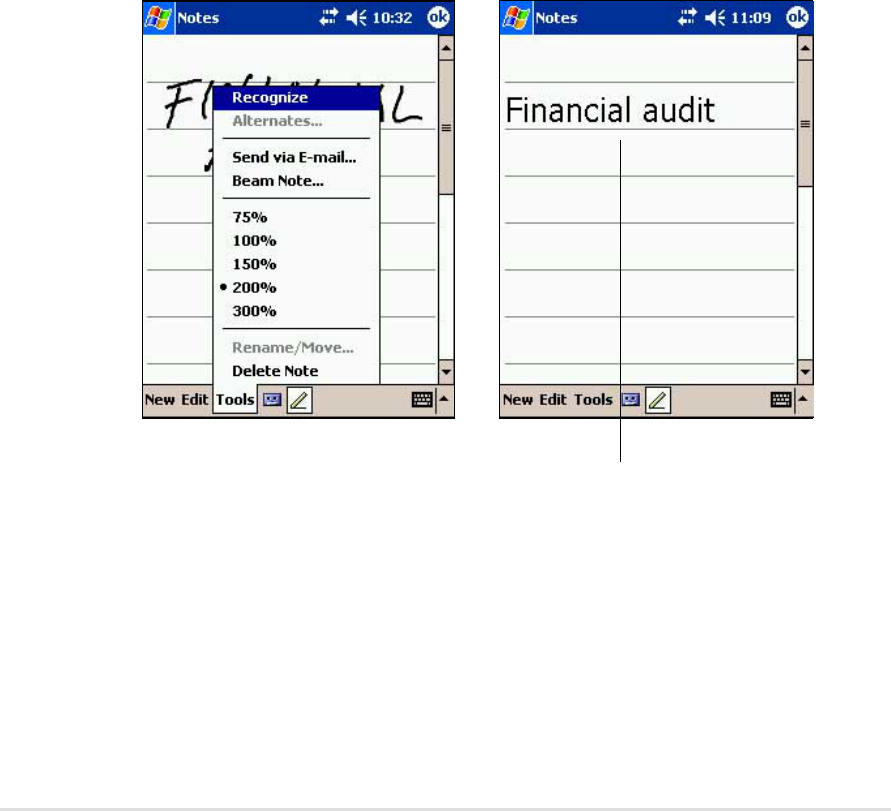
•Tap Tools, then Recognize.
To select a zoom level:
•Tap Tools, then tap a zoom percentage from the options.
The writing is turned into text
Learn the basics
2-7
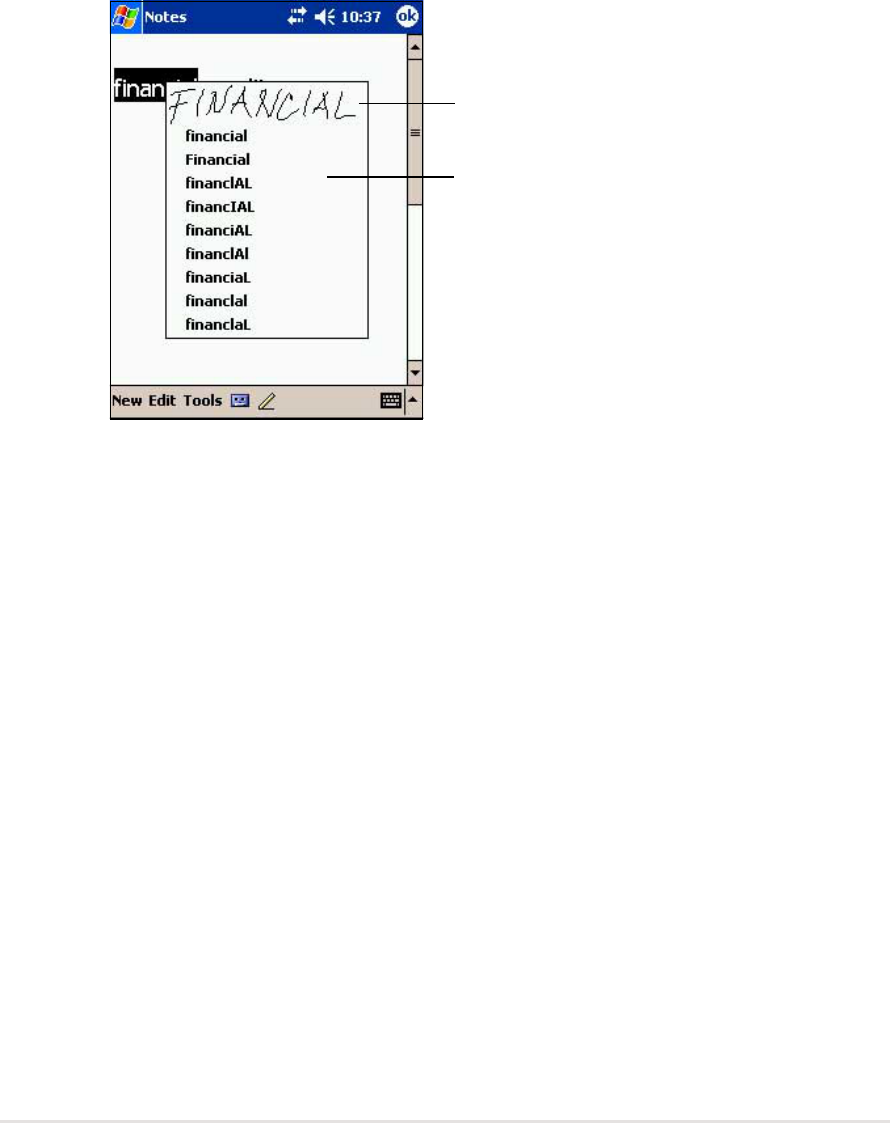
If the conversion is incorrect, you can select different words from a list of
alternates or return to the original writing.
1. Tap and hold the incorrect word.
2. When the pop-up menu appears, tap Alternates to display a list of
alternate words for the selection.
3. Tap the word that you want to use, or tap the writing at the top of the
menu to return to the original writing.
Tips for getting good writing recognition
•Write neatly.
•Write on the line and draw descenders below the line. Write the cross of
the “t” and apostrophes below the top line so that they are not confused
with the word above. Write periods and commas above the line.
•For better recognition, try increasing the zoom level to 300% using the
Tools menu.
•Write the letters of a word closely and leave big gaps between words so
that the device can easily tell where the words begin and end.
•Hyphenated words, foreign words that use special characters such as
accents, and some punctuation cannot be converted.
•If you add writing to a word to change it after the word has been
recognized, the writing that you added will be included when you try to
recognize the writing again.
Tap to return to your
original writing
Or, tap the word that
you want to use

2-8
Chapter 2
Drawing on the screen
You can draw on the screen in the same way that you write on the screen.
The difference between writing and drawing on the screen is how you
select items and how they can be edited. For example, selected drawings
can be resized, while writing cannot.
To create a drawing:
1. Use the stylus to make a stroke three ruled lines high. A dotted box
appears.
2. Make your drawing in or touching the drawing box and crossing three
ruled lines. If the drawing does not cross three lines, it changes to writing.
NOTE To easily work on or view your drawing, change the zoom
level by tapping Tools and selecting your desired zoom.
To edit your drawing:
1. Tap and hold the stylus on the drawing until the selection handle
appears. To select multiple drawings, deselect the Pen button, then
drag to select the drawings you want.
2. Tap and hold the selected drawing, then tap an editing command on
the pop-up menu or tap a command on the Edit menu.
3. Resize the drawing by deselecting the Pen button (if selected) and
dragging a selection handle to your desired size.
The drawing box indicates the
boundaries of the drawing
Pen button
Learn the basics
2-9
Recording a message
In any program where you can write or draw on the screen, you can also
quickly capture thoughts, reminders, and phone numbers by recording a
message. In Calendar, Tasks, and Contacts, you can include a recording
in the Notes tab. In the Notes program, you can either create a stand-
alone recording or include a recording in a written note. If you want to
include the recording in a note, open the note first. In the Inbox program,
you can add a recording to an e-mail message.
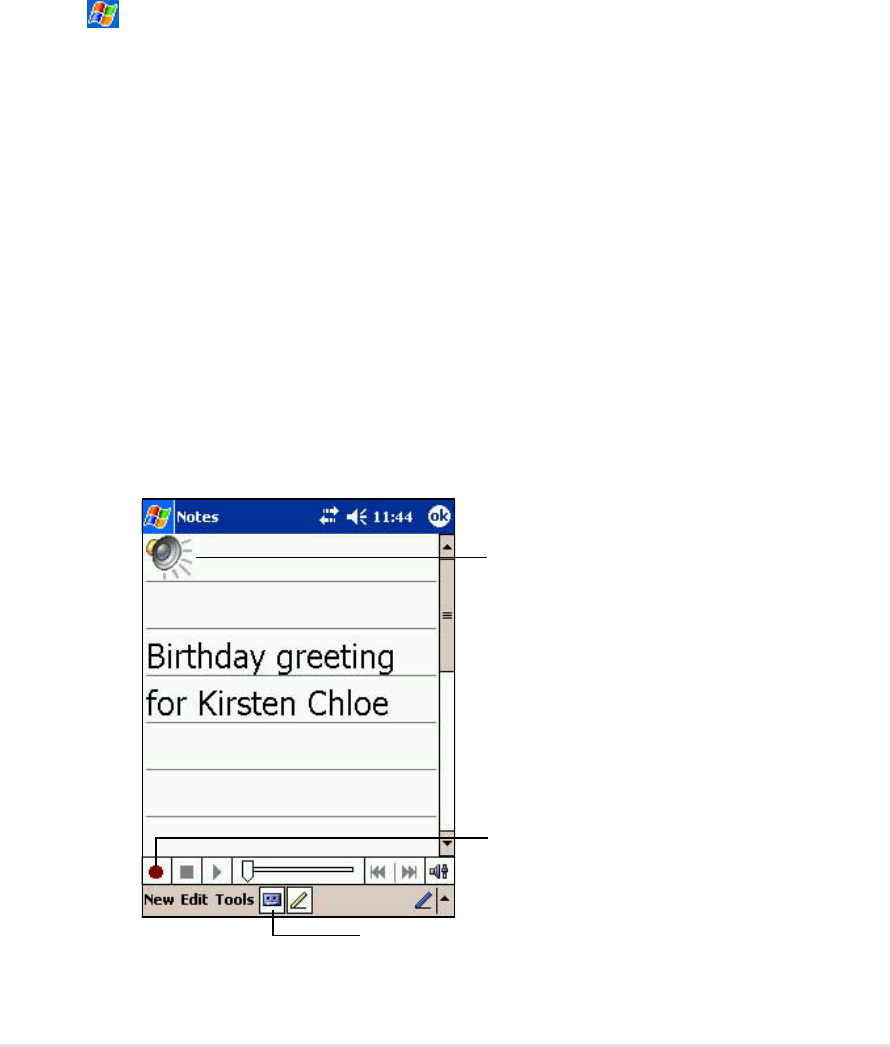
To create a recording:
1. Tap , then tap Notes,.
OR
Tap New, then Note.
2. Tap the Record icon from the command bar to display the recording
toolbar.
3. Tap the Record button (red button) to begin recording.
4. Hold your device with the microphone near your mouth or other source
of sound.
5. To stop recording, tap the Record button. You will hear two beeps. The
new recording appears in the Note list, or as an embedded icon.
6. To play the recording, tap it from the list, or if embedded in a note, tap
the speaker icon.
Indicates an embedded
recording
Tap to show or hide the
Recording toolbar
Tap to begin recording
2-10
Chapter 2
Using a preset message
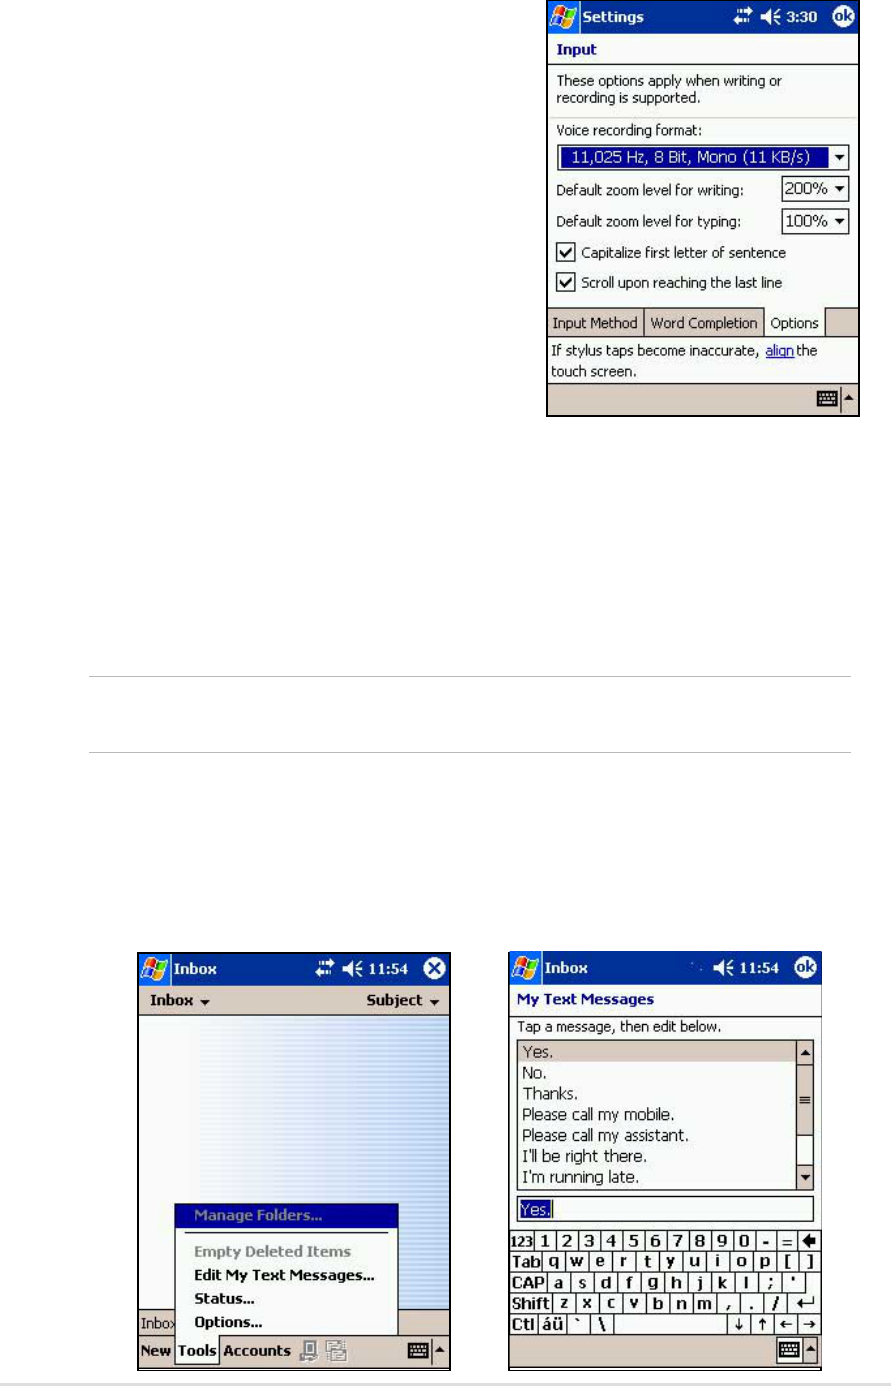
When using Inbox or MSN Messenger, use My Text to quickly insert
preset or frequently used messages into the text entry area. To insert a
message, tap My Text and tap your desired message.
NOTE You can add text after inserting a My Text message.
However, you have to add it before sending the message.
To edit a preset message:
1. Tap Tools, then Edit My Text Messages.
2. Select a message and make your desired changes.
To change the recording format:
1. In the note list, tap Tools then
Options.
2. Tap the Global Input Options link.
3. Tap the Options tab.
Mobile Voice is a 2.4KB audio codec.
It is the recommended format because
it provides good voice recording and
less storage space.
Pulse Code Modulation (PCM)
provides slightly better sound quality
but takes up 50 times more storage
space tham Mobile Voice recordings.
Learn the basics
2-11
Finding and organizing information
The Find and Help features on your device helps you quickly locate
information.
To find information:
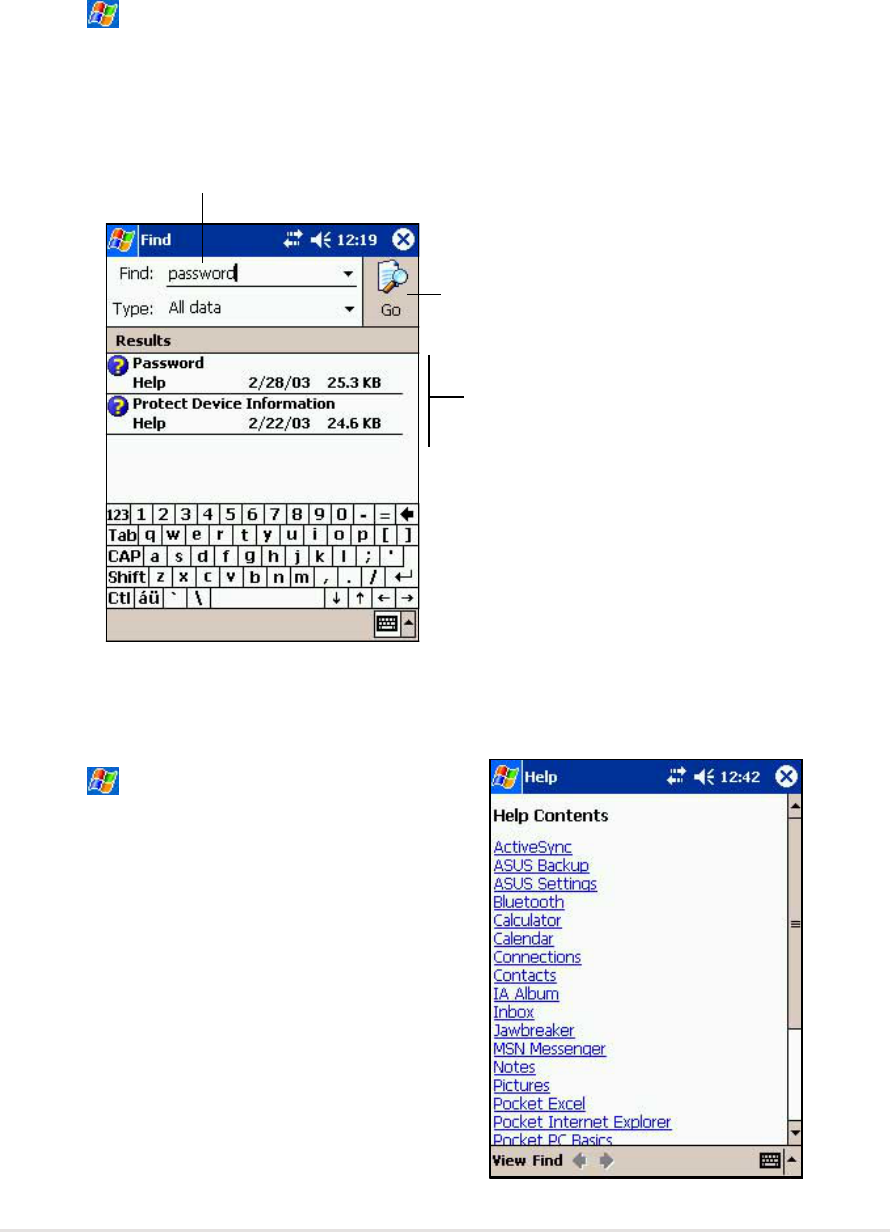
1. Tap , then tap Find.
2. Enter the text that you want to find, select a data type, then tap Go to
start the search. To quickly find information that is taking up space on
your device, select Larger than 64 KB in Type.
Type a word to find
Tap to search for the word
Topics found containing
the searched word
To use the Help feature:
1. Tap , then tap Help.
2. Tap a link to the topic that you wish to
display.
2-12
Chapter 2
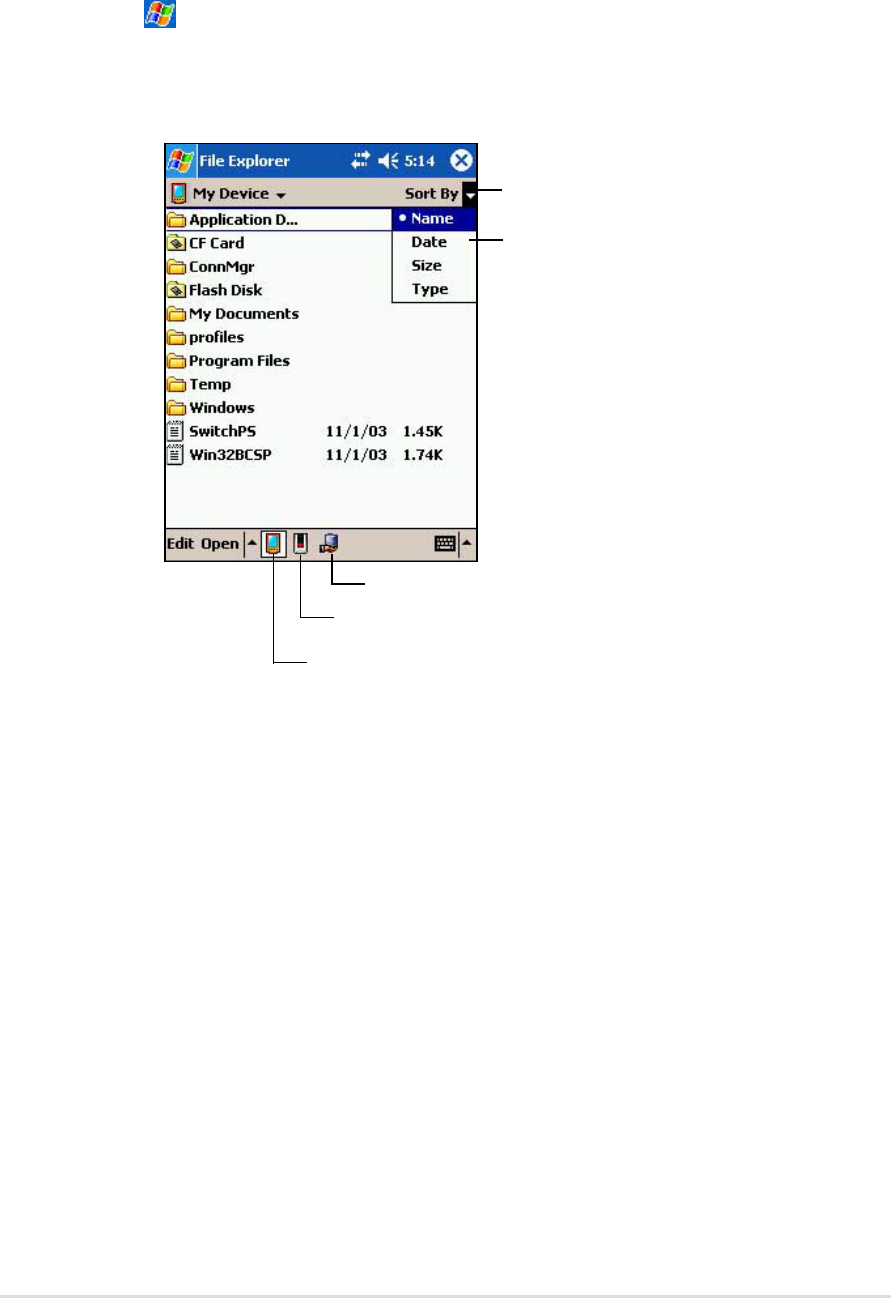
Using the File Explorer
To use the File Explorer to find and organize files:
1. Tap , then tap Programs.
2. In the Program screen, tap the File Explorer icon to display the files in
your device.
Tap to select a sort order
Tap to display sort options
Tap to display the contents of My Documents folder
Tap to display the contents of the
Flash disk or the storage card
Tap to open a path to a network
Learn the basics
2-13
Customizing your device
You can customize your device by adjusting the settings, using the built-in
programs, and installing additional software.
Adjusting settings
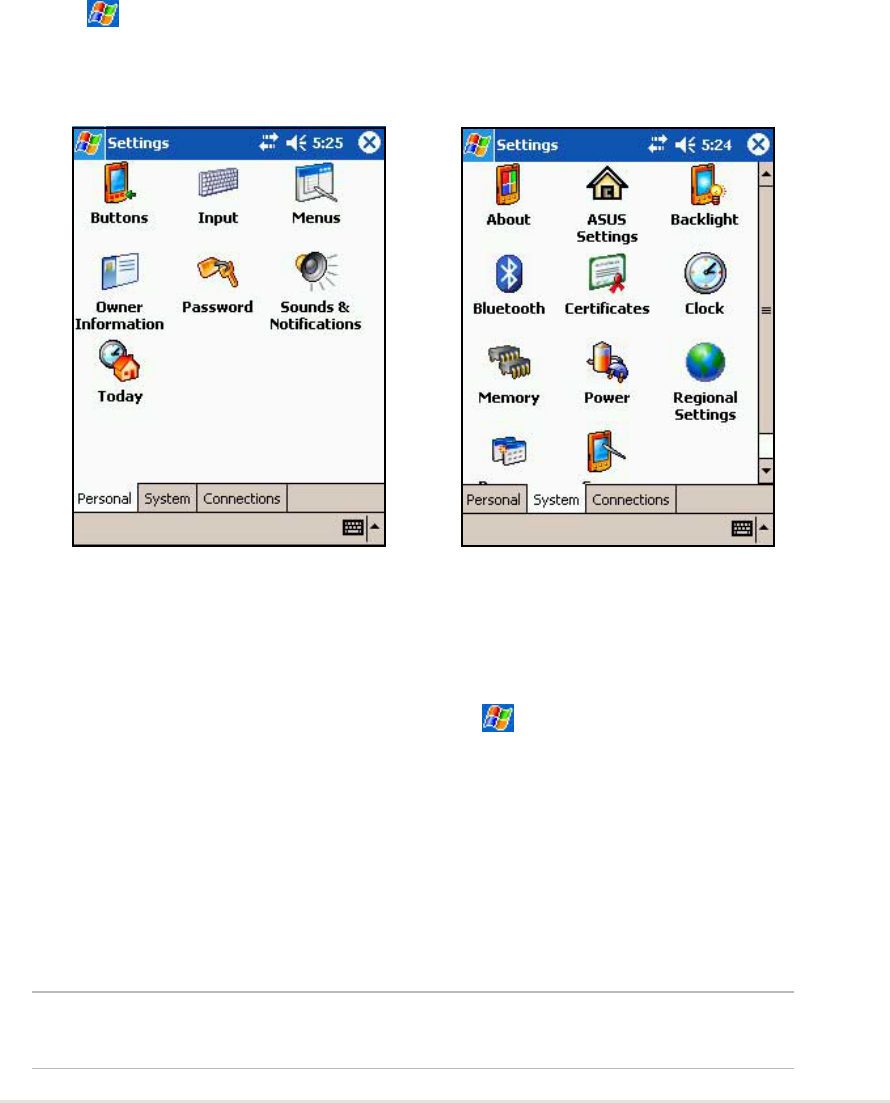
You can adjust the device settings to your preference.
To see the available options:
1. Tap , then tap Settings to display the Settings screen.
2. Tap the Personal or System tab on the bottom of the screen.
You may want to adjust any one of the following items.
•Clock. Change the time or set alarms.
•Menus. Customize what appears on the menu, and enable a pop-up
menu from the New button.
•Owner information. Enter your contact information.
•Password. Add security to your device.
•Power. Display the remaining battery power indicated by a bar chart.
•Today. Customize the look and information displayed on the Today
screen.
NOTE Refer to the section “ASUS utilities” later in this chapter for
details on the bundled ASUS programs.
2-14
Chapter 2
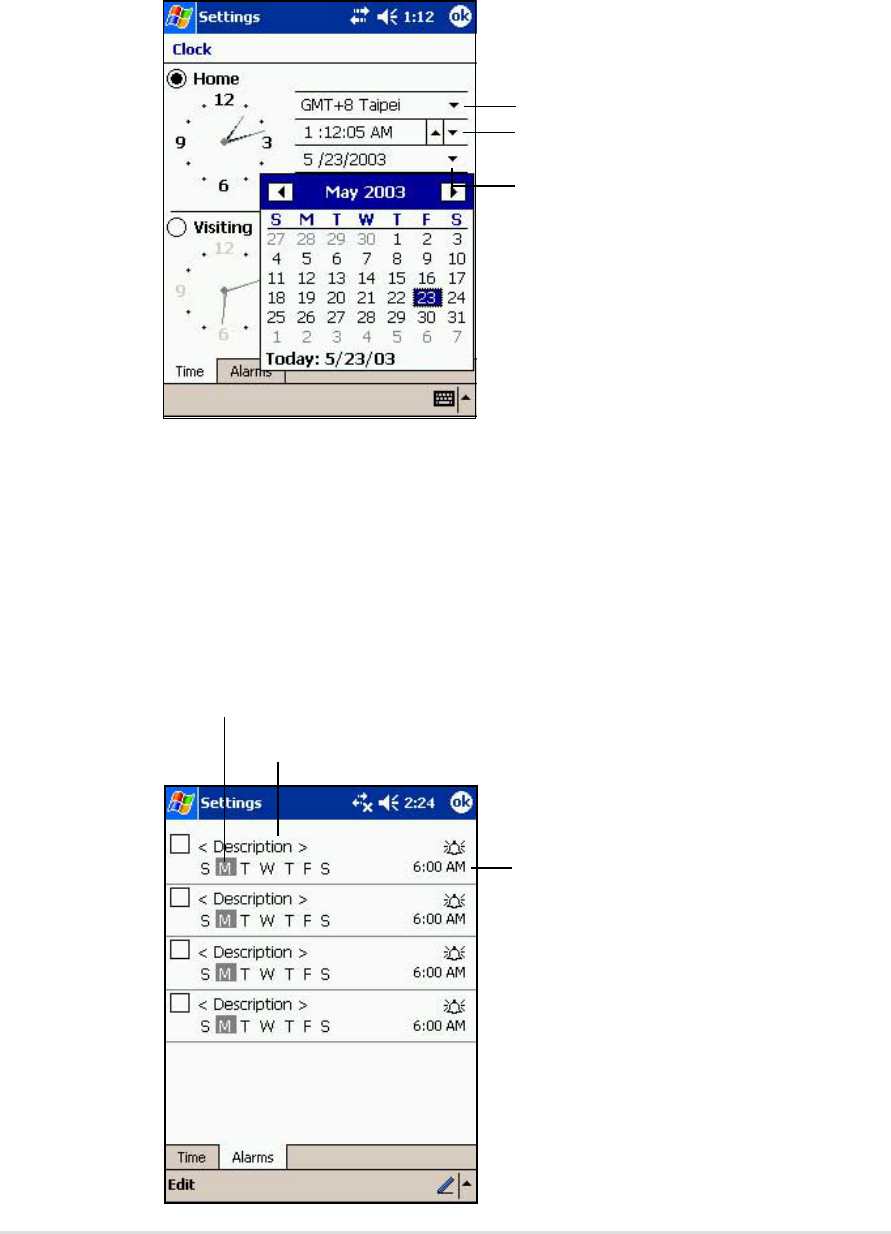
To change the date and time settings:
1. Tap Settings, then the System.
2. Tap the Clock icon.
3. Make your desired settings.
Tap to select a time zone
Highlight a Time item then
tap up or down arrow to set
Tap this down arrow to
display the Calendar
To change the alarm settings:
1. Tap Settings, then the System.
2. Tap the Clock icon, then the Alarm tab.
3. Make your desired settings.
Tap a day of the week for the alarm
Tap and type a description for the alarm
Tap to display the clock and
specify a time for the alarm
Learn the basics
2-15
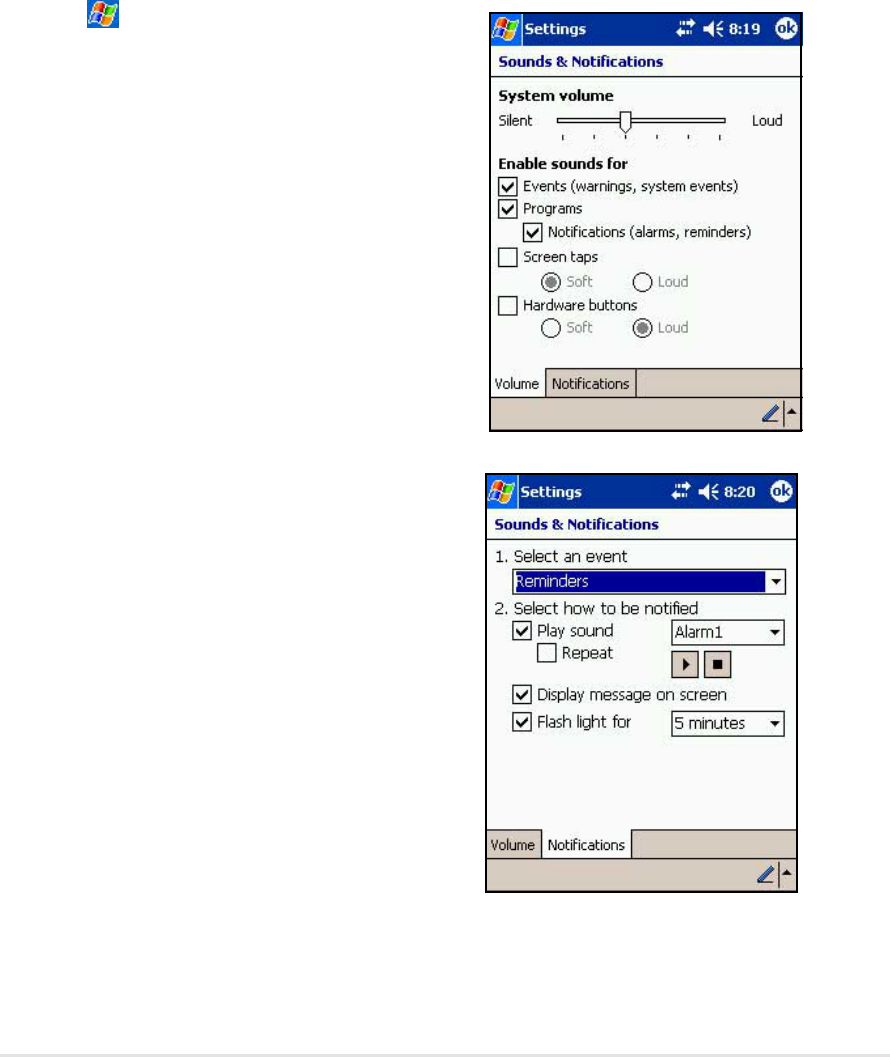
Selecting sounds and notifications
Your device can remind you of things you have to do in several ways. For
example, if you have set up an appointment in Calendar, a task with a due
date, or an alarm in Clock, you will be notified in any of the following ways.
•A message box appears on the screen
•A sound is played (you can select the type of sound)
•A light flashes on the device
To choose the reminder types and sounds:
1. Tap icon then tap Settings.
2. From the Settings screen, tap the
Sounds and Notifications icon to
display the Volume screen.
3. Adjust the items to your desired
settings.
4. Tap the Notifications tab and set the
event notification details.
2-16
Chapter 2
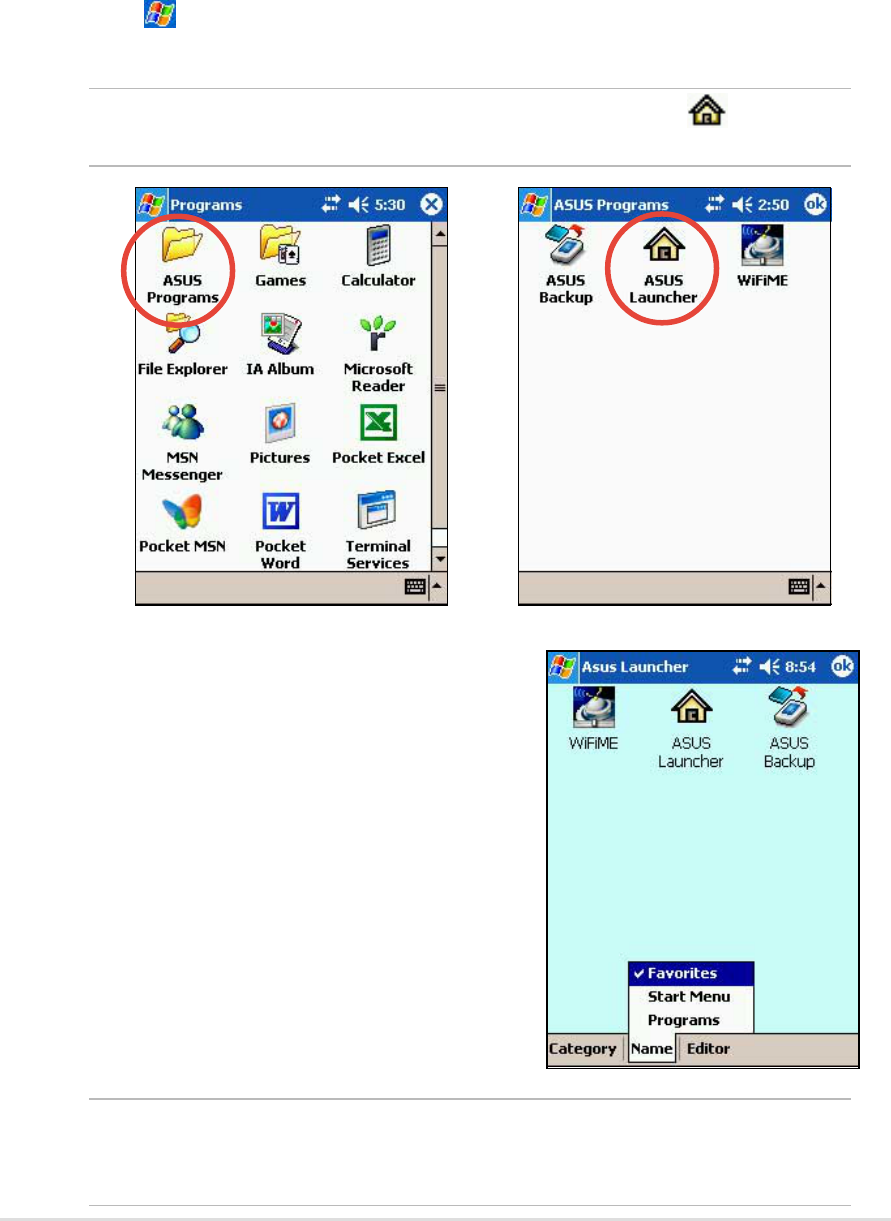
Using ASUS Launcher
This program allows you the convenience of classifying your frequently
used programs, and quickly launching them with just a few taps.
To access ASUS Launcher:
1. Tap , then Programs.
2. Tap ASUS Programs, then ASUS Launcher.
NOTE To quickly access ASUS Launcher, press the button
(leftmost) on your device.
3. From the command bar, tap
Name to display the names of the
existing categories.
The default categories are
Favorites, Start Menu, and
Programs.
4. Tap a category to display the
programs it contains.
By default, the Favorites category
contains the ASUS Launcher and
ASUS Backup program icons.
NOTE You cannot delete the default categories. However, you may
edit the default titles, and add or delete programs contained
in these categories.
Learn the basics
2-17
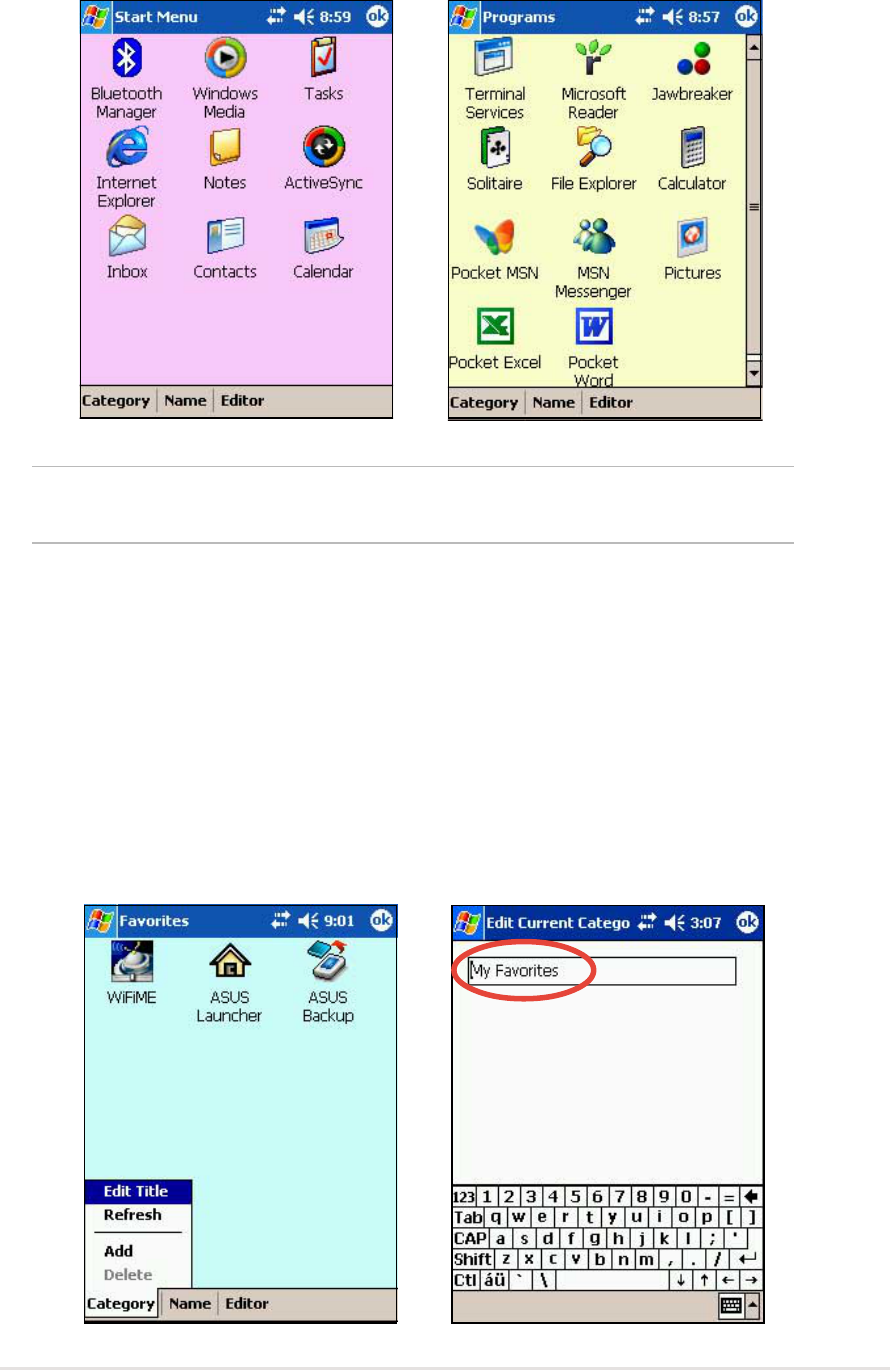
5. Tap Start Menu or Programs to display the default programs in them.
NOTE Whatever category is selected, that category will be launched
the next time you tap the AsusLauncher icon.
To edit the name of a default category:
1. Tap Name, and select a category that you wish to rename. For
example, Programs.
2. Tap Category, then Edit Title.
3. In the Edit Current Category screen, revise the name.
4. Tap OK.
2-18
Chapter 2
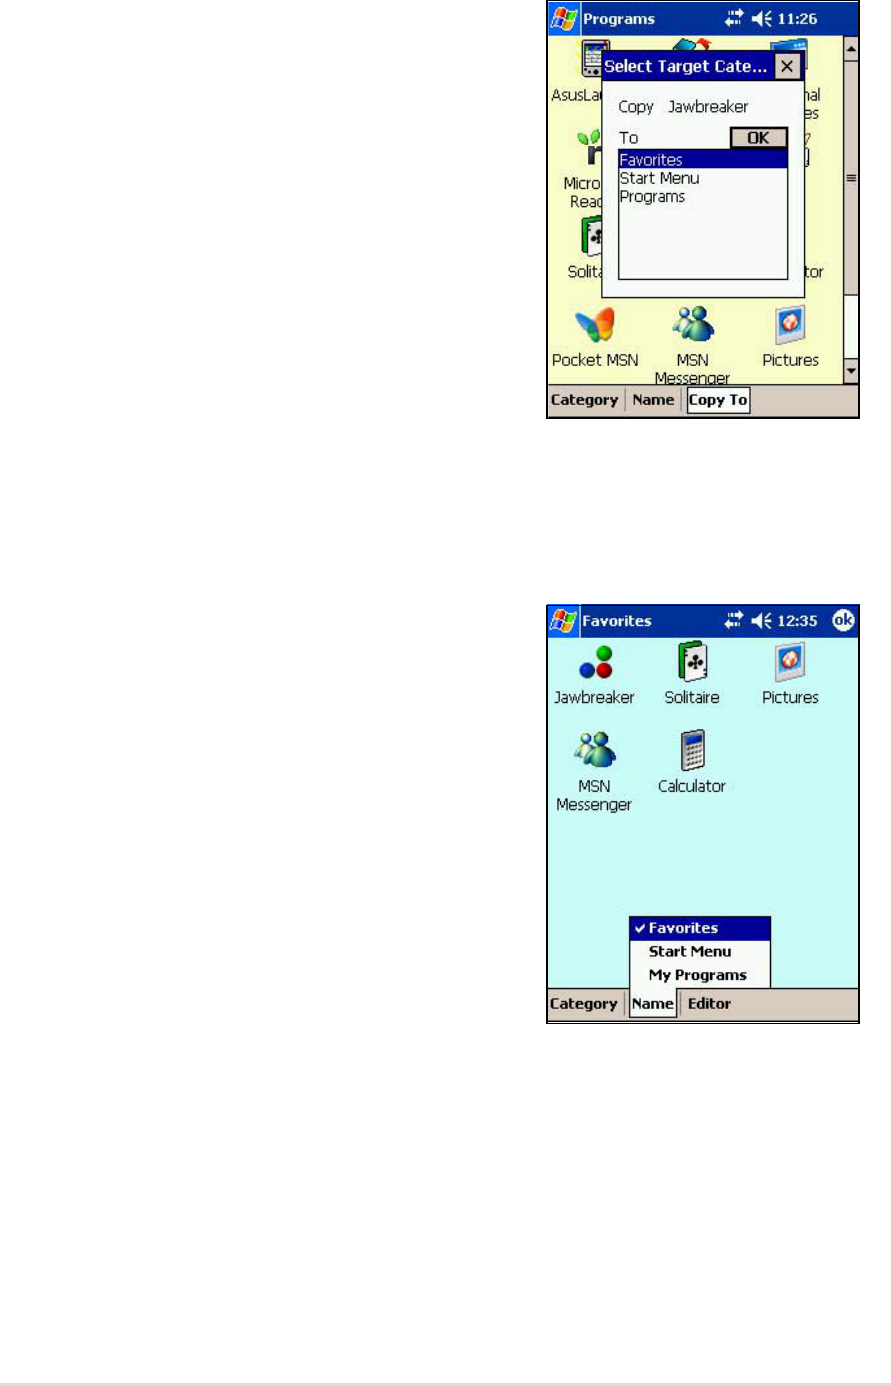
To customize an existing category:
1. Tap Editor, then Copy To.
2. Tap Name, then Programs (or
Start Menu).
3. In the Programs screen, tap the
program icon that you wish to
copy. For example, Jawbreaker.
A pop-up screen appears.
4. Select a target destination for the
program icon. For example,
Favorites.
5. Repeat steps 3 and 4 to copy
other programs that you wish to
launch often.
6. When done, tap Copy To then
Launch to return to the launch
mode.
7. Tap Name then Favorites to
display your customized quick
launch programs.
8. Tap OK to set Favorites as your
quick launch category.
The next time you access
AsusLauncher, the Favorites
category appears.
Learn the basics
2-19
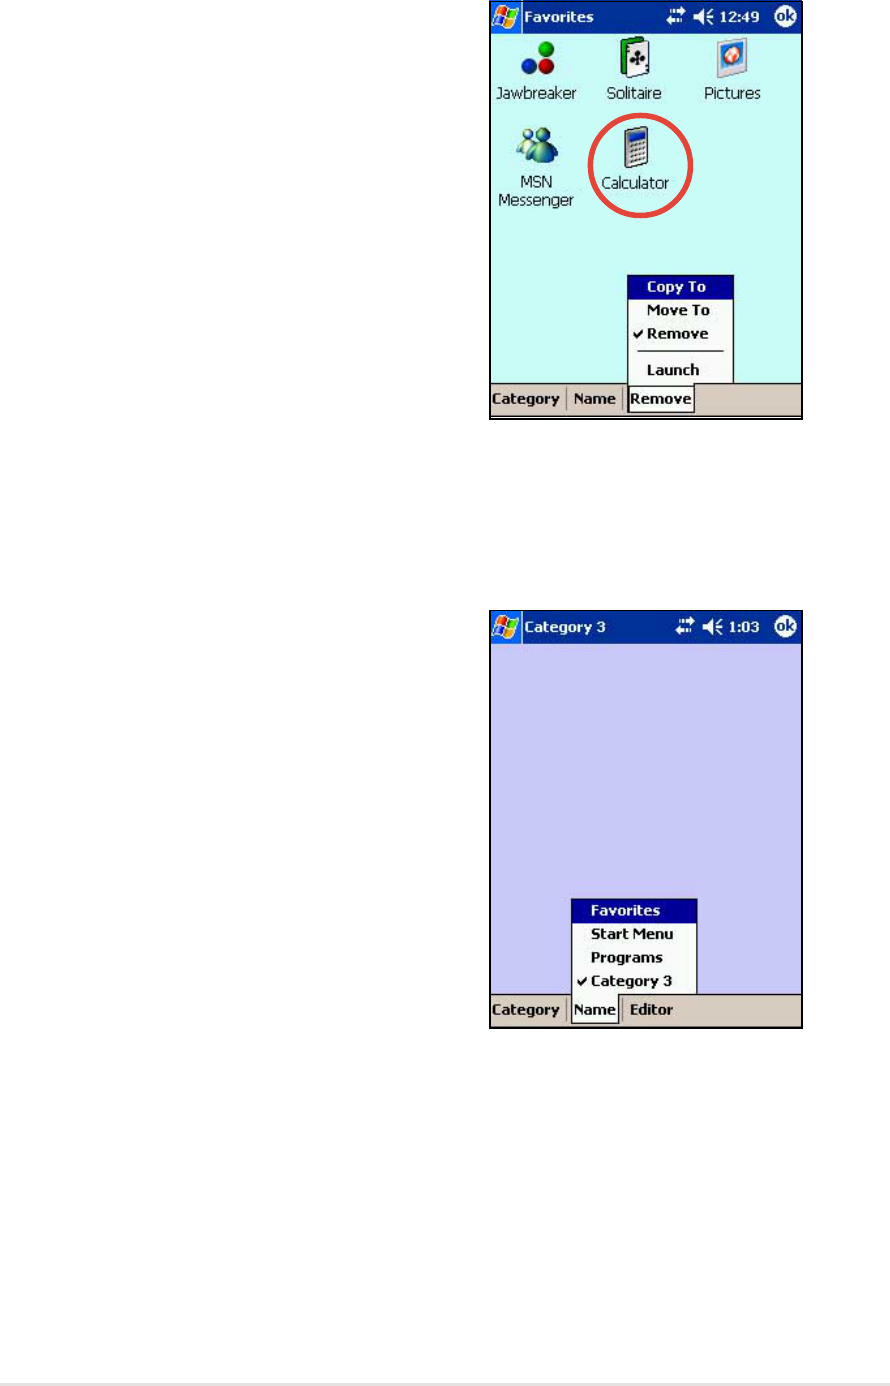
To remove programs from a category:
1. Tap Editor, then Remove.
2. Tap Name, then any of the
existing categories.
3. Tap the program icon that you
wish to remove. For example, the
Calculator icon in the Favorites
screen.
The icon disappears from the
screen as soon as you tap it.
4. When done, tap Remove then
Launch to return to the launch
mode.
5. Tap OK to save your changes.
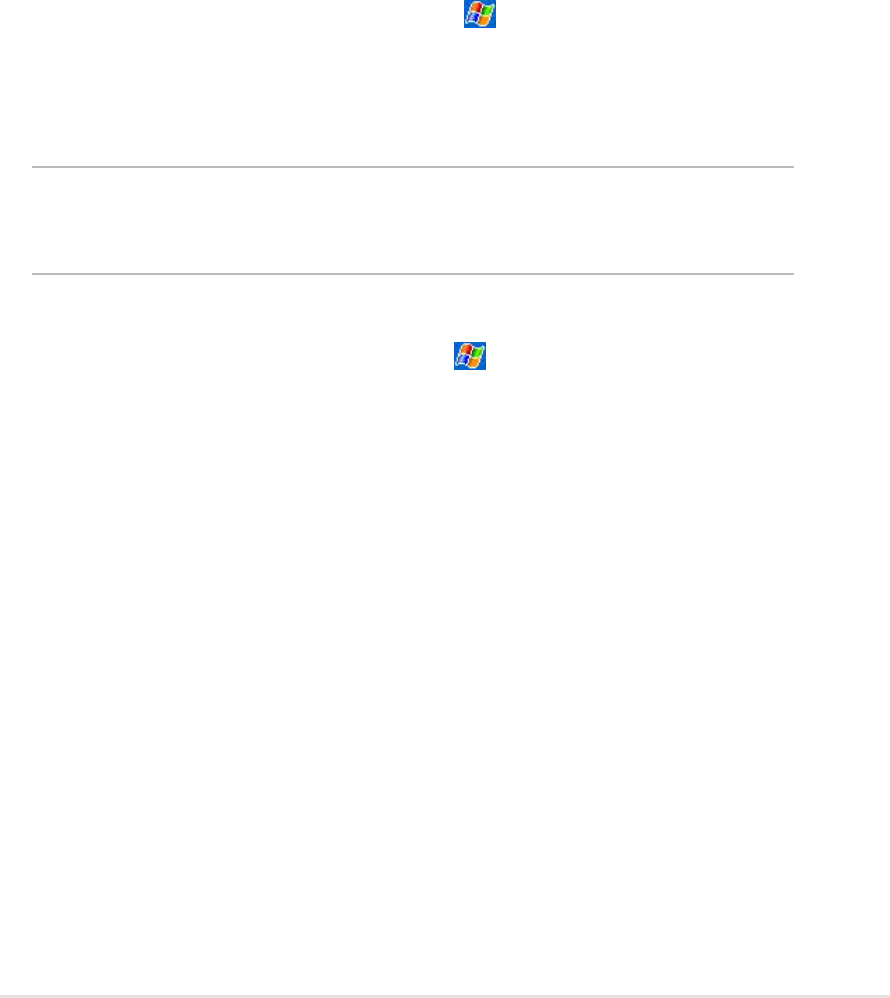
To add a new category:
1. Tap Category, then Add. A new
category is automatically added.
2. Tap Name to see the updated list
of categories.
3. If you wish to rename the new
category, se page 2-17 for
instructions.

2-20
Chapter 2
Adding or removing programs
Programs added to your device at the factory are stored in ROM (Read-
Only Memory). You cannot remove this software, and you will never
accidentally lose ROM contents. ROM programs can be updated using
installation programs with a *.xip extension. All other programs and data
files added to your device after factory installation are stored in RAM
(Random Access Memory).
You can install any program created for your device, as long as it has
enough memory. The most popular place to find software for your device is
on the Pocket PC web site (http://www.microsoft.com/mobile/pocketpc).
To add programs using ActiveSync:
NOTE You need to install the Microsoft ActiveSync on your desktop
computer before you can synchronize and/or add programs
to your device. Refer to “Chapter 3: Microsoft ActiveSync” for
installation instructions.
1. Determine your device and processor type so that you know which
version of the software to install. Tap , then tap Settings. On the
System tab, tap About. In the Version tab, take note of the information
in Processor.
2. Download the program to your desktop computer (or insert the CD that
contains the program into your desktop computer). You may see a
single *.xip, *.exe, or *.zip file, a Setup.exe file, or several versions of
files for different device types and processors. Be sure to select the
program designed for the Pocket PC and your device processor type.
3. Read any installation instructions, Read Me files, or documentation
that comes with the program. Many programs provide special
installation instructions.
4. Connect your device to your desktop computer.
Learn the basics
2-21
5. Double-click the *.exe file.
•If the file is an installer, the installation wizard begins. Follow the
directions on the screen. Once the software is installed on your
desktop computer, the installer automatically transfers the software to
your device.
•If the file is not an installer, you will see an error message stating that
the program is valid but it is designed for a different type of computer.
You need to move this file to your device. If you cannot find any
installation instructions for the program in the Read Me file or
documentation, use ActiveSync Explore to copy the program file to
the Program Files folder on your device. For more information on
copying files using ActiveSync, see ActiveSync Help.
6. When the installation is complete, tap , Programs, and the program
icon to switch to it.
To add a program directly from the Internet:
NOTE You need to be connected to the Internet through an optional
modem card or network card before you can add programs
directly from the Internet.
1. Determine your device and processor type so that you know which
version of the software to install. Tap , then tap Settings. On the
System tab, tap About. In the Version tab, take note of the information
in Processor.
2. Download the program to your device straight from the Internet using
the Pocket Internet Explorer. You may see a single *.xip, *.exe, or
*.zip file, a Setup.exe file, or several versions of files for different
device types and processors. Be sure to select the program designed
for the Pocket PC and your device processor type.
3. Read any installation instructions, Read Me files, or documentation
that comes with the program. Many programs provide special
installation instructions.
4. Tap the file, such as a *.xip or *.exe file. The installation wizard begins.
Follow the directions on the screen.

2-22
Chapter 2
To add a program to the Start menu:
1. Tap , tap Settings, tap Menus, tap the Start Menu tab, and tap the
check box for the program. If you do not see the program on the list,
you can either use File Explorer on the device to move the program to
the Start Menu folder, or use ActiveSync on the desktop computer to
create a shortcut to the program and place the shortcut in the Start
Menu folder.
2. If you are using the File Explorer on the device:
a. Tap , tap Programs, tap File Explorer, and locate the program
(tap the folder list, labeled My Documents by default, then tap My
Device to see a list of all the folders on the device).
b. Tap and hold the program, then tap Cut on the pop-up menu. Open
the Start Menu folder located in the Windows folder, tap and hold a
blank area of the window, then tap Paste in the pop-up menu.
c. The program now appears on the menu. For more information on
using the File Explorer, see the section “Finding and organizing
information” earlier in this chapter.
3. If you are using ActiveSync on the desktop computer:
a. Use the Explorer in ActiveSync to explore your device files and locate
the program. Right-click the program, then click Create Shortcut.
b. Move the shortcut to the Start Menu folder in the Windows folder. The
shortcut now appears on the menu. For more information, see
ActiveSync Help.
To remove a program from the Start menu:
1. Tap , then tap Settings. On the System tab, tap Remove
Programs.
2. If the program does not appear in the list of installed programs, use
File Explorer on your device to locate the program, tap and hold the
program, then tap Delete on the pop-up menu.
Learn the basics
2-23
1. Tap , then tap Settings.
2. Tap the System tab, then tap the
Memory icon.
3. On the Memory screen, tap the
Running Programs tab.
4. Tap the Stop All button, then tap
OK.
2. Tap , then tap .
A message appears asking you to
stop other programs before
running the backup utility.
3. Tap OK and stop all running
programs.
To stop all running programs:
ASUS utilities
Besides the Microsoft program that allows you to back up data, your
device also includes proprietary ASUS utilities. The ASUS utilities allow
you to backup or restore data, and adjust settings to customize your
device and maximize its use.
ASUS Backup
The ASUS Backup utility lets you back up your system files and/or data
contained in the main system memory. Unlike the ASUS SmartKeeper
automatic backup feature that backs up the entire system status (system
and data) into one backup file, this utility allows you to manually create
separate backup files for your system files and data files. You may even
categorize the data files and place into different folders.
To access the ASUS backup utility:
1. Tap , then tap Programs.

2-24
Chapter 2
1. Return to the ASUS programs
screen and tap the ASUS
Backup icon.
2. Tap the Backup tab on the ASUS
Backup screen.
3. Tap All Data button to back up all
data on your device.
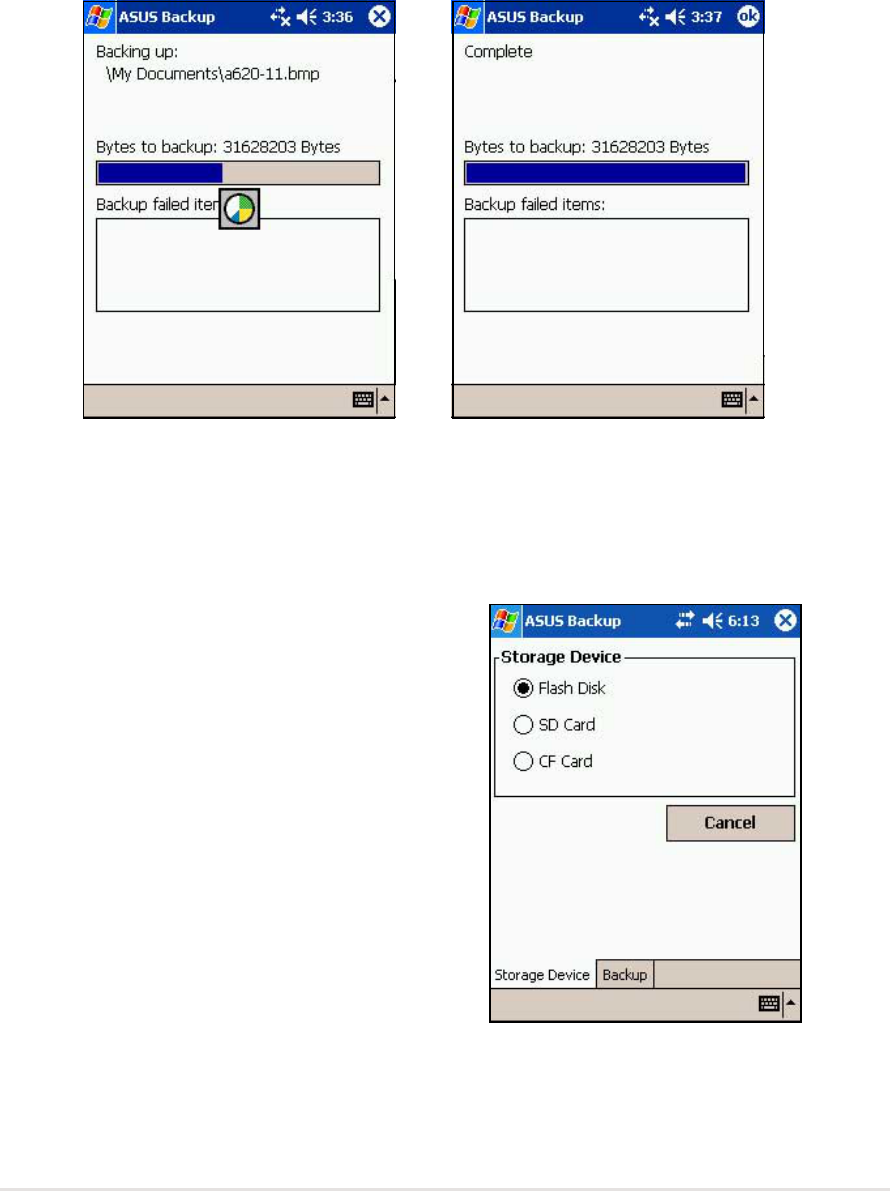
To back up all data on your device:
4. In the Backup File screen:
•specify a file name for the
backup
•specify the folder in which to
store the backup file (optional)
•select the storage device
(Flash Disk or CF card) where
you wish to save your backup
file
5. Tap OK to start the backup
process.
NOTE You need to insert a CF memory card or an SD card if you
wish to save your backup file into a removable storage
device. Otherwise, you can save the backup file into the
Flash Disk.
NOTE See the online help on your device for online instructions to
back up or restore data.
Learn the basics
2-25
6. The screen shows the status of the backup process. When done, a
message appears indicating that the backup is complete, and shows
the total size of the backed up files.
In case the program fails to back up any items, it will show the items on
the screen.
7. Tap OK.
To back up only PIM data on your device:
1. On the ASUS Backup screen, tap
PIM Data button to back up only
the personal information
management (PIM) data on your
device.
2. Select the storage device (Flash
Disk or CF card) where you wish
to save your backup file.
Tapping Cancel returns you to the
previous screen.
3. Tap the Backup tab.
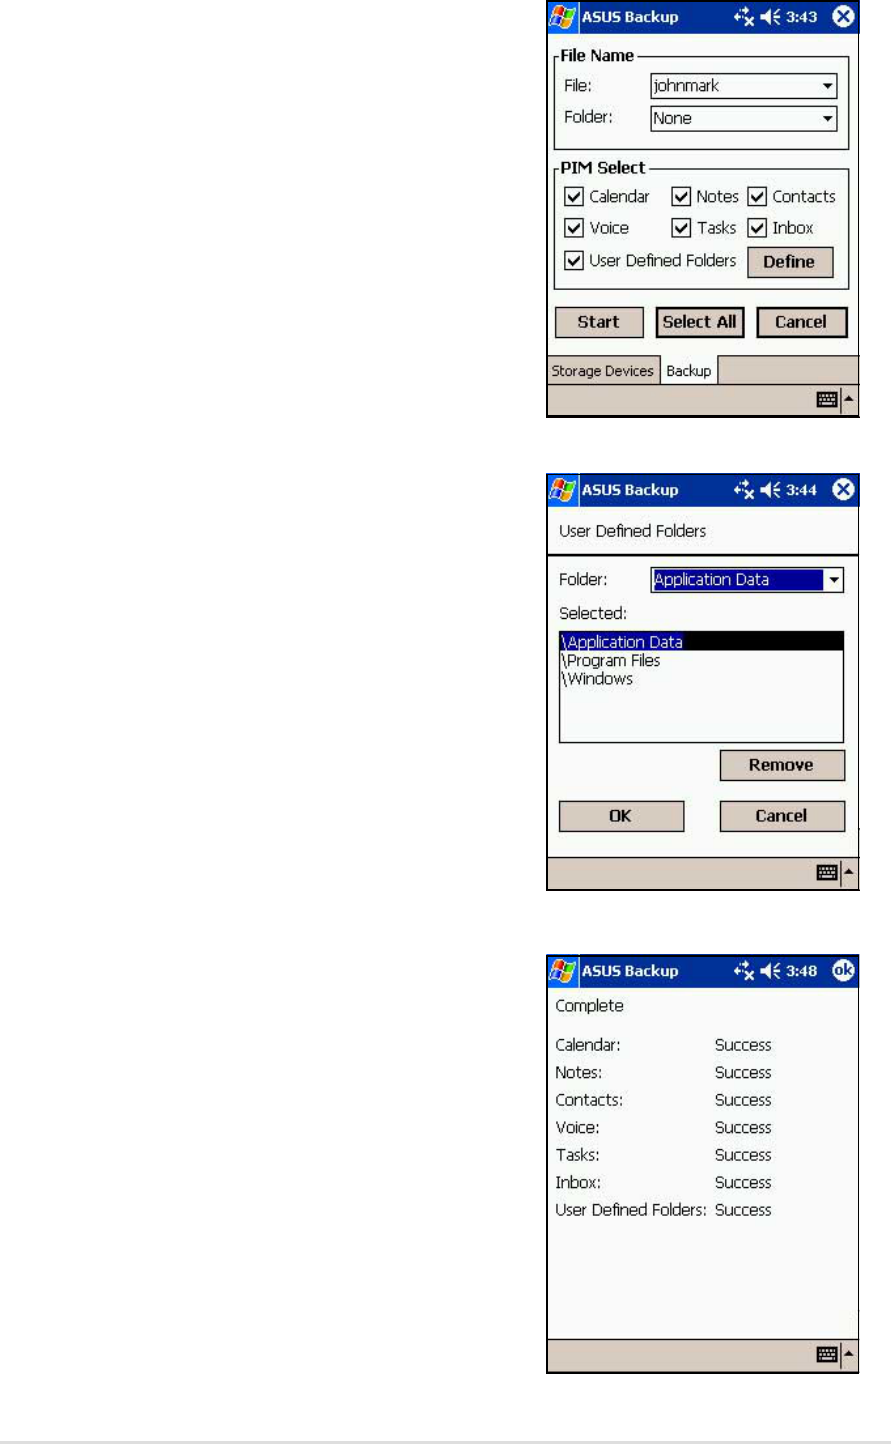
2-26
Chapter 2
If you checked the box User
Defined Folders, tap Define to
specify the folders that you wish
to include in the backup file, then
tap OK.
6. Tap Start to begin the backup
process.
7. When the backup process is
complete, the screen displays the
message “Complete” and a list of
all the backed up items.
8. Tap OK.
4. Type a name for your backup file
and the folder where you wish to
place it. You may opt not to
specify a folder.
5. Check the boxes opposite the
items that you wish to back up, or
tap Select All to select all listed
items.
Learn the basics
2-27
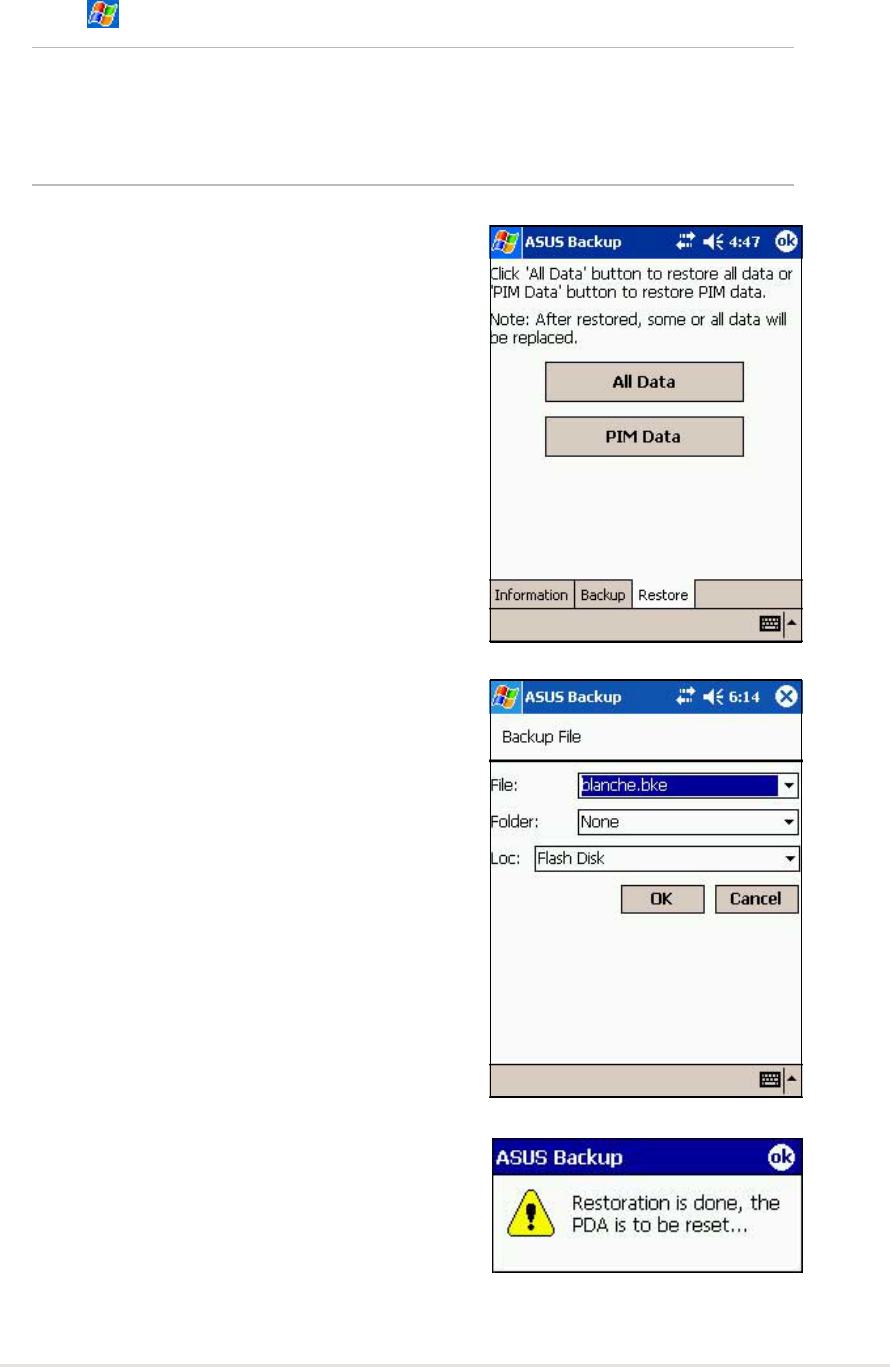
To restore all data:
1. Tap , then tap Programs.
NOTE If you saved your backup file into a CF memory card, you
need to insert that CF memory card into the CF slot when
restoring data. Otherwise, you will receive the message “No
storage devices are found!”
2. On the ASUS Programs screen
Tap the ASUS Backup icon.
When prompted, stop all running
programs. See page 2-29 for
instructions.
3. Tap the Restore tab on the ASUS
Backup screen.
4. Tap All Data.
5. In the Backup File screen:
•select the backup file name
(tap the arrow to list down other
backup files, if any)
•select the folder that contains
your backup file (optional)
•select the storage device
(Flash Disk or CF card) where
you stored your backup file
6. Tap OK to start the restore
process.
7. When the restoration is done, a
message appears prompting you
to reset the device.
8. Tap OK to reset.
2-28
Chapter 2
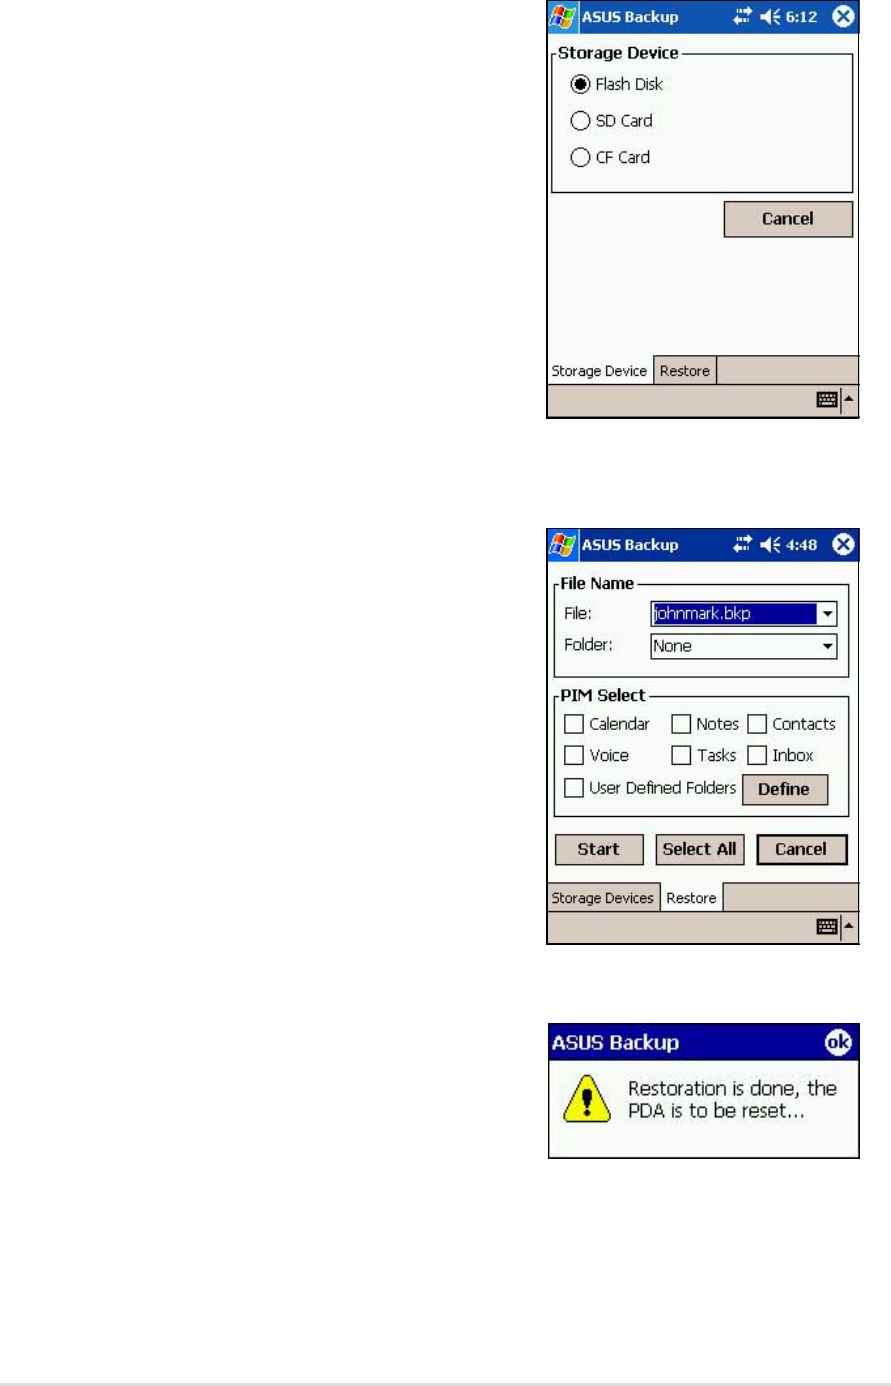
1. On the ASUS Backup screen, tap
PIM Data.
2. When prompted, select the
storage device (Flash Disk or CF
card) where you stored your
backup file.
Tapping Cancel returns you to the
previous screen.
3. Tap the Restore tab.
To restore PIM data:
4. Select the backup file name (tap
the arrow to list down other
backup files, if any).
5. Check the boxes opposite the
items that you wish to restore, or
tap Select All to select all listed
items.
If you checked the box User
Defined Folders, tap Define to
specify the folders that you wish
to restore, then tap OK.
6. Tap Start to begin the restore
process.
7. When the restoration is done, a
message appears prompting you
to reset the device.
8. Tap OK to reset.

Learn the basics
2-29
1. Tap , then tap Settings.
2. Tap the System tab on the
bottom of the Settings screen.
3. Tap the ASUS Settings icon to
display the system information
screen. This screen is displayed
whenever you tap the Info tab.
ASUS Settings
The ASUS Settings screen has four parts: Info, Multimedia, System, and
IR. Each part includes items that you can customize.
To display the ASUS settings:
To change the Microphone settings:
Tap the Multimedia tab, then the AGC to
adjust the settings for the microphone
sensitivity. The AGC features allows you
to adjust the recording and environment
noise level.
•The MIC Sensitivity controls the sound
recording input. Setting the slider
toward the “High” sign allows for a
louder recording, but the environment
noise level may be louder also.
•Check the box opposite Automatic to
adjust the recording volume
automatically. To manually adjust the
recording volume, drag the slider toward the “Low” or “High” sign.
2-30
Chapter 2
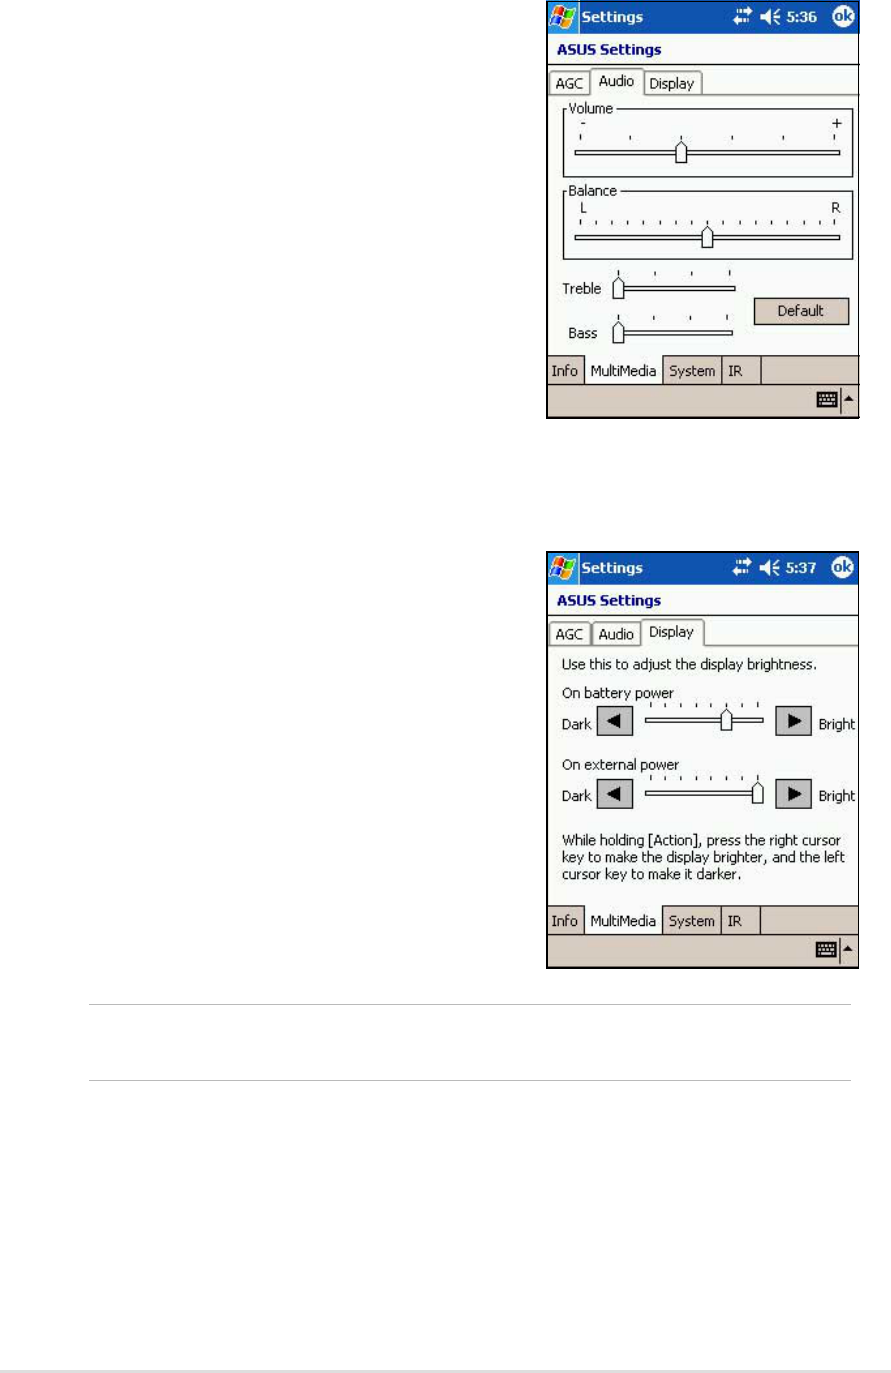
To change the Audio settings:
Tap the Audio tab to adjust the
volume, balance, treble, and bass
settings.
Drag the slider to the left or to the
right until you achieve your desired
sound output.
Tap the Default button to restore the
default audio settings.
1. Tap the Display tab.
2. Set the degree of brightness while
on battery power by dragging the
slider to the left or to the right
until you achieve your desired
brightness.
3. Follow step 2 to set the degree of
brightness when using external
power.
To change the Display settings:
NOTE Using a lower degree of brightness while on battery power
substantially reduces battery power consumption.
Learn the basics
2-31
To change the operation Mode:
Tap the Mode tab to display the running
mode of the CPU.
The Turbo Mode allows better CPU
performance. In this mode, the CPU
speed goes up to 400MHz. Set to this
mode when playing games or playing
video. However, setting to Turbo mode
may reduce the battery life.
The Standard Mode allows for up to
300MHz CPU speed. Set to this mode
when listening to MP3 audio files or for
applications that do not require very fast
CPU speed.
The Power Saving Mode sets the CPU to a fixed speed of 200MHz. Set
to this mode when using text based applications such as Word, Excel, etc.
This mode has a lower CPU performance but extends the battery life.
For automatic power saving, check the box opposite Enable Automatic
Mode. This mode allows for either 200MHz, 300MHz, or 400MHz CPU
speed depending on the program that you are running.
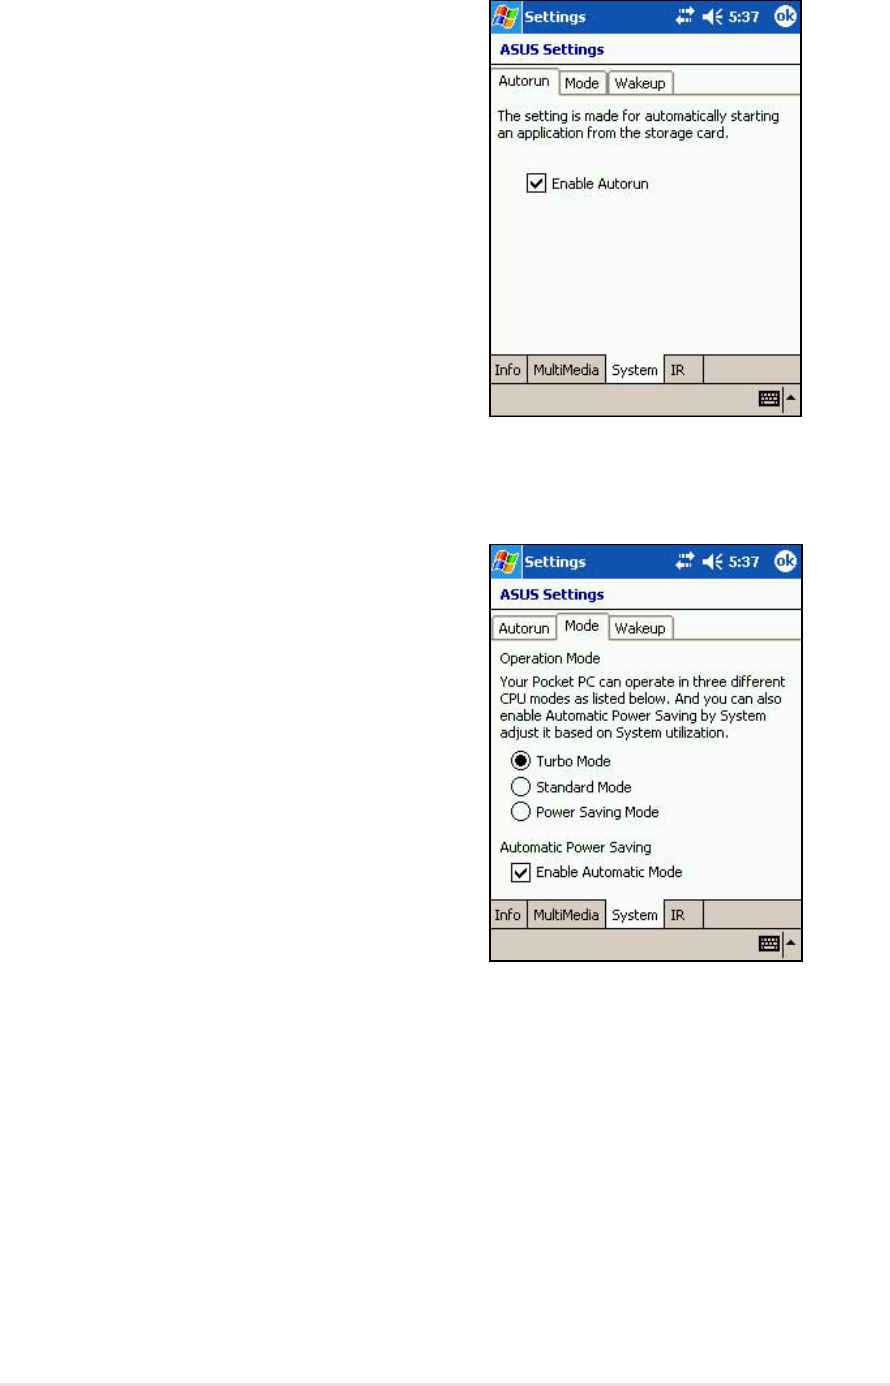
Tap the Autorun tab to select the
source devices to execute the
autorun program.
To select Autorun Devices:
2-32
Chapter 2
Tap the Wakeup tab to enable or
disable the wakeup feature. Checking
the box opposite Turn on power
when a program button is pressed
to enable the the feature.
Pressing any one of the function
buttons on the front panel wakes up
the device.
To change the Wakeup sources:
Tap the IR tab to display the
selection. Click FIR for a maximum of
4Mbps transfer rate, or SIR for
115.2Kbps.
To select the transmission rate for infrared (IR):
Learn the basics
2-33
Bundled programs
Your device includes the most common Windows programs and more.
To access the bundled programs:
1. Tap , then tap Programs.
2. Tap any of the icons to launch a
specific application program.
ASUS Programs
Tapping the ASUS Programs icon displays
the ASUS Backup utility, ASUS Launcher,
and WiFiME program icons.
Tap the ASUS Backup icon if you wish to
use the utility. See section “ASUS
Backup” on page 2-23 for details.
Tap the ASUS Launcher icon to quickly
display your frequently used programs.
Tap the WiFiME icon to launch the
WiFiME program. Refer to the WiFiME
section in “Chapter 9 Wireless LAN.”
Games
Tap the Games icon to display the
available games.
2-34
Chapter 2
Calculator
Tap the Calculator icon to use the
calculator.
File Explorer
Tap the File Explorer icon to access
your files. See page 2-12.
Microsoft Reader
Tap the Microsoft Reader icon to
download and read online books.
See Chapter 5.
Learn the basics
2-35
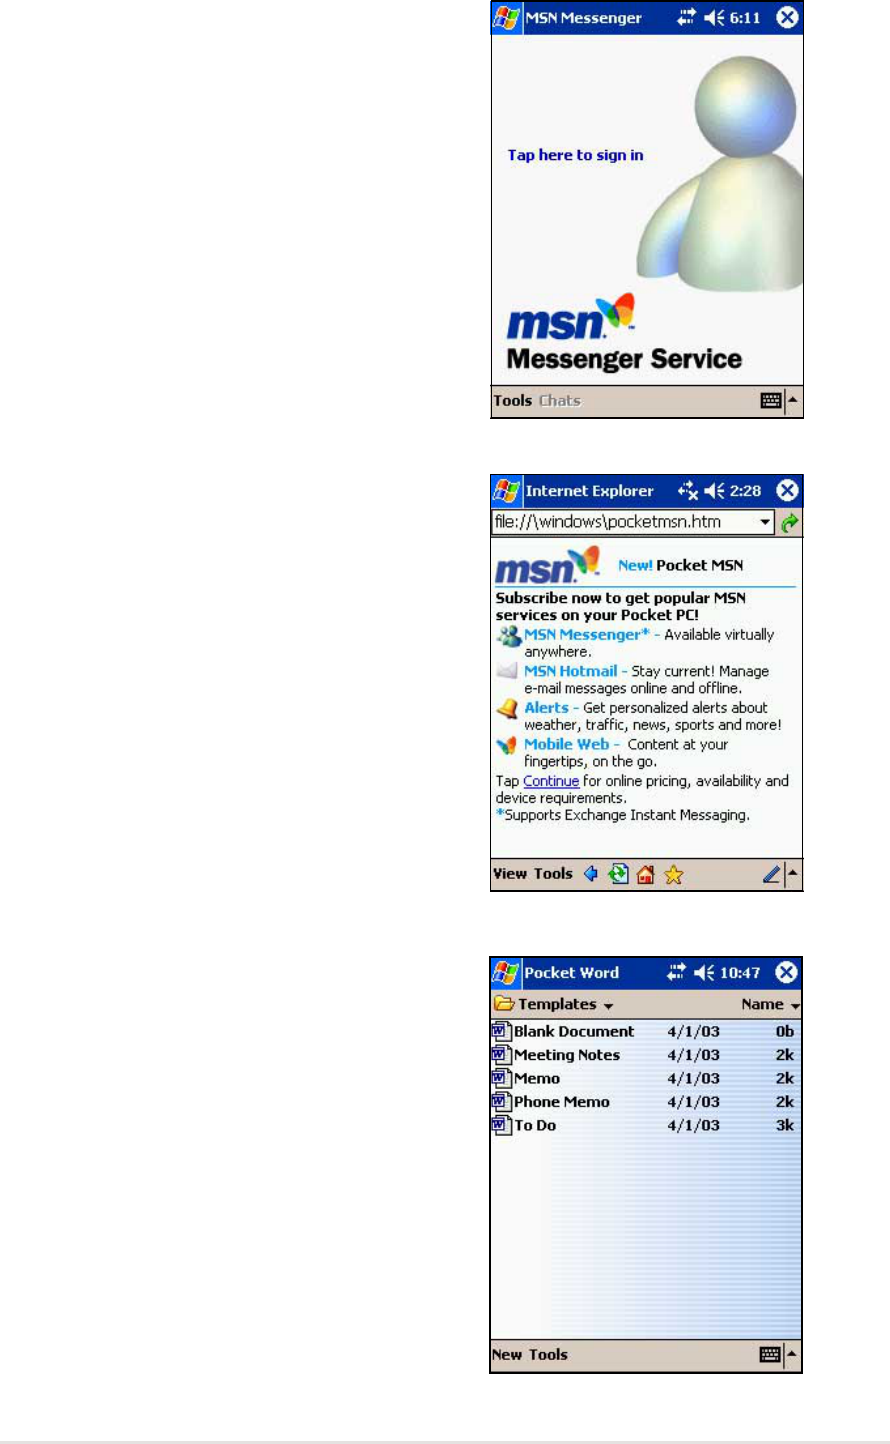
MSN Messenger
Tap the MSN Messenger icon to use
the service. See Chapter 5.
Pocket MSN
Tap the Pocket MSN icon to get
connected to the Internet through the
Pocket Internet Explorer. See
Chapter 6.
Pocket Word
Tap the Pocket Word icon to create
Pocket Word documents. See
Chpater 5.
2-36
Chapter 2
Pocket Excel
Tap the Pocket Excel icon to create
spreadsheet documents. See
Chapter 5.
Pictures
Tap the Pictures icon to view .jpg
pictures stored on your device or on
a storage card. Refer to the online
help on your device for details on
using this feature.
Terminal Services Client
Tap the Terminal Services Client icon
to connect to a terminal server. Refer
to the online help on your device for
more information.

Microsoft
®
ActiveSync
®3-1
Chapter 3
Microsoft
®
ActiveSync
®
♦♦
♦♦
♦Introduction........................................................... 3-2
What is ActiveSync
®
? ............................................................... 3-2
♦♦
♦♦
♦Installing ActiveSync®......................................................................... 3-3
Installing ActiveSync
®
on your computer .................................. 3-3
♦♦
♦♦
♦Synchronizing your device .................................. 3-5
Connecting your device to a computer .................................... 3-5
Setting up a partnership ........................................................... 3-6
Checking synchronized information ......................................... 3-8
Manually initiating synchronization .......................................... 3-9
Synchronization options ......................................................... 3-10

3-2
Chapter 3
Introduction
What is ActiveSync
®
?
The Microsoft
®
ActiveSync
®
is one of the important bundled programs in
MyPal. With ActiveSync, you can synchronize the information on your
desktop computer with the information on your device. Synchronization
compares the data on your device with your desktop computer and
updates both computers with the most recent information.
For example:
•Keep Pocket Outlook data up-to-date by synchronizing your device with
Microsoft Outlook data on your desktop computer.
•Synchronize Microsoft Word and Microsoft Excel files between your
device and desktop computer. Your files are automatically converted to
the correct format.
NOTE By default, ActiveSync does not automatically synchronize all
types of information. Use the ActiveSync options to turn
synchronization on or off for specific information types.
With ActiveSync, you can also:
•Back up and restore your device data
•Copy (rather than synchronize) files between your device and desktop
computer
•Control when synchronization occurs by selecting a synchronization
mode. For example, you can synchronize continually while connected to
your desktop computer or only when you choose to synchronize.
•Select which information types are synchronized and control how much
data is synchronized. For example, you can choose to synchronize your
appointments of the past two weeks only, appointments older than two
weeks are not synchronized.
For more information about using ActiveSync:
1. Start ActiveSync on your desktop computer.
2. From the Activesync menu bar, click Help then on Microsoft
ActiveSync Help.
Microsoft
®
ActiveSync
®3-3
Installing ActiveSync®
The ActiveSync program is already installed on your device. To
synchronize information on your device with your computer, you must also
install ActiveSync on your computer. Install ActiveSync from the
Companion CD that came with your product package.
NOTE Before starting the ActiveSync installation, make sure that
you have Microsoft
®
Outlook
®
installed on your computer. If
you do not have Outlook, install the Microsoft
®
Outlook
®
2002
from the Companion CD. Even if you have Outlook 98 or
Outlook 2000 installed, you are encouraged to update to
Outlook 2002.
Installing ActiveSync
®
on your computer
To install ActiveSync on your computer:
1. Turn on your computer and monitor.
NOTE Do not connect your device to your computer until you have
finished installing ActiveSync.
2. Insert the Companion CD into the CD-ROM drive of your computer.
The CD autoruns and displays the initial screen, then the Main Menu
from which you can start the installation.
3. Click on Start Here from the Main Menu.
3-4
Chapter 3
4. Read the Overview before
installing ActiveSync 3.7 to make
sure that you perform the
installation sequence correctly.
5. If you have not installed Outlook,
install it now. Click Install
Outlook 2002 and follow the
screen instructions to complete
the installation.
6. Click Download Connection
Wizard and read the overview to
see if you require the wizard.
Follow the screen instructions to
install the wizard on your
computer. Return to the Main
Menu when done.
7. Click Install ActiveSync 3.7,
then click Install.
8. When prompted, select Run this
program from its current
location then click OK.
9. Follow the succeeding screen
instructions. Click Finish to
complete the installation.
10. Restart Windows when prompted,
then proceed to the next section
to connect your device to your
computer and start
synchronization.
Microsoft
®
ActiveSync
®3-5
Synchronizing your device
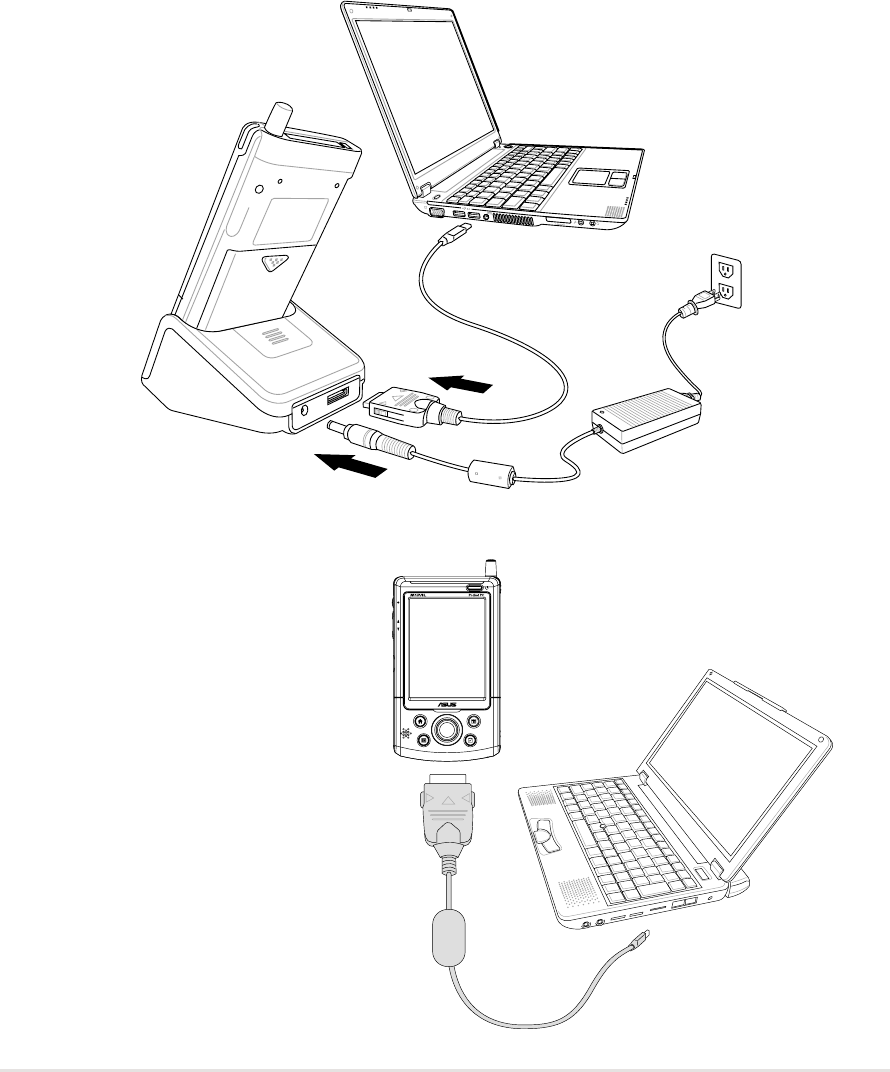
Connecting your device to a computer
To connect your device to your computer:
1. Place the device on the cradle.
2. Connect the AC adapter to the power connector on the cradle.
3. Connect the USB sync cable from the cradle to a USB port on your
computer.
To connect your device to
your computer without
the cradle:
1. Connect flat plug of the
traveling USB sync cable to
the connector at the bottom of
the device.
2. Connect the other end of the
cable to a USB port on your
computer.
3-6
Chapter 3
Setting up a partnership
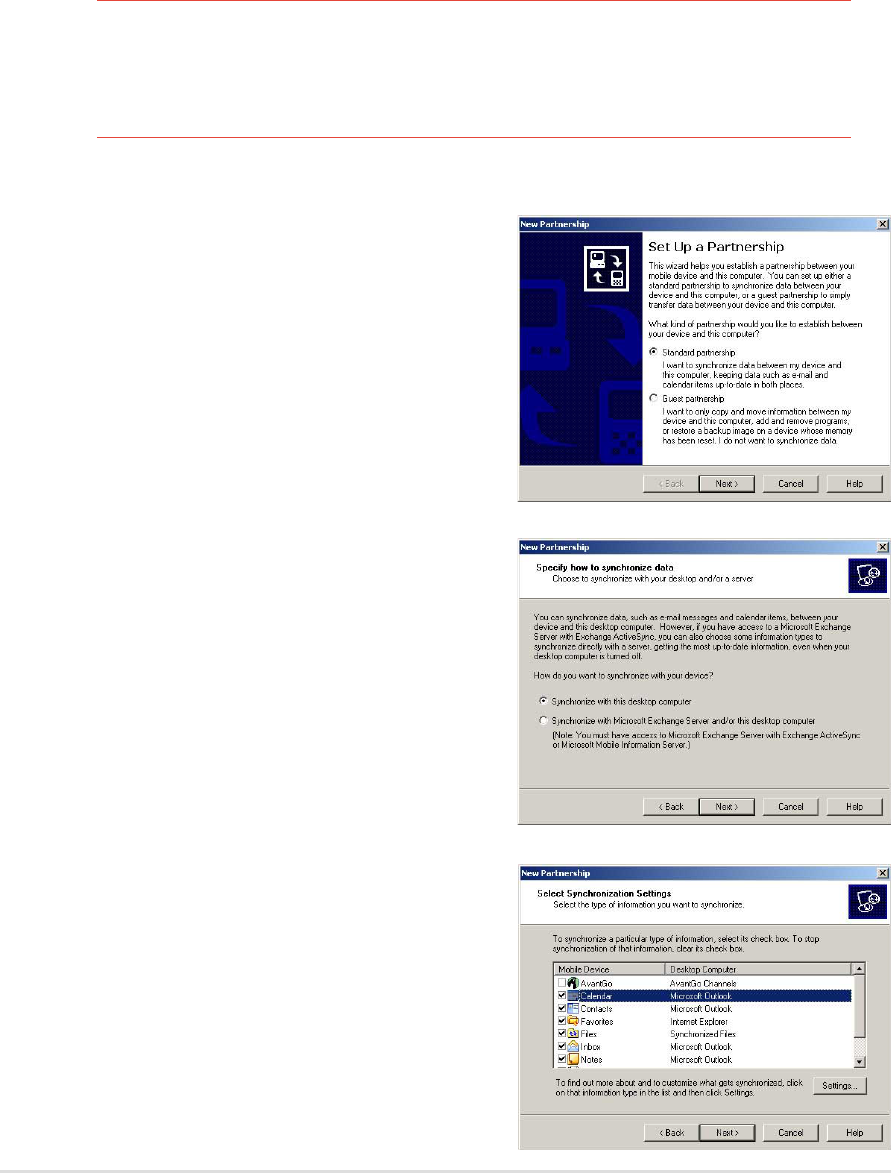
Immediately after you have completed the installation, the New
Partnership wizard will start automatically to help you establish a
partnership and customize your synchronization settings. At this point, you
can decide exactly which types of information you would like to
synchronize with your computer.
A partnership is a file that allows you to synchronize your device
with your desktop computer. This file is stored on your desktop
computer. An additional file that enables your desktop computer to
recognize your device is stored on your device.
2. On the next screen, select
Synchronize with the desktop
computer. Click Next.
3. Select the type of information that
you wish to synchronize. Click
Next.
OR
If you wish to customize a
synchronized item, highlight the
item then click Settings.
To set up a partnership:
1. When the New Partnership
screen appears, select Standard
partnership for the type of
partnership to establsih between
your device and your computer.
Click Next.
Microsoft
®
ActiveSync
®3-7
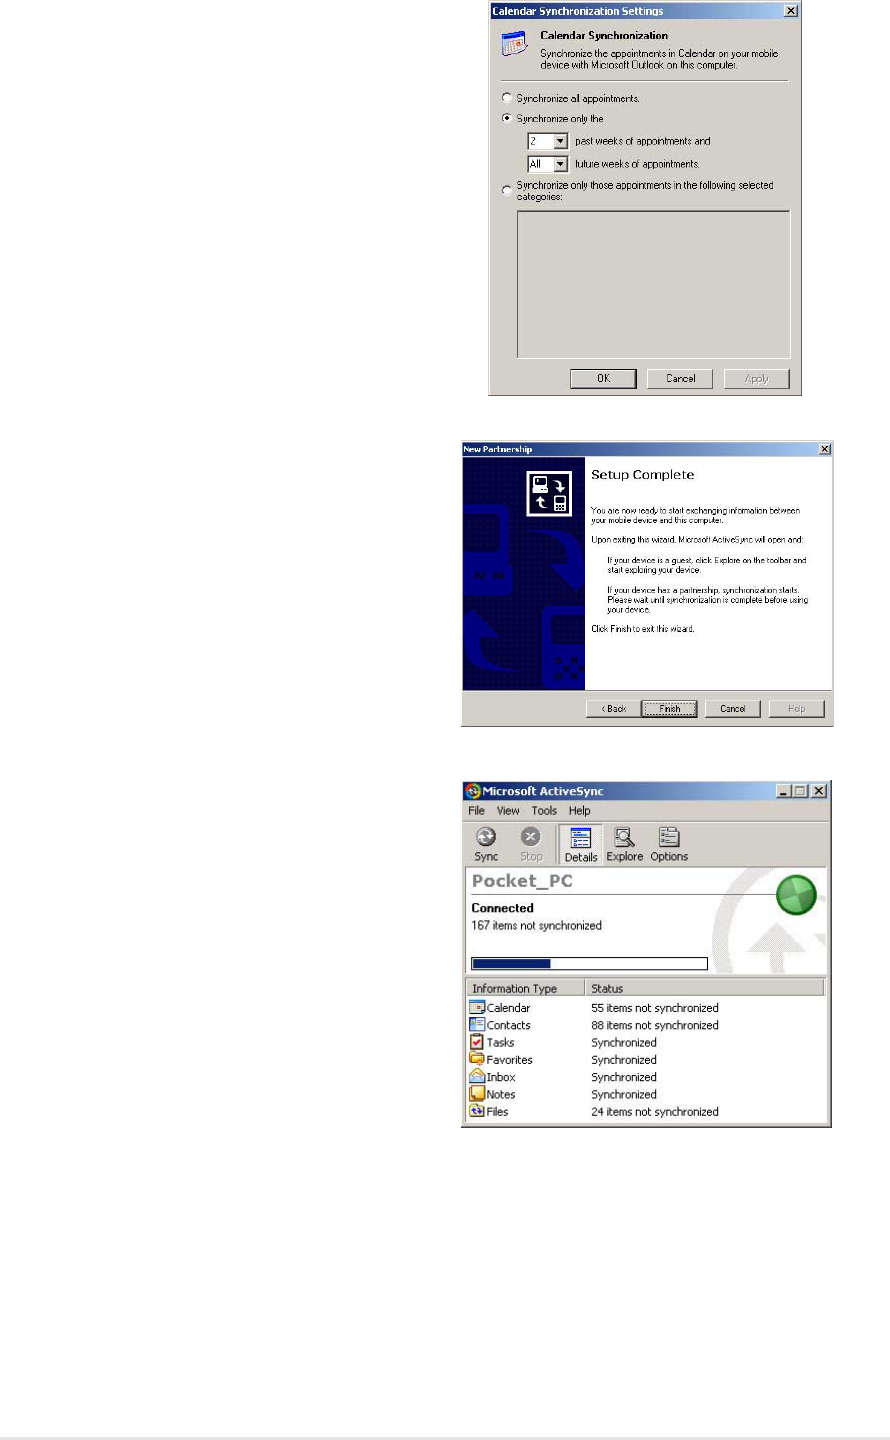
On the Calendar
Synchronization Settings
window, for example, select from
the options how you wish to
synchronize the appointments on
your device with your computer.
Click OK.
4. Click Finish to complete setting a
partnership.
Immediately after you set up a
partnership, ActiveSync
®
starts
automatically and initiates the first
synchronization between your
device and your computer.
Refer to the succeeding sections
for more details on
synchronization.
3-8
Chapter 3
Checking synchronized information
After your first synchronization, take a look at Calendar, Contacts, and
Tasks on your device. You will notice that the calendar information in
Microsoft Outlook on your computer was copied to your device, and the
information that you have on your device was copied to your computer.
NOTE Open Microsoft Outlook on your desktop computer to see the
details of copied information from your device.
Microsoft
®
ActiveSync
®3-9
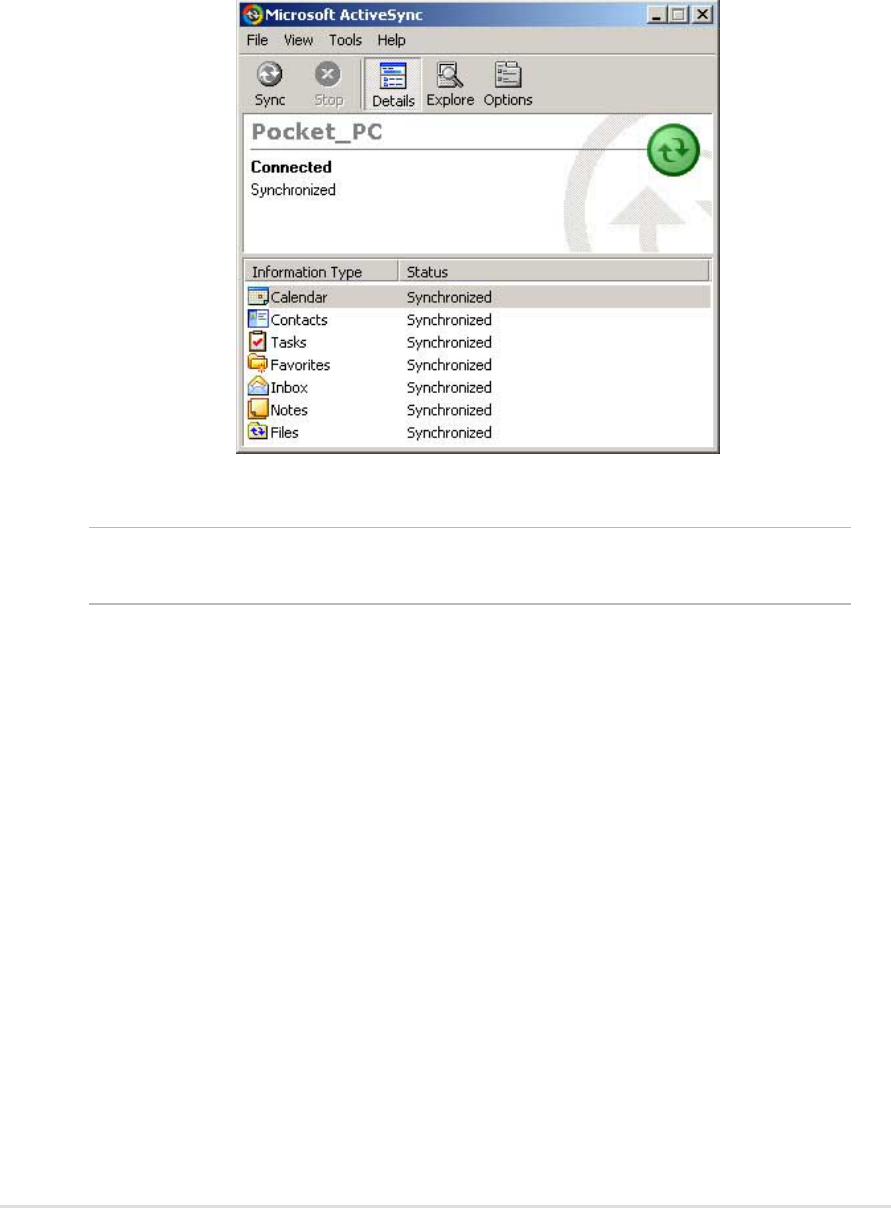
Manually initiating synchronization
Once you have set up ActiveSync and completed the first synchronization
process, you can initiate synchronization from your device at any time.
To manually initiate synchronization:
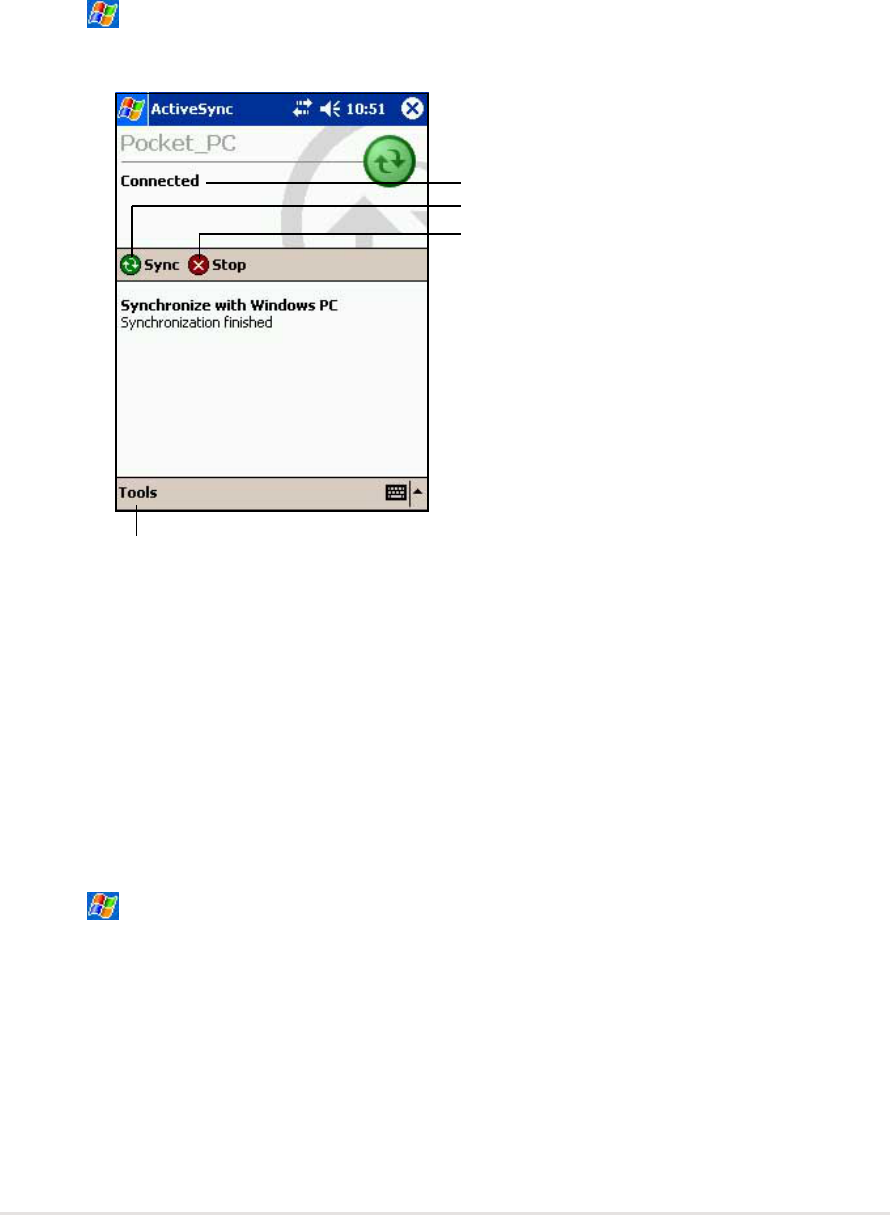
1. Tap , then tap ActiveSync to display the ActiveSync screen.
2. To start synchronization, make a connection between your device and
your computer, then tap Sync.
To end synchronization, tap Stop.
For more information on synchronization:
Tap while in the ActiveSync screen, then tap Help.
Connection status
Tap to connect and synchronize
Tap to stop synchronization
Tap to synchronize via IR or
change synchronization settings
3-10
Chapter 3
Synchronization options
The Microsoft ActiveSync program allows you to customize your
synchronization settings at any time. You can select the items to
synchronize, set the synchronization schedule, and specify the
synchronization rules.
To display the synchronization options:
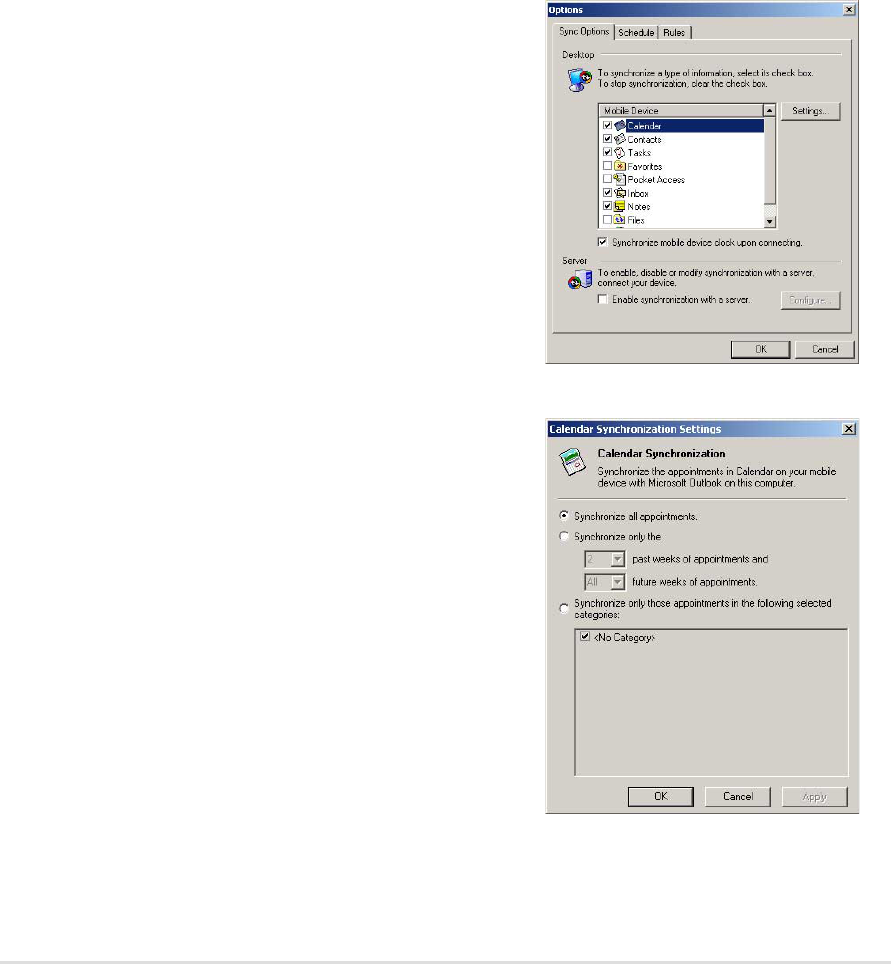
•From the ActiveSync window on your desktop computer, click on the
Options icon, or
•From the menu bar, click on Tools, then Options.
1. Check the box opposite the item
that you wish to synchronize.
2. Highlight a checked item then
click on Settings to specify
synchronization options for the
item.
For example, highlight Calendar
then click on Settings to display
the Calendar Synchronization
Settings window. Customize the
available settings, then click OK
when done.
3. Do the same for the other
checked items.
NOTE: You cannot set the
options for unchecked items.
4. Click OK when done.
To select items to synchronize:
Microsoft
®
ActiveSync
®3-11
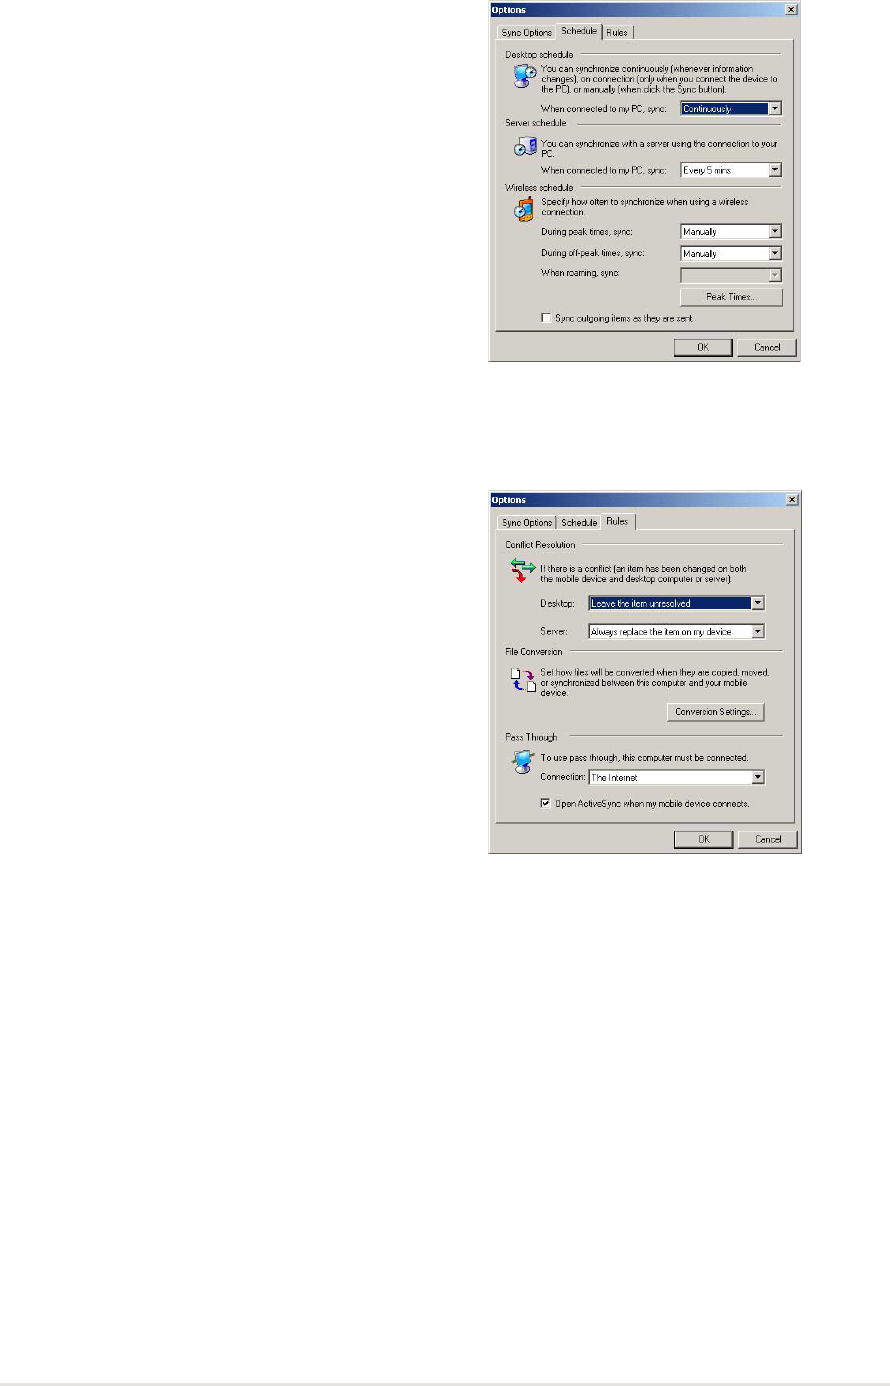
To set synchronization schedule:
1. Click on the Schedule tab.
2. Select your desired
synchronization schedule.
3. Click OK when done.
To specify synchronization rules:
1. Click on the Rules tab.
2. Select your desired settings from
the available options.
3. Click OK when done.

3-12
Chapter 3