ASUSTeK Computer EAAC87 EA-AC87 Wireless-AC1800 Gigabit Access Point/Media Bridge User Manual MSQ EAAC87
ASUSTeK Computer Inc EA-AC87 Wireless-AC1800 Gigabit Access Point/Media Bridge MSQ EAAC87
User Manual
Quick Start Guide
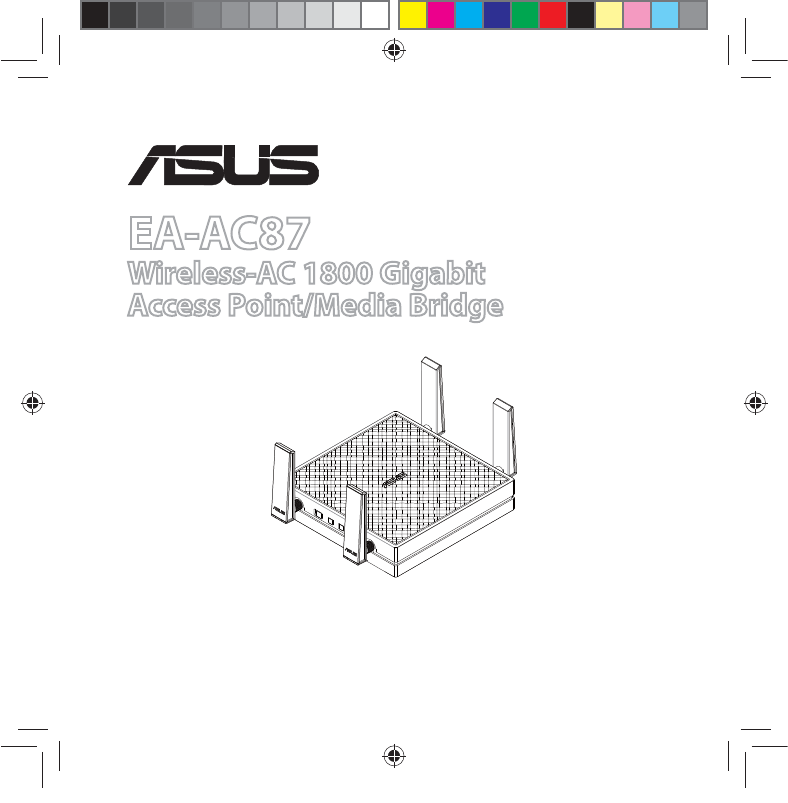
EA-AC87
Wireless-AC 1800 Gigabit
Access Point/Media Bridge
¨
n
a9417_ea-ac87u_qsg.indb 1 2014/6/19 16:44:35

English ................................................................................................................................ 3
Français .............................................................................................................................. 15
Español ............................................................................................................................... 27
NA9417 / First Edition / June 2014
n
a9417_ea-ac87u_qsg.indb 2 2014/6/19 16:44:35
English
3
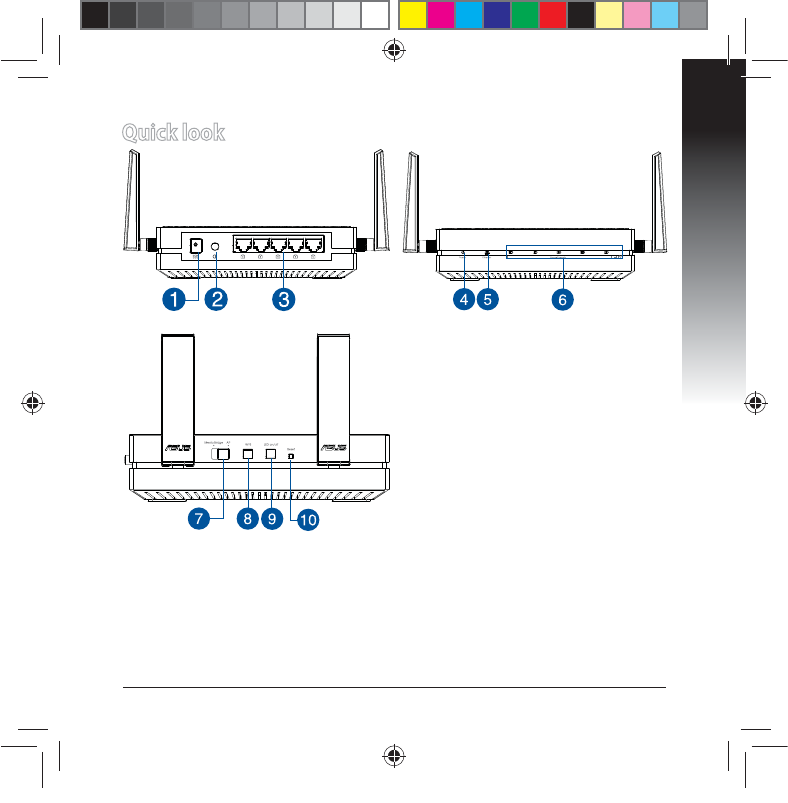
Quick look
1. DC In port
2. Power button
3. Ethernet ports
4. Power LED
5. LAN LED
6. Signal Indicator
7. Switch for Media bridge/AP (Ac-
cess Point) mode
8. WPS button
9. LED on/o button
10. Reset button
n
a9417_ea-ac87u_qsg.indb 3 2014/6/19 16:44:37
English
4
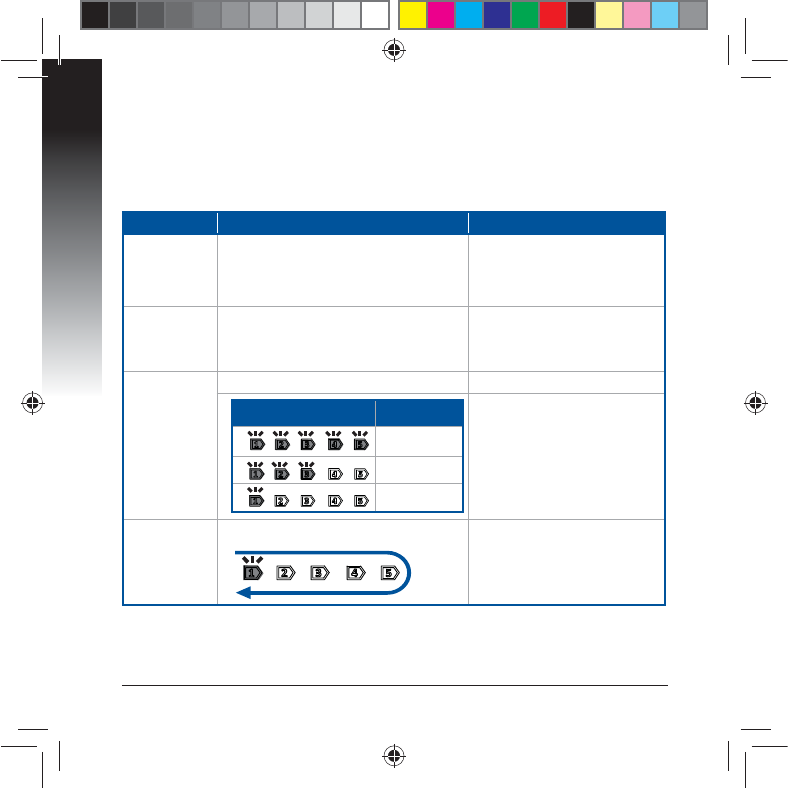
LED indicators
Move the slide switch on the side of your EA-AC87 to your preferred operation
mode (Media Bridge or Access Point). Refer to the following table to conrm the
mode status.
Media bridge mode AP mode
Power LED
Solid On: Power on
O: Power o
Blinking fast: Reset to default
Blinking slow: Rescue mode
Solid On: Power on
O: Power o
Blinking fast: Reset to default
Blinking slow: Rescue mode
LAN LED
Solid On: has physical connection to a
local area network (LAN)
Blinking frequency: according to data
transmission rate
Solid On: has physical connec-
tion to a local area network
(LAN)
Signal Indi-
cator
LED1 solid on: Wi-Fi on LED1~5 solid on: Wi-Fi on
LED action Signal
Excellent
Good
Weak
Wi-Fi site
survey / WPS
connection
Blinking sequentially back and forth:
n
a9417_ea-ac87u_qsg.indb 4 2014/6/19 16:44:37

English
5
Media bridge mode AP mode
LED Status
(Solid on)
The following table lists the LED status when boot up completes.
n
a9417_ea-ac87u_qsg.indb 5 2014/6/19 16:44:37
English
6
Operation modes
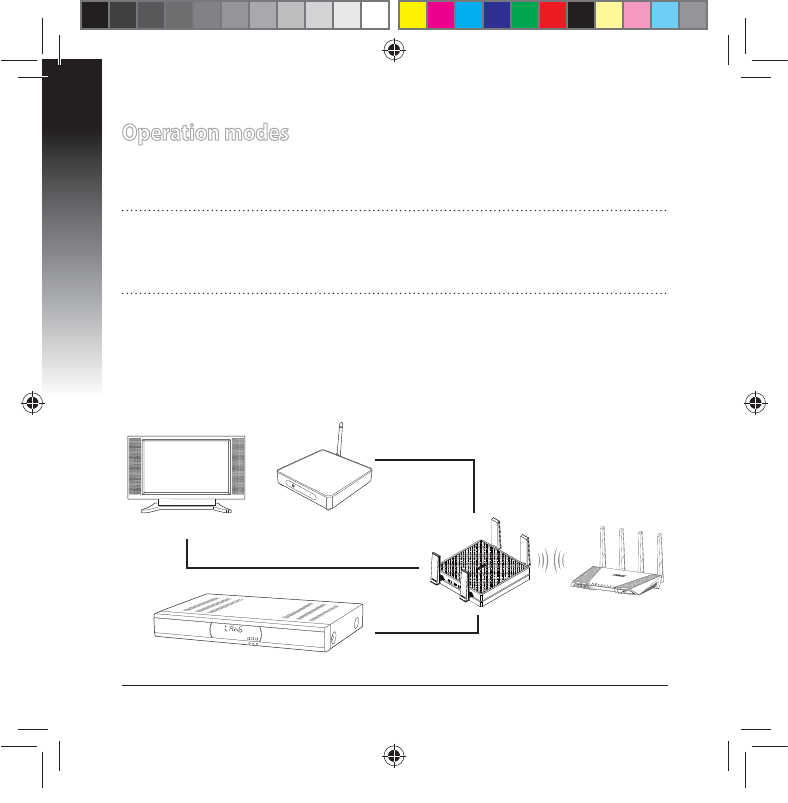
ASUS EA-AC87 provides two operation modes: Media Bridge and Access Point
(AP).
IMPORTANT:
t 'PSUIFCFTUXJSFMFTTQFSGPSNBODFQMBDF&""$BUBEJTUBODFPGNPSFUIBO
meters away from the parent Access Point (AP).
t $IFDLUIFTMJEFTXJUDIPOUIFTJEFPG&""$UPDPOöSNUIFNPEFTUBUVT
Media Bridge mode
#ZEFGBVMU&""$JTTFUUPUIFNFEJBCSJEHFNPEF*OUIJTNPEFZPVDBODPO-
nect any Ethernet-enabled device to your wireless home network via the wireless
SPVUFS5IJTNPEFJTQFSGFDUGPSIPNFUIFBUFSEFWJDFTTVDIBTTNBSU57TFUUPQ
box and HD media player.
STB (Set-top box)
POWER
HD media player
smart TV
n
a9417_ea-ac87u_qsg.indb 6 2014/6/19 16:44:38
English
7
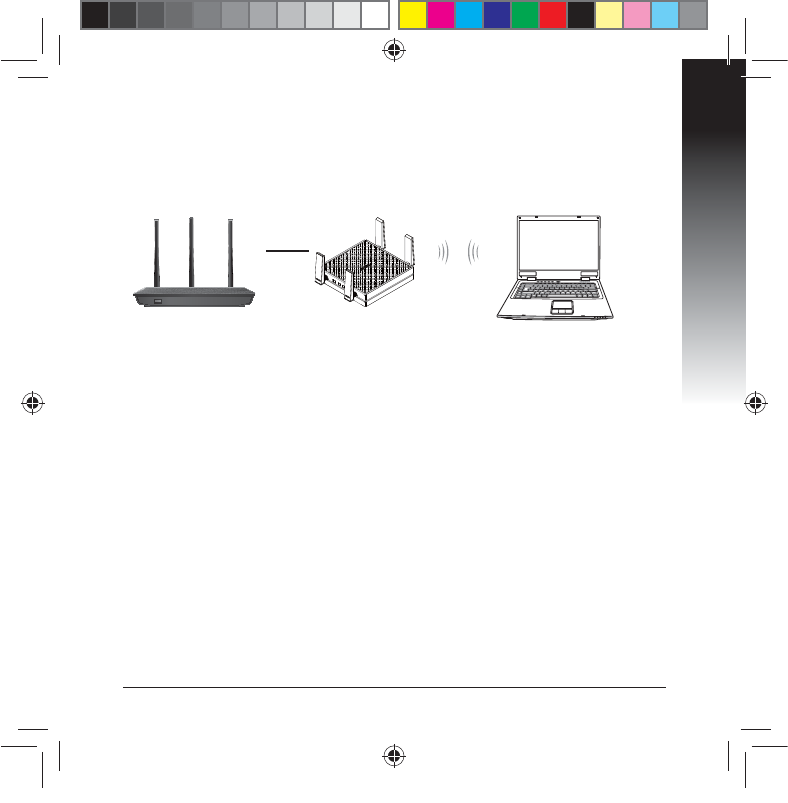
Access Point (AP) mode
You can also turn your EA-AC87 into access point (AP) mode by switching the side
TXJUDI*GZPVBMSFBEZIBWFBSPVUFSZPVDBOVQHSBEFZPVSSPVUFSUPUIFMBUFTUY
AC1800 5Ghz Wi-Fi.
n
a9417_ea-ac87u_qsg.indb 7 2014/6/19 16:44:39

English
8
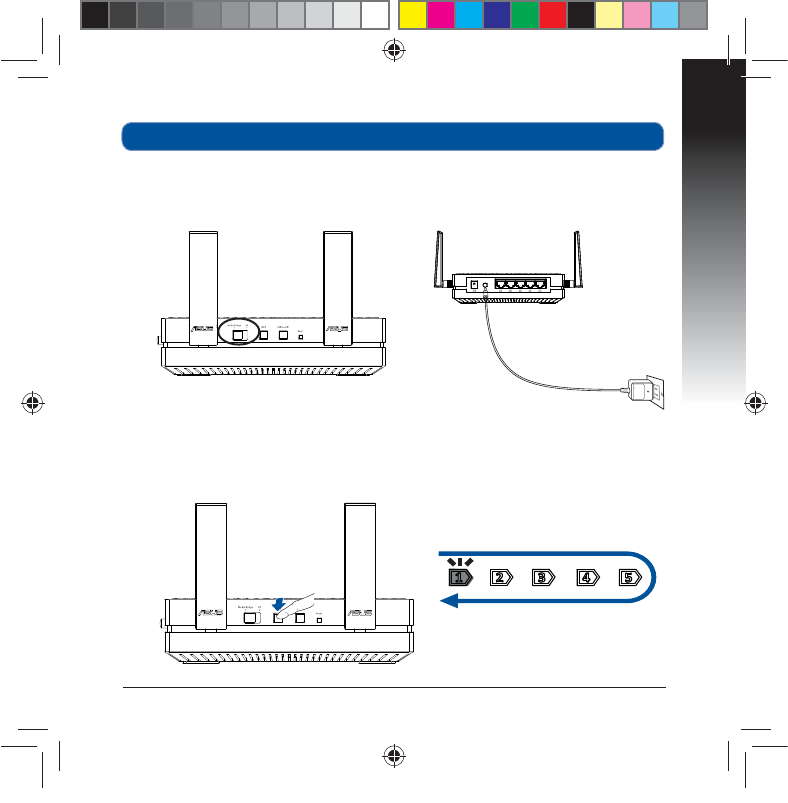
Media Bridge mode
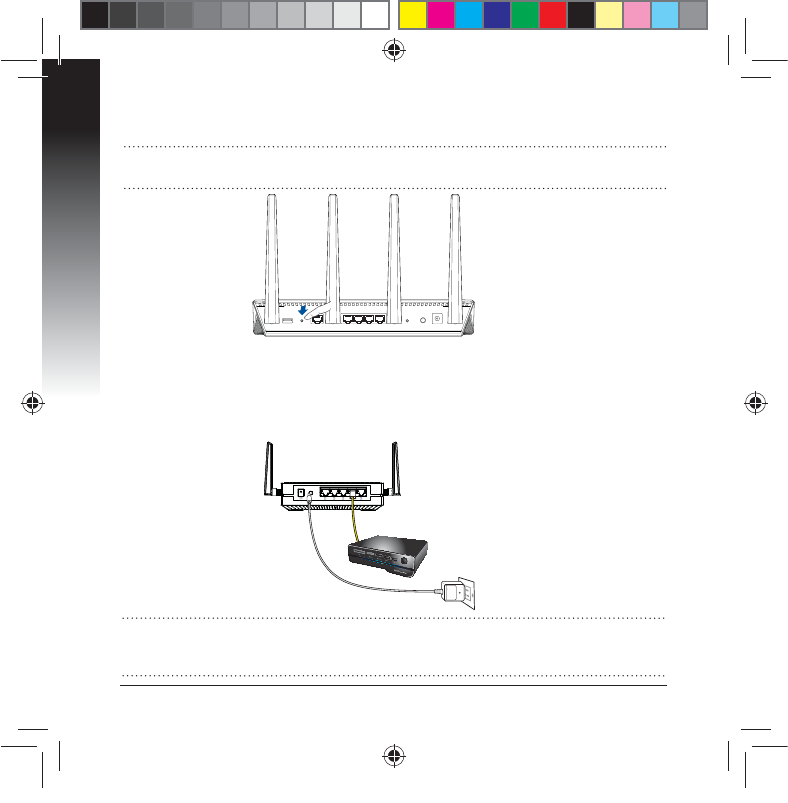
We recommend that you connect your EA-AC87 to a wireless router by pressing
the WPS (Wi-Fi Protected Setup) button.
n
a9417_ea-ac87u_qsg.indb 8 2014/6/19 16:44:39
English
9
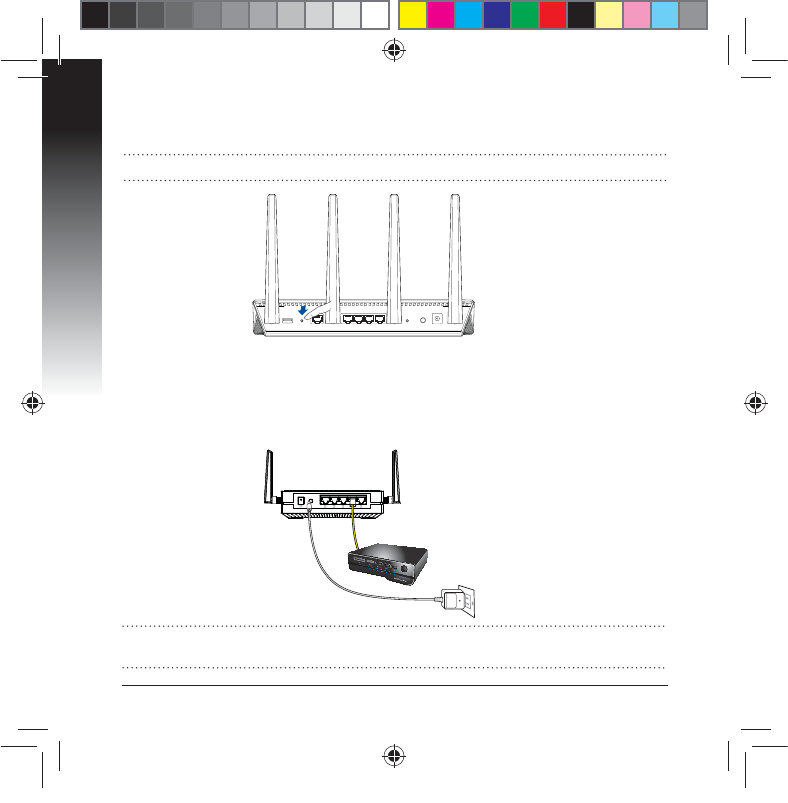
b. Press the WPS button on your EA-AC87 for more than three seconds until the
signal indicator LED1 to LED5 blink sequentially back and forth.
Setting up with WPS
a. Adjust the slide switch to media bridge mode and plug in the power adapter.
n
a9417_ea-ac87u_qsg.indb 9 2014/6/19 16:44:40
English
10
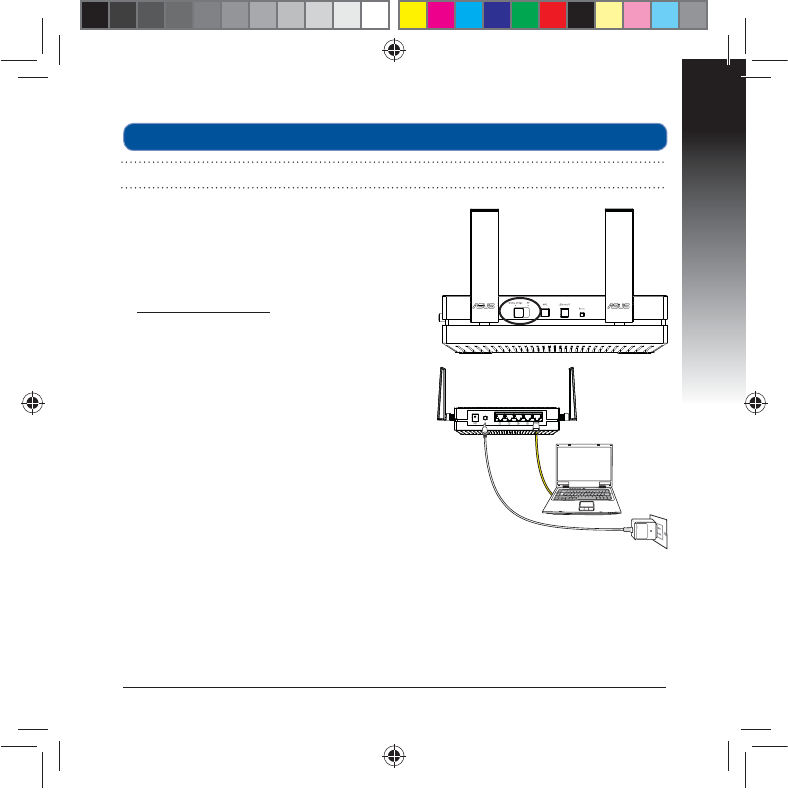
NOTE: Refer to the router’s user manual for the location of its WPS button.
c. Press the WPS button of your router.
E8BJUVOUJMBUMFBTUPOFPGUIF-&%TJHOBMJOEJDBUPSTUVSOTUPBTPMJEMJHIUXIJDI
indicates that it has successfully established connection with your wireless
network.
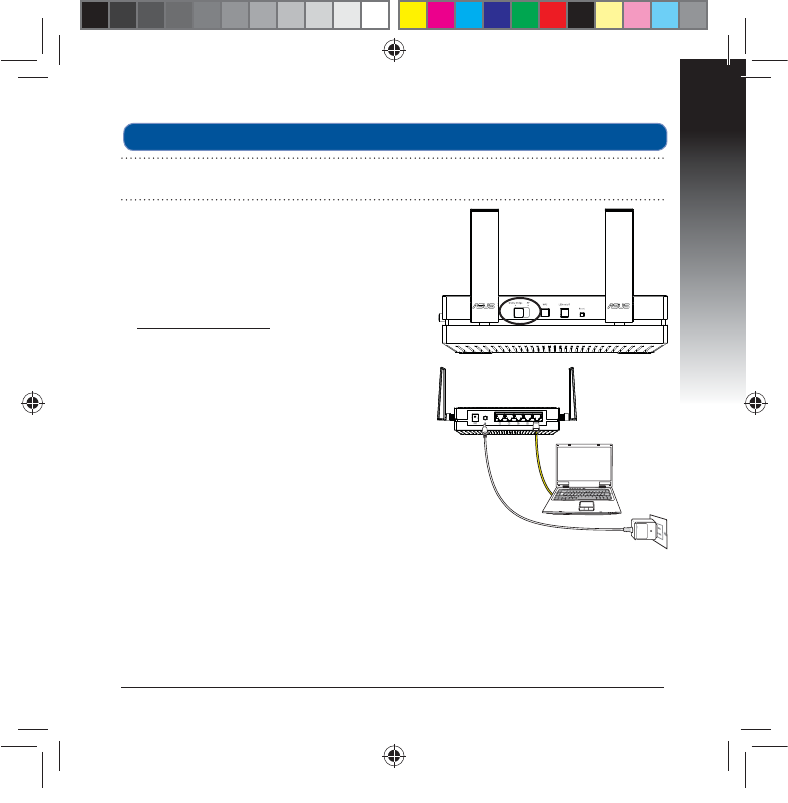
F6TJOHUIFCVOEMFEOFUXPSLDBCMFDPOOFDUZPVSTNBSU57TFUUPQCPY)%NF-
EJBQMBZFSPSPUIFS&UIFSOFUFOBCMFEEFWJDFUPZPVS&""$T-"/QPSU
NOTE: You can also connect your EA-AC87 to your wireless network via the Web
(6*'PSNPSFEFUBJMTSFGFSUPUIFTFDUJPOSetting up via web-based interface.
n
a9417_ea-ac87u_qsg.indb 10 2014/6/19 16:44:40
English
11
a. Adjust the slide switch to media bridge.
b. Plug in the power adapter and using the
CVOEMFEOFUXPSLDBCMFDPOOFDUZPVSDPN-
puter to your EA-AC87’s LAN port.
D*OZPVSXFCCSPXTFSLFZJO
http://ndasus.local in the browser’s address
bar. Key in admin as the default username
and password to log into EA-AC87’s web
graphical user interface (Web GUI).
d. Follow the onscreen instructions to com-
plete the wireless connection setup
e. Check if EA-AC87’s LED indicator turns a
TPMJEMJHIUXIJDIJOEJDBUFTUIBU&""$
has successfully connected to the wireless
network.
Setting up via web-based interface
NOTE:*GZPVIBWFBMSFBEZVTFE814UPDPOOFDUZPVSEFWJDFTLJQUIJTTFDUJPO
n
a9417_ea-ac87u_qsg.indb 11 2014/6/19 16:44:40
English
12
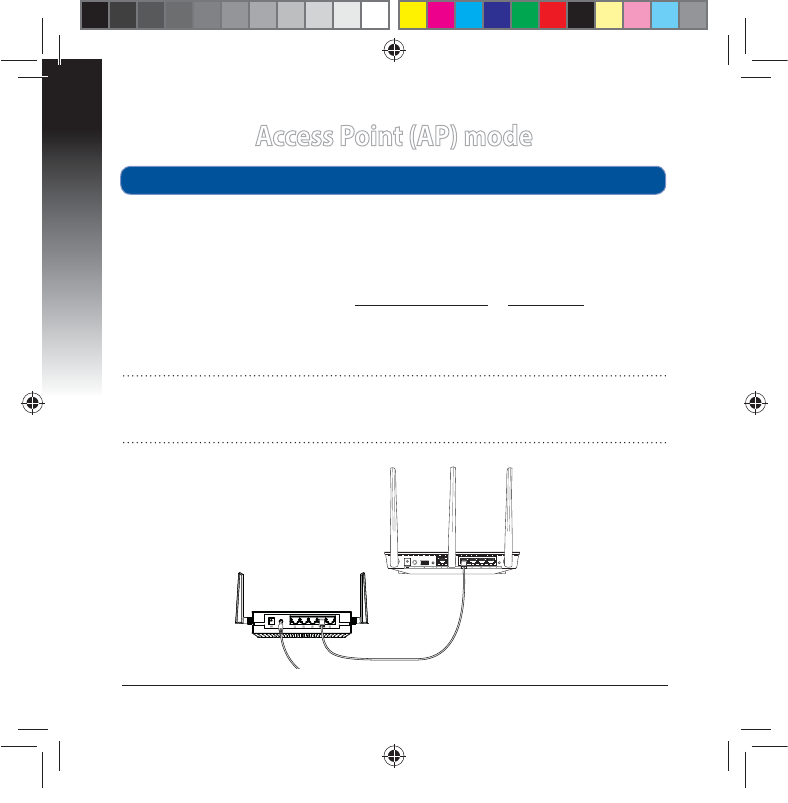
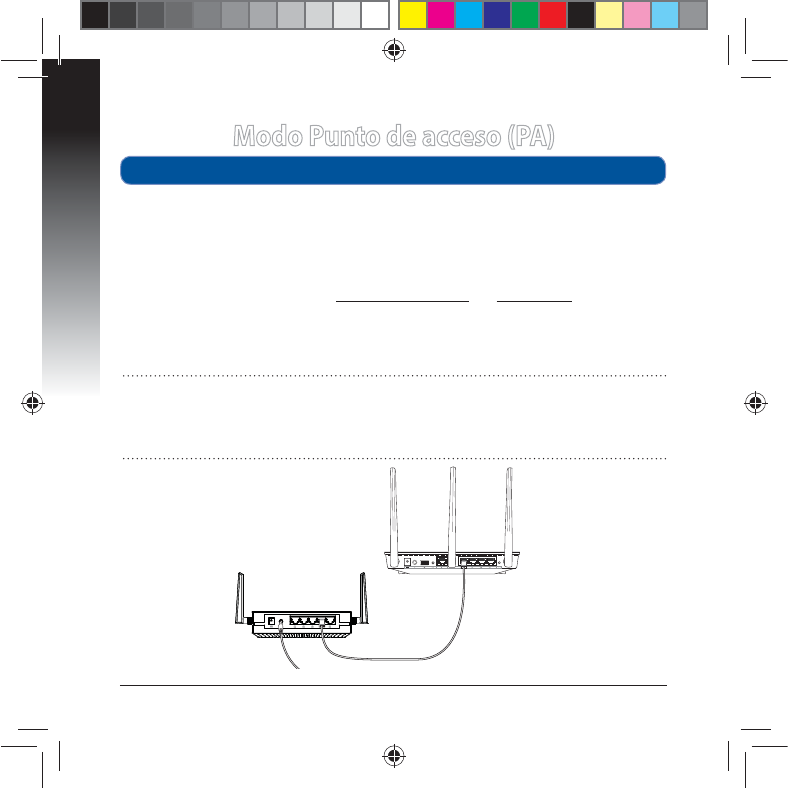
Access Point (AP) mode
a. Adjust the slide switch to AP mode.
b. Plug in the power adapter and using the bundled network cable to connect to
your router’s LAN port.
c. Connect your device to EA-AC87’s default network name (SSID) ASUS_5G.
E0OZPVSXFCCSPXTFSLFZJOUIFhttp://ndasus.local or 192.168.1.1in the
address bar. Key in the default username and password: admin.
e. Follow the Web GUI to congure various settings. You can assign a new SSID
and security key of your EA-AC87.
Setting up via web-based interface
NOTE:
t *O"1NPEFZPVDBOVTFUIF814CVUUPOUPDPOOFDUPUIFSEFWJDFT
t &OTVSFUPDPOOFDU&""$UPBSPVUFShT-"/QPSUCFGPSFTFUUJOHVQ
n
a9417_ea-ac87u_qsg.indb 12 2014/6/19 16:44:41
English
13
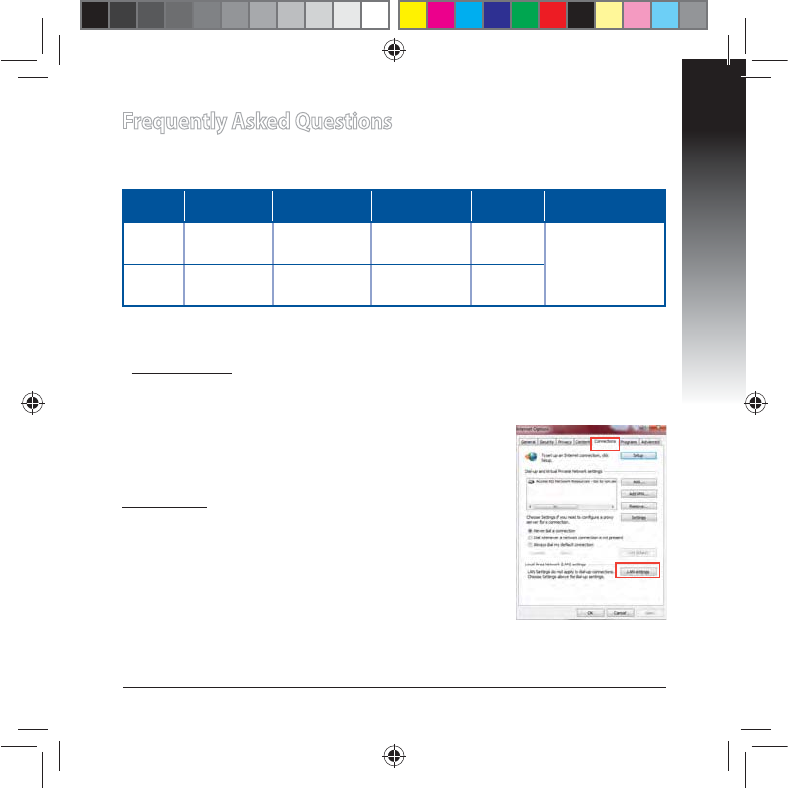
Frequently Asked Questions
Q1: What are the default IP, SSID, and login name password for
EA-AC87?
IP before
setting
IP after
settings
URL for
setup*
Default
SSID
Login username
and password
Media
bridge
mode 192.168.1.1 Assigned by
connected
router
http://
ndasus.local N/A username: admin
password: admin
Access
point
mode
Assigned by
connected
router
Assigned by
connected
router
http://
ndasus.local ASUS_5G
* Windows® XP does not support ndasus.local. If you use Windows® XP operating
TZTUFNQMFBTFEPXOMPBEUIFEFWJDFEJTDPWFSZVUJMJUZGSPN"464XFCTJUF
www.asus.com to nd the IP of EA-AC87.
Q2: I cannot access the web GUI to congure the EA-AC87 settings.
t $MPTFBMMSVOOJOHXFCCSPXTFSTBOEMBVODIBHBJO
t 'PMMPXUIFTUFQTCFMPXUPDPOöHVSFZPVSDPNQVUFS
settings based on its
operating system.
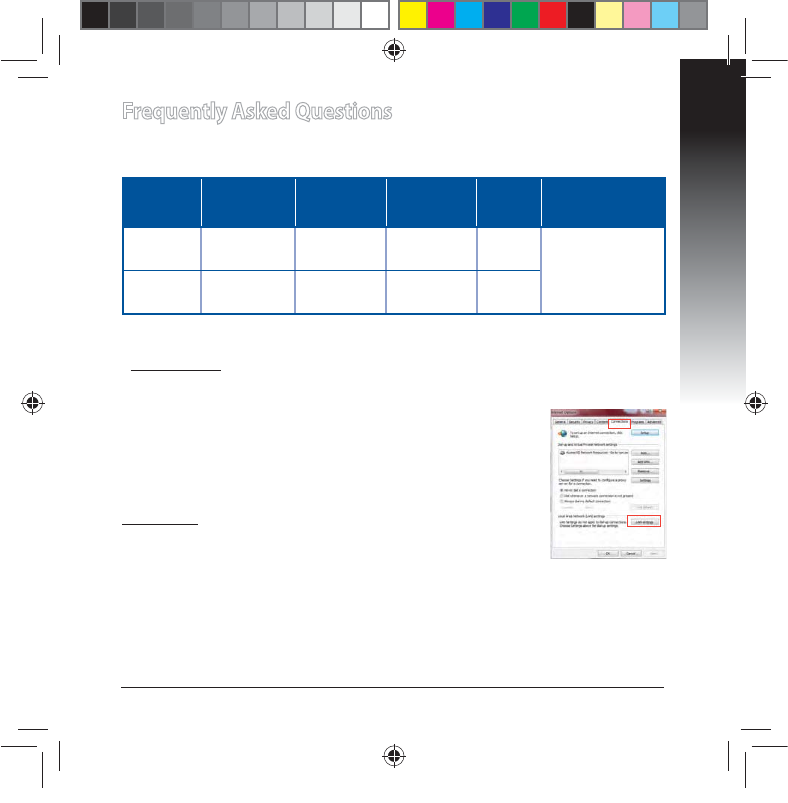
Windows® 7
A. Disable the proxy server, if enabled.
1. Click Start > Internet Explorer to launch the web
browser.
2. Click Tools > Internet options > Connections tab >
LAN settings.
'SPNUIF-PDBM"SFB/FUXPSL-"/4FUUJOHTTDSFFOVOUJDLUse a proxy server
for your LAN.
4. Click OK when done.
n
a9417_ea-ac87u_qsg.indb 13 2014/6/19 16:44:41
English
14
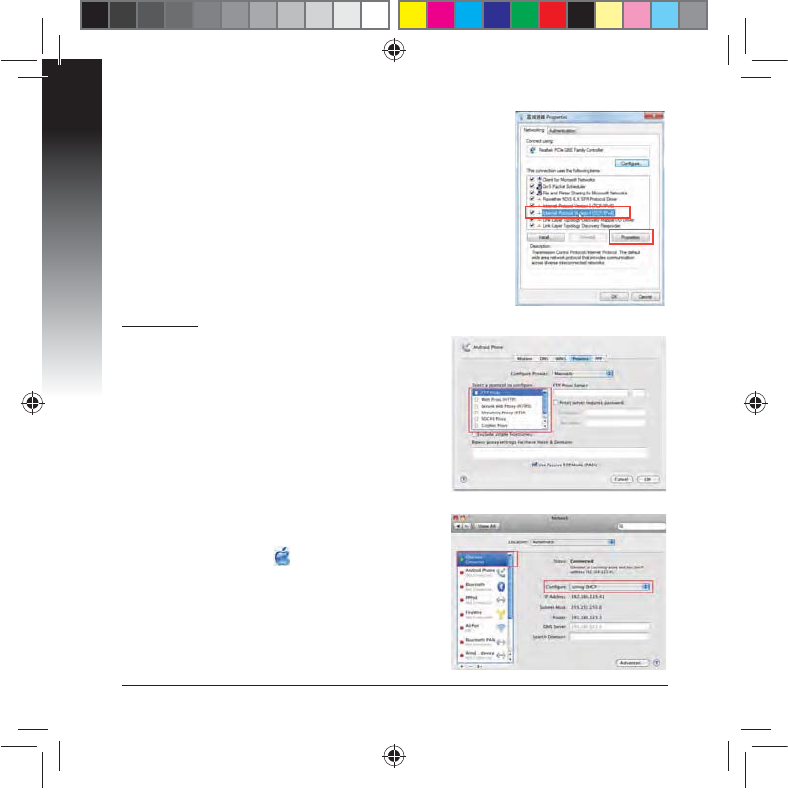
Mac 10.5.8
A. Disable the proxy server, if enabled.
'SPNUIFNFOVCBSDMJDLSafari >
Preferences... > Advanced tab.
2. Click Change Settings... in the Proxies eld.
'SPNUIFMJTUPGQSPUPDPMTEFTFMFDUFTP Proxy
and Web Proxy (HTTP).
4. Click OK when done.
B. Set the TCP/IP settings to automatically
obtain an IP address.
1. Click the Apple icon > System Preferenc-
es > Network.
2. Select Ethernet and select Using DHCP in
the Congure eld.
3. Click Apply when done.
B. Set the TCP/IP settings to automatically obtain an
IP address.
1. Click Start > Control Panel > Network and Internet
> Network and Sharing Center > Manage network
connections.
2. Select Internet Protocol Version 4 (TCP/IPv4)UIFO
click Properties.
3. Tick Obtain an IP address automatically.
4. Click OK when done.
n
a9417_ea-ac87u_qsg.indb 14 2014/6/19 16:44:41
Français
15
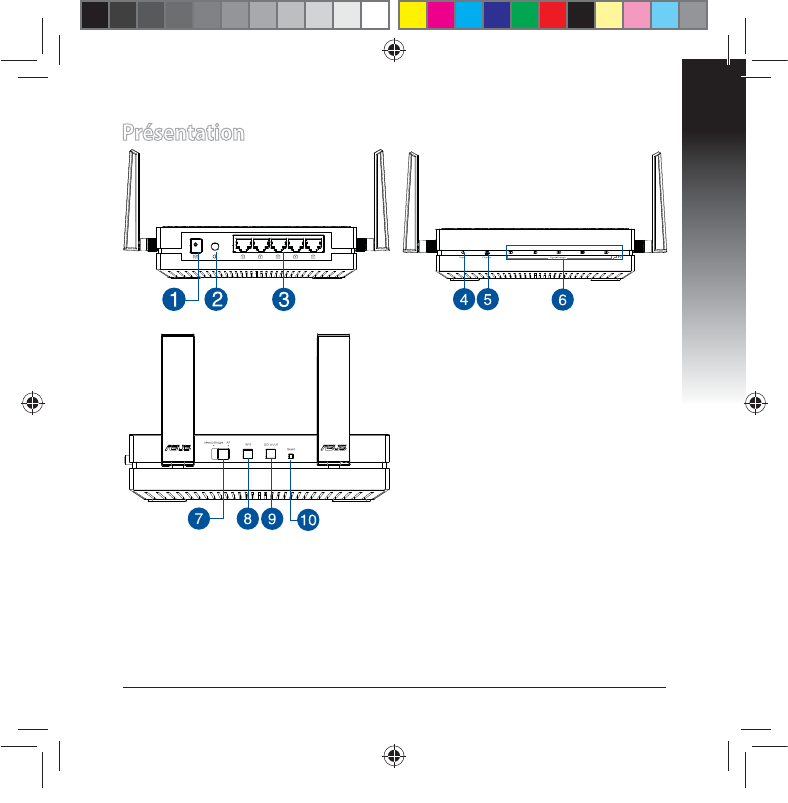
Présentation
1. Prise d’alimentation
2. Bouton Marche/Arrêt
3. Ports réseau Ethernet
4. Témoin d’alimentation
5. Témoin de réseau laire
6. Indicateurs de signal
7. Interrupteur de sélection de mode
(Point d’accès ou pont multimédia)
8. Bouton WPS
9. Bouton d’état des témoins lumineux
10. Bouton de réinitialisation
n
a9417_ea-ac87u_qsg.indb 15 2014/6/19 16:44:42
Français
16
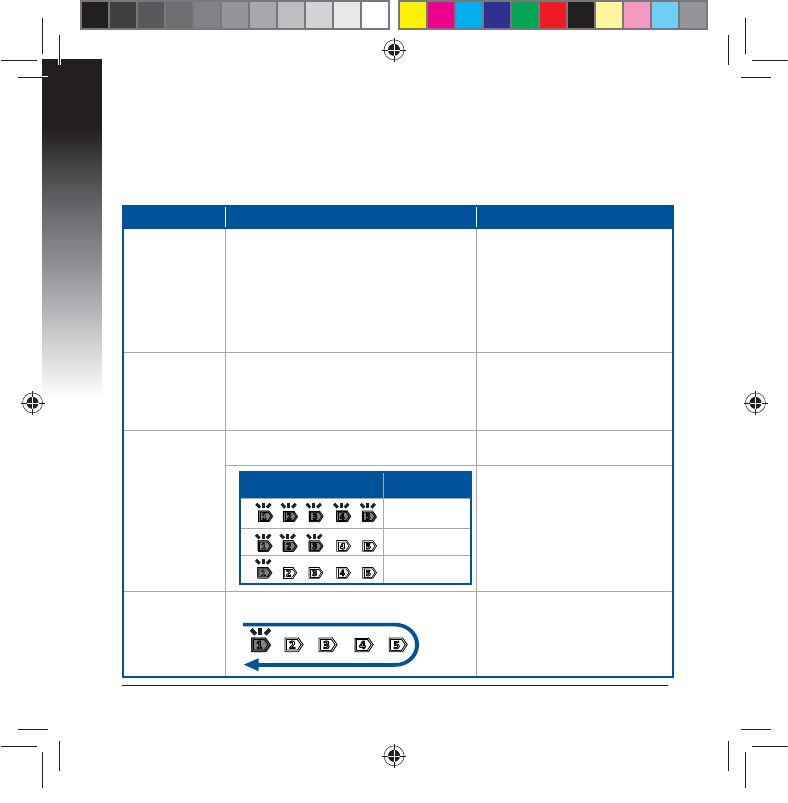
Témoins lumineux
Utilisez l’interrupteur placé sur le côté de votre EA-AC87 pour sélectionner le
mode d’opération (Pont multimédia ou point d’accès sans l). Consultez le tableau
suivant pour plus de détails sur les diérents états des témoins lumineux.
Mode pont multimédia Mode point d’accès
Témoin
d’alimentation
Allumé : appareil prêt à être utilisé
Éteint : appareil éteint
Clignotement rapide : restauration de la
conguration d’usine
Clignotement lent : appareil en mode
Secours
Allumé : appareil prêt à être
utilisé
Éteint : appareil éteint
Clignotement rapide : res-
tauration de la conguration
d’usine
Clignotement lent : appareil
en mode Secours
Témoin de
réseau laire
Allumé : connexion établie à un réseau
local
Fréquence de clignotement : varie en
fonction du débit de transmission des
données
Allumé : connexion établie à
un réseau local
Indicateurs de
signal
Témoin 1 allumé : connexion Wi-Fi
activée Témoin 1 à 5 allumé :
connexion Wi-Fi activée
État des témoins Signal
Excellent
Correct
Faible
Connexion
Wi-Fi / WPS en
cours
Clignotement séquentiel alterné :
n
a9417_ea-ac87u_qsg.indb 16 2014/6/19 16:44:42
Français
17
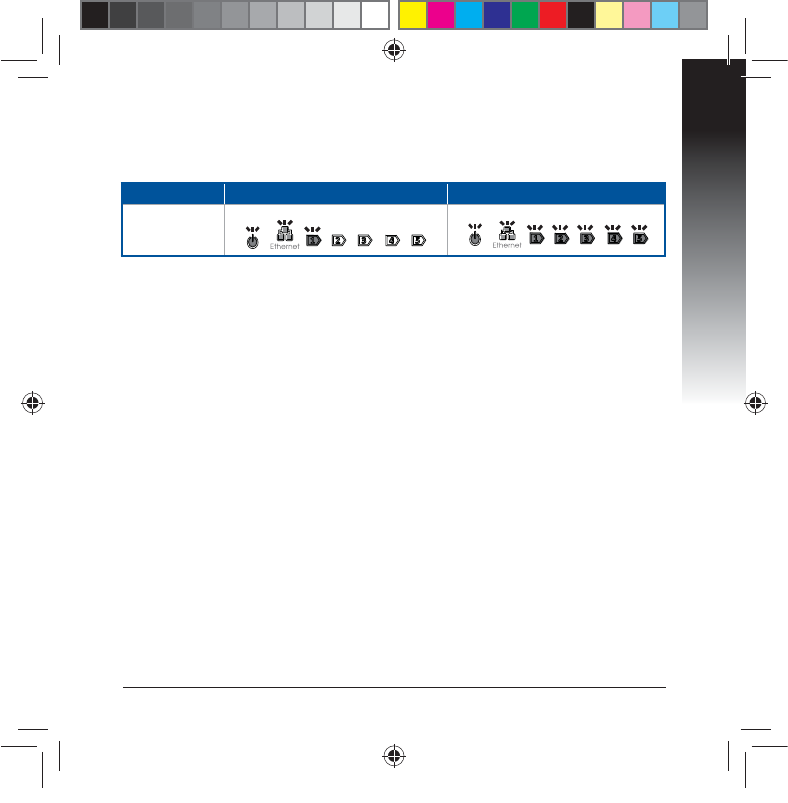
Mode pont multimédia Mode point d’accès
États des
témoins
(Allumés)
Le tableau suivant liste l’état des témoins suivant la mise en route de l’appareil.
n
a9417_ea-ac87u_qsg.indb 17 2014/6/19 16:44:43
Français
18
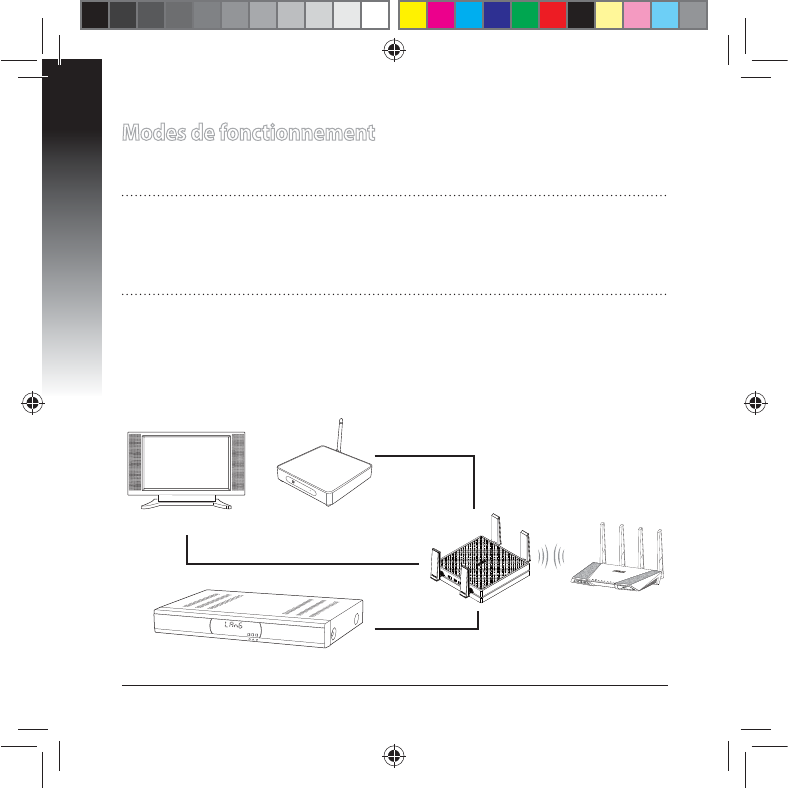
Modes de fonctionnement
Votre ASUS EA-AC87 possède deux modes de fonctionnement distincts : Pont
multimédia et Point d’accès.
IMPORTANT :
t 1PVSPQUJNJTFSMBRVBMJUÏEVTJHOBMTBOTöMQMBDF[WPUSF&""$ËVOFEJTUBODF
EFQMVTEFNÒUSFTEVQPJOUEhBDDÒTQBSFOU
t 6UJMJTF[MJOUFSSVQUFVSQMBDÏTVSMFDÙUÏEFWPUSF&""$QPVSTÏMFDUJPOOFSMF
mode d’opération.
Mode pont multimédia
$FDJFTUMFNPEFEFGPODUJPOOFNFOUQBSEÏGBVUEFWPUSF&""$4PVTDFNPEF
vous pouvez connecter n’importe quel appareil pourvu d’une prise Ethernet à
votre réseau sans l via un routeur sans l. Ce mode est idéal pour les appareils
NVMUJNÏEJBUFMTRVFMFTUÏMÏWJTFVSTDPOOFDUÏTMFTEÏDPEFVSTFUMFTMFDUFVST)%
Décodeur
POWER
Lecteur multimédia HD
Téléviseur connecté
n
a9417_ea-ac87u_qsg.indb 18 2014/6/19 16:44:43
Français
19
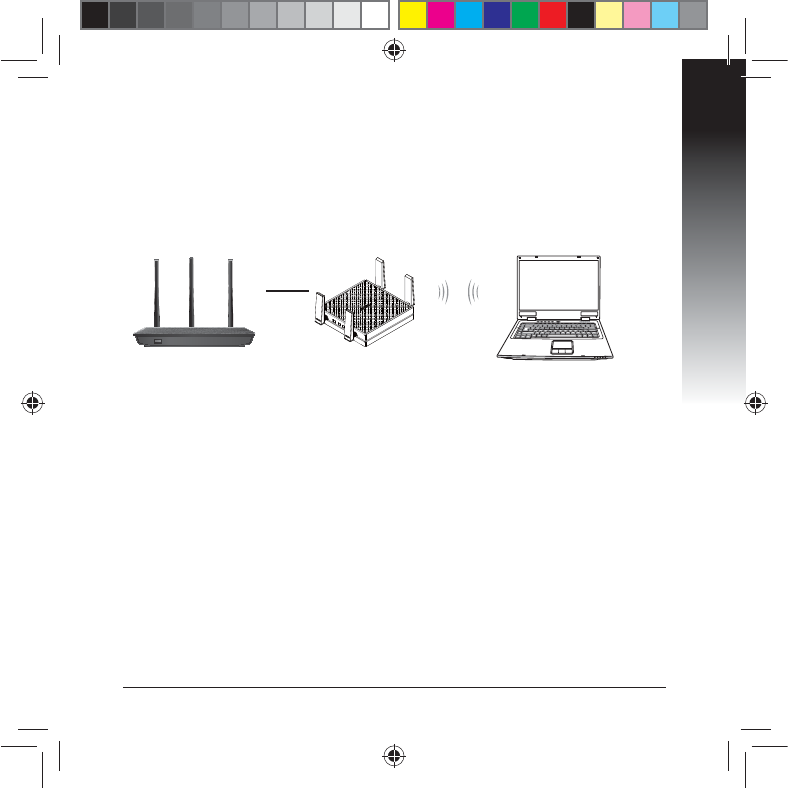
Mode point d’accès
Placez l’interrupteur de sélection de mode sur AP pour utiliser votre EA-AC87
DPNNFQPJOUEBDDÒTTBOTöM4JWPVTQPTTÏEF[EÏKËVOSPVUFVSDFNPEFWPVT
permet de proter de la technologie Wi-Fi AC1800 sur la bande des 5Ghz.
n
a9417_ea-ac87u_qsg.indb 19 2014/6/19 16:44:44

Français
20
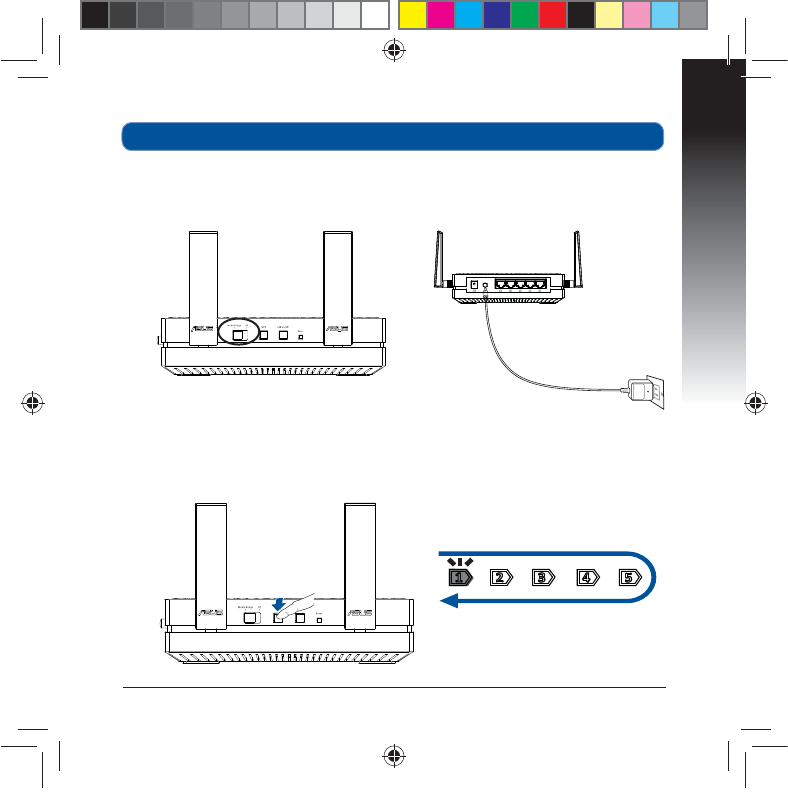
Mode pont multimédia
Il est recommandé de connecter votre EA-AC87 à un routeur sans l par le biais du
bouton WPS (Wi-Fi Protected Setup).
n
a9417_ea-ac87u_qsg.indb 20 2014/6/19 16:44:44
Français
21
2. Appuyez sur le bouton WPS de votre EA-AC87 pendant plus de 3 secondes
jusqu’à ce que les cinq indicateurs de signal clignotent de manière séquentielle.
Conguration WPS
1. Placez l’interrupteur sur la position Media bridge (Pont multimédia) et
branchez l’adaptateur secteur.
n
a9417_ea-ac87u_qsg.indb 21 2014/6/19 16:44:45
Français
22
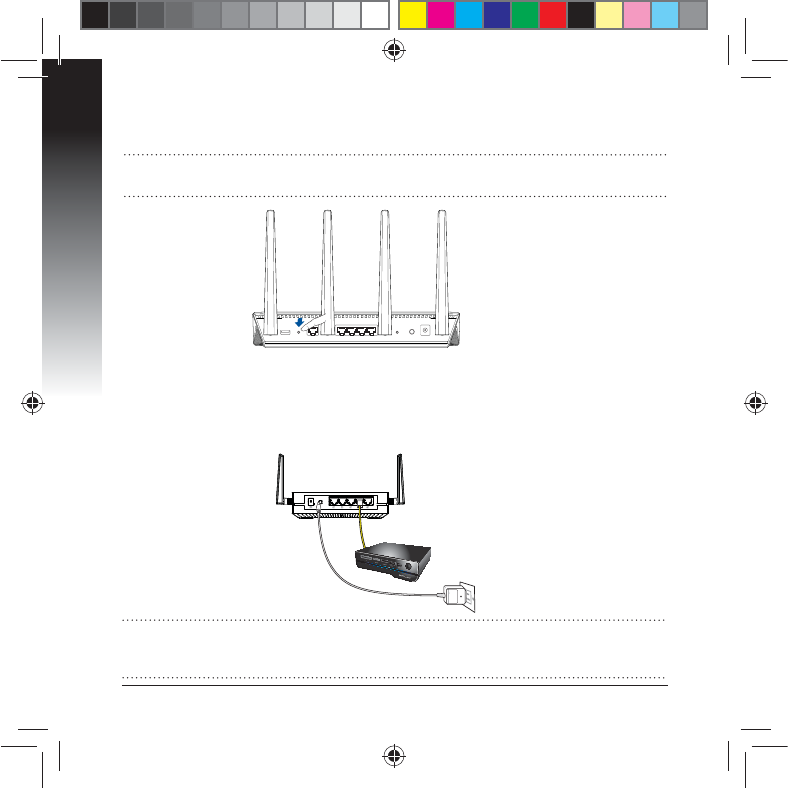
REMARQUE : Consultez le mode d’emploi de votre routeur pour localiser
l’emplacement de son bouton WPS.
3. Appuyez sur le bouton WPS de votre routeur.
1BUJFOUF[MFUFNQTRVBVNPJOTVOJOEJDBUFVSEFTJHOBMSFTUFBMMVNÏQPVS
indiquer que la connexion à votre réseau sans l a bien été établie.
5. Utilisez le câble réseau fourni pour connecter votre appareil multimédia
UÏMÏWJTFVSTDPOOFDUÏEÏDPEFVSMFDUFVSNVMUJNÏEJB)%PVUPVUBVUSFEJTQPTJUJG
externe doté d’une prise Ethernet) au port réseau de votre EA-AC87.
REMARQUE : Vous pouvez également connecter votre EA-AC87 à un réseau sans
öMQBSMFCJBJTEFTPOJOUFSGBDFVUJMJTBUFVS1PVSQMVTEFEÏUBJMTDPOTVMUF[MBTFDUJPO
Conguration via l’interface utilisateur.
n
a9417_ea-ac87u_qsg.indb 22 2014/6/19 16:44:45
Français
23
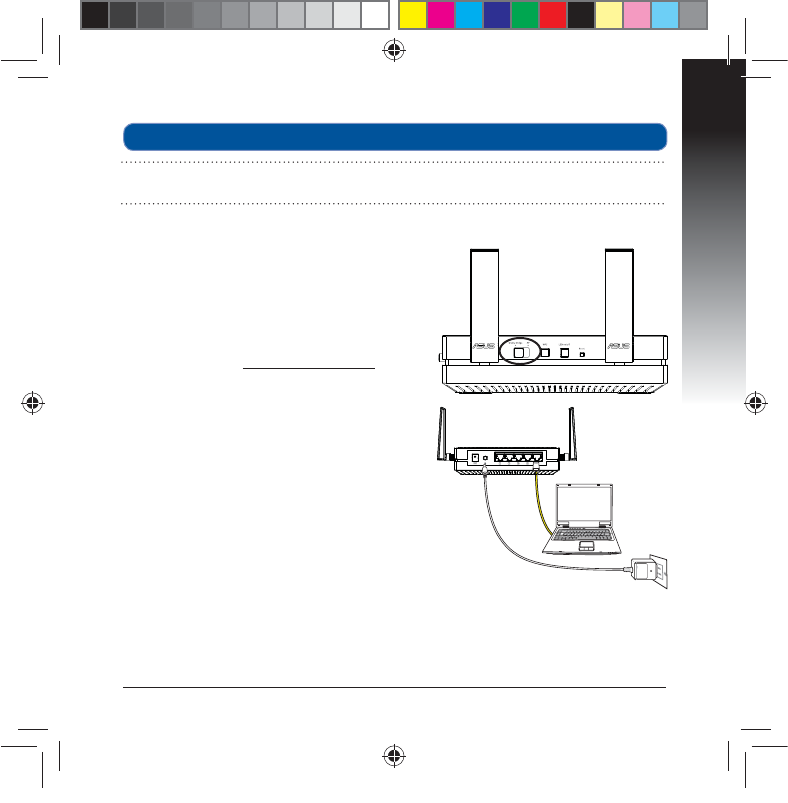
1. Placez l’interrupteur sur la position Media
bridge (Pont multimédia).
2. Branchez l’adaptateur secteur et utilisez le
câble réseau fourni pour connecter votre
ordinateur au port réseau de votre EA-AC87.
%BOTMBCBSSFEBESFTTFEFWPUSFFYQMPSBUFVS
*OUFSOFUFOUSF[http://ndasus.local. Entrez
le nom d’utilisateur et le mot de passe pour
accéder à l’interface de gestion de votre
EA-AC87.
Nom d’utilisateur par défaut : admin
Mot de passe par défaut : admin
4. Suivez les instructions apparaissant à
l’écran pour naliser la conguration de la
connexion sans l.
5. Vériez que le témoin sans l de votre
EA-AC87 est allumé pour conrmer que
la connexion au réseau sans l a bien été
établie.
Conguration via l’interface utilisateur
REMARQUE : Ignorez cette section si vous avez déjà utilisé le bouton WPS pour
établir une connexion à votre réseau sans l.
n
a9417_ea-ac87u_qsg.indb 23 2014/6/19 16:44:45
Français
24
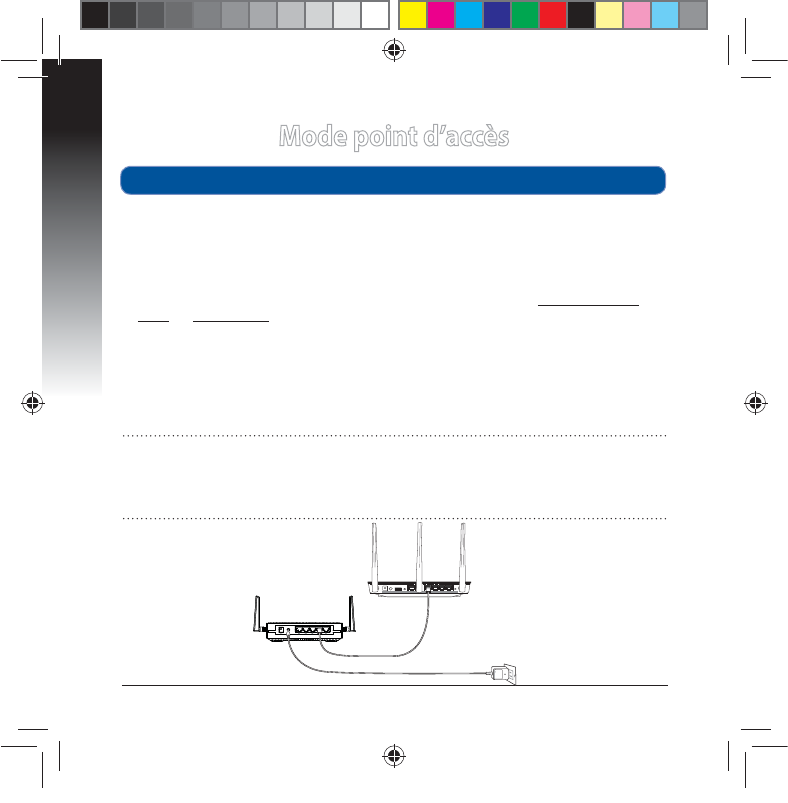
Mode point d’accès
1. Placez l’interrupteur sur la position AP (Point d’accès).
2. Branchez l’adaptateur secteur et utilisez le câble réseau fourni pour connecter
votre routeur au port réseau de votre EA-AC87.
3. Connectez votre appareil au réseau sans l par défaut ASUS_5G.
%BOTMBCBSSFEBESFTTFEFWPUSFFYQMPSBUFVS*OUFSOFUFOUSF[http://ndasus.
local ou 192.168.1.1. Entrez le nom d’utilisateur et le mot de passe pour accéder
à l’interface de gestion de votre EA-AC87.
Nom d’utilisateur par défaut : admin
Mot de passe par défaut : admin
4. Suivez les instructions apparaissant à l’écran pour naliser la conguration de la
connexion sans l.
Conguration via l’interface utilisateur
REMARQUE :
t 6UJMJTF[MFCPVUPO814QPVSDPOOFDUFSEhBVUSFTEJTQPTJUJGTFONPEFQPJOUEhBDDÒT
t /hPVCMJF[QBTEFDPOOFDUFSWPUSF&""$BVQPSUSÏTFBVEhVOSPVUFVSBWBOU
EhVUJMJTFSDFNPEF
n
a9417_ea-ac87u_qsg.indb 24 2014/6/19 16:44:46
Français
25
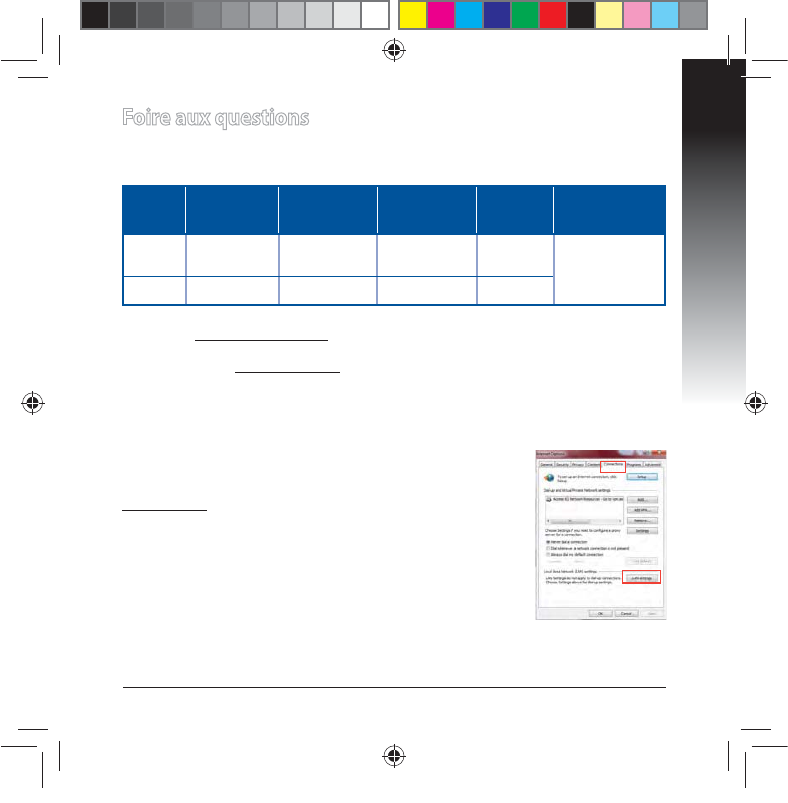
Foire aux questions
Q1 : Où puis-je trouver le SSID, l’adresse IP et les identiants de
connexion par défaut de mon EA-AC87 ?
Mode Adresse IP
par défaut
Adresse IP
suite à une
connexion
URL de
connexion*
SSID par
défaut
Nom d’utilisa-
teur et mot de
passe
Pont
multi-
média 192.168.1.1 Assignée par
le routeur http://
ndasus.local /% Nom d’utilisa-
teur : admin
Mot de passe :
admin
Point
d’accès Assignée par
le routeur Assignée par
le routeur http://
ndasus.local ASUS_5G
* L’adresse http://ndasus.local n’est pas utilisable sous Windows® XP. Sous
8JOEPXT¥91WFVJMMF[UÏMÏDIBSHFSMVUJMJUBJSF%FWJDF%JTDPWFSZËQBSUJSEVTJUF
ociel d’ASUS (www.asus.com) pour obtenir l’adresse IP de votre EA-AC87.
Q2: Je ne parviens pas à accéder au Gestionnaire de conguration
Web pour régler les paramètres de mon EA-AC87
t 3FEÏNBSSF[WPUSFFYQMPSBUFVS*OUFSOFU
t 4VJWF[MFTÏUBQFTTVJWBOUFTQPVSDPOöHVSFSWPUSFPSEJOB-
teur en fonction du système d’exploitation utilisé.
Windows® 7
A. Désactivez le serveur proxy si celui-ci est activé.
1. Cliquez sur Démarrer > Internet Explorer pour lancer le
navigateur.
2. Cliquez sur Outils > Options Internet > onglet
Connexions > Paramètres réseau.
®QBSUJSEFMÏDSBO1BSBNÒUSFTEVSÏTFBVMPDBMEÏDPDIF[MPQUJPOUtiliser un
serveur proxy pour votre réseau local.
4. Cliquez sur OK une fois terminé.
n
a9417_ea-ac87u_qsg.indb 25 2014/6/19 16:44:46
Français
26
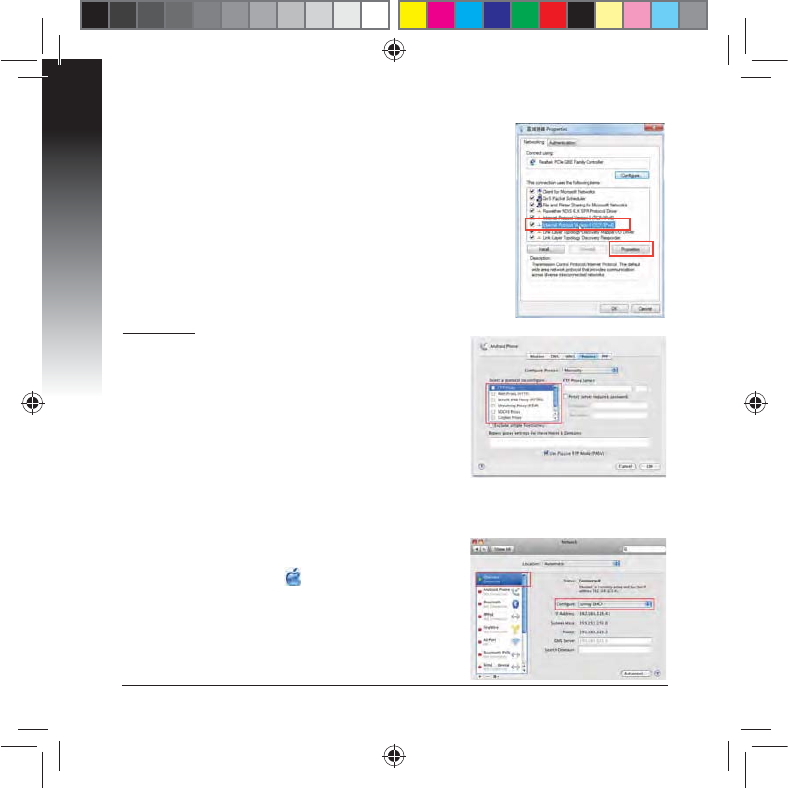
Mac 10.5.8
A. Désactivez le serveur proxy si celui-ci est
activé.
%BOTMBCBSSFEFTNFOVTDMJRVF[TVSSafari >
Préférences... > onglet Avancées.
2. Cliquez sur Modier les réglages... dans le champ
Proxies.
%BOTMBMJTUFEFTQSPUPDPMFTEÏDPDIF[MFTPQUJPOT
Proxy FTP et Proxy web sécurisé (HTTPS).
4. Cliquez sur OK une fois terminé.
B. Congurez les paramètres TCP/IP pour l’obtention
automatique d’une adresse IP.
1. Cliquez sur Démarrer > Panneau de conguration
> Réseau et Internet > Centre réseau et partage >
Gérer les connexions réseau.
2. Sélectionnez Protocole Internet version 4 (TCP/
IPv4)QVJTDMJRVF[TVSPropriétés.
3. Cochez l’option Obtenir une adresse IP
automatiquement.
4. Cliquez sur OK une fois terminé.
B. Congurez les paramètres TCP/IP pour
l’obtention automatique d’une adresse IP.
1. Cliquez sur la Pomme > Préférences Sys-
tème > Réseau.
2. Sélectionnez Ethernet puis Via DHCP dans le
champ Congurer.
3. Cliquez sur Appliquer une fois terminé.
n
a9417_ea-ac87u_qsg.indb 26 2014/6/19 16:44:46
Español
27
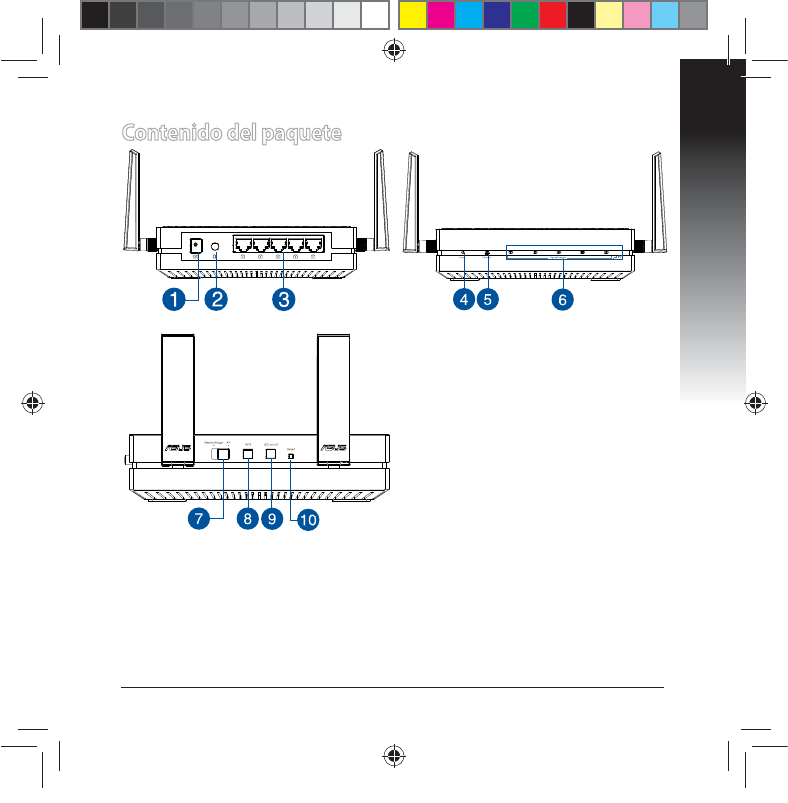
Contenido del paquete
1. Puerto de entrada de CC
2. Botón de alimentación
3. Puertos Ethernet
4. LED de alimentación
5. LED LAN
6. Indicador de señal
7. Conmutador para el modo Puente
multimedia /PA (Punto de acceso)
8. Botón WPS
9. Botón de encendido/apagado LED
10. Botón Restablecer
n
a9417_ea-ac87u_qsg.indb 27 2014/6/19 16:44:47
Español
28
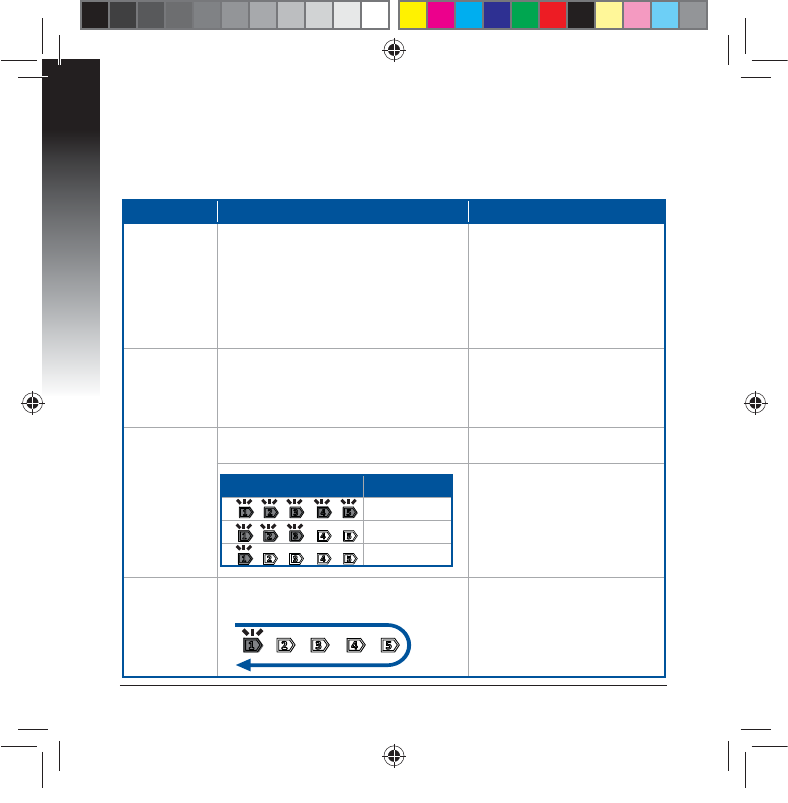
Indicadores LED
Coloque el conmutador situado en el lateral de su EA-AC87 en el modo de funcio-
namiento que preera (Puente multimedia o Punto de acceso). Consulte la tabla
siguiente para conrmar el estado del modo.
Modo Puente multimedia Modo PA
LED de ali-
mentación
Permanentemente encendido: aliment-
ación conectada
Apagado: alimentación desconectada
Parpadeo rápido: restablecer valores
predeterminados
Parpadeo lento: modo de rescate.
Permanentemente encendido:
alimentación conectada
Apagado: alimentación desco-
nectada
Parpadeo rápido: restablecer
valores predeterminados
Parpadeo lento: modo de
rescate.
LED LAN
Permanentemente encendido: hay
conexión física con una red de área
local (LAN).
Frecuencia de parpadeo: conforme a la
tasa de transmisión de datos.
Permanentemente encendido:
hay conexión física con una
red de área local (LAN).
Indicador de
señal
LED1 permanentemente encendido:
Wi-Fi activado LED1~5 permanentemente
encendido: Wi-Fi activado
Acción de LED Señal
Excelente
Buena
Débil
Análisis del
sitio Wi-Fi
/ Conexión
WPS
Parpadeo intermitente hacia atrás y
hacia adelante:
n
a9417_ea-ac87u_qsg.indb 28 2014/6/19 16:44:47
Español
29
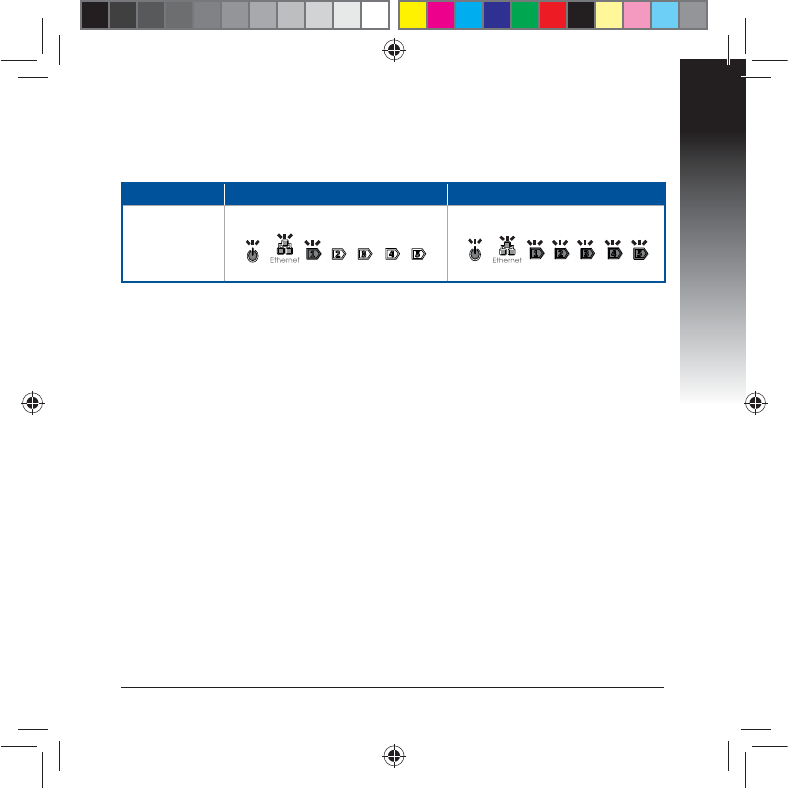
Modo Puente multimedia Modo PA
Estado del LED
(Perman-
entemente
encendido)
En la siguiente tabla se muestra el estado del LED cuando se completa el ar-
ranque.
n
a9417_ea-ac87u_qsg.indb 29 2014/6/19 16:44:47
Español
30
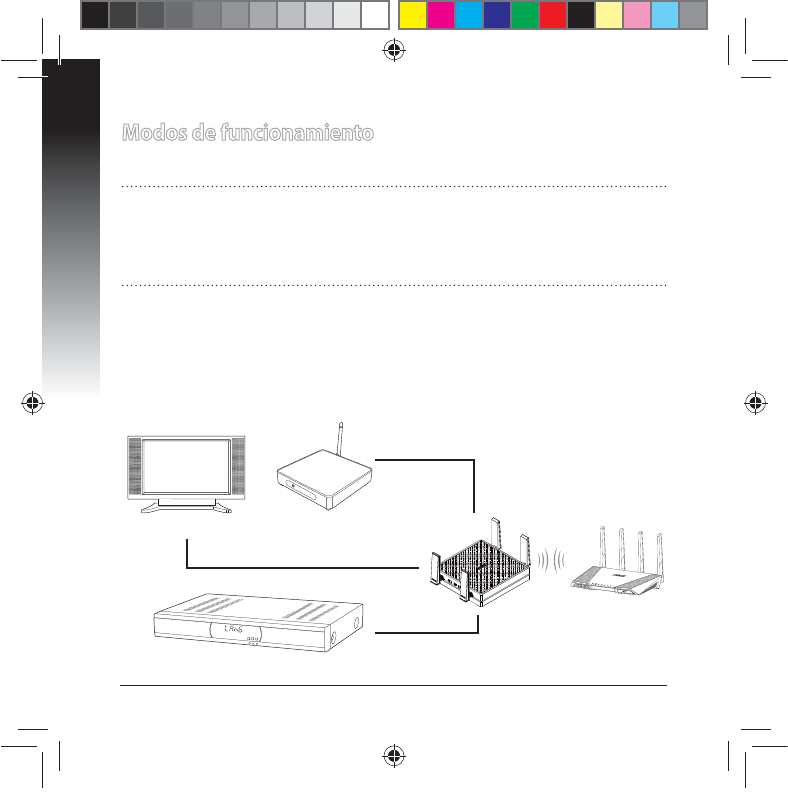
Modos de funcionamiento
ASUS EA-AC87 ofrece dos modos de funcionamiento: Puente multimedia y
Punto de acceso (PA).
IMPORTANTE:
t 1BSBPCUFOFSFMNFKPSSFOEJNJFOUPJOBMÈNCSJDPDPMPRVFFMEJTQPTJUJWP&""$
BVOBEJTUBODJBTVQFSJPSBNEFMQVOUPEFBDDFTP1"QSJODJQBM
t $PNQSVFCFFMDPONVUBEPSTJUVBEPFOFMMBUFSBMEFTV&""$QBSBDPOöSNBS
el estado del modo.
Modo Puente multimedia
%FGPSNBQSFEFUFSNJOBEBTV&""$TFFTUBCMFDFFOFMNPEP1VFOUFNVMUJ-
NFEJB&OFTUFNPEPQVFEFDPOFDUBSDVBMRVJFSEJTQPTJUJWPDPOGVODJPOBMJEBE
Ethernet a su red doméstica inalámbrica a través del enrutador inalámbrico. Este
NPEPFTQFSGFDUPQBSBEJTQPTJUJWPTEFDJOFFODBTBDPNPQPSFKFNQMPUFMFWJTPSFT
JOUFMJHFOUFTEFTDPEJöDBEPSFTZSFQSPEVDUPSFTNVMUJNFEJB
Descodicador
POWER
Reproductor
multimedia HD
Televisor inteligente
n
a9417_ea-ac87u_qsg.indb 30 2014/6/19 16:44:48
Español
31
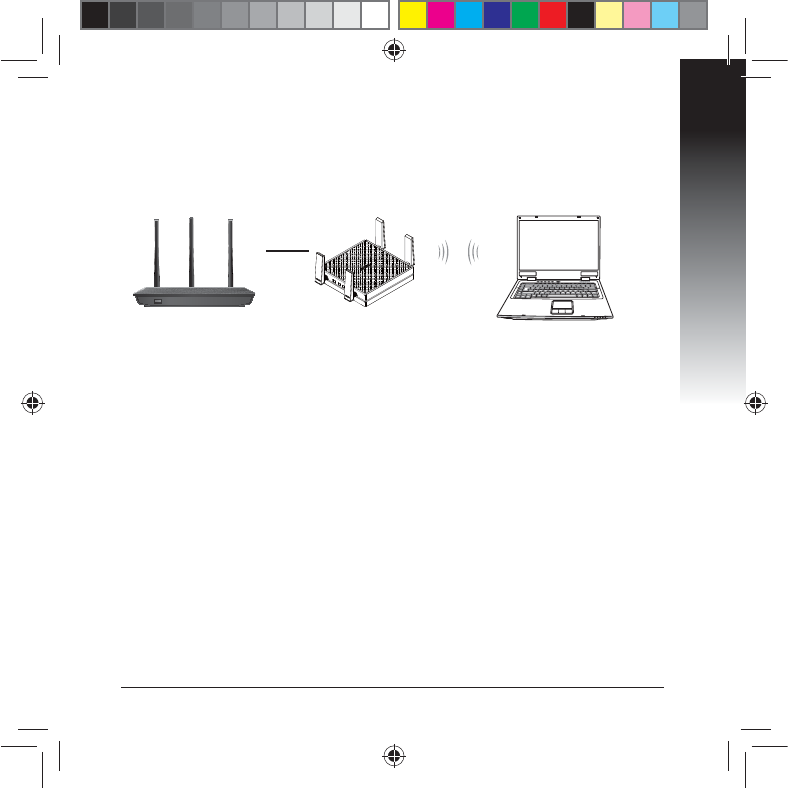
Modo Punto de acceso (PA)
También puede activar el modo Punto de acceso (PA) en su EA-AC87 cambiando
FMDPONVUBEPSMBUFSBM4JZBUJFOFVOFOSVUBEPSQVFEFBDUVBMJ[BSMPBMBWFSTJØO
NÈTSFDJFOUF8J'J(I["$Y
n
a9417_ea-ac87u_qsg.indb 31 2014/6/19 16:44:49

Español
32
Modo Puente multimedia
Le recomendamos que conecte su EA-AC87 a un enrutador inalámbrico presion-
BOEPFMCPUØOEFDPOöHVSBDJØOQSPUFHJEB8J'J8148J'J1SPUFDUFE4FUVQ
n
a9417_ea-ac87u_qsg.indb 32 2014/6/19 16:44:49
Español
33
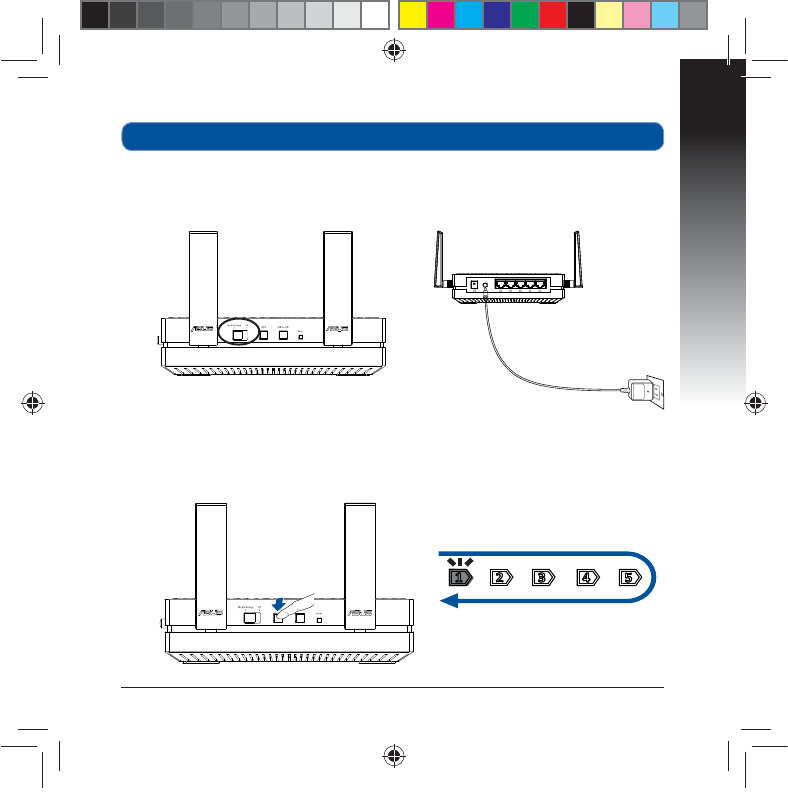
b. Presione el botón WPS de su EA-AC87 durante más de tres segundos hasta
que los indicadores de señal LED1 a LED5 parpadeen secuencialmente hacia
adelante y hacia atrás.
Conguración con WPS
a. Coloque el conmutador en el modo puente multimedia y enchufe el adapta-
dor de alimentación.
n
a9417_ea-ac87u_qsg.indb 33 2014/6/19 16:44:50
Español
34
NOTA: Consulte el manual del usuario del enrutador para conocer la ubicación
de su botón WPS.
c. Presione el botón WPS del enrutador:
d. Espere a que al menos uno de los indicadores de señal LED se ilumine perma-
OFOUFNFOUFMPRVFTJHOJöDBSÈRVFIBFTUBCMFDJEPVOBDPOFYJØODPOMBSFE
inalámbrica correctamente.
F.FEJBOUFFMDBCMFEFSFEJODMVJEPDPOFDUFFMUFMFWJTPSJOUFMJHFOUFFMEFTDPEJ-
öDBEPSFMSFQSPEVDUPSNVMUJNFEJB)%VPUSPEJTQPTJUJWP&UIFSOFUBMQVFSUP-"/
de su EA-AC87.
NOTA: También puede conectar su EA-AC87 a la red inalámbrica a través de la
JOUFSGB[HSÈöDBEFMVTVBSJP8FC1BSBPCUFOFSNÈTEFUBMMFTDPOTVMUFMBTFDDJØO
Conguración a través de la interfaz basada en Web.
n
a9417_ea-ac87u_qsg.indb 34 2014/6/19 16:44:50
Español
35
a. Coloque el conmutador en el modo puente
multimedia.
C&ODIVGFFMBEBQUBEPSEFBMJNFOUBDJØOZNF-
EJBOUFFMDBCMFEFSFETVNJOJTUSBEPDPOFDUF
el equipo al puerto LAN de su EA-AC87.
D&OFMFYQMPSBEPS8FCFTDSJCB
http://ndasus.local en la barra de direc-
ciones del explorador. Escriba admin como
el nombre de usuario y la contraseña
predeterminados para iniciar sesión en la
JOUFSGB[HSÈöDBEFVTVBSJP8FC(6*8FC
de su EA-AC87.
E4JHBMBTJOTUSVDDJPOFTRVFBQBSF[DBOFOMB
pantalla para completar la conguración de
la conexión inalámbrica.
e. Compruebe si el indicador LED de su EA-
BDVTFJMVNJOBQFSNBOFOUFNFOUFMP
que indica que su EA-N66 se ha conectado
correctamente a la red inalámbrica.
Conguración a través de la interfaz basada en Web
NOTA:4JZBIBVUJMJ[BEP814QBSBDPOFDUBSFMEJTQPTJUJWPQBTFQPSBMUPFTUB
sección.
n
a9417_ea-ac87u_qsg.indb 35 2014/6/19 16:44:50
Español
36
Modo Punto de acceso (PA)
a. Coloque el conmutador en el modo AP (PA).
b. Enchufe el adaptador de alimentación y utilice el cable de red suministrado
para conectarlo al puerto LAN del enrutador.
c. Conecte el dispositivo al nombre de red predeterminado (SSID) de su EA-AC87
ASUS_5G.
E&OFMFYQMPSBEPS8FCFTDSJCBhttp://ndasus.local un 192.168.1.1 en la barra
de direcciones. Escriba el nombre de usuario y la contraseña predeterminados:
admin.
F4JHBMBJOUFSGB[HSÈöDBEFMVTVBSJP8FCQBSBEFöOJSMBTEJTUJOUBTDPOöHVSBDJP-
nes. Puede asignar un SSID y una clave de seguridad nuevos para su EA-AC87.
Conguración a través de la interfaz basada en Web
NOTA:
t &OFMNPEP1"QVFEFVUJMJ[BSFMCPUØO814QBSBDPOFDUBSPUSPTEJTQPTJUJWPT
t "TFHÞSFTFEFDPOFDUBSTV&""$BMQVFSUP-"/EFVOFOSVUBEPSBOUFTEF
SFBMJ[BSMBDPOöHVSBDJØO
n
a9417_ea-ac87u_qsg.indb 36 2014/6/19 16:44:50
Español
37
Frequently Asked Questions
P1: ¿Cuál es la dirección IP, el SSID, el nombre y la contraseña de
inicio de sesión predeterminados para EA-AC87?
Dirección IP
antes de la
conguración
Dirección IP
después de la
conguración
Dirección URL
para la con-
guración*
SSID pre-
determi-
nado
Nombre de usuario
y contraseña para
inicio de sesión.
Modo
Puente mul-
timedia 192.168.1.1 Asignado por
el enrutador
conectado
http://
ndasus.local N/D nombre de usuario:
admin
contraseña: admin
Modo Punto
de acceso
Asignado por
el enrutador
conectado
Asignado por
el enrutador
conectado
http://
ndasus.local ASUS_5G
8JOEPXT¥91OPBENJUFöOEBTVTMPDBM4JVUJMJ[BFMTJTUFNBPQFSBUJWP8JOEPXT¥91EFTD-
argue la utilidad de detección de dispositivos del sitio Web de ASUS
www.asus.com para buscar la dirección IP de su EA-AC87.
Q2: No puedo acceder a la interfaz GUI web para congurar los
parámetros del router inalámbrico
t $JFSSFUPEPTMPTFYQMPSBEPSFTXFCFOFKFDVDJØOFJOJDJFEFOVFWP
uno de ellos.
t 4JHBMPTQBTPTEFTDSJUPTBDPOUJOVBDJØOQBSBDPOöHVSBSFMFRVJQP
TFHÞOFMTJTUFNBPQFSBUJWPJOTUBMBEP
Windows® 7
A. Deshabilite el servidor proxy si se encuentra habilitado.
)BHBDMJDFOStart (Inicio) > Internet Explorer para iniciar el
explorador web.
)BHBDMJDFOTools (Herramientas) > Internet options (Opciones de Internet) > cha
Connections (Conexiones) > LAN settings (Conguración de LAN).
3. En la pantalla Local Area Network (LAN) Settings (Conguración de la red de área local
-"/EFTBDUJWFMBPQDJØOUse a proxy server for your LAN (Usar un servidor proxy
para la LAN).
)BHBDMJDFOOK (Aceptar) cuando haya terminado.
n
a9417_ea-ac87u_qsg.indb 37 2014/6/19 16:44:51
Español
38
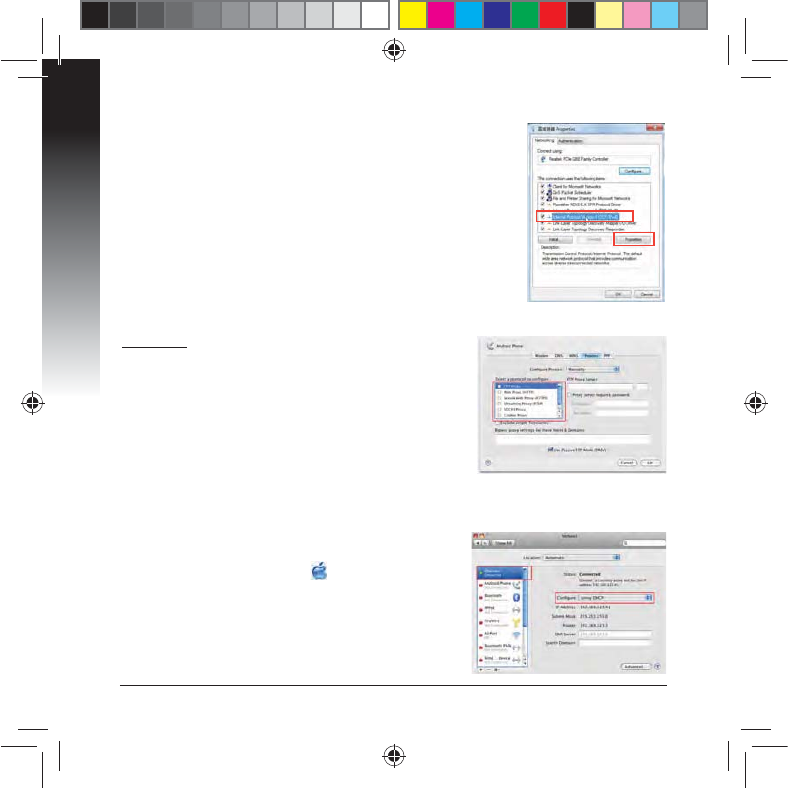
B. Establezca la conguración TCP/IP del equipo para
que reciba una dirección IP automáticamente.
)BHBDMJDFOFMJDPOPEF"QQMF > System Preferences
(Preferencias del Sistema) > Network (Red).
2. Seleccione EthernetZBDPOUJOVBDJØOUsing DHCP
(Usar DHCP) en el campo Congure (Congurar).
)BHBDMJDFOApply (Aplicar) cuando haya terminado.
B. Establezca la conguración TCP/IP del equipo para que reciba
una dirección IP automáticamente.
)BHBDMJDFOStart (Inicio) > Control Panel (Panel de control) >
Network and Internet (Red e Internet) > Network and Sharing
Center (Centro de redes y de recursos compartidos) > Manage
network connections (Administrar conexiones de red).
2. Seleccione Internet Protocol Version 4 (TCP/IPv4) (Protocolo
de Internet versión 4 (TCP/IPv4)) y haga clic en Properties
(Propiedades).
3. Active la opción Obtain an IP address automatically (Obtener
una dirección IP automáticamente).
)BHBDMJDFOOK (Aceptar) cuando haya terminado.
Mac 10.5.8
A. Deshabilite el servidor proxy si se encuentra
habilitado.
&OMBCBSSBEFNFOÞTIBHBDMJDFOSafari > Preferences...
(Preferencias...) > cha Advanced (Avanzado).
2. En el campo ProxiesIBHBDMJDFOChange Settings...
(Cambiar ajustes...).
&OMBMJTUBEFQSPUPDPMPTBOVMFMBTFMFDDJØOEFMPT
elementos FTP Proxy (Proxy de FTP) y Web Proxy
(HTTP) (Proxy de web (HTTP).
)BHBDMJDFOOK (Aceptar) cuando haya terminado.
n
a9417_ea-ac87u_qsg.indb 38 2014/6/19 16:44:51

Manufacturer
ASUSTeK Computer Inc.
Tel: +886-2-2894-3447
Address: No. 150, LI-TE RD., PEITOU, TAIPEI 112, TAIWAN
Authorised representative in Europe
ASUS Computer GmbH
Address: HARKORT STR. 21-23, 40880 RATINGEN, GERMANY
Authorised distributors in Turkey
BOGAZICI BIL GISAYAR SAN. VE TIC. A.S.
Tel: +90 212 3311000
Address: AYAZAGA MAH. KEMERBURGAZ CAD. NO.10 AYAZAGA/ISTANBUL
CIZGI Elektronik San. Tic. Ltd. Sti.
Tel: +90 212 3567070 Address: CEMAL SURURI CD. HALIM MERIC IS MERKEZI
No: 15/C D:5-6 34394 MECIDIYEKOY/ ISTANBUL
KOYUNCU ELEKTRONiK BiLGi iSLEM SiST. SAN. VE DIS TIC. A.S.
Tel: +90 216 5288888
Address: EMEK MAH.ORDU CAD. NO:18, SARIGAZi, SANCAKTEPE ISTANBUL
#''';ÑPGVOGNKþKPG7[IWPFWT
SUPPORT HOTLINE
USA/ CANADA
Hotline Number: 1-812-282-2787
Language: English
Availability: Mon. to Fri.
8:30-12:00am EST
(5:30am-9:00pm PST)
Sat. to Sun.
9:00am-6:00pm EST
(6:00am-3:00pm PST)
BRAZIL
Hotline Number: 4003 0988 (Capital) /
0800 880 0988 (demais localidades)
Language: Portuguese
Availability: Mon. to Fri.
9:00am-18:00
n
a9417_ea-ac87u_qsg.indb 39 2014/6/19 16:44:51

ASUS Recycling/Takeback Services
ASUS recycling and takeback programs come from our commitment to the high-
est standards for protecting our environment. We believe in providing solutions
for you to be able to responsibly recycle our products, batteries, other compo-
nents, as well as the packaging materials. Please go to
http://csr.asus.com/english/Takeback.htm for the detailed recycling information
in dierent regions.
REACH
Complying with the REACH (Registration, Evaluation, Authorisation, and Restric-
tion of Chemicals) regulatory framework, we published the chemical substances
in our products at ASUS REACH website at http://csr.asus.com/english/REACH.htm
Federal Communication Commission Interference Statement
This equipment has been tested and found to comply with the limits for a Class
B digital device, pursuant to Part 15 of the FCC Rules. These limits are designed
to provide reasonable protection against harmful interference in a residential
installation. This equipment generates, uses and can radiate radio frequency
energy and, if not installed and used in accordance with the instructions, may
cause harmful interference to radio communications. However, there is no guar-
antee that interference will not occur in a particular installation. If this equipment
does cause harmful interference to radio or television reception, which can be
determined by turning the equipment o and on, the user is encouraged to try to
correct the interference by one of the following measures:
t3FPSJFOUPSSFMPDBUFUIFSFDFJWJOHBOUFOOB
t*ODSFBTFUIFTFQBSBUJPOCFUXFFOUIFFRVJQNFOUBOESFDFJWFS
t$POOFDUUIFFRVJQNFOUJOUPBOPVUMFUPOBDJSDVJUEJòFSFOUGSPNUIBUUPXIJDI
the receiver is connected.
t$POTVMUUIFEFBMFSPSBOFYQFSJFODFESBEJP57UFDIOJDJBOGPSIFMQ
CAUTION"OZDIBOHFTPSNPEJöDBUJPOTOPUFYQSFTTMZBQQSPWFECZUIFQBSUZ
responsible for compliance could void the user’s authority to operate this equip-
ment.
n
a9417_ea-ac87u_qsg.indb 40 2014/6/19 16:44:51

WARNING:
t "OZDIBOHFTPSNPEJöDBUJPOTOPUFYQSFTTMZBQQSPWFECZUIFQBSUZSFTQPOTJCMF
for compliance could void the user’s authority to operate the equipment.
Prohibition of Co-locationThis device and its antenna(s) must not be co-located
or operating in conjunction with any other antenna or transmitter.
t 6TFSTNVTUOPUNPEJGZUIJTEFWJDF.PEJöDBUJPOCZBOZPOFPUIFSUIBOUIF
party responsible for compliance with the rules of the Federal Communications
Commission (FCC) may void the authority granted under FCC regulations to
operate this device.
This device complies with Part 15 of the FCC Rules. Operation is subject to the
following two conditions: (1) This device may not cause harmful interference, and
(2) this device must accept any interference received, including interference that
may cause undesired operation.
This device and it's antennas(s) must not be co-located or operating in
DPOKVODUJPOXJUIBOZPUIFSBOUFOOBPSUSBOTNJUUFSFYDFQUJOBDDPSEBODFXJUI'$$
multi-transmitter product procedures.
This device is going to be operated in 5.15~5.25GHz frequency range, it is
restricted in indoor environment only.
IMPORTANT NOTE:
FCC Radiation Exposure Statement: This equipment complies with FCC radia-
UJPOFYQPTVSFMJNJUTTFUGPSUIGPSBOVODPOUSPMMFEFOWJSPONFOU5IJTFRVJQNFOU
should be installed and operated with minimum distance 20cm between the
radiator & your body.
n
a9417_ea-ac87u_qsg.indb 41 2014/6/19 16:44:51

Declaration of Conformity for R&TTE directive 1999/5/EC
Essential requirements – Article 3
Protection requirements for health and safety – Article 3.1a
Testing for electric safety according to EN 60950-1 has been conducted. These are
considered relevant and sucient.
Protection requirements for electromagnetic compatibility – Article 3.1b
Testing for electromagnetic compatibility according to EN 301 489-1 and EN 301
489-17 has been conducted. These are considered relevant and sucient.
Eective use of the radio spectrum – Article 3.2
CE Mark Warning
This is a Class B product, in a domestic environment, this product may cause radio
interference, in which case the user may be required to take adequate measures.
IC Statement
5IJTEFWJDFDPNQMJFTXJUI*OEVTUSZ$BOBEBMJDFOTFFYFNQU344TUBOEBSET
Operation is subject to the following two conditions: (1) this device may not cause
interference, and (2) this device must accept any interference, including interfer-
ence that may cause undesired operation of the device.
Le présent appareil est conforme aux CNR d’Industrie Canada applicables aux appar-
eils radio exempts de licence. L’exploitation est autorisée aux deux conditions suivant-
es : (1) l’appareil ne doit pas produire de brouillage, et (2) l’utilisateur de l’appareil doit
accepter tout brouillage radioélectrique subi, même si le brouillage est susceptible
d’en compromettre le fonctionnement.
This device and it’s antennas(s) must not be co-located or operating in con-
KVODUJPOXJUIBOZPUIFSBOUFOOBPSUSBOTNJUUFSFYDFQUJOBDDPSEBODFXJUI*$
multi-transmitter product procedures.
Cet appareil et son antenne (s) ne doit pas être co-localisés ou fonctionnement en
association avec une autre antenne ou transmetteur.
n
a9417_ea-ac87u_qsg.indb 42 2014/6/19 16:44:51

The device for the band 5150-5250 MHz is only for indoor usage to reduce poten-
tial for harmful interference to co-channel mobile satellite systems.
les dispositifs fonctionnant dans la bande 5150-5250 MHz sont réservés uniquement
pour une
utilisation à l’intérieur an de réduire les risques de brouillage préjudiciable aux
systèmes de satellites mobiles utilisant les mêmes canaux;
IC Radiation Exposure Statement:
5IJTFRVJQNFOUDPNQMJFTXJUI*$344SBEJBUJPOFYQPTVSFMJNJUTTFUGPSUIGPSBO
uncontrolled environment. This equipment should be installed and operated with
minimum distance 20cm between the radiator & your body.
Cet équipement est conforme aux limites d’exposition aux rayonnements IC établies
pour un environnement non contrôlé. Cet équipement doit être installé et utilisé avec
un minimum de 20 cm de distance entre la source de rayonnement et votre corps.
Industry Canada Statement
This device complies with RSS-210 of the industry Canada Rules. Operation is
subject to the following two conditions:
t5IJTEFWJDFNBZOPUDBVTFIBSNGVMJOUFSGFSFODF
t5IJTEFWJDFNVTUBDDFQUBOZJOUFSGFSFODFSFDFJWFEJODMVEJOHJOUFSGFSFODFUIBU
may cause undesired operation.
IMPORTANT NOTE:
Radiation Exposure Statement:5IJTFRVJQNFOUDPNQMJFTXJUI*$SBEJBUJPOFY-
posure limits set forth for an uncontrolled environment. End users must follow the
TQFDJöDPQFSBUJOHJOTUSVDUJPOTGPSTBUJTGZJOH3'FYQPTVSFDPNQMJBODF5PNBJOUBJO
DPNQMJBODFXJUI*$3'FYQPTVSFDPNQMJBODFSFRVJSFNFOUQMFBTFGPMMPXPQFSBUJPO
instruction as documented in this manual.
n
a9417_ea-ac87u_qsg.indb 43 2014/6/19 16:44:51

NCC 警語
經型式認證合格之低功率射頻電機,非經許可,公司、商號或使用者均不得擅
自變更頻率、加大功率或變更原設計之特性及功能。
低功率射頻電機之使用不得影響飛航安全及干擾合法通信;經發現有干擾現象
時,應立即停用,並改善至無干擾時方得繼續使用。
前項合法通信,指依電信法規定作業之無線電通信。
低功率射頻電機須忍受合法通信或工業、科學及醫療用電波輻射性電機設備
之干擾。
Safety Warning
SAFE TEMP: This wireless router should be only used in environments with ambi-
ent temperatures between 50C (410F) and 400C (1040F).
%0/05FYQPTFUPPSVTFOFBSMJRVJETSBJOPSNPJTUVSF%0/05VTFEVSJOH
electrical storms.
n
a9417_ea-ac87u_qsg.indb 44 2014/6/19 16:44:51