ASUSTeK Computer F9AWGE780 NOTEBOOK P.C. User Manual AD5EA4E5A4E2A5552E706466
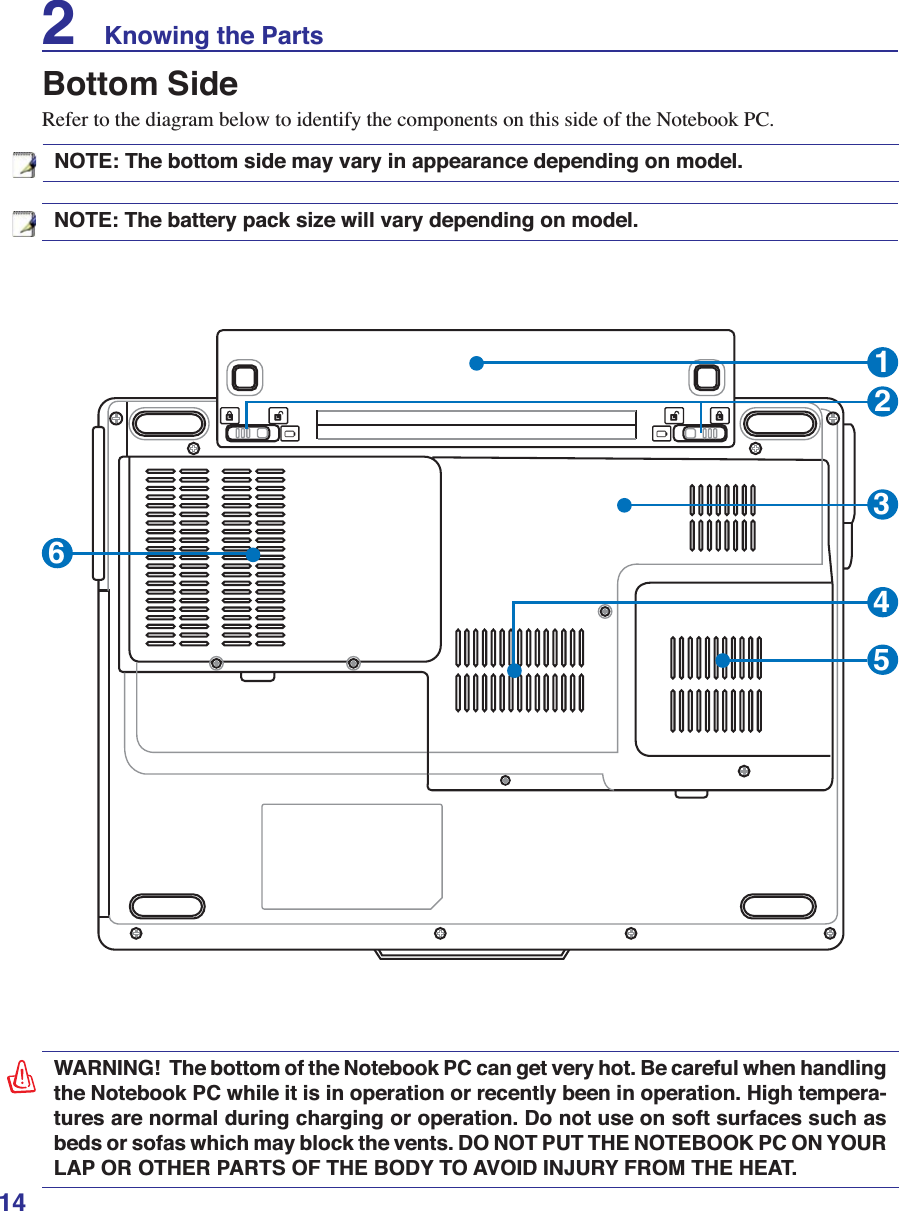
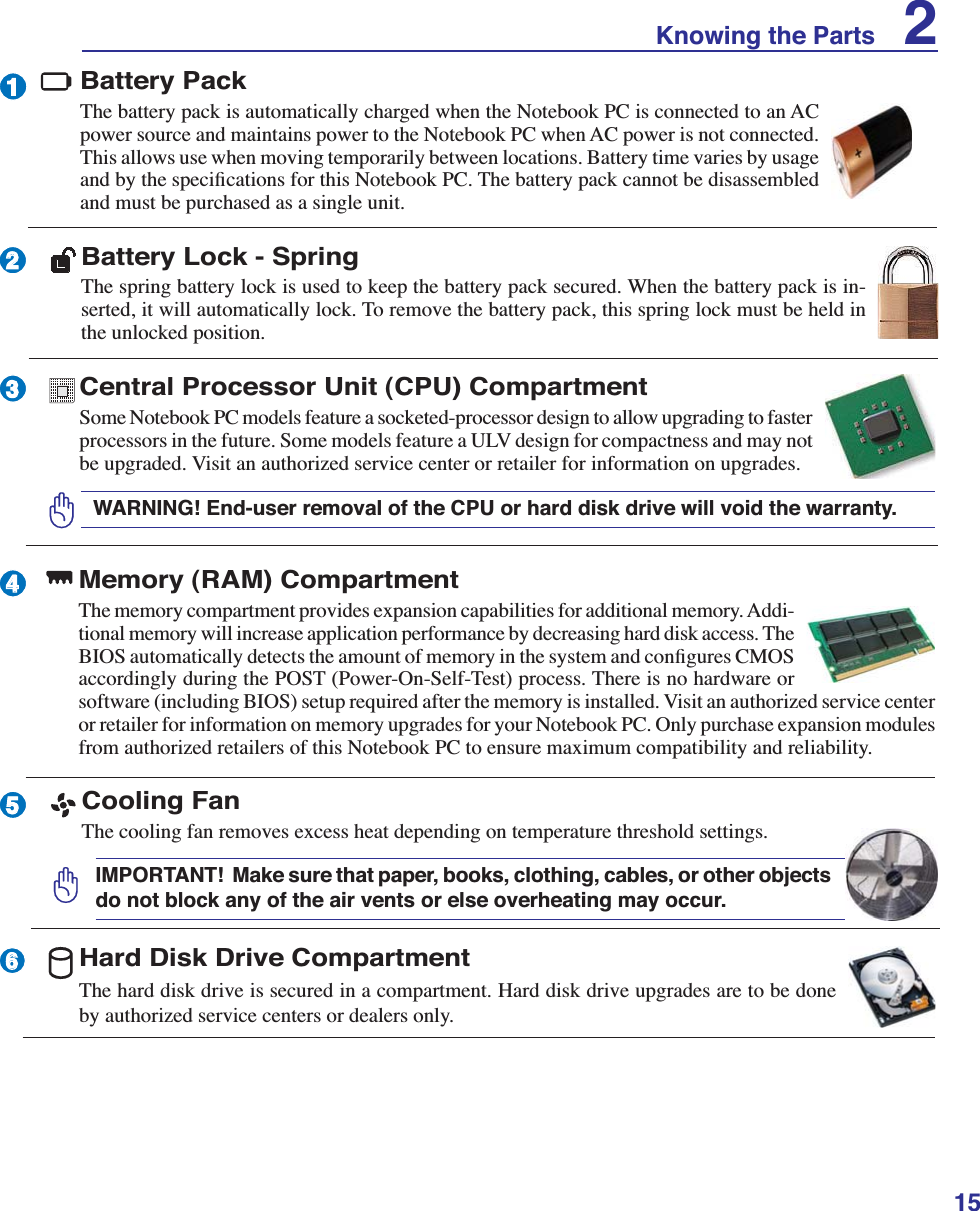
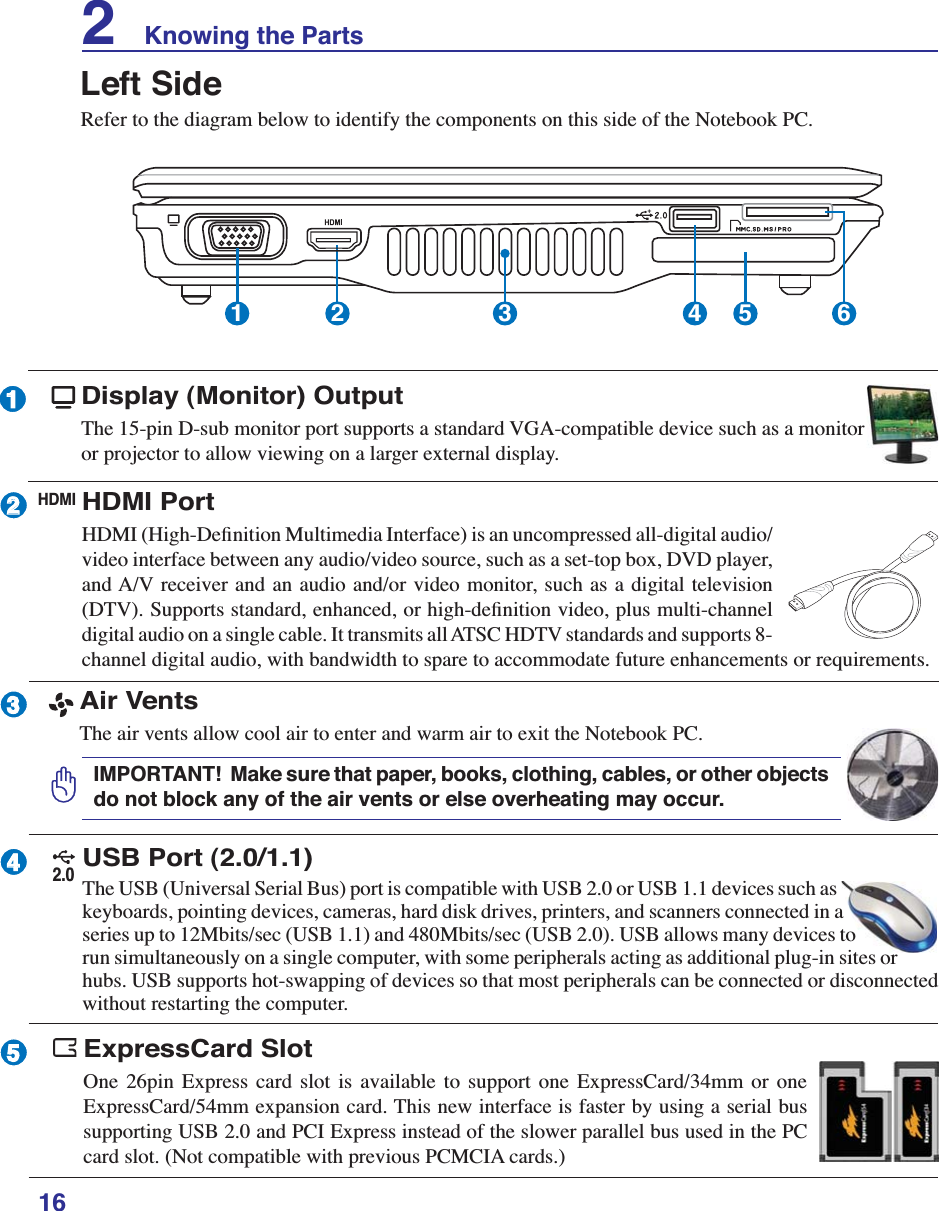
ASUSTeK Computer Inc NOTEBOOK P.C. AD5EA4E5A4E2A5552E706466
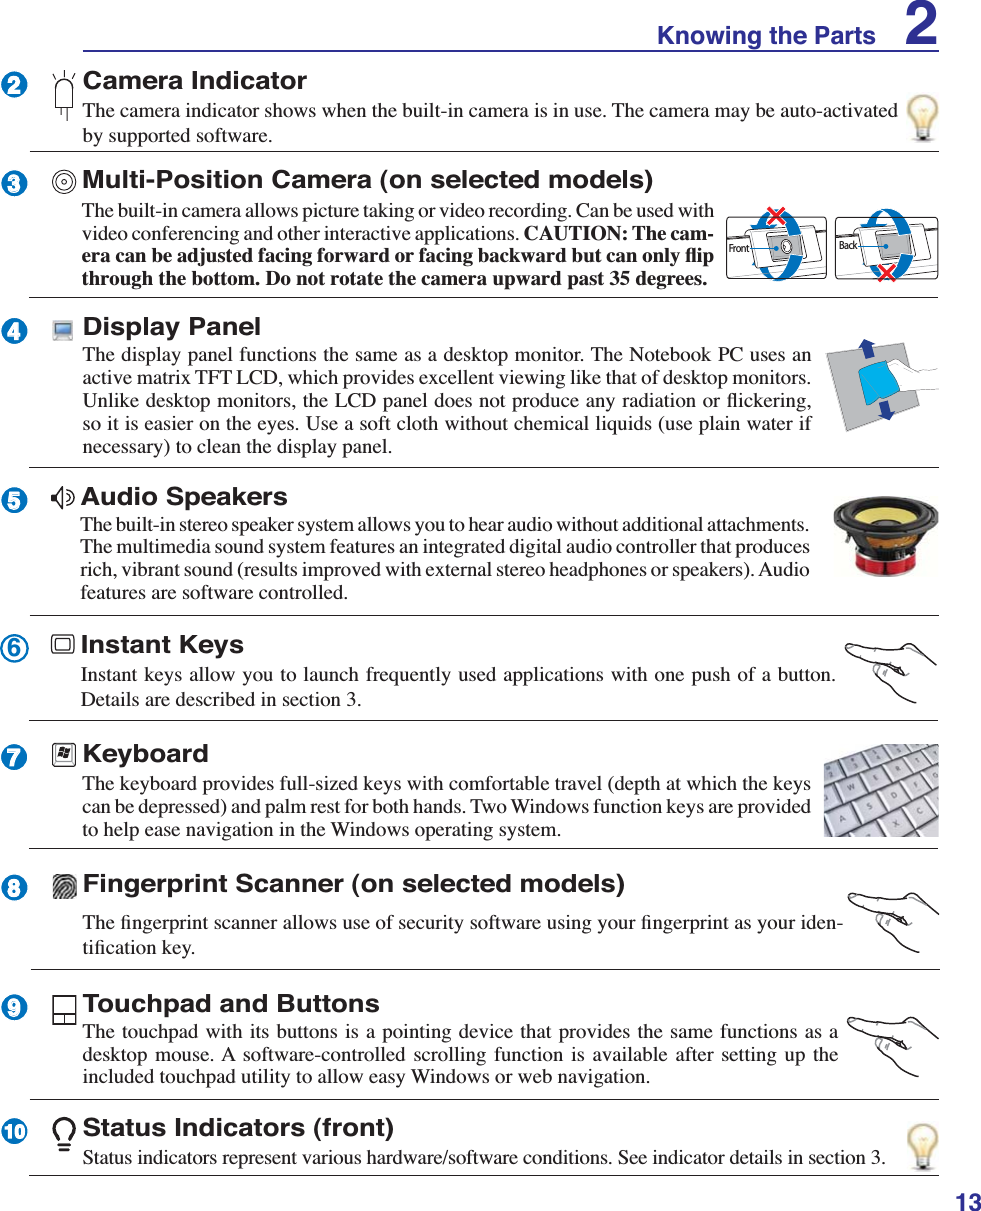
UserManual.wiki
>
ASUSTeK Computer
>
F9AWGE780 User Manual
>
USERS MANUAL 1
Contents
1.
USERS MANUAL 1
2.
USERS MANUAL 2
USERS MANUAL 1
Navigation menu
Upload a User Manual
Namespaces
Wiki Guide
HTML
PDF
Info
Views
User Manual
Discussion / Help
Navigation
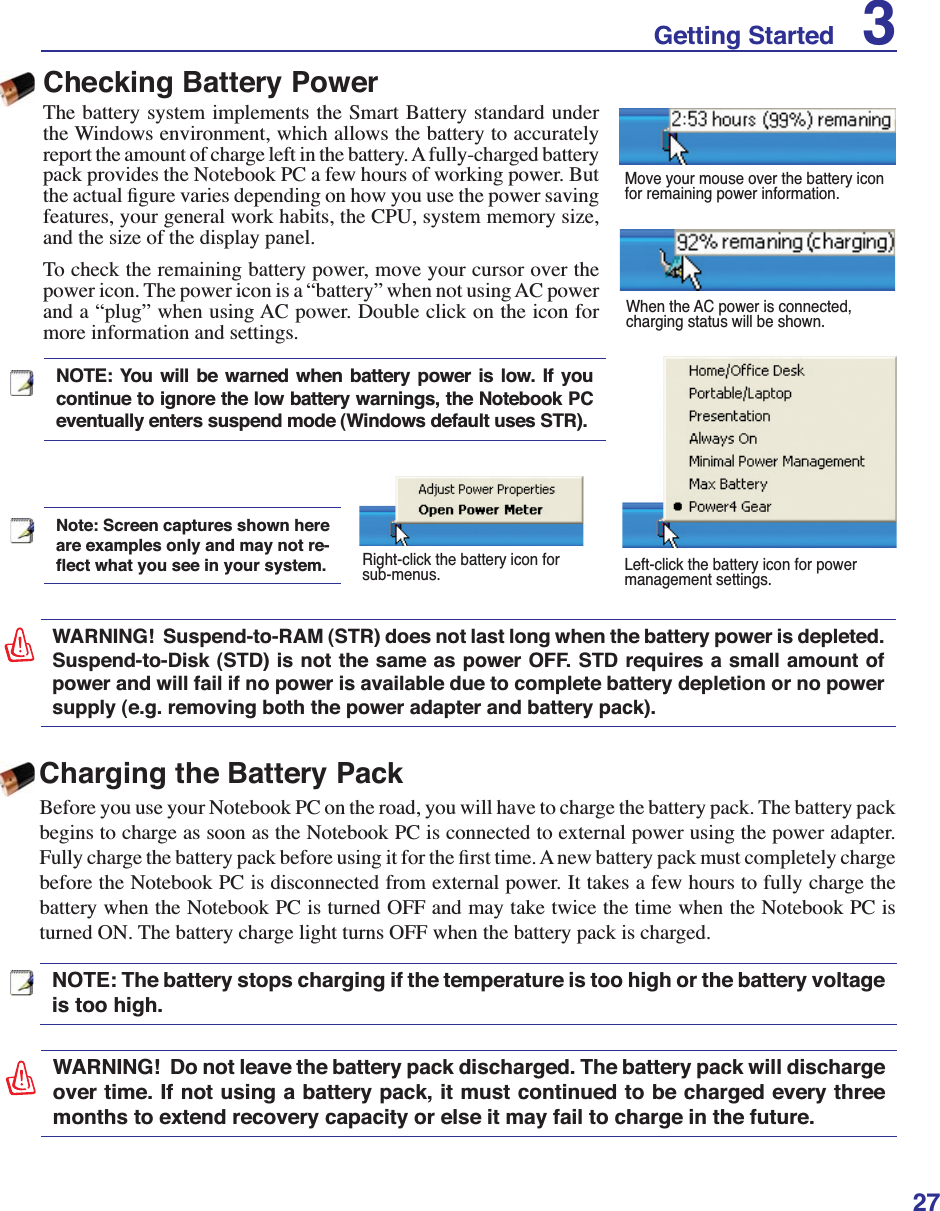
![61 Introducing the Notebook PCAbout This User’s ManualYou are reading the Notebook PC User’s Manual. This User’s Manual provides informa-tion on the various components in the Notebook PC and how to use them. The following are major sections of this User’s Manuals:1. Introducing the Notebook PCIntroduces you to the Notebook PC and this User’s Manual.2. Knowing the PartsGives you information on the Notebook PC’s components.3. Getting StartedGives you information on getting started with the Notebook PC.4. Using the Notebook PC Gives you information on using the Notebook PC’s components.5. Appendix Introduces you to optional accessories and gives additional information. Notes For This ManualA few notes and warnings in bold are used throughout this guide that you should be aware of in order to complete certain tasks safely and completely. These notes have different degrees of importance as described below:NOTE: Tips and information for special situations.TIP: Tips and useful information for completing tasks.IMPORTANT! Vital information that must be followed to prevent damage to data, com-ponents, or persons.WARNING! Important information that must be followed for safe operation.Text enclosed in < > or [ ] represents a key on the keyboard; do not actually type the < > or [ ] and the enclosed letters.< >[ ]](https://usermanual.wiki/ASUSTeK-Computer/F9AWGE780.USERS-MANUAL-1/User-Guide-824848-Page-6.png)
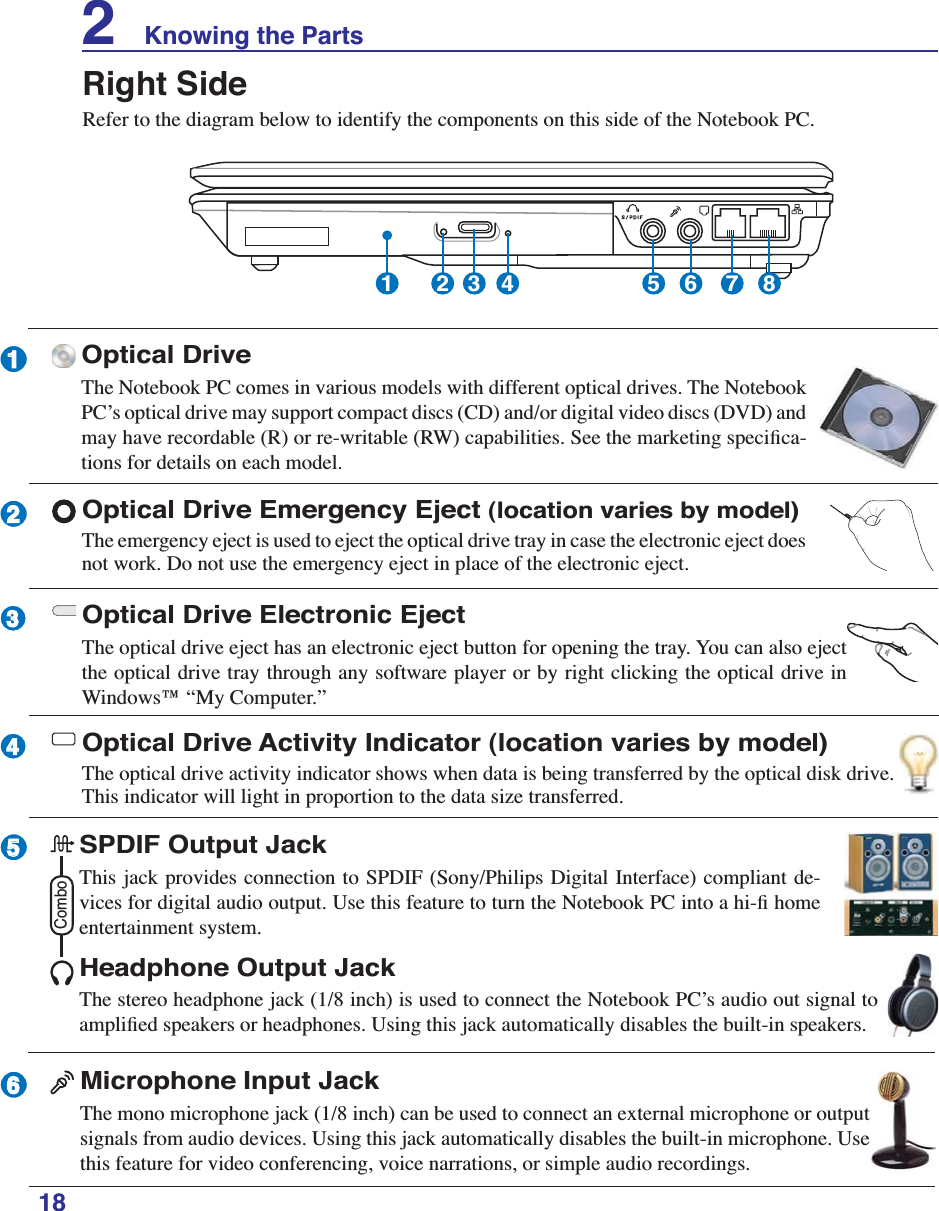


![343 Getting StartedCD Play/PauseDuring CD stop, begins CD play.During CD play, pauses CD play.CD StopDuring CD stop: Ejects the CD tray.During CD play: Stops CD play.CD Skip to Next Track (Fast Forward) & Audio Volume UpDuring CD play, this button has two functions:Track: Push once to skip to the next track during CD playing.Audio: Hold down to increase audio volume.Audio Volume ControlsFn + Speaker Icons (F10): Toggles the audio volume ON and OFFFn + Down Speaker Icon (F11): Decreases the audio volumeFn + Up Speaker Icon (F12): Increases the audio volumeMultimedia Control Keys (on selected models)The multimedia control keys allows for convenient controlling of the multimedia application. The fol-ORZLQJGHÀQHVWKHPHDQLQJRIHDFKPXOWLPHGLDFRQWURONH\RQWKH1RWHERRN3&CD Skip to Previous Track (Rewind) & Audio Volume DownDuring CD play, this button has two functions:Track: 7KHÀUVWSXVKZLOOUHVWDUWWKHFXUUHQWWUDFN6HFRQGSXVKZLOOVNLSWRWKHprevious track.Audio: Hold down to decrease audio volume.Use the [Fn] key in combination with the arrow keys for CD control functions.](https://usermanual.wiki/ASUSTeK-Computer/F9AWGE780.USERS-MANUAL-1/User-Guide-824848-Page-34.png)
![47Using the Notebook PC 4These are examples of the Notebook PC connected to a Wireless Network.Desktop PCPDANotebook PCAccessPointDesktop PCPDANotebook PCWireless LAN Connection (on selected models)The optional built-in wireless LAN is a compact easy-to-use wireless Ethernet adapter. Implementing the IEEE 802.11 standard for wireless LAN (WLAN), the optional built-in wireless LAN is capable of IDVWGDWDWUDQVPLVVLRQUDWHVXVLQJ'LUHFW6HTXHQFH6SUHDG6SHFWUXP'666DQG2UWKRJRQDO)UHTXHQF\'LYLVLRQ0XOWLSOH[LQJ2)'0WHFKQRORJLHVRQ*+]*+]IUHTXHQFLHV7KHRSWLRQDOEXLOWLQZLUH-less LAN is backward compatible with the earlier IEEE 802.11 standards allowing seamless interfacing of wireless LAN standards.The optional built-in wireless LAN is a client adapter that supports Infrastructure and Ad-hoc modes JLYLQJ\RXÁH[LELOLW\RQ\RXUH[LVWLQJRUIXWXUHZLUHOHVVQHWZRUNFRQÀJXUDWLRQVIRUGLVWDQFHVXSWRmeters between the client and the access point.7RSURYLGHHIÀFLHQWVHFXULW\WR\RXUZLUHOHVVFRPPXQLFDWLRQWKHRSWLRQDOEXLOWLQZLUHOHVV/$1FRPHVwith a 64-bit/128-bit Wired Equivalent Privacy (WEP) encryption and Wi-Fi Protected Access (WPA) features.Ad-hoc modeThe Ad-hoc mode allows the Notebook PC to connect to another wireless device. No access point (AP) is required in this wireless environment.(All devices must install optional 802.11 wireless LAN adapters.)Infrastructure modeThe Infrastructure mode allows the Notebook PC and other wireless devices to join a wireless network cre-ated by an Access Point (AP) (sold separately) that provides a central link for wireless clients to commu-nicate with each other or with a wired network.(All devices must install optional 802.11 wireless LAN adapters.)](https://usermanual.wiki/ASUSTeK-Computer/F9AWGE780.USERS-MANUAL-1/User-Guide-824848-Page-47.png)


![564 Using the Notebook PCFingerprint Login7KHÀQJHUSULQWVFDQQHUFDQEHXVHGWRUHSODFHWKHV\VWHPERRWXSDQGRU:LQGRZVORJLQSDVVZRUGFKHFNTo use this feature:1. You must set a Supervisor Password on the “Security” page in BIOS SETUP UTILITY.2. Password CheckRQWKH´6HFXULW\µSDJHLQ%,266(78387,/,7<PXVWEHVHWWR>)LQJHUSULQW@3. Choose Power-on Security in the “Control Center”. 4. Select “Replace the power-on and hard...”.5. Select “Allow power-on security single VLJQRQµ in System Settings from the “Control Center”. This page allows you to select ÀQJHUSULQWORJRQRSWLRQV 'XULQJV\VWHPERRW\RXZLOOVHH´6ZLSHÀQJHUWRDXWKRUL]HDFFHVVµ,I\RXGRQRWVXFFHVVIXOO\GRVRLQWKHDOORZHGWLPHLWZLOOUHYHUWWR´(QWHU3DVVZRUGBµ3UHVVLQJWKH>(6&@NH\ZLOOVKRZ´%LRPHWULFRSHUDWLRQFDQFHOOHGµDQGDOORZ\RXWRHQWHUDSDVVZRUGLQVWHDGRIXVLQJDÀQJHUSULQW,QHLWKHUFDVH\RXZLOOVHH$&&(66*5$17('ZKHQDXWKRUL]HG ,I\RXXVHGDÀQJHUSULQWRQV\VWHPERRW\RXZLOODOVRDXWRPDWLFDOO\ORJLQWR:LQGRZVZLWK\RXUaccount. You will see “Succeeded” on the login screen. If you used a password on system boot, you ZLOOEHUHTXLUHGWRXVH\RXUÀQJHUSULQWRUW\SHLQDSDVVZRUGWRORJLQWR:LQGRZV6. Set the password type for power-on security DVVRFLDWHGZLWK\RXUÀQJHUSULQWLQ´(QUROORU(GLWFingerprints” from the “Control Center”. You will be asked for the relevant BIOS password based on your selection.](https://usermanual.wiki/ASUSTeK-Computer/F9AWGE780.USERS-MANUAL-1/User-Guide-824848-Page-56.png)
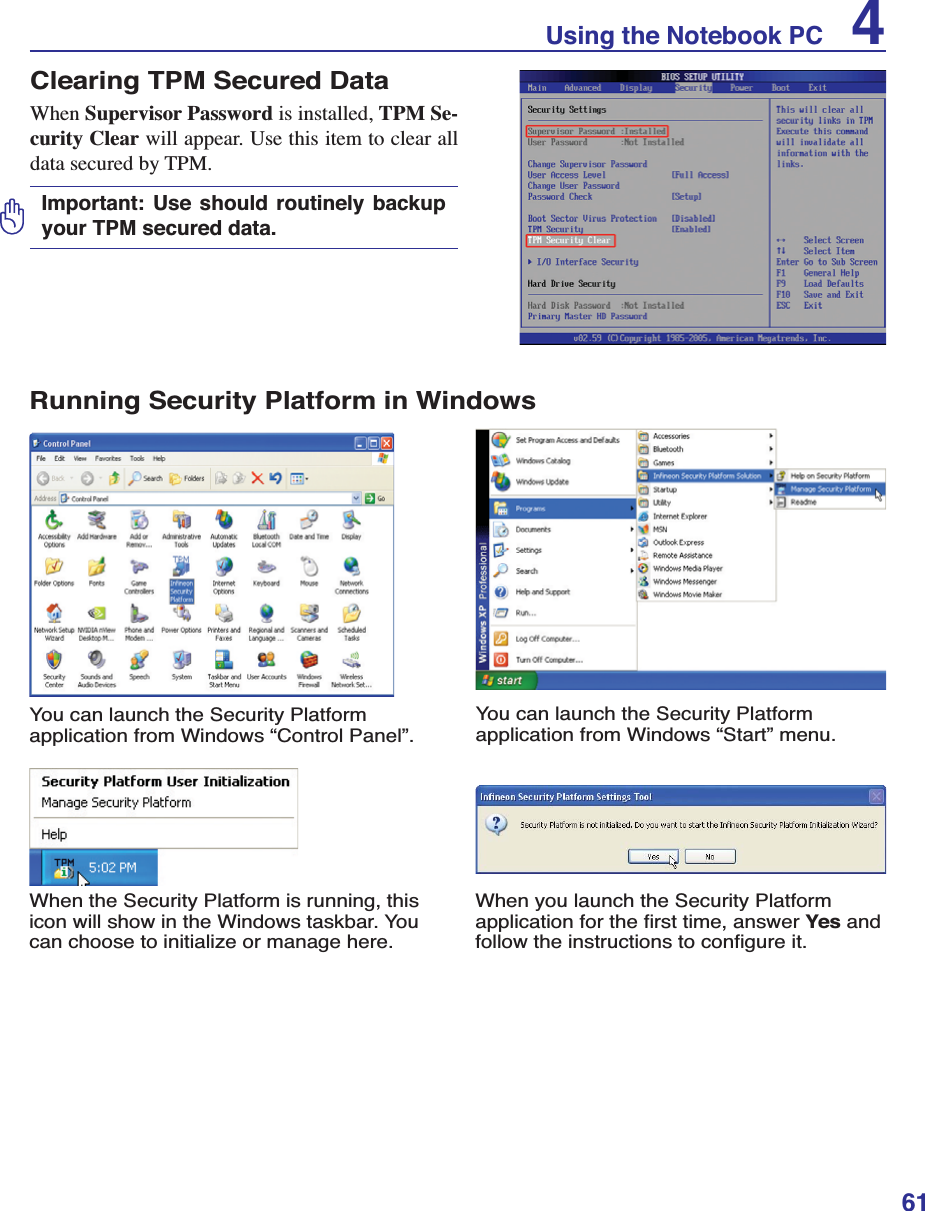
![57Using the Notebook PC 4Trusted Platform Module (TPM) (on selected models)The TPM, or Trusted Platform Module, is a security hardware device on the system board that will hold computer-generated keys for encryption. It is a hardware-based solution that an help avoid attacks by hackers looking to capture passwords and encryption keys to sensitive data. The TPM provides the abil-ity to the PC or notebook to run applications more secure and to make transactions and communication more trustworthy. The security features provided by the TPM are internally supported by the following cryptographic capa-bilities of each TPM: hashing, random number generation, asymmetric key generation, and asymmetric encryption/decryption. Each individual TPM on each individual computer system has a unique signature initialized during the silicon manufacturing process that further enhances its trust/security effectiveness. Each individual TPM must have an Owner before it is useful as a security device. TPM ApplicationsTPM is useful for any customer that is interested in providing an addition layer of security to the com-puter system. The TPM, when bundled with an optional security software package, can provide overall V\VWHP VHFXULW\ ÀOH SURWHFWLRQ FDSDELOLWLHV DQG SURWHFW DJDLQVW HPDLOSULYDF\ FRQFHUQV 730 KHOSVprovide security that can be stronger than that contained in the system BIOS, operating system, or any non-TPM application.Enabling TPM SecurityEnter BIOS SetupSUHVV>)@RQV\VWHPVWDUWXSOn Security page, set TPM Security to [Enabled],PSRUWDQW8VH\RXU730DSSOLFDWLRQҋV´5HVWRUHµRU´0LJUDWLRQµIXQFWLRQWREDFNXSyour TPM security data.Note: The TPM is disabled by default. Use BIOS setup to enable it.](https://usermanual.wiki/ASUSTeK-Computer/F9AWGE780.USERS-MANUAL-1/User-Guide-824848-Page-57.png)
![584 Using the Notebook PC,QLWLDOL]H,QÀQHRQ7306HFXULW\3ODWIRUP (QUROOÀQJHUSULQWXVLQJ364/6HWWLQJ,QÀQHRQ6HFXULW\3ODWIRUP&OLFN&RQ-ÀJXUHRQWKH´$GYDQFHGµSDJH4. Check Enhanced Authentication and clickNext.TPM Setup for Fingerprint Scanner7KHVHLQVWUXFWLRQVZLOOVKRZ\RXKRZWRXVHWKHÀQJHUSULQWVFDQQHUWRDXWKHQWLFDWHWKH,QÀQHRQ730](https://usermanual.wiki/ASUSTeK-Computer/F9AWGE780.USERS-MANUAL-1/User-Guide-824848-Page-58.png)