ASUSTeK Computer F9F Notebook P.C. User Manual T13Fg UserMan
ASUSTeK Computer Inc Notebook P.C. T13Fg UserMan
UserManual.wiki
>
ASUSTeK Computer
>
F9F User Manual
Manual
Navigation menu
Upload a User Manual
Namespaces
Wiki Guide
HTML
PDF
Info
Views
User Manual
Discussion / Help
Navigation

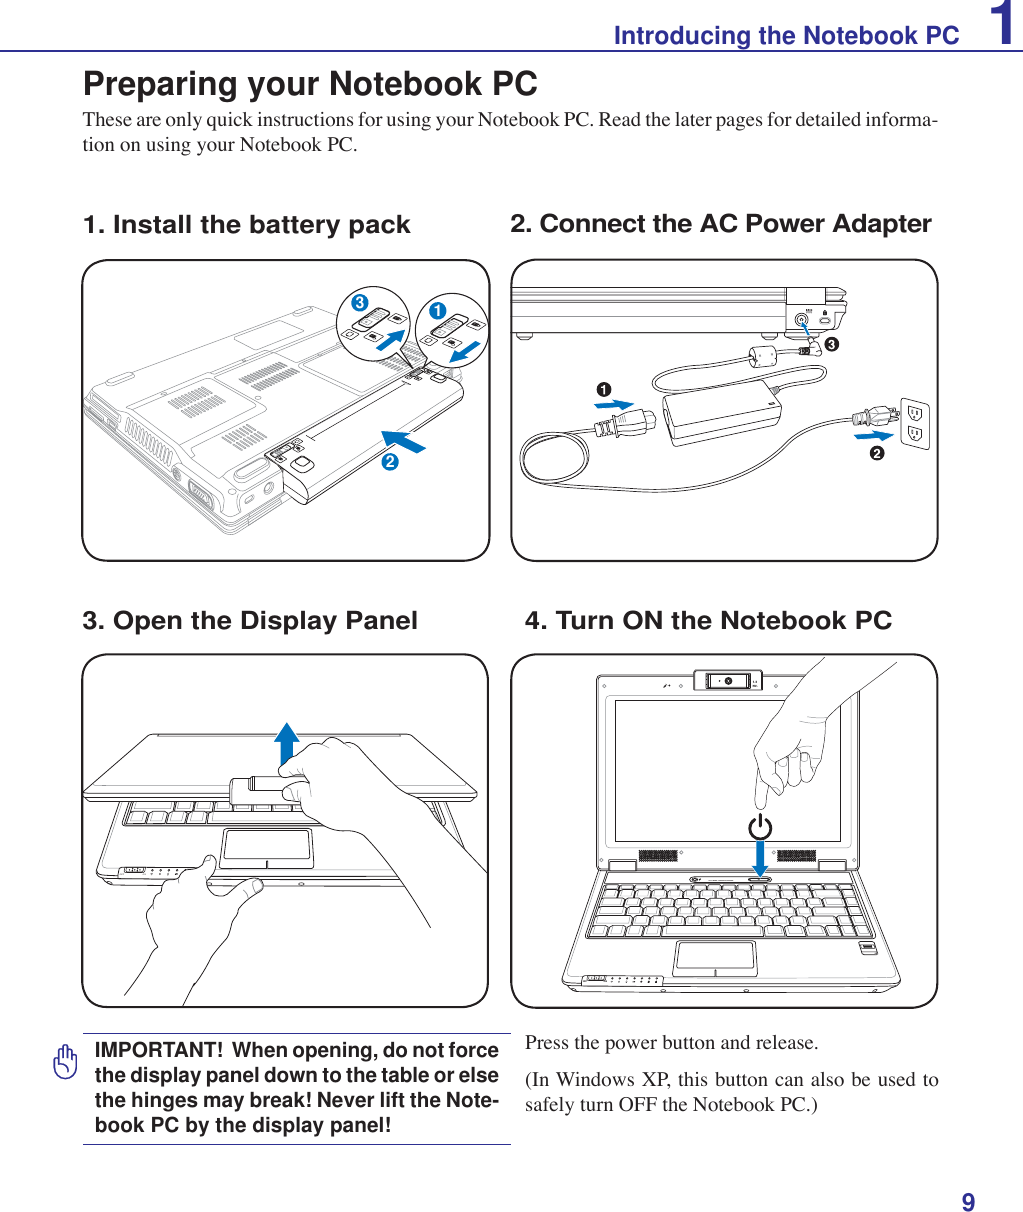
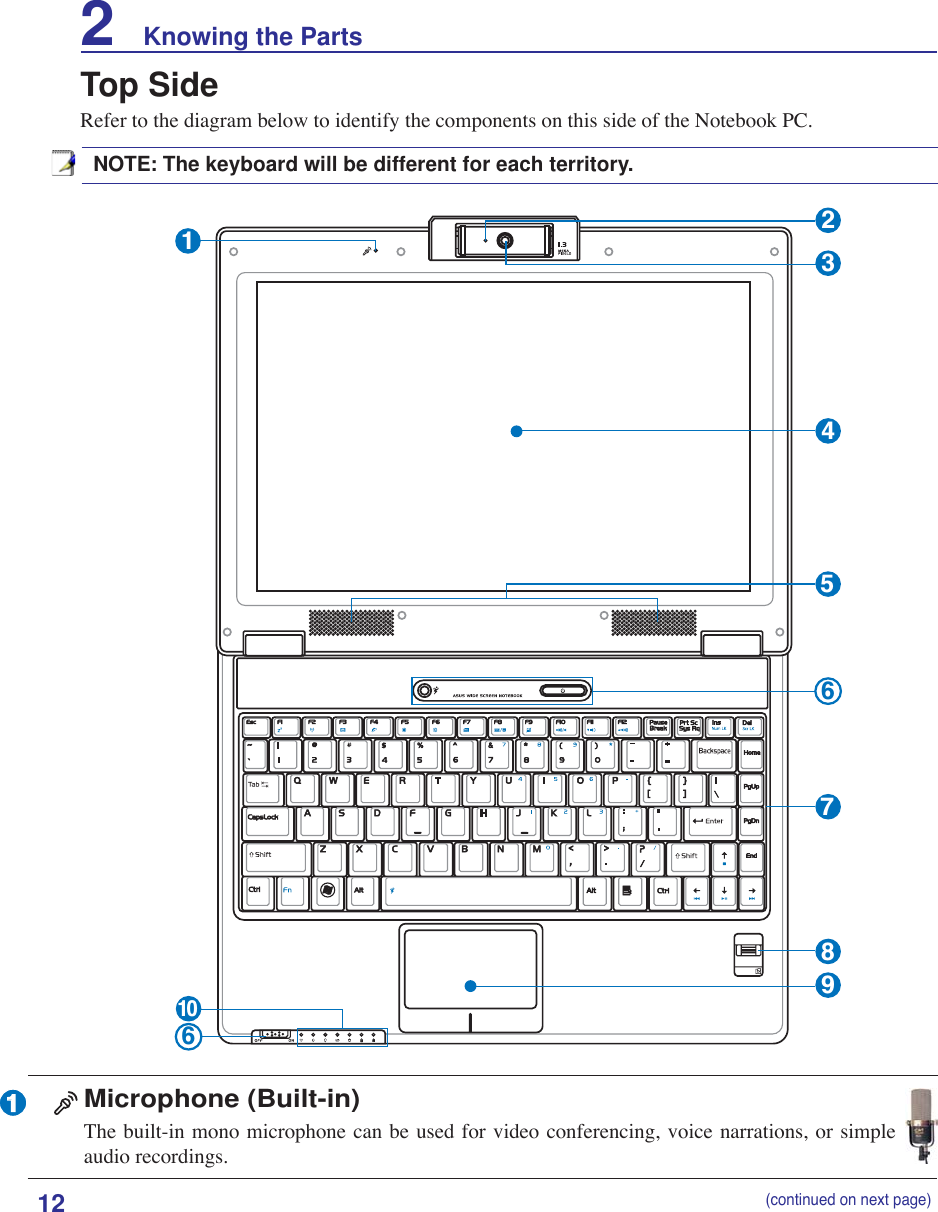
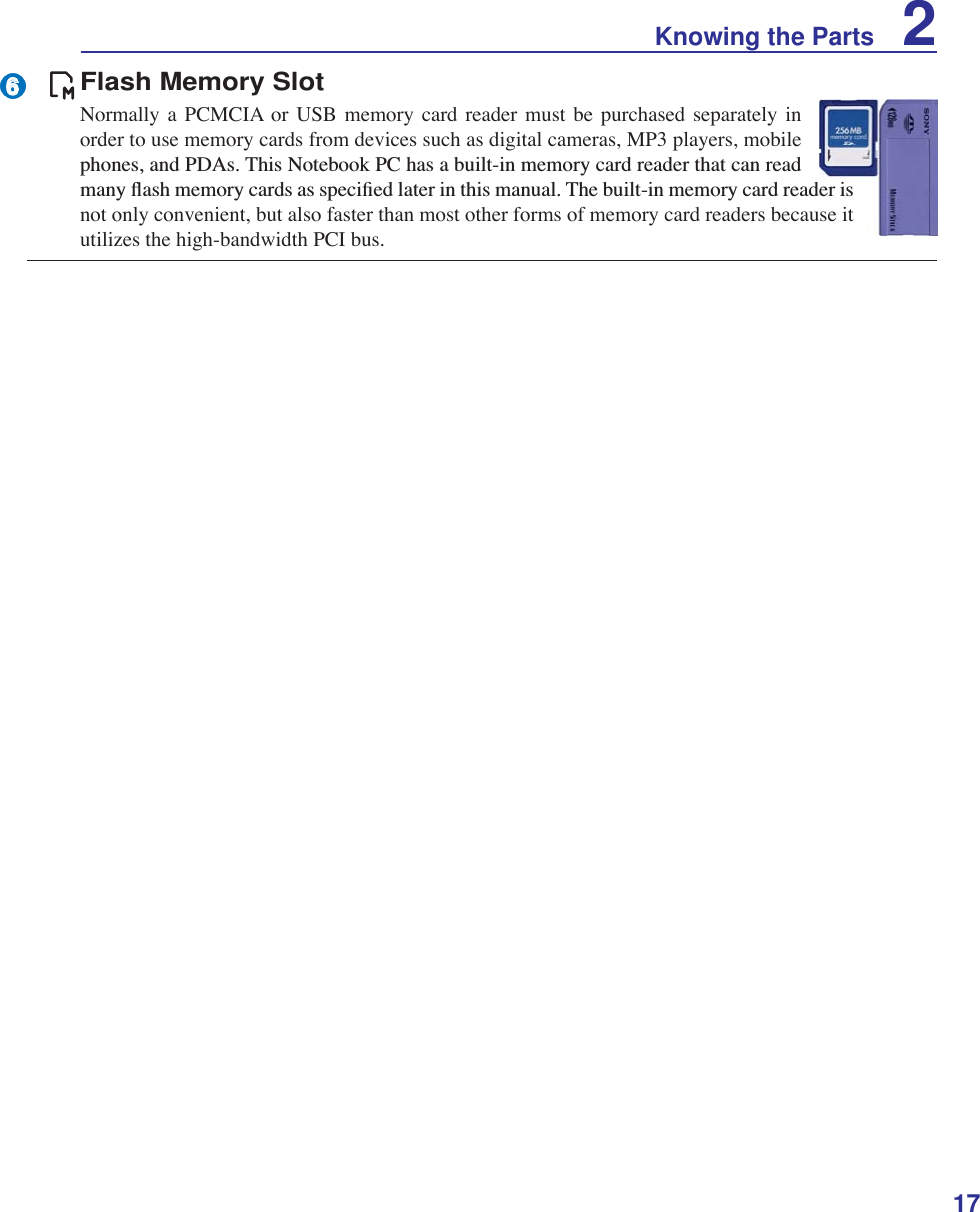
![61 Introducing the Notebook PCAbout This User’s ManualYou are reading the Notebook PC User’s Manual. This User’s Manual provides informa-tion on the various components in the Notebook PC and how to use them. The following are major sections of this User’s Manuals:1. Introducing the Notebook PCIntroduces you to the Notebook PC and this User’s Manual.2. Knowing the PartsGives you information on the Notebook PC’s components.3. Getting StartedGives you information on getting started with the Notebook PC.4. Using the Notebook PC Gives you information on using the Notebook PC’s components.5. Appendix Introduces you to optional accessories and gives additional information. Notes For This ManualA few notes and warnings in bold are used throughout this guide that you should be aware of in order to complete certain tasks safely and completely. These notes have different degrees of importance as described below:NOTE: Tips and information for special situations.TIP: Tips and useful information for completing tasks.IMPORTANT! Vital information that must be followed to prevent damage to data, com-ponents, or persons.WARNING! Important information that must be followed for safe operation.Text enclosed in < > or [ ] represents a key on the keyboard; do not actually type the < > or [ ] and the enclosed letters.< >[ ]](https://usermanual.wiki/ASUSTeK-Computer/F9F/User-Guide-811702-Page-6.png)

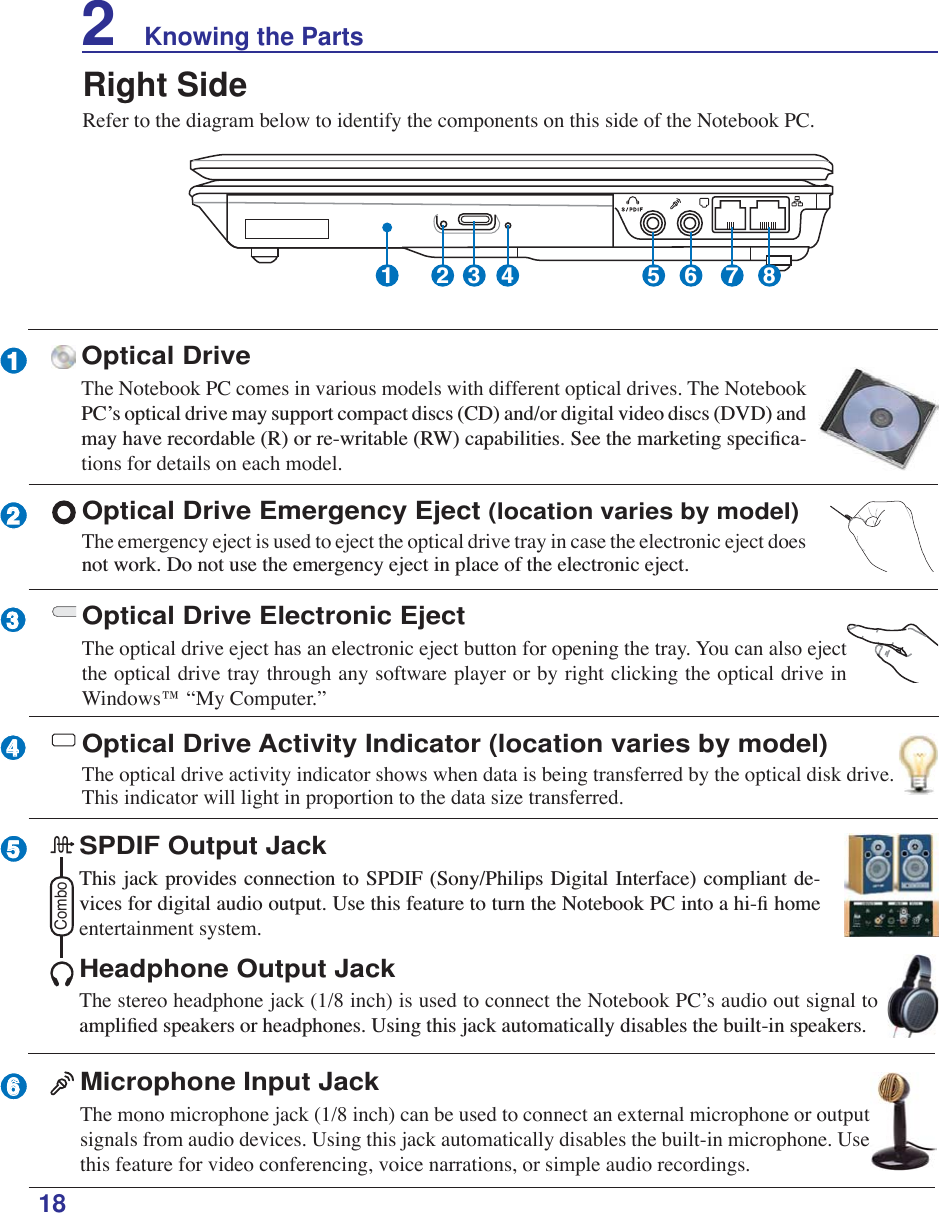


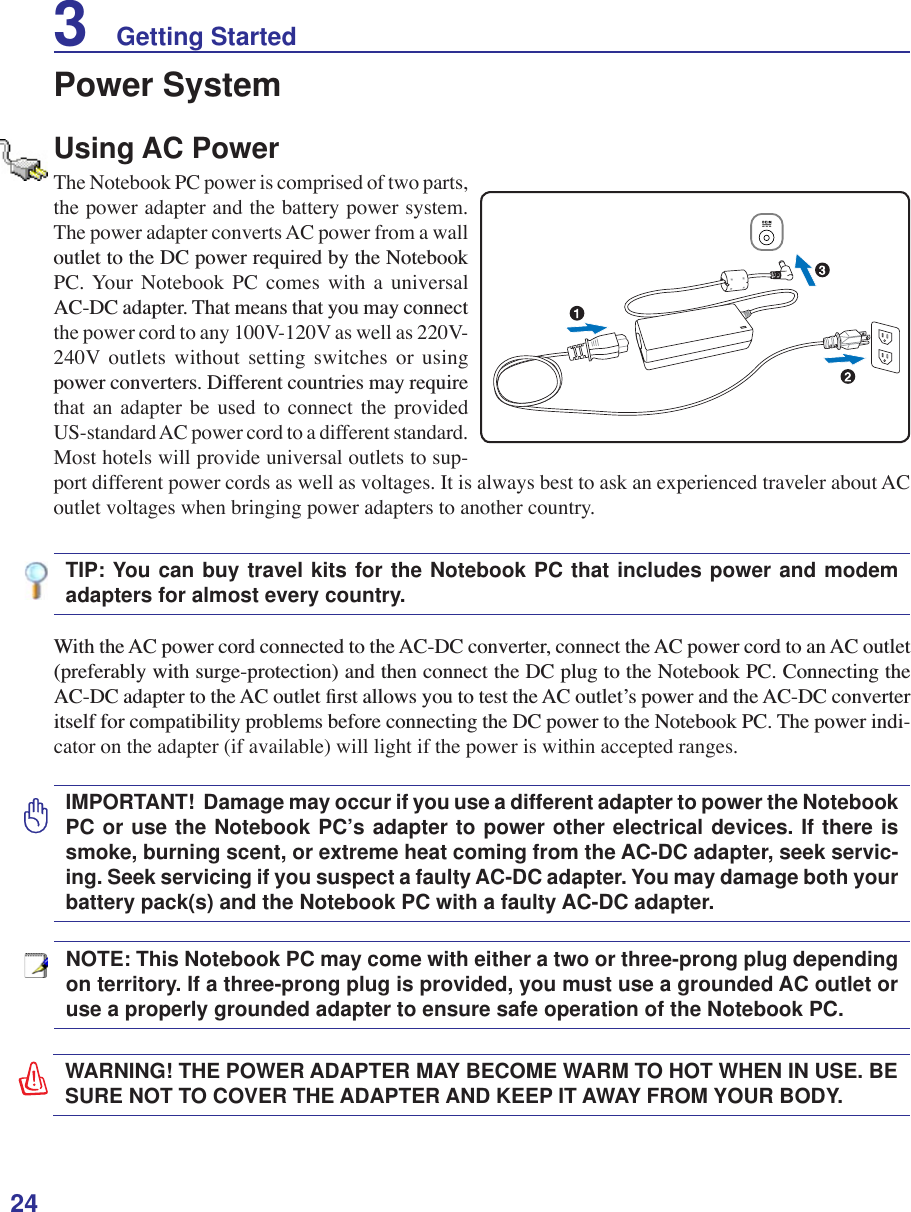

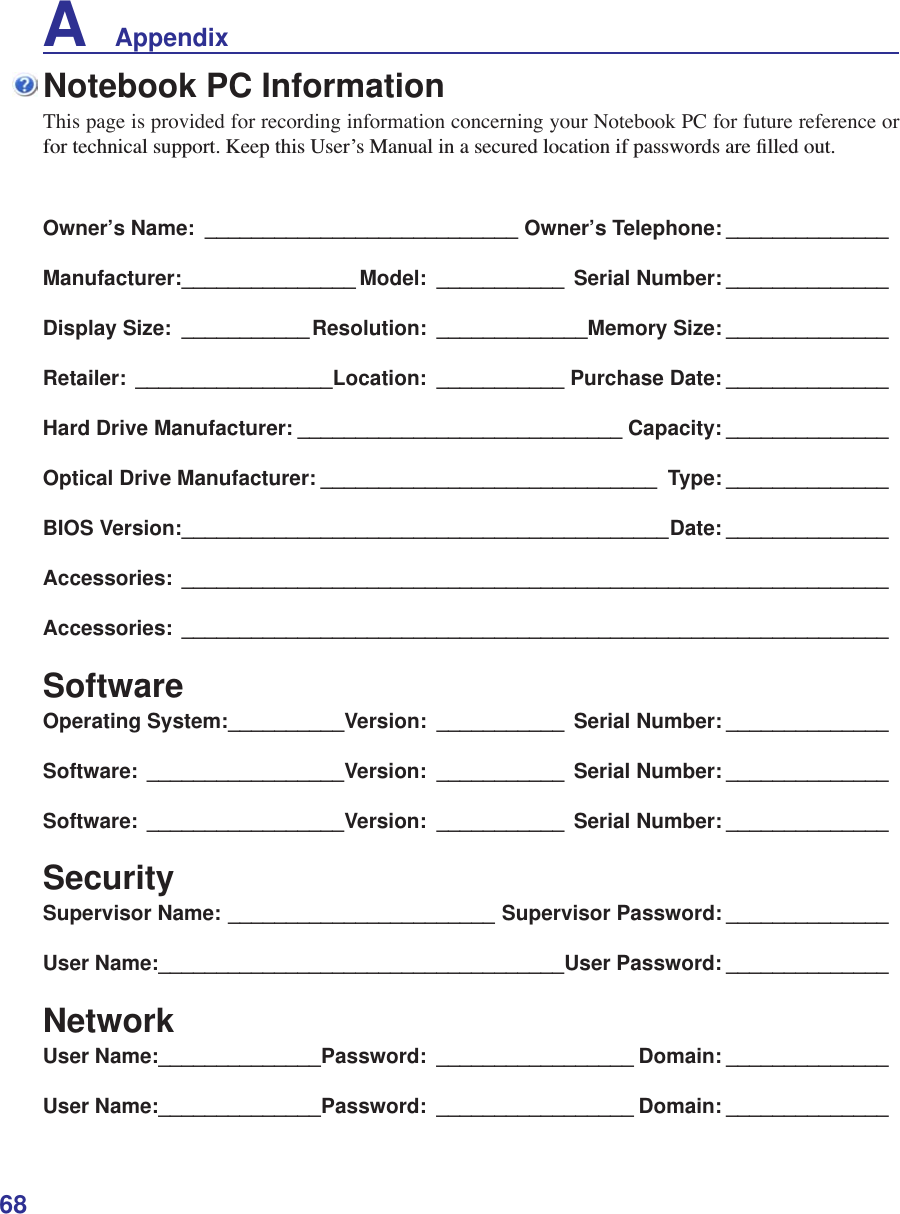
![464 Using the Notebook PCThese are examples of the Notebook PC connected to a Wireless Network.Desktop PCPDANotebook PCAccessPointDesktop PCPDANotebook PCWireless LAN Connection (on selected models)The optional built-in wireless LAN is a compact easy-to-use wireless Ethernet adapter. Implementing the IEEE 802.11 standard for wireless LAN (WLAN), the optional built-in wireless LAN is capable of IDVWGDWDWUDQVPLVVLRQUDWHVXVLQJ'LUHFW6HTXHQFH6SUHDG6SHFWUXP'666DQG2UWKRJRQDO)UHTXHQF\'LYLVLRQ0XOWLSOH[LQJ2)'0WHFKQRORJLHVRQ*+]*+]IUHTXHQFLHV7KHRSWLRQDOEXLOWLQZLUH-less LAN is backward compatible with the earlier IEEE 802.11 standards allowing seamless interfacing of wireless LAN standards.The optional built-in wireless LAN is a client adapter that supports Infrastructure and Ad-hoc modes JLYLQJ\RXÁH[LELOLW\RQ\RXUH[LVWLQJRUIXWXUHZLUHOHVVQHWZRUNFRQÀJXUDWLRQVIRUGLVWDQFHVXSWRmeters between the client and the access point.7RSURYLGHHIÀFLHQWVHFXULW\WR\RXUZLUHOHVVFRPPXQLFDWLRQWKHRSWLRQDOEXLOWLQZLUHOHVV/$1FRPHVwith a 64-bit/128-bit Wired Equivalent Privacy (WEP) encryption and Wi-Fi Protected Access (WPA) features.Ad-hoc modeThe Ad-hoc mode allows the Notebook PC to connect to another wireless device. No access point (AP) is required in this wireless environment.(All devices must install optional 802.11 wireless LAN adapters.)Infrastructure modeThe Infrastructure mode allows the Notebook PC and other wireless devices to join a wireless network cre-ated by an Access Point (AP) (sold separately) that provides a central link for wireless clients to commu-nicate with each other or with a wired network.(All devices must install optional 802.11 wireless LAN adapters.)](https://usermanual.wiki/ASUSTeK-Computer/F9F/User-Guide-811702-Page-46.png)


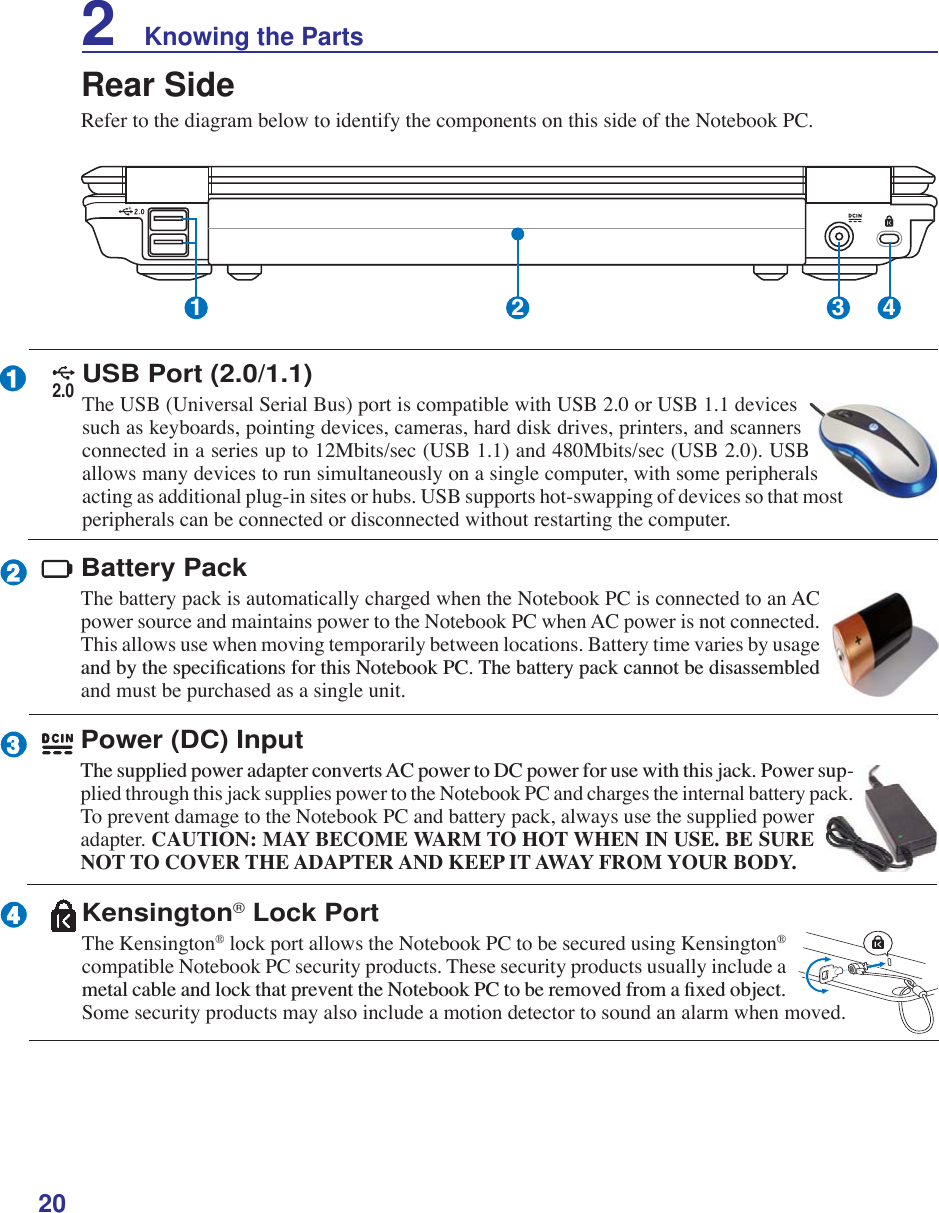
![56A AppendixKensington® LocksKensington® locks (or compatible) allow the Notebook PC to be secured usually using a metal cable and ORFNWKDWSUHYHQWWKH1RWHERRN3&WREHUHPRYHGIURPDÀ[HGREMHFW6RPHVHFXULW\SURGXFWVPD\DOVRinclude a motion detector to sound an alarm when moved./DVHU&ODVVLÀFDWLRQVAs lasers became more numerous and more widely used, the need to warn users of laser hazards became DSSDUHQW7RPHHWWKLVQHHGODVHUFODVVLÀFDWLRQVZHUHHVWDEOLVKHG&XUUHQWFODVVLÀFDWLRQOHYHOVYDU\IURPoptically safe, requiring no controls (Class 1) to very hazardous, requiring strict controls (Class 4).CLASS 1: A Class 1 laser or laser system emits levels of optical energy that are eye-safe and consequently require no controls. An example of this class of laser system is the checkout scanning device found in most grocery stores or lasers used in optical drives.CLASS 2 & CLASS 3A: Class 2 and Class 3A lasers emit visible, continuous-wave (CW) optical ra-diation levels slightly above the maximum permissible exposure (MPE) level. Although these lasers can cause eye damage, their brightness usually causes observers to look away or blink before eye damage occurs. These lasers have strict administrative controls requiring placement of signs warning personnel not to stare directly into the beam. Class 3A lasers must not be viewed with optically-aided devices.CLASS 3B: Class 3B lasers, and Class 3A lasers with outputs of 2.5mW, are hazardous to personnel ZKRDUHZLWKLQWKHEHDPSDWKDQGORRNDWWKHEHDPVRXUFHGLUHFWO\RUE\VSHFXODUUHÁHFWLRQ7KHVHODVHUVFDQQRWSURGXFHKD]DUGRXVGLIIXVHUHÁHFWLRQV3HUVRQQHOZRUNLQJZLWKWKHVHODVHUVVKRXOGZHDUappropriate protective eyewear during any operation of the laser. Class 3B lasers have both administra-tive and physical controls to protect personnel. Physical controls include limited access work areas. Administrative controls include special warning signs posted outside the entrances to the laser work spaces and lights outside the entrances that warn personnel when the lasers are in use.CLASS 4: Class 4 lasers are high-power lasers that will cause damage to unprotected eyes and skin WKURXJKLQWUDEHDPYLHZLQJDQGVSHFXODURUGLIIXVHUHÁHFWLRQV&RQVHTXHQWO\QRSHUVRQQHOVKRXOGbe in a room where a Class 4 laser is operating without proper eye protection.PCI Bus (Peripheral Component Interconnect Local Bus)3&,EXVLVDVSHFLÀFDWLRQWKDWGHÀQHVDELWGDWDEXVLQWHUIDFH3&,LVDVWDQGDUGZLGHO\XVHGE\H[-pansion card manufacturers.POST (Power On Self Test):KHQ\RXWXUQRQWKHFRPSXWHULWZLOOÀUVWUXQWKURXJKWKH3267DVHULHVRIVRIWZDUHFRQWUROOHGGLDJ-nostic tests. The POST checks system memory, the motherboard circuitry, the display, the keyboard, the diskette drive, and other I/O devices.](https://usermanual.wiki/ASUSTeK-Computer/F9F/User-Guide-811702-Page-56.png)
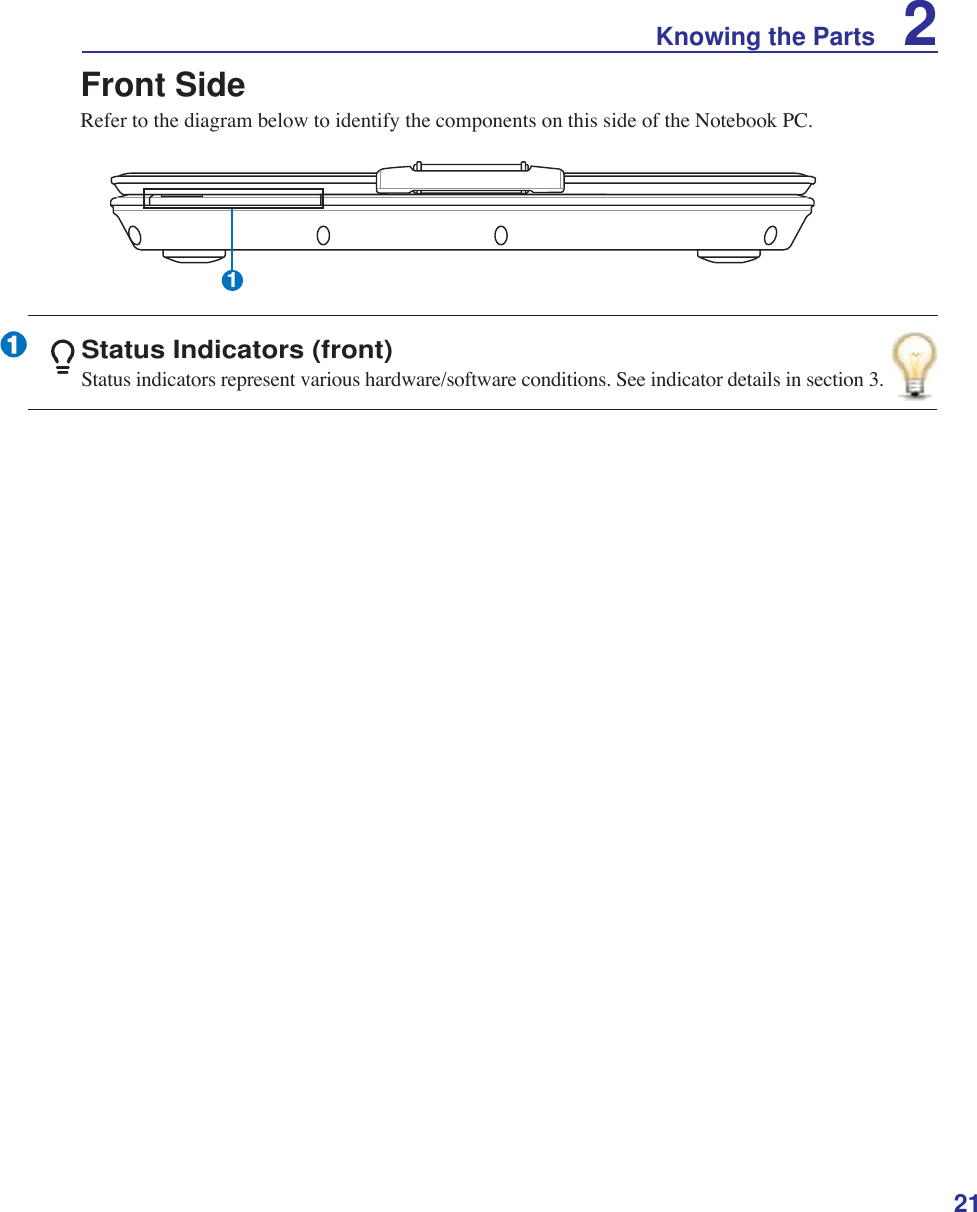
![58A AppendixDeclarations and Safety StatementsDVD-ROM Drive Information7KH1RWHERRN3&FRPHVZLWKDQRSWLRQDO'9'520GULYHRUD&'520GULYH,QRUGHUWRYLHZ'9'WLWOHV\RXPXVWLQVWDOO\RXURZQ'9'YLHZHUVRIWZDUH2SWLRQDO'9'YLHZHUVRIWZDUHPD\EHSXUFKDVHGZLWKWKLV1RWHERRN3&7KH'9'520GULYHDOORZVWKHXVHRIERWK&'DQG'9'GLVFVRegional Playback Information3OD\EDFNRI'9'PRYLHWLWOHVLQYROYHVGHFRGLQJ03(*YLGHRGLJLWDO$&DXGLRDQGGHFU\SWLRQRI&66protected content. CSS (sometimes called copy guard) is the name given to the content protection scheme adopted by the motion picture industry to satisfy a need to protect against unlawful content duplication. Although the design rules imposed on CSS licensors are many, one rule that is most relevant is playback re-VWULFWLRQVRQUHJLRQDOL]HGFRQWHQW,QRUGHUWRIDFLOLWDWHJHRJUDSKLFDOO\VWDJJHUHGPRYLHUHOHDVHV'9'YLGHRWLWOHVDUHUHOHDVHGIRUVSHFLÀFJHRJUDSKLFUHJLRQVDVGHÀQHGLQ´5HJLRQ'HÀQLWLRQVµEHORZ&RS\ULJKWODZVUHTXLUHWKDWDOO'9'PRYLHVEHOLPLWHGWRDSDUWLFXODUUHJLRQXVXDOO\FRGHGWRWKHUHJLRQDWZKLFKLWLVVROG:KLOH'9'PRYLHFRQWHQWPD\EHUHOHDVHGIRUPXOWLSOHUHJLRQV&66GHVLJQUXOHVUHTXLUHWKDWDQ\V\VWHPcapable of playing CSS encrypted content must only be capable of playing one region.5HJLRQ'HÀQLWLRQVRegion 1Canada, US, US TerritoriesRegion 2Czech, Egypt, Finland, France, Germany, Gulf States, Hungary, Iceland, Iran, Iraq, Ireland, Italy, Japan, Netherlands, Norway, Poland, Portugal, Saudi Arabia, Scotland, South Africa, Spain, Sweden, Switzer-land, Syria, Turkey, UK, Greece, Former Yugoslav Republics, SlovakiaRegion 3Burma, Indonesia, South Korea, Malaysia, Philippines, Singapore, Taiwan, Thailand, VietnamRegion 4$XVWUDOLD&DULEEHDQ ([FHSW867HUULWRULHV&HQWUDO$PHULFD 1HZ=HDODQG 3DFLÀF,VODQGV 6RXWKAmericaRegion 5CIS, India, Pakistan, Rest of Africa, Russia, North KoreaRegion 6China127(7KHUHJLRQVHWWLQJPD\EHFKDQJHGXSWRÀYHWLPHVXVLQJWKHYLHZHUVRIWZDUHthen it can only play DVD movies for the last region setting. Changing the region code after that will require factory resetting which is not covered by warranty. If resetting is desired, shipping and resetting costs will be at the expense of the user.](https://usermanual.wiki/ASUSTeK-Computer/F9F/User-Guide-811702-Page-58.png)
![62A AppendixR&TTE Directive (1999/5/EC)7KHIROORZLQJLWHPVZHUHFRPSOHWHGDQGDUHFRQVLGHUHGUHOHYDQWDQGVXIÀFLHQWIRUWKH577(5DGLR7HOHFRPPXQLFDWLRQV7HUPLQDO(TXLSPHQWGLUHFWLYH (VVHQWLDOUHTXLUHPHQWVDVLQ>$UWLFOH@ 3URWHFWLRQUHTXLUHPHQWVIRUKHDOWKDQGVDIHW\DVLQ>$UWLFOHD@ 7HVWLQJIRUHOHFWULFVDIHW\DFFRUGLQJWR>(1@ 3URWHFWLRQUHTXLUHPHQWVIRUHOHFWURPDJQHWLFFRPSDWLELOLW\LQ>$UWLFOHE@ 7HVWLQJIRUHOHFWURPDJQHWLFFRPSDWLELOLW\LQ>(1@>(1@ 7HVWLQJDFFRUGLQJWR>@ (IIHFWLYHXVHRIWKHUDGLRVSHFWUXPDVLQ>$UWLFOH@ 5DGLRWHVWVXLWHVDFFRUGLQJWR>(1@FCC Radio Frequency Interference Requirements7KLVGHYLFHLVUHVWULFWHGWR,1'22586(GXHWRLWVRSHUDWLRQLQWKHWR*+]IUHTXHQF\UDQJHFCC requires this product to be used indoors for the frequency range 5.15 to 5.25GHz to reduce the potential for harmful interference to co-channel of the Mobile Satellite Systems.IMPORTANT: This device and its antenna(s) must not be co-located or operating inconjunction with any other antenna or transmitter.FCC Radio Frequency (RF) Exposure Caution StatementThis equipment complies with FCC RF exposure limits set forth for an uncontrolled environment. To maintain compliance with FCC RF exposure compliance requirements, please follow operation instructions in the user’s manual. This equipment is for operation within 5.15 GHz and 5.25GHz frequency ranges and is restricted to indoor environments only.)&&&DXWLRQ$Q\FKDQJHVRUPRGLÀFDWLRQVQRWH[SUHVVO\DSSURYHGE\WKHSDUW\UH-sponsible for compliance could void the user’s authority to operate this equipment. “The manufacturer declares that this device is limited to Channels 1 through 11 in the *+]IUHTXHQF\E\VSHFLÀHGÀUPZDUHFRQWUROOHGLQWKH86$µThis equipm ent com plies with EU RF radiation exposure limits of 2 W/kg.802.11b=0.342 W/kg, 802.11g=0.224W /kg, 802.11a (5200M H z)= 0.287W /kg, 802.11a (5800M H z)= 0.236W /kg](https://usermanual.wiki/ASUSTeK-Computer/F9F/User-Guide-811702-Page-62.png)
![63Appendix AFrance Restricted Wireless Frequency BandsSome areas of France have a restricted frequency band. The worst case maximum authorized power indoors are: • 10mW for the entire 2.4 GHz band (2400 MHz–2483.5 MHz) • 100mW for frequencies between 2446.5 MHz and 2483.5 MHzNOTE: Channels 10 through 13 inclusive operate in the band 2446.6 MHz to 2483.5 MHz.There are few possibilities for outdoor use: On private property or on the private property of public SHUVRQVXVHLVVXEMHFWWRDSUHOLPLQDU\DXWKRUL]DWLRQSURFHGXUHE\WKH0LQLVWU\RI'HIHQVHZLWKPD[LPXPauthorized power of 100mW in the 2446.5–2483.5 MHz band. Use outdoors on public property is not permitted.In the departments listed below, for the entire 2.4 GHz band: • Maximum authorized power indoors is 100mW • Maximum authorized power outdoors is 10mW 'HSDUWPHQWVLQZKLFKWKHXVHRIWKH²0+]EDQGLVSHUPLWWHGZLWKDQ(,53RIOHVVWKDQ100mW indoors and less than 10mW outdoors:01 Ain Orientales 02 Aisne 03 Allier 05 Hautes Alpes08 Ardennes 09 Ariège 11 Aude 12 Aveyron &KDUHQWH 'RUGRJQH 'RXEV 'U{PH 32 Gers 36 Indre 37 Indre et Loire 41 Loir et Cher45 Loiret 50 Manche 55 Meuse 58 Nièvre 1RUG 2LVH 2UQH 3X\GX'{PH64 Pyrénées Atlantique 66 Pyrénées 67 Bas Rhin 68 Haut Rhin +DXWH6D{QH 6D{QHHW/RLUH 3DULV 7DUQHW*DURQQH84 Vaucluse 88 Vosges 89 Yonne 90 Territoire de Belfort94 Val de Marne This requirement is likely to change over time, allowing you to use your wireless LAN card in more areas within France. Please check with ART for the latest information (www.art-telecom.fr) NOTE: Your WLAN Card transmits less than 100mW, but more than 10mW.Wireless Operation Channel for Different DomainsN. America 2.412-2.462 GHz Ch01 through CH11Japan 2.412-2.484 GHz Ch01 through Ch14Europe ETSI 2.412-2.472 GHz Ch01 through Ch13](https://usermanual.wiki/ASUSTeK-Computer/F9F/User-Guide-811702-Page-63.png)
![66A AppendixService warning label:$51,1*0DNLQJDGMXVWPHQWVRUSHUIRUPLQJSURFHGXUHVRWKHUWKDQWKRVHVSHFLÀHGin the user’s manual may result in hazardous laser exposure. Do not attempt to disas-semble the optical drive. For your safety, have the optical drive serviced only by an authorized service provider.CAUTION: INVISIBLE LASER RADIATION WHEN OPEN. DO NOT STARE INTO BEAM OR VIEW DIRECTLY WITH OPTICAL INSTRUMENTS.CDRH Regulations7KH&HQWHUIRU'HYLFHVDQG5DGLRORJLFDO+HDOWK&'5+RIWKH86)RRGDQG'UXJ$GPLQLVWUDWLRQLPSOH-mented regulations for laser products on August 2, 1976. These regulations apply to laser products manu-factured from August 1, 1976. Compliance is mandatory for products marketed in the United States.WARNING: Use of controls or adjustments or performance of procedures other than WKRVHVSHFLÀHGKHUHLQRULQWKHODVHUSURGXFWLQVWDOODWLRQJXLGHPD\UHVXOWLQKD]DUG-ous radiation exposure.Macrovision Corporation Product NoticeThis product incorporates copyright protection technology that is protected by method claims of certain U.S.A. patents and other intellectual property rights owned by Macrovision Corporation and other rights owners. Use of this copyright protection technology must be authorized by Macrovision Corporation, and is intended for home and other limited viewing uses only unless otherwise authorized by Macrovision Corporation. Reverse engineering or disassembly is prohibited.Optical Drive Safety InformationLaser Safety Information,QWHUQDORUH[WHUQDORSWLFDOGULYHVVROGZLWKWKLV1RWHERRN3&FRQWDLQVD&/$66/$6(5352'8&7/DVHUFODVVLÀFDWLRQVFDQEHIRXQGLQWKHJORVVDU\DWWKHHQGRIWKLVXVHU·VPDQXDO](https://usermanual.wiki/ASUSTeK-Computer/F9F/User-Guide-811702-Page-66.png)