ASUSTeK Computer GALAXY3 PDA Phone User Manual users manual 1
ASUSTeK Computer Inc PDA Phone users manual 1
Contents
- 1. users manual 1
- 2. users manual 2
- 3. zx1 users manual 1
- 4. zx1 users manual 2
users manual 1
P560
User Manual
2
E3588
First Edition
April 2008
Copyright © 2008 ASUSTek Computers, Inc. All Rights Reserved.
No part of this manual, including the products and software described in it, may be reproduced,
transmitted, transcribed, stored in a retrieval system, or translated into any language in any form or by any
means, except documentation kept by the purchaser for backup purposes, without the express written
permission of ASUS Telecom (“ASUS”).
Product warranty or service will not be extended if: (1) the product is repaired, modied or altered, unless
such repair, modication of alteration is authorized in writing by ASUS; or (2) the serial number of the
product is defaced or missing.
ASUS PROVIDES THIS MANUAL “AS IS” WITHOUT WARRANTY OF ANY KIND, EITHER EXPRESS
OR IMPLIED, INCLUDING BUT NOT LIMITED TO THE IMPLIED WARRANTIES OR CONDITIONS OF
MERCHANTABILITY OR FITNESS FOR A PARTICULAR PURPOSE. IN NO EVENT SHALL ASUS, ITS
DIRECTORS, OFFICERS, EMPLOYEES OR AGENTS BE LIABLE FOR ANY INDIRECT, SPECIAL,
INCIDENTAL, OR CONSEQUENTIAL DAMAGES (INCLUDING DAMAGES FOR LOSS OF PROFITS,
LOSS OF BUSINESS, LOSS OF USE OR DATA, INTERRUPTION OF BUSINESS AND THE LIKE),
EVEN IF ASUS HAS BEEN ADVISED OF THE POSSIBILITY OF SUCH DAMAGES ARISING FROM ANY
DEFECT OR ERROR IN THIS MANUAL OR PRODUCT.
SPECIFICATIONS AND INFORMATION CONTAINED IN THIS MANUAL ARE FURNISHED FOR
INFORMATIONAL USE ONLY, AND ARE SUBJECT TO CHANGE AT ANY TIME WITHOUT NOTICE,
AND SHOULD NOT BE CONSTRUED AS A COMMITMENT BY ASUS. ASUS ASSUMES NO
RESPONSIBILITY OR LIABILITY FOR ANY ERRORS OR INACCURACIES THAT MAY APPEAR IN THIS
MANUAL, INCLUDING THE PRODUCTS AND SOFTWARE DESCRIBED IN IT.
Products and corporate names appearing in this manual may or may not be registered trademarks or
copyrights of their respective companies, and are used only for identication or explanation and to the
owners’ benet, without intent to infringe.
3
Table of Contents
Table of Contents ................................................................................... 3
Safety information ............................................................................... 12
Mobile phone etiquette ........................................................................ 18
Mobile manners............................................................................................. 18
Specications ...................................................................................... 19
Package contents ................................................................................ 20
Chapter 1: Knowing your device
Getting to know your device ............................................................... 22
Layout ..................................................................................................... 22
Getting your device ready ................................................................... 25
Installing the SIM card and battery................................................................ 25
Charging the battery...................................................................................... 27
Installing and removing a microSD card ....................................................... 28
Starting up ............................................................................................ 29
Powering your device .................................................................................... 29
Using the stylus ............................................................................................. 29
Calibrating your device.................................................................................. 30
Locking your device ...................................................................................... 30
4
The Home screen ................................................................................. 31
ASUS Today .................................................................................................. 32
The Today screen .......................................................................................... 38
Using MultiHome ........................................................................................... 43
AnyTime Launcher .............................................................................. 44
Searching for information ................................................................... 46
Getting Help ......................................................................................... 46
Chapter 2: Entering data
Using the Input Panel .......................................................................... 48
Using the Block Recognizer .......................................................................... 48
Using the onscreen keyboard ....................................................................... 48
Using the Letter Recognizer.......................................................................... 49
Using the Transcriber .................................................................................... 50
Writing and drawing on the screen .................................................... 51
Recording voice ................................................................................... 52
Chapter 3: Device Synchronization
Synchronizing your device ................................................................. 54
Microsoft® ActiveSync ......................................................................... 54
Synchronizing via mini-USB .......................................................................... 56
Synchronizing via Bluetooth® ....................................................................... 57
Synchronizing with an Exchange Server....................................................... 58
5
Chapter 4: Phone features
Using the phone ................................................................................... 60
Phone pad ..................................................................................................... 60
Turning off the phone function ...................................................................... 60
Adjusting the volume ..................................................................................... 61
Making calls ......................................................................................... 62
Making a voice call ........................................................................................ 62
Making emergency calls................................................................................ 67
Making international calls .............................................................................. 67
Making a video call........................................................................................ 67
Video Call Setting .......................................................................................... 69
Receiving a call .................................................................................... 70
Options during a call ........................................................................... 71
Managing multiple calls ................................................................................. 72
ASUS CallFilter .................................................................................... 73
Launching the shortcut menu ........................................................................ 73
Managing the Accept list ............................................................................... 74
Managing the Reject list ................................................................................ 75
Chapter 5: Messaging
E-mail messaging ................................................................................ 78
Setting up an e-mail account......................................................................... 78
Sending an e-mail message.......................................................................... 80
6
Threaded SMS ...................................................................................... 83
Sending a threaded SMS .............................................................................. 83
MMS messaging ................................................................................... 84
Accessing MMS ............................................................................................ 84
Editing MMS settings .................................................................................... 84
Sending an MMS message ........................................................................... 85
Windows® Live ..................................................................................... 87
Using Hotmail® ............................................................................................. 87
Using Windows® Live Messenger ................................................................. 88
Chapter 6: Organizing your life
Using Contacts .................................................................................... 92
Viewing Contacts .......................................................................................... 92
Using SIM Manager ...................................................................................... 94
Using Calendar .................................................................................... 95
Scheduling an appointment........................................................................... 95
Viewing an appointment ................................................................................ 96
Viewing your schedule .................................................................................. 96
Using Tasks .......................................................................................... 97
The Tasks list ................................................................................................ 97
7
Chapter 7: Customizing your device
Customizing the Start menu ............................................................. 100
Using the Prole Manager ................................................................ 100
Customizing the Today screen ......................................................... 102
Entering your contact information ................................................... 103
Setting Sounds & Notications ........................................................ 103
Setting the date, time, and alarm ..................................................... 104
Setting ring tone ................................................................................ 105
Adding ring tone to selection ....................................................................... 105
Changing the ring tone ................................................................................ 105
Wake up settings ............................................................................... 106
Chapter 8: Getting connected
Using the Wireless Manger ............................................................... 108
Using Bluetooth® .............................................................................. 108
Activating Bluetooth in your device ............................................................. 109
Adding Bluetooth devices............................................................................ 109
Using Wi-Fi® .......................................................................................110
Turning on Wi-Fi ...........................................................................................110
Conguring wireless networks .....................................................................111
Adding a wireless network ...........................................................................112
Using Wi-Fi Manager ...................................................................................113
8
Setting a GPRS connection ...............................................................114
Connecting GPRS ........................................................................................115
Disconnecting GPRS ...................................................................................116
Using the GPRS Tool ...................................................................................116
Setting the network ............................................................................117
Conguring the network ...............................................................................117
Setting your preferred networks ...................................................................117
GSM/3G Networks ...............................................................................118
Chapter 9: GPS features
GPS Catcher ....................................................................................... 120
Updating GPS data ..................................................................................... 120
Setting GPS Catcher ................................................................................... 120
External GPS ...................................................................................... 121
Chapter 10: Multimedia features
Using the camera ............................................................................... 124
Launching the camera................................................................................. 124
Camera mode ............................................................................................. 125
Taking photos .............................................................................................. 128
Video mode ................................................................................................. 129
Recording videos ........................................................................................ 131
9
Viewing pictures and videos ............................................................ 132
Viewing pictures and videos ........................................................................ 132
Editing pictures and photos ......................................................................... 132
Streaming Player ............................................................................... 134
Playing a streaming le ............................................................................... 135
Connecting with bookmarks ........................................................................ 135
EziMusic ............................................................................................. 137
EziPhoto ............................................................................................. 138
YouTube&Flickr .................................................................................. 139
Using YouTube ............................................................................................ 139
Using Flickr ................................................................................................. 140
Chapter 11: Business features
Ur Time ............................................................................................... 142
Setting time ................................................................................................. 142
Setting alarm ............................................................................................... 142
Setting the World Cock ............................................................................... 142
Remote Calendar ............................................................................... 143
Synchronizing your calendar ....................................................................... 143
Setting Remote Calendar ............................................................................ 144
10
Meeting Time Planner ........................................................................ 145
WorldCard Mobile .............................................................................. 146
Remote Presenter ............................................................................. 147
Chapter 12: ASUS Special features
Finger Gesture feature ...................................................................... 152
Enabling the Gesture feature ...................................................................... 152
Using the Gesture ....................................................................................... 152
ASUS status icon ............................................................................... 154
ASUS Zip ............................................................................................ 156
Backup ................................................................................................ 157
Backing-up les ........................................................................................... 157
Restoring les ............................................................................................. 158
Newstation .......................................................................................... 159
Using Newstation ....................................................................................... 159
Using Newstation menus ............................................................................ 160
Chapter 13: Other features
Microsoft® Ofce Mobile ................................................................... 162
Excel® Mobile .............................................................................................. 163
OneNote® Mobile ......................................................................................... 165
PowerPoint® Mobile ..................................................................................... 165
Word® Mobile .............................................................................................. 166
11
ClearVue PDF ..................................................................................... 168
My Secrets .......................................................................................... 169
Auto Cleaner ..................................................................................... 170
Restoring default factory settings ................................................... 170
System information ........................................................................... 171
Task Manager ..................................................................................... 171
Removing programs .......................................................................... 172
Appendices
Notices ................................................................................................ 174
Specic Absorption Rate (SAR) ....................................................... 176
ASUS Contact information ................................................................ 179
12
Safety information
Phone care
Do not attempt to open the phone casing. There are no user serviceable parts inside and you might
damage sensitive electronic circuits and components. Unauthorized disassembly will void the warranty.
Do not leave your phone exposed to strong sunlight or excessive heat for a prolonged period. This may
damage it.
Do not handle your phone with wet hands or expose it to moisture or liquids of any kind. Continuous
changes from a cold to a warm environment may lead to condensation inside the phone, resulting in
corrosion and possible damage.
If you pack your phone in your suitcase during travel, beware of damage. Cramming a suitcase may crack
the LCD display. Remember to switch off your wireless connections during air travel.
As with all other radio devices, touching the built-in antenna area during telephone conversation may
impair the quality and lead to shorter standby time due to increased power consumption.
The battery
Your phone is equipped with a high performance Li-Ion battery. Observe the maintenance guidelines for a
longer battery life.
• Avoid charging in extremely high or low temperature. The battery has its optimum performance in an
ambient temperature of +5 °C to +50 °C.
• Do not store the battery near a re or heat source.
• Use only the battery approved by the manufacturer.
• Never replace the battery with a non-approved battery.
• Never soak the battery in water or any other liquid.
• Never try to open the battery as it contains substances that might be harmful if swallowed or allowed
to come into contact with unprotected skin.

13
• Never short-circuit the battery, as it may overheat and cause a re. Keep it away from jewellery and
other metal objects.
• Never dispose of the battery in re. It could explode and release harmful substances into the
environment.
• Never dispose of the battery with your regular household waste. Take it to a hazardous material
collection point.
• Do not touch the battery terminals.
The charger
• Avoid using the phone while charging.
• Use only the charger supplied with your phone.
• Never pull the charger cord to release it from the mains – pull the charger itself.
WARNING! There is a risk of explosion if the battery is replaced by an incorrect type.
Memory card
• Do not remove or insert a memory card or turn off the handset while data on the card is being read.
• Do not touch the metal terminals with your hands or metal objects.
• Do not bend the memory card or subject it to violent impacts. Keep it away from water and high
temperatures.
• Keep all memory cards out of the reach of small children.
• Do not short circuit the contact points or expose it to liquids or moisture. When not in use, keep it in
an antistatic container.
• Do not use force when inserting or handling the card, and do not expose it to excessive heat or strong
magnetic elds.

14
Cleaning and storing
• Your phone should always be handled with care and protected from dirt, dust and dampness. To
avoid scratches, never place your phone face down.
• If cleaning is necessary, switch the phone off and wipe carefully with a soft, slightly damp (not
wet) cloth. Use a cotton swab to clean the camera lens. Allow the phone to dry completely before
switching it on. Never use solvents for cleaning.
• If you are not going to use your phone for some time, fully charge the battery and store the phone in
a dry place away from direct sunlight. Your phone should be switched off during storage. Recharge
every 6 to 12 months.
• Never expose your phone to heat or strong sunlight.
• Never expose your phone to moisture or liquids of any kind.
• Do not paint your phone or otherwise block the keypad, microphone or earpiece function.
• Do not place stickers that may block the keypad or disturb other functions such as microphone,
earpiece, or camera lens.
WARNING! Failure to follow these instructions may lead to serious personal injury and possible property damage.
Driving safely
Never use handheld phones while driving. It is an offence, that while driving, to hold a phone or cradle it in
your neck at any point, during the setup, making or taking of a phone call, text message or any other data
related mobile communication. Use of fully installed car kits are still permitted, as are the use of alternate
handsfree accessories.
In the interest of safety, we would recommend the use of a cradle while using any form of handsfree
accessory.
While driving, we recommend that you use voicemail wherever possible, and that you listen to your
messages when you are not in the car. If you must make a handsfree call when driving, keep it brief.
Do not place objects, including both installed or portable wireless equipment, in the area over the airbag
15
or in the airbag deployment area. An airbag inates with great force. If the airbag inates, serious injury
could result.
Electronic devices
Most modern electronic equipment is shielded from RF energy.
However, certain electronic equipment may not be shielded against the RF signals from your device.
Pacemakers
The Health Industry Manufacturers’ Association recommends that a minimum separation of six (6”) inches
be maintained between a phone and a pacemaker to avoid potential interference with the pacemaker.
These recommendations are consistent with the independent research by and recommendations of
Wireless Technology Research.
If you have a pacemaker:
• Always keep your phone more than six inches (15cm) from your pacemaker when turned on.
• Do not carry your phone in your breast pocket.
• Use the ear opposite the pacemaker to minimize the potential for interference
• If you have any reason to suspect that interference is taking place, turn your phone off immediately.
Hearing aids
Some digital phones may interfere with some hearing aids. In the event of such interference, call ASUS
Customer Service to discuss alternatives.
Other medical devices
If you use any other personal medical device, consult the manufacturer of your device to determine if it is
adequately shielded from external RF energy. Your physician may be able to assist you in obtaining this
information.
16
Turn your phone off in healthcare facilities when any regulations posted in these areas instruct you to do
so.
Hospitals or healthcare facilities may be using equipment that could be sensitive to external RF energy.
Vehicles
RF signals may affect improperly installed or inadequately shielded electronic systems in motor vehicles.
Check with the manufacturer or its representative regarding your vehicle. You should also consult the
manufacturer of any equipment added to your vehicle.
Posted facilities
Turn your phone off where posted notices so require.
Magnetic media
Magnetic elds generated by mobile devices may damage data on magnetic storage media, such as
credit cards, computer discs or tapes. Do not place your phone next to such media.
You should never expose your phone to strong magnetic elds as this may cause temporary malfunction.
Other Safety Guidelines
Aircraft
Regulations prohibit using your phone while in the air. Switch off your phone before boarding an aircraft
or turn off the wireless connections.
Blasting areas
To avoid interfering with blasting operations, turn your phone off when in a ‘blasting area’ or in areas
posted: “Turn off two-way radio.” Obey all signs and instructions.
17
Potentially explosive environments
Turn your phone off when in any area with a potentially explosive environment and obey all signs and
instructions.
Sparks in such areas could cause an explosion or re resulting in bodily injury or even death.
Areas with a potentially explosive environment are often, but not always, clearly marked. They include
fuelling areas such as gas stations, below decks on boats, fuel or chemical transfer or storage facilities,
vehicles using liquied petroleum gas (such as propane or butane), areas where the air contains
chemicals or articles, such as grain, dust, or metal powders, and any other area where you would
normally be advised to turn off your vehicle’s engine.
Choking
Keep your phone away from children as the SIM card and other small parts present a choking hazard.
Cautions
Your device is a high quality piece of equipment. Before operating, read all instructions and cautionary
markings on (1) AC Adapter (2) Battery and (3) Product Using Battery.
• Do not use this device in an extreme environment where high temperature or high humidity exists.
• Do not abuse the device. Avoid striking, shaking or giving it a shock. When not using the unit, lay it
down to avoid possible damage due to instability.
• Do not expose this device to rain or other liquid.
• Do not use unauthorized accessories.
• Do not disassemble the phone or its accessories. If service or repair is required, return the unit to an
authorized service center. If the unit is disassembled, a risk of electric shock or re may result.
• Do not short-circuit the battery terminals with metal items.
This category II radiocommunication device complies with Industry Canada Standard RSS-310.
18
Mobile phone etiquette
As mobile phone usage rises, there is now a need to create a set of manners in using a mobile phone
in professional and social settings. This section provides you with basic tips with regards to respecting
others while using your mobile phone.
Mobile manners
• Avoid talking on your mobile phone when in enclosed public places such as theaters, libraries,
museums, places of worship, elevators, or auditoriums.
• Avoid using your mobile phone while doing other tasks such as driving, shopping, banking, waiting in
line, or conducting other personal business.
• Avoid using annoying ring tones.
• Avoid taking a call on your mobile phone during business meetings, appointments, or interviews.
• Look for a private place to take a call, and keep your phone conversations brief.
• Talk on your mobile phone quietly, and do not shout.
• Put your mobile phone on silent or vibrator mode to avoid disturbing others.
• Ask permission before taking a picture or a video clip of another person.
• Avoid using capital letters when sending SMS messages as this can be interpreted as shouting.
• When making a call, introduce yourself to the person at the other end of the line, and do not hang up
without saying goodbye.

19
Specications
Processor TI OMAPTM 2431 450MHz + EMP U360
Operating System Microsoft® Windows Mobile™ 6.1 Professional
Memory 256 MB NAND Flash ROM
128 MB SDRAM
Display 2.8-inch, 240 x 320 TFT Touchscreen Liquid Crystal Display (LCD)
with 65,536 color and back-lighting
Frequency band HSDPA 3.6Mbps, UMTS 850/1900/2100Mhz, EDGE/GPRS/GSM
(850/900/1800/1900Mhz): Class 10
GPS Built-in SiRF star III chipset
GPRS Class B, Multi-slot class 10
Camera Back: 3.0 mega-pixel auto focus camera. Front: VGA camera
Connectivity Bluetooth : V2.0 EDR
USB : USB 2.0 compatible
WLAN : 802.11b/g
Battery capacity 1100 mAh Lithium Ion
Expansion slot MicroSD card slot
Audio Mini-USB audio port
Built-in microphone and output speaker
Weight 120.5g (with battery)
Dimension 116.4 x 64.2 x 13.4 mm
Talk time* 3G: 2-3 hrs; 2G: 4-5 hrs
Standby time* 150-200 hrs
NOTE: Specications are subject to change without notice.
* Depending on network environment and phone usage.

20
Package contents
Check your product package for the following items:
* Optional
NOTE: If any of the above items is damaged or missing, contact your retailer.
Standard items
• ASUS P560 device
• Battery
• AC Adapter
• Mini-USB cable
• Headset
• Stylus
• Protection case
• Getting Started CD
• Quick Start Guide
• Warranty Card
• microSD Card*
• Car mobile phone charger*
• Car Kit (PDA holder and windshield suction
pedestal)*

21
Knowing your device
Chapter 1
• Getting to know your device
• Getting your device ready
• Starting up
• The Home screen
• AnyTime Launcher
• Searching for information
• Getting Help
22
Getting to know your device
Layout
1
2
3
4
5
6
7
8 9
10
11
12
13
14
15 16
17
18
19
20
21
22
23
24

23
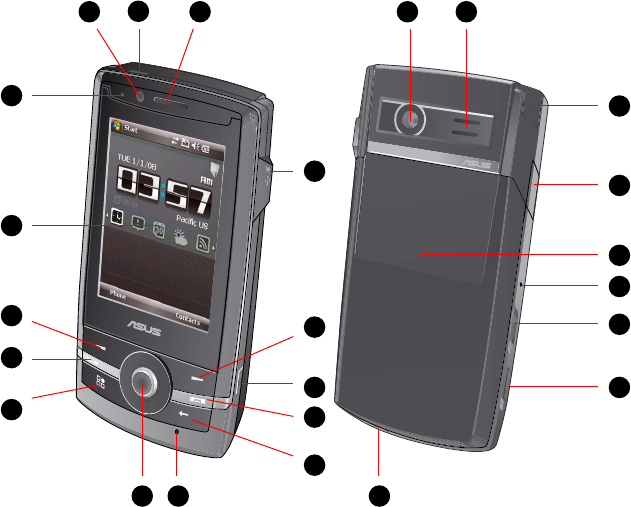
No. Item Description
1Power button Press and hold to power on/off the device.
Press to set suspend mode or to wake device from sleep mode
2Front camera lens Front camera lens for video call.
3Notication LED This multi-color LED noties the following:
• Green - Phone fully charged.
• Flashing green - Network detected.
• Red - Phone is charging.
• Flashing red - Event notication.
• Flashing blue - Bluetooth®, Wi-Fi®, or GPS is ON.
4LCD touch screen This 2.8-inch, 65,536-color, 240 x 320-resolution, touchscreen
TFT LCD allows you to write, draw, or make selections using
the stylus.
5Left Soft key Performs the command indicated above the button.
6Call key Press to receive an incoming call or to make a voice call.
Press and hold to make a video call.
7Anytime Launcher key Press to launch the Anytime Launcher application.
8Navigation key This nine-direction navigation key allows you to navigate
through menus. Press down to conrm a command.
9Microphone The built-in microphone enables you to make or receive phone
calls, record sounds and voice, or give voice commands.
10 Clear key Press to clear the input to the left or to close/exit an open
application.
11 End key Press to end a call.

24
No. Item Description
12 Camera button Press to launch the camera. In camera mode, half-press to focus
the object, and full-press to take a picture. In video mode, press to
start recording and press again to stop.
13 Right Soft key Performs the command indicated above the button.
14 Mini-USB connector
cover
Open it to use the Mini-USB connector to synchronize your data,
charge the battery, or insert the headset.
15 Earpiece receiver Allows you to listen to an active call.
16 Back camera lens 3.0 megapixel lens for taking pictures and video clips.
17 Carrying strap hole Allows you to attach a strap to the device.
18 MicroSD card slot Insert a microSD storage card into this slot.
19 Hold button Slide downward to disable all keys including the LCD touch
screen.
20 Reset hole Using the stylus, press the reset hole to soft-reset your device.
21 Battery compartment Contains the battery that supplies power to the device.
22 Volume button Press to adjust volume of the device.
In calling mode, press to adjust phone volume.
23 Stylus Use the stylus to write, draw, or select items on the LCD touch
screen.
24 Output speaker Allows you to listen to audio media and phone calls.
25
Getting your device ready
Installing the SIM card and battery
Before you can make a phone call using your device, you need to install a Subscriber Identity Module
(SIM) card. The SIM card contains your phone number, subscriber details, phonebook, and additional
phone memory.
Your device comes with a rechargeable Lithium-Ion (Li-Ion) battery.
New batteries come partially discharged and should be fully charged before using them.
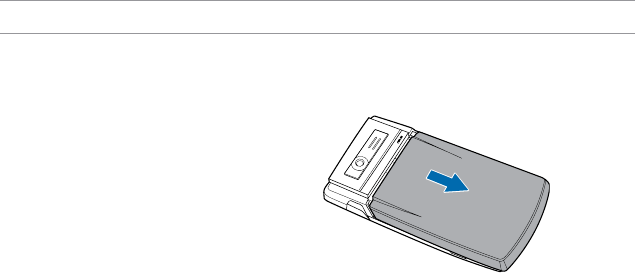
1. Remove the battery compartment cover.
CAUTION: Use only an ASUS qualied battery.
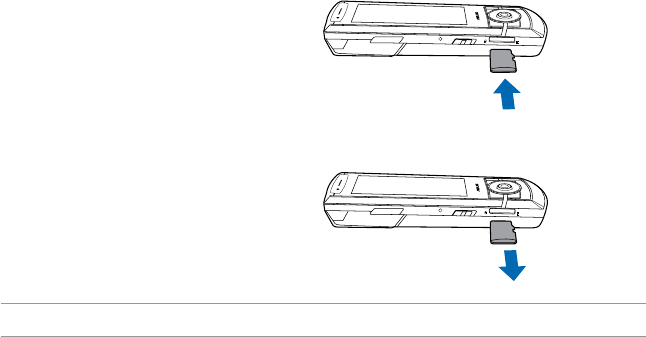
To install a SIM card and battery:
26
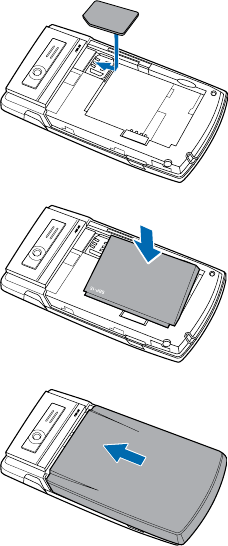
2. Insert the SIM card with its gold contacts
facing down and the notched corner oriented
to the upper left corner of the slot as shown.
3. Install the battery into the compartment with its
copper contacts properly aligned to the copper
conductor on the device.
4. Replace the battery compartment cover.
27
Charging the battery
The bundled battery is shipped partially charged. Charge the battery up to four hours before using for the
rst time.
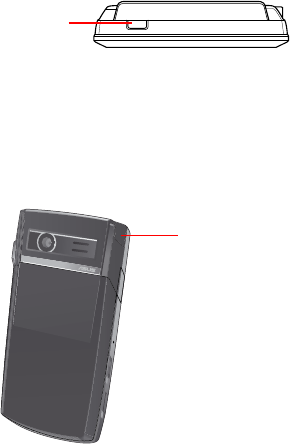
To charge battery:
1. Locate the mini-USB connector cover at the right side of your
device and lift it slightly to open.
CAUTION: DO NOT pull the mini-USB connector cover hardly nor
rip it with any sharp or hard stuff.
2. Connect the AC adapter plug into the mini-USB connector at the
right side of the device.
3. Connect the AC power plug into a grounded wall socket or
power strip.
NOTES:
• The notication LED turns red and the charging battery icon appears on the status bar indicating that the
battery is charging.
• If your battery gets totally discharged, you need to recharge it for at least twenty minutes before you can turn
it back on.
Lift to open
28
Installing and removing a microSD card
Your device is equipped with a microSD card slot. A microSD card provides you with
extended memory where you can store your les and data.
To install a microSD card:
1. Locate the microSD card slot at the left side of the device.
2. With the golden ngers facing down, insert
the microSD card into the slot until it snaps
properly.
3. To remove, push the card until it ejects out, then
remove the card safely.
NOTE: The microSD card is an optional accessary.
29
Starting up
Powering your device
Ensure that your device is fully-charged before using the device for the rst time.
To turn on power:
1. Press and hold the Power button on top of the device.
Using the stylus
The stylus is a pen-like device found behind the upper left corner of your device.
Stylus • Use the stylus to write, draw, select, or drag an
item on the screen.
• Single-tap an item to select or open it.
• Tap and hold an item to see a menu.
2. Follow the onscreen instructions to align the screen and set the local time zone.
Power button
30
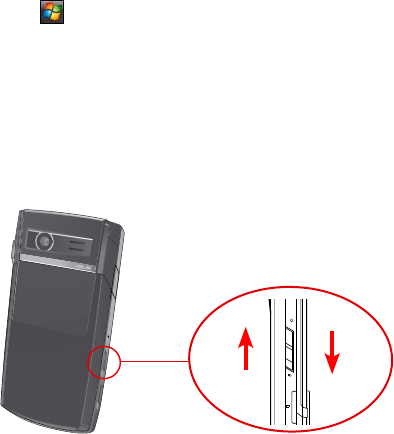
Locking your device
You can lock the keys, buttons, and touch screen of your device to avoid inadvertently dialing numbers or
launching any application.
Calibrating your device
Calibrating your device ensures that the item you tap on the screen is activated. This involves tapping the
center of targets that appear in various locations on the screen.
To calibrate your screen:
1. Tap > Settings > System tab, then tap Screen icon.
2. On the General tab, tap Align Screen, then follow the calibration screen instructions.
Release Lock
• Locate the Hold button and slide
downward to lock.
• Slide upward to unlock.
31
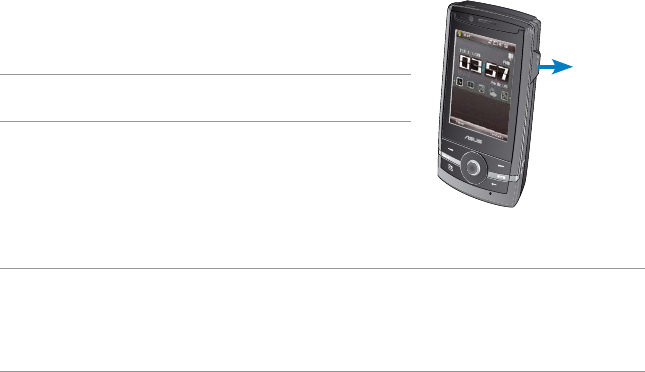
The Home screen
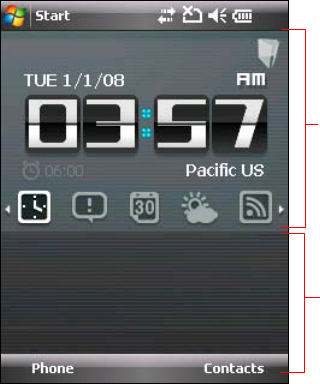
The Home screen on your device displays two parts: the ASUS Today and the Today screens.
ASUS Today screen
Today screen
32
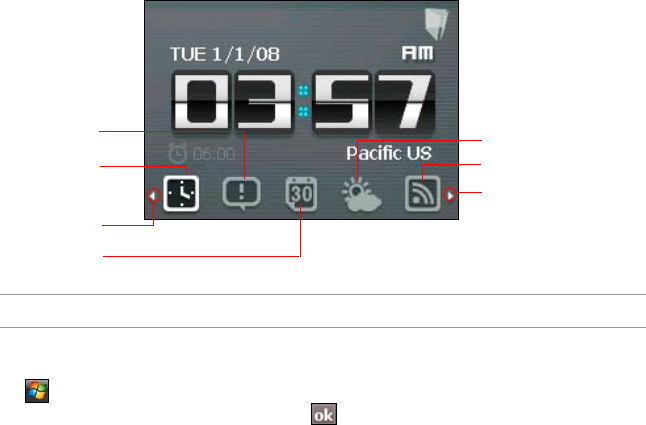
ASUS Today
ASUS Today on your device’s home screen enables you to view or change your time/date settings,
noties you of your missed calls and SMS/MMS/e-mail messages, displays your day’s appointments,
updates you on the current weather and latest news, and enables you to add and play media les on your
device.
Tap to open missed
calls/new messages
Tap to launch Newstation
Tap to view the weather updates
Tap to view time
information
Tap to open Calendar
Tap to move through
icons to your left
Tap to move through icons
to your right
NOTE: You can disable the ASUS Today from your Home screen following the instructions below.
To disable the ASUS Today
1. Tap > Settings > Today > Items tab.
2. Deselect the check box of Asus Today, then tap .
33
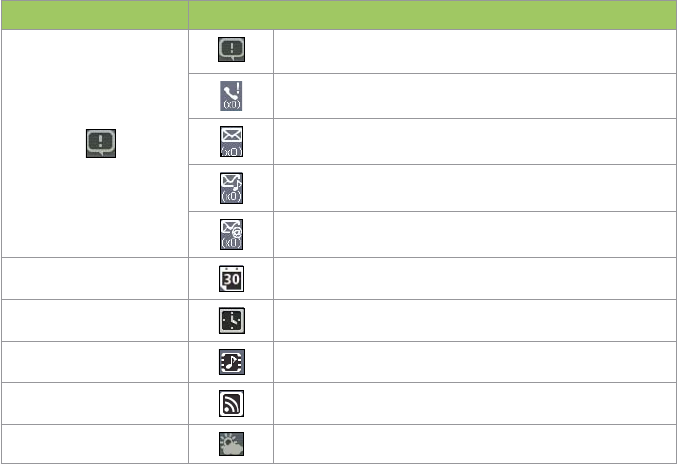
Icons
Refer to the table below for the ASUS Today icons.
Icon Description
Alert icon Alerts you on your missed calls, and new SMS/MMS/
e-mail messages.
Alerts you on your missed calls.
Alerts you on your new SMS messages.
Alerts you on your new MMS messages.
Alerts you on your new e-mail messages.
Calendar icon Displays your appointment for the day.
Date/time icon Displays your date/time settings.
Media icon Enables you to add and play media les.
News icon Displays the latest news.
Weather icon Displays the current weather.
34
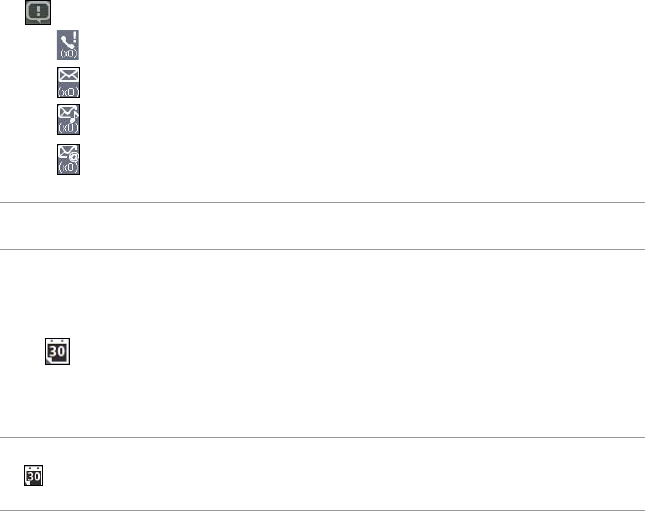
Viewing alerts
ASUS Today noties you of your missed calls, and new SMS/MMS/e-mail messages.
To view alerts
Tap , then tap any of the icons for the information that you want to view.
•
Tap to view your missed calls.
•
Tap to view/read your new SMS messages.
•
Tap to view/read your new MMS messages.
•
Tap to view/read your new e-mail messages.
NOTE: To read your e-mail messages, ensure that you are connected to the Internet via Wi-Fi or GPRS
connection. Refer to the Wi-Fi or GPRS sections in this user guide for more details.
Viewing your day’s appointment
To view your day’s appointment
Tap to view your day’s appointment in the display screen. If you want to change the
information, just click the display screen, then make the necessary changes on the Calendar
screen.
NOTE: You may also enter your calendar of activities or appointments from the ASUS Today screen.
Tap , then tap the display screen, and enter the information for your appointments. You will be notied of your
appointment on the day itself.

35
Obtaining the current weather data
ASUS Today enables you to obtain and view the latest weather data of any place around the world.
NOTES:
• Ensure that you are connected to the Internet via Wi-Fi or GPRS connection. Refer to the Wi-Fi or GPRS
sections in this user guide for more details.
• Before using this feature, ensure that you have congured the weather and network settings. For more
details on conguring the network settings, refer to the section Setting the network in Chapter 8 of the
user guide bundled in your Getting Started CD.
To congure the weather settings
1. Tap > Settings > ASUS Today.
2. Select Enable Weather Update.
3. Select the Country and City that you want to obtain the latest weather data for.
4. Tap when done.
To congure the network settings
1. Tap > Settings > Connections > Network Setting.
2. Select the Country and Operator from the dropdown lists. If your mobile service operator is not on
the list, tap the Auto Detect button.
3. When done, tap .
To obtain the current weather data
From the ASUS Today screen, tap , then tap the display screen to retrieve the latest weather
updates from the server.
36
Downloading the latest news updates
To download the latest news updates
NOTE: Before downloading news updates, ensure that you are connected to the Internet via Wi-Fi or GPRS
connection. Refer to the Wi-Fi or GPRS sections in this user guide for more details.
1. Tap , then tap the display screen. The Newstation screen is displayed.
2. From the Categories list, select the channel that you want to obtain the latest news updates from.
NOTE: Ensure that you are connected to the Internet to get the latest news updates.
3. Tap Menu > Update. Your news downloads are stored as RSS news feeds on your device and
displayed on the ASUS Today screen.
NOTE: You may read these stored RSS news feeds from the ASUS Today screen even without Internet
connection.

37
Playing media les
ASUS Today gives you quick access to the EziMusic, enabling you to play digital audio and video les
stored on your device or in a storage card. You can listen to media les through the speaker of your
device or through a headset.
NOTE: Your device may run low on memory and slow down if you store les on your device. We recommend that
you store audio and video les in a storage card.
To play media les
Tap , then tap the display screen. The EziMusic is launched. Refer to the section of EziMusic in
this user guide for more details on how to play media les.
38
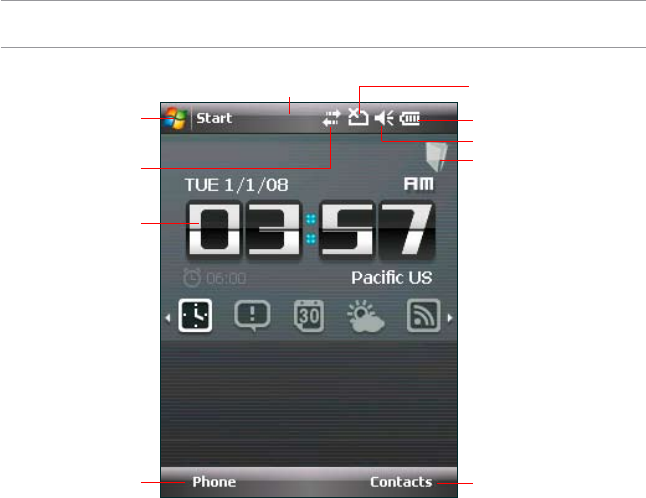
The Today screen
The Today screen displays information useful to you. You can congure the Today screen to have all the
important information that you need.
NOTE: To know more about customizing the Today screen, refer to the section Customizing the Today screen
in Chapter 7 of this user guide.
Tap to open the Start menu
Status bar
Indicates the battery status
Tap to adjust volume
Tap to launch MultiHome
Tap to view connectivity status
Tap to launch the phone function Tap to launch Contacts list
ASUS Today screen
Refer to section ASUS Today
in this User Guide.
Displays the signal status
(The icon shows no SIM card and no signal
When no SIM card is installed.)
39
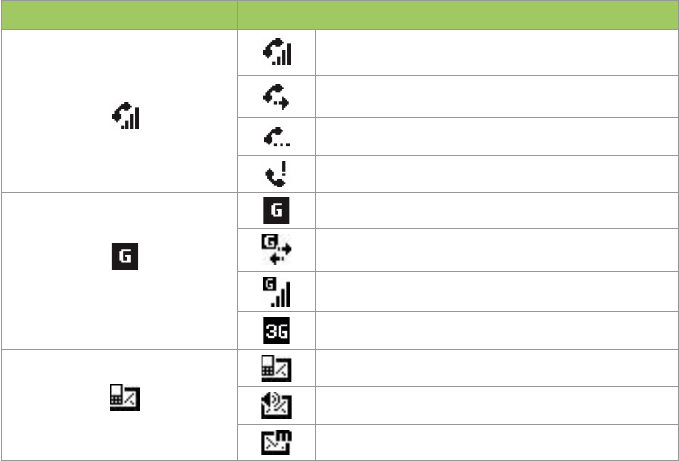
Icon Description
Call status Call in progress
Call forwarded
Call on hold
Missed call
General Packet Radio Service
(GPRS) connection status*
* This icon depends on your location and
mobile service provider.
GPRS available
Connecting via GPRS
Connected via GPRS
3rd Generation (3G) service available
Messaging status New Short Messaging Service (SMS) message
New voice mail
New Multimedia Messaging Service (MMS) message
Status indicators
Refer to the table below for the status indicators.
40
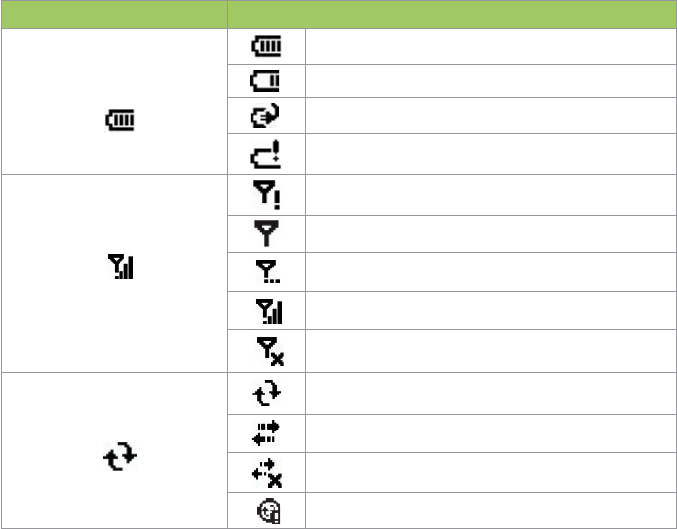
Icon Description
Battery status Battery fully charged
Battery partially charged
Battery charging
Battery low
Signal status No cellular phone service
No signal
Searching for cellular phone service
Indicates signal strength
Phone off.
ActiveSync connection
status ActiveSync synchronization in progress
Connecting with ActiveSync
ActiveSync connection not active
Synchronization error
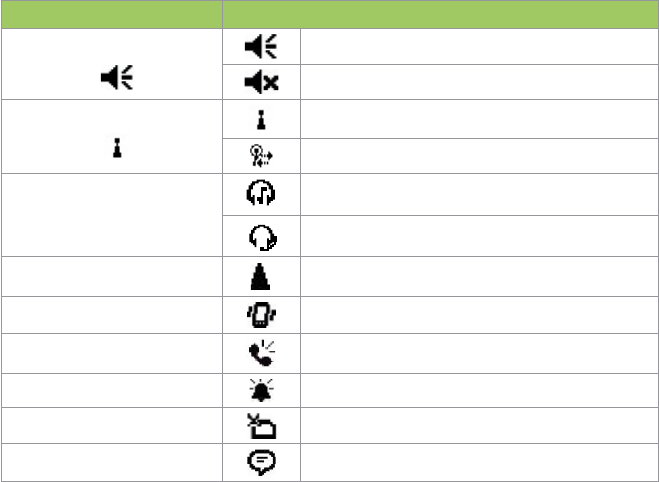
41
Icon Description
Sound status Sound ON
Sound OFF
Wi-Fi status Wi-Fi is not connected
Wi-Fi connected
Bluetooth headset
connection Bluetooth stereo headset connected
Hands-free on
Roaming service Roaming service. This icon appears if you have
international roaming feature.
Mode status Vibrate or Meeting mode on
Speakerphone status Speakerphone on
Alarm status Appears when you set the alarm
SIM card status No SIM card installed
Notication status Notice indicator

42
Screen orientation
You can set the screen to three different orientations:
1. Portrait
2. Landscape (right-handed)
3. Landscape (left-handed)
Set to Portrait mode to get a better view or better operation of certain applications on your device. Set to
Landscape when viewing pictures, video or viewing longer text les.
To change the screen orientation, tap > Settings > System tab > Screen, then select the orientation
you want.
Start menu
The Start menu contains various programs and applications that you commonly use. Tap to display
the Start menu items.
You can also customize the items that appear in the Start menu.
To customize the Start menu:
1. Tap > Settings > Personal tab > Menus.
2. Select the check boxes of the items you want to appear in the Start menu. You can select up to seven
items.
43
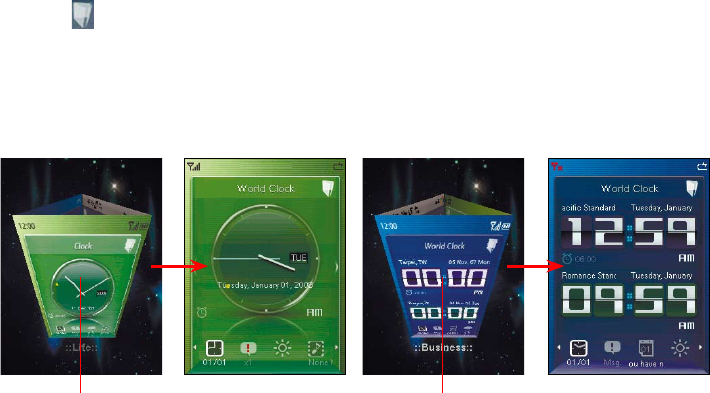
Using MultiHome
MultiHome provides three themes for the ASUS Today screen: Original, Business, and Life. You can
change the theme according to your preference.
To change the theme:
1. Tap from the ASUS Today screen to launch MultiHome.
2. To navigate through the Original, Business, and Life themes, push the navigation key leftward or
rightward, or draw a horizontal line on the screen with the stylus.
3. Tap the screen to apply your selected theme.
Tap the screen to apply the theme
to the ASUS Today screen.
Life theme Tap the screen to apply the theme
to the ASUS Today screen.
Business theme
44
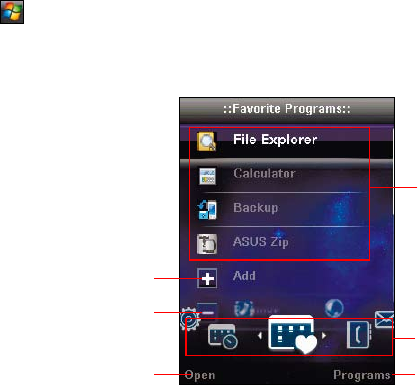
AnyTime Launcher
AnyTime Launcher is an alternative program that allows you to conveniently and quickly launch
applications, perform tasks, and change device settings.
To run the AnyTime Launcher, do any of the following:
• Tap > Programs > AnyTime Launcher.
• Press the AnyTime Launcher key.
Tap to open an application.
Use the navigation key to select.
Tap to add an application to the
Favorite Programs list.
Tap to remove an application from the
Favorite Programs list.
Tap to open the selected application. Tap to view all applications on the
device.

45
Icons
Use the navigation key to scroll through the following icons to open the list of applications or contacts under
them.
Icon Description
Favorite Programs: Allows you to add your favorite programs.
Recent Programs: Displays the recent opened programs.
Favorite Contacts: Allows you to add your favorite contacts.
Message Center: Allows you to access Messaging function and view missed calls.
Internet: Allows you to use Internet related applications. .
Multimedia: Allows you to use multimedia applications.
My Settings: Allows you to congure your device settings.

46
Getting Help
You can easily nd Help for using any program on the device.
To get help for a program:
From the Today screen or program, tap > Help. Then a page opens with links to topics that
explain how to use the program.
Searching for information
The Search tool enables you to search for les and other items stored in your device or in the external
MicroSD card. You can search by le name or by words located in various applications including the
Calendar, Contacts, Excel Mobile, Word Mobile, Help, Messages, Notes, and Tasks. You can also lter
your search to les larger than 64 KB.
To search for a le or an item:
1. Tap > Programs > Search.
2. In Search for eld, enter the le name, word, or other information you want to search.
3. In Type eld, select the data type to help you lter your search.
4. Tap Search. Found items are listed in Results.
5. In the Results list, tap the item with the information you need.

47
Entering data
Chapter 2
• Using the Input Panel
• Writing and drawing on the screen
• Recording voice
48
Using the Input Panel
When you start an application or select a eld that requires text, symbols, or numbers, the Input Panel
icon appears on the menu bar. The Input Panel allows you to select various input methods including:
Block Recognizer, Keyboard, Letter Recognizer, and Transcriber.
Using the Block Recognizer
The Block Recognizer allows you to use a single stroke to write letters, numbers, symbols, or
punctuations, which are converted into typed text.
To use the Block Recognizer:
1. In an application that accepts user input, tap the Input Panel arrow, then tap Block Recognizer.
2. Write letters, numbers, symbols, or punctuations in the designated writing area.
• Write letters on the abc (left) area of the box.
• Write numbers on the 123 (right) area of the box.
• Tap the space button to input a space.
• Tap the special symbols button to input
symbols, punctuations and other special characters.
• Tap Help button for help on how to write characters.
Using the onscreen keyboard
With the onscreen keyboard, you can enter texts, symbols, numbers, or other special characters.
To input text using the onscreen keyboard:
1. In an application that accepts user input, tap the Input Panel arrow, then tap Keyboard.
2. Tap the keys on the onscreen keyboard to enter.
49
To enlarge the onscreen keyboard:
1. Tap the Input Panel arrow, then tap Options...
2. Select Keyboard from the Input Method list.
3. Tap Large Keys.
Using the Letter Recognizer
With the Letter Recognizer you can write individual letters, numbers, or special characters, which are
converted into typed text.
To use the Letter Recognizer:
1. In an application that accepts user input, tap the Input Panel arrow, then tap Letter Recognizer.
2. Write letters, numbers, symbols, or punctuations in the designated writing area.
• Write capital letters on the ABC (left) area of the box.
• Write lower case letters on the abc (middle) area of the box.
• Write numbers on the 123 (right) area of the box.
• Tap the space button to input a space.
•
Tap the special symbols button to input symbols, punctuations and other special characters.
• Tap Help button for help on how to write characters.

50
Using the Transcriber
Transcriber is a handwriting recognition program that allows you to write in cursive, print, or mixed styles.
It recognizes not only written text but also numbers and symbols. Make sure to write legibly. See Help for
more information on the Transcriber.
To use the Transcriber:
1. Start an application that accepts user input, such as Notes or Word Mobile.
2. Tap the Input Panel arrow, then tap Transcriber.
3. The Transcriber Intro screen appears. Tap to close the introduction, or tap Help to nd more
instructions.
To write using Transcriber:
1. Tap screen to position the cursor where you want the text to appear.
2. Use the stylus to write on the screen. The handwriting will be converted to text after you lift the stylus
from the screen.
To edit text:
1. Tap the text you want to edit to position the cursor.
2. You can now rewrite the text or use the Transcriber gestures to edit your selected text. See Help
for more details about the Transcriber gestures.

51
Writing and drawing on the screen
You can write or draw directly on the screen and save notes in your own handwriting. If you prefer to use
your own handwriting or use drawings in your notes, set the default input mode to Writing. If you prefer
text, set the default mode to Typing.
To set the default input mode for Notes:
1. Tap > Programs > Notes.
2. From the Notes list, tap Menu > Options.
3. In the Default mode: box, tap the down arrow and select any of the following:
• Writing - if you want to draw or enter handwritten text in a note.
• Typing - if you want to create a typed note.
4. Set the other options according to your preference.
5. Tap when nished.
To write/draw in a note:
1. Tap > Programs > Notes.
2. From the Notes list, tap New.
If you set the Default mode to Typing, a blank page appears for typed text.
If you set the Default mode to Writing, a page with horizontal lines appears for handwritten text.
You can also tap Menu and then select/deselect Draw option to switch between typing and writing
mode.
3. Write/Draw on the screen.
4. When nished, tap to save the note and return to the Notes list.

52
Recording voice
At any time, whether your phone is on stand-by or active mode, you can record sound, voice, or add a
recording to a note while using your device.
To create a voice recording:
1. Tap > Programs > Notes.
2. From the Notes list, tap New.
3. If you do not see the recording toolbar, tap Menu > View Recording Toolbar.
4. Tap to begin recording.
5. Place the receiver near your mouth or source of sound.
6. Tap when nished recording. A voice record icon appears on the note. You can tap to play
the voice record.
7. Tap .
To add a recording to a saved note:
1. Tap > Programs > Notes.
2. From the Notes list, tap a saved note to open it.
3. If you do not see the recording toolbar, tap Menu > View Recording Toolbar.
4. Tap the record button to begin recording.
5. Place the receiver near your mouth or source of sound.
6. Tap the stop button when recording is nished. A voice record icon appears on the note. You
can tap to play the voice record.
7. Tap .

53
Device Synchronization
Chapter 3
• Synchronizing your device
• Microsoft® ActiveSync

54
Synchronizing your device
Your device enables you to synchronize data in your device with the data on your computer. You can
synchronize contents and transfer data between your device and your computer using Microsoft®
ActiveSync on Windows XP™ platform, or Microsoft® Windows Mobile Device Center on Windows Vista™
platform.
NOTE: For synchronizing on Windows Vista™ platform, refer to the Microsoft® Windows Mobile Device Center’s
website at http://www.microsoft.com/windowsmobile/devicecenter.mspx
Microsoft® ActiveSync
ActiveSync allows you to synchronize data in your device with data in your computer. ActiveSync can also
synchronize over a wireless or mobile network with Microsoft Exchange Server, provided that your mobile
phone service or company is running Microsoft Exchange Server with Exchange ActiveSync. When
synchronized directly with Exchange Server, you can stay up to date even when your computer is turned
off.
During synchronization, ActiveSync compares the data in your device with the data in your computer or
Exchange Server, and updates all data with recent changes.
You can select and synchronize data in the following locations using ActiveSync:
• Contacts
• Calendar
• Email
• Tasks
55
• Notes
• Favorites
• Files
• Media
You can also exchange data between your computer and device without synchronizing.
ActiveSync is already installed in your device, but before you can synchronize data with your computer,
you must rst install ActiveSync in your computer. You can download the latest ActiveSync program from
www.microsoft.com.
After you have installed ActiveSync, set up a sync relationship between your device and your computer.
ActiveSync recognizes your device and automatically transfers the synchronization settings you have in
your device.
If you wish to synchronize your device with Exchange Server through your company or service provider,
obtain the name of the Exchange Server, user name, password, and domain name from your network
administrator before starting the Sync Setup Wizard.
To install and congure ActiveSync/ Microsoft® Windows Mobile Device Center in your computer:
1. Insert the Getting Started CD that came with your device package.
2. Follow the screen instructions.
3. After the setup is complete, the Sync Setup Wizard automatically starts when you connect your
device to your computer. Follow screen instructions to complete the wizard.
4. From the Sync Setup Wizard, you can:
• Congure an Exchange Server connection to synchronize directly with an Exchange
Server. Acquire from your network administrator the required parameters for input.
• Create a synchronization relationship between your computer and your device.
5. Select the information type that you want to synchronize.

56
6. After you nish the wizard, ActiveSync/Microsoft® Windows Mobile Device Center automatically
synchronizes your device. You can disconnect the device after the synchronization is complete.
NOTES:
• When connected, your device is automatically synchronized with your computer. ActiveSync synchronizes
everytime you make a change on either the device or computer.
• You cannot use WLAN to synchronize database.
• Refer to your Windows® Mobile Help, for more information about ActiveSync synchronization.
• Wireless connection may require separately purchased equipment (eg. Wireless router or Access Point).
Synchronizing via mini-USB
You can connect to your device using the bundled mini-USB cable to synchronize to your computer.
To synchronize your device via mini-USB:
1. After installing ActiveSync to your computer, connect the mini-USB plug to the mini-USB connector
at the right side of the device.
2. Connect the other end of the USB cable to your computer. Upon connection, ActiveSync
automatically synchronizes your device.
57
Synchronizing via Bluetooth®
NOTE: Ensure that Bluetooth is turned on both on your device and your computer.
To synchronize your device via Bluetooth:
1. Congure the settings of ActiveSync and Bluetooth on your computer.
NOTE: Refer to the Microsoft® ActiveSync Help on your computer for details.
2. Connect your device with your computer using Bluetooth.
NOTE: Refer to the section Using Bluetooth® in this user guide for more details.
3. From the list of connected devices, tap the name of the computer you want to synchronize with.
4. Select ActiveSync, then tap Save.
5. Tap to exit the Bluetooth settings.
6. From your device, tap > Programs > ActiveSync > Menu > Connect via Bluetooth. The
devices starts to connect to your computer.
7. When connected, tap Sync to synchronize data.
NOTE: Media les, such as music and video les, can be synchronized only via a USB cable.

58
Setting the synchronization schedule
To set the synchronization with Exchange
Server:
1. From the ActiveSync screen, tap Menu
> Schedule.
2. Set the schedule according to your
preference. Refer to the table for input
details.
Volume Recommended setup
High Select a shorter interval
in the Peak times list.
Low
Select As items arrive
option or a longer
interval in the Off-peak
times list.
While roaming
Check Use above
settings when
roaming.
Sending messages Check Send/receive
when I click Send.
Synchronizing with an Exchange Server
To synchronize your device with Exchange Server:
1. From the ActiveSync screen, tap Menu > Add Server Source...
2. Key in your e-mail address, then tap Next. If you prefer the device to detect the Exchange Server
Settings automatically, select the check box.
3. In the Server Address eld, key in the name of the server running Exchange Server then tap Next. If
necessary, tap the check box This server requires an encrypted (SSL) connection.
4. Enter user name, password, and domain then tap Next.
5. Tap the check boxes to select the data items that you want to synchronize with Exchange Server. To
change the available synchronization settings, select a data item then tap Settings. Tap Finish when
done.
6. Start the sync process.

59
Phone features
Chapter 4
• Using the phone
• Making calls
• Receiving a call
• Options during a call
• ASUS CallFilter
60
Using the phone
Like a standard cellular phone, you can use your device to make and receive voice and video calls. You
can also keep a history of calls made, missed, and received, send SMS or MMS messages, take notes
while talking, call from Contacts, and copy data from an installed SIM card to your device.
Phone pad
The phone pad allows you to easily dial and access the Contacts, Call History, and Phone settings. To
launch the phone pad, do any of the following:
• Tap > Programs > Phone.
• Press .
Turning off the phone function
You may use other functions even when your device’s phone function is turned off.
To turn off the phone function:
1. Tap the signal icon or tap > Settings > Connections tab, then tap Wireless Manager.
2. Tap to turn off the phone connection.
61
Adjusting the volume
To adjust the phone or device volume:
1. Tap from the status bar.
2. From the volume menu, you can:
• Move the slider to adjust device or phone volume.
• Tap On, Vibrate, or Off to change the mode and ringer volume settings.
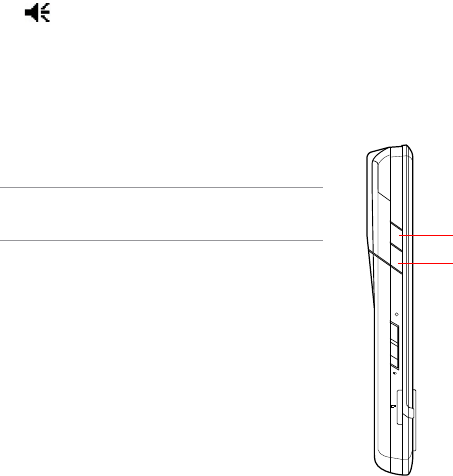
NOTE: You can also press the volume button at
the left side of the device to adjust the volume. Press to increase volume.
Press to decrease volume or turn
volume off.

62
Making calls
You can make a phone call using the phone pad. You can also make calls directly from the Contacts, Call
History, Speed Dial, or Voice Commander.
Making a voice call
Calling using the phone pad
To make calls using the phone pad:
1. Tap > Programs > Phone or press to launch the phone pad.
2. Tap the number or choose a contact or a recently dialed number from the list above the phone pad.
If you tapped the wrong number, tap to erase number to the left.
3. Press to make the call.
4. When nished, press to end the call.
63
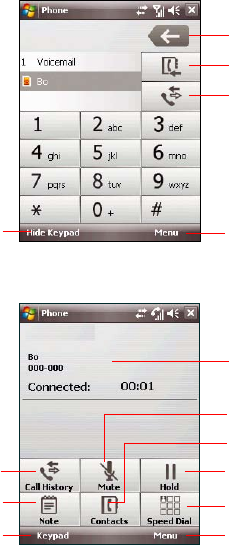
Phone pad features
Tap to put a call on hold
Tap to open the speed dial list
Tap to launch Menu
Displays the current call status
Tap to mute/unmute a call
Tap to launch the Contacts list
Tap to switch between keypad and call
status screen
Tap to launch Call History
Tap to take notes
Back arrow
Contacts
Call history
Tap to show/hide the keypad Tap to launch Menu

64
Calling from Call History
Your device enables you to check your call logs such as your missed, incoming, or outgoing calls.
To make a call from the Call History list:
1. Tap > Phone > .
The Call History screen displays the following tabs:
• All (default): Displays all calls made, received, or missed.
• Missed: Displays all missed calls.
• Outgoing: Displays all the calls you made.
• Incoming: Displays all the calls you received.
2. Scroll to the desired contact or phone number, then tap Call or press .
Tap Menu to do other tasks such as saving a caller’s contact information to your Contacts list, or send
a text message to a caller.
3. Press to end the call.
Calling from Contacts
To make a call from Contacts:
1. Press the Right Soft key or from the Today screen, tap Contacts.
2. You can do any of the following to make a call:
• Tap name of contact, then tap Call.
• Tap name of contact, then press .
• You can also tap and hold the contact, and from the shortcut menu tap Call Work, Call Home, or
Call Mobile.
• Tap Enter a name... then enter the name or number you want to call from Contacts. Press
to dial the highlighted item.

65
Calling using the Speed Dial
The Speed Dial function enables you to quickly and conveniently call frequently-called numbers. You may
assign speed dial entries from 2-99.
To create a Speed Dial entry:
1. Ensure that the entry you want to create is already in the Contacts list.
2. Tap Contacts from the Today screen.
3. Tap the contact number that you want to add to speed dial list. Then tap Menu > Add to Speed Dial...
4. Edit the name and number and select a numeric key for this contact.
5. Tap when nished.
To call a Speed Dial number:
1. Tap > Phone. Tap and hold the numeric key assigned to the contact you want to call.
2. To end the call, press .
Calling using Smart dialer
The Smart dialer feature in your device enables you to nd a contact more quickly. Just key in the rst
letters of the contact you want to call. Your device smartly matches it with your Contacts list and displays
the possible matches.
To use Smart dialer:
1. On the phone pad, key in the rst letters of the contact name.
2. From the list displayed, tap the contact you want to call.
3. Press .
4. To end the call, press .

66
Using Voice Commander
To make a phone call using Voice Commander:
1. Tap > Programs > Voice Commander.
2. From the following screen, your device asks you to “Say command.”
3. Audibly say “Call” then the name to call from your Contact list.
4. Say “Yes” or “No” after the conrmation question.
If you said “Yes”, the application proceeds and dials the number. Otherwise, it returns to the Voice
Commander menu.
5. Say “Goodbye” or tap to exit Voice Commander.
NOTES:
• To use Voice Commander while using a headset, press the answer button* on the headset then follow given
instructions. (* Answer button may not be available in some headset models.)
• Some languages may not support the Voice Commander function.
To delete a Speed Dial entry:
1. Tap > Phone > Menu > View > Speed Dial.
2. Tap the contact that you want to delete from the speed dial list, then tap Delete.
3. Tap Yes from the pop-up message.
To personalize the voice commander:
1. Tap > Settings > Personal tab > Voice Commander Settings.
2. Set the Voice Commander according to your preference.
Refer to the Help center on your device for details.
To launch the Help center, tap > Help.
3. Tap when done.
67
Making emergency calls
Calls to emergency service number can be made under any circumstances, even if you have locked the
SIM card.
To place an emergency call
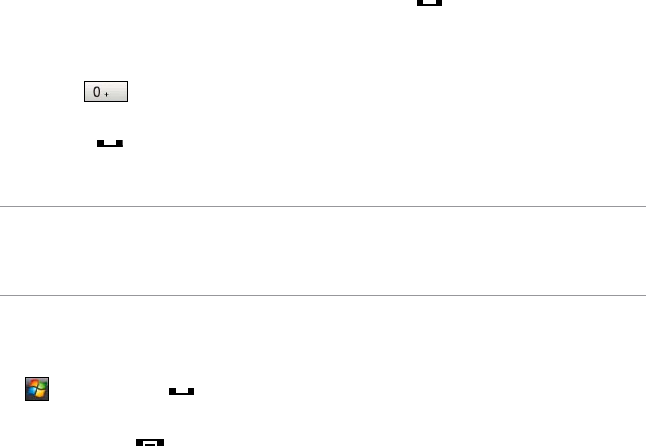
Enter the emergency number appropriate for your location, and press .
Making international calls
To place an international call:
1. Tap and hold on the keypad to enter a (+) plus sign.
2. Enter the full phone number with the country code, area code, and phone number,
and then press .
Making a video call
Using the phone pad
To make a video call using the phone pad:
1. Tap > Phone or press , then key in the number you want to call.
2. Tap Menu > Video Call, then the device begins to establish the connection.
3. When nished, press to end the call.
IMPORTANT:
• Before using the video call function, apply for a 3G SIM card from your mobile service provider.
• Ensure that you and the recipient of your call are both using mobile devices with video call function and a 3G
SIM card.
68
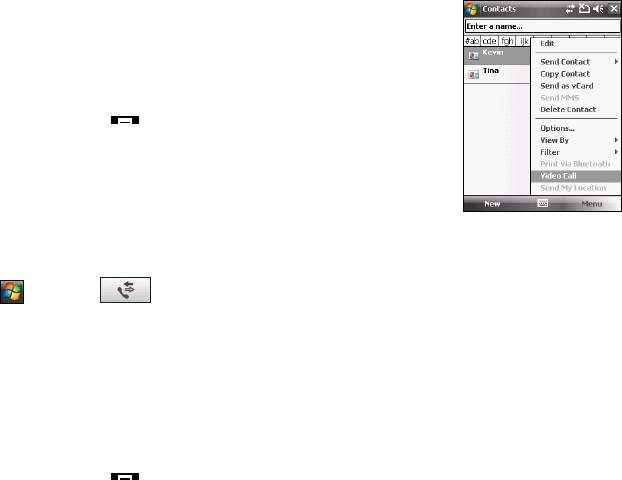
Calling from Contacts
To make a video call from Contacts:
1. From the Today screen, tap Contacts.
2. Select a contact and tap Menu > Video Call.
3. When nished, press to end the call.
Calling from Call History
To make a video call from the Call History list:
1. Tap > Phone > .
The Call History screen displays the following tabs:
• All (default): Displays all calls made, received, or missed.
• Missed: Displays all missed calls.
• Outgoing: Displays all the calls you made.
• Incoming: Displays all the calls you received.
2. Scroll to the desired contact or phone number, then tap Menu > Video Call.
3. When nished, press .

69
Video Call Setting
The Video Call Setting function enables you to set up the video call related features.
General Settings
To set the General settings:
1. Tap > Settings > Personal tab > Video Call Setting > General tab.
2. Select your preferred items.
Select the Accept without camera box if you do not want to show your video prole in video call.
Select the Connect Vibration Alert box if you want to enable the vibration alert when a video call
is established.
Select the prole you want to show in a video call. The default is video prole. You can also set a
picture as your prole.
Set the default audio path for video call.
3. Tap Done or when nished.
•
•
•
•
Service Settings
To set the Service settings:
1. Tap > Settings > Personal tab > Video Call Setting > Service tab.
2. Select the service item that you want to set. Then tap Retrieving Settings... button.
NOTE: The service options vary with different service providers.
3. Set the preferences that you want for your selected service option.
4. Tap when nished.

70
Receiving a call
When you receive a call, a message prompts and allows you to answer or reject the incoming call.
To answer or reject an incoming call:
• To answer a call, tap Answer, or press .
• To reject an incoming call, tap Ignore, or press .
TIP: Press and hold to switch receiver to speakerphone mode.
To terminate a call:
• Press .

71
Options during a call
Listed in the table below are the possible menu options for when a call is in progress. Some of these
options are available only when multiple calls are in progress or during a conference call.
IN-CALL MENU OPTION DESCRIPTION
Hold Places the active call on hold. You can also press during
an active call to put it on hold.
Unhold Activates the call that is on hold. You can also press to
activate the call that is on hold.
Mute Switches off the microphone for the active call (you can hear the
caller but the caller cannot hear you).
Unmute Turns the microphone for the active call back on.
Speakerphone On/Off Activates/deactivates the speakerphone.
Turn Hands-free On/Off Turns on the hands-free function. You can also press and hold
to turn on/off the hands-free function.
Conference Joins together all existing calls if you have subscribed to this
service.
Paste Pastes the phone number you copied from your messages,
notes, or contacts to the phone pad instead of keying in the
number manually.
View Contacts Opens the Contacts list.
Save to Contacts Saves the caller to the Contacts list.
Create Note Allows you to create a note during an active call.
Call History Opens the Call History list.
Speed Dial Opens the Speed Dial list.
Options Opens the Phone settings.

72
Managing multiple calls
To answer another call:
1. Tap to place the rst call on hold and answer the second call.
2. To end the second call and return to the rst call, press .
To hold a call to make a second call:
Tap to place the rst call on hold and call a second number. Press to end the second call and
go back to the rst call.
To switch between calls:
To switch between two calls, tap .
To set up a multiple call:
With multiple calls in progress, tap Menu > Conference.

73
The ASUS CallFilter is a utility that allows you to control all your incoming calls. Using this utility, you
can manage a list of telephone numbers from your Contacts list, call log, message log, or any unlisted
telephone number that you want to accept or reject.
Launching the shortcut menu
The shortcut menu allows you to conveniently activate either the Accept or Reject list.
To launch the shortcut menu:
• Tap > Programs > Call Filter.
ASUS CallFilter
74
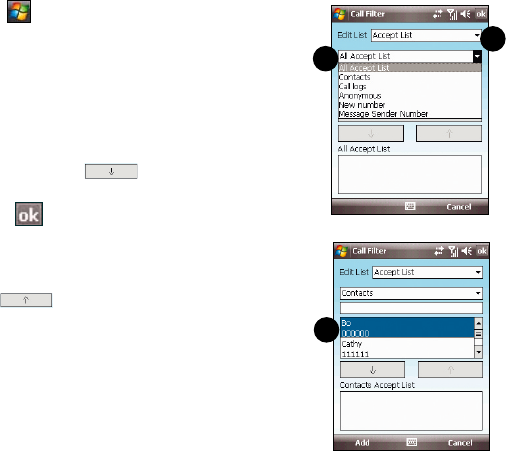
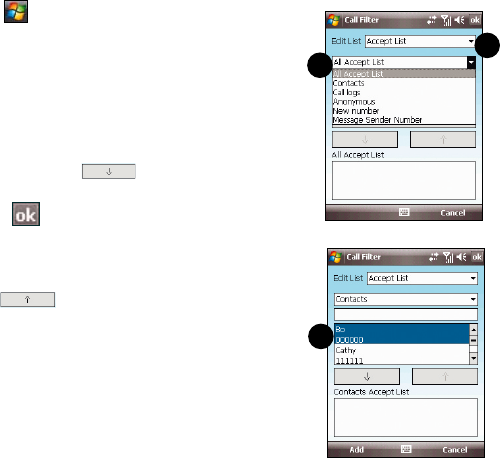
Managing the Accept list
The Accept list allows you to select telephone numbers you only want to accept. Incoming calls that are not
included in the Accept list will automatically be rejected.
To add items in the Accept list:
1. Tap > Programs > Call Filter.
2. Select Accept List from Edit List box.
3. Select source of data. You can get data from
your Contacts, Call log, Message sender
number, or you can add anonymous number
and key in new numbers.
4. From the list (e.g. Contacts), select an item
then tap Add or to add a new Accept
list item.
5. Click to exit.
To remove items from the Accept list, select a
contact from the Accept list then tap Remove
or .
2
3
4
75
Managing the Reject list
The Reject list allows you to select telephone numbers you want to reject. Incoming calls that are in the
Reject list will be rejected.
To add items in the Reject list:
1. Tap > Programs > Call Filter.
2. Select Reject List from Edit List box.
3. Select source of data. You can get data from
your Contacts, Call log, Message sender
number, or you can add anonymous number
and key in new numbers.
4. From the list (e.g. Contacts), select an item
then tap Add or to add a new Reject
list item.
5. Click to exit.
To remove items from the Reject list, select a
contact from the Reject list then tap Remove
or ..
2
3
4

76