ASUSTeK Computer GALAXY3 PDA Phone User Manual zx1 users manual 2
ASUSTeK Computer Inc PDA Phone zx1 users manual 2
Contents
- 1. users manual 1
- 2. users manual 2
- 3. zx1 users manual 1
- 4. zx1 users manual 2
zx1 users manual 2

111
Conguring wireless networks
To congure a wireless network:
1. To launch the Wi-Fi settings page, you can either:
• Tap > Settings > Connections tab > Wi-Fi.
• Tap from the status bar and then tap Settings > Wi-Fi.
2. On the Congure Wireless Networks screen, tap an available wireless network, then make the
necessary changes.
If the wireless network you want to connect to is not on the list, tap Add New....
Refer to the succeeding sections for details on how to add new wireless networks.
Tap the Network Adapters tab and select an adapter. Tap an adapter to set if necessary.
3. Tap when done.

112
Adding a wireless network
If the device fails to automatically detect the wireless network you want to connect to, you can manually
add a network. Ask for the wireless network settings from your network administrator.
To add a wireless network:
1. To launch the Wi-Fi settings page, you can either:
• Tap > Settings > Connections tab > Wi-Fi.
• Tap from the status bar, then tap Settings > Wi-Fi.
Then tap Add New... from the Wireless tab.
2. Enter a name for the network and select an item from the Connects to: drop-down menu. Then tap
Next.
3. Set authentication, data encryption, and network key. Ask your network administrator for these
information. Then tap Next.
NOTE: Obtain the authentication, data encryption, and network key from your network administrator.
4. If you need to change the EAP type, check the check box and then change the EAP type.
5. Tap Finish when done.

113
Using Wi-Fi Manager
The Wi-Fi Manager shows connection status and information on a wireless network, and allows you to
manually scan your area for available wireless networks.
To open the Wi-Fi Manager:
• Tap > Settings > Connections tab > Wi-Fi Manager.
There are four tabs in the Wi-Fi Manager:
Info
This page shows the current connection status and link information.
Setting
This page allows you to dene settings for establishing a device-to-device wireless connection as well
as power saving settings. We recommend to set the Power Save to Enable.
IP Info
This page shows the network information and provides a way to get the new IP address from the
DHCP server.
The Renew button enables you to request the DHCP server for a new IP address. This function would
take several seconds to get the new IP address.
The Ping button serves as the network’s diagnostic tool. It enables you to detect if your device is
connected to the network.
Site Survey
This page shows the available wireless network. Tap Re-Scan to search for available wireless
networks.
Each wireless network is preceded by an icon for easy identication. The network channel, RSSI, and
SSID are also displayed in columns.

114
Setting a GPRS connection
Your device allows you to connect via General Packet Radio Service (GPRS). GPRS is a wireless
communication standard that runs at speeds of up to 144 kbps, compared to 9.6 kbps of the current
Global System for Mobile Communication (GSM). It supports a wide range of bandwidth that allows
sending and receiving small bursts of data, such as e-mail and web browsing. To set a GPRS connection
in your device:
1. From the Today screen, tap / on the status bar, then tap Settings > Connections. Or from the
Settings screen, tap Connections tab > Connections.
2. From the Connections screen, tap Add a new modem connection.
3. Enter a unique name for the connection then select Cellular Line (GPRS) from the modem list.
4. Enter the Access point name. Consult your network service provider for the access point.
5. Enter your user name, password, and domain then tap Finish. Contact your network administrator for
assistance.
NOTES:
• The network connection may vary with different locations and mobile service providers. Consult your mobile
service provider for the applicable network connection in your area.
• The charge of GPRS services and the GPRS connection settings might vary with different operators.
Consult your service provider for suitable solution.
• The GPRS and USB connections cannot be used at the same time.

115
NOTE: When WLAN is used simultaneously with the GPRS, the GPRS will get signal priority. We recommend not
to use WLAN and GPRS at the same time.
If you have set a default GPRS connection, it automatically connects when you launch an application that
connects to the Internet.
1. Launch any application that connects to the Internet such as Internet Explorer. The device will
automatically connect to your default GPRS connection. A pop-up callout appears to display the
connection status.
2. When connected, you can start browsing the Internet. If you are using Internet Explorer, the default
site will be displayed.
1. Tap > Settings > Connections tab > Connections.
2. From the Connections screen, tap Manage existing connections.
3. Tap and hold on an existing connection then from the pop-up menu tap Connect.
Tap Delete if you want to delete the selected connection.
4. When connected, tap to exit.
Connecting GPRS
To connect GPRS:
116
Disconnecting GPRS
To disconnect GPRS:
• From Wireless Manager screen, tap .
NOTES:
• If your ActiveSync is set to sync with Exchange Server automatically, synchronization will occur after you
connect again.
• GPRS will automatically reconnect everytime you launch an application that requires GPRS connection
(such as Internet Explorer or Windows Live Messenger).
Using the GPRS Tool
The GPRS Tool allows you to conveniently select and connect to your GPRS service provider.
To connect via GPRS Tool:
1. Tap > Settings > Connections tab > Network Setting.
You can also tap / on the status bar then tap Settings from the popup callout.
2. From the Network Setting screen, select your GPRS provider from the list.
NOTES:
• Operators vary in different regions.
• The GPRS and USB connections cannot be used at the same time.
117
Setting the network
Your device enables you to congure your device’s network connection as well as set multiple networks in
the order that you want to access them.
Conguring the network
To congure the network settings:
1. Tap > Settings > Connections tab > Network Setting.
2. Select the Country and Operator from the dropdown lists. If your mobile service operator is not on
the list, tap the Auto Detect button.
3. When done, tap .
Setting your preferred networks
Your device enables you to set multiple networks in the order that you want your device to access them.
If your primary network is not accessible, your device will automatically try to access an available network
in your network list.
To set preferred network:
1. From the phone pad, tap Menu > Options > Network tab.
2. Tap Set Networks and follow the onscreen instructions.
3. When you have set your preferred networks, tap to return to the Network tab. In the Network
selection list, tap Automatic.

118
GSM/3G Networks
GSM/3G Networks allows you to conveniently switch network type. Network options include Automatic,
3G, and GSM. The default setting is Automatic, which allows the device to search for the proper service
automatically.
To choose network type
1. Tap > Settings > Connections tab > GSM/3G Networks.
2. Select a proper network type, then tap .
If you prefer to use the service your SIM card automatically detected, select Automatic.
3. When prompted, tap to restart your device and apply changes.
NOTES:
• Network type varies with different service providers.
• Ensure that you choose the right network type for your SIM card.

119
GPS features
Chapter 9
• GPS Catcher
• External GPS

120
GPS Catcher
The GPS Catcher allows you to update the Global Positioning System (GPS) data in your device. The
GPS data contains important information about the status of satellite, and the current date and time for
determining the satellite position.
Updating GPS data
To update GPS data:
1. Tap > Programs > GPS Catcher.
2. Then tap Update to start update.
3. Tap when nished.
NOTES:
• To make a successful update, ensure that your device is connected to the Internet.
• The expiration of GPS data is three days. You need to update it again when it is expired.
• You can also set GPS Catcher to update automatically, refer to the Setting GPS Catcher section for details.
Setting GPS Catcher
To set GPS Catcher:
1. From the GPS Catcher screen, tap Menu > Setting.
2. Set the options according to your preference. Tap Done when nished.

121
External GPS
Your device allows you to use an external GPS device to receive GPS data.
NOTES:
• Your Pocket PC support only Bluetooth-enabled external GPS devices.
• Before using an external device, connect your external GPS device to your Pocket PC via Bluetooth. Refer
to Using Bluetooth® section for details.
To set an external GPS device:
1. Tap > Settings > System tab > External GPS.
2. From the Programs tab, select a program port.
NOTE: By default, the port is set to GPD1. We recommend that you DO NOT change the default setting.
3. From the Hardware tab, specify a hardware port and baud rate for your external GPS device to use.
NOTE: By default, the hardware port is set to COM2, and the baud rate is set to 57600. Refer to the user guide of
your external GPS device for details.
4. From the Access tab, select the Manage GPS automatically (recommended) box.
IMPORTANT: If you clear this check box, some GPS related application in your device may not be able to obtain
GPS data.

122

123
Multimedia features
Chapter 10
• Using the camera
• Viewing pictures and videos
• Using Streaming Player
• EziMusic
• EziPhoto
• YouTube&Flickr

124
Using the camera
The built-in 3.0 megapixel camera allows you to take photos and record audio/video clips.
Launching the camera
To start using the camera, do either of the following:
• Tap > Programs > Pictures & Videos > Camera icon.
• Press the Camera button on the right side of your device.
To exit the Camera, tap the exit icon on the camera screen.
Available capture modes
Your device camera can be set to two capture modes:
• Camera mode - Camera mode allows you to take photos, and save them to your device or microSD.
You can also congure the camera to match an environment, set picture size, select magnication,
adjust the picture quality, apply effects, and modify other advanced settings.
• Video mode - Video mode enables you to record audio/video clips. Like in camera mode, it also
allows you to select the magnication, set the video size, apply some effects, select target storage,
and modify advanced video settings.
Supported formats
Using the camera mode or video mode, the images or video clip captured are stored in the following
formats:
• Still image (Camera mode): - JPEG (.jpg)
• Video (Video mode): - 3GP (.3gp), MPEG-4 (.mp4)
125
Camera mode
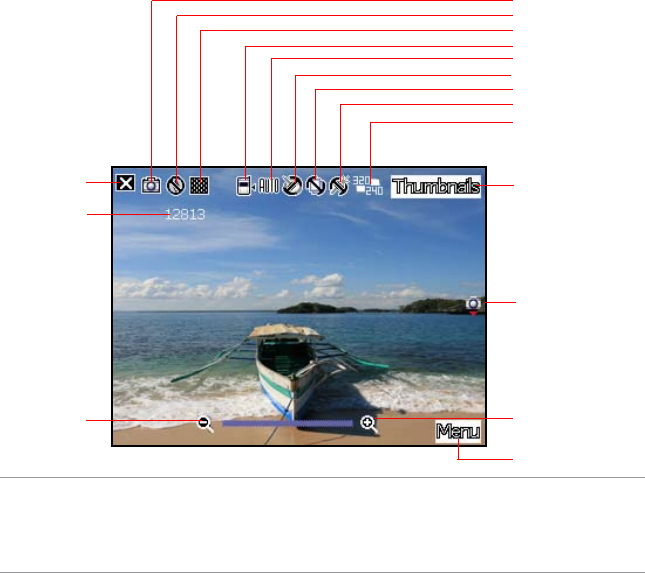
The following describes the screen icons in Camera mode:
Tap to launch menu
Capture mode icon
GPS mode icon
Picture quality icon
Default storage icon
Scene mode icon
Timer icon
Burst mode icon
Effects icon
Picture size
Tap to zoom out Tap to zoom in
Tap to close camera Tap to preview
Pictures and Videos
Number of
available shots
Capture modes:
Camera mode.
Tap to switch to video
mode
NOTES:
• By default, the preview screen is set to landscape.
• After launching the camera, your device is set to camera mode by default.
• In camera mode, the camera button function as shutter button.

126
Camera options menu
The camera options menu allows you to change various camera and picture settings.
To launch options menu:
1. Tap Menu from the camera screen.
2. From the shortcut menu, tap an icon to display contents.
• Change Mode: Allows you to set capture mode into Camera or Video mode.
• GPS Mode: Allows you to turn on or turn off GPS in Camera mode.
• Scene: Allows you to select presets appropriate for a night scene or sports event. Select Auto to
use best setting for any scene.
• Picture Size: Allows you to set the frame size of the picture.
• Picture Quality: Allows you to select picture quality: Normal, Fine, and Super Fine. By default,
the picture quality is set to Fine.
• Zoom: Allows you to change the maximum magnication allowed.
• Self-Timer: Sets the delay of shutter release to 5 or 10 seconds after you have
pressed the camera/shutter button.
• Burst: Allows you to take 4 or 9 pictures in succession with one press of the camera/
shutter button.
• Frame: Allows you to set a frame.
NOTE: Ensure that you have set the screen resolution to 320 x 240 before setting the frame.
• Effect: The Effect option allows you to apply some effects to the subject. Select from
the following conguration options: Black-White, Negative, and Sepia. Set to Normal
for no effect.

127
• Save to: Allows you to select the default storage for captured pictures.
NOTE: Prepare a MicroSD card before setting default storage to Storage Card.
• Advanced: This option allows you to set the following:
- Filename prex format
- Filename prex
- File number
- Date and time stamp
- Shutter sound
- Burst interval
- Color adjustment
- General setting
- MMS mode

128
Taking photos
After launching the camera, your device is set to Camera mode by default. If set to Video mode, tap Menu
> Change Mode > Camera Mode then tap Exit.
You can also switch between camera mode and video mode by tapping the camera/video mode icon on
the screen.
To take photos:
1. Aim device to your subject then half-press the camera button to auto-focus on the subject.
While the camera button is half-pressed, the auto-focus frame appears on the center of the screen.
2. Full-press the camera button. When the icon appears, ensure that the device is stable and not
shaking.
3. Tap Camera and then repeat steps 1 to 2 to take more photos.
NOTE: The image is automatically saved to the default storage location and can be viewed using the Pictures &
Videos application.
129
Video mode
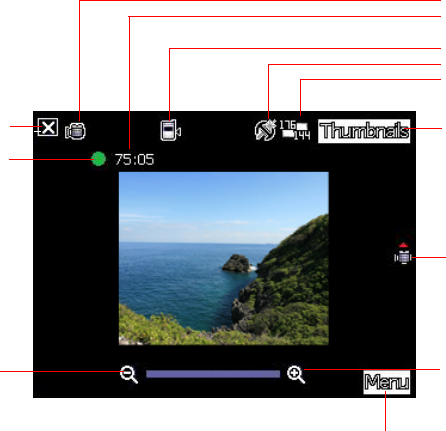
The following describes the screen icons in Video mode:
Capture mode icon
Remaining video
recording time
Default storage icon
Effects icon
Video size
Tap to zoom out Tap to zoom in
Tap to launch Pictures
& Videos
Capture mode icons:
Video mode
Tap to switch to camera
mode
Tap to launch
video menu
Recording indicator
Green: Ready
Red: Recording
Tap to close camera

130
Video options menu
The video options menu allows you to change various video and playback settings.
To launch video options menu:
1. Tap Menu from the video screen.
2. From the shortcut menu, tap an icon to display contents.
• Change Mode: Allows you to set capture mode into Camera or Video mode.
• Zoom: Allows you to change the maximum magnication allowed.
• Video Size: Allows you to set the frame size of video.
• Save to: Allows you to select the default storage location for recorded videos.
NOTE: Prepare a MicroSD card before setting default storage to Storage Card.
• Effect: The Effect option allows you to apply some effects to the subject. Select from
the following conguration options: Black-White, Negative, and Sepia. Set to Normal
for no effect.
• Advanced: This option allows you to set the following:
- File extension
- Filename prex format
- Filename prex
- File number
- Enable or disable audio when recording
- Color adjustment
- General setting
- MMS mode

131
Recording videos
Set the device to video capture mode to record videos.
To set video mode:
• Tap Menu > Change Mode > Video Mode then tap Exit.
• Tap the video mode icon on the screen.
To record video:
1. Aim device to your subject then half-press the camera button to auto-focus on the subject.
While the camera button is half-pressed, the auto-focus frame appears on the center of the screen.
2. Full-press the camera button to begin recording. The record indicator turns from green to red while
video is recording.
3. Press the camera button again to stop recording.
NOTES:
• The video clip is automatically saved to the default storage location.
• Use Windows Media Player Mobile to playback video clip in your device.
• Use Apple® QuickTime™ player, if you wish to play video clips in your computer. You can download
QuickTime™ installer from www.apple.com/quicktime.

132
Viewing pictures and videos
Use the Pictures & Videos Application to preview stored images and playback video clips.
Viewing pictures and videos
To view pictures and videos:
1. Tap > Programs > Pictures & Videos.
2. Tap the picture or video clip you want to see.
• To view pictures or launch video clips stored in MicroSD card, tap the folder list
(labeled My Pictures), and tap Storage Card.
• To view pictures stored in My Pictures folder on your device, tap My Pictures then tap
a picture thumbnail.
• To playback video clips in My Pictures folder on your device, tap My Pictures then
tap a video.
Editing pictures and photos
To edit pictures and photos:
1. Tap > Programs > Pictures & Videos. Tap a picture or a photo thumbnail to open.
2. Tap Menu > Image Editor.
3. Edit the image.
Draw, add stamp, and type on the picture using the tools.
You can also erase and undo editing with the eraser tool and the undo tool.
Refer to the tool icons and their descriptions on the next page.
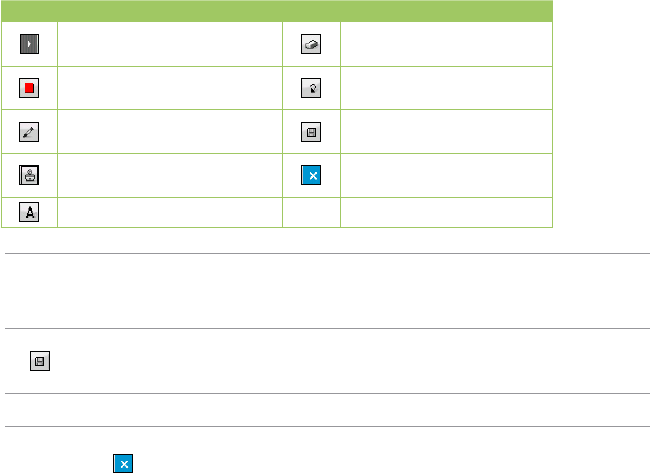
133
Icons Description Icons Description
Tap to hide the tool bar Tap to erase some parts in
the picture
Tap to select the color of your
editing stroke
Tap to undo editing
Tap to select the size of the
pencil stroke
Tap to save the image
Tap to add some stamps in the
picture
Tap to exit editing
Tap to add text
Tool bar
4. Tap to save the picture. Then tap Yes to conrm.
NOTE: In this option, the original picture is replaced by the edited le.
You can also tap in the Tool bar and choose Save as to save the edited picture as another le
name.
NOTES:
• This image editor function can only be applied to the pictures or photos with 320 x 240 resolution.
• The image bigger than 320 x 240 resolution will be zoomed into 320 x 240 resolution.
134
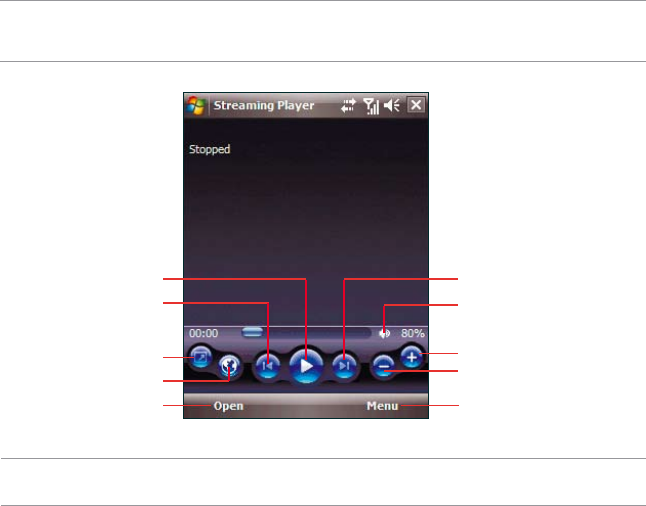
Streaming Player
Streaming Player allows you to play audio or video les streamed to your device from the Internet.
Supported formats include 3gp, 3g2, mp4, and sdp.
NOTE: Before using Streaming Player, ensure that you are connected to the Internet via Wi-Fi, or GPRS
connection. Refer to the sections on Wi-Fi, or GPRS in this user guide for activating any of these connections on
your device.
Tap to play/stop a le
Tap to play the previous le
Tap to maximize the screen
Tap to browse the internet
Tap to open and connect to
an rtsp:// URL website
Tap to put sound on mute mode
Tap to play the next le
Tap to increase the volume
Tap to launch the Menu list
Tap to decrease the volume
NOTE: A Real Time Streaming Protocol (RTSP) website provides multimedia data streams such as audio or
video clips.

135
Playing a streaming le
To play a streaming le:
1. Tap > Programs > Streaming Player, then tap Open.
2. Select Connect with tracking history or manual input of URL.
3. Key in the web address then tap Connect.
NOTE: Streaming Player only recognizes an rstp:// URL web address.
4. Tap to play a streaming le from your preferred rtsp website.
NOTE: You may bookmark your favorite rtsp://URL website. Refer to the next section for more details.
Connecting with bookmarks
Your device enables you to store and play streaming les from your favorite rtsp websites.
NOTE: Before you can connect to a favorite rtsp website, you must rst add the website to your Bookmark list.
To create a bookmark:
1. On the Streaming Player screen, tap Menu > Bookmark Manager.
2. Tap New Folder, then enter the name for the folder.
3. Tap Save to save the folder name. You can add an rtsp://URL website to the folder you have created
the next time you connect to the Internet.

136
To bookmark an rtsp://URL web address:
1. Tap > Programs > Streaming Player, then tap Open.
2. Select Connect with tracking history or manual input of URL.
3. Key in the rtsp://URL web address then tap Connect.
4. Tap to play a streaming le from your preferred rtsp website.
While a streaming le is playing, tap Menu > Add to My Bookmark.
5. Assign a specic name for the streaming le that you want to save.
6. Select the folder in your Bookmark list where you want to save the le.
To play a bookmarked streaming le:
1. Tap > Programs > Streaming Player, then tap Open.
2. Select Connect with Bookmark.
3. Select a le from your Bookmark folders, then tap Connect.
4. Tap to play a streaming le from your favorite rtsp website.

137
EziMusic
EziMusic enables you to enjoy music and manage music les easily.
To launch EziMusic, do either of the following:
• Tap > Programs > EziMusic.
• Press the AnyTime Launcher key, then tap > EziMusic.
The following describes the EziMusic prole on your device.
Tap to play the next le
Tap to play the selected le
Tap to open the menu list
Tap to adjust the volume
Tap to enter the Library
Tap to select the le
Tap to change shufe/repeat modes
Tap to enter the Library
Tap to play the previous le
Displays the time elapsed Displays the total playing time
Drag the slider to change the
playing process
138
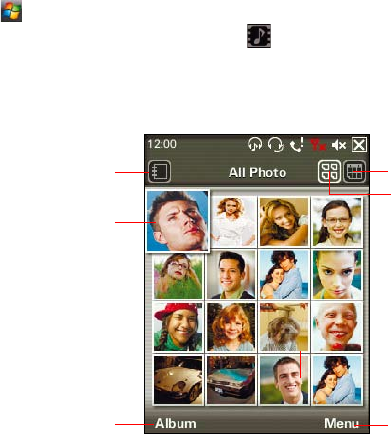
EziPhoto
EziPhoto enables you to view and manage your photos conveniently.
To launch EziPhoto, do either of the following:
• Tap > Programs > EziPhoto.
• Press the AnyTime Launcher key, then tap > EziPhoto.
The following describes the EziPhoto prole on your device.
Tap to open the Calendar
Tap to view all photos
Tap to open the menu list
Tap to open Albums
Tap a photo to view in
full- screen mode
Tap to switch among Album,
Calendar, and All Photos view

139
YouTube&Flickr
YouTube&Flickr enables you to upload videos to the YouTube website and pictures to the Flickr website
via MMS, and e-mail messages.
IMPORTANT:
• Ensure that you have registered the MMS service with your mobile service provider before uploading videos
or pictures via MMS.
• Set up an e-mail account on your device before uploading videos or pictures via e-mail messages. Refer to
the Setting up accounts section in Chapter 5: Messaging for details.
Using YouTube
You are allowed to upload videos directly to the YouTube website from your device via MMS, and e-mail
messages.
IMPORTANT: Before using YouTube, register for a YouTube account and set up your Mobile Prole at the
YouTube website at http://www.youtube.com. YouTube provides you with a special e-mail address ending
with @mms.youtube.com.
To upload video clips to YouTube:
1. Tap > Programs > YouTube&Flickr > YouTube.
2. Tap Menu > Space Setting
3. In the Email for YouTube uploading area key in your e-mail address, then tap Done.
4. Select MMS or an e-mail account from the dropdown list.
5. Tap Add, then tap a video clip from the list.

140
Using Flickr
You are allowed to upload photos directly to the Flickr website from your device via MMS, and e-mail
messages.
IMPORTANT: Before using Flickr, register a Flickr account at the Flickr website at http://www.ickr.com.
To upload photos to Flickr:
1. Tap > Programs > YouTube&Flickr > Flickr.
2. Tap Menu > Space Setting
3. In the Email for Flickr uploading area key in <your username> @photos.ickr.com, then tap
Done.
4. Select MMS or an e-mail account from the dropdown list.
5. Tap Add, then tap a photo from the list.
NOTE: Consult your mobile service provider for the size limit of an MMS message. You are allowed to upload
several photos at a time within the limit.
6. Key in a title, description, and tag for your picture.
7. Tap Send to upload the picture to the Flickr website.
NOTE: Consult your mobile service provider for the size limit of an MMS message. You are allowed to upload
several video clips at a time within the limit.
5. Key in a title, and description for your video clip.
6. Tap Send to upload the video clip to YouTube website.

141
Business features
Chapter 11
• Ur Time
• Remote Calendar
• Meeting Time Planner
• WorldCard Mobile
• Remote Presenter
142
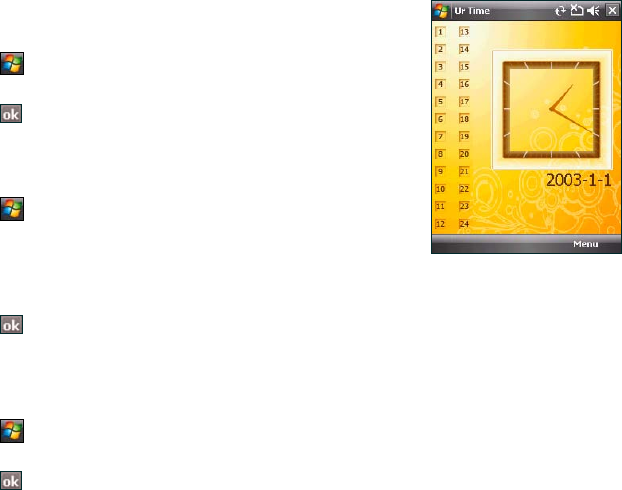
Ur Time
Ur Time allows you to set the time and alarm at your current location as well as set the time for up to four
cities.
Setting time
To set time:
1. Tap > Programs > Ur Time.
2. Tap Menu > Time. Set the local time at your current location.
3. Tap when nished.
Setting alarm
To set the alarm:
1. Tap > Programs > Ur Time.
2. Tap Menu > Alarm, then tap New to add a new alarm, or select an
existing alarm and tap Edit.
3. Set alarm details.
To activate anti-snooze feature, check the Snooze box and set snooze interval.
4. Tap when nished.
Setting the World Cock
To set World Clock:
1. Tap > Programs > Ur Time.
2. Tap Menu > World Clock. You can set the time for up to four cities.
3. Tap . The World Clock appears on the Today screen.
143
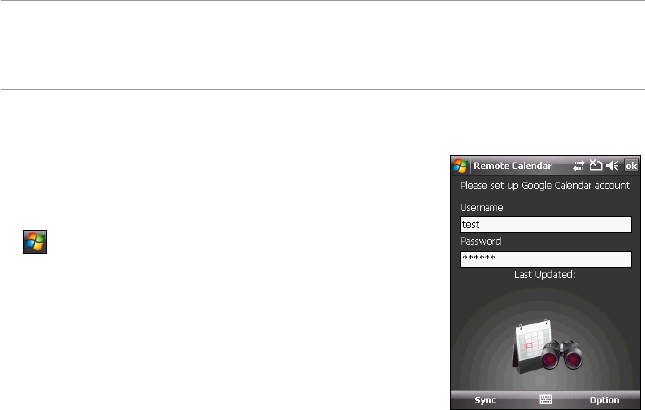
Remote Calendar
Remote Calendar allows you to access your Google Calendar from your device. From your device, you
can either view the calendar or synchronize events and agenda with your Google Calendar in
bi-directional way. Download events from Google calendar, or upload events to Google Calendar with
your device.
IMPORTANT:
• Obtain a Google account before you use this function. Visit www.google.com/calendar for details on account
register.
• Ensure that your device is connected to Internet via GPRS when using the Remote Calendar.
Synchronizing your calendar
Downloading events from Google Calendar
To download agenda or events form your Google Calendar:
1. Tap > Programs > Remote Calendar
2. Key in the Username and Password, then tap Sync to start
synchronizing.
3. When the calendar is synchronized successfully, a pop-up message
appears. Tap Yes to open the calendar or tap No to exit.
144
Uploading events to Google Calendar
To upload new events or modied events to your Google Calendar:
1. Tap > Calendar.
2. Select the event you want to upload to Google Calendar, then tap Menu > Upload to Google.
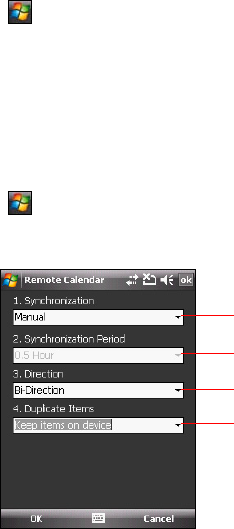
To set your Remote Calendar:
1. Tap > Programs > Remote Calendar > Option > Setting.
2. Set your desired synchronization mode, then tap OK to apply changes or tap Cancel to quit.
Setting Remote Calendar
The Remote Calendar allows you to set synchronization mode.
Tap to select sync mode.
Tap to select sync direction.
Tap to select sync interval.
This item is inactive when the sync mode is set to Manual.
Tap to select priority when event conict happens.
145
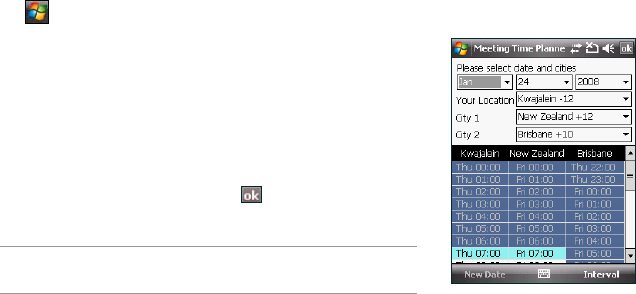
Meeting Time Planner
Meeting Time Planner allows you to nd a suitable time to have a video conference, telephone or net
meeting with participants in different time zones.
To use the Meeting Time Planner:
1. Tap > Programs > Meeting Time Planner.
2. Select the date and the cities.
A color-coded 24-hour timetable of the chosen cities appear,
allowing you to identify the best time for the meeting. Dark blue is
late night/early morning, light blue is off-peak hour, and white is
peak daytime hour. You can also change the time interval shown
by tapping Interval on the lower-right corner of the screen.
3. Select the time for your meeting and tap New Date.
4. Fill in the meeting information and tap to add your date into the
Calendar.
NOTE: You can tap Interval > Summer Time to use daylight saving
time.
146
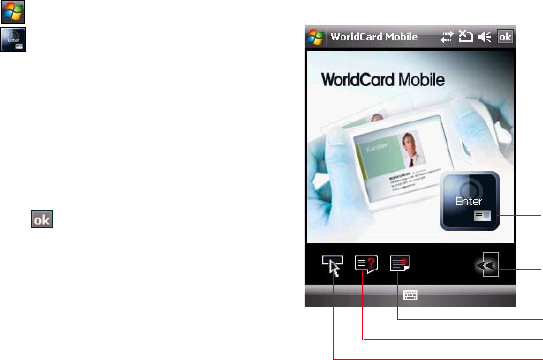
WorldCard Mobile
WorldCard Mobile is capable of automatically recognizing business cards and sorting recognized eld
information by name, title, company, phone number, fax number, address, or other properties. You can
also edit business card information for effective sorting and management.
To use WorldCard Mobile
1. Tap > Programs > WorldCard Mobile.
2. Tap and then press the Camera button
to capture the image of a business card. Tap
WorldCard Mobile.
3. Select a language and then tap Recognize to run
automatic recognition.
4. Edit the business card information if necessary.
5. To save the card information, do any of the
following:
• Tap , then tap Yes to conrm.
• Tap Export to export the selected
information to the Contacts.
Capture Button
Exit
About
Help
Setting
147
Remote Presenter
From your device, Remote Presenter allows you to remotely control PowerPoint™ presentations running
on your desktop or notebook. Operating over a Bluetooth wireless connection, it promotes convenience
and freedom of movement during your presentation. It also enables you to review slide notes without
affecting the audience’s view of the slide show.
To use the Remote Presenter:
1. Tap > Programs > Remote Presenter.
IMPORTANT: Ensure that the Blootooth on you computer is enabled and set to be visible.
2. Tap Next on your device. You device starts searching for other Bluetooth-enabled devices.
3 From the list of Bluetooth devices found, select the name of computer containing your PowerPoint
presentation then tap Next.
4. Check your computer screen when your device prompts a message reminding you to check you
computer.
5. Click the prompted message on your computer screen to allow your device to access the ActiveSync
service of your computer.
IMPORTANT:
• Before you start, make sure to install the Remote Presenter utility on your computer. You can nd the
installation les in the bundled support CD.
• Remote Presenter works with Bluetooth-enabled computers only.
• The screen captures in the following setup are for reference only and the sequence may appear differently,
depending on the previous Bluetooth conguration performed on your system.
148
6. From your computer, key in the passcode then click OK. The passcode is used to secure your
connection.
NOTE: The Bluetooth passcode is only required if a paired relationship is not yet established between devices.
7. Tap Yes from you device and key in the same passcode to allow your computer to connect to your
device.
8. Tap Done from the prompted message reminding you of a successful connection.
9. Tap from the prompted message reminding you to launch the Remote Presenter on your
computer.
10. Launch the Remote Presenter program on your computer.
To do this, from your computer desktop, click Start > All Programs > ASUS > Remote Presenter.
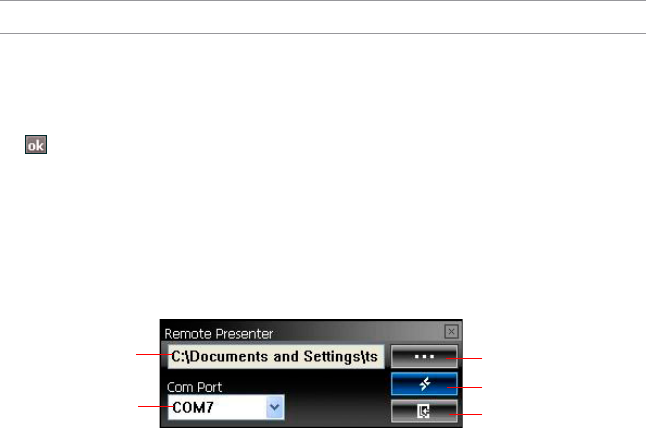
The following describes the Remote Presenter menu on your computer screen.
PowerPoint .ppt le path
Bluetooth COM port.
* The port varies with
different computers.
Click to change path
Click to start or stop
Click to exit
149
10. From the Remote Presenter menu on your computer, click to establish a connection.
When prompted with the Bluetooth Service Authorization message, click OK.
12. From your device, tap Connect. Then tap from the reminder message.
13. A list of PowerPoint (.ppt) les appears on your device when a successful connection is established.
Repeat from step 1 if the connection failed.
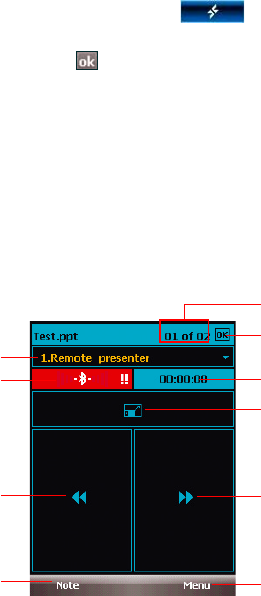
Tap to select slide
Slide number
Indicates Bluetooth® signal
Previous slide
Tap to switch between Note and
Control Panel view
Tap to exit
Timer
Tap to switch between Normal and
Slide Show view
Next slide
Tap to display menu options
14. Tap the name of the PowerPoint (.ppt) le to show then tap Select.
Upon selection, Microsoft® PowerPoint is automatically launched on your computer with the selected
le open.
15. You can now remotely control the PowerPoint presentation on your computer using your device.
The following describes the control panel on your device.

150

151
ASUS Special features
Chapter 12
• Gesture feature
• ASUS status icon
• ASUS Zip
• Backup
• Newstation
152
Gesture feature
This feature detects your nger movements on the screen to trigger special effects such as scrolling,
panning, zooming, and rotating.
Enabling the Gesture feature
To enable the Gesture feature
1. Tap > Settings > System tab > Gesture.
2. Select the check box of Enable Gesture Function.
3. Select the Enable Sound Effects if you want to play the sound when your nger gesture is detected.
NOTE: The sounds are for some of the gestures only.
4. Tap when nished.
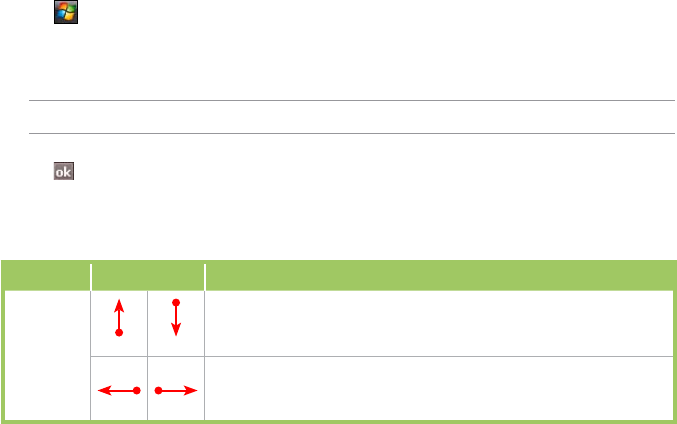
Using the Gesture
Action Gesture Description
Scroll Scroll up/down: Slide your nger upward/downward on the screen.
NOTE: To stop scrolling, touch the screen with your nger.
View previous page/next page in Internet Explorer and EziPhoto:
Slide your nger leftward/rightward on the screen.

153
Action Gesture Description
Pan Pan up/down: Slide your nger upward/downward on the screen
and then stop at your destination.
Pan left/right: Slide your nger leftward/rightward on the screen and
then stop at your destination.
Pan top-left/bottom-right: Slide your nger in a left-slanted upward/
right-slanted bottom direction on the screen and then stop at your
destination.
Zoom Zoom in in Internet Explorer and EziPhoto: Slide your nger in a
right-slanted upward direction on the screen.
Zoom out in Internet Explorer and EziPhoto: Slide your nger in a
left-slanted downward direction on the screen.
154
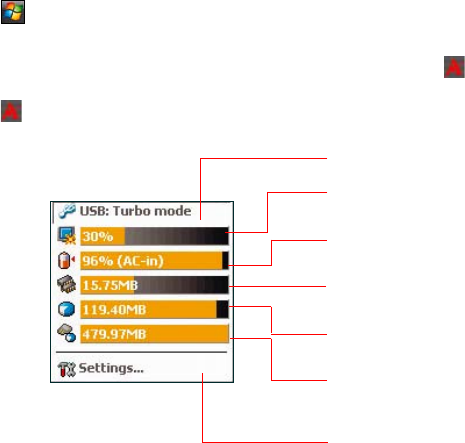
ASUS status icon
The ASUS status icon allows you to easily check and see the current status of the following device
components: USB, LCD Brightness, Battery power, Memory, and microSD card.
To check the status of these components:
1. Tap > Settings > System tab> ASUS Status.
2. Select the items you want to check and the show types.
3. Check the box of Show system status icon. Then the ASUS Status icon appears on the Today
screen.
4. Tap from the Today screen to check the system status.
USB: Allows you to set the USB connection mode.
Brightness: Tap to adjust the LCD brightness on
battery power or external power.
Battery: Displays the remaining battery power and
allows you to set advanced power saving features,
Program memory: Displays the total, currently used,
and remaining program storage memory.
Storage memory: Displays the total, used, and
remaining storage memory.
Storage card: Tap to display the contents of the
Storage card installed (shows only when a microSD
card is installed).
Settings: Allows you to select the items to display in
this ASUS Status pop-up menu.

155
USB setting
Allows you to set the USB connection mode.
LCD Brightness
Adjusts the LCD brightness on battery power and external power.
Battery
Displays the battery power status.
The Advanced settings allows you to set a time when to turnoff the device if not used.
Program memory
Displays the total, in use, and available program memory.
Memory
Displays the total, in use and free memory.
Storage card memory
Displays the total, in use, and available storage card memory.
NOTE: This item shows only when a microSD card is installed.
Settings
Allows you to select the items to display in the ASUS Settings popup menu.
156
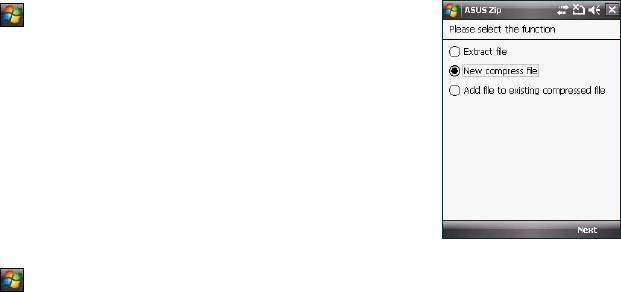
ASUS Zip
ASUS Zip allows you to compress les to save space of your memory card or device.
To compress les:
1. Tap > Programs > ASUS Zip.
2. Select the radio button before New compress le, then tap Next.
3. Select les or folders and tap Add button, then tap Next.
4. Rename the le and select the location and compression mode. Check
the Password box if you want to set password for the le. Tap Next.
5. Tap Done to exit. Check the Exit and open folder box if you want to
open the folder where the compressed les are stored.
To add les to an existing compressed le:
1. Tap > Programs > ASUS Zip.
2. Select the radio button before Add le to existing compressed le, then tap Next.
3. Select a compressed le, then tap Next.
4. Select les or folders you want to add and tap Add button, then tap Next.
5. Tap Done to exit. Check the Exit and open folder box if you want to open the folder where the
compressed les are stored.

157
To extract les from a compressed le:
1. Tap > Programs > ASUS Zip.
2. Select the radio button before Extract le, then tap Next.
3. Select a compressed le, then tap Next.
4. Select a folder to save the extracted les, then tap Next.
5. Tap Done to exit. Check the Exit and open folder box if you want to open the folder where the
compressed les are stored.
Backup
The Backup function allows you to backup as well as restore your les and data to your device and
storage card.
Backing-up les
To backup les:
1. Tap > Programs > Backup > Backup.
2. Select the location and the items you want to backup. Then tap Next.
3. Rename the le and select the storage location for the backup. Then tap Next.
4. Enter four digits as your password to encrypt the backup le. Then tap Next.
5. Tap Start to begin backup. Or tap Back to return to the last screen.
NOTE: The system will turn off all processing applications when backing up les.
6. When nished, tap Reset to reset the device.

158
Setting Backup
To set Backup:
1. Tap > Programs > Backup. Then tap Option.
2. Check the box if you want the device to automatically reset after backup. Then Tap when
nished.
Restoring les
To restore les:
1. Tap > Programs > Backup > Restore.
2. Select the location and the items you want to restore, then tap Next.
3. Rename the le and select the storage location for the backup, then tap Next.
4. Enter the password to decrypt the backup le, then tap Next.
5. Select the items you want to restore from the backed up les, then tap Next.
6. Tap Start to begin restore. Or tap Back to return to the last screen.
NOTE: The system will turn off all processing applications when restoring les.
7. When nished, tap Reset to reset the device.
159
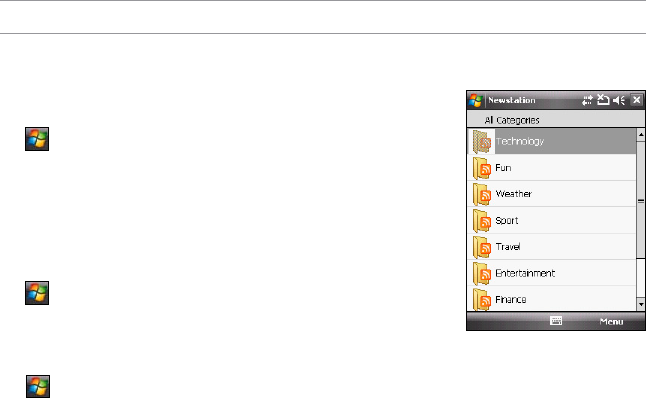
Newstation
With the Newstation in your device, you can conveniently browse news and blogs anywhere and anytime.
NOTE: Ensure that your device is connected to Internet when using Newstation.
Using Newstation
To read RSS news:
1. Tap > Programs > Newstation.
2. Tap a category folder to open.
3. Tap a channel name to open.
4. Browse your favorite subjects.
To create a new category folder:
1. Tap > Programs > Newstation.
2. Tap Menu > New Category then edit the category name.
To add a channel:
1. Tap > Programs > Newstation, then tap a category folder to open.
2. Tap Menu > New Channel. You can add a channel from either Internet or an existing le.
• Input from URL
Select the radio button of Input from URL and enter the URL address. Then tap Next.
Select a category where you want to add the channel. Then tap Finish.
160
• Import from a le
Select the radio button of Import from a le, then tap Next.
Select a folder and choose a le from the list.
Choose channels from the list, then tap Next.
Select a category where you want to add the channel, then tap Finish.
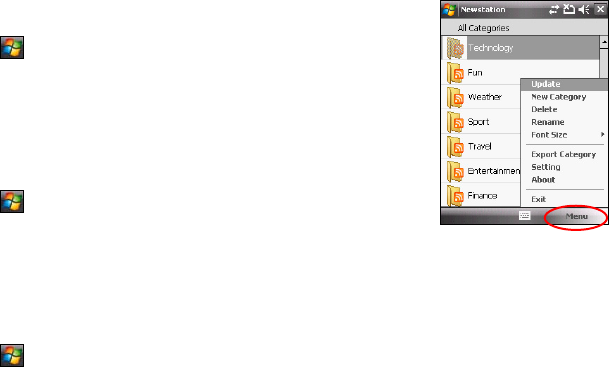
Using Newstation menus
Category Menu
To use the category menu:
1. Tap > Programs > Newstation.
2. Select a category folder. Then tap Menu. The menu list pops up.
3. Tap an option that you need.
Channel Menu
To use the channel menu:
1. Tap > Programs > Newstation.
2. Tap a category folder, then select a channel and tap Menu.
3. Tap an option that you need.
Subject Menu
To use the subject menu:
1. Tap > Programs > Newstation.
2. Tap a category folder. Then tap a channel to open. Select a subject and tap Menu. The menu list
pops up.
3. Tap an option that you need.

161
Other features
Chapter 13
• Microsoft® Ofce Mobile
• ClearVue PDF
• My Secrets
• Auto Cleaner
• Restoring default factory settings
• System information
• Task Manager
• Removing programs
162
Microsoft® Ofce Mobile
Your device comes with preinstalled Microsoft® Ofce Mobile applications which enable you to create,
view, and edit spreadsheets, presentations, note, and word les on your device. Use these applications
like you would normally use the Ofce applications on your computer.
To access these applications tap > Programs > Ofce Mobile. Select the appropriate application to
use.
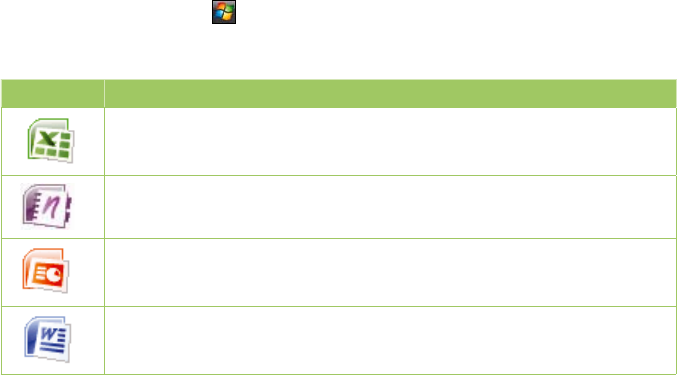
ICON DESCRIPTION
Excel Mobile allows you to view, create, and edit an Excel spreadsheet.
OneNote Mobile allows you to view, create, and edit an OneNote le.
Powerpoint Mobile allows you to view a powerpoint presentation.
Word Mobile allows you to view, create, and edit a word le.
163
Excel® Mobile
Excel workbooks created on a computer can be opened and edited on your device. However, Excel Mobile
does not fully support some features, such as formulas and cell comments.
Unsupported features
• Alignment: Horizontal, vertical, and wrap text attributes remain the same, but vertical text appears
horizontal.
• Borders: Appear as a single line.
• Cell patterns: Patterns applied to cells are removed.
• Fonts and font sizes: Fonts not supported by your device are mapped to the closest font available.
The original font is listed on your device. When the workbook is opened again in Excel on your
computer, the data are displayed in the original font.
• Number formats: Numbers formatted using the Microsoft® Excel 97 conditional formatting feature
are displayed in Number format.
• Formulas and functions: Formulas containing references past row 16384 are replaced with #REF!
Also, the following formulas are converted to values:
• formulas containing functions not supported by Excel Mobile
• formulas entered as an array or containing an array argument. For example,
= SUM({1;2;3;4})
• formulas containing external link references or intersection range reference
• Protection settings: If a password to open has been specied for a workbook, it can be opened in
Excel Mobile but cannot be modied.
• Zoom settings: These are not retained. Excel supports a per worksheet zoom setting, while the
Excel Mobile zoom setting is applied to the whole workbook.
164
• Worksheet names: In a cell in a worksheet, names that reference worksheets within the same
workbook are displayed accurately. Names that refer to other workbooks, arrays such as ={1;2;3;4},
array formulas, or intersection ranges are removed from the name list. If a name is removed from the
list, it is left in formulas and functions, causing those formulas to be resolved as “#NAME?” Tabs that
are hidden in the workbook are not hidden in Excel Mobile.
• AutoFilter settings: These are removed. However, you can use the AutoFilter command in Excel
Mobile to perform similar functions. If you have an AutoFilter applied to a worksheet that causes
rows to be hidden, the rows remain hidden when the le is opened in Excel Mobile. Use the Unhide
command to display the hidden rows.
• Chart formatting: All charts will be saved the way they are shown in Excel Mobile. Unsupported
chart types are changed to one of these supported types: Column, Bar, Line, Pie, Scatter, and Area.
Background colors, gridlines, data labels, trend lines, shadows, 3D effects, secondary axes, and
logarithmic scales are turned off.
• Worksheet features: The following features are not supported in Excel Mobile and are removed or
modied when a workbook is opened on the device: hidden sheets are not hidden; VBA modules,
macro sheets, and dialog sheets are removed and replaced with a placeholder sheet; text boxes,
drawing objects, pictures, lists, conditional formats, and controls are removed; pivot table is converted
to values.
• Excel 2007 Binary (.xlsb) workbooks: Not supported.
• File conversions:
• . xls/.xlt les cannot be saved as .xlsx/.xltx les, and .xlsx/.xltx les cannot be saved as .xls/.xlt
les
• rights-managed and password-protected les can be saved only in their original format.
• Mandatory default le conversions upon saving: .xlsm/.xltm to .xlsx/.xltx; and .pxl/.pxt to .xls/.xlt
165
OneNote® Mobile
OneNote Mobile is a note-taking application. It allows you to capture information in multiple ways and
organize it according to your needs. Besides text, you can also insert audio recording and pictures to your
notes.
Unsupported content types
• Fonts: Does not support font changing.
• Audio content: Only audio recorded with the built-in voice recorder is supported.
• Content search: Content search is not supported.
PowerPoint® Mobile
Powerpoint presentations created on a computer can be viewed but not edited on your device. All le
content is preserved and will be displayed if the presentation is later transferred to a computer, regardless
of whether the content is supported on the device.
Unsupported content types
• Fonts: Unsupported fonts will be mapped to the closest available font.
• Audio/video content: Only embedded .wav les are supported.
• Password protection: If a password to open has been specied, the presentation cannot be viewed.
If a password to modify has been specied, the presentation can be viewed but not saved using
PowerPoint Mobile.
166
Word® Mobile
Word documents created on a computer can be opened and edited on your device. However, Word
Mobile does not fully support some features, such as revision marks and password protection. Some data
and formatting may be lost when you save the document on your device.
Unsupported features
• Backgrounds: These are not displayed or saved by Word Mobile.
• Bi-directional text: While Word Mobile will open documents containing bi-directional text, the
indentations and alignment may be displayed and saved incorrectly.
• Document protection: Word documents can be protected from unauthorized changes by using
Protect Document on the computer. Word Mobile does not support displaying les that have been
protected in this manner.
• Fonts and font sizes: Fonts not supported by your device are mapped to the closest font available.
The original font is listed on your device. When a document that has been edited in Word Mobile is
opened on the computer, text is displayed in the original font.
• Footnotes, endnotes, headers, footers: These features are not displayed by Word Mobile, but they
are retained when a document is edited and saved on the device. When a document is opened again
on a computer, these features are displayed in their original form.
• Lists: Indented lists are not displayed on the device in the same they are displayed on the computer.
They are mapped to closest indentation level supported by Word Mobile. However, the list information
is retained in the document, so when it is opened again on a computer, lists are displayed in their
original form.
• Metales: These are not retained by Word Mobile. Instead, a graphical representation of the object
will be displayed.
• Page breaks: Word Mobile does not display page breaks. However, all page breaks except a break
placed at the end of a document are retained in the document. When a document is opened again on
a computer, page breaks are displayed.
167
• Page borders: Lined page borders are supported. However, artistic page borders are not. The
graphics will be converted to lined borders.
• Password-protected les: If a password to open has been specied for a document, it cannot
be opened in Word Mobile. If a password to modify has been specied for a document, it can be
opened in Word Mobile but cannot be modied.
• Shapes and text-boxes: These are not displayed or saved by Word Mobile.
• Smart tags: These are not displayed or saved by Word Mobile.
• File conversions: Files with Ofce 2003 extensions (.doc, .dot) cannot be saved with Ofce 2007
extensions (.docx, .dotx), and vice versa. However, these le types can be saved as .rtf and .txt les.
• Rights-managed and password-protected le conversions: These les can be saved only in their
original format.
Partially supported features
• Picture bullets: While regular bullets are supported, picture bullets are not. The picture bullets are
not displayed or saved by Word Mobile.
• Revision marks: These are not retained. When a document with revision marks is opened in Word
Mobile, the document will appear as though all revision marks have been accepted. When the
document is saved, revision marks will be lost.
• Table styles: Some or all of the formatting dened in the style will be lost when a document is saved
by Word Mobile.
• Underlined styles: Underline styles not supported by Word Mobile are mapped to one of the four
supported styles: regular, dotted, wavy, or thick/bold/wide.
• Legacy Pocket Word les: You can open *.psw les in Word Mobile. However, if you edit a le, you
will need to save it in *.doc, *.rtf, *.txt, or *.dot format.

168
ClearVue PDF
ClearVue PDF allows you to read documents in Portable Document Format (PDF).
To launch the ClearVue PDF application:
Tap > Programs > ClearVue PDF.
To exit the ClearVue PDF application:
Tap File > Exit.
•
•
TO DO THIS
Open a PDF le Tap File > Open.... Tap a le to open.
Close an open le Tap File > Close.
Open a recently
viewed le
Tap File > Recent Files. A list of recently viewed les appears. Tap the le
you want to open.
Zoom the content
of an open le
Tap Zoom. Select the scale you want to use or tap Custom... to customize
the scale.
169
My Secrets
My Secrets is a secret archive to keep your classied documents, pictures, and video. The items placed
in the My Secrets folder are encrypted for protection. A user-dened password is required to unlock the
folder or change the settings.
You are requested to set up My Secrets before using it.
To set up My Secrets:
1. Tap > Programs > My Secrets.
2. Select Express Mode (Recommended) then tap Next.
3. Enter a four-digit password and then enter it again to conrm.
4. Tap Finish to exit.
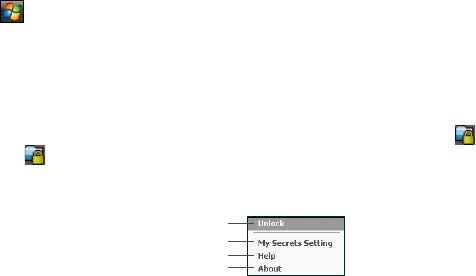
The My Secrets folder in My Documents becomes the encrypted folder. An icon appears on the Today
screen. Tap to show the shortcut menu. You can change your password or cancel encryption by
tapping My Secrets Setting on the shortcut menu as shown.
Tap to lock/unlock the folder.
Tap to access the Advanced Settings.
Tap to access the Help center.
Tap to view version info.
170
Restoring default factory settings
This option allows you to restore the device system to its default factory settings.
To restore default settings:
1. Tap > Settings > System tab > Default Settings.
2. Enter ‘1234’ in the Password eld and tap OK to conrm that you want to restore to default settings.
3. Tap Yes to start restoring.
WARNING: This option will delete all les stored in this device. Backup your important data to your storage card
or computer before restoring to the default settings.
Auto Cleaner
To free memory, you can use this function to conveniently close the running applications that you are not
using.
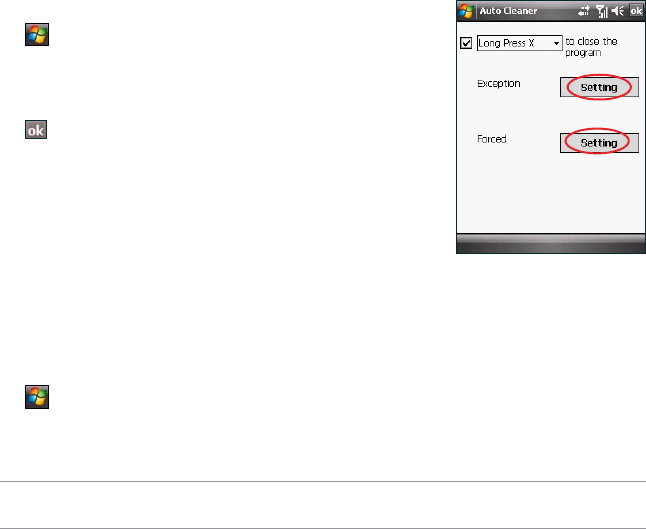
To set Auto Cleaner:
1. Tap > Settings > System tab > Auto Cleaner.
2. Select the check box to activate the Auto Cleaner function, then
select either Short or Long press X to close the program.
3. Tap Setting button to set the Exception and the Forced.
4. Tap when nished.

171
System information
The System Information contains important device information including the current device settings and
version.
To launch the System Information:
1. Tap > Settings > System tab > System Information.
2. Tap the Device Info tab for device hardware information.
3. Tap Version tab to display the ROM, Boot, Radio and Battery version.
Task Manager
The Task Manager allows you to monitor the currently running programs, memory and CPU occupancy.
You can use this function to end these programs easily. You can also switch to any of the listed programs
from the Task Manager screen.
To launch Task Manager:
Tap > Programs > Task Manager.
To end a program:
Select the program you want to end and tap End Task.
To end all tasks, tap Menu > End All Tasks.
To switch to a program:
Select a program and press down the Navigation key, or tap Menu > Switch To.

172
Removing programs
To free the storage memory of your device, you can remove the programs you installed. But for the
programs preinstalled in your device, you are not allowed to remove them.
To remove a program:
1. Tap > Settings > System tab > Remove Programs.
2. Select a program you want to remove, then tap Remove.
3. A warning message pops up. Tap Yes to conrm.

173
Appendices
• Notices
• Specic Absorption Rate (SAR)
• ASUS contact information
174
Notices
Federal Communications Commission (FCC) Regulations
This device complies with part 15 of the FCC Rules. Operation is subject to the following two conditions:
1. This device may not cause harmful interference; and
2. This device must accept any interference received, including interference that may cause
undesired operation.
This device has been tested and found to comply with the limits for a Class B digital device, pursuant to
Part 15 of the FCC Rules. These limits are designed to provide reasonable protection against harmful
interference in a residential installation. This equipment generates, uses and can radiated radio frequency
energy and, if not installed and used in accordance with the instructions, may cause harmful interference
to radio communications. However, there is no guarantee that interference will not occur in a particular
installation If this equipment does cause harmful interference to radio or television reception, which
can be determined by turning the equipment off and on, the user is encouraged to try to correct the
interference by one or more of the following measures:
• Reorient or relocate the receiving antenna.
• Increase the separation between the equipment and receiver.
• Connect the equipment into an outlet on a circuit different from that to which the receiver is
connected.
• Consult the dealer or an experienced radio/TV technician for help.
Changes or modications not expressly approved by the party responsible for compliance could void the
user‘s authority to operate the equipment.

175
Canadian Department of Communications Statement
Country Code selection feature to be disabled for products marketed to the US/CANADA Operation is
subject to the following two conditions:
1. This device may not cause interference; and
2. This device must accept any interference, including interference that may cause undesired
operation of the device.
This Class [B] digital apparatus complies with Canadian ICES-003.
Cet appareil numerique de la classe [B] est conforme a la norme NMB-003 du Canada.
This Category II radiocommunication device complies with Industry Canada Standard RSS-310.
Ce dispositif de radiocommunication de categorie II respecte la norme CNR-310 d’Industrie Canada.
Replaceable batteries
If an equipment is provided with a replaceable battery and if replacement by an incorrect type could result
in an explosion (e.g. with some lithium batteries), the following applies:
• if the battery is placed in an OPERATOR ACCESS AREA, there shall be a marking close to the
battery or a statement in both the operating and the servicing instructions;
• if the battery is placed elsewhere in the equipment, there shall be a marking close to the battery
or a statement in the servicing instructions.
The marking or statement shall include the following or similar text:
CAUTION:
• RISK OF EXPLOSION IF BATTERY IS REPLACED BY AN INCORRECT TYPE.
• DISPOSE USED BATTERIES ACCORDING TO THE INSTRUCTIONS.

176
Operator access with a tool
If a TOOL is necessary to gain access to an OPERATOR ACCESS AREA, either all other compartments
within that area containing a hazard shall be inaccessible to the OPERATOR by the use of the same
TOOL, or such compartments shall be marked to discourage OPERATOR access.
An acceptable marking for an electric shock hazard is (ISO 3864, No. 5036).
Equipment for restricted access locations
For equipment intended only for installation in a RESTRICTED ACCESS LOCATION, the installation
instructions shall contain a statement to this effect.
WARNING: The user needs to switch off the device when exposed to areas with potentially explosive atmospheres
such as petrol stations, chemical storage depots and blasting operations.
Specic Absorption Rate (SAR)
Bodyworn operation
For bodyworn operation, this device has been tested and meets the FCC RF exposure guidelines for
use with an accessory that contains no metal and the positions the handset a minimum of 1.5 cm from
the body. Use of other enhancements may not ensure compliance with FCC RF exposure guidelines. If
you do no t use a body-worn accessory and are not holding the device at the ear, position the handset a
minimum of 1.5 cm from your body when the device is switched on.
Exposure to radio waves
THIS MODEL MEETS INTERNATIONAL GUIDELINES FOR EXPOSURE TO RADIO WAVES
Your mobile device is a radio transmitter and receiver. It is designed not to exceed the limits for exposure
to radio waves recommended by international guidelines. These guidelines were developed by the
178
ASUS
Address: 15 Li-Te Road, Peitou, Taipei, Taiwan
Tel: 886228943447; Fax: 886228907698
Declaration
We declare that the IMEI codes for this product, ASUS - LAMBORGHINI ZX1, are unique to each
unit and only assigned to this model. The IMEI of each unit is factory set and cannot be altered by the
user and that it complies with the relevant IMEI integrity related requirements expressed in the GSM
standards.
Should you have any questions or comments regarding this matter, please have our best attention.
Sincerely yours,
ASUSTeK COMPUTER INC.
Tel: 886228943447
Fax: 886228907698
Email: http://vip.asus.com/eservice/techserv.aspx
179
ASUS Contact information
ASUSTeK COMPUTER INC. (AsiaPacic)
Address 15 Li-Te Road, Peitou, Taipei, Taiwan 11259
Website www.asus.com.tw
Technical Support
Telephone +886228943447
Support Fax +886228907698
Software download support.asus.com*
ASUS COMPUTER INTERNATIONAL (America)
Address 44370 Nobel Drive, Fremont, CA 94538, USA
Telephone +15029550883
Fax +15029338713
Website usa.asus.com
Software download support.asus.com*
ASUS COMPUTER GmbH (Germany and Austria)
Address Harkort Str. 21-23, D40880 Ratingen, Germany
Telephone +49210295990
Fax +492102959911
Online contact www.asus.com.de/sales
Technical Support
Telephone +49180595990
Fax +492102959911
Online support www.asus.com.de/support
Website www.asus.com.de/news
* Available on this site is an online Technical Inquiry Form that you can ll out to contact technical support.
180
Declaration of Conformity
We, Manufacturer/Importer
(full address)
ASUS COMPUTER GmbH
HARKORT STR. 25
40880 RATINGEN, BRD. GERMANY
declare that the product
( description of the apparatus, system, installation to which it refers)
PDA Phone
ZX1
is in conformity with
(reference to the specification under which conformity is declared)
in accordance with 2004/108/EC-EMC Directive and 1995/5 EC-R &TTE Directive
EN 55022: 2006
EN 300328 Electromagnetic compatibility and Radio Limits and methods of measurement
spectrum Matters (ERM); wideband of radio disturbance characteristics of
transmission equipment operating in information technology equipment
the 2.4GHz ISM band and using spread
spectrum modulation techniques; Part 1: EN 55024:1998+A1:2001+A2:2003
technical characteristics and test conditions Information Technology
Part2: Harmonized EN covering essential equipment-Immunity
requirements under article 3.2 of the R&TTE characteristics-Limits and methods of
measurement
EN 300386 Electromagnetic compatibility and Radio EN 50360/ the limitation of exposure of
spectrum Matters (ERM);Telecommunication EN 50361 the general public to electromagneticnetwork
equipment; Electromagnetic fields (0 Hz to 300 GHz) International
Compatibility (EMC) requirements Commission on Non-Ionising
Radiation Protection (1998), Guidelines for
EN 301489 Electromagnetic compatibility and Radio limiting exposure in time-varying electric,
spectrum Matters (ERM); Electromagnetic magnetic, and electromagnetic fields
compatibility(EMC) standard for radio
equipment and services; Part 17: Specific EN 61000-3-2 :2000+A2:2005
conditions for wideband data and Disturbances in supply systems caused
HIPERLAN equipment
EN 61000-3-3:1995+A1:2001
Disturbances in supply systems caused
EN301511 Global System for Mobile communications(GSM) EN 55013 Limits and methods of measurement
Harmonized EN for mobile stations in the GSM 900 of radio disturbance characteristics of
And GSM 1800 bans covering essential requirements broadcast receivers and associated
of article 3.2 of article 3.2 of the R&TTE directive(1999/5EC) equipment
EN 55020 Immunity from radio interference of
broadcast receivers and associated
EN 301908-1 Electromagnetic compatibility and Radio spectrum equipment
EN 301908-2 Matters(ERM);Base Stations(BS),Repeaters and
User Equipment(UE)for IMT-2000 Third-Generation EN 50081-2 Generic emission standard Part 2
cellular Networks;-Part1:Harmonized EN for IMT-2000, Industrial environment
Introduction and common requirements, covering
Essential requirements of article 3.2 of of the R&TTE Directive EN 50082-2 Generic immunity standard Part 2:
Part2:Harmonized EN for IMT-2000,CDMA Direct Spread Industrial environment
(UTRD FDD) (UE)covering essential requirements of article
3.2 of the R&TTE Directive.
CE marking (EC conformity marking)
The manufacturer also declares the conformity of above mentioned product
with the actual required safety standards in accordance with LVD 2006/95 EC
EN 60065 Safety requirements for mains operated EN 60950-1 Safety for information technology equipment
electronic and related apparatus for including electrical business equipment
household and similar general use
EN 60335 Safety of household and similar EN 50091-1 General and Safety requirements for
electrical appliances uninterruptible power systems (UPS)
Manufacturer/Importer
(Stamp)
Date : Apr. 11 , 2008