ASUSTeK Computer O2G1 Cellphone with WLAN & Bluetooth User Manual Part 2
ASUSTeK Computer Inc Cellphone with WLAN & Bluetooth Users Manual Part 2
Contents
- 1. Users Manual
- 2. Users Manual Part 1
- 3. Users Manual Part 2
Users Manual Part 2
Chapter 7
72
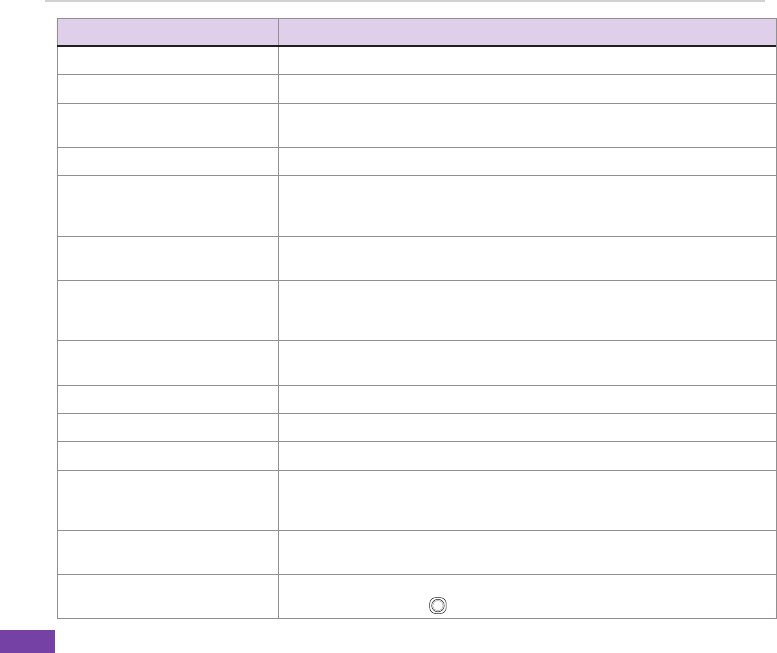
TO DO THIS
Add a contact Press Menu > Add Contact, and follow the instructions on the screen.
Delete a contact Select the contact to delete and press Menu > Delete Contact.
Send an instant message Select the contact with whom you want to chat and press Menu > Send
Message. Enter your message and press Send.
Quickly add common phrases Press Menu > My Text and select a phrase from the list.
Reply to an instant message Press Menu > Chats and select the name of the person sending the instant
message. The message displays, along with a box for your reply. Enter
your reply and select Send.
Add other people to a
conversation
From a chat session, press Menu > Invite, and then select a contact.
Receive instant messages
at any time your phone is
connected to a network,
Press Menu > Options > Passport Account > Run this program when
connection is available > Done.
Switch to another chat session Press Menu > Chats. In the list of ongoing chats, select the name of a
contact with whom to chat.
Return to the contacts list From a chat session, press Menu > My Contacts.
End a chat session From a chat session, press Menu > End Chat.
See all who are chatting Press Menu > Chats.
Block someone on your MSN
Messenger contacts list from
seeing and contacting you
IntheMSNMessengercontactslist,selectthecontact’sname.Press
Menu > Block. The contact will no longer be able to see your status or
send you messages.
Unblock a contact IntheMSNMessengercontactslist,selectthecontact’sname.Press
Menu > Unblock.
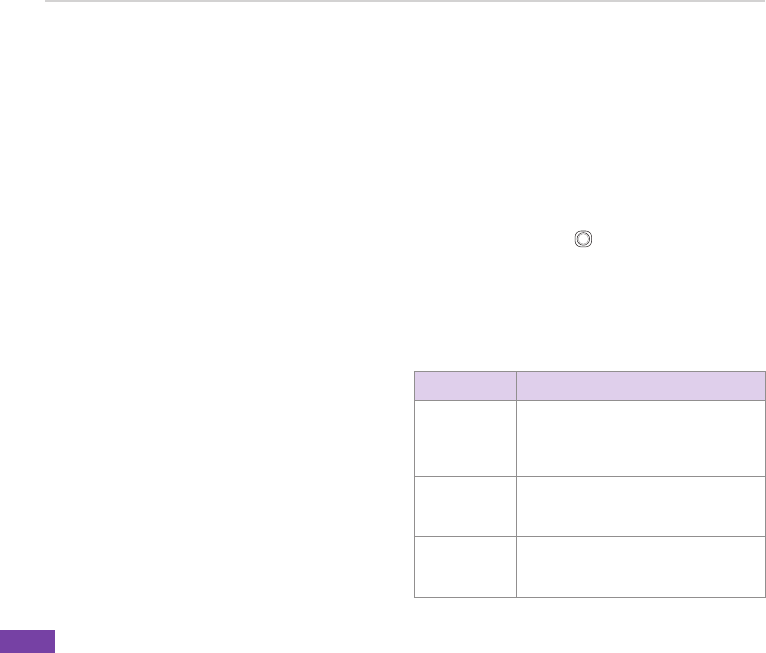
Change your status In the MSN Messenger contacts list, select your name. Select a status
description and press .
Chapter 7
73
Using MSN Hotmail
With MSN Hotmail, you can access your hotmail mailbox on your Smartphone and send and receive
e-mails.
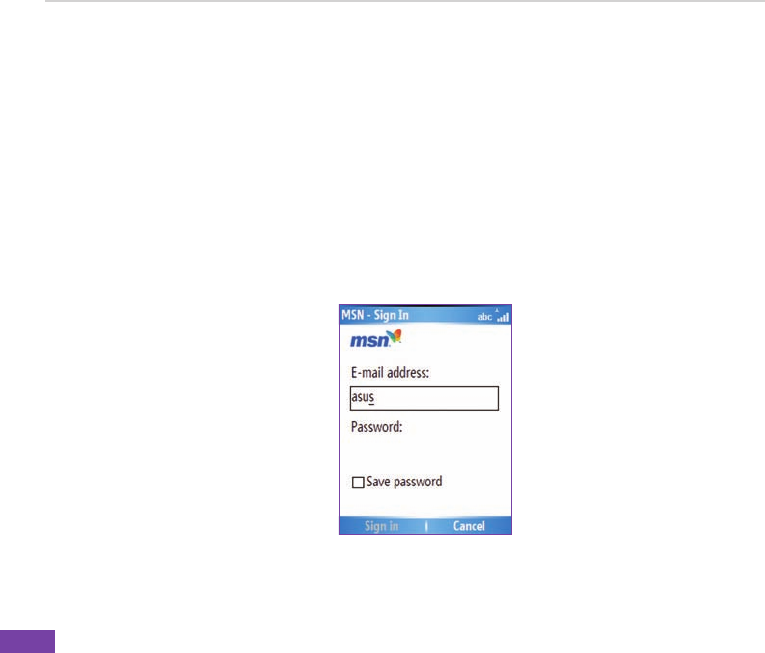
To sign in and out of MSN Hotmail
1. On the Home screen, press Start > Pocket MSN > MSN Hotmail.
2. On the MSN - Sign In screen, enter the e-mail address and password for your Hotmail account.
3. Select Save passwordifyoudon’twanttoenteryourpasswordagaininthefutureandpress
Sign In.
4. To sign out, press Menu and then select Sign Out.

Chapter 7
74

75
Chapter 8 Organizing Your Life
8-1 Using Contacts
Contactsmaintainalistofyourfriendsandcolleaguessothatyoucaneasilyndtheinformationyou
look for, whether you are at home or on the road. Using Bluetooth on the device, you can quickly share
Contactsinformationwithotherdeviceusers.IfyouuseutlookonyourPC,youcansynchronize
Contacts between your phone and PC.
Viewing Contacts
To view the Contacts list, do one of the following:
• On the Home screen, press Start > Contacts.
• On the Home screen, press Contacts.
The contact list displays the names of your contacts alphabetically. Beside each name in the contact list
isanabbreviationforthedefaultcommunicationmethod,suchastheperson’sworkphonenumber(w)
or home phone number (h). If the contact information includes a work phone number, your Smartphone
automatically sets it as the default number.
If there are phone numbers stored in your SIM card, the entries will be displayed at the end of the list,
with a SIM card icon following the name.
Chapter 8
76
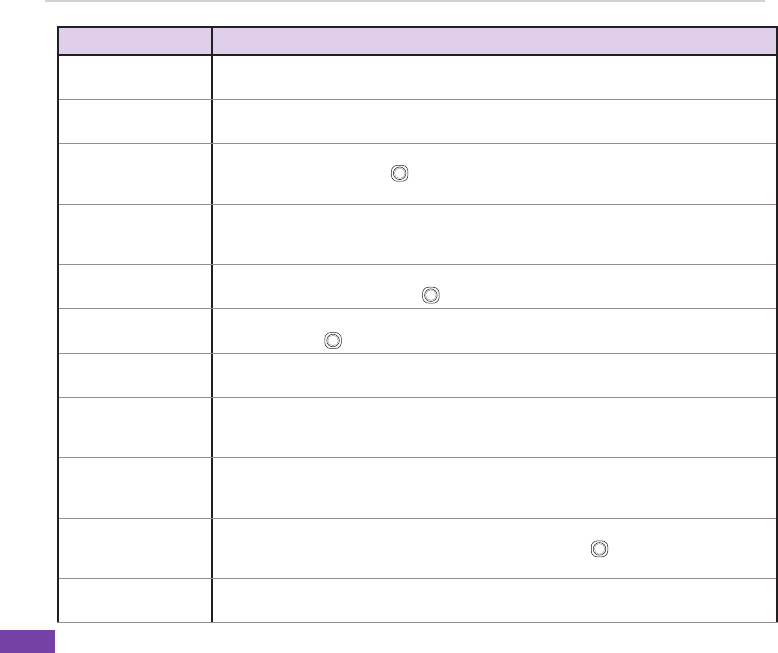
TO DO THIS
Create a new contact On the Home screen, press Start > Contacts > New. Enter information for the new
contact and press Done.
Create a new contact
on the SIM card
On the Home screen, press Start > Contacts. Press Menu > New SIM Contact.
NOTE: You can only store one phone number for a SIM contact.
Editacontact’s
information
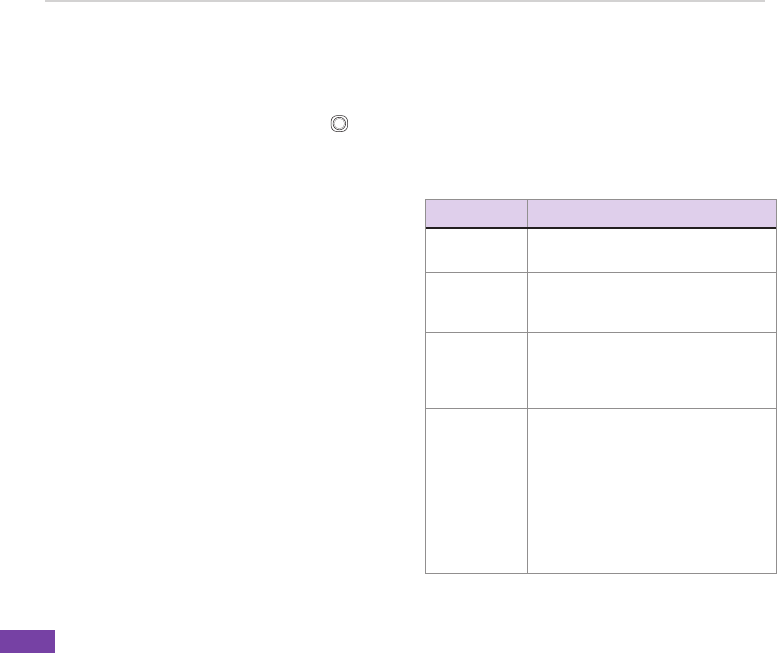
On the Home screen, press Start > Contacts. Select the contact whose information
you want to edit and press . Press Menu > Edit.Whennishedmakingchanges,
press Done.
Call a contact from
the contact list
On the Home screen, press Start > Contacts. Select the contact to call and press
Send. To call a phone number other than the default, select the contact, use the Left/
Right navigation keys to scroll to the number you want to call, and press Send.
Send a text message
to a contact
On the Home screen, press Start > Contacts. Select the contact to which you want to
send a text message and press . Scroll to Send Text Message.
Send an e-mail to a
contact
On the Home screen, press Start > Contacts. Select the contact to which you want to
email and press . Scroll to Send e-mail and press E-mail > Outlook E-mail.
Send an MMS
message to a contact
On the Home screen, press Start > Contacts. Select the contact to which you want to
send an MMS message and press Menu > Send MMS.
Beamacontact’s
information to
another device
On the Home screen, press Start > Contacts. Select the contact to beam and press
Menu > Beam Contact. Select the device and press Beam.
Find a contact by
name
On the Home screen, press Start > Contacts. If you are not in Name view, press
Menu > View By > Name.Entertherstfewlettersofthecontact’snameortherst
few digits of the phone number until the contact is displayed.
Find a contact by
company
On the Home screen, press Start > Contacts. Press Menu > View By > Company.
Select the company that your contact works at and press to see all the contacts
who work there.
Find a contact using
lter
From the Contact list, press Menu > Filter. Select the category that you have
assigned to the contact. To show all contacts again, select All Contacts.
Chapter 8
77
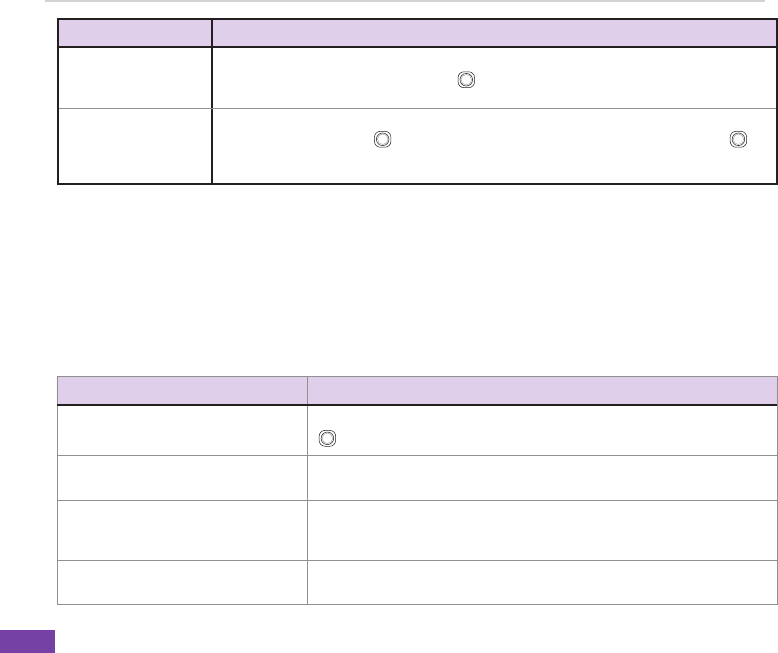
TO DO THIS
Assign a ring tone to
a contact
On the Home screen, press Start > Contacts. Select the contact to which you want to
assign a custom ring tone and press . Press Menu > Edit and scroll to Custom ring
tone. Use the Left/Right navigation keys to select a ring tone and press Done.
Add a pictures to a
contact
On the Home screen, press Start > Contacts. Select the contact to which you want to
add a picture and press . Press Menu > Edit and scroll to Picture and press .
Select an already existing picture and press Select or select Camera and take a
picture to use.
Managing your SIM contacts
All your contacts that are stored on your SIM card are listed in the SIM Manager. You can save all the
contacts on your SIM card to your Smartphone using your SIM Manager.
Accessing SIM Manager
On the Home screen, press Start > More > Tools > SIM Manager.
TO DO THIS
ViewaSIMcontact’sinformation In SIM Manager, select the contact that you want to view and press
.
Copy a SIM contact to your phone In SIM Manager, press Menu > Copy to Contact and then press OK
toconrm.
Copy all SIM contacts to your phone In SIM Manager, press Menu > Select All to select all the contacts on
your SIM card. Press Menu > Copy to Contact and then press OK to
conrm.
Delete a SIM contact from your SIM
card
In SIM Manager, press Menu > Delete and then press OKtoconrm.

Chapter 8
78
TO DO THIS
Delete all SIM contacts from your
SIM card
In SIM Manager, press Menu > Select All to select all the contacts on
your SIM card. Press Menu > Delete and then press OKtoconrm.
EditaSIMcontact’snameand/or
phone number
In SIM Manager, select the contact that you want to edit and press
Menu > Edit.
Copy a contact from your phone to
your SIM card
In SIM Manager, press Menu > Copy Contact to SIM. Select the
contact you want to copy from your phone memory to your SIM card
and press Select.
View text messages on your SIM
card
In SIM Manager, press Menu > SMS.
Return to contacts view from Text
messages screen
After you have pressed Menu > SMS, you can return to Contacts by
pressing the Back button.
Delete all text messages on your
SIM card
In SIM Manager, press Menu > SMS > Menu > Select All. All the text
messages on your SIM card are selected. Press Menu > Delete and
then OKtoconrm.
Delete a text message on your SIM
card
In SIM Manager, press Menu > SMS. Select the text message to
delete and Press Menu > Delete.
Copy all the text messages from
your SIM card to your phone
In SIM Manager, press Menu > SMS > Menu > Select All. All the text
messages on your SIM card are selected. Press Menu > Copy to Text
Message and then OKtoconrm.
Copy a text message from your SIM
card to your phone
In SIM Manager, press Menu > SMS. Select the text message to copy
to your phone, press Menu > Copy to Text Message and then OK to
conrm.
Copy a text message from your
phone to your SIM card
In SIM Manager, press Menu > SMS. Select the text message to copy
to your phone, press Menu > Copy Text Message to SIM and then
OKtoconrm.
Access text messages on your
phone from SIM Manager
In SIM Manager, press Menu > Switch Text Message.
Chapter 8
79
8-2 Using Calendar
Use Calendar to schedule appointments, including meetings and other events. Your appointments
for the day can be displayed on the Home screen. You can also set Calendar to remind you of
appointments.IfyouuseutlookonyourPC,youcansynchronizeappointmentsbetweenyour
phone and PC.
To open the Calendar program, do one of the following:
• On the Home screen, press Start > Calendar.
• On the Home screen, scroll to the upcoming appointment and press .
Scheduling an appointment
To schedule an appointment
1. On the Home screen, press Start >
Calendar.
2. Press Menu > New Appointment.
3. Enter information about the appointment.
To schedule an all-day event, in End time,
select All day event.
4. Press Done.
TO DO THIS
Make an
appointment
recurring
Select the appointment and press
Action. Press Edit. Scroll to Occurs
and select one of the recurrence
options.
Delete an
appointment
Select the appointment to delete
and press Menu > Delete
Appointment.
Beam an
appointment
Select the appointment to beam and
press Action. Press Menu > Beam
Appointment.
Chapter 8
80
Viewing an appointment
To view an appointment
1. On the Home screen, press Start > Calendar.
2. Select the appointment and press .
TO DO THIS
Viewtoday’s
agenda
From any Calendar view, press
Menu > Go to Today.
View your
agenda for a
specicdate
From any Calendar view, press
Menu > Go to Date. Enter the date
to view and press Done.
Show week
numbers
From any Calendar view, press
Menu > Options. Scroll to Month
view and select Show week
numbers.
Change the
display of the
work week
In any Calendar view, press Menu >
Options and do the following:
• Tospecifytherstdayofthe
week, in First day of week,
select Sunday or Monday.
• To specify the number of days
you want to appear in a week, in
Week view, select 5-day week,
6-day week, or 7-day week.
Viewing your schedule
You can view your schedule in your calendar in
three different views: Week View, Month View,
and Agenda View.
To view your schedule
1. On the Home screen, press Start >
Calendar.
2. Press Menu and then select your desired
view.
• Week View
• Month View
• Agenda View

Chapter 8
81
8-3 Using Tasks
Use Tasks to keep track of what you have to do.
The Tasks list
The task list is your “things to do” list. When you create or edit tasks with Outlook on your PC and
thensynchronizeitwithyourphone,additonalinformation,suchasduedate,priority,andcategory,
may show. A task that has been marked as high priority is preceded by an exclamation mark, and
one marked as low priority by a downward-pointing arrow. Overdue tasks are displayed in bold red.
NOTE YoucansynchronizeinformationonyourphonewithyourPCtokeepyourtask
list up to date in both locations.
TO DO THIS
Create a task On the Home screen, press Start > Tasks. Scroll to the Enter new
task here box at the top of the screen, enter the task name, and
press .
Mark a task as completed On the Home screen, press Start > Tasks. Scroll to the task to mark
complete, then press Complete.
Delete a task On the Home screen, press Start > Tasks. Scroll to the task to delete,
then press Menu > Delete Task. Press Yestoconrm.
Change a completed task to
incomplete
On the Home screen, press Start > Tasks. Scroll to the completed
task to as incomplete, then press Activate.
Find a task On the Home screen, press Start > Tasks. Press Menu > Sort by and
select a sort option or Menu > Filter and select a category.

Chapter 8
82
8-4 Using Voice Notes
You can use Voice Notes to create and play back short voice recordings and verbal reminders.
Recordings are included in the All Notes list and are named consecutively Recording 1, Recording 2,
and so on.
TO DO THIS
Create a voice note On the Home screen, pres Start > More > Voice Notes. The All Notes
screenisdisplayed.Holdthephone’smicrophonenearyourmouth.
Press Record to start recording your voice note. A counter displays
the number of seconds elapsed during recording. Press Stop to stop
recording.
Play, rename, or delete a voice note From the All Notes screen, select the voice note and then press Menu
> Play, Menu > Rename, or Menu > Delete.
Set a voice note as a ring tone From the All Notes screen, select the voice note to use as your current
ring tone and then press Menu > Set As Ringtone. Press OK to
conrm.
83
Chapter 9 Multimedia
9-1 Working with photos and videos
Using Pictures & Videos
The Pictures & Videos program allows you to work with photos and video clips on your phone. After
youhavetakenthephotosandvideoclips,youcanorganize,edit,beamorsendthemusinga
messaging program.
To open the Pictures & Videos program, press Start > Pictures & Videos.
TO DO THIS
Take a photo or a video clip Select Camera > Menu > Change Mode. Select Camera Mode to take a
photo. Select Video Mode to take a video clip.
Set the photo scene Set to Camera Mode. Select Menu > Scene. You may either select Auto
or Night scene.
Setthephoto/videosize Set to either Camera Mode or Video Mode. When you have choosen the
mode, select Menu > Picture (or Video) Size to select the photo/video
size.
Set the photo quality Set to Camera Mode. Select > Menu > Picture Quality. Choose from
Normal, Fine, or Super Fine.
Settheashmode Set to Camera Mode. Select Menu > Flash Mode. Choose from Off, On,
or Auto.
Zoom a photo Set to Camera Mode. Select Menu > Zoom.
Set the timer for taking a photo Set to Camera Mode. Select Menu > Self-Timer.

84
TO DO THIS
Save a photo or a video clip Set to either Camera Mode or Video Mode. Select Menu > Save to. You
can save a video clip in a storage card or in the main memory.
Set the effect on a photo or on
video clip
Set to either Camera Mode or Video Mode. Select Menu > Effect.
Set the advanced settings Set to either Camera Mode or Video Mode. Select Menu > Advanced.
View a picture or a video clip Select the picture or video clip you want to view and press View.
Delete a picture or a video clip Select the picture or video clip you want to delete and press Menu >
Delete.
View your pictures as a slide
show
Press Menu > Play Slide Show.
Set a picture as the Home
screen
Select the picture you want to use as the Home screen and press View >
Menu > Use as Home Screen. Use the Left/Right navigation keys to select
the display area and press Next . Adjust the transparency and press Finish.
Send a picture or a video clip Select the picture or video clip you want to beam and press Menu > Beam.
Select the device to which you want to send and press Beam.
Change the name of a picture Select a picture and press View >Menu > Save > Save as...Menu > Save > Save as.... Change the
name is the Nameeld.
Edit a picture Select the picture you want to edit and press View. Press Menu > Edit, and
do the following:
• To rotate the picture 90 degrees, press Menu > Rotate.
• To crop the picture, press Menu > Crop. Use the navigation pad to
positiontherstcornerofthecroppingareaandpressNext. Position the
second corner and press Finish. To start over, press Previous.
• To automatically readjust the brightness and contrast levels of the
picture, press Menu > Auto Correct.
Press Menu > Save As, to save the edited picture with a different name or
to a different location.

85
9-2 Listening to music and watching videos
UseMicrosoft®WindowsMedia™PlayerMobileforSmartphonetoplaydigitalaudioandvideoles
thatarestoredonyourphoneorontheWeb.Youcanlistentomedialesthroughthespeakeronthe
back of your smartphone or through a stereo headset.
WindowsMediaPlayerMobilecanplaythefollowingtypesofles:
• Windows Media Audio (WMA)
• Windows Media Video (WMV)
• Motion Picture Experts Group-2 Audio Layer-3 (MP3)
• Third generation video standard H.263 baseline (3GP)
Use Microsoft Windows Media Player on your PC to copy digital audio and video to your phone.
Windows Media Player screens
Playback screen
The default screen that displays the playback controls (such as Play, Pause, Next, Previous, and Volume)
and the video window. You can change the appearance of this screen by choosing a different skin.
Now Playing screen
The screen that displays the Now Playing playlist. This special playlist indicates the currently playing
leandanylesthatarequeueduptoplaynext.
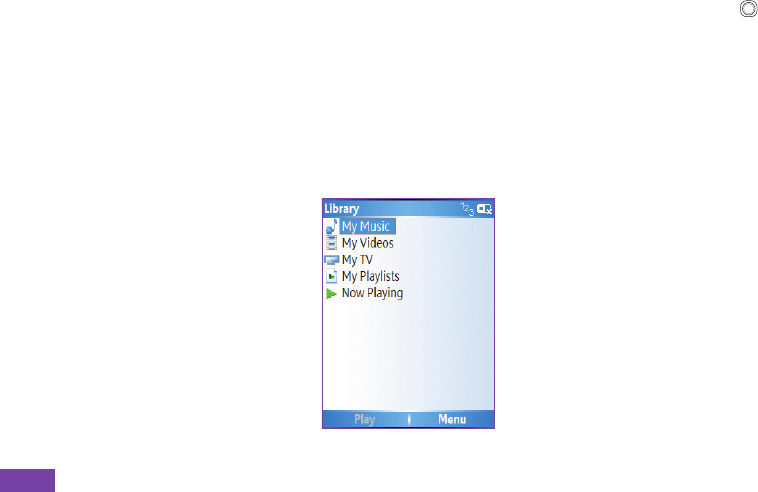
Library screen
Thescreenthatletsyouquicklyndyouraudioles,videoles,andplaylists.Itcontainscategories
such as My Music, My Videos, My TV, and My Playlists.
86
Playing media les
To play a media le
1. On the Home screen, press Start > Windows Media.
2. Press Menu > Library.
3. Do one of the following:
• Toplayalefromalibrary,selectthelibraryyouwanttouseintheLibrarylistandpress .
• Toplayalethatisnotinalibrary,pressMenu > Open File.
• Toplayalefromtheweb,pressMenu > Open URL. In URL, enter the Web address, or select
a site you have visited before in History.
4. Selecttheleyouwanttoplay,andthenpressPlay.
87
Playback screen options
When playback of an audio or video clip is in progress, the menu contains the following options.
OPTION DESCRIPTION
Library DisplaystheLibraryscreensoyoucanchoosealetoplay.
Play/Pause Playorpauseplaybackofcurrentle.
Stop Stops playback. If playback is started again, it will start from the beginning of the
currentle.
Shufe/Repeat Select Shufe to play the items in the Now Playing playlist in random order and
Repeat to play . the items in the Now Playing playlist repeatedly.
Full Screen When a video is playing, it is displayed using the entire screen.
Options Lets you adjust various Media Player options related to playback, video, network,
library, skins, and hardware button assignment
Properties Displaysinformationaboutthelethatiscurrentlyplaying.
About Displays information about Windows Media Player.
Chapter 9
88
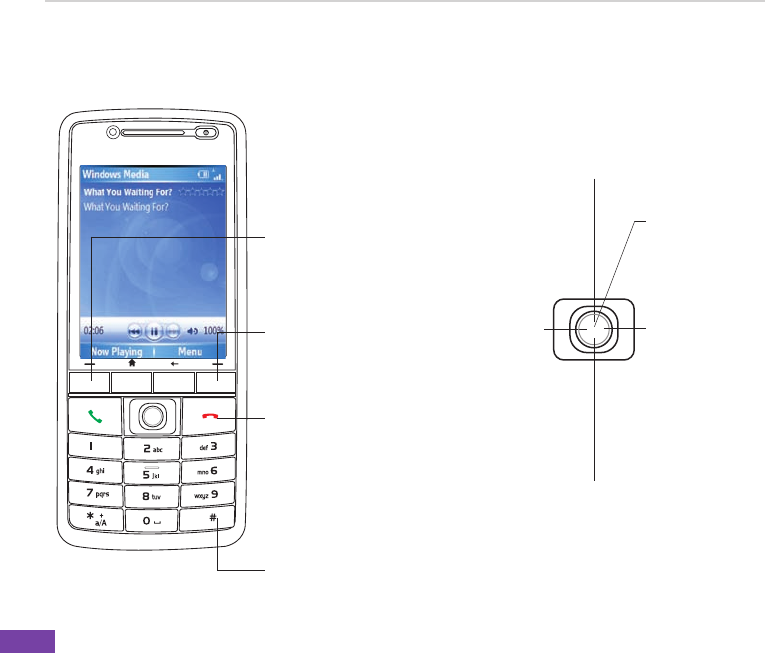
Play/Pause
Press to play/pause
thecurrentle
Previous/Rewind
Push left once to go
back to the beginning
of the current clip;
push twice to go to
the previous clip.
Hold to rewind on the
currentle.
Volume +
Push up to increase
volume
Volume -
Push down to decrease
volume
Next/Fast Forward
Push once to skip to
the next le. Hold to
fast forward on the
currentle.
Keypad controls Joystick controls
Playback controls
Now Playing
Press to access
information about
theplayingle.
Menu
Press to access
playback options
MinimizeWindows
Media Player
Press to minimize
Windows Media
Player. Currently
open files will
continue playing in
the background.
Mute
Press to mute/
unmute currently
playedle.

Chapter 9
89
9-3 Using Java (MIDlet Manager)
Your phone supports Java 2 Edition, J2ME. The Java MIDlet Manager allows you to download Java
applications,suchasgamesandutilities,thatarespecicallydesignedformobilephonesandthen
easily install and managed them.
Toinstall,run,andmanageMIDletprograms(MIDlets)onyourphone,youhavetorstdownload
the MIDlets to your device directly from the Internet or from your PC.
Installing Java MIDlets directly from the Internet
To install Java MIDlets directly from the Internet
1. On the Home screen, press Start > More > Tools > Java. The esmertec Java screen appears.
2. Press Menu > Install > Internet to open Internet Explorer.
3. Locate the MIDlet/MIDlet suite while connected to the Internet.
4. Select the MIDlet/MIDlet suite to download.
5. Press Yes to start installing the MIDlet/MIDlet suite.
6. Press Done toconrm.
Installing Java MIDlets from a PC
You can install the MIDlets/MIDlet suites on your phone from a PC using the USB sync cable,
infrared, or Bluetooth. MIDlets copied to your phone using infrared, Bluetooth, or e-mail attachments
are automatically saved in the My Documents folder.
Chapter 9
90
To install Java MIDlets from your PC
1. Download the games and utilities that you want to install on your phone to your PC.
2. Open ActiveSync on your PC and click Explore.
3. Go to the My Device\My Documents or the My Device\Storage Card folder on your
Smartphoneandpastetheles.
4. On the Home screen of your phone, press Start > More > Tools > Java. The esmertec Java
screen appears.
5. Press Menu > Install > Local. A list of all MIDlets/MIDlet suites available will be shown.
6. Select the MIDlet/MIDlet suite to install and press Install.
7. Press Yes to install.
8. Press Done toconrm.
Running Java MIDlets
To run Java MIDlets
1. On the Home screen, press Start > More > Tools > Java. The phone displays a list of MIDlets.
2. Select a MIDlet, and then press .
TO DO THIS
Uninstall a MIDlet From the Java main screen, select the MIDlet to uninstall and press Menu
> Uninstall.
Update a MIDlet From the Java main screen, select the MIDlet to update and press Menu >
Update.
Change the display name of a
MIDlet
From the Java main screen, select the MIDlet to rename and press Menu
> Edit.

91
Federal Communications Commission Statement
This device complies with Part 15 of the FCC Rules. Operation is subject to the following two conditions:
1) This device may not cause harmful interference, and
2) This device must accept any interference received, including interference that may cause undesired operation.
This device and its antenna must not be co-located or operating in conjunction with any other antenna or transmitter.
This equipment has been tested and found to comply with the limits for a Class B digital device, pursuant to Part 15 of
the FCC Rules. These limits are designed to provide reasonable protection against harmful interference in a residential
installation. This equipment generates, uses and can radiate radio frequency energy and, if not installed and used
inaccordancewithmanufacturer’sinstructions,maycauseharmfulinterferencetoradiocommunications.However,
there is no guarantee that interference will not occur in a particular installation. If this equipment does cause harmful
interference to radio or television reception, which can be determined by turning the equipment off and on, the user is
encouraged to try to correct the interference by one or more of the following measures:
• Reorient or relocate the receiving antenna.
• Increase the separation between the equipment and receiver.
• Connect the equipment to an outlet on a circuit different from that to which the receiver is connected.
• Consult the dealer or an experienced radio/TV technician for help.
Canadian Department of Communications Statement
This digital apparatus does not exceed the Class B limits for radio noise emissions from digital apparatus set out in the
Radio Interference Regulations of the Canadian Department of Communications.
This class B digital apparatus complies with Canadian ICES-003.
WARNING!
The use of shielded cables for connection of the monitor to the graphics card is required to
assurecompliancewithFCCregulations.Changesormodicationstothisunitnotexpressly
approvedbythepartyresponsibleforcompliancecouldvoidtheuser’sauthoritytooperate
this equipment.
Appendix Notices

92
UL Safety Notices
Required for UL 1459 covering telecommunications (telephone) equipment intended to be electrically connected to a
telecommunication network that has an operating voltage to ground that does not exceed 200V peak, 300V peak-to-
peak, and 105V rms, and installed or used in accordance with the National Electrical Code (NFPA 70).
WhenusingtheSmartphone,basicsafetyprecautionsshouldalwaysbefollowedtoreducetheriskofre,electricshock,
and injury to persons, including the following:
• Do not use the Smartphone near water, for example, near a bath tub, wash bowl, kitchen sink or laundry tub, in a
wet basement or near a swimming pool.
• Do not use the Smartphone during an electrical storm. There may be a remote risk of electric shock from lightning.
• Do not use the Smartphone in the vicinity of a gas leak.
Required for UL 1642 covering primary (non-rechargeable) and secondary (rechargeable) lithium batteries for use as power
sources in products. These batteries contain metallic lithium, or a lithium alloy, or a lithium ion, and may consist of a single
electrochemical cell or two or more cells connected in series, parallel, or both, that convert chemical energy into electrical
energy by an irreversible or reversible chemical reaction.
• Do not disposetheSmartphonebatterypackinare,astheymayexplode.Checkwithlocalcodesforpossible
specialdisposalinstructionstoreducetheriskofinjurytopersonsduetoreorexplosion.
• Do not usepoweradaptersorbatteriesfromotherdevicestoreducetheriskofinjurytopersonsduetoreor
explosion.UseonlyULcertiedpoweradaptersorbatteriessuppliedbythemanufacturerorauthorizedretailers.
Operator access with a tool
If a TOOL is necessary to gain access to an OPERATOR ACCESS AREA, either all other compartments within that area
containingahazardshallbeinaccessibletothePERATRbytheuseofthesameTL,orsuchcompartmentsshallbe
marked to discourage OPERATOR access.
Anacceptablemarkingforanelectricshockhazardis(IS864,No.506)
Equipment for restricted access locations
For equipment intended only for installation in a RESTRICTED ACCESS LOCATION, the installation instructions shall
contain a statement to this effect.
93
Prohibition of co-location
This device must not be co-located or operating in conjunction with any other antenna or transmitter
15.105 Federal Communications Commission (FCC) Requirements, Part 15
This equipment has been tested and found to comply with the limits for a class B digital device, pursuant to part 15 of
the FCC Rules. These limits are designed to provide reasonable protection against harmful interference in a residential
installation.
This equipment generates, uses and can radiate radio frequency energy and, if not installed and used in accordance
with the instructions, may cause harmful interference to radio communications. However, there is no guarantee that
interference will not occur in a particular installation. If this equipment does cause harmful interference to radio or
television reception, which can be determined by turning the equipment off and on, the user is encouraged to try to
correct the interference by one or more of the following measures:
—Reorientorrelocatethereceivingantenna.
—Increasetheseparationbetweentheequipmentandreceiver.
—Connecttheequipmentintoanoutletonacircuitdifferentfromthattowhichthereceiverisconnected.
—Consultthedealeroranexperiencedradio/TVtechnicianforhelp.
Regulatory information / Disclaimers
Installation and use of this Wireless LAN device must be in strict accordance with the instructions included in the
userdocumentationprovidedwiththeproduct.Anychangesormodications(includingtheantennas)madetothis
devicethatarenotexpresslyapprovedbythemanufacturermayvoidtheuser’sauthoritytooperatetheequipment.
Themanufacturerisnotresponsibleforanyradioortelevisioninterferencecausedbyunauthorizedmodication
ofthisdevice,orthesubstitutionoftheconnectingcablesandequipmentotherthanmanufacturerspecied.Itis
theresponsibilityoftheusertocorrectanyinterferencecausedbysuchunauthorizedmodication,substitutionor
attachment.Manufactureranditsauthorizedresellersordistributorswillassumenoliabilityforanydamageorviolation
of government regulations arising from failing to comply with these guidelines.
Checklist of Regulatory Statement
15.21
Youarecautionedthatanychangesormodicationsnotexpresslyapprovedinthismanualcouldvoidyour
authorizationtousethedevice.
CAUTIN:Anychangesormodicationsnotexpresslyapprovedbythepartyresponsibleforcompliancecould
voidtheuser’sauthoritytooperatetheequipment.

94
Replaceable batteries
If an equipment is provided with a replaceable battery and if replacement by an incorrect type could result in an
explosion (e.g. with some lithium batteries), the following applies:
– if the battery is placed in an OPERATOR ACCESS AREA, there shall be a marking close to the battery or a
statementinboththeoperatingandtheservicinginstructions;
– if the battery is placed elsewhere in the equipmen, there shall be a marking close to the battery or a statement in the
servicing instructions.
The marking or statement shall include the following or similar text:
CAUTION
RISK OF EXPLOSION IF BATTERY IS REPLACED
BY AN INCORRECT TYPE.
DISPOSE OF USED BATTERIES ACCORDING
THE INSTRUCTIONS
Compliance is checked by inspection.
CAUTIN:TomaintaincompliancewithFCC’sRFexposureguidelines,thisequipmentshouldbeinstalledand
operatedwithminimumdistance20cmbetweentheradiatorandyourbody.Useonthesuppliedantenna.Unauthorized
antenna,modication,orattachmentscoulddamagethetransmitterandmayviolateFCCregulations.
MPE Statement (Safety Information)
Your device contains a low power transmitter. When device is transmitted it sends out Radio Frequency (RF) signal.
Safety Information
In order to maintain compliance with the FCC RF exposure guidelines, this equipment should be installed and operated
withminimumdistance20cmbetweentheradiatorandyourbody.Useonlywithsuppliedantenna.Unauthorized
antenna,modication,orattachmentscoulddamagethetransmitterandmayviolateFCCregulations.
Caution Statement of the FCC Radio Frequency Exposure
This Wireless LAN radio device has been evaluated under FCC Bulletin OET 65C and found compliant to the
requirements as set forth in CFR 47 Sections 2.1091, 2.1093, and 15.247(b)(4) addressing RF Exposure from radio
frequency devices. The radiation output power of this Wireless LAN device is far below the FCC radio frequency
exposure limits. Nevertheless, this device shall be used in such a manner that the potential for human contact during
normaloperation—asamobileorportabledevicebutuseinabody-wornwayisstrictlyprohibit.Whenusingthis
device, a certain separation distance between antenna and nearby persons has to be kept to ensure RF exposure
compliance. In order to comply with the RF exposure limits established in the ANSI C95.1 standards, the distance
between the antennas and the user should not be less than 20cm.

95
Sending pictures 86
Setting to Discoverable 57
Synchronizing30, 60
Turning on/off 41, 57
C
Calendar
Scheduling an appointment 81
Call barring 44
Call key 4
Calls
Answering 21
Emergency 20
From Call History 18
From Contacts 18
From the Home screen 17
International 20
Rejecting 21
Using speed dial 19
Charging
Battery 8
Connecting
Internet 50
Phone to PC 27
Connections
Dial-up 50
GPRS 51
Infrared 53
Internet 55
Proxy 51
USB 54
VPN 51
Contacts
SIM 79
Viewing 77
D
Date
Setting 37
Delete
Pictures 85
Video clips 85
Device lock 3, 16
Dial-up connection 50
Display
External 2
E
E-mail accounts
Setting up 66
E-mail messages
Composing 67
Downloading 69
Sending 67
Synchronizing70
Earphone jack 3
Emergency calls 20
End button 4
Exchange Server
Synchronizing30
External display 2
Index
A
Action key 4
ActiveSync
Copyingles47
Installing 26
Adding programs 46
Alarm
Setting 37
Answering voice calls 21
B
Back key 4
Battery
Charging 8
Inserting 7
Beam
Bluetooth 60
Picture 89
Video clip 89
Bluetooth
Beaming 60
Creating a partnership 58
Headset 59
Partnership 60
Printer 61
Receiving information 60
Renaming device 60
Security 61
Index

96
F
Features
Back 2
Bottom 2
Front 2
Side 2
Top 2
File Explorer
Beamingles49
Creating folders 48
Deletingles49
Deleting folders 49
Movingles49
Moving folders 49
Renamingles49
Renaming folders 49
Sendingalebye-mail49
Starting 48
Using 48
Files
Copying 47
Fixed dialing 43
H
Home key 4
Home screen 13
Personalizing36
Setting 85
Status indicator icons 14
I
Indicators
Battery 2
Bluetooth 2
LED 2
Network 2
Notication2
Status 14
Infrared
Synchronizing29
Infrared (IR) port 3
Infrared connection 53
Input modes
Changing 62
Multipress mode 63
Numeric mode 64
T9 mode 63
Inserting
Battery 7
Installing
ActiveSync 26
Battery 7
Java MIDlets
From a PC 92
From the Internet 92
Micro SD card 7
SIM card 6
Storage card 7
International calls 20
Internet
Connecting 50
Internet Explorer Mobile 55
Changing options 55
J
Java MIDlets
Installing 92
Running 93
K
Key lock 3, 16
Keypad
Locking 41
Unlocking 42
Keys
Action 4
Back 4
Call 4
End 4
Home 4
Left soft 4
L
LEDash2
LED indicator 2
Left soft key 4
Locking
Phone 43
SIM card 42
M
Messaging
Changing options 67
Deleting accounts 67
E-mail 67
Inserting a signature 69
Managing accounts 67
Managing folders 70
MMS 71
Switching accounts 67
Text 67
MIDlets
Running 93
Micro SD card

97
Installing 7
Removing 7
MMS messaging
Accessing 71
Editing settings 71
Hiding recipient 73
Hiding sender 73
My Text 73
Preset text 73
Requesting delivery notice 73
Sending
Pictures 86
Video clips 86
Using templates 73
Modem Link 53
USB connection 54
MSN Hotmail 76
MSN Messenger 74
Multi-color LED indicator 2
Multimedia player controls
Locking 41
Unlocking 42
Multipress mode 63
Entering
Punctuation 64
N
Navigation
Pad 4
Numeric mode 64
P
Partnership
Creating 27
Personalizing
Home screen 36
Phone
Back features 2
Bottom features 2
Front features 2
Locking 43
Resetting 46
Restarting 45
Side features 2
Top features 2
Turning off 9
Turning on 9
Phone settings
Call barring 44
Fixed dialing 43
Pictures
Auto Correct 89
Beaming 89
Croping 89
Default location 90
Deleting 88
E-mailing 89
Filenameprex90
Rotating 89, 90
Saving 89
Sending by Bluetooth 89
Sending by MMS 89
Viewing 88
Pictures and Videos
Editing a picture 89
Viewing a picture 88
PIN
Changing 43
PIN2
Changing 43
Pocket MSN 74
Ports
Earphone jack 3
Infrared (IR) 3
Power button 3
Printer
Conguring61
Proles16
Changing settings 38
Programs
Adding 46
Calendar 81
Contacts 77
File Explorer 48
Creating folders 48
Internet Explorer Mobile 55
Java 95
Modem Link 53
MSN Hotmail 76
MSN Messenger 74
Pictures & Videos 85
Pocket MSN 74
Removing 46
Tasks 83
Voice Notes 84
Windows Media Player 88
Controls 91
Q
Quick List 16
Quick List button 3
R
Radio mode
Turning on/off 41
Rejecting voice calls 21
Remotesynchronization33

98
Removing programs 46
Resetting
Phone 46
Restarting
Phone 45
Right soft key 4
S
Scheduling
Synchronization31
Screen
Settings 35
Security
Bluetooth 61
Settings
Alarm 37
Date 37
Phone
Call barring 44
Fixed dialing 43
Prole38
Time 37
Settings screens 35
Setting up
E-mail accounts 66
SIM card
Installing 6
Locking 42
Unlocking 42
SI SL security 44
Speakerphone 2
Speed dial 19
Creating 19
Start menu 15
Status indicator icons 14
Storage card
Installing 7
Removing 7
Strap holder 3
Synchronizing
Creating a schedule 31
E-mail messages 70
Remotely 33
Using Bluetooth 30
Using infrared 29
Using USB sync cable 29
With an Exchange Server 30
With a PC 28
T
T9 mode 63
Entering
Punctuation 64
Tasks 83
Text
Changing case 64
Entering 62
New line 65
Plus sign 65
Punctuation 64
Space 64
Symbols 65
Text messages
Composing 67
Sending 67
Time
Setting 37
U
UL Safety Notices 95
Unlocking
keypad 42
Multimedia player controls 42
SIM card 42
URL exception 52
USB connection 54
V
Video clips
Adding audio 87
Beaming 86
E-mailing 86
Playing 85
Sending by MMS 86
Setting time limit 87
Voice mail
Retrieving 21
Voice Notes 81
Volume button 3
W
Windows Media Player 91
Controls 2, 91
Wireless Manager 3, 16, 41

99
ASUS COMPUTER GmbH (Germany and Austria)
Address Harkort Str. 25, D-40880 Ratingen, Germany
Telephone +49-2102-95990
Fax +49-2102-959911
Online contact www.asuscom.de/sales
Technical Support
Telephone +49-2102-95990
Fax +49-2102-959911
Online support www.asuscom.de/support
Web site www.asuscom.de/news
For FCC
PCS Head: 0.696 mW/g
PCS Body: 0.704 mW/g
WLAN Body: 0.021 mW/g
For DGT
GSM: 0.724 mW/g
DCS: 0.467 mW/g
WCDMA: 0.964 mW/g
WLAN: 0.012 mW/g
For CE
GSM: 0.724 mW/g
DCS: 0.467 mW/g
WCDMA: 0.964 mW/g

RF Exposure Information (SAR)
This device meets the government’s requirements for exposure to radio waves. This device
is designed and manufactured not to exceed the emission limits for exposure to radio
frequency (RF) energy set by the Federal Communications Commission of the U.S.
Government.
The exposure standard for wireless devices employs a unit of measurement known as the
Specific Absorption Rate, or SAR. The SAR limit set by the FCC is 1.6W/kg. *Tests for
SAR are conducted using standard operating positions accepted by the FCC with the device
transmitting at its highest certified power level in all tested frequency bands. Although the
SAR is determined at the highest certified power level, the actual SAR level of the device
while operating can be well below the maximum value. This is because the device is
designed to operate at multiple power levels so as to use only the poser required to reach the
network. In general, the closer you are to a wireless base station antenna, the lower the
power output.
The highest SAR value for the device as reported to the FCC when tested for use at the ear is
0.696 W/kg for PCS Head SAR and 0.00738 W/kg for WLAN Head SAR and when worn on
the body, as described in this user guide, is 0.704 W/kg for PCS Body SAR and 0.021 W/kg
for WLAN Body SAR. (Body-worn measurements differ among device models, depending
upon available enhancements and FCC requirements.)
While there may be differences between the SAR levels of various devices and at various
positions, they all meet the government requirement.
The FCC has granted an Equipment Authorization for this device with all reported SAR
levels evaluated as in compliance with the FCC RF exposure guidelines. SAR information
on this device is on file with the FCC and can be found under the Display Grant section of
http://www.fcc.gov/oet/fccid after searching on FCC ID: MSQO2G1
For body worn operation, this device has been tested and meets the FCC RF exposure
guidelines for use with an accessory that contains no metal and the positions the handset a
minimum of 1.5 cm from the body. Use of other enhancements may not ensure compliance
with FCC RF exposure guidelines. If you do no t use a body-worn accessory and are not
holding the device at the ear, position the handset a minimum of 1.5 cm from your body when
the device is switched on.
The user needs to switch off the device when exposed to areas with potentially explosive
atmospheres such as petrol stations, chemical storage depots and blasting operations.