ASUSTeK Computer O2G1 Cellphone with WLAN & Bluetooth User Manual
ASUSTeK Computer Inc Cellphone with WLAN & Bluetooth Users Manual
Contents
- 1. Users Manual
- 2. Users Manual Part 1
- 3. Users Manual Part 2
Users Manual
USER MANUAL
Graphite
O2/Graphite
ASUS contact information
ASUSTeK COMPUTER INC. (Asia-Pacic)
Address 15 Li-Te Road, Peitou, Taipei, Taiwan 112
Web site www.asus.com.tw
Technical Support
Telephone +886-2-2894-3447+886-2-2894-3447
Support Fax +886-2-2890-7698
Software download support.asus.com*
ASUS COMPUTER INTERNATIONAL (America)
Address 44370 Nobel Drive, Fremont, CA 94538, USA
Fax +1-510-608-4555
Web site usa.asus.com
Technical Support
Telephone +1-502-995-0883
Support fax +1-502-933-8713
Software download support.asus.com*
* AvailableonthissiteisanonlineTechnicalInquiryFormthatyoucanllouttocontacttechnicalsupport.
02 Xda Graphite
User Manual
E2695
First edition
August 2006
Copyright © 2006 ASUSTeK COMPUTER INC. All Rights Reserved.
No part of this manual, including the products and software described in it, may be reproduced, transmitted,
transcribed, stored in a retrieval system, or translated into any language in any form or by any means, except
documentation kept by the purchaser for backup purposes, without the express written permission of ASUSTeK
COMPUTER INC. (“ASUS”).
Productwarrantyorservicewillnotbeextendedif:(1)theproductisrepaired,modiedoraltered,unlesssuch
repair,modicationofalterationisauthorizedinwritingbyASUS;or(2)theserialnumberoftheproductisdefaced
or missing.
ASUS PROVIDES THIS MANUAL “AS IS” WITHOUT WARRANTY OF ANY KIND, EITHER EXPRESS OR IMPLIED,
INCLUDING BUT NOT LIMITED TO THE IMPLIED WARRANTIES OR CONDITIONS OF MERCHANTABILITY
OR FITNESS FOR A PARTICULAR PURPOSE. IN NO EVENT SHALL ASUS, ITS DIRECTORS, OFFICERS,
EMPLOYEES OR AGENTS BE LIABLE FOR ANY INDIRECT, SPECIAL, INCIDENTAL, OR CONSEQUENTIAL
DAMAGES (INCLUDING DAMAGES FOR LOSS OF PROFITS, LOSS OF BUSINESS, LOSS OF USE OR DATA,
INTERRUPTION OF BUSINESS AND THE LIKE), EVEN IF ASUS HAS BEEN ADVISED OF THE POSSIBILITY
OF SUCH DAMAGES ARISING FROM ANY DEFECT OR ERROR IN THIS MANUAL OR PRODUCT.
SPECIFICATIONS AND INFORMATION CONTAINED IN THIS MANUAL ARE FURNISHED FOR INFORMATIONAL
USE ONLY, AND ARE SUBJECT TO CHANGE AT ANY TIME WITHOUT NOTICE, AND SHOULD NOT BE
CONSTRUED AS A COMMITMENT BY ASUS. ASUS ASSUMES NO RESPONSIBILITY OR LIABILITY FOR ANY
ERRORS OR INACCURACIES THAT MAY APPEAR IN THIS MANUAL, INCLUDING THE PRODUCTS AND
SOFTWARE DESCRIBED IN IT.
Microsoft, Activesync, Outlook, Pocket Outlook, Windows, and the Windows logo are either registered trademarks or
trademarks of Microsoft Corporation in the United States and/or in other countries. Microsoft products are licensed
to OEMs by Microsoft Licensing, Inc., a wholly owned subsidiary of Microsoft Corporation.
Table of Contents
Chapter 1 Getting Started ........................................................................................... 1
1-1 Introducing the O2 Xda Graphite .................................................................................1
1-2 Getting to know your Smartphone ................................................................................2
1-3 Installing the SIM card and battery ...............................................................................5
1-4 Installing and removing a micro SD card ......................................................................6
1-5 Charging your Smartphone ..........................................................................................7
1-6 Turning your Smartphone ON/OFF ..............................................................................8
Chapter 2 Learning to Use Your Smartphone ........................................................... 9
2-1 Home screen ..............................................................................................................11
2-2 Start menu ..................................................................................................................13
2-3 Quick List ....................................................................................................................14
Chapter 3 Using Call Features ................................................................................. 15
3-1 Making a voice call .....................................................................................................15
3-2 Retrieving voice mail messages .................................................................................19
3-3 Responding to a voice call .........................................................................................19
3-4 Options during a call ...................................................................................................20
Chapter 4 Synchronizing with ActiveSync .............................................................. 23
4-1 Microsoft ActiveSync ..................................................................................................23
4-2 Installing ActiveSync on your PC ................................................................................24
4-3 Connecting your phone to a PC .................................................................................25
4-4 Creating a partnership ................................................................................................25
4-5 SynchronizingwithaPC ............................................................................................26
4-6 SynchronizingwithanExchangeServer ....................................................................28
4-7 Creatingasynchronizationschedule .........................................................................39
4-8 Remotesynchronization .............................................................................................31
Chapter 5 Managing Your Smartphone ................................................................... 33
5-1 PersonalizingyourSmartphone .................................................................................33
5-2 Improving performance ..............................................................................................37
5-3 Turning on/off wireless mode .....................................................................................39
5-4 Keeping your Smartphone secure ..............................................................................39
5-4 Setting network options ..............................................................................................43
5-5 Emergency restarting of your phone ..........................................................................43
5-6 Resetting your phone .................................................................................................43
5-7 Adding and removing programs .................................................................................44
5-8 Managingandbackinguples ...................................................................................45
Chapter 6 Getting Connected ................................................................................... 49
6-1 Connecting to the Internet ..........................................................................................49
6-2 Using your phone as an external modem ...................................................................52
6-3 Using Internet Explorer Mobile ...................................................................................54
6-4 Using Bluetooth® .......................................................................................................56
Chapter 7 Messaging ................................................................................................ 61
7-1 Entering text and numbers .........................................................................................61
7-2 Setting up accounts ....................................................................................................65
7-3 Managing accounts ....................................................................................................66
7-4 Text and e-mail messages ..........................................................................................67
7-5 MMS messaging .........................................................................................................70
7-6 Using Pocket MSN .....................................................................................................73
Chapter 8 Organizing Your Life ................................................................................ 77
8-1 Using Contacts ...........................................................................................................77
8-2 Using Calendar ...........................................................................................................81
8-3 Using Tasks ................................................................................................................83
8-4 Using Voice Notes ......................................................................................................84
Chapter 9 Multimedia ................................................................................................ 85
9-1 Working with pictures and videos ...............................................................................85
9-2 Listening to music and watching videos .....................................................................87
9-3 Using Java (MIDIet Manager) ....................................................................................91
Appendix Notices ...................................................................................................... 93

ASUS 02 XDA Graphite specications
Processor + Modem
IntelPXA270416MHz+IntelHermon
Operating system
Microsoft® Windows Mobile™ 5.0 (Smartphone)
Network system
UMTS (3GPP Band I), Tri-Band GSM (900/1800/1900), GPRS class 10
Memory
128MB Flash ROM
64MB SDRAM
LCD Screen
2.2”screensize,QVGAscreenresolution,65Kscreencolor,TFTscreen
technology
Expansion slot
One slot for a micro SD card
Wireless transmission
Bluetooth® v2.0 / USB v1.1 (Client + Host)
Audio
2.5 mm stereo earphone / microphone jacks, built-in speakerphone
Dimensions
109.5 mm x 46 mm x 18 mm
Weight
100 grams (with battery)
Battery
1100mAh rechargeable Lithium-Ion
Battery life
Standby time: Up to 275 hours (GSM) / 300 hours (WCDMA)
Talk time: 5 hours (GSM) / 2.5 hours (WCDMA)
Audio/Video
Music formats accepted: MP3. WMA, WAV, AMR-NB, and A/V Streaming
supported
Internet browsing
HTTP and WAP2.0
Messsaging
SMS, MMS 1.2 and E-mail
JAVA
J2ME (CLDC 1.1 + MIDP2.0)
Ringtones
40 channels polyphonic ringer & MP3
* The actual performance is dependent on multiple factors, including network and usage environment.

Package contents
Your package includes several accessories for the Smartphone. After unpacking, check the items
against the list below and make sure that they are in good condition. If any item is missing or
damaged, contact your dealer or retailer immediately.
Standard items
• ASUS O2 Xda Graphite Smartphone
• USB sync cable
• AC adapter with DC_IN via mini-USB plug
• Software CD
• Standard battery
• Stereo headset with micrphone
• Manual / Quick Start Guide
• Carrying case (can be added at an extra cost)
IMPORTANT To avoid damaging your Smartphone and accessories, it is recommendable
to operate this unit within a temperature range of 0 ~ 40 oC (68 ~ 86 oF) and
50% humidity. Anything that goes beyond or below this temperature range
may damage the unit and/or shorten the battery life.

1
Chapter 1 Getting Started
1-1 Introducing the ASUS 02 Xda Graphite Smartphone
The ASUS® 02 Xda Graphite Smartphone is a tri-band mobile phone with practical features such as
messagingcapabilities,organizer,GPRSfunctionality,andamicroSDcardslot.
In addition to 128 MB phone memory, the micro SD card extends storage space, which allows you to
savephotos,messages,texts,graphics,andaudioles.
Chapter 1
2
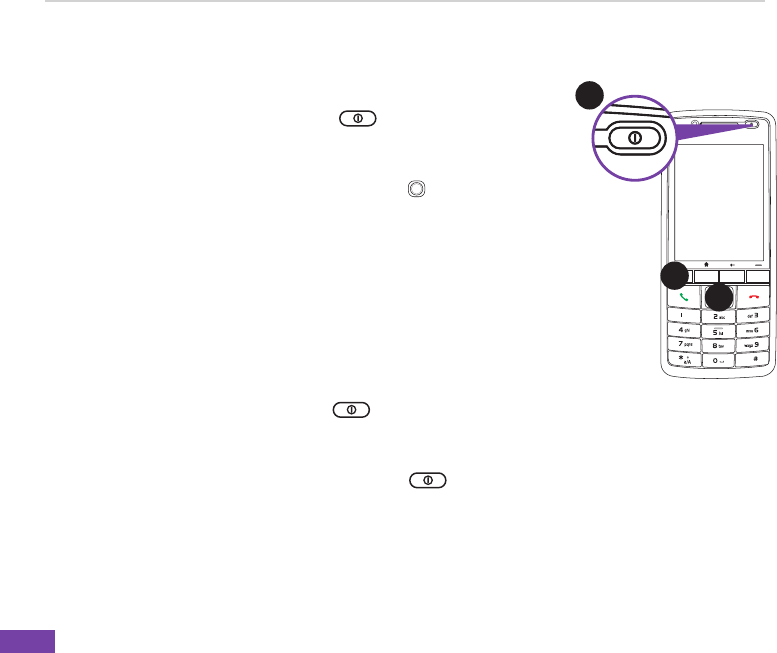
1-2 Getting to know your Smartphone
Front features
1
2
3
4
56
78
9
10
FEATURE
1. Earpiece
2. Power On/Off button / LED indicator
Allows you to turn your 02 Xda ON/OFF. It also indicates
the status of your battery, signal/network, Bluetooth, etc.
See the LED indicator table for more information.
3. LCD Screen
Displays the menu, current time, battery power , signal
strength,andcurrentprole.
4. Left and Right Soft keys
The Left and Right Soft keys perform the command
indicated above the button. The Left Soft key unlocks
the keypad, just press this button and the Asterisk (*)
key .
5. Home key
Takes you to the Home screen.
6. Back key
Takes you back to the previous screen.
7. Call key
Answers a call or dial a number. Press twice to redial last
number.
8. End key
Ends a call. Press and hold to lock the keypad.
LED INDICATOR STATUS
Steady amber Battery is charging.
Steady green Battery is fully charged.
Flashing green Signal/network detected.
Flashing blue Bluetooth is set to “On” or
“Discoverable.”
Flashing amber Eventalarm/notication
Chapter 1
3
FEATURE
9. 5-way joystick
Push left, right, up, and down to scroll through the menu
les,programicons,andfolders.
Press to launch a chosen program, list the contents of a
folder,oropenale.
10. Keypad
Alphanumeric keys enter numbers and texts.
Asterisk (*) key enables you to switch between
cases (upper/lower cases) and caps lock within a text
messagingmode.Inatexteld,pressandholdtodisplay
an entire list of input mode to make a selection.
Inatexteld,pressthiskeytoenterzero(0).Press
and hold to enter a plus sign (+) for making international
calls.
Inatexteld,presstoenteraspace.Pressand
hold to access the symbols menu.
2
.
0
M
e
g
a
P
i
x
e
l
s
Back features
11
12
13
FEATURE
11. Speakerphone
Enables you to listen to music or to talk over the phone
handsfree.
12. Camera lens
13. Back cover
Chapter 1
4
FEATURE
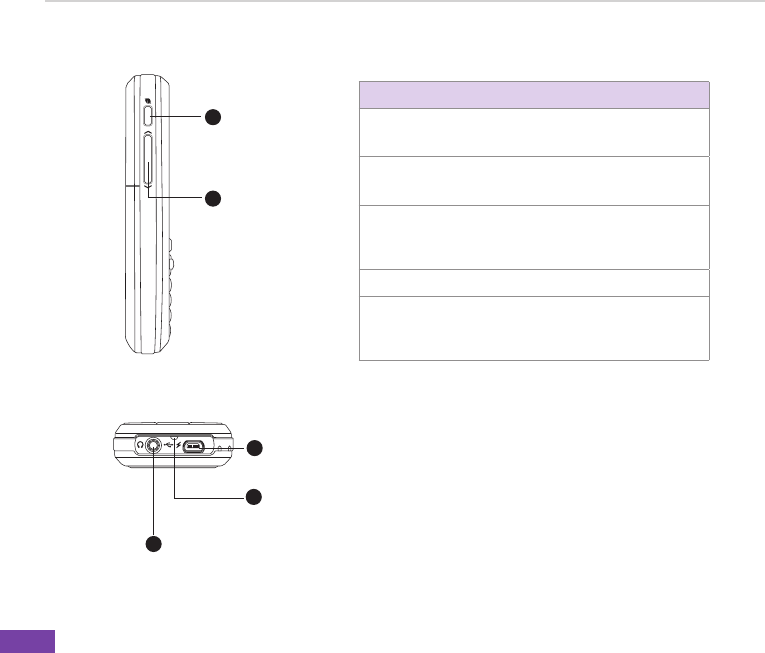
14. Internet button
Launches the Internet Explorer.
15. Volume button
Adjusts the volume of your phone.
16. Mini-USB sync/power connector
SynchronizesdatainyourphonewithyourPCorcharges
your battery.
17. Microphone
18. Earphone jack
Insert a headphone to listen to music or to use your phone
handsfree.
Side features
14
15
Bottom features
17
18
16
Chapter 1
5
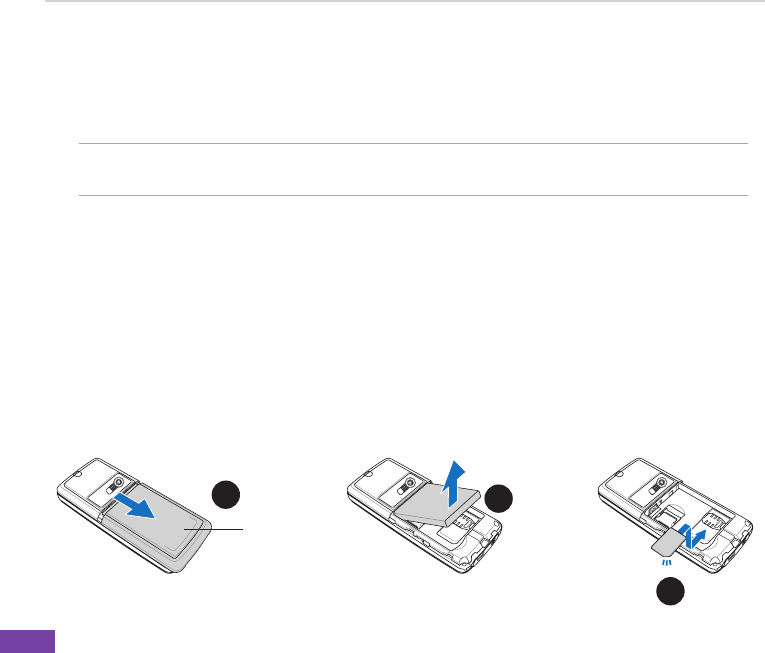
1-3 Installing the SIM card and battery
The phone operator provides you with a Subscriber Identity Module (SIM) card that stores your
mobile phone number, phone book entries, SMS/MMS messages, etc. Install the SIM card before
you install the battery.
NOTE
The SIM card usually comes embedded on a plastic card. Read the SIM card documentation before
removing the SIM card. Remove any rough edges on the SIM card before you install it into the phone.
To install the SIM card
1. Press down the back cover release latch (A) and slide it open in the direction of the arrow as
shown.
2. Lift and remove the battery.
3. Insert the SIM card into the card slot with the contacts area facing down.Insert the SIM card into the card slot with the contacts area facing down.
2
.
0
M
e
g
a
P
i
x
e
l
s
1
A
2
2
.
0
M
e
g
a
P
i
x
e
l
s
3
2
.
0
M
e
g
a
P
i
x
e
l
s
Chapter 1
6
2
.
0
M
e
g
a
P
i
x
e
l
s
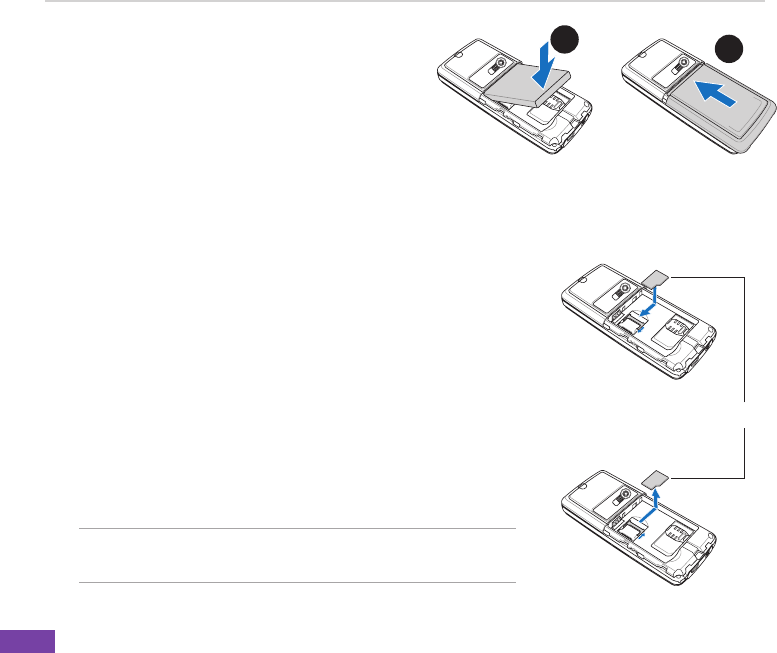
To insert the battery
1. Align the exposed metal contacts on the
edge of the battery with the contacts on the
phone.
2. Slide the back cover into your phone.Slide the back cover into your phone.lide the back cover into your phone.
12
1-4 Installing and removing a micro SD card
To install / remove a micro SD card
1. Remove the back cover and the battery.
2. The micro SD car slot is located above the SIM card slot. Slide the
metallicpartoftheslottotheleft,andipitopen.
2. To install a micro SD card: With the label side (usually the side with
thecardmanufacturer’sname)faceup,andthebarcode/serialnumber
side face down, slide the card gently into the micro SD card slot.
To uninstall a micro SD card: Slide the micro SD card out.
3. Flip the metallic part of the cover back into its position, and slide
it to the right to secure it.
4. Put back the battery and the back cover.
Label side
CAUTION A micro SD card ts only in one orientation. DAmicroSDcardtsonlyinoneorientation.D
NOT force the card into the slot!
2
.
0
M
e
g
a
P
i
x
e
l
s
2
.
0
M
e
g
a
P
i
x
e
l
s
2
.
0
M
e
g
a
P
i
x
e
l
s
Chapter 1
7
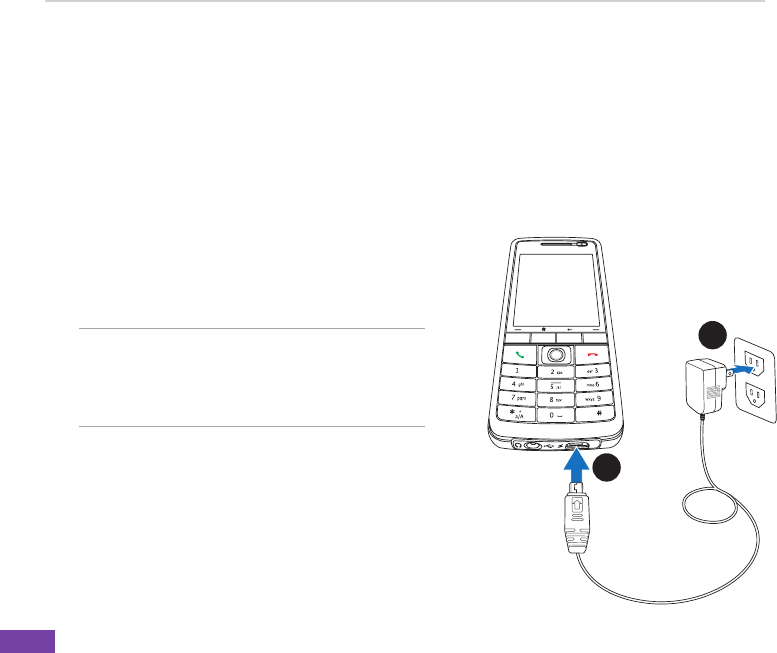
1-5 Charging the battery
Fullychargethebatterybeforeusingthephoneforthersttime.Thismaytakeabout eight (8) hours.
You can charge the battery whether the phone is on or off.
A battery icon on the main and external displays indicates the battery power level. Refer to “Status
indicator icons” in 2-2 Home screen for battery icon indications.
To charge the battery
1. Connect the AC adapter to a power source.
2. Connect the power cable plug to the mini USB sync
and power connector.
NOTE The power LED lights up amber to
indicate that the battery is charging
and lights up green when the
battery is fully-charged.
1
2
Chapter 1
8
1-6 Turning your Smartphone ON/OFF
To turn ON your phone
1. Press and hold the Power button for about three seconds
until the display turns on.
2. IfyouareaskedforaPersonalIdenticationNumber(PIN)code,
key in the code using the keypad, then press . The main display
shows the idle screen.
3. Enter your PIN code (if necessary) and press Done.
Wait for your operator and Microsoft screens to load.
To turn OFF the phone
Do one of the following:
• Press and hold the Power button for about three seconds
until the Microsoft Mobile power off screen shows and wait for the
display to turn off.
• Press and quickly release the Power button and select
Power off from the Quick List screen.
1
2
3
9
Chapter 2 Learning to Use Your Smartphone
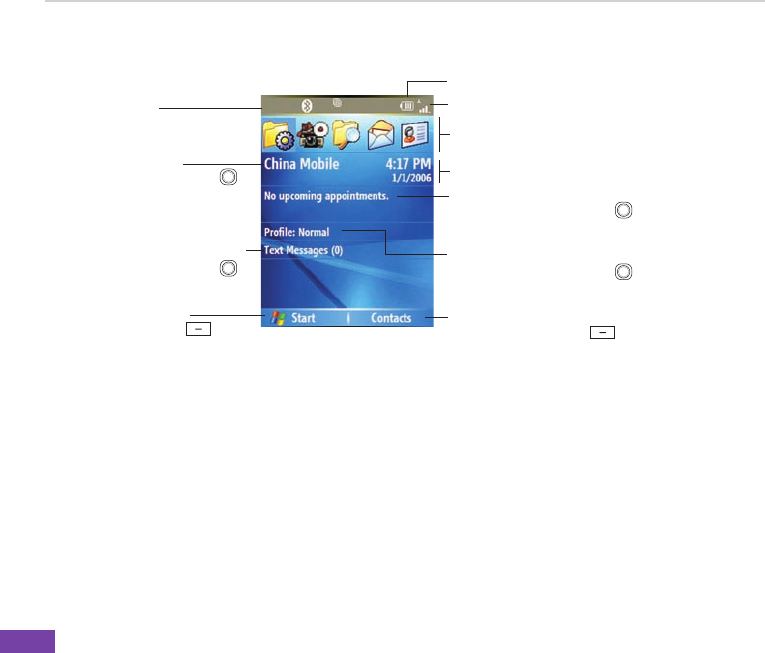
2-1 Home screen
The Home screen automatically displays when you turn on your Smartphone or leave it idle.
ThetopoftheHomescreendisplaysthevemostrecently-usedprograms.Thecenterofthe
displayshowstheserviceprovider,thetime,yournextappointment,yourcurrentprole,andthe
number of new text messages. Scrolling to any of these items and pressing the joystick opens
the associated program.
NOTE Pressing at any time takes you back to the Home screen.
TocustomizetheHomescreen(layout,colorscheme,backgroundimage),
press Start > Settings > Home Screen.
Chapter 2
10
Time/Date
Your next appointment
Select and press the joystick to open
Calendar
Your service provider
Select and press the joystick
to open Wireless Manager
Number of unread text messages
Select and press the joystick
to open Messages
Currentringtoneorvolumeprole
Select and press the joystick to
changetheprole
Most recently-used programs
Status indicators
Left soft key command
Press the Left soft key
to launch the Start menu,
which displays all the installed
programs
Right soft key command
Press the Right soft key to open
Contacts, Messages, or Call History.
Network signal strength
Power status
Chapter 2
11
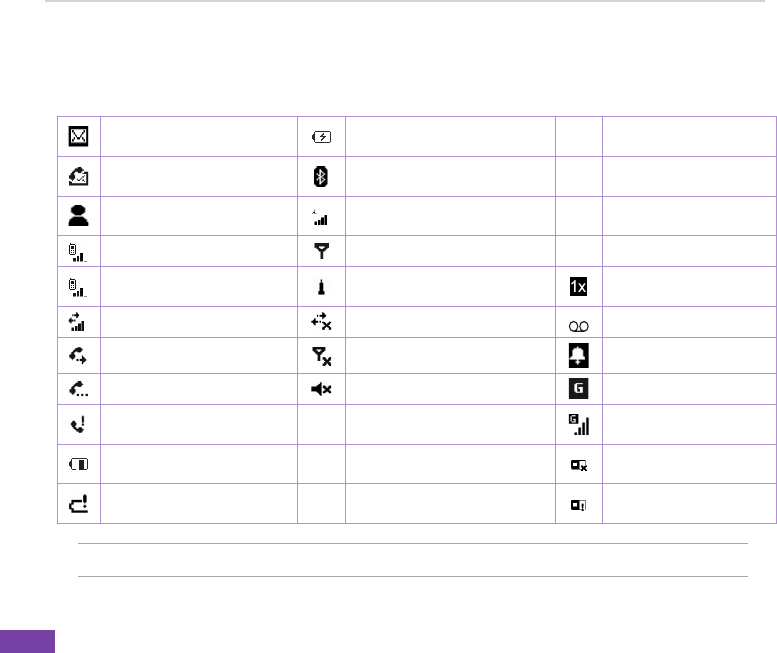
Status indicator icons
Status indicators appear at the top of the screen and on the Home screen. The following table lists
common status indicators and their meanings.
New e-mail or text message
(SMS) Battery charging
t
9
T9 text input mode,
lowercase
New voice mail Bluetooth
T
9
T9 text input mode, smart
case
New instant message Signal strength
T
9
T9 text input mode, caps
lock
XXXVoice call No signal
1
2
3
Numeric input mode
Voice call in progress Roaming 1XRTT connection
available
Data call in progress Sync connection off No voice mail
Calls are forwarded XXXRadio off Pending alarm
Call on hold Ringer off GPRS available
Missed call
abc
Multipress input mode,
lowercase GPRS in use
Battery level
Abc
Multipress input mode, smart
case Missing SIM card
Low battery
AB
C
Multipress input mode, caps
lock Faulty SIM
NOTE Actual status indicator icons may vary from the ones represented in this guide.
Chapter 2
12
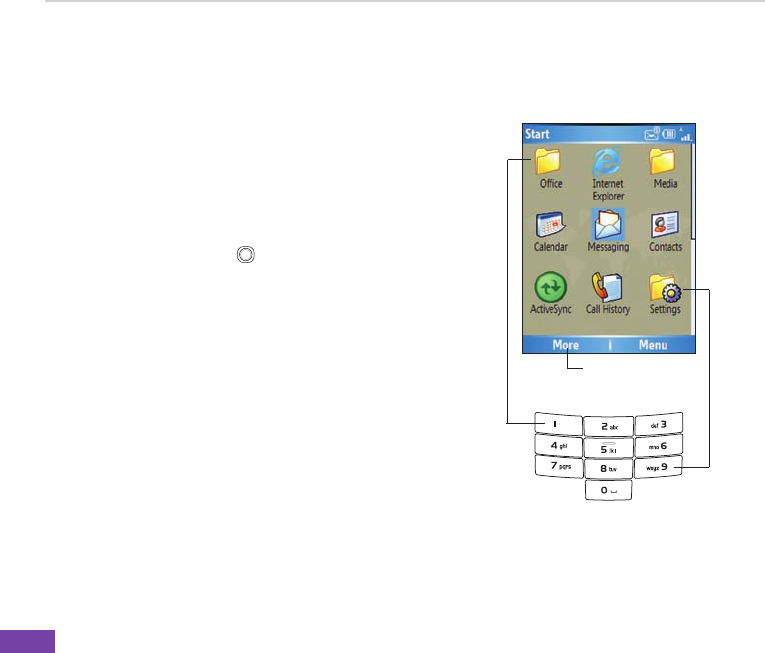
2-2 Start menu
Your Smartphone comes with many pre-installed programs that you can use. These programs can be
accessed from the Start menu.
To use the Start menu
1. On the Home screen, press Start.
2. Do one of the following:
• Scroll to a program using the navigation
keypad and press .
• Press the corresponding number on the
alphanumeric keypad. For example, press
1 to open Internet Explorer and 9 to open
Settings.
Displays the next
page of programs
Press to open
fce
Press
to open
Settings
You can download programs from the Internet and
use ActiveSync to add these programs to the Start
Menu on your phone.
To remove programs, use File Explorer (Start
> More > File Explorer) or Remove Programs
(Start > Settings > Remove Programs).
Chapter 2
13
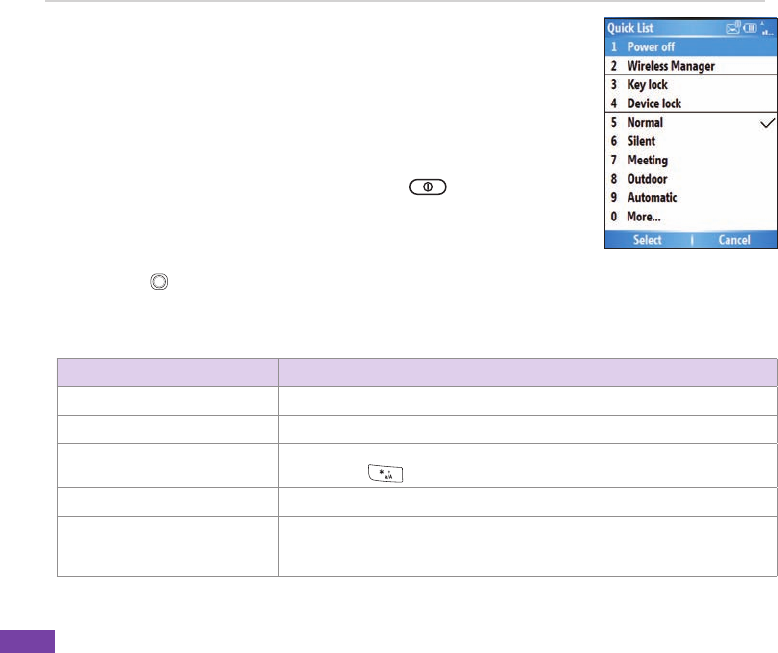
2-3 Quick List
The Quick List provides you with a quick access to the commonly-used
commands such as turning off/locking the phone, turning off wireless
capabilities,andchangingtheproletype.
To use the Quick List
1. Press and quickly release the Power button to display the
Quick List.
NOTE: If you press and hold too long, the phone will be powered off.
2. Select the command you want by scrolling through the list and
pressing . You can also press the corresponding number on the
alphanumeric keypad.
3. To return to the Home screen, press Cancel.
QUICK LIST COMMAND DESCRIPTION
Power off Turns off the phone
Wireless Manager Turns on/off the phone and/or all wireless capability.
Key lock Locks the keypad. To unlock the keypad, press Unlock, and then press the
Asterisk key .
Device lock Select how soon your phone will lock after the last keypress.
Normal / Silent / Meeting /
Outdoor / Automatic / Headset /
Car / Speakerphone
Select to make one of these prolesthecurrentone.Acheckindicatesthe
currentprole.Tochangeprolesettings,selectaproleandpressMenu
> Edit.
14
Chapter 3 Using Call Features
3-1 Making a call
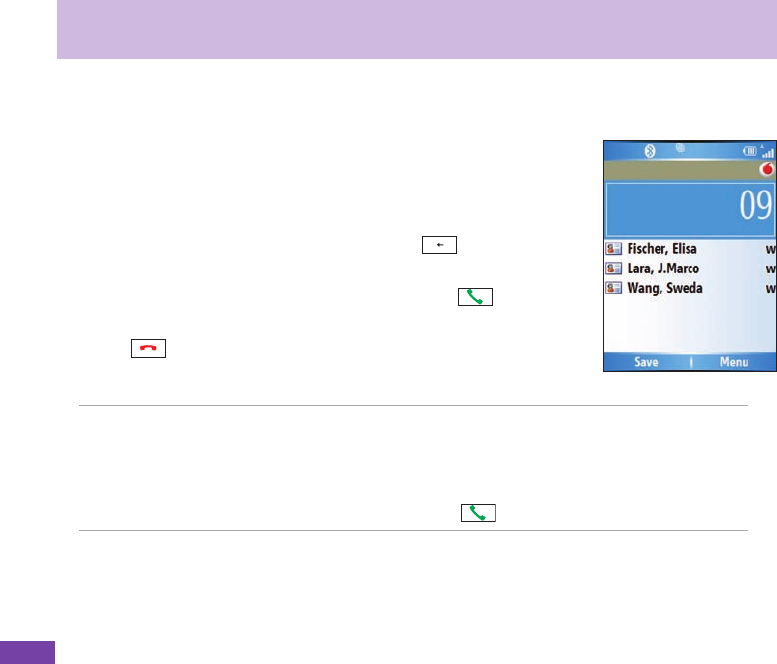
Calling from the Home screen
To call from the Home screen
1. On the Home screen, enter the phone number you want to call.
If you entered the wrong number, press Back to delete the last
digit;pressandholdtodeletealldigits.
2. Once you have entered the number, press Call or to make the
call.
3. Press to end the call.
NOTE As you enter a phone number, the Smartphone searches Contacts, Call History,
andtheSpeedDialliststondamatchingnameand/ornumber.Whenyousee
the name or number of the person you want to call on the list, select it using the
Up/Down navigation keys.
To redial the last number called, press twice.

Chapter 3
15
Calling a Contacts entry
To call a Contacts entry
1. On the Home screen, press Contacts.
2. Use the Up/Down navigation keys to select the contact name you want to call.
TIP Toquicklyndacontactinalonglistofcontacts,youcanentertherstfewletters
ofthecontact’snametonarrowthesearch.
3. Press Call or to make the call.
NTE Bydefault,thecontact’smobiletelephonenumberisdialedrstwhenyoumake
a call from Contacts unless you specify otherwise.
To change the default number for a Contact
1. On the Home screen, press Contacts.
2. Select the contact whose default phone number you want to change.
3. Use the Left/Right navigation keys to change the default number. The letter to the right of the
contact’snameindicatesthedefaultnumber—m(mobile),w(work),orh(home).
Calling a number from the Call History list
To make a call from the Call History list
1. On the Home screen, press or press Start > Call History.
2. Select the number or name you want to call, and press or .

Chapter 3
16
Calling using speed dial
You can create speed dials for frequently-called phone numbers or frequently-accessed items. You may
choose Speed Dial entries from 2-99. Speed Dial 1 is reserved for voice mail access and the number
isconguredinyoursettings.YoucancreateaSpeedDialforaphonenumber,aprogramontheStart
menu,anE-mailaddress,orWebpageaddress(URL)thatisstoredinyourphone’sContacts.
NOTE You must assign a speed dial key to a phone number before you can use the
speed dial feature.
You can create a speed dial only for a phone number, e-mail address, or Web
pageaddressthatisstoredinyourphone’sContacts.Youcannotcreateaspeed
dial for a contact stored in the SIM card.
To create a speed dial for a phone number, e-mail address, or URL address
1. On the Home screen, press Start > Contacts.
2. Select a contact and press to view the contact details.
3. Select the phone number, e-mail address, or URL address, for which you want to assign a speed
dial and press Menu > Add to Speed Dial.
4. Enter appropriate details in Name, Value, and Keypad assignment . In Keypad assignment, use
the Left/Right navigation keys to select, or press to view the full list of choices.
5. Press Done.
NOTE To quit at any time during this process, press Menu > Cancel.

Chapter 3
17
To make a call using speed dial
nthekeypad,pressandholdthespeeddial’sassignment.Ifthekeypadassignmentconsistsoftwo
digits,presstherstdigitthenpressandholdtheseconddigit.
To create a speed dial for an item on the Start menu
1. On the Home screen, press Start.
2. Select an item and press Menu > Add Speed Dial.
4. Enter the appropriate details in Name, Value, and Keypad assignment . In Keypad assignment,
use the Left/Right navigation keys to select, or press to view the full list of choices.
5. Press Done.
Making emergency calls
Calls to emergency service numbers can be made even if you have locked the SIM card and/or your
phone.
To place an emergency call
Enter the emergency number appropriate for your location, and press Send .
Making international calls
Tomakeinternationalcalls,youmustrstentertheinternationalprex(+),followedbythecountry
code and the rest of the phone number.

Chapter 3
18
To place an international call
1. Press and hold 0 on the keypad to enter a plus sign.
2. Enter the full phone number with the country code, area code, and phone number, and then
press .
3-2 Retrieving voice mail messages
On the Home screen, press Voice Mail or press and hold 1 . Follow the voice instructions to
retrieve your messages.
3-3 Responding to a call
Whenyoureceiveacall,thescreendisplaysthecaller’snameandphonenumber.Ifthecallerisnot
in your Contacts list, the screen displays the number only. When you receive a phone call, you have
the option to answer or to ignore it.
To answer a voice call
Press Answer or .
To ignore a voice call
Press Ignore or .
NOTE Selecting Ignore or will send the caller to your voice mailbox if it is enabled.
If it is not, the caller will hear a busy tone.
Chapter 3
19
3-4 Options during a call
Below are the options during or for making a call. Some of these options are available only when
multiple calls are in progress or during a conference call.
IN-CALL MENU OPTION DESCRIPTION
Hold Places the active call on hold.
Unhold Activatesthecallthat’sonhold.
Mute on Switches off the microphone for the active call (you can hear the caller
butthecallercan’thearyou).
Mute off Turns the microphone back on for the active call.back on for the active call.for the active call.
Speakerphone On/Off Activates/deactivates the speakerphone. NOTE: You can also press and
hold during an active call.
Conference Joins together all existing calls if you have subscribed to this service.
Turn Hands-free On/Off Activates/deactivates the hands-free function. This function is only
avaliable if your phone has been conected to a hands-free kit. When
activated, the call will be redirected to the hands-free kit, allowing you to
talk using the remote earphone/microphone set.
Contacts Opens the Contacts list.
View Contact Display information about the caller.
View Calendar Opens the Calendar program
Call History Opens the Call History list.

Chapter 3
20

21
4-1 Microsoft ActiveSync
WithActiveSync,youcansynchronizethedataonyourPCwiththatonyourSmartphone.Synchronization
compares the data on your phone with your PC and updates both with the most recent information.
Youcanalsousesynchronizationtoaddnewprogramstoyourphone.
BeforeyoucansynchronizeyourphonewithyourPC,youneedtocompletethefollowingsteps:
1. Install ActiveSync on your PC.
2. Connect your phone to the PC.
3. Create a partnership between the two devices.
NOTE Formoreinformationaboutsynchronization,seetheActiveSync Help on your PC.
Chapter 4 Synchronizing with ActiveSync

Chapter 4
22
4-2 Installing ActiveSync on your PC
The ActiveSyncprogramispre-installedonyourSmartphone.Tosynchronizethedataonyourphone
with your PC, you must also install ActiveSync on your PC. Install ActiveSync from the Getting Started
CD included in your product package.
NOTE Before starting the ActiveSync installation, make sure that you have Microsoft® Outlook®
installed on your PC. If you do not have Outlook, install the Microsoft® Outlook® from
the Getting Started CD. If you have Outlook 98 or Outlook 2000 installed, you are
encouraged to update to the Outlook bundled in the Getting Started CD.
IMPORTANT Do not connect your phone to your PC until you have nished installing
ActiveSync.
To install ActiveSync on your PC
1. Place the Getting Started CD into the CD drive of your PC and follow the on-screen instructions to
install ActiveSync.
2. Click Start Here to display the Overview screen.
3. If you have not installed Outlook, install it now. Click Install Outlook and follow the screen instructions
to complete the installation.
4. Click Install ActiveSync, then follow the on-screen instructions to complete the installation.
Chapter 4
23
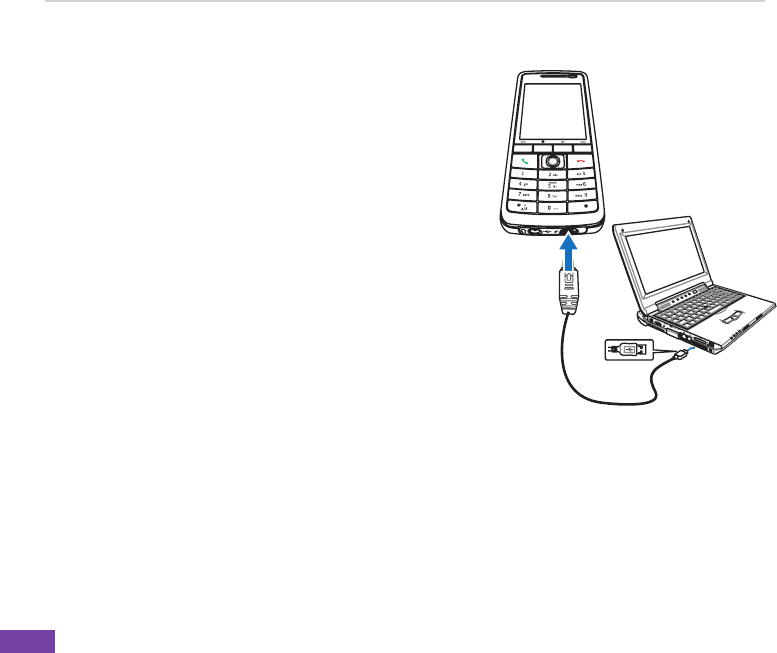
4-3 Connecting your phone to a PC
To connect your Smartphone to a PC
1. When prompted, connect the appropriate end of the USB
sync cable to the mini USB and power connector at the
bottom of your phone and the other end to a USB port
on your PC.
2. ActiveSync will autostart when it detects your phone, and
the Smartphone Sync Setup Wizard will open.
4-4 Creating a partnership
The wizard guides you through the steps in creating a
partnership. In the Sync Setup Wizard, you can do the
following:
• CreateasynchronizationrelationshipbetweenyourPCandyourphone.
• CongureanExchangeServerconnectiontosynchronizedirectlywithyourphone.Beforedoing
this, obtain the name of the Exchange Server, and the domain name from your administrator.
• Choose the information types (Calendar, Contacts, Tasks, Outlook E-mail, Favorites) to
synchronize.
Whenyounishthewizard,ActiveSyncautomatically synchronizes your phone. nce synchronization isautomaticallysynchronizes your phone. nce synchronization issynchronizesyourphone.ncesynchronizationis
completed,youcandisconnectyourphonefromyourPC.Aftertherstsynchronization,yourselected
information from your PC that you selected will appear in your Smartphone.

Chapter 4
24
4-5 Synchronizing with a PC
Changing information to synchronize
By default,ActiveSync does not automatically synchronize all utlook information. You can use
ActiveSyncoptionstoturnsynchronizationforspecicinformationtypesonandoff:
1. On the Home screen, press Start > ActiveSync.
2. Press Menu > Options.
3. Do one or more of the following:
• Selectthecheckboxfortheitemsyouwanttosynchronize.
• Clearthecheckboxforanyitemsyoudonotwanttosynchronize.
• TocustomizesynchronizationofaPC,selectthePCnamethenpressMenu > Settings.
• Tocustomizesynchronizationofaparticulartypeofinformation,selecttheinformationtypethen
press Settings.
• TostopsynchronizingwithaPCcompletely,selectthePCnameandpressMenu > Delete.
NOTE E-mailcanbesynchronizedwithonlyonePC.

Chapter 4
25
Using USB sync cable
When you connect your phone to the PC, ActiveSync automatically detects it and startsautomatically detects it and starts detects it and starts
synchronizing.
1. Connect your phone to a PC using the USB sync cable.
2. ActiveSync should automatically detect it and start synchronizing. If not, on the Home screen, pressActiveSyncshouldautomatically detect it and start synchronizing. If not, on the Home screen, pressautomaticallydetect it and start synchronizing. If not, on the Home screen, pressdetectitandstartsynchronizing.Ifnot,ontheHomescreen,press
Start > ActiveSync.
3. Press Synctostartsynchronizing.
4. Press Stoptostopsynchronizationbeforeitcompletes.
Using Bluetooth
YoucansynchronizeyourphonewithaPCusinglocalwirelesstechnologiessuchasBluetooth.
To synchronize using Bluetooth
1. FollowtheinstructionsinActiveSyncHelponthePCforconguringBluetoothonyourPCtosupport
ActiveSync.
2. On the Home screen, press Start > ActiveSync.
3. Press Menu > Connect via Bluetooth. Ensure that the phone and PC are within close range.
NOTE IfthisisthersttimeyouhaveconnectedtothisPCusingBluetooth,youmust
completetheBluetoothwizardonthephoneandsetupaBluetoothpartnership
with the PC before synchronizing.FormoreinformationaboutsettingupaBluetooth
partnership, see “Creating a Bluetooth partnership” in 6-4 Using Bluetooth.

Chapter 4
26
4. Press Sync.
5. When nished, press Menu > Disconnect Bluetooth. To preserve battery power, turn off
Bluetooth.
4-6 Synchronizing with an Exchange Server
To set up an Exchange Server connection, you will need to get the name of the server and the
server domain name from your service provider or system administrator. You must also know your
Exchange user name and password.
NOTE Beforeyouchangesynchronizationsettingsonthephone,disconnectitfrom
your PC.
1. On the Home screen, press Start > ActiveSync > Menu > Congure Server. If you have not
yet set up sync with Exchange Server, this will say Add Server Source.
2. In Server address, enter the name of the server running Exchange Server, and press Next.
3. Enter your user name, password, and domain name, and press Next.
If you want the phone to save your password so that you will not need to enter it again when
connecting, select the Save password check box.
4. Selectthecheckboxesforthetypesofinformationitemsthatyouwanttosynchronizewiththe
Exchange Server.
5. Tochangeavailablesynchronizationsettings,selectthetypeofinformation,andpressMenu >
Settings.
6. Tochangetherulesforresolvingsynchronizationconicts,Menu > Advanced.
7. Press Finish.

Chapter 4
27
4-7 Creating a synchronization schedule
YoucancreateascheduleforautomaticallysynchronizinginformationonyourSmartphonewithyour
PC or with Microsoft Exchange Server.
TosetupasynchronizationschedulewithyourPC,youmustuseActiveSynconthePC.Formore
informationonsynchronization,seeActiveSyncHelponthePC.
Toset upasynchronizationschedulewithanExchange server,youmustuseActiveSync onyour
phone. See the next section for details.

Chapter 4
28
Scheduling synchronization
Beforechangingthesynchronizationsettingsonthephone,disconnectthephonefromyourPC.
To schedule synchronization
1. On the Home screen, press Start > ActiveSync > Menu > Schedule.
2. Do one or more of the following:
TO SYNC DO THIS
Automatically as items arrive. Under Peak times, select As items arrive. It’s more cost-efcient to
synchronizeonatregularintervalswhenmailvolumeishigh.
Under Off-peak times, select As items arrive.Thiscanbemorecost-efcient
thansynchronizingonaregularschedulewhenmailvolumeislow.
When you are working, or e-mail
volume is high.
Select an appropriately frequent interval in the Peak times list.
When e-mail volume is low. Select a longer interval or As items arrive in the Off-peak times list.
While roaming Select the Use above settings while roamingcheckbox.Tominimize
roamingcharges,clearthecheckbox,andsynchronizemanuallywhile
roaming.
When you press Send in
Messaging on the phone
Select the Send outgoing items immediately check box.
NOTE To change peak time settings to more accurately adjust to periods of e-mail volume
for you, press Menu > Peak Times.

Chapter 4
29
4-8 Remote synchronization
Remotesynchronizationissynchronizingyourphoneoverawirelessconnectioninsteadofusinga
directlocalconnectiontoaPC.SynchronizingremotelywithyourPCmaydependonyournetwork
conguration.Forexample,youmayneedtosetupavirtualprivatenetwork(VPN)connectiontoyour
network.
Tosynchronizeremotely,youneedtosetupaconnectionrstandthencongureyourphone.For
moreinformationonremotesynchronization,seetheActiveSync Help guide.

Chapter 4
30

31
5-1 Personalizing your Smartphone
Settings screens
You can view and change the settings on your Smartphone according to your preferences. This
includes changing the Home screen layout, adding your own ring tone, and setting options for
received calls, call forwarding or call waiting.calls, call forwarding or call waiting.
On the Home screen, press Start > Settings to display the Settings screen.
Chapter 5 Managing Your Smartphone
NOTE Selecting More from the Settings screen will display a second screen of
Settings options.

Chapter 5
32
Personalizing your Home screen
To personalize your Home screen
1. On the Home screen, press Start > Home Screen.
2. Make your desired changes and press Done .
To personalize the Home screen with your own image
1. On the Home screen, press Start > More > Pictures & Videos.
2. Select an image to use as the background image and press .
3. Press Menu > Use as Home Screen.
4. Use the Left/Right navigation keys to select the display area and press Next.
5. Use the Left/Right navigation keys to adjust the transparency and press Finish.
Setting the date, time, and alarm
To set the date and time
1. On the Home screen, press Start > Settings > Clock and Alarm > Date and Time.
2. Enter the correct information and press Done.
To set an alarm
1. On the Home screen, press Start > Settings > Clock and Alarm > Alarm.
2. Enter the correct information and press Done.

Chapter 5
33
Changing regional settings
To change regional settings
1. On the Home screen, press Start > Settings > More > Regional Settings.
2. In Language, select your preferred language for the phone interface and menus.
3. In Locale, select your current location. The Locale option automatically changes the format of the
remainingoptions,suchasdate,time,andcurrency,toreectthoseusedinthatlocale.
4. Press Doneafteryouhavenishedmakingchanges.
NOTE To activate the new language settings, you will need to turn the phone off and
back on.
Changing prole settings
Aproledetermineshowyougetnotiedofeventssuchasincomingcalls,upcomingappointments,
andnewmessages.YourcurrentproleisdisplayedontheHomescreen.
To quickly change the current prole
Toquicklyswitchtoadifferentprole,pressandquicklyreleasethePower Button and scroll to
thedesiredproleintheQuickListscreenandpressSelect. To open the second page of the Quick
Listscreenformoreproleoptions,selectMore.
NOTE WhenproleissettoAutomatic, your phone will automatically switch to Silent
mode whenever you have a meeting set up in Calendar.

Chapter 5
34
To modify a prole
1. On the Home screen, press Start > Settings > Proles.
2. Scrolltotheproleyouwanttochange,pressMenu, and select Edit.
3. Change the settings and press Done.
NOTE To restore the default settings of a prole, press Menu and select Reset to
default.
Customizing sounds for ring tones
UseSoundssettings tocustomizethe soundsforring tones,notications,reminders, alarmclock,
alert, and key tones. The phone comes with 20 pre-installed polyphonic ring tones from which you
can choose.
To change the sound
1. On the Home screen, press Start > Settings > Sounds.
2. Highlight the item for which you want to change the sound.
3. Do one of the following:
• Scroll left/right to select a different sound.
• Press to open the full list of sounds available for that event.available for that event.for that event.
To use your own sound
1. LocatethesoundleonyourPCandcopythele.
NOTE Thelemustbein.wav, mid, .wma, or .mp format..wav, mid, .wma, or .mp3 format..
2. Connect your phone to the PC.

Chapter 5
35
3. Open ActiveSync on your PC and click Explore.
4. Go to the Storage\Application Data\SoundsfolderonyourSmartphoneandpastethele.
5. On the Home screen of your phone, press Start > Settings > Sounds.
6. Highlighttheitemtocustomizeandscrollleft/righttondthesoundle.
Entering your contact information
The Owner Information screen is for entering and displaying personal information, such as your name,
phone number, and e-mail address. Entering this information is recommended as it allows the person
whondsthephonetobeabletocontactyouincaseitislost.
To enter owner information
1. On the Home screen, press Start > Settings > More > Owner Information.
2. Enter your details and press Done.
5-2 Improving performance
Changing accessibility settings
To change accessibility settings
1. On the Home screen, press Start > Settings > More > Accessibility.
2. You may set your preferences for the following:

Chapter 5
36
Multipress time out: Set the length of time to wait between keypresses when entering text in
Multipress mode.
Conrmation time out: Setthedelaybeforeanunconrmedactiontimesout.
In-call alert volume: Set the volume for incoming call or receiving new message alerts while you
are on the phone.
Smartdial Setting:
3. Press Donewhennished.
Changing power settings
UsePowerManagementtocheckthebatterylevelandtocongurepower-savingsettings,suchas
backlight and display time-outs.
1. On the Home screen, press Start > Settings > Power Management.
TherstitemshowedisMain battery indicator , where you can see
how much power is left in the battery. This item is not adjustable.
2. You may set your preferences for the following:
Backlight time out on battery: Set the amount of time for the phone
to be idle before the backlight turns off.
In Backlight time out on AC: Set the amount of time for the phone
to be idle before the backlight turns off when using AC power.
Display time out: Set the time limit for the phone to be idle before
the screen turns off.
3. Press Donewhennished.
Chapter 5
37
5-3 Turning on/off wireless mode
To turn on/off Bluetooth
Do one of the following:
• Press and quickly release the Power button to display the Quick List screen and select
Wireless Manager. Select Bluetooth and press .
• On the Home screen, press Start > Settings > Connections > Bluetooth. Select On, Discoverable,
or Off.
To turn on/off radio mode
Press and quickly release the Power button to display the Quick List screen and select Wireless
Manager. Select All and press to toggle between on and off mode.
NOTE Turn off all radio interfaces of your phone when on an aircraft or in a hospital.
You will not be able to make calls or send messages/emails but will still be able
tousetheorganizerfunctionsofyourphone.
5-4 Keeping your Smartphone secure
Customizethelevelofsecurityyouwantyourphonetohavebylockingthekeypad,theSIMcard,or
the entire phone.
Locking the keypad and multimedia player controls
To lock the keypad
Press and quickly release the Power button to display the Quick List screen and select Key lock.

Chapter 5
38
To unlock the keypad
Press Unlock followed quickly by the * key .
Locking the SIM card
LockingtheSIMcardprevents unauthorized use of yourphone,butyouwill still be abletomake
emergency calls. When you turn on the phone, you will be asked to enter your PIN1 password.
To lock the SIM card and set the PIN
1. On the Home screen, press Start > Settings > Security > Enable SIM PIN.
2. Enterthepassword(SIMcard’sPIN1),andpressDone.
Once the PIN is enabled, your Smartphone will ask you to enter the PIN whenever you turn it on.
To unlock the SIM card
1. On the Home screen, press Start > Settings > Security > Disable SIM PIN.
2. Enterthepassword(SIMcard’sPIN1),andpressDone.
To change the PIN
1. On the Home screen, press Start > Settings > Security > Change SIM PIN.
2. Enter the original PIN1 code.
. EnterandconrmthenewPIN,andthenpressDone.
To change PIN2
1. On the Home screen, press Start > Settings > Security > Change PIN2.
2. EntertheoriginalPIN2code(SIMcard’sPIN2).
. EnterandconrmthenewPIN2,andthenpressDone.

Chapter 5
39
Locking the phone
To lock the phone
1. Do one of the following:
• On the Home screen, press Start > Settings > Security > Device Lock.
• Press and quickly release the Power button to display the Quick List screen and select
Device lock.
2. Select the Prompt if device unused for check box by pressing .
. Scrolldowntotheeldbelowandselecttheamountoftimeforthephonetobeinactivebeforeit
locks automatically.
4. In Password type, select the type of password you want to use.
5. Enterandconrmyourpassword,andthenpressDone.
Controlling outgoing calls
Fixed dialing allows you to restrict your outgoing calls to selected phone numbers, if supported by your
SIM card. You need the PIN2 code for this function. When this function is active, you can only call those
phonenumbersthatareinyourxeddialinglist.Callbarring,ontheotherhand,blockscertaintypes
of call. Before you can use it, you must set up a Fixed dialling list.
1. On the Home screen, press Start > Settings > Phone > Fixed Dialing.
2. Select Enable xed dialing by pressing and then press Done.
3. Enter your SIM PIN 2, and press Done.ncexeddialinghasbeenturnedon,youcanbeginto
storexeddialingnumbers.

Chapter 5
40
4. Press Menu > Edit Numbers.
5. Press Menu > Addandenterthephonenumbertoaddtoyourxeddialinglist.
6. Press Done.
7. Repeat steps 2 and 3 to add more numbers.
Blocking incoming/outgoing calls
Emergency calls can still be made with Call Barring on.
1. On the Home screen, press Start > Settings > Phone > Call Barring.
2. In Block incoming calls, select Off, When roaming, or All calls.
3. In Block outgoing calls, select Off, Int’l except to home, Int’l calls, or All calls.
4. Press Done.
5-4 Setting network options
To change the phone network, press Start > Settings > Phone > GSM/3G Networks. You may
choose between GMS, 3G or automatic, which automatically detects your network every time you
power on your phone.
NOTE You must turn your phone off and then turn back on to apply the network
changes.

Chapter 5
41
5-5 Restarting your phone
You may sometimes need to restart your phone such as when a program is not performing properly,
or the phone does not respond to key presses.
To restart the phone
1. Remove the battery.
2. Reinsert the battery and turn on your phone.
5-6 Resetting your phone
Resetting your phone will remove all the data from memory and restore the phone back to its factory
default settings.
NOTE When you reset your phone, all the data you have entered in RAM, including
all les, system settings, and additional programs you have installed, will be
erased.
To reset your phone
1. On the Home screen, press Start > More > Tools > Default Settings.
2. Enter 1234toconrmthatyouwanttorestoredefaultsettingsandpressOK.
The phone will restart automatically after it has been reset.
5-7 Adding and removing programs
You can use ActiveSync to add programs to your phone or add a program directly from the Internet.

Chapter 5
42
To add programs
1. Download the program to your PC.
2. Read the installation instructions or documentation that comes with the program. Many programs
provide special installation instructions.
3. Connect your phone to the PC.
4. Double-clickthe*.exele.
• Iftheexecutableleisaninstallationwizard,followtheinstructionsonthescreen.ncethe
programhasbeeninstalledonyourPC,thewizardwillautomaticallytransfertheprogramto
your phone.
• Ifaninstallationwizarddoesnotstart,youwillseeanerrormessagestatingthattheprogramis
valid but that it is designed for a different type of PC. You will need to copy this program to your
phone.Ifyoucannotndanyinstallationinstructionsfortheprogram,useActiveSynctocopy
theprogramletotheProgramFilesfolderonyourphone.
To remove a program
Programs that come with the phone cannot be removed.
1. On the Home screen, press Start > Settings > Remove Programs.
2. Scroll to the program to remove.
3. Press Menu > Remove.
5-8 Managing and backing up les
To manage your les, you can use the File Explorer or a storage card (micro SD card) on youror a storage card (micro SD card) on your
Smartphone, or the ActiveSync on your PC.

Chapter 5
43
YoucanbackuplestoyourPCusingActiveSyncorcopylestoastoragecardonyourphone.You
canalsoefcientlymanage your lesandfoldersusingthe File Explorerprogramonyour phone.
Changes you make to the information on one PC will not affect the information on the other PC. If you
wanttoautomaticallyupdateinformationonbothyourphoneandPC,synchronizetheinformation
instead.Formoreinformationaboutcopyingandsynchronizingles,seetheActiveSync Help guide
on your PC.
To copy a le using ActiveSync
CopyingaleresultsinseparateleversionsonyourphoneandyourPC.Becausethelesarenot
synchronized,changesmadetoonelewillnotaffecttheother.
1. Connect your phone to your PC.
2. In ActiveSync, click Explore.
. GotothelethatyouwanttocopyonyourphoneorPC.
4. Do one of the following:
• Tocopytheletoyourphone,right-clickthele,andclickCopy. Right-click the desired folder
on your phone, and click Paste.
NOTE Tocopylestoastoragecard,insertamicroSDcard(see1-4 Installing and
removing a micro SD card).YoucanplayMPandothermedialesdirectly
from a micro SD card inserted into your phone.
• TocopytheletoyourPC,right-clicktheleandclickCopy. Right-click the desired folder on
your PC, and click Paste.
Chapter 5
44
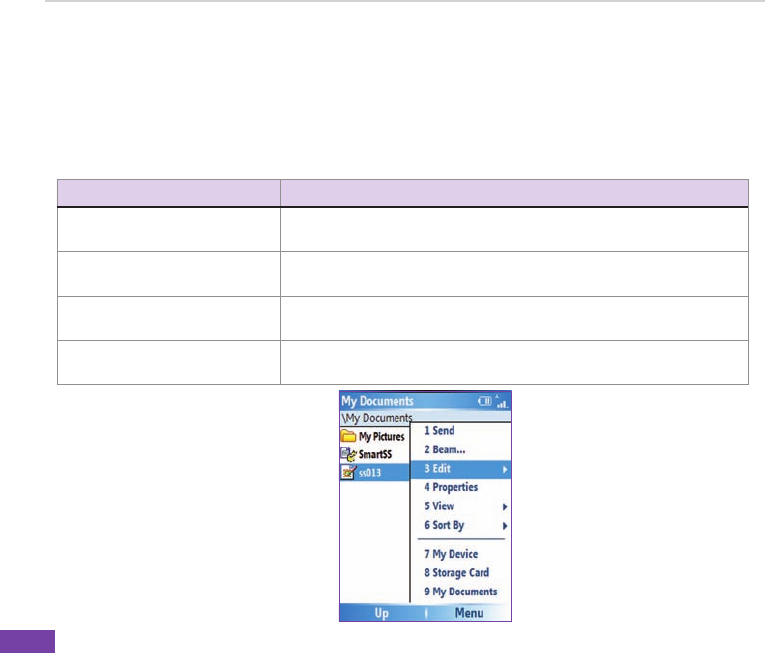
Using File Explorer
FileExplorerallowsyoutomanagethelesandfoldersonyourphonejustlikeyoudoonyourPC.
To start File Explorer
• On the Home screen, press Start > More > File Explorer.
Once in the File Explorer aplication, you can do the following:
TO DO THIS
Create a new folder Go to where you want to create the new folder. Press Menu > Edit >
New Folder. Enter a name for the new folder and press the joystick.
Renamealeorfolder Selecttheleorfolderthatyouwanttorename,andpressMenu >
Edit > Rename.
Deletealeorfolder Selecttheleorfolderthatyouwanttodelete,andpressMenu > Edit
> Delete.
Beamale Selectthelethatyouwanttosend.PressMenu > Beam. Select the
device to which you want to send and press Beam.
Chapter 5
45
TO DO THIS
Sendalebye-mail Selecttheletosend,pressMenu > Send > Outlook E-mail. The
utlookE-mailscreenwillopenwiththeselectedlealreadyattached.
Displayinformationaboutale
or folder
Selecttheleorfolder,andpressMenu > Properties.
Sortlesandfolders Press Menu > Sort By, and select a sort option.
Movealeorfolderfromone
location to another
Selecttheleorfolderthatyouwanttomove.PressMenu > Edit >
Cut. Navigate to the new location and press Menu > Edit > Paste.
Duplicatealeorfolder Selecttheleorfolderthatyouwanttoduplicate.PressMenu > Edit
> Copy. Navigate to the new location and press Menu > Edit > Paste.

Chapter 5
46

47
Chapter 6 Getting Connected
You can set up an Internet or a network connection to do such activities as browse the Internet or intranet,
sendandreceiveemailandinstantmessages,andsynchronizeinformationusingActiveSync.
With an active connection, you can browse the web, download e-mails, chat using MSN Messenger, or
synchronizewirelesslywiththeserver.CheckwithyourInternetServiceProvidertoseeifaconnection
hasalreadybeensetupforyou,andifover-the-aircongurationissupported.
6-1 Connecting to the Internet
On the Home screen, press Start > Settings > Connections to open the Connections screen.
Connections settings allow you to set up Dial-up, Virtual Private Network (VPN), Bluetooth, Proxy,
and General Packet Radio Service (GPRS) connections, so you can connect to the Internet or your
corporate network.
Dial-up connection
To create a Dial-up connection
Every network connection is different. You should gather all of the relevant information or network
settings you need before starting this process.
1. On the Home screen, press Start > Settings > Connections > Dial-up.
2. Press Menu > Add.
3. Enter the appropriate information.

Chapter 6
48
NOTE In Connects to, select The Internet to connect directly to the Internet, Work
to connect to your corporate network, WAP Network to connect to a Wireless
Application Protocol network, or Secure WAP Network to connect to secure WAP
sites, such as a bank.
4. Press Done.
GPRS, Proxy, and VPN connections
You can create GPRS, Proxy, and VPN connections using the same procedure as that for a Dial-up
connection.
GPRS connection
GPRS is a high-speed transmission through the mobile phone network, which provides permanent
online connection. To use GPRS to connect to the network, you need to apply for GPRS service with
your Internet Service Provider.
Proxy connection
IfyouareconnectedtoyourISPorprivatenetworkduringsynchronization,yourSmartphoneshould
download the proper proxy settings from your PC. If these settings are not on your PC or need to be
changed, ask your Internet Service Provider or network administrator for the proxy server name, server
type, port, type of Socks protocol used, and your user name and password. A proxy connection is used
to access the Internet using an existing connection to your corporate network.

Chapter 6
49
VPN connection
A VPN connection helps you to securely connect to servers, such as a corporate network, using an
existing Internet connection. Ask your network administrator for your user name, password, domain
name, TCP/IP settings, and host name or IP address of the VPN server.
Changing option settings
The Options screen enables you to specify the number of redial attempts, time to wait before
disconnecting, and how your PC connects to the network.
To access the Options screen
1. On the Home screen, press Start > Settings > Connections.
2. Press Menu > Advanced > Menu > Options.
Adding a URL exception
Some companies use periods in their intranet URLs (for example, intranet.companyname.com). A
WorkURLexceptiontellsInternetExplorerMobiletolookontheWorknetworktondtheURLinstead
of searching the Internet.
To add a URL exception
1. On the Home screen, press Start > Settings > Connections.
2. Press Menu > Advanced > Menu > Work URL Exceptions.
3. Press Menu > Add.

Chapter 6
50
4. In URL Pattern, enter the URL, and press Done.
NOTE SeparatemultipleURLswithasemicolon(;).
You should not create URL exceptions for URLs on the Internet.
6-2 Using Internet Explorer Mobile
You can use Internet Explorer Mobile to browse mobile favorites and channels that have been
downloaded to your device without connecting to the Internet. You can also connect to the Internet
through an ISP or a network connection to browse the Web.
NOTE Make sure that you have set up your Smartphone’s connection (see 6-1
Connecting to the Internet).
Opening Internet Explorer Mobile
To open Internet Explorer
On the Home screen, press Start > Internet Explorer.
With Internet Explorer Mobile, the Favorites list is displayed as the main screen instead of a home
page, so you can easily go to your favorite Web sites. You can add Web sites that you visit frequently
to this list.

Chapter 6
51
TO DO THIS
Change connection options 1. Press Menu > Tools > Options > Connections.
2. Do one of the following:
• To allow Internet Explorer to select network settings, select
Automatically detect settings.
• To manually choose network settings, in Select network, select the
network to which Internet Explorer should connect.
View your Favorites list From any Web page, press Favorites.
Go to a Web page In Internet Explorer, press Address Bar. Enter the Web page address and
press Go.
Go to a Web page in the History
list
Press Menu > History. Select a Web page, and click Go.
Clear history, cookies, or
temporaryles
Press Menu > Tools > Options > Memory.
Add a Web page to the
Favorites list
From the Web page that you want to add, press Menu > Add to Favorites.
ChangethesizeoftextonWeb
pages
Press Menu > Zoomandselectthesizeyouwant.
Show or hide pictures on Web
pages
Press Menu > View > Show Pictures. A check mark next to Show
Pictures indicates that pictures will be displayed on Web pages.
View a page in full screen mode Press Menu > View > Full Screen.
Exit full screen mode Press one of the soft keys, and then press Menu > View > Full Screen to
cancel the selection.
Change Web page display
options
Press Menu > View. Select one of the display options.
Create a new folder in Favorites Press Favorites > Menu > Add Folder.
Chapter 6
52
TO DO THIS
Move a favorite to a folder Press Favorites. Select the favorite to move. Press Menu > Edit. Under
Folder, scroll to the folder to which you want to move the favorite and
press Done.
Send a link via e-mail Go to the Web page you want to send and press Menu > Tools > Send
Link via E-mail. Select Text Messages or Outlook E-mail.

Chapter 6
53
6-3 Using Bluetooth®
Bluetooth is a short-range wireless communications technology that allows you to communicate
withotherdevices,suchasheadsets,printers,PCs,GPSreceivers,andotherusers’mobile
devices. Devices with Bluetooth capabilities can exchange information without requiring a physical
connection. Unlike infrared, you do not need to line up devices to exchange information through
Bluetooth. The devices only need to be within a range of about 10 meters (30 feet) in an open space
environment. You can even beam information to a device in a different room, as long as it is within
thespeciedrange.
Setting the Bluetooth mode
By default Bluetooth is turned off. If you turn it on, and then turn off your phone, Bluetooth also turns
off. When you turn on your phone again, Bluetooth turns on automatically.
To set the Bluetooth mode
1. On the Home screen, press Start > Settings > Connections > Bluetooth.
2. Select On, Off, or Discoverable, and press Done .
NOTE You can also turn Bluetooth on and off by pressing and quickly releasing Power
to access the Quick List and selecting Wireless Manager. Select Bluetooth >
Menu > Bluetooth Settings to set Bluetooth mode or select Bluetooth and
press to quickly toggle Bluetooth on and off.

Chapter 6
54
BLUETOOTH MODE DESCRIPTION
On The Bluetooth radio is turned on and you can use Bluetooth features.
Off The Bluetooth radio is turned off. You might want to turn the radio off at times to
conserve battery power, or in situations where radio use is prohibited, like on airplanes
and in hospitals.
Discoverable The Bluetooth radio is turned on, and other Bluetooth devices within range (about 10
meters) can detect your phone.
Creating a Bluetooth partnership
Before your phone can communicate with another device, you need to create a partnership between
your phone and the other Bluetooth-enabled device. Your phone can create partnerships with up to
10 other Bluetooth devices.
To create a Bluetooth partnership
1. Ensure that the two devices are within close range and that both Bluetooth-enabled devices are
discoverable.
2. On the Home screen, press Start > Settings > Connections > Bluetooth.
3. Press Menu > Devices > Menu > New. Your phone searches for other Bluetooth-enabled devices
and displays them in the list.
4. Select the device with which you want to create a Bluetooth partnership, and press Add.
5. Enter a enter a personal identication number (PIN) between 1 and 16 characters, and press
Done.

Chapter 6
55
6. Enter the same PIN on the other device.
NOTE nceyoucreateapartnership,thedevicesdon’tneedtobediscoverabletobeam
informationbetweenthem;Bluetoothneedsonlytobeturnedon.
Pairing with a Bluetooth headset
1. On the Home screen, press Start > Settings > Connections > Bluetooth and set Bluetooth on
your phone to Discoverable.
2. Turn on your Bluetooth headset and bring it to within 30 meters of your Smartphone.
. PutyourBluetoothheadsetintopairingmode.RefertoyourBluetoothheadset’susermanualfor
instructions.
4. On your phone, press Menu > Devices > Menu > New.
5. Select the Bluetooth headset on the Add Devices list and press Next.
6. Enter the passkey provided in the headset user manual. The phone will now pair with the
headset.
7. Set the Bluetooth mode on your phone to On and you are ready to talk hands free.
Listening to streaming audio with a Bluetooth headset
1. Make sure that your phone is paired with a Bluetooth headset by following the instructions in “Pairing
with a Bluetooth headset.”
2. On the Home screen, press Start > Settings > Connections > Bluetooth Proles > Audio and
select a Bluetooth headset in Default headset.
3. Select the Stream audio to headset check box and press Done.

Chapter 6
56
NOTE Select the Automute checkbox if you want to enable audio streaming to the
Bluetooth headset only and clear it if you want to enable audio streaming to both
the phone speaker and the Bluetooth headset.
4. Open Windows Media Player and start playing music.

Chapter 6
57
TO DO THIS
Beam information
using Bluetooth
Make sure that Bluetooth is turned on and that the device that you want to beam to is
discoverable. Select the item that you want to beam and press Menu > Beam [item].
Select the Bluetooth device to which you want to beam the item and press Beam.
Accept a Bluetooth
partnership
Make sure that Bluetooth is turned on and that your phone is discoverable. When
prompted to accept a Bluetooth partnership with the other device, press Yes. In PIN,
enterapersonalidenticationnumber(PIN)between1and16characters,andpress
Done. You must enter the same PIN that was entered on the device requesting the
Bluetooth partnership.
Receive beamed
information
On the Home screen, press Start > Settings > Connections > Beam. Select
Receive incoming beams.
Do the following:
• To receive beams by using Bluetooth, ensure Bluetooth is turned on and that your
phone is discoverable and within close range.
Press Yes.
Rename a Bluetooth
device
On the Home screen, press Start > Settings > Connections > Bluetooth > Menu
> Devices. Select the Bluetooth device to rename and press Menu > Rename. In
Name, enter a new name for the Bluetooth device, and press Done.
Synchronizeusing
Bluetooth
On the Home screen, press Start > ActiveSync > Menu > Connect via Bluetooth.
See “Using Bluetooth” in 4-5 Synchronizing with a PC for more information.
End a Bluetooth
partnership
On the Home screen, press Start > Settings > Connections > Bluetooth > Menu >
Devices. Select the Bluetooth device with which you want to end the partnership and
press Menu > Delete.
Specify a folder for
received images from
the Image server
On the Home screen, press Start > Settings > Connections > Bluetooth Proles
> Image. In Default image directory, enter the desired directory for storing received
images.

Chapter 6
58
TO DO THIS
Open received
images from the
Image server in the
image viewer
On the Home screen, press Start > Settings > Connections > Bluetooth Proles >
Images. Select the Open received images check box.
Save a thumbnail
version of received
images in the same
folder as the received
images
On the Home screen, press Start > Settings > Connections > Bluetooth Proles >
Images. Select the Request thumbnail check box.
Conguresecurityfor
Bluetooth use
On the Home screen, press Start > Settings > Connections > Bluetooth Proles >
Security.
Specify a folder
on your phone to
share with another
Bluetooth-enabled
device
On the Home screen, press Start > Settings > Connections > Bluetooth Proles >
File Transfer. In Root directory, enter the path to the folder. Select the Use server
authorizationcheckboxifauthorizationisrequiredeachtimearemoteclientwants
to connect.
Congurea
Bluetooth printer
On the Home screen, press Start > Settings > Connections > Bluetooth Proles >
Printer.
View the status of
individual printing
jobs
On the Home screen, press Start > Settings > Connections > Bluetooth Proles >
Printer. Press Menu > Status.
59
Your Smartphone is capable of composing, sending, and receiving Outlook e-mail, Internet e-mail,
Multimedia Messaging Service (MMS) messages, and text messages.
7-1 Entering text and numbers
You can enter text and numbers by using the keypad. The phone supports three input modes for entering
text and numbers: Multipress, T9, and Numeric. Multipress and T9 modes are used for entering text,
andNumericmodeisusedforenteringnumbers.Whenyouselectaeldthatrequirestextornumbers,
the phone automatically selects the appropriate input mode. The status indicator on the top right side
of the display screen shows the input mode that is currently active.
To change the input mode
1. In text messaging mode, press and hold
* .
2. Select the input mode and press .
The status indicator for the selected input
mode appears at the top right corner of the
screen.
Chapter 7 Messaging
INDICATOR INPUT MODE
abc
Multipress text input mode, lowercase
Abc
Multipress text input mode, smart case
AB
C
Multipress text input mode, caps lock
t
9
T9 text input mode, lowercase
T
9
T9 text input mode, smart case
T
9
T9 text input mode, caps lock
1
2
3
Numeric input mode

Chapter 7
60
Using Multipress mode
Multipress mode allows you to enter text by pressing the assigned key once, twice quickly, or so until
your desired character appears. For example, to enter the letters P, Q, R, or S, you use the 7 key .
Press once for P, twice for Q, three times for R, and four times for S. The letter entered most recently is
underlined until you have completed the keypresses for the letter and moved on to the next letter.
In Multipress mode, you can lock in a letter in several ways: press the Right navigation key, press the
space key , or pause and enter the next letter.
To Change the Multipress time out
On the Home screen, press Start > Settings > More > Accessibility. In Multipress time out, select
the length of the pause between key presses.
Using T9 mode
To form a word in T9 mode, press the numeric keys that contain the letters you want. As you enter
letters,T9analyzesyourkeypressesandattemptstocompletetheword.Forexample,toenterthe
word “today”, press 8 , 6 , 3 , 2 , 9 .
To enter text in T9 mode
1. Press and hold * and select T9. The T9 indicator appears at the top of the screen.
2. Enter letters by pressing the keys on which the letters appear. Press a key only once for each
letter. If there is more than one choice in the T9 dictionary for your entry, a list of available words
is displayed.

Chapter 7
61
NOTE Press # to enter a space after the word as entered, or select one of the
available words, and the space is added automatically.
If you do not see the desired word, select Add Word? from the list, and press
. Press Done to add the word to your text and save it in the phone´s dictionary,
or Cancel to add the word to your text without saving it.
Using Numeric mode
To enter numbers, use Numeric mode. If you need to enter a number within a line of text, change to
Numericmodetoenterthenumber,andthenchangebacktoMultipressorT9modetonishentering
the text.
1. If necessary, change to Numeric mode by pressing and holding * .
2. Enter the number or numbers you want using the keypad.
3. Change back to Multipress or T9 input mode by pressing and holding * ,andthennishentering
your text.
NOTE Ifaeldpermitsanumericentryonly,suchasaphonenumber,theinputmode
automatically defaults to Numeric mode.
Chapter 7
62
TO DO THIS
Change between uppercase,
lowercase, and caps lock
Press the * key within a text input mode. The status indicator for the
selected mode appears at the top right corner of the screen.
Enter a space In Multipress or T9 mode, press the # key.
Enter punctuation in Multipress
mode
Press 1 repeatedly until you see the punctuation mark that you want.
To see all of the available symbols, press and hold the # key.
Enter punctuation in T9 mode Press 1, and select from a list of common punctuation.
Enter a symbol Press and hold the * key. Select Symbols to display the Symbol
screen. Select the symbol you want and press Action.
Enter the plus sign for international
calls
Inanumericentryeld,pressandholdthe0 key
Start a new line In a multi-line text box such as the Notes area of a contact or a
calendar appointment, press Action. This works in any input mode.
Backspace and delete a single
character in any input mode.
Press the Back key.
Backspace and delete an entire text
ornumericeldinanyinputmode.
Press and hold the Back key.

Chapter 7
63
7-2 Setting up accounts
Before you can send and receive e-mails, you need to set up an e-mail account that you have with an
Internet service provider (ISP) or an account that you access using a VPN server connection (typically
aworkaccount).Youcansende-mailmessagesbysynchronizingorbyconnectingdirectlytoanE-
mail server through your Internet service provider or a corporate network.
NOTE Before you set up e-mail on your Smartphone, you must have an Internet or e-
mail account.
To set up an e-mail account
1. On the Home screen, press Start > Messaging > Outlook E-mail.
2. Press Menu > Options > New Account.
3. In Your Name, enter your display name for this account, and in E-mail address, enter the e-mail
address for this account.
4. Select Attempt to obtain e-mail settings from the Internet. Automatic setup attempts to download
necessary e-mail server settings so that you do not need to enter them manually.
5. Press Next.
NOTE If Automatic setup is successful, your user name is already entered and you
can press Next, and then Finish to complete setting up your account, or press
Options to access additional settings.
If Automatic setup is unsuccessful or you have an account you access using a VPN
server connection, you will have to contact your ISP (Internet Service Provider)
or network administrator to obtain information for entering settings manually.

Chapter 7
64
7-3 Managing accounts
TO DO THIS
View a list of accounts On the Home screen, press Start > Messaging. A list of accounts is
displayed with the number of unread messages in the Inbox of each account
shown in parenthesis.
Send/receive Internet e-mail
messages
On the Home screen, press Start > Messaging. Select the Internet e-mail
account for which you want to send and receive messages and press Menu >
Send/Receive. To stop this process, press Menu > Stop Send/Receive.
Mark a folder for
synchronization
On the Home screen, press Start > Messaging > Outlook E-mail. Press
Menu > Folders > Menu > Manage Folders.Selectafoldertosynchronize
and press Sync.Thenexttimeyousynchronize,thefolder(s)thatyou
markedonyourSmartphonearesynchronizedwiththecorrespondingfolders
in Outlook on your PC.
Delete an account On the Home screen, press Start > Messaging. Select an account and press
Select. Press Menu > Options > Account Options and then select the
account you want to delete. Press Menu > Delete.
Switch between accounts With an account open, press Menu > Switch Accounts or use the Left/Right
navigation keys to quickly switch to another account.
Changing account options On the Home screen, press Start > Messaging. Select an account and press
Select. Press Menu > Options and then select the type of option you want to
change. Select Donetoconrm.

Chapter 7
65
7-4 Text and e-mail messages
To compose and send a text or e-mail message
1. On the Home screen, press Start > Messaging.
2. Select Text Messages or an e-mail account and press or Select.
3. Press New.
4. In To, enter the mobile phone number or e-mail address of the person to which you want to send
the message or press to select the person from your contacts.
NOTE If you are sending a message to more than one recipient, separate them with a
semicolon(;).
You can only send text messages to contacts with a mobile phone number.
5. Press the Down navigation key, and enter your message.
6. Whennished,pressSend.
NOTE Ifyouareworkingofine,e-mailmessagesaresavedtotheutboxfolderand
sent the next time you connect.
Chapter 7
66
TO DO THIS
Insert a picture into an e-mail
message
While composing your message, press Menu > Insert > Picture.
Insert a voice recording into an
e-mail message
While composing your message, press Menu > Insert > Voice Note.
Set the priority, security, and
language of an e-mail message
While composing your message, press Menu > Message Options.
Cancel a message While composing your message, press Menu > Cancel Message.
Save a message While composing your message, press Menu > Save to Drafts.
Delete a message With the message you want to delete selected, press Menu > Delete.
Move a message to another folder With the message you want to move selected, press Menu > Move.
Scroll to the new folder and press Select.
Sort messages On any account screen, press Menu > Options > Display. In Sort
Messages by, select your desired sort method.
Insert a signature On any account screen, press Menu > Options > Signatures.
Change message options On any account screen, press Menu > Options.
Downloading e-mail messages
Use Messaging to send and receive e-mail messages in one of two ways:
• Synchronizee-mailmessageswithMicrosoftExchangeorMicrosoftutlookonyourPC
• Send and receive e-mail messages by connecting directly to an e-mail server through an Internet
Service Provider (ISP) or a network

Chapter 7
67
Synchronizing e-mail messages
Youcane-mailmessagesas partofthegeneralsynchronization process.You willneedtoenable
mailsynchronizationinActiveSync.Formoreinformationonenablingmailsynchronization,seethe
ActiveSync online help on your PC.
NOTE To connect directly to an e-mail server, see 4-6 Synchronizing with an Exchange
Server.
Managing folders
EachMessaging accounthas aset ofvefolders:DeletedItems,Drafts,Inbox,utbox,andSent
Items. These folders store messages that you send and receive through the account. You can move
a message to a different folder within the same account.
TO DO THIS
View message folder contents On the Home screen, press Start > Messaging. Select the account that
you want to view. Press Menu > Folders and select the folder that you
want to view.
Moving a message to a different
folder
On the Home screen, press Start > Messaging. Select the account
with the message that you want to move. Scroll to the message you
want to move and press Menu > Move. Select the folder into which to
move the message.
Empty the Deleted Items folder On the Home screen, press Start > Messaging. Select the account
with the Deleted Items folder that you want to empty. Select Deleted
Items and press Select. Press Menu > Empty Folder.

Chapter 7
68
7-5 MMS messaging
MMS (Multimedia Messaging System) allows you to send text messages with multiple slides. Included
on each slide can be a picture, video or audio, and/or text. MMS messages are sent by GPRS (General
Packet Radio Service) to e-mail accounts or other MMS-enabled mobile devices.
NOTE You need to subscribe to the GPRS and MMS services with your service provider
before you can send and receive MMS messages. Ask your phone operator on
how to activate the MMS feature. Only mobile phones with MMS feature can
send/receive MMS messages.
Depending on the service that you subscribe to, you may not be able to send and
receive MMS messages to users using a different mobile phone network.
Accessing MMS
Do one of the following:
• On the Home screen, press Start > Messaging > MMS.
• After capturing a picture or video clip, press Menu > Send > MMS.
Editing MMS settings
On the MMS main screen, press Menu > Options > Account Options > MMS to open the Preferences
screen and edit MMS settings. Select or clear check boxes according to your needs.
On the MMS main screen, press Menu > MMS Settings > MMSC Settings, and select your Internet
Service Provider from the list. Press Menu > Edit to access Multimedia Messaging Service Center
(MMSC) settings.You should contact your mobile service operator for detail settings.

Chapter 7
69
Composing and sending an MMS message
To compose and send an MMS message
1. On the Home screen, press Start > Messaging > MMS > New.
2. IntheTo:eld,enterthemobilephonenumberore-mailofyourrecipient.Youcanenteritusing
the keypad or press Menu > Add Recipient to select from your Contacts. If you have more than
one recipient, separate them with semicommas.
. IntheSubjecteld,enterasubjectforthemessage.
4. Select the Insert Picture/Video box and press . All of your pictures and video clips will be displayed
in thumbnail view.
5. Select a picture or video clip and press or Select.
6. Select the Insert Audio box and press . All of your available audio clips will be displayed in
thumbnail view.
7. Select the audio clip you want to attach, then press or Select.
NOTE Youwillnotbeabletoattachanaudioletoaslidewithavideoclip.
8. PresstheDownnavigationkeytoscrolldowntothetexteldandenteryourmessage.
9. Press Send to send the message.
Chapter 7
70
The following assumes that you are on the MMS message screen.
TO DO THIS
Copy the message to other
recipients
Use the Up/Down navigation keys to scroll up to display the Cc
eld.Entertherecipient‘sphonenumberore-mailaddressorpress
to select a recipient from your Contacts list.
Hidearecipient’scontact
information from other message
recipients
Use the Up/Down navigation keys to scroll up to display the Bcc
eld.Entertherecipient‘sphonenumberore-mailaddressorpress
to select a recipient from your Contacts list.
Hide sender information Press Menu > MMS Settings > Send Options. Select the Hide
Sender check box.
Go to the next slide Press the Right navigation key.
Go to the previous slide Press the Left navigation key.
Create an MMS message from a
template
Press Menu > Template > Gallery to compose a message using a
predenedtemplate.
Create an MMS message template Create a message or open an existing message, and press Menu >
Template > Save.
Add preset or frequently used text
strings to a message
Inatexteld,pressMenu > Insert > My Text. Select the text string
that you want to add and press or Insert.
Create or edit a preset message
before adding it to the message
body
Inatexteld,pressMenu > Insert > My Text to open the My Text
screen. Press Menu > Add My Text or Menu > Edit My Text.
Request message delivery
notication
Press Menu > MMS Settings > Send Options. Select the Delivery
Report check box.

Chapter 7
71
7-6 Using Pocket MSN
Pocket MSN on your device is an instant messaging program that allows you to do the following:
• See who among your contacts is online and chat with them by sending and receiving instant
messages.
• Access your hotmail account, if you have one, and send and receive emails.
To use Pocket MSN, you must have a Passport to use the MSN Messenger Service. If you have a
Hotmail® or MSN account, you already have a Passport. Once you have obtained either a Microsoft
Passport or Microsoft Exchange account, you are ready to set up your account.
Sign up for a Microsoft Passport account at http://www.passport.com.
Get a free Microsoft Hotmail e-mail address at http://www.hotmail.com.
Using MSN Messenger
To sign in and out of MSN Messenger
1. On the Home screen, press Start > More > Pocket MSN > MSN Messenger.
3. On the MSN Messenger main screen, press Sign In.
4. Enter the e-mail address and password for your Passport or Hotmail account.
5. Select Save passwordifyoudon’twanttoenteryourpasswordagaininthefutureandpressSign
In.
6. To sign out, press Menu and then select Sign Out.
NOTE If you do not sign out of MSN Messenger, you will remain connected. This may
result in additional charges from your service provider.

Chapter 7
72
TO DO THIS
Add a contact Press Menu > Add Contact, and follow the instructions on the screen.
Delete a contact Select the contact to delete and press Menu > Delete Contact.
Send an instant message Select the contact with whom you want to chat and press Menu > Send
Message. Enter your message and press Send.
Quickly add common phrases Press Menu > My Text and select a phrase from the list.
Reply to an instant message Press Menu > Chats and select the name of the person sending the instant
message. The message displays, along with a box for your reply. Enter
your reply and select Send.
Add other people to a
conversation
From a chat session, press Menu > Invite, and then select a contact.
Receive instant messages
at any time your phone is
connected to a network,
Press Menu > Options > Passport Account > Run this program when
connection is available > Done.
Switch to another chat session Press Menu > Chats. In the list of ongoing chats, select the name of a
contact with whom to chat.
Return to the contacts list From a chat session, press Menu > My Contacts.
End a chat session From a chat session, press Menu > End Chat.
See all who are chatting Press Menu > Chats.
Block someone on your MSN
Messenger contacts list from
seeing and contacting you
IntheMSNMessengercontactslist,selectthecontact’sname.Press
Menu > Block. The contact will no longer be able to see your status or
send you messages.
Unblock a contact IntheMSNMessengercontactslist,selectthecontact’sname.Press
Menu > Unblock.
Change your status In the MSN Messenger contacts list, select your name. Select a status
description and press .
Chapter 7
73
Using MSN Hotmail
With MSN Hotmail, you can access your hotmail mailbox on your Smartphone and send and receive
e-mails.
To sign in and out of MSN Hotmail
1. On the Home screen, press Start > Pocket MSN > MSN Hotmail.
2. On the MSN - Sign In screen, enter the e-mail address and password for your Hotmail account.
3. Select Save passwordifyoudon’twanttoenteryourpasswordagaininthefutureandpress
Sign In.
4. To sign out, press Menu and then select Sign Out.

Chapter 7
74

75
Chapter 8 Organizing Your Life
8-1 Using Contacts
Contactsmaintainalistofyourfriendsandcolleaguessothatyoucaneasilyndtheinformationyou
look for, whether you are at home or on the road. Using Bluetooth on the device, you can quickly share
Contactsinformationwithotherdeviceusers.IfyouuseutlookonyourPC,youcansynchronize
Contacts between your phone and PC.
Viewing Contacts
To view the Contacts list, do one of the following:
• On the Home screen, press Start > Contacts.
• On the Home screen, press Contacts.
The contact list displays the names of your contacts alphabetically. Beside each name in the contact list
isanabbreviationforthedefaultcommunicationmethod,suchastheperson’sworkphonenumber(w)
or home phone number (h). If the contact information includes a work phone number, your Smartphone
automatically sets it as the default number.
If there are phone numbers stored in your SIM card, the entries will be displayed at the end of the list,
with a SIM card icon following the name.
Chapter 8
76
TO DO THIS
Create a new contact On the Home screen, press Start > Contacts > New. Enter information for the new
contact and press Done.
Create a new contact
on the SIM card
On the Home screen, press Start > Contacts. Press Menu > New SIM Contact.
NOTE: You can only store one phone number for a SIM contact.
Editacontact’s
information
On the Home screen, press Start > Contacts. Select the contact whose information
you want to edit and press . Press Menu > Edit.Whennishedmakingchanges,
press Done.
Call a contact from
the contact list
On the Home screen, press Start > Contacts. Select the contact to call and press
Send. To call a phone number other than the default, select the contact, use the Left/
Right navigation keys to scroll to the number you want to call, and press Send.
Send a text message
to a contact
On the Home screen, press Start > Contacts. Select the contact to which you want to
send a text message and press . Scroll to Send Text Message.
Send an e-mail to a
contact
On the Home screen, press Start > Contacts. Select the contact to which you want to
email and press . Scroll to Send e-mail and press E-mail > Outlook E-mail.
Send an MMS
message to a contact
On the Home screen, press Start > Contacts. Select the contact to which you want to
send an MMS message and press Menu > Send MMS.
Beamacontact’s
information to
another device
On the Home screen, press Start > Contacts. Select the contact to beam and press
Menu > Beam Contact. Select the device and press Beam.
Find a contact by
name
On the Home screen, press Start > Contacts. If you are not in Name view, press
Menu > View By > Name.Entertherstfewlettersofthecontact’snameortherst
few digits of the phone number until the contact is displayed.
Find a contact by
company
On the Home screen, press Start > Contacts. Press Menu > View By > Company.
Select the company that your contact works at and press to see all the contacts
who work there.
Find a contact using
lter
From the Contact list, press Menu > Filter. Select the category that you have
assigned to the contact. To show all contacts again, select All Contacts.
Chapter 8
77
TO DO THIS
Assign a ring tone to
a contact
On the Home screen, press Start > Contacts. Select the contact to which you want to
assign a custom ring tone and press . Press Menu > Edit and scroll to Custom ring
tone. Use the Left/Right navigation keys to select a ring tone and press Done.
Add a pictures to a
contact
On the Home screen, press Start > Contacts. Select the contact to which you want to
add a picture and press . Press Menu > Edit and scroll to Picture and press .
Select an already existing picture and press Select or select Camera and take a
picture to use.
Managing your SIM contacts
All your contacts that are stored on your SIM card are listed in the SIM Manager. You can save all the
contacts on your SIM card to your Smartphone using your SIM Manager.
Accessing SIM Manager
On the Home screen, press Start > More > Tools > SIM Manager.
TO DO THIS
ViewaSIMcontact’sinformation In SIM Manager, select the contact that you want to view and press
.
Copy a SIM contact to your phone In SIM Manager, press Menu > Copy to Contact and then press OK
toconrm.
Copy all SIM contacts to your phone In SIM Manager, press Menu > Select All to select all the contacts on
your SIM card. Press Menu > Copy to Contact and then press OK to
conrm.
Delete a SIM contact from your SIM
card
In SIM Manager, press Menu > Delete and then press OKtoconrm.

Chapter 8
78
TO DO THIS
Delete all SIM contacts from your
SIM card
In SIM Manager, press Menu > Select All to select all the contacts on
your SIM card. Press Menu > Delete and then press OKtoconrm.
EditaSIMcontact’snameand/or
phone number
In SIM Manager, select the contact that you want to edit and press
Menu > Edit.
Copy a contact from your phone to
your SIM card
In SIM Manager, press Menu > Copy Contact to SIM. Select the
contact you want to copy from your phone memory to your SIM card
and press Select.
View text messages on your SIM
card
In SIM Manager, press Menu > SMS.
Return to contacts view from Text
messages screen
After you have pressed Menu > SMS, you can return to Contacts by
pressing the Back button.
Delete all text messages on your
SIM card
In SIM Manager, press Menu > SMS > Menu > Select All. All the text
messages on your SIM card are selected. Press Menu > Delete and
then OKtoconrm.
Delete a text message on your SIM
card
In SIM Manager, press Menu > SMS. Select the text message to
delete and Press Menu > Delete.
Copy all the text messages from
your SIM card to your phone
In SIM Manager, press Menu > SMS > Menu > Select All. All the text
messages on your SIM card are selected. Press Menu > Copy to Text
Message and then OKtoconrm.
Copy a text message from your SIM
card to your phone
In SIM Manager, press Menu > SMS. Select the text message to copy
to your phone, press Menu > Copy to Text Message and then OK to
conrm.
Copy a text message from your
phone to your SIM card
In SIM Manager, press Menu > SMS. Select the text message to copy
to your phone, press Menu > Copy Text Message to SIM and then
OKtoconrm.
Access text messages on your
phone from SIM Manager
In SIM Manager, press Menu > Switch Text Message.

Chapter 8
79
8-2 Using Calendar
Use Calendar to schedule appointments, including meetings and other events. Your appointments
for the day can be displayed on the Home screen. You can also set Calendar to remind you of
appointments.IfyouuseutlookonyourPC,youcansynchronizeappointmentsbetweenyour
phone and PC.
To open the Calendar program, do one of the following:
• On the Home screen, press Start > Calendar.
• On the Home screen, scroll to the upcoming appointment and press .
Scheduling an appointment
To schedule an appointment
1. On the Home screen, press Start >
Calendar.
2. Press Menu > New Appointment.
3. Enter information about the appointment.
To schedule an all-day event, in End time,
select All day event.
4. Press Done.
TO DO THIS
Make an
appointment
recurring
Select the appointment and press
Action. Press Edit. Scroll to Occurs
and select one of the recurrence
options.
Delete an
appointment
Select the appointment to delete
and press Menu > Delete
Appointment.
Beam an
appointment
Select the appointment to beam and
press Action. Press Menu > Beam
Appointment.

Chapter 8
80
Viewing an appointment
To view an appointment
1. On the Home screen, press Start > Calendar.
2. Select the appointment and press .
TO DO THIS
Viewtoday’s
agenda
From any Calendar view, press
Menu > Go to Today.
View your
agenda for a
specicdate
From any Calendar view, press
Menu > Go to Date. Enter the date
to view and press Done.
Show week
numbers
From any Calendar view, press
Menu > Options. Scroll to Month
view and select Show week
numbers.
Change the
display of the
work week
In any Calendar view, press Menu >
Options and do the following:
• Tospecifytherstdayofthe
week, in First day of week,
select Sunday or Monday.
• To specify the number of days
you want to appear in a week, in
Week view, select 5-day week,
6-day week, or 7-day week.
Viewing your schedule
You can view your schedule in your calendar in
three different views: Week View, Month View,
and Agenda View.
To view your schedule
1. On the Home screen, press Start >
Calendar.
2. Press Menu and then select your desired
view.
• Week View
• Month View
• Agenda View

Chapter 8
81
8-3 Using Tasks
Use Tasks to keep track of what you have to do.
The Tasks list
The task list is your “things to do” list. When you create or edit tasks with Outlook on your PC and
thensynchronizeitwithyourphone,additonalinformation,suchasduedate,priority,andcategory,
may show. A task that has been marked as high priority is preceded by an exclamation mark, and
one marked as low priority by a downward-pointing arrow. Overdue tasks are displayed in bold red.
NOTE YoucansynchronizeinformationonyourphonewithyourPCtokeepyourtask
list up to date in both locations.
TO DO THIS
Create a task On the Home screen, press Start > Tasks. Scroll to the Enter new
task here box at the top of the screen, enter the task name, and
press .
Mark a task as completed On the Home screen, press Start > Tasks. Scroll to the task to mark
complete, then press Complete.
Delete a task On the Home screen, press Start > Tasks. Scroll to the task to delete,
then press Menu > Delete Task. Press Yestoconrm.
Change a completed task to
incomplete
On the Home screen, press Start > Tasks. Scroll to the completed
task to as incomplete, then press Activate.
Find a task On the Home screen, press Start > Tasks. Press Menu > Sort by and
select a sort option or Menu > Filter and select a category.

Chapter 8
82
8-4 Using Voice Notes
You can use Voice Notes to create and play back short voice recordings and verbal reminders.
Recordings are included in the All Notes list and are named consecutively Recording 1, Recording 2,
and so on.
TO DO THIS
Create a voice note On the Home screen, pres Start > More > Voice Notes. The All Notes
screenisdisplayed.Holdthephone’smicrophonenearyourmouth.
Press Record to start recording your voice note. A counter displays
the number of seconds elapsed during recording. Press Stop to stop
recording.
Play, rename, or delete a voice note From the All Notes screen, select the voice note and then press Menu
> Play, Menu > Rename, or Menu > Delete.
Set a voice note as a ring tone From the All Notes screen, select the voice note to use as your current
ring tone and then press Menu > Set As Ringtone. Press OK to
conrm.
83
Chapter 9 Multimedia
9-1 Working with photos and videos
Using Pictures & Videos
The Pictures & Videos program allows you to work with photos and video clips on your phone. After
youhavetakenthephotosandvideoclips,youcanorganize,edit,beamorsendthemusinga
messaging program.
To open the Pictures & Videos program, press Start > Pictures & Videos.
TO DO THIS
Take a photo or a video clip Select Camera > Menu > Change Mode. Select Camera Mode to take a
photo. Select Video Mode to take a video clip.
Set the photo scene Set to Camera Mode. Select Menu > Scene. You may either select Auto
or Night scene.
Setthephoto/videosize Set to either Camera Mode or Video Mode. When you have choosen the
mode, select Menu > Picture (or Video) Size to select the photo/video
size.
Set the photo quality Set to Camera Mode. Select > Menu > Picture Quality. Choose from
Normal, Fine, or Super Fine.
Settheashmode Set to Camera Mode. Select Menu > Flash Mode. Choose from Off, On,
or Auto.
Zoom a photo Set to Camera Mode. Select Menu > Zoom.
Set the timer for taking a photo Set to Camera Mode. Select Menu > Self-Timer.

84
TO DO THIS
Save a photo or a video clip Set to either Camera Mode or Video Mode. Select Menu > Save to. You
can save a video clip in a storage card or in the main memory.
Set the effect on a photo or on
video clip
Set to either Camera Mode or Video Mode. Select Menu > Effect.
Set the advanced settings Set to either Camera Mode or Video Mode. Select Menu > Advanced.
View a picture or a video clip Select the picture or video clip you want to view and press View.
Delete a picture or a video clip Select the picture or video clip you want to delete and press Menu >
Delete.
View your pictures as a slide
show
Press Menu > Play Slide Show.
Set a picture as the Home
screen
Select the picture you want to use as the Home screen and press View >
Menu > Use as Home Screen. Use the Left/Right navigation keys to select
the display area and press Next . Adjust the transparency and press Finish.
Send a picture or a video clip Select the picture or video clip you want to beam and press Menu > Beam.
Select the device to which you want to send and press Beam.
Change the name of a picture Select a picture and press View >Menu > Save > Save as...Menu > Save > Save as.... Change the
name is the Nameeld.
Edit a picture Select the picture you want to edit and press View. Press Menu > Edit, and
do the following:
• To rotate the picture 90 degrees, press Menu > Rotate.
• To crop the picture, press Menu > Crop. Use the navigation pad to
positiontherstcornerofthecroppingareaandpressNext. Position the
second corner and press Finish. To start over, press Previous.
• To automatically readjust the brightness and contrast levels of the
picture, press Menu > Auto Correct.
Press Menu > Save As, to save the edited picture with a different name or
to a different location.

85
9-2 Listening to music and watching videos
UseMicrosoft®WindowsMedia™PlayerMobileforSmartphonetoplaydigitalaudioandvideoles
thatarestoredonyourphoneorontheWeb.Youcanlistentomedialesthroughthespeakeronthe
back of your smartphone or through a stereo headset.
WindowsMediaPlayerMobilecanplaythefollowingtypesofles:
• Windows Media Audio (WMA)
• Windows Media Video (WMV)
• Motion Picture Experts Group-2 Audio Layer-3 (MP3)
• Third generation video standard H.263 baseline (3GP)
Use Microsoft Windows Media Player on your PC to copy digital audio and video to your phone.
Windows Media Player screens
Playback screen
The default screen that displays the playback controls (such as Play, Pause, Next, Previous, and Volume)
and the video window. You can change the appearance of this screen by choosing a different skin.
Now Playing screen
The screen that displays the Now Playing playlist. This special playlist indicates the currently playing
leandanylesthatarequeueduptoplaynext.
Library screen
Thescreenthatletsyouquicklyndyouraudioles,videoles,andplaylists.Itcontainscategories
such as My Music, My Videos, My TV, and My Playlists.
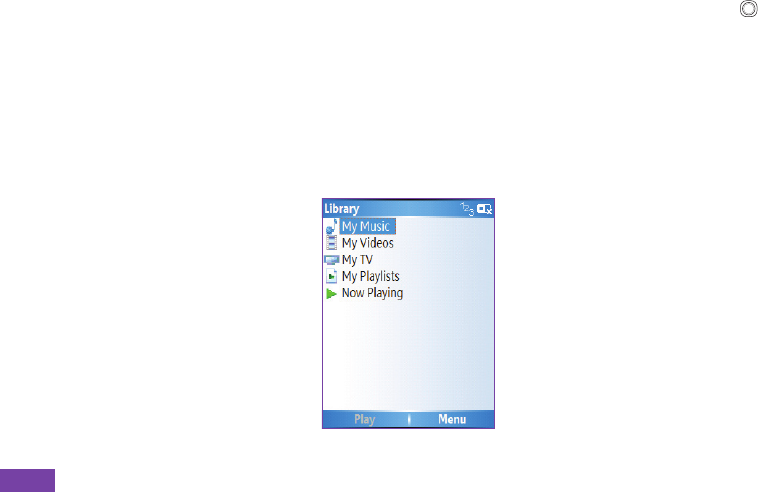
86
Playing media les
To play a media le
1. On the Home screen, press Start > Windows Media.
2. Press Menu > Library.
3. Do one of the following:
• Toplayalefromalibrary,selectthelibraryyouwanttouseintheLibrarylistandpress .
• Toplayalethatisnotinalibrary,pressMenu > Open File.
• Toplayalefromtheweb,pressMenu > Open URL. In URL, enter the Web address, or select
a site you have visited before in History.
4. Selecttheleyouwanttoplay,andthenpressPlay.

87
Playback screen options
When playback of an audio or video clip is in progress, the menu contains the following options.
OPTION DESCRIPTION
Library DisplaystheLibraryscreensoyoucanchoosealetoplay.
Play/Pause Playorpauseplaybackofcurrentle.
Stop Stops playback. If playback is started again, it will start from the beginning of the
currentle.
Shufe/Repeat Select Shufe to play the items in the Now Playing playlist in random order and
Repeat to play . the items in the Now Playing playlist repeatedly.
Full Screen When a video is playing, it is displayed using the entire screen.
Options Lets you adjust various Media Player options related to playback, video, network,
library, skins, and hardware button assignment
Properties Displaysinformationaboutthelethatiscurrentlyplaying.
About Displays information about Windows Media Player.

Chapter 9
88
Play/Pause
Press to play/pause
thecurrentle
Previous/Rewind
Push left once to go
back to the beginning
of the current clip;
push twice to go to
the previous clip.
Hold to rewind on the
currentle.
Volume +
Push up to increase
volume
Volume -
Push down to decrease
volume
Next/Fast Forward
Push once to skip to
the next le. Hold to
fast forward on the
currentle.
Keypad controls Joystick controls
Playback controls
Now Playing
Press to access
information about
theplayingle.
Menu
Press to access
playback options
MinimizeWindows
Media Player
Press to minimize
Windows Media
Player. Currently
open files will
continue playing in
the background.
Mute
Press to mute/
unmute currently
playedle.

Chapter 9
89
9-3 Using Java (MIDlet Manager)
Your phone supports Java 2 Edition, J2ME. The Java MIDlet Manager allows you to download Java
applications,suchasgamesandutilities,thatarespecicallydesignedformobilephonesandthen
easily install and managed them.
Toinstall,run,andmanageMIDletprograms(MIDlets)onyourphone,youhavetorstdownload
the MIDlets to your device directly from the Internet or from your PC.
Installing Java MIDlets directly from the Internet
To install Java MIDlets directly from the Internet
1. On the Home screen, press Start > More > Tools > Java. The esmertec Java screen appears.
2. Press Menu > Install > Internet to open Internet Explorer.
3. Locate the MIDlet/MIDlet suite while connected to the Internet.
4. Select the MIDlet/MIDlet suite to download.
5. Press Yes to start installing the MIDlet/MIDlet suite.
6. Press Done toconrm.
Installing Java MIDlets from a PC
You can install the MIDlets/MIDlet suites on your phone from a PC using the USB sync cable,
infrared, or Bluetooth. MIDlets copied to your phone using infrared, Bluetooth, or e-mail attachments
are automatically saved in the My Documents folder.
Chapter 9
90
To install Java MIDlets from your PC
1. Download the games and utilities that you want to install on your phone to your PC.
2. Open ActiveSync on your PC and click Explore.
3. Go to the My Device\My Documents or the My Device\Storage Card folder on your
Smartphoneandpastetheles.
4. On the Home screen of your phone, press Start > More > Tools > Java. The esmertec Java
screen appears.
5. Press Menu > Install > Local. A list of all MIDlets/MIDlet suites available will be shown.
6. Select the MIDlet/MIDlet suite to install and press Install.
7. Press Yes to install.
8. Press Done toconrm.
Running Java MIDlets
To run Java MIDlets
1. On the Home screen, press Start > More > Tools > Java. The phone displays a list of MIDlets.
2. Select a MIDlet, and then press .
TO DO THIS
Uninstall a MIDlet From the Java main screen, select the MIDlet to uninstall and press Menu
> Uninstall.
Update a MIDlet From the Java main screen, select the MIDlet to update and press Menu >
Update.
Change the display name of a
MIDlet
From the Java main screen, select the MIDlet to rename and press Menu
> Edit.

91
Federal Communications Commission Statement
This device complies with Part 15 of the FCC Rules. Operation is subject to the following two conditions:
1) This device may not cause harmful interference, and
2) This device must accept any interference received, including interference that may cause undesired operation.
This device and its antenna must not be co-located or operating in conjunction with any other antenna or transmitter.
This equipment has been tested and found to comply with the limits for a Class B digital device, pursuant to Part 15 of
the FCC Rules. These limits are designed to provide reasonable protection against harmful interference in a residential
installation. This equipment generates, uses and can radiate radio frequency energy and, if not installed and used
inaccordancewithmanufacturer’sinstructions,maycauseharmfulinterferencetoradiocommunications.However,
there is no guarantee that interference will not occur in a particular installation. If this equipment does cause harmful
interference to radio or television reception, which can be determined by turning the equipment off and on, the user is
encouraged to try to correct the interference by one or more of the following measures:
• Reorient or relocate the receiving antenna.
• Increase the separation between the equipment and receiver.
• Connect the equipment to an outlet on a circuit different from that to which the receiver is connected.
• Consult the dealer or an experienced radio/TV technician for help.
Canadian Department of Communications Statement
This digital apparatus does not exceed the Class B limits for radio noise emissions from digital apparatus set out in the
Radio Interference Regulations of the Canadian Department of Communications.
This class B digital apparatus complies with Canadian ICES-003.
WARNING!
The use of shielded cables for connection of the monitor to the graphics card is required to
assurecompliancewithFCCregulations.Changesormodicationstothisunitnotexpressly
approvedbythepartyresponsibleforcompliancecouldvoidtheuser’sauthoritytooperate
this equipment.
Appendix Notices

92
UL Safety Notices
Required for UL 1459 covering telecommunications (telephone) equipment intended to be electrically connected to a
telecommunication network that has an operating voltage to ground that does not exceed 200V peak, 300V peak-to-
peak, and 105V rms, and installed or used in accordance with the National Electrical Code (NFPA 70).
WhenusingtheSmartphone,basicsafetyprecautionsshouldalwaysbefollowedtoreducetheriskofre,electricshock,
and injury to persons, including the following:
• Do not use the Smartphone near water, for example, near a bath tub, wash bowl, kitchen sink or laundry tub, in a
wet basement or near a swimming pool.
• Do not use the Smartphone during an electrical storm. There may be a remote risk of electric shock from lightning.
• Do not use the Smartphone in the vicinity of a gas leak.
Required for UL 1642 covering primary (non-rechargeable) and secondary (rechargeable) lithium batteries for use as power
sources in products. These batteries contain metallic lithium, or a lithium alloy, or a lithium ion, and may consist of a single
electrochemical cell or two or more cells connected in series, parallel, or both, that convert chemical energy into electrical
energy by an irreversible or reversible chemical reaction.
• Do not disposetheSmartphonebatterypackinare,astheymayexplode.Checkwithlocalcodesforpossible
specialdisposalinstructionstoreducetheriskofinjurytopersonsduetoreorexplosion.
• Do not usepoweradaptersorbatteriesfromotherdevicestoreducetheriskofinjurytopersonsduetoreor
explosion.UseonlyULcertiedpoweradaptersorbatteriessuppliedbythemanufacturerorauthorizedretailers.
Operator access with a tool
If a TOOL is necessary to gain access to an OPERATOR ACCESS AREA, either all other compartments within that area
containingahazardshallbeinaccessibletothePERATRbytheuseofthesameTL,orsuchcompartmentsshallbe
marked to discourage OPERATOR access.
Anacceptablemarkingforanelectricshockhazardis(IS864,No.506)
Equipment for restricted access locations
For equipment intended only for installation in a RESTRICTED ACCESS LOCATION, the installation instructions shall
contain a statement to this effect.

93
Prohibition of co-location
This device must not be co-located or operating in conjunction with any other antenna or transmitter
15.105 Federal Communications Commission (FCC) Requirements, Part 15
This equipment has been tested and found to comply with the limits for a class B digital device, pursuant to part 15 of
the FCC Rules. These limits are designed to provide reasonable protection against harmful interference in a residential
installation.
This equipment generates, uses and can radiate radio frequency energy and, if not installed and used in accordance
with the instructions, may cause harmful interference to radio communications. However, there is no guarantee that
interference will not occur in a particular installation. If this equipment does cause harmful interference to radio or
television reception, which can be determined by turning the equipment off and on, the user is encouraged to try to
correct the interference by one or more of the following measures:
—Reorientorrelocatethereceivingantenna.
—Increasetheseparationbetweentheequipmentandreceiver.
—Connecttheequipmentintoanoutletonacircuitdifferentfromthattowhichthereceiverisconnected.
—Consultthedealeroranexperiencedradio/TVtechnicianforhelp.
Regulatory information / Disclaimers
Installation and use of this Wireless LAN device must be in strict accordance with the instructions included in the
userdocumentationprovidedwiththeproduct.Anychangesormodications(includingtheantennas)madetothis
devicethatarenotexpresslyapprovedbythemanufacturermayvoidtheuser’sauthoritytooperatetheequipment.
Themanufacturerisnotresponsibleforanyradioortelevisioninterferencecausedbyunauthorizedmodication
ofthisdevice,orthesubstitutionoftheconnectingcablesandequipmentotherthanmanufacturerspecied.Itis
theresponsibilityoftheusertocorrectanyinterferencecausedbysuchunauthorizedmodication,substitutionor
attachment.Manufactureranditsauthorizedresellersordistributorswillassumenoliabilityforanydamageorviolation
of government regulations arising from failing to comply with these guidelines.
Checklist of Regulatory Statement
15.21
Youarecautionedthatanychangesormodicationsnotexpresslyapprovedinthismanualcouldvoidyour
authorizationtousethedevice.
CAUTIN:Anychangesormodicationsnotexpresslyapprovedbythepartyresponsibleforcompliancecould
voidtheuser’sauthoritytooperatetheequipment.

94
Replaceable batteries
If an equipment is provided with a replaceable battery and if replacement by an incorrect type could result in an
explosion (e.g. with some lithium batteries), the following applies:
– if the battery is placed in an OPERATOR ACCESS AREA, there shall be a marking close to the battery or a
statementinboththeoperatingandtheservicinginstructions;
– if the battery is placed elsewhere in the equipmen, there shall be a marking close to the battery or a statement in the
servicing instructions.
The marking or statement shall include the following or similar text:
CAUTION
RISK OF EXPLOSION IF BATTERY IS REPLACED
BY AN INCORRECT TYPE.
DISPOSE OF USED BATTERIES ACCORDING
THE INSTRUCTIONS
Compliance is checked by inspection.
CAUTIN:TomaintaincompliancewithFCC’sRFexposureguidelines,thisequipmentshouldbeinstalledand
operatedwithminimumdistance20cmbetweentheradiatorandyourbody.Useonthesuppliedantenna.Unauthorized
antenna,modication,orattachmentscoulddamagethetransmitterandmayviolateFCCregulations.
MPE Statement (Safety Information)
Your device contains a low power transmitter. When device is transmitted it sends out Radio Frequency (RF) signal.
Safety Information
In order to maintain compliance with the FCC RF exposure guidelines, this equipment should be installed and operated
withminimumdistance20cmbetweentheradiatorandyourbody.Useonlywithsuppliedantenna.Unauthorized
antenna,modication,orattachmentscoulddamagethetransmitterandmayviolateFCCregulations.
Caution Statement of the FCC Radio Frequency Exposure
SAR compliance for body-worn operations is restricted to belt-clip, holsters, or accessories that have no metallic
component in the assembly and which provide at least 1.5cm separation between the device, including its antenna,
and the users body.

95
Sending pictures 86
Setting to Discoverable 57
Synchronizing30, 60
Turning on/off 41, 57
C
Calendar
Scheduling an appointment 81
Call barring 44
Call key 4
Calls
Answering 21
Emergency 20
From Call History 18
From Contacts 18
From the Home screen 17
International 20
Rejecting 21
Using speed dial 19
Charging
Battery 8
Connecting
Internet 50
Phone to PC 27
Connections
Dial-up 50
GPRS 51
Infrared 53
Internet 55
Proxy 51
USB 54
VPN 51
Contacts
SIM 79
Viewing 77
D
Date
Setting 37
Delete
Pictures 85
Video clips 85
Device lock 3, 16
Dial-up connection 50
Display
External 2
E
E-mail accounts
Setting up 66
E-mail messages
Composing 67
Downloading 69
Sending 67
Synchronizing70
Earphone jack 3
Emergency calls 20
End button 4
Exchange Server
Synchronizing30
External display 2
Index
A
Action key 4
ActiveSync
Copyingles47
Installing 26
Adding programs 46
Alarm
Setting 37
Answering voice calls 21
B
Back key 4
Battery
Charging 8
Inserting 7
Beam
Bluetooth 60
Picture 89
Video clip 89
Bluetooth
Beaming 60
Creating a partnership 58
Headset 59
Partnership 60
Printer 61
Receiving information 60
Renaming device 60
Security 61
Index

96
F
Features
Back 2
Bottom 2
Front 2
Side 2
Top 2
File Explorer
Beamingles49
Creating folders 48
Deletingles49
Deleting folders 49
Movingles49
Moving folders 49
Renamingles49
Renaming folders 49
Sendingalebye-mail49
Starting 48
Using 48
Files
Copying 47
Fixed dialing 43
H
Home key 4
Home screen 13
Personalizing36
Setting 85
Status indicator icons 14
I
Indicators
Battery 2
Bluetooth 2
LED 2
Network 2
Notication2
Status 14
Infrared
Synchronizing29
Infrared (IR) port 3
Infrared connection 53
Input modes
Changing 62
Multipress mode 63
Numeric mode 64
T9 mode 63
Inserting
Battery 7
Installing
ActiveSync 26
Battery 7
Java MIDlets
From a PC 92
From the Internet 92
Micro SD card 7
SIM card 6
Storage card 7
International calls 20
Internet
Connecting 50
Internet Explorer Mobile 55
Changing options 55
J
Java MIDlets
Installing 92
Running 93
K
Key lock 3, 16
Keypad
Locking 41
Unlocking 42
Keys
Action 4
Back 4
Call 4
End 4
Home 4
Left soft 4
L
LEDash2
LED indicator 2
Left soft key 4
Locking
Phone 43
SIM card 42
M
Messaging
Changing options 67
Deleting accounts 67
E-mail 67
Inserting a signature 69
Managing accounts 67
Managing folders 70
MMS 71
Switching accounts 67
Text 67
MIDlets
Running 93
Micro SD card

97
Installing 7
Removing 7
MMS messaging
Accessing 71
Editing settings 71
Hiding recipient 73
Hiding sender 73
My Text 73
Preset text 73
Requesting delivery notice 73
Sending
Pictures 86
Video clips 86
Using templates 73
Modem Link 53
USB connection 54
MSN Hotmail 76
MSN Messenger 74
Multi-color LED indicator 2
Multimedia player controls
Locking 41
Unlocking 42
Multipress mode 63
Entering
Punctuation 64
N
Navigation
Pad 4
Numeric mode 64
P
Partnership
Creating 27
Personalizing
Home screen 36
Phone
Back features 2
Bottom features 2
Front features 2
Locking 43
Resetting 46
Restarting 45
Side features 2
Top features 2
Turning off 9
Turning on 9
Phone settings
Call barring 44
Fixed dialing 43
Pictures
Auto Correct 89
Beaming 89
Croping 89
Default location 90
Deleting 88
E-mailing 89
Filenameprex90
Rotating 89, 90
Saving 89
Sending by Bluetooth 89
Sending by MMS 89
Viewing 88
Pictures and Videos
Editing a picture 89
Viewing a picture 88
PIN
Changing 43
PIN2
Changing 43
Pocket MSN 74
Ports
Earphone jack 3
Infrared (IR) 3
Power button 3
Printer
Conguring61
Proles16
Changing settings 38
Programs
Adding 46
Calendar 81
Contacts 77
File Explorer 48
Creating folders 48
Internet Explorer Mobile 55
Java 95
Modem Link 53
MSN Hotmail 76
MSN Messenger 74
Pictures & Videos 85
Pocket MSN 74
Removing 46
Tasks 83
Voice Notes 84
Windows Media Player 88
Controls 91
Q
Quick List 16
Quick List button 3
R
Radio mode
Turning on/off 41
Rejecting voice calls 21
Remotesynchronization33

98
Removing programs 46
Resetting
Phone 46
Restarting
Phone 45
Right soft key 4
S
Scheduling
Synchronization31
Screen
Settings 35
Security
Bluetooth 61
Settings
Alarm 37
Date 37
Phone
Call barring 44
Fixed dialing 43
Prole38
Time 37
Settings screens 35
Setting up
E-mail accounts 66
SIM card
Installing 6
Locking 42
Unlocking 42
SI SL security 44
Speakerphone 2
Speed dial 19
Creating 19
Start menu 15
Status indicator icons 14
Storage card
Installing 7
Removing 7
Strap holder 3
Synchronizing
Creating a schedule 31
E-mail messages 70
Remotely 33
Using Bluetooth 30
Using infrared 29
Using USB sync cable 29
With an Exchange Server 30
With a PC 28
T
T9 mode 63
Entering
Punctuation 64
Tasks 83
Text
Changing case 64
Entering 62
New line 65
Plus sign 65
Punctuation 64
Space 64
Symbols 65
Text messages
Composing 67
Sending 67
Time
Setting 37
U
UL Safety Notices 95
Unlocking
keypad 42
Multimedia player controls 42
SIM card 42
URL exception 52
USB connection 54
V
Video clips
Adding audio 87
Beaming 86
E-mailing 86
Playing 85
Sending by MMS 86
Setting time limit 87
Voice mail
Retrieving 21
Voice Notes 81
Volume button 3
W
Windows Media Player 91
Controls 2, 91
Wireless Manager 3, 16, 41

99
ASUS COMPUTER GmbH (Germany and Austria)
Address Harkort Str. 25, D-40880 Ratingen, Germany
Telephone +49-2102-95990
Fax +49-2102-959911
Online contact www.asuscom.de/sales
Technical Support
Telephone +49-2102-95990
Fax +49-2102-959911
Online support www.asuscom.de/support
Web site www.asuscom.de/news
For FCC
PCS Head: 0.696 mW/g
PCS Body: 0.704 mW/g
WLAN Body: 0.021 mW/g
For DGT
GSM: 0.724 mW/g
DCS: 0.467 mW/g
WCDMA: 0.964 mW/g
WLAN: 0.012 mW/g
For CE
GSM: 0.724 mW/g
DCS: 0.467 mW/g
WCDMA: 0.964 mW/g

RF Exposure Information (SAR)
This device meets the government’s requirements for exposure to radio waves. This device
is designed and manufactured not to exceed the emission limits for exposure to radio
frequency (RF) energy set by the Federal Communications Commission of the U.S.
Government.
The exposure standard for wireless devices employs a unit of measurement known as the
Specific Absorption Rate, or SAR. The SAR limit set by the FCC is 1.6W/kg. *Tests for
SAR are conducted using standard operating positions accepted by the FCC with the device
transmitting at its highest certified power level in all tested frequency bands. Although the
SAR is determined at the highest certified power level, the actual SAR level of the device
while operating can be well below the maximum value. This is because the device is
designed to operate at multiple power levels so as to use only the poser required to reach the
network. In general, the closer you are to a wireless base station antenna, the lower the
power output.
The highest SAR value for the device as reported to the FCC when tested for use at the ear is
0.696 W/kg for PCS Head SAR and when worn on the body, as described in this user guide,
is 0.704 W/kg for PCS Body SAR and 0.021 W/kg for WLAN Body SAR.(Body-worn
measurements differ among device models, depending upon available enhancements and FCC
requirements.)
While there may be differences between the SAR levels of various devices and at various
positions, they all meet the government requirement.
The FCC has granted an Equipment Authorization for this device with all reported SAR
levels evaluated as in compliance with the FCC RF exposure guidelines. SAR information
on this device is on file with the FCC and can be found under the Display Grant section of
http://www.fcc.gov/oet/fccid after searching on FCC ID: MSQO2G1
For body worn operation, this device has been tested and meets the FCC RF exposure
guidelines for use with an accessory that contains no metal and the positions the handset a
minimum of 1.5 cm from the body. Use of other enhancements may not ensure compliance
with FCC RF exposure guidelines. If you do no t use a body-worn accessory and are not
holding the device at the ear, position the handset a minimum of 1.5 cm from your body when
the device is switched on.
The user needs to switch off the device when exposed to areas with potentially explosive
atmospheres such as petrol stations, chemical storage depots and blasting operations.