ASUSTeK Computer P1802T ASUS Portable AiO User Manual
ASUSTeK Computer Inc ASUS Portable AiO
User Manual.pdf

English
User Manual
ASUS Portable AiO
P1802-T Series
First Edition
January 2014
E8685

English
P1802-T ASUS Portable AiO can be used with P1802 ASUS All-in-One PC
COPYRIGHT INFORMATION
No part of this manual, including the products and software described in it, may be reproduced, transmitted, transcribed, stored in
a retrieval system, or translated into any language in any form or by any means, except documentation kept by the purchaser for
backup purposes, without the express written permission of ASUSTeK COMPUTER INC. (“ASUS”).
ASUS PROVIDES THIS MANUAL “AS IS” WITHOUT WARRANTY OF ANY KIND, EITHER EXPRESS OR IMPLIED, INCLUDING BUT NOT
LIMITED TO THE IMPLIED WARRANTIES OR CONDITIONS OF MERCHANTABILITY OR FITNESS FOR A PARTICULAR PURPOSE. IN NO
EVENT SHALL ASUS, ITS DIRECTORS, OFFICERS, EMPLOYEES OR AGENTS BE LIABLE FOR ANY INDIRECT, SPECIAL, INCIDENTAL,
OR CONSEQUENTIAL DAMAGES (INCLUDING DAMAGES FOR LOSS OF PROFITS, LOSS OF BUSINESS, LOSS OF USE OR DATA,
INTERRUPTION OF BUSINESS AND THE LIKE), EVEN IF ASUS HAS BEEN ADVISED OF THE POSSIBILITY OF SUCH DAMAGES ARISING
FROM ANY DEFECT OR ERROR IN THIS MANUAL OR PRODUCT.
Products and corporate names appearing in this manual may or may not be registered trademarks or copyrights of their respective
companies, and are used only for identication or explanation and to the owners’ benet, without intent to infringe.
SPECIFICATIONS AND INFORMATION CONTAINED IN THIS MANUAL ARE FURNISHED FOR INFORMATIONAL USE ONLY, AND ARE
SUBJECT TO CHANGE AT ANY TIME WITHOUT NOTICE, AND SHOULD NOT BE CONSTRUED AS A COMMITMENT BY ASUS. ASUS
ASSUMES NO RESPONSIBILITY OR LIABILITY FOR ANY ERRORS OR INACCURACIES THAT MAY APPEAR IN THIS MANUAL, INCLUDING
THE PRODUCTS AND SOFTWARE DESCRIBED IN IT.
Copyright © 2014 ASUSTeK COMPUTER INC. All Rights Reserved.
LIMITATION OF LIABILITY
Circumstances may arise where because of a default on ASUS’ part or other liability, you are entitled to recover damages from
ASUS. In each such instance, regardless of the basis on which you are entitled to claim damages from ASUS, ASUS is liable for no
more than damages for bodily injury (including death) and damage to real property and tangible personal property; or any other
actual and direct damages resulted from omission or failure of performing legal duties under this Warranty Statement, up to the
listed contract price of each product.
ASUS will only be responsible for or indemnify you for loss, damages or claims based in contract, tort or infringement under this
Warranty Statement.
This limit also applies to ASUS’ suppliers and its reseller. It is the maximum for which ASUS, its suppliers, and your reseller are
collectively responsible.
UNDER NO CIRCUMSTANCES IS ASUS LIABLE FOR ANY OF THE FOLLOWING: (1) THIRD-PARTY CLAIMS AGAINST YOU FOR
DAMAGES; (2) LOSS OF, OR DAMAGE TO, YOUR RECORDS OR DATA; OR (3) SPECIAL, INCIDENTAL, OR INDIRECT DAMAGES OR FOR
ANY ECONOMIC CONSEQUENTIAL DAMAGES (INCLUDING LOST PROFITS OR SAVINGS), EVEN IF ASUS, ITS SUPPLIERS OR YOUR
RESELLER IS INFORMED OF THEIR POSSIBILITY.
SERVICE AND SUPPORT
Visit our multi-language web site at http://support.asus.com

English
3
ASUS Portable AiO
Table of Contents
About this manual ................................................................................................................................................ 5
Conventions used in this manual ....................................................................................................................... 5
Typography ................................................................................................................................................................. 5
Safety information ................................................................................................................................................ 6
Setting up your system...........................................................................................................................................6
Care during use ......................................................................................................................................................... 6
Sound Pressure Warning ........................................................................................................................................ 7
Package contents .................................................................................................................................................. 8
Chapter 1: Hardware Setup
Getting to know your ASUS Portable AiO .................................................................................................... 9
Front view ....................................................................................................................................................................9
Chapter 2: Using your ASUS Portable AiO
Placing your ASUS Portable AiO on the table or desk ............................................................................. 15
Charging your ASUS Portable AiO .................................................................................................................. 16
Using touch screen gestures on Android™ ................................................................................................. 17
Chapter 3: Working with Android™
Starting up for the first time .............................................................................................................................. 21
Android™ lock screen .......................................................................................................................................... 22
Unlocking your device ............................................................................................................................................ 22
Entering Google Now..............................................................................................................................................22
Home Screen........................................................................................................................................................... 23
Screen views ...............................................................................................................................................................23
Connecting to the world .................................................................................................................................... 24
Connecting to Wi-Fi networks ............................................................................................................................. 24
Using Bluetooth ........................................................................................................................................................ 25
Managing Apps ...................................................................................................................................................... 27
Creating app shortcuts ........................................................................................................................................... 27
Removing an app from the Home Screen ....................................................................................................... 27
Viewing app info ....................................................................................................................................................... 27
Creating app folder .................................................................................................................................................. 28
Viewing apps under the Recents screen .......................................................................................................... 29
Task Manager ............................................................................................................................................................. 30
File Manager .......................................................................................................................................................... 31
Accessing the internal storage ............................................................................................................................ 31
Accessing the external storage device ............................................................................................................. 31

English
4
ASUS Portable AiO
Table of Contents
Settings ..................................................................................................................................................................... 33
Gallery ....................................................................................................................................................................... 34
Gallery main screen .................................................................................................................................................34
Sharing and deleting albums ............................................................................................................................... 35
Sharing, editing and deleting images ............................................................................................................... 35
Using the wireless display feature................................................................................................................... 38
Using screen sharing mode .................................................................................................................................. 39
Turning your ASUS Portable AiO off ............................................................................................................... 40
Putting your ASUS Portable AiO to sleep.........................................................................................................40
Appendices
Notices ...................................................................................................................................................................... 41
REACH ........................................................................................................................................................................... 41
ASUS Recycling/Takeback Services .................................................................................................................... 41
COATING NOTICE ...................................................................................................................................................... 41
Federal Communications Commission Statement ....................................................................................... 41
RF exposure warning...............................................................................................................................................42
Canadian Department of Communications Statement..............................................................................42
Canada, Industry Canada (IC) Notices ............................................................................................................... 42
Declaration of Conformity (R&TTE directive 1999/5/EC) ............................................................................ 44
CE Mark Warning ....................................................................................................................................................... 44
CE marking for devices without wireless LAN/Bluetooth .......................................................................... 44
CE marking for devices with wireless LAN/ Bluetooth ................................................................................ 45
Wireless Operation Channel for Different Domains ..................................................................................... 45
VCCI: Japan Compliance Statement ...................................................................................................................45
France Restricted Wireless Frequency Bands ................................................................................................. 46
Band 5G restriction .................................................................................................................................................. 46
Prevention of Hearing Loss .................................................................................................................................. 48
Global Environmental Regulation Compliance and Declaration ...........................................................49
ENERGY STAR complied product ........................................................................................................................ 49

English
5
ASUS Portable AiO
About this manual
This manual provides information about the hardware and software features of your ASUS
Portable AiO, organized through the following chapters:
Chapter 1: Hardware Setup
This chapter details the hardware components of your ASUS Portable AiO.
Chapter 2: Using your ASUS Portable AiO
This chapter provides you with information on using your ASUS Portable AiO.
Chapter 3: Working with Android™
This chapter provides an overview of using Android™ in your ASUS Portable AiO.
Conventions used in this manual
To highlight key information in this manual, some text are presented as follows:
IMPORTANT! This message contains vital information that must be followed to complete a task.
NOTE: This message contains additional information and tips that can help complete tasks.
WARNING! This message contains important information that must be followed to keep you safe
while performing tasks and prevent damage to your ASUS Portable AiO's data and components.
Typography
Bold This indicates a menu or an item that must be selected.
Italic This indicates sections that you can refer to in this manual.
All illustrations and screenshots in this manual are for reference only. Actual product
specications and software screen images may vary with territories. Visit the ASUS
website at www.asus.com for the latest information.

English
6
ASUS Portable AiO
Safety information
Your ASUS Portable AiO is designed and tested to meet the latest standards of safety for
information technology equipment. However, to ensure your safety, it is important that you
read the following safety instructions.
Setting up your system
Read and follow all instructions in the documentation before you operate your system.
Do not use this product near water or a heated source such as a radiator.
Set up the system on a stable surface.
Openings on the chassis are for ventilation. Do not block or cover these openings. Ensure
that you leave plenty of space around the system for ventilation. Never insert objects of any
kind into the ventilation openings.
Use this product in environments with ambient temperatures between 0˚C and 35˚C.
If you use an extension cord, ensure that the total ampere rating of the devices plugged
into the extension cord does not exceed its ampere rating.
Care during use
Do not walk on the power cord or allow anything to rest on it.
Do not spill water or any other liquids on your system.
When the system is turned o, a small amount of electrical current still ows. Always
unplug all power, modem, and network cables from the power outlets before cleaning the
system.
The touch screen requires periodic cleaning to achieve the best touch sensitivity. Keep the
screen clean from foreign objects or excessive dust accumulation. To clean the screen:
Turn o the system and disconnect the power cord from the wall.
Spray a small amount of a household glass cleaner onto the supplied cleaning cloth
and gently wipe the screen surface.
Do not spray the cleaner directly on the screen.
Do not use an abrasive cleaner or a coarse cloth when cleaning the screen.
If you encounter the following technical problems with the product, unplug the power cord
and contact a qualied service technician or your retailer.
The power cord or plug is damaged.
Liquid has been spilled into the system.
The system does not function properly even if you follow the operating instructions.
•
•
•
•
•
•
•
•
•
•
•
•
•
•
•
•
•
•

English
7
ASUS Portable AiO
The system was dropped or the cabinet is damaged.
The system performance changes.
Sound Pressure Warning
Excessive sound pressure from earphones or headphones can cause hearing damage or loss.
Adjustment of the volume control as well as the equalizer to settings other than the center
position may increase the earphones or headphones output voltage and the sound pressure
level.
•
•
English
8
ASUS Portable AiO
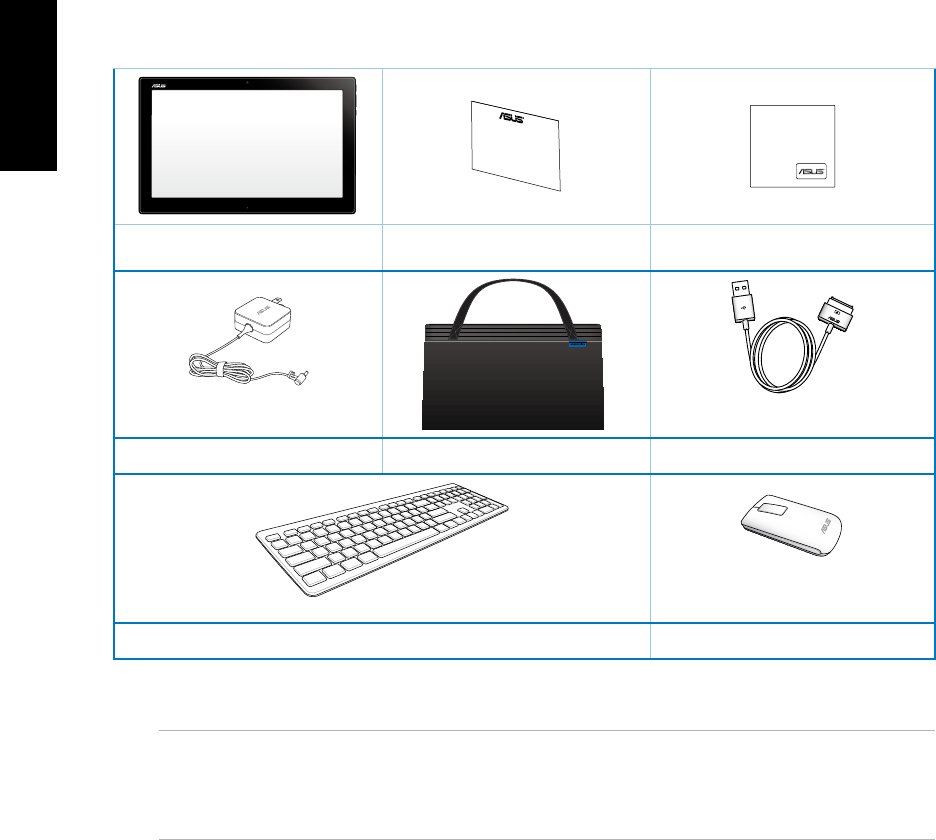
Package contents
NOTES:
• Contact your retailer if any of the items are damaged or missing.
• Contents may vary per country or region.
ASUS Portable AiO warranty card cleaning cloth
power adapter
ASUS Portable AiO bag
USB connection cable
Wireless keyboard Wireless mouse
English
9
ASUS Portable AiO
Chapter 1: Hardware Setup
Getting to know your ASUS Portable AiO
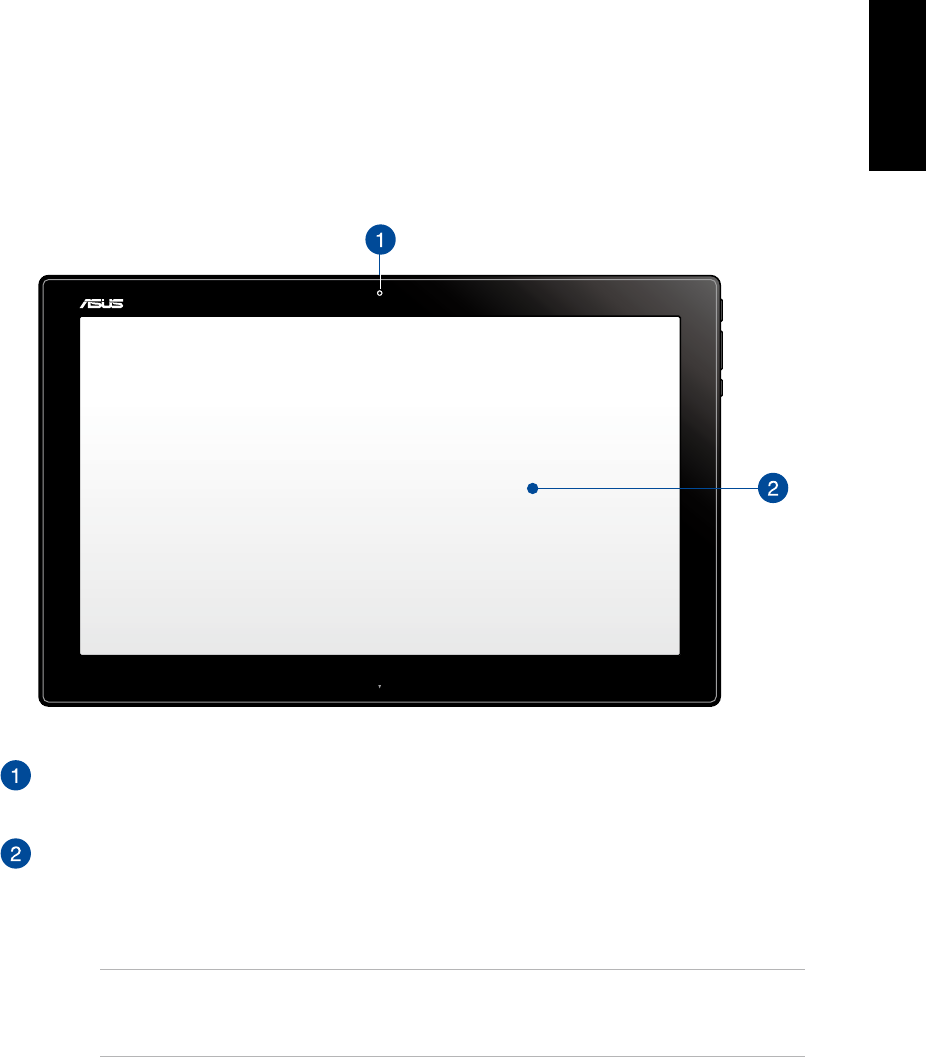
Front view
Webcam
The built-in webcam allows you to start video chats online.
Touch screen panel
This high-denition touch screen panel provides excellent viewing features for photos,
videos, and other multimedia les on your ASUS All-in-One PC. It also allows you to
operate your ASUS Portable AiO using touch gestures.
NOTE: To know more about using touch screen panel gestures when operating your
ASUS Portable AiO, refer to the Using touch screen gestures on Android™ section in this
manual.
English
10
ASUS Portable AiO
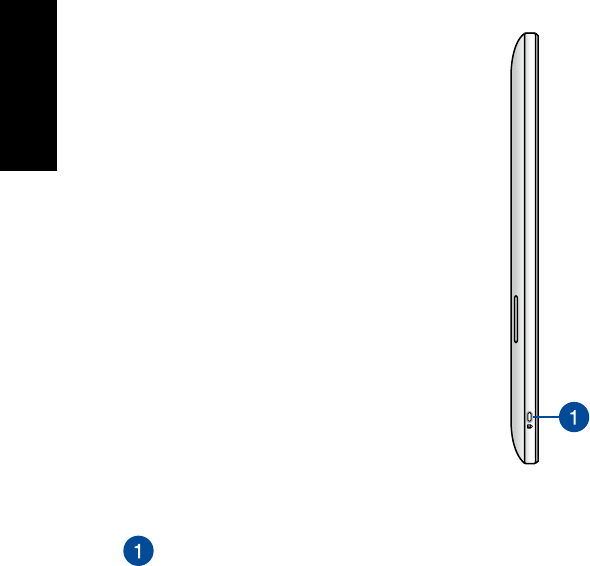
Left Side
Kensington® lock port
The Kensington® lock port allows you to secure your ASUS Portable AiO using
Kensington® compatible security products.
English
11
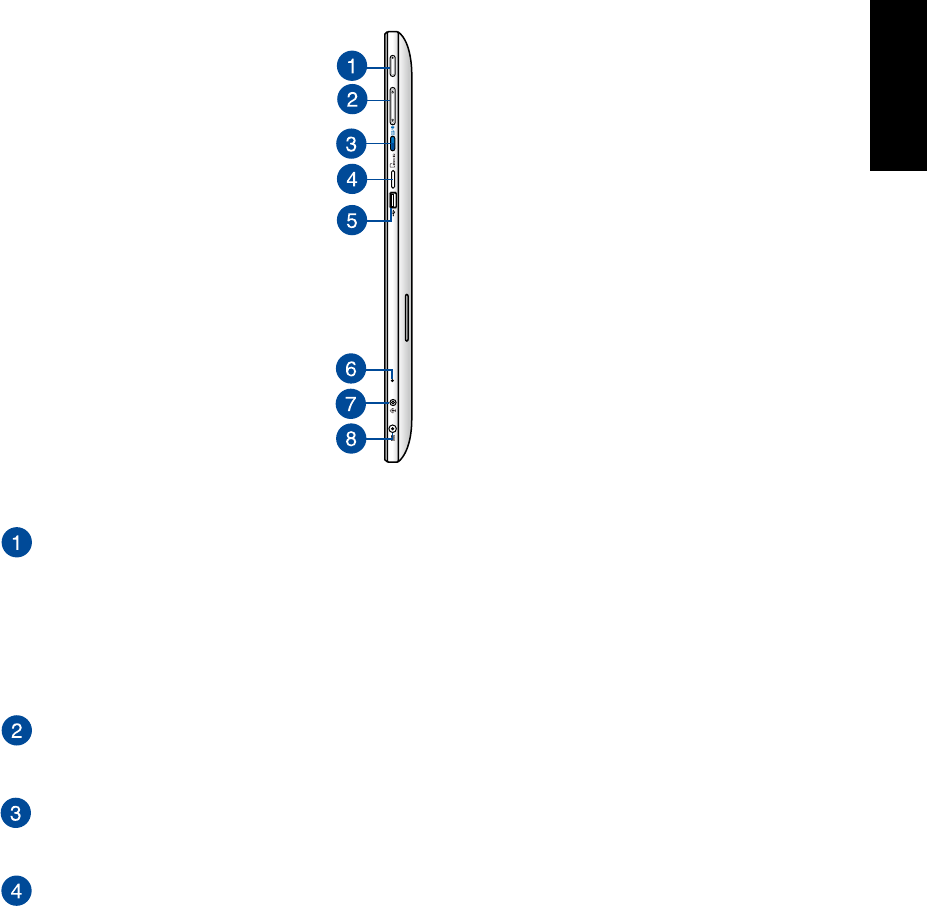
ASUS Portable AiO
Power button
Press the power button to turn your ASUS Portable AiO on or o. You can also use the
power button to put your ASUS Portable AiO to sleep or hibernate mode and wake it
up from sleep or hibernate mode.
In the event that your ASUS Portable AiO becomes unresponsive, press and hold the
power button for about four (4) seconds until your ASUS Portable AiO shuts down.
Volume control
Press to turn the volume up/down for the current operating system being used.
Mode button
Press this button to switch your operating system from Windows® 8.1 to Android™.
MicroSD card reader
Your ASUS Portable AiO comes with an additional built-in memory card reader that
supports microSD and microSDHC card formats.
Right Side

English
12
ASUS Portable AiO
USB 2.0 port
This Universal Serial Bus (USB) 2.0 port allows you to connect compatible USB 2.0 or
USB 1.1 devices to your ASUS Portable AiO.
Microphone
The built-in microphone can be used for video conferencing, voice narrations, or
simple audio recording.
Headphone output/microphone input combo port
This port allows you to connect your ASUS Portable AiO to amplied speakers or
headphones. You can also use this port to connect your ASUS Portable AiO to an
external microphone.
Power input
The supplied power adapter converts AC power to DC power for use with this jack.
Power supplied through this jack supplies power to the ASUS Portable AiO. To prevent
damage to the ASUS Portable AiO, always use the supplied power adapter.
WARNING! The power adapter may get warm or hot when in use. Do not cover the
adapter and keep it away from your body.
English
13
ASUS Portable AiO
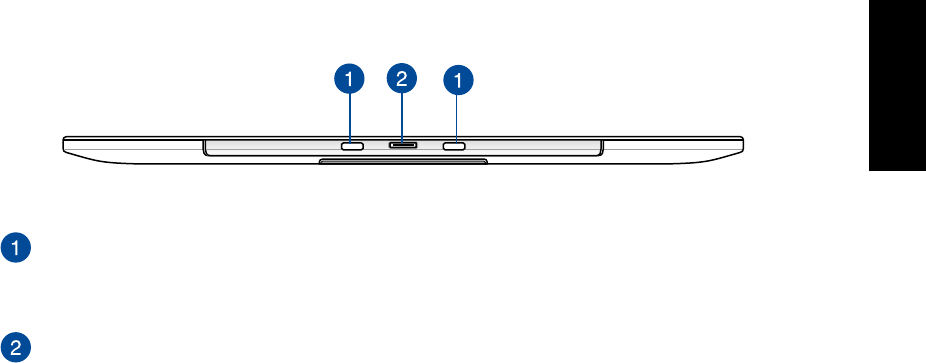
Bottom view
PC Station slots
Align and insert the PC Station tabs into these slots to securely attach the ASUS
Portable AiO to the PC Station.
ASUS Portable AiO connector
This connects the ASUS Portable AiO to your PC Station and transforms both devices
into an ASUS All-in-One PC. While connected to the PC Station, the ASUS Portable AiO
serves as a touchscreen display panel to your ASUS All-in-One PC and also allows you
to access and switch between using Windows® 8.1 and Android™.Windows® 8.1 and Android™.
English
14
ASUS Portable AiO
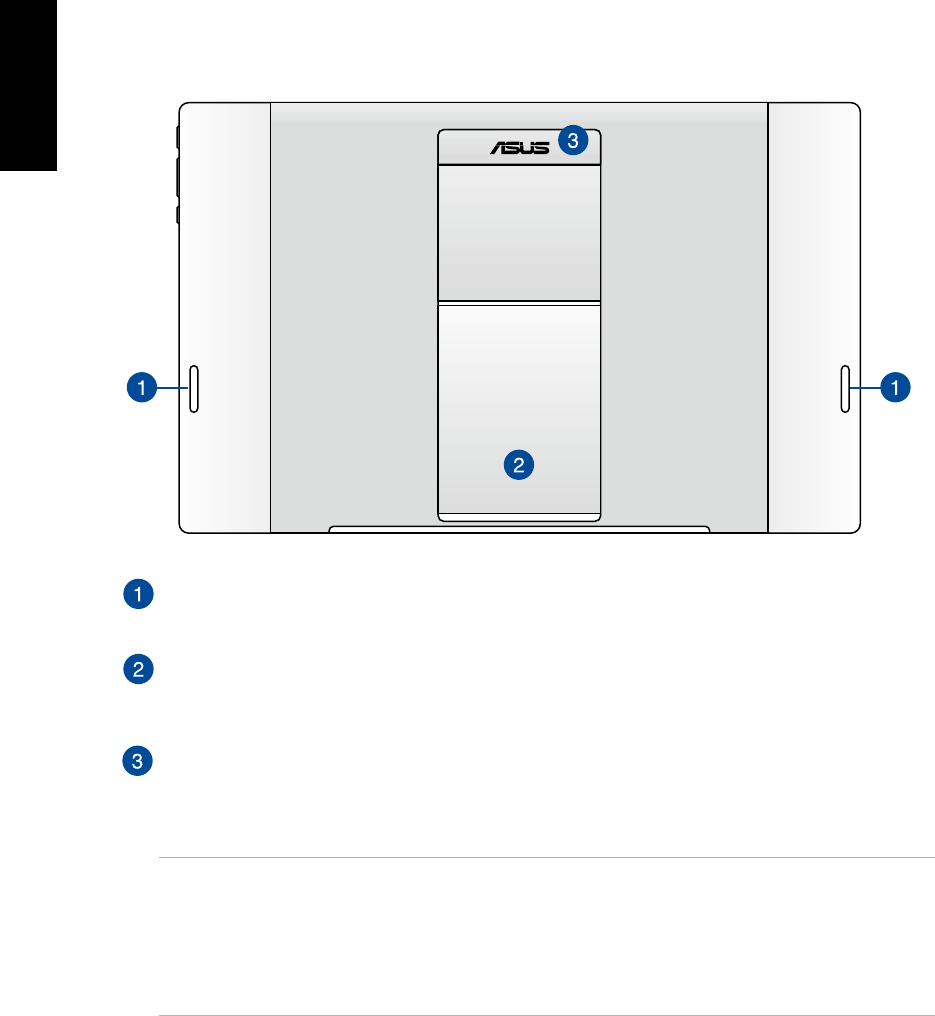
Rear view
Audio speakers
Your ASUS Portable AiO is equipped with built-in high quality speakers.
ASUS Portable AiO stand
Pull out and adjust the stand to provide stable support for your ASUS Portable AiO
when it is placed on a table or desk.
ASUS Portable AiO handle
Carry the ASUS Portable AiO easily using the ergonomic ASUS Portable AiO handle.
NOTES:
• When docking your ASUS Portable AiO to your PC Station, ensure that your ASUS Portable AiO
stand is returned to its original position.
• The magnet at the back of your ASUS Portable AiO helps you to dock it into your PC Station.
This magnet may de-magnetize nearby objects.
English
15
ASUS Portable AiO
Chapter 2: Using your ASUS Portable AiO
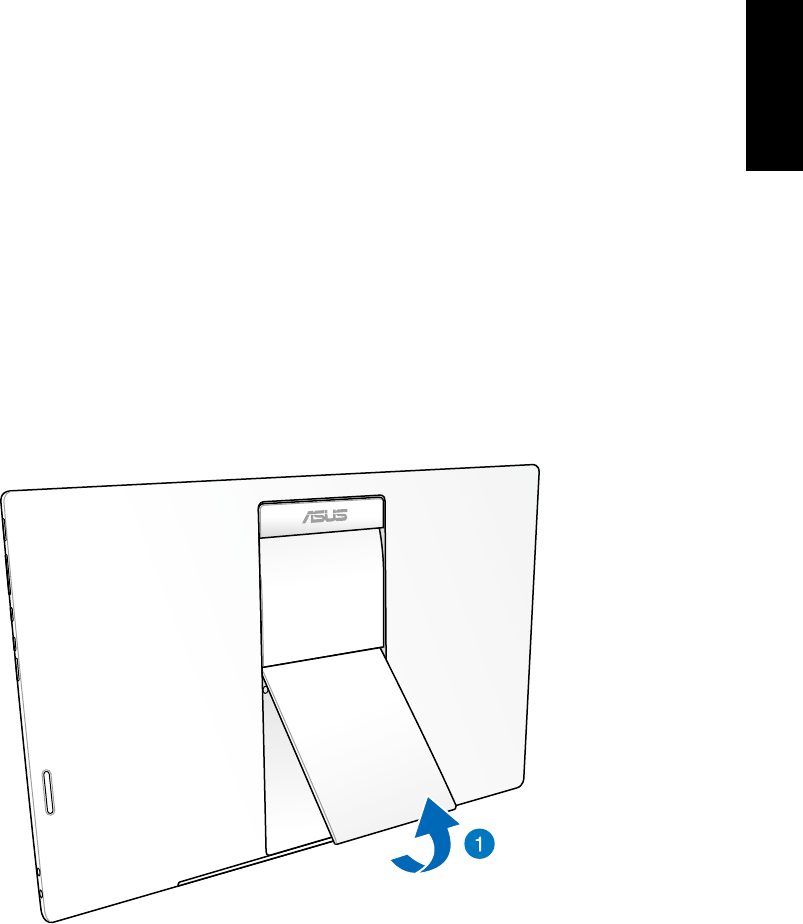
Placing your ASUS Portable AiO on the table or
desk
To place your ASUS Portable AiO on the table or desk:
1. Pull and adjust the ASUS Portable AiO stand.
2. Place your ASUS Portable AiO on a at surface such as a table or desk.
English
16
ASUS Portable AiO
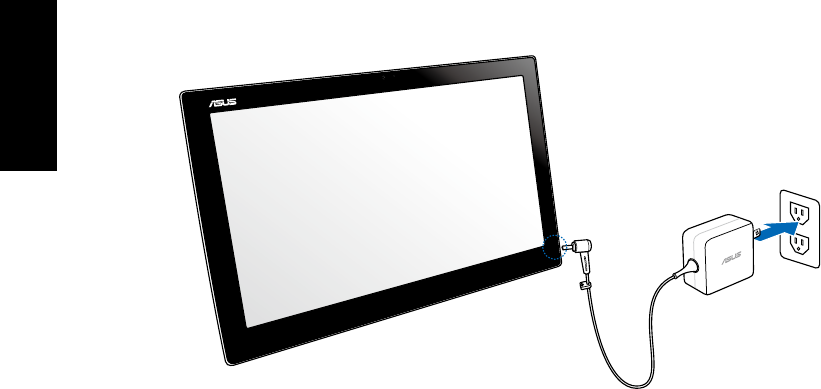
Charging your ASUS Portable AiO
110V-220V
Connect the power adapter to your ASUS Portable AiO’s DC-in port and plug to the correct
socket outlet with the correct input rating. The input voltage of the adapter is 100Vac~240Vac.
English
17
ASUS Portable AiO
Using touch screen gestures on Android™
Use the following touch screen gestures to launch programs and access the settings of your
ASUS Portable AiO. These touch screen gestures can be activated using your ASUS Portable
AiO’s touch screen panel.
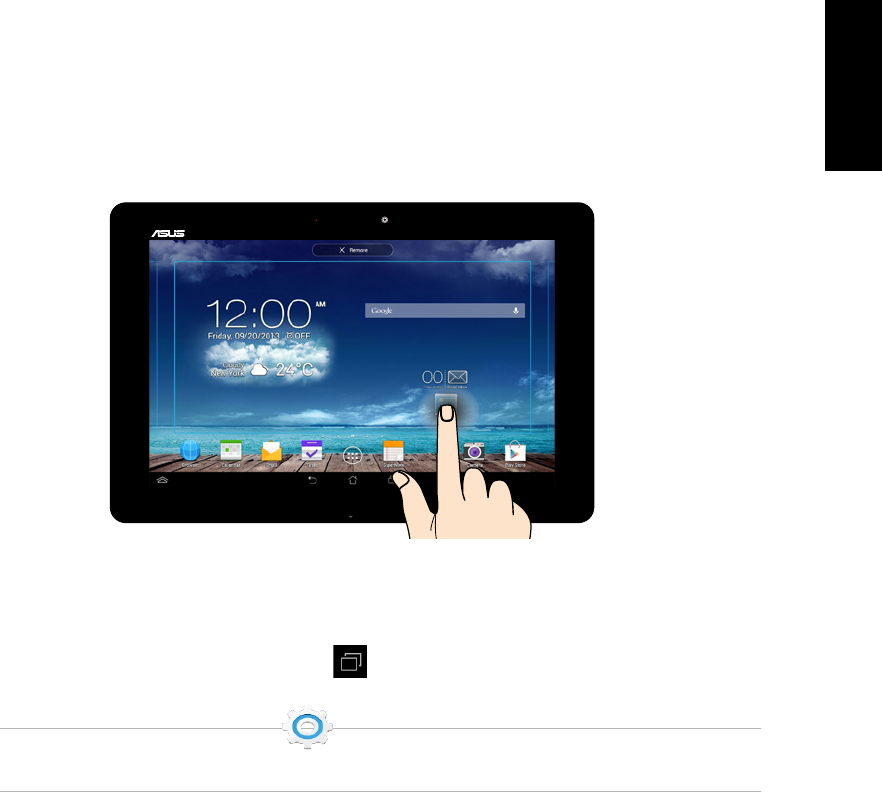
To move an app, tap and hold the app and drag it to a new location.
•
To delete an app from the main screen, tap and hold the app and drag it up to the top
side of the screen.
•
To capture a screen image, tap and hold .
NOTE: To enable this setting, go to
Settings
> ASUS Customized Setting then tick
Capture screenshots by holding the Recent Apps Key.
•
Tap and hold/Long press
English
18
ASUS Portable AiO
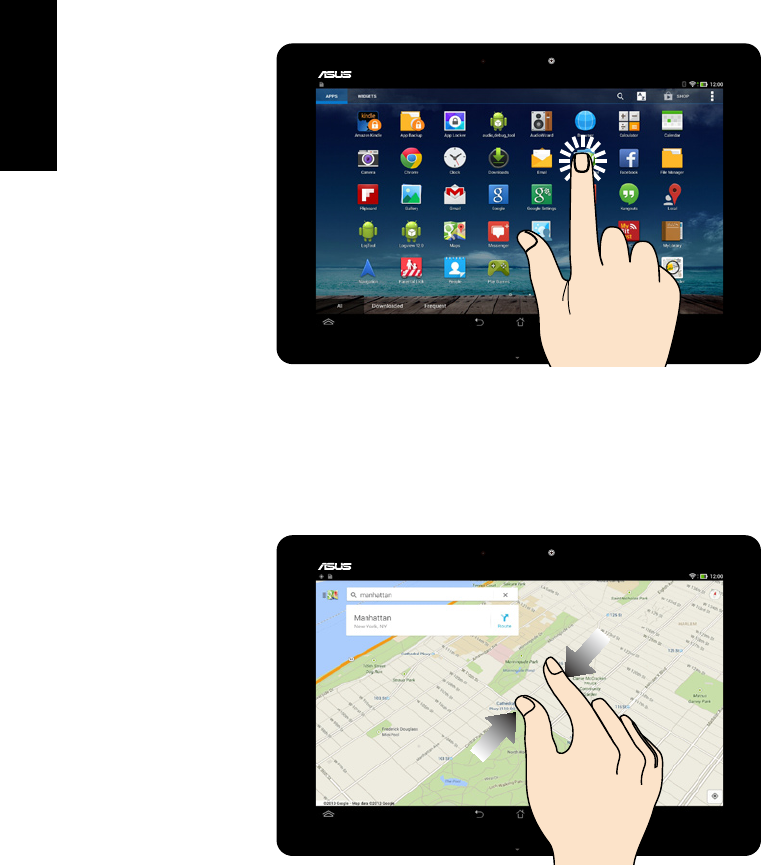
Tap an app to launch it.
•
In the File Manager app, tap to select and open a le.
•
Tap/touch
Zoom out
Bring together your two ngers on the touch screen panel to zoom out an image in Gallery,
Maps or Places.
English
19
ASUS Portable AiO
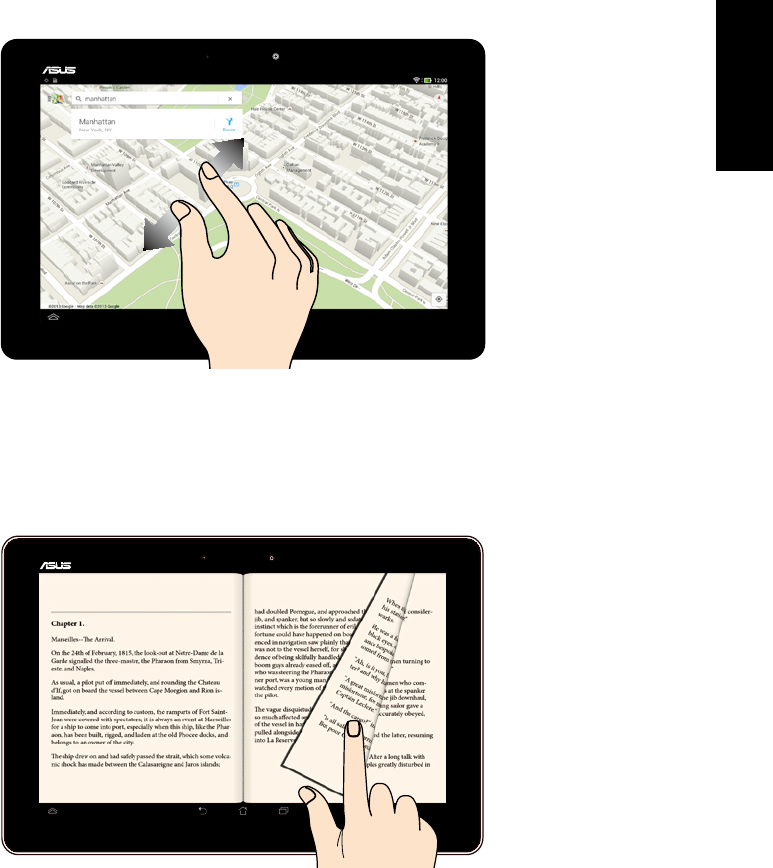
Zoom in
Spread apart your two ngers on the touch screen panel to zoom in an image in Gallery, Maps
or Places.
Swipe
Swipe your nger to the left or to the right on the touch screen panel to switch between
screens or to ip through the pages of an e-book or a gallery of images.

English
20
ASUS Portable AiO
English
21
ASUS Portable AiO
Chapter 3: Working with Android™
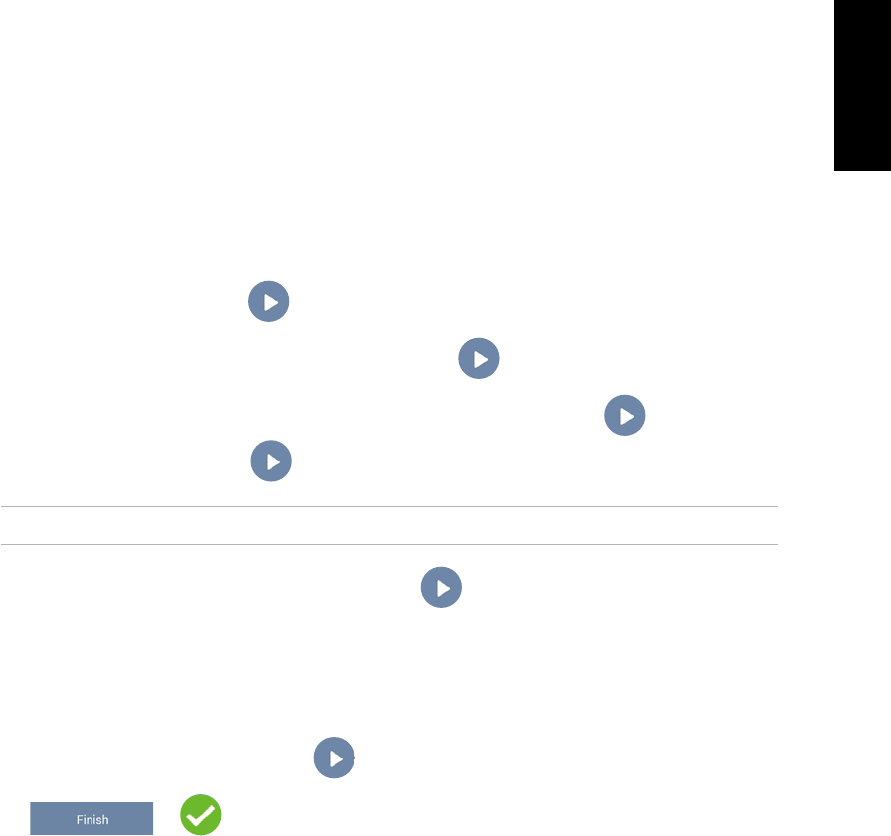
Starting up for the rst time
When you turn on your ASUS Portable AiO for the rst time, a series of steps appear to guide
you in conguring the basic settings of your Android™ operating system.
To start your ASUS Portable AiO for the rst time:
1. Turn your ASUS Portable AiO on.
2. Choose a language, then tap .
3. Select an input method or keyboard format, then tap .
4. From the list of available Wi-Fi networks, tap a network name then tap . To skip
connecting to a network, tap .
NOTE: Some Wi-Fi networks may prompt you to key in a passcode.
5. Select the type of data synchronization, then tap .
6. Follow the onscreen instructions to congure the following items:
• Google Account
• Google location and services
7. Set the local date and time, then tap .
8. Tap or to enter Home screen.
9. On the Home Screen, tap OK to start navigating your ASUS Portable AiO.
English
22
ASUS Portable AiO
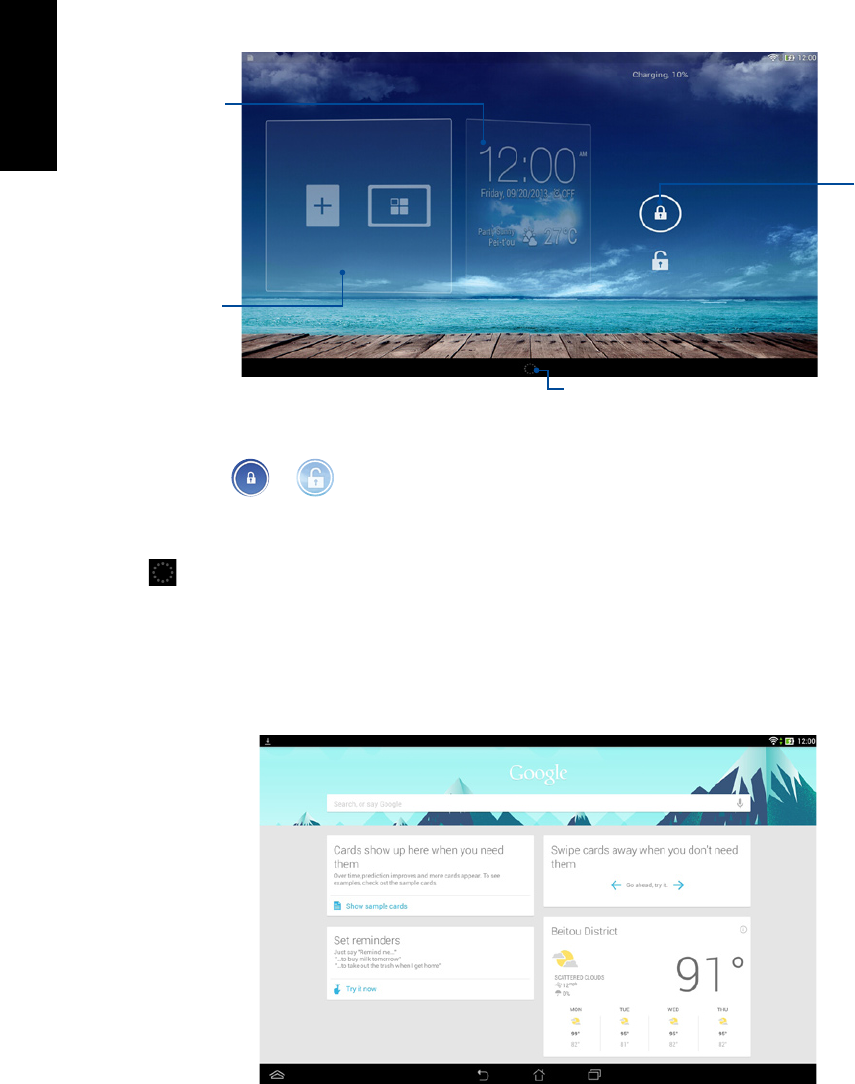
Android™ lock screen
Unlocking your device
Tap and drag to .
Time, date, and
weather panel
Wallpaper and
widget panel
Lock icon
Google Now launcher
Entering Google Now
Tap on the system bar then drag it to Google icon.
Google Now
Google Now is your ASUS Portable AiO's personal assistant, giving you instant updates on
weather conditions, nearby restaurants, ight schedules, scheduled appointments, and other
related information based from your web history, synced calendars and reminders.
English
23
ASUS Portable AiO
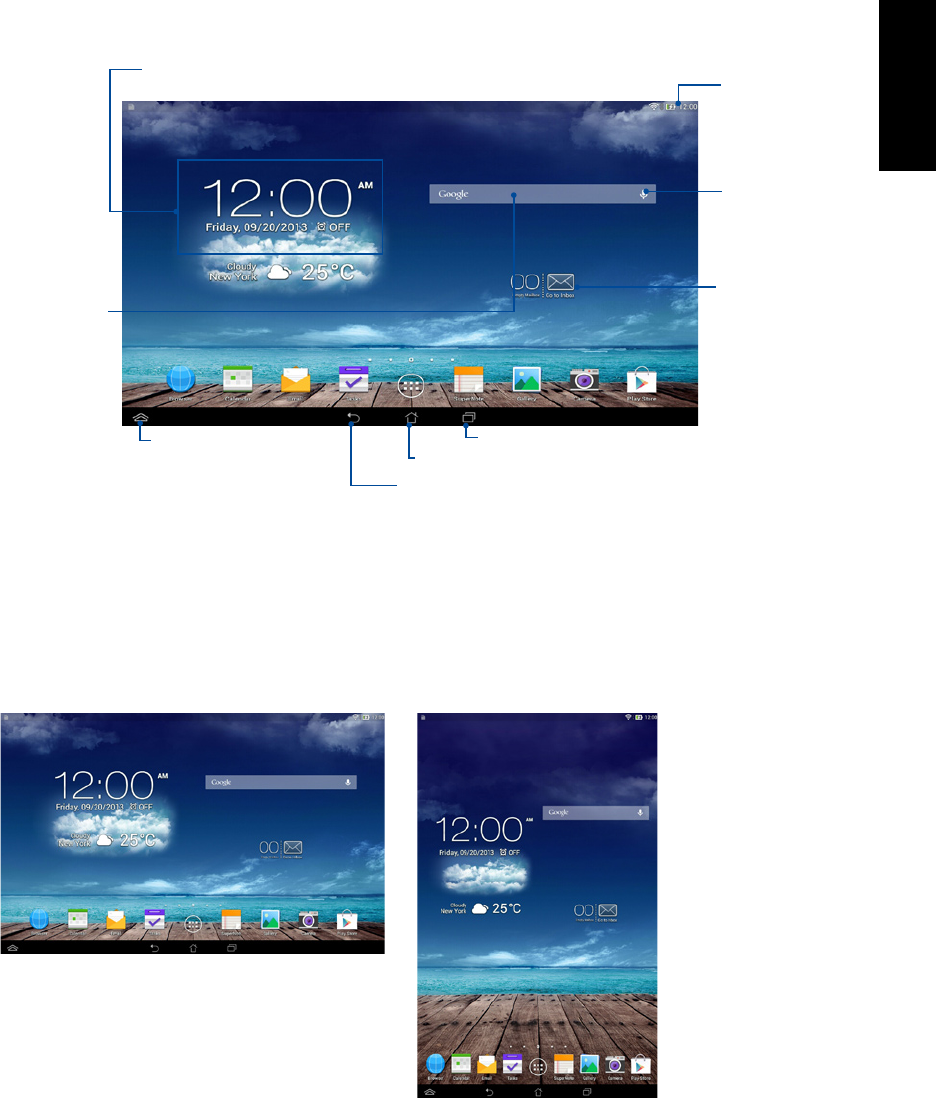
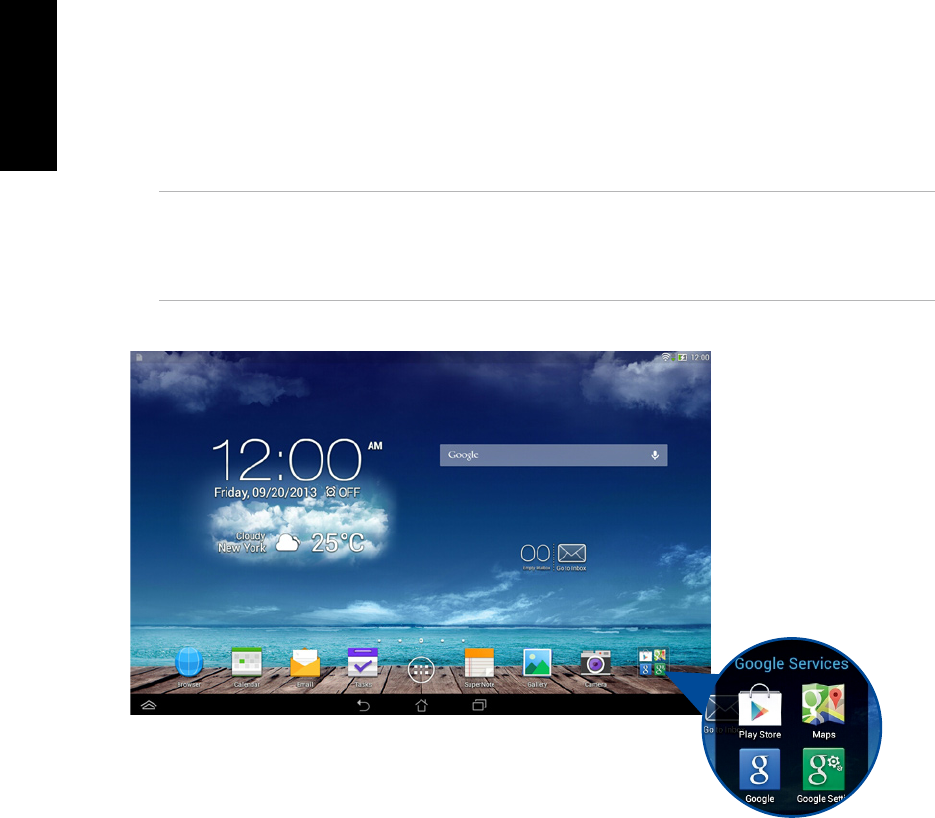
Home Screen
Notication area
and Settings
Tap to set up the location, date, and time alarm
Return to Home Screen
Display recent apps
Return to the previous screen
Open Google
Voice search
Open Google
Text search
Read e-mails in
Email app
Shortcut to Android™
and ASUS utilities
Screen views
The built-in gravity-sensor and gyroscope of your ASUS Portable AiO enable automatic screen
rotations depending on how you hold it. You can quickly switch between a landscape or
portrait view by steering your ASUS Portable AiO to the left or to the right.
Landscape view Portrait view
English
24
ASUS Portable AiO
Connecting to the world
Connecting to Wi-Fi networks
Wi-Fi wireless networking technology allows you to exchange data wirelessly over a network.
To use Wi-Fi, enable the Wi-Fi feature in your ASUS Portable AiO and connect to a wireless
network. Some wireless networks are secured with a key or protected with digital certicates
and requires additional steps to set up; others are open and you can easily connect to them.
NOTE: Turn Wi-Fi o when you are not using it to help save battery power.
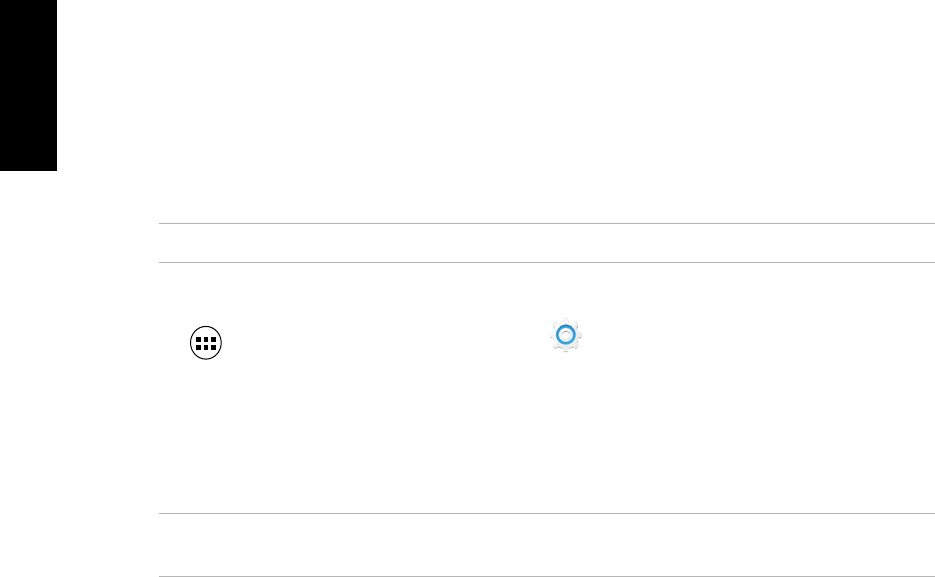
To enable Wi-Fi and connect to a Wi-Fi network:
1. Tap to go to the All Apps screen then tap
Settings
.
2. Slide the Wi-Fi switch to ON. When enabled, your ASUS Portable AiO scans for available
Wi-Fi networks.
3. Tap a network name to connect to it. If the network is secured or protected, you are
prompted to key in a password or key in other credentials.
NOTE: If your ASUS Portable AiO nds a network that you have connected to previously, it
automatically connects to it.
English
25
ASUS Portable AiO
Using Bluetooth
Enabling or disabling Bluetooth in your device
Bluetooth is a wireless standard used for exchanging data over short distances. Bluetooth
exists in many products, such as smartphones, computers, ASUS Portable AiO devices, and
headsets.
Bluetooth is very useful when transferring data between two or more devices that are near
each other.
The rst time you connect to a Bluetooth device, you must pair it with your ASUS Portable AiO.
NOTE: Turn Bluetooth o when you are not using it to help save battery power.
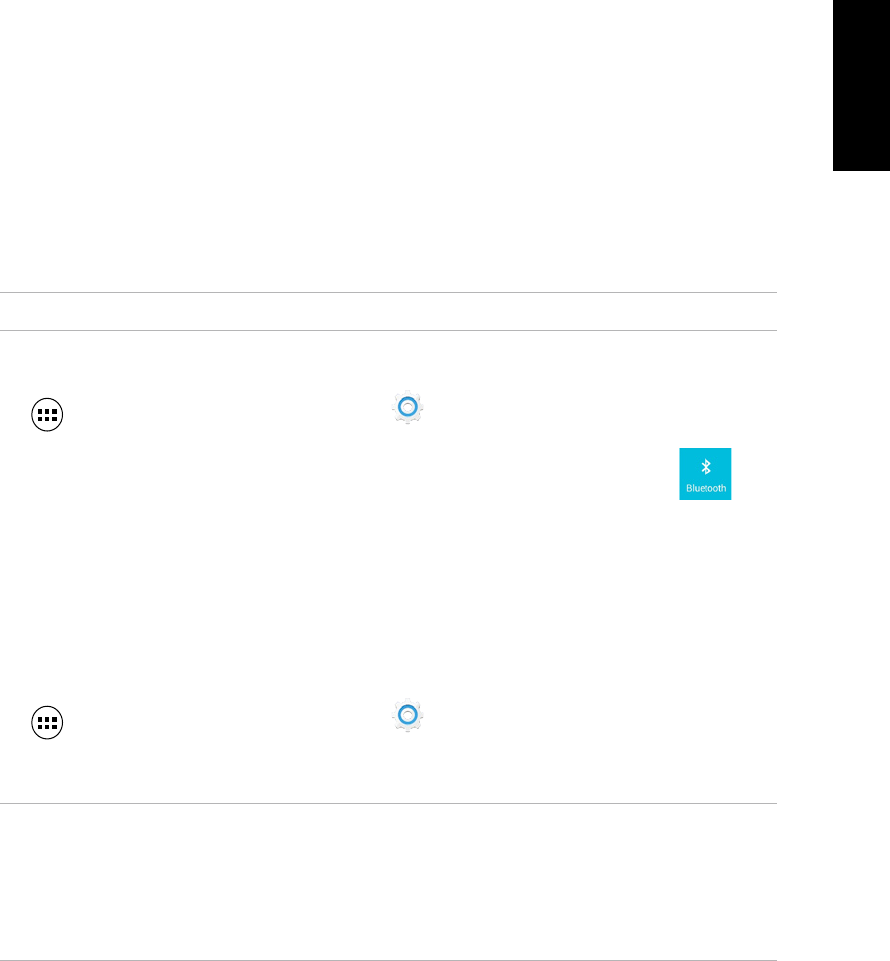
To enable or disable Bluetooth in your ASUS Portable AiO, you can do any of the following:
• Tap to go to the All Apps screen then tap
Settings
. Slide the Bluetooth switch to ON.
• Slide down the Notication area to display ASUS Quick Settings panel then tap .
Pairing your ASUS Portable AiO with a Bluetooth device
Before you can connect to a Bluetooth device, you must rst pair your ASUS Portable AiO to
that device. The devices stay paired, unless you remove the paired connection between them.
To pair your ASUS Portable AiO to a device:
1. Tap to go to the All Apps screen then tap
Settings
. Slide the Bluetooth switch to ON.
2. Tap Bluetooth to display all available Bluetooth devices within range.
NOTES:
• If the device you want to pair with is not in the list, ensure that its Bluetooth feature is turned
ON and set as Discoverable.
• See the technical documentation that came with the device to learn how to turn its Bluetooth
ON and how to set it to discoverable.

English
26
ASUS Portable AiO
3. If your ASUS Portable AiO has nished scanning before your Bluetooth device is ready, tap
SEARCH FOR DEVICES.
4. In the list of available devices, tap the Bluetooth device that you want to pair with. Follow
the succeeding screen instructions to complete the pairing. If necessary, refer to the
technical documentation that came with the device.
Connecting your ASUS Portable AiO to a Bluetooth device
After you have paired your ASUS Portable AiO to a Bluetooth device, you can easily reconnect
to it again manually, after it is back in range.
To connect:
1. Tap to go to the All Apps screen then tap
Settings
. Slide the Bluetooth switch to ON.
2. In the list of PAIRED DEVICES, tap the name of the paired device.
Unpairing and conguring a Bluetooth device
To unpair or congure a Bluetooth device:
1. Tap to go to the All Apps screen then tap
Settings
. Slide the Bluetooth switch to ON.
2. Tap Bluetooth then tap beside the connected Bluetooth device that you want to
unpair or congure.
3. From Paired Bluetooth device screen, you can do any of the following:
• Tap Unpair to unpair the device.
• Tap Rename to rename the Bluetooth device.
• Tap any of the listed proles to enable or disable a prole.
4. Tap on the system bar to go back to previous screen.

English
27
ASUS Portable AiO
Managing Apps
Creating app shortcuts
Get easy access to some of your favorite applications by creating app shortcuts on your Home
Screen.
To create app shortcuts:
1. Tap to go to the All Apps screen.
2. From the All Apps screen, tap and hold the app’s icon then drag it to the Home Screen.
Removing an app from the Home Screen
Free up space for new app shortcuts by removing existing app shortcuts on your Home Screen.
To remove app shortcuts:
1. Tap and hold an app until the X Remove appears on top of the screen.
2. Drag the app to X Remove to remove it from the Home Screen.
Viewing app info
You can view the detailed app information while creating a shortcut for the app. While holding
an app on the All Apps screen, the display switches to Home Screen and the App info appears
on the top of the Home Screen display. Drag the app to App info to display its detailed
information.
English
28
ASUS Portable AiO
Creating app folder
You can create folders to organize shortcuts on your Home Screen.
To create an app folder:
On the Home Screen, tap and drag an app or shortcut onto another app until a transparent
square appears.
NOTES:
• The created folder is shown in a transparent square.
• You can add multiple apps in your folder.
English
29
ASUS Portable AiO
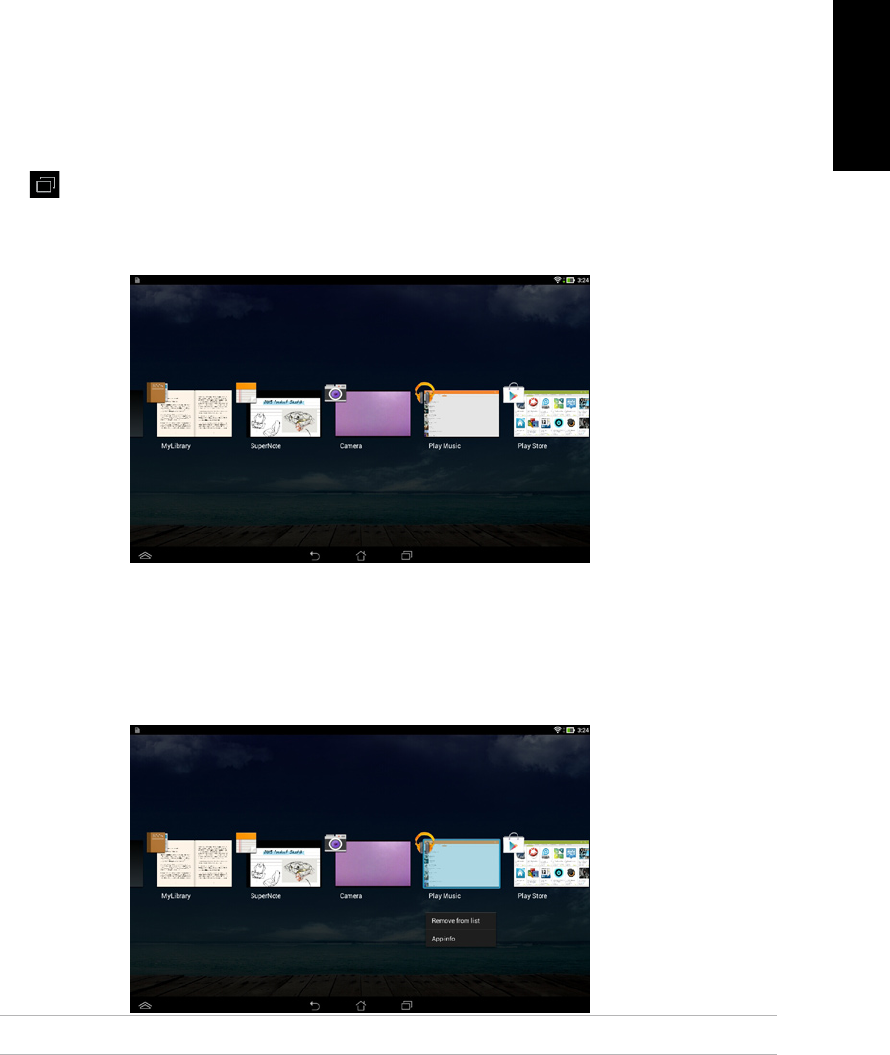
Viewing apps under the Recents screen
The Recents screen allows you to view a list of app shortcuts based from your recently
launched apps. Using the Recents screen, you can easily go back to or switch between the
apps you recently launched.
To access the Recents screen:
1. Tap on the system bar.
2. A list shows up to display all of your recently launched apps. Tap on the app you want to
launch.
NOTE: You can also remove a recent app from the list by swiping it up or down.
To view a recent app’s menu:
1. Tap and hold a recent app to display its menu.
2. To remove the app from the list, select Remove from list. To view its information, select
App info.
English
30
ASUS Portable AiO
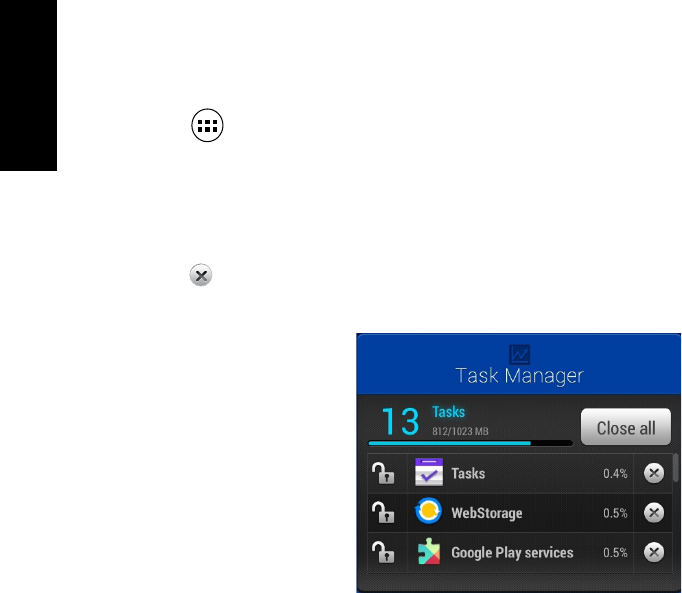
Task Manager
ASUS widget displays a list of currently running utilities and applications and their usages in
percentages on your ASUS Portable AiO.
1. TapTap to go to the All Apps screen then tap WIDGETS to display the Widgets menu.
2. Tap and hold ASUS Task Manager to display the ASUS Task Manager box on the Home
Screen.
4. Tap beside the running app to close it. Tap Close All to close all running apps at once.
3. Swipe the list up and down to view all launched apps.
English
31
ASUS Portable AiO
File Manager
File Manager allows you to easily locate and manage your data either on the internal storage or
the connected external storage devices.
Accessing the internal storage
To access the internal storage:
1. Tap to go to the All Apps screen.
2. Tap
File Manager
> Internal Storage on the left panel to view the contents of your ASUS Portable
AiO then tap an item to select. If a microSD card is inserted, tap MicroSD to view the
contents of your microSD card.
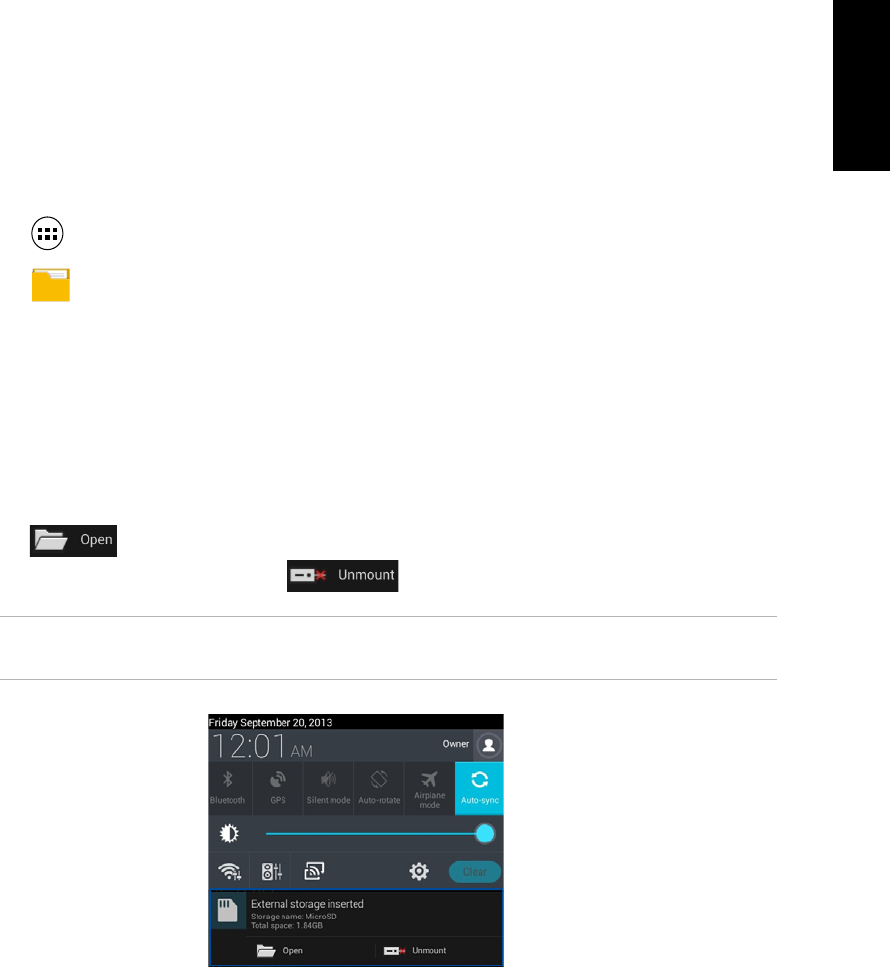
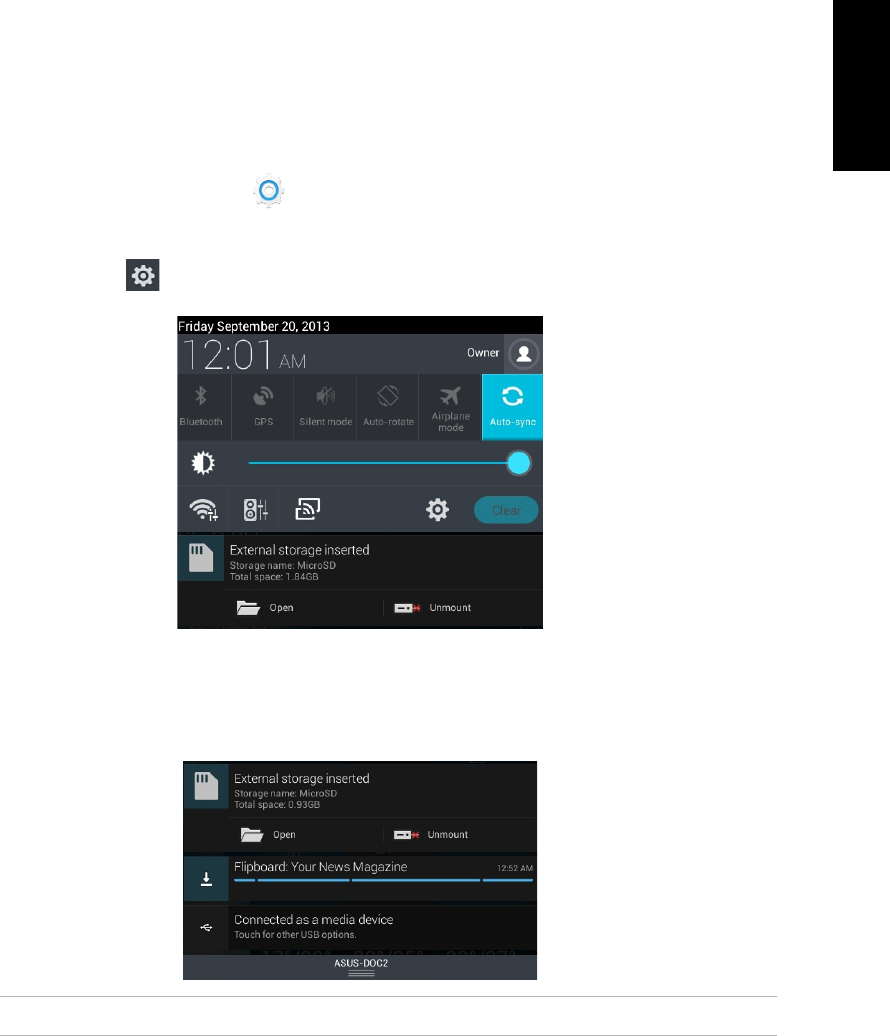
Accessing the external storage device
To access the external storage device:
1. Swipe down the notication bar on top of the screen to display the notication box.
2. Tap to display the contents of your microSD card. To unmount the microSD card
from your ASUS Portable AiO, tap .
IMPORTANT! Ensure to save your data stored in your microSD card before unmounting the
microSD card from your ASUS Portable AiO.
English
32
ASUS Portable AiO
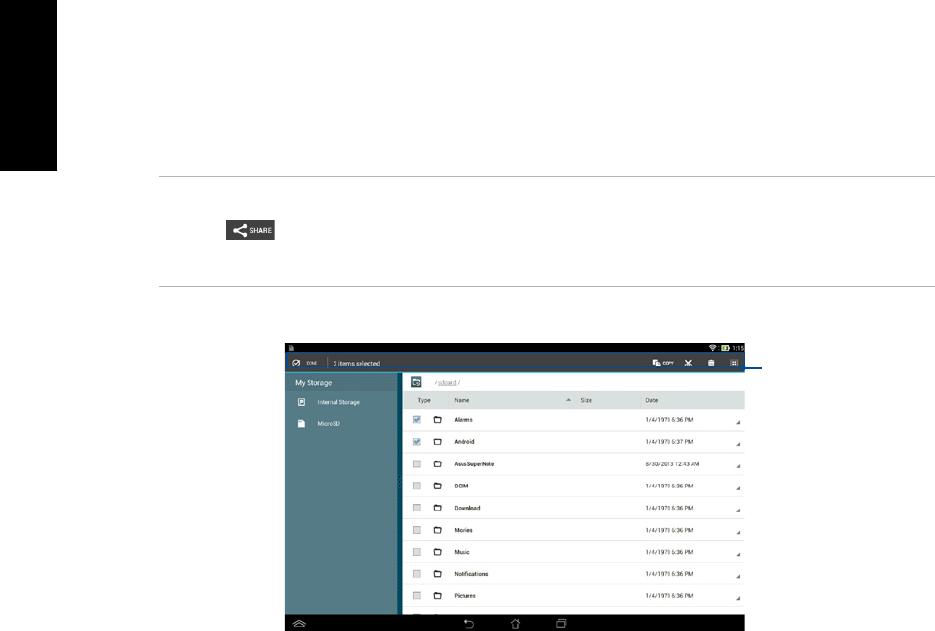
Customizing your contents
From File Manager, you can copy, cut, share and delete the contents of your device and the
installed external storage device.
When you customize a le or folder, tick the box beside the le or folder and the action bar
appears on the upper right corner of the screen.
NOTES:
• The action will only appear if you customize a le or les inside the folder.
• You can also tick the le or folder then drag and drop it to your desired destination folder.
Action bar
English
33
ASUS Portable AiO
Settings
Settings screen allows you to congure the system settings of your ASUS Portable AiO. With
this system app, you can congure your ASUS Portable AiO’s wireless connectivity, hardware,
personal, account and system settings.
There are two ways to launch the Settings screen.
1. From the All Apps screen, tap
Settings
to display the menu.
2. Swipe down the notication bar on top of the screen to display ASUS Quick Settings
panel then tap .
Notication panel
Notication panel appears under the Quick Setting panel for alerts or updates of apps,
incoming e-mails and utility status.
NOTE: Swipe the notication to the left or to the right to remove the item from the list.

English
34
ASUS Portable AiO
Gallery
View images and play videos on your ASUS Portable AiO using the Gallery app. This app also
allows you to edit, share, or delete image and video les stored in your ASUS Portable AiO.
From Gallery, you can display images in a slideshow or tap to view the selected image or video
le.
To launch Gallery, tap
Gallery
on the Home Screen.
Gallery main screen
Gallery
settings
Tap to quick-launch Camera app
English
35
ASUS Portable AiO
Tool bar
Sharing and deleting albums
To share an album, tap and hold an album until a tool bar appears on top of the screen. You
can upload or share the selected albums online or delete them from your ASUS Portable AiO.
Sharing, editing and deleting images
To share, edit or delete an image, tap to open an image then tap on the image to launch the
tool bar on top of the screen.
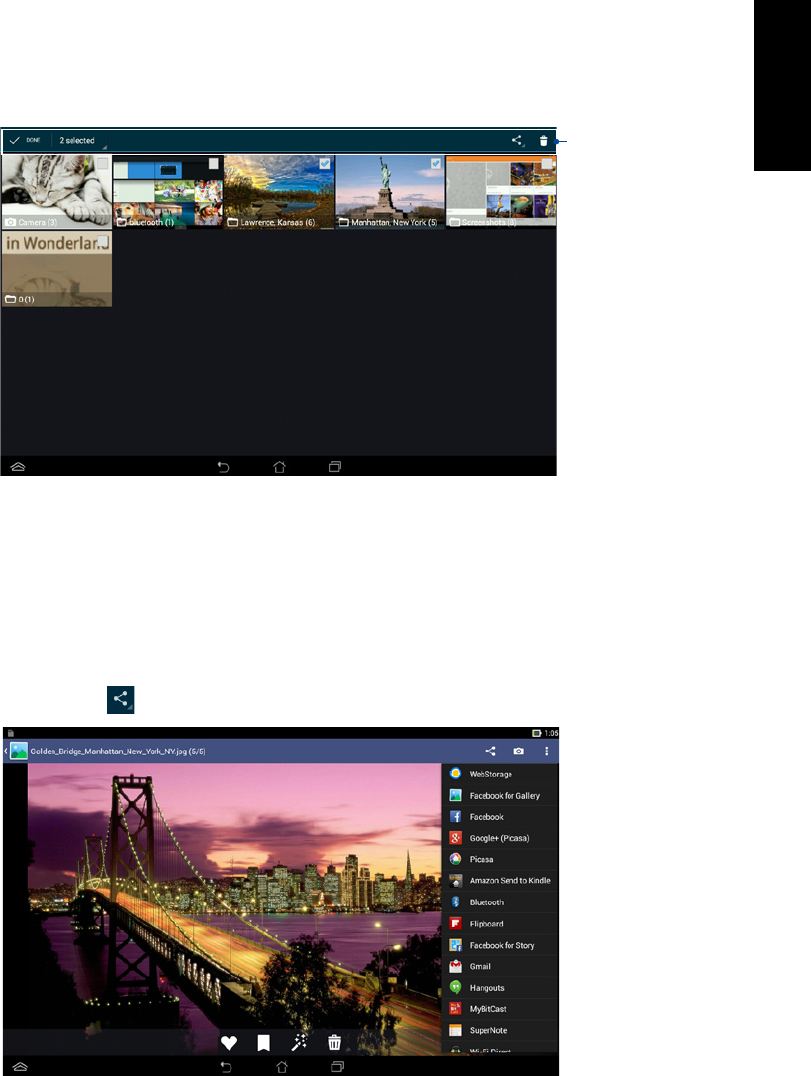
Sharing images
1. From Gallery screen, open an album containing the image that you want to share.
2. Tap to select then tap and select from the list of sharing apps.

English
36
ASUS Portable AiO
To share multiple images:
1. From Gallery screen, open an album containing the images that you want to share.
2. Tap and hold one image then tap the other images.
3. Tap then select from the list of sharing apps.
Editing an image
1. From Gallery screen, open an album containing the image that you want to edit.
2. Tap an image to open then tap .
3. Tap the editing tools to start editing.
Editing tools

English
37
ASUS Portable AiO
Deleting images
To delete an image:
1. From the Gallery screen, open an album containing the image that you want to delete.
2. Tap an image to open then tap .
3. Tap OK.
To delete multiple images:
1. From the Gallery screen, open an album containing the images that you want to delete.
2. Tap and hold one image then tap the other images.
3. Tap then tap OK.
English
38
ASUS Portable AiO
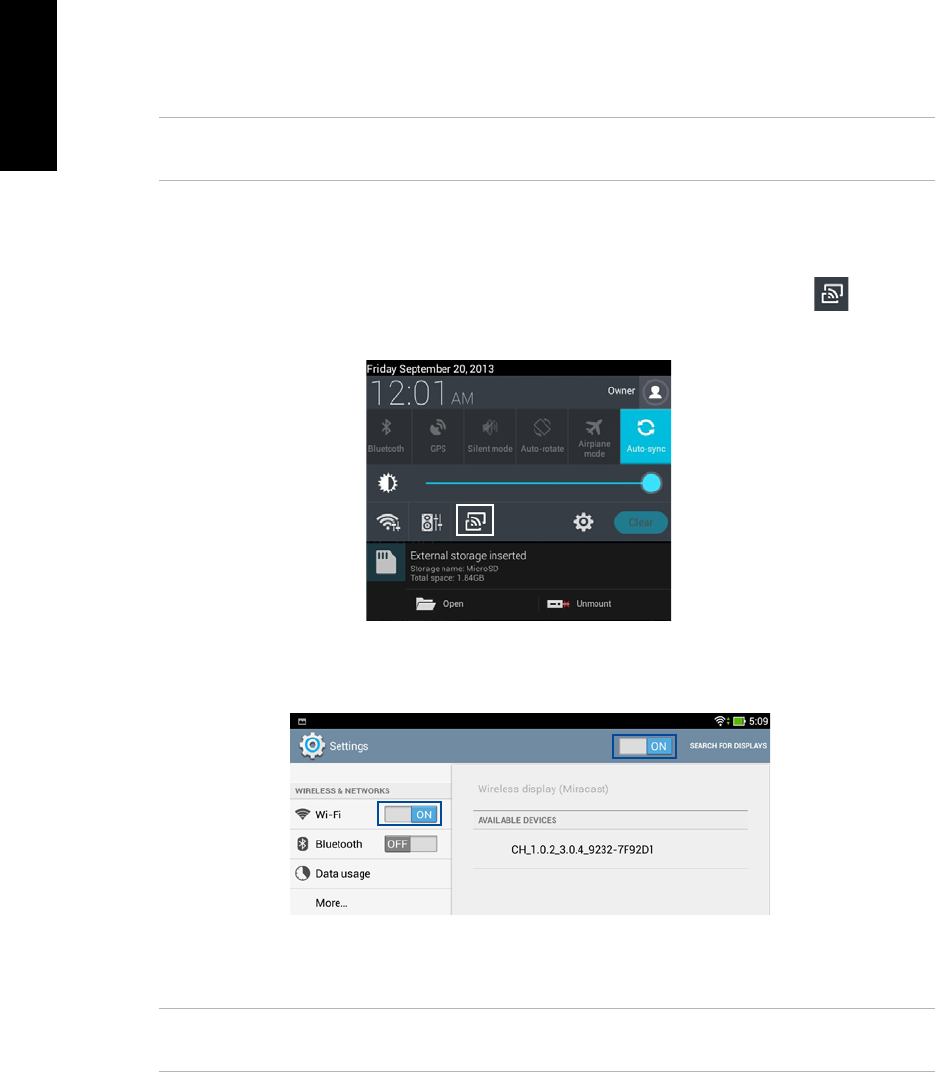
Using the wireless display feature
Your ASUS Portable AiO is equipped with a wireless display feature that allows you to project
your display to compatible external displays.
IMPORTANT! You need to connect to a Wi-Fi network to use this feature. For more details, refer to
the Connecting to Wi-Fi networks section in this manual.
Refer to the following steps when using this feature:
1. Connect your ASUS Portable AiO to a Wi-Fi network.
2. Swipe down on your home screen to launch the notication box then select to launch
Settings.
3. Set Search for display to ON to start connecting to available display devices. Select your
preferred external display under the AVAILABLE DEVICES option.
4. Once the connection is set, you can start projecting your ASUS Portable AiO’s screen on
your chosen external display.
NOTE: Refer to your external display’s user guide for additional steps on how to connect to
devices.with wireless display features.
English
39
ASUS Portable AiO
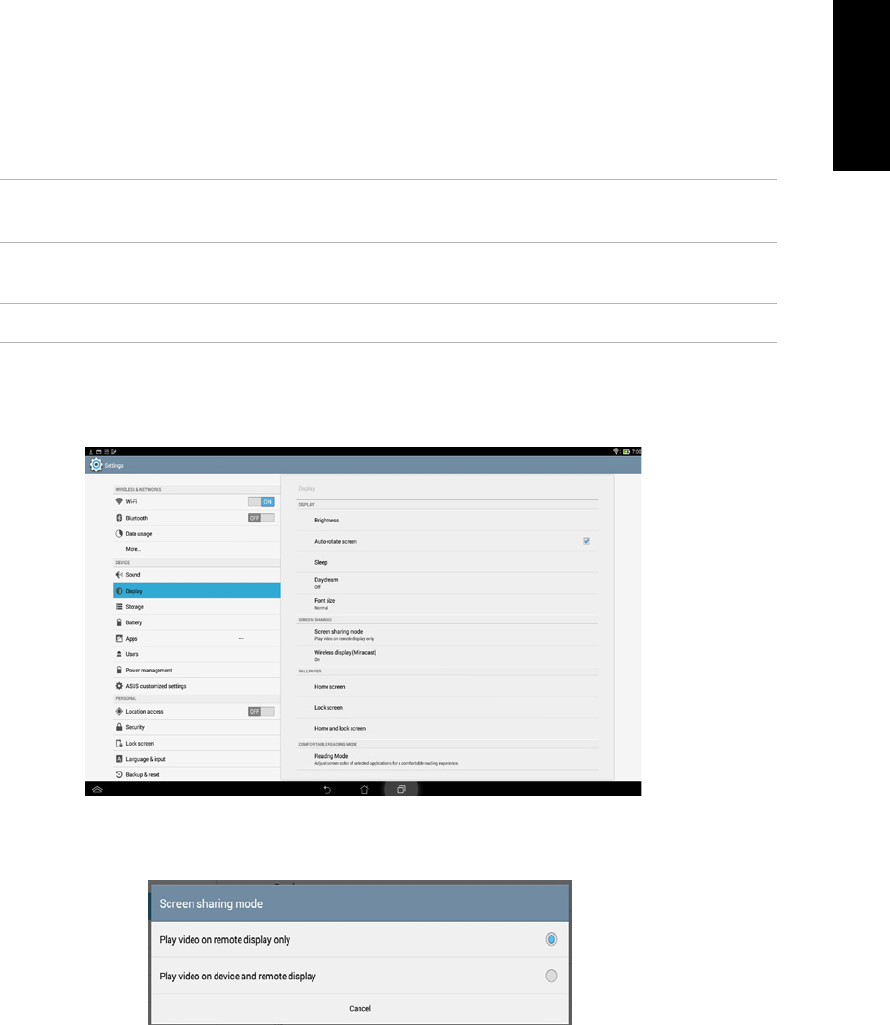
Using screen sharing mode
Your ASUS Portable AiO’s wireless display feature comes with a screen sharing mode. This
mode allows you to multiask by playing videos from your ASUS Portable AiO to an external
display while simultaneously using your ASUS Portable AiO for other activities.
Refer to the following steps on how to enable this mode:
IMPORTANT! The screen sharing mode only works for videos played using your ASUS Portable
AiO’s Gallery app.
4. Tap Screensharing mode under the SCREEN SHARING option then select which mode
you would like to use for playing videos.
1. Connect your ASUS Portable AiO to a Wi-Fi network.
NOTE: For more details, refer to the Connecting to Wi-Fi networks section in this manual.
2. Launch Settings.
3. Under the Device option, select Display.

English
40
ASUS Portable AiO
Turning your ASUS Portable AiO off
You can shut down your ASUS Portable AiO by doing any of the following:
Press the power button for about two (2) seconds and when prompted, tap Power O
then tap OK.
If your ASUS Portable AiO is unresponsive, press and hold the power button for about eight
(8) seconds until your ASUS Portable AiO turns o.
IMPORTANT! Forcing the system to shut down may result to data loss. Ensure that you back up
your data regularly.
•
•
Putting your ASUS Portable AiO to sleep
To put your ASUS Portable AiO on Sleep mode, press the power button once.

English
41
ASUS Portable AiO
Appendices
Notices
REACH
Complying with the REACH (Registration, Evaluation, Authorization, and Restriction of
Chemicals) regulatory framework, we publish the chemical substances in our products at ASUS
REACH website at http://csr.asus.com/english/REACH.htm
ASUS Recycling/Takeback Services
ASUS recycling and takeback programs come from our commitment to the highest standards
for protecting our environment. We believe in providing solutions for you to be able to
responsibly recycle our products, batteries, other components, as well as the packaging
materials. Please go to http://csr.asus.com/english/Takeback.htm for the detailed recycling
information in dierent regions.
COATING NOTICE
IMPORTANT! To provide electrical insulation and maintain electrical safety, a coating is
applied to insulate the device except on the areas where the I/O ports are located.
Beschichtungshinweis
WICHTIG!Um die elektrische Isolation und die elektrische Sicherheit zu gewährleisten, ist das
Gehäuse mit einer Beschichtung zur Isolation versehen. Diese Beschichtung ist an den E/A-
Anschlüssen des Gerätes nicht vorhanden.
Federal Communications Commission Statement
This device complies with Part 15 of the FCC Rules. Operation is subject to the following two
conditions:
This device may not cause harmful interference, and
This device must accept any interference received including interference that may cause
undesired operation.
This equipment has been tested and found to comply with the limits for a Class B digital
device, pursuant to Part 15 of the FCC Rules. These limits are designed to provide reasonable
protection against harmful interference in a residential installation. This equipment generates,
uses and can radiate radio frequency energy and, if not installed and used in accordance with
manufacturer’s instructions, may cause harmful interference to radio communications.
•
•

English
42
ASUS Portable AiO
However, there is no guarantee that interference will not occur in a particular installation. If
this equipment does cause harmful interference to radio or television reception, which can be
determined by turning the equipment o and on, the user is encouraged to try to correct the
interference by one or more of the following measures:
Reorient or relocate the receiving antenna.
Increase the separation between the equipment and receiver.
Connect the equipment to an outlet on a circuit dierent from that to which the receiver is
connected.
Consult the dealer or an experienced radio/TV technician for help.
IMPORTANT! Outdoor operations in the 5.15~5.25 GHz band is prohibited.
The equipment must not be co-located or operating in conjunction with any antenna or
transmitter.
CAUTION: Any changes or modications not expressly approved by the guarantee of this
device could void the user’s authority to operate the equipment.
RF exposure warning
This product complies with the FCC portable RF exposure limit set forth for an uncontrolled
environment and is safe for intended operation as described in this manual. Further RF
exposure reduction can be achieved if the product can be kept as far as possible from the
user’s body or if the device is set to a lower output power, if available.
The highest SAR value for this device is 0.42 W/kg.
Canadian Department of Communications Statement
This digital apparatus does not exceed the Class B limits for radio noise emissions from digital
apparatus set out in the Radio Interference Regulations of the Canadian Department of
Communications.
This class B digital apparatus complies with Canadian ICES-003.
Canada, Industry Canada (IC) Notices
This device complies with RSS-210 of the Industry Canada Rules. Operation is subject to the
following two conditions: (1) This device may not cause harmful interference, and (2) this
device must accept any interference received, including interference that may cause undesired
operation.
Ce dispositif est conforme à la norme CNR-210 d’Industrie Canada applicable aux appareils
radio exempts de licence. Son fonctionnement est sujet aux deux conditions suivantes: (1)
le dispositif ne doit pas produire de brouillage préjudiciable, et (2) ce dispositif doit accepter
tout brouillage reçu, y compris un brouillage susceptible de provoquer un fonctionnement
indésirable.
•
•
•
•

English
43
ASUS Portable AiO
Caution :
(i) the device for operation in the band 5150-5250 MHz is only for indoor use to reduce the
potential for harmful interference to co-channel mobile satellite systems;
(ii) high-power radars are allocated as primary users (i.e. priority users) of the bands 5250-5350
MHz and 5650-5850 MHz and that these radars could cause interference and/or damage to
LE-LAN devices.
Avertissement:
(i) les dispositifs fonctionnant dans la bande 5 150-5 250 MHz sont réservés uniquement pour
une utilisation à l’intérieur an de réduire les risques de brouillage préjudiciable aux systèmes
de satellites mobiles utilisant les mêmes canaux;
(ii) De plus, les utilisateurs devraient aussi être avisés que les utilisateurs de radars de haute
puissance sont désignés utilisateurs principaux (c.-à-d., qu’ils ont la priorité) pour les bandes 5
250-5 350 MHz et 5 650-5 850 MHz et que ces radars pourraient causer du brouillage et/ou des
dommages aux dispositifs LAN-EL.
Radiation Exposure Statement:
The product comply with the Canada RSS-102 portable RF exposure limit set forth for an
uncontrolled environment and are safe for intended operation as described in this manual.
The further RF exposure reduction can be achieved if the product can be kept as far as possible
from the user body or set the device to lower output power if such function is available.
The highest SAR value for this device is 0.42 W/kg.
Déclaration d’exposition aux radiations:
Le produit est conforme aux limites d’exposition pour les appareils portables RF pour les Etats-
Unis et le Canada CNR-102 établies pour un environnement non contrôlé.
Le produit est sûr pour un fonctionnement tel que décrit dans ce manuel. La réduction aux
expositions RF peut être augmentée si l’appareil peut être conservé aussi loin que possible du
corps de l’utilisateur ou que le dispositif est réglé sur la puissance de sortie la plus faible si une
telle fonction est disponible.

English
44
ASUS Portable AiO
Declaration of Conformity (R&TTE directive 1999/5/EC)
The following items were completed and are considered relevant and sucient:
Essential requirements as in [Article 3]
Protection requirements for health and safety as in [Article 3.1a]
Testing for electric safety according to [EN 60950]
Protection requirements for electromagnetic compatibility in [Article 3.1b]
Testing for electromagnetic compatibility in [EN 301 489-1] & [EN 301 489-17]
Eective use of the radio spectrum as in [Article 3.2]
Radio test suites according to [EN 300 328-2]
CE Mark Warning
This is a Class B product, in a domestic environment, this product may cause radio interference,
in which case the user may be required to take adequate measures.
CE marking for devices without wireless LAN/Bluetooth
The shipped version of this device complies with the requirements of the EEC directives
2004/108/EC “Electromagnetic compatibility” and 2006/95/EC “Low voltage directive”.
Maximum authorized power indoors is 100mW
Maximum authorized power outdoors is 10mW
Departments in which the use of the 2400–2483.5 MHz band is permitted with an EIRP of less
than 100mW indoors and less than 10mW outdoors:
01 Ain 02 Aisne 03 Allier
05 Hautes Alpes 08 Ardennes 09 Ariège
11 Aude 12 Aveyron 16 Charente
24 Dordogne 25 Doubs 26 Drôme
32 Gers 36 Indre 37 Indre et Loire
41 Loir et Cher 45 Loiret 50 Manche
55 Meuse 58 Nièvre 59 Nord
•
•
•
•
•
•
•
•
•
English
45
ASUS Portable AiO
/
CE marking for devices with wireless LAN/ Bluetooth
This equipment complies with the requirements of Directive 1999/5/EC of the European
Parliament and Commission from 9 March, 1999 governing Radio and Telecommunications
Equipment and mutual recognition of conformity.
is for class II device.
The highest SAR value for this device is 0.112 W/kg.
Wireless Operation Channel for Dierent Domains
N. America 2.412-2.462 GHz Ch01 through CH11
Japan 2.412-2.472 GHz Ch01 through Ch13
Europe ETSI 2.412-2.472 GHz Ch01 through Ch13
VCCI: Japan Compliance Statement

English
46
ASUS Portable AiO
France Restricted Wireless Frequency Bands
Some areas of France have a restricted frequency band. The worst case maximum authorized
power indoors are:
• 10mW for the entire 2.4 GHz band (2400 MHz–2483.5 MHz)
• 100mW for frequencies between 2446.5 MHz and 2483.5 MHz
NOTE: Channels 10 through 13 inclusive operate in the band 2446.6 MHz to 2483.5 MHz.
There are few possibilities for outdoor use: on private property or on the private property
of public persons, use is subject to a preliminary authorization procedure by the Ministry of
Defense, with maximum authorized power of 100mW in the 2446.5–2483.5 MHz band. Use
outdoors on public property is not permitted.
In the departments listed below, for the entire 2.4 GHz band:
60 Oise 61 Orne 63 Puy du Dôme
64 Pyrénées Atlantique 66 Pyrénées Orientales 67 Bas Rhin
68 Haut Rhin 70 Haute Saône 71 Saône et Loire
75 Paris 82 Tarn et Garonne 84 Vaucluse
88 Vosges 89 Yonne 90 Territoire de Belfort
94 Val de Marne
This requirement is likely to change over time, allowing you to use your wireless LAN card in
more areas within France. Please check with ART for the latest information (www.arcep.fr)
NOTE: Your WLAN Card transmits less than 100mW, but more than 10mW.
Band 5G restriction
In the frequency band 5 150-5 350 MHz, WAS/RLANs shall be restricted to indoor use.
To prevent radio interference to the licensed service (i.e. co-channel Mobile Satellite systems)
this device is intended to be operated indoors and away from windows to provide maximum
shielding. Equipment (or its transmit antenna) that is installed outdoors is subject to licensing.
Because high power radars are allocated as primary users (meaning they have priority) in
5250-5350 MHz, these radars could cause interference and/or damage to license exempt LAN
devices.
English
47
ASUS Portable AiO
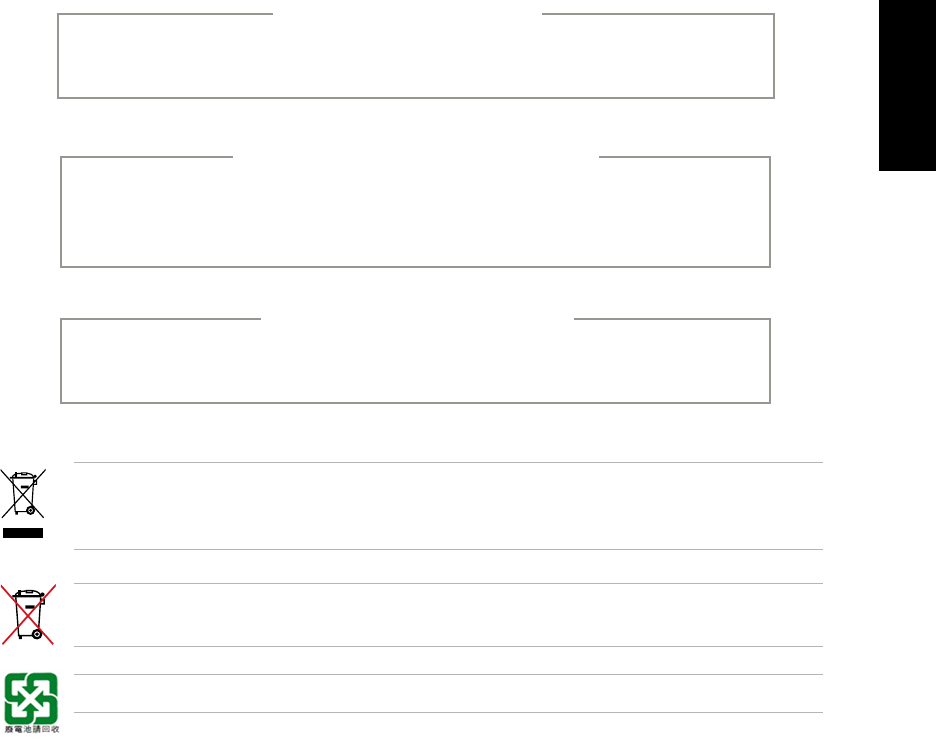
This symbol of the crossed out wheeled bin indicates that the product (electrical, electronic
equipment, and mercury-containing button cell battery) should not be placed in municipal
waste. Check local regulations for disposal of electronic products.
DO NOT throw the battery in municipal waste. The symbol of the crossed out wheeled bin
indicates that the battery should not be placed in municipal waste.
請勿將電池當作一般垃圾丟棄。這個標誌表示電池不應視為一般垃圾丟棄。
NO DISASSEMBLY
The warranty does not apply to the products that
have been disassembled by users
Lithium-Ion Battery Warning
CAUTION: Danger of explosion if battery is incorrectly replaced. Replace
only with the same or equivalent type recommended by the manufacturer.
Dispose of used batteries according to the manufacturer’s instructions.
No Exposure to Liquids
DO NOT expose to or use near liquids, rain, or moisture. This product is not
waterproof or oil-proof.
English
48
ASUS Portable AiO
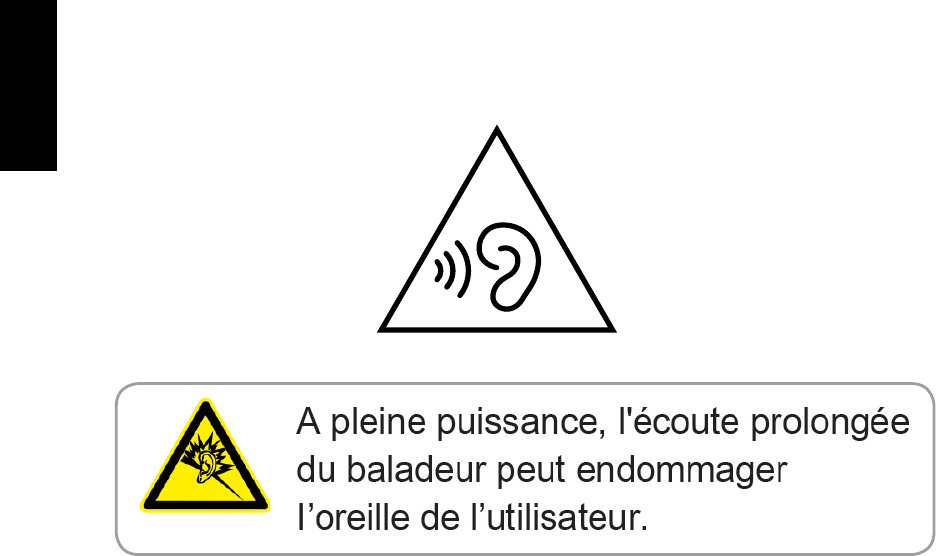
Prevention of Hearing Loss
To prevent possible hearing damage, do not listen at high volume levels for long periods.

English
49
ASUS Portable AiO
Global Environmental Regulation Compliance and Declaration
ASUS follows the green design concept to design and manufacture our products, and
makes sure that each stage of the product life cycle of ASUS product is in line with global
environmental regulations. In addition, ASUS disclose the relevant information PC Stationd on
regulation requirements.
Please refer to http://csr.asus.com/english/Compliance.htm for information disclosure based
on regulation requirements ASUS is complied with:
Japan JIS-C-0950 Material Declarations
EU REACH SVHC
Korea RoHS
Swiss Energy Laws

English
50
ASUS Portable AiO
Manufacturer ASUSTeK Computer Inc.
Tel: +886-2-2894-3447
Address: 4F, No. 150, LI-TE RD., PEITOU, TAIPEI 112, TAIWAN
Authorised
representative in
Europe
ASUSTeK Computer GmbH
Address: HARKORT STR. 21-23, 40880 RATINGEN, GERMANY