ASUSTeK Computer P320 PDA PHONE User Manual USERS MANUAL 2
ASUSTeK Computer Inc PDA PHONE USERS MANUAL 2
Contents
- 1. USERS MANUAL 1
- 2. USERS MANUAL 2
- 3. USERS MANUAL 3
USERS MANUAL 2

56
6. After you nish the wizard, ActiveSync automatically synchronizes your device. You can disconnect
the device after the synchronization is complete.
NOTES:
• When connected, your device is automatically synchronized with your computer. ActiveSync synchronizes
everytime you make a change on either the device or computer.
• You cannot use WLAN to synchronize database.
• Refer to your Windows® Mobile Help, for more information about ActiveSync synchronization.
• Wireless connection may require separately purchased equipment (eg. Wireless router or Access Point).
Synchronizing via mini-USB
You can connect to your device using the bundled mini-USB cable to synchronize to your computer.
To synchronize your device via mini-USB:
1. After installing ActiveSync to your computer, connect the mini-USB plug to the mini-USB connector
at the bottom of the device.
2. Connect the other end of the USB cable to your computer. Upon connection, ActiveSync
automatically synchronizes your device.
57
Synchronizing via Bluetooth®
NOTE: Ensure that Bluetooth is turned on both on your device and your computer.
To synchronize your device via Bluetooth:
1. Congure the settings of ActiveSync and Bluetooth on your computer.
NOTE: Refer to the Microsoft® ActiveSync Help on your computer for details.
2. Connect your device with your computer using Bluetooth.
NOTE: Refer to the section Using Bluetooth® in this user guide for more details.
3. From the list of connected devices, tap the name of the computer you want to synchronize with.
4. Select ActiveSync, then tap Save.
5. Tap to exit the Bluetooth settings.
6. From your device, tap > Programs > ActiveSync > Menu > Connect via Bluetooth. The
devices starts to connect to your computer.
7. When connected, tap Sync to synchronize data.
NOTE: Media les, such as music and video les, can be synchronized only via a USB cable.

58
Volume Recommended setup
High Select a shorter interval in the
Peak times list.
Low Select As items arrive option
or a longer interval in the
Offpeak times list.
While roaming Check Use above settings
while roaming.
Sending messages Check Send/Receive when I
click Send.
Synchronizing with an Exchange Server
To synchronize your device with Exchange Server:
1. From the ActiveSync menu, tap Menu > Add Server Source.
2. Enter your email address, then tap Next. If you prefer the device to detect the Exchange Server
Settings automatically, tap the check box Attempt to detect Exchange Server Settings
automatically.
3. In the Server Address eld, enter the name of the server running Exchange Server then tap Next. If
necessary, tap the check box This server requires an encrypted (SSL) connection.
4. Enter your name, password, and domain then tap Next.
5. Tap the check boxes to select the data items that you want to synchronize with Exchange Server. To
change the available synchronization settings, select a data item then tap Settings. Tap Finish when
done.
6. Start the sync process.
Setting the synchronization schedule
To set the synchronization with Exchange
Server:
1. From the ActiveSync screen, tap Menu
> Schedule.
2. Refer to the table for input details.

59
Phone features
Chapter 4
• Using the phone
• Making a call
• Receiving a call
• Options during a call
• ASUS Call Filter
60
Using the phone
Like a standard mobile phone, you can use your device to make and receive calls. You can also keep
a history of calls made and received, send SMS or MMS messages, take notes while talking, call from
Contacts, and copy data from an installed SIM card to your device.
Phone pad
The phone pad allows you to easily dial and access the Contacts, Call History, Speed Dial, and Phone
settings.
To launch the phone pad, do any of the following:
• Tap > Phone.
• Press the Call key .
Smart dialer
The Smart dialer feature in your device enables you to nd a contact more quickly. Just key in the rst
letters of the contact you want to call. Your device smartly matches it with your Contacts list and displays
the possible matches.
To use Smart dialer:
1. On the phone pad, key in the rst letters of the contact name.
2. From the list displayed, tap the contact you want to call.
3. Tap Call or press .
4. To end the call, tap or press the End key .
61
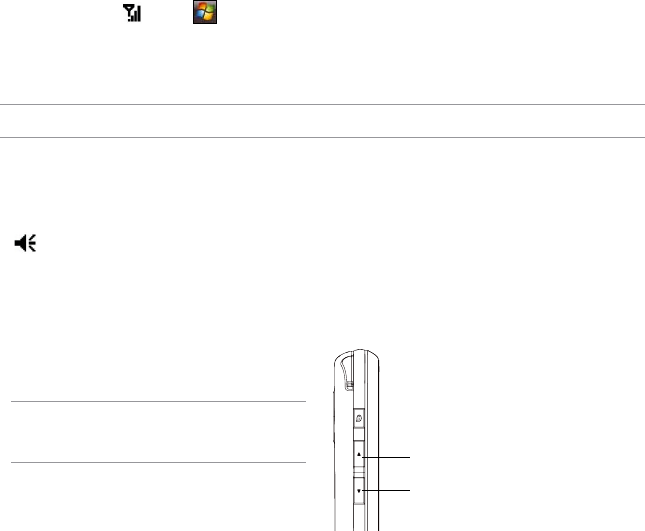
Press to increase volume
Press to decrease volume or
turn volume off.
Turning off phone function
To turn off phone function:
1. Tap the signal icon , or tap > Settings > Connections.
2. Tap Wireless Manager.
3. Tap Phone to turn on/off the phone connection.
NOTE: You may still use other functions even when your device’s phone function is turned off.
Adjusting the volume
To adjust the phone or device volume:
1. Tap from the status bar.
2. From the volume menu, you can:
• Move the slider to adjust device or phone volume.
• Tap On, Vibrate, or Off to change the system and ringer volume settings.
NOTE: You can also press the volume controller
keys at the left side of the device to adjust the
volume.
62
Making a call
You can make a phone call using the phone pad. You can also make calls directly from the Contacts,
Call History, Speed Dial, or Voice Commander.
Using the phone pad
To make a call using the phone pad:
1. To launch the phone pad, do either of the following:
• Tap > Phone.
• Press .
2. From the phone screen, tap the number or choose a contact or a recently dialed number from the
list above the phone pad.
If you tapped the wrong number, tap the back arrow to erase number to the left.
3. Tap or press to make the call.
4. When nished, tap or press to end the call.
63
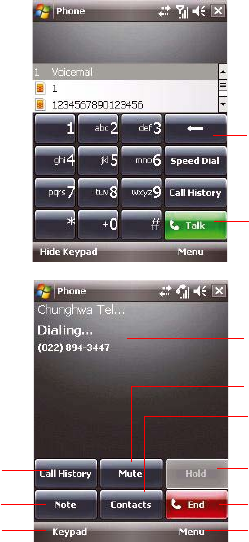
During an active call, tap to put call on hold
Tap to end call
Tap to launch Menu
Displays the current call status
Tap to put an active call on mute mode
Tap to launch Contacts list
Tap to launch keypad
Tap to turn speaker ON/OFF
Tap to take notes
Back arrow
Talk button
Phone pad features

64
Making calls from Contacts
To make a call directly from Contacts:
1. Press the Right Soft key or from the Today screen, tap Contacts.
2. You can do any of the following to make a call:
• Tap name of contact, then from the Contacts screen, tap Call.
• Tap name of contact, then press .
• You can also tap and hold the contact, and from the shortcut menu tap Call Work,
Call Home, or Call Mobile.
• Tap Enter a name... then enter the name or number you want to call from
Contacts. Press to dial the highlighted item.
3. Tap or press to end the call.
Making calls from Call History
Your device saves your call logs such as your missed, incoming, or outgoing calls.
To make a call from call history:
1. To launch Call History, you may either:
• Tap > Phone, then tap from the phone pad.
• Tap Asus Launcher, then tap the Call History icon .
The Call History screen displays the following tabs:
• All: This is the default tab. It displays all calls made, received, or missed.
• Missed: Displays all missed calls.
• Outgoing: Displays all the calls you made.
• Incoming: Displays all the calls you received.
65
2. Scroll to the desired contact or phone number, then tap Call or press .
Tap Menu to do other tasks such as saving a caller’s phone information to your Contacts list, send a
text message to a caller, delete a call log, or lter call logs.
3. Tap or press to end the call.
Calling using the Speed Dial
The Speed Dial function enables you to quickly and conveniently call frequently-called numbers. You may
assign speed dial entries from 2 to 99.
To create a Speed Dial entry:
1. Ensure that the entry you want to create is already in the Contacts list.
2. Tap > Phone.
3. Tap on the phone pad.
4. Tap Menu > New.
5. Tap to select a contact from the list.
6. In the Location box, select an available key then tap .
To delete a Speed Dial entry:
• In the Speed Dial list, tap and hold an entry then tap Delete.
To call a Speed Dial entry:
1. Tap > Phone, then key in the assigned speed dial for the contact you want to call.
2. Tap or press to end the call.

66
Calling using the Voice Commander
To make a phone call using the Voice Commander:
1. Tap > Programs > Voice Commander.
2. From the prompt screen, your device asks you to “Say command.”
3. Audibly say “Call” then the name to call from your Contact list.
4. Say “Yes” or “No” after the conrmation question.
If you said “Yes”, the application proceeds and dials the number. Otherwise, it returns to the Voice
Commander menu.
5. Say “Goodbye” or tap to exit the Voice Commander.
To assign a shortcut button for the Voice Commander:
1. Tap > Settings > Personal tab > Buttons.
2. On Select a button eld, select the button that you want to assign to the Voice Commander.
3. On Assign program eld, select Voice Commander from the list.
4. Tap when done.
NOTE: Depending on the button that you have selected, you may short-press or long-press the Record button at
the left side of the device to launch the Voice Commander.

67
Making emergency calls
Calls to emergency service numbers can be made under any circumstances, even if you have locked the
SIM card or your phone.
To place an emergency call:
Enter the emergency number appropriate for your location, and press .
Making international calls
To place an international call:
1. Press and hold + on the keypad to enter a (+) plus sign.
2. Enter the full phone number with the country code, area code, and phone number, and then press .
Receiving a call
When you receive a call, a message prompts and allows you to answer or reject the incoming call.
To answer or reject an incoming call:
• To answer a call tap Answer, or press .
• To reject an incoming call, tap Ignore, or press .
NOTE: Press and hold the Call key to switch receiver to speakerphone mode.
To terminate a call:
• Tap or press to terminate an incoming or outgoing call.

68
Options during a call
Listed in the table below are the possible menu options when a call is in progress. Some of these options
are available only when multiple calls are in progress.
IN-CALL MENU OPTION DESCRIPTION
Hold Places the active call on hold.
Unhold Activates the call that is on hold. You can also press to
activate the call that is on hold.
Mute Switches off the microphone for the active call (you can hear the
caller but the caller cannot hear you).
Unmute Turns the microphone for the active call back on.
Speakerphone On/Off Activates/deactivates the speakerphone.
View Contact Opens the Contacts list.
Save to Contacts Save the caller to the Contacts list.
Create Note Allows you to create a note during an active call.
Call History Opens the Call History list.
Speed Dial Opens the Speed Dial list.
Options Opens the phone settings.

69
Managing multiple calls
To answer another call:
1. Tap Hold to place the rst call on hold and answer the second call.
2. To end the second call and return to the rst call, press .
To hold a call to make a second call:
• Tap Menu > Hold to place the rst call on hold and call a second number. When you have nished
the second call, press to take you back to the rst call.
To switch between calls:
• To switch between two calls, press Swap.

70
ASUS Call Filter
The ASUS Call Filter is a utility that allows you to control all your incoming calls. Using this utility, you can
manage a list of telephone numbers from your Contacts list, call log, message log, or any unlisted telephone
number that you want to accept or reject.
Launching the shortcut menu
The shortcut menu allows you to conveniently activate either the Accept or Reject list.
To launch the shortcut menu:
• Tap from the ASUS Today screen.
From the shortcut menu, do any of the following:
• Tap Accept List to receive only incoming calls whose numbers are in the Accept list.
• Tap Reject List to reject all incoming calls whose numbers are in the Reject list.
• Tap Edit to open the Call Filter utility screen.
• Tap Close to deactivate Call Filter.
71
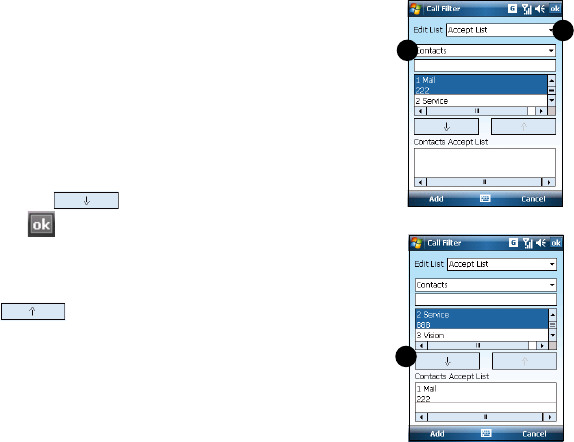
Managing the Accept list
The Accept list allows you to select telephone numbers you only want to accept. Incoming calls that are
not included in the Accept list will automatically be rejected.
To add items in the Accept list:
1. From the ASUS Call Filter shortcut menu, select
Edit.
2. Select Accept List from the Edit List box.
3. Select your source of data. You can get data from
your Contacts, Call log, Message sender number,
or you can add an unlisted number and key in new
numbers.
4. From your data source, select an item then tap
Add or to add a new Accept list item.
5. Tap to exit.
To remove items from the Accept list, select a
contact from the Accept list then tap Remove or
.
2
3
4
72
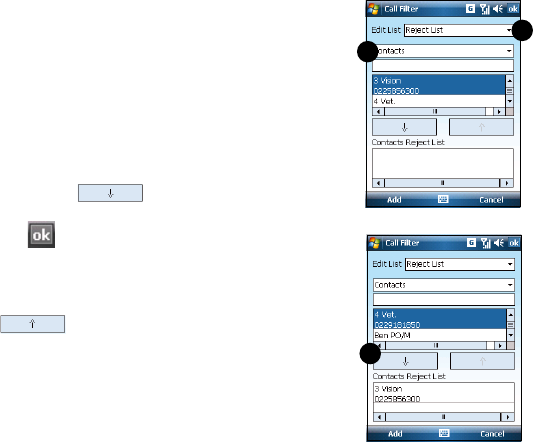
Managing the Reject list
The Reject list allows you to select telephone numbers you want to reject. Incoming calls that are in the
Reject list will be rejected.
To add items in the Reject list:
1. From the ASUS Call Filter shortcut menu, select
Edit.
2. Select Reject List from the Edit List box.
3. Select source of data. You can get data from
your Contacts, Call log, Message sender
number, or you can add an unlisted number and
key in new numbers.
4. From the list (e.g. Contacts), select an item then
tap Add or to add a new Reject list
item.
5. Tap to exit.
To remove items from the Reject list, select a
contact from the Reject list then tap Remove or
.
3
2
4

73
Messaging
Chapter 5
• E-mail messaging
• Threaded SMS
• MMS messaging
• Windows® Live
74
E-mail messaging
Setting up an e-mail account
Before you can send and receive e-mail messages, you need to set up an e-mail account that you have
with an Internet Service Provider (ISP) or an account that you access using a VPN server connection
(typically a work account). You can send e-mail messages by synchronizing or by connecting directly to
an e-mail server through your Internet service provider or a corporate network.
NOTE: Before you set up an e-mail address on your device, you must have an Internet or an e-mail account.
To set up an e-mail account:
1. Tap > Messaging > Setup E-mail.
2. Key in your E-mail address and Password, then tap Next.
NOTE: By default, your device automatically attempts to obtain your e-mail settings from the Internet, particularly
for Internet e-mail accounts such as Yahoo or Hotmail accounts.
3. If you want to manually enter your e-mail settings, clear the Try to get e-mail settings automatically
from the Internet checkbox. Otherwise, tap Next.
NOTE: Obtain the e-mail server information from your mobile service provider.
4. Key in Your name and Account display name, then tap Next.
75
Managing e-mail accounts
TO DO THIS
View a list of accounts Tap > Messaging. A list of accounts is displayed with the
number of unread messages in the Inbox of each account shown
in parenthesis.
Send/receive Internet e-mail
messages Tap > Messaging. Select the Internet e-mail account for which
you want to send and receive messages and tap Menu > Send/
Receive. To stop this process, tap Menu > Stop Send/Receive.
Delete an account Tap > Messaging. Select an account and tap Menu > Delete.
Switch between accounts With an account open, tap Menu > Go To, then tap the account
you want to switch to.
Changing account options Tap > Messaging. Select an e-mail account and tap Select.
Tap Menu > Tools > Options and then select the type of option
you want to change. Select Done to conrm.
5. From the dropdown list, select the time interval that you want to automatically send/receive e-mail
messages. If you want to view more download settings, tap Review all download settings, and
select your preferred download settings.
6. When done, tap Finish.
76
Sending an e-mail message
To send an e-mail message:
1. Tap > Messaging.
2. Tap an e-mail account.
3. Tap Menu > New .
4. In To: eld, enter the mobile phone number or e-mail address of the person to which you want to send
the message or tap Menu > Add Recipient to select from your Contacts list.
NOTE: If you are sending a message to more than one recipient, separate them with a semicolon (;). You can
only send text messages to contacts with a mobile phone number.
5. Key in your message in the message text eld.
6. When nished, tap Send .
NOTE: If you are working ofine, e-mail messages are saved to the Outbox folder and sent the next time you
connect.

77
TO DO THIS
Insert a picture into an e-mail
message While composing your message, tap Menu > Insert > Picture.
Insert a voice recording into an
e-mail message While composing your message, tap Menu > Insert > Voice
Note.
Set the priority, security, and
language of an e-mail message While composing your message, tap Menu > Message
Options.
Cancel a message While composing your message, tap Menu > Cancel
Message.
Save a message While composing your message, tap Menu > Save to Drafts.
Delete a message With the message you want to delete selected, tap Delete.
Move a message to another
folder With the message you want to move selected, tap Menu >
Move. Scroll to the new folder and press Select.
Sort messages On any account screen, tap Menu > Tools > Sort By, and
select your desired sorting method.
Insert a signature On any account screen, tap Menu > Tools > Options >
Signatures.
Change message options On any account screen, press Menu > Tools > Options.
Downloading e-mail messages
Use Messaging to send and receive e-mail messages in one of two ways:
• Synchronize e-mail messages with Microsoft Exchange or Microsoft Outlook on your computer.
• Send and receive e-mail messages by connecting directly to an e-mail server through an Internet
Service Provider (ISP) or a network.
78
Synchronizing e-mail messages
You can include e-mail messages as part of the general synchronization process. On Windows® XP
platform, you need to enable mail synchronization in Microsoft® ActiveSync. For more information on
enabling mail synchronization, see the ActiveSync online help on your computer. On Windows® Vista
platform, you can synchronize your e-mail messages via the Windows® Mobile Device Center.
NOTES:
• For synchronizing on Windows Vista™ platform, refer to the Windows® Mobile Device Center’s website at
http://www.microsoft.com/windowsmobile/devicecenter.mspx
• To connect directly to an e-mail server, see Synchronizing with an Exchange Server in this user guide.
Managing folders
Each e-mail account has a set of ve folders: Deleted Items, Drafts, Inbox, Outbox, and Sent Items.
These folders store messages that you send and receive through the account. You can move a message
to a different folder within the same account.
TO DO THIS
View message folder contents Tap > Messaging. Select the account that you want to
view. Tap Menu > Go To > Folders and select the folder that
you want to view.
Moving a message to a different
folder Tap > Messaging. Select the account with the message
that you want to move. Scroll to the message you want to
move and tap Menu > Move. Select the folder into which to
move the message.

79
Threaded SMS
Your device organizes your SMS messages from a single contact or number into a single thread of
conversation, making it easier for you to follow the messaging ow and send the appropriate responses.
Sending a threaded SMS
To send a threaded SMS message:
1. Tap > Messaging > Text Messages > Menu > New
2. Key in your recipient’s phone number or tap To: to select a recipient from the Contacts list. Separate
multiple recipients with a semicolon (;).
3. Key in your message.
4. When nished, tap Send to send out the message.
NOTE: Once your recipient replies to your message, your device displays the message thread, making it easier
for you to follow the mobile conversation with your recipient.

80
MMS messaging
Multimedia Messaging System (MMS) allows you to send text messages with multiple slides. Each slide
may include a picture, video or audio, or text. MMS messages are sent by General Packet Radio Service
(GPRS) to e-mail accounts or other MMS-enabled mobile devices.
NOTES:
• You need to subscribe to the GPRS and MMS services with your service provider before you can send and
receive MMS messages. Ask your mobile service provider on how to activate the MMS feature. Only mobile
phones with MMS feature can send/receive MMS messages.
• Depending on the service that you subscribe to, you may not be able to send and receive MMS messages to
users using a different mobile phone network.
Accessing MMS
To access MMS:
• Tap > Messaging > MMS.
• After capturing a picture or video clip, tap Menu > Send.
Editing MMS settings
1. From the MMS main screen, tap Menu > Tools > Options.
2. From the list of accounts, tap MMS.
3. On the MMSC Settings tab, select your Internet Service Provider from the list. Tap Edit to access
Multimedia Messaging Service Center (MMSC) settings.
NOTE: Contact your mobile service provider for detailed settings.

81
Sending an MMS message
To send an MMS message:
1. Tap > Messaging > MMS > Menu > New.
2. In the To: eld, key in the mobile phone number or e-mail of your recipient. You can enter it using the
phone pad or tap Menu > Add Recipient to select from your Contacts. If you have more than one
recipient, separate them with a semicolon (;).
3. In the Subject eld, enter the subject for the message.
4. Tap the Insert Picture/Video eld.
5. Tap to select a picture or video clip displayed in thumbnail view.
6. Tap the Insert Audio eld.
7. Tap to select the audio clip you want to attach, then tap Select .
NOTE: You will not be able to attach an audio le to a slide with a video clip.
8. Tap the Insert Text eld and enter your message.
9. Tap Send to send the message.

82
The following assumes that you are on the MMS message screen.
TO DO THIS
Copy the message to other
recipients Using the stylus, move the scroll bar to display the Cc eld.
Enter the recipient‘s phone number or e-mail address or
tap Menu > Add Recipient to select a recipient from your
Contacts list.
Hide a recipient’s contact
information from other message
recipients
Using the stylus, move the scroll bar to display the Bcc eld.
Enter the recipient‘s phone number or e-mail address or
tap Menu > Add Recipient to select a recipient from your
Contacts list.
Hide sender information Tap Menu > Options > Send Options. Select the Hide
Sender check box.
Create an MMS message from a
template Tap Menu > Template > New from Template to compose a
message using a predened template.
Create an MMS message template Create a message or open an existing message, and tap
Menu > Template > Save as Template.
Add preset or frequently used text
strings to a message In the text eld, tap Menu > My Text. Select the text string
that you want to add.
Edit a preset message Tap Menu > My Text to open the text string you want to edit.
Request message delivery
notication Tap Menu > Options > Send Options. Select the Delivery
Report check box.

83
Windows® Live
Windows® Live provides a set of services including e-mail, messaging, and search that brings all your online
necessities together. With Windows® Live, you can conveniently do the following on your device:
• Access your Hotmail, MSN, or Microsoft Exchange account and send or receive e-mail messages.
• Start a chat with your friends who are online.
• Search the web using the Windows® Live search engine.
To use Windows® Live, you must have a Passport account. If you have a Hotmail® or an MSN® account,
you already have a Passport. Once you have obtained either a Microsoft® Passport or Microsoft® Exchange
Server account, you are ready to set up your account.
NOTE: You need a Microsoft® Passport account to use Windows Live® application. If you do not have a passport
account, go to www.passport.com to obtain one.
Using Hotmail®
To sign in Hotmail®:
1. Tap > Programs > Windows Live.
2. On the Windows Live - Sign In screen, tap Sign in to Windows Live to enter Windows Live Setup
session.
3. Tap Accept, then enter the e-mail address and password for your Hotmail® account.
4. Select Save password and tap Next.
5. Tap the check boxes to show or hide Windows® Live items on the Today screen, then tap Next.
6. Select the items you want to synchronize on your device, then tap Next. Wait for a few minutes for the
synchronization process to nish.
The next time you sign in to Windows® Live, your username and password is displayed.

84
Using Windows® Live Messenger
To sign in and out of Windows® Live Messenger:
1. Set e-mail address and password in Windows® Live.
2. When you have set up your account, tap > Programs > Messenger.
3. On the Windows® Live Messenger main screen, tap Sign In.
4. To sign out, tap Menu > Sign out.
NOTE: If you do not sign out of the Windows® Live Messenger application, you will remain connected. This may
result in additional charges from your service provider.

85
Organizing your life
Chapter 6
• Using Contacts
• Using Calendar
• Using Tasks
86
Using Contacts
Contacts contains your list of contact information such as mobile or work numbers and e-mail addresses.
Using Bluetooth® on the device, you can quickly share Contacts information with other device users. If you
use Outlook on your computer, you can synchronize Contacts between your device and computer.
Viewing Contacts
To view the Contacts list, do one of the following:
• On the Today screen, tap Contacts.
• Tap > Contacts.
• On the Today screen, press the right soft key.
The contact list displays the names of your contacts alphabetically. Beside each name in the contact list
is an abbreviation for the default communication method, such as the person’s work phone number (w)
or home phone number (h). Your device automatically sets a contact’s mobile number as the contact’s
default number.
If there are phone numbers stored in your SIM card, the entries will be displayed at the end of the list, with
a SIM card icon following the name.
TO DO THIS
Create a new
contact Tap Contacts > New > Outlook Contact. Enter information for the new
contact and tap .
Create a new
contact on the SIM
card
Tap Contacts > New > SIM Contact. Enter information for the new contact
and tap .
NOTE: You can only store one phone number for a SIM contact.
Edit a contact’s
information Tap Contacts. Select the contact whose information you want to edit, and
tap Menu > Edit. When you have nished making the changes, tap .
Call a contact from
the contact list Tap Contacts. Tap the contact to call and tap Call. To call a phone number
other than the default, select the contact, use the stylus to scroll to the
number you want to call, and tap Call.
87
TO DO THIS
Send a text
message to a
contact
Tap Contacts. Tap the contact to which you want to send a text message,
and tap Send Text Message.
Send an MMS
message to a
contact
Tap Contacts. Select the contact to which you want to send an MMS
message and tap Menu > Send MMS.
Beam a contact’s
information to
another device
Tap Contacts. Select the contact to beam and press Menu > Send Contact
> Beam. Select the device and press Beam.
Find a contact by
name Tap Contacts. If you are not in Name view, tap Menu > View By > Name.
Enter the rst few letters of the contact’s name until the contact is displayed.
Find a contact by
company Tap Contacts. Tap Menu > View By > Company. Tap the company to view
all the contacts listed under it.
Find a contact
using lter From the Contacts list, tap Menu > Filter. Select the lter category. To show
all contacts again, select All Contacts.
Assign a ring tone
to a contact Tap Contacts. Tap the contact to which you want to assign a custom ring
tone to. Tap Menu > Edit and scroll to Ring tone. Select a ring tone and tap
.
NOTE: You can only assign a ring tone to contacts who are in your Outlook
Contact list.
Add a picture to a
contact Tap Contacts. Tap the contact to which you want to add a picture to. Tap
Menu > Edit and scroll to Picture. In the Picture eld, tap Select a picture
and choose the picture to use.
NOTE: You can only add a picture to contacts who are in your Outlook
Contact list.
Copy a contact to
your SIM card Tap Contacts. From the list, tap the contact, then tap Menu > Copy to SIM.
Select the contact you want to copy, then tap Copy. Tap when done.
88
Using Calendar
Use Calendar to schedule appointments, including meetings and other events. Your appointments
for the day can be displayed on the Today screen. You can also set Calendar to remind you of your
appointments. If you use Outlook on your computer, you can synchronize appointments between your
phone and computer.
To open the Calendar program, do one of the following:
• Tap > Calendar.
• On the ASUS Today screen, tap .
Scheduling an appointment
To schedule an appointment:
1. Tap > Calendar.
2. Tap Menu > New Appointment.
3. Enter information about the appointment.
To schedule an all-day event, in All Day,
select Yes.
4. Tap .
TO DO THIS
Make a recurring
appointment Select the
appointment and tap
Menu > Edit. Scroll
to Occurs and select
one of the recurrence
options.
Delete an appointment Select the
appointment to delete
and tap Menu >
Delete Appointment.
Beam an appointment Select the
appointment to beam
and tap Menu >
Beam Appointment.

89
Viewing an appointment
To view an appointment:
1. Tap > Calendar.
2. Tap the appointment to view.
Viewing your schedule
To view your schedule:
1. Tap > Calendar.
2. Tap Menu and then select one of these
views:
• Agenda
• Day
• Week
• Month
• Year
TO DO THIS
View
today’s
agenda
From any Calendar view, tap
Menu > Go to Today.
View your
agenda for
a specic
date
From any Calendar view, tap
Menu > Go to Date. Tap the date
to view.
Show week
numbers From any Calendar view, tap
Menu > Tools > Options. Select
Show week numbers checkbox.
Change
the display
of the work
week
In any Calendar view, tap Menu
> Tools > Options and do the
following:
• To specify the rst day of the
week, in 1st day of week, select
Sunday or Monday.
• To specify the number of days
you want to appear in a week, in
Week view, select 5-day week,
6-day week, or 7-day week.

90
Using Tasks
Use Tasks to keep track of what you have to do.
The Tasks list
The task list is your “things to do” list. When you create or edit tasks with Outlook on your computer and
then synchronize it with your device, additional information, such as due date, priority, and category, may
show. A task that has been marked as high priority is preceded by an exclamation mark, and a low priority
task is marked by a downward-pointing arrow. Overdue tasks are displayed in bold red.
NOTE: You can synchronize information on your phone with your computer to keep your task list up to date in
both locations.
TO DO THIS
Create a task Tap > Programs > Tasks. Enter the task name in the Tap
here to add a new task eld.
Mark a task as completed Tap > Programs > Tasks. Select the task to mark as
completed, then tap Complete.
Delete a task Tap > Programs > Tasks. Select the task to delete, then
tap Menu > Delete Task. Tap Yes to conrm.
Change a completed task to
incomplete Tap > Programs > Tasks. Select the completed task,
then tap Activate to change the status to incomplete.
Find a task Tap > Programs > Tasks. Tap Menu > Sort by and
select a sort option. You may also tap Menu > Filter and
select a category.

91
Customizing your device
Chapter 7
• Customizing the Start menu
• Using the Prole Manager
• Using the Theme Manager
• Customizing the Today screen
• Entering your contact information
• Setting up sounds and notications
• Setting the date, time, and alarm
• Setting the ring tone
• Wake up settings
92
Customizing the Start menu
You can choose up to seven programs to appear in the Start menu.
To customize the Start menu:
1. Tap > Settings > Personal tab > Menus.
2. Select up to seven programs that you want on the Start menu.
3. Tap .
Using the Prole Manager
Prole Manager provides you with a convenient way to customize the ring tone and notication settings of
your device to suit different scenarios.
There are four prole modes that you can choose from:
•
Normal: This mode allows you to customize the ring tone for incoming calls, messages, and alert
notications.
• Meeting: In this mode, the volume is turned off and your phone vibrates to alert you about an
incoming call.
• Silent: This mode puts both the volume and ring tone of your device on mute mode.
• Automatic: When set to this mode, your device’s sound and alert settings are automatically
switched from Normal to Meeting mode based on your Calendar.
To change to Normal mode:
1. Tap > Settings > Personal tab > Prole Manager.
2. Select Normal, then select one of these options from the dropdown list: Default, Outdoor, and
Personal. If you want to change the settings of an option, tap Edit.
3. Tap Tone, Volume, or Name tabs and make the necessary changes.
4. When done, tap .

93
To change to Meeting mode:
1. Tap > Settings > Personal tab > Prole Manager.
2. Select Meeting.
3 If you want to change the settings, tap Edit.
4. Tap the slider to adjust the speech volume setting.
5. When done, tap .
To change to Silent mode:
1. Tap > Settings > Personal tab > Prole Manager.
2. Select Silent.
3 If you want to change the settings, tap Edit.
4. Tap the slider to adjust the speech volume setting.
5. When done, tap .
To change to Automatic mode:
1. Tap > Settings > Personal tab > Prole Manager.
2. Select Automatic.
NOTE:: If the system detects that you are currently busy based on your Calendar, the sound and alert settings in
your device automatically switch from Normal to Meeting mode.
3. Tap .

94
Using the Theme Manager
Theme Manager allows you to change the appearance of your device such as the background, items
shown on the Today screen, and the skin of the Windows® Media Player.
To customize the theme:
1. Tap > Settings > Personal tab > Theme Manager.
2. On the Theme tab, select any of the themes.
3. On the Schedule tab, you may set the theme to automatically change on workdays and weekends.
To do this:
• Select Enable Theme Switcher, and select the themes for Workday Theme and Weekend
Theme.
4.
Tap .
To edit the theme:
1. Tap > Settings > Personal tab > Theme Manager.
2. On the Theme tab, select the theme you want to edit.
3. Tap Menu > Edit. Select the items that you want to edit from these four tabs:
• On the Today tab, select the appearance for the Today screen from the dropdown list. To
change the theme from 6:00 p.m. to 6:00 a.m. , enable Change appearance at night. You may
also select Wallpaper to add a wallpaper to the Today screen.
• On the Items tab, select the items that you want to display on the Today screen.
• On the Skin tab, select the skins for the dialer and Windows® Media Player.
• On the Name tab, enter the name for the theme.
4.
Tap when nished.

95
Customizing the Today screen
To customize your Today screen:
1. Tap > Settings > Today.
2. On the Appearance tab, select the background for the Today screen.
If you want to use a picture as your Today background, select Use this picture as the background
and tap Browse to locate the picture you want to use.
3. On the Item tab, select the items you want displayed on the Today screen.
4.
When done, tap .
To customize the Today screen with your own image:
1. Tap > Programs > Pictures & Videos.
2. Tap the image to use as the background image
3. Tap Menu > Set as Today Background.
4. Adjust the transparency level and tap .
Entering your contact information
The Owner Information feature allows you to enter and display your personal contact information, such as
your name, alternative contact numbers, and e-mail address, on your device.
NOTE: We recommend that you enter your contact information so you can easily be contacted in case of loss.
To enter owner information:
1. To launch the Owner Information screen, do either of the following:
• On the Today screen, tap the Tap here to enter owner information eld.
96
• Tap > Settings > Owner Information.
2. Enter your details and tap .
Setting up sounds and notications
Use the Sound and Notications settings to enable sounds and to customize the ring tones for incoming
calls, reminders, alerts, and messages.
To set sounds and notications:
1. Tap > Settings > Sounds & Notications.
2. On the Notications tab, select an event, and set the Ring type and Ring tone.
3. Tap .
Setting the date, time, and alarm
To set the date and time:
1. Tap > Settings > System tab > Clock & Alarms.
2. On the Time tab, enter the time zone, date, and time settings.
3. Tap .
To set the alarm:
1. Tap > Settings > System tab > Clock & Alarms.
2. On the Alarm tab, enter the necessary alarm settings.
3. Tap .
NOTE: You can also congure the date/time settings directly from the ASUS Today screen. Tap and enter the
necessary settings.

97
Setting the ring tone
With your device you can add and congure your favorite music as your phone ring tone. You can easily
congure your favorite song or sound as your ring tone with the following compatible audio formats: aac,
amr, .mp3, .wav, .wma, and .mid.
Adding ring tone to selection
To add a ring tone to the selection category under phone setting:
1. Tap > Settings > Ring tones.
2. Select a specic le extension from the list box.
3. Tap to check a ring tone le that you want to add.
Tap to play ring tone sound and tap to stop.
4. Tap when nished.
Changing the ring tone
To change the ring tone:
1. Tap > Settings > Phone.
2. On the Phone tab, select a ring tone from the Ring tone list box. The songs or sounds that you
added as ring tone appears on this list along with the default ring tones that came with the device.
Tap to play ring tone sound and tap to stop.
3. Tap when nished.

98
Wake up settings
You can set the wake-up actions whenever your device is in sleep mode.
To set the wake-up action:
1. Tap > Settings > Personal tab > Wakeup Source.
2. Select from the available wake-up actions.
Tap Select All to select all actions or tap Select None to deselect all available actions.
3. Tap when nished.

99
Getting connected
Chapter 8
• Using the Wireless Manager
• Using Bluetooth®
• Using Wi-Fi
• Setting a GPRS connection
• Setting the preferred network

100
Using the Wireless Manager
The Wireless Manager allows you to enable or disable your wireless connections in a single location.
This is a quick way to preserve battery power or to turn off the functions in your device such as phone or
Bluetooth function.
To use the Wireless Manager:
1. Tap > Settings > Connections tab.
2. Tap Wireless Manager.
3. From the Wireless Manager screen, do any of the following:
• Tap the button for a desired wireless connection type to turn it on or off.
• Tap to turn off all wireless connections.
• Tap Settings to change settings for one of the displayed wireless connection types.
4. Tap Exit or to exit Wireless Manager.
Using Bluetooth®
Bluetooth® is a short range wireless communications technology that allows devices with Bluetooth
capabilities to exchange data within a radius of about 10 meters (30 feet) without requring a physical
connection. With Bluetooth enabled in your device, you can:
• Connect and communicate, such as beam les, tasks, contacts, with other devices with
Bluetooth features.
• Use Bluetooth service. After you connect to another device or computer using Bluetooth, you
can use the services available on that device.
101
Activating Bluetooth in your device
Use the Wireless Manager to enable or disable Bluetooth in your device. You can access the Wireless
Manager by performing any of the following:
1. Launch the Wireless Manager. To do this, you can either:
• Tap Start > Settings > Connections tab > Wireless Manager.
• Tap the Wireless Manager icon from the Today screen.
2. From the Wireless Manager screen, tap Bluetooth.
NOTE: When not in use, deactivate Bluetooth in your device to conserve battery power.
Adding Bluetooth devices
1. Ensure that Bluetooth is enabled on the device you want to add and the device is set as
Discoverable.
2. Tap > Settings > Connections tab > Bluetooth.
3. Tap Add new device... to search for available Bluetooth devices. The search may take a while.
4. Select the device you want to connect with then tap Next or press the Right Soft key.
5. Enter the alphanumeric passcode of the device you want to connect then tap Next or press the Right
Soft key. You can nd the passcode in the documentation that came with the other device.
6. Enter the display name for this connection.
7. Repeat steps 3 6 to connect more devices.

102
Pairing with a Bluetooth headset
1. Tap > Settings > Connections > Wireless Manager.
2. Tap Bluetooth to activate the Bluetooth connection.
3. Turn on your Bluetooth headset and bring it to within ve to ten meters of your device.
4. Put your Bluetooth headset into pairing mode. Refer to your Bluetooth headset’s user manual for
instructions.
5. On your device, tap > Settings > Bluetooth, then tap Add new device.... Your device searches
for Bluetooth-enabled devices within its reach.
6. Select your Bluetooth headset on the Add Devices list and press Next.
7. Enter the passkey provided in the headset user manual. Your device will now pair with the headset.
8. The Bluetooth icon appears on the status bar indicating that you can now talk handsfree.
NOTE: To ensure a better signal reception, DO NOT shield the keypad or battery compartment cover with your
hand while talking handsfree on your device using a Bluetooth headset.

103
Using Wi-Fi
The Wi-Fi icon on the Today screen gives you easy access to the Wi-Fi feature on your device. Tapping
the icon displays a menu that allows you to: Turn Wi-Fi on/off and open Wi-Fi Manager.
NOTE: You can use your device’s Bluetooth and Wi-Fi features simultaneously.
Turning on Wi-Fi
To turn on Wi-Fi:
1. From the Today screen, tap > Turn on Wi-Fi.
The Device then automatically scans for all available wireless networks within the Wi-Fi range.
2. From the list of detected wireless networks, select a wireless network that you want to connect the
device to.
3. Select whether the wireless network connects to The Internet or Work network.
4. Tap Connect.
Conguring wireless networks
To congure a wireless network:
1. To launch the Wi-Fi settings page, do either of the following:
• Tap Settings after selecting a wireless network to connect your device to.
• Tap > Settings > Connections tab > Wi-Fi.
2. From the Congure Wireless Networks screen, tap an available wireless network, then make the
necessary changes.
If the wireless network you want is not on the list, tap Add New....

104
3 Tap the Network Adapters tab and select an adapter. Tap an adapter to set it if necessary.
4. Tap when done.
Adding a wireless network
If the device fails to automatically detect the wireless network you want to connect to, you can manually
add the network. Ask for the wireless network settings from your network administrator.
To add a wireless network:
1. To launch the Wi-Fi settings page, do either of the following:
• Tap Settings after selecting a wireless network to connect your device to.
• Tap > Settings > Connections tab > Wi-Fi.
2. Tap Wireless > Add New....
3. Enter a name for the network and select an item from the Connects to: dropdown menu, then tap
Next.
NOTE: You can get the authentication, data encryption, and network key from your network administrator.
4. Set authentication, data encryption, and network key, then tap Next.
5. If you need to change the EAP type, check the adapter box, then change the EAP type.
6. Tap Finish when done.

105
Using Wi-Fi Manager
The Wi-Fi Manager shows the connection status and information on a wireless network, and allows you to
manually scan your area for available wireless networks.
To open the Wi-Fi Manager, you can do any of the following:
• Tap > Wi-Fi Manager.
• Tap Start > Settings > Connections tab > Wi-Fi Manager.
There are four tabs in the Wi-Fi Manager:
• Wi-Fi Status: This page shows the current connection status and link information.
• Setting: This page allows you to dene settings for establishing a devicetodevice wireless
connection as well as power saving settings.
NOTE: We recommend to set the Power Save to Enable.
• IP Info: This page shows the network information and provides a way to get the new IP address
from the DHCP server.
The Renew button enables you to request the DHCP server for a new IP address. This function
would take several seconds to get the new IP address.
This Ping button serves as the network’s diagnostic tool. It enables you to detect if your device is
connected to the network.
• Site Survey: This page shows the nearest available wireless network.
Each wireless network is preceded by an icon for easy identication. The network channel, RSSI, and
BSSID are also displayed in columns.

106
Setting a GPRS connection
Your device allows you to connect via General Packet Radio Service (GPRS). GPRS is a wireless
communication standard that runs at speeds of up to 115 kbps, compared to 9.6 kbps of the current
Global System for Mobile Communications (GSM). It supports a wide range of bandwidths that allows
sending and receiving small bursts of data, such as e-mail messages and web browsing.
To set a GPRS connection in your device:
1. From the Today screen, tap on the status bar.
2. Tap Settings on the message prompt.
3. From the Settings screen, select the Connections tab then tap Connections icon.
4. From the Connections screen, tap Add a new modem connection.
5. Enter a unique name for the connection then select Cellular Line (GPRS) from the modem list.
6. Enter the Access point name.
7. Enter your user name, password, and domain then tap Finish. Contact your network administrator for
assistance.
NOTES:
• The network connection may vary with different locations and mobile service providers. Consult your
mobile service provider for the applicable network connection in your area.
• The charge of GPRS services and the GPRS connection settings might vary with different operators.
Consult your service provider for suitable solution.
• The GPRS and USB connections cannot be used at the same time.

107
Connecting GPRS
To connect GPRS:
1. Tap > Settings > Connections tab > Connections.
2. From the Connections screen, tap Manage existing connections.
3. Tap and hold on an existing connection then from the popup menu tap Connect.
Tap Delete if you want to delete the selected connection setting.
4. When connected, tap to exit.
NOTES:
• When WLAN is used simultaneously with the GPRS, the latter will get signal priority.
• We recommend not to use WLAN and GPRS at the same time.
Browsing the Internet
If you have set a default GPRS connection, it automatically connects when you launch an application
that connects to the Internet.
To browse the Internet:
1. Launch any application that connects to the Internet such as Internet Explorer.
The device will automatically connect your default GPRS connection. A popup callout appears to
display the connection status.
2. When connected, you can start browsing the Internet. If you are using Internet Explorer, the default
site will be displayed.
108
Disconnecting GPRS
To disconnect GPRS:
1. Tap from the status bar.
2. From the popup callout, tap Disconnect.
NOTES:
• If your ActiveSync is set to sync with Exchange Server automatically, synchronization will occur after you
connect again.
• GPRS will automatically reconnect everytime you launch an application that requires GPRS connection such
as Internet Explorer and Windows® Live.
Using the GPRS Tool
The GPRS Tool allows you to conveniently select and connect to your GPRS service provider.
To connect via GPRS Tool:
1. Tap > Settings > Connections tab > Network Setting.
You can also tap on the status bar then tap Settings from the popup callout.
2. From the Network Setting screen, select your GPRS provider from the list.
NOTES:
• Operators vary in different regions.
• The GPRS and USB connections cannot be used at the same time.
109
Setting the network
Your device enables you to congure your device’s network connection as well as set multiple networks in
the order that you want to access them.
Conguring the network
To congure the network settings:
1. Tap > Settings > Connections tab > Network Setting.
2. Select the Country and Operator from the dropdown lists. If your mobile service operator is not on
the list, tap the Auto Detect button.
3. When done, tap .
Setting your preferred network
To set your preferred network:
1. From the phone pad, tap Menu > Options > Network tab.
2. Tap Set Networks and follow the onscreen instructions.
3. When you have set your preferred networks, tap to return to the Network tab. In the Network
selection list, tap Automatic.

110

111
GPS features
Chapter 9
• GPS Catcher
• External GPS
112
GPS Catcher
GPS Catcher allows you to update the Global Positioning System (GPS) data in your device. The
GPS data contains important information about the status of satellite, and the current date and time for
determining the satellite position.
NOTE: All functions about GPS or similar are not intended to be used for location of persons, especially for “life-
safety” and “non-life-safety” applications.
Updating GPS data
To update GPS data:
1. Tap Start > Programs > GPS Catcher.
2. Tap Update to start update.
3. Tap when nished.
NOTES:
• To make a successful update, ensure your device is connected to the Internet.
• GPS data expires in three days. You need to update it again when it expires. You can also set GPS Catcher
to update automatically.
Setting GPS Catcher
To set GPS Catcher:
1. From the GPS Catcher screen, tap Menu > Setting.
2. Set the options according to your preference.
3. Tap when nished.
113
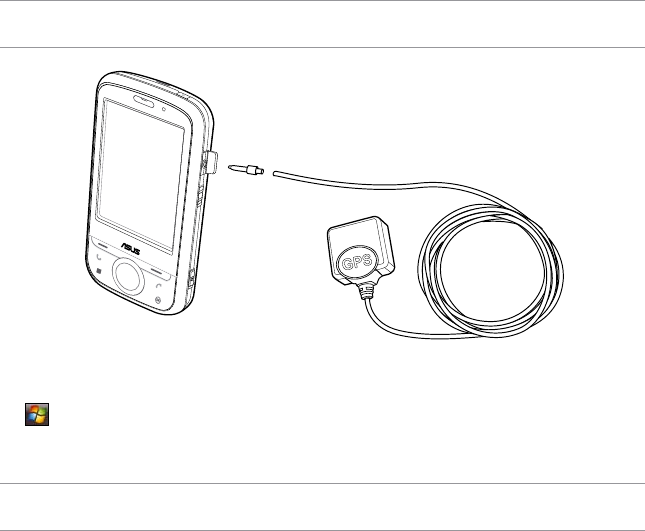
External GPS
Your device allows you to use an external GPS device to receive GPS data. To use an external device,
you need to set the connection between your device and your external GPS device.
NOTE: An MMCX compatible external GPS antenna connector is included in the package. Insert this connector
to an external GPS antenna.
Setting an external GPS device
To set an external GPS device:
1. Tap > Settings > System tab > External GPS.
2. From the Programs tab, select a program port.
NOTE: Other GPS applications in your device will use the same COM Port as you set here. Ensure that this port
is also available in the other GPS applications.

114
3. From the Hardware tab, specify a hardware port and baud rate for your external GPS device to use.
NOTE: Refer to the user guide of your external GPS device for details.
4. From the Access tab, select the Manage GPS automatically (recommended) box.
IMPORTANT: If you clear this check box, some GPS related application in your device may not be able to obtain
GPS data.

115
Multimedia features
Chapter 10
• Using the camera
• Viewing pictures and videos
• Streaming Player
116
Menu
Thumbnails
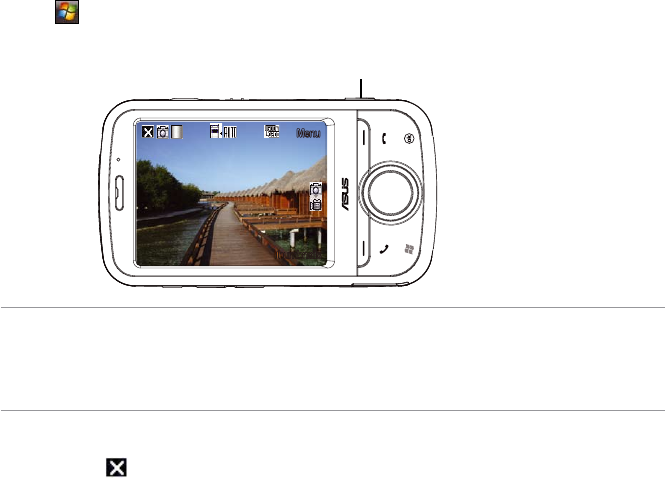
Using the camera
The built-in 2.0 megapixel camera allows you to take photos and record audio/video clips.
Launching the camera
To launch the camera:
• Tap > Programs > Pictures & Videos > Camera.
• Press and hold the Camera key on the right side of your device.
To exit the Camera:
• Tap the exit icon on the camera screen.
NOTES:
• By default, the preview screen is set to landscape.
• After launching the camera, your device is set to camera mode by default.
• In camera mode, the camera button functions as the shutter button.
Camera/shutter button
117
Available capture modes
Your device camera can be set to two capture modes:
• Camera mode Camera mode allows you to take photos, and save them to your device or microSD.
You can also congure the camera to match an environment, set picture size, select magnication,
adjust the picture quality, apply effects, and modify other advanced settings.
• Video mode Video mode enables you to record audio/video clips. Like in camera mode, it also
allows you to select the magnication, set the video size, apply some effects, select target storage,
and modify advanced video settings.
Supported formats
Using the camera mode or video mode, the images or video clip captured are stored in the following
formats:
• Still image (Camera mode): JPEG (.jpg)
• Video (Video mode): 3GP (.3gp), MPEG4 (.mp4)
118
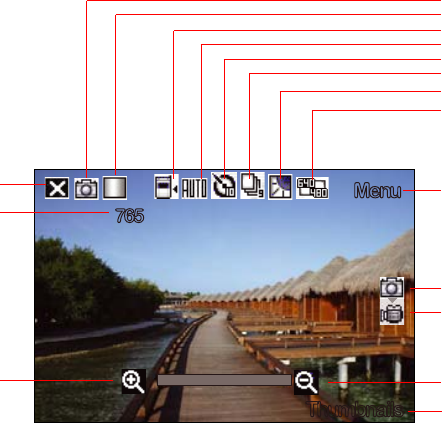
Camera mode
The following describes the screen icons in Camera mode:
Menu
Thumbnails
765
Capture mode icon
Tap to zoom in Tap to zoom out
Tap to close
camera Tap to launch
camera menu
Number of
available
shots
Capture modes:
Camera mode
Video mode
Tap to preview
Pictures and Videos
Picture quality icon
Default storage icon
Scene mode icon
Timer icon
Scene mode icon
Effects icon
Picture size icon

119
Icon Description
Capture mode /Indicates the current capture mode.
Picture quality / / Indicates the picture quality used.
Default storage /Indicates default storage for captured images and
videos clips.
Scene mode / / Indicates the scene mode used.
Timer /When the camera timer is enabled (5 seconds
or 10 seconds), the corresponding timer icon
appears. When you press the shutter button or the
navigation button to take a picture, the count down
begins and picture is taken after the time set.
Burst mode /Indicates the number of frames in burst mode.
Effects / / / Indicates the effects used.
Picture Size / /
///
Shows the resolution used. When set to
1600x1200 resolution, the zoom in/zoom out
function is disabled.
Exit Tap to exit camera.
Camera mode icons
Refer to the table below for the camera mode icons.
120
Camera options menu
The camera options menu allows you to change various camera and picture settings.
To launch options menu:
1. Tap Menu from the camera screen.
2. From the shortcut menu, tap an icon to display contents.
Change Mode
The Change Mode option allows you to set capture mode into Camera or Video mode.
Scene
The Scene option allows you to select presets appropriate for a night scene or sports event. Select Auto
to use best setting for any scene.
Picture Size
Allows you to set the frame size of picture.
Picture Quality
This option provides three picture quality presets: Normal, Fine, and Super Fine. The picture quality is
set to Super Fine by default.
Icon Description
Zoom In Tap to zoom in view of subject on screen.
Zoom Out Tap to zoom out view of subject on screen.
Thumbnails Tap to launch Pictures and Video application and
preview your images in thumbnails.
Menu Tap to launch camera menu options.